Microsoft is gearing up for another artificial intelligence led announcement tentatively scheduled for next month where it will showcase more OpenAI influenced technologies for its productivity suite.
During its Bing + ChatGPT announcement earlier this week, Microsoft alluded to the difference between the publicly available ChatGPT experience and a seemingly beefier version that leverages its Prometheus Model in Bing.
According to The Verge, Microsoft’s Prometheus Model powered version of ChatGPT will be in more than just Bing as the company plans to share details in March of its push into productivity with OpenAI’s language AI technologies.
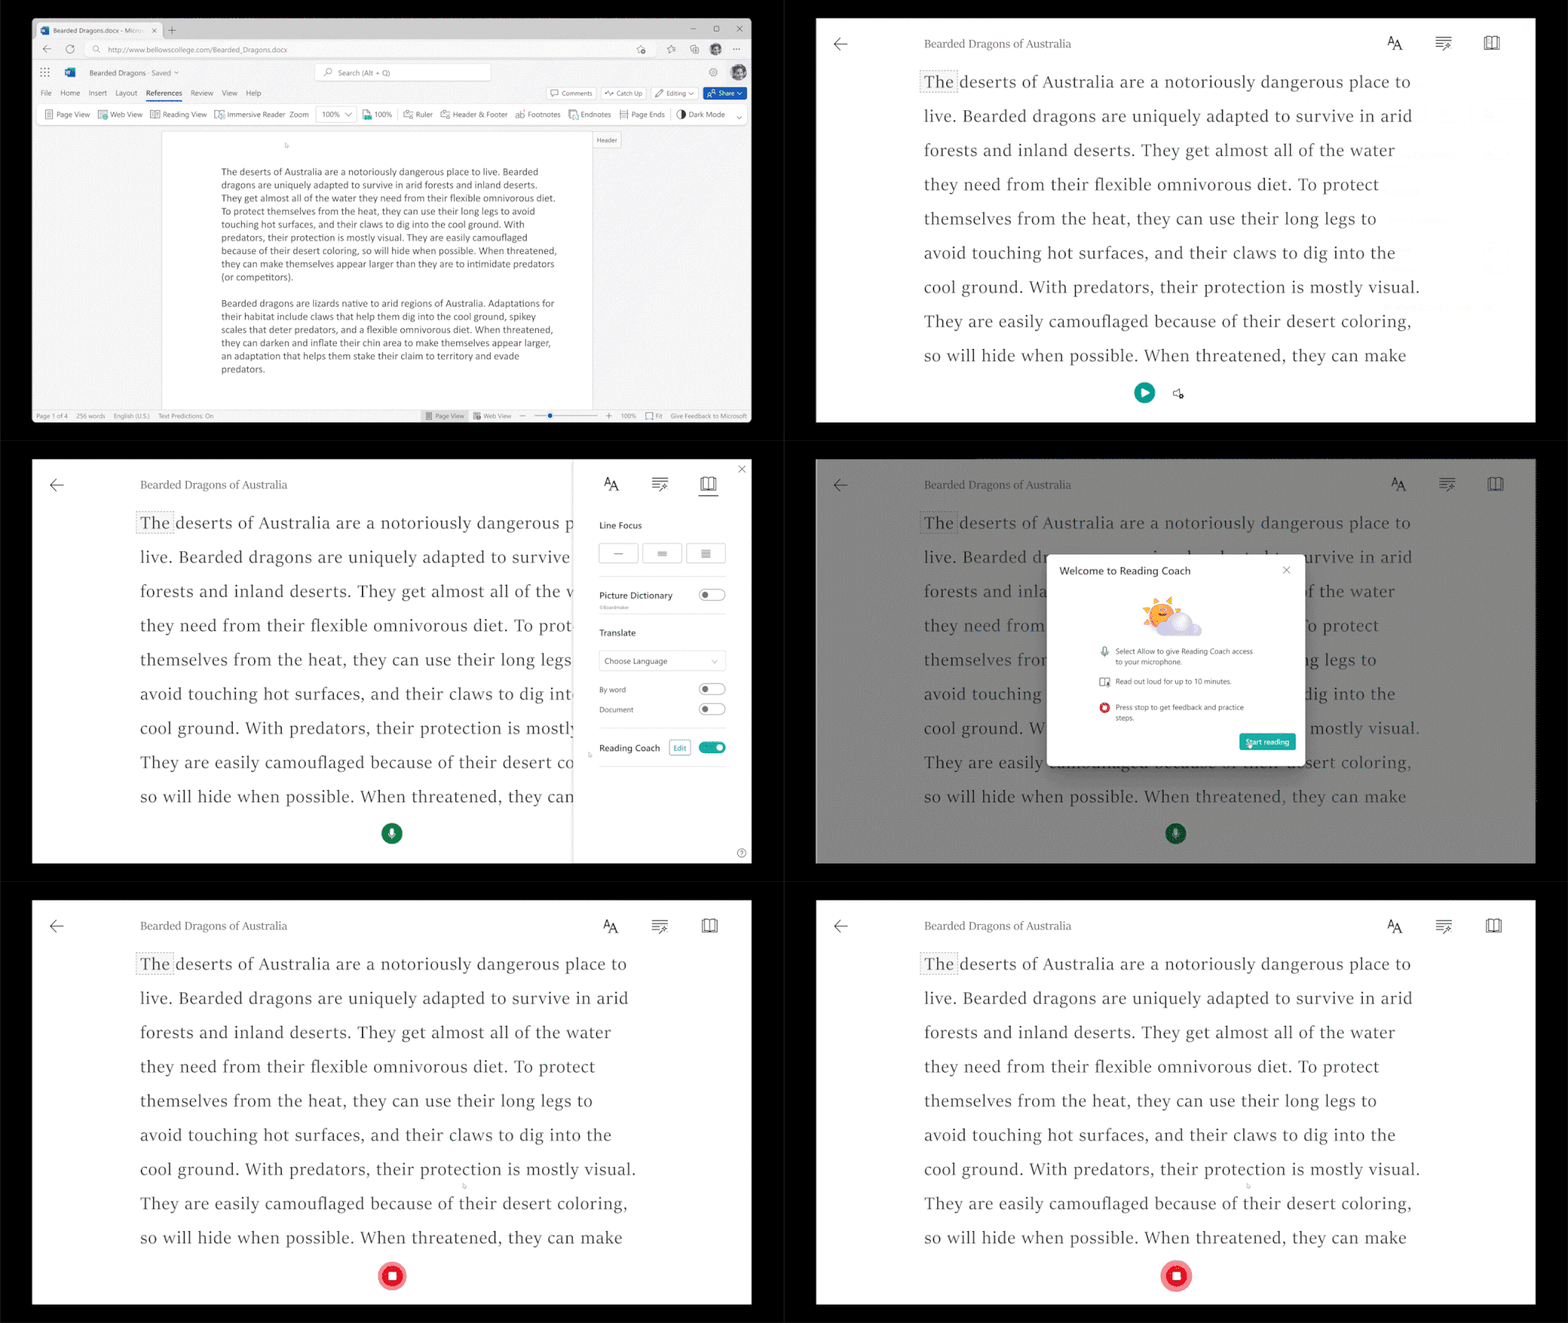
It should be noted that Microsoft has already implemented OpenAI technologies into many of its productivity and enterprise tools such as Azure, Microsoft Viva Sales, Word and Outlook. The integration has been subtle until now with OpenAI powering the suggested reply function in compositions for Outlook and Word.
However, it looks like Microsoft plans to expand the current Bing sidebar integrated tools that appear alongside Office web apps into dedicated apps which could span both desktop and mobile use.
Based on The Verge reporting, Microsoft is looking to bolster its templates, suggested graphics, graphs and other visualizations in apps such as Excel and PowerPoint with more details leveraged from OpenI language models.
Microsoft appears to be stepping on the gas as a way for the company to get out ahead of similar announcements it believes Google will have in the coming months as well.
Sources tell The Verge that Microsoft was originally planning to launch its new Bing AI in late February, but pushed the date forward to this week just as Google was preparing its own announcements. Google then announced its ChatGPT rival Bard a day ahead of Microsoft’s event.
Contrary to the neck and neck pace of announcements and perceived competition, a number of Microsoft executives believe they’re ahead of Google’s development in this particular market, and that their competition may come from lesser-known rivals in the sector.
Microsoft is currently enjoying a bump in media attention and a slightly renewed interest in Bing as it saw more than 1 million sign ups for the Bing +ChatGPT waitlist and its own Bing app rank as the third most popular app in Apple’s App Store in the US this week.
In January, Microsoft announced its plans to cut 10,000 employees over the next coming months. The company’s CEO further highlighted that initial plans made during the COVID-19 pandemic didn’t quite turn out as expected, and that they were facing a different economic reality.
Bloomberg reports that Microsoft’s plan to cut some employees from its workforce continued to take shape yesterday. The affected parties are reportedly spread across the Surface devices, HoloLens mixed reality hardware, and Xbox divisions. 343 Industries was also affected last month though Microsoft promised to continue supporting Halo Infinite.
Earlier this month, Microsoft’s COO and CVP of Windows and Devices, Robin Seiler highlighted that Microsoft is still committed to supporting HoloLens 2 and its Mixed Reality program despite concerns by the public. With the news of the layoffs hitting the Hololens hardware team hard, it is difficult to establish Microsoft’s commitment to it. What’s more, it is unclear whether the production of a third iteration of the goggles is still in play.
The Information also reported that Microsoft’s Industrial Metaverse team has also been scrapped completely. The company put this team in place four months ago to help drive the sales of Microsoft’s mixed reality headset as well as make HoloLens the new screen for frontline workers.
Microsoft hasn’t commented on the layoffs but has affirmed its commitment to the mixed reality space and the current HoloLens 2 version. It hasn’t yet been established how hard both the Xbox and Surface divisions have been hit. Though Xbox boss, Phil Spener did send out an email stating, “I encourage everyone to take the time and space necessary to process these changes and support your colleagues.”
According to a WARN notice filed in Seattle, 617 employees have been affected. This adds to the massive layoffs trend that has been going on across major tech firms. Just yesterday, Microsoft’s GitHub, GitLab, and Yahoo announced that they’ll be cutting their workforce.
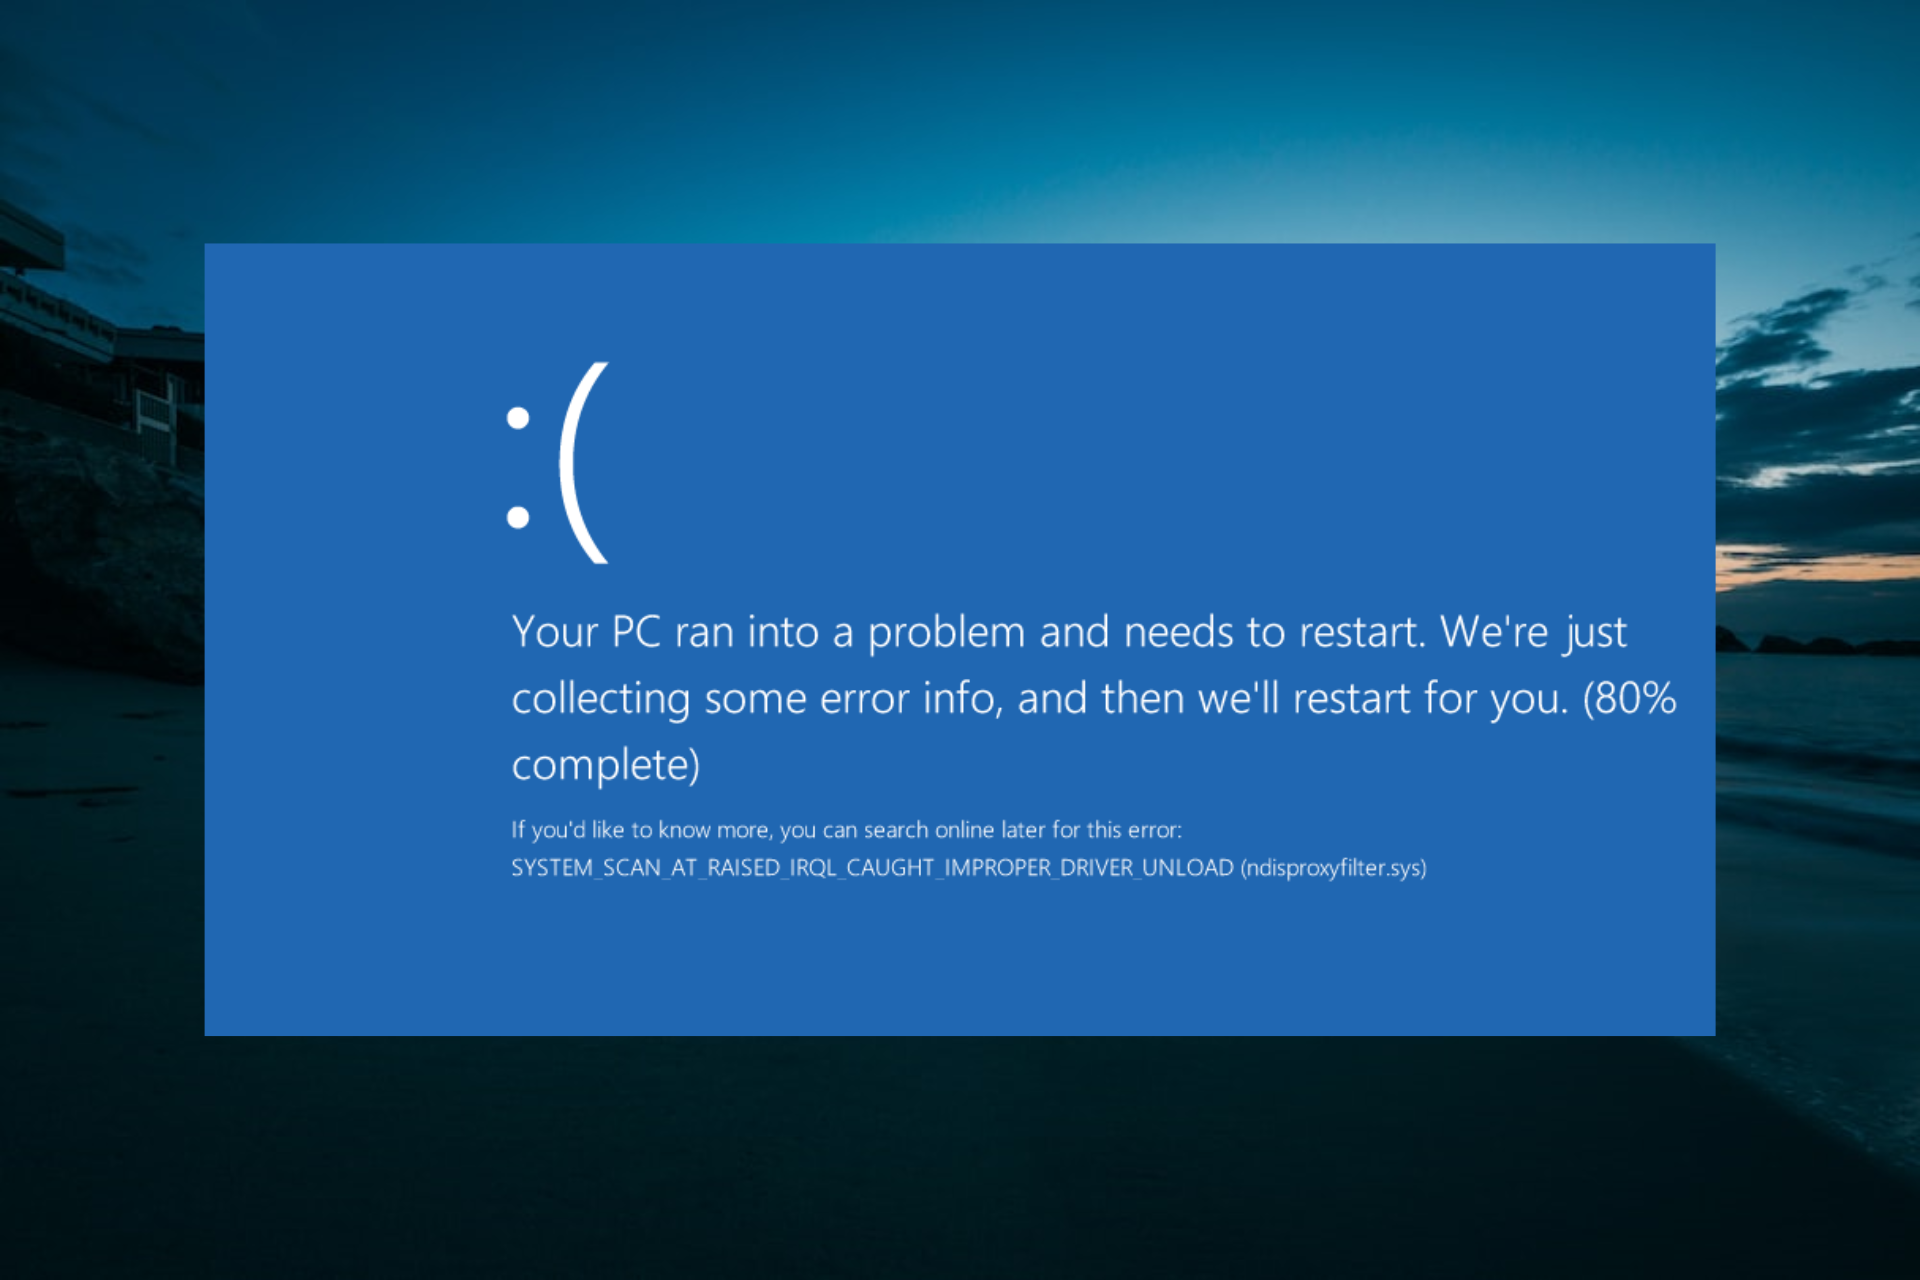
Blue Screen of Death errors is probably some of the most severe errors on Windows 10. Errors such as System Scan at Raised IRQL will restart your computer to prevent damage to your PC.
Therefore, you must know how to fix them. And knowing the level of urgency, we have prepared this guide to help you select the System Scan at Raised IRQL caught improper driver unload error.
What does stop code System Scan at Raised IRQL mean?
Below are some of the possible causes of the System Scan at Raised IRQL issue:
Outdated driver: The major cause of this issue is an outdated or faulty driver. Reinstalling or updating the faulty driver should solve this problem quickly.
Faulty memory partition: Another cause of this problem is a corrupt memory sector. You can fix this by running the CHKDSK command.
Antivirus interference: At times, the System Scan at Raised IRQL accompanied by the Invprotectdrv64 sys code and a blue screen can be down to issues with your third-party antivirus. The best solution is to uninstall the software temporarily and probably replace it with one of the best antiviruses for Windows 10.
Now that we know the causes of this issue, listed below are some of its variations, as reported by users:
System_scan_at_raised_irql_caught_improper_driver_unload Windows 10: This error can affect any version of Windows, and users reported this issue in Windows 10.
System_scan_at_raised_irql_caught_improper_driver_unload spac.sys, nvlddmkm.sys: Sometimes, this error message will give you the file name that caused it. If this happens, you can use the file name to easily find the software, hardware, or driver that is causing this issue.
How can I fix System Scan at Raised IRQL?
1. Repair Windows 10 with a specialized software
We recommend using third-party software that scans your PC and aims to repair all the damaged files that keep your Windows OS from working correctly. It’s a fast and secure way to protect your device and maintain your system in optimal condition.
2. Update Windows 10
Press the Windows key + I and select the Update & Security option.
Click the Check for updates button.
Now, install any available updates and restart your PC.
Windows updates are essential for the smooth running of your PC. However, they mostly contain bug fixes for hardware and software issues that can lead to Blues Screen errors like System Scan at Raised IRQL.
Hence, you should always download and install the latest patches.
3. Uninstall the problematic drivers
Press the Windows key + X and select Device Manager from the list.
Double-click the Display adapters option to expand it and right-click the device there.
Now, choose Uninstall device.
If available, check the Delete the driver software for this device box and click the Uninstall button.
Finally, wait for Windows 10 to remove your driver and restart your PC.
Sometimes specific drivers aren’t compatible with Windows 10 and cause the System Scan at Raised IRQL Blue Screen of Death error. So, you’ll have to remove them.
We must mention that this problem was reported by SiS Mirage 3 Graphics owners, but even if you own a different graphic card, you can still try this solution.
4. Download the latest drivers
Right-click the Start Menu and select the Device Manager option.
Expand the Display adapters option and right-click the device there.
Now, select Update driver.
Finally, choose Search automatically for drivers and install any available updates.
If uninstalling your driver does not eliminate the System Scan at Raised IRQL error, you need to update your driver to the latest version. You can do that manually by following the steps above or via the manufacturer’s website.
Alternatively, you can use a dedicated driver updater in Outbyte Driver Updater to update your drivers automatically.
With this tool, you won’t be missing any necessary updates. This is because it comes with a Schedule Manager feature that offers notification whenever new patches are available.
What’s more, you have a vast database at your disposal that offers over 18 million driver files that you can download to keep your device functioning at its best capacity.
Press the Windows key + I and select the Apps option.
Select the app you want to remove and click the Uninstall button.
Finally, follow the onscreen instructions to complete the removal process.
Firewalls and antiviruses are essential for your system’s safety. However, they can interfere with Windows 10 and cause the System Scan at Raised IRQL error to appear.
According to users, Barracuda NextGen Firewall F-Series was causing this error to appear, and after removing this tool, the BSoD error was fixed.
So, you should remove any third-party antivirus you are using and check if the error is fixed.
6. Run the CHKDSK scan
Press the Windows key + S, type cmd, and select Run as administrator under Command Prompt.
Type the command (change C to your drive letter) below and hit Enter to run it: chkdsk c: /r
Now, press Y when prompted, and the scan will start automatically after restarting your PC.
The System Scan at Raised IRQL can sometimes occur due to corrupted files on your hard drive. To find and fix those files, it’s recommended that you perform a CHKDSK scan.
We have to mention that you’ll have to repeat this scan for all hard drive partitions to fix this error.
If you can’t boot into your PC normally, follow the steps below to run the scan:
Restart your computer a few times during the boot sequence to enter the Advanced recovery menu.
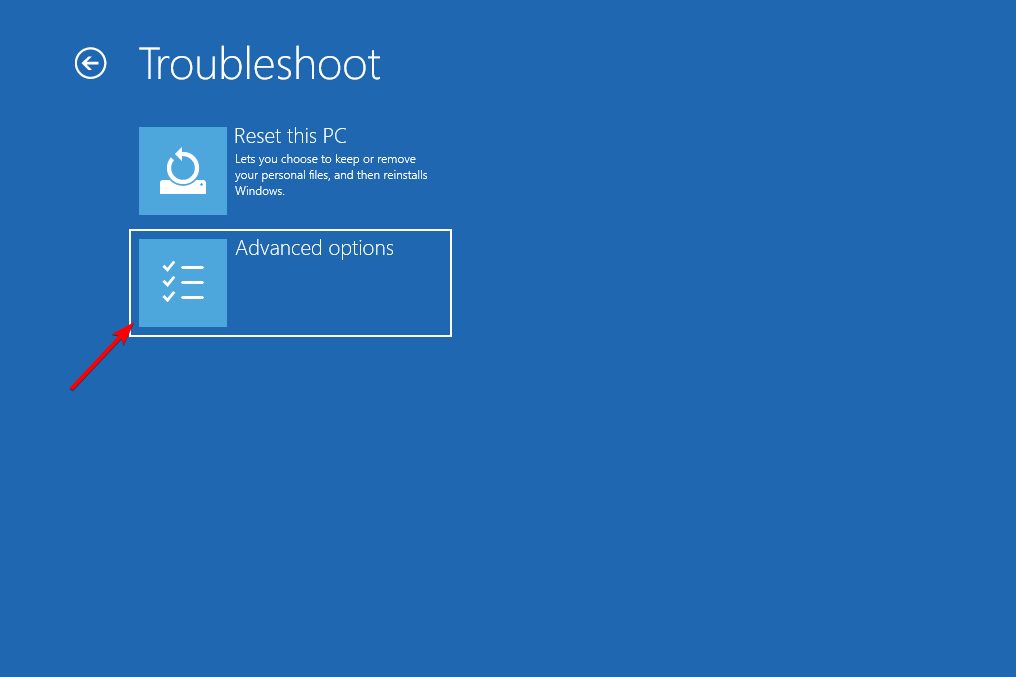
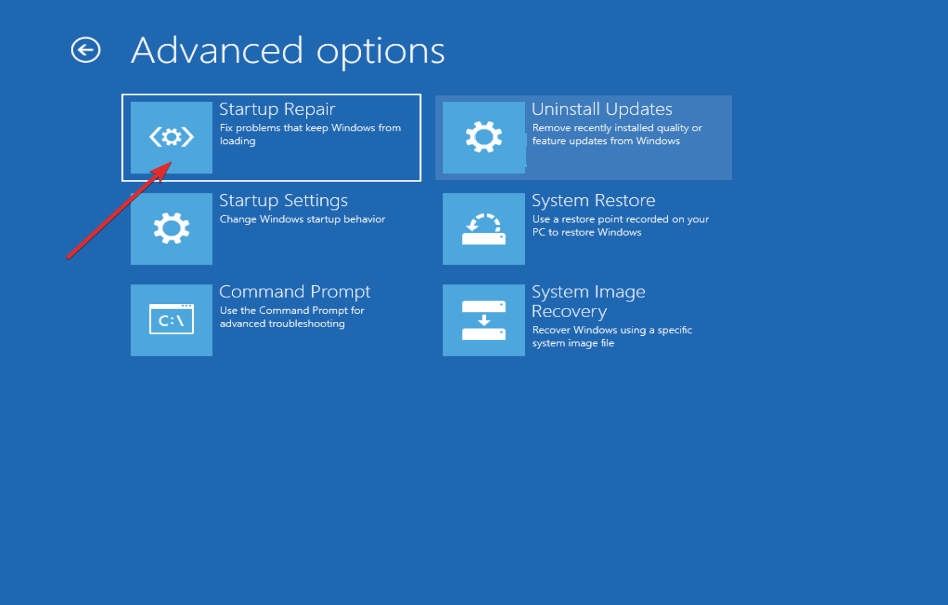
Choose Troubleshoot > Advanced options.
Now, select the Command Prompt.
Finally, type the command below and hit Enter to run it: chkdsk c: /r
With this, you should be able to fix the bad sectors on your drive.
7. Remove overclock settings and check your hardware
Many users tend to overclock their hardware for better performance, but overclocking your hardware comes with certain risks.
If you’re not careful, you can cause permanent damage to your PC by overclocking, or you can get a Blue Screen of Death error.
Several users reported that they managed to fix this error by setting their RAM settings to default. However, remember that almost any overclocked component can cause this error, so remove all overclock settings.
If your PC isn’t overclocked, this error could be caused by faulty or recently installed hardware, so be sure to remove any new hardware since it might not be compatible with your PC.
We can conclude this guide on the System Scan at Raised IRQL issue. You now have all the information needed to fix the issue and only need to follow the instructions carefully.
Let us know which of the abovementioned methods worked best for you in the comments below.
Microsoft has released a fresh update to the Stable Channel for everyone to download, bumping it to version 110.0.1587.41. The release is fairly minor, but it does unpack several feature updates. Here’s everything you need to know:
First up is the new Immersive Reader policies, designed to simplify your web page layouts. The new policies will allow admins to control the accessibility of Grammar Tools and Picture Dictionary features within Immersive Reader. Next up is the added capability to enable sync for Azure Active Directory signed in customers. This will allow users to “sync roams data across all signed in instances of Microsoft Edge”.
And finally, Edge will now provide users with an easy way to send files and notes across all signed in mobile and desktop devices dubbed Drop. Aside from these feature updates, the release also features some depreciated and new policies. We invite you to check out Microsoft’s changelog for more on these.
Microsoft Edge should auto-update to the latest version, but if it doesn’t, you can trigger it manually. Just head to the browser’s menu, choose Help and Feedback then About Microsoft Edge and wait for the update to download, and then restart.
In related news, Adobe Acrobat recently got deeply integrated with Edge to further enhance the PDF experience for users. Share your thoughts with us in the comment section.
Black Desert is an MMORPG game for Windows with millions of players. However, some of its players reported BDO Corrupted file detected message.
There are other problems, such as high CPU usage in Black Desert, but we already tackled that in a separate guide. Therefore, today we’ll focus on fixing corrupted files.
What causes the corrupted file detected error in BDO?
There are several reasons for this error message, but the following ones are the most common:
Antivirus software – It’s possible that your antivirus is blocking exe files, thus causing this problem. To fix it, disable it temporarily or add the game to the list of exclusions.
Corrupted game files – If your files are corrupted, you might get a Corrupt disk error in Steam or any other platform. To fix it, find and remove those files manually.
Damaged installation – Sometimes, your installation can get damaged and cause this issue. If that happens, your only option is to reinstall the game.
How can I fix BDO corrupted file detected error?
1. Disable third-party antivirus software
Open the System Tray from the Taskbar, right-click on the antivirus icon, and disable the toggle for Protection is ON.
Click Yes to confirm the action.
NOTE
Keep in mind that these steps will be different depending on the antivirus software that you have installed.
2. Delete the version.dat file
Press Windows + E to launch File Explorer, open the Black Desert Onlineinstallation folder (BDOnline), and locate the version.dat file.
Right-click the version.dat file and selectDelete.
Thereafter, open the Black Desert Online Launcher again, which will update the file deleted.
Some players have also said renaming, not deleting, the version.dat file can resolve the issue. All you have to do is change its name to versionold.dat.
Press Windows + E to open File Explorer, and open the Downloads folder.
Press the Ctrl + A hotkey to select all content within your downloads folder, and then hit Del to delete them.
Choose the appropriate response in case a confirmation prompt appears.
NOTE
If your hard drive has very little free space, it’s also recommended you free up some storage space. Check out our best methods to free up hard disk space guide for further details about cleaning hard drives.
4. Reinstall Black Desert Online
Press Windows + R to open Run, enter appwiz.cpl in the text field, and click OK.
Next, select Black Desert Online from the programs listed here, and click Uninstall.
Follow the on-screen instructions to complete the process, and once done, restart the computer.
Run the setup and let it install the relevant files for the game.
The default Windows uninstaller often leaves behind leftover files. You can uninstall Black Desert Online and thoroughly erase its leftover files with a freeware third-party uninstaller utility like IObit Uninstaller.
Press Windows + S to open the Seach menu, type memory and select Windows Memory Diagnostic.
Click on Restart now and check for problems.
NOTE
If the Windows Memory Diagnostic reports errors, you might need to replace a faulty RAM module to fix Black Desert’s corrupted file detected issue.
The potential fixes above are ones some players have confirmed can help resolve BDO’s corrupted file detected error.
Can a corrupted file be uncorrupted?
While it’s not entirely impossible to uncorrupt a file, the chances of you being able to do that manually are low. And it, to a certain degree, depends on what caused the problem. In case it’s malware or virus, a reliable antivirus might come in handy.
But, if a file is corrupted due to bad sectors on the hard drive, there is not much you can do beyond running the built-in Check Disk utility. For corrupt system files, running the DISM tool and SFC scan may help.
Besides, if the normal files are corrupt, it’s best to use dedicated repair software to uncorrupt them. To avoid this trouble, we recommend using automatic backup software to quickly retrieve a copy of the corrupted file.
On the Windows 11 Taskbar, you only see a few apps or icons on the system tray, and the rest of the running apps are hidden.
To access the hidden apps, you need to click on the upward arrow, and the flyout menu will appear. Fewer icons keep your System Tray and Taskbar clutter-free; however, if you don’t want that, you can permanently disable the hidden icon menu on Windows 11.
In this guide, we will cover all the methods to turn the hidden icon menu off or on. Let’s get started!
How can I disable or enable the hidden icon menu on Windows 11?
1. Use the Settings
Press Windows + I to open the Settings app.
Click Personalization from the left pane and click Taskbar in the right pane.
Scroll through the Taskbar settings, and locate the Other system tray icons option.
You will get a list of apps under the option. Toggle on the button for the app you want to appear on Taskbar.
To disable the upward arrow or the hidden icon menu altogether, toggle on the switch all the apps listed.
To enable it again, toggle off the switch for all the apps listed.
2. Use the drag n drop method
Go to Taskbar, locate the corner overflow option, and click on it.
Press and hold the app icon from the menu, and drag and drop it on the Taskbar.
Do the same for all the apps present in the hidden icon menu. Once all the apps are off the menu, the hidden icon menu will disappear.
To make the hidden icon appear again, click and hold the icon and drag it. You will see the upward arrow and drop the icon in it.
3. Use the Registry Editor
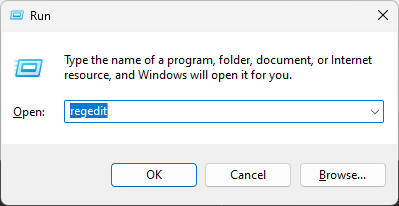
Press Windows + R to open the Run window.
Type Regedit and press Enter to open Registry Editor.
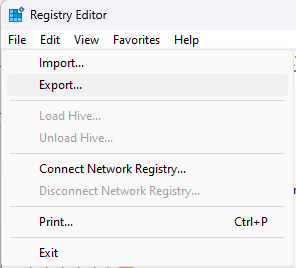
First, we need to take a backup. For that, click File and select Export. Now save the .reg file to a desired location.
Follow this path: Computer\HKEY_CURRENT_USER\Software\Microsoft\Windows\CurrentVersion\Policies\Explorer
Right-click on the right pane, select New, then click DWORD. Rename it as NoTrayItemsDisplay.
Double-click the DWORD and change the Value data for DWORD to 1.
If you want to enable it, change the DWORD’s Value data to 0.
Restart your computer to let the changes take effect.
Copy and paste the following command in the empty field and press Enter: explorer shell:::{05d7b0f4-2121-4eff-bf6b-ed3f69b894d9}
On the next window, remove the checkmark next to Always show all icons and notifications on the Taskbar and click OK.
So, these are the methods you can follow to turn on or off the hidden icon menu on Windows 11. Try them and let us know what worked for you in the comments section below.
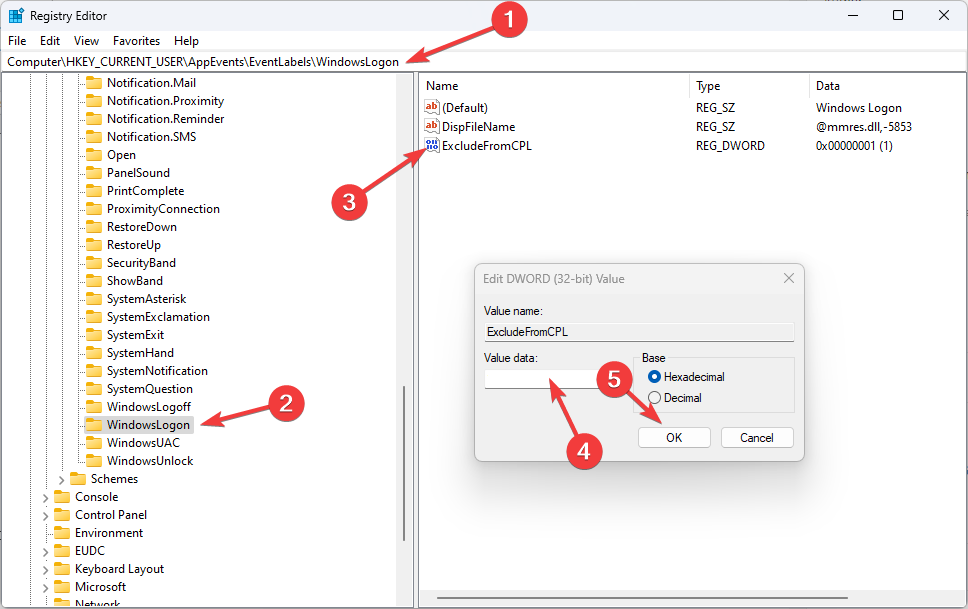
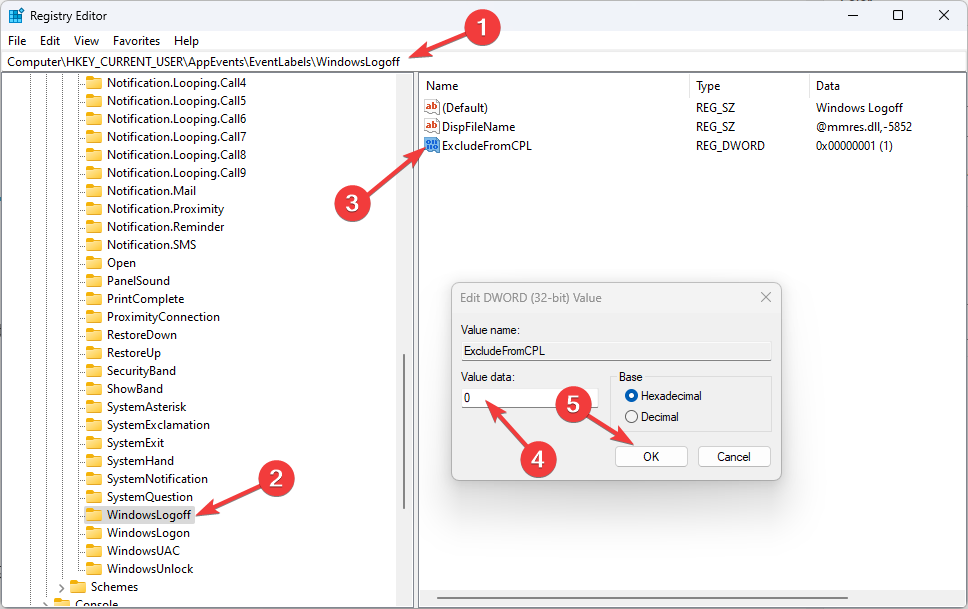
Type regedit and hit Enter to open Registry Editor.
Navigate to this path: Computer\HKEY_CURRENT_USER\AppEvents\EventLabels\WindowsLogoff
Locate ExcludeFromCPL and change the Value data to 0.
Restart your PC.
2.3 Change settings in Control Panel
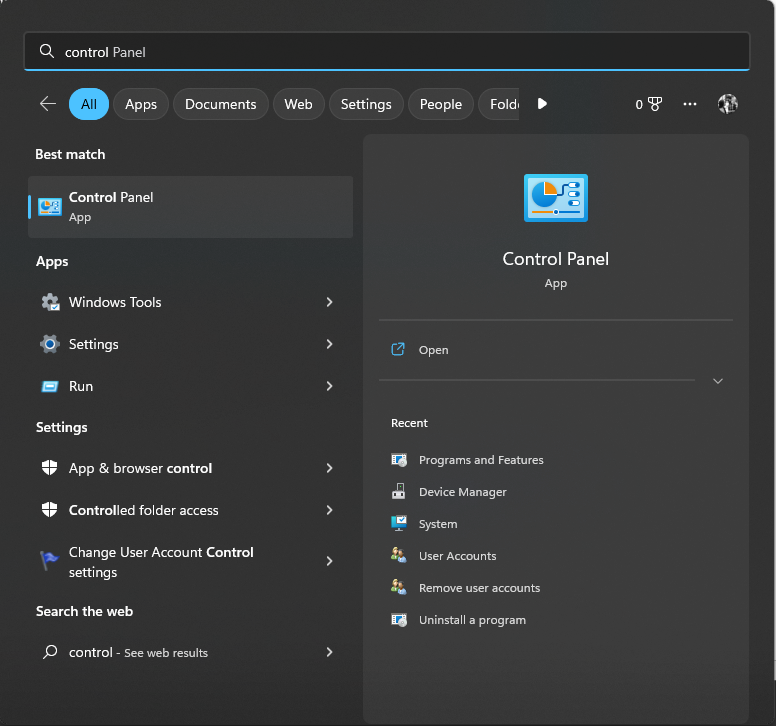
Open Control Panel by using the steps mentioned in the first method.
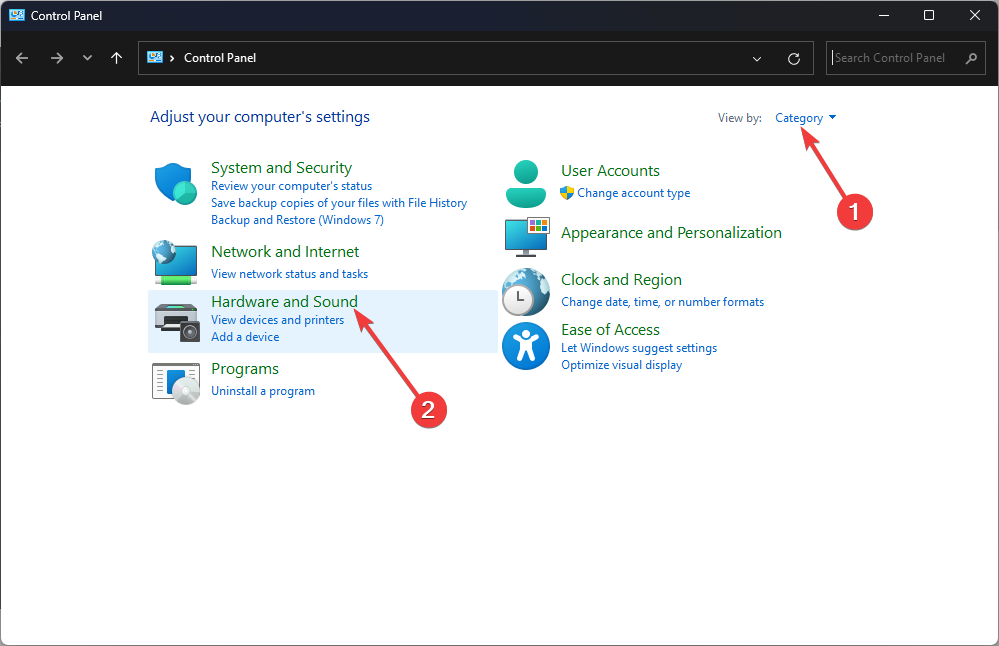
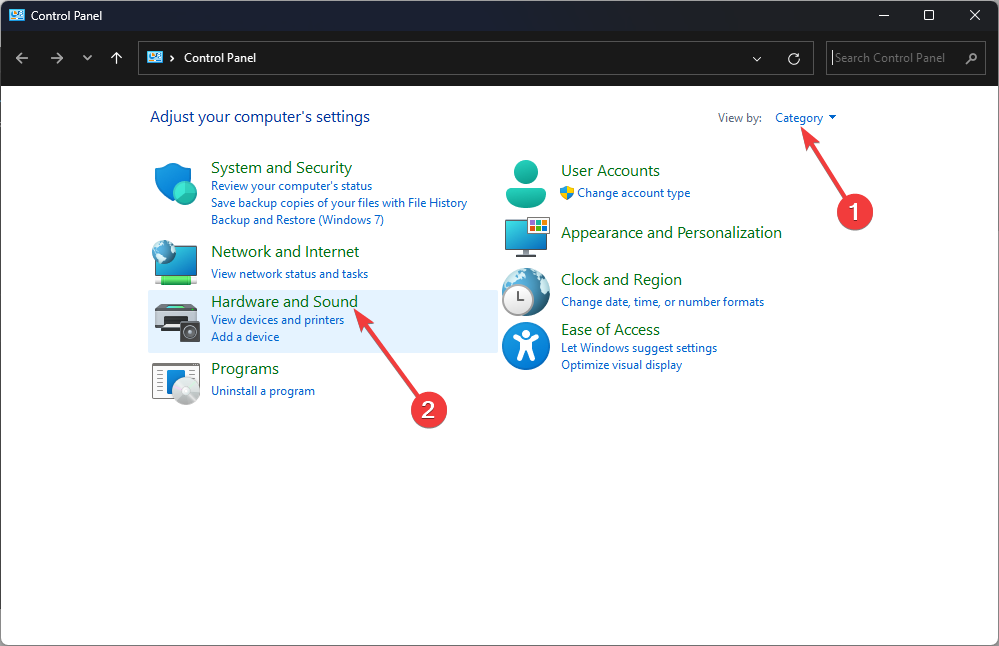
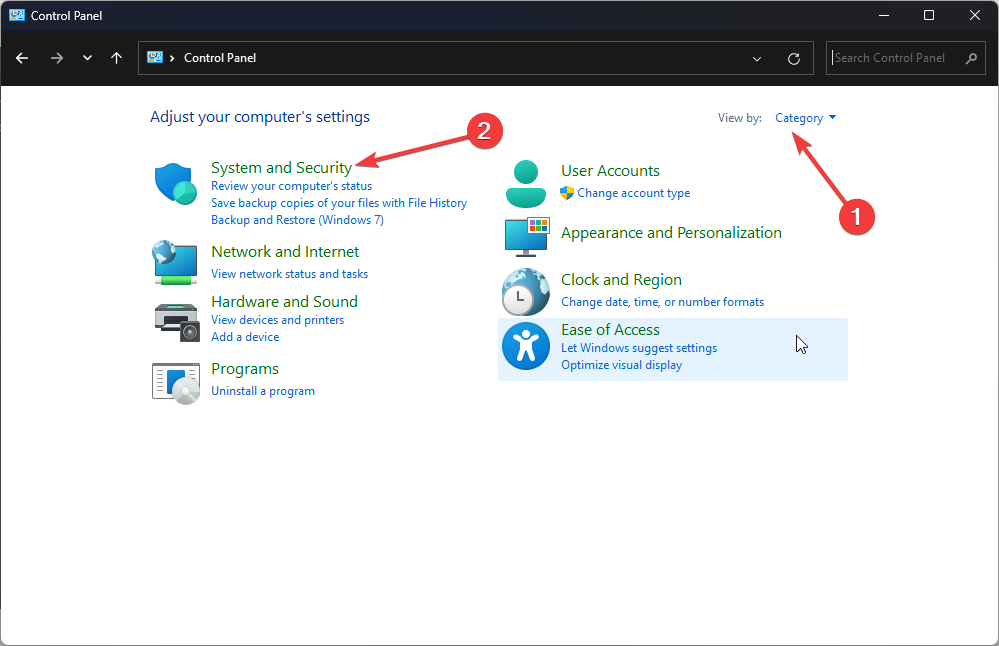
For View by, select Category. Click Hardware and Sound.
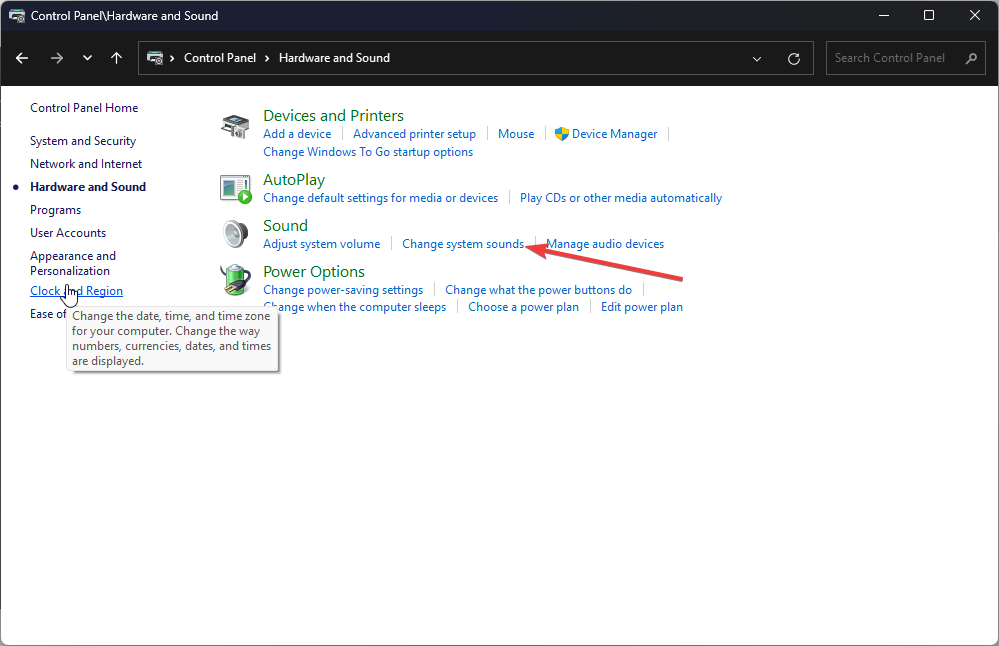
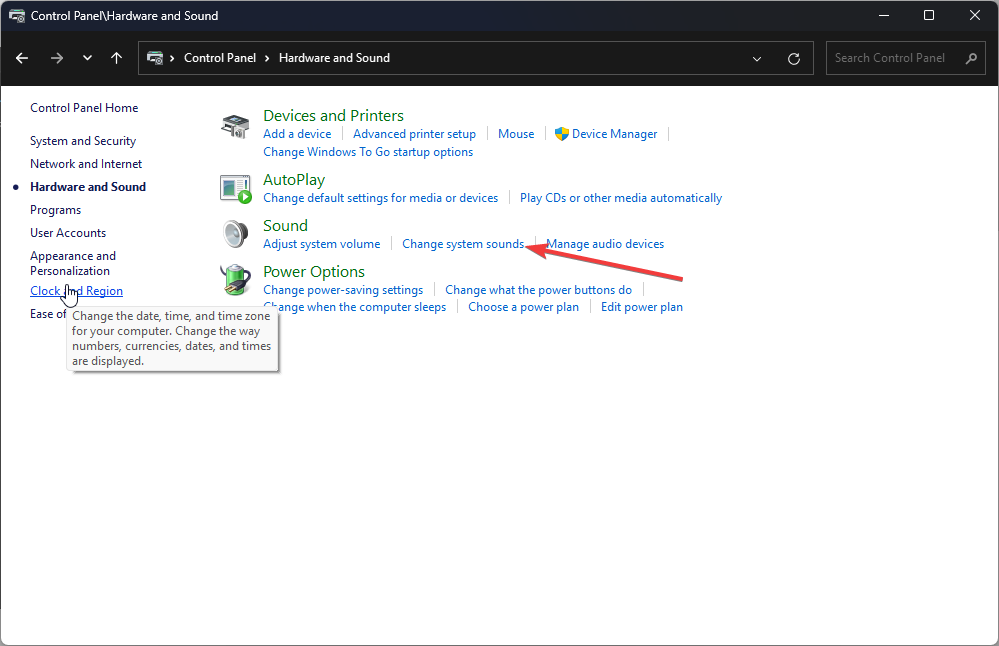
Under Sound, click Change system sounds.
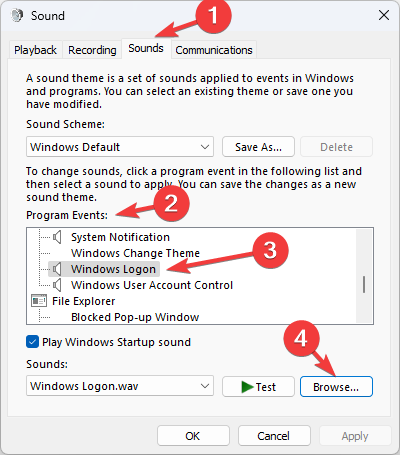
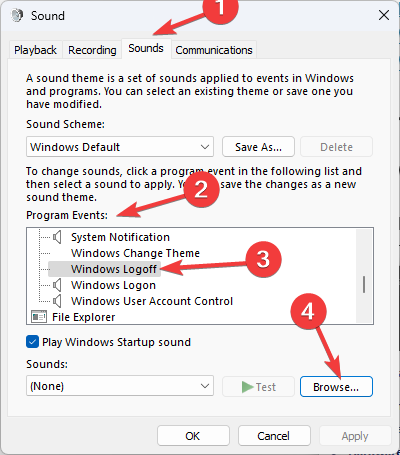
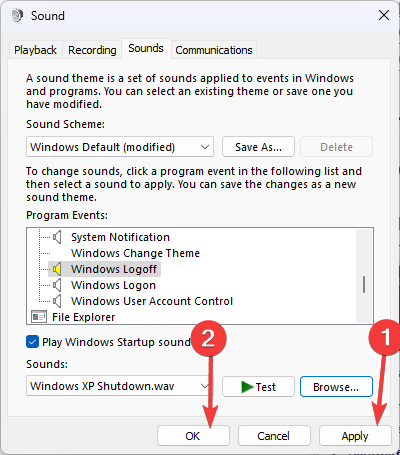
On the next page, under Program Events, navigate to Windows, then select Windows Logoff.
Click Browse.
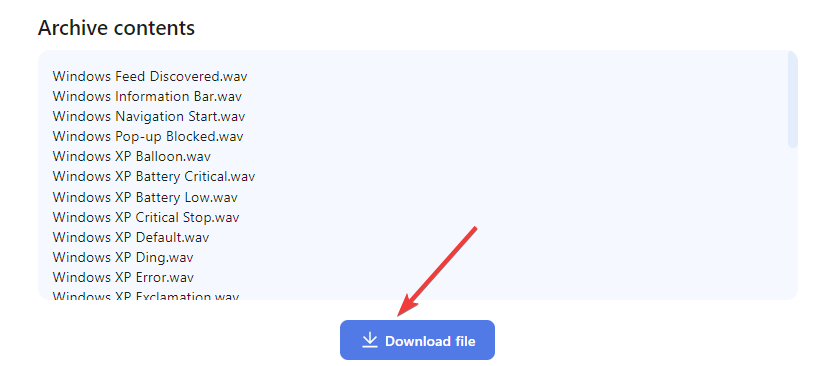
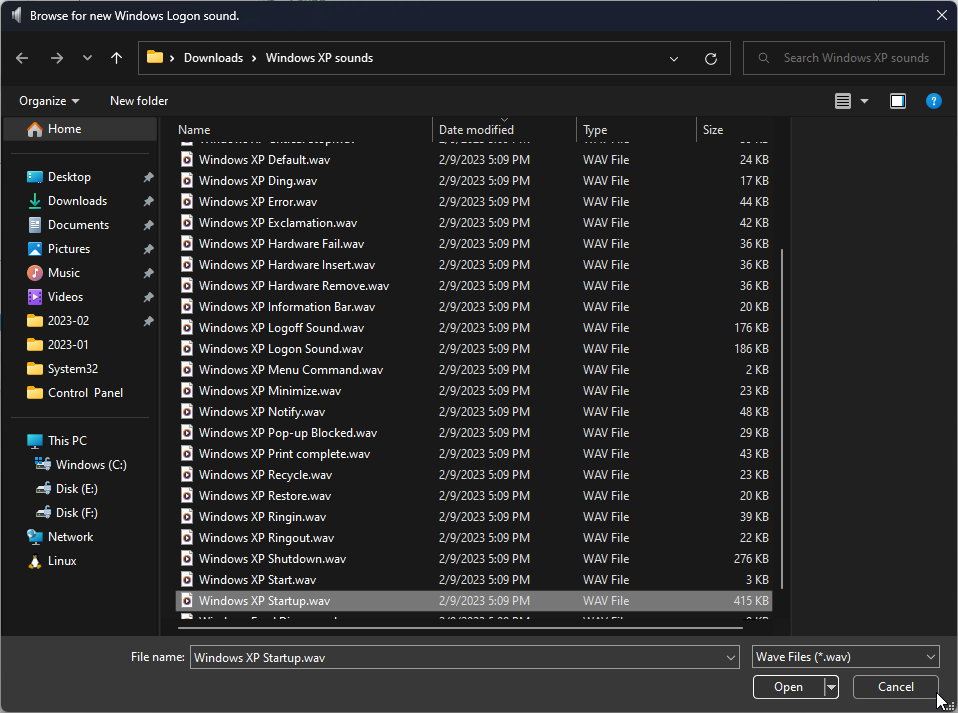
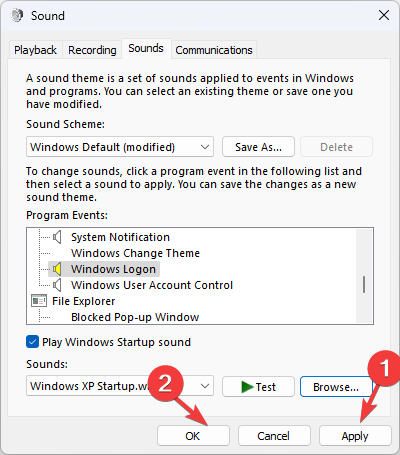
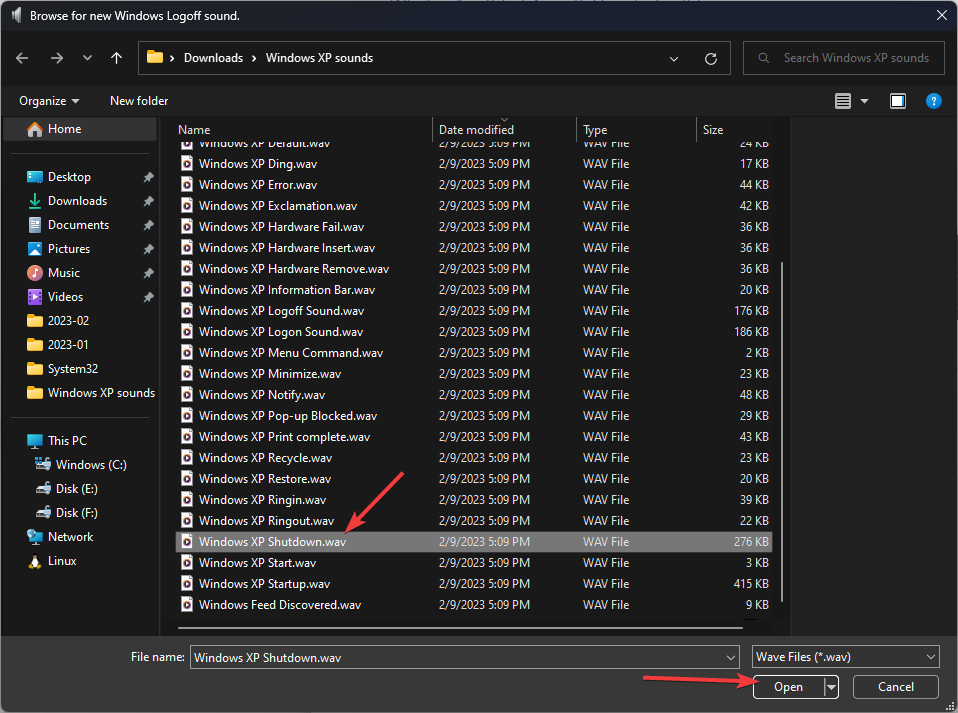
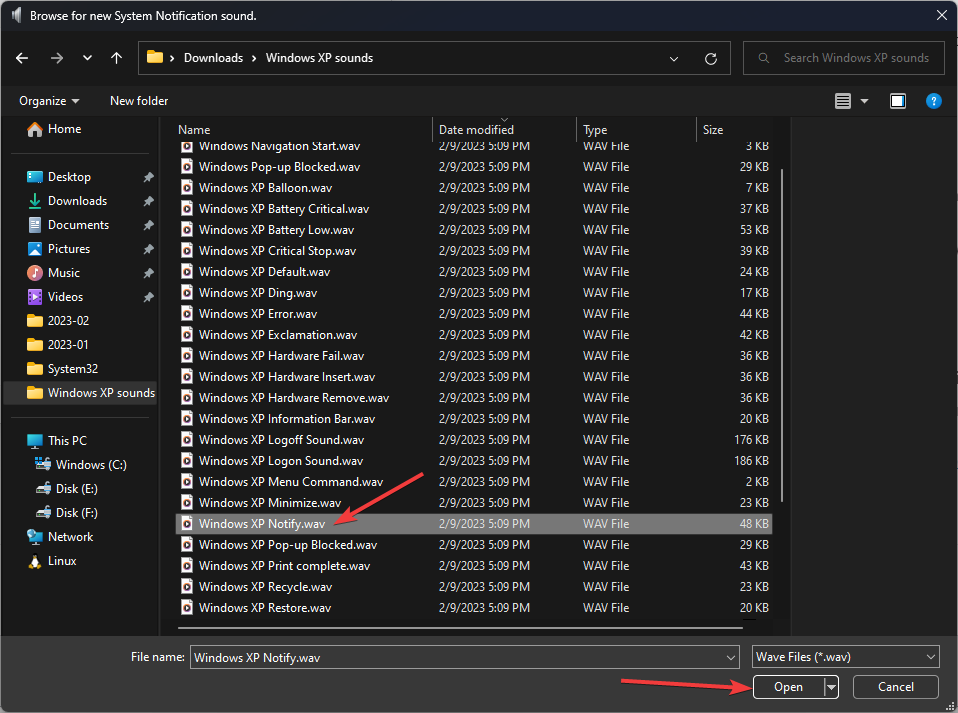
Select the shutdown sound from the folder you downloaded in the first step and click Open.
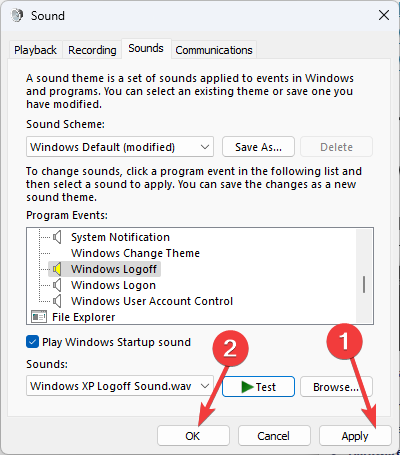
Click Apply and then OK.
3. Enable other sounds
Open Control Panel by using the steps mentioned in the first method.
For View by selecting Category from the drop-down. Click Hardware and Sound.
Under Sound and click Change system sounds.
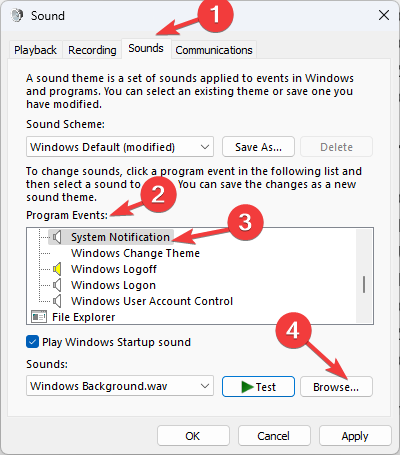
Now go to Program Events under Windows, navigate to the sound you want to change, and select it. Click Browse.
Select the .wav file from the downloaded folder and click Open.
Click Apply and OK.
So, this is how you can download and set up Windows XP sounds on your Windows 11 computer. If you have any questions or concerns, please feel free to mention them in the comments section below.
Right-click on the Start button and choose System from the context menu.
Click the Advanced system settings option from the left pane.
6. Use the Settings app
Press Windows + I to open the Settings app.
Click System, then click About.
Now click Advanced system settings.
7. Use the Windows PowerShell
Go to the search bar, type PowerShell, and click Run as administrator.
Copy and paste the following command and press Enter: SystemPropertiesAdvanced
8. Use the Command Prompt
Go to the search bar, type Command Prompt, and click Run as administrator.
Type the following command to open Advanced system settings and press Enter: control sysdm.cpl
What are the best advanced system settings for optimization?
Open Advanced system settings using one of the methods mentioned above.
With the Performance option, you can modify the visual effects, change VRAM size, and configure processor scheduling.
Next, the User Profiles option can create, manage, and delete user profiles.
With the Start and Recovery option, you can configure settings to decide what happens if your computer encounters a problem. Also, you can configure System Restore, manage disk space usage and perform system restore operations.
The Environment Variables button can let you view and edit environment variables used by apps and operating systems to keep configuration information.
No wonder it’s a go-to tool for users who care about system maintenance.
So, this is how you can get to advanced system settings on Windows 10 using sysdm.cpl to improve the performance of your computer and modify environment variables. If you’re using a legacy version of Windows, we also have a guide on how to access advanced system settings on Windows 7.
Today we’ll tell you all you need to know to install the Google Indic Keyboard on your Windows 11 PC.
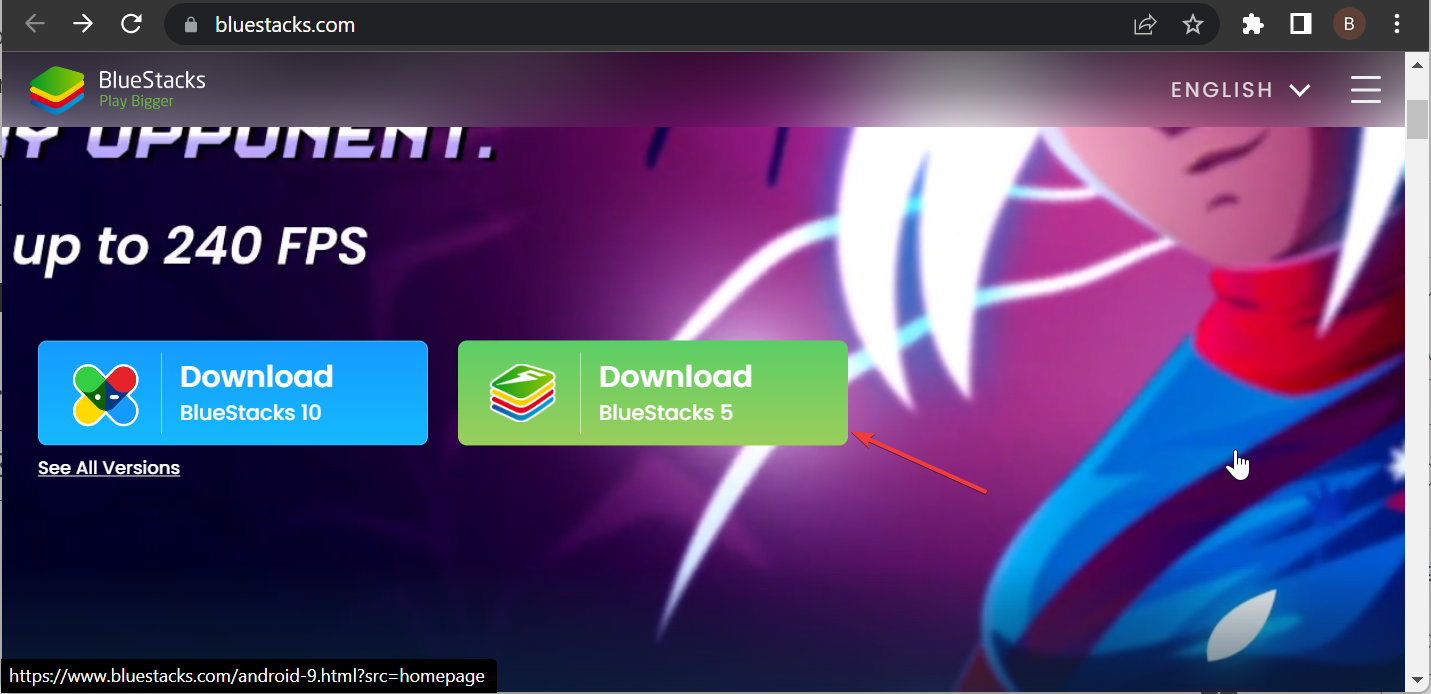
The app isn’t in the Microsoft Store, you’ll have to use an Android Emulator for it. To simplify the process, we will walk you through the steps in the next section of this guide.
How do I install Google Indic Keyboard on Windows 11?
Click the Install button and wait for the process to complete.
Finally, double-click on the app and start typing in your preferred language.
With the steps above, you have successfully installed the Google Indic Keyboard on Windows 11. Note that you can only use the app on your Android emulator, so you should not remove BlueStack or any other emulator you use.
The undoing changes made to your computer error on Windows 10 is an update-related issue. Most users encounter it after installing the latest patches on their PC.
This Blue Screen error can be frustrating, as it rarely finishes undoing the changes. This guide will show the easy ways to stop this endless loop and restore normalcy on your PC.
What is the undoing changes made to Windows 10?
The undoing changes made to your computer error on Windows 10 occur when there is an issue with an update. Below are some of the causes of this issue:
Faulty system files: One of the leading causes of this error is a broken or missing system file. The quickest way to rectify this is to repair and restore these files.
Faulty or incomplete Windows update: In some cases, this error shows up because of an issue with the update you are trying to install. You need to uninstall this update to restore regular service on your PC.
Issues with third-party apps and processes: Sometimes, third-party apps might run programs that interfere with your Windows update. To ensure this is not the case, you should enable Safe Mode and check if the issue persists.
How do I fix undoing changes in Windows 10?
Before exploring the solutions in this section, below are some troubleshooting steps to try:
Turn off your WiFi
Wait it out
Shutdown your PC
If these do not solve the problem, you can now delve into the solutions below:
1. Enable Safe Mode
Press and hold the power button to shut down your PC forcibly. Power it on and force it to shut down when the Windows logo appears. Repeat this thrice to bring up the Advanced recovery menu.
Select the Troubleshoot option.
Now, choose Advanced options.
Select Startup Settings.
Next, click the Restart button.
Press the corresponding key to Enable Safe Mode or Safe Mode with Networking when your PC restarts.
The first thing to do if you are dealing with the undoing changes made to your computer error on Windows 10 is to try to enter Safe Mode.
If this is successful, you know the issue is not caused by drivers and other critical processes needed to run your PC.
2. Repair system files
If you can’t boot into your PC normally, repeat the steps above to enter Safe Mode.
Press the Windows key, type cmd, and select Run as administrator under Command Prompt.
Now, type the command below and hit Enter to run it: DISM.exe/Online /Cleanup-image /Restorehealth
Wait for the command to finish running. If you encounter any issues, insert a media installation drive on your PC and run the command (replace C:/Repair/Source/Windows with the installation drive letter) below: DISM.exe /Online /Cleanup-Image /RestoreHealth /Source:C:RepairSourceWindows /LimitAccess
Now, wait for the command to finish running, type the command below, and hit Enter: sfc/scannow
Finally, wait for the command to finish running and restart your PC.
The Windows 10 undoing changes made to your computer error can be down to corrupt system files. However, Windows 10 has built-in tools to repair and restore these files.
Press the Windows key + I to open the Settings app and select Update & Security.
Select the View update history option.
Now, choose Uninstall updates.
Right-click the faulty update and select Uninstall.
Finally, follow the onscreen instructions to complete the process.
Another quick way to solve the undoing changes made to your computer error on Windows 10 is to uninstall the faulty update. This will reverse the changes made to your PC, causing the error.
4. Enable metered connection
Press the Windows key + I and select Network & Internet.
Click the Properties button under your active connection.
Now, toggle the switch under Set as metered connection forward to enable it.
If you encountered Windows 10 undoing the changes made to your computer error while installing an update, the best thing to do is to stop automatic updates temporarily.
The easiest way to do this is to enable the metered connection.
5. Run the Windows Update troubleshooter
Press the Windows key + I and select the Update & Security option.
Select the Troubleshoot option in the left pane and click Additional troubleshooters.
Now, choose Windows Update and click Run the troubleshooter.
Finally, apply any recommended fixes.
Since this is an update-related issue, you must involve the Windows Update troubleshooter. This tool restarts all the required services and components to update your PC.
It also checks for any glitch responsible for the undoing changes made to your computer error on Windows 10.
Press the Windows key + S, type cmd, and select Run as administrator under Command Prompt.
Type the following commands and press Enter each: net stop wuauservnet stop bitsrename C:\Windows\SoftwareDistribution\ to SoftwareDistribution.baknet start wuauservnet start bits
Finally, wait for the commands to finish running and try to update your PC again.
The Software Distribution folder saves your updated files and cache. However, it can get corrupt over time, leading to issues like the undoing changes made to your computer error on Windows 10.
To fix this, you need to rename the folder and allow your PC to create a new one.
7. Perform a system restore
Repeat steps 1 to 3 in solution 1.
Select the System Restore option.
Now, select a restore point and click the Next button.
Finally, follow the onscreen instructions to complete the process.
If none of the solutions above solves this problem, you need to perform a system restore. This will restore your PC to a point when everything is working well and restore normalcy.
We have concluded this detailed guide on the undoing changes made to your computer error on Windows 10. You now have everything you need to fix the issue and only need to follow the instructions carefully.
TLS 1.0 and TLS 1.1 are the two most popular versions of the Transport Layer Security (TLS) protocol, which provides security for Internet communications such as Web browsing, email, and instant messaging.
Given that attackers are constantly developing new methods of attack, there have been some vulnerabilities found in earlier versions of TLS which can allow attackers to decrypt your data. Nevertheless, here’s how you can enable either in Windows 11.
What’s the difference between TLS 1.0 and 1.1?
TLS 1.0 and TLS 1.1 are the two most widely used versions of the Transport Layer Security (TLS) protocol. Both versions offer a similar level of security and encryption. However, there are some differences that users should be aware of when choosing between them:
Security – In terms of security, there is little difference between these two protocols: both are still considered secure, though some may consider them obsolete and prefer newer versions such as TLS 1.2 or even 1.3 (which isn’t supported by many browsers yet).
Speed – TLS 1.1 is faster than TLS 1.0 because it uses fewer CPU cycles during processing.
Difficulty in upgrading – Some older client applications may not be able to support newer versions of the protocol due to a lack of resources or compatibility issues with their operating systems.
How do I enable TLS 1.0 and TLS 1.1 in Windows 11?
1. Enable TLS 1.0
1.1 Use the Control Panel
Hit the Windows key, type Control Panel in the search bar and click Open.
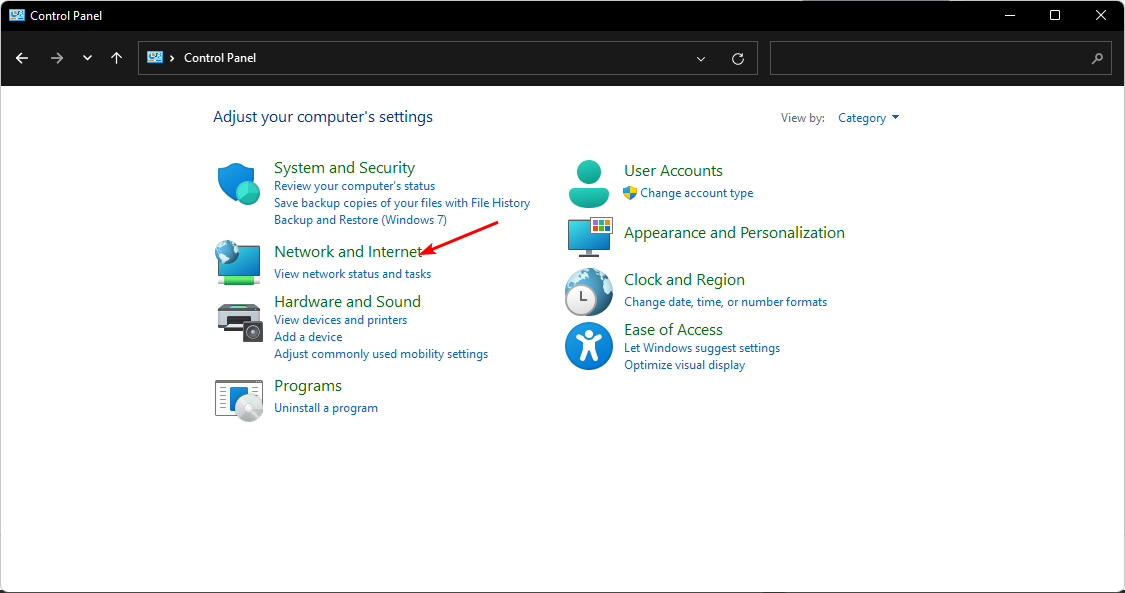
Select Network and Internet.
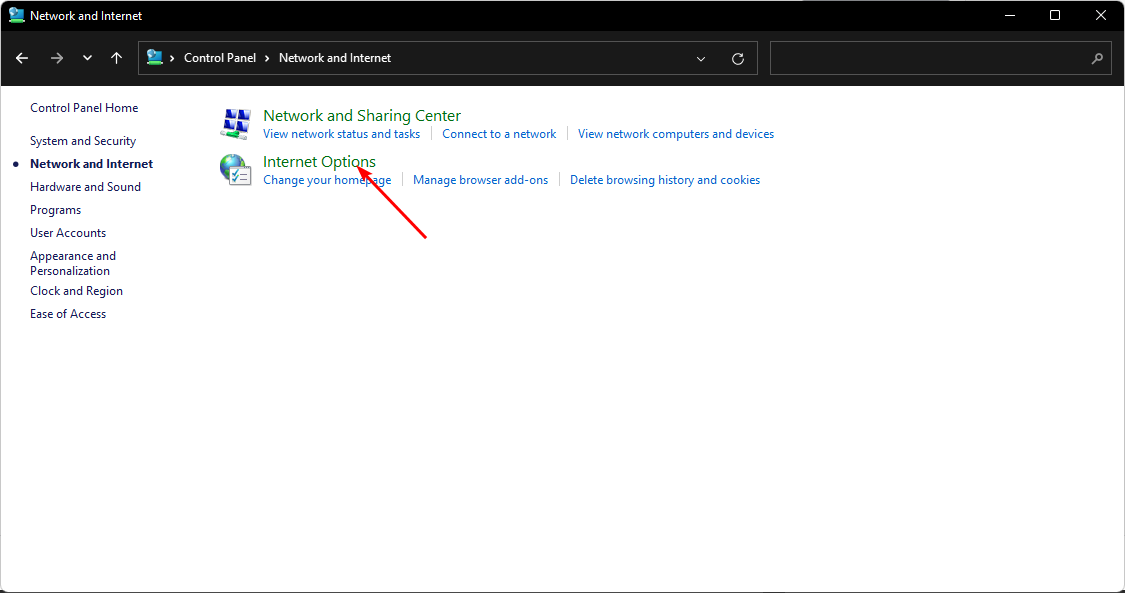
Click on Internet Options.
In the Internet Properties dialog box that pops up, navigate to the Advanced tab.
Scroll down and under Settings, check the box next to Use TLS 1.0, then hit the Apply and OK buttons to save changes.
1.2 Use the Run command
Hit the Windows + R keys to open the Run command.
Type inetcpl.cpl in the dialog box and hit Enter.
Navigate to the Advanced tab in the Internet Properties window that pops up.
Scroll down and under Settings, check the box next to Use TLS 1.0 then hit the Apply and OK buttons to save changes.
2. Enable TLS 1.1
2.1 Use the Control Panel
Hit the Windows key, type Control Panel in the search bar and click Open.
Select Network and Internet.
Click on Internet Options.
In the Internet Properties dialog box that pops up, navigate to the Advanced tab.
Scroll down and under Settings, check the box next to Use TLS 1.1, then hit the Apply and OK buttons to save changes.
2.2 Use the Run command
Hit the Windows + R keys to open the Run command.
Type inetcpl.cpl in the dialog box and hit Enter.
Navigate to the Advanced tab in the Internet Properties window that pops up.
Scroll down and under Settings, check the box next to Use TLS 1.1, then hit the Apply and OK buttons to save changes.
Although you can still enable the TLS 1.0 and 1.1 protocols, it is important to note that they are no longer supported by most browsers and cannot be trusted to provide secure connections.
Xbox has a great collection of games, and with the video gaming brand available on PCs, users can play their favorite titles on computers. However, many reported that the Xbox app is not downloading games in Windows 11, usually followed by an error code.
Issues with it are common, and some even had trouble installing the Xbox app. Once users managed to bypass or eliminate this issue, another appeared, which seemed to dampen their enthusiasm.
Why is the Xbox app not downloading games?
Here are a few reasons the Xbox app is not downloading games in Windows 11:
Misconfigured network settings: Many users found out that their network settings were misconfigured, which led to the problem.
Issues with the Gaming Services: The Gaming Services is critical for the effective functioning of the Xbox app, and issues with it can lead to games not downloading in Windows 11.
Conflicting apps: A third-party antivirus or firewall can block the attempts and be the reason you can’t download anything.
What can I do if Xbox app is not downloading games in Windows 11?
Before we head to the slightly complex solutions, try these quick ones first:
Go to the official Xbox Status page, and check if the servers are all working fine. In case they are down, wait for the problem to be resolved, and then try installing the game.
Get a free VPN, configure it before you start downloading the game, and then disable it once the progress moves beyond the initial levels.
In case you have a third-party antivirus installed, disable it and verify whether you can now download games from the Xbox app in Windows 11. If yes, we recommend you uninstall the program and switch to an effective third-party antivirus.
If none work, move to the fixes listed next.
1. Modify the network settings
Press Windows + R to open Run, type ncpa.cpl in the text field, and hit Enter.
Right-click on the active network adapter, and select Properties.
Untick the checkbox for Internet Protocol Version 6 (TCP/IPv6), and click on OK to save the changes.
Now check whether you can download games from the Xbox app. If not, again open the network properties, select Internet Protocol Version 4 (TCP/IPv4), and click on the Properties button.
Select the Use the following DNS server addresses option, enter the following in the fields, and click OK to save the changes:
Preferred DNS server: 8.8.8.8
Alternate DNS server: 8.8.4.4
Reconfiguring the network settings has helped a lot of users fix things when the Xbox app is not downloading games in Windows 11. So, try disabling IPv6 and switching to Google’s DNS server.
2. Reinstall the Gaming Services
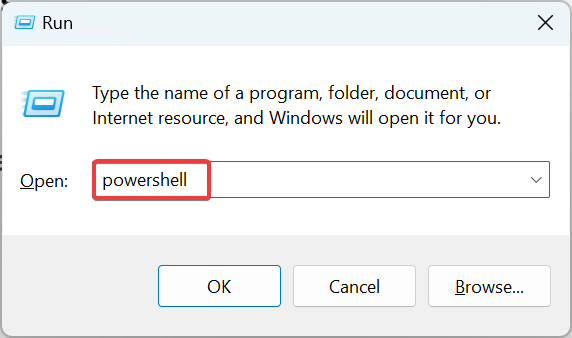
Press Windows + R to open Run, type powershell, and hit Ctrl + Shift + Enter.
Click Yes in the UAC prompt.
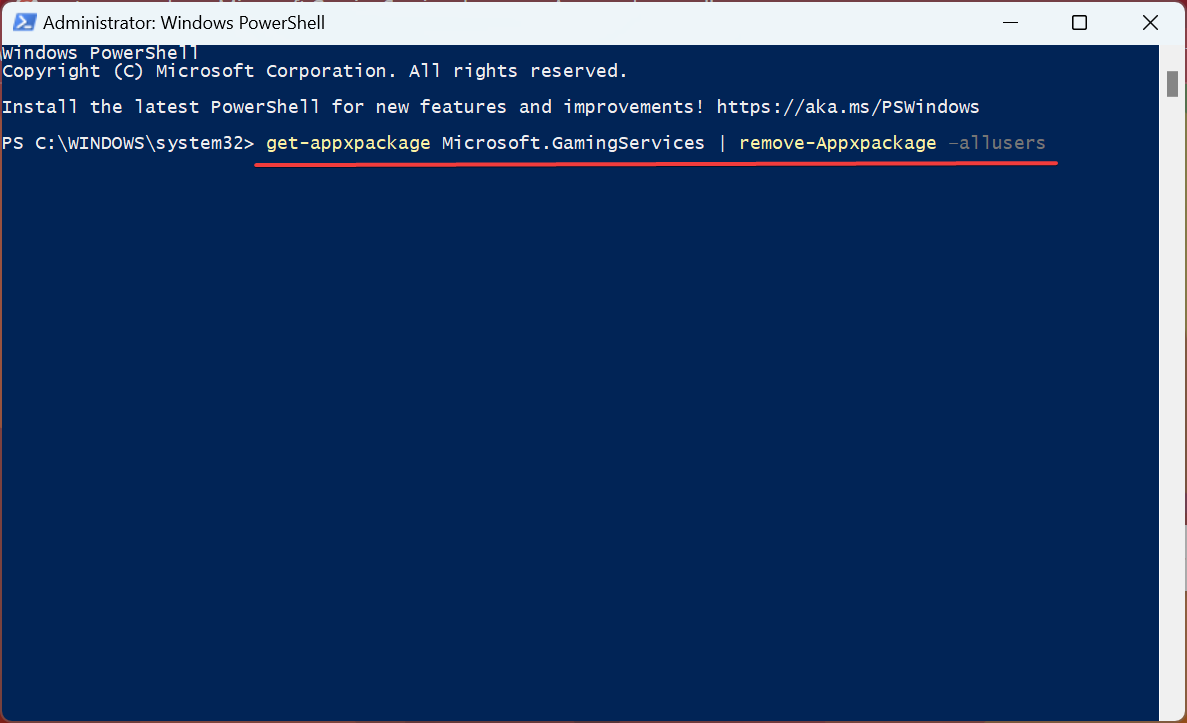
Now, paste the following command and hit Enter:get-appxpackage Microsoft.GamingServices | remove-Appxpackage –allusers
Next, execute the following command:start ms-windows-store://pdp/?productid=9MWPM2CQNLHN
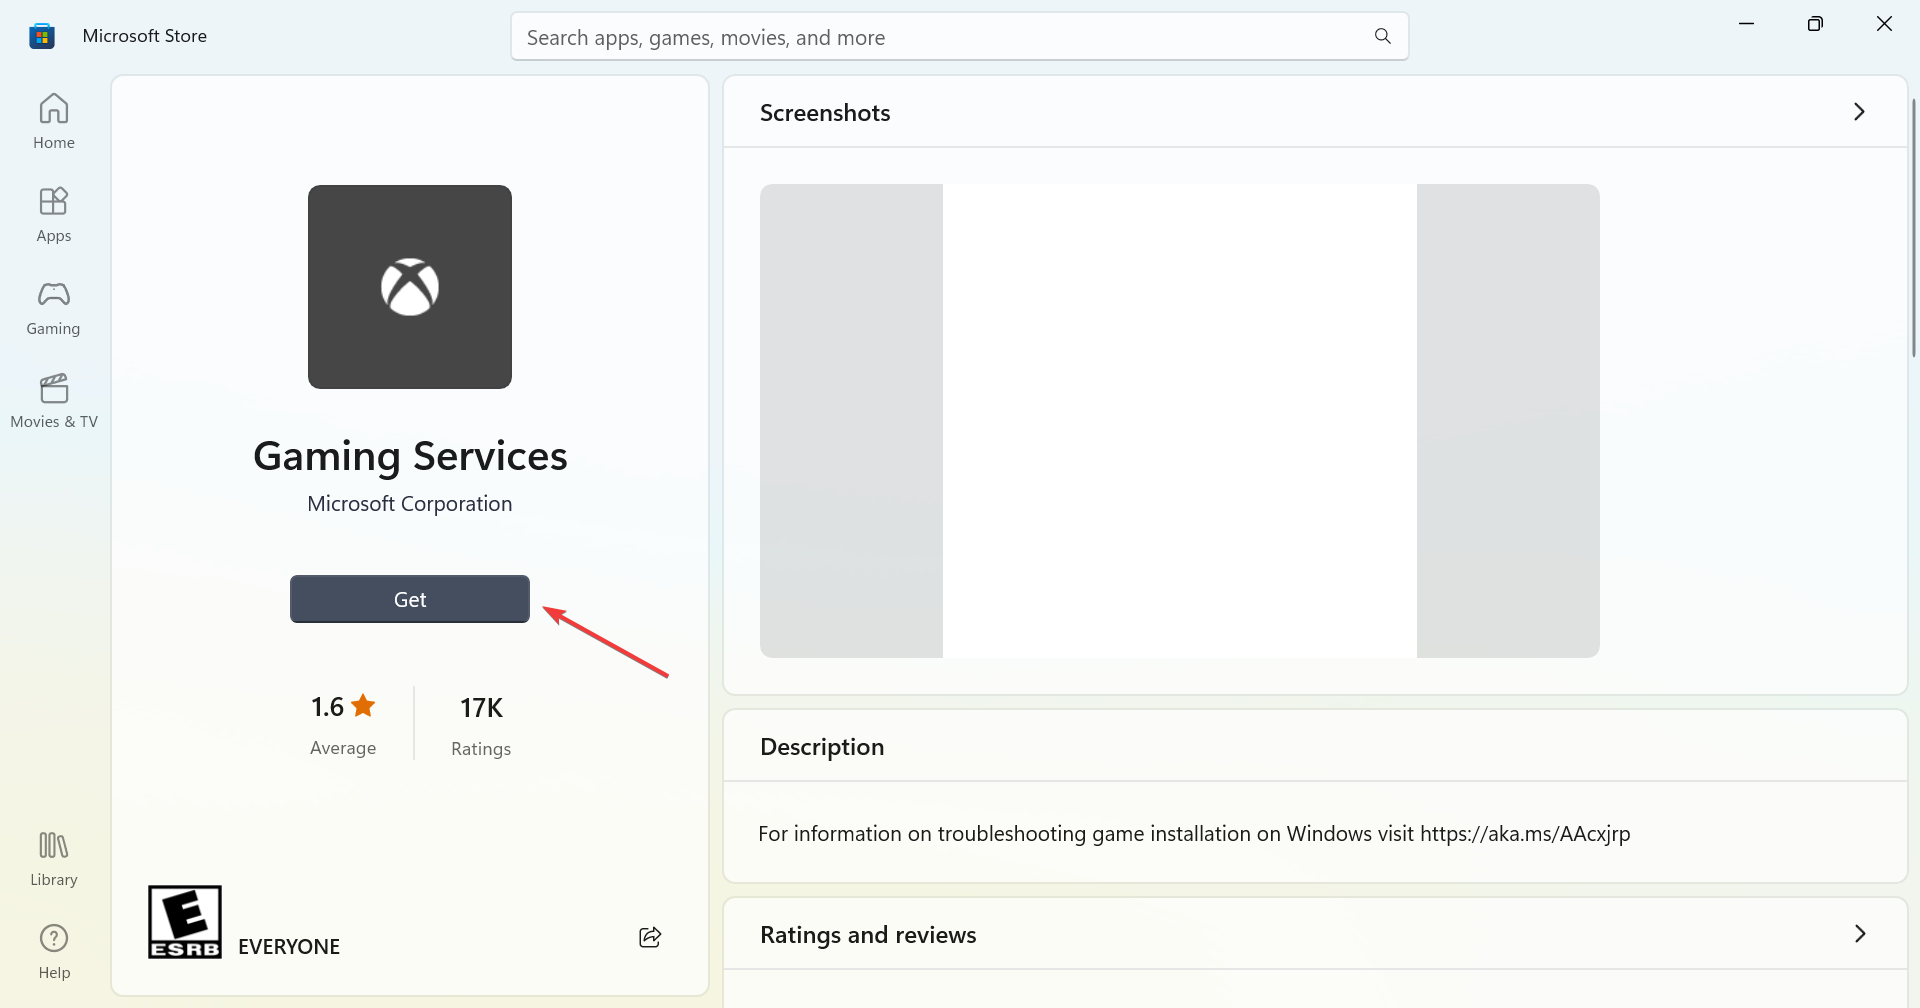
Finally, click on the Get button to reinstall the Gaming Services.
Gaming Services has often been found to be linked with issues leading to the Xbox app not downloading games in Windows 11, and reinstalling it usually does the trick.
3. Change sign-in settings
Press Windows + I to open Settings, choose Accounts from the navigation pane, and then click on Sign-in options on the right.
Now, disable the toggle for Use my sign-in info to automatically finish setting up after an update.
4. Set C: drive as the install location
Open the Xbox app, click on the profile icon near the top left, and select Settings.
Now, head to the General tab, and under the Change where this app installs games by default dropdown menu, select the C: drive.
Once done, restart the computer for the changes to come into effect.
Press Windows + S to open Search, type Services in the text field, and click on the relevant search result.
Scroll down and locate all the Xbox services. Since the services are listed alphabetically, they will all be together.
Right-click on the first service from the list and select Properties.
Choose Automatic from the Startup type dropdown menu, click on Start to run the service, and then on OK to save the changes.
Similarly, run all the other Xbox services listed here, restart the computer, and then try downloading games.
That’s it! One of these solutions must have helped you fix issues that led to the Xbox app not downloading games in Windows 11. We also have another article where Xbox downloads may stall so these solutions may come in handy.
If you’re looking for a car WiFi device to stay connected on the go, we share the best models you can use right now.
Now that the world has gone digital, there’s an increasing demand for staying connected wherever you are, whether traveling or even relaxing at home.
For car owners, especially when stuck in traffic, in-car Wi-Fi comes in handy, taking off the hassle of having to convert credit to internet bundles before browsing. There are several ways you can get Wi-Fi in your car, including:
Using your smartphone
This is very popular, but your phone has to have the capabilities to become a Wi-Fi hotspot before using it in your car.
However, it may not be your best bet owing to the huge amounts of data it consumes, plus draining your battery meaning you have to keep it charged as you drive along.
Mobile hotspot
This is a small router, usually square or rectangular shaped, that lets you connect multiple devices at the same time.
A mobile hotspot is flexible, portable, and saves your phone’s data and battery as it uses a different data plan, but this means added costs monthly.
It is a good alternative if your car doesn’t come with a car WiFi built into it already.
Wireless router
This can be installed in your car, eliminating the need to keep carrying around a mobile hotspot device. It is more expensive though as you’d have to buy it, have it installed then pay for a data plan for the router.
Built-in Wi-Fi
In-car Wi-Fi that’s already built into your car is the best due to its signal strength, as well as how easy it is to use because you need not carry anything around.
However, its use is limited to whenever you are inside or near the car. Plus, you’d have to really be a heavy internet user if you want to pay for monthly subscriptions.
If you’re looking for an car WiFi device or mobile hotspot that you can use in your own jalopy, here are the best that will keep you connected on the go.
If you’re looking to use Wi-Fi in your car, then this device might come in handy. The device is certified to work in most North American countries.
You can use it to create a wireless network in your car and connect any Wi-Fi-compatible device to it. The device doesn’t come with any additional feels, so you can use it without restrictions.
However, you’ll need to have a SIM card and a contract with a mobile operator if you want to access the Web. Overall, it’s a great car WiFi device for your car, so be sure to consider it.
If you need portable WiFi for car, then this hotspot might do the trick. According to the manufacturer, this device doesn’t need a SIM and you can pay as you go. However, the option for a SIM card is available as well.
This hotspot supports 4G and it can work in over 140 countries around the world. It’s important to mention that this device has a touchscreen so you can easily see battery level, signal strength, and other information.
The device can support up to 10 devices and thanks to a 3000mAh battery, it can last up to 10 hours on a single charge. If you’re planning a road trip, this will be a perfect addition to your car.
Advanced users that look for the best car WiFi will surely be interested in this model that comes from Netgear.
This mobile hotspot provides speeds up to 2.5Gbps and it supports 5G signal, WiFi 6 is available as well, and it delivers speeds up to 3.6Gbps. As for the number of connections, this model can work with up to 32 devices.
This model also has an Ethernet port, so you can connect it to other network devices if needed. This is an advanced hotspot, but if you want the highest quality Wi-Fi signal in your car, this is the perfect car WiFi device for you.
Another great portable WiFi for a car is GlocalMe Numen Air 5G. This model offers speeds up to 2.5 Gbps, which should be more than enough for most users.
This car WiFi device can be used without a SIM card, but if you own one, you can use your own data plan. As for compatibility, this model works in 50 5G countries and supports more than 100 operators.
Thanks to the Wi-Fi 5 technology, you can share your network with up to 16 devices, and a built-in 5400mAh can also be used for charging your USB devices.
If you want a simple-to-use car WiFi device, then ZTE ZMAX Connect might be what you need. This model accepts all SIM cards but it works best with T-Mobile and AT&T cards.
Using this model you can make 2.4 GHz or 5GHz network, and connect up to 10 devices. As for encryption, this model uses WPA and WPA2, which should provide some level of protection.
To monitor the status of your network, this model has four LEDs, and all the configuration is made via an online interface. Overall, it’s a simple but powerful car hotspot.
How can I get Wi-Fi in my car?
Using your smartphone hotspot is a popular solution, but you have to consider the huge amounts of data it consumes, plus draining your battery.
In-car Wi-Fi that’s already built into your car is the best due to its signal strength, as well as how easy it is to use because you need not carry anything around.
What are the advantages of in-car Wi-Fi?
You get a wider range of data plans that suits everyone’s use from light users to heavy internet surfers
You can plug in without worrying about your batteries, or even charging
In-car Wi-Fi allows you to charge your phone while driving, so you need not worry about running out of juice
In-car Wi-Fi delivers fast connection speeds owing to the 4G compatibility
You can also connect multiple devices with in-car Wi-Fi
It’s also a good way of keeping everybody occupied especially on a long road trip or journey
The downside with in-car Wi-Fi, however, is it can be more expensive, depends on network coverage, its availability is pegged on the network provider, and there’s practically no way you can drive while browsing.
Wi-Fi is obviously faster than 4G LTE Mobile Data, but downloads can get stuck over Wi-Fi. Some smartphone brands include a sanity check to switch your connection from a slow Wi-Fi to a faster cellular connection.
Well, the Windows operating system is known to be a user-friendly operating system. It allows for various customization options that can help you make your computer really your own. You can change the wallpaper, change the lock screen, change the icons, change the mouse cursor, and much more.
You can also change the default folder view in Windows OS. In this guide, we will show you exactly how you can change the default folder view in Windows 11. This will help you view all the files of a folder at a time or view the folders as large icons. Let us get right into it.
What are the different folder layouts or view in Windows 11?
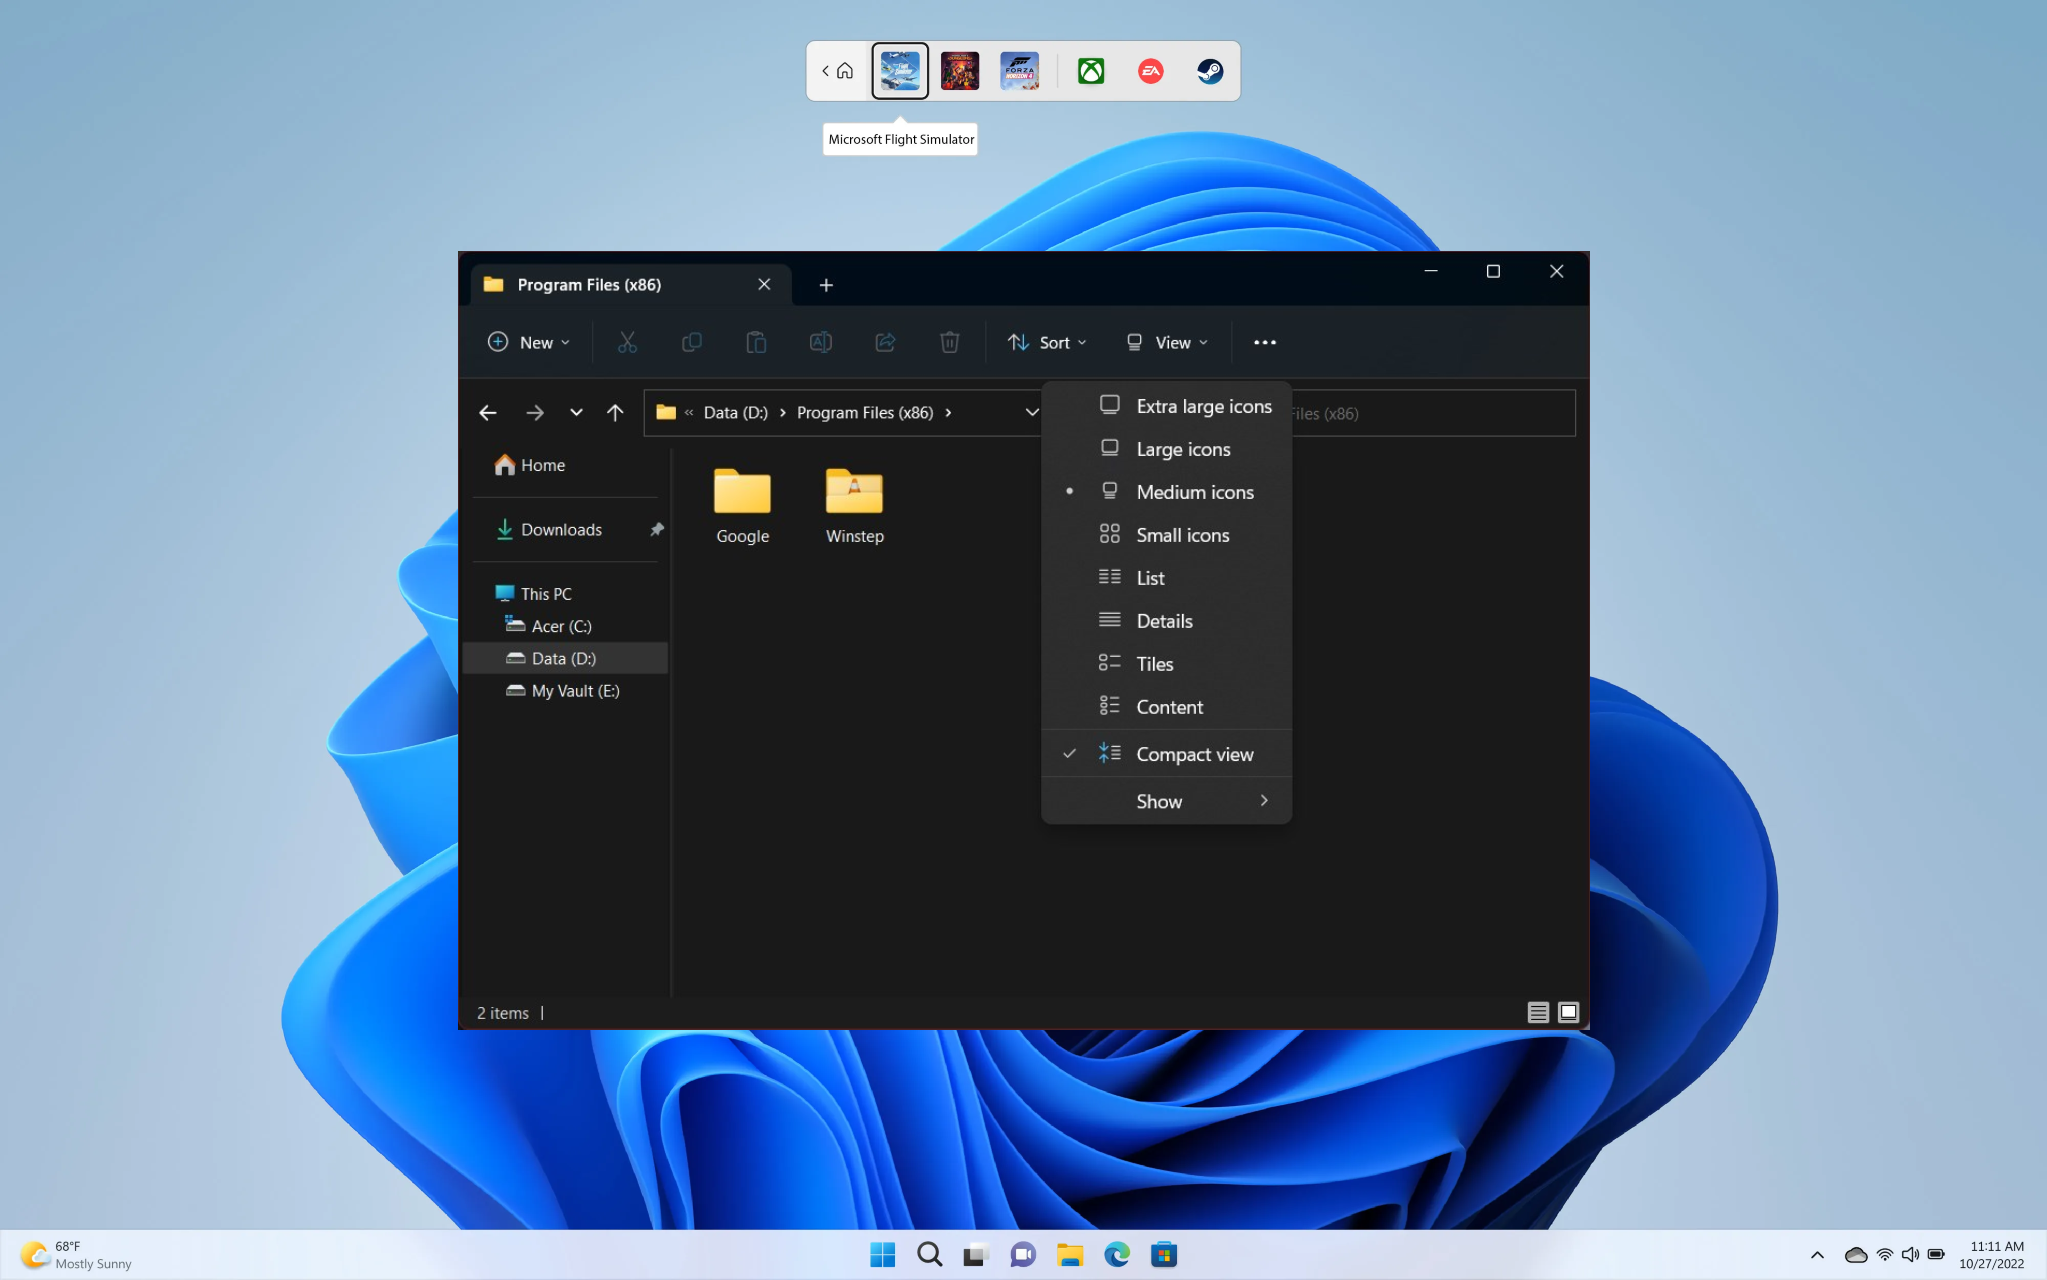
When you change the layout of the folder, it helps you to manage or view the details of the folder at your convenience. There are a total of 8 different folder layouts or views to choose from.
Extra large icons
Large icons
Medium icons:
Small icons
List
Details
Tiles
Content
How can I change the default folder view in Windows 11?
1. Use the mouse scroll wheel
Open File Explorer by pressing Win + E keys.
Open the folder to which you wish to change the default folder view.
Press the Ctrl button on your keyboard and scroll the mouse wheel up or down to cycle through the different folder layouts.
Release the Ctrl button when you are happy with the folder view.
2. Use the keyboard shortcut
Press Win + E keys to open File Explorer.
Open the folder you want to change the default folder view of.
Use the combination of keyboard shortcuts to change the folder view:
Select any of the folder layouts from the drop-down menu.
4. Use the File Explorer toolbar
Press Win + E keys to open File Explorer.
Open any folder.
Click on the Details (left) or Large icons (right) button on the bottom toolbar to switch the folder layout.
5. Use the context menu
Press Win + E keys to open File Explorer.
Open any folder.
Right-click on an empty space inside the folder.
Click on View and select any of the different layouts from the context menu.
How to set a default Folder View for all folders in Windows 11?
Open the file explorer by pressing the Win + E keys.
Open any folder.
On the top toolbar, click on View.
Select any of the folder layouts from the drop-down menu.
Click on the 3-dot icon.
Select Options.
Switch to the View tab.
Click on the Apply to Folders button.
In the prompt that appears, select Yes.
These are the steps that you need to perform if you wish to apply the selected folder view or layout across the entire file explorer. In this way, you do not need to choose the layout every time you enter a new folder.
Also, several users have been facing an issue where the folder’s view changes automatically without user input. If you are experiencing the same issue and are looking for solutions, then do not worry, as we have a dedicated guide that will help you resolve the problem.
Read our guide on how you force your Windows 11 PC to rename a folder. This has been troubling users for quite some time, and you can easily fix it using the mentioned solutions.
Feel free to let us know in the comments below which one of the above methods you used to change the default folder view in your Windows 11 laptop or PC.
Let us introduce you to the best Windows 10 repair software options available.
Windows 10 is the latest operating system from Microsoft which has been optimized for both desktops and mobile devices. It does the job mighty well, switching from either mode seamlessly and with the least fuss.
However, Windows 10 isn’t without its share of shortcomings and issues. Some can be minor ones that you might well choose to ignore though some turn out to be crippling and hinder normal functioning adversely.
Either way, going for a complete re-install of the OS can solve all issues though that isn’t the simplest thing to do every time.
Fortunately, there are easier options available in the form of software tools that you can use to get rid of most Windows 10 issues. Not only are they immensely effective but most Windows 10 repair tools are free.
Is there a Windows 10 repair tool?
Yes, Windows 10 has a suite of troubleshooters for the most common problems you might encounter. These troubleshooters are pretty easy to use, but in most cases (as our readers and many other users confirm), they don’t necessarily fix the issues as intended.
If you have a specific issue to solve, you can try one of these all-in-one fixers:
Fortect – Greatest system repair solution
Outbyte Driver Updater – Best driver updater software
O&O ShutUp10 – Best for protecting online privacy
Windows Repair Tool – Wide variety of advanced user settings
Missed Features Installer – Safely install any software without errors
Pre-requisites for fixing Windows 10
Before you set about downloading the software, ensure you are running the latest version of Windows 10. That is because Microsoft routinely releases new updates to fix the most common issues.
Plus, the updates come with the latest version of antivirus software and anti-malware programs. Keeping your PC updated can be another means of ensuring you have dealt with known issues with Windows 10.
What is the best free Windows 10 repair tool?
Depending on the problem you’re facing, there are multiple options. Some are free, some have free trials and some have incredibly advanced features that you can only access with a paid license. Here’s a list of the most used on the market:
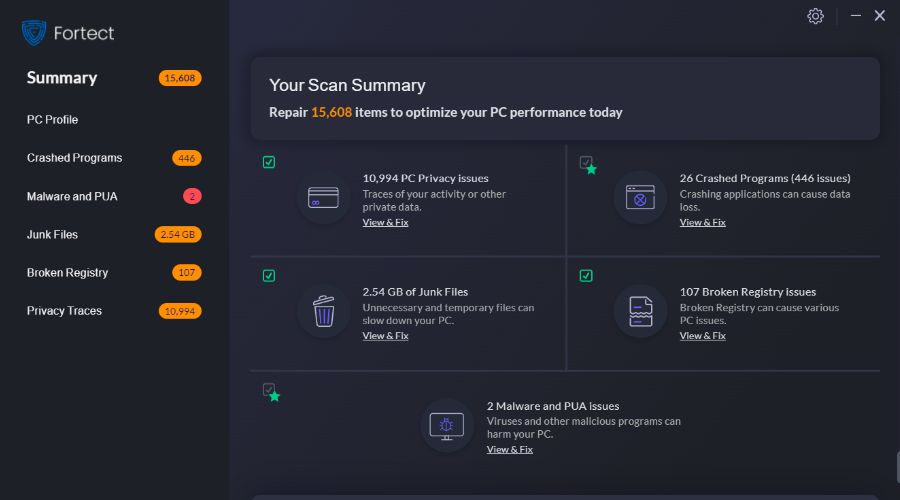
The new kid in town is called Fortect, a complete system repair solution that can fix any existing issue on your PC.
You can start using this software with a system-wide scan that will diagnose your device and find risky issues that will compromise your PC over time.
The tool has multiple modules that can detect specific system issues such as registry file malfunctions, detect junk files and the storage you can save, detect PUAs and malware threats, and many more.
As a result of the scanning process, you can simply repair all the PC issues by pressing one click. Then, your device will be much more optimized and completely error-free.
In addition, you can use the automatic repair feature that will clean broken registry files, fix damaged system files and also improve your online privacy.
Fortect
Waste no more time on unfit tools and repair your PC with this complete software.
Once you let Outbyte Driver Updater scan your PC, it will find drivers that need to be updated, provide you with links to the latest drivers, and download and install those automatically as well.
Given that outdated drivers can lead to a host of issues with your Windows 10 installation, having updated drivers will help you get rid of most of those at least, if not all.
Outbyte Driver Updater
It will find any missing or old drivers and update them within only a couple of seconds with ease.
The O&O ShutUp10 program is for those who take their online privacy rather seriously.
Though Microsoft has a slightly better record of snooping on its customer vis-a-vis the other technology majors like Facebook or Google, it still is known to gather user data.
That apart there also are issues of telemetry and tracking that have some users worried. The program offers several settings with a short description of what those stand for.
O&O ShutUp10
Get control over your privacy and decide when Windows can access it or not.
The program created by Tweaking.com will help address almost the entire gamut of Windows 10 issues.
From Windows Firewall and Winsock and DNS cache fixes to Registry permission and such, Windows Repair will help address all of those and with surprising accuracy.
In case the software proves ineffective, Windows Repair can help you fix the issues manually though that applies to advanced users only. For this, there is the specific Repairs tab.
There is a cache though, developers of Windows Repair strongly recommend the Windows Repair program only in Safe Mode for best results.
Get Tweaking Windows Repair
Repair most Windows issues automatically or use the power settings to do it manually.
There are chances you are having issues with your Windows 10 device owing to some features that failed to install properly.
This is particularly true for those who upgraded from Windows 7 or Windows 8/8.1. Though, even a fresh installation often leads to features failing to install.
It is here that the Missed Features Installer can come in handy. So if you are craving the Classic Start Menu or 3D Pinball, the Missed Features Installer can help set things right for you.
Windows 10 also comes with several built-in tools. These offer convenient options to work around many of the common issues of Windows 10. Here is a brief description of those and is worth checking out.
1. Windows 10 troubleshooter
This can be invoked if you navigate to Settings, then click on Update & Security. Here, from the left pane, you can see the Troubleshoot option.
The Troubleshooter will guide you with on-screen instructions. It will help you with a variety of problems, including those related to the keyboard, internet, BSOD errors, Windows Store app, printer, and so on.
2. Windows Software Repair Tool from Microsoft
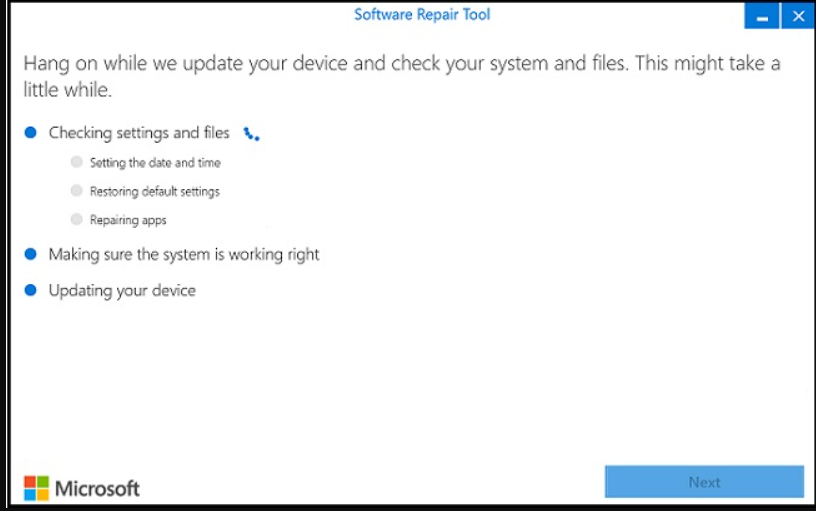
This is a tool that Microsoft designed to help mitigate software issues on Surface devices. Though, it can be just as effective for Windows 10 installation on any other device as well.
What the Software Repair tool essentially does is restore Windows 10 to its default settings. Besides, also repairs apps and updates the same as well.
3. System Restore
This can be extremely effective if some recent changes crippled your system. Here is an excellent guide on how to use System Restore and create a restore point.
4. Reset this PC
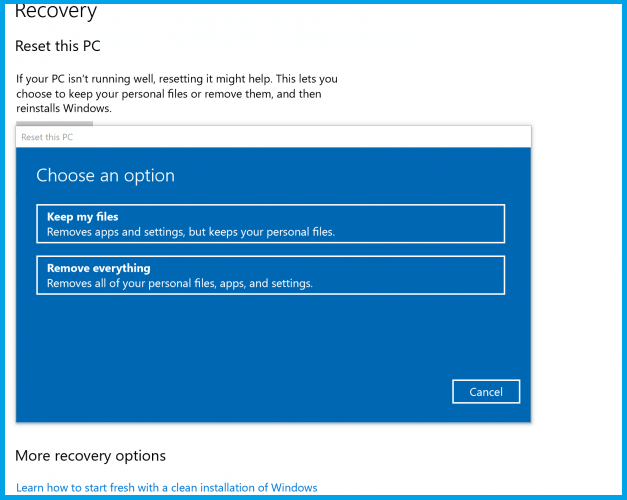
This is another handy tool that resets your PC to the default Windows 10 settings. The feature can be effective when faced with nagging issues. You have two options here, ‘Keep my files’ and ‘Removes everything’.
Decide as per your need and make sure you back up all your files if you opt for the second choice as it deletes your entire hard disk and installs Windows 10 afresh.
The tool is of help when faced with files missing or corrupted errors. The built-in System Files Repair command-line tool is handy in such situations.
If you are looking for a Windows PC troubleshooter tool check this awesome guide and learn more on how to automize the process.
What software do computer technicians use?
The tools recommended above are the best on the market and computer technicians use them to debug and repair PCs.
So, you can pick any of the Windows 10 repair tool download above because they are verified and working for your PC.
PC repair and optimization software will also include tools for assessing systems, file recovery, driver updates, removing duplicate files, and much more.
All you need to do is open Command Prompt as admin followed by typing Sfc /scannow. Press Enter, and you will be provided with the scan progress report along with other relevant info.
So, there you have it, quite a comprehensive guide to help restore things. All of the above solutions are a great help when errors appear and you need to troubleshoot them, but if you still have issues check out this detailed guide for more fixes.
If you encounter any issue that is not addressed by the above solutions, please let us know.
The session circular kernel context logger failed to start with the following error: 0xc0000035 is a ghost that has haunted the last three major releases of Windows. It’s an error that Windows 10 essentially inherited from Windows 7.
While it occurs less frequently on Windows 10, it still shows up to cause a Blue Screen of Death from time to time. But why and how can you fix it? In this guide, we’ll answer these questions and more.
Why has Circular Kernel Context Logger failed to start?
Below are some of the factors that can cause the session “Circular Kernel Context Logger” failed to start with the following error: 0xc0000035 issue on your PC:
Disabled service: Some users have reported that this issue occurs because the Superfetch service is disabled. The solution to this is to enable the service and restart your PC.
Outdated drivers: Sometimes, this problem can be caused by faulty or outdated network drivers. Updating your drivers to the latest version should restore normalcy.
Issues with network settings: In some cases, this error message shows up because IPv6 is enabled. Many users have been able to fix it simply by disabling the feature.
How can I fix Circular Kernel Context Logger 0xc0000035?
1. Reboot your computer completely
Click on the Start Menu.
Click on the Power button.
Now, select the Restart option.
Sometimes, the easiest fix is usually the most effective. A simple restart might do the trick. For example, if you are dealing with the Circular Kernel Context Logger error.
The issue might be due to glitches that will be cleared upon restarting your PC.
2. Delete the MSSEOOBE.etl file
Press the Windows key + E and Navigate to the ProgramData folder in your Local (C:) drive.
Click on Microsoft.
Select Microsoft Security Essentials.
Now, click on Support.
Right-click the MSSEOOBE.etl file and select the Delete option.
Finally, restart your PC.
The MSSEOOBE.etl file is part of the Microsoft Security Essentials. However, it can cause the Circular Kernel Context Logger error.
Hence, you need to delete the folder to fix the issue. Note that this solution only works for users running Microsoft Security Essentials.
3. Enable the Superfetch/SysMain service
Press the Windows key + R, type services.msc, and click the OK button.
Now, double-click the Superfetch or SysMain service to open its properties.
Set the Startup type to Automatic and click the Start button if the service is not running.
Next, click Apply, followed by OK.
Finally, restart your PC.
In some cases, the Circular Kernel Context Logger error can show up if the Superfetch service is disabled. So don’t be alarmed if you can’t find the Superfetch service on your PC.
This is because In later versions of Windows 10, the Superfetch service is named SysMain. So they virtually do the same thing.
4. Adjust the maximum file size of the startup event trace sessions
Press the Windows key + R, type perfmon, and click OK.
Expand Data Collector Sets from the left tree.
Click on Startup Event Trace Sessions.
In the main panel, scroll down till you find the ReadyBoot entry, and then double-click on it.
Click on the Stop Condition tab.
Set maximum size to 40MB (or more).
Finally, click OK and close the Performance Monitor.
The session circular kernel context logger failed to start with the following error: 0xc0000035message may appear because the maximum file size of the Startup Event Trace Sessions isn’t enough. You can use this solution to fix it.
Press the Windows key + R, type ncpa.cpl, and click the OK button.
Right-click on the first connection you see and click on Properties.
Now, uncheck Internet Protocol Version 6 (TCP/IPV6).
Click OK.
Finally, repeat steps 2 to 3 for the other network adapter on the list.
Another effective solution to this Circular Kernel Context Logger error is to disable IPV6. This has solved the problem for many users. So, it would be best if you tried it.
6. Update your network drivers
Press the Windows key + X and select Device Manager.
Double-click the Network adapters option to expand it, and right-click on your primary LAN device.
Now, select Update driver from the context menu.
Click on Search automatically for drivers.
Finally, install any available updates and restart your PC.
You should update your driver if the fixes above do not solve the Circular Kernel Context Logger error. One of the best ways to do this is to use the Windows update, as shown above.
Alternatively, you can update your drivers automatically with the help of dedicated software. This way, you will save time and be sure you get the correct driver version.
In this regard, we recommend Outbyte Driver Updater because it is easy to use and very light. To get started, install the program, select the driver you want it to update, and let it find the best versions available.
You can also scan all your drivers and find if you need to update or repair any. The tool will give you a simple report about the state of each driver. You have to let it start updating/repairing.
If none of the solutions in this guide worked for you, then your only other option is to reinstall or upgrade Windows if you’re using an older version.
However, if this error persists but doesn’t impact the way your system runs, then it’s okay to ignore it.
So which solution worked for you? Would you like to point out a blind spot on our side? Please don’t hesitate to leave a comment down below. As always, thank you for reading.
A PC repair tool is known to fix issues on desktops or laptops. These utilities can come in different shapes and sizes.
However, only the very best Windows repair tools will enable you to solve a multitude of system errors to ensure the OS runs as smoothly as possible.
Some of them are system optimizers, others are more like troubleshooters, while some provide quick fixes for a variety of issues.
With so many choices at your disposal, it’s only natural to get easily confused. We’ve consistently analyzed each and every one of the tools in the lIst below, but here’s a quick look at some of the best:
Fortect – Very good at repairing BSOD
Fortect PC Cleaner – Powerful and very easy to use
Advanced SystemCare – Fast & straightforward
System Mechanic Ultimate Defense – All-in-one tool
Fix-It Utilities Pro – Simple interface and basic features
Is there a Windows 10 repair tool?
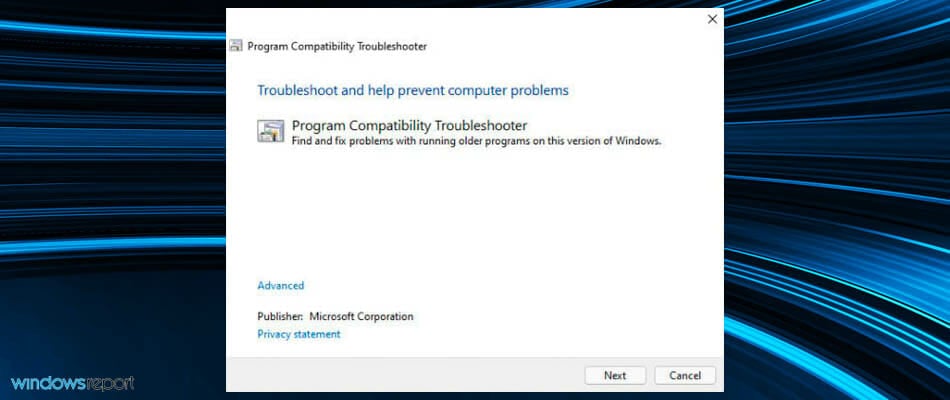
Yes, Windows does have a built-in repair tool, but it doesn’t usually do much. The only area where Windows Repair has proven useful to us is when experiencing networking and program compatibility issues.
We consider it to be extremely important that you use a tool that can resolve all of these issues and guarantee a streamlined experience on your computer.
What can repair software do?
Repair software, will ensure that all the elements that could create problems with your system will be optimized, repaired, and even replaced if needed.
A good repair software offers quick and easy access to all of these features, proves its versatility by first identifying the problem, and then repairs it without much input from the user. There are even great PC repair tools for Windows 7 that could revive your old computer in no time.
Owning an application that automates troubleshooting processes is important, as this eliminates the need to be proficient in troubleshooting methods and the possibility of a mistake as well.
Fortect is a PC repair product that you can count on when it comes to keeping your device in an optimized state as it has multiple advanced features.
It runs a thorough scan of your computer’s system, which takes up to five minutes, to determine its condition and find which elements need to be enhanced so that your PC can run steadily.
The preparatory scan comprises a search for any system vulnerabilities, damaged and missing files, junk, or unwanted apps that may slow down your PC.
When the scanning process is finished, this software will repair and replace all the broken and missing files, including DLLs and registry keys to automatically recharge your operating system.
Fortect is able to handle even issues like the blue screen of death and it also helps in the OS recovery after virus damage or any other issue that may affect performance.
Furthermore, it helps you remove all the junk files by cleaning up your folders, disk, and hard drive to reach a PC optimization.
Fortect has three PC repair plans from which you can choose, depending on how many devices you need to protect.
Other key features of Fortect you might be interested in:
Blue screen of death prevention
Repairs Windows damage
Operating system restoration
Easy to use
Browser Cleanup
Thorough diagnostic report
Fortect
A steady repair program that will help you easily reach an optimized state of your computer.
PC Cleaner can repair your computer with just a few simple scand of different elements. You are able to target specific areas, such as the memory, registry, corrupted, or residual files.
This tool can be set to automatically clean your PC on a schedule with specific preset scans of the elements you want.
Residual files from different program installations can easily cause issues to your computer, but luckily they can be fixed or repaired with PC Cleaner.
This software can also scan and repair your computer registry, which often is the cause of the most problematic computer problems, such are Windows errors and BSODs.
What makes PC Cleaner one of the best tools for repairing your computer is its ease of use. The software comes with a very intuitive interface and low resource consumption.
A full registry scan and repair will only take you a few minutes, which is way less than most other cleaning software you will find.
Main features of PC Cleaner:
Memory cleaner and boost
Residual files remover
Registry cleaner
Security features optimizer
Fortect PC Cleaner
Repair your computer with just a few clicks with this powerful software.
Advanced SystemCare is an all-in-one toolkit that can be used to fix most Windows issues with. This software is primarily designed to clean, optimize, and protect your privacy.
It promotes an intuitive 1-click approach, so you don’t have to waste your precious time when you want to get rid of junk files, invalid shortcuts, and spyware threats.
In addition to the basics, Advanced SystemCare offers some great extra niceties for safer browsing and online security day and night.
To be more precise, it protects your system from viruses and malware with its own program. Even more, Advanced SystemCare checks that your Windows Firewall is protecting the computer from outside threats and offers extra tools for tougher security.
Also, keep in mind that this tool analyzes the performance of your hard drives, if they’re starting to fail, and corrects them if possible.
It even optimizes hard drives in order to enjoy faster access to regularly used files and programs.
As for the Internet Boost feature, rest assured that it stabilizes your network and successfully accelerates Internet speed by choosing the best channel for your area.
Some Advanced SystemCare key features include:
Privacy shield for improved privacy protection
Anti-tracking for online browsing
Auto RAM clean for a smoother PC experience
It accelerates Internet speed
Easily solves system weakness and eliminates the probability of security loopholes
Sweeps privacy traces that you may not even be aware of
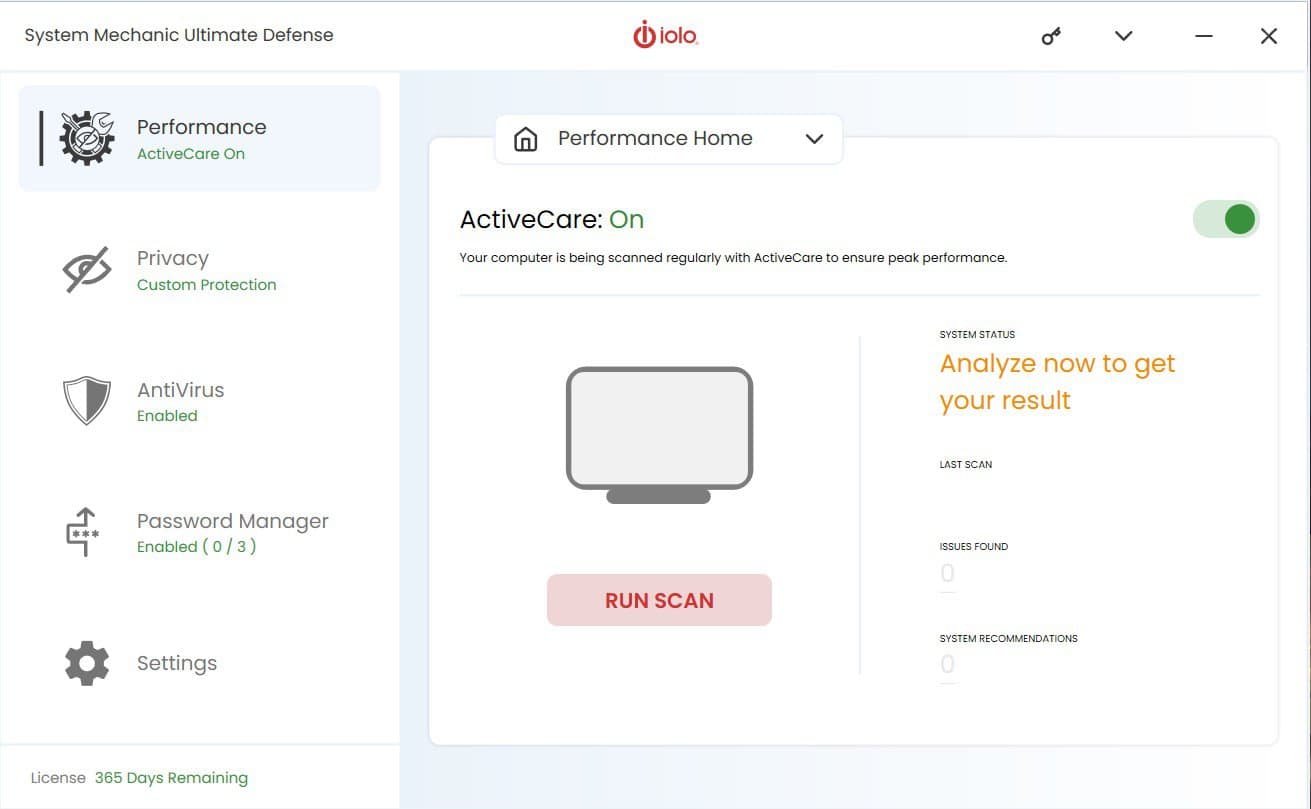
System Mechanic Ultimate Defense is a complete repair kit that packs numerous repair and optimization tools. This is one of the most highly rated system optimizers for Windows 10.
One of the best things about the software is its all-in-one PC repair tool that can fix Windows issues with just a few clicks.
The user interface presents you with a clear and obvious set of choices that not only allow you quick access but also provide a very useful overview of the system.
Options like LiveBoost maximize the output of your RAM, CPU, and HDD, thus making your system run smoothly, and at full capacity.
To initiate an all-out scan of your system, all you need to do is to click the Scan button, and the software will cover all the important elements.
Alternatively, you can select individual repair tools to fix more specific things. For example, System Mechanic includes a Registry Tuner, Shortcut Repair, System Troubleshooter, and Drive Medic tools to repair registries, shortcuts, etc.
It also comes with an Internet Repair Tool to fix Internet connections that give you a hard time.
In addition, System Mechanic Ultimate Defense has its own anti-virus utility that can purge viruses. So, it has pretty much everything you’ll need from a PC repair tool for Windows 10 and the latest OS.
Here are some other great features that are waiting to be discovered:
On-Demand Boost lets you manually tweak power settings
Securely deletes files
Esily removes system-hogging bloatware
Boosts performance in real time for streaming and gaming
Increases security for open router ports and connected home devices
Internet booster is part of the package as well
Iolo System Mechanic Ultimate Defense
Repair, optimize, and improve the security of your computer with this powerful software.
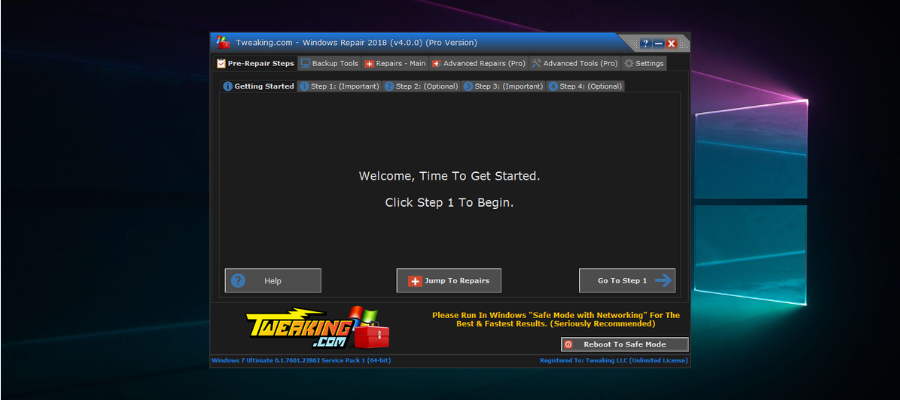
Tweaking Windows Repair is another incredibly versatile and powerful tool that can help you repair a wide variety of issues on your Windows PC.
Don’t be fooled by the old-school design of their website, as it uses state-of-the-art technology to ensure that no problems go unsolved.
To make it even better, the software takes you through a step-by-step process that ensures that all elements of your system’s stability are inspected thoroughly, and all problems are resolved. All you have to do is initiate the process, and then simply follow the on-screen instructions.
The software is extremely intuitive to use, meaning that you can have access to professional-level tools without the need to get lost in menus and sub-menus.
Thanks to the way it was designed, Tweaking Windows Repair gives you access to a hub of information. This contains everything you need to know about the state of your system, and also provides quick access to any of the elements.
It offers problem-solving for registry errors, and file permissions, as well as resolving a wide plethora of issues with Windows Update, Internet Explorer, and Windows Firewall.
Added to this, using this software allows you to safely restore your OS’s original settings, thus avoiding any changes made by malware and other third-party software installations.
Here are some other useful features that are worth mentioning:
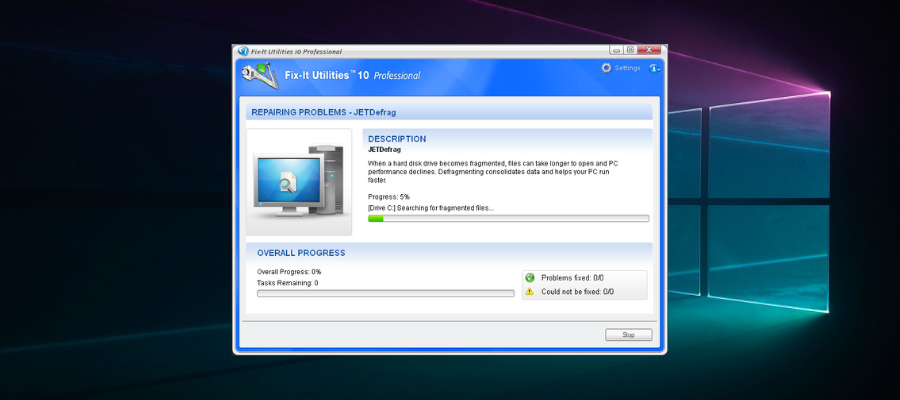
Fix-It Utilities Prois another PC repair toolkit packed with system optimization options and tools. The utility gives you an in-depth repair solution for software issues.
The latest version 15 comes with an intuitive online dashboard that enables you to manage devices via the web.
Fix-It is compatible with Windows platforms from XP to 10 and it includes a FixUp Wizard to help you diagnose and repair system issues and test hardware.
It also has a lot of handy extra tools for fixing software issues. For instance, you can fix registry errors with the Registry Fixer which thoroughly scans the registry. The software‘s Broken Shortcut Fixer fixes broken registry shortcuts.
With Disk Fixer you can solve hard drive errors. You can also set up a bootable rescue CD with Fix-it Utilities that can help restore Windows when you can’t log in to the OS.
Moreover, Fix-It provides a full suite of privacy-oriented features in order to remove all traces of your online and offline activities.
It basically scans your computer for documents containing credit card numbers and sensitive data and cleans chat histories, Internet searches, cookies, and more.
Other great features that this tool brings to the table:
Targets large files for quick cleaning
Cleans logs, caches, Windows Registry, memory dumps, and not only
Not all PC repair toolkits are safe, as there are various fake software tools online that only act as a gateway for malware to infect your system.
To avoid any unexpected issues, make sure to download your .exe installation files from trusted sources.
That being said, our guide only contains download links that were verified and proven to be completely safe.
All software solutions we discussed in this guide also have good companies with SSL certificates. So, if you’re downloading the software from our site, there is absolutely nothing to worry about when it comes to your security.
What are the differences between paid and free software?
Besides the obvious cost implication, paid software is usually better at performing the tasks it should, and this applies to repair applications as well.
The reasons for this are very simple, being that if the software requires a license, it means that people are working tirelessly in the development department providing you with state-of-the-art features and constant updates.
When it comes to free software, that doesn’t happen, so the risks involved surpass the price accessibility.
In the end, you will be glad you did. However, if you only have in mind a Fortect-free alternative, you’ll surely find it from our top picks above.
What is the best free PC repair program?
While we do recommend using programs with paid licenses because they have a lot more features and improved security. Fortect and System Mechanic have free trials that can be very useful.
For those of you looking for different repair software, mentioned below are the links to our guides with each listing out the best available options:
HDD repair software Windows 10: effective tools to fix issues with the HDD (Hard Disk Drive); you can also look for SSD repair software, if that’s the one you are using
Audio repair software: these will eliminate any issues with the audio input and output which makes it a must have for users
Power supply repair software: for those facing issues with the power supply and unable to turn on the system or the battery drains too quick, these tools could help
RAM repair software: these tools better optimize the available RAM and boost the system performance
GPU repair software and CPU repair software will also come in handy if you are facing issues with system performance. In case you notice overheating, it’s likely that the fan is not working and a CPU fan repair software could help.
If the computer doesn’t turn on most of the time, it indicates a problem with the motherboard itself and motherboard repair software can help eliminate the issue.
The ones listed above cater to problems primarily pertaining to hardware. In case you are encountering issues pertaining to software, here’s the list of our guides listing the best available tools:
BSOD repair tool: fix issues causing BSOD (Blue Screen of Death) error in Windows
DLL repair Windows 10: resolve issues arising out of corrupt or missing DLL (.dll) files
In case you are facing issues executing commands, search for the best Windows 10 repair tool for Command Prompt. For problems with the installation, you will also find a bunch of ISO repair tools on the web.
You can even find Windows 10 repair tools for USB to fix problems with the USB flash drive and recover data.
The above two collections of guides list out enough tools that will solve the majority of problems in Windows 10. But there are some specific tools that deal with corrupt files, and we have a dedicated guide for each type:
For those of you wondering how to repair malware-infected files, there are a bunch of options available on the web. Though your antivirus should also effectively do the job.
These are five of the best PC repair toolkits that allow you to resolve any sort of issue your system might encounter, and also prevents them from happening again.
Some gamers have complained over the Microsoft forum that they cannot play games on their PCs because their second GPU is undetected.
This problem can be frustrating but is not the most difficult to fix. This guide will show you how to fix this issue and help you get back to playing your favorite games.
What can I do if my 2nd GPU is not detected?
Before proceeding to the solutions in this section in a bid to fix the second GPU not working issue, below are some prerequisite troubleshooting steps to try:
Reseat the graphics cards
Swap the GPUs
If these do not work, you can now explore the ensuing fixes:
1. Check if drivers are up to date
Press the Windows key + X and select the Device Manager option.
Double-click the Display adapters option to expand it, and right-click your PCI-Express graphics card.
Next, select the Update driver option.
Finally, choose Search automatically for drivers and install any available updates.
If the second GPU is not detected, you must first try to update your drivers to the latest version. This is because an outdated driver can cause issues with your graphics card.
If you’re looking for an even quicker solution to update your computer drivers, use Fortect Driver Updater. This software takes all the guesswork out of updating your drivers since it always provides you with the latest versions.
More so, if you update your drivers, but some of them are corrupt, this tool will fix them in no time. Lastly, if you have devices but don’t have the drivers installed, this tool will find them just as quickly.
This process will update your GPU driver software if it isn’t up to date. However, if your drivers are up to date and you’re still facing the same issue, try some of the following solutions.
Right-click on the Start icon and select Device Manager.
Expand the Display adapters option and right-click your onboard graphics card.
Now, select the Disable device option.
Finally, choose the Yes option when prompted.
You put another graphics card on your PC because it is better than the onboard GPU. So, if the Second (2nd) GPU is not detected in the Device Manager, you should disable the onboard one and restart your PC.
Press the F2 or the Del key during computer startup to enter the BIOS menu, depending on your PC manufacturer.
Now, select the Advanced tab using the left/right arrow keys.
Select the Video Configuration option using the Up/Down arrow keys.
Next, go to First Display Device or Primary Graphics Adapter, depending on the motherboard model.
Now, select the PCI-Express Graphics option and press Enter.
Finally, press F10 to save the new settings.
Maybe your PCI-Express GPU is not even active. This can be why the second GPU is not detected on your PC.
You will have to do some work in the BIOS to determine that and turn it on.
Why is my second GPU not detected?
Below are some of the factors that can prevent your second GPU from being detected:
Outdated driver – If your GPU driver is outdated, your second graphics card might not be detected. The solution to this is to update your driver to the latest version.
Wrong GPU placement – Sometimes, this issue can be because you didn’t place your graphics card. Hence, if the second GPU is not used, you should reseat the failing graphics card.
Microsoft announced its new AI powered Bing on Tuesday, opened up a waitlist, and promised that they would bring “the new Bing” to “millions in the coming weeks.” They’re off to a good start so far as Yusuf Mehdi, a corporate Vice President at Microsoft and the presenter at the invite only presentation, announced on Twitter that over 1 million people have signed up for the preview in only 48 hours:
We're humbled and energized by the number of people who want to test-drive the new AI-powered Bing! In 48 hours, more than 1 million people have joined the waitlist for our preview. If you would like to join, go to https://t.co/4sjVvMSfJg! pic.twitter.com/9F690OWRDm
If you missed out, you can still sign up at bing.com/new.
The new Bing offers not only a traditional search offering, but an AI infused “Bing Chat,” that provides 1,000 characters of space to build complex queries, which Bing will then attempt to answer using a special search optimized version of OpenAI’s ChatGPT, thought to be based on the as yet unreleased ChatGPT4. By the way if you’re excited, like we were that seeing the new Bing home page meant you were in the preview, not so fast. It looks like Microsoft has turned on the new home page, but is still getting ready to add people from the waitlist, but it shouldn’t be long now.
What are your first impressions of the idea of a new AI powered Bing? Check out our roundtable for our thoughts, and let us know what you think in the comments.
If Microsoft Edge keeps crashing on Windows 10 or 11, the issue might be linked to corrupted cache, broken extensions, or damaged system files. Use the steps below to troubleshoot and get the browser working again.
Yes. A bad cache can stop pages from loading and crash tabs. Clearing it also helps restore recently closed browser tabs.
Conclusion Microsoft Edge crashes are often easy to fix if you follow the right steps. Clear your cache, repair the app, and check your extensions first. If you’re running Windows 11, review known Edge problems to stay ahead of recurring issues.
Windows is often said to be a highly customizable OS, but most users remain unaware of the wide range of changes they can make. For instance, many wonder if they can change the boot logo in Windows 10.
By default, every time you boot the OS, a Windows logo appears on the screen with a few dots spinning in a circle which denotes the boot progress. Let’s find out all there’s to now.
Can you change the Windows startup logo?
Yes, you can easily change the Windows startup or boot logo without making any significant modifications to the BIOS or the OS. And the best part, you can do it with a simple open-source tool.
While there are a few other ways, the complex ones run the risk of bricking the PC if you are not careful during the process. So, let’s stick to the simpler option to change the boot logo in Windows 10.
How do I change the boot logo in Windows 10?
Before we start the actual process, here are a few quick checks and changes to ensure that things work:
Make sure your PC employs UEFI as the firmware interface. Though most newer generation PCs do, a quick way to verify this is to check System Information and look at the BIOS Mode.
Disable Secure Boot on the PC through the BIOS. The method here differs for every OEM, so you must check the official website for the exact steps.
Once done with these two, let’s start the actual process.
NOTE
Given that changing the boot logo in Windows 10 is a slightly complex process, we have divided the steps into three sections for higher clarity and enhanced ease. The last section details how you can revert to the default settings.
1. Get the image ready
Right-click on the image you want to set as the boot logo, hover over Open with, and choose Paint from the list.
Under the Image section, select Resize.
Now, choose Pixels as the unit, enter 250 under both Horizontal and Vertical, and then click OK. Alternatively, you could use a third-party tool or website to resize the image.
Once done, click on the File menu, hover the cursor over Save as, and select BMP picture.
Navigate to the desired folder, enter splash as the file name, under Save as type, choose 24-bit Bitmap, and click on Save.
After the file is ready, let’s head to the next step, which is to get HackBGRT running to change the boot logo. It’s an open-source tool and easy to use.
Head to the Downloads folder, right-click on the HackBGRT.zip file, and select Extract All.
Choose the desired path for extracted files, and click on Extract.
Once done, head to the extracted files, and run setup.exe.
Click Yes in the UAC prompt.
3. Change the boot logo
The tool will now open in a Command Prompt window, press I to proceed with the installation.
A notepad window will launch, listing the various details. Simply close it.
In the Paint window that opens next, click on the File menu, and choose Open.
Now, open the partition created by the tool, select the EFI folder, and then the HackBGRT folder. In our case, the path was:A:\EFI\HackBGRT
You will now find a splash.bmp image here. Copy the one you created earlier, head back to this window, and press Ctrl + V to paste it.
Click on Replace the file in the destination option in the prompt that appears.
Once done, click on Open, and then close the Paint window.
The Command Prompt will read HackBGRT is now installed. Press any key to quit. Close it.
That’s it! You have successfully changed the boot logo in Windows 10. Every time you restart the computer, the new logo will appear instead of the old Windows icon.
Reverting to the default settings is easier than ever using HackBGRT. Open the tool and press either D to restore the default settings or R to remove the HackBGRT files completely.
Now, when you boot Windows, it will display the default logo instead of the customized one.
That’s it! This was the easiest method to change to boot logo in Windows 10 using a simple and user-friendly open-source tool. Make sure to check the conditions (listed earlier) beforehand and make the relevant changes to avoid any issues later.
Monitoring our resources is essential for having a healthy PC. Knowing the peaks of your computer’s abilities can sometimes be a lifesaver and will prevent it from overloading and overheating. So, you may need a PC vitals monitor.
For example, if we know our CPU’s current temperature, we can prevent it from overheating. Therefore, we can be sure that our computer is functioning normally, even during the hottest days.
For this purpose, we know a couple of valuable programs that will provide you with any info about your computer’s behavior.
In this article, specifically, we’re going to talk about CPU temperature measures.
How to choose an excellent tool to monitor your CPU temperature?
We will help you decide which one is the best for you by considering elements like:
Ability to set your CPU speed – If you are overclocking your CPU or plan to, a tool with the ability to set CPU speed settings can help monitor the temperature and control the fan speed to prevent overheating.
Option to show internal voltages – It’s an essential factor as voltages can directly impact the stability and performance of your system and the CPU temperature.
Ability to monitor the temperature of all cores – This can be an essential factor, as temperatures can vary between cores and cause performance issues or potential damage.
Monitoring software display GPU temperature – Monitoring both the CPU and GPU temperature can give you a complete picture of your system’s health and performance and help you identify potential issues more quickly.
Customize the processor’s max/min speed – Customizing the processor’s speed can affect the temperature, as higher speeds generally result in higher temperatures, while lower speeds can help reduce heat.
Automatic shutdown in case of overheating option – It can help prevent potential damage to hardware caused by excessive heat. This feature is helpful for systems used for demanding tasks, such as gaming or video editing, which can generate a significant amount of heat.
Now, let’s explore some great PC vitals monitor options.
At first sight, you wouldn’t probably choose PRTG Network Monitoring because nothing about its name suggests it would be helpful.
Besides, it takes some product inspection to learn all its capabilities. But we guarantee the PC vitals monitor will become a must once you understand how PRTG can help.
PRTG monitors three large performance areas: server threshold, network traffic limits, and temperature.
Regarding temperature monitoring, the software looks at servers, routers, and switches to inform about CPU and server bottlenecks in due time.
PRTG allows you to set thresholds and customized alarms to take immediate action before the CPU fails.
Although most CPUs come with overheat protection, PRTG looks deeper into other system details to find the root cause, which you will most probably get as an explanatory all-in-one report.
Some great features of PRTG Network Monitor include:
Network device monitoring
Bandwidth usage monitoring
Performance and availability analysis
Alerting and reporting capabilities
PRTG Network Monitor
Get to the root of your computer’s CPU temperature issues with this complex monitoring tool and restore full system performance quickly.
HWMonitor is a simple software for displaying your components’ performance. It shows stats like your system’s temperatures, fan speeds, and voltages.
This software is developed by CPUID, a developer of CPU-Z and PC Wizard, so we can say it has a pedigree.
The best thing about HWMonitor is its simplicity. The program lists all results on a single window, divided into layouts, similar to the Device Manager in Windows.
You can see your motherboard‘s temperatures and voltages, your processor’s temperatures and voltages, and your GPU’s temperatures and voltages.
Three sets of values are displayed – the current value, the minimum value, and the maximum value.
If you need to check your computer’s temperature quickly, HWMonitor is probably the best solution.
However, it doesn’t have more advanced features, like saving monitoring or SMBus data to a text file, controlling fan speeds, or setting warning alarms.
Rainmeter is different from any other PC vitals monitor software on this list. It is not a standard program for measuring the system’s performance but a free utility for customizing your desktop.
Rainmeter works similarly to Gadgets, except it features way more options.
Rainmeter shows various data types on your desktop, including time, date, weather, CPU and RAM usage, temperatures, disk usage, and more.
It is powered by skins, which you can download all over the internet. Each skin provides some piece of info that might be useful to you.
When you install Rainmeter, it will use its default skin, which only shows CPU and RAM usage.
However, installing other skins can make it more versatile and powerful.
You can find skins in various places, but the most common are DeviantArt, Customize.org, and the Rainmeter subreddit. Double-click when you download a skin (.rmskin file) to install and enable it.
As skins contain multiple features, you can choose which feature you want to display on your desktop.
6. CPU Thermometer – Simple system information and diagnostic
CPU Thermometer is a minimalistic program for measuring your CPU temperature. The program is straightforward to use, as it only shows CPU temperature and the current CPU load of each core.
Due to its simplicity, the CPU Thermometer lacks advanced features. The only customization option you have is the ability to change value metrics between Celsius and Fahrenheit.
CPU Thermometer shows your current temperature as a tray icon in the taskbar, which is good if you don’t want to deal with extra windows.
As we said, this program is straightforward and basic, and it’s for users who don’t want to do any deep analysis but check their CPU temperature.
This concludes our list of the best hardware performance monitoring software for Windows 10.
These tools offer anything you need to keep track of your CPU temperature, voltage, and more, so you can choose the right program according to your needs.
Do you know about some other excellent monitoring programs? Let us know in the comments section below.
Windows 11 Insiders, along with a Dev and Beta Channel update, are also getting an update to the Windows Subsystem for Android. The update, bumping the version number up to 2301.40000.4.0, offers a number of improvements:
Improved audio input latency and reliability
Improvements to camera experience (camera metadata now exposed to camera apps)
Improvements to framerate performance: certain benchmarks have improved by 10%-20% on ARM and 40%-50% on x64
Fixed zooming out in apps using touchpad or mouse
Improvements to platform reliability
Using latest Chromium WebView to version 108
Synchronizing global microphone and camera privacy toggles between Windows and Android apps
Android 13 security updates
The Windows Subsystem for Android allows Windows 11 Insiders the ability to run Android apps on Windows, once the subsystem is installed.
Xbox Game Bar is a new feature that Microsoft has added to Windows 11. When you’re playing a game, you can open it to record videos and take screenshots of your progress in the game. Thus, today we will show you how to fix the Xbox Game Bar record greyed-out error.
Windows 11 users have reported that the Xbox Game Bar does not appear when invoked via a shortcut or quick startup icon after the system has been successfully booted. Or the record button is greyed out and doesn’t seem to work.
Let us get to it.
Why is the record button greyed out Xbox game bar?
There could be several reasons why the record button is greyed out on the Xbox Game Bar:
Game mode is not enabled – The Xbox Game Bar is designed to work with games running in Game mode. The record button will be greyed out if you are trying to record a non-game application.
UAC is blocking the Xbox Game Bar – The Xbox Game Bar may be blocked by UAC on your system, triggering the problem.
The game is running in full-screen mode – The Xbox Game Bar can’t record games or applications running in full-screen mode.
Hardware acceleration – Some systems may have hardware acceleration enabled that interferes with the Xbox Game Bar’s recording functionality.
The game is not compatible – Some games or applications may not be compatible with the Xbox Game Bar’s recording functionality. Hence, you may expect this problem.
How can I fix Xbox Game Bar capture if it’s greyed out?
1. Edit the Game DVR value
Open the Windows Search function and type regedit in. Then, click on the top result to open it.
Go to the following location by copy-pasting it in the search bar at the top: Computer\HKEY_CURRENT_USER\Software\Microsoft\Windows\CurrentVersion\GameDVR
If you don’t have the AppCaptureEnabled key, right-click anywhere in the window and choose New,followed by the 32/64 bit value option.
Lastly, enter AppCaptureEnabled in the Value name, then double-click on it to set its value to 1.
Regedit is the Windows registry editor, which is a graphical tool that allows you to inspect and monitor the registry of the operating system. As well as edit it if required.
2. Reset the app
Open Settings and go to Apps, followed by Apps & features.
Type Xbox inside the search bar and choose Advanced options from the three-dotted menu next to Xbox Game Bar.
Finally, scroll down until you find the Reset button and click on it. That’s it; the Xbox Game Bar record greyed-out error should be resolved.
When you reset an app, it will restore its original state and settings. It will behave exactly as it did when it was first installed on your Windows 11 computer.
However, unlike the traditional removing and reinstalling software, it completes automatically and considerably more quickly in this case.
3. Repair the ieframe.dll file
Launch Command Prompt as an administrator by right-clicking on the cmd top result and choosing Run as administrator.
Type or paste the following commands and press Enter after each one: sfc /scanfile=c:\windows\system32\ieframe.dll sfc /verifyfile=c:\windows\system32\ieframe.dll assoc sfc /scannow
Lastly, reboot your computer and check whether the Xbox Game Bar record greyed out the issue is gone.
Dynamic Link Library (DLL) files can be corrupted or deleted in various circumstances. These circumstances include software malfunctions, memory crashes, and even corrupted registry files.
DLLs are critical components of your system, even though they are susceptible to damage. A dedicated repair tool that can identify problems before they impact your system can significantly improve your PC experience.
Was this a helpful guide for you? Leave us a comment in the section below and tell us what you think and whether you have more solutions in mind. Thanks for reading!
Windows Update is an essential component of the Microsoft Windows OS. It manages everything that has to do with the OS’ updating process, so keeping it in good condition is necessary.
Unfortunately, it is a software component that is prone to occasional errors.
Such would be the case with an error message some users have been reporting to have received. The error message states:
Windows Update components must be repaired, One or more windows update components are configured incorrectly
Fortunately, there are several things you could try doing that will fix this issue. Because of the importance of having Windows Update working in tip-top condition, we’ve compiled a list of all the solutions you should try.
What causes Windows Update components must be repaired error?
This Windows Update component must be repaired error can be caused by several factors, including:
Corrupted Windows Update components – The components that manage the Windows Update process may become corrupted, leading to this error.
Antivirus software – Some antivirus programs can interfere with the Windows Update process, leading to this error.
System files corruption – System file corruption can cause the Windows Update components to stop functioning correctly.
Broken Windows Update database – The Windows Update database may become damaged or corrupted, leading to this error.
Network connectivity issues – Network connectivity issues, such as a slow or unreliable internet connection, can prevent Windows from downloading and installing updates.
Insufficient disk space – If your hard drive needs more free space, Windows may not be able to download and install updates.
To resolve the error, you can try the fixes we recommend below.
How can I repair my Windows Update components?
1. Run Windows Update Troubleshooter
1. Boot the PC in a Clean Boot State
Press Windows + R, type msconfig, and hit Enter.
Go to the General tab, choose Selective Startup, clear the checkbox next to Load Startup Items, and finally, tick the boxes next toLoad System Services and Use Original boot configuration.
Go to the Services tab, check the box next to Hide All Microsoft Services, and click Disable all.
Click Apply and then OK.
Restart the PC.
1.2 Run the Troubleshooter
Download the Windows Update Troubleshooter from Microsoft.
Double-click on the download to Run it.
Follow the wizard to complete the process.
2. Run a System File Checker
Press Windows, type in cmd, right-click the Command Prompt icon, and select Run as administrator.
Type in this line:
sfc /scannow
Let the scan run its course, and then restart the PC.
An alternative to this process would be an automatic assistant that can help you scan your PC thoroughly for malfunctioning system elements and repair them by finding healthy files as replacements from its vault.
3. Use DISM to repair any damaged files
Press Windows, type in cmd, right-click the Command Prompt icon, and select Run as administrator.
Type in this line:
DISM /online /Cleanup-Image /RestoreHealth
The DISM tool can be used in a wide variety of situations. Fortunately, this includes repairing any damaged or incomplete Windows Update components.
Check out this complete guide for more information on how to use DISM.
Users reported the error message A debugger has been found running in your system please unload it from memory and restart program. So, we will address this on Windows 11 in this guide.
The developers make every effort to protect their source code from third-party applications and viruses, which can prevent applications from launching at all when debugging applications are running alongside them.
Follow along as we will show you how to fix the A debugger has been found running in your system please unload it from memory and restart program error; right after, we’ll see what a debugger is in more detail.
What is a debugger in my system?
A debugger, also known as a debugging tool, is a computer program used to test and debug other computer programs.
These tools have specific functions, which include the following:
Error resolution – A debugger helps identify and resolve errors or bugs in computer programs.
Code scanning – It allows developers to step through the code line by line and inspect variables, conditions, and other program elements in real time.
Sourcecode analysis – The debugger can also help identify the root cause of the problem by showing where the code diverges from the expected behavior.
Breakpoint functions – Debuggers often provide tools such as breakpoints, which allow the developer to pause the program’s execution at a specific point and evaluate the state of the code.
Code exit functionality – Debuggers also often provide the ability to edit code on the fly, allowing developers to test and fix errors without restarting the entire program.
An alternative method of running the code under investigation is to use an instruction set simulator (ISS). This technique provides great flexibility in terms of the ability to halt the execution of the code when you encounter specific conditions.
But it is typically slightly slower than executing the code directly on the appropriate (or identical) processor. So now let’s see how you can fix the A debugger has been found running in your system please unload it from memory and restart program issue.
How can I fix A debugger has been found running in your system error?
1. Update Windows
Open the Settings app and navigate to Windows Update.
Here, click on the blue button that either says Install now, Restart now, or Check for new updates.
Wait for the process to complete, then reboot your computer to solve the A debugger has been found running in your system please unload it from memory and restart program problem.
2. Start Windows 11 in Safe Mode
Click on the Start menu and select the Power icon.
Hold the Shift key from your keyboard, and select the Restart option.
Select Troubleshoot, then tap on Advanced options.
Next, Choose Startup Repair and tap on theRestartbutton.
Your computer will now enter the Safe Mode environment and solve the A debugger has been found running in your system please unload it from memory and restart program error.
While it is possible to uninstall an update with the computer is still in normal mode, we generally recommend that you boot into Safe Mode before uninstalling an update. Then, access the Settings app and go to Windows Update, followed by Update history.
Scroll down until you meet the Uninstall updates option and select it.
Now select the latest Microsoft Windows update and choose Uninstall. This should fix the A debugger has been found running in your system please unload it from memory and restart program issue.
Windows updates frequently bring bug fixes, security patches, and new features to your computer. Still, they can also cause problems such as performance degradation or data loss, which can be highly distressing.
If you notice strange behavior after an update, you can roll it back to get things back to normal.
Updates for Windows are generally classified into two categories: Quality Updates and Feature ones. The regular Cumulative Updates include security patches, bug fixes, and other minor tweaks.
Don’t hesitate to tell us what you think by leaving a comment in the section below. Thanks for reading!
If you want to disable pagefile on Windows 7, you will need to follow a few easy steps. This article will describe them and also help you learn about a few related things.
Paging files can be necessary and has a lot of benefits. Especially if your PC has a low amount of RAM, it may help to gain some performance. However, sometimes, you may need to disable it for any reason, including troubleshooting purposes.
What is pagefile?
Page files are system files that hold information for RAM. When your PC runs out of memory, RAM stores some data on a specific part of an HDD or SSD. Windows may read page files when necessary. Also, RAM may swap information with these files if required.
Usually, it may act as virtual memory and boost performance on PCs with low memory capacity. But, for some users with low disk space, it also can be a problem if the pagefile.sys size becomes bigger.
How can I disable pagefile on Windows 7?
Before disabling the page file, you should think about the following things:
Do you have enough RAM to run every program smoothly on your PC?
Do you have a valid reason to disable the page file?
If you get a positive answer, you can follow two steps to turn off virtual memory or paging file on Windows 7.
1. Open the Performance options window
Press Win + R on the keyboard to open Run.
Type the following command and press Enter to open the Advanced System Settings: sysdm.cpl
Go to the Advanced tab and click on Settings under the Performance section.
After opening the performance options, you will need to follow the steps mentioned below.
2. Turn off pagefile
Navigate to the Advanced tab and click on Change.
Uncheck Automatically manage paging file size for all drives.
Select the System drive and mark No paging file.
Click on Set.
Do it for any other drives if necessary.
After doing the above things, restart Windows 7. From now, it will not create or use any page file.
What happens if you disable the paging file or set the initial size to less than 3 GB?
Though some recommend disabling the page file, you should not do so for several reasons. Contrary to popular opinion, disabling the page file will not improve the PC’s performance.
Rather, it will cause programs to crash as soon as Windows runs out of RAM to allocate, and in some cases, the PC itself crashes. Besides, several users reported their inability to run resource-intensive processes, particularly Virtual Machines.
Coming to the Initial Size of the paging file, Microsoft recommends that you keep it 1.5 times the available memory. So, if your PC has 2 GB RAM, the Initial Size will be 3 GB (3072 MB). Setting it lower shouldn’t have adverse effects, but avoid doing that.
So, for safety, let Windows handle the page files until there is a valid reason to stop this feature. If necessary, you also can increase Windows virtual memory and page file size. You can refrain from increasing the size if there are low disk space issues.
If you face problems that seem to be related to the page file, it may be because of incompatible drivers. So, use a tool like Outbyte Driver Updater to update drivers.
Also, if you have any questions regarding this, feel free to ask in the comment box.
Many users complain about their HP laptop camera not working when they try to use it. Furthermore, problems with the laptop’s camera prevent them from making video chats or conference calls on their HP laptops.
While many factors may be responsible for your system camera not working, some primary underlying causes are prominent.
Why is my laptop’s built-in camera not working?
Users can experience difficulties with their laptop’s camera due to many factors that may range from outdated Windows OS to others, such as:
Issues with the camera privacy settings: If the apps are not allowed to access the camera in the privacy settings, it can prevent it from working. Feel free to check out our guide on the best ways to access webcam settings in Windows 11 for further details.
Outdated drivers issues: Your laptop’s built-in camera may not work if the driver responsible for it is outdated. Take a closer look at our guide on how to update drivers on Windows 11.
Broken camera drivers: The camera driver may become corrupt, prompting issues with the camera.
What can I do if camera is not working on my HP laptop?
1. Tweak your camera privacy settings
Click the Start button and click on Settings to open the app.
Select the Privacy option and navigate to the Camera tab.
Click to turn on the Camera access for the device.
Toggle on Let apps access your camera on the Camera tab.
Then toggle on the apps you want to give camera access to.
Also, if you find the HP laptop camera not working in Windows 7, reconfiguring the privacy settings should help.
2. Disable Windows Defender Firewall
Click the Start button, type firewall in the search space, and select Windows Defender Firewall from the options.
Click on Turn Windows Defender Firewall on or off on the left pane.
Select the Turn off Windows Defender Firewall options, then click OK.
Although disabling the Firewall is not recommended, there are situations like this that warrant it for some time.
Click on the Start button, type device manager in the search box, and press Enter.
Navigate to Cameras and click to expand the menu.
Right-click on the laptop camera or integrated webcam driver option from the drop-down, and tap on the Update driver option.
Choose the Search automatically to update the drivers option.
Restart your computer once the driver update is complete.
Updating your HP laptop camera driver will fix bugs affecting the camera, preventing it from functioning correctly. Installing the latest drivers was also effective when the HP laptop camera was not working in Windows 10.
4. Update your operating system
Click the Start button, select Settings, and click on Windows Update.
On the Windows update page, select Check for updates (if there are any updates available, rest assured that Windows will automatically search and install them).
Windows OS updates help users fix bugs and issues affecting the version on their PC. Hence, improving its performance can fix the HP camera’s black screen issues.
For those wondering how to turn on the built-in camera on the HP monitor, it’s quite simple. For most, simply plugging in the monitor should do the trick. If it doesn’t, make sure you don’t have a webcam connected, or select the built-in camera from settings.
Error 0x800700b7 – 0x2000a is another one of those annoying Windows Update errors that arise when users try to upgrade Windows 11/10 to new versions.
Here is the complete error message: 0x800700b7 – 0x2000a… The installation failed in the SAFE_OS phase with an error during PREPARE_FIRST_BOOT operation.
What’s causing this 0x800700b7 – 0x2000a update error?
The 0x800700b7 – 0x2000a update error doesn’t have a single cause. It can arise because of any of the following factors:
Corrupted system files or image: There might be some corrupted system files causing the issue.
Insufficient drive storage space for updates: Error 0x800700b7 – 0x2000a occurs because there isn’t enough drive space available for updates.
Conflicting third-party antivirus software: Some third-party antiviruses can interfere with the Windows update process.
Issues with the update components: Some Windows Update components might be damaged or corrupted.
Applying potential resolutions that will likely address those causes can fix that issue. This is how you can resolve the 0x800700b7 – 0x2000a update error.
Remember, there are a few other others, the 0x800700b7 provisioning error and the 0x800700b7 IIS (Internal Server Error) error, and 0x800700b7 (-2147024713), which are completely different from the one we are discussing.
How can I fix the 0x800700b7 – 0x2000a error in Windows 11?
Let’s go through some preliminary checks and actions:
Restart your PC. Maybe the update is simply stuck, and this simple solution might turn out to be the answer.
Usually, using third-party repair software can help you perform this process more efficiently by scanning your PC for corrupt files and straightforwardly replacing them with new elements from its vault.
4. Uninstall third-party antivirus tools
Bring up the search tool and type appwiz.cpl there.
Click appwiz.cpl to view a Programs and Features applet.
Select your antivirus software, and click the Uninstall option for it.
Then click Yes on any confirmation box.
Try updating Windows after uninstalling the antivirus utility.
If you prefer not to remove a third-party antivirus tool, you can try disabling it. Right-click an antivirus tool’s system tray icon to look for and select an option for turning off its shied.
5. Reset update components
You can refresh the Windows update components by refreshing them. Our how-to reset update components guide includes instructions for how to do that by using a script.
The procedure is a lot less invasive than resetting the whole system, and it will repair Windows Update.
6. Perform a clean boot
Press the Windows key + R to start the Run console, then type msconfig.
Uncheck (disable) the General tab’s Load startup items checkbox.
Select the Services tab’s Hide all Microsoft services setting.
Click Disable all to deselect checkboxes for all the unneeded third-party services.
Press MSConfig’s Apply and OK buttons to save the boot settings.
Then select Restart to clean boot when prompted.
Try updating Windows from the Settings app after restarting.
Fixing Windows update errors isn’t always a piece of cake. However, the potential 0x800700b7 – 0x2000a solutions above might work for some users, but maybe not all.
If error 0x800700b7 – 0x2000a continues, consider resetting Windows or upgrading the platform with an ISO. To perform a reset, check out WR’s guide about how to factory reset Windows 11.
You can discuss error 0x800700b7 – 0x2000a in the comment section below. You can add questions or even share other error 0x800700b7 – 0x2000a resolutions that might work.
A codec is a type of protocol for encoding and decoding data. Different codecs have alternative compression algorithms for the transmission of data.
There are various codecs for data transmission between Bluetooth devices and PCs. The bit depth, max bitrate, and sampling rates of Bluetooth codecs impact the sound quality on their devices.
What Bluetooth codec does Windows 11 support?
Windows 11 doesn’t utilize any specific Bluetooth codec. The codec used is determined by the hardware device. Such devices have different integrated codec support. Yet, there are two codecs that Windows 11 often uses with compatible hardware.
SBC: It’s a basic audio codec established by Bluetooth Standards Organization. It has a low 16-bit depth rate, a max 320 Kbps bitrate, and a 48 kHz maximum frequency.
AAC: It stands for Advanced Audio Coding and is the Bluetooth codec for Apple devices. Its support was added to Windows in 2021 to enhance the streaming quality. The sampling rate is 44.1 kHz, and the maximum bit rate is 320 Kbps.
How can I check the Bluetooth codecs used in Windows 11?
Windows 11’s System Information app does include Audio Codecs and Video Codecs categories. However, that app doesn’t provide clear or reliable details about Bluetooth codecs being used.
Bluetooth Tweaker is a better alternative third-party app with which to see what codecs are being used. That’s not a freeware program, but you can try out a trial Bluetooth Tweaker version as follows.
Double-click the BtTweakerSetup-1.4.1.1.msi file in the folder your browser downloaded it to.
Select the I accept the terms checkbox in the Bluetooth Tweaker Setup window.
Click the Bluetooth Tweaker Setup window’s Install button.
Connect a Bluetooth device with your Windows 11 PC.
Open the Bluetooth Tweaker software.
Select a Bluetooth device on the left of the software’s window to view codec info. The codec selected by Windows info shows you what codec is being used.
How do I change the Bluetooth codec in Windows 11?
Windows 11 doesn’t include any options for changing the Bluetooth codecs used for devices. So, that’s not something you can configure on Windows 11 PCs.
The system detects the device and automatically sets the appropriate settings to deliver the sound. But if your machine doesn’t detect your Bluetooth device, this guide will help you sort things out.
How can I check Bluetooth codec device compatibility?
The BluetoothCheck website provides Bluetooth code device compatibility info. Click one of the codec links on that website to view its compatible device and accessories lists.
When you click a device on a codec’s compatibility list, you’ll see all its supported Bluetooth audio codecs. Then you can also select links for comparing devices and checking accessory compatibility.
Although you can’t configure what Bluetooth codecs Windows 11 uses, you can still check what codecs devices support before purchasing. Look at the specifications on devices’ webpages or use the BluetoothCheck website to find out what codecs they support.
The best Bluetooth codecs are those with higher bitrates, such as LDAC and aptX HD. Those codecs enable the transmission of high-resolution audio.
In case you were wondering What Bluetooth codec does Windows 10 use?, it natively supports the aptX (classic) codec.
We hope this article helped you learn more about Windows 11 Bluetooth codecs and how they are used.
Some users have said they see an fTPM/PSP NV corrupted message when they boot up their PCs after getting a new CPU installed. They can’t boot into Windows because of the fTPM/PSP NV error, but others see the same message again.
How come the fTPM/PSP NV corrupted error occurs?
The fTPM/PSP NV error message references an fTPM module, which is the main cause of the issue. That’s a type of Firmware TPM (Trusted Platform Module) implementation for encrypting system drives with BitLocker.
Therefore, the fix can often be to reset fTPM on your PC. However, some users need to disable BitLocker to reset fTPM. You get two options here:
Press Y to reset fTPM. If you have Bitlocker or encryption enabled, the system will not boot without a recovery key.
Press N to keep the previous fTPM record and continue the system boot. fTPM will not enable in the new CPU, you can swap back to the old CPU to recover TPM-related keys and data.
The first option will reset the fTPM. However, some users continue to see the fTPM/PSP NV message even though they can enter Windows after selecting Y. Some users who press the N key get prompted to enter a PIN, but things don’t always work.
Is it OK to reset fTPM?
Many ask, what will happen if I reset fTPM? The answer is simple. If you have Bitlocker enabled, don’t do it without turning off encryption first. But if you are certain that BitLocker is disabled, resetting fTPM shouldn’t be a problem.
A quick tip here is not to reset fTPM on the first go. Instead, boot Windows and check if BitLocker is enabled. You can then make the necessary changes without any risks.
How can I fix the fTPM/PSP NV corrupted error?
Here’s what you should do first:
If you’re sure BitLocker is not enabled on your PC, press Y (yes) when the error message appears. Windows should successfully boot now and hopefully won’t see the fTPM/PSP NV corrupted message again.
1. Disable BitLocker
NOTE
This resolution is recommended for users who aren’t sure if BitLocker is enabled on their PC.
Select not to reset fTPM/PSP NV by pressing N.
Once Windows boots, press Windows + S to open Search, type cmd, and click on Run as administrator.
To check if BitLocker is enabled, paste the following command and hit Enter: manage-bde -status
If the command entered shows BitLocker protection is On, execute this command: manage-bde C: -off
Wait for the decryption process to finish.
Then restart the PC and press Y if you see the fTPM/PSP NV message again.
This should work if you had a new CPU installed and got fTPM NV corrupted on ASRock and even for other devices.
2. Disable fTPM (Security Device Support)
NOTE
This resolution is suggested for users who can enter Windows but keep seeing the fTPM/PSP NV message. Disabling fTPM will stop the message.
Turn on the computer and then press the F2 or Del key to enter the system BIOS. If these two keys don’t work, check the manufacturer’s website for the one in your case.
Navigate to the Advanced section and select fTPM configuration.
Choose Firmware TPM from the TPM Device Selection dropdown menu.
Click OK in the confirmation prompt, then save the changes and exit the BIOS.
This should fix the fTPM NV corrupted error on Asus and other manufacturers, though the steps may differ for each.
As BIOS interfaces vary, we recommend users look through the manufacturer guidelines for further details about how to disable fTPM on their PC models. You will find such instructions on the manufacturer’s website.
How to disable BitLocker when I can’t log in to Windows?
Turn off the PC, then turn it on, and as soon as you see the Windows logo, hold the power button to turn it off again. Do so three times, and on the fourth attempt, Automatic Repair will kick in. Wait for it to complete the scan.
Now, choose Troubleshoot.
Click on Advanced options.
Select the Command Prompt in the Advanced options menu.
First, input this command while replacing BitLocker Recovery Key with the one in your case and hit Enter:manage-bde -unlock C: -rp BitLocker Recovery Key
Next, execute this command to disable BitLocker:manage-bde -off C
You’ll also need your BitLocker key to decrypt the drive. To find that key, sign into a Microsoft account in a browser on another device. Then you can view your BitLocker recovery key.
Things are not as tricky when you get a new CPU installed, and fTPM/PSP NV corrupted message appears on a new PC. With the right approach, you can have it up and running quickly. Also, while dealing with it, find out how to fix BitLocker errors in Windows.
If you have any queries or know of another solution, drop them in the comments below.
Kindle is a very popular e-book reader, but many users reported that Kindle for PC is not working for them.
If this happens, you should update the Kindle app, but that doesn’t always help. Therefore, we’ve gathered a couple of solutions that can help with this error.
Why is my Kindle app for PC not working?
There are several reasons for this issue, but the following ones are the most common:
Other services – Wacom services can interfere with the Kindle app, so be sure to disable them. Keep in mind that this can cause a Wacom error: No device connected to appear.
Corrupted directories – Sometimes, a corrupted directory can cause this problem to occur. Simply removing it fixes the issue.
What can I do if Kindle for PC is not working?
1. Update the system driver
Press Windows key + X and select Device Manager from the list.
Locate the device you want to update, right-click it and choose Update Driver.
Select Search automatically for updated driver software.
Follow the on-screen instructions to complete the process.
Once the driver is updated, restart your computer.
Do this for your Kindle and other USB devices.
Update drivers automatically
Manually updating your system drivers is an advanced procedure. Installing the wrong driver versions may damage your PC.
Therefore, you need to use an automated tool that would scan your PC and provide the best driver versions for your system. We strongly recommend a third-party tool automatically updating drivers.
2. Disable Wacom services
NOTE
Disabling the Wacom services can cause your Wacom tablet to stop working, so be sure to enable them after you’re done.
Press Ctrl + Shift + Esc to open Task Manager.
In the Background processes locate Wacom professional tablet service.
Right-click it and choose End task.
Optional: Go to the Services tab. Right-click each Wacom service and choose Stop.
3. Delete My Kindle Content directory
Go to your Documents directory. It’s located in C:\Users\(your user name)\Documents\
Locate My Kindle Content directory and right-click it. Choose Delete.
Start Kindle app.
Go to Tools and select Options.
Navigate to Content and click on the Change Folder.
Set a new folder and save changes.
After doing that, check if the problem is still there.
Press Windows key + X and choose Apps and features.
Select the Amazon Kindle app. Next, click on the Uninstall button.
Follow the instructions on the screen to remove the app.
Press Windows key + R, type the following, and press Enter: %userprofile%\appdata\local\amazon
Locate Kindle and Kindle for PC directories and remove them.
After removing the software, install it again from Amazon official website and check if that solves the problem. Few users recommended using the older version, so try that as well.
You might also need to deregister your app from your Amazon account after removing it, so try that as well.
We do hope that any of the aforementioned solutions will fix your Kindle for PC not responding to problems and that you didn’t encounter any other problems.
Microsoft will permanently disable Internet Explorer, its longest-running web browser, on February 14, 2023, on certain versions of Windows 10 through a Microsoft Edge update, according to a newly-updated FAQ.
Previously, the popular browser went out of service in June 2022 as the first of the two retirement phases. As things stand, any click or search about Internet Explorer will be redirected to Edge, which comes with a built-in Internet Explorer mode.
“With a growing number of websites no longer supporting Internet Explorer, Microsoft Edge offers a faster, more secure, and more modern browsing experience that can still open legacy, Internet Explorer-dependent sites when needed”
The news comes amidst Microsoft’s expansion to the AI world by announcing a ChatGPT-powered Bing, the world’s first AI-supported search engine, which will be integrated to its Edge browser.
End of an era at Microsoft, as Internet Explorer is ending its support
The Redmond-based tech giant has spent months encouraging customers to get ready by proactively retiring the browser from their organizations.
Thus, IE 11 will be retired for Windows 10 client SKUs, version 20H2 and later, and Windows 10 IoT, version 20H2 and later.
Please note that the products not affected by this retirement are:
IE Mode in Edge
IE 11 desktop on Windows 8.1
Windows 7 (with Extended Security Updates)
Windows Server LTSC (all versions)
Windows Server 2022
Windows 10 client LTSC (all versions)
Windows 10 IoT LTSC (all versions)
What you should also definitely keep in mind is the fact that the Internet Explorer 11 desktop app is not available on Windows 11.
Why, you ask? Well, it might have something to do with the fact that Edge has been aggressively promoted as the default browser for Windows 11.
Also worth mentioning is that IE Mode in Microsoft Edge will be supported until 2029, in order to give web developers eight years to modernize legacy apps.
Microsoft also informed users that the Internet Explorer desktop application will be progressively redirected to Microsoft Edge over the coming months.
That being said, keep in mind that, if support for a version of Windows ends before 2029, support for IE Mode on that version also will end.
Microsoft will also provide a one-year notice ahead of retiring Internet Explorer Mode, as there will be no extensions for IE 11 support past the stated retirement dates.
Remember that the first version of the browser was released in 1995, alongside Windows 95, so this really marks the end of an era at Microsoft.
What other browsers can I use?
While there are a lot of options out there, among which is the highly-popular Google Chrome, Firefox, Brave, Edge, Vivaldi, DuckDuckGo, we do recommend Opera One.
The Opera One browser is very light, fast and secure. All this is due to the fact that comes with many functionalities already built right in. You’ll get free VPN, Ad-blocker, AI and social media and messaging apps in it’s side bar.
Opera One
One of the lightest, fastest, and most reliable browsers out there.
Following a turbulent two years of pandemic induced educational reforms, teachers are looking at an expanded set of student needs that can require more tools than ever to deliver unique and personalized learning experiences, enter Microsoft’s Learning Accelerators.
During its Microsoft Reimagine Education 2023 event, the company introduced its Learning Accelerators tools which aim to streamline the creative, review and analysis processes for teachers as they track individual student progress.
Learning Accelerators include both Coach tools and Progress tools. The Coach tools provide students real-time coaching and opportunities for self-directed learning. The Progress tools are designed to help teachers personalize assignments as well as feedback and instruction assisted by actionable insights. The tools help schools unlock the full potential of every student in a secure and inclusive environment.
For clarity, the Coach and Progress tool works in tandem to help encourage the growth of student’s abilities and Microsoft plans to add Comprehension questions to its Reading Coach and Reading Progress tools within the current Immersive Reader tool.
Students can find Immersive Reader across Word Online, OneNote, Microsoft Teams Assignments, Flip, and even in Minecraft Education. Reading Coach and Reading Progress are readily available in over 116 languages with new inclusivity highlights developed in.
Microsoft hasn’t specified a specific date, but notes it’s coming “soon.”
Microsoft is also looking to bolster Information Literacy to help students discern facts from opinions with Search Coach and Search Progress. Search Coach and Search Progress aim to provide real-time coaching to students on how to form efficient queries while also determining reliable sources and content in an ad-free online environment.
Teachers will have access to search insights to help them form more personalized information literacy for students as they develop fundamental behaviors for navigating online information.
Microsoft Bing SafeSearch is enabled by default, so students only see sites that go through a filter that blocks adult content from search results. Students can practice concepts and work on building their information literacy skills in a secure, educational environment.
Real-time coaching to students on forming effective queries as well as identifying and reviewing reliable sources.
Daily search tips and targeted tips included on the results page, filter options that help students find relevant sources, and much more.
Customizable filers that teachers can easily set for personalized lessons and students can use to make their searches more specific for additional independent practice on certain concepts.
Optional filters like a Fact Check button that can be enabled by the teacher to encourage students to review sources with some of the top fact checking websites and an option for teachers to create their own list of sites for students to use.
Microsoft also introduced Speaker Coach and Speaker Progress which look to improve a student’s ability to present information. Students can access in English within Microsoft PowerPoint, Microsoft Teams and LinkedIn with Microsoft looking to put it in Teams Assignments for the 2023-2024 school year.
Speaker Coach evaluates and provides real-time feedback on a student’s pacing, pitch, use of words and vocabulary while the Speaker Progress tool aids a teacher in creating and reviewing speech assignments for both the classroom and individual students.
A new Math Coach tool was introduced that will help break down each part of a math problem with text explanations for each step and operation while the Math Progress tool will help teachers generate more personalized practice questions as they identify concepts students find challenging. Match Coach and Math Progress will be avialian preview for the 2023-2024 school year.
Lastly, Microsoft talked about Education Insights Premium coming to all versions of Microsoft 365 Education as well as the no-cost offering of Office 365. Students using Windows 11 will now be aided with a new simple sign-in feature for Windows 11 Pro Education that supports third party providers such as Clever and Google, later this month.
Canon printer error 5b00 usually shows up when the ink absorber pad reaches its limit. If you’re printing and suddenly your Canon stops and flashes a support code, this error might be the reason.
It doesn’t always mean the printer is broken, but it does point to a clog in the system, most often related to waste ink overflow. Fixing it can get technical, but there are a few things you can try before tossing the whole machine or heading to a repair shop.
You should not try this solution repeatedly over time since the absorber pads will be completely saturated, and further printing may lead to significant leakage. However, trying it a few times in quick succession, if the first attempt wasn’t fruitful, won’t do any harm.
First, turn off the printer.
Now, press and hold the Stop button, and then simultaneously hold the Power button to turn the printer on.
With the Power button still held, press the Stop button 5 times to make the printer enter the Service Mode, and then release the Power button.
Next, press the Stop button thrice and then the Power button once to print a Service Page.
Finally, press the Stop button 5 times, followed by the Power button one last time.
You can now turn off the printer for a while, and when you turn it back on, things should be up and running.
By following this method, you can perform the Canon 5B00 error code reset and hopefully fix the error.
2. Take your printer to a service center
If the trick listed earlier didn’t work, you would have to take the printer to a service center. While many recommend manually cleaning the waste ink absorber pad, there’s no point in doing so unless the Waste Ink Counter is reset.
And since the previous method didn’t help reset WIC, getting it done by a professional is the only viable alternative.
Tip
You may come across websites that claim to sell keys to reset WIC. These are not legitimate, and we wouldn’t recommend you employ such means to fix the printer.
Wrapping up
That’s all there’s to error 5B00 on Canon printers. As we said earlier, there are not a lot of solutions for the problem, which should be evident by now.
If you know of any other solutions that work, do drop them in the comments section below and help fellow Canon users.
This error usually points to a full ink absorber pad. The printer stops to prevent ink overflow and damage.
Can I fix Canon error 5b00 myself?
Yes, you can try a manual reset or use third-party tools to reset the ink counter. If that fails, you may need to replace the ink absorber or take it to a service center.
Is Canon error 5b00 a hardware problem?
Not necessarily. It’s a maintenance warning tied to the printer’s waste ink system, not a mechanical failure.
Microsoft had some amazing games in the past, and many are wondering how to run Age of Mythology on Windows 10.
It’s possible to run old games on Windows 10, but before we show you how to do it, let’s see what prevents this game from running properly.
Does Age of Mythology work on Windows 10?
Yes, the game works on Windows 10, but you might have problems running the physical copy of the disc. There are a few reasons for this:
DRM – The biggest issue with old games is DRM protection. Older protection just isn’t compatible with newer versions of Windows. If you encounter this issue, check our CD games won’t play guide to see how to fix it.
Missing components – Many of these games used older components that aren’t available anymore, and that will cause compatibility issues.
This game version is fully compatible with newer versions of Windows, and it should work right out of the box without issues.
2. Use a virtual machine
NOTE
For this method to work, you must reveal file extensions on your virtual machine’s operating system.
Install virtual machine software and an older version of Windows on it.
After that, install Age of Mythology from a CD.
When you try to run the game, you’ll get Video Card 0: vmx_fb.dll VMware SVGA II Vendor(0x15AD) Device(0x405) error.
Go to the gfxconfig folder inside of Age of Mythology installation directory. By default, it should be: C:\Program Files\Microsoft Games\Age of Mythology\gfxconfig
Right-click empty space and choose New. Next, pick Text Document.
Name the file according to the error you got. In our case, that’s 0x15AD_vmware.gfx. Note, it’s crucial that your file has gfx extension and not .txt.
Open the newly created file with Notepad. To do that, double-click it and choose Notepad.
Paste the following in the Notepad document: [config] Vendor=VMware defaultdevice=CyberBladeXP.gfx [knownGoodDriver] Month=0 Day=0 Year=0 Product=0 Version=0 SubVersion=0 Build=0 [device] 0x405=CyberBladeXP,CyberBladeXP.gfx
Save changes.
After doing that, the game should be able to run on your virtual machine software without any issues.