On the older versions of Windows, ejecting the USB drive from the Safely Remove Hardware shortcut was usually easy to find.
Well, since Microsoft introduced us to Windows 10, 8, and Windows 8.1 operating systems, a lot of people seem to be having problems finding this icon and using it properly.
We will show you exactly how to properly eject the USB drive in a few short steps using the guide below.
Before you eject USB drives from your PC
Making sure your folders with music, films, and other kinds of data are saved properly on your storage device (USB) is really an important thing to do before removing the USB
So, if you are trying to properly remove the USB hardware on Windows 10, and you have trouble doing so, you will see exactly how to access this feature by reading the short tutorial below.
How can I eject USB from Windows 10?
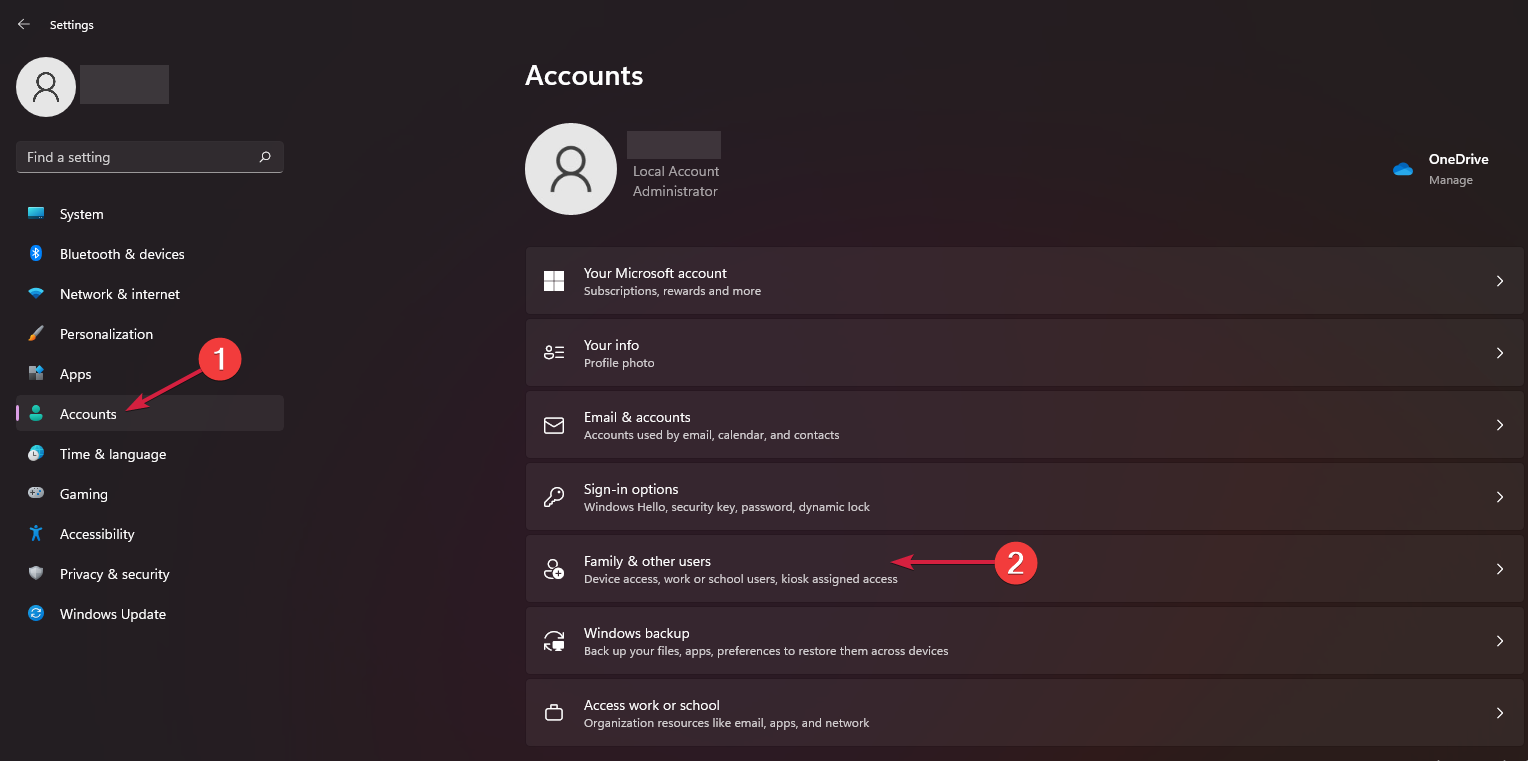
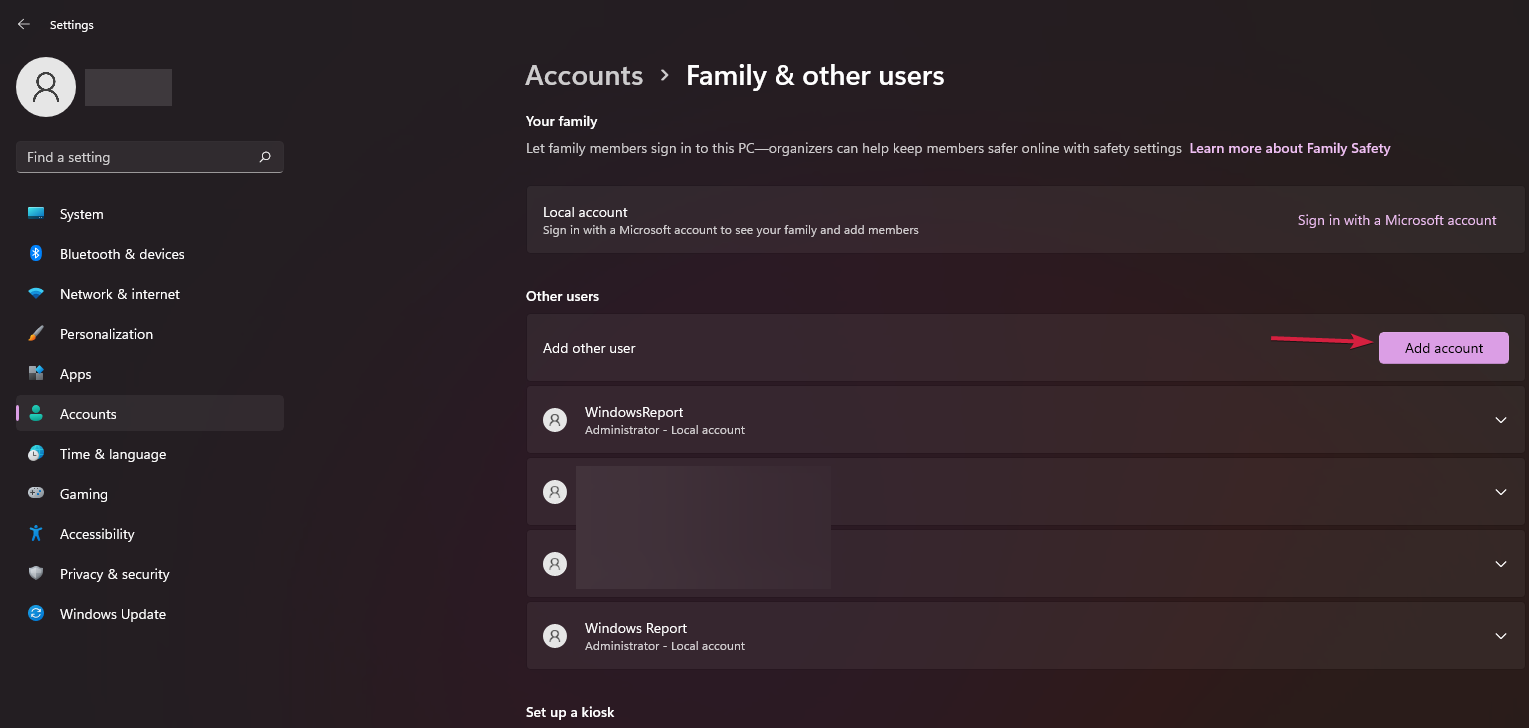
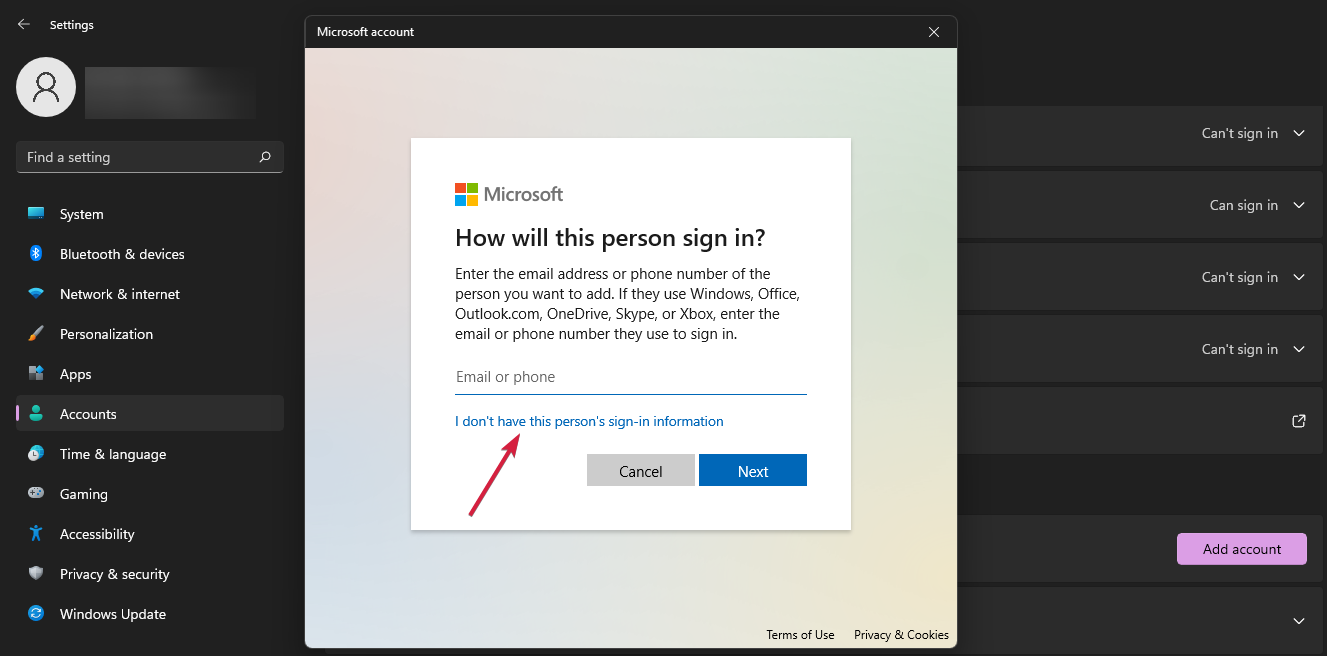
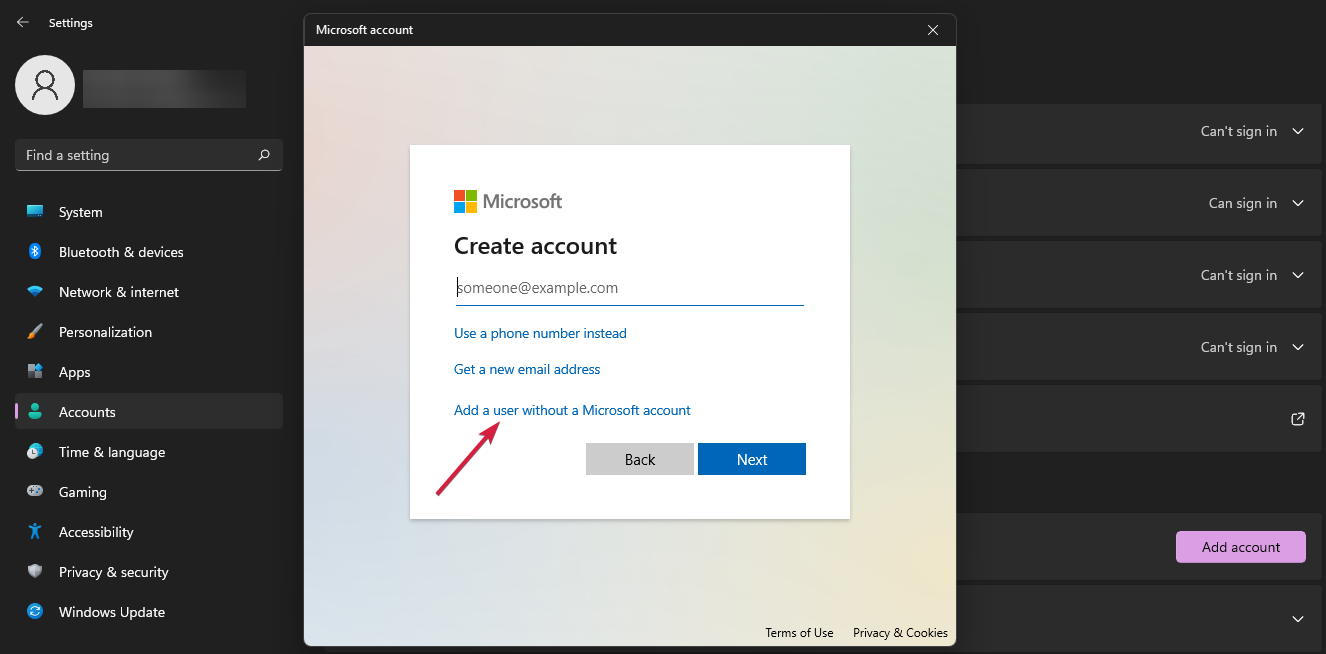
1. Create a Safely Remove Hardware shortcut
1. Right click on a free space on the desktop and select New from the tab that appears.
2. Now we need to select the Shortcut option by left clicking on it.
3. Set the location of the shortcut to be the following: RunDll32.exe shell32.dll,Control_RunDLL hotplug.dll
4. Click Next.
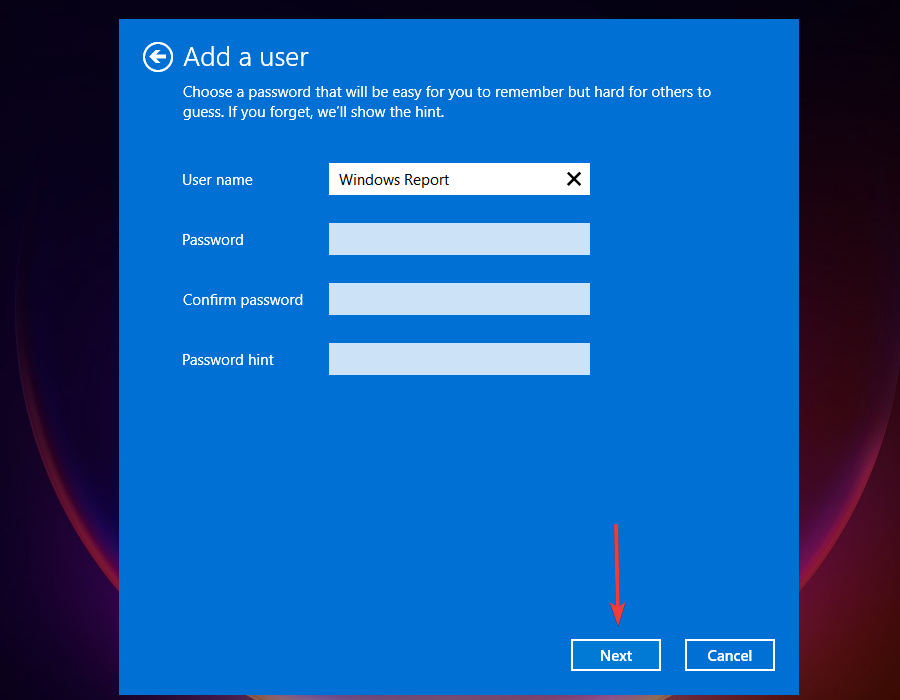
5. Name the shortcut to Remove Hardware or any other name you find more appropriate, so that you can easily recognize it.
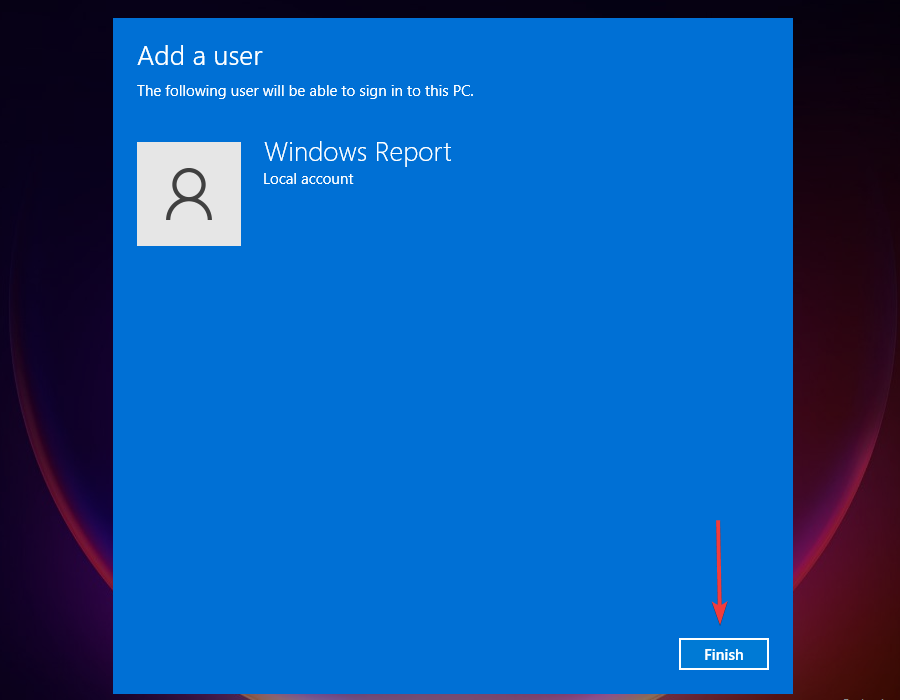
6. Click the Finish button on the lower side of the window.
7. Now that you have the shortcut on the desktop, before you unplug the USB, you need to double click the Remove Hardware icon and select the USB you want to remove by left clicking on it.
8. Select Stop on the lower side of the Safely Remove hardware window you opened. Wait a little bit.
9. Windows will notify you with a message when it will be safe to remove the USB hardware from your computer.
In order to use a shortcut to safely eject hardware on your Windows 10, you must first create it. You can easily do so directly from your PC’s desktop.
You can manually configure the shortcut’s location and name, so that it performs the desired action: ejecting USBs.
First, make sure that your USBhardware is not running any operation (copying or syncing) and then enable the Safely Remove Hardware icon from Taskbar settings:
To enable the Safely Remove Hardware icon > right-click on the taskbar > select Taskbar settings
Scroll down to Notification Area > Select which icons appear on the taskbar
Go to Windows Explorer: Safely Remove Hardware and Eject Media > turn it on.
Of course, if the Safely Remote Hardware icon is already available on your taskbar, you can quickly eject your USBhardware by selecting the icon, then select the hardware you want to remove and confirm your choice.
That is all, this is how you can safely remove your USBstorage device on Windows 10. If you have any other thoughts don t hesitate to write below.
ISP (Internet Service Provider) is a company that gives people, and companies access to the internet and other associated services.
IPTV (Internet Protocol television) is a service that offers television programming and other visual material using the Transmission Control Protocol/Internet Protocol (TCP/IP) suite instead of cable TV, broadcast TV, or satellite signals.
Generally, ISP blocking IPTV is a common occurrence, but there are ways to stop it from happening.
Why has my IPTV stopped working?
One of the reasons is installation and updating issues. Some IPTV software tools are illegitimate and may cause problems with your device during installation. Furthermore, updates are required if you have the proper IPTV. Your app probably won’t launch if you don’t update it.
Crashing issues can also make IPTV stop working. Crashing may be caused by excessive traffic and viewing IPTV for an excessive amount of time.
Not forgetting, internet provider blocking IPTV is a reason your IPTV is not working. Internet providers have the authority to stop some services or terminate your account if you violate their terms of service, which may forbid using IPTV.
How can I tell if my ISP is blocking IPTV?
For many, ISP blocking IPTV is a problem that is not easily noticed. To tell if ISP is blocking IPTV, follow the listed steps.
Click the Windows Start button and then select Settings.
Select Network & Internet from the Settings menu.
Click on VPN on the left-hand side menu and add a VPN connection.
navigate to the website using its IP address rather than its URL. You should be able to unblock the site if your ISP just restricted the URL or used DNS filtering, in which case you will be aware that your ISP is restricting your access to the site.
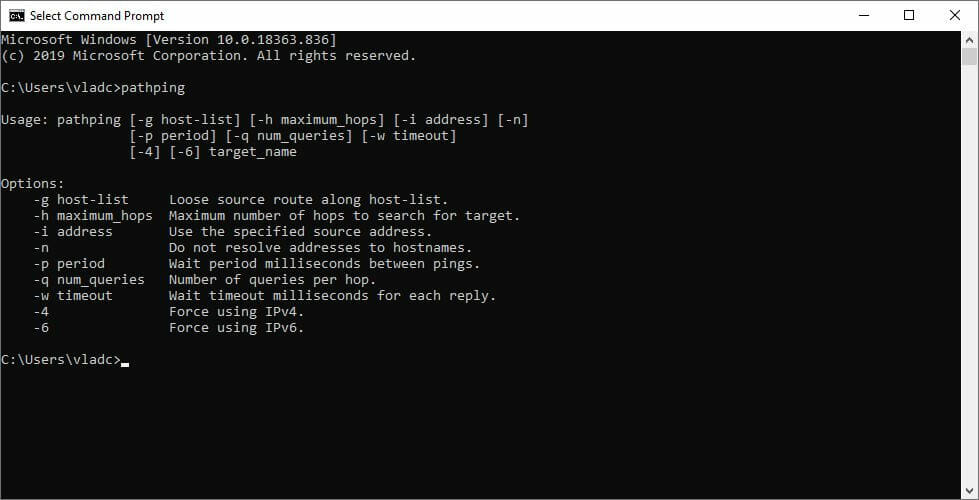
Use the ping command (“ping [site name]”) in the Command Prompt to determine a website’s IP address.
If the page loads after entering the website’s address into your browser, your ISP is limiting access to the site for you.
If the page won’t load, the problem lies with the website rather than your IP address.
How do I stop ISP from blocking IPTV?
1. Use a VPN
A great choice in this context is ExpressVPN. It lets you watch IPTV in a secure and private way, which means your internet provider cannot block services or lower your connection speeds based on content.
Moreover, all your internet traffic, including your IPTV streams, proceeds through an encrypted VPN tunnel, and not a single source can see into that tunnel. Thus, no one can see which websites you are browsing or which services you are using.
➡️ Here is a short guide you can follow:
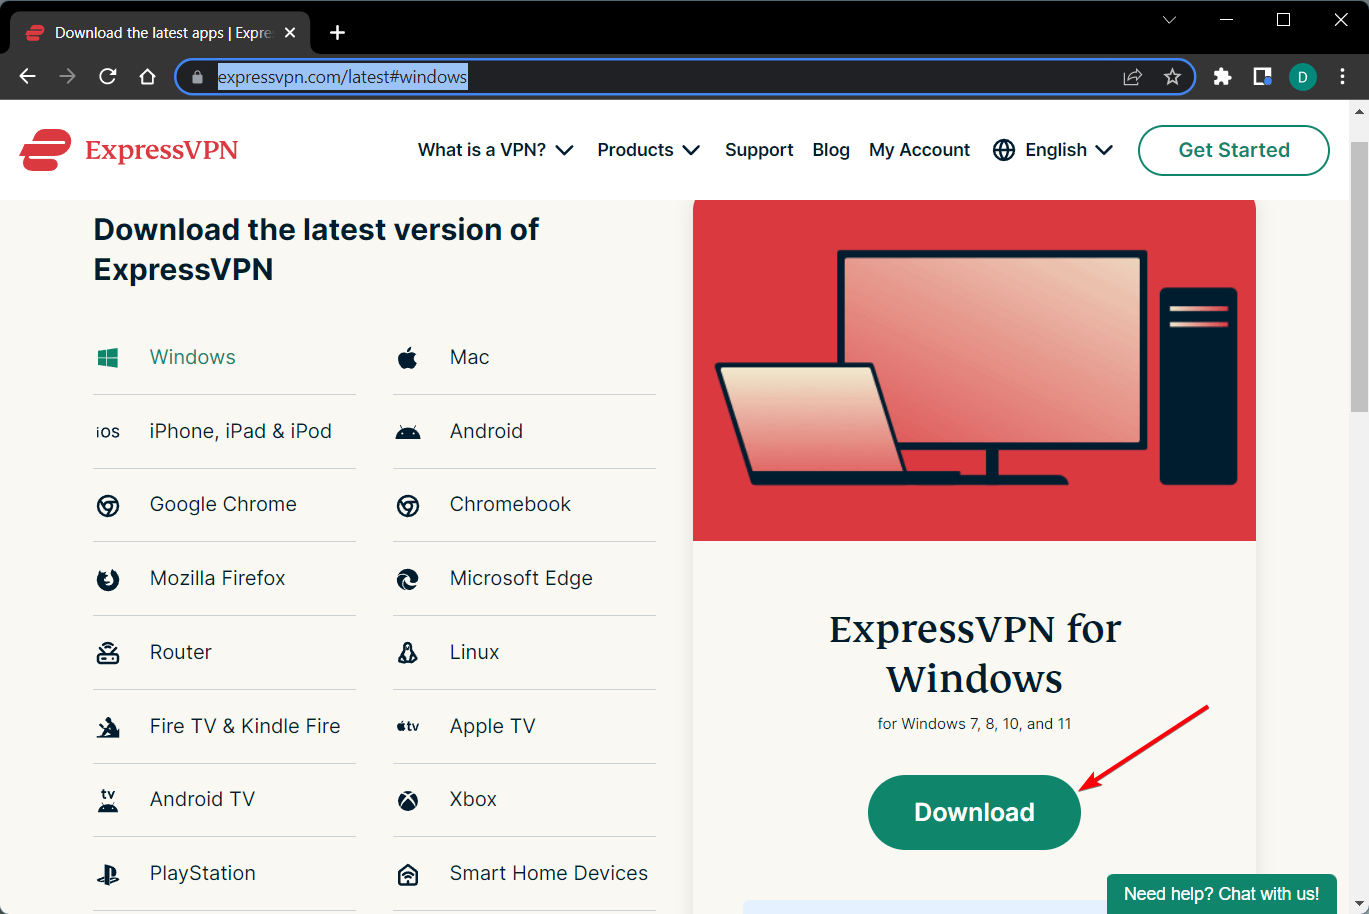
Go to ExpressVPNwebsite and click on the Download button.
Then, double-click and install ExpressVPN on your PC.
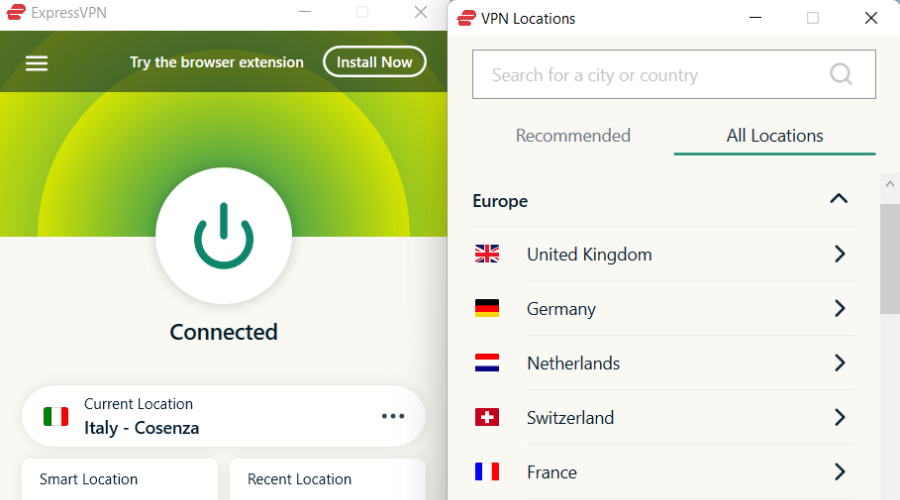
After you run the application, click on Choose location.
In Recommended tab, select a country that allows IPTV.
Enjoy IPTV without any blocking.
ExpressVPN is a much easier, safer, and faster option for this process, but if you prefer to do this manually, you can always choose and use the manual alternative as well.
ExpressVPN
A VPN with high speed that is ultra-secure and easy to use thanks to its various features.
Click the Windows Start icon and then select Settings.
Select Network & Internet on the Settings menu.
On the left-hand side, select VPN.
Click Add a VPN connection and then provide the correct login details.
Click Save to add the VPN connection.
Connect by choosing the connection from the VPN Settings screen.
By using a VPN service, you can browse the internet more safely. It allows you to stay anonymous, which means you can avoid possible threats from getting your data and communications by providing a fake IP location.
2. Use an intelligent DNS
Log into your router Admin Panel. You can find this information in the manual for your modem or router.
Enter the admin username and password for your router.
Locate the DNS settings and modify them to use the Smart DNS proxy DNS IPs.
Click on the Windows Start icon and type Comand Prompt.
Select Command Prompt and launch it.
Type ping, followed by a space, your website’s address (including the “www.” component), and then add with a space -t. For example, ping www.mywebsite.com -t.
4. Use a free proxy
Press the Windows + I key combination to launch Windows Settings.
Select Network & Internet on the Settings menu.
On the left-hand side menu, click on Proxy.
Ensure that the toggle for Automatically detect settings is enabled.
Turn on the Use a Proxy Server toggle under the Manual Setup section. Windows will check to see if your network already has an automated proxy server established and ready to go. It will identify it for you and urge you to follow its recommendations if it does.
Assuming Windows discovers a PAC file, turn on the Use Setup Script switch under the Automatic Proxy Setup.
Click Save after entering the script’s address.
5. Use Tor
Obtain a VPN and install Tor by downloading it from Tor’s official download site. You might choose to join right away or configure it beforehand.
Before you launch Tor, connect to your VPN to provide the best level of internet security.
How do I use VPN with IPTV?
You’ll be prepared to go if you follow these simple instructions.
Sign up with a reputable VPN; you can choose one of the best Windows 10 VPNs.
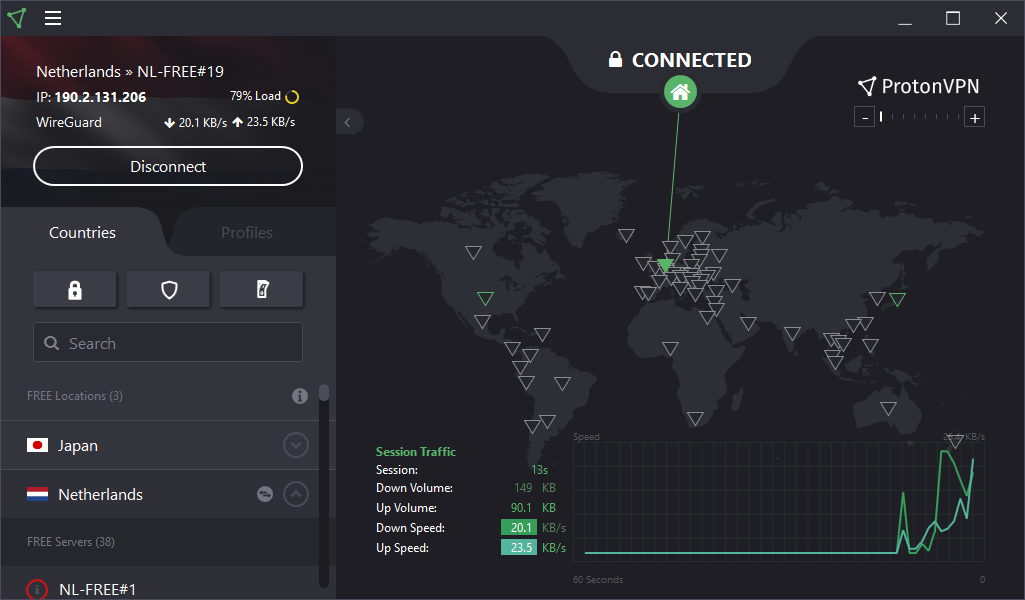
Download and install the VPN app on your device – we are using Proton VPN.
Open the program, then establish a connection to a new server.
Open your preferred IPTV and then start watching anything you want.
Most ISPs are notorious for blocking IPTV, which affects many users. Fortunately, you can solve this problem using one of the abovementioned solutions.
If you encounter any issues, feel free to share them in the comment section below. In addition, let us know about any other solutions that are not shared in this article.
Usually, people use VPNs to give their online privacy a much-needed boost. Maybe even secure their default Internet connection against snooping individuals who might be eager to access some data they’re not supposed to.
There are several scenarios when personal information leaks out of your devices on a daily basis. Even liking your best friend’s photo on social networks might help build your online profile.
And each opportunity has someone (or something) ready to grab it.
Nowadays, numerous websites use tracking methods to collect apparently anonymous data on you for various purposes.
As it’s been proved several times so far, some of the collected information is sold to various third parties with an agenda.
Other times, user-collected data is simply used for targeted ads. And we know how annoying that can be.
For instance, chatting with your friends about some piece of furniture, only to discover ads on your frequently-visited websites urging you to buy that specific item. And it only takes moments for the ads to find you.
Is a VPN the same as an adblocker?
No, it is not. Using a VPN implies other processes compared with ad-blockers, meaning that it hides your IP address from online parties.
The ad-blocker on the other hand can protect you from online ads and tracking scripts from your accessed websites.
By default, VPN software can’t block digital ads like an adblocker because it doesn’t serve the same purpose. However, many VPNs have ad-blocker features included.
How can I block advertisements?
You can turn to ad blockers, of course. These tools detect ad servers and prevent them from displaying content on your device, whether on a website you visit or within an app you’re using.
The only downside is that many creators design their websites around ad panels. Or modify their designs so that ad panels are seamlessly (or so they think) integrated within the pages.
Using an ad blocker will either hide these panels altogether, which could make the website’s layout look awful, or simply blank their content.
In the latter scenario, you’ll see large chunks of blankness on websites or within apps.
The great news is that you won’t see as many ads. The even greater news is that you won’t risk accessing some malware-ridden websites by accidentally clicking ads.
You know exactly the type. You scroll down on a click-bait article, hoping to find what you’re looking for, when out of the blue a wild ad slides or pops under your cursor or finger.
And then the inevitable happens, you click it, and all hell breaks loose. You can’t go back to the original article, as more and more redirects unfold right before your eyes. Ad blockers can make sure that this is just a bad dream.
? Will ads ever go away?
It is stated that traditional paid-placement marketing it’s already in the past. Even though you will still see ads online, this strategy is not that efficient anymore.
? Are ad blockers illegal?
No, they aren’t. You can stop unpleasant ads using ad-blocker without any legal issues. It’s possible to install them as extensions and use them accordingly.
? Does a VPN block ads?
We’ve praised VPNs as these perfect privacy-protection machines, but can they block ads?
Unfortunately, it’s not one of their standard features, so chances are you won’t find ad-blocking capabilities on just about any VPN.
The good news is that most, if not all VPNs have tracker-removal abilities. So even if your VPN lacks an ad-blocker, chances are you won’t be targeted by those spooky ads that seem to know everything about you.
The even better news is that some VPNs have built-in ad-removal capabilities.
? Does a VPN block Twitch ads?
Affirmative, you can stop different ad types on Twitch using a VPN with ad-blocking functionality. It’s possible to even block pre-roll or mid-roll ads from Twitch.
? Does a VPN stop targeted ads?
Yes, it does. It’s possible to block targeted ads from tracking websites using technology that acts like a proxy and hides the Internet traffic from your ISP.
? Does VPN block Youtube ads?
In theory, no. Your VPN can’t block YouTube ads by itself in case it doesn’t have a specific feature. There are premium tools that can block them from any website.
Which VPN blocks ads?
We’ve compiled a list of the best VPNs that can easily remove ads. Note that these VPNs may be different in terms of price, features, number of servers, speed, security, and logging.
However, they all do an excellent job of preventing ads from spawning on your screen.
So you can pick the best VPN with AdBlock and use it to navigate freely without seeing aggressive ads everywhere.
If you need a good-for-everything service, we recommend ExpressVPN. It passed all of our tests with flying colors, whether it was speed or security we have tested.
ExpressVPN
If you’re looking for a VPN that can block ad trackers, this VPN covers your needs.
There are a few options to stop YouTube ads using security methods that help you navigate clean:
A VPN with AdBlock
VPN Browser extensions
Browsers that have ad-blocker integrations
Ad-blocker installed as extensions.
Generally, these are the main solutions you can utilize to stop ads on YouTube and enjoy content without interruptions.
Can VPN remove ads? Some can, some can’t
To wrap it up nicely, it’s possible to find VPN services that can also block ads. You have the living proof just a few rows above.
There are several VPNs that, aside from their privacy protection and connection security features also offer ad-blocking capabilities.
However, While most of them have embedded the ad-blocker within the main service, some of them make use of proprietary browser extensions to let you remove ads from your online environment.
If you’re having Borderlands 3 lag in multiplayer mode, use a VPN to quickly fix this issue and improve your gaming experience.
Borderlands 3 (BL3) is a first-person shooter that you can play on Steam, Stadia, Windows, Mac, PlayStation 4, and Xbox One. Although it has a single-player edition, BL3 shines in the multiplayer version, where you can team up with 3 other players in co-op mode.
Unfortunately, many users can’t fully enjoy the game with their peers due to Borderlands 3 lag. If you’re one of them, just use a VPN to reduce your ping.
It’s your best chance to eliminate BL3 lag spikes and high ping issues. Besides, you can also fix packet loss with a VPN.
Why is my Borderlands 3 laggy?
Borderlands can be laggy and could be caused by a network or frame rate (FPS) issue. If you experience Borderlands 3 stuttering and lag in both online and offline modes, the frame rate issue is most likely to blame, and you should take steps to perform a low FPS PC fix to get back on track.
If you only encounter the problem when playing the game online, your network should be to blame. In this case, you may encounter the issues listed below, which we resolved with the VPNs on this list.
Borderlands 3 lag when playing with friends
Borderlands 3 co op lag
Borderlands 3 lag multiplayer PC, PS4, Xbox one
Borderlands 3 high ping, rubberbanding
Borderlands 3 server lag
Borderlands 3 internet lag
Borderlands 3 network lag
Borderlands 3 lan lag
Borderlands 3 crossplay lag
Borderlands the pre-sequel multiplayer lag
Borderlands 3 suddenly lagging
The easiest way to stop Borderlands 3 from lagging is by using a VPN to reduce your ping. The following list presents the best VPNs from the industry that are known for fixing lang and ping.
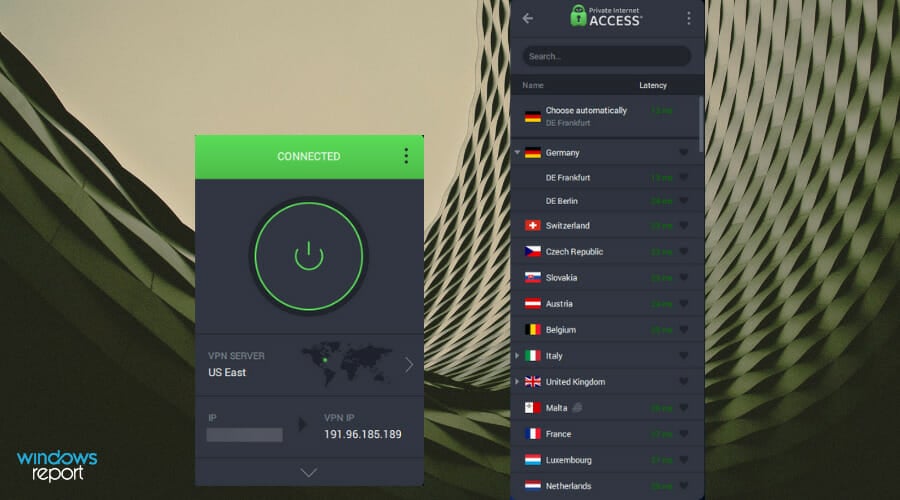
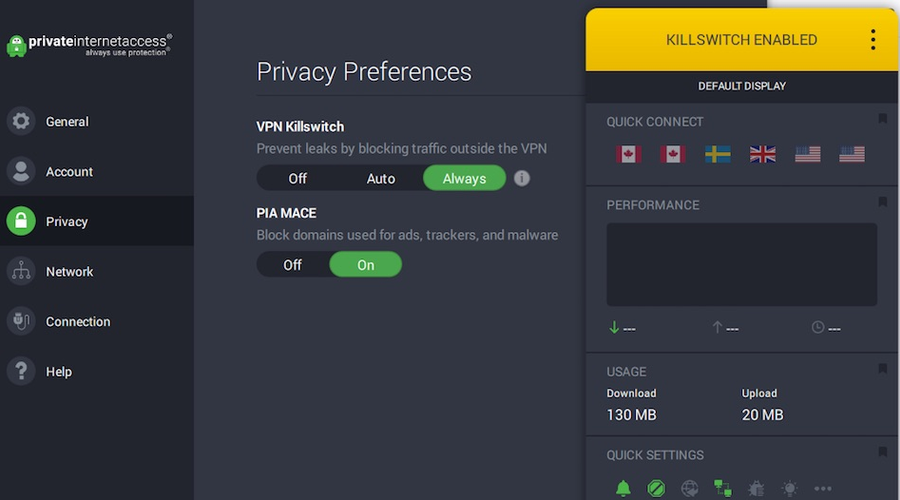
Private Internet Access (PIA) is the best Borderlands 3 VPN for reducing lag and high ping. It comes equipped with numerous VPN servers and can help you host game servers, thanks to the fact that it has support for native port forwarding.
This VPN solution is operated by Kape Technologies. You can choose between static and dynamic IP addresses, use exclusive DNS servers to boost your Internet connection speed, as well as easily fix network congestion.
You should also know PIA is among the few VPNs that offer 24/7 live chat support. This way, you can ask for technical assistance whenever you have trouble attempting to redirect your network traffic through VPN and fix Borderlands 3 co-op lag.
More about PIA:
+3,300 VPN servers in 49 countries
Compatible with Windows, Mac, PS4, Xbox One
No-logging policy
Easily handles Borderlands 3 multiplayer lag
30-day money-back guarantee (no free trial)
Private Internet Access
Whenever Borderlands 3 starts to lag on your PC, PS4, or Xbox One, turn to PIA for help.
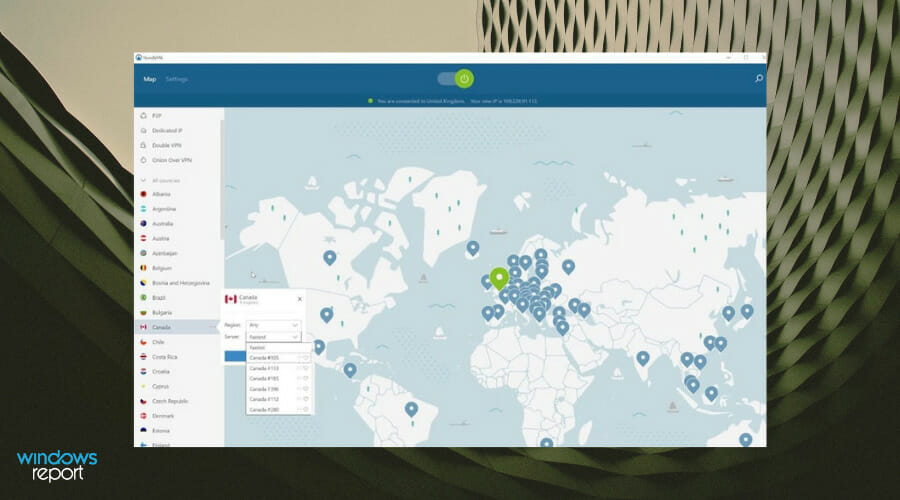
An alternative way to fix Borderlands 3 lag on Steam, PS4, Xbox One, and PC is by turning to NordVPN. Operated by Tefincom & Co.
This is a superior VPN solution that improves your Internet connection speed during gameplay. It can also fix Wi-Fi packet loss.
What makes NordVPN a special Borderlands 3 VPN app is that it can hide the fact that you’re using a VPN. This way, you can get around any VPN blocks on your computer or console. And you can easily turn off the VPN reuse your normal Internet connection.
NordVPN supports custom DNS servers and an integrated kill switch. It secures your browsing sessions using CyberSec, an exclusive malware blocker. As far as encryption is concerned, it uses the OpenVPN protocol.
More about NordVPN:
+5,100 VPN servers in 59 countries
Set it up on Windows, Mac, PS4, Xbox One
Strict no-logging policy
Effortlessly fixes Borderlands 3 multiplayer lag
30-day money-back guarantee (no free trial)
NordVPN
Reduce BL3 lag and high ping by connecting to the high-speed servers of this powerful VPN tool.
ExpressVPN is one of the world’s largest VPN services, so we will explain how well that is on the cards for Borderlands 3. When you connect to ExpressVPN, you get unlimited bandwidth at high speeds.
With 160 locations in 94 countries to choose from. Avoid DDoS attacks by hiding your IP address, and benefit from the split-tunneling feature if you disable a VPN or do other things.
ExpressVPN makes it simple to stop ATT throttling and ensure that you have the most bandwidth available. In Borderlands, you can use ExpressVPN to access pre-ordered games a few hours earlier in some cases, while doing so may result in censorship if not available in your region.
More about ExpressVPN:
Speeds ideal for gaming and streaming
Servers in over 94 countries
Compatible with consoles and routers
Excellent customer service
30-day money-back guarantee
Packets with high-level encryption
There are no bandwidth or data limits to worry about, and ExpressVPN can even bypass ISP throttling, which could otherwise interfere with your gameplay in Borderlands 3.
ExpressVPN
If you want the best Borderlands 3 performance, then just use the UDP Lightway protocol.
Surfshark premium subscription is not a ten-for-one-penny deal. Despite the plethora of features available, their price offering remains the cheapest in the VPN market.
To begin, Surfshark’s extensive server coverage is unmatched. The population of Surfshark VPN servers cannot be compared to NordVPN’s army of 5,500+ servers.
Surfshark’s content, on the other hand, remains global and extensive, with 1,700 servers in over 60 countries.
CleanWeb, a Surfshark feature that protects subscribers from phishing and malware attacks, is another exciting feature.
Furthermore, the Whitelist feature works similarly to split tunneling, except that it only allows pre-selected apps and websites to bypass the VPN.
More about Surfshark VPN:
No footprints
Allows torrenting
256-bit AES encryption
Full DDoS protection and prevention
Surfshark’s unlimited simultaneous connections are one of its main selling points! This means there is no limit to the number of people or devices that can connect to the service, and you won’t have to log in and out every time you switch devices.
Surfshark
Play Borderlands 3 gameplay with your buddies without having any lag with this VPN fast connection.
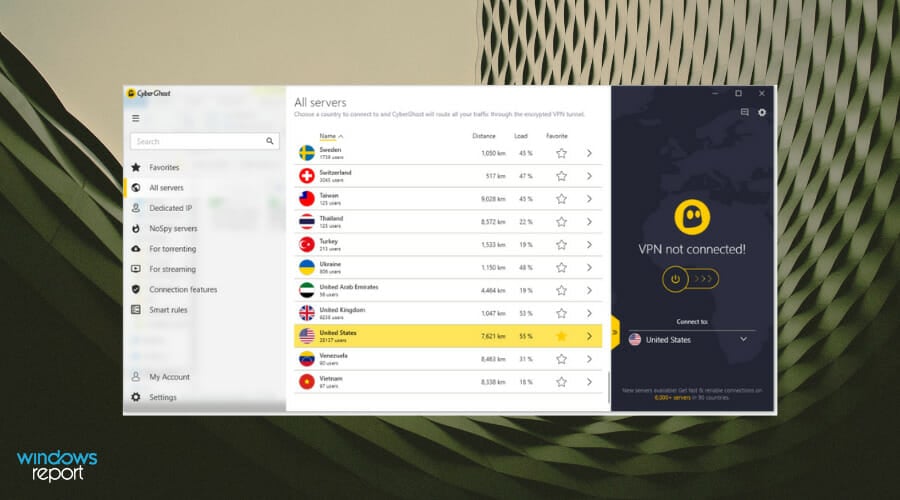
Another way to deal with BL3 multiplayer lag is by using CyberGhost VPN. Also a product of Kape Technologies, this VPN tool is one of the fastest on this list. It’s also the only one here that you can test for free (no credit card required). Plus, it can evade geoblocks.
CyberGhost VPN has a huge network of servers to help you fix BL3 online lag. You can use it to minimize jitter, set up split tunneling, activate an emergency kill switch, switch to private DNS servers, and enable DNS leak protection.
What makes CyberGhost VPN an ideal Borderlands 3 VPN are its high-speed VPN servers and premium security features that keep you safe from DDoS attacks. Also, you can easily fix Xbox packet loss.
More about CyberGhost VPN:
+6,500 VPN servers in 89 countries
Works with Windows, Mac, PS4, Xbox One
No data logs
Quickly fixes Borderlands 3 laggy co-op issues
Up to 45-day money-back guarantee (1-day free trial)
Cyberghost VPN
If Borderlands 3 lags after an update, turn to this reliable VPN to solve this matter in a few steps.
The Xbox One and PlayStation 4 versions are still not optimized, and Borderlands 3 keep freezing. Increasing the settings from medium to high yields diminishing returns.
For most mainstream cards, medium settings at 1080p are ideal; additionally, the game prefers more cores and threads, preferably a quad-core. It doesn’t run well, but the frame losses aren’t worth the higher settings.
To stop frame drops in Borderlands 3, adjust your graphics settings, update your drivers, and try running the game through a VPN to reduce network congestion and game server overload.
The first thing to know is that Borderlands 3 relies far more on GPU power than CPU power, especially at higher settings and resolutions. The second important aspect is that if you only need 60 frames per second, almost any recent CPU should suffice.
Whenever you have Borderlands 3 lag issues that prevent you from enjoying the game with your friends, just use one of the three BL3 VPN tools we described above to solve your problems fast and easily.
In a nutshell, a VPN may help you resolve your lag problem in some cases. So, which VPN should you probably go with? Nevertheless don’t use a free VPN service.
As the saying goes, If you don’t pay for it, you become the product, using free VPNs can have unintended consequences, such as information leakage.
Join our Borderlands 3 Troubleshooting section to fix other issues related to this game. If you typically lag or lose network packets in games, visit our Gaming VPN Hub.
A VPN is the ideal choice, especially since you can use it to not only fix lag but also packet loss. And, if you can’t decide which VPN is the best for gaming, we suggest going with ExpressVPN.
Brawlhalla is a fighting game that you can play online for free. It’s available on Windows PC, OS X, PlayStation 4, Xbox One, and Nintendo Switch.
There are multiple game modes in Brawlhalla, but the most popular one is to fight other players until they’re knocked off the stage.
The game runs servers in several regions, including the United States, Europe, Southeast Asia, Australia, and Brazil. Unfortunately, a lot of users have high ping when playing Brawlhalla, which prevents them from fully taking advantage of the game.
In this case, you can use a VPN to improve ping, reduce lag and delay, and ultimately enhance your gaming experience. Even the team behind Brawlhalla recommends using a VPN to overcome connection speed problems.
Why is Brawlhalla so laggy?
Aside from obvious Brawlhalla connection issues with the game, the problem could also be caused by an unstable or slow Internet connection, thus resulting in Brawlhalla servers lagging.
That is why it is critical that we invested enough time in researching potential solutions to fix these. This way, we learned what caused Brawlhalla lag ps4, and Brawlhalla lag switch to occur.
That’s why we are here, to show you the test results when using a VPN to fix Brawhalla ping, lag, and connection issues.
What is a good ping for Brawlhalla?
Pings of less than 100ms are ideal for online games such as Brawhalla. Pings greater than 150ms, on the other hand, will cause lag.
Those are the links for every region to test your Brawhalla high ping issue:
Perform a 100-ping test to that address and log the results (replace <server address> with the address you determined in the above section).
Go to Start Menu.
Type in cmd.
Press Enter.
Type: ping -n 100 <server address>
When finished, right-click on the window title bar.
Choose Edit and Select All
Press Enter to copy it.
Right-click in your email and choose Paste to paste it into your email.
How do I fix lag on Brawlhalla mobile?
Brawlhalla mobile lag can be avoided if you switch your phone settings to Performance Mode, or install a VPN on your phone that will employ the kill switch mode in order to redirect more traffic to the game.
Why do I have 3 bars in Brawlhalla?
Three bars (yellow) indicate an input delay of between 4 and 7 frames. Your latency is detected by those bars. You may experience input delay if some bars drop.
Even when you play the game and still get Brawlhalla lag with 4 bars, the problem may be when using a controller instead of a mouse or keyboard. If you want to use a controller when playing on PS4 or Xbox, we recommend using a wired controller instead of a wireless one.
We end our rundown with a VPN loved by many due to its exceptional speed rates and great privacy features.
NordVPN is a great candidate because it has over 5 000 worldwide servers and imposes no restriction on traffic. You can browse anonymously and use up as much bandwidth as you need.
Not only that, but this service combines multiple advanced privacy features including private DNS on every server, virtual IP address, and obfuscated servers.
With all these powerful features your identity and browsing data will stay completely anonymous and not even your ISP will be able to detect your activity.
This means that the risk of getting any restrictions on your traffic is extremely low. Your ISP won’t detect your traffic data, so it won’t be able to know how much bandwidth you actually use.
What else you should know about NordVPN:
Strict no logs policy
Anti-malware protection
Can be used on up to 6 devices
Split tunneling
DoubleVPN
NordVPN is available under several subscription plans, with the 2-year plan offering the best deal when it comes to monthly charges.
NordVPN
Enjoy exceptional speed rates and complete anonymity with this advanced VPN service.
ExpressVPN is fast, with over 3,000 servers in 94 countries. Data and bandwidth are both unlimited. ExpressVPN is easily undetected, allowing you to bypass ISP throttling, and it even works in countries with strict censorship, such as China.
This VPN prioritizes security. With 256-bit encryption, perfect forward secrecy, a kill switch in the desktop apps, and DNS, WebRTC, and IPv6 leak protection, you can rest assured that your data is safe.
ExpressVPN keeps very few metadata logs and no data that can be used to identify you. Desktop clients for Windows, macOS, and Linux are available, as are mobile apps for iOS and Android.
What else you should know about ExpressVPN:
Kill switch and split tunneling
Powerful 256-AES encrypted connections
Native obfuscation servers
Bypasses ISP throttling without notice
Available on all devices
30-day money-back guarantee
If you want to protect every internet-connected device in your home, including those that don’t have native apps, you can configure the VPN with specific routers. ExpressvPN supports up to five concurrent connections.
ExpressVPN is a fantastic way to have a truly global gaming experience. ExpressVPN is the ideal way to increase your gaming time, whether you want to legally access more content online or simply reduce lag and bandwidth restrictions.
ExpressVPN
Decrease lag spikes and use split tunneling to allocate more bandwidth for Brawhalla.
If you’re interested in the fastest VPN app to help you reduce Brawlhalla ping, look no further than Private Internet Access (PIA).
Created by Kape Technologies, PIA has stable and speedy VPN server connections. And, if you need more speed, you can disable encryption.
PIA has thousands of servers in over 80 countries, including the regions supported by Brawlhalla game servers. You can use private DNS servers and encrypt your traffic with OpenVPN or WireGuard.
PIA can offer you a seamless online experience with the help of its built-in adblocker as well as its anti-tracking features.
The VPN is very easy to set up and includes plenty of customization options.
Private Internet Access lets you connect to up to 10 devices, including your router. You can find dedicated apps and guides on how to install and use the VPN on the device of your choice.
What else you should know about PIA:
Supports Windows PC, OS X, PlayStation 4, Xbox One, Nintendo Switch
Allows 10 simultaneous connections
No identifying logs
30-day money-back guarantee (no free trial)
Private Internet Access is a subscription-based VPN with multiple plans available. If you are not sure about its capabilities, you can try it out and, if not satisfied, you will get a refund in the first 30 days of your subscription.
Private Internet Access
Get Brawlhalla optimal ping with the help of this incredibly fast VPN solution.
Surfshar VPN for Brawhalla is the best gaming VPN for the money value. Surfshark, a provider known for its clean, modern apps and ability to circumvent blocks, provides a strong VPN and does not impose connection limits.
Surfshark’s security features are constantly being expanded. In addition to 256-bit encryption and perfect forward secrecy, all platforms include a kill switch, protection against DNS, IPv6, and WebRTC leaks, split tunneling, and automatic wifi protection. Your data is never logged by this provider.
What else you should know about Surfshark:
Internet kill switch
Whitelisting for apps
Ad-blocker
Geolocation spoofing for Android phones
256-bit AES Encryption
Unlimited simultaneous connections
Surfshark is much better suited if you want to stream Brawhalla rather than reduce lags and pings, thanks to its fast server connections.
Surfshark
Connect to blazing speeds servers and avoid DDoS attacks with this robust VPN provider.
CyberGhost VPN has an impressive network of servers that you can explore when trying to reduce Brawlhalla ping: more than 6,200 servers in 89 countries, which also include the game server areas. It’s a VPN solution developed by Kape Technologies.
CyberGhost VPN helps improve your gameplay by routing your DNS requests through proprietary DNS servers. It supports the OpenVPN protocol and also includes an ad and malware blocker.
Cyberghost has a strict no-logs policy. They do not keep any information regarding your browsing history, session duration, bandwidth usage, or IP address.
The service is built to provide high-speed rates and offers unlimited bandwidth. Not only will you be able to enjoy seamless Brawlhalla sessions, but you will be able to do it for as much time as you like.
The service uses 256-bit AES encryption along with secure protocols to ensure your data stays private. It also includes a secure killswitch that blocks all traffic in case the connection drops.
What else you should know about CyberGhost VPN:
Works with Windows PC, OS X, PlayStation 4, Xbox One, Nintendo Switch
Connect up to 7 devices at once
Zero traffic logs
45-day money-back guarantee (1-day free trial)
Cyberghost VPN is a subscription-based service, with a 3-year plan offering the best value. All plans include a 45-day money-back guarantee.
Cyberghost VPN
Eliminate all your Brawlhalla ping issues with the aid of this VPN app.
Brawlhalla is a colorful, fun, and action-packed game that you can play for free. However, it can be really annoying to keep losing fights because of high ping.
Using a VPN solution like the one we described above should fix this problem, though. If you can’t decide which one is better, we recommend going with NordVPN.
For daily commuters, Waze offers excellent features to save time by providing directions and updates on traffic. However, sometimes you encounter W aze no network connection errors in Android and iOS devices.
This connectivity issue can happen unexpectedly and limit your access to transport apps like Waze. According to users who experienced the same problem, it can be due to network issues or broken GPS services.
However, the problem can also be caused by the app itself, and you should consider practical solutions regarding your phone or in the application settings.
This issue can occur for several reasons, including app and smartphone issues. Several Waze users have reported this issue in the Reddit Community forum.
Why is Waze not working on my phone?
If the Waze app is not working, there can be multiple reasons, but the most likely is your application cache. Clearing the cache usually helps with these types of problems.
Sometimes, you might have to clear the application data or reinstall the app. It’s also possible that your GPS is causing problems, so check if it’s working correctly.
Why is Waze not working on iPhone?
Regardless of the platform that you use, the causes are the same. In most cases, there’s a glitch with the application or its cache.
Alternatively, you might want to check Waze servers and ensure that there’s no outage.
Luckily, there are ways to fix this issue, and this guide will show you how to do it.
In the US on an iPhone. Network settings reset Location settings off, phone reset, back on Location settings reset Check GPS is working with Google & Apple Maps Signed out of Waze & logged back in Wazeapp still won’t / can’t find GPS
Follow this article to fix Waze’s inability to connect to GPS issues in your smartphone.
How do I fix Waze not being able to connect to GPS?
1. Disable Cellular Network
One solution that seems to have worked for other users is to disable the Cellular Network preference in the settings and restart the phone.
For iPhone
On your iPhone, go to Settings. Tap on Cellular.
Now select Cellular Data Options.
Disable the 4G or LTE option that you have in the settings.
Restart your iPhone.
After the restart, launch Waze and check if the GPS is working.
Make sure you enable the cellular network from the setting.
This is a simple workaround, and it should help you fix Waze no network connection iOS/iPhone error.
For Android
From the Home Screen, tap on Settings. Go to Network & internet.
Head over to SIM cards & mobile networks.
Disable the VoLTE option.
Tap your network provider name and change the Preferred network to 2G/3G.
Restart the phone and launch Waze. Check if the issue is resolved.
Also, enable the VoLTE option along with the preferred network back.
Fixing the Waze no network connection on Android is simple; you just need to ensure that you’re using the correct type of connection.
Following this step-by-step guide often helped the users to resolve Waze GPS connection issues so it might resolve the problem efficiently on Android or iOS devices.
Hence, check your phone network settings and change them accordingly to repair the connection troubles.
2. Clear app cache data
From the home screen, tap on Settings.
Scroll down to Apps.
Tap on Manage Apps and wait for the apps list to load.
Locate and tap on Waze.
At the bottom of the page, tap on Clear Data.
Choose Clear Cache and tap on Yes to confirm the action.
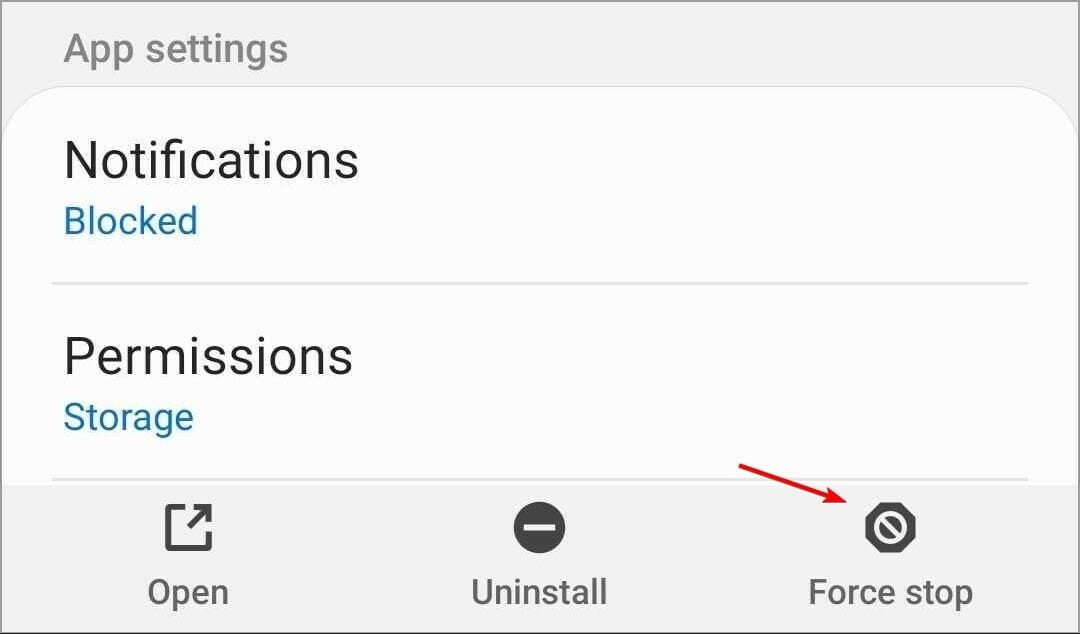
Tap on Force stop and select Yes to confirm the action.
You can use this solution to clear data on Android or iOS apps and eliminate useless data stored on the app. This way, you can troubleshoot the error and resolve the connection issue.
3. Use Speedify
If you have problems with the Waze no network connection error, be it on your phone or PC, you can fix them with Speedify software.
The app will combine multiple connections for maximum performance and ensure you have a stable connection at all times.
The app works with Wi-Fi, cellular, Ethernet, tethered, and satellite connections, so if your connection is dropping, this app will surely help.
If nothing seems to be working, try uninstalling and reinstalling the app.
From the home screen, tap and hold on to the Waze app icon.
Select Uninstall from the options.
Tap on Yes to confirm the action.
Once the app is uninstalled, restart the phone. It is essential to restart the phone. Installing the app without restarting the phone did not work to our taste.
Open the Play Store and install the Waze app.
Launch the app and log in with your credentials.
If the Waze no network connection error only occurs while using it with the CarPlay, disable CarPlay and try again. You can disable CarPlay by doing the following:
Select Settings.
How to go to General and select CarPlay.
Select your model and turn the feature off.
This is because Apple blocks third-party apps from accessing GPS while using CarPlay.You can also try this solution if you’re getting a Waze no-network connection on Android Auto.
This helpful method will help you to check if Waze no network connection error is caused by testing your GPS status with a dedicated app.
It can be applied on Android and Mac devices, so you only have to follow the steps above and test if your GPS works appropriately.
In case this is the cause for Waze not connecting, you should contact the support for your mobile device to resolve the issue.
Why won’t Waze find a route?
If this happens, there’s probably a glitch with the app, thus causing it to be unable to calculate the best route.
Alternatively, a network connection issue might be preventing you from reaching the Waze network and finding the correct path.
What can I do if Waze says No network connection?
Sometimes reinstalling the app can be the best way to fix this issue. Alternatively, you can check if your GPS sensor works appropriately in other apps.
App cache can cause this issue, so try clearing it on your phone. If that doesn’t work, the last option would be to reinstall the app.
In conclusion, following the steps in this article, you can fix the Waze unable to connect to GPS issues on your Android and iOS devices.
This isn’t the only connectivity issue that users had, and we wrote about other problems in our Waze Bluetooth not working guide, so be sure to check it out.
Tell us if one of our solutions fixed the Waze no network connection error and how it turned out for you. Please share your experience in the comments section below.
To view hidden folders and Files in Windows 11, open File Explorer (Win + E) and select View > Show > Hidden items. Yes, it’s that easy but you can find additional solutions below.
How can I view Hidden Folders and Files in Windows 11?
1. Use the Show Hidden Files, Folders and Drives Option
1. From your desktop taskbar, press on the File Explorer icon to open it.
2. To access more File Explorer options, click on the three horizontal dots, then select Options.
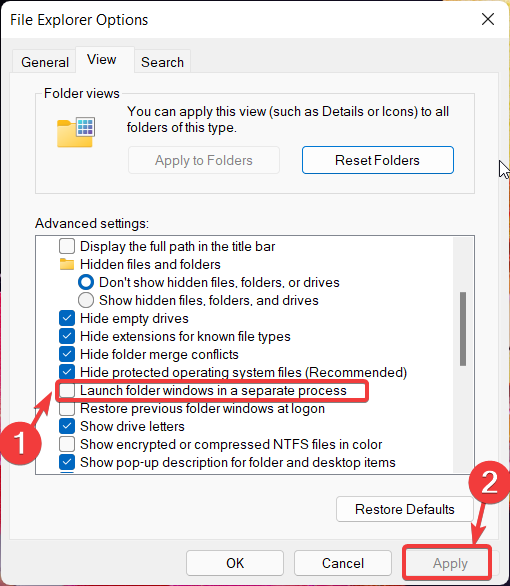
3. Select theViewtab, then search forHidden files and folders, and expand it.
4. At this point, you have to uncheck theDon’t show hidden files, folders or drivessection, then tickShow Hidden Files, Folders and Drives.
5. Click on Apply, then on OK, and exit the window.
You can easily show hidden files and folders on your Windows 11 device via File Explorer. You just need to take advantage of File Explorer’s settings and let the Show Hidden Files, Folders and Drives Option do its magic.
As you can see, this is an easy-to-apply procedure that you should try if you want to view Hidden Folders and Files in Windows 11.
NOTE
By applying the steps above, you can easily view the Hidden Files and Folders Option. However, let us remind you that besides the regular hidden items, your OS also includes Protected Operating System Files.
2. Uncheck the Hide Protected Operating System Files option
Open File Explorer Options, following the first two steps listed in the previous method.
Uncheck the Hide protected operating system files(Recommended) Option.
As previously revealed, when you show Hidden Folders and Files, Windows will continue to hide Protected Operating System Files. You may easily recognize them since they include the system attribute.
Deleting or modifying such files could have a huge impact on your system. Apply the above procedure if you need to access them for a good reason and precisely as given or else you risk damaging your OS.
Can I hide back the Unhidden Folders and Files?
To easily do so, just access File Explorer advanced options as you learned from this article, then checkmark back Don’t show hidden files, folders, or drivers.
This will definitely fulfill your needs if you change your mind after unhiding them. It is the same process as presented in the first solution, except for the final steps.
So, you’ve seen how simple is to view Hidden Folders and Files in Windows 11. In addition, to refresh your knowledge about the new OS design, feel free to check out a full Windows 11 22000.65 build review.
Therefore, if File Explorer is crashing, don’t hesitate to check out our easy fixes and get things back to normal in no time.
For any other thoughts or questions, do not hesitate to leave a comment in the section below. We’d love to hear your opinion regarding this procedure, in particular, and the OS that’s in the spotlight these days.
Keyboard double typing is a relatively common issue that can arise on Windows 11/10 PCs. Double typing is when keyboards register double (multiple) characters when users try to input single letters.
Users’ keyboards aren’t much good when letters get duplicated. Some users who have needed to fix double typing have posted on Microsoft’s forum.
For instance, one of our readers complained that his keyboard repeats the E key when he types it.
Does a similar thing happen when you word process on your keyboard? Here are some primarily Windows 11 solutions that can feasibly fix double typing.
Why is my keyboard repeating what I type?
Double typing more commonly arises on mechanical keyboards. Dirty mechanical keyboard switches can cause it. Users have confirmed cleaning switches for affected keys can resolve double typing.
However, there are other causes for double typing. For instance, this issue can arise for keyboards with faulty or outdated drivers. So, reinstalling keyboard drivers may also help.
The issue can also sometimes be due to keyboard settings. Some users may need to adjust overly high Repeat rate and delay keyboard settings.
How do I fix a double-typing keyboard on Windows 11?
1. Run Windows 11’s keyboard troubleshooter
Click Start, and select the Settings shortcut pinned there.
Select Troubleshoot to view further navigation options.
To bring up Windows 11’s list of troubleshooting tools, click the Other trouble-shooters box.
Click the Keyboard troubleshooter’s Run option.
Then, apply any changes or fixes suggested by the troubleshooter.
You can also follow this full walkthrough on running the Windows keyboard troubleshooter to fix duplicate key presses: Keyboard Troubleshooter in Windows.
2. Update your keyboard’s driver
There are various ways you can update a keyboard’s driver. Check out Windows Report’s guide to updating device drivers in Windows 11 for further details about how to update them.
Driver updater tools like Fortect Driver Updater provide an easy solution. This tool will check if your keyboard drivers are wrong or outdated and ensure they are running their latest version.
To open Control Panel without the keyboard in Windows 11, click Cortana’s taskbar button. Then select the Speak to Cortana microphone option and say Open Control Panel.
Select the View by drop-down menu’s Small icons option in the Control Panel.
Click Keyboard to bring up the properties window.
Lower the Repeat rate bar’s slider to Slow.
Drag the Repeat delay bar’s slider left to Long.
Click Apply to save the keyboard settings.
Select OK to exit the Keyboard Properties window.
Restart your PC after changing the keyboard settings.
4. Set a threshold with the Keyboard Chattering Fix software
Select Download Now, then choose Secure Download (US) on the webpage.
Unarchive the files and double-click Keyboard Chattering Fix.exe to start the app.
Then enter 90 (or 100) in the Threshold value box.
Click Apply to save the threshold setting.
NOTE
You’ll need to have the Keyboard Chattering Fix software running in the background when typing for this fix to work. This software doesn’t include an auto-start option, but you can manually place its EXE in the Startup folder.
5. Clean keyboard switches on mechanical keyboards
Unplug the keyboard from its desktop PC.
Remove keycaps from keys that double type.
Blow off dust and debris from the key switches (preferably with a compressed air can).
Place the removed keycaps back on their key switches.
Reconnect your keyboard and see if the issue reoccurs.
Windows 11 doesn’t have any specific reset keyboard option you can select for that purpose.
However, you can reset the keyboard to a default layout if you’ve installed multiple language packs like this.
Select to open Settings, and click the Time & Language tab.
Then click Language & Region to access the options in the screenshot below.
Click the … button for your keyboard’s original default language.
Select Move up to place the default keyboard language at the top of the list.
You can also remove the Keyboard layout for the language you don’t use; this will remove accents and might resolve this issue.
We hope one of those resolutions fixes your keyboard’s double typing. Cleaning key switches, updating drivers for keyboards, and the Keyboard Chattering Fix software can resolve many cases of that issue.
If those possible solutions don’t fix the double typing, there could be a hardware issue with the keyword.
You can return a keyboard within its warranty period to its manufacturer for uncharged repairs.
Feel free to share any queries regarding keyboard double typing below this post. Have you fixed double keyboard typing with a different method not specified above? If so, let us know about it below.
Remote Desktop is a handy Windows 10 feature that allows us to control our computer from another device.
Of course, to enable the Remote Desktop feature, you need an active internet connection. So, if your computer is not correctly connected to the internet, you won’t be able to use this feature.
However, some other factors could cause the feature to stop working, and we will talk about these issues and solutions for them in this article.
How can I tell if RDP is running?
Press the Windows key + R to open the Run utility.
Type regedit32 in the run box and click OK.
Navigate to the paths below in the left pane: HKEY_LOCAL_MACHINE\SYSTEM\CurrentControlSet\Control\Terminal ServerHKEY_LOCAL_MACHINE\SOFTWARE\Policies\Microsoft\Windows NT\Terminal Services
If the value of the fDenyTSConnections is set to 1, RDP is disabled. But if it is cleared to 0, RDP is enabled.
If RDP is disabled, you can enable it to run from here.
What can I do if the remote desktop is not working?
1. Check your internet connection
As mentioned earlier, the Internet is required for Remote Desktop to connect with another device. So, check if everything is okay with your internet connection.
If you determine that you have some problems connecting to the internet, check out our articles about Internet problems and Limited internet connection in Windows 10, and you might find the solution.
2. Check if remote connections are allowed
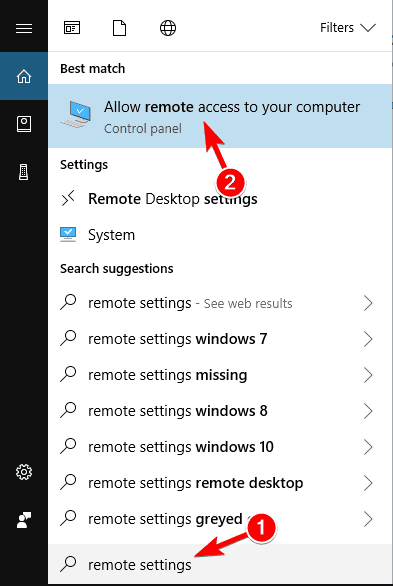
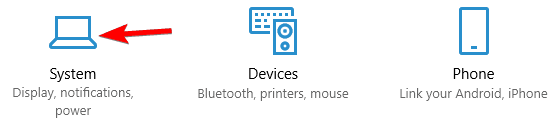
Go to Search, type remote settings, and open Allow Remote connections to your computer.
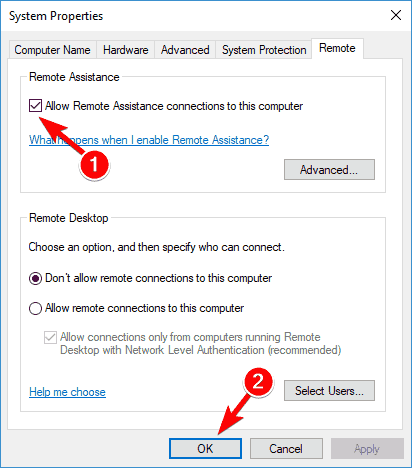
Check Allow remote connections to this computer and click OK to save changes.
Just like you need to allow Remote Desktop through the Firewall, you also need to enable remote connections on your computer if you’re using this feature for the first time.
Remote connections are now enabled, and you should try to connect again. We also noticed another possible issue that could prevent using Remote Desktop.
If the computer you want to connect to remotely is in the Sleep or Hibernate mode, the connection won’t be possible, so check if the computer is ‘awake,’ and then try to connect again.
3. Remove your credentials from Remote Desktop
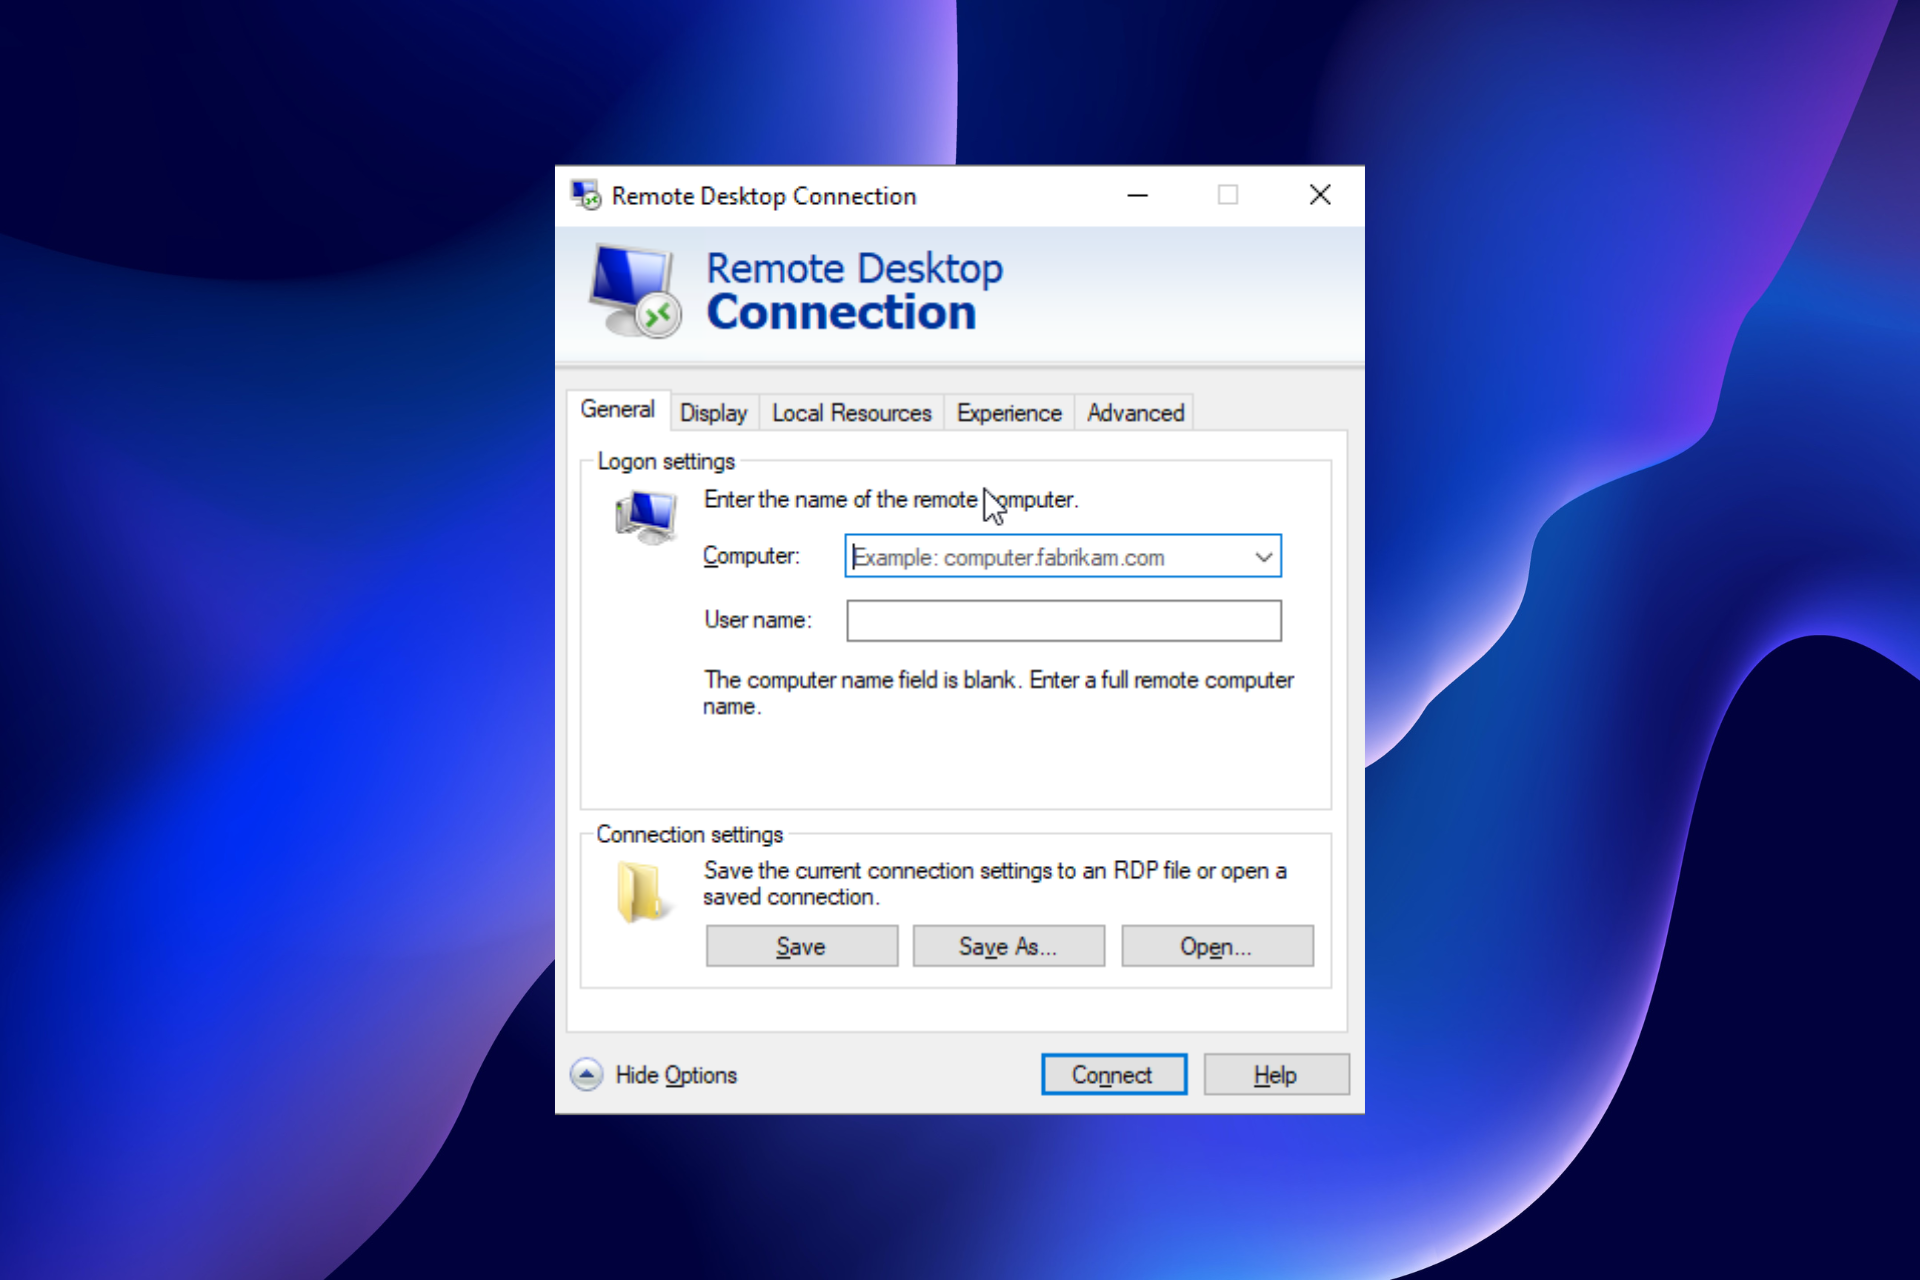
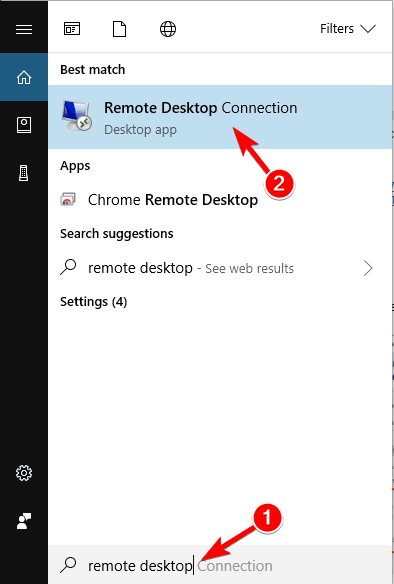
Press Windows key + S and enter remote desktop.
Click on Remote Desktop Connection from the menu.
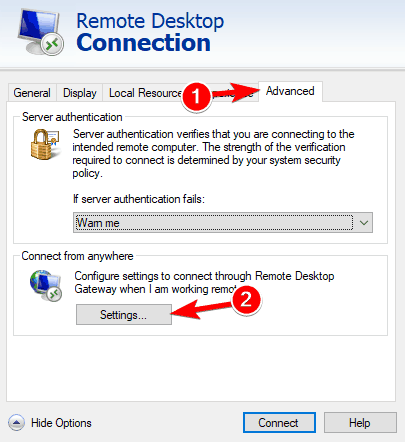
Click the Advanced tab, followed by the Settings button.
Now, click on Delete Credentials.
According to users, sometimes Remote Desktop won’t connect due to problems with your credentials. However, you can fix that issue simply by removing the saved credentials.
After deleting your credentials, check if the problem persists. Many users reported that this solution fixed the problem, so try it out.
If custom scaling is turned on, you should see A custom scale factor is set message. Click on Turn off custom scaling and sign out.
If Remote Desktop doesn’t connect, the problem might be related to custom scaling. Many users use custom scaling on larger monitors, but sometimes this feature can cause issues with Remote Desktop.
Once you sign back in, the scaling should be set to default, and all problems with Remote Desktop will be resolved. Many users reported that this solution worked for them, so we strongly recommend you try it out.
5. Change Firewall Settings
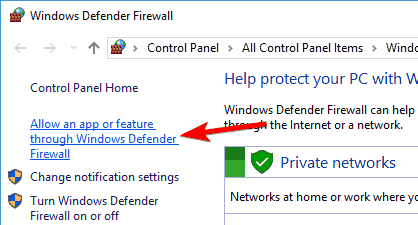
Go to Search, type firewall, and open Windows Defender Firewall.
Go to Allow an app or feature through Windows Firewall.
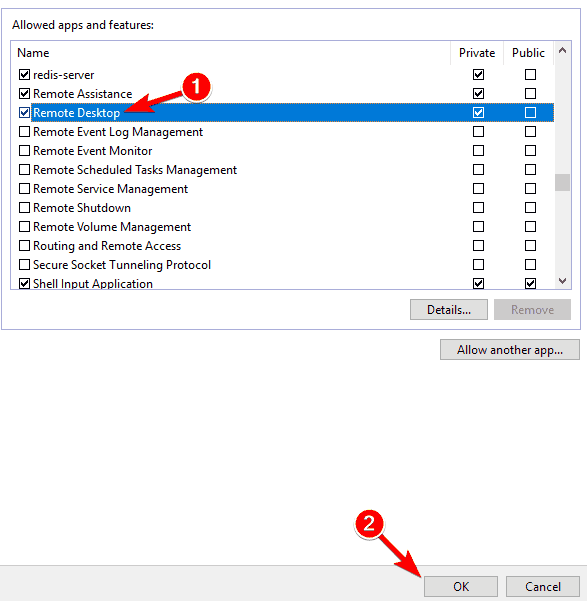
Click on Change Settings.
Find Remote Desktop, check it, and click OK to save changes.
Windows Firewall is also one of the most common causes of Remote Desktop problems. If Firewall blocks the Remote Desktop, you won’t be able to connect it with another device.
Now try to connect your computers via Remote Desktop, and it should work.
Remote Desktop is not enabled in Firewall by default, so if you’re running Remote Desktop for the first time, allowing it through Windows Firewall is a must.
In addition to your firewall, it’s essential to check if your antivirus isn’t blocking the Remote Desktopfeature.
Sometimes antivirus can interfere with your system and prevent this feature from working correctly. Sometimes, you might have to uninstall your antivirus to fix this issue.
If you’re looking for a new antivirus compatible with Remote Desktop, we suggest you consider changing your antivirus software to ESET NOD32. This software works great with Windows 10 and protects you without interfering with other processes and apps.
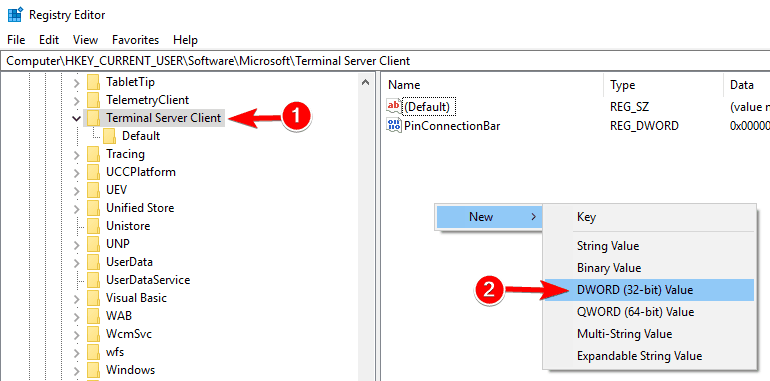
In the left pane, navigate to HKEY_CURRENT_USERSoftwareMicrosoftTerminal Server Client key
In the right pane, right-click the space and choose New > DWORD (32-bit) Value.
Enter RDGClientTransport as the name of the new DWORD.
Double-click the newly created RDGClientTransport DWORD to open its properties.
Set Value data to 1 and click on OK to save changes.
According to users, you might be able to fix this problem by making one small change to your registry.
After making these changes, check if the problem persists. This might be a slightly advanced solution, but many users reported that it worked for them, so you might want to try it out.
7. Add the IP address and server name to the hosts file
Several users reported that they could not use Remote Desktop due to their host’s file.
According to them, you need to manually add the IP address and server name to the host’s file on your PC to fix the issue.
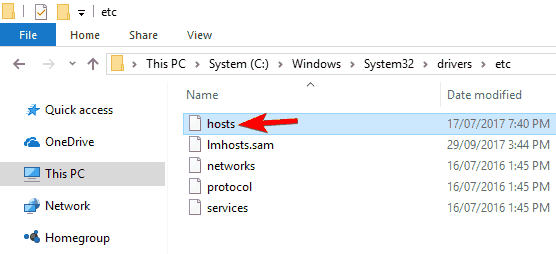
To do that, navigate to This directory and edit the hosts file with Notepad: C:WindowsSystem32Driversetc
Remember that the host’s file is a system file, so if you want to modify it, you’ll need administrative privileges.
For more information on how to modify your host’s file and gain administrative privileges, we strongly recommend checking Access denied when editing the host’s file article.
Once you change your host’s file, the issue with Remote Desktop should be resolved.
8. Check if the 3389 port is enabled
If Remote Desktop won’t connect, the problem might be your firewall. Your firewall can block specific ports to protect your PC, but sometimes your firewall can block particular ports by mistake.
For example, port 3389 is used by Remote Desktop, and if your firewall is blocking this port, you won’t be able to use this feature at all.
If this port is enabled, but the issue still appears, try disabling and enabling your firewall. Sometimes a quick firewall reset can fix the problem, so you might want to try that.
9. Change your connection from Public to Private
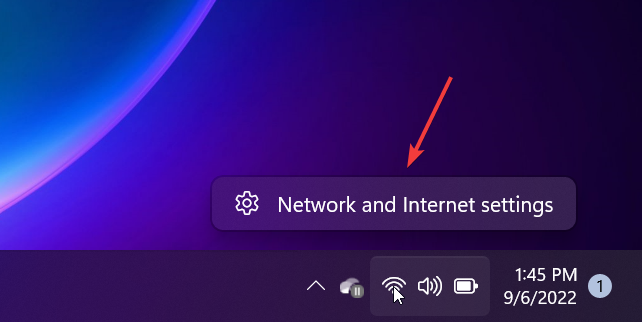
Click the network icon in the bottom right corner of your Taskbar and click on your network connection. In our case, the network connection name is Network, but it might be different on your PC.
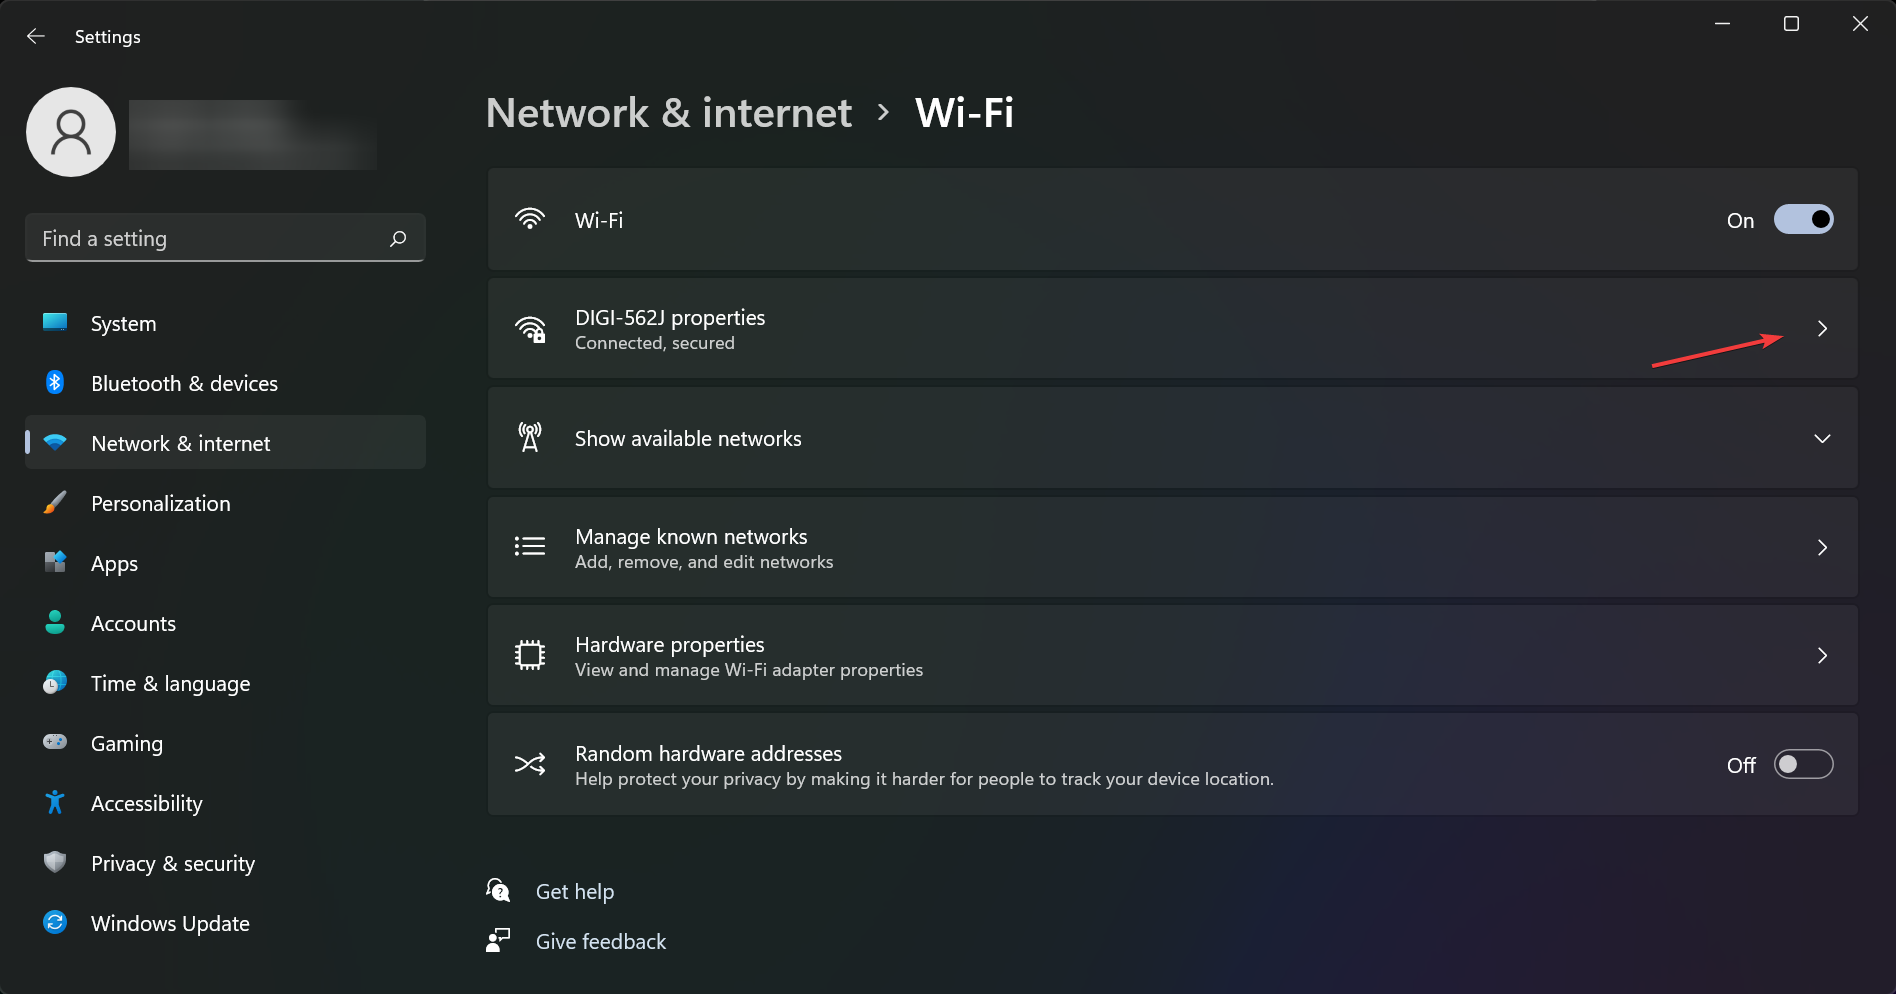
Click on your network connection name.
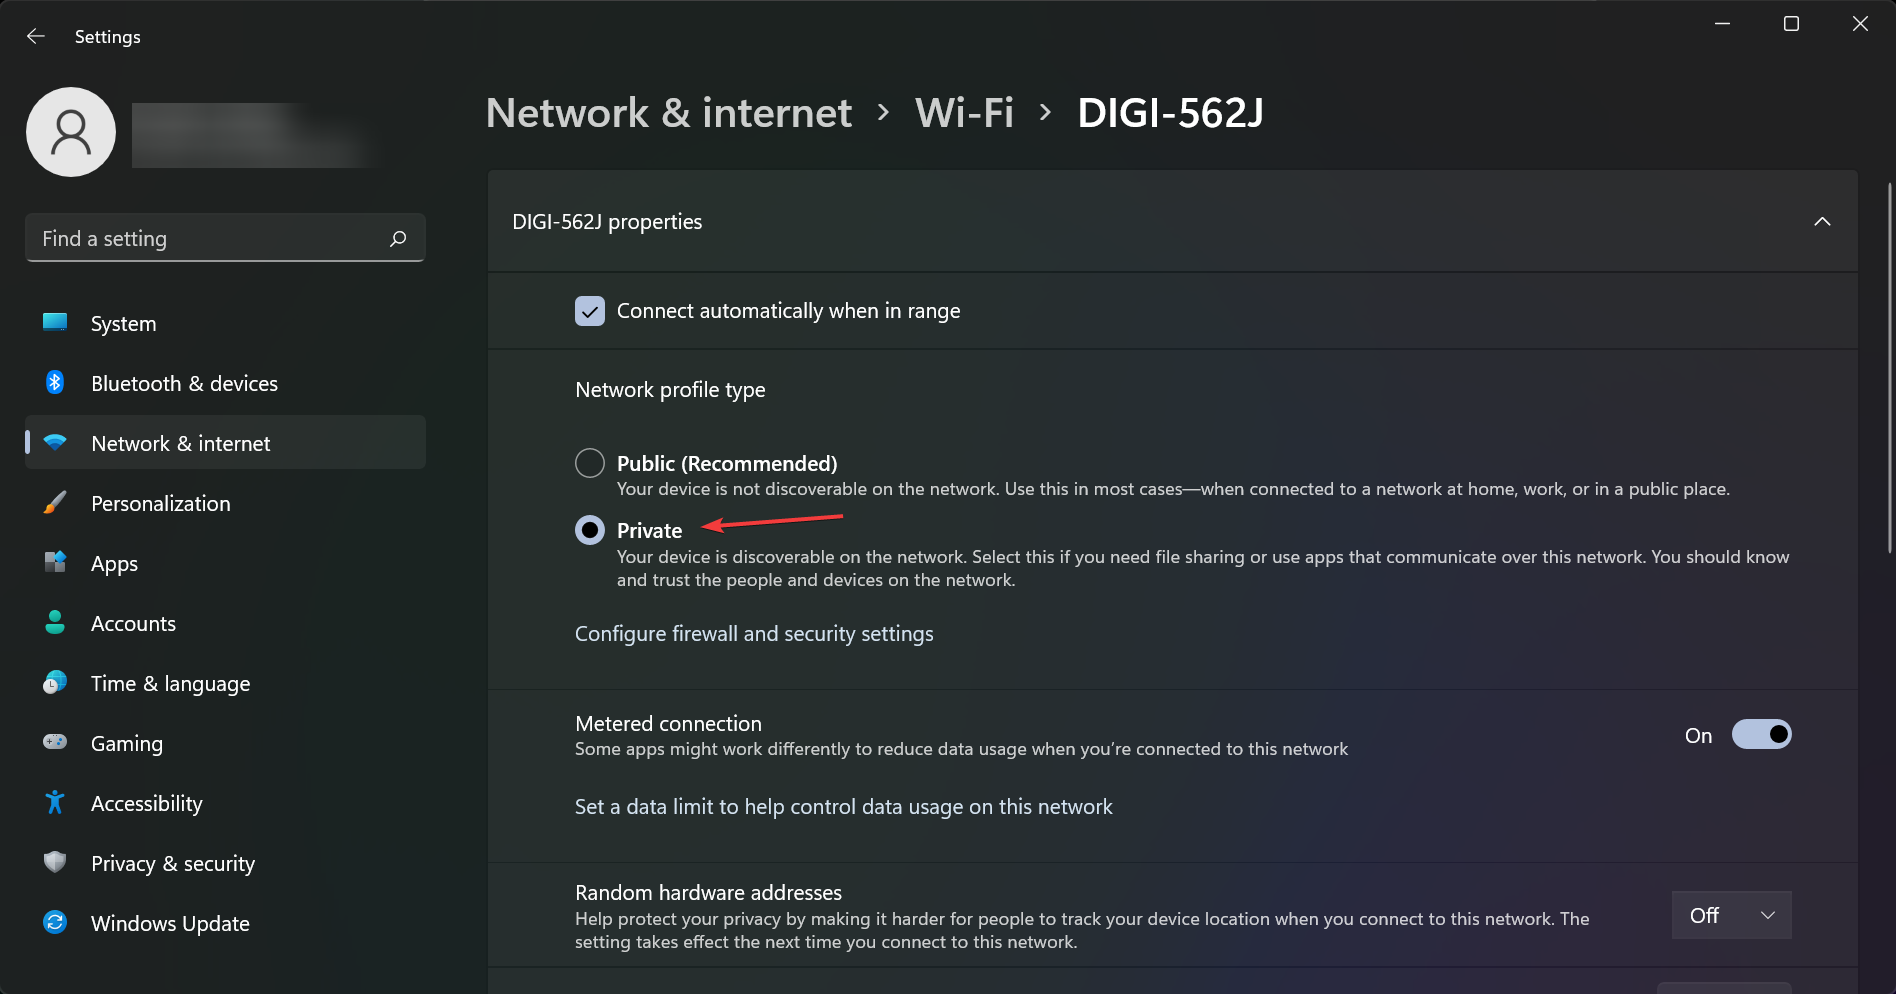
Select Private as your network profile.
To protect your PC, remote connections are disabled if you use a public connection. After doing that, the problem with the Remote Desktop should be resolved entirely.
Also, if none of the solutions worked, you can use Mikogo to solve the connectivity problems. With this remote desktop software, you get complete security and control of your PC.
How do I force a remote desktop connection?
Open the Run utility, type regedit32 in the run box, and press Enter.
Follow the paths below in the left pane: HKEY_LOCAL_MACHINE\SYSTEM\CurrentControlSet\Control\Terminal ServerHKEY_LOCAL_MACHINE\SOFTWARE\Policies\Microsoft\Windows NT\Terminal Services
If the value of the fDenyTSConnections is set to 1, clear it to 0 to enable RDP.
With this, you can force a Remote Desktop connection on Windows.
Remote Desktop not working over VPN
Remote desktop not connecting through VPN cases are more frequent than you can imagine.
While the potential culprits can be diverse, ranging from connectivity issues (ports, network adapters, and so on) to communication and protocols, the problem is likely caused by an incorrect setup.
Whether the VPN disconnects when Remote Desktop is activated or the Remote Desktop fails with the VPN connected, getting the two of them to collaborate harmoniously is essential.
While trying to install Discord, many customers have complained that they receive an error message stating that Installation has failed.
Using the troubleshooting instructions outlined below, you will be able to resolve any issues that may arise during the Discord installation process. But first, let’s find out whether Windows 11 suits the gamers out there.
Why can I not install Discord?
Occasionally, Discord will cease to function for no apparent reason, yet most of the time, the issue is caused by corrupted data files. A Windows 11 upgrade or a new program installed on your computer may cause internal Discord packages to become incompatible.
Because you are downloading the installation files from Discord’s servers, it is imperative that the servers be in good functioning order to prevent any problems.
There are a variety of things that might be causing this problem, including data from Discord that messes with the installation process; the drivers for your device, or even antivirus software that won’t let the files get downloaded properly.
Don’t be concerned if the Discord installation has failed in Windows 11 because of other reasons. The good news is that you have the ability to correct the situation; and there are plenty of easy ways to do it.
Is Windows 11 better for gaming?
In contrast to some earlier Windows releases, Windows 11 is a good platform for gaming. It makes no significant changes to the file system or APIs; thus any games that are compatible with Windows 10 should also be compatible with this OS.
As far as we can tell, both modern and retro games are equally compatible; and any tweaks or fixes that worked on prior versions of the operating system would also work now.
Microsoft has introduced some new gaming-specific features that are either included with Windows 11 or will be included in future upgrades. As a result, it may be an, even more, superior operating system for gaming than Windows 10.
Using DirectStorage, high-performance SSDs can load assets onto a GPU rapidly and efficiently without straining the CPU’s resources. This is the PC version of the Xbox Series X|S’s Velocity Architecture, which should speed up load times significantly.
Auto HDR is also included in Windows 11, and it converts any SDR game that makes use of DirectX 11 to a high-dynamic range game. This improvement provides for a greater variety of brightness and color options; which should assist to give older games a little more punch.
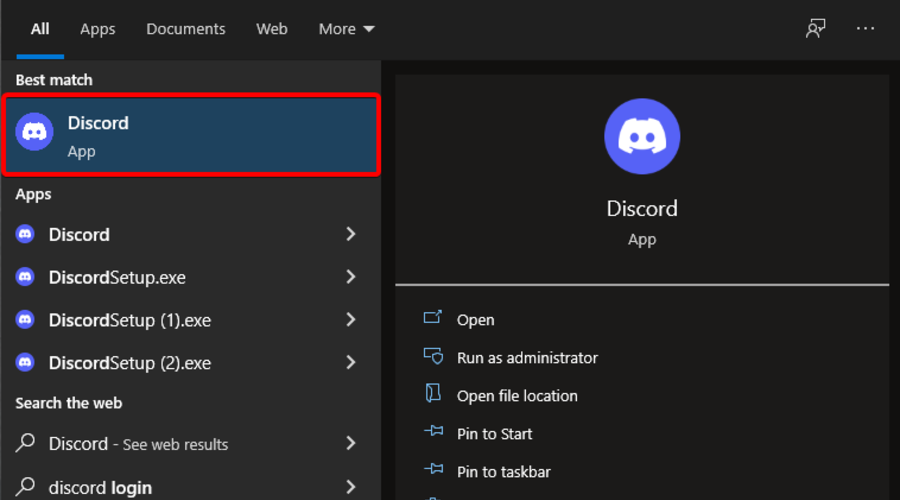
What can I do if Discord installation has failed in Windows 11?
1. Disable Discord in Task Manager
If the Discord download installation has failed, press the Windows key + R to open up a new Run box and type or paste in taskmgr, then click OK.
Under the Process tab, select any Discored-related process, and click End task.
Depending on how many Discord processes are running, you may have to perform this step numerous times to complete the work successfully. Now you can close the Task Manager window and reattempt to install Discord.
2. Delete Discord data
Press the Windows key + R to open up a new Run box and type or paste in %AppData%, then click OK.
Your File Explorer will open a window. Right-click the Discord folder and choose the Delete option from the drop-down menu.
Press the Windows key + R to open up a new Run box and type or paste in %LocalAppData%, then click OK.
Navigate to the Discord folder, right-click on it, and choose Delete. The Discord update failed loop error from Windows 11 will be solved afterward.
Following a restart of your computer, you will be able to reinstall Discord on your PC without difficulty. Simply download the application and run the setup file, then the application should be correctly installed.
3. Update available device drivers
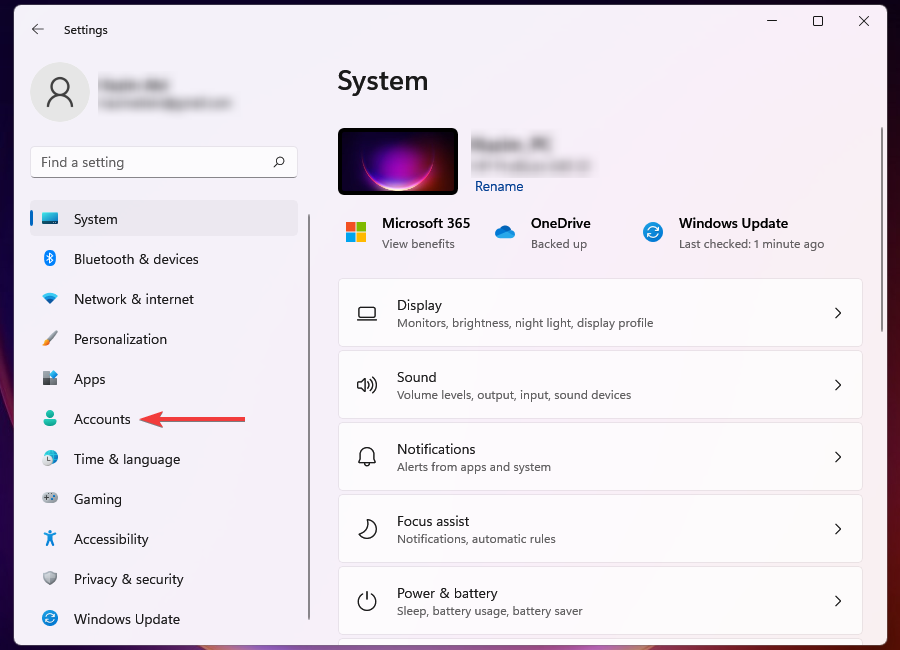
Press the Windows key + I to open the Settings app, and click on Update & Security from the left panel followed by Advanced options on the right side.
Scroll down until you find the Additional options section, then click on Optional updates.
Now click on the Driver Updates option, select all the driver updates you are presented, and lastly, click on the Download & install button. By performing a driver update, the Windows 11 Discord error will be fixed.
Although Windows is normally responsible for driver updates, you can manually check for updates if you experience a problem. Once you’ve done updating your drivers, reattempt to install Discord.
Click the expand arrow from your taskbar and right-click on your antivirus icon then choose Avast shields control followed by Disable for 10 minutes.
If you have other antivirus programs installed, you can disable the app temporarily by following the same steps as above, or similar steps.
If the problem does not occur anymore, it is probable that your antivirus application was the root of the problem. You should consider picking another compatible antivirus solution for Windows 11 to protect your computer.
5. Update Windows
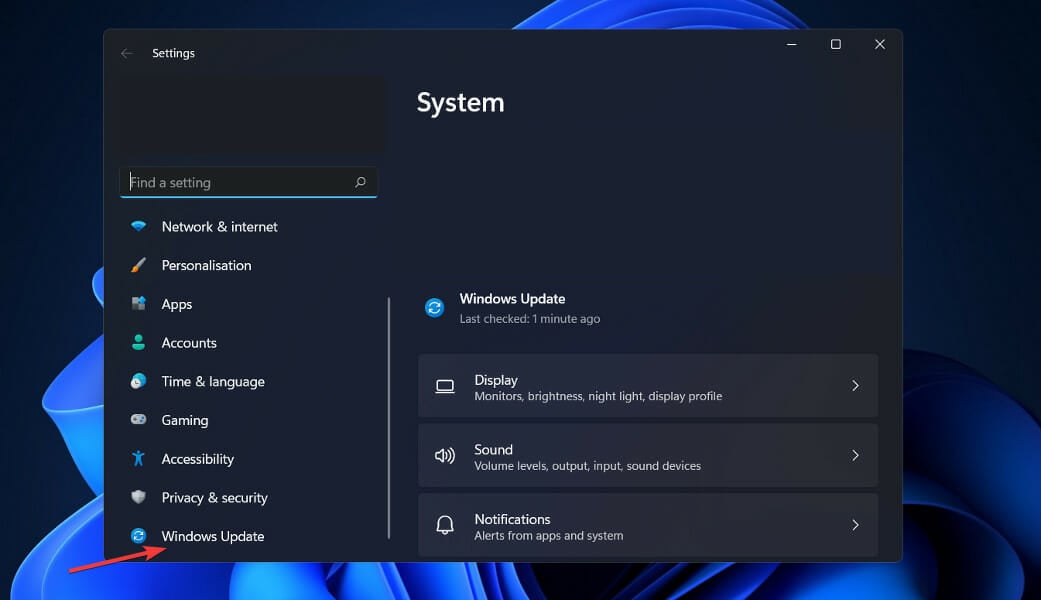
Press the Windows key + I to open the Settings app, then click on Windows Update in the left panel.
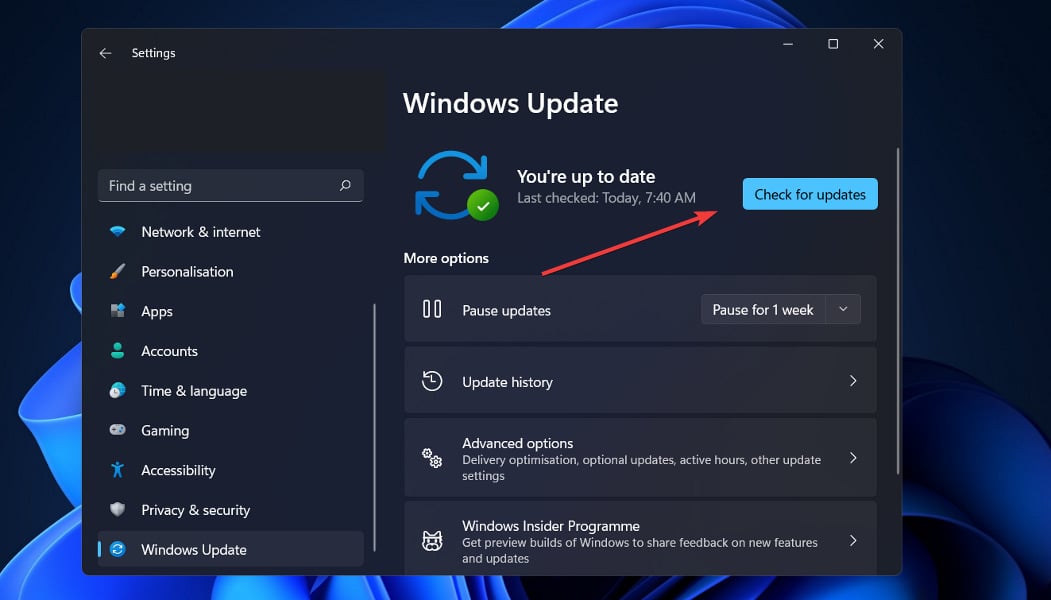
If you have any new updates to download, click on the Install now button and wait for the process to finish, otherwise click on the Check for updates button. The Discord installation has failed in Windows 11 error will be solved.
If you are running an older version of Windows, it is possible that this is a contributing factor to the error, which can be rectified by updating the operating system.
For those of you who enjoy video games, you may be familiar with Steam, a digital distribution service for video games produced by Valve Corporation. Users can download, install, and manage a variety of games via the Steam platform.
Windows 11 has been developed with a fresh style and a slew of new features. Consider that the OP includes incredible gaming features such as Auto HDR and DirectStorage, as well as improved connectivity with the Xbox app and the Xbox game pass.
As a result, if you enjoy playing video games, it is worthwhile to consider installing the operating system.
However, before making the switch from Windows 10, you might ask whether Steam is compatible with the latest operating system.
The response is unequivocally affirmative. With the release of Windows 11, a slew of programs, including Steam, have stated that they are definitely compatible with the operating system.
Check out our article on how to resolve Discord installation issues on Windows 10 for more details on the problem at hand as well as new potential solutions. They are recommended for Windows 11 too.
There are a few Hulu loading errors that can arise for some users when they try to launch the Hulu app. For example, error 94 is one loading error with a message that says, Failed to load Hulu.
Some Hulu users might encounter that error, or similar ones, which can often be a network connection or app incompatibility issue.
Why do Hulu connection errors appear?
Because of the sheer number of Hulu error codes that deal with connection issues, it is tough to pinpoint the exact reasons for this type of error occurring, but we can safely assume that there are the most probable culprits:
Unstable internet connection
Using a VPN service
Trying to connect through a Proxy server
Not being located on the right part of the globe
Faulty network drivers
Not updating Windows to the latest release
What are the most common connection errors for Hulu?
As with other software options, Hulu error codes like P-DEV317 error sometimes don’t provide enough information regarding how to resolve that issue or don’t even point to a specific problem.
Sometimes, Hulu error codes such as a black screen can indicate a problem with your physical device or its components; in other cases, they might appear as a cause of a faulty internet connection.
In today’s guide, we will explore this subject further and look at what you can do to efficiently resolve this issue and prevent it from happening again.
That being said, Hulu connection errors can also appear on various devices, so having a handy guide to follow can make a huge difference.
Is Hulu down?
Considering the circumstances, it is fair to wonder if server-side problems from the streaming service itself may not cause your connection issues to Hulu. However, knowing this for a fact could give you peace of mind, knowing that your connection issue is temporary.
To find out if Hulu servers are down, you can explore the official Hulu Support page on Twitter for any official statements from the company.
Another alternative would be to use an online third-party tool like the DownDetecter for the Hulu webpage, which will automatically update with reports as users encounter them.
How can I fix network connection errors on Hulu?
➡ Hulu connection error on Smart TVs
If you’re experiencing the Hulu connection error on your smart TV, no matter what brand it is, the solutions to resolve them are similar, so we will cover them together.
In case you’re experiencing Hulu connection errors on a Samsung TV, or if you’re seeing the same issue connection issue on an LG one, these fixes should prove helpful:
1. Update your Hulu app to the latest version
Even though we could not describe the steps exactly, as they will vary depending on the exact type and brand of device you’re using, it is recommended that you always have the Hulu app updated.
To check for this, you can open the TV Menu, navigate to the About or Update sections, and perform a check. If any updates are found, please take the time to update it and then try to see if the problem persists.
If it does, follow the next solutions described in this guide.
2. Ensure that the TV is correctly connected to your network
Ensuring that your smart TV is connected optimally to your network is paramount and straightforward to look past, especially when using a WiFi connection.
If you connected your TV through an Ethernet cable, ensure that both ends of the line are correctly connected to and from the route and to and from the TV.
If you connect your Smart TV using WiFi, then it would be recommended to check any network settings on your TV and ensure everything is connected.
3. Clear caches and cookies for the Hulu app
Keeping your device clean of caches and cookies will ensure a smooth operation of the Hulu app and, thus, no connection issues.
For this reason, we recommend that you remove any files that can be qualified as clutter. You can do so by following these steps:
Turn on your Smart TV.
Find the Settings menu on your TV.
Open the Apps option, and select the Hulu app.
Navigate to Storage, and click the Clear Cache button.
Confirm the decision by clicking Clear Data.
Open the Hulu app again and check if the problem is resolved.
4. Restart your TV
You can also try to resolve this connection error on Hulu by turning the TV off and then turning it on again.
Even though it might seem like an obvious solution, researching users’ statements has proven efficient.
Restarting your TV allows it to clear any possible errors while allowing the app to be refreshed without being reset entirely.
To successfully power cycle your Smart TV, it is recommended that you turn it off by using the remote and then unplug it from the wall socket. Afterward, it is recommended that you wait a few minutes, then plug the device back into the wall socket, and try opening the Hulu app again.
5. Reset the Hulu app on your Smart TV
As in most electronics, resetting the device to factory settings will most likely eliminate all the elements that can cause the dreaded connection error on Hulu.
If you’re unsure about how to reset the app on your Smart TV, you can follow these steps:
First, turn on your Smart TV.
Open the Hulu app.
Press and hold the Back button on your remote control until Hulu opens the home page of your Smart TV.
You’ve successfully reset the Hulu app, so ensure the problem is resolved.
6. Uninstall and reinstall the Hulu app
If all the above methods have failed to help, we will need to remove and reinstall the app on the TV.
Uninstalling Hulu
Turn on your TV.
Press the Home button on the remote.
Choose Apps from the menu, and click on Manage Installed Applications.
Click the Hulu app from the list, and choose Delete.
Wait a few minutes for the process to finish.
Reinstalling Hulu
Turn on your Smart TV.
Open the Menu.
Type Hulu inside the search bar appearing at the top of the screen.
Select the Hulu app, and click Install.
➡ Hulu network error on Roku TV
Hulu has also experienced Roku TV issues, which most commonly happen because of outdated or corrupted apps.
Editor’s tip
The troubleshooting steps for the Hulu connection errors on Smart TV (which we presented directly above this section) can also be applied to the Hulu network error on Roku TV.
The previous solution focuses more on the Hulu side of things. At the same time, the section below will cover a more Roku-related set of methods to try out, so if you’re experiencing Hulu issues on Roku TV, you’re completely covered if you follow both sections mentioned here.
If everything else that requires an internet connection works without issues, then you might feel stuck, but don’t worry, as we have some of the best fixes for this issue:
1. Check the Roku internet connection
To have a smooth and immersive experience, your internet connection must be stable and robust enough.
To check the Roku internet connection, go to Settings, open Network, and click the Check connection button.
This test will inform you if the internet signal is strong enough, and you can troubleshoot the issue further.
2. Make sure the device is correctly connected to the TV
Even though it might seem like an obvious method, countless users have had issues with their Roku device simply because of a faulty connection to the TV.
What does a faulty Roku connection to the TV look like? It usually means that the USB is not fully plugged into the device or that a lot of dust has covered the tip of the male or female USB port.
Clean any dust from the USB port on the Roku device and the TV, and then try connecting it again.
3. Restart your Roku device
Turning off and then turning on your Roku will ensure that no remaining files are left unrefreshed and can thus resolve this issue once and for all.
4. Check for Roku system update
To check for an update, Open the Roku Settings menu, click About, and choose Update.
Wait for the process to complete, and then try to see if the issue is resolved.
➡ Hulu keeps saying connection error on Firestick
Users across the internet have reported this annoying issue on Reddit and even the Hulu forums.
As you can see from the image presented above, this error shows the message:
Connection error
Sorry, we encountered an error. Please check your connection and try again. For more information or instruction on testing your network connection, go to help.hulu.com.
The main issue with this error is that it appears 3 or 4 times during a 20-minute period, which is far too much for anybody trying to enjoy a binge-watching session.
1. Close the Hulu app and re-open it
Even though it might seem like a simple method, this has proven helpful in the cases of multiple users who encountered the same issues with Hulu.
Closing the Hulu app and restarting it allows for the caches and cookies to be refreshed on the respective device and, thus, could contribute to showing the connection error.
2. Change the connection settings for your router
The exact options you will be able to find when accessing the setup page for your router will differ depending on the device model and even the contract type you signed with your ISP.
Considering all that, because the Firestick is not strong enough to deal with faster internet connections, it could be helpful to change from a 5GHz WiFi connection to a 2.4 GHz (if your router supports these settings).
In the same way, if your WiFi connection is currently on the 2.4GHz setting, try and change it to 5GHz, as this might resolve the connection problem.
3. Try another router or modem
If all the solutions mentioned above have failed to solve the Hulu connection problem, the cause for this recurring issue might be the router or modem itself.
If that is the case, we recommend that you replace the device with a newer model and try to see if the problem disappears.
➡ Hulu connection error on PS4
Make sure your internet connection works without issues
Ensure that your PS4 is correctly connected to the network
Check the network signal strength and move the PS4 closer to the router if needed
These are some of the most common pre-fix actions to ensure that your PS4 will work on Hulu without issues.
The error 503 on Hulu provides you with a message regarding the incapability of providing the requested service, and this can cause the error to vary considerably, even though the same fixes are efficient:
Service Unavailable
HTTP server error 503
503 error
The common reason for experiencing this issue is that the servers could be down, or you might have gotten unlucky and chosen to use the service during server maintenance.
Additionally, other situations might result in seeing this error on Hulu or a variation of the same in the form of this webpage is unavailable, including having the servers too busy at that specific time. Finally, this issue occurs on all devices, including but not limited to Windows, Mac, Android, Linux, etc.
1. Reset your internet connection by unplugging the router
First, try unplugging your internet router and PC when the Hulu loading error arises. Then, shut down your PC and open it.
Then turn off, unplug your router, and wait about five minutes.
Plug the router back in and turn it on.
Then, restart your desktop or laptop.
Relaunch the Hulu app.
2. Remove any caches from your browser and Hulu app
The Hulu app might have corrupted cache data. To clear the cache for the UWP Hulu app, press the Windows key + S keyboard key.
Type app in the text box, and click Apps & features within the search utility.
Then select the Hulu app listed.
Click Advanced options to open other settings.
Press the Reset button.
Click Reset again to confirm.
3. Update Hulu
If your Hulu app needs updating, updating it might be a potential fix for its loading error. To edit the UWP Hulu app, click Microsoft Store on Windows 10’sStart menu.
Click See more to open MS Store’s menu.
Click Downloads and updates to open the options shown directly below.
Then click Get updates to download available app updates.
4. Update Windows
Hulu loading errors can be due to incompatibility issues with older device software. Type updates in its search utility to ensure Windows 10 is fully updated.
Click Check for updates to open the Windows Update tab in Settings.
If a Windows 10 build is available, click Download and install to update the platform.
If there isn’t a new build version available, click Check for updates to download and install available patches.
5. Disable VPNs
VPNs don’t mix so well with Hulu as they can generate connection incompatibility. To disable a VPN, press the Windows and R keys simultaneously to launch Run.
Input ncpa.cpl in the Open box, and click the OK option.
Right-click your VPN connection and select the Disable option for it.
Then try opening Hulu without the VPN connection.
6. Reactive streaming device
Reactivating your streaming device might kick-start Hulu’s streaming. To do that, open the Hulu website in a browser.
Log in to Hulu if required.
Move the cursor over your user profile to select Account at the top right of the window.
Click Manage Devices to open a list of your Hulu devices.
Click Remove to delete devices listed there.
After that, you can get reactive a removed device by adding the activation code in the Add Device box.
7. Reinstall Hulu
Try reinstalling the Hulu UWP app. Then, open the search utility in Windows 10.
Input the keyword app in the Type here to search box.
Click Apps & features to open the window shown in the snapshot below.
Select the Hulu app, and click its Uninstall button.
Restart Windows after uninstalling the Hulu app.
Click Get on Hulu’s MS Store page to reinstall the latest app.
8. Contact Hulu support
Simply visit the Hulu support page, where you can contact the team and even call them directly and ask for help. In addition, the support people can inform you about any technical issues on their side, depending on the area you live in.
Those are some potential fixes for generic Hulu loading errors that might kick-start the app.
In addition, the resolutions above can fix numerous Hulu loading issues, such as the we can’t verify your email address or error above 94, so follow the steps strictly.
There are some of us that really don’t appreciate being bombarded with system or app notifications while we’re just browsing, listening to music, or simply minding our business.
But don’t worry. because as always, you made the right decision and came to the one place where everything gets fixed and dealt with.
However, today, we are going to look at some solutions for when you want to enable or disable your Firewall notifications on your Windows PC.
That being said, if the Windows Firewall notifications keep popping up and you just can’t take it anymore, this is what you have to do.
Can I turn off all the notifications in Windows Defender?
Yes, you definitely can, and we are about to show you how to do just that through this article, so make sure to read until the end.
Don’t worry, we’re not going to drag you through a massive process that could take up your entire afternoon.
You will be surprised to know that this is really easily done so just sit back, warm up your mouse clicking fingers, and let’s do this together.
So, in order to disable the turn-on feature for Windows Firewall notifications, please carefully go through the guide below.
How do I disable firewall and network protection notifications?
Press Win + I to access Settings.
Select Privacy & Security, then click on Windows Security.
Click on Privacy & network protection.
Select Firewall notifications settings.
Click on Manage notifications.
Under Firewall & network notifications, turn the settings off.
And, it goes without saying that the same process will apply when you want to enable the notifications as well. So, either way, you have all you need right now.
What happens if you stop Windows Firewall service?
Before you think of disabling the Firewall, make sure you one hundred percent understand what this software’s role is.
The Windows Firewall helps protect your PC by preventing unauthorized users from gaining access to your device through the Internet or a network.
That being said, if the firewall is turned off, traffic on all ports will be able to access the system and an attacker may be more able to exploit a weakness in a network service.
So, on Windows 11, if you want to turn off Firewall notifications, this is all the information you can possibly need on the topic.
Remember that, if the Windows Firewall is turned off, you don’t need to disable notifications, but we strongly recommend you keep the Firewall on at all times.
Tip
Furthermore, using an antivirus can offer you more safety than using only the integrated Firewall of your Windows device. ESET HOME Security Essential is a great option because it has an excellent feature that protects your devices from malware, phishing scams, ransomware, and other online threats. Additionally, it also has a feature that helps you recover your device in case it gets stolen or lost.
Has this guide helped you fix the problem? Let us know in the comments section located below.
Installing Microsoft Skype for Business as a stand-alone app from a Microsoft Office 365 ProPlus suite should work like a breeze, at least until getting the following error message: This feature has been disabled by your Administrator.
The same thing happens if you use Microsoft Office 2013 or Office 2016 client and try to perform certain actions in the applications.
What causes the This feature has been disabled by your Administrator message?
This issue is usually caused by a Windows Registry policy that prevents the Office application to connect to the Internet.
There are a few things Microsoft Office requires in order to access online services, complete a download, or get the latest online content from Office.com. Internet connectivity is definitely one of them.
Hence, check if there is a 0 value for the UseOnlineContent registry entry from Overview of identity, authentication, and authorization in Office 2013 or Office 2016.
When finding such a value, either remove the key or set its value to 2. For clearing out this error message in no time, please do as follows.
How to fix This feature has been disabled by your administrator?
The way you can fix this problem is by changing the value for the UseOnlineContent registry via Registry Editor.
If the value of the UseOnlineContent registry is set to 0, that means Microsoft Office is disallowed to connect to the internet.
However, do keep in mind that serious problems might occur if you modify the registry incorrectly. Proceed at your own risk.
3. Press the Windows + R keys at the same time to open the Run dialog.
4. Type regedit in Run box, in order to open the Registry Editor.
5. Find and click this registry subkey: HKEY_CURRENT_USERSoftwareMicrosoftOffice15.0CommonInternet or HKEY_CURRENT_USERSoftwareMicrosoftOffice16.0CommonInternet.
In the case of using Office 2013, it will be 15. In the case of Office 2016, you’ll find 16.
6. If the UseOnlineContent registry entry exists in this path, skip the next two steps.
7. If not, on the Edit menu, point to New.
8. Click on DWORD Value.
9. Type UseOnlineContent.
10. Press Enter.
11. Right-click on UseOnlineContent.
12. Now, hit Modify.
13. In the Value data box, type 2, and then click OK.
14. You could also completely remove the UseOnlineContent key.
15. Exit Registry Editor.
16. Now, you need to restart your system for the changes to take effect properly.
17. Finally, open the Microsoft Office application. You can now continue the same procedure you were performing before getting the error message.
Note: Make sure to follow the above-mentioned steps carefully. Major problems occur when modifying the registry incorrectly. Apply the given steps at your own risk.
The Registry settings UseOnlineContent set to 0 is the red flag you’re after. This means Microsoft Office is disallowed to connect to the Internet, yet that’s no longer an issue.
If you have any further questions or suggestions, leave them in the comments section below and we’ll be sure to check them out.
High resource consumption can be a problem and affect the device’s performance. And many reported high CPU usage due to the explorer.exe process on Windows 10.
High CPU usage is one of the most dreaded problems, and it often takes a while before users can identify what’s actually causing the issue since the system doesn’t throw any error messages.
Here are some similar issues that users reported:
Windows explorer hogging CPU Windows 10 – This issue can occur if your system is infected by malware. However, you should be able to fix the issue by performing a full system scan.
Windows 10 explorer high CPU utilization – This is a variation of the original error, and in most cases, you can fix the problem simply by removing the problematic application from your PC.
Windows explorer constant CPU usage – Another common issue that can occur with Windows Explorer is constant CPU usage. This can be caused by temporary files, so be sure to remove them.
Explorer.exe high CPU usage when moving mouse – This is a slightly unusual issue, but you should be able to fix it using one of our solutions.
Let’s now walk you through all one needs to know about the problem and the most effective solutions for it.
Why does explorer.exe use high CPU?
Explorer.exe is the name of the Windows Explorer process, and under an ideal scenario, it shouldn’t consume much CPU, typically in the range of 0-5%. If it’s higher than that, there’s a problem that needs to be identified and eliminated to get the best performance.
One of the common reasons behind Windows Explorer high CPU usage in Windows 10 is corrupt system files. Certain third-party apps are also known to trigger CPU usage for explorer.exe.
Besides, system errors, temporary files, issues with the hard disk, and malware can also lead to the problem. In addition to these, if the computer idles out too soon or incompatible hardware has been connected, you might witness explorer.exe high CPU usage when moving the mouse.
What is the normal memory usage for Windows Explorer?
It depends on the number of Windows Explorer windows you have open, in addition to the task being carried out. Also, when you launch Windows Explorer, the memory usage will suddenly spike and then lower automatically after a few seconds.
Windows Explorer’s Memory Consumption
In most cases, the memory usage of Windows Explorer, when left idle, will hover around 40-100 MB, while my computer currently shows 179.7 MB when actively using it in two different windows. If there is an issue with the system, it might increase even further.
How do I fix explorer.exe high CPU usage?
1. Remove old and temporary files
Press Windows + S, type Disk Cleanup, and click on the relevant search result.
Make sure that your system drive, by default C, is selected and click OK.
Your PC will now scan the selected drive. This process usually takes a couple of seconds.
Select the files you want to remove and click OK.
If you want, you can click the Clean system files button in order to remove additional files.
If you’re having problems with explorer.exe high CPU usage in Windows 10, the problem might be caused by old and temporary files.
Programs on your computer create hundreds of temporary files, and sometimes these can interfere with your system, so it’s advised to remove them.
Alternatively, there are specialized cleaning tools that can efficiently erase temporary files on your PC without leaving any leftovers.
2. Disable cloud storage clients
According to users, sometimes this issue can occur due to cloud storage services such as Dropbox or OneDrive.
These services sync files automatically in the background, and that can cause explorer.exe high CPU usage in Windows 10.
To fix the problem, users recommended disabling OneDrive and uninstalling Dropbox temporarily and see if that solves the problem.
There are several ways to uninstall an application, but the most effective one is to use uninstaller software. It will remove all files and registry entries associated with the application you’re uninstalling, ensuring no leftover files interfere with the system.
3. Check for misleading desktop icons
Sometimes explorer.exe high CPU usage can occur due to certain icons on your desktop. This is an unusual occurrence, but it can happen on your PC.
Apparently, the issue is caused by a file or a shortcut on your desktop that doesn’t have an icon. For some reason, these types of files cause issues such as high CPU usage with explorer.exe in Windows 10.
To fix the problem, you just have to remove files/shortcuts without icons from the desktop, and the problem will be resolved.
4. Check for malware
Sometimes explorer.exe high CPU usage can occur due to malware. A certain process can be running in the background without your knowledge, and that can cause high CPU usage on your PC.
If you’re having this issue on your PC, we advise you to perform a full system scan and check if that solves the problem. To run the scan, you may use the built-in Windows Security or go with the third-party solution.
Windows Security
If Windows Security is unable to find the malware, you might want to move over to an effective antimalware tool that has the ability to detect malware, spyware, and other dangerous threats.
As an alternative, there is a powerful security tool that will safeguard your PC against digital threats with the latest protection functionality.
You can check our tested recommendations and choose an antivirus that is capable of securing your system from spyware or ransomware attacks, without affecting other processes or slowing down your computer.
5. Install the latest updates
Press Windows + I to open the Settings app, and select the Update & Security section.
Click on the Check for updates button.
Wait for Windows to scan and locate the available updates, and if any are listed, click on Download and install.
Restart your PC to install them, and check if the problem is still there.
If you’re having issues with explorer.exe high CPU usage on your Windows 10 PC, the problem might be the missing updates. Windows 10 is a solid operating system, but sometimes certain bugs can appear and cause high CPU issues.
However, you can fix this problem simply by installing the latest updates. Windows 10 usually installs the updates automatically, but you can always check for updates on your own.
Press Windows + R, type msconfig in the text field,and click OK.
Go to the Services tab, check the Hide all Microsoft services option, and then click the Disable all button.
Head over to the Startup tab and click Open Task Manager.
Locate all apps that read Enabled under the Status column, right-click on them individually and select Disable.
Head back to the System Configuration window and click on Apply and OK to save changes.
Now, restart your PC.
Once your PC restarts, check if the problem is still there. If not, enable services and applications one by one until you manage to recreate the problem. Keep in mind that you’ll need to restart your PC every time you enable a group of services or applications.
According to users, sometimes explorer.exe high CPU usage in Windows 10 can occur due to third-party applications on your PC.
Many applications and services tend to start automatically when Windows is booted, and that can cause this and other problems to appear.
Also, you can fix this issue simply by performing a Clean boot. In the Clean boot state, all startup applications and services should be disabled, allowing you to troubleshoot the problem.
7. Clear the contents of the Temp folder
Press Windows + R to open Run, paste the following path in the text field, and click OK:C:\Windows\Temp
Press Ctrl + A to select all the files here, and then hit the Del key.
Next, press Ctrl + Shift + Esc to open Task Manager.
Locate Windows Explorer, right-click on it, and select Restart from the menu.
After restarting Windows Explorer, the problem should be completely resolved. According to users, explorer.exe high CPU usage in Windows 10 can sometimes be caused by files in the Temp directory, and if Disk Cleanup couldn’t do it, the manual approach should do the trick.
8. Delete the AudioSes.dll
Press Windows + E to open the File Explorer, paste the following path in the address bar, and hit Enter:C:/Windows/System32
Locate AudioSes.dll and move it to the Desktop.
Now, paste the following path in the address bar and hit Enter:C:/Windows/SysWOW64
Locate AudioSes.dll, and move it to a different directory.
If you’re having explorer.exe high CPU usage in Windows 10, the problem might be related to the AudioSes.dll file. According to users, this file can sometimes cause the issue, and the only way to fix it is to move this file.
This isn’t the most reliable solution, and modifying the contents of the Windows directory is usually not advised, so be sure to use extra caution. If any new problems occur, restore these two files to their original locations.
9. Run SFC and Check Disk scans
TypeCommand Prompt in the Search bar, and click on Run as administrator.
Click Yes in the UAC prompt.
Now, paste the following command and hit Enter to run the SFC scan:sfc /scannow
Next, execute the following command to run Check Disk, while replacing X with the system drive on your computer, which should, in all likelihood, be C:chkdsk /f X:
You’ll be asked to schedule a scan, press Y to do so, and then hit Enter.
Now, restart the computer.
Sometimes the explorer.exe high CPU usage problem in Windows 10 can occur due to corrupted files on your PC. In this case, the SFC (System File Checker) scan comes to your rescue. Also, run the Check Disk scan to look for issues with the hard drive.
How do I stop Windows Explorer from running in the background?
Though many recommend terminating the Windows Explorer process from the Task Manager, the method doesn’t make sense because the taskbar and other critical elements are coupled with it.
So, when the Windows Explorer process is terminated, the Taskbar and even the desktop icons would disappear.
In this case, it’s best that you remove it from the startup apps if Windows Explorer or a particular folder has been configured to launch at boot.
That’s it! By now, you should be able to fix explorer.exe high CPU usage in Windows 10. Some of the solutions here would also work in the case of Windows Explorer high memory usage in Windows 10.
Besides, if the system heats up, find out how to fix a high CPU temperature in Windows.
Don’t forget to tell us whether these steps helped you deal with the problem. You can do that in the comments section below.
In order to protect your PC from unauthorized access Windows 11 and 10 use network credentials. However, several users reported certain issues when asked to enter network credentials on Windows 11 and 10. The main culprit for this issue is the Advanced Sharing setting that could be improperly set.
How do I fix network credentials problems on Windows 11?
1. Turn off the Password protection protection sharing
Right click the network icon on the taskbar and select Network and Internet settings.
In the next window, click on Network and Sharing Center.
Choose the Change advanced sharing settings option from the left.
Next, enable the Allow Windows to manage homegroup connections (recommended) option listed under Homegroup connections.
Click Save changes but note that you need administrative privileges to change this setting.
Expand the All Networks section and check the Turn off password protected sharing option.
Hit the Save changes button to complete the process.
This solution will remove the annoying Enter network credentials message, but it’s a temporary one. After you’ve completed the needed file transfers, turn back the feature on because it’s very useful to protect the network access.
2. Check that your IP addresses are properly assigned
In a local network, you probably assign all computers static IP addresses in order to access them easier.
According to users, your IP address might be set to automatic, and that can sometimes cause issues with network credentials, therefore be sure to check if the IP addresses of your network devices are set to static.
To set your IP addresses to static you can always use your router’s built-in software. If you’re facing trouble with the static IP address, this guide should help out.
3. Enter your Microsoft credentials
Windows 11 and 10 rely heavily on your Microsoft account, and since you can use your Microsoft account to sign into Windows, you can also use it to access other network devices in your local network.
Users reported that you can fix problems with network credentials simply by entering your Microsoft account username and password instead of your local account’s username and password.
It is important to mention that many network issues are caused by malware, various scripts, and bots. You can secure yourself by installing a Virtual Private Network tool.
4. Enter the computer name in the username field
According to users, you can fix problems with network credentials by entering the name of the computer that you’re trying to access followed by the username.
For example, if the computer you’re trying to access is named Computer1 and you have a user named Mike, you need to enter both the computer name and the username in the user input field.
In our example, the username field would be Computer1Mike. Bear in mind not to enter any slashes before the computer name.
5. Use username and password to log in to Windows 11
Users reported that you can’t connect to other network computers if you don’t use a username and password to log in.
This limitation mostly affects users that log in to Windows 10 by using a PIN, therefore if you need to access and share files with others, you might want to temporarily stop using a PIN code for login.
If your PIN is not working properly, you can get to the bottom of the problem with the help of this article.
6. Add other PC’s network credentials to Credential Manager
Press Windows key + S and enter credential and choose Credential Manager from the menu.
Make sure that Windows Credentials is selected, then click Add a Windows credential.
Enter the name of the computer you want to access, the user name, and the password related to that user name.
Once you’re done click OK.
After adding the other computer’s information to the Credentials Manager you should be able to access it without any problems.
7. Change Advanced sharing settings
Press the Windows key + S, type sharing, and click on Manage advanced sharing settings.
Now, check the Turn on network discovery along with Turn on automatic setup…, then also check the Turn on file and print sharing option below and hit the Save changes button in the end.
Now expand All Networks section.
In the Password protected sharing section, select Turn off password protected sharing. Click the Save changes button.
Several users reported that you can fix this problem simply by changing the following Advanced sharing settings.
After making these changes, the problem should be completely resolved.
8. Change your security policies
Press Windows key + R and enter secpol.msc. Now press Enter or click OK.
When the Local Security Policywindow opens, in the left pane navigate to Local Policies and selectSecurity Options.
In the right pane, double-click Accounts: Limit local account use of blank passwords to console logon only.
Now select Disabled from the menu and click on Apply and OK.
After making these changes, the problem with this message should be completely resolved and everything will start working again.
9. Change your services
Press Windows key + R and enter services.msc. Now press Enter or click OK.
When Services window opens, locate Credential Manager on the list and double-click it.
The properties window will now appear. Set Startup type to Disabled and click the Stop button to stop the service. Now click Apply and OK.
Once you stop the service, check if the problem is resolved.
Press Windows key + R and enter netplwiz. Now press Enter or click OK.
Uncheck Users must enter a user name and password to use this computer. Now click OK and Apply to save changes.
Restart your PC to apply the changes.
Once you log back in, repeat the same steps, but this time, enable the Users must enter a user name and password option and save changes.
After doing that, the problem should be completely resolved and the password protection setting will work as it should.
How do I fix network credentials problems on Windows 10?
Windows 10 and 11 are not so different so you should know that all the solutions presented above will also work on the old Windows 10 without any problems.
Problems with network credentials can sometimes be hard to fix, but we hope that you managed to fix them after using one of our solutions.
Why do I need to enter network credentials?
Enter network credentials message can appear while trying to access shared drives or directories and prevent you from accessing your files.
So, this means that the network location you are trying to access is protected with a password.
Similar issues that users reported are the following:
Enter network credentials the username or password is incorrect
Enter network credentials while using Windows 7
Windows 10 network credentials incorrect – You might have to change your security policies
Enter network credentials/ Access is denied – Try disabling certain services and check if that helps.
Network credentials asking for password – The issue might be your user account; simply create a new user account and check if that solves your problem
We all know how important staying secure in this everchanging online world really is, especially seeing how many phishing campaigns are running at the same time.
But what do you do when your antivirus software doesn’t work anymore? If you are struggling with Microsoft Defender, we will show you how to get out of this situation.
Users reported that when opening Defender, sometimes, all the settings on the interface are grayed out and inaccessible.
We are about to show you how to fix the Windows Security service being disabled and greyed out, so make sure you go through the entire guide.
Why is my real-time protection greyed out?
You should know that, sometimes, when different antivirus software is enabled, Windows Defender usually becomes grayed out.
Furthermore, you can also get an error message that reads You’re using another antivirus program, just so it doesn’t take you by surprise.
Many users actually reported that, after temporarily disabling their third-party antivirus programs while using Windows Defender, the problem did not reoccur.
So, if you need assistance with your Windows Defender service stopping and is greyed out, you came to the right place.
How do I fix Windows Defender if settings are greyed out?
1. Uninstall other third-party antivirus software
Search for Control Panel and open the app.
Click on Uninstall a program.
Look for the app you want to uninstall, right-click on it and select Uninstall.
2. Restart WSC (Windows Security Center)
Press Win + R to open the Run command dialog box.
Type services.msc and press OK.
Scroll down to the Windows Security Center, right-click on it and select Restart.
Restart your PC.
3. Edit Local Group Policy
Press Win + R to open the Run command dialog box.
Type gpedit.msc and press the OK button.
Click on Computer Configuration, then Administrative Template, and Windows Components.
Select Microsoft Defender Antivirus, then double-click Turn off Microsoft Defender Antivirus.
Search for Perform recommended maintenance tasks automatically and open the app.
Click on Advanced.
Select Apply repairs automatically, then click on Next.
5. Repair Corrupted or Missing System Files
Press Win + R to open the Run command dialog box.
First, type CMD, then press Ctrl + Shift + Enter to open an elevated Command Prompt.
Type the command, then press Enter: DISM/Online/Cleanup-Image/ScanHealth
Type the following command, then press Enter: DISM/Online/Cleanup-Image/RestoreHealth
Restart your PC.
Press Win + R to open the Run command dialog box.
Type this command and press Enter: sfc/scannow
In this situation, an automatic diagnosis and a system optimization tool can be more helpful. It simplifies the process of detecting and eliminating malware.
6. Create System Restore Point
Search for Create a Restore Point and open the result.
Select the System Protection tab, click on System Restore, then press Next.
Select Show more restore points, pick the one you want, and click Next, then Finish.
7. Update Windows
Press Win + S to open Settings.
Select the Windows Update tab.
Click the Check for updates button, let it install, then press Restart now.
How do I turn off Windows Firewall if it’s greyed out?
Search for regedit and open the Registry Editor app.
Click on HKEY_LOCAL_MACHINE, then select Software.
CLick on Policies, then Microsoft, and then WindowsFirewall.
Right-click on WindowsFirewall and delete the branch.
Restart your PC.
From user reports, we understood that there are many situations in which you may need to disable the Windows Firewall application.
First of all, you should know that, typically, the Firewall options are grayed out because they are being controlled by a group policy setting in a domain.
That being said, be sure the network administrator does not have a reason for having these options blocked prior to performing this procedure.
Just carefully follow the steps in this guide and you will be prepared to deal with a situation in which the Windows 10/11 Defender settings can be greyed out.
And, if that happens, the Windows Defender Firewall disable options will also be greyed out as a result.
You are probably a big fan of Gmail. The email client, like most other Google products, has an intuitive interface that gives you all the tools you need to manage your inbox, sent, and draft email folders.
But, because Google keeps adding new features to Gmail, that interface sometimes feels too damn cluttered. You will be forgiven for wanting to clean or remove Gmail sidebar to get a leaner, more minimalist look.
Should I remove the Gmail sidebar?
Among the things that you may want to delete from your Gmail in order to get that lean look and feel you desire is the Google Hangouts chat box.
Yes, the ability to access all your apps – the entire Google suite, Twitter, and others – from your email client has some benefits.
Yet, those constant chat suggestions, ads, and app notifications can turn your Gmail into a jungle and clutter things up.
There are tools you can use to remove or hide most of the non-essential Gmail features, like the navigation bar, stars, the Gmail logo, and search bar, and some buttons to achieve a truly spartan Gmail. But today we will cover the ways you can use to remove some elements of both sidebars.
Even when it does finally load, I will still get the pesky something is not right or Oops, the system encountered a problem error message as some of the app‘s features fail to load.
How can I minimize or remove the Gmail sidebar?
1. Use an alternative email client
If like to keep things simple and minimalistic, even when it comes to mail clients, then maybe an alternative tool would be better for you.
Third-party email clients include advanced contact sorting tools, as well as some useful email templates and spellcheckers, so they may actually improve your overall experience.
2. Turn off Google Hangouts/Chat
1. Log into your Gmail account.
2. Click the settings icon. It’s the gear wheel in the top right corner, right under your profile picture will be.
3. Choose Settings on the drop-down menu.
4. Click the Chat tab and check the Chat Off option.
5. Press the Save Changes button at the bottom of the page.
You might have spotted something strange going on on the left of your screen since the latest Google updates. That is because Google has been replacing Hangouts with Google Chat, expecting to give it the traction it needs to be successful.
Google Chat is turned on by default in Gmail, both the website and the mobile app. If you wish to remove the Gmail sidebar, you can turn off Google Chat from your screen.
3. Delete the right sidebar on Gmail
For some people, the Hangouts Chatbox is on the right-hand sidebar. This cramps your Gmail even more as it shrinks the screen space for your emails, which is its primary purpose.
You probably don’t need to see a record of all your recent chats every time you open your Gmail.
Follow these steps to remove the right-side chat box and free up some space;
Click the settings icon and select Settings on the drop-down menu,
Click the Labs folder and type Right side chat in the search bar,
Turn off that lab and save the changes.
If you had already turned off Chat in the Chat folder referred above you may need to first turn it on to access the right sidebar chat lab. You can then go back to the Chat folder settings and turn off Chat again.
4. Remove unimportant labels to remove them from your left sidebar
Click the settings gear icon in your Gmail and choose the Settings option on the drop-down menu,
Click on the Labels folder. You will see a list of labels currently showing on your left sidebar, like this;
Simply check the hide option against every system label and category you have no use for on your sidebar.
Have you noticed how you almost never use some of the labels on the left sidebar of your Gmail?
Some of these include All mail, Starred, Personal, Travel, Drafts, [Imap]/Trash, [Imap]/Sent, and Spam.
The more permanent option will be to choose the ‘remove’ option, which will delete the label altogether.
We didn’t want to be that drastic and simply hid them. I can simply click the more button to bring up all the hidden labels.
We chose to hide all the categories and other labels like Drafts, All Mail, Trash, and Spam. That instantly brought a lighter feel and minimalist look to our Gmail.
5. Use the Gmail Ad Remover to clear the right-hand sidebar
Google or search the Chrome Webstore for ‘Adblocker for Gmail‘,
Click the Add to Chrome button in the top right corner of the addon’s window.
Before Google removed the Gadgets feature, you had probably learned to live with images of your Facebook and Twitter feeds on your Gmail constantly taunting you to check your notifications and get distracted from that important email you have to reply to.
But ads right inside your Gmail are just annoying. The worst thing is they compete for the same real estate on which your emails are supposed to display – the right-hand sidebar.
Maybe Google foresaw the irritation these ads would bring and developed the Gmail Adblocker.
Consider other ways of improving your Gmail experience
Other than cleaning both your right and left sidebars, there is a lot more you can do to minimize or trim your Gmail to make it more manageable.
You can consider unsubscribing from any newsletters you no longer read and delete junk mail or highlight them as spam as soon as you receive them.
There are also some good email management tools like unroll me, which does a great job cleaning your inbox and rolling your favorite newsletters and regular emails into a single bundle.
If you want to be really drastic, you can also consider not publishing your email address and only sharing it with your important contacts.
We hope these few tricks will help clean your sidebars, reduce clutter, and minimize your Gmail.
A leaner Gmail, with lesser distractions, will certainly help you to stay on top of your tasks and get more work done.
Discord is a great service that lets you communicate via text, video, and voice. It’s all about creating communities, no matter the field. Initially, Discord was meant to help gamers communicate more efficiently.
However, over time priorities have changed and this app has been optimized to fit the need of education workers, company owners, neighborhood communities, and virtually anyone who wants an effective way to keep in touch with others.
If you’re a long-time Discord user, you may have part of one or two servers. Maybe even got banned from some of them. Hey, we’re not here to judge. We know that getting banned from a Discord server can be heartbreaking, especially if you did nothing wrong.
Why did I get banned on a Discord server?
You can get banned on a Discord server due to several reasons and we recommend checking them to prevent such annoying situations:
Violating Discord’s Terms of Service
Suspicious IP address
Spamming
Trolling
Being abusive or disrespectful
Being a Raider (deliberately bringing a server down)
These causes explain why we’re here: we want to help you achieve redemption by unbanning yourself. Here’s what you need to do:
How can I get unbanned from Discord servers?
1. Create a new account
1. Hit the Windows key, type Discord, then click on the first result to open the app.
2. In the left bottom of the window, click on User Settings (marked as a gear icon).
3. Scroll down, then click on the red Log Out button.
4. Open again Discord, by hitting the Windows key, typing Discord, then opening the app.
5. Click on Register.
6. Type the details (email, username, password, date of birth). Also, make sure you use an email that is not already related to Discord.
7. Checkmark the I have read and agree to Discord’s Terms of Service and Privacy Policy, then click on Continue.
8. Agree with the Captcha notification.
9. There you are, having a new and fresh account.
10. Connect to a VPN.
11. Access the servers you were previously banned on with the other account.
The quickest way to get back on discord is to create a new account. This one is quite obvious if you want to quickly get unbanned from a Discord server.
If your old account has been banned from a server, you’ll definitely need a new one to be able to re-connect.
Basically, you do not get unbanned per se, but you can access the Discord servers you were banned on with a new account. It is as if the ban was lifted.
Keep in mind that Discord servers are more often than not moderated by human admins. Thus, it goes without saying that you should choose a username that’s not even similar to your old one and keep your identity hidden.
Note that if you’ve received a Discord-wide ban, you’ll need to create a new account and use a VPN to circumvent the ban. Discord tracks its users by both username and IP address.
Therefore, creating a new username but using the same IP might get the new account banned. The same goes for using the same username on a banned IP address: you’ll just get the new IP address banned.
If you didn’t burn all the bridges behind you, maybe it’s time to bury the hatchet. Contact the server admin, let them know you’re sorry for your actions and maybe they’ll let you back in on the server.
This also applies to the Discord Trust and Safety team. Contact them through whatever channel you prefer and appeal the ban.
Make sure to use nice words and don’t act all entitled. Nobody likes self-entitlement, especially when it comes to lifting bans.
3. Use a trustworthy VPN
If you’ve been banned and you can’t access any server any longer, you’ll need to change your IP address.
To get unbanned from a Discord server, using a reliable VPN service such as Private Internet Access can get a new IP address in no time.
However, it’s worth mentioning that using a VPN means that you’ll share the IP address with others.
Thus, you may be assigned an IP address that’s already banned. In this case, just choose another server and try connecting to Discord once again.
Let’s take a look at some of PIA’s most important features:
Over 10 years of experience in VPN services
Easy configuration and user-friendly interface
Trusted By Millions Of Satisfied Customers
100% Open source
Strict no-logs policy
Private Internet Access
Enjoy using Discord and get a dedicated IP address and total privacy with Private Internet Access.
If a moderator bans someone on Discord, this member can’t post on the server, see messages, send or get voice chats. Moreover, they won’t be able to see other users who are on the server from which they’ve been banned.
The person you’ve banned won’t get a notification. But when they try to enter the server, they’ll see a message that the link has expired.
Also, keep in mind that member violates the rules at any point, you can ban them anytime you need. Since these are IP-based bans, they won’t be able to use the server even if they make another account but still use the same IP address.
To simply do it, open the server on which you want to ban that person, right-click on his/her username, then click on the red Ban <username> button, as in the picture below.
It is important to remember that whether you’re using Discord on your computer or a smartphone, you’re allowed to unban any member.
Perhaps you’ve previously made a mistake, or they’ve apologized, which is why you decide to revoke a ban.
All things considered, if you just got banned from Discord, it’s not the end of the world. You’ll just have to take care of two things if you want back in: your IP address and your username.
A VPN is a quick, effective way to get a new IP address, but unfortunately, good VPNs don’t come for free. On the other hand, creating a new Discord account is both completely free and easy to do.
Last, but not least, you might want to try appealing the ban if sneaking back into a forbidden Discord server isn’t your cup of tea.
Windows 11, like the previous iterations, wants you to use a Microsoft account to sign in.
However, you can still create a local account on Windows 11, in case you are skeptical of a Microsoft account, like many others. Or, you may be sharing the system and want a dedicated account for everyone.
When creating a local account, you are bound to miss out on some of the features that are exclusive to a Microsoft account.
But, if you have made up your mind, there are a bunch of ways to create a new local account on Windows 11. Go through them all, identify the one that you are comfortable with, and get the job done.
Should I switch to a local account on Windows 11?
You will be missing out on a bunch of services that are exclusive to the Microsoft account, but on the other hand, it’s perfect, in case you want to use your PC as a standalone device.
The features that can only be accessed on a Microsoft account are paid purchases on the Microsoft Store, and the option to sync settings so as to access them from any other device when signed in using the same account, OneDrive, amongst others.
Although switching to a local account doesn’t offer the same set of features as a Microsoft account, it’s not such a bad idea either.
Creating a local account is beneficial from the point of view of security since it doesn’t allow tasks and programs to run with administrative privileges, thereby reducing the chances of harm due to viruses or malware.
Can I create a local account without a password?
Yes, you can create a local account without a password on Windows 11 and that’s one of the best parts about it.
If you are the only one using the PC, entering a password each time when logging in may seem like an unnecessary task. Creating a local account would be an ideal approach for such users.
How can I create a local account on Windows 11?
1. Create a local account via Settings
Press Windows + I to launch Settings.
Select Accounts from the tabs listed on the left.
Click on Family & other users on the right.
Click on Add account button next to Add other user.
Select I don’t have this person’s sign-in information.
Click on Add a user without a Microsoft account.
Enter the user name, password, and answer the three security questions (if you enter a password) in the respective fields, and click on Next to create the local account.
If you don’t want to create a password-protected local user account, leave the password field blank in the above step.
2. Use the netplwiz command to create a local account
Press Windows + R to launch the Run console, enter netplwiz in the text field and click on OK.
Click Add in the User Accounts window.
Select Sign in without a Microsoft account (not recommended).
Click on Local account button.
Enter a username and password (optional) for the new user account, and a hint, in case you set a password. Once done, click on Next.
Click on Finish to create the Local account.
The local account is now created and you can start using it right away.
3. Use Command Prompt
1. PressWindows+Xto launch theQuick Access/Power User menu.
2. Select Windows Terminal (Admin) from the options.
3. Click Yes on the UAC prompt.
4. In the command line tool, click on the downward-facing arrow at the top, and select Command Prompt.
5. Type or paste the following command and hit Enter (replace UserName and Password with the actual ones you want to use): net user <UserName> <Password> /add
6. After the account is created, close the command line tool.
A fast and easy method to create a local account on your Windows 11 device is to use your built-in command tool.
Through Command Prompt, you can set up a local account with or without a password in just a few lines.
Can I change the account type from Standard to Administrator?
Administrator accounts offer a lot more options and permissions to users and allow advanced troubleshooting.
However, whether to set up a local account as an Administrator is purely a personal choice based on your requirements.
If Windows 11 is not allowing local accounts, make sure you have administrative privileges. If the machine is owned by an organization, this might be prevented by a local policy.
These are all the ways you can create a local account on Windows 11. While the first two are relatively time-consuming methods, they are often preferred by users not acquainted with Command Prompt.
Now, with a proper understanding of each method, choose the one that suits you best.
Hyper-V is built-in hardware virtualization software for Windows 11 Enterprise, Pro, and Education editions. With that virtualization application, you can set up and run virtual machines with different platforms.
For example, you can try out Linux platforms, such as Ubuntu, within Hyper-V. Consequently, Hyper-V doesn’t start when that error arises.
What does Hyper-V do on my Windows PC?
Hyper-V separates each Virtual Machine within the same physical machine, which allows multiple users to access various systems independently on the same hardware.
This type of isolation guarantees that even if one virtual machine crashes, it doesn’t impact other workloads running on the same physical machine.
What does the Virtual Machine Management missing error mean?
If you get the error The Virtual Machine Management is not present on this machine, this message is suggesting you make sure that the feature is fully enabled. You can do that by applying the resolutions below.
The Virtual Machine Management is not present on this machine. Ensure that the Hyper-V Services feature is enabled.
However, Hyper-V doesn’t always run as expected for some users. One error message that pops up for some users when they try to launch Hyper-V states:
Consequently, Hyper-V doesn’t start when that error arises. If you get the error The Virtual Machine Management is not present on this machine, this message is suggesting you make sure that the feature is fully enabled. You can do that by applying the resolutions below.
Check if virtualization is enabled in Windows 10/11
First, check that virtualization is enabled on your PC. You have to enable virtualization on your desktop or laptop to utilize Hyper-V and any other virtual machine software.
Now, check that virtual machine technology is enabled for your PC as follows.
First, click the magnifying glass taskbar icon for the search tool.
Enter Task Manager within the text box, and open it.
Select the Performance tab shown directly below. The virtual machine detail there will be either yes (enabled) or no (not enabled).
If the virtual machine is not enabled, you’ll need to enable virtualization via your PC’s BIOS (Basic Input Output Settings).
The first resolution within our Hyper-V and containers features are not enabled error article provides further details for how you can enable virtualization via the BIOS.
How can I fix the Virtual Machine Management is missing error in Windows 10/11?
1. Make sure all Hyper-V features are installed
1. Press the taskbar’s magnifying glass button.
2. Enter Windows features in the search box.
3. Select Turn Windows features on or off to open the window in the snapshot directly below.
4. Click the + sign for the Hyper-V feature there.
5. Then make sure all the Hyper-V checkboxes (for platform and management tools) are selected there.
6. Press the OK button to install any missing Hyper-V features.
The first thing you should do if you’re getting the Virtual Machine Management Service is Missing error is check whether you have all the Hyper-V features installed.
If one or multiple features are not installed, Hyper-V cannot properly function. Therefore, it is important to ensure they are installed, and if they are not, perform a manual installation.
2. Check whether Hyper-V services are enabled and running
Right-click the taskbar’s Start button and select Run.
Type this text in the Open box and thereafter click OK: services.msc
Then double-click all the Hyper-V services shown directly below to open their properties windows.
If any Hyper-V services are disabled, select Manual on their Start-up type drop-down menus.
Press the Start buttons for Hyper-V services that aren’t running.
Click Apply to save new service settings.
Select OK to close their windows.
Thereafter, try launching Hyper-V again.
3. Enable Hyper-V via the Command Prompt
Bring up the search utility with the Windows key + S hotkey.
Enter cmd in the search tool’s text box.
Click Run as administrator for the Command Prompt search result.
Type in this command within the Prompt’s window and press Enter: DISM /Online /Enable-Feature /All /FeatureName:Microsoft-Hyper-V
Wait for enabling feature process to reach 100 percent.
Press the Start button.
Finally, select the Power and Restart options.
4. Uninstall third-party virtualization software
Press the Windows key + X at the same time, and select Run on the menu.
To open Programs and Features, input the following text in Run and click OK: appwiz.cpl
Select any third-party virtualization software installed on your PC.
Click the Uninstall option for the selected software.
Select Yes on software removal confirmation prompts.
Restart Windows 11 after uninstalling the third-party virtualization software.
You can uninstall software and erase all leftover residual files with third-party uninstaller tools like IOBit Uninstaller.
IOBit Uninstaller includes additional options for erasing leftover files and registry keys left behind by uninstalled software.
5. Reinstall Hyper-V
First, open Windows Features as outlined within the first three steps of resolution one.
Deselect the primary Hyper-V checkbox and all other Hyper-V ones selected.
Click the OK button.
Select Power > Restart on the Start menu after uninstalling Hyper-V.2
Thereafter, open Windows features again.
Select all the Hyper-V feature checkboxes.
Click OK to save and reinstall the selected features.
If prompted to do so, restart Windows again.
What are the best alternatives to Hyper-V?
You don’t necessarily need to fix and utilize Hyper-V to try out different platforms in Windows 11 with virtual machines. There are some notable third-party virtual machine applications available for Windows PCs. Our Virtualization software to run different OS guide tells you more about them.
VMware Workstation Player 16 and VirtualBox are perhaps the two most notable freely available virtualization applications. VirtualBox supports an especially wide range of guest platforms. Certainly, both are user-friendly virtual machine software packages that are compatible with Windows 11.
However, give all the potential fixes for Hyper-V’s Virtual Machine Management not present error above a try first before considering alternative software. Likewise, installing missing Hyper-V features or enabling and running certain services for it will fix that issue.
You can also get further troubleshooting guidance from Microsoft’s Hyper-V support forum. Click the Ask a question button on that forum to set up a TechNet profile and add a post about the issue there. Furthermore, that forum’s Microsoft agents and wider community might be able to provide other fixes.
We hope you can fix the Virtual Machine Management is not present error with the potential resolutions above. Lastly, if you have any questions about fixing that error, feel free to add them to the comments section below.
Are you an HP user getting the error No boot disk detected when you boot up your PC? There is no reason to worry; we’ve got the right solutions for you.
Some Windows users reported that when they boot up their HP computer, they see the error message No boot disk detected or the disk has failed.
What causes the No boot disk detected error?
This error occurs because, during the process of booting up a computer, the system checks the HDD for boot information and other Operating System information so as to utilize the information to boot up the system.
However, if the HP computer is unable to retrieve any not boot information or Operating System details on the HDD, the error message is displayed on the screen. Another variation of the error message that may appear is the requested system device cannot be found.
The reason for the boot information retrieval failure is largely connected to the HP computer/laptop which includes:
Incorrect boot order settings
Missing operating system from the HDD
Hard Disk failure
Loose Hard disk connection to PC
Corrupt Boot Configuration Data (BCD)
Meanwhile, we are going to show you efficient solutions that are applicable in solving the hp error no boot disk detected problem.
How can I fix the error No boot disk detected or the disk has failed?
1. Set the boot disk at the top of the computer’s boot order in BIOS
One of the reasons for the no boot disk detected or the disk has failed error message is because the HDD/ boot disk is not at the top of the boot order.
The system retrieves boot information and OS details by following a boot order; the boot order consists of the sequence of sources that the computer searches in order retrieve valid information.
However, if the HDD/boot disk is not at the top of the boot order, the computer tries to boot from another source which results in the error message.
If you intend to set the boot disk i.e. HDD at the top of the boot order in BIOS (Basic Input/Output System), follow these steps:
1. Power up your computer.
2. Press the F1 key or any specified key to enter the BIOS (other keys such as F1, F12 or Delete may be used, depending on your HP system).
3. Locate your computer’s boot order under BIOSBoot.
4. Select the HDD/SSD i.e. the boot disk and move it upward using the arrow key.
5. Save the changes by following the screen prompts and exiting the BIOS.
6. After you exit the BIOS, your PC will restart, and will be devoid of the error problem.
However, if the HDD i.e. the boot disk is at the top of the boot order in the BIOS, you can proceed to the next method.
Another reason for the computer’s inability to boot up is because the HDD is in a failed state which triggers the error ‘No boot disk detected or the disk has failed’.
You can detach the HDD from your PC; connect it to another PC to access the files and folders on the PC so as to check if the HDD is accessible.
However, if you are unable to access the contents of the HDD, you definitely need a replacement. You can return the HDD back to your manufacturer-HP if the PC still has a warranty or purchase a new HDD from your HP eCommerce website, Amazon, or from your local computer shop.
However, we highly recommended that you can carry out the replacement with a professional – computer engineer.
Meanwhile, when you replace the HDD with a new one, ensure you install a new Windows OS on it.
Keep your new HDD healthy by using one of these perfect HDD cleaner tools.
3. Perform a clean installation of the Windows OS
Another way of fixing this error problem is to perform a clean install of Windows OS on your PC.
However, this method will clear all pre-installed apps, files, and folders but it will solve the boot error problem regardless of this.
The Operating System or boot information on your HDD may have been wiped out intentionally or due to virus attacks on your PC.
Sometimes, the laptop may wobble resulting in a loosened state of the PC-to-HDD connections.
The wires connecting the HDD to the system and vice versa might have been unfastened which causes the ‘no boot disk detected or the disk has failed’ error message.
Follow these steps to check the connections and fix the problem:
Power off your computer and remove the battery. Open up your computer’s casing afterward.
Detach the HDD from your computer
Clean all the ports and wirings linking the HDD to the computer and vice versa.
Now, reconnect the HDD to the computer. (Ensure that all the connections are fastened tightly.
Hence, attach the battery and power up your computer.
However, if you do not have the tools and required practical knowledge involved in using this method; it is advisable that you consult a computer technician or computer engineer to help you out.
5. Run Automatic Repair/Start Repair
You can also fix the boot error problem by performing automatic repair/start repair on your system by using Windows bootable installation DVD. Here’s how to do this:
Insert Windows 10 bootable installation DVD and restart your PC afterward.
Press any key to boot from CD or DVD when prompted to continue.
Select your language preferences, and click “Next”.
Click Repair your computer in the bottom-left.
In the “choose an option” screen, Click Troubleshoot > Click Advanced option > Automatic Repair or Startup Repair. Then, wait for the Windows Automatic/Startup Repairs to be complete.
Alternatively, if Method 5 did not solve the HP error no boot disk was detected or the disk has failed, you can run CHKDSK on your PC to fix the problem.
Also, the steps are similar to Method 5 above, although, it requires utilizing command codes. Here’s how to do this:
Boot from Windows bootable installation DVD.
When prompted, press any key to boot from CD or DVD.
Select your language preferences, and click Next.
Now, click on Repair your computer.
Hence, click on Troubleshoot > Advanced options > Command Prompt.
Hence, type CHKDSK C: /F without quotes in the Command Prompt.
Then type CHKDSK C: /R without quotes in the Command Prompt and hit Enter key.
After the CHKDSK process, restart your PC.
In conclusion, any of the methods listed above should be able to help you fix the HP error no boot disk detected or the disk has failed’, the choice is yours to make.
However, if you can afford to purchase a new HDD, you can try Method 2 or Method 3 to perform Windows clean install.
If you have any problems trying out any of the fixes we mentioned, please let us know by commenting below.
Many users want to know how to turn on the phone without a Power button and Volume button, and in this guide, we’re going to show you a few tricks that might work for you.
How can I turn on the phone without a Power button and volume button?
Before trying anything else, try pressing the Power button several times, you might need to use a bit more pressure.
1. Connect a charger to your Android phone
Connect the phone to the charger.
Leave it charging.
If the battery is empty, charging the phone might boot it.
2. Use the Volume keys
Press and hold the Volume up and Volume down buttons.
While holding the buttons, connect the phone to your PC with a USB cable.
Further, if your device ID doesn’t show up in Step 7, it either means that USB debugging is disabled on your smartphone or you don’t have the required drivers.
How can I restart the Android phone using the Volume and Power buttons?
Press the key combination to access the smartphone’s boot menu.
In the boot menu, select the Reboot system now option.
The key combinations to enter the boot menu varies between Android models.
To navigate options in the boot menu, use your up and down volume keys, and select them using the power button.
On hitting the power button with the Reboot system now option highlighted, your Android will automatically restart.
We hope that you succeeded in turning on your Android phone by reading our article. Before you leave, you might be interested in our guide on how to recharge the phone while the laptop is in Sleep Mode. Let us know in the comments section below if you have any questions.
Every time Microsoft makes a design upgrade in Windows, there are people that prefer the old way because of different reasons.
One example is the new File Explorer in Windows 11 that substitutes the ribbon with a new command bar, unlike Windows 10.
Nowadays, it seems that every fresh UI design detail that Microsoft comes with for Windows 11 immediately gets rejected by the user community, under the pretext that they liked things better on Windows 10.
Can I get the classic File Explorer ribbon menu back in Windows 11?
Luckily, there still are some tips and tricks that some of the more tech-savvy users know how to use in order to revert some UI elements back to how they looked on the previous operating system like the File Explorer Ribbon on Windows 11.
Anything can be achieved, as long as you know where to look.
If you are one of the users that greatly appreciate the old style of doing things, as well as the old system layout, know that you can revert to the File Explorer ribbon from Windows 10, and here’s how you do it.
How do I restore the old File Explorer ribbon menu on Windows 11?
1. Manually edit the Registry
1. Click the search icon on your taskbar and type Registry Editor, then click the first result.
2. Navigate to the following registry key: Computer\HKEY_LOCAL_MACHINE\SOFTWARE\Microsoft\Windows\CurrentVersion\Shell Extensions
3. Right-click the Shell Extensions folder on the left side and select New > Key.
4. Name the new key Blocked.
5. Open the Blocked registry key and create a new string value by right-clicking any free space in the main panel and selecting New > String Value.
6. Name the string value {e2bf9676-5f8f-435c-97eb-11607a5bedf7}.
7. Restart your PC to apply changes.
The process of getting the old File Explorer ribbon only requires a few moments of your time and it’s achievable without having a thorough knowledge of how computers actually work.
A simple Registry tweak will get you the desired result within a few clicks. However, you should know that performing Registry modifications is risky and should be done carefully, as to not cause any damage to your PC.
To return to default File Explorer in Windows 11, open Registry Editor and delete the Blocked key you created, close the editor, and then restart your PC.
2. Via Control Panel (only works on versions prior to build 71)
Access the Control Panel app on your Windows 11 device.
Select Appearance and Personalization.
Click on File Explorer Options.
Check the tiny box next to the text that says Launch folder windows in a separate process, found under the View tab. Once you’ve done this, click on Apply and you are good to go.
If you followed these steps correctly, the end result should look something like this:
NOTE
After you install the Cumulative Update for Windows 11 (10.0.22000.71), this tweak won’t work anymore.
If, however, at some point you get bored with this look and want to switch to the Windows 11 version, simply follow the same steps and untick the little box you ticked in order to make this happen.
Which one of the ribbons do you prefer for your File Explorer? The old Windows 10 one, or the new and improved Windows 11 version? Let us know in the comments section below.
FFXIV, short for Final Fantasy XIV, is an MMORPG released by Square Enix in 2010. Although it’s been released a decade ago, the game still has a strong player base.
More so considering that, unlike other similar games, FFXIV is subscription-based. There’s a $12.99 monthly fee you’ll need to pay if you want to enjoy the game.
However, you can enjoy a free trial if you just want to take the game for a spin. The downside is that you’ll only be able to play your character up until level 35 using the trial.
FFXIV, like many other online games and/or services, faces the same technical challenges. The ones regarding connectivity, to be more precise.
Therefore, you’ll still encounter high ping, jitter, and even the dreaded packet loss from time to time while playing FFXIV.
Why do I keep losing connection in FFXIV?
If you are disconnected during play or logged out due to an unstable connection, go to the World status page to see how your World is doing. This is the first step in determining if there is a problem with the servers, or from your end.
The reason you may have disconnection issues on our end is entirely dependent on the type of connection you’re using, as well as the quality of the hardware from the ISP’s distributing node in your area to the wiring in your home.
Another type of disconnect that should be mentioned is a routing issue. That is, your connection is fine, but data is lost somewhere between you and Yoshi P, meaning your ISP throttles your bandwidth and sets limits on your connection.
This is more common, but also much more difficult to resolve because you may need to stop ISP throttling by yourself or wait for a few days for routing tables to be updated.
Is FF14 getting DDoSed?
FFXIV was recently subjected to DDoS attacks on their servers, specifically the North American in-game locations, and all servers were taken offline for security reasons.
The FFXIV DDoS attack is especially frustrating for players who are in the middle of completing content. Those who were progressing in a difficult raid or at a critical point in the story would have encountered a sudden server crash.
If you are a victim of DDoS attacks, you may find yourself in the following situations:
▶FFXIV sending receiving 0 ▶FFXIV constant packet loss ▶FFXIV random packet loss ▶FFXIV ps4 packet loss ▶FFXIV connection poor ▶FFXIV lagging but internet is fine ▶FFXIV rubberbanding ▶FFXIV high receiving ping ▶FFXIV ping request timed out
To be clear, the game is still playable, but be wary of it happening again until Square Enix resolves the issue, or you could use DDoS protection software to avoid data leaks and other privacy concerns.
What is packet loss in FFXIV and how to test it?
Packet loss is generally the same, no matter where you encounter it. It occurs whenever you send or receive data packets, but some of them never make it to their destination point.
As a result, a desync occurs between you and the server, or between you and the other players. Packet loss usually comes and goes, that’s why most of the time you won’t even notice it.
However, if it’s rather severe, you’ll start to notice massive slowdowns, rubberbanding, little to no responsiveness, and even disconnections if you’re unfortunate enough.
Note that most of the time, packet loss is caused by network congestion and you simply can’t do anything to avoid or fix it other than waiting it out.
Choose a fast server (we recommend testing the Europe servers) and connect to it.
Run the test again or launch FFXIV.
Check if the packet loss issue still persists.
With 3,000+ servers in 94 countries worldwide, ExpressVPN has excellent global server coverage. These servers not only provide access to FFXIV servers that may be located outside of your region, but they also unblock other geo-blocked local content, such as streaming services and gaming servers.
ExpressVPN’s servers all offer 256-bit AES military-grade encryption, kill switch protection, and a split tunneling feature. Broad router compatibility can be used to safeguard all of your connected devices (including your PlayStation).
In order for the VPN fix to work, packet loss must occur somewhere on your ISP’s side of the connection. For instance, if it throttles your bandwidth, or has improper network routing.
But even if it can’t solve your packet loss situation, investing in a VPN is a power move, especially if you’re concerned about your online privacy and the security of your connection.
I’m playing from the EU without a tunnel and have no latency issues with any content. In the context of this game, 90ms is excellent. To be honest, you’re unlikely to find anything better.
ISPs appear to prefer routing traffic between South America and North America through Europe for some reason. This isn’t unique to FFXIV. We have seen this issue with a connection to Amazon’s data center in Sao Paulo.
Unfortunately, unless you use a VPN, you may be better off using any other data center than a North American data center.
Is WTFast good for FFXIV?
You can use WTFast because you know there will be some routing issues in the future with FFXIV. When the ping is very low, but you occasionally get terrible lag that makes the game unplayable.
Programs like WTFast are good for FFXIV, but how well they work for each individual is likely to vary. In terms of ping reduction, WTFast reduced pings in our tests from around 55-60 to around 42-46.
WTFast mostly used to prevent packet loss, but it does not protect you against DDoS attacks in the same way that ExpressVPN does, that means natively.
Tip
Visit our Gaming Hub if you want to read more awesome guides, reviews, and news.
To sum it up more often than not packet loss in FFXIV comes and goes, as it’s likely caused by network congestion. However, if you notice a pattern in its occurrence, maybe stepping in is not such a bad idea.
Try using a VPN, since it’s been proven that it can help improve packet loss. However, this quick and easy fix will only work if the packet loss occurs on your ISP’s side of the connection.
If you want to access every FFXIV server in the world (bypass geo-restrictions), check out our best VPNs for FFXIV.
If the VPN fix doesn’t work, you can always try getting your hands dirty with some manual troubleshooting. Even if it doesn’t solve packet loss 100%, it’s still healthy practice to keep your network in top shape.
Windows 11 password sign-in options missing or not working properly is a fairly common error. Biometrics and PIN usually work fine, but if you’re facing issues with password sign-in, it’s often due to misconfigured settings or system glitches.
To fix this, you may need to adjust your sign-in settings, set up automatic sign-in, update your OS, or perform a system restore. Below, you’ll find detailed steps for these and other solutions.
What can I do if Windows 11 sign-in options aren’t working?
1. Change the sign-in options settings
Press Windows + I to launch the Settings app.
Select the Accounts tab from the ones listed in the navigation pane on the left.
Next, click on Sign-in options on the right.
Disable the toggle for the option For improved security, only allow Windows Hello sign-in for Microsoft accounts on this device (Recommended) under Additional settings.
Now, restart the computer and check if you are able to sign in with your account password.
With the option For improved security, only allow Windows Hello sign-in for Microsoft accounts on this device (Recommended) enabled, you wouldn’t be able to sign in with your account password.
Disabling the setting should resolve the sign-in options not working in Windows 11 error.
2. Set up automatic sign-in
Press the Windows key + R to start Run, type netplwiz and press Enter or click OK.
Now uncheck the box writing Users must enter a username and password to use this computer.
After you click Apply, you will require to enter the password once again to validate the change.
Enter create a restore point in the text field at the top and click on the relevant search result that appears.
Click on the System Restore button.
Click on Next to proceed, in case the restore points are not appearing here.
Select the desired restore point from the list and click on Next. The date of creation for each restore point will be mentioned so as to make an informed selection.
Verify the restore settings and click on Finish to start the process. The system will restart during restore, hence it’s recommended that you save the open files to avoid data loss.
5. Create a new user account
Press Windows + I to launch Settings.
Click on Accounts from the tabs listed on the left.
Next, click on Family & other users on the right.
Click on the Add account button next to Add other user.
Now, enter the login credentials for the new Microsoft account that you want to use. In case you want to use the computer as a stand-alone device, creating a local account would be a good approach.
You also have the option to fix the corrupted account, but it would take time. Although the guide linked is for Windows 10, the methods listed there are effective in Windows 11 too.
You can easily change the login password from the sign-in options settings. Here’s how you can do that:
Press Windows + I to launch the Settings app.
Select the Accounts tab from the left.
Next, click on Sign-in options from the right pane.
Select the Password option and click on the Change button.
Now, verify it’s you through the selected sign-in option, if prompted.
Enter your old and new passwords in the respective text fields and click on Next.
Click on Finish to complete the process.
This solution will also fix Windows 11 not accepting password problem. The system recovery solution above will also work.
What can I do if there’s no sign-in screen in Windows 11?
If the sign-in screen doesn’t appear, try these quick fixes: restart Windows Explorer using Task Manager, check that your display settings aren’t set to a secondary or disconnected monitor, and boot into Safe Mode to troubleshoot. You can also try disconnecting external devices or performing a system reboot.
For more detailed solutions like repairing system files or resetting Windows settings, see this full guide on how to fix the login screen not appearing issue.
Wrapping up
That’s all there is to sign-in problems in Windows 11 and the most relevant solutions to eliminate them. In case the problem persists even after executing all the steps listed here, restore Windows 11 to its factory settings.
Microsoft implemented many features in Windows to help it perform faster and in an advanced way. It allows users to configure their computers to their preferences.
Unfortunately, Windows is not perfect, and users complain about several concerns they encounter. The Windows stuck on applying Group Policy is an error common to the Windows 10/11 computers.
Furthermore, Group Policy is a Windows feature that controls users’ and computers’ working environments. It contains advanced settings that help network administrators to manage the working environment of accounts in Active Directory.
There are varieties of this issue like applying software installation policy stuck. It can occur in different Group Policy practices. Many things can be responsible for this difficulty. We’ll discuss the causes and how to fix the issue.
Why does Group Policy take so long?
Network issues: Group Policy can take a while or get stuck while applying if your network connection isn’t working. Often, unstable and slow connections to the internet can impede the process. Also, a cable network connection can reduce your network speed and strength. Hence, it can result in please wait for the Group Policy client, which can take forever to load.
Boot errors: Several computer components can develop faults if there is an issue with the booting. It affects how the computer interacts with its parts and can cause Windows 10/11 to be stuck on applying Group Policy.
Issues with Group Policy services: Whenever there is a concern about the Group Policy service on your computer, it can make it difficult to run smoothly. However, numerous things can go wrong with the Group Policy service also.
Outdated Windows: Users need to keep their computers up to date to ensure that it doesn’t lack the necessary patches and updates. However, the Windows server stuck applying group policy can occur due to outdated Windows. Most times, users ignore how detrimental outdated Windows can be. But, it can result in many difficulties.
How do I fix Windows stuck on applying Group Policy error?
1. Check your network connection
Performing a power cycle on the router is a way to fix the Windows stuck on applying Group Policy error. It helps the router fix any issues with it and improve the network connection to your computer.
Likewise, we recommend you switch to a wireless network connection if you use a cable.
2. Restart the computer
Click on Start.
Select Power and click on Restart.
Click on OK.
Another way is to press and hold the power button on your computer for 10-15 seconds to force restart it. Restarting your computer will fix boot errors that might cause difficulties.
Press the Windows + Rkeys simultaneously to open Run.
Type in services, then press Enter.
Navigate to the Group Policy Client and right-click on Services.
Select Properties and change the Startup type to Automatic.
Click on Start, then Apply.
Click OK to save the changes.
Restart the computer and see if the issue persists.
4. Run a GP update
Right-click on the Start button.
Click on Command prompt (Admin) to prompt the CMD window.
Run the following command and wait while it processes: gpupdate/force
Afterward, restart your computer to check if Windows is still stuck on applying Group Policy.
5. Update Windows
Click on Start.
Select Settings from the options.
Click on Windows Update, then select Check for updates.
Windows will automatically search and download updates if there are any available. Updating Windows is a general fix for most issues users encounter on their computers.
How do I speed up Group Policy processing?
Improving the performance and speed of the Group Policy on your computer can be achieved by limiting the number of GPOs (Group Policy Objects).
However, having a small number of Group Policy Objects to process on startup will speed up the Group Policy processing.
Many Windows 10 users, while working on their laptops, are accidentally touching the laptop’s touchpad, thus making the mouse cursor move.
By following the tutorial below you can learn how to turn off the touchpad and also from where you can activate it again if you ever want to switch from the classical mouse to the touchpad again in Windows.
Follow the installation wizard to install it on your system.
After the installation is complete an icon will appear in your system tray. This program will disable your touchpad but only when it detects typing on the keyboard..
3. Disable the touchpad via Device Manager
Right-click on the Start Button and select Device Manager.
Expand the Human Interface Devices list.
Find the touchpad driver (note the name might be different on your device).
Right-click on the device and select Disable device.
4. Turn off the touchpad from Windows Settings
1. Press the Windows + I keyboard shortcut.
2. The Windows Settings menu will open on the screen.
3. Navigate to the Devices tab.
4. Go to Touchpad.
5. Here there is a switch that turns the touchpad on and off. Toggle the feature off. Alternatively, you can also untick the box below to automatically turn it off when a mouse is connected.
Another easy method you can use to disable the touchpad involves modifying your Settings via Windows Settings.
There is a built-in menu on your Windows 10 device that allows you to configure your touchpad’s settings however you like.
You can also encounter some issues with your touchpad random freeze or touchpad simply not working. This is not a problem as there are lots of fixes on the internet and we have some as well. Just check our fix guide for the touchpad freezes problem or for touchpad not working issues.
You have above four quick methods to turn off the laptop’s touchpad in a Windows operating system environment. For any questions on these methods don’t hesitate to write us below in the comment section of the page.
Many users reported that Discord keeps freezing and that problem is usually caused by key bindings that overlap with the ones in other apps. Other causes include running the app in Compatibility mode or because hardware acceleration is enabled.
What can I do if Discord is freezing on authenticating?
1. Disable key binds
Open the Start menu.
Type Discord and open it.
Click on Settings.
Search for Keybinds and select it.
A list will appear, and you will see a red cross on each key bind.
To delete the key bind, click the red cross icon.
Repeat this for all key binds and check if this resolves after deleting the key binds.
Key binds are associations between a physical key on a keyboard and a parameter. Unfortunately, they can sometimes cause Discord to keep freezing.
This can quickly be resolved by deleting the key binds, so follow the steps above.
2. Turn off the Compatibility mode
Right-click on the Discord app, then choose Properties.
Click on the Compatibility tab.
Disable Run this program in compatibility mode for option.
Click on Apply, then on OK.
Now, re-run the Discord app and see if the issue is fixed or not.
If Discord keeps freezing, the issue might be related to Compatibility mode. To fix the problem, try disabling the Compatibility mode for Discord.
Our presented steps didn’t work? We also suggest checking the Run this program in compatibility mode for option and choosing a different Windows version.
3. Disable the Hardware Acceleration
Open the Start menu.
Type Discord, then open the app.
Then, click on Settings from the bottom of the window.
Choose Appearance.
Click on Advanced.
Turn off the Hardware Acceleration.
Press OK.
Hardware acceleration is the use of PC hardware to perform some functions more efficiently than in software running on a more general-purpose CPU.
Turning off the Hardware Acceleration can also help if Discord keeps freezing. So, follow these steps to disable the Hardware Acceleration on the app.
After careful research, we have listed all the common causes that make your PC freeze randomly.
Insufficient RAM.
High CPU temperature due to extensive usage.
Corrupt system files.
Presence of virus or malware.
Faulty hard disk.
You haven’t installed the latest Windows OS version.
Installed drivers are not up to date.
Corrupt temporary files.
Faulty operating system.
While all these are popular reasons your PC would freeze randomly, we have a dedicated guide that lists some practical solutions that will help you randomly fix the PC freezing problem.
What are the most popular Discord problems?
At the end of this article, we consider properly presenting a series of Discord errors that might occur during your gaming experience.
It is essential to be aware of any potential glitches, so make sure you read the following information carefully.
Unable to use share-screen – Some users reported this as one of the most irritating issues. If Discord screen share is not working, do not hesitate to discover our dedicated fix guide.
Not able to search – The app might also have problems in this way. We suggest checking some valuable solutions to find what you can do in case the Discord search is not working.
Unable to communicate efficiently with your teammates – This one means that Discord audio keeps cutting out. Fortunately, we prepared a list of fixing options.
Of course, there are many other examples of Discord errors, but we ensured to deliver only the most popular ones.
These are just a few solutions that might help if Discord keeps freezing on your PC. Please let us know if you found our suggestions helpful in the comments section below.
It is no longer a secret that the latest Microsoft OS came up with some great features.
After conducting a series of research, we found out that some of you are extremely interested in how to change icons in Windows 11. And this guide will show you some easy options to do it.
Before anything else, keep in mind that you can perform this process for various pieces, such as folders, shortcuts, or pinned apps.
But first, let’s take a look at some notable advantages of customizing Windows 11 icons.
Why are icons important?
Icons are often used to explain certain features, as you can visually represent each of them. They help you to better understand each part of your OS and also facilitate the visual separation of the contained elements.
Windows 11 brings up icons set by default and they may sometimes be too generic or simply bland. When you change the icon of an app according to your own preferences might spice things up a bit, by creating a more personalized digital environment.
In these terms, icons help to optimize your navigation and also reduce considerably your work time.
How can I change an app’s icon in Windows 11?
1. Change Folders icons
1. Right-click on the folder you need, then select Properties.
2. Click on the Customize tab, then choose to Change icon.
3. Now, you’ll see a list of icons that can be used for the folder. There are some basic ones that can be used, but you can also browse your PC for custom ones.
4. Choose an icon, then click on OK.
5. Press on the Apply and OK buttons in the Properties window to save the changes.
6. Refresh the folder’s location to apply the changes. The folder should now have the desired icon.
The most commonly changed icons are those that belong to folders. Changing a folder’s icon helps users personalize it and find it more easily on their PC when they look for it.
That being said, you can change the folders’ icons via the Properties window on Windows 11, by right-clicking on them. You can choose a new default icon or browse for a custom one.
Right-click on the shortcut you need, then select Properties.
Select the Shortcut tab, then choose to Change icon….
Click on the prefered icon, then click on OK.
In the Properties window, click again on OK.
3. Personalize Desktop icons
Hit the Windowskey, then navigate to the Settingsmenu.
Click on Personalization, then on Themes.
Under the Related settings section, click on Desktop icons settings.
Select the needed Desktop icon, then choose to Change icon…
Choose the model that you like the most, then click on OK.
Desktop icons are probably some of the most seen during daily work. To build a more personalized environment and to have an ideal first view, changing their icons is undoubtedly a great idea.
If the Desktop icon settings option isn’t available (as in the above example), make sure your Windows license is activated, then check for the operating system’s latest updates, and reboot your PC.
4. Change Pinned Taskbar Programs icons
Look at your taskbar, right-click on the desired pinned program, then right-click again on its name, and choose Properties.
Now the process will be pretty similar to what we presented on shortcuts case.
So, click on the Shortcuts tab, then choose to Change icon….
Select the most wanted one, then click on OK.
Also, click on OK in the Properties window.
Pinned programs are usually the most used ones, which simplify your daily work. In these terms, instead of searching for them, you should change their icons to more recognizable items.
Windows 11 allows you to use a limited number of icons. However, it seems like many of you may want to add custom icons. And don’t worry about that, the process is pretty simple.
You’ll need to download first the desired PNG icons from the web, then convert them to ICO format.
After getting the new ICO model, transfer the files to a separate folder. Make sure you don’t move them around since it can cause trouble locating them for Windows.
Once you have the required images in ICO format placed in a designated folder, you can start changing the icons.
Note that the process is similar to the ones presented before. However, instead of choosing one from the list of options, you’ll have to browse and choose the ICO file.
How can I select custom icons?
But let’s take a closer look at the actual procedure:
Right-click on the needed folder, then select Properties.
Navigate to the Customize tab, then choose to Change Icon….
Click on the Browse… button.
Go to the folder where you stored the ICO files, then select the one you want to set, and click on Open.
For this one, you’ll first need an ICO file. Now move it to a designated folder and ensure that you don’t change the location of the folder or the file, since you would need the path for the ICO image file.
Go to the file’s location, click on the file, then choose to See more (marked as three horizontal dots), and select the Copy path option.
Use the following keyboard shortcut: Windows + R.
Type regedit, then click on OK.
Navigate to the following location: HKEY_LOCAL_MACHINE\SOFTWARE\Microsoft\Windows\CurrentVersion\Explorer\DriveIcons
From the left window pane, search for DriverIcons, then right click on it, and select New and Key.
Now right-click on the key you just created, hover the cursor over New and select again Key.
Name this key as DefaultIcon.
Open it, then double-click on Default.
Paste the path of the ICO file you earlier copied in the text field under Value data, and click on OK. Make sure you add the path between double quotes (“).
As you can see, Microsoft producers did a great job related to workplace customization. However, to improve your personal design, we also recommend taking a look at how to change font size in Windows 11.
Today’s article listed only the easiest solutions to changes the icons of an app in Windows 11. So, make sure you’ll definitely get a more personalized digital environment by using them.
Because your opinion is important to us, do not hesitate to share it by leaving a comment in the section below.
If you are a gamer, this is an exciting article for you. More so if you are a fan of the Xbox and PC gaming. We will share all you need about the Xbox Accessories app.
This is about the most relevant app you should have on your computer if you have or need to use an Xbox controller on your PC.
You may modify your headset and controller to operate as you want them to with the help of the Xbox Accessories app, which will improve the gameplay experience.
How do you install it and get it connected? Well, that is what we will be exploring.
Do you need Xbox accessories app?
Are you wondering if you need the app? Well, we will help you make up your mind by showing you all that is accomplished with the app.
First, when used in conjunction with the Xbox Adaptive Controller, an Xbox Elite Wireless Controller, or the Xbox Wireless Controller, the Xbox Accessories app expands your options for gameplay.
You may build and update controller profiles by switching triggers and sticks, remapping buttons, and adjusting controller vibration.
The software enables Copilot mode, which lets you use two distinct game controllers like they were one and allows you to upgrade the controller’s firmware.
Also, you may store numerous profiles on an Xbox Adaptive Controller or an Xbox Elite Wireless Controller so you can utilize them anytime for gameplay.
Furthermore, on the Xbox Elite Wireless Controller, you can change the sensitivity curves for the thumbstick, change the mapping for the paddles and bumpers, and adjust the vibration intensity.
This program lets players who use the Xbox Adaptive Controller or the Elite Series 2 switch thumbsticks’ Y and X axes and set Shift inputs.
The Xbox Elite Wireless Controller gives you an advantage in your best games, and you can even change the Xbox button’s brightness.
Lastly, you may personalize your controller’s name and keep up to 256 distinct settings within the program.
How do I download & install the Xbox Accessories app?
1. Download and install the Xbox Accessories app
Visit the Xbox Accessories official link on your internet browser.
Click on Get in Store app.
On the popup, click on Open Microsoft Store.
Click on the Install button.
Lastly, give it a few minutes for the Xbox Accessories app installation to complete.
2. How do I use the Xbox Accessories app on a PC?
Make sure that your controller is plugged in. For example, you may have to push the little Xbox button at the top of the controller.
Click on the Start menu, type in Xbox accessories, and click the app.
Click on Next to begin the configuration.
On the Optimize for your screen, click on Next again.
In the More ways to customize window, click Next.
Click Next in the subsequent two windows that display.
Now click Next in the Let’s begin screen, input your profile name and select the Save button.
Click on Update Required if prompted to.
On the Before we start window, click Continue (make sure you have your controller plugged correctly in).
Once the update is completed, click on Configure.
Finally, now you will have the choice to copy your controller profiles. If you want to do this, click the Copy button; if not, Click the No thanks button.
Choosing the No thanks option means that the controller would be automatically set up, and if you click Copy, you simply copy your profile from the left pane, and you are done.
Today we’ll show you how to download and install the Mantra RD service on your Windows 11. Further, we’ll also help you troubleshoot it in case it’s not working.
Let’s get right to it.
How can I download and install Mantra RD on my PC?
Type mantra rd service in the Google search box and click on the first result from the Mantratecapp domain.
In the new window, type the captcha in the box, then tap Submit.
Click on Download MFS100 RD Service (1.0.4) andDownload MFS100 Driver (9.2.0.0)– Win 7/8/10, respectively and wait for the download to finish.
Now, navigate to the download folder and double-click on MantraRDService_1.0.4.
In the setup window, click on Next.
On the next page, tap Install and let the process complete.
Then click on Finish.
For installing the driver, go to the download folder again, and this time double-click on MFS100Driver_9.2.0.0.
On this window, tap Install.
After the installation is completed, tap Finish.
Now a blue window will pop up, which lets you test the application. To do so, click on Start Capture and put your finger on the sensor, and wait for the recognition process to be completed.
During this time, you can see the pattern of your finger in the right pane and check its quality score under it. If the recognition process goes well, a new window appears, which shows this message: Capture Success, Finger data is saved at application path.
First, ensure you have installed the appropriate Mantra RD service driver for the device. If not, the uninstalled driver is unquestionably the cause of the issue.
However, if you receive a message stating Serial Number Corrupted, it indicates that the device is damaged.
In this case, you need to contact the person from whom the device has been purchased. You can send the device for repair or replacement.
If you encounter a problem where the device is attached to the system but not showing up in the Device Manager or not working in the app; in this case, you should ensure that the USB host is open for the device.
It is also possible that the device’s USB plug or USB port is damaged, and because of that, the system is not able to detect the device.
Conclusion
MFS100 is based on optical sensing technology and can be used for authentication, identification, and verification functions that let your fingerprint act like a digital password that cannot be lost, forgotten, or stolen.
The robust optical sensor can withstand scratches, impacts, shocks, and electrostatic shocks without being damaged.
This high-tech device can store images, Raw Data, and minutiae of the fingerprint captured for ISO standards fast matching speed: 1:100,000 within a second.
In the comments section below, let us know if you were able to download and Install Mantra RD Service on Windows 11.
We store all sorts of files and folders on our PCs, but sometimes specific files and directories can become corrupted and unreadable.
Indeed you’ve encountered the problem of corrupted and unreadable files or directories at some point, and nothing is more frustrating than not being able to access them, especially if you’re in serious need.
But there are some valuable tips to remember when you run into this unpleasant situation, so don’t lose hope.
This can be a big problem for users, but there’s a way to fix a corrupted and unreadable file or directory on Windows 10. Before we dig in, let’s see some specific situations and examples where you might encounter this issue.
What does it mean when it says the file or directory is corrupted and unreadable?
The error message File or directory is corrupted, and unreadable is a type of error might be considered essential. This occurs when malicious software causes damaged files, affecting your file system.
All programs may have a damaged file that can no longer fulfill its function. Thus, this type of file is called corrupt.
Why is the folder corrupted?
This problem can occur for a number of reasons, including recurring ones:
System crashes – These can be caused by hardware or software problems, and their occurrence can lead to file corruption.
Update errors – The frequency of update errors is a fairly common thing among users and they can lead not only to corrupt files but also to BSoD errors.
Power outages – Unfortunately, these problems can cause many issues to your OS, especially as they happen without warning signs.
Corrupted directories can be a problem since they won’t allow you to access your files. Speaking of corrupted directories, users reported the following issues:
The file or directory is corrupted and unreadable folder – According to users, sometimes they might encounter this message while trying to access certain directories. This can lead to errors such as ERROR_HANDLE_EOF. If you have issues reading files or folders, be sure to try some of our solutions.
Repair corrupt folders – Even if you have damaged folders on your PC, you might be able to repair them and recover your files. There are many third-party tools that can help you with that, so be sure to check them out.
The file or directory is corrupted and unreadable in the C drive, please run the chkdsk utility – In some cases, you’ll get an error message asking you to run the chkdsk utility on your C drive. We explained in detail how to run chkdsk in this guide, so be sure to check it out.
Fix/Repair corrupted directory external hard drive – Sometimes files can get corrupted on external hard drives as well. In some cases, you might be able to recover your files with third-party tools; but usually, the best option is to run a chkdsk scan. If everything fails, you might have to format your drive.
How can I fix the corrupted folder on Windows 10?
1. Use the chkdsk tool
Tap the Windows key, enter cmd, and open the Command Prompt result as an administrator.
Type the following command, press Enter, and be sure to replace X with the letter that matches your hard drive partition: chkdsk /f X:
Wait while chkdsk scans your hard drive partition.
According to users, one way to fix problems with corrupted directories is to use the chkdsk tool. Chkdsk is a command line tool that repairs any folder, scans the specific hard drivepartition, and fixes corrupted files or folders.
After the scan completes, the issue should be resolved entirely.
We must mention that a few users reported that the chkdsk command deleted files from their partition without warning, so be sure to back up any important files just in case.
2. Keep reconnecting your external storage device
Using an external storage device is a great way to free some space on your hard drive and keep your important files backed up.
Unfortunately, users reported that this issue occurs on their external storage devices. According to users, one of the simplest ways to fix this problem is to keep reconnecting your external hard drive.
After you reconnect your drive a couple of times, Windows 10 will notify you of an issue with the industry and ask you for permission to repair it.
The repair process should take about 30 seconds, and the issue should be resolved after the process is completed.
If you’re still having issues with corrupt directories on your PC, you might want to try using recovery software to restore your files.
We have to mention that these tools can give you varying results, depending on the amount of corruption.
If you’re looking for good file recovery software, we strongly recommend the professional tool Stellar Data Recovery, which quickly recovers files from corrupted directories.
3. Format your external storage device
Make sure that the external storage device is connected to your PC.
Right-click the Start icon and choose Disk Management from the menu.
When the Disk Management window opens, locate the Unallocated space section, right-click it and choose New Sample volume. Select the correct partition on your external hard drive to avoid file loss.
New Simple Volume Wizard will now open. Click Next.
Select the volume size, and click Next.
Select Assign the following drive letter option, and choose the desired letter.
Now select the format options, and click Next.
Click the Finish button to complete the process.
Users reported an error message regarding a corrupted directory while trying to access their external storage device.
One way to fix this problem is to partition and format the drive by following the above steps.
If the drive is partitioned, you must format it from This PC. To do that, follow these steps:
Open This PC and locate your external storage device. Right-click it, and choose Format.
When the Format window opens, enter the Volume label, choose File system type, and click the Start button to start the formatting process.
Wait until the drive is formatted.
After the drive is formatted, you’ll be able to access your external storage device without any problems. However, remember that formatting will delete all files from your external storage device.
4. Check the health of your hard drive
Corrupted directories can be a sign of a damaged hard drive, and if you want to ensure that your hard drive is healthy and working correctly, you should check its health.
If your hard drive fails, you should consider replacing your hard drive and backing up your files.
Many third-party applications can help you with that, and if you need a tool that can clone your hard drive to a new one, you should consider using a professional one.
In case you’re unfamiliar, Safe Mode is a segment of Windows that runs with default applications and settings, so it’s perfect for troubleshooting.
Once you enter Safe Mode, try reaccessing the problematic directory.
6. Create a new user profile
Press Windows + I to open the Settings app, then navigate to the Accounts section.
Now select Family & other people from the menu on the left. Then, select Add someone else to this PC in the right pane.
Select I don’t have this person’s sign-in information.
Now choose to Add a user without a Microsoft account.
Enter the desired username, and click Next.
If you’re having problems with corrupted directories, the issue might be related to your user profile. For example, if your user profile is corrupted, you might not be able to access specific directories.
However, you can always circumvent this issue simply by creating a new user account. After that, switch to a recent version and check if the problem persists.
If you can access all directories without issues, it means that a corrupted account was causing the problem.
Since there’s no way to repair a corrupted account, you’ll need to move your files to a new account and start using it as your main one.
How can I fix the corrupted and unreadable file or directory on Windows 11?
Open File Explorer by pressing Windows + E, then go to the hard drive with the error.
Right-click it and select Properties.
Go to Tools, then click Check to scan the hard drive and fix any errors.
How do you check if a folder is corrupted?
In Windows-based operating systems, the CHKDSK (check disk) system tool or utility performs a scan of your hard drive to look for problems with the file system.
To maintain proper computer hygiene, you should regularly run the CHKDSK tool to check for and fix faults on your hard drive and keep your system data organized. We showed you how to use it in the first solution, so check it out.
How to prevent file or directory corruption
Repairing a corrupted directory on Windows 10 can be a complicated process, but if you encounter a problem with a corrupted guide, be sure to try one of our solutions above.
But if you want to prevent this issue from occurring in the future so that you don’t have to go through the same process every time, then there are some things to consider:
➡ Protect your PC against cyber threats
Malware plays a defining role in file corruption problems, although its primary purpose is to corrupt your entire operating system, not just one file.
Microsoft Defender is a reliable ally against malware and viruses that can attack your PC, but often hacker innovations outpace it.
Choose an antivirus solution that fits your needs, and use it with utmost confidence to save your work and protect your PC.
➡ Check your hard-drive
Regarding resilience over time, HDDs are more vulnerable and require extra attention from users who want to maintain their PCs at optimal standards.
Bad sectors are common problems on your hard drive, often leading to corrupted files or directories and affecting your entire system.
To ensure that you keep your HDD healthy, you should periodically perform a defragmentation or chkdsk command, which is within reach of any simple user.
To perform HDD defragmentation in Windows 10, just follow the steps below:
Click on the Search button on your taskbar, and type defrag.
Select Defragment and Optimize Drives.
Choose the drive you want to optimize.
Click Optimize to initiate the process.
You will see that the Current status section has changed.
➡ Other useful tips
Make sure you do not delete any file without inquiring about its nature and whether it may affect the system.
Shut down and restart your PC using the standard environment provided by your PC, not just the physical power button.
Never interrupt the system processes you are performing.
Sometimes when your PC is damaged, it becomes impossible to open specific files. A safe solution would be opening files or directories in Safe Mode or creating a new user profile.
You may have encountered vertical lines on your computer screen, running from the top to the bottom of your display, either blue, white, or multi-colored.
This may create a lot of anxiety, especially when you fear that your PC may be crashing.
To fix this problem and the horizontal lines on 144hz monitor one and more, we prepared a list of possible solutions that should come in handy. Make sure to check them out below.
What causes vertical lines on my monitor?
If the monitor displays lines even when not linked to cables or other input methods, the issue is most likely caused by the monitor itself.
In some cases, image problems, such as lines, can be brought on by faulty internal ribbon connections or the LCD panel itself. You may have blacklight bleed if you notice light leaking around the borders of your computer monitor.
Suppose the lines disappear while your external display is not receiving any input. In that case, you may have a problem with the connection between your computer and the external monitor or an issue with your computer’s graphics drivers, driver settings, or image settings.
Why do vertical lines appear on the laptop screen?
Many users reported green lines on Windows laptops, and your drivers frequently cause this issue, so make sure you update them often.
This is a common problem; horizontal lines on laptop screens have been reported on both Lenovo and Acer devices.
Right-click the Start icon, then select Device Manager.
Expand theDisplay adapters folder, right-click your graphics card, and select Update driver.
Restartyour PC. The vertical lines on the monitor caused by your graphics card will be gone afterward.
Note: You may need to know the name of your video card, for instance, if it is NVIDIA, AMD, or Intel, because then you’d have to download directly from the website of either of these.
3. Downgrade the video card driver to an older version
Right-click the Start icon, then select Device Manager.
Expand the Display adapters section, right-click the graphics driver, and select Properties.
Navigate to the Driver tab, then click Roll back driver if you have the option enabled. If you have a single vertical line on your laptop screen, it will no longer be an issue after this.
Press Windows and enter control. Next, select Control Panel from the result list.
Click View by on the right corner and select Large icons.
Choose Troubleshooting.
Go to the left pane and click View All.
Select Display Quality.
Type in a password for admin, or give permissions when prompted. Then, the vertical lines on the computer screen problem will be solved.
5. Check whether the vertical lines appear in the BIOS
Shut down your PC, but keep the power cable connected.
Turn it on again.
Press F10 repeatedly.
If you get to the BIOS settings and the lines are still displaying, it may be a hardware failure. In this situation, perform a hard or forced reset, then a BIOS update.
Remember not to interrupt the process as it might cause more damage that’s harder to fix. If updating BIOS seems scary, you can make things way more accessible with the help of our tech experts. For example, the vertical lines on the Lenovo laptop screen issue will be fixed afterward.
If you don’t get any vertical lines displayed in the BIOS, it is a software-related issue, such as outdated drivers. In this case, you need to update the display drivers by following:
Right-click the Start icon, then select Device Manager.
Expand the Display adapters folder, right-click the graphics driver, and select Update driver.
Exit Safe Mode.
6. Perform a clean boot
Type msconfig in the Windows search box and press Enter.
Find the Services tab, and check the Hide all Microsoft services box. ClickDisable all.
Go to the Startup tab, then click Open Task Manager.
Select any startup program you think might be interfering, then choose Disable.
Close Task Manager, click OK in the System Configuration window and reboot your PC. The vertical lines on the computer screen issue will be fixed.
Performing a clean boot for your computer reduces software-related conflicts that can bring up the root causes of the Startup repair incompatibility with your operating system.
These conflicts can be caused by applications and services that typically start up and run in the background when you start Windows.
If you can’t open Task Manager, we’ve got the right solution for you. After all these steps are carefully followed, you will have a clean boot environment, after which you can try booting your computer again.
How do I know if my monitor is broken?
The failure of the backlight is the primary cause of dimming in LCDs and LEDs. On the other hand, dimming happens primarily in CRT monitors when the element cathode tube ray ceases to operate.
If your monitor takes a long time to load, then it is another indication that your monitor is getting close to the end of its useful life. In addition, it is most likely an indication of an internal problem that may ultimately result in the LCD’s failure.
In the long term, some pixels become defective and refuse to display the picture in contrast. As a result, the screen will show blank pixels where those pixels formerly were. These pixels are either considered dead or corrupted, depending on their state.
Did any of these solutions fix the single vertical line on the monitor issue? Let us know by dropping your comment in the section below.
Windows Defender is still, in the eyes of many, a very reliable solution when it comes to cybersecurity needs, so it’s no wonder that so many people still use it.
However, that doesn’t mean that this software won’t sometimes backfire, which is why you came to the right place to get something like that fixed.
Yesterday, many users have reported that Windows Defender had notified them about a Win32/Hive.ZY virus on their PCs.
However, there’s no need to become anxious, as there is nobody trying to access your data. Microsoft has confirmed that a bug was causing the issue, and has already fixed it.
Defender started showing sever infection notifications
Many Windows users woke up yesterday to a pile of notifications from Windows Defender, which is the default antivirus in the Windows OS.
The software had actually alerted them that it had detected malware on their system. Let’s just say that is not what you want to see on your monitor.
This so-called virus was identified as Win32/Hive.ZY. As you imagined, this caused panic among users who didn’t know how their computers got infected.
According to what affected users had to say about this, Windows Defender displayed a notification that said that the threat had been removed from the device.
From the available screenshots, we can see that the malware was described as a dangerous program that executes commands from an attacker.
And, you should also know that Win32/Hive.ZY is actually listed on Microsoft Security Intelligence’s threat database as a generic detection.
Keep in mind that, although the antivirus immediately quarantined the threat, the same notification would reappear after about a minute or two.
These alarmingnotifications caused further confusion among users, who began scanning their computers using third-party tools such as Malwarebytes Anti-Malware.
Furthermore, some of the affected users mentioned they had noticed that the problem seemed to have occurred only when they tried to run specific apps such as Chrome, Edge, Spotify, and Discord.
What puzzled users to the brink of insanity was the fact that closing these apps caused the notifications to stop.
Also important to remember is that these applications have something in common, and that is that they are all based on Chromium or Electron.
Microsoft confirms this was only a Dender bug
Through Microsoft’s Discord community, the Redmond tech giant has explained that the Win32/Hive.ZY is nothing to get worried about.
In fact, this false positive issue originated in the Security Intelligence Update for Microsoft Defender Antivirus, which was KB2267602 (Version 1.373.1508.0).
Know that the virus definition update in question was rolled out to users yesterday, and a bug in the database was incorrectly flagging Chromium-based apps as malware.
Yes, Microsoft has already issued a fix for the false positive detection, and has advised users to update to the latest definitions. Please note that version: 1.373.1537.0 and above fixes this issue.
If by any chance, you are still experiencing the issue, you can download the latest virus definitions directly from Microsoft’s website, and install them manually.
Just to save some time, we have the download links for you right here:
Microsoft Advertising, previously Bing ads, is introducing five additional ad products and updates to its suite of tools, among them Pinterest Import, Performance Max beta, Multimedia Ads support in Editor, Cruise, Tours and Activities ads, and finally Subdomains in Dynamic Search Ads (DSAs).
First up is Pinterest Import which will let advertisers bring their campaigns, ads, and assets from Pinterest Ads to Microsoft Audience Network. “The advanced import option allows you to customize your campaigns for Microsoft Advertising and make changes to bids, budgets, and other settings”.
However, advertisers will not be able to import audiences as well. Instead, advertisers are encouraged to make use of Microsoft’s Audience Network Planner which will assist them to reach out to the target audience.
Secondly, advertisers can now replicate their efforts across all platforms using Google Ad’s Performance Max campaigns. This tool is however still in closed beta, therefore, interested parties will need to contact their account admins to sign up for it. Google Performance Max campaigns can be imported by advertisers to serve as Smart Shopping Campaigns and Local Inventory Ads in Microsoft.
Thirdly, Microsoft Advertising now comes with enhanced support for Multimedia Ads in Microsoft Advertising Editor which in turn allows users to improve the performance of their campaigns. Microsoft Advertising Editor is now widely available though support for the Microsoft Audience Network is still in pilot.
Automotive ads were launched last month, and now both Cruise Ads and Tours and Activities Ads have reached general availability.
And finally, users can easily “add subdomains like mysite.contoso.com in addition to your top-level domains like contoso.com” since subdomains in DSA are now generally available. This will make it easier for advertisers to import their domains and at the same time assert precision. Be sure to check if Subdomains in DSAs are currently available in your market. Remember you have 5 additional months to transition to Responsive Search Ads as the deadline has been pushed to February 1, 2023
IPTV is one of the best ways to watch live TV and movies on your PC, smartphone, or tablet. But sometimes, you may find that your ISP is blocking IPTV websites. Vodafone Germany is one of the leading mobile phone companies in Europe and is also a major player in the IPTV market.
One of the biggest problems with this provider is that it sometimes blocks IPTV services. It’s not uncommon for ISPs (Internet Service Providers) to block certain websites and services, especially when they’re not allowed by law.
If the issue is geo-restriction, we have an expert article on how you can bypass geo-blocking and access such sites.
How do I check if my ISP is blocking streaming?
If you want to ascertain that your ISP is blocking you from streaming your favorite sites, you can use one of the below methods:
Use a VPN – Simply connect to a VPN server in another country and visit the websites. If it works, then it means that your ISP is blocking streaming.
Test your internet speeds – Running a speed test and comparing previous results will give you an idea of whether your bandwidth has been capped. You can use a speed tester which will show you both upload and download speeds. If one is being throttled, you’ll be able to tell.
Use another connection – If you have an alternative connection, try connecting to it and observe. This can be done by connecting to a public Wi-Fi hotspot or by connecting through a mobile phone network.
Once you have discovered your streaming is being blocked, proceed to the following solutions to bypass it.
How do I stop Vodafone Germany from blocking IPTV?
1. Use a VPN
A VPN is the best way to unblock blocked programs and we have an expert list of VPNs for streaming in Germany. It allows you to hide your real location and make it seem as if you are somewhere else in the world.
The reason why so many people use VPNs is that they make it easy for people who live in places where there are strict censorship laws. If you’re trying to watch IPTV from anywhere else in the world, they can also be extremely helpful.
By using a VPN, anyone can appear as if they’re located someplace else and unblock any content that is otherwise inaccessible due to their physical location or government regulations.
We recommend Express VPN because it has an instant setup and it is very easy to use. It is also a very fast, secure, and anonymous software.
Follow these steps as a quick guide:
Firstly, go to the ExpressVPN website and click on download.
After that, click on the setup and install the application on your computer.
Then, run the VPN and click on Choose Location button.
Check the Recommended option and select a country compatible with IPTV.
Enjoy watching IPTV without any problems.
ExpressVPN is a great option thanks to its strong security and its remarkable speed that remains consistent on both short-distance and long-distance connections.
ExpressVPN
An extremely safe VPN service with a large network server that helps you enable any content without any effort.
If you want to unblock IPTV services in Vodafone Germany, you can try using a proxy server. It allows you to bypass any restrictions imposed by your ISP or government.
However, keep in mind that some websites may block proxies too so it’s worth testing before buying a subscription for your favorite provider.
If Vodafone Germany is still blocking your IPTV, you can switch to an alternative browser preferably one with an integrated VPN service such as Opera.
You may also come across a similar issue where Rogers is blocking a website but we have covered various fixes to bypass this problem.
Don’t hesitate to share any additional solutions that may have worked for you that we have not mentioned here. Let us know in the comments section below.