Solved: ATTEMPTED_SWITCH_FROM_DPC Error on Windows 11

The ATTEMPTED_SWITCH_FROM_DPC error occurs when a faulty component of Windows 11 or a black screen, triggers an event that initiates the OS to shut down forcibly.

It can pop up with multiple faces and interrupt your work at any moment. Though the error may look complicated at first, we’re here to help you comprehend the issue and fix it.

What does attempted switch from DPC mean?

The DPC stands for Delayed/Deferred Procedure Call and is a mechanism used by devices and applications on your computer to perform tasks without waiting for a response from the operating system.

The attempted switch from DPC error in Windows 11 occurs when an application tries to switch between threads, but the process isn’t ready yet or waiting for data that hasn’t arrived yet.

How do I fix the ATTEMPTED_SWITCH_FROM_DPC BSoD in Windows 11?

Start off with the following basic workarounds before any advanced troubleshooting:

1. Run DISM and SFC scans

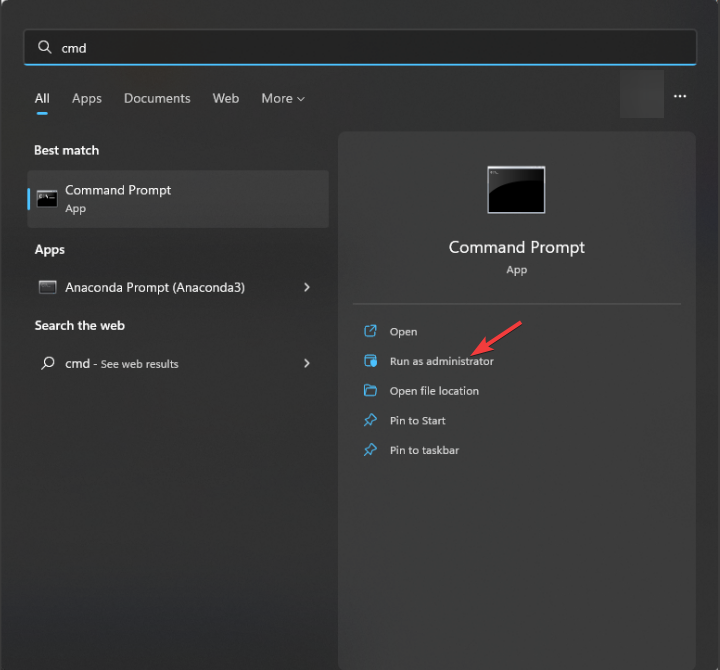
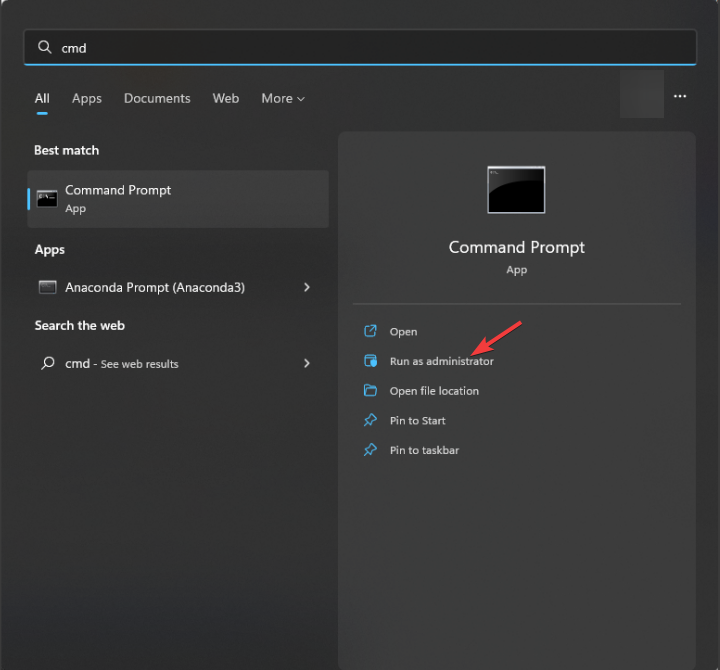
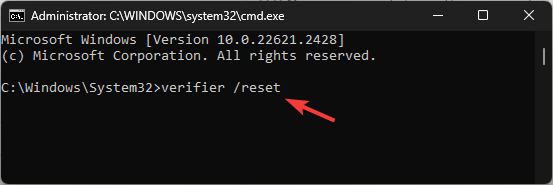
  1. Hit the Start Menu icon, type cmd in the search bar, and click Run as administrator.cmd-run-admin-w11 unexpected kernel mode trap windows 11
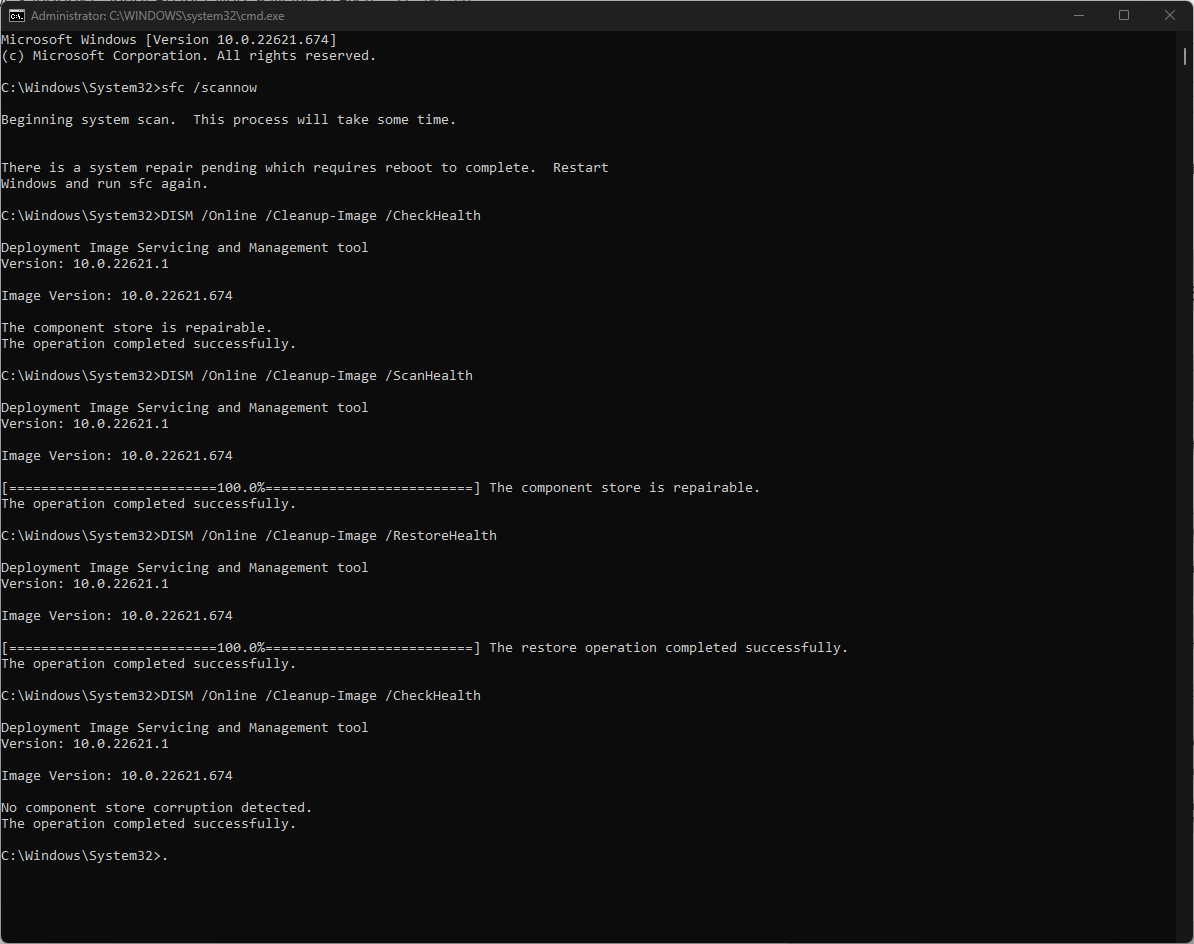
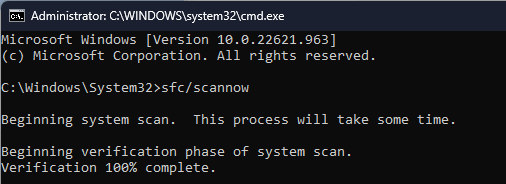
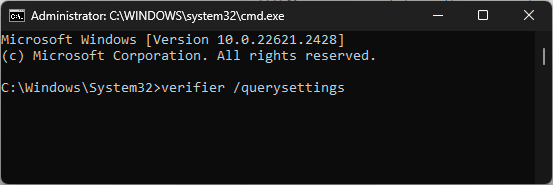
  2. Type the following commands and press Enter after each one:DISM.exe /Online /Cleanup-Image /Restorehealth sfc /scannow

Another solution would be to use professional system repair tools. This software will greatly simplify your work and repair your system with just a few clicks.

2. Rollback previous Windows update

  1. Press the Win + I keys to open the Settings menu.
  2. Click on Windows Update on the left pane.
  3. Select Update history on the right.
  4. Under Related settings, select Uninstall updates.
  5. Choose the recently installed update and hit the Uninstall button.
  6. Follow the on-screen prompts.
  7. Restart your PC and see if it helps.

The system service exception error on Windows 11 also occurs due to faulty Windows Updates, so try downloading the update from the Microsoft Catalog if this doesn’t work.

3. Scan for viruses

  1. Press the Windows key, search Windows Security, and click Open.

  2. Select Virus & threat protection.
  3. Next, press Quick scan under Current threats.

  4. If you don’t find any threats, proceed to perform a full scan by clicking on Scan options just below Quick scan.Scan options
  5. Click on Full scan, then Scan now to perform a deep scan of your PC.Full Scan Scan Now
  6. Wait for the process to finish and restart your system.

4. Update your GPU drivers

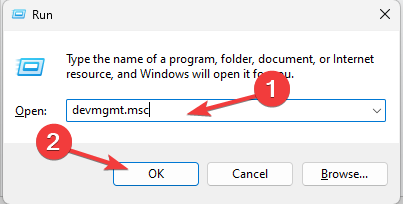
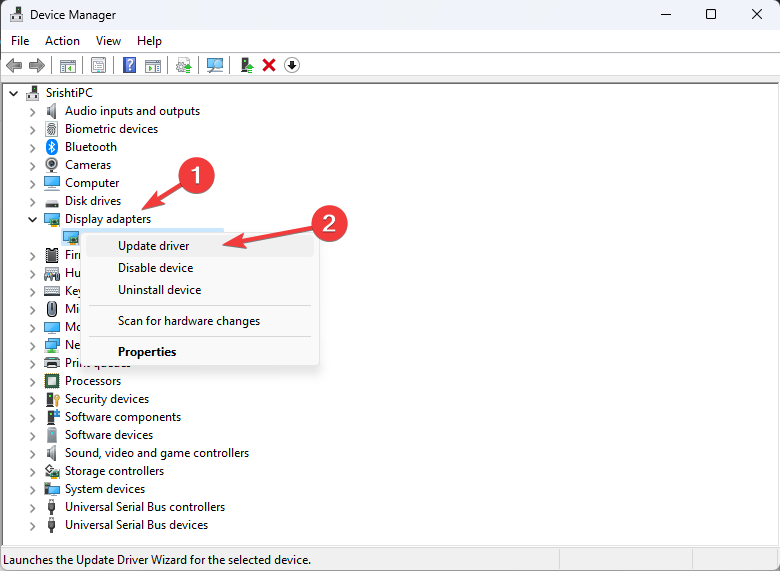
  1. Click the Search icon, type Device Manager in the search bar, and click Open.device manager w11
  2. Navigate to Display adapters to expand, right-click on your graphics card, and select Update driver.Graphic Driver Update
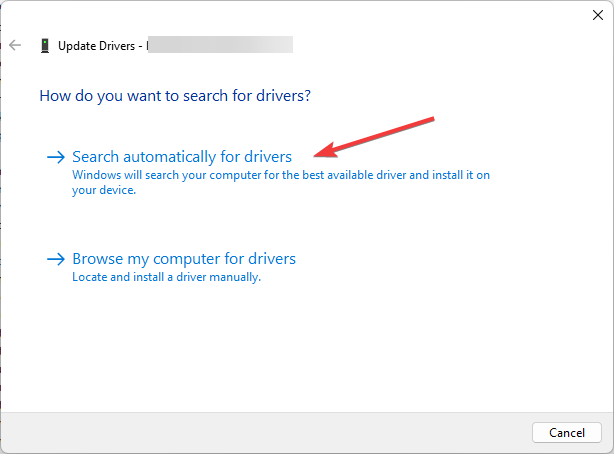
  3. Select Search automatically for drivers.

Ensure to do the same for your Chipset and Bluetooth drivers as well.

5. Reinstall your GPU drivers

  1. Click the Search icon, type Device Manager in the search bar, and click Open.device manager w11
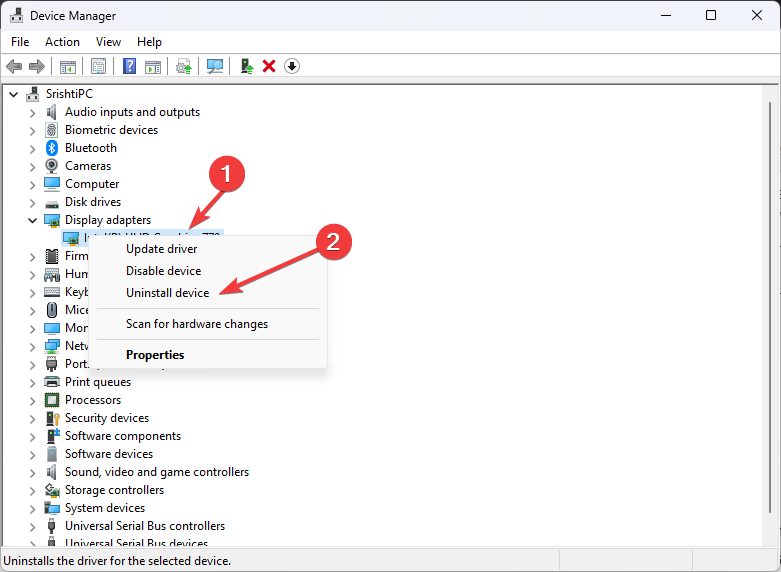
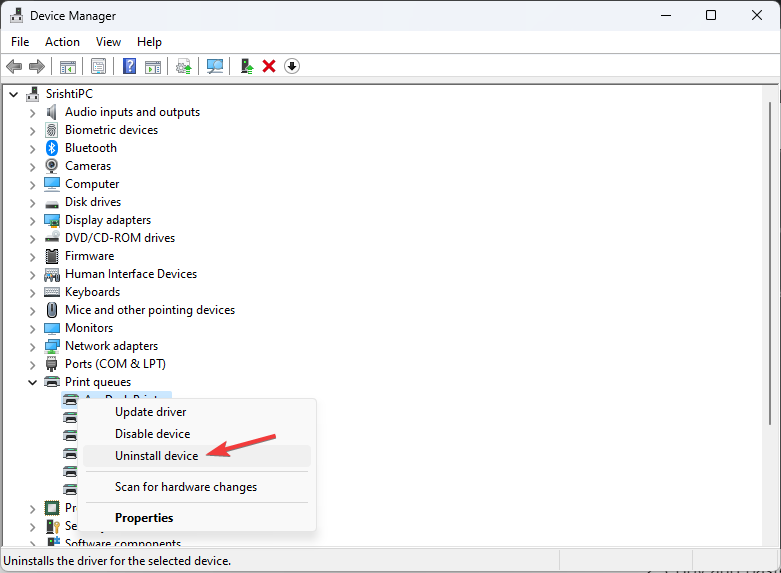
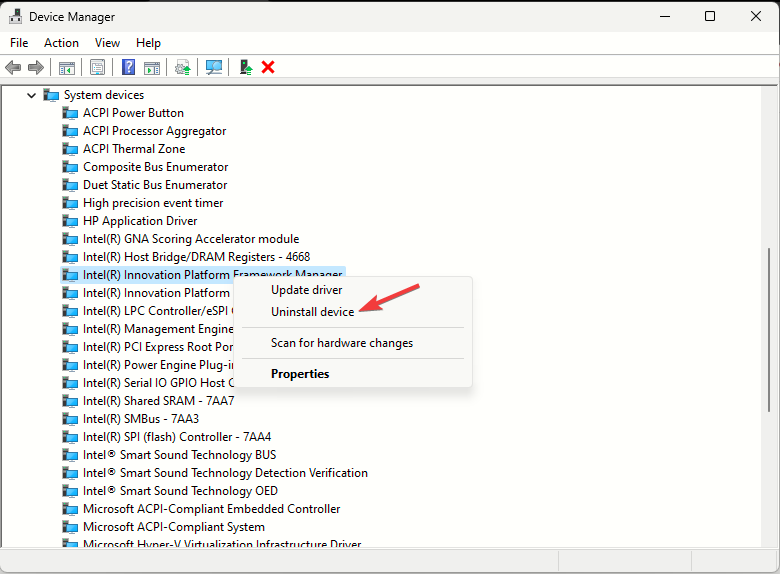
  2. Navigate to Display adapters to expand, right-click on your graphics card and select Uninstall device.Uninstall graphics driver dcom error 1084
  3. Confirm uninstallation in the next prompt. Uninstall graphics driver
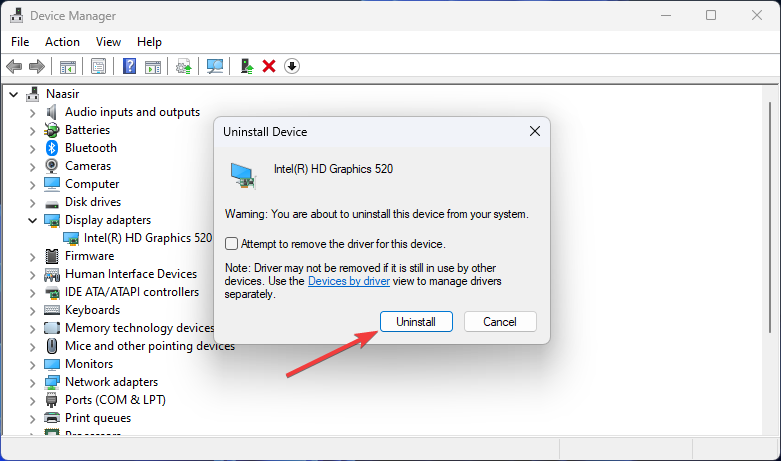
  4. Restart your PC and the drivers will automatically be installed.

6. Clean install your GPU drivers

  1. Before you download and install the NVIDIA drivers, ensure you close all unnecessary background processes, disable an overzealous antivirus/firewall, and disable any overclocking software.
  2. Navigate to your browser and download the corresponding NVIDIA driver for your OS.
  3. Locate the installation file, right-click on it, and select Run as administrator.
  4. Click Yes if the UAC prompt pops up and leave the default storage path as suggested.
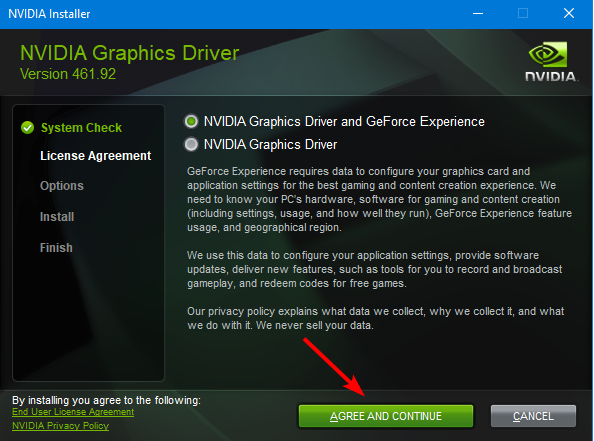
  5. Agree to the terms and conditions.
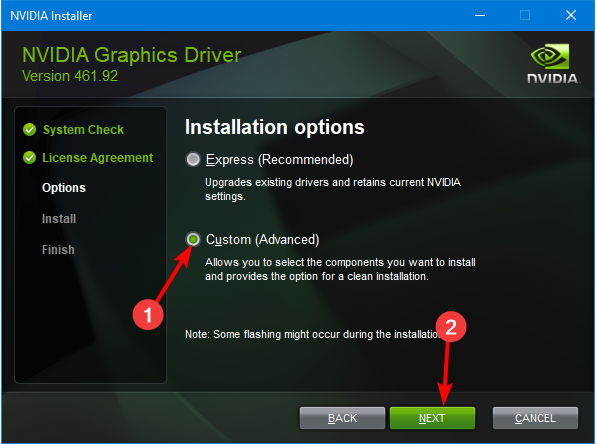
  6. In the next window, select Custom (Advanced) install, then hit Next.
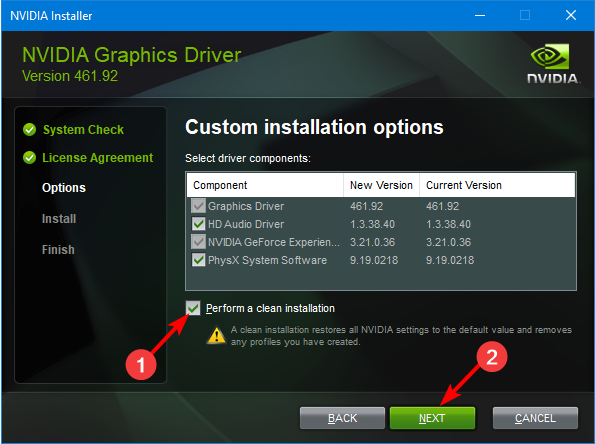
  7. Check the Perform a clean installation box then hit Next.
  8. Wait for the installation to finish, then restart your PC.

Users with an NVIDIA GPU noted the nvlddmkm.sys driver made an appearance and was a major cause of the issue. Installing the drivers afresh will ensure any compatibility issues previously brought about by automatic updates are taken care of.

7. Perform clean boot

  1. Hit the Windows key, type msconfig, and open System Configuration.

  2. Switch to the Services tab and select Hide all Microsoft services.

  3. Click on the Disable all button, then hit the Apply button to save the changes.

  4. Go back and click on the Startup tab, select Open Task Manager then click OK.

  5. In the Startup tab of the Task Manager, Disable all the Enabled startup items.

  6. Close Task Manager and restart your PC.

8. Perform a System Restore

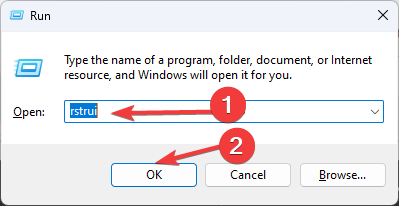
  1. Press the Windows key, type Control Panel, and click Open.control-panel-search fallout new vegas runtime error
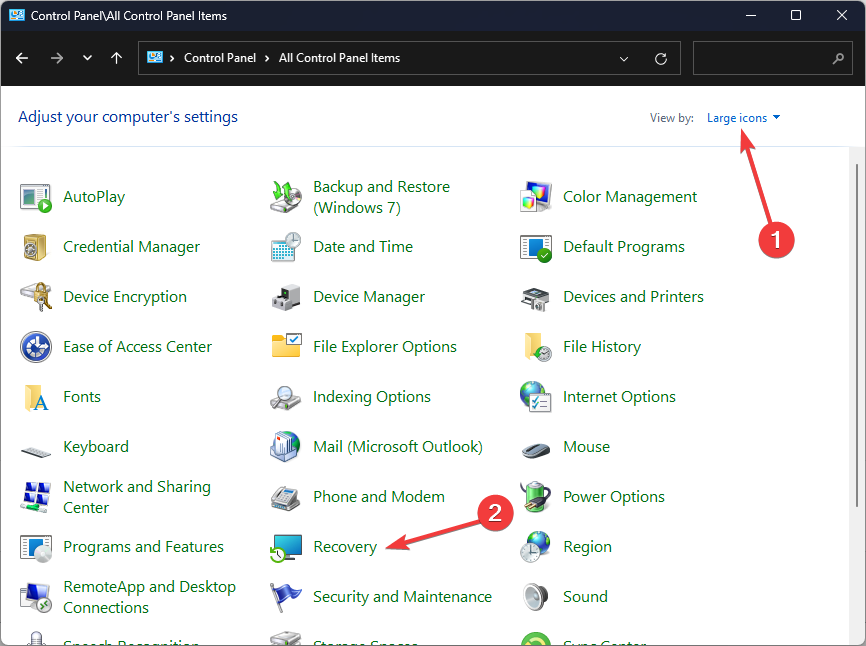
  2. Select Large icons as View by and click Recovery.Recovery Control Panel Advrcntr6.dll
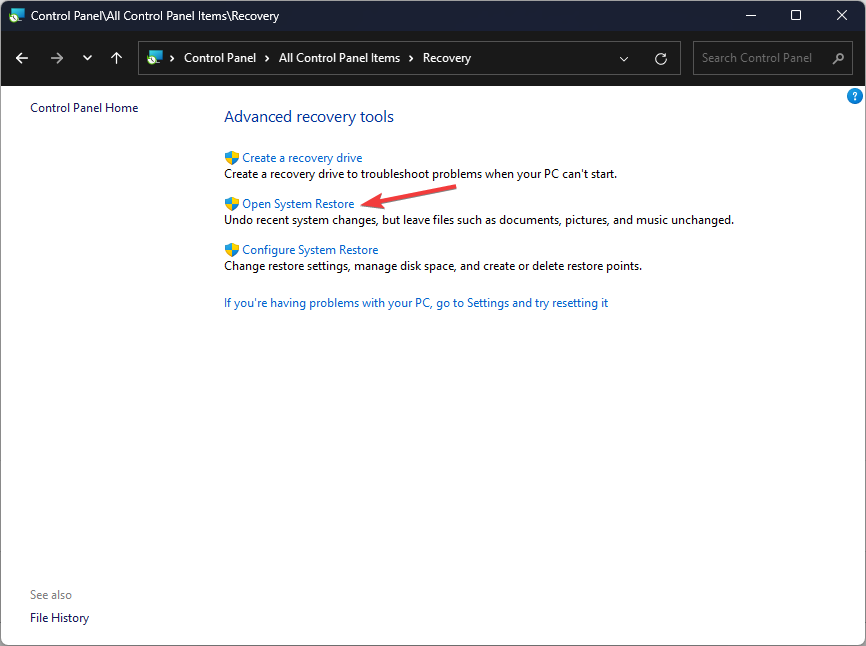
  3. Click Open System Restore.Open system restore
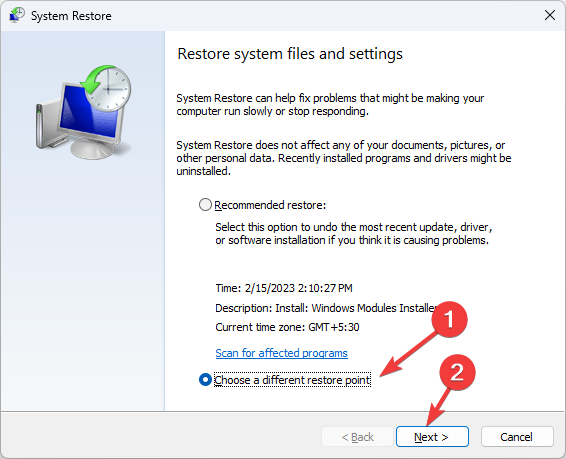
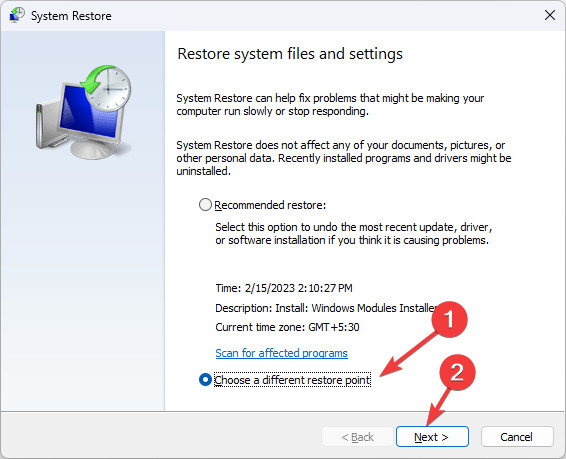
  4. Select Choose a different restore point and click Next.Next Choose a different restore point
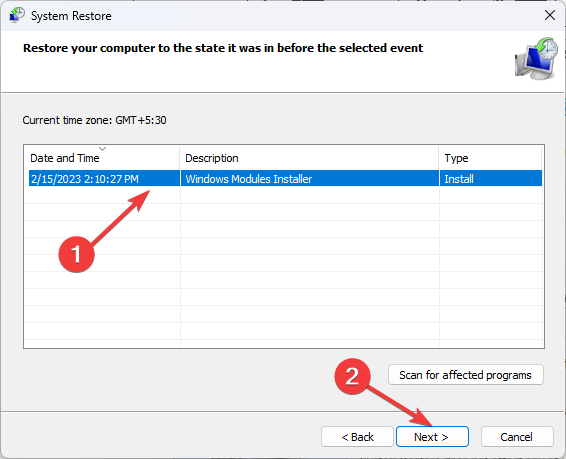
  5. Now select the restore point and click Next. Choose a point
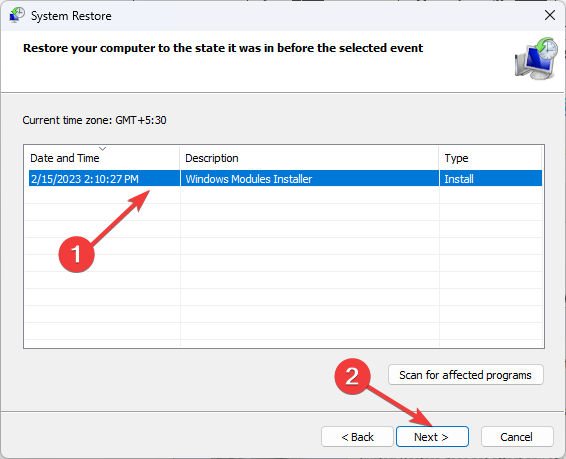
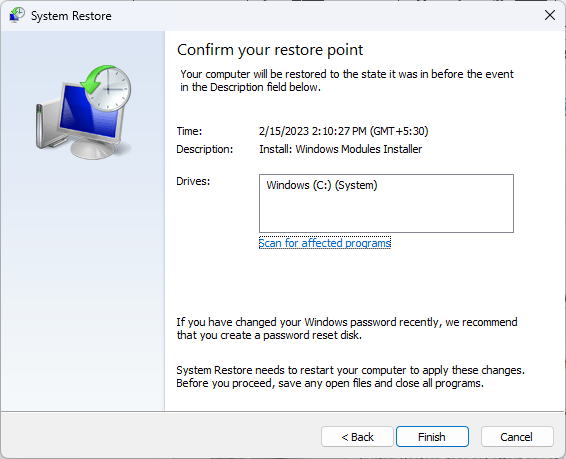
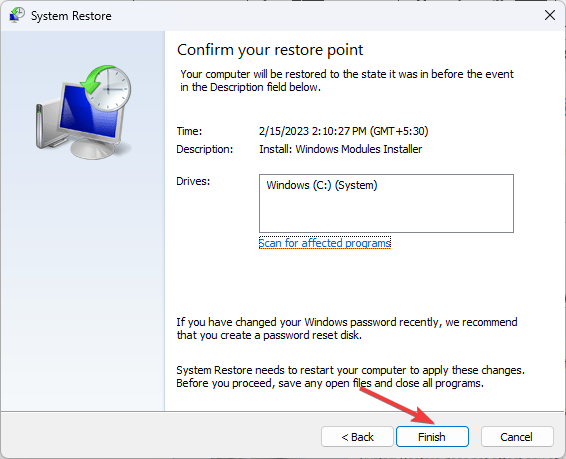
  6. Click Finish to restore the previous settings, and Windows will restart.Finish Restore point

9. Update BIOS

  1. The process of updating BIOS will differ depending on your motherboard. For this step, we shall be updating the HP motherboard.
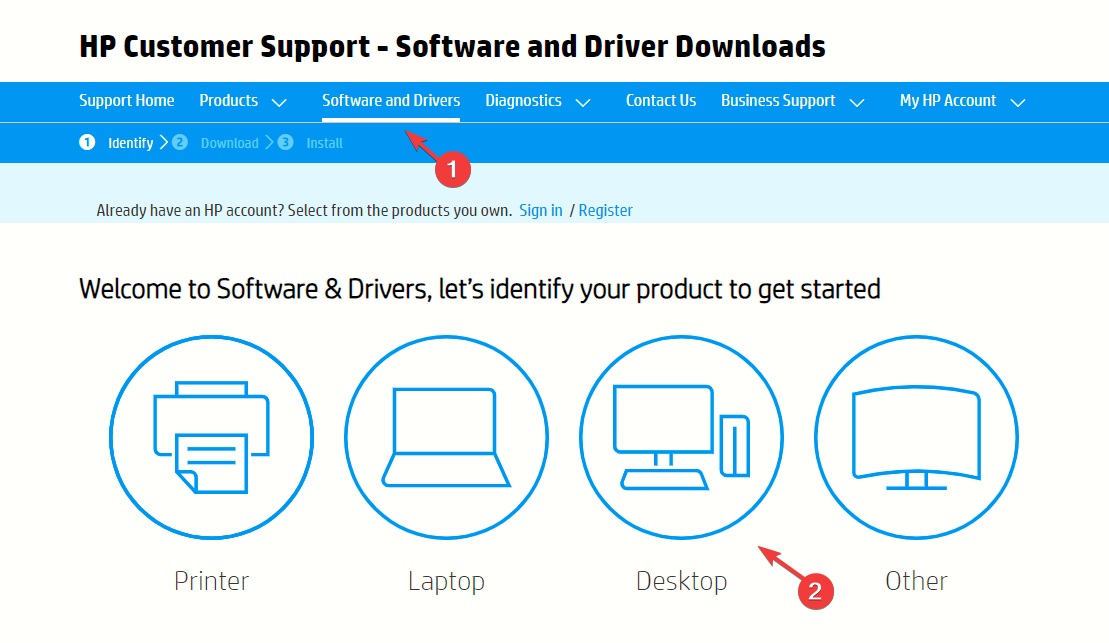
  2. Navigate to the HP driver and software download website.
  3. Choose laptop or desktop, depending on the type of computer you’re using.
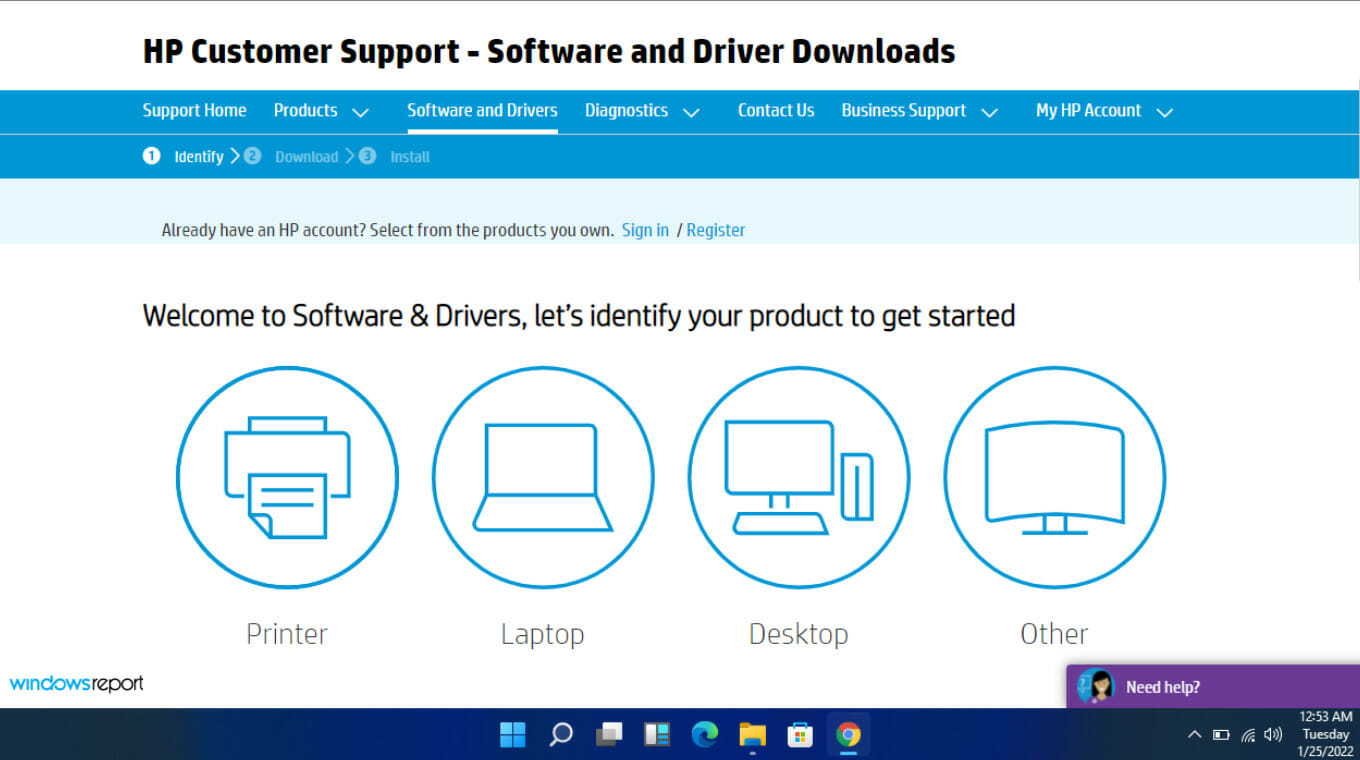
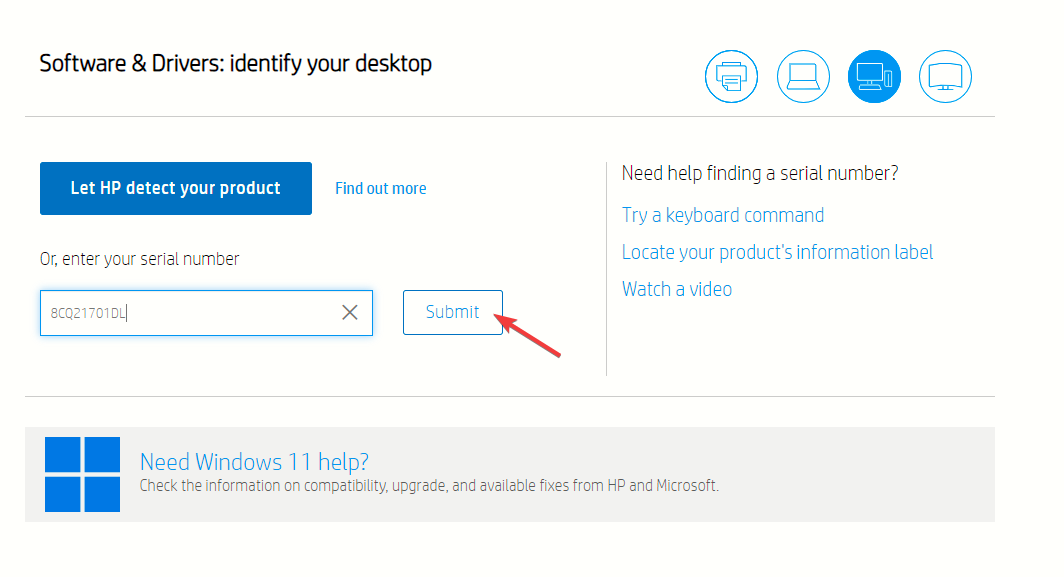
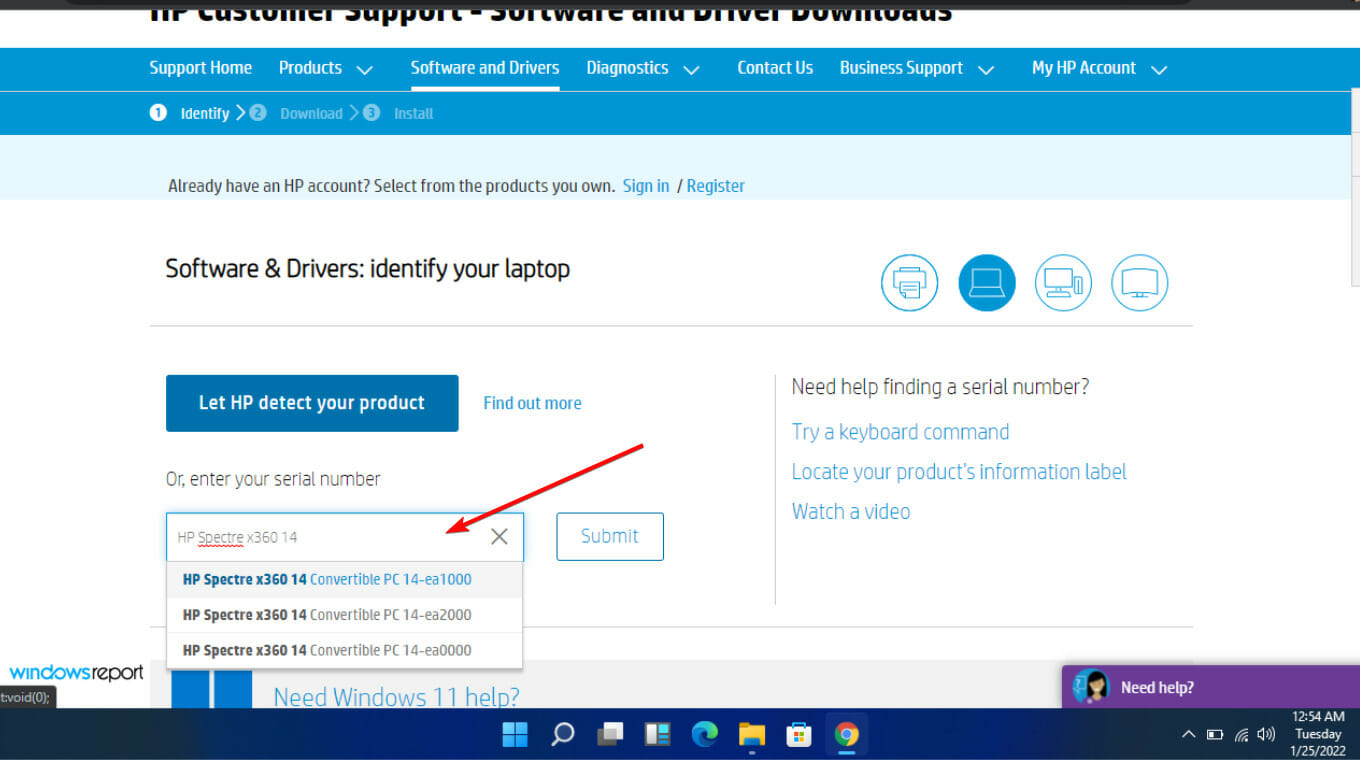
  4. Enter your exact serial number or your exact computer model.
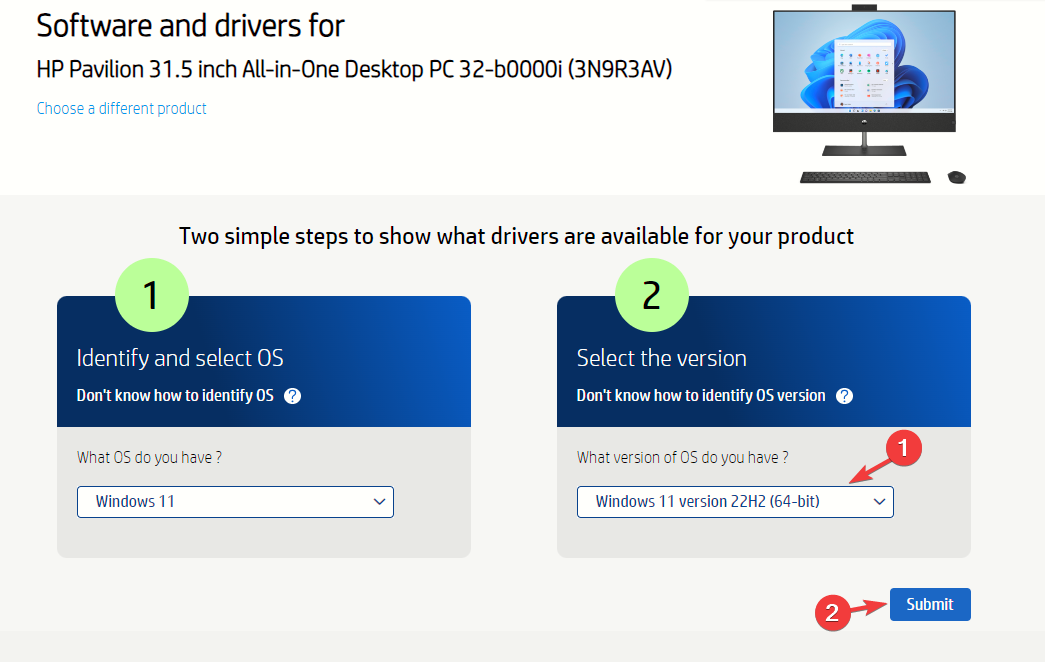
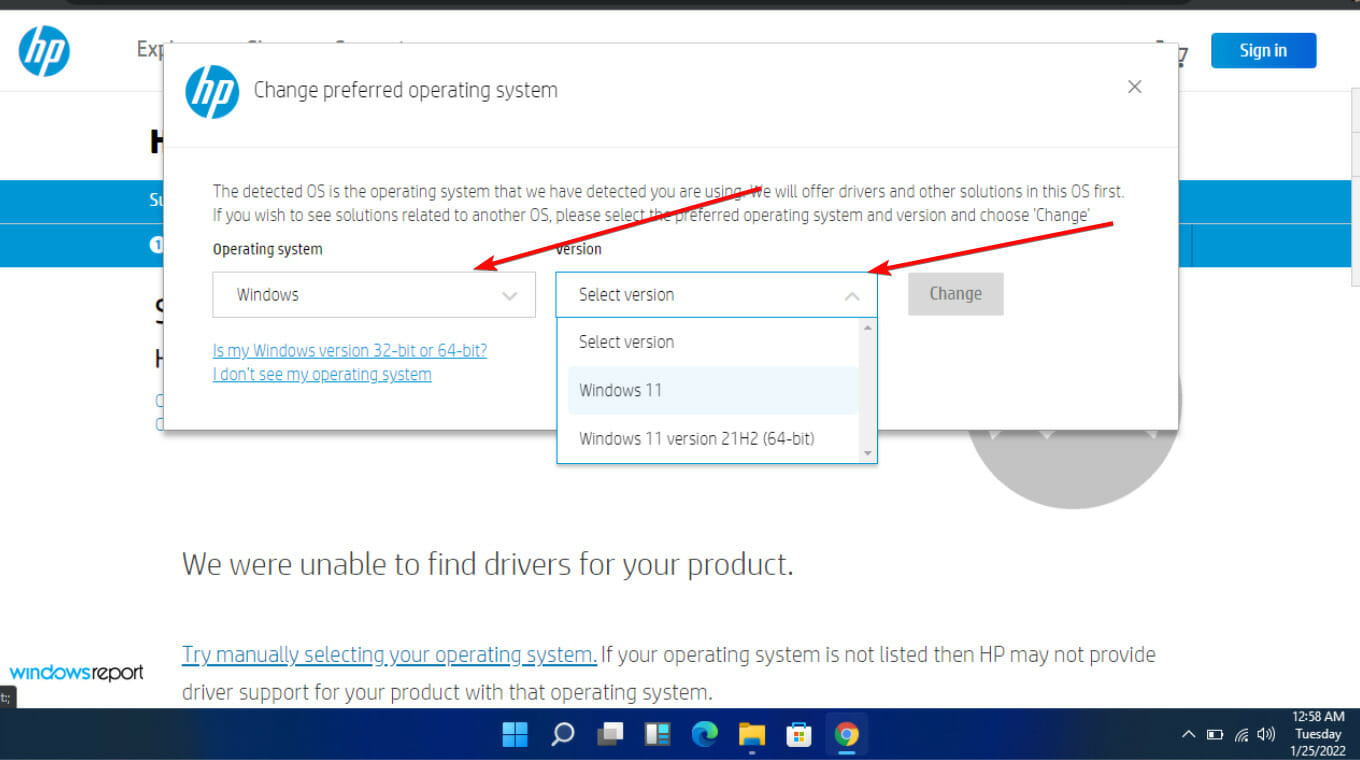
  5. Select your OS and OS version, then click Submit.
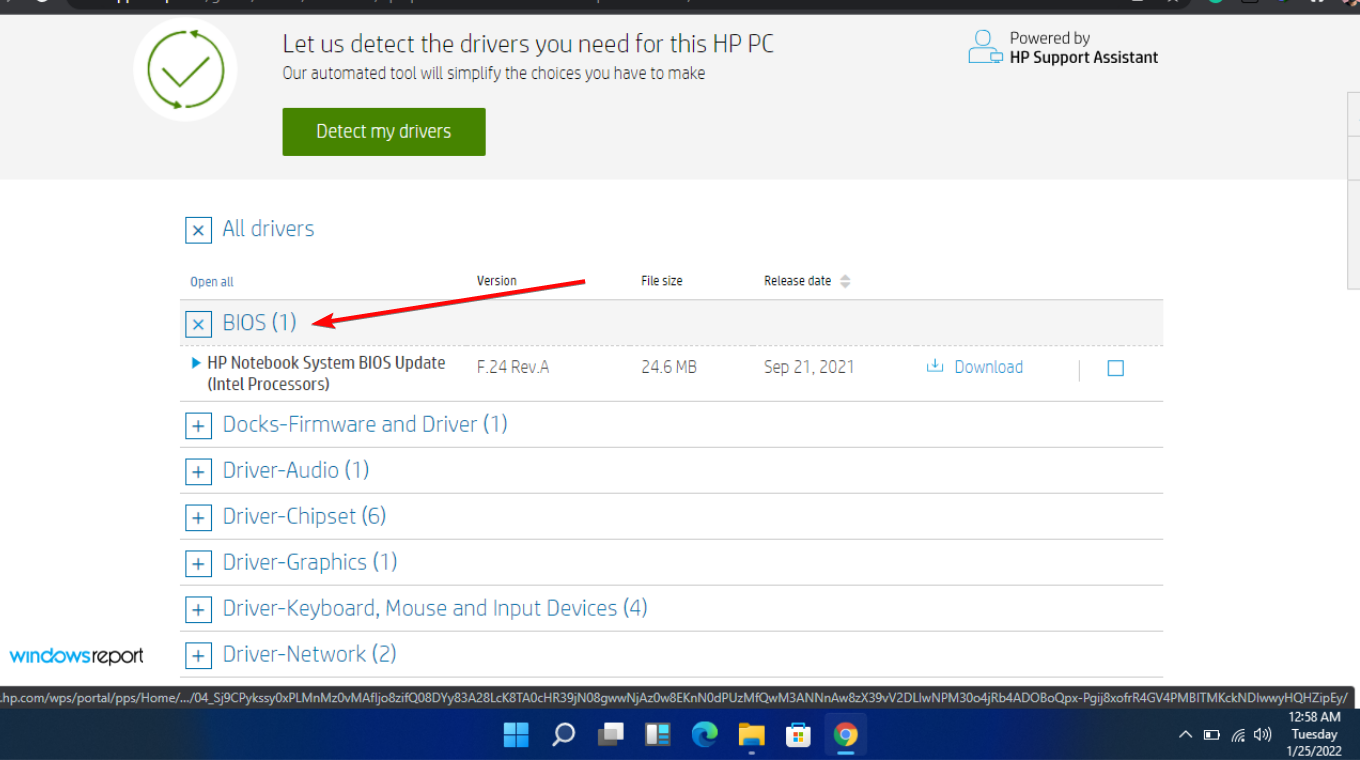
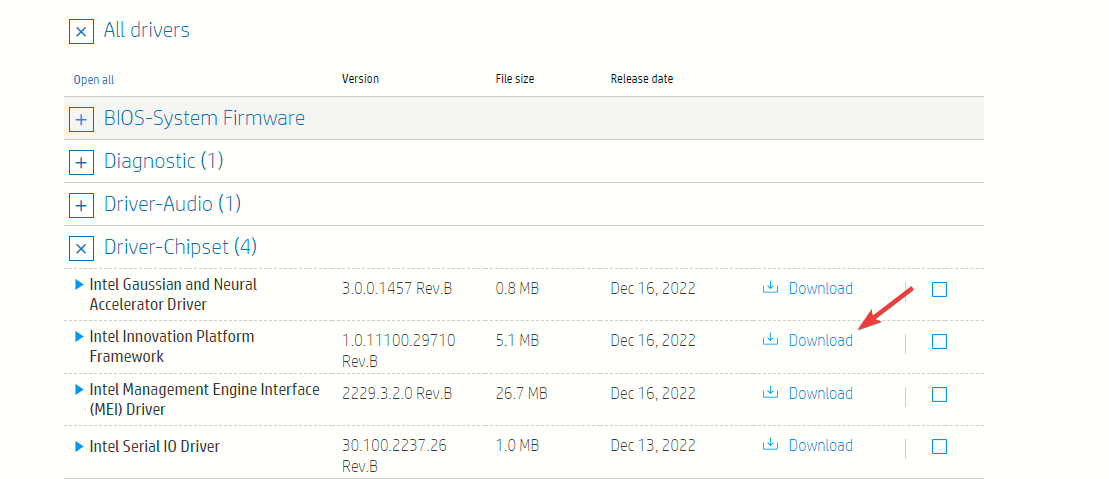
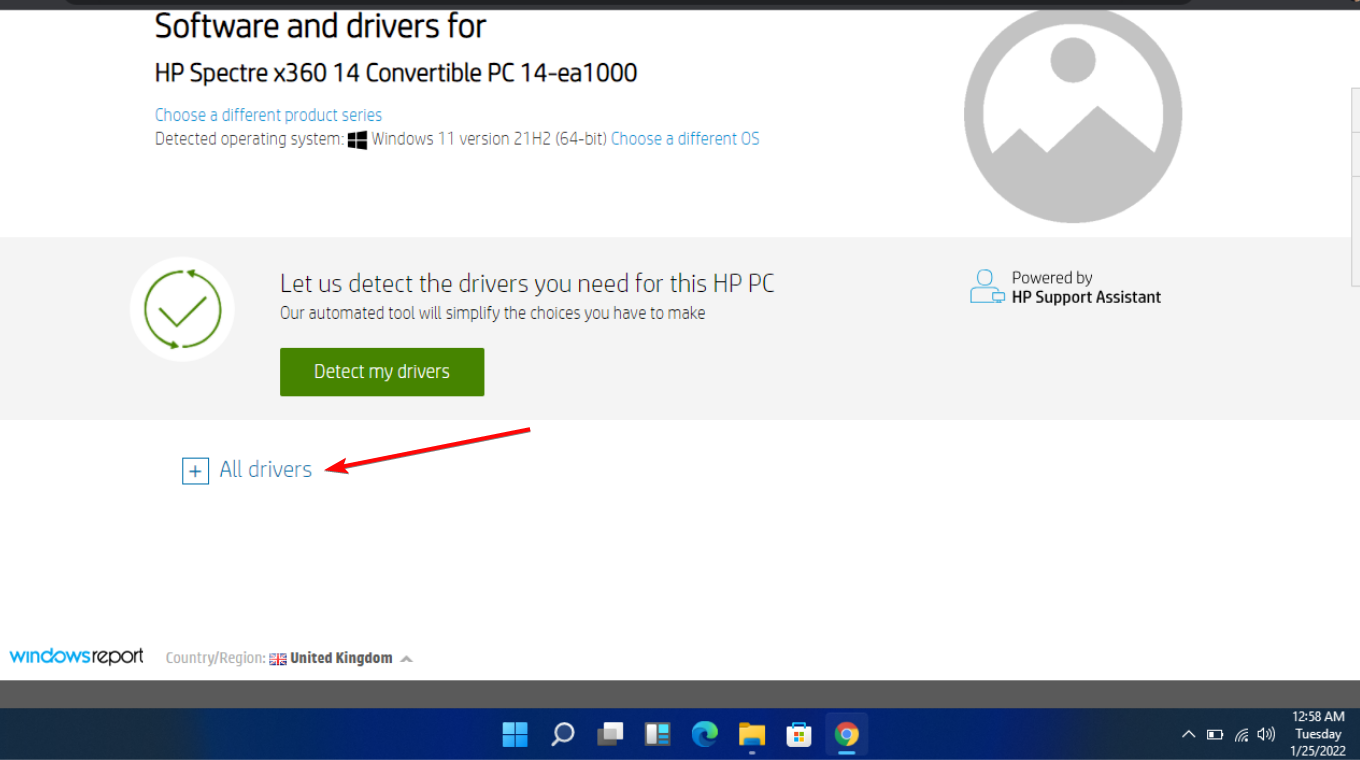
  6. Click on All drivers and then expand BIOS to see available updates.
  7. Click the download icon.
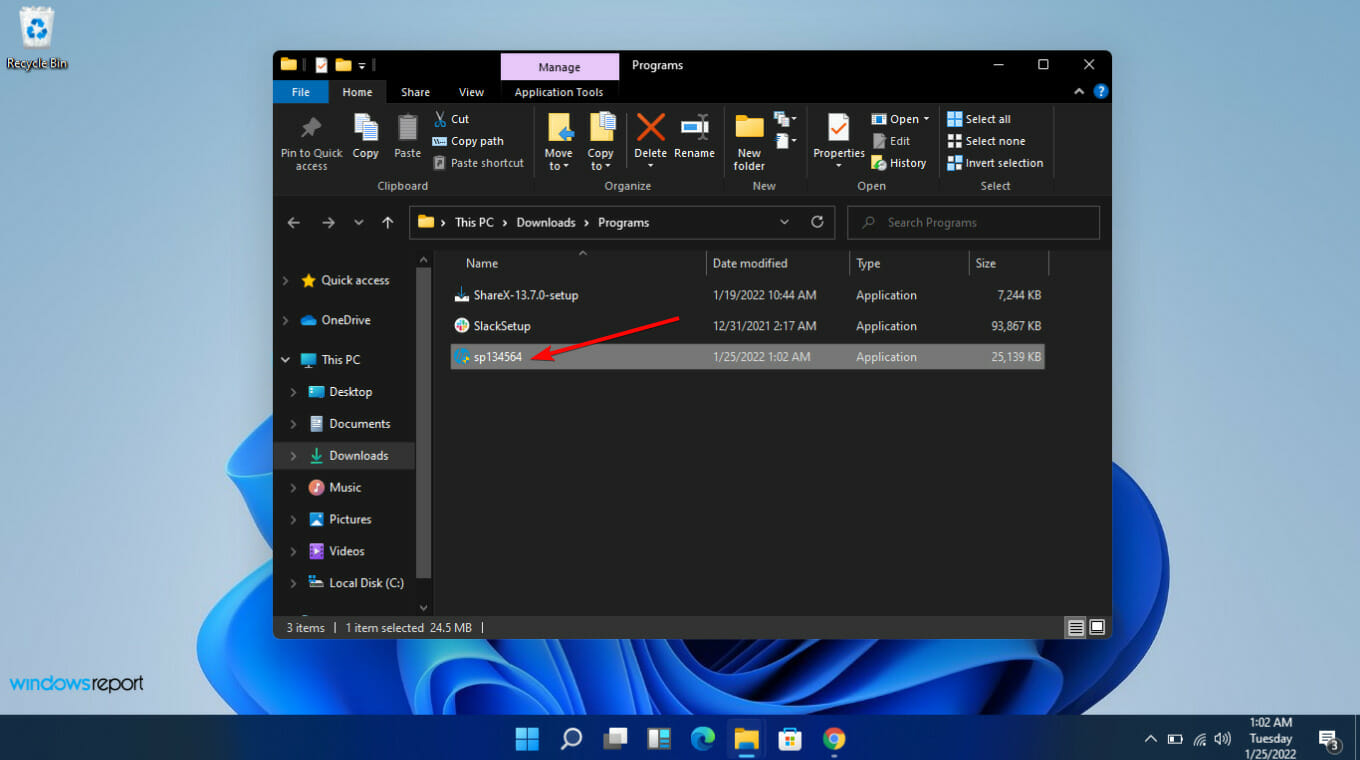
  8. Install the .exe file, following the on-screen instructions.
  9. Restart your PC.

10. Perform a Startup Repair

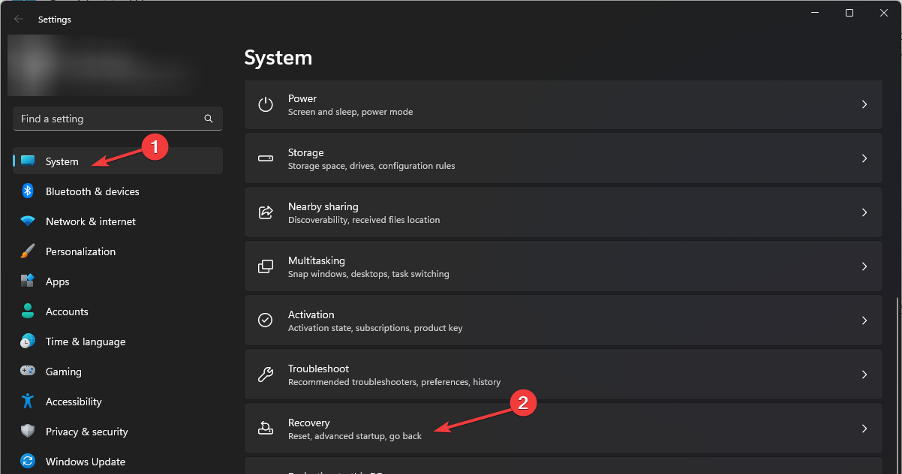
  1. Press Windows + I to launch the Settings app, and then click on Recovery on the right in the System tab.
  2. Next, click on the Restart now button next to Advanced startup.Recovery Advanced Startup
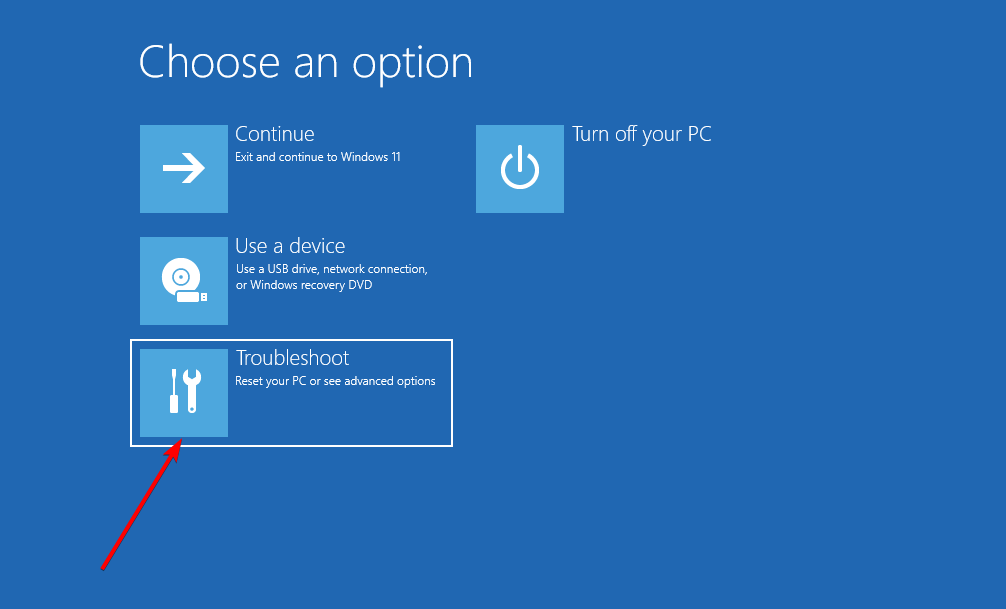
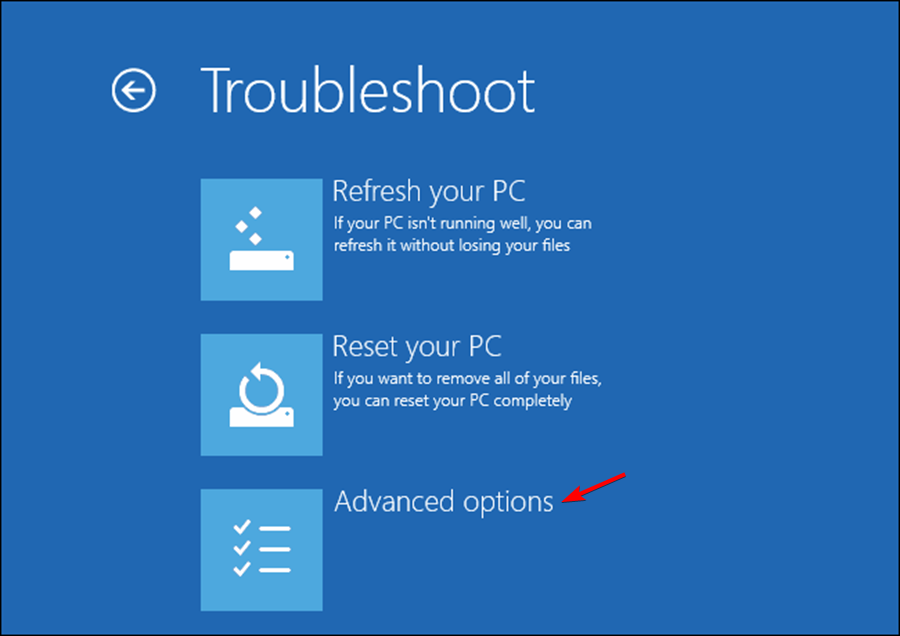
  3. Wait for the computer to restart, enter Windows RE (Recovery Environment), and then select Troubleshoot.Troubleshoot
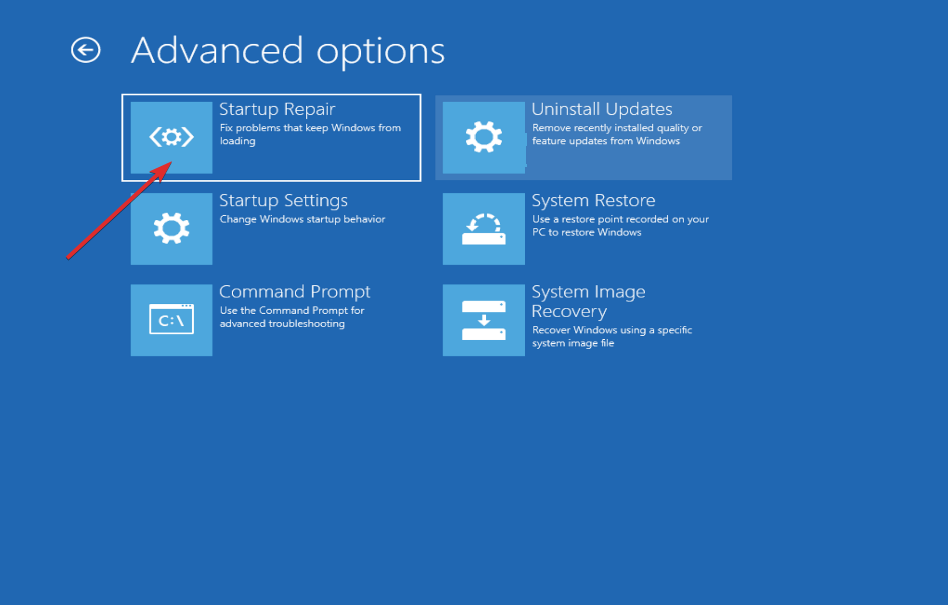
  4. Next, select Advanced options.Advanced options
  5. Finally, click on Startup Repair.Startup repair to fix machine check exception windows 11

It’s generally pretty easy to fix these errors, and you should be able to troubleshoot them on your own by following the easy steps provided above. Worst case scenario, if none of them works, you can also use an automated utility, and we have the best BSoD fixers lined up to fix them for you.

These tools are great in fixing a bunch of BSoD-related errors, especially those with little to no information like the unexpected store exception error or the Machine Check Exception stop code.

Hopefully, this article has provided helpful answers to your questions about the attempted switch from dpc Blue Screen of Death error on Windows 11. If you have any other questions or know other ways to fix this error, please share with us in the comments below.

Solved: Windows 11 Desktop is Not Refreshing Automatically

When you copy or delete something from the desktop, the Windows 11 desktop is not refreshing automatically, and you don’t see the change? All the editors at Windows Report have undergone this problem at some time and we know how to fix it.

Why are my Windows 11 desktop icons not updating? 

  • OneDrive may be the culprit. Read our solutions below to see how to unlink it from your PC and solve the issue.
  • Problems with File Explorer settings and clogged file history.
  • Corrupted system files.

How do I fix my Windows 11 desktop if it’s not auto-refreshing?

1. Remove the Desktop folder from OneDrive

1.1 Remove the Desktop folder from the OneDrive app

  1. Right-click the OneDrive icon on the taskbar and select its Settings.
  2. On the Sync and backup tab, click on Manage backup.
  3. Now, disable the backup for Desktop and hit the Disable backup button again to acknowledge the change.

This is an elegant way of disabling the backup for the Desktop folder but if it fails, you can also try the alternative below.

1.2 Remove the Desktop folder from OneDrive in Windows Explorer

  1. Press the Win + E shortcut to open File Explorer.
  2. Go to the OneDrive Personal folder, click on the Desktop folder from the right pane, and hit the Delete key on your keyboard.
  3. Click Yes to acknowledge the operation.

Most of the time, the problem is that OneDrive has trouble syncing the desktop, conflicting with the auto refresh in Windows 11.

By deleting the Desktop folder from OneDrive, the files on the desktop won’t sync anymore, preventing the issue. In the Windows Report lab, we also tried uninstalling and reinstalling OneDrive, but it didn’t work.

You should know that there are plenty of alternatives to OneDrive so you can use a better one next time.

2. Clear File Explorer history and restore defaults

  1. Press the Windows key + E to open File Explorer.
  2. In the Explorer window, click on the Menu button (three horizontal dots) and select Options.
  3. Now, check all the boxes in the Privacy section, including Show recently used files or folders in Quick Access, if you have them, and hit the Clear button.
  4. In the Folder Options window, click on the Restore Defaults button right below.

Clearing the Windows Explorer history and restoring it to default settings is another efficient method to fix the problem if the files saved to desktop are not visible until you hit refresh.

With this solution, you may also fix problems with File Explorer not refreshing but the highlighted guide has more insight into this particular issue.

3. Run an SFC scan

  1. Click the Search box, type cmd, and select Run as administrator from the results to open Command Prompt with full privileges.
  2. Type the following command and press Enter to run it: sfc /scannow
  3. Wait for the scanning to complete and restart your PC.

For some users, the solutions above didn’t work because the root of the problem was some corrupted system files. The SFC scan will repair them and after a reboot, everything will return to normal, and the Windows 11 desktop will auto-refresh like it’s supposed to.

This process can be greatly simplified when using a tool that specializes in system restoration. This software will scan your system and repair or replace any broken and corrupted files within minutes.

4. Terminate the Windows Explorer processes

  1. Right-click the Start button and select Task Manager from the list.
  2. Now, from the Processes tab, right-click on Windows Explorer and select End task from the menu.
  3.  Now, go to the desktop and see if the refreshing issue has been fixed.

For some of our readers, this explorer refresh was enough to refresh the desktop icons automatically.

How do I manually refresh my Windows 11 desktop?

  • The refresh shortcut for the desktop screen is F5. So, to manually refresh the desktop icons, go to the desktop and hit F5.
  • Another simple way to refresh the desktop is to right-click on a free space on your desktop and select Refresh from the menu.
  • You may also use the Shift + F10 shortcut to open the context menu and select Refresh.

Here we conclude our guide on how to fix Windows 11 if the desktop is not refreshing automatically. From the WR lab tests, the culprit is OneDrive, and disabling its Desktop backup should fix the problem for most users.

However, a clogged File Explorer history or simply corrupt system files may cause this issue as well.

If you didn’t upgrade to the latest OS, you may also be interested in our guide on how to fix Windows 10 icons.

For any other questions or suggestions for new solutions, hit the comments section below and leave us a note.

How to Open a JSON File on Windows 11

A JSON file is a Javascript file supported by many different programming APIs; working on JSON files is essential for developers, coders, data analysts, or anyone working within a data-driven process.

In this guide, we will discuss step-by-step instructions to open a JSON file using inbuilt & third-party tools on Windows 11 and shed light on common issues users face while dealing with it.

How do I read JSON files in Windows 11?

1. Use the Windows Notepad

  1. Press the Windows key, type notepad, and click Open.Notepad open  -json file opener
  2. Go to File, then select Open.File - open
  3. Locate the file and click Open.Notepad_Open the json file
  4. The JSON file will be open in the Notepad app.Notepad_file opened

2. Use Visual Studio Code

  1. Press the Windows key, type visual studio code, and click Open.vISUAL STUDIO CODE OPEN
  2. Go to File, then select Open File.File - open VS code -json file opener
  3. Locate the file and click Open.Code_JSON file open
  4. The JSON file will be open in the Visual Studio Code app.Code_JSon file on Windows

3. Use a web browser

  1. Press Windows + E to open the File Explorer window.
  2. Locate the JSON file, right-click it, hover over Open with, and select Google Chrome.Open with - Google Chrome - json file opener
  3. If you can’t see the option, then click Choose another app.Choose another app - JSON file opener
  4. Now, select Google Chrome, and click Just Once.Choose the app and click Just once
  5. You can now view the file in your browser.chrome_open the JSON file

You can also use Mozilla Firefox to open and view the JSON file on your computer. If you face any problems opening it in Firefox, read this guide to learn quick solutions.

4. Use Microsoft Word

  1. Press the Windows key, type word, and click Open.Word open - json file opener
  2. Go to the File menu.WINWORD_c File menu
  3. Click Open, then select Browse.WINWORD _Select and open
  4. On the Open dialog box, select File format as All Files from the drop-down, then choose the file and click Open.WINWORD_ JSON file
  5. You can view and edit the JSON file on Word.WINWORD_open in WORD

5. Use the WordPad app

  1. Press the Windows key, type wordpad, and click Open.Word pad open
  2. Go to the File, then select Open.File - open JSON windows 11
  3. Change the file type to All files from the drop-down menu on the Open dialog box, then choose the JSON file and click Open.wordpad_open file
  4. You can view and edit the file on WordPad.wordpad_fFile open

You can also use other popular text editors like Noetpad++ and online tools to open and edit the file.

Editing, saving, and closing your JSON File in Windows 11

You can use simple text editors like WordPad, Microsoft Word, WordPad, or Notepad or advanced editors like Visual Studio Code to make changes to the file, and to save it, press Ctrl + S on the editor.

You can also go to the File menu and select Save as to save the file with a different name and at a desired location. Once done, click on the red X to close the file.

If you need help opening other types of files check out this guide on how to open ENC file.

How do I convert a JSON file to readable?

You can use any of the text editors mentioned above to open & edit the JSON file. To convert it to a plain text file, open Notepad, click File, select Save as, select All Files, and type the name for the file with a .txt extension.

You can also convert your Excel file into a JSON file to simplify things; check out this easy-to-use converter software list to get it done.

Common Issues While Working With a JSON file on Windows 11

Issue FacedIssue ExplainedQuick Solutions
Incorrect File ExtensionThe file extension is incorrect; that’s why you can’t open the fileDouble-check the file extension. If found incorrect, rename the file to correct it.
Editing files with improper softwareWindows doesn’t have a native app to open the file & using Notepad might complicate things.Use Visual Studio Code or Notepad++ to edit the file.
JSON formatting errorsMissing commas, double quotes, curly braces, and mismatched brackets can cause an issue.Use the proper JSON objects, arrays, and key-value pairs. Look for the suggestions or errors in the editor to understand more.
JSON files are not working on WindowsOpening the app in the wrong editor could cause an issue.To open the app, you must use Notepad, WordPad, or Visual Studio Code. To easily access the file, select any editor as the default app.

When you encounter formatting problems while editing, such as missing commas or unexpected characters, you may run into a JSON parse error. This guide explains how to fix it quickly.

FAQs

What is a JSON file?

A JSON (JavaScript Object Notation) file is a text-based format used to store and exchange data. It is commonly used for configuration files, data storage, and APIs.

How can I open a JSON file?

You can open a JSON file with a text editor such as Notepad, Notepad++, or a code editor like Visual Studio Code. For structured viewing, you can use specialized JSON viewers.

Can I open a JSON file in Excel?

Yes, you can open a JSON file in Excel by importing the data using the “Get Data” feature in newer versions of Excel. This will convert the JSON data into a table format for easier reading.

How can I edit a JSON file?

To edit a JSON file, open it in a text editor or code editor, make changes, and save the file. Be sure to maintain the correct JSON syntax (properly formatted key-value pairs) to avoid errors.

If you are a coder, WR experts always recommend using an advanced text editor like Notepad++ or Visual Studio Code to open and edit the JSON file, as the file stores data & objects in the format.

Moreover, the advanced editor highlights the errors, making editing the file easier, speeding up the process, and saving you time. We also have some great articles on how to open PIB files and ADOC files.

If you have trouble opening a JSON file on Windows 11, please mention your query in the comments section below. We will be happy to help!

How to Automatically Copy Files From One Folder to Another on Windows 11

It’s important to keep a backup of important files and you can easily automatically copy files from one folder to another on your PC with built-in tools.

Windows already has commands that allow you to copy files, and in this guide, we’ll show you how to utilize them to automate the copying process.

How to automatically copy files from one folder to another in Windows 11?

1. Create a batch file

  1. Open Notepad.
  2. Paste the following code, but be sure to adjust the source folder and destination folder values so that they match the paths on your PC:
    @echo off set "source=C:\Users\WindowsReport\Downloads" set "destination=D:\Backup" robocopy "%source%" "%destination%" exit /b
  3. Click on File and choose Save as.
  4. Set the save directory, set the file type to All files, and set the name to copyfiles.bat.
  5. Save changes.

2. Create a scheduled task to run the script

  1. In the search box type task. Select Task Scheduler from the list.
     
  2. Click on Create Basic Task.
  3. Next, set the name and description for your task and click on Next.
  4. Set how the task will trigger. We used When the computer starts, but you can set the task to run every few days or every week.
  5. Select Start a program.
  6. Next, click the Browse button.
  7. Select the batch file copyfiles.bat that you created.
  8. Lastly, click on Finish to add a new task.

3. Use third-party software

  1. Download FreeFileSync and install it.
  2. Start the application.
  3. Click Browse and choose the file path for both the source and target directory.
     
  4. Next, select the desired sync method.
  5. Lastly, click on Synchronize.

In case you’re having issues with this tool, you can use any other file sync software.

Batch script to move files from one folder to another based on date/name

To move files based on their name, use the following script, just manually set the file pattern as well as the source and destination directory:

@echo off
set "sourceFolder=C:\SourceFolder"
set "destinationFolder=C:\DestinationFolder"
set "filePattern=*2010*"

for %%F in ("%sourceFolder%\%filePattern%") do (
    move "%%F" "%destinationFolder%"
)

echo Files moved based on file name pattern.
pause

To move files based on their modified date, use the following script:

@echo off
set "sourceFolder=C:\SourceFolder"
set "destinationFolder=C:\DestinationFolder"
set "cutoffDate=2023-01-01"

for /f %%F in ('dir /b /a-d /o-d %sourceFolder%') do (
    set "fileDate="
    for /f %%D in ('wmic datafile where name^="%sourceFolder%\%%F" get LastModified ^| findstr /r "^[0-9]"') do (
        set "fileDate=%%D"
    )
    
    if defined fileDate (
        if "%fileDate%" LSS "%cutoffDate%" (
            robocopy "%sourceFolder%" "%destinationFolder%" "%%F"
        )
    )
)

echo Files moved based on date cutoff.
pause

As you can see, it’s relatively simple to use a script to copy files from one folder to another automatically on Windows 11. To better understand how these commands work, we suggest learning how to copy files using Command Prompt.

To ensure that everything is working as it should, it’s a good idea to compare folders and copy missing files accordingly. For more information on file management, visit our guide on how to extract files from multiple folders.

What method do you use to copy files automatically on your PC? Share it with us in the comments section below!

How to Get the Downloads Bar at the Bottom on Chrome

Earlier, the download bar used to appear at the bottom of Chrome, but recently, developers switched to a Chrome download bubble near the top-right corner.

Every piece of information, be it the download progress, recently downloaded files, or failed attempts, appears in the same dropdown list in Google Chrome. And this left many longing for the previous UI with the download tray!

Why is the download bar not showing at the bottom of Chrome?

Chrome made changes to its UI in August ’23 and went with a download button in the toolbar.

The bar that earlier appeared at the bottom of Google Chrome was removed, though not entirely. It can still be accessed by reconfiguring the Chrome flags. 

How do I get the download bar at the bottom of Chrome?

  1. Open Google Chrome, paste the following path and hit Enter to go to: Chrome://flags/#download-bubblepath
  2. Now, select Disabled from the dropdown menu next to the Enable download bubble flag.disable flag to get download bar to bottom
  3. Finally, click Relaunch to restart the browser for the changes to come into effect.relaunch

Remember, Flags allows users to enable or disable experimental features in Chrome. They are often removed at later stages after Google releases the feature in the stable channel. So, this solution might not always work unless Google decides otherwise.

Potential issues when getting the downloads bar at the bottom on Chrome

  • Anytime you reset the flags, the download bar will automatically disappear.
  • Harmful files may automatically begin to download without warning.
  • Extension icons may overlap with other icons, making it harder to locate the download bubble icon.
  • Experts and developers recommend against manually configuring Google Chrome flags. The browser may malfunction, or data and security might be compromised.

While some may argue that the download bubble in the toolbar is the optimal position, a few, accustomed to the old ways, want the download bar at the bottom of Chrome. And there’s nothing wrong with it. We used it that way for far too long!

Besides, Chrome is a far from perfect browser, and we do encounter issues with it. For instance, a few users found the address bar missing, or some couldn’t find the toolbar. Also, there’s another bug in the browser that shows Download in progress when there are none.

For any queries or to share your thoughts on these changes by Google, drop a comment below.

How to Open EPUB Files on Windows 11

EPUB or Electronic Publication, a format associated with eBooks, can’t be accessed in Windows 11 using the built-in apps. While Microsoft Edge supported the format earlier, the functionality was dropped after its transition to the Chromium project.

Kindle initially didn’t support the EPUB file formats, but after a series of recent announcements, it’s confirmed that EPUB will replace the MOBI file extension on Amazon’s eBook reader.

How do I read eBooks on Windows 11?

There are several ways to open eBooks on Windows 11, and it all comes down to the eBook file format. If it’s a popular file extension, say PDF or DOCX, you could use Microsoft Edge or Office 365, respectively.

For some formats like EPUB, ASCM, and MOBI, you will need a third-party app.  Though for ASCM, you may also have to authorize the PC to read Adobe DRM protected items.

How do I open an EPUB File on Windows 11?

1. Use a third-party reader

  1. Go to Adobe’s official website, and click the Windows link next to Download Digital Edition.download 
  2. Once downloaded, double-click the setup file and accept the license terms.
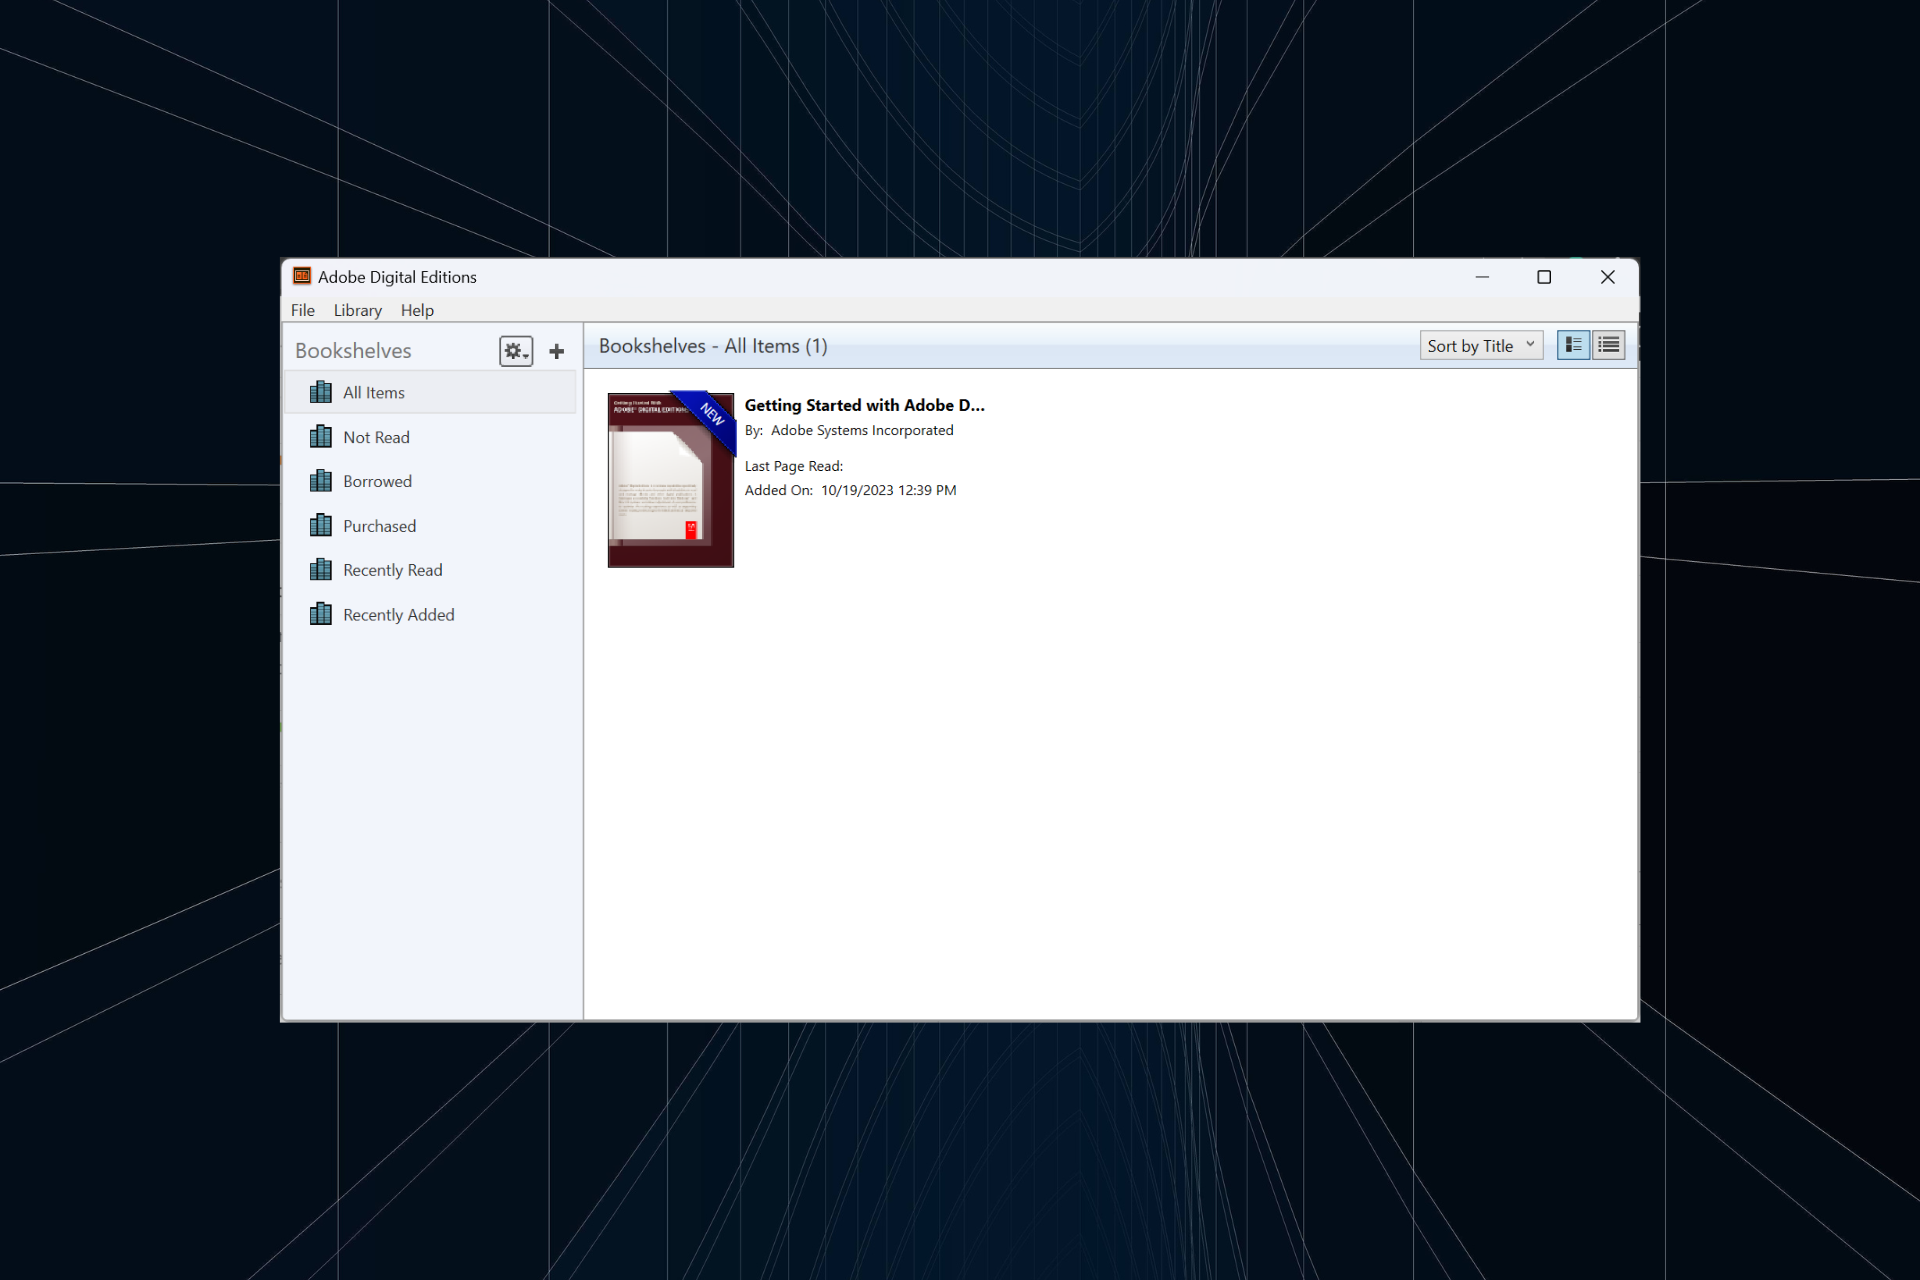
  3. Now, make sure the checkbox for Associate .ascm and .epub file types is ticked, and follow the on-screen instructions to complete the installation of Adobe Digital Editions.associate file type to open epub file
  4. Launch the the program, click the File menu, and select Add to Library.add to library to open epub file
  5. Next, locate the EPUB file, select it, and click Open.open
  6. The file should now be available for reading in Adobe Digital Editions.

When you want to open a digital book, especially one using the ASCM, EPUB, or PDF extensions, Adobe Digital Editions is the best option. Besides, there are several other reliable EPUB readers in Windows 11 for a seamless reading experience.

2. Install a browser extension

Tip icon Tip
The steps listed here are for Chrome, though the EPUBReader extension is available for all popular browsers. 
  1. Launch Google Chrome, and open the Chrome Web Store page for EPUBReader. 
  2. Click the Add to Chrome button.add to chrome
  3. Click on Add extension in the confirmation prompt.
  4. Now, right-click on the EPUB file, choose Open with, and then select your browser from the flyout menu. If it doesn’t appear right away, click on Choose another app and then select the browser or manually locate it.open epub file from file explorer 
  5. When you do it the first time, it will ask for access to file URLs. Click on Setup file access to continue.setup file access
  6. Next, enable the toggle for Allow access to file URLs.allow access to file URLs to open epub file

You can now open any files with the EPUB extension in Google Chrome. For other browsers, you will need to download the extension separately. Here are the direct download links:

3. Convert the file into a readable format

If you don’t want to use a third-party app or extension for viewing digital books, there’s always the option to convert them into a supported format, say PDF. 

And we recommend you use an effective eBook conversion software for the same. These support a wide array of formats and are easy to use. Besides, simply changing the extension to EPUB won’t work and will render the file unreadable.

Can I convert EPUB to PDF?

Yes, you can convert EPUB to PDF and several other formats, including DOCX, AZW, MOBI, TPZ, and TXT, amongst others. There are several options available, including downloadable software and websites.

Microsoft Edge dropping EPUB support doesn’t mean you can’t open them anymore. There are several other options to access EPUB files available. Remember, the format is universally accepted and is here to stay!

Now that you know how to open EPUB files in Windows, reading your favourite books won’t be a hassle anymore! 

For any queries or to share your eBook recommendations with the community, drop a comment below.

Exclusive: Qualcomm to debut Snapdragon Seamless, enabling cross-platform device experiences, at upcoming Summit

Update – we have another exclusive, it seems at the same Summit Qualcom will release a new AI super-charged platform called the Snapdragon X Elite that aims to revolutionize the PC landscape with faster CPU performance.
—
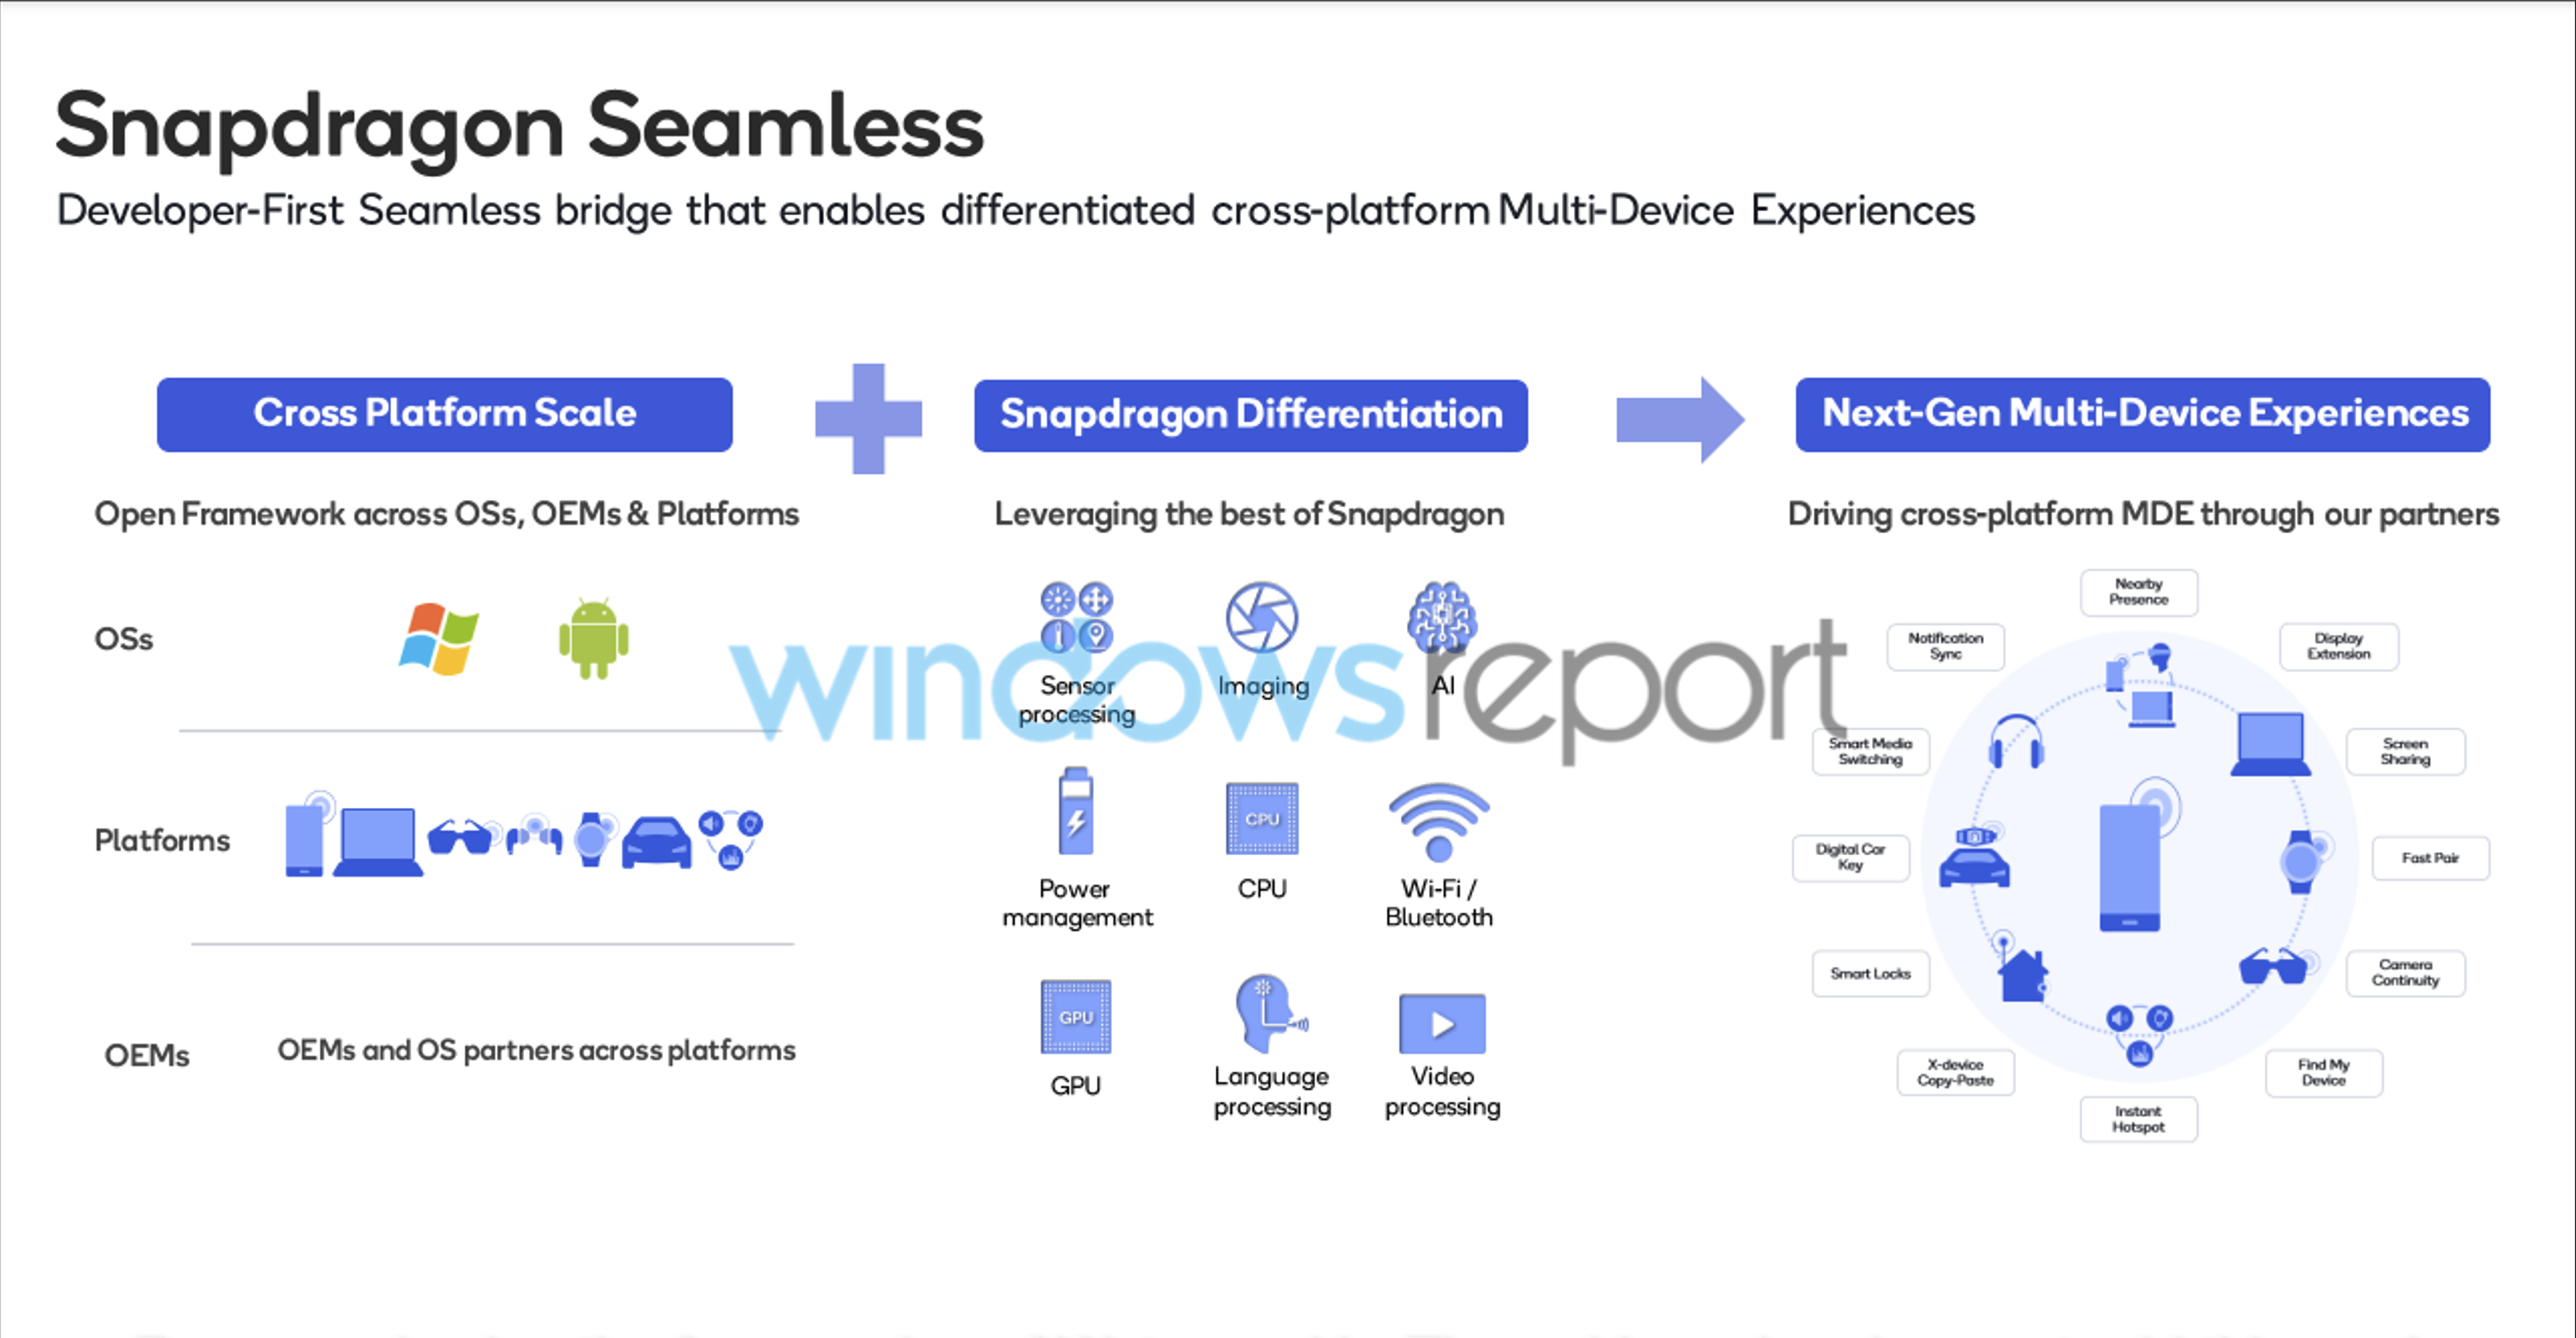
Qualcomm will introduce Snapdragon Seamless, a set of features that will enable cross-platform device experiences, at the upcoming Snapdragon Summit, which will take place on Oct. 24-26 in Maui. The tech giant calls the new Snapdragon Seamless the bridge that enables differentiated cross-platform Multi-Device Experiences.

Qualcomm Snapdragon Seamless Confidential Document

According to the document shared with us by our source, Snapdragon Seamless will allow easy integration and interaction between Qualcomm-hardware-based OEM (original equipment manufacturer) devices and OS partners across platforms, such as Android and Windows.

The multi-device experiences will include platforms such as smartphones, laptops, VR/AR headsets (including the new Meta Quest 3, which is a Qualcomm-hardware-based device), headphones, smartwatches, smart glasses, and even cars.

But what does all this mean in real-world scenarios? If you own multiple Snapdragon-powered devices, you can pair them faster, sync notifications between them, and switch media streaming without thinking about it. Camera continuity is an interesting one, as you can use your camera (and maybe the media library) across multiple devices.

This will be possible through the Snapdragon-enhanced services (Sensor processing, Imaging, AI, Power management, CPU, Wi-Fi/Bluetooth, GPU, Language processing, and Video processing), which will create cross-platform multi-device experiences that will focus on:

  • Nearby presence
  • Display extensions
  • Screen sharing
  • Fast pair
  • Camera continuity
  • Find my device
  • Instant hotspot
  • X-device Copy-Paste
  • Smart Locks
  • Digital Car Key
  • Smart Media Switching
  • Notification Sync

Is Snapdragon Seamless similar to Galaxy Connected Experience?

Well, yes and no. First of all, in many ways, and for good reasons, Qualcomm’s Snapdragon Seamless shares multiple similarities with Samsung’s Galaxy Connected Experience, a set of features that enables multi-device experiences, released by the tech giant earlier this year.

Samsung continuously develops and improves multi-device experiences, especially between the company’s devices (smartphones, laptops, smartwatches, tablets). For example, earlier this year, Quick Share, a beloved Samsung feature, was finally released to all non-Samsung Windows 11 laptops, allowing for greater integration into the Galaxy Connected Experience of non-Samsung devices.

While Samsung’s technology has been integrated with Windows 11, Qualcomm seems to be making even more significant steps, bringing together many more devices from different manufacturers. The great news? All Qualcomm-based OEM devices are automatically enlisted in the Snapdragon Seamless experience.

This dramatically impacts creative professionals and enterprises by allowing for better integration, synced workflows, and easier deployment. Through cross-platform MDE, companies can leverage Seamless features across their entire business, making it (maybe) a determining factor for hardware acquisitions.

The new Snapdragon Seamless will be presented in greater detail at the Snapdragon Summit, and you can attend by accessing this link. Don’t forget to leave a comment and tell us your take on Snapdragon Seamless and how you think it will influence your day-to-day life, personal or professional.

How to Open an XML File on Windows 11

XML (eXtensible Markup Language) files are plain text files that act as a universal format for storing and transferring data across several platforms.

In this guide, we will discuss ways to open an XML file on Windows 11 with step-by-step instructions and a short description to convert an XML file to a readable format.

What Microsoft program opens XML files? You can use various Microsoft Office programs like Word, & Excel to open and edit files with .XML file extension on Windows 11.

All you need to do is right-click the file, select Open With, then choose the program. You can also use Windows Notepad to access the XML format file.

How do I open XML files in Windows 11?

1. Use Microsoft Excel to open & edit file

You can use two options to open XML files on Excel: File and Data. Let us discuss both:

  1. Press the Windows key, type excel, and click Open.Open Excel - Open an XML File on Windows 11
  2. Go to the File menu.EXCEL_File menu
  3. Next, you will see the Open XML window, select As an XML table, then click OK.EXCEL_elect As an XML table, then click OK.
  4. If you get another prompt, click OK to proceed.EXCEL_ click OK to proceed
  5. The file will now open; you can view and make any changes.EXCEL_XML document

The Data menu method involves loading the data from XML documents via Power Query, a data automation tool in Excel. Follow these steps to open the file using it:

  1. Press the Windows key, type excel, and click Open.
  2. Click Blank workbook, go to Data, then click Get Data.
  3. From the drop-down menu, hover over the From File option, then select From XML.Get data - fROM xml FILE
  4. Now browse and select the XML file, click Import to open.EXCEL_Sample file Import - Open an XML File on Windows 11
  5. On the Navigator window, under the Display Options, select the file to see the preview. If satisfied, click Load.EXCEL_Navigator window, under the Display options, select the file to see the preview. If satisfied, click Load.

2. Use Microsoft Word to open & edit the file

  1. Press the Windows key, type word, and click Open.Word open
  2. Go to the File menu.WINWORD_c File menu
  3. Click Open, then Browse.WINWORD_Open, then Browse.
  4. Locate the file and click Open.Select a file and click Open
  5. The file will open without custom XML elements.WINWORD_XML file open

Starting from Microsoft 2007, Word doesn’t support custom XML elements. Also, if you make any changes and save the file, the formatting will be removed permanently.

3. Use the Notepad app to open & edit the file

  1. Press the Windows key, type notepad, and click Open.nOTEPAD OPEN
  2. Click File, then Open.File - open
  3. If you can’t see the file on the Open dialog box, choose All Files from the drop-down, select the file, and click Open.Notepad_Selct the file and click Open

4. Use Visual Studio Code to open & edit the file

  1. Press the Windows key, type visual studio code, and click Open.vISUAL STUDIO CODE OPEN
  2. Click File, then select Open File.File - open VS code - Open an XML File on Windows 11
  3. On the Open File window, select the file and click Open.Codechoose XML file
  4. If you get a prompt asking permission to open the file, click Open. You can now edit the file in Visual Studio Code.Code_XML file open - Open an XML File on Windows 11

5. Use Microsoft Edge to view the file

  1. Press Windows + E to open Windows File Explorer.
  2. Locate the XML file, right-click it, hover over Open with, then select Microsoft Edge.Select Microsoft Edge
  3. The file will open on Edge in read-only format.msedge_open XML

You can also launch Microsoft Edge, open a new tab, then drag & drop the file to view it.

6. Use Google Chrome to view the file

  1. Press Windows + E to open Windows File Explorer.
  2. Locate the XML file, right-click it, hover over Open with, then select Google Chrome.
  3. If you can’t find the option, click the Choose another app option from the context menu.Choose another app 1
  4. From the Select an app to open this .XML file pop-up window, select Choose an app on your PC.Choose another app
  5. On the Open with window, navigate to this path: C:\Program Files\Google\Chrome\Application
  6. Select Chrome.exe and click Open.Choose Chrome to open XML on Windows 11
  7. It will appear on the previous list; select it and click Just Once or Always, depending on your preferences. The file will now open on your browser.chrome_open XML on Windows 11

There are some other browsers that can be used to open this type of file on Windows, like Opera One and Mozilla Firefox.

How do I convert an XML file to a readable file?

The simplest way is to open the Extensible Markup Language (XML) file in Excel using the abovementioned steps in Method 1 and save it in XLS format at a desired location on your computer.

However, if you want to convert an XML document to another readable format, you can use other online XML editors for free.

To conclude, you can use any method mentioned to open the file type, but choosing the suitable one depends on your requirements.

In case you are looking for a way to open and view the OXPS file, another XML file format, read this guide for step-by-step instructions.

If you know another way to open XML files on Windows 11, please share them with us in the comments section below. We will happily add it to the list.

Solved: You Are Not Currently Using a Display Attached to an Nvidia GPU

You are not currently using a display attached to an Nvidia GPU error can be quite alarming since it will prevent you from fully utilizing your dedicated GPU.

This can be a problem if you want to perform intensive tasks, such as gaming or video editing, but luckily there are ways to fix this problem, and in this guide, we’ll show you how to do that.

Why is my Windows 11 display not using Nvidia GPU?

  • Your display is connected to the wrong port. Many users connect the display by mistake to a GPU port on the motherboard thus causing the error.
  • Software issues, such as having the wrong drivers installed.

How to fix You are not currently using a display attached to an Nvidia GPU?

Before we start fixing the issue make sure that your monitor is properly connected to the GPU and not to the motherboard.

1. Temporarily disable your GPU driver

  1. Press the Windows key + X and choose Device Manager.
  2. Locate your Nvidia display adapter driver on the list, right-click it, and choose Disable device.
  3. Wait for a few moments, right-click the driver again, and select Enable device.

2. Download the latest driver

  1. Next, go to the Nvidia download page.
  2. Select your model on the list.
     
  3. Find the correct driver version and download it.
  4. Once it’s downloaded, run the setup file and follow the instructions on the screen to perform a driver update.

If you are having trouble updating drivers you can always rely on powerful third-party tools such as Fortect Driver Updater. This software will scan your system, identify the drivers you need, and automatically download them in just a few minutes.

⇒ Get Fortect Driver Updater

3. Reinstall the driver

  1. Open the Device Manager.
  2. Locate your Nvidia video card, right-click it, and choose Uninstall device.
    Uninstall device
  3. Check Attempt to remove the driver for this device and click on Uninstall.
    attempt
  4.  After, download the Nvidia driver and install it again.

If you’re on a laptop, users are recommending downloading graphics drivers from the laptop manufacturer instead of the Nvidia. In some circumstances, the issue might be resolved by using an older driver.

How do I make my Windows 11 PC use Nvidia GPU instead of Intel for display?

  1. Start the Nvidia Control Panel.
  2. Select Manage 3D Settings in the left pane to adjust your display settings.
  3. In the Global Settings tab, set Preferred graphics processor to High-performance Nvidia processor to configure it as the primary graphics card.
  4. If you want to set the default GPU processor for individual apps, do the same from the Program Settings tab.

You are not currently using a display attached to an Nvidia GPU error message can affect your performance, but usually appears when trying to run Nvidia configuration software. If the Nvidia Control Panel is not opening, then this error can be responsible for it.

In some instances Error code 22 can cause your Nvidia graphics card not to be detected, however, we have dedicated guides that address these issues. Unfortunately, this isn’t the only issue that Nvidia has, and many reported that Nvidia GPU Boost isn’t working for them.

Did you find a different solution to fix this error? If so, share it with us in the comments section.

How to Add or Remove Strikethrough on Google Docs

Strikethrough function is vital in conveying the changes and corrections in a document on Google Docs. Moreover, it is a great way to strike off the task from to-do lists when completed.

In this guide, we will discuss steps to add or remove strikethrough on Google Docs on various operating systems and devices.

What is the shortcut for strikethrough in Google Docs? Alt + Shift + 5, when pressed together, can strikethrough text on a document in Google Docs, Google Sheets, and Google Slides. To remove it, press the same combination of the keys after selecting the text.

How can I do strikethrough text in Google Docs?

Before moving to the detailed steps to cross your text in a document on the online word processor, make sure you have these things:

  • A working web browser.
  • Access to your Google account.
  • Google Docs app (if working via phone or tablet)

1. Using the keyboard shortcut

  1. Launch your preferred browser, open Google Docs, then the document you want to use.shortcut to add strikethrough Google Docs
  2. Highlight the text, press Alt + Shift + 5 on Windows, and for Mac, press Shift + Cmd + X.

2. Using the Format menu on desktops & laptops

  1. Launch your preferred browser, open Google Docs, and then the document you want to use.
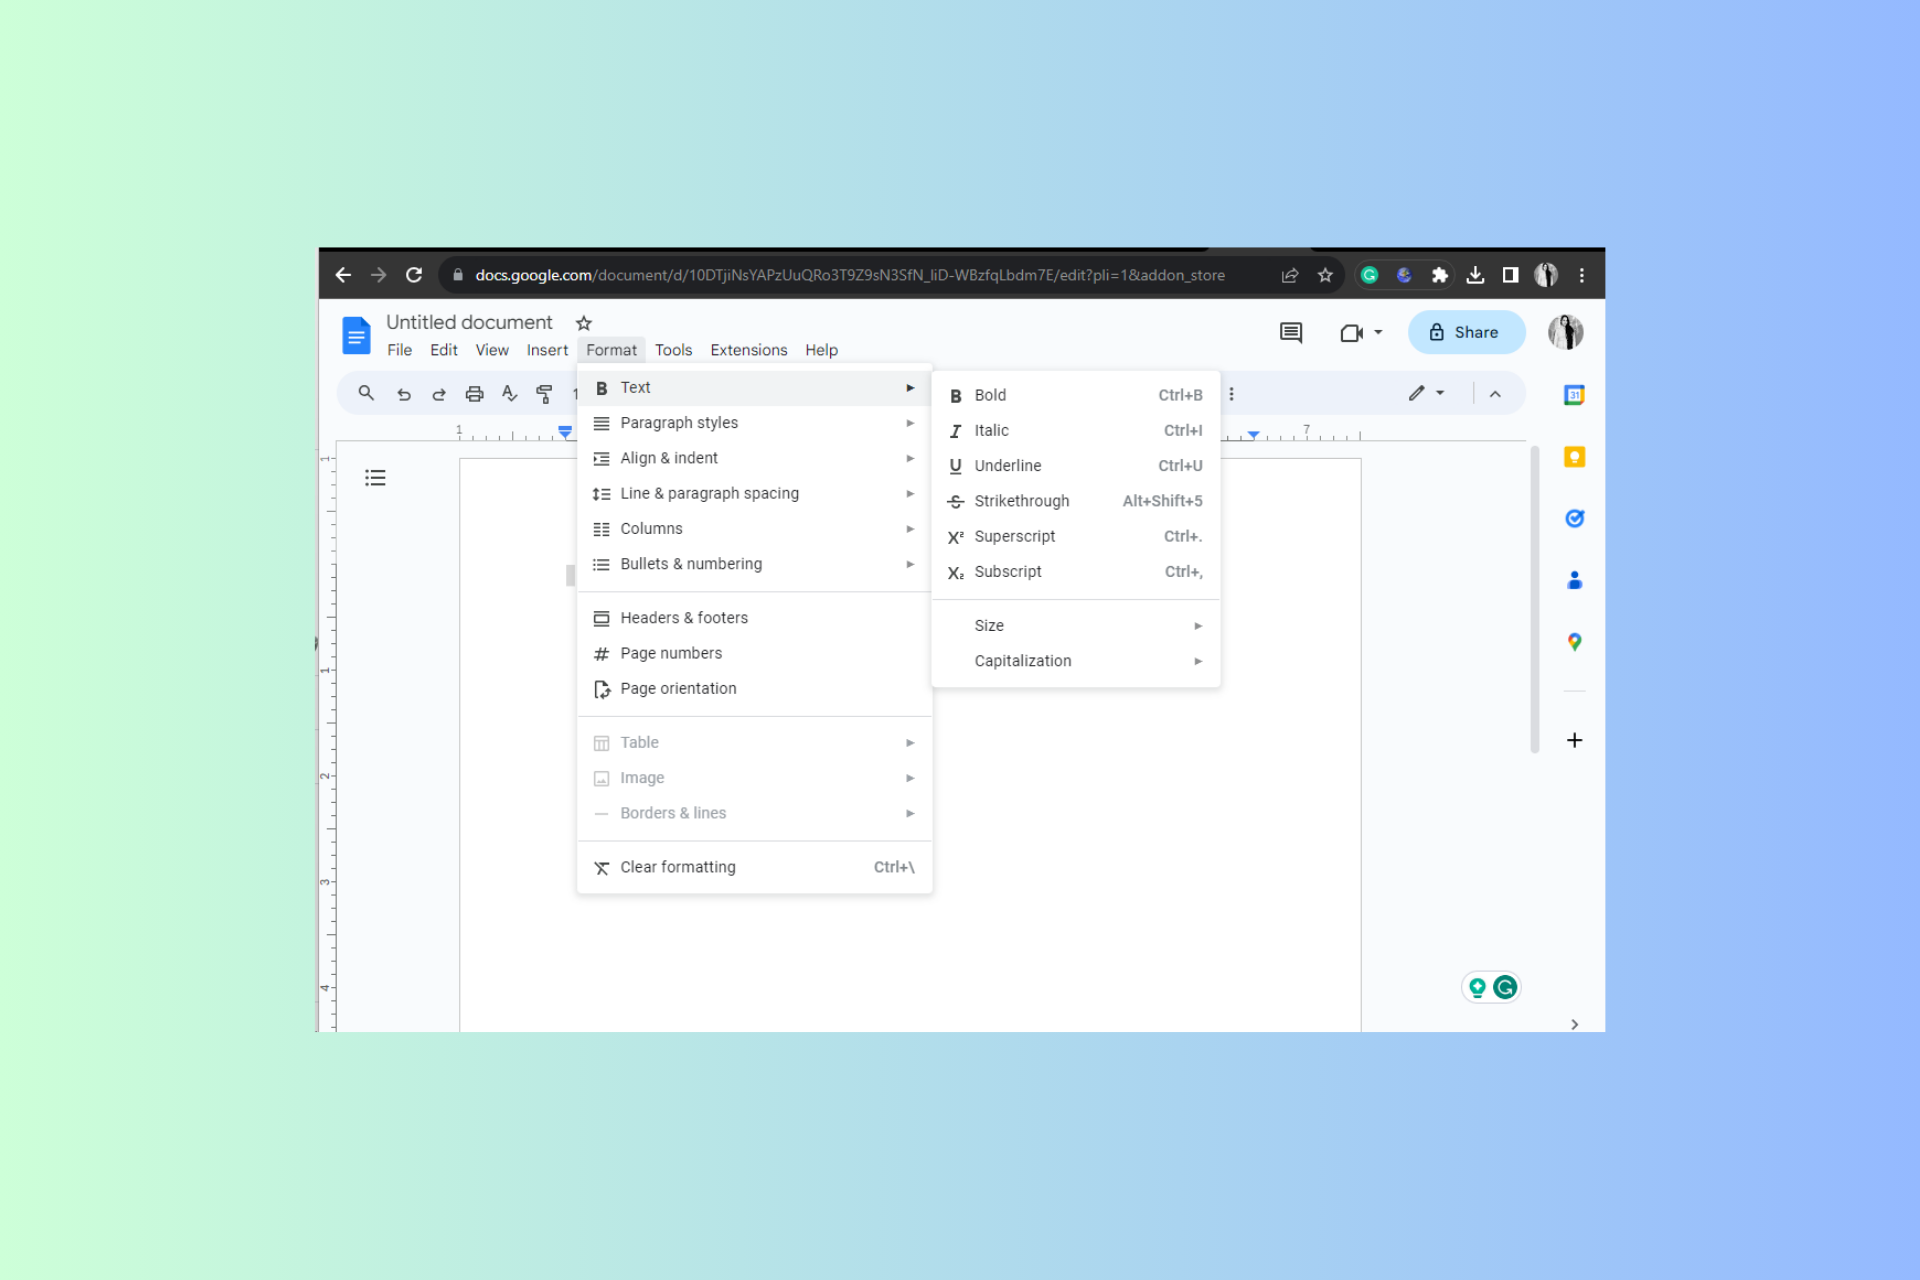
  2. Highlight the text, go to the Format tab on the menu bar, hover over Text, and select the Strikethrough option.Strikethrough google docs Format menu
  3. You can also write text with this format by using Step 2 on an empty document.

If you are into content creation, apart from the Strikethrough feature, there are other handy features that come with Google Docs. One such is an Outline feature; read this guide to learn how to enable it.

3. Using the Google Docs app on your mobile device

  1. Locate the Google Docs app from your home screen and tap it to Open.
  2. Open a document you want to use, and tap on the text you want to highlight.
  3. On the Android or iOS phone, locate and click the underlined letter A from the top.On the Android or iOS phone, locate and click the underlined letter A from the top.
  4. A pop-up with options will appear, then go to the Text tab and tap the Strikethrough symbol.A pop-up with options will appear, then go to the Text tab and tap the Strikethrough symbol. Google Docs

You can use any of the methods on your compatible device to enable the Strikethrough feature on Google Slides & Google Sheets as well.

If you are into editing documents, you might be interested to know how to use the em dash in Google Docs; read this guide to learn more.

How to remove strikethrough in Google Docs?

To remove the strikethrough function in Google Docs, select the text, then press the keyboard shortcut combination depending on the OS or reverse engineer the steps using the Format option from the menu bar.

However, if you wish to clear the entire formatting, highlight the text, then press Ctrl +\ on Windows and Cmd + \ on Mac.

Wherein tap on the text to select it, then tap the underlined letter A on your mobile app, and select the Strikethrough symbol to remove it. You can tap the Clear formatting option from the same pop-up to remove all formatting.

To conclude, you can use any method to enable or disable the function, depending on your operating system.

However, you must keep a few tips in mind while using the Strikethrough feature on Google Docs, such as being consistent, using it to highlight changes, avoiding overusing it, relying on keyboard shortcuts to turn on or off the feature, making it more accessible.

In case you use Google Docs more often, you should also know how to view a document anonymously on the platform; read this guide for more details.

If you have questions or suggestions about the subject, feel free to mention your thoughts in the comments section below.

How to Unarchive Emails on Gmail

Sometimes, you may archive an email from your Gmail inbox knowingly or unknowingly. There’s a good chance you won’t want that email back, but if you ever do, you’ll be happy to know that all is not lost.

The good thing is these emails are not deleted, and unarchiving them isn’t rocket science, as you shall see below.

Why unarchive emails?

  • You want to import old mail into new Gmail and are looking for important messages to bring along.
  • You’re looking to follow up with someone who might have missed your original email.
  • Your account was deleted and unrecoverable, but you’ve restored it and want to access old emails.
  • You want to review old messages as part of an audit or compliance issue.
  • You want to print out something from an archived message.

How do I unarchive emails in Gmail?

1. Gmail for web

  1. Log into your Gmail account on a browser of your choice.
  2. On the left-hand pane, click on All mail.
  3. Check the boxes next to the emails you want to unarchive, then click on the Move to inbox icon.
  4. Alternatively, you can open individual email messages and click on the Move to inbox icon.

2. Gmail mobile

  1. Launch your Gmail app.
  2. Tap on the menu icon in the top left corner and click on All mail.
  3. Next, tap and hold on the email message to select, tap on the three ellipses at the top right corner, and select Move to inbox.
  4. Alternatively, you can tap to open the email, tap on the three ellipses at the top right corner, and select Move to inbox.

What are some tips and tricks for easily accessing archived emails on Gmail?

  • Quick undo – If you accidentally archive an email, you have a window of five seconds to restore it to your inbox.
  • Create labels – Labels are a handy way to organize your inbox and make it easier to find specific messages. This way, if you want to restore archived emails, you can easily spot them.
  • Use the search bar – You can type in a phrase from an email you want to access, and it’ll show up at the top of your results list. For a more refined search, use the Advanced search feature.
  • Use filters – If you have a large pile of emails, filters can help you access archived emails easily and quickly. You can filter by date, sender, and attachments, among other variables.

How long do archived emails stay in Gmail?

Archived emails will stay in your Gmail until you delete them. They have no expiry date, making it an ideal way to organize your mail. You don’t want to delete it and lose your only copy. But you don’t want it cluttering up your inbox, either.

And if you deleted it, you can also recover deleted archived mail. If you want to get rid of your archive entirely, consider making your emails go to a specific folder to locate them easily and enhance better storage and organization of your inbox. You can also stop syncing emails across different devices.

Hopefully, you don’t find yourself in this situation too often, but if it happens to you, just follow the steps mentioned above to unarchive your Gmail emails. You’ll be able to get back to the task of responding to your messages and staying on top of your inbox. Moreover, if you want to know how to highlight text in your emails, we can help out!

Let us know if this worked, or if you know of any other reliable way of doing it.

How to Turn Off Google Trending Searches [For All Devices]

While Google remains our go-to option for exploring the web, trending searches are a concern for many who look for ways to turn it off. As soon as you click Google’s search bar, it automatically populates the list with search suggestions.

While this comes in useful if you are interested in the popular searches in your region and worldwide, it’s often a hindrance for those with a curated search query.

Why am I getting trending searches on Google?

Trending searches are Google’s idea of presenting popular queries to you. It compiles search queries from across the globe, analyses them, and presents the most popular ones based on what Google thinks you might be looking for.

Remember, trending searches are different from Google Trends. The latter presents the most searched terms daily or in real-time. 

How do I get rid of trending searches on Google?

1. On a PC (Chrome, Edge, Firefox, and Opera)

  1. Open the Google homepage, click the Settings option near the bottom-right corner, and select Search settings from the flyout menu.search settings
  2. Go to Other settings from the left panel, and disable the toggle for Auto-complete with trending searches.turn off trending searches

It’s easy to turn off Google trending searches on a PC, be it in Google Chrome, Microsoft Edge, Mozilla Firefox, or Opera browser. It works the same way on all!

2. On mobile (Android and iOS)

  1. Open Google on your mobile’s browser, and click the hamburger icon near the top-left corner.menu
  2. Select More settings from the menu.more settings
  3. Go to the Other settings tab.
  4. Disable the toggle for Auto-complete with trending searches.turn off trending searches on mobile

As was the case earlier, disabling popular searches on Google works the same way across Android and iOS devices and also mobile browsers, including Safari. If you are not a fan of Google recommending stuff, consider removing the most visited sites from Chrome.

3. On the Google app

  1. Open the Google app, and tap the profile icon near the top-right corner.
  2. Select Settings from the list of options.settings
  3. Tap on General.general
  4. Finally, disable the toggle for Auto-complete with trending searches, and tap Done to save the changes.turn off trending searches in Google app

Why can’t I remove trending searches on Google?

  • The changes might just not reflect yet. Restart the browser, and trending searches will disappear!
  • You are running an outdated version of the browser or the Google app. Update the one you are using. 
  • If trending searches keep returning on Google, you may have cleared the search history, which, in turn, reconfigured the settings to default.
  • Others who access the same account may be re-enabling the feature each time.

For privacy and efficiency-oriented users, it will be beneficial to disable trending searches from appearing on the Google homepage. Besides, you may also consider disabling Search highlights on Windows 11 if running the latest iteration of the OS.

Remember, Google searches can be a problem for some. For instance, users saw their searches appearing on other devices, a massive privacy concern. Or a few had Google history show searches that were never made. But it can all be fixed in no time!

For any queries or to share your thoughts on popular searches, drop a comment below.

Solved: We Restrict Certain Activity to Protect Our Community

Your activity on Instagram can sometimes lead you to problems like the We restrict certain activity to protect our community error message. It may stem from something such as not having a valid phone number or unknowingly sharing/commenting on certain posts.

If you’re lucky, it can be a minor glitch that will go away in a few hours, but in the worst-case scenario, you’ll have to wait a couple of days to regain access to your account.

What do We restrict certain activities to protect our community mean?

When you use Instagram, you are subject to its Terms of Use. This means your activity and behavior on the platform are monitored and restricted to protect the community. Some features, like Instagram music may be unavailable if you violate these terms.

How long does Instagram restriction last?

It depends on the type of violation that got you banned, the severity of your violation, and how many times you’ve broken those guidelines in the past.

Typically, the restrictions can last anywhere from 24-48 hours, especially for new users who encounter the We limit how often you can do certain things on Instagram error. Sometimes, it can be up to 30 days.

How do I fix the We restrict certain activity to protect our community error?

Start off with the following basic steps before moving to the technical solutions:

1. Update your profile

  1. Open your Instagram app and click on your Profile picture at the bottom right corner.
  2. Next, tap on the menu at the top right corner and select Settings.
  3. Tap on Account.
  4. Next, select Personal information and update your details from email address to phone number and date of birth.

Be sure to only fill in factual information and link to accounts you personally own. If the information you provide deviates from the truth, your account may be banned permanently.

2. Enable Two-factor authentication

  1. Open your Instagram app and click on your Profile picture at the bottom right corner.
  2. Next, tap on the menu at the top right corner and select Settings.
  3. Tap on Security.
  4. Find the Two-factor authentication option.
  5. Select one or more of the methods listed where the authentication code will be sent.

3. Clear cookies and cache

  1. Open your Instagram app and click on your Profile picture at the bottom right corner.
  2. Next, tap on the menu at the top right corner and select Settings.
  3. Tap on Account.
  4. Select Browser settings.
  5. Tap on Clear cookies and cache.
  6. Tap on Clear browsing data in the next prompt.

4. Remove suspicious devices from your account

  1. Launch your Instagram app.
  2. Click on your profile icon and select Settings.
  3. Next, tap Security.
  4. Select Login Activity. 
  5. You should see a list of all locations where you’re currently logged in. Note that the top result should display an Active now tag.
  6. If you spot a suspicious device or location, tap on the three ellipses next to it and select Log out.

This could also be done more easily by using specialized security software, such as TotalAV, this tool will scan your device, remove any threat to your accounts, and protect you from future issues.

5. Set up message filters

  1. Open your Instagram app and tap on the messages icon.
  2. Tap on Requests.
  3. Again, tap on Decide who can message you.
  4. Here, decide whether to receive the requests based on your relationship with the users.

If you’ve been receiving a lot of spam messages, Instagram may have flagged your account as a bot because of the inorganic interactions, which goes against the community guidelines.

6. Delete links from your profile

As a business or individual, you may have put up links on your bio to your shop/blog or any other affiliation to you for further action. If this link has been hijacked by cybercriminals, it may be considered spam hence why your account is being restricted.

It would be a good idea to remove the link from your profile as you try to figure out whether everything is okay on the other side.

7. Remove third-party apps

If you have enabled third-party apps to post on your behalf or perform other tasks, you can go to Settings>Security>Apps and websites and then temporarily remove them.

Some of these apps may be classified as bots or even scams, and since they perform unauthorized actions most of the time, any unusual activity may be flagged as a violation and lead to account restrictions.

8. Reinstall the Instagram app

The app may have temporary glitches, especially if it is old or has compatibility issues with your device. Reinstalling it will clear old files that may have been corrupt and interfered with the app’s work.

9. Contact support

If you’re positive that you have not violated any of Instagram’s community guidelines, you can contact its customer support and argue your case. Sometimes, even Instagram makes mistakes.

Once you appeal, Instagram will review your request and may reinstate your account if it establishes the restriction was anot in order.

What are some common reasons for activity restrictions?

  • Illegal activities – Illegal activities like drug trafficking, child exploitation, and sex crimes are unacceptable on the platform.
  • Copyrighted content – Sharing of images/videos that you don’t own or have no right to share can lead to account restrictions. You may get the something went wrong error, and posts may fail to load.
  • Harmful activity – You may not encourage or promote intentional self-harm or share violent or graphic images.
  • Spamming – Any kind of automated activity unrelated to organic engagement, including liking or commenting on photos just to gain followers or likes, is grounds for restrictions.
  • Unusual or suspicious activity – This can include accounts that are posting unusually large amounts of content, multiple duplicate posts, or inorganic follower increase in a short period.
  • Inappropriate content or hate speech – Your account may be restricted if you post images or videos of nudity or sexually explicit content, violence, explosives, or bullying/hate speech.

As you try to figure out ways to regain access to normal posting on your account, avoid any backdoor techniques as you may find out you can’t login to your Instagram account completely.

Ultimately, adhering to the community guidelines is the best way to avoid such errors. Once you understand what is expected of you, avoiding mistakes and staying within limits without compromising your account will be easier.

Before you go, you might be interested in a similar Wait for a few minutes Instagram error.

Has your Instagram account been restricted before? We’d love to hear what steps you took to lift the restrictions. Drop us a comment down below.

Solved: Your VAIO Failed to Start Windows

The Your VAIO failed to start Windows error message appears at boot and prevents the operating system from loading. In some cases, after repeated attempts, you may come across a black screen with the Sony VAIO laptop not starting. 

We tracked it down, and the problem could be with Windows, the hardware, or the connected peripherals. And it’s fairly easy to get things up and running in most cases!

Why is my VAIO laptop not starting?

VAIO laptops don’t start when the system files are corrupt, or the BIOS boot options are misconfigured. If you can get to the Automatic Boot Repair or Startup Repair, it is most likely the former.

Besides, we can’t rule out the possibility of a malfunctioning hard disk/SSD or bad sectors on the drive.

How do I fix my Sony Vaio boot?

Before we start with the slightly complex solutions, try these quick ones first:

  • Press the power button to turn off the computer, then restart it and check whether the error message disappears.
  • Make sure the hard disk is properly connected to the PC. Check for loose connections and fix them.
  • Remove any non-critical peripherals connected to the PC. This includes your mouse and keyboard. Often, older models could be the reason the Sony VAIO operating system is not found.

If none work, head to the fixes listed next.

1. Change the Boot Mode

  1. Press the Power button to turn off the computer and then power it on.
  2. On the error screen, click on Start BIOS setup.start BIOS setup
  3. Go to the Boot tab, and select Boot Mode under Boot Configuration. For some models, the mouse doesn’t work in BIOS, so you will have to use the cursor keys to navigate and Enter to select an option.
  4. Now, choose Legacy if UEFI is currently selected.Legacy to fix your vaio failed to start windows
  5. Once done, hit F10 to save the changes and exit the BIOS.

When the laptop reads, Your VAIO failed to start Windows, and Windows won’t boot, change the Boot Mode to Legacy. And once the laptop loads the OS, you may fix problems with the UEFI mode. 

2. Go into Start Vaio Care (Rescue Mode)

  1. On the error screen, click the Start VAIO Care (Rescue Mode) option near the bottom right.Rescue Mode
  2. Next, click on Shut down.
  3. Now, wait for a few minutes, then power on the device, and it should load the OS.

3. Reset the BIOS

  1. Click the Start BIOS setup recovery option.BIOS
  2. Once the PC loads the BIOS, press F9 or F3, as the case may be, to load the setup defaults.
  3. Choose the appropriate response in case a confirmation prompt appears. 
  4. Now, hit F10 to save the change and exit the BIOS.reset BIOS to fix your vaio failed to start windows

If the boot device sequence or other BIOS settings were recently changed, especially after an automatic BIOS update, resetting it will do the trick! Besides, it also helps when the PC is stuck restarting.

4. Reinstall Windows

 In case the previous solutions didn’t work, you may consider reinstalling Windows. This can be achieved through the installation disc that came along with the PC, or you can create a bootable USB drive.

Once done, simply reinstall Windows. Remember, this will wipe out all the stored data on the PC, but it will work fine unless the problem is hardware-related.

5. Get the hardware inspected

When nothing else works, it’s most certainly a failing boot drive. HHDs (Hard Disk Drives) typically have a life span of 4-6 years, while SSDs (Solid State Drives) can last up to 10 years.

So, if yours has already crossed that threshold, consider replacing the drive. Besides, if you are presently using an HDD, we recommend switching to a reliable SSD for faster performance and minimal issues. This also helps when the laptop freezes while performing automatic maintenance.

To conclude, when the Sony VAIO operating system is not found, you should boot from USB and reload the OS. Once you have things up and running, consider improving the boot speed of Windows.

For any queries or to share which fix worked for you, drop a comment below.

Where Are Fonts on Windows 11? Folder Location & More

Have you ever wondered where all those fonts on your computer are stored? Knowing where to find your fonts is crucial whether you’re a graphic designer or someone who likes to personalize their system. In this piece, we will walk you through the font locations in Windows and show you how to manage them effectively.

Font locations might be missing due to a Windows error or a corrupted file. Those issues can be easily solved with the help of professional repair software.

How to find fonts on your computer

In Windows 10 and Windows 11, fonts are primarily stored in the same directory, C:\Windows\Fonts. This default font folder contains all the preinstalled fonts and user-installed fonts.

How to Navigate to the Fonts Folder

Method 1: Using File Explorer

  1. Open File Explorer by pressing Windows Key + E.
  2. Now open your C drive > Windows > Fonts folder.

Method 2: Using Control Panel

  1. On your taskbar, open the Search field and type Control Panel. Hit Enter.
  2. In the top-right of the Control Panel windows, in the Search Control Panel bar, type fonts and press Enter.

Method 3: Using Shell Command

  1. Press Windows Key + R to open the Run dialog box.
  2. Type shell:fonts and press Enter.

Creating a Shortcut to the Fonts Folder

Having quick access to the fonts directory can be helpful. Here’s how to create a shortcut:

  1. Navigate to the Fonts folder using the above methods.
  2. Right-click on the Fonts folder, then click on Show more options.
  3. Choose Send to and then Desktop (create shortcut).

Now, you’ll have a shortcut to the default font folder location on your Windows 11 desktop for easier access. You can even use a keyboard shortcut to open it: right-click the shortcut > click Proprieties > click Shortcut tab > under Shortcut key, add your preferred key combination.

Remember that depending on your user profile, you might need administrative rights.

Adding or Removing Fonts

To Add Fonts:

  1. Download the font file (usually TTF files or OTF files). If it’s archived, unzip it.
  2. Open the Fonts folder.
  3. Drag and drop the downloaded font file into the folder.

To Remove/Uninstall Fonts:

  1. Open the Fonts folder.
  2. Locate the font you wish to remove.
  3. Right-click on the font and choose Delete.

Downloading and Installing New Fonts

Adding additional fonts can give your projects a new look. You can add Thai fonts, TrueType fonts, non-European fonts, 3D fonts, or even custom fonts.

  1. Visit a reputable font website like Google Fonts or DaFont.
  2. Choose a font and download the file.
  3. Follow the steps above to Add Fonts.

If you want more details on how to download fonts on Windows 10 and 11, check out this guide. Also, if you want to download Microsoft Office fonts, the process is pretty similar.

Conclusion

Knowing where fonts are stored and how to manage them empowers you to take full control of your system’s aesthetics and functionality. From locating the default fonts folder location to adding or removing fonts, these simple steps can make a big difference in how you use and personalize Windows 10 and Windows 11.

You can also use fonts software to create your own. If that’s too time-consuming, check out the most popular fonts for Windows 11 that you can download right now.

How to Disable End-to-End Encryption in WhatsApp

Enabling end-to-end encryption adds an extra layer of protection on WhatsApp to prevent anyone other than the sender and receiver from accessing it. But have you ever thought of disabling it?

Would there be any possible advantages of doing so? We explore how to turn off this feature and the possible repercussions.

Why Disable End-to-End Encryption in WhatsApp?

  • You want to use third-party or modded apps.
  • Share your content with others, such as when sending a photo or video to someone else.
  • You’re looking to decrypt your messages.
  • You are having issues with WhatsApp especially when backing up your chats.

How do I turn off end-to-end encryption on WhatsApp?

1. Android devices

  1. Launch the WhatsApp app on your phone, tap on the three ellipses, then select the Settings menu.
  2. Tap on Chats.
  3. Next, tap on Chat backup.
  4. Tap on End-to-end encrypted backup.
  5. Now tap on Turn Off.
  6. You’ll be prompted to enter your encryption key or the 64-digit encryption key. If you lost it, tap on I lost my encryption key and follow the on-screen instructions.

2. iOS devices

  1. Launch the WhatsApp app on your iphone.
  2. Tap on the Settings icon at the bottom right corner and tap on the Chats tab.
  3. Now tap on Chat Backup.
  4. Locate End-to-end Encrypted Backup and tap on it.
  5. Tap on Turn Off, enter your security key and the feature will be disabled.

In the latest version of WhatsApp, end-to-end encryption for chats is enabled by default. This means whenever you start a new chat, you will get a notification that your messages are now end-to-end encrypted.

However, you can turn off end-to-end encryption for cloud backups saved in your Google Drive or any other backup service provider.

Can end-to-end encryption be decrypted?

You don’t have to worry about unauthorized access to your personal messages because WhatsApp cannot decrypt them. This is because encryption by default is for all chats, and even for backup encryption, they would need access to your backup encryption key.

This applies to law enforcement agencies. If anyone has been suspected of illegal activities and it was a legal requirement to surrender WhatsApp chats, the company would be unable to comply because they don’t have access.

However, another loophole is when you create WhatsApp backups and edit your encryption settings to disable the feature. Your messages will be stored unencrypted on the servers leaving your data vulnerable to anyone who can access them or other third-party apps associated with your backup solution.

And that’s how you disable end-to-end encryption in WhatsApp. As you can see, the process isn’t particularly difficult. However, disabling the end-to-end encryption isn’t a good security practice, and we don’t recommend it.

If its problems with WhatsApp web not working or Whatsapp won’t sync messages, switch to the app version instead of getting rid of your extra layer of security.

Do you prefer the end-to-end encryption security feature on or off? Let us know in the comment section below.

How to Block a Website in Chrome [4 Ways]

It’s important to know how to block a website in Chrome, especially if that website is harmful or distracting and interferes with your everyday activities.

This is pretty simple to do, and it only takes a couple of clicks, so in today’s guide, we’re going to show how to do that on your PC.

Does Google block some websites?

By default, Google blocks certain websites that are unsafe, malicious, or websites that promote illegal activities.

How can I block a certain website on Google Chrome?

1. Use the Chrome extension

  1. Visit the StayFocusd extension page and click Add to Chrome.
     
  2. Click on Add extension to confirm and wait while the browser extension is downloaded and installed.
  3. Once the extension starts, set Max Allowed Time per Day to 0 or any other value and click on Save Changes.
  4. Next, click on Add blocked websites.
  5. Enter the domain name in the correct format and click on Add blocked website.
  6. Repeat the last two steps for all websites you want to add to the block list.

2. Add a firewall rule

  1. Press the Windows key + X and choose Windows Terminal (Admin).
  2. Next, type ping and the domain that you want to block. In our example, we used ping facebook.com
  3. Now you’ll get the IP address of that domain. Save it, because you’ll need it for future steps.

After you’ve obtained the address you need to create a firewall rule by doing the following:

  1. Press Windows key + S and type firewall. Choose Windows Defender Firewall with Advanced Security.
  2. In the left menu, go to Outband Rules and click on New Rule.
  3. Select Custom and click Next.
  4. Now choose This program path and click Browse.
  5. Select chrome.exe from its installation directory. On our PC that’s: C:\Program Files\Google\Chrome\Application
  6. In the Protocol and Ports section, click on Next.
  7. In the Which remote IP addresses does this rule apply to select These IP addresses and click the Add button.
  8. Now paste the IP address of the website you want to block and click OK.
  9. In the next screen, select Block the connection.
  10. On the Profile screen, click Next.
  11. Lastly, add a name and description for your rule, so you can easily recognize it.

3. Edit hosts file

  1. In the Search bar type notepad. Locate Notepad on the list, right-click it, and choose Run as administrator.
     
  2. Go to File and select Open.
  3. Navigate to C:\Windows\System32\Drivers\etc\hosts
  4. Set the file type to All files and double-click on hosts.
  5. At the end of the file add the following line: 0.0.0.0 example.com
  6. Save changes.

This solution will block the website for all applications and not just the Chrome browser.

4. Modify router settings

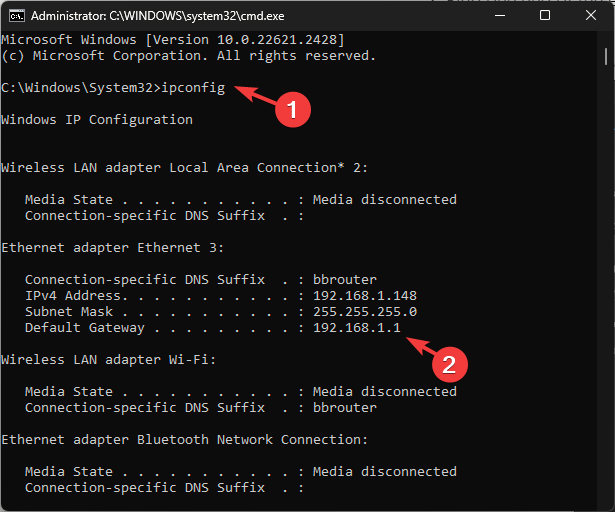
  1. Go to your router’s configuration page by typing router IP in the address bar and log in.
  2. Next, locate the Parental Control option in the Security menu.
  3. Add the IP address of the website or its domain name.
  4. Make sure to add the IP address of the device that will be affected by this rule, unless you want to block the website on the entire network.
  5. Save changes.

Keep in mind that this solution affects the entire PC and not just your Chrome browser.

How to block websites on Chrome mobile?

For Android device

  1. Download AppBlock on your phone.
  2. Start the app and tap on Add in the Quick Block section.
  3. Go to Webs, enter the name of the website, and tap on Save.
  4. Make sure that the app has the necessary permissions to work properly.

For iPhone device

  1. Tap on Settings and choose Screen Time. Select Content & Privacy Restrictions and then Web Content.
  2. Select Limit Adult Websites and then choose Add Website.
  3. Enter the website URL and save the changes.  After that, the website will be blocked on your mobile device.

Remove unwanted ads, pop-ups & malware in Chrome

  1. Open Settings in Chrome and go to Privacy and security and choose Site Settings.
  2. Select Pop-ups and redirects and make sure it’s set to Don’t allow sites to send pop-ups or use redirects.
  3. Go back to Site Settings and choose Additional content settings and then Intrusive ads.
  4. Enable Ads are blocked on sites known to show intrusive or misleading ads.
  5. To remove malware, go to Reset settings and choose Restore settings to their original defaults.

If you want to block a website in Chrome, the easiest way is to use a third-party extension, but if you want a more reliable solution, consider adding a firewall rule that blocks that page. If you need something simpler, then you can use specialized software to block websites on your PC.

For additional security, many users prefer using antivirus with web filtering to achieve the same results. While the focus of this guide was on Chrome, you can apply most of these solutions to block websites in Microsoft Edge as well.

In case you encounter issues with blocked websites, our guide on how to allow Chrome to access the network in your firewall can help you fix it.

What method do you use to block websites in Chrome? Share your experiences with us in the comments section.

Solved: Facebook Dating is Not Showing Up

Many users reported that Facebook Dating is not showing up to them at all. This can be a problem since you won’t be able to access the feature at all.

Luckily, there are a few solutions you can use to fix this problem, so keep on reading to learn more.

Why is Facebook Dating not available to me?

If Facebook Dating is not available, it’s because you’re in a region that doesn’t have it available, or the Facebook app doesn’t have access to your location.

Then, there’s the corrupt app cache or running an outdated version of the app can also cause this problem.

How do I fix Facebook Dating if it’s not showing up?

Before we start ensure that your account has been active for at least 30 days. Try restarting or updating your Facebook app. Also, check if the Facebook servers are properly running.

Changing your relationship status to single and setting your age to at least 18 should enable this feature. Using Facebook Lite can also help sometimes.

Note icon NOTE
The steps listed here are for an iOS device, but the idea remains the same across operating systems. The equivalent measures on an Android device will yield similar results and get things up and running. 

1. Enable the location services

  1. Open the iPhone Settings, and tap on Privacy & Security.privacy & security
  2. Now, go to Location Services.location services
  3. Scroll down, locate the Facebook app and tap on it.
  4. Choose While using the app under Allow location access, and then enable the toggle for Precise Location. allow location to fix facebook dating not showing up
  5. Once done, relaunch Facebook and check whether Dating appears in the navigation bar.

You will have to grant Facebook location permission when Dating is not showing. Also, if Facebook doesn’t appear under Location Services, go to Facebook Status > tap on Check in > choose any option (Allow once, Allows while using the app, or Don’t allow) in the prompt > the app will now be listed in settings.

2. Pin Dating to the navigation bar

  1. Launch the Facebook app, tap the three-line menu icon at the bottom right, expand Settings & Privacy, and tap on Settings.settings to fix facebook dating not showing up
  2. Select Navigation bar under Preferences.navigation bar
  3. Tap on Customize the bar.customize the bar to fix facebook dating not showing up
  4. Tap the dropdown menu next to Dating.
  5. Finally, select Pin, and Dating should appear in the navigation bar.pin dating

3. Clear the app cache

  1. Open your phone settings, and tap on General.general
  2. Tap on iPhone Storage.
  3. Select Facebook from the list of apps.Facebook
  4. Tap on Delete App to clear all related data and choose the appropriate response if a confirmation prompt appears.delete app to fix facebook dating not showing up 

For apps on iPhone, you can’t separately delete the data. It rather uninstalls the app. Try that and reinstall Facebook from the App Store. Or you could easily clear the app cache on Android since the functionality is available.

Besides, if there are already other issues with the app, fix them first, including Something went wrong on Facebook and the App not active Facebook error. These may indicate problems with the account which conflict with the dating feature.

This isn’t the only issue, you can encounter, and many reported that the Message button is missing on Facebook as well as the Add friend button. However, we tackled those issues in separate guides.

For more solutions, see our full guide on Facebook Dating not working.

For any queries or to share what worked for you, drop a comment below.

How to Change Your Display Name in Google Meet

To change your display name in Google Meet, you must change your name in your Google account or use a combination with your nickname. 

Can I change my name in Google Meet without changing the Google account name? No, you can’t.

Some of our readers also asked how to change their name in Google Meet while in a meeting, but it’s impossible. If you change your Google name, you will have to exit the meeting and rejoin.

How do I change my preferred name in Google Meet and Gmail?

1. How to change your name in Google Meet on PC

  1. Open a browser and log into your Google account.
  2. Type or paste the following line into the address bar and press Enter to access the name in the basic info section: https://myaccount.google.com/name
  3. Now, click on the Edit icon to change your name.
  4.  In the personal info window, you may change your first name and last name, then hit the Save button below.
  5. When you go back, you will also see that you can set a nickname for yourself. If you click the edit icon and enter a nickname as well, you will be able to change your display name in Google Meet or other Google apps with a combination of names and the nickname.
  6. Click on the Display name as.
  7. You will have three possible options to choose from: First name and Last name, First name Nickname Last name, or First name Last name (Nickname). Hit Save if you choose an option.

Now, your display name will be changed automatically in all Google apps that feature your display name, including Google Meet. However, we remind you that if you are currently in a Google Meet session, you need to exit and join the meeting again to see the change.

To complete the change, you might also want to change your profile picture. You can do that from the Google Account main page and click on the Personal info tab.

2. Change your display name in Google Meet using your mobile device

2.1 On an Android device

  1. Go to the Android Settings, tap on Google, and select Manage your Google account.
  2. Now, select the Personal info tab, tap the Name option, and change your name in the dedicated fields.

2.2 On iOS

The procedure is similar on iOS but you need to open the Gmail app on your iPhone, tap the menu button, and select Settings. Then, it’s the same method: go to Manage your Google account > Personal info > Name and change it.

As you can see, the procedure on your mobile phone is even easier than on a browser.

How to change your name on Google Meet as a student?

To change a name on Google Meet, you will have to contact the admin of your school or work account.

Only they can update your display name for Google Meet, Gmail, and other Google apps.

Utilizing other features that come with Google Meet

  • Changing the Google Meet background – To change the background in Google Meet, click the three vertical dots button, select Apply visual effects, and select a background from the Backgrounds category.
  • Joining Google Meet from Gmail – You can to a meeting straight from your Gmail account. Here’s a guide on how to join Google Meet from Gmail.
  • Connecting a meeting room system to Google Meet – Our guide on how to connect a meeting system to Google Meet will help you with that.
  • Changing the camera on Google Meet – Go to Settings in Google Meet, click on Video, and select the camera from the drop-down menu. You may also change the microphone from the Audio section.

Here we conclude our guide on how to change the display name in Google Meet and change how your name appears in video meetings.

You might as well be interested in our guide on how to hide the Google Meet buttons from Gmail.

For any other questions or problems you might encounter, go to the comments section below and leave us a note.

Outlook to let users share mail and calendar with others, regardless of permission

Outlook for Web, and the new Outlook, which will become the default Outlook client in 2025, will allow users to share mail and calendar with others, no matter the level of permission, in a new feature that grants greater inbox control, according to the latest addition on the Microsoft 365 Roadmap.

Outlook on the Web and the new Outlook for Windows provides users with the ability to share mail and calendar with other users at different permission levels. 

Microsoft

But this is not all, though. The feature will also include an option for admins to use a new policy – Turn off sharing recommendations. This policy will prevent users from sharing folders.

Outlook will get the new controlling inbox features in November, and it will be generally available on the web and desktop platforms.

Outlook allows greater control over inboxes: Why does it matter?

Being able to quickly share mail and calendars with other more privileged users, means that entry-level users won’t have to wait for permission to do so, and admins won’t have to worry about needing to grant that permission, in the first place.

It will allow for seamless communication using Outlook, and it will greatly reduce time in contexts when time would be an issue.outlook control inbox

Even more, the new policy coming with the feature will allow admins to stop unwanted folders from being shared with other users, potentially preventing malware and other forms of cyberattacks, such as phishing.

Once enabled, users won’t be able to share folders, unless explicitly allowed, making it a great tool to control inboxes on Outlook.

Microsoft will also release Copilot to Outlook next month, and the AI tool will be able to help users compose emails, replies, and follow-ups, so November is an important month for this app. And speaking of sharing folders, Outlook recently got a feature allowing users to save attachments in their preferred folder.

Latest Edge uses your browsing data to generate AI-answers on Bing Chat

Microsoft Edge has received a Bing Chat feature in the sidebar for some time now. Using it, you can ask complex questions and get answers, generate summaries, change Edge browser settings, and more.

Recently, Microsoft rebranded Bing Chat in the sidebar with a new Copilot icon and modified the Bing Chat settings to clearly convey that Edge will send browsing data to Microsoft for producing page summaries on Copilot.

Until now, the Bing chat setting Allow access to any webpage or PDF, enabled by default, informed users that they were Allow(ing) Bing chat to access their browser’s web content to personalize their experience with summaries and highlights.

The new setting available in Canary under Sidebar > Bing Chat > Allow Microsoft to access Page content clarifies that you’re sending browsing data to Microsoft to make AI-generated answers and suggestions more relevant on Copilot.

Send my browsing data to Microsoft to make Ai-generated answers on Copilot

When you ask Copilot in Edge to summarize text on a long page, Edge asks your consent for Microsoft to access the page content with the checkbox ticked to agree on Send my browsing data to make AI-generated answers and suggestions more relevant on Bing with an option to continue and confirm chatting.

Once you agree, the page summary will be generated by sending your query, previous conversation history, and full browsing context to Bing Chat. This also enables a related setting in the sidebar.

Next time, Bing chat automatically generates a summary and sends it to Microsoft without obtaining your consent again. Remember this and avoid using Bing chat on sensitive information pages to protect your privacy. Alternatively, disable the Allow Microsoft to access Page Content setting if you don’t want to use it.

You can even go a step further. If you’re on Windows 11, telemetry and data collection are on by default, but you can also disable them.

What’s your take on Bing Chat or Copilot in Microsoft Edge? Let us know in the comments below how helpful it is in your daily routine.

Solved: Overwatch 2 Keeps Crashing on Windows 11

Many users have complained that Overwatch 2 has been crashing mid-game for no reason. If you are one of them, this guide can help!

We will discuss the potential causes of the issue along with expert-recommended fixes to put you back in the video game with uninterrupted excitement.

Why does Overwatch 2 keep crashing my computer?

  • Compatibility issues due to outdated graphics drivers.
  • Your system doesn’t meet the system requirements, causing performance issues.
  • Software conflicts or corrupted game files.
  • Overheating or overclocking.

How do I stop Overwatch 2 from crashing on Windows 11?

Before proceeding with any steps to fix Overwatch 2 crashing on Windows 11, go through the following preliminary checks:

1. Repair files on Battle.net

  1. Press Windows + E to open the File Explorer window.
  2. Go to Documents, locate the Overwatch file, and rename it Overwatch.old.
  3. Press the Windows key, type battlenet, and click Open.Battlenet - overwatch 2 keeps crashing windows 11
  4. Go to the Library section, go to Overwatch 2, then select the Settings menu.
  5. Click Game Settings.Select Game Settings
  6. Select Additional command line arguments, copy & paste this command, and click Done: --tank_WorkerThreadCount 2 -d3d11 -threads 2Additional command line arguments
  7. Now click the Settings icon again, and select Scan and Repair.Settings icon again, and select Scan and Repair
  8. Next, click Begin Scan, wait for 15 minutes, and it will inform you if it fixed any files.Begin Scan

2. Change the compatibility settings for the game

  1. Navigate to this path: C:\Program Files (x86)\Overwatch
  2. Right-click the game’s exe file and select Properties from the context menu.Right-click the game and select Properties from the context menu -overwatch 2 keeps crashing windows 11
  3. Go to the Compatibility tab, remove a checkmark next to Disable fullscreen optimizations, and place one next to Run this program as an administrator.explorer_run as admin
  4. Click Apply, then OK to save the changes.

3. Update/reinstall your graphic driver

  1. Press Windows + R to open the Run dialog box.Device Manager Run command -overwatch 2 keeps crashing windows 11
  2. Type devmgmt.msc and click OK to open Device Manager.
  3. Locate and click Display adapters to expand it.
  4. Right-click the graphics driver and select Update driver.Graphics Driver update
  5. Click Search automatically for drivers, then follow the on-screen instructions to complete the process.Update driver 2
  6. If no update is available, right-click the driver and select Uninstall device.Uninstall graphics driver
  7. Go to Action, then select Scan for hardware changes to reinstall the graphics card driver & resolve compatibility issues.Action scan for hardware changes

4. Run an SFC scan

  1. Press the Windows key, type cmd, and click Run as administrator.CMD elevated overwatch 2 keeps crashing windows 11
  2. Type the following command to identify and replace the problematic system files with a clean copy from the local cache or the original installation media and hit Enter: sfc /scannowSFCSCANNOW CMD
  3. Once the commands are executed, restart your computer to let the changes take effect.

5. Adjust the graphics settings

  1. Press Windows + I to open Settings.
  2. Go to System, then click Display.System display -overwatch 2 keeps crashing windows 11
  3. Choose Graphics.Graphics  -overwatch 2 keeps crashing windows 1
  4. Click Browse and look for the Overwatch game folder on your computer, then select Add.
  5. Once added, click the app, then select Options.Options
  6. Choose High performance or Let Windows decide (High performance) and click Save.Choose High performance and click Save

6. Change the Power plan

  1. Press Windows + R to open the Run dialog box.Type powercfg.cpl and click OK to open the Power plans - overwatch 2 keeps crashing windows 11
  2. Type powercfg.cpl and click OK to open the Power plans.
  3. Select the High Performance option, then close the window. Launch the game to check if the issue persists.explorer_High performance

7. Allow the game through the firewall

  1. Press the Windows key, type control panel, and click Open.Control Panel start menu -overwatch 2 keeps crashing windows 11
  2. Select Category as View by and choose System and Security.System and Security CP
  3. Click Allow an app through Windows Firewall under the Windows Defender Firewall option.Windows Defender
  4. Click Change settings, then click Allow another app.Change app
  5. Next, click Browse, select the app, and click Add to include it in the list.explorer_click Browse, select the app, and click Add to include it
  6. Now locate the app, place a checkmark next to Public & Private, then click OK to save the changes.explorer_lace a checkmark next to Public & Private, then click OK to save the changes.

Maintaining a stable internet connection and allowing Overwatch 2 through the Windows firewall can help you prevent other issues like Overwatch Lost Connection to Game Server [LC-202] as well.

8. Set High Priority for Overwatch 2 and Battle.net

  1. Press Ctrl + Shift + Esc to open Task Manager.
  2. Go to the Details tab, and locate Battle.net.exe, then select Set priority, then select High.Battle.net.exe, then select Set priority, then select High. -overwatch 2 keeps crashing windows 11
  3. Locate Overwatch 2 and follow the same steps, then close Task Manager.

9. Reinstall the Overwatch app

  1. Press the Windows key + I to open the Settings app.
  2. Go to  Apps, and select Installed Apps.Apps - Installed apps -overwatch 2 keeps crashing windows 11
  3. Click the three dots next to Overwatch 2, and select Uninstall.Uninstall - overwatch 2 keeps crashing windows 11
  4. Click Uninstall again to confirm the step.Uninstall 2
  5. After Overwatch is removed from your PC, download the game from the Battlenet app.
  6. Follow the onscreen instructions to complete the process.

Reinstalling the app can also be beneficial if you are experiencing high CPU usage caused by Overwatch.

Does Overwatch 2 needs a high-end PC?

No, you can get 30 FPS in Overwatch 2 if your PC fulfills the minimum requirements, i.e., Memory 6 GB RAM, 50 GB free disk space, a graphics card NVIDIA GeForce GTX 600 series, AMD Radeon™ HD 7000 series, and Intel Core i3 processor.

Also, the game is not resource-intensive and can be played without any issues. However, corrupted game files of Overwatch 2 can cause it to crash.

Therefore, to avoid game crashes on your PC, keep your graphics driver updated, ensure there is sufficient space on your computer, and keep Windows OS updated to the latest version.

Did we miss a method that helped you? Don’t hesitate to mention it in the comments section below. We will be happy to add it to the list.

How to Connect an Access Point to a Wireless Router Without a Cable

If you want to extend your Wi-Fi reach to far corners of your home, office, or any space without cables, this guide can help!

We will discuss simple ways to connect an access point to a wireless router without a cable & boost your connectivity to enjoy a more expansive and efficient wireless setup.

How can I connect an access point to a wireless router without a cable?

Before proceeding with any steps to connect an access point to a wireless router, go through the following preliminary checks:

  • Make sure your wireless router and access point are in working condition, are capable of wireless connection, and have access to a power outlet.
  • You need a working laptop or desktop to configure the router settings.
  • Ensure the Access Point device supports bridging.
  • Make sure your wireless drivers are updated to avoid issues like problems with wireless adapter or access point.

1. Configure the main Wi-Fi router

  1. Press the Power button to turn on the router by connecting it to a power source.
  2. Plug one end of the ethernet cable into the modem and the other to the router, then connect it to the internet.
  3. Press the Windows key, type cmd, and click Run as administrator.CMD elevated -How to connect access point to wireless router without cable
  4. Type ipconfig and hit Enter. Locate and copy the IP address next to the Default Gateway option.cmd_ipconfig
  5. Next, open a browser & paste the Default Gateway address in the address bar, and press Enter.
  6. Input the username and password mentioned at the back of the router. Enable DHCP, found usually under the Services or Network Setup page.chrome_How to Connect an Access Point to a Wireless Router Without a Cable
  7. Now note down the following values you need to proceed with the setup on the Access Point:
    • The first and last address of the DHCP IP Pool range
    • SSID(name of the wireless network) and password
    • Security Mode ( such as WPA2-Mixed PSK) and the frequency band (2.4GHz or 5GHz)
    • The router’s Mac address; if you can’t find it on the Status or General settings page, look for it at the back of the router. You can skip it if both the routers are of the same brand.
  8. Before closing the router settings page, click Save Changes or Apply Changes to confirm the changes.
  9. The action will restart the router. Once rebooted, remove the cable from the Wi-Fi router.

For a detailed walkthrough on accessing your router settings, check out this guide on how to login to your router.

2. Set the static IP address for Wireless Access Point

  1. Connect your AP (the second router) and your laptop via ethernet cable like you did with the main router.
  2. Disable Wi-Fi and find the Default Gateway using the ipconfig command from the Command Prompt.
  3. Open a browser & paste the Default Gateway address in the address bar, and press Enter. Usually, for TP-Link, it is 192.168.0.1& for GX, it is 192.168.1.1
  4. Enter username and password, which is usually admin and admin.
  5. First, check the Working mode of the router; it should be AP.
  6. Locate WDS bridging mode; for the TP-Link router, go to Advanced>System Tools> System Parameters, then select Enable WDS Bridging.
  7. Next, input all the information you have noted down from the main router, including the first and last address of the DHCP IP Pool range, security mode, etc.
  8. Enter the SSID similar to the main Wi-Fi router, and enter the same password, security method, Wi-Fi channel, & frequency band as the main one.Connect an Access Point to a Wireless Router Without a Cable
  9. Next, go to LAN or a similar option and change the IP address to something close to the wireless router’s IP address. Let’s say your router’s IP address is 192.168.1.1; then set the IP address to 192.168.1.2 and click Save.
  10. Next, disable the DHCP Server, double-check the IP address under LAN, and click Save.
  11. Reboot your router.

3. Connect the Wireless Access Point to the main router

  1. Once you have configured both devices to connect them without a cable, press Wi-Fi-protected setup (WPS) on both routers simultaneously; as the new settings are saved, the router will restart.wps-5
  2. Keep the Access point or the second router away from the main one, but it should stay in the range for uninterrupted connectivity.
  3. You can now connect your wireless device to the internet using AP’s network credentials and test the speed.

What is the difference between a WiFi extender and an access point?

CategoryWi-Fi ExtenderAccess Point
FunctionalityReplicates & amplifies the existing Wi-Fi signal to extend coverage.Creates a new Wi-Fi network or extends the current one by connecting the main router via ethernet cable or wirelessly.
InstallationSet up is simple & involves pairing with the primary router; hence, no wired connection is needed.Requires an ethernet cable at least at the time of setup. Also, you must have the SSID and password handy to configure this one.
PlacementPositioned between the primary router & areas with weak Wi-Fi signals.Can be placed in areas where you want to extend the Wi-Fi coverage.
SSID and SecurityIt may have a different SSID than the primary router so that it can have several Wi-Fi networks.Can use the same SSID and security settings as the primary router, providing seamless connectivity.

If you want to understand more about access points and explore the differences between Wi-Fi Mesh and access points, read this guide.

Always keep both routers in range to attain seamless connectivity and uninterrupted internet. If the frequency band you are using is either 5GHz or 2.4GHz, keep the router within 200 ft, and keep them as high up as possible to ensure there are no physical barriers between them.

Also, be very careful while selecting the band frequency on your devices, as the interference between two frequencies could affect your Wi-Fi performance.

The guide explains the general method to connect an access point to your wireless router without cable; if you want tips specific to your router, feel free to mention your queries in the comments section below.

Fix: ESIF TYPE – IPF TIME Error on Windows 11

If your computer is crashing with a blue screen and you see ESIF TYPE – ERROR MODULE IPF Time on your Event Viewer on Windows 11, this guide can help!

We will explore some WR expert’s recommended methods after discussing the common causes of the issue.

What is ESIF TYPE – IPF TIME Error on Windows 11?

ESIF TYPE – IPF TIME Error is an event marked as an error in the Event Viewer, and it is related to the Intel Innovation Platform Framework (IPF) or Intel Speed Shift Technology (SST) on Intel-based PCs. Here are some probable causes of the issue:

  • Outdated or corrupted drivers.
  • Third-party software interference.
  • Misconfigured power or system BIOS settings.
  • System instability due to overheating, power supply issues, or memory problems.

How do I fix the ESIF TYPE – IPF TIME Error in Windows 11?

Before engaging in advanced troubleshooting steps to get rid of this error message, you should consider performing the following checks:

  • Ensure your Windows and BIOS firmware are updated to the latest version.
  • Press the Windows key, type event viewer, then click Open; look for the error, and click Details to determine the cause. If an app is responsible for the issue, reinstall it.
  • Reboot your PC and verify if you have a stable internet connection.
  • Backup your important data.

1. Run SFC & DISM scans

  1. Press the Windows key, type cmd, and click Run as administrator.CMD elevated
  2. Type the following command to identify and replace the problematic system files with a clean copy from the local cache or the original installation media and hit Enter: sfc /scannowCMD DISM & SFC  -esif type error module ipf time
  3. Next, copy & paste the following command to check if the component store is healthy and press Enter: Dism /Online /Cleanup-Image /CheckHealth
  4. To access the level of corruption, type the following command and hit Enter: Dism /Online /Cleanup-Image /ScanHealth
  5. Copy & paste this command to attempt to repair the Windows image by restoring the corrupted files with good copies from a reliable source and press Enter: Dism /Online /Cleanup-Image /RestoreHealth
  6. Once the commands are executed, restart your computer to let the changes take effect.

This process can be greatly simplified by using specialized third-party repair software. This tool will scan your system and repair or replace any broken or corrupted files within minutes and with just a few clicks.

2. Update the Intel IPF & Chipset driver

  1. Go to your computer’s motherboard manufacturer’s website; we have used an HP device to demonstrate the steps.
  2. Select the product from the Software and Drivers window from the Laptop, Desktop, and Other & Printer options.product from the Software and Drivers window from the Laptop, Desktop, and Other options.
  3. Enter your device’s serial number or allow the site to recognize your device, then select Submit.your device’s serial number or allow the site to recognize your device. -  ESIF TYPE - IPF TIME Error on Windows 11
  4. Once done, mention your Windows OS and click Submit.chrome_mention your Windows OS and click Submit.
  5. Click All drivers, then the Driver Chipset category to expand, locate the Intel Innovation Platform Framework driver and click Download.chrome_fClick All drivers, then the Driver Chipset category to expand, locate the Intel Innovation Platform Framework driver and click Download.
  6. Double-click the installation file and follow the on-screen instructions to install the updated version of the driver.
  7. Now look for Intel Chipset Installation Utility and Driver or anything related to SMB controller driver and click Download.
  8. Double-click the downloaded file and follow the on-screen instructions to update the driver.
  9. Once complete, restart your computer to save the changes.

3. Reinstall the Intel IPF & Chipset driver

  1. Press Windows + R to open the Run dialog box.Device Manager Run command -  ESIF TYPE - IPF TIME Error on Windows 11
  2. Type devmgmt.msc and click OK to open the Device Manager app.
  3. Locate System devices, and locate Intel (R) Innovation Platform Framework Manager, right-click and choose Uninstall device.Uninstall device
  4. Next, locate Intel(R) SMBus -7AA3 or similar, right-click it, and select Uninstall device from the context menu.
  5. Go to Action and select Scan for hardware changes to reinstall the missing drivers.Action scan for hardware changes
  6. Close Device Manager and check if the ESIF TYPE – ERROR MODULE IPF TIME still appears on the Event Viewer.

Also, go through the entire list of drivers mentioned and look for a yellow triangle. If found, right-click the driver and select Uninstall device, then reboot your computer to reinstall.

4. Perform a system restore

  1. Press Windows + R to open the Run window.rstrui command Restore point -esif type error module ipf time
  2. Type rstui.exe and click OK to open the System Restore window.
  3. Select Choose a different restore point and click Next.Next Choose a different restore point
  4. Now, select a restore point from the list and click Next.Choose a point
  5. Click Finish to initiate the restoration process.Finish

Windows will restart and try to take your system to the chosen point; however, if it comes up with an error like the Restore point was not successfully complete, read this guide to know the solutions.

5. Perform an in-place upgrade (Last resort)

  1. Visit the Windows 11 official download website and locate the Download Windows 11 Disk Image (ISO) for x64 option, select Windows 11 (multi-edition ISO), and click Download Now.
  2. Next, choose a language from the drop-down, click Confirm, then click the Download button.chrome_Next, choose a language from the drop-down, click Confirm, then click the Download button.
  3. Once the ISO file is downloaded, locate and right-click it to choose Mount from the context menu. choose Mount from the context menu.
  4. On the next window, double-click the setup.exe file to open the Windows 11 Setup wizard and click Yes on the UAC prompt.Setup1
  5. On the Install Windows 11 dialog box, click Next.
  6. Click on Accept on the license terms page.
  7. On the Ready to install page, make sure the Keep personal files and apps option is selected to keep your files. If it is not selected, click Change what to keep and choose to keep files.
  8. Next, click Install.Install

Your computer will restart a couple of times to complete the upgrade. Once done, you will get to the login screen.

Our WR experts suggest that to avoid ESIF TYPE – IPF TIME Error in Windows 11, ensure you always have a reliable antivirus in place and keep an eye on your system drivers, Windows OS, and BIOS updates.

These precautionary measures can also help you prevent issues like ESIF TYPE – DPFT TIME Error, wherein outdated Intel Dynamic Platform Thermal Framework driver causes issues.

If you have any questions or suggestions about the subject, feel free to mention them in the comments section below. We will be happy to assist.

BSoD Code 139: How to Fix it

Blue Screen of Death is one of the most annoying issues that Windows users have been facing for a long time. One of the most dreaded ones is BSoD code 139.

In this guide, we will delve into common causes and discuss expert-recommended fixes to regain control of the system functionality.

What is blue screen code 139?

This BSoD Bug Check code 0x139: KERNEL_SECURITY_CHECK_FAILURE indicates that the kernel has identified the corruption of a critical data structure. Sometimes it also appears as kernel_security_check_failure (139). Here are the probable causes of the error:

  • Recent software/hardware installations or updates.
  • Outdated or incompatible drivers.
  • Malware infection or corrupted system files.
  • Memory-related issues.

How do I fix blue screen code 139? 

Before proceeding with any steps to fix the BSoD error code 139, go through the following preliminary checks:

1. Update your device drivers

  1. Press Windows + R to open the Run dialog box.Device Manager Run command - BSoD Code 139
  2. Type devmgmt.msc and click OK to open Device Manager.
  3. Go to each category individually, and look for an exclamation mark in the yellow triangle on the device’s logo. If you see it, right-click the driver and choose Update driver.Graphics Driver update
  4. Next, click Search automatically for drivers and follow the on-screen instructions to complete the process.Update driver 2 BSoD Code 139
  5. Repeat the process if multiple drivers have the yellow triangle to resolve any driver issues.

2. Run an SFC scan

  1. Press the Windows key, type cmd, and click Run as administrator.CMD elevated -BSoD Code 139
  2. Type the following command to identify and replace the problematic system files with a clean copy from the local cache or the original installation media and hit Enter: sfc /scannowSFCSCANNOW CMD
  3. Once the commands are executed, restart your computer to save the changes.

This whole process could be made easier by using specialized third-party software. These kinds of tools automized most of the steps described here and everything can be done with just a few clicks.

3. Run the Windows Diagnostic tool

  1. Press the Windows key, type windows diagnostic, and click Open.Memory diagnostic tool BSoD Code 139
  2. Select Restart now and check for problems, then your computer will reboot.memory-diag-tool 3 -Restart now and check for problems, then your computer will reboot.
  3. The Windows Memory Diagnostic tool will scan your system to check for issues related to the computer’s memory (RAM).memory-diag-tool
  4. Once the test is complete, your system will reboot and take you to the login screen.

Login, and you will get the results on the screen. If the test found issues, remove dust or debris from the RAM and ensure it is properly seated.

Run the tool again, and if it still shows errors, you might have to replace or repair the faulty RAM to fix the BSoD code 139.

4. Run the CHKDSK command

  1. Press the Windows key, type cmd, and click Run as administrator.CMD elevated -BSoD Code 139
  2. Copy & paste the following command after replacing C with your system drive and hit Enter: chkdsk C: /f /r /xCHKDSK  -eplacing C with your system drive
  3. Type Y to proceed and press Enter.
  4. To initiate the scan, your computer will restart. Once the scan is complete, reboot your PC again.

The scan checks the integrity of your hard drive and fixes various disk-related issues, such as Memory Management error 0x0000001A on Windows 11; read this to learn more.

5. Run the Driver Verifier to track down a misbehaving driver

Before running the utility, make sure you create a restore point and enable storing mini dump using these steps:

  1. Press Windows + R to open the Run dialog box, then type sysdm.cpl and click OK.explorer_type sysdm.cpl and click OK. -bsod code 139
  2. Go to the Advanced tab, locate Startup and Recovery, and click Settings.Startup and Recovery , then Settings
  3. Remove the checkmark next to Automatically restart, & for the Write debugging information option, select Small memory dump (256 KB), and set the Small dump directory to %SystemRoot%\Minidump, then click OK and restart your computer.

Once your PC is turned on, follow these steps to run Driver Verifier to scan for driver faults:

  1. Press the Windows key, type verifier, and click Open. Click Yes on the UAC prompt.indows key, type verifier, and click Run as administrator -bsod code 139
  2. For the Select a task page, select Create custom settings (for code developers) and click Next.Create custom settings (for code developers) and click Next.
  3. Next, on Select individual settings from this full list page, select all the options except DDI compliance checking and randomized low resource simulation, then click Next.verifiergui_Next, on Select individual settings from this full list page, select all the options except DDI compliance checking and randomized low resource simulation, then click Next.
  4. From the Select what drivers to verify, place a checkmark next to Select driver names from the list, then click Next.verifiergui_From the Select drivers to verify list, select all the non-Microsoft provided drivers and Finish.
  5. Click Finish; then you will get a popup asking to initiate the restart; click OK, then restart your computer.Click Finish

Now, you must ensure the verifier is running. To do that, follow these steps:

  1. Press the Windows key, type cmd, and click Run as administrator.CMD elevated -BSoD Code 139
  2. Type the following command and hit Enter: verifier /querysettingscmd_ verifier /querysettings
  3. If it is running, you will see the list of drivers. Now reboot the system and wait for it to crash to a Blue Screen; meanwhile, you can use it normally.
  4. If your system crashes, it triggers a Blue Screen of Death (BSoD) with a specific error code. Note it down to find out the problematic driver.
  5. The Driver Verifier will also store all information about the crash in a dump file; you can read the log files using the Windows debugger tool.

Next, to reinstall the problematic driver, then disable the Driver Verifier using Command Prompt, follow these steps:

  1. Press Windows + R to open the Run dialog box.Device Manager Run command - BSoD Code 139
  2. Type devmgmt.msc and click OK to open Device Manager.
  3. Go to the driver, right-click it, select Uninstall device, then restart your computer to reinstall it.Uninstall device
  4. Once your computer is up, open Command Prompt with administrator rights and type the following command, then hit Enter: verifier /resetcmd_verifier /reset
  5. Reboot your computer normally.

In case you are still encountering the BSoD error code 139, restore your PC to the last known good configuration.

To avoid BSoD errors, always keep your drivers and Windows up to date and install only the software and hardware compatible with your device.

If you have any questions or suggestions about the subject, feel free to mention them in the comments section below.

Windows 11 has reached 400 million users, still far behind Windows 10

It seems Windows 11 has reached an important milestone: there are over 400 million Windows 11 users in the world, according to an internal report accessed by Windows Central.

The report is not yet public, and Microsoft has not released a statement about it yet, but this means Windows 11 needed 2 years to reach this point. In comparison, Windows 10 reached this number in less than a year, according to the same article.

What does it mean? Well, it means that Windows 11 is still not popular enough among Windows users. You can find the most important Windows 11 stats here, but one thing is clear: it seems gamers love this operating system because it has experienced a growth in popularity for gamers over 2023.

However, according to the same report (it’s not yet made public by Microsoft, so take this news with a pinch of salt), Windows 11 is on its way to getting to 500 million users by January 2024. This would be quite the achievement considering Windows 11’s market share is still very low: 23,64%, according to the latest stats.

Windows 11: 400 million users, Windows 10 still going very strong

Despite Microsoft announcing that Windows 10 will reach the end of support in October 2025, the operating system is still the dominant Windows on the market. The latest statistics place it at a staggering 71,62% market share, which is nearly triple that of Windows 11.

It took a while for Windows 10 to reach 1 billion users, as it did so in 2020, 5 years after its release. But it seems that not even the release of Windows 11 could stop its dominance. windows 11 400 million users

Plus, we’re talking about different OS. Windows 11 sports many AI features, which Microsoft has been at the forefront of, ever since AI came into the picture. But it seems users are not impressed. Many people choose to downgrade back to Windows 10, after updating to Windows 11.

However, as Windows 10’s end is approaching, a lot of people will have to upgrade to Windows 11. But if this is the only way Windows 11 ramps up more users, then it’s not exactly the best way.

But what do you think?

Microsoft Edge integrates Copilot in its Bing Chat tool

Microsoft Edge Canary has integrated Copilot (with its new icon) in the Bing Chat sidebar, in the latest update to the channel. First spotted by Windows enthusiast, @Leopeva64, Microsoft made some first changes when the option Ask Bing was turned into Ask Copilot.

The new Copilot icon, which debuted in September when the Redmond-based tech giant revealed it at the Microsoft Surface Event, also appeared in the tool every time it was refreshed.

Was Microsoft thinking of replacing Bing Chat with Copilot? Arguably yes, and we explain the reason behind it: uniformity. As the Redmond-based tech giant is releasing multiple AI features out there, it’s better to have a single product, rather than multiple. This way, customers won’t get confused.

It seems that this is what Microsoft is doing, at least in Edge.

This is how Copilot looks in Microsoft Edge

  1. Microsoft changed the Bing Chat icon, to Copilot’s newest icon, as you can see in the picture below.microsoft edge copilot
  2. Copilot also appears when you hover over the icon. So no more Bing Chat, it seems.
  3. When right-clicking, the option to Ask Copilot will appear. To us, however, this option is not yet there, even though Edge Canary has the latest update.microsoft edge copilot

As for functionalities, Copilot on Microsoft Edge has the same features as Bing Chat: it will be able to use plugins, for example.

In Edge Canary, Copilot even makes an appearance in the settings, so it’s safe to say Microsoft has integrated there, as well.

According to its Settings, using Copilot on Microsoft Edge will improve the experience of using Copilot in Windows 11. However, users have to enable the option, first, as you can see in the image below.

It seems the Redmond-based tech giant is really taking the steps to align its now popular AI tool, Copilot, everywhere. Where does Bing Chat end, and Copilot begin, though?

And don’t leave aside the fact that Microsoft Edge now lets you add screenshots to Copilot, so feel free to take advantage of that by applying our quick steps.

How to Make Your X (Twitter) Account Private [2 Ways]

If you do not want everyone to know what you’re up to on the internet, making your X (Twitter) account private is something you should consider.

The process is as simple as a toggle of a button, as you shall see below.

The Benefits of a Private X Account

  • The biggest benefit is privacy so that only people in your circle can see what you post on your timeline.
  • You can be more open about your interests and activities without fear of judgment from others.
  • Get more control over who follows you and doesn’t by accepting/rejecting follow requests.
  • Easily delete inappropriate tweets or other content posted by mistake before they gain traction.
  • Filter unwanted interactions with strangers, as their messages won’t reach your inbox.

How do I make my X (Twitter) account private?

How to make X (Twitter) account private on desktop

  1. Launch your X app or X for web on a browser if your Twitter app fails to launch.
  2. On the left-hand pane, click on More.
  3. Select Settings & Support>Settings and privacy.
  4. Click on Privacy and safety then select Audience, media and tagging.
  5. Check the Protect your posts box.

How to make X (Twitter) account private on mobile

  1. Launch your X app on your phone.
  2. Tap on your profile picture, select Settings & Support>Settings and privacy.
  3. Next, tap on Privacy and safety.
  4. Tap on Audience and tagging.
  5. Toggle on the Protect your posts option.

You should now see the padlock icon next to your username. Now anyone who is not a current follower will not see your posts and will have to make a follower request to gain access.

Does Twitter tell you who viewed your profile?

X (formerly Twitter) doesn’t show you who viewed your profile because it would be a privacy concern for users. The only way to know if someone has viewed your profile is by using third-party apps that can track this information.

Even so, the apps will not reveal the identity. You will only get the number of profile visits. 

It’s no secret that online privacy is important to just about everyone. If you’re one of the big players on Twitter, you might be a little worried about your account being hacked. Keeping your tweets protected is a start to securing your account.

However, if you don’t give much thought to privacy or aren’t that concerned about keeping your tweets private, you can leave your account public and even go further and integrate Slack into your Twitter account. This can help you stay updated on when your name is mentioned and keep interactions active.

And for the best user experience to get the best of both worlds, we recommend the best Twitter browsers that will elevate your browsing on the app.

Do you prefer your account private or public? Let us know in the comment section below.

Solved: This Network May Have a Captive Portal Warning

If you’ve ever tried to access a public Wi-Fi hotspot and met with the This network may have a captive portal warning, this article will be of interest to you.

For the most part, it’s probably a minor bug that can be fixed by restarting your devices; if not, our troubleshooting steps can help eliminate this block.

What does it mean when a network may have a captive portal?

A captive portal is typically associated with public Internet or a sponsored service made available to guest users after they have passed through an authentication step.

This can be a login screen, a check-in page, a paywall, website logins, etc. Each of these has different security risks and is recommended for specific situations.

How do I fix the captive portal error on Windows 11?

Start off with the following simple workarounds before the main solutions:

1. Disable your antivirus temporarily 

  1. Hit the Start menu icon, type Windows Security in the search bar and click Open.
  2. Click on Firewall & network protection, then select Public network.league of legends black screen after champion select
  3. Locate Microsoft Defender Firewall and toggle the off button.turning off Microsoft Defender Firewall Windows

2. Change the DNS settings

  1. Hit the Windows key, type Control Panel in the search bar, and click Open.
  2. Select Network and Internet>Network and Sharing Center.Network and Sharing Center
  3. Click on Change adapter settings.
  4. Right-click on your Wi-Fi connection and click on Properties from the list of options.
  5. In the Properties window, select Internet Protocol Version 4 (TCP/IPv4) or Internet Protocol Version 6 (TCP/IPv6) option, depending on your network card configuration and hit OK.

3. Disable problematic browser extensions

  1. Launch your browser in this case Google Chrome, and click on Menu.
  2. Go to More Tools > Extensions.chrome extensions
  3. Here, you need to disable the most recently installed extension first. Disable the extension and restart Chrome.
    webpage was blocked by an extension
  4. If the issue persists and you don’t have any recently installed extensions, start disabling all the extensions one by one.
  5. Start with VPN, security, online service, or adblockers extensions then restart the browser.

4. Disable your VPN 

  1. Press the Windows key and select Settings.settings windows 11
  2. Next, select Network & internet and click on VPN in the right-side menu.
  3. Select the VPN connection you want to disable, click on the drop-down and select Remove.remove VPN

Users who like to mask their identity in public places by hiding IP addresses may find out they can’t access the Internet in such places. If you must use it, we suggest you disguise your VPN.

5. Disable Proxy 

  1. Press the Start Menu icon and select Settings.settings windows 11
  2. Click on Network & Internet on the left pane, then scroll down and click Proxy on the right pane.Network proxy settings
  3. Select Edit next to Use a proxy server option in the Manual proxy setup section, toggle off Use a proxy server and click on Save.Disable proxy server

How do I set up a Captive Portal Authorization system?

  • Choose an appropriate Captive Portal solution – A captive portal solution should be compatible with your hardware, secure enough to prevent unauthorized access, and easy to use.
  • Set up custom DNS servers or use standard DNS servers – Servers allow you to control how traffic is redirected. Custom DNS servers redirect web traffic to their own web portals, while standard DNS servers provided by your ISP will allow users to access all websites without restrictions.
  • Specify public access restrictions and acceptable use policies – You can enforce restrictions by specifying what websites are allowed to connect to the network, determining the time limit for each session, and blocking certain types of traffic.
  • Configure mobile phone usage and video calling options – You can configure your router to limit access to devices or limit phone usage by disabling video calling. This will prevent bandwidth from running out.
  • Create an email address for authentication purposes – This will allow you to receive a confirmation email from the system upon successful login.
  • Define IP addresses allowed – You can create a blacklist and whitelist where you will deny or allow access to certain IP addresses or subnets.
  • Adjust the portal behavior settings to sort out interaction desired with users – This is a setting to interact with users. It will gauge the behavior during login, and after a timeout period with no recorded activity, users will be logged out or encounter an error.

Ultimately, if you’re still unable to access the Wi-Fi connection because of the captive portal warning message, there isn’t much you can do if you’re not in control of the router.

If you’ve been successful, we’d recommend you take the necessary steps to safeguard your device when accessing public networks. You should also consider getting a random MAC address in situations where you have to reveal your IP address.

Did you find a way to get past the captive portal warning? If you have tried any of these methods and were able to get through the captive portal warning, please let us know in the comments below.

DHCP vs. Static IP: What’s the Difference Between Them?

Confused about DHCP and Static IP addresses? Understanding the difference is crucial whether you’re setting up a home network or making sense of your work environment. This guide aims to demystify DHCP and Static IP addresses, focusing on their benefits, drawbacks, security implications, and how you can identify which one you’re using.

What are DHCP and Static IP Addressing?

Before diving into the complexities, it’s vital to establish a foundational understanding of DHCP and Static IP addressing. Check out this informational guide if you need to understand IP addresses better.

  • DHCP (Dynamic Host Configuration Protocol): It’s an automated system that assigns IP addresses to network devices. The address can change over time, making it a dynamic IP address.
  • Static IP: As the name implies, a static IP address doesn’t change. It is manually set up and remains constant.

Advantages and Disadvantages

DHCP IP Advantages:

  • Automatic Configuration: DHCP takes care of the IP address assignment automatically. Unlike a static address, the dynamic IP address changes automatically. 
  • Easy to Manage: Ideal for large networks where manual configuration would be time-consuming. Commonly used in business networks by network administrators. 

DHCP IP Disadvantages:

  • Unpredictable IP Changes: Devices might experience disruptions due to frequent IP changes. That’s one of the most encountered issues regarding dynamic addresses. 
  • Potential IP Conflicts: Rare but possible, two devices could end up with the same IP.

Static IP address Advantages:

  • Consistency: Because it never changes, services relying on specific IP addresses run without interruption. 
  • Direct Accessibility: A static address is handy for remote server maintenance. Useful for Internet service providers and file servers. 

Static IP address Disadvantages:

  • Manual Configuration: Every device must be manually set up. Depending on the network size, one or more network admins must configure it on every device. This is especially problematic for enterprise networks. 
  • Network Complexity: Not ideal for large networks due to the management difficulty and possible network issues.

Security Implications

When it comes to security, each has its strengths and weaknesses:

  • DHCP IP: While easier to set up, it’s also easier for malicious actors to join the network.
  • Static IP: Slightly more secure as unauthorized devices won’t automatically get an IP address. However, it’s not foolproof.

How to Identify Your IP Configuration

For Windows Users:

  1. Press Windows Key + R to open the Run dialog box.
  2. Type cmd and press Enter.
  3. In the command prompt, type ipconfig /all and press Enter.
  4. Look for DHCP Enabled. If it says Yes, you’re on DHCP. If No, it’s a Static IP address.

For macOS Users:

  1. Go to Apple Menu > System Preferences > Network.
  2. Choose your network and click Advanced.
  3. Under the TCP/IP tab, Using DHCP means you’re on DHCP. Otherwise, it’s a Static address.

Conclusion

Understanding DHCP and Static IP isn’t just for tech geeks; it’s beneficial for anyone using a network. While DHCP offers automation and ease, Static IP provides stability and some security advantages. If you’re more interested in security, we have guides for setting a static IP in Windows 10 and Windows 11.

Disabling static IP can help with errors such as ERROR_IP_ADDRESS_CONFLICT2, so don’t hesitate to change this setting.

Depending on the network settings, that also applies to mobile devices. Identifying which one you’re using is a few clicks away, so you can make informed decisions about your network management & configuration.

Fix: The Network You Are Using May Require You to Visit its Login Page

You connect to a Wi-Fi network but when you open a browser, you get the message The network you are using may require you to visit its login page. All of the editors at Windows Report have faced this message at least a few times but we know how to fix it quickly.

Why does Wi-Fi require you to visit its login page? The Wi-Fi requires you to visit the login page because most likely you’re using a public Wi-Fi network that is running a so-called captive portal that requires accepting some terms of service.

How do you fix Wi-Fi that requires login?

Before getting deeper into our solutions devised by the WR networking team, try a few workarounds:

  • Try opening another browser. If the other one doesn’t bring up The network you are using may require you to visit its login page, then reset the browser you have been using before.
  • Double-check if your device is connecting to your private network and not a different one. Read below to see how you can force your device to forget a network.
  • Check if other devices can connect to the same hotspot and see if they receive the same message. If not, the solutions below will help you fix the device you’re using.

1. Reset the network settings

  1. Left-click the Start button, type powershell, and click Run as administrator.
  2. Click Yes on the User Account Control prompt.
  3. Then, copy and paste the following lines and press Enter: netsh int ip reset
  4. Now, paste or type the following command and run it by pressing Enter to flush the DNS cache: ipconfig /flushdns

Assuming that your network settings have been altered and now lead to a captive portal, this solution will bring everything back to normal. It works on both Windows 11 and 10 seamlessly and you won’t see any network login screen or a portal login in your browser.

We also have a complete guide on how to reset the TCP/IP stack on Windows 11 that will help you with more methods of doing that.

2. Forget the hotspot and reconnect to your own

  1. Click the Start button and go to Settings.
  2. Now, click on Network & internet from the left and select Wi-Fi from the right.
  3. Next, choose Manage known networks from the right pane.
  4. You will see a list of present and past used Wi-Fi network locations. Click Forget on all of them but make sure you’ve got the password to your own hotspot that you want to connect to.
  5. Now, reconnect to your hotspot using the password. If you haven’t changed it before, it’s the one printed on the back of your router or modem.

If the hotspot you connected to lately was set to auto-connect, you might see The network you are using may require you to visit its login page message, but if your PC forgets that connection, it won’t be able to do that again.

On Windows 10, you can do the same by navigating to Settings > Network & Internet > Wi-Fi > Manage known networks. If a website is not accessible, read this guide to learn how to get through.

3. Reset your browser to factory defaults

Note icon NOTE
This solution will reset all the settings and passwords in Google Chrome and will remove all the add-ons.
  1. Open Chrome, type the following line into the address bar and press Enter: chrome://settings/reset
  2. Now, click on Restore settings to their original defaults.
  3. Finally, click on Reset settings to acknowledge the change.

We used Google Chrome as an example because it’s the most popular browser, but all the modern browsers have the reset feature in their Settings menus.

If you don’t want to fully reset your browser, you can start by deleting the browser cache and cookies, removing any proxies, and uninstalling any add-ons you might have loaded recently.

So, by following the solutions tested by the WR software team, you will get rid of any captive portals and your internet connections should be back to normal.

Usually, resetting the internet settings and flushing the DNS should work but, in some cases, you also need to get rid of the problematic hotspot or reset your browser.

If your Windows 11 PC can’t connect to a network, the highlighted guide will help you with the right solutions.

In case you’re facing the Network Change Detected error, read this article for methods to fix it. 

Go to the comments section below and leave us a note if you have further questions.

How to Remove Duplicate Windows Firewall Rules

Duplicated Windows Firewall rules can cause confusion, especially if you’re manually configuring your firewall, and in some cases, it can cause certain applications or services to stop working.

It’s possible to fix this issue, and in this guide, we’ll show you a couple of methods that you can use, so let’s get started.

Where are Windows Defender Firewall rules stored?

You can find your firewall rules stored in the following key in your registry at the following path: Software\Policies\Microsoft\WindowsFirewall\FirewallRules

How do I delete duplicate rules in Windows Firewall?

1. Manually delete the rules from firewall settings

Note icon NOTE
Deleting certain rules might lead to network issues, so remove them at your own risk.
  1. Press the Windows key + S and enter defender. Select Windows Defender Firewall with Advanced Security.
     
  2. From the left pane, select Outbound Rules or Inbound Rules.
  3. Select multiple rules by using Shift or Ctrl and the left mouse button.
  4. Once you’ve selected duplicate firewall rules, right-click them and choose Delete.
  5. When asked to confirm, click on Yes.
  6. Repeat these steps for all rules you want to remove.

Instead of deleting rules, it might be a better option to disable them instead. That way if anything goes wrong, you can enable these rules again.

2. Use the script to remove Windows Firewall rules

  1. Open Notepad.
  2. Paste the following code:
    # Here we use `netsh advfirewall firewall show` to get all firewall rules, since it's way faster than Get-NetFirewallRule!!!!!!! $output = (netsh advfirewall firewall show rule name=all verbose | Out-String).Trim() -split '\r?\n\s*\r?\n' $propertyNames = [System.Collections.Generic.List[string]]::new() $objects = @( $(foreach($section in $output ) { $obj = @{} foreach( $line in ($section -split '\r?\n') ) { if( $line -match '^\-+$' ) { continue } $name, $value = $line -split ':\s*', 2 $name = $name -replace " ", "" $obj.$name = $value if($propertyNames -notcontains $name) { $propertyNames.Add( $name ) } } $obj }) | % { foreach( $prop in $propertyNames ) { if( $_.Keys -notcontains $prop ) { $_.$prop = $null } } [PSCustomObject]$_ }) $r = $objects | Group-Object -Property RuleName, Program, Action, Profiles, RemoteIP, RemotePort, LocalIP, LocalPort, Enabled, Protocol, Direction # If you want to take a look # $r | ?{$_.Count -gt 1} | Select-Object -ExpandProperty group | Out-GridView $r | ?{$_.Count -gt 1} | %{ $name = $_ | Select-Object -ExpandProperty group | Select-Object -ExpandProperty RuleName -First 1 # Here we have to use this cmdlet, since `netsh advfirewall firewall delete` can't differentiate rules with the same names and will delte them all! Get-NetFirewallRule -DisplayName $name | Select-Object -Skip 1 | Remove-NetFirewallRule }
  3. Click on File and choose Save as.
     
  4. Set Save as type to All files and set the name of the file to firewall.ps1. Lastly, click Save.
  5. Press Windows key + S and type powershell. Select Run as administrator.
    Powershell Show The Folder Size on Windows 11Show The Folder Size on Windows 11
  6. Switch to the directory where your ps1 file is saved using the cd command like this: cd C:\Users\WindowsReport\Documents
  7. Next, type firewall.ps1, and the script should start and remove duplicate entries.

Keep in mind that this is an advanced solution, so you should use it only if you have some basic knowledge of the PowerShell commands and you understand what the script does.

Tips for cleaning Windows Firewall rules

  • Review the rules before you remove them. Many rules aren’t duplicates, and they are configured to work with different protocols or ports.
  • Instead of deleting, it’s always better to disable a rule and check if any issues appear after doing so.
  • Remove only redundant rules or unused ones.
  • Label and organize rules properly. Arrange rules by priority or functionality.

Duplicate Windows Firewall rules shouldn’t concern you, especially if you didn’t manually create them. Despite looking almost the same, likely, rules aren’t duplicates, so don’t delete them unless you’re 100% certain and you know what the rules in question are doing.

In case you want to learn more about Windows Firewall, you can use it to check if firewall is blocking a port or a program or you can configure Windows Firewall to allow IP ranges on your PC.

Speaking of which, you can even configure firewall rules for Windows activation to ensure that no issues occur during the process.

Have you encountered duplicate Windows Firewall rules on your PC and how did you handle them? Share your findings with us in the comments section.

Solved: Get Help Not Working on Windows 11

The Get Help app allows users to find answers to all their queries and connect to Microsoft support, but for some, it’s not working in Windows 11. Though not a major problem for most, it does affect users facing issues with the OS.

Besides, its recent integration with Windows troubleshooters makes it all the more important to have Get Help running. For those wondering why Get Help is not opening, it’s usually due to corrupt system files, issues with the OS, problems with the network, or even the app itself.

How do I fix the Get Help app if it’s not working on Windows 11?

Before we start with the slightly complex solutions, try these quick ones first:

  • Restart the computer and see if Get Help still throws an error message. Also, check for updates and install any new available version of Windows.
  • Verify whether Get Help works in a clean boot environment. In case it does, one of the third-party programs or services are conflicting with it.
  • Check whether Windows Firewall is blocking the app and, if that’s the case, whitelist Get Help. Also, eliminate issues with the network connection.
  • Disable any proxy servers set up on the PC.

If none work, move to the fixes listed next.

1. Repair the corrupt system files 

  1. Press Windows + R to open the Search menu, type Command Prompt in the search bar, right-click on the relevant result, and select Run as administrator.cmd
  2. Click Yes in the UAC prompt.
  3. Paste the following DISM commands one at a time and hit Enter after each:DISM /Online /Cleanup-Image /CheckHealth DISM /Online /Cleanup-Image /ScanHealth DISM /Online /Cleanup-Image /RestoreHealth
  4. Now, execute this command for the SFC scan: sfc /scannowsfc scan to fix get help not working windows 11
  5. Once done, restart the computer.

Corrupt system files are a common reason a built-in app or Get Help is not working in Windows 11. And running the DISM commands and SFC scan will help!

This whole process can be simplified by using specialized third-party repair tools. This software is specially designed to repair and replace broken system files.

2. Download Microsoft Edge WebView2

Tip icon Tip
If you get an error during the installation, try another method (of the three available) to download the component.
  1. Go to Microsoft Edge Developer, and click the Download Now option to get Microsoft Edge WebView2.Microsoft Edge WebView2 to fix get help not working windows 11
  2. Now, choose any of the methods to proceed with the download, be it via the Evergreen Bootstrapper, Evergreen Standalone Installer, or the Fixed Version.
  3. Once done, run the setup and follow the on-screen instructions to complete the installation process.

3. Repair or Reset the Get Help app

  1. Press Windows + I to open Settings, go to Apps from the navigation pane, and click Installed apps.installed apps
  2. Locate Get Help, click on the ellipsis next to it, and select Advanced options.advanced options
  3. Click the Repair button and check for improvements.repair
  4. If that doesn’t work, click on Reset.reset app to fix get help not working windows 11
  5. Again, click Reset in the confirmation prompt to get rid of any common issues with Get Help.

For detailed instructions on using Microsoft’s built-in support tool, check out our complete guide on the Get Help app in Windows 11.

4. Reset the network settings

  1. Press Windows + I to open Settings, go to Network & Internet from the left pane, and click on Advanced network settings.advanced network settings
  2. Now, click Network reset.
  3. Click the Reset now button.reset now to fix get help not working windows 11
  4. Finally, click Yes in the confirmation box. 

5. Reinstall the Get Help app

  1. Press Windows + R to open Run, type powershell, and hit Ctrl + Shift + Enter.powershell
  2. Click Yes in the UAC prompt.
  3. Now, paste the following command and hit Enter to uninstall Get Help: Get-AppxPackage *Microsoft.GetHelp* -AllUsers | Remove-AppxPackageuninstall get help
  4. Once done, open the Microsoft Store, type Get Help in the search box, and open the app from the results.get help
  5. Click the Get button to download the app.get

When Windows Get Help is not working, and the problem seems to be with the app itself, reinstall it. You can’t remove Get Help through conventional methods since it’s a default app, but force uninstalling via PowerShell works in this case!

6. Perform an in-place upgrade

  1. Go to Microsoft’s official website, choose the product language and OS edition, and then download the Windows 11 ISO.iso
  2. Double-click the downloaded ISO, wait a few seconds and then click Open in the prompt that appears.
  3. Now, run the setup.exe file.setup.exe
  4. Click Next to proceed.
  5. Now, check the Windows 11 license terms, and click Accept.
  6. Verify the setup reads, Keep personal files and apps, and click Install.in-place upgrade to fix get help not working windows 11
  7. Wait for the process to complete. It may take a few hours.

For problems with any of the Windows components, including when Get Help is not working in Windows 11, an in-place upgrade will help. And you won’t lose any files or apps in the upgrade process!

7. Contact support online

When nothing else works, you can always get help in Windows 11 through other means. Microsoft has introduced the Get Started app, and there are several online forums, both official and those run by users.

Besides, you can contact Microsoft support online through the official website. 

While Get Help serves an important role and should be working in Windows 11, it’s not the only way to fix issues. You can always refer to official online channels or come to us for Windows-related problems. We have extensively covered the operating system.

You can also learn how remote assistance works in Windows by checking the Remote Help App guide which explains how support teams use secure screen sharing and control features.

A more complex problem, though, is when How to get help in Windows keeps popping up, and to fix it, you need to modify the file permissions.

For any queries or to share what worked for you when Get Help is not working in Windows 11, drop a comment below.

ProductInfo.dll: What is it & How to Fix its Bad Image Error

If you spot a suspicious process like ProductInfo.dll in your processes list in the Task Manager, your system’s security may have been compromised. It’s also possible that the DLL file is legitimate but it has just been corrupted.

Luckily, fixing DLL errors is relatively easy and shouldn’t take up too much of your time.

What is ProductInfo.dll?

ProductInfo.dll is a file associated with the A-Volute_3D_Sound_Experts software. It is used by the program to store data related to various functions used in the application. The program’s main purpose is to provide immersive sound experiences through sound technology and audio processing algorithms.

You’ll likely find it in the following directory: C:\ProgramData\A-Volute\A-Volute.28054DF1F58B4\Modules\ScheduledModules

How do I fix ProductInfo.dll bad image error?

1. Use a third-party DLL fixer

ProductInfo.dll, is a non-system file and mostly occurs due to compatibility issues between your PC and the file. This means to find a missing DLL file, you may have to attempt a bunch of solutions before you get a fix.

Since this takes a significant amount of time, we recommend using a DLL-repair tool. Such tools are great for fixing such issues and ensuring the files are in sync.

2. Run DISM and SFC scans

  1. Hit the Start Menu icon, type cmd in the search bar, and click Run as administrator.cmd-run-admin-w11 unexpected kernel mode trap windows 11
  2. Type the following commands and press Enter after each one:DISM.exe /Online /Cleanup-Image /Restorehealth sfc /scannow

3. Re-register the DLL file

  1. Hit the Windows key, type Command Prompt right-click on it, and select Run as administrator.cmd-run-admin-w11 unexpected kernel mode trap windows 11
  2. Type the following command and press Enter:
    regsvr32 ProductInfo.dll
  3. This command registers the missing DLL file. However, if more than one DLL file is not registered, you can use the following command:
    for %1 in (*.dll) do regsvr32 /s %1

4. Download the file manually

You can fix this error by downloading the right version of the ProductInfo DLL file. Here, you’ll have to check your Windows version and download the appropriate DLL file for 32-bit or 64-bit depending on yours.

Since you cannot verify the authenticity of the site, ensure you have a comprehensive antivirus software and that it is up-to-date. Once downloaded, locate the file and move it to the ProductInfo file directory. Also, make sure to delete the previous corrupted one.

Note icon NOTE
The DLL-files.com site is not an official source, and WindowsReport is not affiliated with it in any way. If you download the file, be sure to run an antivirus check.

5. Scan for viruses

  1. Press the Windows key, search Windows Security, and click Open.
  2. Select Virus & threat protection.
  3. Next, press Quick scan under Current threats.
  4. If you don’t find any threats, proceed to perform a full scan by clicking on Scan options just below Quick scan.Scan options
  5. Click on Full scan, then Scan now to perform a deep scan of your PC.Full Scan Scan Now
  6. Wait for the process to finish and restart your system.

6. Uninstall the associated program

The ProductInfo.dll must be part of a program so you can locate its uninstaller file in its directory, run the uninstaller and remove it. Alternatively, you can use the Control Panel or the Settings app to remove its parent program.

When uninstalling, also ensure to remove remnant files that may have corrupted the file so that when you reinstall the application and replace the file, they’re not reused to re-register it.

7. Perform a System Restore

  1. Press the Windows key, type Control Panel, and click Open.control-panel-search fallout new vegas runtime error
  2. Select Large icons as View by and click Recovery.Recovery Control Panel Advrcntr6.dll
  3. Click Open System Restore.Open system restore
  4. Select Choose a different restore point and click Next.Next Choose a different restore point
  5. Now select the restore point and click Next. Choose a point
  6. Click Finish to restore the previous settings, and Windows will restart.Finish Restore point

What are other tips and considerations when troubleshooting ProductInfo.dll errors?

  • Update drivers – ProductInfo.dll errors can cause problems with your computer, such as slow performance, errors during installation or startup and more. Updating related drivers can boost the performance of your PC.
  • Check for Windows Updates – Outdated system files can cause DLL errors, so make sure that you have the latest updates from Microsoft.
  • Repair corrupt Registry entries – Sometimes things go wrong with your PC’s database that could end up in corrupt registry entries. If not repaired in time, ProductInfo.dll errors can occur. You can avoid this by using a reputable registry cleaner program.
  • Disable firewall/antivirus temporarily – If the associated program with the DLL file was not installed properly, it may have compatibility issues with your antivirus. You can either disable Windows Defender temporarily or allow it through the firewall.
  • Limit CPU processes – Some DLL files have been known to cause issues because they use a large amount of CPU resources when running. You can end the process or limit its CPU usage.

The easiest way to avoid getting ProductInfo.dll errors is simple. You should never download and install programs on your computer before running an antivirus program.

We hope this article has provided you with all the information you need to effectively troubleshoot and potentially fix your ProductInfo.dll error messages. And should you encounter system DLL errors like the sysmain.dll or version.dll, feel free to check out what approach to take to resolve them.

Our latest guide covers rnd.dll, so don’t miss it for more useful information.

Have you managed to fix this DLL error? We’d like to know which solution was the easiest for you. Let us know in the comment section below.

Event 4502 WinREAgent on Windows 11: How to Fix

Several users reported the Event 4502 WinREAgent message on their PC, and even though this error didn’t cause any issues, it still had users worried.

In today’s guide, we’re going to take a closer look at this error, see what it means, and show you a few potential methods you can use to fix it.

What is the event ID 4502?

  • This is an error message that appears in Event Viewer.
  • It’s usually caused by a Windows Update.
  • A recovery partition that’s too small can give you this error.

How do I fix event 4502 WinREAgent on Windows 11?

1. Perform a system restore

  1. Press the Windows key + R and enter rstrui.
    rstrui command Restore point Taskbar Thumbnail Preview Disappears too Quickly on Windows 11
  2. This will open the System Restore window. Click on Next.
  3. Select the desired restore point and click Next.
  4. Follow the instructions on the screen to complete the process.

2. Remove recent Windows updates

  1. Press the Windows key + I to open the Settings app.
  2. Next, select Windows Update and choose Update history.
    update history steamwebhelper.exe
  3. Select Uninstall updates.
    uninstall updates to fix 0xc000009a
  4. Select the update you want to remove, click Uninstall, and follow the instructions on the screen.
    how to uninstall windows 11 update button

3. Change the size of the recovery partition

Note icon NOTE
This is an advanced solution and you’re using it at your own risk. We’re not responsible for any issues that might occur.
  1. Press the Windows key + S and type cmd. Select Run as administrator.
    CMD elevated -Valorant Not Uninstalling on Windows 11
  2. Run the following command to see the info regarding the recovery partition and be sure to save this information since you’ll need it later: reagentc /info
     
  3. Next, you need to disable this feature by running reagentc /disable

Now we need to remove the recovery partition by doing the following:

  1. In the same command line run: diskpart
  2. Next, you need to show all available drives with list disk
  3. Select the disk where your OS is installed. In our example it’s the number 0, so we used: sel disk 0
  4. List all partitions with list part
  5. Now select your system partition. In our example that’s number 3, so we used sel part 3
  6. Now shrink the partition with the following command: shrink Desired=500 Minimum=500
  7. Select the system recovery partition. On our PC that’s number 5, so we used: sel part 5
  8. Now delete it by running: delete partition override
  9. Create a new partition with create partition primary
  10. Next, format the drive with the following command: format fs=ntfs quick
  11. Run the following commands to assign the attributes and drive letter:
    set id=de94bba4-06d1-4d40-a16a-bfd50179d6ac
    gpt attributes=0x8000000000000001
    assign letter=R
  12. Exit diskpart with exit

Lastly, we need to recreate the recovery partition:

  1. Now copy the necessary data with these commands:
    mkdir R:\Recovery\WindowsRE
    xcopy /h C:\Windows\System32\Recovery\Winre.wim R:\Recovery\WindowsRE
    reagentc /setreimage /path R:\Recovery\WindowsRE /target C:\Windows
  2. Enable WinRE with the following command: reagentc.exe /enable
  3. Lastly, check if WinRE is on the right partition by running reagentc.exe /info

Event 4502 is usually just a message in Event Log and if it doesn’t cause you any problems, you shouldn’t try to fix it. Removing updates can temporarily help, but if the issue reappears, you might have to change the size of the recovery partition.

To better understand this issue, we suggest reading our guide on the $WinREAgent folder. Unfortunately, these aren’t only event issues, and many reported Event ID 16 and Event ID 4663, but we covered those in earlier guides.

Did you ever encounter event 4502 WinREAgent and how did you fix it? Share your solutions with us in the comments below.

Solved: Windows 11 Touchscreen Stops Working in Tablet Mode

While it’s an exciting functionality that enhances the overall experience, a few users found that the touch screen is not working in tablet mode. For most, it worked fine in laptop mode, but as soon as they flipped the screen, it wouldn’t respond to touch input.

The problem could appear when flipping the screen beyond a specific angle. Besides, the issue was also present in ChromeOS and across manufacturers, be it HP, Dell, Lenovo, or Acer, amongst others. 

But first, verify whether your laptop has the functionality. We are frequently asked, why does my laptop have tablet mode but no touch screen. It’s because the feature is native to the operating system, but for it to work, you will also need compatible hardware, i.e., a screen that responds to touch.

Why does my touchscreen work in normal mode but not in tablet mode on Windows 11?

  • Corrupt or outdated touchscreen drivers
  • Bug in the installed Windows updates
  • Third-party apps triggering conflicts
  • Hardware issues, usually loose or damaged cables

How do I fix my Windows 11 touchscreen if it’s not working in tablet mode?

Before we start with the slightly complex changes, try these quick ones first:

  • Check whether the tablet touchscreen is working in the BIOS. If it is, the problem lies with the software side of things. Otherwise, it’s most likely a hardware issue.
  • Verify whether the touch functionality stops working at a specific angle when the screen is rotated. This, too, may signal a hardware problem where the cables around the hinges are unable to identify or process touch input.
  • Install the latest Windows updates. Also, if the touch screen is not working in ChromeOS, downloading the latest OS version will work.
  • In case you have a screen protector, remove it and check for improvements. 
  • Check for corrupt system files and repair them. Also, uninstall apps that were added recently. 

If none work, head to the fixes listed next.

1. Reinstall the touchscreen drivers

  1. Press Windows + R to open Run, type devmgmt.msc in the text field, and hit Enter.
  2. Expand the Human Interface Devices entry, right-click on HID-compliant touch screen, and select Uninstall device.uninstall device to fix touch screen not working in tablet mode
  3. Again, click Uninstall in the confirmation prompt that appears.uninstall
  4. Restart the computer and verify whether the touchscreen in tablet mode is still not working.

2. Update the drivers

  1. Press Windows + X to open the Power User menu, and select Device Manager from the list of options.
  2. Double-click the Human Interface Devices entry, right-click on HID-compliant touch screen, and choose Update driver.update driver to fix touch screen not working in tablet mode
  3. Click on Search automatically for drivers and wait for Windows to install the best version available locally.search automatically
  4. If that doesn’t work, again go to the Update Driver window, and select Browse my computer for drivers.
  5. Click on Let me pick from a list of available drivers on my computer.pick driver
  6. Select any HID-compliant touch screen drivers listed here, and click Next.install driver to fix touch screen not working in tablet mode
  7. Follow the on-screen instructions, and once the driver is installed, restart the computer.

For Windows 11 tablet mode to work effectively, you will need the latest drivers. And if you ever find the touch screen drivers missing, manually updating them will do the trick! 

Besides, if there are no drivers available on the PC, go to the manufacturer’s website, download the latest version, and manually install the driver.

3. Modify the Registry

  1. Press Windows + S to open Search, type Registry Editor in the search bar, and click the relevant result.
  2. Click Yes in the UAC prompt.
  3. Navigate the following path or paste it in the address bar and hit Enter: HKEY_CURRENT_USER\Software\Microsoft\Wisp\Touchpath
  4. Now, double-click the TouchGate DWORD on the right.touchgate
  5. Under the Value data field, enter 1, and click OK to save the changes.value data to fix touch screen not working in tablet mode
  6. Restart the computer and check whether the touch screen now starts working in tablet mode.

4. Perform a system restore

  1. Press Windows + R to open Run, type rstrui.exe in the text field, and click OK.rstrui.exe
  2. Select Choose another restore point and click Next.
  3. Pick the oldest restore point from the list and click Next.restore point
  4. Finally, verify the details and click Finish to start the restore process.

If the touch screen is not working in Lenovo or when you switch to tablet mode in Windows 11, restoring the system to a point where the issue doesn’t exist will help! Remember, this will only fix software-related problems.

5. Contact the manufacturer

When nothing else works, it’s most certainly a hardware problem to blame. Identify whether the functionality doesn’t work on the entire screen or just a part of it.

At this point, the only viable solution against an unresponsive touch screen is to contact the manufacturer. If still under warranty, they might replace the screen or repair the damaged cables and sensors. Or you could contact a local hardware shop that specializes in repairs. 

Remember, tablet mode on Windows 11 works differently than the previous iterations. Now, it kicks in automatically when the screen is rotated. This eliminates a lot of problems but doesn’t work against hardware or technical issues.

Once things are up and running, consider calibrating the touch screen in Windows 11 for the best performance and to personalize the experience.

We also have a guide on what to do if your Lenovo touchscreen is not working, so don’t miss it for more solutions.

For any queries or to share which fix worked for you, drop a comment below.