The file has properties that can’t be copied to a new location error usually occurs when users try to copy files from one drive to another destination.
This error is prominent if your drive is in the FAT format instead of NTFS. Irrespective of the cause of the error, we have curated simple and direct solutions that will help you fix it in this guide.
What does it mean that properties can’t be copied to the new location?
The file has properties that can’t be copied to a new location error means that the format of the source drive and the destination are different. This usually happens if the source drive is in NTFS format while the destination is in FAT.
The NTFS format supports some properties related to ADS and file encryption. The FAT format, on the other hand, cannot store these properties, which leads to the error message.
This leads to losing these properties during the transfer if you go on with it. Fortunately, the original files will work normally on the destination drive.
How can I fix the file has properties that can’t be copied to a new location error?
1. Ignore the message
The best solution to this problem is often to ignore the message and proceed with the file transfer. This is because the properties that can’t be copied to the new location are not crucial to the functionality of your files.
So, more often than not, when you get this error message, ignore it. Your files will work as they should without issues.
2. Format drive
Tip
Note that this solution will wipe all the files on the drive. So, make sure you back up your files before proceeding.
Press the Windows key + R, type diskmgmt.msc, and click OK.
Right-click the FAT drive and select Format.
Now, click the dropdown in front of File System and select NTFS.
Enter any name of choice in the Volume label box.
Finally, check the box for Perform a quick format and click OK.
If the file has properties that can’t be copied to a new location error proves problematic for you, you need to format the drive to NTFS. This will permanently eliminate the format difference and get rid of this error.
Right-click the file you are trying to transfer and select Properties.
Now, click the Security tab at the top.
Next, choose your user account and click the Edit button.
Finally, tick all the boxes under the Allow section and click OK.
If you are getting the file has properties that can’t be copied error despite the source and destination being of the same format, you can get past the error by allowing all permissions for the files.
4. Compress the file
Press the Windows key + E and right-click the file you want to send.
Select the Send to option.
Now, choose the Compressed (zipped) folder option.
Finally, wait for the compression to complete and transfer the compressed file instead.
A quick way to bypass the file has properties that can’t be copied to a new location error is to compress the file before sending. This will help you complete the transfer without issues.
The file has properties that can’t be copied to a new location error is one of the least worrying issues users encounter on Windows PCs. Most times, you only need to ignore the message.
But if you still want to get rid of it, the solutions in this guide should help you do it. In the same vein, if you are dealing with a similar issue, like an unexpected error is keeping you from copying the file, check our detailed guide to fix it.
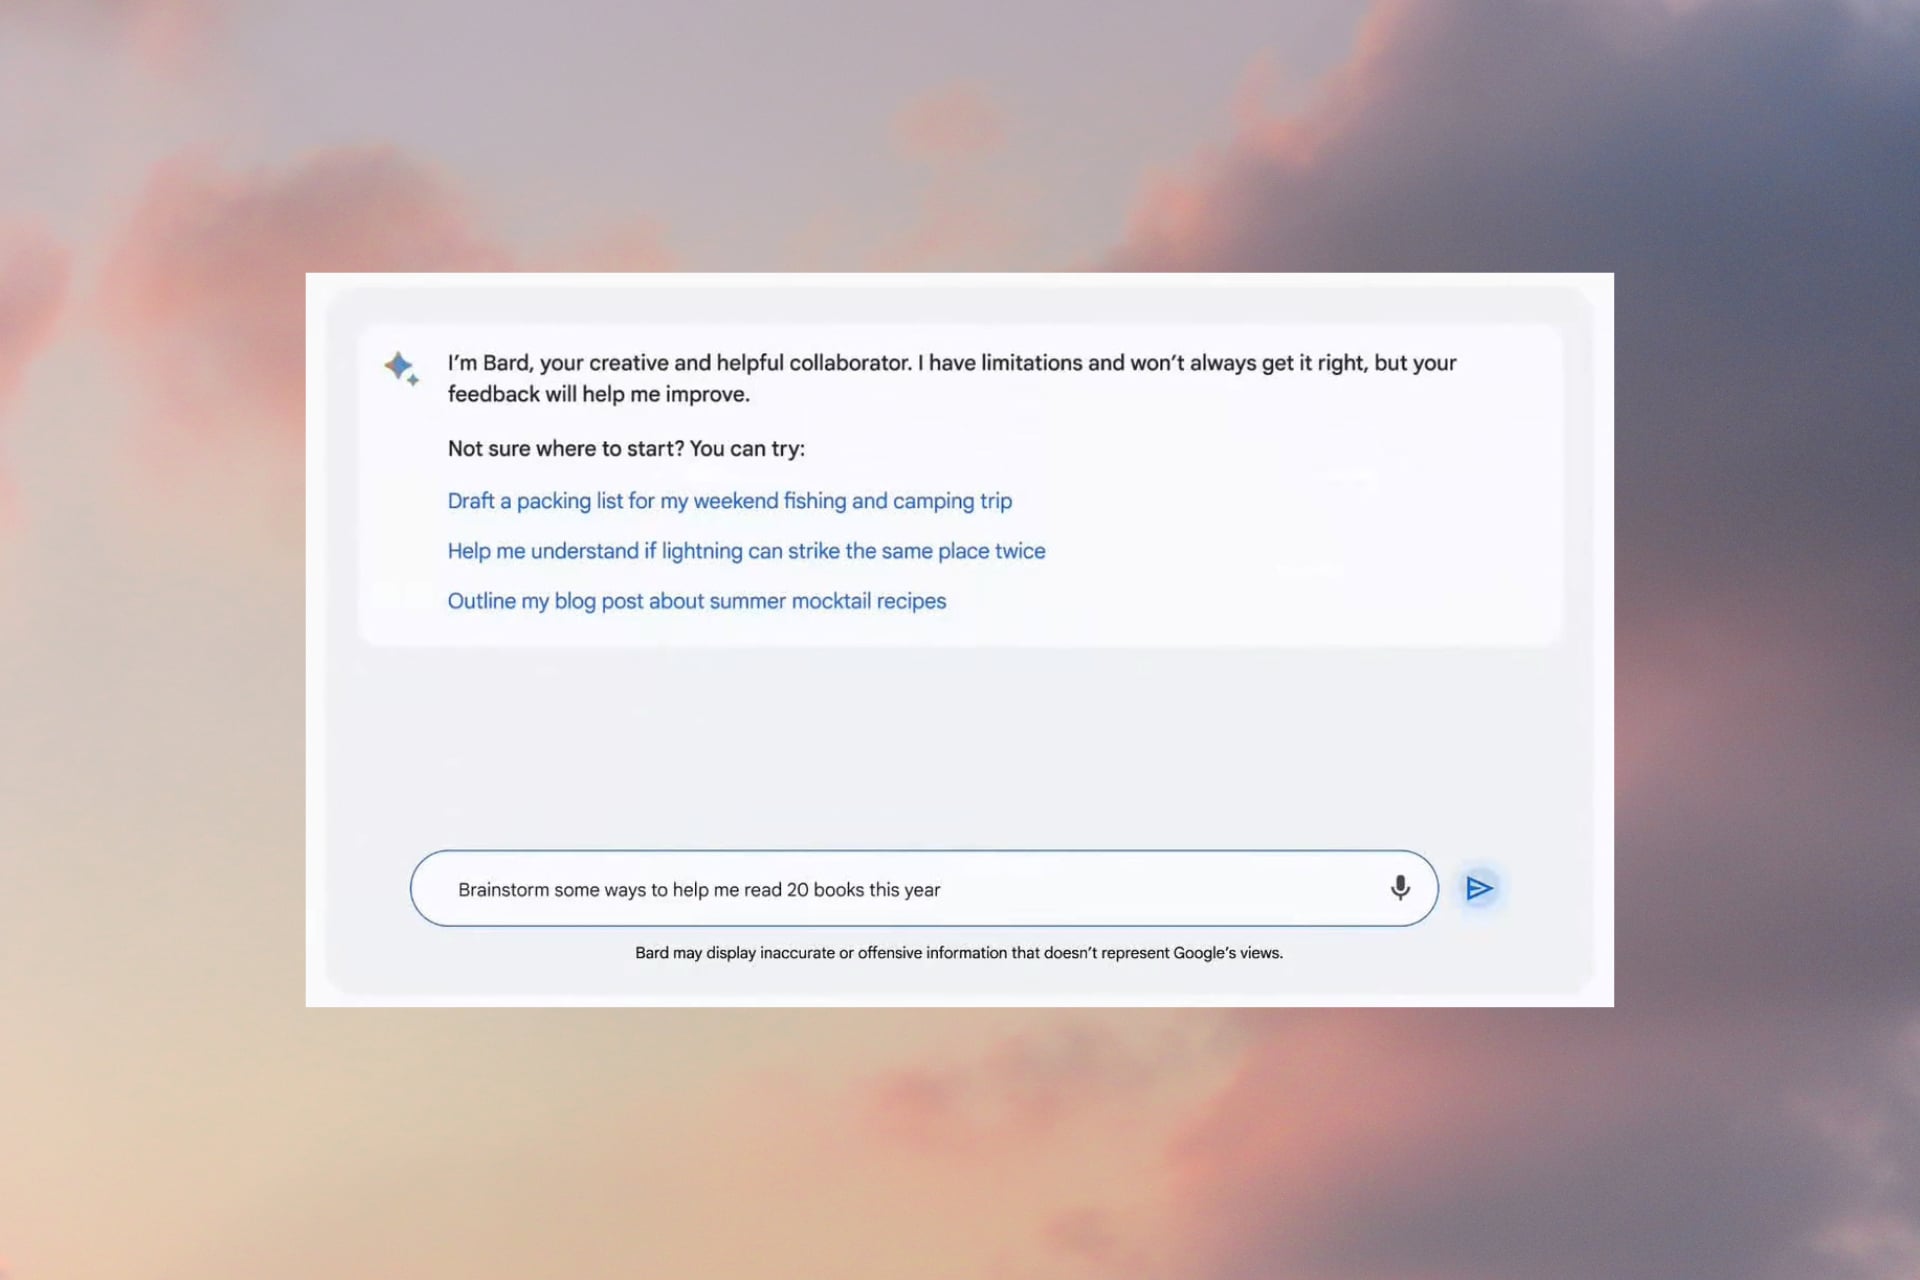
If the Bard AI is not working for you, it can be frustrating, as it may prevent to use it to explore things and get information.
In this guide, we will discuss the common causes behind the issue and provide solutions to help you resolve it.
Why is Bard AI not working?
There can be several reasons for the problem; some of the common ones are mentioned here:
Internet connectivity – The platform requires a stable internet connection to function; if your internet connection is weak, it can affect the performance of Bard AI or may prevent it from working.
Server issues – The service may have temporary server problems or be under maintenance, resulting in unavailability or reduced functionality. Wait for a while, then try again.
Browser compatibility – If your browser is outdated or has a lot of cache and cookies, it may slow the functioning of the browser, affecting any website you visit, including Bard AI.
High demand – It is a popular service, and during high demands, the servers may experience a heavy load, resulting in slower response times or unavailability.
Technical glitch – If the platform encounters bugs or technical glitches, it can impact its performance, causing the issue.
Now that you know the causes of the issue, let us check out the solutions.
How can I fix the Bard AI not working issue?
Before engaging in advanced troubleshooting steps, you should consider performing the following checks:
Wait for a while, then refresh the page.
Restart your computer and launch your browser.
Verify if you have an active internet connection.
Ensure your Windows and browser is up to date.
Check the server status; if it is down, wait for it to come online.
If none of these tweaks worked for you, move to the troubleshooting methods mentioned below.
1. Clear the browser cache
Launch your browser. Here we are demonstrating the steps using Google Chrome. Click the three horizontal dots and select Settings.
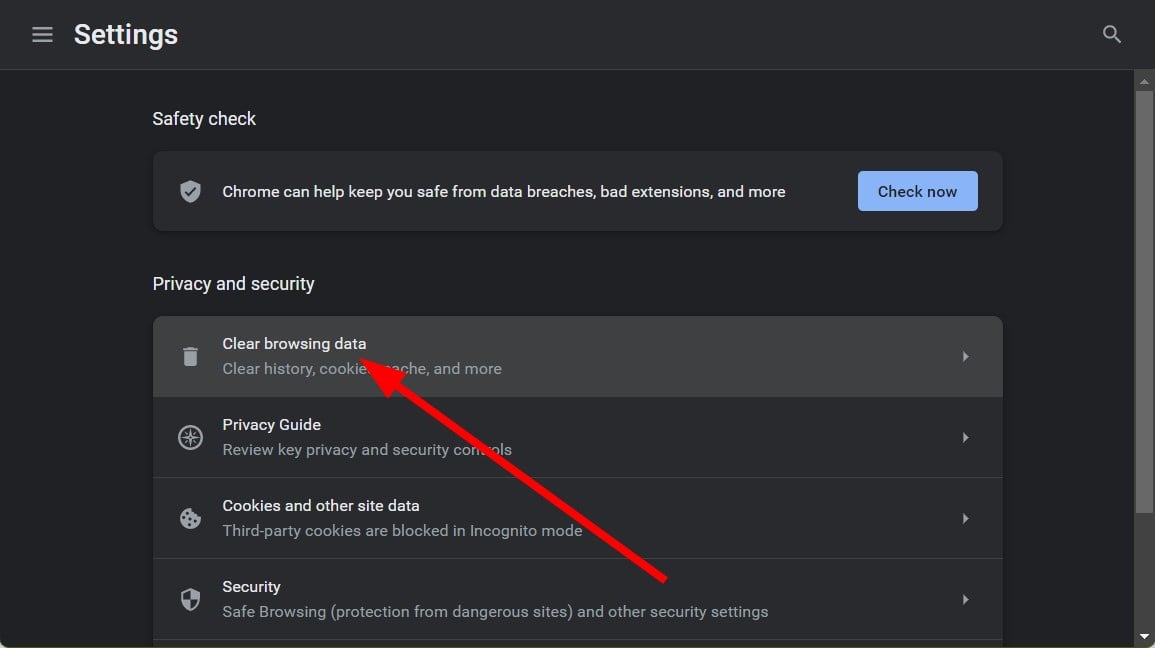
Go to Privacy and security and click Clear browsing data.
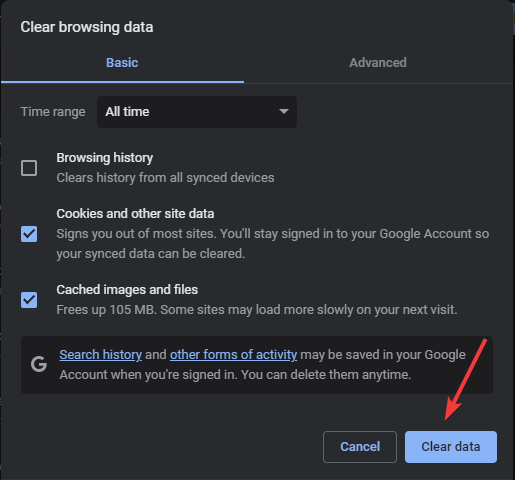
Select Browsing history, Cookies and other site data, & Cached images and files, then click Clear data.
2. Run a malware scan
Press the Windows key, type windows security, and click Open.
Go to Virus & threat protection and click Scan options.
Select Full scan and click Scan now.
If your computer has viruses, it may hinder the normal functioning of your browser and the machine. Therefore scanning your computer with a reliable antivirus can also help.
Alternatively, you can try a reliable third-party tool like TotalAV, launch it, and run a deep scan to resolve the issue and prevent other digital threats from entering your device.
3. Disable browser extensions
Launch the browser and click three horizontal dots.
Select More tools, then click Extensions.
On the Extensions page, go to the extension and toggle off the switch beside it to temporarily disable all of the active ones.
Click Remove to delete the ones that you don’t use.
PC performance monitoring tools are essential for your computer’s health. However a high-end PC might be, it’s pretty common for Windows users to start complaining about the sluggishness of the system at some point.
If you want to regularly inspect your computer functionality, which is ideal, you can use PC health monitor tools. For this purpose, it’s advised to employ the best HDD health check tools and resolve hardware issues.
In some cases, the problem might be due to low-spec hardware. But more often, it turns out to be something else. Like most things in this world, Windows needs to be taken good care of and serviced regularly.
We strongly recommend giving the following diagnostics tools and software for monitoring system performance a chance first. You might be surprised by how much you will be able to resolve using them!
If you’re a gamer, you should pay closer attention to your system so this list also includes the best PC monitoring software for gaming.
How can I monitor my PC performance?
It’s comforting to know that everything is operating as it should, whether you’re a seasoned professional who fixes computers or a novice who just plays games on them.
In the event that a problem does arise, having the ability to rapidly identify the source of the issue directly from your desktop may help you save both time and, in some instances, money.
We have compiled a list of some of the most helpful and user-friendly digital tools that can be used to monitor the operation of your personal computer and, if necessary, diagnose problems.
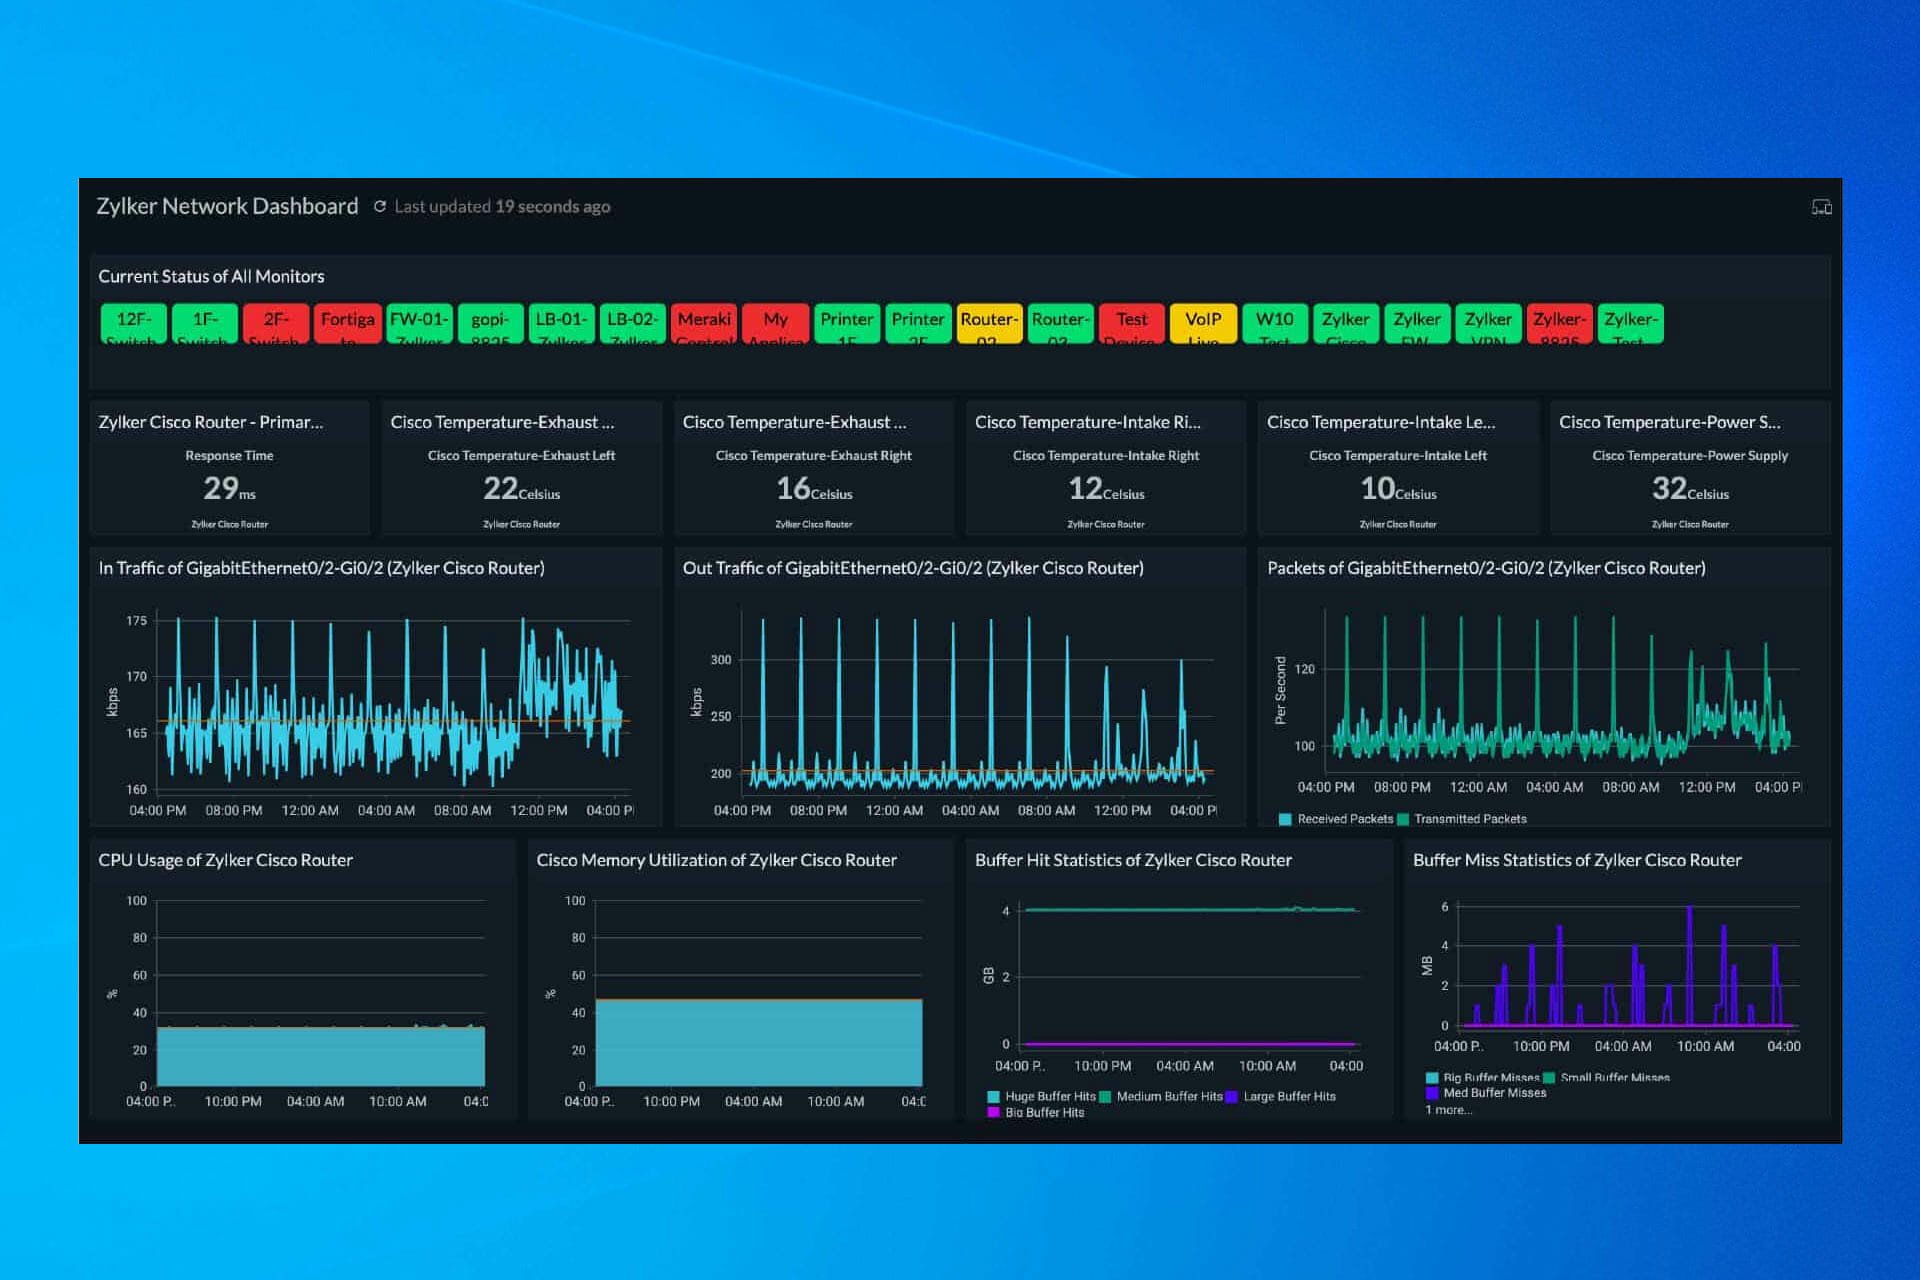
If you have more endpoints or PCs to manage, we recommend using a professional tool such as ManageEngine OpManager.
This solution comes with many performance metric monitors out of the box, leaving no stone unturned on your network.
Not only that, but you will be able to see the graphical representation of the performance monitor’s output for each component in real-time.
You don’t need to struggle because OpManager automatically discovers new devices and adds them to your network.
The tool will apply a template to every discovered machine according to its category. This template is packed with a list of performance monitors for that category, but you can customize it for your particular needs.
Just to get an idea of the complexity that OpManager is capable of, the solution comes with more than 9,500 device templates out-of-the-box and it supports over 53,000 vendor templates.
And if something gets wrong with the metrics you monitor, you instantly get an alert message.
Although this is clearly a professional-grade tool, you can scale it down to monitor just a few computers.
Let’s review some of its key features:
Intuitive dashboard with easy-to-use UI
Monitors all key performance metrics such as CPU and memory utilization, lowest resource-consuming devices, and more
Drag-and-drop workflow creator to create and execute simple programs
Virtual system monitoring
Comes with 9,500 device templates and support for over 53,000 vendor templates
ManageEngine OpManager
Monitor the performance of each computer on your network with this professional-grade solution!
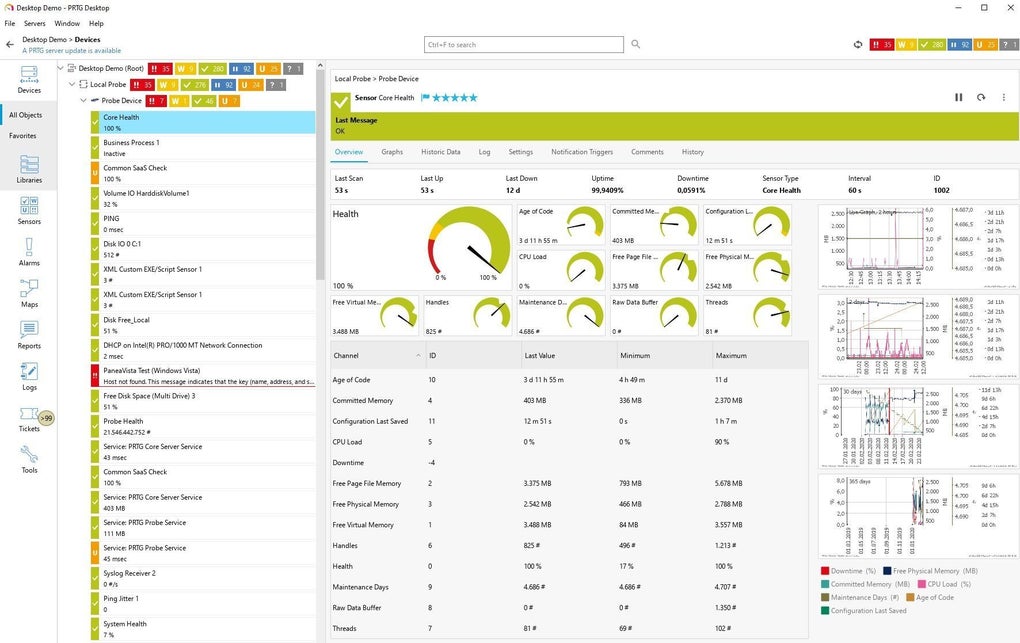
PRTG Network Monitor is an all-in-one 24/7 PC resource monitor software that surveys your entire system and is quick to notify you of any potential issues, thus allowing you to take appropriate measures.
By automatically collecting data essential to your system’s health, such as RAM and CPU usage, temperature, bandwidth, and more, this fantastic tool proactively checks and takes precautionary measures to increase the reliability of your system.
Let’s quickly look at its key features:
Spot damaged hard disks, malware infections, connection failures, and more through the central monitoring
Global proactive detection and health-check tasks
Monitor CPU temperature, performance, and utilization to identify potential issues from an early stage
Has a PC Performance Monitor widget
WMI Memory, SNMP Memory, and SSH Meminfo Sensors to monitor your memory usage
Real-time bandwidth monitoring to prevent network bottlenecks and overloads
Monitor disk space to identify failing operations and boost performances
PC monitoring software for gaming
PRTG Network Monitor
Keep your PC safe and healthy with this advanced software!
AIDA64 Extreme is an advanced PC performance monitoring software with a free version that has real-time diagnostic utilities, in-depth information on both hardware and software as well as overclocking support.
By closely monitoring sensors, AIDA64 is able to collect precise readings for quintessential parameters such as memory and CPU usage, temperature, and much more.
Once issues are detected, the diagnostic utility comes into play to prevent critical failures and damages. What’s more, the tool also provides a set of benchmarks to measure the performance of your entire system.
Let’s quickly look at its key features:
Best-in-class hardware detection module and accurate diagnostic tools
Multi-threaded stress testing module
Benchmarking option to measure your overall system’s performances
Software audit capacities with extensive coverage for DLL files, software licenses, startup programs, and more
Fully customizable SensorPanel to monitor all the various sensors, including temperature, cooling system, voltages, fan speeds, etc.
AIDA64 Extreme
An industry-leading system information tool gives very precise information on hardware as well as criteria for high computer performance.
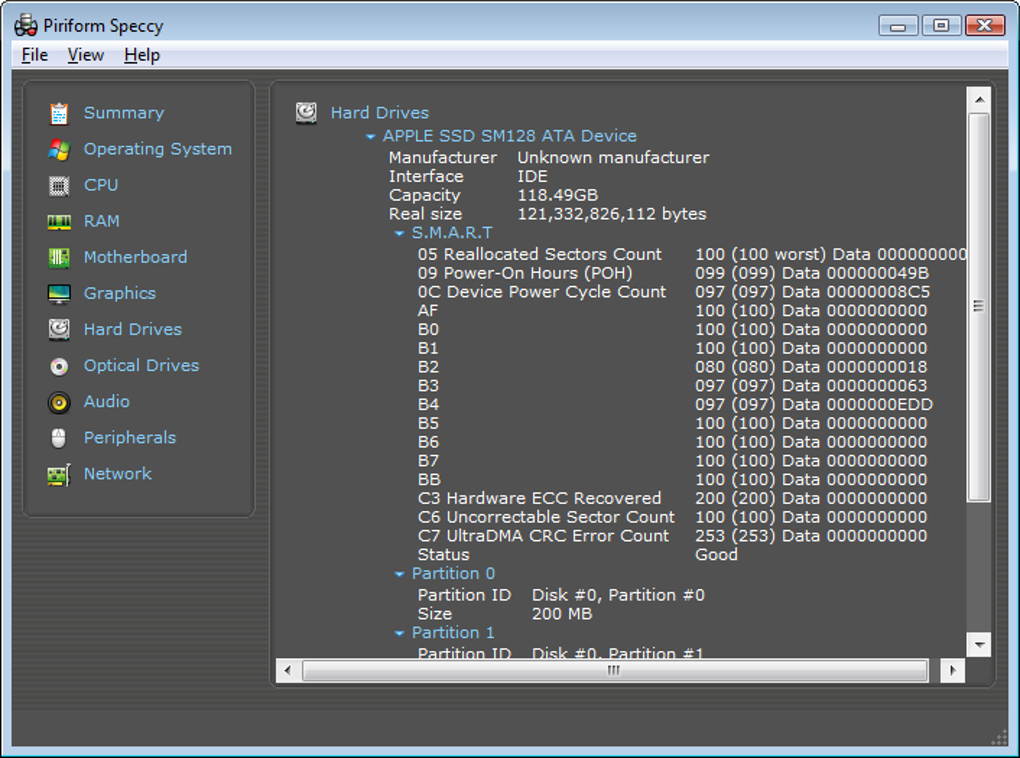
Speccy is one of the best tools available for letting you know about CPU and GPU temperature and more, for free. Of course, if you choose to go premium, so will the features you can enjoy.
Despite being advertised as a lightweight solution, Speccy is as powerful a program as they get, delivering all the tools you need to measure your PC’s performance.
And it does so through an advanced system information tool that closely monitors all the sensors attached to your computer.
As far as we see it, this software focuses on simplicity and delivering results. Accurately. And isn’t that what you would expect from a health check and monitoring software?
Let’s quickly look at its key features:
Quick or in-depth scanning functions to analyze all your HDD components
Detailed reports or quick summaries are available with detailed status for every item measured
Collects data from all the sensors integrated into your PC, including temperature, GPU, CPU,
RAM, motherboard, and much more
Real-time monitoring to spot failures and proactively solve them before they occur
In-built snapshot tool to capture scan results and share them later on for diagnostic purposes
Speccy
Get advanced insights on your system’s performance and take preventive measures with the fastest detection software on the market!
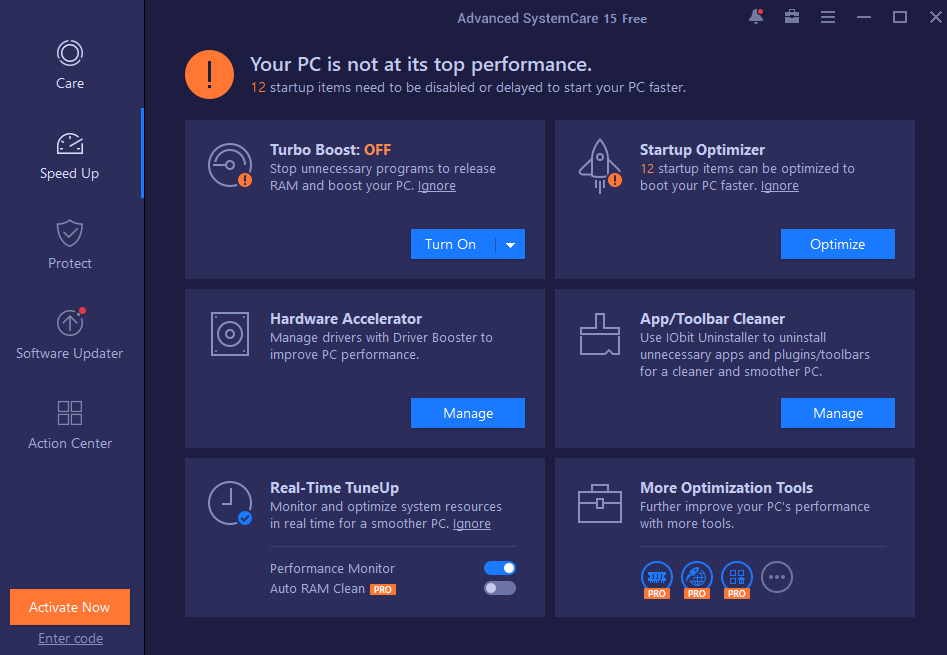
If you’re after a tool to improve the overall performance of your system, then Advanced SystemCare is a sure choice.
This is an all-in-one PC optimization utility that carefully monitors your system’s health and acts without hesitation to block malicious links and websites hidden in your email, automatically update obsolete software, optimize your Startup sequence, and block untrusted programs.
What’s more, it wipes junk files and navigation traces clean, thus increasing your Internet speed, all with just one click. Easy, right?
Let’s quickly look at its key features:
Professional PC Clean-up suite to prevent junk file cluttering and free precious resources such as disk space
Internet Booster feature to maximize network bandwidth and increase your Internet speed
Enhanced privacy and data protection
Startup optimization (end useless startup processes and reduce boot time)
Turbo Boost feature to improve your PC’s performance and response time by releasing RAM
Software Updater (with 60% more new programs included)
IOBit Advanced System Care
Intelligently clean and speed up your PC based on your optimization habits, automatically monitor your PC performance conditions, and release additional RAM storage.
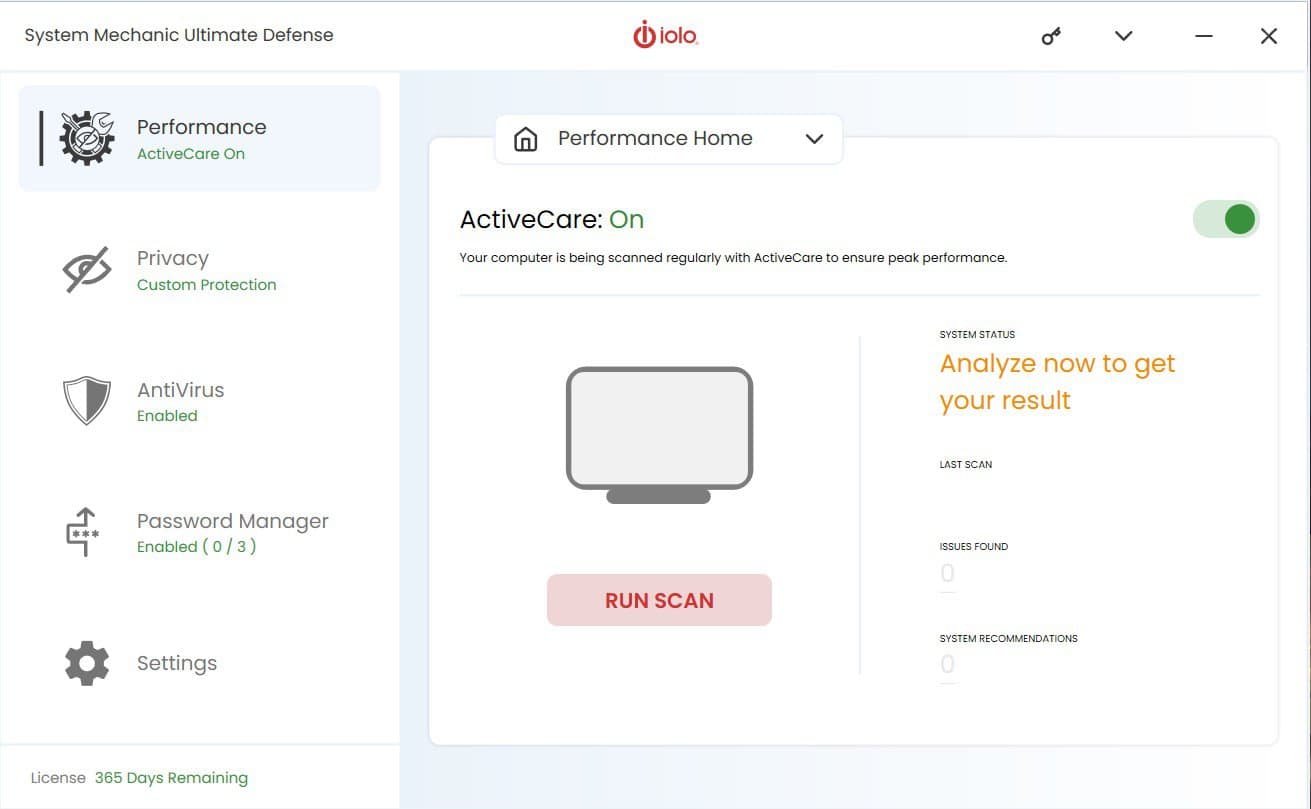
System Mechanic delivers the ultimate suite to monitor and improve your PC’s performances with as many as seven powerful products crafted to speed up, repair, and secure your entire system. It comes as a PC performance monitor overlay that is easy to use from the first steps.
Boasting a neatly organized interface with a Navigation bar and Content pane for convenient, intuitive, and quick access, you have all the tools to monitor your system’s performances at your fingertips. Even if it is not a tool that will show you data the way professional ones do, you will have an Idea about what’s happening on your PC.
The System Mechanic is an all-in-one PC optimization software with professional clean-up utilities that can remove junk files and repair broken key registries with a single click.
Let’s quickly look at its key features:
End-to-end PC health check and resources monitoring through Quick Scan or Deep Scan, as per your convenience (scan the entire system or choose specific files)
Prevent bloatware and startup bottlenecks
Eliminate useless, resources-consuming apps that run in the background to speed up your PC’s response time
PC Cleanup toolbox to remove unwanted junk files, broken shortcuts, temp files, and useless registry entries
In-built System Troubleshooter and automatic monitor and repair set-up
Real-Time Boost feature to automatically optimize CPU, RAM, and storage drives and improve overall PC performance
Iolo System Mechanic
Improve computer performance and enhance security with this professional software.
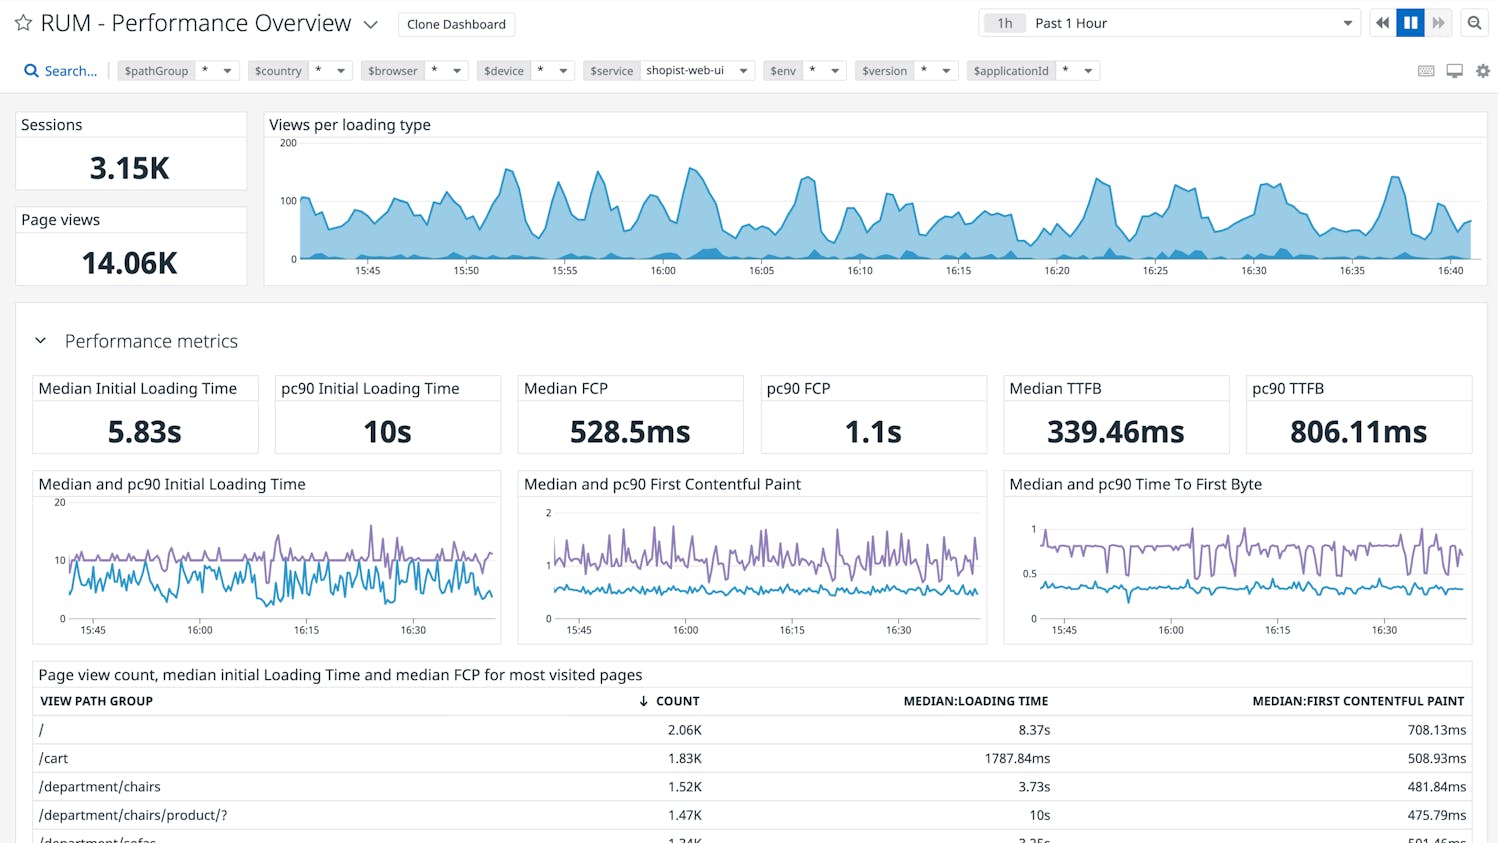
Real User Monitoring (RUM) from Datadog gives a glimpse into the frontend effectiveness of your business from the perspective of user proficiency.
Each user experience is connected with synthetic tests, back-end metrics, traces, logs, and network performance data. These help you discover bad user experiences and fix context issues throughout the network.
The monitoring/graphing interface is versatile, allowing you to show complicated graphs without scripting.
Here are the main features of Datadog:
When analyzing issues, swing from RUM data to request traces and logs for full information
View overall frontend performance data or break and split them by country, device, application, and more
With Error Tracking, you can intelligently combine high-volume application problems into a small number of issues
Visualizations such as time series, top lists, and tables may be used to better understand the user experience.
Use characteristics like user ID, email, and name to contextualize user sessions in your apps.
Combine full-stack monitoring in a single platform for frontend and backend development teams.
Using a platform that reveals concerns in a social setting while encouraging cooperation and providing all of the data in one place stimulates more engagement around instrumentation and root causes analysis and raises the visibility of possible problems before they become significant issues.
LogicMonitor – Intelligent insights for cutting-edge applications
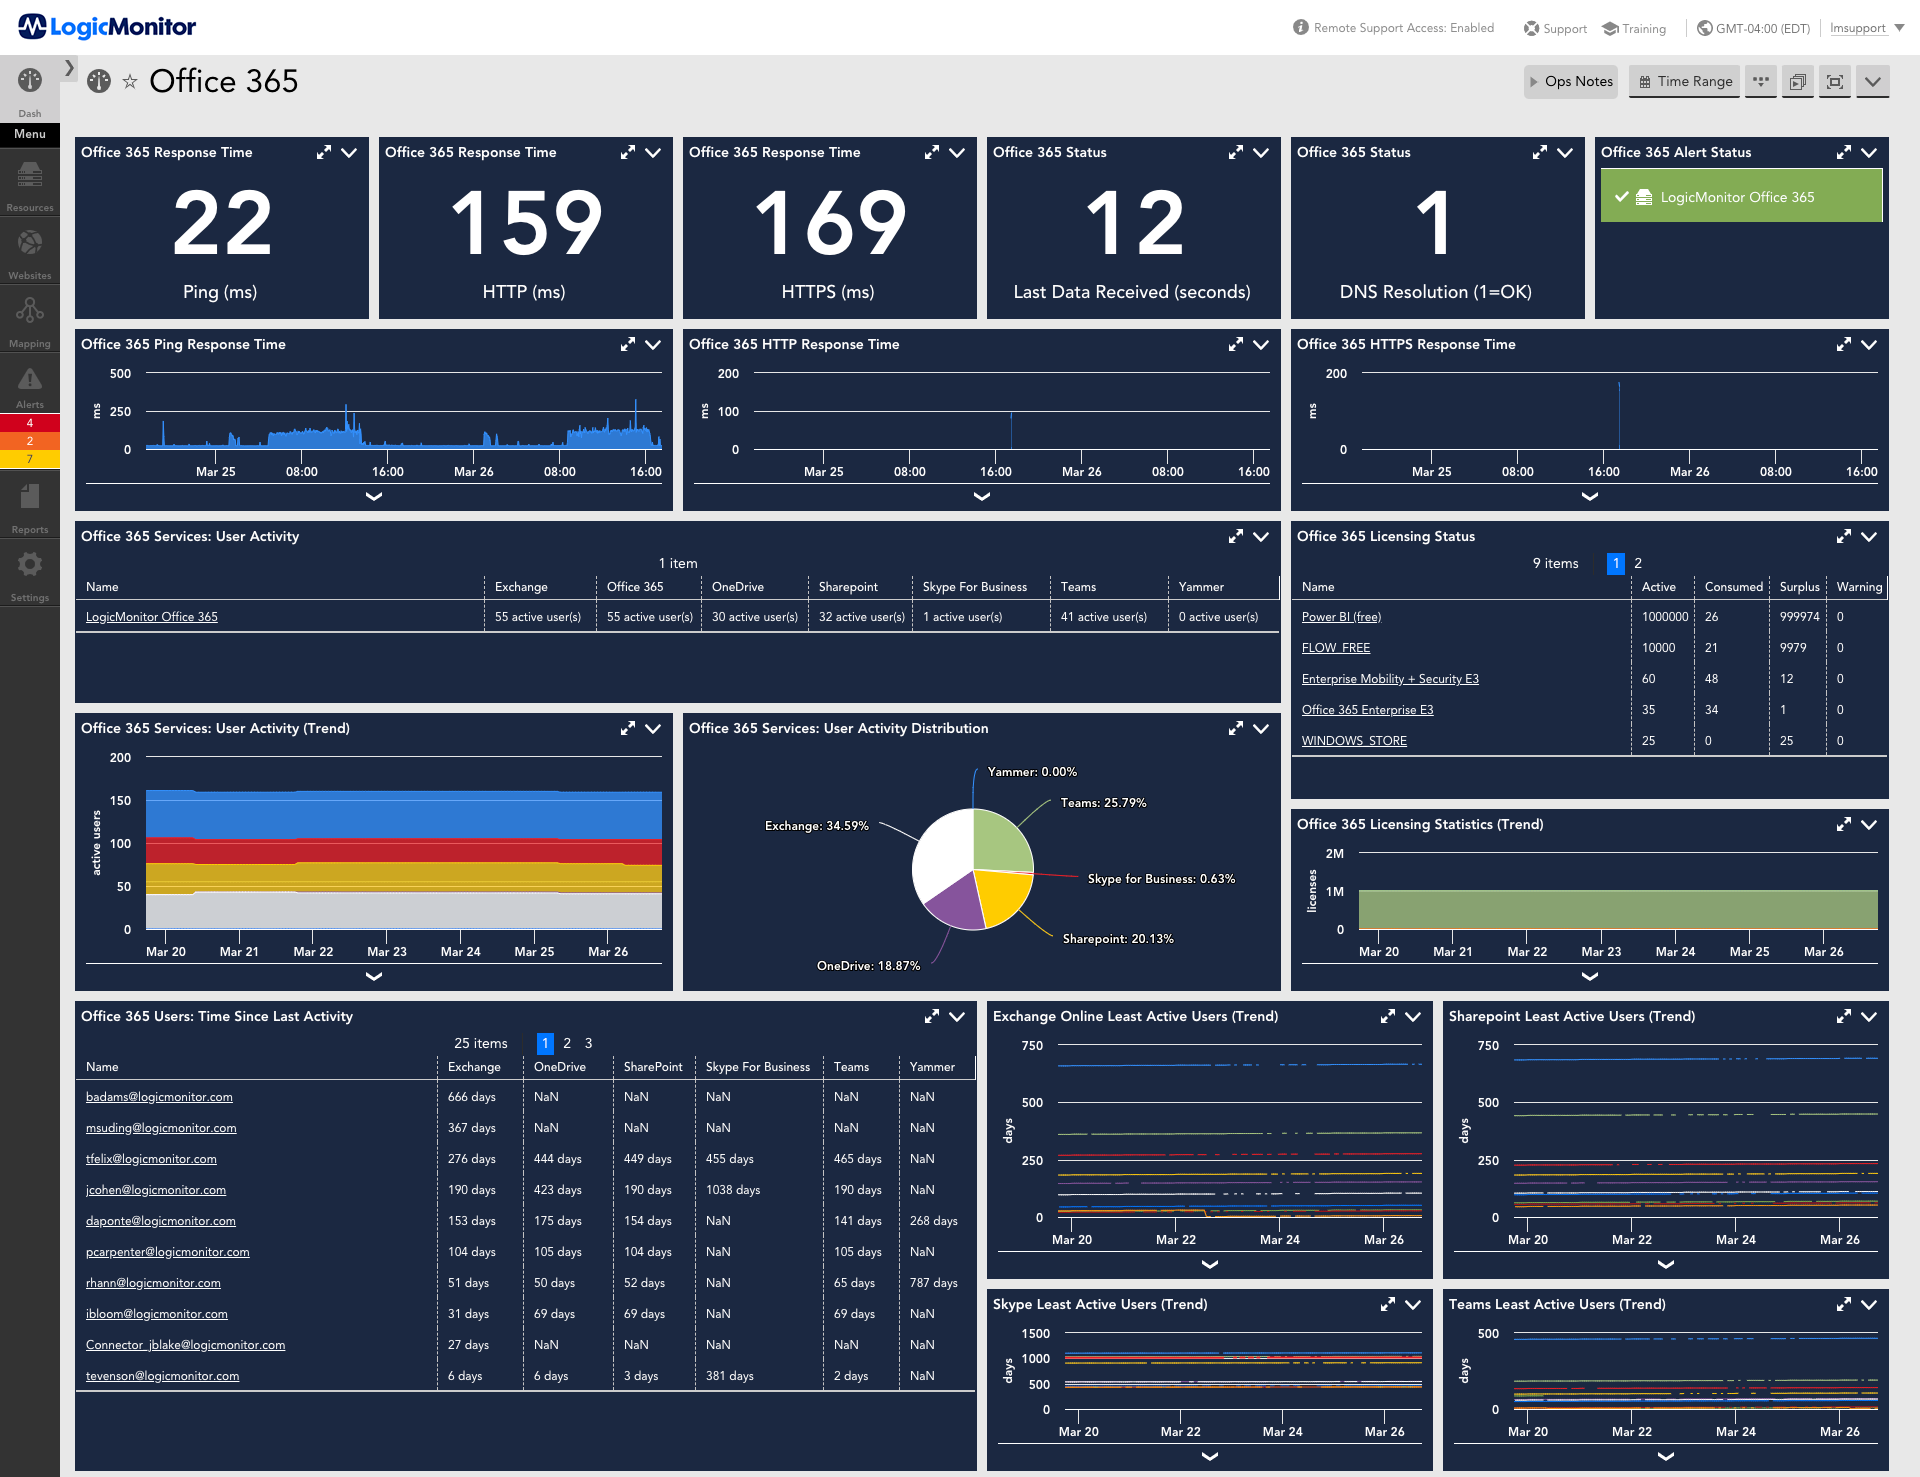
LogicMonitor monitors hybrid environments if you also have on-premise devices, which means you’ll have everything organized in one tool. It is SaaS-based and very customizable, with amazing dashboards as well.
It comes with predefined templates, so you can just enter an IP address, and it will detect everything and begin monitoring/alerting/graphing without the need for any coding.
Every aspect of the LogicMonitor experience, from technological architecture to day-to-day business operations, incorporates security best practices.
These are the key features of LogicMonitor:
A formal security software development lifecycle includes many stages of threat modeling and security testing
Based on secure Linux servers with perimeter and host-based intrusion prevention system
Intelligence monitoring for sophisticated IT architectures
Finds containers, microservices, and underlying resources automatically
Intelligent insights for cutting-edge applications – contextually combine traces, logs, and metrics
Monitor key database metrics including throughput, query execution performance, the number of active connections, buffer pool utilization, threads operating, and more.
Dashboards, intelligent alerting, forecasting, and thorough reporting from LogicMonitor provide insight into database performance and application health. Identify deadlocks, bottlenecks, error rates, and other issues quickly.
A PC hardware monitoring software investigates every aspect of the hardware and looks for issues with it. For instance, it will identify the CPU temperature, the power delivered to various components, and whether all of it falls under the optimal range.
The data is then plotted in the form of graphs or listed. If the software identifies an issue, it will highlight the same so that necessary corrective measures can be undertaken and the problem resolved as soon as possible.
Some of these work as PC performance monitor widgets, while others use the more intuitive PC performance monitor overlay concept.
Is there a free PC monitoring software?
Many great applications can help you monitor your PC, and many users are using CPU monitoring software to keep a close eye on their computer temperature.
Monitoring your network usage is also possible with bandwidth monitoring applications, so you can see which apps are using most of your bandwidth.
Users are also advised to keep a close eye on their power supply, and for that purpose, we suggest using specialized software for testing the power supply. Many of these applications are free, and they can be used with few restrictions, so they are worth checking out.
Some programs can provide precise details regarding your CPU utilization or temperature, RAM consumption, or hard disk memory. This is useful if you need complete data for the performance and activities of your system.
We hope that you find all these monitoring tools useful. You probably will not need all of them, so pick the one that seems the most valuable for maintaining your Windows PC.
FAQs
What does PC performance monitoring software do?
PC monitoring tools track CPU, GPU, RAM, disk health, and network usage in real time. They help detect overheating, bottlenecks, or failing components before they cause major issues.
What is the best free PC monitoring software?
Speccy and BitMeter OS are excellent free options. They provide quick insights into CPU/GPU temperatures, memory usage, and disk health without requiring advanced setup.
How do I check my CPU and GPU performance on Windows 10/11?
You can use Windows Task Manager and Performance Monitor to view CPU and GPU activity. For more detailed stats, tools like AIDA64 Extreme or PRTG offer in-depth monitoring.
Do gamers need PC performance monitoring tools?
Yes. Gamers benefit from monitoring software because it helps track temperatures, frame stability, and resource usage. This prevents overheating, lag, and performance drops during gameplay.
Windows Hello is one of the most secure sign-in options on Windows 10 and 11. Unfortunately, even this feature encounter issues at times, with users complaining of a we could not find a camera compatible with Windows Hello Face error.
This can be pretty frustrating, as you have to use another sign-in option to get into your PC. Fortunately, the fixes to this issue are not complicated, requiring a few tweaks here and there.
Why does Hello Windows 11 not recognize my camera?
Several factors can be responsible for the could not find a camera compatible with the Windows Hello Face error. Below are some of them:
Outdated camera driver: If your Windows 11 camera is compatible with Hello Face and you are still getting this error, it might be a driver issue. What you need to do here is to update your driver.
Disabled service: At times, this issue might be because the Hello Face feature is disabled. You need to enable the feature to get it working again.
Faulty system files: Sometimes, this problem might be down to broken or missing system files. Repairing and restoring these files will do wonders here.
How do I fix my camera if it is incompatible with Hello Face?
1. Update the camera driver
Press the Windows key + X and select Device Manager.
Double-click the Cameras option to expand it, and right-click the device there.
Now, select Update driver.
Finally, select the Search automatically for drivers option and install the available updates.
An outdated camera driver can be the reason for the could not find a camera compatible with Windows Hello Face error. You can fix it by updating your IR camera drivers to the latest version.
If Windows cannot find the latest drivers, you can go to the manufacturer’s website to download them. Alternatively, you can employ a specialized driver updating tool to get the job done for you.
This special tool will automatically scan for all defaulting drivers and fix them. All these without much input from you.
2. Install the FaceDriver file
Press the Windows key + E to open File Explorer and navigate to the path below: C:\Windows\System32\WinBioPlugIns\FaceDriver
Right-click the HelloFace.inf file and select Install.
Finally, follow the onscreen instructions and restart your PC.
If you are still getting the could not find a camera compatible with Windows Hello Face error, you need to install the Hello Face inf file.
Press the Windows key, type cmd, and select Run as administrator under Command Prompt.
Type the command below and hit Enter to run it: DISM /online /cleanup-image /restorehealth
After the command finish running, type the command below and hit Enter: sfc /scannow
Finally, wait for the command to finish running and restart your PC.
Corrupt system files can cause the could not find a camera compatible with Windows Hello Face error. You can fix this by running the SFC and DISM commands on an elevated Command Prompt.
Furthermore, to ensure a thorough Windows repair, we suggest you try a dedicated repair tool to do the job for you.
4. Enable the Windows Hello feature
Press the Windows key + I and select Apps in the left pane.
Choose the Optional features option.
Finally, select Windows Hello Face and click the Install button.
At times, the simplest fix might be the most effective, and this has proved true for some users. Hence, you need to make sure the Windows 11 Hello Face feature is enabled.
5. Restart Biometric services
Press the Windows key + R, type services.msc, and click OK.
Now, right-click the Windows Biometric Service option and select Stop.
Press the Windows key + E to open File Explorer and navigate to the path below: C:\Windows\System32\WinBioDatabase
Next, copy the content of the folder to another location and delete the original.
Finally, go back to the Services window, right-click Windows Biometric Service, and select Start.
In some cases, issues with the Biometric services might be the reason for the could not find a camera compatible with Windows Hello Face error. Restarting this service should rectify the problem.
6. Use the Get Help app
Press the Windows key, type help, and select Get Help.
Now, type your issue and follow the guidance of the virtual agent.
There you have everything you need to fix the we could not find a camera compatible with Windows Hello Face error. All that is left for you to do is to follow the instructions above carefully, and things should be back to normal.
Roblox is one of the most used platforms by gamers. However, things are not always smooth with the platform, as some users are complaining that Roblox is stuck on an endless configuring loop.
This renders the app useless, as you won’t able to get into it. If you are also dealing with this issue, the solutions in this guide will help you force the configuration through.
Why is Roblox stuck on configuring?
Listed below are some of the potential reasons Roblox might be stuck on configuring on your PC:
Antivirus interference: Oftentimes, this occurs because your antivirus software is blocking the configuration. You can push the process through by disabling or uninstalling the antivirus.
Location issues: You might be experiencing this issue because of problems with your present location. What you need to do here is to use a trusted VPN.
Corrupt app cache: If the Roblox cache is corrupt, it might cause configuration issues. Clearing the app cache should do the trick here.
How can I fix Roblox if it is stuck on configuring?
Below are some of the basic troubleshooting steps to attempt before making changes to your PC in a bid to fix this issue:
Restart your PC.
Check your internet connection.
1. Disable/uninstall antivirus
Press the Windows key, type virus, and select Virus & threat protection.
Click the Manage settings link.
Now, toggle the switch for Real-time protection backward to disable it.
If you use a third-party antivirus, right-click its icon on the Taskbar, and select Disable.
Next, if disabling the third-party does not work, press the Windows key + R, type appwiz.cpl, and click OK.
Right-click the app and select the Uninstall option.
Finally, follow the onscreen instructions to complete the process.
The first thing to try if Roblox is stuck on configuring is to check if your antivirus is not blocking it. To be sure, you can disable the security software temporarily.
If this does not work, you need to uninstall your third-party antivirus and relaunch Roblox.
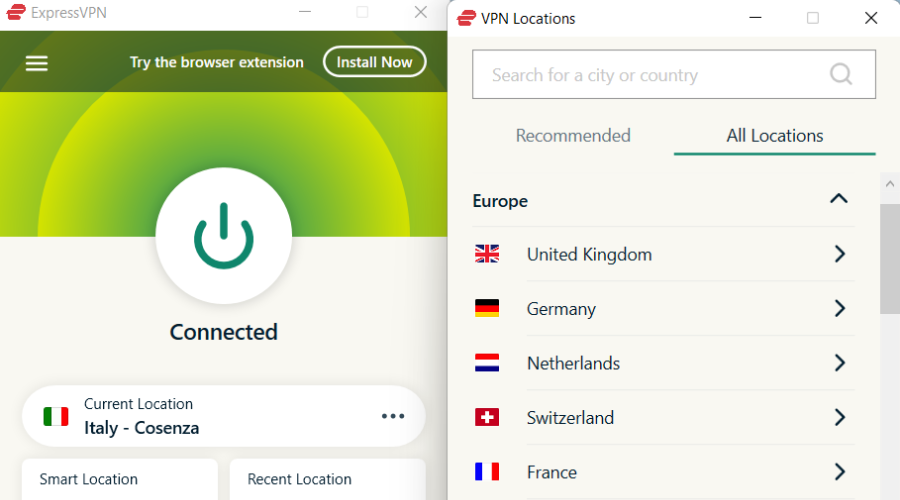
Location issues are one of the major reasons Roblox might get stuck in an endless configuring loop. Fortunately, you can circumvent this by using a top VPN service.
ExpressVPN is an excellent software that allows you to switch between locations with just a few clicks of the mouse.
It can also let you bypass any location restriction without getting detected and can solve most of your location-related issues without fuss.
Moreover, ExpressVPN has lightning-fast speeds, DDoS protection, and unlimited bandwidth to get the most out of your gaming experience.
ExpressVPN
Play Roblox with blazing-fast speeds, strong security, and no bandwidth throttling at all.
Press the Windows key + R, type %appdata%, and click OK.
Click the AppData link at the top.
Now, double-click the Local folder to open it.
Finally, right-click the Roblox folder and select Delete.
If Roblox is stuck on configuring while you are trying to update it, it might because of issues with your app cache.
So, you need to clear Roblox cache and restart the update process.
4. Reinstall Roblox
Press the Windows key, type control, and select Control Panel.
Now, click Uninstall a program under the Programs option.
Next, click the Roblox option and select Uninstall at the top.
Follow the onscreen instructions to complete the uninstallation process.
Finally, go to the official website to download the latest app version.
If Roblox remains stuck on configuring, you need to uninstall the app. This should eliminate the problems that prevent the updating process from going through.
After the removal process is complete, you need to go to the official website to download the latest version of the app.
We have reached the end of this guide on fixing the Roblox stuck on configuring issue. We believe you should now be able to fix the issue, provided you follow the steps carefully.
And it’s here. Bing Search finally gets the dark mode feature for PC and it looks pretty great. After a period of important updates from Microsoft, the Redmond tech giant has apparently added this feature to Bing Search.
As spotted by this Reddit user, the dark mode looks elegant and spacious on Bing, which is why so many users have requested it.
As you may know, Bing has been getting a lot of good features lately. It has an AI-based technology that helps you in your searches. It also comes with suggestions, and all sorts of recommendations based on what you are looking for.
Microsoft also said that the mobile and desktop versions of Bing will benefit from videos, Knowledge Cards, graphs, improved formatting, and social sharing capabilities within the chat, according to their blog post.
How to enable Bing Search dark mode
Open Edge and search for something with Bing
Once you’re on the search page, go to Settings
Head over to Appearance and select Dark
You should be all set now
SwiftKey, which is an AI-powered keyboard, is also coming to Bing, as one of its features. Not only that, but the Redmond tech giant also allows you to add a Bing Chat widget to your home screen, so you can have easy access to the feature.
On the other hand, Skype benefits from AI-powered Bing in group chats, so you can easily look for information and suggestions while you’re talking to your friends or workmates.
This is all part of Microsoft’s intention to make increase the popularity of Edge and Bing, and so far it works. The new Bing mobile app continues to enjoy popularity, as it is downloaded by millions of users. It has been reported that the app’s daily download increased by a staggering 8x since its launch.
With that in mind, Microsoft is trying to listen to the feedback and implement it as soon as possible. Bing Search dark mode is one of these features that have been long requested by users.
What do you think about it? Do you like how it looks? Let us know in the comments section below.
The GeForce Experience app is one of the many apps that start with your PC b by default. However, some users are complaining that the NVIDIA GeForce Experience is not starting with Windows 10 and 11 for some reason.
This takes away the ease of managing your graphics card settings. If you are also troubled by this issue, the solutions in this guide will help you resolve it quickly.
Why is NVIDIA GeForce Experience not starting on Windows?
There are various reasons NVIDIA GeForce Experience might not be starting on your Windows PC. Below are some of the prominent ones:
Faulty driver: In some cases, GeForce Experience might not be opening because of issues with your graphics driver. The solution to this is to reinstall or update your driver to the latest version.
Antivirus interference: Your third-party antivirus software might be blocking the GeForce Experience software from starting on startup. You can fix this by disabling your antivirus temporarily.
Faulty software installation: At times, the issue can be due to faulty software installation. You need to reinstall the app from official sources to resolve it.
How do I get my NVIDIA GeForce Experience to start on Startup on Windows?
1. Restart the required services
Press the Windows key + R, type services.msc, and click OK.
Double-click the NVIDIA GeForce Experience Service to open its properties.
Now, set the Startup type to Automatic and click the Start button.
Click the Apply button followed by OK.
Next, locate the following and repeat Steps 2 to 4:
Nvidia Telemetry Container
Nvidia Geforce Experience Backend Service
Finally, close the Services window and restart your PC.
Oftentimes, NVIDIA GeForce Experience might not be starting with Windows because some of its important services are disabled. Enabling or restarting these services should restore normalcy in this case.
2. Disable antivirus temporarily
Press the Windows key, type virus, and select Virus & threat protection.
Click the Manage settings link.
Now, toggle the switch for Real-time protection backward to disable it.
Finally, if you use a third-party antivirus, right-click its icon on the Taskbar, and select Disable or any corresponding option.
Sometimes, NVIDIA GeForce Experience might not be starting on startup on Windows 10 or 11 because your security software is blocking it. The solution to this is to disable it temporarily.
Press the Windows key + X and select the Task Manager option.
Right-click the NVIDIA GeForce Experience option and select the End task option.
Now, click the Services tab at the top.
Next, right-click the Cryptographic Service (or CryptSvc) option and select Stop.
Finally, relaunch GeForce Experience.
Some users have found the NVIDIA GeForce Experience not starting on Windows issues to be problems with the Cryptographic service. Restarting this service and the GeForce Experience process fixed this issue for them.
4. Update your driver
Press the Windows key + X and select Device Manager.
Double-click the Display adapters option to expand it, and right-click the GeForce adapter there.
Now, select the Update driver option.
Choose the Search automatically for drivers option and install the available updates.
If updating the driver does not work, choose Uninstall device in Step 2 instead.
Finally, click the Uninstall button and restart your PC.
An outdated driver can cause the NVIDIA GeForce Experience app not to start with Windows. Hence, you need to update your driver to the latest version. If updating does not work, you should try to reinstall the driver completely.
Alternatively, you can use a dedicated driver solution to update your driver. Also, if the driver is broken, this automatic tool will replace it with the original version from its extensive database.
Press the Windows key + R, type appwiz.cpl, and click OK.
Right-click the NVIDIA GeForce Experience option and select the Uninstall option.
Now, follow the onscreen instructions to complete the process.
Finally, go to the official website to download and install the software.
In some cases, you might have no choice but to uninstall NVIDIA GeForce Experience if it’s not starting on Windows 11 or 10. Reinstalling it from official sources should help clear the potential glitches that might be causing the issue.
If NVIDIA GeForce Experience is not starting on Windows PC, it reduces the ease of accessing the software. However, you can fix the issue by following the solutions in this guide.
Windows backup is a great tool to safeguard your data against failures and disasters. However, sometimes you may find yourself stuck with an error message indicating that Windows backup failed to get an exclusive lock on the EFI system partition.
Windows 11 backup errors are not new, so let’s have a closer look at what this one means and how you can get back to smooth backups again.
What does the Windows backup failed to get an exclusive lock error mean?
If you get the Windows backup failed to get an exclusive lock on the EFI system partition message when backing up your PC, another application is using the drive, and the backup process cannot be completed.
This can happen because of one or more of the following reasons:
The disk was not partitioned correctly – If you have two partitions on a hard disk, Windows Backup cannot create a backup image of the entire disk if one is formatted with the wrong partition style.
Another program or user account locks the file – This can happen if another program or user account is writing to or reading from this file while Windows Backup backs it up. It, therefore, cannot access the file to avoid data corruption.
Incorrect settings – Some incorrect backup settings on your computer may be causing this issue.
Antivirus settings – Antivirus software can interfere with the backup process, especially if it’s set to scan files before they’re backed up.
Network connection issue – In some cases, Windows backup failed to get an exclusive lock error message can also be caused by a network connection issue between your computer and the storage device where backups are stored.
Windows backup service – The Windows backup service may be having a glitch and hence can’t perform its normal operations.
How can I fix the Windows backup failed to get an exclusive lock error?
Here are some preliminary steps that may help you resolve this issue:
Hit the Start menu icon, type Windows Security in the search bar and click Open.
Click on Firewall & network protection, then select Public network.
Locate Microsoft Defender Firewall and toggle the off button.
2. Perform a System File Checker scan
Hit the Start Menu icon, type cmd in the search bar, and click Run as administrator.
Type the following command and press Enter: sfc /scannow
Alternatively, you can save time and effort and perform this action more in-depth by using a dedicated repair program.
3. Run a virus scan
Press the Windows key, search Windows Security, and click Open.
Select Virus & threat protection.
Next, press Quick scan under Current threats.
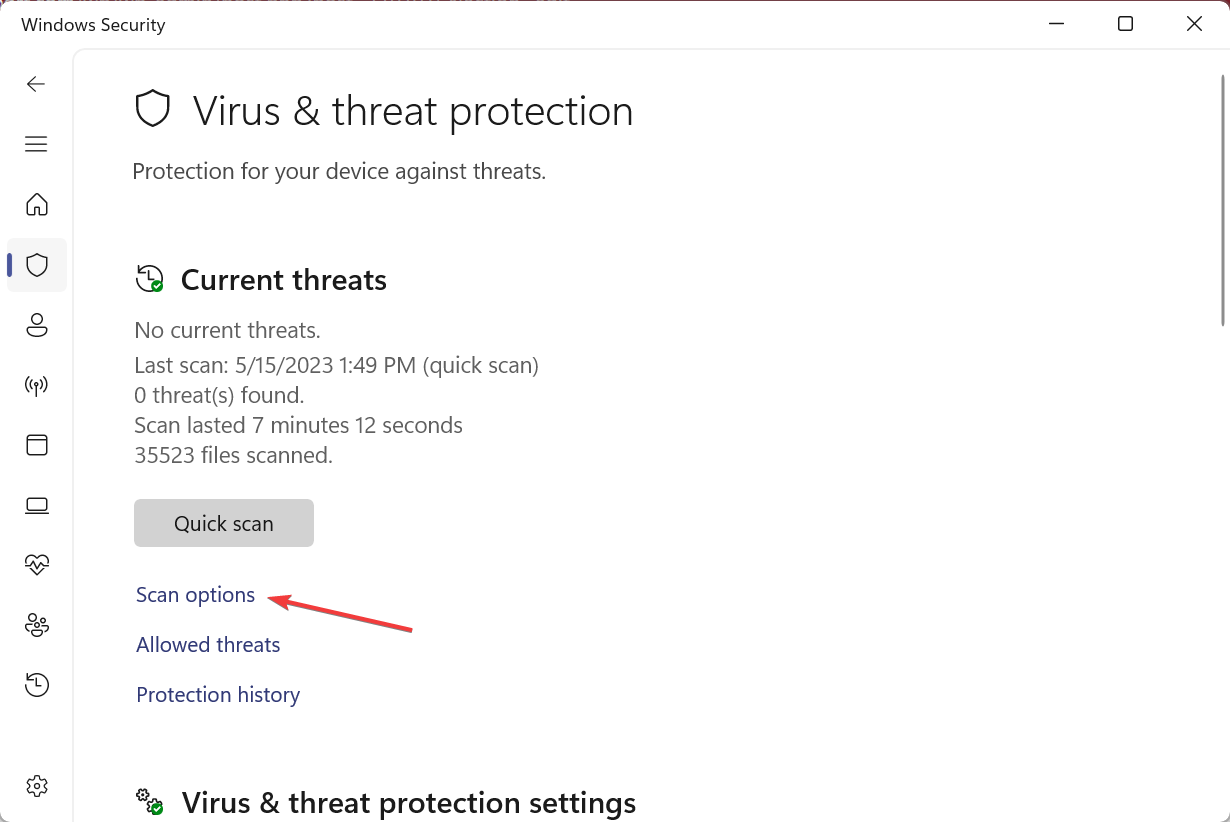
If you don’t find any threats, proceed to perform a full scan by clicking on Scan options just below Quick scan.
Click on Full scan, then Scan now to perform a deep scan of your PC.
Wait for the process to finish and restart your system.
4. Uninstall recently installed programs
Hit the Windows key, type Control Panel in the search bar, and click Open.
Navigate to Uninstall a program under programs.
Find the most recently installed program, click on it, and select Uninstall.
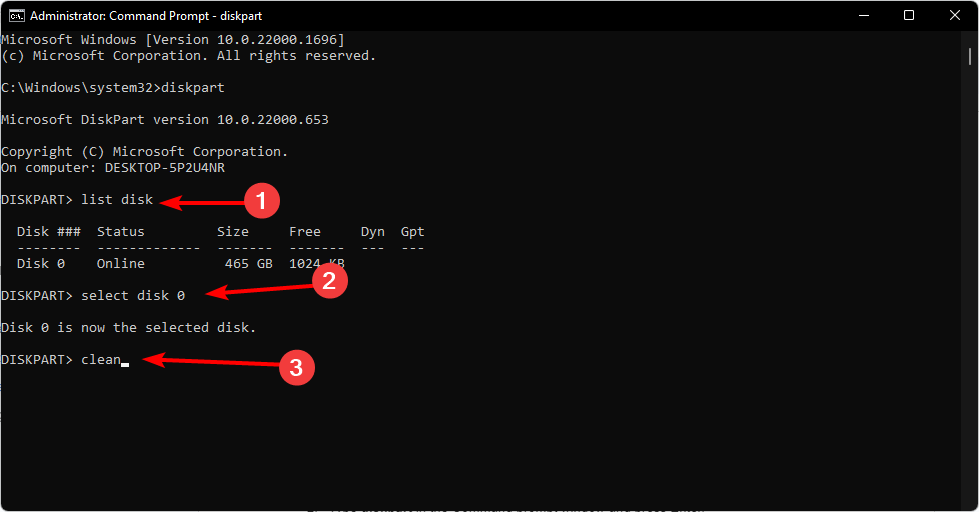
5. Reformat your backup drive
Hit the Start Menu icon, type cmd in the search bar, and click Run as administrator.
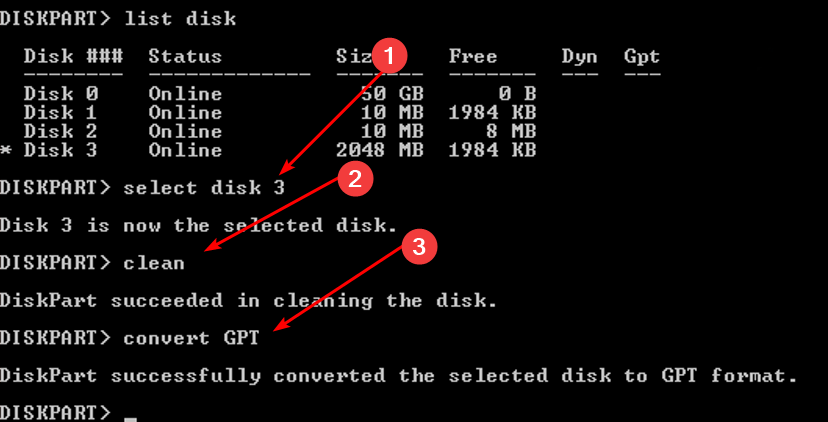
Type the following command and press Enter:diskpart
Next, type listdisk to display the number of available drives in your system.
Check the number listed against the drive you want to format and Enter the following command. Remember to replace X with the corresponding number of the drive:selectdisk X
Next, type in clean to clear everything from the drive.
Type in convert gptand press Enter.
Wait for the process to finish, and type in the following command:create partition primary
Next, Enter the following commands to format and assign the drive a letter:select partition xformat quick fs=NTFS assign letter C
Restart your PC.
6. Perform a clean boot
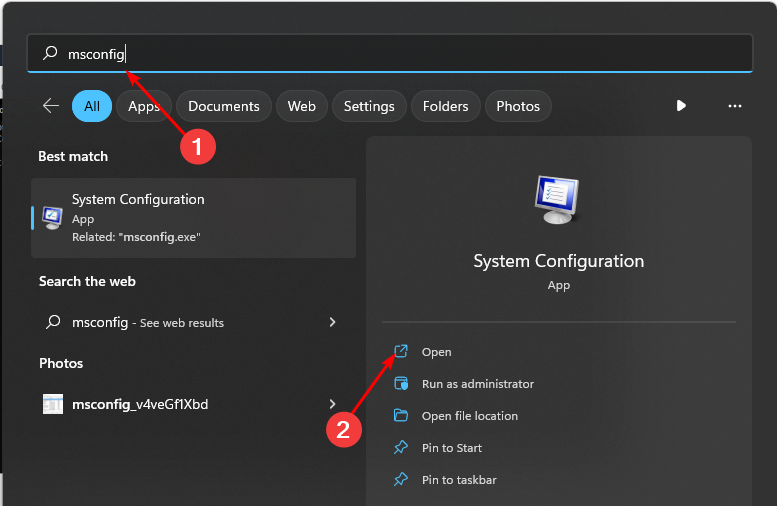
Hit the Windows key, type msconfig, and open System Configuration.
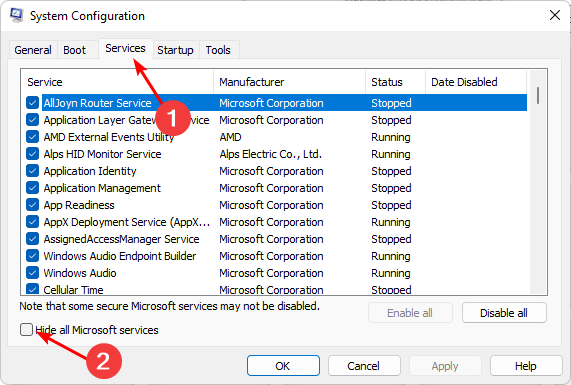
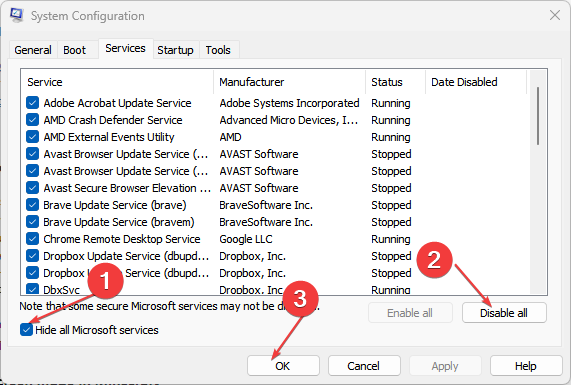
Switch to the Services tab and select Hide all Microsoft services.
Click on the Disable all button, then hit the Apply button to save the changes.
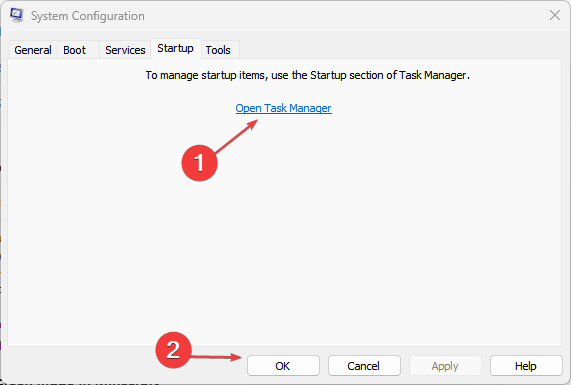
Go back and click on the Startup tab, select Open Task Manager then click OK.
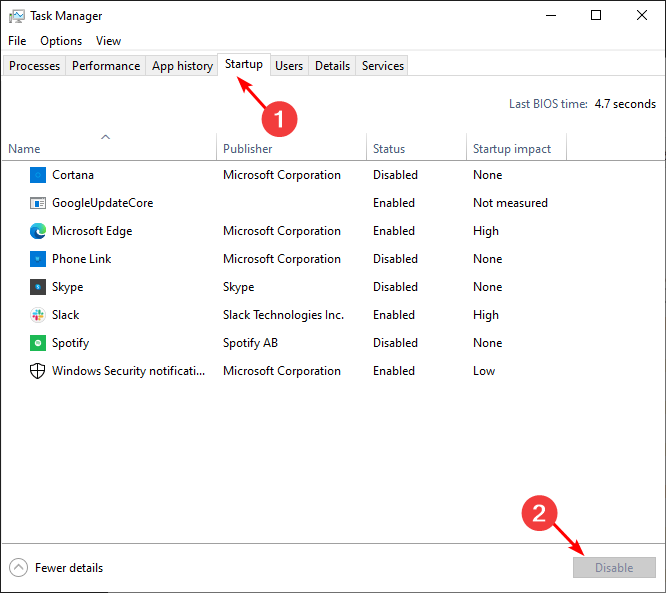
In the Startup tab of the Task Manager, Disable all the Enabled startup items.
Close Task Manager and restart your PC.
7. Change the logon user
Hit the Windows + R keys to open the Run command.
Type services.msc in the dialog box and hit Enter.
Locate the Block Level Backup Engine Service, right-click on it, and select Properties.
Navigate to the Log On tab, check the This Account box and click on Browse.
In the new Window, click on Advanced.
Next, click on Find Now. A list of available users will be displayed.
Select a user account and enter credentials where necessary, then click on Apply and OK to save the changes.
8. Use an alternative backup solution
If you’re still facing the Windows backup failed to get an exclusive lock on the EFI system partition error, it may be time to try other avenues.
There are a lot of Windows 11 backup options available that you can choose from as you wait for this issue to be resolved.
That’s it from our end, but leave us a comment below if you could address this issue using a solution not mentioned here.
A section of users is getting the secure_pci_config_space_access_violation stop code with an array of errors mostly related to drivers.
What stands out is that these errors occur when they are trying to launch games. Valorant appears trending at the top of the list, causing the blue screen. If you’re familiar with this BSoD error, most users recommend a few solutions, as shown below.
What causes the SECURE_PCI_CONFIG_SPACE_ACCESS_VIOLATION error?
The secure_pci_config_space_access_violation is a BSoD error that occurs under different circumstances. As reported by users, some started seeing it after installing new updates, and a majority when launching games.
When the Blue screen occurs, you may experience frequent crashes and freezes on your PC. The error is usually accompanied by a message, and the most common ones include:
wnpdriver.sys
Vgk.sys
Amdryzenmasterdriver.sys
These errors may be caused by:
Hardware change – It’s likely that this error will occur if you have recently upgraded or changed your hardware components such as motherboard, processor, or memory. This means that your system may not be able to detect all of its components properly, and it will give you this error.
Malware infection – Malware can use up valuable system resources, leaving little for other programs to work with.
Outdated drivers – Outdated video drivers can cause crashes and other strange behavior on your PC.
Memory leak – The secure_pci_config_space_access_violation error can also occur when there is a security violation when a driver attempts to access memory in the secure PCI configuration space, which is protected by the operating system.
How can I fix the SECURE_PCI_CONFIG_SPACE_ACCESS_VIOLATION error?
A few checks to perform before moving on to the more advanced solutions include:
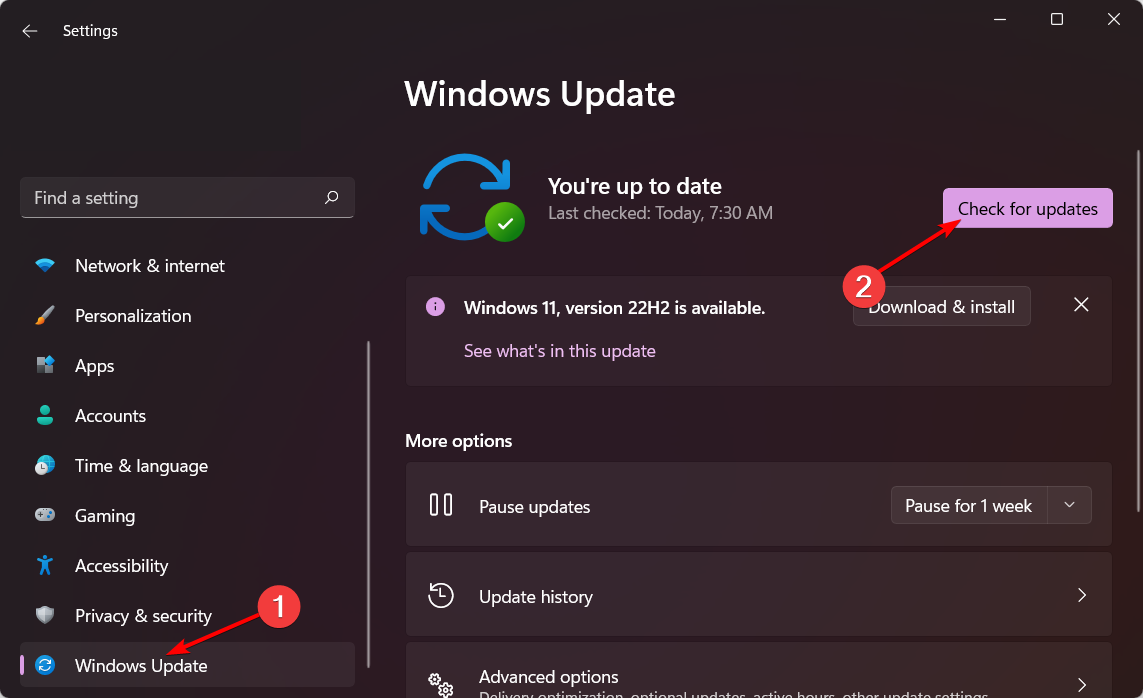
Click on Windows Update then click on Check for updates.
Download and install if available.
2. Turn off memory integrity
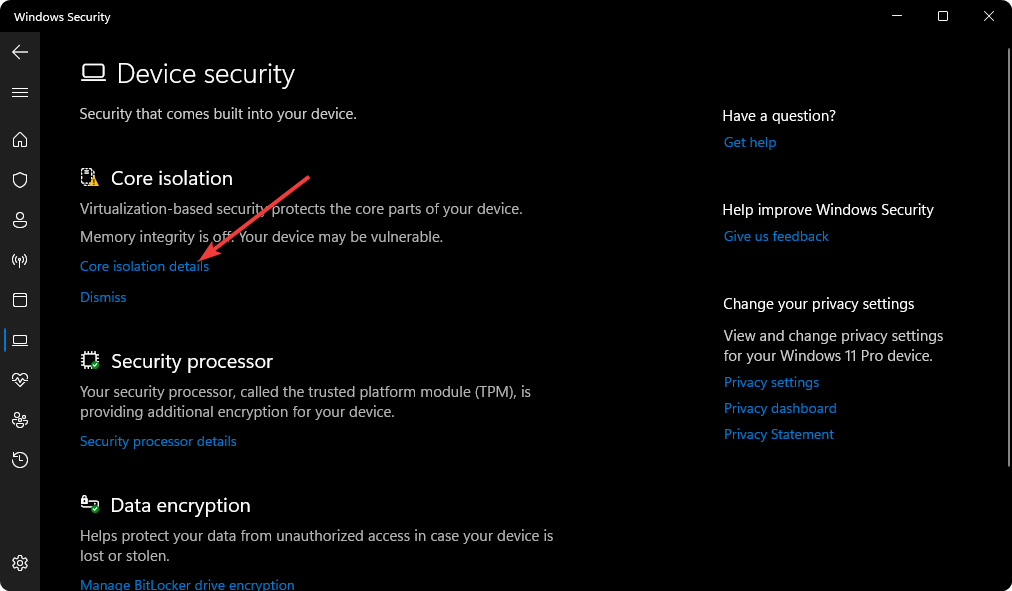
Open the Start Menu, type Windows Security, and press Enter.
Click on three vertical lines in the top left corner to expand the menu items.
Go to Device security.
Click on Core isolation details under Core isolation.
Toggle the switch to turn it off.
Turning off memory integrity can be beneficial if the secure_pci_config_space_access_violation error occurred when your PC tried to access a space in memory without permission.
The secure memory region can only be accessed by programs granted access by the operating system. Keep in mind that turning off this feature exposes your system to risk. Find out more about whether you should keep memory integrity on or off in our article.
3. Uninstall AMD software
Hit the Windows key and click on Settings.
Navigate to Apps on the left pane, then click on Apps & features on the right pane.
Search for AMD software from the list, click on the three ellipses, and select Uninstall.
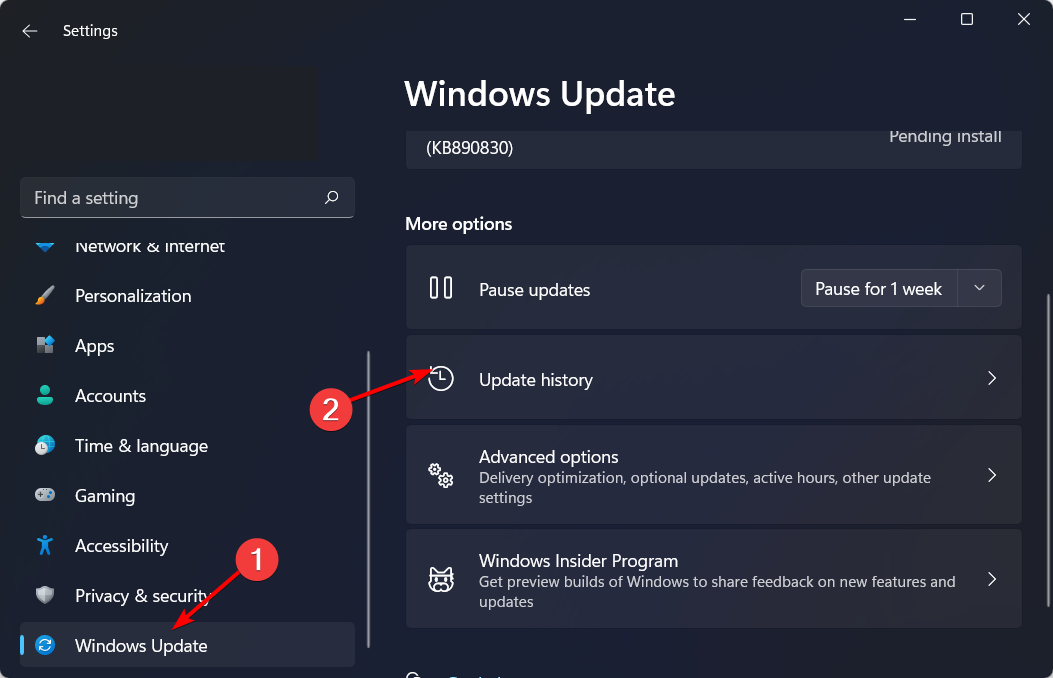
Press the Windows + I keys simultaneously to open Settings.
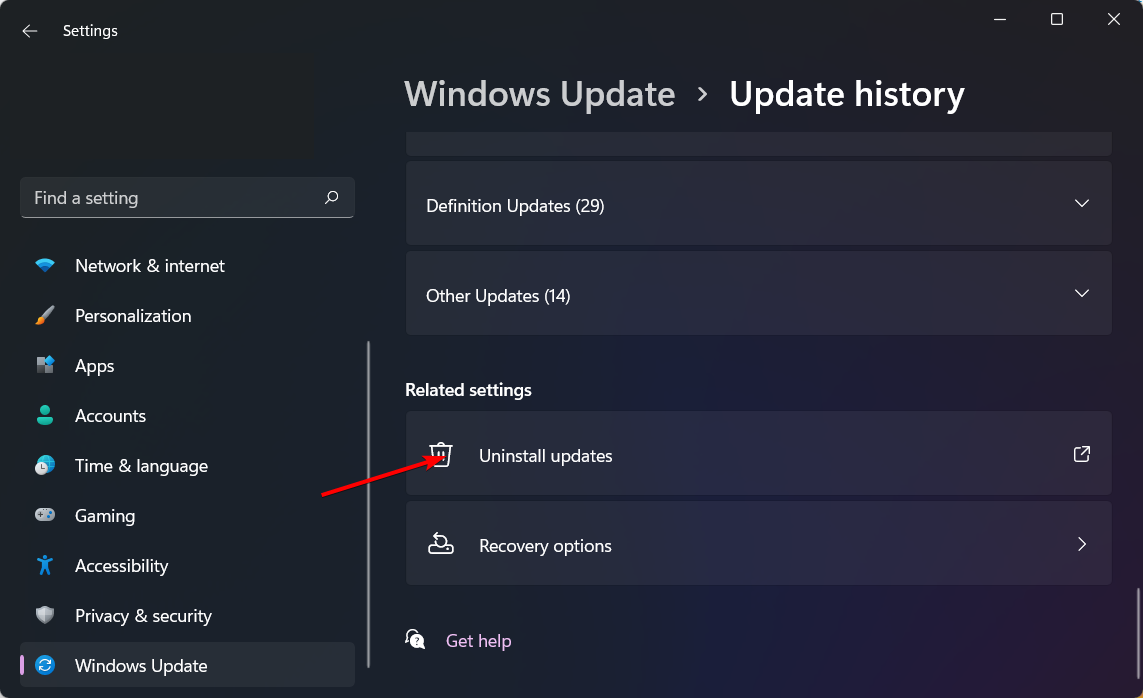
Navigate to Windows Updates and click on Update history.
Click on Uninstall updates.
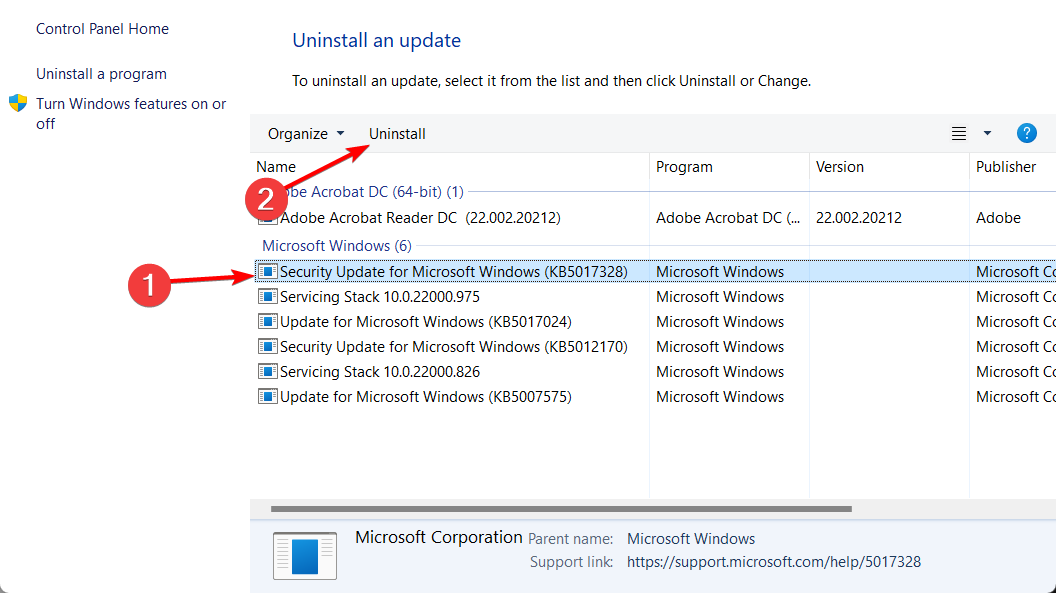
Select the most recent update, then click Uninstall.
6. Perform a clean boot
Hit the Windows key, type msconfig, and open System Configuration.
Switch to the Services tab and select Hide all Microsoft services.
Click on the Disable all button, then hit the Apply button to save the changes.
Go back and click on the Startup tab, select Open Task Manager then click OK.
In the Startup tab of the Task Manager, Disable all the Enabled startup items.
Close Task Manager and restart your PC.
7. Perform a System Restore
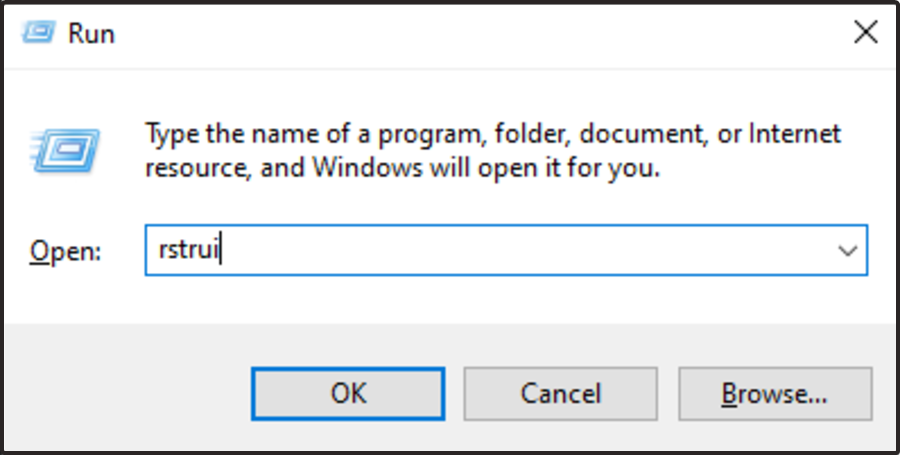
Press the Windows + R keys, type rstui, and hit Enter.
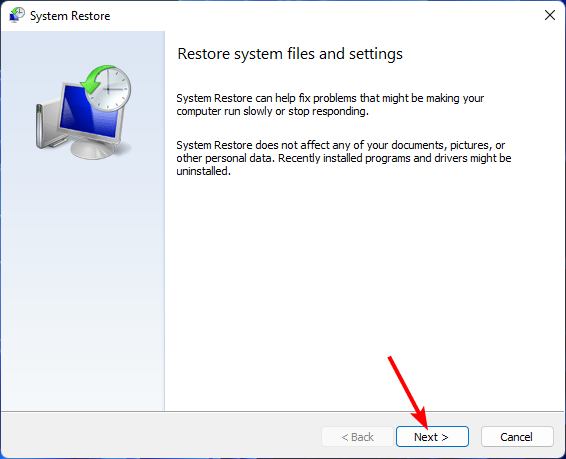
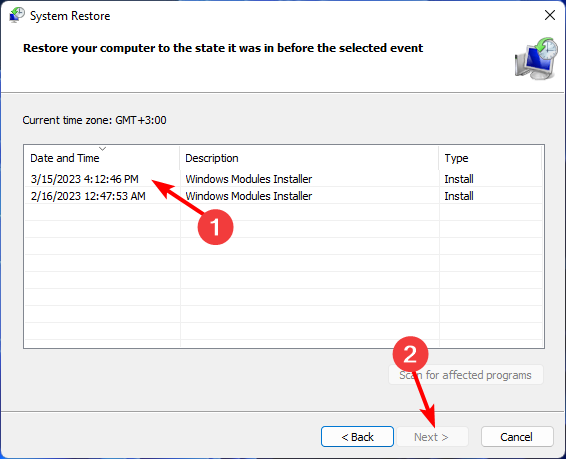
The System Restore window will open. Click on Next.
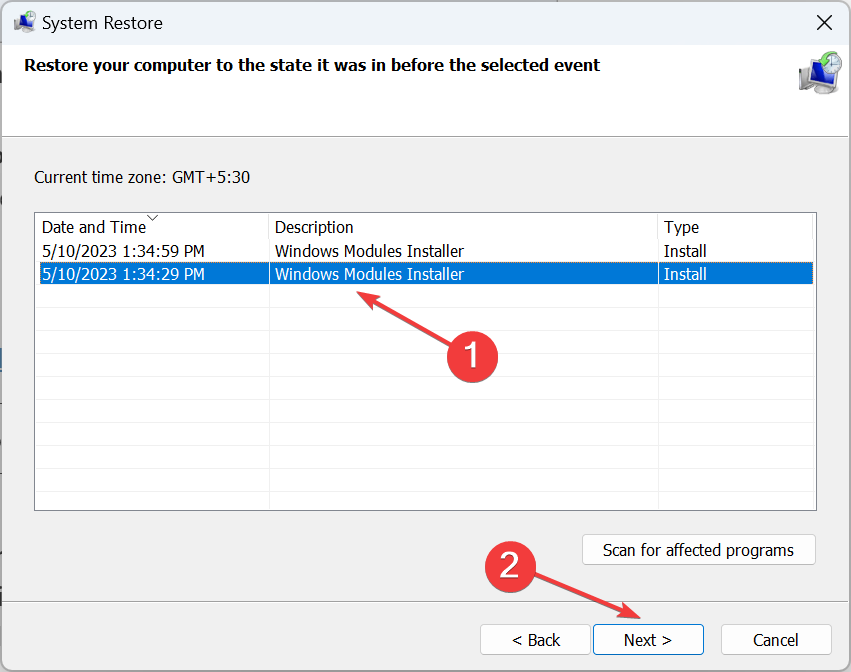
Select the restore point you wish to revert to and click on Next.
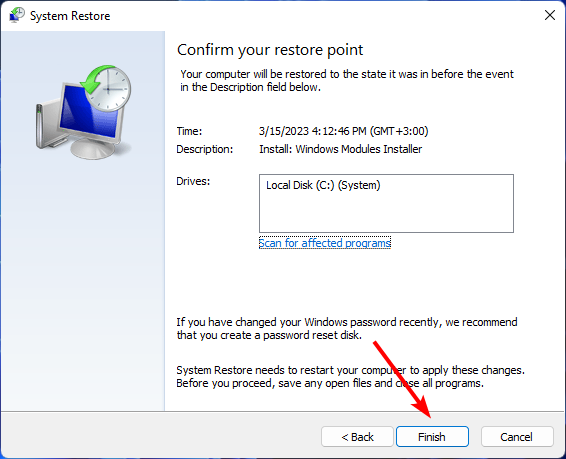
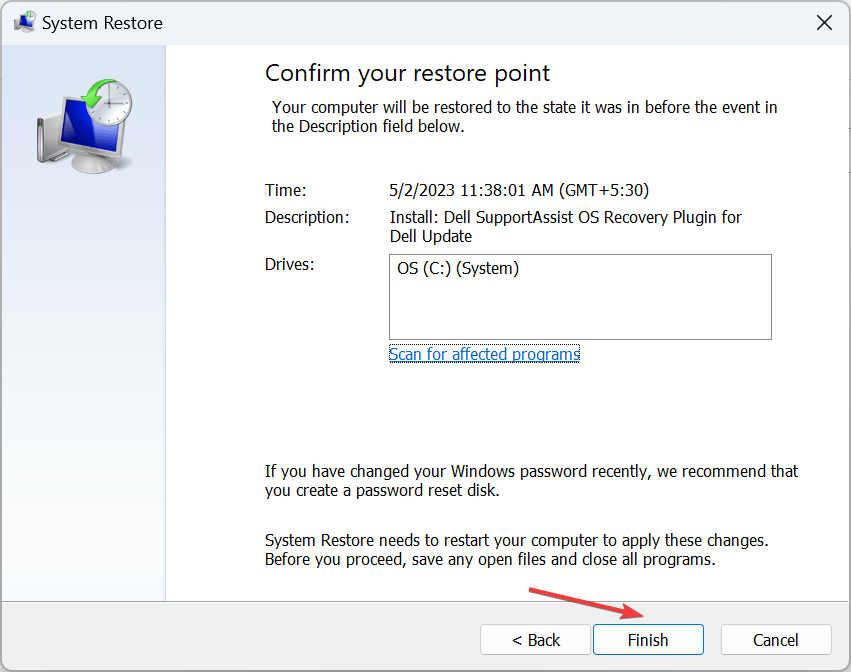
Now click on Finish.
And that’s how to fix the secure_pci_config_space_access_violation error. Hopefully, this issue is a thing of the past after trying our recommended fixes.
We’d also suggest you familiarize yourself with one of our BSoD fixers to help you address such issues automatically.
OpenAI’s playground is one of the most-used services owing to its simplicity and ability to respond to your queries. You can chat or ask questions, then press the submit button, but lately, it seems not to be working.
Also, check out our article on what to do when Caktus AI is not working. Onto today’s issue, let’s see why this button seems to give out and how to fix it.
Why is my OpenAI playground not working?
If you’re repeatedly pressing the submit button on OpenAI playground, but it seems not to be working, below are some possible reasons behind this strange behavior:
Corrupt cache – Your browser collects a lot of information when you visit sites and stores them in form of cache. Over time, this information can become corrupt and prevent access to some sites.
Restricted region – OpenAI only works in specific regions. Just like you may get a ChatGPT is not available in your country message, your location could be a hindrance if you’re in a restricted area or using a VPN.
Outdated browser – If you’re using an outdated browser, the OpenAI playground submit button may not work because of a conflict between the two software.
Exceeded quota limits – OpenAI has a limit on the free credits provided, so if yours run out, your submit button may not work.
Invasive extensions – Sometimes, the extensions you install or others that have sneaked into your browser may prevent you from accessing certain websites.
What can I do if the OpenAI Playground submit button is not working?
Try the following simple workarounds before any multiple-step solutions:
Verify that your device is connected to the internet and the speeds are optimal.
Restart your browser.
Switch to an incognito/private tab or another browser.
Restart your PC.
1. Update your browser
Launch your Edge browser and click on the three ellipses at the top right corner.
Select Settings.
Click on About Microsoft Edge and check whether there are any updates available.
2. Clear browser cache and cookies
Launch your Edge browser and click on the three ellipses at the top right corner.
Select Settings.
Click on Cookies and site permissions on the left pane, then select Manage and delete cookies and site data option on the right pane.
Next, click on See all cookies and site data.
Now click on Remove all.
Deleting temporary files allows you to free up disk space on your hard drive by removing unnecessary data that has been left behind by programs or applications running on your PC.
3. Disable your extensions
Open Microsoft Edge and click on the three horizontal ellipses at the top right corner.
Click on Extensions, then select Manage extensions.
Locate any recently added extensions and toggle the off button.
Open Microsoft Edge and click on the three horizontal ellipses at the top right corner.
Click on Settings.
Select Reset settings and hit Restore settings to their defaults.
Confirm reset in the dialog box that appears.
5. Disable/enable your VPN
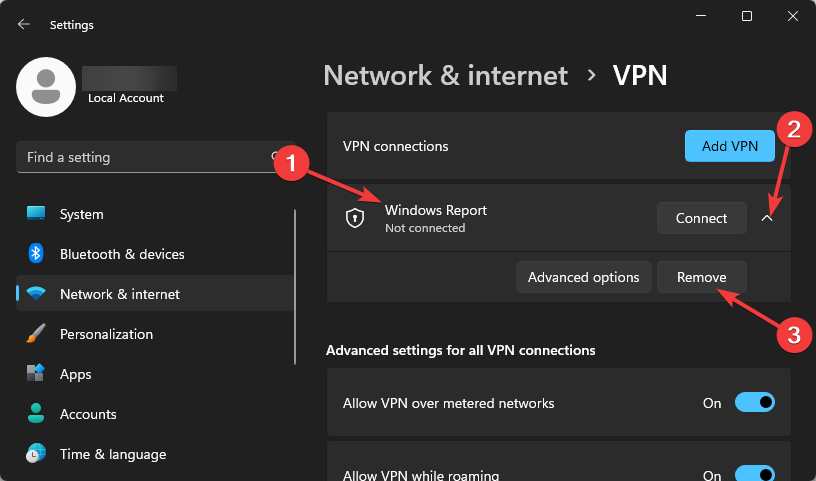
Press the Windows key and select Settings.
Next, select Network & internet and click on VPN in the right-side menu.
Select the VPN connection you want to disable, click on the drop-down, and select Remove.
Is there a time limit on OpenAI playground?
Yes, OpenAI has a limit, but it is not about time. Generally, the free credits offered when you sign up are meant to last you up to three months, but if you are using it more than the average user, your credits could run out sooner rather than later.
When this happens, your OpenAI playground will not generate anything. You will have to purchase more to continue enjoying the services.
It can be a bit pricey to upgrade and increase your credits, so if you’re unable to, check out our recommendation of more AI software that offers free trials or a lesser subscription fee.
While you’re still here, it is important to keep your system virus-free. AI software seems to be popping up, and like any user, you may be keen to try them.
However, this is the time to be on high alert as hackers also create fake software, hoping to inject malware into your system. To be on the safe side, ensure you install one of our AI antivirus software to keep malicious code at bay.
Were you able to get your submit button working again? Let us know in the comment section below.
Microsoft recently made a deal that would bring first-party Xbox titles to cloud gaming platform Boosteroid for the next ten years. One of several such deals Microsoft has inked this year, it would also apply to Activision Blizzard games including Call of Duty if and when the ABK merger completes.
Now Xbox Game Studios is about to begin delivering on that deal with four PC titles from its catalog due to show up on Boosteroid on June 1, with the announcement coming via Xbox Wire. The four games in question are Deathloop, Grounded, Pentiment and Gears 5.
Boosteroid members – we’ve got you. Starting June 1 you’ll be able to play Deathloop, Gears 5, Grounded and Pentiment. Another step toward making PC games from Xbox globally available through cloud gaming services. More on the blog: https://t.co/nmRgIdchBH@Boosteroid_main
This move on the part of Microsoft to offer its first party games on competing platforms—particularly cloud streaming ones—has been seen as a means of winning over regulators for its acquisition of Activision Blizzard. Although the deal was handed a major blow by the CMA, which ultimately decided to block the merger in the U.K., Microsoft continues its push to finalize. Last week the deal was approved by the European Commission and then China.
While browsing through the web, you interact with a lot of images and videos. At times, you might even need to grab the images from a site or article. In most cases. these images might not meet your standards.
In turn, you end up downloading the image to your Windows PC and uploading it to an image editor for extensive edits. For most users, this is a long and cumbersome method that takes up a lot of time. This acts as a great impediment to the user’s productivity as it cripples effectiveness and efficiency.
But as it happens, Microsoft Edge ships with a built-in image editor feature. This means that users can easily edit images within the browser before downloading them and using them elsewhere.
The feature is designed to help users make light edits to images before downloading them. This helps users save time while simultaneously enhancing their productivity.
However, if you’re looking to make more extensive edits to the image, you’ll need to use tools like Microsoft PowerToys and the Snipping tool in Windows 11 which recently got a screen recording feature.
In this guide, we’ll show you how you can edit images within Microsoft Edge. Here’s what you need to do:
How to edit images using Microsoft Edge’s built-in editor
Right-click on the image you want to edit within the Edge browser and select Edit Image.
A new editing window will pop up featuring four tabs: Crop, Adjustment, Filter, and Markup. You can click on any tab depending on your editing needs.
Important notes
In March, Microsoft debuted the Bing Image Creator powered by OpenAI’s DALL∙E model to further enhance the new Bing and Edge preview experience. Essentially, with the Bing Image Creator users can easily generate unique images using their own words.
When generating images using the tool, you’ll receive four 1024×1024 square images. At the moment, it’s not possible to specify the exact dimensions you’d like to generate the images in. As such, we’ll show you how to edit images to fit your desired dimensions and standards.
By typing in a description of an image, providing additional context like location or activity, and choosing an art style, Image Creator will generate an image from your own imagination. It’s like your creative copilot. Just type something like “draw an image” or “create an image” as a prompt in chat to get creating a visual for a newsletter to friends or as inspiration for redecorating your living room.
Right-click on the image you’d like to edit and select the Edit Image option.
A new edit window will pop-up with four tabs at the top. You can start off by clicking on the Crop tab.
The Crop tab comes with a variety of options. You can rotate the image 90 degrees or flip it horizontally or vertically. Additionally, you can use arrow keys to crop the image as displayed in the interface.
What’s more, you can click on the Free button at the bottom to change the aspect ratio of your image. There’s a wide variety of options to select from: Square, Rectangle,16:9, and so on. There’s also a reset button at the top that allows you to retract and restore changes made to the image.
As for the Adjustment tab, it features two categories: Light and Color. Both categories feature a wide variety of options that you can choose from to enhance your image’s appearance.
The Filter tab on the other hand, also features a ton of cool filters that you can apply to your image to alter its shades and colors.
And finally, the Markup tab allows you to scribble on the image. It features assorted flavors of pens with different colors. You can change the ink properties of the pen by clicking on it. There’s also an erase button at the bottom that removes the inscriptions using a single click.
Once you’re done making edits, you can now save the image by clicking on the Save button at the top. You can either choose to copy the image to your clipboard or download it and save it in your files.
Quick image edits with Microsoft Edge
Understandably, the built-in image editor in Microsoft Edge is not as sophisticated or extensive when compared to other standalone apps. However, it will help you get the job done if you’re only looking to make minimal edits to the image and upload it elsewhere.
Not only does it save time, but it also enhances your productivity. Have you used Microsoft Edge’s built-in image editor to edit your images? Share your experience with us in the comments.
If you are a Windows 10 or 11 user, you have the exciting option of connecting your mobile phone to your computer using the Phone Link app. In the past, there were alternative options available, such as Dell Mobile Connect, which allowed seamless access to your phone’s content on your PC. However, Dell Mobile Connect is no longer actively developed, making Phone Link the default choice for users seeking this functionality.
But wait, there’s another contender in town – the Intel Unison app for Windows. You might be wondering why do we need yet another app when Phone Link is already available. Let us take a closer looker and see how they stack against each other.
Phone Link vs Intel Unison – Compared
We take a closer look at their connectivity with an Android device. By the end, you will have a clear understanding of which one is the better fit for your needs. So, let’s get started and explore the world of phone-to-computer connectivity.
Windows Support
Phone Link is available on both Windows 10 and 11. On the other hand, Intel Unison is catering to Windows 11 alone, so if you are on the earlier version, then Phone Link is the way to go.
Getting Started
Microsoft’s Phone Link is available for Android and iPhone, while you can download its Windows version from the Microsoft store. And to use it on an iOS device, you will need Windows 11 running on your computer.
Similarly, you can find can get Intel Unison for Android and iPhone from their respective app stores. The Windows app is available on the Microsoft store. You can only install it on Windows 11 ( version 22621.0 or higher).
Both of these apps have a similar pairing approach, but Intel Unison is the more user-friendly option. Setting up Intel Unison is incredibly simple – you just need to download the app on both your computer and mobile phone, then effortlessly pair the two devices by scanning a QR code. We didn’t encounter any errors during this process.
When it comes to accessing calls and notifications, the experience is quite comparable. Once you have granted the necessary permissions, you have the option to respond to notifications either through the app itself or using the Windows popup. Phone Link lets you to pin notifications while the remaining customization features remain unchanged.
Both apps enable calling contacts through Bluetooth connectivity using your computer’s inbuilt mic and spear or plugged-in earphones/headphones.
Universal Clipboard
When you are in the Apple ecosystem, the universal clipboard makes it incredibly easy to copy across devices. Phone Link has brought it to Duo, select Samsung and Honor devices. You can seamlessly transfer text and images between a supported Android device and Windows PC.
The same is not possible for Intel Unison, contrary to what made the headlines when it was first launched. There are no settings for it, as we checked thoroughly by installing it on three computers with Windows 11.
Files Transfer
This is where Phone Link adds extra steps to make it work while keeping it exclusive to select Samsung and Honor devices. First, you have to turn on the phone mirroring to see it on the Phone Link app on Windows. And do remember that this permission is not a one time as you have to request it and approve it on the phone for every session. Then it only covers photos from Gallery and files from the My Files app.
Intel Unison really shines here, as you can simply transfer files between Android and PC. Use the Unison app on Windows to send and receive ones through a simple drag and drop. Their mobile app can do the same with an identical interface to keep things simple.
Photo Gallery Access
Your phone is connected to the laptop or PC and all the photos are available on Phone Link and Intel Unison in the gallery tab. When you disconnect the Bluetooth, then Phone Link will stop right there while Unison continues to work.
What it means is that you can click photos from your phone and they will instantly appear on the Intel Unison app on the Windows PC. On the other hand, Phone Link will need you to reconnect Bluetooth to update the gallery with the new photos.
Phone Link also limits showing photos from the Android phone to the recent 2,000 items. So if you are going to dive deep into the gallery, then you might hit a wall. We could not find any similar media limit for Intel Unison.
Use Mobile Apps on PC
You can bid goodbye to Android emulators if you want to use apps on the PC. Again this is dependent upon the fact that you are using one of the supported Samsung or Honor devices.
Use the mirroring option and then use can the mobile apps on your Phone Link app on Windows. The frame rates are anywhere between 20 to 30 and inconsistent because it doesn’t feel very smooth on my monitor.
Intel Unison currently does not offer this feature, so you can use Phone Link if using Android apps is important to you.
Staying Connected with Windows
Phone Link offers a feature-rich connectivity experience with Windows. That is only possible when you have a select Android device, so it is subjective. On the other hand, if you want to seamlessly transfer files between the phone and the Windows PC then Intel Unison is your best bet.
Background image removal is a complex task. If you’re not an expert, and you don’t want to outsource the job to one, you can install a dedicated background removal software.
There is a wide range of photo editors that will help you perform that task but some of them require a significant level of skill.
We have listed the best background removal software on the market, so take a look at our list and take your pick according to your needs.
We tried out inPixio’s background removal tool, and we’re seriously impressed! It’s incredibly straightforward—just upload our photos, and the AI handles the rest.
It does an amazing job, even with tricky details like hair and fur. The background disappears in seconds, leaving us with clean, professional results.
We especially appreciate the seamless background replacement, the ability to add transparent backgrounds, and support for a wide range of file formats.
Plus, it’s perfect for both personal pics and product shots. It’s fast, accurate, and super easy to use.
Let’s look at some of its key features:
Dedicated background removal feature
Replace the sky with a more vibrant one quickly
Very easy to use by anyone
Produce creative montages using original stickers, objects, and backgrounds
Cut out objects and people in your photos
Share on Facebook and Twitter
Photo Studio Pro 12
Instantly perfect your photos! Get inPixio to remove backgrounds effortlessly.
Photoshop’s Remove Background feature is a game-changer. Open your image, click “Remove Background” in the Quick Actions panel, and the background disappears in seconds.
It handles complex details with impressive precision. For those final touches, you can use the Refine Edge Brush to clean up any remaining bits and blend your subject seamlessly into a new background.
Plus, Photoshop makes it easy to add transparent backgrounds or combine multiple images.
Take a look at its most important features:
Extensive tools for creating cutouts, removing the background, and getting rid of elements from photos
Huge collection of free graphical elements to add
Great integration with other Adobe products
Save your work in a plethora of formats, including vectorial
CorelDRAW is a powerful RAW image editor that you can use to add a series of effects to your photos, as well as retouch or enhance your pictures.
You can also use this software to remove background thanks to its dedicated Cutout Lab feature.
This useful option allows you to cut out image areas from the surrounding background, while preserving edge details, such as hair or blurred edges.
After you access the Cutout Lab option, click the Highlighter tool and define the edges of the objects you want to keep, then use the Inside fill tool to address the outside area.
CorelDRAW is a feature-rich tool that you can use for many image editing purposes. The software is particularly suitable for graphics designers.
Check out some of its key features:
Capture and save images of your screen
Organize and manage an extensive font library
Create high dynamic range images with AfterShot HDR
Background Remover from VEED.IO is a free online tool that can remove the background from your photos with one click.
The usage is so simple that a kid could do a great job with it. Just add the photo from which you want to remove the background and the web app will do that automatically.
You may add the photo in JPG, JPEG, PNG, WEBP, and AVIF formats by just dragging and dropping it onto the designated area.
However, when you download the result, it will be a transparent PNG file.
There’s also the option to load the image into the online editor which you may also use for free.
Take a look at its most important features:
Supports a range of photo file formats, including JPG, JPEG, PNG, WEBP, and AVIF
Simple, one-click download of the background removed image
Control the transparency of your background, blur it, or replace it with a color of your choice
Download the result conveniently as a transparent PNG file
Icons8’s Background Remover is a fantastic tool for anyone looking to simplify background removal.
With just one click, the AI detects the main subject and removes the background, making the process effortless—just drag and drop your photo into the web app.
It works best with clear, sharp images; for photos with less defined edges or some blurriness, the software might struggle a bit, especially with details like blowing hair.
If you need to enhance your photo’s clarity, check out their Smart Upscaler. You can remove backgrounds from 3 images for free, and for more, a quick sign-up is required.
Let’s go through some of its best features:
Simple, drag-and-drop image uploading
One-click background removal
Processes 3 images for free
Artificial intelligence main subject detection
Download photos with transparent backgrounds in PNG format
Icons8 Background Remover
Use this amazing tool that will remove the background of your photos in a single-click action.
If you’re looking for an image background remover, then this might be just what you need. The service is incredibly simple to use, you just need to upload an image from your PC, and that’s it.
The AI will process your image, and you’ll be ready to download it. Of course, you can crop an image to select the subject better. Additional adjustments are also possible with available tools.
This means that you can manually remove the background or restore certain elements that were removed by the AI. Overall, this is a great and incredibly simple service that will let you change the image background with ease.
Other great features:
Incredibly simple to use
Allows you to paste images from your clipboard
Crop feature
Ability to modify the results
Cutout.pro
Simplify your background removal! Get Cutout.pro to process your images quickly and easily.
Remove BG lets you remove background from an image for free. It’s really simple to use. Just upload the image, and the app will automatically detect the main subject and remove the background.
You don’t even need to click on anything.
Then simply hit the Download button and you will get the result in PNG format. However, the resulting image is low resolution.
If you want to download it in HD resolution, you will need to go for a subscription, and for that, you will be able to process up to 500 images per minute, which is pretty impressive.
You can also buy only a few credits because the processing of a file will cost you 1 credit, including the download.
As its official description says, PhotoScissors instantly removes the background from your photos.
Specifically, you can quickly mark the area you want to preserve, as well as the areas you want to cut out, and the software will take care of the rest.
If you’re not an image editing expert, PhotoScissors is the right choice for you as you don’t need any specific skills for the job.
PhotoScissors also allows you to swap backgrounds, create a photo collage or move objects on photos.
There is no limit to the image size. This background removal software supports all popular graphic formats.
Let’s review some of its best features below:
Quick and easy background removal
No image size limit
Basic photo editor included
Apply effects to the new background and the resulting image
GIMP is a feature-rich image editor that also supports background removal and transparent background and it’s free and open-source.
Although you’ll need a significant amount of patience to draw the edges of the image you want to keep, the result is worth the effort.
However, when it comes to background removal, this background removal software has some limitations.
If you want to remove the background on a photo with a kitten, that’s going to be a very difficult, and sometimes even impossible task.
Selecting all the strands of hair sticking out from a fluffy cat can be indeed a daunting task but if the objects have regular edges, GIMP will help you get the job done.
GIMP is a great software to remove background for free, but it does have a learning curve.
Check out its best features:
Free, open-source tool
Works on Windows, Linux, and macOS
Supports third-party plugins
Multi-language support such as C, C++, Perl, Python, Scheme, and more
What should I look for in a background removal tool?
If you often need to change the background and you need pristine results, we recommend buying professional graphics software.
These are feature-rich tools that you can use for other image editing tasks, as well but you will have to go through some serious training if you’re not a professional.
On the other hand, if your background removal task is a short-term one, then you can use dedicated AI-powered apps. There are online or downloadable tools out there that will remove your background with a single click, as long as your image is sharp enough.
Here we conclude our selection of the best background removal software and we hope that you found what you were looking for.
We also recommend looking at our list including the best free photo editors because some of them come with background removal features.
If you’ve used other background removal tools that you think we should add to this list, let us know in the comments below.
Also, leave there any other questions that you may have, and we’ll be sure to check them out.
DLLs are a critical part of Windows installation, and many get added with time as you install programs. But, when a DLL is missing, you won’t be able to run applications that depend on it. And one such DLL that affects a wide range of apps and games is tbbmalloc.dll.
The tbbmalloc.dll file is developed by Intel Corporation and linked to Intel(R) Threading Building Blocks for Windows. Employed as a Scalable Locator Directory, the DLL is vital for the effective functioning of many apps, including Skyrim and Fallout 4. So, let’s find out all about the issue!
Corrupt system files: A common underlying cause when apps can find tbbmalloc.dll is corrupt system files. Though not linked to Microsoft, this is likely because the system files affect the functioning of the OS and installed apps.
Missing app components: When the problem is limited to a specific app, it could be that the program is missing vital components due to issues with the installation.
Malware conflicting with the program/DLL: For some users, it was a malware or virus on the PC that triggered the error.
DLL was deleted: There’s also the likelihood that the DLL was deleted by the program accessing it or even the end user, though it’s generally the former.
How do I fix a missing tbbmalloc.dll?
Before we proceed to the complex ones, try these quick solutions first:
Restart the computer.
Disable any third-party antivirus or security software installed on the PC.
If none work, head to the fixes listed next.
1. Replace the DLL
For such errors, your primary approach should be to replace the DLL with a healthy copy from another computer running the same program. The file is usually available in the program’s directory. For Fallout 4, the tbbmalloc.dll location is:steamapps\common\Fallout 4
You will usually find it in the same folder as the executable (.exe) launcher file. So, locate the DLL, copy it to an external USB, and then move it to the program’s directory, and you should be able to run things without any errors.
If you don’t want to risk your system’s health and avoid potential errors by manually replacing the DLL, we suggest you try a dedicated DLL fixer.
2. Scan for malware
Press Windows + S to open Search, type Windows Security in the text field, and click on the relevant search result.
Click on Virus & threat protection.
Click on Scan options.
Now, select Full scan and then click the Scan now button.
For some users, it was malware that corrupted the file, and, as a result, users came across the tbbmalloc.dll crash. So, run a full-system virus scan with the built-in Windows Security or use a dedicated antivirus solution.
3. Repair the game files (for Steam)
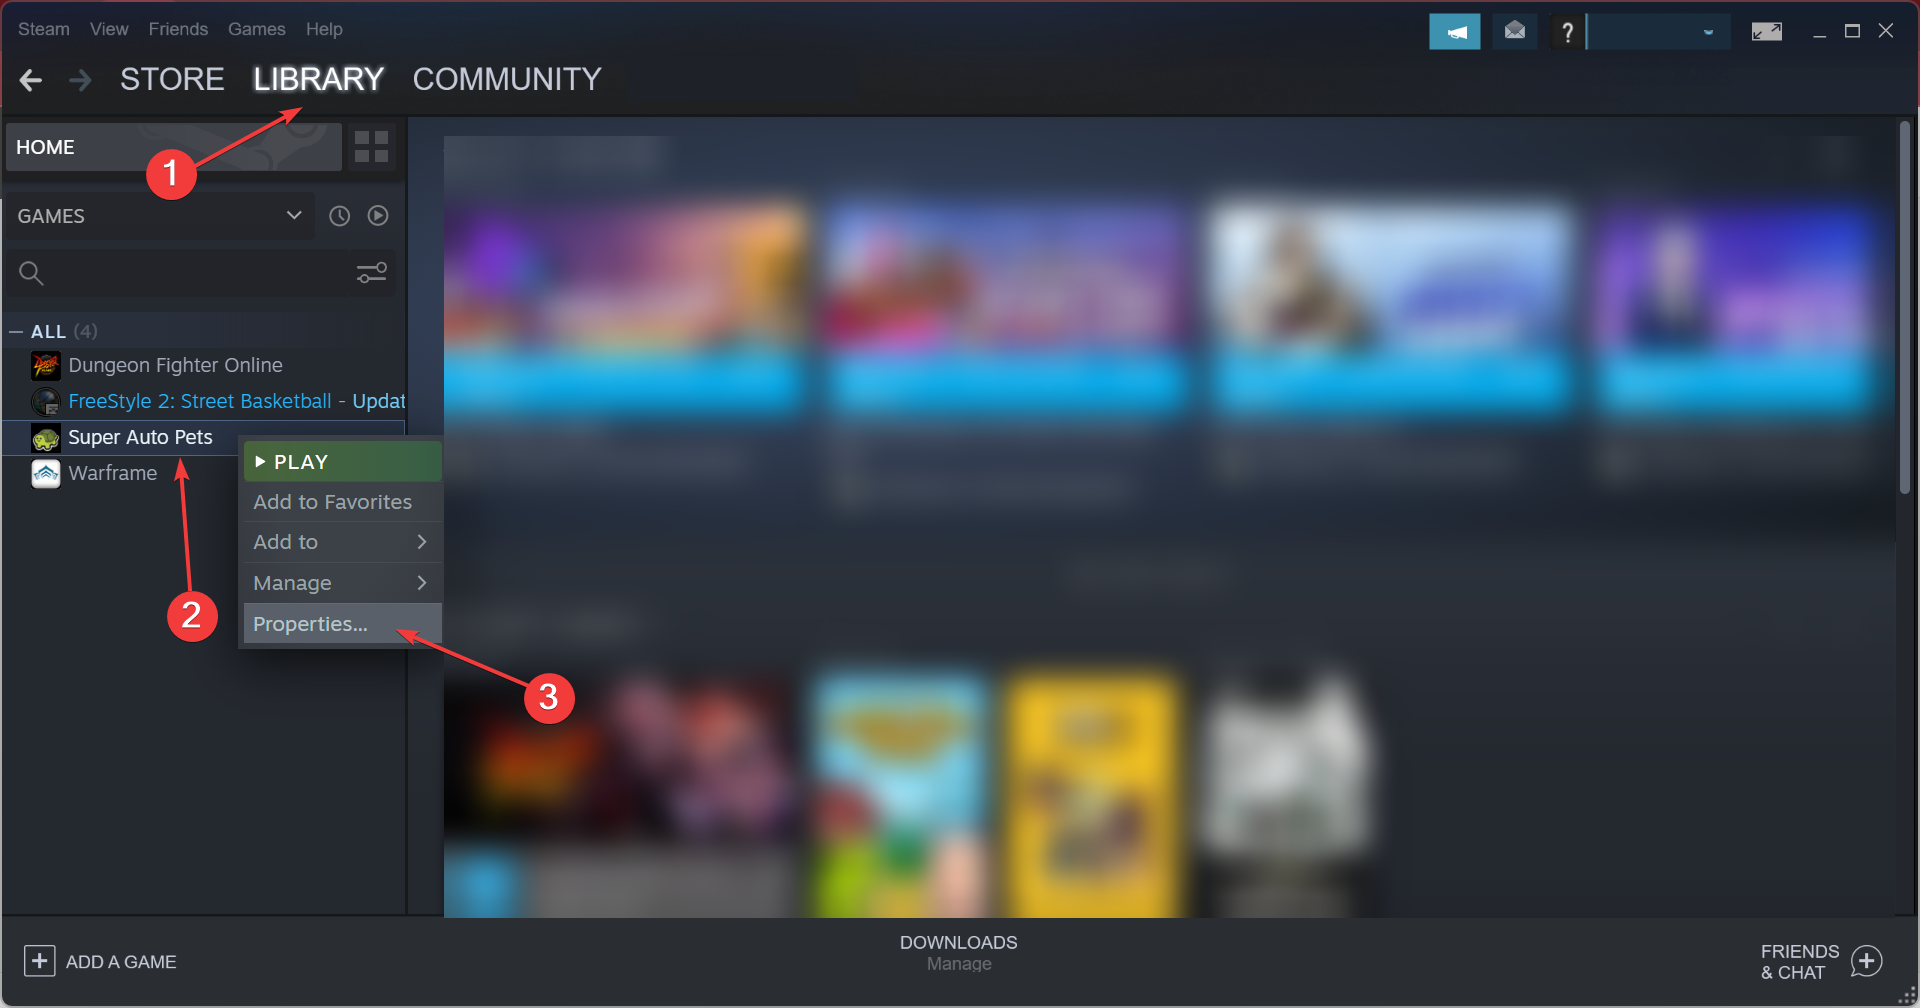
Launch Steam, navigate to the Library, right-click on the game, and select Properties.
Navigate to the Local Files tab, and click on Verify integrity of game files.
Wait for the process to complete.
In case the problem is localized to a game, say tbbmalloc.dll not found on The Elder Scrolls V: Skyrim, it could be the game files to blame, and repairing them should do the trick. And almost every gaming client offers an option for it.
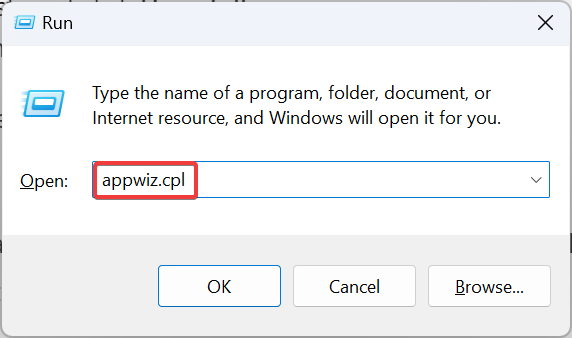
Press Windows + R to open Run, type appwiz.cpl in the text field, and hit Enter.
Select the app or game that’s throwing the error, and click Uninstall.
Follow the on-screen instructions to complete the process.
Once done, restart the computer, then download the program from an official source, say the dedicated website, gaming client, or Microsoft Store.
For tbbmalloc.dll errors localized to specific programs, a quick solution is to uninstall the app, and then download it all over again. Ensure to clear the app cache or any left-over files and Registry entries. An effective way to do that is to use reliable uninstaller software.
5. Perform a system restore
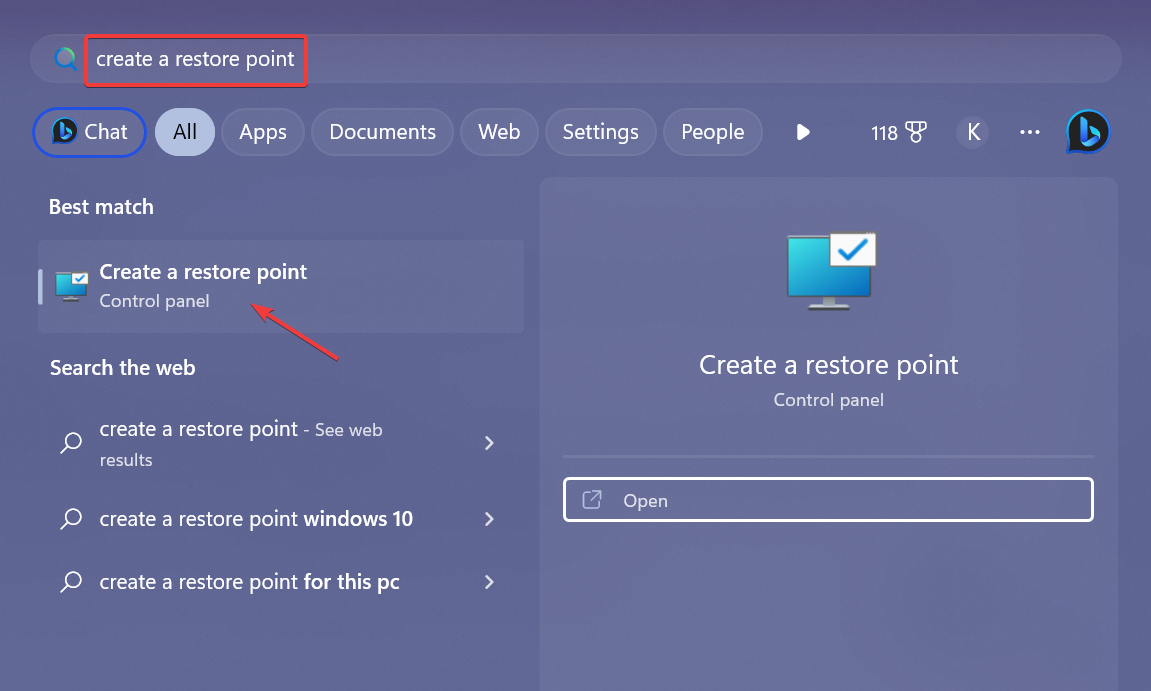
Press Windows + S to open Search, type Create a restore point, and click on the relevant search result.
Click on System Restore.
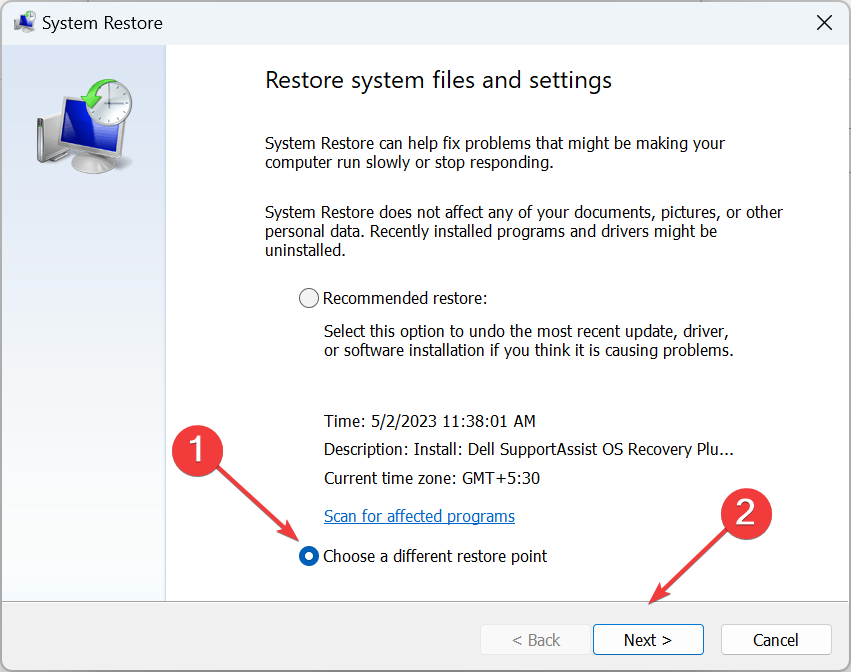
Select Choose a different restore point, and click Next.
Pick a restore point from the list, preferably created as far before the error first appeared, then click Next.
Now, verify the restore details, and click on Finish to start the process.
When nothing else works, the last option is to perform a system restore using an older restore point. Though you may lose some apps or configured settings, it would fix the missing tbbmalloc.dll error for good!
For users who have a lot of programs installed and regularly face such issues, our advice would be to download an effective DLL repair tool.
For any queries or to share which solution worked for you, drop a comment below.
Any healthy Windows PC has hundreds of DLLs or sometimes even more if there are far too many programs installed. A DLL or Dynamic Link Library is a file shared by several applications simultaneously, thus increasing the likelihood of error. And oleacc.dll is often affected.
When there are issues, users come across a DLL not found error, and the application relying on it fails to launch. Problems like these are common and always easily fixable, whether it’s a DLL published by Microsoft or a third party. So, let’s find out!
What is the Oleacc dll?
The oleacc.dll, published by Microsoft, is a system file and part of the Microsoft Active Accessibility components in the Control Panel. It performs a wide range of functions and is sometimes called upon by programs.
Here are a few reasons oleacc.dll is missing on your PC:
System files are corrupt: In most cases, the problem appears when Windows has corrupt system files, and this also affects the functioning of the PC in general.
The DLL file was deleted: A few users realized the DLL was accidentally deleted, either due to an inadvertent fault of theirs or by a third-party program accessing it.
Program is unable to access the DLL: Some programs require the DLLs to be stored in specific directories for easy accessibility, and when that’s not the case, it throws a missing DLL error.
How do I fix a missing oleacc.dll error?
Before we move forward, try these quick solutions:
Restart the computer to terminate any non-critical program actively using the DLL and rendering it inaccessible to others.
Check for the missing DLL in the Recycle Bin and restore the file.
Download the pending Windows updates.
Disable any third-party antivirus installed on the computer.
If none work, head to the fixes listed next.
1. Re-register the DLL
Press Windows + R to open Run, paste the following command, and hit Enter:regsvr32 oleacc.dll
If you come across a confirmation, run the affected program again and check whether the error is fixed.
2. Manually replace the DLL
A quick solution for the oleacc.dll Outlook crash is to manually replace the DLL with a healthy one from another PC. The DLL’s storage location is:C:\Windows\System32
System32 folder
So, open the System32 folder on another Windows PC, copy the DLL file to a USB drive, and then move it to the same location on the affected computer. Just make sure to remove the corrupt/unreadable oleacc.dll that existed beforehand.
If the error persists, paste a copy of the DLL into the program’s directory, then restart the computer to verify whether things work out.
As an alternative, it’s much easier to go for specialized DLL solutions that can repair DLL file issues and replace corrupted ones automatically.
3. Repair the corrupt system files
Press Windows + S to open Search, type Command Prompt in the text field, and click on Run as administrator.
Click Yes in the UAC prompt.
Paste the following three commands individually and hit Enter after each to run DISM:DISM /Online /Cleanup-Image /CheckHealthDISM /Online /Cleanup-Image /ScanHealthDISM /Online /Cleanup-Image /RestoreHealth
Now, run this command for the SFC scan:sfc /scannow
Once done, restart the computer for the changes to come into effect.
In case it’s the corrupt system files responsible for the oleacc.dllis either not designed error message, running the DISM tool and SFC scan should fix things. These two identify any corrupt files and replace them with their cached copy stored on the PC.
Press Windows + R to open Run, type appwiz.cpl in the text field, and hit Enter.
Select the affected application from the list, and click on Uninstall.
Follow the on-screen instructions to complete the process.
If the problem is limited to a particular application and it wasn’t fixed even after you put the DLL in its directory, chances are that the app wasn’t installed properly.
The best option here is to uninstall the application and download it from scratch. This worked when oleacc.dll was missing in Chrome and Citrix.
5. Perform an in-place upgrade
Tip
The process here details performing an in-place upgrade on Windows 11. Users on Windows 10 will need to download the Media Creation Tool and use it for the process.
Go to Microsoft’s official website, select the required edition and product language, then download the Windows 11 ISO.
Open the contents of the ISO and launch the setup.exe file.
Click Yes in the prompt.
Click on Next to proceed.
Now, click Accept to agree to Microsoft’s notices and license terms.
Finally, verify that the setup reads Keep personal files and apps, and click on Install to start the in-place upgrade.
As a last resort, you can always perform an in-place upgrade to replace all system files, basically, reinstall Windows. But this doesn’t affect the stored files or apps, so all your data is safe.
Once done with the repair upgrade, the missing oleacc.dll in PowerBuilder and other applications will be fixed.
Before you leave, check the best DLL repair tools and get one today to prevent such errors in the future.
For any queries or to share more solutions with us, drop a comment below.
Virtual Machine forms an integral part of many PCs by eliminating the need for another device. But running one is not as easy, and users encounter various errors due to the dependency on a wide array of settings. One such is the VT-x is not available (VERR_VMX_NO_VMX) error.
Though commonly seen on VirtualBox, other similar software can throw the error and prevent users from running the Virtual Machine. Fret not! It’s usually a trivial problem to blame, and you can get things up and running in no time. So, let’s find out!
Why is my VTx not working in VirtualBox?
Here are a few reasons you are facing the problem:
VT-x is not enabled: In most cases, users realized that VT-x or Virtualization Technology was disabled in the BIOS, and enabling it did the trick.
Hyper-virtualization is enabled: Another reason users face the issue is when Hyper-V or Hyper-Virtualization is enabled in Windows because it conflicts with VT-x.
VT-x is not supported: For some users, the problem appeared when VT-x was not supported on the PC, and it should be apparent right away when using the virtual machine for the first time.
Third-party apps triggering conflicts: Several antiviruses and security software can conflict with the functioning of the OS, including the VT-x setting, and trigger errors.
How do I fix error VT-x is not available (VERR_VMX_NO_VMX)?
Before we move to the slightly complex solutions, here are a few quick ones to try:
Restart the computer to terminate all non-critical background processes.
Install any available Windows updates in case the problem is a known bug and a patch is available for it.
Revert any recent changes to the PC. For instance, if you got the VT-x is not available (VERR_VMX_NO_VMX) error after downloading software, uninstall the program to get things running.
If none work, move to the fixes listed next.
1. Enable VT-x in BIOS
Power off the computer, then turn it on and repeatedly hit the Esc, F10, F12, or Delete key, depending on the device manufacturer, to access the BIOS. You can find the exact key on the OEM’s website or the in manual that came along with the PC.
Once in the BIOS, head to the Security or System Security section.
Now, enable the Virtualization Technology (VT-x) feature.
Save the changes, exit the BIOS, and boot Windows.
When faced with the VT-x is not available (VERR_VMX_NO_VMX) Ubuntu error, your primary approach should be to ensure that VT-x is indeed enabled. Also, if you find it already activated, re-enable the setting.
2. Disable Hyper-V
Press Windows + R to open Run, type cmd, and hit Ctrl + Shift + Enter.
Click Yes in the UAC prompt.
Now, paste the following commands one at a time and hit Enter after each:bcdedit /set hypervisorlaunchtype Offbcdedit /set vm Nodism.exe /Online /Disable-Feature:Microsoft-Hyper-V
Once done, restart the computer and run the Virtual Machine to verify whether the problem persists.
While this is not the case by default, an update led to Hyper-V conflicting with VT-x when enabled, which triggered the VT-x is not available (VERR_VMX_NO_VMX) Windows 7 error. And disabling the former, in this case, should get things up and running.
3. Turn off Memory Integrity
Press Windows + S to open Search, type Windows Security in the text field, and click on the relevant search result.
Now, click on Device security.
Click on Core isolation details.
Now, disable the toggle for Memory integrity.
Once done, restart the computer, and run the Virtual Machine.
Another feature often found to conflict with the Virtual Machine is Core isolation or Memory integrity, which triggers the VT-x is not available (VERR_VMX_NO_VMX) Windows Server 2019 error.
The purpose of Memory integrity is to prevent unauthorized code from running on the PC. Besides this, it may also conflict with performance-boosting software. So, you should try disabling these and verify whether the error is fixed.
Press Windows + R to open Run, type appwiz.cpl in the text field, and hit Enter.
Select the installed third-party antivirus from the list, and click Uninstall.
Follow the on-screen instructions to complete the process.
In case the previous solutions didn’t work, it could the antivirus to blame for the VT-x is not available (VERR_VMX_NO_VMX) Oracle VirtualBox error.
Make sure to remove any cache or revert changes made by the program. A quick solution to ensure this is to use a dedicated uninstaller software, which clears the Registry entries created by the antivirus, thus reverting any changes made to the PC.
5. Downgrade the VM software
When nothing works, it’s mostly like non-compatibility with the recent version of the VM software to blame for the VT-x is not available (VERR_VMX_NO_VMX) Windows 10 error. And for this, the only viable solution is to downgrade the software.
Check which version you have, uninstall the software, and then download an older version from the official website. Here are the direct links to download pages for the various VM software:
VMWare (Choose an older version from the dropdown menu)
That’s it! And after you have fixed the error, do not forget to find out how to enable Windows 11 on a Virtual Machine and test out the latest iteration before making the final upgrade.
For any queries or to share what worked for you, drop a comment below.
Group or resource is not in the correct state is a popular error encountered by users while trying to open UWP apps. This error is prominent on apps that were installed from Microsoft Store.
Thankfully, this error can be easily fixed with the right information. And that is what we have provided in this detailed guide.
Why am I getting the group or resource is not in the correct state error?
Below are some of the potential causes group or resource is not in the correct state issue:
Conflicting apps: If your PC is running two apps with conflicting programs simultaneously, it might lead to this error. You can fix this by performing a clean boot.
Outdated network driver: In some cases, this error might be due to a broken or outdated driver. The solution to this is to reinstall or update your network driver.
Faulty system files: If the system files needed to run your app is corrupt or broken, you are likely to get this error message. Repairing these files should restore normal service on your PC.
How can I fix the group or resource is not in the correct state error?
1. Perform a clean boot
Press the Windows key + R, type msconfig, and click OK.
Choose Services at the top, check the Hide all Microsoft services box, and click the Disable all button.
Now, click the Startup tab at the top and select Open Task Manager.
Next, right-click each of the apps there and select Disable.
Finally, go back to the System Configuration window, and click Apply, followed by OK.
Sometimes, the group or resource is not in the correct state error can be caused by conflicting apps or processes. The quickest way to circumvent this is to perform a clean boot.
If the error does not appear in a clean boot state, you need to enable the disabled apps and processes in batches to know the one causing the problem.
2. Update network adapter driver
Press the Windows key + X and select Device Manager.
Click the arrow next to the Network adapters option to expand it and right-click each of the devices there.
Now, select the Update driver option.
Finally, click Search automatically for drivers and install any available update.
Another effective fix to the group or resource is not in the correct state error is to update your network adapter driver. Aside from the steps above, you can go to the manufacturer’s website to download it.
Alternatively, you can use an automatic driver update tool to perform this task. This excellent software automatically scans for outdated and missing drivers and restores them with little effort from you.
Press the Windows key + R, type ncpa.cpl, and click OK.
Now, right-click your network adapter and click Enable.
If the adapter is enabled, click the Disable option and repeat Step 2 to enable it after some minutes.
Finally, restart your PC.
At times, you might be facing the group or resource is not in the correct state error because your network is disabled knowingly or otherwise. You simply need to enable it to fix the issue.
Press the Windows key, type cmd, and select Run as administrator under Command Prompt.
Type the command below and hit Enter to run it: DISM /online /cleanup-image /restorehealth
Wait for the command to finish running. Now, run the command below:sfc /scannow
Finally, wait for the command to finish running and restart your PC.
Corrupt system files are among the leading causes of the group or resource is not in the correct state error. Thankfully, Windows has two different tools that can fix this issue.
Alternatively, you can fix this issue for good using a dedicated repair tool. These tools replace any corrupt or missing file with the original version, thereby saving from the stress of running a series of commands and repairing the files manually.
5. Run the built-in troubleshooters
Press the Windows key + I and select Troubleshoot in the left pane.
Click the Other troubleshooters option.
Now, click the Run button before the Program Compatibility Troubleshooter option and follow the onscreen instructions to complete the process.
Finally, click the Run button before the Windows Store Apps option and follow the onscreen instructions.
With this, we can end this comprehensive guide on fixing the group or resource is not in the correct state error. If the solutions above fail to solve the problem, you might need to reset your PC.
If you are facing other issues like media disconnected, check our detailed guide to fix it.
This error is somewhat similar to the Error 1460 cluster shared volume that we covered in one of our previous guides, so don’t miss it.
Were you able to fix the issue? Feel free to let us know in the comments below.
Have you noticed an event ID 5379 popup in the event viewer at the same time as your mouse disconnects? If you have, you are probably wondering what the solution is.
In this article, we have investigated the problem, and we introduce probable triggers as well as the most practical solutions.
Why does my mouse disconnect with the event ID 5379 notification?
The following are the possible causes of this disconnecting mouse issue:
Faulty or incompatible mouse driver – It’s possible that the mouse driver installed on your computer is either outdated, corrupted, or incompatible with your operating system.
USB power management – Sometimes, when the system goes into power-saving mode, it might disable the USB ports, which can cause the mouse to disconnect.
Wireless interference – If you use a wireless mouse, the connection may be affected by other devices or wireless signals in the surrounding area.
Hardware or mouse defect – Sometimes, a faulty or malfunctioning mouse can cause frequent disconnections. It’s important to consider hardware issues as a potential factor.
How do I fix event ID 5379 caused by a disconnected mouse?
Before going into any detailed solution, try the following workarounds:
Check for hardware damage – You may try the mouse on a different computer and replace your mouse if it is damaged.
Restart the computer – In some cases, the glitch may be minor, and a simple reboot will force any problematic process causing the error to stop.
Stay within range – If you use a wireless mouse, ensure you are within range to avoid disconnection.
Check USB connections – Ensure the cables or USB ports are not damaged; you may clean them to remove particles.
If none of the pre-solutions work, proceed to the major fixes we explore below.
1. Update mouse drivers
Right-click the Start menu and select Device Manager.
Expand the Mice and other pointing devices category, right-click on your mouse, and click Update driver.
Select Search automatically for drivers.
Verify it fixes the mouse disconnection causing the event ID 5379.
2. Restore the computer
Press Windows + R to open the Run dialog.
Type rstrui, and hit Enter.
Click the Next button.
Select a restore point and hit Next.
Click on Finish.
The computer would restart in the process, but at the end, verify that it fixes the mouse disconnection that triggers event id 5379.
Right-click the Start menu and select Device Manager.
Expand the Universal Serial Bus controllers category.
Right-click on each USB Root Hub and select Properties.
In the Properties window, go to the Power Management tab, then uncheck the box that says Allow the computer to turn off this device to save power.
Click OK, and now, repeat these steps for all USB Root Hubs listed.
Finally, restart your computer and check if the mouse disconnection issue persists.
There you have it. Note that we have not discussed these fixes in any particular order, so after the initial workarounds, you should try whatever seems the most applicable to your situation.
A few of our readers are caught between deciding whether to remove Bing from Windows 11. While the web search engine owned by Microsoft is essential to many users, you may have a different preference.
In this guide, we will take you through some of the easiest ways to remove it and explore circumstances that warrant its removal.
Should I remove Bing from Windows 11?
This decision is up to you, but here are some reasons you may want to remove the Microsoft search.
Preference – If you have a preferred search engine, removing Bing will allow you to personalize your search experience by using your preferred search engine.
Privacy concerns – Users may be concerned about how Bing collects data and prefer search engines with stronger privacy policies.
Search results accuracy – If you find that Bing’s search results are not meeting your expectations in terms of accuracy and relevance, you may consider switching to a different search engine.
Resource management – Removing or disabling Bing can free up system resources by reducing the number of background processes and services associated with the search engine.
How do I remove Bing from my Windows 11?
1. Modifying the Registry to remove Bing
Press Windows + R to open the Run dialog.
Type Regedit and hit Enter.
Navigate to the path below: Computer\HKEY_CURRENT_USER\SOFTWARE\Policies\Microsoft\Windows
Right-click Windows, select New, then Key.
Name the new key Explorer.
Right-click on Explorer, and select New and DWORD.
Name the DWORD DisableSearchBoxSuggestions.
Finally, to disable search box suggestions, double-click on DisableSearchBoxSuggestions, change the value to 1, and then click OK.
2. Using Group Policy Editor to remove Bing
Press Windows + R to open the Run dialog.
Type gpedit.msc and hit Enter.
Navigate to the path below: User Configuration\Administrative Templates\Windows Components\File Explorer
Click on File Explorer on the left pane, then on the right, double-click Turn off display of recent search entries in the File Explorer search box.
Select Enabled, then click on Apply and OK.
Finally, restart the computer, and this will remove Bing from Windows 11.
Type cmd and hit Ctrl + Shift + Enter to open an elevated Command Prompt.
Type in the script below and hit Enter. This command adds a registry entry to disable Bing search. reg add "HKCU\Software\Microsoft\Windows\CurrentVersion\Search" /v BingSearchEnabled /t REG_DWORD /d 0 /f
Finally, restart the computer so that the changes can take effect.
These are the different ways to remove Bing from Windows 11. All the above methods are effective, so you should try whichever seems the most applicable.
If you need to use the Group Policy Editor to remove Bing but do not have it installed on your computer, our comprehensive guide will show you how to install Group Policy Editor on Windows Home.
Prefer to keep Bing but just remove content filters? Follow our guide on how to turn off SafeSearch on Bing for step-by-step instructions.
And, of course, reach out to us using the comments section below and let us know which of the above methods you prefer.
Ie4uinit is a Windows process that belongs to Internet Explorer. It’s used by IE to load the first time you run it, to set up your default home page and other settings.
This file is located in the C:\WINDOWS\system32 directory, where all of the programs on your computer are stored. If it’s causing problems, you’ll find this article of much help.
What is ie4uinit exe in Windows?
The ie4uinit.exe process is a Microsoft Internet Explorer process. It is a system process that runs in the background when you start your computer, allowing you to browse the web.
If you don’t use Internet Explorer often, there’s no need to keep this file on your system. If you use it regularly, it’s best to leave it alone and let it run when needed.
Some common errors associated with the ie4uinit.exe file include:
Ie4uinit.exe Error
Invalid Win32 Program: ie4uinit.exe
Sorry, ie4uinit.exe encountered a problem
Ie4uinit.exe not executing
Sorry, we can’t find ie4uinit.exe
Ie4uinit.exe not found
Error starting program: ie4uinit.exe
Ie4uinit.exe halted
Ie4uinit.exe: App Path is Faulting
These errors are a result of the following:
The program is not installed correctly – Since this file is related to the Internet Explorer browser, which has since been discontinued, errors may arise from installation from unverified sources.
Malware infection on your computer – A lot of legitimate Windows files are usually clowned by hackers who use similar names. This is all done to inject malware into your system.
Missing DLL files – It is possible that the DLL file associated with the ie4uinit.exe file is missing or corrupted.
Software conflicts – There may be a third-party application that is preventing the file from executing.
Corrupted registry – The associated registry keys may be missing or damaged. A corrupted registry can cause all sorts of issues with your computer, including ie4uinit exe error.
How can I fix ie4uinit.exe errors?
A few basic workarounds to perform before the main steps include:
End all ie4uinit.exe processes from Task Manager.
Search for the exe file and delete it if it is not in the legitimate Windows folder.
Hit the Start Menu icon, type cmd in the search bar, and click Run as administrator.
Type the following commands and press Enter after each one:DISM.exe /Online /Cleanup-Image /Restorehealthsfc /scannow
You can also try a dedicated repair program to execute the process mentioned above so that you can remove all corrupt files and other potential system errors.
2. Scan for viruses
Press the Windows key, search Windows Security, and click Open.
Select Virus & threat protection.
Next, press Quick scan under Current threats.
If you don’t find any threats, proceed to perform a full scan by clicking on Scan options just below Quick scan.
Click on Full scan, then Scan now to perform a deep scan of your PC.
Wait for the process to finish and restart your system.
Install the file and open it. The application may fail as it is no longer supported but a workaround is to enable it in Microsoft Edge.
Open Microsoft Edge and click the ellipsis button on the top-right corner.
From the drop-down menu, select the Settings option.
Next, click on the Default browser option.
Under Internet Explorer compatibility, click on the drop-down menu next to Allow sites to be reloaded in Internet Explorer mode and select Allow.
Next, click on the Restart button.
Before you reinstall the browser, it is important to do a clean sweep of any software leftover files. If these were the cause of the ie4uinit.exe error, installing the browser again with the same corrupt files present will only cause a reoccurrence of the issue.
4. Perform a System Restore
Press the Windows + R keys, type rstui, and hit Enter.
The System Restore window will open. Click on Next.
Select the restore point you wish to revert to and click on Next.
Now click on Finish.
If you’re still experiencing the ie4uinit.exe errors, it may be time to perform a clean install on your PC. After all, Microsoft has already ended its support for Internet Explorer, and it’s time to give its replacement a chance.
Microsoft Edge is not your ordinary browser; you can find all about its features in our comprehensive article.
You may also run into the textinputhost.exe file error, so don’t hesitate to check out our expert article on how to disable it.
Let us know what solution fixed this error in the comment section below.
The Xbox One is a great gaming console with a lot of potential. Unfortunately, it has some bugs that can ruin your experience. One of these bugs is your Xbox One console getting stuck on the green screen.
If your Xbox One turns on and displays a green screen, you might wonder what’s wrong with your console. This guide will help you troubleshoot the problem so you can get back to gaming as quickly as possible.
Why does my Xbox turn on green screen and then go black?
If your Xbox One is not loading the homepage and instead you get a green screen, here are some common reasons why:
Unfinished updates – Sometimes, Xbox One may fail to update even though it has automatic updates that run in the background when available. You may encounter the green screen if they are interrupted by network disconnection.
Hard drive failure – If your console turns on a green screen and then goes black, there could be an issue with your hard drive. It’s possible that your data has become corrupt and needs to be recovered or replaced completely.
Power supply issues – If you are using an older model of the Xbox One, there might be some problems with its power supply unit (PSU).
Overheating – This can happen because of several factors, including faulty fans, dust build-up inside the console, or even a faulty power supply unit.
Server problems – If the servers are down or a maintenance window is underway, this will result in limited services being available until the maintenance has been completed.
How do you fix the green screen of death on Xbox One?
A few workarounds to try before attempting the main troubleshooting steps include:
If you’re using an HDMI cable, swap it out for another one to see if the issue persists.
Unplug your Xbox console from its power source for 1 minute, then plug it back in and turn it on again.
Find the $SystemUpdate file in the files extracted and copy it to your USB drive.
Remove the USB drive from the laptop or desktop.
Unplug the Xbox One, then plug it back in again after a few minutes.
Press the Bind and Eject buttons, and hold those buttons to keep them pressed. Then, with the Bind and Eject buttons held, press the Xbox button.
Let go of the Bind and Eject buttons after the second power-up tone. Thereafter, the Xbox One should start up at the Xbox Startup Troubleshooter.
Next, insert the USB drive that includes the update files in an Xbox One USB slot.
Select the Offline system update option with the controller’s D-pad and A button to initiate the update.
Offline updates are a great save, especially if you’re experiencing intermittent connection. This will ensure your updates are not interrupted, minimizing the chances of an update failure.
2. Clear system cache
Press the Guide button on your controller.
Navigate to Settings and select System Settings.
Click on Storage.
Highlight a storage device then press the Y button on your controller to open Device Options.
Click on Clear System Cache under Device Options screen.
Click Yes when the confirm storage device maintenance prompt pops up.
The Family Safety feature can be useful, but sometimes it can get tiresome, so many are wondering how to disable Microsoft Family Features on Windows 11.
How do I disable Microsoft Family Features on Windows 11?
Click the three dots icon next to the name of the person you want to remove. Choose Remove from family group.
Lastly, click on Remove to remove the child’s account from the group.
After doing that, the family safety feature will be disabled for that child’s account. This is a quick and easy way to disable Family settings on Windows 11 for a single account.
2. Leave the family group
Navigate to the Microsoft Family page in your browser.
Click the three dots icon next to your name and choose Leave family group.
Click on Remove to confirm.
Once you leave the family group, you will disable Family Safety on Windows 11 for the entire family.
Press Windows key + R and enter services.msc. Next, click OK.
Locate Parental Controls and double-click it.
If the service is running, click the Stop button. Next, set the Startup type to Disabled. Lastly, click on Apply and OK to save changes.
Now you know how to turn off Microsoft Family Safety, and in most cases, it can be done by disbanding the family group.
Although this is a useful feature, it has its share of issues, and many reported that Microsoft Family Safety isn’t working on their PC. Luckily, we covered that issue in a separate guide.
Some of our readers have reported running into an error the Installer failed to install this driver when they tried to install their drivers. The error can be annoying but can be fixed by following basic steps.
Hence, this guide will discuss ways to resolve the problem. Also, you may be interested in our guide about what to do if the no signed device drivers found error appears on your PC.
Why did the installer fail to install this driver properly?
Various factors may be responsible for the error on your computer. Some notable ones are listed below:
Corrupt driver file – The installer failed to properly install this driver error can occur when the downloaded driver file is corrupt, making it impossible for the installer to access and install the driver.
Driver incompatibility – Reinstalling a driver or downloading a new version on your computer may be unsuccessful because the driver is incompatible with your OS. So, it causes the installation process to result in errors.
Security software restrictions – Having security software or programs running firewall services can impede the driver installation on your computer. It occurs when they flag the process as a threat to the system, resulting in this error.
Device Installation Restrictions configuration – When the Device Installation Restrictions option is running in the Computer configuration, it can prevent the installation of devices not described by other policy settings, causing the error.
Regardless, we’ll take you through the steps to fix the issue and install your driver.
How can I fix the installer failed to properly install this driver error?
Before attempting any advanced troubleshooting steps, apply the following:
Perform a Clean boot – It will start the system with only the most essential files and services required by the operating system, preventing third-party programs from interfering with your driver installation.
Turn off background apps – Ending tasks for background processes and apps running on your computer will stop programs from intercepting or blocking the driver installer.
Update/backdate Windows OS – Installing the latest operating system updates will fix compatibility problems liable to cause the error. Also, you can roll back the Windows update if you installed an update before the error.
Proceed with the fixes below if the error occurs after following the steps above:
1. Run the chipset with a command line switch
Left-click the Start button, type Command Prompt, and click the Run as administrator option.
Click Yes on the User Account Control (UAC) prompt.
Copy and paste the following in the command bar, then press Enter: SetupChipset.exe -overall
After the command line is complete, restart your computer and check if you can install the concerned driver.
SetupChipset.exe is part of Intel(R) Chipset INF, and running its command helps configure a Software Package to deploy tricky drivers.
2. Disable Device Installation Restrictions
Press the Windows + R key to open the Run dialog box, type gpedit.msc, and press Enter to open Group Policy Editor.
Navigate to the following path: Computer Configuration\Administrative Templates\System\Device Installation
Then click Device Installation Restrictions. Double-click the Prevent installation of devices not described by other policy settings option on the right pane.
Click to select Disabled, and then click OK to save the changes.
Restart the computer and try the driver installation to see if the error persists.
Disabling the Device Installation Restrictions option in the Group Policy Editor allows the system to install devices and drivers not described by other policy settings.
Check our guide about how to fix the Group Policy error on Windows PCs if you encounter any problems.
The Accelerometerst.exe application error on Windows 10 is an error that many users report. It’s especially troublesome for users that have installed the Windows 10 Creators update.
Thankfully, it is not the most difficult issue to fix, provided you follow the solutions in this detailed guide.
Why am I getting the Accelerometerst.exe application error?
Below are some of the potential causes of the Accelerometerst.exe application error on Windows 10:
Corrupt system files: If some crucial system files are broken or missing, you can get this error message. You can fix this by restoring these files.
Outdated HP 3D Drive Guard: The HP 3D Drive Guard has been throwing up different errors since many users upgraded to Windows 10. The solution is to uninstall the app and install the latest version.
Faulty Microsoft Visual Studio: Another potential cause of this error is issues with the Microsoft Visual Studio tool. You need to repair or reinstall the tool to get past the error.
How can I fix the Accelerometerst.exe application error on Windows 10?
1. Run an SFC scan
Press the Windows + S key, type cmd, and select Run as administrator under Command Prompt.
Type the command below and press Enter to run it: sfc /scannow
Finally, wait for the command to finish running and restart your PC.
Sometimes, the Accelerometerst.exe application error on Windows 10 can be caused by missing or corrupt system files. You can fix this by running an SFC scan.
If this process doesn’t give results, you may choose a system repair tool to scan your Windows OS and repair defective system files.
2. Uninstall HP 3D DriveGuard
Press the Windows key, type control, and click Control Panel.
Choose Uninstall a program under Programs.
Now, right-click the faulty program and select the Uninstall option.
If you are an HP user, the Accelerometerst.exe application error on Windows 10 can be due to issues with the HP 3D DriveGuard. To fix this, uninstall the app and install the latest version.
Press the Windows key + R to open the Run utility.
Type the command below and click the OK button: regsvr32 /u c:\Windows\System32\vcruntime140.dll
Now, launch the Run utility again, type the command below, and hit Enter: Regsvr32 c:\Windows\System32\vcruntime140.dll
Issues with VCRUNTIME140.dll is one of the major causes of the Accelerometerst.exe application error on Windows 10. The solution to this is to unregister and re-register the DLL file.
If you can’t find the DLL file on your PC, then this solution will not work for you.
4. Install Microsoft Visual C++ Redistributable Package Update 3
Visit the official website to download the Microsoft Visual C++ Redistributable Package Update 3 for Visual Studio 2015.
Click the Download button.
If you are using a 64-bit PC, click the checkbox before vc_redist.x64.exe. On a 32-bit PC, you only need to click x86.exe.
Next, follow the onscreen instructions to complete the download process.
Finally, double-click the downloaded file to install the tool and restart your PC.
The Accelerometerst.exe application error on Windows 10 can sometimes be due to problems with the Microsoft Visual Studio 2015 package. Thankfully, there is an update pack released by Microsoft to fix these potential issues.
5. Repair the Microsoft Visual C++ Redistributable file
Press the Windows key + R, type appwiz.cpl, and click the OK button.
Right-click the Microsoft Visual C++ 2015 Redistributable file and select the Uninstall option.
Finally, click the Repair button and follow the onscreen instructions to complete the process.
If downloading the Update package does not work for you, you can repair the 2015 Visual C++ Redistributable file on your PC. This has proved effective for many users, and you can try it too.
6. Perform a system restore
Press the Windows key + R, type rstrui.exe, and press Enter.
Click Next on the new page.
Now, choose your ideal restore point and click the Next button.
Finally, click Finish and follow the onscreen instructions to complete the process.
If you started noticing the Accelerometerst.exe application error on Windows 10 after installing an app or making some changes to your PC, you need to perform a system restore.
This will help you reverse the changes that might be causing the problem.
With this, you now have everything you need to solve the Accelerometerst.exe application error on Windows 10. All you now need to do is to follow the instructions carefully, and things should be back to normal.
Similarly, if you are facing other issues like adbwinapi.dll not found, check our detailed guide to fix it.
Feel free to let us know the solution that helped you solve the problem in the comments below.
It could be very frustrating if you encounter an error message that says A referral was returned from the server while installing applications on Microsoft Windows 11.
We have investigated the Windows error, and in this guide, we will introduce you to probable causes and some of the most practical resolutions.
Why am I getting a referral was returned from the server?
Users have experienced the error for several reasons, including the following:
Permission issues – When users lack administrator permissions, they cannot carry out certain functions and may encounter the error.
Update errors – Sometimes, the error will start after a bad Windows update or if you use an outdated OS.
User account control issue – UAC can sometimes disrupt communication or connectivity between your computer and the referral server.
How do you solve a referral was returned from the server?
Before going through the solutions explored in this guide, we recommend the following workarounds:
Use an admin user account – You may log out of your current user and relog in as an administrator.
Restart the computer – A restart may work because it fixes minor glitches by forcing the problematic processes to shut down.
If you can not fix the error with the above preliminary solutions, move on to the detailed fixes below.
1. Update User Account Control settings
Press Windows + R to open the Run dialog.
Type control and hit Enter.
Click on the User Accounts settings.
Select Change User Account Control settings.
Drag the slider down to Never Notify and click OK.
Finally, restart the PC and verify if it fixes a referral was returned from the server.
2. Tweak admin values in the registry Editor
Press Windows + R to open the Run dialog.
Type regedit and hit Enter.
Navigate to the path below: HKEY_LOCAL_MACHINE\SOFTWARE\Microsoft\Windows\CurrentVersion\Policies\System
Double-click ValidateAdminCodeSignatures on the right pane, set the Value data to 0, then click OK.
Next, double-click EnableUIADesktopToggle, set the Value data to 0, and hit OK.
Finally, reboot the PC and see if it fixes a referral was returned from the server.
3. Update user account preferences in Group Policy
Press Windows + R to open the Run dialog.
Type gpedit.msc and hit Enter.
Navigate to the path below: Computer Configuration / Windows Settings / Security Settings / Local Policies / Security Options
On the right pane, double-click User Account Control: Only elevate signed and validated executables.
Select Disabled, then click Apply and OK.
Finally, verify if the fix works for a referral was returned from the server.
4. Run apps in Compatibility Mode
Press Windows + R to open the Run dialog.
Type cmd and hit Ctrl + Shift + Enter.
Type in the script below and hit Enter, then restart the computer. net user administrator /active:yes
Right-click on the program that causes the error and select Properties.
Click on the Compatibility tab and select Change settings for all users.
Tick the Run this program as an administrator checkbox and hit OK.
There you have it; some of the best ways to fix a referral was returned from the server on your Windows devices.
We recommend starting with the resolution as they may save you the time and energy of further troubleshooting. Also, since Group Policy may be integral in fixing the error, you may read our guide on getting Group Policy on Windows 11.
Lastly, other readers will love to hear from you, so please drop a comment below and tell us the fix that worked for you.
Microsoft news recap is a weekly feature highlighting the top Microsoft news stories of the past week. Sit back, grab some coffee, and enjoy the read!
Microsoft bumps Bing Chat’s character limit to 4,000
It’s now possible to send longer queries to Bing Chat as Microsoft has doubled the character limit to 4,000, which allows for more detailed queries to be provided.
China’s antitrust committee joins Microsoft’s growing list of Activision approvals
It is now possible to use iMessage on Windows 11 through Microsoft’s Phone Link app, as Microsoft has expanded support to iPhone, after originally only supporting Android phones.
????COOL, NEW FEATURE ALERT???? access your phone from your PC with Microsoft Phone Link! learn more: https://t.co/leOAsROEr1
Xbox Quick Resume feature might be coming to Windows PCs
Xbox’s Quick Resume feature that allows players to exit a game and return to it instantly, without losing progress, could be on its way to Windows PCs, after hints were dropped that it could be on the way.
Microsoft dropping hints that it’s thinking about bringing Xbox Quick Resume or something similar to Windows. This would be great for PC gamers. Here’s Roanne Soanes, head of Xbox hardware, discussing improving the Windows experience here pic.twitter.com/8eT87PhYoy
Cygwin is a popular software amongst developers due to its ability to allow the compiling of Linux-based applications on Windows. And given its advanced operation, users can’t uninstall Cygwin in Windows like the other apps.
There is no option in Settings to uninstall the program, and users can’t find Cygwin in Control Panel. So, can you remove Cywin from Windows? The answer is yes, but it’s a little more complicated than one would imagine. Let’s find out!
Is Cygwin safe to install?
Yes, Cygwin is safe to install! It’s the go-to software for many developers due to the availability of various open-source tools. It serves as a viable solution for those looking to run Linux apps on Windows.
So, if you haven’t yet made up your mind to uninstall Cygwin in Windows, here are a few benefits of it:
Easy to use: Enhanced accessibility and ease of use are two of the primary benefits of Cygwin, making it one of the best terminal emulators to install.
Doesn’t burden the disk: Cygwin is lightweight and doesn’t consume a lot of space. It’s an executable file that downloads the required resources to run.
Quicker results: When it comes to results, Cygwin is definitely amongst the top options, given its superior performance and ability to deliver quickly and correctly.
How do I completely remove Cygwin?
Tip
Since the conventional ways don’t work with Cygwin, we will be using some advanced methods. So follow the steps as it is. And before you start, make sure to create a restore point to revert Windows to a stable state in case things go wrong.
1. Using the Command Prompt
1.1 Disabling the related services
Press Windows + R to open Run, type services.msc in the text field, and click OK.
Locate and double-click the CYGWIN sshd service.
Select Disable from the Startup type dropdown menu, click on Stop, and then OK to save the changes.
Similarly, stop the following services as well, if any are found:
Cygwin cron
Cygwin cygserver
Cygwin inetd
Cygwin apache
Cygwin postgresql
1.2 Uninstalling Cygwin
Press Windows + R to open Run, type cmd, and hit Ctrl + Shift + Enter.
Click Yes in the UAC prompt.
Paste the following command and hit Enter to take folder ownership:takeown /r /d y /f cygwin
Now, run this command for advanced permissions:icacls cygwin /t /grant Everyone:F
Finally, execute the following command to delete the executable and its files:rmdir /s /q cygwin
1.3 Clearing the Registry entries and leftover files
Press Windows + R to open Run, type regedit, and hit Enter to open Registry Editor.
Click Yes in the prompt.
Locate the Cygwin key under any of the two, HKEY_LOCAL_MACHINE and HKEY_CURRENT_USER.
If any are found, right-click on them and select Delete.
Click Yes in the confirmation prompt.
Also, delete any cache, Start Menu icons, or desktop shortcuts for Cygwin.
That’s it! Though slightly time-consuming, this is the simplest way to uninstall Cygwin with CMD in Windows 7, as well as the other iterations. After uninstalling all Cygwin packages and the remnant files, you will also free up significant disk space.
2. By modifying the permissions
Press Windows + E to open File Explorer, go to the C: drive, right-click on the Cygwin folder, and select Properties.
Go to the Security tab, and click on Advanced.
Now, click on Change.
Enter the current username in the text field, click on Check Names, and then on OK.
Tick the checkboxes for Replace owner on subcontainers and objects and Replace all child object permission entries with inheritable permission entries from this object, then click OK.
Click on OK to save the changes.
Again, head to the Security tab, and click Edit.
Click on Add.
Enter the username you used earlier, then click on Check Names, and OK.
Select the user, then tick the checkbox for Full control, and click OK to save the changes.
Once done, all that’s left is to select the folder and hit Delete to clear the Cygwin files.
Another way to uninstall Cygwin in Windows is via File Explorer after taking the folder ownership. This is very similar to the Command Prompt method, the difference being that all operations are performed manually. And do not forget to clear the Registry entries and any cache, as detailed earlier.
If you find the two solutions to be rather complicated, a quick way to uninstall Cygwin in Windows 11 is to use dedicated uninstaller software. These can identify any processes and apps on the computer and quickly remove them.
Besides removing the program, an uninstaller will also identify any Registry entries and look up the app cache, ensuring that it’s all deleted alongside.
When an application needs to perform tasks that require administrative privileges, such as installing new software or updating system files, it needs your consent hence why you may see the consent.exe file in your system.
If you’ve been wondering whether you need this file on your PC, we unpack what the consent.exe file does and its importance in this article.
What is the consent UI for administrative applications?
The consent.exe file is a Windows-based executable used to interact with the user and verify their consent to perform certain actions, such as installing a software program or changing the computer’s settings.
Sometimes, you can download an application but are unsure what it does or how it works. It is best not to allow it to run within your computer until you have researched what it does and whether it is safe to install on your computer.
You’ll most likely find the consent.exe file in the C:\Windows\System32 folder. Anywhere else should be a red flag, as it could be a virus masquerading as the real file.
Should I disable the consent.exe file?
It’s a known fact that you cannot get all the apps you need from Windows Microsoft Store. Sometimes, you’ll need to download non-Microsoft programs from third-party sites.
They may be necessary, but you risk inviting viruses, trojans, and malware into your system, especially without a comprehensive antivirus.
Here is where the consent.exe program comes in. As part of the UAC, it ensures that any changes you make to your PC are approved. If consent.exe sees suspicious activity, it will stop the process from executing and ask whether you want to allow this action.
While it may be an additional layer of security, a section of users has reported that having this file in their system brings up more problems than it solves.
For instance, some are experiencing PC freezes, random crashes, and high CPU usage. If you notice that consent.exe takes up a lot of CPU or RAM resources, or if it’s constantly running in the background, you might want to disable it.
How can I disable the consent.exe file?
Start with the following preliminary steps before the more complex solutions:
Find the consent.exe process in Task Manager and end it.
Hit the Start Menu icon, type UAC in the search box, then click Open to access the Change User Account Control settings.
The User Account Control Settings window will open. Click and hold the slider, hover your mouse over the Never notify option at the bottom, then click OK.
You will no longer get the prompt whenever you want to install an app.
Keeping this setting at Never notify is, however, not recommended because it allows non-administrators access to specific system functions without requiring them to elevate privileges each time they do so.
This is very dangerous, especially when using a shared computer, because other users can install malware into your system, and you wouldn’t know it until it is too late.
2. Use the Registry
Press the Win + R shortcut keys to open the Run console, type regedit, and hit Enter to open the Registry Editor window.
Next, navigate to the below path, and double-click on the EnableLUADWORD.
In the Edit DWORD (32-bit) Value dialogue, change the Value data from 1 to 0. Press OK.
If you’re using Rytr.me AI, you’re probably working hard to get the most out of the AI software, but sometimes, things don’t work out as planned. Maybe you can’t get a response after a query input, or the website just won’t load.
It’s nothing alarming, but it is an issue that needs to be addressed immediately. Below, we take you through some common issues with Rytr not working and how to resolve them quickly.
Why is Rytr not working?
AI assistants are just like any other website with downtimes, scheduled maintenance, and usual glitches. When Rytr is not working, it could be because of one or more of the following reasons:
Scheduled downtime – Websites sometimes have downtime to upgrade features or fix any bugs reported to improve the efficiency of their products and services.
Bug/glitch – It is possible that there is a bug that has infected the website preventing it from working normally.
Extensions/plugins – If Rytr stopped working after installing an extension, it is probably the culprit causing this issue.
Build-up cache/cookies – While cookies and cache help you load sites faster, they can sometimes be overwhelming when they have not been cleared in a while, causing issues with loading some sites.
Excessive traffic – It is also possible that too many people are trying to access Rytr at the same time, causing the server to be overloaded.
Outdated/corrupt browser – If you’re still using an older browser, this could be the problem. Most developers roll out updates to their products as soon as browsers are updated for compatibility purposes.
Character limit – Since Rytr has a monthly character limit for the free plan, you may have exhausted yours hence why it is not working.
What can I do if Rytr is not working?
Try out the following basic checks first:
Check for any browser updates.
Verify from Rytr whether their website is running or has any scheduled maintenance.
Open your Chrome browser and click on the three vertical ellipses at the top right corner.
Select Settings.
Next, click on Reset and cleanup, then select Restore settings to their original defaults.
Confirm Reset settings in the next dialog box.
4. Report the issue
Your last resort is to report the issue of Rytr not working. Rytr has various avenues where you can connect with them, from Live chat, Email, and social media platforms.
Ensure to include every detail, no matter how insignificant you may think it is, to solve the problem promptly.
Is Rytr free to use?
Yes, Rytr is indeed free. They’ve even indicated on their website that it is free forever. While AI software seems to be taking over, most don’t come cheap.
You’ll have to part with a generous amount to subscribe to a monthly or annual plan. Others who offer free plans have a character limit. This brings us to the next question. Is there a character limit on Rytr?
Yes, it does have a character limit. If you can’t afford to upgrade to the paid plan offering unlimited characters, you’ll have to make do with the free plan with a 10,000 monthly character limit.
It may not be enough, but it’s better than other ChatGPT alternatives that don’t offer a free trial or plan.
That brings us to the end of this article, but keep the conversation flowing in the comment section below. We want your thoughts on Rytr AI, problems encountered so far, and any other interesting thing.
If you encounter the error message 503 valid rcpt command must precede data, it usually means there’s a problem with the recipient (RCPT) command during SMTP (Simple Mail Transfer Protocol) communication.
How do I fix the 503 valid rcpt command must precede data error?
Before you proceed with the solutions in this guide, do the following:
Verify your internet connection – You may have to use a wired connection or change your ISP to guarantee a good connection.
Restart all applications – Sometimes relaunching your apps may fix tiny bugs; you may also consider rebooting the device.
Disconnect your VPN – It is recommended that any VPN be disconnected as they may have rigorous firewall or security configurations that can block the necessary ports or protocols.
However, if you are unsuccessful after using the above pre-solutions, proceed to more detailed fixes below.
The email address you used in the From field is visible to the recipient when you send an email. Using a different email address than the one in your outgoing mail settings may lead to authentication problems and error 503.
Also, it’s important to note that using special characters, such as apostrophes, in email addresses can result in email transmission issues and potentially trigger the Outlook 503 error. To ensure accuracy, you should review and eliminate any special characters or symbols in the recipient’s email address.
4. Fix corrupt PST file
If the Outlook PST file is damaged, you might encounter the error 503. So you can use an advanced PST file repair software like Stellar Repair for Outlook.
Of the many background processes running on the PC, some perform critical tasks while others, if eliminated, do not affect the core functioning of the OS. A proper understanding of both helps reduce CPU usage in Windows. One such is the NetworkCap.exe process.
And besides resource consumption, there are various other issues accompanying the process. For some users, NetworkCap.exe caused slow Internet speed, dropping from 10 Mbps to a few hundred Kbps. If you are facing problems, here’s everything you need to know!
What is Network Cap exe?
The process relates to HP Network HSA Service and usually comes preinstalled on some HP devices. The executable file for NetworkCap.exe is stored in the System32 folder in either of these locations:C:\Windows\System32\DriverStore\FileRepository\hpcustomcapcomp.inf_amd64_79c5c41204d03777x64C:\Windows\System32\DriverStore\FileRepository\hpcustomcapcomp.inf_amd64_7898ab4dfb5a2c7bx64
The HP tool is often found running the Task Manager even when not manually initiated by the user. This is what concerns users, and many ask if NetworkCap.exe is a virus. The answer is no, but it could be categorized as bloatware in Windows.
Should I delete NetworkCap.exe?
NetworkCap.exe is a network monitoring tool, but given that it’s not a core Microsoft process, there’s no harm in removing it. And this should not affect the functioning of core Windows processes or even third-party programs.
But before you do, we recommend creating a restore point so as to have the ability to revert the changes in case things go wrong.
How do I fix NetworkCap.exe errors?
1. Manually delete the file
One of the quickest solutions to fixing issues with NetworkCap.exe, be it slow Internet or high memory consumption, is to remove the executable file.
Simply head to the file’s storage location and delete it. Also, make sure to remove the executable file from the Recycle Bin.
2. Scan for malware
Press Windows + S to open Search, type Windows Security in the text field, and click on the relevant search result.
Click on Virus & threat protection.
Click on Scan options.
Now, choose Full scan and click on Scan now.
Wait for the scan to complete.
While the NetworkCap.exe process is not malware, it could be triggered by one. Or there’s a chance that the PC is infected by a virus disguised as the process. And in this case, running a malware scan is the best choice. You could also use a dedicated antivirus solution for more effective results.
3. Set to low priority
Press Ctrl + Shift + Esc to open the Task Manager, and go to the Details tab.
Locate the NetworkCap.exe process, right-click on it, hover the cursor over Set Priority, and choose Low from the list of options.
Once done, restart the computer.
Remember, this is not a long-term solution and won’t keep the process from running. It will just prioritize other processes over it and help keep the resource consumption under check.
4. Use a dedicated task-killer software
When nothing else seems to work, you can use a dedicated software to kill the NetworkCap.exe process as soon as it runs.
Configure the software such that it automatically checks for instances of the process every 15-30 seconds and terminates them.
That’s all there is about the NetworkCap.exe HP process and some effective ways to eliminate it in no time. Before you leave, check some quick tips to make Windows run faster than ever.
Blue screen errors can be troublesome since they cause your PC to crash. One BSOD error that many users reported recently is c000021a.
If you’re unfamiliar with BSOD errors, we have a great guide on Blue screen causes that we suggest you read before trying any solutions from this guide.
Before we can fix this issue, let’s take a closer look at what causes this error to appear.
What does stop code 0xC000021A mean?
c000021a is a BSOD error, and it’s usually caused by the following:
Driver issues – Outdated or incompatible drivers can often cause this problem, so be sure to reinstall or update them.
File corruption – Corrupted system files can often cause this error to appear.
How do I fix c000021a fatal system error?
1. Update/uninstall the problematic driver
Press Windows key + X and choose Device Manager.
Locate the device that you suspect that is causing the issue.
Right-click it and choose Uninstall device.
If available, check Remove driver software for this device and click on Uninstall.
In some cases, you need to update your drivers, and you can do this by following these steps:
Visit your device manufacturer’s website.
Locate your model on the list.
Go to the Drivers section. Now locate the latest driver and download it.
Once the driver is downloaded, run the setup file to install it.
After updating or reinstalling your drivers, the c000021a error will be gone.
Select your setup language and go to Repair your computer.
Navigate to Troubleshoot and select Advanced Options. Lastly, choose Command Prompt.
Enter bcdedit command and look for device setting. Memorize the letter after the partition value.
Run the following command sfc /scannow /offbootdir=D:\ /offwindir=D:\windows
Wait for the scan to finish.
If the problem is still there, you can use the following command as well: dism /image:D:\ /cleanup-image /revertpendingactions
Optional: You can also run the following command: chkdsk c: /r
NOTE
In steps 5 and 7, you need to use the same letter that you got in step 4, so don’t just copy and paste the commands from above.
If you can access Windows you can fix the c000021a error by doing the following:
Press Windows key + X and choose Windows Terminal (Admin).
Now run DISM /Online /Cleanup-Image /RestoreHealth
Wait for it to finish.
Next run sfc /scannow
After both commands are completed, check if the problem is still there.
These are just a couple of solutions that can help you fix the c000021a BSOD error on your PC. As you can see, in most cases, the problem is related to system corruption or drivers.
The infuriating error code 0xc06d007e has been plaguing users, causing a great deal of frustration among tech enthusiasts whenever they try to perform a Software Update. Numerous complaints have been raised regarding this issue.
The current subject matter draws parallels to the Exception code 0xe0434352 error, which we have previously tackled in an extensive manual.
To effectively tackle the matter at hand, it is imperative that we first explore the underlying source.
What is an unknown software exception 0xc06d007e error?
The Unknown Software Exception 0xc06d007e error is a common issue that a variety of factors can cause:
Third-party programs clashing – Have you ever encountered issues with certain programs on Windows? It could be due to conflicting background applications that automatically launch upon startup.
Antivirus complicity – It’s not uncommon for antivirus software to be overzealous and erroneously prevent authorized third-party programs from running.
How can I fix unknown software exception 0xc06d007e error?
Here’s what to do first:
Update your software – If certain software gives you this error, install the latest updates.
1. Uninstall McAfee
On your search bar type in remove programs and click on it.
Next locate the McAfee software you want to delete.
Adobe software can also prompt similar issues, you can manually uninstall the program Moving the contents of your Adobe Acrobat cache folders to a different location can be a helpful solution. Simply locate the folder by:
C:\Users\"your current user account name"\AppData\Local\Adobe
C:\Users\"your current user account name"\AppData\Local\LocalLow\Adobe
C:\Users\"your current user account name"\AppData\Local\Roaming\Adobe
After restarting your computer, Acrobat will generate new temporary folders and files. By doing this, you can compare the previously cached files with the freshly generated ones to identify any inconsistencies.
It’s important to note that cached content cannot be relocated until all Acrobat-associated processes have been terminated. Keep this in mind when trying to move any cached items.
Click on Select Download under Download Windows 11 Disk Image (ISO), then choose Windows 11.
Now, click the Download button.
Choose the product language you want, then click the Confirm button.
Now you will receive a download link, and you will be able to click on the 64-bit Download button to get the Windows 11 ISO.
Right-click the ISO file you downloaded and select theMountoption. Another option for this is tocreate a bootable USBor DVD.
A new virtual drive will pop up in yourFile Managerwindow. Click on it and double-click the setup file to begin the installation process.
We trust that this guide has effectively resolved your problem. Should you encounter any additional obstacles, we suggest looking into error code 0xe06d7363 for similar solutions.
Your feedback would be greatly appreciated, so please leave a comment below and inform us of the most effective solution you found.
Processes like these are often shrouded in mystery, with many wondering if ekrn.exe is a virus. The suspicion is further raised by the fact that the process triggers high memory usage. For some users, it also used 100% CPU.
EKRN stands for ESET Kernel Service and is a component of the ESET Smart Security program. The primary role of the process is to ensure that the relevant core kernel drivers can run without hindrance, which allows utilities like the antivirus, firewall, and anti-phishing to function effectively.
Remember, ekrn.exe is not a core Windows process but is initiated by a third-party program, ESET Smart Security. So, disabling it or removing the program won’t affect the functioning of the OS. The ekrn.exe file location is either of these two: C:\Program Files (x86)\ESET\ESET NOD32 AntivirusC:\Program Files (x86)\ESET\ESET Smart Security
How do I remove ekrn.exe in Windows?
1. Terminate the process
Press Ctrl + Shift + Esc to open the Task Manager, and navigate to the Details tab.
Locate the ekrn.exe process, right-click on it, and choose End task.
After terminating the process, you should see an immediate improvement in the PC’s performance. But this is a short-term solution since the process is configured to launch automatically when you boot Windows. For longer relief, try the next solution.
2. Disable the relevant services
Press Windows + R to open Run, type services.msc in the text field, and hit Enter.
Locate the ESET service, right-click on it, and then select Properties.
Select Disabled from the Startup type dropdown menu, and click on the Stop button.
Once the service stops running, click Apply and OK to save the changes.
Similarly, disable any other ESET services that appear here.
Disabling the ESET services is another way to fix ekrn.exe high disk usage, but remember that it turns off the protection as well. So make sure that Windows Security is working.
Press Windows + R to open Run, type appwiz.cpl in the text field, and click OK.
Select the ESET program from the list of installed ones, and click on Uninstall.
Follow the on-screen instructions to complete the process.
Make sure to remove any other ESET entries that are listed here similarly.
That’s it! If the previous solutions didn’t deliver the desired results, uninstalling ESET should do the trick. Removing the security software also works when ekrn.exe cannot be deleted the conventional way.
Is it safe to use ESET?
While the ekrn.exe process could create a bit of trouble for users, the ESET antivirus is considered one of the best in the market and is often the primary choice of users. Though not as popular as Norton, Avast, or McAfee, ESET has a decent market share and offers a wide array of security features.
Besides, ESET regularly introduces new features to enhance security to identify and eliminate the most intricate of threats. And so far, there haven’t been any complaints, except for the process.
When you do, clear any remnant files and cache and delete the Registry entries. This will ensure a complete uninstallation. And an easy way for that is to use dedicated uninstaller software.
If you were wondering how to disable ekrn.exe, these are all ways: terminating the process in the Task Manager, disabling the ESET services, or uninstalling the program altogether.
Msra.exe, a Windows Remote Assistance tool, allows you to provide or receive remote assistance for troubleshooting purposes. This guide will explain what Msra.exe is and cover step-by-step instructions on downloading and using it effectively.
What is msra.exe?
Msra.exe is a legit system file responsible for launching the Windows Remote Assistance tool. It allows you to connect to another computer remotely, take control of the machine and provide technical assistance.
The system file is commonly used by IT professionals, support techs, and people seeking tech help from the support team.
This file is usually available in C:\Windows\System32 and is not associated with suspicious or unauthorized activity. However, if the file is found in any other location, a malicious program might be disguising itself with a similar filename to avoid detection.
How can I download msra.exe?
NOTE
You can’t download this system file separately; downloading it manually from unreliable websites is not advised. However, if the file is missing or corrupted, follow the steps below.
1. Run an SFC scan
Press the Windows key, type cmd, and click Run as administrator.
Copy and paste the following command to repair system files and hit Enter: sfc/scannow
Wait for the scan to complete, then restart your computer.
If you want to choose a more thorough repair process and prevent other possible system damage, we recommend you use a specialized repair program.
2. Run Windows Update
Press Windows + I to open the Settings app.
Go to Windows Update and click Check for updates.
If there is an update available, click Download and Install.
Wait for the process to complete.
The computer will restart during the installation; you must save your work. Sometimes, getting these latest updates installed can resolve the missing files issue.


 Tip