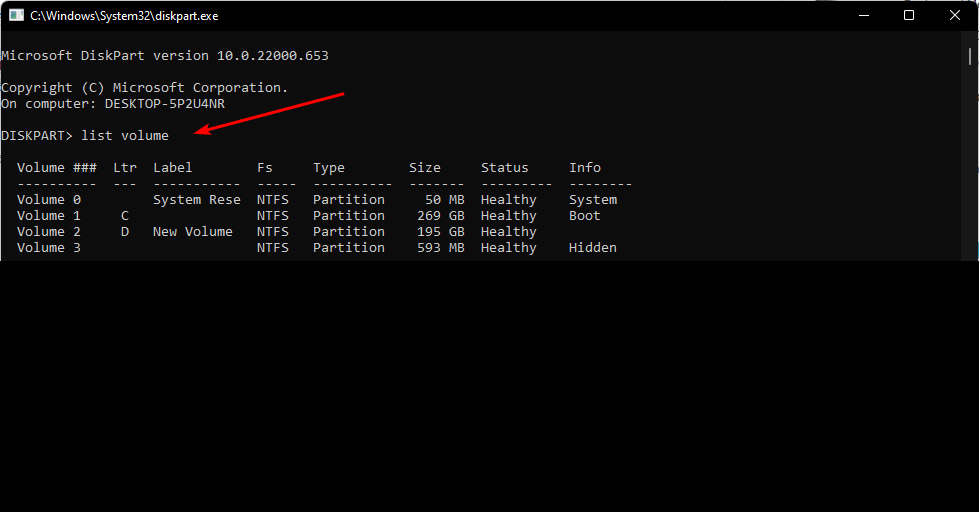
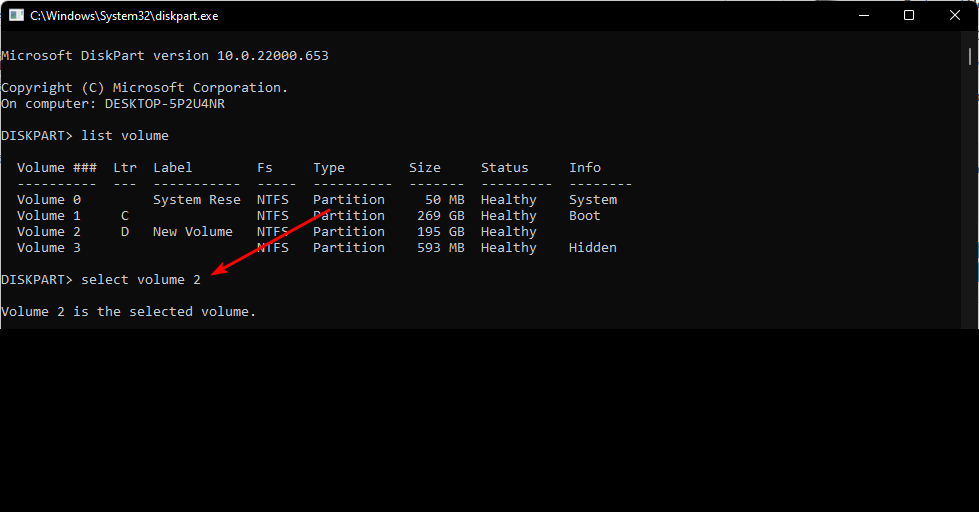
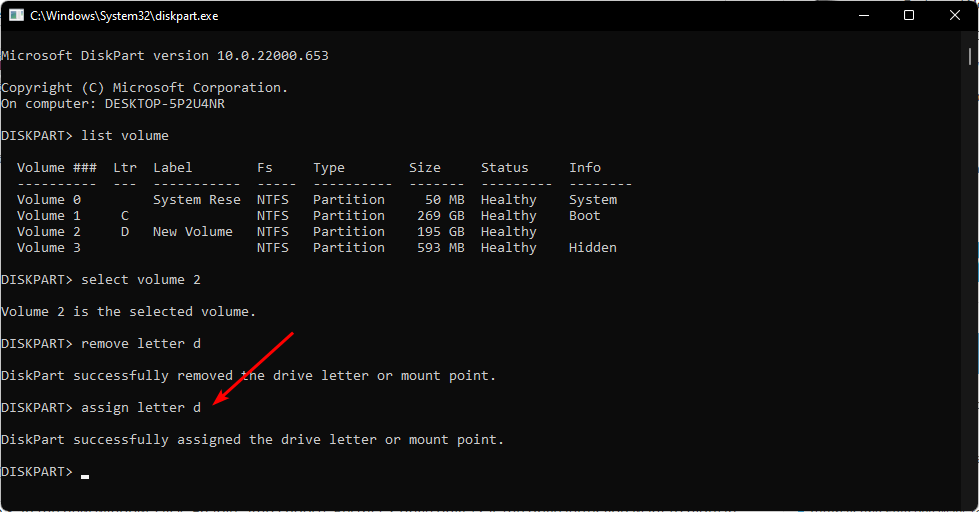
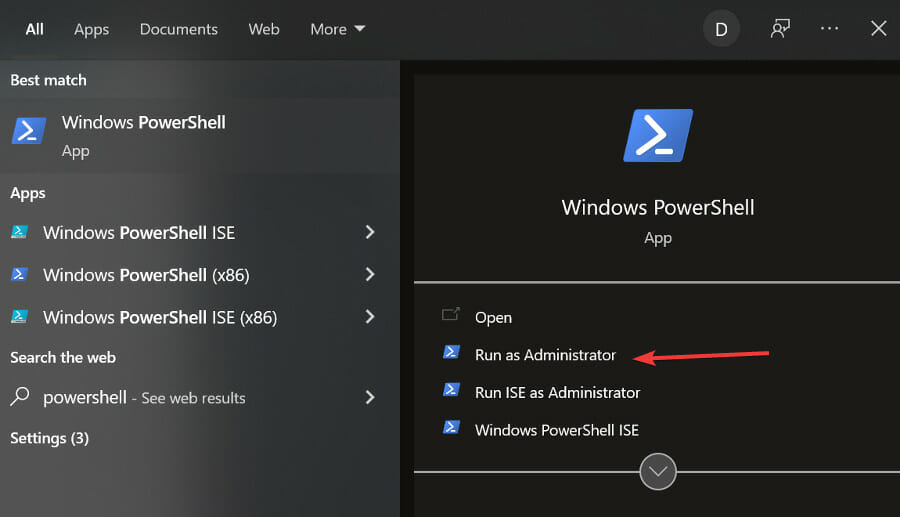
How to Repair Corrupted WAV Files: 3 Quick Ways

A WAV file, also known as a WaveForm audio file, is a standard audio format that is found mainly on Windows computers.

Such files are normally uncompressed, though they support full compression. When uncompressed, the files are larger than the major audio formats such as MP3.

Because of this, WAV files aren’t always used as the preferred audio format. This applies especially when trying to share music files or when purchasing music online.

Files get corrupted for several reasons like an unexpected computer shutdown or software error.

In the case of WAV files, there are ways to repair and/or fix corrupt elements using audio-editing software programs that play, manage, edit, and fix WAV files easily.

The common ways you can open WAV files include using VLC, iTunes, Windows Media Player, etc.

Here are some solutions you can use to fix a corrupt WAV file.

How can I repair corrupted .wav files?

1. Determine if the file is damaged

  1. Find the corrupted WAV file.
  2. Right-click it and select Properties.
  3. Select the Details tab
  4. Check for the information of the file from the Details pane (if there’s no info, the file is corrupted).
  5. Open an audio-editing software.
  6. Open the corrupt WAV file to repair as a RAW file.
  7. Save the file in the WAV format.
  8. Close the audio-editing software and try to play the file to ensure repair and conversion was finished.

In addition, you can use one of many available services that let you repair WAV file online.


2. Use Adobe Audition to repair the file

If you don’t have the time to manually fix corrupted WAV files, you can use Adobe Audition to automatically repair and restore audio.

The tool offers a series of troubleshooting options that will help you to fix corrupted audio files, reduce noise, add or remove audio effects, and more.

This amazing software enables you to repair corrupted WAV files with just a few clicks of the mouse.

Because time is very important for everybody in this day and age, being able to fix corrupted WAV files quickly can save you a lot of trouble. This applies even more in the case that the corrupted file is needed for your work.

Lucky for you, because Adobe Audition is the perfect corrupt WAV file repair software, you’ll get professional results with a minimum level of effort.

  1. Select the problematic WAV file.
  2. Open it in Adobe Audition.
  3. Navigate to the Effects Menu.
  4. Select the Diagnostics option to detect and repair issues.adobe audition repair wav file
  5. Wait for the process to complete.
Adobe Audition

Adobe Audition

Fix audio quality problems with any of your recordings, and enjoy in wide range of incredible features with Adobe Audition.
Free trialVisit website

3. Use the VLC Media Player

  1. Download VLC and install it.
  2. Right-click your WAV file, and select Open with VLC Media Player.
  3. Open the Playback section and click the Media menu.
  4. Select the Convert/Save option.
  5. Click Add from the File menu.
  6. Choose the WAV file and click Convert/Save from the bottom of the screen.
  7. Click Browse and choose which folder should be used to save your new WAV file.
  8. Type in the file name and extension. (ex. convertedfile.wav)
  9. Choose the Audio CD option from the Settings menu.
  10. Click Start to run the process.

Once completed, the audio file will appear in the folder you chose earlier, and the header information will be reconstructed. This enables you to play the file in any other media player.

If this method didn’t work for you,you can use other services to repair corrupted audio file online.

Were you able to repair the corrupted WAV file using any of these solutions? Let us know in the comments section below.


CS:GO Packet Loss: What Causes it & 5 Ways To Fix it

CS: GO packet loss can be a major issue as it will influence your latency and multiplayer experience. However, there are ways to fix this problem, and today we’re going to show you how to do it.

Why does CS:GO lose packets?

This happens due to network issues or DNS problems on your PC.

How to fix packet loss in CS:GO?

1. Restart your modem and router

  1. Turn off your PC.
  2. Unplug your modem and router for at least 30 seconds.
  3. Reconnect them and wait until they are fully operational (the indicator lights are back to their normal state).
  4. Restart your PC and relaunch CS:GO to see if everything is working properly.

2. Use a VPN to access more gaming servers

  1. Sign up for a premium VPN subscription. (We tested ExpressVPN)
  2. Install the VPN on your PC.
  3. Launch it and log into your account.
  4. Connect to a convenient server. (Try connecting to recommended servers first.)
  5. Launch CS:GO.
  6. Check if the problem still persists.

ExpressVPN is an excellent, all-around VPN from Kape Technologies that passed all of our tests successfully. Aside from improving your packet loss situation, ExpressVPN can also improve your online privacy, circumvent geoblocking, and secure your connection.

However, it’s worth mentioning that using a VPN might not always improve packet loss. This fix should only work if your ISP is the cause of the issue (bandwidth throttling, improper network management).

Thus, if the issue lies on your side with the device itself, or the game server is in maintenance, using a VPN won’t solve the packet leaks situation. It will be useful for you to use a VPN solely to reroute the traffic better.

Furthermore, the support you get from customer care ExpressVPN cannot be understated.

ExpressVPN

If ISP is throttling you, turn to a VPN service that can actually provide an array of optimized servers.
Check price Visit website

3. Troubleshoot your connection manually

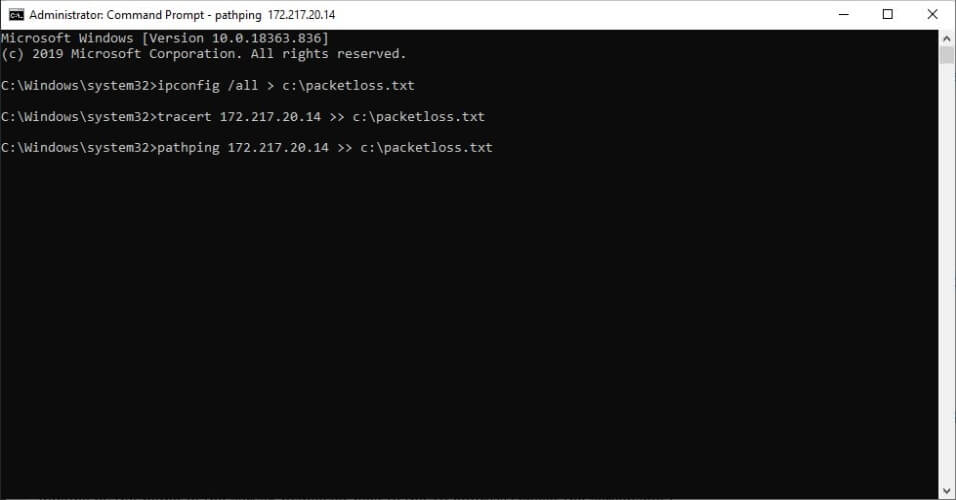
  1. Use our comprehensive guide to run a packet loss testPacket loss analysis Windows with tracert and pathping
  2. Locate the node (hop) that’s leaking packets
  3. Take any of the following measures, depending on the results:
  • Check/repair/update/upgrade/replace any faulty component on your home network (PC, cables, router)
  • Check Counter Strike latency
  • Try using a wired connection instead of Wi-Fi (Wi-Fi can cause packet loss).
  • Call your ISP if you notice any malfunctions on its corresponding hops.
  • Ask your ISP to contact the network distribution company if the issue is on their side.
  • Contact Valve’s support crew if it seems their servers experience packet loss.

4. Flush your DNS cache

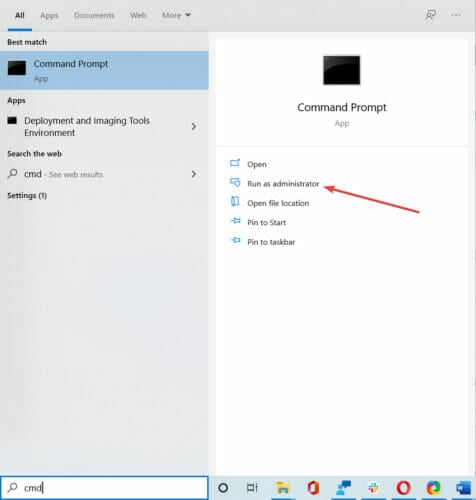
  1. In the Windows search bar, type Command Prompt.Start CMD
  2. Choose Run as administrator.
  3. If you are asked for permission, select Yes.
  4. In the Command Prompt window, enter the following commands one by one and press Enter:
    ipconfig /flushdns
    netsh int ip reset
  5. Wait for the process to finish before closing the Command Prompt window.
    Check to see if your ping time in CS:GO has improved.

5. Switch to a Google DNS server

  1. Select Run by right-clicking the Start button.
  2. In the Open box, type ncpa.cpl and press the OK button.
  3. Right-click your internet connection and select Properties.
  4. Double-click Wi-Fi Properties to bring up the window shown below. change dns server manually WiFi properties - fix attackers might be trying to steal your information from
  5. Click on Configure.
  6. Select the radio button Use the following DNS server addresses.
  7. In the Preferred DNS server box, type 8.8.8.8.
  8. In the Alternative DNS server box, enter 8.8.4.4.
  9. Check the Validate settings on the exit checkbox.
  10. Click the OK button.

In order to fix CS:GO packet loss, you need to practice healthy network management. This is the most efficient course of action you could take against packet loss.

Check out our comprehensive guide on packet loss if you want to find out more about the matter.

To wrap it up, you can fix CS:GO packet loss easily if all the stars are aligned.

However, sometimes the issue is on your ISP’s side and there’s little to nothing you can do to alleviate it, other than contacting customer support and informing someone about the situation.

You can use a VPN to improve packet loss, but note that it will only work if packet leaks occur on your ISP’s end.

Visit our Gaming Hub to discover more awesome reviews, guides, and tips & tricks.

Although a VPN might not fix packet loss every time, we still recommend it for the privacy and security boost it can give you. And the geo-restriction bypass, of course.

[Fixed] Fatal Error: Failed to Connect With Local Steam Client

The Fatal error failed to connect error message pops up for some Steam users when they try to launch games.

The error message states: Fatal error failed to connect with local Steam Client process. Please make sure that you are running the latest version of Steam.

That error usually occurs for Valve games, such as Counter-Strike and Team Fortress 2. Those games don’t launch when the Fatal error failed to connect error message pops up.

So let’s explore how to easily fix this error that blocks your access to your favorite games.

How can I fix failed to connect with local steam client process?

1. Verify game files

  1. Open the Steam client software.
  2. Select the Library tab in Steam.
  3. Right-click the game that doesn’t launch and select Properties.
    steam properties Fatal error failed to connect
  4. Click the Local Files tab.
  5. Then select the Verify Integrity of Game Files option.
    verify integrity of game files Fatal error failed to connect with local Steam Client process

2. Log out and back in to Steam

Log out and back in to Steam
  1. Open the Steam window.
  2. Click the Steam menu at the top left of the software’s window.
  3. Select the Change user option.
  4. Press the Logout button to provide further confirmation.
  5. A Steam Login window will then open from which users can enter their account details to log back in.

If the error pertains to a user’s Steam account, logging out of Steam and then back in might just fix it.

And this is a surprisingly straightforward resolution that some users have said fixes the Failed to connect with local Steam client process error.

3. Close Steam via Task Manager

  1. Right-click the Taskbar and select Task Manager.
  2. Then select Steam Client on the Processes tab.task manager Fatal error failed to connect
  3. Press the End task button to terminate Steam.
  4. In addition, select all other Steam processes listed on the Processes tab (if any) and click End task.
  5. Thereafter, restart the Steam software.
  6. Some users might also need to restart Steam with admin rights by right-clicking the software’s shortcut icon and selecting Run as administrator on the context menu.

Note that users who successfully used this solution also closed the gaming client, and all other Steam processes, with Task Manager.

4. Switch to a Steam Beta account

Switch to a Steam Beta account
  1. Launch the Steam client.
  2. Click the Steam menu, and select the Settings option from there.
  3. Click Account on the left of the Settings window.
  4. Press the Change button.
  5. Select the Steam Beta Update option on the Beta participation drop-down menu.
  6. Select the OK option.
  7. Then restart Steam as prompted.

Don’t worry! A beta account gets all the latest updates before it rolls out to non-beta users.

5. Check for Steam updates

The error message states, Please make sure that you are running the latest version of Steam. Thus, the error message drops a hint for users to update Steam.

You can check for updates by clicking Steam and File. Then select the Check for Steam Client Update option.

Reinstalling Steam is another way users can update the software. Then users can get the most update Steam version from the software’s website before reinstalling.

However, you will need to copy the Steamapps folder to another directory to preserve their game data when uninstalling.

  1. Press the Windows key + E keyboard shortcut to open File Explorer.
  2. Open the Steam game folder in File Explorer. The default path for that folder is C:Program FilesSteam.
  3. Then select the Steamapps subfolder, and press the Copy to button.copy to Fatal error failed to connect
  4. Select a folder to copy Steamapps to.
  5. Thereafter, uninstall Steam by pressing the Windows key + R, entering appwiz.cpl, in Run, and clicking OK.uninstall applications Fatal error failed to connect with local Steam Client process
  6. Then select Steam, and click the Uninstall or Change/Remove button.
  7. Restart Windows after removing Steam.
  8. Thereafter, click Install Steam on the software’s website to download the installer for the latest version. Open the setup wizard to add Steam to Windows.
  9. Move the copied Steamapps subfolder back into the Steam folder after reinstalling the gaming client.

Those are some of the resolutions that players have confirmed to fix the Fatal error failed to connect error.

As such, the above resolutions will probably fix the error for most users so that they can play Valve games on Steam again.

Before you leave, don’t forget to check our guide on lowLevelFatalError since it can offer more insight on this issue.

How to Change Domain Controller IP Address

Domain Controllers (DCs) are actively used for authenticating users and the devices connected to the domain.

Because of these works, they are best set up and left as is. This becomes important in terms of their hostname and network details.

Changing the IP of the domain controller may not be ever required but a time may come when you change it.

Moreover, domain controllers are assigned to a static IP address so they are reliable and discovered across the network without any issues.

While changing the IP address of the domain controller may cause certain issues for the administrator, because of its critical nature.

However, if the DC is not hosting any other roles, changing IP isn’t a big problem and can be done easily.

In this guide, we will show you exactly how you can change the IP of the domain controller safely and with no issues. Let us get right into it.

How do I find the IP address of my domain controller?

  1. Open the Start menu.
  2. Type Command Prompt and open it as an administrator.
  3. Execute the below command and press Enter. set userchange IP of domain controller cmd
    • If the USERDNSDOMAIN isn’t displayed then likely the server isn’t a domain member. You may want to consult with your Network Admin because it will be required in the later steps.
    • You need the USERDOMAIN value for the DCDiag test.
  4. Type the below and press Enter. nslookup
  5. Execute the below command and press Enter. set type=all
  6. Type the below command and press Enter. _ldap._tcp.dc._msdcs.<DOMAIN_NAME>change IP of domain controller press enter
    • Replace the <DOMAIN_NAME> with the USERDNSDOMAIN value you got in Step 3.
  7. This DNS query will display the SRV record of each domain controller.
  8. Check for hosts containing the same name or the same IP address. Notably, each entry should have a unique hostname and IP address.
  9. To exit out of nslookup, enter: exit

Using the above steps, you would be able to find the IP address of your domain controller. The steps may look a bit too much but it is for those who know what they are doing.

How do I change the system name and IP address from the domain control network?

1. Rename the system name

1.1. Using System Properties

  1. Download the Remote Server Administration Tools.
  2. Launch the installer.
  3. Read and accept the license and click I accept.
  4. After the installation is complete, open the RSAT tool.
  5. On the start screen, click on Server Manager.
  6. Click on Change System Properties.
  7. Click on the Computer Name tab, and click Change.
  8. Hit the OK button to acknowledge the renaming.
  9. Under Computer Name, type the name you wish.
  10. Click OK.

1.2. Using Netdom

  1. Open the Start menu.
  2. Run the command prompt as an administrator.
  3. Execute the below command and press Enter. netdom computername <Current computer name> /add:<New Computer Name>
    • <Current Computer Name>: Enter the current, or primary, fully qualified DNS name of the computer that you are renaming.
    • <New Computer Name>: Enter the full qualified DNS name for the computer you are renaming.
  4. Type the below command to assign the new name to your PC and press Enter. netdom computername <CurrentComputerName> /makeprimary:<NewComputerName>
  5. Restart your PC.
  6. After the PC reboots, open CMD.
  7. Execute the below command. netdom computername <NewComputerName> /remove:<OldComputerName>

We have shown you two methods to change the system name, i.e. one using system properties and the other one using Netdom.

Do note that whichever method you choose, you have to update the FRS object and Update the DFS Replication member object.

2. Update the FRS member object

  1. Open the Start menu.
  2. Open Windows Tools.
  3. Select Active Directory Users and Computers.
  4. Click Advanced Features in the View menu.
  5. Expand the domain node, System, File Replication Service, and Domain System Volume (SYSVOL share).
  6. The objects below Domain System Volume (SYSVOL share) are the FSR Member objects, find the object that shows the old name of the domain controller.
  7. Right-click the FRS Member object and click Rename.
  8. Type the new name of the domain controller.

3. Update the DFS Replication member object

  1. Open the Start menu.
  2. Open Windows Tools.
  3. Select Active Directory Users and Computers.
  4. Click Advanced Features in the View menu.
  5. Expand the domain node, System, DFSR-GlobalSettings, Domain System Volume, and Topology.
  6. Locate the <DomainControllerName> object showing the old name of the DC.
  7. Right-click the msDFSR-Member object and click Rename.
  8. Enter the new name of the domain controller.

4. Change the IP address of domain controller

  1. 1. Press the Windows key on your keyboard or click on the Start button on your taskbar to open the Search menu.

  2. 2. Type cmd in the search box and right-click on the first result, then select Run as Administrator.

    cmd-run-admin 0x80070002 windows update
  3. 3. Write the below command and press Enter to remove any cached DNS entries created by the local DNS server: ipconfig /flushdns

    flush dns
  4. 4. Execute the below commands one by one and press Enter:

    Net Stop DNS

    Net Start DNS

    Net Stop Logon

    Net Start Logon


  5. 5. Now run the below command to ensure the new IP address is registered by the DNS server: ipconfig /registerdns

    ipconfig command cmd
  6. 6. Finally, run the below command to update the Service Principal Name (SPN) records: dcdiag /fix

  7. The Domain Controller’s IP can be easily changed via the built-in command tool known as Command Prompt or cmd. All you need to do is input a few commands in it, and the tool will do the job for you.

Is a domain controller the same as Active Directory?

We won’t give you complex terminologies as we want you to understand terms easily. An Active Directory is like a database. It stores information of users and computers as objects.

On the other hand, the domain controller is a service that runs Active Directory and uses the data stored by the AD for authentication and giving access to the user. Notably, a DC or domain controller manages the security policies of Windows NT or Windows Server.

So, the easiest way to remember the difference between Active Directory and DC is that Active Directory handles your identity and security access, on the flip side the Domain Controllers authenticate your authority.

That is it from us in this guide. We hope that we gave you the complete information on how you can change the IP of the domain controller. Let us know in the comments below if you come across any issues while following the above steps.

What is MEMZ Trojan Virus & How to Remove it for Good

MEMZ is a Trojan that has received much attention from Windows PC users lately, who are intrigued by the vortex images it creates on their computers.

To this day, MEMZ still remains an obscure virus for many Windows users, and the chance of getting more information from Microsoft is zero now.

The tech giant has locked the original thread about this Windows 10 MEMZ virus. There is only this active thread Microsoft Community. It seems like it all began as a joke, but many users got affected by it.

Leurak, the creator of the virus, intended it only to be for fun, and it was for Youtuber danooct1’s ‘Viewer-made malware’ series. He privately sent it out to some others, and some of the reciepients failed to follow Leurak’s request NOT to share it to their peers or strangers.

MEMZ virus on a stream was originally created by Leurak for YouTuber danooct1’s Viewer-Made Malware series.

Now it’s available to the public and you can find several versions on GitHub: some are MEMZ virus Clean and others Destructive.

What is and how do I remove the MEMZ virus?

1. What is the MEMZ virus?

MEMZ is a custom-made Trojan that uses highly complex and unique payloads that activate in a row. The first few payloads are harmless, but the final payload can make your PC completely unusable.

Once a computer is infected, the virus displays a message informing users they won’t be able to use their machines if they restart them. So remember to never restart a PC with MEMZ on it.

If you’re wondering how this Trojan manifests itself, some effects include automatic web search queries in the browser, the mouse cursor changing form, and random clicking.

Many other weird errors and glitches, concluding with a screen tunnel from countless screenshots can also take over your display. 

Furthermore, MEMZ Trojan can do an exciting and very destructive thing: overwrite the first 64 KB of the hard disk. 

Your machine won’t be able to run the OS and will display this message instead: Your computer has been trashed by the MEMZ Trojan. Now enjoy the Nyan cat…

After that, the Nyan Cat will take over your computer. MEMZ’s trademark is the Nyan Cat animation acting as a bootloader.

There are two versions of MEMZ: a harmless one, which people use for fun, and a malware version that affects the Master Boot Record. The second one is dangerous and can make a PC unusable.

2. Remove MEMZ from Command Prompt

  1. Open the search bar and type cmd.
  2. Select Command Prompt as admin.
  3. In the Command Prompt window, type the following command and press Enter: taskkill /f /im MEMZ.exe 

This kills all the MEMZ processes without crashing the system. The downside is that the Nyan Cat will still appear after you restart your computer.

3. Use a third-party antivirus

An excellent antivirus will for sure get read of any computer viruses, malware, and even this annoying and dangerous Trojan.

We recommend you install a modern cybersecurity solution that can help you eliminate multiple other threats, like spyware, ransomware, and Trojan viruses.

AI-powered, this antivirus software learns continuously how to protect your computer better. This solution is used by over 110 million users around the world, so that’s one of the first reasons to try it.

TotalAV

Get rid of the problematic MEMZ Trojan with one of the best antiviruses available.
Free Trial Visit Website

4. Reinstall your Windows 10 OS

If no solutions worked for you, there is only one other you may try. Unfortunately, some Trojan viruses are so well made, that only a fresh reinstall of OS will save you from them.

However, you don’t have to be scared of this step. Save all your data on an external hard disk or cloud and then use the installation CD.

It should not take 30-40 minutes to reinstall Windows 10. The most time-consuming part is reinstalling all other software, but your computer will be free of Trojan viruses in a few hours.

Don’t forget to install an antivirus to protect your PC from upcoming threats. You can use the one from the above solution or any of these best antiviruses compatible with Windows 10.

If you ever encountered the MEMZ virus on your PC or even the Zeus malware, use the above solutions and tell us if they worked for you in the comments section below.

To remove any other Trojans or malware, consider using any of these best virus removal tools for Windows 10.

Also, if you are aware of other ways to remove the trojan, feel free to mention them.

How to Fix TeamViewer Not Connecting / Not Working on PC

Did you experience any issues with your Teamviewer program on Windows 10? There are some glitches in this new OS that you will need to fix in order to make the app for remote connections work again.

But don’t worry because after reading and following the instructions listed below, your TeamViewer will work again. The most common issues on Windows 10 are related to black screen errors. 

For example, when you log in to another Windows PC and all you see is a black screen but you can move the mouse normally or perhaps you just cannot connect to any requested PC or laptop.

Unfortunately, this is not the only issue affecting the software. Other Teamviewer problems include: the app stops working, doesn’t connect to another PC, or it won’t start.

There are also various Teamviewer errors such as No connection to partner, Session limit reached, and so on. For a general understanding of these issues, read the troubleshooting guide available below.

How do I fix Teamviewer issues on Windows computers?

1. Install the latest Teamviewer version

The best way for checking your Teamviewer is to make sure you have a version compatible with your Windows 10 system. If you do not, then the program will stop working.

You can uninstall the current Teamviewer version and try to install the latest version from the official website.

But before you do, make sure that the version you install is completely compatible with your Windows 10 operating system either for a 32-bit system or for a 64-bit system.

If you don’t know how to check the exact version of your Windows operating system, you should take a look at our dedicated guide and find out.

2. Turn off Windows Firewall

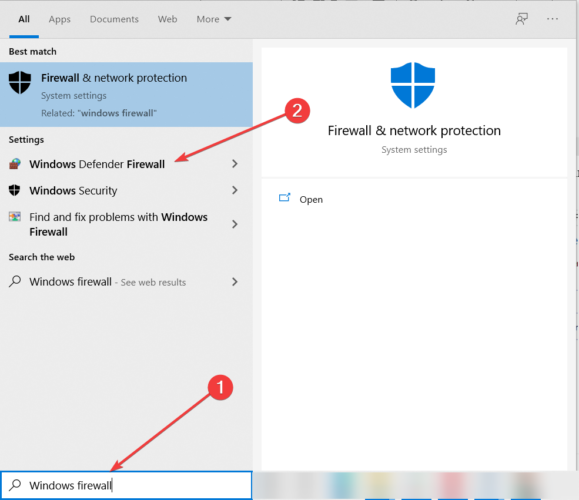
  1. Left-click on the Search button you have in the menu bar.
  2. Write in the search box the words Windows Firewall.
  3. Select Windows Defender Firewall.
  4. In the Windows Firewall window click on the feature Turn Windows Firewall on or off.
    how to turn off windows firewall
  5. Select Turn off Windows firewall for both private and public networks.
    Turn off Windows firewall
  6. Reboot your system.

Check if your TeamViewer is still having problems connecting. If this didn’t resolve the issue turn the Windows 10 firewall back by following the steps above and selecting Turn on Windows firewall.

Additionally, you can manually check if the Windows Firewall is blocking an app, such as TeamViewer, or a port. For more details, check our comprehensive guide.

3. Use a more reliable remote desktop software

There is a large market for software that can help you enter a device remotely. Therefore, we highly encourage you to take advantage of this opportunity and choose Mikogo.

When TeamViewer fails to function, a dependable alternative option is always handy and unquestionably time-saving.

If the issue persists and hampers your Windows 10 system, we have a series of remote desktop solutions you can try. Browse our itemized guide and choose the one that suits your needs.

4. Check your antivirus settings

Anyone should use an antivirus to keep the computer and other devices safe from online threats, such as viruses, ransomware, spyware, and more.

Sometimes, a virus can block applications on your computer, so, make sure to run a full system antivirus scan as malware may also prevent TeamViewer from opening.

Despite the benefits of having a cyber-security tool installed, keep in mind that your antivirus may sometimes block TeamViewer.

False positives can occur even for the best cyber security solutions. However, you can add TeamViewer to the antivirus exclusions list.

If the issue persists and it’s affecting your Windows 10 system, we’ve got a list of remote desktop solutions that you can try. Check out our detailed guide and choose the one you like.

So, follow the suggestions listed above to fix your Teamviewer issues on Windows 10. If you want to know more about this software, visit our latest guide on Teamviewer_Service.exe. Also, if you have any questions related to this article, use the comment section below to let us know.

How To Add An User To Windows Server [2008, 2012 & 2016]

If you want to know how to add a user to your Windows server machine, you don’t need to search for the answer anymore. You will find it on this page.

It is very important that you understand that every user that uses your Windows server needs to have a user account. You will need to create a new domain user account.

In this how-to guide, we will explore this subject entirely, and we will offer you step by step instructions to achieve this easily.

All you need to do is to carefully follow the steps in the order they were written. This will ensure that you will not change any settings that may affect the way your machine operates.


How can I add an user to Windows Server?

Note: You will need to be logged in to an account with administrator privileges to be able to create new users on any version of Windows Server.

Windows Server 2008

  1. Press the Start button -> select Administrative Tools -> Active Directory Users and Computers.
  2. Right-click the domain on which you want to create the user on -> choose New -> User.
  3. Type the user‘s name in the respective boxes.
  4. Choose a user logon name (needs to be unique in the respective domain).
  5. Type the required password twice correctly.
  6. Choose any options that you want to apply to the password.
  7. Click Next -> verify that the entire set of information is correct.

Windows Server 2012 and 2016


Note: Even though the specific steps for these two versions of Windows Server (2012 and 2016) will vary, the general idea is the same.

  1. Press the Win+X keys on your keyboard -> choose Computer Management.
  2. Click the Local Users and Groups option from the left-side menu to expand it.
  3. Right-click the Users folder -> choose New User.
  4. Fill out the form with the appropriate name and description.
  5. If you want the newly created account to have a password that never expires, you should click the respective box. If not, the password will expire after some time, and it will need to be reset.
  6. Click the Create button
  7.  If you want to add this account to the Admin group -> click on the Groups folder – double-click Administrators from the list -> click Add -> add the name of the account you created -> click Apply -> Ok.

In today’s how-to guide we explored the best method to add new users to a Windows Server.

Please make sure to follow the steps presented in this list carefully in order to avoid causing any issue on your Windows Server.

We would love to know if this guide has proven useful to you. You can let us know by leaving the comment in the section found below this article.

Blueprint Software for PC: 7 Best to Use in 2026

Construction projects are a complicated task, and having the right set of tools can make the designing and modeling process much simpler.

A blueprint does just that: it simplifies things. In fact, its role is to act as a proposal that shows clients what the suggested floor or design plan will look like.

If you get the green (or should we say blue?) light at this stage, a 3D model of the exterior and interiors usually follows. As such, the ability to create 2D and 3D objects along with blueprints is a big plus.

Luckily for you, we have reviewed some of the best home design software that lets you effortlessly design highly accurate floor plans, so you don’t have to worry about finding it on your own.

Packed with drag-and-drop capacities, these feature-rich home design software with blueprints are a sure bet when it comes to delivering results. Put your trust in our research and you won’t be disappointed.

So make sure you take these tools for a spin and pick the one that meets your requirements. Here are our top picks for the best blueprint-creating software for Windows.

Product nameCollaboration toolsKey feature
Adobe Illustrator✅– Vector graphics for blueprints
Edraw Max✅– Thousands of templates and symbols
AutoCAD✅– 2D and 3D geometry models
Autodesk 3ds Max✅– 3D Stunning rendering
DreamPlan Home Design Software✅– Interior design modeling
SmartDraw✅– CAD software tools
Sketchup✅– Sustainable building designs

What is the best blueprint software to get?

Adobe Illustrator – High-resolution vector designs

Only with the correct software will you obtain the best blueprint results in the shortest time. If that’s precisely your goal, then do keep in mind that Adobe Illustrator is more than the best vector graphics software.

Perhaps the most interesting fact about Adobe Illustrator is how versatile it really is. You just need a little time to get used to it and you’ll be able to create whatever you have in mind.

Start with simple logos or book illustrations and go all the way to making floor plans.

This can prove extremely useful if you’re into construction projects or if you intend to move into a new apartment or house and want to take care of everything in advance.

To make it happen, simply activate the shape tool you want to use, click the artboard, and add the dimensions of the shape you want to create.

The next step is to add objects to the room, so don’t hesitate to use the Shape tools to accomplish this. Things could get even easier if you know the precise measurements of the objects you want to add to the room.

Some key features you’ll most likely appreciate:

  • Resolution-independent vector graphics for top results on all your projects
  • A generous suite of styles, effects, and individual characters
  • Seamless integration with other Adobe products
  • Both students and teachers are eligible for a great discount on the Creative Cloud apps collection
  • Countless tutorials regardless of your current skill level

Adobe Illustrator is subscription-based. You can pick from multiple subscription plans. You can try it for free for 7 days.

Adobe Illustrator

From simple logos to full-scale construction plans, there’s nothing you cannot design with the most versatile vector-based design software.
Free trial Visit website

Edraw Max – Floor plan designs

Edraw Max is a multi-purpose program and offers one of the easiest blueprint designing tools to create floor plans, office layouts, and building plans.

It can produce up to 13 types of floor plans that can be applied to home design, office layout, electrical and telecom, and security access plans. It also features an option for garden design.

The floor plan maker comes equipped with a good number of floor plan templates and samples to give you a head start while more can be downloaded from the library online.

You can add more information to the floor plan by adding hyperlinks, attachments, and other graphics objects. The finished blueprint can be exported in multiple formats including Visio, Office, and graphics format.

Edraw Max is not just a blueprint and floor plan-creating tool but can also be used for other diagram works in different fields like electrical and science illustration etc.

EdrawMax has top-level SSL encryption. No one can access any information without your permission. All actions made within the app are completely private.

Some key features you’ll most likely appreciate:

  • Full vector graphics design solution for Floorplans
  • Support Visio XML documents
  • Drag and drop functionality
  • 13 types of floor plans included
  • Hyperlink support

EdrawMax can be used with a subscription, but you can try it for free for 30 days.

Edraw Max

Edraw Max

Edraw Max is an application to create diagrams on Mac and PC, and it is one of the best Visio alternatives in the marketplace.
Free trialVisit website

AutoCAD – 2D and 3D drafting tool

AutoCAD is probably the most well-known CAD program that you can have today. Despite offering an extensive set of design tools, it has a user-friendly interface great for beginners and intermediate users.

If you are a student, AutoCAD has a free editor for young learners. It is a professional-grade program used to create 2D and 3D drawings for architecture and mechanical parts.

You can use AutoCAD to create floor plans, sections, and elevations. It is compatible with multiple file formats including DWG, DXF, DWF, DGN, SKP, STEP, and STI.

You can also import plans from other programs or even 3D print your designs. AutoCAD is a subscription-based software that requires the users to pay on a monthly basis but offers web and mobile app support.

There are third-party add-ons made available for AutoCAD that add an additional set of features to the program.

AutoCAD has a renovation mode that can display existing construction, add on top of it, and demolish. All these actions are done in one drawing in order to avoid layering errors.

The software also lets you create notes and add important information to your design. It offers detailed components such as bolt heads, fixed-length nails, connectors, and more.

Some key features you’ll most likely appreciate:

  • A user-friendly and intuitive user interface
  • Free student program
  • Create 2D / 3D drawings for architecture and mechanical parts
  • Recommended for beginners and advanced users

AutoCAD is a subscription-based software with multiple plans available. It has a 30-day free trial.

AutoCAD

Design all your favorite floor plans, sections, and elevations with this amazing software. Get the best deal now.
Free trial Visit website

Autodesk 3ds Max – 3D rendering and animation

When dealing with construction projects, Autodesk 3ds Max is one partner you can trust to alleviate those early, but rather challenging stages that imply designing, 3D modeling, and rendering.

Packed full of rich and flexible tools, this software will shape your architectural vision perfectly down to the last detail.

You can start your project by importing already existing CAD files to create your design frame and start building it up in 3D from there.

Another important aspect on which the software has focused is productivity. 3ds Max lets you accelerate your workflow with automation, extend built-in workflows with APIs, and scale content quickly and easily.

Autodesk can help you create realistic designs. The material, texture, and color editor lets you add material finishes, create and customize textures, and play with colors to generate designs that don’t miss any detail.

Some key features you’ll most likely appreciate:

  • Extensive toolkit to model premium designs and finely detailed interiors
  • Living space design visualization and preview rendering
  • Friendly UI and intuitive controls
  • Integrated workflows to accelerate productivity

Autodesk 3ds Max is a paid service, but you can try it for free and see if the features it provides satisfy your design needs.

Autodesk 3ds Max

Design and model detailed projects with efficiency by using the intuitive, yet advanced Autodesk 3ds Max
Check price Visit website

DreamPlan Home Design Software – Realistic 3D dream house

The home design software for DreamPlans is the cheapest blueprint creation software on this list, but do not get fooled by its price, because it does still pack a punch when it comes to features.

While it may not offer as many features as other tools, for small projects, DreamPlan provides enough features to create a blueprint of a floor plan while finishing it with a 3D home model.

The tool is easy to use and offers a roof wizard to get started. The floor plans can be imported into the software for modification.

Creating floor plans for homes, condos, and apartments is easy with the DreamHome program. Plans are further customizable using a custom set of colors, textures, furniture, and decoration tools.

DreamPlan is good for small projects and offers a good number of tools to create blueprints and 3D / 2D maps along with interior and exterior decoration options.

However, the tool lacks advanced plumbing and electrical tools which means you need to consult a third party for these tasks.

You can design rooms in detail with appliances for bedrooms, kitchens, or bathrooms. It also offers some furniture and other objects that you can experiment with your design.

Some key features you’ll most likely appreciate:

  • Affordable home design program
  • Basic design tools for floor plan
  • 3D home model support

When it comes to exterior design, DreamPlan has landscape and garden tools that allow you to plant trees, create gardens, reshape outdoor terrain, and more.

DreamPlan Home Design

Use DreamPlan Home Design to create the blueprint for your projects at a competitive price.
Check price Visit website

SmartDraw – Simplified CAD tool

The next software is an intuitive solution for getting blueprint designs using professional tools and templates.

SmartDraw comes with improved diagrams and visual representation for your dream home, offering blueprint examples for different constructions.

Additionally, the software provides standard templates for various industries such as flowcharts, mind maps, floor plans, network diagrams, project timelines, etc.

The users can easily add shapes, text, images, and other elements to their blueprint project.

You should know it’s possible to automate diagram creation and blueprint designs, arrange objects and automatically connect shapes on your sketch board.

It’s worth mentioning that it allows a wide range of diagram types with CAD engineering designs that will boost your blueprint drawing ability.

Besides all, you have a clever formatting system that helps the user with moving or rearranging shapes automatically to keep a logical view.

Other key features include:

  • Thousands of blueprint templates
  • Over 70 diagrams and charts
  • Import and export option
  • Integrate Office and Google workspaces

⇒ Get SmartDraw

Sketchup – Visual 3D modeling

Sketchup is an advanced and versatile 3d modeling tool that is suitable both for beginners and advanced users. It has a web-based version that is available for free and a pro version that offers a larger set of features for more demanding projects.

This tool can be easily integrated into other similar software, but you can also use it on its own since it provides enough features that let you work through every stage of the project.

Users report that it is easier to use and learn than other similar tools. You can easily draw your 2D designs and the software generates precise 3D presentations of them.


Sketchup can easily import pre-existing 3D modeling projects without any errors. It is compatible with all models available in the 3D Warehouse, which is a great resource for free, user-generated 3D model projects of all sorts. It is available as a plugin for Sketchup or as a stand-alone app.

The software allows you to create your models, define and fully customize all parameters, and also plan every step necessary. It can also generate construction and fabrication documentation based on your models.

Sketchup also has multiple learning materials available online. It has a blog with news, tips, and tricks, a discussion forum where users can share experiences and help each other.

Moreover, it is resourceful in professional-level, in-depth tutorials for multiple types of projects including landscape designs, interior designs, and general modeling practice.

Some courses provide captions in multiple languages.

Other key features include:

  • Extensive object library
  • Supports testing and comparing
  • Layer manager
  • Lightning effects

Sketchup is a great tool for professionals and beginners alike, providing special plans for students and teachers. The free, web-based version is a great starting point that you can use to get acquainted with the program and learn its basics.

⇒ Get Sketchup

Most of these blueprint programs let you achieve more than one task. Apart from creating blueprints for home and mechanical projects, you can also use them to create 3D visuals of the actual project.

Whether you are an individual, an architect, or a student, this list of the best software to create blueprints and home designs will help you get started. Do let us know your pick in the comments.

Epson Cannot Recognize Ink Cartridge: 4 Quick Fixes

The Ink cartridges cannot be recognized error is not an entirely unusual error message for Epson printer users. That error message can pop up for users when they insert new incompatible or not genuine ink cartridges in their Epson printers.

The Epson cannot recognize ink cartridge error can also arise for older cartridges when they run out of ink. Users can’t print anything when an Epson printer doesn’t recognize a cartridge.

How can I fix the Epson cannot recognize ink cartridge error?

First, double-check that new cartridges are the right ones for your printer. Check that one of the printer models listed on the cartridge packaging matches your printer model.

If the cartridges are the right ones for the printer, check out the resolutions below.

1. Insert the Print Ink Cartridges One at a Time

Ink cartridges printer won't recognize ink cartridge

If you’re installing more than one new cartridge, try installing the cartridges one at a time instead. It might be the case that the error arises for just one of the cartridges, and installing them each separately will help identify what one that is. Furthermore, inserting new cartridges one at a time can even fix the issue on more recent Epson printer models.


2. Open the Printer Troubleshooter

  1. Windows 10’s Printer troubleshooter might come in handy for resolving the “Ink cartridges cannot be recognized” error. Users can run that troubleshooter by pressing the Windows key + S hotkey.
  2. Enter ‘troubleshooter’ as the keyword in the search box.
  3. Then click Troubleshoot settings to open the Settings tab shown below.Troubleshoot tab printer won't recognize ink cartridge
  4. Select Printer and click Run the troubleshooter.
  5. Then select the printer model to troubleshoot, click Next, and go through the suggested resolutions.
Printer troubleshooter printer won't recognize ink cartridge

3. Reset the Printer and Reinsert the Ink Cartridge

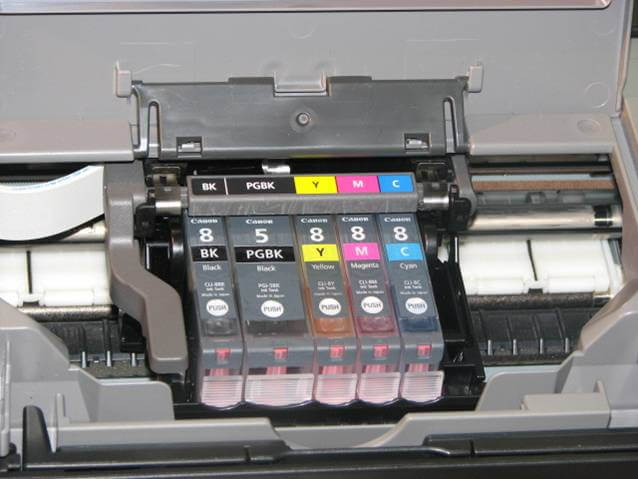
  1. The “Ink cartridges cannot be recognized” error arises when cartridges aren’t fully clicked in, so reinserting the cartridges can resolve the issue. First, turn on the printer and remove the ink cartridges.
  2. Thereafter, turn the printer off and unplug it for a few minutes to reset it.
  3. Plug the printer back in, and turn it on.
  4. Thereafter, check the ink cartridge installation guidelines within the printer’s manual. Insert the cartridges within the printer exactly as outlined in the manual and make sure they’re fully clicked in.Inserted ink cartridges printer won't recognize ink cartridge

4. Clean the Cartridge Chips

The “Ink cartridges cannot be recognized” error can also be due to dirty cartridge chips. So, remove the cartridge that isn’t recognized and place it on a flat surface. Then wipe down the metal contact chip on the cartridge with a dry cloth to clean it. Thereafter, install the cartridge again.

ink cartridge printer won't recognize ink cartridge

We hope that your Epson cannot recognize ink cartridge issue is gone by now. Let us know which solutions worked out for you.

None of the Networks Previously Connected to Are in Range: Fix

Wireless networks are great if you don’t want to deal with wires and you want to keep your workspace neat.

Unfortunately, a number of Windows users reported on forums receiving the following error messages in regards to Wi-Fi Ranges:

  • None of the networks you have previously connected to are in range
  • This computer is set to manually connect to ‘Device Name

Many users reported shorter Wi-Fi ranges after updating to Windows 10, and this can be a big problem, especially if you rely on a Wi-Fi network for internet access.

How can I fix the None of the networks you have previously connected to are in range error?

1. Update your network adapter drivers

In most cases, issues with Wi-Fi range are caused by an outdated driver, therefore it’s advised to update your network adapter drivers.

To do that, just visit your motherboard or network adapter manufacturer’s website and download the latest drivers.

Some users are also suggesting to uninstall your currently installed Wi-Fi drivers and use the default drivers instead. To do that, follow these instructions:

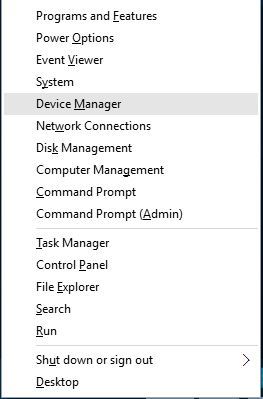
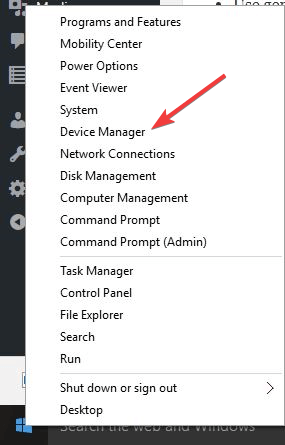
  1. Press Windows Key + X and select Device Manager.
    device-manager
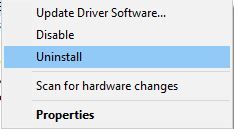
  2. Locate your wireless adapter in Device Manager, right click it and choose Uninstall.
    uninstall-driver
  3. Once your driver has been uninstalled, restart your computer. This will install the default driver and your problem should be fixed

If you use wireless networks on regular basis, we advise you to have a look at our guide on how to protect your Windows 10 device on a public Wi-Fi network.

1.1 Use a dedicated tool

The easiest way to update your drivers in order to fix any Wi-Fi issues would be to use dedicated software.

By doing that you will avoid installing the wrong drivers and causing even more issues to your device.

We’ve tested most of the available tools, and we would like to recommend that you give Outbyte Driver Updater a try.

It’s a reliable and stable tool that will scan and update your drivers in just a few moments.

The built-in library that Outbyte Driver Updater has will ensure that all the downloaded and installed drivers are the last versions available.

Moreover, Outbyte Driver Updater comes with other useful features, such as a download manager and drive backup.

⇒ Get Outbyte Driver Updater

2. Set the wireless adapter to work in maximum performance mode

By default, wireless adapters are set to work in medium power saving mode on Windows 10, and this can sometimes cause issues with Wi-Fi range.

-In order to fix this problem, it’s advised that you change the Wi-Fi adapter power settings to Maximum performance. To do that, just follow these simple steps:

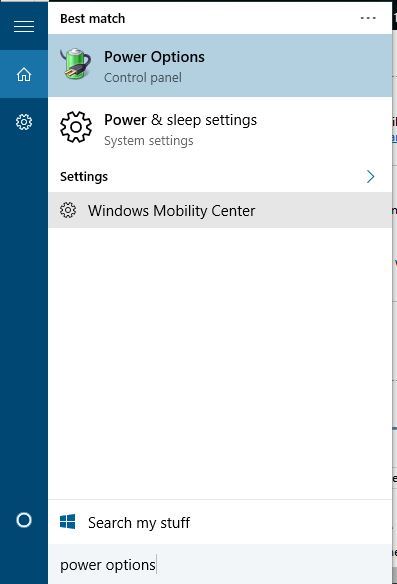
  1. Press Windows Key + S and enter Power Options.
  2. Select Power Options from the menu.
    power-options
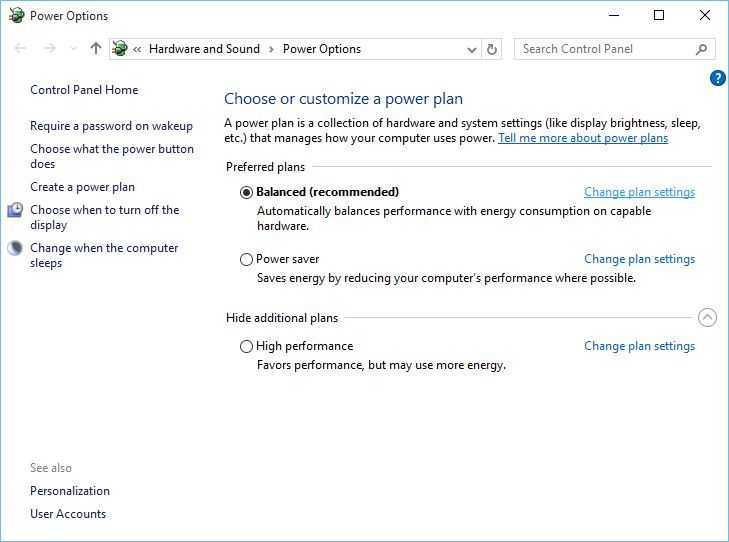
  3. Once the Power Options window opens, locate your current plan and click Change plan settings.
    change-plan-settings
  4. Click on Change advanced power settings.
  5. Locate Wireless Adapter Settings and set the Power Saving Mode to Maximum Performance.
    power-saving-mode
  6. Click Apply and OK to save changes.

Alternatively, you can just switch to High performance mode in Power Options and Power Saving Mode will be automatically set to Maximum Performance.

Bear in mind that using High Performance mode will drain your battery faster.


3. Check if your wireless card is working correctly

Sometimes there might be certain issues with Wi-Fi range if there’s a hardware problem with your wireless adapter.

Users reported that loose wire can sometimes create these sorts of issues, and if that’s the case you might want to replace your Wi-Fi card with a new one.


4. Change the Sensibility value

Some users are claiming that changing the Sensibility value can fix the Wi-Fi range issues on Windows 10. To change Sensibility value, you need to do the following:

  1. Press Windows Key + X and select Device Manager from the list.
  2. Once Device Manager opens locate your Wi-Fi adapter, right-click it and choose Properties.
  3. Go to the Advanced tab and locate Roaming Sensitivity Level, Roaming Aggressiveness or Roam Tendency to Highest or Aggressive.
  4. Set Transmit Power or Transmit Power Level to Highest.
  5. Select Antenna Diversity and set it to Auto.
  6. In Band Preference choose Prefer 802.11a if your wireless network is using 5GHz frequency or set it to Prefer 802.11g/b if your wireless network is using 2.4GHz frequency.
  7. Save changes and restart your device.

5. Disable Bluetooth

Few users are claiming that you can fix the Wi-Fi range issues by disabling your Bluetooth adapter. To do that, you need to follow these steps:

  1. Open Device Manager. You can do that by pressing Windows Key + X and choosing Device Manager from the menu.
  2. Once Device Manager starts, go to Bluetooth section and expand it.
  3. Locate your Bluetooth adapter, right click it and select Disable from the menu.

6. Set antenna diversity to Auxiliary

According to few users, setting antenna diversity to auxiliary fixes this issue. To do that, you need to do the following:

  1. Open Device Manager and locate your wireless adapter, right click it and choose Properties.
  2. Go to Advanced tab and set Antenna diversity to Auxiliary.
  3. Save changes and check if the issue is resolved.

7. Check if your card is properly installed

Sometimes your Wi-Fi card might not be properly installed, so check if it’s placed properly in the PCI slot. In addition, make sure that the screws are tight or else you might experience certain issues.


8. Update your router firmware

In certain cases updating your firmware can fix the problems with Wi-Fi range. Updating your router firmware isn’t the simplest procedure, so make sure to check your router manual for detailed instructions.

Bear in mind that if you don’t update your router firmware properly you can cause permanent damage to the router.


9. Change the router frequency

Modern routers use a 5GHz frequency, so if your router supports it, make sure that you use it. By using 5GHz frequency you’ll encounter less interference and thus a stronger signal.

In order to switch to 5GHz frequency, check your router manual for detailed instructions.


10. Change the router wireless channel

If there are multiple wireless networks available, sometimes there might be interference, especially if all of these networks are using the same channel.

To fix this issue, it’s important for you to set up your wireless channel manually. To see how to do that, check your router’s instruction manual.


11. Change your router or Wi-Fi adapter antenna

Many routers and Wi-Fi adapters come with a switchable antenna, therefore if you’re having any Wi-Fi range issues, you might want to consider replacing your Wi-Fi antenna with a stronger one.

If you’re buying a new Wi-Fi antenna, make sure you get the high-gain antenna for best performance and Wi-Fi range.


12. Use Wi-Fi repeater or Wireless Access Point

If you have range issues with your Wi-Fi connection, you might want to consider using Wi-Fi repeater or Wireless Access Point.

Wi-Fi repeater is a simpler and more straightforward solution which is perfect for your home while Wireless Access Point comes with more advanced features and it might be more suitable for your workspace.


13. Make sure nothing disrupts Wi-Fi signal

Your Wi-Fi range issues may also be caused by particular items or pieces of hardware that are interfering with the Wi-Fi signal.

For example, it is a well-known fact that microwave ovens disrupt Wi-Fi signal.

Remove any pieces of equipment such as baby monitors, garage door openers, kitchen appliance and so on that might be blocking or limiting your Wi-Fi signal range.


14. Buy a Wi-Fi extender

Well, if nothing worked, you can try using a Wi-Fi extender. Check out this list of the 21 best Wi-Fi extenders for your Windows 10 computer.

These devices will boost your Wi-Fi signal and hopefully solve the None of the networks you have previously connected to are in range error that you’re experiencing.


15. Replace your modem/router

Obsolete hardware may also cause Wi-Fi range issues. So, if you are using an old modem or router, maybe it’s time to replace it with a new one.

Wireless networks have their advantages, but they can experience issues with range. If you encounter the None of the networks you have previously connected to are in range error message, let us know which solution helped solve your issue.


How to Fix Spotify Facebook Login not Working: Quick Guide

Spotify is currently one of the most popular audio streaming platforms, very easy to use and access anywhere. You can use either a free, limited plan of Spotify or the premium plan, with ad-free unlimited access to songs and playlists.

Spotify is account mandatory, so you have to create an account on the platform in order to use the services. Or you can log in using Facebook or Apple, in which case the provider will get access to some of your personal details.

When you log in using Facebook, especially on a new device, you sometimes get the error message A Facebook error has occurred. Please try again.

How can I get rid of the Facebook login error on Spotify?

1. Use the Spotify device password

spotify won't log in with facebook
  1. Log in to Spotify with Facebook from another device.
  2. Go to your Profile > Account > Set device password.
  3. Use the Send email to set the password button.
  4. Copy the username somewhere.

An email will be sent to you to the address you’re using to log into Facebook. Use the give username and password to log into Spotify with the new device.

2. Clear the app from Facebookclear spotify in facebook

  1. Log in to Facebook on the new device.
  2. Go to the account menu > Settings.
  3. In the left-side menu choose Apps & Websites > look for Spotify > Edit > Delete.

Then, open Spotify and try to log in using Facebook again.

One of these two methods should help you log in to Spotify with your Facebook account without having to uninstall and reinstall the app, as it’s sometimes recommended.

Should you have any other suggestions, please share it with us in the comments section below.

Best Windows 11 Desktop Computers [2026 List]

If the portability of your Windows 11 PC is an important factor for you, then choosing a powerful Windows 11 laptop can be far more efficient than investing in a desktop setup.

As desktops are bulkier and thus have more space for components, you can invest in an incredibly powerful machine that would be able to tackle any task without any problems for the next years at least.

Another important advantage to choosing a desktop instead of a laptop is that the latter doesn’t always come with upgradable parts. This of course doesn’t apply to some gaming laptops, which will usually allow you to add an extra SSD and RAM.

As an alternative, you could choose to go with a proven brand like Razer which already produced laptops that allow a free upgrade to Windows 11.

The capabilities of the laptops in the mentions above could persuade you into going on the laptop route, but if that’s not the case, in today’s guide we will dive deeper into the subject of Windows 11 desktop PCs. You can also improve the performance of Windows 11 with some simple tricks.

We make sure to include various setups, which would prove helpful and accessible for users with different circumstances and preferences, but also those of you who don’t want to break the bank for this experience.

How we chose the best Windows 11 desktop PCs

Our team of expert testers worked tirelessly to ensure that the list of Windows 11 desktops they created was built containing the most objective and thorough information available, and their 15 years of combined experience has been used fully.

Every product presented in this guide will have good overall capabilities and will be able to run Windows 11 without any problems.

The points of difference between the devices will be evident based on a few important criteria which need to be considered every time a PC purchase is in your interest.

Tip icon Tip
Editor’s tip:

Here are some of the most important elements that you need to consider when trying to find a good Windows 11 desktop PC:

➡ CPU power
➡ GPU capabilities
➡ RAM
➡ Storage capacity and type
➡ Cooling system setup
➡ Design

Carefully choosing the right configuration by looking at the elements mentioned above will surely help you choose the perfect setup for your needs, and also fit perfectly into your desired price range.

What to consider when choosing the best Windows 11 desktop

CPU power

As in the case of all PCs, the power of your processor will make an enormous difference when it comes down to how your system will react to any task you expose it to.

The speed and accuracy when reading data from the hard drive is of paramount importance no matter if you’re going to play games or simply explore the web. You can always resort to some useful techniques to make Windows 11 faster, but having a good CPU installed will help considerably.

Investing in a system that has a powerful CPU will also prove to be a better idea in the long term, as new software, apps, OSs, and games are released with upgraded system requirements.

Optimal CPU temperatures are extremely important to consider when analyzing CPUs, as this will impact the way your system will react to tasks.

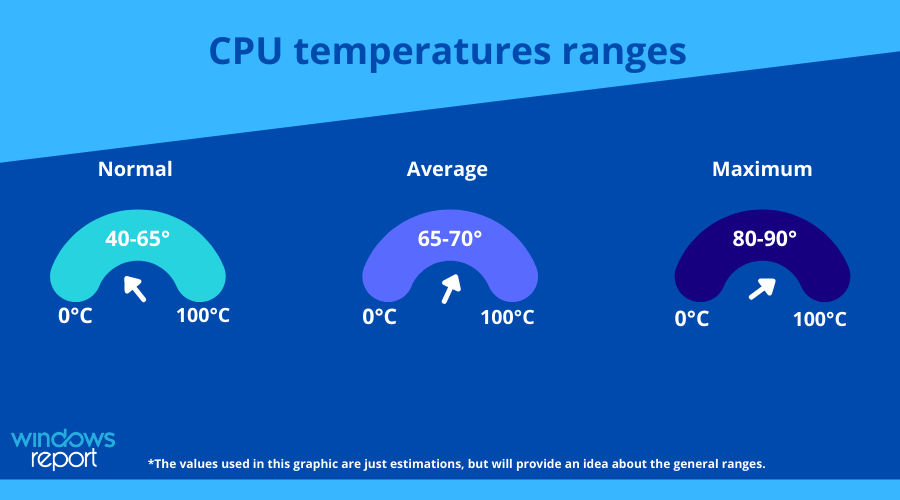
Even though a cooling system will effectively reduce the overall temperature of your system, here are some of the ranges for CPU temperatures:

As you can see from the graph above, a normal CPU temperature is constantly between 40 to 65 degrees Celsius, and the average (depending on PC cooling system type), will clock in at about 65-70 degrees Celsius.

The entire set of CPUs we will present to you in this guide can run Windows 11 without any problems, and we included affordable options, medium-range setups, and high-end powerhouses which will cost more.

GPU capabilities

The GPU, or graphics processing unit is another very important component of a good PC, which impacts a whole spectrum of activities to their core.

This hardware element provides you with the entire visual experience offered by your device, including everyday usage, and also movies, games, and Internet browsing. Even more, if you are interested in mining cryptocurrency, the GPU is responsible for the processing of digital coins.

Diving into this subject a bit further, if you want to start mining crypto by using your PC, we have also written extensively about how to protect your crypto mining operations from third parties.

In some cases, computer systems have multiple GPU slots on the motherboard, but most have only one. Extending the GPU capabilities can also be done by using a powerful eGPU (external GPU), which can double, and even triple your system capabilities just by plugging it into one of your computer’s ports.

RAM

The rapid access memory, also known as RAM is another very important element found in your PC. This piece of hardware ensures that your system can process a variety of different data subsets at once.

Most people think about RAM in the context of gaming, which is not wrong at all, as running a game will require your system to process a wide range of different data at the same time – images, sounds, game engine, rendering the character’s actions, the virtual world reacting to the user’s actions, etc.

The same principle applies to running multiple applications on your PC, each of them requiring a different subset of data to be processed in a synchronized fashion.

For this reason, having a good amount of RAM can improve your overall PC experience, even though running the latest games will require a lot more memory than running simple apps.

Storage capacity and type

Data storage is a very important aspect of any computer, as this allows the operating system to be installed and used, keeps all the files of any program you install, and beyond that, all the personal files of the user – photos, videos, music, etc.

Being able to access all that data whenever you need it will require that the storage runs optimally, and at a high speed. Of course, better speeds are always good when it comes to processing data, and this is where the storage type makes a huge difference.

There are two main types of storage options, as your system will have an HDD (hard drive disk), an SSD (solid-state drive), or a combination of both.

The two types vary a lot both in terms of speed, stability, and price, and the graph below will give you a useful overview of these differences.

As you can see from the image presented above, SSDs stand out on every level, ensuring faster transfer and data reading speeds, an increased storage capability, and have proven to also be more durable, as no moving parts are present.

In the case of HDDs, even though no moving parts are active after the HDD is turned off, during operation, the read and write heads are constantly moving over the drive platter, at distances of only a few nanometers. This causes HDDs to be a lot more susceptible to shocks of any kind, which can permanently damage the drive.

Now that we know that SSDs are better options when it comes to storage for your PC, we need to mention another important element, which is that not all SSDs are the same either.

  • SATA SSD – an older version of SSDs, which uses the SATA interface. These interfaces only allow data to be transfered thorugh one channel. Even though a lot faster than HDDs, with a speed of 500 MB/s they can’t match the newer type.
  • NVMe SSD – using the newly-developed NVMe interface, SSDs with this interface allow data to be transfered by using multiple channels, thus incresing the speeds for both witing and reading information (3,500 MB/s).

Cooling system setup

The cooling system installed on your desktop PC will have a huge impact on the overall performance of your setup, as the temperature of the hardware needs to be maintained for optimal efficiency.

That being said, cooling systems are mostly installed next to the CPU, which tends to get very hot while using your PC at maximum capacity.

The maximum temperature for a PC is somewhere between 80 and 90 degrees Celsius. These are values that should not be reached by a system if you want it to perform and maintain in the long term. Starting from 80 degrees, your CPU will start to malfunction, and can even permanently stop working.

This is why having a good cooling system installed on your PC can not only make a huge difference in performance but also when it comes to the longevity of your device.

Not all cooling systems are the same, and in the graphic below you can see some of the main features for each of the main types:

Depending on your preference, you can choose either of them, but generally, air-based cooling system effects are more pronounced when it comes to other hardware components, but will cause your device to be considerably louder.

On the other hand, a water-based cooling system occupies less space, and, even though efficient while cooling the CPU, it is comparatively more expensive than the other option.

Design

The design of your desktop PC doesn’t only imply looking good on your desk, but can also improve the overall performance of the system.

When it comes to choosing a Windows 11 desktop PC for your home, both types of design elements are very important:

  • Aesthetics – choosing a device that not only fits the design of your home/room, but also occupies the exact amount of space you need it to, is a very important aspect. This applies even more when it comes to investing a large sum in your desktop PC, as a larger price might also involve using a device for a longer period of time.
  • Functional design – even though it might seem that design only deals with aesthetics, a well thought-through structure for your desktop PC’s case can also mean enough cooling vents, and other features. Added to this, a larger PC case will require more cooling power, but a smaller case will also heat up faster.

As you can see, a balance between the above-mentioned elements of the design needs to be achieved to have a satisfactory desktop PC experience while using Windows 11.

Tip icon Tip
Buyer’s tips:

➡ If you are interested more in a very powerful CPU, and don’t care that much about the GPU setup, then the Empowered PC Sentinel provides you with everything you need.

This device can be extremely useful when it comes to office work, multitasking, and even allows decent gaming.

➡ In case you are more inclined to choose a device based on its gaming capacity, the HP Omen 30L offers a great setup for a very good price.

The same goes for the CUK Continuum, which has a better CPU but is a bit more costly than the model mentioned previously.

➡ For those of you who want a decent all-around Windows 11 desktop PC, and don’t want to spend that much money, while also being inclined to use it for gaming, the SkyTech Prism II is a very good choice.

The AMD Ryzen 7 5800X CPU and the combination with a powerful GPU ensure great results.

➡ The HP Omen 25L, even though can’t be compared in overall capabilities with the other options in this guide, is a very good option that comes at a very accessible price.

The CPU offers enough power for medium-range gaming, and the GPU can handle day-to-day tasks without issues.

The table shown above provides you with a quick overview of how the devices presented on this list fit into users’ needs.

To get a full understanding of why the desktop PCs were chosen, and which are better than others, let’s now dive deeper into their specs:

CUK Continuum

  • Intel Core i9-10900KF CPU
  • NVIDIA GeForce RTX 3080 Ti - 12GB
  • 32GB DDR4 RAM
  • 512GB NVMe SSD + 2TB HDD
  • Comes with a wired gaming keyboard and a mouse
  • Small SSD, even though accompanied by a 2TB HDD

The Continuum desktop PC from CUK is one of the best systems you can invest your hard-earned cash in, without worrying about upgrades and lagging for at least the next couple of years. This timeframe of course will vary depending on how updated you want to keep your hardware.

This device comes with a powerful Intel Core i9-10900KF processor with 10 cores, and our tests have shown that it can reach speeds of up to 5.3 GHz, with the lowest value coming in at about 3.7 GHz. This 20MB cache 125 W setup offers great processing speeds that can enable you to explore the latest games, run high-impact applications, and even works well for crypto-mining.

When it comes to the benchmark scores, this CPU has proven to be 2% better than the CPU found in our next selection, and the fact that it has a liquid cooling system provides a bit more of an extra edge.

The graphics hardware installed on this device features an NVIDIA GeForce RTX 3080 Ti board, with 12GB GDDR6X memory, which ensures that all graphics-intensive

Even though this CPU offers all the power you will need for the time being, the benchmark results from our tests show that it comes in at a 1% lower overall score when compared to the GPU installed on the next device in this list.

To ensure that you will be able to run all the latest games, and run multiple other applications at the same time, it comes with 32GB DDR4 2933MHz CL16 RAM. Even though there are systems out there that have greater value in this department, the frequency at which it runs will surely provide you with an all-around immersive experience.

This device comes packed with a wired gaming keyboard and mouse, and also features a 512GB NVMe SSD, with a bonus of a 2TB HDD running at 7200rpm.


HP OMEN 30L

  • Intel Core i9-10850K CPU
  • NVIDIA GeForce RTX 3090 GPU - 24 GB
  • 32 GB RAM DDR4
  • 1 TB of PCIe NVMe M.2 SSD
  • Free upgrade to Windows 11
  • Storage space could be bigger

This HP Omen device uses a powerful 10th Generation Intel Core i9-10850K CPU, which allows you to create digital art of a variety of types, use it for gaming, or any other activity you choose.

The benchmark scores for this CPU scored 2% lower than the model presented above but ensures 3% overall better scores when compared to the following model in the list.

When it comes to graphics, the HP Omen GT13 30L uses an NVIDIA GeForce RTX 3090 GPU which offers amazing performance both when it comes to gaming, and graphic-intensive applications like 3D rendering tools, image processing, video processing, etc. This GPU has a whopping 24 GB GDDR6X dedicated memory, which managed to score 1% better at overall benchmark tests than the GPU found in the previous device, and also 1% better scores than the next model. 

The 32 GB RAM HyperX DDR4 you will never be stopped from running multiple applications at the same time and has offered more than enough power to run the latest games without any sort of lagging.

To ensure fast data reading and writing speeds, the 1 TB of PCIe NVMe M.2 SSD storage rounds up this device nicely, ensuring that you will not have storage space issues. If you need even more space, you can always invest in another M.2 SSD to expand it even further.

This device also comes with a free upgrade to Windows 11, which can prove to be an extremely useful feature for those of you that do not want to invest in the newly-developed OS as well.


SkyTech Prism II

  • AMD Ryzen 7 5800X CPU
  • GeForce RTX 3080 Ti GPU - 12 GB
  • 16GB DDR4 RAM
  • 1TB Gen4 NVMe SSD
  • 6 RGB 360mm AIO coolers
  • Medium-range amount of RAM

SkyTech Prism II is another powerful desktop PC that can help you experience some of the games you’ve wanted to play for a while, while also proving to be versatile enough to tackle many other tasks as well.

It comes with an AMD Ryzen 7 5800X 8-Core processor which operates at 3.8 GHz and is capable of reaching 4.7 GHz by using Boost. Even though this CPU scored 3% lower benchmark results than the previous desktop model, the accessible price makes it a very good option.

The GeForce RTX 3080 Ti GPU offers a 12GB GDDR6X setup, making it 1% less powerful than the GPU installed on the previously-mentioned desktop system, and a whopping 41% better test results compared to the next. 

To ensure that you will be able to run multiple applications at the same time, and have enough power to run some of the latest games, the 16GB DDR4 RAM doesn’t disappoint. Running at 3200MHz ensures fast processing speeds even at medium to high graphics settings.

The 1TB Gen4 NVMe SSD allows you more than enough space to keep your files, download and install games, store personal files, and even collect some 4K quality videos.

This desktop impressed us with the beautifully designed Phanteks Qube case, which comes in a white finish. This design allows you to showcase the inner workings of this PC and fits almost any environment without sticking out too much.

To round this device up completely, it also comes equipped with 6 RGB 360mm AIO cooler fans that improve performance and look great as well.


Empowered PC Sentinel

  • Intel Core i9-11900 CPU
  • NVIDIA GeForce RTX 3070 Ti GPU - 8GB
  • 32GB DDR4 RAM
  • 512GB NVMe SSD + 2TB HDD
  • LED backlit USB gaming keyboard + mouse
  • Slower GPU than other options
  • Small SSD, even though accompanied by a high-speed HDD

The Empowered PC Sentinel from CUK comes with an Intel Core i9-11900 Eight-Core Processor, making it the most powerful CPU on this list. It uses a 16MB Cache, running from 2.5GHz to 5.2GHz, and has the temperature kept in check with a 65W liquid cooling system.

When compared to the first option on our list, this CPU is 11% better in overall benchmark tests, and a whopping  28% better score than the next option in the list.

When it comes to graphics, the NVIDIA GeForce RTX 3070 Ti GPU with 8GB GDDR6X memory has good overall scores and allows you to explore some of the latest games, but it had 41% worse scores than the previous setup, and an amazing 71% score above the next desktop presented in this guide.

The 32GB DDR4 RAM  running at 3000MHz ensures that you will be able to run multiple applications at the same time without worrying about lagging or having your system getting stuck.

With this setup, you also receive a 512GB NVMe Solid State Drive which ensures fast writing and reading speeds for the data stored on it, and also a 2TB 7200rpm HDD.

This device also comes with a wired LED backlit USB gaming keyboard, and a mouse, so the setup is ready to tackle any task as soon as the delivery reaches your home.

Even more, to ensure no worries whatsoever, this desktop comes with a 3-year limited warranty from CUK, which is a very good addition to the sturdy package that’s already offered for the price.


HP OMEN 25L

  • AMD Ryzen 7 3700X CPU
  • NVIDIA GeForce RTX 3060 GPU - 12GB
  • 16 GB DDR4 RAM
  • 512 GB PCIe NVMe SSD + 1 TB HDD
  • AllyFlex Mousepad
  • Small SSD
  • Medium-range CPU
  • Medium-range GPU

The HP OMEN 25L uses an AMD Ryzen 7 3700X processor with 8 cores and has a base frequency of 3.60 GHz which can be increased to up to 4.4 GHz with Max Boost.  Even though the CPU is 28% slower than the previous model mentioned in this list, it still provides great processing power if not planning to run games at high graphics settings.

The NVIDIA GeForce RTX 3060 GPU which has 12GB RAM has been able to run some of the latest games without too much lagging, even though the refresh frame rate can’t be compared with the other options presented in this guide. If you don’t mind reducing the quality of your games, then this piece of hardware provides everything you need.

To run some of the most recent games, the 16 GB DDR4 RAM ensures that you will be able to run games, open multiple applications at the same time, and provide enough memory for daily tasks without any issues.

When it comes to storage, the HP OMEN 25L uses a 1 TB 7200RPM SATA HDD and a 512 GB PCIe NVMe M.2 SSD, which can also be extended to fit your needs.

As a bonus, you also get great connectivity ports, including USB Type-A, USB SuperSpeed Type-C, and a high-speed Ethernet port. Even more, an AllyFlex mousepad is added to the package for your enjoyment.


Bottom runners

Even though our team of testers has chosen some of the best Windows 11 desktop PCs on the market to create this list, some other options didn’t make the list but are still worth mentioning.

Here are some other options which could be a very good choice for some users:

➡ SkyTech Shadow 3.0

This device hasn’t made our list, as the price-quality ratio was surpassed by other models, but still provides a Ryzen 5 3600 CPU, and a decent GPU: NVIDIA GeForce RTX 2060.

➡ SkyTech Blaze II

With a Ryzen 5 3600 GPU clocking in at 3.6 GHz and an NVIDIA 1660 Super with 6GB video RAM, this desktop comes in at an accessible price and provides great capabilities.


As you can see from the list above, there are a variety of measuring points when it comes to choosing the best Windows 11 desktop PC for you, but we made sure to include all the information you would need to make an informed decision.

We made sure to include options for you even if you want high-end gaming machines, but also more accessible middle-range and low-end PCs that still do the job.

Feel free to share what option you chose from the list by using the comment section below.

Task Manager Not Responding / Opening: Fix

Task Manager is a useful tool, but many users reported that Task Manager is not working on their Windows 10 PC. This can be a big problem, and in today’s article, we’ll show you how to fix it.

Problems with Task Manager can be somewhat serious, and speaking of Task Manager issues, here are some problems that users reported:

  • Task Manager not opening, working properly, responding Windows 8, 7 – There are various problems that can occur with Task Manager, but you should be able to fix most of them with one of our solutions.
  • No Task Manager Windows 10 – Sometimes your Task Manager can be disabled by Group Policy, but you can easily revert these settings.
  • Task Manager Windows 10 not showing, working won’t open – In some instances, this problem can occur if there’s an issue with your registry, but you can easily fix that.
  • Task Manager has stopped working – This problem can sometimes appear due to a malware infection, so be sure to scan your system.

What can I do if Task Manager is not responding or won’t open?

1. Modify the registry

  1. Press Windows Key + R and enter regedit. Press Enter or click OK.
    regedit run window Task Manager Windows 10 not working won't open
  2. In the left pane, go to the following key: HKEY_LOCAL_MACHINESOFTWAREMicrosoftWindows NTCurrentVersionImage File Execution Optionstaskmgr.exe
  3. In the right pane, locate and delete the Debugger string.

If Task Manager is not working properly, the issue might be your registry. As you know, the registry holds all sorts of information and settings, and sometimes one of these settings might be incorrect, thus causing the problem to appear.

After making these changes, restart your PC and check if the problem is resolved. Since modifying the registry is a potentially dangerous task, we advise you to create a backup before making any changes. In addition, you can also create a System Restore point.

2. Perform an SFC/DISM scan

  1. Press Windows Key + X to open Win + X menu. Choose Command Prompt (Admin) or PowerShell (Admin) from the menu.
    command prompt win + x menu No Task Manager Windows 10
  2. Once the Command Prompt opens, type sfc /scannow and press Enter.
    sfc scannow No Task Manager Windows 10
  3. The scan should now start. This process can take about 15 minutes, so don’t interfere with it.

After the SFC scan is finished, check if the issue is still there. In some instances, the SFC scan might not be able to fix the problem, you’ll need to run DISM scan by doing the following:

  1. Start Command Prompt as an administrator.
  2. Enter DISM /Online /Cleanup-Image /RestoreHealth command and press Enter to run it.
    Tdism scan ask Manager Windows 10 not working won't open
  3. DISM scan will now start. This scan can take about 20 minutes or more, so don’t stop it while it’s scanning.

Sometimes your system files can get corrupted, and that can lead to various problems. If Task Manager is not working, you might be able to fix the problem by running SFC or DISM scan.

Once the scanning is finished, check if the problem is still there. If you weren’t able to run the SFC scan before, try running it again after completing the DISM scan and check if that helps.

3. Use third-party tools

If the problem with Task Manager is still there, perhaps you can temporarily use a third-party solution as a workaround. There are many great free Task Manager alternatives, and some of them are even more advanced than Task Manager.

If you’re looking for a Task Manager alternative, be sure to check our review of best task manager software for Windows.

Task Manager is an integral part of Windows, and if you’re having any problems with Task Manager, be sure to try some of our solutions.

⇒ Get AnVir Task Manager

4. Use chkdsk

  1. Open Command Prompt as administrator.
  2. Once the Command Prompt starts, enter chkdsk /f :X and press Enter.
    • Replace the :X with your system drive letter. In the majority of cases, that’s C:.
      chkdsk scan Task Manager not responding Windows 7
  3. Now you’ll be asked to schedule a scan. Press Y to confirm.

If Task Manager is not working on your PC, the problem might be file corruption. Sometimes your system drive can get corrupted, and this can cause various problems in Windows.

To fix this and many other problems, users are suggesting that you perform a chkdsk scan.

After the scan is scheduled, it will start automatically once you restart your PC. Keep in mind that chkdsk scan can take about half an hour, sometimes even longer, so be patient.

Once the scan is finished, check if the problem with Task Manager is still there.

5. Create a new user account

  1. Open the Settings app and go to the Accounts section.
    accounts settings app Task Manager Windows 10 not working won't open
  2. Choose Family & other people from the menu on the left. Click the Add someone else to this PC button in the right pane.
    family & other people Task Manager has stopped working
  3. Choose I don’t have this person’s sign-in information.
    I don't have this person sign-in information Task Manager not responding Windows 8
  4. Now select Add a user without a Microsoft account.
    add a users without a Microsoft account No Task Manager Windows 10
  5. Enter the desired user name and password and click Next.
    enter user information Task Manager Windows 10 not showing

If Task Manager is not working, perhaps the problem might be your user account. Sometimes your account can get corrupted, and this will lead to this and many other errors.

Since there’s no easy way to repair a corrupted account, perhaps you might be able to fix the issue simply by creating a new user account.

Once you create a new user account, switch to it and check if the problem is still there. If the problem doesn’t appear on the new account, you can move your personal files to the new account and start using it instead of your old account.

6. Make sure that Task Manager isn’t disabled

  1. Open Registry Editor.
  2. In the left pane, navigate to the ComputerHKEY_CURRENT_USERSoftwareMicrosoftWindowsCurrentVersionPoliciesSystem key. If this key isn’t available, you’ll need to right-click the Policies key and choose New > Key. Now enter System as the name of the new key.
    new key registry Task Manager has stopped working
  3. Navigate to the System key and in the right pane locate DisableTaskmgr. If this value isn’t available, right-click the right pane and choose New > DWORD (32-bit) Value. Enter DisableTaskmgr as the name of the new DWORD.
    new dword registry Task Manager not opening
  4. Double-click DisableTaskmgr key, and set Value data to 0. Now click OK to save changes.

In some cases, your Task Manager might be disabled by a system policy. This can be a problem, but you should be able to fix it by making a couple of changes in your registry.

After doing that, check if the problem with Task Manager is still there.

7. Scan your system

In some cases, it’s possible that this error occurred due to malware. Certain malware might block Task Manager from running in order to prevent you from ending the malware application. However, you should be able to fix this problem simply by performing a malware scan.

There are many tools that you can use to scan your PC. First and foremost, you can try the built-in Windows Defender to run a scan if you do not have anything else installed. It is a pretty good tool that offers a high level of protection.

However, we recommend you to use third-party software because they are generally a little quicker to detect threats and have more security features than Windows Defender.

You can find plenty of good Windows 10 compatible antivirus software that will surely find and remove the issue.

8. Change Group Policy settings

  1. Press Windows Key + R and enter gpedit.msc. Press Enter or click OK.
    gpedit.msc run window Task Manager has stopped working
  2. Select User Configuration>Administrative Templates>System>Ctrl+Alt+Del Options from the left pane. In the right pane, double-click Remove Task Manager.
    remove task manager group policy editor Task Manager not opening
  3. Select Disabled or Not Configured and click Apply or OK. If the policy is already set to one of these options, then this solution doesn’t apply to you.
    disable policy No Task Manager Windows 10

If you keep having problems with Task Manager, it’s possible that the Task Manager is disabled by your group policy. Sometimes malware can do this without your knowledge, but you might be able to fix this problem by making a couple of changes in group policy.

After making these changes, check if the problem is still there.

9. Perform a System Restore

  1. Press Windows Key + S and type system restore. Now choose Create a restore point from the list of results.
    create a restore point search No Task Manager Windows 10
  2. Once the System Properties window appears, click the System Restore button.
    system restore Task Manager Windows 10 not showing
  3. System Restore window will now open. Click Next to proceed.
    system restore main window Task Manager has stopped working
  4. Look for Show more restore points option and enable it, if available. Now you just have to select the desired restore point and click Next.
    choose a restore point Task Manager not working properly
  5. Follow the instructions on the screen to complete the process.

If the problem with Task Manager is still there, perhaps you can fix it by performing a System Restore.

After performing System Restore, check if the problem is still there.

By following these steps you should be able to fix any Task Manager-related issues on your PC. If you know of any other solutions that may work, leave us your suggestions in the comments section below.
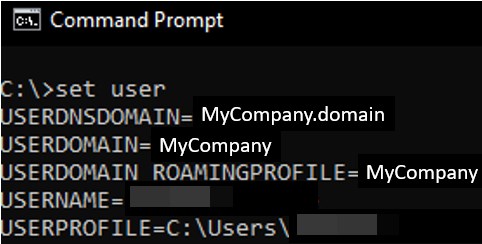
How to Get the Windows 7 Photo Viewer on Windows 10

The Photos app has replaced the Windows 7 Photo Viewer as the default image viewer in Win 10. Windows 10 doesn’t even include the registry keys for Photo Viewer.

However, that doesn’t mean you can’t open the WPV in Win 10. There are, in fact, a few ways you can restore the WPV in Windows 10. This is how you can open Photo Viewer in Windows 10.

How can I run Windows 7 Photo Viewer on Windows 10?

1. Select Windows Photo Viewer as your default image viewer

  1. Click on the Windows search bar on the taskbar and type default apps.
  2. Select Default apps to open the window shown directly below.
  3. Click on Photos under Photo Viewer to open the app list directly below.
  4. Select Windows Photo Viewer listed on the app list to choose it as the default image viewer.
  5. The Photo Viewer will now open whenever you click an image.

If you’ve upgraded to Windows 10 on a desktop or laptop that originally came with Win 8.1 or 7, you’ll find that the Windows Photo Viewer is still there.

The Photo Viewer registry keys are still in place on PCs that originally came with earlier Windows platforms. Thus, all you really need to do to open pictures with Windows Photo Viewer is to configure the default app settings so that it’s the default image viewer software by following the steps above.

If you’re still running Windows 7 and you need some great software to organize your photos, we have a great list of tools.

2. Make Photo Viewer work by using Command Prompt

2.1 Open Photo Viewer by using Command Prompt

  1. Press the Win key + R to open the Run window.
  2. Enter cmd and click OK to open the window below.
  3. Input the following command and press Enter: rundll32 "%ProgramFiles%Windows Photo ViewerPhotoViewer.dll", ImageView_Fullscreen
  4. An empty Windows Photo Viewer window will open as below when you press Enter. However, you can’t open any images in the Photo Viewer, which isn’t much good!

Photo Viewer will not be listed on the Choose an app list if Windows 10 is the original platform on a desktop or laptop. Nevertheless, you can still launch WPV with the Command Prompt.

2.2 Open photos in Photo Viewer using Command Prompt

To open the Photo Viewer with some images, you’ll need to enter a full path to a folder that includes images at the end of the command.

For example, the command could be something like this: rundll32 "%ProgramFiles%Windows Photo ViewerPhotoViewer.dll", ImageView_Fullscreen C:\Users\My Photos

Just make sure that you include the full folder image path, and then press the Enter key.

That will open Photo Viewer with all the images included in the folder path, and you can flick through them by pressing the Windows Photo Viewer’s Previous (Left arrow) and Next (Right arrow) buttons.

3. Add a Windows Photo Viewer Shortcut to the Desktop

  1. Right-click the desktop and select New, select Shortcut to open the window shown directly below.
  2. Enter the following line followed by your image folder path: rundll32 "%ProgramFiles%Windows Photo ViewerPhotoViewer.dll", ImageView_Fullscreen
  3. Press the Next button, and enter a title for the shortcut in the text box.
  4. Click the Finish button to add the Windows Photo Viewer shortcut to the desktop as below.
  5. Click the Windows Photo Viewer desktop shortcut to open the WPV. It will open with the images within the folder specified in the Command Prompt earlier.

You don’t need to open the Command Prompt to launch WPV with an image folder. Instead, you can add shortcuts to the desktop that open WPV with a specified picture folder like instructed above.

So that’s how you can get the Windows 7 image viewer back in Windows 10. However, there are also plenty of alternative freeware third-party image viewers you can install.

This software guide provides further details for the top seven Windows 10 photo viewers.

Important note: Microsoft officially ended Windows 7 support. If you’re planning to upgrade to Windows 10, make sure to check out our wide collection of guides on how to make the transition as smooth as possible.

Best Windows 10 VoIP Apps [Free, Paid]

Windows 10 has become one of the most used version of Windows. It comes with many new features which also includes an app store from where the users of Windows 10 can download and install different apps.

By allowing people to choose from thousands of apps, Microsoft went a step ahead by offering all the popular and famous apps on your personal computers.

One of the most used category of apps by any computer user is the VoIP apps. VoIP stands for Voice over Internet Protocol. It allows the user of such app to communicate with their friends and family over the Internet using their voice.

Users constantly face difficulty with choosing the best VoIP apps for them to use on their computer running Windows 10. Here are some of the best VoIP software application for Windows 10.

What are the best VoIP software for Windows 10?

Express Talk VoIP Softphone

Express Talk VoIP Softphone VoiP software

If you’re looking for a VoIP client that also works as a softphone, you might want to consider this tool.

Express Talk VoIP Softphone allows you to make free audio and video calls to other PCs, but you can also use it to call regular phones by using a VoIP SIP gateway provider.

It’s worth mentioning that you can also use this software to call emergency numbers if needed.

Regarding the calling, you can easily see the caller ID of every person that calls you, and there’s also a call logging feature available. You can also place callers on hold which is quite useful if you’re getting multiple calls simultaneously.

The application has its own phonebook that fully works with Microsoft Address Book, and you can use this phonebook to organize your contacts or to make quick calls.

Speaking of calls, the application has certain call enhancement features such as data compression, echo cancellation, and noise reduction that should improve the overall call quality.

There are some features for business users, and thanks to these features, you can configure up to 6 phone lines with this tool and make conference calls with up to 6 people.

You can also record phone calls or pick them up from a different extension or transfer them.

As for supported hardware, Express Talk VoIP Softphone will work with your microphone, headset, or webcam, but it’s also fully compatible with USB phones.

Overall, Express Talk VoIP Softphone is a great VoIP application, and if you’re looking for a new VoIP software, perhaps this might be the perfect application for you.

Overview:

  • Free audio and video calls between PCs
  • Ability to make PC to phone calls using a VoIP SIP gateway provider
  • Caller ID, call logging, call holding
  • Built-in phonebook
  • Data compression, echo cancellation, noise reduction, and comfort noise
  • Support for a wide range of USB hardware

    –  Download now Express Talk VoIP Softphone

Skype

best voip software windows 10 skype

In this race of technology and moreover in VoIP software, Skype was the first to enter. The app offers free Skype to Skype audio calls, free video calls and even group audio and video calls.

Apart from this Skype also offers instant messages whether audio or text based. Skype also allows the users to share pictures, audio files and even documents through attachments.

Moving towards the advanced options Skype deals with call forwarding, sending SMS messages to mobile phones, caller ID, skype number, calls to landline and mobile phones and video conferencing.

But for these services user has to buy Skype Credit or subscribe to any of the proposed plan.

In the new update of Windows 10, Skype has been integrated inside Windows 10 making it the primary app for voice call, video call and messaging.

Skype allows to save contacts in its contact book and lets you call or message instantly through call or messaging app.

Ekiga

best voip software windows 10 ekiga

Gnome Meeting was the previous name for Ekiga. It is a free, open source VoIP software. it has all the features of a VoIP and supports almost all of the most popular internet telephony protocols.

It also allows the users to message, video conferencing, call holding, call transfer and forwarding.

Jitsi

best voip software windows 10 jitsi

Jitsi was previously known as SIP Communicator. Jitsi is a free and open source program for instant messaging and VoIP. It is a Java based software and is supported with many operating systems.

Jitsi features audio and video calling, instant messaging, screen sharing, call hold, call recording, desktop streaming and encryption for calls and chats.

Micro SIP

best voip software windows 10 microsip

This software offers portability to the user and is open source software for making calls using the SIP protocol. It can be stored in a USB and can be transferred into any computer with all of the user’s configurations.

Micro SIP is a very lightweight software which does not use much resources of the system it is used on.

Micro SIP supports voice and audio calls, messaging, and call encryption and much more.

Zoiper

best voip software windows 10 zoiper

ZioPer is VoIP software for Windows which is free and very cheap on premium rates. ZoiPer is a multipurpose VoIP which performs many functions.

It features voice calls, video calling, instant messaging, fax and presence. All in one compact software.

ZioPer looks everywhere for your contacts on your Windows 10 and it combines them in one list for easy access. Alongside these features ZioPer also shows the caller ID.

And it is a very lightweight software which has the minimal impact on your computer.

TeamSpeak

best voip software windows 10 teamspeak

TeamSpeak is a VOIP client that has the capability of working for normal users as well as people who want to host it on a server.

This program is mostly used by gamers because of the ease of usage that it provides to be in touch with their teammates while they are in-game.

You just have to download the TeamSpeak client, connect it to a server or an IP that you have and you will be able to communicate with everyone on that server or client IP via voice or text.

Discord

best voip software windows 10 discord

Discord is a relatively new VOIP app and it is making buzz amongst people who game frequently as it comes with a really nice intuitive interface.

You can download Discord, make an account, create a server and start adding people to your channel to connect with them. This also has a web client that you can use and it needs no downloads at all.

VoIP Software from the Microsoft Store

MobileVoIP

best voip software windows 10 mobile voip

Mobile VoIP is a free app on Microsoft Store. It allows free and cheap calls to other Mobile VoIP users, landline and mobile phones. It has a simple interface so the users can operate is with ease, all they need is a working microphone and speakers.

Mobile VoIP offers Instant messaging and audio / Video calls as a basic VoIP app. It also offers several free destinations for international calling and cheap rates for other destinations.

Viber

best voip software windows 10 viber

Viber was initially launched as a mobile app but now it is also available in Windows 10 app store for download. The only drawback is that it is required to be installed on mobile before it can be used on Windows 10.

It Syncs with your Viber account and offers a wide range of services. Viber offers to send instant messages whether audio or text. It also allows the users to voice call to other Viber contacts over the internet.

Viber also offers Viber out service. Viber out service allows you to place calls to mobile phones and landlines at very cheap and affordable rate, these rates start from 1.9 cents per minute.

These rates depend on which country you are calling. Viber is also updated frequently so the support from developers is really good.

OoVoO

best voip software windows 10 oovoo

OoVoO is an instant messaging, Voice and Video calling service. OoVoO has all the latest features of a VoIP the features that distinct it from others are as follows; 12-way video and audio conferencing which allows as many as 12 people to talk simultaneously to each other.

It is available in Windows 10 app store and it can also be accessed on your internet browser thorough internet which allows easy access.

OoVoO allows to send and receive files over the app messaging and can share screen over the app. OoVoO offers cheap rates for calls on landline numbers.

A very interesting feature is that the users can connect landline calls to the VoIP calls in a conference call.

Line

best voip software windows 10 line

Line is one of the top VoIP apps on Windows 10 and it allows the users to instant message and voice as well as video call over the internet.

Users can add contacts through their phones and sync them with their Windows 10 Computer. And then simply text or call through one push of a button.

LINE app also features a timeline to update statuses, images or sticker to show the current mood of the user. It also lets the user to send and receive pictures and hundreds of sticker to make chat more interactive and fun.

Voxofon

best voip software windows 10 voxofon

Voxofon is one more VOIP app that is available on the Microsoft Store. You and the person you want to talk to need to have the Voxofon app in order to use it.

You can also use this app to make calls to someone else who has a landline phone or a mobile phone. But for doing so, you need to have enough credits which you will need to purchase.

And with this, our list of top VoIP apps for Windows 10 concludes.

All of these apps are the most famous apps which are offered on Windows 10. They provide the best quality calls and messaging service over the internet.

These apps provide the cheapest way of communication for the people who wants to talk and communicate with their friends and family all over the world using the internet.

If you have any other suggestions, or maybe you’re aware of another VoIP software that didn’t make the list, share it with us in the comments section below.
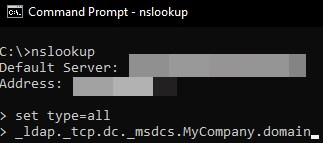
Also, leave there any other questions you may have and we’ll check them out.

Why is 4K TV Blurry & How to Get the Best Picture [Answered]

With technological advancement and faster data speed, 4K TVs have become the norm. However, sometimes, the super clear picture quality you expect from a UHD TV may not appear due to your 4K TV not clear issue.

Poor image quality in 4K TVs can be attributed to many reasons, including lower resolution video, incorrect video playback configuration, and faulty hardware.

In this article, we have listed the best troubleshooting tips to help you fix poor picture quality on a 4K TV.

Why is my 4K TV blurry?

4K TV not clear

Depending on the make of your TV, there are multiple reasons why your TV is not clear. Here are a few reasons for unclear video playback.

  1. You are watching low-resolution content on your 4K TV.
  2. Your UHDTV setting is not set up properly.
  3. You are using a cable that does not support 4K video input.
  4. The source device does not support 4K resolution.

How can I fix poor picture quality on your 4K TV?

1. Test 4K content

4K TV not clear
  1. You can test your TV with 4K videos. Follow these steps to do the same.
  2. Make sure you are connected to the internet.
  3. Press the Home button on your remote control.
  4. Select the YouTube app from the launch bar.
  5. Select the 4K category from the top of the YouTube screen.
  6. Choose any of the 4K videos and play them. This should give you an idea if your 4K TV is able to play UHD content in native resolution.

2. Change Home Mode

Smart TV picture not clear
  1. If your TV is set up for store use, change it to home mode.
  2. On your 4K TV remote control press the Home button.
  3. Navigate to Settings > Advanced > General.
  4. Select Home Mode from the option.
  5. Now try to play a 4K video and check for any improvements.

3. 4K TV not showing 4K

If the issue persists, check the video sources. Make sure you check the cable connection and source device resolutions.

Perform these check

  1. Make sure all your cable ends are properly connected at both ends of the source device and your 4K TV.
  2. Unplug the connected cables and ensure the right end is plugged into the device and TV.
  3. Ensure you use HDMI or a better connection to transmit the video signals.
  4. Lastly, check the native resolution of your output device. If you are using a projector or other third-party devices, check if it supports 4K resolution.
  5. Your TV shows the incoming signal from the output device on the home screen.

4. Adjust the backlight

  1. On your Samsung TV, try adjusting the TV’s backlight to fix the 4K TV not clear issue.
  2. Press the Home button on the remote control.
  3. Navigate to Settings > Picture > Expert > Backlight.
  4. Play with the Backlight option to get your preferred quality.

In this article, we have listed all the possible fixes you can apply to fix your 4K TV unclear issue in no time.

If you’re wondering what is the difference between HD+ and Full HD resolutions, our article will clear that problem. In case you’re using LG TV, you might be interested in our LG error code 106 guide that addresses network issues.

Do apply the fixes above and let us know which solution worked for you in the comments.

Toolbar is Missing in Google Docs? Here is How to Get it Back

When creating or editing Google documents online, you may notice the toolbar is missing in Google Docs when you attempt to access a tool.

Luckily, the missing toolbar is likely a settings issue, so resolving it should be straightforward, just like the Google Doc won’t open the problem. Here, we will explore some solutions you can apply to bring back your missing toolbar.

How do I get back the missing Google Docs toolbar?

1. Unhide the toolbar

Google Docs lets you hide the toolbar for a less crowded working area. Sometimes, you do not see the toolbar because you hid it accidentally.

To restore the toolbar, open a Google Docs file, place your cursor on the text box, and press Ctrl + Shift + F. This shortcut also hides the toolbar you use when you wish to unhide the toolbar.

Alternatively, you can unhide the toolbar using the arrow on the top right-hand corner of the screen.

When the toolbar is hidden, the arrow faces downward, and when shown, the arrow points upward. Therefore, if the arrow faces down, click on it to reveal the hidden toolbar. Another technique for unhiding the toolbar is to press the Fn + ESC key combination.

Sometimes, the toolbar is not missing but greyed out and disabled, which means that the owner of the Google Docs file has not granted you edit permissions.

The following solution shows how to request and grant users permission to edit the Google Docs file.

2. Get edit permissions

2.1 How to request permission to edit a Google Docs file.

  1. Open the Google Docs file.
  2. If you have only permission to view the file, you will see a button labeled View only on the greyed-out toolbar.
    • Click on it.
  3. From the dropdown, request edit access from the owner.

2.2. How to grant a user edit permissions to a Google Doc.

  1. Open a Google Docs file.
  2. Next, navigate to the Data tab by clicking on it at the top of the screen.
  3. From the resulting dropdown, click on Protected sheets and ranges.
  4. Choose a Google sheet from the right-hand column and hit the Change permissions button.
  5. From here, to allow a user to use the toolbar, mark the checkbox next to their name.
  6. Hit Done after granting permission to the relevant users.

If you don’t have permission to edit a document, the Google Docs toolbar will be missing on your end. With the steps above, you should be able to request permission from the document owner.

3. Enable Compact Controls

  1. Open a Google doc file.
  2. Now, click the View tab at the top.
    view google docs toolbar missing
  3. Finally, select the Compact Controls option.

Compact Controls is another feature that can make the Google Docs toolbar go missing. Enabling it should quickly restore your toolbar. It should be noted that this feature might not be available for you.

So, you can’t apply this solution if you can’t find it.

The missing Google Docs toolbar restricts your control over your documents. Thankfully, it is an issue that can be fixed quickly, as shown in this guide.

If Google Docs is not printing on your PC, check our detailed guide to fix it quickly. Besides, a common problem affecting many is Error 150 in Google Slides, but you can fix it by allowing video embedding.

Let us know the solution that helped you fix this issue in the comments below.

To resolve this, we have shown you how to unhide the missing Google Docs toolbar and get permission to edit it.

How to Change & Configure Microsoft Edge Proxy Settings

Many people use proxy in order to protect their privacy online, and just like many other web browsers on Windows 10, Microsoft Edge also offers support for proxy.

Configuring proxy settings in Microsoft Edge is relatively simple, and today we’re going to show you how to do it.

Proxy is another remote computer that works as a hub and intercepts your network traffic before sending it to you. There are many uses for proxy, but in most cases, people use it to get an extra layer of security.

When using a proxy, your IP address won’t be shown, instead, you’ll connect to the Internet using the proxy’s IP address.

Proxy is a decent solution if you’re concerned about your privacy, but you should know that there are both free and paid proxy services available.

According to users, paid proxy services are usually more secure and reliable, so choose carefully while selecting your proxy.

Configuring proxy in Microsoft Edge is quite simple, and you can manually configure it, or you can simply speed this process up and use an automatic configuration file that will configure the proxy for you.

How do I configure Microsoft Edge proxy settings?

1. Change Microsoft Edge proxy settings

  1. Open Microsoft Edge.
  2. Click the Menu button in the top right corner and select Settings from the menu.
    proxy-1
  3. Scroll down to the Advanced settings section and click View advanced settings button.
    proxy-2
  4. Click the Open proxy settings button.
    proxy-3
  5. Go to the Manual proxy setup section and turn on Use a proxy server option.
    proxy-4
  6. Enter the necessary information and click the Save button.
  7. After that, you’ll be asked to enter your Proxy username and password.

Changing proxy settings in Microsoft Edge is quite simple, and you can do it by following the above steps. After performing the procedure, your proxy will be configured and ready to use.

If you don’t want to manually configure your proxy, you can simply use the automatic configuration option. To do that, follow these steps:

  1. Press Windows Key + I keyboard shortcut to open the Settings app.
  2. Go to Network & Internet section and navigate to the Proxy tab.
  3. Turn on Automatically detect settings and Use setup script options.
    proxy-5
  4. Enter the script address URL and click the Save button.

Another way to change proxy settings in Windows 10 is to use Internet Options. To do that, do the following:

  1. Press Windows Key + S and enter internet options. Select Internet Options from the menu.
    options-1
  2. Go to the Connections tab and click on the LAN settings button.
    options-2
  3. LAN Settings window will open. You can now set up a proxy server manually or choose the option to automatically detect settings and use an automatic configuration script.
  4. After you configure your proxy, click the OK button to save changes.
    options-3

Keep in mind that these changes are applied system-wide, so even if you set up a proxy, it won’t just affect Edge, it will affect all other applications that support proxy.

Quick Tip:

Opera One provides a proxy VPN that can safeguard your online privacy by creating a safer environment while you surf the web. All network traffic from the browser is routed through that secured proxy VPN.

As a result, your apparent location shifts to the server’s location, keeping you away from tracking activities. This browser is also a smart one as it comes with it’s own built-in AI.

Opera One

Reroute your network traffic with the built-in proxy VPN, and have a smooth browsing experience.
Free Download Visit website

2. Consider using a VPN

Proxy settings can be a bit tricky to handle and modify. Therefore, if you prefer to keep it simple, we recommend you take a second to see the bigger picture.

A proxy only secures your torrent client or web browser, while a VPN encrypted tunneling secures 100% of all your Internet access. That’s why you shouldn’t waste your time.

In order to find the right VPN for your needs, better be informed before making the final choice and thus have your pick from the best VPNs for Windows 10.

If you’re concerned about your privacy online, the proxy can be a decent solution. Setting up a proxy for Microsoft Edge is relatively simple, and we hope that this article was helpful to you.

The guide above can also prove to be of use if you are interested in the following topics:

  • Microsoft Edge proxy settings/Edge proxy settings – Just refer to the above procedure and you’ll discover all about changing the Microsoft Edge proxy settings.
  • Proxy Microsoft Edge/Microsoft Edge proxy – You most likely use a proxy in order to protect your privacy online. This isn’t the only option since a VPN like PIA can also do wonders.
  • Edge proxy – You’ve made your choice in terms of privacy, so take a closer look above to find more about the settings you could change.

[wl_navigator]

Caps Lock Stuck On / Num Lock Stuck On: Quick Fixes

Sometimes after a new Windows 10 update has rolled out, many have gone ahead and downloaded it on their devices.

But some users have been reporting recent problems related to the functionality of Caps Lock and Num Lock keys.

If you too have just updated Windows 10 on your computer and you have problems with your Caps Lock and Num Lock keys, then you should know you are not the single one in this situation.

Across the forums, many have started reporting their Caps Lock stuck on, or their Num Lock stuck on. Read on to find out how to fix this.

How do I fix Caps Lock & Num Lock keys that are stuck?

A quick computer restart is a preliminary fix you should do before anything else. A restart fixes many technical issues and could solve the Caps Lock stuck on issue as well.

Tweak your Advanced Key Settings

  1. Press the Windows key to launch the Start menu.
  2. Open the Settings menu.
  3. Select Time & Language.
  4. Go to the Language tab.
  5. Select the Keyboard menu.
  6. Click Input language hot keys.
  7. On the Advanced Key Settings tab, select Press the Shift key.
  8. Click OK, then Save.

To better understand how the Shift key affects Caps Lock functionality and learn additional fixes, check out this comprehensive guide on using the Shift key to turn off Caps Lock. It provides detailed steps to adjust the setting and prevent similar keyboard issues in Windows 10.

Caps Lock and Num Lock related problems

Caps Lock or Num Lock stuck is not the only problem you can technically have with your keyboard. We have detected more of them and wrote about all that causes them and how to fix these problems. Here they are:

After you’re done, press the Shift key, and Caps Lock will then return to its usual behavior. Obviously, this is just a temporary fix, until Windows 10 gets officially available.

If you happen to know other solutions on how to make the Caps Lock and Num Lock keys function properly, leave your comment below and let us know.

Best Anatomy App & Software for PC [3D, Human, Complete]

Digital advances have now made it possible to study the human body in stunning 3D.

And while the number of this type of anatomy app for PC continues to grow daily, only a few are capable of exploring the deeper layers of human complexity.

In this post, we list the best 3D anatomy software to use for human body research. Here’s a quick preview:

  • 3D Human Anatomy – Excellent human anatomy software for PC
  • iMuscle – Perfect for entire workouts or individual exercises
  • Complete Anatomy – Best 3D anatomy software available on the market + it’s?
  • Essential Anatomy – Hide, Fade & Isolate individual or multiple structures
  • Anomalous Medical – Free download of 3D human anatomy

But first, you might wonder – and legitimately so – about the costs that accompany this exhilarating method of study and observation.

Is there a free anatomy app?

Most of the apps listed here come with a price tag – a moderate one, that is.

Nevertheless, we made sure to include some free anatomy apps for Windows that you can download directly from the Microsoft Store.

Without further ado, let’s dig in and start exploring.

Which app is better for anatomy?

1. 3D Human Anatomy – Excellent human anatomy software for PC

3D Human Anatomy is a learning tool that caters to the needs of both professionals and amateurs. It’s built for physicians, educators, and professionals and it aims to explain conditions, ailments, and injuries.

Its contents consist of Skeleton (all bones in our body), Ligaments (shoulder and knee ligaments only), and Muscles (145 muscles, highly detailed muscle models). Plus, you get to test your knowledge with no less than 400 3D location/position quizzes.

The various systems are also included, as follows: circulation (arteries, veins, and heart), nervous, respiratory, reproductive (both male and female), and urinary systems.

What’s more, it also can be used as an anatomy guide or anatomy dictionary.

The app’s features include:

  • You can rotate models to any angle and zoom in and out
  • Virtual dissection: Peel layers of muscles and reveal the anatomical structures below them.
  • Audio pronunciation for all anatomy terms.
  • 3D location quizzes to test your knowledge
  • Search the name of the anatomical structure and reveal the 3D location
  • Switch on/off different anatomy systems
  • Both male and female reproductive systems are available
  • Information from Wikipedia and Gray’s anatomy textbook
  • Great for learning anatomy and physiology

⇒ Get 3D Human Anatomy

2. iMuscle – Perfect for entire workouts or individual exercises

iMuscle lets you zoom into an area on a 3D human body model and tap on a muscle to reveal specific workouts that suit your desired shape.

This anatomy app for PC includes animations that provide guidance on how to perform each exercise.

In fact, there are over 650 high-quality 3D animated exercises and stretches for both gym and home users with 50+ present workouts and hints and tips for every exercise.

You can search for exercises by type, area worked or equipment used and you can even tap muscles to find exercises associated with that muscle.

And if you want to design your own routine, you can easily create workouts with the Drag &drop feature.

The app’s features include:

  • Rotate and zoom in to a real 3D model with the musculature exposed to reveal superficial and many deep muscles
  • Slick new interface with easy-to-find workout and exercise areas featuring animated exercise icons
  • Add customized exercises to the app database
  • Share your progress with friends, workout partners, or clients via e-mail, Facebook & Twitter
  • Sync workouts between multiple devices by backing up and restoring from OneDrive
  • Easily track your body measurements
  • Track statistics for entire workouts or individual exercises
  • Add an unlimited amount of users

⇒ Get iMuscle

3. Complete Anatomy – Best 3D anatomy software on the market + ?

Can you use Complete Anatomy on Windows? The Complete Anatomy app for PC is one of the most advanced anatomy learning tools in the world.

It features state-of-the-art instruments and 3D recordings with audio, along with moving muscles to help you study the human body in a totally new way.

The tool includes more than 6,200 high-resolution anatomical structures and it even lets you transform 2D learning materials into 3D. Thus, you can view anatomical structures, including nerve paths.

It also comes with tools for visualizing complex functions like nerve supply to muscles, layer guides to identify bone parts, and muscle origin.

Finally, it provides 12 complete systems (Skeletal, Muscular, Connective Tissue, Arterial, Venous, Lymphatic, Nervous, Respiratory, Digestive, Endocrine, Urogenital, and Integumentary, plus Heart, and Brain).

The app’s features include:

  • Skeletal Full Body Layers: Featuring bone parts, bone surfaces, and muscle origin/insertion points
  • Isolate Region: Easily view selected Body Regions
  • Lectures with topics for beginners to specialists to learn from top anatomical experts
  • Create your own groups and invite users to join
  • Animate Muscles: Visualize muscle movements for each articulation directly on the 3D model – view from any angle/zoom in.
  • Muscle Innervation: Visualize the nerve supply to any muscle, and follow its path back to the nerve origin.
  • Instantly alter the model with innovative tools: Cut, Spurs, 3D & 2D Pens, Growths, Fractures, Discover, and Pain.
  • 3D Recordings: Record your interactions with the model, along with audio, to recap later
  • Screens: Browse through our tailored content or feature content you’ve created and share
  • Annotation, Quizzes, and Tailored Content
  • Multi-select, Explode/Assemble, and Offline Mode

⇒ Get Complete Anatomy

4. Essential Anatomy – Hide, Fade & Isolate individual or multiple structures

Essential Anatomy boats a 3D graphics engine developed by 3D4Medical from scratch powering a highly-detailed anatomical model and providing high-quality graphics.

The app includes essential anatomy for ten systems: Skeletal, Muscles, Connective Tissue, Veins, Arteries, Nerves, Respiratory, Digestive, Urinary, and Lymphatic, plus Brain and Heart.

Essential Anatomy also lets you view any anatomic structure in isolation and from any angle.

It has a way of stripping away layers of muscle and turning on and off systems without having to deselect individual structures.

The app’s features include:

  • New 3D technology via 3D4Medical’s latest graphics engine
  • Over 4,000 highly detailed anatomical structures
  • Multiple Selection Mode
  • Preset and customizable Bookmarks
  • Correct audio pronunciation for every structure
  • Latin nomenclature for each anatomical structure
  • User-friendly and intuitive interface
  • Multiple search options with Custom search modes
  • Dynamic quiz function – Drag and Drop and Multi-choice
  • Extensive social media tools and sharing capability

⇒ Get Essential Anatomy

5. Anomalous Medical – Free download of 3D human anatomy

The free version of Anomalous Medical’s 3D Anatomy Software helps you explore the human anatomy.

But if you want to explore even more by breaking apart each system into its individual parts, you can purchase the premium version.

The app lets you create animations by combining your materials and expertise with interactive 3D anatomy using the Authoring Tools.

⇒ Get Anomalous Medical

If you think we’ve missed other great anatomy software to use, let us know in the comments below.

BIOS Corruption On Windows 10: 7 Ways To Repair It

BIOS is one of the most critical components of your PC since it’s in charge of starting your PC and checking your hardware.

Unfortunately, problems with BIOS can occur, and they can prevent your system from booting.

BIOS corruption can be a serious problem, but there are a few ways to fix it on your Windows 10 PC.

How can I repair BIOS corruption on Windows 10?

1. Flash your BIOS

If you’re having problems with corrupted BIOS or a BIOS ID check error, you might be able to fix the problem simply by flashing your BIOS.

Updating your BIOS is an advanced and potentially dangerous process. Therefore, check your motherboard manual for detailed instructions on how to flash your BIOS.

We also wrote an article on how to flash your BIOS on Windows 10, so be sure to check it out for some instructions.

2. Remove your motherboard battery

According to users, you might be able to fix the problem with corrupted BIOS simply by removing the motherboard battery.

By removing the battery, your BIOS will reset to default, and hopefully, you can fix the problem.

To remove the motherboard battery, you need to open your computer case, and in most cases, that will violate your computer’s warranty, so keep that in mind.

If your PC is under warranty, it might be better to take it to the official repair center and ask them to fix it.

If you decide to perform this process yourself, remove the battery and wait 5-10 minutes for the battery to drain completely.

After your battery is drained, insert it back into your motherboard and check if the issue is resolved. Some users suggest replacing your battery with a new one, so you might also want to try that.

If you’re using a laptop, remove your laptop and motherboard batteries to reset the BIOS.

Some users also reported that you need to set your HDD mode in the BIOS to AHCI after resetting it, so be sure to do that.

3. Reset your BIOS

According to users, you can fix this issue simply by resetting your BIOS.

There are several different ways to do that, and probably the simplest one is to enter BIOS and restore it to default values. To do that, follow these steps:

While your PC boots keep pressing Del or specific F key to enter BIOS, usually, there will be a message saying to press a certain key to enter SETUP.

If you can’t find this key, check your motherboard manual to see which key is used to enter BIOS. Once you enter BIOS, look for Load Setup Defaults option.

This option should be located in the Exit section. Select Load Setup Defaults and save changes. Keep in mind that this process might be different depending on the version of BIOS that you’re using.

Another way to reset your BIOS is to change jumper positions on your motherboard. Most motherboards have a jumper next to the BIOS chip, allowing you to reset it. To do that, follow these steps:

  1. Turn off your PC and disconnect all cables.
  2. Open the PC case.
  3. Look for a jumper with CLEAR CMOS or something similar written next to it.
  4. Move the jumper to the clear position.
  5. Turn on your PC and turn it off.
  6. Now, move the jumper back to its original position.

Remember that you need to place the jumper in the appropriate position to reset your BIOS.

If you place it incorrectly, you can cause permanent damage to your PC, so be extra cautious.

To avoid causing damage, we strongly suggest you check your motherboard manual for detailed instructions on changing the jumper configuration. You can also remove your motherboard battery to reset your BIOS.

Our previous solution explained this process, so check it out.

4. Remove your graphic card

Many PCs have both integrated and dedicated graphic cards, and users reported that you can fix the problem with corrupted BIOS simply by removing your graphic card and connecting your monitor to the integrated graphic card.

Keep in mind that by removing the dedicated graphic card you might be violating your computer warranty.

5. Use Windows Key + B key combo

According to users, you can fix this problem on HP computers simply by pressing the Windows Key + B key combo while your PC boots. To do that, follow these steps:

  1. Turn off your PC.
  2. Press and hold Windows Key + B.
  3. While keeping these keys pressed, press and hold the Power button for 2 or 3 seconds.
  4. Release the Power button but keep Windows Key + B pressed until BIOS update screen appears or until you hear a beeping sound. During this process your screen might go blank for 40 seconds or more and you might hear beeping sounds from your computer. This is perfectly normal, so no need to worry about it.
  5. HP BIOS Update screen will now appear. Wait until the process is finished.
  6. After your BIOS is recovered, select Continue Startup button to complete the process.

6. Use HP System BIOS Update Utility tool

According to users, you can fix this issue on HP computers by using the HP System BIOS Update Utility tool. To do that, go to HP’s website and download the latest version of BIOS on your computer.

You might have to enter your PC’s model or product number to download BIOS, so keep that in mind. After downloading the new version of BIOS, you need to create a recovery USB drive by following these steps:

  1. Connect an empty USB drive to your PC.
  2. Double click the BIOS file that you downloaded.
  3. InstallShield Wizard will appear. Click Next.
  4. Accept the terms of service and click Next.
  5. In Location to Save Files window click Change.
  6. Select your USB flash drive, click OK and then click Next.
  7. HP System BIOS Update Utility will open. Click Next.
  8. Select Create Recovery USB Flash drive and click Next.
  9. Select your USB flash drive and click on Next.
  10. Wait while the files are copied to your flash drive. After the process is completed, click on Next.

After creating a bootable USB flash drive, connect it to the problematic PC and follow the instructions from the previous solution.

7. Replace your motherboard

If the problem persists, it might be that your BIOS chip is damaged, and the only way to fix this issue is to replace your motherboard. You might see peculiar behavior like your caps lock blinking when your motherboard is damaged.

If your PC is still under warranty, take it to the repair center and ask them if they can fix it.

BIOS corruption on Windows 10 can be a severe problem, but we hope you managed to fix it using one of our solutions.

If you want to know about the best BIOS settings on your Windows 10 PC; we have a separate guide.

Netflix Black Screen On Windows 11: 8 Easy Fixes

When you’re getting a Windows 11 Netflix black screen when you try to launch or watch Netflix, the issue may be with your device more than it is the service itself.

Here are some solutions you can take to fix Netflix black screen issues if you’re using a Windows computer or device.

How do I fix the Windows 11 Netflix black screen issue?

1. Run your browser as administrator

Sometimes certain programs on your PC may refuse to run as intended without administrator rights.

If you do have admin rights on your computer, make sure you run your browser with administrator privileges specifically.

Here’s how you can do that:

  1. Quit and exit any or all open browser windows
  2. Click the Start button
  3. Select All appsNetflix black screen
  4. On the list of items, right-click your preferred browser icon (Internet Explorer, Firefox, Chrome or Opera)
  5. Select Run as administrator
  6. Select Allow or click Yes if prompted to
  7. In the new window, try to play your favorite flick or show again

If you manage to fix the Windows 11 Netflix black screen and you’re able to stream Netflix shows or movies, then the problem is that your account doesn’t have admin rights.

In this case, you can ask for rights on your account.

2. Clear cookies from your web browser

Follow the steps below to clear Netflix cookie from your browser:

  1. Go to www.netflix.com/clearcookies
  2. You will be signed out of the accountNetflix black screen
  3. Click Sign in
  4. Enter your Netflix email and password
  5. Try to launch Netflix again

If this doesn’t fix the Netflix black screen, try the next solution.


3. Restart browser

Here’s how to execute this:

  1. Close all open browser windows
  2. Launch the Task Manager
  3. Make sure your browser isn’t still open
  4. Launch your browser
  5. Try to stream Netflix again

Does this resolve the Netflix black screen issue? If not, try the next solution.


4. Clear Chrome browsing data

Take the steps below to execute this:

  1. Click on the Chrome menu (three dots at the top right corner) on the toolbar
  2. Select Settings
  3. Select Advanced at the bottom as you scroll down
  4. Go to Privacy
  5. Select Clear Browsing DataGoogle chrome clear browsing data - fix attackers might be trying to steal your information from
  6. Go to the Clear the following items from the drop-down box
  7. Select the Beginning of time
  8. Check media licenses
  9. Select Clear browsing data
  10. Launch Netflix again

5. Reinstall graphic card drivers

Sometimes your display drivers may be outdated, which can cause a wide assortment of issues, including black screen in various apps.

To rule this out, check if you have installed the latest version of your display drivers.

However, you shouldn’t rely exclusively on Windows’ built-in driver checker/installer.

Go to the website of your graphics card’s manufacturer, download the latest drivers and install them manually.

6. Remove Adware from your PC or device

Adware can also cause the Netflix black screen issue. Remove any adware on your PC and check whether it fixes the problem.

You can use a variety of third-party tools to do so. Check our list of best adware antiremoval tools to use on Windows.

7. Check app permissions

If you’re using the Windows 11 Netflix app, you can try resetting it and making sure it has appropriate permissions:

  1. Press Window key + I to open the Settings app
  2. Choose Apps
  3. Click on the Netflix app and open Advanced options
  4. Click Reset and then check permissions
  5. Start Netflix and try to load any content

8. Disable your antivirus

Antivirus software can sometimes interfere with the Netflix player for streaming shows and movies.

In this case, you can disable antivirus software temporarily then try to play your movie or show again.

If it works after trying this method, then your antivirus is either outdated, or it’s preventing Netflix from playing.

Thus, you may need to update your antivirus or switch to a better alternative.

All things considered, if you encounter the Windows 111 Netflix black screen issue on your computer, don’t fret; there are many ways you can fix it.

Which one of them worked best for you? Leave us your feedback in the comments section below.

Windows System Sounds Are Too Loud: How to Fix Them

Is your system sound too loud in Windows 10 or Windows 11? Are you seeing the volume display showing as a lower level yet it plays on maximum volume, and turning it up doesn’t help?

If this is the case, or you’re having a similar problem with different specifications, then your machine could be having sound problems.

Sound issues come up when there are audio driver problems or sound files and settings are changed, resulting in the controls in the sound mixer being greyed out.

Read on to find out what to do when Windows system sounds are too loud on your device.

How can I fix Windows system sounds being too loud?

There are different ways to resolve the issue of the Windows system sounds being too loud, but you could start by rebooting your machine and installing any pending updates.

If the problem persists, you can try the solutions below to see if it goes away.

1. Restore the original audio driver

This quickly resets audio settings for the audio or sound hardware, causing Windows to reinitialize the audio configuration.

Depending on your kind of computer, a driver recovery will restore the audio drivers for your sound hardware that was pre-installed on it.

2. Use an Audio Enhancer app

First off, this helpful way to improve the system sound on your PC and boost the sound with enhancement effects. You can thus refine the sound regardless of your media player or headphone type.

Using an audio booster, the user has absolute control over the sound of the device because of the advanced band equalizer and modern audio tunning.

Hence, the Boom3D from Global Delight Apps is one of the best equalizers that have been ever developed.

The solution is a no-brainer due to its intuitive UI, with great sound adjustment features, and intelligent sound-to-ear adaptation.

 What you need in this situation is its equalizer feature, and here’s what you can do with it:

  • Change sound indicators from a zero point on the equalizer
  • Activate a sound preset and change the frequencies from there for the right sound intensity
  • Adding special effects that will eliminate certain frequencies
  • Choosing any type of headphones and adapting to their sound construction.

With these features, you will be able to minimize the volume on your Windows laptop or PC, especially if certain frequencies are too loud.

Boom 3D

Use this app to lower the volume in Windows 10 and manage your sound with 3D enhancements.
Free trial Visit website

3. Run Hardware Troubleshooter

  1. Right-click Start.
  2. Select Control Panel.
  3. Go to View by option.
  4. Click the drop-down arrow and then select Large icons.
  5. Now, click Troubleshooting.
  6. Click View all option on the left pane.
  7. Locate Playing Audio.
  8. Run Playing Audio troubleshooter and then follow the prompts.


The Hardware troubleshooter tool is built-in on Windows 10 operating system so as to check and resolve any sound issues you may have.

4. Update the audio driver

  1. Right-click Start.
  2. Select Device Manager.
  3. Locate Sound, Video and game controllers.
  4. Click to expand the list.
  5. Right-click on the Sound card.
  6. Click Uninstall.
  7. Download the latest audio driver set-up file from the manufacturer’s website.
  8. Install the audio driver.

Update the network and the audio drivers for Windows 10 from your Device Manager manually by uninstalling, and then reinstalling them from the manufacturer’s website.

Yet, this process may become complicated due to numerous device driver versions or problematic installation. So, it’s more likely to update your drivers by using professional driver update tools.

5. Uninstall Sound card drivers

  1. Right-click Start.
  2. Select Device Manager.
  3. Search for the sound card driver from the list of devices.
  4. Right-click on the sound card driver.
  5. Select Uninstall.
  6. If you get the option Delete the driver software for this device, click and then remove corrupted drivers.
  7. Restart your computer if prompted to do so.
  8. After restarting, install the latest drivers.

Sometimes background sound issues may be caused by a damaged or incompatible driver or a problem with your sound card.

If it is your sound card driver, complete the above procedure to uninstall it and see if it resolves the issue.

6. Buy or build an inline attenuator

If software solutions don’t help, you can buy an attenuator or build one, as this is a fixed volume reduction device or extension cable with volume control.

7. Adjust settings using Levels tab

  1. Plug in your headset.
  2. Click Start and then select Control Panel.
  3. Select Hardware and Sound.
  4. Select Sound.
  5. Choose your Headset and click Properties.
  6. Click the Levels tab.
  7. Drag the slider left to a reasonable level.
  8. Click OK.

If headphones are too loud in Windows, reconfiguring the sound level should do the trick.

8. Use Equalizer APO

  1. Download and install Equalizer APO.
  2. Restart your computer.
  3. Open C:Program FilesEqualizer APOconfigconfig.txt.
  4. Replace it with Preamp: -24 dB or a similar value to your liking.

Don’t hesitate to give a try to Equalizer APO when the volume is too loud. The changes will be applied immediately when saving the file.

9. Lower system volume

  1. Click Start and open Control Panel.
  2. Select Hardware and Sound.
  3. Click Sound.
  4. Click the Default Device option.
  5. Select Properties/Levels.
  6. Scroll down and check the level, if it is at 100, lower it to 10 percent.

10. Turn off sound processor

Some computers may have a built-in sound equalizer like DTS Studio Sound, which starts automatically with Windows.

This processor can create an amplified signal forcing you to have a volume set high at 3 or 4, so you cannot adjust it, and it gets too loud.

In this case, turn off the processor to get a regular sound volume that you can modulate finely, and it will fix things when the sound is too loud in Windows 11.

11. Switch to Windows native audio driver

  1. Right-click Start and then select Device Manager.
  2. Expand the Sound, video & game controllers.
  3. Right-click on Realtek High Definition Audio.
  4. Select to Update Driver Software.
  5. Click on Browse my computer for driver software.
  6. Click Let me pick from a list of drivers on my computer.
  7. Put a check in the box Show compatible hardware if not already checked.
  8. In the list of devices, click High Definition Audio (the native driver).
  9. Click Next.
  10. On the Update Driver Warning box, click Yes (install the driver).
  11. Restart the laptop if prompted. If not prompted, then no need to restart.

Depending on the audio driver your computer model uses, it could create problems like the volume being too loud in Windows 10.

If using Realtek, for example, it could cause such issues, so you can switch to the native audio driver, as described above.

To get back to the Realtek driver, do it again, but reverse the names in the steps above.

12. Install updated firmware (BIOS)

BIOS allows Windows to start when the computer is turned on. Updating it can resolve compatibility conflicts that may exist between different hardware components on the computer.

Before you begin updating the BIOS note the product number of your computer, have an Internet connection ready, and a pencil and paper.

  • Find your current BIOS version number by clicking Start, then typing exe in the search box. Click msinfo32.exe from the list of results
  • In the System Information window, look for BIOS Version/Date (your current BIOS version) and write it down on the paper
  • While still in the System Information window, look for Processor entry and write it down on the paper. Ensure that the BIOS you are about to install is meant for use with your computer’s specific processor.
  • Find and download BIOS updates by going to your computer manufacturer’s website and finding the product page for your computer’s model. Select the OS and click Submit. If a BIOS category is listed, select BIOS, then choose the correct one for your processor and follow the screen prompts

Note: Make sure to read the overview and system requirements to confirm the BIOS update is for your computer, then click Download and save it to your desired location. Don’t select Run BIOS update over the network.

  • Install the BIOS update, which will take a few minutes, during which time the computer may beep or display goes blank, cooling fans will turn on and off, and the power button will flash – this is normal and expected. Do NOT shut down or restart until the update is complete.
  • Close any open programs prior and disable your antivirus (enable after installation).
  • Find the BIOS file and double-click on it to start the installation, then follow the on-screen prompts.
  • Wait for the installation to complete and restart your computer.

After updating the BIOS, do a sound test to check the volume. If you still find the volume too loud in Windows 10, perform a system restore, as shown in the next solution.

13. Perform a system restore

  1. Click Start.
  2. Go to the search field box and then type System Restore.
  3. Click Create a Restore point.
  4. Click Next.
  5. Pick a restore point created before you first experienced the problem.
  6. Click Next.
  7. Click Finish.

If the sound was regulated before but has since stopped working or is too loud, use the Windows System restore utility to attempt to correct the problem.

Note icon NOTE
The Windows System Restore utility restores system files to a specific point in time, called a restore point. Any software application or utility that is installed after the restore point is created will not work and must be reinstalled.

After the system restore, test the sound again to see if it restores your sound back to normalcy.

If you’re still having trouble with the volume too loud in Windows 10, post a comment in the section below and let us know the details.

Even more, keep in mind that the previously mentioned solutions may be applied when dealing with any of these issues:

  • Speakers too loud at lowest volume – If you’re looking for an easy fix, then let us tell you that restoring the original audio driver will do wonders in your case.
  • Windows 10 audio too loud – If the sound volume on your Windows computer has become too loud, feel free to adjust settings using the Levels tab or update your audio driver.
  • Windows 10 notification sounds too loud – If you are getting this problem with notification sounds too loud, you should run the Hardware Troubleshooter. It helps fix a wide variety of issues.
  • Windows 10 system sounds too loud – When the system sounds too loud, there is another thing that you can do. As detailed above, download Boom 3D and make a few quick changes.

We hope you managed to fix the Windows system sound too loud issue on your device using our guide. Let us know which solution worked for you in the comments section below.
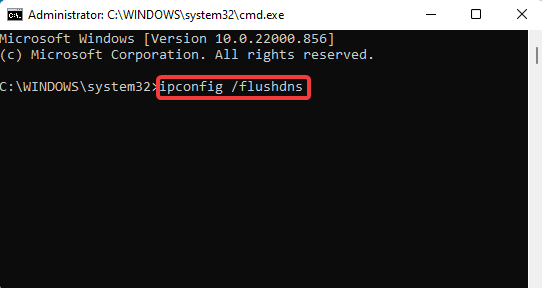
Fix: Windows 11 is Not Assigning Drive Letter Automatically

When you connect a new drive to a computer, the operating system assigns it a letter automatically. A drive letter is a unique identifier used to identify a specific disk drive or partition. It’s often used as a shortcut for the physical device name and can be seen in File Explorer or Disk Management tool. 

However, this may not always be the case, and sometimes, your drive may be missing a letter. This is a normal occurrence, and it happens because Windows does not recognize your SSD among other reasons. If you’re facing something similar, we have some answers below on how to fix this issue.

Why is Windows 11 not assigning a drive letter automatically?

If you have inserted a USB mass storage device and it’s not showing a drive letter, it could be because of one or more of the following reasons:

  • BIOS is unable to detect a drive – It’s possible that the BIOS isn’t recognizing an optical disc drive in your computer. This can be caused by a faulty device driver, or the CD-ROM is not working.
  • Old OS – The computer might be using an older operating system and doesn’t support assigning drives automatically. You may have to upgrade to Windows 11.
  • Virus/malware – It is possible that the system is infected with malware or viruses that prevent it from assigning drives automatically especially if you don’t have a comprehensive antivirus solution.
  • Improper disk formatting – If the disk you are using is not properly formatted, Windows 11 won’t be able to read the sd card and hence can’t find the drive letter. You must format the drive before you can assign it a drive letter.
  • Disabled automatic drive assignment – In some earlier versions of Windows, the option to automatically assign drive letters is not enabled by default.
  • Incompatible hardware – This can happen if you have an old hard drive that is incompatible with the new operating system, or an old laptop or desktop computer that has been upgraded to Windows 11 without meeting the system requirements.

When you create a new drive letter in Windows, the operating system automatically assigns the letter to that drive. But if you want to assign a different drive letter to a particular drive, you can do so using the following methods.

How do I assign drive letters in Windows 11? 

1. Use Settings

  1. Hit the Windows key and select Settings.
  2. Click System on the left pane and select Storage on the right pane.
  3. Select Advanced storage settings under Storage management and click on Disks & volumes.going disks and volumes under advanced storage settings windows 11
  4. Click on the drive you wish to change and hit the Properties button.
  5. Select Change drive letter.clicking change drive letter windows 11
  6. From the drop-down, select the new drive letter and press OK to save changes

2. Use Disk Management 

  1. Right-click on the Start Menu icon and select Disk Management.Disk Management
  2. Next, right-click the drive you wish to assign and select Change Drive Letter and Paths.
  3. In the pop-up window that appears, click on the drive and hit Change.
  4. Select the Assign the following drive letter option and in the drop-down, select a new drive letter and click OK.
  5. If there’s still no drive letter in disk management, you may have to enable it via Command Prompt.

3. Use Command Prompt

  1. Hit the Windows key, type Diskpart in the search bar, and click Run as administrator.
  2. Type in the following command to list the number of drive partitions: list volume
  3. Next, type in select volume Y replacing Y with the corresponding drive you wish to change.
  4. Now type assign letter X and replace X with the letter you wish your new drive to be named as. 

4. Use Powershell

  1. Hit the Windows key, type Powershell in the search bar, and click Run as administrator.disable cortana windows 10
  2. Type the following command to list the drives in your system: Get-Disk
  3. Next type the following command replacing 0 with the corresponding drive number and F with the new letter you wish to assign the drive: Get-Partition -DiskNumber 0 | Set-Partition -NewDriveLetter F

How do I force a drive letter to assign?

A few preliminary checks that may help include:

1. Assign the drive letter manually

  1. Right-click on the Start Menu icon and select Disk Management.Disk Management
  2. Next, right-click on the drive you wish to assign and select Change Drive Letter and Paths.
  3. In the pop-up window that appears, click on the drive and hit Add.
  4. Click on Assign the following drive letter option and in the drop-down, select a new drive letter and click OK.

2. Enable the auto-mount option

  1. Hit the Windows key, type Diskpart in the search bar, and click Run as administrator.
  2. Type and Enter the following commands: automount automount enable
  3. Next, type exit to leave the diskpart command and check whether your drive has been assigned a letter.

3. Disable hidden/missing default drive letter attributes

  1. Hit the Windows key, type Diskpart in the search bar, and click Run as administrator.
  2. Type in the following command to list the number of drive partitions: list disk
  3. Next, type select disk X replacing X with the corresponding number of the drive in question.
  4. Now type list part to display the number of partitions available for that disk.
  5. Type select partition Y and replace Y with the corresponding number of the partition in question.
  6. Next type attributes volume. If the Hidden and No Default Drive letter options come with a Yes, proceed to the next command.
  7. Type in the following commands and press Enter after each one to disable: attributes volume clear hidden attributes volume clear no default drive letter

And that’s how to fix the issue where Windows 11 is not assigning a drive letter to your drives. Elsewhere, if you’d like to show drive letters before drive names, we have an expert article detailing how to go about it.

We also show you how to remove non-existent CD drives from your system that may appear but lead to a dead end when you click on them.

If Windows was not assigning drive letters automatically, we’d love to know which method worked out for you. Leave us a comment down below.

FIX: Error Code 0x80070003 Update Files Are Missing

Trying to update Windows but getting error code 0x80070003? You’re not alone.The full error message: Some update files are missing or have problems. We’ll try to download the update again later. Error code: (0x80070003).

So, how do you fix this? You’ll need to adjust settings, fix file corruption, and modify the registry. It may seem like a lot, but don’t worry – we’ve outlined each step below. Just follow along!

How do I fix error code 0x80070003?

1. Modify the Registry

    Windows updates can run into trouble due to corrupted registry files, so you may need to change your Registry settings. Apply the provided steps below without changing other files.

  1. 1. Press Windows + R to open Run, type regedit in the text field, and hit Enter.

    error-code-0x80070003-windows-update
  2. 2. Click Yes in the UAC prompt.

  3. 3. Paste the following path in the address bar and hit Enter:HKEY_LOCAL_MACHINE\SYSTEM\CurrentControlSet\Services\WIMMount

    error-code-0x80070003-windows-update
  4. 4. Now, double-click on the ImagePath entry on the right.

    imagepath to fix 0x80070003
  5. 5. Make sure the Value data here has system32\drivers\wimmount.sys listed under it. If it doesn’t, make the changes and click on OK. 

    change value data to fix 0x80070003
  6. 6. Now, press Windows + E to open File Explorer, paste the following path in the address bar, and hit Enter:C:\Windows\System32\drivers\

    file explorer to fix 0x80070003
  7. 7. Verify you have the wimmount.sys file here.

    check wimmount.sys to fix 0x80070003
  8. 8. Finally, restart the computer.

Once done, check if you can now download Windows Updates without encountering the 0x80070003 error.

2. Run the Windows Update troubleshooter

  1. Download Windows Update Troubleshooter.
  2. Once the file is downloaded, run it.
  3. Select one of the available options and click on Next.
  4. Wait for the process to finish.
  5. If the issue is still there, repeat the process, but select a different troubleshooter.

3. Run the DISM and SFC scan

  1. Press Windows + R to open Run, type cmd, and hit Ctrl + Shift + Enter.cmd
  2. Click Yes in the UAC prompt.
  3. Now, paste the following three commands one at a time and hit Enter after each:DISM /Online /Cleanup-Image /CheckHealth DISM /Online /Cleanup-Image /ScanHealth DISM /Online /Cleanup-Image /RestoreHealthdism tool
  4. Next, execute the following command to run the SFC scan:sfc /scannowsfc scan to fix 0x80070003
  5. Once done, check if you are now able to install the updates.

Corrupt system files are a likely reason you are getting the 0x80070003 update error in Windows, and the SFC (System File Checker) scan and DISM (Deployment Image Servicing and Management) tool should do the trick in this case.

4. Restart or stop the Windows Update Service

  1. Press Windows + R to open Run, type services.msc, and then hit Enter.
  2. Now, right-click on the Windows Update service, and select the Stop button.
  3. Reboot your PC.
  4. Return to the Windows Update service, right-click on it, and select Start.

This solution usually works, but if you’re having issues with services, check out what to do when the Windows Update service isn’t running.

5. Reset the Windows Update Components

In case the previous methods didn’t work, it could be corrupt Windows Update components to blame. Here, the simplest solution is to reset the Windows Update Components.

You can do that by running a batch file or manually executing the commands. The process is usually quick and highly effective at eliminating the 0x80070003 error with the KB5007186 update.

6. Manually download each update

  1. Visit the Microsoft Update Catalog website.
  2. Enter the KB number of the update you want to download.
    How to fix the 0x800f0831 Windows 11 update error
  3. Now locate the update that matches your PC architecture and download it.
  4. Once the update is downloaded, run it and follow the instructions on the screen to install it.

7. Perform an in-place upgrade

  1. Visit the official Windows 10 download page and click on the Download Now button.dowload media creation tool to fix 0x80070003
  2. After the tool is downloaded, right-click on it and select Run as administrator.run as administrator to fix 0x80070003
  3. Click Yes in the UAC prompt.yes
  4. Wait for the tool to get things ready.wait
  5. Click on Accept to agree to the Microsoft Software License Terms.accept terms to fix 0x80070003
  6. Choose Upgrade this PC now and click Next.upgrade this PC now to fix 0x80070003
  7. Wait for the update to download. This can take a while.downloading
  8. When you reach the Choose what to keep screen, select Keep everything and then proceed with the in-place upgrade.
  9. Now follow the instructions to complete the process.

This is by far the most effective method to fix the 0x80070003 error. And remember, the installed applications and stored files won’t be affected during the process.

How to fix update error 0x80070003 on Windows 11?

1. Run a quick SFC scan

  1. Right-click the Start button and select Windows Terminal (Admin).
  2. Now run the following command: sfc /scannow
  3. Wait for it to finish. The process can take 10 minutes or more.
  4. After it’s finished, check if the problem is still there.

The reason why you’re getting error code 0x80070003 is that you have problems with essential Windows services. Corrupt system files and misconfigured Registry settings are also common culprits.

But if you follow the steps above carefully, the error code 0x80070003 should be fixed by the time you reach this part.

In case the problem persists, you have no option but to reinstall Windows 10, and remember, you will lose the applications and files stored on the computer.

Also, you may use a reliable Windows Update repair tool and fix all such errors automatically and in no time.

Should you run into any issues along the way, let us know in the comments below.

Monitor Fades To Black On PC: 4 Quick Fixes

Are you experiencing problems with your monitor screen? If the colors are no longer accurate and if you feel like everything is fading in and out, you need to diagnostic the issues and find a fix as soon as possible.

A fading monitor screen can mess up your work and can turn out to be an annoying issue, mainly because finding the reasons why the brightness and the colors are no longer as vivid as before can represent a real challenge.

Why does my monitor slowly fade to black?

Well, if you get a fading monitor screen after installing or running a new app or program, or if the issue occurred after you flashed a new Windows 10 update, you can start to isolate the malfunction.

In most situations, there isn’t a hardware-related issue but a malfunction caused by a certain program or feature. So, as you can already tell, you can fix everything by yourself through dedicated troubleshooting solutions.

Of course, if after applying the steps explained in this tutorial you won’t be able to solve the Windows 10 fading monitor screen issue, you should consider a hardware problem – it’s possible to have a faulty monitor or display.

In that case, you should take your device back to service and ask for a more experienced opinion and implied assistance.

What should I do when my monitor fades to black?

1. Initiate a system restart

Sometimes, the screen monitor might fade out due to an unresponsive program or other similar corrupted processes. So, in this case, the problems can be fixed easily by refreshing the Windows 10 OS. Well, the quickest way in which you can obtain a fresh restart is by rebooting your device.

During the reboot, your Windows 10 system will be reinitialized and all your built-in features will restart. If minor problems were causing the screen malfunction, now you should be able to fix everything without applying more dedicated troubleshooting steps; otherwise, go ahead and resume the rest of the guidelines from below.

2. Apply Windows updates

  1. Press the Win+I keyboard hotkeys.
  2. From the System Settings window that will be launched click on the Update & Security field.
  3. Next, click on Windows update, located in the left panel of the main window.
  4. windows update
  5. If there is a Windows 10 update available for your device you will notice its notification displayed.
  6. Just follow on-screen prompts and install the available patches.
  7. When done, reboot your computer.

Note: If the fading screen monitor problem occurred after a Windows 10 was applied, you can remove this update in order to see if that resolves your issue. To remove a certain system update follow:

  1. Use the steps from above and access the Windows Update page.
  2. From there, scroll down and click on the Advanced options link.view update history windows 10
  3. Select View your update history.
  4. Select which update to uninstall and reboot your system in the end.

3. Update graphic drivers

  1. Right-click on the Windows Start icon.
  2. From the list that will be displayed choose Device Manager.device manager windows 10
  3. From Device Manager expand the Display Adapters entry.
  4. There, right-click on your graphic drivers and choose Update Driver Software.
  5. Wait while the update is applied.
  6. Close Device Manager and reboot your Windows 10 device.

Alternatively, you can use dedicated driver updater software to make sure your drivers are always in check. Utilities such as Outbyte Driver Updater come with large driver databases and up-to-date technology to find the perfect driver for your hardware. It is lightweight and automatic, saving you a lot of time.

4. Reinstall graphic drivers

  1. Access Device Manager again, as already detailed above.
  2. Expand Display Adapters and right-click on your drivers.
  3. Choose Uninstall.
  4. When done, close Device Manager and reboot your computer.
  5. On Startup, you will be prompted to install the latest graphic drivers.
  6. Just follow on-screen prompts and resume the installation process.

If automatically reinstalling the graphic drivers isn’t working for you, try to manually install them from your manufacturer’s official website.

Of course, first of all, completely uninstall the drivers from your computer – after removing them from Device Manager, access Control Panel, switch to a category, and click on the Uninstall option available beneath the Programs entry; find any programs associated with your graphic driver and uninstall it.

Finally, resume the manual installation process – just download and run the executable file from your manufacturer’s official website and reboot your Windows 10 system in the end.

The troubleshooting steps explained above should help you fix the fading screen monitor issue. Along with the already detailed solutions, you can also run a system scan (run sfc /scannow from an elevated command prompt window) or you can initiate a system restore – if the problem is somehow related to Windows 10 system files, by using a restore point you can address the malfunctions.

Don’t forget that you can also experience a hardware problem, a situation during which you might have to ask for more experienced assistance.

Speaking of monitor issues, we also have a guide on what to do if the monitor keeps turning off and on, so you might want to check it out.

We hope you managed to fix your monitor fades to black issue and restored the proper functionality of your PC. Let us know in the comments section below which solution worked best for you.

Fix: GPU Keeps Crashing / Freezing on Windows 10 & 11

GPU crashing on Windows 10/11 can ruin your gaming experience and slow down other operations depending on GPU. 

Here, in this guide, we will discuss the methods to fix the video card that keeps crashing right after talking about the causes of its occurrence. 

What causes the graphics card keeps crashing on Windows 10/11?

There are various reasons behind the graphics card keeps freezing issue; some of the popular ones are: 

  • Outdated DirectX – The DirectX, if outdated, can cause issues with your GPU, causing it to crash. To fix it, you need to update it.
  • Obsolete graphics driver – If the graphics driver on your computer is old or outdated, then the GPU might crash while playing games.
  • Incompatible game settings – If some of the settings on your game are misconfigured or not aligned with the GPU, your GPU might crash randomly.
  • Overclocking – If you have overclocked your GPU, then with the excessive load, the GPU might crash.
  • Overheating – Excessive load and dust can cause overheating, another popular reason for the GPU crashing.

How do I fix the graphics card that keeps crashing on the PC?

Before moving to the detailed troubleshooting steps, follow these quick fixes first:

  • Disable background apps.
  • Make changes to in-game settings.
  • Finally, check for the power supply unit.
  • Clean the GPU if it is externally placed, or open the cabinet of your PC and clean it.

1. Update DirectX

  1. Press Windows + R to open the Run console.DXDIAG run -gpu keeps crashing
  2. Type dxdiag, and press Enter to open DirectX Diagnostic Tool.
  3. Check the DirectX Version and if it is outdated, then proceed.DXDIAG WINDOWS
  4. Press Windows + I to open Security.
  5. Go to Windows Update and click Check for updates.
  6. If there is an update available, download and install it. Windows will install the latest version of DirectX for you.

2. Update the graphics driver

2.1 Update the driver manually

  1. Press Windows + R to open the Run window.DEVICE MANAGER - GPU crashing
  2. Type devmgmt.msc and press Enter to open Device Manager.
  3. Locate and click on Display adapters. Go to graphics driver and right-click it. Select Update driver.Graphics Driver update -gpu keeps crashing
  4. On the next window, select Search automatically for drivers. Now, follow the on-screen prompts to complete.Search automatically for drivers

2.2  Use a third-party tool

It is essential to keep drivers up to date for a smooth, functioning PC. You can do it manually, but it is a time-consuming process.

Using a third-party driver updater is advised to help you update the drivers without hassle. These powerful tools allow you to quickly scan for and download any outdated driver. 

3. Stop overclocking

If your GPU is crashing, it could be overclocking the settings that you have modified. To stop overclocking, you need to revert the core clock, voltage, and memory clock settings to default.

You can use GPU overclocking software such as MSI Afterburner to do that. For demonstration purposes, we have used the steps to Reset settings using MSI Afterburner:

  1. Launch the MSI Afterburner app.RESET -gpu keeps crashing
  2. Locate the Reset button from the bottom of its user interface.

4. Run the SFC scan

  1. Press the Windows key, type CMD and click Run as administrator.DOS COmmand Prompt -GPU crashing
  2. Copy and paste the following command and press Enter: sfc/scannow
  3. Once the scan is complete, restart your PC.

So, these steps must be followed to fix GPU crashing on Windows 10/11. Besides that, we recommend using a bottleneck calculator to see if your PC components are compatible. If nothing worked for you and your GPU is old, you can consider replacing it with a new one.

If you have any questions or concerns, feel free to mention them in the comments section below. We will be happy to help! 
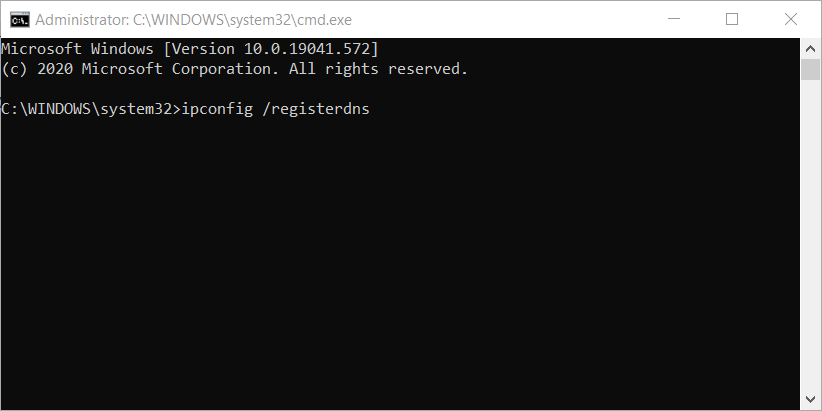
CyberMonday Adobe Without Subscription – 50% OFF [2023]

There’s no better choice than Adobe Illustrator in the vector editing software industry. But can you buy it outright as a professional designer or illustrator?

Carefully read the lines below and make an informed choice instead regarding the subject of using Adobe without subscription. You’ll be thankful to yourself at a later point!

Can you buy Adobe without a subscription?

As appealing as it may sound to avoid paying for a subscription plan, it is not feasible.

Trying Adobe Illustrator as part of a 7-day trial version or paid on a monthly/yearly basis are your only viable options right now.

Looking for shady alternatives is no good. Purchasing Adobe Illustrator through illegal methods is not recommended either since the promise of a lifetime version is merely a dream.

How can I use Adobe without a subscription for free?

Are you thinking to try the latest release of Illustrator for free, without having to resort to illegal methods? You may do so and here are your options.

1. Use the trial version of Adobe Illustrator

The best part is that the trial lets you test its amazing array of tools completely free of charge.

Moreover, it works on both macOS and Windows, so it doesn’t matter which platform you prefer to use. We share the enthusiasm with all of you who are eager to test the software.

However, with the risk of having your expectations disappointed, do note that this trial starts when you check out and it lasts for no more than seven days.

Although unlikely, keep one aspect in mind if you happen to discover that Adobe Illustrator isn’t what you’ve expected.

Your trial will automatically turn into a paid Creative Cloud membership after these seven days, so cancel in time if that’s your wish. And even if you’d like to, you can’t download a trial version of Illustrator CS6.

Adobe Illustrator

A powerful application to set your imagination free, and create professional-level digital photography easily.

2. Alternatives to Adobe Illustrator permanent license

As said before, you can no longer pay a one-time fee, grab the software, and use it for as long as you please. The Adobe Illustrator one time purchase offer is gone.

Since the Adobe Illustrator permanent license is out of the question, what are your options next?

Adobe decided to drop the Creative Suite brand and made the transfer to a subscription model known as Creative Cloud.

There are different configurations waiting for you, which could get a bit confusing.

However, it might just be music to your ears to hear that none of these monthly or annual plans will empty your bank account. On the contrary, some of them will help you save a bit of your money.

For example, Adobe Illustrator which is used by countless designers worldwide to create various types of amazing artwork gives you access to the latest features and updates as soon as they’re released.

Add up to the list of outstanding features for busy professionals, 100GB of cloud storage, Adobe Fonts, Adobe Portfolio, and Adobe Spark, and you won’t be able to face the temptation.

Moreover, you can benefit from 40% off Adobe Illustrator, as part of the Creative All App Cloud. Hence, you will benefit from over 20 professional apps to create amazing graphics.

Either you need Illustrator or another editing program, you can benefit from leading features regarding photography, video editing, or vector graphics on your desktop.

With that being said, you should profit from the presented deal on Adobe Cloud or simply get the single app if it suits you better.

The most affordable option is to pay for the single-app plan:

  • Annual plan, paid monthly — US$20.99/month
  • Annual plan, prepaid — US$239.88/year
  • Students & teachers — US$19.99/month

⇒ Get Illustrator

If you fancy the idea of a complete package that gives you all Creative Cloud apps, these are your options:

  • Annual plan, monthly payments – $29.99/month ($359.88 per year)
  • Prepaid annual plan – $359.88/year
  • Teams plan – starting at $33.99/month

⇒ Get Creative Cloud

As for those discounts, as a student or a teacher of any educational establishment, you may save up to 50% on the Adobe Illustrator purchase.

If you’re eligible, take advantage of the offer and use it at a later point to buy any software or the entire Creative Cloud applications list.

That’s how buying Adobe with a subscription is possible if you plan to make major professional changes. Let us know which plan works for you better in the comments section below.

Xbox App Won’t Install: 10 Ways to Fix It

Xbox app not installing can be frustrating when all you want is to start gaming on your PC. Whether the installer won’t launch, the app refuses to download, or your games get stuck mid-install, these issues can stop you in your tracks. Luckily, most problems have straightforward fixes, from checking Windows updates to resetting the Microsoft Store, so you can get back to gaming without hours of frustration.

How do I fix Xbox app if it won’t install?

Before getting to the actual software tweaks, make sure you have a stable Internet connection. If you use a VPN client or a proxy server, try disabling and removing them if the Xbox app won’t install.

Also, download and install the Xbox app from Microsoft Store directly, not from third-party websites.

1. Reset the Xbox app package

    In order to repair the Xbox app on your PC, you can follow the quick guide below using the PowerShell commands.

  1. 1. Go to Search, type Powershell, and click on Run as administrator.

    xbox-app-windows-10-wont-open
  2. 2. Enter the following command, and press Enter: Get-AppXPackage -AllUsers | Foreach {Add-AppxPackage -DisableDevelopmentMode -Register "$($_.InstallLocation)\AppXManifest.xml"}

    xbox-app-windows-10-wont-open/
  3. 3. Wait for the process to finish

After performing this PowerShell command, try to run your Xbox app for Windows 10 again. If you’re still unable to run it, try the solution listed below.

Keep in mind that resetting the cache will remove any saved passwords and private information stored in the app. It’s not ideal, but sometimes the cache can deem the software unusable.

2. Run the License Service Script

  1. Open Notepad.
  2. Paste the following text into Notepad: echo offnet stop clipsvcif “%1″==”” ( echo ==== BACKING UP LOCAL LICENSES move %windir%serviceprofileslocalserviceappdatalocalmicrosoftclipsvctokens.dat %windir%serviceprofileslocalserviceappdatalocalmicrosoftclipsvctokens.bak )if “%1″==”recover” ( echo ==== RECOVERING LICENSES FROM BACKUP copy %windir%serviceprofileslocalserviceappdatalocalmicrosoftclipsvctokens.bak %windir%serviceprofileslocalserviceappdatalocalmicrosoftclipsvctokens.dat )net start clipsvc
  3. Save the file as license.bat.
  4. Execute the script.
  5. The script will uninstall the app, so head over to the Microsoft Store, and reacquire Xbox app.

This script was introduced in Windows 10 Technical Preview when users had problems running certain Windows 10 apps.

You could give it a try, it won’t hurt. Now, should you need more information, we helped diagnosed and fix a similar problem with the Xbox app not opening on Windows 10.

You could also try refreshing the Client License Service. In this case, you’ll need to download the ClipSVC.reg file on your PC, double-click it and allow it to merge with the one already running.

A restart should suffice to make it work again.

3. Clear the Microsoft Store cache

  1. Press Windows + R to launch Run, type wsreset.exe, and hit Enter.
  2. Once the reset process is finished, restart your PC and then check if the Windows Store App works as it should.

The Xbox App depends on the Microsoft Store App to run properly. So, if there is something wrong with the Store app, many apps won’t launch or won’t download anything.

In this case, resetting the Store cache can fix the problem, so make sure you do that by following the steps above.

4. Check for the latest Windows updates

  1. Click the Start button and select Settings.
  2. Pick Update & Security to open the Windows Update window.
  3. Click the Check for updates button and wait a few seconds to see if there are any new ones.
  4. If there are, click on Install now. The Xbox app won’t install on the D drive issue will be solved afterward.

Not having the latest Windows updates installed can cause problems with the installation or run of any apps, so this is an important step to take.

Alternatively, you could refresh the Windows update service by downloading a .reg file and merging it, just like we showed you in one of our previous solutions.

5. Run the Windows Apps troubleshooter

  1. Click on the Start button and select Settings.
  2. Now click on Update & security.
  3. Select Troubleshoot from the left pane, and then click on Additional troubleshooters from the right pane.
  4. Scroll down until you find Windows Store Apps, click on it, and select the Run the troubleshooter button.
  5. Follow the steps to carry on the troubleshooting process. The Xbox app not working on PC issue will be fixed.

Like any app, the Xbox one is prone to regular problems, but you can fix them by running the Windows Store Apps troubleshooter as shown in the steps above.

6. Create a New Local Admin Account

Some profile corruption can block installations:

  1. Go to Settings → Accounts → Family & other users → Add account.
  2. Create a local admin account.
  3. Log in with the new account and try installing the Xbox app.

7. Repair Corrupted System Files

  1. Open Command Prompt (Admin).
  2. Run: sfc /scannow
  3. After that completes, run: DISM /Online /Cleanup-Image /RestoreHealth
  4. Restart and try installing the Xbox app.

8. Enable Required Services

Ensure these services are running:

  • Microsoft Store Install Service
  • Windows Update
  • Xbox Live Auth Manager
  • Xbox Live Game Save
  • Xbox Accessory Management Service

Use Win + R → services.msc to check their status.

9. Reset Windows Store Components (Advanced)

  1. Open PowerShell (Admin).
  2. Run: Get-AppxPackage -allusers Microsoft.WindowsStore | Foreach {Add-AppxPackage -DisableDevelopmentMode -Register "$($_.InstallLocation)\AppXManifest.xml"}
  3. Then try reinstalling the Xbox app.

10. Install Gaming Services Manually

  1. Open Microsoft Store → search for Gaming Services.
  2. Click Install (or Update if already installed).
  3. After that, try installing the Xbox app again.

How do I manually install the Xbox app?

  1. Press Windows then type Microsoft Store and open the top result.mic-store xbox app won't install
  2. Input Xbox inside the search bar at the top of the window, press Enter then click the Get button next to the Xbox app result.xbox-get xbox app won't install

Obviously, this method will only work if the store is also working as intended. However, if the Microsoft Store won’t download anything, you might need to perform an in-place upgrade.

  1. To do that, go to the Windows 11 download page and select the multi-edition ISO.
  2. Use the Mount option, select Setup.exe, and follow the prompts to install.
  3. Don’t forget to check the boxes allowing you to keep both your personal files and your apps.

A lot of users also reported that the Xbox app keeps closing in Windows 10. We have an excellent guide dedicated to fixing Xbox app closing issues.

As was the case with solution #1, you’ll have to keep in mind that, deleting the cache will remove any saved information from the MS Store, including login credentials, payments, etc.

Some of our readers also suggested changing the Windows region from Settings to the United States and reset the Microsoft Store service before downloading and installing the Xbox app so you should try that too.

If you also have problems opening the Xbox app in Windows 10, our team has devised a comprehensive step-by-step guide to resolve that issue. We also have a guide on what to do if Xbox app won’t let you sign in, so don’t miss it.

This isn’t the only error you can encounter, and we covered Xbox app 0x89231806 error in another guide, so you might want to check it out.

That’s about that, as you can see, the solution to this problem lies in resetting the app. In case these solutions didn’t work for you, or you have some solutions of your own, let us know in the comments.

Download & Install Windows 7 Service Pack 2 (64-bit & 32-bit)

The roll-up tool, Service Pack 2 for Windows 7, simultaneously installs all previously released updates for these systems.

Follow the guidelines below to install it on your PC:

How to download Windows 7 service pack 2

Note icon NOTE
Microsoft officially ended mainstream Windows 7 support on January 14, 2020. This means your PC will no longer receive security updates and patches. We advise upgrading to a newer version like Windows 10 or 11. And if you want to keep using Windows 7, make sure to use a reliable antivirus and be extra cautious when surfing the web.

Here’s how to download and install Windows 7 service pack 2 for 64-bit and 32-bit machines:

  1. Go to the Microsoft Update Catalog.
  2. In the search bar at the top, type KB3020369.microsoft update catalog windows 7 service pack 2
  3. Select the package you want to install and click on the Download button.download windows 7 service pack 2
  4. Follow the on-screen instructions to finish installing Windows 7 service pack 2.

The update includes all patches from February 22, 2011 (Windows 7 SP1) to April 12, 2016. Downloading this tool installs all previous updates for Windows 7 or Windows 8.1 at once.

Dubbed KB3020369, it serves as a Service Pack 2 for Windows 7, containing nearly all non-security updates released after SP1.

What is Windows monthly quality rollup?

Besides showing us this ‘convenience rollup tool,’ Microsoft also introduced the idea of monthly rollups.

Monthly rollups are released at the end of each month and will contain all non-security updates for Windows 7 or Windows 8.1 released during that month.

Monthly rollups are offered to users through Windows Update, WSUS, SCCM, and Windows Update Catalog.

Summary

That’s all you need to know about downloading Windows 7 Service Pack 2 for 64-bit and 32-bit systems. Remember that Microsoft officially ended support for Windows 7 on January 14, 2020, which means no further updates or security patches.

If you have any more questions about this topic, feel free to ask us in the comments below.

How to Pin Recycle Bin to Taskbar on Windows 11

If you are one of those users who want a clean desktop without any icons obscuring a single pixel of their new Windows 11 wallpapers, we got you covered. The first step is to pin the Recycle Bin to the Taskbar in Windows 11.

An uncluttered taskbar brightens up our mood and makes working a lot more fun. But with the Recycle Bin refusing to let go, the task looks a bit challenging. Don’t worry! We have got you covered.

Can I pin Recycle Bin to the Taskbar?

While there’s no built-in option, you can still pin Recycle Bin to the Taskbar in Windows 11 with a quick workaround that works seamlessly across devices. Also, for those who didn’t know, you could pin a website to the Taskbar in Windows 11.

It’s a little more time-consuming than the conventional single-click option as for the rest of the apps, but the whole process shouldn’t take more than a few minutes.

How can I add Recycle Bin to the taskbar on Windows 11?

    In order to pin your Recycle Bin app to your taskbar, you need to create a shortcut for it, which you will then add to the taskbar. You can fully customize the shortcut by giving it a name and icon of your choice. Here’s how to do it:

  1. 1. Create a shortcut on the desktop

    The first thing you will need to do is, of course, create a shortcut. You can do so by right-clicking anywhere on your desktop, in order to spawn the menu, from which you will first select New item, and afterward choose Shortcut.

    create shortcut windows 11
  2. 2. Set up a shortcut path

    After you created the shortcut, it’s time to select a path for it. To make sure that you create a shortcut for the Recycle Bin, input the following path into the window that opened, and then press Next: %SystemRoot%\explorer.exe shell:RecycleBinFolder

    choose shortcut path windows 11
  3. 3. Give a name to the shortcut

    Now it’s time to name this shortcut so that it matches your preference. In this particular case, you can give this shortcut the same name as the Windows built-in tool that you are trying to pin to the taskbar, which is Recycle Bin.

    name shortcut w11
  4. 4. Click on Show more options

    You will probably also want an icon that matches the Recycle Bin’s one. You can change it by right-clicking on the shortcut and selecting Show more options.

    show more options shortcut
  5. 5. Go to Properties

    This action will spawn the classic right click drop down menu, from which you have to select Properties.

    properties shortcut
  6. 6. Click on Change Icon

    From the settings windows that will appear, all you have to do is click on the Change Icon button.

    change icon shortcut windows 11
  7. 7. Set up a new icon for the shortcut

    Another settings window will open, one that will provide you with quite a few icon choices for your new shortcut. After selecting the one you want, click on OK, and then on Apply.

    change shortcut icon selection
  8. 8. Click on Show more options

    You are almost done! After performing all these actions, right-click on your new shortcut and select Show more options from the menu.

  9. 9. Pin the shortcut to the taskbar

    The last step is to click on the Pin to taskbar option and your shortcut will automatically be added to the Windows 11 taskbar.

    pin shortcut to taskbar

Now that you have everything pinned to your Start menu or your taskbar, you can enjoy your new, clean, operating system’s desktop.

Similarly, you can pin a batch file to the Taskbar on Windows 11 to access repetitive tasks without any hassle. To learn more, read this guide.

Did you find this article helpful? Let us know in the comments section below.

How to Uninstall HP Print and Scan Doctor [Easy Guide]

The HP Print and Scan Doctor is a free printer/scanner diagnostic tool for Windows PCs. Nevertheless, it has its downfalls, so you might want to know how to uninstall HP Print and Scan Doctor easily.

Now, the utility helps solve the most common problems in HP printers/scanners, such as:

However, many users complained that the HP Print Scan Doctor is waking their computer when it shouldn’t. This can be related to an HP Print and Scan Doctor file corrupted scenario.

Others are unsatisfied with the fact that HP Print and Scan Doctor may occasionally prompt you to reinstall it even if it’s currently installed.

For instance, it may require you to allow it to reinstall if it finds a missing/outdated printer driver.

This is one of the reasons why you might want to remove HP Print and Scan Doctor. So how safe is it? Let’s find out.

Is HP Print and Scan Doctor safe?

This is indeed a legitimate tool.

  1. You can download HP Print and Scan Doctor from the official HP support site.
  2. Switch on your printer and ensure it’s connected to the PC
  3. The file is light so the download completes within a few moments. Up next is installation.
  4. Right-click the executable installation file (you can find it in the download folder or in the taskbar).
  5. Click Run and wait for the program to extract.
  6. Click yes once prompted by User Account Control settings and accept the terms.
  7. The installation is completed within moments and the program automatically opens.
  8. On the displayed Welcome screen, click the Start tab to see all the available printers on your PC.How do I troubleshoot my HP scanner
  9. Select the printer you want to fix from the list, then click Next.
  10. If the printer with problems isn’t shown or if there’s a connection problem, click the option My product is not listed. The tool will prompt you to turn the printer off and then on.
  11. Choose how your printer is connected, for example, USB.How do I troubleshoot my HP scanner
  12. Now follow the relevant on-screen instructions before tapping Retry. Your HP printer should eventually appear on the list.
  13. Click Fix Printing or Fix Scanning, according to your situation. The software communicates with the printer and identifies all the potential problems.What is HPPSdr EXE
  14. To repair, follow the on-screen step-by-step instructions which will depend on the issue being worked on. Be sure to take the actions the software recommends.
How do I download HP print and scan doctor?

How do I uninstall HP Print and Scan Doctor?

1. Delete the HPPSDR.exe file

  1. Navigate to the program’s current file location e.g. the desktop.
  2. Right-click on the HP Print and Scan Doctor icon.
  3. Choose Open file location.
  4. Click Delete to remove the HPPSDR folder along with the tool.

If you went straight for the Control Panel uninstall features, you might be awed to discover the utility is simply not listed there. Where is HP Print and scan Doctor on my computer? That’s the big question.

Since it’s not actually full-scale software, but merely an executable file, you will not find the app on the list of installed programs.

Instead, you will be able to locate it in the file path (the download destination) you chose when downloading it.

2. Use uninstaller software

If the simple deletion is not enough to get the HP Print and Scan Doctor removed from your PC, consider using a specialized tool for the job.

When it comes to eliminating no longer needed items – including stubborn leftovers that tend to stick behind and generate clutter, uninstaller software is your best bet.

Dedicated uninstaller tools will detect any leftover files and registry entries related to the app you want to delete and permanently remove them from your computer.

HP Print and scan Doctor tries its best to resolve any incorrect printer configurations, print quality, and related HP printer issues. Here’s a quick overview of its capabilities (which are no less impressive):

? Check Print Quality (including faint/missing colors and broken lines). You need to first print a quality diagnostics page.
? Align Print Cartridges (To improve print quality, HP requires that you align newly installed cartridges and periodically align old cartridges as well).
? Clean Printheads Cleaning (If your HP printer displays a missing or failed Printhead error, we have some extra tips for you).
? Print Essential Printer Diagnostic Information (This will help you narrow down on persistent problems).
? Check Toner/Cartridge Ink Levels
? Troubleshoot firewall issues
(Firewall problems cause your printer to lose connection to the PC).

That said, you may no longer need to call a technician with each small problem thanks to this utility.

Solved: Stop Code BAD SYSTEM CONFIG INFO Error in Windows 10

Blue Screen of Death errors, also known as STOP errors, are one of the most serious problems on Windows 10.

The BAD_SYSTEM_CONFIG_INFO error causes a blue screen and can be very intimidating because it prevents you from using the system normally.

What is BAD_SYSTEM_CONFIG_INFO and what causes it?

BSoDs are usually caused by hardware problems so one of the components like RAM or your hard drive might be failing.

However, in this case, the culprit may be the Boot Configuration Data (BCD) in Windows 10. Luckily, it can also be caused by incorrect system settings or third-party software.

We’re saying luckily because these kinds of problems are easier to tackle than having to replace any of your PC’s components.

Other manifestations of the BAD_SYSTEM_CONFIG_INFO error

BAD_SYSTEM_CONFIG_INFO falls into the category of BSoD errors. Along with it, in this article, we’re also going to cover the following issues and more:

  • Bad_system_config_info registry
  • Bad_system_config_info RAM
  • Bad system config info on startup, boot
  • Blue screen of death bad_system_config_info
  • Bad_system_config_info after update
  • Bad_system_config_info hard drive, HDD
  • Bad system config info loop
  • Bad_system_config_info ntoskrnl.exe, ntfs.sys, classpnp.sys, rdyboost.sys

So, if you’re having trouble with any of these error instances, be sure to try the solutions below.

How do I fix the BAD SYSTEM CONFIG INFO BSoD error?

1. Fix the BCD file

Note icon NOTE
To complete this solution, you’ll need a Windows 10 installation DVD or a bootable USB flash drive with Windows 10 on it.
  1. Insert the bootable DVD or USB flash drive and boot your PC from it. If you don’t have one, we have an excellent guide on how to create a bootable media.
  2. Click on Next and then click on Repair your computer.
  3. Choose Troubleshoot.
  4. Then Advanced Options, and select Command Prompt.
  5. Enter the following lines and press Enter after each line in order to execute it:
    • bootrec /repairbcdBad system config info on startup bootrec /repairbcd
    • bootrec /osscanBlue screen of death bad_system_config_info bootrec /osscan
    • bootrec /repairmbrBad_system_config_info after update bootrec /repairmbr

It’s worth mentioning that the last command will delete Master Boot Records and recreate them, so be careful while using it. 

After you’re done, close Command Prompt and restart your PC, then check if the error persists. If the BCD file was the problem, it should have been resolved.

2. Edit the BCD file

  1. Restart your computer while it boots. Repeat this step until you start the Automatic Repair.
  2. Choose Troubleshoot.
  3. Then select Advanced Options and start Command Prompt.
  4. Enter the following lines:
    • bcdedit/deletevalue {default} numprocBad_system_config_info registry bcdedit/deletevalue {default} numproc
    • bcdedit/deletevalue {default} truncatememoryBad_system_config_info RAM bcdedit/deletevalue {default} truncatememory
  5. Close Command Prompt and try starting Windows 10 again.

When you encounter the BAD SYSTEM CONFIG INFO error in Windows 10, your computer may have damaged files.

For that matter, we suggest using a full repair solution that can scan and then safely repair corrupted system files.

These tools are also capable of scanning your registry files and determining any issues with the Registry. Besides that, they will scan and repair malware or unwanted program risks and entirely clean the system.

In addition, you’re covered against BSoD problems and resolve system crashes due to broken settings on your Windows PC.

That said, your computer will be left in an optimized state so don’t hesitate to use them on your device.

3. Update your drivers

  1. Press the Start button, type device manager, and select the app from the results.
  2. Expand the sections and look if there is a device marked with an exclamation symbol next to it, right click on it and select Update driver.
  3. Now click on Search automatically for drivers.
  4. The system will look for any new drivers and if it finds one, it will install it. If not, click on Search for updated drivers on Windows Update.
  5. First, click on the Check for updates button to see if there are new Windows updates you should install.
  6. If the system is up to date, click on View all optional updates.
  7. Next, select the Driver updates section, check the boxes for any new drivers and click the Download and install button.
  8. You should perform the steps for all the drivers, even if they don’t have the exclamation mark, just to be on the safe side.

Outdated or incompatible drivers can cause many issues. For example, if your drivers don’t work, you won’t be able to use certain hardware, and in the worst-case scenario, you’ll get a BSoD error such as BAD_SYSTEM_CONFIG_INFO.

This is why, in order to avoid all BSoD errors, be sure that all major components are up to date with the latest drivers.

If updating the drivers from Device Manager doesn’t fix the problem, visit your hardware manufacturer’s website, locate your device, and download the latest drivers for it.

After installing the latest drivers, BSoD errors should be resolved. Bear in mind that you’ll have to update as many drivers as you can in order to successfully fix this problem.

Therefore, we suggest using the most efficient dedicated driver tools to automatically get the necessary updates. This scans your system and finds compatible software to replace outdated drivers.

4. Fix the Windows Registry

Note icon NOTE
By entering the commands below you’ll rename some important folders. After you rename them, Windows 10 won’t be able to use them anymore. You can also delete them, but it’s always better to rename them in case you need to restore them later.

4.1 Rename the Registry files

  1. Boot your computer from Windows 10 installation media (check the previous solution).
  2. Choose Troubleshoot.
  3. Now select Advanced Options, and click on Command Prompt.
  4. Paste the following lines and press Enter after each line in order to run it:
    • CD C:\Windows\System32\config
      ren C:\Windows\System32\config\DEFAULT DEFAULT.old
      ren C:\Windows\System32\config\SAM SAM.old
      ren C:\Windows\System32\config\SECURITY SECURITY.old
      ren C:\Windows\System32\config\SOFTWARE SOFTWARE.old
      ren C:\Windows\System32\config\SYSTEM SYSTEM.old

4.2 Copy the new folders

  1. Enter the following lines into Command Prompt:
    • copy C:\Windows\System32\config\RegBack\DEFAULT C:\Windows\System32\config
      copy C:\Windows\System32\config\RegBack\SAM C:\Windows\System32\config
      copy C:\Windows\System32\config\RegBack\SECURITY C:\Windows\System32\config
      copy C:\Windows\System32\config\RegBack\SYSTEM C:\Windows\System32\config
      copy C:\Windows\System32\config\RegBack\SOFTWARE C:\Windows\System32\config
  2. This will copy the registry backup and replace the old files. Close Command Prompt and restart your computer.

Some users have repaired their Windows registry and prevented BSOD errors from activating on their computers by using different registry editors.

5. Perform a System Restore

  1. Restart your computer a couple of times while it boots to start the Automatic Repair process.
  2. Select Troubleshoot.
  3. Click on Advanced Options, and select System Restore.
  4. Then, select your username and follow the instructions.
  5. Select the restore point you wish to restore to and click Next.
    Bad_system_config_info hard drive restore the system from a restore point
  6. Wait for the System Restore process to finish.

6. Perform a Windows 10 reset

Note icon NOTE
Before starting this procedure, be sure to create a backup because the reset process will delete all files from your C partition.
  1. Start the Automatic Repair process by restarting your computer a few times.
  2. Choose Troubleshoot and select Reset this PC.
  3. Select Remove everything.
  4. Then, choose Only the drive where Windows is installed, and then select Just remove my files.
  5. Click the Reset button and wait for the process to finish.

In order to complete the Windows 10 reset, you might need Windows 10 installation media, so be sure to have one. After the reset process is completed, you’ll have a fresh installation of Windows 10.

7. Check your hardware

  1. Click the Start button, type memory diagnostic, and click on the Windows Memory Diagnostic app from the results.
  2. Select Restart now and check for problems.
  3. The system will restart and perform a memory check to verify if there are any problems with your RAM modules.

Most commonly the BSoD errors are caused by faulty RAM, so be sure to check your memory first. If the diagnostic finds any such issue, you will need to replace the faulty module.

Users reported that BAD_SYSTEM_CONFIG_INFO error can also be caused by a faulty hard drive, and according to users, replacing the hard drive fixed the problem.

It’s worth mentioning that almost any component may lead to this issue, so be sure to perform a detailed hardware inspection.

Our readers reported that this error was fixed by using bcdedit or by fixing Windows Registry, so be sure to try those solutions.

BAD_SYSTEM_CONFIG_INFO isn’t as serious as other BSoD errors, and we hope that after performing the recommended steps above, you managed to fix your PC.

It would also be helpful to read our guide on what to do if a BSoD error occurs during Windows 10/11 updates.

If you have any other suggestions or solutions, don’t hesitate to post them in the comments section below because they will help other readers.

Save Money & Time: Deals & Offers for Windows Software & Hardware

In today’s fast-paced world, finding the best deals on Windows software and hardware can save you both money and time. Whether you need to upgrade your computer system or find the latest software for work or play, there are plenty of options available to help you get the most out of your purchases. Just like finding great offers at a top online casino, smart shopping for software and hardware deals can significantly enhance your experience. Keeping an eye out for discounts, bundles, and special promotions can make a big difference to your budget and productivity.

Discounted Software Deals

One of the easiest ways to save on Windows software is to look for discounts and promotional offers. Many software companies offer seasonal sales, special discounts for students, or bundle deals where you can get multiple programs at a reduced price. Remember to check if the software is compatible with your current system to avoid any compatibility issues.

Hardware Bundles

When it comes to hardware, bundling is a great way to save money. Retailers and manufacturers often offer bundles that include essential components such as a computer, monitor, and peripherals at a lower combined price. For example, you might find deals that include a new laptop with a free external hard drive or a monitor. These bundles not only offer savings but also ensure you have everything you need to set up your new system. Always check the specifications and warranties included in these bundles to ensure they meet your needs.

Seasonal Sales and Promotions

Seasonal sales are a fantastic opportunity to save on Windows software and hardware. Major shopping events like Black Friday, Cyber Monday, and Back-to-School promotions often feature significant discounts on a wide range of products. Retailers like Amazon, Best Buy, and Newegg are known for offering special deals during these times. Keeping an eye on these sales can help you snag great bargains. Signing up for newsletters from your favorite stores can also keep you informed about upcoming sales and exclusive offers.

Refurbished and Open Box Options

If you’re looking to save even more, consider purchasing refurbished or open box hardware. Refurbished products have been restored to like-new condition and often come with a warranty, making them a reliable and cost-effective choice. Open box items are products that have been returned by customers but are still in excellent condition. Both options can offer substantial savings compared to buying new. Websites like the Microsoft Store’s refurbished section or local electronics retailers often list these options.
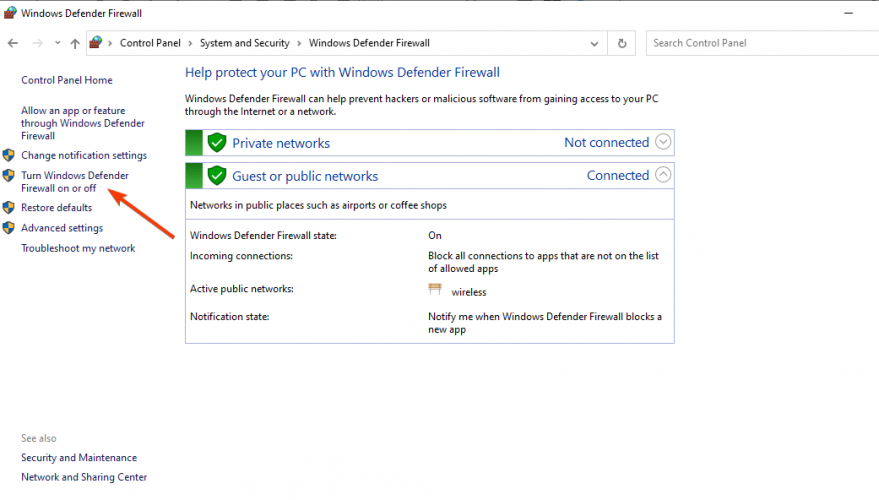
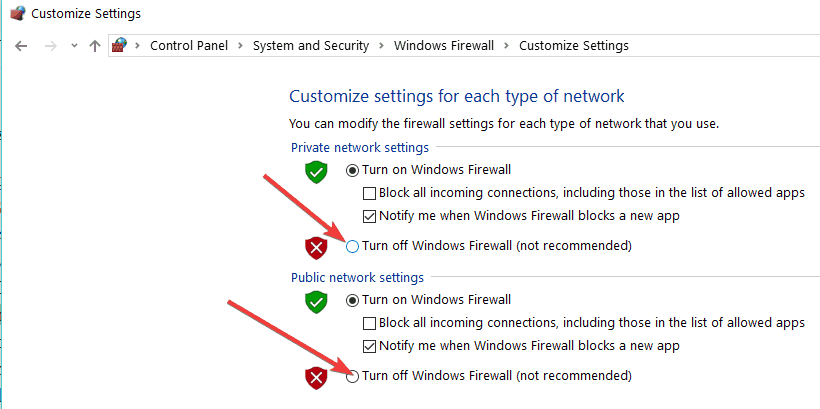
Best Deals Not Only for Your Software

If you’re looking to enhance your gaming experience, exploring an online casino bonus club can be a great way to enjoy additional benefits. Online casino bonus clubs offer a range of incentives, from welcome bonuses to free spins and loyalty rewards. By joining a bonus club, you can maximize your playing time and increase your chances of winning without spending more. These clubs often provide exclusive promotions and perks tailored to regular players, making it a smart choice for those who enjoy frequent gaming. Whether you’re new to online casinos or a seasoned player, finding the right bonus club can add extra excitement and value to your gaming adventures.

For more information on top offers and deals, and to explore the exciting world of online casinos with top bonuses, click on this page.

The expert team at Casino-Bonus.Club highly recommends their site for finding the best online casino experiences. They praise the website for its easy-to-use layout and detailed reviews of top casinos. The team values the site’s thorough analysis of bonuses and promotions, which help players find the best offers. Regular updates ensure users get the latest information. Overall, they believe Casino-Bonus.Club is a key resource for anyone looking to enhance their online casino experience.

Conclusion

Saving money and time on Windows software and hardware requires a bit of strategy and attention to detail. By exploring discounted software deals, hardware bundles, seasonal promotions, and refurbished options, you can find significant savings and enhance your computing experience. Just as savvy players seek the best offers at a top online casino, careful shopping can lead to great deals and improved productivity. Staying informed through expert opinions and deal alerts can help you make the most of your purchases. Remember, a little research can go a long way in securing the best deals and making smart choices for your technology needs.

Fix: Amazon Fire Stick Stuck on Amazon Logo & Main Reasons

Amazon Fire Stick is a great multimedia device, but many users reported that it gets stuck on the Amazon logo for them.

This can be a big problem since you won’t be able to access anything or use your device. However, there’s a way to fix this issue for good, and today we’ll show you how to do it.

Why is my Amazon Fire Stick stuck on the Amazon logo screen?

There are several reasons why your Fire Stick might get stuck on the Amazon logo screen.

It’s possible that your device is booting slowly due to a recent update or an issue with the power supply.

Power supply issues are quite common, especially if you’re not using the original power adapter. Another cause of this problem can be the overheating of the device.

Lastly, a bad update or your settings can cause this problem, so you might have to reset your device to factory settings to fix it.

Now that you know the causes of this issue, let’s see how we can fix it.

How do I fix my Firestick stuck on my logo screen?

1. Wait it out

  1. Start your Fire Stick.
  2. Wait for the device to get stuck on the Amazon logo.
  3. Leave your device like that for at least an hour, or better yet, leave it overnight.
    clock fire stick stuck on amazon logo
  4. After waiting a couple of hours, check if the problem is still there.

A couple of users reported that this method worked for them, and it seems that the Fire Stick was stuck on an update, but after waiting for an hour or so, the issue was completely resolved.

2. Restart your device

If your Firestick is still stuck on the Amazon logo after waiting a long time, you should restart it. This is because the issue might just be caused by a minor glitch within the system.

A simple restart has fixed this issue for many users, and you should try it too. To do this, you need to disconnect the Fires Stick from your TV and wait for about 30 seconds.

You can now connect it back after and check if the issue persists.

3. Check the power supply

  1. Check the power supply cable.
  2. Always use the original supply cable that came from Amazon because it delivers the necessary power.

A few users reported that replacing their cable with the official one from Amazon fixed the problem, so be sure to try that.

4. Check your HDMI port

  1. Connect your Fire Stick to a different HDMI port.
  2. Now check if it works.
  3. If you’re using HDMI hubs or splitters, remove them and connect the device directly to the TV.
  4. Try removing other HDMI devices and check if that helps.
  5. Make sure that you’re using a high-speed HDMI cable.
    hdmi connector fire stick stuck on amazon logo
  6. Check if your TV is HDCP-compatible.
  7. If everything else fails, try using a different TV.

The HDMI cable and port are the primary connectivity source between your Fire Stick and TV. Hence, you need to make sure they are working perfectly.

5. Check if your Fire Stick is overheating

  1. Disconnect Fire Stick from your TV and the power source.
  2. Leave it disconnected for about 30 minutes.
  3. Connect the device again and check if the problem is still there.

6. Connect Firestick directly to your TV

If you are using an HDMI hub, extender, or any form of adapter, it might cause your Firestick to get stuck on the Amazon logo screen. The best practice, according to Amazon, is to plug the device directly to your TV.

Also, if you are connecting your device directly, ensure you use a high-speed HDMI cable.

7. Reset Fire Stick to the factory settings

  1. Press and hold the Right and the Back button on your remote.
    fire stick remote fire stick stuck on amazon logo
  2. Keep them pressed for about 10 seconds or more.
  3. Follow the reset instructions on the screen to complete it.

Resetting your Firestick is the last resort if all other solutions do not work. Doing this will remove the apps, files, and other contents on your device and reset the changes made.

This also works for other issues like Fire Stick setting menu not loading, so it should do the trick in this case too.

If that doesn’t work, you might have to contact Amazon support and ask them to send you a replacement. This

Being stuck on the Amazon logo on your Fire Stick can be a big problem, but in most cases, you can fix it simply by waiting for the update to finish in the background. If that doesn’t work, you can always try our other solutions.

If the Amazon Fire Stick is showing a no signal message, check our detailed guide to fix it quickly.

Got a solution that worked for you? Let us know in the comments below.