Getting an update error 0x80245006 can cause so much trouble by preventing the download of Windows updates.
Not only that your system could become vulnerable, but at the same time you might miss new features that Microsoft is developing for Windows 10.
So how can you fix update error 0x80245006 on Windows 10? Let’s find out!
How can I fix Update Error 0x80245006?
Follow the steps below to fix There were some problems installing updates, but we’ll try again later. If you keep seeing this and want to search the web or contact support for information, this may help: (0x80245006) errors:
1. Check your proxy settings
Search for internet options and select it from the results.
Click Connections tab and then click on LAN Settings.
Click Advanced.
Find the Do not use proxy server for addresses beginning with input field and enter the following addresses into it:
.windowsupdate.com;
.microsoft.com;
.windows.com;
Save your changes. You might have to restart your computer before the changes are applied.
2. Use the Windows Update troubleshooter
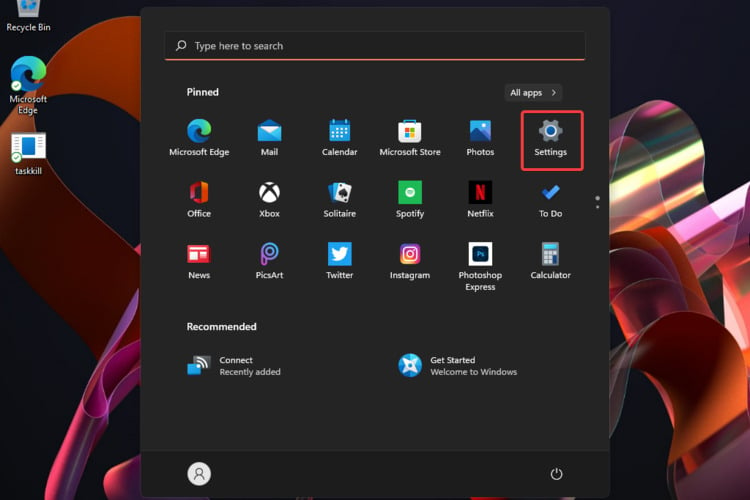
Type Settings in the Start bar.
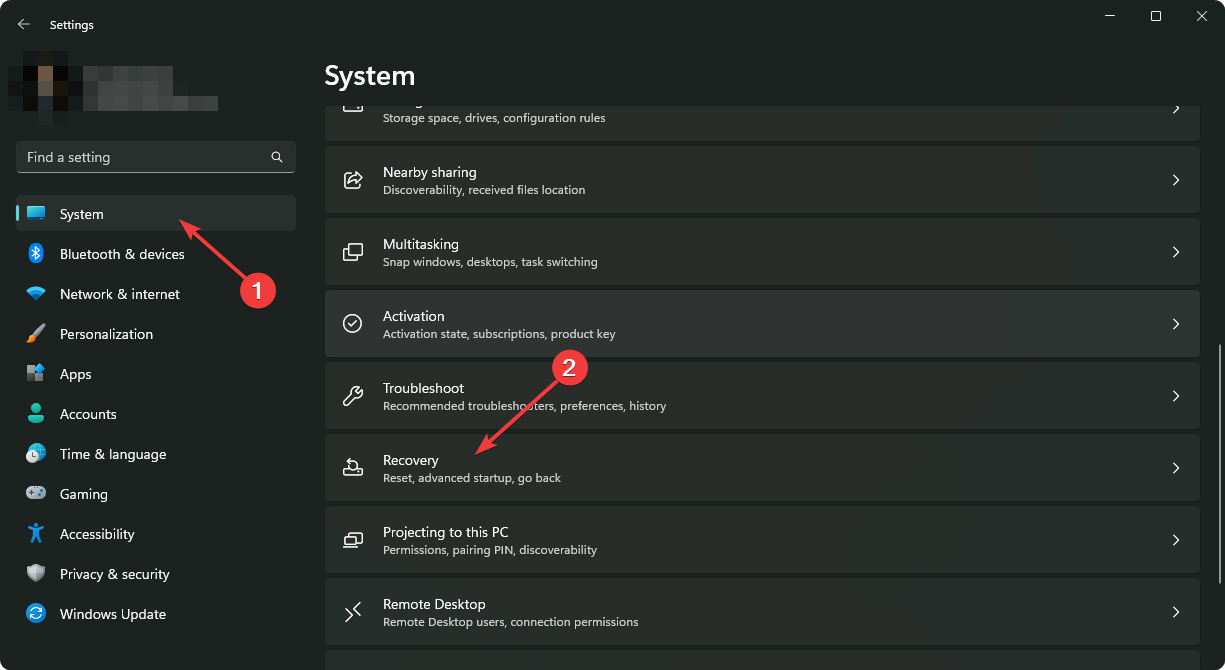
Go to System.
Pick Troubleshoot.
Select Other troubleshooters.
Under Most frequent, select Windows Update and Run.
Many users experienced error 0x80245006 while trying to download Windows Updates. This problem can prevent you from downloading any new updates and leave your computer vulnerable.
However, you might be able to fix the problem by using the Windows Update troubleshooter.
3. Check if the necessary services are running
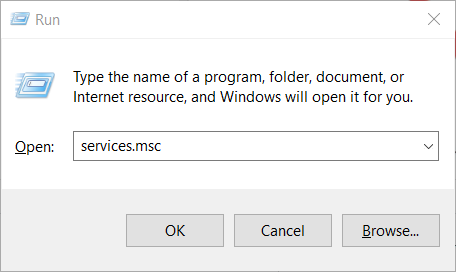
Press Windows Key + R and enter services.msc. Now press Enter or click OK.
Locate Background Intelligent Transfer Service and check its status. If the service status isn’t set to Running, right click on it and choose Start from the menu.
Repeat the previous step for Windows Update and Workstation services. After doing that, close the Services window.
4. Disable certain services using Command Prompt
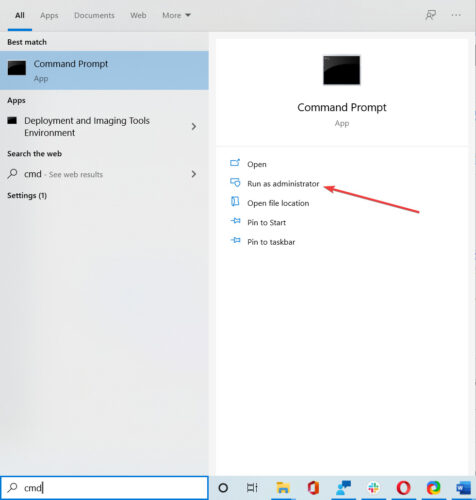
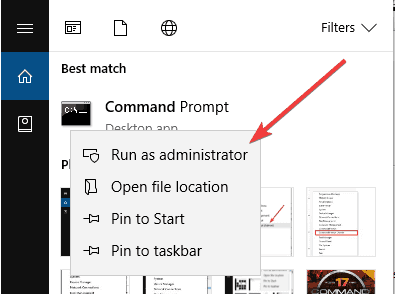
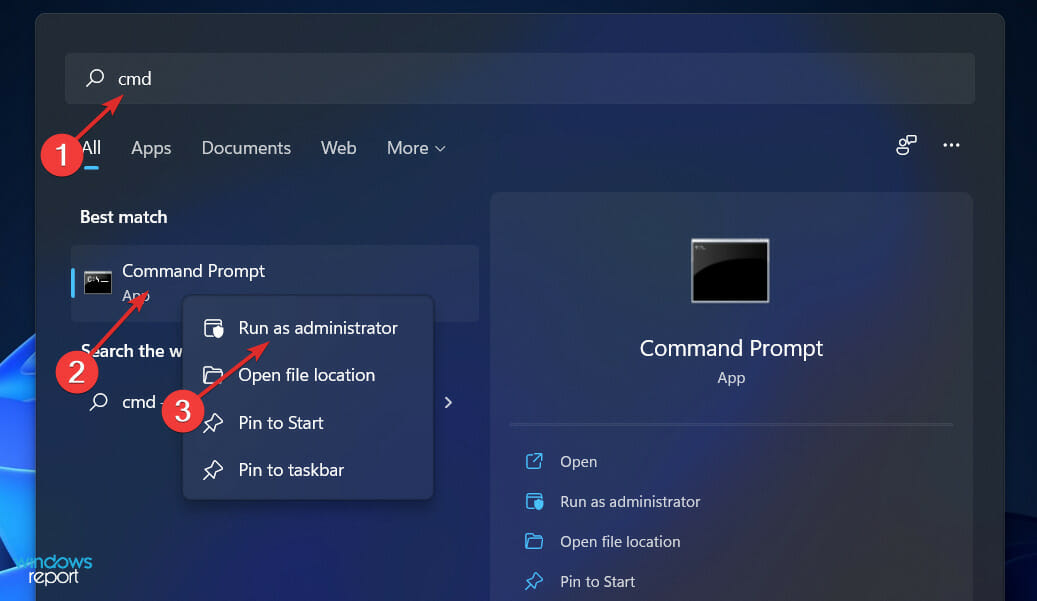
Search for cmd and click on Run as administrator to start Command Prompt.
After all the commands are executed, close Command Prompt and restart your PC. Once the PC restarts, check if the problem is resolved. Several users reported that this solution fixed the problem for them so be sure to try it out.
5. Perform a Clean boot
Press Windows Key + R, enter msconfig and press Enter or click OK.
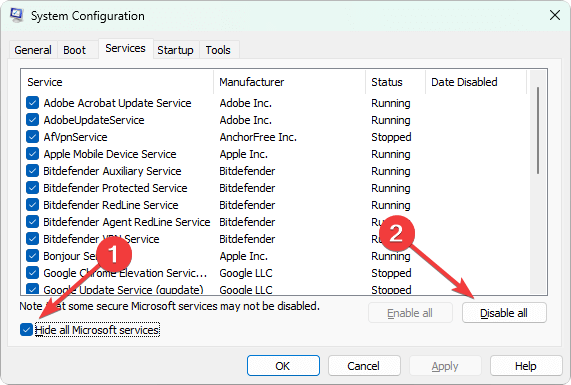
Go to the Services tab and check Hide all Microsoft services. Now click on Disable all.
Navigate to the Startup tab and click on Open Task Manager.
Right-click the first item on the list and choose Disable from the menu. Repeat this step for all startup applications on the list.
Close Task Manager and go back to the System Configuration window. Click on Apply and OK to save changes and restart your PC.
If Clean boot doesn’t help, you should consider removing any recently installed applications and check if that solves the problem.
6. Remove AdFender software
AdFender is a system-wide adblocking software that allows you to use Microsoft Edge without ads. Although this tool sounds great, it has been discovered by users that this tool has one major flaw.
According to users, AdFender will block Windows updates.
So it can cause the 0x80245006 update error and the only solution is to remove AdFender if you have it installed.
7. Perform SFC and DISM scans
7.1 Perform a SFC scan
Open Command Prompt as shown in solution number 6.
Enter sfc /scannow and press Enter to run the command.
This process can take up to 15 minutes, so don’t interrupt it.
Once the scan is finished, check if the problem still appears.
7.2 Run a DISM scan
Start Command Prompt as administrator.
Now enter the following command and press Enter: DISM /Online /Cleanup-Image /RestoreHealth
The scan can take about 20 minutes or more, so be sure not to interrupt it.
Once the DISM scan has finished, check if the problem is resolved. If the issue still persists, or if you were unable to run an SFC scan before, be sure to repeat the SFC scan once again and check if that solves the problem.
Other Windows Updater errors
Error 0x80245006 can appear in various circumstances, and speaking of this error, these are some of the most common problems that users reported:
Windows Update fail 0x80245006 – Occurs while trying to use Windows Update. Try running the Windows Update Troubleshooter or check your proxy settings.
Code: 0x80245006 Windows Store – If you encounter this error, make sure that your antivirus isn’t interfering with your network connection. Also, try disabling startup applications on your PC.
Windows 8.1 error 80245006 – This error can appear on any version of Windows and both Windows 10 and Windows 8.1 users reported it. However, the solutions are almost the same for both versions.
Server 2016 0x80245006 – This problem can also appear in Windows Server 2016, and if you encounter it, you should be able to fix it using one of our solutions.
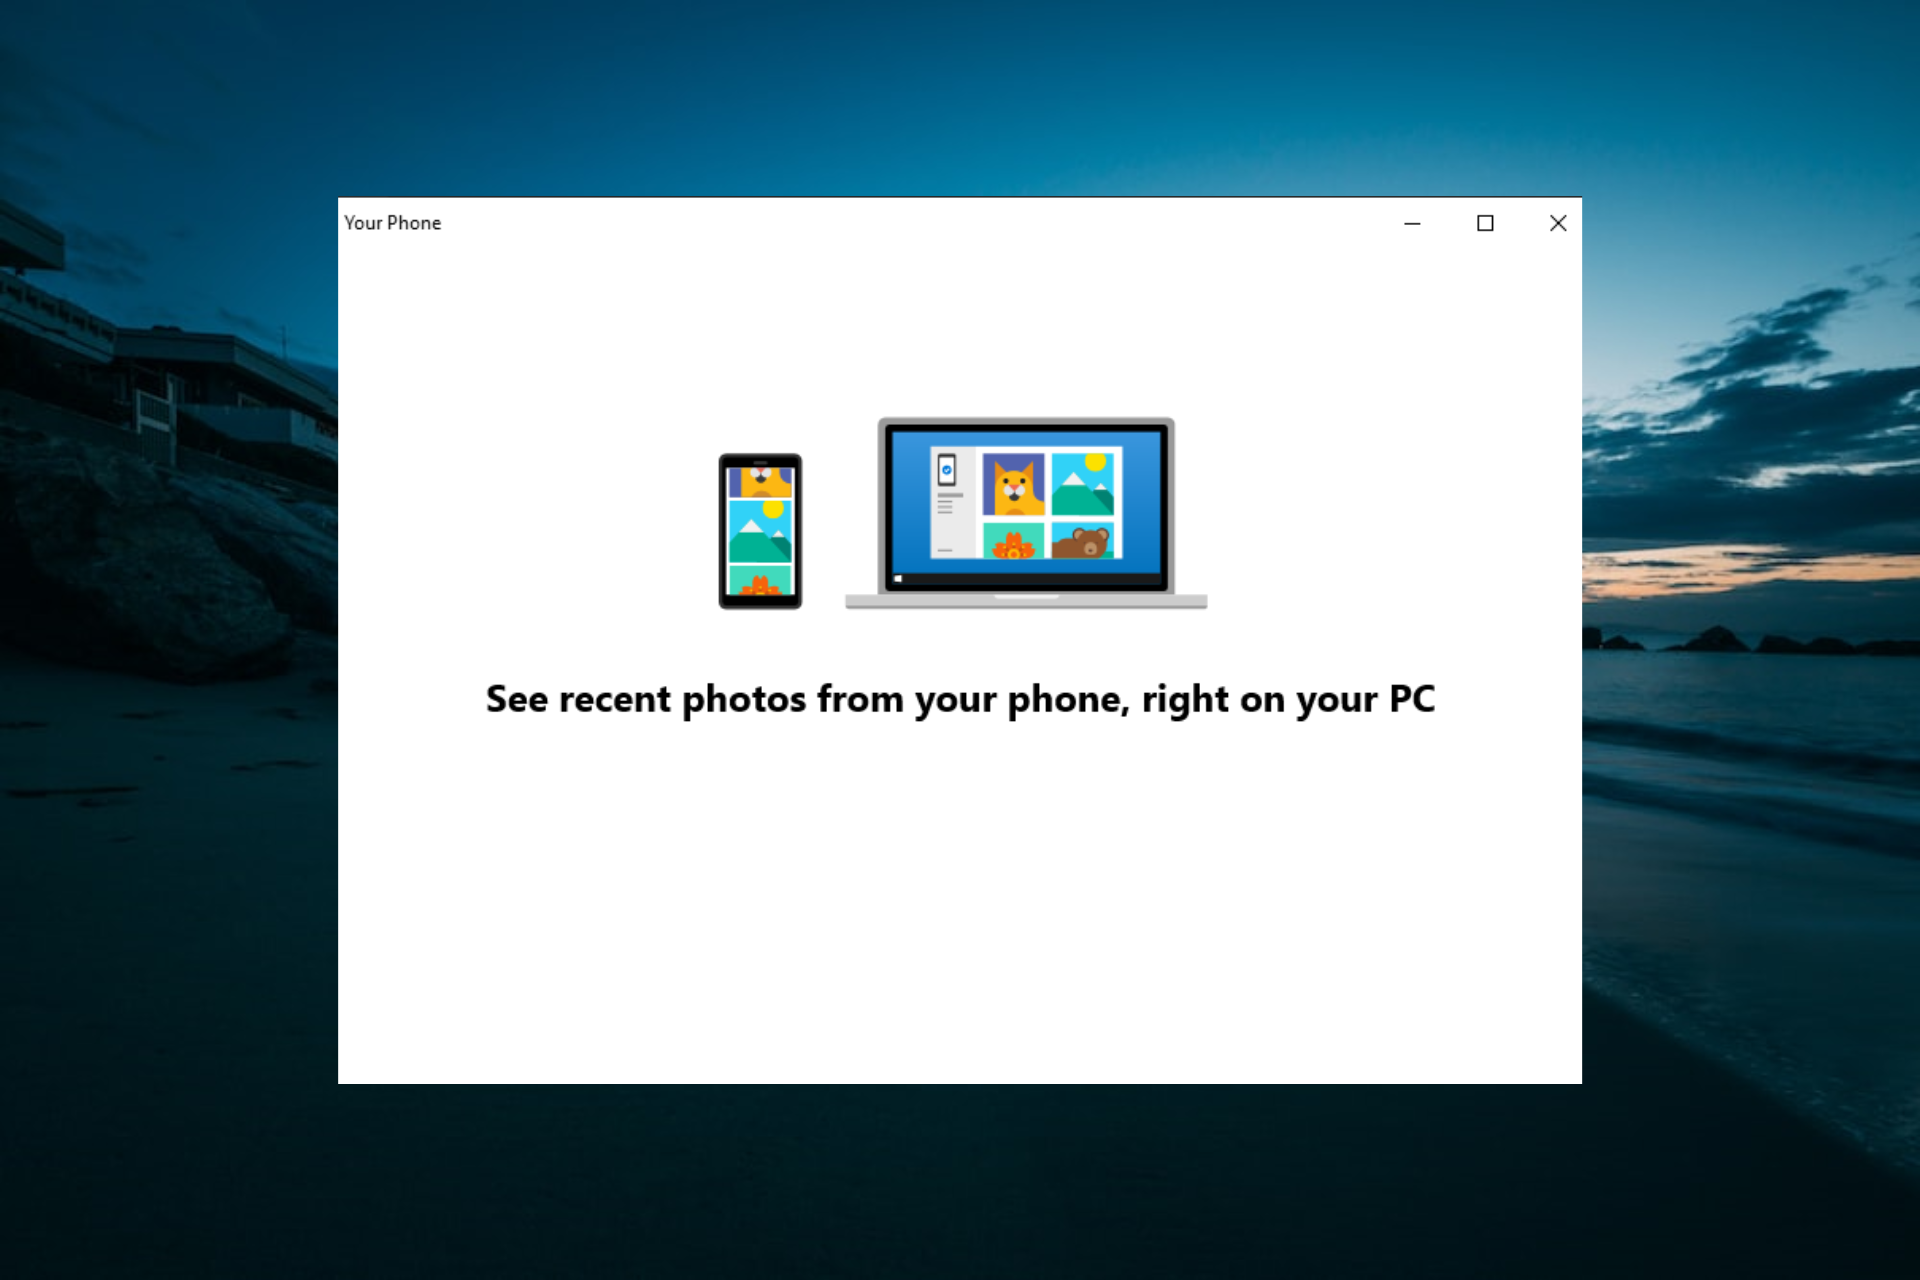
Some users have wondered what the YourPhone.exe process is in Windows 10. That is, as some might now guess, a Your Phone process that sends notifications from mobiles to Windows desktops.
It lets users sync photos across Windows 10, Android, and Apple devices. In addition, users can utilize Your Phone to send SMS texts from desktop or laptop.
Is Your Phone exe a virus?
As mentioned earlier, Your Phone is a background app that integrates Windows with mobile devices. Hence, it is not a virus, and you have nothing to worry about.
But, if you are still looking to disable the app, we will show you the best ways to do it in this guide.
How do I disable Yourphone.exe in Windows 10?
1. Use the Settings app
Press the Windows key + S, type background, and select the Background apps option.
Scroll down to the Your Phone app.
Now, toggle the switch before it backward to disable it.
Finally, close the Settings app and restart your PC.
The first method to disable Microsoft yourphone.exe is to turn it off under background apps. With this, the app will stop using your resources, and it will not be visible in Task Manager.
2. End the process in Task Manager
Press the Windows key + X and select the Task Manager option.
Right-click Your phone under processes.
Now, select End task.
If yourphone.exe is running, you can disable it for good in Task Manager by following the steps above.
3. Reset the app
Press the Windows key + I and select the Apps option.
Scroll down and click Your Phone in the right pane.
Now, click Advanced options under it.
Finally, click the Reset button and wait for the process to complete.
Sometimes, you might want to disable yourphone.exe because it is consuming too much resources or because it encountered a problem. The best thing to do is to reset the app and it should be back to normal.
Press the Windows key, type powershell and select Run as administrator under Windows PowerShell.
Type the command below and hit Enter to run it: Get-AppxPackage Microsoft.YourPhone -AllUsers | Remove-AppxPackage
Now, wait for the command to finish running and the app will be removed.
If you want to remove yourphone.exe on Windows 10 and 11 for some reason, you only need to run the commands above. Thankfully, you can download it in Microsoft Store if the need arises.
Can I delete Your Phone exe?
Your Phone is not an essential Windows process, so you can disable or remove it. We have shown how to uninstall the app in solution 4 above.
So, you can always follow the step if you need to.
So, that’s how users can disable the YourPhone.exe process in Windows 10. You will find this guide useful if you are also looking to remove the app completely.
Are you getting error 79 on your HP printer? We’ve got solutions so read this comprehensive guide.
One of the most frustrating moments when using a printer is when you get an error, more so when you don’t know what to do next.
Before you can fix error 79 on your printer, it’s good to know the causes so that the next time it shows up, you’re ready for it because you know exactly where it’s coming from.
What does 79 service error mean?
Error 79 is displayed on your HP printer’s control panel in two ways:
Error 79 turn off then on
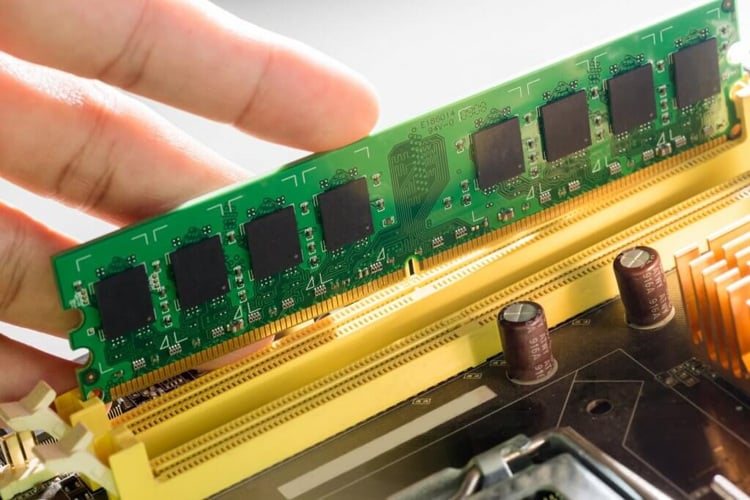
Error 79 service error turn off then on – meaning an incompatible DIMM was probably installed.
How do I fix error 79 on HP printer?
1. Turn HP printer off then on
Turn the printer’s power off.
Wait for at least 30 seconds or so.
Turn on the power again.
Wait for the printer to initialize.
If your HP printer displays this type of error 79, chances are it has experienced an internal firmware error.
Note: If you are using a power surge protector, first remove it, then plug back the printer directly to the wall socket, before turning on the power again.
If the Error 79 message persists on your printer’s display, disconnect any network or USB cables, as well as the power cycle.
If the printer goes back to Ready status, check its firmware version, then update the firmware in case a newer version is available.
In order to find your printer’s firmware version, print a Configuration Report from the printer’s control panel, or you can also visit the HP Support page to check for the latest firmware version available.
In case the error 79 issue recurs on your printer, try and isolate it to something that could be in your own environment.
Reinstall the DIMM to confirm that it sits properly in the printer.
Turn on the HP printer.
2.2 Remove or replace the DIMM
Remove any installed DIMMS
Perform a retest on your HP printer
If the print work is fine, install a DIMM that is supported by your printer
3. Reinstall the drivers
In the Windows Search bar, type Control and open Control Panel.
Choose Uninstall a program and remove all HP printer-related software.
Right-click Start and open Device Manager.
Under the Print queues, remove the HP device by uninstalling it.
Restart your PC and wait until the driver is installed automatically.
Install the HP associated software again and, hopefully, that should be enough to fix the problem.
Another viable step is to completely remove the printer device from your PC and reinstall it again. This approach requires you to uninstall both drivers and HP associated software and that shouldn’t be hard.
You can also give a try to a specialized third-party tool that will scan your PC for any missing our outdated drivers and update them.
In case the error 79 message persists, kindly get in touch with HP’s Customer Support team with specifics on your issue and they’ll be glad to assist you.
One of our readers also suggested to use the universal driver post script version and change the device type as color under Device settings under Properties if your printer is color.
We sure hope one of these solutions helped you. Let us know your experience in the comments section.
Quick Access in Windows is the direct equivalent of Windows 7’s Favorites, and the two have many similarities and differences.
Quick Access is that sidebar you see on the left pane of your screen in File Explorer. That is where all of the most used apps and opened folders are located, and it is a tool Windows uses to increase productivity. This guide shows you solutions if you can’t unpin a folder.
Why can’t I unpin a folder from quick access?
The most common reasons include the following:
The folder might be a system folder.
Your folder might be pinned to Quick Access by a policy.
The folder might be pinned to Quick Access by a third-party application.
You may face other folder-related errors, like some users complaining they can not open files in the folder. Folder issues are generally easy to fix.
What can I do if I can’t unpin from Quick Access?
1. Try a regular unpin
Press Windows + E to open File Explorer.
Click the QuickAccess option and right-click on a pinned folder.
Select the Unpin from Quick access option.
2. Create a new folder in the old location, and unpin it
Sometimes when you change the location of a folder in the Quick Access bar, you may notice that it is stuck and that clicking it will result in an error message.
As such, if you encounter this issue, create a new folder precisely where the one you cannot unpin used to be. It doesn’t have to contain anything as long as it has the same name. Once created, you can unpin it from Quick Acess and delete it for good.
This feature will clear all recent folders in Quick Access, but it won’t affect the ones added by hand.
4. Select multiple items and unpin them
Press Windows + E to Open File Explorer.
Click the QuickAccess option, then select the Pinned item stuck in the right pane or the folder view.
Press CTRL and select another item that you want to Unpin.
5. Perform a total Quick Access reset
Press Windows + E to Open File Explorer.
Go to the following file path: %AppData%MicrosoftWindowsRecentAutomaticDestinations
Delete the file below; the Quick access pinned and frequent items data are kept here. f01b4d95cf55d32a.automaticDestinations-ms
Additionally, you can Press Windows + R and type in the following line: cmd.exe /c del "%AppData%MicrosoftWindowsRecentAutomaticDestinationsf01b4d95cf55d32a.automaticDestinations-ms"
Open File Explorer again and the list will now be filled with default options
Following these steps, you can unpin any folder from the Quick Access bar without issues.
If you still can’t unpin from Quick Access or found a different solution, share it in the comments section below so other users can try it.
Google Drive can’t connect? If that’s the case, there might be something up with your overall connection.
So check that first with the Windows Internet Connections troubleshooter.
However, if you’re certain your overall connection is ok, these are a few potential fixes that might enable you to connect with the Google Drive app.
Google Drive has millions of users worldwide, but despite its popularity, this cloud storage service has its flaws.
Speaking of Google Drive and its issues, here are some problems that users reported:
Google Drive not syncing Windows 10 – According to users, sometimes Google Drive won’t sync in Windows 10 at all. This can be a big problem, but we already covered this issue in great detail in our Google Drive won’t sync article, so check it out for more solutions.
Google Drive sync problems – Many users reported that syncing issues can occur with Google Drive. If that’s the case, be sure to check if your antivirus or firewall aren’t interfering with Google Drive.
Google Backup and Sync can’t connect – This issue can appear if you’re using Backup and Sync application on your PC. To fix the problem, be sure to remove all applications that can interfere with Google Drive.
Google Drive constantly unable to connect – Many users reported that this error message appears constantly on their PC. If that’s the case, restart Google Drive and check if that helps.
Google Drive unable to connect after sleep, proxy – Sometimes this issue can occur if you’re using a proxy. Simply change your proxy settings in Google Drive and check if that solves your issue.
How do I fix Google Drive refused to connect?
Solution 1 – Switch off the Windows Firewall
The first thing to note is that the Windows Firewall can block software connections. As such, switching it off might solve the Google Drive no connection problem. This is how you can switch off the firewall:
Enter ‘firewall’ into the Cortana search box. Now you should select Windows Defender Firewall to open firewall options and settings.
Click Turn Windows Firewall on or off to open the options shown directly below.
Now click both the Turn off Windows Firewall options there and press OK.
Most users don’t know what to do when the Windows search box goes missing. Readthis article to learn how you can get it back in just a couple of steps.
Solution 2 – Check Anti-Virus Software isn’t Blocking Google Drive
It might be the case that anti-virus software is blocking Google Drive’s connection.
As such, it’s worth checking your anti-virus application settings. As the settings vary greatly for each utility, no specific instructions can be given for this.
However, you should search for some firewall options in the anti-virus software that might enable you to unblock programs.
Alternatively, you could uninstall your anti-virus utilities via Programs and Features.
If you can then connect to Google Drive, it will be clear enough that the anti-virus software was blocking the connection in some way.
According to users, antivirus tools such as McAfee and Avast can lead to this issue, so be sure to remove them.
For the Norton users, we’ve got a dedicated guide on how to completely remove it from your PC. There’s a similar guide for McAffe users, as well.
If you’re using any antivirus solution and you want to completely remove it from your PC, consider getting one of the best uninstaller software. These tools will remove all files related to a specific app without leaving any trace.
If removing your antivirus software solves the issue, you need to switch to different antivirus software.
You can find lots of options available, but there are a few things to take into account when picking the best antivirus software for your PC, including a good threat database, up-to-date shields, and browsing security and privacy.
It’s worth mentioning that there’s a quick workaround that can fix this problem for ESET users.
To fix the problem, simply open ESET settings and activate HIPS (Host intrusion prevention system).
After doing that, Google Drive should start working again.
Solution 3 – Remove the e-Rewards Notify Software
Have you installed the e-Rewards Notify software? If so, you should remove that software from Windows.
This program is known to disconnect Google Drive as it automatically configures your network to use a proxy. Google Drive doesn’t work with an authenticated proxy.
Note that e-Rewards also creates three new Windows services which you can switch off by entering ‘services’ into the Cortana search box and clicking Services.
Search for the e-Rewards services in the window shown directly below, right-click the services and select Properties and then press the Stop buttons.
If a certain software is interfering with Google Drive, the best way to fix the problem is to remove it. There are many ways to do that, but the best one is to use uninstaller software.
In case you’re not familiar, uninstaller software is a special application designed to remove other programs from your PC.
In addition to removing the desired applications, this tool will also remove all files and registry entries associated with it.
This will ensure that the problematic application is completely removed and prevent any leftover files from interfering with your PC.
Solution 4 – Restart Google Drive Sync
Sometimes the easiest solution is the best one, and many users reported that they fixed Unable to connect message simply by restarting Google Drive.
To do that, you just need to follow these simple steps:
Keep in mind that this is just a workaround, so you’ll have to repeat it until you find a permanent solution.
Restarting Google Drive can be a simple fix for connection errors. First, you should right-click the Google Drive icon on the system tray.
Then click the More button with three vertical dots.
Next, you should select the Quit Google Drive option on the context menu.
Now open the Google Drive app again.
Solution 5 – Create a new administrator account
According to users, sometimes this issue can be caused by your user account.
If your user account is corrupted or not configured properly, you’ll encounter Unable to connect message in Google Drive.
However, you can easily fix that by creating a new user account. To do that, just follow these steps:
Press Windows Key + I to open the Settings app.
When Settings app opens, navigate to Accounts section.
Navigate to Family & other people section in the menu on the left. In the right pane, click Add someone else to this PC.
Select I don’t have this person’s sign-in information.
Enter the desired user name and password and click Next.
If you’re having trouble opening the Setting app, take a look atthis article to solve the issue.
After creating a new account, you need to change it to the administrative account. To do that, just follow these steps:
In Settings app, go to Accounts > Family & other people. Now locate the new account in Other people section. Select the account and click Change account type.
Change Account type to Administrator and click OK to save changes.
After doing that, switch to the new account and check if the problem with Google Drive still persists. Keep in mind that you might have to install Google Drive again on the new account.
Solution 6 – Run Windows Program Compatibility Troubleshooter
The Program Compatibility Troubleshooter is one of the troubleshooters included in Windows.
This can come in handy for fixing software that isn’t working, as is the case with Google Drive’s connection error.
So it might help fix Google Drive, and this is how you can run the troubleshooter.
Open Control Panel and navigate to Troubleshooting.
Now you can click Run programs made for previous versions of Windows to open the window directly below.
Click Advanced and select the Run as administrator check box.
Now press the Next button to select a program to fix. Then you can select Google Drive from a list of programs.
Click Next again to start the scanning. The troubleshooter might then show you a list of Google Drive issues it can fix for you.
You can’t open Control Panel? Take a look at this step-by-step guide to find a solution.
Solution 7 – Change proxy settings
According to users, sometimes proxy settings can interfere with Google Drive and cause Unable to connect message to appear.
Apparently, Google Drive has some issues with proxy settings, and if you have issues with Google Drive, be sure to turn off Automatically detect proxy settings.
After turning off this option, enable Direct connect and your problem should be completely resolved.
Solution 8 – Reinstall Google Drive app
If you’re having problems with Google Drive, you might want to consider reinstallation.
Sometimes your installation can get corrupted and that can cause this and other Google Drive problems to occur.
In case your installation is corrupted, you can fix the issue simply by removing Google Drive from your PC.
To ensure that Google Drive is completely removed, we advise you to use one of the uninstaller applications we mentioned in one of our previous solutions.
Now you just have to install Google Drive again and your issue should be resolved.
Keep in mind that you need to install the latest version of Google Drive if you want to avoid this and similar issues in the future.
Those are some probable fixes for Google Drive connection errors, so feel free to try them all and let us know if they work for you.
If you have any other suggestions or questions, feel free to leave them in the comments section below.
If you’re here, you’re most likely having issues with your DNS and your Playstation console. If you try to connect to the Internet on a PS4 or PS5 with incorrect DNS servers, you’re likely to get error messages, such as DNS error NW-31253-4, PNW-31254-5, NW-31251-2 (cannot connect to Wi-Fi), NW-31250-1, or NW-31247-7.
Before any complex solutions, restart your console and your router and check if the DNS settings are correct. Also, verify if your connection is stable.
How do I fix a DNS error on PS4 and PS5?
1. Manually configure DNS settings
Power on your PS4 and go to Settings.
Navigate to Network and choose Set Up Internet Connection.
Choose an internet connection type between Wi-Fi and LAN.
Connect your router or ethernet cable.
Click on Custom setup.
Change the IP Address Settings to Automatic.
Go to the DNS Settings and change it to Manual.
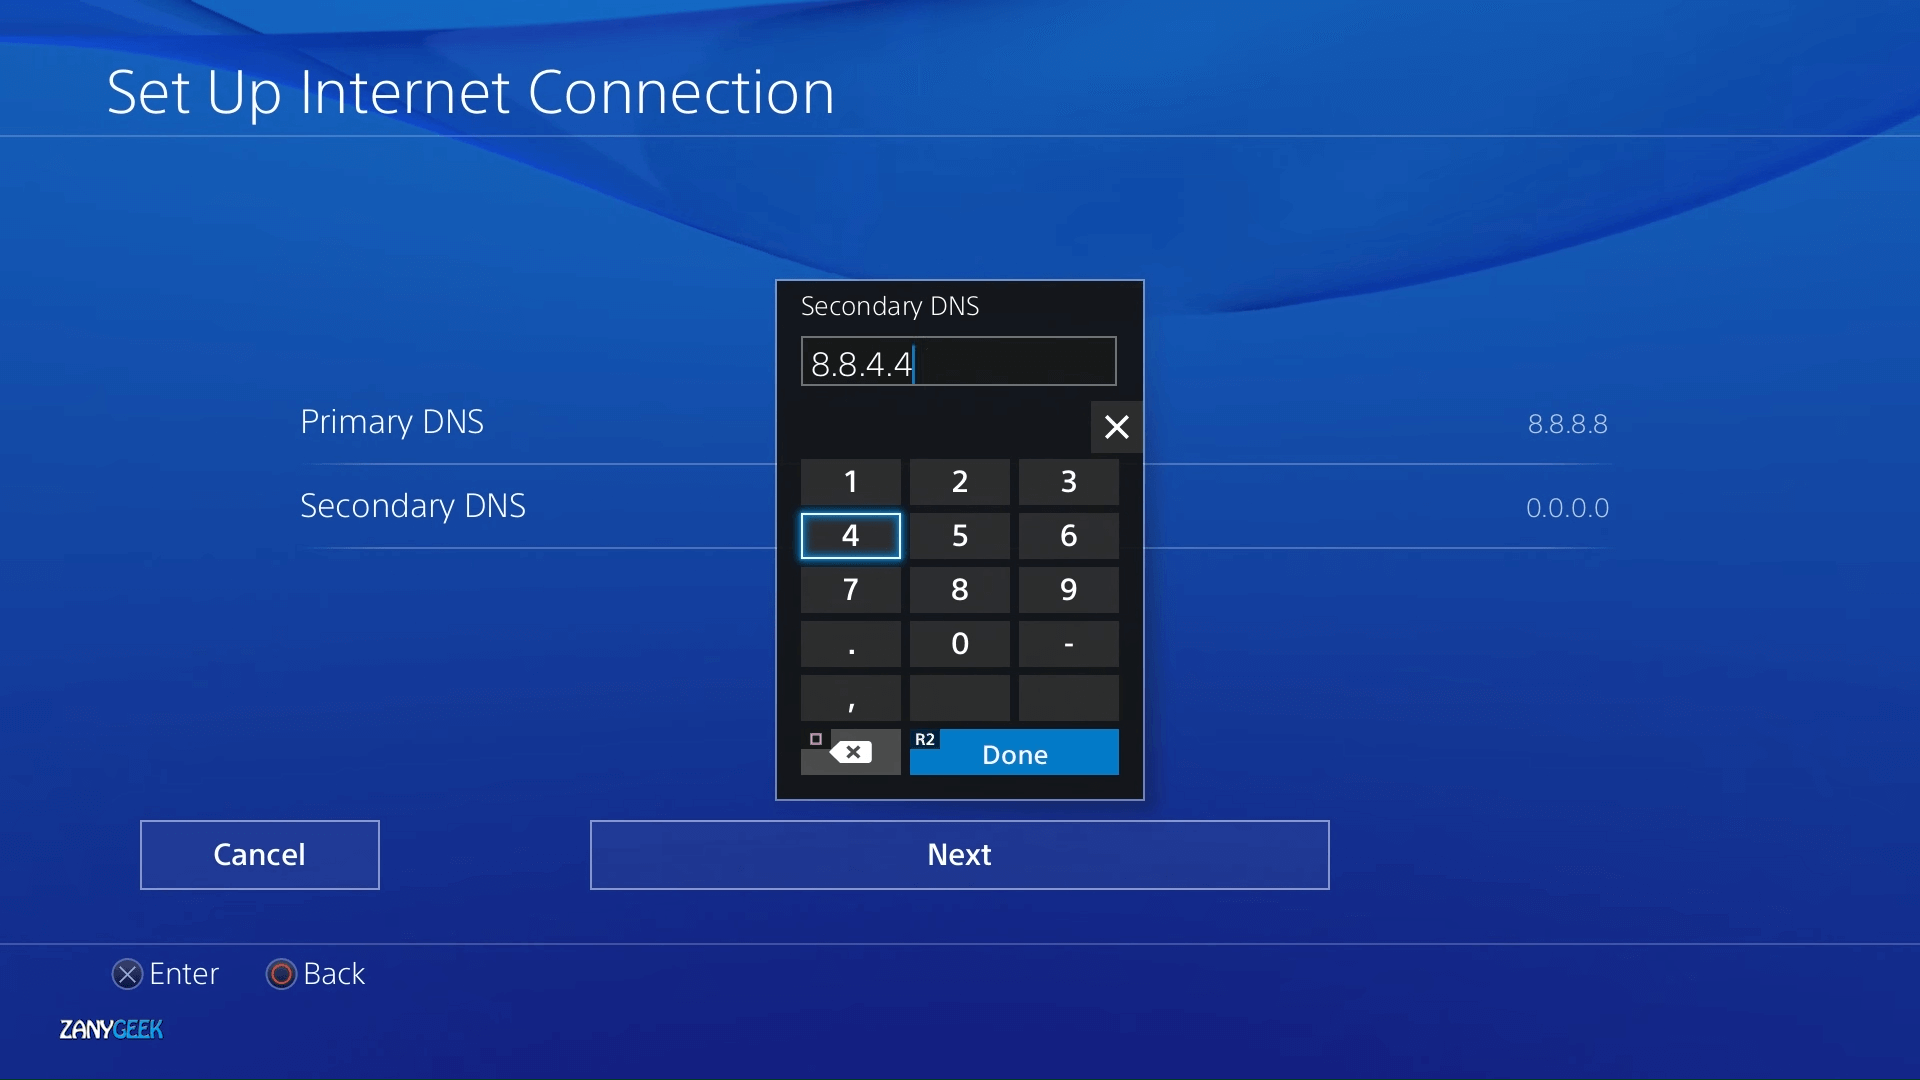
Enter the address of the default Google DNS servers – Primary: 8.8.8.8 and Secondary: 8.8.4.4.
Hit the Next button.
Select Automatic.
Choose the Do Not Use option in your proxy server.
NOTE
In Step 8, you can also use other DNS servers. For example, Open DNS – Primary: 208.67.222.222; Secondary: 208.67.220.220. Cloudflare DNS settings – Primary: 1.1.1.1, Secondary: 1.0.0.1.
If the DNS error still appears on PS4 or PS5 after configuring the correct DNS server settings, then you need to reset your network settings. Follow the guide below carefully.
2. Reset your DNS settings
Turn off the console.
Disconnect the system from power as well as your router.
Leave it in this state for 4 minutes.
Boot the console into Safe Mode by pressing the Power button and holding it for 10 seconds.
Connect your controller using a reliable USB cable.
Click on Restore Default Settings.
Check if you’re still getting the NW-31253-4, NW-31254-5, NW-31250-1, and NW-31246-6DNS errors.
Don’t worry, this method doesn’t delete your game data or media files. It only resets your console settings to their default values and fixes the DNS error stating that a DNS server cannot be used.
Manually configuring the DNS settings is PlayStation’s recommended fix for DNS errors on PS4 and PS5. Therefore, changing your DNS settings after resetting your console is bound to get rid of the annoying errors.
3. Disable the firewall and leave the console ports open
Open your router’s admin panel or online interface. (Usually, all it takes is entering your router’s IP address in the URL bar from your browser).
Use your assigned credentials to log in.
Locate the Firewall section and disable it. (Note that the name of this option can vary, according to your specific router model or brand).
If you only need to open the ports used by your console, look for the ports option instead and forward them to the IP address corresponding to your PlayStation console.
To obtain the IP address and other details that might come in handy such as DNS, subnet mask, and default Gateway:
Open the Settings menu on your console.
Go to Network.
This time select View Connection Status instead of Set Up Internet Connection.
NOTE
These are the port numbers you need to open in order for the PSN servers to properly connect to the Internet:
Your console requires specific ports to properly communicate with dedicated servers from the PlayStation network.
If you own a router with a built-in firewall, the rules behind can end up blocking these ports and thus triggering the infamous DNS error on PS4 and PS5.
Why does my PlayStation console says that a DNS server cannot be used?
The reason for encountering these error messages is that you have misconfigured DNS settings. The consequence is grave enough not to be ignored.
With any of these errors from the NW-31253-4 error code and beyond, you won’t be able to make use of PlayStation’s online services. In this sense, it’s fair to say that error code NW-31253-4 is similar to Playstation’s network sign-in error.
So, what is a DNS error on PS4 or PS5 exactly? It’s a connectivity error that can arise due to misconfigured DNS settings or when your network changes and the system attempts to map your old configuration to the new networking settings.
Apply the solutions above when your system shows you the PS4 system error saying that the DNS server cannot be used.
With working DNS servers, you’ll be able to access all your PlayStation internet services with no issues.
When you try to connect from a remote client to the server or computer, you may encounter a partner that did not connect to the routererror in TeamViewer. The full error reads:
No connection to partner! Partner did not connect to router. Error code:WaitforConnectFailed!
Why is my TeamViewer not connecting to partner?
This error usually occurs if the partner computer is not connected to a network. However, it can also be triggered by faulty installation and incompatible TeamViewer versions installed on both computers.
In this article, we have listed a couple of troubleshooting tips to help you resolve the TeamViewer partner did not connect to router error.
How do I fix the TeamViewer partner unable to connect error?
1. Disable IPV6 on both computers
Press the Windows key + S and type control.
Click on Control Panel to open it.
In Control Panel, go to Network and Internet > Network and Sharing Center.
From the left pane, click on Change adapter settings.
Right-click on your currently active network adapter.
Select Properties.
In the Properties window, uncheck the Internet Protocol Version 6 (TCP/IPv6) option.
Click OK to apply the changes.
Once you have disabled IPV6, make sure to repeat the steps on your client’s computer as well.
Try connecting to TeamViewer and check if the TeamViewer partner could not be contacted at the given network address error is resolved.
If you have a Windows phone and you wish to control your PC remotely with TeamViewer, check this useful article out and learn how.
2. Check TeamViewer version and update
Open TeamViewer on your computer.
Click on Help and select About TeamViewer.
Note down the Version number.
Check if your client is also running the same version or other versions.
Click Help and select Check for new version.
Download and install if a new version is found.
If you or the client is running an outdated version of TeamViewer, it may fail to connect, resulting in the Teamviewer is not running on a partner computer error.
Make sure both the computers are running the latest version of TeamViewer to avoid any conflict.
3. Allow full access control to TeamViewer
Launch TeamViewer on your computer.
Click Extras and select Options.
In the TeamViewer option window, open the Advanced tab.
Click on the Show advanced options button.
Under Advancedsettings for connections to this computer section, click the drop-down menu and select Full Access.
Click OK to save the changes.
Restart TeamViewer and check for any improvements.
4. Flush the DNS configuration
Press the Windows key + S and type cmd.
Right-click on Command Prompt and select Run as Administrator.
In Command Prompt, type the following command one by one and hit enter to execute: ipconfig/releaseipconfig/renewipconfig/flushdns
Once done, exit the Command Prompt and check if the TeamViewer is not running on the partner computer error is resolved.
Outdated DNS entries can cause connection issues. Clearing the DNS cache can help you resolve any connection issues occurring due to corrupted DNS entries.
5. Restart the network
Make sure the modem is turned on.
Pull the cable from the back of your modem.
Make sure all the lights are off and leave the modem idle for a minute.
Connect the modem cable and turn on the device.
Wait for the modem’s lights to stop blinking and turn green.
Try connecting to TeamViewer and check for any improvements.
Many network-related problems can be easily fixed by restarting your internet modem or router.
The partner did not connect to the router error in TeamViewer can be resolved by disabling the IPV6 protocol.
However, if the issue persists even after disabling the IPV6 protocol, try clearing the DNS cache and giving full access control to TeamViewer.
If you continue having problems, you can try a different remote control software. Give Mikogo a try as it has an up-to-standard set of features. Or you can also choose one of these remote management software, they’re of great quality as well.
That’s about it for this article. We hope one of our solutions solved the problem for you. Make sure to let us know what worked out for you in the comment section below.
Chromecast is a digital media player developed by Google that enables users to control and initiate playback of various content on high-definition televisions using computers and other devices.
Like all other portable media devices, Chromecast can have problems. There may be instances when you can’t find Chromecast on your laptop or your computer.
If your PC can’t find Chromecast, you can try the solutions described below in order to fix the problem.
What can I do if my PC can’t find Chromecast?
Before you try out more complicated solutions, you should restart your router and your computer. It is always a good idea to reboot your router, and your Chromecast device by unplugging them from the power source for about 2 minutes.
Also, reboot you casting device, meaning your computer. Most of the time, when you encounter a random problem, it is best to ensure that your hardware isn’t just glitched.
Sometimes, the only thing you have to do is to restart your devices, and your problem will be solved.
1. Verify the Wi-Fi signal
Open Start menu and type Network Status in the search bar, then press Enter.
Select Wi-Fi on the left, then click on the network your PC is connected to.
Check the strength of your Wi-Fi.
Reposition your PC/laptop if necessary.
The first thing you should check is the Wi-Fi signal. If it’s weak, either move the router nearer or consider changing the location of your device.
In order for Chromecast to work, both your PC and the gadget need to be connected to the same Wi-Fi network, so make sure both are in the range of your Wi-fi.
2. Check the power supply
Many users use the USB service port on their television as a very convenient way to provide power, but it is not actually the ideal way to power your Chromecast.
Not all USB ports are created equal on HDTV sets and it is possible that the port is poorly grounded, or otherwise not provided clean and steady power to your Chromecast.
Hence, it is possible that Chromecast is not getting enough power supply. You should consider plugging it into the power supply which came with the Chromecast and power it using the wall current.
If your power supply is in pristine condition and it is not malfunctioning, everything should work fine after u plugged everything in accordingly.
However if your laptop can’t find Chromecast even after it was plugged in, it means there has to be another issue.
3. Change the Wi-Fi channel
Go to the settings page of your router on a browser
Find and click Wireless catalog (probably it is under Settings catalog)
On the Wireless pane, make sure your network operates at 2.4GHz
Chromecast is reportedly known to only work on 2.4 GHz on your wireless router.
If your router is set to some other frequency band, the device may not be able to connect. Follow the aforementioned steps here to check it and try to change your Wi-Fi channel to improve your Wi-Fi signal.
4. Use the HDMI extender
There is a short HDMI extender cable, about a couple of inches long, that may come with your Chromecast or can be bought separately.
You can use it to plug your Chromecast into your TV HDMI’s port. This enables more breathing room for your Chromecast to detect Wi-Fi networks.
Plugging it in is pretty simple and straightforward. If, after plugging your HDMI extender calbe your problem persist, look for further info in the article.
5. Check if Chromecast is connected to the same network
Another useful suggestion is to make sure that your Chromecast device and other devices are connected to the same network.
Hence, check that the network name displayed on the TV is the same one currently selected on your computer.
The interface of your TV might be different depending on the model, since there are many operating systems for smart TVs, such as Tyzen OS, or WebOS.
Go into your network settings and make sure your TV is connected to the right Wi-Fi network.
6. Factory reset from the Chromecast App
Open the Chromecast app on your computer – check the Start menu, Applications or the directory where you installed it
Click Settings. If you have multiple Chromecasts on your network, be sure to select the one you want to format
Click on Factory Reset
Click on Reset. The Chromecast will now reset to factory settings, and you will be able to restart the setup process.
If none of the above solutions solve your problem, you can go ahead and perform a factory reset. A factory reset will bring Chromecast back to its default settings.
7. Manually reset Chromecast
If you cannot access your Chromecast, you will need to take a more hardware-based approach.
Google put a hard reset button on both the first and second-generation Chromecasts, so you can perform a factory reset easily.
So, while the Chromecast is hooked up to the TV, press the button along the edge of the Chromecast and hold it for approximately 25 seconds.
If it is a first-generation Chromecast, release the button when the indicator light switches from solid to flashing.
The second-generation Chromecast‘s LED indicator will begin flashing orange. You should release the button when the LED turns solid white
If you use Chromecast with Google TV and your PC still cannot find it after these steps, check the remote too. A stuck or unresponsive remote can block setup and reconnection, so follow our Google TV remote not working guide to re pair or reset the remote, then try discovery again.
8. Disconnect from VPN/ proxy
Chromecast devices cannot communicate with a computer over these networks. If you need help with this, please check with your service provider for instructions.
VPN services are great ways to maintain your unanimity while browsing the internet, thus making your browsing safe and secure.
Unfortunately, Chromecast is not compatible with the internet provided by VPNs.
9. Verify if firewall/antivirus is not blocking connections
Please make sure that firewall/antivirus software is up to date and is not blocking the connection to the Chromecast device.
To see if the problem is caused by interference with your security software, you can temporarily turn off your security software and check if the problem is solved.
Consult your software documentation for instructions to disable it. If this solves the problem, contact the vendor of your security software and ask them for advice, or install a different security program.
One of our readers also suggested that you can solve this problem by uninstalling the Edge browser. If you don’t know how to do that, use this expert guide on how to remove Edge from Windows 10.
All in all, your computer not being able to find your Chromecast can be very annoying, but we hope that you managed to fix this issue after using one of our solutions described above.
If you have other suggestions also, please let us know in the comments section below.
If your external monitor is not detected after sleep, stick around. We’ll help you fix it.
Many reasons may lead to monitoring connection problems. It can be a driver issue, cable problems, power management, the monitor’s refresh rates, or even your project mode.
Regardless, if you follow the instructions below, you should be able to fix the external monitor not being detected, no matter the cause.
What do I do if my second monitor is not detected after sleep?
1. Disable Link State Power Management
Press the Windows start button, start typing control panel, and then click on Control Panel.
Select Power Options from the menu.
Under Choose or customize a power plan, click on Change plan settings next to the power plan that you are using.
Click on Change advanced power settings.
Scroll down and expand the PCI Express menu option, and then select Off under the Link State Power Management.
Click Apply and then OK to save your settings.
2. Roll back to a previous display driver
Press the Windows + R key combination to start the Run box.
Type devmgmt.msc and click OK or simply press Enter.
Expand the Display adapters option and then right-click on your display driver.
Select Properties.
Click on the Driver tab at the top and then select Roll back driver.
Follow the on-screen instructions to get the previously installed driver.
If the Roll Back Driver option is grayed out, that means you don’t have an older driver to load and you should skip this solution.
If rolling back doesn’t work, try an automated solution to find a recent version of the needed driver and update it, this might fix the issue. Our top choice in this case is Fortect Driver Updater – straightforward and reliable.
3. Set the same refresh rates on your monitors
Press the Windows + I key combination to launch Windows Settings.
Select System from the menu.
Select Display on the left-hand side and then scroll down and click on Advanced display settings.
Check the refresh rate for Display 1 at 60 Hz as shown below.
Click the drop-down menu under Choose display and change to Display 2 to check its refresh rate.
Change one of the refresh rates to match the other one, click Apply, and then OK to save your changes.
4. Disable deep sleep on your monitor
Check to see if your monitor has the Deep Sleep feature – common in Dell monitors and a few others.
Press the Settings or Menu button on your Dell monitor to display the monitor settings.
Scroll down the Settings menu to other monitors.
If Monitor Deep Sleep is enabled, make sure to disabled it.
Turn off your monitor and then turn it back on.
5. Restart the graphics driver
Press the keyboard shortcut Ctrl + Shift + Win + B key combination at the same time.
Wait for your main screen to flicker off.
Both the main monitor and the external monitor will turn on.
We hope the steps above helped you fix the monitor not being detected on your Windows PC. If you have any more questions, don’t hesitate to ask in the comments below.
Google Drive is one of the most widely-used cloud storage services. Despite that, Google does place some restrictions on file sharing using bandwidth limits.
As such, when there are lots of downloads for a shared Google Drive file in a short time period, you might get the following error:
Sorry, you can’t view or download this file at this time. Too many users have viewed or downloaded this file recently. Please try accessing the file again later. If the file you are trying to access is particularly large or is shared with many people, it may take up to 24 hours to be able to view or download the file. If you still can’t access a file after 24 hours, contact your domain administrator.
Why does it say this file cannot be downloaded at this time?
There are multiple reasons why this would happen, but it’s usually a small server-side bug and nothing to worry about. Of course, this implies you have full access to the said file.
This error effectively blocks Google Drive users from downloading the shared file for a day or so.
While you could always wait a few days and then download it, there’s also a handy workaround that allows you to download files that exceed Google Drive’s bandwidth restrictions. Here’s how it works:
How to fix Sorry, you can’t view or download this file error?
1. Fix Google Drive file issues
First, sign in to your Google Drive account.
Open the Google Drive file link you can’t download. Click its Download button so that you’re redirected to the page that states You can’t view or download this file at this time.
Edit the page URL by replacing the UC part of the URL with open. Then, the URL will be https://drive.google.com/open?id= instead of https://drive.google.com/uc?id=.
Now, load the edited URL.
A new page opens with a few buttons at the top. Click the Add to drive button on the page.
Click the My Drive option on your GD account page. Now you’ll be able to select the shared file.
Next, you should right-click the locked file that isn’t downloading and select the Make a copy option.
Then you can right-click the file copy and select Download from the context menu.
That will then save the file to a folder from which you can open it. This neat trick enables you to download any file types otherwise blocked by Google Drive quotas.
2. Try out a better cloud storage alternative
Online cloud storage solutions have easily gained the reputation of completely replacing traditional on-premise storage hardware.
Prevent hiccups such as being unable to view or download certain files by using Sync. That’s a top cloud storage option to keep, access, and share your data even while on the go.
Cautious users are thrilled about the fact that Sync backs up all files automatically in one centralized location.
Therefore, with apps for Windows, Mac, Android, iPad, iPhone, and the web, no files could ever get lost or not benefit from end-to-end encryption protection.
Sync
There are lots of things to like about Sync. It offers an intuitive interface and all your files are safe from prying eyes.
Which of these two options is your choice? Do you intend to stick with Google Drive or other cloud storage options are already more tempting?
Our previous recommendation may also be enjoyed when dealing with the following errors:
Download not possible at this point in time – Plenty of users claim that they are unable to download files from their Google Drive. If you’re one of them and the issue persists, try out Sync.
Too many users have viewed or downloaded this file recently – When getting this error, the bandwidth of the download has been probably already reached. Maybe it’s time to get past this limitation by choosing a new cloud storage solution.
Sometimes, when trying to install Windows updates or running Windows Update utility you may encounter the Windows update error C80003F3. This error can occur on newer as well as the older version of Windows as explained by a user in the Microsoft community forum.
Unable to install Windows Update. Error: C80003F3 Windows update wont run. Says windows update services not running but it is running.
If you are also troubled by this error, here are a couple of troubleshooting tips to help you resolve the Windows update error C80003F3.
How do I fix the Windows update error C80003F3?
1. Run Windows Update troubleshooter
Click on Start and select Settings.
Go to Update and Security.
Open the Troubleshoot tab.
From the right pane, scroll down to Windows Update and select it.
Click the Run the Troubleshooter button.
The troubleshooter will initialize the scan to detect issues with the Windows Updater utility.
Follow on-screen instructions and apply the recommended fixes. If prompted, click Applythis fix option.
Close the troubleshooter and try updating Windows once again.
2. Enable Windows Update services
Press Windows Key + R to open Run.
Type services.msc and click OK.
In the Services window, locate the Windows Module Installer service.
Right-click on Windows Module Installer and select Properties.
In the Properties window, make sure the service is running. If not, click the Start button.
For Startup type, click the drop-down menu and select Automatic.
Click OK > Apply to save the changes.
In the Services window, locate Cryptographic Service and repeat the steps from 4-6.
Locate the Trusted Installer service and repeat the steps again, then check whether the C80003F3 error is gone.
Enable Windows Update services using Command Prompt
Press the Windows key and type cmd.
Right-click on Command Prompt and select Run as Administrator.
In the Command Prompt window, type the following command one by one and hit enter to execute: SC config trustedinstaller start=auto SC config bits start=auto SC config cryptsvc start=auto
Once executed, close the Command Prompt window and check for any improvements.
Follow on-screen instructions to run the script on your computer.
This will reset all the Windows Update component successfully.
Once the process is complete, restart the computer and check for any improvements.
Reset Windows Update components using Command Prompt
Press Windows Key + R to open Run.
Type cmd and then press Ctrl + Shift + Enter to open Command Prompt as administrator.
In the Command Prompt window, type the following command and hit enter one by one. net stop wuauserv net stop crypt Svcnet stop bits net stop msiserver
Once all the commands are executed, enter the following command: ren C:WindowsSoftwareDistribution SoftwareDistribution.old ren C:WindowsSystem32catroot2Catroot2.old
The above command will clear and rename the SoftwareDistribution and Catroot2 folder.
Once the folders are disabled, enter the following commands to enable the services: net start wuauserv net start cryptSvc net start bits net start msiservr
Close the Command Prompt and restart your computer. Check for any improvements.
4. Disable/uninstall firewall apps
Press Windows Key + R to open Run.
Type control and click OK.
In Control Panel, go to Programs > Programs and features.
Locate the Comodo firewall (if installed) and click on Uninstall.
Click Yes to confirm the action.
Restart your computer and check for any improvements.
On the older version of Windows, like Windows 7, the Comodo firewall has reportedly created issues with the Windows Update services. Uninstall the software and check if that helps resolve the issue.
5. Re-register WSIS DDLs
Press Windows key + R to open Run.
type notepad and click OK to open Notepad.
In the Notepad window, enter the following in the notepad document: net stop bits net stop wuauserv net stop appidsvc net stop cryptsvc Del “%ALLUSERSPROFILE%Application DataMicrosoftNetworkDownloaderqmgr*.dat” Del %windir%SoftwareDistribution*.* /S /Q Ren %windir%system32catroot2 catroot2.bak sc.exe sdset bits D:(A;;CCLCSWRPWPDTLOCRRC;;;SY)(A;;CCDCLCSWRPWPDTLOCRSDRCWDWO;;;BA)(A;;CCLCSWLOCRRC;;;AU)(A;;CCLCSWRPWPDTLOCRRC;;;PU) sc.exe sdset wuauserv D:(A;;CCLCSWRPWPDTLOCRRC;;;SY)(A;;CCDCLCSWRPWPDTLOCRSDRCWDWO;;;BA)(A;;CCLCSWLOCRRC;;;AU)(A;;CCLCSWRPWPDTLOCRRC;;;PU) cd /d %windir%system32 regsvr32.exe /S atl.dll regsvr32.exe /S urlmon.dll regsvr32.exe /S mshtml.dll regsvr32.exe /S shdocvw.dll regsvr32.exe /S browseui.dll regsvr32.exe /S jscript.dll regsvr32.exe /S vbscript.dll regsvr32.exe /S scrrun.dll regsvr32.exe /S msxml.dll regsvr32.exe /S msxml3.dll regsvr32.exe /S msxml6.dll regsvr32.exe /S actxprxy.dll regsvr32.exe /S softpub.dll regsvr32.exe /S wintrust.dll regsvr32.exe /S dssenh.dll regsvr32.exe /S rsaenh.dll regsvr32.exe /S gpkcsp.dll regsvr32.exe /S sccbase.dll regsvr32.exe /S slbcsp.dll regsvr32.exe /S cryptdlg.dll regsvr32.exe /S oleaut32.dll regsvr32.exe /S ole32.dll regsvr32.exe /S shell32.dll regsvr32.exe /S initpki.dll regsvr32.exe /S wuapi.dll regsvr32.exe /S wuaueng.dll regsvr32.exe /S wuaueng1.dll regsvr32.exe /S wucltui.dll regsvr32.exe /S wups.dll regsvr32.exe /S wups2.dll regsvr32.exe /S wuweb.dll regsvr32.exe /S qmgr.dll regsvr32.exe /S qmgrprxy.dll regsvr32.exe /S wucltux.dll regsvr32.exe /S muweb.dll regsvr32.exe /S wuwebv.dll netsh winsock reset netsh winhttp reset proxy net start bits net start wuauserv net start appidsvc net start cryptsvc
Click File and select Save As.
Enter a name for the file and save it with .bat extension (like script.bat).
Make sure the Save as type is set to All Files.
Right-click on the saved file and select Run as Administrator.
The Windows update error C80003F3 can occur due to various reasons. In this article, we have listed all the possible solutions to help you fix the error in Windows and successfully install the updates.
For those unfamiliar with this term, clearing the cache means emptying it, and this article will show you how to do it in Windows 11 easily.
Considering computers, a cache is a non-permanent file (or files) that may be needed again in the future. Therefore, the cache is kept hidden until that time, thus protecting the content.
Cache files are essential, but they can also take up valuable space. This can be a problem if you have a limited-capacity SSD. However, there is some good news. In most cases, cache files can be safely erased to clear up disk space.
How can I clear the cache memory on Windows 11?
1. Use the Settings menu
1.1 Clear Temporary Files
Hit the Windows key, then click on the Settings menu.
From the left window pane, select System, then, from the right window side, navigate to Storage.
Wait for your OS to scan and assess the temporary cache files stored on your system.
Click on the Temporary files option.
The various cache files will now be listed.
Scroll down, then select the files that you want to delete, and click on the Remove files button.
In the pop-up window, click on Continue to complete the process.
Now your selected files are deleted.
1.2 Clear the Location cache
Important reasons to clear Windows 11 cache
➡ Frees up Disk Space
Your OS accumulates a vast range number of cache files over time. Consequently, they may consume a significant portion of your hard disk.
If your system is running low on memory, clearing the cache would help clear disk space.
➡ Prevents errors
Windows 11 cache files might get corrupted over time, leading to various errors. In extreme cases, some of them may seriously harm your operating system’s performance.
Clearing the cache periodically prevents these errors and keeps your system healthy.
➡ Boosts performance
A low available storage space leads to a slowed-down system. Hence, clearing the cache will boost your OS’s performance.
Now from the left window pane, select Privacy & security, then click on the Location.
Search for Location History section, then click on the Clear button.
Your location activity stored on the system will be deleted.
2. Use the Disk Cleanup app
Press on the Windows key, then type Disk Cleanup, and select it.
Under the Files to delete section, choose the files that you want to clear, then click on OK.
To clear the system files, you should click on the Clean up system files button.
Select the drive in which the system files are stored, which will most likely be the C: drive.
Wait for Disk Cleanup to scan and identify the system files that can be removed.
Once this is done, select the files that you want to delete from under the Files to delete section and click on OK.
If you’re not satisfied with the results of this built-in app, or you want to simplify this process, you can always use a specialized disk cleanup software.
A regular health check improves speed by removing unnecessary programs, and these tools do an excellent job of decluttering disk space.
3. Navigate to Command Prompt to clear the DNS cache
Hit the Windows key, then type cmd, then choose to Run as administrator.
Type the following command, then press Enter: ipconfig /flushdns
The Domain Name System cache will now be cleared.
4. Clear the Microsoft Store cache
Press simultaneously on Windows + R keys, then type wsreset.exe, and click on OK.
This will open a black window with no text which will disappear once the cache is cleared.
After that, Microsoft Store will launch.
5. Clear Microsoft Edge cache in Windows 11
Open Microsoft Edge.
Click on the Settingsmenu, marked as three horizontal dots, then hover over History, and choose to Manage History.
Look at the top-right corner, then click on Clear browsing data, marked as a Recycle Bin.
Click on Time range option, then select the range for which you want to clear the cache.
Now, checkmark the Cached image and files option, then click on Clear now to delete it.
Click on the Settings menu (which is now marked as three vertical dots), hover on History, then select History from the secondary context menu.
Look at the left window pane, then click on the Clear browsing data option.
From the drop-down menu, select a Time range for which you want to clear the cache.
Checkmark the Cached images and files box, then click on Clear data.
Considering the last two presented options, keep in mind that anytime you open a website, the browser will download certain files such as images and codes, to reduce the loading time on subsequent visits.
However, it isn’t recommended to clear the browser cache unless you’re encountering issues while accessing a particular website.
Also, note that the cache can affect your disk storage, so if you do not delete it occasionally, it may harm your OS. That’s where third-party software comes in handy, so we also recommend checking the best deep clean hard drive software.
Is clearing the cache safe?
If you’re wondering whether or not clearing the Windows 11 cache is safe, the answer is definitely yes.
The cache stores non-essential files. But what exactly does it mean?
We’re talking about files not 100% needed for the correct app operation. In these terms, deleting it should not adversely affect the functionality of your programs or OS.
Our presented options are the most effective in clearing the system cache on Windows 11. If you’re on Windows 10, we have a guide on how to clear cache and cookies on Windows 10 as well.
Struggling with cache problems in Xbox Series X? Our article provides insights on Clearing Cache on Xbox Series X for improved gaming.
If you have any other questions, do not hesitate to contact us in the comment section below.
Sometimes, Task Manager may show wrong CPU usage, which can create a lot of unwanted troubles for Windows users. Fortunately, this article contains the most accurate solutions to solve this problem.
Though this problem is not a very widespread one, a lot of users have been noticing that Task Manager is not showing correct CPU usage on Windows 11 22H2. For some users, the problem is not very noticeable. But, for others the CPU usage looks very abnormal, like always more than 90% or 100%.
This problem is not like high CPU usage on Task Manager. That is a different issue, and we have already published a solution for that.
Is Task Manager accurate for CPU usage?
Windows users depend on Task Manager to measure CPU, Memory, Network, and some other system resource usage. However, the main concern is whether its CPU usage graph is accurate or not.
It is very hard to answer. But, if there is no bug, the Task Manager shows accurate CPU usage. Though you will always find small differences between various performance monitoring tools, it doesn’t mean these are showing the wrong stats.
What can I do if Task Manager is showing the wrong CPU usage?
It is unknown why exactly you have been getting this problem. So, to save you time and avoid unwanted issues, we suggest you do the following things before trying out the actual solutions:
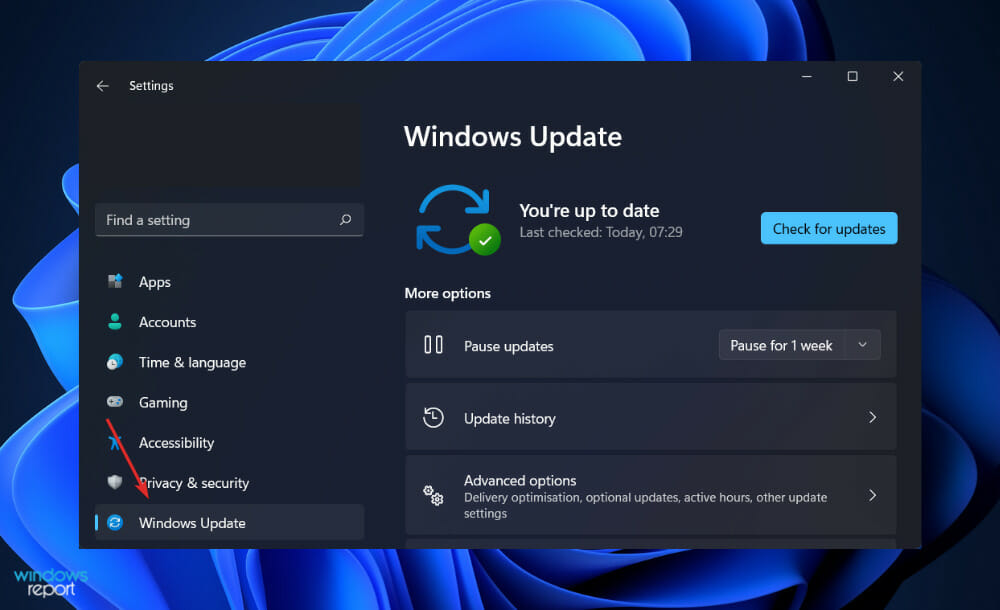
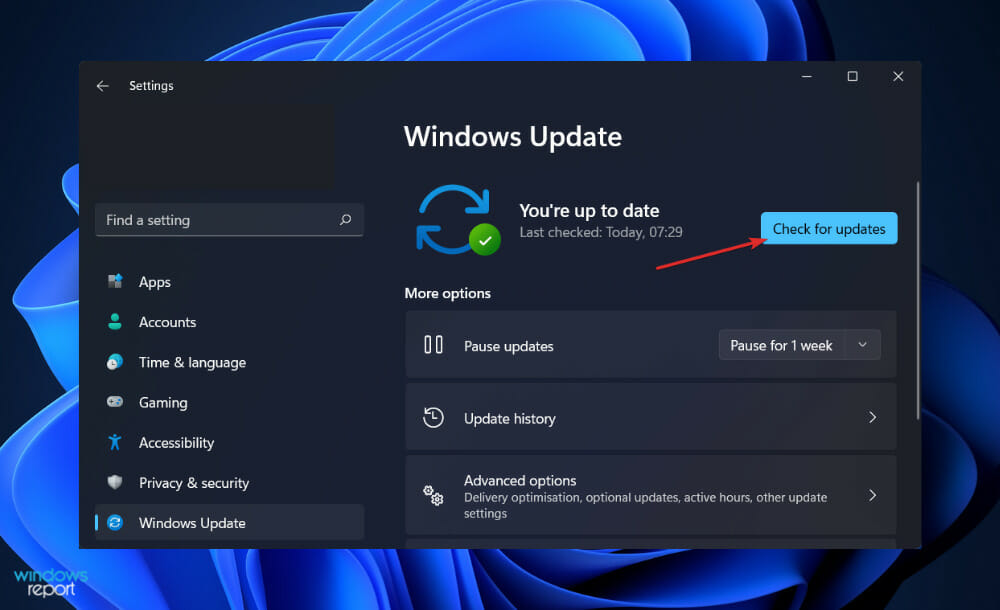
Update Windows to the latest version.
Disable your antivirus program temporarily and see if it helps.
Make sure your PC is meeting all of the system requirements of the current Windows version. See Windows 11 system requirements.
After that, follow these methods to solve Windows Task Manager shows incorrect CPU usage.
1. Tweak Power Settings
Press Win + I on the keyboard to open Windows 11 Settings.
Go to System and click on Power & Battery.
Click on the dropdown menu next to the Power mode and select Best performance.
Restart Windows.
For some users, especially those who have been using laptops, doing the above things may solve the problem completely.
Turn it on and keep pressing the F12/F2/Del or anything else depending on your motherboard model to enter into the BIOS/UEFI dashboard.
Go to the option something like System Utilities or Advanced CPU Settings.
Go to System configuration and any option like Platform configuration.
Find the Power and Performance or any similar option and go there.’
Find an option like Global C-state Control or C-State Efficiency Mode.
Disable it.
Save the settings and restart your PC.
If Task Manager is reporting wrong CPU usage on your PC, particularly if you are using an AMD processor, disabling C-State control may solve this problem.
4. Run the Memory Diagnostic tool
Press Win + R on the keyboard to open Run.
Type the following command and press Enter: mdsched.exe
Follow any on-screen instructions and restart your PC to start the testing.
Task Manager CPU usage percentage may be wrong due to internal memory problems of your computer. The best way to identify it is the Windows Memory Diagnostic tool. The above steps will launch this tool and run the memory test for you.
The problem is related to physical damage to your RAM modules; you may need to replace them with new ones.
Many Windows 11 users who reported CPU usage higher than Task Manager were able to solve the problem by resetting the Windows. Particularly, after upgrading from an older build, some users encountered the problem on Windows 11 version 22H2.
For some, the Clean installation of Windows worked. So, you also may consider doing it.
If you are unhappy with this built-in performance monitoring tool, you can consider using these best Task Manager alternatives.
This is how you can fix Windows Task Manager’s wrong CPU usage issue. If you have any other methods that can help others, feel free to let us know in the comment box.
Powering off your Windows 10 device isn’t always recommended, especially if you want to increase your productivity and keep your data and programs running in the background so that you may quickly resume work where you left off.
If you want to skip the power off/power on sequence, you can put your Windows 10 system in sleep mode.
Many users reported they sometimes could not wake their devices from sleep mode. Basically, if they aren’t using their devices for several hours, the computer will not wake from sleep mode unless a force restart is being applied.
So, what is there to do when the computer monitor won’t wake up from sleep on Windows 10? Well, in this guide, we will explore a few troubleshooting solutions that will help you to fix this problem.
What can I do if my computer monitor won’t wake up from sleep on Windows 10?
1. Run the Power Troubleshooter
First things first, you can use the built-in Power troubleshooting tool in order to see if you can automatically fix the sleep mode issue.
Here are the steps to follow:
Click on the Start button and select the Settings icon to open the Settings page
Select Update & Security
In the left-hand pane, click on Troubleshoot
Under Fix and find other problems, select the Power troubleshooter and run it.
Alternatively, you can also launch the troubleshooter from the Control Panel:
Click on Search, type control panel and double-click on the Control Panel app to launch it
From the left pane of the main window, select View all
Choose Power from the general settings and just follow the on-screen prompts.
2. Uninstall and reinstall your drivers
The next thing to do is to uninstall your drivers, including the display adapters.
Click on the Start box, type device manager and launch the Device Manager
Go to Display Adapters
Right-click on the adapters and select the Uninstall device option
Then go to your manufacturer’s official webpage and download the latest version of your drivers.
3. Create a new Power Plan
You can also create a new Power Plan in order to personalize and customize the way you power off your Windows 10computer.
Go to Control Panel
Type power in the search box and select Power Options
Click on Choose a power plan and then select Create a power plan
Follow the on-screen instructions to define the new power plan.
Make sure the Fast startup option is disabled in the new plan.
4. Uninstall recent Windows updates
The problem might also be caused by Windows 10 updates. We all know that Microsoft regularly releases updates for your Windows 10 system. Oftentimes, these updates are installed automatically.
Well, all you need to do is to turn off the Windows Update feature and to apply the updates manually. In order to do this, open Settings, go to Update & Security, then to Windows Update and adjust the option in the Advanced options menu.
Moreover, if this problem occurred shortly after you installed the latest Windows updates, you may want to uninstall them as well.
Speaking of updates, according to a recent survey, over 50% of users confirmed that Windows updates triggered various technical issues on their machines. As a result, removing recent updates may help you fix the problem.
5. Use the powercfg.exe command
There is a useful command that you can use to quickly fix most sleep and hibernation problems.
Launch Command Prompt as administrator
Type powercfg.exe /hibernate off and then hit Enter
Restart your computer
Open Command Prompt again
Type powercfg.exe /hibernate on and hit Enter
This simple and handy command should resolve the problem whereby your computer fails to resume from sleep or hibernation.
6. Check your Power Management settings
If Windows 10 won’t wake up with mouse or keyboard, make sure your Power settings allow these devices to wake the computer.
Launch the Device Manager
You’ll all the devices connected to your computer.
Locate your keyboard and mouse options
Start with your keyboard, right-click on it and select Properties
In the new window, go to the Power Management tab
Make sure the option Allow this device to wake the computer is checked.
Repeat these steps for the mouse if you want your mouse to wake your computer from sleep mode as well.
If you’re using an old laptop, you may want to disable Intel Rapid Start Technology in your BIOS Power settings. The Windows 10 Deep sleep option is not available on older configuration machines and this might cause sleep mode issues.
What is sleep mode used for?
Using sleep mode is great as you will be able to turn on your device extremely fast without loading the default programs and built-in features each time you reboot your device.
Also, all your processes will be restored once you wake your computer from sleep mode, so all of your data will be safe even if you didn’t save it before entering sleep mode.
These are the troubleshooting solutions that should fix your Windows 10sleep mode issue. If the problem persists after applying the solutions listed above, let us know in the comments below. We will dig further for additional solutions.
The Outlookclient offers the flexibility to work offline if the Internet is not working. However, several users have reported an Outlook account clientdisconnected message after signing in.
This problem can occur with both old and newer versions of Outlookclients as reported by the users in the Microsoft community forums.
Although I can access current emails using Microsoft 365, I have a desktop version that is specific to my computer. Recently when I sign in on my computer, a disconnected message comes up in the bottom right corner of my screen.
Why does my Outlook email keep disconnecting?
One of the most common causes of Outlook being stuck in a disconnected state is a poor internet connection. Other causes include conflicts with 3rd party apps like Skype or Office.
If you are also bugged by similar issues, here are a couple of troubleshooting tips to help you resolve the error Outlookclient disconnected error in Windows.
How do I get my Outlook back online?
1. Close Skype for Business
Click the arrow icon in the taskbar to show hidden apps.
Right-click on Skype for Business and select Exit.
Relaunch Outlook. Click the Send/Review tab.
Click on Work Offline.
Now check the status. If the status shows Working Offline, close Skype.
If the status shows something else, click the Work Offline button again until the status is changed to Working Offline.
Relaunch Outlook.
Look for a sign-in window separate from the Outlook window. (If not visible, minimize other apps that are running and press F9 to trigger it.)
Enter the username and password in the window.
In the Outlookclient, click on the Work Offline button to change the status to Work Online.
Now the Outlookclient disconnected issue should be resolved.
Make sure you restart the computer once, before accessing Skype for Business again.
2. Repair Office 365
Press Windows Key + R to open Run.
Type control and click OK to open the Control Panel.
Go to Programs, then to Programs and Features.
Select the Microsoft Office version and click on Change.
The repair window will show two options. Quick Repair – This option works without the Internet. Select it and follow the on-screen instructions. Online Repair – If the Quick Repair did not resolve Outlookclient disconnected error, try this option. Select the option and follow the on-screen instructions.
Once the repair is complete, close the troubleshooter and relaunch Outlook. Check for any improvements.
3. Remove and re-add Microsoft Account
Launch the Outlookclient.
Click on File and select the Info tab.
Click on Account Settings and select Account Settings.
Select your account and click on Remove. Click Yes to confirm the action.
Relaunch Outlook.
Click on File and click on Add Account.
Enter the login details and check for any improvements.
Add your email account to the new profile. You can now use the Outlook account without the disconnected error.
By following the steps in this article you should be able to fix the Outlookclient disconnected error in Windows.
Let us know which steps worked for you in the comments. Similarly, if you’ve used another method, share it with us and we’ll surely include it in our guide.
Do you have NOX installed on your PC? Are you experiencing any form of lag while running it? This article is specially designed for you! Here, we’ll be showing you some of the most effective troubleshooting fixes, to resolve the lag and speed up your NoxPlayer.
NOX is an Android emulator for PC, which is basically designed to afford PC users the opportunity to enjoy Android gaming experience on their computers. The emulator is suitably built to work perfectly well (in sync) with most Windows PCs.
However, depending on your system’s (PC) configuration, settings and specs, you might experience some lags while running NOX. Essentially, the emulator‘s performance is wholly dependent on your system’s performance.
Hence, if you are experiencing any form of lag while running NoxPlayer on your PC, follow this article with rapt attention, as we bring you five of the most reliable troubleshooting solutions, to resolve and fix NOX emulator lag.
The following troubleshooting fixes constitute some of the most effective methods, to fix NOX emulator lag on PCs.
Quick tip:
Before starting off and trying to fix NoxPlayer, you should consider the possibility of using an alternative instead.
On that note, we recommend that you give LDPlayer a try, since it is also free, and does everything that NoxPlayer does, and more!
If, after trying all possible fixes, you are still unable to fix NOX emulator lag, the ultimate solution would be to reinstall the program. By reinstalling the Android emulator, you get a fresh (bug-free) app, which should now work perfectly, provided all system requirements have been met.
2. Enable Virtual Technology (VT) on your System
Download LeoMoon CPU-V and run it to check if your PC hosts VT.
Also, the app would show you if VT is enabled or not.
If it is, then something else is causing the lag; otherwise. proceed with the next steps. VT is usually embedded in a PC‘s BIOS.
Click the Windows + R keys to open Run dialog box.
In the Run box, input Dxdiag.
Select OK. This will bring up your PC‘s BIOS details.
After bringing up your BIOS details, you can then run BIOS to activate the VT embedded in it.
Virtual Technology (VT) comes inbuilt with most standard computers. However, most times, the VT function is usually disabled, in which case, you are bound to experience some lags while running the NoxPlayer.
To resolve this issue, all you need to do is to enable the VT setting on your system, and you’ll experience a significant boost in the running speed..
The procedure for running BIOS varies across platforms. Hence, depending on your system’s build, the procedure outlined herein might not work for you.
Follow the steps below to run BIOS on your system:
Power off your PC and reboot it.
On the boot menu, run BIOS by clicking the F2 button (or any of the F-keys, depending on your system).
Go to Configuration and locate one of the following:
Virtualization
Intel Virtual Technology or
VT-x.
Enable the virtual engine.
Hit the F10 button to save changes.
Exit
Note: For Win 8 and Win 10 users, make sure you disable the Hyper-V feature on your PC, before enabling the VT function.
Enabling VT on your PC should fix NoxPlayer lag issues, and you can now enjoy optimized Android experience on your PC, via NoxPlayer.
If this doesn’t work, you can try the next troubleshooting fix.
3. Reconfigure the RAM and CPU allocated to NoxPlayer
Launch NoxPlayer and navigate to the top right-hand corner of the home page.
Click on the Settings option.
Under Settings, select Advanced.
Check the Customize box.
Configure the performance settings as you desire (setting CPU and RAM to higher values is the recommended configuration).
Enter the desired value in the designated box for CPU.
Do the same for RAM.
Click on Save Changes
NoxPlayer should be working at optimum capacity now.
This procedure works in sync with the virtual technology function; hence, if your system does not support VT, you can’t fix NoxPlayerlag using this procedure.
If you are still experiencing lags, you can change the graphics rendering mode (under Advanced settings).
Note: In trying to improve NOX performance via CPU and RAM customization, ensure to leave sufficient CPU and RAM space for the computer to run other system operations. Failure to do this might result in an eventual system crash.
Under the “Preferred graphics processor” drop-down, select “High performance NVIDIA processor”.
Like most emulators, NoxPlayer requires a standard graphics setup to function properly. So, if you are experiencing lags, the problem could be from your system graphics cards (or GPU setup).
The ultimate solution in this case, is to increase the performance of your system’s GPU, specifically the graphics cards. Although there is a number of ways to do this, we’ll be showing you the standard ones in this section.
This would jack-up the graphics card performance
However, if you want to set the graphics card to higher performance on the only NoxPlayer, you can customize the setting as follows:
Under Manage 3D settings (as described above), go to the Program Settings tab.
On the Select a program to customize drop-down, select NoxPlayer.
Under the second drop-down menu, select High-performance NVIDIA processor.
Press Apply to save changes.
And you are all set!
For AMD:
Note: This process requires two sets of graphics cards. Hence, you need to check if you have two graphics cards on your system.
Click on the Windows + R keys (to open the Run dialog box).
Type devmgmt.msc in the box (to launch Device Manager).
Click on Display adapters to display the graphics card(s).
If there are two graphics cards, proceed; otherwise, abort.
Navigate to your desktop window and click Start > Programs.
Select Catalyst Control Center.
Under Catalyst Control Center, locate Power and click on it.
Select Switchable Graphics Application Settings.
Locate NoxPlayer and set its graphics to High Performance.
Once cache is cleaned, NoxPlayer should now be working fine, without lag.
More often than not, NoxPlayer would be running slow after heavy usage. And most times, all you need to do to fix the error is to CLEAR the emulator‘s cache (like in Android phone).
NoxPlayer is one of the most prominent Android emulators in the market. And it is designed to run at optimum capacity, in sync, with a host PC. Hence, in the event of performance reduction or lag, the primary problem is usually caused by the host computer.
In any case, we have outlined five standard troubleshooting procedures, which, if appropriately applied, would fix NoxPlayer lag, and speed up the program’s performance on your PC.
If you find this piece helpful (or otherwise), kindly leave us a comment in the designated box below.
Windows 11 was announced recently, and many are looking forward to it. We have already compared Windows 10 and 11, and we can confidently say that Windows 11 is a significant step forward.
Judging by Windows 11 build 22000.65, the new Windows looks pretty enticing with its exciting design and features, but is it better than its main competitor, macOS?
Today’s guide will compare Windows 11 and macOS Ventura and see your better operating system.
Windows 11 vs macOS Ventura comparision
User interface
Windows 11 and macOS have many similarities, and with a new design that features rounded corners, the Windows 11 user interface resembles macOS more than ever.
However, that’s not all; the Taskbar on Windows 11 is moved to the center, similar to the Dock on macOS, so it seems that Microsoft is taking notes from Apple regarding the design.
The Start Menu has been decluttered, and now it features your pinned apps and recommended files, folders, and apps. This mainly includes any recently opened files or applications for quick access.
As you can see, no more will you see all installed apps or Live Tiles so that you can focus only on the most critical tasks. However, you can still access all installed applications using the All apps button in the Start Menu.
Unlike Windows, macOS uses Launchpad, which lets you see all your installed applications and organize them into groups simply by clicking your Dock.
As for customization, these options on macOS are relatively limited, while you can completely change the look of Windows 11 with free Windows 11 themes and skins.
Windows 11 brings a fresh and sleek user interface that was supposed to be a part of the canceled Windows 10X project for touchscreen devices, and we’re glad that it has made its way to desktop computers.
Regarding Windows 11 vs. Apple OS in terms of visual appearance, it all comes down to personal preference, but some users think that macOS looks more minimalistic.
Security and encryption
These are not the only similarities that Windows 11 has with macOS. Microsoft is also trying to enhance security using a TPM chip, now a hardware requirement for Windows 11.
If you’re unfamiliar with TPM, we suggest you check our TPM and Windows 11 guide for more information. The TPM chip is quite similar to Apple’s T2 chip that newer models have.
Both chips have similar features for file encryption, boot protection, and storing your credentials.
macOS uses runtime protection and state-of-the-art protection built-in antivirus software with executing disable features, address space layout randomization, and system integrity protection.
One of the best parts of macOS security is FileVault. It is similar to Windows 11’s BitLocker. However, in this case, macOS is a bit better in terms of performance. Therefore, enabling FileVault doesn’t have a significant impact on performance, unlike BitLocker.
This Apple OS also has other security features like Lockdown that come in handy in many extreme cases.
Lastly, macOS uses Mac App Store for downloading and installing software, thus ensuring that the software is 100% secure and complies with Apple’s rigorous security standards.
There’s also a Gatekeeper feature for applications downloaded from the Internet. With this feature, the applications downloaded from the Internet are scanned by Apple for any malicious code.
As you can see, macOS is a pretty closed platform, which makes it entirely secure, so it’s unlikely that you’ll install any malicious applications. On top of that, macOS is a UNIX-based system, so it’s faster in general.
On the other hand, Windows is a more open platform, and you can install third-party apps without any restrictions, which can be a security risk.
In addition, Windows has a more extensive user base than macOS, with 73% of the market share, resulting in more potentially malicious software and malicious users.
On the other hand, note that macOS holds about 15.5% of the world’s market share.
Windows 11 has built-in Windows Security Defender and reliable antivirus software. Windows 10 also has this feature called Windows Defender, which is a bit behind the latest one.
Microsoft is also changing how Microsoft Store works, which should tighten the security and ensure you download simple and secure apps.
Although Microsoft is making some changes to improve the security of Windows 11, most notably by adding the TPM chip requirement, we still feel like the macOS is a more secure operating system.
It’s not that Windows 11 is insecure; it’s perfectly secure as long as you have good antivirus software and remain vigilant while browsing the web.
Regarding security and the whole Windows 11 vs. Apple OS debate, macOS is a much more closed system that relies heavily on App Store for application distribution; we feel that it’s more secure now.
Multitasking and window snapping
Windows 11 also brings new multitasking options like Snap Layouts and Snap Groups. The first feature lets you quickly arrange windows on your screen using one of six available layouts.
Snap Groups memorizes your snap layouts, allowing you to return to the applications available in your Snap layout quickly.
On the other hand, macOS is very limited in this case, and there are no different layouts to choose from. Therefore, you can put multiple apps side by side manually only. However, with the release of macOS Ventura, Apple introduced a new stage manager feature.
It allows users doing multitasking more easily. Though this feature is more helpful in switching between app windows, you will still get a better experience with it than in pass experiences.
Mission Control is another feature that conveniently helps macOS users switch between apps and virtual desktops.
Windows 11 brings improvements in terms of docking, which makes it better when using multiple monitors. In addition, the system will now minimize windows on the second display once you disconnect it.
However, the windows will be automatically restored as soon as you connect an additional display, allowing you to continue exactly where you left off.
When comparing Windows 11 vs. Ventura in terms of multitasking, we feel that Windows 11 is far superior with its snap layouts and snap groups features.
Android/iOS integration
Starting from the Big Sur, macOS can run iOS apps natively. This means that you can run almost any iOS app on your Mac alongside your regular apps. However, app publishers can make their apps unavailable on macOS.
That is why you will not find all iOS apps on the App store. But the number of apps available is still huge.
However, there’s a caveat: to run iOS apps natively, you’ll need to have a Mac with an Apple M1 or M2 or any other Apple Silicon chips. We wrote in-depth about iOS apps on Mac in our how to install iOS apps on the macOS guide, so be sure to check it out.
You will get the best from macOS if you have an iPhone or other Apple devices. Everything works like magic in this ecosystem. You can quickly transfer files using Airdrop in the blink of your eye, mirror your iOS screen smoothly, and sync your photos, videos, etc., without going through many settings.
With Windows 11, users can finally run Android apps natively in Windows. To achieve this, Microsoft is using Intel Bridge technology, but Android apps should also work with AMD processors.
Android apps are available for download from using the Microsoft Store, but Microsoft is using Amazon App Store to bring them to PC.
Many users aren’t fans of this choice since Amazon App Store has less app variety when compared to Google Play, so it’s possible that you won’t be able to find some of your favorite apps.
In addition, Google is introducing Android App Bundles that could change the way how we run Android apps, and this can lead to compatibility issues with Android apps on Windows 11 in the future.
Nevertheless, this is an exciting feature, and we can’t wait to try it out, but at the moment, macOS integration with iOS apps seems more streamlined with better compatibility.
App Store
Windows 11 Store also underwent some changes, and now it brings a more streamlined interface allowing you to easily access games, apps, and movies from the sidebar.
Another significant change is that Microsoft Store can host any app, including Win32, Android, .NET, Universal apps, Xamarin, Electron, React Native, Java, and Progressive Web Apps.
Moreover, the new store should be able to handle installing the applications from the browser, meaning that the Microsoft Store will automatically download and install your applications in the background.
App Store on macOS has been an integral part of Apple’s ecosystem, and it’s used to distribute apps across both macOS and iOS platforms.
It currently has around 1.8 million apps, and Apple is constantly working to ensure that 100% of the apps on its store are secure and malware-free.
In addition, each app needs to be authorized by you to access specific data, so you can always ensure that apps have only the necessary permissions.
Apple enforces strict security standards, and millions of apps have been rejected because they aren’t adhering to the privacy, content, or compatibility policy that Apple enforces.
In the Windows 11 vs. Ventura app distribution debate, we have to admit that Apple has created a universal and highly secure method for application distribution.
Microsoft is doing the same with the revamp of the Microsoft Store, and we’re still looking to see how this will work in practice, but we’re sure that Microsoft will enforce the highest security standards for its app store.
Gaming
When it comes to gaming, Windows is an absolute champion compared to macOS, without a doubt. Unfortunately, Macs aren’t optimized for gaming, so they can’t compete with Windows PCs.
However, Macs can run certain games, but the performance and compatibility are far superior on the PC platform.
Windows 11 brings many new features for gaming, including DirectX 12 support, Auto HDR, and the DirectStorage feature for faster game loading.
As for gaming improvements, users can now purchase Xbox Game Pass for Windows 11. This will give them access to various games and games developed by Xbox Game Studios and Bethesda on the launch day.
There’s also an Xbox Game Pass Ultimate, allowing you to enjoy Xbox Cloud Gaming from your browser, even on low-end PCs.
Microsoft has again proven that Windows is a leading gaming platform, and comparing Windows 11 vs. Apple OS in gaming wouldn’t even be fair.
Touchscreen functionality
Mac devices offer no support for touchscreen functionality. Instead, they are utilizing only touchpad gestures. Some Macbook pro models have a touch bar to give you a very minimal touch experience with macOS. However, reportedly, Apple will not bring any more touch-bar-based devices in the future.
On the other hand, the Windows platform had support for touchscreens since Windows 8, and this will also be the case with Windows 11.
The new interface is optimized for touchscreen devices, and Windows 11 brings a couple of new touchscreen gestures, an improved touchscreen keyboard, and haptic feedback for pens soon.
Microsoft is focusing heavily on improving the touchscreen functionality, and Windows 11 will continue that trend.
Widgets
Widgets are a new addition to Windows 11 and are intended as a replacement for Live Tiles. The widgets have their panel and can be accessed from the Taskbar or with a keyboard shortcut.
Of course, you can arrange, move or disable Windows 11 widgets any way you want. In our opinion, devices work better than Live Tiles since they won’t be cluttering the Start Menu anymore.
In macOS, widgets are grouped with notifications, which can sometimes create clutter. On the other hand, Windows 11 keeps widgets and notifications separate, each having its pane.
Overall, macOS widgets look sleek and work great. There’s a wide array of third-party devices to choose from. In addition, it allows you to see all sorts of helpful information at a glance.
If we had to pin Windows 11 vs. macOS Ventura and compare the widgets, we’d say that both systems have a lot of offers in terms of widgets. This feature on both Windows and macOS is valuable and straightforward to use.
Communication
Windows 11 will come with Microsoft Teams built-an allowing users to communicate and collaborate easily.
Microsoft Teams allows users to chat quickly and make video or audio calls. In addition, of course, group calls are fully supported.
Collaboration is another huge component of Microsoft Teams, allowing users to work on files using Microsoft Office.
macOS relies on iMessage for the chat. It also depends on FaceTime as the primary means of communication, focusing on group calls. The software works alongside various apps to make video calls from Safari or Calendar.
Sadly, FaceTime isn’t focused on collaboration, so besides video chat, there’s no option to collaborate on files, which makes Microsoft Teams a better choice, in our opinion.
Though you can install third-party chat and collaboration applications on both OS, nothing will work as great as the native options.
Other special features
macOS Ventura has brought many new and improved features. It has an enhanced focus mode, so you can only see notifications from the allowed apps.
Windows already has such a feature, and we expect it to make its way onto Windows 11. However, Focus mode on macOS Venture has presets, so you can easily switch between them.
To top it off, the Focus mode will sync with all devices, which is not available for Windows.
From the macOS Monterey, Mac users can use the Quick Note feature to make short notes and save them. Of course, you’ll be able to collaborate on your notes with others and tag your messages accordingly.
The new version of macOS will allow you to seamlessly pair and work between devices so that you can control your iOS device from your Mac computer.
Another great feature is Live Text, which allows you to recognize text from images and copy it seamlessly.
macOS Ventura also has a feature in FaceTime that allows you to enjoy multimedia with others or share the screens with the SharePlay feature.
The call quality has improved thanks to spatial audio and voice isolation. FaceTime also allows you to schedule and share calls with a web link in macOS Monterey.
Lastly, you can use FaceTime to communicate with Windows and Android users as long as they have a supported web browser.
Safari went through some changes, and it now comes with a streamlined look with floating tabs that take less space. In addition, you can create tab groups and access them on any Apple device.
In terms of looks, Windows 11 is similar to macOS Venture in many cases. However, it has some features that work better than the macOS counterparts.
On the other hand, Venture brings a lot of new features that work great across Apple’s ecosystem.
We can’t compare Windows 11 vs. macOS Ventura because there are many similarities with Monterey, so everything we said about Ventura applies to macOS Monterey, even the Big Sur.
It seems that Windows 11 works better on mobile phones than expected, even though it’s designed only for tablets and hybrid devices.
Overall, it’s pretty exciting that developers managed to get Windows 11 to run on the old Microsoft Lumia 950 XL phone.
However, comparing Windows 11 vs. iOS wouldn’t be fair. It is because this is just a project of a single Windows enthusiast and not intended for everyday use. In addition, Microsoft has no plans to bring Windows 11 to mobile phones.
What are the best Windows 11-ready laptops?
As long as your device has a compatible CPU and a TPM chip, you should be able to run Windows 11 without any problems.
However, if you’re looking for a laptop that can run Windows 11 out of the box, consider these Windows 11-ready laptops.
Why is macOS better than Windows?
Many users prefer macOS because it’s more secure than Windows. It is because Apple is pretty rigid with its software policy. So, the chances of downloading malicious software from the Apple App Store are slim to none.
Some users prefer the interface since it feels more streamlined than Windows. However, you can make Windows look like macOS with some tweaking.
macOS is also better optimized since Apple uses only specific hardware, so each software is thoroughly tested and optimized for maximum performance on macOS.
Can I run Windows 11 on macOS?
Yes, you can run Windows on macOS, and we already wrote a guide on how to install Windows on macOS using the Boot Camp feature on macOS.
If you’re not a fan of Boot Camp, you can always use PC emulation software on your Mac, but you might not get the same performance as Boot Camp.
Which one is better, Windows 11 or macOS? The two systems are beginning to look relatively similar with the interface revamp that Windows 11 will bring.
In terms of functionality, window snapping is far better on Windows 11, and the widget section is separated from notifications, which we liked. And as for gaming, there’s no doubt Windows 11 is far superior to macOS.
On the other hand, macOS has seamless integration with other Apple devices, and it has a fair share of unique features that we would like to see in Windows someday.
In the end, it all comes down to your personal preference, what you plan to use your computer for, and if you plan to use it alongside iOS devices.
Many iOS users listen to music on iTunes, Apple’s media player, media library, online radio broadcaster, and mobile device management app.
Users can also download and organize digital media files on their OS X and Windows devices and enjoy their favorite music, movies, TV shows, and other content they purchase from the iTunes Store.
However, there are some Windows 10 users who are looking for alternatives to iTunes that are faster and better at transferring files. We’ve made a list of alternatives worth installing on your Windows 10 PC.
What are the best iTunes alternatives for Windows 10?
iMobie allows you to live a simple and Safe Digital life with mobile solutions such as saving your favorite photos, videos, and other data to your device.
The app is compatible with all Apple devices, so you can transfer data between platforms such as a tablet, mobile, and laptop without problems.
Besides just transferring data, this software helps you back it up in case of an emergency. Additionally, it’s filled with other practical tools and features that will improve your browsing.
Some of the app’s main features:
Transfer, manage, and backup data
Compatible with iPhone, iPad, iPod, iTunes, and iCloud
System repair and unlock
iMobie
Transfer and manage your data securely with high speed, precision thanks to iMobie.
This awesome tool will convert any file designed for an apple product into a fully compatible file for other devices such as Windows or another type of phone.
Additionally, it will keep the original quality and the crispness of the photos, videos, and audio that you convert, unlike similar apps that lose quality.
Unlock your iTunes and make them work for PS4, Samsung, iPhone, the Nexus Series, and more. This app’s format compatibility is more than enough.
Let’s see its main features:
100% secure download and purchase
30 days money back guarantee
Lifetime customer support
Fast email ticket response
iTunes Video Converter Platinum
The iTunes Video Converter Platinum is all you need to enjoy your favourite songs on other devices.
Dr.Fone makes it very easy to transfer music, playlists, videos, iTunes U, TV Shows, Audiobooks, and more from iPhone, iPad, iPod, and Android phones to PC/Mac/iTunes Library, and vice versa.
This phone manager helps you transfer files between any two devices with super-fast speed and multiple files can be imported or exported in a batch with just one click.
This powerful software has also a lot of features and options that allow you to customize the transfer process thus making it more specific to your needs.
Dr.Fone’s key features:
File transfer between apps and phones
Data recovery
System repair
Data eraser
Dr.Fone
Transfer all formats of data between your devices, make backups and repair your phones with Dr.Fone.
The package will eliminate the need to use iTunes as it’s a complete iDevice management suite allowing reverse copying, the importing of music from your iDevice to your PC.
The syncing of an iTunes media library with an Android smartphone. The free version of TunesGo for Windows has a few missing features, but overall, it will serve your needs pretty decently.
Here are some of its key features:
Data transfer, backup, and recovery
No iTunes needed for the iOS-related features
Fully compatible with the latest iOS version
Wondershare TunesGo
Wondershare TunesGo is the best solution for taking full control of your iOS and Android devices.
It’s totally free and doesn’t need to be installed, so you’ll use it right out of the box to transfer media files between Mac, Windows, and Linux devices.
Other functions involve copying and deleting songs at very high speeds, but the only disadvantage is that it takes too long to shut down.
If you have an iPod and want to transfer media files to your Windows 10 PC or another Mac, then PodTrans is the best choice. It’s very easy to use and works at a very high speed.
You’ll get used to its interface quickly and you’ll easily find the song that interests you in your playlist. The only problem with it is that it doesn’t monitor progress in real-time.
That’s about it for our article today. All of these awesome players or file converters will let you enjoy iTunes music without having to play it on an Apple device.
Feel free to give us any feedback regarding the subject of the best iTunes alternatives for Windows 10, or your experience with the products in the comment section below.
The Windows was unable to get a list of devices from Windows Update. Please try again later error message pops up for some users when trying to install printers. That error message pops up when users select the Add a local printer option on the Add Printer window.
Consequently, users can’t install their printers. Here are a few resolutions that can fix the Windows was unable to get a list of devices error. These work for both Windows 10 and Windows 11.
How can I fix the Windows was unable to get a list of devices from Windows Update error?
1. Check if There are Pending Updates
The Windows was unable to get a list of devices error might arise when there’s a pending update.
To check if that’s the case, press the Windows key + Q hotkey and enter update in Cortana.
Then select Check for updates and make sure you install all of the listed updates. Restart Windows if there’s a pending update, and then try installing the printer after the update has been installed.
3. Edit the SoftwareDistribution Folder Title and Reset the Catroot2 Folder
Click the Start button, type cmd, and select Run as administrator from the results.
Input the following command and press Enter to run it: net stop wuauserv
Enter the following command and press Enter: net stop bits
Then execute the following command: rename C:\Windows\SoftwareDistribution SoftwareDistribution.bak
To restart Windows Update, input the following command: net start wuauserv
Type the following command and press Enter: net start bits
Input the following command and hit Enter: net stop cryptsvc
To reset catroot2, enter the next command as shown below: md %systemroot%\system32catroot2.old
Then input this command and press Enter: xcopy %systemroot%system32catroot2 %systemroot%system32catroot2.old /s
Close the Command Prompt window.
Open File Explorer using the Win + E keys and browse to this folder path: C:\Windows\System32
Select the catroot2 folder and press the Delete button.
Then restart Windows.
The second resolution usually fixes the Windows was unable to get a list of devices issue for most users.
However, the first and third resolutions are two alternatives that might also fix the printer error.
Some users have also stated that deleting all the files in the DataStore subfolder within SoftwareDistribution can fix the issue.
We hope you managed to fix the Windows was unable to get a list of devices from Windows Update issue on your PC. And while you are at it, find out how to fix all Windows Update errors in one go.
Let us know all about it in the comments section below.
Task Manager is the app that monitors your system and keeps your other programs running in a well-organized list. Using it in Windows 11 is not so different than what you know from the previous OS.
It is very handy and allows you to view, enable, or disable any processes running on your computer and operating system.
Even more, it displays running services as well as those that were stopped, so it offers a complex perspective related to your digital activity.
There may be times when you’ll need to close certain Task Manager processes to improve your PC’s performance. Unfortunately, random bugs may appear, preventing you from being able to properly close them.
If you encounter this issue, there are some accessible options that will surely help, as you can see in this guide on how to stop all processes in your OS and as detailed in our below tips.
Why is my application not closing from Task Manager?
Some users already claimed that certain processes are not closing in Windows 11 Task Manager. Our readers have asked us why programs like Steam and Firefox do not fully close and the process is just sitting in Task Manager, doing nothing.
The most common manifestations are: crashing, freezing, or hanging your programs, and there is no doubt each of them is pretty annoying.
You should note that certain processes can not close in Windows 11 Task Manager because they come from a malicious application, such as spyware or adware.
Consider that Trojans, malware, and worms can harm your processes, then compromise the security and performance of your PC, so that’s why you should use the best antivirus software for Windows 11.
Now that you are a bit more familiar with this topic, take a closer look at some detailed procedures that should help you troubleshoot this issue efficiently.
What can I do if Task Manager is not closing a program?
1. Use the Alt + F4 command
Hit the Windows key, then type Task Manager, and open it.
In Task Manager, click on the app you want to close.
Press Alt + F4 simultaneously.
Let go of both keys at the same time.
This option is the simplest one to force certain processes to close in Task Manager, and it’s the same one used on the previous OS. However, if it doesn’t work, make sure you keep on reading.
2. Close the process from the Settings menu
Open Settings using the Start menu.
Go to Apps, then select Apps and features.
Look for the app you need to close, click on the More icon (marked as 3 vertical dots), and select Advanced options.
Scroll-down, then click on the Terminate button.
If the keyboard shortcut didn’t work for you, the Settings menu might make a difference. Also, consider that is simple and only takes a few seconds to do it.
3. Use Command Prompt
Click on the Start button. type cmd, right-click on it, then choose to Run as administrator.
Type the following command to see all the processes that are running, then press Enter: tasklist
After the list is showing completely, type the following command (notepad.exe is your type of file, consider this as a general example, you should type your exact model).taskkill /notepad.exe/taskname/F
Type the following command: (also consider notepad.exe as a general example, you should type your particular example). taskkill / IMnotepad.exe
If you don’t know your file type (needed above), just run the following command:
TASKKILL / ?
If you tried the previous options and your processes are still not closing in Windows 11 Task Manager, this method will surely work.
In these terms, Windows will automatically terminate the app and its related processes which are also running in Task Manager. Therefore, the Task Manager not closing program issue should be gone.
If you aren’t sure which processes are safe to close in Task Manager, let us remind you from the very start that this utility lets you check all running applications and processes on your PC.
Yes, that’s where you can easily find and kill processes that are misbehaving in any way. However, End Process isn’t an option to take into consideration unless you’re positive that you’re not applying it for one of those critical computer processes.
In that regard, you should be cautious when ending Windows Logon, Windows Explorer, Windows Startup applications, and system entry processes in Task Manager.
On the contrary, you may kill processes from hardware manufacturers, along with regular software processes, as well as known unused software processes.
NOTE
Besides the fact that terminating system-critical processes can crash your PC, keep in mind that you also risk losing important data. Therefore, we strongly advise you against doing so, unless you save your data before killing a process.
Does Task Manager affect performance?
There are plenty of actions you can perform on your Task Manager to improve your PC performance. In the section below, you’ll find five of the most popular, so make sure you take a closer look at each of them:
Browse your processes – By default, when opening Task Manager, the first thing you’ll see is the Apps section, but don’t hesitate to check out all the bakground processes.
Troubleshoot startup problems – If certain Task Manager processes are misbehaving, then it’s always a good idea to look for previous instances of the program.
View memory usage of your Task Manager processes – It is always effective to check the Task Manager Performance tab.
Stop runaway processes – Some Task Manager processes can consume CPU time, so looking for this kind of processes might make a difference. To improve your OS capabilities, you should kill them completely.
Identify RAM hogging-services – Also, checking which programs are using all your memory is a great idea because these can usually cause low PC performance.
Each time your OS runs into difficulties, Task Manager is supposed to be ready to step in. If none of the above methods has resolved the issue for you, don’t hesitate to take a closer look at these powerful Windows Task Manager alternatives.
Some are free of charge, so it is up to you to decide if any of them can replace the default Task Manager. Let us know your choice of solution for the Task Manager not closing program issue in the comments section below.
Windows 10 like the older version of the OS allows the users to dual boot two Windows or Linux OS for productivity and education reason. Irrespective of the reason, the dual boot options is helpful for many.
However, after the recent update, many users have reported on the Microsoft Support forum that, since an update, they are stuck with the Choose an operating system prompt every time. Thus, one or both systems in the dual boot configuration won’t boot.
Windows tried to update (version 1803) on 2018-05-18 but failed. After that, every boot it showed “Choose an operating system” boot menu where I had two Windows 10 options to choose from. One of them booted normalny and the second one restarted the computer and showed boot menu again.
Fix this with the steps below.
How do I change the default operating system on a dual boot window?
1. Set a Default OS in Windows 10
Press Windows Key + R to open Run.
Type control and press OK to open the Control Panel.
In the Control Panel, go to System Security and select System.
Click on Advanced System Settings (left panel).
In the System Properties window, click the Advanced tab.
Click on the Settings button under “Startup and Recovery” section.
In the Startup and Recovery window, click the Drop-down menu under “Default operating system”.
Choose the desired operating system.
Also, uncheck “Times to display a list of operating systems“ checkbox.
Click OK to save the changes.
Close the System Properties window and reboot the system. During the restart, Windows will load the default OS without asking the user to choose an operating system.
2. Check for Drivers Updates and Failed Featured Updates
To check the update history, go to Start > Settings. Click on Update and Security > Windows Update. Check if any update is pending. If yes, you may want to download and install the update.
If not, click on View update history.
Now check all the updates, especially the Quality Updates. If any of the updates have failed to install, you may want to reinstall the update. Clicking on the update will show you what fixes did that update bring.
If nothing seems working, you may have to install the Windows 10 OS again from scratch. Doing so will erase all the data from your C: drive, so take a backup of your personal files and then reinstall the OS using a bootable drive.
Sometimes, your network might not work properly because the DNS server cannot be reached. This can be a problem, and today we’re going to show you how to fix this issue.
DNS server isn’t responding – This message can occur due to your antivirus. To fix the problem, temporarily disable your antivirus.
DNS server unavailable – If this message occurs, try changing your DNS manually. Switch to OpenDNS or Google DNS.
Server IP address could not be found – Sometimes this problem is caused by a network glitch. You can reset your network using Command Prompt.
DNS server cannot be contacted – Caused by network problems. Try running a network troubleshooter on your PC.
What can I do if the DNS server cannot be reached?
If you’re having any network issues, the first thing that you need to check is your antivirus software.
If you’re on Windows 10, you’ll still be protected by Windows Defender even if you choose to remove your third-party antivirus, so there’s no need to worry about your safety too much.
If deleting the existing antivirus program resolves the issue, this is a good opportunity to explore upgrading to new antivirus softwarethat is most compatible with your PC.
Most antivirus solutions provide live protection against malware, Trojans, and worms, as well as Social Network Protection, Safe Online Banking, and Password Manager systems.
Furthermore, you could get a built-in VPN to safeguard your online privacy at all times by routing your traffic through secure servers.
Most importantly, a suitable antivirus solution will not interfere with your DNS server or settings.
The most common issue an AV causes is the server not responding, so make sure to check our full guide on how to fix the DNS server not responding.
2. Change your DNS
Click the network icon on your Taskbar and select your network connection from the menu.
In the right pane, click Change adapter options.
Right-click your network connection and choose Properties from the menu.
Select Internet Protocol Version 4 (TCP/IPv4) and click the Properties button.
Select Use the following DNS server addresses and set the following values: Preferred DSN server: 8.8.8 and Alternate DNS server: 8.4.4
Click the OK button to save changes.
Note: You can also use the Open DNS by using the following servers: Preferred DNS server 67.222.222 and Alternate DNS server 67.220.220
According to users, if the DNS server cannot be reached, perhaps you can fix the problem by using a VPN. You will get a new IP address, and your privacy will be protected while surfing the web.
Even if you don’t have this problem, having a good VPN is a great way to protect your privacy online.
There are many services available out there, but if you’re looking for a good and reliable VPN, be sure to try out Private Internet Access.
First of all, this software will protect your privacy even from your ISP and you will be able to use public Wi-Fi networks without worrying about any threats.
Having a different IP will unlock a lot of new content from on-demand video platforms like Netflix, HBO GO, Amazon Prime Video, and others.
However, the best part is that Private Internet Access provides the highest speeds so prepare for perfect streaming and no buffering.
4. Use Command Prompt
Search for cmd and choose Run as administrator to start Command Prompt.
Run these commands:
ipconfig /flushdns
ipconfig /registerdns
ipconfig /release
ipconfig /renew
NETSH winsock reset catalog
NETSH int ipv4 reset reset.log
NETSH int ipv6 reset reset.log
Exit
5. Use the network troubleshooter
Open the Settings app and navigate to the Update & Security section.
Select Troubleshoot from the left pane. In the right pane, select Internet Connections and now click Run the troubleshooter button.
Follow the instructions to complete the troubleshooter.
Note: If the issue persists, try running the Network Adapter troubleshooter as well and check if that helps. Several users reported that a troubleshooter fixed the problem for them, so be sure to try it out.
6. Set your DNS to Obtain an IP automatically
Repeat steps 1-4 from Solution 2.
Select Obtain DNS server address automatically and click OK to save changes.
Now do the same for Internet Protocol Version 6 (TCP/IPv6).
7. Try using a different device to access the Internet
If the DNS server cannot be reached, the problem might be your PC configuration. To determine if the problem is related only to your PC, it’s advised to try other devices and see if they can access the Internet.
For the best results, it’s advised to use another Windows PC, but you can also use your phone or any other device.
If other devices can connect to the internet, then the problem is most likely related to your PC and its settings, so you can focus on it in order to solve the problem.
8. Try restarting your router
If this problem is still there, perhaps the issue is related to your router. To fix the problem, users are suggesting to restart your router/modem and check if that helps.
This is fairly simple to do and in order to do it, just press the Power button on your modem/router to turn it off.
Now wait for about 30 seconds and press the Power button again to start your modem or router. Wait while the device boots completely and check if the problem is still there.
9. Delete the files from the etc directory
Navigate to the following directory: C:WindowsSystem32driversetc
Delete all files from this directory but before that, we advise you to back them up, just in case.
Problems with DNS will prevent you from accessing the Internet, but if you’re having this problem, be sure to try some of our solutions.
For any suggestions or additions, feel free to drop us a line in the comments section below.
If you’ve ever tried to close a program in Windows only to get the dreaded ‘Not Responding’ message, you know how frustrating it can be.
When a program crashes, or even hangs/freezes, your first move is usually to kill it using the Task Manager, which is perfectly fine.
Sometimes Windows will even give you options to either close the program or End Now, or wait for it to respond. But the worst part is if it glosses over with a grayed out screen and a constantly rotating circle that shows the program isn’t going anywhere any time soon.
Moreover, there are programs that can freeze without alerting you, but, if you’d like to fix the problem when the task manager can’t end a task, read on.
What can I do if Task Manager won’t end a task?
Here you can find some preliminary fixes to try out before applying more complicated solutions:
Hit CTRL+ALT+DEL and select sign out to end the task much faster. However, it is important to note that not all processes can be stopped using Task Manager.
You can also reboot your computer if you’re not seeing any progress with Task Manager or there’s no response from Windows at all.
1. Use the Taskkill command
This involves using the Command Prompt to kill a specific process, though it is cumbersome to keep opening it each time a program freezes or stops responding. To do this:
Right click on your desktop
Select New
Select Shortcut
>Enter a location for the shortcut
Paste the command: taskkill /f /fi “status eq not responding”
Press Finish once you’re done
The Taskkill command kills a process that is not responding or is frozen, by telling the command to forcefully kill the specific task, and run only on processes that meet the filter criteria (which is the text in quotes). This way, only the process with the Not Responding status will be killed.
You can hasten this process using a keyboard shortcut. To do this:
Right click your new shortcut
Select properties
Under Shortcut tab, click Shortcut key box and set a custom shortcut
Windows will add CTRL+ALT automatically to any letter you press (you can change to CTRL+Shift if you want)
A command prompt window will be launched, set Run to Minimized so that it doesn’t flash when you press the shortcut
You can also use the steps below to kill the non-responsive process in Windows 10:
In the search bar, type CMD and right click Command Prompt then select Run as administrator
In the command prompt window, type the commandtasklist to view all tasks that are running
Type the commandtaskkill /notepad.exe/taskname/F (F means forcefully). If you want to know the type of file (in this case notepad.exe), run the commandTASKKILL / ?
Depending on the process you want to kill, type IM before the file type and press enter e.g. taskkill / IMnotepad.exe
You’ll get a message saying “Sent termination signal to the process notepad.exe with PID 4624 (PID is process ID defined by the computer system). If you know the PID of a task, you can run the taskkill command but instead of the file type, insert the PID of the process you want to kill. To kill more than two processes simultaneously, enter the process ID sequentially with the prefix PID
2. Use ALT+F4
This is a keyboard shortcut that performs the same program closing effect as tapping the X on the top right corner of a program window. To do this:
Tap on the program you want to force quit
Press and hold down the ALT key
Press F4 once while holding down ALT then let go of both keys at the same time
3. Use Task Manager to force quit
If the above solutions didn’t help solve Windows 10 won’t end task problem, try using Task Manager to force the unresponsive program to quit. To do this:
Press CTRL+SHIFT+ESC to open Task Manager
Find the program you want to force quit and Task Manager will direct you to its process under Processes tab in the Name column
Right click on it and select Go to details
Don’t press End task
Right click on the highlighted item
Select End process tree while under Details Tab
Note: If you get a warning saying “Do you want to end the process tree of [program file name], it is okay. It means the selected program will be closed and any other processes it started that froze. This should help you get rid of the end task not working in Task Manager issue.
4. Create a new admin profile
If Windows 10 won’t end tasks, it may indicate a corrupted profile. To resolve this, create a new admin profile and use it for a while. If it works, move your files to the new profile and delete the old one.
After creating a new account and login, try running Chkdsk in repair mode to check for any files that may have been damaged and correct them. To do this:
In the search bar, type CMD and right click Command Prompt then select Run as administrator
In the command prompt window, type chkdsk /f /r /x (leave spaces between the letters as shown)
Press Enter
A note that the process can’t run until you restart will display, type Y for yes and press Enter again
Chkdsk will run after you restart and take some time to complete (about two hours or so). Once it finishes, boot normally and login normally and see if the tasks are working well again.
Were you able to resolve the Task Manager won’t end task issue using the above solutions? Let us know in the comments section below.
Looking for a way to rename the Software Distribution and Catroot2 folders? We’ll show you how to do that in more than one way.
The Software Distribution folder holds all temporary Windows Updates files. But sometimes, you might have to change its name to fix specific problems. In most cases, the Catroot2 folder will have the same problem simultaneously.
Why do I need to rename the Software Distribution and Catroot2 folders?
This issue originates from the fact that Windows can’t install the updates correctly. Renaming the SoftwareDistribution to SoftwareDistribution.old will allow the system to regenerate and deal with the updates.
The problem is that some of our readers couldn’t rename the Software Distribution and Catroot2 folders.
You may get messages like The action can’t be completed because the folder or a file in it is open in another program catroot2, or Can’t rename catroot2 folder access denied
But that does not mean you won’t be able to accomplish this task at all. All it takes are some inspired tips, and that’s precisely what you will find below.
Is it OK to delete Catroot2 is a question we get often., The simple answer is yes. So let us get to it.
How do I rename the Software Distribution and Catroot2 folders in Windows 10?
1. Use Command Prompt
1. In the Windows Search box, typecmd, then select Run as administrator from the results.
3. In the cmd window, type the following commands andhit Enter after each one:
4. After the process is finished, go to C: > Windows.
5. The Software Distribution folder should now be named SoftwareDistribution.bak.
Note that in the case of the Catroot2 folder, you replace the Software Distribution rename script with the one below: rename C:\Windows\System32\catroot2 Catroot2.bak
The keyboard doesn’t just help you input alphabets, numbers, and special characters and streamlines our basic use of the PC. But what would you do if Windows 11 is not detecting the keyboard?
Several readers have reported the problem, most after resetting the OS to its factory settings. With the keyboard inaccessible, you are left with pretty much nothing to do.
In this guide, we list out the reasons behind the issue, the most effective fixes if Windows 11 doesn’t detect the keyboard, and the steps to enable the touch keyboard to use for the time being.
Why is Windows 11 not detecting the connected keyboard?
This could be due to a bunch of reasons, depending on whether you have a wired or wireless keyboard. Here are some of the most common causes:
Improper connection – If you have moved your desktop recently or if something or someone messed with the cable, it might be disconnected from the port or damaged.
Fast Startup issues – This feature is great to speed up the booting process but it can interfere with a lot of processes such as keyboard recognition. Disabling Fast Startup might fix this issue.
If you are by any chance able to identify the underlying issue, just head to the relevant fix and execute it.
In case you are unable to, fret not! Follow the steps in the next section in the same sequence as they are listed to quickly and effectively troubleshoot the error.
What can I do if Windows 11 is not detecting the keyboard?
Before getting into any of the more complicated solutions, let’s make the following checks:
Disconnect the keyboard, clean both the USB and the port, and check for any damage to cables (for wired keyboards). Then reconnect it properly to see if it works.
Try connecting the keyboard to another port on the system, just to make sure that the ports are not disabled.
Connect the keyboard to another device, and check if it works. If it does, the problem is with the computer itself and not the keyboard. In which case, head to the other fixes listed next. If the keyboard doesn’t work on another device, it’s a clear sign that it’s malfunctioning and you should replace it. Take a look at our curated list of the best keyboards available in the market.
NOTE
The solutions below can be used only if the keyboard is recognized by BIOS and not Windows. If BIOS doesn’t recognize any keyboards, you should take your PC to a repair center for specialized help.
1. Check if the USB ports are disabled (for wired keyboards)
In many cases, it was the disabled USB ports that lead to Windows 11 not detecting the keyboard problem. Here, you will have to check whether the USB ports are disabled from the BIOS.
In order to enter the BIOS, you will have to press either F2 or F12 as soon as the screen lights up when you turn on the system. To be on the safe side, hit the key multiple times.
Once in the BIOS, look for the USB Configuration Setting which is usually listed under the Advanced tab, and enable the ports. To find out the exact steps, we recommend you head to the official manufacturer’s website, and look up their FAQ or support section.
2. Update the keyboard driver
Drivers play a critical in the functioning of every device since these relay commands between the OS and the hardware. If there are problems with the driver, you are likely to encounter issues. Therefore, updating the keyboard driver is likely to solve the problem.
1. Right-click on the Start icon in the Taskbar and select Device Manager.
3. Double-click on the Keyboards entry to view the various devices listed under it.
4. Now, locate the problematic keyboard.
5. Right click on it and select Update driver from the context menu.
6. Next, choose Search automatically for drivers from the two options that appear in the Update Drivers window.
It’s recommended that you always have the latest driver installed for all your devices.
The Device Manager method listed above only scans for newer versions of the system and not the other available sources. So, if you haven’t downloaded one previously, Windows wouldn’t be able to find the latest version this way.
If that sounds like too much trouble, you can also go with reliable third-party software. We recommend using Outbyte Driver Updater, a dedicated tool that scans all available sources for the latest version and keeps the installed drivers up-to-date.
Outbyte Driver Updater
Just a few clicks to update all your drivers and optimize the system.
Press Windows + I to launch the Settings app, and click on Troubleshoot on the right in the System tab.
Next, click on Other troubleshooters.
Locate the Keyboard troubleshooter and click on the Run button next to it.
Choose the appropriate response when prompted, and follow the on-screen instructions to complete the troubleshooting.
Whenever facing an error with anything on Windows, you should look for a dedicated built-in troubleshooter. Microsoft offers a few of these to help users diagnose and fix problems with the system.
4. Disable fast startup
Right-click the Start button and select File Explorer.
Click on the carat icon near the top-left, and select Control Panel from the list of options in the dropdown menu.
Click on System and Security from the options that appear here.
Next, click on Change what the power buttonsdo under the Power Options entry.
Click on Change settings that are currently unavailable to disable fast startup.
Finally, untick the checkbox for Turn on fast startup (Recommended), and click on Save changes at the bottom.
5. Remove the battery (for laptops)
NOTE
Only perform this solution if your laptop has a removable battery.
Oftentimes, it’s the laptop battery that’s known to cause problems with the keyboard, since it’s placed right under it. When the battery overheats, it can affect the functioning of the keyboard and the latter might not be detected at times in Windows 11.
In this case, turn off the system, remove the battery, plug the laptop into a power source and turn it on. If the keyboard now starts working, the problem, in all likelihood, lies with the battery.
It’s best that you replace the malfunctioning battery with an original one that’s meant for your laptop. Never use batteries from a local manufacturer or ones that are not specifically for your device.
6. Reset Windows 11
If the above fixes haven’t resolved the keyboard detection problem in Windows 11, you should reinstall the OS. If you started encountering the error right after resetting it previously, doing it all over again can just as well fix it.
How do I enable the touch (virtual) keyboard in Windows 11?
If Windows 11 is not detecting the keyboard, it would certainly be challenging. Even you would face trouble executing the fixes listed above. In this case, we recommend enabling the touch keyboard.
Touch (virtual) keyboard in Windows 11
Though it’s promoted for touch-enabled devices, the keyboard will work just as fine on any other device. Instead of using the touch feature, you will have to click on the relevant key.
Also, you have the option to customize the key size and background, apart from the size and theme of the virtual keyboard.
If you enjoy high-qualitymedia streaming services, then you most probably know about the Amazon Fire TV Stick. But glitches are never far. Like so many others, you might struggle with Firestick volume low issues.
Now, that is not to say it’s not a nifty tool to use. On the contrary, you can use it to launch and control content with the Alexa Voice Remote, plus stream for free with Tubi, IMDb TV, and others.
Additionally, you can watch favorites from Netflix, YouTube, Prime Video, HBO, STARZ, SHOWTIME, and more.
However, some users aren’t all that pleased with the Fire Stick, citing a multitude of audio issues.
Anyone else have volume issues watching movies? Constantly turning up and down my volume between action scenes and conversations? Only have this issue while utilizing the stick.
Why is my Firestick so quiet?
Audio-related issues vary in nature, but one common consensus is that there is indeed a lot of them.
And speaking about that, here are more amazon fire stick sound issues reported by users worldwide:
Amazon Fire TV sound distortion – Amazon Fire Stick sound distorted
Fire Stick sound cutting out
Amazon Fire Stick crackling sound
Fire Stick no sound
Fire TV volume suddenly too low
Netflix volume low on Firestick
From weak or unstable Internet connections to improper TV settings and faulty hardware, there can be many culprits responsible for the amazon fire stick volume issues.
This article will summarize a few go-to solutions that will fix some of the most common Amazon Fire Stick audio issues.
How do I fix the sound on my Fire Stick?
1. Check your TV settings
Make sure the audio on your TV isn’t muted.
If your Fire TV device is connected to an A/V receiver, make sure the receiver is on.
If you’re using an HDMI cable to connect your Fire TV device to your TV, try unplugging and plugging it back in again.
Additionally, you may need to replace the HDMI cable altogether.
More so, a bad Amazon Fire Stick can also be an issue.
3. Check your Internet connection
The speed of your Internet can also be a problem, as most content requires about 3 Mbps to function normally.
As such, consider upgrading to a better Internet subscription if available.
4. Confirm if the power is low or if there are frequent power outages
Being low on power means that the Fire Stick will be slower than normal, and it can also cause possible reboots when it tries to do intensive processing.
This means you should consider doing a check on your home’s power grid, or at least the outlets powering your TV.
If you are facing this problem, also consider changing the screen resolution of videos to a lower one, so that the Fire Stick can handle it more easily on low power.
5. Perform a quick reboot on your Fire Stick
Simply disconnect the power cord from the back of the TV for around 60 seconds, and then plug it back in.
Select the app that’s not working and press Uninstall.
Finally, reinstall the app from the Fire Stick Home Screen.
Some people have an app issue that can only be fixed by deleting and reinstalling the particular app, so follow the steps above.
So, is your Firestick volume low? If that’s the case, this is how to fix audio on Firestick. In addition to solving Amazon Fire Stick volume issues, the solutions can also help if the Amazon Fire TV stick is not connecting properly.
So make sure you check them out! Got any other solutions? Feel free to let us know in the comments below.
Windows 10 is closely connected with Microsoft’s own Xbox One console, but many users are wondering how to use PS3 controller on Windows 10.
Xbox users have Xbox Console Companion preinstalled, that makes using Xbox controllers easier, but if you want to use PlayStation 3 controller, you can do that by following these steps.
How can I use PS3 controller on Windows 10?
1. Use DS3 driver
Unpair your PS3 controller from the console and turn the console off.
Check Install DualShock 3 driver and Install Bluetooth driver. Make sure that Install DualShock 4 driver is unchecked.
Next, expand the Choose DualShock 3 controllers to install and select your controller.
Lastly, click Install and wait for the process to finish.
If you want to use PS3 controller wirelessly, you need to check Install Bluetooth driver during the configuration process. In addition, be sure to expand Choose Bluetooth dongles to install and select your device.
After doing that, you should be able to use PS3 controller on PC without any issues.
For an error-free gaming experience is always a good idea to use dedicated software that will make sure all your drivers will be up to date. One tool that does exactly this, is Outbyte Driver Updater.
This software will keep your controller connected to the PC and will keep you away from connection/recognizing errors while playing games.
Outbyte Driver Updater is reliable, fast, efficient and your drivers will be updated in no time.
Once you download it, make sure to select Surface Pro, and from there on the software will proceed to update and fix any old, missing, or damaged drivers.
You can also check out the best controllers on the market right here. If you have any more questions, feel free to drop them in the comments section below.
You must have had issues with email access if you have several email accounts with different providers. Using a browser with multiple tabs open is not the best option, as it can slow down your computer and get quickly out of hand.
But that can change with an email client for Windows 7. An email client is a desktop software that enables you to send/receive/draft all your emails in one place. Let us explore some of the best options for you.
Does Windows 7 have email client?
Unlike its predecessors, Vista and XP, Windows 7 does not have a built-in email client. Instead, you will need to download one best email client programs, like Yahoo email for Windows 7.
After the installation, you only need to set the client as your default email, and you are good to go.
These third-party email clients come with a few benefits, including:
They are not owned by a particular email service and allow you to log in to all your accounts.
Many third-party email clients are easier to navigate as you see an overview of the activity of each account in just one main window. You can easily navigate and switch between accounts in just a few clicks.
In addition, you get features such as RSS feeds, calendars, and VOIP apps.
Some of them even double as efficient email backup software. If you are a Windows 7 user, having an email client that supports your OS and doesn’t take up too much space is essential.
This guide will help you find the very best mail app for Windows 7. So, if you are wondering whether to use Windows 7, the answer is straightforward: of course, you can use it! Check out our guide to learn how to keep using it forever.
NOTE
Although the email clients from our list still work on Windows 7, Microsoft discontinued its ASU so the OS is officially obsolete. Also, the majority of the developers stopped or will stop upgrading their products for Windows 7.
What is the best email client for Windows 7?
Mailbird – Email client with social apps integration
Mailbirddoes not just enable you to access your emails, but it also connects to all your social apps. As we like to say, it is the very best mail app for Windows 7.
You can easily connect with your Facebook account, Google Calendar, WhatsApp, Moo do, Asana teamwork application, and many more.
However, email snoozing, quick previews, and speed reading are only available on the Mailbird commercial version.
Considering that these features can significantly boost your productivity, it is worth investing in the commercial Mailbird version.
Mailbird allows you to create your theme with different color schemes and layouts. You can organize your email list precisely the way you want it.
You can use Mailbird in 17 different languages, and they work on integrating even more.
Mailbird also has a powerful search feature that allows you to find old attachments by entering just a few important keywords.
Mailbird is a stunning email client program compatible with Windows 7 PCs, from Professional to the Home, and comes with free and premium versions.
Let’s quickly look at its key features:
Straightforward setup
User-friendly interface
Integration with major social applications
Only supports one email account
Integrate contact’s profile photos
Mailbird
The highly versatile and uncluttered Mailbird perfectly matches your Windows 7 running device!
eM Clientis another strong contender for the best free email client software for Windows 7. This software has existed for over ten years and is widely known for supporting many email providers such as Gmail, Exchange, and Outlook.
This email app for Windows 7 is available in two versions, Free and Premium. Unlike the premium version, the free version is limited to only two email accounts.
eM Client has advanced quick search options that let you find old email messages without scrolling.
It also has advanced data encryption that secures all incoming and outgoing messages. It also has a powerful backup tool that creates automatic backups, so nothing gets lost.
This software has a translation option and an integrated spellchecker that ensures great communication in multiple languages.
You can set the eM client’s UI to display information in 20 different languages.
eM Client also allows you to create your email signature and automatically attach it at the end of your emails on all the platforms you decide to connect to the client.
eM Client has a free version and two pro plans available. Both subscription plans have 30-day free trials.
Let’s quickly look at its key features:
Easy migration tools
Smart translation
Integrated contacts and calendar menu
Integrated chat application
Support for Google Chat and Jabber
Only supports two email accounts
eM Client
Enjoy a unique combo of simple UI and powerful features for effortless emailing on Windows 7
Thunderbird was developed by Mozilla Foundation, the same organization which powers Mozilla Firefox. This email client setup process for Windows 7 is so easy that even a novice computer user can install and use it.
You can use your custom webmail or popular webmail services (Gmail, Outlook, etc.); as long as you remember the username and password.
The best part is that Thunderbird can be enhanced by installing several third-party add-ons for even more options to complete your emailing experience.
Thunderbird lets its users create address books with the contact information they receive via email. You can save the email address and the name and add other details such as a photo, birthday, address, and more.
Another feature that saves us a lot of hassle is the attachment reminder. It detects the word attachment within the text content of your email and alerts you if you forget to add the attachment before sending the email.
The software also has excellent filtering and searching tools, so you don’t have to worry about spending hours looking for old emails. Lastly, Thunderbird is available in both 32 and 64-bit for Windows 7.
As its name suggests, Opera Mail is an open-source email client developed by the Opera team.
If you have used the Opera web browser before, you would agree that this free email client for Windows 7 is expectantly good, just like the Opera browser.
The Opera Mail email client, now available as a standalone program, is ideal for Windows 7 PC.
Even though it has plenty of valuable features, Opera Mail is not the safest option. It has not been updated since 2016 and may lack some essential security features. You can, however, still download it safely from the Opera official website.
The software has an integrated spellchecker, so you can rest assured that you send impeccable emails.
Opera Mail lets you create contact lists. You can add users from multiple email providers and provide names and other valuable information that help you quickly identify the person you need.
Opera Mail also has an integrated spam filter that prevents unwanted emails from appearing in your inbox.
Opera Mail is free software that allows Windows 7 users to keep track of all their emails without too much memory.
MailSpringis a lightweight email client that lets you integrate all your email accounts into one app. You can easily navigate multiple accounts in just a few clicks without losing track of any important information. It supports every major mail provider.
The search option allows you to find specific emails using different keywords. The search options are advanced as you can use quick hints to generate a list of all emails sent to a particular email address containing attachments, unread, and more.
This software has an integrated feature that allows you to create your mail signature. Don’t forget to attach valuable contact information and keep your emails professional-looking and helpful for your recipients.
Email enables communication across the globe without much restriction, which is why the translation feature provided by this email client is vital.
There are instances when you need to communicate with people that don’t share your language. Mailspring generates AI-powered translations that can help with that.
On top of that, if you are more comfortable with using another language as your default UI language, Mailspring offers over 60 options you can choose from.
Another helpful feature that contributes to better communication is the template library. Mailspring allows you to use pre-made templates depending on the type of email you want to send. You can also create templates to automate part of the emailing task.
Mailspring is compatible with computers that run Windows 7 (and higher). It is lightweight, elegant, and easy to use. The software has an extensive set of free features, but it also provides a subscription-based plan for users that need professional-level email management.
Claws Mail – Ideal client for advanced email users
Claws Mail is a powerful mail app for Windows 7 that caters to advanced email users in particular. You must manually set up your POP3/IMAP settings to use Claws Mail.
This program is ideal for custom webmail such as[email protected]. Meanwhile, you can also use it on popular webmail services, but you have to adjust your account settings.
The inability to send HTML messages and the email settings process ranked it low on this list. Nevertheless, Claws is extremely powerful and can improve your email activity.
Claws Mail uses SSL encryption, meaning all your data is protected and completely private.
This email client lets you organize your emails with advanced features such as user-defined headers, color labels, multiple-folder support, and more.
You can also create detailed address books. Safely enter and access valuable information about your contacts.
Claws Mail has an integrated spell checker that alerts to errors before email submission.
Hexamail Flow is a free email client for Windows 7. It has an easy-to-use interface, so you’ll quickly get the hang of it if you haven’t used this tool before.
This email client for Windows 7 packs advanced email options, contacts, calendars, event links, reminders, email history, and much more. Hexamail Flow is compatible with all the major email providers and email server software available on the market.
This software lets you send large files by automatically integrating them into Google Drive.
Hexamail also doubles as a task manager with a card-based task board. You can create hierarchical to-do lists and automate some tasks from the settings provided.
The email client has an advanced search tool that lets you quickly find information in your emails, calendar, task lists, and contacts.
Let’s quickly look at its key features:
Email Scheduling
Email hiding or masking
Grouping feature by domain, sender, conversation, or subject
Automatically resizes large photos before sending them out.
This is a licensed-based service. You can select the number of users you need the product for.
XML (Extensible Markup Language) files do not do anything independently. Instead, they are just a way of storing data that can be easily read by other software.
There are a lot of programs that use XML to store information. In other words, you can open, create, and edit an XML file in any text editor.
XML files are similar to HTML files but not the same; XML is used for carrying data, while HTML is used for displaying it.
There are a few programs that can read and edit XML files, and we chose five of the best. This article will explain how to open an XML file in Windows 10.
You have multiple ways to read or edit your XML files using these handpicked tools. Hence, it’s possible to see the content files in the Tree view or Code format.
Look at their sets of features to see which is the best XML reader for Windows.
Filmora is a well-known video editor software that can’t fail to help you create captivating videos. Plus, it’s capable of text editing and kinetic typography.
This tool has multiple video editing tools like motion tracking or keyframes. So, if you need expressive videos to share with family or friends, this is a suitable place.
Besides all this, you can also do text editing creatively. There are customizable text colors, size or font, animated text, etc.
With Filmora Editor, you can manage text files and export them in various formats. Even though XML format exporting is not available with the software, you can still view and edit text files whenever you need to.
There is kinetic typography that can be done using this editing tool. You can use different styles, moving text, or creative fonts to express your ideas with artistic effect.
Hence, we trust this video editing software will greatly support you in accessing and editing text like XML files to create eye-catching text animations or videos.
Filmora Video Editor
Edit your text files in a creative manner with this big community software.
File Viewer Plus is probably the best program you can find to open different types of files. It supports over 400 file formats, including XLSX, XLTX, XLTM, and XSD.
The software can provide support to view common file types such as Office documents, image files or PDFs. Also, you can open various media player files on one platform.
The Smart File Detection feature will help you out in case you are not sure what type of file you are facing and need to detect the format first.
In addition to reading various file types, the software application lets you analyze and edit some of them. You can also convert edited files to other formats, like having a Word file and converting it to PDF.
Here are the key features of File Viewer Plus:
Edit and convert text documents, and images to different formats
Convert audio and video files to various multimedia formats
Advanced image editing: edit, resize, crop, and many other features
Converting multiple files at once
Use the Inspect feature to see what a document that you cannot open contains
These are just a few of the features that File Viewer Plus offers to its users. Download it now and give it a try, you will not be disappointed.
File Viewer Plus
Easily open XML and other over 400 file formats with this powerful software.
XML Explorer is another lightweight and fast utility that allows you to view XML files. The best thing about this software is that it can handle huge XML files.
The program has been tested even on files that are over 300 Mb.
XML Explorer allows users to enjoy the fast exploration of data, copying of formatted XML information, evaluation of XPath expression, and XSD schema validation.
The program uses a DockPanel Suite and a docking library for .NET Windows Forms development, which mimics Visual Studio .NET.
Here are the key features of XML Explorer:
XML Explorer validates XML documents using XSD schema that is specified in the document
Shows a list of validation errors, so you can navigate and select the node by double-clicking on the error
An expression library stores and manages commonly used XPath expressions (similar to Firefox Bookmarks)
It supports various document tabs, and you can also middle-click to close those tabs
There are fully-featured Visual Studio-style dockable panels
XML Explorer does not support editing for now.
Overall, this is a convenient tool, and you can find out more about its capabilities by downloading it to see how it works.
EditiX XML Editor is another high-quality XML editor and XSLT editor, compatible with Windows and other operating systems.
This tool is designed to help web authors and application programmers take advantage of the latest XML and XML-related technologies such as XSLT/FO, DocBook, and XSD Schema.
EditiX XML Editor offers users an extensive range of XML functionalities within a refined IDE that is able to guide users with intelligent entry helpers.
All the processes will be manageable via shortcuts and working locally can be managed by OASIS XML Catalogs.
In the end, you can utilize this XML software for free or modify it according to the GNU (General Public License).
Here are the key features of EditiX XML Editor:
Even beginners can easily get the hang of how this tool works
The program comes with real-time XPath location and syntax error detection
The helpers are also provided with context syntax popups supporting DTD, RelaxNG, and Schema
Comes with support for various templates and project management
You will be able to apply XSLT or FO Transformation, and the result will be shown in a dedicated view
This piece of software will turn out ideal, especially for web authors, app makers, and programmers.
Essential XML Editor is a lightweight program for text-based XML document editing. Enough key features are included in this editor to provide users with everything they need.
Earlier versions of this editor have been released under the name Open XML Editor.
But now, it’s required to purchase an activation key to use all the features packed in this tool, and that’s why the term “open” is not considered appropriate anymore.
The Essential XML Editor also includes some more advanced features, such as plug-ins for third-party Relax NG and W3C XML Schema validators
Here are the key features of Essential XML Editor:
There is a built-in XML well-formedness tester included alongside a DTD Validator and a plug-in for the Saxon XSLT processor
Other features that are supported by this software include undo/redo, search and replace, shortcuts for every command, a built-in file system explorer, a submenu of recently opened files, and more
There is also a detailed page setup and print preview dialogs
The program also comes with an external hex editor that can be customized according to the users’ preferences
The key features of this editor can be used for free, without any time limitations. To use the advanced features, you have to pay a small fee.
XML Tree Editor from Oxygen is able to display XML files as tree views, and the software also allows essential operations including adding, editing, and even deleting text nodes along with their attributes.
The primary target of this software is to provide a user-friendly tool to create and edit XML configuration files for users who don’t know much about XML.
The commands available for XML tags include the following: Add, Edit, Delete, Rename, Move to another position on the tree, Copy to another location, Copy from a separate reference XML document.
XML Tree Editor also supports language translation; the program is the only tool necessary to make a new translation.
Here are the key features of XML Tree Editor:
The software comes with a built-in Free Pascal Lazarus that allows really easy compilations for various target platforms
The available commands for comments include adding, deleting, and editing
The text node is not separated from its container tag, and it can contain virtually anything
The program is very customizable, and it comes with two XML configuration files
The search facilities that this software has to offer include searching through text values
This program represents the ideal way to move and edit XML nodes effortlessly and without wasting time. Some users say that this tool is quite similar to Notepad++.
XML Notepad offers users a simple and intuitive interface that will allow anyone to browse and edit XML documents.
The program uses incremental search in both text and tree views, and this means that as you type, it will navigate to matching nodes
Also, it supports drag/drop, allowing easier manipulation of the tree even from the file system and across various instances of XML Notepad.
There are configurable fonts and colors via the options dialog, and a full find/replace dialog offers support for XPath and regex.
You have also included an HTML viewer that can process XML-stylesheet processing instructions.
Here are the key features of XML Notepad:
The Tree View is synchronized with Node Text View to provide quick editing of node names and values
XML Notepad supports cut/copy/paste functionalities
There is an infinite undo/redo for all edit operations
You will also get the opportunity to edit large text node values
With the help of XML Notepad, you will enjoy excellent performance even on large XML documents and this software is able to load a 3 Mb document in just a second
You will get instant XML schema validation while you are editing, and errors and warnings will be shown in the error list window
XML Notepad supports custom editors for date, dateTime and time datatypes
These are the best programs that allow you to read/edit XML files. We recommend that you head over to their official websites to check out as many details about them as possible before making your final decision.
We would like to hear from you regarding some of these specialized XML file viewers. You can reach us in the comments section and hear your experience.
The Japanese IME is not ready yet error can occur if the default input method is not set to the Japanese Microsoft IME. In some instances, the issue can occur due to a glitch in the Windows keyboard setting or the language pack itself. Follow the steps below to fix it.
How do I fix Japanese IME is not ready yet on Windows 10/11?
1. Set Japanese IME as the default input method
Click on Start and select Settings.
Click on Time and Language options.
Open the Language tab from the left pane.
Scroll down and click on Choose an Input method to always use as default.
Under override for the default input method, click the drop-down menu and select Japanese IME.
Click Save to apply the changes.
Reboot the computer and check if you can use Japanese IME as the default input method. Make sure that you have the Japanese IME language pack installed before trying to set it as a default input method in the settings.
Install the French language pack
If the issue persists, try installing the French language pack. This workaround is useful if you are unable to type a few Japanese characters when typing. Here’s how to do it.
Click on Start and select Settings.
Go to Time & Language.
Open the Language tab.
Click on Add a preferred language.
Search for the French language pack and install it on your computer.
Once installed, try typing in Japanese to see if the issue is resolved.
2. Run the keyboard troubleshooter
Click the Start button and select Settings.
Click on Update & Security.
Open the Troubleshoot tab from the left pane.
Scroll down and select Keyboard.
Click onthe Run the Troubleshooter button.
Windows will scan the system for keyboard and input-related issues and recommend fixes.
Follow on-screen instructions to apply the fixes.
Once done, close the troubleshooter.
To check if the issue is resolved, try typing in Japanese. If the issue persists, reboot your computer once and then try again.
3. Reinstall the Japanese language pack
Press the Windows key + I to open Settings.
Go to Time & Language.
Click on the Language tab from the left pane.
Scroll down and select Japanese and then click Remove.
Confirm the action to remove the language by clicking on Yes/Uninstall.
Once removed, go back to the Languagetab.
Click on Add a preferred language.
Search for Japanese and then proceed to install the language pack.
Once installed, reboot your computer.
4. Reset IME property settings
Click the language icon on the taskbar and select More keyboard settings.
Under Japanese, click the three dots and select Langage options.
Scroll down to Microsoft IME and click Options.
Select the General section.
Scroll down and click on the Restore button. Wait for your setup to revert to default and see if you’re still getting the IME error.
Windows by default supports English as the input language. However, users can download and install other language packs of their choice as well like Japanese keyboard IME.
The Japanese keyboard IME not working on Windows 10 & 11 issue can occur if the language pack is corrupted or due to incorrect input method configuration.
Follow all the steps in this article to fix the problem on your Windows 10 & 11 system.
Businesses or organizations use multiple programs and tools to get the job done. They rely on the best auditing tools and network monitoring tools to accomplish the appropriate tasks. Then they are also required to manage credentials for multiple applications and databases.
For such cases, businesses use different single sign-on tools. This guide will give you a list of some of the best single sign-on tools that you can use for your businesses, no matter the size. This will negate the need of using multiple services for authenticating access.
What is single sign-on tools and their benefits?
A single sign-on tool will help you to sign in to multiple applications with a single set of credentials. Most IT organizations link their system and personal identities with credentials.
Using the single sign-on tools or SSO, you don’t have to worry about maintaining a huge data set of credentials and it can also help simplify the identification process.
Also, organizations make use of multiple programs and have files stored in different locations. Accessing each of them would require an employee to enter multiple credentials. This could be negated by using a single sign-on tool or an SSO.
Here are some of the key features of the single sign-on tools:
They make the system more secure
You don’t have to maintain a large data set of credentials
Centralizes access to all accounts using one credential
Improves end-user experience
Saves money on investing in multiple tools for automation, integration, etc.
Let us now check out the list of the best sign-on tools that you can use for your business or organization.
What are some of the best sign-on tools for a business?
One of the best SSO or sign-on tools that you can use for your business is the ManageEngine AdSelfService Plus.
It will scan the user’s Active Directory (AD) and check the services allowed to that account. The AdSelfService Plus will then create a single login portal, allowing the login to flow through to provide access to the apps.
The user is only required to remember their Windows credentials to access all the enterprise apps. There are multiple benefits of using the ManageEngine AdSelfService Plus SSO tool.
One of the best ones is that it negates the need to ask the Help Desk for password-related issues, as you can do it all by yourself. It can also update locally cached credentials and offers 2FA secure log-on.
Here are some of the best features of the ManageEngine AdSelfService Plus:
Offers 2FA authentication.
Self-password reset mechanism.
User activity logging.
Repeated failed login activity.
Real-time push notifications.
ManageEngine AdSelfService Plus
A well-packed and self-service password management tool.
Okta – Popular identity and access management provider
Okta is a very renowned name in the single sign-on tools market. There are multiple businesses across the globe making use of this tool to have a single credential to access all their services.
It has integration with over 7,000 applications, allowing the IT managers of a company easily provide access simply and securely without much hassle.
Okta uses a cloud-based sign-on service to connect everything from cloud to ground. Here, you can view, manage and secure all user access from the dashboard.
It connects to third-party legacy SSO solutions and has over 1,400 SAML and OpenID Connect integrations. Using Okta’s advanced Insights security tool, you can also block malicious login attempts.
Some of the key features of Okta are:
Support for 7,000+ applications.
Advanced security tools.
Password vaulting.
RADIUS, and LDAP support.
Easy-to-use and manage dashboard.
Allows connection to and from any number of identity stores.
JumpCloud SSO is another popular single sign-on tool that is trusted by over 180K organizations worldwide.
It is an open directory platform that enables easy and secure access to a wide range of applications and services, from any location.
JumpCloud SSO offers full-scale, centralized identity management, all in one place. It comes with multi-factor authentication to protect identities, a native password manager to save credentials, provides security for all devices accessing company resources, and much more.
You can even enforce policies and patches to the system remotely and can develop multiple team-based divisions. The program is easy to use and comes with an automatic onboarding mechanism.
Whether you are a big or a small organization, OneLogin’s policy-driven single sign on mechanism is suitable for both.
It comes with multiple features, including multi-factor authentication, and context-aware access management, ensuring that only authorized access is provided.
OneLogin desktop keeps secure profiles of devices connected with the OneLogin Cloud Directory. Once the user is logged in with a OneLogin credential they can access all the apps using the OneLogin SSO portal.
This tool lets you create any number of logins for the same type of app, offers 6,000+ pre-integrated apps, and gives users the freedom to log in to OneLogin using services such as Facebook, Google+, LinkedIn, and Twitter.
Here are some of the best features of the OneLogin SSO tool:
Offers admin rights at a granular level.
Can log in using services such as Facebook, Google+, LinkedIn, and Twitter.
LastPass SSO – Offers SSO as a standalone or combined service
You might have definitely heard of the popular password manager LastPass. Well, it also offers SSO as a standalone feature or a combined service.
It has a large number of integrations and support of over 1,200 applications and services. You can combine LastPass SSO with enterprise password management (EPM) and its secure multi-factor authentication to bring the best possible security to every access.
The UI is pretty easy to understand, and the platform has multiple layers of protection to keep the encryption key secure. Admins can relax, as it is a feature to make onboarding automatic. It has a vast API library.
That is it from us in this guide. Apart from keeping passwords secure, you also need to have the necessary tools to make sure that you can recover them without any issues.
Many users are complaining that whenever they try updating their Windows PC, they are greeted by a message that reads: Windows could not configure one or more system components. To install windows, restart the computer and then restart the installation.
Despite the warning message advising users to restart their PC to solve the problem, this solution doesn’t work. This can be a big problem, as it prevents you from installing important updates.
Thankfully, it is a problem that can be fixed, and we will show you the way out in this guide.
How to fix Windows could not configure one or more system components?
1. Rename some folders
Press the Windows key + E to open File Explorer and navigate to the path below: c:\windows\system32\inetsrv
Rename the inetsrv folder to inetsrv.old. If you get an Access is denied error, you need to take ownership of the folder before renaming it.
Now, press the Windows key + R, type services.msc, and click OK.
Right-click the Application Host Helper Service and select Stop.
Now, go back to File Explorer and navigate to the path below: c:\windows\winsxs
In the WinSxS folder, search for windows-iis and move all folders with the name mask windows-iis to another location.
Finally, when the update process is complete, you can delete the inetsrv.old folder.
In most cases, Internet Information Services folders have been found to cause Windows could not configure one or more system components. You can fix this by renaming some folders that are crucial to the process.
2. Disable IIS
Press the Windows key + S, type control, and select Control Panel.
Click Uninstall a program under Programs.
Now, click Turn Windows features on or off in the left pane.
Uncheck the box next to Internet Information Services in the list.
Finally, click the OK button to confirm the action.
If renaming the IIS files on your PC failed to solve the Windows could not configure one or more system components issue, you need to uninstall the Internet Information Services.
If you get a permission denied prompt, you need to log in as an admin or make your current account the admin.
3. Get rid of certain files from your PC
Launch File Explorer and navigate to the path below: C:/ProgramData/Microsoft/Crypto/RSA/MachineKeys
If the ProgramData folder is not visible, click the View tab at the top and check the box for Hidden files.
Look for these files and delete them:6de9cb26d2b98c01ec4e9e8b34824aa2_GUIDd6d986f09a1ee04e24c949879fdb506c_GUID76944fb33636aeddb9590521c2e8815a_GUID
Sometimes, the machine keys used by the IIS during the update process might be causing Windows could not configure one or more system components issue.
The solution is to delete the keys and let your PC create new ones.
4. Uninstall old Wi-Fi driver, and update other network drivers
Press the Windows key + R, type devmgmt.msc, and click OK.
Double-click the Network adapters option to expand it, and right-click your wireless device.
Now, select Uninstall device.
Click the Uninstall button to confirm the action.
Next, expand the Network adapters option again and right-click each device there.
Select the Update driver option.
Finally, choose Search automatically for drivers and install any available update.
Some users have found faulty Wi-Fi drivers to cause Windows could not configure one or more system components. This usually happens when you have not updated your drivers for long.
The solution is to uninstall the Wi-Fi driver and update other network drivers.
5. Disconnect your SD card reader
This may seem like an odd solution compared to all the others, but users reported that removing the SD card reader solved the problem for them.
Also, if you have any other external devices connected to your PC, you should remove them and check if you can update your PC without issues.
There you go. We believe you should be able to fix the Windows could not configure one or more system components issue with the solutions in this guide.
If your NVIDIA graphics card is not being deteced or recognized in Windows 11, you’re not alone. This common issue can happen after a system update, driver change, or fresh install.
It leaves your display running on basic GPU or not working at all. Luckily, it’s easy to fix.
Whether you’re trying to fix missing GPU detection, troubleshoot driver conflicts, or simply figure out why your NVIDIA card isn’t showing up, we’ll walk you thorugh all steps necessary below.
What can I do if the Nvidia graphics card is not detected?
1. Show hidden devices
Right-click on the Start icon, then click on Device Manager to open it.
Click on View from the window’s top side, then choose Show hidden devices to show the Nvidia graphics card.
Double check if the graphics card is detected now; if not, please move to the next solution.
Users stated that they had somehow managed to conceal their Nvidia graphics card. By revealing the hidden elements, they could see the GPU and other devices they had previously forgotten about being installed on their system.
If the Nvidia GPU is not detected in the Device Manager, you should try other solutions.
2. Update BIOS
In case you run into errors like Nvidia graphics card not detected Windows 11, a great reliable method would be to update your BIOS as showed below.
1. Visit your motherboard manufacturer’s website; for example, we will head to Lenovo’s website and click on PC.
2. Locate your model and enter its number in the search bar, then navigate to the Drivers & software section.
3. Look for the latest BIOS for your computer and download it.
4. Move the downloaded file to a flash drive from File Explorer by clicking on This PC followed by your flash drive, as they instruct you on their website. Make sure not to delete the flash drive by accident.
5. Restart your PC and keep pressing F2 or Del to enter BIOS.
6. Select the BIOS update option and choose the file you downloaded from the flash drive.
7. Wait for the process to finish, then continue with the bootup process. Now you should be able to see the Nvidia graphics card.
3. Update the graphics card
Press the Windows key + I to open the Settings app.
Click on Windows Update from the left pane, followed by Advanced options on the right.
Scroll down until you find the Additional options section, then click on Optional updates.
Now click on the Driver Updates option, select all the driver updates you are presented with, and click on the Download & install button.
Even though Windows is generally in charge of driver updates, if you are experiencing an issue, you can perform a manual search for updates. Therefore, we strongly advocate using a specialist program such as Fortect Driver Updater to do automatic scans for out-of-date drivers.
If the Nvidia graphics card is not detected on your laptop, you should try this OS update solution.
4. Enable the graphics card
Right-click on the Start icon, then click on Device Manager to open it.
Now expand the Display adapters section, right-click on the Nvidia graphics card option, and choose Enable device. In our case, we get the Disable device alternative since the card is already enabled.
Check if the error is now rectified.
If the Nvidia GPU is not detected in Windows 11, you should try other solutions.
5. Use CMD
Press the Windows + S key to open the Search bar, type cmd, and right-click on the most relevant result to run it as an administrator.
Now type or paste in the following command and press Enter: bcdedit /set pciexpress forcedisable
Restart the computer and see if it has been fixed.
6. Uninstall updates
Press the Windows key + I to open the Settings app.
Click on Windows Update from the left pane, followed by Update historyon the right side to open the list with your recent updates.
Now scroll until you find the Related settings section and click on Uninstall updates.
You can choose whichever update you want to uninstall from the new window. For example, you may click on the latest Windows update and uninstall it.
Later on, after you can see the graphics card, you should try updating your OS again, hoping the new installation won’t be buggy.
Uninstalling updates is a great solution for Windows 11 graphics card issues.
Press the Windows key + I to open the Settings app.
Click on Windows Update in the left panel.
If you have any new updates to download, click on the Install now button and wait for the process to finish; otherwise, click on the Check for updates button.
Using an older version of Windows could be causing the problem, which can be fixed by updating to the most recent version. However, the mistake will most likely be fixed in a later update to the software package.
Why is my NVIDIA graphics card not being detected?
Usually, your GPU is undetected when a driver is not installed correctly, or the graphics card is not compatible with one of the other components of your PC.
There are several other reasons why your laptop doesn’t detect the installed graphics card, including:
An outdated BIOS
A mismatched or outdated graphics card driver
GPU not activated on the BIOS settings
An error from the latest Windows upgrades like 0x80070103
Incorrect insertion of the graphics card into the card slot
The Windows 10 User Account Control (UAC) feature often triggers the You do not have sufficient access to uninstall error. While UAC is intended to enhance system security by restricting access to installed files and programs, it can make uninstalling certain apps a hassle.
If you’d like to disable UAC and eliminate this error, just follow the steps below.
How can I fix insufficient access to uninstall error message?
1. Try getting Administrator permissions
Navigate to the installation directory of the application you want to remove.
Locate uninstall executable, right-click it and choose Run as administrator from the menu.
Follow the instructions on the screen to complete the uninstall process.
2. Use Registry Editor
On your Windows 10 device, go to Start Screen and use Windows Key + R keyboard shortcut in order to open the Run box.
There type regedit and press OK.
From Registry Editor go to: HKEY_LOCAL_MACHINESOFTWAREMicrosoftWindowsCurrentVersionUninstall
Now if you click on each key from that path you will be able to access each program from your device, thus you will be able to uninstall the same.
Now, select the software you want to uninstall and take a look at the right panel of the Registry editor. Double click on UninstallString to open its properties.
When the Properties window opens, copy the path from the Value data field.
Up next, on your device open a command prompt window – right-click on your Start Button, or press Windows Key + X keyboard keys and select Command Prompt (Admin).
Now right-click inside the Command Prompt window to paste the path and press Enter
After doing that, the uninstall process will start and you should be able to uninstall your application.
It’s worth mentioning that this method doesn’t work for applications that use MSI installers, so keep that in mind.
3. Check if uninstall path is correct in your registry
Open Registry Editor. We showed you how to do that in our previous solution.
Once Registry Editor opens, you need to go to one of the following keys in the left pane.
For 32-bit applications go to: HKEY_LOCAL_MACHINESOFTWAREMicrosoftWindowsCurrentVersionUninstall
For 64-bit applications go to: HKEY_LOCAL_MACHINESOFTWAREWow6432NodeMicrosoftWindowsCurrentVersionUninstall
In the right pane, you should see many subkeys represented by numbers and letters. You need to click on each individual key until you find the problematic application. The easiest way to recognize an application is to look for DisplayName string in the right pane.
Once you locate the problematic application, look for the UninstallString value in the right pane. Sometimes this string might have a slash or some other character in front of its value causing the problem to appear. Double click the UninstallString.
Now be sure to remove extra characters from the Value data field and click OK to save changes. Keep in mind that your value data should remain encapsulated in quotes.
Press Windows Key + S and enter user control. Select Change User Account Control settings from the menu.
Move the slider all the way down to the Never notify. Now click on OK to save changes.
5. Delete the Safer key from your registry
Open Registry Editor.
When Registry Editor opens, in the left pane navigate to: HKEY_LOCAL_MACHINESOFTWAREPoliciesMicrosoftWindows
Expand the Windows key and navigate to safercodeidentifiers key. If you have 0 and Paths subkeys there, it’s rather likely that your registry has been altered by malware. Simply right-click Paths key and choose Delete from the menu.
When the confirmation dialog appears, click on Yes.
So, there you have it; that’s how you can remove the You don’t have sufficient access to uninstall message from Windows devices.
We all have videos from many sources and devices but often we find out that they are not compatible with every device or player. That’s why a tool such as HitPaw Video Converter can leverage all the differences as one of the best video converters on the market.
How can HitPaw Video Converter help you?
As we’ve mentioned in the title of this article, HitPaw Video Converter is not only an ultra-fast video and audio converter that can transform all your videos into any format.
Its developers updated the software with a lot of new features like video background noise removal, a Blu-Ray DVD and DVD to MP4 converters, a lossless music converter, a vocal remover, and a video/image compressor.
And that’s not even all because, with HitPaw Video Converter, you may also download videos, audio, and thumbnails from over 1000 websites including YouTube, Facebook, and Vimeo.
In fact, from our tests, the app is one of the best YouTube video downloaders software out there.
In this article, we will outline the newly released features and how they can be used on your PC.
What are the new features of HitPaw Video Converter?
1. Remove background noise from video
HitPaw added a background noise remover tool that works equally fine on video and audio as well.
You will find this separate feature in the new Toolbox menu from the software. And, as you would expect, it’s extremely easy to use.
Just drag and drop your file into the window and the noise-removing process will start automatically.
In the end, you will be able to listen to the before and after sound, together with the audio histogram below, and save the new file.
You also have the option to replace the old file with the new one to avoid any confusion afterward.
2. Wonderful Blu-Ray DVD converter
HitPaw Video Converter now has the option to convert Blu-Ray to DVD and DVD to MP4.
In fact, with this software, there are few video file types you can’t convert and we didn’t run into any such case yet.
The process is extremely simple, by dragging and dropping into the Convert window and then selecting the target format and resolution.
But the most wonderful part of the HitPaw Video Converter app is the fact that you can select the target video type by device or by usage on the social service.
For instance, you may choose to save the video for an iPhone or Samsung smartphone or prepare the clip for YouTube, TikTok, Facebook, Instagram, and more.
Now, you can download songs, albums, playlists, and podcasts from Spotify and iTunes.
Basically, you’ve got yourself a Spotify to MP3 converter and you may also convert Apple music to MP3.
And you can do so in batches with a single click. With Spotify music, you need to paste or drag the link and select the target file type (MP3, M4A, or WAV), then hit the Convert All button.
The best part is that all the audio conversions are lossless. That means you will get the exact song as it is, without any quality alteration.
4. Accurate AI vocal remover
If you want to create a unique Karaoke playlist, HitPaw has an astonishing AI vocal remover in the Toolbox of the Video Converter app.
You simply drag and drop the audio into the tool’s window, and the vocal remover will start processing the file.
In the end, you will be able to listen to the original, the music, and the vocals separately and export them with just one click.
In our tests, the app did an amazing job! We only heard a few noises where the voice used to be but only in the loudest parts of the song.
6. Highly efficient video/image compressor
We’ve all been there! We want to share a video quickly but it’s too big to fit in an email or message.
The video/image compressor from HitPaw Video Converter may shrink your video to a fraction of the original.
For instance, in the screenshot above, an MP4 clip of 546 MB can be compressed to only 82 MB with the highest compression level.
And it can get to half of that if you set the quality to Low which is incredibly efficient. In fact, you may also preview the resulting clip to see if it’s up to the standards you look for.
Moreover, you can compress videos and photos in bulk action, applying the same changes to all the files.
That means, for instance, that you will be able to compress all your library of videos or images in one go and free tons of space on your drive.
Other important features of HitPaw Video Converter
Of course, we can’t overlook the main feature of this tool, which is the conversion capability.
By using HitPaw Video Converter, you virtually convert video and audio files to any format: MP4 to MP3, MP3 to WAV, MKV to MP4, and the options are endless.
Another important feature is the built-in video editor. In fact, it’s not only an editor for cutting, merging, cropping & rotating, changing the speed, and applying watermarks to your video.
You will discover that it’s a great tool to create videos and personalize them with filters and effects to get great results.
HitPaw Video Converter comes with a Free trial version with limited functionality but it’s still great for testing the product before committing to purchase.
We hope that our article provided new and useful information about HitPaw Video Converter. We also recommend trying it for yourself and getting to your own conclusions as well.
Do you guys remember the newly redesigned Media Player that was introduced to the Windows 11 operating system?
Well, you will be pleasantly surprised to find out that Microsoft has decided to share the revamped Media Player with Windows 10 users as well.
So. if you haven’t yet upgraded to Windows 11 and decided to stick with its predecessor a little longer, this is a neat treat from Microsoft,
Windows 10 users are getting the new Media Player as well
As you remember, Microsoft began rolling out its new, redesigned Media Player to Windows 11 Insiders back in November 2021.
The Redmond tech company has since been gradually updating it with new interesting and helpful features like Audio CD Ripping, and more high-fidelity audio file formats.
And, there are also features that video watchers will like, such as video folder navigation, which was also added recently.
Meanwhile, on Windows 10, Groove Music has been the default music-playing app, but this too is about to come to an end, just like MSDT.
Why? Well, it looks like that is set to change as Microsoft is now starting to replace Groove Music on Windows 10 with the new Windows Media Player.
Keep in mind that the development is not entirely new though and it was probably coming to all users sooner or later.
That is because the Redmond firm had already begun rolling out the new Media Player to Windows 10 Release Preview channel Insiders.
Judging from user reports, the new Media Player is now starting to become available on the Microsoft Store which means all Windows 10 users should soon be able to use it.
That being said, you may not receive the new Windows Media Player right away on Windows 10 via the Microsoft Store as it is likely going to be a general rollout.
Have you started using the new Media Player on your Windows 10 device? Share your experience with us in the comments section below.