Razer being a PC game accessory maker makes almost everything from gaming keyboards to headphones and from gaming laptops to mice. Razer has some of the best gaming mice in its product lineup for competitive gamers.
Razer mice are equally practical for both gamers and working professionals with their swappable panels for different functionalities offering precise input and RBG lighting for a fun time.
In this buying guide, we have gathered the best deals on Razer gaming mice.
The Razer Viper Ultimate Hyperspeed, as the name suggests, is an extremely light and versatile mouse that offers a great gaming experience no matter if you’re an amateur or a professional.
The RGB charging dock will keep your device at full battery constantly, while the 20K DPI ensures a precise and smooth gaming experience without any compromises.
You also get 8 programmable buttons to use as shortcuts, which can give you a definitive advantage against your gaming opponents.
The Razer Naga Trinity is a three-in-one mouse that comes with versatile swappable side panels offering a world of customization options along with precise input with a 16,000 DPI 5G Optical Sensor and equally great comfort for long gaming sessions.
The three swappable side panels – 12 buttons, 7 buttons, and a simple two-button panel can be used with different types of games. It can be programmed with 19 commands.
The DeathAdder Elite is similar to Naga Trinity in looks, but the main difference between the two is the missing swappable panels in the former one as it comes with the traditional two-button layout. Then again it costs a lot less than Naga Trinity.
The DeathAdder also boasts a True 16,000 5G optical sensor the mechanical switches are rated for 50 million clicks. The Chroma lighting is customizable through the Razer Synapse driver tool.
The Razer Basilisk is a practical mouse offering a comfortable feel, easy-to-use Synapse software, and an affordable price tag for a gaming mouse.
The Basilisk uses a 16,000 DPI 5G optical sensor for precise input and comes with a removable DPU clutch. The wheel resistance is customizable while the thumb rest offers much-needed comfort.
If you are looking for a performance wireless gaming mouse, then the Razer Lancehead offers excellent wireless connectivity with up to 24 hours of battery life on a single charge.
It uses the same 16,000 DPi 5G optical sensor for precise input and comes with nine independently programmable buttons.
That’s about it! Have you found your favorite Razer mouse deal yet? Do let us know your pick in the comments below.
If Xbox One S turns on but no display is showing can be a big problem and prevent you from using your console properly. However, you might be able to fix this problem using one of these solutions.
Connecting your TV to your Xbox console can sometimes prove to be a difficult task, especially if your xbox is not showing on tv.
Unfortunately, this is one of the most frequent issues Xbox One and Xbox One S owners encounter after installing the latest updates or when starting their consoles.
If your TV screen often remains blank or black, we’ve got a series of quick workarounds for you. Follow the troubleshooting steps listed below to fix the connection between your TV and console.
How can I fix Xbox One S turns on but no display is showing? Try these solutions
Xbox not showing on TV screen when you return Home
One way to fix this problem is to simply restart your console. This is incredibly simple to do, and in order to do it, you just need to follow these steps:
Hold the Xbox button on the front of the console for 10 seconds to turn your console turn off.
Press the Xbox button on the console to turn your console back on.
Xbox One S no display screen when watching a Blu-Ray Disc
Most likely, your console’s video output is set to Allow 24Hz. To fix the no display screen issue, you’ll need to turn this feature off:
Press the Xbox button to go to the Home screen > scroll left to open the Guide.
Select Settings > select All settings.
Go to Display & sound > select Video options.
Click Enable 24Hz > turn off this setting.
Xbox not showing on TV screen after you turn on the console
If you’re having this problem, there’s a small chance that your Xbox One isn’t properly connected. However, you can check if everything is working properly by doing the following:
Make sure that both your TV and console are turned on and your TV’s input signal is HDMI.
Check that the HDMI cable connection to your console and TV is secure.
Make sure that the HDMI cable is connected to the console’s “out to TV” port.
Cold boot your console (hold the power button for 10 seconds).
Reset your display settings:
Eject any disc from the console
On the console, press and hold the Xbox button for five seconds
Press and hold the Xbox button and the Eject button until you hear a beep to turn on the console. Don’t let go until the second beep occurs.
Note that this action boots your console in low-resolution mode. Go to Settings to reset this setting.
Plug the HDMI cable into a different HDMI port on your TV.
Use a different HDMI cable to connect your console to your TV.
Connect your console to a different TV.
No picture on screen when you use an AVR
Turn on your devices in the following order, waiting for each device to fully power-up:
Turn on your TV.
Turn on the AVR once your TV is displaying a picture.
Turn on your console.
Switch the input source of your AVR away from the console and then back.
Restart the AVR.
Set your TV connection to HDMI:
Return to the Home screen > scroll left to open the guide.
Select Settings >Display & sound.
Select Video output > TV connection > select the HDMI option.
No display screen after you install a system update
Select I need to troubleshoot a system update error.
Select I am experiencing a startup issue.
Select Black screen (yes, select this option to troubleshoot blank TV screen issues).
Follow the troubleshooting solutions offered by the tool.
We hope the solutions listed above help you to fix the blank TV screen issues you’ve encountered. If you’ve come across other workarounds, feel free to list the troubleshooting steps in the comments section below.
Xbox One S screen flickering
If you experience this problem, first, check your HDMI connection. Make sure that the cable is connected strongly on both sides. Also, try to use another cable. If that’s not solving the issue, power cycle your console.
To do that, press and hold the power button for 10 seconds, until the console shuts down completely, then power it on again and see if the problem is solved.
Xbox One S is stuck on a green screen
If you have this problem, first, try the solution from the previous solution to power cycle your Xbox.
If the problem persists, try to factory reset your console. To do that,follow the steps below
Hold Eject and Sync buttons, and click the Power button.
Wait until you hear two startup tones and you will see a menu with 4 options: Restart, Power off, Factory reset, and Update off of Flash Drive.
Select the Factory reset. Choose whether you want to keep your installed games or not.
Then Xbox One will boot normally. If you chose to keep them, all your games will be still stored on the game drive.
Xbox One X blank screen
If the screen is blank, there could be two possible problems. It might be a problem with the HDMI connection, in which case you need to verify cable connection and try to use another cable, or it may be a more serious problem with your hard drive.
If the hard drive goes bad, it might cause this problem and the solution is to try another hard drive on your console or try the hard drive you have on another device to see whether it’s a problem from the console or the drive.
Is your Devices and Printers not opening on your Windows 10 device? Here is all you need to know.
Devices and Printers usually display printers and other devices within the Control Panel. Here you can perform basic operations and organize these devices.
Hence it becomes a bit of a bother when you can not get access to this applet. We will discuss the causes and the best solutions in this guide.
Why is Devices and Printers not opening on Windows 10?
We were able to gather the causes of this problem from many users. Fro,m these findings, the following are at the top of the list of possible triggers:
Corrupt files – If you have a few corrupted or bad system files, you may experience this problem.
Disabled services – A few services like the Bluetooth and Print Spooler services may have been turned off. This can trigger this problem.
Problem with DLLs – A blank Devices and Printers applet might be due to missing DLLs. Registering DLLs is a resolution that some users have confirmed can fix Devices and Printers.
Haven discussed triggers, let us explore some of the most trusted solutions available.
How can I fix Devices and Printers not opening on Windows 10?
1. Check the Bluetooth and Print Spooler Services are Enabled
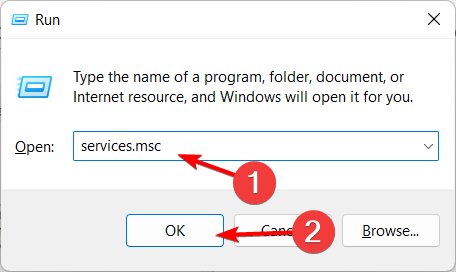
Go to Start, type services.msc, and hit Enter.
Double-click Bluetooth Support Service.
Select Automatic on the Startup type drop-down menu, press the Start button if the service is stopped, and click Apply and OK.
Repeat the steps above for all other Bluetooth services on the Services window, such as Bluetooth User Support, Bluetooth Audio Gateway, etc.
Also repeat the process for the Printer Spooler service.
2. Run a system file scan
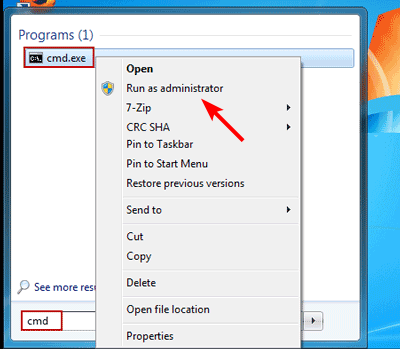
Click Start, type command prompt, right click on the Command Prompt option, and select Run as administrator.
Type the script below and hit Enter. DISM.exe /Online /Cleanup-image /Restorehealth
Type the next script below and again hit Enter. sfc /scannow
After the SFC scan, the Command Prompt window might state, Windows Resource Protection found corrupt files and successfully repaired them. If so, restart your desktop or laptop.
To make things faster and safer we recommend using a system repair tool specialized in scanning your system file integrity and solving any issues at hand.
3. Open Devices and Printers in a New User Account
Press Windows + I to open the Settings app.
Select Accounts, navigate to Family & other people, then click Add someone else to this PC.
Click I don’t have this person’s sign-in information on the Microsoft Account window.
Then click Add a user without a Microsoft account.
Enter the user account details in the required text boxes, and then press the Next button.
Thereafter, restart Windows and select to log in with the new user account you just set up.
Those are some of the resolutions that have fixed the Devices and Printers applet in Windows for many users. These resolutions may come in handy also if the Printer properties is not opening.
If you have another fix for Devices and Printers, feel free to share it below.
Microsoft has a new deal on Samsung Galaxy watches prepared for 2021’s Black Friday & Cyber Monday but the offer are still ongoing, just ready for the Christmas sales. You can save up to $100, depending on the wearable device’s model, and get this: the cheapest device starts at only $59.99.
Wearables have started to gain traction a few years back, as people started to get more interested in logging their physical activity or seeing their phone notifications without having to take the device out of their pockets.
So, if you’ve been considering investing in a Samsung Galaxy wearable, now is a great opportunity for you to do so. Note that at the time being, Microsoft just offers us a sneak preview of the deal.
The actual offer becomes available starting 11/19/2021. Thus, you have plenty of time to prepare yourself.
Samsung Galaxy Watch3 BT is a popular Samsung wearable that helps you stay connected and track your day-to-day activities in a seamless fashion. And it has a premium, elegant design, as well.
This device can monitor many parameters, including SpO2, VO2 Max, heart rate, oxygen levels, and how many steps you take. In addition, you can use Samsung Galaxy Watch3 BT to access various apps via Bluetooth, display notifications, and access your multimedia playlists easily.
Samsung Galaxy Watch Active 2 is a powerful smartwatch that lets you monitor your heart rate, sleep patterns, and workouts. It has a super AMOLED display placed on a thin frame, so it could fit even elegant attires if needed.
It can be charged wirelessly, and, more important, you can use your compatible Galaxy phone’s Wireless PowerShare feature to give Samsung Galaxy Watch Active 2 a quick boost.
The watch also comes with a built-in sleep tracker and the Calm app, which could help you lower your stress levels and restore your focus.
Helps you reach fitness goals with useful insights
While both choices are excellent wearables from Samsung, it all comes down to how much you’re willing to spend and what are your needs from this type of tech.
It goes without saying that advanced users might prefer the Samsung Galaxy Watch3 BT, but if you don’t mind sacrificing a bit of functionality for a better price, then the Galaxy Watch Active 2 might be what you need.
Are you going to buy any wearables (smartwatches, bands) this Holiday deals or upgrade your existing ones? Tell us all about it in the comments section below:
Windows 10, like the previous iterations, is prone to errors and ever since it was released, we have come across a bunch of them.
One of these is the 0x800f0831, a Windows 10 install error. Note that it is encountered while updating Windows and doesn’t allow the process to complete properly. We all know how important it is to keep up-to-date with the latest version of the OS.
When running an outdated version, you don’t just miss out on several new features but the PC is also exposed to threats and the chances of encountering errors are high.
Before we delve into the solutions, let’s first walk you through the underlying issues that may cause the install error – 0x800f0831.
What causes the install error 0x800f0831?
There are numerous underlying issues that are known to cause this Windows installation error. Some of these occur more frequently than others, and we have listed them in the same sequence:
Missing files from the previous update
Corrupt system files
Antivirus conflicting with Windows Update
Misconfigured VPN
Issues with the Windows Update service
With a basic understanding of the problem, you are now in a far better position to proceed to troubleshoot the error. First, we recommend reverting any change that you made in the recent past on your Windows PC.
If that doesn’t fix the 0x800f0831 Windows 10 install error, execute the fixes listed here as given.
How can I fix the Windows Update error 0x800f0831?
1. Use a PC repairing software
If you require a faster and more effective method to bypass the 0x800f0831 Windows Update install error, you can use a specialized repair tool.
2. Run the Windows Update troubleshooter
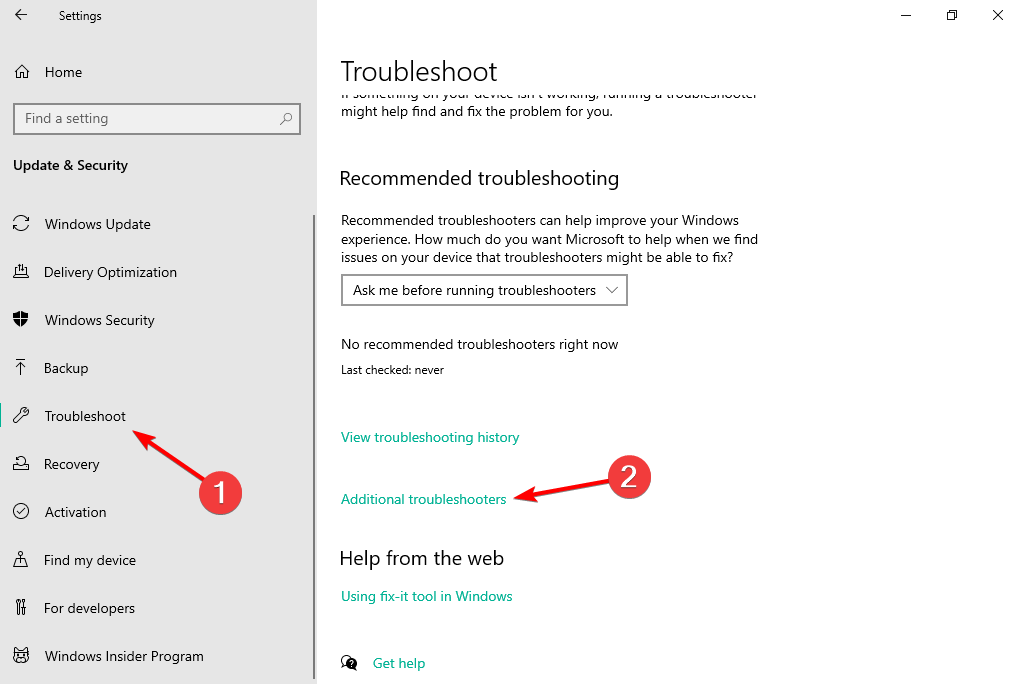
Press Windows + I to launch the Settings app, then click on Troubleshoot on the right in the System tab.
Click on Other troubleshooters.
Next, locate the Windows Update troubleshooter and click on the Run button next to it.
Wait for the troubleshooter to diagnose the issue, and choose the appropriate repsonse, when prompted, to fix them.
Whenever you encounter an error in Windows, it’s recommended that you first look for a relevant troubleshooter. These are more than capable of fixing a wide variety of errors, both hardware, and software, and do not require much effort from your end.
3. Run the SFC and DISM scan
Press Windows + S to launch the Search menu. Enter Windows Terminal in the text field at the top, right-click on the relevant search result, and select Run as administrator from the context menu.
Click Yes on the UAC (User Account Control) prompt that pops up.
Next, click on the down arrow at the top, and select Command Prompt from the list of options. Alternatively, you can press Ctrl + Shift + 2 to launch the Command Prompt tab.
Now, type/paste the following command and hit Enter to run the SFC scan:sfc /scannow
Once it’s complete, paste the following command and hit Enter to run the DISM tool:DISM /Online /Cleanup-Image /RestoreHealth
Wait for the scan to complete, then restart the computer and check if the 0x800f0831 Windows 10 install error is fixed.
Both the SFC and DISM are critical in detecting problems with the update process. The SFC (System File Checker) scan identifies corrupt system files, and if any are found, replaces them with their cached copy stored on the system.
The DISM (Deployment Image Servicing & Management) tool, on the other hand, looks for problems with the Windows image and can modify the installation media, if required.
4. Restart the Windows Update service
Press Windows + R to launch the Run command. Type services.msc in the text field, and either click on OK or hit Enter to launch the Services app.
Locate and double-click on the Windows Update service to launch its Properties.
Click on the Startup type dropdown menu, and select Automatic from the list of options.
Next, click on the Start button under Service status, and then click on OK to save the changes.
After starting the Windows Update service, check if the 0x800f0831 install error is fixed.
5. Reset Windows Update components
Press Windows + R to launch the Run command. Type wt in the text field, hold the Ctrl + Shift, and either click on OK or hit Enter to launch an elevated Windows Terminal.
Click on the downward arrow at the top, and select Command Prompt from the menu to open it in a new tab.
Now, type/paste each of the following commands and hit Enter after each to reset the Windows Update components and fix the 0x800f0831 Windows Update error.
Execute the following two commands to stop the BITS and Windows Update services:net stop bitsnet stop wuauserv
Next, execute the following command to delete the qmgr*.dat files:Del “%ALLUSERSPROFILE%Application DataMicrosoftNetworkDownloaderqmgr*.dat”
The following commands will rename some critical folders. Though if you are attempting the reset the process for the first time, skip this step, and if the process doesn’t go through, try it the next time.Ren %Systemroot%\SoftwareDistribution\DataStore DataStore.bakRen %Systemroot%\SoftwareDistribution\Download Download.bakRen %Systemroot%\System32\catroot2 catroot2.bak
Execute the following two commands to reset the BITS and Windows Update service:sc.exe sdset bits D:(A;;CCLCSWRPWPDTLOCRRC;;;SY)(A;;CCDCLCSWRPWPDTLOCRSDRCWDWO;;;BA)(A;;CCLCSWLOCRRC;;;AU)(A;;CCLCSWRPWPDTLOCRRC;;;PU)sc.exe sdset wuauserv D:(A;;CCLCSWRPWPDTLOCRRC;;;SY)(A;;CCDCLCSWRPWPDTLOCRSDRCWDWO;;;BA)(A;;CCLCSWLOCRRC;;;AU)(A;;CCLCSWRPWPDTLOCRRC;;;PU)
Next, type/paste the following command and hit Enter to execute it:cd /d %windir%\system32
Now, execute each of the following commands individually to re-register the BITS and Windows Update files:
11. Now, paste the following command and hit Enter to reset Winsock:netsh winsock reset
12. The last step is to restart the BITS and Windows Update service, so execute the following commands to do that:net start bitsnet start wuauserv
6. Disable VPN
Press Windows + I to launch the Settings app, and select Network & Internet from the navigation pane on the left.
Click on VPN on the right.
Next, click on the configured VPN, and select Remove from the options that appear.
Click Confirm on the pop up.
7. Enable .Net Framework 3.5
Press Windows + R to launch the Run command. Type appwiz.cpl in the text field, and click on OK or hit Enter to launch the Programs and Features window.
Click on Turn Windows features on or off from the left.
Now, tick the checkbox for .Net Framework 3.5 (includes .Net 2.0 and 3.0), and click on OK to save the changes.
If required, follow the on-screen instructions to download the relevant files.
Now, restart the computer and check if the 0x800f0831 install error is fixed.
There are various installation issues, apart from 0x800f0831, in Windows 11. To help you fix these, we have a dedicated set of guides that you should know about.
Also, note that there are a few elements that need to be set up properly before starting the OS upgrade process, or else you risk getting an error saying Windows 11 update stuck at 100%.
As you can see, if you ever encounter an installer error, just find the relevant guide, and get your system back up and running in no time.
That’s all there is to the 0x800f0831 installer error in Windows 11, along with the most relevant fixes for it. If these don’t work, you can reset Windows 11 to its factory settings.
Tell us which fix worked and your experience of Windows 11 thus far, in the comments section below.
Black Friday & Cyber Monday have become synonymous with the yearly shopping season, and no one is more excited about it more than fans of gadgets and electronics.
Among these, the most eager to get the best deals are probably gamers, since they all know how just slapping the gaming label on something ups the price by a lot.
Well, Microsoft has a little surprise for them this year, since it will be including a very powerful and very promising gaming laptop in its yearly Black Friday & Cyber Monday sale. Although BF and CM are over, the laptop still can be found at a great deal during this Holiday season.
Get the latest deal for Asus TUF FX505DT-WB72
The Asus TUF series of gaming laptops is the company’s second response to all other big manufacturers that have their proprietary subdivisions, such as Dell’s Alienware
Their first subdivision, Republic of Gamers, is still going strong, but it seems that the year 2020 belongs to TUF, and the Asus TUF FX505DT-WB72 is among the most popular models.
What makes these laptops particularly great is not only the powerful interior components that can easily support this generation’s games but also the very durable and solid-looking exterior that looks like it can actually take a beating if you ever lose an online match.
Of course, given this laptop’s popularity, it should come as no surprise if you find similar, or even better, offers on other retailer’s websites, so go ahead and check out the link below as well:
Keep in mind that Microsoft only released a peek of what’s to come during the Holiday season sales, so more and maybe even better offers may appear on their catalog, so make sure you keep a close eye on it.
Are you planning on stepping up your gaming with this powerful laptop, or have you set your eyes on something better?
Let us know by leaving your feedback in the comments section below.
DPC or Deferred Procedure Call handles driver efficiency by prioritizing important tasks first and the unimportant ones at a later stage. When your PC is suffering from high DPC latency issues, you’ll have audio driver problems which would cause clicks, pops, other distorted audio sounds, or even BSOD errors.
In this case, you need to check the DPC latency issue by using a third-party tool. This is where DPC Latency Checker comes into the picture
What is the DPC Latency Checker?
You can choose the best tool based on the version of the Windows operating system you are currently using. For instance, if you are on Windows 7 or newer versions, then you should go for the LatencyMon DPC latency checking tool from Resplendence.
Otherwise, if you are using an older PC, then your best bet for narrowing down the DPC latency issue is by using the trusted DPC Latency Checker tool. However, do note that you can use this tool on newer Windows PCs as well. The tool has multiple benefits, which we will talk about below.
Using the DPC Latency Checker, you can get the information if any of the drivers on your PC is implemented improperly or causes excessive latency known as DPCs. This tool not only helps you know if your PC has latency issues but also tells you what is causing the problem.
Here are some of the benefits of using the DPC Latency Checker tool:
You get to know the interruptions in real time.
You get to know if your Windows system is configured properly.
The tool will also give you information if a particular computer system is suitable for streaming applications or not.
How can I download and use the DPC Latency Checker tool?
1. Download the DPC Latency Checker tool
DPC Latency Checker is a portable program that you can download and use via a USB flash drive as well. It is a tiny tool and does not require installation. The portable program feature allows you to simply use it on another device without needing to download it again on it.
While the official website does not work, you can make use of the third-party link to download the tool on your PC. Once you download the file, all you need to do is run the EXE file and that is it.
Launch DPC Latency Checker file; it does not require any installation.
As soon as you launch the tool, it will start checking the latency.
The Latency Checker will periodically update the internal data at a regular interval as displayed in Test Interval.
Here are the details that you can get using this tool:
Current Latency: This indicates the maximum DPC latency measured within the last second.
Absolute Maximum: It represents the maximum latency measured since the tool was started.
You can hit the Reset button to clear this value. The bar graph shows the Current Latency value over time. Do note that each bar represents the maximum DPC latency that occurred within a second.
The most recent value is shown as the right-most bar. Every second, bars are scrolled from right to left and a new bar is added on the right-hand side. You can stop the latency analysis by using the Stop button.
How to analyze latency issues with DPC Latency Checker?
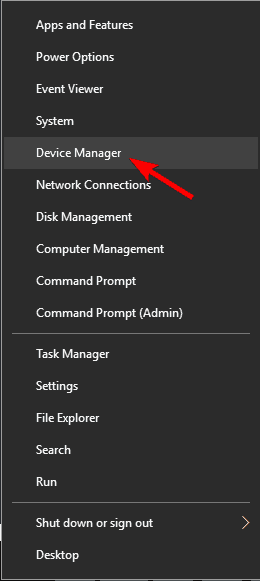
Right-click on the Start menu icon and select Device Manager.
Right-click on the device, and select Disable from the context menu.
After disabling a device, run the DPC Latency Checker.
Check if the excessive latency value disappearsor not.
If the excessive latency value is there then, disableanother device from the Device Manager. Perform this step until the high latency value disappears from the Latency Checker tool.
When the excessive latency value disappears from the tool, you have found the specific device causing the problem.
While launching a game you may encounter the 0x8b050066 error on Xbox One. It is a common error and Microsoft has provided an official troubleshooting guide for the same.
That said, several Xbox One users have reported similar errors in the Microsoft community forum.
I recently purchased The Long Dark disk and it won’t even begin installing. I keep getting error0x8b050066.So I recently moved to a new apartment and don’t have internet yet, so I’m wondering if I need internet to install the game?
If you are also troubled by this error, here are a couple of troubleshooting tips to help you resolve the 0x8b050066 error on Xbox One.
How do I fix 0x8b050066 Error on Xbox One?
1. Check the Xbox Live service status
Before trying any other troubleshooting tips, make sure the Xbox Live service is up and running.
Under the Services section, check if any of the services are down for maintenance.
Scroll down to the Games & Apps section.
Check if any of the game outages are reported.
If there are reported outages, wait until the service is up and running and then try again.
2. Perform a power cycle
Make sure the power Xbox One is powered on.
Press and hold the Xbox button on the console. Keep it pressed for about 10 seconds.
Release the button once the LEDs stop flashing.
Once the Xbox One is powered off, leave it idle for a few minutes.
Disconnect all the cables connected to the console including the HDMI cable as well as the power cord.
After a few minutes, connect all the cables back to the console.
Press the Xbox button again to power on the console.
Once the console is fully powered on, try to install the game that was causing the error and check for any improvements.
Performing a power cycle will resolve any temporary issues with the console that is preventing the installation or blocking the game from being launched.
3. Install the game in Offline Mode
1. Press the Xbox button on your controller to open the Guidemenu.
2. From the menu, navigate to Settings > System > Settings.
3. Choose the Networkoption from the Settingmenu.
4. Under the Networkmenu, open NetworkSettings.
5. Choose Goofflineoption. This will put the Xbox One console in the offlinemode.
6. Try installing the game and check for any improvements.
Now launch the game again and see if the errors shows up again. If it does, go to the next solution.
4. Uninstall and reinstall your game
Press the Xbox button on the controller to open the Guide.
Select My games & apps option and then select See all.
Choose Games or Apps.
Highlight the game you want to uninstall and press the Menu button.
Select Uninstall. To confirm the action, select the Uninstall all option.
This will uninstall the selected app or game.
Insert the game disc and reinstall the game.
After the installation is complete, launch the game and check for any improvements.
Reinstalling the game or app will help you get rid of any corrupted files that are causing the game to crash.
5. Reset Xbox One
Press the Xbox button on the controller to open the guide.
Navigate to System > Settings > System and select Console Info.
Select Reset Console.
Select Reset and Kepp my games & apps. This will reset the OS and delete all potentially corrupted data without deleting your games and apps.
Once the reset is complete, try installing the game and check for any improvements.
If the issue persists, you can factory reset the console by choosing the Reset and remove everything option.
The 0x8b050066 error on Xbox One can be resolved by following the troubleshooting tips in this article. However, if there is a service outage, wait until the issue is fixed by the developers.
We’re back with exciting news. We have put together some of the best offers you can find online on portable DVD players.
Even if video streaming services are quite popular these days, certain users still cherish their DVD collection. If you are one of them as well, there is no secret that many of the latest laptops don’t have disc drives.
That’s where portable DVD players step in. With their built-in screens, generous rechargeable lithium batteries that can be powered by your car charger or AC adapter, you may enjoy your favorite movies for longer on planes or trips that may last for hours.
So, if you are on the lookout for one, here you can find a few portable DVD players that you shouldn’t miss out on.
How to choose the best portbale DVD player?
Our team of expert testers, with a combined experience of 15 years, has tackled a variety of testing tasks for any device you could imagine.
Their experience comes into play as a very important element when choosing the products we described in this guide, and a large variety of factors have been taken into consideration.
The options that have been chosen offer great quality and cover the entire spectrum of price ranges, thus enabling everybody to find something that fits their needs both financially and otherwise.
What are the best portable DVD player 2022 offers?
On top of our list, you can find an interesting DVD player coming from HDJUNTUNKOR with no less than two sets of operating systems, one for daily viewing, another for onboard viewing.
Besides being the only model offering such an advantage, note that with a customized car bag, this portable DVD player does not need to be taken out of the headrest mount bag when used in the car, therefore significantly reducing the inconvenience during traveling.
As for the built-in break-point memory function, get ready to enjoy a DVD that will begin where you left off last time. Pretty convenient, right?
Let us tell you from the very start that this portable DVD player for kids is designed to support a wide range of formats, including DVD, CD-R (RW), DVD-R (+R), DVD-RW (+RW), CVD (SVCD), VCD (DVCD), CD, and more.
Its rechargeable battery ensures playing for 5-6 hours, a number that you’ll most likely find as being ideal for most of your trips.
Even more, there are many factors to consider when choosing the right portable DVD player for your little one and an anti-shock function is a must. Rest assured that it’s present here as well and will protect the disc and reduce video interruptions caused by shaking.
This is another DVD player that stands out if you’re looking for a model with a built-in 2500mAh rechargeable battery to play songs and videos for up to 5 and even 6 hours.
It rotates so that you can mount it in the headrest mount and those double earphone jacks are perfect if you want to keep both your kids relaxed and entertained on your family trip.
Moreover, the Last Memory function makes watching cartoons more convenient than ever by restarting them from the break-point.
The compact build along with the ability to support 5 hours of operation on a single charge makes this portable DVD player the perfect entertainment source just about anywhere.
The 11.6-inch display allows for 360 degree of swivel action while the twin speaker is loud enough to fill your senses to the brim. The Resume function ensures you can start off from the point you watched last time.
As for the volume, the ieGeek portable DVD player comes equipped with two high-power speakers ideal for a clear, loud, and crisp sound.
Ready to get back to your old movie collection or simply planning to listen to music during an upcoming road trip? All of the portable DVD players we’ve recommended above can last for about five hours on a single charge, which is enough power to get through most of the journey.
Razer makes some of the best gaming laptops with the top of the line specs and razer-thin form factor.
The latest iteration of Razer laptop can act as a business laptop during the day and transform into a LAN party gaming beats by night.
These gaming laptops come in three series, Stealth, Blade and the Blade Pro. The Stealth is a more compact device, while the Blade and Pro come in 15″ to 17″ display sizes.
Razer is offering jaw-dropping deals on its gaming laptop lineup, and we have hand-picked the best deals for this guide.
If you are considering to buy one of Razer laptops, be sure this buying guide is tailored made just for you.
Note: Deals are subject to change. Keep in mind that the price tag may vary as some discounts may no longer be available by the time you’ve made your purchasing decision. So, hurry up and hit the buy button.
What are the best Razer Blade gaming laptops deals?
Powered by Intel 11th Gen 8-Core CPU up to 5.1GHz and NVIDIA GeForce RTX 30, Razer Blade Pro is a perfect gaming laptop that can handle the latest titles with ease.
With 360Hz refresh rate you can experience high-intensity gaming without missing a single frame. Regarding the memory, the laptop has 16GB which should be more than enough for most games.
The storage is set at 1TB SSD, so you won’t have any issues storing your favorite games and other multimedia. Overall, this is an amazing laptop, especially if you want to play the latest gaming titles.
The all-new Razer Blade 15 is the world’s smallest 15″ laptop offering top of the line specifications in a compact chassis thanks to its edge-to-edge display design.
It is a well-built Razer-thin laptop with a minimal yet premium feel.
The Razer Blade Stealth is a 13″ compact ultrabook that not only caters to business and work needs but also packs enough juice for quick gaming sessions.
The vibrant display combine with excellent performance makes it one of the best all-season ultrabook in the market.
If you want bigger than 15″ display, try theRazer Blade Proas it comes with a 17″ display with the top of the line specs.
These are some of the hottest deals on Raze Blade and Razer Stealth gaming laptops. Comment your favorite Razer Blade laptop pick below.
Windows updates are critical, and with the latest iteration still in the early days, it’s recommended that you always have the latest version installed.
But, several users have been receiving the 0x80073701 Windows 11 error when trying to install updates.
With each update, Microsoft releases many new features, some of which are meant to boost the system’s performance. But, various errors prevent you from installing updates.
What does the install error 0x80073701 on Windows 11 mean?
Regarding the update errors, there are a few common underlying causes. Most often than not, it’s a minor glitch that prevents you from installing updates. Here are the major triggers:
Corrupted or faulty Windows Update component – These WU components are an integral reason behind the success of an OS update. Once corrupted, you may expect glitches.
Bad or corrupted system files – Curropted system files will mean that common PC processes will be broken or unresponsive.
Windows Update glitch – The WU component’s ongoing bug is the most frequent cause of this specific problem. This may be a result of a broken update troubleshooter.
Stopped update services – There’s also the possibility that critical services responsible for identifying, downloading, and installing updates may not be running.
Now that you have a basic understanding of the underlying causes let’s walk you through the most effective fixes for the 0x80073701 error in Windows 11.
The easiest way to fix the Windows 11 0x80073701 Windows Update error 0x80073701 is to use a reliable and dedicated third-party tool. Some of these are available, but not all are as effective as this one.
Windows Update is meant to improve the overall performance of your operating system, integrate new features, and even upgrade the existing ones. However, there are times when certain errors may occur out of the blue.
Thankfully, if you happen to run into such issues, there are specialized Windows repair tools that can help you solve them in no time.
After the process is completed your computer should work perfectly fine and you will no longer have to worry about Windows Update errors of any kind.
2. Run the Windows Update troubleshooter
Running necessary tools like the Windows Update Troubleshooter helps to identify the main causes that generate this error on Windows 11 OS.
Press Windows + I to launch the Settings app, and click on Troubleshoot on the right in the System.
2. Click on Other troubleshooters.
3. Locate the Windows Update troubleshooter, and click on the Run button next to it.
4. Follow the on-screen instructions and choose the necessary response when prompted to fix the error.
3. Run the DISM tool and SFC scan
If it was the corrupt system files that caused the error code 0x80073701 in Windows 11, running the DISM (Deployment Image Servicing and Management) tool and SFC scan should fix it.
Press Windows + S to launch the Search menu, enter Windows Terminal in the text field at the top, right-click on the relevant search result, and select Run as administrator from the context menu.
Click Yes in the UAC (User Account Control) prompt that pops up.
Now, click on the downward-facing arrow and select Command Prompt from the list of options. Alternatively, you can hit Ctrl + Shift + 2 to launch Command Prompt in a new tab.
Paste the following three commands one at a time, and hit Enter after each to run the DISM tool.DISM.exe /online /cleanup-image /scanhealthDISM.exe /online /cleanup-image /restorehealth
Once done, execute the following command to run the SFC scan.sfc /scannow
4. Run the Windows Update service
Press Windows + R to launch the Run command, enter services.msc in the text field, and either click on OK or hit Enter to launch the Services app.
Locate the Windows Update service, right-click on it, and select Properties from the context menu.
Click on the Startup type dropdown menu, and select Automatic from the list of options.
Now, if the service is not running, click on the Start button, and then on OK at the bottom to save the changes.
5. Delete contents of the Software Distribution folder
Press Windows +S to launch the Search menu, enter Windows Terminal in the text field, right-click on the relevant search result, and select Run as administrator from the context menu.
Click Yes in the UAC prompt that pops up.
Click on the downward-facing arrow at the top and select Command Prompt.
Now, type/paste the following commands and hit Enter after each to stop a bunch of Windows Update related services.net stop wuauservnet stop cryptsvcnet stop bitsnet stop msiserver
Once done, press Windows + E to launch the File Explorer, paste the following path in the address bar and hit Enter.C:\Windows\SoftwareDistribution\
Double-click on the DataStore folder here to view its contents.
Next, press Ctrl + A to select all the files here, and hit the Del key to delete them.
Choose the appropriate response, in case a confirmation prompt pops up.
Now, go back to the Command Prompt tab in Windows Terminal, and execute the following commands to run the services that you stopped earlier.net start wuauservnet start cryptsvcnet start bitsnet start msiserver
After you are done with the process, again check for updates, and verify if you are able to install them. In case you still encounter the error code 0x80073701 in Windows 11, head to the next method.
Press Windows + X or right-click on the Start icon to launch the Power User menu, and select Windows Terminal (Admin) from the list of options.
Click Yes in the UAC (User Account Control) prompt that appears.
Next, click on the downward-facing arrow near the top and select Command Prompt.
First, execute the following two commands to stop the Windows Update service and BITS.net stop wuauservnet stop bits
Next, paste the following command and hit Enter to delete the qmgr*.dat files.Del “%ALLUSERSPROFILE%Application DataMicrosoftNetworkDownloaderqmgr*.dat”
Now execute the following three commands to rename a few critical folders. However, you can skip this step if this is the first time you are resetting the Windows Update components. If it doesn’t work first, execute these on the next attempt. Ren %Systemroot%\SoftwareDistribution\DataStore DataStore.bakRen %Systemroot%\SoftwareDistribution\Download Download.bakRen %Systemroot%\System32\catroot2 catroot2.bak
Execute these commands individually to reset the BITS and Windows Update service.sc.exe sdset bits D:(A;;CCLCSWRPWPDTLOCRRC;;;SY)(A;;CCDCLCSWRPWPDTLOCRSDRCWDWO;;;BA)(A;;CCLCSWLOCRRC;;;AU)(A;;CCLCSWRPWPDTLOCRRC;;;PU)sc.exe sdset wuauserv D:(A;;CCLCSWRPWPDTLOCRRC;;;SY)(A;;CCDCLCSWRPWPDTLOCRSDRCWDWO;;;BA)(A;;CCLCSWLOCRRC;;;AU)(A;;CCLCSWRPWPDTLOCRRC;;;PU)
Next, paste the following command and hit Enter.cd /d %windir%\system32
The next step is to paste each of these commands individually and then hit Enter after each to reregister some critical files.
10. Now, execute this command to reset Winsock.netsh winsock reset
11. The last step is to restart the BITS and Windows Update service, execute these two commands to do that.net start bitsnet start wuauserv
The Windows Update Components play a critical role in installing updates, and if these are corrupt due to any reason, you are likely to encounter the error code 0x80073701 in Windows 11. Resetting the components has been found to fix the issue for many users.
7. Manually install the update
Go to Windows 11 Update History, locate the update you were having trouble installing, and copy the KB (Knowledge Base) number for it.
Netx, go to Microsoft Update Catalog where all the versions are available for download, paste the KB number in the text field near the top-right corner and click on Search.
Click on the Download button to the relevant option in your case.
Now, right-click on the link that appears here, and select Save link as from the context menu.
Choose the desired location to download the file, and click on Save.
After the file is downloaded, double-click on it to launch the setup, and follow the on-screen instructions to complete the process.
Once done, restart the computer and you will now have the Windows 11 version installed that you were earlier facing the error code 0x80073701 with.
If it’s a problem with the update itself, manually downloading it could work and you shouldn’t face the error for the subsequent updates. If you still do, resetting Windows 11 to its factory settings could help.
Also, the built-in troubleshooters are more than capable of dealing with such issues but several users have reported that the Windows Update troubleshooter is not working, so it’s imperative that you resolve the issue and be up-to-date with the latest Windows version.
Tell us which fix worked to fix the install error 0x80073701 on Windows 11 and your experience of the OS thus far, in the comments section below.
Lexar USB flash drive is popular among people due to its better performance, reliability, affordable price, and high security. But many reported that the Lexar USB drive is not working.
The PC may have trouble detecting a USB drive a few years old or even, sometimes, a new one. Troubleshooting is quick, but there were instances where the drive had run its course, and replacing it was the only viable option. So, let’s find out all about the issue.
Why is my Lexar USB not working?
Here are some of the reasons the Lexar flash drive is not showing up:
Issues with the connection – If the connection between the USB drive and the PC is not proper, the drive won’t show up.
Incompatible or outdated drivers – Drivers play a critical part in the effective functioning of the flash drive, and if you have incompatible, corrupt, or outdated drivers, it will throw errors.
Drive letter not assigned – You have to assign a drive letter to each storage device, in the absence of which, it would cease to work.
Conflicting hardware – In some cases, another piece of hardware often conflicted with the Lexar USB drive, and, as a result, it was not working.
How can I fix my Lexar USB if it’s not working?
Before you try the slightly complex solutions, here are a few quick tricks that might work:
Unplug the Lexar flash drive, restart the computer and then plug it back in. This works when Windows cannot automatically fetch the best drivers for a device.
Try plugging the device into another port. If you have a desktop, connect the Lexar USB to a port on the back since that did the trick for many users.
Disconnect any non-critical hardware connected to the PC, for instance, the speakers, printers, microphones, or headphones, amongst others. A user reported that it was a webcam that prevented the Lexar USB drive from showing up.
Recollect if you installed any program around the time the Lexar USB first stopped working, and uninstall the app.
Make sure the USB port is not disabled in the BIOS. Since the steps differ for every manufacturer, we recommend you refer to the manual that came along with the PC or check the official website for the exact process.
If none of these work, head to the solutions listed next.
1. Run the troubleshooter
Press Windows + R to open Run, paste the following command, and hit Enter: msdt.exe -id DeviceDiagnostic
Now, follow the on-screen instructions to run the troubleshooter.
Running the dedicated Hardware and Devices troubleshooter will seamlessly fix things when Lexar USB is not working. So, this should be the first thing you do.
2. Update the USB Device Driver
Right-click on theStart button, then select Device Manager.
Expand Universal Serial Bus controllers, right-click on the USB drive, and then select Update driver.
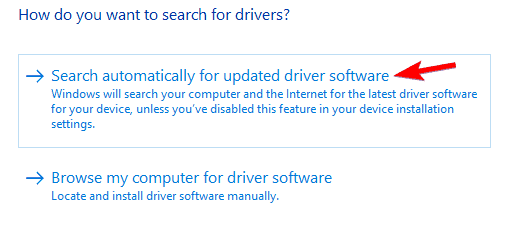
Select Search automatically for drivers and wait for the installation to complete.
Once the process completes, restart your PC and then reconnect your Lexar 64GB USB 3.0.
If Windows can’t find a better version, try to manually install the driver for the Lexar USB drive and verify whether it now starts working.
They are easy to use, reliable, and the best part is yet to come – they are completely automatic, thus you won’t risk any damage to your PC by going through the process manually.
3. Assign a drive letter
Press Windows + S to open Search, type Create and format hard disk partitions in the text field, and click on the app from the results.
Now, locate the USB drive, right-click on it, and choose Change Drive Letter and Paths.
Click on Add.
Next, you can either go with the default drive letter or choose another one from the dropdown menu, and then click OK.
Until a USB drive is assigned a drive letter, it doesn’t show up in File Explorer. Though it would be listed in the Device Manager, which also sometimes helps identify the case. Once you are done assigning a drive letter, check if the Lexar USB is still now working.
4. Change the Power Management settings
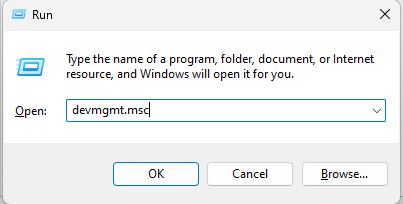
Press Windows + R to open Run, type devmgmt.msc, and click OK.
Expand the Universal Serial Bus controllers category, and double-click on the USB Root Hub device.
Navigate to the Power Management tab, untick the checkbox for Allow the computer to turn off this device to save power, and click on OK to save the changes.
Repeat this for every USB Root Hub from the list.
5. Format your USB flash drive
If all the above methods fail to work, a USB format is required to repair the Lexar 64GB USB 3.0 if it’s not working.
It’s highly recommended that you use a dedicated software to format the flash drive, as there’s simply no room for error when dealing with such a delicate process.
We’ve put our trust in an amazing tool mentioned below as it allows you to quickly and thoroughly format virtually any USB flash drive with your choice of FAT, FAT32, exFAT, or NTFS partition types.
This software will erase all data and delete space on flash drives that cannot be removed in the traditional way, and it will restore your flash drive back to its original storage form.
If the Lexar USB is still not working, go ahead and contact Lexar Support. They may be able to help identify hardware malfunctions and provide a resolution for that.
Also, if you were wondering why your Lexar USB keeps flashing, it’s probably because data transfer is underway. If the LED stops blocking, that’s when you have to worry about things.
When you sign up for OneDrive, you get 5 GB of cloud storage for free. You can always buy more or upgrade to a Microsoft 365 account to get even more free OneDrive storage to use. This guide will show you how to view your available storage in OneDrive on the web, Windows 10, and Windows 11.
Manage OneDrive storage on the web
If you want to view the amount of space that is currently being used, it is a lot easier to find out on the web than it is using the OneDrive app on Windows. Here’s what you need to do.
Here’s how to check your storage on OneDrive to see how much space you’ve used and how much storage is available.
Right-click the OneDrive icon in the system tray.
Click the gear icon to go to Help & Settings.
Click Settings.
Click the Account tab to see the OneDrive storage currently being used.
Once you have finished these steps, you can review the OneDrive storage you have used and how much space you have left in your cloud storage account. Additional OneDrive options include the ability to choose which folders you want available on your PC and an option to set the time that your Personal Vault locks if you aren’t actively using it.
Manage OneDrive storage in the Microsoft Store app
The OneDrive app in the Microsoft Store might not be used as often, but you can still check how much storage you are using and have available. Here’s what you need to do.
Open the OneDrive Microsoft Store app on your PC.
Click the three-dot menu in the upper right of the window and click Settings.
Under About OneDrive, you will see the amount of space used and available in your OneDrive. If you want to see a more detailed view of your storage, click Options.
Here, you can see a storage breakdown of your OneDrive. Click Empty recycle bin to free up space or click What’s taking up space? to view and delete large files, photos, or other content you no longer need.
Get more OneDrive storage for free
If you don’t want to pay for a Microsoft 365 subscription or upgrade to a bigger OneDrive subscription, you can get more OneDrive storage for free using Microsoft’s referral program. Here’s what to do.
Click the gear cog in the upper right and choose Options.
Next to “Referral Bonus,” click Earn more to get an invite link to share. For each person you get to sign up for OneDrive as a new customer, you will receive an extra 0.5 GB space of storage. Please note the maximum amount of OneDrive storage you can get by sharing a referral link is 10 GB.
The Sims 4 is a fun game, allowing players to practice their social skills and build strong connections with the other Sims. However, many got the VC++ runtime redistributable error when installing the game.
The complete message reads, Error: The VC++ runtime redistributable package was not installed successfully. Setup cannot continue. So, let’s find out how you can fix things and get The Sims 4 running.
What causes Error The VC++ Runtime Redistributable error?
Here are a few reasons why you might be getting The VC++ runtime redistributable package was not installed successfully error with The Sims 4:
Microsoft Visual C++ Redistributable is corrupt – In many cases, users found that the installed redistributable was corrupt, and simply reinstalling it fixed things.
Correct Microsoft Visual C++ Redistributable is not installed – Many apps require a particular redistributable, which, if absent, would trigger the error.
Issues with the game installer itself – Sometimes, there are problems with Origin or the game installer, and another attempt should get things running.
How can I fix VC++ Runtime Redistributable error in The Sims 4?
Before we start making complex changes, here are a few tricks that might work:
Restart the computer and then try installing The Sims 4.
Update Windows if there are any new versions available.
If you have a third-party antivirus installed, disable it, and verify whether the problem is fixed. In case it is, uninstall the app, and then download a more reliable antivirus.
If these don’t work, head to the solutions listed next.
1. Reinstall the redistributable packages
Press Windows + R to open Run, type appwiz.cpl in the text field, and hit Enter.
Now, select the Microsoft Visual C++ Redistributables listed here individually, click on Uninstall and follow the on-screen instructions to complete the process. Do keep a list of the ones you remove.
Launch the setup and allow the installation to complete.
Once done, check if Error: The VC++ runtime redistributable package was not installed successfully 1603 while installing The Sims 4 is fixed.
2. Uninstall the recent Windows update
Press Windows + I to open Settings, navigate to Windows Update, and click on Update history.
Now, scroll down to the bottom, and select Uninstall updates.
Locate the recent update, and click on Uninstall next to it.
Again, click Uninstall in the confirmation prompt.
In many cases, it was a buggy update that triggered Error: The VC++ runtime redistributable package was not installed successfully 5100 when installing The Sims 4. And uninstalling it should get things running.
Do remember that you may have to remove a few updates before the actual culprit is found. Also, we recommend you look through online forums to identify which recent updates are causing the error.
3. Make sure the critical services are running
Press Windows + S to open Search, type Services, and click on the relevant search result.
Locate the Windows Installer service, right-click on it, and select Start.
Wait for the service to start, and then try installing The Sims 4.
If the problem remains unresolved, head to the next solution.
According to users, VC++ Runtime Redistributable errors can sometimes appear due to your registry. Your registry might have some corrupted entries, and those entries can interfere with The Sims 4 and other games and prevent you from running them.
To fix this problem, users are suggesting cleaning your registry and removing problematic entries. This can be tedious if done manually, but many great registry cleaners can help you with this problem.
Analyze and run the cleaner first, scan your registry for problems, and run the program to fix them. After cleaning the registry, the issue should be resolved entirely.
5. Reinstall Origin
Press Windows + I to open Settings, navigate to Apps, and then click on Installed apps.
Locate Origin, click on the ellipsis next to it, and click on Uninstall.
Once done, launch the setup and follow the on-screen instructions to complete the installation process.
If nothing else has worked yet, reinstalling Origin might do the trick when you keep getting the VC++ runtime redistributable error. And you should now be able to seamlessly install The Sims 4.
A powerful router with security features and speed is essential for these times but can be quite expensive. Now, thanks to these flash deals, you can make great savings on things you actually need!
These Netgear routers are on sale for a limited, make sure to check frequently the manufacturers in case the deal expires, so you can choose the one you like and get it now for the best price.
What are the best Netgear routers deals to get in 2022?
This model offers an amazing range and it can cover up to 2500 square feet and provide a network for up to 40 devices.
Wi-Fi 6 technology is supported allowing you to achieve incredible speeds. There are 4 Ethernet ports available, allowing you to connect a wide array of devices.
USB 3.0 port is present, and it lets you easily share files over the network. Overall, this is an amazing router, and it will work with any modem, so it’s worth checking out.
Netgear Nighthawk X6S
One of the best bargain deals from Netgear we’re happy to share with you is Netgear Nighthawk X6S. This tri-band WiFi router is compatible with Amazon Echo/Alexa and has Gigabit Ethernet, MU-MIMO.
Check out its main features :
AC4000 WIFI—Up to 750+1625+1625 Mbps wireless speed
Another great router is Netgear R7800, a 4×4 dual-band smart Wifi router with Gigabit Ethernet ports, MU-MIMO, and is compatible with Amazon Echo/Alexa.
Here are its main features :
Network storage- ready with superfast twin USB 3.0 and eSATA
AC2600 WiFi-800+1733 Mbps speeds with a powerful 1.7GHz dual-core processor
Four-stream (4×4) WiFi Architecture for smoother 4K video streaming
Multi-user MIMO technology for more throughput,
Ability to use ReadyCLOUD to access the storage remotely
Nighthawk App – allows you to easily set up your router, manage internet access, etc.
We can say that this particular one is a very powerful gaming WiFi router with 4 ethernet ports. It can reach Wireless speeds up to 2.6 Gbps and is optimized for a low ping.
We can mention these features:
Ability to connect to a secure gaming VPN server
Ability to use geo-filtering to connect to the closest servers and players
Four 1-Gigabit Ethernet ports and 1.7 GHz dual-core processor network efficiency
Advanced Quality of Service – allows you to bypass network congestion and reduce lag spikes
Ddkmd.sys is a system file used by Windows to relay information between hardware and software to carry out any specified function. But it often leads to issues, and one of the most common is ddkmd.sys Blue Screen of Death error.
The error can be encountered while launching apps, games, and sometimes, in full-screen mode. In addition, many users reported that the ddkmd.sys error even when turning on the PC. So, let’s find out how you can fix things.
What causes the ddkmd.sys error?
Here are some of the reasons you keep getting the ddkmd.sys crash with blue screen:
Conflicting hardware – In many cases, users faced the error due to problematic hardware. One user found that a RAM stick was faulty, and replacing it fixed things.
Problems with installed apps – Installed apps and drivers are a probable reason, with DuetDisplay being the most common underlying cause behind the ddkmd.sys issue.
Third-party antivirus triggering errors – Oftentimes, third-party antiviruses installed on the computer can trigger this error.
Corrupt system files – If the system files are corrupt, you will have trouble accessing certain apps and features, along with encountering regular BSOD errors.
The error usually comes up in with the following messages:
SYSTEM_SERVICE_EXCEPTION (ddkmd.sys) – The concerned file triggers the System_Service_Exception BSOD error, and the OS crashes, as a result.
PAGE_FAULT_IN_NONPAGED_AREA (ddkmd.sys) – Another error message you may encounter, and our solutions should fix things.
How can I fix the ddkmd.sys BSOD errors?
Before you try the slightly complex solutions and end up making several changes, here are a few quick tricks:
Restart the computer and check whether Windows boots without encountering the error. You may have to try a couple of times until it successfully boots.
Disconnect all non-critical hardware from the PC, for instance, printer, headphones, microphones, speakers, and similar ones.
Disable any third-party antivirus installed on the computer. In case that fixes things, uninstall the program.
When encountering the problem while running an app in full-screen mode, switch to Windowed mode, and check if the situation improves.
Install the latest available version of Windows.
If these don’t work, head to the solutions listed next.
1. Use a 3rd party BSoD error fixer
When fixing system files that cause BSoD you can always rely on specialized software to streamline the process. These tools allow you to quickly scan your computer for any broken files and then replace them with fresh genuine ones from their own databases.
2. Uninstall DuetDisplay
Press Windows + R to open the Run command, type appwiz.cpl, and hit Enter.
Locate and select DuetDisplay, and then click on Uninstall.
Follow the on-screen instructions to complete the uninstall process.
That’s it! The most common reason behind ddkmd.sys crashing is DuetDisplay, and uninstalling it should get things up and running. Also, you could use an uninstaller software tool.
3. Update drivers
Press Windows + X to open the Power User menu, and select Device Manager.
Expand the Display adapters entry, right-click on the graphics adapter, and select Update driver.
Now, select Search automatically for drivers.
If you know what part of the hardware is causing the problem, update its drivers to the latest version.
If the ddkmd.sys error shows up while using a web browser like Chrome or Edge or watching videos from YouTube or MediaPlayer; the faulty driver is most probably your display or video card driver.
The best solution to have all your drivers up to date automatically is to use a dedicated tool.
A faulty RAM can be identified through a series of tests. The easiest way is to run the built-in Windows Memory Diagnostic, a tool to find out fundamental issues and eliminate them.
If that doesn’t work, use MemTest86+, an open-source memory testing tool. It is one of the best tools that run a wide array of tests, identify problems, and eliminates them in no time. In case the ddkmd.sys error remains unresolved, head to the next solution.
Press Windows + R to open Run, type rstrui in the text field, and click OK.
Now, click on Next to proceed.
Select a restore point from the list, and then click on Next. Make sure to choose a restore point created before the error was first encountered.
Now, click on Finish to initiate the restore process.
Wait for the restore process to complete.
A System Restore reverts changes to the OS, including removing installed apps and reconfiguring settings. But the personal files won’t be affected. And it will surely fix the ddkmd.sys error.
Avast and some other antiviruses are fond of causing network connection issues. Many users complain about a problem where Avast says a new network is detected while connecting to a recent one.
Avast detecting a recent network as a new one can occur for many reasons that vary from issues with the antivirus software and your PC. The most common reason is outdated Avast antivirus software on your PC. It can cause the app to malfunction and result in issues.
Furthermore, Avast can affect your network connection due to other factors, such as:
Avast firewall interference –The network issue can occur due to the interference of the Avast firewall, prompting you to reconnect to an old network as a new one. Also, the firewall can override previous connections for some reason. Check how to allow programs through the firewall here.
Issues with the network –The router network you’re connected to may be faulty or corrupt, so Avast can override the previous connection and show it as a new one. So, a compromised driver can cause it.
Virus and malware –Avast can say a new network is detected when you have an old network because of virus and malware activities on your device. It can affect your device’s performance and prompt some issues with Avast.
The cause of the problem may differ for various users. Nevertheless, you can fix the problem by following the troubleshooting steps below.
What can I do if Avast keeps detecting my network as new?
Here are some important preliminary checks:
Power cycle your network router and reconnect to the network.
Try the following solutions if the problem persists:
1. Turn off the Avast shield on your PC
Double-click the Avast app icon on your PC to launch it.
Click the Menu button in the top-right corner of the page, then select Settings.
Click on Protection, select the Core Shields option, then toggle off all the shields activated.
Close the Avast software and check if the network problem persists.
You can always turn the shields back on automatically by setting a time for them. Turning off Avast shields on your computer will fix any interference from its firewall.
2. Update Avast antivirus
Double-click the Avast app icon on your PC to launch it.
Click the Menu button in the top-right corner of the page, then select Settings.
Go to the General tab, the Update button.
Click on Check for updates, then click Update to install any update available.
Network routers can be infected by bugs from outdated firmware, resulting in errors that cause them to malfunction. So, updates and patches are deployed to fix these issues on your router.
The updating steps differ for every router device. However, you can navigate the router menu and check for the router Firmware update option. Also, you can contact the manufacturer for guidance on how to update your router.
5. Uninstall the Avast antivirus with Utility
NOTE
This is the last option to consider, as it can affect your security settings and permanently delete the configurations you have on Avast.
Continuing with our coverage of 2022 deals, here again, is a compilation of some of the most lucrative deals you can have on 4TB sized external hard drives.
So, if you have been saving to buy one, here is the moment you have been waiting for. The external hard drive is the best way to protect your data from sudden file loss, so why not get one in these 2022 deals?
NOTE
Deals are subject to change. Sometimes, some of the deals listed in our guides may no longer be available by the time you hit the buy button. So, hurry up and grab them while they’re hot.
The Seagate external hard drive offers a simplistic solution for your data storage needs while still being reliable and secure. It offers speedy performance and connects to external hardware via USB 3.0 but is also backward compatible with USB 2.0.
It is plug-and-play compatible and offers drag-and-drop support right out of the box, requiring no installation prior to its use.
The hard drive comes in an attractive tower form factor but conforms to the tough reliability and safety standards WD is known for. There is the built-in 256-bit AES Hardware Encryption feature which rules out chances of data breach to almost a null.
Then there also is the auto data backup software which ensures you never lose out on important data and files. It supports the exFAT file system and offers both a USB 3.0 port and USB 2.0 connectivity. However, at 2.2 lbs, it isn’t exactly lightweight.
The Seagate Expansion supports plug-and-play operation and requires no prior installation. It also supports a drag-and-drop feature right out of the box.
The hard drive also boasts of fast data transfers via SuperSpeed USB 3.0 besides being compatible with USB 2.0 as well. The hard drive also comes in an attractive form factor and tips the scales at 2.06 pounds.
Besides offering fast yet easy operation, the WD external hard drive is best suited for gaming back ups from the PlayStation 4 console.
The set-up process for the same is easy too as gamers just have to connect the hard drive to the PS4 consoles via a USB 3.0 cable and after a few easy steps, they are all set to go. Also at 0.51 lbs, the hard drive offers unmatched portability as well.
This is another stylish offering from WD that too sports the tower form factor. The hard drive however ships in the unformatted state, which means you will need to format it first before it can be put to use.
Further, it offers only USB 3.0 connectivity which WD is claiming will allow for ultra-fast data transfers. Besides, the Elements hard drive is also about superior reliability and security while also being quite lightweight at just 4.8 ounces.
Now that you know what external drives to choose, you don’t have to worry about not having enough space for your games, photos, or videos.
Every operating system has some sort of problem and the same goes for Windows 10. Speaking of which, few Windows 10 users have been experiencing proxy issues.
According to users, they are getting Windows could not automatically detect this network’s proxy settings error message.
If you’re having similar problems, do have a look at our solutions below. There are many proxy-related issues that can occur, and in this article, we’re going to cover the following problems:
Windows 10 can’t detect proxy settings
This is a common variation of this error and it can be easily fixed by using one of our solutions.
Windows could not automatically detect proxy server
Sometimes you might get a message saying that Windows can’t detect the proxy server.
This issue is usually related to your network configuration.
Windows won’t save proxy settings
According to users, they are unable to save their proxy settings.
This is a common error but you should be able to fix it with solutions from this article.
Windows proxy settings keep changing
This is another common problem with proxy.
According to users, their proxy settings keep changing and they are unable to configure the proxy.
Windows 10 proxy settings not saving, changing
This is probably one of the most annoying proxy errors that can occur.
According to users, they are unable to save or change their proxy settings.
NOTE
This issue affects all versions of Windows from old school Windows 7 to the latest, Windows 11.
Windows could not automatically detect this network’s proxy settings in Windows 7
If you’re still running on Windows 7 and you happen to come across this error message, follow these quick steps before trying anything else:
Open Internet Explorer and go to Tools, then Internet Options.
Switch to the Connections tab and set the Automatically detect settings option and all its sub-sections to off.
Restart your PC and see if the error persists.
Users report that the Internet on their computers is running very slow and they have difficulty accessing video streaming sites such as Youtube, Vimeo, and Netflix.
As you can see, this can be quite a problem and cause many inconveniences, but luckily for you, we have the solutions.
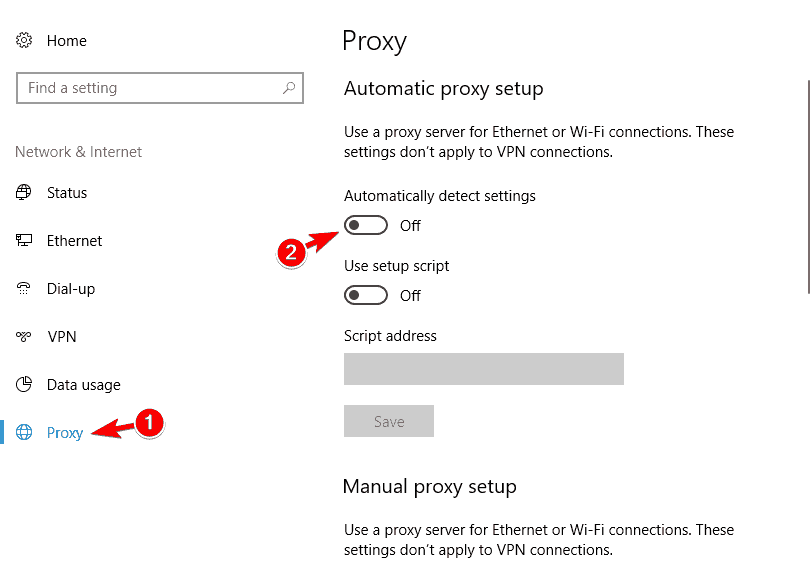
How to deal with proxy issues on Windows 10?
1. Check your proxy server settings
Press Windows Key + R on the keyboard.
When Run dialog appears type inetcpl.cpl and hit Enter.
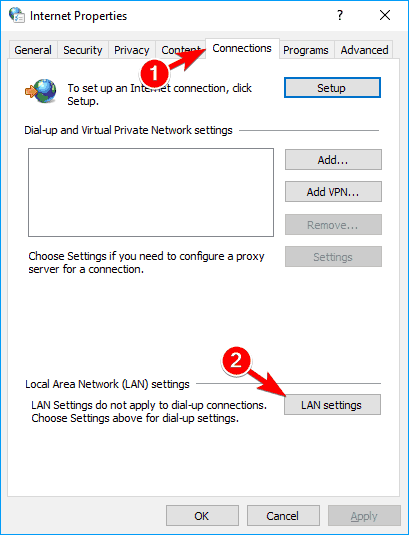
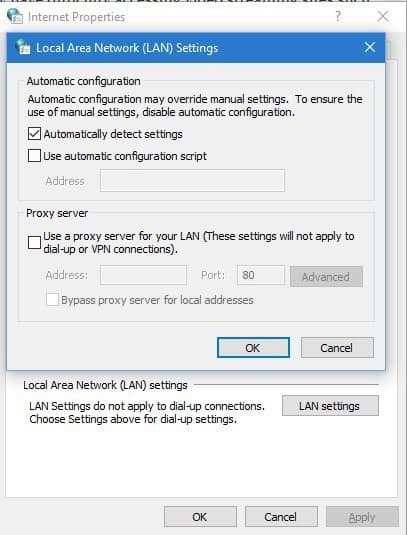
Click the Connections tab, and then click the LAN settings button.
Check if your proxy settings are okay.
2. Reset TCP/IP
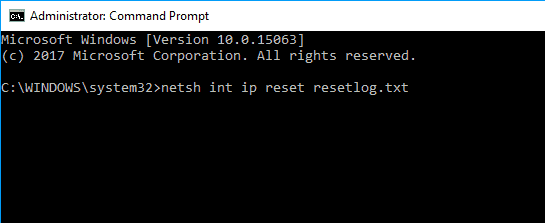
Press Windows Key + X and select Command Prompt (Admin) from the menu.
When Command Prompt starts, type: netsh int ip reset resetlog.txt
Restart your computer and see if the issue is resolved.
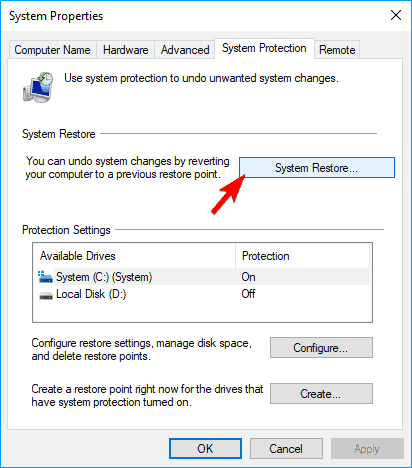
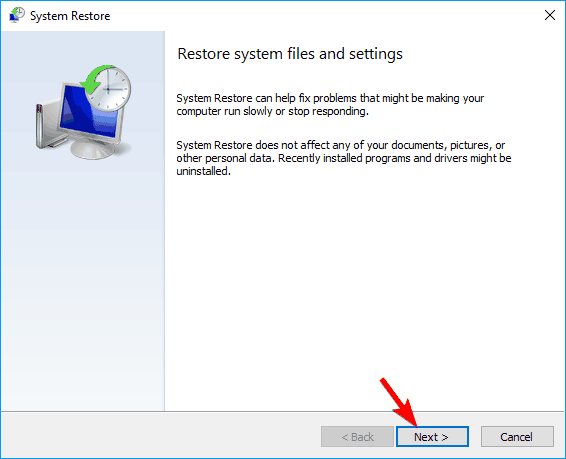
When System Restore window appears, click on Next.
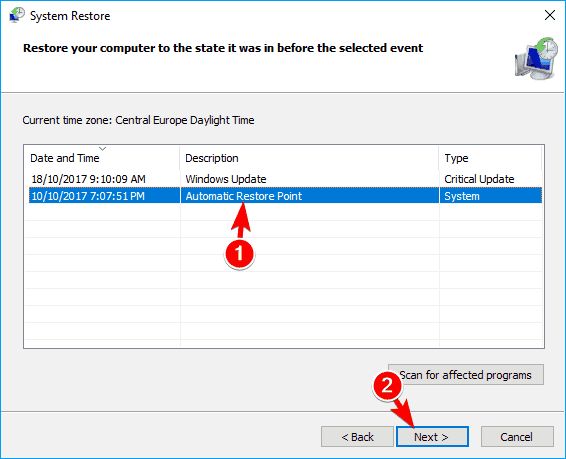
Now you should see a list of recent restore points.
If available, check Show additional restore points option.
Select the desired restore point and click on Next.
Follow the instructions on the screen to complete the restoration process.
After completing the restoration, the error message should be resolved and everything will start working again.
Many users reported that this solution fixed the problem for them, so be sure to try it out.
If you have not yet created a system restore point, we recommend you to do that regularly, because it can help with many problems PC users experience.
Also, if the System Restore doesn’t complete and you encounter some kind of error, try doing the same procedure in Safe Mode.
3.1. Use a dedicated third-party program
One other solution would be to use specialized software that can repair your computer files and bring your settings back to default. Sometimes your settings can get screwed up by corrupted system files.
4. Perform an SFC scan
Open Command Prompt as an administrator.
To see how to do that, check Solution 2.
Now enter the following command: sfc/scannow
The SFC scan will now start.
The scanning process can take about 10-15 minutes, so don’t interrupt it.
If you can’t perform the scannow operation because of an error, this article will help you get past it.
According to users, you can fix Windows could not automatically detect proxy simply by using Command Prompt.
Once the scan is finished, check if the problem still appears. If so, you might have to use DISM scan.
To do that, open Command Prompt as administrator.
Enter the command: DISM /Online /Cleanup-Image /RestoreHealth
DISM scan can take about 20 minutes or more, so don’t interrupt it. Once the DISM scan is finished, check if the issue is resolved. If you were unable to run the SFC scan before, try running it after the DISM scan.
After running both scans, your issue should be resolved. Several users reported that SFC scan fixed the problem for them, so we advise you to try it out.
Want to know more about corrupted files on Windows 10 and what can you do? Take a look at this amazing guide about it.
5. Uninstall your antivirus software
Using your computer without an antivirus is not the best idea, but fortunately for you, Windows 10 comes with Windows Defender which will protect you when you remove your antivirus software.
According to some users, your antivirus software such as AVG can cause some issues with proxy on Windows 10, so it’s advisable to remove your current antivirus software.
There are specific ways to remove your particular antivirus. For example, you can uninstall Norton Antivirus from Programs and Features, with its own uninstaller tool, or you can remove it in Safe Mode.
In case you want to be secure while surfing the internet, you will need to get a full-dedicated tool to secure your network. A VPN protects your PC from online attacks, masks your IP address, and blocks all unwanted access.
To properly remove an antivirus program, we recommend using a third-party uninstaller application that will thoroughly clean your PC of any tough entries that may resist a simple removal.
In other circumstances, it appears to be even preferable. For example, CCleaner allows you to not only delete your antivirus software but also thoroughly wipe the internal drive of all traces of it.
After removing your antivirus software check if the issue is resolved. If the issue is resolved be sure to download and install different antivirus software.
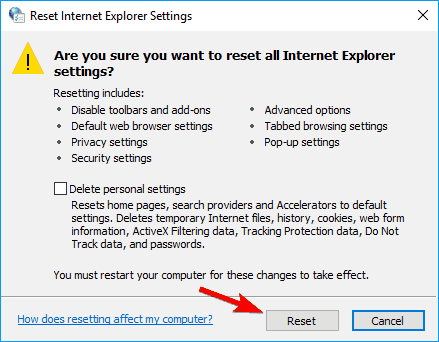
If you want, you can clear your personal data by checking Delete personal settings.
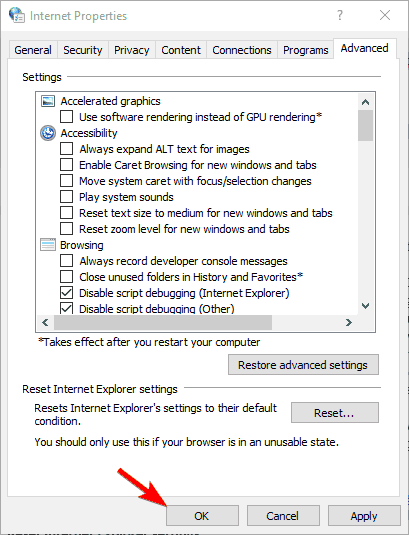
Optional: Click on Restore advanced settings.
Now click on Apply and OK to save changes.
Windows Could not automatically detect network’s proxy settingserror can sometimes occur due to your Internet settings. However, you should be able to fix the issue simply by resetting your settings to default.
After resetting your Internet settings the issue should be resolved.
7. Restart your network adapter
Right click the network icon in the bottom right corner and choose Open Network and Sharing Center.
Click on Change adapter settings from the menu on the left.
Locate your network connection, right click it and choose Disable.
Now right click your network connection again and choose Enable from the menu.
One of the simplest ways to fix Windows could not automatically detect network’s proxy settings error is to restart your network adapter.
After restarting your network adapter, the issue should be resolved and your network connection will start working again.
Keep in mind that this might not be a permanent solution, so you’ll have to repeat it if the problem reappears.
8. Enable Obtain DNS server address automatically
Open Network and Sharing Center and go to Change adapter settings.
Locate your network connection, right click it and choose Properties from the menu.
Select Internet Protocol Version 4 (TCP/IPv4) and click on Properties button.
Select Obtain DNS server address automatically and click on OK to save changes.
According to users, you might be able to fix Windows could not automatically detect network’s proxy settings error simply by obtaining your DNS automatically.
Many users prefer setting their DNS manually, but sometimes it’s better to use automatic settings.
After doing that, the issue should be resolved and you’ll be able to access the Internet without any problems. If the DNS server is not responding, make sure all your drivers are up to date.
9. Change proxy settings
Press Windows Key + I to open the Settings app.
When Settings app opens, navigate to Network & Internet section.
In the left pane, go to Proxy and in the right pane disable Automatically detect settings.
Users reported that disabling this feature fixed the problem for them, so make sure you try it.
Users also report experiencing an error that won’t let the proxy turn off at all on Windows 10. If this is the case for you, you will have to fix this issue first and then move on to change your settings.
Open the Settings app and navigate to the Update & security section.
In the left pane select Troubleshoot.
Select Network Adapter in the right pane and click on Run the troubleshooter.
When Troubleshooter opens, follow the instructions on the screen to complete it.
Optional: Some users are recommending to run Internet Connections troubleshooter, so you might want to try that as well.
After completing the troubleshooting, the issue should be resolved completely.
Windows 10 proxy issues can cause many problems. If you’re getting Windows could not automatically detect network’s proxy settings error, we hope that some of our solutions will be helpful for you.
We recommend you look into the best antivirus software on the market to make sure you get an up-to-date tool that will truly protect your PC without interfering with your connection.
If you’re aware of another method to solve this problem, share your troubleshooting steps in the comments section below. You can also leave there any other questions that you have.
This guide gives you some of the best sound cards for Windows 10 PCs.
An onboard or integrated sound card is sufficient for most users. It works great when you listen to music, watch cool YouTube Videos, and do other light stuff with background music.
However, if you are an audiophile or a hardcore gamer, you are serious about sound. You want something that will heighten your immersion levels.
This will mean an investment in a sound card.
Does a PC need a sound card?
It is not an absolute need, but for the best sounds, it is the better option.
You probably own high-quality headsets, but you feel something is ruining your immersion level. So buying a dedicated sound card becomes your only option.
And here are some benefits of using them:
System resource conservation – It lessens the central processing unit (CPU) burden. This makes more processing power available for demanding activities like gaming or other applications.
Sound quality – As expected, they will improve the sound quality of your device.
Immersive experience – Separately installed sound cards may provide immersive 3D audio, which is particularly important for high-end games that otherwise would need a specialized sound processor or solution.
More audio channel support – Improved surround sound and headphone precision are made possible by adding extra audio outputs for 5.1 and 7.1 channel audio.
This article lists the five best sound card options for your Windows 10 PC.
NOTE
Note: Deals are subject to change. Keep in mind that the price tag often varies. We recommend going to the vendor’s website to check the price. Also, some of the products may be out of stock by the time you’ve made your purchasing decision. So, hit the buy button while the sale is on!
The Creative Sound Blaster AE-7 is our first pick in this guide, as it offers some handy features that are sure to improve your audio-listening experience whether you’re watching a movie or playing a game.
Using this sound card while gaming enables you to feel integrated into the environment that you’re exploring, thus allowing you to focus even more on the task at hand.
The double amplifier offers crystal-clear sound, perfectly covering low, mid, and high-pitch noises.
Besides this, it also uses accurate hardware-accelerated audio powered by a quad-core processor that will never leave you lagging power and clarity.
It comes with a top-notch 127dB DNR ESS SABRE-class 9018 DAC and a Quad-Core processor that perfectly handles all the audio tasks.
The Xamp discrete headphone bi-amplifier powers each earcup of your headphones separately with 1Ω output impedance.
It can also drive studio-grade headphones of up to 600Ω, including high-end planar-magnetic headphones, so the better your equipment, the better the sound quality.
Important features:
Powerful bi-amp technology
ESS SABRE-class 9018 DAC
DSD64 playback support
DTS Connect Encoding/ Dolby Digital Live
Software customization tool included
The bass control setting from the software is sometimes lagging
The Sound Blaster Audigy is also an incredibly cheap, high-performance sound card. Creative has positioned itself as a top brand in producing sound cards.
Their Sound Blaster Audigy has earned customers’ trust due to its simple design, quality features, and affordable price.
This sound card delivers a compelling 5.1 multichannel surround sound that easily converts your PC into a cinematic entertainment system.
The Audigy is not as complicated as most top-end sound cards but delivers 106 dB of signal-to-sound ratio (SNR).
This means you get 20 DB more than on the standard sound cards on motherboards.
It comes with a suite of Sound Blaster audio processors, such as SBX Pro Studio, that allows you to change the bass level, left/right balance, and more.
The high headphone amplification of up to 600-ohm impedance results in high-performance and distortion-free audio.
Important features:
5.1 or 7.1 surround sound
SBX Pro Studio - advanced audio processing
Comes with the Sound Blaster Audigy Fx Control Panel
The Creative 70SB174000000 Sound BlasterX AE-5 PCIe gaming sound card is one of our top picks in this department, as it offers mighty and crisp sound.
This helpful sound card not only allows you to immerse yourself fully in the environment you’re exploring in your games but also defies explanations regarding its sound clarity.
Besides this, it is the only sound card from this range that allows you to use the Xamp, a customized headphone amplifier that will take your gaming session to the next level.
The AE-5 Plus is the equivalent of a high-end graphics card for sound, and it supports 5.1 discrete and 7.1 virtual surround, as well as Sound Blaster’s Surround Virtualization technology.
The SABRE32 ultra-class PCI-e DAC provides Hi-Rez sound with up to 32-bit / 384 kHz playback and a 122 dB DNR, practically removing distortion and jitter.
This sound card is about the perfect sound and ensures the show because it features customizable RGB LEDs on its body and an included RGB LED strip.
So, it doesn’t even lack the bling of a gaming card. Even if it’s an internal device, you will find a way to display its talents.
If you are looking for a classy sound card that is powerful enough to handle all your gaming audio needs, you might want to try out the Sound Blaster Z PCIe.
This sound card has a series of attractive features that every audiophile would want. It features a Sound Core3D Audio processor for advanced audio capabilities.
This adds to the inbuilt SBX Pro Studio sound technologies to deliver unprecedented sound clarity with stunning 3D surround effects.
An inbuilt control panel allows you to switch between two options. A flip switch lets you toggle between your headphones and the computer speakers.
This sound card delivers 116 DB of sound-to-noise ratio (SNR), which Creative claims it’s 99.99% pure sound, and 34.4 times better than motherboard audio.
In addition, this sound card comes with a removable, beam-forming dual microphone perfect for in-game communication.
The Sound Blaster Z is compatible with Windows 10, and you can download the driver from the manufacturer’s site. Its price fluctuates, but keep an eye on the discounts.
Important features:
Dual-microphone array
Sound Core3D Audio Processor
SBX Pro Studio for 3D effects
Audiophile-grade capacitors
Gold-plated I/O connectivity
When drivers are not updated popping sound appears
ASUS hi-fi sound cards deliver sound quality that is hard to describe, and the STX 11 is no exception.
These high-end sound cards don’t come cheap, but they deliver quintessential performance that keeps the spirit and philosophy of audiophiles alive.
The signal-to-noise (SNR) ratio of the Essence line is usually higher than that of standard cards found on motherboards.
While standard cards hover around 88 dB SNR, the Essence STX 11 boasts an industry-leading 124 dB SNR.
Another essential feature that every audio-savvy looks for in a sound card is surround sound support. The STX 11 provides 7.1 multichannel surround sound.
This allows you to hook up to an 8-speaker audio system and get rich surround sound as opposed to the 5.1ch setup, which can only support up to 6 speakers.
In addition, Asus provides an op-amp swap kit with the STX 11 that allows users to easily change the tone and timbre of the sound they hear.
And if you like using headphones, then you’ll love the Asus headphone amplification that supports up to 600-ohm impedance.
This amplification boosts the sound while removing any distortions to deliver a sound close to the original recordings.
Moreover, the STX 11 is compatible with Windows 10 PC. ASUS has drivers for Windows 10, both 32 and 64-bit. However, they are not on the CD; you must download them from the Asus site.
We can now conclude our list with the best sound cards for Windows 10 PCs.
We have not made our list in any particular order, and we recommend that you get what seems most suitable.
Our list contains only the sound cards that are compatible with Windows 10. They include excellent 5.1, PCI, external, and USB sound card options for Windows 10 PCs.
If you have any other suggestions about sound cards, we will wait for them in the comments section below.
Is OneDrive uploading at 0.0 KB/s or just taking forever to upload your files? Whether you’re syncing gigabytes of media or a simple folder, slow OneDrive upload speeds can be frustrating. Here’s how to fix it and improve performance.
Close other apps that might be using your network.
If these troubleshooting steps do not increase your upload speed, you can now delve into the fixes below:
1. Disable network limit
Right-click the Cloud icon on the Taskbar and click the Gear icon in the top right corner.
Select the Settings option.
Now, click the Network tab at the top and tick the button for Don’t limit under the Upload rate section.
Finally, click the OK button to save the changes.
If the OneDrive uploading is slow and stuck at around 0.0 kb/s, it might be because you have limited the app’s network usage. You can quickly disable the feature and restart the upload.
2. Pause and resume sync
Right-click the OneDrive icon on the Taskbar and click the Gear icon.
Click the Pause syncing option and choose the duration to pause it.
Now, wait a few minutes, repeat Step 1, and choose Resume syncing.
In some cases, the slow OneDrive upload issue is down to problems encountered by the app during the upload process. Pausing and resuming the process should fix this quickly.
3. Unlink the account
Click the Cloud icon on the notification area of your Taskbar and click the Gear icon in the top right corner.
Choose the Settings option.
Now, click Unlink this PC.
From here, click the Unlink account button to confirm the action.
Finally, restart OneDrive from the Start Menu and follow the onscreen instructions to complete the account setup process.
Some users have found the slow upload issue on OneDrive to be with their account setup. Unfortunately, the reason for this can be challenging to pinpoint. Thus, it is better to unlink your account and relink it.
4. Restart OneDrive
Press Windows + X and choose the Task Manager option.
Right-click the Microsoft OneDrive option and select End task.
Now, click the Start icon and search for OneDrive to restart the app.
5. Scan for File Conflicts or Unsupported Files
Problematic files can block or stall the upload queue:
Open your OneDrive folder and sort by size
Avoid syncing files over 15 GB
Remove temp, system, or shortcut files like .tmp or .lnk
This often resolves cases where OneDrive is stuck uploading at 0.0 KB/s without an error.
6. Move Files in Smaller Chunks
Uploading a massive folder at once can overload OneDrive:
Split files into smaller batches (2–3 GB max)
Add each group to the OneDrive folder in stages
This helps OneDrive process uploads more efficiently and avoid timeouts or hangs.
7. Allow Through Firewall
Security tools may scan or block syncing activity:
Open your antivirus app and add OneDrive to its list of allowed or trusted apps
In Windows, go to Start > Settings > Privacy & security > Windows Security > Firewall & network protection > Allow an app through firewall
Find and check Microsoft OneDrive on both Private and Public networks
Especially useful if your OneDrive upload speed is far below your internet upload.
8. Reset the OneDrive Application
If all else fails and OneDrive uploads stay extremely slow, try a soft app reset (non-destructive):
Press Win + R, then run this: t%localappdata%\Microsoft\OneDrive\onedrive.exe /reset
Wait a few seconds — OneDrive will relaunch on its own
This clears any hidden app-level issues without affecting your files.
9. Keep Windows & OneDrive Updated
Go to Settings > Windows Update and install any pending updates
Download the latest OneDrive version from the official site
Older builds may contain bugs or compatibility issues that affect upload stability.
Summary
We have come to the end of this guide on how to fix the OneDrive slow upload issue. However, with solutions here, we believe you are well-equipped to solve the problem.
However, if the issue persists, you might consider switching to one of the best cloud storage apps for Windows PC. While OneDrive has the advantage of integration with the OS, these storage options are known to be faster.
Feel free to let us know in the comments below if any of our solutions helped you fix the issue.
FAQs
Why is OneDrive uploading at 0.0 KB/s even with good internet?
Likely due to stalled files, antivirus scanning, or sync queue overload. Try smaller batches and whitelist OneDrive.
How long does it take to upload to OneDrive?
It depends on your upload bandwidth. Uploading 1 GB on a 10 Mbps line takes ~15 minutes.
Does syncing with OneDrive slow down your computer?
Yes, especially if you’re syncing many files. Background syncing may affect CPU and disk usage.
Many users report the Windows security error appearing on their screen when using their computers. When the Event ID 1108: The event logging service encounters an error pops up, it can make your system unusable.
Likewise, others complain about a similar Event ID 1001 error in Windows 11.
What is Event ID 1108?
The Event ID 1108 indicates that the logging service encountered an error while processing an incoming event from the publisher. It comes from Microsoft Windows Security Auditing, showing that the logging service can’t correctly write the event log.
Furthermore, event ID 1108 comes after a defective or compromised event. So, when logging parameters are not passed correctly to the logging service, it won’t be able to log the event, resulting in an error.
Why do I encounter this error?
There are a few reasons why the event ID 1108 appears on your PC. The most common one is the Log service being disabled. When the service is disabled, it won’t be able to process any log or event, resulting in errors.
Other factors that may be responsible for the error are:
Incorrect security settings in the log directory –The Log service may run into errors if the security settings configured in the log files are wrong. They can affect how it interacts with the events.
Missing parameters in the logging service – When parameters essential for the logging service are missing, it won’t be able to process the incoming event. It may result in errors like event ID 1108 and event ID 41 on Windows 11.
Too many log files – Running into these errors can sometimes mean that your device has too many log files that it can’t handle. So, it prompts the event error to tell you it’s stuck.
These causes may vary in different log instances, but you can fix them by troubleshooting your system.
How do I fix the Event ID 1108 Windows security error?
Before trying any advanced troubleshooting steps, proceed with the following:
If the error persists, try the solutions provided below.
1. Restart Windows Event Log Service
Press Windows + R key to open the Run dialog box, type services.msc, and press Enter.
Find the Windows Event Log service in the services list, right-click on it and select Restart from the drop-down.
Restart your PC and check if you can fix the Event ID 1108 error.
Restart Windows Event Log service will help refresh its log and clear off event logs that are not correctly logged, causing it to run into errors.
2. Modify the Registry Editor
Press Windows + R key to open the Run dialog box, type Regedit, and press Enter to open the Registry Editor.
Navigate to the following path: HKEY_LOCAL_MACHINE\SYSTEM\CurrentControlSet\Services\EventLog
Right-click on Start on the right pane, then click on Modify from the drop-down.
Set the Value Data as 1 and click OK to save the changes.
Modifying the registry value can fix any problems with the EventLog that is causing the error. You may be interested in how to customize the Registry Editor on Windows 11.
One method that could really work here is using a third-party repair tool that will scan and find any issues on your computer.
4. Run System Restore
Left-click the Start button, type restore, and click on Create a Restore Point.
Go to the System Protection tab, then click System Restore.
Select the Choose a different system restore option and click Next to choose a specific Restore Point.
Select the last time the system worked correctly, then click Next.
Click the Finish button.
A system restore will backdate your computer, removing the compromised items on it. If you can’t get around the above steps, check how to fix Restore Point if it’s not working on your PC.
5. Overwrite redundant Log files
Press Windows + X key to open the Quick Access Menu and click the Event Viewer.
Select Windows Logs from the drop-down, choose the System option, and click on Properties.
Navigate to the General tab and check the box for Overwrite events as needed (oldest events first).
Click OK, then Apply.
Overwriting the redundant Log files will clear any events not correctly logged that are causing issues with the system.
The Enhance your photo feature in Windows 10’s Photos app allows users to edit and create different pictures. Lately, some report that auto enhance is missing in Photos.
Many users report that they experience issues with the Windows Photos app started after updating their Windows operating system. The update has a bug that makes it unstable on your PC or a compatibility problem.
Furthermore, you can encounter Photos auto enhance missing on your device for other reasons:
Photos Media Engine add-on not installed –Users can sometimes experience issues with the auto enhance feature in Photos if the Photos Media Engine add-on does not exist by default. It helps add new features and capabilities to the app.
Corrupt files or obsolete Photos app –If there is any error with the Photos app and its files, it can affect performance, and core functionality may disappear. Also, when there’s a problem with the Photos app’s settings, it can cause issues.
Outdated Windows – Some users may experience the auto enhance feature missing in Windows Photos if their Windows operating system is outdated. Check the possible fixes if the Windows update is not working.
The cause of Windows 10 Photos auto enhance missing may vary for different users. Nonetheless, fixing the problem is simple.
How can I fix the Windows 10 Photos auto enhance missing issue?
Don’t hesitate to go through the following preliminary checks:
If the issue persists, proceed with the solutions below.
1. Install Photos Media Engine Add-on
Go to Microsoft Store and click the get button to install Photos Media Engine Add-on. The installation process will go through if the Add-on is not installed on your PC.
We recommend you restart your PC for the newly installed Add-on to sync with other Windows programs.
2. Restore Libraries to Default
Press Windows + E to launch File Explorer, then left-click on any space in the left corner of the screen.
Select the Show Libraries option, right-click on Libraries from the list and click Restore Default Libraries.
Restart your PC and check if the auto enhance feature in Windows 10 Photos is still missing.
Press Windows + I key to open the Windows Settings app.
Select Apps and go to Apps & features.
Click the Photos app and select Advanced options from the options under it.
Scroll for Reset and click the Reset button.
4. Run Windows Store Apps troubleshooter
Right-click the Start button and select Settings.
Select Update & Security.
Click on Troubleshoot from the left pane and select Additional troubleshooter.
Scroll to the bottom of the list and click on the Run the troubleshooter button against the Windows Store Apps.
The Windows Store Apps troubleshooter will find and fix any irregularities affecting its activity. If the Windows troubleshooter stops working on your computer, check some quick ways to fix it.
5. Reinstall the Windows Photos app package
Right-click the Start button, select the Windows PowerShell folder, then click on Windows PowerShell to run the program.
Type the following command lines and press Enter: get-appxpackage *Microsoft.Windows.Photos* | remove-appxpackage
Wait until the app package is reinstalled, restart your PC, and check if the auto enhance feature appears.
Though the Windows Photos app can be reinstalled, its package can be invoked to restore the app to its default settings. It will clear any corrupt files and fix any issues with the app. Check our guide if PowerShell is not working on your PC.
For further queries, use the comments section. Also, kindly tell us which of the solutions worked best for you in fixing the Windows 10 Photos auto enhance missing issue.
If you find yourself using a 32-bit version of Windows 7, 8, or even an older Windows version, you might have noticed that your memory is getting used up faster than you’d like. Due to how most software is created nowadays, upgrading to a 64-bit system will help you with these issues.
A 64-bit operating system is a more advanced version that can access more than 4GB of RAM on your computer, offering improved performance and efficiency. Before diving into the upgrade process, it’s crucial to verify whether your current OS is 32-bit or 64-bit to ensure a seamless transition.
I know what you might think, such a change most certainly would require a wipeout of your entire system, let me assure you that you can upgrade from 32-bit to 64-bit without formatting.
I’ll walk you through the steps to make this transition smooth, so you can enjoy the benefits of a 64-bit OS without the hassle of reformatting your machine. Let’s get started on enhancing your system’s capabilities without the headache of a full reinstall.
Can I upgrade from 32-bit to 64-bit?
To upgrade from 32-bit to 64-bit, you need to make sure that your system meets the minimum requirements for the 64-bit version of Windows. According to the official Microsoft support website, these are:
1 gigahertz (GHz) or faster 64-bit processor
2 gigabyte (GB) RAM
20 GB available hard disk space
DirectX 9 graphics device with WDDM 1.0 or higher driver
Among other questions you should ask yourself include:
Do I have more than 4GB of RAM and do I use more than 4GB of RAM?
Am I using high-resolution monitors or virtual machines?
Do I use applications that make use of multiple cores?
To check for compatibility, follow the steps below:
Click on the Start menu and search for System Information.
Locate System Type and if it reads x64-based PC, you can upgrade to 64-bit.
You also need to ensure that your CPU and drivers are compatible with the 64-bit. For drivers, check your manufacturer’s website and look for the 64-bit driver versions.
To check CPU compatibility:
Hit the Start icon, type cmd, and select Run as administrator.
Type in set pro and click Enter.
You should now be able to tell whether your processor is compatible.
If everything checks out, proceed to the guide below.
How can I upgrade Windows 7 from 32-bit to 64-bit?
You can either download Windows 7 ISO files or insert the 64-bit windows installation disk in the DVD ROM then Restart the PC.
Press any key to boot from the DVD.
Windows 7 installation files will load. Click to select your preferred language and other preferences then click Install Now in the next window.
Accept the license terms and click Next.
Select Upgrade installation.
Choose a Disk partition where you want to install Windows and click Next.
Wait for Windows to finish installing.
You can also follow the same steps only this time perform a clean install and reuse the same Product Key you used for the 32-bit version to upgrade to the 64-bit.
Yes, you can install 64-bit Windows on a 32-bit system but you shouldn’t. While it’s possible to install a 64-bit version of Windows on a 32-bit machine, it’s not recommended because of compatibility issues with some software and hardware.
This isn’t a supported configuration and may cause problems down the line. 64-bit software can’t run in 32-bit mode, so if you try to run 64-bit apps on your computer, they’ll crash.
There are also some important limitations to keep in mind:
Some drivers will only work with the 32-bit version of Windows.
The 64-bit version of Windows may not support all hardware components of your computer’s hardware configuration such as video cards or network adapters.
And that’s how to easily upgrade from a 32-bit version to a 64-bit in Windows 7. We also have a trick up our sleeves on how you can continue using Windows 7 forever if you are not a fan of the latest iterations from Microsoft.
There are good reasons to upgrade from 32-bit to 64-bit Windows. For example;
More memory – A 64-bit operating system is capable of addressing much more memory than a 32-bit system, thus allowing you to work with large files without having to worry about running out of memory.
Faster processing – With the 32-bit version, you are limited to 4GB of RAM, but with the 64-bit version, you can use up to 16 exabytes of RAM. This means that your computer will be able to run programs faster and more efficiently.
Greater stability – Upgrading from 32-bit to 64-bit actually makes your system more stable because it uses less memory than before.
Improved compatibility – Most modern hardware is designed for 64-bit platforms, so upgrading from 32-bit to 64-bit will allow your system to take full advantage of the newer technology available today.
More security – Because a 64-bit operating system can use more than 4GB of RAM, it is less vulnerable to attacks from malware that exploits memory holes or other vulnerabilities.
Better performance – You’ll see an overall improvement in how quickly your computer responds to your input because programs will run faster and use less CPU capacity while they’re running.
Let us know of any problems you may have encountered during the upgrade in the comment section below.
Are you getting exception error 0xe06d7363 when attempting to launch a few programs or apps in Windows? That is a Windows application error that shows up when a program or process doesn’t start.
Then you might get an error message along the lines of The exception unknown software exception (0xe06d7363) occurred in the application.
There are myriad factors for 0xe06d7363 errors. This error can arise from conflicting third-party software scripts, malware, pending software updates, file conflicts, etc. As such, there are also numerous potential fixes for the 0xe06d7363 issue.
How to fix error 0xe06d7363 on PC?
1. Scan for Malware
As Windows system errors are often due to malware, an anti-virus scan might fix exception error 0xe06d7363.
Check out our list of the most effective anti-virus utilities for Windows, so you can install one of them and scan your PC for malware activity.
For example, a proven and reliable security software is TotalAV, as it runs in-depth scans of your system and brings its own powerful firewall, a ransomware shield, a password manager, and many more.
Junk files waste hard drive space and might even generate file conflicts. As such, deleting temporary junk files might help resolve the 0xe06d7363 error.
Even if erasing temporary files doesn’t make much difference, it’s still good system maintenance. You can delete junk files with the freeware CCleaner as follows.
First, click Download now to save CCleaner’s installer to a hard drive folder.
Open CCleaner’s setup wizard to add the software to Windows.
Open CCleaner and click Cleaner on the left of its window.
Select the Temporary Files check box on the Windows tab.
Pressing the Analyze button will give you an overview of how much disk space CCleaner will free up when it deletes the files.
Press the Run Cleaner button and click OK to erase the files. The 0xe06d7363 error in Forza Horizon 5 will be solved afterward.
3. Strip Third-Party Services From the Windows Startup
The 0xe06d7363 exception errors are often due to conflicting third-party software scripts undermining programs. Consequently, booting Windows without any third-party services can be among the more effective remedies for error 0xe06d7363.
Removing third-party services from the Windows startup will minimize potential software conflicts. This is how you can disable non-Microsoft services for a clean boot.
Type msconfig in the Windows search box and press Enter.
Click Services to open the tab. Select the Hide all Microsoftservices option to remove the more essential services from the list. Press the Disable all button to deselect all the third-party service checkboxes.
Click the Startup tab then click Open Task Manager.
Select any startup program that might be interfering then choose Disable.
Close Task Manager, press Apply then OK to close MSconfig then restart your PC.
Restart your desktop or laptop. Note that this will fix 0xe06d7363 in Windows 11 and 10.
4. Open the Application in Safe Mode
To start Windows 10 in Safe Mode, press Windows then click the Power icon. Hold the Shift key and click Restart.
You computer will restart and show the Advanced options screen. Here, select Troubleshoot.
Click the Advanced options option.
Choose Startup Settings.
Press the Restart button to reboot Windows.
After the system reboots, press the F4 key to select Safe Mode.
Open the same software that was previously crashing. The 0xe06d7363 kernelbase.dll error will be fixed.
5. Undo System Changes with System Restore
If a recently installed third-party program is responsible for exception error 0xe06d7363, the System Restore tool might resolve the issue.
System Restore will remove all the software you added to Windows after a restore point and undo system changes. You can probably restore Windows to a date when you weren’t getting any 0xe06d7363 software errors.
Open System Restore by entering restore point in the Cortana search box. Click Create a restore point to open the System Protection Control Panel tab, which includes a System Restore button.
Click System Restore to open the System Restore utility.
You can open a list of restore points by selecting the Choose a different restore option and clicking the Next button.
Select the Show more recent restore points option to expand the list.
Choose a suitable restore point to revert Windows to, and press the Next button.
Click Finish to restart and restore Windows to the selected date. The 0xe06d7363 C++ error will be solved.
6. Reinstall the Program
If the 0xe06d7363 error occurs when launching one specific program, consider reinstalling the software. Reinstalled software will always have a new configuration. You can uninstall the program via the Programs and Features Control Panel tab.
Microsoft has announced that starting from December, it will begin rolling out “a long expected feature” to Microsoft Forms. The new feature, inserting image as choices will be available for both forms and quizzes users.
According to Microsoft:
We understand that visualization is critically important in teaching and learning to assist students digest context easier and create connection with knowledge faster, especially for young kids when they are still growing language skills.
You can insert images in forms or quizzes as choices by bulk importing, dragging and dropping, or copying and pasting. For the bulk import option, the upload size is limited to 5MB per image. “Images from OneDrive, local or Bing search are all accessible,” Microsoft added. What’s more, users can only bulk select 5 images per batch. Bulk import is supported on both desktop and mobile.
The new feature also supports image customization, whereby you can resize the image or drag the images to change focus using the image editor. However, any image uploaded images in forms or quizzes as choices is auto center-cropped fitting to the predefine border by default.
And finally, “images will be displayed when users create & preview the survey in design time, when responders fill the survey or when the owner wants to check details in individual result page. The rest of other cases (such as analysis view in response tab or data in Excel worksheet), there is only text showing up as representations of these choices,” says Microsoft.
You can visit Microsoft’s blog post to learn how to make use of the feature. Be sure to also share your thoughts with us in the comment section below.
In this troubleshooting guide, we will show you how you can fix the Failure configuring Windows updates, reverting changes loop error on your Windows 7/8/10 PC.
Disabling Secure boot during the update procedure and enabling it after the process is finished solves this issue and you can get back to your everyday work on your computer. For more solutions, check out the list of methods below!
How do I get past Failure configuring Windows updates?
Before diving into the troubleshooting steps below, it might be a good idea to run a quick SFC scan. Update errors are often triggered by corrupted or missing system files.
1. Disable Secure boot
Reboot your Windows 10 system. When the system starts up you will need to continuously press the ESC button on the keyboard.
You should have in front of you the Startup menu on a black background.
Move to the System Configuration tab using the right arrow on the keyboard.
In the System Configuration menu, you will need to select Boot options by pressing the Down arrow on the keyboard.
Press the Enter button on the keyboard.
Press the arrows on the keyboard down to the Secure boot feature.
Press the Enter button on the keyboard.
Select the Disable option on this feature and press the Enter button.
Press the F10 button on the keyboard to save your changes and exit the menu.
Press the Enter button to confirm the saved changes.
Your Windows 10 device should reboot now.
Check and see if you still have the same Failure configuring Windows updates stuckerror. If you don’t you will need to let your system finish the updates and enable the Secure boot feature after it is done.
2. Hard reset your laptop and remove all peripherals
Shut down your Windows 10 device.
Remove any external USB peripherals from the laptop.
Remove any other additional wires from your external devices to the laptop.
Unplug the power adapter from your Windows10 device.
Press and hold the power button on the laptop for about twenty seconds.
Plug only the power adapter into the laptop.
Press the power button to open your device.
You should get to a black background screen where you have to select the Start Windows normally feature.
Press the Enter button on the keyboard.
Run Windows Update again.
After the update process is finished, connect all your peripherals to the laptop.
Reboot your Windows 10 device.
Check and see if you still have the same issue.
3. Disable your antivirus/ firewall
Use an uninstaller software in order to completely remove your antivirus since it can interfere with the Windows Update.
Alternatively, we recommend using a flexible antivirus program that offers you the option to disable it for a limited amount of time or add programs, apps, websites, and files to an exclusion list.
This guide will discuss all the available fixes for the problem right after examining the causes. Let’s begin!
What causes the Event ID 15 TPM error?
Generally, the error appears if you have a problem with the TPM device. Some of the reasons for the error are:
TPM fails to respond: When Windows is trying to communicate or use the TPM device for functionalities that respond on TPM, including Bit Locker and Next Generation Credentials, and it fails to respond, it could cause the Event ID error.
TPM performing self-test – When TPM resumes from sleep, it performs a self-test before processing any commands. During self-testing, if Windows tries to retrieve a random number, but the command fails, then Windows will receive this error. If the command fails three consecutive times, the OS logs the event. Hence we see the error.
How can I fix the Event ID 15 TPM module error on Windows 10?
Before diving into serious troubleshooting, let us try these simple fixes first:
If nothing from the above worked for you, it is time to move on to these troubleshooting steps:
1. Uninstall and reinstall the TPM driver
1.1 Use Device Manager
Press Windows + R to get the Run window.
Type devmgmt.msc and hit Enter.
Now click on Security devices to expand, right-click on Trusted Platform Module, and select Uninstall driver.
Reboot your computer. When your PC starts up, it will install the driver again.
1.2 Use a third-party tool
With driver updater utility like Outbyte Driver Updater, you can update drivers without hassles. It downloads the best compatible drivers for your device and installs them in a few clicks.
Launch the app, and it will scan your computer for outdated drivers.
Once the scan is complete, you will get a list of drivers.
Select the drivers and click Update.
The tool will download the latest and compatible drivers.
Click Next, follow the on-screen prompts, then restart your computer.
Using automated tools has its advantages such as safely finding and updating outdated drivers and automatically installing new updates, saving time in all these processes.
Press the Windows key, type Windows Security, and click Open.
Now navigate to Device Security. Click Security processor details.
Click Security processor troubleshooting.
Now click Clear TPM.
Choose the positive response for the on-screen prompts to finish.
3. Disable Windows Credential Manager
Press Windows + R to get the Run window.
Type gpedit.msc and press Enter.
Follow this path and double-click on Turn on Virtualization Based Security: Computer Configuration\Administrative Templates\System\ Device Guard\Turn on Virtualization Based Security
Now under Credential Guard Configuration, select Disabled from the drop-down.
Restart your PC.
4. Check if Core isolation is enabled
Press the Windows key, type Windows Security and click Open.
Now navigate to Device Security. Click Core isolation details.
Make sure the toggle switch for Memory integrity is On.
Download Windows 11 ISO and select Windows 11 (multi-edition ISO).
On Select, the product language option, choose English or your preferred language and click Confirm, and then Download.
Right-click on ISO and select Mount. Now click Setup.exe.
On Install Windows 11 dialog box, select Next.
On the next screen, click Accept to agree to the license terms.
Follow the on-screen prompts to complete the process.
Tip
Select Keep personal files and apps on the Ready to Install page to save your files from getting deleted.
We covered a similar error in our TPM-WMI 1796 error guide, so don’t miss it.
So, these steps can be used to resolve the Event ID 15 source TPM error. If we have missed out on any method that worked for you, please let us know in the comments section below.
There are multiple user queries where users have asked how to format an external hard drive if it is not visible on their PCs. Here is one user query:
How can format WD 500GB External Hard disd drive that is not visible at my computer. The disk simply shows at the task bar, it cannot be read, the green light also shows on the disk. I need to format the drive…….how do I do that since it’s not visible.
If you also have a similar question regarding how to format an external hard drive that is not visible, then this guide is here to help you. We will show you some solutions to help you format the external hard drive when it’s not visible. So, let us get right into it.
Why is the external hard drive not showing up?
Here are a few reasons that could cause the external hard drive to not show up on your Windows PC.
Problematic port: Chances are that the port is problematic where you have connected your external hard drive.
System drive problem: If the external hard drive is corrupt or there are some issues with it, then it could trigger multiple problems.
It is not powered on: Some hard drives come with their own power chord which is required to be connected to the power outlet. In case that is not connected, your HDD won’t show up on your PC.
How can I format an external hard drive if that is not visible on my PC?
Before applying advanced troubleshooting methods, here are some quick fixes to help you resolve the error.
Restart your PC and reconnect your external hard drive. There might be some temporary glitch or something that is preventing the hard drive from being detected.
Try a different port. You can connect your hard drive to a different USB port or to a different computer altogether and check whether this resolves the issue.
Chances are that the hard drive driver version isn’t compatible with your PC and is causing the issue. You can try updating the drivers.
Let us move on to advanced solutions.
1. Update the driver
Press Windows key + X and select Device Manager from the list.
Locate the Disk drives section and expand it.
Check if any of the listed devices have a yellow exclamation mark next to them. If there is an exclamation mark next to your device this means that there might be a driver issue.
Right-click the device and choose Update Driver.
Select Search automatically for driver software.
Your system will check if a new update is available for the drive and prompt you to install it if it finds one.
In addition, you might want to check the manufacturer’s website for the latest drivers. After updating the driver, try formatting the external hard drive and see if this resolves the issue. Getting the latest drivers also helps when an exFAT drive is not showing up.
Alternatively, to ease manually updating drivers on your PC, you can use third-party software. The driver updating apps are reliable solutions that contain libraries of millions of up-to-date drivers, and you can install them with a few clicks.
Select the file system type and you can also add the Partition Label.
Click Apply at the top-left to confirm the operation.
Several users have reported that their undetectable external hard drive was detected using a third-party partition tool AOMEI Partition Tool.
You can also try using the tool, format it within it, and see if this resolves the error.
4. Check if your hard drive shows in BIOS
Turn off your PC.
Restart it and while it boots, keep pressing F2, F8, F11, or Del to enter the BIOS menu. It might be a different keyboard key for your brand’s laptop. So, check your motherboard’s manual.
Once you enter BIOS, look for your hard drive.
If your hard drive appears in BIOS, it’s connected and working.
If the hard drive doesn’t show in BIOS, it’s rather likely that it’s not properly connected or there is some problem with your external hard drive.
You can look closer at our dedicated guide that will teach you how to easily access the BIOS menu if you are finding it hard to do.
That is it from us in this guide. Let us know in the comments below which one of the above solutions helped you with how to format an external hard drive that is not visible problem.
Every version of the Windows OS has system requirements that determine the devices that can run them. So, you can encounter the Windows 11 unsupported hardware watermark if there’s a system requirement issue.
Why did I get Windows unsupported hardware watermark?
The Windows unsupported hardware watermark is a warning feature introduced to test and warn users that their hardware isn’t compatible with Windows 11. It indicates that the System requirements are not met by the device installing the new Operating System.
So, users don’t adhere to the requirements when they get the unsupported hardware watermark on their Windows PC.
Nevertheless, some users with devices that meet the requirements complain about the Windows 11 unsupported hardware watermark appearing. Hence, some factors that can cause this problem are:
Corrupt system files – Having corrupt system files on your computer can cause numerous issues with how it works. It can affect many components of the PC, prompting errors like the Windows 11 unsupported hardware watermark.
Windows update issues – Sometimes, users may experience problems after updating their Windows operating system if the update is not stable, or it was installed incorrectly. Also, not installing a credible version of Windows on your PC can be an issue.
Apart from the requirement issues that cause the Windows 11 unsupported hardware watermark, other factors may cause it. Fortunately, you can easily remove and fix the watermark on your computer.
How do I fix Windows unsupported hardware watermark?
Before trying any steps for fixing Windows unsupported hardware watermark, observe the following preliminary checks:
Proceed with the following steps if the issue persists:
1. Remove the unsupported hardware watermark via the Registry Editor
Press Windows + R key to open the Run dialog box, and type Regedit to open Registry Editor.
Navigate using this path and click Enter: HKEY_CURRENT_USER
Double-click on the Control Panel, then click on UnsupportedHardwareNotificationCache.
Right-click on the SV2, click on modify, change the DWORD value from 1 to 0, then click OK to save the changes.
Close the Registry and restart your computer.
Changing the SV2 value should make the watermark disappear on your computer. However, if you don’t have the UnsupportedHardwareNotificationCache key in your Control Panel, you must create one.
Choose Windows Update, then click on Advanced options.
Scroll down the list and choose Recovery.
Click on the Go Back button under the Recovery options menu.
Microsoft will ask why you must go back to Windows 10. Choose an answer and then click Next.
Select the No, thanks button.
Click Next to confirm.
Make sure you don’t forget your PIN and password because you’ll need them later. Click Next.
Click the Go back to earlier build button.
For users who upgraded to Windows 11 from Windows 10, reverting to the previous version is another option to get rid of the watermarks.
Rolling back will allow you to use the supported Windows version for your PC. Nonetheless, you can read about fixing the rollback option missing on Windows 10/11 and revert to a supported Windows.
3. Use Windows 11 on an unsupported device
For users who’d love to stick with using Windows 11 on their unsupported devices they can try the following steps:
3.1 Disable Windows 11 Automatic Update
Press Windows + R key to launch the Run dialog box and type services.msc, then click OK.
Locate Windows Update, then click Stop.
Click the drop-down button next to Startup type, select Disabled and click OK to save the option.
Many users don’t understand what the hiberfil.sys file on their PC does. It is a system file containing the activities of the Hibernate Mode power option on the computer. However, you can encounter some issues with the files.
Hiberfil.sys is a system file that houses the files created by the Windows operating system during hibernation. It contains the memory content of your system before the time it goes to Sleep Mode or Hibernation.
Furthermore, the hiberfil.sys system file helps restore the user session that was previously running before hibernating or sleeping the PC. Hence, the system can shut down without losing the session before the state.
Why do I need to clear it?
The hiberfil.sys files are in large volumes that can take about 3 to 5 gigabytes of disk space. Also, the file size can increase depending on the content used on the PC.
Some benefits of clearing the hiberfil.sys files are:
Keeping these files consumes an outrage amount of disk space which can cause low storage issues. So, clearing the hiberfil.sys file will free up disk space on your computer.
However, deleting the hiberfil.sys files alone don’t guarantee that your Windows will not recreate them.
Though, it is safe to delete the hiberfil.sys files, it is essential to disable the Hibernate Mode on your PC. It ensures that the deleted session files are not recovered.
How do I clear or delete the Hiberfil.sys file?
There are a couple of ways to delete the hiberfil.sys files, but we recommend you observe the following preliminary checks first:
The above steps will help prepare your PC for the upcoming processes. However, you’ll need to disable the Hibernation power option before deleting the hiberfil.sys file.
1. Disable hiberfil.sys using the Command Prompt
Left-click the Start button, type cmd in the search space and select Run as Administrator.
Type the following command, then press Enter: powercfg -h off
Close the Command Prompt.
The above command will stop your computer from using the Hibernation power option, then automatically delete the hiberfil.sys file. Check what to do if you can’t run Command Prompt as an admin on Windows 10/11.
2. Disable hiberfil.sys using Windows Settings
Type control panel in the text bar on your taskbar and select Power options.
Go to Related settings and click on Additional power settings.
Click on the Choose what the power buttons do option and select Change settings currently unavailable.
Uncheck the box for Hibernate and click the Save changes button.
Unchecking the Hibernation box will disable it from being a part of your system’s power options.
Click on the View tab, click Options, and then go to the View tab.
Check the box for Show hidden files, folders, and drives, then uncheck the box for Hide-protected operating system files.
Click OK, then Apply.
Deleting the hiberfil.sys files and disabling Hibernation will completely clear the file and free up disk space. Check how to fix File Explorer if it crashes on your computer.
4. Delete hiberfil.sys via the registry
Press Windows + R key to open the Run window, type Regedit, and then press Enter to open the Registry Editor.
Navigate to the following locations: HKEY_LOCAL_MACHINE\SYSTEM\CurrentControlSet\Control\Power
Double-click the HibernateEnabled entry and set the Value data field to 0.
It will disable Hibernate mode on your computer and delete the hiberfil.sys file.
Uplay is the official launcher for Ubisoft games and is well known in the gaming world. However, Uplay has its share of problems that users encounter. A common one is that Uplay won’t launch games.
Users may encounter issues running Ubisoft games on their PC due to some errors affecting Uplay’s performance. The most common cause for the Uplay not launching games is missing DLL files. When the DLL files are not intact, it can prevent Uplay from working correctly.
Other factors that may be responsible for Uplay not being able to launch games are:
Interference from third-party apps – Third-party apps such as antivirus software and others can impede the activities of the Ubisoft launcher on your PC. Likewise, they can use the system resources and bandwidth available to run other applications.
Corrupt Uplay cache – The local cache files for the Uplay client on your computer can become old and corrupt. Hence, it blocks the ability to run games on the Uplay app.
Issues with Windows update – Some users can encounter issues with their Uplay app after updating their OS to a specific build. It is.m because some Windows updates come with bugs that affect apps running on the computer.
Outdated graphics driver – It is common to encounter issues with your game launcher if your graphics driver is not up-to-date.
These causes can vary for different users. Nevertheless, you can fix the above causes by troubleshooting your PC.
What can I do if Uplay is not launching games?
Go through the following preliminary checks before trying any advanced troubleshooting steps:
Right-click on the Uplay client icon on your desktop, then select Properties from the drop-down.
Go to Compatibility and check the box for Run this program as an administrator, then click OK.
Restart your PC and launch Uplay to check if the problem persists.
Running Uplay as an administrator can fix any permissions issues impeding its performance. If you have problems with the steps above, read about what to do if you can’t run apps as administrators on your PC.
Go to the Uplay installation directory, right-click on the game’s executable file, and select Properties from the drop-down.
Navigate to the Compatibility tab and check the box for Run this program in compatibility mode, then choose the operating system.
Click OK to save the changes, then Apply.
Running the Uplay client in compatibility mode will fix any barriers from the game version and update errors.
If you run an old version of the app on your PC, check the ways to play old games on Windows 10/11.
4. Clear Uplay’s cache
Press Windows + E to open File Explorer.
Navigate to the following location: C:\Program Files (x86)\Ubisoft\Ubisoft Game Launcher\cache
Press Ctrl + A to highlight all, then delete to clear the content of the cache folder.
Restart your PC and launch Uplay to check if the issue persists.
Clearing the cache file on your PC will delete the corrupt files affecting the Uplay client.
5. Disable Windows Defender
Left-click the Start button, type WindowsSecurity, and launch it.
Select the Virus & threat protection option and click Manage settings.
Toggle off the Real-time protection option to disable the Windows Defender Antivirus.
Disabling the Windows Defender service on your PC can fix any interference it is causing to the Uplay client. This also helps with uplay_r164.dll errors.
If you keep getting Kernel PNP error 411 in the Event Viewer and are concerned about what to do, then you are in the right place.
This guide will discuss what Kernel PNP is and how to deal with Kernel PNP errors. Let’s start!
What is Kernel PNP?
Kernel mode PNP manager is a part of Plug and Play manager. It interacts with OS drivers and components to manage, configure and maintain devices. PnP drivers support a machine’s physical, logical, and virtual devices.
What is the Kernel PNP error?
A Kernel PNP error usually comes up on Windows if you have malfunctioning hardware or outdated device drivers. Therefore, for PNP mode to work, all the drivers installed must work properly.
How do I fix Kernel PNP Error 411?
Before moving to the detailed troubleshooting, let us try some quick fixes that can help us with the error:
On the Services tab, place a checkmark besideHide all Microsoft Services and then click Disable all.
Go to the Startup tab, and click Open Task Manager.
Locate each Enabled item, right-click on it, and select Disable.
Close Task Manager. Click Apply and OK on the System Configuration window.
Restart your computer when prompted.
2. Use Command Prompt
Press the Windows key, type CMD, and click Run as administrator.
Type the following command and press Enter: sfc/scannow
Copy and paste the following commands and press Enter after every command: Dism /Online /Cleanup-Image /CheckHealthDism /Online /Cleanup-Image /ScanHealthDISM /Online /Cleanup-Image /RestoreHealth
Restart your computer.
3. Install/ Update Drivers
3.1 Install Drivers Manually
Press Windows + R to get the Run window.
Type devmgmt.msc and hit Enter.
Click on Display drivers to expand, right-click on the Graphics Driver, and click Update driver.
Now go to System devices, expand it, and follow the same process to update the chipset drivers.
Launch the app to scan your computer for obsolete drivers.
Once the scan is complete, select the drivers and click Update.
The tool will start downloading the latest drivers for your PC.
Now click Next and follow the on-screen instructions, then restart your computer.
Keeping your device drivers updated with a reliable driver updater tool such as Fortect Driver Updater is easy and less time-consuming. This driver updater downloads and installs the best drivers for your device in a few clicks.
Using Fortect Driver Updater will make sure that all drivers are updated safely and your PC will automatically receive any other future updates.
Apart from a high-specification PC, it would be best to have good headphones to communicate with your friends or colleagues when setting up a workstation or gaming setup. There is a bunch of great pair of headphones with a built-in microphone. However, if the headphones do not respond, it could be pretty frustrating.
If you are looking for a guide that will help you to use headphones with an inline mic on your Windows 10 PC, then you are in the right place. Because in this post, we will give you a bunch of solutions to use the in-built mic in your headphones. Let us get right into it.
How to set up and test a mic on Windows PC?
1. Set up a mic on the PC
Connect your microphone to the appropriate jack on your PC.
Press the Win + I keys to open the Settings menu.
Select the System tab and click on Sound on the left side.
Choose the microphone under the Choose your input device drop-down menu.
2. Test a microphone
Connect your microphone to the appropriate jack on your PC.
Press the Win + I keys to open the Settings menu.
Select the System tab and click on Sound on the left side.
Select the correct device as the microphone under the Choose your input device drop-down menu.
Under the Test your microphone heading, you will see the sound levels if your mic is connected correctly.
How can I use the inline mic on my Windows 10 PC?
Connect your microphone to the appropriate jack on your PC.
Press the Win + I keys to open the Settings menu.
Select the System tab and click on Sound on the left side.
Select the correct device as the microphone under the Choose your input device drop-down menu.
Select the System tab and click on Sound on the left side.
Select your microphone under the Choose your input device drop-down menu.
Click on Device properties.
The microphone will be enabled by default.
You can hit the Disable button to disable the mic.
Also, there is a Volume slider that you can use to adjust the volume of the microphone.
How to adjust headphone mic levels on a PC
Connect the headphone with the mic on the correct port on your PC if there are three ports, plug in the Mic port.
You will receive a pop-up on your PC. Click on OK.
RighPress the Win + I keys to open the Settings menu.
Select the System tab and click on Sound on the left side.
Click on the Sound control panel.
Switch to the Recording tab.
Right-click on your microphone and select Properties.
Click on the Levels tab.
Drag the slider for Microphone and Microphone Boost to the max limit.
Click on Apply and OK.
The headphone’s mic is often not of that excellent quality, especially when you are using headphones bundled with mobile phones.
So, you can enhance the levels by boosting the microphone volumes following the above steps.
You can check out our guide that lists some practical ways to turn on the mic on your Windows 10 PC. If your microphone isn’t working, you can refer to our guide, which lists some solutions to resolve the issue.
That is it from us in this guide. Let us know in the comments below if you could use your headphones’ inline mic on your Windows 10 PC by following the abovementioned steps.
Binding of Isaac is an RPG shooter game with many features. Unfortunately, even though it has been around for some time, the Isaac-ng.exe has stopped working error still appears when playing the game on Windows 10.
Playing the Binding of Isaac can result in issues due to missing or corrupt game files. These broken game files can block the ability of the game to run its components and prompt it to display the Isaac-ng.exe has stopped working on Windows 10.
Other factors that can cause the Isaac-ng.exe has stopped working on Windows 10 are:
Outdated graphics cards – Games like Binding of Isaac use much graphics content to run their gaming interfaces. So, if the graphics driver on your PC is not updated, it can cause issues with the game, resulting in the Isaac-ng.exe not working error.
Third-party app interference – Other apps running on your computer can impede the performance of the Bindings of Isaac game on your PC. Apps like antivirus software can block the path of the game.
Outdated Windows OS – It is common for users to run into errors with their games if their operating system is not updated. It causes compatibility issues. Also, Windows won’t be able to fix the bugs affecting it. So, it can impact the programs running on your computer.
Users may encounter the Isaac-ng.exe has stopped working error message on Windows 10 for various reasons. Hence, we’ll show you some fixes for the error.
What can I do if Isaac-ng.exe stops working on my Windows 10?
Before proceeding with any troubleshooting steps, try the following preliminary checks:
Navigate to the following path to find the My Games folder: C:\Program Files (x86)\Steam\userdata
Right-click the Binding of Isaac folder and select the Open with notepad option, then change the Steamcloud value from 1 to 0.
Restart the game client.
Tweaking the Steamcloud value will resolve issues with the settings that can cause the game not to work,
4. Delete the binding of Isaac folder
Press Windows + E keys to launch File Explorer.
Go to the following path: This PC\Username\Documents\My Games
Right-click the Binding of Isaac folder and click on Delete.
Then, restart the game and check if the problem appears.
Deleting the game file will help it recreate a new one, clearing the corrupt files. Read about fixing File Explorer if it crashes on your computer.
5. Reinstall the game
Press Windows + R to open the Run window, type appwiz.cpl, and click the OK button.
Right-click The Binding of Isaac from the list and select Uninstall.
Open File Explorer and go to the following path and delete the game folder: This PC\C drive\Program Files (x86)\Steam\Steamapps\Common\The Binding of Isaac
Then, reinstall the game on your Steam client.
Reinstalling the game will fix any installation file issues that may impede its performance.
Avast is one of the most popular antivirus software. It has many features that set it above other antivirus software. Nonetheless, it has its share of issues. The common problem is that Avast can’t turn on the firewall.
The Avast firewall is not working or turning on for several reasons. However, conflict with Windows Firewall is the most common cause of the problem. So, Avast may run into issues if Windows Firewall is enabled.
Other factors that can be responsible for the Avast firewall not turning on are:
Outdated Avast client – Users can encounter issues with the Avast client on their computers if it is outdated. Also, there may be bugs impeding its performance, causing it not to work as it should. So, the Avast firewall may not turn on if the app is outdated.
Corrupt system files – The Avast firewall can run into issues if there are malicious or corrupt files on your system. These files can block the activities of the Avast antivirus and other programs running on your computer.
Issues with Avast installation files – The Avast client on your PC may encounter difficulties if its installation files are missing or corrupt.
These are some common causes of Avast antivirus not turning on. Fortunately, users can fix the problem by troubleshooting their apps and computers.
What can I do if Avast cannot turn on Firewall?
We recommend you go through the following preliminary checks before proceeding with any advanced solution:
Press Windows + R key to open the Run dialog box, type msconfig in the text bar, and click OK.
Navigate to the Services tab and check the box for the Hide all Microsoft services option, then click Disable all.
Go to the Startup tab and click Open Task Manager.
Select the unnecessary startup programs and click the Disable button.
Restart your PC and check if the error appears.
A clean boot will prevent any third-party app from launching from the start, blocking any interference from the apps. Also, it’ll disable startup apps that may prompt the error.



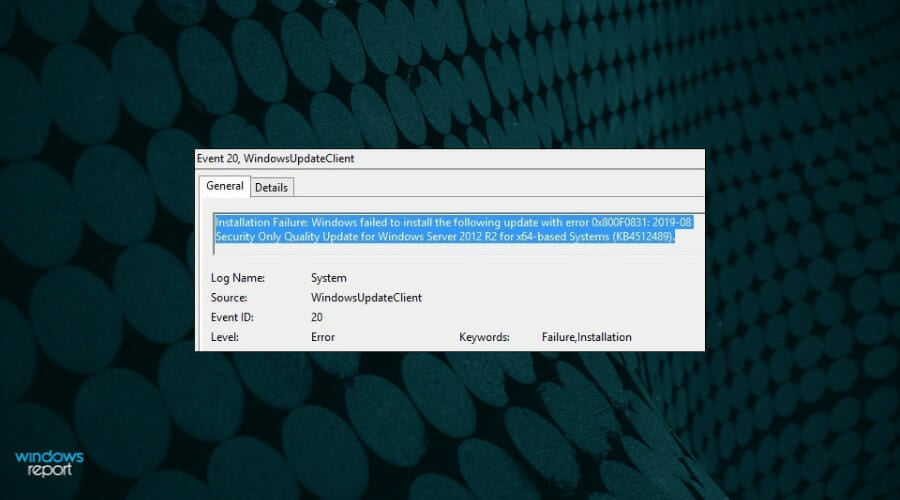
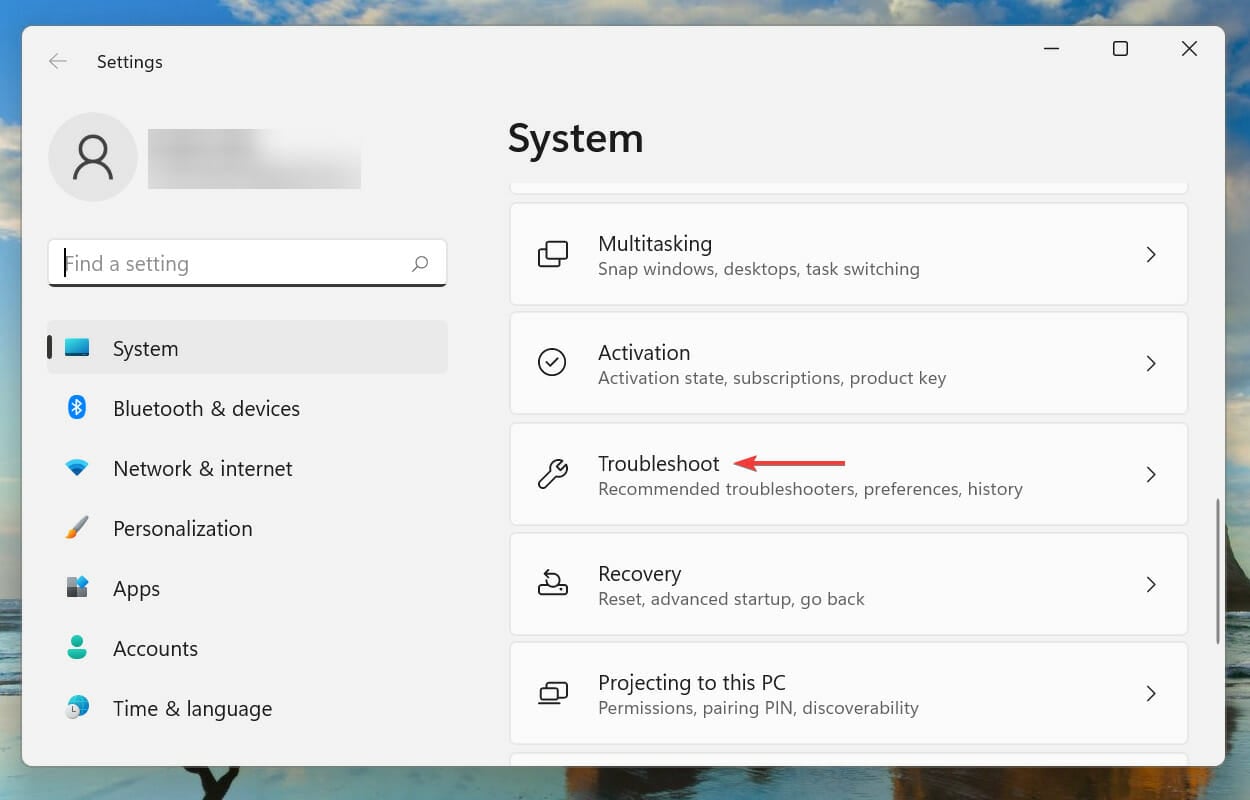
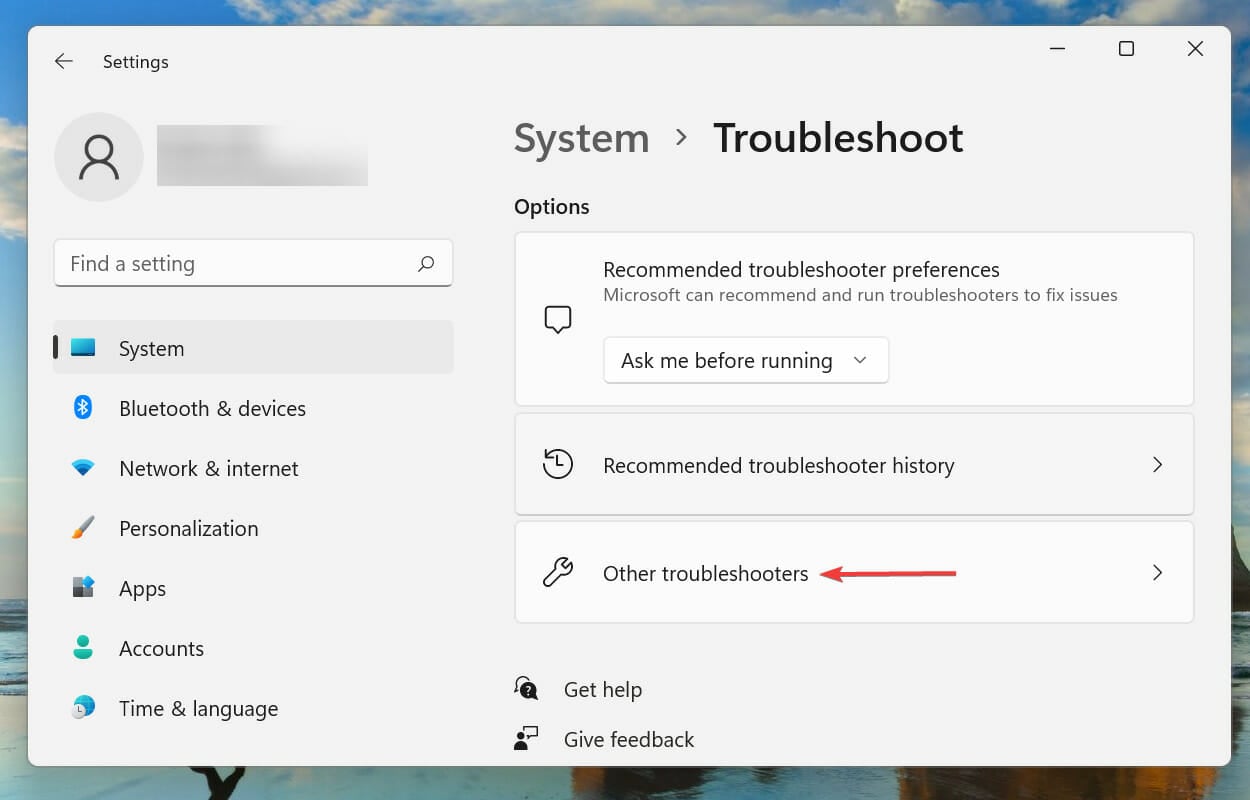
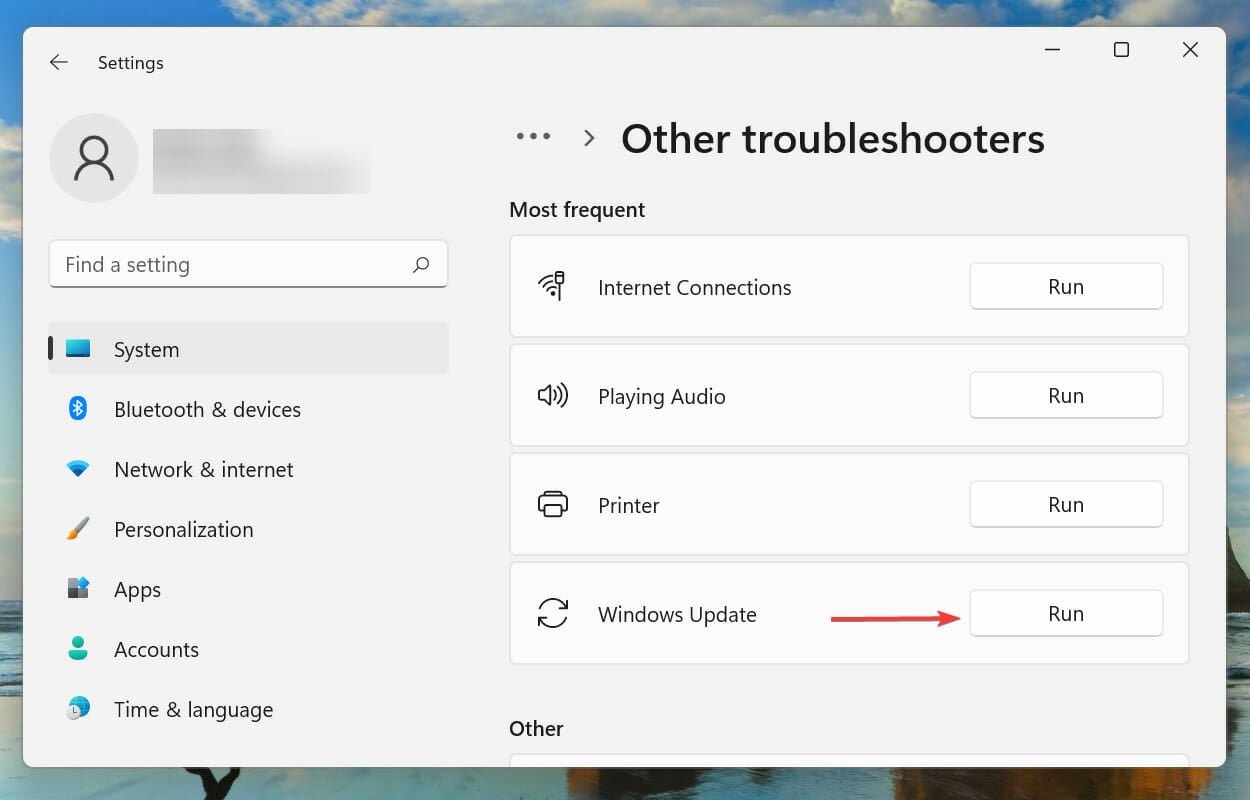
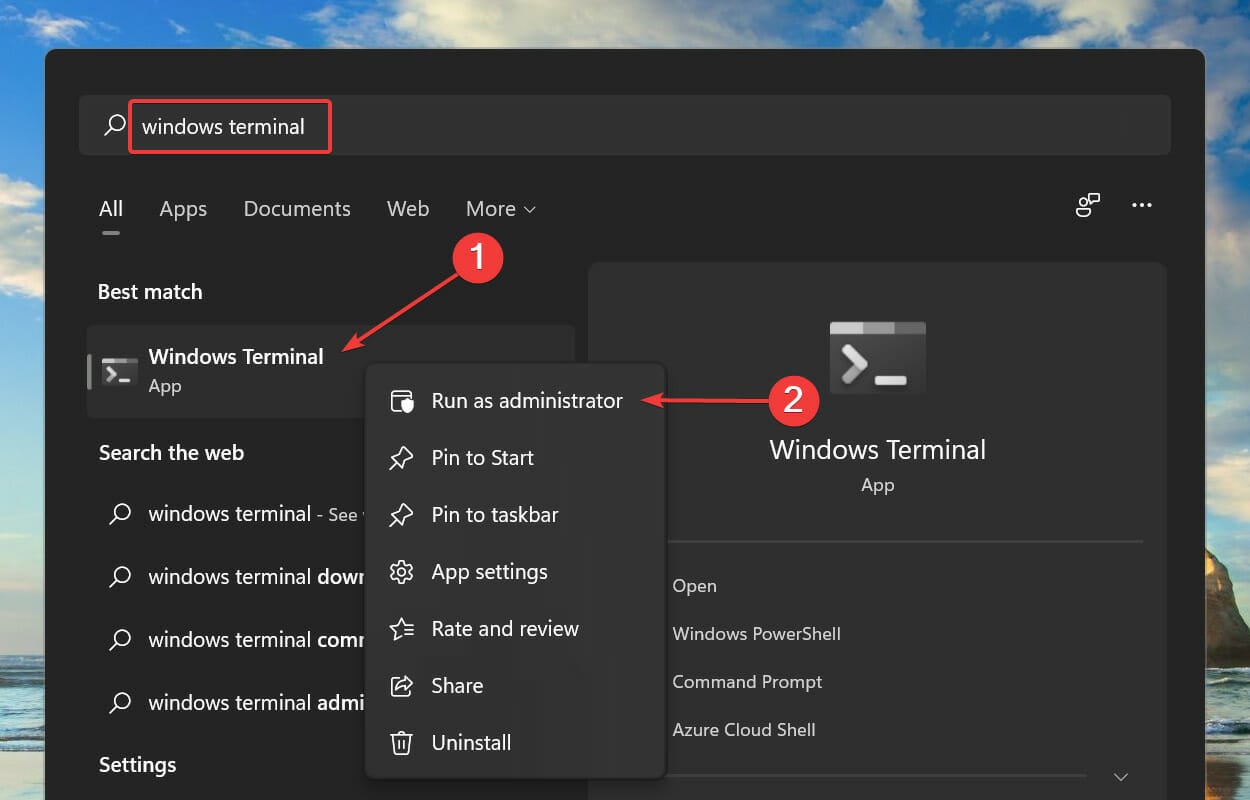
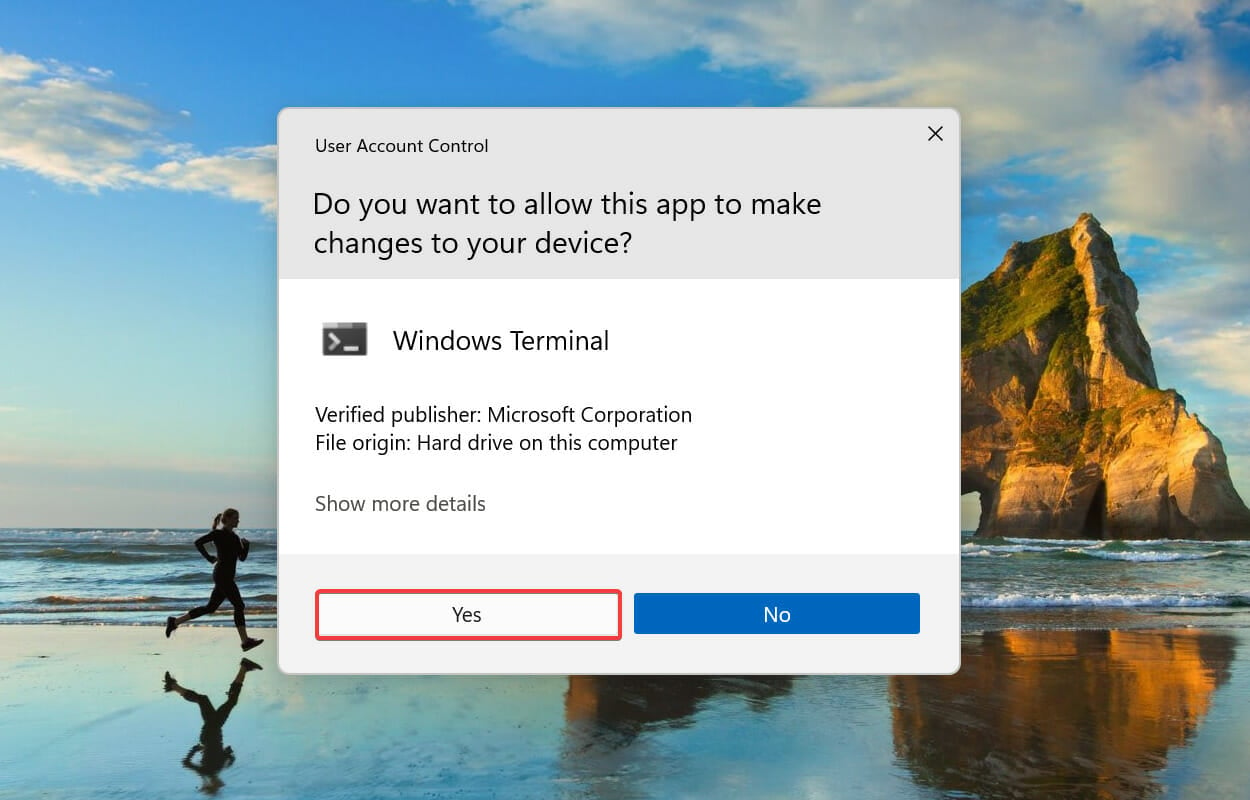
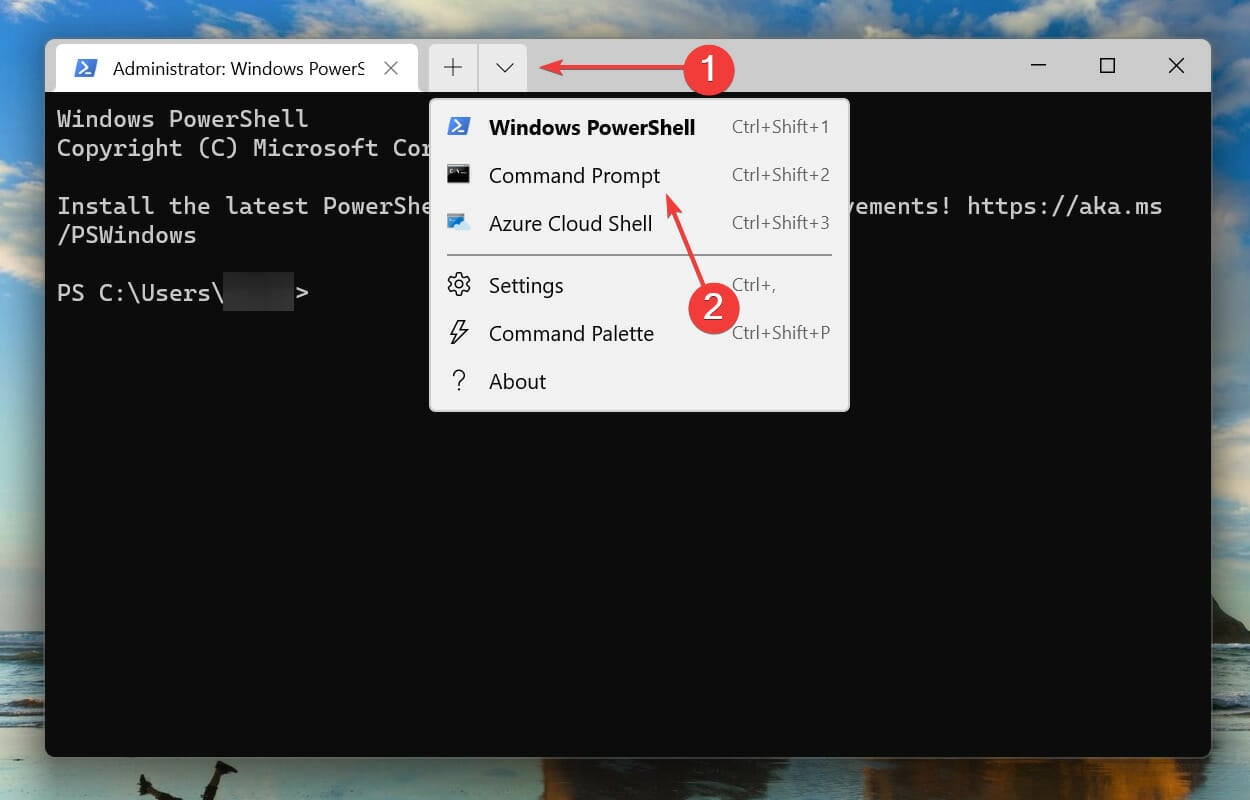
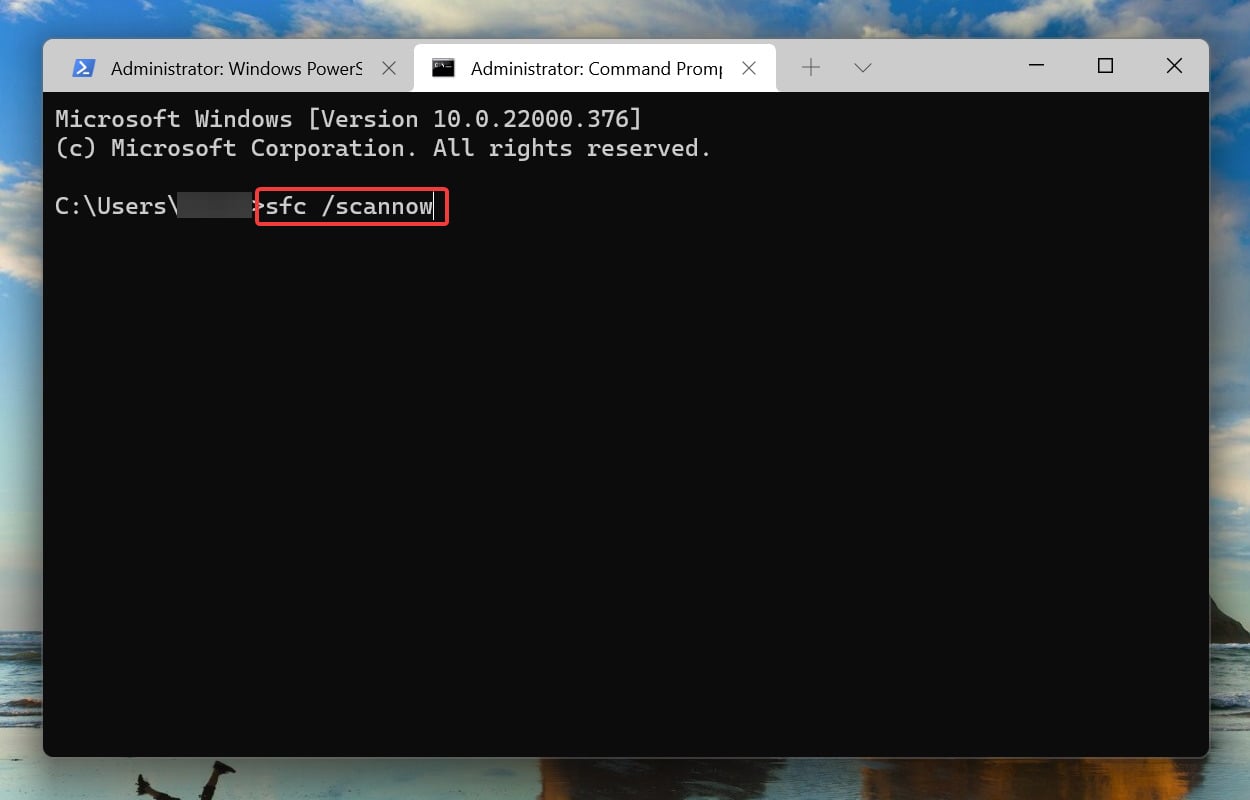
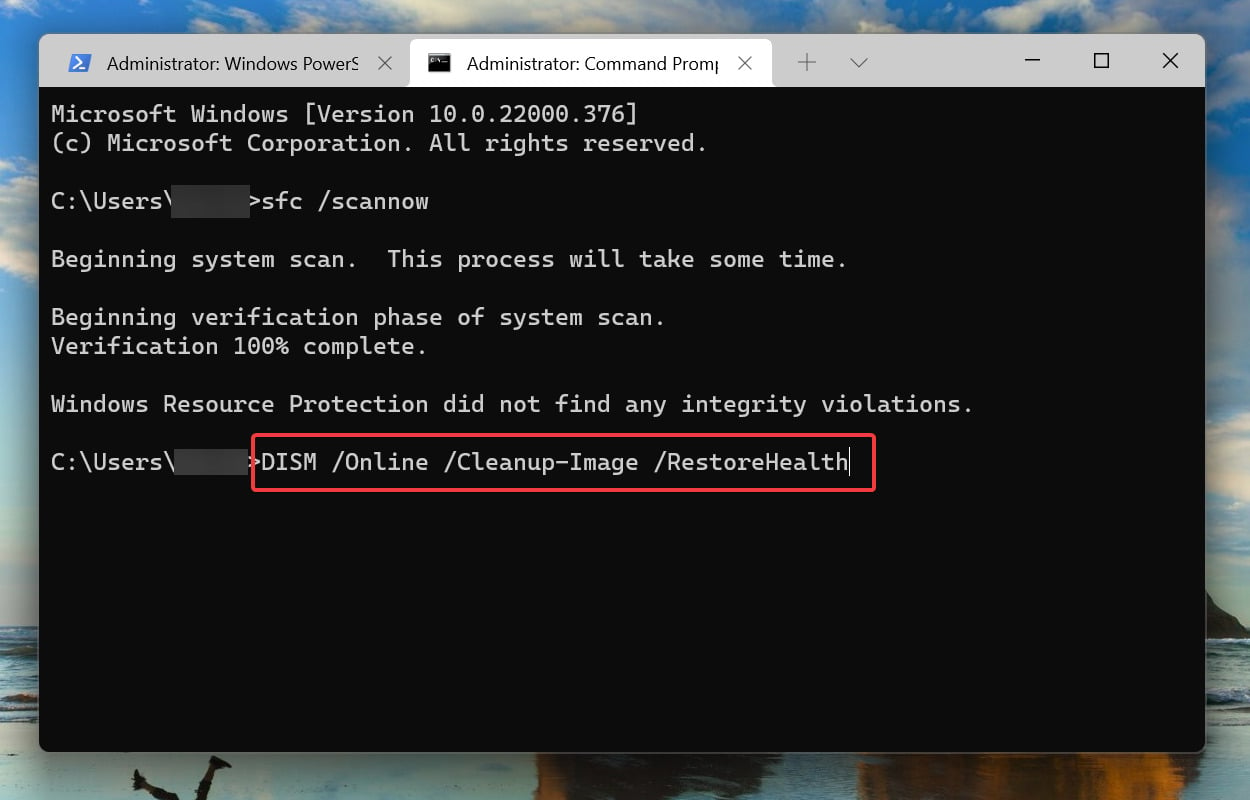
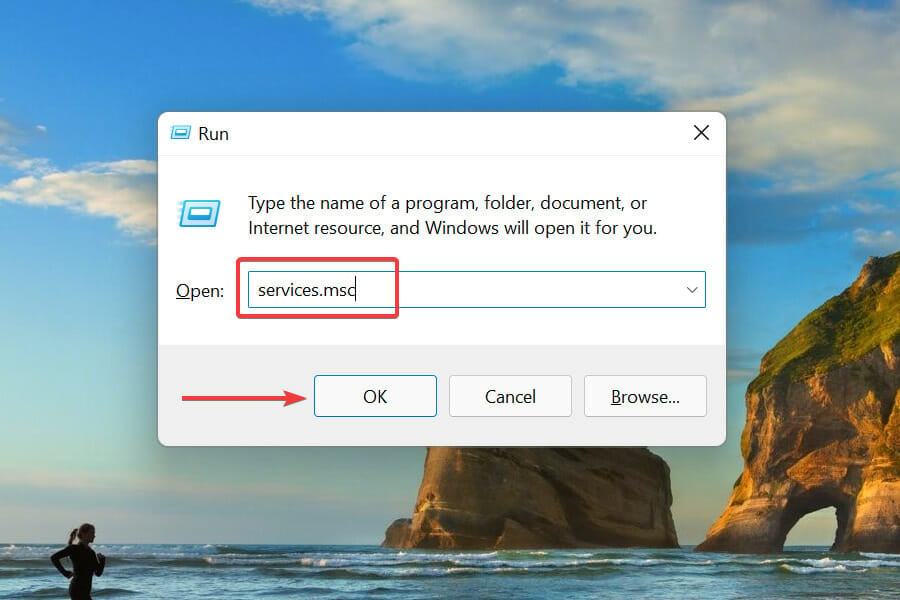
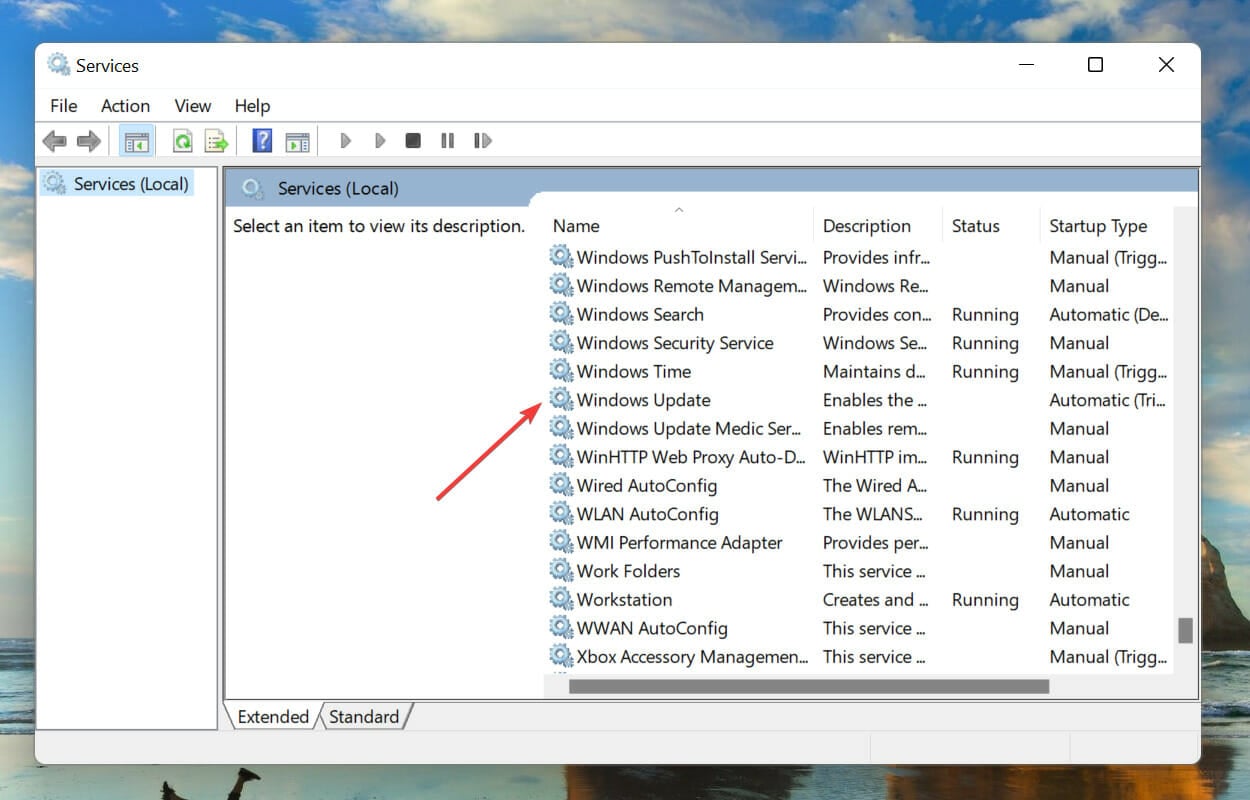
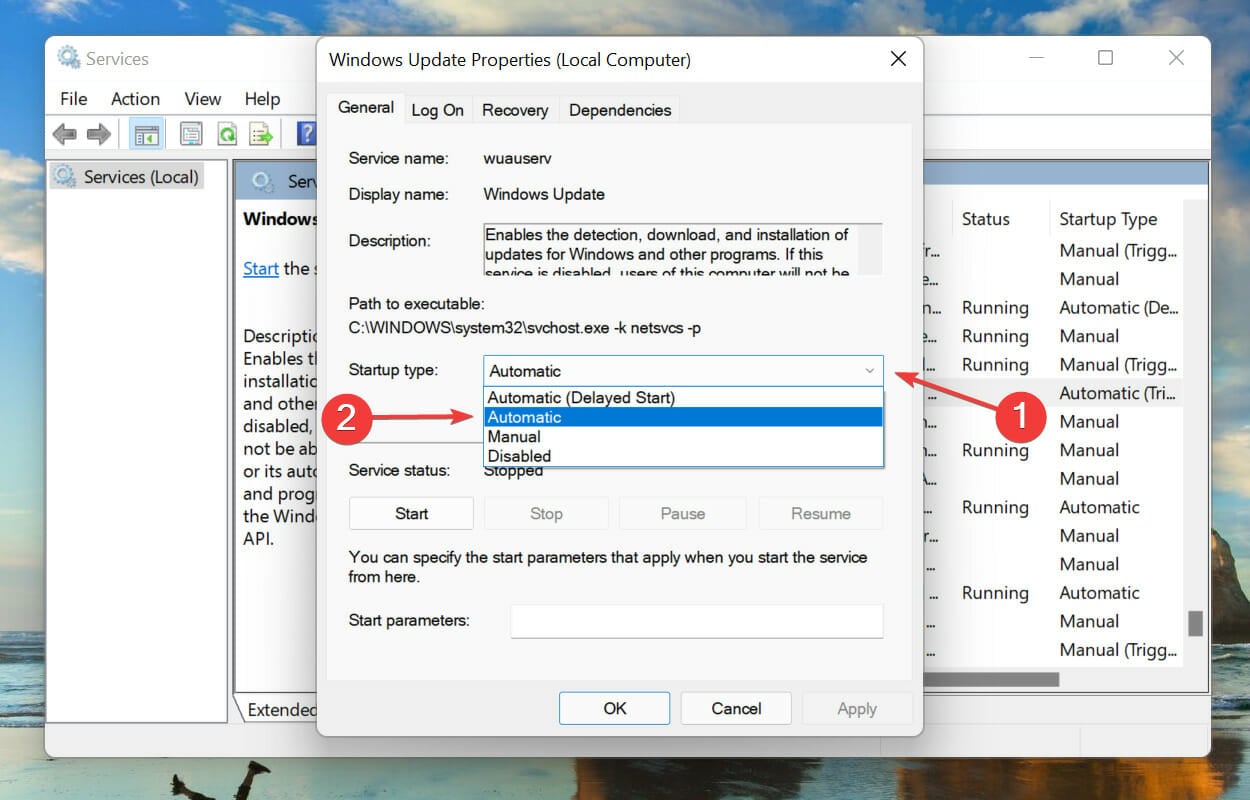
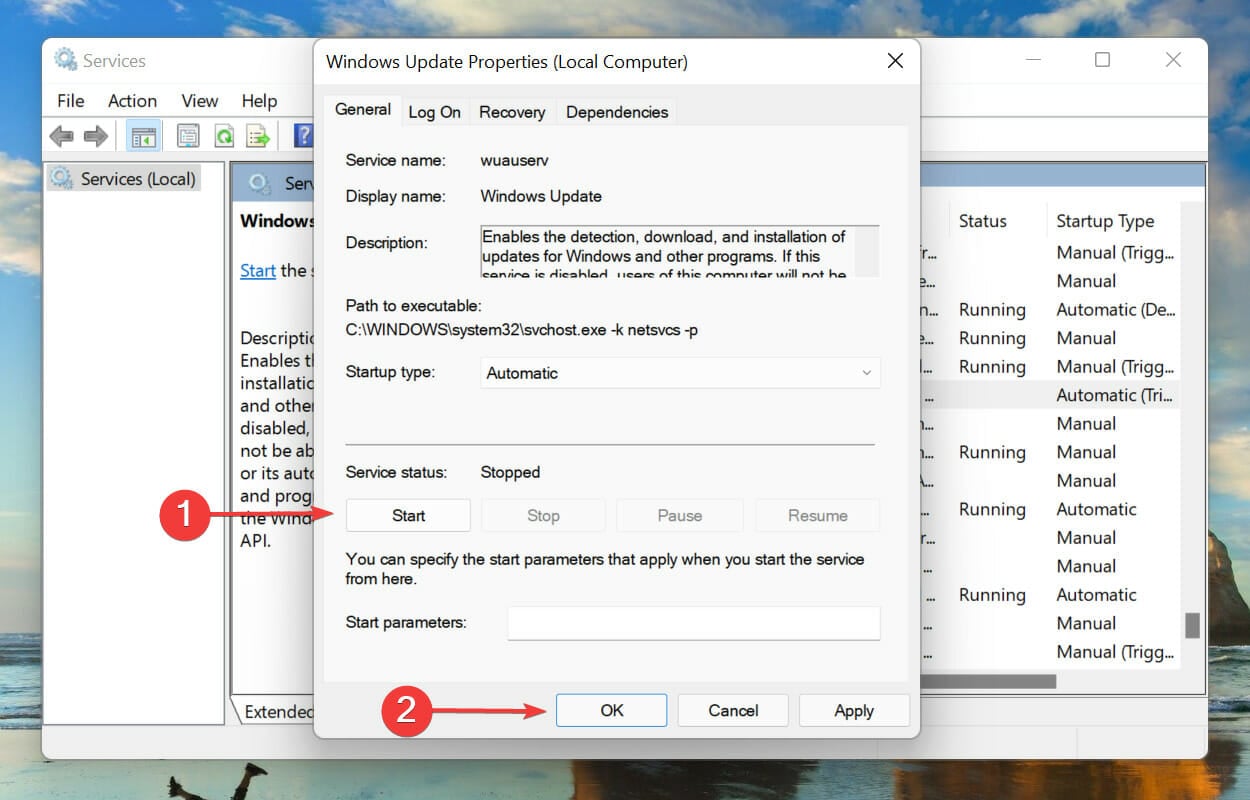
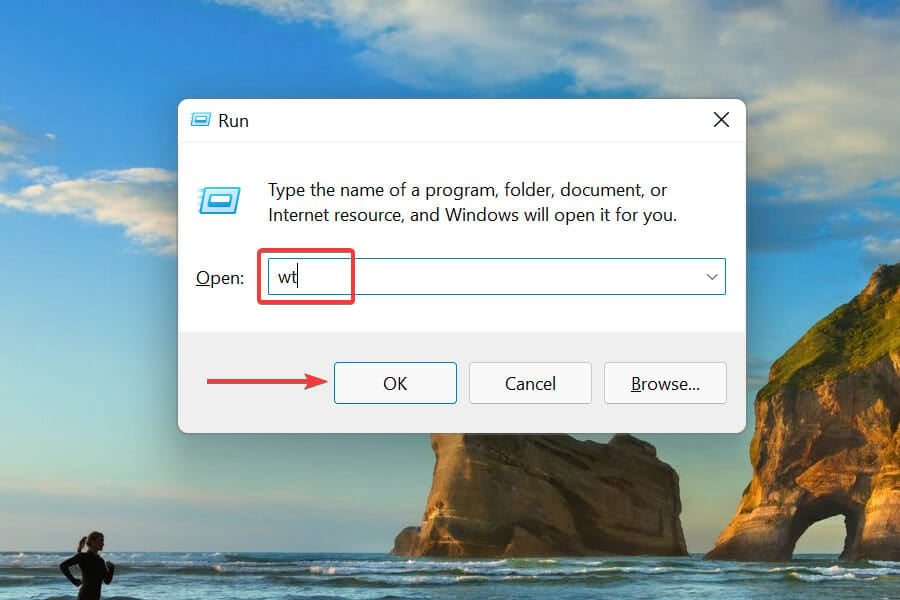
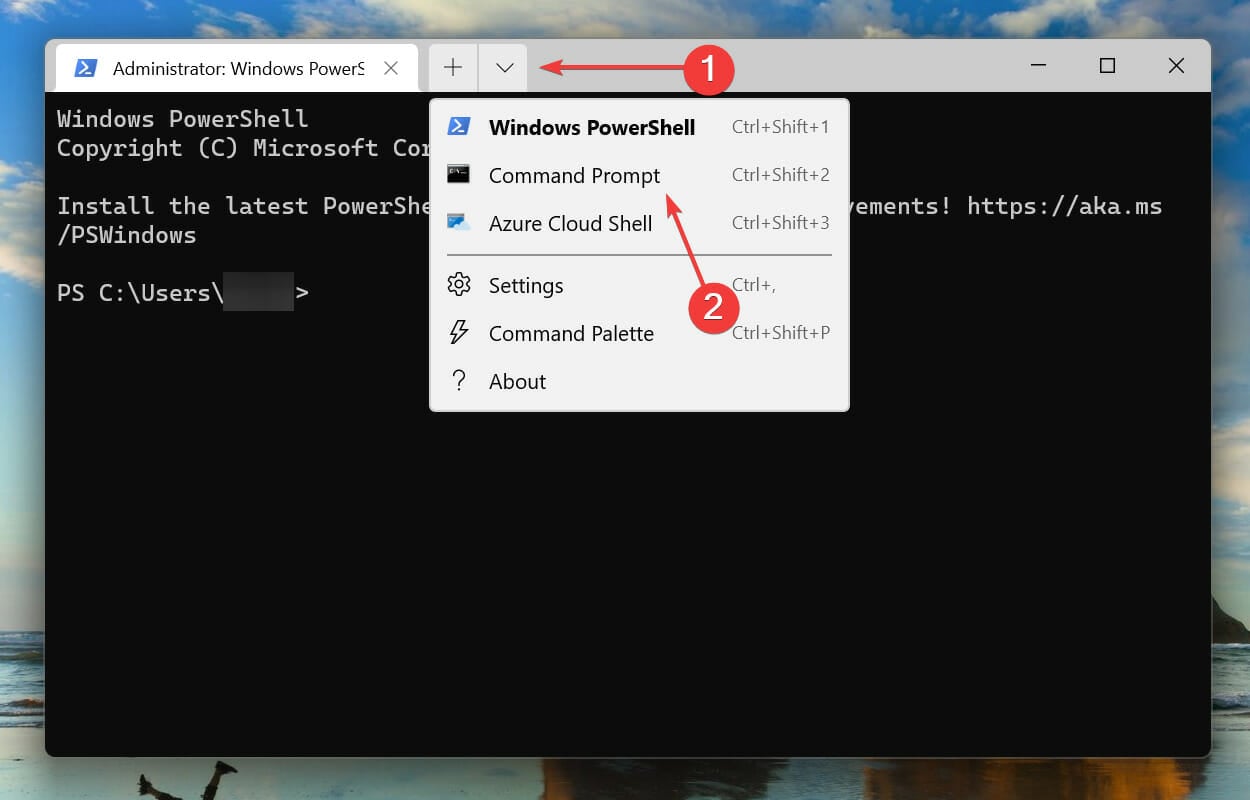
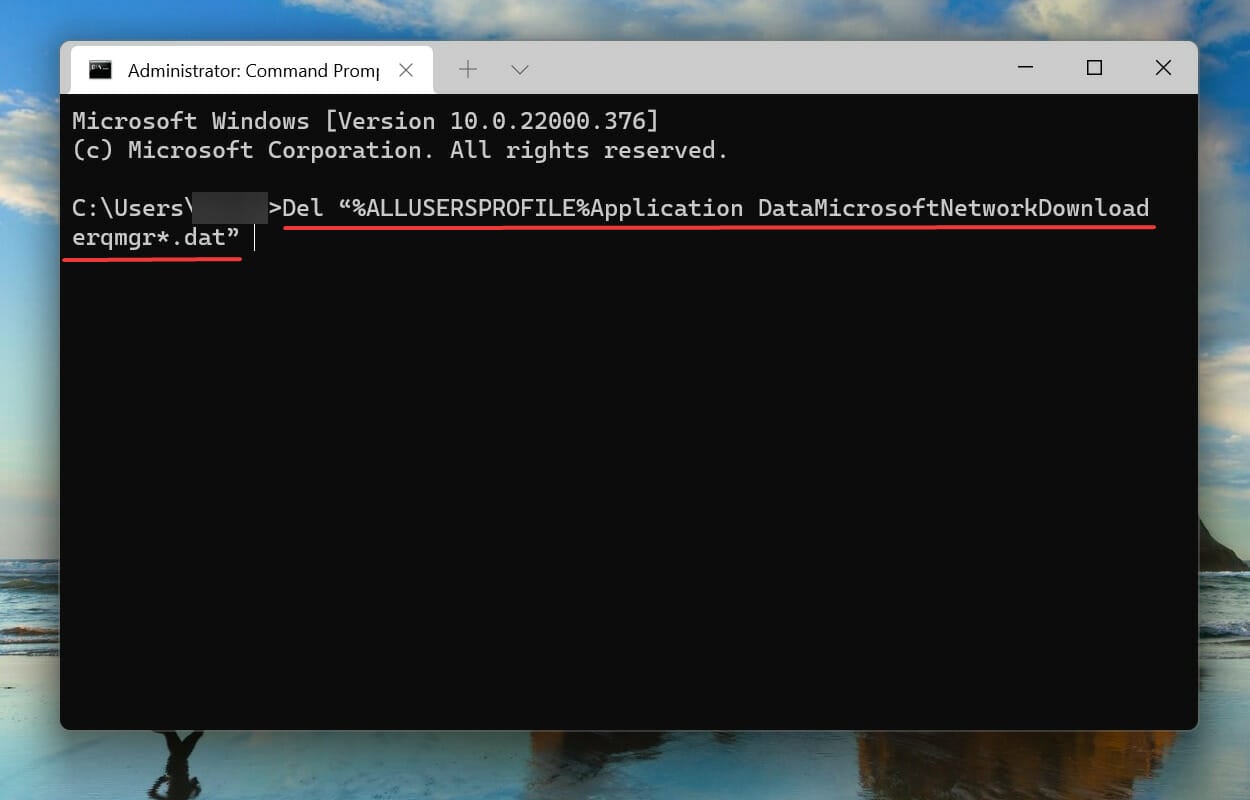
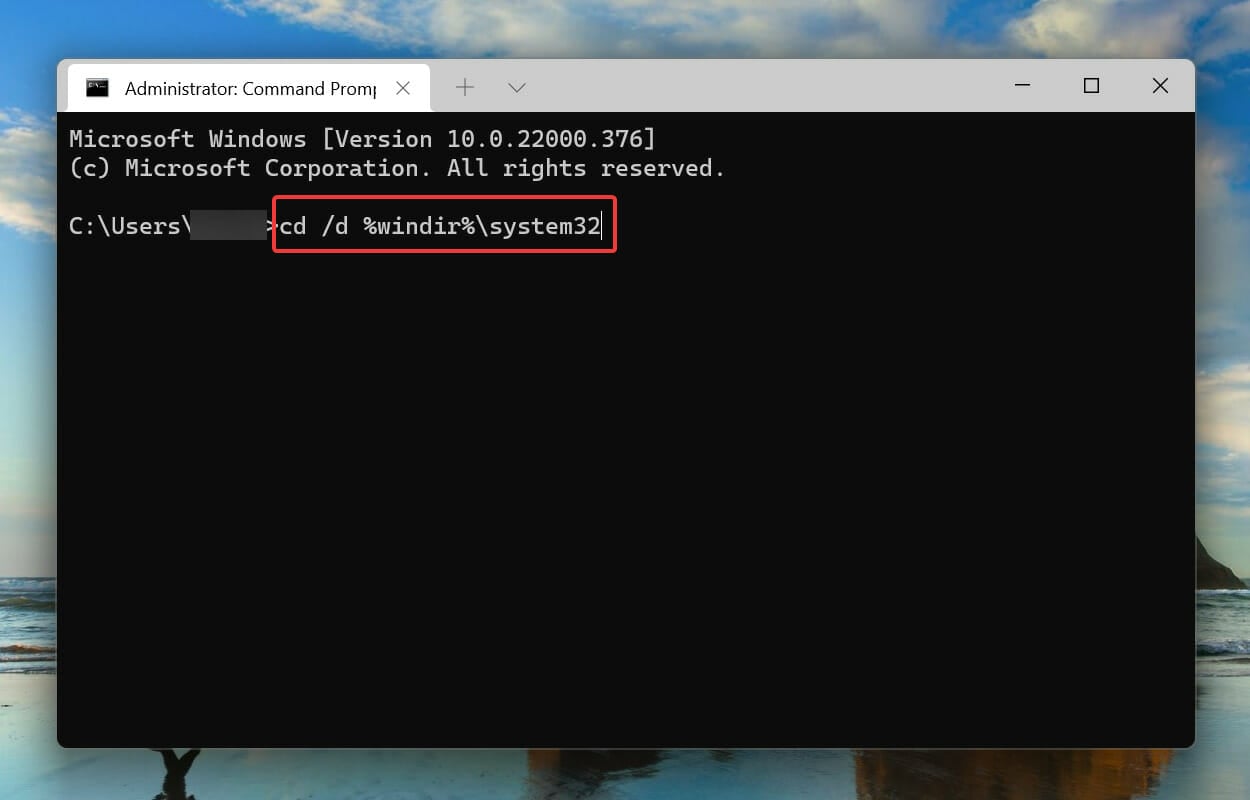
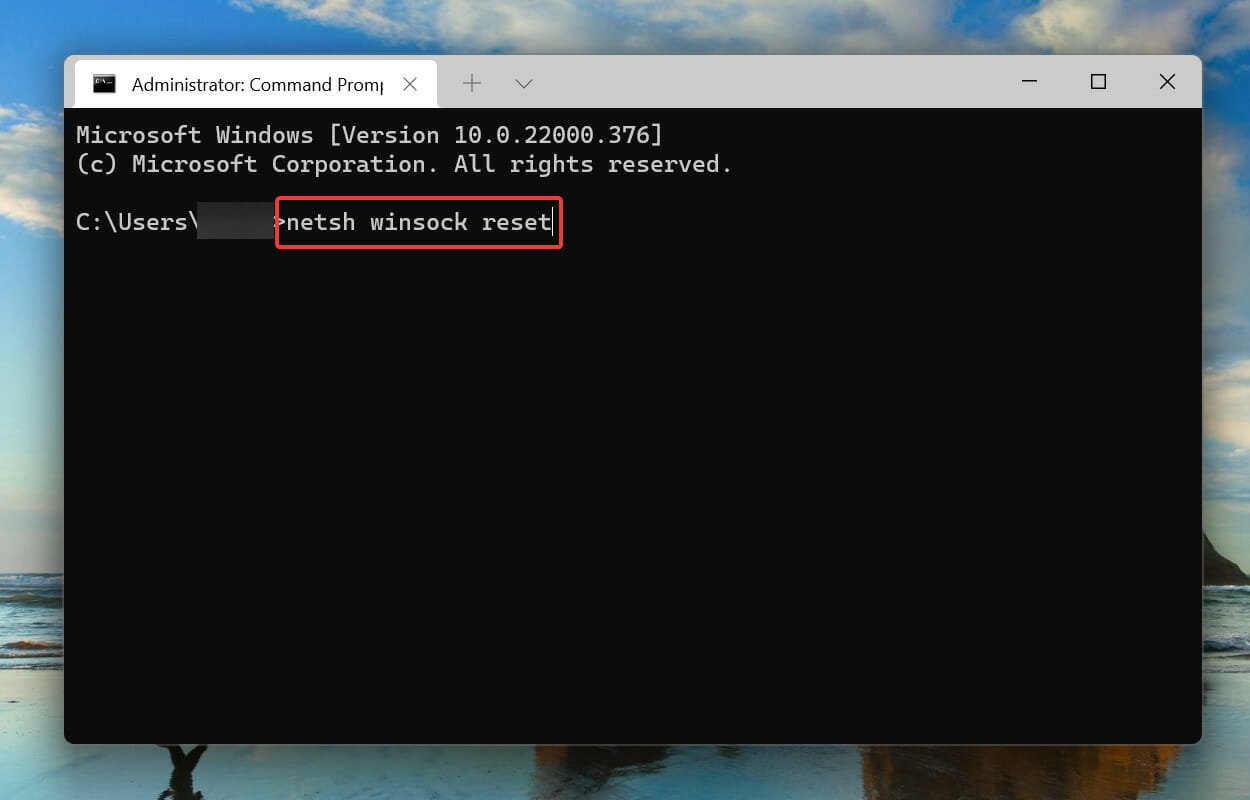
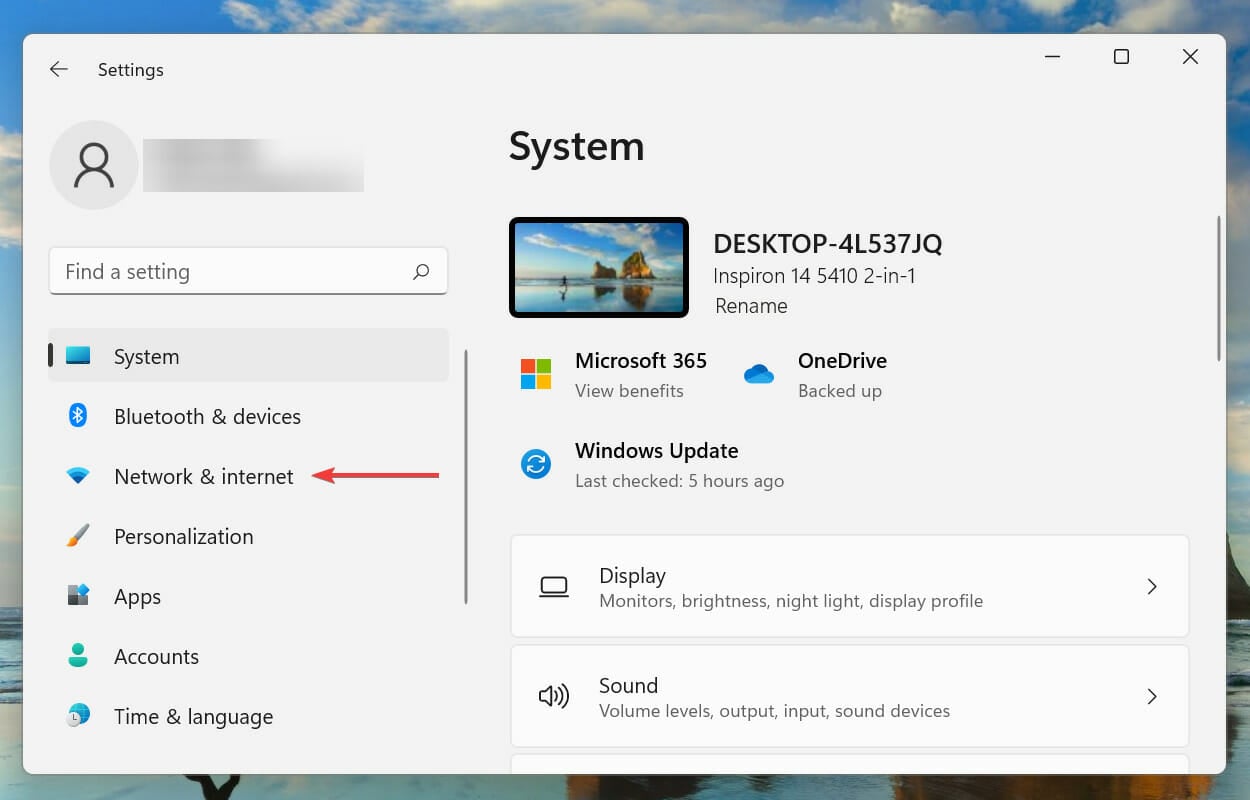
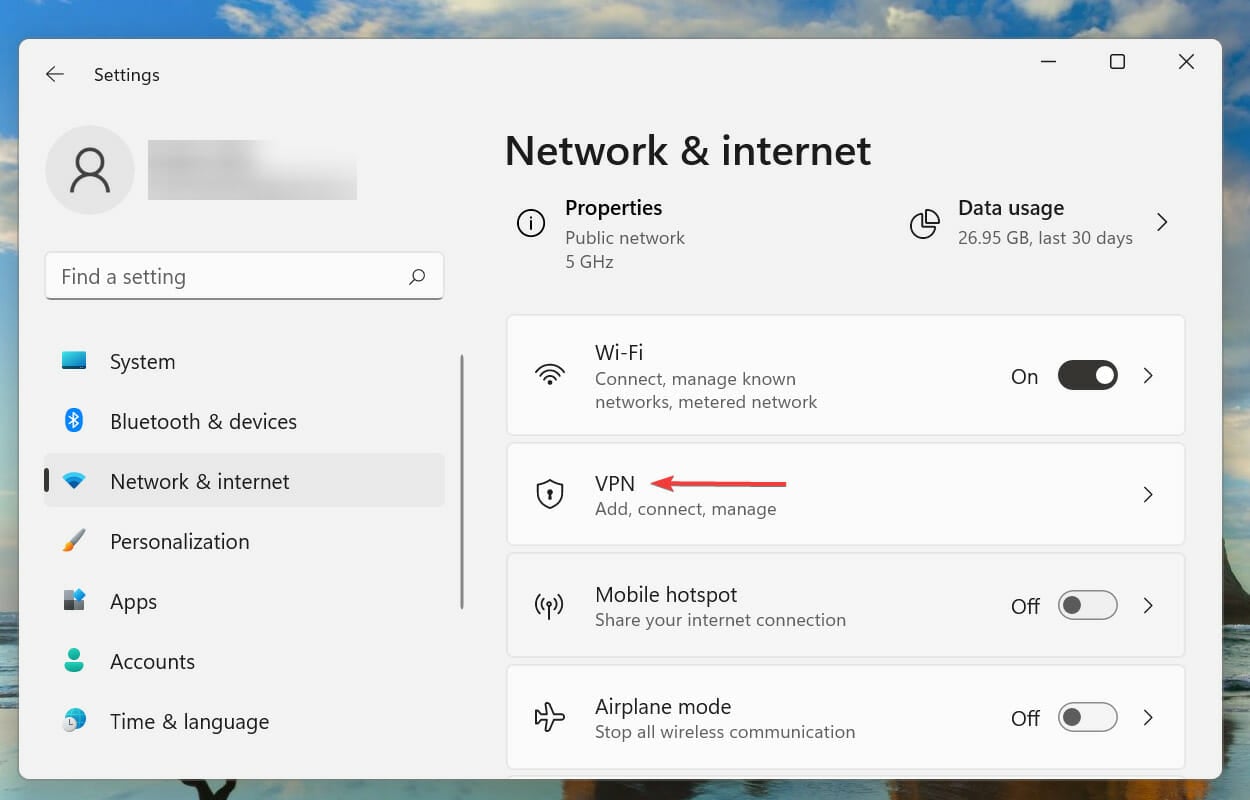
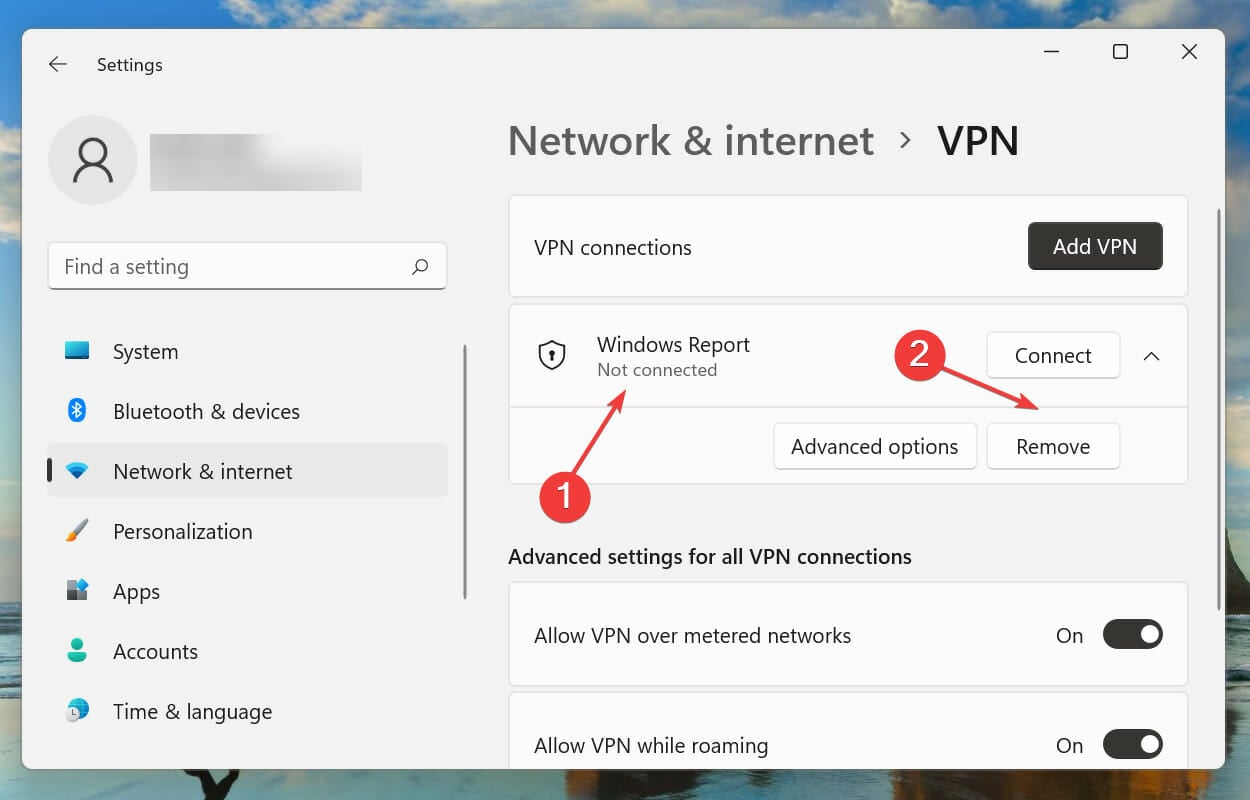
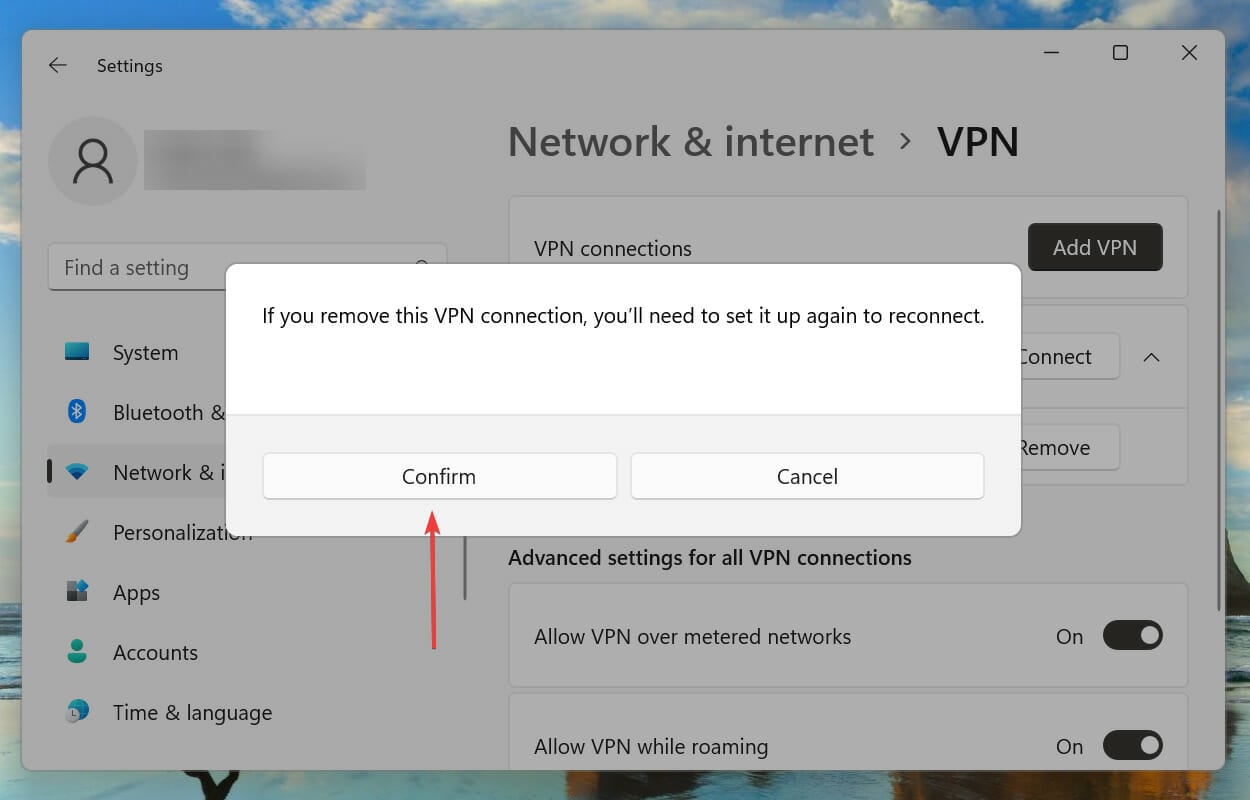
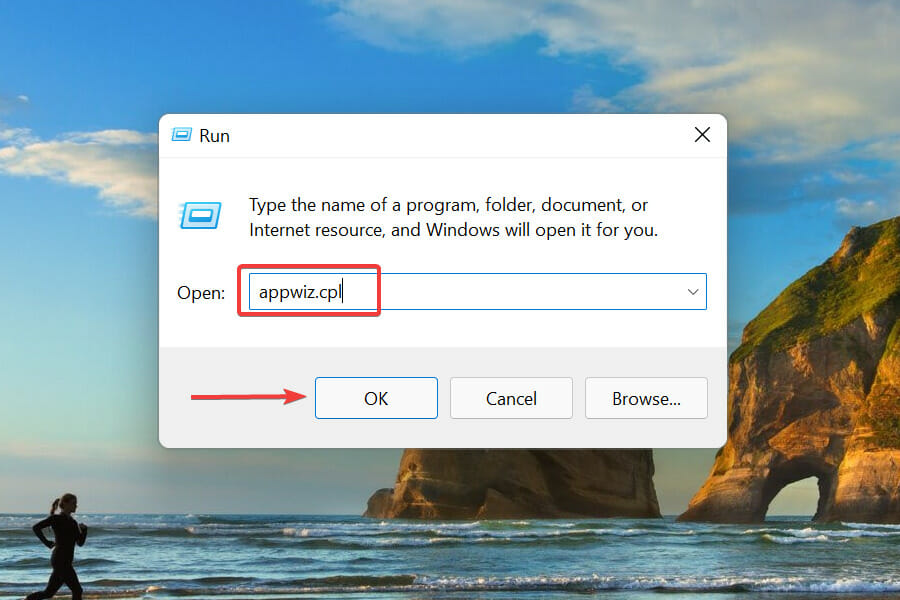
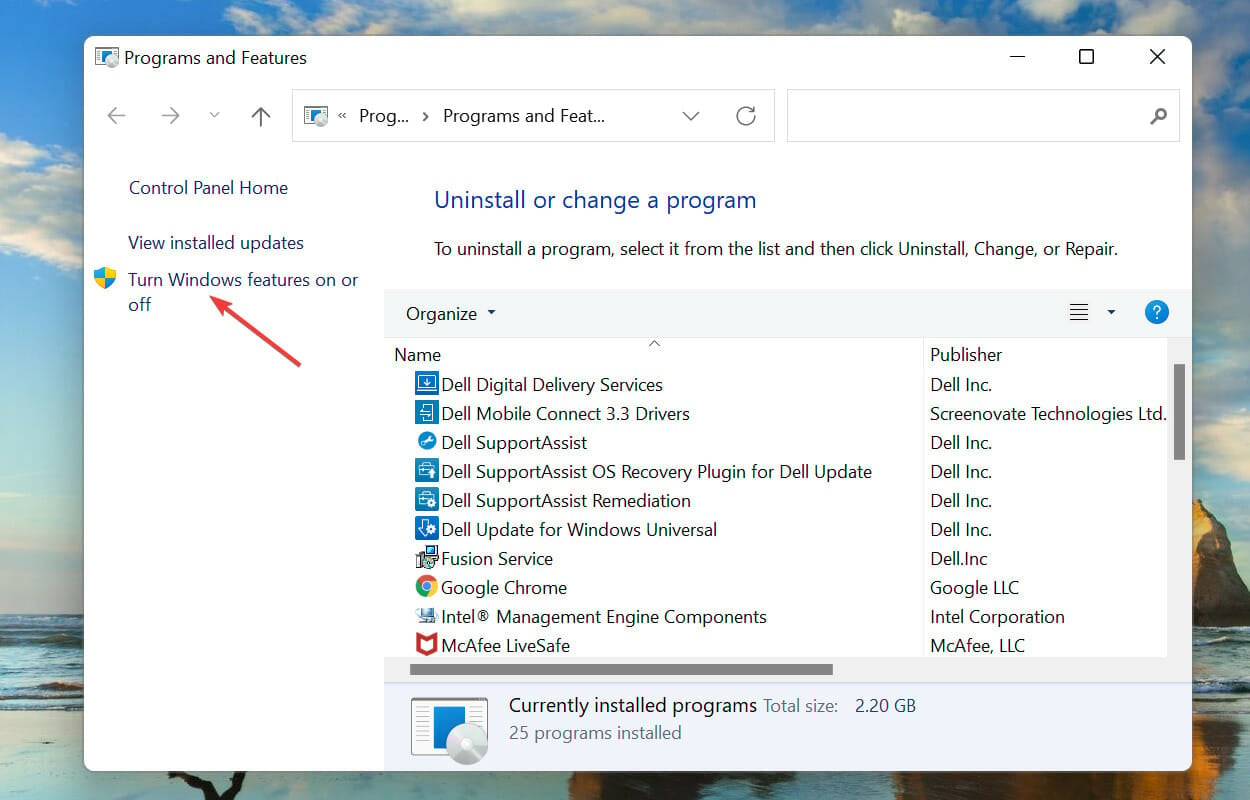
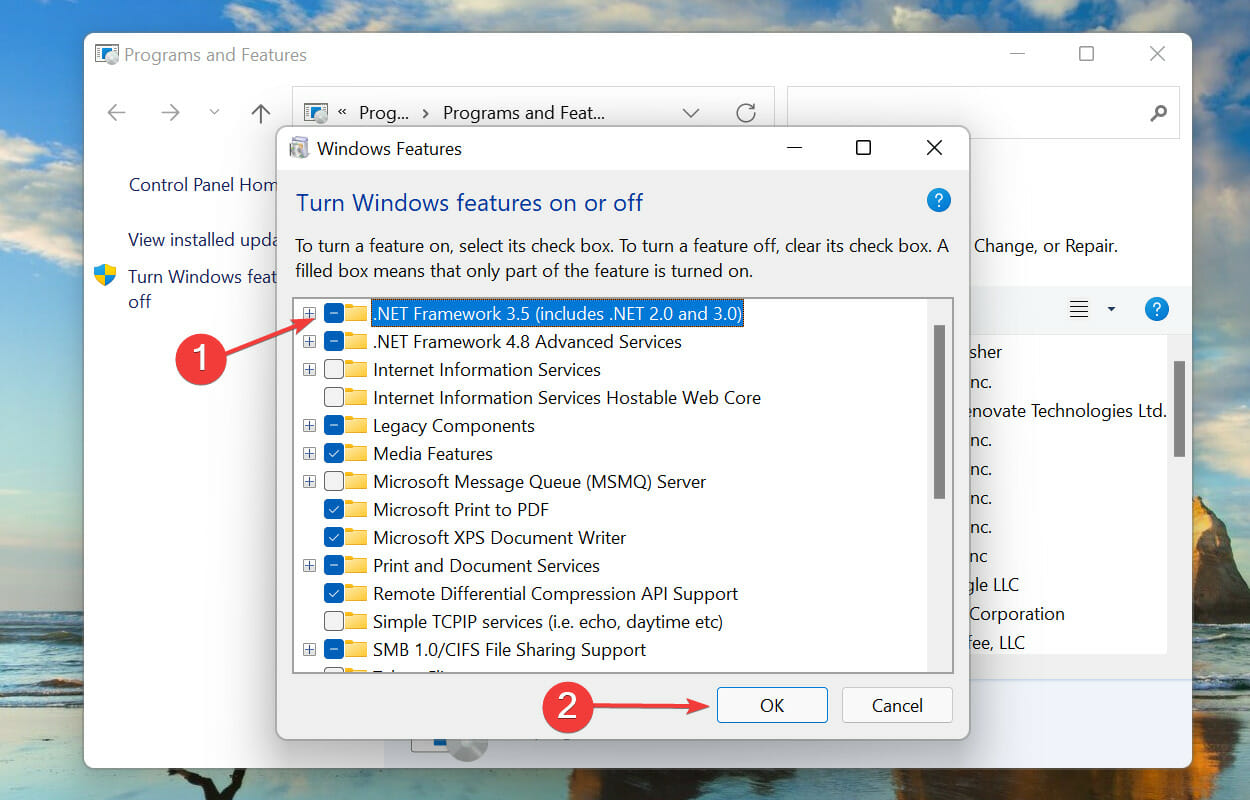
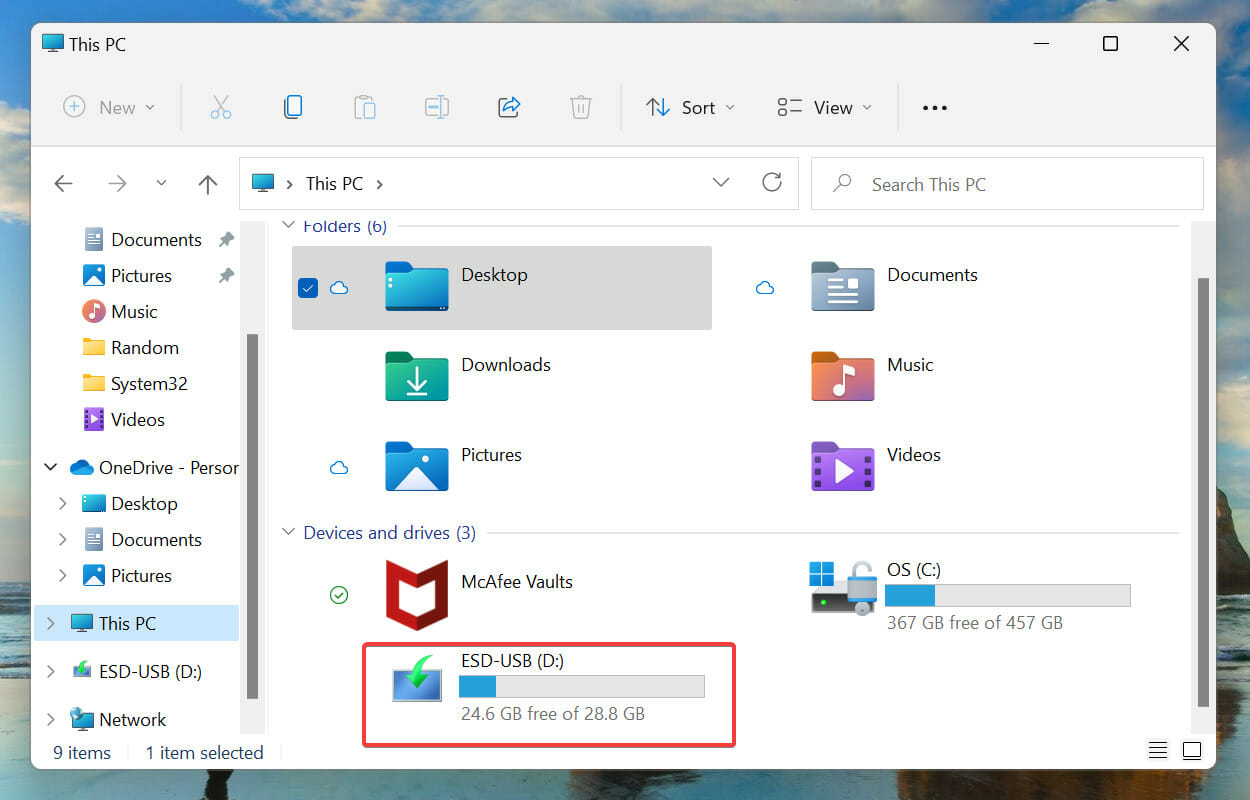
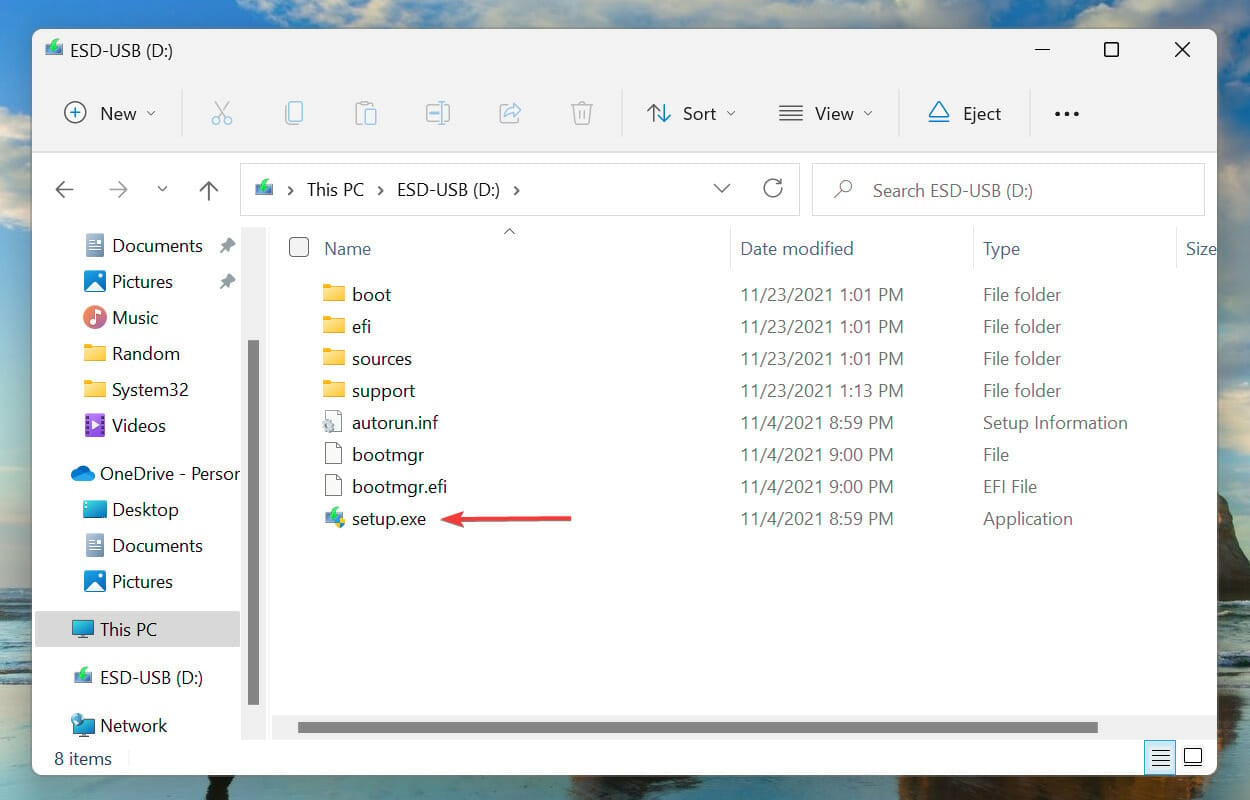
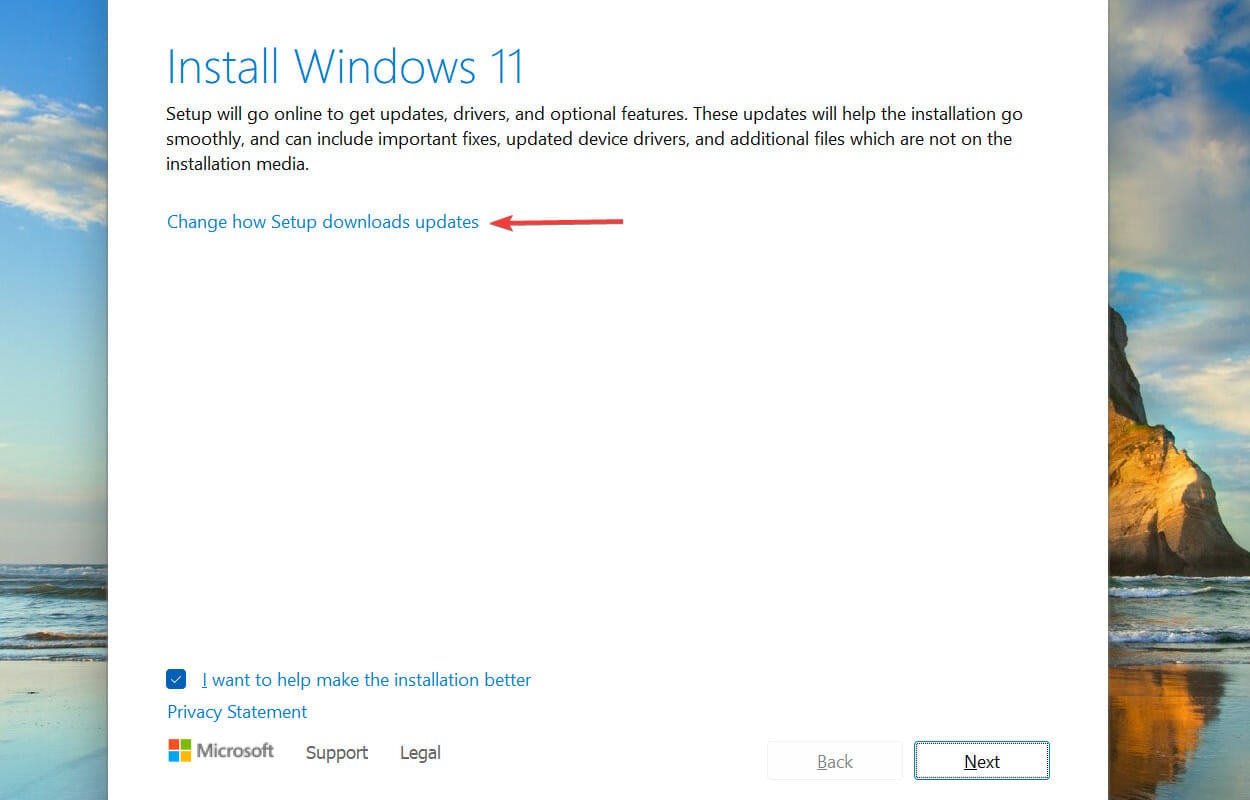
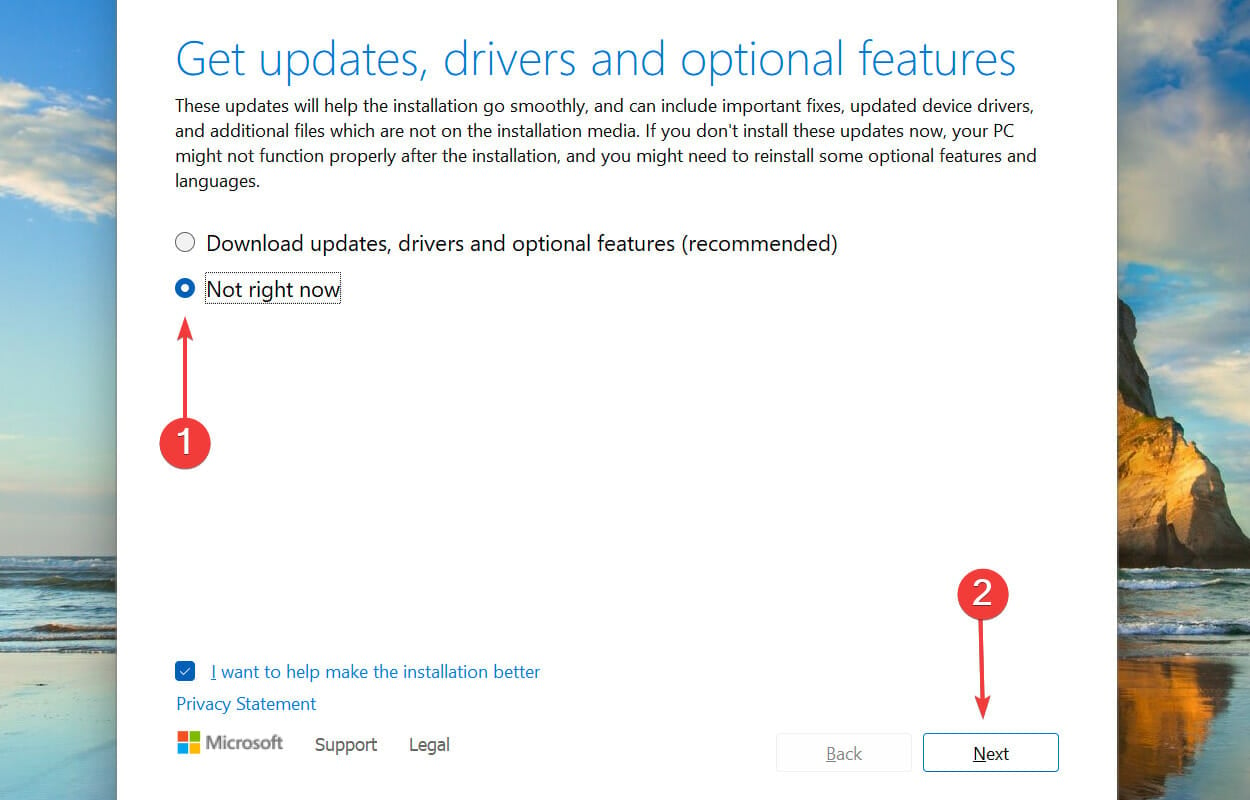
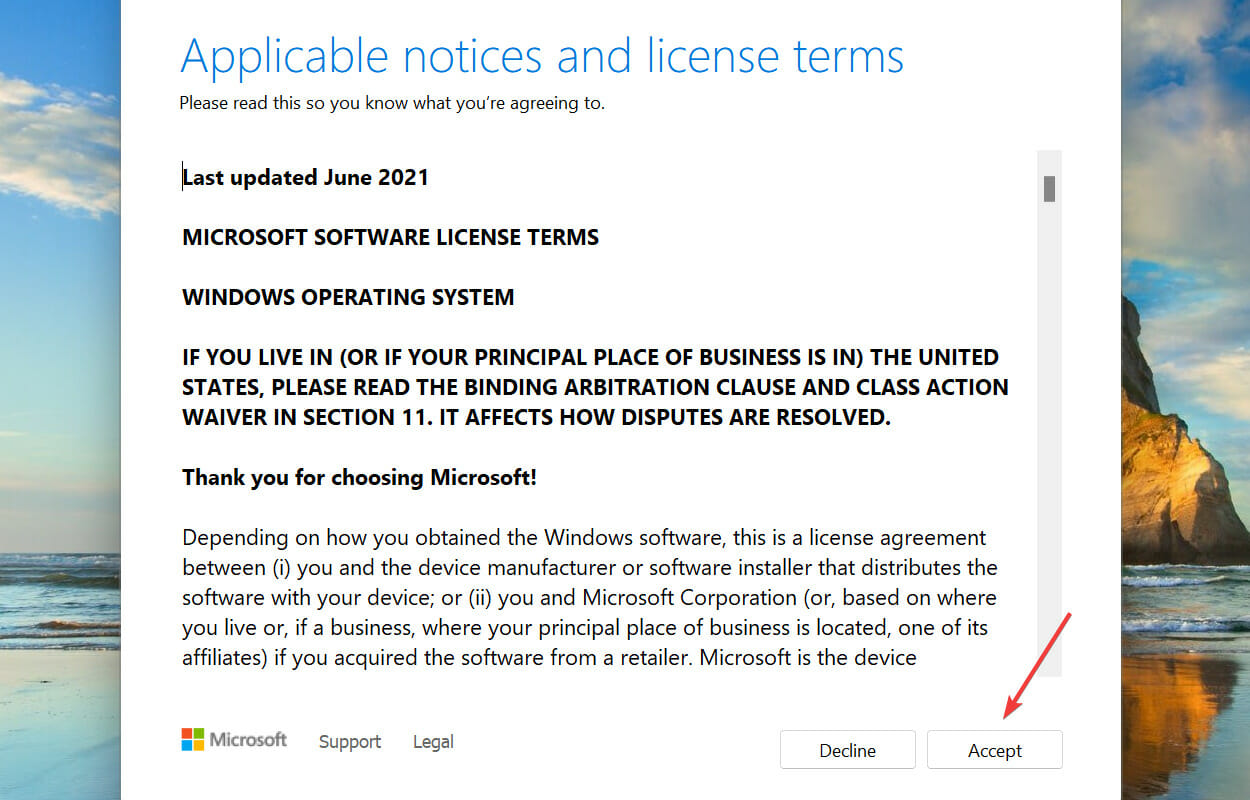
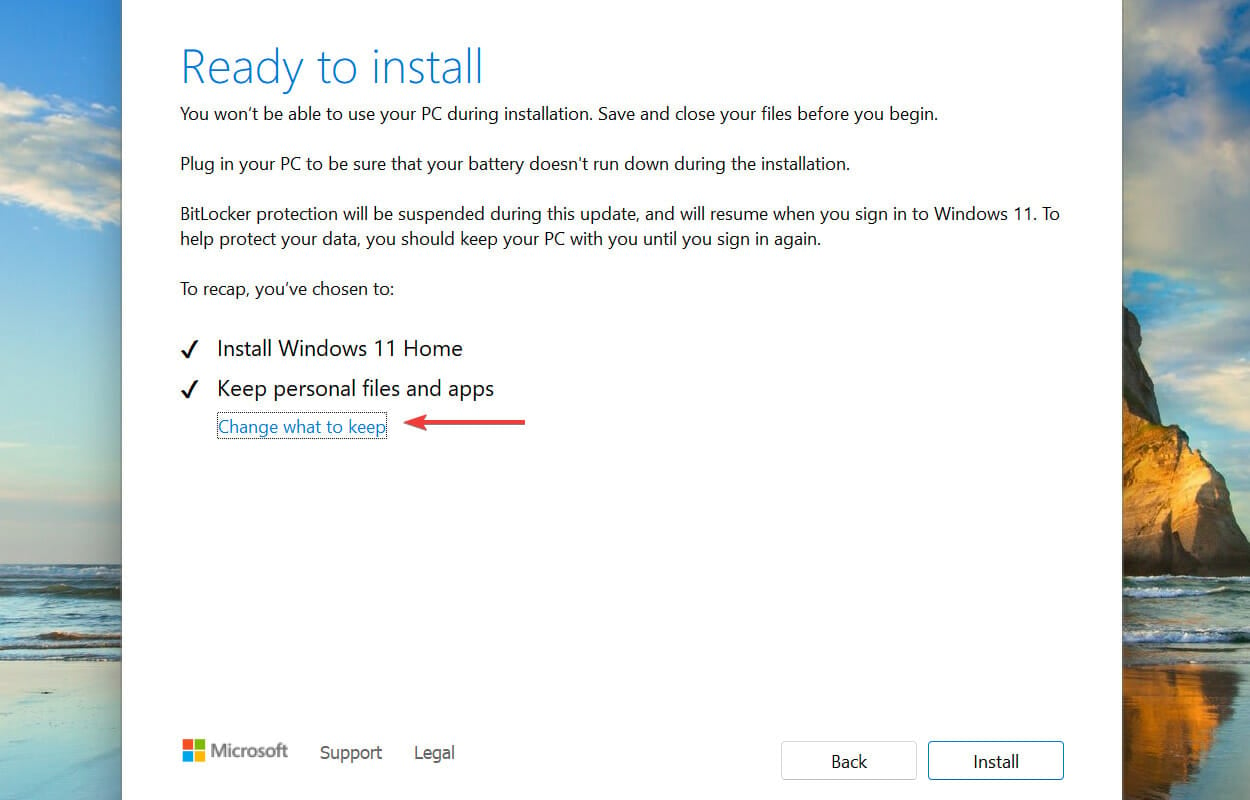
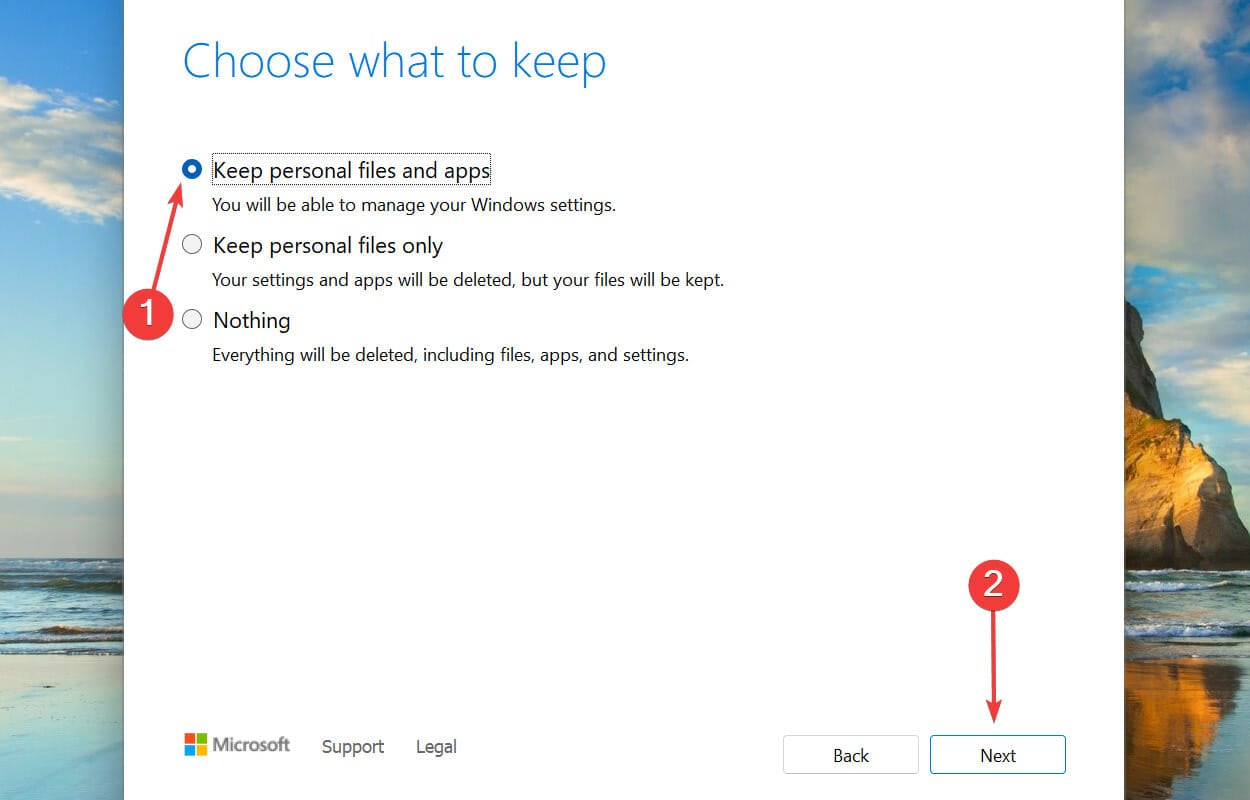
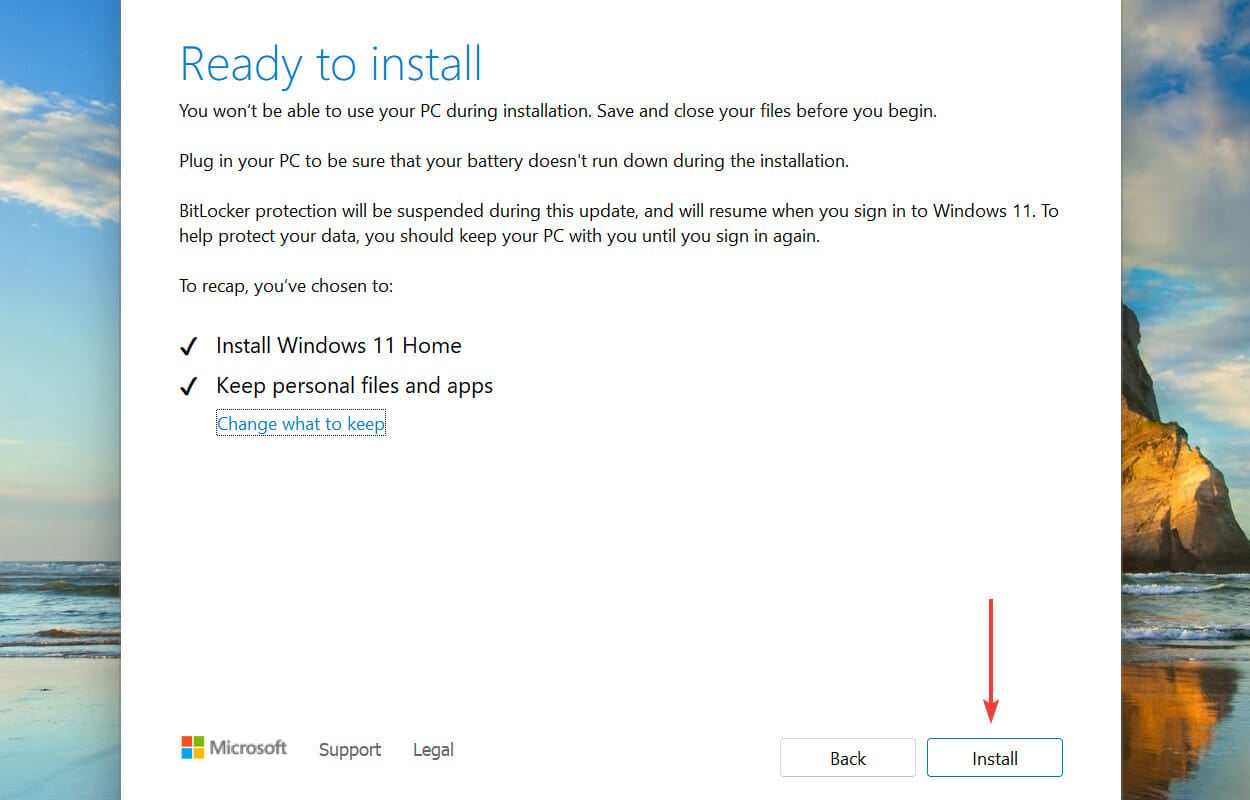


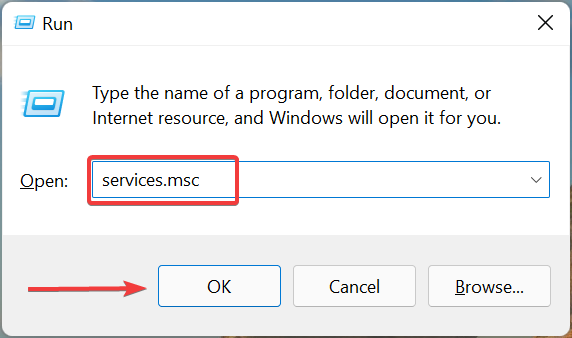
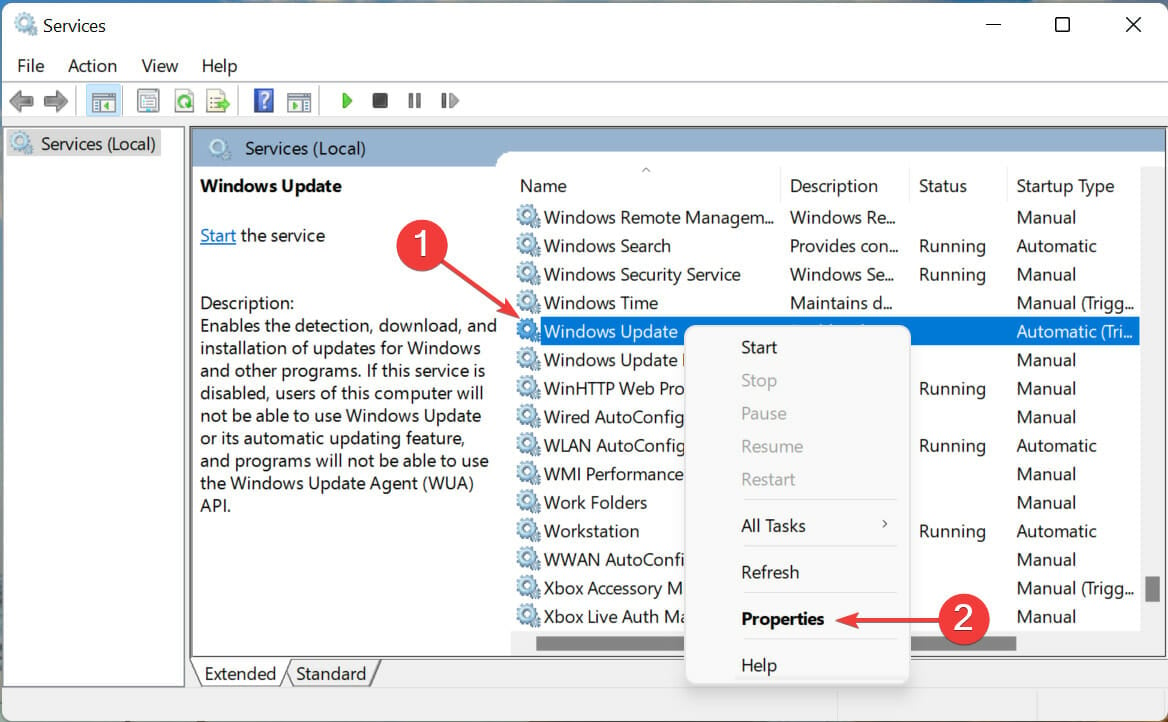
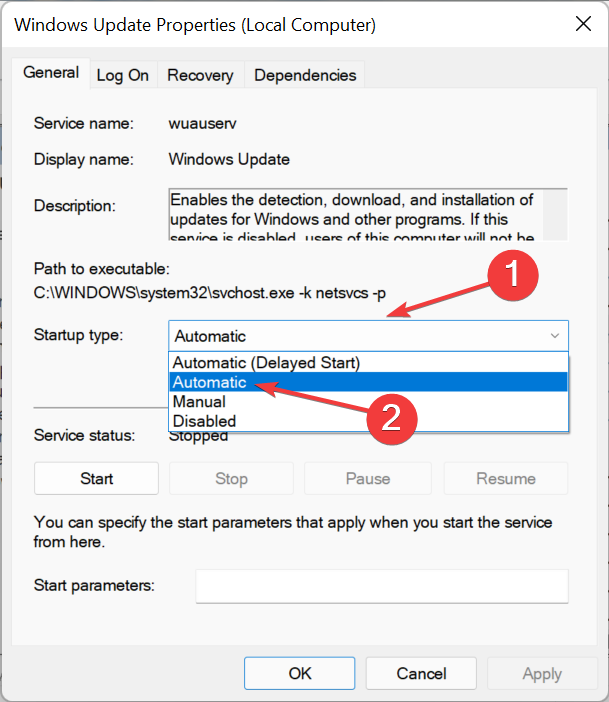
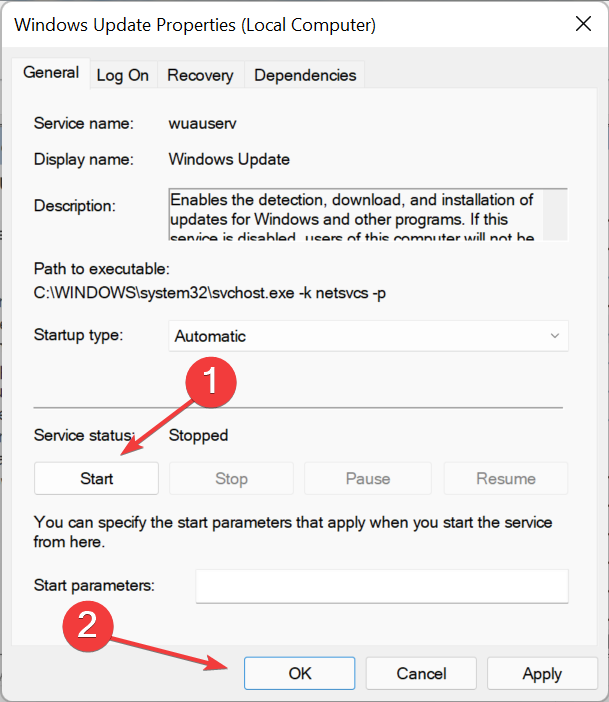
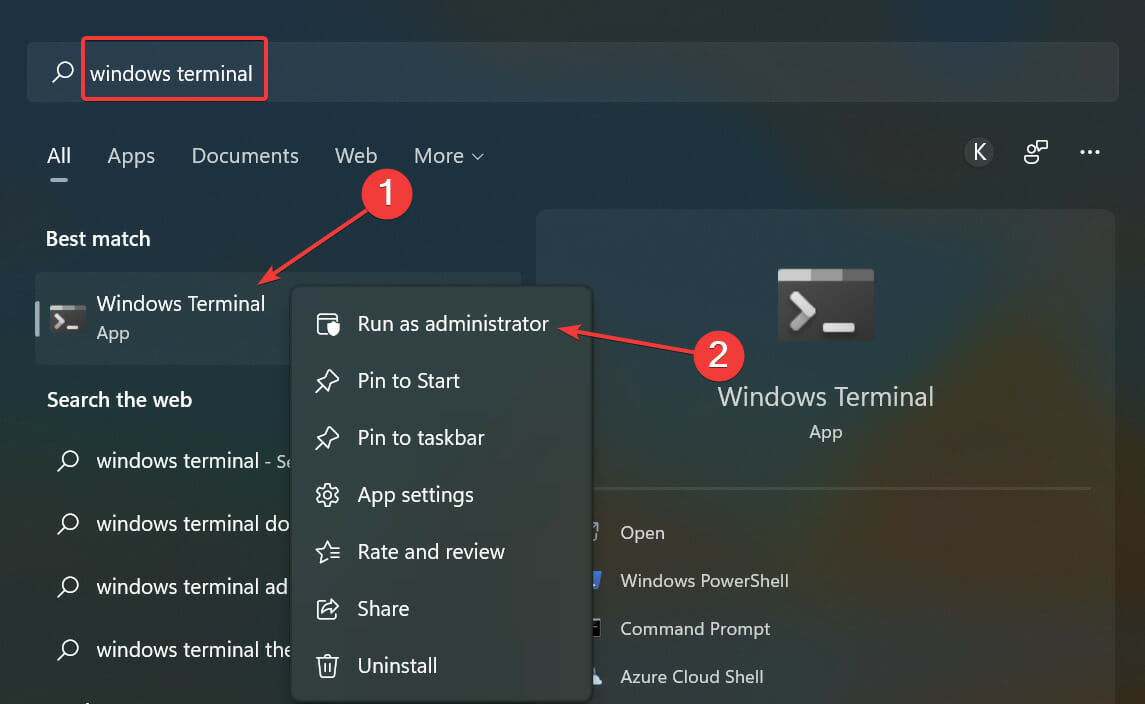
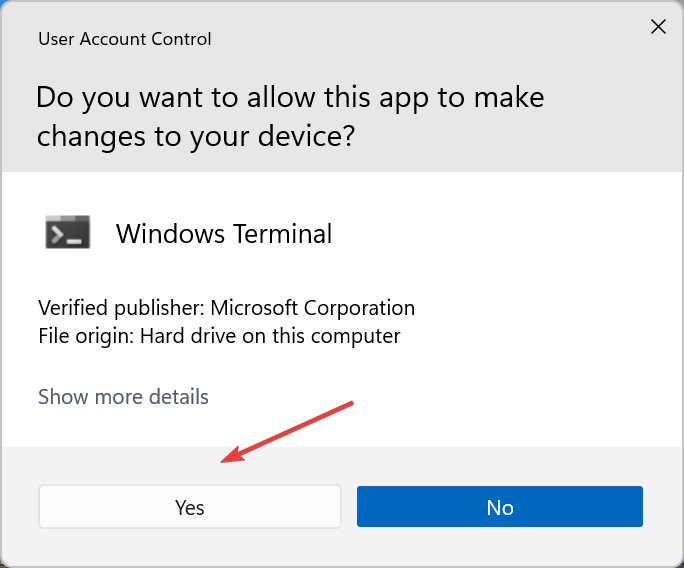
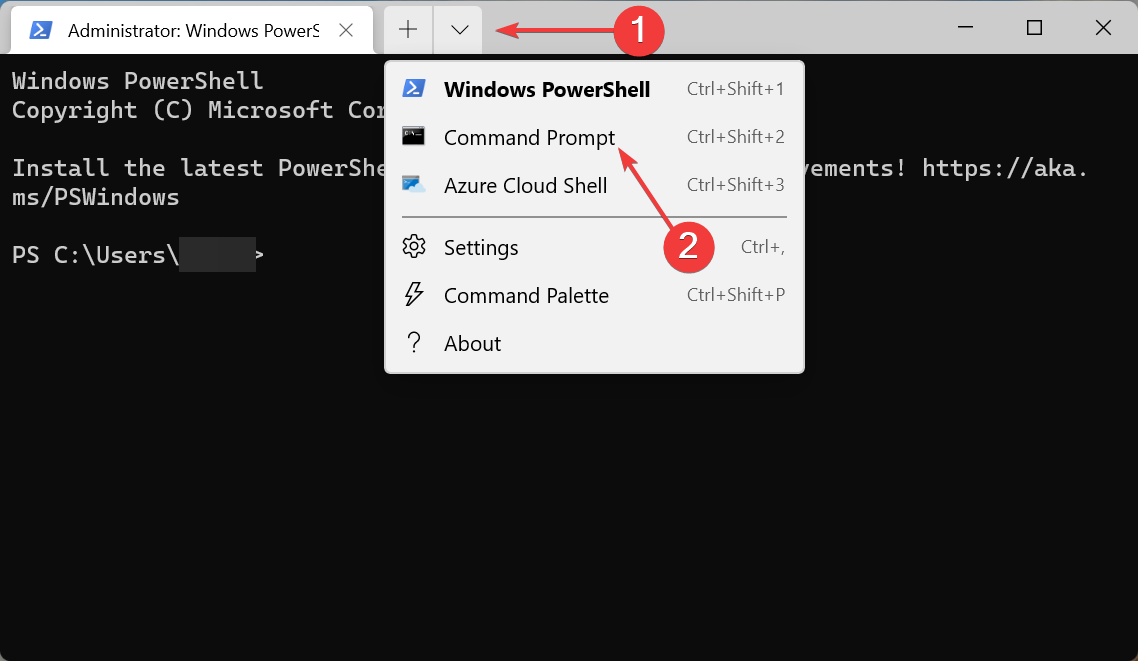
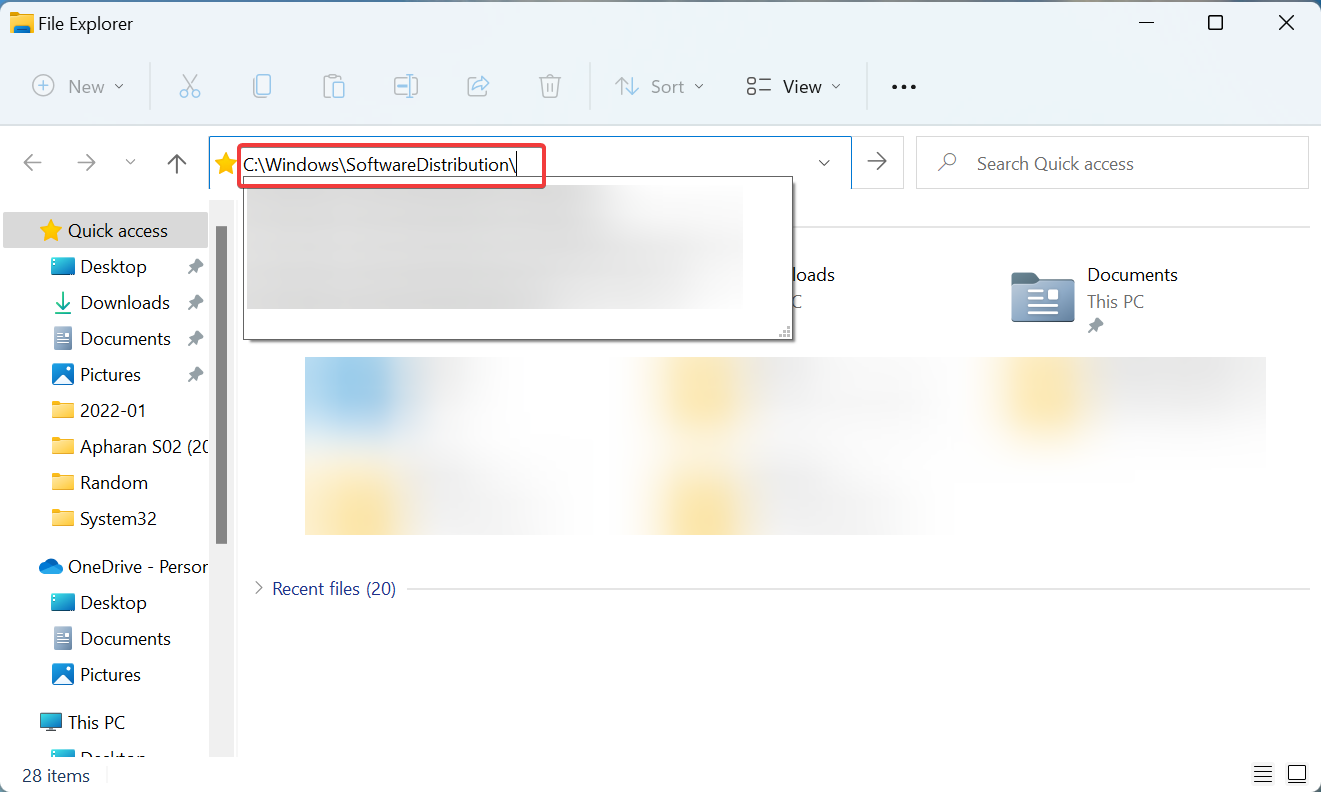
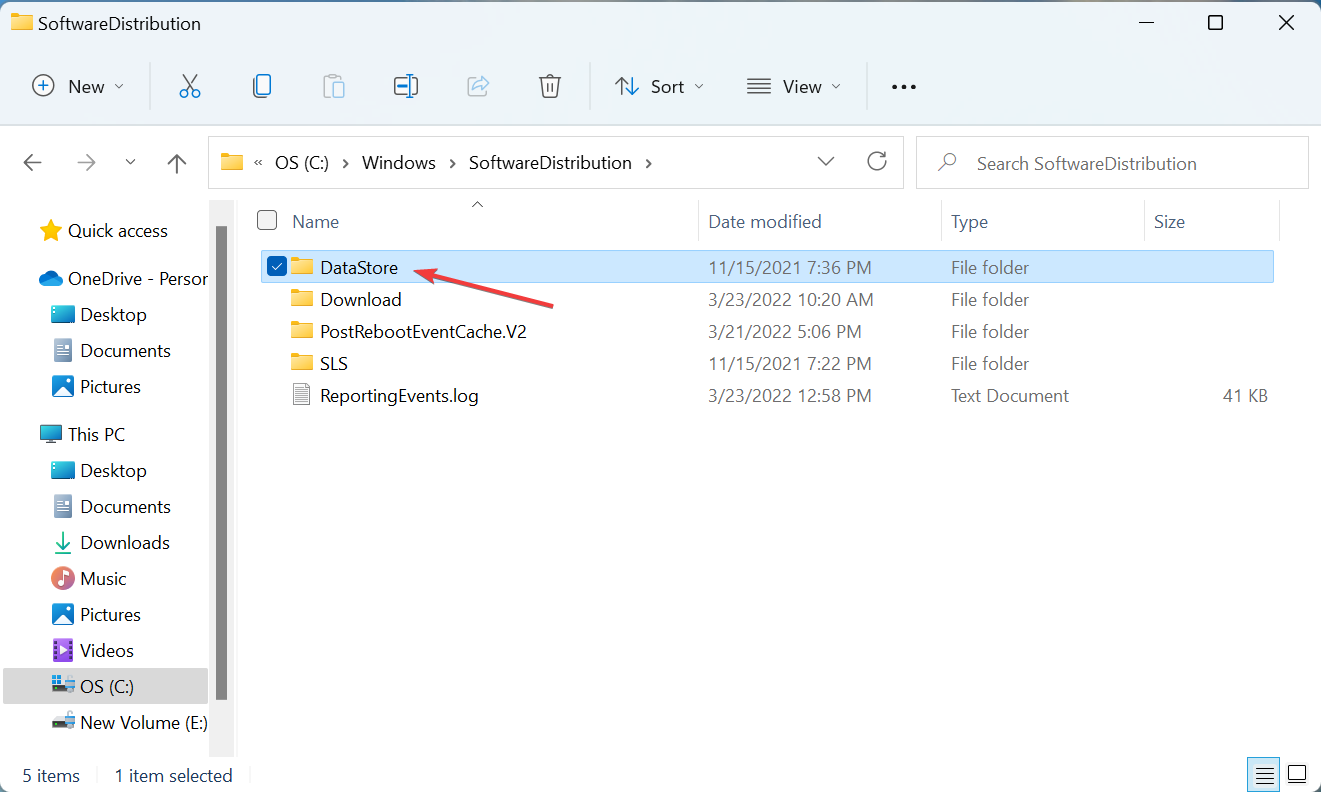

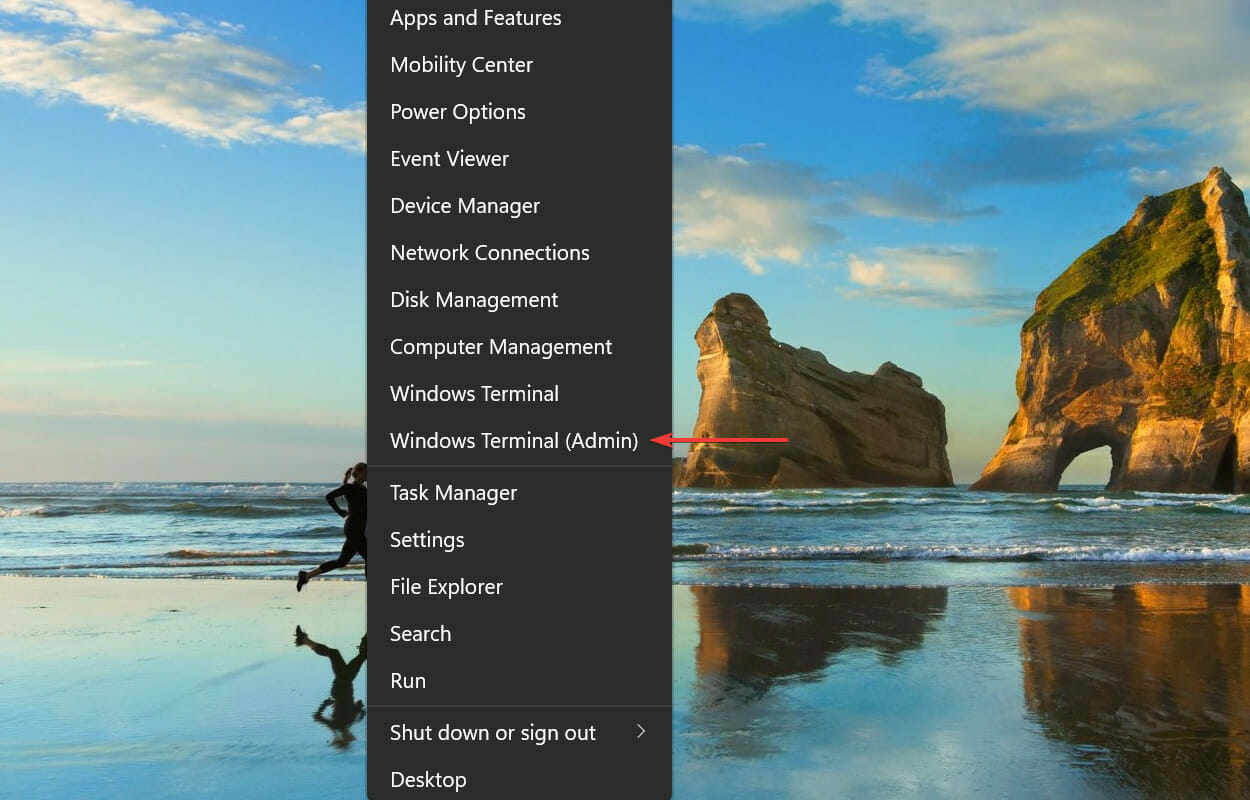
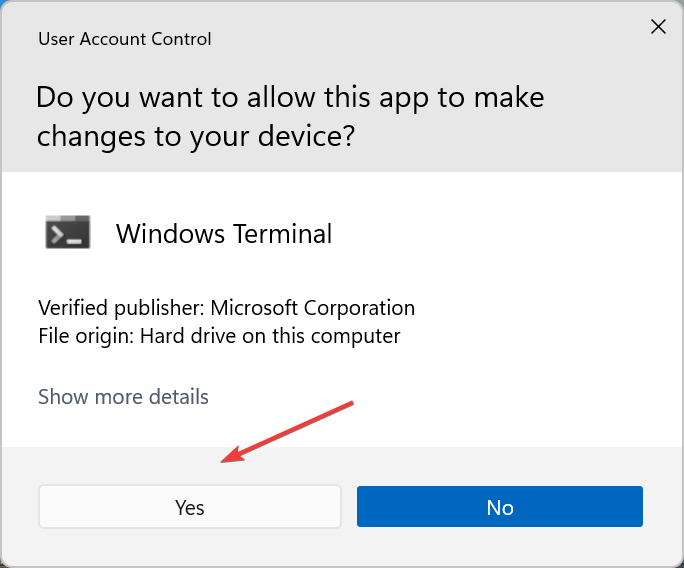
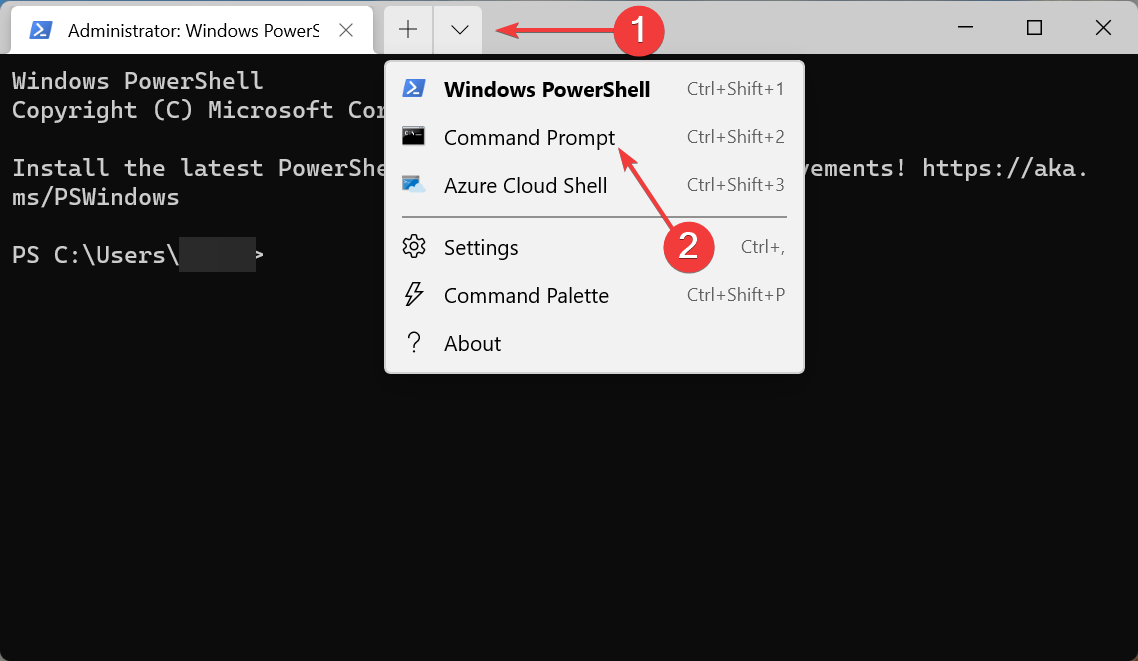
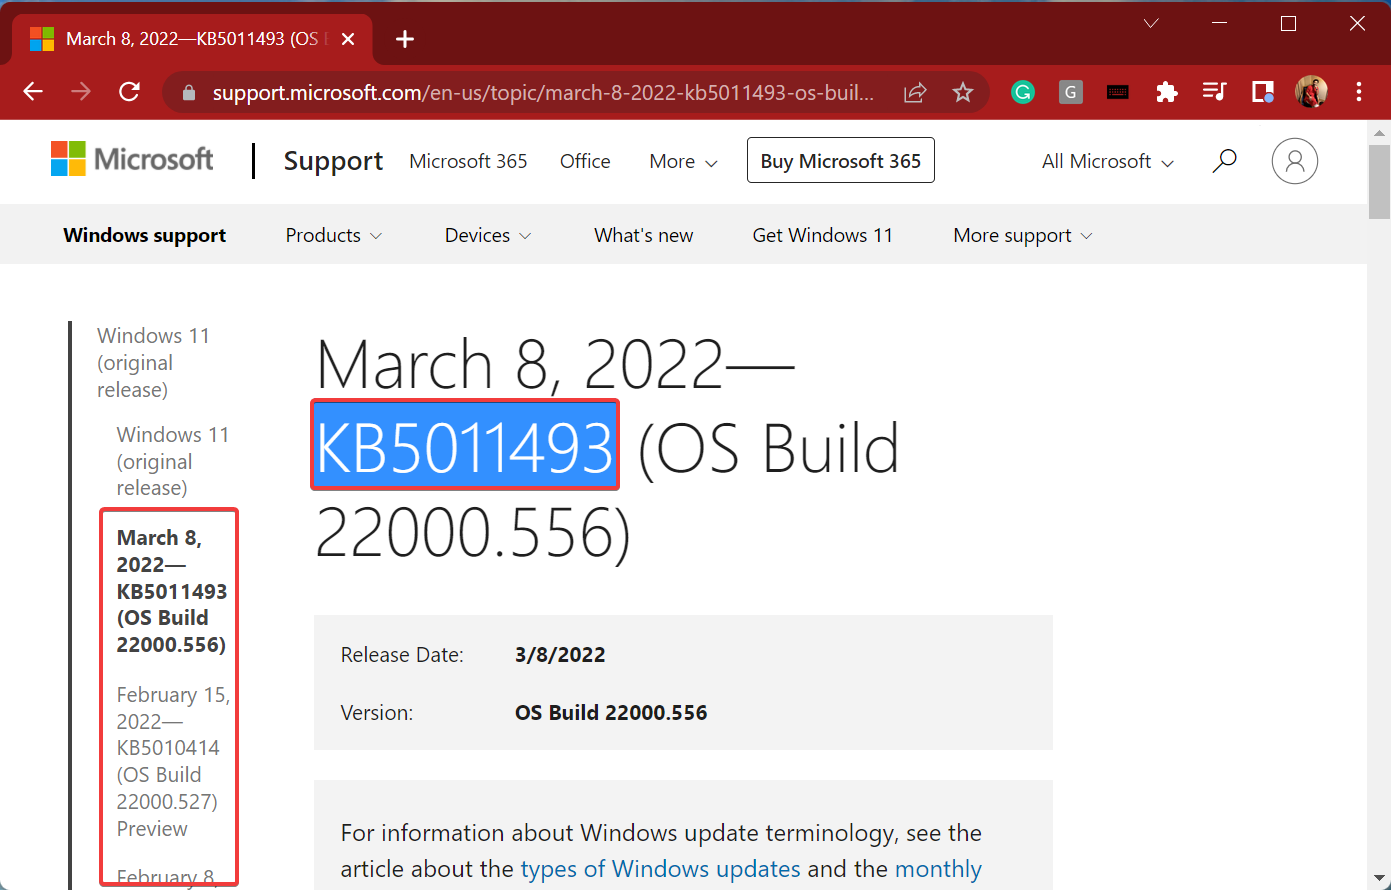
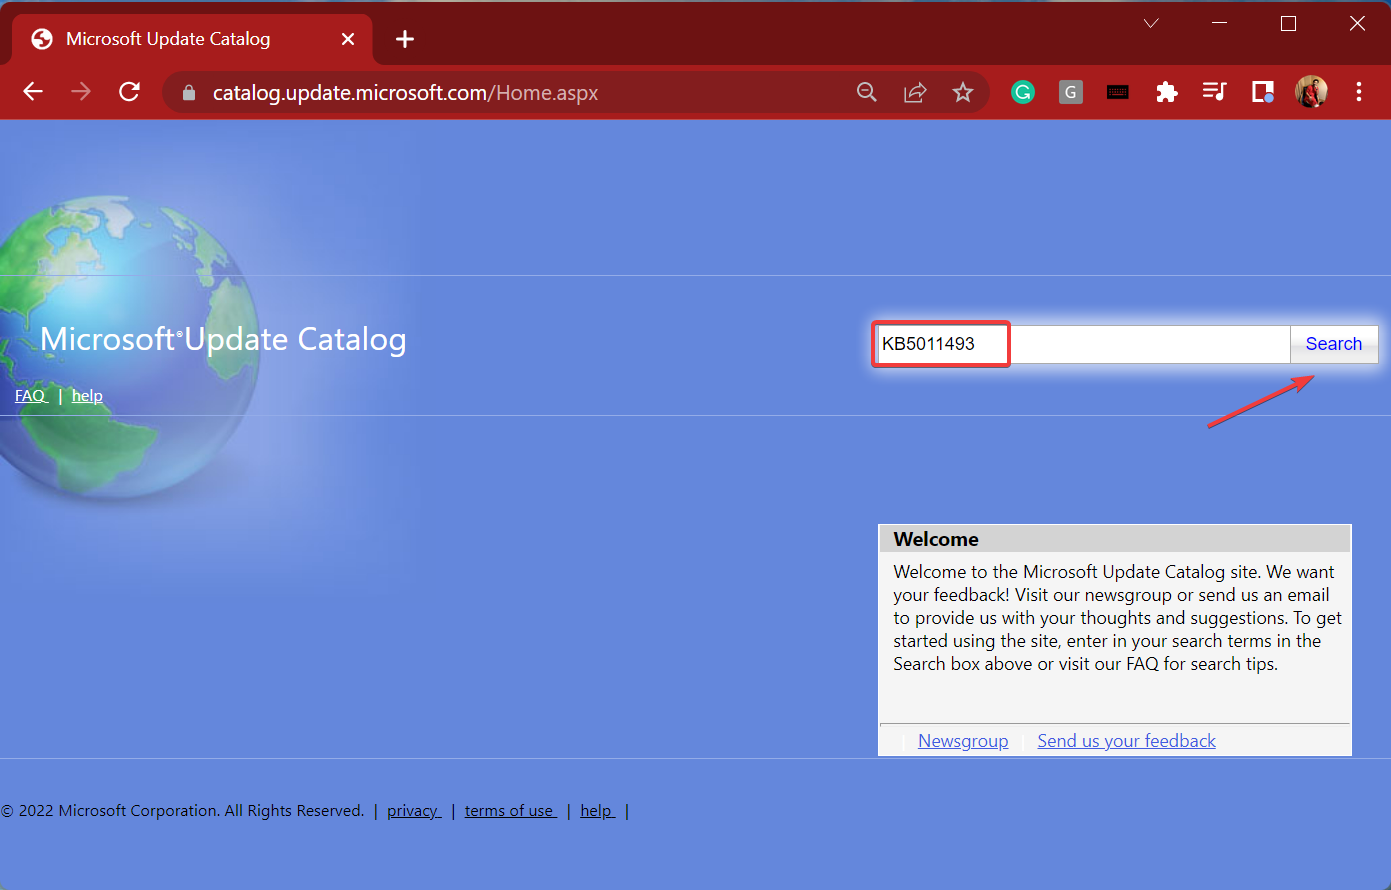
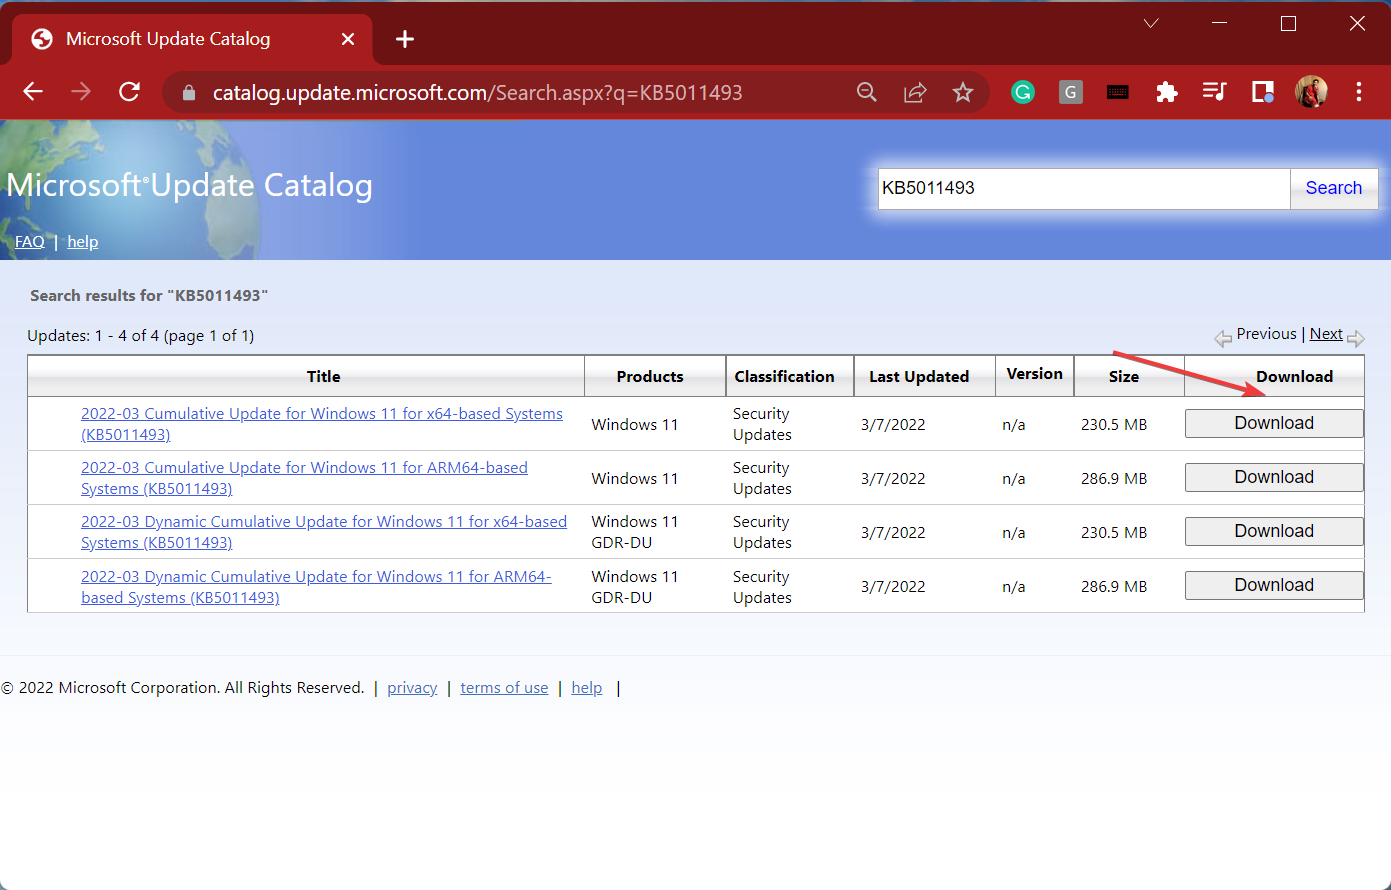
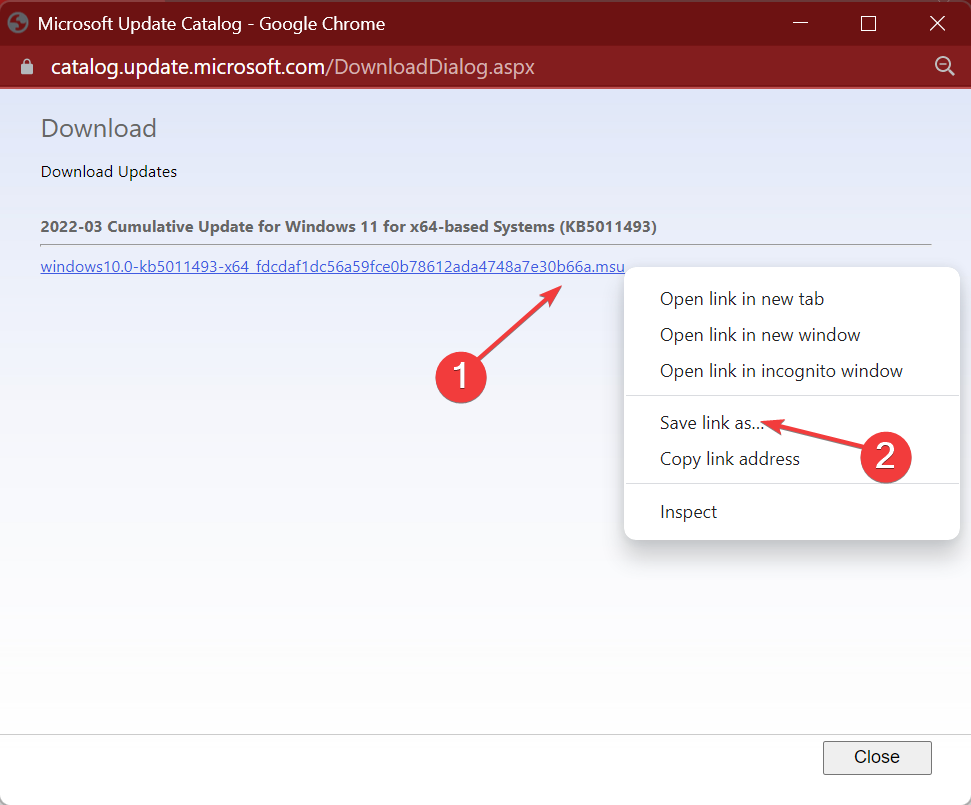
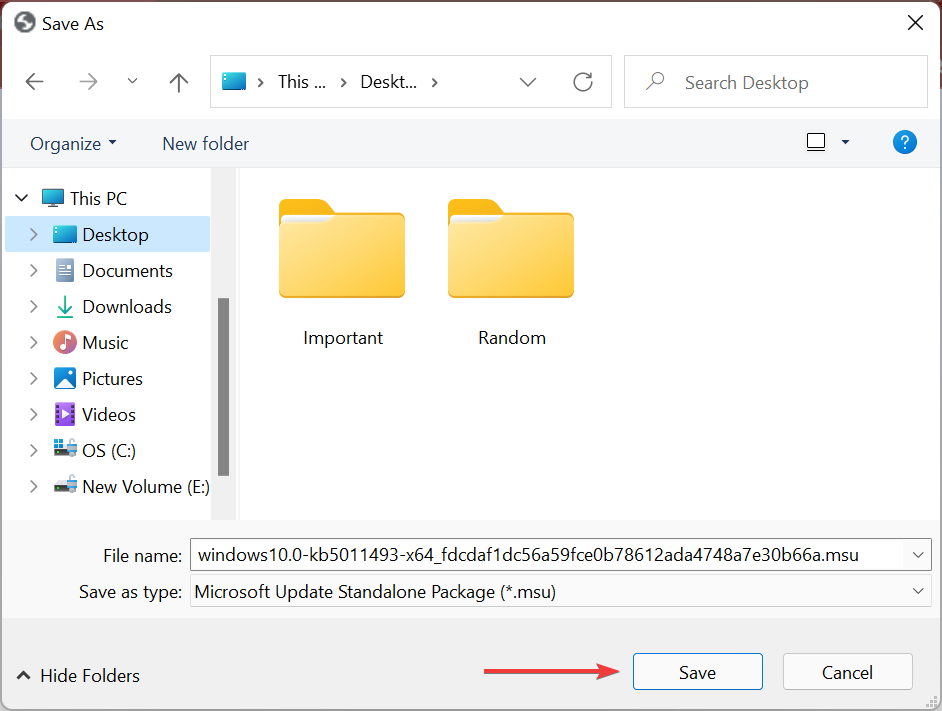
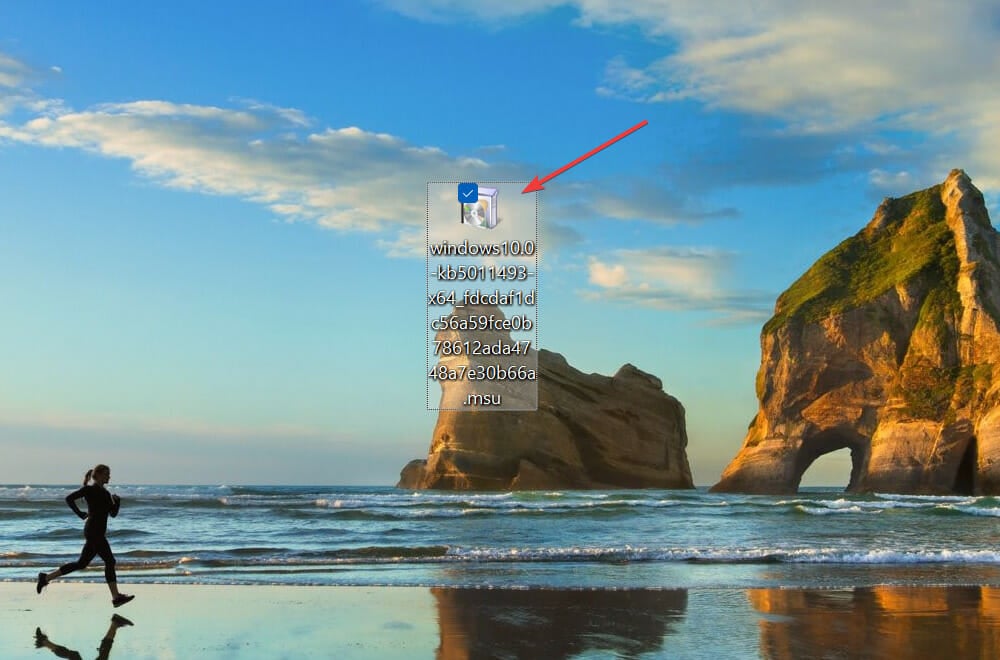


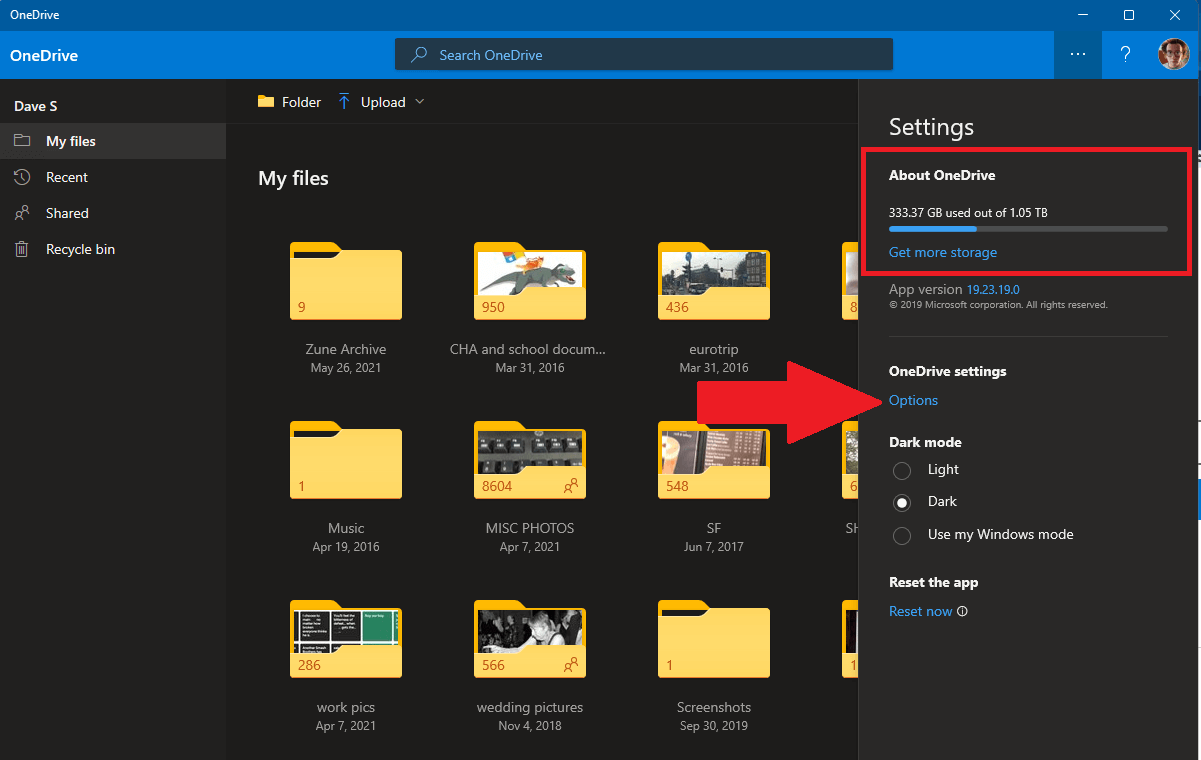


 Please note the maximum amount of OneDrive storage you can get by sharing a referral link is 10 GB.