This Site Is Temporarily Unavailable: How to Bypass It

When you visit a website, and it says that it’s unavailable, it means that the site is down. It can be because of a server issue or because of technical issues. But what happens when this is a Microsoft site you desperately need to activate your copy of Windows?

Well, this is what some users have to deal with as they try to access the Microsoft site. This site is temporarily unavailable due to maintenance. Please try again later is the message displayed on the screen even after numerous sign-in attempts. Stay with us as we unpack some solutions for this.

What does it mean when a website is temporarily unavailable?

When a website is temporarily unavailable, there is a problem with the server, and your browser cannot access it. If the Microsoft website is unavailable, it can happen for various reasons. 

Some common reasons for this include:

  • Computer problems – This can be caused by computer problems such as viruses, malware, or hardware issues. You should contact your Internet Service Provider (ISP) for further assistance.
  • Technical error – Your computer may be having problems connecting to the server where the website is hosted. Most websites are hosted on servers, and sometimes these servers can be overloaded or have other problems.
  • Internet service provider (ISP) issues – Your ISP may have enforced bandwidth limits, or there are other errors in routing.
  • Browser issues – Sometimes, it just happens to be the browser you’re using that has issues. 
  • Website maintenance – Websites have maintenance windows that will go offline for short periods. This is usually done to fix bugs and improve their site’s functionality.

In light of all these, you may be wondering how long does Microsoft lock you out? It’s hard to come up with a definite timeline, especially when the issue is not server related. Usually, Microsoft gives a timeline on when the scheduled maintenance will be done.

If the issue has to do with your ISP, hardware, or any other problem listed above, you can try the solutions listed below.

How do I get past the This site is temporarily unavailable error?

Before you attempt any of the recommended solutions, we advise you to check the following:

  • Check and remove any bandwidth limits that may be placed on your PC.
  • Ensure your internet speeds are optimal.
  • Close any other tabs or background processes.
  • Ensure you’re using an updated version of your browser.
  • Refresh your browser and try again.
  • Try with another browser and see if the error persists.
  • Verify from the Microsoft official page on the server status.

1. Update your personal information

  1. Navigate to your Microsoft Edge browser and log in to your Microsoft account.
  2. Click on Your info.
  3. Check for any outdated info that may be inconsistent then Edit accordingly. Ensure your names match then click to Save.
  4. Now try accessing the website again.

Updating your personal information may reactivate your Microsoft account, especially if it had been flagged off as being dormant.

It’s also important to use Windows official browser: Microsoft Edge or Internet Explorer depending on your version of the OS. Other browsers may still work, but we recommend using this one.

2. Clear browser cache and cookies

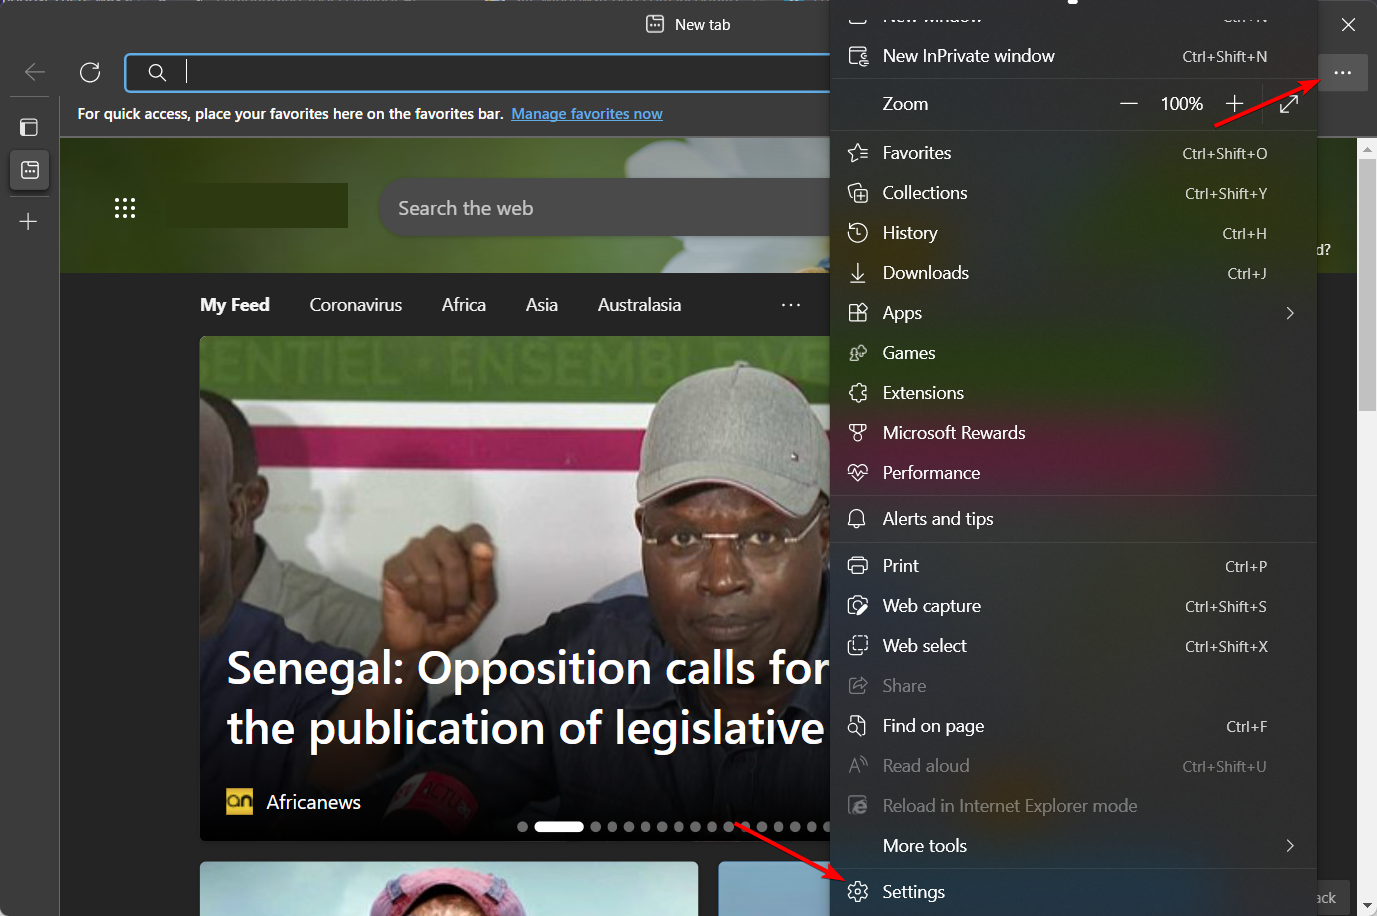
  1. Open Microsoft Edge and click on the three horizontal ellipses at the top right corner.
  2. Click on Settings.settings-edge-option there was a problem playing this video
  3. Select Cookies and site permissions then click on Manage and delete cookies and site data.
  4. Expand See all cookies and site data.
  5. Select Remove all.

The process for clearing cache and cookies will vary across the board depending on the browser you’re using, but these steps should give you a general idea of the process.

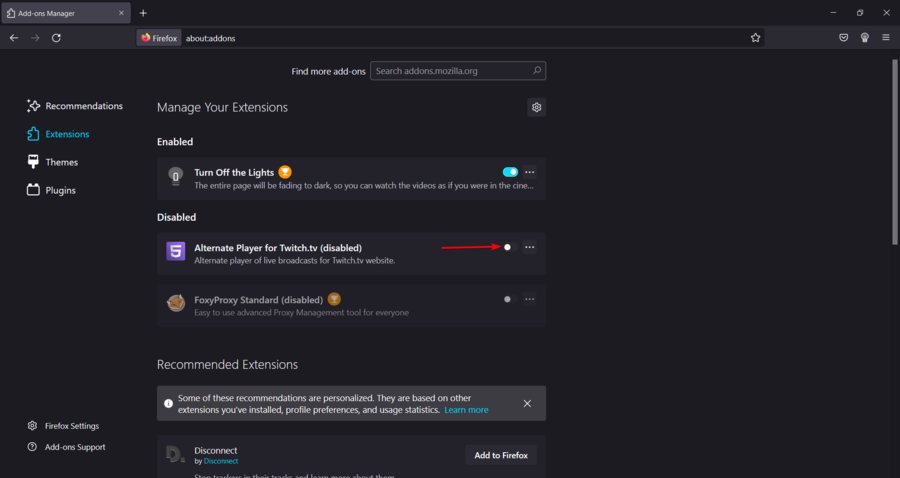
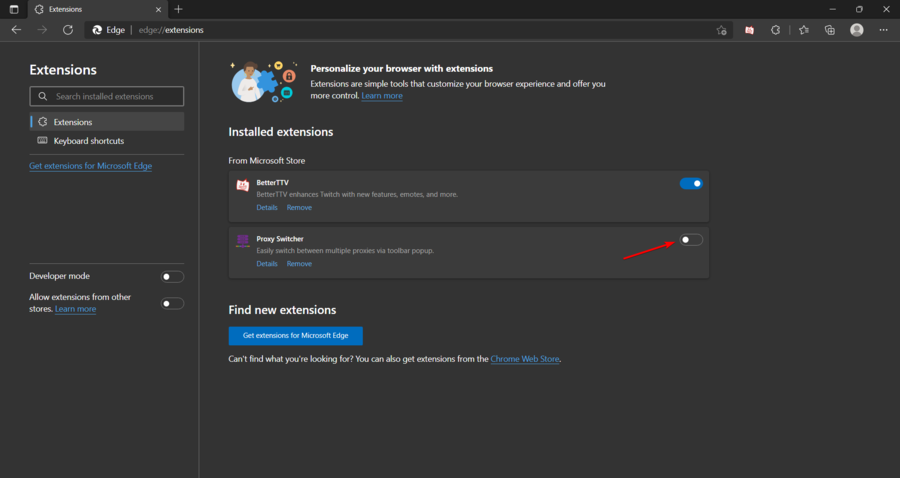
3. Disable extensions 

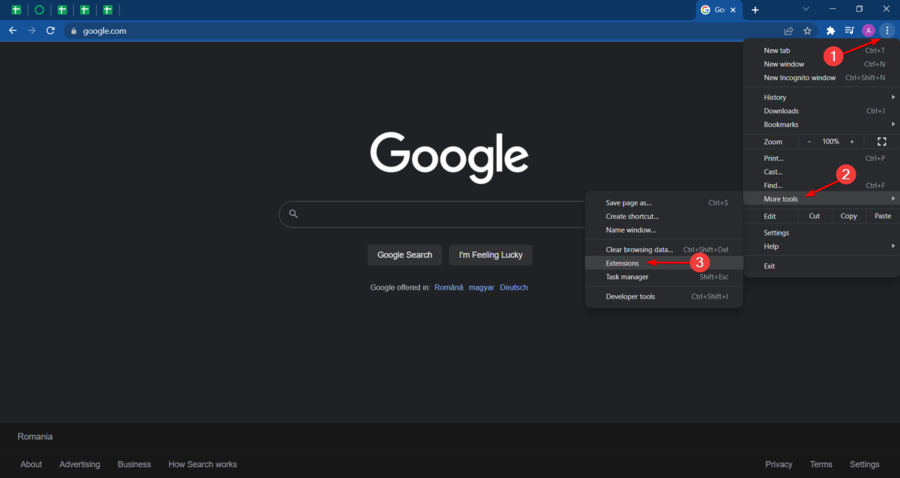
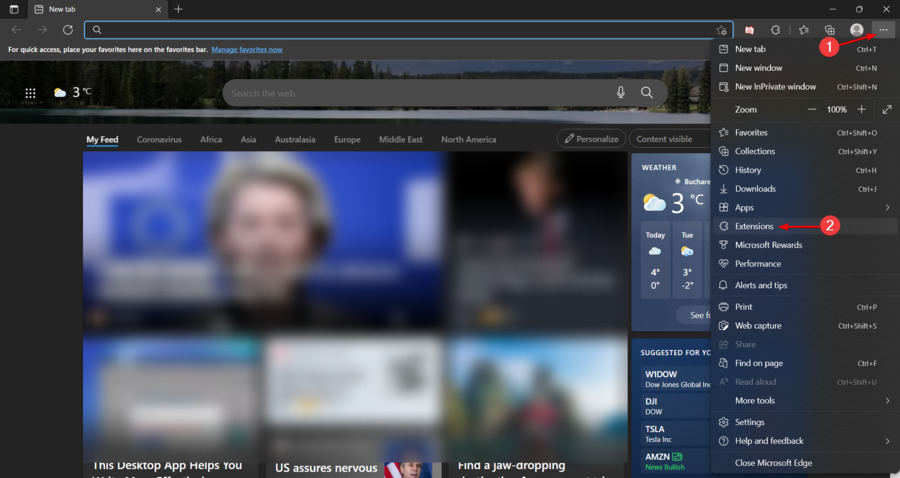
  1. Open Microsoft Edge and click on the three horizontal ellipses at the top right corner.
  2. Click on Extensions.
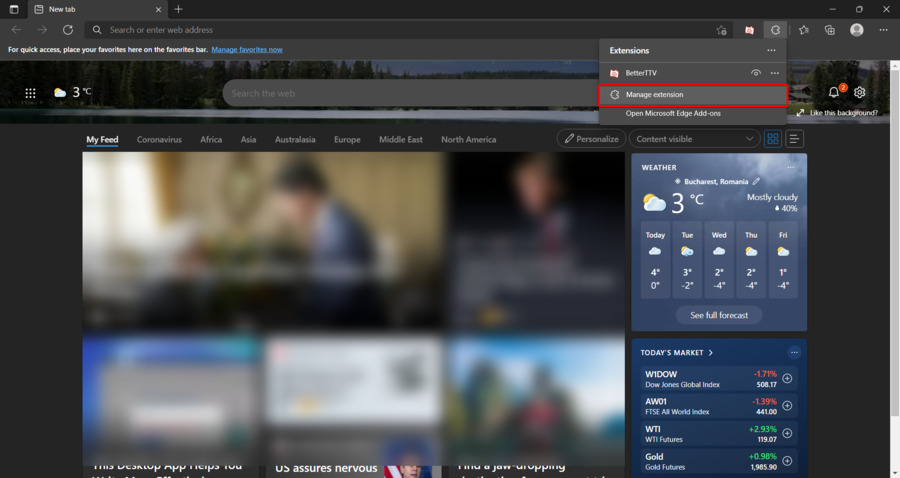
  3. Next, select Manage extensions.
  4. Locate any recently added extensions and toggle the off button.

Extensions generally add functionality to a browser, but they can sometimes interfere with how it works. Some extensions can block you from accessing certain web pages, so disabling them may resolve the issue.

If you’re still getting this site is temporarily unavailable error when you try to access the Microsoft site, it would be best to contact Microsoft support. Sometimes, it may be your account having issues, and just an isolated case.

Other related issues include the webpage may be temporarily down but have a look at our fix guide to address the error.

If you solved this error with any other solutions other than the ones mentioned above, we’d love to hear about them. Drop us a comment down below.

SD Card Automatically Deletes Files: 5 Ways to Fix It

Many users rely on SD cards to keep media files on their phones, tablets, and computers. However, there are many reported issues that SD card automatically deletes stored files. In this article, we will explore the causes of this issue in detail and provide tips on how to fix losing your files on SD cards.

Alternatively, check our guide about how to fix Windows 11 not reading SD cards.

Why did my SD card auto-delete files?

There could be several reasons why your SD card auto-deleted files. Here are some possible explanations.

  • Viruses and malware – viruses and malware attacks can corrupt an SD card causing it to malfunction and causing files in the SD card to auto-delete.
  • Corrupt system files – If the system files are corrupt, it can affect the services it is responsible for. It can also affect the devices and media tools connected to the system.
  • Physical damage – exposure to dust, water, and crack can damage an SD card which can make files auto-delete. It can impede its performance.
  • Factory defect – The SD card can auto-delete files when an error in production which can make the SD card malfunction.

The reasons for SD cards automatically deleting files can vary depending on the device. The explanations provided above outline possible reasons why this might occur.

What can I do if my SD card auto-deletes files?

Apply the following preliminary checks for SD card auto-delete issues:

  • Check for physical damage.
  • Check the SD card available space.
  • Scan SD card with antivirus software.

If the preliminary checks do not fix the issue, proceed with the following advanced steps.

1. Unmount and reinsert the SD card

  1. Press the Windows + E to open the Windows File Explorer.
  2. Navigate to the SD card drive on the left-hand pane, right-click, and click Eject to safely unmount it.
  3. Physically remove the SD card and reinsert it, then check if the error persists.

Unmounting and reinserting the SD card will troubleshoot the SD card, allowing the pc to read the portable storage.

2. Format the SD card

  1. Press the Windows + E key to open the Windows File Explorer.
  2. Select This PC, right-click on the SD card drive, and select Format from the context menu.
  3. Select the file system with NTFS or FAT32 for 32GB cards and exFAT for 64GB and click on Start.

Formatting an SD will clear all the data and reset it, preparing it for new users. Check our guide about the best apps to format SD cards.

3. Run SFC/DISM scan

  1. Press the Windows button, type Command Prompt, and click on Run as administrator to open it.
  2. Click Yes if the Windows User Account Control prompt appears.
  3. Type the following and press Enter: sfc /scannow
  4. Then type the following command and press Enter: Dism/Online/Cleanup-Image/RestoreHealth
  5. Restart your PC and check if the error persists.

Performing an SFC/DISM scan will troubleshoot the storage device and repair corrupt storage. Check our guide about fixing SFC scannow not working on Windows.

Another reliable possibility you can opt for performing an SFC/DISM scan is a dedicated repair tool that can do the job for you.

4. Perform the chkdsk command on your SD card

  1. Insert your SD card on your PC.
  2. Right-click on the start button, type cmd and click on Run as administrator to open the Command Prompt.
  3. Type in the following command prompt and press Enter. chkdsk D:/f/r/x
  4. The letter D refers to the drive letter you want to repair.
  5. Close the Command Prompt and check if the issue persists.

Running chkdsk on an SD card will check and repair faulty storage sections on the SD card and help you point out issues on your SD card, hinting you the remaining life span of it.

Read about how to fix the chkdsk command taking forever to run on Windows.

5. Re-Clean your SD card

  1. Left-click the Start button, type Command Prompt, and click the Run as administrator option.
  2. Click Yes on the User Account Control (UAC) prompt.
  3. Type this command and press Enter: diskpart 
  4. Type this and press Enter to identify the list of storage disks on your PC: list disk
  5. Input the disk letter of your SD card to select your SD card. You can check your drive letter in File Explorer.
  6. Type the following and press Enter to re-clean your SD card: Clean

Users should check the letter of their SD drive on their PC and ensure to input the correct disk letter. Read about how to use disk cleanup to free space on Windows.

In addition, read about how to fix Windows that cannot recognize micro SD cards on your device. Likewise, you can find the best software to repair corrupted SD cards for Windows OS.

Conclusively, all questions or suggestions concerning SD cards automatically deleting files can be dropped in the comments section.

How to Repair Corrupt System Files in Windows 11 [SFC, DISM & More]

Corrupted system files in Windows 11 can slow down your PC, break apps, or cause crashes. This often happens after malware infections, failed updates, or sudden shutdowns.

To fix the problem, you can use built-in tools like the System File Checker. Just run the SFC command ito scan and repair missing or broken files. In tougher cases, DISM or help from the Microsoft Fix It Windows 10 site support can help you replace Windows corrupt files quickly.

Follow the steps below to learn more.

How can I fix corrupted system files on Windows 11?

Before attempting any advanced troubleshooting steps, we recommend you go through the following:

If you can’t fix the corrupt system files, proceed with the troubleshooting steps below:

1. Run the SFC and DISM to repair damaged system files

  1. Left-click the Start button, type Command Prompt, and click the Run as administrator option.
  2. Click Yes on the User Account Control (UAC) prompt.
  3. Type the following and press Enter: sfc /scannow  
  4. Type the following commands and press Enter after each: DISM /Online /Cleanup-Image /RestoreHealth
  5. Restart your PC and check if the corrupt system file issue persists.

Running an SFC scan will detect and repair corrupt system files liable to cause issues with your computer. Check how to fix the run as administrator option if it’s not working on your PC.

As an alternative solution to the manual method above, you can try third-party software that can proceed with this action automatically to save time and effort.

2. Update Windows OS

  1. Press the Windows + I to open the Windows Settings app.
  2. Click the Windows Update and click on Check for Updates. Next, wait for the Windows update result and click on Install Update if a Windows update is available.
  3. Restart your PC to check if you fixed the corrupted system files.

Updating the Windows OS will install new updates and patches for fixing bugs corrupting your system files. Read about fixing Windows not connecting to update service if the error occurs on your PC.

3. Uninstall recent Windows updates

  1. Press Windows + I key to open the Settings app.
  2. Go to Windows Update and select Update history.
  3. Click the Uninstall updates button and select the most recent update.
  4. Click on Uninstall.

Uninstalling the recent Windows update will resolve issues with the last installed update causing system files to be compromised. Read our guide on how to uninstall updates on Windows 11 for more steps.

4. Run System Restore

  1. Press Windows + R key to open the Run dialog box, type control, then press Enter to open the Control Panel.
  2. Input recovery in the Control Panel search bar and select Recovery.
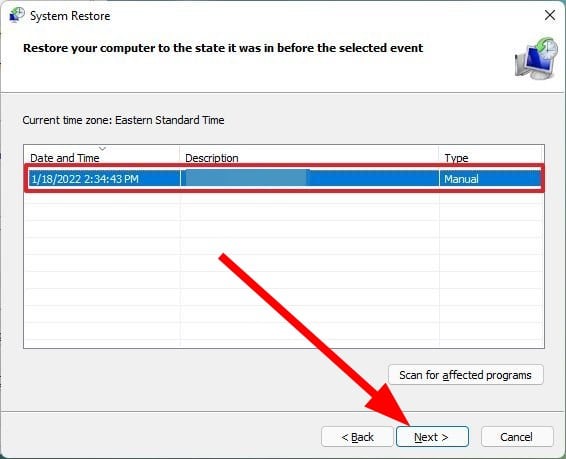
  3. Then click Open System Restore.
  4. Click Next in the Restore system files and settings window.
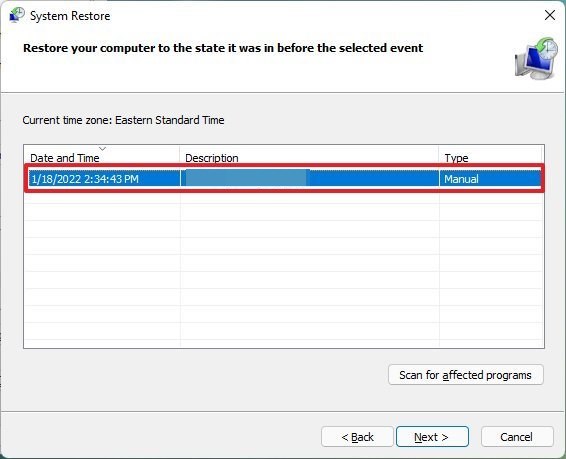
  5. Choose the restore point you want to restore from, then click Scan for affected programs.

The System Restore will backdate the system to an earlier point. It removes recent files, apps, drivers, and updates installed after the restore point, which may corrupt system files. Read how to fix Restore Point if it’s not working on your PC.

5. Run System Maintenance Troubleshooter

  1. Press Windows + R key to open the Run dialog box, type control, then press Enter to open the Control Panel.
  2. Navigate to the top-right corner and expand the drop-down for Category, then select Large icons.
  3. Select Troubleshooting from the list.
  4. Click on View all on the left pane.
  5. Then, click on System Maintenance from the list of Troubleshooters.
  6. Click Next to proceed with the troubleshooting process.

The System Maintenance troubleshooter will find any issues causing corrupt system files. If any error is found, it will recommend solutions you can use to fix it.

6. Reset your PC

  1. Press Windows + I key to open the Windows Settings app.
  2. Click on System from the left pane and click on the Recovery option.
  3. Under the Recovery options section, go to Reset this PC and click on the Reset PC button.
  4. On the Reset this PC page, choose either the Keep my files option or the Remove everything option to perform a complete reset.
  5. After choosing, click on Next to proceed with the instructions based on your selection.
  6. Press the Reset button in the next window to confirm the action and reinstall Windows 11 to factory mode.

Resetting your PC is the last option we recommend if you can’t fix corrupt system files. It will remove files and programs from your computer depending on your specific needs and may lead to data loss.

In addition, you can check our guide on fixing corrupt system files on Windows PC for more solutions to use. Also, you can read our detailed review of the best Windows 11 antivirus software for your PC.

If you have further questions or suggestions on fixing corrupted system files in Windows 11, kindly drop them below.

Share Feature on Microsoft Edge Not Working: How to Enable It

The Windows Microsoft Edge browser offers a fast and reliable way to share web content with others. However, users encounter issues using Microsoft Edge shared features on their devices.

Therefore, this guide will take you through the causes of shared features on Microsoft Edge not working and how to enable it. Alternatively, you can read about how to fix Microsoft Edge not connecting to the internet on your device.

Why is the share feature not working on Edge?

The shared features function on the Microsoft Edge browser can malfunction due to the following reasons:

  • App bug – Bugs are viruses or malware in the programming code of a software application that can cause an app not to function as intended. Thus, an app bug on Microsoft Edge can affect the share function and impede its performance.
  • Extension conflict – Installing third-party software apps that enhance the browser can affect the browser’s performance. Therefore, an incompatible extension software can affect the Microsoft Edge share features.

The reason listed above can cause the Microsoft Edge share function to malfunction, and it varies on different PCs.

What can I do if the share feature is not working on Edge?

Users should apply the following before trying advanced troubleshooting:

  • Close and reopen the Microsoft Edge browser.
  • Restart your Windows device.
  • Close all background running apps.

You can proceed with the following advanced troubleshooting if the error persists.

1. Add or remove the Share button on the Microsoft Edge toolbar

  1. Open the Microsoft Edge. Click on the three dots and right-click on the Share option.
  2. Select Hide from toolbar to hide the share button.
  3. Repeat steps 1 and 2 and select Show in toolbar to show the share button.

The process above will enable and disable the Share button on the Microsoft Edge toolbar.

2. Clear Microsoft Edge cache and cookies

  1. Launch the  Microsoft Edge app on your device. Click on the three dots on the top right side and select Settings.
  2. On the left side panel menu, select the Privacy, search, and services option. Navigate to the Clear browsing data section, and select the Choose what to clear option.
  3. Select All Time from the Time range at the top, check the boxes next to Cookies and other site data, and the Cached images and files option. Then click on Clear now.

Clearing the browser cache and cookies will troubleshoot all pre-stored data about a web page that can affect the browser’s performance. Check our guide about how to clear the computer cache in Windows 11

3. Update the Microsoft Edge app

  1. Open the  Microsoft Edge app on your device. Click on the three dots on the top right and select the Help and feedback option.
  2. Select About Microsoft Edge from the side menu. Microsoft Edge will automatically check for updates on the About page if there are any.
  3. Toggle on the Download Update over metered connections to allow the app to download and install.

Updating the Windows Edge browser software will fix all bugs in the previous versions. Read about how to download & install Microsoft Edge Offline Installer for 32/64-bit computers.

4. Remove browser extensions

  1. Open the Microsoft Edge browser and click the three dots at the top right corner. Navigate through and click on Extensions.
  2. Select from the list of Extensions and click on Manage Extensions.
  3. Toggle off the Extension to disable it and check if the error persists.
  4. Repeat this process for all Extensions to find the Extensions causing the error.
  5. Select Remove to remove the Extensions causing the error.

Removing the browser extensions will fix issues with Extensions causing the browser to malfunction. You can read step-by-step details to view browser extensions on Windows.

5. Disable Windows Firewall

  1. Click the Start button, type control panel, then press Enter to open the Control Panel.
  2. Select the Windows Defender Firewall option.
  3. Click the Turn Windows Defender Firewall on or off option from the left side.
  4. Go to the Private network settings and Public network settings, then click the radio buttons for the Turn off Windows Defender Firewall (not recommended) option.
  5. Exit the Control Panel and restart your PC.

Disabling the Windows Defender will troubleshoot Windows Defender interference with the Edge browser.

Check our guide on how to disable windows defender if you encounter issues with it.

You can also read how to fix Microsoft Edge not opening on your Windows device. Even more, check how to fix Microsoft Edge when it is slow on Windows devices.

Do not hesitate to let us know which solution worked in the comments area below.

Windows 10 File Explorer Keeps Opening: How to Stop It

File Explorer is the default file manager software for Windows. However, our readers reported that Windows 10 File Explorer keeps opening itself. Hence, it causes interruption while using the PC.

Also, we have a detailed guide for fixing File Explorer preview pane not working on Windows PCs.

Why does the Windows 10 File Explorer keep opening?

There isn’t a specific reason why File Explorer keeps opening on Windows 10. However, some probable causes are:

  • File Explorer bug – If this happens right after an update or a severe crash, the app may simply be bugged, and it also may result in File Explorer crashing repeatedly or malfunctioning.
  • The AutoPlay feature is enabled – If enabled on your PC, it can cause File Explorer to keep opening by itself.
  • Corrupt or missing system files – If the system files are corrupt on Windows 10 or not accessible, it can cause the program to malfunction or affect other programs running on the system.
  • Viruses and malware infection – Apps opening by themselves might be a sign of infection. Also, viruses and malware can cause File Explorer to work slowly on the computer.

Fortunately, there are some troubleshooting steps you can follow to fix the problem and get File Explorer working correctly.

What can I do if Windows 10 File Explorer keeps opening?

Before trying any advanced troubleshooting steps, go through the following:

  • Turn off background apps running on your computer.
  • Restart Windows in Safe Mode and check if you can fix File Explorer opening without the user’s consent.
  • Make sure you installed all the latest updates to your OS. A patch fixing the File Explorer may already be issued.

Should the problem persist, go ahead and proceed with the solutions below.

1. Perform a Clean boot on your PC

  1. Press Windows + R key to open the Run dialog box, type msconfig, and click OK.
  2. Click the Services tab, check the box for the Hide all Microsoft services option, then click the Disable all button.
  3. Go to the Startup tab and click Open Task Manager.
  4. Select the startup programs and click the Disable button.
  5. Restart your PC and check if the issue persists.

Performing a Clean boot stops services interfering with File Explorer from running when you boot the system. It disables startup apps from running on your computer when not prompted.

2. End tasks for File Explorer processes on your PC

  1. Press Windows + R key to open the Run dialog box, type taskmgr.exe, and click OK to open Task Manager.
  2. Find the File Explorer app, right-click it, then select End Task from the drop-down menu.
  3. Click on File from the taskbar and select Run new task from the menu.
  4. Type explorer.exe in the box and click OK to restart the File Explorer process on your computer.
  5. Restart your PC and check if the issue continues.

Ending tasks and restarting the File Explorer processes on your computer will stop background activities prompting it to open randomly. Also, it fixes ongoing actions liable to impede its performance.

3. Disable the Use AutoPlay for all media and devices option

  1. Left-click the Start button, type control panel, then choose the best match to open the Control Panel.
  2. Click the View by icon and change it to Large or Small icons.
  3. Under All Control Panel items, click the AutoPlay option.
  4. Uncheck the box for the Use AutoPlay for all media and devices option, then change the Removable drive option to Take no action.
  5. Click on the Save button to confirm the changes.
  6. Restart your PC and check if File Explorer keeps opening.

Disabling the AutoPlay feature stops apps from opening automatically to perform tasks on the PC.

4. Run a System File Checker (SFC) scan

  1. Left-click the Start button, type Command Prompt, and click the Run as administrator option.
  2. Click Yes on the User Account Control prompt.
  3. Type the following and press Enter: sfc /scannow
  4. Restart your PC and check if the issue persists.

Running an SFC scan on your PC will find and repair missing or corrupt system file issues that may cause File Explorer to malfunction.

Read our guide on fixing the run as administrator option if it’s not working on your PC.

5. Run Windows Defender scan

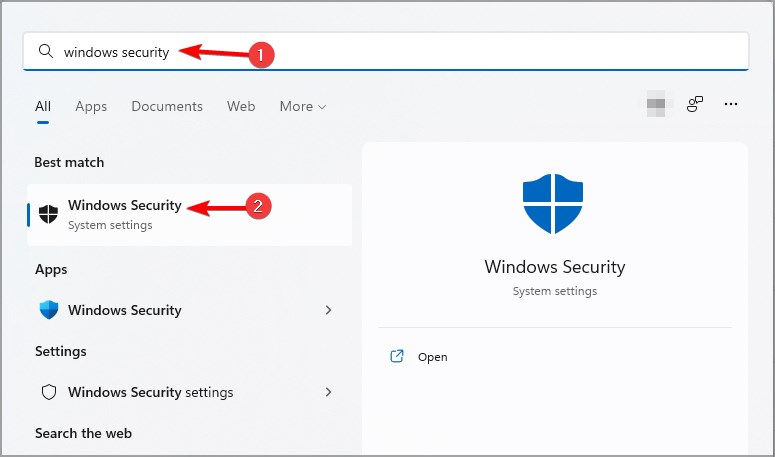
  1. Left-click the Start button, type Windows Security, then choose the best match to open the app.
  2. Click on Virus & Threat Protection from the menu and select Scan options.
  3. Then click the Full scan button to initiate an extensive scan and click the Scan now button.
  4. Lastly, wait while the scan completes.

Running a Windows Defender scan will find and remove any malware and viruses affecting the File Explorer on your computer.

Read how to fix the Windows Virus and threat protection not working on Windows 11.

In conclusion, you may be interested in our guide on how to fix File Explorer freezing or not responding & more issues on Windows computers. Also, check how to extract files from multiple folders in File Explorer.

If you have further questions or suggestions, kindly use the comments section.

How to Enable or Disable Printing in Application Guard

Aside from Windows Defender and third-party antivirus tools for Windows 11, there are more ways that you can secure your system. The Microsoft Defender Application Guard is one of Windows’ features that can help you keep viruses and malware at bay.

Although this feature is much welcomed in most users’ PCs, some may find it limiting as it can restrict some functionalities, such as printing. Whatever the case, in this article, we show you how to enable or disable it, depending on your needs.

What is Microsoft Defender Application Guard managed mode?

Microsoft Defender Application Guard is a service in Windows 11 that provides additional protection from malware. When turned on, Microsoft Defender Application Guard provides a safe environment to run your applications.

This allows you to run your apps in an isolated environment that prevents them from performing malicious actions. When enabled, Application Guard enforces many restrictions on what an application can do on the system, such as:

  • Restricts third-party modification – Application Guard prevents malicious programs from modifying or reading files on your system.
  • Prevents installing malicious files – Application Guard can also prevent malicious programs from installing software as an administrator.
  • Creates a safe environment – Create and manage a list of trusted applications allowed to run on an endpoint.

How do I enable printing in Application Guard?

1. Use Windows Security 

  1. Hit the Windows key, type Windows Security in the search bar, and click Open.
  2. Click on  App & browser control on the left pane, then under Isolated browsing, select Change Applications Guard settings.
  3. To enable printing, toggle on the button under Print files.
  4. Restart your PC to effect the changes.
  5. If you would like to disable it, simply toggle the off button.

If, for some reason, you have enabled printing but are still unable to do so, there may be a build-up of corrupt cache and cookies on the Edge browser. You may have to clear the corrupt cache and cookies, then try printing again.

It’s also worth checking out if your printer drivers are updated and that the printer is in good working condition.

2. Use Registry Editor

  1. Hit the Windows + R keys to open the Run command.
  2. Type regedit in the dialog box to open the Registry Editor.
  3. Navigate to the following location: Computer\HKEY_LOCAL_MACHINE\SOFTWARE\Microsoft\Hvsi
  4. Double-click on EnablePrinters to modify, and under Value data enter 1 to enable then hit OK.
  5. If you’d like to disable it, set the Value data to 0.

Given that not every Windows user is tech-savvy, we have to give a disclaimer at this point. The registry can be a very dangerous place to edit if you don’t know what you’re doing. You risk making your PC inoperable if anything goes wrong.

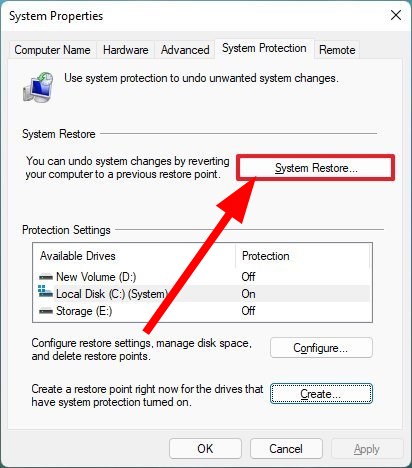
We recommend that you create a restore point before editing the registry. This is useful if you are not sure what change you are making. It will be easier to roll back any changes when you have a restore point.

How do I know if my Application Guard is enabled?

The easiest way to find out whether Application Guard has been enabled is through the Group Policy. To check, follow the steps below:

  1. Hit the Windows + R keys to open the Run command.
  2. Type gpedit.msc in the dialog box and hit Enter to open the Group Policy.GPEDiT.msc -Windows Remediation Service Failed to Start?
  3. Navigate to the following location: Computer Configuration\Administrative Templates\Windows Components\Microsoft Defender Application Guard\Turn on Microsoft Defender Application Guard in Managed Mode setting
  4. If the Enabled check box is not selected, it has not been enabled. You can select it, then click on Apply and OK to save the changes.

Once you’ve enabled the feature, when you enter a URL in Edge, Application Guard will verify if it is a trusted site. If it is not, it will be redirected to the isolated environment.

Onto more good news, the feature is now widespread, and Chrome and Firefox users can also enjoy the protection by downloading the Windows Defender Application Guard extension.

You may also be looking to enable or disable copy-paste in Application Guard, so check out our step-by-step article on how to do it.

Please leave a comment down below on whether you have been able to enable or disable printing in Application Guard.

How to Password Protect Notepad File: 2 Easy Ways

Notepad doesn’t offer built-in password protection, but there are safe ways to lock your text files using free tools or manual methods. This guide shows you how to protect Notepad files with a password on Windows using beginner-friendly solutions.

Also, you can read about how to enable and fix Notepad not opening on Windows 11.

How can password-protect Notepad files?

1. Password protect Notepad file with Windows File Encryption

  1. Navigate to the Notepad file and right-click on it, then select Properties from the drop-down menu.
  2. Click on the Advanced button under the General tab.
  3. Check the box for Encrypt content to secure data, click the OK button and select Apply in the Properties window.
  4. Click on Encrypt the file only option from the new dialog box and select OK.

The above steps will allow users to encrypt the target Notepad file, adding a security key to be required every time it is opened.

Users can now move the file to devices that support NTFS file format and FAT32 encryption. You can read about how to encrypt files and folders on Windows PCs.

2. Use of a third-party app to passwords protect the Notepad file

Users can resort to third-party file and folder password-protect apps to protect Notepad files on their devices.

Most third-party password protection software in the store is either free or paid-for apps.

Therefore, the go-to software that will help you encrypt your Notepad files and avoid any viruses is WinZip, as it can easily lock up any files on your PC with strong password protection.

You only need to install the software and start protecting Notepad files with its enhanced file security and powerful compression tools.

For more support, check out our guide about the best password manager with emergency access for your device.

Can you lock Notes in Notepad on Windows?

Notepad has no built-in feature to lock or password-protect individual notes or files from external access. It is a basic text editor designed for simple text editing tasks and does not have advanced security features like encryption or password protection.

However, users can download third-party programs from the app store to add password protection to individual files or folders on their computers. You can use these programs to password-protect your important notes created in Notepad or any other text editor.

Alternatively, you can use a cloud-based note-taking application like Microsoft OneNote or Evernote, which offers built-in password protection and encryption features to secure your notes.

In addition, you may be interested in our guide on how to add a dark Notepad to Windows 11. Also, we have a detailed article on how to recover Notepad documents in Windows 11.

Should you have further queries on this or other topics, kindly drop them in the comments section.

How to Get Rid of Chrome Notifications Permanently

Google Chrome notifications alert you about important events, such as email messages, calendar appointments, and news updates. However, different users have complained about receiving many notifications that are irrelevant to them.

Thus, we will examine why you keep getting Chrome notifications and how to turn them off Chrome notifications. Also, you can read about how to manage browser ls notifications on Windows operating systems.

Why do I keep getting Chrome notifications?

Here are some reasons you might be getting Chrome notifications on your device.

  • Malicious adware – Adware is software designed to display advertisements on a computer, usually pop-ups or banners. Adware is installed on users’ devices without their knowledge and is often malicious. Thus, malicious adware can cause browsers automatically open unwanted ad notifications in the Chrome browser.
  • Website notification is Enabled – the Google Chrome browser often asks if Users want to receive notifications when visiting a website for the first time. If the User clicks on Allow on the pop-up, this will enable notifications for that website, and users may receive messages even when they’re not actively using the site.
  • Browser extensions – extensions are third-party browser software that enhances browser functions. Most Chrome browser extensions are beneficial. However, some may send notifications as part of their functionality.

The above-stated reasons vary on different devices. However, we will discuss how to turn off Google Chrome notifications.

How do I turn off Chrome notifications?

Try out the following preliminary checks before:

You can proceed with the following advanced steps if the preliminary checks do not fix it.

1. Disable Chrome notifications in Windows Setting

  1. Press the Windows + I key to open the Windows Settings app.
  2. Select the System category and click on Notifications.
  3. Navigate to the Get Notifications from these senders section.
  4. Locate Google Chrome from the list of apps and turn off the toggle next to it.

The Windows operating system has an in-built feature that allows users to manage app notifications in the Windows Settings. So, you can toggle off the notifications for Chrome there.

Check our guide about how to fix Windows Settings not opening on your device.

2. Turn off notifications in Chrome Settings

  1. Open Google Chrome on your PC. Click the three-dot icon in the top right corner, and select Settings.
  2. Click on the Privacy and Security tab from the left sidebar and select Site settings from the right pane.
  3. Navigate to the Permissions section and click on Notifications.
  4. From the Default behavior, select Don’t allow sites to send notifications to turn off Google Chrome notifications.

Performing the process above will allow users to disable Chrome notifications using Chrome settings. You can read about how to fix chrome not opening on your device.

3. Disable notifications for specific websites

  1. Open Google Chrome on your PC. Tap the three-dot icon in the top right corner, and select Settings.
  2. Click on the Privacy and Security tab from the left sidebar and select Site settings from the right pane.
  3. Navigate to the Permissions section and click on Notifications.
  4. Select the Add button next to Not allowed to send notifications.
  5. Input the URL for the website you want to turn off notifications and click on Add.

The following steps will allow users to turn off notifications for specific websites, preventing them from sending ads or timely prompts.

4. Disable chrome extensions

  1. Open Google Chrome on your PC. Click the three-dot icon in the top right corner, and select Settings.
  2. Select Extensions from the left sidebar.
  3. Turn off the toggle switch under the Extension you want to disable from the list of Extensions.

Disabling the browser extensions will stop notifications caused by Extension functionalities.

Check our guide about the best security and privacy Extensions for Chrome browsers to enjoy your browsing experience.

In conclusion, you can read about how to disable notifications on Windows 11 devices. Also, check our guide about how to fix the notification panel not opening on Windows 11.

Do you have further questions or suggestions about this guide, then leave them in the comments section.

How to Recover a Deleted Operating System

We’ll discuss how to recover the deleted Operating System on your PC. Also, we have a detailed guide on easy methods to Rebuild Boot Partition on Windows 10 and get your PC to boot again.

Can you reinstall Windows after deleting it? Deleting an operating system means deleting the whole system partition responsible for its functionality. It makes it impossible to access the operating system and leaves your PC blank. There’s no loaded software to help your computer boot due to missing BOOTMGR and BCD.

However, it is possible to reinstall an operating system at any time after deleting it from your PC. Also, it doesn’t cost more stress or time than it usually does with a preloaded installation of the operating system. So, deleting the operating system from your computer allows you to reinstall even a higher version.

How can I recover a deleted Operating System?

Go through these preliminary checks:

  • Ensure to plug your computer into a stable power source.
  • Disconnect any external devices or peripherals plugged into your PC.
  • Create a bootable USB drive for Windows Operating System.
  • Plug your bootable drive into the PC to boot from a drive.

The above preliminary checks will prepare the system and the necessary tools needed for the operating system recovery and reinstallation.

1. Use a Windows installation media to rebuild system reserved partition

  1. Insert the installation disk into your PC.
  2. Press the power button on your PC, and select boot from the Windows installation disk from the option.
  3. Click the Repair your computer option on the Install now screen.
  4. Click on the Troubleshoot option, and then select the Advanced options.
  5. Select the Command Prompt option.
  6. Type the following and press Enter: bootrec /fixmbr
  7. Type the following command and press Enter: Diskpart select disk 0 list partition
  8. select partition n: n means the drive letter of the Windows OS partition.
  9. Then type and press Enter: active exit
  10. Type the following command and press Enter to fix the boot information: bootrec /fixboot bootrec /rebuildbcd

The above commands help rebuild the system reserved partition and restore the operating system from the partition where it was installed.

2. Use third-party recovery tools

There are numerous data recovery tools you can use to retrieve a deleted operating system on your computer, which can work in different ways and vary in function, but overall can help you recover important data easier.

To simplify the process, we recommend you try reliable products like Kernel Data Recovery Software, as it can help you recover lost files or folders after a Windows corruption incident.

Furthermore, you can restore data from removable devices, such as USBs, and from emptied recycle bin folders.

Kernel Data Recovery Software

Restore lost, corrupt, or deleted files and other significant data with this great app.

In conclusion, you may be interested in our article about easy methods to access Recovery Mode from every part of the OS on Windows 11. Also, you can check how to fix the can’t create Recovery drive error on Windows 11.

To see how to safely delete your OS, check our guide on how to remove Windows and keep all your files.

If you have further questions or suggestions, kindly drop them in the comments section.

Forza Horizon 5 Crashing on PC: 3 Ways to Get It Working

Forza Horizon 5 is a racing video game by Playground games. It is popular because it offers an exploration of the vibrant open-world landscapes of Mexico and features fun driving action in the world’s best cars.

However, users complain about some issues they encounter with the game, and Forza Horizon 5 crashing on PC is a common problem. Also, we have a detailed guide on what to do if Forza Motorsport 7 crashes on your PC.

Why is Forza Horizon 5 crashing on PC?

Experience the Forza Horizon 5 game crash on your PC can be due to numerous factors impeding its performance. Some notable factors are:

  • Compatibility issues – Forza Horizon 5 has system requirements determining the PCs that can run it. So, if your system doesn’t meet the requirements for running the game, it may cause it to malfunction or crash. Also, it prevents the game from functioning efficiently because the system isn’t strong enough to handle it.
  • Outdated graphics card – Graphics cards are responsible for the graphics content on your screen. Forza Horizon 5 uses lots of graphics power to run and can run into issues if graphics drivers are outdated. It indicates that the graphics device isn’t intact to run the game.
  • Corrupt game files – The game may crash on your PC if its game files are corrupt or missing. These game files are responsible for the interaction between the game and the system. So, you may experience issues with the game if its files are corrupt.

Other factors may cause Forza Horizon 5 to crash on your PC. Fortunately, you can fix the problem by troubleshooting your PC and tweaking the game.

How can I fix Forza Horizon 5 if it crashes on PC?

Before trying any advanced troubleshooting steps, go through the following:

  1. OS – Windows 10 version 1909 or higher.
  2. CPU – AMD Ryzen 3 1200 / Intel Core i5-4460.
  3. RAM – 8GB.
  4. GPU – AMD Radeon RX 570 / Nvidia GeForce GTX 970.
  5. Storage – 110GB available (HDD or SDD).

1. Run Forza Horizon 5 as an Administrator and in Compatibility Mode

  1. Press Windows + E to open File Explorer.
  2. Locate the Forza Horizon 5, right-click on it, and select properties from the drop-down.
  3. Navigate to the Compatibility tab, check the box for the Run this program as an administrator option, and check the box for Run this program in compatibility mode.
  4. Choose a Windows version from the drop-down.
  5. Click OK to save the changes.

Running the game as an administrator will fix permission issues or settings that caused it to crash. Also, it’ll resolve compatibility issues.

Check what to do if running as administrator is not working on Windows 10/11.

2. Update the Nvidia graphics driver

  1. Press Windows + R keys to prompt the Run window, type devmgmt.msc, and click OK.
  2. Click on Display Adapters, and right-click the driver from the drop-down menu, and click the Update driver.
  3. Select the Search automatically for drivers option.
  4. Restart your PC and check if the Forza Horizon 5 crash issue persists.

Updating the graphics driver will fix bugs affecting the game and install the latest features to improve its performance. Check other steps for updating graphics drivers on Windows 11 if you have any issues.

Alternatively, with a specialized program like Outbyte Driver Updater, not only you can fix gaming-related bugs but you can also prevent them by updating your drivers with the latest options from its advanced database.

Outbyte Driver Updater

Fix the errors affecting the game and get the latest updates for your PC’s drivers.
Free Trial Download now

3. Check the integrity of the game file

  1. Left-click the Start button and type Steam, then double-click to open it.
  2. Select the Library tab, right-click on Forza Horizon, and choose Properties.
  3. Click the Local Files tab and select the Verify Integrity of Game Files button.

Checking the game’s integrity will verify and resolve all corrupt or missing game files.

Read more on the ways to verify the integrity of game files not working for more advanced steps.

Alternatively, you can check our guide on Forza Horizon 4 not launching and ways to fix it on Windows 11. Also, we have a detailed article about how to fix Forza Horizon 5 stuttering on Windows 11.

In conclusion, this guide should help if Forza Horizon 5 keeps crashing on your PC. However, if you have further questions or suggestions, kindly drop them below in the comments section.

Posted in PC

No Desktop Folder in Users: How to Get It Back

The computer Desktop is a folder in the User profile for default storage that you access quickly and has the frequently used apps, files, and folders. However, users have reported having issues with the Desktop missing in the Users folder.

Thus, we will examine the causes of the no Desktop folder in the User and how to fix the error. Alternatively, you can read how to fix no file on the desktop for Windows devices.

Why is there no desktop folder in Users?

You may encounter issues with Desktops Folder missing in Users due to the following causes.

  • Virus attacks – Viruses are malicious programs that replicate and extend to other devices. Viruses disrupt normal computer operations and steal data which can cause desktop folders not to show in user profiles.
  • Location error – System location deals with the physical location of a file or folder on the computer’s hard drive. Any abrupt or sudden change in the desktop folder location can cause an error in the User folder, making it unavailable.
  • Windows update error – Users update Windows OS to enhance system performance, fix bugs and improve security. However, installing a corrupt or faulty Windows update may inadvertently delete or overwrite a file.

The above-listed are the causes of no desktop folder in windows. Nevertheless, we’ll take you through basic fixes to resolve them.

What can I do to get the desktop folder in Users?

Before anything, try the following:

  • Use of third-party Recovery software – Third-party recovery software is a type of software that helps users recover lost or deleted data from various storage devices.

1. Show hidden files and folder

  1. Press the Windows + E to open File Explorer.
  2. Click on the View tab and check the Hidden items box in the Show/hide category to show the hidden file and folder.

Showing all hidden files and folders on your device will help you see the desktop folder if hidden. Read about how to show hidden folders and files on windows devices.

2. Perform chkdsk on your PC

  1. Left-click the Start button, type Command Prompt, and click the Run as administrator option.
  2. Click Yes on the User Account Control (UAC) prompt.
  3. Type in the following command prompt and press Enter: chkdsk D:/f/r/x
  4. The letter D refers to the drive letter you want to repair.
  5. Close the Command Prompt and check if the issue persists.

Using the chkdsk command on your PC will help find and repair issues with the Desktop folder. Read about how to fix the chkdsk command taking forever to run on Windows.

3. Run SFC scannow

  1. Press the Windows button, type Command Prompt, and click on Run as administrator to open it.
  2. Click Yes if the Windows User Account Control prompt appears.
  3. Type the following and press Enter: sfc /scannow
  4. Restart your PC and check if the error persists.

Running an SFC scan will help to locate and recover missing or faulty system files. Check our guide about fixing SFC scannow not working on Windows.

You can also try another possibility to perform an SFC scan, which is a dedicated repair tool that can detect all corrupt system files and automatically find healthy replacements from its online vault.

4. Restore the Desktop folder to the default path

  1. Press the Windows + E key to open Windows Explorer.
  2. Right-click on the Desktop tab on the left pane and select Properties from the context menu.
  3. Click on the Location tab, select the Restore Default button, and click OK.
  4. Click Yes If the Windows prompt to create a Desktop folder at the default location.
  5. Select Yes to move contents from the old location to the default location.

Performing the following steps will help recover the Desktop folder and its contents to the previous version of the folder. Check our guide about how to recover deleted files on Windows.

If the error persists after trying the above methods, using a third-party recovery tool can be the last resort when folders are missing in Windows 11.

Conclusively, read about how to fix files and folders missing on your Windows operating system. Also, you can check our guide about how to fix Desktop icons not showing on Windows 11.

If you have further questions or suggestions, kindly drop them in the comments section.

Fix: PowerShell Export-CSV Access to the Path Is Denied

PowerShell is a task automation management app that allows users to perform admin-level tasks with command-lets, also known as cmdlets. There’s one in particular that users have had trouble running.

And that is Export-CSV, as some users are denied connecting the cmdlet to a path. You can try running ErrorAction to give you an idea of what action to take next, but there are solutions worth exploring.

Why is the PowerShell Export-CSV giving me trouble?

Before going into why the cmdlet is giving you a hard time, it’s important to go over why this problem occurred in the first place. Because a lot of the time, it comes to two things.

Either there’s something wrong systemically on your computer, or you just made some small error that cascaded into a bigger problem.

  • You may have incorrect syntax – Syntax in PowerShell refers to a specific set of rules that control the program’s structure. Having incorrect syntax will cause commands not to work.
  • PowerShell had missing modules – If your machine’s Powershell lacks certain modules or is damaged, they won’t work. Luckily, Microsoft has a set of instructions on how to fix this.
  • The computer may have some damaged files – Damaged files can cause various programs not to work. Be sure to download some repair software to fix the software.
  • Your computer is infected with malware – Like damaged files, a computer virus can mess with the system’s functionality. Be sure to install some antivirus software to clean up your hard drive.

How can I stop PowerShell from denying me access?

Getting past this PowerShell issue is pretty tricky to do. At the most basic level, it involves diving into the various systems on Windows 11 and even a bit of programming.

But before diving into the solutions, there are a few things that you can do to fix this problem:

  • The best thing you can do is download the latest Windows 11 update. Microsoft rolls out an update at least once a month, bringing all kinds of bug fixes.
  • Be sure that you’re running PowerShell with administrator permissions. You can do this by selecting Run as Administrator in the Start menu when you search for PowerShell.
  • Double-check the code of the script that you’re trying to run. Ensure there aren’t any extra spaces in the path, like a forward dash or anything else that shouldn’t be there.
  • Additionally, check for any spelling errors in PowerShell. If the power can’t understand your instructions, then nothing will happen. This’ll be tricky to do if there’s a lot of text.
  • Be sure to name your CSV file. Something as simple as that has been shown to fix this error instantaneously.
  • Make sure you’re using the correct cmdlet. Similar to the previous point, the wrong one can cause commands not to function properly. Microsoft has guidelines on how to implement these properly.

1. Configure task security options

  1. If you plan to create a new task on your computer, launch the Task Scheduler.
  2. Click Create Task on the right-hand side.
  3. Click the boxes next to Run whether user is logged on or not as well as Run with highest privileges.
  4. Next, go to the Actions tab and click New at the bottom of the page.
  5. On the Action menu, select Start a program.
  6. Under the Program/script section, click the Browse button. Locate PowerShell in your system files and add it to the Task Scheduler.
  7. As an example, PowerShell was discovered in the following address of Windows 11: C:\Windows\System32\WindowsPowerShell\v1.0
  8. Double-click PowerShell once it’s been found. Click OK to close the window, then OK again.

2. Run the ExecutionPolicy command

  1. Bring up Windows PowerShell and select Run as Administrator.
  2. In PowerShell, type in the following command and hit Enter on your keyboard: Set-ExecutionPolicy AllSigned
  3. If asked if you want to execute the policy change, press the Y key.
  4. Now enter the same command again into PowerShell.

3. Change the administrative account

  1. The easier way to do this is to launch the Settings menu and go to the Accounts tab.
  2. Select Other users.
  3. Click your user account and select Change account type. In the new window that appears, change the Account Type to Administrator.
  4. Another method involves first launching the Control Panel, then selecting User Accounts at the bottom of the window.
  5. Click the account you want to give administrator permissions to. Select Change your account type.
  6. Select Administrator, then click the Change Account Type to apply the changes to your account.

It’s also possible to change your account into an administrative one using either PowerShell or the Command Prompt if you prefer those methods. Be sure to check out our guide on how to do this.

What can I do if Try-Catch isn’t working on PowerShell?

Try-Catch can be used in PowerShell to fix errors, and exceptions in a code and can be used to address the Export-CSV cmdlet error. But it doesn’t always work due to similar syntax errors.

Like the solutions above, you can try double-checking the spelling of your code and give yourself administrator permission to run it. You can also try setting the ErrorAction value.

While we have you, it’s recommended that you learn how to print out an environmental variable. It’s a function that stores data information for all the programs on an operating system.

Feel free to comment below if you have questions about other PowerShell errors. And please tell us if there’s a specific guide for any Windows 11 issues you’d like to see.

Fix: Microsoft Office Click to Run (SxS) High Disk Usage

All the apps in Microsoft Office depend on the Click-to-Run feature to run properly. It boosts the performance of the software like Word and Excel so that they can launch quickly.

However, Click-to-Run has its share of problems. In addition to taking up a lot of CPU resources, the feature has been known to have high disk usage resulting in performance problems.

What causes Click-to-Run to have high disk usage?

Before going into solutions on how to stop Click-to-Run from taking up resources, it’s important to get into why this happens. That way, you can prevent this from occurring in the first place:

  • Your computer has been infected by malware – This is, by far, the most likely reason why the feature is taking up a lot of resources. Install some antivirus software to get rid of the malware.
  • You don’t have the latest Windows Update – Be sure to stay updated on the security patches. And there are two ways to do this: automatically through the Settings menu or from Microsoft itself.
  • Corrupt files are ruining system functions – Corrupted files can result from a computer virus infection and must be addressed separately.

How can I fix Microsoft Office Click-to-Run?

Luckily, there are many ways to resolve Office Click-to-Run problems, both simple and complex solutions for those particularly stubborn times. Here’s what you should first do:

  • The first thing that you should do is restart your computer. Most of the time, a simple reboot will fix Click-to-Run so Office apps can run smoothly.
  • Be sure to download and install the latest Windows 11 Update. These patches always come with a variety of fixes in tow.
  • Launch the Office apps in Safe Mode and see if they run properly. If they do, it’s recommended that you either download the latest Office update or repair the files.
  • In a similar vein, repairing files can also fix corrupt system files. You can do this by either running an SFC scan or the Disk Cleanup tool.

1. Delete cache files

  1. Launch the File Explorer and paste the following into the address bar (be sure to replace USERNAME with your own): C:\Users\USERNAME\AppData\Local
  2. Open the Microsoft folder.
  3. Scroll down and double-click the Office folder.
  4. Enter the 16.0 folder.
  5. Delete the Wef folder.
  6. Go back to the Local folder, scroll down, and open Packages this time.
  7. Locate the folder titled Microsoft.Win32WebViewHost_cw5n1h2txyewy and open it.
  8. Go into the AC folder, then double-click #!123.
  9. In there, there should be a folder titled INetCache. Delete it.

If the INetCache folder isn’t there, you’re fine. You don’t have to do anything else. Also, do not delete Microsoft.Win 32 folder mentioned earlier.

2. Disable Click-to-Run in Services

  1. In the Windows Search bar, bring up the Services app. Click the entry when it appears.
  2. Scroll down until you locate Microsoft Office Click-to-Run Service. Right-click it, and in the context menu, select Properties.
  3. Expand the menu under Startup Type and select Disabled.
  4. Click Apply, then OK.
  5. Restart your computer to enable the changes.

3. Uninstall Click-to-Run

  1. Launch the Control Panel and click Programs and Features. If you don’t see this entry, set View By to Large Icons.
  2. Locate Microsoft Office Click-to-Run, right-click it, and select Uninstall.
  3. If asked to remove all apps installed by Click-to-Run, click Yes.

4. Repair Click-to-Run

  1. Launch the Control Panel and return to the Programs and Features section as seen in the previous solution.
  2. Right-click an Office app. Select Change in the context menu.
  3. A User Access Control window may appear asking if you want to make changes. Select Yes.
  4. In the new window that appears, click Online Repair to repair the office program. Quick Repair is faster but isn’t as thorough.
  5. Click the Repair button to begin and wait for the process to finish.

5. Set priority

  1. Start by launching the Task Manager.
  2. Click the three-line icon on the left side. This will take you to the Details panel.
  3. Scroll down until you locate OfficeClickToRun.exe.
  4. Right-click the entry and hover over Set Priority.
  5. Set the priority to High. If that doesn’t, set it to Real Time.

Conversely, if the problem continues, lower the priority even further and see if that works.

6. Disable Superfetch

  1. Launch the Services app. Scroll down until you find SysMain.
  2. Right-click it and select Properties in the context menu.
  3. Set the Startup Type to Disabled.
  4. Click Apply, then OK.
  5. Restart your computer to enact the changes.

7. Disable metered connection

  1. Launch the Settings menu.
  2. Go to the Network & Internet section. Select your Wi-Fi‘s Properties tab.
  3. Toggle the Metered Connection switch to turn it off.

Is it possible to get a fresh copy of Click-to-Run?

Sort of. You can’t download Click-to-Run by itself, but what you can do is reinstall the Office apps. Doing this will net you a fresh version of the feature, and there are multiple ways to do this.

You can try to go to the Microsoft Office website, log in and reinstall the software. Or download the Office Deployment Tool, but you should only try this if you’re an IT professional.

While we have you, it’s recommended that you learn how to fix Microsoft Office Error Code 147-0, which prevents apps in the suite from opening. It usually happens when you try to start launching one.

The error can be caused by corrupt system files or faulty software installation. Deleting the Office Registry Subkeys works in addressing the problem as well as updating the software.

This can be a nasty issue, and if you’re still having this problem, your only option might be to remove Office Click to Run.

Feel free to comment below if you have questions about other Windows 11 errors. And please tell us if there’s a specific guide for any Office app you’d like to see.

511 CPU Fan Not Detected: How to Fix This Boot Error

The CPU fans help to keep the computer in a cool and healthy state, dispersing heat generated by the processor and other components of the PC.

However, many Windows users have complained of getting an error message that says the 511 CPU fan not detected. It indicates the CPU fan isn’t working correctly or is not responsive to the device’s activities.

You may be interested in our guide on the best CPU Temperature Monitoring Software for Windows 11.

Why am I seeing the 511 CPU fan not detected error?

The 511 CPU Fan not detected error may pop up on your computer for many reasons. It means the system can’t connect or use the 511 CPU fan. Some probable causes that may prompt the error are :

  • Physical damage on the PC – Any physical damage may affect a component inside or outside the computer. So, your system falling can cause physical damage to CPU fans, heatsink, or motherboard, preventing it from reducing heat in the system. Hence, it can prompt the 511 CPU fan not detected error.
  • Dusty or dirty CPU fan – The CPU fans on your computer may not work if they are filled with dust or dirt. It can prevent them from spinning or contacting the fan header surface. Also, the fan can malfunction if the internal composition hasn’t been maintained in a long time and can affect other parts of the motherboard.
  • Issues with the BIOS settings – The BIOS Settings Manager allows users to control advanced hardware components like fan speed. So, issues with the CPU fan not being detected or responsive can be due to a misconfiguration in the BIOS system.
  • CPU fan connection issues – If the CPU fan does not connect firmly to the motherboard, it can cause the system not to detect it when starting the PC. So, the 511 CPU fan not detected error can be due to the CPU fan not fitting correctly in its socket.

These causes may vary on different devices. Nonetheless, we’ll take you through some basic steps to fix the error and get your CPU fan running again.

What can I do if 511 CPU fan is not detected?

Before trying any advanced troubleshooting steps, we recommend you go through the following:

  • Disconnect external devices plugged into the computer.
  • Restart the PC in Safe Mode and check if the issue persists.
  • Check your PC for physical damages – You can check the outer case of the system while it is closed and open.
  • Replace the CPU fan – Replacing the fan with a new and functional one will help fix the issue.

If you can’t fix the issue, proceed with the solutions below:

1. Secure CPU fan connections

  1. Unplug the PC from its power source.
  2. Close the apps running on your PC, then hold the power button to shut down the system and drain power.
  3. Open the back case of the computer, then find the CPU fan and the port on the Motherboard.
  4. Loosen the fan screws, remove the locks, and take the fan out. Wait for some minutes and plug it back into the port.
  5. Couple the PC and restart it to check if the issue persists.

2. Clean the CPU fan and its port on the motherboard

Note icon NOTE
Before attempting any cleaning process on the motherboard, we recommend you read the system manual. You can consult a professional for help because any damage to the motherboard can result in pricey repairs.
  1. Unplug the PC from its power source, then press and hold the power button on your PC to drain any power residue.
  2. Carefully unscrew the back casing of your PC to access the motherboard, then remove all the cables connected to it.
  3. Get a blower, a brush, or a clean microfiber cloth to clean the dust.
  4. Repeat the above step for the CPU fan to remove dust and dirt from the CPU Fan’s rotors and heatsink.
  5. Reconnect all the components to the Motherboard and ensure each unit is well-seated in its port.
  6. Power on your PC and check if the 511 CPU fan not detected error persists.

Cleaning the inner compartment of the PC removes the dirt and dust that may cause it to be stuck or grounded.

3. Update your Windows PC

  1. Press the Windows + I to open the Windows Settings app.
  2. Select the Windows Update category and click on Check for Updates. Wait for the Windows update result and click on Install Update if a Windows update is available.
  3. Restart your PC to check if the fan works.

Updating the Windows OS will install new updates and fix compatibility issues that may prompt the 511 CPU not detected errors. Read about fixing Windows not connecting to update service if the error occurs on your PC.

4. Reset BIOS

  1. Press the Windows + I to open the Windows Settings app.
  2. Select the System category and click on Recovery.
  3. Then, click Restart Now under Advanced startup.
  4. Tap on Troubleshoot.
  5. Then select Advanced options and click on UEFI Firmware Settings.
  6. Click Restart, and your system will restart and take you to the BIOS.
  7. In BIOS Mode, find the Reset to default option and click on it to perform the resetting operation.

Resetting BIOS (Basic Input/Output System) on your computer will refresh the output/input system and fix hardware errors. It’ll resolve corrupt BIOS components causing the 511 CPU not detected an error.

We also have a guide on what to do if your CPU fan is not spinning, so don’t miss it.

Conclusively, you may be interested in our guide on the best cooling pads you can get for your PC. Kindly use the comments section if you have any questions or suggestions.

The Drive Is Not a Valid Backup Location: How to Fix It

System images are a great way to back up your computer. They allow you to create a snapshot of your entire system, including your files, settings, and programs. This is useful if you want to recover from a catastrophic event like a hard drive crash or virus infection.

However, things don’t always go as planned, and your selected drive may be written off as an invalid backup location. If this is the case, you’ll find this article worth your time as we explore why this happens and possible fixes.

Why can’t I create a system image on USB?

System images can be created using an external hard drive or the built-in Windows recovery tools. The best way to create system images is to use an external hard drive because this will ensure that you have a saved copy in case something goes wrong with the original one.

If you’re having trouble creating a system image on a USB drive, below are some possible causes:

  • Faulty drive – If the disk is in a bad state, it may be impossible to run a system image on it, making it unreliable.
  • The disk is not formatted correctly – If your USB drive does not have the correct file system or a partition error, it won’t work.
  • OS support – The ability to create a system image on USB depends on whether or not your operating system supports this feature. 
  • Insufficient storage space – To create an image of your entire hard drive, you have to have at least 10 GB of free space or check the space requirements for the version of Windows you have.
  • USB flash drive is write-protected – If you try to copy the system image to a USB flash drive, but it is write-protected, Windows will not allow you to write files to the USB device. 

Can I put a system image on a USB flash drive?

Yes, you can. You might be able to create a system image on USB, but it’s not recommended. System images are good for reinstalling Windows after installing a new hardware or software update. 

To create a new system image, you’ll need to use an external hard drive that has enough space for the new image. If you don’t have an external drive, you can find out how much space is needed and get a USB drive with enough space.

How do I make a drive a valid backup location?

First things first, ensure the following are in check:

  • Try deleting some files or folders from your backup location to free up space on that drive.
  • Run an antivirus scan on the drive involved in this backup project – especially if multiple users share it.
  • Ensure your USB ports are in good working condition, as some ports may not be working.

1. Format the drive

  1. Hit the Windows + E keys to open File Explorer.
  2. Locate the USB drive, right-click on it, and select Format.
  3. Navigate to the File system option, select NTFS from the drop-down menu and hit Start.
  4. Try again and see if the error persists.

The main purpose of formatting a USB drive is to prepare it for use on your PC. This process makes sure the data you have stored on the drive is accessible by your operating system and that everything is in working order.

2. Share USB as a network drive

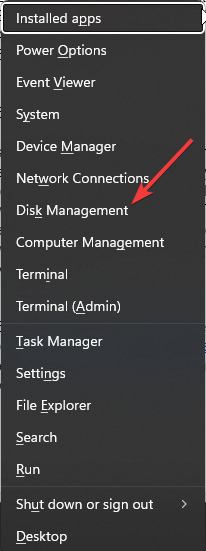
  1. Right-click on the Start Menu and select Disk management.Disk Management
  2. Locate your USB drive, right-click on it, and select Properties.
  3. Navigate to the Sharing tab and select Advanced Sharing.
  4. Check the Share this folder, then click on Permissions.
  5. Under Group or user names, select Everyone then allow Full Control permissions.
  6. Hit the Windows key, type cmd in the search bar, and click Run as administrator.cmd-run-admin-w11 unexpected kernel mode trap windows 11
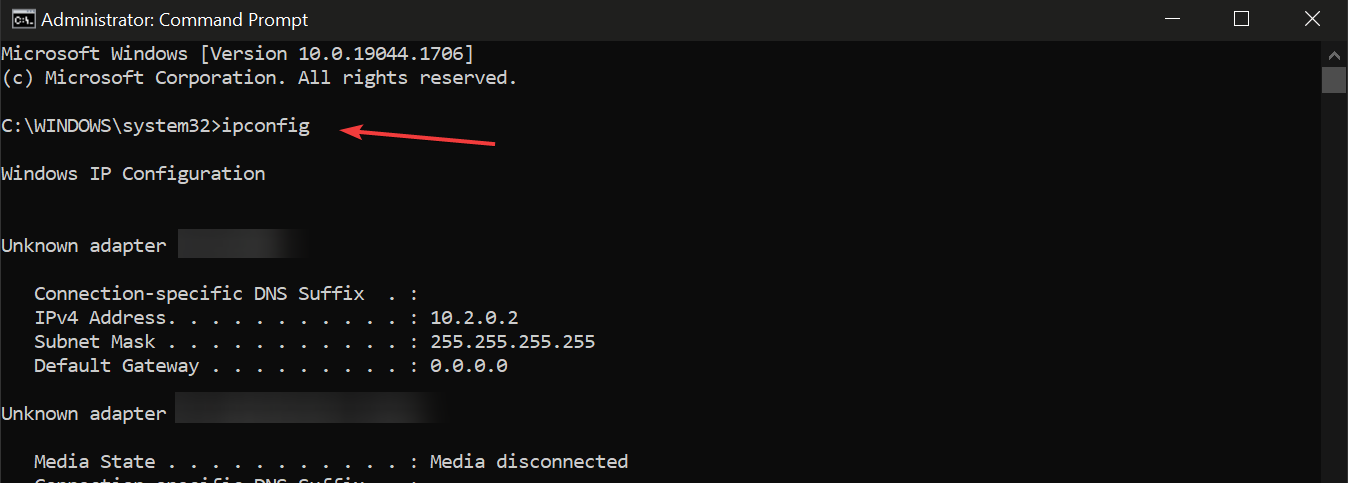
  7. Type ipconfig and hit Enter. Take down the IPV4 address and keep this information close to be used in the next steps.setup vpn windows 10
  8. Hit the Start Menu icon, type Control Panel in the search bar and click Open.control-panel-search fallout new vegas runtime error
  9. Click on Backup and Restore.
  10. Select Create a system image.
  11. Select the On a network location option, then click on the Select button.
  12. Enter the information collected in 7 above under Network Location and your login credentials.
  13. Click Next and select your backup drive.

3. Use a third-party backup software

The most common reason for backup failures is a corrupt or damaged backup file. This is often due to insufficient storage space on your computer, but it could also be caused by malware or other issues.

If you’ve got an SSD and a backup hard drive, you might be wondering how to make your backups fast and reliable. The answer is simple: use a third-party backup software such as AOMEI Backupper. It’s fast, reliable, and safe.

⇒ Get AOMEI Backupper

Hopefully, you’re no longer stuck with a drive that is an invalid backup location after these steps. You may also experience a Windows backup error, so don’t hesitate to check out our helpful guide.

Let us know if you have been able to solve this issue in the comment section below.

Fix: Couldn’t Install Updates Because the PC Was Turned Off

Installing updates on Windows computers allows you to install patches and builds to help fix bugs and improve system performance. You can install updates for a particular app or the update system.

However, users report We couldn’t install some updates because the PC was turned off error message when initiating the update process. It impedes the update from installing.

Also, we have a detailed guide on the Something didn’t go as planned update installation error on Windows 11.

Why do I get couldn’t install updates because PC was turned off?

We couldn’t install some updates because the PC was turned off error on Windows 11 shows up while trying to run Windows Update. It occurs when updating via the Settings app compared to other means.

Some notable factors that may cause the error are:

  • Issues with Windows Update Service – Users can encounter error on their Windows computers due to problems with the Windows Update Service. It assigns the necessary settings and components for updating Windows devices. Hence, a wrong configuration or disabling the service can cause the error.
  • Faulty or corrupt Windows Update – If the update you’re trying to install on your Windows PC is corrupt or doesn’t have complete update files, it can cause errors during installation. Also, the system can’t read the updated installation file if the corrupt system files on the PC impede it.
  • Interference from Antivirus software – Antivirus software will scrutinize and monitor the activities on your PC, including Windows updates. So, it may wrongly pick up a threat from the update installation process, causing it to block it, resulting in the couldn’t install some updates error.
  • Power outage while downloading the update – The installation error can occur when there’s a startup or power issue on the system. It can cause problems with the activities running on the system resulting in Windows updates not working on the PC.

These factors may vary in different systems. Nonetheless, we’ll discuss some basic steps you can follow to fix the issue and get the update installation process working smoothly.

What can I do if I couldn’t install updates because PC was turned off?

Before trying any advanced troubleshooting steps, go ahead with the following:

If you can’t fix the update installation issue, proceed with the troubleshooting steps below:

1. Perform a Clean boot on your PC

  1. Press Windows + R key to open the Run dialog box, type msconfig, and click OK.
  2. Click the Services tab and check the box for the Hide all Microsoft services option, then click the Disable all button.
  3. Go to the Startup tab and click Open Task Manager.
  4. Select the startup programs and click the Disable button.
  5. Restart your PC and check if the issue persists.

Performing a Clean boot stops services interfering with other features on your PC from running when you boot the system. It prevents them from launching when you start the update process.

2. Run Windows Update Troubleshooter

  1. Press Windows + I key to open the Windows Settings app.
  2. Click System and select Troubleshoot.
  3. Then click on Windows Update and click the Run button beside it.
  4. Follow the on-screen prompts and restart your PC afterward.

The Windows Update troubleshooter will repair issues causing the Windows update not to work and problematic installation on your PC.

Also, this solution might be effective If the error pops We couldn’t install updates because there’s a problem with the date and time.

3. Reset the Windows Update process

  1. Left-click the Start button, type Command Prompt, and click the Run as administrator option.
  2. Click Yes on the User Account Control (UAC) prompt.
  3. Type the following commands and press Enter after each one: net stop wuauserv net stop cryptSvc  net stop bits  net stop msiserver
  4. Run the following command one after the other: ren C:\Windows\SoftwareDistribution SoftwareDistribution.old  ren C:\Windows\System32\catroot2 Catroot2.old
  5. Type the following commands and press Enter after each one: net start wuauserv   net start cryptSvc   net start bits   net start msiserver
  6. Exit the Command Prompt and restart your PC.

The above steps will repair the Windows update process and fix the issues in Windows update services settings. Also, it can clear the outdated caches on your PC.

4. Disable Windows Firewall

  1. Click the Start button, type control panel, then press Enter to open the Control Panel.
  2. Select the Windows Defender Firewall option.
  3. Click the Turn Windows Defender Firewall on or off option from the left side.
  4. Go to the Private network settings and Public network settings, then click the radio buttons for the Turn off Windows Defender Firewall (not recommended) option.
  5. Exit the Control Panel and restart your PC to check if the update installation works.

Disabling the Windows Defender Firewall on your PC will resolve any interference it’s causing in the update installation process.

5. Run Windows update via the Command Prompt

  1. Left-click the Start button, type Command Prompt, and click Run as administrator.
  2. Click Yes on the User Account Control prompt.
  3. Type the following commands to start checking for updates:
    • Check for updates: UsoClient StartScan  
    • download updates: UsoClient StartDownload
    • Install the downloaded updates: UsoClient StartInstall
    • Restart your device after installing the updates: UsoClient RestartDevice
    • Download and install updates: UsoClient ScanInstallWait to check

The computer restarts after the installation process is complete, and you should be able to install your updates.

6. Clear Windows Update cache via File Explorer

  1. Press the Windows + E key to open File Explorer on your computer.
  2. Go to Local Disk (C), right-click on it, then select Properties from the drop-down menu.
  3. Click on the Disk Clean-up option, then the Cleanup system files button.
  4. Check the boxes for Windows upgrade log files and Temporary Windows Installation files, then click OK.
  5. Restart your PC and try the update installation to see if the issue persists.

You can check our guide on what to do if File Explorer keeps crashing on your PC.

Alternatively, you can check our guide on fixing slow Windows updates on their PCs. Also, we have a detailed guide on Windows Update error 0x8007045b and some fixes.

If you have further questions or suggestions, kindly drop them in the comments below.

Fix: Windows Cannot Load the Device Driver Code 39

Users tend to install new hardware on their devices to upgrade system performance. However, users have reported encountering hardware errors and driver communication on their devices.

Thus, In this article, we will discuss some effective methods to resolve the Windows cannot load the device driver code 39 error. Also, you can read about how to fix driver issues on Windows OS.

Why can’t Windows load the device and give error code 39?

Different factors can cause Windows not loading the device driver error code 39. Some causes are listed below.

  • Driver issues – The system driver pack allows the Windows operating system to communicate effectively with the system hardware components. Thus, an outdated or corrupt system driver pack can lead to device driver code 39 on your pc.
  • Corrupt system file – The effect of virus activity, corrupt hard disk sector, and software conflict can cause a corrupt or missing Windows system file on a computer. Therefore, a corrupt system registry can cause the Windows OS not to load a device’s hardware driver.
  • Hardware failure – A system hardware part can be faulty due to wear and tear, power surge, and system overheating can cause the components not to connect with the operating system. Also, an incompatible hardware component can cause Windows not to load the device driver error code 39.

The above-stated are the specific cause of the device driver error code 39, which vary on various devices.

What can I do if Windows cannot load the device error code 39?

Apply the following preliminary checks:

  • Scan your device with antivirus.
  • Restart your PC in Safe mode.
  • Check for the Windows hardware compatibility list (HCL).
  • Replace hardware part – trying new hardware components on the user’s PC will help ascertain if the error is associated with incompatible parts.

Proceed with the following advanced steps if the error persists.

1. Update Windows drives

  1. Press the Windows + I key to open the Windows Settings.
  2. Navigate to the Windows Update tab and select the Advanced options.
  3. Click on the select Optional Update.
  4. Click the drop-down button on the Driver Update and checkmark the list of updates available.
  5. Select the Update and Install button and wait for the drivers to install.

Updating the Windows driver will aid the Operating System’s effective communication with the newly installed hardware components.

Users can read about how to update system driver packs on Windows on their devices.

2. Run System Restore

  1. Press Windows + R key to open the run dialog box, type control, then press Enter to open the Control Panel.
  2. Input recovery in the Control Panel search bar and select Recovery.
  3. Then click Open System Restore.
  4. Click Next in the Restore system files and settings window.
  5. Choose the restore point you want to restore from, then click Scan for affected programs.

Performing a system restore will troubleshoot all settings or recent activities that can cause the windows not to load the device driver error code 39. Read how to fix Restore Point if it’s not working on your PC.

You can also try automatic repair programs to detect corrupt system files and locate healthy, new components as replacements from its massive repository.

3. Delete the UpperFilters and LowerFilters registry values

  1. Press the Windows button, type regedit, and press Enter to open the Registry Editor.
  2. Copy and paste the following part to your Registry Editor address bar and press Enter: HKEY_LOCAL_MACHINE\SYSTEM\CurrentControlSet\Control\Class\
  3. Locate problematic device folders under the Class folder and delete the LowerFilters and the UpperFilters in the device folder.
  4. Close the Windows Registry Editor and restart your PC.

The above steps apply to users who can locate the LowerFilters and UpperFilters in the folder. You can read about how to fix a broken registry in Windows 11.

Note that you should repair faulty hardware parts if the error persists after trying all the above recommendations.

Alternatively, read about how to fix errors activating Windows after hardware change on a PC. Also, check our guide about how to diagnose hardware on Windows 11 OS.

Conclusively, if there are further questions or suggestions concerning this problem of Windows not loading device driver code 39, then drop them in the comments section.

How to Format USB to FAT32 on Windows 10 & 11

A USB is an essential tool as it provides extra storage space you can carry without worrying about the size. While the NTFS format is popular now on Windows, many still prefer FAT32 to move files between different OS.

This guide will show you the different ways you can format a USB to FAT32 on your Windows 10 and Windows 11 PC. So, let us get right into it.

How can I format USB to FAT32 on Windows 10 and Windows 11?

Note icon NOTE
The steps shown here are similar for Windows 10 and Windows 11 PCs. Therefore, you can follow the same methods for either operating system.

1. Via File Explorer

  1. Press the Win + E keys to open the File Explorer.
  2. Right-click on your USB drive and select Format from the context menu.
  3. Under the File system drop-down, select FAT32.
  4. You can give a name to your volume label or live it as is.
  5. Click the Start button.
  6. The drive will be ready once the format is complete.

This is probably the easiest way to format a USB drive to FAT32. All you need to do is open File Explorer and follow the steps to convert your USB to FAT32.

2. Via Disk Management

  1. Open the Start menu by pressing the Win key.
  2. Type Disk Management and open Create and format hard disk partitions.
  3. Right-click on your USB drive and select Format.
  4. Here you can give a Volume label.
  5. Select FAT32 from the File system drop-down.
  6. Click OK.

You can use the Disk Management tool to format drives, as the File Explorer method lets you format partitions.

3. Via Command Prompt

  1. Press the Win key to open the Start menu.
  2. Open the command prompt as an admin.
  3. Type the below command and press Enter. format /FS:FAT32 X (Here, replace the X with the drive letter of your USB drive)
  4. The operation will start.
  5. Once complete, the drive can be used from File Explorer.

You can run the same command on Windows PowerShell and format your USB drive to FAT32.

4. Via Diskpart

  1. Press Win + R keys to open the Run dialogue.
  2. Type diskpart and press Enter.
  3. Run the below commands and press Enter one by one. list disk select disk n (replace n with the disk number of the USB flash drive) list partition select partition m (replace m with the USB flash drive partition number) format fs=fat32 quick

5. Via a dedicated tool

  1. Download and install the AOMEI Partition Assistant tool.
  2. Launch the program.
  3. Right-click on your USB drive and select Format Partition.
  4. Choose FAT32 from the File system drop-down.
  5. Click OK.
  6. Click on Apply.

AOMEI Partition Assistant is a professional tool that you can use to resize or move partitions, merge partitions, split and format partitions, and much more.

However, you can also use it to convert your USB to FAT32 quickly and accurately. Do note that formatting removes all data present on your USB. So, back up the data before proceeding with the above methods shown.

Also, you can check out our guide that lists some of the best tools that can help you format an SD Card.

If you are having issues formatting your external HDD, then you should check out our guide, which will give you some practical solutions to fix the problem.

Why should I format my USB to FAT32?

FAT32 stands for File Allocation Table, and 32 represents the number of bits that file systems use to store file addresses.

FAT32 is widely used as most devices are compatible with it. Another exciting benefit of FAT32 is that it works cross-platform and across operating systems. Also, users who found that Windows 11 does not recognize exFAT switched the file system to FAT32.

However, there are also downsides attached to the FAT32 format. It isn’t as efficient as other modern file systems, such as NTFS. Moreover, it is less secure and comes with a maximum file size of 4GB and a partition size of 8 GB. So, there are limitations to FAT32 as well.

If you want to learn more, we suggest reading our Converting exFAT to FAT32: Step-by-Step guide for more information.

Feel free to let us know in the comments below which solutions helped you format the USB drive to FAT32.

Microsoft Teams Error Code CAA20002: How to Fix It

Microsoft Teams might be slowly replacing Outlook due to the features and capabilities of the app. However, like Outlook, MS Teams has a few occasional errors. 

If you’re experiencing the Microsoft Teams error code caa20002, this post will provide the steps to resolve the error.

What causes the Microsoft Teams error code caa20002?

MS Teams’ code caa20002 is similar to Microsoft Outlook error code caa20002. The following are a couple of reasons causing code caa20002 error on MS Teams:

  • Poor Internet connection – Microsoft Teams requires a strong internet connection to launch the app. If your PC can’t connect to network, you’ll need help accessing Microsoft Teams.
  • Corrupted files – If corrupted cache files are in the Microsoft Teams folder, the error caa20002 might be triggered.
  • Compromised Password – If Microsoft detects that your Microsoft Teams password has been compromised, it might prevent you from accessing the app.
  • Multiple device logins – If you’re logged in to Microsoft Teams on too many devices, you might run into the caa20002 error code. 

Now that we know the reasons causing this issue, let’s apply the solutions below to fix it.

How do I fix the Microsoft Teams error code caa20002?

Before we proceed to more advanced solutions, here are some quick fixes you can apply:

  • Fix network congestion and restart your router.
  • Turn off your VPN if you’re using any.
  • Close and relaunch the Microsoft Teams app.

If those steps couldn’t resolve the error, here are some advanced fixes:

1. Clear the Microsoft Teams cache

  1. Right-click on the Start button and select Task Manager.
  2. Locate the processes of Microsoft Teams, select it, and click End task.
  3. Press Win + R on your keyboard to open the Run program, type %appdata%\Microsoft\teams inside the box, and hit Enter key. 
  4. Delete the folders named: application cache, blob_storage, Cache, databases, GPUcache, IndexedDB, Local Storage, and tmp. 

Clearing the Cache should relieve the Microsoft Teams app of corrupt files or folders and prevent the caa20002 error code from popping up.

2. Enable TLS 1.2

  1. Click the Search icon, type internet options, and click on Intenet Options.
  2. Select the Advanced tab, then scroll down and check the Use TLS 1.2 box. Also, make sure that 1.0 and 1.1 above it are unchecked.
  3. Click on Apply and OK to acknowledge the changes and try to open Microsoft Teams again.

Microsoft Teams error code caa20002 is mostly caused by an improper connection to the server which uses TLS 1.2. Thus, this solution is a simple fix that will sort out the problem.

3. Log out from other devices

  1. Launch Microsoft Teams.
  2. Navigate to your Profile Picture at the top right corner of the app and select Sign Out.

Repeat this for every secondary device you’ve signed in with your MS Teams credentials.

After logging out of the devices, you must sign in with your credentials to gain access to Microsoft Teams.

4. Change the MS Teams Password

  1. Visit Microsoft’s account page to sign in. Sign in using the same credentials for Microsoft Teams.
  2. Go to Security from the navigation bar and submit your password again.
  3. Locate the Password Security tab and select the Change my password option.
  4. On the Change my Password page, type in your current password, then the new one. Click Save. 
  5. Relaunch MS Teams.

We also recommend a guide to help you fix the Microsoft password reset if it doesn’t work.

5. Reinstall Microsoft Teams

  1. Press Windows + R keys to open the Run dialog box, type appwiz.cpl, and click OK to open the Programs and features.
  2. Select Microsoft Teams and click Uninstall. Click Yes to confirm.
  3. Follow the instructions on the installation wizard to finish the uninstall.
  4. Download Microsoft Teams from the official Microsoft website and click on Download for Desktop. 
  5. Open the file and follow the instructions to reinstall it.

Reinstalling Microsoft Teams should automatically fix any errors that existed previously. However, you should delete the app after applying all the fixes without getting a positive result.

If you still can’t resolve the error after attempting all our fixes, you can launch the web version of Microsoft Teams until the error is fixed.

You might also be interested in reading our guide on what to do if Microsoft teams is not working on Windows 11 for more information.

With these solutions, you should be able to fix the Microsoft Teams error code caa20002 easily. If you need further guidance or have questions, kindly drop them in the comments section.

Windows Server Time is Out of Sync: 2 Best Ways to Force Sync

If your Windows Server time is out of sync, you came to the right place. Not having the correct time on your Windows server can be extremely annoying, especially if you are using apps that require time to be synced.

We already showed you how to fix time on Windows 10, and today we will show you how to deal with this issue on Windows Server.

Why is my Windows time always out of sync?

There are several reasons for this issue on Windows Server:

  • Group Policy settings – In most cases, incorrect group policy settings can cause this problem. Change them accordingly, and the issue will be gone.
  • Improperly configured settings – Sometimes Windows Time isn’t configured properly. Use Command Prompt to configure it and fix the problem.

What can I do if Windows Server time is out of sync?

Before we start fixing this issue, there are a few checks that you can perform:

  • Enable UDP port 123 – Windows uses this port for time synchronization, so ensure your hardware or software firewall isn’t blocking it.
  • Make sure that your host time is properly configured – If you’re running a server inside of a virtual machine, check if the time on the host device is correct.

1. Use Command Prompt

  1. Open Search and enter cmd. Right-click Command Prompt and choose Run as administrator.
  2. Run the following command: w32tm /query /source
  3. In case it shows a different server, correct the time on that server and run the following command: w32tm /resync /rediscover 
  4. If the command from step 2 says comes back as free or running local CMOS, run the following commands:
    net stop w32time
    w32tm /config /syncfromflags:manual /manualpeerlist:"0.pool.ntp.org 1.pool.ntp.org 2.pool.ntp.org 3.pool.ntp.org" /reliable:yes /update
    net start w32time
    w32tm /config /update
    w32tm /resync /rediscover

You can follow this detailed guide on how to configure an NTP server in Windows Server to ensure your system syncs correctly and avoids future time drift.

2. Modify the Group Policy

  1. Press Windows key + R and enter gpedit.msc. Press Enter.
  2. Now navigate to Computer Configuration and choose Administrative Templates. Next, expand System and go to Windows Time Service. Lastly, choose Time Providers.
  3. Double-click on Configure Windows NTP Client.
  4. Enable the policy and set the following settings:
    NtpServer: tick.usno.navy.mil  (or your preferred server of choice)
    Type: NTP
    SpecialPollInterval: 3600
  5. After doing that, open Enable Windows NTP Client and Server services, end set each to Enabled.
  6. Keep in mind that these settings should be only on your master clock. To ensure that run the following commands:
    root\CIMv2
    Select * from Win32_ComputerSystem where DomainRole = 5

The rest of your computers should be configured as follows:

  1. Open Group Policy Editor.
  2. Go to Computer Configuration and expand Administrative Templates. After that, choose System. Lastly, go to Windows Time Service.

  3. Double-click on Global Configuration Settings.
  4. Set it to Enabled and save changes.
  5. Next, go to Time Providers in the left pane.
     
  6. Select Configure Windows NTP Client.
  7. Enable the policy and configure it as follows:
    Type: NT5DS
    CrossSiteSyncFlags: 1
    SpecialPollInterval: 3600
  8. Save changes.

Because we understand how important it is for you to have a correct time set on your machine, for both personal and software-related reasons, following the above steps will surely help.

Many reported that the Windows Time service is missing, but we fixed that issue in one of our other guides.

You can do this by using the comment section found below this article.

DAX3API.exe: What is it & How to Uninstall it

There are multiple user reports regarding the DAX3API.exe running in the Task Manager. Because the DAX3API.exe stopped running, some users are treated with different error messages with a blue screen. People are confused about whether this DAX3API.exe is a virus, threat, or an essential Windows program.

And if it is a virus, how can they eliminate it? If you are also one of such users looking for answers, you are in the right place. Because in this guide, we will give you a complete explanation of what DAX3API.exe is and how you can uninstall it from your PC. Let us get right into it.

What is DAX3API.exe?

DAX3API.exe is a Windows service that runs in the background. It is associated and gets installed with devices that have Dolby Atmos components.

The usual path of this file is C:\Windows\System32\dolbyaposvc. This is a file that the Dolby Laboratories software developer develops. The EXE file extension indicates that it is an executable file.

However, attackers can easily clone such files and inject them into the target’s PC as a virus or malware. Therefore, if you encounter system-related issues on your PC and the error message points towards DAX3API.exe, it is better to remove it from your PC.

How to check if DAX3API.exe is legit or not?

Method 1

  1. Press Ctrl + Shift + Esc buttons to open the Task Manager.
  2. Right-click on the column section and select Publisher.
  3. Scroll down and locate DAX3API.exe and check its publisher.

This process or file is legit if the publisher’s name is Dolby Laboratories. However, if it is something else or a random name, then it is a virus or threat.

Method 2

  1. Go to the below-mentioned location in File Explorer. C:\Windows\System32\dolbyaposvc
  2. Locate the DAX3API.exe file.
  3. If you could find the file inside the mentioned location, it is legit.
  4. If there is no such file, then this is a threat.

Method 3

  1. Open the Start menu by pressing the Win key.
  2. Open Device Manager.
  3. Expand the Software components section.
  4. Right-click on DolbyAPO SWC Device and select Properties.
  5. Switch to the Driver tab.
  6. Click on Driver Details.
  7. See if there is a reference to the DAX3API.exe file or not.
  8. If yes, then this is a legit file.

If you cannot find the file in the said location or by following any of the methods mentioned above, then you should uninstall it from your PC. Check out the next section below to learn how to uninstall DAX3API.exe from your PC.

How to uninstall DAX3API.exe from your PC?

1. Delete from its location

  1. Press Win + E to open the File Explorer.
  2. Navigate to the below path. C:Program Files>Dolby Laboratories>DAXAPI >DAX API
  3. Locate DAX3API.exe_uninstall.exe.
  4. Open the file and follow the steps to uninstall the program.

2. Delete from the Settings menu

  1. Press the Win + I keys to open the Settings menu.
  2. Click on Apps on the left pane.
  3. Select Installed apps.
  4. In the search apps field, type DAX3API or Dolby Laboratories.

3. Use a dedicated uninstaller

  1. Download and install IObit Uninstaller.
  2. Launch the program.
  3. Click on Programs on the left pane.
  4. Locate Dolby associated program and click on the Bin icon.
  5. Click Uninstall.

Well, we recommend you use a dedicated software uninstaller to remove sticky and virus programs.

Often you won’t be able to find such programs in their usual locations, and it is better to use such software. Our guide lists some of the best software uninstallers you can use on your Windows 11 PC.

That is it from us in this guide. However, there are files, including Netfilter2.sys and Gdrv2.sys, that can be potential viruses, and you should immediately remove them from your PC.

Feel free to let us know in the comments below if you could remove the DAX3API.exe file from your PC and if it was present as a threat on your PC or not.

5 Best Windows 10 School Apps to Help Kids With Learning

Many kids use their computers from a young age, and many use Windows 10 school apps to help them learn.

There are many great education software tools available on the market, but in today’s guide, we’re focusing on Windows Store apps exclusively.

If you have a kid who has a Windows tablet or another device with access to the Microsoft Store, here are some handy apps that he can download to help him with his chores at school.

What are the best Windows 10 apps for school?

OneNote – Best notetaking app

One of the best Windows 10 school apps you can use is OneNote. Microsoft develops the app, allowing you to easily take notes.

With this app, you can place your notes anywhere on a page, similar to a regular notebook, and it fully works with stylus pens or even your fingers. OneNote can work with text, images, audio, videos, and documents regarding the supported content.

You can even save websites and recipes with the Web Clipper extension. After you take your notes, you can easily search them and find what you’re looking for.

OneNote is an incredibly powerful app, and it’s perfect for students or any other type of user who wants to take notes with ease.

Other great features:

  • Supports keyboard, stylus, or touch input
  • It allows you to save images, audio, videos, documents
  • Arrange your notes freely like on paper
  • Built-in search for all notes

⇒ Get OneNote

Minecraft Education – A new and fun way to learn

Minecraft has become a cultural phenomenon, and Microsoft decided to use that in classrooms by developing Minecraft Education.

To put it simply, this is a Minecraft game, but it’s designed to help children learn in a fun and intriguing way. The game has 700 lessons and 200 hours of K-12 Computer Science curriculum.

This game allows children to develop problem-solving and communication skills in an exciting environment. The game also supports block-based coding, JavaScript, and Python, which can be used to learn programming basics.

Even though this isn’t a classic educational app, it’s still a fun and exciting way for kids to learn, so you might want to try it.

Other great features:

  • Learn while playing Minecraft
  • 700 lessons
  • 200 hours of computer science curriculum
  • Support for block-based coding, JavaScript, and Python

⇒ Get Minecraft Education

Quizlet – Best app for creating flashcards

Quizlet might be just what you need if you need an app to help you learn. This app allows you to create flashcards for learning. That’s not all, you can also choose from millions of other flashcards created by other users.

The app can be used to learn foreign languages and history or science. The app also has a couple of modes, and you can test your memory with Write mode or your speed in Match mode.

Of course, you can easily share the flashcards you create with your classmates or students. If you’re planning to learn for an exam, then Quizlet is a must-have app.

Other great features:

  • Ability to create flashcards
  • Two modes
  • Ability to share flashcards with others
  • Perfect for learning languages, science, math, or coding

⇒ Get Quizlet

FluidMath – Animate math problems

Math isn’t a fun subject for many, but the FluidMath app might change that. This app can recognize handwritten math problems and turn them to life.

In addition to recognizing your handwritten equations, the app will create interactive visualizations and computations, allowing you to analyze your problem better.

The software is interactive and engaging, so it’s perfect for grades 6 to 12. The application suits pre-algebra, algebra 1 and 2, pre-calculus, and calculus.

This is a highly interesting application that might make learning math more interesting, so be sure to give it a try.

Other great features:

  • Can recognize handwritten math equations
  • Integrative graphs
  • Numeric and symbolic calculator
  • Explicit and implicit function plots

⇒ Get FluidMath

Elements – Fun way to learn the periodic table

In case you’re learning chemistry then this app will help you learn more about chemical elements. The app has a colorful periodic table allowing you to distinguish elements easily.

Of course, you can click on any element and see more information about it. This includes its electron shell diagram, history, and various atomic properties.

If needed, you can easily compare the properties of any two elements, and there are links so you can research each element if you want.

This is a simple but extremely powerful app, and if you’re learning chemistry, be sure to download it and give it a try.

Other great features:

  • Colorful overview of chemical elements
  • Extensive information about each element
  • Easily accessible atomic properties
  • Ability to compare two elements

⇒ Get Elements

We hope that you found these apps useful. With computers being a part of the classroom, it’s important to type fast, and to improve your skills, be sure to check our software to type faster guide.

What is your favorite school software? Let us know in the comments below.

Bing’s AI chatbot is the perfect torrent-finding companion

Microsoft’s AI-powered Bing search engine can do a lot of things: performing complex layered searches, writing poems, short stories, and codes, building a vacation plan, or even being a companion when you’re feeling lonely.

But to find the right torrent website to download pirated content?

This little oopsie from Microsoft is spotted by u/vitorgrs. After inserting the popular show The Last of Us + torrent with high seeds in the chat box, the smart bot replied with a few suggestions of torrent links effortlessly.

It’s unclear whether Microsoft will patch this to prevent content piracy in the future, but so far, there’s no statement from Microsoft just yet.

What’s all the fuss with Microsoft’s ChatGPT Bing?

AI-powered Bing has been collecting outburst after outburst, but Microsoft doesn’t seem to be phased at all.

Recently, the Redmond-based tech giant even rolled out the mobile app versions for Edge and Skype, available for iOS and Android users. You can speak to it too, as it features a voice command functionality, and even add it to a Skype conversation.

Speaking of privacy, Google and Bing signed an anti-piracy deal to deprecate illegal websites back in 2017. Under the surveillance of the UK government and rights holders Motion Picture Association (MPA) and the British Phonographic Industry (BPI), the two search providers signed the deal to delete links that point to copyright sites.

What do you think about this news? Will Microsoft get in hot water for this? Let us know in the comments!

Microsoft Viva Review: How Does it Compare to Yammer?

When Microsoft launched Teams, questions were raised about why someone would want Teams and Yammer both. Microsoft decided to end the discussion, and the company integrated Yammer into Microsoft 365 tools like Teams and now calls it Microsoft Viva.

Yammer, now known as Microsoft Viva, is a workplace social and community platform where employees can connect and interact with each other on specific topics or even different ones. This guide will give you a complete Microsoft Viva review and how it compares to Yammer.

What is Microsoft Viva?

With Microsoft Viva, employees can interact with their colleagues or get insights from top officials on various discussion topics.

The main aim of Microsoft Viva is to bring together learning, knowledge, resources, communications, and insights together to enhance the employee experience.

Employees can post pictures, text, videos, or any other content and keep other employees updated about their whereabouts. Also, various components of Microsoft Viva have their distinct role.

  • Viva Connections
    • This is a Microsoft Viva component that helps you deliver or access companies’ policies, participate in company discussions, create a new topic of discussion, and much more.
    • The main aim of Viva Connections is to provide a sense of belonging to the employees.
    • This module of Microsoft Viva provides customized and valuable information, and people can work in a digital space connected with other employees.
    • You can use the search bar for relevant content, sites, news, and other information from across the organization.
  • Viva Insights
    • Each employee gets access to their personal experiences and insights that will help them secure time for regular breaks, focus on work, learn and develop themselves, and more.
    • A new dashboard brings employee feedback from LinkedIn Glint with Viva Insights’ collaboration data, allowing leaders to accurately identify the root cause of team struggle and make changes to get desired output.
    • Customers can include data from other sources, such as Zoom or Slack.
  • Viva Learning
    • To keep you updated, it brings the best content from LinkedIn Learning, Microsoft Learn, and other third-party partners.
    • The topics range from broader ones to granular ones as well.
    • The topics are accessible in a variety of formats as you please.
  • Viva Topics
    • Microsoft Viva Topics uses AI solutions to automatically organize content related to your team projects, products, and customers.
    • Leaders can curate and share knowledge pretty easily via web pages.
    • It makes it easy to access knowledge.

Comparison: Microsoft Viva Engage Vs. Yammer

While Microsoft Viva Engage is built on the base of Yammer, many new features have been added, such as leadership corners, storyline announcements, ask-me-anything events, campaigns, etc., to provide a much-improved experience.

Here are the new features on Microsoft Viva Engage that differ from Yammer.

1. Leadership Corner

Here, leaders can connect with their employees and educate them about things that should be known to them. Moreover, Leaders can discuss, post on their storylines, create virtual events, and more.

Employees can get in touch with their leaders from a single place. In addition, leaders can easily broadcast news, information, or updates to the entire organization and measure the impact created by it using analytics.

2. Storyline Announcements

You can share your thoughts and ideas of information via engaging stories. You can add images, texts, videos, and other media to your stories and post them.

Further, you can also create polls and have the entire organization vote for that idea. Finally, storyline announcements can be targeted to a specific audience or community and pinned to view on top of your feed.

3. Ask-Me-Anything events

Employees can further interact with their leaders, share their ideas using the Ask-Me-Anything (AMA) events, and participate in other virtual events to strengthen their bond with the company.

You can submit your question before or during the event and get notified when your leader has responded to your question. You can even schedule the Ask-Me-Anything event and search it for future reference.

4. Campaigns

Campaigns can be created or managed by leaders or community managers. For example, you can create a campaign to drive awareness of like-minded people to a specific idea or topic.

You can add a custom headline, description, and a call to action. In addition, employees can join the campaign, interact with the leaders and promote it to enhance its impact further.

5. Advanced Analytics

Leaders or community managers can look at the analytics that can help them measure and improve the effectiveness of their engagement efforts.

The metrics that can be evaluated are insights on reach, sentiment, feedback, trends, influencers, etc. Advanced Analytics makes use of the powers of the Microsoft Graph to provide a better representation of the metrics.

You can check out our guide that helps you understand how to use and download Microsoft Viva Engage.

These are all the new things available in Microsoft Viva Engage that top the features of Yammer. The three main benefits of using Microsoft Viva Engage are facilitating remote work, strengthening team bonds, and promoting self-expression and reach.

New features for Microsoft Viva Engage are rolling out from February 13, 2023. While Yammer will be replaced in Microsoft Teams, its web and mobile apps will continue to work.

You will no longer receive new features on Office 2019

Microsoft issues another dire warning for its Office 2019 users. After announcing the end of life of Microsoft Office 2013 earlier, the tech giant said that it plans to move Office 2019 to extended support, ending the period of its mainstream support, on October 10, 2023, until October 14, 2025.

It applies to all editions, including Home and Business, Home and Student, Personal, Professional, and Standard.

“Microsoft is committed to providing products with improved security. Although we strive to remove vulnerabilities during development, software vulnerabilities remain a fact today and we must be prepared to respond when they are discovered”

The announcement is met with quite polarizing receptions since the latest stable release arrived not too long ago in January 2023, but people had already seen it coming. Upon its release, Office 2019 was bundled with several perpetual SKU editions. The most popular one, Home & Student, includes Word, Excel, PowerPoint, and OneNote.

What does moving Office 2019 to extended support mean?

Moving from mainstream support to extended support means that the software will no longer receive new features, free incident support, and request non-security updates. The cycle usually lasts for 5 years from the product’s release. After that, Redmond officials will move it to extended support.

Although users can still expect security updates and paid support during this cycle, the tech company will no longer accept requests for features, warranty support, or design changes.

It doesn’t mean that you can not use these apps anymore, however. You can, but be mindful that the end of its life is just around the corner. Matter of fact, a suggestion to move to the latest Microsoft 365 when accessing Office 2019 page’s on Microsoft’s website will greet you.

What do you think about Microsoft ending mainstream support for its Office 2019 products? Let us know in the comments!

Chrome.exe Entry Point Not Found: How to Fix it

Entry Point Not Found is a standard error that there indicates that there is a missing or corrupt file associated with the program. This could also trigger if essential system files are missing from your PC. Most commonly, this happens when the DLL file is affected.

The error message pops up when you launch the application in question. This guide will give you complete information on how to fix the Chrome.exe entry point not found error on your PC. So let us get right into the article.

What causes the Chrome.exe Entry Point Not Found error?

After researching the internet, we found some common issues that could trigger Chrome.exe Entry Point Not Found error.

  • Important Chrome files are missing: If there was a problematic install or some important Chrome files are missing then you will get this error.
  • System files are corrupt: Corrupt or missing system files can also trigger multiple errors, one of which is Chrome.exe Entry Point Not Found error.
  • Visual C++ Redistributable latest package is missing: You should make sure that the Visual C++ Redistributable package is the latest version on your PC.
  • Presence of damaged DLL file: The DLL file mentioned in the error message might be corrupt or missing, which is why the program is showing the error.

How can I fix the Chrome.exe Entry Point Not Found error?

1. Reinstall Google Chrome

  1. Press the Win key to open the Start menu.
  2. Open Control Panel.
  3. Click on Programs and Features.
  4. Select Google Chrome and hit the Uninstall button at the top.
  5. Follow the on-screen to delete the program.
  6. Visit the official Google Chrome download link.
  7. Install the program on your PC and check whether this fixed the issue.

Reinstalling the program usually fixes the error as it installs all the files from scratch. Make sure that during installation, there aren’t any interruptions.

2. Re-register the DLL file

  1. Open the Start menu by pressing the Win key.
  2. Open the command prompt as an admin.
  3. Type the below command and press Enter. Replace the XXX.dll with the DLL error mentioned in the error message. regsvr32 /u a XXX.dll regsvr32 a XXX.dll
  4. Restart your PC.

3. Install the latest Visual C++ Redistributable package

  1. Visit the official Visual C++ website.
  2. Download both the 32-bit and 64-bit versions.
  3. Launch both the EXE and install it.
  4. Restart your PC.

4. Run the System File Checker

  1. Open the Start menu by pressing the Win key.
  2. Open the command prompt as an admin.
  3. Type the below command and press Enter. sfc /scannow
  4. Restart your PC.

You can proceed with the above steps and use the in-built SFC Scan tool to scan your PC for corrupt system files.

However, often SFC Scan isn’t that effective when fixing issues such as the Chrome.exe entry point not found error. In such a case, we suggest you download a specialized repair tool.

You can quickly fix corrupt system files and BSOD errors, fix damaged DLLs and system crashes, clean up spyware or malware, improve PC stability, and much more.

5. Scan your PC for viruses or malware

  1. Open the Start menu by pressing the Win key.
  2. Type Windows Security and open it.
  3. Hit the Virus & threat protection option.
  4. Click on Quick Scan.
  5. Wait for the scan to complete.
  6. Perform the necessary actions to remove the virus or malware, if found any.
  7. Click on Scan options and select Full Scan to perform a deep scan.

Windows Security is an in-built Windows tool that will help you keep your PC clean from viruses and malware. However, it isn’t that effective in most situations.

For such situations, you must have a dedicated antivirus tool installed on your PC to protect it. We have a list of some of the best antivirus tools that you can download on your PC.

6. Perform a System Restore

  1. Open the Start menu by pressing the Win key.
  2. Type create a restore point and open it.
  3. Select the drive where you have installed the OS.
  4. Click System Restore.
  5. Click Next.
  6. Select the restore point.
  7. Click on the Next button.
  8. Click Finish.

System Restore will restore your system to a state where everything was working normally and when you weren’t facing the Chrome.exe entry point not found error.

However, you should remember that the system restore will work only if you have created a system restore point on your PC. You can learn that by checking out our guide on creating a restore point.

That is it from us in this guide on how you can fix the Chrome.exe entry point not found error. You can also check out our guide that will help you resolve the Chrome browser history disappearance issue.

Chrome users have also reported on multiple occasions that their browsing speed is too slow. Fortunately, you can apply the solutions in our guide to fix the issue.

To learn about other files associated with Chrome, visit our guide on GoogleUpdate.exe.

Feel free to let us know in the comments below which one of the above solutions helped you fix the Chrome.exe entry point not found error.

OneDrive.exe Entry Point not Found: 4 Ways to Fix It

Some users deal with the OneDriveSetup.exe entry point found error when trying to run the app. If you’re one of them, stick around. Below, we’ll explain how to fix his error so you can get back to using your cloud storage platform ASAP.

How can I fix the OneDrive.exe entry point not found?

1. Reset OneDrive

  1. Press the Windows key + R, type the command below, and click OK: %localappdata%\Microsoft\OneDrive\onedrive.exe /resetlocal app  onedrive.exe entry point not found
  2. If you get an error message from the command above, run either of the following that does not give an error: C:\Program Files\Microsoft OneDrive\onedrive.exe /resetprogram files C:\Program Files (x86)\Microsoft OneDrive\onedrive.exe /resetprogram 86
  3. Finally, wait for the process to complete, and OneDrive will restart automatically.

A faulty app cache can lead to a series of problems, including the OneDrive.exe entry point not found error message. Resetting the app should clear the cache and restore normalcy.

2. Run an SFC Scan

  1. Press the Windows key, type cmd, and select Run as administrator under Command Prompt.
    cmd admin
  2. Type the command below and hit Enter: sfc /scannowsfc scan onedrive.exe entry point not found
  3. Finally, wait for the command to finish running and restart your PC.

Some system files are essential to how your apps and processes work. If these files are corrupt, you can face different error messages, including the OneDrive.exe entry point not found error.

Thankfully, Microsoft has a built-in tool – SFC scan – especially for repairing system files.

3. Reinstall OneDrive

  1. Press the Windows key + I and select the Apps option.
    apps
  2. Select the Microsoft OneDrive option and click the Uninstall button.
    uninstall  onedrive.exe entry point not found
  3. Now, follow the onscreen instructions to complete the removal process.
  4. Finally, go to the official website to download the latest version of OneDrive.

If the solutions above fail to fix the OneDrive.exe entry point not found error, you should reinstall the app. This will eliminate lingering issues that might be causing the problem.

Microsoft blocked the uninstallation of OneDrive for a while but recently, the Redmond giant has allowed it again.

4. Repair the Windows Image

  1. Type PowerShell in the search bar and select Run as administrator under the result.open powershell as administrator
  2. In the PowerShell window, type or paste the following command and press Enter: Repair-WindowsImage -Online -RestoreHealth.repair windows image powershell
  3. Wait for the process to complete and restart your PC.windows image repair running
  4. Check OneDrive to see if you’re having the same problem.

Repairing the Windows image fixes corrupt system files and components. This makes sure apps run smoothly and fixes compatibility issues, so it should help with OneDrive errors.

Below are some of the causes of the OneDrive.exe entry point not found error message on your PC:

  • Faulty app cache: The most prominent cause of the OneDrive setup entry point not found error is a corrupt app cache. The solution to this is to reset the OneDrive app.
  • Corrupt system files: Another reason for this error message is a broken or faulty system file. You can get past this by repairing these files.

The OneDrive.exe entry point not found error can be pretty annoying as it prevents you from syncing and accessing your files. However, you should be able to fix it convincingly with the solutions in this guide.

If OneDrive is constantly syncing on your PC, check our detailed guide to fix it quickly.

Let us know the solution that helped you fix this issue in the comments below.

Checking if the Site Connection is Secure Stuck: Fix & Bypass Loop

Sometimes while browsing the web you might notice that you get stuck on Checking if the site connection is secure messages on certain websites.

Usually, this issue can appear due to some specific limitations that block your IP address, country, and origin from accessing certain websites with Cloudflare on your browser.

Speaking about that, you can encounter this issue on several browsers such as Firefox, Safari, and others. In fact, you might see an entirely different version of the error: checking your browser before accessing stuck.

In these terms, you have to consider adjusting your date and time, disabling add-ons, or even better, using a specialized VPN that will hide your online activity.

Of course, because today’s issue might occur because of temporary and random glitches, we have one option that will support you in quickly testing this aspect.

Why am I stuck on checking your browser before accessing?

Several users reported that they are stuck on this screen: checking if the site connection is secure for Cloudflare websites.

This is normally a good thing as it indicates the respective website has Cloudflare protection. However, if you get stuck in an endless verification loop, it does not benefit anyone.

The Cloudflare protection or challenge feature helps to validate your browser and makes sure it’s not running any malicious scripts that could otherwise compromise a website.

When the checking if the site connection is secure screen gets stuck, that respective challenge does not take place as a result of a syntax error in the script.

How do I fix checking if a site connection is secure?

  1. Switch to a more performant browser
  2. Try Incognito Mode
  3. Check your date and time
  4. Disable Add-ons
  5. Use a VPN

Before we dig in, here are some quick prerequisites you should tick:

  • Close the tab and/or relaunch the browser
  • Reset your browser to default settings

1. Switch to a more performant browser

If you’re looking for a quick way to bypass checking if the site connection is secure messages, switching to a different browser solved the problem.

Opera might be the perfect fit for you as it comes with a built-in ad blocker that will make your web pages load faster.

Another great feature is the built-in VPN with unlimited bandwidth that will provide you with an extra layer of protection.

This will greatly help if you encounter other adware-related errors such as webpages wanting to run the following add-on and more.

  Opera

Opera

Enjoy a quick setup and error-free online experience!

2. Try Incognito Mode

  1. Hit the Windows key, type your browser’s name, then open the first result (In this particular case, we choose Chrome as an example).
  2. Use the following keyboard shortcut to open the Incognito mode: Ctrl + Shift + N.
  3. Check if the issue persists.

3. Change date/time to fix checking if a site connection is secure

  1. Use the following keyboard shortcut to open Windows Settings: Windows + I.
  2. Go to the Time & Language section.
  3. Disable the Set time automatically options.
  4. Wait for a few moments, and turn it back on.

After doing that, your time and date should be synced. Alternatively, you can set your date and time manually or just click the Sync now button.

4. Disable Add-ons to fix checking if a site connection is secure

4.1 Google Chrome

  1. Press on the Windows key, type Chrome, then open the first result.
  2. From the top-right corner of the page, click on the 3-dots menu, then hover the mouse over More Tools, and navigate to Extensions.
  3. Click on the extension you want to disable, then toggle the nearest button on Off.

4.2 Mozilla Firefox

  1. Press on Windows, type Firefox then open it.
  2. Use the following keyboard shortcut: Ctrl + Shift + A.
  3. In the opened extensions list, search the ones you want to disable, then toggle the button on Off.

4.3 Microsoft Edge

  1. Hit Windows, type Edge, then open the browser.
  2. In the top-right corner of the window, click on the 3-dots menu, then navigate to Extensions.
  3. Choose to Manage extensions from the pop-up window.
  4. Search for the extension you want to disable, then toggle the nearest button on Off.

5. Use a VPN to fix checking if a site connection is secure

Last, but not least, probably the best option to get rid of a checking if the site connection is secure stuck screen is to use a trustworthy VPN, that will always let you navigate anonymously and without any issues.

ExpressVPN is one of the world’s leading VPN services and secure proxies for browser users. It allows you to encrypt your network traffic and stay protected when online.

If you choose to use it while browsing, keep in mind that it works great with Google Chrome, Mozilla Firefox, and Opera. But it’s just as easy to use and set up on all devices.

This VPN allows you to create multiple simultaneous connections and it’s also compatible with various OSs like Windows, macOS, Linux, Android, or iOS, routers, servers, and more.

⇒ Get ExpressVPN

Some of the solutions in this article are a bit more time-consuming while others can help you get rid of the issue in just a couple of clicks.

Make sure to try the right ones for you and don’t forget to let us know in the comments section below what worked best.

Using Acronis to Prevent Ransomware and File Loss for Home Users

Our digital lives tend to be more complex each day and we have data scattered on all our devices. However, saving our data in the cloud is not really the same as creating a professional backup.

That’s where a dedicated security and backup tool like Acronis Cyber Protect Home Office (formerly Acronis True Image) can help you prevent ransomware and file loss.

How Acronis Cyber Protect Home Office helps you secure data?

First, we should know the difference between storing our data on a cloud service and creating a backup.

Don’t get us wrong, it’s OK to copy your files to your cloud storage account, but if the whole system breaks down, you will have to restore it before copying back your files.

Acronis Cyber Protect Home Office not only allows file backup, but it can go as far as backing up the whole system or even cloning all the disks on your machine.

Moreover, the solution comes with full antivirus, anti-malware, and anti-ransomware protection and it encrypts all the data from your backups.

In this article, we will explain how you can prevent ransomware and file loss with Acronis Cyber Protect Home Office.

How do I use Acronis Cyber Protect Home Office?

1. Back up and recover your entire PC

  1. Click on the Backup menu from the left and then select the destination for your backup. By default, the source part will be selected for the whole system.
  2. You will be able to choose between 4 options: Acronis Cloud (you have 5 GB of free storage), an external drive, a NAS on your network (could be another PC linked on the same network), or to browse for a location on the same PC.
  3. Anything you choose, make sure you match the storage you need for the system backup.
  4. After performing the backup, you will get a success message.
  5. Now, if something happens to your system, click on Recovery from the Backup menu and hit the Recover now button.
  6. You will be prompted to restart your PC and Acronis Cyber Protect Home Office will start the process after reboot.
  7. You may change the recovery options in case you want to recover a disk, a partition, or just files.

Of course, we chose to back up the whole system, but you may click on the source button and select only a drive, or one or more files or folders.

2. Create a bootable media for recovery

  1. Select the Tools menu from the left, then click on the Rescue Media Builder from the list of tools.
  2. Choose the Simple option.
  3. Now, you have 3 options: Save the recovery media as ISO or WIM images and burn or install them on an external media, or, the easier solution, plug in a USB flash drive and select it as the third option.
  4. Now, you may click the Proceed button, but you also have the option to format and permanently delete all the data from the drive.

That’s it! Now, if something happens to your system, you have an emergency media to boot from.

3. Protect your PC from viruses and ransomware

  1. Click on the Protection menu from the left and hit the Run a full scan button.
  2. After completing the scan, click on Settings to set up the protection elements.
  3. Make sure that Anti-ransomware Protection and Real-time Protection are ON.
  4. Scroll down and activate the Web filtering feature as well. It will protect you against malicious websites. In case of any incorrect detections, you can click the Manage exceptions button and add the trusted website.
  5. Now, click on the Antivirus scan tab and set up the schedule interval and type of scans for your system. By default, it’s set for weekly full scans but you can change that from this menu easily.

Other important features of Acronis Cyber Protect Home Office

We have shown you how to create a full backup of your system and protect your PC from viruses and ransomware.

However, Acronis Cyber Protect Home Office has a lot more important features that we will highlight briefly:

  • Sync – With this feature, you can synchronize the folders between two PCs that have the software installed or between your PC and Acronis Cloud.
  • Archive – If your PC is full of old and big files, use this tool to select and compress them to occupy less space on your drive.
  • Clone Disk – Obviously, this tool is useful to create a mirror image of your disks on another internal or external disk.
  • Parallels Access – It is an extremely useful tool that allows you to control another PC remotely.
  • System Clean-up – This tool scans your system, then cleans and removes any junk from your system or system components.
  • Acronis Secure Zone – With this app, you may create a specially protected partition to store any backups.
  • DriveCleanser – This feature helps you completely wipe out all the data and partitions from a disk.

For more information on this solution, we have a complete review of Acronis Cyber Protect Home Office.

We also recommend checking our selection of the best automatic backup solutions for your PC.

The software has a free trial version for 30-day limited testing, but we recommend the full product anytime.

⇒ Get Acronis Cyber Protect Home Office

Have you tried the software yet? Let us know about your experience in the comments section below.

Roblox Keeps Freezing and Crashing: Here’s How to Fix It

On earlier versions of Windows, users reported errors that resulted in Roblox not opening in Windows. The same error trickled down to Windows 11. If you’re experiencing Roblox freezes or crashes on your computer, here are the best fixes to help you resolve the error.

Is Roblox compatible with Windows 11?

Roblox is compatible with all Windows versions, Windows 11 included. The application is natively supported by Windows 11, allowing you to crossplay with users from other platforms.

Why is Roblox freezing on my computer? 

There are several reasons why Roblox keeps crashing on PC. They include:

  • Outdated graphics driver: Roblox, like most games, requires graphics cards to operate. If your graphics card needs to be updated, Roblox might crash.
  • Insufficient resources: If you’ve got too many running background apps or if your PC is right on the edge of minimum requirements to run the game, Roblox can crash and freeze on Windows 11.
  • Antivirus software interference: Similar to firewall restrictions, antivirus software can cause a Roblox crash if it flags harmful tendencies in any of the app’s files.
  • Poor Internet connection: Roblox requires a strong network connection for the game to run smoothly. If Roblox keeps crashing on Windows 11, your network connection might be the cause.

Now that we know why this happens, let’s fix the problems with the solutions below.

How do I fix Roblox if it freezes on my computer?

Before proceeding with advanced troubleshooting techniques, here are some quick fixes you can apply:

  • Fix any network congestions on your PC and restart your router.
  • Close any apps running in the background.
  • Tune down the graphics settings from the game to maximize its performance.
  • Temporarily disable Antivirus, including Windows Defender.

If Roblox crashes after attempting these tweaks, here are a few advanced fixes you can try.

1. Change Graphics quality

  1. Left-click the Start button, type roblox, and hit Enter.
  2. Click on the Menu bar and select Settings.
  3. Locate the Graphics Mode option and set it to Manual.
  4. Navigate to the Graphics Quality section and drag the slider to the left to reduce the quality.
  5. You can reduce the quality according to your preference.
  6. Relaunch Roblox after adjusting the graphics quality.

Ideally, computers with low specs should run Roblox at the lowest possible graphics settings to avoid persistent crashes with the app.

Also, running Roblox on a computer with low RAM could lead to Roblox white screen of death or freezing.

2. Update the graphics driver

  1. Press Windows key + R, type in devmgmt.msc, and click OK.
  2. Expand the Display adapter, right-click on the graphics card, and select Update driver.Update display driver
  3. Click on Search Automatically for the drivers and restart your PC after the driver is installed.search automatically for drivers

Should you want to try other means to update the graphics driver if the Device Manager is not working, hop on our guide to fix it.

One of the easiest options to update your computer’s drivers is by using third-party driver updating software to perform this automatically.

3. Add Roblox to the Windows Firewall Allowed list

  1. Press Windows key + R to open a dialog box, type in firewall.cpl, and hit Enter to open Windows Defender Firewall.
  2. Select Allow an App through Windows Defender Firewall.
  3. Choose Change settings at the top of the new window and select the Allow another app button at the bottom corner.
  4. In the next window, select Browse, choose Roblox to add it to the list, and click Add.
  5. Click OK to save your changes and relaunch Roblox to see if the crashing persists.

Here is a guide that shows how to know if the Windows firewall is blocking a program. Hence, you can identify if you need to run this solution or not.

4. Reinstall Roblox

  1. Press Windows key + R, type in appwiz.cpl, and hit Enter to open the Programs and Features window.
  2. On the right pane, click Roblox from the list of options and select Uninstall.
  3. Press Windows key + E to open File Explorer.
  4. Navigate to this path C:\Users\(Your Windows Username)\AppData\Local
  5. Locate the Roblox folder and hit the Delete key on your keyboard.
  6. Download Roblox from Microsoft Store and reinstall the app.
  7. After installing Roblox, launch it to see if it keeps crashing.

This solution will clear all your previously saved data and cache of the game that may cause Roblox to freeze your computer. It is also an effective solution if Roblox is not opening on Windows 11.

If you’re running Roblox on Chrome, here are the best ways to fix Roblox if it’s not working on Chrome.

Some users also encountered errors while updating worn items on Roblox, but we discussed this issue in a separate guide.

Meanwhile, if you’ve got other tricks that helped you stop Roblox from crashing on your Windows 11 PC, do let us know in the comments.

5 Safest Messaging Apps for Kids to Text Friends and Family

Social media has become the new norm with no regard for age restrictions. However, due to the woes of exposing your kids to derogatory information, you need to ensure that messaging apps for kids are safe for them.

Hence, this guide will highlight the safest messaging apps for kids with parental control.

Why should parents choose messaging apps for kids?

Unfortunately, there are downsides to the freedom of using a normal messaging app. Some of these major issues are:

  • Contact from strangers – There are messaging apps that encourage meeting new people without age restrictions. Hence, kids could be contacted by strangers.
  • Cyberbullying – Your kid may be vulnerable to cyberbullying or harassment from others.
  • Ensures accountability: Normal messaging or texting apps will allow your child to delete messages they don’t want you to see quickly. Safe texting apps prevent messages from being deleted.

What are the safest messaging apps for Kids?

Messenger Kids – Best messenger for kids

Messenger Kids messaging app

The Messenger Kids app is one of the safest messaging apps for kids, which allows for parental control as the child’s account is managed through a parent or guardian’s Facebook account.

Moreover, the app is free and enables kids to connect, communicate and play with family and friends easily.

It is built with fun packs for kids, such as child-friendly stickers, frames, emojis, and GIFs. They can also make video calls using fun masks.

Further, Messenger Kids is a safe messaging app that allows parents to approve and remove contacts through a personalized control system for parents. What’s more, relieving about the app is that it does not run ads, and there are no in-app purchases.

The following are some of Messenger Kids’ best features:

  • Contact management
  • Account management
  • Supervised friending
  • Activity monitoring
  • Sleep mode
  • The software is available for Android, and iOS devices

⇒ Get Messenger Kids

GeckoLife – Guarantees kid’s safety

Another safe messaging app for kids is GeckoLife. It is a social network designed with privacy features for families or small groups with kids’ safety in mind.

Also, the GeckoLife app was designed for parents to model good social-networking manners and help kids develop smart social-networking skills in a safe environment.

Some of the key features of this app include:

  • The app is free
  • Fosters social networking skills among kids
  • The application is available for Android, and iOS devices

⇒ Get GeckoLife

Google Chat – Best for limiting kids’ exposure

This is another free and safe communication software for kids under 13 years old and up. They can video chat, send instant messages, and share photos.

One of the features of this app setting allows children to chat only with approved family members and friends. Additionally, it needs manual contact addition and does not permit the deletion of individual messages.

Though Google Chat is not specifically designed for children, you can set up an account using Google Family Link for children under 13 years old to make it a safe messaging app.

However, the app doesn’t have much of a kid-friendly interface, but it allows for full parental control.

Hence, find the best features that make the app a safe one below:

  • It filters bad language
  • Educational Value
  • It does not permit ads and purchases.

⇒ Get Google Chat

JusTalk Kids – Best video chat app for kids

JusTalk kids - Safe messaging app

With the JusTalk Kids app, children can exchange messages and make video chats. Also, kids can enjoy amusement features like drawing and gaming while having discussions.

Also, the app is known for its secure communication features, such as end-to-end encryption, which is used to protect the privacy of both parents and children’s personal information, including call and message history.

As part of the safety features, children are not permitted to accept friend requests or calls, or messages from strangers.

Below are the highlight of the features:

  • Amusement features during virtual discussions
  • End-to-end encryption for privacy protection
  • Supervised friending

⇒ Get JusTalk Kids

Fennec Messenger – Great features for parental control

Fennec Messenger - Safe messaging app

Fennec is an instant messaging platform created with children, families, and friends in mind. To keep your child safe, Fennec Messenger offers a variety of parental controls.

Moreover, you can manage their contacts if needed on the Fennec Messenger app on your phone.

By exploring the app, you discover additional safety measures that allow your kids to enjoy chatting in a safe and supervised environment. Some of these include:

  • Contact management
  • Supervised texting activities

⇒ Get Fennec Messenger

Using messaging apps for kids is one of the best ways to protect your children online. With the help of this parental control software, you can restrict the content your kids are exposed to.

Alternatively, if you need designed software for Windows 11, we have the best parental control software in one of our articles.

And in case your family safety app is not working on Windows 10/11, you can explore the best fixes in this guide.

In conclusion, if you have any questions or suggestions on the safest messaging apps for kids that parents can control, do not hesitate to use the comments section.

How to Install Games on SSD: 5 Ways to Load Games Faster

PC owners often use SSDs as the primary device for their Windows OS and large-file programs owing to the wide array of benefits offered by these. Some also keep wondering how to install games on SSD and whether this helps.

Moving or installing games on an SSD differs for each gaming client, but the benefits are the same. However, several factors are at play here, and a proper understanding of these will help determine how to install games on an external SSD.

How do I install games on SSD?

[wr_toc]

1. Steam

  1. Open the app, click on the Steam menu at the top left, and select Settings.settings
  2. Navigate to the Downloads tab from the left, and then click on Steam Library Folders.steam library folders
  3. Click on the + icon.add
  4. Now, choose the SSD from the list and click Add.add drive for how to install games on ssd
  5. Tick the checkbox for the game you want to install on SSD, and click on Move.move for how to install games on ssd
  6. Choose the SSD you added as a library earlier from the dropdown menu, and click Move.choose drive for how to install games on ssd
  7. Wait for Steam to move all the game files to the SSD.

That’s it! If you were wondering how to install games on separate SSD, this would do it. Steam is one of the platforms that offer a built-in option to move games between drives, which makes it a favorite amongst gamers.

How to install Steam games to SSD?

  1. Launch the program, click on the Steam menu, and select Settings.steam
  2. Go to the Downloads tab, and click on Steam Library Folders.steam library folder
  3. Click on the + icon to add a new driveadd
  4. Choose your SSD from the dropdown menu, and click Add.new location
  5. Now, move to the SSD, click on the ellipsis, and select Make Default.make default to change install location

That’s it! From now on, every game you install will be downloaded and added to the Steam folder on the SSD since it’s the default drive.

2. Epic Games

  1. Press Windows + E to open File Explorer, paste the following path in the address bar, and hit Enter:C:\Program Files\Epic Games\path
  2. Copy the folder for the game that you want to install on the SSD, and move it to the target folder on the new drive.
  3. Open Epic Games, go to the Library, click on the ellipsis under the game, and click Uninstall.uninstall
  4. Click Uninstall in the confirmation prompt.confirm
  5. Now, navigate the path on the SSD where you copied the game files, and rename the folder, say add 0 towards the end of its name.rename
  6. Head back to Epic Games, click on the ellipsis below the game, and choose Install.how to install games on ssd
  7. Click Browse, choose the new install location on SSD, and then click on Install.install location
  8. Wait for the download to progress up to 2-3%, and click the Pause option.pause
  9. Click on the ellipsis, and choose Cancel Install.cancel install for how to install games on ssd
  10. Go back to File Explorer, open the folder you moved and renamed earlier, press Ctrl + A to select all the files, then move to the new game folder created by Epic Games, and hit Ctrl + V. Delete the empty folder afterward.
  11. After moving the game files, open Epic Games, click on Resume, and then wait for the file verification to complete.resume

The process is slightly complex for those trying to install games on a second SSD with Epic Games. The time here depends on the size of the game files. Nonetheless, you can move games to another drive.

3. Origin

  1. Create a new folder on the SSD where you want to move the game.
  2. Now, open Origin, go to My Games Library, and click on the game you want to install on SSD.my game library
  3. Click on the Settings icon, and choose Move Game.move game for how to install games on ssd
  4. Now, go to the folder you created earlier, and click Select folder.select folder
  5. The game files will now be moved to the SSD.

4. GOG Galaxy

  1. Press Windows + E to open File Explorer and navigate the following path:C:\Program Files (x86)\GOG Galaxy\Gamespath
  2. Copy the game folder you want to move to the SSD, and then paste it into the new drive.
  3. Now, open GOG Galaxy, and then click on the Install button for the game.install
  4. When asked to select a storage location, choose the folder where you moved the game files, and click Install.choose folder for how to install games on ssd
  5. The installation will complete quickly, given the game files are already in the new folder.

For those trying to discover how to install games on SSD on GOG Galaxy, the process is surely not as easy as Steam or Origin, but it wouldn’t take much time.

5. Battle.net

  1. Download Battlenet if you haven’t already then press Windows + E to open File Explorer, paste the following path, and hit Enter:C:\Program Files (x86)path
  2. Select the game you want to move, and then hit Ctrl + C.copy for how to install games on ssd
  3. Now, go to the SSD where you want to store the game and press Ctrl + V to paste the folder.paste for how to install games on ssd
  4. Open Battle.net, click on the app icon, and choose Settings.settings for how to install games on ssd
  5. Head to Game Settings from the navigation pane, expand the game you plan to move, and click on the Use a Different Folder button.use a different folder for how to install games on ssd
  6. Go to the SSD where you copied the game files, choose the main folder, and click Select Folder.new location
  7. Click Done to save the changes.done
  8. Next, click on Update to get any pending files.update for how to install games on ssd
  9. Once done, run the game, and if it works fine, you can safely delete the folder in the Program Files (x86) directory.

If you were trying to discover how to install games on SSD in Battle.net, it would take a few minutes but won’t hog the network or have you download the game all over again.

Do I need to install games on SSD?

It depends on the storage space available on the SSD since users usually have a two-drive setup, an SSD coupled with an HDD.

If you have sufficient free space even after moving all the games to the SSD, go for it. If you run out of storage, start prioritizing and moving only the ones you frequently play.

Here are a few benefits of installing games on SSD.

  • Quicker load time: The primary reason behind installing Windows on an SSD is the faster load time, and the same applies to games. Any games stored on the Solid State Drive will load quickly, thus saving significant time.
  • Better performance: SSDs allow data to be read quickly, which boosts gaming performance and leads to a better overall experience.
  • Fewer errors: SSDs, due to fewer moving parts, are less prone to issues, thus delivering an error-free gaming experience.

How many GB SSD is enough for gaming?

This depends on the size of the games you want to store on the SSD. Some modern games fill up as much as 200 GB on the drive, so if you have a few of these, a 1 TB SSD is a must. For moderate gaming, a 512 GB SSD would do just as well.

Experts also recommend keeping 15-25% storage free on the SSD, so you must factor that in. Generally, a 1 TB SSD should provide the much-needed boost, and you won’t run out of storage space soon.

How do I move games to SSD without reinstalling?

You can move games to SSD in Steam and Origin without reinstalling, while reinstallation is required for others.

Yet the reinstall process for other gaming clients, be it Battle.net, GOG Galaxy, or Epic Games, is quick since we have already moved the game files, which don’t need to be downloaded again.

How do I see what games are on my SSD?

The quickest way to find out the games stored on the SSD is to open it in File Explorer. You will now find a folder for the gaming client if any of its titles are stored here.

Besides, you could check the storage path for the individual games in the client to identify the ones installed on the SSD.

Also, you can use a dedicated tool to move your games on an SSD. Laplink PC Mover is a program created to help you transfer all sorts of files from one PC to another or from PC to SSD.

LapLink PCMover is a data migration utility that automatically backs up your registry settings and game data files before moving them to an SSD or another PC if needed.

It’s error-free as long as you carefully follow the on-screen directions. You may choose which settings and data files are moved to the SSD or let PCMover migrate everything.

While we are on the subject, find out the best settings to improve the gaming performance on PC.

For any queries or to share a solution not listed here, comment below.

Is Your File Explorer Sidebar Missing? How to Get It Back

Since Microsoft rolled out Windows 11, users have reported errors with File Explorer. One such error includes the Windows File Explorer sidebar missing.

In this article, we’ll provide you with the necessary steps you can take to help you successfully resolve this error. 

Why is the File Explorer left pane missing?

The Windows File Explorer left pane missing is usually triggered after a Windows update. However, other reasons might cause the File Explorer left pane to disappear. Some of them include the following:

  • File Explorer settings: If you’ve tampered with the app’s configuration, it might be why the Windows File Explorer sidebar is missing.
  • Corrupt Windows files: If your PC’s system files get corrupted, you’ll run into operational errors, which can cause the app’s left pane to disappear.
  • Windows Upgrade: If you just upgraded your PC from a lower Windows version, the File Explorer sidebar might disappear.

Now that we know the potential reasons behind this glitch, let’s see how we can fix it.

How do I get my File Explorer sidebar back?

Before we attempt more advanced troubleshooting steps, here are some quick tips you can test:

  • Close File Explorer and restart the application.
  • Restart your PC.
  • Resize the File Explorer (maximize) window.

If these steps couldn’t fix the File Explorer sidebar missing, here are some advanced solutions.

1. Change the File Explorer settings

  1. Press the Windows + R keys to open File Explorer and click on View.
  2. Select Show and check the option for the Navigation pane.enable navigation to open missing sidebar
  3. Close File Explorer and relaunch the app.

While this is an efficient fix that will immediately get your sidebar back, you can also apply this solution as a fix if File Explorer is not showing the top bar.

2. Re-Register the shdocvw.dll file

  1. Left-click the Start button, type command prompt in the search bar, and select Run as Administrator.cmd as admin
  2. Select Yes when the UAC prompts for confirmation.
  3. Type in the following command and hit Enter: regsvr32 /i shdocvw

The shdocvw.dll file controls the majority of the Windows user interface. Since this error is UI related, re-registering the file might help resolve the error.

3. Roll back the latest Windows update

  1. Press Windows key + I to open Settings.
  2. Select Windows Update and click on Update History.
  3. Click on Uninstall updates.
  4. Locate the specific update from the list of Windows Updates and click on Uninstall to remove the update.

If Windows File Explorer is missing, rolling back a Windows update can help resolve the problem. Here is a detailed guide that includes what you need to know about Windows update settings. 

After installing a Windows Update, you might run into errors that can only be fixed by uninstalling the update.

4. Run SFC and DISM scans

  1. Left-click the Start button, type command prompt in the search bar, and select Run as administrator.
  2. Type the following command and hit Enter: sfc /scannow
  3. After the scan is finished, type the following command and hit Enter: DISM.exe /Online /Cleanup-image /Restorehealth
  4. Wait until the processes are completed and close Command Prompt.

A DISM scan helps detects and fix problems with files on your computer; running the scan might help resolve the File Explorer left pane missing.

Alternatively, you can opt for a specialized repair tool to scan your PC for corrupt or missing files and replace them automatically with healthy parts.

Should your SFC scan stops to work or not responding, hop on this guide to find quick fixes for the problem.

If your File Explorer sidebar needs to be included, it’s nothing serious. You likely have a faulty Windows update, or you changed the view settings.

With the steps listed above, you can restore your Windows sidebar quickly. If you’ve got other solutions that helped you resolve this problem, you can let us know in the comments section.

Why Does 9anime Keep Buffering? 3 Simple Fixes to Apply

The 9anime keeps buffering is one of the errors some of our readers have reported recently with more requests to know what is causing the issue.

9anime is one of the most popular anime websites which generates a lot of traffic. One could easily conclude the reason for this error is due to the massive traffic on the site daily. But in this article, we’ll address other causes and how to fix them.

Why does 9anime keep buffering?

Websites like 9anime endure traffic overload. So, issues like the 9anime keeps buffering error are inevitable. Below are some other factors contributing to this issue:

  • The server is temporarily shut down for maintenance – Whenever the 9anime server is under maintenance, you can either switch to other servers or wait for it to be restored.
  • Third-party or incompatible applications are blocking 9anime – Some users also reported that this error can be blamed on the intrusion caused by third-party applications on your computer.
  • Region-restricted content – The service is only available for a specific region. You can simply get over this by using one of the best VPNs for Windows.
  • Cache and cookies are overloaded – Video streaming issues might occur when your browser gets clogged with cookies. This issue could be resolved by clearing your cache and cookies.

Now that you know some of the potential reasons behind the 9anime keeps buffering issue, let’s proceed to how you can fix this problem.

How do I fix 9anime if it keeps buffering?

Before engaging in any advanced troubleshooting or settings tweaks, we recommend performing the following:

  • Make sure you are properly connected to the Internet.
  • Switch to another browser.
  • Check the official website to know if the website is experiencing any issues or undergoing maintenance.

However, if none of the above fixed the issue, you can explore the advanced solutions below.

1. Disable Adblockers on your browser

  1. Start the Chrome browser.
  2. Locate the Adblocker extension at the top-right corner of the bar and click on it.
  3. Toggle off or Pause the adblocker and check if this fixes the 9Anime issue or not.
  4. Alternatively, right-click on the Adblocker extension icon to view the options.
  5. Then, choose Remove from Chrome.
  6. Next, press Remove to uninstall the adblocker extension from Chrome.
  7. Restart your browser and check if this fixes the issue.

As effective as Adblockers are, they often trigger false positives and can cause multiple issues with websites, especially streaming websites. If you need 9anime Adblockers for your PC or Mobile, you can get them here.

Our example showed the method on Google Chrome, but disabling and uninstalling ad-blockers is very similar on other browsers as well.

Adblockers can block scripts that 9Anime needs to run. For broader troubleshooting steps beyond adblockers, see our detailed guide on 9anime not working.

2. Clear your browser’s cookies and cache

  1. Launch your browser.
  2. Click on the three-dot menu, select More tools, and choose Clear browsing data.
  3. Select All time, check the boxes for Cookies and other site data, and Cached images and files. Then click on Clear data.
    Clear data

If the cookies and cache on your browser become overloaded, video streaming errors like slow loading, buffering, lagging, or stuttering happen.

Although the solution is tailored for Chrome, the method is similar to all other popular browsers.

3. Try other 9anime mirrors

Some Internet service providers block certain websites, and 9anime might be one of them. Luckily, there are a lot of other official mirrors to try.

Check out the updated list of 9anime mirror URLs: 9anime.to, 9anime.pw, 9anime.at, 9anime.video, 9anime.page, 9anime.life, 9anime.live, 9anime.one, 9anime.love, and 9anime.app.

And that’s it on how to fix the 9anime keeps buffering issue.

In case you encounter an error where 9anime is not working in Chrome, do not hesitate to check our detailed guide on the issue.

Other streaming services can also experience issues, and we wrote a great guide on fixing HiAnime not working that you shouldn’t miss.

You can also find solutions in our step-by-step guide on Kemono not working if you face errors on that platform.

If you have any questions or suggestions, do not hesitate to use the comments section below.

Corsair Keyboard not Lighting up: 6 Ways to Turn Lights on

One of the greatest things about some Corsair keyboards is their lighting effects. Yet, users have posted on some forums that the Corsair keyboard is not lighting up.

For some users, the lighting can completely stop working. Irrespective of the cause of the issue and its severity, you should be able to fix it with these resolutions.

Why are Corsair keyboard lights not working?

The Corsair keyboard not lighting up issue can be traced to various factors. Below are some of the notable causes:

  • Outdated driver: If your Corsair K55, K70, or K100 keyboard is not lighting up, you should first check if you have the latest drivers. If not, you need to update your driver to the newest version.
  • Problematic Windows update: If you started noticing this issue after updating your PC, there might be an issue with the latest patch you installed. The quick way to fix this is to remove this update.
  • Outdated firmware: An outdated Corsair keyboard firmware can potentially lead to issues, including this lighting problem. So, you need to check if an update is available for the software.

What can I do if the Corsair keyboard is not lighting up?

1. Update your keyboard’s driver

  1. Press the Windows key + X and select the Device Manager option.
    device manager corsair keyboard not lighting up
  2. Double-click the Keyboards option to expand it, and right-click your Corsair keyboard.
  3. Now, select the Update driver option.
    update driver
  4. Finally, choose Search automatically for drivers and install any available updates.
    search auto

First, check if you need to update your Corsair keyboard’s driver. The easiest way is to run a driver updater software scan.

A driver updater utility will show if your Corsair keyboard’s driver is outdated. Up next, you can install the latest driver for your keyboard with the driver updater software.

2. Reset the Corsair keyboard

2.1. Wired keyboards

  1. Unplug the Corsair keyboard from your PC.
  2. Press and hold down the Esc key.
  3. While holding the Esc key, plug your Corsair keyboard back into the PC.
  4. Release the Esc key about five seconds after reconnecting the keyboard. You should then see the keyboard flash after the reset.

2.2. Wireless keyboards

  1. Users with wireless Corsair keyboards will need to turn them off.
  2. Then hold down the Esc key while the keyboard is off.
  3. Turn the keyboard back while pressing and holding the Esc key.
  4. Let go of the Esc key five seconds after you turn the keyboard back on. The keyboard should flash when it’s reset.

3. Update your Corsair keyboard’s firmware

  1. Open the iCUE download page in a browser.
  2. Click to download the latest iCUE software there.
  3. Then, install iCUE with the setup wizard for it you download.
  4. Open the iCUE software window.
  5. Click the Settings tab.
  6. Select the Corsair keyboard you need to fix lighting for.
  7. Press the Update button to install firmware for your keyboard.
  8. Select the Force update radio button to get the latest firmware version for your keyboard.
    force update corsair keyboard not lighting up

After doing this, the Corsair keyboard should start lighting up like before.

Note icon NOTE
There’s also a setting for your keyboard on the same Device Settings panel in iCUE. Drag that Brightness bar to maximum (far right) if it’s not already.

4. Disable SDK

  1. Download and install iCUE as outlined within the first three steps of the third resolution.
  2. Launch the iCUE software.
  3. Select iCUE’s Settings tab.
  4. Then, select General on the iCUE Settings panel.
  5. Uncheck the Enable SDK checkbox.
    enabled sdk

With this done, your Corsair keyboard should start lighting up again.

5. Restore Windows 10 to an earlier date

  1. Press the Windows key + R, type rstrui.exe, and click OK.
    rstrui
  2. Click the Next button on the page that pops up.
    next Corsair keyboard should starting lighting up
  3. Now, select your preferred restore point and click the Next button.
    restore point
  4. Finally, click the Finish button and follow the onscreen instructions to complete the process.
    finiish

You’ll probably need to reinstall some software after rolling back Windows because programs installed after chosen restore points get deleted.

6. Uninstall recent Windows updates

  1. Press the Windows key + I to open the Settings app and select Update & Security.
    update and Corsair keyboard should starting lighting up
  2. Click the View update history option.
    view update
  3. Now, select Uninstall updates.
    uninstall updates
  4. Finally, right-click the most recent update and click Uninstall to remove it.
    update uninstall

This resolution specifically fixes Corsair keyboard lighting that stops working after recent Windows updates.

If a keyboard’s lighting stops working after a build update, you must select a rollback option within the Windows Update Settings tab to reinstall the previous build version.

The above fixes are among the possible resolutions to forget about lighting issues. And since you don’t regret your choice, check out these great Corsair keyboards too.

Let us know which of the above fixes worked for you as well. Do not hesitate to use the comments area below in that regard.

Unrecognized Game Client Cannot Continue: 2 Ways to Bypass

Many users have been reporting the Unrecognized game client cannot continue errors on various PC games.

Why am I getting an Unrecognized game client cannot continue error? Below are some of the factors that can cause this error, as reported by users:

  • Corrupt game files – If you are facing the Unrecognized game client cannot continue error on Dead by Daylight, Apex, Fortnite, or Battlefield 2042, it is likely due to issues with the game files. The quick way around this is to verify the integrity of the files.
  • Issues with the game: Sometimes, this problem might be due to incomplete game installation or other issues. You need to uninstall the game and reinstall it after some minutes.

How can I fix the Unrecognized game client cannot continue error?

1. Check game file integrity

  1. Launch Steam and click the Library option at the top.
    library unrecognized game files cannot continue
  2. Right-click the faulty game and select Properties.
    properties
  3. Now, choose Local files in the left pane.
    local files
  4. Finally, click Verify integrity of game files and wait for the process to complete.
    verify integrity unrecognized game files cannot continue

You should verify the game files if you are getting the Unrecognized game client on Star Citizen or other Steam games. This will let you know if there are issues and possible ways to fix them.

2. Uninstall and reinstall the game

  1. Launch Steam and click the Library tab at the top.
    library unrecognized game files cannot continue
  2. Right-click the problematic game and select Manage > Uninstall.
    manage uninstall
  3. Now, confirm your action by selecting Uninstall.
    uninstall button
  4. Finally, go to the Steam Store to redownload the game.

If verifying your game files does not fix the Unrecognized game client error, you can uninstall and reinstall the game. With this, you will have a fresh game installation without glitches plaguing the previous one.

We have reached the end of this detailed guide. All you need to do now is follow the instructions carefully, and you should be able to launch your games without issues.

If Steam is not recognizing your installed games, check our detailed guide to fix it quickly.

Let us know the solution that helped you fix this issue in the comments below.