5 Quick Fixes for GTA V Crashing on Windows 11

GTA V has been around for quite a while, and the game has a few errors and bugs. One such error is GTA V crashing on Windows 11.

If you’re experiencing this problem, this article will provide you with 5 quick fixes to help fix the crashes on your Windows 11.

Why is GTA V crashing on Windows 11?

There are several reasons why GTA V keeps crashing on Windows 11. Here are some of the most common ones, highlighted by gamers:

  • Incompatible or outdated graphics driver: If your system’s graphics driver is incompatible with GTA V, or it’s outdated, you might run into operational errors. Check various ways to update your graphics driver.
  • Hardware specifications: A computer with below-par system requirements will find it hard to run GTA V without crashing. 
  • Virus or Malware: On rare occasions, the reason behind GTA V crashing on Windows 11 might be a virus operating in the system. Download the best antivirus and anti-malware from the list here.

Now that we know the main causes of GTA V crashes on Windows 11, let’s fix it with the solutions below.

How do I Fix GTA 5 crashing on Windows 11?

Before we attempt to troubleshoot this error, here are a few preliminary steps you can apply:

  • Check your system requirements and target the recommended ones.
  • Disable Antivirus and firewall protection.
  • Check your internet connection and fix the network connection.

If the above steps couldn’t resolve GTA V crashing, here are some advanced troubleshooting steps you can attempt:

1. Force Stop GTA V and restart your PC

  1. Simultaneously press Ctrl + Shift + Esc. Click on More Details to expand the applications list.
  2. Right-click the Grand Theft Auto V and select End task to force stop the game.
  3. Press the Windows key, select Power, and click Restart to reboot your PC. 

When the PC restarts, attempt to run GTA V to see if the game continues crashing. In addition, if GTA V is lagging, force-stopping the game might help resolve lag problems. 

2. Delete the GTA V cache

  1. Press Windows + R keys to launch the Run window, type %appdata%, and click OK.
  2. Then, go to the Local folder.
  3. Select and delete the entire Rockstar Games folder.
  4. Then, re-launch GTA V.

Deleting the GTA V folder under Documents doesn’t pose any operational risk to the game. Once you launch the game again, the folder will automatically be created, and hopefully, the game will run smoothly without crashing. 

3. Update the Graphics driver

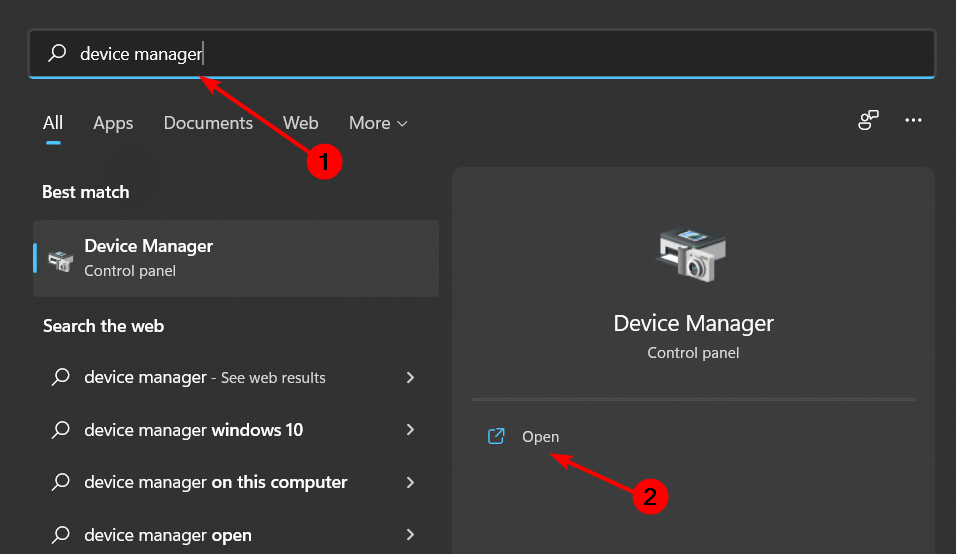
  1. Right-click the Start button and select Device Manager.
  2. Expand the Display adapters section, right-click on the graphics adapter, and select Update driver.
  3. Click on Search automatically for divers.

If you’re installing the drivers manually, you’ll need to download the drivers from the official Nvidia or AMD website. 

Also, here is a detailed guide on how to update your drivers manually and automatically in Windows 11. 

Alternatively, if manually updating your drivers takes some time, you can try a dedicated tool like Outbyte Driver Updater. This software will scan your system and update your drivers within a few minutes.

Outbyte Driver Updater

Update all your drivers in no time, so you can return to your favorite game.
Free Trial Download Now

4. Verify the Integrity of game files

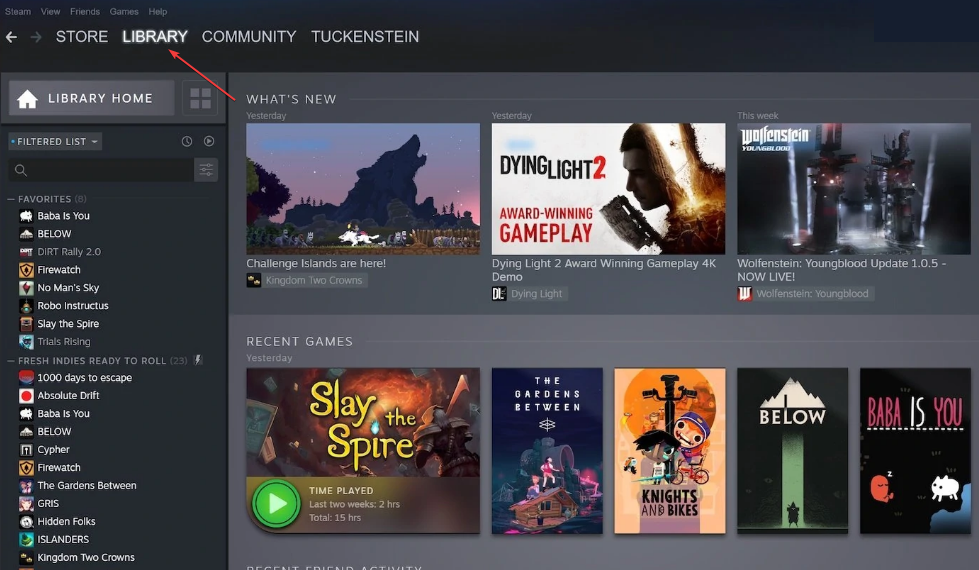
  1. Launch Steam and navigate to the Library tab.Steam library
  2. Right-click on Grand Theft Auto V and click on Properties.
  3. Select the Local Files tab, click on Verify Integrity of Game Files, and wait until the process is completed.verify integrity
  4. Launch GTA V after the scan. 

Games downloaded from Steam are thoroughly checked for viruses to ensure the integrity of the game files. However, some files may be corrupted during the download or installation process.

5. Reinstall GTA V

  1. Launch Steam and select Library.Steam library
  2. Then, right-click on GTA V and select Manage.
  3. Click on Uninstall to completely remove GTA V.
  4. Restart your PC and reinstall the game on Steam.

Reinstalling GTA V should be a last resort and only be attempted after all troubleshooting efforts have proven futile.

It has also been known as an effective solution in issues like the FiveM could not contact entitlement service error; read this guide to learn more.

GTA V Crashing on Windows 11 is usually triggered when running an outdated or incompatible graphics driver. Always make sure you’re running the latest version and compatible version of your graphics driver.

You might also be interested in learning what to do if GTA V is not using the GPU on your PC.

If you have any alternate solutions that have helped you resolve this error, you can drop them in the comments below. 

Why is Project Playtime Tutorial Not Working? Easy Fix

Some of our readers have recently reported the Project Playtime tutorial not working issue they encounter as they try to watch how to play the game.

For most, watching tutorials enables them to learn faster about what to expect and how to survive in a game. Knowing how frustrating this can be if the Project Playtime tutorial is not working, we have provided some potential fixes in this article.

Why is Project Playtime tutorial not working?

Although connection issues are reported the most as the factor behind this issue, there can still be several other reasons for this error. We highlight the most important ones below:

  • Network connection issues – To watch the game tutorial without any hiccups, you need to have a steady internet connection. If your internet is not properly connected you won’t be able to access the Project Playtime tutorial.
  • A bug in the game – Many players got stuck in the tutorial because they couldn’t get through certain tasks. Until it gets fixed by the developer, you will only be left with the option to skip the tutorial

Can I skip the Project Playtime tutorial?

Yes, press the Esc key, then you just need to click on the top left part of the Operations menu (where the objectives appear) and skip it.

In case any of these reasons are the cause of the problem, we recommend you attempt any of the solutions provided below.

How to access the tutorial in Project Playtime?

Before engaging in any troubleshooting or settings tweaks, perform the following:

  • Restart your computer, router, and modem.
  • Check if there is any available update for the app.
  • Try accessing the Project Playtime tutorial from a different device.
  • Check your Internet connection.

If none of these fixes work for you, you can explore the advanced troubleshooting methods below to resolve the issue.

1. Update your GPU Drivers

  1. Press the Windows + X keys to open the Quick Link Menu and select Device Manager.
  2. Then, double-click on Display adapters. Right-click on the driver and select Update driver.Update display driver
  3. Choose to Search automatically for drivers.search automatically for drivers
  4. Restart your computer to apply changes.

If you are using the outdated graphics driver, you may be unable to access the Project Playtime tutorial. However, updating your GPU Drivers should fix the issue. If it does not, proceed to the next fix.

2. Disable Overlay Programs

  1. Open the Steam client and navigate to Library.Steam library
  2. Right-click on Project Playtime, then select Properties.
  3. Navigate to the General section and simply uncheck the Enable Steam Overlay checkbox.enable in-game overlay
  4. Go back to Library and try to access the tutorial in Project Playtime.

Some affected players have reported that disabling the Steam overlay on their Windows PC has proved an easy fix for the project playtime tutorial not working.

3. Disable the antivirus and firewall

  1. Left-click on the Start menu, type firewall in the search box, and click on Windows Defender Firewall.
  2. From the left pane, click on Turn Windows Firewall on or off.turn windows defender off and on
  3. Select Turn off Windows Firewall for the Private, Domain, and Public Network Settings.turn off the radio button windows defender
  4. Now, restart your computer for the changes to take effect.

After disabling Windows Firewall, you’ll have to disable Windows Defender (your system’s antivirus program) by following the steps below:

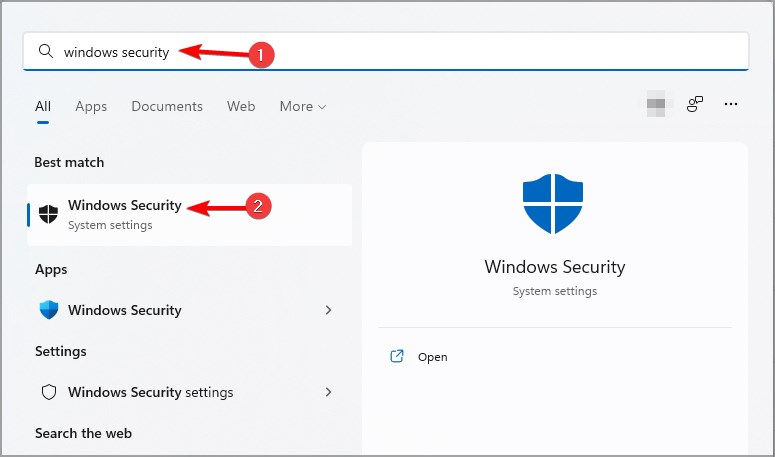
  1. Press the Windows key, search for Windows Security, and launch it.
  2. Click on Virus & threat protection and click on Manage settings.Virus and threat protection
  3. Next, turn off the Real-time Protection option.Turn off Real time protection
  4. Lastly, ensure your PC applies changes.

If, in any case, you’re using any third-party antivirus program, then make sure to turn it off manually by using the System Configuration Utility.

4. Reset Project Playtime

  1. Press the Windows + X keys to access your apps and select Installed apps.
  2. Locate Project Playtime and click on the options icon. Next, click on Advanced options.
  3. Then, select Reset and click Reset to confirm.

Once done, restart your PC and check if you can now access the Project Playtime tutorial.

Make sure you try each of these fixes one after the other to know which one fixes the issue. Additionally, if Project Playtime fails to connect to the server, you can get help here.

You can use the comments section below for any questions or suggestions.

Posted in PC

How to Fix ChatGPT Too Many Redirects Error

Some of our readers have been encountering the error of too many redirects when using the ChatGPT. This redirect loop error often manifests as ERR_TOO_MANY_REFIRECTS.

Another similar situation is when the ChatGPT encounters a network error, preventing users from accessing its chatbox. So, let’s explore the causes and possible fixes for the error.

What causes the Chat GPT too many redirects error?

The redirection loop occurs when your browser tries to access a URL that points to another URL, which points to others. Hence, the browser becomes stuck and displays the error.

ChatGPT may prompt the too many redirects error for many reasons. However, the predominant cause is an overloaded server which disrupts performance.

Other likely causes are:

  • Server issues – If the Chat GPT server is being upgraded or encountering difficulties, it might trigger this error.
  • Slow/unstable Internet connection – This is a sub-network error. So, if your network connection is being tampered with, then the too many redirects error may occur on ChatGPT.
  • Third-party apps interference – Apps such as VPNs and antiviruses have firewalls that could interfere with the performance of your browsers.
  • Misconfiguration on the ChatGPT website – Issues with corrupt cookies and site data might also be responsible for this redirection loop.

Meanwhile, this error might show up differently, depending on your browser. Here are the popular variations below:

  • Chrome – This page isn’t working. Chat.openai.com redirected you too many times.
  • Firefox – An error occurred during a connection to chat.openai.com. This problem can sometimes be caused by disabling or refusing to accept cookies.
  • Edge – Vhat.openai.com redirected you too many times.
  • Safari – Too many redirects occurred trying to open “vchat.openai.com.” This might occur if you open a page that is redirected to open another page which is then redirected to open the original page.

How do I fix the ChatGPT too many redirects error?

Before making significant tweaks, try these:

  • Disable all VPNs and antiviruses on your device. You can check out how to disable VPN here.
  • Check your network connection’s speed and power cycle your router if need be.
  • Switch to a different browser.

If, after trying these, the error persists, then perform the fixes below.

1. Check the OpenAI server status

  1. Launch your browser and check the status of OpenAI.
  2. A green bar means the service is operational, and a red/orange/light green bar connotes an outage.

If there’s an outage, wait till the server is operational before trying. This solution is also effective if ChatGPT is not working.

2. Clear ChatGPT cookies

  1. Launch your browser, click Menu, and select Settings.
  2. Choose the Privacy and security tab and select Cookies and other site data.
  3. Search for ChatGPT’s site and click the Remove icon.

This is a faster and more effective means to clear the site data without meddling with the entirety of your browser’s data. However, if this fails, then proceed to remove your data.

3. Clear your browser cache

  1. Launch your browser.
  2. Go to the Menu button, select More tools, and click on Clear browsing data.
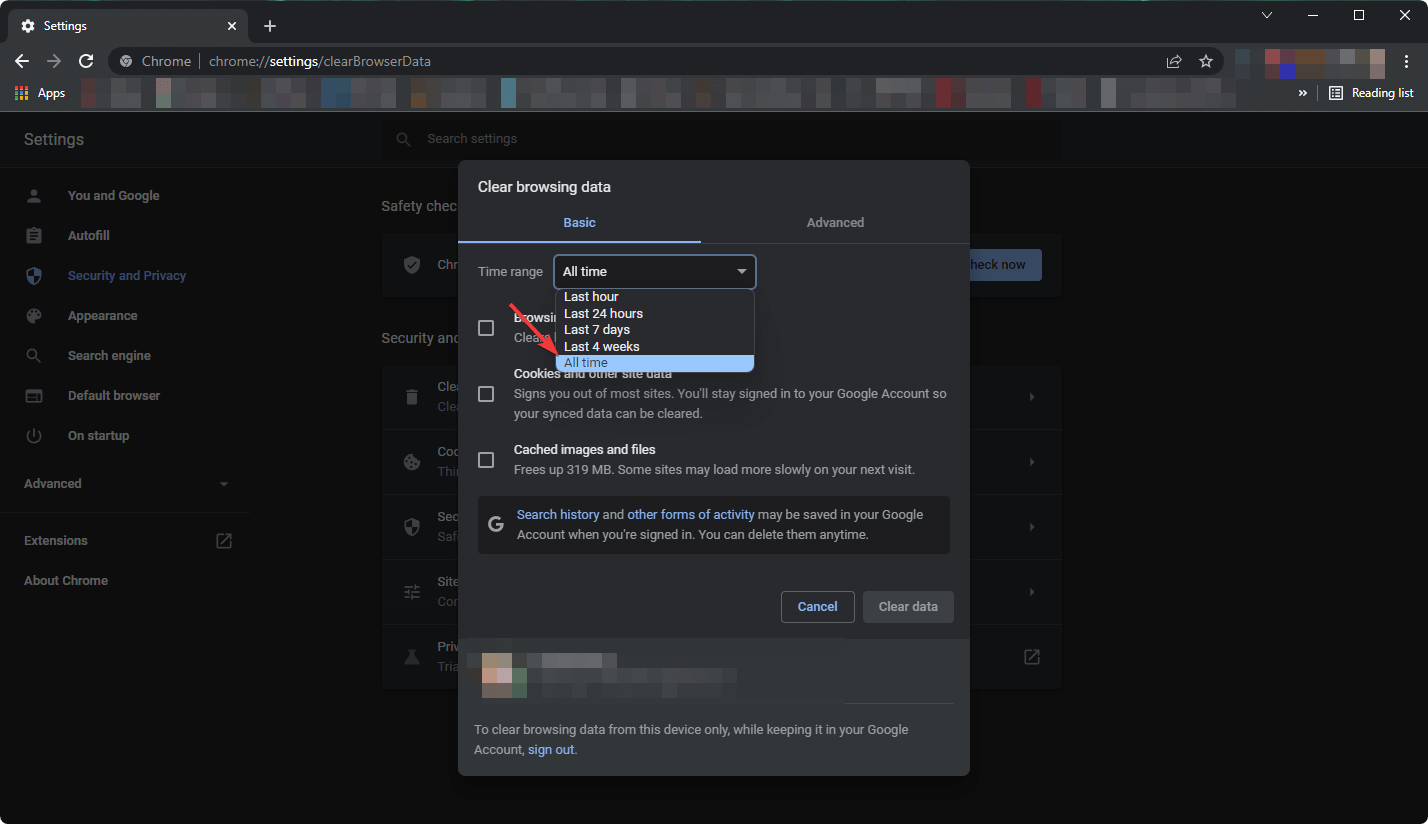
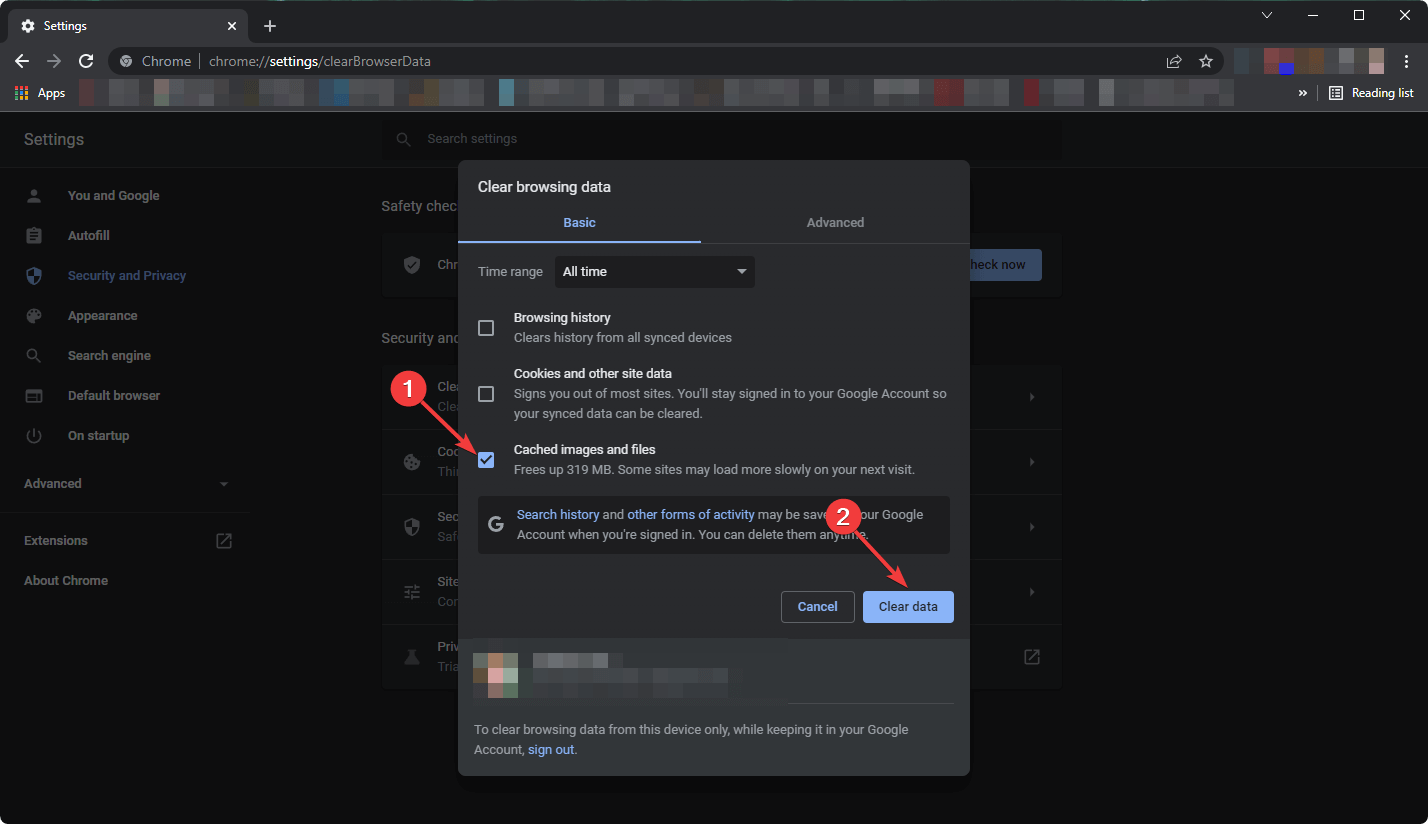
  3. Select the Time range as All time, check the boxes for Cookies and other site data, and Cached images and files. Then click Clear data.
  4. Restart the browser and retry the ChatGPT site.

By clearing the browser cache, all the corrupted files will be removed. Hence, the too many redirected error will cease.

In this solution, we used Google Chrome as an example but the procedure is similar on all other popular browsers.

Should you have difficulties clearing search history on your browser, check out our fix to troubleshoot it.

4. Log out and into the ChatGPT

  1. Launch your browser, go to ChatGPT, and click Log out.
  2. Then click on Log in to gain access back.

This is similar to rebooting your access to the website. If it were an issue with your account, it would be easy to identify by doing this.

OpenAI’s ChatGPT has been growing exponentially in acceptance and usage. Hence, various errors have been popping up, including this too many redirects.

Hence, ensure to follow all the fixes we have outlined for optimal results when faced with this situation. Also, you can read our guide on bypassing ChatGPT if it’s not available in your country.

These fixes will also help troubleshoot Instagram if it’s directing you too many times. We also have a guide on how to use ChatGPT without phone number, so don’t miss it.

In conclusion, if you have any suggestions or questions regarding this guide, kindly drop them in the comments section.

Fix: Amazon App Store Stuck Installing/Download Issues

The Amazon App Store stuck installing is an error that has been recently reported by some of our readers who can’t download Amazon App Store.

If you are experiencing this issue and you don’t seem to know the reason and what fix to apply, don’t worry as this guide will teach you what to do to fix the issue.

Why is Amazon Store stuck on installing?

There can be several reasons why you are experiencing the Amazon App Store stuck on install pending in Windows 11. The following are some of the factors responsible for this error:

  • Insufficient disk space – This error mostly occurs when your device is low on storage.
  • Network issues – The Amazon App Store services may run out of bandwidth due to network congestion on your computer, which will cause the update to become stuck or frozen.
  • Windows Update cache – If some update files are missing or have problems, it may block the process, which may then cause the Amazon app stuck on install pending error.
  • Unnecessary Startup apps & services – The problem could be caused by some startup programs and services that run needlessly and slow down the computer’s response to other operations.
  • Geo restriction – The app is only available in 31 countries, and if Amazon Appstore is not available in your country, this guide will help you.

We have a few all-purpose fixes to assist you in fixing the Amazon App Store stuck on preparing downloads.

How do I fix the Amazon App Store if it’s stuck on installing?

Before exploring the advanced solutions, you should consider performing the following preliminary checks:

  • Turn off background apps running on your PC.
  • Check if you are properly connected to the Internet and power cycle your network router.
  • Restart your PC.
  • Perform a Disk cleanup to free some space on your PC, then restart your device and then try again.

If, after applying the above preparatory, nothing worked, let us explore some of the dedicated fixes.

1. Turn on the Virtual Machine Platform in Windows

  1. Press the Windows + S keys to launch the Search menu, type Turn Windows features on or off in the search box and launch it.turn windows features on off
  2. Check the box next to Virtual Machine Platform and click OK.enable virtual machine platform

Once the required files are downloaded, restart your PC for the changes to come into effect. If the problem persists, check the next solution.

2. Reset Microsoft Store Cache on your computer

  1. Press the Windows key, type CMD in the Windows Search bar, and choose to Run as administrator.
  2. Type the following command line in the text field and press Enter: WSRESET - i
  3. Wait for the process to complete, then retry the download after the Microsoft Store app has opened.

Resetting Microsoft Store means running the application anew. This should fix the Amazon App Store if it’s stuck on installing. If you can’t run Command Prompt, check this step-by-step guide to fix the issue.

3. Sign out and back into your Microsoft account

  1. Open the Microsoft Store app. At the top-right corner, click on your Profile icon.
  2. Click on the active account and choose Sign out.
  3. Close the Microsoft Store app and relaunch it.
  4. Click on the blank icon and select Sign In.
  5. Enter your login details and check for improvements.

Some users reported that they could fix the Amazon App Store stuck on installing error after they signed out and then signed into their Microsoft account. If you need to fix your Microsoft account, hop on this guide.

And that’s it on the Amazon App Store stuck installing/downloading issues. Ensure that you carefully follow the instructions in each of the fixes provided in this article.

Similarly, is your Amazon Appstore not working in Windows 11? Check this guide to know how to fix it.

For some of our readers who have requested to know how to install Amazon Appstore on Windows 11 outside U.S., you can explore the step-by-step guide in this article.

If you have any other questions or solutions to this problem, leave them in the comments section below.

Ark Video Driver Crashed And Was Reset: Fixed

Some of our readers have reported that they are looking for a fix after encountering Ark Video driver crashed and was reset error.

Therefore, this article will highlight the possible fixes for this error. You can check our detailed guide for ways to fix your games if they keep crashing.

Why did Ark Video driver crashed and was reset?

Since gamers commonly report this error message, the problem is hinged on how to fix the video driver issues in Windows. Below are some of the potential reasons:

  • Corrupted video driver – Outdated or corrupted drivers are the main reason for game crashes and Ark is not the exception.
  • Low system resources – The device doesn’t meet the hardware requirements of the game.
  • Hardware problems – Try to run hardware diagnostics and see if there is any damage with the PC’s hardware components.
  • Application Interference – If the game was working perfectly until you installed a third-party application, try uninstalling it and try running the game again and see if it still crashes.

Now you know some of the potential causes for the Ark Video driver crashed and was reset error. Let’s explore some troubleshooting tweaks that worked for others.

What should I do if I get the ARK video driver crashed and was reset error?

It is very important to take note of some of these preliminary checks before attempting the more serious tweaks:

  • Ensure that your device meets the minimum system requirements of the game you want to run. Do note that a game can crash after adding more RAM to your PC.
  • Make sure you have DirectX11 or later installed on your PC.
  • End unnecessary tasks and programs.
  • Adjust the visual effects in the game’s menu to increase its performance.

Having confirmed the above checks and the problem is yet unfixed, you can work your way through any of the advanced solutions below to fix the Ark Video driver crashed and was reset error.

1. Update or reinstall your graphics driver

  1. Left-click the Start button, type Device Manager, and launch it.
  2. Expand the Display adapters, right-click the graphics driver, and select Update driver from the drop-down.Update display driver
  3. Select Search automatically for drivers and restart your PC.search automatically for drivers
  4. Check if the error persists. If not, repeat the solution but on step 2, select Uninstall device instead.
  5. Now, restart your computer and Windows will automatically install a new driver.

It is an essential step to update the driver whenever you encounter Video driver issues. Hence, this should fix the Ark Video Driver crashing error. Also, you can check out other ways to update graphics driver on your PC here.

Other than manually updating your drivers, you can use a specialized tool as well to make sure that your drivers get the correct and latest updates automatically.

⇒ Get Outbyte Driver Updater

2. Verify the Integrity of your game cache

  1. Launch Steam and go to Library.Steam library
  2. Right-click on Ark: Survival Evolved and select Properties from the drop-down menu.
  3. Navigate to the Local Files tab, and click on Verify the Integrity of your Game Cache.verify game cache
  4. Steam now begins to compare the manifests and will verify the integrity of your game. This process may take a while so don’t cancel it.

Verifying the integrity of your game via Steam will help validate the update installed for your game.

3. Change the launch options of your game

  1. Launch Steam and go to Library.Steam library
  2. Right-click on Ark: Survival Evolved and select Properties from the drop-down menu.
  3. Under the General tab, click on Set launch options, and type this command in the text box -USEALLAVAILABLECORES -sm4 -d3d10 -nomansky -lowmemory –novsyncSteam set launch options
  4. Click the OK button and close the Properties window.
  5. Now try to play the game and check if that helped.

According to some users, the cause of the problem may be that the game burdens the computer, at this moment causing the Ark video driver crashed and reset error. Changing the launch options of the game should fix the issue.

4. Increase GPU processing time

  1. Press Windows + R to open the Run window, type regedit, and click OK to open the Registry Editor.
  2. Navigate to the following path: HKEY_LOCAL_MACHINE\SYSTEM\CurrentControlSet\Control\GraphicsDrivers
  3. Locate TdrDelay DWORD. If it’s not available, right-click the empty space, select New, choose DWORD, and name it TdrDelay.regedit graphics driver
  4. Double-click TdrDelay and change the value from 2 to 8.

Ensure you have created a restore point before making any changes on the Registry Editor to avoid issues.

These are the top fixes for the Ark Video Driver crashed and was reset error. You can also check the solutions provided for the Video driver crashed error on Borderlands 3 in one of our detailed guides.

If any of the fixes in this article has helped you, please let us know by using the comments section below.

Steam Content File Locked: Unlock It With These 7 Solutions

Steam is a popular client with close to 130 million active users who use it to play their favorite games on Steam. Though highly polished, the gaming client has been found to run into issues, especially the Content file locked error in Steam.

The error has been encountered by users worldwide and for a wide range of games, which makes troubleshooting a lot more intricate. So, let’s find out all about the problem and go through the solutions.

What does it mean on Steam when it says content file locked?

The Content file locked error in Steam, on Elden Ring and other games, appears when trying to update them and stops the process from completing. It’s usually encountered when the download reaches 90-95%. Here are a few reasons you might be getting the error:

  • Running low on storage: Some users pointed out that the error appeared when running out of storage on the drive where the Steam files were saved.
  • Problems with the drive: The steam VR Content file locked error can also appear due to issues with the drive, which affect the program’s ability to read and write data to it.
  • Missing permissions: If Steam is not run with the required permissions, you may face trouble updating games.
  • Issues with the cache: For those getting the Content file locked error in Steam iRacing, a corrupt download cache could be the underlying cause.

How can I fix content file locked on Steam?

Before we move to the slightly complex solutions, try these quick tricks first:

  • Restart the computer and then try updating the game.
  • Run the app as an administrator since Steam could be missing the permissions required while updating the game.
  • If you have a third-party antivirus installed, disable it. Several of these have been found to cause the Steam Content file locked error with Wallpaper Engine. If that works, we recommend you switch to a reliable and effective antivirus.
  • When getting the error, you can hover the cursor over the message to identify the problematic file. Try deleting it and verify whether that resolves the problem.
  • Run Disk Cleanup to clear storage space on the PC, and then try updating the game.
  • Check the disk for bad sectors and other issues.

If none worked, head to the fixes listed next.

1. Terminate the game’s process

  1. Press Ctrl + Shift + Esc to open Task Manager, and locate the game throwing the error.
  2. Right-click on it, and select End task.end task to fix steam content file locked
  3. Similarly, terminate the Steam process as well.
  4. Once done, relaunch Steam and try to update the game that earlier threw the error.

Several users reported getting the Steam Content file locked error with Vavle and a few other games when they were running in the background, and terminating the process did the trick. Also, if a Steam game is configured to run at boot, make sure to disable the startup program.

2. Reset Winsock

  1. Press Windows + R to open Run, type cmd, and hit Ctrl + Shift + Enter.cmd
  2. Click Yes in the UAC prompt.
  3. Paste the following command and hit Enter:netsh winsock resetreset winsock to fix steam content file locked

3. Verify the integrity of game files

  1. Open Steam, go to the Library, right-click on the game that’s throwing the error, and then choose Properties.properties
  2. Navigate to Local Files from the left, and click on Verify integrity of game files.verify integrity of game files to fix steam content file locked
  3. If any issues are found, the affected files will automatically be replaced. test
  4. To confirm, again run the integrity test.confirm

Issues with some game files can often lead to the Content file locked Steam error with MW2. And the gaming client has a built-in option to fix such problems.

4. Clear the Download cache

  1. Launch the app, click on the Steam menu at the top left, and choose Settings.settings
  2. Go to the Downloads tab, and click on Clear Download Cache.clear download cache to fix steam content file locked
  3. Click OK in the confirmation prompt.confirm
  4. Once done, log into Steam and check if you can now update the game.

5. Move the game to another library

  1. Open the app, click on the Steam menu, and select Settings.open settings
  2. Navigate to the Downloads tab, and click on Steam Library Folders.steam library folders
  3. Click on the + icon.add
  4. Select another drive from the dropdown menu, and click Add.choose drive
  5. Now, move back to the previous drive, tick the checkbox for the affected game, and then click Move.move game to fix steam content file locked
  6. Select the drive you added earlier, and again click Move.move to fix steam content file locked

After you are done moving the game to another drive in Steam, the Content file locked error shouldn’t appear again.

6. Delete the local files and then reinstall the game

  1. Open Steam, right-click on the game, hover the cursor over Manage, and choose Browse local files.browse local file
  2. Press Ctrl + A to select all the files here, and then hit Delete. Also, delete the folder they were stored in.
  3. Now, go back to Steam, right-click on the game, choose Manage, and then select Uninstall.uninstall game to fix steam content file locked
  4. Click Uninstall in the confirmation prompt.uninstall
  5. Once the process is complete, click on Install.install
  6. Choose the install location from the dropdown menu, and then click Next.reinstall to fix steam content file locked
  7. After the game is installed, you should be able to update it without running into an error again.

7. Reinstall Steam

  1. Press Windows + R to open Run, type appwiz.cpl in the text field, and hit Enter.appwiz.cpl
  2. Locate and select Steam, and then click on Uninstall.uninstall to fix steam content file locked
  3. Follow the on-screen instructions to complete the process.
  4. Once done, restart the computer for the changes to come into effect.
  5. Now, head to Steam’s official website and again download the gaming client.steam
  6. Run the setup to install it, and then sign back in.

If none of the solutions so far have worked, reinstalling Steam would get things up and running, and you should not receive the Content file locked error anymore.

Also, we recommend that avid gamers check our quick tips and tricks to optimize Windows for gaming.

For any queries or to share another solution, use the comments section below.

Caa5004b: How to Fix This Microsoft Teams Error Code

The error code Caa5004b in Microsoft Teams occurs when users attempt to log in. The process is cut short just as soon as they enter their passwords. According to the reports, some users cannot launch the teams app.

The Teams app will not be working at times, so this should not come as a surprise. If you’re in a hurry, you can try the web version, but if you prefer using the desktop app, keep reading as we decipher how to resolve this error.

Why am I getting the error code Caa5004b?

Sometimes, desktop apps can malfunction and prevent you from using them. Mostly, they’re accompanied by an error code that directs you to address the underlying issue. For the Caa5004b error code in Teams, some of its main causes include:

  • Server issues – The Teams server may be overloaded when logging in or just downtime.
  • Outdated application – Some applications may become unresponsive if not updated with the latest features.
  • Corrupt cache – Over time, the Teams folder accumulates a cache, which can get corrupted if not cleared regularly.
  • Internet connection issues – If your connection is slow or unstable, you may have trouble logging in to your Teams app.

How do I fix the error code Caa5004b?

A few basic steps that may resolve the issue include:

  • Try changing your Microsoft Teams password and see if you can log in.
  • Check and update your Teams app from the Microsoft Store.
  • Verify that your internet speeds are optimal.
  • Check whether there are any bandwidth limits set on your Teams app.
  • Ensure you’re running the latest version of Windows.
  • Restart your router to re-establish the internet connection.
  • Check Microsoft’s server status to see if there is any scheduled maintenance ongoing or downtimes.
  • Use the web version and check if you can access your Teams account.

1. Clear Teams cache

  1. Hit the Windows + R keys to open the Run command.
  2. Type %appdata%\Microsoft\Teams in the Run dialog box and then select OK.
  3. Select all files and folders in the %appdata%\Microsoft\Teams directory and hit the Delete button.
  4. Restart Teams and check if you’re now able to launch it.

2. Disable your antivirus temporarily 

  1. Hit the Start menu icon, type Windows Security in the search bar and click Open.
  2. Click on Firewall & network protection, then select Public network.league of legends black screen after champion select
  3. Locate Microsoft Defender Firewall and toggle the off button.turning off Microsoft Defender Firewall Windows

3. Disable VPN 

  1. Press the Windows key and select Settings.settings windows 11
  2. Next, select Network & internet and click on VPN in the right-side menu.
  3. Select the VPN connection you want to disable, click on the drop-down and select Remove.remove VPN

4. Re-register your Teams account

  1. Hit the Windows key and click on Settings.settings windows 11
  2. Click on Accounts on the left pane, then select Access work or school.access workor school option
  3. Locate the Teams account you’re trying to log in using, then disconnect it.
  4. Wait for a few moments, then add the account again.

5. Clear Microsoft Account Credentials

  1. Hit the Windows Search icon, type Credential Manager in the search bar, then click Open.
  2. Click on Windows Credentials.Windows credentials - OneDrive 0x8004deb2
  3. Select MicrosoftAccount, click on it to expand, then hit Remove.
  4. You’ll get a command prompt asking you to confirm whether you want to remove the credentials, so click on Yes.

6. Reinstall Teams

  1. Hit the Start Menu icon on the Taskbar and click on Settings.settings windows 11
  2. Click on Apps on the left pane, then select Apps & features on the right pane.
  3. Navigate to Microsoft Teams app, click on the three ellipses and select Uninstall.uninstalling microsoft teams
  4. Launch the Microsoft Store, search for the Teams app and click Install.
  5. Follow the on-screen prompts and try again.

Some users who also got the error were part of the Azure Active Directory accounts. Most of the above solutions did not work but dropping off and rejoining the domain helped resolve this issue. 

If you’re part of a domain account and come across the same Caa5004b error, contact your administrator and ask them to drop you off and then add you again.

And that’s all we had regarding this error, but be sure to check out our other articles on Teams login errors.

We also address issues with Teams not downloading files, so don’t hesitate to visit our expert guide.

Your feedback is important to us, so let us know if you’ve been able to resolve this error in the comment section below.

Discord Failed to Extract Installer: 4 Easy Fixes to use

Discord is a popular VoIP and instant messaging app used by many in the gaming community. Of late, it has also gained prominence amongst crypto enthusiasts. But many reported issues installing it, usually the Failed to extract installer error in Discord.

The error message in the setup for Discord reads, Installation has failed. Failed to extract installer. And this mostly happens when you had Discord installed previously, uninstalled the program, and are now trying to reinstall it. So, let’s find out all about the problem.

Why do I get Discord failed to extract installer?

Here are a few reasons the Discord installer has failed:

  • Residual files from the previous installation: If Discord was indeed previously installed and there are some files left of it, the setup might throw an error.
  • A related process running in the background: In many cases, a process using Discord or the app process itself could be running in the background, thus triggering the error.
  • An app blocking the installation: Several third-party antiviruses or security software have often been found to block the installation of Discord.
  • Running the setup with insufficient permissions: The absence of required permissions to install Discord might also lead to this error.

What can I do if Discord failed to extract installer?

Before we head to the slightly complex solutions, here are a few quick things you can try:

If these don’t work, head to the fixes listed next.

1. Delete all local files

  1. Press Windows + R to open Run, paste the following path, and hit Enter:%appdata%appdata
  2. Select the Discord folder, right-click on it, and choose Delete.delete folder to fix discord failed to extract installer
  3. Now, again press Windows + R, paste this path, and click OK:%localappdata%localappdata
  4. Similarly, delete the Discord folder here as well.delete to fix discord failed to extract installer
  5. Next, press Windows + S to open Search, type Registry Editor, and click on the relevant search result.registry editor
  6. Click Yes in the UAC prompt.
  7. Paste the following path in the address bar and hit Enter:HKEY_CURRENT_USERSoftwarepath
  8. Locate the Discord key in the navigation pane, right-click on it, and select Delete.delete key to fix discord failed to extract installer
  9. Click Yes in the confirmation prompt.yes
  10. Once done, restart the computer for the changes to come into effect.
  11. Finally, you can try installing Discord, and the setup shouldn’t throw an error.

The local files and Registry entries from the previous installation are often why you get the Failed to extract installer error with Discord. A quick fix is to completely uninstall Discord first.

2. Run in compatibility mode

  1. Head to the location where the DiscordSetup.exe file is stored, right-click on it, and choose Properties.properties
  2. Go to the Compatibility tab, tick the checkbox for Run this program in compatibility mode for, and select either Windows 7 or Windows 8 from the dropdown menu.run in compatibility mode to fix discord failed to extract installer
  3. Once done, click on Apply and then OK to save the changes.save
  4. Now, run the installer. If it doesn’t work, choose the other iteration recommended earlier, and try again.

3. Try Discord PTB (Public Test Build)

  1. Go to Discord’s official website, scroll down, click on Download Public Test Build, and choose your OS from the list.discord ptb
  2. After the setup is downloaded, run it, and follow the on-screen instructions to complete the process.

Discord PTB is a test build where new features are tried before being introduced to the main app. Though it’s not as unstable as you would expect, given that features in it are already tested in the Canary version.

But the best part about Discord PTB is that it does not look for the existing files on the computer but creates its own. So, this way, you shouldn’t get the Discord Failed to extract installer error anymore.

4. Scan your device for malware

  1. Press Windows + S to open Search, type Windows Security in the text field, and click on the relevant search result.window security
  2. Click on Virus & threat protection.virus & threat protection
  3. Click Scan options.scan options
  4. Select Full scan and then click Scan now.scan now to fix discord failed to extract installer

A common reason you get the Discord File extraction has failed error is due to some malware on your device. You can remove it with the built-in Windows Security, but the app doesn’t always do the job.

In that matter, we recommend using Malwarebytes, as it’s reliable and fairly easy to run.

Once you have installed the software, make sure to Run as administrator and wait for the program to finish cleaning your device.

Let’s take a look at some of the most valuable attributes of Malwarebytes:

  • Cleans up any infected computer
  • Protects your identity and privacy from hackers
  • Takes care of your documents and financial files from ransomware
  • Protects you from malicious and fake websites
  • Stops malware that degrades computer performance

There you have it! These are some of the most reliable and easy ways to fix the Discord Failed to extract installer error.

If you were looking for another program, here’s our curated list of the best VoIP software.

Let us know which fix worked for you in the comments section below.

5 Best Free Mail Server for Windows to Manage Emails

A mail or email server is simply a virtual mailman or post office through which the emails are sent on their way to the intended single or multiple recipients. And you may often need a mail server for Windows, preferably a free one.

These also run into issues, for instance, the Email server does not support secure connection errors. So, you must go with a reliable and, if available, open-source mail server. Let’s learn about these and walk you through the best available Windows mail server.

How do I create a free email server?

Setting up a mail server is easier than one would imagine. Here are a few things you will need to set it up:

  • A computer with an OS installed: The first item on the list is a computer, which could be a laptop or desktop, with decent storage and a fast enough processor. If needed, make the relevant changes to boost the PC’s performance beforehand.
  • Domain name: You will also need a domain name to set up the email addresses.
  • Stable Internet: A stable connection is another requirement for a reliable and effective email server. If the Internet keeps disconnecting or the speed is slow, you may encounter issues soon.
  • Service to create the email server: This is the most vital part and the subject of our guide. You will need software to create the server, preferably with advanced features like spam filter and antivirus protection.

What is the best free Windows mail server?

hMail Server – Built-in antispam features

The hMailServer is an open-source free mail server for the operating system used by ISPs, companies, governments, and schools, among others across the globe.

It supports common protocols such as IMAP, SMTP, and POP3, with easy integration into many webmail systems and flexible score-based spam protection. Besides, it works with your antivirus to scan incoming and outgoing emails.

Features include an available source code for anyone to read or extend, built-in antispam features like SPF and SURBL, and integration with third-party antispam systems like SpamAssassin and ASSP.

Also, hMailServer t can be used with any webmail system that supports IMAP and SMTP, like RoundCube and SquirrelMail.

⇒ Get hMailServer

Mail Enable – Advanced AJAX webmail client for flexibility

To use this free mail server for Windows, you must get the Standard Edition, which you can use on unlimited domains and users.

It provides robust IMAP, POP3, Webmail, and SMTP services. It is simple and easy to install with powerful administration software to get your mail server up and running quickly.

The Standard edition may be free, but it contains no spyware or adware, and you can use it for personal or commercial purposes without any time or user restrictions.

Features include an advanced AJAX webmail client for flexibility, personal calendaring, contacts, tasks, folders, auto signatures, and more. You also get stable and functional support for unlimited users and domains on POP and SMTP mail services.

Popular features such as scheduling tasks and meetings, sending invitations, managing projects, out-of-office start/end autoresponder, security measures to protect against unauthorized access, and control panel integration are also available.

Moreover, if you send YouTube video links, your recipients can click and play the video within the message body. Webmail also allows interactive inline streaming of audio MP3 files.

⇒ Get Mail Enable

Zimbra – Innovative messaging experience

This is a pretty cool name for a mail server. Zimbra is a solution built for the cloud, public and private, providing enterprise-class email, calendar, and collaboration services.

It offers the most innovative messaging experience by connecting end users to the information and activity in their personal clouds.

Features include messaging and collaboration, which you can do anywhere on a connected device with IMAP/POP, integration with external directories for authentication, and simplified administration.

Besides, there is antispam and antivirus functionality, synchronization to any device with a rich browser-based experience, and flexible deployment.

Zimbra is available for desktop clients on Windows 10 and other operating systems. It aggregates Gmail, Yahoo!, Mail, Hotmail, and other POP/IMAP accounts while syncing with your address book and calendar.

⇒ Get Zimbra

Apache James – Also used as a Mail Transfer Agent

James is an abbreviation for Java Apache Mail Enterprise Server. This free mail server for Windows 10 has a modular architecture based on a rich set of modern and efficient components for a complete, stable, secure, and extendable server running on JVM.

You can create your solution for email treatment by assembling the components you need and then custom-filtering them using the James Mailet container.  It is portable, running on 100 percent pure Java (6 upwards) on the JVM.

Features include email protocols such as SMTP, POP3, IMAP, etc. The Mailet container is independent, extensible, and pluggable. Also, there’s storage API (Mailbox, Search, and User) and storage implementations.

Apache James, the free SMTP server for Windows 10, can also be used as a Mail Transfer Agent when you enable only SMTP or as an IMAP mail delivery agent. It is a living open-source project, meaning that any function not already available can be developed.

⇒ Get Apache James

Axigen Free Email Server – Address book integration

Axigen is an email and calendar server that you can for free for up to 5 users. The platform supports fast and secure email transfer, in addition to other useful features such as address book integration, contacts import and export, customizable rules and filters, etc.

If you want to use this platform for business purposes, you can do that too.

There are plenty of business and collaboration features that allow you to efficiently manage your calendar, tasks, and notes, share files and folders or give your personal assistant the right to send emails in your name.

⇒ Get Axigen Free Email Server

That’s it! These were the best free email server for Windows, easily configurable and simple. So, get one today!

If you are also concerned about security on the web, check the best browsers that identify online threats.

Do share your thoughts and let us know your pick from the software listed above.

How to Fix Windows 10 Turns On Airplane Mode by Itself

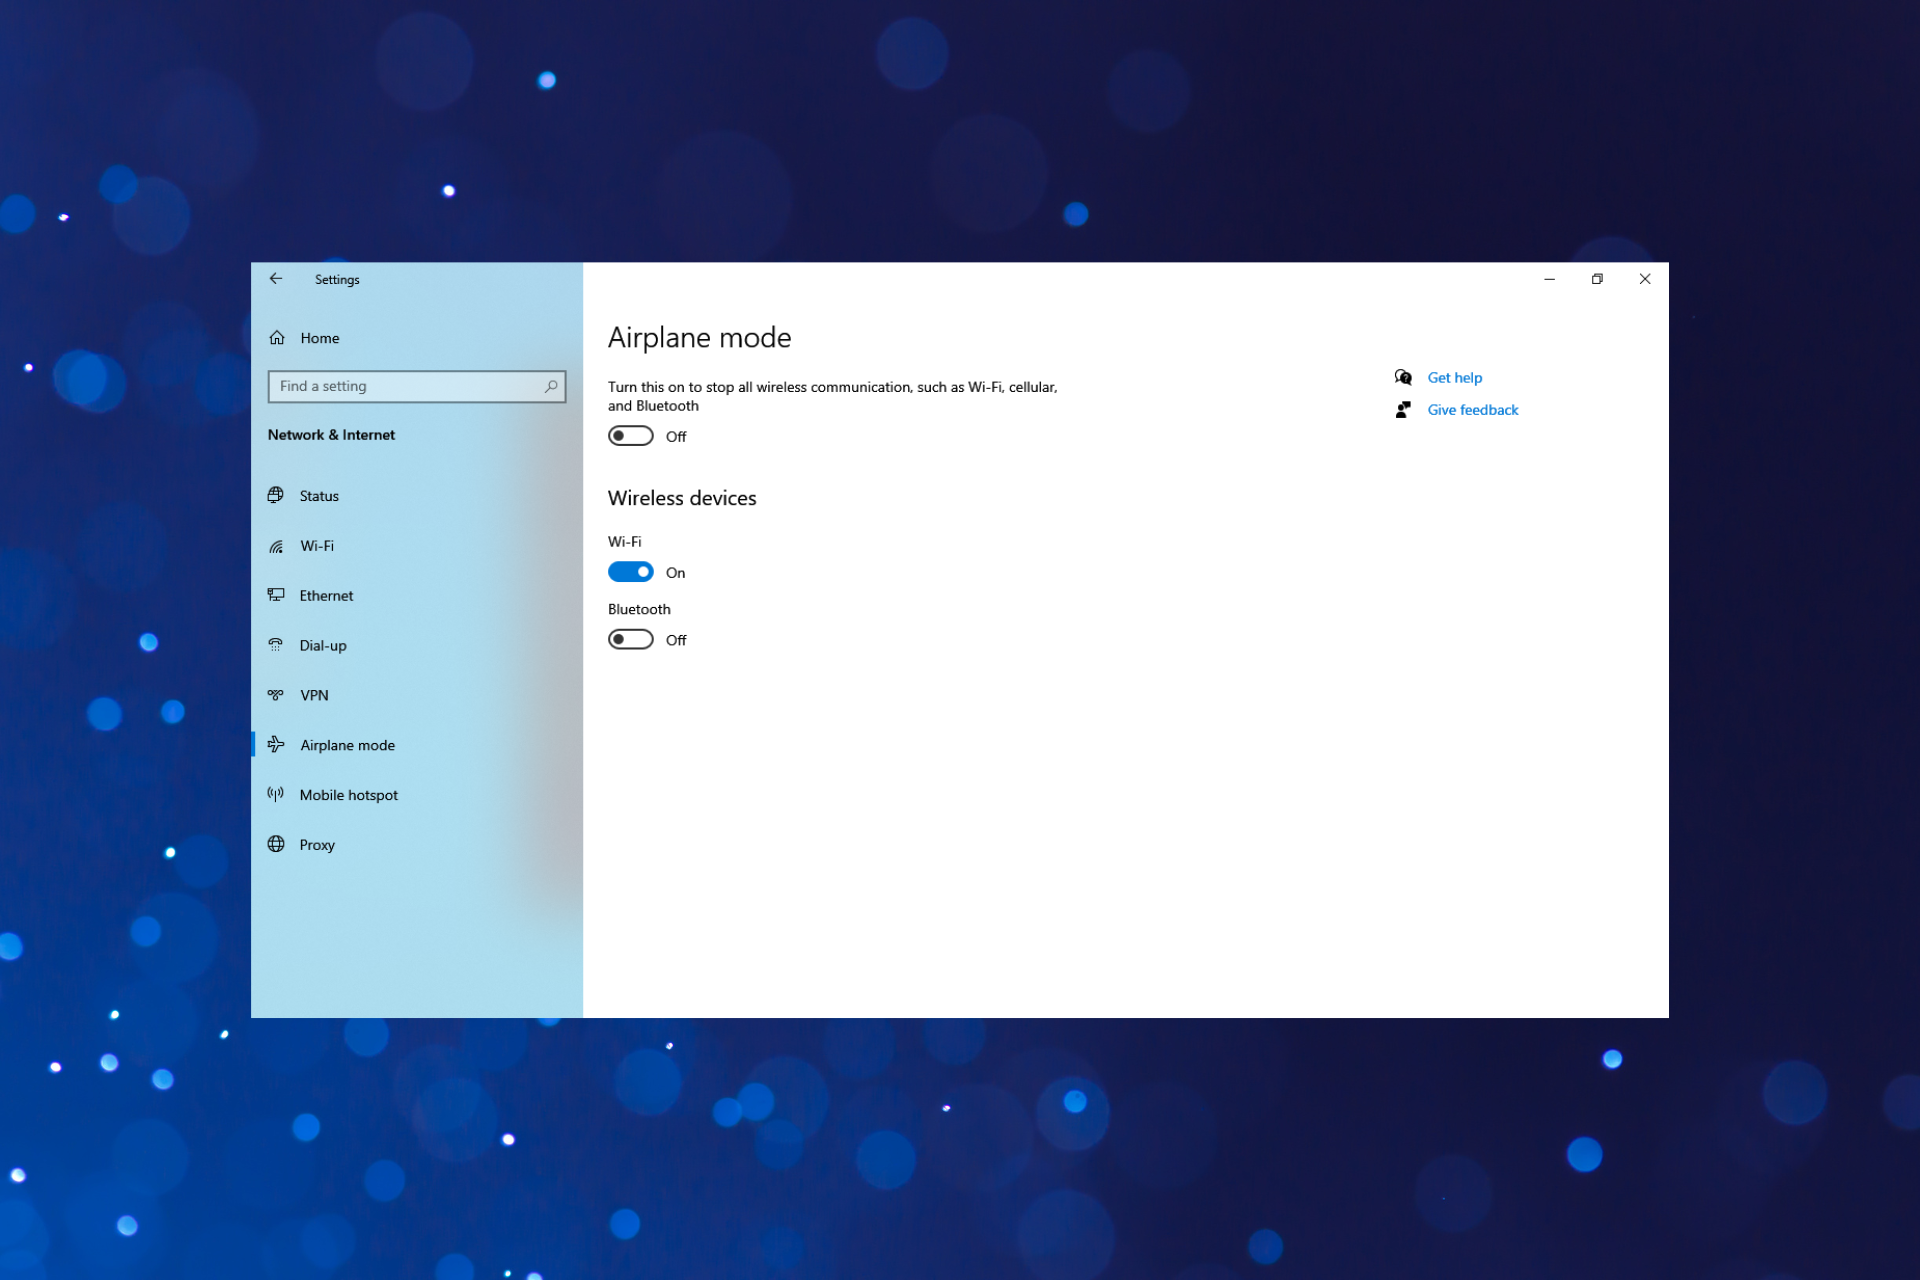
Many users have reported that the Airplane Mode automatically turns on in Windows 10. The problem hints at an underlying cause which, if not eliminated right away, may lead to a bigger problem later on. First, see if you have a dedicated key for Airplane Mode and make sure you’re not hitting it by mistake or it’s not pressed by something randomly. Also, if you have a UPS backup battery connected, unplug it.

What can I do if Windows 10’s Airplane Mode automatically turns on?

1. Disable the Radio Management Service

  1. Press Windows + R to open Run, type services.msc in the text field, and click OK.services
  2. Locate the Radio Management Service, right-click on it, and select Properties.radio management service
  3. Now, select Disabled from the Startup type dropdown menu.disabled to fix airplane mode automatically turns on windows 10
  4. Click on the Stop button. You, most likely, wouldn’t be able to stop the service, and it would throw an error, but carry on with the steps.stop
  5. Click OK to save the changes.save changes
  6. Now, reboot the computer.
  7. Type Command Prompt in the Search bar, and click on Run as administrator.command prompt
  8. Click Yes in the UAC prompt.
  9. Now, paste the following commands one at a time, and hit Enter after each:ipconfig/release ipconfig/renew ipconfig/flushdns

This has helped many users fix things when the Airplane mode automatically turns on in Windows 10. Do give it a try.

2. Update the wireless adapter driver

  1. Press Windows + R to open the Run, type devmgmt.msc in the text field, and hit Enter.devmgmt.msc
  2. Double-click on the Network adapters entry.network adapters
  3. Right-click on the wireless adapter here and select Update driver.update driver to fix airplane mode automatically turns on windows 10
  4. Finally, select Search automatically for drivers and wait for Windows to install the best one.search automatically for drivers

That’s it. Many users managed to fix things when Airplane mode automatically turn on in Windows 10 by simply updating the driver for the wireless adapter.

If that doesn’t work, similarly update the drivers for other similar devices. But Windows wouldn’t always be that effective with updating drivers.

So, it is better to let third-party software update the necessary drivers. We strongly recommend you use a dedicated tool to update your drivers.

One great example is a tool that allows even beginner-level users to keep their drivers updated and functional.

Simply download and install Outbyte Driver Updater, and as soon as you first launch it, it will scan your system for drivers that need to be either updated or repaired.

The system is fully automated, and all you need to do is select which drivers you need to be fixed and then perform a simple system restart to apply the changes.

Outbyte Driver Updater

Excellent tool that will update and fix outdated, broken, or missing drivers in an instant!
Free trial Download now

3. Change the power settings

  1. Press Windows + X to open the Power User menu, and select Device Manager from the list.device manager
  2. Expand Network adapters, right-click on the one in use, and select Properties.properties
  3. Now, navigate to the Power Management tab, untick the checkbox for Allow the computer to turn off this device to save power, and click on OK to save the changes.disable to fix airplane mode automatically turns on windows 10
  4. Once done, restart the computer.

4. Disable the Radio Switch device

  1. Type Device Manager in the Search bar, and click on the relevant search result.device manager
  2. Now, expand the Human Interface Devices entry.human interface devices
  3. Now, right-click on the Radio Switch device here, and select Disable device.disable device
  4. Click Yes in the confirmation prompt.disable to fix airplane mode automatically turns on windows 10

Once done, reboot the computer, and then verify if Airplane mode still automatically turns on in Windows 10. If yes, head to the next solution.

5. Perform a clean boot

  1. Press Windows + R to open Run, type msconfig, and hit Enter.msconfig to fix airplane mode automatically turns on windows 10
  2. Navigate to the Services tab, select the Hide all Microsoft services option, and click on Disable all.disable all services to fix airplane mode automatically turns on windows 10
  3. Now, go to the Startup tab, and click on Open Task Manager.open task manager to fix airplane mode automatically turns on windows 10
  4. Locate programs that read Enabled under Status, select them individually, and click on Disable.disable startup app to fix airplane mode automatically turns on windows 10
  5. Once done, head back to the System Configuration window and then click on OK.save changes to fix airplane mode automatically turns on windows 10
  6. Finally, click Restart in the prompt.restart to fix airplane mode automatically turns on windows 10

A clean boot is performed to start Windows by using a minimal set of drivers and startup programs. This helps eliminate software conflicts that occur when you install a program.

Once in the clean boot state, again head back to System Configuration, one by one, start the services and startup apps that you disabled earlier and wait for the error to reappear. As soon it does, the service or app last enabled is the culprit, and you should disable/uninstall it.

How do I permanently turn off airplane mode in Windows 10?

  1. Press Windows + R to open Run, type cmd, and hit Ctrl + Shift + Enter.cmd
  2. Click Yes in the UAC prompt.
  3. Now, paste the following command and hit Enter:SC CONFIG RmSvc START= DISABLEDdisable airplane mode
  4. Once you get a success message, restart the computer for the changes to come into effect.
  5. To re-enable Airplane Mode, again open Command Prompt with administrative privileges and execute the following command:SC CONFIG RmSvc START= AUTO

Why does Airplane Mode keep turning on Windows 10?

Here are some of the reasons the Airplane mode keeps turning on a laptop running Windows 10:

  • A bug in the OS – If you started encountering the problem after updating Windows 10, it’s likely that the installed version has a bug triggering the issue.
  • Outdated, corrupt, or incompatible drivers – Problems with the driver are likely to cause the issues, and the best option here is to update the drivers.
  • Third-party apps – If you have any third-party apps that can control the network settings, one of these may be responsible for the problem.
  • Presence of a physical switch – Some devices have a physical switch to enable/disable the Airplane mode, and you may be hitting it inadvertently.

Some of the devices you are likely to encounter the error with are:

  • Airplane mode automatically turns on Windows 10 in Dell – Many users who suffered the issue were Dell users, but it doesn’t necessarily indicate a problem with the device.
  • Airplane mode automatically turns on Windows 10 in HP – Some HP users, both laptops and desktops, too faced the problem, and the solutions listed here work just as well in this case.

That’s all there’s to Airplane mode automatically turning on in Windows 10 and the fixes that did the trick for most users.

In case the problem persists, we recommend you reset Windows 10. If that, too, doesn’t work, take your PC to a repair shop since it could be the hardware to blame.

Let us know what worked or any other solutions that come to your rescue in the comments section below.

Windows 7 Randomly Shuts Down: 7 Ways to Fix It For Good

Sometimes, your Windows 7 computer may shut down randomly. This is usually happening because of overheating, power supply issues, software issues, buggy drivers, interfering software, or improper BIOS configuration.

Now that we know the causes of Windows 7 shutting down randomly, let us look at some ways to fix it.

What can I do if Windows 7 randomly shuts down?

Start by making sure cooling vents are not blocked and that the fan is working properly. If all that looks good, follow the steps below for some troubleshooting.

1. Turn off Fast Startup

  1. Click on the Windows button and select Control Panel.
  2. Click on System and Security and then click on Power Options.
  3. Click on Choose what the power buttons do from the left menu bar and then click on Change settings that are currently unavailable.
  4. In the Shutdown settings tab, uncheck the Turn on Fast Startup option and then click on the Save changes button.

If you are using Windows 11 and facing the same problem, then you can check this guide to turn off Fast Startup in Windows 11.

2. Disable automatic restart on system failure

  1. Click on the Start button and restart your computer.
  2. As the computer is booting up, keep pressing the F8 key, and you will enter the Advanced Boot Options window.
  3. Use the arrow keys to select Disable automatic restart on system failure and press Enter.

Along with the random shutdown problem, sometimes, if your system restarts randomly, then here is a guide to solve my computer restarts unexpectedly.

3. Update the outdated Display adapter drivers

  1. Click on the Start button and then right-click on Computer and select the Properties option from the dropdown.
  2. Click on Device Manager on the left menu bar.
  3. Double-click on Display adapters, then right-click on Inter(R) G33/G31 Express Chipset Family and then click on Update Driver Software.
  4. Then, click on Search automatically for updated driver software.
  5. Follow the on-screen prompts, and you will be done with your updated drivers.

4. Scan your computer for viruses

  1. Click on the Start button, type Microsoft Security Essentials, and then press Enter.
  2. From Scan options, click the Full radio button and then click on Scan now button.
  3. After the scan is complete, if nothing is found, the PC will be marked as Protected. Your computer will be cleaned up if Security Essentials finds malware.

In case your Windows Defender is not scanning your system. Then, check our complete guide on Windows Defender won’t scan on Windows.

5. Update your Windows

  1. Click on the Start button and then select the Control Panel option.
  2. Then, click on System and Security.
  3. Inside the System and Security windows, click on Windows Update.
  4. Then, click on Check for updates, and the system will start checking available updates. This process may take some time.
  5. Then click on the Install updates button to begin the installation of the update.

Once the process is completed, your Windows will be updated to the latest version, and the problem will be rectified. Do not hesitate to check our guide if your Windows won’t update.

6. Disable Startup programs

  1. Press Window + R to open the Runbox, type the following command, and press Enter: msconfig
  2. Click on the Startup tab, select all the options, click on the Disable all button, and finally click on OK.
  3. After this, restart your computer and check whether the issue is resolved or not.

7. Edit the Power plan

  1. Click on the Start button and then select the Control Panel option to open it.
  2. Click on System and Security and then click on Power Options.
  3. Then, click on Change plan settings.
  4. Click on the dropdown of Put computer to sleep, select the Never option and click on the Save changes button.

If the laptop shuts down randomly when not overheating, your power settings could be the underlying cause, and reconfiguring them should do the trick.

Can CPU cause sudden shutdown?

Yes, the CPU can cause a sudden shutdown, given that it powers the computer, quite literally. A drastic fall in the power supply or hardware issues with the CPU can all be responsible even when the PC shuts down automatically after a few minutes.

Regarding the overheating problem, the CPU bears the maximum brunt, and modern-day computers are configured to shut down when the temperature reaches a certain threshold automatically.

If your system shuts down when you are gaming, and you are curious that it is not overheated, check our computer shutting down while gaming guide.

If you are using a firewall and firewall notifications are bothering you, and you want to disable them, check our guide on how to disable firewall notifications. Moreover, you can reinstall Windows 7 easily with its USB/DVD Download Tool.

We hope that this article helped you a lot in solving your issue. If you have any further questions, let us know in the comments section below.

Amazon Error 2063: How to Fix This Prime Video Code

Amazon Prime is one of the most extensive streaming services in the world, with a vast collection of shows and movies. However, users have been complaining about a long list of errors on the platform, especially error 2063. So, we’ve put this guide together to help you solve it.

What causes Amazon error 2063?

There are tons of possible reasons that can bring about the error code 2063 on Amazon Prime. Here’s a list of the most common ones:

  • Incorrect payment details – For anyone facing this error code, the first thing to suspect is your payment information.
  • Heavy browsing cookies and cache – When browsing cache and cookies are left uncleared over time, they grow big and can cause conflict between your browser and the page you’re visiting.
  • Amazon system error – Sometimes, the problem may not be from your end but might be due to server problems from Amazon.
  • Using VPN – If you aren’t using a good VPN for Amazon Prime, you may run into issues like this.

Now that you know some possible causes of the error 2063 let’s see how you can solve it. 

How can I fix Amazon error 2063?

We advise you to try the following preliminary checks:

  • Make sure that all your payment details are correct. 
  • If the problem is related to your browser, you can try to use a different browser for Amazon Prime.
  • Contact Amazon support to be sure the problem is not from their end.

If you cannot fix the issue with these basic solutions, move on to these advanced troubleshooting methods. 

1. Clear browsing cookies and cache

  1. Open your browser and click on the Menu icon (three vertical dots) at the top left corner of your screen then select Settings.
    Chrome browser settings
  2. Choose Privacy and security on the left pane and click on Clear browsing data on the right.
    clear browsing data
  3. On the Basic tab, check the box next to Cookies and other site data and Cached image and files then click on the Clear data button.
    Clear cache and cookies
  4. Go back to Amazon Prime once the cookies and cache files have been cleared successfully.

If you are not using the Chrome browser, there are other ways you can use to clear the browsing cache on Windows 11. Check out our guide for detailed steps.

2. Turn off Windows Defender Firewall

  1. Press the Windows icon on your taskbar, type Windows Defender Firewall into the Search box, and select the Best match result.
    Windows defender
  2. On the left side navigation, click on Turn Windows Defender Firewall on or off.
    Turn off Windows defender
  3. Next, choose the Turn Windows Defender Firewall radio button and click the OK button to apply changes.
    Turn Windows Defender Firewall
  4. Restart your computer and try Amazon Prime again.

3. Disable Proxy settings

  1. Press Windows + I hotkeys on your keyboard to open Settings. Click on Network & internet on the left pane then scroll down to select Proxy.
    Network and internet settings
  2. Under Manual proxy setup, click on the Edit button next to Use a proxy server.
    Edit proxy settings
  3. Toggle off the radio button under Use a proxy server and click on the Save button to apply the change.
    Disable proxy server

4. Remove your VPN temporarily

  1. Press Windows + I hotkeys on your keyboard to open Settings. Click on Network & internet on the left pane then scroll down to select VPN.
    VPN settings
  2. Locate the VPN you want to remove, click on the arrowhead icon, and select Remove from the dropdown options.
    remove VPN
  3. Now restart your PC and try Amazon Prime again.

Why is Amazon Video not accepting my card?

When Amazon Video does not accept the card, incorrect details are likely entered. Or, the bank servers responsible for processing transactions may be down.

Also, there’s an option to enable cards for online payments. If that’s not turned on, the payment will fail. For credit cards, make sure you have not hit the credit limit.

Is Amazon not accepting Visa debit cards?

While Amazon had, at a point, planned to stop accepting Visa cards due to a high fee levied on transactions, the whole idea was shelved after it reached an agreement with Visa.

So, Amazon is now accepting Visa debit and credit cards, and you shouldn’t have a problem using these to purchase products from the e-commerce giant.

Why is my card getting declined even though I have money?

Here are a few reasons your card is declined even though there is money in the account:

  • Blocked card: In most cases, the declined card was blocked either by the holder or the bank.
  • Hit the limit: The card may have a daily, weekly, or monthly limit, and as soon as you reach it, the card will get declined on subsequent payments.
  • Server issues: If the servers are down, the card will decline. The issuing party informs of any downtime well in advance to ensure minimal user discomfort.
  • Card has expired: Cards have an expiry date, usually listed as Valid Thru, after which they cease to work, and users need to apply for a new card.
  • Suspicious activity detected: If the card issuer detects suspicious transactions or activity, it might put the card temporarily on hold and, as a result, the transactions get declined.

There you have it: 4 step-by-step methods to get rid of Amazon Prime error 2063. After solving this problem, it is also possible that you encounter error 9074 on Amazon Prime. Everything you need to solve it is in our guide.

And for free streaming sites, you may encounter the ITV-101 error on Freevee, so don’t hesitate to check out our detailed guide for quick fixes.

Do you find this article helpful? Share your thoughts in the comments section below.

FIXED: Facebook Error Code 1: An Unknown Error Has Occurred

If you keep seeing the message “An unknown error has occurred. Code 1” on Facebook, don’t panic—this guide has practical solutions that can help.

While this error is most commonly seen on the Facebook mobile app, it can also show up in your browser. It usually happens when logging in, whether on a familiar device or a new one, and sometimes appears when using Facebook to sign into other apps or services.

How to fix the Facebook error code 1?

1. Clear the cache and data

1.1 On browser

  1. Open your browser on a PC or Mac.
  2. Press CTRL + Shift + Del for PC or Command + Shift + Del for Mac.
  3. Set the time range to All time.
    choose clear browsing data time range
  4. Select Cached images and files and Cookies and click on Clear data.
    metamask not showing balance

1.2 On an app

  1. On your Android phone, go to Settings.
  2. Go to Apps.
    going apps settings android
  3. Find and tap on Facebook.
  4. Go to Storage
    .
    going storage app preferences android
  5. Tap on Clear Data.
    clearing app data android

If necessary, you can re-install the app. On iOS, you won’t find any way to clean the cache. So, you will need to re-install the app there.

After that, try to log in or use Facebook again. You will not face that unexpected error again.

2. Enable the permission

2.1 For third-party app

  1. Go to Facebook Settings.
  2. Navigate to Security and Login.
  3. Go to Apps and websites.
  4. Go to View and Edit for your preferred app.
    clicking view and edit fb app preferences
  5. Grant required permission for the app.

2.2 For the Facebook app

  1. Go to Facebook app settings as shown in method 1.2.
  2. Go to Permissions.
    clicking permission android app settings
  3. Grant the required permissions.

The third-party app or services require permission to do their normal operation. Otherwise, you may get the error code 1. In this case, you won’t have to modify permission on Facebook’s smartphone app.

But, if you cannot log in on Facebook, modifying permission may help sometimes.

3. Remove the third-party connected apps

  1. Go to Apps and websites like in Solution 2.1.
  2. Delete the third-party apps.
    removing apps on fb

4. Correct the date & time

4.1 On PC

  1. Press Win + I on the keyboard to open Settings.
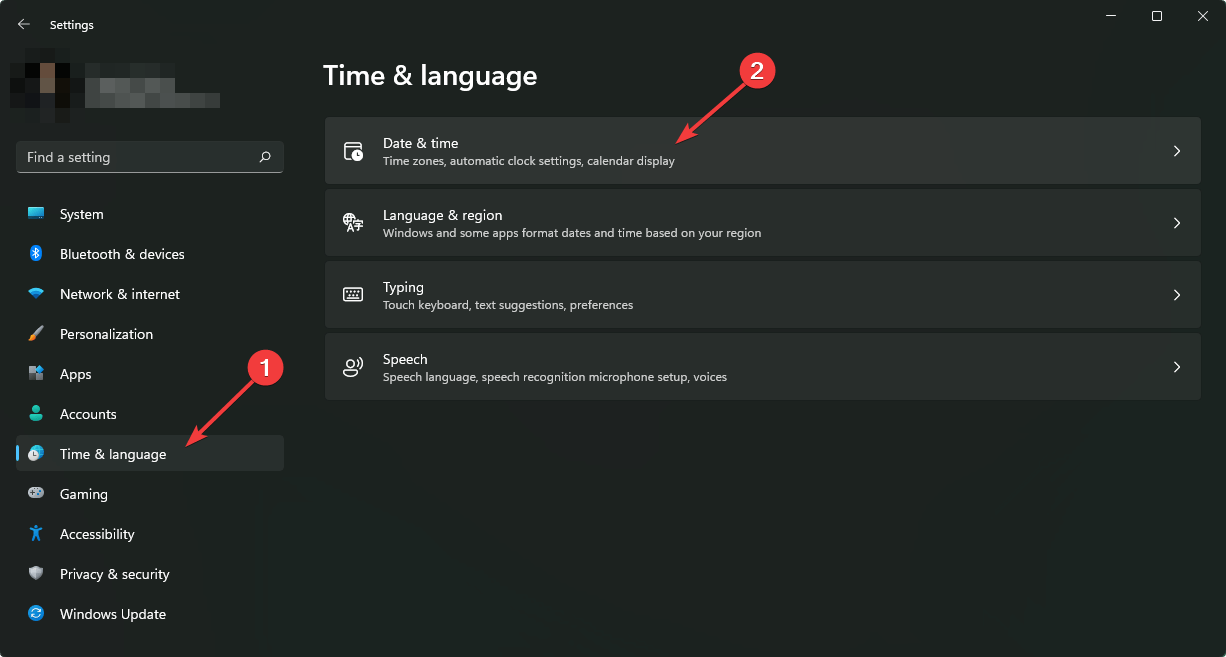
  2. Go to Time & language and click on Date & time.
    going date and time settings win11
  3. Enable Set time automatically and make sure the Time zone is in the correct state.
    set time automatically win11

4.2 On an Android device

  1. Go to Settings.
  2. Go to General management.
    going general management settings android
  3. Tap on Date & Time.
    going time n date android
  4. Enable Set Automatically and make sure the correct time zone is set.

4.3 On an iOS device

  1. Go to Settings.
  2. Tap on General.
    going ios settings general
  3. Go to Date and time.
    going date n time ios settings
  4. Set it to Automatic.
    set time automatically ios

5. Reset the network settings

5.1 On a PC

  1. Go to Windows settings like before.
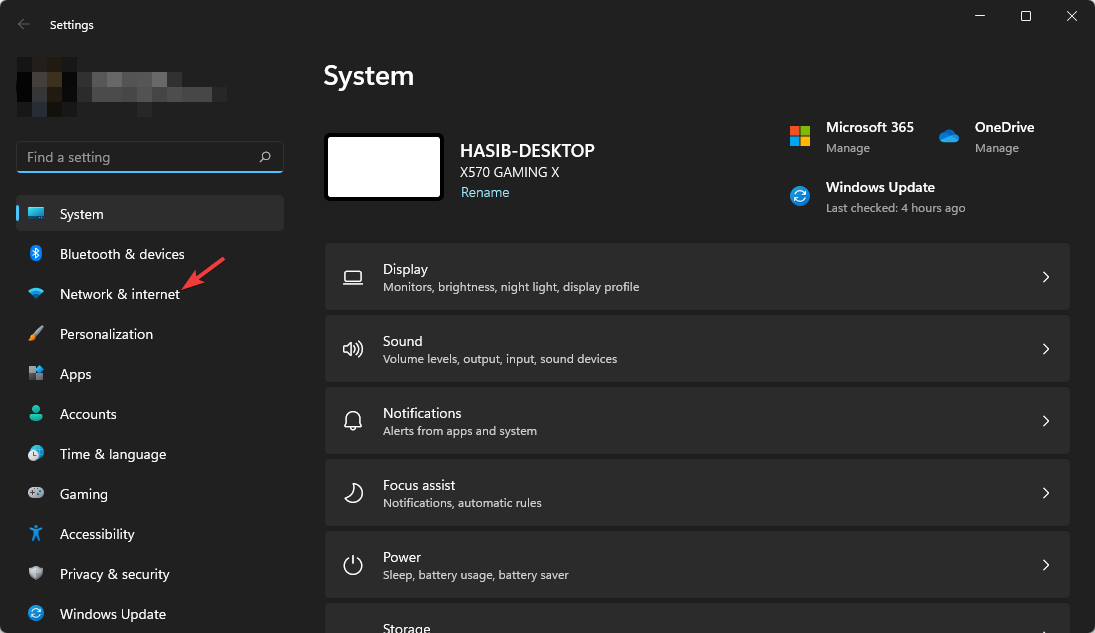
  2. Go to Network & internet.
    clicking network internet win11
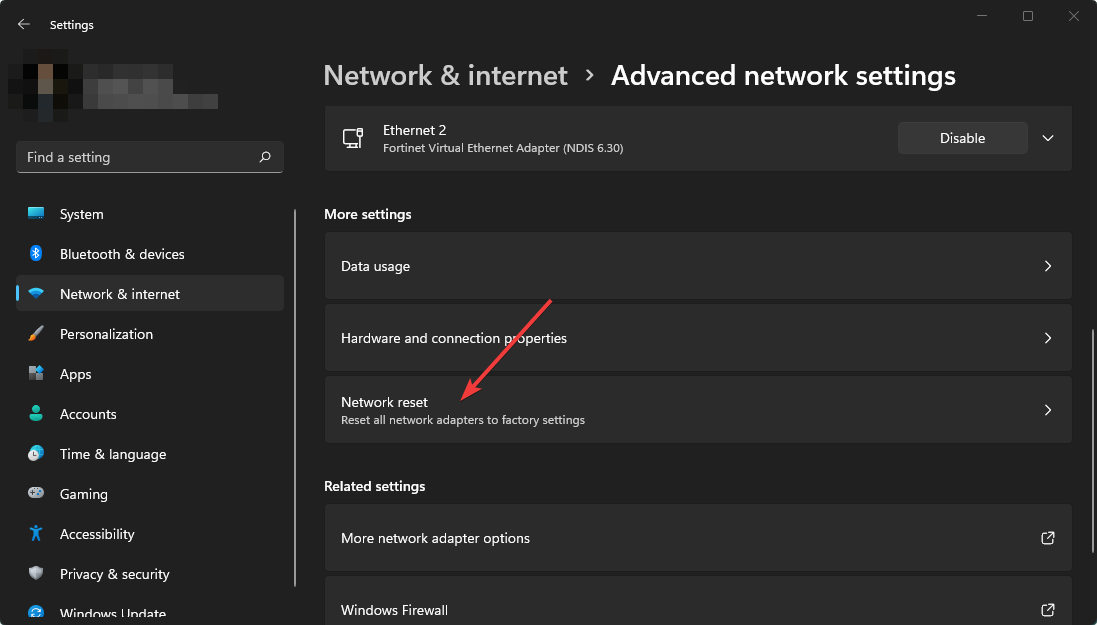
  3. Click on Advanced network settings.
  4. Go to Network reset.
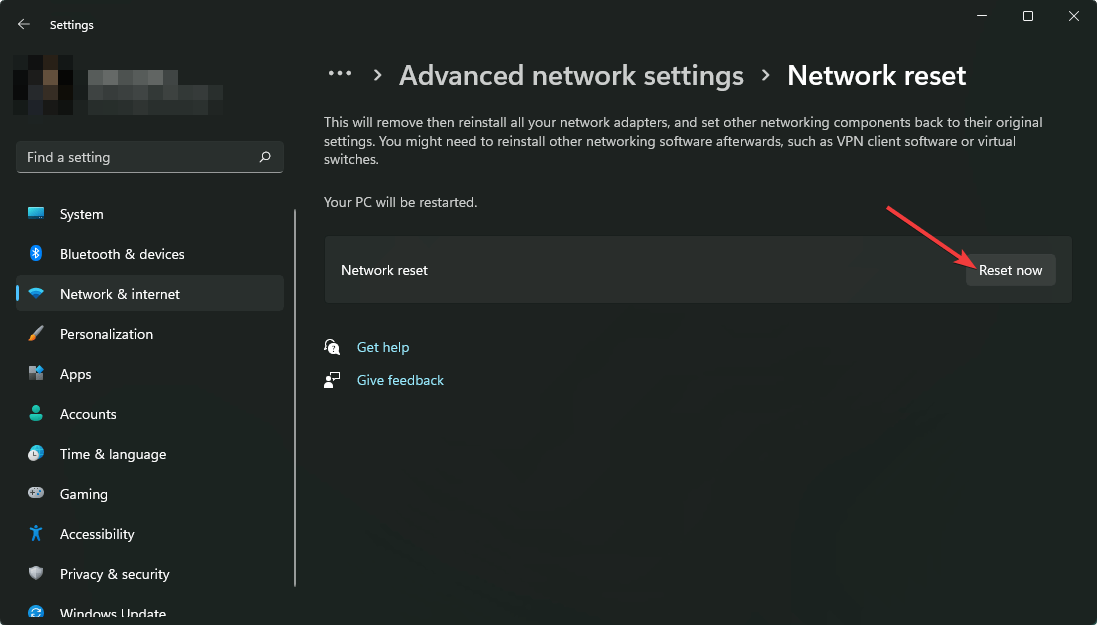
  5. Click on Reset now and follow any on-screen steps.
    clicking reset now for network reset win11 settings

5.2 On an iOS device

  1. Go to General in Settings.
  2. Tap on Transfer or Reset iPhone.
    going transfer and reset iphone
  3. Tap on Reset.
  4. Choose Reset Network Settings.
    reset network settings ios

5.3 On an Android device

  1. Go to General management on Settings.
  2. Tap on Reset.
  3. Tap on Reset network settings.
    reset network settings android

After resetting the network, the login failed, and an unknown error should not occur again. Sometimes, improper network configurations may cause your device to communicate with the Facebook server properly. In this case, resetting the configuration should help.

6. Update Facebook to the latest version

  1. Open the App Store (iOS) or Google Play Store (Android).
  2. Search for Facebook.
  3. If you see an Update button, tap it to install the latest version.
  4. Once updated, open the app and try logging in again.

Keeping the app current ensures you have the newest bug fixes and security improvements.

7. Check for VPN or proxy issues

Sometimes, a VPN or proxy server can interfere with Facebook logins.

  1. If you use a VPN, try turning it off temporarily.
  2. If you rely on a proxy, disable it from your browser or system settings.
  3. Try signing into Facebook without these services enabled.
  4. If Facebook loads correctly, switch to a more reliable VPN provider if you need one.

8. Reinstall the app (clean installation)

If the app update doesn’t work, a full reinstall helps.

  1. Delete the Facebook app from your device.
  2. Go to the App Store or Google Play Store.
  3. Download and install the latest version.
  4. Log in with your credentials.

This clears out hidden corrupted files that a simple cache wipe may not remove.

9. Use a different network or device

Network restrictions or misconfigurations can trigger error code 1.

  1. Connect to another Wi-Fi network (such as a mobile hotspot).
  2. If possible, try logging in from another device.
  3. If the issue doesn’t appear elsewhere, the problem likely comes from your original connection.

10. Enable two-factor authentication and reset your session

A security check can sometimes block access.

  1. On another trusted device, log into your Facebook account.
  2. Go to Settings & Privacy → Security and Login.
  3. Enable Two-Factor Authentication with SMS or an authenticator app.
  4. Under Where you’re logged in, log out of all sessions except the one you trust.
  5. Try signing in again on your device.

This forces Facebook to create a fresh session and often removes error code 1.

What causes Facebook login error code 1?

Facebook login error code 1 usually appears as a “Login failed [1]” message when logging in via Facebook or Messenger. It’s a general error caused by:

  • Disabled permissions on third-party apps or the Facebook app. This can happen if you recently changed your settings.
  • Network issues, such as an unstable connection. Restarting your router may help.
  • Facebook server outages, which prevent login attempts.
  • Corrupted cache/data, especially in browsers, which can trigger various Facebook errors.

Wrapping up

Facebook login error code 1 may seem confusing, but it usually comes down to things like permissions, cache issues, or network settings. Whether you’re using the app or logging in via browser, the fixes listed above should help you solve it.

If problems persist, try clearing your cache, resetting network settings, or reinstalling the app. And keep in mind, error code 1 isn’t the only Facebook issue out there. For example, if you’ve run into the “Error performing query” message or seen your messages stuck on “Sent” but not “Delivered”, there are solutions for those too.

Stay calm, follow the steps, and you’ll be back on Facebook in no time.

FAQ

What is Facebook login error code 1?

Error code 1 usually means there’s a general issue preventing your device from connecting to Facebook’s servers. It could be due to network problems, disabled app permissions, or corrupted cache.

What does error code 2 mean in Facebook login?

Error code 2 typically points to a server-side issue or poor internet connection. It means your login request couldn’t reach Facebook’s servers. Try checking your network or waiting a bit before trying again.

Is Facebook login error code 1 common on PCs?

While it’s more common on mobile apps, PC users can also encounter it—especially when logging in via a browser or a third-party app that uses Facebook for authentication.

Can reinstalling the Facebook app fix error code 1?

Yes, reinstalling the app can often resolve the issue by clearing corrupted data and restoring default settings.

3 Ways to Fix Your Lexmark Printer when It’s Not Printing

If you have ever experienced a paper jam with your Lexmark printer, you are familiar with the hassle of clearing it. It can be frustrating when you print something only to find that the document didn’t print properly or that the printer is not printing.

When you first set up a new Lexmark printer, it will probably work fine. But if you’ve had the printer for a while and its performance has been declining, something could be wrong with your printer.

Over time, your Lexmark printer’s drivers may become outdated, and you will need to install the latest printer drivers to ensure your printer continues to perform efficiently.

Why does my Lexmark printer says ready but won’t print?

If your Lexmark printer is showing that it’s ready to print but won’t start, there are a few reasons why this could happen. Below are some possible causes:

  • Connectivity problem – The most common cause is the USB cord being out of place or not plugged in. Try making sure everything is plugged in and the USB cord is connected to both the printer and your computer. If that doesn’t work, restart both your computer and your printer.
  • Out of paper – Check the paper tray to ensure it’s not empty. If it isn’t, remove any jammed paper or dirt from the rollers and try printing again. The printer may not recognize the paper present and hence won’t print.
  • The printer doesn’t recognize your computer – The first thing you should do is check to make sure your computer and printer are on the same Wi-Fi network (if Ethernet cables connect them).
  • Not enough toner – It’s not uncommon for your printer to stop printing because it doesn’t recognize the toner cartridge. This often happens when you replace an empty cartridge with a new one or one almost empty. Your printer will think the new cartridge is faulty, and so it will stop working or print blank pages even though the new cartridge works just fine everywhere else.

What can I do if my Lexmark is not printing?

Before we head to the slightly complex solutions, let’s try a few quick tips and tricks:

  • Check the printer for dust and debris and clean them all.
  • Reconnect the cartridge, ensure it’s firmly placed, and have sufficient ink inside it.
  • Clear the printer queue. If you can’t clear the printer queue, simply delete the files in the following path:C:\Windows\System32\spool\PRINTERS
  • Make Lexmark the default printer through Settings or the Control Panel.

If none of these work, move to the solutions listed next.

1. Update printer drivers 

  1. Hit the Windows key, type Device Manager in the search bar, and click Open.
  2. Locate and Expand the Print queues section, then right-click on the Brother printer, and select Update Driver Software.
  3. Click on Search automatically for drivers.

Doing this process manually can be tricky sometimes. Another option that we recommend is using a specialized software. Outbyte Driver Updater is a program that helps you find outdated drivers automatically.

It scans your whole device and then offers you a list of drivers that are slowing down your PC. Then, it replaces the old ones with the latest version from its database.

Outbyte Driver Updater

A program that helps you update your old drivers in no time and boosts your device performance more safely.
Free Trial Download now

2.  Restart Print Spooler

  1. Hit the Windows + R keys simultaneously to open the Run command.
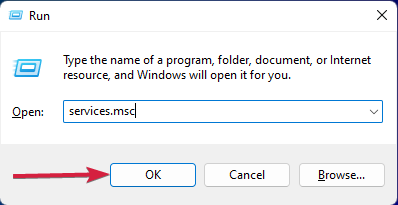
  2. Type in services.msc then hit Enter.
  3. Locate Print Spooler, right-click and select Restart.restart print spooler service

3. Run the Printer troubleshooter

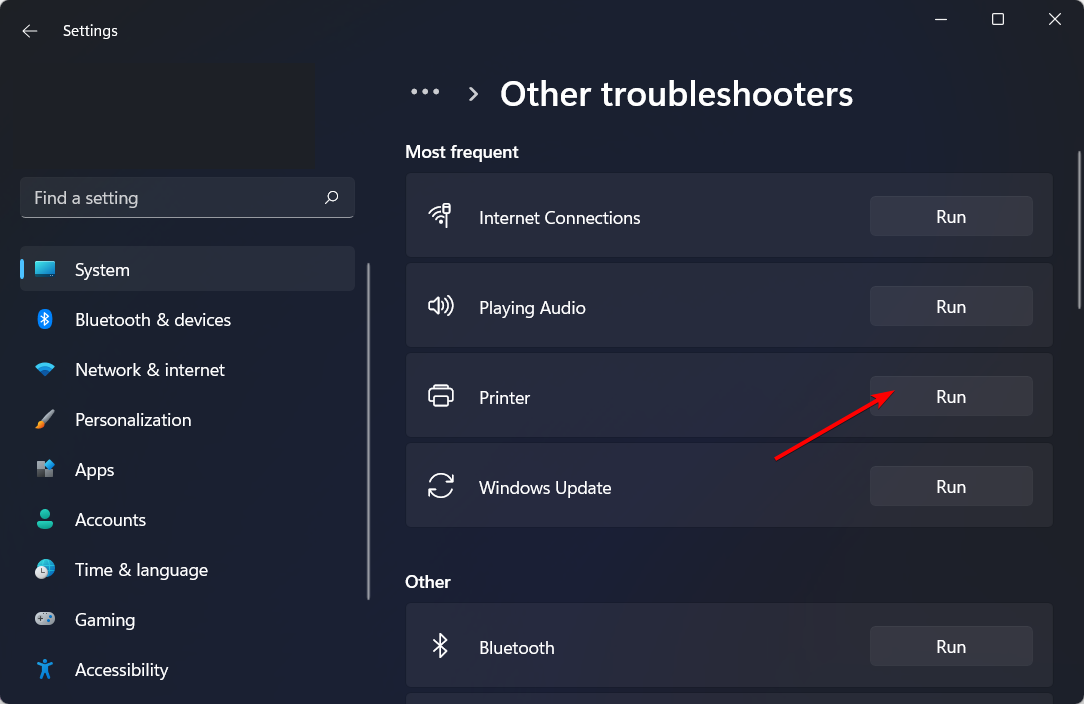
  1. Press the Windows key and select Settings.settings windows 11
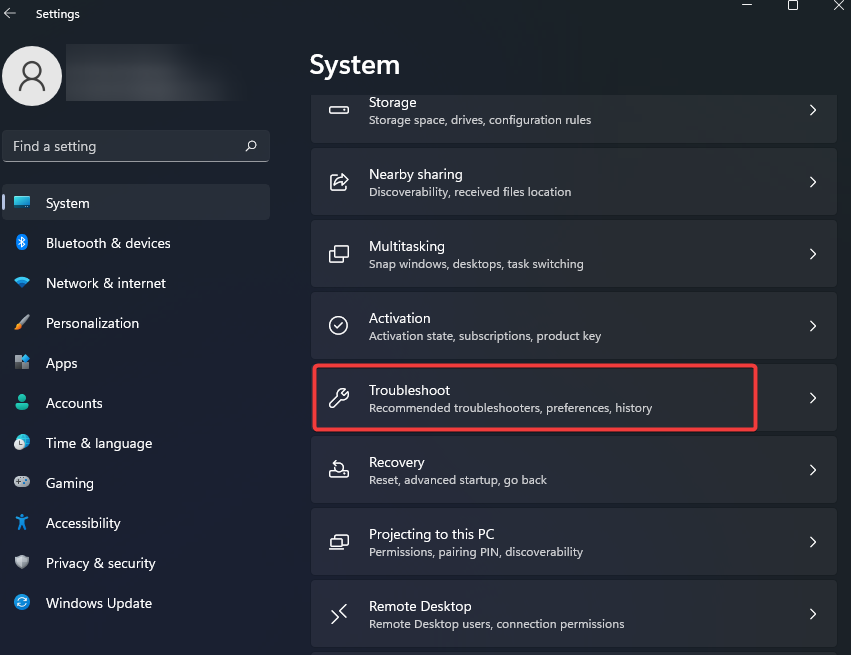
  2. Click on System, then select Troubleshoot.Windows update high CPU
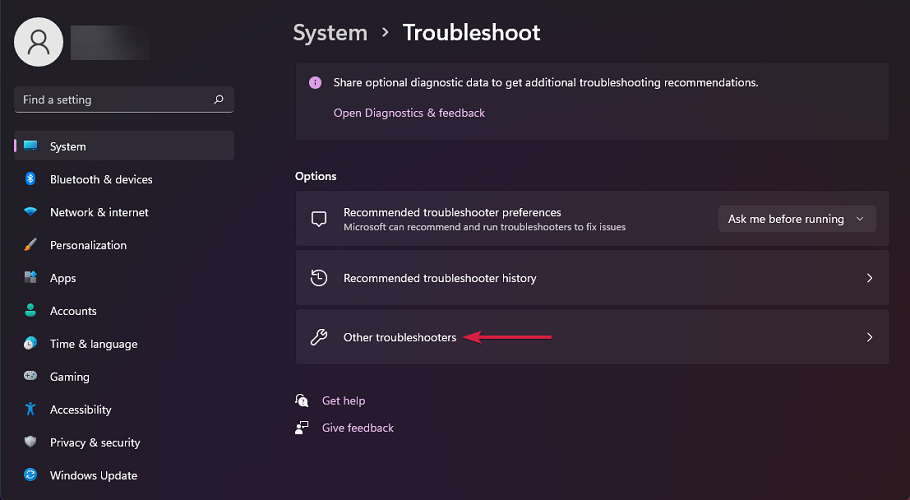
  3. Select Other troubleshooters.
  4. Navigate to the Printer section, then click on the Run button.printer-run windows cannot connect to the printer
  5. Follow the on-screen instructions and choose the appropriate response when prompted to complete the troubleshooting.

How do I reset my Lexmark printer?

  1. Power off the printer using the switch provided on the side.
  2. Hold the 2 + 6 keys on the top panel until the Configuration Menu appears.
  3. Now scroll down, and tap on the arrow next to Reset Factory Defaults.restore factory defaults
  4. Select Out of Service Erase.out of service erase
  5. Tap on the arrow for Erase memory.erase memory
  6. Finally, tap on Yes to confirm and wait for the reset to complete.yes
  7. After the printer turns on, reconfigure it to get things up and running.

Why is my printer connected but not printing?

We’ve all been there: you’re printing a document for work, only to find that your printer isn’t working. You do some troubleshooting and realize that the printer is on. What gives?

While it’s quite easy to get your printer set up and producing great-looking documents, there are a few things that can go wrong that leave the printer connected but not printing, such as:

  • It’s not the default printer – It’s easy to forget to switch your default printer when you have multiple printers connected. Disable other printers you are not using or set it as your default printer.
  • A faulty USB cable/port – When you’ve got a printer connected to your computer via a USB cable, but it still isn’t printing, the problem could lie with either the cable or a damaged USB port. The first thing to do is check both ends of the cable to ensure they’re securely plugged into their respective devices.
  • Wi-Fi signal is poor – If your computer is on a wireless network, make sure it can see your printer – if it’s not showing up, restarting both the computer and the printer will usually fix this problem. Also, if your computer is too far away from the printer, or if there is any form of physical barrier interfering with the signal, it might be necessary to move the printer closer. You’ll find that your Lexmark printer starts to print and then stops.

You can also take the initiative to boost your Wi-Fi speeds and improve its performance if it gives you problems.

If the problem persists, don’t hesitate to contact Lexmark support, as the issue could be with your specific printer model.

Let us know what solution could fix this issue in the comments section below.

Windows Security Actions Recommended: 6 Ways to Fix it

Windows Security is the free built-in antivirus offered by Microsoft as a part of the OS. And it does the job fairly well. But issues with it are not uncommon, such as Actions Recommended appearing for Windows Security in the system tray with a warning sign.

The bug has been around for quite a while and has affected Windows 10 and Windows 11 users, reporting that Windows Security Actions Recommended won’t go away. So, let’s find out all about the problem.

Why do I get Windows Security actions recommended, but nothing is shown?

Here are a few reasons you usually get the error:

  • Missing updates: Users usually get the error when either the OS updates or the ones for Windows Security are missing.
  • Misconfigured settings: If the Windows Security settings are misconfigured, or certain of these are not enabled, the Windows Security Actions recommended yellow triangle will appear.
  • OneDrive not set up: For some, the error appeared when OneDrive was not set as the file recovery option in Windows Security.

How can I fix Windows Security actions recommended message?

Before we head to the slightly complex solutions, try these quick ones first:

  • Restart the computer.
  • Check for any pending updates for Windows, install them, and then verify if the Windows Security Actions recommended not working issue goes away.
  • Set up Windows Hello.

If none work, move to the fixes listed next.

1. Enable periodic scanning

  1. Press Windows + S to open the Search menu, type Windows Security, and click on the relevant search result.windows security
  2. Click on Virus & threat protection.virus & threat protection
  3. Now, scroll down, and enable Period scanning.enable to fix windows security actions recommended

The easiest way to fix things when Windows Security Actions recommended message appears is to enable Periodic Scanning. The option is available for those who use a third-party antivirus along with Windows Security.

2. Dismiss warnings

  1. Press Windows + I to open Settings, and click on Update & Security.update & security
  2. Go to Windows Security from the navigation pane, and click on Open Windows Security.open windows security
  3. Click on Virus & threat protection.virus & threat protection
  4. Now, click on Dismiss under Ransomware protection.dismiss to fix windows security actions recommended
  5. Also, check for other similar warnings and either reconfigure settings or dismiss them.

3. Clear Windows Security files

  1. Press Windows + E to open File Explorer, and navigate the following path:C:\ProgramData\Microsoft\WindowsDefender\Scans\History\Service
  2. Press Ctrl + A to select all the files here, and then hit the Delete key to delete them.delete files to fix windows security actions recommended

A few users reported that clearing the Windows Security log files cleared the Actions recommended warning that kept appearing in Windows 10.

4. Enable Reputation-based protection settings

  1. Press Windows + S to open Search, type App & browser control, and click on the relevant search result.app & browser control
  2. Click on Reputation-based browser protection settings.reputation-based
  3. Enable all the settings listed here and tick every checkbox.enable all to fix windows security actions recommended
  4. Once done, restart the computer for the changes to come into effect.

Another quick way to get rid of the Windows Security Actions recommended message is to enable the Reputation-based browser protection settings on the PC.

5. Refresh firewall rules

  1. Open Windows Security, and click on Firewall & network protection.firewall & threat protection
  2. Now, click on Advanced settings at the bottom.advanced settings
  3. Click Yes in the UAC prompt.
  4. Now, click on the Refresh option to the right.refresh to fix windows security actions recommended

6. Check for Windows Security updates

  1. Launch Windows Security, and click on Virus & threat protection.virus
  2. Click on Protection updates.protection updates
  3. Now, click on Check for updates.check for updates to fix windows security actions recommended
  4. If any updates are available, download them.

That’s it! If nothing listed previously worked, installing the latest security intelligence updates in Windows Security should remove the Actions recommended message.

Also, for enhanced protection, both from local and online threats, we recommend you switch to an effective and user-friendly antivirus.

If you have any queries or want to share a solution not listed here, comment below.

5 Best Email Recovery Software for Outlook to Download

Lost email messages can be a problem, but there is always a way to recover them. While there are some built-in options, these don’t always work, and this is when you have to download an email recovery software for Outlook.

This software is usually simple to use, and it can easily recover lost email messages. A simple Google search would list several of these, but not all do the job effectively. That’s why we decided to list the best Outlook email recovery tools.

How can I restore my Outlook emails?

Here are a few ways you can restore Outlook emails:

  • Check the dedicated folder: When an email or another item is deleted, it goes to the Deleted Items folder, and from it, you can easily recover a deleted email in Outlook.
  • Use the Recover Deleted Items option: An email removed from the Deleted Items can still be restored from the Recover Deleted Items folder. However, the process is slightly more complex, and the option is unavailable for everyone. So, the best option is to download Outlook email recovery software.
  • Import PST file: For those trying to find out how to retrieve old emails in Outlook, importing the PST file would be a great way. If the Outlook PST file cannot be configured, is missing, again, you will have to rely on email recovery software.
  • Contact the administrator: If you were wondering how to restore Outlook emails, another option is to contact the domain administrator.

As you can see, the options to recover deleted Outlook emails or folders in Office 365 are not that simple. this is why we recommend you download an email recovery software for Outlook and let it do the job.

What is the best Email recovery software for Outlook to download?

1. Outlook PST Recovery – The best software available

If you’re using Outlook and want to recover lost emails, Outlook PST Recovery might be the right tool for your needs.

The software is designed to recover data from corrupted PST files, and it can recover deleted emails, attachments, contacts, calendars, notes, tasks, and other data.

Outlook PST Recovery will show you the mailbox preview so you can perform a precise recovery. As for compatibility, the software works with Outlook 2019, 2016, 2013, and older versions.

Regarding the data recovery, you can export the mailbox data in PST, EML, MSG, RTF, HTML, and PDF format.

Outlook PST Recovery is a great Outlook email recovery software, and since it works with all versions of Outlook, it’s one of the best choices for email recovery.

Outlook PST Recovery features:

  • Can recover data from corrupted PST files
  • Can recover emails, attachments, contacts, calendars, and other data
  • Ability to preview the mailbox
  • Can split and compact the PST files
  • Can save recovered emails in PST, EML, MSG, RTF, HTML, and PDF format

Outlook PST Recovery

Recover lost emails, attachments, and other email data in all versions of Outlook with Outlook PST Recovery.
Free trial Visit website

2. Outlook PST Repair – Effective at repairing PST files

If you’re looking for specialized Outlook recovery software, Outlook PST Repair might be just what you need. The software is designed to repair Outlook PST files, regardless of size.

Regarding recovery, you can recover deleted emails and attachments, but it can also repair password-protected files.

Once the items are recovered, they are saved to a new PST file. Outlook PST Repair supports other formats, and you can export your data in DBX, MBOX, MSG, EML, TXT, RTF, HTML, and MHTML formats.

If needed, you can also save your PST data directly to webmail such as Yahoo Mail, Gmail, AOL, and others. To use this feature, you need to enter your webmail credentials during the restoration process.

Outlook PST Repair offers a wide array of features, and if you need to recover your Outlook emails, this might be the perfect software for the job.

Outlook PST Repair features:

  • Works with 365 Outlook, 2019, 2016, 2013, 2010, and 2007
  • Can recover deleted attachments and emails
  • Can export recovered data in DBX, MBOX, MSG, EML, TXT, RTF, HTML, and MHTML format
  • Ability to save PST files directly to webmail
  • Works with all PST files, regardless of their size

Outlook PST Repair

This tool is advanced recovery software that can recover lost emails and attachments in any version of Outlook.
Check price Visit website

3. Recoverit Data Recovery – Allows recovery from lost partitions

recoverit

Recoverit Data Recovery is a data recovery software and it can recover all sorts of files. First off, the software will recover deleted files, as well as files from formatted or lost partitions.

The software can also recover files from external drives, as well as files that were lost due to malware infection or system crashes.

Recoverit Data Recovery is incredibly simple to use, and you can even preview files before recovering them. As for supported file types, the application supports all major file types.

Email recovery is also available, and you can recover deleted and lost emails from Outlook, Gmail, Thunderbird, and other email clients.

Even though Recoverit Data Recovery isn’t specialized for Outlook email recovery, it still offers great features, so you should consider it.

Recoverit Data Recovery features:

  • Ability to recover deleted files
  • Can recover formatted disks and lost partitions
  • Video repair feature
  • Recover files from external drives
  • Email recovery from Outlook, Gmail, Thunderbird, and other clients

Recoverit Data Recovery

Recoverit Data Recovery is a useful software that can recover deleted files, formatted disks, partitions, and emails.
Check price Visit website

4. AnyRecover– Easy-to-use interface

anyrecover

Another helpful software that offers email recovery services is AnyRecover. It can not only help you recover lost emails but support +2000 internal devices and bring back deleted data.

The data you can recover includes emails, attachments, photos, videos, and audio files. The software has an extensive preview feature, so you can preview any data before you recover it.

AnyRecover supports advanced search for data based on subject, email text, and other information. You can also convert OST to PST, EML, MSG, RTF, HTML, and PDF.

As for compatibility, the software works with all versions of Outlook from 2019 to 2003, so you should be able to recover emails regardless of the version of Outlook you’re using.

The tool is a simple but powerful email recovery software for Outlook, and it’s a great choice if you need to recover your emails.

AnyRecover features:

  • 98% email recovery rate
  • Incredibly simple user interface
  • Fast scanning and complex scan algorithm
  • Advanced filtering system to find files easily
  • Can repair corrupted PST/OST files

AnyRecover

Choose this all-rounded program and bring back any erased emails or types of files from your PC.
Check price Visit website

5. ApowerRecover – Recovers all kinds of files

best email recovery outlook download

ApowerRecover is a file restore software it can restore lost files from computers, internal and external hard drives, memory cards, camcorders, flash drives, etc.

The software works with almost all file types, and it can recover your files regardless of their type. Although it isn’t designed as an email recovery software, it can recover Outlook emails, which is a major plus.

ApowerRecover offers a deep scan feature, so it should be able to find files that are lost or corrupted. Also, you can stop the scanning any time you want, which is also a plus.

The user interface of the application is pretty straightforward, so even first-time users will be able to recover their files and emails.

ApowerRecover might not be a specialized email recovery software, but it can recover all sorts of files, and it’s a solid choice for Outlook email recovery.

ApowerRecover features:

  • Simple to use interface
  • Deep scan feature
  • Can recover almost any file type
  • Outlook email recovery
  • Works with hard drives, external drives, flash drives, memory cards, etc.

ApowerRecover

Restore all essential files on your PC, including all your lost email files with this effective recovery tool.
Check price Visit Website

Recovering lost emails doesn’t have to be hard. If you want to download a specialized Outlook email recovery software, we suggest using Outlook PST Recovery or any other tool from this article.

You might also be interested in our guide on how to recover Outlook emails using OST to PST Converter, which will offer great help in this situation.

If you have any other information about tools that helped you, mention them in the comments section below.

Windows Mail Not Downloading Emails: 4 Solutions to Use

The Mail app is the built-in email client for Windows developed by Microsoft and is used by many users. Mail is easy to use and much simpler than Outlook, but it often runs into issues. One such is when Windows Mail is not downloading emails.

If the Mail app is not working or downloading emails while there is no issue with the sent emails, it presents a major problem, one that needs to be rectified at the earliest. So, let’s find out all about the issue and the solutions that worked for other users.

Why is Windows Mail not downloading emails?

Here are a few possible causes why the Mail app is not downloading emails:

  • Problems with the server: When you cannot download emails in the Mail app, it could be that the email provider’s server is facing an outage.
  • Running an outdated version: Even using an outdated version of the app can lead to various issues, including Windows Mail not downloading emails.
  • Firewall blocking the connection: In many cases, the built-in or third-party firewall was found to block connection attempts.
  • Issues with Internet connectivity: If the Internet keeps disconnecting or speed is slow, you will face trouble downloading or sending emails in Windows Mail.

What can I do if Windows Mail is not downloading emails?

Before we start making slightly complex changes, here are a few quick things to do:

  1. Check for any pending OS updates and install them. Many recently reported that the emails were not downloading or downloaded in an unreadable form in Windows Mail for Yahoo accounts, which was due to a bug.
  2. Make sure the Internet works fine. You can use Ookla or other speed test software to verify the same.
  3. Disable any antivirus or similar security software installed on the PC. If Windows Mail now starts downloading emails, we recommend you switch to an effective and error-free antivirus.
  4. Try using the web version of the email client to verify whether the servers are down.
  5. Sign out and log back into the account(s) connected to the app using the web client. Then, remove the linked account in Windows Mail and add it again.
  6. For those facing issues with the email contents not appearing fully, click the Forward button, then cancel the action after a few seconds, and the files will download. Remember, this is just a workaround.

If these don’t work, move to the solutions listed next.

1. Change the app settings

  1. Open the Mail app, click the Settings icon near the bottom left, and select Manage accounts.manage accounts
  2. Choose the affected account.account
  3. Now, click on Change mailbox sync settings.change to fix windows mail not downloading emails
  4. Select as items arrive from the Download new content dropdown menu, tick the checkbox for Always download full message and Internet images, enable the three Sync Options, and click on Done at the bottom.enable sync options to fix windows mail not downloading emails
  5. Finally, click Save.

Your primary approach when Windows Mail is not downloading emails is to make sure the settings are in order. Once done, check whether the problem is resolved. If not, head to the next solution

2. Update the Windows Mail app

  1. Press Windows + S to open Search, type Microsoft Store, and click on the relevant search result.microsoft store
  2. Click on the Library option near the bottom left, and then on Get updates.get updates to fix windows mail not downloading emails
  3. If an update is listed for Mail and Calendar, allow it to download.

3. Whitelist Mail and Calendar in the firewall

  1. Press Windows + S to open Search, type Allow an app through Windows Firewall, and click on the relevant result.allow an app
  2. Click on Change settings.change settings to fix windows mail not downloading emails
  3. Make sure both the Private and Public checkboxes are ticked for Mail and Calendar, and then click OK to save the changes.configure firewall

4. Reset the app and add account via Advanced setup

  1. Press Windows + I to open Settings, choose Apps from the navigation pane, and then click on Installed apps.installed apps
  2. Now, click on the ellipsis next to Mail and Calendar, and choose Advanced options.advanced options
  3. Next, click the Reset button.reset to fix windows mail not downloading emails
  4. Again, click Reset in the confirmation prompt.reset
  5. Once it’s complete, open the Mail app, and choose Advanced setup.advanced setup
  6. Choose Internet email.internet email
  7. Now, fill out the information here. For the Incoming and Outgoing email server, search the web for your email client, enter the correct one, and then click Sign in.sign in to fix windows mail not downloading emails

A few users managed to fix things when Windows Mail was not downloading emails by adding an account via Advanced setup. Though slightly time-consuming, it works well in this case. Also, we recommend you reset the app beforehand to eliminate other issues.

One of these solutions would have fixed things, and the emails would start to download in Windows Mail automatically.

Those looking for an alternative can check our curated list of the best email clients for Windows.

Do tell us which fix worked for you in the comments section below.

ETrade Pro not Launching: Use These 5 Methods to Open it

ETrade Pro is a popular web-based trading platform available on Windows PC. However, some users have reported the ETrade Pro is not launching for some reason.

If you are also troubled by this problem, here are some troubleshooting steps to help you resolve it effortlessly.

Why is ETrade Pro not working?

If ETrade Pro is not launching on your PC, below of the factors that can cause it:

  • Presence of malware: In some cases, this issue can occur if there are viruses on your PC. It would be best to eliminate these viruses using Microsoft Defender or one of the best antivirus software for Windows 10.
  • Interference from third-party apps: Third-party apps like your antivirus software can cause this issue. You need to uninstall these apps to launch your trading platform.

How can I fix ETrade Pro if it’s not launching?

1. Scan your PC for adware

  1. Press the Windows key, type virus, and select Virus & threat protection.
    virus etrade pro not launching
  2. Select Scan options.
    scan option
  3. Now, select the Full Scan option and click the Scan now button.
    scan now

Adware sneakily gets installed when you install some freeware from the internet. However, these programs create issues and can cause the ETrade Pro not launching issue.

To eliminate this, you need to perform a full malware scan. However, if you need to eliminate adware issues once and for all, an efficient antivirus can stop adware immediately.

This antivirus option provides all-in-one security, including powerful antispyware and antimalware features. Adware threats will be therefore erased every time it’s needed, thus not blocking other applications.

⇒Get TotalAV

2. Disable suspicious startup apps

  1. Press the Windows key + X and select Task Manager.
    task manager etrade pro not launching
  2. Click the Startup tab at the top.
  3. Now, right-click any suspicious app and select Disable.
    disable

Sometimes, when web surfing, some adware gets installed and starts with your PC. These apps might be the reason ETrade Pro is not launching.

This way, you prevent other apps from interfering with your trading platform and fix this issue without installing or uninstalling anything from your PC.

3. Launch the Java version of ETrade Pro from the web

  1. Open the ETrade website and log in to your account using the credentials.
    log in
  2. Go to Research and select Products.
  3. Select E-Trade Pro from the list.
  4. Next, launch the Java version.

E-Trade Pro allows you to launch and use their software from the web if the desktop app is not working. While this is more of a workaround than a solution, it should help you work with the platform till the issue is resolved.

4. Disable antivirus and firewall

  1. Press the Windows key, type security, and select Windows Security.
    windows security
  2. Select Firewall & network protection in the left pane.
  3. Now, select your active network.
    public etrade pro not launching
  4. Toggle the Microsoft Defender Firewall switch backward to disable it.
    firewall
  5. Next, return to the Windows Security page and select Virus & threat protection in the left pane.
    virus and
  6. Click Manage settings.
    manage settings
  7. Now, toggle the switch for Real-time protection backward to disable it.
    real time etrade pro not launching
  8. Finally, if you use a third-party antivirus, right-click its icon on the taskbar, and select Disable.

Some users have reported that the ETrade Pro not launching issue can be caused by antivirus or firewall. This is especially true for the Kaspersky Internet Security software.

Disabling the security software should fix the issue.

5. Uninstall antivirus software

  1. Press the Windows key + I and select Apps.
    apps
  2. Select your antivirus software and click the Uninstall button.
    uninstall etrade pro not launching
  3. Finally, follow the onscreen instructions to complete the process.

You should uninstall the app if disabling your antivirus software does not fix the ETrade Pro not launching issue. With this, you should be able to resolve the issue for good.

We have reached the end of this guide. We believe you now have everything needed to fix the ETrade not launching issue.

If you need a list of the best Trading software for Windows PC, check our detailed guide for the top options available.

Let us know the solution that helped you fix this issue in the comments below.

Still using Office 2013 apps? Microsoft has some bad news

Microsoft is coming with a dire warning for Office 2013 users. The end of life of the beloved productivity suite, which is plagued by bugs for some users, is coming on April 11, 2023, five years after the end of its mainstream support.

Apps include Microsoft Office 2013, OneNote, Outlook, PowerPoint, Project, Project Server, Publisher, Word, Excel, and Access.

Upon retirement or end of support, there will be no new security updates, non-security updates, free or paid assisted support options or online technical content updates.

That means, organizations that still use Office 2013 can still continue to function but will be exposed to serious security risks, as Microsoft will no longer provide bug fixes, security support, or phone services.

During the extended support period before this, Microsoft still provided operational support albeit no new feature was announced.

Microsoft won’t provide any new security updates, and the continued use of Office 2013 after April 2023 may increase your organization’s exposure to security risks or impact your ability to meet compliance obligations.

Other than Office 2013, what apps are coming to their end of life?

In the same blog post, Microsoft said that it plans to cut support for Microsoft Office, Word, Outlook, PowerPoint, and Excel 2019 for Mac users starting October 10, 2023.

Extended Support includes security updates at no cost, and paid non-security updates and support. Additionally, Microsoft will not accept requests for design changes or new features during the Extended Support phase.

Access, Excel, Office, Outlook, PowerPoint, Project, Visio, Publisher, and Word 2019 are also moving to extended support on the same date.

What are your thoughts about Microsoft cutting support for Office 2013 products? Let us know in the comments!

Stream Deck profile disappeared: How to recover it

Losing a Stream Deck profile can be a painstakingly awful experience, especially for those who rely on them for streaming on Twitch. After all, it’s where all the settings are stored and it’s not always nice to come back and re-configure everything before starting the stream.

This u/EverythingNowShow user, for example, just recently upgraded their motherboard, CPU, and operating system to Windows 11. They lost all their Stream Deck presents in the process but were able to recreate them.

“However, upon restarting my computer, all of the presets that I painstakingly recreated had disappeared. I recreated them again, and this time I made sure to export them into a separate file. Much to my dismay- upon restart the presets are blank again, and exported profile backup files also yield blank profiles.”

So, what may be causing this problem, you may ask? And how can I recover Stream Deck profiles? While it’s always wise to have it backed up somewhere else, it’s not a very good experience to lose them every time you boot up your computer.

Read along to find out how to recover Stream Deck profiles.

How to recover Stream Deck profiles?

1. Go to C:\Users[your username]\AppData\Roaming\Elgato\StreamDeck\Backup (on Windows 11).

Starting with Stream Deck 5.3, profiles now back up automatically every time you update the app.

2. Find the backup file with the file extension .StreamDeckProfilesBackup, then double-click.

3. The Stream Deck software will ask if you’d like to import the backup. Hit Restore to overwrite existing profiles and restore this.

4. The profiles will be imported and a profile will be automatically selected.

Have you ever had this problem? Let us know in the comments!

Microsoft Windows – The Application is Not Responding [Fix]

Are you getting the error message – the application is not responding in Windows 10 and 11? When that happens, a program freezes up, and then you can’t close its window the usual way or select any of its options.

Sometimes, it causes a general freeze on the PC, and nothing else responds. Finally, the entire computer crashes in extreme cases and displays the dreaded blue screen of death.

There isn’t necessarily a guaranteed fix for software freezing up, but these are a few of the various spots that can significantly reduce applications not responding in Windows 10 and 11.

What does it mean when an application is not responding?

When software ceases correctly communicating with Windows, it stops responding.

Numerous issues may be to blame when Windows software stops working, freezes, or becomes unresponsive.

Windows applications may cease because of a clash between the app and the computer’s hardware, a shortage of system resources, or software defects.

Speaking of application issues, here are some common problems that users reported:

  • Microsoft Windows, the application is not responding. However, the program may respond again if you wait – This message can sometimes appear as soon as your PC boots. However, you might be able to fix it simply by removing problematic applications or by updating Windows.
  • Application not responding desktop, Spotify, Google Chrome, browser – This issue can affect almost any application on your PC. If you have this issue with specific applications, reinstall them and check if that solves the problem.
  • Microsoft Windows the application is not responding on startup – You may need to open the Services app and ensure the service is set to start automatically at startup.
  • Microsoft Windows the application is not responding. Do you want to end the process – In most cases, if you wait, the process will respond, but if it doesn’t, you should end it.
  • Video not playing in Windows 11 – Check your antivirus software in order to solve this error in Windows 11.
  • Video plays sound but no picture in Windows 10 – By updating the Windows Update service, you will be able to bring the picture back.
  • Videos will not play on my computer Windows 7 – Some of the solutions below will also work in Windows 7, so make sure to find them out.
  • Video plays on phone but not on computer – In this case, it is clear that the computer has an issue that needs to be addressed.

Whatever the case is, there are usually a few ways to get around it or prevent future occurrences. But before you go into our fixes, ensure that you have a working antivirus to rule out the chances of crashes due to malware.

What to do if the PC is not responding?

The best way to close a frozen program is to press the Ctrl + Alt + Del hotkey to open Task Manager, select the software on the Processes tab, and press End task.

In Windows 10, sometimes, when the application is not responding, the program may respond again if you wait. This may take a few seconds to several minutes, and in cases where something big is broken, hours or never.

Do not be discouraged because we have some great resolutions for you in this article.

How can I fix The program not responding error on Windows 10?

1. Check your antivirus

According to users, sometimes you might get an Application not responding message due to your antivirus. As you know, antivirus tools can sometimes interfere with your system and trigger specific issues to appear.

We recommend that you disable certain antivirus features and check if that works. You can also try disabling your antivirus if the issue is still present. In the worst-case scenario, you might have to remove your antivirus to solve this issue altogether.

Even if you remove your antivirus, Windows 10 will activate Windows Defender and protect you from online threats.

However, we recommend using third-party antivirus software as well. They have a higher detection rate than Windows Defender, and many of them are equipped with a broader set of features.

You can find many options that won’t interfere with other system processes or apps. Some of the best antivirus software out there silently protect you in the background without using too many system resources.

2. Reinstall the software

  1. Click the Start menu, type control panel, and then click on the Control Panel app.
    The application is not responding
  2. Click on Uninstall a program.
    The application is not responding
  3. Click on the problematic app and select Uninstall.
    The application is not responding
  4. Follow the wizard to complete the uninstallation.

Consider reinstalling the software if it’s a more specific program that’s often not responding. Reinstalling a fresh copy of a program will guarantee it’s the most updated version.

Alternatively, you can uninstall problematic applications by using uninstaller software. Uninstaller software is a unique application that will altogether remove the selected program from your PC.

These applications will remove all files and registry entries associated with the selected application ensuring that the application is completely removed.

Many uninstaller software includes additional optimization features that allow you to remove useless or duplicate files from your PC, enabling it to run smoother.

3. Open fewer programs at a time

First, note that overextended system resources are a primary factor behind software not responding. When too many programs are open at once, they compete for increasingly limited system resources.

Consequently, that can lead to software conflicts and one application not responding. Our handy guide will tell you a little more about RAM and how you can optimize Windows 10.

Thus, a simple fix for applications not responding is to open less software on your taskbar and close some background processes. Having less software open will maximize system resources for fewer programs.

You can close some background processes by right-clicking the taskbar, selecting Task Manager, selecting a background process, and clicking End task.

If the End task doesn’t work on your Windows 10 PC, you can fix it quickly with just a few Windows commands. Alternatively, you can move on to the other suggestions below.

4. Scan and fix the Registry

Sometimes your Registry might hold corrupted entries, which can interfere with your system and cause the Application not responding message to appear.

We recommend that you clean your Registry. However, doing this manually can be complex and tedious; therefore, using a dedicated registry cleaner tool is better.

5. Update the Windows Update service

  1. Click on the Start menu and enter service, then click on the Services app.
    The application is not responding
  2. Right-click on Windows Update and select Properties.
    The application is not responding
  3. Set the Startup type to Automatic.
    The application is not responding
  4. Then press the Apply and OK buttons to confirm the new setting.

Updating Windows 10 Update service will also reduce software not responding errors. So ensure you have Windows Update enabled and preferably configured to automatic so the software can make the most of the update agent.

You can also set up your Windows 10 apps to update automatically.

6. Run Command prompt health scripts

6.1 Run the System File Checker

  1. Press the Windows key + X hotkey and select Command Prompt (Admin) from the Win + X menu.
    Application not responding Spotify
  2. Now input the script below and hit Enter,
    sfc /scannow
    Programs not responding Windows 8
  3. The scan will probably take up to 15 minutes or perhaps a little longer. When the scan has finished, the Command Prompt window might state that Windows Resource Protection found corrupt files and successfully repaired them.
  4. Next, close the Command Prompt and restart Windows.

The System File Checker is a handy tool that you can fix corrupted system files. Unfortunately, corrupted system files can also cause the program not to respond to errors.

6.2 run the SFC scan

  1. Press the Windows key + X hotkey and select Command Prompt (Admin) from the Win + X menu.
    Application not responding Spotify
  2. Now enter the script below, and press Enter afterward.
    DISM /Online /Cleanup-Image /RestoreHealth
    Programs not responding Windows 8
  3. DISM scan will now start. The scan can take about 20 minutes, sometimes even more, so don’t interrupt it.

If the SFC scan didn’t fix your problem, or if you couldn’t run the SFC scan, you might be able to resolve the issue by running a DISM scan instead.

Once the DISM scan is finished, check if the problem still appears. If the issue is still present, you might want to try rerunning the SFC scan and check if that solves the problem.

7. End Windows Desktop Manager task

  1. Press Ctrl + Shift + Esc to open Task Manager.
  2. When Task Manager opens, locate the Windows Desktop Manager process, right-click it, and choose End Task from the menu.
    Microsoft Windows the application is not responding. The program may respond again if you wait

After doing that, the issue should be resolved. However, keep in mind that this is just a workaround, and it’s somewhat likely that the Windows Desktop Manager will start again once you restart your PC.

According to users, sometimes specific tasks can slow down your PC and cause this issue to appear.

The most common cause of this problem is Windows Desktop Manager; to fix the issue, it’s advised to end this process.

8. Make changes to your registry

  1. Press Windows Key + R and enter regedit, then press Enter or click OK.
  2. Go to File > Export.
  3. Set Export range to All. Now enter the desired file name and click the Save button. After doing that, you’ll have a backup of your registry ready.
  4. If anything goes wrong after modifying the registry, run the backup file to restore your registry to the original state.
  5. Now go to Edit > Find.
  6. Enter the code below or Core Parking and click Find Next.
    54533251-82be-4824-96c1-47b60b740d00
    Application not responding desktop
  7. Delete the keys related to CoreParking. Then, repeat steps 5-6 to find all keys related to CoreParking and delete them.

According to users, specific registry values can sometimes cause this issue to appear. However, you can fix the problem simply by deleting a few registry entries.

After deleting all these keys, check if the problem is still present.

How can I fix the application is not responding on Windows 11?

You should note that all the fixes we have discussed in this article are applicable in Windows 11. So follow the same steps, and you should solve the application is not responding error.

Remember you should also start by force-ending the problematic program using the hotkeys Ctrl + Alt + Del to open the Task Manager app and selecting End program on the specific app.

Why is my PC so slow and unresponsive?

Too many simultaneously open applications consume processing power, which is a common reason for your computer not responding. Furthermore, your computer may operate slowly for various reasons, including malware infestation, hardware problems, excessive memory utilization, etc.

Those are a few of the best ways you can fix the program not responding errors. In addition, more general system maintenance, including registry, virus, and SFC scans, will reduce applications not responding in Windows 10.

If you cannot open any Windows apps, you might want to take your troubleshooting further. But don’t worry; we are always here to guide you.

If you’re aware of an alternative method, please share it in the comments section below so that other users can try it. Also, leave there any other suggestions or questions you may have.

Printer Cannot be Contacted Over the Network: 3 Fixes to try

Many people reported that their printer fails to print with the following error: Printer cannot be contacted over the network. This issue affects those printers that are added as network printers.

If you are also dealing with this issue, try one of the following troubleshooting tips to eliminate this error.

Why is my printer not connecting to the network?

Below are some of the causes of the printer cannot be contacted over the network issue:

  • Disabled services: Sometimes, the Canon or Epson WF-3540 Series printer cannot be contacted over the network issue can be due to some disabled system services. The solution to this is to restart these services.
  • Connection issues: If your Sharp printer or other products cannot be contacted over the network, it might be down to minor connection issues. You can fix this by removing and adding the printer again.

What to do if the Printer cannot be contacted over the network

1. Remove the Printer and Add it Again

  1. Press the Windows key, type control, and select Control Panel.
    control  printer cannot be contacted over the network
  2. Choose View devices and printers under the Hardware and Sound section.
    view device
  3. Now, right-click your printer and select the Remove device option.
    remove device printer cannot be contacted over the network
  4. Next, click the Yes button to confirm the action.
  5. Wait for the process to complete and click Add a printer at the top.
    add a
  6. Your system will now start looking for all the available printers. Click the one you want to add and click the Next button.
  7. Finally, follow the onscreen instructions to complete the process.

Sometimes, the most straightforward fix might be the most effective. For example, if you are getting the printer cannot be contacted over the network prompt, the first thing to try is to remove the device and add it again.

This will clear up any glitch that might be causing the issue.

2. Enable certain services

  1. Press the Windows key + R, type services.msc, and click OK.
    serviices
  2. Double-click the Remote Access Auto Connection Manager service to open its properties.
    remote access printer cannot be contacted over the network
  3. Now, click the Stop button to halt it.
    stop
  4. Next, set its Startup type to Automatic and click the Start button.
  5. Click the OK button to save the changes.
    automatic printer cannot be contacted over the network
  6. Now, repeat steps 2 to 5 for the services below:
    • Routing and Remote Access
    • Secure Socket Tunneling Protocol Service 
    • Remote Access Connection Manager

After restarting these services, check if the printer cannot be contacted over the network error message that persists.

Follow the steps below if one of the services gives you this error: Windows could not start the service on Local Computer. Error 1079: The account specified for this service differs from the account specified for other services running in the same process.

  1. Repeat steps 1 and 2 above for the faulty service.
  2. Click the Log On tab at the top and tick the radio button for This account.
  3. Now, click the Browse button.
    log on
  4. Type your user account name in the Enter the object name to select box and click the Check names button.
    check names
  5. Next, wait for the name to be confirmed and click the OK button.
  6. Finally, type in your account password in the Password and Confirm password boxes and click OK.
    password printer cannot be contacted over the network

With this, you should be able to eliminate the Printer cannot be detected over the network issue for good.

3. Set up a Static IP Address

  1. Press the Windows key + R, type control, and click OK.
    control run
  2. Click View devices and printers under the Hardware and Sound section.
    view device
  3. Right-click the specific printer and select Properties.
    properties
  4. Now, click the Ports tab at the top and scroll down to find an entry similar to an IP address. Note down the address for future use.
    select file type printer cannot be contacted over the network
  5. Open your web browser, type the IP address in the address bar, and hit Enter.
  6. Next, log into your printer network settings.
  7. Select IP Configuration under the Networking tab. Next, find an option titled IP Address Configuration or TCP/IP.
  8. Now, change its value from Automatic to Manual or Static.
  9. Finally, type the IP address you want for your printer and click Apply.

The printer cannot be contacted over the network issue can be annoying. Fortunately, you can fix it for good by following the solutions in this guide.

If your printer has not IP address, check our comprehensive guide to fix it effortlessly.

Let us know the solution that helped you fix this issue in the comments below.

Error 1005 Access Denied: 9 Simple Methods to Bypass it

If you stumble upon the error 1005 Access Denied in a web browser, the website you’re trying to visit has banned your IP address.

Like many computing errors, this can be a very annoying situation to be stuck in. Sadly, it is peculiar to virtually all the best browsers for all devices, so Chrome, Edge, and Firefox users suffer from the error.

In this article, we explore the common causes and prefer the best solutions when you are faced with error 1005.

What is the meaning of error 1005?

This error can happen for many reasons. For example, too many requests from your IP address may be interpreted as spam and trigger the error.

Here are some of the primary causes for the Access Denied error with code 1005:

  • Website owner blocked your IP address: Sometimes, the website owner might have restricted access to users from a specific or a range of IP addresses due to security reasons like spam. You need to use one of the best VPNs for Windows PC to get past this restriction.
  • Webpage licensing issue: This error message can also pop up if the webpage is unavailable to all countries due to licensing or government issues (geoblocking).
  • Incorrect data and time: In some cases, the error 1005 might be down to incorrect settings on your computer, such as date and time. The way out here is to make the necessary change to your time and date accordingly.
  • Cloudflare blocked your IP address: Cloudflare can also block your IP address for security reasons.
  • The website blocks VPN traffic: Some websites disallow any traffic from a VPN. Therefore, it would be best if you disabled your VPN to access such sites.

Here are some variants to this error code:

  • Error 1005 Cloudflare, error 1006: Try adding an exception to your firewall or disabling your antivirus.
  • Error 1005 Crunchyroll, banned IP: Your IP address was banned, but you can fix this by changing your IP with a VPN or proxy.
  • The owner of this website has banned your IP address Cloudflare: The Crunchyroll solutions apply here, too.
  • Error 1005 VPN: Might be caused by your current VPN service, so try disabling your VPN or switching to another VPN app.
  • Error 1005 access denied: This may be triggered because you do not have access rights.
  • Unable to process your request at this time 1005: In this case, you may have to retry later.
  • Regions error code 1005: In this case, you must use a VPN because your geographical region has blocked you.

How do I fix the Access Denied error with code 1005?

1. Use a reliable VPN service

Drop your free VPN app for a reliable virtual private network service like ExpressVPN. It encrypts your data traffic, keeps you safe on the web, and helps you unblock websites like Crunchyroll.

Streaming content is the most geo-restricted content all over the world. Using this VPN will allow you to watch all your favorite TV shows, movies, and even anime that are locked to a specific country.

Gain access to any of this content in just a few seconds. You are connected to an IP location in another country with a few clicks.

Even if some of its IP addresses get exposed and blocked by other websites, you can always switch servers and get a new IP that’s not blacklisted.

Furthermore, ExpressVPN runs private DNS servers to protect your DNS queries. It also supports a malware blocker for web browsers, a kill switch, and split tunneling.

ExpressVPN

Enjoy gaining access to geo-restricted content and staying protected with ExpressVPN.
Check price Visit Website

2. Check your proxy settings

  1. Click on the Start menu and select the Settings app.
    error 1005
  2. Click on Network & internet on the left pane, then select the Proxy option on the right.
    error 1005
  3. Under the Automatic proxy setup, ensure the Automatically detect settings option is turned off.
  4. Turn off the Use a proxy server option under the Manual proxy setup section.
    error 1005

Nothing is stopping you from using a VPN and proxy at the same time. It’s an excellent way to amplify your online privacy, and you can still access blocked websites.

3. Clear your browsing cookies

3.1 Clear cache in Chrome

  1. Click on the browser’s menu, select the More tools option, then click Clear browsing data.
  2. Select the Basic tab, and choose a Time range.
  3. Tick Browsing history, Cookies and other site data, and Cached images and files.
  4. Now, hit the Clear data button.
    error 1005

3.2 Clear cache in Firefox

  1. Click the menu at the top right corner and select Settings.
    error1005
  2. On the browser’s left pane, click the Privacy & Security option and scroll to the Cookies and Site Data section.
  3. Next, click the Clear Data button.
    error 1005
  4. Tick the Cookies and Site Data and Cached Web Content options.
  5. Finally, click the Clear button.
    clear

Websites store information about your device in cookies, including your IP address. So, even if you try to change your IP address, you might still receive the Access Denied error with code 1005 due to those cookies.

A temporary fix is to try accessing the website in incognito/private / in-private browsing mode. But you must clear the cookies for regular browsing sessions and then restart the web browser.

4. Disable your free VPN service

If you’re using a free VPN app to protect your online privacy and access blocked content, you might get blocked by websites like Crunchyroll.

Remember that all users are connected to the same VPN server and can visit the same websites you do. Too many requests from the same IP likely result in banning that IP.

For instance, we used Opera One, turned on its built-in VPN service, connected to the American virtual location, and tried visiting Crunchyroll. However, as you can notice from the screenshot above, we were met with the Access Denied error 1005 instead.

Using Opera’s VPN will allow you to access a unique IP address that can be changed anytime. Access video content on any platform, any country, with Opera One.

Disable your free VPN service and try to reaccess the website. If you’re still keen on using a VPN for security and privacy (which we highly recommend), proceed to the next step.

5. Add an exception to the firewall

  1. Click the Start menu, type firewall, and select Firewall & network protection.
    error 1005
  2. Click Allow an app through firewall.
  3. Now, click the Change settings button.
  4. Locate your web browser on this list and enable the Private and Public options.
    error 1005
  5. Click Allow another app to find it if it’s not on this list.

Your firewall settings could be why you keep getting the Access Denied error with code 1005 in your web browser.

It’s unlikely because if the firewall blocks your web browser traffic, you shouldn’t be able to visit any website.

The instructions above apply to the Windows Defender Firewall. If you have a third-party firewall installed, adapt the steps accordingly.

6. Check your antivirus

Consider this solution only if you use an anti-malware solution, not Windows Defender.

Look under the hood of your antivirus tool and check if it’s blocking your web browser. If so, you must add your browser to a whitelist.

7. Set your system time settings to auto

  1. Press the Windows key + I and select Time & language in the left pane.
  2. Select the Date & time option.
    time and language error 1005
  3. Now, toggle the switch for Set time automatically forward to enable it.
    set auto

As curious as it seems, your PC’s date and time settings could interfere with web browser traffic, resulting in various errors.

But you can fix this problem by setting the date and time to auto mode. It means allowing Microsoft to automatically retrieve the correct data from the web according to your time zone.

8. Change your DNS servers

  1. Click on the Start menu, type control panel, and select the Network and Sharing Center option.
    error 1005
  2. On the left pane, click on Change Adapter settings.
    error 1005
  3. Right-click on your network and select Properties.
    error 1005
  4. Double-click on Internet Protocol Version 4 (TCP/IPv4).
    error 1005
  5. Tick the Use the following DNS server address radio button.
  6. Finally, set the Preferred DNS server to 8.8.8.8 and the Alternate DNS server to 8.8.4.4.

If your DNS resolver fails at its job, it could result in a slow page loading time and insecure Internet settings, leaving you open for DDoS attacks.

Some websites might not even work. But you can fix this problem by changing the DNS servers of your PC. We suggest opting for the free, public, and super-secure DNS servers provided by Google Public DNS.

9. Contact the website admin

If everything else fails, it’s time to fire up your email client and contact the webmaster or site administrator.

It could simply be an error on their end that you can quickly resolve by requesting visitor privileges on their website.

With this, we have reached the end of the guide on fixing error 1005, Access Denied on your browser. We believe you now have everything needed to get past the error code and access your favorite websites.

If you are also getting you don’t have permission to access this server error, check our detailed guide to get past it. Another prominent issue is that you should know about is Cloudflare error 1001, but we covered it in another guide.

In the comments below, let us know the solution that helped you fix this issue.

Fix: Windows Failed to Start After Hardware or Software Change

Some of our readers who recently complained about the Windows failed to start a recent hardware or software change might be the cause error need to know that this error is inevitable if there is any hardware or software change to your computer.

This error affects the regular boot process of your computer and, at times, causes data loss. This article will teach you how to fix the error.

Why do I encounter Windows failed to start after hardware or software change?

One of the major reasons could be that you have installed hardware or software which has triggered the error. Below are some other factors reported by some users:

  • Corrupted BCD file – If you often experience power outages or there are disk write errors, it can cause your BCD file to become missing or corrupted, producing this issue.
  • Corrupted or damaged system files – System file corruption or damage is a common cause of starting failures. Read about how to repair damaged system files here.
  • Viruses and malware infections – Some viruses and malware may have affected the system files and triggered the error. Try one of the best antivirus software shortlisted in this article.
  • Conflicting third-party programs – Some readers claim the error occurred after installing a program that wasn’t compatible with one of the resident apps. Consider using one of these best uninstaller software to remove them.
  • Problems with connected devices – This error can manifest due to a conflict with an attached external device. Disconnect them and then reconnect them individually to know which is causing the issue.

Now that you know some of the potential reasons behind this issue, you can work your way through any of the fixes provided in this article.

What can I do if Windows failed to start due to hardware or software change?

It may be worth a simple fix for you if you consider performing the following preliminary checks:

  • Disconnect all peripheral devices such as a printer, scanner, camera, or any other USB devices (if any) except for your mouse and keyboard, which you’ll need for navigation.
  • Check the storage drive for any damage or connection problems.
  • Boot into Safe Mode. You may try these fixes if Windows refused to boot into Safe Mode.

Having confirmed the above checks and the problem persists, you can explore the advanced solutions provided below.

1. Run the Automatic/Startup Repairs

  1. Insert Windows bootable installation DVD or Recovery Disc and restart your PC.
  2. After getting the prompt to Press any key to boot from CD or DVD, click on any key to continue.
  3. Choose your language preferences and click on Next and then, click on Repair your computer.
  4. In the next section, choose Troubleshoot.
  5. Click on Advanced options on the Troubleshoot screen.
  6. Then, select Automatic Repair or Startup Repair.
  7. Wait for Windows to complete the Automatic/Startup Repairs.

As soon as the process is complete, restart your PC for the fix to take effect. Now, check if the problem is fixed. If it persists, try the next fix.

2. Rebuild BCD Configuration

  1. Follow steps 1-5 in the method above and click on Command Prompt while using your Windows installation disk.
  2. Type the following commands one after the other and press Enter after each:
    • bootrec.exe /FixMbr
      bootrec.exe /FixBoot
      bootrec.exe /RebuildBcd
  3. Then, exit Command Prompt and restart Windows.

Rebuilding BCD has been reported by several users to have proved a potential fix for the Windows failed to start a recent hardware or software change might be the cause error.

3. Run SFC and CHKDSK Scans

  1. Insert your Windows booting media and restart your PC.
  2. Choose your language preferences and click on Next and then, click on Repair your computer.
  3. Select Troubleshoot.
  4. Click on Advanced options.
  5. Now select Command Prompt.
  6. Type the following command line and hit Enter: sfc /scannow
  7. Then type the following and hit Enter: chkdsk C: /f /r /x
  8. Now, exit the command prompt and restart your PC.

You can try running the SFC and CHKDSK scans, as they will search for bad sectors and perform recovery on them.

Alternatively, you can clearly repair this kind of error on Windows with a dedicated optimizing tool that will scan and fix corrupted files that result in Windows failed to start errors.

4. Perform a System Restore

  1. Insert Windows bootable installation media and restart your PC.
  2. After getting the prompt to Press any key to boot from CD or DVD, click on any key to continue.
  3. Choose your language preferences and click on Next and then, choose the Repair your computer option.
  4. Click on System Restore and follow the on-screen prompts to complete the restore.
  5. Restart your PC to effect the changes made.

Another helpful way to fix computer problems is by using the built-in System Restore feature in Windows.

You should be able to fix the issue after working your way through the provided fixes in this article.

Similar to this error is the UNetbootin Windows Failed to Start and Windows didn’t load correctly. You can check how to fix them using our detailed guides.

If you have any questions or suggestions, do not hesitate to use the comments section below.

Elden Ring Controller not Working: 5 Easy Ways to Enable it

Some users complain that the controller is not working when playing Elden Ring. Interfering apps and wrong settings could be at fault.

Luckily, there are some workarounds you can go through to fix this annoying issue, as we are about to show you.

What can I do if my controller won’t work with Elden Ring?

To start, disconnect other external devices like a mouse or keyboard and connect only the controller. Also, disconnect all Bluetooth devices and close other controller software.

If this still does not solve the problem, you can now proceed to the solutions below:

1. Disable HID-Compliant game controller

  1. Press the Windows key + X and select the Device Manager option.
    device manager
  2. Double-click the Human Interface Devices option to expand it, and right-click the HID-Complaint game controller option.
  3. Now, select the Disable device option.
    disable device
  4. Finally, click the Yes button when prompted to confirm the action.
    yes

Some users think the HID-Complaint game controller could be why the Eldn Ring controller is not working on Steam. However, they could fix it simply by disabling the device, as shown above.

2. Uninstall vJay software

  1. Press the Windows key + R, type appwiz.cpl, and click OK.
    appwiz command
  2. Right-click the Vjay app and select Uninstall.
    uninstall
  3. Finally, follow the onscreen instructions to complete the process.

The Vjay software is known to work against the Elden Ring controller on PC, leading to various issues. So, you need to remove it to fix this controller issue too.

3. Disable Steam Overlay

  1. Launch Steam and click the Library option at the top.
  2. Now, right the ELDEN RING game and select Properties.
    properties
  3. Next, click the General tab in the left pane.
  4. Finally, uncheck the box for Enable Steam Overlay while in-game.
    enable steam

The Steam Overlay feature facilitates easy game streaming. However, it can also be why Elden Ring controller is not working.

You need to disable the feature to get back to using your controller.

4. Change the Controller setting on Steam

  1. Launch Steam and select the Settings option.
  2. Choose Controller.
  3. Now, select General controller settings.
  4. Finally, check the box for the option you are using. Many users suggest choosing the Generic Gamepad Configuration option instead.
    generic

Sometimes, the Elden Ring controller might not work on your PC because you have not enabled the controller support. You should be able to do this by following the steps above.

5. Change Steam Input Per-Game Setting

  1. Launch Steam and click the Big picture mode icon at the top.
    big picture
  2. Choose the Library option.
    library
  3. Now, select Games > Elden Ring.
  4. Choose the Manage Games option.
  5. Next, select From Steam Input.
  6. Choose Controller options.
  7. Finally, select the Forced On option under Steam Input Per-Game Setting and relaunch Steam.
    forced on

The Steam Input Per-Game Setting feature allows you to play your game with the input setting you enabled. This has fixed the Elden Ring controller not working issue for many users. So, it would be best if you tried it too.

Lastly, if the feature is already activated, you can select the Force Off feature and check if that solves the problem.

With this, we can conclude this guide on fixing the Elden Ring controller is not working issue. Keeping your controller in check as well as other drivers ensures the game is error free.

If you are facing a similar issue in Elden Ring not launching, or not using GPU check our detailed guides to fix it quickly.

In the comments below, let us know the solution that helped you fix this issue.

WinZip Won’t Open: 3 Solutions to get it to Work Again

WinZip is one of the best tools for archiving files, but many users reported specific issues. For example, WinZip is not opening at all for some users.

This can be a problem since you won’t be able to extract any archives, but in today’s article, we will show you how to fix this problem once and for all.

Why is WinZip not opening?

Several factors can cause WinZip not to open on your PC. Below are some of the notable ones, according to users:

  • Outdated app: If WinZip won’t open zip files on your PC, it might be because the app is outdated. The solution to this is to download the latest version of the app.
  • Faulty installation: An incomplete or faulty installation is another known cause of this problem. Also, WinZip files might not open because some app files were corrupted. The solution is to uninstall the app and reinstall the latest version.

What can I do if WinZip won’t open?

1. Update the app

You will likely encounter different errors if you run an outdated version of WinZip. Sometimes, the WinZip window might not show or won’t open if it does.

Hence, to prevent frequent issues, you should download and install the latest version of WinZip

2. Reinstall WinZip

  1. Press the Windows key + I to open the Settings app and select the Apps option.
    apps
  2. Select WinZip and click the Uninstall button.
    uninstall
  3. Finally, follow the instructions on the screen to complete the process.

Once you remove WinZip, download it from the official source and install it again.

Hence, you can simply uninstall and then reinstall WinZip from its official website with one click. Doing this may also restore the corrupted files and fix the software on your PC.

For a complete removal process before reinstalling, see our step-by-step guide on how to uninstall WinZip on Windows 11 properly.

3. Make sure you have .NET Framework installed

  1. Visit Microsoft’s dotnet website.
  2. Now download the required version of the .NET Framework.
  3. Start the downloaded file and follow the instructions on the screen.

WinZip relies on .NET Framework, and if you don’t have the required version available, you won’t be able to run it. Once the .NET Framework is installed, check if WinZip is now opening.

What can I do if WinZip won’t open on Mac?

  1. Locate the WinZip app and select Move to Trash.
    move to winzip wont open
  2. Now empty your Trash.

Alternatively, you can do the following:

  1. Start Launchpad and type WinZip.
  2. Click and hold WinZip, and select X in the upper left corner of the screen.

After you uninstall WinZip, you need to download and Reinstall WinZip.

Once the software is installed and activated, the issue should be resolved. For example, many users reported problems with Big Sur, but after updating WinZip to the latest version, the problem was entirely resolved.

WinZip is excellent software, and if it’s not opening on your PC, ensure your trial version hasn’t expired. In most cases, you can fix these problems simply by purchasing the WinZip license and reinstalling the software.

If you can’t extract ZIP files on your PC, check our detailed guide to curtail the cause of the issue effortlessly.

Are you having additional problems with WinZip? Let us know in the comments below!

Microsoft shares insight on how Prometheus powers the new Bing

As you all know, the Redmond tech giant launched the new chatbot-AI based version of Bing earlier this month.

Fast forward to today and the company has also revealed it would be expanding the new Bing’s reach to mobile devices and to Skype.

That being said, know that one big aspect of the new Bing that hasn’t gotten as much attention is Microsoft’s in-house Prometheus technology.

To correct that, Jordi Ribas, the head of engineering for Microsoft’s Bing team, shared some information on Prometheus via a LinkedIn post.

What is Prometheus and how does it help Bing?

From reading the post we can learn that it all started in the summer of 2022, when OpenAI showed a demo of its chatbot AI technology to Microsoft, which would launch to the public just a few months later as ChatGPT.

Microsoft decided it could actually combine ChatGPT’s natural language with Bing’s up-to-date search information, and the result was Prometheus.

Now, with the Bing grounding technique, Prometheus is also able to integrate citations into sentences in the Chat answer so that users can easily click to access those sources and verify the information.

Thus, sending traffic to these sources is important for a healthy web ecosystem and remains one of top Bing team goals.

Please note that, since the new Bing went public earlier this month, Microsoft has obviously received a lot of feedback about its accuracy.

Redmond officials state that in the near future, the Prometheus model will increase the grounding data sent to it via Bing by four times the current amount which should make chat answers more accurate.

Another important aspect is that the design team took on the challenge and, after multiple iterations, developed a new UX that unified Search and Chat in a single interface.

With this, users could easily switch back and forth by clicking on UX elements on the page, or by simply scrolling or swiping up and down.

What is your opinion on the design process and capabilities of the new Bing? Share your thoughts with us in the comments section below.

Why did Modern Warfare 2 Uninstall Itself? [Simple Guide]

Playing games like Modern Warfare 2 on the PC is something almost everyone does for relaxation or fun. However, it can be tragic to open your game library and discover that MW2 uninstalled itself. It is an unusual issue that some gamers have experienced.

Also, we receive reports about Call of Duty: Modern Warfare not saving settings for some reason.

What causes Modern Warfare 2 to uninstall itself?

The Modern Warfare 2 game uninstalling itself on Xbox or PC may seem like a mystery to some gamers, but it has underlying causes. However, some factors that can be responsible for the game uninstalling itself are:

  • Game update issues – Modern Warfare 2 is unavailable in your game library due to its updating process. The update replaces the original game file instead of applying a patch, and if you cancel the update, it’ll count as deleting the game.
  • Corrupt Modern Warfare 2 game files – If its game files are corrupt, they can alter the base file, causing it to remove itself.
  • Issues with the game installation file location – If you stored the game in a temporary folder, you should know that the content of a temp folder is not always stable and can delete at any time.

Also, issues with Windows installation or your console can cause Modern Warfare 2 to uninstall itself. Fortunately, you can fix the problem by troubleshooting your console/PC.

What can I do if Modern Warfare 2 uninstalled itself?

Before trying any advanced fixes, go through the following:

  • Ensure to download all the updates completely to prevent the loss of the previously installed game.
  • Fix network congestion on your device.
  • Update your console. To update the Xbox console, check our detailed guide about updating the Xbox One console and try reinstalling the game to check if the error persists.
  • If you’re playing the game on a PC, install all the Windows updates.

If you can’t fix the problem, proceed with the solutions below.

1. Power cycle the Xbox console and reinstall the game

  1. Hold the Power button on the Xbox console for about ten seconds to drain all power residue.
  2. Unplug the power cable from the console, then wait for 2 minutes.
  3. Connect the power cable back into the console, then press the Power button to turn it on.
  4. After the Xbox is fully booted, reinstall Modern Warfare 2.

Power cycling the Xbox console will resolve issues that can cause problems with its activities.

2. Reinstall the game in a separate folder

  1. Left-click the Start button, type Battle.net, and click Open to launch the app.
  2. Go to Settings.
  3. Then, click the Downloads section. Click on the Default install location and ensure it is not set to a Battle.net version folder.
  4. Change the location to a different folder and reinstall the Modern Warfare 2 app.

Since installing the game in a temp file can be problematic, we recommend reinstalling it separately from the Battle.net or Steam desktop app folder. It’ll help keep the game installation safe and secure against further update disparities.

Also, be sure to completely download the update without interrupting, as it can result in the game being cleared off your system.

You might also be interested in how to fix the Xbox controller that is detected but not working on your console or what to do when you encounter a reset rank error.

More so, you can read about how to verify the integrity of game files not working and get your game running.

Should you have further queries or suggestions concerning this guide, please drop them in the comments section.

Metro Exodus Black Screen: 4 Fixes to use if You’re Stuck

Metro Exodus is an epic apocalyptic first-person shooter for Windows. Unfortunately, some Metro players have had a few blank screen issues with the game.

For some players, the screen goes blank just after the intro or launching of the game. Consequently, those players can’t get Metro Exodus up and running.

Why am I getting a black screen in Metro Exodus?

There could be several reasons why you are getting a black screen in Metro Exodus, and here are the most common ones and their solutions:

  • Graphics drivers – Outdated drivers are known to trigger many problems, so you should ensure they are always up to date. 
  • Display resolution – If your resolution is too high, your system may struggle to run the game, which can cause a black screen.
  • Antivirus software – Some malware removal tools can interfere with the game’s performance and cause a black screen. 
  • Overclocking – Overclocking your CPU or graphics card can cause stability issues in the game, leading to a black screen.
  • Hardware issues – If none of the above are responsible, it could be a hardware issue. So your system may not meet the minimum requirements to run the game.

How can I fix the Metro Exodus black screen problem?

1. Rename Metro files

  1. Open File Explorer with the Windows key + E keyboard shortcut.
  2. Steam users will need to open this path:
    C:\Program Files (x86)\Steam\steamapps\common\Metro Exodus
  3. Epic Games users should open the folder:
    C:\Program Files\Epic Games\Metro Exodus
    Metro Exodus folder metro exodus black screen
  4. Then search for these game files in your Metro Exodus folder: Intro.webm, Legal.webm, and Credits.webm.
  5. Edit those file titles by right-clicking them, selecting Rename, and entering .old at the end of the file name. The files should be intro.webma.old, legal.webm.old, and credits.webm.old.

This fix will work if you get the Metro Exodus black screen after the game intro.

2. Restart Metro in Safe Mode

  1. Press the Alt + F4 hotkey when the Metro screen goes blank.
  2. Next, right-click your Taskbar and select Task Manager.
    metro exodus black screen
  3. Click the Metro.Exodus.exe process on the list of processes, then select the End task option.
    metro exodus black screen
  4. Now click End process on the dialog box window to terminate the game.
  5. Click Yes on the Metro Exodus dialog box to open the game in safe mode.
  6. Next, click the Options box, and select Video.
  7. Select the DX 11 (DirectX 11) option.
    metro exodus black screen

This fix will also work if you get the Metro Exodus black screen after the game intro.

3. Run in window mode

  1. Launch Steam.
  2. Click on Library.
  3. Right-click the Metro Exodus game and click Properties.
  4. Under Launch options input -windowed.
    metro exodus black screen

Alternatively, follow the steps below:

  1. Press the Alt + Enter hotkey when Exodus starts.
  2. Next, select Options, then Video to open the game’s graphical settings.
  3. Next, select a resolution for the game that matches your Windows desktop’s resolution.

If you encounter the Metro Exodus black screen on launch, this fix should work.

4. Lower resolution with the benchmark utility

  1. Open this Steam folder:
    C:\Steam Games\steamapps\common\Metro Exodus
  2. Open the Benchmark.exe file.
  3. Lower your resolution configuration for the game with the benchmark utility.
    metro exodus black screen

This fix will work if you experience the Metro Exodus screen flash.

These are some of the confirmed fixes for Exodus’ blank screen issue. Hopefully, future patch updates for Exodus will fix the above bugs.

Meanwhile, don’t hesitate to share your experience with us by using the comment section below.

How to use Bing on Edge and Skype mobile

After a few weeks of the new AI-powered Bing on desktop, Microsoft said that the search engine experience is here for mobile users, especially for Edge and Skype mobile apps on both iOS and Android devices.

Matter of fact, you’re in for a treat because Microsoft also announced that it comes to voice access that lets you speak to your phone to command searches. Although it starts a little slower in a robotic kind of voice, the functionality works just fine. The chatbot is also well integrated into Skype and you can invite it to conversations.

“In this spirit of learning and continuing to build new capabilities, we’re excited to share today the preview release of the new Bing and Edge mobile apps. We’re beginning to roll out the incredible capabilities of the new Bing and Edge on your smartphone along with some exciting new features, such as voice input. In addition, we are creating a new chat experience, beginning with Skype, to enhance your social communications with your friends and family.”

So, other than that, it shares the same functionality as its desktop counterpart. When typing a search/a command in the toolbar, you can do a complex search and make refinements. It can even create stories, poems, or ideas for a project in a ChatGPT-like experience.

How can I use Bing on Edge and Skype mobile?

1. Go to your mobile’s app store (Android or iOS). In this case, we’re on an iOS-supported device.

2. Click Get.

3. Only those who have been accepted from the waitlist can access the new. If you do, click this button to start the chat.

4. If not, you’ll see this screen pops up. Click Join the waitlist.

It seems like the recent controversy surrounding the new Bing does not phase Microsoft at all. Some users reported that they have been violated, gaslighted, and bullied, while others have gotten into a bizarre argument over the day’s date on top of being called a bad user.

Have you used the new Bing on desktop or mobile? Let us know in the comments!

How to Fix Modern Warfare 2 Vault Edition Not Working

Call of Duty: Modern Warfare 2 is one of the best first-person shooter games. Even though the game is quite pricey, a Vault edition is released and costs more money. However, users report Modern Warfare 2 Vault Edition not working after paying for it.

Likewise, players complain about other issues like Call Of Duty: Modern Warfare not saving settings after adjusting it.

Why is Modern Warfare 2 Vault Edition not working?

Modern Warfare 2 Vault Edition not working is common to Xbox, PlayStation 4 & 5, and PCs. It can occur in variations like Modern Warfare 2 Vault Edition upgrade not working on PC and Modern Warfare 2 Vault Edition content not working on Xbox.

Furthermore, the error can occur on the device for many reasons. Some factors that may be responsible are:

  • Corrupt game installation file – Bugs and corrupted files cause the game to malfunction, resulting in an error. You can check out the best file repair software to fix corrupted files here.
  • Issues with Account licensing – If the license has expired or needs to be reactivated, the game will not work.
  • Using the New Zealand hack – Some players changed their time zone to New Zealand for early access, but that can trigger issues with the game not working.

These causes may vary on different devices. Nonetheless, we’ll take you through some basic troubleshooting steps for fixing the problem.

What can I do if Modern Warfare 2 Vault Edition is not working on Xbox/PC?

Go through the following preliminary checks:

  • Turn off apps running in the background on your computer.
  • Relaunch the Modern Warfare 2 Vault Edition.
  • If you are using the Call of Duty: Modern Warfare 2 New Zealand hack, reset to your timezone and await the official launch.
  • Restart your PC/Xbox and check if the problem persists.
  • You may also request to repair your console. Do not hesitate to consult the Device service and repair page to submit a repair request.

The Modern Warfare 2 Vault Edition not working issue can be solved with the solutions below.

1. Install all available game files and add-ons on Xbox

  1. Using your controller, select My Games and Apps from the Xbox menu.
  2. Press the Menu button and go to the Manage games and add-ons tab.
  3. Select the Modern Warfare 2 game.
  4. Install all available game files and add-ons.
  5. Press the Xbox button on your controller to open the guide, then select Profile & system, and select Settings.
  6. Go to General, go to Power Options, and select Restart now.
  7. Restart the console and check if the issue persists in the game.

Installing all game files will fix the problem if it is due to game installation files not being fully installed on your console. This solution will fix the Vault edition MW2 not working Xbox problem.

If the MW2 Vault Edition is not showing up in the store, you may change the region of your console and search again.

2. Restore licenses on PlayStation

  1. Go to your PlayStation Settings.
  2. Select Users and Accounts and choose Other.
  3. Select Restore Licences.

On PlayStation consoles, the most common cause of Modern Warfare 2 Vault Edition not working is that the licenses are not loaded, and this solution will fix the problem.

3. Restart Windows in Safe Mode

  1. On the sign-in screen, press the Shift key while holding the Power button.
  2. Hold the shift key to open the Advanced Recovery Options page.
  3. Click on Troubleshoot, then select the Advanced options.
  4. Click on Startup Settings.
  5. Press 4 to Enable Safe Mode and select Restart.

Restarting Windows in Safe Mode will fix any startup issues that may interrupt the game. It’ll resolve the Vault Edition Modern Warfare 2 not working.

4. Scan and repair Modern Warfare 2 on PC

  1. Left-click the Start button, type Battle.net, then open the desktop app.
  2. Select Modern Warfare 2 in your library and click Settings next to the Play button.
  3. Click on the Scan and Repair option, then Begin Scan.
  4. If the scan finds any corrupt or missing files, it’ll automatically repair them.
  5. Restart your game and check if the issue persists.

Repairing your game files can fix corrupt installation files causing the Vault Edition not to work in your game. Check ways to repair Blizzard games with corrupt files for more information.

In case the MW2 Vault Edition upgrade is not working, you may also think about reinstalling the game with the previous version.

You’re probably asking: Is the MW2 Vault edition worth it? Many players say it does, but that only depends on your assessment.

Alternatively, read our guide on fixing Modern Warfare packet loss and get your game to work. Likewise, our readers can check our article on Dev Error 6068 in Modern Warfare and how to fix it.

For further queries or questions concerning this guide, you can drop a comment in the section below.

Posted in Fix

iCloud for Windows Did Not Install Properly: 4 Easy Fixes

Many users contacted us, reporting that the iCloud for Windows did not install correctly on Windows 10. They can’t install it even after multiple tries and with different client versions.

The iCloud for Windows software lets you sync Apple’s cloud storage with your Windows desktop or laptop. This is undoubtedly handy software for sharing documents, photos, videos, and calendars across multiple devices.

We will discuss the causes and the best solutions for installation problems.

Why won’t iCloud for Windows install on my PC?

There can be several reasons why iCloud for Windows may not install on your PC. Here are a few possible reasons:

  • Compatibility issues – iCloud for Windows may not be compatible with your PC’s operating system or hardware. 
  • Outdated software – If your PC’s software is outdated, you may encounter issues while installing iCloud for Windows. 
  • Firewall or antivirus software – Your PC’s firewall or antivirus software may be blocking the installation of iCloud for Windows. 
  • Corrupted installation files – If the installation files for iCloud for Windows are corrupted, you may be unable to install the software. 
  • Apple ID issues – iCloud for Windows requires an Apple ID to function. Ensure that you are signed in with the correct Apple ID and that it works properly.

What is the latest version of iCloud for Windows?

The latest version of iCloud for Windows was version 12.5. iCloud for Windows is regularly updated by Apple to ensure compatibility with the latest versions of Windows and to add new features and functionality.

If you’re getting any installer package error for iCloud, these are a few potential fixes that might get the software up and running.

What can I do if iCloud for Windows did not install properly?

  1. Add the Windows Media Pack to Windows 10 N/KN
  2. Uninstall the previous iCloud for Windows version
  3. Turn Windows Media Player on
  4. Run the Program Install and Uninstall Troubleshooter

1. Add the Windows Media Pack to Windows 10 N/KN

  1. Open Microsoft’s official page from which you can save the Media Feature Pack to your hard drive.
  2. Press the Download button on that page.
  3. Then you can select to download the KB3099229_x86.msu or KB3099229_x64.msu Media Feature Pack. download media feature packThe KB3099229_x64.msu option is for 64-bit Windows, and KB3099229_x86.msu is for 32-bit.
  4. Press the Next button to download the Media Feature Pack.
  5. Then you can open the installer to install the pack.

Windows Media Player is an essential requirement for the iCloud for Windows software. The WMP is widely included with most Windows 10 versions except N and KN.

So N and KN users might get an error message stating that media features are missing when installing iCloud, so you must install it as mentioned.

2. Uninstall the previous iCloud for the Windows version

  1. Press Windows + R, type appwiz.cpl, and hit Enter.
    icloud for windows did not install properly
  2. Click on iCloud and select the Change button.
    icloud for windows did not install properly
  3. Select Remove and click Next.

If you’re attempting to install a more updated iCloud version to replace an older version, uninstall the outdated copy of the software first.

It’s also better to do that with a third-party uninstaller that removes leftover files, folders, and Registry entries. It is essential to remember that standard, simple uninstalling doesn’t remove all this data.

Not only will leftover files prevent you from installing an updated version of your app, but they will also take up storage space for no reason.

Uninstaller tools are easy to use. Most have an interface similar to Windows’s Add or remove programs panel. You get to a list with all the programs on your PC and select which one you want to uninstall.

Then allow the uninstaller to complete the process, reboot your PC and try to install iCloud again.

3. Turn Windows Media Player on

  1. Type Windows features in the search box, and select Turn Windows features on or off to open the window below.
  2. That window includes a Media Features checkbox. Click the + to expand Media Features. If that checkbox isn’t selected, select the Windows Media Player checkbox to turn the WMP on.
  3. Press the OK button to close the Media Features window.

4. Run the Program Install and Uninstall Troubleshooter

  1. First, open this webpage and press the Download troubleshooter button to save the Windows troubleshooter.
    icloud for windows did not install properly
  2. Select MicrosoftProgram_Install_and_Uninstall.meta to open the troubleshooter.
  3. Click Advanced and select Apply repairs automatically.
  4. Press the Next button to run the troubleshooter.
  5. Select the Installing option to detect and fix software installation errors.select the program installation troubleshooter
  6. The troubleshooter asks you to select a program you’re trying to install. Select iCloud for Windows from that list, then press the Next button.

With any of these solutions, you can install iCloud for Windows. Then, when you’ve got the software up and running, check out this article that provides further details on how to set up iCloud for Windows 10.

Feedback is welcome, so don’t hesitate to use the comments section below and tell us which solution worked for you.

0x80070015 Bitlocker The Device is not Ready: 8 Ways to Fix

If you are a Windows user and have encountered the error message 0x80070015 Bitlocker The Device is not Ready, you may wonder what this message means and how to resolve it.

This error message can occur when trying to encrypt or decrypt a drive using Microsoft’s Bitlocker encryption software.

We will run you through common triggers and the best solutions to fix the error.

Why does error 0x80070015 in Bitlocker occur?

Error 0x80070015 in Bitlocker can occur due to a variety of reasons. Here we enumerate some of the primary triggers:

  • Hardware issues – If the drive you are trying to encrypt or decrypt has physical damage, it can cause the error. Additionally, if the drive is not connected correctly or is experiencing power issues, it may lead to an error.
  • Software conflicts – Conflicts between Bitlocker and other software on your system can cause the error. This can occur if you have recently installed or updated software that interacts with the drive you are encrypting or decrypting.
  • Malware or viruses – Malware or viruses can also cause the error. These malicious programs can interfere with the encryption or decryption process.
  • Corrupted system files – If system files on your computer become corrupted, it can cause various errors, including the Bitlocker error.
  • Drive format issues – If the drive you are trying to encrypt or decrypt has formatting issues, such as being formatted in a file system that Bitlocker does not support, it can lead to the error.

Overall, error 0x80070015 in Bitlocker can occur for various reasons, and identifying the root cause can be challenging. However, you can resolve the issue by troubleshooting.

How can I fix 0x80070015 in Bitlocker?

Before diving into any fixes, we suggest checking the drive connection. This error often occurs on external drives, so ensure the device is correctly connected to your computer. You can also unplug and plug it back in to establish the connection.

It would be best to close all the programs using the drive before jumping into any solutions.

1. Run the Hardware and Devices troubleshooter

  1. Press Windows + I to open the Settings app.
  2. Select Update & Security.
    0x80070015 bitlocker
  3. Select Troubleshoot in the left-hand pane, search for Hardware and Device, and click Run the troubleshooter.
    0x80070015 bitlocker

Windows has its built-in hardware troubleshooter that can fix general issues causing your hardware to malfunction. If you’re having trouble with the troubleshooter itself, this fix guide might come in handy.

It is worth mentioning that some external drive manufacturers offer dedicated troubleshooters. If the device is not ready and the error persists, go to your drive manufacturer’s website and check if any drive troubleshooter is available.

If so, download and install the troubleshooter and run it to fix your drive.

2. Uninstall and reinstall the USB controller driver

  1. Press the  Windows key + X and select Device Manager.
  2. Locate and expand Universal Serial Bus controllers, right-click your driver, and select Uninstall device.
  3. Restart your computer and check this action solves the problem.

You may want to repeat the process for all outdated drivers. It would be best to have a yellow mark on the obsolete drivers.

It’s also possible to update your drivers automatically by letting the Device Manager search for the newest updates.

If you want to apply this, you should simply select the Update driver option from the context menu and choose the method to automatically update the USB driver.

Otherwise you can always rely on an automated tool such as Outbyte Driver Updater which not only search, find and update the USB driver on your behalf, but will do it for any other outdated or missing driver on your device without hesitation.

⇒ Get Outbyte Driver Updater

3. Assign a drive letter to your external drive

  1. Press Windows Key + R to bring up the Run window, type diskmgmt.msc, and hit Enter to bring up the disk management console.
    0x80070015 bitlocker
  2. Right-click on the external drive to open the Drive menu, click Change Drive Letters and Paths, then click the Change button.
    0x80070015 bitlocker
  3. Click the Assign the Following Drive Letter radio button, then select the drop-down box to view the available drive letters.
  4. Select the desired drive letter to assign to the external drive and click OK. A warning message will appear; click OK.

4. Install the latest drivers in compatibility mode

  1. Download the driver from the manufacturer’s website.
  2. Right-click on the driver setup file and select Properties.
  3. Click on the Compatibility tab, check the box for Run this program in compatibility mode for, and select the OS version from the drop-down menu.
  4. Once the installation completes, restart your computer and retry your command.

Install the latest driver for USB from your drive’s manufacturer website, and try installing it in Windows compatibility mode to run the program using settings from a previous Windows version.

5. Run a full system scan

  1. Type Windows Security in the Search bar, and click on the relevant search result.
    0x80070015 bitlocker
  2. Now, click on Virus & threat protection here.0x80070015 bitlocker
  3. Click on Scan options.
  4. Select Full scan and click the Scan now button at the bottom.

Malware may cause various issues on your computer, including errors. Perform a full system scan to detect malware on your computer and fix the Bitlocker error 0x80070015.

6. Repair your files

  1. Hit Start, type command, right-click the Command Prompt option and select Run as administrator.
    0x80070015 bitlocker
  2. Now type the script below and hit Enter.
    sfc /scannow
    0x80070015 bitlocker
  3. Wait for the scanning process to complete, and then restart your computer. All corrupted files will be replaced on reboot.

The simplest way to repair your registry is to use a dedicated tool, such as CCleaner. Remember to back up your registry first in case anything goes wrong.

You can also use Microsoft’s System File Checker to check for system file corruption. However, this utility is only available on Windows 10.

7. Update your OS

  1. Press Windows + I to open the Settings app.
  2. Click on Update & Security.
  3. Select the Check for updates button and wait while updates are downloaded.
    0x80070015 bitlocker

Ensure you’re running the latest Windows OS updates on your machine. As a quick reminder, Microsoft constantly rolls out Windows updates to improve the system’s stability and fix various issues. For example, an update may fix the Bitlocker error 0x80070015.

8. Clean boot your computer

  1. Press Windows + R, type msconfig, and hit the Enter key. This will open the System Configuration window.
  2. Click the Services tab, tick the Hide all Microsoft services option, and click on the Disable all button.
  3. Next, click on the Startup tab, and select Open Task Manager.
  4. Click on each startup item in the Task Manager window and select Disable.
    0x80070015 bitlocker
  5. Close the Task Manager window and go back to the System Configuration window.
  6. Click on OK and then click on Restart.

A clean boot starts Windows using a minimal set of drivers and startup programs to eliminate software conflicts that may occur when installing a program, updating it, or simply launching it.

The BitLocker error code 0x80070015 can be frustrating when accessing encrypted data on a BitLocker drive. However, our shared solutions will help you resolve the issue.

Lastly, please share what worked best for you in the comments section.

VirtualBox Fatal Error During Installation: 3 Methods to use

VirtualBox fatal error during installation is often menacing for people hoping to use the virtualization application. This error will suddenly terminate the installation, and you will not be able to run Windows 10 as a host.

While installing VirtualBox is straightforward, you may sometimes face this difficulty. So we will navigate through triggers and solutions to the installation error.

Why is VirtualBox not installing?

From user feedback, we gather that various elements may be responsible for VirtualBox not installing on your computer. A few of these include the following.

  • Insufficient system requirements – VirtualBox requires a 64-bit CPU and operating system and enough free disk space and memory to function correctly. If your computer does not meet these requirements, VirtualBox may not install.
  • Antivirus software interference – Antivirus software can sometimes interfere with the installation process of VirtualBox. 
  • Conflicting software – Other virtualization software, such as VMware or Hyper-V, can conflict with VirtualBox and prevent it from installing. 
  • Lack of administrative privileges – If you don’t have the necessary administrative privileges to install software on your computer, VirtualBox may not install correctly.
  • Error messages – If you receive an error message during installation, take note of the error code and search for a solution online. The error message can help identify the specific problem preventing VirtualBox from installing.
  • Outdated drivers or software – VirtualBox may not install or function properly if your drivers or software are outdated. 
  • Corrupted installer – If the VirtualBox installer file is corrupted or incomplete, it may not install correctly. 

With these triggers out of the way, let us discuss some fixes.

How can I fix the VirtualBox fatal error during installation?

Before trying any solutions, try an alternative program that allows you to create multiple virtual environments on a single device or server.

VMware is an advanced tool with robust capabilities that enable you to deploy Kubernetes environments on the Desktop and run/build/push/pull OCI Containers with vctl. It has a customizable interface and supports the latest Windows 10 updates.

⇒ Get VMware

1. Run VirtualBox Installer as Admin

  1. Locate the directory where the VirtualBox installer is saved.
  2. Right-click on the Installer and select Run as administrator.
    run as administrator
  3. When the UAC prompts appear, click on Yes to proceed.
  4. Proceed with the on-screen instructions and check if the error is resolved.

2. Disable Antivirus

  1. Click on the hidden access arrow in the Taskbar.
    virtualbox fatal error during installation
  2. Click on your antivirus icon, hover over Avast shields Control and select Disable for 10 minutes (This step varies for different antivirus software).
    virtualbox fatal error during installation

If necessary, also disable Windows Real-Time Network Protection from the settings. To do this:

  1. Type Windows Security in the Search bar, and click on the relevant search result.
    virtualbox fatal error during installation
  2. Select Virus & threat protection.
    virtualbox fatal error during installation
  3. Click on Manage settings.
  4. Turn off the Real-time protection toggle switch.

3. Run Microsoft Program Install troubleshooter

  1. Go to the Microsoft Program install troubleshooter page and click the Download troubleshooter button.
  2. Run the Microsoft Program Install Troubleshooter tool and click on Next.
  3. From the options, select Installing.
  4. The tool will scan the system for problems and recommend appropriate action.
  5. Lastly, reboot the system and check for improvements.

That is as far as we shall discuss in this guide. However, following the troubleshooting steps outlined in this article can increase your chances of successfully installing VirtualBox and enjoying its benefits.

Finally, in the comments section, let us know which solutions were most effective.

Javascript Error Occurred in the Main Process [Windows 11 Fix]

The Windows 11 Javascript error is a common occurrence, mainly if you use your browser a lot.

Javascript is a programming language that can be included on web pages to make them more interactive. When a user visits a webpage containing Javascript, the web browser executes (or runs) the script. 

This means that websites can include programs running directly inside the browser rather than requiring the user to download and install an application on their computer. 

When you encounter a Javascript error, it is likely your browser isn’t able to process the Javascript code. Most of the time, this is because of an outdated version of the software or browser.

Why I’m I experiencing the Windows 11 Javascript error?

The Windows 11 Javascript error may occur because of some of the reasons listed below:

  • Javascript is not enabled – When the error occurs, your browser is not allowing the particular website to run JavaScript. Web browsers allow you to access and enable or disable JavaScript through the browser settings. If you have problems using JavaScript on certain websites, this might help identify your issue.
  • Using an outdated browser – Occasionally, you may run into a JavaScript error in your web browser. This can happen when your browser is out of date. You’ll want to ensure you use your web browser’s latest version.
  • Antivirus is blocking Javascript – Antivirus software such as your Firewall can block Javascript for security reasons. Certain antivirus programs may cause it to crash while browsing the Internet since they block the execution of JavaScript code on specific sites. Try disabling the antivirus program and see if it works.
  • Browser extensions – Extensions and add-ons can cause problems accessing websites with effective JavaScript code. Disable browser extensions and add-ons, then rerun the site to see if you have resolved the issue.
  • Browser cache – Sometimes, an outdated browser cache can also lead to problems with JavaScript code in specific web browsers. Please clear your browser’s cache and cookies before restarting it to resolve this issue.
  • Corrupted files – If your operating system files are corrupted, it can also cause problems with loading pages that rely on effective JavaScript code. Run an SFC scan to replace corrupted system files with new ones and check if that fixes your problem.

If you suspect any of these could be the root cause of the Javascript error, proceed to try our solutions below.

How can I fix the Windows 11 Javascript error?

Before troubleshooting, consider switching to a different browser may be better. For example, most browsers support Javascript, and it might be easier to use a different one.

Sometimes, a simple switch-up can make all the difference when using another browser. For example, a different browser might have better Javascript support. Many browsers are available to choose from, and most are free.

Finding the most suited browser choice with built-in features and great practical navigation tools that work with Javascript language.

Hence, Opera One is one of the most popular browsers worldwide that can be used on various operating systems and devices. The browser is highly-customizable, and even comes with a built-in AI.

Opera One

Consider this fully secured browser with optimized navigation and error-free usage.
Free Download Visit website

1. Enable Javascript in your browser

  1. Navigate to your browser (in this case, Chrome), then click on the three horizontal dots at the top right corner to open the Menu.
  2. Select Settings.
  3. Next, click on the Advanced option and click on Content Settings. 
  4. Find Javascript.
  5. Toggle it on to ensure it is allowed.

2. Enable Active Scripting

  1. Press Windows + R keys simultaneously to open the Run dialog box.
  2. Type inetcpl.cpl to open Internet Properties.
  3. Select the Security tab and click on Custom level.
  4. Navigate to the Scripting section, click on Enable, then press OK. 
  5. Click Yes on the pop-up windows to effect the changes.
  6. Restart your PC and see if the problem persists.

3. Delete temporary Internet files

  1. Press Windows + R keys simultaneously to open the Run dialog box.
  2. Type inetcpl.cpl to open Internet Properties.
  3. Select the General tab, and under Browsing History, click the Delete button.
  4. Check Temporary Internet Files, Cookies, and History in the dialog box that pops up and press Delete.
  5.  Go back and see if the problem persists.

4. Check and install Windows Updates

  1. Hit the Windows + I keys to open Settings.open settings
  2. Select Windows Update on the left pane.
  3. Click on Check for updates.
  4. Restart your PC once the updates finish installing.

Regarding security risks, disabling JavaScript will not protect you from all possible threats. That doesn’t mean that JavaScript can’t be used maliciously, though. 

Malicious JavaScript can be used to hijack cookies and other sensitive data or even to change the appearance of a Web page so that users unwittingly download malware or reveal personal information (such as bank details).

As a safety precaution, it is always advisable to rely on secure and high-performance browsers for all your online activities.

In addition, you may experience issues with your browser as sometimes Javascript is not supported but worry not, as we have an expert guide on how to fix it.

We hope you were able to find a solution if you were experiencing the Javascript error on your Windows 11 PC.

As always, share any thoughts or suggestions in the comments section below.

How to Enable Advanced Graphics on Windows 11

Windows 11 is a powerful operating system but doesn’t come with the most powerful graphics cards. The graphics card is the main component of your computer that helps you to display images on the monitor.

This is especially useful if your computer has a low resolution and you want the best experience possible. If you notice a bit of lagging and stuttering when playing games, enabling advanced graphics on your WIndows 11 PC could help you, and in this article, we show you how.

How can I improve my graphics card performance in Windows 11?

Most Windows devices come with an integrated GPU. Depending on the activities you perform on your PC, it could be enough for you. However, gamers will need a dedicated GPU. Still, even with an integrated graphics card, you can get more out of it.

Here’s what you can do to elevate your GPU’s performance:

  • Upgrade your RAM memory – RAM is a crucial hardware component to your computer’s performance. This is important because when you’re running a game or an application, the more memory you have, the faster you’ll be able to access that data.
  • Upgrade drivers – Upgrading your graphics card driver should be done regularly. This will ensure that your system continues to receive the latest updates from the manufacturer and eliminates any compatibility issues. 
  • Change the display resolution – A higher resolution will help you enjoy better visual quality when playing games or watching videos on your computer. To that effect, we have some of the best display settings for better graphics.
  • Install a third-party graphic card driver – The integrated GPU has been designed as a low-cost option for users who do not want to spend money on a dedicated graphics card. But it’s not as powerful as the dedicated cards. You may notice that sometimes Windows 11 is not using the GPU, or your games run slowly and crash occasionally if you’re using this card.
  • Power settings – Your system’s power settings will also affect GPU performance. You will need to tweak your power settings to get a balance of efficiency and performance.

While all these may help you get the most out of your graphics card, it’s also important to consider the overall system configuration. This will ensure that your system has enough power to handle everything that you want it to do and that you’re not just overworking your GPU.

How do I enable advanced graphics in Windows 11?

1. Use Windows Security

  1. Hit the Windows key, type Windows Security in the search bar, and click Open.
  2. Click on App & browser control, then select Change Applications Guard settings under Isolated browsing.
  3. Locate the Advanced graphics section and toggle it on.
  4. Windows will restart, and this setting will now be activated.

2. Use the Registry Editor

  1. Hit the Windows + R keys to open the Run command.
  2. Type regedit in the dialog box to open the Registry Editor.
  3. Navigate to the following location: Computer\HKEY_LOCAL_MACHINE\SOFTWARE\Microsoft\Hvsi
  4. Double-click on EnableVirtualGPU, then set 1 as the Value data and hit OK.

If you prefer using this route, we must remind you that making edits to the Registry could have serious consequences. Your PC could be at risk of being unusable. 

To cushion yourself from such eventualities, we recommend that you create a restore point first. This will allow you to return to a previous version if anything happens.

If you’d like to know how to maximize your gaming performance in Windows 11, we have a list of graphic settings that will offer you an unmatched gaming experience. 

You can also tweak your mouse settings for enhanced gameplay, so don’t hesitate to check out our article.

If you have enabled advanced graphics on your Windows 11 PC, we’d love to hear about your experience thus far. Leave us a comment down below.