How to avoid spam emails after upgrading to Windows 11

In a digital age like this, being spammed with ads in your email inbox seems like a common reoccurrence. Microsoft, the world’s largest tech giant with an operating system product that’s running on almost every electronic device, is no stranger to that controversy.

Besides the Microsoft Rewards controversy that showers you with redeemable gift points for searching on Bing, the Redmond-based company installs bloatware on every computer with Windows 11 pre-installed in it. That unwanted third-party software also usually comes from the PC’s manufacturer itself, eg. Dell, Asus, etc.

This user on Reddit, for example, reported that after performing a fresh install of Windows 11, the setup forced them to create a Microsoft account on their Dell computer. Then, by the time the installation finished, the user found unwanted apps living inside its ecosystem plus annoying email ads.

I was pretty shocked to find all of the Microsoft bloatware installed including Netflix, Skype, LinkedIn and a whole bunch of Dell add ons which I never requested. Even more shocking to me, since then I’ve received six separate marketing emails either selling me OneDrive or offering me tips and tricks etc, and they have no option to unsubscribe, so they’ll just keep coming.

So, is there any way to fix it, considering Microsoft always pushes users to create an account instead of letting them use local accounts as they did with previous Windows?

Read along to find out how.

How to avoid spam emails after upgrading to Windows 11

1. Fresh install with a local account

1. When setting up Windows 11, do not connect to the internet. If you don’t know how, read our guide to do a fresh reinstall of Windows 11 with 2 easy steps. 

2. Hold [Shift] + F10 (sometimes [Fn] + [Shift] + F10)

3. Type this command on the Command Prompt:

oobe\bypassnro

4. The setup process will restart, but it’ll allow you to make an offline account. 

2. Control Panel

1. Before connecting to the internet, open the Control Panel.

2. Type Change device installation settings into the search box. The result should show it under Devices and Printers.

3. Click No (your device might not work as expected), then hit Save changes.

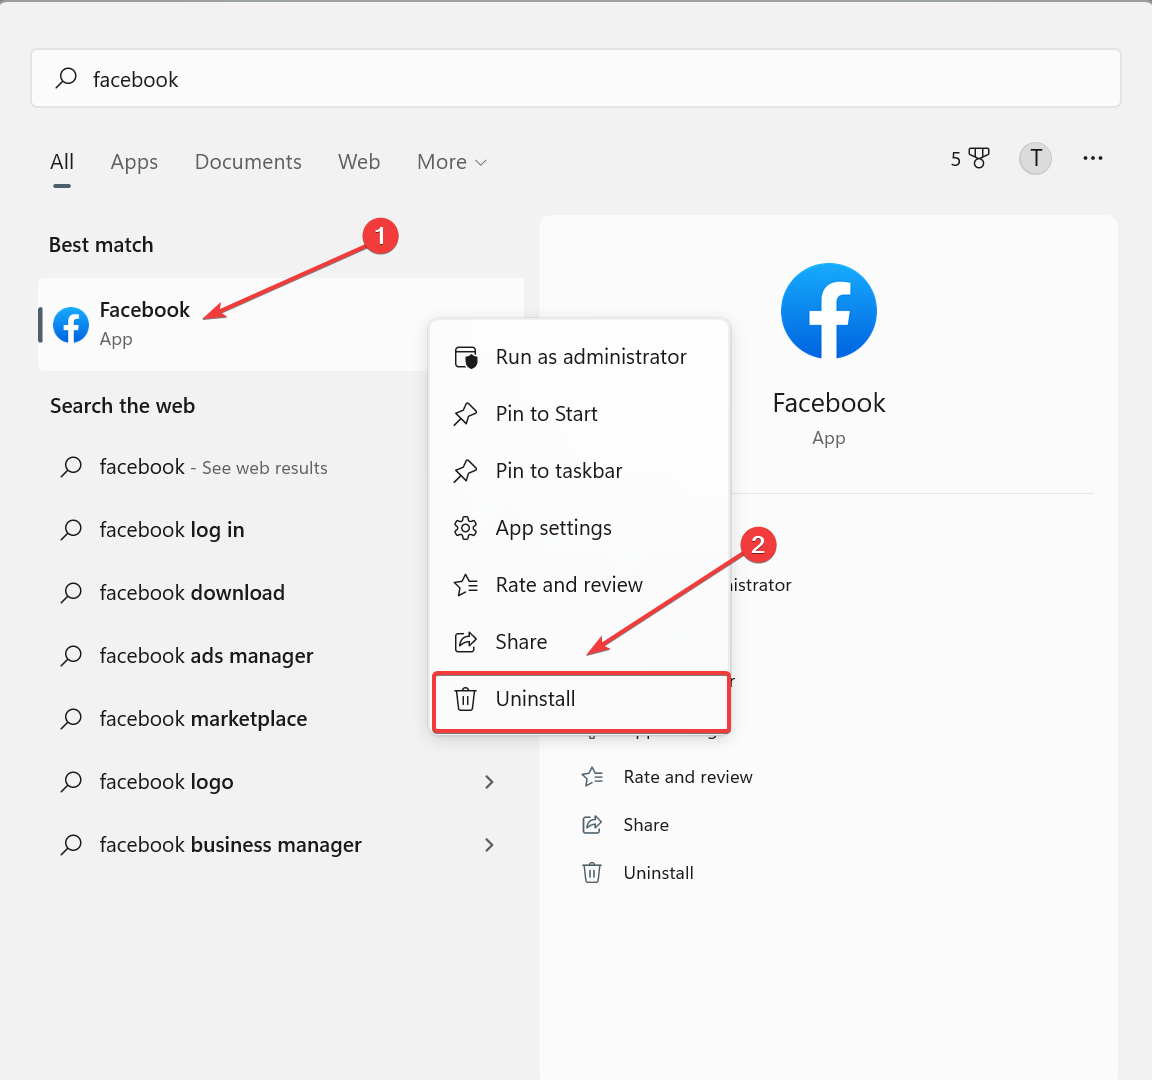
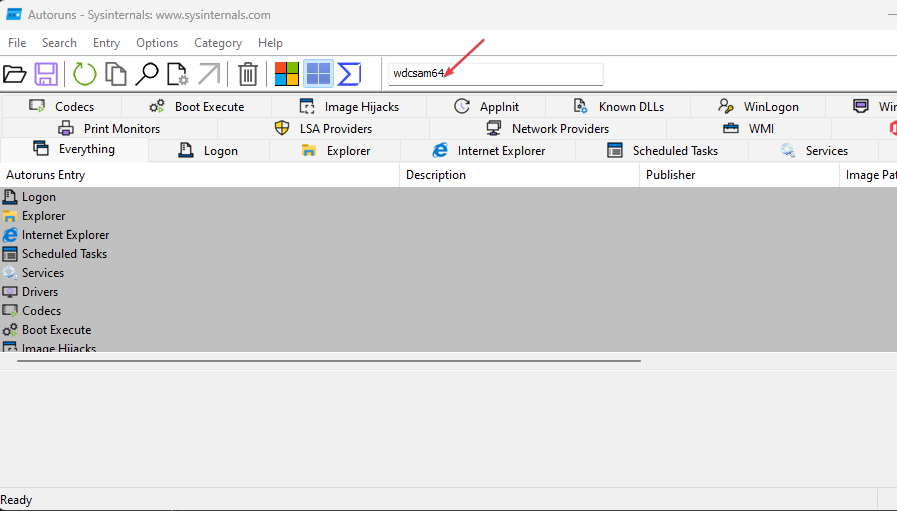
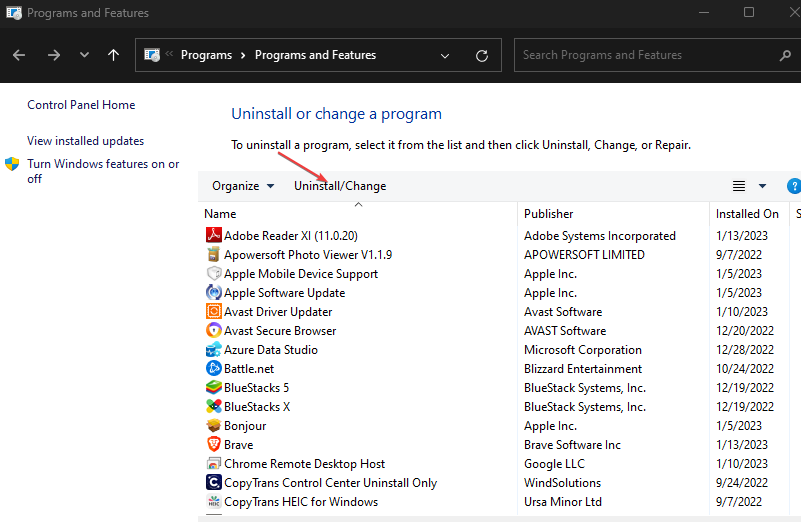
Additionally, you can also uninstall those apps manually, but it can still be a hassle as it’ll still try to push the manufacturer’s bloatware upon running a Windows Update in the future.

Are you annoyed by Microsoft’s bloatware or do you have any experience in this? Let us know in the comments!

Steam: How to Choose which Monitor a Game opens on

Multi-monitor setups are very common nowadays, especially when you are an avid gamer.

These can sometimes replace the need to buy ultra-wide and curved monitors, and they also allow you to multitask while gaming.

However, whenever you launch a game, the default setting is to make it appear on your primary monitor.

If for some reason you want to make your games launch on your other monitors, then all you need to do is follow the steps written in the guide below. And we also have a simple guide on troubleshooting games opening on the wrong display, so don’t hesitate to take a closer look.


How can I change which monitor a game opens on?

1. Use a dedicated multi-monitor management tool

displayfusion logo

Before proceeding with any of the solutions and workarounds listed in this article, the first thing you should consider is the use of a dedicated multi-monitor management tool.

These tools usually allow you to perform all manner of desktop enhancements and modifications in a fast and simple manner.

In the case at hand, playing your games on other monitors other than your primary one can be easily achieved with DisplayFusion.

This software tool is an extremely lightweight multi-monitor management tool that will allow you to increase your productivity and the number of things you can do when using your setup.

Here are some of the perks of using DisplayFusion:

  • Create customizable hotkeys
  • Enable multi-monitor taskbars
  • Enable multi-monitor title bar buttons.
  • Its has a trial version that lasts indefinitely
  • Customize the way your setup displays your favorite wallpaper

⇒ Get DisplayFusion


2. How to change which monitor Steam plays games on?

    Besides using dedicated multi-monitor software tools, there are also tricks and workarounds that you can use to make games run on your secondary monitors.

    You can force Steam to open a game on the monitor of your choice in various methods, depending on your preferences.

  1. 1. Run the game in Windowed mode and drag it to the screen you want.

    If you don’t know how to run Steam games in Windowed mode, follow the steps from our in-depth guide.

  2. 2. Set the second monitor as a primary monitor in Windows.

    If your second monitor is not detected, try the troubleshooting steps from our dedicated article.

  3. 3. Run the game in borderless windowed mode and use Shift+Win+Arrow Right to move it to the right.

    Do note that this method might leave a gap the size of your taskbar on the secondary monitor.

  4. 4. Add the following launch option for Steam via the app’s built-in settings: -sdl_displayindex <int>

    In order to specify which monitor you want Steam to open the game in, simply modify the <int> with your monitor’s number.

    For example, if you want Steam to open the game with the monitor that’s assigned via Windows settings to be your first, use this command: -sdl_displayindex 0

  5. 5. Lastly, some games allow you to choose a monitor when in fullscreen or borderless windowed mode.


3. Make CS: GO open on different monitor

Since Counter-Strike; Global Offensive is exclusively a Steam game, all of the methods presented above will work just as well with CS: GO.


4. Make Fortnite open on another monitor

  • Run the game in Windowed mode and drag it to the screen you want.

Unlike Steam games, you can easily switch Fortnite from fullscreen to windowed mode from the video settings.  Once you’ve done that, simply mode the windows to a second monitor.

However, if you want to play Fortnite in fullscreen mode you secondary monitor, your only choice is to set the second monitor as a primary monitor in Windows.


5. Make Overwatch open on a different monitor

Similarly to the first two solutions, this Blizzard title can also be launched on a secondary monitor if you use the following two methods:

  • Play Overwatch it in Windowed or Borderless Windowed mode and simply drag it to the secondary screen.
  • Turn your secondary screen into a primary screen and set it as a priority from when launching Overwatch.

By following the right steps or by using the right tools, you should be able to play your favorite games from your secondary monitor, while still using the primary one to perform other tasks.

If this guide wasn’t helpful, check our guide on how to move a game to another monitor to learn more.

Let us know which of the methods did you use by leaving us a message in the comments section below.

3 Ways to Fix Chrome When the Font Size is Too Small on Tabs

Many of our readers complain that they cannot read the text on the Google Chrome tab because the font size is too small.

At the moment, there’s no official way to enlarge the text size on a browser tab, but there are some tricks that can help you to make them readable.

While this will increase the Chrome tab font size, it will also make the text on the entire browser larger, for example, for the web pages, settings, and everything.

But, if you want to know how to change the font size on Windows 11, you can follow our detailed post for some useful tips.

Why are my Chrome tabs font so small?

If you realize that the Google Chrome font size has reduced suddenly, it could be due to any of the following reasons:

  • Changed the Chrome font size: An inadvertent change to the Chrome font size, either manually or using an extension, can lead to the problem.
  • Modified the Windows scaling parameters: Changes to Windows settings also affect Chrome and other installed applications, so make sure you check that.
  • An incompatibility issue: Incompatibility issues, like running an outdated version of the browser or the OS, can also be why your Chrom font is too small.
  • Bugs affecting the Chrome font size: If the problem appeared after updating the browser, it could be a bug in the latest version.

Fortunately, we have some useful tricks up our sleeves that can help you to enlarge the Chrome tab font size.

Quick Tip:

A solution that you might take into consideration is switching to a browser that has great customization features. Opera One Browser has an OpenType feature which includes character spacing, alignment, ligatures, alternative characters, and many others.

The Opera One Browser is highly customizable, you can change the type and font of the text. You can also set or create a different theme and choose alignment and font treatment for that theme based on you wishes.

Opera One

Personalize your browser using Opera One’s amazing and simple features for a better browsing experience.
Free Download Visit website

How do I change font size in Chrome tabs?

1. Run Chrome in compatibility mode

  1. Right-click on the Chrome icon on the desktop and select Properties. open chrome properties
  2. In the Properties window, select the Compatibility tab, go to Compatibility mode, and check the box next to Run this program in compatibility for.
  3. Now, select a previous Windows version from the list. Press Apply and then OK to save the changes and exit.Run this program in compatibility for

2. Make text size bigger in display settings

  1. Go to Start and type Increase Text in the Windows search bar.
  2. Under Best match, click on Make text size bigger. click on make text size better
  3. This will take you to the Text size settings in Windows settings.
  4. Here, go to Text size and move the slider to the right to enlarge the text size. Press Apply. Text size settings

Once the changes are applied, you should now see the Chrome tab fonts larger and clearer.

3. Use custom scaling to change font size

  1. Open Windows Settings by pressing the Win + I shortcut keys.
  2. On the left side of the Settings app, select System. system settings
  3. Click on Display on the right. Click on display in system settings
  4. Now, on the right, go to Scale & layout and click on Scale. Scale & layout
  5. On the next screen, go to the Custom scaling field. Here, set a figure between 100 – 500 as mentioned, and click on the tick mark. custom scaling
  6. You would now be prompted to sign out for the changes to be effective.

Now, open Chrome and check if the font size on tabs has increased and you can read them properly.

How do I change the font back to normal in Chrome?

  1. Launch the browser, click on the ellipsis near the top right, and choose Settings.settings
  2. Now, go to the Appearance tab, and switch to the recommended font size. For other changes, click on Customize fonts.appearance
  3. Now, choose the default settings for the various options here.customize fonts

How do I increase the font size for the bookmarks bar?

Changing or increasing the font size for the Chrome bookmark bar only is not possible for now.

In such a case, you can follow the above solutions to increase the text size of the entire Chrome browser, which will automatically enlarge the font size of the bookmarks bar.

Some users also try to increase the tab text size by pressing the Ctrl and + key together. However, that simply Zooms in the browser content and not the tab font.

So, if you are wondering how to make the Google Chrome tab font bigger, you can follow the above methods for a quick workaround.

But if the fonts on your browser have changed unexpectedly, you can follow our guide to troubleshoot the issue.

If you have any other queries related to Google Chrome, you can leave a message in the comments box below.

How to Fix Xbox Payment Error Code c101a007

Did you encounter Xbox payment error c101a007? Do not panic. This is a standard error that many of our readers have also encountered and complained about.

Hence, this guide will provide you with the causes of this error and the possible ways to fix it.

What causes Xbox payment error code c101a007?

  • Unauthorized payment mode – This typically occurs as a result of exceeding the card limit, the insufficient amount in your account, a blocked card, erroneous AVS information, an expired credit card, wrong security code input, and a credit limit reached.
  • Suspicious sign-in activities – Microsoft will temporarily lock the account to prevent fraud and abuse if there is a suspicious login attempt or several failed login attempts.

How do I fix the Xbox payment error code c101a007?

Before proceeding to the advanced solutions provided for this error, ensure that you are using a valid credit card and that the credit card is duly funded. You could also try to use a different payment method.

1. Add a new payment method

  1. Sign in to your Microsoft account and go to the Payment & billing tab.
  2. To Add a new payment method, scroll down and click it.
  3. Select your preferred payment option and click on Save.

Suppose you are experiencing the Xbox payment error code c101a007. In that case, you should consider contacting your bank by contacting the customer service provider to verify if your card or bank account has issues.

If you’re still unable to make your payment after contacting your bank, then your payment method is not the problem. You can try the next fix.

2. Contact the Xbox Support Team

  1. Visit the Xbox support page.
  2. Scroll down to Still Need Help and press the Contact Us button.
  3. Fill in the details of your complaint in the box provided.

After contacting the Xbox support team, wait for some time while Xbox fixes the issue as best it can.

3. Change your billing information

3.1 On Windows

  1. Using any web browser, log in to your Microsoft account.
  2. Navigate to Payment & billing and click on Billing info.
  3. Now, select Edit profile and modify your billing address as appropriate.

3.2 On Xbox

  1. On the Xbox home screen, scroll to the left and open Guide.
  2. Choose All Settings under the Settings section.
  3. Select Payment & billing under Account.
  4. Next, click on Change billing address.
  5. Enter your payment information. Remember that by hitting B on the joystick and selecting Next, you can skip the billing information you don’t wish to change.
  6. To save changes, click Save info.

If you are experiencing payment issues on Xbox, such as the payment error code c101a007, you can try changing your billing information to see if that works for you. It worked for some of our readers.

In case you need further help with fixing your payment issues, you can explore our complete guide on how to fix Xbox billing errors.

The Xbox payment error code c101a007 may hinder your ability to purchase online content, but you should be able to resolve this issue using one of our solutions.

In case you’re having issues with Google Pay, be sure to visit our guide on tackling Google Pay’s OR-RWE-03 error code.

If any of the above worked for you, please let us know using the comments below.

Dolphin Emulator Not Working on Windows: 5 Ways to Fix

Dolphin Emulator is one of the most popular game emulators on Windows. Sometimes, the emulator stops working, which can trigger the Dolphin emulator not working in Windows.

If Dolphin Emulator isn’t working on your Windows PC, we’ll provide you with the steps needed to resolve the error.

Why is Dolphin not working?

There are a couple of reasons why the Dolphin Emulator is not working on Windows 10. They include:

  • Not enough resources – Dolphin Emulator requires at least 2 GB of RAM, but like any emulator and virtual machine, if you only have 4 GB in total on your system, it’s going to be hard to launch.
  • GameCube Dpad adapters – In most cases, a damaged GameCube pad adapter can cause the Dolphin emulator to crash. Also, it can trigger the Dolphin controller detected but not working error.
  • Outdated application – If you’re running an outdated version of Dolphin Emulator, you might get a crash message when you try to run the application.
  • Network connection – If you have an unstable internet connection, the Dolphin emulator might fail to run. Also, it could trigger the Dolphin traversal server error.
  • Antivirus restrictions – Some security software can block applications like Dolphin Emulator from operating.

Now that we know what we’re up against, let’s see how to fix the problem quickly.

What can I do if Dolphin Emulator is not working?

Before we move to more advanced solutions, here are a couple of quick fixes you can apply:

  • Restart Dolphin Emulator.
  • Check your system specs to see if they meet the minimum requirements for running the game.
  • Unplug any GameCube Dpad adapters.
  • Close all the background apps and make sure your OS is updated.

If the above steps couldn’t resolve Dolphin Emulator crashing on Windows 11, here are a few advanced fixes you should try.

1. Clear cache data

  1. Press Windows key + E to open File Explorer.
  2. Then, navigate to the path: C:\Users\[YourUserName]\Documents\Dolphin
  3. Locate the Cache folder, right-click it, and select Delete.
  4. Wait for the entire folder to delete and close File Explorer, then relaunch Dolphin Emulator.

When deleting the Dolphin Emulator cache, delete only the cache folder, not other important files.

2. Disable Antivirus software

  1. Press Windows key, type Windows Security, and launch it.
  2. Select Virus and Threat Protection and choose Manage settings.
  3. Then, toggle off Real-Time Protection. You can also disable more options in this tab.

Antivirus Software unknowingly gets in the way of running applications, you can temporarily disable them to see if Dolphin Emulator is still crashing.

3. Reinstall Dolphin Emulator

  1. Press Windows + I to open Settings.
  2. Select Apps and click on Installed apps.
  3. Locate Dolphin Emulator, click the three dots, and select Uninstall. Then, select Uninstall to confirm the selection.
  4. Visit the Dolphin Emulator download page and download the latest file.
  5. Open your File Explorer, right-click on the downloaded file, and click Extract all.
  6. Open the newly extracted folder, locate dolphin.exe file, right-click it, and select Run as administrator.
  7. Follow the installation wizard to complete the reinstallation of the Dolphin Emulator.

Reinstalling Dolphin Emulator should only be done if you’ve exhausted all means of resolving the error. For more information, we have a great guide on how to download the Dolphin emulator, so don’t miss it.

You can also use this method to download and update Dolphin Emulator to its latest version.

Tip icon Tip
If the Dolphin Emulator error persists, you can try a reliable alternative like LDPlayer because it has the best compatibility and strong stability with higher FPS and faster processing.

Fixing the Dolphin Emulator freezing on Windows doesn’t require much technical know-how; with the steps outlined above, you should be able to restore the app to its functional state.

You’ll get Microsoft’s rewards if you use Edge

Microsoft has added plenty of new features to its built-in Edge browser: the new Bing, 365 integration, you name it.

Even more so, it’s pre-installed on every Windows system as a revamped version of Internet Explorer, which was just axed completely earlier. 

One of the attempts that have been spotted is the Microsoft Rewards scheme. To put it simply, for each search you perform on Bing in Microsoft Edge on PC or mobile, you can earn from 5 up to 20 points a day (around 150 to 600 points a month).

Those Microsoft Rewards points can be accumulated for a chance at gift cards from clothing stores, online games, film rentals, furniture shops, and more.

As we tested, we’ve seen Roblox digital code being priced at 1,500 points, and H&M and IKEA’s 20 euros gift cards for 30,650 points each. The list of partnered shops is always being added, and you can also use those to donate to any charitable organization of your choice. 

What’s up with all the backlash with Microsoft Rewards?

It’s safe to say that Edge has been quite unpopular among users. As noted by StatCounter, Edge merely has 11% of the global market share of browsers, whereas its Google Chrome competitor controls the majority by 66%. It only makes sense if Microsoft is doing all it can to lure users to its browser. 

It may seem like a handsome reward, really, but Microsoft is really putting itself in hot water with this. Earlier, many free users have spotted ads living inside their Outlook mobile inboxes on both iOS and Android platforms. 

Plus, any attempt to download browser competitors like Chrome will be greeted with a discouraging pop-up that says Microsoft Edge runs on the same technology as Chrome, with the added trust of Microsoft.

What do you think about this? Let us know in the comments!

Fix Microsoft Edge: an error has occurred download interrupted

Mircosoft Edge is the default browser that is pre-set for Windows devices and has come a long way since its infamous predecessor, Internet Explorer.

Many users have reported the message: an error has occurred download interrupted pops up when trying to download files or extensions. There are several solutions to this problem, keep reading to quickly solve the issue.

How do I get Chrome extensions on Microsoft Edge?

  1. Open Microsoft Edge and click on the three dots in the right-hand corner.
  2. Select Extensions. Click on three dots then select extensions.
  3. Click on Manage extensions. Click manage extensions.
  4. Toggle Allow extensions for other stores to on. Toggle allow extensions from other stores.

You can install Chrome extensions on Microsoft Edge, you just need to allow the download of extensions from other stores in your Edge settings. After this, users can download any extension from the Chrome Web Store.

How do I fix Microsoft Edge if an error has occurred?

1. Repair Microsoft Edge

  1. Click on Start and open Settings (or press Windows + I).
  2. Select Apps, then Apps & features. In Settings, open Apps and features.
  3. Under App list, search Microsoft Edge. Search Microsoft Edge.
  4. Click on the three dots next to Microsoft Edge and select Modify. Modify Microsoft Edge.
  5. Select Repair. Repair Microsoft Edge to fix error code.

This will automatically perform any updates and bug fixes for Microsoft Edge. Repairing Microsoft Edge will reinstall the browser but your data won’t be affected. If you do want to backup your bookmarks, favorites, and more you can do so in the browser settings.

2. Reset Microsoft Edge

  1. Open Microsoft Edge.
  2. Click on the three dots in the top right-hand corner and select Settings. Microsoft Edge settings.
  3. Select Reset settings then Restore settings to their default values. Reset Microsoft Edge settings.
  4. Click Reset. Click on reset.

Sometimes doing a clean reset can get rid of any corrupted files and thus might solve the issue. Try resetting Microsoft Edge and then attempt to download your extension again.

This will affect your startup page, tab page, and pinned tabs if you have those features personalized. It will also clear cookies and temporary data. Browser data like bookmarks, history, and passwords will not be affected.

3. Disable extensions

  1. Open Microsoft Edge and click on the three dots in the top right-hand corner.
  2. Select Extensions. Click on extensions.
  3. Click on Manage extensions. Manage extensions.
  4. Disable each extension. Disable each extensions.

If you have a faulty or dated extension, then it may cause issues when downloading files or add-ons. Try disabling all of your add-ons and then attempt your download again. If there is a faulty extension, you can identify it by turning on the extensions one by one and seeing which one causes the problem.

4. Delete the hosts file

  1. Open File Explorer.
  2. Click on Local Disk (C:).
  3. Open Windows. Open local disk.
  4. Scroll down to System32 and open it. Open System32.
  5. Find drivers and open it. Open drivers.
  6. Open the folder titled etc. Open etc folder.
  7. Right-click on hosts and delete. Delete the hosts file.
  8. Or copy the file path. C:\Windows\System32\drivers\etc.

5. Try another browser

If the problem persists, we recommend switching to another browser. Opera One is a fast and reliable browser that supports Chrome extensions.

Opera One includes a built-in ad blocker and a free VPN that allows users to browse securely. The convenient sidebar gives users access to bookmarks, workspaces, news, social media messaging, and AI.

Opera One is a highly customizable browser so users can personalize their browsing experience without needing to install a bunch of third-party extensions.

⇒ Get Opera One

Hopefully, the solutions above helped solve the issue if you are receiving the error message: an error has occurred download interrupted. Sometimes the solution can be as simple as resetting or repairing Microsoft Edge.

Be sure to keep your browser updated to avoid running into Microsoft Edge problems in Windows 11. Microsoft Edge regularly releases updates to ensure its browser is running properly.

If you have a different solution to this issue that is not listed above, let us know in the comment section below.

Fix: All Options are Greyed Out in Disk Management

Disk Management is a handy Windows 11 tool that manages all the disk drives connected to your computer. It enables you to manage them and any associated partitions.

Sometimes, you may experience a problem with Disk Management in that all the options for a drive are greyed out. This renders them unusable and unable to be managed appropriately.

Why are the options greyed out in Disk Management?

Before going into the fixes, it’s essential to understand what causes options to get greyed out. That way, you’ll know exactly what to do if it happens again.

  • Your computer’s data is corrupt – Corruption can be found in the system files or disk drive. Either way, you should run a clean-up scan to clear it up.
  • The disk drive hasn’t been properly formatted – Disk drives that aren’t properly formatted can result in capability errors. You can format the drive using DiskPart via the Command Prompt.
  • Your machine is infected with malware – Drives that can be formatted correctly are usually victims of a computer virus. Be sure to download some antivirus software to clean it up.

How can I fix greyed-out options in Disk Management?

Before going into the more complicated solutions, there are a handful of quick fixes that you should try out:

  • We recommend restarting your computer as the first thing you should do. A simple reboot is often all you need to fix Windows 11 errors.
  • As stated earlier, run a clean-up scan on your computer like an SFC/DISM scan via Command Prompt. Doing so will also repair any messed-up files on your drive.
  • Run the Hardware and Devices troubleshooter, which you can find in the Settings menu. You also have multiple options for configuring the tool, like having it run automatically.
  • Use some disk management software to maintain your hard drive’s partitions. You have multiple apps to choose from, like AOMEI, Paragon, and MiniTool.
  • And before you do anything else, it’s recommended that you create a recovery disk, also known as a recovery drive, to restore your computer’s settings to a previous state in case you want a do-over.

1. Expand volume via DiskPart

  1. In the Windows Search bar, bring up the DiskPart command. Click the entry when it appears.
  2. If a User Account Control window appears, select Yes.
  3. Type list disk into DiskPart and hit Enter on your keyboard. A list of all the disks on your computer appears.
  4. Enter select disk into DiskPart, then the number of the disk with the greyed-out problem. For example, select disk 0
  5. Type list partition into DiskPart and hit Enter on your keyboard. A list of all the partitions on your computer appears.
  6. Enter select partition then the number of the partition you want to expand. For example, select disk 6
  7. Now type in extend and hit Enter on your keyboard.

If the Extend Volume option in the Disk Management context menu is greyed out, this solution works best for that error.

2. Reformat partition vis DiskPart

  1. Like in the previous solution, launch DiskPart.
  2. And just like before, enter list disk to make all drives on your computer appear.
  3. Type in select disk and the disk number, then press Enter. For example, select disk 0.
  4. Enter clean into DiskPart to clear out the files and folders on the hard disk.
  5. After cleaning, type in create partition primary.
  6. Next, enter the following command to DiskPart: format fs=ntfs
  7. After formatting, type assign in DiskPart to assign a drive letter.

You should do this solution if the Format option is greyed out in Disk Management.

3. Perform Startup Repair

  1. Launch the Settings menu. Stay on the System tab and click Recovery.
  2. In the Recovery section, click the Restart now button next to Advanced Setup.
  3. After restarting, select Troubleshoot.
  4. Select Advanced Options, then Startup Repair.
  5. In the Boot Manager, select Reset the system to reboot your computer.

4. Change partition style

  1. Before changing the partition style, you need to find out what the initial style is. Launch Disk Management from the State menu.
  2. Right-click the disk at the bottom of the window and select Properties in the context menu.
  3. Go to the Volumes tab and look under Disk Information for the partition style. As you can see in this example, the disk is a GUID Partition Table or GPT.
  4. Now launch DiskPart and type in list disk.
  5. At the prompt, enter select disk then the number of the disk you want to change. For example, select disk 0.
  6. Next, type in clean to clear up the disk and hit Enter on your keyboard.
  7. And finally, type in convert mbr to change your GPT partition into a Master Boot Record or MBR.
  8. If you have an MBR partition and want to change it to GPT, type in convert gpt.

5. Run the repair disk command

  1. Like before, type in list disk in DiskPart and press Enter on your keyboard.
  2. Repair the disk by typing in the following command then hit Enter on your keyboard: repair disk =disk 0
  3. To repair other disks, simply replace the number at the end with the one you want such as repair disk=disk 1

How can I recover unallocated disk partitions?

Like the greyed-out options, unallocated partitions can be caused by malware and corrupt files, although running an SFC scan will not work.

Instead, you must go into the Disk Management tool and format the partition or use third-party software like AOMEI Partition Assistant.

While we have you, we recommend learning how to perform a dual boot-up on separate hard drives. Doing so will allow you to simultaneously boot two operating systems on a single computer.

This is particularly useful if you need to work on separate systems but don’t have an extra computer. The process is pretty involved as it will require you to set a new partition for the new OS.

We also recommend reading our guide on how to convert a RAW to NTFS drive without formatting.

Feel free to comment below if you have questions about other partition tools. And please tell us if there’s a specific guide for any native Windows 11 software you’d like to see.

7 Ways to Fix a Black Screen on Remote Desktop in Windows 11

Remote Desktop Connection (RDC) is a useful feature on Pro and Enterprise versions of Windows that allows users to remotely connect to another computer without needing other software. But a black screen on Remote Desktop in Windows 11 can ruin it all.

The black screen issue is one of the most common problems users encounter. Are you wondering why the screen goes black? How to fix this issue? Here are some quick ways to fix a black screen on a remote desktop in Windows 11.

Why is my remote desktop all black?

The first step is to find out what is causing the black screen to appear on your remote desktop. In the following, we introduce some of the most important reasons for this problem.

  • Windows update: One of the most important reasons for the black screen problem in Remote Desktop is updating Windows. This problem may occur after updating Windows.
  • Remote desktop settings: You may have accidentally changed the remote desktop settings, and this will cause the black screen to appear
  • GPU driver: Another reason for the black screen may be changing GPU driver settings.
  • Windows settings: If your Windows settings are on the default mode, it is unlikely that the black screen problem will occur, but sometimes you accidentally change some settings, and this will cause a black screen with remote desktop in Windows 11.

How do I fix a black screen in remote desktop?

1. Restart Remote Desktop Services

  1. On the keyboard, press the Win + R keys to open the Run window. Type in services.msc in this window and click OK.
  2. Look for the Remote Desktop Services in the window that opens, and double-click it.Go to Remote Desktop Services
  3. On General Tab, click Stop and then click OK.Restart Remote Desktop Services

2. Relaunch Explorer.exe

  1. Press Ctrl + Shift + Esc to open the Task Manager.
  2. Click the Details tab, then find the item explorer.exe and right-click it. Finally, click End Task.Open Task Manager
  3. Now click the File tab and select Run new task.
  4. In the window that opens, type C:\WINDOWS\explorer.exe and then click OK. Open Task Manager

3. Change the screen resolution

  1. Go to the first page of your desktop and right-click. Select the Display settings to enter the display resolution settings.
  2. In the window that opens, you can see the screen resolution, change these numbers. In many cases, the black screen problem is solved by changing the screen resolution.Change the screen resolution.png

4. Change the color depth of the remote session

  1. Press the Win key on the keyboard and search for Remote Desktop Connection. Now click Open.
  2. Click Show Options at the bottom of the window to display more settings.CLick on More option in Remote Desktop menu
  3. Click the Display tab and change the depth of the image from Highest Quality (32-bit) mode to True Color (24-bit) mode in the Colors section, and click Connect.Change the color depth of the remote session

5. Disable Persistent bitmap caching

  1. Press the Win key on the keyboard and search for Remote Desktop Connection. Now click Open.
  2. Click Experience Tab, then uncheck the Persistent bitmap caching option.Disable Persistent bitmap caching

6. Update GPU Driver process

  1. Right-click the Start button and select the Device Manager option.
  2. Find the Display adapters, right-click Intel(R) HD Graphics and Update driver Option.Update GPU Driver process
  3. In the window that opens, click the Search automatically for drivers option and wait for the driver to be updated.Update GPU Driver process

In many cases, the problem of the Windows remote desktop showing a black screen in Windows 11 is solved by updating the GPU driver.

7. Disable fast startup

  1. Press the Win key on the keyboard and search for Control Panel and click Open.
  2. On the right-upper corner, click View By and select Large icons; then, click on Power Options.Disable-fast-startup
  3. Select the Choose what the power buttons do option.Choose what the power buttons does option
  4. Click Change settings that are currently unavailable to activate the Shutdown setting section, then uncheck the Turn on fast startup option.ncheck the Turn on fast startup option

If the previous solutions didn’t help, disabling Fast Startup should have fixed the black screen on a remote desktop in Windows 11.

How to fix Windows 10 RDP’s black screen?

Changing the display settings, updating the graphics driver, modifying the color depth of display resolution, or disabling Fast Startup, all work as effective fixes when dealing with a Windows 10 RDP black screen.

Also, a few users pointed out that ensuring the same DPI (Scale) on both devices may help fix the problem. So, you must try that as well.

How do you Ctrl Alt Del on remote desktop?

To activate Task Manager in remote desktop mode, you can use the combination keys CTRL + ALT + End instead of CTRL + ALT + Del keys.

Another way is to use the on-screen keyboard. For this, just type osk in the start menu to open your virtual keyboard. Now you can select CTRL + ALT + Del keys with the mouse.

Windows 11’s remote desktop black screen can occur for various reasons, and there are various ways to fix it.

However, in most cases, it appears that restarting the remote desktop service and relaunching Explorer.exe has proven to be more effective.

In the comment section below, let us know if you could fix the black screen on the remote desktop in Windows 11.

Windows 11 HDMI Audio Not Working: 7 Ways to Fix It

If you’re getting no sound through HDMI, chances are your Windows 11 HDMI audio output isn’t set up correctly.

Whether you’re trying to enable HDMI audio in Windows 11, install the right HDMI audio drivers, or adjust the HDMI audio settings, this guide will help. It also covers what to do when monitor sound is not working in Windows 11 or when audio over HDMI simply won’t play despite being connected.

What can I do if HDMI is not playing audio in Windows 11?

1. Run Windows 11’s Sound Troubleshooter

  1. Launch Settings (press Windows key + I), and select Troubleshoot in that app.
  2. Click Other trouble-shooters to view a list of Windows 11’s troubleshooters in the Settings app.
  3. Select the Play Audio troubleshooter’s Run button.
    The Run option windows 11 hdmi audio not working
  4. Apply any resolutions suggested by the troubleshooter.
    Playing Audio troubleshooter windows 11 hdmi audio not working

When the NVIDIA HDMI audio is not working in Windows 11, a quick trick is to run the built-in dedicated troubleshooter.

2. Make sure your HDMI is set as the default playback device

  1. Press the Windows and R buttons on your keyboard simultaneously.
  2. Then input this command for opening sound settings: control mmsys.cpl sounds
  3. Click OK to open the Sound window.
    mmsys Run command windows 11 hdmi audio not working
  4. Right-click an HDMI output device on the Playback tab to select Enable.
  5. Select the HDMI output device, and press the Set Default button.
    Playback tab windows 11 hdmi audio not working
  6. Click Apply and OK to save the new sound settings.

3. Update sound drivers

  1. Press Windows + X to select the Device Manager option on the Power User menu.
  2. Then double-click the Sound, video, and audio controllers category.
  3. Right-click the High Definition Audio category to select Update driver.
    Update driver option windows 11 hdmi audio not working
  4. Select the Browse my computer for drivers option in the Update Drivers window.
  5. Click the Let me pick option.
    Let me pick option windows 11 hdmi audio not working
  6. Select High Definition Audio Device, and click the Next button.
    High definition Audio Device model windows 11 hdmi audio not working
  7. Click Yes on the Update Driver Warning window.

You can also update the audio driver with software like Outbyte Driver Updater. It is a driver updater utility that includes options for scanning and automatically updating device drivers on your PC. 

4. Reinstall sound drivers

  1. Open the Sound, video, and audio controllers category in Device Manager as covered in steps one and two of method four.
  2. Click High Definition Audio Device with the right mouse button to select Uninstall device.
    Uninstall device option windows 11 hdmi audio not working
  3. Select the Uninstall option.
    The Uninstall option windows 11 hdmi audio not working
  4. Press Alt + F4 to select Restart.

If HD audio is not working in Windows 11, reinstalling the sound drivers may do the trick.

5. Restart the Audio Service

  1. Bring up Run by pressing the Power User menu’s Win + X hotkey and selecting it there.
  2. Type in this Run command for the Services tool: services.msc
  3. Click OK to launch Services.
  4. Double-click the Windows Audio service.
    Windows Audio service windows 11 hdmi audio not working
  5. Select Automatic on the Windows Audio service’s drop-down menu if that service is disabled.
    The Automatic option windows 11 hdmi audio not working
  6. Click the service’s Start button.
  7. If that service is already enabled, right-click Windows Audio and select a Restart option for it.
    Restart option windows 11 hdmi audio not working
  8. Repeat the above steps for the Windows Audio Endpoint Builder service.

6. Enable all audio controllers

  1. Open Device Manager as outlined in previous resolutions.
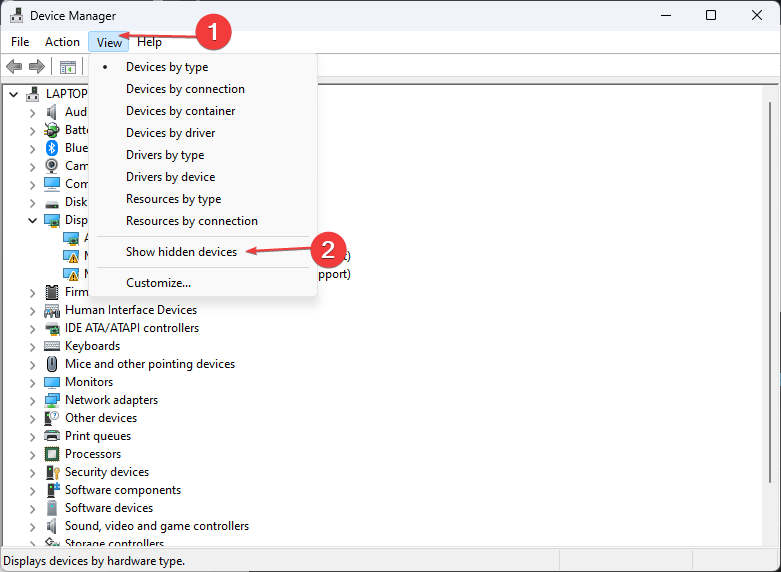
  2. Click the View menu, and select its show Show hidden devices option.
    Show hidden devices option windows 11 hdmi audio not working
  3. Double-click System devices to extend that category.
  4. Right-click High Definition Audio Controller and select Properties.
    Properties option windows 11 hdmi audio not working
  5. Select the Driver tab.
  6. Click Enable if that option is available on the tab.
  7. Repeat those steps for any other audio devices listed for that category.

When HDMI audio still doesn’t work due to DRM restrictions or playback blocks, learn how to fix protected content not playing in Windows 11.

Why is audio not working with HDMI?

Here are a few reasons audio is not working with HDMI in Windows 11:

  • Issues with the connection: Usually, it’s a loose or improper connection that leads to audio issues.
  • Damaged cables: Whenever faced with this problem, you should check the cable for external damages since it, too, might be the reason the audio is not working with HDMI.
  • Corrupt, incompatible, or outdated driver: When you have incompatible, corrupt, or outdated drivers, the corresponding device starts to throw errors. Reinstalling or updating the driver should do the trick.
  • Misconfigured audio settings: The problem can also arise if you have the built-in audio device set as default instead of the one connected via an HDMI cable.

What HDMI version is needed for Dolby Atmos?

You can utilize Dolby Atmos with any HDMI cable type. HDMI 2.0 will be sufficient, but the higher bandwidth HDMI 2.1 cables deliver higher resolution video.

We hope one of those resolutions fixes the HDMI audio issue on your Windows 11 PC. Try applying all of them to find one that works for you.

These methods can also be useful if sound is not working on dual monitors, so be sure to try them.

Feel free to discuss this HDMI audio issue in the comments section below. Users who’ve found other ways to fix HDMI sound not working are welcome to share their resolutions there.

ChatGPT Alternative: 5 Best to Pick From in 2026

The demands for top ChatGPT alternatives have been on the request tabs of some of our readers ever since its popularity surge.

It’s barely a few months since the launch of ChatGPT, the AI-powered chat tool developed by OpenAI, and ever since then, it has gained a lot of popularity among the general public.

To that effect, we have come up with some of the best ChatGPT alternatives.

What are the top features to identify a good AI chatbox?

AI is the new cool, and there are many other similar AI chatboxes with great features. However, it can be daunting to pick one of these chatboxes as your preferred option.

Hence, we will outline the most important features that every good AI chatbox must have:

  • Customization – An essential feature is the ability to modify the chatbox to individual users’ personalities and needs.
  • Support for multiple languages – Having an AI chatbox that supports diverse languages will ease the user’s interactions with it.
  • Versatile integration – The AI chatbox should have a robust API that supports integration into other platforms.
  • Emotionally intelligent – Empathy and sympathy are essential in identifying quality AI. Hence, if the AI on the chatbox can feel your emotion in the situation, it is an excellent addition.

Now, let’s see the best alternatives to ChatGPT that you can use today.

What are the best alternatives to ChatGPT?

CodeGen by Salesforce – Best alternative for coding

codegenai

CodeGen is a ChatGPT alternative open source, and a large-scale language model that can create programs based on plain text prompts, as you could have already inferred from the name.

Further, the approach is based on the idea of conversational AI, which tries to combine human creative input with virtually limitless AI coding potential.

The most amazing feature of CodeGen is that anyone, regardless of technical proficiency, can use it. Nevertheless, since AI isn’t yet flawless, programming expertise will help to produce better and more beautiful solutions.

Some of the standout features are:

  • It is Multilingual
  • Easy to use without requiring tech-savvy
  • NLP-enabled
  • Fast and efficient in response time

⇒ Get CodeGen 

Bloom – Best open source alternative

Bloomai

One of the best ChatGPT alternatives for coding is the multilingual language model called Bloom.

It was developed by more than 1,000 AI researchers and is regarded as the best GPT-3 replacement. It is an open-source platform.

In contrast to GPT-3, Bloom required 384 graphics cards with a combined memory of more than 80 GB to train on 176 billion parameters.

Some of its features are:

  • It supports multiple languages
  • Omnichannel and offers a seamless customer service experience

⇒ Get Bloom

Replika – Best personal AI chatbot

Replika AI

Replika is one of the best ChatGPT alternatives for inspiring creativity when you’re feeling lonely.

Also, it is a chatbot powered by AI that may easily pass for a friend and will always reply to your texts promptly.

In addition, Replika is available to chat with you about life, love, and the most common subjects that you might bring up with your friends and family.

Some of its key features are:

  • Emotionally intelligent
  • Customizable and offers a great user interface
  • Users’ privacy is guaranteed

⇒ Get Replika

ELSA – Best for Language learning

ELSA AI

English Language Speech Assistant is referred to as Elsa in abbreviated form. It is a language-learning application using AI.

Further, a collection of simple assignments for the user to grasp is produced after using AI to analyze the user’s voice.

Elsa is available for both Android and iOS-powered smartphones and tablets, so you can take it anywhere with you.

A few standout features are outlined below:

  • It supports multiple languages
  • Analytical features
  • It is NLP-enabled

⇒ Get Elsa for Android 

⇒ Get Elsa for iOS 

Chatsonic AI by Writesonic – Includes great features

ChatsomicAI

Chatsonic AI by Writesonic outshines OpenAI’s ChatGPT by crossing several yardsticks.

Compared to ChatGPT, Chatsonic AI offers a wider variety of more potent and advanced functions, such as voice recognition, Google Search integration, and image creation.

Below are some of the features that make Chatsonic AI the smartest AI chatbot:

  • Authenticated content 
  • Voice command 
  • Google Search integration  
  • Image generation  

⇒ Get Chatsonic

And that’s it on the best alternatives to ChatGPT. If ChatGPT is not available for use in your country, consider exploring our article for ways to bypass it.

Also, for users anxiously asking why is my ChatGPT not working, we have provided some fixes for this error in our guide.

In conclusion, these are the best alternatives for ChatGPT. Should you have further questions or suggestions about this guide, kindly drop them in the comments section.

How to Get Rid of System Requirements Not Met Watermark

Some Windows 11 users have clamored that they get the system requirements not met watermark on their screens. This appears to notify you that your device is incompatible with Windows 11 minimum requirements. Hence, we’ll explore effective methods for removing the watermark on your PC.

Also, you can take a look at a similar situation involving Windows 11 ads and how to get rid of them.

What is the system requirement not met watermark?

The system requirement not met watermark in Windows 11 indicates that your computer does not meet the minimum system requirements to run the operating system. Thus, it appears when you have installed Windows 11 on unsupported hardware.

Furthermore, it can occur due to outdated or missing drivers and software. You may need to upgrade your hardware or perform system updates to meet the requirements for Windows 11.

It’s important to note that system requirements for Windows 11 can vary depending on the edition and version of the operating system.

How can I get rid of the system requirement not met watermark?

Before proceeding with any advanced steps for removing the watermark, perform the following:

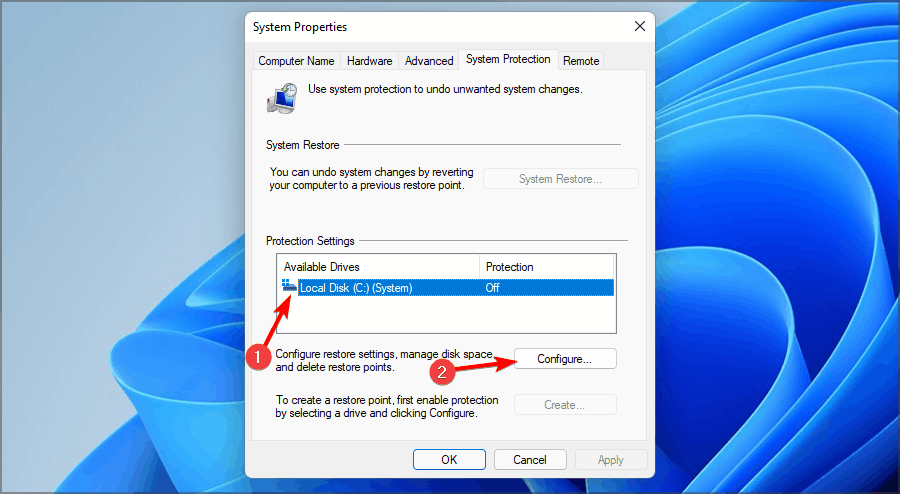
  • Create a restore point to restore Windows to the previous date if something goes wrong.
  • Disconnect from any remote connections.

If the watermark persists after these, then try the fix below:

Use the Registry Editor

  1. Press the Windows button, type regedit, and press Enter to open the Registry Editor.
  2. Click Yes on the Windows UAC prompt.
  3. In the Registry Editor, go to the following path: HKEY_CURRENT_USER\Control Panel\UnsupportedHardwareNotificationCache
  4. If you cannot find the UnsupportedHardwareNotificationCache key in the registry path, go to: HKEY_CURRENT_USER\Control Panel
  5. Right-click on the Control Panel key, select New from the drop-down, and then select Key. Then name the new key as UnsupportedHardwareNotificationCache.
  6. Click the UnsupportedHardwareNotificationCache key, right-click on the right-hand side of the screen, select New from the drop-down, and then select DWORD (32-bit) Value.
  7. For users running Windows 11 stable build, Beta, or Release Preview, name the value as SV1. For users running an Insider build, name it SV2.
  8. Double-click on the SV1/SV2, input 0 in the Value data bar, and then click the OK button.
  9. Close the Registry Editor and restart your PC to check if the watermark is not on the screen.

The above method will allow users to remove the system requirements not met watermark in Windows. You may take a look at how to fix a corrupt Registry Editor on Windows if you encounter such a problem while following the steps.

In addition, Reactivating Windows after a hardware change may also be necessary. Hence, follow our guide to doing this.

Although not necessary, checking for Windows compatibility on your might help prevent the installation of incompatible OS that will prompt this problem in the first place. Thus, learn how to use the Windows compatibility check tool here.

If you have further questions or suggestions, leave them in the comments section.

How to install and set up OneDrive on Android

With the increasing amount of data we create and consume on our Android devices, it’s essential to have a reliable way to store and access our files from anywhere. OneDrive, Microsoft’s cloud storage solution, offers a seamless way to do just that. It allows you to store and access files, documents, photos, and videos on the cloud, which means you can access them from anywhere, anytime.

If you are interested in using OneDrive on your Android device, you are in luck. Installing and configuring OneDrive is a quick and easy process that takes just a few minutes. In this article, we will first install OneDrive app and then walk you through the steps to set up OneDrive on your Android device.


Install OneDrive on Android

1. Install OneDrive from the Play Store.

Microsoft OneDrive
Microsoft OneDrive
Price:
Free


After installing the app, follow our step-by-step guide on how to login to OneDrive to start syncing your files.

2. Launch the app on the phone and key in your Microsoft account credentials.

setup onedrive on android

You can also create a new account if this is your first time using OneDrive. Or, if you don’t want to sign in yet, you can give permission and see all your photos on the app.

3. You will land in the Home tab and you will seem files from your OneDrive. If you have just created an account, then it will be empty. You can use the Take a Tour to learn the basics of the app.

setup onedrive on android


Upload a file on OneDrive

Upoading a file to OneDrive on your Android phone is easy.

1. Tap on the plus button at the top and you will see list of options.

setup onedrive on android

2. Select upload to upload a file from your phone. You can then upload files up to 250 GB in size. You can also upload files directly into folder or sub-folders.

setup onedrive on android


Make Files Available Offline on OneDrive

You can always download files from the cloud. But when you are working with someone on file/folder, then its newer version may become available over the time. Thats when need to make your files available offline.

This will let you access them without internet and the file will get updated with the latest version when the device connects to the internet.

1. Tap on the three-vertical-dots given next to a file/folder.

setup onedrive on android

2. Slide the button to Make available offline. Then you can access the file without internet through the app. It will be updated to a newer(if possible) the next time you are correct to the internet. You can remove them from offline access by tapping the make available offline button again.

setup onedrive on android

3. Your files marked for offline view will appear below recent files in the Offline files section.

setup onedrive on android

Add Camera Photos to OneDrive

Google only offers 15 GB of free space for people who don’t opt for its One membership. And it really is not enough when you click a few pictures and recieve few media files from others. Even the device space fills up real fast when you have 20-30 odd apps on the smartphone. Therefore, you can set up OneDrive to load all the photos to its cloud and free up the space on the phone.

1. Head to the Photos tab.

2. Tap on the Turn ON button, given under the Camera upload is off prompt. This will start the photos and videos upload process, and the total time will depend upon your upload speed.

setup onedrive on android

You can disable Camera backup by heading to the Settings > Camera Backup > Turn off Backup.

Scan and Upload Documents to OneDrive

Just like Google Drive, you can directly scan documents using phone’s camera and then upload to OneDrive.

1. Tap the camera button which is located at the bottom.

setup onedrive on android

2. Give permission to the OneDrive app to use the phone’s camera to the documents.

setup onedrive on android

3. A rectangular box on will try to find a docment through the lens. When you have the content inside the box, capture it through the button.

setup onedrive on android

4. Then adjust the borders to crop out the unwanted area and then tap confirm.

setup onedrive on android

5. After that you can make the final changes through the editing tools. You can scan more pages through the Add button and then click Done to create a PDF of the scanned documents.

setup onedrive on android

Add files to a Secure Vault on OneDrive

Your device may be used by the kids for games or a friend might use it for calling a cab. Its always better to be careful with important documents that you cannot afford to be viewed by others. A secure vault on OneDrive can help you keep all the important safe and away from anyone who might use your device.

1. Head to Files and tap Personal Vault.

setup onedrive on android

2. Tap Continue to move forward.

setup onedrive on android

3. Now lets start the process of verifying your identity by first re-entering the password.


4. Then, enter a code through one of the authentication options.

setup onedrive on android

5. After that you will have to type in a 6-digit pin. You will need that to enter for accessing the vault.

setup onedrive on android

You can scan any kind of document to add it directly to the vault. Along with that, other files and folders can be moved to the vault.

setup onedrive on android

Canon Printer Paper Jam: How to Easily Fix It

Canon printers are among the most popular types of printers available on the market today. This is so because they offer high-quality printing and a wide range of options for users.

However, sometimes your printer will not work as it should, or your PC can’t detect your Canon printer. Perhaps you are having issues with your ink cartridges, or maybe you did not know how to use your printer properly.

Whatever the case, this article is here to help you figure out what is wrong with your printer and how to fix it.

Why does paper keep jamming in my Canon printer? 

If you’re having problems with your Canon printer and are wondering why the paper keeps jamming, it could be a number of reasons. Here’s what to look for:

  • Faulty paper – If you have been using the same roll for a long time, it may become worn out and start to tear. This will cause the paper to stick to the rollers and stop feeding properly.
  • Dusty rollers – If there is too much dust on these rollers, they will become clogged and unable to transport paper smoothly from one side of the rollers to another.
  • Cartridge issues – The ink cartridge may be clogged due to dirt or debris left behind by the previous print job. Also, your printer may reject your new cartridge. 
  • Faulty connection between your printer and computer – The jamming could be due to the cable connection between your printer and computer. You may have accidentally disconnected a cable or plugged it back in wrongly.
  • Outdated ink cartridges – If you have an older cartridge, it is not going to work properly and may cause the paper to be jammed in the printer.
  • Incorrect installation of the printer driver – If you have downloaded a driver not for your specific printer, you might face issues with paper jamming in Canon printers.
  • Wrongly installed ink cartridges – If an ink cartridge is not installed correctly or taken care of properly after installing them again on your Canon printer, it may cause such issues.

How do you fix a paper jam on a Canon printer?

A few preliminary checks to ensure your printer is working fine include:

  • Remove all unnecessary items from the area surrounding your printer. Too many items nearby may block the path from the front of your printer to where it produces the output. 
  • Make sure there is no debris or other foreign objects inside the paper tray. 
  • Look for torn or damaged pages and remove them.
  • Replace the printing paper with a new batch.
  • Check for any ink stains around each hole where the ink comes out or goes back into the device, especially if your printer is making black marks.
  • Disconnect any cables connected between your computer and printer and then replace only those required for your printer.
  • Ensure your Canon drivers are up-to-date.
  • Turn off your computer and unplug it from power.

1. Remove the jammed paper

  1. If you have a paper jam in the middle of a printing job, you’ll have to pause or stop printing first.
  2. Turn off the printer by pressing the Power button. 
  3. Depending on the model number of your Canon printer, you can either press the Menu button to eject the Catridge or pull the front tray.
  4. Check for any jammed paper and remove it. Be gentle while removing it to avoid tearing it and leaving some parts inside.
  5. Once you’ve removed the jammed paper, turn on your printer and retry printing.

2. Open the backside

  1. Switch off your printer and turn it so that the backside is facing upwards.
  2. Locate the transport cover and unscrew it gently, removing the cover. Check the recommended screwdriver on your manual for your unit to avoid damaging the cover.
  3. Using tweezers, remove any torn paper that may be stuck in the printer between the rollers. Avoid touching any other parts, and once done, replace the cover again. 

3. Clean the rollers

With Canon printers, there are many methods to clean the rollers. While the traditional method involves switching the printer off and using a damp cloth to clean the rollers carefully, Canon has developed a tool to help you do it easily.

With the Canon IJ printer assistant tool, you don’t have to turn off the printer. It is a requirement for it to be ON for the cleaning to take place. All you need to do is follow the instructions depending on your model, load some paper, and roller cleaning will take place.

Perhaps you’re wondering what to do when your Canon printer says paper jam, but there is none. You may have performed all the steps above but still have no luck printing. 

This could indicate that your Canon printer is either faulty and needs to be repaired or just outdated and you need an upgrade. An all-in-one printer may do you some good.

We also have an expert list of Canon printing programs if you need help with printing jobs.

Do let us know if you have been able to get rid of the Canon printer paper jam issue in the comment section below.

Fix Xbox Error Code 0x87e30064 Using 3 Easy Methods

Xbox users often experience errors that prevent Xbox from connecting to Xbox Live. One such error is the 0x87e30064 error code. If the 0x87e30064 error code plagues your Xbox, this article provides a few ways to resolve the error.

What causes the error code 0x87e30064 on Xbox?

The 0x87e30064 error code is traditionally triggered when the console is unable to connect to Xbox Live Service. However, here are some other reasons why you may be facing this error:

  • Corrupted game files – In the process of downloading games, there might have been a hitch in the process resulting in corrupt game files, which could lead to the 0x87e30064 error.
  • Outdated Xbox System – If you’re running an outdated version of your Xbox, you might trigger the 0x87e30064 error code.
  • Network or server issues – In rare cases, Xbox Live may be down due to server issues, this can trigger the 0x87e30064 error. However, your local connection may be responsible as well.
  • Faulty hardware – In rare cases, the 0x87e30064 is triggered when the Xbox system has an internal fault. In such cases, you’ll need to take it to a professional for repairs.

Now that we have identified the possible causes for this error, let’s explore how to troubleshoot the problem below.

How do I fix the 0x87e30064 error code on Xbox?

Here are a couple of quick fixes you can attempt before we move on to advanced troubleshooting:

  • Restart your Xbox.
  • Before updating your Xbox, ensure it’s connected to the internet, and you’re signed into Xbox Live service.
  • Check your network connectivity for network congestion and power cycle the router.

If these preliminary methods didn’t help, proceed with the solutions below.

1. Update your Xbox

  1. Press the Xbox button to open the Menu, select Profile and System and click Settings.xbox settings
  2. Select System. Click on Updates and select Update Console. If your Xbox has an update, it will be installed.

If you see a grayed-out No console update available message, your system is fully up to date.

Here is a detailed guide showing how to fix Xbox update error codes. You’ll find the guide useful if you run into errors while trying to update your console.

The 0x800c00b error prevents users from signing into Xbox. You can read our guide to help resolve the problem.

2. Reinstall the corrupt game

  1. Power on your console and press the Xbox button on your controller.
  2. With your controller, navigate to My Games and Apps and open it.
  3. Select the Games to delete the desired game.
  4. Use the D-pad to ensure the game is highlighted, and press right on the d-pad.
  5. Press the Menu button on your controller and select Uninstall.
  6. Press A to confirm the deletion.
  7. Now download and reinstall the game.

Uninstalling a game from your console will delete all game add-ons like saved data, settings, etc. However, if you’re connected to the internet and signed into Xbox Live while uninstalling the game, your saved game data might be automatically backed up.

3. Power Cycle your Xbox

  1. Press and hold the Xbox button on your controller for ten seconds to power off the system.
  2. Press and hold the Xbox button to turn your Xbox back on.
  3. When power cycling your Xbox, hold down the Xbox button until the system completely shuts down.

You can also power cycle using the Xbox guide:

  1. Press the Xbox button on the console.
  2. Use your controller to navigate to the Profile and System option and select Settings.xbox settings
  3. Select General option and Power & Startup.
  4. Click Restart now.

Both methods will power cycle your console and hopefully resolve the 0x87e30064 error code.

These are the top fixes to troubleshoot the error code 0x87e30064 on Xbox. Ensure to follow all the steps for each solution strictly.

We also recommend reading our guide on how to fix Xbox Error Code 0x87e10bef because it’s pretty similar. Another recently emerged error is Xbox error code 80151912, but we covered it in a separate guide.

If you’ve got any tricks that helped fixed the 0x87e30064 error code on your Xbox, you can let us know in the comments.

Posted in Fix

Canva to Word File: How to Convert or Transfer it

It can be quite tricky to export Canva to Word regarding designs. However, there are few workarounds that can help you achieve this.

How can I convert Canva to a Word document?

1. Insert the Canva file as an image

  1. Click on the Share button in the top-right corner of the screen.canva share
  2. This opens the Share this design menu, and click on the Download button at the bottom of the menu.canva png download
  3. In the drop-down menu, select PDF or PNG. Click Download and choose where you want to save your file.dowwnload the file
  4. Open your file in Microsoft Word and insert it into your document.open the image in Word
  5. That’s it! You have now successfully inserted your Canva design into a Microsoft Word document.

This method can be useful if you want to add your designs to Word, but keep in mind that you won’t be able to customize them. Now that you know how to copy an image from Canva to Word, you can use it in your designs.

2. Export the file as PDF and convert it to docx

  1. After completing your Canva design, click on the Share button in the top-right corner of the screen.
  2. This opens the Share this design menu, and click on the Download button at the bottom of the menu.
  3. Under File type, now select PDF Standard from the drop-down menu, then click the purple Download button.download pdf standard
  4. After downloading your Canva design as a PDF file, go to Adobe Acrobat’s website.
  5. Now, upload the PDF file to the tool, either by clicking the Select files button or by dragging and dropping them into the grey box.
  6. Next, choose the Document language and click on Export to DOCX. As soon as you do, the Word document will be downloaded to your device.
  7. Then, open the Docx in Microsoft Word.

And that’s it on saving Canva as Docx! You can now open your Docx file in Word and edit it there.

Can you export Canva to Word?

This isn’t possible at the moment, as the platform doesn’t offer this option. However, you can use the workarounds from above instead.

Can Canva convert PDF to Word?

No, Canva can’t convert PDF to Word. However, there are many PDF to Word converters that you can use instead.

How can I convert Canva to Publisher format?

It is, at the moment, directly impossible to export Canva to Publisher. However, you can use Canva’s sharing options to download Canva’s designs and afterward use Microsoft Publisher’s Insert File feature to export Canva designs to Publisher.

And that’s it on how to export Canva to Word. We trust that the steps in this guide are applicable to save you from the hassles of creating designs across document-creating platforms.

If you need Canva for Windows 11, you can explore this guide to download the latest version for your PC.

Here are the top fixes if you get the something went wrong error while trying to load Canva. We also have a guide on what to do if Canva won’t let you edit text, so don’t miss it.

In conclusion, kindly drop your suggestions or questions in the comments below.

Event ID 56: What Is & How to Fix It

Some Event IDs in Windows can often be ignored as they do not interfere with the system’s functioning. However, with Event ID 56, the pop-up seems to interrupt normal operations, as you can either end up with a BSOD error or unexpected shutdowns.

The Event ID is sometimes accompanied by the Event ID 56 ACPI 2, which further gives you more clues that a driver is faulty. Regardless of the details, some universal solutions have worked for users, and we share them with you in this article.

What is Event ID 56?

Event ID 56 is a generic Windows error that appears when certain events occur. Multiple factors, such as a hardware problem with the computer or a problem with the operating system, can cause this error.

One thing that stood out from most reports was that ASUS users were the most affected by the Event ID 56 error.

Although the Event ID 56 error can be from a source application popup, some of the general causes include:

  • Unused audio drivers – According to some users, some audio drivers that have not been in use for a while were the cause of this issue.
  • Incompatible hardware – This could be the issue if your PC has been in use for a while and you’re yet to update your BIOS, especially after updating to a newer version of Windows.
  • Defective CPU – Although it can be hard to detect a faulty CPU, there are some tell-tale symptoms that can help you detect when it is failing.
  • Outdated drivers – It’s always good practice to keep your drivers up-to-date as they keep things running smoothly on your PC.

How do I fix Event ID 56?

Before you embark on the advanced solutions, we recommend that you try the following first, as these preliminary steps could resolve the issue:

1. Restart the Windows Update service

  1. Hit the Windows + R keys to open the Run command.
  2. Type services.msc in the dialog box and hit Enter.run services.msc command
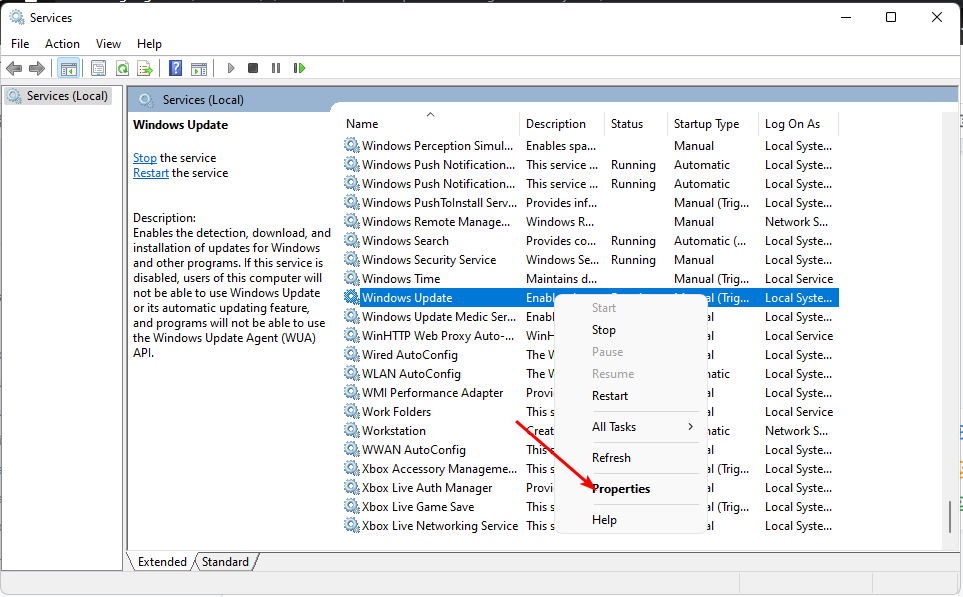
  3. Navigate to Windows Update Service, right-click on it and select Properties.
  4. Under Startup type, click on the drop-down menu and select Automatic.
  5. Now click on Start and click Apply then OK to save the changes.

2. Update BIOS

  1. The process of updating BIOS will differ depending on your motherboard. For this step, we shall be updating the HP motherboard.
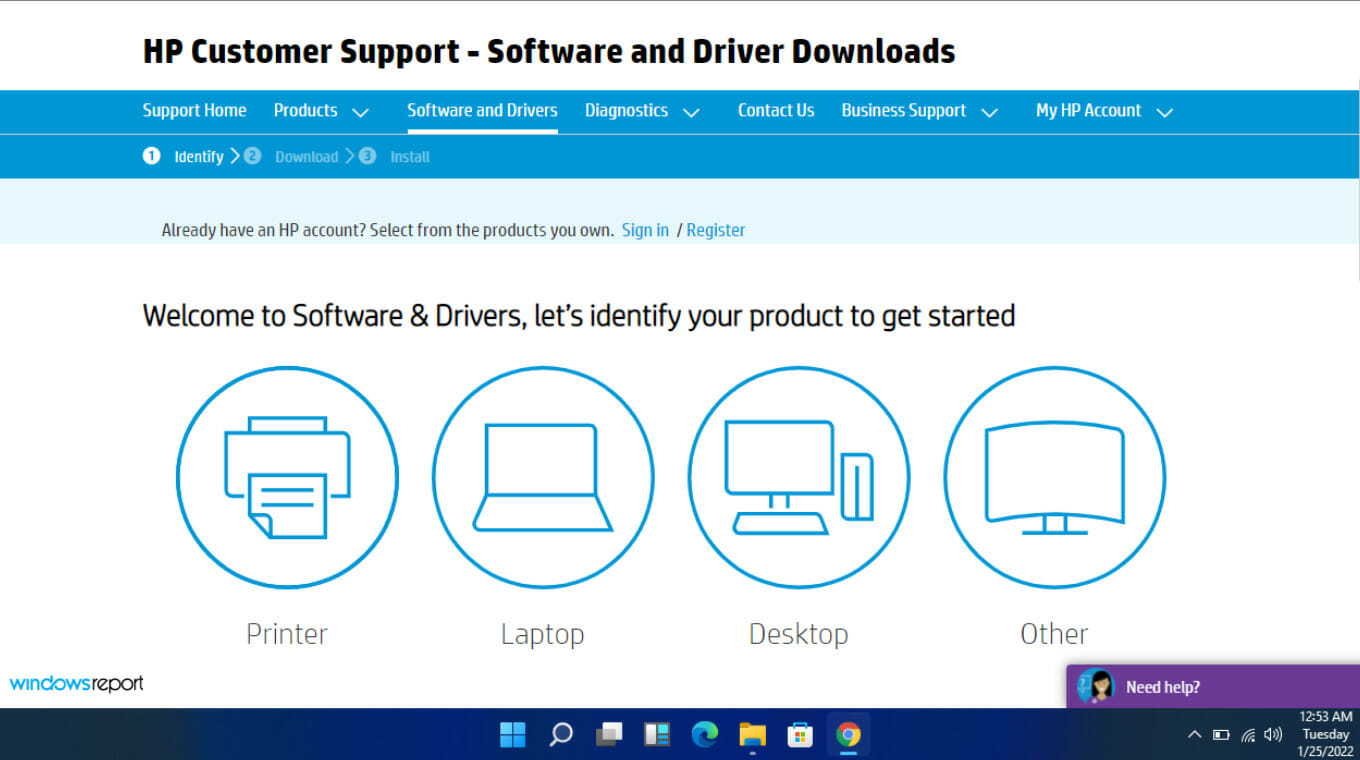
  2. Navigate to the HP driver and software download website.
  3. Choose laptop or desktop, depending on the type of computer you’re using.
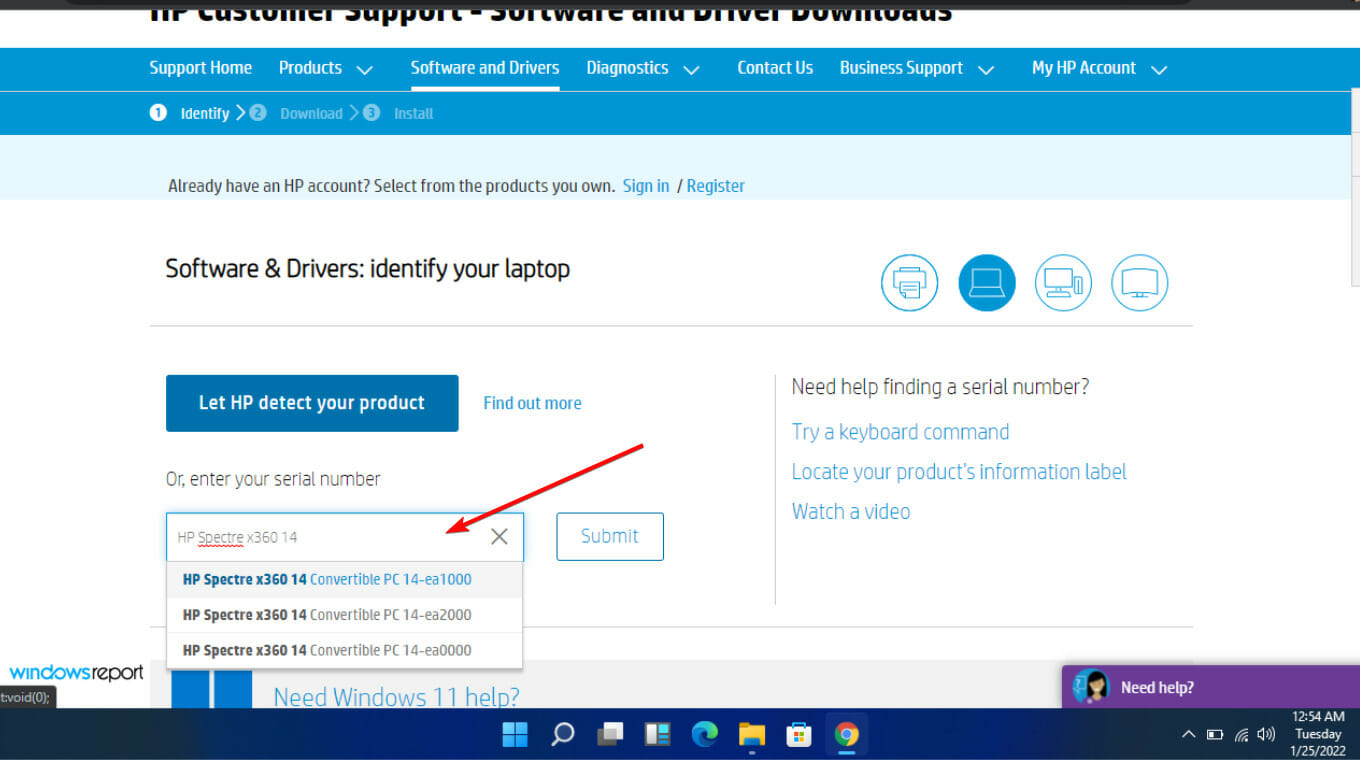
  4. Enter your exact serial number or your exact computer model.
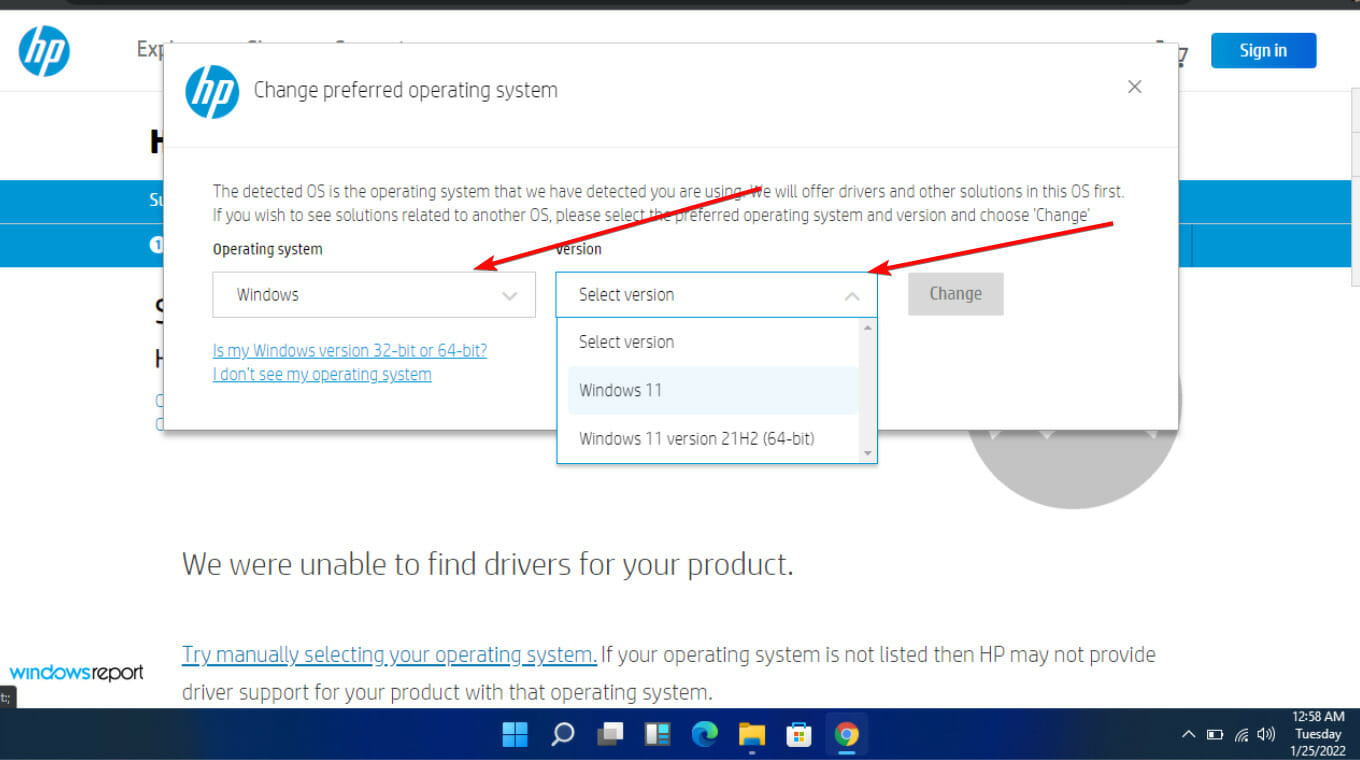
  5. Select your OS and OS version, then click Submit.
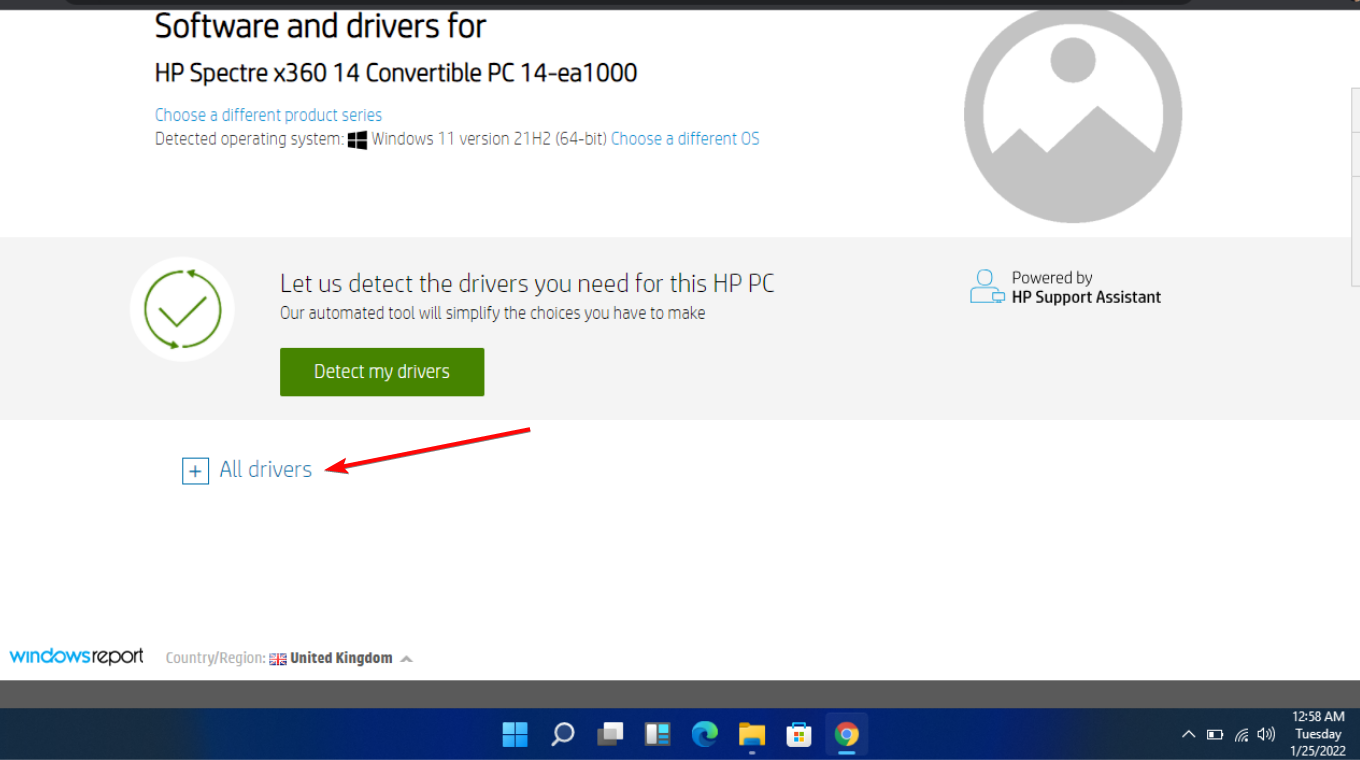
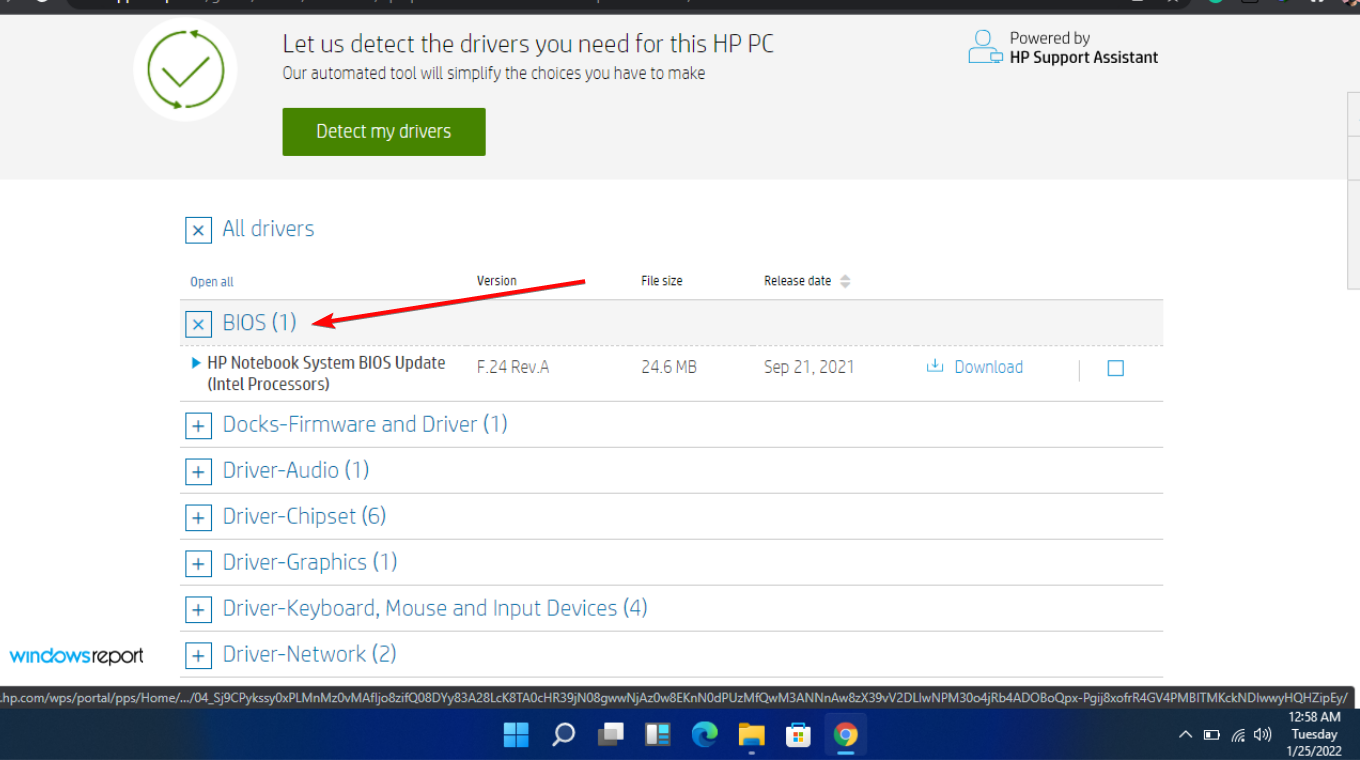
  6. Click on All drivers and then expand BIOS to see available updates.
  7. Click the download icon.
  8. Install the .exe file, following the on-screen instructions.
  9. Restart your PC.

3. Disable C-States

  1. Enter into your PC’s BIOS settings.
  2. Navigate to the Advanced tab and click on CPU Configuration. 
  3. Locate C-States Control option and Disable it. 
  4. Save the changes and exit the BIOS setup utility.

Disabling C-States is a way to reduce power consumption by turning off parts of the CPU that aren’t being used. 

It is important to note that although disabling C-States does not affect the performance of the CPU, it will take a significantly longer time for it to wake up whenever it goes into sleep mode.

Apart from these solutions, a handful of users could bypass Event ID 56 by overclocking their CPUs. While this can be beneficial in boosting your PC’s performance, if not monitored, you risk damaging your CPU permanently. 

If you go through this route and it works for you, we highly recommend you also install overclocking monitoring software so that the lifespan of your processor is not affected.

For those who are unfortunate, perhaps performing a system restore or upgrading your motherboard might help in this situation.

If you have experienced this error and have any other solution not mentioned here, please comment below.

Windows 11 Freezes But Mouse Still Moves: 3 Ways to Fix it

Many reported that Windows 11 freezes but the mouse still moves, and this can be a frustrating issue since you won’t be able to do anything. Luckily, there are few solutions that can help you fix this.

Why does my PC keep freezing but I can move my mouse?

This issue occurs due to Hardware-accelerated GPU scheduling or corruption of system files.

What can I do if Windows 11 freezes but the mouse still moves?

Before we start, ensure that both Windows and the application that freezes are up to date.

1. Disable hardware-accelerated GPU scheduling

  1. Press the Windows key + I to open Settings.
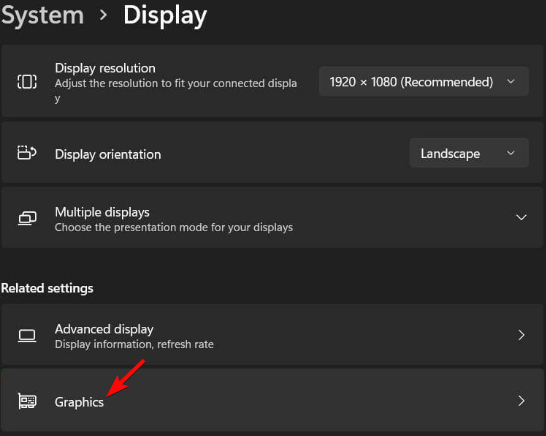
  2. When it opens, go to Display.
    display settings w11
  3. Select Graphics.
    graphics settings
  4. After that, select Change default graphics settings.
    default graphics settings
  5. Disable Hardware-accelerated GPU scheduling.
    hardware-accelerated-GPU-scheduling-off

To learn more about this feature, we have an in-depth guide on Hardware-accelerated GPU scheduling, so don’t miss it.

2. Run the DISM and SFC scan

  1. Left-click the Start button, type command prompt, and click Run as administrator.
  2. Run the following command: DISM /Online /Cleanup-Image /RestoreHealth
    dism restorehealth
  3. It might take a while for it to complete, so be patient.
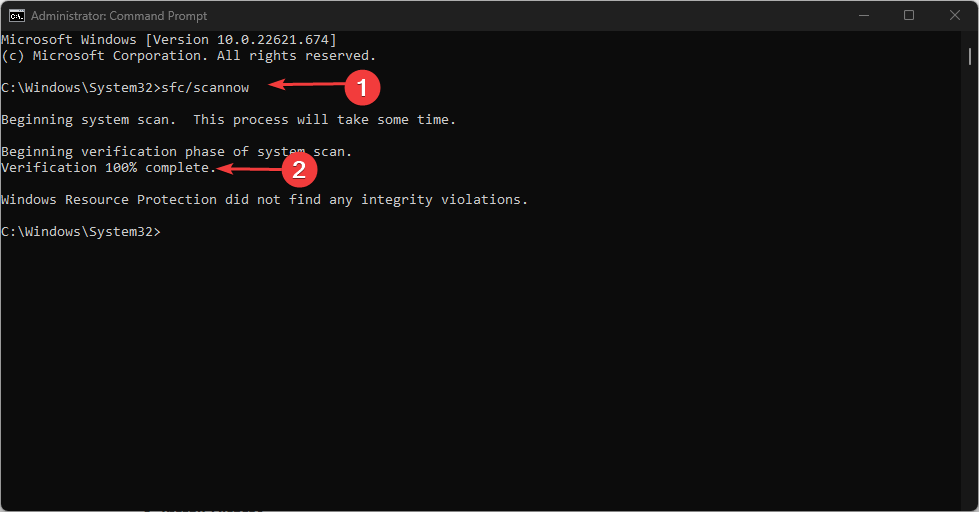
  4. Once finished, type the following command line and press Enter: sfc /scannowsfc scannow cmd
  5. If the error is discovered, it will be fixed immediately. Then, close the Command Prompt and restart your PC.

3. Update your GPU drivers

  1. Right-click on the Start button and select Device Manager from the list.
  2. Expand the Display adapter, right-click on the needed driver, and select Update driver.
  3. Choose Search automatically for drivers and restart your PC after it is done.

Besides following the manual steps mentioned above, you can also use specialized driver updating software to update your GPU drivers automatically.

If the error is still present, you can try installing an older version of BIOS since a few users reported that this method has worked for them.

These are just a few fixes that can help you if Windows 11 freezes but the mouse still moves, however, some users reported that their PC freezes and restarts, but we covered this in a separate guide.

Others reported that Windows 11 freezes randomly while for others Windows 11 freezes on startup, but we covered both of these issues in separate guides.

ChatGPT Error Code 1020: How to Fix the Access Denied Issue

ChatGPT is fairly new to users but like all software, it’s plagued by annoying bugs and errors. One such error is the error code 1020.

If you’re currently experiencing this error while trying to open ChatGPT, it’s possible that you’ve encountered a ChatGPT network error.

If the network isn’t a problem, we got a detailed guide that provides you with the steps needed to fix the error code 1020.

What is ChatGPT access denied error code 1020?

If you run into the error code 1020 while using ChatGPT, it means the web server is overloaded, and the site owner is attempting to free up resources by limiting the number of users accessing the site.

In some cases, the error code 1020 could also indicate that you’ve exhausted your daily limit for the service, hence, you’re unable to access the site.

How do I fix ChatGPT error code 1020: Access Denied?

If the above steps couldn’t resolve the ChatGPT error code 1020, here are more advanced solutions you can attempt.

1. Clear ChatGPT browser cookies

  1. Launch your browser. Click on the three dots at the top right corner of the window and select Settings.
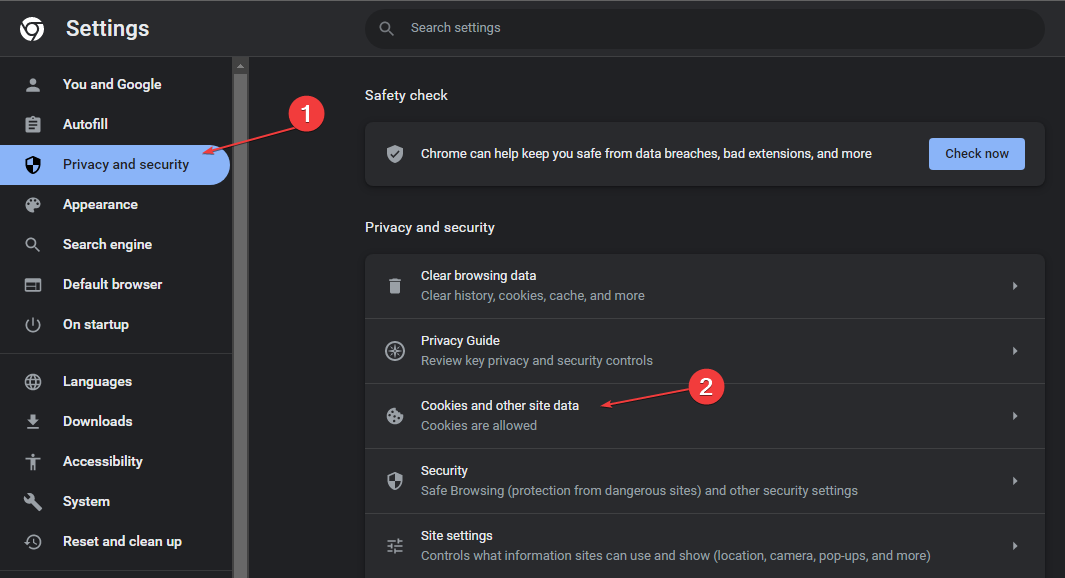
  2. On the left side of the window, click Privacy and Security, and click Cookies and other site data.
  3. Scroll down and click See all Site Data and Permissions.
  4. then, type in OpenAI in the search bar at the right pane to see all the stored cookies.
  5. Click on the Trash button on each of the displayed ChatGPT cookies and click Clear.
  6. Open ChatGPT to see if the error is resolved.

Clearing the browser data of ChatGPT should get rid of error 1020 and anomalies you’ve previously experienced on the website.

Further, you can clear browsing data on exit on Chromium browsers by following the steps in this guide.

2. Use a VPN

A VPN service provides protection for your identity and hides your IP address from all types of possible threats and prying internet eyes, and keeps your data private at all times.

One of the best VPN extensions you can try for your Chrome is ExpressVPN because you can browse the internet safely and securely with its powerful encryption.

You can easily control and turn on the app from your Chrome browser window and protect your privacy by preventing websites from discovering your real IP address and location.

If you’d like to install VPNs on your PC, here is a list of our picks for the best free VPNs on Windows.

3. Reset your IP address and DNS server

  1. Left-click the Start button, type cmd, and select Run as administrator.
  2. Type the following commands and hit Enter after each one:
    • ipconfig /flushdns
      netsh winsock reset
      netsh int ip reset
  3. Type control panel in the Windows Search bar and hit Enter.
  4. Select Network and Internet and choose Network and Sharing Center.
  5. Right-click on your Internet Connection and click Properties.
  6. Then, click on Internet Protocol version 4(TCP/IPv4) and select Properties.
  7. Check the option of Use the Following DNS Address to change the DNS Address. Set the Preferred DNS Server to 8888 and the Alternate DNS Server to 8844.
  8. Click OK and close the Control Panel.

These DNS servers belong to Google and are completely safe and trustworthy. With luck, changing your DNS servers to these should fix ChatGPT error code 1020.

If you’ve attempted all fixes and you couldn’t resolve the error, you can contact the Chat GPT support team. Login to ChatGPT using the steps above. Click on the Help button to start a conversation and report your error.

ChatGPT is a relatively new software, it’s bound to have errors and bugs. However, such errors like code 1020 don’t require much technical know-how to resolve.

We strongly recommend reading our complete guide on how to use ChatGPT in WhatsApp.

With the steps outlined above, you should be able to restore the service to its operational state

How to Set OneDrive Files to Always Keep on This Device

Some of our readers have requested to know how to access their OneDrive always keep on this device. This is because there are times when you would like to keep some files for offline use so they can be accessed anywhere and anytime regardless of internet connection issues.

We will show you how to tweak this setting in this article.

What does always available on this device mean?

The OneDrive always available on this device setting helps you download files/folders to your device for offline use.

It is one of the OneDrive Files On-Demand features which can be enabled by default in OneDrive settings to reduce storage consumption or OneDrive is full of errors aside from the OneDrive sync feature.

With the OneDrive always keep on this device feature, your files are stored and can be accessed from the personal cloud without downloading them on your device. Further, once you are signed into the OneDrive app, this feature enables you to access your files from any PC anywhere in the world.

In addition, once the feature is enabled, the data for the selected files are not physically downloaded, which means, the files show on your device, but they take up almost no space, regardless of how big they are.

However, only files stored in OneDrive can be set to always keep on this device.

How do I set OneDrive files to always keep on this device?

Before engaging in advanced settings tweaks, you should perform the following:

The above checks are essential to making OneDrive files always stay on your device. Having confirmed the above checks, you can explore the steps.

1. Turn on Files On-Demand

  1. Sign into OneDrive on your device.
  2. Next, click the OneDrive Cloud icon in your system tray, select the gear icon, and click on Settings.
  3. Then, click on the Settings tab and click on Download files as you use them under Files on-Demand.
  4. Select Continue to confirm the process.

OneDrive Files On-Demand enables users to access files in their cloud storage in OneDrive without downloading them or consuming the PC’s storage space.

However, users should note that each device has its Files On-Demand settings, so make sure you enable them for each one you intend to use.

2. Set Always keep on this device via OneDrive folder

  1. Sign into OneDrive on your device.
  2. Next, click the OneDrive Cloud icon in your system tray and select Open folder.
  3. Locate all the files or folders with the online-only or locally available status, right-click them, and select Always keep on this device.
  4. Wait for the syncing. After that, the file or folder will now display a dark green tick.  

Alternatively, if you want to change all of your OneDrive files to Always keep on this device at the same time, simply right-click on the OneDrive folder in the navigation pane of File Explorer and click on Always keep on this device to adjust to all of your OneDrive files at once.

In case your OneDrive keeps crashing you can check how to fix it here. Some of our readers have requested how to fix the 0x80070194 error on OneDrive cloud issues. You can bookmark the fixes in case you encounter the same situation.

And that’s it on how to set OneDrive files to Always keep on this device. If you have any questions or suggestions, please use the comments section below.

How to Enable System Wide Dark Mode in Windows 11

How to enable system-wide Dark Mode in Windows 11? All previous versions of Microsoft’s Windows operating system featured a constantly evolving design that changed and updated the user interface to make it more appealing and functional.

However, while these features gave a better user experience, they weren’t always popular or accessible to users that enjoyed closely matching their desktop styles with an overall logo scheme or brown colors. 

Does Windows 11 have a system-wide Dark Mode? 

The days of bright white computer screens are over. Over the years, people have been getting more used to dark themes.

There’s a reason for that. Dark modes help your eyes and can save you from straining yourself long-term. Moreover, they help avoid eye-related health problems that many develop with prolonged use of computers.

If you wonder whether Windows 11 has a system-wide Dark Mode, the answer might surprise you!

Windows 11 offers many fresh changes and updates, but one of the most exciting is the system-wide Dark Mode. Users of the Windows 11 operating system can navigate their devices without being blinded by the bright light, similar to the system-wide dark mode in Windows 10.

How do I get system-wide Dark Mode in Windows 11?

  1. 1. Click the Start button, then press on Settings.

    windows 11 settings choose
  2. 2. Navigate to the Personalization menu from the left pane.

    windows 11 personalization menu
  3. 3. Select Colors.

    colors menu windows 11
  4. 4. Click on Choose your mode to open a menu with three options: Light, Dark and Custom.

    choose colors mode windows 11
  5. 5. Select Dark.

  6. 6. Close the Settings window.

  7. One of the most significant new features in Windows 11 is system-wide Dark Mode. As you can see in the solution above, it’s really simple to set it up.

    All you need to do is navigate to the Personalization > Colors settings on your PC and manually choose Dark Mode from the list of options.

    However, if you don’t have a licensed copy of Windows 11, you won’t be able to edit the personalization options. That is also a key indication that you don’t have a certified copy of Windows 11.

How can I set Accent color to Automatic?

  1. Press the Windows Start button and choose Settings.
  2. Click Personalization from the left pane and select Colors from the right.
  3. Now, got to the Accent color option and set it to Automatic. That will allow Windows to set an automatic set of colors based on your background.

Suppose you want to enable the feature for Windows to set an accent color based on your background.

The reason behind this would be that if you chose a darker color background, the system will mimic those colors getting you closer to your desired outcome.

Is Dark Mode better for your eyes? 

Windows 11 Dark Mode has been a long time coming, and now that it’s here, we have to ask: is Dark Mode better for your eyes?

The answer is yes! Dark Mode makes it easier to see the screen in dimly lit areas, and because it uses less white color, it’s easier on the eyes and can help reduce eye strain.

One more question on every Windows 11 Dark Mode user’s mind: Does Dark Mode save battery?

In a word, yes! Dark Mode saves battery by reducing the power to light up your screen. If you’ve ever sat in a dark room, you know how much energy it takes to keep the screen lit.

Also, the answer is yes for those wondering whether there is an automatic Windows 11 dark mode. But you will need a third-party app for it or make some intricate changes.

How to adjust your display brightness?

If you use a laptop, try adjusting the brightness to a comfortable level. If you use a desktop computer, try raising it so it’s not directly in your line of sight but still within reach.

You may even want to set it up so that it faces away from you when you’re using it. Most laptops have dedicated brightness buttons on the F keys.

How to change the color temperature of your screen?

Try setting your screen’s color temperature to a warmer setting so there’s less contrast between white and black areas of the screen (which can cause eye strain).

Go to the Settings menu, click on the Display option, then select Color Management and Color temperature. There you can select a Warm or Cool setting.

This being said, we hope that now you have managed to switch your Windows 11 to Dark Mode system-wide, and now it’s a lot more pleasant.

Other readers are complaining the contrary, that Windows 11 Is Stuck in Dark Mode. If that’s the case, hit the link to fix the situation quickly.

However, if you’re interested in scheduling Dark Mode in Windows, the highlighted guide will help you. You can also enable dark mode on Google Maps.

If you have any other questions or suggestions, please share them in the comments section below.

How to Change Widget Language on Windows 11

The Windows 11 widgets are small programs that show information on your desktop. These can display weather, stocks, or news headlines. You can also use them to show pictures or videos on your desktop.

By default, Windows 11 language is set to English, but users claim that the Widgets bar displays a different language. This puts non-English speakers at a disadvantage because they may be unable to use the widgets. 

If you don’t find them useful, you can easily disable the widgets and continue your activities. However, if you find that they make your life easier, the good news is that you can change the language if you want to.

Why are my widgets in a different language? 

If you find your widgets displaying a different language, here are a few reasons why:

  • Country or region settings – You may have noticed that some of your widgets are displayed in a different language than the one you selected for your OS. This is because the country or region setting differs from the language selected for your Windows 11.
  • Your language packs are missing or damaged – There might be some problems with your language packs. To check if there is any issue with your language pack, you can try to uninstall and install it again.
  • Unsupported language – If you have enabled other languages, but they are not supported by your device, the widget may not show up in the desired language. It will instead display a different language than the one you selected.
  • You have not installed any language packs – Language Packs are small files that contain all the necessary resources for displaying your desired language on your computer. If you want to change the display language of your widgets, you need to install these first.

Other reasons include running an outdated OS which you can easily fix by updating your OS to a newer version.

How do I change the Language of my widgets in Windows 11? 

  1. 1. Navigate to your Widgets bar and click on your profile picture icon.

    windows 11 widgets click on profile picture
  2. 2. Go to the bottom and click on Manage your news and interests.

    manage news and interests windows 11
  3. 3. The Microsoft page will now open.

  4. 4. Click on the Experience Settings tab, then select Language & content.

    settings for experience windows 11
  5. 5. In the drop-down menu, choose your desired Widgets language.

    select widgets language options
  6. 6. Restart your PC for the changes to take effect.

  7. Whether the widgets language is causing errors on your PC or you simply want to try out a different one, you can easily change it via Microsoft’s Experience Settings.

    From that section, you can modify both the language and the content of your news and interests feed in a few clicks.

How do I install a language pack on Windows 11?

  1. Press Windows + I to open Settings, go to Time & language from the navigation pane, and then click on Language & region on the right.time & language
  2. Click on Add a language.add a language
  3. Search for the language you want to add, choose the relevant search result, and click Next.select language
  4. Click on Install at the bottom.language pack

After you have added the language pack, you can change the language in Windows 11. And similarly, you can change Windows 10 language from Chinese to English.

How do you update widgets in Windows 11? 

In order to update these widgets, you’ll need to open the corresponding app or service first. For example, the Weather widget uses the Weather app to get weather information. As such, updating the Weather app will consequently update the weather widget.

To find out the associated app or service, follow the steps below:

  1. Hit the three horizontal ellipses next to your selected widget.
  2. At the bottom, you will see Powered by Microsoft Weather (In this case, the weather widget).
  3. You can then proceed to update the app also to update the widget.

If you’re using a third-party widget, you can update it from the developer’s site or Microsoft Store if it’s available there. Ensure you install a reliable antivirus program, especially when downloading programs from untrusted sites.

If you are new to widgets and are wondering what all the fuss is about, we have curated a list of the best Windows 11 widgets to make your life easier.

Remember that widgets can be unforgiving on your RAM, so ensure to keep only those you need. If you find out that they are consuming too much, you can fix your widgets’ high CPU usage, as outlined in our expert guide.

Let us know if you have been able to change your Windows 11 widgets’ language in the comment section.

Error Performing Query Facebook Error: How to Fix It Fast

If you ever get the error performing a query on Facebook or Facebook Marketplace it’s because of server issues or bugs with Facebook. A corrupt cache or an outdated app on your end can also be at fault.

Follow the steps outlined below to fix it:

How do I fix the Facebook error performing query?

1. Refresh the page

1.1 On desktop

  1. Once you encounter the error, press Ctrl key + R or F5 key on your keyboard to refresh the page.
  2. Perform the desired operation again.

1.2 On mobile

  1. While on the Facebook app, use your finger to pull down the webpage to reload it.
  2. Repeat the operation that led to the error.

2. Restart your device

1.1 On your Windows desktop

  1. Press the Windows key and X at the same time, to display the Quick Link menu.
  2. Select Shutdown or sign out and press Restart.
  3. Once the computer has restarted, log into your Facebook account.

2.2 On mobile

  1. Keep the power button pressed for 5 seconds and select Restart.
  2. Once your device has restarted, reopen the Facebook app and the error will have disappeared.

3. Reinstall Facebook

3.1 On your Windows desktop

  1. Open the Start menu by pressing the Windows key on your keyboard.
  2. Type Facebook in the search bar.
  3. Right-click on the Facebook Windows app and click on Uninstall.
  4. Once the process has been completed, reopen the Start menu by pressing the Windows key.
  5. Type microsoft store in the search bar and press Enter.
  6. Once the app has opened, type facebook in the search bar at the top of the screen and press Enter.
  7. Once the Facebook app search result is displayed, click on the Install button.

3.2 On your mobile

  1. Press and hold the Facebook app icon and select App info.
  2. Choose Uninstall.
  3. Find the Play Store in your phone’s app drawer.
  4. Start the application, type Facebook, and click on the Install button.

FAQs about Facebook query error

What does Error performing query mean on Facebook?

It usually indicates a temporary server issue, a session problem, or cached data interfering with your request.

Why am I getting a query error in Facebook Marketplace?

This often happens due to listing glitches, server rollouts, or outdated app/browser versions. Trying again later or switching devices can help.

Can browser extensions cause the query error?

Yes. Ad blockers or privacy extensions may block Facebook scripts. Disable them temporarily to test

Is the query error permanent?

No. It’s usually temporary and clears after updates or when Facebook resolves server-side issues.


We also have a guide on It looks like you were misusing this feature by going too fast message, so don’t miss it. Some users also reported that the Facebook news feed won’t load, but we have a separate guide for it.

Many users reported that the Facebook app is not working or that Facebook Dating is not showing up, but we covered those issues in separate guides.

Some have encountered Something went wrong on Facebook, as well as This content isn’t available right now message, but we have guides for them as well.

Similarly, if your Facebook messages are showing as sent but not delivered, or you’re seeing Facebook’s “An unknown error has occurred (code 1)”, both issues can often be resolved with a few targeted fixes.

We hope that our solutions helped you fix the Facebook Dating error while performing query. If you found a solution on your own, share it with us in the comments.

Slack Won’t Open? 5 Ways to Force Start it

Being one of the best collaboration platforms for remote jobs, it can be annoying to experience difficulties with Slack.

Users report that Slack won’t open on Windows 11, which makes it hard for Windows users to access their Slack accounts. Likewise, some users complain about Slack screen-sharing issues on PCs.

Why won’t Slack open on Windows 11?

Slack not opening on Windows 11 can be due to factors plaguing the app. The most common cause for this problem is that Slack servers are down. When the servers are down, the platform won’t function. It mainly occurs during maintenance or upgrades.

However, other factors that can be responsible for the Slack app not working on your PC are:

  • Corrupt/missing Slack data files – You can experience difficulty with the Slack app on your computer if its data file is corrupt or missing. It affects the app’s functionality and causes the app to be unresponsive.
  • Outdated Slack app – When the Slack app on your device is not updated, it won’t be able to fix bugs infecting it. So, the Slack desktop app not opening can be because the app is outdated.
  • Outdated Windows OS – it is common for apps on Windows to malfunction when Windows OS is outdated. It happens because Windows can’t fix bugs affecting it without updates, and it’ll lack the patches to improve performance.
  • Third-party app interference – Apps like antivirus software can impede the activities of the Slack app. Antivirus software can detect malicious activity, blocking it from opening.

What can I do if Slack doesn’t open on Windows 11?

Before trying any advanced troubleshooting on your PC, go through the checks below:

  • Perform a power cycle on your router.
  • Close unnecessary apps on your PC.
  • Temporarily disable antivirus software running on your PC.
  • Restart your computer to resolve startup problems.

After trying the steps above, and you cannot access the Slack app on Windows 11, proceed with the following solutions.

1. Run Slack as admin

  1. Press Windows + S keys to prompt the Search box, type Slack, and click on it.
  2. Select Run as administrator from the drop-down, then click on the OK button to confirm the permission to run the Slack app as an administrator.

When you allow Slack to run as an administrator, it will get past hurdles preventing it from running properly.

2. Check Slack’s server

Go to Slack’s System Status page and check for any updates on the issue. If there is any information about the server being down, all you can do is wait patiently until it is fixed.

However, if there is no update about a server issue, proceed to the other solutions.

3. End the task for Slack to restart the app

  1. Right-click the Start button and select Task Manager.
  2. Select the CPU and Memory usage option in the Task Manager.
  3. Go through the page, right-click the Slack app from the PC, then click on the End task option from the drop-down.
  4. Click OK to confirm that you want to end the task for Outlook (you can also close other apps running in the background on your PC by repeating the steps for unnecessary apps).
  5. Restart your PC and check if the Slack not opening issue still persists.

When you end tasks for Slack in the Task Manager, it will stop background activities, causing it to be unresponsive.

4. Disable Windows Defender Firewall

  1. Click the Start button, input Windows Security in the search space, and press ENTER.
  2. Select the Virus & threat protection option, and click Manage settings.
  3. Toggle off the Real-time protection option to disable the Windows Defender Antivirus.

It will stop Firewall interference with the Slack app on your PC. Read how to fix the Windows Defender if you cannot change settings on Windows 11.

5. Update Windows

  1. Click Start on your Desktop, select the Windows Settings app, or press the Windows + I keys.
  2. Choose Windows Update and select the Check for updates option (if there are any updates available, Windows will search for and install them).

Windows update will fix bugs plaguing your PC, causing it to block the Slack app from opening. Updating the Windows OS also serves as a way of updating your Device drivers to their latest versions.

Is Slack supported on Windows 11?

Yes, Slack is supported on Windows 11 and works flawlessly on the latest iteration. Even the system requirements for Slack list Windows 11 as a compatible OS.

Also, many wonder if you can install 32 bit apps on Windows 11. The answer is Yes. Though a 64-bit iteration, Windows 11 supports 32-bit or x86 apps, so you won’t have a problem running them.

Even the 32-bit version of Slack should run fine on Windows 11, but we recommend you stick with the 64-bit one for better performance.

After fixing Slack not opening on your PC, you should update the app to avoid recurring issues. Read how to fix update issues with Slack on your PC.

Conclusively, we have a detailed guide on how to fix Slack notifications not working on Windows 11. And if it’s not your cup of tea, check out this side-by-side Google Chat vs Slack comparison and make your decision.

For further questions and suggestions, kindly leave them in the comments below.

5 Ways to Fix Microsoft Word Not Opening in Windows 11

Below, we’ll show you how to repair Microsoft Word when it’s not opening in Windows 11.

The most likely reason why you can’t open Microsoft Word is because of corrupt or missing files. Issues with Windows updates, interfering antivirus software and an outadte app can also be at fault.

Whether it’s not responding, not opening in Safe Mode, or simply not reacting at all when you’re trying to open it, we’ve got tried and tested solutions below.

All explained step by step.

How to fix Word not opening

1. Reboot your PC in Safe Mode

  1. On the sign-in screen, press the Shift key while holding the Power button.
  2. Press and hold the Shift key to prompt the Advanced Recovery Options page.
  3. Click on Troubleshoot, then select the Advanced options.
  4. Click on Startup Settings and select the Restart option.
  5. Press F4 to Enable Safe Mode. 

Wait until your computer reboots in safe mode. This will fix startup errors that may impact the activity of apps like Microsoft Word.

You can check other ways of rebooting Windows in Safe Mode in a few steps.

2. End the task for Microsoft Word

  1. Right-click Windows Start and select Task Manager.
  2. Navigate through and select the Microsoft Word client from the PC, then click on the End task button from the drop-down.
  3. Click OK to confirm that you want to end the task for the Microsoft Word app on your computer.
  4. Restart your PC and check if you can launch Microsoft Word successfully.

The above steps can also work for ending tasks for other apps that may conflict with your Word running on your PC.

You can also access the Task Manager by other means. Hence, read how to open Task Manager via shortcuts on your PC.

3. Repair corrupt Word files

  1. Click the Start button and type Microsoft Word into the search box, and launch the app.
  2. Click on File and select Open on the left side of the screen. Scroll down and select Browse.
  3. Navigate through and check for corrupted Word files on the PC.
  4. Click on the file, tap the arrow pointing down beside the Open button, and select the Open and Repair option to allow Microsoft Word to fix the corrupt file impeding its performance.

However, you can read about the best tool for fixing corrupt documents in Microsoft Word.

You can also repair Word files by using a specialized such as Stellar Repair for Word. This software is specially designed to repair any issues that may corrupt your files. Using this tool will ensure you don’t lose anything from your file, including hyperlinks, comments, fonts, bookmarks, and many more.

Stellar Repair For Word

Quickly repair your broken Word files without losing anything inside with this powerful tool.
Check Price Visit Website

4. Temporarily disable Windows Defender Firewall

  1. Click Start on the taskbar, type Windows Security in the search box, and press Enter.
  2. Select the Virus & threat protection option from the search results, then click Manage settings.
  3. Toggle off the Real-time protection option to disable Windows Defender Antivirus.

Disabling the Windows Defender Firewall will fix any interference with Microsoft Word. Learn how to fix the Windows Defender Firewall if it can’t change settings on Windows 11.

5. Update Windows

  1. Click Start on your taskbar and select the Windows Settings app.
  2. Click on Windows Update and select the Check for updates option.

If there are any updates available, Windows will search for and install them. Windows update will fix bugs affecting your PC and blocking the Microsoft Word app from opening.

Check our article for a guide on how to fix Windows not connecting to update services on your PC.

6. Repair or reinstall Microsoft Office

  1. Press the Start button, type Control Panel in the search box, and launch it.
  2. Click on Programs and select Programs and Features.
  3. Then find Microsoft Office from the installed apps, click the three dots at the front, and select Repair from the options, then OK.
  4. Click on Repair in the new prompt for confirmation. (If you’re unable to fix the issue after repairing the Microsoft Office app on your computer, proceed to the steps below)
  5. Repeat steps 1-4, click three dots at the front of Microsoft Office, select Uninstall from the options, and then OK.
  6. Restart your computer and install the latest Microsoft Office version available for Windows.

Uninstalling Microsoft Office will fix issues affecting problems affecting Word and other services under it. Also, it’ll help update Microsoft Office to the latest build. Besides, a reinstall will do just as well when Word is not responding in Windows 10.

After installing the app, check how to fix Microsoft Word not activated error per adventure it appears.

You may also be interested in how to remove watermarks in Microsoft Word in a few steps. Also, you can read about fixing errors Word experiences when opening a file on your PC.

If the Read out loud feature is not working in Word, this guide will help you fix it quickly. In case you want to add a code block on Microsoft Word, read this guide for detailed steps.

Don’t forget to let us know which solution worked for you by using the comments area below.

Fix: Wdcsam64.sys Memory Integrity Error on Windows 11

Since Windows 11 launched, some users have experienced memory integrity error often caused by incompatible system files.

The wdcsam64.sys error prevents the system from enabling core isolation. If you’re currently experiencing this error, we’ve got the perfect solutions to help you resolve the error.

What causes wdcsam64.sys memory integrity error?

The following are some of the most common causes of wdcsam64.sys memory integrity error:

  • Corrupt Windows files – If your system has corrupt Windows system files, it can cause the wdcsam64.sys memory integrity error.
  • Incompatible drivers – Incompatible drivers are among the most common causes of the wdcsam64.sys error.
  • Virus and malware – In rare cases, the wdcsam64.sys error is triggered when the system is infected with viruses and malware.

Now that we know what we’re dealing with, let’s fix this issue once and for all.

How do I resolve incompatible drivers for memory integrity?

1. Delete WD Discovery using Sysinternals tool autoruns

  1. Visit the Microsoft Official Autoruns Download Page and download the zip file.
  2. After the download, press Windows key + E to open File Explorer.
  3. On the left pane, click on Downloads and locate the file you just downloaded. Right-click on the file i.e Autoruns.zip and select Extract all.
  4. After the extraction, open the newly created folder, locate supporting.exe, and double-click the file to launch the app.
  5. Once the tool loads successfully, type wdcsam64 in the Search box and hit Enter.
  6. Locate any item related to wdcsam64 and delete them.
  7. Restart your PC to enable memory integrity.

Autoruns is a tool designed specifically for Microsoft to identify software configured to run in a system when the device is booted, or a user logs into their device.

2. Uninstall WD Discovery

  1. Press Windows key + R, type in appwiz.cpl in the dialog box, and hit Enter.
  2. In the Programs and Features window, locate WD Discovery, right-click on it, and select Uninstall.
  3. In the next window, click on Uninstall.
  4. Press Windows key + E to open File Explorer.
  5. In the File Explorer window, hover on the See more tab and select Options.
  6. Navigate to the View tab and check the option to Show hidden files, folders, and drives.
  7. Then, click on Apply and close the window.
  8. On the left pane of File Explorer, click on Local Disk (C:), click on Users, and select the folder with your username.
  9. Locate the .wdc file and hit the Delete key on your keyboard.
  10. Then, open AppData, navigate to Local, and select the Temp directory.
  11. Highlight all the folders titled WD Discovery and delete them.

By uninstalling and deleting the files related to WD Discovery, you should be able to fix the wdcsam64.sys memory integrity error.

3. Remove the WD devices

  1. Right-click the Start button and select Device Manager.
  2. Click on View and select Show Hidden Files.
  3. Locate WD Drive Management devices, right-click on WD SES Device, and select Uninstall.
  4. In the next popup window, check the option of Delete the driver software for this device, and click on Uninstall and restart your PC.

4. Run an SFC Scan

  1. Type in cmd in the Windows Search bar and click on Run as administrator to open the Command Prompt window.
  2. Type the following and hit Enter: sfc /scannow
  3. Wait for the scan to finish.

Windows Resource Protection may indicate that the SFC program detected no integrity issues or found corrupt or broken files but could not repair some.

If Windows displays the message Windows Resource Protection discovered corrupt files but could not fix some of them, you’ll need to run a DISM scan.

If you want to use an automatic alternative for SFC and DISM scans, you can try using a specialized repair tool because it offers a thorough scanning report of your corrupt or missing OS files, and ultimately finds healthy components

Further, the wdcsam64.sys error is usually triggered by incompatible drivers. If you’re installing drivers manually, ensure you install the latest version from the official manufacturer’s website.

We have another guide dedicated to HtcVComV64.sys and its issues, so don’t hesitate to check it out.

In conclusion, you can leave your questions and suggestions below in the comments section if you have any regarding this guide.

Fix: Windows 11 Keeps Installing Old Intel Graphics Driver

The Windows Update Assistant is in charge of selecting updates to be installed. The tool sometimes rolls out older driver versions to be installed. This causes Windows to keep installing the old Intel graphics driver. If you’re experiencing this issue, this article has all the fixes needed to resolve the error.

Why does Windows keep installing old intel graphics drivers?

  • Compatibility problems: If the driver you’re attempting to install is incompatible with your OS, the system will revert to the old graphics driver.
  • Misconfiguration: A glitch or a misconfiguration in a Windows update can cause the OS to install old drivers.
  • Conflicting updates: Driver updates are usually installed as a replacement for the older version, but some updates might install as a new entity. If installed as a new entity, the old and the updated driver might conflict.

Now that we know the problems behind this issue, let’s fix it with the solutions below.

What can I do if Windows keep installing old Intel graphics driver?

Before we proceed with more advanced solutions, here are a couple of quick fixes you can apply:

If the above steps couldn’t fix the error, here are more advanced solutions you can perform.

1. Adjust driver installation settings 

  1. Press the Windows + S, type view advanced system settings, and select Open.
  2. Locate the Hardware tab, select Device Installation Settings, and click OK.
  3. Click on No in the Automatically download manufacturers’ apps and custom icons tab. Then click on Save Changes.
  4. Exit the window and restart your PC.

Changing the driver installation settings is one of the first solutions you should attempt if Windows 11 keeps installing old Intel Drivers.

2. Uninstall the older versions of Intel drivers

  1. Right-click the Start button and select Device Manager.
  2. Locate the Display adapter option and select it to expand the tab. Select your graphics driver from the drop-down menu, right-click it, and select Uninstall.
  3. Restart your PC once the uninstallation is complete.

When you uninstall older driver versions, you’ll have to manually reinstall the drivers. Without the drivers installed, your PC will experience a series of errors.

This process is not always working smoothly and you can encounter driver incompatibilities that may lead to system risks. So, you can switch to a driver-dedicated tool that will scan your PC and reinstall any drivers in no time.

3. Roll back Windows Updates

  1. Right-click the Windows button and select Device Manager.
  2. Locate the Display adapters section, click on it to expand the menu, right-click on the graphics driver, and select Properties.
  3. Navigate to the Driver tab in the pop-up window. Scroll down to locate the Roll Back Driver option and click on OK.
  4. Exit the Device Manager and restart your PC to see if the issue persists.

While trying to roll back the drivers update, you might run into the unable to install drivers error. Ensure to read our guide to help you fix the error.

If the Roll Back Driver option is grayed out, you don’t have an older driver to get back to.

4. Disable Automatic Updates for Windows Drivers

  1. Press Windows + R keys to open the Run window, type in gpedit.msc, and hit Enter.
  2. In the Local Group Policy Editor box, navigate to this path: Computer Configuration\Administrative Templates\Windows Components\Windows Update\Manage Updates offered from Windows Updates
  3. On the right pane of the Windows entry panel, click on the option of Do Not Include Drivers with Windows Update.
  4. In the next window, select Enabled, click on Apply, and click OK to confirm your changes.
  5. Restart your PC to see if the issue persists.

This method of excluding drivers from Windows Update only works with the Pro and Enterprise Edition of Windows 11.

Manually installing drivers is a time-consuming task and often very complex. It’d be more beneficial to use an Automatic Driver Update tool.

Intel has its own tool that can help you update drivers, however, many reported that Intel Driver Support Assistant is not working properly, but that can be fixed.

If you’ve got any more suggestions on how to fix Windows 11 keeps installing old Intel Drivers, you can let us know in the comments below.

YouTube Invalid Response Received: How to Quickly Fix It

Several users are experiencing YouTube freezing issues, yet encountering an error message that reads Invalid response received when viewing or uploading videos on YouTube is also common.

This error can be frustrating, and it prevents you from accessing the platform. Hence, we’ll examine some quick and easy steps to fix the YouTube Invalid response received error on Chrome or other browsers.

What causes YouTube’s Invalid response received?

The major causes of the YouTube Invalid response received error are outlined below:

  • Browser timeout – If the web browser fails to connect to the host server within the required time, this results in a browser timeout error. It may be due to network connectivity issues, server overload, or other technical problems.
  • Multiple account issues – If you have multiple accounts logged in on your device, it may lead to this error message when uploading videos.
  • Browser extensions conflict – Extensions are installed on browsers to improve functionality. However, browser extensions like security and ad-blockers can affect its performance.

You should note that the above causes may differ on devices. However, we will examine the possible fixes below.

How can I fix the YouTube Invalid response received?

You should apply the following preliminary checks:

Proceed to the following advanced steps if the error persists.

1. Check the Google Account name

  1. Open your browser app, then visit the Google Account page.
  2. Sign in to your Google account or check if you have logged in to the correct one.
  3. Select Personal info from the left pane and double-click on the Name address bar.
  4. Select the Pencil icon to input your name and click the Save button.

The above steps will allow you to check and verify your accounts. Should you face a problem with signing in to your Google account, then read our guide to fix it.

2. Clear browser cache and cookies

  1. Launch the browser app on your device. Click on the three dots on the top right side and select Settings.
  2. Select the Privacy and Security option and click the Clear browsing data section.
  3. Select All Time from the Time range at the top, check the boxes next to Cookies and other site data, and the Cached images and files option. Then click on Clear now.

Clearing the browser cache and cookies will remove all pre-stored data and refresh the website. However, if you want to clear the cache in Windows 11 as well, look at our guide.

3. Remove third-party extensions

  1. Open the browser, click the three dots at the top right corner, select More tools, and select Extensions.
  2. Alternatively, select the list of Extensions and click on Manage Extensions.
  3. Toggle off the Extensions to disable it and check if the error persists.
  4. Repeat this process for all Extensions to find the one causing the error.

Removing the browser extensions will fix ad-blocker issues that can affect your browser’s functionality. Also, you can read step-by-step details to view extensions on your device without opening the browser.

4. Temporarily disable Windows Defender

  1. Press the Windows button, type Settings, and open it.
  2. Select Privacy & Security and click Windows security.
  3. Select Virus and threat protection and click Manage settings.
  4. Toggle off the switch under the Real-time protection option.

Turning off Real-time protection will fix any antivirus interference with your browser. Further, the Windows Defender can also be disabled by following the steps outlined in this guide.

As outlined above, using the YouTube app might be another alternative if all else fails.

Since most of Youtube’s Invalid response received error complaints are from website users, the app should work smoothly. Hence, you can read about the best software for YouTube on Windows.

Also, take a look at our guide on how to fix errors that occur on YouTube permanently on your devices.

If you have further questions or suggestions concerning this guide, kindly drop them in the comment section below.

Posted in Fix

Fix: WDCSAM64_PREWIN8.SYS Core Isolation Turned Off

WDCSAM64_PREWIN8.SYS is an old driver found in both Windows 10 and Windows 11. It is not an essential file in the computer, so its unavailability won’t cause any issues with the system.

Furthermore, WDCSAM64_PREWIN8.SYS is a driver from Western Digital Technologies. The driver can get installed on your PC if you have any Western Digital hard disk drive or other devices.

The error message is often: Core Isolation Memory Integrity Fails to Enable Because of Incompatible Driver WDCSAM64_PREWIN8.SYS. It can occur on your PC due to corrupt system files and missing or incompatible drivers.

What can I do if WDCSAM64 PREWIN8.SYS Core Isolation is turned off?

1. Remove the driver using the DISM and PNPUtil tools

  1. Left-click the Start button, type Command Prompt, and click the Run as administrator option.
  2. Click Yes on the User Account Control (UAC) prompt.
  3. Copy this command and paste, then press Enter after each one: dism /online /get-drivers /format:table
  4. Under the Provider Name table, find the line containing the WDCSAM64_PREWIN8.SYS, then take note of the Published name.
  5. Type in the following command, replacing the Published name with the driver name, for example: pnputil /delete-driver oem46.inf /uninstall /force
  6. Restart your PC and check if the error persists.

Removing the driver can get rid of the interference it has with Memory Integrity. Check our guide on how to fix Command Prompt not working on your PC.

2. Update Windows Operating System

  1. Press Windows + I key to open the Windows Settings app.
  2. Click on Windows Update and click on Check for updates. If any updates are available, it will search for and install them.

Updating Windows will fix the bugs causing errors on your PC and resolve compatibility issues affecting the driver. Read about fixing Windows not connecting to update service if the error occurs on your PC.

3. Update the wdcsam64_prewin8.sys driver and other concerned drivers

  1. Press Windows + R keys to prompt the Run window, type devmgmt.msc, and click OK to open the Device Manager.
  2. Go to the View tab and click Show hidden devices.
  3. Find the device that has a yellow triangle with an exclamation mark inside it or the wdcsam64_prewin8.sys driver. Right-click on the device and select the Update driver option from the drop-down.
  4. Select the Search automatically for drivers option and wait till the update finishes.
  5. Restart your PC and check if the error persists.

Updating the driver will resolve compatibility issues and fix bugs causing it to impede the Memory integrity processes on your PC.

4. Run an SFC scan

  1. Left-click the Start button, type Command Prompt, and click the Run as administrator option.
  2. Click Yes on the User Account Control prompt.
  3. Type the following and press Enter: sfc /scannow 
  4. Restart your PC and check if the Windows update error persists.

Running an SFC scan will scan and repair corrupt system files causing the WDCSAM64_PREWIN8.SYS error.

Check how to fix the Run as administrator option if it’s not working on your PC. Alternatively, you may take a look at our guide on Wdcsam64.sys Memory Integrity Error on Windows 11 for more troubleshooting steps.

Also, you can check our detailed guide about the Brusbsib.sys Incompatible Driver error and ways you can fix it.

If you have any questions or suggestions, kindly drop them below in the comments section.

Caa70004 Microsoft Teams Error: 8 Ways to Fix It

Teams is an extremely sought-after collaboration app, especially since the Covid-19 pandemic. The application has an impressive library of features, making it one of the top video-chat applications.

While its catalog is no doubt a sight to behold, the app is still plagued by a few errors from time to time. Sometimes the Teams is not working, and other times, it is the Caa70004 that prevents users from launching the app. If you’ve been locked out of your Teams app account, we offer some solutions below.

What is the Caa70004 Teams error in Microsoft Teams?

Standalone apps are great, but sometimes they can be problematic as they encounter issues with launching or loading. The Caa70004 Teams error is an issue that users who try to launch the desktop app encounter.

Some of the reasons why you may be encountering this error are:

  • Outdated application – If your Teams app has not been updated in a while, it may not be optimized for your current version of Windows.
  • Compatibility issues – Sometimes, when you upgrade from one Windows version to another, some files can get mixed up and cause compatibility issues.
  • Corrupt cache – Your Microsoft Teams app can get corrupted over time with cache build-up, so this may be the cause of the error.
  • Conflicting apps – Some similar applications may interfere with the Teams app, so you may have issues launching it.
  • Firewall/antivirus interference – It is possible that your firewall is blocking Teams from launching. Sometimes, your antivirus can flag off a program as a potential risk to your system.

How do I fix the error code Caa70004?

Before you attempt any of the slightly advanced solutions, we recommend you try these first:

  • Close any background processes that may be conflicting with the Teams app.
  • Sign out from Teams, then sign in back again.
  • Check whether you’re using an updated version of the Teams app.
  • Verify from Microsoft on the server status to ensure there is no downtime.
  • Try the Teams web version to establish whether it is an app-related issue.
  • Switch to a different internet connection if available. You can hotspot yourself from your phone’s data and try logging in again.
  • Try logging in from a different device if available.

1. Clear Teams cache

  1. Hit the Windows + R keys to open the Run command.
  2. Type %appdata%\Microsoft\Teams in the Run dialog box and then select OK.
  3. Select all files and folders in the %appdata%\Microsoft\Teams directory and hit the Delete button.
  4. Restart Teams.

2. Disable VPN 

  1. Press the Windows key and select Settings.settings windows 11
  2. Next, select Network & internet and click on VPN in the right-side menu.
  3. Select the VPN connection you want to disable, click on the drop-down and select Remove.remove VPN

3. Disable Proxy 

  1. Press the Start Menu icon and select Settings.settings windows 11
  2. Click on Network & Internet on the left pane, then scroll down and click Proxy on the right pane.Network proxy settings
  3. Select Edit next to Use a proxy server option in the Manual proxy setup section, toggle off Use a proxy server and click on Save.Disable proxy server

4. Run Teams in Compatibility mode 

  1. Hit the Windows + E keys to open File Explorer.
  2. Navigate to the following location: C:\Users\<user folder>AppData\Local\Microsoft\WindowsApps\MicrosoftTeams
  3. Find the Teams executable file, right-click on it and select Properties.
  4. Navigate to the Compatibility tab, then check the Run this program in Compatibility mode for checkbox.
  5. In the drop-down menu, select Windows 8, then click on Apply and OK to save the changes. 

5. Allow Teams through firewall

  1. Hit the Search icon, type Windows Security in the search bar and click Open.
  2. Click on Firewall & network protection.
  3. Select Allow an app through firewall.allow an app through firewall
  4. In the drop-down menu, check Teams or teams.exe, then click OK to save changes.

6. Disable your antivirus temporarily 

  1. Hit the Start menu icon, type Windows Security in the search bar and click Open.
  2. Click on Firewall & network protection, then select Public network.league of legends black screen after champion select
  3. Locate Microsoft Defender Firewall and toggle the off button.turning off Microsoft Defender Firewall Windows

7. Remove Microsoft Account Credentials

  1. Hit the Windows Search icon, type Credential Manager in the search bar, then click Open.
  2. Click on Windows Credentials.Windows credentials - OneDrive 0x8004deb2
  3. Select MicrosoftAccount, click on it to expand, then hit Remove.
  4. You’ll get a command prompt asking you to confirm whether you want to remove the credentials, so click on Yes.

8. Reinstall Teams

  1. Hit the Start Menu icon on the Taskbar and click on Settings.settings windows 11
  2. Click on Apps on the left pane, then select Apps & features on the right pane.
  3. Navigate to Microsoft Teams app, click on the three ellipses and select Uninstall.uninstalling microsoft teams
  4. Launch the Microsoft Store, search for the Teams app and click Install.
  5. Follow the on-screen prompts and try again.

If all else fails, you can contact Microsoft Support and report the issue. They may be able to recommend other solutions not listed above. You may also run into another similar Microsoft Teams error Caa20002, but we have unpacked the solutions for it in our helpful guide.

We also have a guide on addressing any other Microsoft Teams crashing issues during launch, so don’t hesitate to check out our article.

Let us know if you have been able to resolve this issue in the comment section below.

How to Password Protect a Word Document [Encryption Guide]

A security breach is one of the most common issues users experience on their computer computers. It usually results in data theft, scams, phishing, etc. Many users report intruders accessing their documents and confidential data.

Hence, we’ll take you through ways to password-protect Word documents on your PC. Also, we have a detailed guide about Word documents being blank when opened and some steps for fixing the issue.

Why do I need to password-protect a Word document? Password Protect is a feature in Microsoft Word that allows users to create a document and set a unique password to protect it. The sole purpose of the security system is to prevent unauthorized users who happen to have the document from editing or making adjustments.

Furthermore, adding password protection to your Microsoft Word document keeps the contents safe from prying eyes. It limits access to the document by allowing a group of selected individuals with a password to access and edit it.

How can I password-protect a Word document?

1. Use the Encrypt with Password option

  1. Launch the Microsoft Word app on your computer.
  2. In the top-left corner, click the File tab, then select Info from the left sidebar.
  3. Click the Protect Document button on the right pane, then select the Encrypt with Password option.
  4. On the new prompt, type a password to protect the document, then click the OK button.
  5. Retype the password and click the OK button.
  6. On the left sidebar, click the Save button to keep the changes.

Encrypting with a password means every time you open the document, you’ll be prompted to enter a password to decrypt its contents. It prevents unwanted access to the encrypted document. Also, it makes it virtually impossible to open the document.

Check our article about what to do if Microsoft Word has stopped working on your PC.

2. Use the Mark as the Final feature

  1. Open the Microsoft Word app on your computer.
  2. Go to the top-left corner, click the File tab, then select Info from the left sidebar.
  3. On the right side of the screen, click the Protect Document button, then select Mark as Final.
  4. Click OK on the confirmation dialog box indicating that marking a document as final will also save it.
  5. Click OK on the final confirmation dialog box.

Setting the Mark as Final option in the Protect Document feature prevents all typing, editing commands, and proofing marks to the Word document.

Check the best tool for fixing corrupt documents in Microsoft Word.

3. Use third-party software

Users can password-protect Word documents using third-party tools to add unique keys to protect them from unauthorized external access. So, we recommend you find reliable security software to encrypt the file from your computer.

One of the most dependable software you can try in this situation is WinZip as it is an app with which you can encrypt your files safely and securely.

It helps you password-protect your Word documents and other important files, making it impossible for third parties to see or access your content.

It has strong file encryption, turning your Word document into unreadable ciphertext which can only be unlocked by entering your established password.

WinZip

Try the WinZip program to encrypt all the important documents safely from your PC.
Free Trial Visit Website

In addition, we have a detailed guide on the best free and paid document comparison software you can download on your PC.

Also, you may be interested in our article about how to fix errors Word experiences when opening the file on your PC.

If you have further questions or suggestions concerning this guide, kindly drop them in the comments section.

Teams Keeps Asking to Sign In: 5 Ways to Stop It

Microsoft Teams is one of the best real-time communication and professional collaboration platforms for individuals and organizations. A login session should have your account signed into the app until you log out or make any changes.

However, users report that Microsoft Teams keeps asking them to sign in with their password. Likewise, you can read our guide on fixing Microsoft Teams status stuck on Out of Office on your PC.

Why is Microsoft Teams constantly asking me to sign in?

Teams constantly asking users to sign into their accounts with their login credentials makes it tasking to keep your account signed into the app. Some likely factors that can cause the issue are:

  • Corrupt Teams cache – Microsoft Teams keep app cache files to help it run smoothly and faster. These files can become corrupted when they are stored for a long time and can cause issues with the app’s performance. So, a corrupted Teams cache can trigger the constant demand for sign-in.
  • Teams Account issues – Encountering Teams sign-in problems can result from logging issues or account-related errors impeding its operations. It can affect other parts of the app and cause it to be unresponsive or malfunctioning.
  • Outdated Windows OS and Office client – Running an outdated operating system on your PC can cause bug infections. It can affect the programs running on your computer and cause the Teams app to crash or malfunction. Also, the issue can be if the Office app is outdated.

Other factors not highlighted above may be responsible for the issue. Fortunately, there are a couple of solutions you can follow to fix it.

What can I do if Teams keep asking me to sign in?

Before proceeding with any advanced troubleshooting steps, go ahead with the following:

If the issue persists, proceed with the solutions below:

1. Restart the Microsoft Teams app

  1. Press Ctrl + Shift + Esc keys to open the Task Manager.
  2. Select the Microsoft Team app, click the End task option from the drop-down, then click OK.
  3. Restart your PC and check if the Teams sign-in issue persists.

Ending tasks will refresh Microsoft Teams processes and stop every background activity affecting its performance. Check our article about shortcuts for accessing the Task Manager on your PC.

2. Clear Microsoft Teams cache

  1. Press the Windows + R keys to open the Run dialog box, type %appdata%, and press Enter.
  2. Go to the Microsoft folder on the left side and click on it.
  3. Find the Teams folder and double-click to open it.
  4. Press Ctrl + A to highlight all the folders in the Teams folder, and press Delete to clear them.
  5. Close and relaunch Microsoft Teams to see if the recurring sign-in issue persists.

When you clear the Microsoft Teams app cache, it deletes the corrupt data files causing the apps to malfunction and allowing them to collect new data.

3. Sign out and sign into your Microsoft Teams account

  1. Left-click the Start button, search for Microsoft Teams and open it from the search results.
  2. Click on the profile picture in the top-right corner, click on the Signout option, and click OK.

Signing out of your account from Microsoft Teams will fix any sign-in issues causing it to ask for a new login session. Read our guide on how to fix Microsoft Teams keep restarting issue on your PC.

4. Update Microsoft Teams

  1. Launch the Microsoft Teams app on your PC and click on the three dots in the top-right corner to open the Menu.
  2. Click on the Check for updates option from the drop-down. If there are any updates available, Teams will check and automatically install them.

Updating Microsoft Teams will resolve bugs impeding its functionality and install new features to improve its performance.

5. Update Windows Operating System

  1. Press Windows + I key to open the Settings app.
  2. Click the Windows Update option and click on Check for updates. If any updates are available, it will search for and install them.

Updating Windows OS will fix the bugs affecting it and add new features to improve your system performance.

Check our guide about fixing Windows not connecting to update service if the error occurs on your PC.

In conclusion, you can check our article on how to keep Teams status green [Active] on your PC. Also, we have a detailed guide on ways to recover deleted chats in Microsoft Teams.

Can’t Resize or Move an App? Here’s How to Force It

In Windows 11, moving or resizing an app is as easy as dragging it on your desktop. You may be looking to space out or make your app icons more compact on your desktop but are stuck.

While this may seem like a normal function, some users have found themselves unable to do either. If you’re in the same predicament, we have some solutions below to help you regain this functionality.

Why can’t I resize or move an app in Windows?

If you are using a PC and it is not possible to move or resize an app, here are some possible reasons:

  • Multiple versions of the application – If you have more than one version of an app, there may be incompatibility issues between them. 
  • Buggy update – A recent Windows update may have brought about this change. Some updates may come coupled with some bugs.
  • Corrupt user profile – If the integrity of your user profile has been compromised, modifying anything on your PC can be extra hard.
  • Virus/malware – If a malicious code has found itself on your PC, it may be interfering with how some programs behave, and that’s why you can’t move or resize an app.
  • Outdated drivers – Drivers are essential for the proper functioning of your system. If your PC is missing some drivers or they are outdated, there may be a disconnect when you try to perform some actions.

How do I force an app to resize or move?

A few basic tweaks that could help resolve the problem include:

  • Ensure all your drivers are up-to-date.
  • Disable or uninstall any third-party software that you may have recently installed on your computer.
  • Try switching profiles to establish if yours is corrupt. You can create a new one if you don’t already have one.
  • Check for any Windows updates and install them.
  • Check for any disk errors using the CHKDSK command.
  • Turn off your computer and unplug it from the wall. Then plug it in again and restart it.

1. Run a virus scan 

  1. Press the Windows key, search Windows Security and click Open.
  2. Select Virus & threat protection.
  3. Next, press Quick scan under Current threats.
  4. If you don’t find any threats, proceed to perform a full scan by clicking on Scan options just below Quick scan.Scan options
  5. Click on Full scan then hit Scan now to perform a deep scan of your PC.Full Scan Scan Now
  6. Wait for the process to finish and restart your system.

Also, if you have a third-party antivirus for your Windows 11, running a scan may help detect issues that Windows Security may have missed. 

2. Run the DISM and SFC scans 

  1. Hit the Windows key, type cmd in the search bar and click Run as administrator.cmd-run-admin-w11 unexpected kernel mode trap windows 11
  2. Type the following commands and press Enter after each one: DISM.exe /Online /Cleanup-Image /Restorehealth sfc /scannow

3. Uninstall recent Windows updates

  1. Hit the Start Menu and select Settings.settings windows 11
  2. Click on Windows Update and select Update history on the right pane.update-history restart to repair drive errors
  3. Scroll down and under Related settings, click on Uninstall updates.uninstall-updates-w11 computer-recognize-logitech-unifying-receiver
  4. This will take you to the most recent installed updates.
  5. Select the topmost update and click on Uninstall.uninstall-update-latest computer-recognize-logitech-unifying-receiver
  6. Restart your PC and check if the problem persists.

4. Perform a clean boot 

  1. Hit the Start Menu icon, type msconfig, and open System Configuration.
  2. Switch to the Services tab.
  3. Select Hide all Microsoft services, click on the Disable all button then hit the Apply button to save the changes.Hide all Microsoft services
  4. Go back and click on the Startup tab.
  5. Select Open Task Manager.
  6. In the Startup tab of the Task Manager, Disable all the Enabled startup items.
  7. Close Task Manager and Restart your PC.

5. Perform a System Restore

  1. Click the Search icon, type create restore point and click Open.
  2. Select the drive you wish to enable system restore for and click on Configure.
  3. Now select Turn on system protection. Set the Max Usage value and click on Apply and OK to save changes.
  4. Go back and repeat step 1.
  5. When the System Properties window opens, click on Create.system properties create restore point windows 11
  6. Enter the desired name for the restore point and then click the Create button.create a restore point windows 11 name
  7. Wait while Windows creates the restore point.
  8. Press the Windows + R keys, type rstui and hit Enter.
  9. Select the restore point you wish to revert to and click on Next.
  10. Now click on Finish.

A quicker and more efficient way of performing a System Restore is by using a dedicated third-party repair tool as it can automatically restore files from system malfunctions after running an in-depth scan to detect them in the first place.

If you’ve tried all these solutions but still can’t get your apps to resize or move, we recommend resetting your PC. This can help you establish whether there were any problems with installing your copy of Windows.

We also have an exciting article that can help you change your icon spacing if the default spacing is not ideal.

You can also change the Taskbar size if it is too small for you using our guided article.

Let us know which solution has solved this issue in the comment section below.

Windows Media Creation Tool Deleted My Files [Recover Guide]

The Media Creation Tool on Windows PCs is a utility tool that allows users to upgrade their computers to the latest Windows version. Also, it helps create a Windows installation USB drive disc you can use to perform a clean install or repair a problematic Windows PC.

However, users complain that Windows Media Creation Tool deleted files on their PC when running it. Also, we have a detailed guide on fixing 0x80072f8f – 0x20000 Media Creation Tool Error that appears while upgrading your OS.

Why did Windows Media Creation Tool delete my files?

Windows Media Creation Tool deleting files on the PC occurs when the downloading software starts the download. It can delete a partition or clear all the data on the drive or USB storage device. However, the issue can be due to some factors, such as:

  • Not paying attention to the Windows Media Creation Tool USB Drive warning – During the setup process, the Windows Media Creation Tool prompts a notification asking users to proceed with the installation by selecting a drive or allowing it to delete the files on the drive. So, users might have continued without making the necessary changes to save files, resulting in the file deletion issue.
  • Prior issues affecting the drive – The problem with Windows Media Creation Tool deleting files can sometimes be due to a faulty or corrupt drive. If the selected disk drive isn’t working correctly, it may result in its files being erased or hidden.

Other factors may cause file deletion issues when using the Windows Media Creation Tool. Nonetheless, we’ll take you through some basic steps to fix the problem and possibly retrieve the deleted files.

What can I do if Windows Media Creation Tool deletes my files?

Go through the following preliminary checks:

Follow the steps below to resolve the Windows Media Creation Tool issue and retrieve files:

1. Run the Check Disk Utility

  1. Left-click the Start button, type Command Prompt, and click the Run as administrator option.
  2. Click Yes on the User Account Control (UAC) prompt.
  3. Type the following command and press Enter: chkdsk C:/r/x
  4. Exit the Command Prompt and restart the PC to check if the deleted files are indeed removed from the disk drive.

Running the CHKDSK command allows the system to take control of the disk, read hidden partitions, and troubleshoot issues that may make its data unavailable.

Read this guide if you experience chkdsk.exe running on every boot issue on Windows 11 for fixes to resolve it.

2. Run System Restore

  1. Press Windows + R key to open the run dialog box, type control, then press Enter to open the Control Panel.
  2. Input recovery in the Control Panel search bar and select Recovery.
  3. Then click Open System Restore.
  4. Click Next in the Restore system files and settings window.
  5. Choose the restore point you want to restore from, then click Scan for affected programs.

System Restore will backdate the system to an earlier point. It removes recent activities after the restore point, recovering the system to the previous point with its files intact. Read our guide on how to fix Restore Point if it’s not working on your PC.

3. Use Third-party Data Recovery tools

Users can recover deleted files even if they are no longer in the Recycle Bin on the PC. So, there’s a possibility that you can retrieve the Windows Media Creation Tools deleted files by using third-party Data Recovery tools.

An authentic third-party data recovery tool you can definitely try is Kernel Data Recovery Software because it has a complete collection of solutions to recover your data from corrupt files and devices.

It can help you restore lost files or folders from USBs, SD cards, and even permanently deleted files from the emptied recycle bin.

Kernel Data Recovery Software

Restore your files and folders safely and faster with this accurate program.
Free Trial Visit Website

However, it may be impossible to recover all your files through the Data Recovery Tools, but it is efficient for recovering most files. You can check our guide on the best File Recovery Software for Windows 11 to retrieve your deleted files.

In conclusion, you may be interested in how to repair corrupted files after recovery to avoid your files being compromised or destroyed.  

If you have further questions or suggestions after reading this guide, kindly drop them in the comments section.

WHEA Logger: What Does It Mean & How to Fix It

The Windows PC is advanced and has many components that make it suitable for various purposes. However, there are several issues users are liable to encounter while using their PC. The WHEA Logger is a recent error common among Windows users, usually accompanied by numerous Event IDs.

It is related to hardware issues and can be generated during any activity on the PC. Also, you may be interested in our detailed article about WHEA Internal Error and some fixes to resolve it.

What is WHEA Logger?

The Windows Hardware Error Architecture (WHEA) is a component in Windows PCs that raises an Event Tracing for Windows (ETW) event whenever a hardware error occurs. It records these hardware error events in the system event log whenever they occur.

Furthermore, the WHEA Logger documents the descriptions of the numerous hardware error events raised by WHEA, making it easier for users to discern the error. Also, hardware error events can be obtained by querying the system event log or by receiving an event notification from an app.

However, the Windows Hardware Error Architecture (WHEA) Logger records hardware-generated events captured by the Operating System. Then, it displays them in the Event Viewer by using Event IDs to identify them distinctively on your PC.

What are the causes of WHEA Logger event IDs?

Because WHEA error events are accompanied by different event IDs such as 1, 17, 18, 19, 47, etc., they can occur for various reasons. Some are:

  • Hardware failures – You can encounter WHEA errors due to hardware failures such as hard drive failures, memory failures, issues with the processor, and others. They prevent the system from communicating with its running hardware, resulting in errors.
  • System Driver issues – When you have outdated or corrupted drivers running on your PC, it can also cause WHEA errors. These drivers are responsible for the hardware on your PC, so the system may malfunction when they aren’t intact or accessible.
  • Power supply issues and Overheating – The system can malfunction when the power supply is unstable. It can impede the activities of the hardware, preventing it from accessing enough power to run. Also, overheating can cause the components of the PC to malfunction.

Other factors not listed above may be responsible for WHEA errors. Nevertheless, we will discuss some fixes to resolve them and get your system working correctly.

How can I fix WHEA Logger?  

Before proceeding with any advanced troubleshooting steps for fixing the problem, try the following:

If the above steps are futile, proceed with the solutions below:

Fix WHEA-Logger Event ID 1

1. Run the SFC and DISM to repair damaged system files

  1. Left-click the Start button, type Command Prompt, and click the Run as administrator option.
  2. Click Yes on the User Account Control (UAC) prompt.
  3. Type the following and press Enter: sfc /scannow
  4. Type the following and press Enter after each: DISM /Online /Cleanup-Image /RestoreHealth
  5. Restart your PC and check if the WHEA Logger event ID 1 persists.

Running an SFC scan will detect and repair corrupt system files liable to cause hardware issues on your PC. Check how to fix the run as administrator option if it’s not working on your PC.

Fix WHEA-Logger Event ID 17

2. Update Windows OS

  1. Press the Windows + I to open the Windows Settings app.
  2. Click the Windows Update category and select Check for Updates. Wait for the Windows update result and click on Install Update if a Windows update is available.
  3. Restart your PC.

Updating the Windows OS will install new updates and patches for fixing bugs affecting the current version. Also, it can resolve hardware compatibility problems prompting the WHEA Logger event ID 17 in the Event Viewer.

Read about fixing Windows not connecting to update service if the error occurs on your PC.

Fix WHEA-Logger Event ID 18

3. Use the Hardware Troubleshooter command line

  1. Left-click the Start button, type Command Prompt, and click the Run as administrator option.
  2. Click Yes on the User Account Control (UAC) prompt.
  3. Type the following and press Enter to launch the Windows Hardware and Device Troubleshooter: mysdt.auxiliary diagnostic device 
  4. Click Next to proceed with the analysis and troubleshooting process.

Running the Hardware and Devices troubleshooter will resolve hardware problems that may cause the WHEA Logger event ID 18. Check our guide on how to fix Command Prompt not working on your PC.

Fix WHEA-Logger Event ID 19

4. Update your Keyboard drivers

  1. Press Windows + R keys to prompt the Run window, type devmgmt.msc, and click OK to open the Device Manager.
  2. Expand the Keyboard entry to update, right-click on the device, then select Update driver from the drop-down menu.
  3. Click on Search Automatically for the updated driver software option.
  4. Repeat the procedure for other drivers on your PC.

Updating the device drivers on your PC will fix bugs affecting the device and install new features to improve its performance. Check our guide for more steps for updating drivers on Windows 11 if you have any issues.

If you want to try other methods for updating your keyboard drivers, you can use the Outbyte Driver Updater app, which can help you get the latest updates from its repository after thoroughly scanning your device.

Outbyte Driver Updater

Try this outstanding software and locate the best versions of your device drivers.
Free Trial Download now

Fix WHEA-Logger Event ID 47

5. Run the Check Disk Utility

  1. Left-click the Start button, type Command Prompt, and click the Run as administrator option.
  2. Click Yes on the User Account Control (UAC) prompt.
  3. Type the following command and press Enter: CHKDSK C:/r/x
  4. Close the Command Prompt and restart the PC to check if the WHEA Logger event ID 47 persists.

Running the CHKDSK command allows the system to take control of the disk and check for hardware issues.

Read this guide if you experience chkdsk.exe running on every boot issue on Windows 11 for fixes to resolve it. Alternatively, you can check our guide on how to fix WhEA Uncorrectable Error on Windows PC.

Do not hesitate to let us know which solution worked for you in the comments section below.

NTUSER.DAT: What Is It & How to Delete or Fix It

NTUSER.DAT is a file that Windows creates housing all of the information for a user account, like its system settings and various customizations. It is strongly recommended that you do not delete this file.

Without this NTUSER.DAT, Windows won’t be able to load in your settings and may even corrupt your user profile. Instead, you will be replacing the old file with a new one.

What causes the NTUSER.DAT file not to work?

If an NTUSER.DAT file is corrupt or broken in some way, you may get message windows on your computer stating that it failed to load, it’s missing, or some general error occurred.

Below is a list of the most likely culprits of a damaged or missing NTUSER.DAT file.

  • Your computer has corrupt registry files – Corrupt registry files can be caused by a computer virus or faulty Windows update. It’s recommended that you use some repair software to fix the damage.
  • Your hard drive has been infected by malware – Viruses can mess up a computer’s functions. You should download some antivirus software like Bitdefender to clean everything up.
  • The NTUSER.DAT file has been deleted – If you did delete the file, you must restore NTUSER.DAT by copying one from another user profile.

How can I fix the NTUSER.DAT file?

There are several things that you can do to fix performance problems centered around the NTUSER.DAT. Because it’s not always just the file that’s causing errors.

Also, it’s recommended that you do these fixes while using an administrator profile. You can learn how to create one in the first complex solution down below.

  • Run a registry scan to fix files. This can be done by running the Command Prompt as an administrator and entering the SFC scan command.
  • Be sure to download and install the latest Windows Update. These always come with patches for bugs on Windows 11 and may fix the NTUSER.DAT problem.
  • Run Windows System Restore if you have a restore point. It’ll revert things to an older Windows 11 version before you started to have the NTUSER.DAT error.
  • And if all else fails, fully reinstall Windows 11. Doing this will completely restore all of your missing files, including NTUSER.DAT.

1. Create an administrator profile

  1. The first thing you should do is open the Settings menu and go to the Accounts tab.
  2. Click Other users.
  3. There are two ways to do this. You can expand another account in the tab and click Change account type.
  4. Set the account type to Administrator. Then select OK.
  5. If you want to add a new account, click the Add account button.
  6. Enter the login information of the account that you want to add in the new window that appears.
  7. Now perform the previous steps of changing the account type to Administrator.

As a reminder, this is the first step you should take because it impacts all the solutions; both simple and complex.

2. Remove NTUSER.DAT

  1. First, you will need to create an account with administrator-level permissions or log into it if you already have one ready.
  2. Log into the admin account you just created and launch File Explorer. Type C:\\Users in the address bar of the window.
  3. Open the folder for the account housing the NTUSER.DAT file you want to delete.
  4. Scroll down to find the NTUSER file. If you don’t see it, hover over View.
  5. Hover over Show, then click Hidden items.
  6. Right-click NTUSER and select Rename. Give the file a new name like NTUSER.OLD. If something goes wrong, you can restore it and start over.
  7. If you ultimately decide to delete it, don’t forget to empty the Recycle Bin to get rid of it completely.

Once you remove NTUSER.DAT, go on to the next part. If you still don’t see the file after selecting Hidden Items, try booting your computer in Safe Mode. It should appear then.

3. Recover the NTUSER.DAT file

  1. Using the same admin account, enter another user folder that doesn’t have a corrupt NTUSER.DAT file. Profiles like Guest or Public work as well.
  2. Highlight NTUSER.DAT in this second profile and copy it.
  3. Go to the user account folder that has the problematic NTUSER.DAT file and paste the new one in.
  4. Log out of the administrator account and log into the account that you previously had trouble with. It should work now.

4. Delete the user profiles

  1. Launch the Settings menu and go to the Accounts tab.
  2. Expand the account that you want to get rid of. Click Remove.

This should be considered a last-ditch effort if you can’t fix a corrupt user profile.

5. Use Third-Party Tools

In some cases, it may be possible to repair a corrupted NTUSER.DAT file using a third-party tool designed to fix registry problems.

However, some tools can cause further damage or compromise the security of your system, so you should be careful and use only reputable tools. Always back up your system before attempting any repairs.

What can I do if other important system settings go missing?

Understanding the importance of the NTUSER.DAT file and how it affects Windows user accounts is essential to maintaining a smooth and stable computing experience.

Knowing how to repair, restore, or replace this critical file can help prevent potential problems and keep your system in top shape.

Regularly checking for Windows updates, running antivirus software, and making backup copies of important files can also help avoid problems related to the NTUSER.DAT file and other system components.

To solve this problem, it’s recommended that you run an SFC scan as stated earlier, and uninstall recent Windows 11 updates. Sometimes the updates aren’t tested as well as they should be.

Feel free to comment below if you have questions about other Windows 11 errors. And please tell us if there’s a specific guide you’d like to see regarding other registry file errors.