8 Best Audio Editing Software For Windows 10/11 [2026 Guide]

If you like playing with sounds, you need a powerful audio editor for Windows 10. Whether you want to create your own ringtones or create and edit music, a reliable tool to edit audio files will always ease your work.

When choosing a sound editor for Windows 10, you should first consider the purpose you’re going to use it for. Then, you should review the features list and see if a particular tool meets your needs.

User feedback is also essential, as it gives you more information about the actual user experience.

In this article, we’re going to take into consideration all these elements and list the best audio editing software for Windows 10

What is the best audio editing software for Windows 10?

Adobe Audition – Best audio editing software

adobe-audition-windows-10-audio-editing-tool

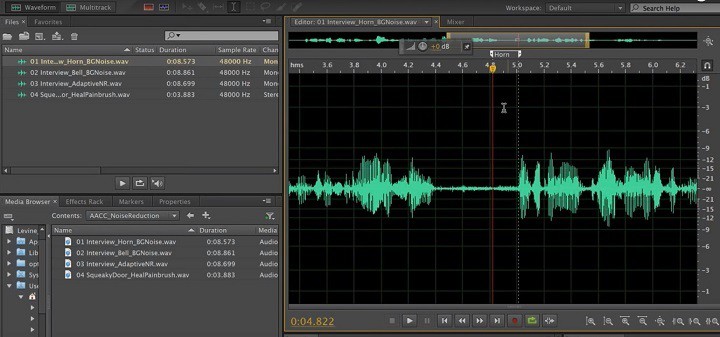
Adobe is well-known for its PDF Reader, but the company also offers a powerful audio editor called Adobe Audition.

This tool allows you to edit your audio files like a pro: you can mix, edit, and create audio content with a tool that includes multitrack, waveform, and spectral display.

Adobe Audition is a part of Adobe Creative Cloud and offers professional-level editing features for your audio files.

The user interface is similar to that of other Adobe products, this helps you to get started quickly. Your audio files will have a pristine sound thanks to Adobe Audition.

The main features of this tool include:

  • Record audio files
  • Import audio files and browse media
  • Remove noise from audio files: use the Paintbrush selection tool to select the unwanted noise and remove it
  • Remove background noise, and heal your files automatically before you export them

Adobe Audition

Edit your music with one of the best sound editor software for Windows 10.
Check price Visit Website

WavePad Audio – Bookmark audio for precise editing

wavepad-audio-editor-windows-10

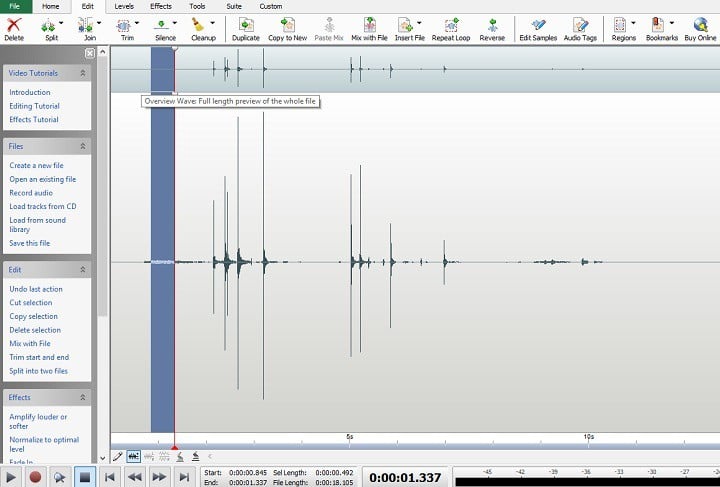
WavePad Audio is a professional audio editing software that offers more features than you’ll possibly have the time to test.

You can cut, copy and paste parts of recordings, and then add effects like echo, amplification, and noise reduction.

WavePad supports almost all audio files, so you can always rely on this tool to edit even the most obscure file types – WavePad can handle it.

Key features include:

  • Integrated VST plugin support for access to thousands of additional tools and effects
  • Batch processing allows you to apply effects and/or convert thousands of files as a single function
  • Scrub, search, and bookmark audio for precise editing
  • Create bookmarks and regions to find, recall, and assemble segments of long audio files
  • Spectral analysis (FFT), speech synthesis (text-to-speech), and voice changer

WavePad Audio

Edit your audio files like a professional with these great software that has plenty of features.
Check price Visit website

Gilisoft Audio Editor – Mixing effects

gilisoft audio editor

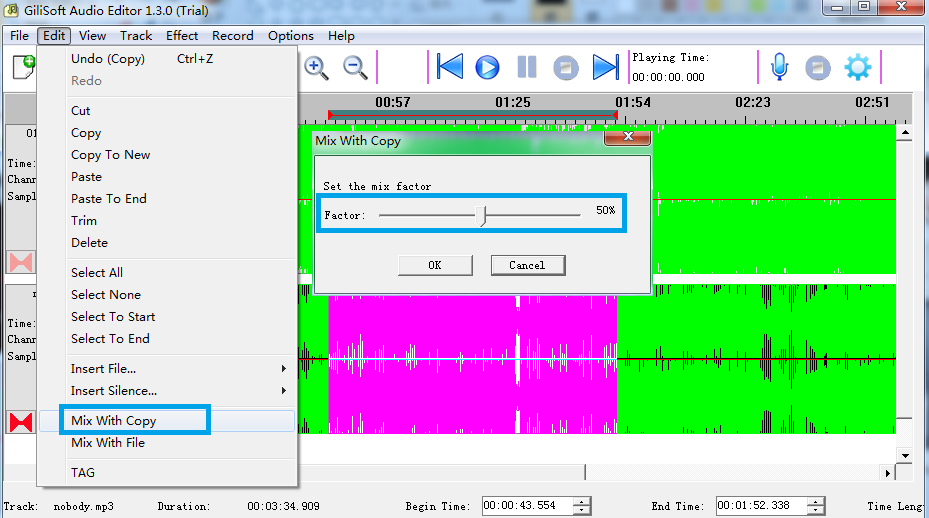
If you are looking for an audio editor that features professional-grade tools in a non-professional and very beginner-firnedly format, then Gilisoft Audio Editor is the tool for you.

You can do pretty much anything you want, including recording and editing music. When editing audio files, you can cut, copy, and paste parts of recordings and add effects like echo amplification.

As far as file format goes, it supports a wide range of audio formats, such as MPEG (MP3, MP2), WAV, Windows Media Audio, Ogg Vorbis, MP2, M4A, CDA, RA, RAM, TTA, Audio Tracks, Dialogic VOX, etc.

Finally, you can make the music you created your own since the program lets you edit the MP3 tag as well, so you can input any name in the artist or album fields of the file.

Gilisoft Audio Editor

Record and then edit your music with these excellent software tool.
Check price Visit website

FL Studio – Best for Beginners

fl-studio-windows-10-audio-editor

FL Studio is a very powerful audio editor perfect for music professionals.

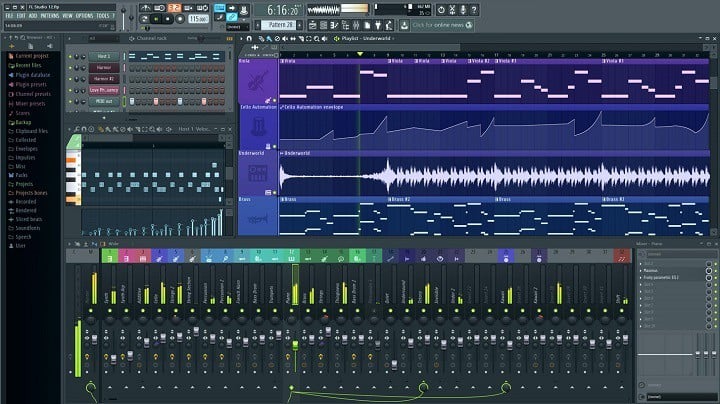
This tool is a software music production environment that packs all the features you need to compose, arrange, record, edit, mix, and master professional-quality music.

You can notice its complexity from the moment you launch it. All the features are grouped into categories, and the lower part of the software’s screen looks like the mix studio of a professional artist.

Key features include:

  • Fits any screen size or resolution you use
  • Multi-touch capability extends to the Mixer
  • Multiple drag and drop for audio files onto Playlist (from a Windows file browser)
  • Detachable windows: put any window, even the top menu bar, where you like on the screen.
  • Lifetime free updates

Long story short, you should install FL Studio 12 only if you create or edit music, otherwise, any of the audio editors mentioned above will do.

FL Studio

Edit your music with one of the most powerful audio editor, perfect for music production environment.
Check price Visit website

Audacity – Multiple clip editing

audacity-audio-editor-windows-10

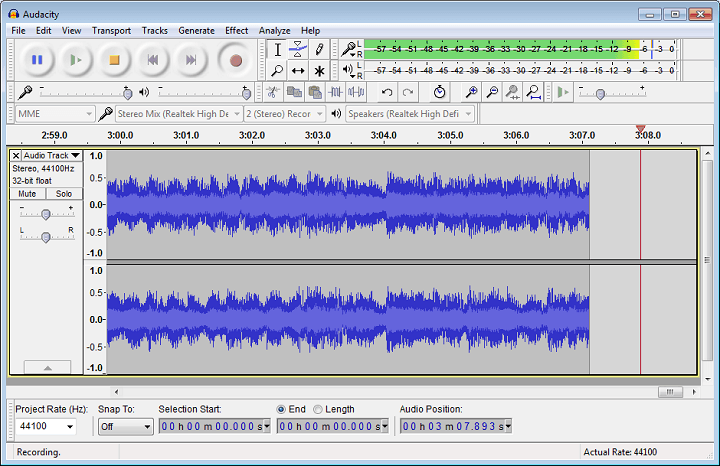
Audacity is an open-source, cross-platform audio software for multi-track recording and editing. This feature-rich tool is one of the most reliable and powerful audio editors currently available on the market.

It is constantly updated, and each version of Audacity will definitely bring a better user experience.

Audacity can not only edit audio files but also record audio content. It can record live audio through a microphone or mixer, digitize recordings from other media, and also capture streaming audio.

Key features include:

  • Import sound files, edit them, and combine them with other files or new recordings
  • Export your recordings in many different file formats, including multiple files at once
  • Supports the following formats: WAV, AIFF, AU, FLAC, Ogg Vorbis, GSM 6.10, 32-bit and 64-bit float WAV, RF64, U/A-Law, MP2, MP3, AC3, M4A/M4R (AAC) and WMA
  • Edit easily with scrubbing and seeking or Timeline Quick-Play
  • Multiple clip editing is supported
  • Draw tool to alter individual sample points
  • Automatic crash recovery in the event of abnormal program termination
  • Effects such as: noise reduction, alter frequencies, reduce or isolate vocals, other built-in effects

⇒ Get Audacity

Lexis Audio Editor – 10 band equalizer

lexis-audio-editor-windows-10-audio-editor

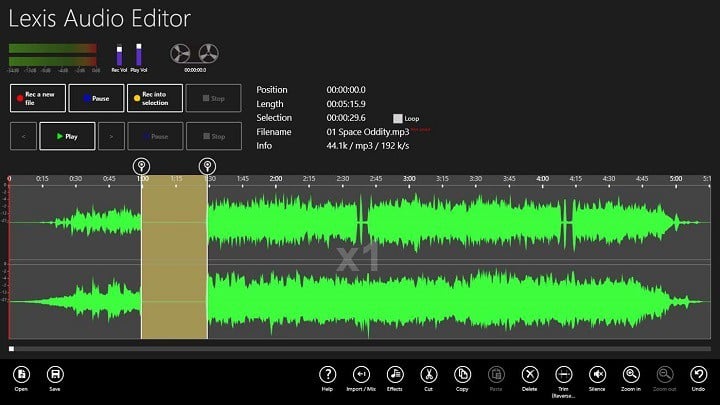
Lexis Audio Editor is perhaps the most user-friendly audio editor available for Windows 10. Its interface is very simple and easy to use, and the black background protects your eyes during long audio editing sessions.

Lexis Audio Editor allows you to create new audio records or edit audio files. You can then save the files in one of the 4 audio formats available.

Indeed, the file format variety is not that impressive, but the tool compensates through its reliability and the audio editing options it offers.

Key features include:

  • Cut, copy and paste
  • Delete, insert silence, trim, fade in, fade out
  • Normalizing, noise reduction
  • Record into existing file, import file into existing file
  • Mixes the current file with another file
  • Compressor
  • Change tempo, speed, pitch
  • Audio formats: mp3 (-320kb/s), wav (16 Bit PCM), wma (-192kb/s) and m4a (-192kb/s)

⇒ Get Lexis Audio Editor

Free Audio Editor – Built-in text-to-speech tool

free-audio-editor-windows-10

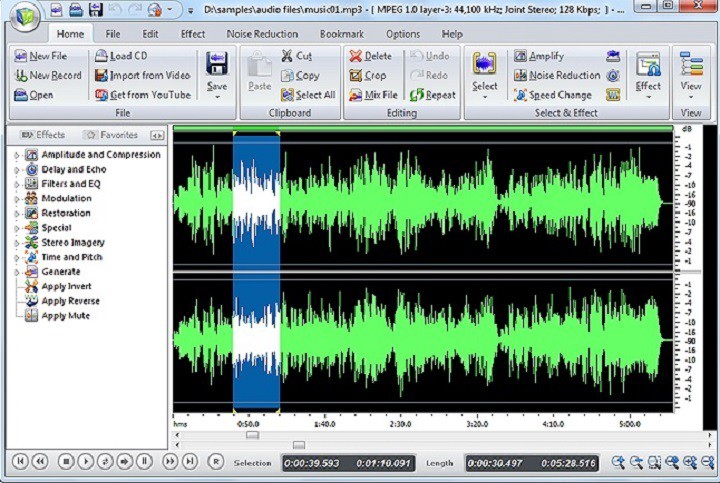
Free Audio Editor is a powerful tool for editing and enhancing your audio files.

According to the official description of this tool, this is the number 1 free audio editing software. After going through the full list of features, we think this statement is not at all exaggerated.

Free Audio Editor allows you to edit audio files using the traditional Waveform View or the frequency-based Spectral Display to quickly isolate and remove unwanted noise.

You can select and edit audio files with millisecond precision. If you’re working with low-quality audio content, you can use one of the tools available to remove the noise and reveal crystal-clear sounds.

Free Audio Editor lets you remove imperfections such as hiss, pops, clicks, rustles, chirps, shuffles, buzz, and creaks using the best noise reduction tools available.

Key features include:

  • More than 25 audio formats supported
  • The built-in audio CD burner lets you create your own custom music
  • Built-in text-to-speech tool
  • Frequency analysis and amplitude statistics
  • Keyboard shortcuts

More than 30 native signal and effects processing engines are available, and the real-time preview enables you to hear the results while creating the final version of the file.

⇒ Get Free Audio Editor 

Oceanaudio – Easy to use tool

oceanaudio-windows-10-audio-editor

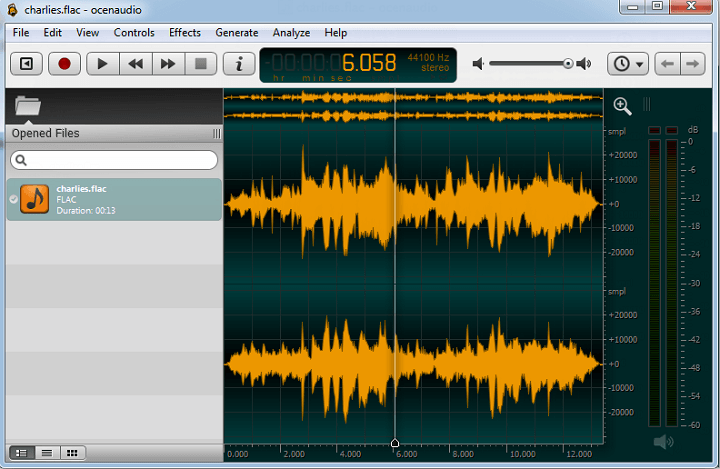
Oceanaudio is an impressive Windows 10 audio editor suitable for regular audio file processing. If you’re looking for a fast and easy-to-use audio editor, then Oceanaudio is the right choice.

As the tool’s developers confirm it, Oceanaudio is the ideal software for people who need to edit and analyze audio files without complications.

Experienced users will also enjoy using this tool thanks to the advanced features it packs.
Key features include:

  • Real-time preview: you can hear the processed signal while adjusting the controls
  • Cross-platform support
  • Simultaneously select different portions of an audio file and listen, edit or even apply an effect to them
  • There is no limit to the length or the quantity of the audio files you can edit

Oceanaudio is not intrusive and always remains responsive, no matter how many files are open. Errors like the property requested was not found are less likely to occur. For this tool, the user comes first, as it focuses primarily on usability, offering intuitive audio editing features.

⇒ Get Oceanaudio

As you can see, the audio editing tools listed in this article share common features, but they also have unique, specialized features suitable for particular editing tasks.

You can use any of these tools to trim MP3 files with ease, or to edit them any way you like, so don’t hesitate to try them all.

We hope this list helped you decide which audio editor to install on your Windows 10 device.

Among Us Black Screen on PC? Here’s how to fix it

Among Us is a popular multiplayer PC game available on Steam. Unfortunately for some users, Among Us black screens when launched from the Steam client and the PC desktop shortcut.

Among Us can stop working on PC due to several reasons. To fix the issue, check your firewall and antivirus, troubleshoot the home network, or check for server issues.

In this article, let’s take a look at a few troubleshooting steps to help you fix the Among Us not working on PC issues.

What can I do if Among Us black screens on PC?

1. Switch out of the game

Among Us not working on PC
  1. Press the Alt + Tab key on your keyboard.
  2. Select a different open window.
  3. Next, press the Alt + Tab key again and select Steam/Among Us window.

If you are experiencing black screen issues after launching the game, try switching between the windows.

If that does not work, check if the issue is triggered due to screen resolution conflict. Make sure you are in the Among Us black screen window and hit Alt + Enter to open the game in Windowed mode.

If the game works, enter Alt + Enter to make it a full window.

2. Verify the integrity of game files

  1. Launch Steam on your PC.
  2. Open the Library tab.

  3. Right-click on Among Us and select Properties.


  4. Open the Local Files tab in the Properties window.
  5. Click the Verify integrity of game files button.
  6. Wait for Steam to verify and fix any issues with the game files.
  7. Relaunch Steam and check if Among Us launches without any issues.

Sometimes the game files can get corrupted while the game is being updated and might cause Among Us to black screen on PC. Steam has a special feature that verifies your game data and replaces any faulty files.

3. Choose a different game server (if it black screens when joining a server)

Among Us not working on PC
  1. Launch Among Us on Steam.
  2. Click the Globe icon in the bottom right corner.
  3. Select a different server depending on the region.
  4. Trying joining a game again and check for any improvements.

Changing the in-game server is useful if you see a game full error when joining a lobby. However, make sure to choose a server that is closer to your region. Selecting a region that is not closer to your location can cause high ping and disconnection issues.

4. Check for permission issues

  1. Right-click on the Among Us .exe file from the desktop shortcut or installation folder.
  2. Select Properties.


  3. In the Properties window, open the Compatibility window.
  4. Under the Settings section, check Run this program as an administrator box.
  5. Click Apply and then click OK to save the changes.
  6. Relaunch Steam and open Among Us to see if that helps you resolve the issue.

If the game is crashing at launch, it could be due to GPU overclocking issues. Several users have reported that restoring their GPU frequencies to factory default has fixed the crashing issue on PC. You can read more on Among Us crashing and freezing here.

5. Run the game using Android emulator software

Another good way to ensure Among Us works is installing LD Player. The software is an Android Emulator which is meant to create a fake android mobile phone inside your PC, so you can play the Google Play specific games on your system.

If you are looking for the best mobile emulator on the market, LD Player is the choice for you, having features such as multi-instance gaming, support for both AMD and Intel processors, and mouse and keyboard compatibility to give you a head start in your games

In addition, the software is compatible with the most popular android games out there, such as PUBG Mobile, Mobile Legends, Clash of Clans, and Among Us.

Simply download the software and set up your virtual phone, install the game you wish to play, and enjoy a quality experience.

⇒ Get LD Player

6. Disable antivirus and firewall

  1. Press the Windows key + I.
  2. In the Windows Settings window, find Update & Security and select it.

  3. Open Windows Security, then click to open Firewall and Network Protection.

  4. Open Public profile.
  5. Toggle the switch to turn off Windows Defender Firewall. Click yes to proceed if prompted by UAC.

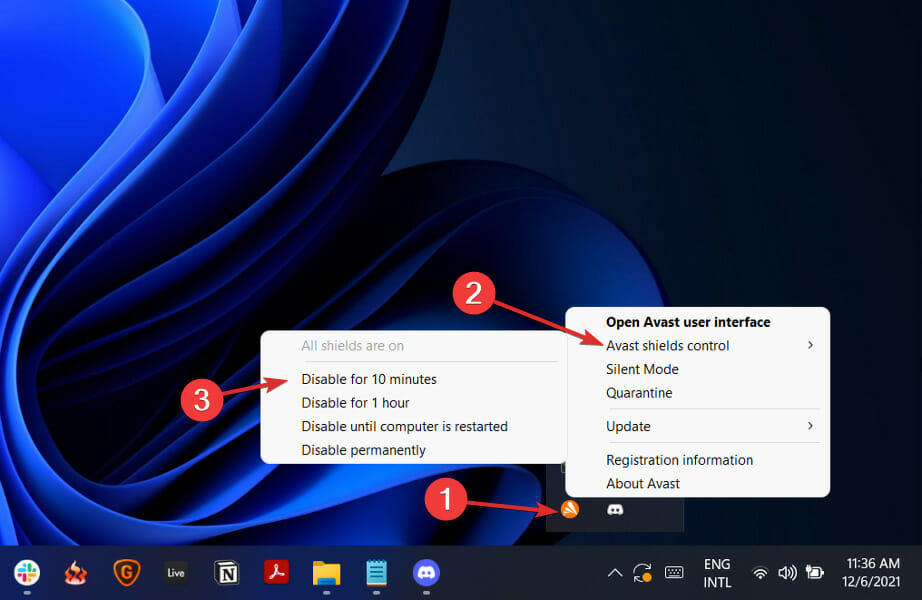
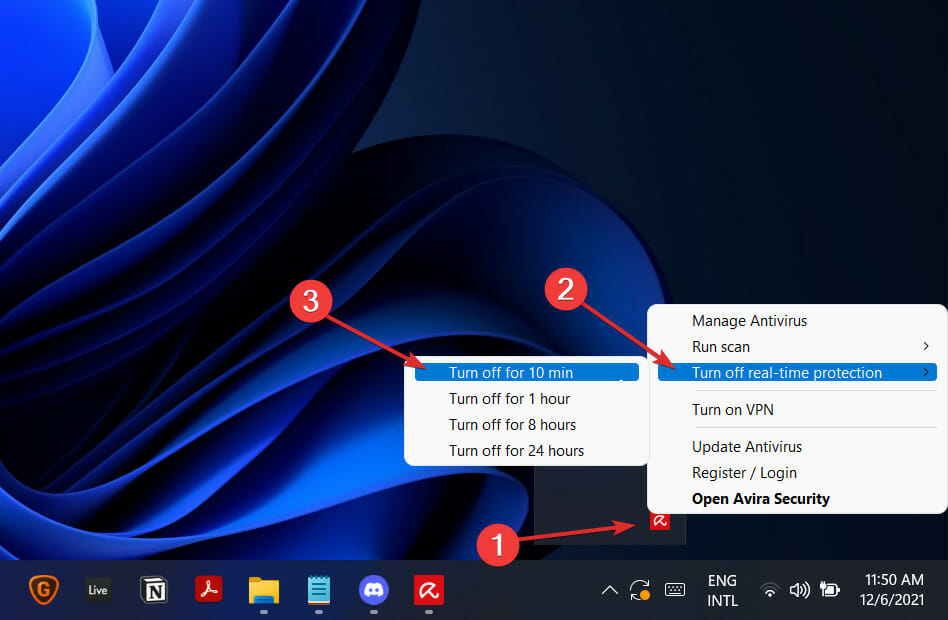
After disabling the firewall, check your antivirus. Disable the antivirus temporarily from the system tray. This should help you figure out if security programs are blocking the connection. Make sure to enable the firewall and antivirus after troubleshooting the problem.

7. Reinstall Among Us

Among Us black screen
  1. Launch Steam client on your PC.
  2. Open the Library tab from the top.
  3. Right-click on Among Us from the list of installed games.
  4. Select Manage > Uninstall.
  5. Click the Delete button once more, and that’s it.
  6. Once uninstalled, restart your PC.
  7. Launch Steam and download Among Us.

Among Us can stop working on your PC for many reasons. However, we have listed the most common reason and the fixes that should help you get back online and find the imposter.

These were the possible fixes that would make Among Us work on your PC. The game is not demanding, so it should work on any device. Give these a try, because they will surely help you out. Even more, you should take immediate action if getting a black screen when connecting your laptop to a TV HDMI.

You can also follow this guide on how to play Among Us on Windows to confirm your setup and rule out basic issues before you start troubleshooting black screen errors.

If you have anything to add regarding Among Us, feel free to say it in the comment section below.

Error Setting Traits on Provider: 5 Ways to Fix It

Many Windows users have difficulty using their PCs for their activities. It is due to the recurrent Event IDs causing the system to crash or malfunction. The IDs follow the Error setting traits on the Provider message.

However, users can check for the Event IDs via the Event Viewer program on Windows 11.

What causes the Error setting traits on Provider?

Users report encountering The Error setting traits on Provider message {8444a4fb-d8d3-4f38-84f8-89960a1ef12f} on Windows. The error comes with several Event IDs that are stored in the Event Viewer. These Event IDs can vary on different devices.

Furthermore, the Error setting traits on Provider can occur for many reasons. Some of the common causes are:

  • Missing Windows Update – When essential Windows updates are missing, the system will lack needed updates to help fix issues affecting it and add new features to its Operating System. So, you can encounter the error if your OS lacks an essential update.
  • System file corruption – It is common to run into issues with Windows PC when there are corrupt system files on them. These files impede the activities of the PC and can cause the Error setting traits on Provider.
  • Issues with the graphics driver – The problem may be due to an outdated graphics driver or any inconsistency involving the current graphics driver you’re using on your PC. They can cause the system to crash or not operate properly.

However, we’ll take you through steps you can follow to fix the Error setting traits on Provider on your Operating System.

How can I fix the Error setting traits on Provider?

Go through the following preliminary checks:

 Proceed with the solutions below if you can’t fix the problem.

1. Run the SFC and DISM to repair damaged system files

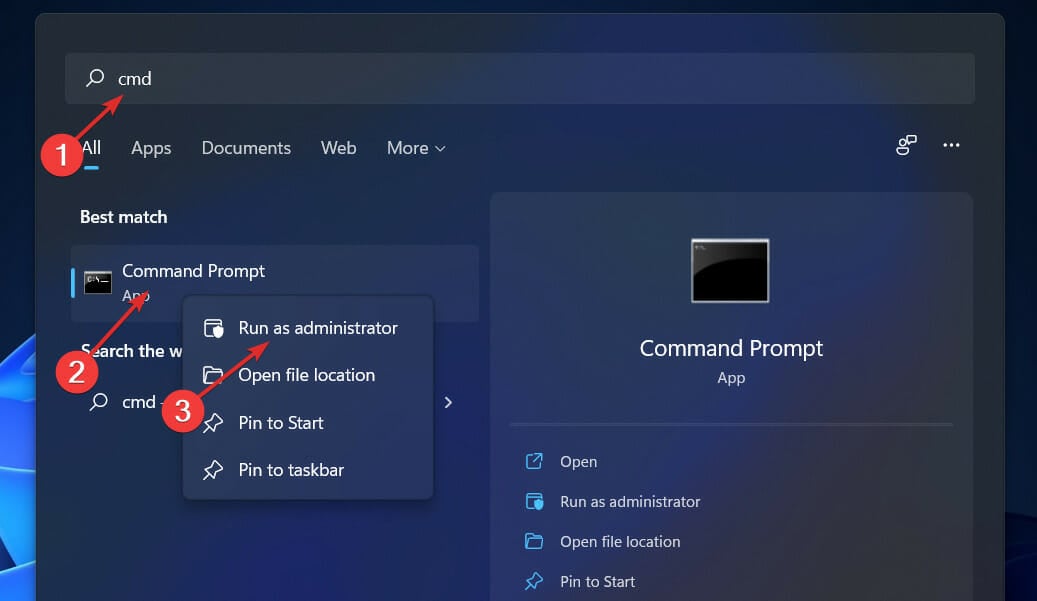
  1. Left-click the Start button, type Command Prompt, then select Run as administrator.
  2. Click Yes if the Windows 10 User Account Control prompt appears.
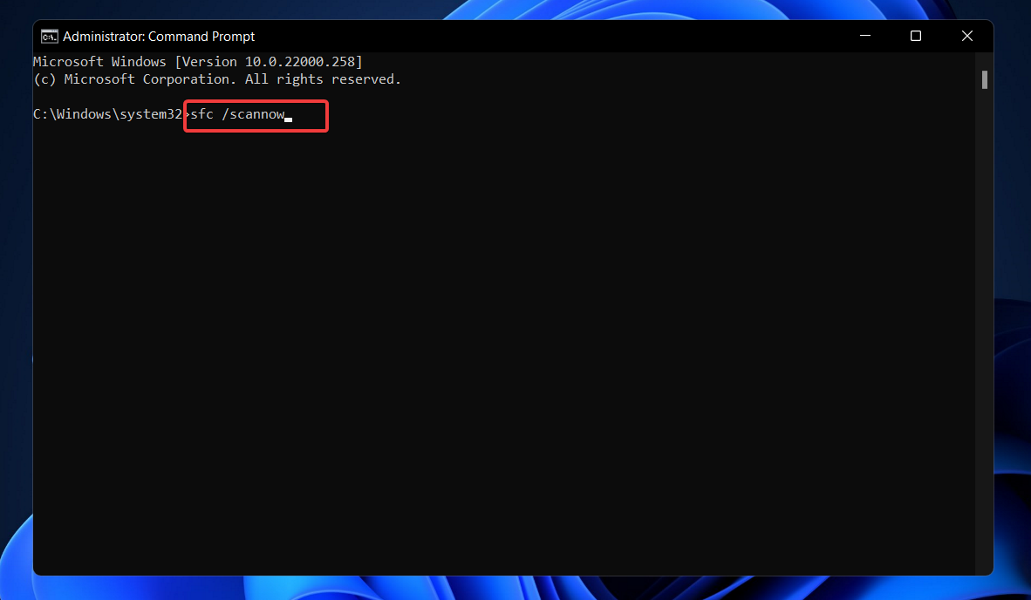
  3. Type the following and press Enter: sfc /scannow
  4. Then, type the following commands and press Enter after each: DISM /Online /Cleanup-Image /RestoreHealth
  5. Restart your PC and check if the updates.exe still appears.

The SFC and DISM scan will detect corrupt system files and restore the corrupted files. Check how to fix the run as administrator option not working on their PCs.

2. Update your graphics driver

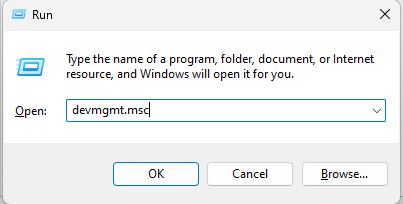
  1. Press Windows + R keys to prompt the Run window, type devmgmt.msc, and click OK.
  2. Click on Display adapters, select the driver from the drop-down menu, and click the Update driver option.
  3. Select the Search automatically for drivers option and restart your PC.

Updating the graphics driver will fix bugs affecting it and install the latest features to improve game performance.

Check other steps for updating graphics drivers on Windows 11 if you have any issues.

3. Reset your PC

  1. Press Windows + L key to open the sign-in screen.
  2. Press the Shift key, click the Power button, then select Restart to restart your PC in Windows Recovery Environment (WinRE) environment.
  3. On the Choose an option page, select Troubleshoot.
  4. Then click Reset this PC.
  5. Choose one of the options in the reset preference.

Resetting your PC will clear system settings and items causing the error to occur.

4. Update your BIOS

Note icon NOTE
This process differs, depending on your PC’s manufacturer.
  1. Go to the HP driver and software download website, select your product from the list, and input your serial number or computer model.
  2. Select your OS, the OS version, and click Submit.
  3. Click the + button against All drivers, click the + button against BIOS to see available updates, and click on Download.
  4. Double-click the downloaded file, install the .exe file, and then follow the on-screen instructions to complete the installation.
  5. Restart your PC.
  6. Select the Apply Update Now option to implement the installed BIOS update during the startup.

Updating the BIOS will improve compatibility and enhance system stability.

The updating process varies on different PCs, so we have a guide on how to check and update BIOS on various laptops.

Alternatively, you can check our guide on how to fix the Event Viewer reboot event ID error in Windows 11.

If you have further questions or suggestions, kindly drop them in the comments section.

Windows 10 Password Recovery Tool: 11 Best for 2026

Nowadays, passwords are more important than ever. You basically cannot log in to your Windows 10 or 11 computer without entering it (or without performing some tricks). And if you lost it, there are some password recovery tools that can help you out.

When a password is required to log in to your machine, the worst thing that can possibly happen is to lose it.

If this happened, it seems like there’s no other solution than clean installing your system again. Well, that doesn’t have to be the case, because there are ways to recover it.

In this article, we’re going to talk about various password recovery software for Windows 10 and 11. These specialized tools can help you solve your problem quickly, in case you’ve lost it and you’re unable to log in to your computer.

Note icon NOTE
Password recovery tools are specialized software used for recovering and resetting passwords. Take advantage of them only for personal use.

Why should you use a Windows password?

The main reason why you should create a password on your Windows OS is privacy. These days, there are a lot of security risks in the digital world, the main one being hackers.

Passwords are the first line of defense against any kind of unauthorized access. This means that you can protect your computer from being used by somebody else in your absence.

Setting up a password is mandatory when you’re working on a company housing multiple employees in the same office.

Additionally, it will protect you from hackers who are trying to access the PC while you’re being away. Having a password will make it harder (and in some cases, impossible) for them to steal your data.

What is the best password recovery software for Windows 10?

  1. Stellar Password Recovery – Overall best password recovery tool
  2. Password Kit Standard – Easy to use
  3. Windows Password Unlocker Bundle – Compatible with all Windows versions
  4. Windows Password Reset Standard – Versatile password reset tool
  5. Active Password Changer Professional – For Commercial use
  6. Ophcrack – Fast and accurate
  7. Offline NT password and Registry Editor – Complete password eraser
  8. LCP – Different password recovery modes
  9. Hash Suite – For professional use
  10. John the Ripper – Different OS compatibility
  11. PassFab 4WinKey – Works with Microsoft accounts

Stellar Password Recovery

When it comes to data recovery, you simply cannot go wrong with the most trusted software in the industry.

From memory cards to USB and RAW storage drivers, whatever the storage media, be it internal or external, you can easily retrieve your assets even if they were affected by corruption or malware infection with this amazing tool.

Powerful and reliable, the software is also incredibly easy to use – just launch the app and start scanning to retrieve your precious files.

The software is compatible with all Windows-based storage media and most popular file formats, including photo and video.

Easily retrieve information from corruption-affected hard drivers, formatted partitions, severe cases of data loss, and more.

You can also use filters to sort out the data that needs to be retrieved. There are different scanning methods, such as Deep Scan and Quick Scan.

Let’s quickly look at its key features:

  • Recover data on RAW drive volumes
  • Compatible with all Windows-based storage media
  • Supports most file formats
  • Deep Scan and Quick Scan modes are available
  • Filters to easily sort the data that needs retrieving

Stellar Password Recovery

Reliable and efficient data recovery under any circumstance. Any storage media, any format, any state.
Check price Visit website

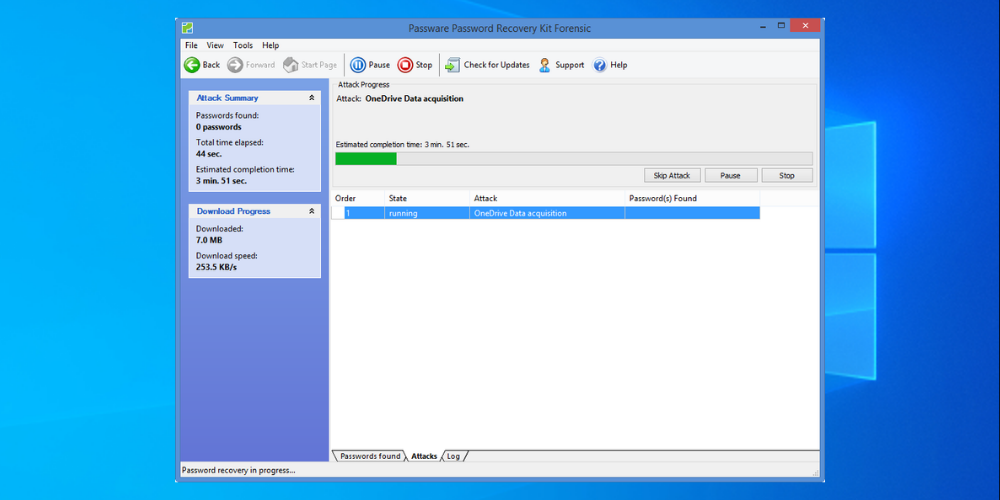
Passware Kit Standard

Passware Kit Standard creates a bootable media that you can use on startup to recover your password.

The program is very simple to use, and it can even recover both local (standard version) and domain admin account (Enterprise edition only) passwords.

This tool provides faster password recovery for TrueCrypt, Android, Zip, and many other types of files, decrypts Apple File System (APFS) disks and macOS High Sierra Keychains.

Regarding speed, GPU-accelerated password recovery is now up to 350% faster for TrueCrypt system partitions. The software has plenty of power plans catered for different businesses, sizes, and even home use.

You can use a free trial of the program to create bootable media, but you won’t be able to recover any passwords until you pay for the full version.

Passware Kit Standard utilizes your computer’s hardware to increase its processing power and provide instantaneous results.

Additionally, the software was used in high-profile investigations by NASA, Deloitte, and the U.S. Departments of Justice and Security.

The best thing about this tool is that you don’t need to be an IT expert, everyone can handle it.

Let’s check out some of its best features:

  • 80+ file types supported
  • Resets Windows admin passwords
  • Works instantly
  • Utilizes the installed hardware
  • Provides a password history
Passware Kit Standard

Passware Kit Standard

Undo the mistakes of forgetting credentials with the #1 tool for decrypting files and quickly recovering passwords.
Check priceVisit website

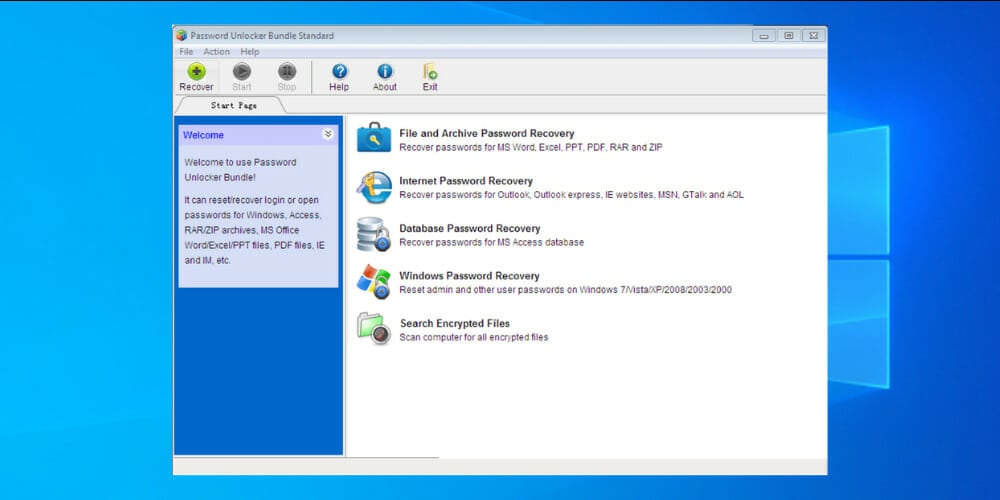
Windows Password Unlocker Bundle

One of the premium software on our list is Windows Password Unlocker. This tool uses bootable media to recover passwords on startup.

If for any reason you have any of the email passwords lost or unavailable, you can easily recover them in a snap with Password Unlocker Bundle.

What’s not so encouraging about this software is that it requires Professional or Enterprise versions to actually be able to retrieve any passwords, as the Standard version is only used for creating bootable media.

The Password Unlocker is a technology made to recover passwords for Microsoft Office, Windows, PDF, RAR, ZIP, PDF, and more.

It can also recover email passwords for Outlook and those cached in the browser. Don’t worry about compatibility. As long as you are using it on any Windows version, you’re going to have no issues.

Note that it only takes a second for the application to successfully recover any lost password for chatting tools such as MSN, AOL, or GoogleTalk.

You might think that the price is a little bit high, but you have to keep in mind that this bundle will recover passwords for a wide variety of software, which is a big plus.

Here’s a list of the app’s best features:

  • Compatibility with all Windows versions
  • Works with all MS Office products
  • Supports a wide variety of file formads
  • Simple and intuitive UI
  • Also recovers lost passwords for popular chatting apps
Windows Password Unlocker

Windows Password Unlocker

If you’ve forgotten the password to your Windows PC, use this tool to recover it and log back in!
Check priceVisit website

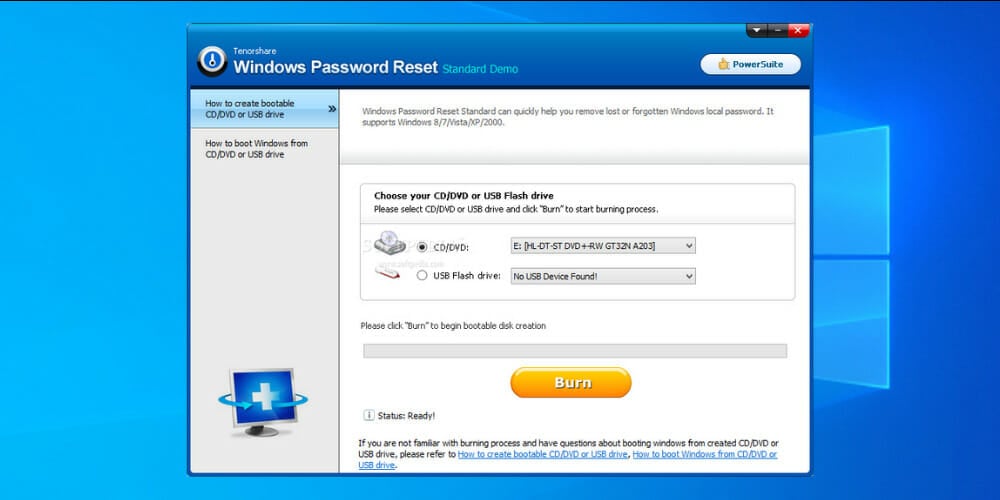
Windows Password Reset Standard

Another premium software on our list is Windows Password Reset Standard. The only requirement is a new CD/DVD to install it on.

This tool also deletes your password instead of recovering it, working similarly to previous options of this kind from the list.

However, Windows Password Reset Standard is a lot simpler than others, but it also comes with fewer options. To start using it, just download an ISO file, mount it, and start resetting your password.

As this tool comes with fewer features than Active Password Changer Professional, it is also available for a smaller price.

If you want to buy Windows Password Reset Standard, know that the software is affordable, even if there aren’t multiple price plans available.

There’s even a trial version for you to check out and test before purchasing or upgrading to a paid one, so feel free to give that a go as well if you’re not sure yet.

Check out some of its core features:

  • 100% success rate
  • 24/7 technical support available
  • 90 days money back guarantee
  • Free updates for a lifetime
  • Compatible with all Windows versions

⇒ Get Windows Password Reset Standard

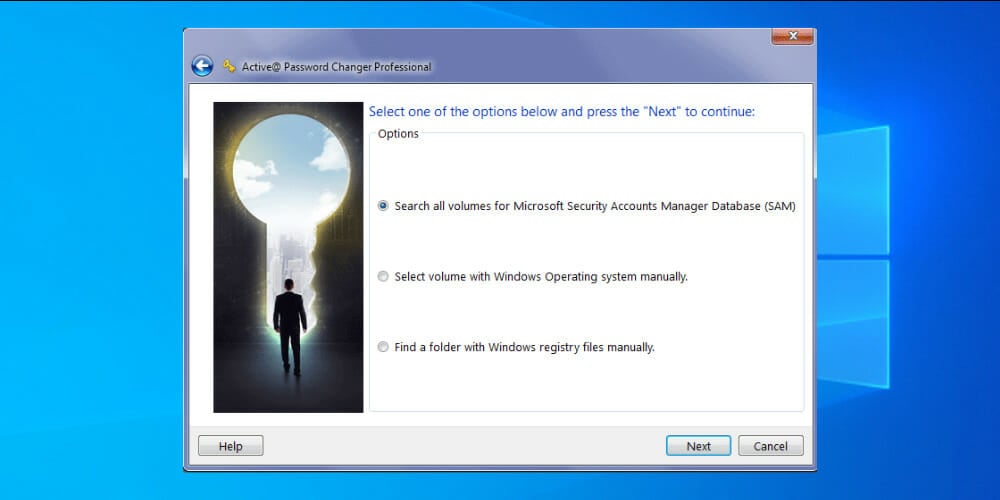
Active Password Changer Professional

Now, it’s time to check out some premium password cracking tools for Windows 10, in case you want to try some of the commercial solutions.

If you want to try some of the more commercial solutions, the first premium password cracking software for Windows 10 on the list is Active Password Changer Professional.

When it comes to this category, there’s no better choice than Active Password Changer Professional.

It’s extremely easy to set up and use, which is good news for novice users. If you are using Windows 7 you can recover your password with tools such as these.

Active Password Changer Professional acts as a paid, but much simpler version of Offline NT Password & Registry Editor, so it deletes your password instead of recovering it.

So, if you want a simple yet powerful program to delete your forgotten password almost immediately, Active Password Changer Professional is perhaps the best choice.

Unfortunately, you’ll need to pay to use it, but there are many price plan options that you can order, and some of them are really affordable.

Let’s see its awesome features:

  • Resets Windows user passwords
  • Improved & user friendly UI
  • Compatible with all Windows versions
  • BIOS & UEFI boot media modes
  • Supports multiple languages

⇒ Get Active Password Changer Professional

Ophcrack

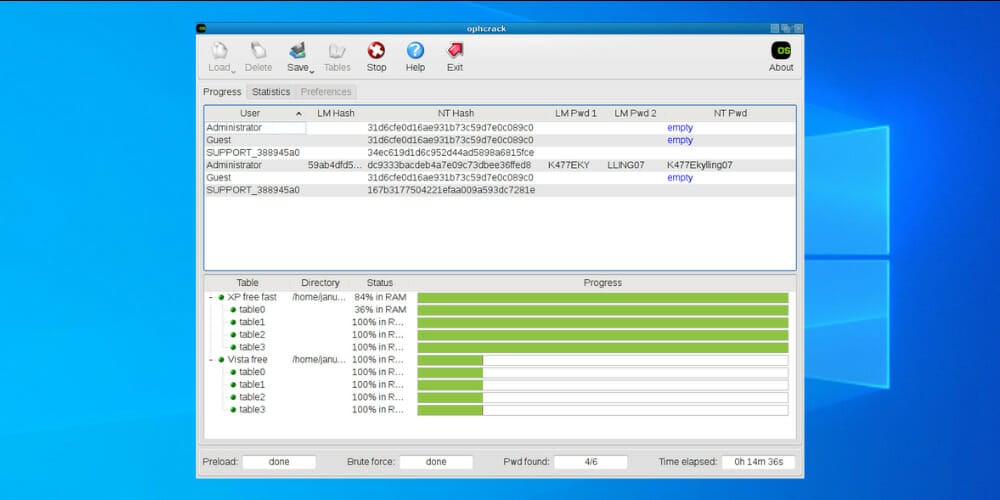
By all charts and based on the experience of many users, Ophcrack is arguably one of the best Windows password recovery tools you can find.

It’s extremely effective, fast, and simple even for first-time users. This tool is so powerful that it doesn’t even require you to log in to Windows to be able to achieve your goal.

You just download the ISO image, mount it on bootable media, and it will automatically recover your password when you boot your PC.

The program will start, then it will locate your Windows (Microsoft) Account and begin the retrieval process immediately.

According to tests, Ophcrac is able to get your password back in minutes. And keep in mind that Ophcrack is completely free!

You should know that using the software requires a certain level of background knowledge. The recovery process is a bit tedious if it’s done manually, but the live CD version of it automates most of it so you don’t need to worry.

The preference menu gives you a few more options that help with the password cracking process, such as throttling the app’s use of your CPU and disk drivers while it’s working.

So, if you want to download Ophcrack, you can grab it for free at no additional cost. It will crack simple passwords in a matter of minutes or complex ones in a matter of hours.

Here are some of its main features:

  • Free
  • Supports all Windows versions
  • LiveCD cracks LM hashes
  • Open-source
  • Real-time graphs to analyze passwords

⇒ Get Ophcrack

Offline NT Password & Registry Editor

Offline NT Password & Registry Editor is another password recovery tool compatible with all the Windows versions.

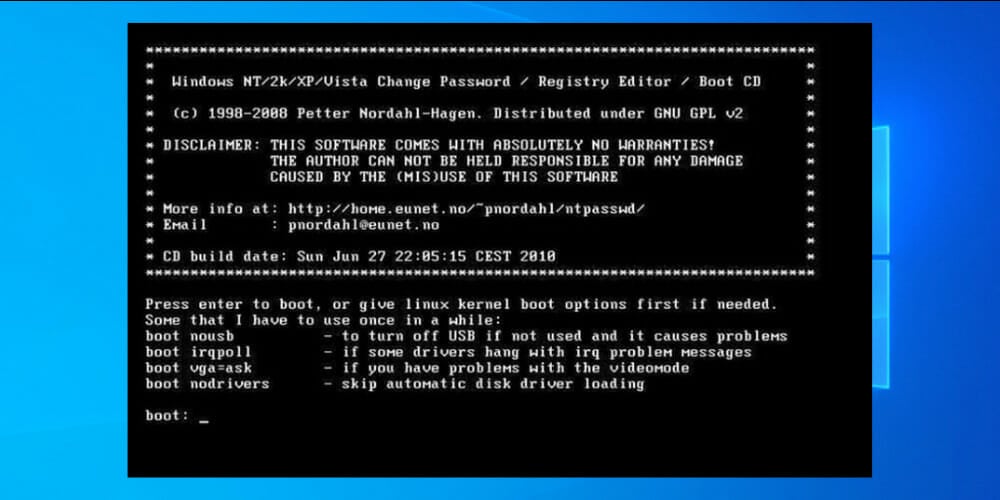
In fact, it doesn’t recover your password. Instead, it erases it completely so you can set up a new one normally (and remember it this time), which makes it a unique tool on our list.

It works similarly to Ophcrack: you download an ISO file, mount it to a bootable media, plug it in your computer, and the process can start.

Windows stores its user information, including encrypted passwords, in a file called sam. The file is part of the Windows Registry found in the system32 config file, and it’s not easily accessible.

Thankfully, this Offline NT password and Registry editor can read and understand the contents of the file, decrypt and ultimately remove the password.

It’s even faster than Ophcrack because usually, it resets a password immediately. However, Offline NT Password & Registry Editor is not so easy to use for an average user, because it requires some command line work.

If you manage to get around the unusual interface, there’s no better password-deleting tool you can find. Offline NT Password & Registry Editor is available for free, and you can download it from the link below.

Some of its core features include:

  • Built on the CMD UI
  • Works on any bootable media
  • Supports al Windows versions
  • Doesn’t need an internet connection
  • Resets passwords of any complexity

⇒ Get Offline NT Password & Registry Editor

LCP

LCP is another free User Account Control password-recovering tool. But unlike the previous entries from the list, this one requires you to have access to a user account on a computer.

So, if you can’t access your user account, get back to one of the tools from above. It works with multiple operating systems, including Windows and Linux.

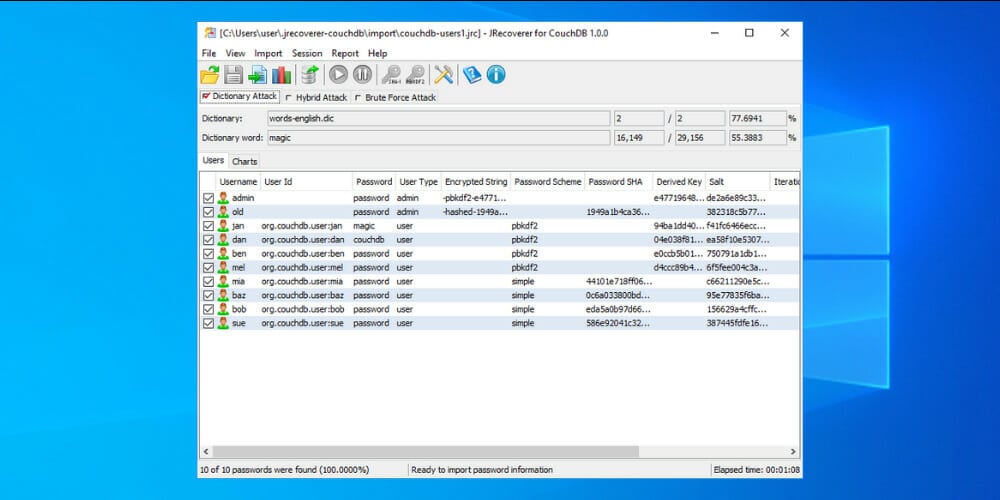
As for the program itself, it uses three methods of cracking your password: a dictionary attack, a brute force attack, or a hybrid dictionary/brute force attack.

Each method has its own benefits but you’ll need some basic knowledge of the matter to be able to perform any of these actions.

LCP can use a lot of resources from your computer while recovering a password, so it is advisable that you don’t use your machine for anything else during the process.

Moreover, the tool supports different languages such as Spanish, German, French, Portuguese, Italian, and Russian.

When it comes to updates, we have to admit that the program is not being changed frequently, but could only mean it doesn’t require any adjusting since it’s that good. The last update happened on the 28th of May, 2018, when version 1.5.0 was released.

Let’s see the software’s best features:

  • Multi-language support
  • Works with all Windows versions
  • Has multiple methods of cracking passowrds
  • Free
  • Simple and comprehensive interface

⇒ Get LCP

Hash Suite

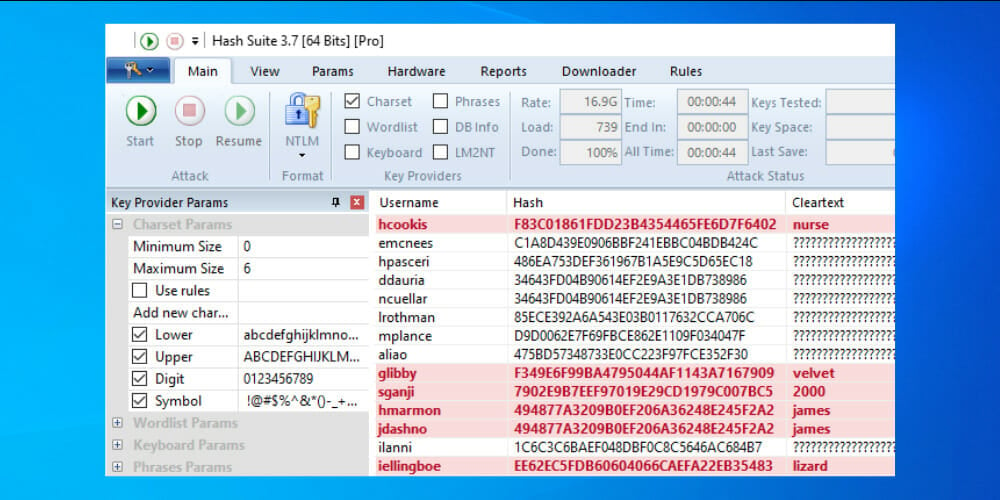
Hash Suite is a tool for advanced password crackers. This program’s purpose is to test the security of password hashes, and of course, crack them.

It offers deep analysis, reports, and statistics. Basically anything you need to manage your passwords and hashes.

Keep in mind that it is extremely powerful and considered one of the fastest password crackers on the market. It has a simple design, and an easy-to-use user interface only adds up to the functionality of this tool.

As we said, this tool is not for beginners because it requires employing a pwdump tool to gain the necessary hashes for Hash Suite to crack.

Heat Suite can support up to 13 types of hash, including NTLM, LM, SHA-1, SHA-256, MD5, SHA-512, DCC, DCC2, SSHA, md5crypt, bcrypt, sha512crypt, and sha256crypt.

The software also uses network traffic capture file formats imported by WiFi WPA PSK (also known as pre-shared key).

So, if you’re not familiar with these terms, it’s better to look for another option. But if you know what you’re doing, check out the list of possible pwdump tools. If you want to download Hash Suite, you can do so for free from the link below.

The program gets constantly updated with minor tweaks or major feature improvements. You can find the changelogs containing all of these updates on their website.

Check out the software’s most notable features:

  • High performance
  • Completely free
  • Intuitive UI
  • Compatible with all Windows versions
  • Offers reports with statistics

⇒ Get Hash Suite

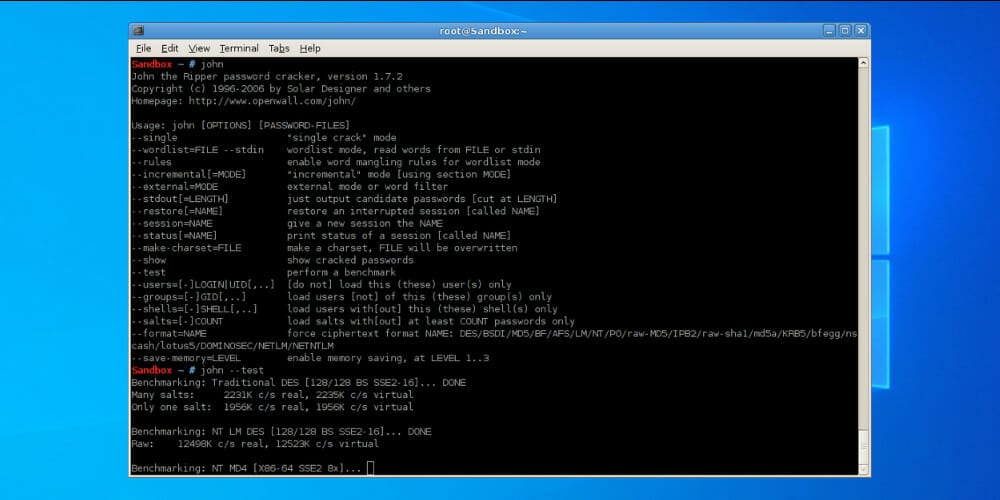
John the Ripper

John the Ripper is a free program, technically, though it requires the special wordlists to discover passwords that, of course, are available for a certain price.

However, you might find some free wordlist alternatives that are compatible with John the Ripper, but we’re not sure how these will perform.

Keep in mind that this software can reset the passwords for multiple operating systems such as Windows, Unix Flavours (Linux, *BSD, Solaris, ATX, etc), macOS, web apps such as WordPress, and more.

This tool is also aimed at advanced users, because it also uses a command-line environment, that average users will probably find hard to understand.

John the Ripper utilizes a special smart mode that tries probable password candidates first, instead of the widely used brute-force that doesn’t take the complexity and simplicity of a password into account.

When it comes to compatibility and system requirements, the app is not picky, and it works well with both integrated GPUs from Intel and AMD CPU cards, or dedicated ones such as the GTX 970, etc.

Note that John the Ripper is completely free, so you can grab it right now without being charged any dime!

Let’s have a look at its best features:

  • Smart mode included
  • Resets passwords for all operating systems
  • Works with WordPress and other software as well
  • Simple to use
  • Minimalist interface

⇒ Get John the Ripper

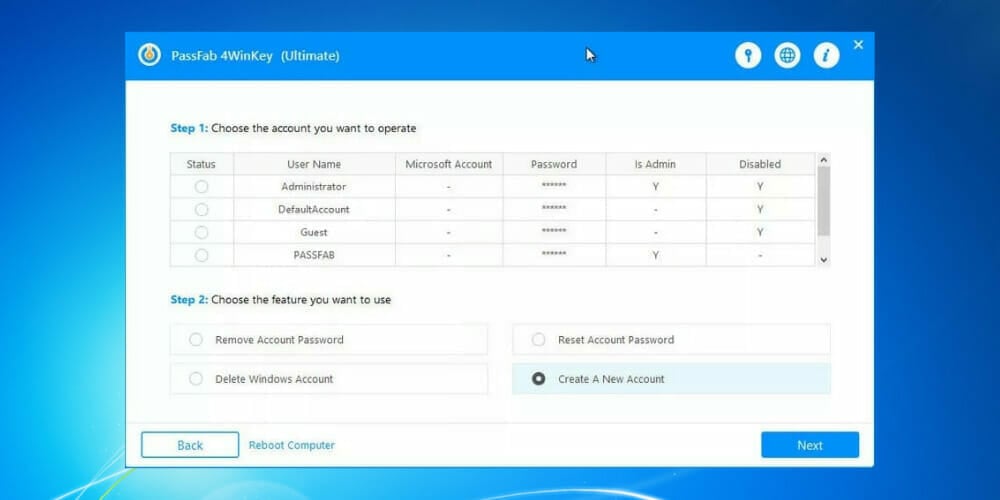
PassFab 4WinKey

If you are looking for a trusty password recovery and reset tool for Windows 10, you should definitely check out PassFab 4WinKey.

With a simple click, create a Windows password reset disk by inserting a USB, CD, or DVD. The process is simple and absolutely free.

Additionally, you can remove old user accounts that aren’t needed anymore, even if you don’t have permission to do it.

In the same manner, the software lets you set up new accounts with admin accounts in case you lost access to the user account.

The software will bypass any restrictions without needing a password, no matter if the account is an administrator or a normal user.

It also works with Microsoft accounts! No need for any extra security info. Just use PassFab 4WinKey and recover lost credentials.

More so, the app works with Windows Servers as well. If you no longer have access to it, this neat software will solve the problem.

The process is quite simple, and the app is compatible with Windows Server 2019, 2012, and 2008, no matter what kind of RAID server it is.

Tip icon Tip
You can get the product for 30% off by using the coupon PFULTI during the purchase!

Let’s have a look at the app’s main features:

  • Access locked computers
  • Create or delete accounts
  • Remove the admin/user local passwords
  • Create Windows password reset disks
  • Reset lost Microsoft account passwords

⇒ Get PassFab 4WinKey

Now that you probably used one of these tools to remove your old password, it is time to set another one for security reasons.

Setting up a password in Windows 10 isn’t hard, but make sure you don’t lose it this time. In case that happens, you can always use one of the many apps included in this list.

All the recommendations made in the article will work in these scenarios as well:

  • Windows 10 password recovery tool – A reset tool is also known as a recovery tool.
  • password finder Windows 10 – If you need to find your lost passwords, a password reset tool will do the job.
  • Windows 10 administrator password tool – If there are no other admins that can reset the password for you, feel free to do it all alone with one of the mentioned programs.
  • Windows 10 password cracker – Sometimes these tools are referred to as password crackers since they might be used by illegitimate users.
  • Windows 10 password remover – While you can’t permanently remove the password, you can replace it with a new one.
  • Windows 10 password reset USB free download – Most of the free tools recommended are installed on a USB that you boot up from.

How do you set up a password on Windows 10?

  1. Go to the Start Menu, type in Settings and select it.
  2. Select Accounts.
  3. Then, choose Sign-in options, and Password.
  4. Now, enter the password you chose twice.
  5. You can also create a hint to help you remember.

Make sure you never lose the Windows password again

If you want to remember the password you set for the administrator account on Windows, the best way to go about it is to create a memorable one.

Pick a topic, something meaningful that you know won’t slip away from your mind in time. Additionally, setting up a clever password hint that only you will be able to figure out is another good idea.

Lastly, you can install a password manager that will keep track of all of your passwords. They use encrypted files and other security measures to make sure all of your data is safe and won’t get stolen, so don’t worry about that.

That’s it for our list of the best password recovery tools. As you can see, all these programs are different in terms of power, usability, recovery methods, price, and more. So if you know exactly what you want, you can choose one based on your needs.

In order to avoid situations where you need to recover your Windows 10 password, we recommend you use a good password manager. It will not only help you manage your passwords, but it will also let you know when one of them is weak.

If you have one of the most often encountered problems – you can’t type the password, just check our guide and fix it.

Also, if your problem refers to a lost email account, here are the best software choices for email password recovery.

Do you agree with our list or do you have some other software to add? Tell us in the comments section below.

Code 43 in Windows 11: How to Fix This Error

As time passes, more and more errors encountered in the previous iteration are now witnessed in Windows 11. So, the latest iteration may look much more user-friendly and advanced, but it’s not entirely immune to errors. One of these is the error code 43 in Windows 11.

The error message accompanying it reads Windows has stopped this device because it has reported problems (Code 43).

Also, the device with which the issue is encountered crashes. Therefore, it is imperative to eliminate the error code 43 in Windows 11 to get things up and running like before.

What does error code 43 mean?

The error is usually encountered with external USB devices or graphics cards, but it could also happen with other pieces of hardware.

From user experience, the two primary triggers include:

  • Driver-related factors – These may be corrupted drivers or, in some cases, outdated drivers.
  • Startup settings – Primarily, Fast Startup may trigger this error because even though it is efficient in reducing boot time, such speed may start drivers to malfunction.

When the error is encountered, it indicates an issue with the device that has stopped working, the relevant driver has crashed, or it has notified Windows that the device has run into a problem.

Since the error primarily involves the device driver, we will explore almost every troubleshooting method that deals with it.

And by the time you are done with this guide, error code 43 in Windows 11 will eliminate the problematic device.

How do I fix error code 43 in Windows 11?

Before going into the solutions, try the following primary measures:

  • First, reconnect the device if it is external. For instance, if you faced the error code 43 in Windows 11 with USB storage, remove it and connect it to another port on the same system.
  • Also, there’s a possibility that another device is conflicting with the current one, and you may run into the error. In this case, shut down the computer, and unplug all non-critical peripherals with only the mouse, monitor, and keyboard connected.

1. Update Windows 11

  1. Press Windows + I to launch the Settings app, and select Windows Update from the tabs on the left.Windows Update
  2. Click on the Check for updates button on the right.Download & install
  3. If an update is listed after the scan, click on Download & install.

2. Reinstall the driver

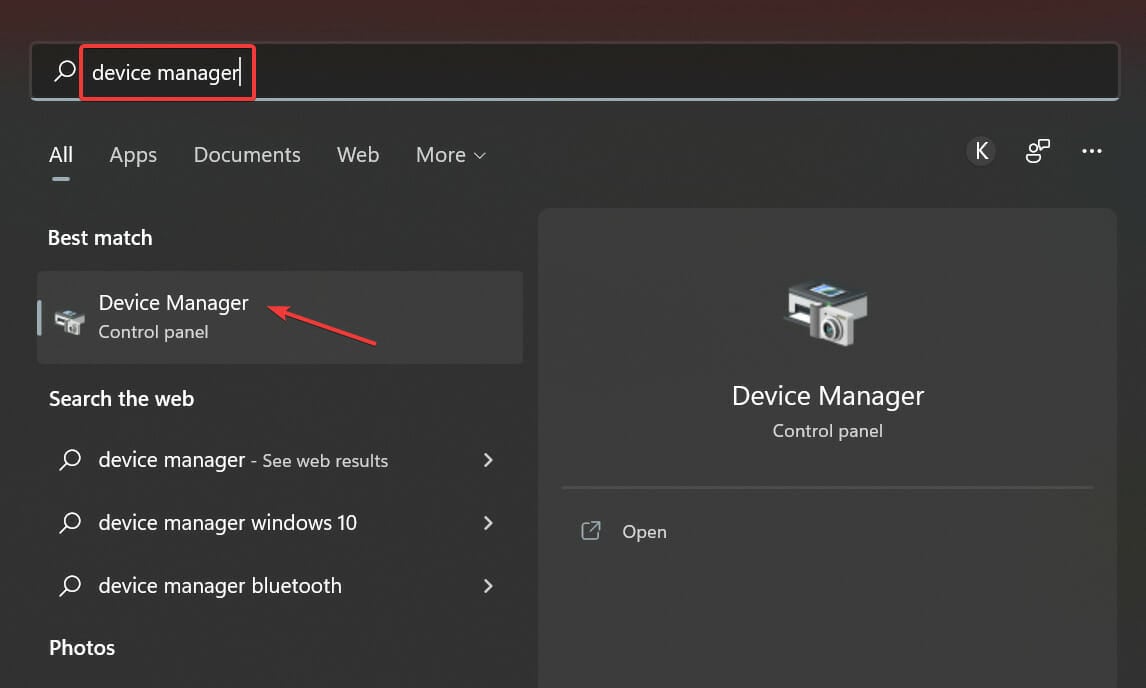
  1. Press Windows + S to launch the Search menu, enter Device Manager in the text field at the top, and click on the relevant search result.Device Manager
  2. Locate the malfunctioning device, right-click, and select Uninstall device from the context menu.
    Uninstall device to fix Windows 11 error code 43
  3. Tick the checkbox for Attempt to remove the driver for this device and click on Uninstall.Attempt to remove the driver for this device

If it’s a corrupt driver behind the Windows 11 error code 43, it can be easily fixed by reinstalling the device. Also, it’s easy to identify one. A device with a corrupt driver will have a warning sign at the corner of its icon.

3. Update the driver

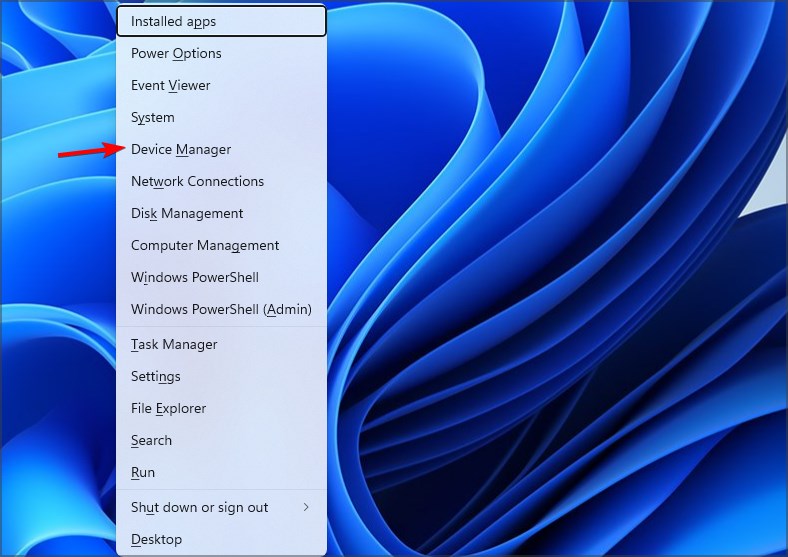
  1. Press Windows + X or right-click on the Start icon to launch the Quick Access/Power User menu, and select Device Manager from the list of options.Device Manager to fix windows 11 error code 43
  2. Locate the problematic device, right-click, and select Update driver from the context menu.Update driver to fix windows 11 error code 43
  3. Now, click on Search automatically for drivers from the two options that appear in the Update Drivers window.
    Search automatically for drivers
  4. Wait for the system to find the best available driver and install it for the problematic device.

An outdated driver often caused the Windows 11 error code 43 for users. This could be a bug in the current version or a one-time crash. But to be on the safe side, you should update the driver.

With each update, the manufacturer will be various new features, performance enhancements, and patches for previously known bugs. Therefore, it’s recommended that you always have the latest driver version installed.

You can always manually install the latest driver version if the Device Manager method cannot get the update process through.

Or, you can use a reliable third-party app to update the installed drivers automatically. We recommend using Outbyte Driver Updater, a reliable tool that will automatically look for any available updates, and install them on your computer, thus keeping all the drivers up-to-date.

Outbyte Driver Updater

Install your drivers automatically with the best updates by using Outbyte Driver Updater.
Free Trial Download now

4. Roll back the driver update

  1. Press Windows + R to launch the Run command, enter devmgmt.msc in the text field, and either click OK or hit Enter to launch the Device Manager.devmgmt.msc
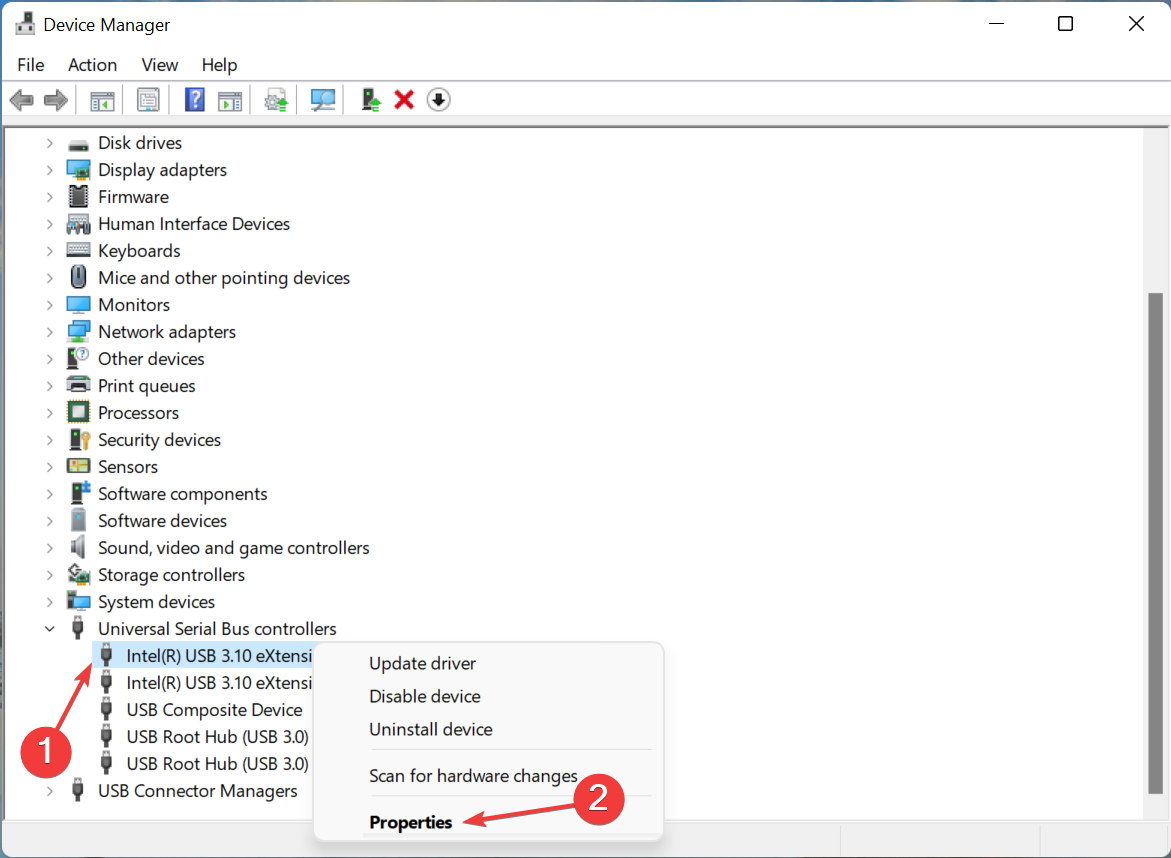
  2. Right-click on the malfunctioning device and select Properties from the context menu.Properties
  3. Navigate to the Driver tab and click on the Roll Back Driver option.roll back driver to fix windows 11 error code 43
  4. Now, select a reason for rolling back the driver update, and click on Yes at the bottom.select reason

If the error code 43 in Windows 11 started ever since you updated the driver, you could roll back to the previous version. When you update a driver, Windows will save the files for the currently installed version in case things don’t work out and you want to reinstall it.

5. Disable Fast Startup

  1. Press Windows + S to launch the Search menu, enter Control Panel in the text field at the top, and click on the relevant search result that appears.Control Panel to fix windows 11 error code 43
  2. Click System and Security.System and security
  3. Next, click on Change what the power buttons do under Power options.Change what the power buttons fo
  4. Click on Change settings that are currently unavailable.Change settings that are currently unavailable
  5. Untick the checkbox for Turn on fast startup (recommended), and then click on Save changes at the bottom.Untick turn on fast startup to fix windows 11 error code 43

Fast Startup is a Windows feature that lessens the OS’s boot time by keeping specific critical drivers and the kernel in an active state to load when the computer is turned on quickly.

After disabling fast startup, check if Windows 11 error code 43 is eliminated. In case it persists, head to the following method.

6. Change power settings for the malfunctioning device

  1. Press Windows + S to launch the Search menu, enter Device Manager in the text field, and then click on the relevant search result.Device Manager
  2. Next, right-click on the problematic device and select Properties from the context menu.Properties
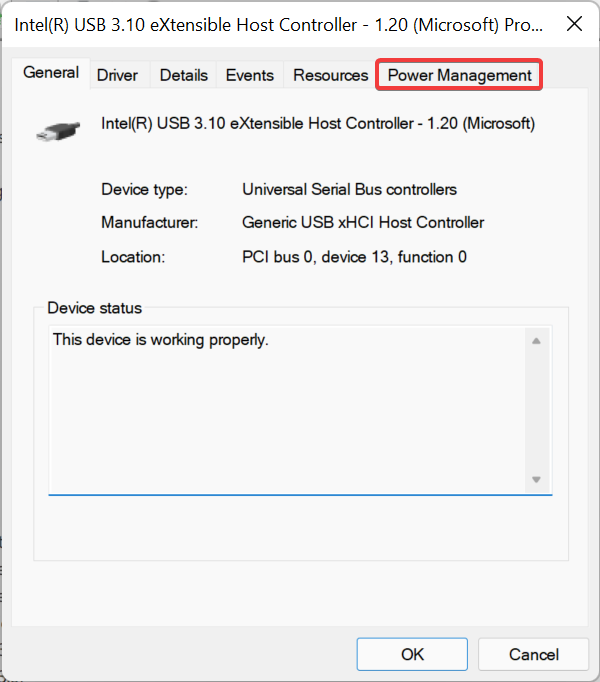
  3. Navigate to the Power Management tab.
    Power management to fix windows 11 error code 43
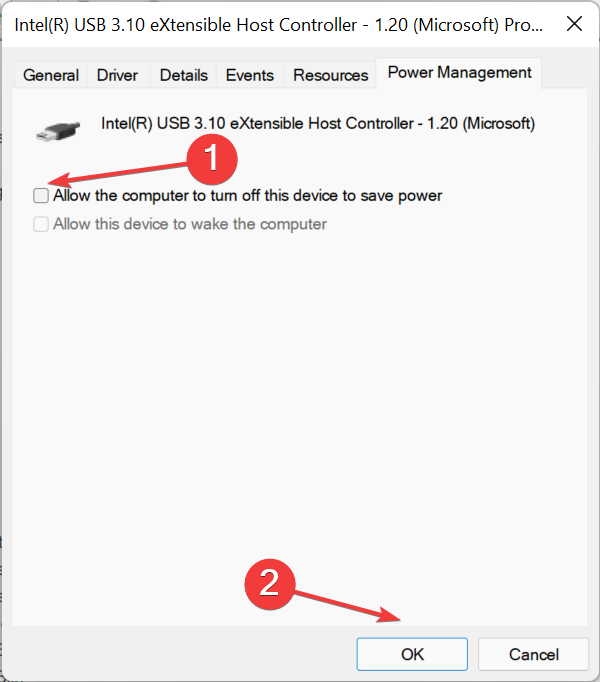
  4. Untick the checkbox for Allow the computer to turn off this device to save power and click on OK at the bottom to save the changes.
    Disable allow the computer to turn off this device
  5. Once done, restart the computer for the changes to come into effect.

If the computer is allowed to turn off a device, it might lead to issues when restarting and cause the Windows 11 error code 43. So, you should disable the feature.

These are all the ways you can fix the error and get the malfunctioning device up and running. If none of the methods listed here work, you may reset Windows 11 to its factory settings.

Also, several users have reported that Windows 11 is not recognizing USB devices, another similar error that can be easily fixed. So, if you ever encounter it, go through the methods listed in the linked guide.

Tell us which fix worked for you in the comments section below.

Here’s How to Fix Bluestacks Black Screen on your PC

Bluestacks is a popular Android emulator for Windows, but many users reported a black screen while using Bluestacks.

This can be a big problem and prevent you from running many applications, and in this article, we’re going to try to fix this issue.

This isn’t the only issue that users encountered, and speaking of issues, here are some common problems that users reported:

  • Bluestacks black screen Intel graphics, Nvidia – Can be caused by driver problems, so reinstall or update them. Changing graphics card settings or running Bluestacks using the integrated graphics may also solve the issue.
  • Bluestacks black screen after loading app, apps not working black screen – The app you’re trying to run is encountering issues, can be solved by reinstalling the app.
  • The Bluestacks screen turns black – Can be caused by the sleep timer, can be solved by downloading the Settings app , and setting the sleep timer to 30 minutes or so.
  • Bluestacks goes to black screen – Occurs if your Bluestacks installation is damaged, can be fixed by reinstalling Bluestacks.
  • Bluestacks black screen after initializing, on startup – Try updating Bluestacks or switch to a different Android emulator.

How can I fix the Bluestacks black screen issue?

1. Reinstall your graphics card driver

  1. Press Windows Key + X and select Device Manager from the menu.
    device manager win +X menu bluestacks black screen
  2. Find your graphics card driver on the list, right-click it, and select Uninstall device.
    uninstall device menu bluestacks screen goes black
  3. If available, check to Remove driver software for this device option, and click the Uninstall button to remove the driver.
    uninstall device dialog bluestacks dark screen
  4. After you successfully remove the driver, click Scan for hardware changes icon to install the default driver.
    scan for hardware changes icon bluestacks black screen

Note: Bear in mind that the default driver might not offer the same performance, so if you want to play the latest games, you might want to update it.

2. Update your graphics card drivers

  1. Press Windows Key + X and select Device Manager from the menu.device manager win 10
  2. Select Display Adaptors in the list of Drivers to unfold the options.
  3. Update drivers by right-clicking on your GPU.
  4. Choose Search automatically for drivers, and wait for the process to finish.

If reinstalling the graphics card driver didn’t solve the problem with Bluestacks and black screen, you should definitely try updating your drivers to the latest version and check if that helps.

If the manual method seems a bit too complicated, you can always use third-party solutions.

By using this tool you’ll scan your entire system for outdated drivers and choose which drivers you want to update automatically.

The tool is quite simple to use, and you should be able to update all your drivers in just a couple of clicks.

⇒ Get Outbyte Driver Updater

3. Run Bluestacks with integrated graphics

A black screen in Bluestacks can sometimes appear if you have both dedicated and integrated graphics processors. Several users reported that they fixed the problem simply by setting Bluestacks to run with integrated GPU.

To do that, you just have to right-click the Bluestacks shortcut and choose the option to run it with integrated graphics. If this method works, you’ll have to repeat it every time you want to start Bluestacks.

If you want to configure Bluestacks to run always powered by your integrated GPU, you need to make a couple of changes in your graphics card control panel software.

Simply locate Bluestacks in Nvidia Control Panel or Catalyst Control Center and assign your integrated graphics as the default graphics processor.

Bear in mind that your integrated graphics doesn’t offer the same performance as dedicated graphics, so you might not be able to achieve the same performance in games while using your integrated graphics.

4. Turn off the sleep timer

According to users, sometimes a black screen appears simply because Bluestacks goes to sleep. This usually occurs after a minute or two or when loading certain games.

To fix this problem, users are suggesting installing the Settings app on Bluestacks and use the app to turn off the sleep timer. Once you disable the sleep timer, check if the problem is still there.

You can create a custom Power Plan when running BlueStacks by following these steps:

  1. Go to Control Panel → Hardware and Sound → Power Options.
  2. Create a Power Plan and name it Bluestacks.
  3. Change the setting for Put Computer to sleep to Never.

Select this Power Plan whenever you use Bluestacks, and you will never have problems with the PC going to sleep, preventing black screen errors. Nonetheless, should you want to change back to your favorite power plan, you can always go back and change it.

5. Turn off the Threaded optimization

  1. Open the Nvidia Control Panel.
  2. Select Manage 3D Settings from the left pane, click the Program Settings tab and select Bluestacks from the list (if it’s not there, click the Add button and select Bluestacks Frontend).
  3. Locate Threaded optimization on the list and set it to Off. Click Apply to save changes.
    threaded optimization nvidia control panel bluestacks black screen

After making these changes, check if the problem is still there. If you’re using AMD graphics, you should have the same options available in the Catalyst Control Center.

6. Reinstall the app you’re trying to run

If you keep getting a black screen while trying to run Bluestacks, perhaps the problem is related to your installation. Sometimes your Bluestacks installation might be damaged, and that can cause this issue to appear.

To fix the problem, it’s advised to uninstall Bluestacks completely from your PC, and then install it again.

After doing that, the app should be able to start without any problems.

7. Try a different emulator

Bluestacks is a solid Android emulator, but it’s not the only one, and if you’re having a black screen while using it, perhaps you might want to consider switching to a different Android emulator.

If you’re looking for a good Bluestacks alternative, we strongly recommend you try LD Player.

LD Player is one effective Android emulator. It has a lot of gaming features like setting your own shortcut key to make things easier while playing a game.

You may use keymapping for several types of gameplay and to test various Android applications. With LD Player, you may effortlessly download any application that is accessible through Google Play Store.

Furthermore, its multi-instance function allows your PC to run multiple applications in the background, without any disruptions.

Conclusion

If you want to learn more about this emulator, explore our comprehensive Bluestacks guide. Check out our awesome Gaming Hub for more information about the world you love.

We hope that one of our solutions helped you fix the problem with Bluestacks. If you have any suggestions or additions, please write them in the Comments section below.

How to Disable User Account Control in Windows 10 [Answered]

The User Account Control (UAC) is the feature that sends you prompts application tries to make a change to the system files. You can either allow or prevent this, giving you control over what changes are made to your PC.

However, sometimes, the UAC might encounter issues and you might need to disable it for a program you trust. This is why we have prepared this detailed guide to show you the easy ways to achieve this feat.

How to disable UAC in Windows 10

1. Use Control Panel

    1. Press the Windows key, type control, and select Control Panel.
    control
  1. 2. Select the User Accounts option.

    user disable uac windows 10
  2. 3. Now, choose User Accounts again in the next page.

    user accounts disable uac windows 10
  3. 4. Next, click Change User Account Control settings.

    change
  4. 5. Finally, drag the slider in the left down to the Never notify edge and click the OK button.

    never

With the above method, you should be able to disable UAC for good on Windows 10 using the Control Panel.

2. Use the Registry Editor

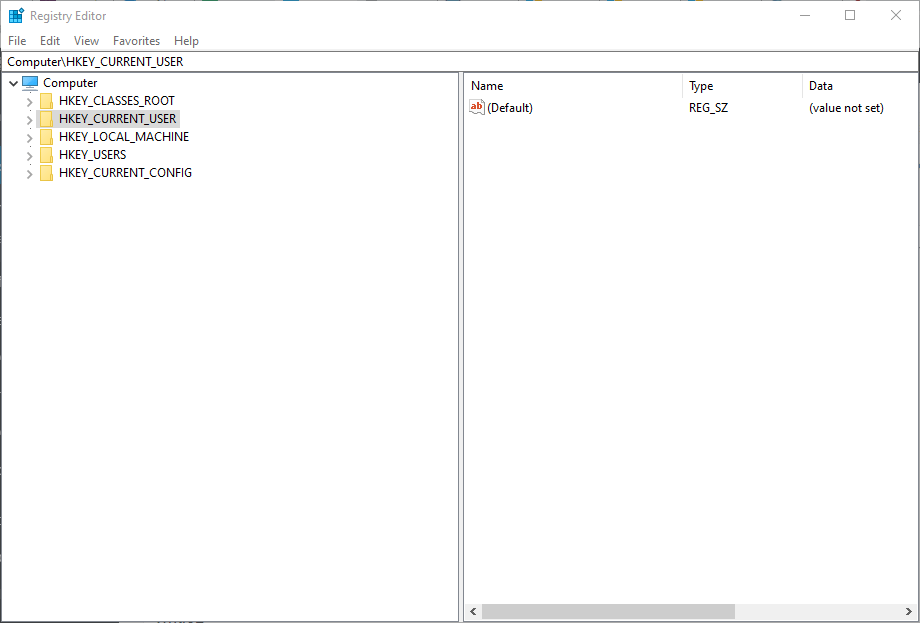
  1. Press the Windows key + R, type regedit, and click OK.
    regedit disable uac windows 10
  2. Navigate to the path below in the left pane: HKEY_LOCAL_MACHINE\SOFTWARE\Microsoft\Windows\CurrentVersion\Policies\System
  3. Now, double-click the EnableLUA DWORD in the right pane.
    enable
  4. Set its Value data to 0 and click OK.
    value data
  5. Finally, close the Registry Editor and restart your PC.

In some cases, you might find that disabling UAC in Control Panel on Windows 10 is proving difficult. In this situation, you can always use the Registry Editor, as shown above.

UAC in Windows 10 issues and fixes [2018 update]

You should be informed of some important things that happened to the UAC in Windows 10 before trying to manage it. First, there were rumors that UAC would be removed from Windows 10.

However, that has yet to materialize till this time of writing. And users are still reporting several issues with UAC changing system files one of the most dangerous ones.

With this, we can round up this guide on how to disable UAC on Windows 10.

Feel free to let us know if you encounter any issues while implementing any of the solutions above in the comments below.

Mobile Hotspot not Working in Windows 10: 6 Fixes to Try

Many users use mobile hotspots, but what if mobile hotspot not working on Windows 10? This is a common issue, and many reported that their laptop won’t connect to a mobile hotspot.

Before we start fixing this problem, let’s see what causes it to appear on your PC.

Why is my mobile hotspot is not connecting to my PC?

There are several reasons for this issue, but here are some of the common ones:

  • Windows update -Sometimes a bad update can cause this issue, so you’ll need to uninstall the update.
  • Wireless driver issues – If your driver isn’t up to date, you might experience issues. Go ahead and update your drivers to fix that.
  • WAN Miniport adapter – This component can cause errors with hotspots, and removing it usually fixes the issue.
  • Firewall settings – Sometimes Windows Defender Firewall is preventing connections, and you’ll need to reset it to fix that.

How can I fix mobile hotspot if it’s not working on Windows 10?

Before we start fixing this issue, there are a few quick checks that you can perform:

  • Change the hotspot password – Few users claim that changing the hotspot password on your phone can help with this issue, so be sure to try it.
  • Turn the phone off and on – Sometimes a phone glitch can cause this issue. Simply restart it and check if that solves the problem for you.
  • Install the latest updates – Many reported that this is a Windows bug, and installing the latest updates usually helps.

1. Update the wireless driver

Note icon NOTE
For this method to work, you’ll need to use an Ethernet connection or download the drivers on a different device and then transfer them.
  1. Visit your Wi-Fi adapter manufacturer’s website.
  2. Locate your model on the list.
  3. Select the latest driver and click on Download.
  4. Once the driver is downloaded, install it.

If your mobile hotspot not working on Windows 10, we strongly suggest you update all outdated drivers automatically by using Outbyte Driver Updater.

This is a tool that will save you from manually searching and installing fresh driver versions since it will do the whole job.

It’s a great alternative and safe, at the same time, to ensure that your device gets the latest drivers’ updates.

  1. Download and install Outbyte Driver Updater.
  2. Allow the tool to scan your PC for missing and out-of-date device drivers.
  3. Inspect the detailed report the tool will offer once scanning finishes.
  4. Choose the device driver you want to update. (You can also bulk update all outdated drivers.)

Outbyte Driver Updater

Prevent possible manual-installing issues and let Outbyte Driver Updater automatically perform this task.
Free Trial Download now

2. Uninstall WAN Miniport adapters

  1. Press Windows key + X and choose Device Manager from the list.
  2. Locate WAN Miniport in the Network adapters section, right-click it and choose Uninstall device.
  3. Select Uninstall to confirm.
  4. Repeat these steps for all WAN Miniport adapters.
  5. After removing them all, restart your PC.

3. Reset Windows Firewall to default settings

Note icon NOTE
Restoring defaults might cause some issues with certain applications, so you’ll have to configure them again manually.
  1. Press Windows key + S and enter firewall. Choose Windows Defender Firewall.
     
  2. Click on Restore defaults.
  3. Lastly, click on Restore defaults to confirm.

4. Create an exception in the firewall

Note icon NOTE
This issue was reported in Bitdefender, but it might work for other firewalls.
  1. Open Bitdefender Firewall.
  2. Create a firewall exception rule.
  3. Check Apply this rule to all applications.

     
  4. Check Custom Local Address. Enter 192.168.137.1 as the IP and save changes.

After doing that, the problem should be gone from your PC.

5. Use a hotspot software app

Another simple, and automatic, solution would be to use a dedicated app such as Connectify Hotspot that can turn your Windows 10 device into a hotspot.

What this program does is extend the range of your wireless signal in your home by combining several Internet connections, either wired or wireless.

This facilitates Internet access for all devices without you having to resort to additional hardware.

When using Connectify Hotspot, you basically eliminate networking issues since it bridges other devices.

You also get real-time network usage monitoring as well as firewall protection for each connected device.

⇒ Get Connectify Hotspot

6. Rollback Windows update

  1. Press Windows key + S and enter update history. Select View your Update history from the list of results.
  2. Select Uninstall updates.
     
  3. Double-click the update you want to remove and follow the instructions on the screen.

Keep in mind that the update will likely install itself again, so you might need to block automatic updates to prevent that.

Hopefully, you managed to fix this issue by using the solutions from this guide. If the problem persists, our We can’t set up a mobile hotspot guide should be able to help you.

Let us know if any of the solutions we shared worked for you. If you have any other questions, leave them in the comments section below and we’ll be sure to check them out.

How to Fix Crunchyroll Error 403: 5 Tested Solutions

Crunchyroll is a streaming service with an extensive library of anime videos for subscribers to watch. However, a forbidden 403 error can arise when users try to access Crunchyroll video content or pages. Consequently, users can’t view Crunchyroll videos or website pages when that issue arises.

What is the Crunchyroll 403 forbidden error?

The 403 forbidden error is a common one that can arise for many websites. Although there is some variation in 403 forbidden error messages, they usually mean users are trying to access forbidden website resources (or content).

Here are some of the reasons why you’re encountering the 403 forbidden error message in Crunchyroll:

  • Geographical restrictions – Crunchyroll is limited to users outside the United States. Therefore, many users outside the U.S. utilize VPN software to bypass the service’s geographical restrictions. However, Crunchyroll blocks a lot of VPN IP addresses.
  • Server outage – Sometimes, the service may be off due to server outage or maintenance. You may use an online tool like Downdetector to see if that is the issue with Crunchyroll.
  • Old cached page versions and URL typos – Some problems within your browser or an incorrectly written address may result in error 403.

So, Crunchyroll users aren’t always trying to access forbidden video content when error 403 arises.

Now that we know what this is all about, let’s go to the actual solutions to fix the problem as quickly as we can.

How can I fix Crunchyroll forbidden error 403?

Before getting to more complex solutions, let’s cross some preliminary checks and actions that may solve the problem quicker:

  • Restart your browser or try to access Crunchyroll on a different browser.
  • If you’re utilizing a VPN, try selecting a different server to connect to Crunchyroll. For bypassing Crunchyroll’s U.S. restrictions, you’ll probably be able to choose numerous different state servers.
  • Log out and into your Crunchyroll account.

If you already tried all these actions, let’s go to the actual solutions to fix the error 403 in Crunchyroll.

1. Clear your browser’s cookies and cache data

Google Chrome

  1. Click the Chrome’s Menu button (the three vertical dots), select More tools, and pick Clear browsing data.
  2. Select All Time on the Time range drop-down menu, select the Cached images and files and the Cookies and other site data checkboxes, and hit the Clear data button. You may select Browsing history as well.

Firefox

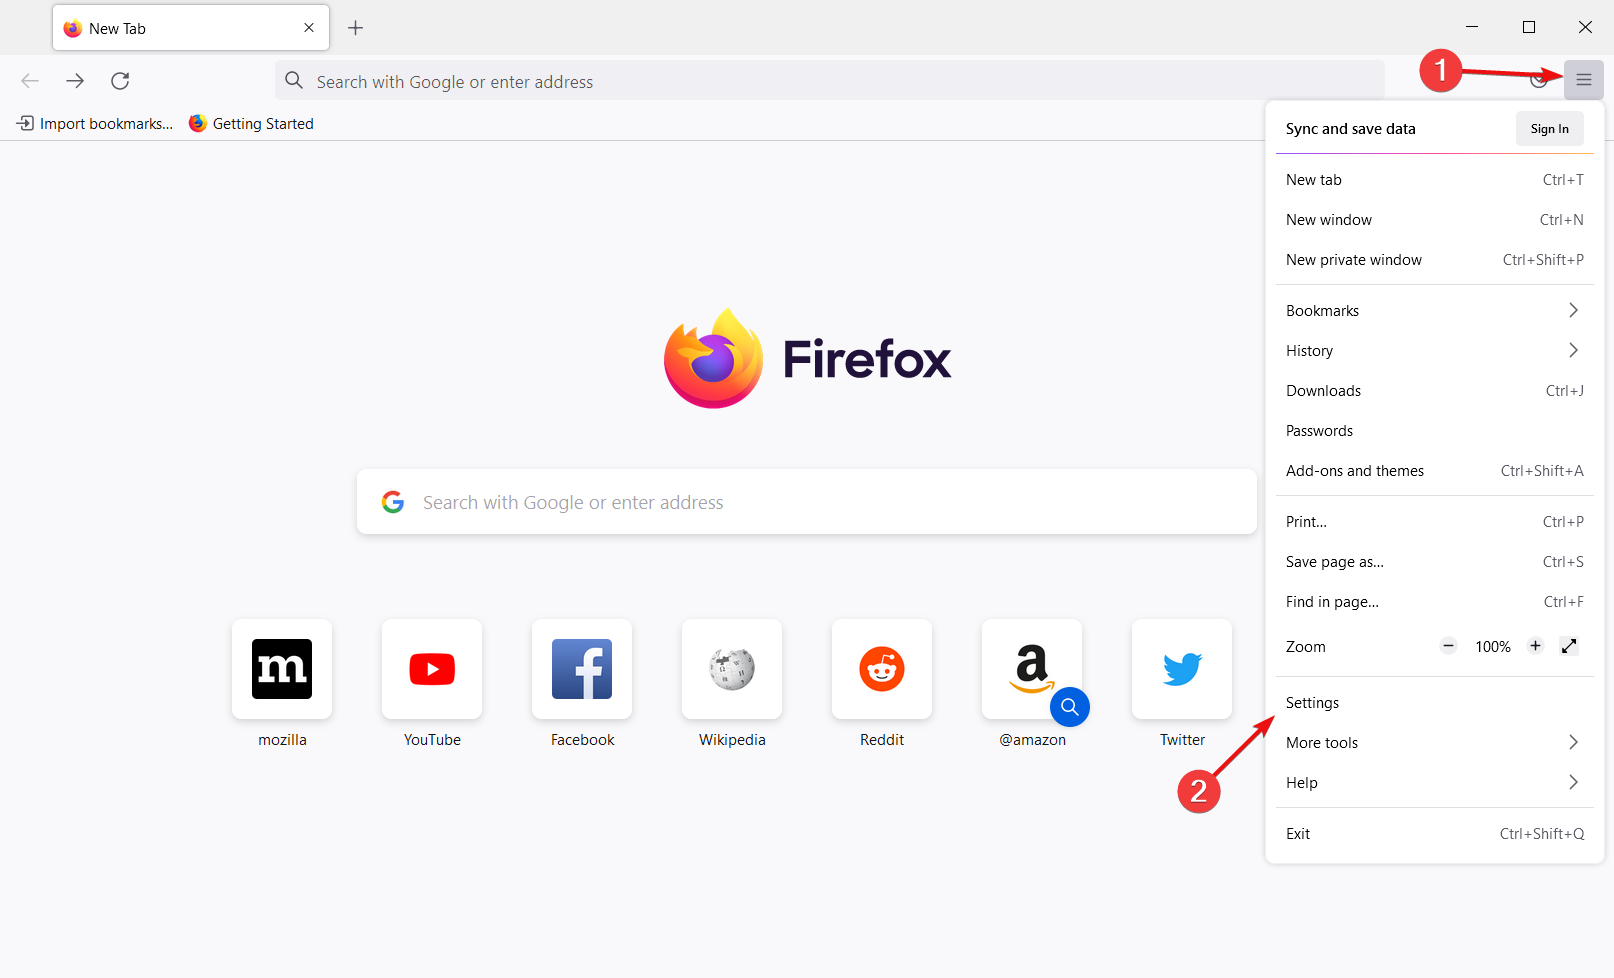
  1. Click the Open Application Menu button in Firefox and select Settings.
  2. Choose Privacy & Security from the left and press the Clear Data button.
  3. Select the Cookies and Site Data and the Cached Web Content options, then press the Clear button.

Edge

  1. Press Edge’s Menu button and click Settings.
  2. Select Privacy, search, and services on the left and press the Choose what to clear button.
  3. Select the Cookies and Cached images data options and click Clear now to erase the data.

We have outlined the methods to clear the cache on the most popular browsers out there. However, the method is very similar for other browsers as well.

2. Reset your web browser

Google Chrome

  1. Type the following line in Google Chrome’s URL bar, and press the Enter key: chrome://settings/
  2. Scroll down the Settings tab, and click Advanced to expand it.
  3. Then click on Reset and clean up, and select the Restore settings to their original defaults option.
  4. Press the Reset settings button to confirm.

Firefox

  1. Enter the following line in Firefox’s URL bar, and hit the Return key: about:support
  2. Press the Refresh Firefox button.
  3. Then click again the Refresh Firefox button in the pop-up window to reset the browser.

Edge

  1. Type the following line in Edge’s URL bar, and press the Enter keyboard key: edge://settings/reset
  2. Click Restore settings to their default values option and press the Reset button.

3. Try a VPN known to work with Crunchyroll

If selecting different servers with your current VPN doesn’t do the trick, you might need better VPN software. NordVPN is among the best VPN providers for Crunchyroll which has more than 5,000 servers. About 1,970 of those are U.S. servers you can connect with to access Crunchy’s U.S. catalog.

NordVPN comes with advanced features few other VPN providers can match. It works with several protocols and utilizes AES-256-CBC encryption algorithms. Furthermore, NordVPN doesn’t restrict connection speeds or bandwidth, which minimizes video buffering.

Other NordVPN features

  • It enables users to connect with P2P sharing and Tor networks
  • NordVPN’s kill switch automatically disconnects PCs when VPN connections drop
  • Users can pause VPN connections with NordVPN’s pause option
  • Comes with a 30-day refund guarantee

NordVPN

Let NordVPN protect your PC and get unlimited speeds and bandwidth to reduce video buffering.
Free Trial Visit Website

4. Disable your VPN if you don’t need it for Crunchyroll

Note icon NOTE
This resolution is more specifically for U.S. users who don’t need to bypass Crunchyroll’s geographical restrictions with VPNs.
  1. Click the Start button, type network connections, and select View network connections to open the window in the snapshot directly below.
  2. Right-click your listed VPN connection and select the Disable option.

Of course, you may also access the menu of your VPN software and disable it from there.

The above resolutions are the most likely fixes for Crunchyroll error 403. Note that utilizing VPNs to bypass video geo-restrictions can be considered a breach of Crunchyroll’s terms of service. So, users who do so run the risk of possible Crunchyroll account sanctions.

You might also be interested in how to fix the Internal Server Error on Crunchyroll. This guide will help you fix the problem quickly.

For any other questions or suggestions, don’t hesitate to write about them in the comments section below.

9 Best Pencil Sketch Converters for Photos and Drawings

Have you ever wanted to convert your favorite photo to line drawing with free software? This type of effect makes the elements of the image pop out more and has that characteristic sketch look.

In order to achieve that look, sometimes the guidance lines are visible, and you can see the artist’s smudging of the paper, like the resulting piece of art, was hand-drawn using either charcoal or pencils.

Fortunately for you, you don’t have to start taking drawing classes and then spend more time until you actually learn how to do it properly.

In order to obtain a professional-looking result, the best option is to use specialized tools that analyze all pixels and color gradients found in your photo and then transform them into a sketch-like result.

In this article, we will explore some of the tools to convert photos to line drawing with the best free software, that allows you to transform any of your pictures into sketches in just a few clicks.

What are the best tools to convert photos to sketches?

Adobe Photoshop – Content-Aware Fill feature

If you’re into graphic design, photo editing, or any other image manipulation process, Adobe Photoshop should always be your first choice.

This software tool is used by millions worldwide. It’s easy to use but it also has some advanced features that come in handy for complex projects. That’s why amateurs and professionals prefer it over other tools.

Photoshop is also great if you want to convert photos to pencil sketches and drawings. Furthermore, it has an incredible array of brushes, filters, and photo effects that can help you take your editing to the next level.

Let’s take a look at some other useful features that you can find in Photoshop:

  • Content-Aware Fill lets you cut distracting parts of your image
  • A multitude of brushes to choose from
  • Customizable workspace with easy-to-use options
  • Advanced editing features for professional results
  • Frame tools, slicing tools, magic wand, symmetry mode, and many others

Fotor – Online usage

Fotor is an online photo editor with multiple editing tools, including a remarkable photo-to-sketch conversion tool.

Thanks to its AI technology, it helps you convert all your pictures into realistic sketches without any effort.

All you need to do is to upload your photos, choose a sketch filter and convert them into art pieces within a few seconds.

Fotor also offers a drawing converter that turns your photos into professional-looking and high-definition portraits.

Other best features you might want to know about:

  • Photo enhancer
  • Background remover
  • Collage maker

Colorcinch – Text masking feature

Colorcinch, formerly known as Cartoonize, is a very intuitive software that has not only various basic editing features but advanced settings as well.

That said, you can use this app to convert your photos into sketches and adjust them however you like with just a click.

Moreover, Colorcinch provides lots of sketch effects so that your pictures will look just like a pencil drawing.

You can also benefit from essential editing tools like resizing, enhancing, and exposure-controlling features to create beautiful images.

AKVIS Sketch – Easy to use

AKVIS Sketch gives you the power to easily apply a wide range of different effects to your digital photos. You can turn your picture into a black-and-white sketch, or into an oil painting.

The algorithms used by AKVIS collect data regarding the colors, proportions, and added effects, to offer you some of the best image processing on the market.

This software has an easy-to-use UI, that allows you to process your picture with any filters or editing you choose. Also, you can modify your image even more by choosing to make the hatching denser or finer.

One of the best features of this software is the Timeline options. This tool shows you a history of your latest 10 actions in the program and makes suggestions regarding the best filters to add.

You can also use this software to batch-process images, allowing you to save time, and offering the same level of results as in the case of single image processing.

AKVIS Sketch

A great app with an easy-to-use interface that allows you to process your pictures into sketches.
Check price Visit Website

Canva – Beautiful templates

Canva is an excellent program that unlocks your creativity by offering diverse design and editing tools.

It lets you turn your favorite photos into sketches, and drawings, making them look like professional artwork.

With Canva, all you have to do is to upload your photo, edit it however you prefer, adjust settings, and decrease the image transparency.

Furthermore, you can improve your photos with the enhancer tool and fix blurry, dark, or even oversaturated pictures in a matter of seconds.

SoftOrbits Sketch Drawer – Wide range of presets

SoftOrbits Sketch Drawer - picture to sketch

Sketch Drawer from SoftOrbits is a great software option that allows you to easily transform your digital pictures into amazing works of art with a sketch look.

This software analyzes your image and then, if you choose to do so, can convert all the colors into a colorful sketch, by transforming every pixel into a pencil stroke.

This process allows you to obtain great sketches by just using a few clicks and moving some sliders.

Sketch Drawer contains a wide range of presets that allow you to apply any desired effect – black and white sketch, watercolor, or color sketch.

⇒ Get SoftOrbits Sketch Drawer

FotoSketcher – Free usage

FotoSketcher - pic to painting/ pic to sketch

FotoSketcher is another great software option that can easily transform your digital images into professional-looking artwork.

The effects found in this program cover a few different styles -pencil sketches, watercolors, oil paintings, abstract art, etc.

You just need to download this free program, and with just a few clicks and movement of slides, you can add a wide range of effects, and then export them directly.

It contains a good range of presets that allow you to make an informed decision regarding how your image will look after the process is completed. Moreover, you can preview the effects before adding them.

The tool also allows you to edit your images with standard features like sharpening effects, luminosity customization, and color saturation. It also can customize options like edge intensity, threshold, and brightness.

⇒ Get FotoSketcher

XnSketch – Edge strength adjustments

XnSketch - photo to sketch

XnSketch is a very powerful and free software that allows you to easily turn your digital images into pencil sketches, among other effects.

This software contains a total of 18 different effects – black strokes, white strokes, pastels, pencil sketches, colored sketches, etc.

Using this software also gives you the power to adjust edge strength and opacity. The tool also offers options for adjusting contrast, brightness, saturation levels, etc.

It allows you to share your artwork with others either by exporting them as a PNG or JPG image on your hard drive or by sharing it on social networks.

⇒ Get XnSketch

Instant Photo Sketch – Lightweight software

instant photo Scheck

Instant Photo Sketch is a lightweight free software that allows you to easily transform your photos into sketches, by the use of its effects.

Compared to the other software options we presented in this list, Instant Photo Sketch doesn’t offer a wide range of features and customization options.

However, as the name suggests, it gets the job done fast when it comes to applying sketch effects to your images. This software can automatically transform your picture by clicking one button and moving one slider.

The slider allows you to choose the level to which the chosen effects are applied, and can also customize the brush stroke.

You can also zoom in when editing your images, and after the conversion is done, you can easily export your images into either .jpeg or .png files.

⇒ Get Instant Photo Sketch

The ability to turn your photos into sketches can make them look really cool. By using the tools we mentioned above, you should be able to turn a picture into a graphic.

Let us know in the comment section below what software option you chose and how it performed for you.

How to Fix Wi-Fi Repeater Not Working [Can’t Connect]

Wi-Fi repeater/extender won’t connect? We’ll give you all the information you need to fix it.

There are cases in which your Wi-Fi works without any issues until you’re trying to connect an extender. Then, your device tells you that it can’t connect to the network, or, in some cases, can’t connect at all.

What do I do if the Wi-Fi extender isn’t working?

Firstly, make sure that you have connected it correctly, according to its manual. Every Wi-Fi repeater comes with a connection diagram or steps that you mush follow in order to make it work.

Now, let’s get to more advanced fixes.

1. Reset Wi-Fi extender/repeater

All WiFi extenders come with a reset button. All you have to do is press/switch the reset button and wait for 10 seconds. It’s usually located at the back of your extender, near the Ethernet cable port.

This will turn settings to default and let you adjust them. We recommend not changing anything before you check whether the extender works now. If it’s all working, be mindful of how you adjust your setup.

2. Forget the network from your PC

  1. Press Windows + I key combination to open Settings.
  2. Select Network & Internet.
  3. From the left pane, choose Wi-Fi.
  4. Click on Manage known networks.
  5. Click on your Wi-Fi repeater/extender and select Forget.
  6. After you click on Forget, the network will disappear from the list. Go to the right corner of your taskbar and click the Wi-Fi icon.
  7. Search for the repeater’s network and connect to it again.

3. Check to see if your Wi-Fi repeater is on the same network

Check your router’s SSID and check to see if another similar network is available by using another device (phone, tablet, etc.).

For example, if your router SSID is TP-Link_Router, the default SSID for your extender would be TP-Link_Router or Link_Router_EXT.

To change these settings, you will need to access the IP address for router settings your internet provider gave you, by using your PC‘s browser.

4. Check for hardware issues

If no LED is on, either the device is broken, the charger or the power outlet has an issue. To conclude that is a repeater problem, you can check the power outlet with another device, to see if it’s working properly.

In this article, we explored some of the best troubleshooting methods if your Wi-Fi repeater is not working and you are not able to connect to the Internet.

Please feel free to let us know if this guide helped you solve your issue, by using the comment section below.

6 Easy Fixes for COM Surrogate High CPU Usage

In this guide, we will show you the easy ways to fix the COM Surrogate high CPU or high RAM usage. Despite being a basic process, it’s registering high resource usage for some users.

COM Surrogate helps run software extensions and handles tasks like thumbnail extraction in File Explorer. Here’s how to reduce the amount of CPU or RAM it uses:

    How do I fix COM Surrogate high CPU, disk and memory usage?

    Before starting the steps below, complete any pending downloads. COM Surrogate may be building thumbnail previews, causing high CPU usage.

    1. Perform a clean boot

      1. Press the Windows key + R, type msconfig, and click OK.
      msconfig com surrogate high cpu
    1. 2. Click the Services tab at the top, check the box for Hide all Microsoft services, and click Disable all.

      services com surrogate high cpu
    2. 3. Choose Startup at the top and click Open Task Manager.

      open
    3. 4. Right-click each of the processes there and select Disable.

      disable
    4. 5. Now, go back to the System Configuration window and click Apply, followed by OK.

      apply

    A clean boot starts your PC with only essential services. If the issue is fixed, re-enable apps in batches to find the cause.

    2. Perform SFC and DISM scans

    1. Press the Windows key + S, type cmd, and select Run as administrator under Command Prompt.
      cmd com surrogate high cpu
    2. Type the command below and hit Enter: sfc/scannowsfc scannow
    3. Wait for the command to complete, type the command below, and press Enter: DISM.exe /Online /Cleanup-image /Restorehealthdism restore
    4. Finally, wait till this command finishes its operation.

    Broken or corrupt system files cause many problems on PCs, and it is not surprising that it can lead to the COM Surrogate high CPU usage. Note that you should run the DISM scan even if the SFC scan fails.

    3. Scan for malware

    1. Press the Windows key, type virus, and select Virus & threat protection.
      virus com surrogate high cpu
    2. Click Scan options.
      scan options
    3. Choose your preferred scan option and click the Scan now button.
      scan now

    Malware can sometimes hide under a system process and cause it to behave abnormally. This can be the reason COM Surrogate is registering high CPU usage.

    Alternatively, if you want to be sure that you have removed even the most hidden viruses, we recommend using a third-party antivirus like TotalAV. This security software scans your PC thoroughly and removes all traces of malware.

    4. Close the process using Task Manager

    1. Press Ctrl + Shift + Esc to start Task Manager.
    2. When Task Manager starts, find the COM Surrogate process and right-click it.
    3. Choose End task from the menu.
      end task com surrogate high cpu
    4. If you can’t find the COM Surrogate process, go to the Details tab and search for dllhost.exe.
    5. Right-click it and choose End Task.
      dll host

    After ending this process, check if the problem is resolved.

    5. Use Process Monitor to find the problematic file

    1. Download Process Monitor.
      process monitor
    2. Run it and find the file that dllhost.exe is trying to access.
    3. Remove that file. You might have to close COM Surrogate or dllhost.exe using Task Manager to delete that file.

    Sometimes a corrupt image or video file can cause the COM Surrogate high CPU usage issue. In this case, you need to find the file and remove it to restore normal service on your PC.

    6. Check your hard drive for errors

    1. Open the Command Prompt as administrator.
    2. Type the command below and hit Enter: chkdsk /f /rchkdsk
    3. Now, wait for the command to complete and restart your PC.

    At times, COM Surrogate does not just register high CPU usage but also high memory use. To make sure everything is alright with your memory, you need to run the CHKDSK command and try to fix any corrupt sectors.

    COM Surrogate’s high CPU usage can result from third-party apps, corrupt system files, or malware. To address high CPU usage, perform a clean boot to identify problematic apps, repair any corrupt system files, and run a virus scan to detect malware.

    Are you facing a similar issue with Explorer.exe high CPU usage or Windows 11 High CPU Usage? Then, check our excellent guides for the surefire ways to fix them.

    Feel free to let us know the solution that helped you fix this issue in the comments below.

    8 Best Voice Recording Apps for Windows 10 [Free, Paid]

    I remember that among the first things that I did when I got my first computer was playing around with the sound recorder function.

    With the coming of Windows 10, we kept this secret passion, and whenever we have a free moment, we start singing and then laughing, listening to what we just recorded with our beautiful voices.

    Microsoft has a pretty Voice Recorder app inside Windows 10, but it’s rather basic, with a simple and clean interface.

    We will talk about Windows’ sound and voice recorder options, and bring up a shortlist of apps from the Microsoft Store that can do just the same, and maybe with some added features.

    We have tried our best to compile a shortlist below with some of the most useful recording tools. If you know of any others, don’t hesitate and let us know in the comments section.

    What are the best sound recorders for Windows 10?

    1. RecordPAD – Versatile voice recorder
    2. Adobe Audition – Excellent user interface
    3. Gilisoft Audio Recorder Pro – Enhanced recording clarity
    4. NowSmart Sound Recorder – Easy to use
    5. Audacity – Sound mixing feature
    6. Lucky Recorder – Tool for professionals
    7. Lexis Audio Editor – Superb audio editor
    8. Windows 10 built-in Voice Recorder – Simple tool

    RecordPAD

    RecordPad is a sound recording program that lets you record sound, music, audio, and narration snippets.

    It is a sophisticated program that enables you to record with various devices. With a command-line option, it may also be easily connected with other programs.

    With RecordPad Sound Recorder, you can easily discover your audio by utilizing the filter and speech search features. Adjust your audio clips using the play options, and then burn, convert, transcribe, or add your clips to an existing project when you’re through.

    RecordPAD can record sound, speech, notes, music, or any other type of audio. Audio recordings may be stored in WAV, MP3, and AIFF formats.

    You may also use the Express Burn software to burn the recordings directly to a CD. System-wide hotkeys allow you to control recording from the keyboard while working in other apps.

    You can use batch files to automate this application since it supports command line parameters.

    RecordPAD

    RecordPad is perfect for adding voice and other audio to digital presentations, producing audiobooks, or recording a message.
    Free trial Visit Website

    Adobe Audition

    Adobe Audition is our top pick in this guide as it provides various sound and voice recording features, and everything is packed in a visually pleasing user interface.

    What makes Audition stand out from the crowd is the fast processing speeds it offers and also the variety of other useful features.

    It’s a high-quality audio editing, processing, and mastering software with multi-tracking capabilities. It does not, however, support MIDI. Therefore, if you wish to mix and master in Audition, every track you produce must be audio.

    So, for example, you might export MIDI files from a DAW to audio tracks and then import them into Audition; but, Audition cannot handle MIDI data.

    You add effects to several recordings to obtain the exact sound you need for TV, film, or the web. You can effortlessly integrate audio into other Adobe products if you have Adobe Creative Cloud. If you do not have Adobe CC, you may export the audio and import it into your preferred video editing program.

    Adobe Audition also comes packed with various sound effects that can be customized to suit your needs.

    Here are the key features found in Adobe Audition:

    • Wide range of tutorials online that cover a vast array of utilities
    • Easy to record audio and voice with just a few clicks of the mouse
    • Works perfectly with Adobe Premiere Pro
    • Real-time clip stretching for fast and efficient previews
    • Non-destructive editing at its best
    • Great plug-in support

    Adobe Audition

    Adobe is a complete sound recording and editing solution, and it’s the choice for most professionals.
    Free trial Visit Website

    Gilisoft Audio Recorder Pro

    With GiliSoft Audio Recorder Pro, you can record music from YouTube, Pandora, or any other streaming audio website, online radio programs, and parts of a movie. The recording result can be played on a PC, a portable mp3 player, or a car audio system.

    This streaming audio recorder connects directly to your sound card, allowing you to record any sound or music in near-perfect clarity.

    Record all voice conversations, including those with Skype, Yahoo Messenger, Google Talk, and other VoIP apps, and store them as wav, mp3, Ogg, or WMA files. It may record automatically (when you make a call or have a voice chat with any VoIP application) or manually. You may configure it to run automatically with Windows.

    Gilisoft Audio Recorder Pro provides advanced time-triggered recording, which allows you to plan recording for a website or anything else that runs on your desktop to begin or end at a certain time.

    Before starting a recording, you may use the recording preview function to preview the outcome using the specified audio recording device/source. It can work with more than one sound card (including a USB sound card).

    What makes it different is the predefined audio recording to aid the fast setup and management of recording parameters, recording schedule, and voice activation when there is no sound to record.

    Gilisoft Audio Recorder Pro

    A useful and reliable tool for recording sounds to MP3, AAC, M4R, or WMA audio files.
    Free trial Visit Website

    NowSmart Sound Recorder

    NowSmart Sound Recorder is an easy-to-use app to record other apps, web pages, and many more.

    You wish to record music from YouTube, Pandora, or any other streaming audio website, as well as online radio programs or the audio portion of a movie so that you can listen to your favorite audio material later – on a PC, a portable mp3 player, or your car’s audio system.

    Audio Record Wizard in Windows 7, 8, and subsequent versions have a new function that allows you to record both computer noises and speech at the same time. In other words, it can record both sides of a Skype or Google Talk discussion.

    Unfortunately, NowSmart Sound Recorder does NOT save recording history, but you can find previous recordings by clicking on Settings (the three dots) and then Open Storage Location.

    The app is free, and you can download it from the Microsoft Store.

    ⇒ Get NowSmart Sound Recorder

    Audacity

    Audacity is an open-source sound/audio editor that is both powerful and free. It also functions as a multi-track recorder.

    It can only record and play sounds and import and export Wav, AIFF, MP3, and OGG files.

    When these files are loaded, you may modify them by utilizing tools like cut, copy, and paste, combine multiple tracks, and apply various effects.

    Use Audacity if you have a music track, a narration track, and some sound effects that you wish to combine into a mixed soundtrack. That’s what it’s made for.

    Create a mashup of some of your favorite songs, and experiment with it to see what you can come up with.

    There are several options for removing background noise when recording. So it’s a wonderful recording program that’s simple to use and can be utilized in various creative ways.

    Audacity is fairly capable of doing tasks such as deleting vocals from music or vice versa.

    ⇒ Get Audacity

    Lucky Recorder

    Lucky Recorder is the right tool for you if you’re looking for a professional audio recording app. It features a simple and intuitive user interface.

    High-quality audio recording with an easy-to-use user interface and settings provides you with a clear sound if you want to Karaoke or record your voice when translating books and other media. You may export to file, upload to OneDrive, and email the file.

    This app can record meetings, lectures, personal notes, and more. If you need to listen to particular recording parts, you can always play back your audio files and share them.

    ⇒ Get Lucky Recorder

    Lexis Audio Editor

    Lexis Audio Editor is an audio recorder and editor with lots of features.

    You can create or edit audio files and then save them in multiple formats. Other features include normalizing, noise reduction, recording and importing into existing files, and a 10-band equalizer.

    You can also change the tempo, speed, and pitch, then save the recordings in mp3 (-320kb/s), wav (16 Bit PCM), WMA (-192kb/s), and m4a (-192kb/s).

    Furthermore, using the Cut, Copy, and Paste features, you may select which sections of a music file to record into an existing file. You may also import a voice or sound into an existing format, resulting in a mash-up of customized sounds.

    Perhaps some voice recordings do not require any background sound, allowing you to remove, insert silence, normalize noise reduction, and fade in and out to create the perfect speech.

    Lexis Audio Editor has a free version and a paid one, the only difference between them is that saving in mp3 format is only available in the paid version.

    ⇒ Get Lexis Audio Editor

    Windows 10’s built-in Voice Recorder

    Inside Windows 10, there used to have been two solutions for recording sounds or just your voice: the old Sound Recorder and the new, official app of Voice Recorder.

    Now you can only access Voice Recorder by typing voice recorder in Windows Search.

    The Voice Recorder app for Windows 10 is quite fun and incredibly simple. After recording your voice or the sounds around you, you can choose to play, trim, delete or rename the file.

    Start a recording or restart a previously paused recording with a single click, and autosaved recordings are saved to your Documents folder for convenient access.

    You may easily share your recordings with friends and family or transfer the recordings to other audio editing applications. Note significant moments in the recording, and have your best sounds saved for later use.

    The recordings are saved in the Voice Recorder app menu. On Windows 10, Voice Recorder has a brand-new interface that is much lighter and simpler than the one available on Windows 8.

    ⇒ Get Windows Voice Recorder

    How to record sound with Voice Recorder App on Windows 10?

    1. Press the Windows key, type voice, and select Voice Recorder.
      type voice recorder windows 10
    2. Click the Microphone icon at the middle to start recording.
      microphone
    3. To pause or stop the recording, click the Pause or Stop icons respectively.
      stop
    4. Finally, to edit your recordings, use the tools in the bottom right corner of your screen.tools voice recorder windows 10

    Those are the simple steps to follow to record with the built-in app on Windows 10

    That’s it for our list of the best sound & voice recording apps for Windows 10. We hope that you found the perfect tool that you were looking for.

    If you have any other suggestions or questions, don’t hesitate to leave them in the comments section below, and we’ll be sure to check them out.

    Why is Xbox Mic Quiet? Here’s How to Fix & Make it Louder

    Xbox One is a great console, but many users reported that Xbox mic very quiet during gaming sessions. This isn’t the only issue, and many reported that Xbox is unable to find mic, but we covered that one in a separate guide.

    Fixing this issue is relatively simple on your Xbox, so let’s go ahead and do that.

    Why is my mic so quiet when I talk on Xbox?

    There are several reasons for this issue, and they usually fall into the following categories:

    • Hardware issues – If your device is damaged or not properly connected, you can experience this problem.
    • Profile settings – Your settings can prevent you from communicating with others, or make you unable to add friends on Xbox One.

    How to turn up mic volume on Xbox?

    Before we start fixing this issue, there are a few preliminary checks you can perform:

    • Check the hardware – Inspect the headset and its cord for any damage. Make sure that the connector is clean. Make sure that the headset is properly connected to your controller. If you can, try the headset on a different Xbox device.
    • Check for updates – Ensure that both your console and controllers are up to date.
    • Inspect the batteries – Check the batteries and make sure they are fully charged. Also, check if they are set properly in place.
    • Compatibility – Make sure that the headset is compatible with Xbox One.

    1. Test your Xbox One chat headset

    1. Sign in to Xbox Live on your Xbox One console
    2. Press the Xbox button to open the guide.
    3. Select Start a party (Note: You do not need to invite anyone for this test)
    4. Make sure the volume is turned up.
    5. Speak into the microphone.

    If your headset is working, you will see the ring around your avatar light up.

    2. Use Skype to test the headset

    1. Sign in to your account.
    2. Select the Skype app.
    3. Choose People, and then select the Skype Test Call contact.
    4. Select Voice call and Skype will try to connect your voice call.
    5. The call will ask you to speak into the mic and will repeat what was heard.

    3. Adjust the microphone volume

    1. Press the Xbox button.
    2. Navigate to System and then select Audio.
    3. Set Mic monitoring to a higher value.

    4. Change to Energy saver

    1. Open Xbox One’s settings and navigate to Power and Startup. Select Power mode.
    2. Set Power mode to Energy saving.
    3. Save changes.

    5. Check Xbox profile settings

    1. Press the Xbox button on your controller.
    2. Select Settings and then All Settings from the list of options.
    3. Go to Account using the left navigation pane and choose Privacy and online safety.
    4. Select Adult defaults and click on View details and customize.
    5. In Communicate with voice and text, select Specific friends or Everybody, depending on who you want that profile to talk to.


    6. Check mic through Sign in

    1. Go to the Home of Xbox One.
    2. Navigate to the Sign-in.
    3. Select Choose this person.
    4. After selecting the person which you have already created in Xbox, check your mic after joining any party

    7. Power cycle your Xbox

    1. Press the Xbox button on your controller for a few seconds to turn off the controller completely without removing the headphones.
    2. Press the Xbox button on Xbox One to turn it off.
    3. After all the modules are turned off, take out the power cable of Xbox One.
    4. Leave everything as it is for approximately 5 minutes.
    5. Turn everything back on and check if your mic is working properly.

    This isn’t the only issue and many reported that their Xbox One headset microphone isn’t working at all, but we covered that problem in a separate guide.

    In case you’re still dealing with this issue, you can use Microphone monitoring to test your microphone.

    Did any of these solutions help you solve your problem and now the mic works properly? Please let us know your thoughts on this in the section below.

    How to Fix GPU Memory Leak Issues for Windows Games

    Memory leak issues are not entirely uncommon on Windows PCs. When there’s a memory leak, software packages utilize excessive memory. Different types of memory leaks can arise for standard system RAM and graphics cards’ VRAM. Such leaks can have a notable impact on PC performance.

    What’s VRAM?

    VRAM (Video Random Access Memory) is a specific type of graphical RAM for temporarily storing graphics data. Dedicated graphics cards have their own VRAM for handling advanced graphics. Some NVIDIA and AMD graphics cards (GPUs) boast up to 16 GB VRAM.

    What are GPU memory leaks?

    A GPU memory leak is one that more specifically pertains to graphics cards’ VRAM. Such leaks typically arise because games and other graphics-intensive software don’t correctly release memory. Consequently, VRAM utilization can reach up to, and even eclipse, 100 percent for affected programs.

    Such GPU memory leaks most commonly arise for Windows games, which are the most graphics-intensive software. When games utilize almost all available VRAM, notable frame rate drops can occur. Such frame rate drops result in stuttering and slow gameplay.

    In the worst cases, GPU memory leaks can crash games. For example, the Out of video memory error is a widely reported one for games. When that issue arises, games crash when starting; and the error message shown directly below pops up.

    Out of vide memory error gpu memory leak

    Such issues will more commonly arise on PCs equipped with lower-specification graphics cards. The less VRAM a graphics card has, the more likely games will outstrip available VRAM when GPU leaks occur. Therefore, lowering graphical settings can often reduce the impact of GPU memory leaks.

    If you ever need to fix a GPU memory leak for a game, various potential solutions might help reduce the excessive VRAM utilization. These are some of the more proven resolutions for fixing VRAM memory issues.

    How can I fix GPU memory leaks in Windows?

    1. Reduce in-game graphical settings

    1. Launch the game the GPU memory leak occurs for, and open the graphics or video settings tab for the game.
    2. Select a lower general graphical preset setting than the current one.
    3. If you can’t find any general graphics preset setting, manually lower the resolution, texture, FPS, and shadow graphical options instead.
      Graphics preset options gpu memory leak
    4. Thereafter, make sure you save the settings.

    This resolution is primarily for fixing GPU memory leaks that don’t crash games. When a game doesn’t start up because of a VRAM issue, try adjusting graphical settings outside it as outlined in the next resolution.

    2. Reduce your graphics card’s graphical settings

    NVIDIA

    1. Open the NVIDIA Control Panel app.
    2. Next, click the Adjust image settings with preview.
    3. Select the Use my preference emphasizing quality radio button.
    4. Now drag the bar’s slider to the left performance end.
    5. Click Apply to save the new graphical settings.

    AMD

    1. Right-click the desktop and select AMD Radeon Settings.
    2. Select the Gaming tab, then click Global Settings.
      Global Graphics settings gpu memory leak
    3. Next, select Performance for the Texture Filtering Quality option.
    4. Lower the Frame Rate Target Control setting.
    5. Turn off the Vertical Refresh and Anisotropic Filtering Mode settings if any are enabled.
    6. Select the Apply option to confirm the new settings.

    3. Run Steam games on DirectX 12

    1. Open the Steam app.
    2. Select Library at the top of Steam’s window.
    3. Right-click a game in your library you need to fix a GPU memory leak for and select Properties.
    4. Press the Set Launch Options button.
    5. Type the following in the text box: -force-d3d12
    6. Then click the OK button.
    7. Thereafter, restart Steam to start the game, which will now run with a DirectX 12 configuration.

    You can also adjust in-game DirectX settings for many games. If you don’t need to fix GPU memory leaks for Steam games, try selecting DirectX 12 via in-game graphical options.

    4. Increase virtual memory allocation

    1. Click the Start button, type advanced system settings and click View advanced system settings.
    2. Press the Settings button to bring up a Performance Options window.
    3. Select the Advanced tab, then click the Change button.
    4. Deselect the selected Automatically manage paging file size for all drives checkbox and click the Custom radio button.
    5. Enter the value 12000 within the Initial box, then input the value 30000 in the Maximum box.
    6. Click the Set button and restart your desktop or laptop when prompted to do so.

    5. Update your graphics card’s driver

    1. First, right-click the Start menu button to select Device Manager.
    2. Click on Display adapters to open that category, right-click your adapter and select Update driver.
    3. Then select the Search automatically for drivers option to initiate a search. Windows might detect and install a new graphics card driver.

    However, the Update Driver utility isn’t always entirely reliable for updating drivers. So, it might also be worth running a scan with a third-party driver updater utility.

    This driver updater software will better identify if your graphics card has an outdated driver and enable you to update it. Plus, due to its automatic scanning feature, it will notify you when your drivers go out of date.

    ⇒ Get Fortect Driver Updater

    6. Clean-boot Windows

    1. Press the Windows key + R to start the Run console, type msconfig and press Enter to launch the System Configuration applet.
    2. Click the Selective startup option.
    3. Uncheck the Load startup items checkbox, select the checkboxes for Load system services and Use original boot configuration if those options aren’t selected.
    4. Click Services to switch to that tab, click the Hide all Microsoft services option and choose Disable all.
    5. Press the Apply and OK to close the MSConfig utility.
    6. Select Restart on the dialog box that opens.

    If your graphics card has only a small amount of VRAM, it might be a good idea to get a new graphics card. GPU memory leaks aren’t necessarily hardware issues, but a graphics card will less likely run out of VRAM for games when it has more of it. However, give the resolutions above a try first. You may also want to read the related article on shared GPU memory in Windows 11.

    The potential resolutions above might make games’ GPU memory leaks arise for somewhat more playable. To resolve standard system RAM leaks for software, check out our Memory leaks in Windows 10 guide.

    Black Box on Mouse Pointer: 5 Ways to Get Rid Of It

    Some users reported a black box on mouse pointer, and it seems that this issue appears if your mouse cursor is corrupted.

    This is an annoying issue, and in today’s guide we’re going to show you how to properly fix it.

    Why does my Mouse pointer have a black square?

    This is an annoying issue, and it’s usually caused by the following:

    • Outdated drivers – If your graphics drivers are out of date, you might encounter glitches. Therefore, it’s advised to update your graphics drivers.
    • Mouse settings – In order to fix this issue, sometimes you just need to change mouse settings on your PC.

    How can I fix black box on mouse pointer?

    1. Select the None mouse pointer scheme option

    1. Press the Windows key + S and type pointer. Select Change the mouse pointer display or speed.
    2. Select the Pointers tab.
      Pointers tab black box on mouse pointer
    3. Then select the (None) option on the Scheme drop-down menu. Press the Apply button to save the new settings.

    2. Select the Enable pointer shadow setting

    1. Press the Windows key + S and type pointer. Now select Change the mouse pointer display or speed.

    2. Go to the Pointers tab and check Enable pointer shadow.
    3. Lastly, click Apply and OK to save changes.

    3. Adjust the mouse pointer’s size

    1. Press the Windows key + I to open the Settings app.
    2. Next, navigate to Ease of Access.
    3. Select the Mouse pointer from the left pane. After that, drag the slider on the Change pointer size bar to the far right to select an extra-large setting.
    4. Thereafter, close and then reopen the Mouse pointer tab in Settings.
    5. Then drag the Change pointer size bar’s slider to its original setting or one of preference.

    4. Update your graphics card’s driver

    1. Press the Windows key and X at the same time. Next, click the Device Manager menu shortcut.
    2. Double-click the Display adapters category in Device Manager.
    3. Right-click your PC’s listed graphics card and select Update driver.
    4. Click the Search automatically for drivers option. The Update Drivers utility might then download and install the latest driver for your graphics card.

    Note that the Update Drivers utility in Windows doesn’t always update drivers even when there are more recent ones available. So, it’s usually better to update drivers with third-party driver updater software.

    ⇒ Get Outbyte Driver Updater

    5. Disable the WDDM graphics display driver for Remote Desktop Connections policy

    Note icon NOTE
    Windows 10 Home edition does not include Group Policy Editor.
    1. Press Windows key + R and type gpedit.msc. Next, press Enter.
    2. Then click Computer Configuration within Group Policy Editor’s window.
    3. Expand Administrative Templates to select Windows Components.
    4. Select the Remote Desktop Services component. After that, navigate to Remote Desktop Session Host.

    5. Next, go to Remote Session Environment on the left side of Group Policy Editor. Finally, double-click on Use WDDM graphics display driver for Remote Desktop Connections.
    6. Click the Disabled radio button. Select the Apply and OK..

    Those are some of the potential resolutions for fixing black boxes around cursors users have confirmed to work.

    We hope this guide helped you get your mouse cursor back. What other solutions did you try? Let us know in the comments below.

    5 Best Oversize Light Up Gaming Mouse Pads for Your PC

    A quality gaming mouse pad is a must, and many are looking for the best oversize light up gaming mouse pad.

    These types of pads can really enhance your gaming setup, and in today’s guide, we’re going to show you the best models to choose from.

    Are larger mouse pads better?

    It comes down to personal preference, but larger mouse pads do have a couple of benefits:

    • More space – The obvious benefit of larger mouse bad is more space for your gaming keyboard and mouse.
    • Better sensitivity – If you’re using your mouse in low DPI mode, you will benefit from more space on your desk.

    What is the best oversize light up gaming mouse pad?

    Gerlos Gaming Mouse Pad – Best overall

    • 31.5×11.8 inches
    • 12 different lighting modes
    • Non-slip rubber base
    • Waterproof surface
    • Mouse drag issues for some users

    This gaming pad comes with 12 different lighting modes, 3 dynamic and 9 static, so you can always find the perfect color that matches your gaming environment.

    The pad is made of high-elastic natural rubber, and with a non-slip rubber base, it will sit firmly in place during the most intense gaming sessions.

    The top comes with a smooth and waterproof surface, so it will be able to sustain accidental spillage. Regarding the size, it measures 31.5×11.8 inches, so it’s perfect for any keyboard and mouse.

    You can connect the mouse pad to the PC via a USB port, and adjust the color and brightness level with a press of a button.

    Overall, it’s a great mouse pad, and if you’re looking for an extra large one, this is the perfect model to get.

    Razer Goliathus– Works great with other Razer devices

    • Amazing Razer Chroma lighting
    • It includes a built-in cable catch for mouse cable
    • Users can enable color synchronization across Razer devices
    • Available with alternative black, pink, and mercury white color schemes
    • Its one USB port is restricted to RGB lighting only

    Razer is renowned for its top-notch gaming products. The Razer Goliathus mouse pad is yet another top-notch gaming peripheral from Razer. This pad measures about 36.2 x 11.6 inches and features a well-balanced micro-textured surface that provides very precise tracking.

    The Goliathus incorporates advanced lighting effects that are a hallmark of Razer peripherals. This pad is powered by the Razer Chroma software that enables dynamic RGB lighting effects with 16.8 million colors. Its users can adjust brightness and apply quick and advanced RGB effects.

    This mouse pad’s Razer Chroma lighting effects can even integrate with some AAA games. For supported games, it has responsive lighting effects that respond to in-game events like explosions. Those integrated lighting effects for supported games are certainly a notable mouse mat novelty.

    Beyond its fancy lighting effects, Chroma also has a non-slip base like the LUXCOMS RGB Soft Gaming Mouse Pad. Thus, this is another grippy pad that stays very firmly in place without any slipping about.

    SteelSeries QcK Prism XL Gaming Surface – Highly customizable lighting

    • Its stitched edges prevent pad peeling
    • High-quality surface with a smooth feel
    • This pad works well with both high and low DPI (dots per linear inch) mouse settings
    • Nice RGB lighting novelties
    • It’s a bit pricey

    The QcK Prism XL Gaming Surface is an intuitive mouse pad with some notable novelties. Its XL size is a 35.4 x 11.8-inch pad. However, the QcK Prism XL Gaming Surface also has a desk-size pad that measures a whopping 63 by 31.5 inches, which is surely too big (and pricey) for most users.

    This is a mouse mat with top-notch tracking precision for both optical and laser mice. Therefore, it gives you maximum control over action-packed games.

    Most of the QcK Prism XL Gaming Surface’s novelties are based on 2-zone RGB backlighting. With its Engine Apps, you can set up lighting effects for Discord Chat notifications and in-game alerts. The Audio Visual Engine App even enables you to set up visual shows with lights dancing to music beats.

    QcK Prism XL Gaming Surface is also PrismSync gear. That means you can sync the mouse pad’s lighting effects with those of other PrismSync devices. You can coordinate the pad’s lighting effects with illuminated PrismSync headsets, keyboards, and mice.

    Thermaltake Gaming Mouse Pad – Works with other Thermaltake products

    • Advanced RGB lighting options
    • Its lighting effects sync with products of the Thermaltake and Razer Chroma ecosystems
    • Durable stain-resistant design keeps the pad clean and fresh
    • An anti-slip base keeps the pad firmly in place
    • Pricey

    The Thermaltake Level 20 Extended Gaming Mouse Pad is a flashy and durable mouse mat that’s built to last. It measures 35.4 x 15.8 inches, which makes it the same size as the QcK Prism XL Gaming Surface. If you want a luxurious mouse pad, then this is the one for you.

    This mouse pad is more durable than most because of its stain-resistant design. It also has a stitched perimeter that ensures the pad doesn’t peel and wrap around the edges.

    However, the Level 20 Extended Gaming Mouse Pad’s advanced RGB lighting is what really elevates it above most others. With its iTake software, users can set up six different lighting profiles with a range of effects. Users can also adjust color, speed, and intensity variables for modes.

    Furthermore, the Level 20 Extended Gaming Mouse Pad is TT RGB Plus compatible. As such, users can sync the mouse pad’s lighting with other Thermaltake products. Thermaltake keyboards, headsets, mice, liquid coolers, and gaming desks are among the other TT RGB Plus compatible devices.

    The Level 20 Extended Gaming Mouse Pad also supports Amazon Alexa for audio controls. With Alexa, users can control the mouse pad’s lighting by issuing voice commands.

    Tilted Nation RGB Gaming Mouse Pad – Requires no configuration

    • 31.5 x 11.8 inches
    • 7 static colors and breathing mode
    • Waterproof and smooth surface
    • Easy to use
    • Doesn’t have a dedicated app

    If you need a gaming pad for your keyboard and mouse, you’ll be pleased to hear that this model measures 31.5 x 11.8 inches.

    Regarding the lighting, you can choose between 7 static colors and a breathing mode. The surface of the pad is smooth, so you won’t experience any mouse dragging while using it.

    The pad is made from neoprene, so it can withstand intensive mouse action without issues. It’s worth mentioning that this mouse pad is waterproof, so you won’t have to worry about accidental spillage.

    Tilted Nation RGB Gaming Mouse Pad comes with a braided cable and a power button that you can use to easily adjust the lighting. It’s simple to use and a great choice for any gamer.

    We hope that this guide helped you find the best oversize light up gaming mouse pad. Those are expansive mouse pads with some great lighting effects and other novel features to boot.

    If you need something more professional, consider these aluminum mousepads for your work PC.

    What’s your mouse pad of choice? Let us know in the comments below.

    More Xbox games are now officially supported on Steam Deck with latest update

    Steam OS 3.4 is now available for Steam Deck, bringing with it a number of stability, performance and security improvements.

    Some of the more intriguing improvements are changes to Steam Deck’s desktop mode, KDE Plasma. These include,

    • Widget upgrades
    • New touchscreen gestrures
    • New themes and wallpapers
    • New Overview view displaying all open windows and virtual desktops

    Other improvements include the addition of an eject option for removable drives (this unmounts the removable drive, though it does now physically eject it). TRIM is also re-enabled for the internal drive to improve writing performance.

    Also, another 16 Xbox games are now classed as either “verified” or “playable” with the latest Steam Deck update. Note these games aren’t necessarily new to the platform; some were added to these lists in previous updates.

    Verified

    • Deathloop
    • Pentiment
    • DOOM Eternal
    • Dust: An Elysian Tail
    • New Super Lucky’s Tale
    • Ms. Splosion Man

    Playable

    • Halo Infinite
    • The Elder Scrolls V: Skyrim
    • Forza Horizon 4
    • Fallout 4
    • State of Decay 2
    • Tell Me Why
    • Quake Champions
    • Fable – The Lost Chapters
    • ReCore: Definitive Edition
    • LocoCycle

    Desktop Icons Not Showing: How to Get Them Back

    Windows 10 is a stunning OS with a series of excellent features. However, it is not a perfect machine, with many users reporting that the desktop icons are not showing.

    This can be frustrating, but it is not an issue that is unheard of, just like the desktop icons blank issue. You can quickly fix it by applying the solutions in this detailed guide.

    Why did my icons disappear from my desktop on Windows 10?

    • Improper settings can sometimes cause your desktop icons to disappear from your PC.
    • In some instances, third-party applications can cause this problem and cause icons to go missing.
    • Your icon cache might be damaged or corrupted, and that’s what’s causing the issue.
    • Issues with a second monitor can cause glitches with desktop icons to appear.
    • Minor problems with the Windows Explorer process can make icons disappear.

    What can I do if my desktop icons are not showing?

    1. Make sure the Show Desktop icons feature is enabled

    1. Right-click on the empty area on your desktop.
    2. Choose View and select Show desktop icons.
      show view
    3. Try checking and unchecking Show Desktop icons option a few times, but remember to leave this option checked.

    If the Windows 11 desktop icons are not refreshing, read this dedicated guide to sort it out.

    2. Change the Desktop icon settings

    1. Click the Start button and select Settings.
    2. Choose Personalization.
    3. Go to Themes from the left pane, then scroll down on the right and click on Desktop icon settings.
    4. Now, select the icons you want to see on your desktop, then click on Apply and OK to make the changes.
    5. If you are here, you may also uncheck the Allow themes to change desktop icons box but this will only apply to their appearance on the screen.

    3. Rebuild the icon cache

    1. Press the Windows key + E to launch File Explorer and click the View tab at the top.
    2. Check the box for Hidden items to display hidden files and folders.
      view hidden desktop icons not showing
    3. Now, navigate to the path below: C:\Users\(User Name)\AppData\Local
    4. Right-click on IconCache.db and select Delete.
      delete
    5. Next, go to the Recycle Bin and empty it.
    6. Finally, restart your computer.

    One of the most common tweaks when resolving the missing desktop icons on Windows 10 is rebuilding the cache. It is always effective in fixing these issues. So, you should try it.

    4. Disable the tablet mode

    1. Press the Windows key + I to open Settings and select System.
      system
    2. Choose Tablet from the left.
    3. Now, click the dropdown under When I sign in and select Never use tablet mode.
      never desktop icons not showing

    One of the factors that make the desktop icons not toshow properly on Windows 10 is the tablet mode. Users have been able to fix this issue simply by disabling this feature. So, you should try it too.

    Although it may sound banal, it’s quite possible you overlooked this. So, to be sure, check if your Desktop icons are set to appear once again.

    5. Run explorer.exe

    1. Press the Ctrl + Shift + Esc keys to open Task Manager.
    2. Right-click the explorer.exe or Windows Explorer process under the Processes tab and select the End task button.
      end-task
    3. Now, click the File option at the top left and click Run new task.
      file desktop icons not showing
    4. Type explorer.exe in the box, and then proceed to click OK.
      explorer.exe

    The explorer.exe process is important for smoothly running your apps and processes. If it is a problem, your desktop icons might not be showing on Windows 10. The solution here is to restart the program.

    6. Move the desktop folder from OneDrive

    1. Press the Windows key + E to open File Explorer.
    2. Click the OneDrive folder in the left pane.
      onedrive
    3. Now, double-click the Desktop folder and copy its contents.
    4. Finally, select the Desktop option in the left pane and press the Windows key + V to paste them into the folder.
      desktop

    Sometimes, your PC might get too clever and move all the contents of the Desktop to OneDrive. This can be why your Desktop icons are not showing on Windows 10. The solution to this is to copy the contents out.

    7. Disable the second monitor

    1. Right-click on a free space on your desktop and select Display settings.
    2. Look for the Multiple displays option, click on the drop-down menu, and select Show only on 1, where 1 is your main display.
    3. You may also simply disconnect the second display.

    If you’ve used a dual monitor setup before, desktop icons may be set to appear on the second monitor. So, disable the second monitor if you’re not using it, and repeat solution 4.

    Your icons should appear again.

    8. Perform a system restore

    1. Press the Windows key + R, type rstrui.exe, and click OK.
      rstrui desktop icons not showing
    2. Click the Next button on the window that pops up.
      next
    3. Now, select a restore point and click the Next button.
      restore point desktop icons not showing
    4. Finally, click the Finish button to confirm the action and follow the onscreen instruction.
      finish

    If you noticed that your icons are missing after making some changes to your PC, you need to restore your device to when everything is working well.

    With this, we can conclude this guide on how to fix your desktop icons if they are not showing on Windows 10. All you need to do now is to follow the instructions to the letter, and things should be back to normal.

    Still, on icons, you may want to get rid of the shortcut arrows in Windows 11 so check out our guide on how to do it.

    If your Desktop icons are flashing, you can check our detailed guide dedicated to the issue to fix it quickly. Also, find out how to save the desktop layout and restore it anytime.

    In the comments below, let us know the solution that helped you fix this issue.

    Fix the System Application Force Next 0007 Error

    Getting errors displaying your content [system_application_force_next_0007] when using Azure can be frustrating. However, to solve the problem, you need to understand what caused the error.

    This guide will outline the reasons behind the error and potential fixes to resolve the issue. 

    What causes the error displaying your content [system_application_force_next_0007] on Azure?

    There could be various reasons behind the error in displaying your content on Azure. Some of the popular ones are mentioned above: 

    • Incorrect configuration of your application or service – If the configuration of your application or service is not correct, then you might see the issue.
    • Network or connectivity issues – If your internet connection is weak, then you might face this issue. Check your connection or talk to your ISP to speed it up.
    • Outages in Azure platform –  If the Azure platform is experiencing outages or is under maintenance, you can face this problem.
    • Bugs or compatibility issues –  If the service or application has compatibility issues or bugs, it could come up with this error.

    What can I do to fix the error displaying your content [system_application_force_next_0007] on Azure?

    Tip icon Tip
    The fixes mentioned below work for other errors, including Error loading extension and definition, and the RPC channel Microsoft_Azure_Marketplace was terminated for an unknown reason.

    Before engaging in advanced troubleshooting steps, you should consider performing the following checks:

    • Check your internet connection
    • Try to use Azure on a different browser.
    • Remove adblocker extensions from your browser before logging in to Azure.

    If these don’t help your case, follow the below-mentioned troubleshooting steps to resolve the error.

    1. Check Azure status 

    1. Launch your preferred browser.
    2. Go to the Azure status page.azure-status -error displaying your content azure
    3. You will see the platform’s status here if an outage or maintenance occurs.

    2. Check the logs of application or service

    1. Login to Azure.
    2. Go to the app’s page on the portal.
    3. From the left menu, go to the Monitor tab.
    4. Select the Logs option.view-activity-log
    5. You can use filters for a specific resource type, resource group, and time range for the logs you want to view on the Logs page. You can also search for particular entries using the search box.

    3. Check your application or service’s configuration 

    1. Go to the Azure portal.
    2. Sign in with your Azure account.
    3. Select the app or service you want to view the configuration from the left menu.
    4. Now, from the resource page, select the Configuration tab. This will display the current configuration settings for the web app or service.open-general - Error displaying your content Azure
    5. Check the connection strings, environment variables, and other settings and modify them.

    4. Check for updates or patches for your app or service

    1. Go to the Azure portal and sign in to your Azure account.1-all-services -error displaying your content azure
    2. Select the All services link from the left menu, go to the Administration section, and select Updates.
    3. On the Updates page, under the Resource provider section, you will get updates for the resource providers with State Available.Updates available
    4. If an update is available, you will see a notification. Alternatively, you can click on Check for updates button from the top menu.

    5. Contact Azure support

    If nothing has worked for you so far, it is advised to contact Microsoft Azure Support for assistance. Explain to them the situation, and all the steps you have performed, so that they can better understand the problem.

    So, these steps can be used to resolve errors displaying your content on Azure. Try them and let us know which worked for you in the comments below.

    Excel SUM Formula Not Adding Correctly: How to Fix

    As a spreadsheet application, Excel is one big calculator that also displays numeric data in tables and graphs. The vast majority of Excel users will need to utilize the application’s SUM function (or formula). As the SUM function adds numbers up, it’s probably Excel’s most widely utilized formula.

    The SUM function will never miscalculate numbers. However, SUM function cells don’t always display the expected results.

    Sometimes they might display error messages instead of numeric values. In other cases, SUM formula cells might just return a zero value. These are a few ways you can fix an Excel spreadsheet not adding up correctly.

    Why is the Excel SUM formula not adding correctly?

    There are several reasons why the SUM formula in Excel might not be adding correctly. Some possible causes include:

    • The formula is using the wrong cell references: Make sure you are using the correct cell references in your formula, and that the cells being referenced are actually part of the data you want to sum.
    • There are hidden rows or columns that are being included in the calculation: If you have hidden rows or columns in your data, make sure they are not being included in the calculation by accident. You can check this by looking at the cell references in the formula and seeing if they include any hidden cells.
    • There are cells with text or errors in them: If there are cells in the range being summed that contain text or errors, the SUM formula will not work correctly. You can fix this by making sure all cells being summed contain only numerical data.
    • The cell format is set to text: If the cell format is set to text, the SUM formula will not work correctly. You can fix this by selecting the cells you want to sum, and then going to the Home tab in the ribbon and clicking on the “Number” dropdown in the “Number” group. Choose “General” or another number format from the list.
    • The formula has been entered incorrectly: Make sure you are using the correct syntax for the SUM formula, including the equal sign (=) and the open and close parentheses.

    How can I fix Excel SUM functions that don’t add up?

    1. Check the syntax of the SUM function

    First, check you’ve entered the SUM function in the formula bar with the right syntax.

    The syntax for the SUM function is:

    =SUM(number 1, number 2)

    Number 1 and number 2 can be a cell range, so a SUM function that adds the first 10 cells of column A will look like this: =SUM(A1:A10). Make sure there are no typos of any description in that function that will cause its cell to display a #Name? error as shown directly below.

    #NAME? cell error excel spreadsheet not adding up correctly

    2. Delete spaces from the SUM function

    The SUM function does not add up any values when there are spaces in its formula. Instead, it will display the formula in its cell.

    To fix that, select the formula’s cell; and then click in the far left of the function bar. Press the Backspace key to remove any spaces before the ‘=’ at the beginning of the function. Make sure there aren’t spaces anywhere else in the formula.

    Function with spaces in it excel spreadsheet not adding up correctly

    3. Widen the formula’s column

    If the SUM formula cell displays #######, the value might not fit within the cell. Thus, you might need to widen the cell’s column to ensure the whole number fits.

    To do that, move the cursor to the left or right side of the SUM cell’s column reference box so that the cursor changes to a double arrow as in the snapshot directly below. Then hold the left mouse button and drag the column left or right to expand it.

    Narrow spreadsheet column excel spreadsheet not adding up correctly

    4. Remove text formatting from cells

    The Excel SUM function will not add up any values that are in cells with text formatting, which display text numbers on the left of the cell instead of the right side. To ensure all cells within a SUM formula’s cell range have general formatting. To fix this, follow these steps.

    1. Select all the cells within its range.
    2. Then right-click and select Format Cells to open the window shown directly belowFormat Cells window excel spreadsheet not adding up correctly
    3. Select General in the Category box.
    4. Click the OK button.
    5. The cells’ numbers will still be in text format. You’ll need to double-click each cell within the SUM function’s range and press the Enter key to switch its number to the selected general format.
      Cells with text format excel spreadsheet not adding up correctly
    6. Repeat the above steps for the formula’s cell if that cell displays the function instead of a value.

    5. Select the Add and Values Paste Special options

    Alternatively, you can add values in cells with text formatting without needing to convert them to general with this trick.

    1. Right-click an empty cell and select Copy.
    2. Select all the text cells with the function’s cell range.
    3. Click the Paste button.
    4. Select Paste Special to open the window shown directly below.Paste Special window excel spreadsheet not adding up correctly
    5. Select the Values and Add options there.
    6. Click the OK button. Then the function will add the numbers in the text cells.

    Those are a few of the best ways you can fix Excel spreadsheet formulas that aren’t adding up correctly.

    In most cases, the SUM function doesn’t add up because it hasn’t been entered right or because its cell reference includes text cells.

    If you know of any other way to fix this Excel-related issue, leave a message in the comment section below so other users can try it.

    Best Audio Drivers for Windows 10 + Setup Tips & Tricks

    Whether you’re getting ready to join a meeting or dive into a new PC game, having a reliable audio driver installed on your Windows system is essential. Without it, your sound might not work properly—or at all. If you’re unsure which audio driver is best for your setup, don’t worry—this guide has you covered.

    We’ll walk you through the best audio driver available for Windows, along with clear steps on how to download and install it. Let’s get started!

    relatek hd audio manager user interface

    Realtek Audio Drivers are the best free audio drivers available for your Windows 10 PC. They provide high-quality audio on a computer.

    These drivers are typically offered by motherboard or computer OEMs.

    They allow the computer to communicate with audio hardware on the motherboard. You can install the latest version of audio drivers from the manufacturers’ website, the Realtek website, or via dedicated updaters.

    More about Realtek HD Audio Driver

    • License available for free
    • The latest version available – is 6.0876.1
    • File size – 72.6 MB

    ⇒  Get Realtek HD Audio Drivers here

    ASIO driver for Windows

    This free universal audio ASIO driver for Windows can be downloaded from the ASIO4ALL website.

    This driver is designed to work with a wide range of audio devices.

    Music producers and audio professionals popularly use it because it provides low latency audio performance and support for advanced audio features. 

    More about ASIO4ALL

    • Available for free
    • Latest version available – 2.15
    • File size – 311 KB

    ⇒  Get ASIO4ALL Audio Drivers here

    Jack Audio

    jack audio

    Jack Audio Connection Kit offers professional-level audio features. It also includes a driver for Windows 10 that excels in low-latency audio and MIDI routing.

    It is designed for users who need advanced audio management capabilities, enabling complex setups and flexible routing of audio signals between multiple applications.

    More about Jack Audio:

    • Routes audio and MIDI between applications
    • Minimal audio delay
    • Customizable

    ⇒ Get Jack Audio

    How can I download and install an audio driver on Windows 10?

    1. Use the Device Manager 

    1. Press Windows + R to open the Run window. Device Manager RUN COMMAND
    2. Type devmgmt.msc and hit Enter to open Device Manager. 
    3. Go to Sound, video, and game controllers, right-click Realtek ® Audio and select Update driver.Update audio driver 
    4. Now on the next screen, select Search automatically for drivers.Update driver - Download an d install audio driver windows 10
    5. Click Search for updated drivers on Windows Update.Update driver - Best Audio drivers for Windows 10
    6. Go to Advanced options.Advanced options
    7. Under Additional options, click Optional updates. optional
    8. If there is any update available, click Download and Install. 

    A simpler method to update your drivers is to employ the help of a professional driver updater and let the software do all the work for you.

    2. Use the device manufacturer’s website

    1. Go to the device manufacturer’s website. Here we are using HP to demonstrate the process. Next, head to the HP support page.
    2. Go to the Software and Drivers tab, and then select your product.Hp customer support page audio driver download install Windows 10
    3. Click Let HP detect your product. Then, click OK on the prompt.Hp customer
    4. Select your device and the Windows OS version, then click Submit.Software and drivers
    5. Now click All drivers to expand. 
    6. Expand Driver-Audio and if there is an update, click Download.All drivers
    7. Double-click the .exe installation file to install it.
    8. Follow the on-screen instructions to complete.

    So, this is it! Now you know about the best audio drivers for Windows 10 and the methods to download and install the best drivers on your x64-bit Windows 10 computer.

    And if you’re interested in troubleshooting more audio-related issues, check out our guide on the Windows USB audio driver. You can also learn how to fix the generic audio driver problem or restore the Realtek HD Audio Manager if it’s missing

    If you find installing audio drivers manually time-taking, you can get a reliable third-party app to get the latest compatible drivers on your computer. Try these steps and let us know which worked for you in the comments below.

    How to Disable Analyze in Excel in Power BI: 3 Easy Steps

    There are many situations in which you don’t want users to download or export data from Power BI. Many people try to find this option in this tool but to no avail.

    Also, the problem is pretty heavy, since it’s all about protecting your data.

    One user opened a thread on the official forum:

    We are about to launch a Power BI Dashboard to external users and I have just realised that they will be able to use Analyse in Excel. It is not ideal that they can use Export but having external users being able to use Analyse in Excel gives them far to much access to the data and will mean that we would not be able to laucnh. Does anyone know if there is a way to turn this off?

    So, since this is a great feature to work with, the user wants to disable Analyse in Excel only for external users, but not for internal ones.

    Power BI Service has this option but is not so apparent at first sight. For that reason, we offer you an easy and approachable method to do it on your PC.

    How do I disable Analyze in Power BI Excel?

    1. Go to the Admin portal.
    2. Click on Tenant settings.
    3. Turn off Export data and Allow users to use Analyze in Excel with on-premises datasets.power bi disable analyze in excel

    Although this method solves the problem, it disables a part of Power BI that the OP planned to use for internal users. So, the option is far too blunt for some people.

    ? Why is Analyze in Excel greyed out?

    The Analyze in Excel option can be greyed out in the PowerBI apps because the Export data is disabled or the feature is not enabled by the tenant at all.

    You can get in contact with your tenant or organization admin to make sure the feature is enabled in PowerBi, thus solving this problem.

    ? How do I enable Excel Analyze in Power BI?

    The method is quite straightforward so you only need to enable the Export data option in the PowerBi interface.

    To do that, go to File > Options and Settings > Options. Under the Current file, go to Report settings and click on Allow end users to export summarized data option.

    That’s it! You should now be able to use the Analyze in Excel functionality with no issues.

    Conclusion

    As we said at the beginning of this article, Analyze in Excel poses a severe problem regarding data protection. Moreover, disabling this function looks more like a workaround than a solution.

    For quite a few users, it is necessary to preserve Analyze in Excel for some operations.

    Nonetheless, the option to disable the feature is there. Now, Microsoft will only need to twitch it just a little bit.

    Was our method helpful? Do let us know in the comment section below!

    Plugable USB Bluetooth 4.0 not Working: 4 Best Fixes

    If you notice your pluggable USB Bluetooth 4.0 adapter is not working when connected to your device, know that you are not alone.

    For many Windows 10 users, this problem occurs as they state on different forums, looking for a way to fix it.

    We will explore in this article the exact steps you need to take to solve this problem quickly, so keep reading.

    Why is my Bluetooth USB adapter not working?

    Different factors will trigger this problem among users. However, at the top of the list are the following:

    • Driver issues – These, in some cases, will be outdated drivers and, in other cases, corrupted ones.
    • Stopped services – Users may experience this issue if essential Bluetooth services have been stopped or not started on the computer.

    We will explore some of the most efficient fixes for this problem on your computer. These fixes may work for users facing Maxuni Bluetooth 5.0 driver download issues.

    How can I fix my pluggable USB Bluetooth 4.0 not working?

    1. Uninstall and reinstall the driver

    1. Right-click the Start menu and select Device Manager.
      pluggable usb bluetooth 4.0 not working
    2. Double-click the Bluetooth category.
      pluggable usb bluetooth 4.0 not working
    3. Right-click on your Bluetooth driver and select Uninstall device.
    4. Follow the prompts to complete the uninstallation, then restart the PC. At the restart, the driver would be reinstalled.

    2. Update the driver

    1. Right-click the Start menu and select Device Manager.pluggable usb bluetooth 4.0 not working
    2. Double-click the Bluetooth category.pluggable usb bluetooth 4.0 not working
    3. Right-click on your Bluetooth driver and select Update driver.
    4. Select the Search automatically for updates option.

    Check if issues of the pluggable USB Bluetooth 4.0 not working have been resolved.

    3. Check Bluetooth services

    1. Press the Windows key and R to open the Run box.
    2. Type in services.msc and press Enter.
    3. Next, right-click Bluetooth Support service and click Restart. 
      pluggable usb bluetooth 4.0 not working
    4. Now, double-click Bluetooth Support service and locate the General tab.
    5. Go to the Startup type and change it to Automatic.
    6. Next, press Apply and OK to save and exit. 

    4. Use a dedicated software

    Another common reason why your pluggable USB Bluetooth 4.0 is not working can be related to faulty or missing drivers.

    Although the drivers are usually updated anytime Windows 10 has new releases; there are situations where something may go wrong, and any issue with the drivers also impacts the associated software.

    To solve this problem and avoid it from occurring in the future, we recommend you use a dedicated third-party tool to solve the issue.

    We hope the solutions presented in this article helped you solve the pluggable USB Bluetooth 4.0 not working efficiently.

    Don’t hesitate to drop us a message in the dedicated section below and let us know which of the above steps worked best for you.

    Windows Security Not Opening in Windows 11: How to Fix it

    When you install Windows 11, Windows Security or Windows Defender becomes the default antivirus and security solution. It is one of the most excellent remedies available, and it is effective in most circumstances.

    Nevertheless, one of the most frequently encountered concerns has been that the Windows 11 Windows Security is not opening or functioning as expected after an upgrade or random upgrade.

    Why is my Windows Security not opening on Windows 11?

    The reasons Windows Security settings are not opening or launching on Windows 11 after upgrading are close to close. Below are the popular reasons:

    • Glitches with the app: One of the reasons Windows security is not loading on Windows 11 is some glitches preventing it from opening. The solution here is to reset the app.
    • Faulty system files: If the system files meant to load the Windows Security apps are faulty, the app won’t open. You need to repair the system files to fix this.

    How can I fix the Windows 11 Windows Security not opening issue?

    1. Reset using PowerShell Command

    1. Right-click on the Start icon and select the Windows Terminal (Admin) option.windows-terminal windows 11 security center not opening
    2. Click the dropdown at the top and select the Windows PowerShell option.
      powershell security not opening windows 11-windows-11
    3. Copy and paste the command below and hit Enter: Get-AppxPackage Microsoft.SecHealthUI -AllUsers | Reset-AppxPackageget windows security not opening windows 11
    4. Restart your PC and check if the Windows Security app is now working.
    5. If it does not work, type the command below and hit Enter to reinstall the app: Set-ExecutionPolicy Unrestricted Get-AppXPackage -AllUsers | Foreach {Add-AppxPackage -DisableDevelopmentMode -Register "$($_.InstallLocation)\AppXManifest.xml"} powershell-command windows 11 security center not opening

    You need to reset the app if Windows Security is not working or Windows Defender is not opening. The command below has worked for many. You can reinstall the app using the second command if resetting does not work.

    2. Repair the app

    1. Press the Windows key + I to open the Settings app, choose Apps in the left pane, followed by Apps & features.apps-apps-and-feature  windows 11 outlook crashing
    2. Once you are inside the Apps & features window, search for Windows Security in the search bar from the top, and click on the three-dot menu next to it, followed by Advanced options.windows-security-app windows 11 security center not opening
    3. Scroll down until you find the Reset section, then click on the Repair button to start the repairing process.
      repair-app  windows 11 outlook crashing

    Allow the Repair process to finish before rebooting your computer to guarantee your changes are applied. Then, by starting Windows Security, it lets you see if its functionality has been restored.

    3. Reset the app

    1. Press the Windows key + I, go to Apps in the left pane, followed by Apps & features.apps-apps-and-feature  windows 11 outlook crashing
    2. Once inside the Apps & features window, search for Windows Security in the search bar, and click on the three-dot menu. Now click on Advanced options.windows-security-app windows 11 security center not opening
    3. Scroll down until you meet the Reset section, then click on the Reset button.reset-app windows 11 skype crashing

    4. Run SFC

    1. Press the Windows + S key to open the Search bar, then type cmd, right-click on the most relevant result shown to you, and run it as an Administrator to get full privileges.cmd-run-as-admin avast high cpu windows 11
    2. Type in the following command and press Enter to start the process:
      sfc /scannowsfc-scan-windows-11 gdi+windows error message on shutdown

    The process may take some time to finish, so you may need to restart your computer. SFC will automatically find and restore corrupted files and folders. If that does not help, you can try using specialized repair tools, which are much more advanced than Windows built-in tools.

    5. Run DISM

    1. Press the Windows + S key to open the Search bar, then type cmd, and right-click on the most relevant result to run it as an Administrator.cmd-run-as-admin avast high cpu windows 11
    2. Paste or type in the following commands and press Enter after each: DISM /online /Cleanup-Image /ScanHealth DISM /Online /Cleanup-Image /RestoreHealthdism-command  the installer has encountered an unexpected error installing this package 2203

    Continue to be patient until the process is finished. Be advised that the process could take up to ten minutes to finish. Once you’ve completed this step, restart your computer to ensure the changes take effect.

    After you repair the Windows Security app, learn how to use every protection area with this clear guide: How to Use Windows Security.

    6. Disable your antivirus

    1. Click the expand arrow from your taskbar and right-click on your antivirus icon. Now choose Avast shields control followed by Disable for 10 minutes to stop it from interfering.disable-antivirus-icon xbox controller not recognized windows 11
    2. If you have other antivirus programs installed, you can temporarily disable the app following the same steps as above or similar ones with a few differences.avira-disable-icon xbox controller not recognized windows 11

    With the fixes above, you should be able to fix the Windows Security not opening on Windows 11 issue. If you want to use a third-party tool, check out our post on five of the best antiviruses for Windows 11.

    Alternatively, you can look at our article on the best antiviruses with low CPU usage for Windows 11.

    If you want to know how to turn on Dev Device protection on your Windows 11 computer, we have a detailed guide to help you with that.

    In case you have more issues, don’t miss our guide on how to reinstall Windows Security on Windows 11 for more solutions.

    Let us know in the comments section below which solution worked best for you in solving the Windows 11 Windows Defender not working issue and which antivirus software you prefer.

    Windows 11 Defender Not Working: 5 Ways to Fix it

    A significant part of every Windows version, Microsoft Defender, has become one of the most reliable programs to protect your device against malware.

    Built into Windows 11 as well, this program offers in-depth threat resistance research and advanced security to provide protection on all Windows devices.

    So when an issue occurs and it doesn’t work properly or Windows 11 cannot open Windows Security, users turn to the Internet in search of causes and solutions to fix the error and get back the protection they need for their devices.

    That is why we are going to take a look at the most common causes and show you how to get things on the right track.

    How do I fix the Windows 11 Defender not working issue?

    Before trying out more complicated solutions when your Windows Defender is not working, try out some of these quick fixes:

    • Restart your computer
    • Restart Windows Defender

    1. Change the date and time

    1. Click on the Start icon from the taskbar.Start button
    2. Select the Settings option.Settings
    3. Go to Time & language option from the left pane.Time and language
    4. Select the Date & time option from the right pane.Date and time
    5. Click on the Change button and set the correct date and time for your zone.Change date and time

    2. Update Windows

    1. Click on the Start icon from the taskbar.Start button
    2. Select Settings.Settings
    3. Click on Windows Update.Windows update
    4. Click on Check for updates.Check for updates

    3. Enable real-time protection

    1. Click on the Search icon from the taskbar.Search
    2. Type Windows Security and select it from the options.Windows Security
    3. Head over to Virus & threat protection.Virus and threat
    4. On the right pane, under Virus & threat protection settings, click on Manage settings.Manage settings
    5. Switch the toggle On from under Real-time protection.Protection ON

    4. Run a SFC scan

    1. Click on Search from the taskbar.
    2. Type command prompt, and click on Run as administrator.Run as admin cmd
    3. Enter the following line: sfc/scannowsfc scan now
    4. Wait for the process to finish as it will take some time and then restart your computer.

    5. Change the Proxy Server

    1. Click on the Search icon from the taskbar.
    2. Type Command Prompt and select the Run as Administrator option.Run as admin cmd
    3. Type in one of the following:
      • NETSH WINHTTP SET PROXY 1.1.1.1:8080
      • NETSH WINHTTP SET PROXY MYPROXY.NET:8080
    4. Reboot the system and see if it solves the issue.

    If you change your mind and want to give a try to a third-party tool, choose Bitdefender since it’s known for the high detection rates of the latest malware, along with unbeatable multi-layer ransomware protection.

    This was our last solution for the Windows 11 Defender not working issue. Moreover, you can read more about the causes of this problem.

    Why is my Windows Defender not working in Windows 11?

    If you have third-party antivirus software installed on your computer, note that it might lead to certain Windows Defender errors.

    Choose to use either Windows Defender or a third-party antivirus tool. Also, if you just got a new laptop, check if it came with a preinstalled antivirus trial version as this can stop Windows Defender to work properly.

    Here is what Microsoft said regarding the compatibility with other antivirus products:

    What happens when another non-Microsoft antivirus/antimalware solution is used? Can you run Microsoft Defender Antivirus alongside another antivirus product? The answers depend on several factors, such as your operating system and whether you’re using Microsoft Defender for Endpoint (Defender for Endpoint) together with your antivirus protection.

    And if you work with programs like Flash or Java, you might need to uninstall the free security scanner which can cause some issues.

    Although this might come as a surprise, another common reason why Windows Defender might not start is an incorrect time and date as most system functions are dependent on time and date.

    Even more, an outdated PC can lead to many errors so we always recommend you perform a full update on your computer and on the antivirus as well.

    If you’re having difficulties updating Windows Defender, you might need to install the virus definitions manually.

    Windows 11 cannot open Windows Security

    Several users described a similar situation: when they click on the Open Windows Security button from the Windows Security tab inside Settings, they see an unusual pop-up instead of actually opening the application.

    It reads You’ll need a new app to open this windowsdefender link, giving them the option to search the Microsoft Store for an app.

    Fortunately, though, there is an easy solution to solve the problem right away. You simply need to press the Windows key, type PowerShell, right-click it and select Run as administrator, then copy-paste this command and press Enter: Get-AppxPackage Microsoft.SecHealthUI -AllUsers | Reset-AppxPackage

    Fore more info on what to do if Windows Security is not opening on Windows 11, check out our dedicated guide.

    What does Windows Defender has to offer to Windows 11 users?

    Windows Defender is pretty much the same as it was on the previous OS but there is one remarkable feature called Microsoft Defender Application Guard (MDAG) that you should know more about.

    It is available for several types of devices such as enterprise desktops and mobile laptops, as well as personally-owned laptops that are managed through Microsoft Intune or a similar tool.

    Designed for Microsoft Edge and for Microsoft Office, the main purpose for Microsoft’s Application Guard is to prevent developing attacks and improve employee productivity:

    Microsoft Defender Application Guard (Application Guard) is designed to help prevent old and newly emerging attacks to help keep employees productive. Using our unique hardware isolation approach, our goal is to destroy the playbook that attackers use by making current attack methods obsolete.

    The way the system works is quite easy to understand. For example, for Microsoft Edge or Internet Explorer, MDAG will help isolate previously defined untrusted sites, therefore, protecting your company from any attack.

    If someone opens a page from an untrusted website, Microsoft Edge will open the page in an isolated Hyper-V-enabled container.

    The course between the host PC and the isolated container – SOURCE: docs.microsoft

    You can choose which websites, cloud resources, or internal networks are to be trusted or not. Also worth mentioning is the fact that this feature doesn’t require Hyper-V to be turned on.

    Now there you have it, the most likely situations that can create errors and the solutions to fix them on your Windows 11 device.

    Moreover, if your Windows Defender is turned off on your Windows 11 PC, do not hesitate to edit your registry in order to enable it back on.

    And if the Windows Defender service won’t start, make sure to clean your registry and check your environment variables.

    What solution from the ones presented above worked for you to fix the Windows 11 Defender not working issue? Let us know in the comments section below.

    IPv4 No Internet Access Error [SOLVED]

    One of the most annoying Windows 11 problems must be the IPv4 no internet access issue. From outdated, corrupt or incompatible network drivers to third party app conflicts and misconfigured settings, a lot of underlying issues could cause it.

    But don’t worry. We’ll explain all you need to know to get it fixed ASAP. Let’s get started.

    How can I fix the IPv4 No Internet Access issue?

    1. Install the latest network drivers

    1. Open Device Manager.
    2. Go to the Network Adapter section.
    3. Locate the network driver you’re currently using, right-click on it, and select Update driver.update network driver
    4. Confirm your choice and wait for the process to complete.

    Alternatively, you can easily do this with a third-party driver updater. Simply download it, run it, and let it automatically scan for any missing, broken, or outdated drivers. You will then get to choose what to do with each and every one of them.

    2. Modify the HT Mode settings

    1. Press Windows + R to open Run, type ncpa.cpl in the text field, and hit Enter.ncpa.cpl
    2. Right-click on the active network adapter, and choose Properties.properties to fix ipv4 no internet access
    3. Click on Configure.configure
    4. Navigate to the Advanced tab, select HT Mode under Property, then choose HT Mode 20|40 under the Value dropdown menu, and click on OK to save the changes.change HT Mode to fix ipv4 no internet access
    5. Once done, restart the computer for the changes to come into effect.

    3. Renew the IP address

    1. Press Windows + S to open the Search menu, type cmd, right-click on the relevant search result, and select Run as administrator.cmd
    2. Click Yes in the UAC prompt.
    3. Now, paste the following two commands one at a time and hit Enter after each:ipconfig /release ipconfig /renewrelease IP to fix ipv4 no internet access

    Finally, restart the computer and verify whether the No Internet access error on IPv4 is resolved. If not, head to the next solution.

    4. Reset Winsock (Windows Socket API)

    1. Press Windows + R to open Run, type cmd, and hit Ctrl + Shift + Enter.command prompt
    2. Click Yes in the UAC prompt that appears.
    3. Now, execute the following two commands one after the other:netsh winsock reset netsh int ip resetreset winsock

    5. Check your IP settings

    Here’s how to enable IPv4 and IPv6 protocols:

    1. Go to Search, type network and open Network and Sharing Center.
    2. Go to Change adapter settings from the left pan.
    3. Right click on your connection device (in most cases it’s called just Ethernet) and go to Properties.
    4. Under This connection uses the following items: check Internet Protocol Version 4 (TCP/IPv4) and Internet Protocol Version 6 (TCP/IPv6).
    5. Click OK and restart your computer.

    When you turn your computer back on, you should be able to connect to internet without any problems.

    There’s a chance that Windows 10 turned off your IPv4 and IPv6 protocols after the installation, this doesn’t happen very often, but it could happen. So logically, all you need to do to get your internet connection back is to turn on these protocols again.

    Sometimes, your IPV6 may be enabled but not working. Re-enabling it should fix this issue. However if you are still can’t access the internet on IPv6, we suggest you check out this guide.

    6. Change the channel width

    1. Navigate to Network and Sharing Center from the list of results
    2. Go to Change adapter settings
    3. Select your wireless adapter by right-clicking it > go to Properties > Go to Configure
    4. Select the  Advanced tab > select the 802.11 channel width and change the value. Keep using a different value until you’ve established a stable internet connection.change wireless bandwidth value
    5. Save your new settings.

    This step applies to wireless networks. By changing the bandwidth settings, you allow your computer to use other wireless frequencies and expand its reach.

    7. Disable Internet Protocol Version 6 (IPv6)

    1. Press Windows + S to open the Search menu, type View network connections, and click on the relevant search result.view network connections
    2. Right-click on the current adapter, and choose Properties.properties
    3. Now, uncheck the option for Internet Protocol Version 6 (TCP/IPv6), and click on OK to save the changes.disable IPv6 to fix ipv4 no internet access
    4. Finally, restart the computer.

    If nothing else worked, the last solution is to disable IPv6 and force the computer to use IPv4 instead. This solution did the trick for many and should help get things up and running

    If you encounter this issue related to IPv6, then you can safely use the previously mentioned solutions to fix it. They work for both IPv4 and IPv6 connectivity issues.

    If you have any other Windows 10-related issues you can check for the solution in our Windows 10 Fix section.

    We hope you managed to fix your IPv4 no internet access issue. Lets us know in the comments section below which solution worked for you.

    Wallpaper Engine High GPU Usage: How to Stop it in 5 Steps

    Generally, programs like Wallpaper Engine use many system resources, especially GPU, as the app is designed to run high-quality animated wallpapers. However, it could be something else if you are experiencing 100% GPU usage while using Wallpaper Engine.

    Here, in this guide, we will discuss the potential causes and some tested fixes to resolve the issue.

    Why is Wallpaper Engine using too much GPU?

    There could be a few reasons why Wallpaper Engine may be using a lot of GPU resources:

    • Outdated graphics drivers – If your computer drivers are obsolete, your GPU won’t run Wallpaper Engine efficiently. This will lead to performance issues and high GPU usage.
    • Computer doesn’t meet system requirements – Wallpaper Engine runs high-quality animated wallpaper, which requires a lot of system resources. If your computer configuration doesn’t meet your needs, it may struggle to run the program efficiently. Thus, causing the issue.
    • Programs running in the background – If you have other resource-intensive apps running on your computer, it can cause GPU usage to increase. Hece performance issues while running Wallpaper Engine.
    • Your PC is infected – If your computer is infected with viruses or malware, it can spike your CPU or GPU usage, leading to performance issues. Use a reliable security app to scan your PC.

    What can I do to fix the Wallpaper Engine using too much GPU error?

    Before engaging in advanced troubleshooting steps, you should consider performing the following checks:

    • Update the Wallpaper Engine app
    • Check for Windows Updates
    • Close other programs
    • Check system requirements for the app.
    • If you are using multiple monitors, ensure all monitors are connected to the same GPU. Using the wrong GPU would result in Windows performing poorly while trying to merge them.

    1. Clean install of graphics driver

    1.1 Use Device Manager

    1. Press Windows + R to open the Run window.Device Manager RUN COMMAND
    2. Type devmgmt.msc and hit Enter to open Device Manager.
    3. Click on Display adapters to expand. Next, select, right-click the driver, and click Uninstall driver.Uninstall driver -wallpaper engine high gpu usage
    4. Restart your PC. Upon restarting, your computer will find and download the Windows-certified drivers.

    1.2 Use a third-party tool

    The Device Manager can only install Windows-certified drivers. However, not all the latest GPU drivers are certified, as manufacturers generally don’t ask for approval for every version. You can download the latest drivers using AMD, NVIDIA, or Intel websites. However, this could be time-consuming and suggested if you know your way around a computer.

    Therefore, to save you some time and get the work done quickly, it is suggested to use a driver updater tool such as Outbyte Driver Updater. This driver updating tool can scan and download the latest drivers in a few clicks. Follow these steps to use the tool: 

    1. Download and install Outbyte Driver Updater.
    2. Launch the tool and click Scan.
    3. It will show you all the outdated drivers. Select them and click Update.Outbyte Driver Updater 2 Wallpaper Engine high GPU usage
    4. The tool will download the latest version of drivers. 
    5. Click Install and follow the on-screen process to complete the installation.

    2. Disable game overlay

    2.1  Disable Steam overlay

    1. Launch Steam.
    2. From the top left corner, locate and click Steam, then select Settings.settings steam  -wallpaper engine high gpu usage
    3. Go to the In–Game tab.
    4. Remove the checkmark beside Enable the Steam overlay while in game.Steam overlay
    5. Click OK.

    2.2 Disable Nvidia overlay

    1. Launch GeForce Experience. 
    2. Click Settings.
    3. From the left pane, click General, then toggle off the switch for In-Game Overlay.game overlay - wallpaper engine high GPU usage

    3. Change GPU affinity

    1. Press Windows + I to open Settings.
    2. Click System, then select Display.System display - wallpaper engine high gpu usage
    3. Now under Related Settings, click Graphics.graphics
    4. Under Custom options for apps, click Browse.custom browse
    5. Select the .exe file for Wallpaper Engine from the next window and click Add.Add
    6. Once added, click on the app, then Options.options
    7. Select Let Windows decide and click Save.graphics preference

    4. Tweak Wallpaper Engine settings

    1. Open the Wallpaper Engine app and go to Settings.Settings
    2. Go to the Performance tab.Performance Wallpaper engine high gpu usage
    3. For Other application focused, select Keep running.
    4. Now for Other application maximized and Other application full screen, select Pause.
    5. Under Quality, select set Preset to Low, Anti-aliasing to MSAA x2, Resolution to Full, and FPS to 24.
    6. Also, place a checkmark next to Reflections.
    7. Move to the General tab, and remove the checkmark beside Set high priority for Start with Windows option.Set high priority
    8. Scroll down and put a checkmark beside UI hardware acceleration.UI hardware acceleration
    9. Click OK  to save the settings.

    5. Scan your computer for malware

    1. Press the Windows key, type Windows Security and click Open.windows security
    2. Go to Virus & threat protection and click Scan options.
    3. Select Full scan and click Scan now.Full scan -wallpaper engine high gpu usage
    4. Now, wait for the tool to complete the scan.

    So, these are some methods you can use to resolve Wallpaper Engine causing high GPU usage. Try them and let us know which worked for you in the comments below.

    How To Go Full Screen On Windows 11 [5 Ways + Shortcuts]

    Today, we’ll show you how to go full screen in Windows 11 for various apps. In general, the shortcut keys are:

    • F11 (or Fn + F11 on some laptops): Fullscreen in browsers
    • Win + Shift + Enter: Fullscreen in native Windows apps
    • Alt + Enter: Fullscreen in media players and games

    Besides shortcuts, there are other ways to reach full screen. Today, we’ll give you all the info you know, so you can maximize any window in no time.

    We’ll also show you ways to turn it off so you won’t get stuck in full screen.

    Sounds good? Let’s get started.

    How can I go full screen in Windows 11?

    1. Use VirtualBox

    1. Open VirtualBox on Windows 11.
    2. From the top menu, click on View.
    3. Select the Full-screen Mode.
    4. Click on Switch.

    4. Full screen browsers in Windows 11

    1. Open the browser you need, then click on Settings and more options, usually marked as three dots.
    2. Look at the Zoom section, then click on the square heads icon.
    3. Now you’ll be able to see your browser on the full screen mode.

    You can follow the same process for multiple browsers, like Chrome, Microsoft Edge, or Firefox.

    The easiest way to get your browser in or out of the full screen is by using the F11 key. Remember that it also allows you to switch certain networking or chat apps views.

    3. How to enable full screen in File explorer (for folders)

    You can get your Windows 11 File Explorer into the screen mode by pressing on the already mentioned key (F11). Getting back to the normal preview will require using the same key.

    4. How to enable full screen in Microsoft Office in Windows 11 (shortcut+ settings)

    You can either use the following keyboard shortcut: Alt + V, followed by the U key, or click on the Toggle Full Screen View command at the top of the window.

    If you’re not able to see the required command, make sure you keep on reading to find out how you can easily add it.

    Note that these two options work only for Microsoft Word and Excel. If you need to get the PowerPoint full-screen, you’ll have to hit the F5 key.

    5. Streaming apps full screen

    While many users prefer using the Full-screen icon, keep in mind that you can also apply the following keyboard shortcut: Windows + Shift + Enter. It would be much less time-consuming.

    netflix windows app

    How to exit fullscreen mode in Windows 11?

    To exit fullscreen mode in Windows 11, use the same keyboard shortcuts as you do to enter fullscreen mode:

    • F11 or Fn+ F11 for browsers (Edge, Chromium, Firefox, etc)
    • Win + Shift + Enter for Windows apps (Settings, Control Panel, Troubleshooters, etc)
    • Alt+ Enter for media players and games

    If Shortcuts Don’t Work:

    • Use Task Manager: Press Ctrl + Shift + Esc to open Task Manager, find the application or process in fullscreen, and end it if necessary.
    • Restart Your Computer: A restart may resolve persistent fullscreen issues.
    • Check Application Settings: Look for specific options within the application’s menus to exit fullscreen mode.
    • Update Graphics Drivers: Ensure your graphics drivers are up to date to avoid compatibility issues.
    • Safe Mode: Restart in Safe Mode and attempt to exit fullscreen mode from there.
    • System Restore: Use System Restore to revert your system to a previous state if the issue arose recently.

    What are the most common full screen issues?

    The full-screen mode is a great feature that will simplify your daily work on Windows 11. However, you might notice random related problems. From what we found, these are the most common ones:

    If you’re still wondering how the full-screen mode can help you, take a look at the section below and find some valuable reasons.

    Fullscreen is useful in many ways

    • A better view perspective – For enhanced clarity and minimal distraction, you might have to set your Windows 11 apps on full screen. This is a great way to keep focus during your daily activity.
    • More clear screenshots – Some of you may need to take specific screenshots, that will capture any desktop detail. It will definitely require the full screen mode, so this is another reason to learn how to quickly do it. Also, we recommend taking a look at some of the easiest methods to take a screenshot on Windows 11.
    • It hides specific details – If you choose to go full screen, unnecessary items will be hidden. So again, you’ll be able to focus on your main content.

    Feel free to use this guide whenever you want to remember how to go full screen on Windows 11. Also, to get the best out of this feature, you should check our recommended articles.

    If you have any questions on this topic, do not hesitate to notify us by leaving a comment in the dedicated section below.

    ‘File Could Not Be Found’ Error in Excel: How To Fix

    Some Excel users have queried how they can fix an Excel file could not be found error on the Microsoft forum. The error message states:

    [filename] could not be found. Check the spelling of the file name and verify that the file location is correct.

    That error message pops when those users try to open an Excel file within the software or click an XLS spreadsheet file to start the application. The issue arises for Excel 2007 and 2010 versions.

    How to fix ‘[filename] could not be found. Check the spelling of the file name and verify that the file location is correct.’ ?

    To fix this error, you will need to determine the cause of the problem and take appropriate action.

    • Check the file’s location: Make sure that the file is still in the location where you expect it to be. If the file has been moved or deleted, you must find the new location or restore the file.
    • Check the file name: Make sure that the file name is spelled correctly and that the extension is correct. If the file name or extension is incorrect, you will need to rename the file or change the extension to match the actual format of the file.
    • Check the file path: If the file is located on a network drive or a remote server, ensure that the file path is correct and that you have the necessary permissions to access the file.

    1. Edit the file and folder titles

    1. Open the folder that includes the spreadsheet the Excel file could not be found error arises for.
    2. Right-click the spreadsheet file you need to fix the error for and select the Rename option.
    3. Enter a shorter file title for the spreadsheet document.
    4. In addition, edit the spreadsheet file’s folder title by right-clicking it and selecting Rename.
      • Input a shorter title for the folder, and press the Enter key.

    If the folder’s path includes numerous subfolders, try shorting their folder titles by selecting the Rename option as outlined above.

    2. Move the file to an alternative folder path

    1. Alternatively, try moving the Excel file the error arises for to a different folder.
      • To do so, open File Explorer.
    2. Select the Excel spreadsheet to move.
    3. Click the Move to button in the snapshot directly below.
    4. Select a folder to move the file to on the menu.
    5. Alternatively, click Choose Location to open the window below.
      • You can select an alternative folder path from there.
    6. Click the Move button.
    7. Click OK to exit the Move Items window.

    3. Edit the registry

    1. If the Excel file could not be found error arises when you launch the application, try this registry fix.
      • Right-click the Start button in Windows 10 and select Run.
    2. Enter regedit in Run and press Return to open the Registry Editor.
    3. Open this registry key path:
      • HKEY_CLASSES_ROOT > Excel.Sheet.8 > shell > Open > command.
    4. Double-click (Default) on the right pane to open its Edit String window.
    5. Erase %1 from the end of the string in the Value data box.
      • The Value data string should then be:
        • C:\PROGRAM FILES\MICROSOFT OFFICE\OFFICE\EXCEL.EXE
    6. Click OK to close the Edit String window.

    4. Deactivate Excel add-ins

    1. The file could not be found error can also be due to an XLA add-in file.
      • To deactivate Excel’s add-ins, click the File tab in the application.
    2. Select Options to open the Excel Options window.
    3. Click the Add-ins tab on that window.
    4. Select Excel Add-ins on the drop-down menu.
    5. Click the Go button.
    6. Deselect the add-in checkboxes on the Add-in window to deactivate them.
    7. Select the OK option to exit the window.

    While disabling an add-in, you can quickly add the ones you want to use to avoid the #NAME errors in Excel; read this to learn more.

    Those are resolutions users have confirmed fixed the Excel file could not be found error for them.

    Users who have fixed the same error message using other methods can share their alternative fixes below.

    Preparing Windows Is Stuck? 3 Easy Fixes

    One of the more common issues you may experience while updating your Windows computer is when it gets stuck while it’s preparing Windows or seeing the Getting ready message. This typically happens when the computer is installing an update.

    Normally, the updating process doesn’t take all that long; 20 to 30 minutes at most under normal conditions or shorter if the update size is small.

    These normal conditions are contingent on your computer having the requirements like having enough storage, fan speed, and having a solid-state drive or SSD.

    If you have a conventional hard drive on your computer, you can expect to wait much longer, up to an hour or more. But sometimes, even with the correct hardware, the updating may get stuck on the “Preparing to configure” screen.

    Fortunately, fixing this issue is fairly easy and can be done on your own. This guide will show you multiple methods on how to get past the Preparing Windows stuck screen on Windows 10 & Windows 11 devices.

    What do I do if Windows is stuck on preparing Windows?

    1. Restart the computer

    1. Press down on the Ctrl + Alt + Del keys at the same time to bring up the Lock screen.
    2. In the bottom right hand corner, click on the Power icon. A small window will appear giving options.
    3. Select Restart to restart the computer. Restarting should solve most problems.

    2. Boot Windows 11 into Safe Mode

    1. While stuck on the configuration screen, press the F11 key repeatedly.
    2. Do not stop pressing the key until the Advanced Startup screen appears.
    3. On Advanced Startup, select Troubleshoot, the last option.
    4. In the new window, select Advanced options.
    5. After being taken to another page, select Startup settings.
    6. A list of coming changes will appear on the screen, most importantly booting Windows 11 into Safe Mode.
    7. Click Restart after reading.
    8. Select F5 which is Enable Safe Mode with Networking.
    9. Your Windows 11 computer is now in Safe Mode. Close the Microsoft Edge window that appears.
    10. Hover over the Windows Start icon on the bottom bar and right click it.
    11. Choose Shut down or sign out.
    12. Select Restart from the new drop down menu.
    13. Once it restarts, your computer is free from the locked updating screen.

    3. Perform Automatic Startup Repair

    1. Going back to the Advanced Startup screen, select Troubleshoot.
    2. Click on Advanced options.
    3. Select Startup Repair which is the first option.
    4. You can either select to Shut down the computer or click on Advanced options to try something else.

    4. Uninstall Updates

    1. On the Advanced Startup page, select Troubleshoot.
    2. Select Advanced options again.
    3. Select Uninstall Updates in the upper right hand corner.
    4. You are given two options, Uninstall latest quality update and Uninstall latest feature update.
    5. Select Uninstall latest quality update to revert back to the previous version of Windows 11.
    6. You will be taken to a new window asking if you want to uninstall the update. Select Uninstall quality update.
    7. After a few minutes, a message will appear stating that the last update has been removed. Click Done on this new window.
    8. From there, Click Continue to exit and go to your Windows 11 home screen.
    Tip icon Tip
    If you want to know which update you should uninstall, look at the Update history panel under the Windows Update tab in the Setting menu. It will tell you how far back you will go when you uninstall an update.

    Why is my computer stuck on preparing Windows?

    There are a multitude of possible reasons for the update getting stuck on a screen. The file size may be large and your computer may struggle with it.

    Windows 11 has a list of specific requirements that must be met to be used. You can check if your computer meets these requirements by downloading the PC Health Check app.

    If your computer is indeed slow, it’s recommended that you wait for an extended period to give your machine the chance to download and install the update.

    It’s also possible that during the setup process some important files are missing or become corrupted. If a file is missing or corrupt, the computer won’t know what to do with it and cause the error.

    A corrupt file may come from a power outage or overheating machine interrupting the update.

    A glitch might be the cause too as they can be caused by anything. Microsoft is currently working on fixing all of the known issues plaguing Windows 11 and even has a dedicated page on its website detailing what work is being done.

    How can I stop future Windows 11 updates?

    If you go back to the Settings menu on Windows 11, you can pause updates from being automatically installed by going down to Windows Update and going to the Pause updates tab.

    You can pause updates from coming through for a week and decide when to resume the updates at any time you want.

    Since Windows 11 is still a new operating system, the bugs and glitches will persist for some time. For example, build 22449 was pretty unstable when it came out a few months ago. Some people have even claimed that it disabled their Wi-Fi adapter.

    Other people have reported Start menu and taskbar issues on earlier builds as well, but fortunately, there are fixes for these as well. Suffice it to say, sometimes it’s best to wait a little while before putting in that new update.

    Feel free to leave a comment below if you have any questions on fixing the preparing Windows stuck window or more. Also, leave comments about guides that you’d like to see or information on other Windows 11 features.

    Touchpad Click Not Working? How to Enable it Again

    Many users prefer using a trackpad instead of their mouse. However, some users reported that the touchpad click is no longer working.

    If your trackpad touch click isn’t working correctly, that can be a big problem, but in most cases, the issue is caused by your settings or drivers.

    Why is my laptop touchpad not clicking?

    • The touchpad might not be adequately enabled from the settings, or it has a delay set.
    • Issues with touchpad drivers can prevent it from running.
    • Your registry isn’t correctly configured.

    In today’s article, we’ll try to fix this annoying problem. Just keep on reading the solutions detailed below.

    How do I fix my touchpad if it’s not clicking?

    1. Be sure that this feature is enabled

    1. Press the Windows key + S and enter control panel. Select Control Panel from the list.
    2. When the Control Panel opens, select Mouse.
      mouse control panel Tap to click not working Windows 10
    3. The mouse window will now open. Go to the Device settings tab.
    4. Now click the Settings button and go to Tapping.
    5. Check the Enable tapping checkbox, and click OK.

    If the touchpad click is not working on your Lenovo or Acer laptop, it’s possible that it isn’t enabled. Your trackpad supports various configuration.

    A couple of users reported that the Tap to click feature was already enabled, but after turning it off and back on again, the problem was resolved.

    2. Make sure that delay is turned off

    1. Open the Settings app. To do that quickly, use Windows key + I shortcut.
    2. When the Settings app opens, go to the Bluetooth & devices section. Next, go to Touchpad.
    3. Make sure that the delay is set to No Delay.

    3. Reinstall the touchpad driver

    1. Press the Windows key + X and choose Device Manager from the list.
    2. Locate your touchpad driver, right-click it, and choose Uninstall device from the menu.
    3. When the confirmation dialog appears, just click Uninstall. If Remove driver software for this device option is available, don’t check it.

    Reinstalling the driver can fix this problem, and other similar problems like Touchpad settings missing.  After that, you’ll have to restart your device, and Windows will automatically install the necessary drivers.

    You can troubleshoot brand specific issues by reviewing dedicated guides such as the one for Dell models in the Dell laptop touchpad not working article, which covers driver failures, gesture problems, and settings conflicts that can also affect other Windows laptops.

    4. Make sure that your drivers are up to date

    According to users, touchpad issues can occur due to your drivers. If your drivers are out of date, they might have certain bugs that will cause the touchpad click to stop working.

    You can make sure your drivers are always up to date with the help of professional driver updating software. These tools allow you to scan for, identify, and update drivers in just a few minutes.

    5. Make changes to your registry

    1. Press the Windows key + R and enter regedit. Press Enter or click OK.

    2. In the left pane, navigate to HKEY_LOCAL_MACHINE\SOFTWARE\Synaptics\SynTP\Install
    3. In the right pane, double-click DeleteUserSettingsOnUpgrade DWORD to change its settings. If this DWORD isn’t available, you might have to create it manually by right-clicking the right pane and selecting DWORD (32-bit) Value from the New menu.
    4. Change the value of the DWORD to 0 and click OK.

    Remember that this solution only works if you have this key in your registry. If not, you can just skip it.

    6. Perform a System Restore

    1. Press the Windows key + R and enter rstrui.
    2. System Restore will now open. Click Next to proceed.
    3. Look for Show more restore points option and enable it, if available. Select the desired restore point and click Next.
      restore

    How do I reset my trackpad?

    1. Open the Settings app.
    2. Select Bluetooth & devices and then choose Touchpad.
    3. Click on Reset button next to Reset touchpad settings and gestures to defaults.

    And do not forget to check for other touchpad issues, such as click works, but the cursor doesn’t move in Windows.

    Is your touchpad disabled on the logon screen? Check out our detailed guide and fix it in no time. We also have a guide on what to do if touchpad settings are missing on Windows 11, so feel free to visit it.

    You’ll also find more potential causes and quick fixes in our mouse touchpad not working guide, so be sure to check it out. For more suggestions or other questions, please access the comments section below.

    WiFi Symbol Not Showing On Laptop [SOLVED]

    It can be a real headache if the Wi-Fi symbol is not showing on your laptop. The wireless icon should appear in adapter settings under network connections. This can be caused by wireless adapter driver issues, corrupted adapter firmware, disabled wireless radio, or improper Windows installation.

    First of all, make sure you’re not using a cable connection. If you see the icon above instead of the Wi-Fi icon, that means you’re connected through a cable. You may also see a globe icon. Click on it to set up a Wi-Fi connection. If that’s not your case, apply the solutions below to get back the WiFi icon on your laptop.

    What can I do if my WiFi symbol is not showing on laptop?

    1. Update the wireless adapter driver

    Outdated driver software can lead to several issues with hardware. These include driver corruption, missing software components, and incompatible driver.

    Updating to the latest software version for your driver can repair any issue related to legacy software.

    The best way to safely update your drivers is to use a specialized tool to help with downloading and installing the right driver versions.

    Since installing the wrong driver can damage your laptop irreversibly, we strongly recommend that you use this method.

    2. Turn on wireless radio

    Turn on wireless radio

    If the Wi-Fi icon is not showing on your laptop, chances are that the wireless radio is disabled on your device.

    You can enable it back again by turning on the hard or soft button for the wireless radio. Refer to your PC manual to locate such a button.

    Also, you can turn on the wireless radio through the BIOS setup. Enter the BIOS setting during the reboot process and locate the network settings page. From there, you can enable the wireless radio. Save the changes and exit BIOS.

    3. Update the router and adapter firmware

    Outdated firmware can sometimes block your router from gaining access to the Internet. The impact extends all the way to the adapter.

    As firmware updates vary from one manufacturer to another, you can refer to the user guide that came with your router to update its firmware.

    Drivers get outdated regularly, and with Outbyte Driver Updater you simply scan your device and get expert, professional advice on the best components you can get.

    We suggest this software because it does the job quickly and efficiently thanks to its advanced updating technology.

    ⇒ Get Outbyte Driver Updater

    4. Perform a system restore

    Perform a system restore

    The Wi-Fi icon may sometimes disappear after waking your PC up from hibernation mode.

    You can fix this issue by restoring your system to a previous setting when it was performing fine.

    First, go to System Restore and select a restore point when the wireless network was working properly. Then wait for the process to complete.

    5. Install a USB wireless adapter

    Install a USB wireless adapter

    If all else fails, the only option left is to buy a USB wireless adapter. You can plug these LAN card dongles into a standard USB port in order to connect to the Internet.

    If your WiFi icon is not showing in Windows 10, check out our dedicated guide. Likewise, if your WiFi symbol is not showing on Windows 11, we have another guide to help you out.

    If you know of other workarounds to fix a WiFi symbol not showing on a laptop, share your ideas in the comments below.

    USB WiFi Adapter Not Working [FIXED]

    A USB Wi-Fi adapter is a handy little gadget that should be part of your home essentials alongside a good computer or a fast Internet connection.

    If your computer has no Wi-Fi connection built into it, you can choose to use a USB Wi-Fi adapter to ensure you get online and continue browsing, streaming Netflix, or even playing games.

    USB Wi-Fi adapters eliminate the need for running cables or installing internal hardware, plus you can use them on multiple devices.

    If you’re trying to get online but your USB WiFi adapter is not working, here are some solutions you can use.

    How can I fix USB WiFi adapter not working?

    1. Roll back the network adapter driver

    1. Right-click Start.USB WiFi adapter is not connecting to the Internet
    2. Select Device Manager.
    3. Select Network adapters and click to expand the list then choose the network adapter name.USB WiFi adapter is not connecting to the Internet
    4. Right-click the network adapter, and then select Properties.USB WiFi adapter is not connecting to the Internet
    5. In Properties, select the Driver tabUSB WiFi adapter is not connecting to the Internet
    6. Select Roll Back Driver, then follow the promptsUSB WiFi adapter is not connecting to the Internet

    If the button is unavailable, that means there’s no driver to roll back to.

    If Windows can’t find a new driver for your network adapter, visit your computer manufacturer’s website to download the latest network adapter driver.

    1.1 Update drivers automatically

    We strongly suggest you do this process automatically by using the Outbyte Driver Updater tool.

    Dedicated software like this one ensures that you download just the right driver for your PC; besides, it also makes the very best recommendations in this sense, so you won’t have to waste time searching the Internet.

    Hence, if you strongly need to update your network driver correctly and without any difficulties, proceed confidently with specialized driver updating software.

    2. Check your Wi-Fi connection

    1. Click Start and select Settings.
    2. Go to Network & Internet.USB WiFi adapter is not connecting to the Internet
    3. Select Wi-Fi to check for available networks.USB WiFi adapter is not connecting to the Internet
    4. If a network you expect to see appears in the list, select it.
    5. Click Connect.USB WiFi adapter is not connecting to the Internet

    3. Turn off Airplane Mode

    1. Make sure the Wi-Fi is on. Then, open Network & Internet settings, as shown above.
    2. Select Airplane modeUSB WiFi adapter is not connecting to the Internet
    3. Turn it OFF if it is turned on

    4. Restart your Wi-Fi router

    If the previous solutions didn’t work and your USB WiFi adapter is not working, and you have tried to move closer to your router or access point, you can also restart your Wi-Fi router.

    This helps create a new connection to your ISP, but it will disconnect everyone on your network temporarily. It should be one of the last solutions to try though. Here’s what to do:

    • Unplug the power cable for the router from the power outlet and wait at least 30 seconds
    • Plug back the router to the power source.
    • Wait a few minutes for the router to power on fully (you can check this by looking at the status lights on the two devices).
    • Try and connect your PC again.

    5. Run the network troubleshooter

    1. Right-click on Start.
    2. Select Control Panel.USB WiFi adapter is not connecting to the Internet
    3. Select Network and InternetUSB WiFi adapter is not connecting to the Internet
    4. Select Network and Sharing center.USB WiFi adapter is not connecting to the Internet
    5. Go to the search box and type Identify and repair network problems.
    6. Select Identify and repair network problems to run it following the instructions carefullyUSB WiFi adapter is not connecting to the Internet

    6. Temporarily turn off the firewall

    There are times when your firewall or antivirus and anti-malware software may prevent you from connecting to the Internet.

    You can temporarily turn it off and try to connect again. Check the software’s documentation for steps on how to do this, although the steps should be quite intuitive.

    It’s recommended, though, to turn the firewall back on as soon as you can. Otherwise, your computer remains vulnerable to hackers and malware threats.

    7. Uninstall the network adapter driver and restart

    1. Before proceeding, make sure you have a backup of your network drives saved on an external source.
    2. Right-click Start and selectDevice Manager.USB WiFi adapter is not connecting to the Internet
    3. Select Network adapters and click to expand the list then choose the network adapter name.USB WiFi adapter is not connecting to the Internet
    4. Right-click the network adapter, and then select UninstallUSB WiFi adapter is not connecting to the Internet
    5. Select Delete the driver software for this device checkboxUSB WiFi adapter is not connecting to the Internet
    6. Click Uninstall
    7. Restart your computer

    Windows will automatically install the latest driver. If Windows doesn’t automatically install a driver, try to install the backup driver you saved before uninstalling.

    Alternatively, you can use the method recommended in the first step to use dedicated software for this.

    You can apply this solution if your network connection stopped working after a recent update, as well.

    8. Use network reset to reinstall network devices

    This should be the last step you try if the other solutions don’t help when your USB Wi-Fi adapter is not connecting to the Internet.

    It can also help solve connection problems you might have after upgrading from a previous version of Windows to Windows 10, as well as fix problems where you can connect to the Internet but not to shared network drives.

    It removes any network adapters you have installed and the settings for them.

    Once your computer restarts, network adapters are reinstalled, with default settings.

    Note: To use network reset, you must run Windows 10 version 1607 or later.

    1. Click Start and select Settings.
    2. Select Network & Internet.USB WiFi adapter is not connecting to the Internet
    3. Select Status, then Network reset.
    4. Select Reset now.
    5. Click Yes to confirm.
    6. Wait for your PC to restart and see if that fixes the problem.

    After using network reset, you may need to reinstall and set up other networking software you might be using, such as VPN client software or virtual switches from Hyper‑V.

    Note: Network reset might set each one of your known network connections to a public network profile where your computer is not discoverable to other PCs and devices on the network, which can help make your PC more secure.

    If your PC is part of a homegroup or used for file or printer sharing, you need to make it discoverable again by setting it to use a private network profile.

    Here’s how to make your computer discoverable again:

    1. Go to Network & Internet as shown before.
    2. Select Wi-Fi .USB WiFi adapter is not connecting to the Internet
    3. On the Wi-Fi screen, select Manage known networksUSB WiFi adapter is not connecting to the Internet
    4. Select the network connection you want to change.
    5. Click Properties.
    6. Under Network profile, select Private.

    Did any of these solutions resolve the USB WiFi adapter not working issue? Let us know by leaving a comment in the section below.

    Download & Install Zoom for Windows 11 [64/32 Bit]

    In today’s guide, we’ll talk about everything you need to know about how to download Zoom in Windows 11. We’ll also walk you through its best features. Let’s get right to it.

    How can I download Zoom on Windows 11?

    1. Through the manufacturer’s website

    1. Navigate to the Zoom Download Center.
    2. Look under Zoom Clients for Meetings, then click on the Download 64-bit Client.
    3. Once downloaded, go to your Downloads folder, then double-click on the file to begin the installation.
    4. During the installation, choose Yes when you’re asked if you want Zoom to make changes to your device.
    5. Zoom will be automatically installed and ready for you to sign in or join a meeting.
    6. If you don’t already have an account, just choose to Join a Meeting.
    7. Enter the meeting credentials, then click on Join.

    2. Through Microsoft Store

    1. Open Microsoft Store from your Taskbar.
    2. Search for Zoom, then click on Zoom Clouds Meetings.
    3. Click on the red Install button.
    4. Follow the on-screen instructions to complete the installation.
    Note icon NOTE
    You can also choose to install the Zoom Rooms version.

    Because it represents one of the most important tools in getting Zoom, you should definitely also take a closer look at the new Microsoft Store in Windows 11.

    Is Zoom free?

    Yes, Xoom has a free tier. It supports unlimited group meetings for up to 40 minutes, one-on-one calls for up to 30 hours, private group chat, and cross-platform availability. There are also paid versions that include additional benefits like larger meetings, cloud storage, and meeting transcripts.

    Zoom pricing (Source: Zoom)

    What are Zoom’s best features?

    Zoom is a favorite among online meeting apps for a few reasons:

    • It’s affordable
    • The app is very simple, easy to use, and quick to install
    • Integrates built-in features to improve video and picture experience
    • Allows conferencing with backgrounds and filters
    • Works on multiple operating systems and devices
    • It has a focus mode, which is ideal for online classrooms and professional meetings

    What’s new about Windows 11 Zoom?

    The latest Zoom version, 5.8.1 (1435). This implies a series of resolved issues, such as minor bug fixes or security enhancements.

    With its support, you can start meetings with HD quality for video and audio, and in case someone is missing the meeting, you can record the whole thing and share it with your colleague. And you can invite up to 100 people to join.

    To find the newest and most important features in Zoom, you should definitely check one of the manufacturer’s articles.

    It is extremely easy to get. You’re able to download and install it through two different methods, as shown above.

    We hope our guide offers you a more complex perspective on how Zoom currently works in Windows 11. As you can see, the software is incredibly simple to use, and you can join the meetings in a matter of seconds.

    If you’re not a fan of this tool, then you might want to learn how to use Microsoft Teams in Windows 11.

    Also, if you ever notice that Zoom filters are not showing, make sure to fix this annoying error for good.

    Any other questions or thoughts? Always feel free to share them with us by leaving a comment in the section below.