How to Print Labels From Excel: 6 Easy Steps

Printing labels from a mailing list maintained in Excel can be tricky. However, it can be done with some help from Word’s Start Mail Merge feature. 

This guide will discuss a step-by-step process to print labels from Excel. Let’s get started! 

Can you print labels directly from Excel?

Yes, you can print labels directly using Excel. However, doing so will not give you many options to customize the labels. Also, it is a bit tricky. Therefore, it is advised to use Word’s Start Mail Merge feature and Excel data to create labels from the mailing list.

How do I print labels from an Excel spreadsheet?

Before proceeding with the steps, go through the following preliminary checks:

  • First, make sure your data is uniformly formatted and mistake-free.
  • To make mailing labels, you need to add descriptive column headings.
  • Double-check to ensure that there is no blank row or column within the list.
  • Create separate columns for the title, first and last name, street address, etc.

1. Prepare the worksheet in Excel

  1. Launch Excel and open a spreadsheet.
  2.  Segregate the details in individual columns; the header should be Title, First Name, Last Name, Street Address, City, State, and ZIP code.Arrange your data - Print labels EXCEL
  3. Fill in the data accordingly, go to File, and then click Save from the left sidebar.
  4. Now click Browse, name the file, and save it in the desired location.Browse

2. Setup labels in Word

  1. Launch Microsoft Word on Windows; under New, click Blank document.
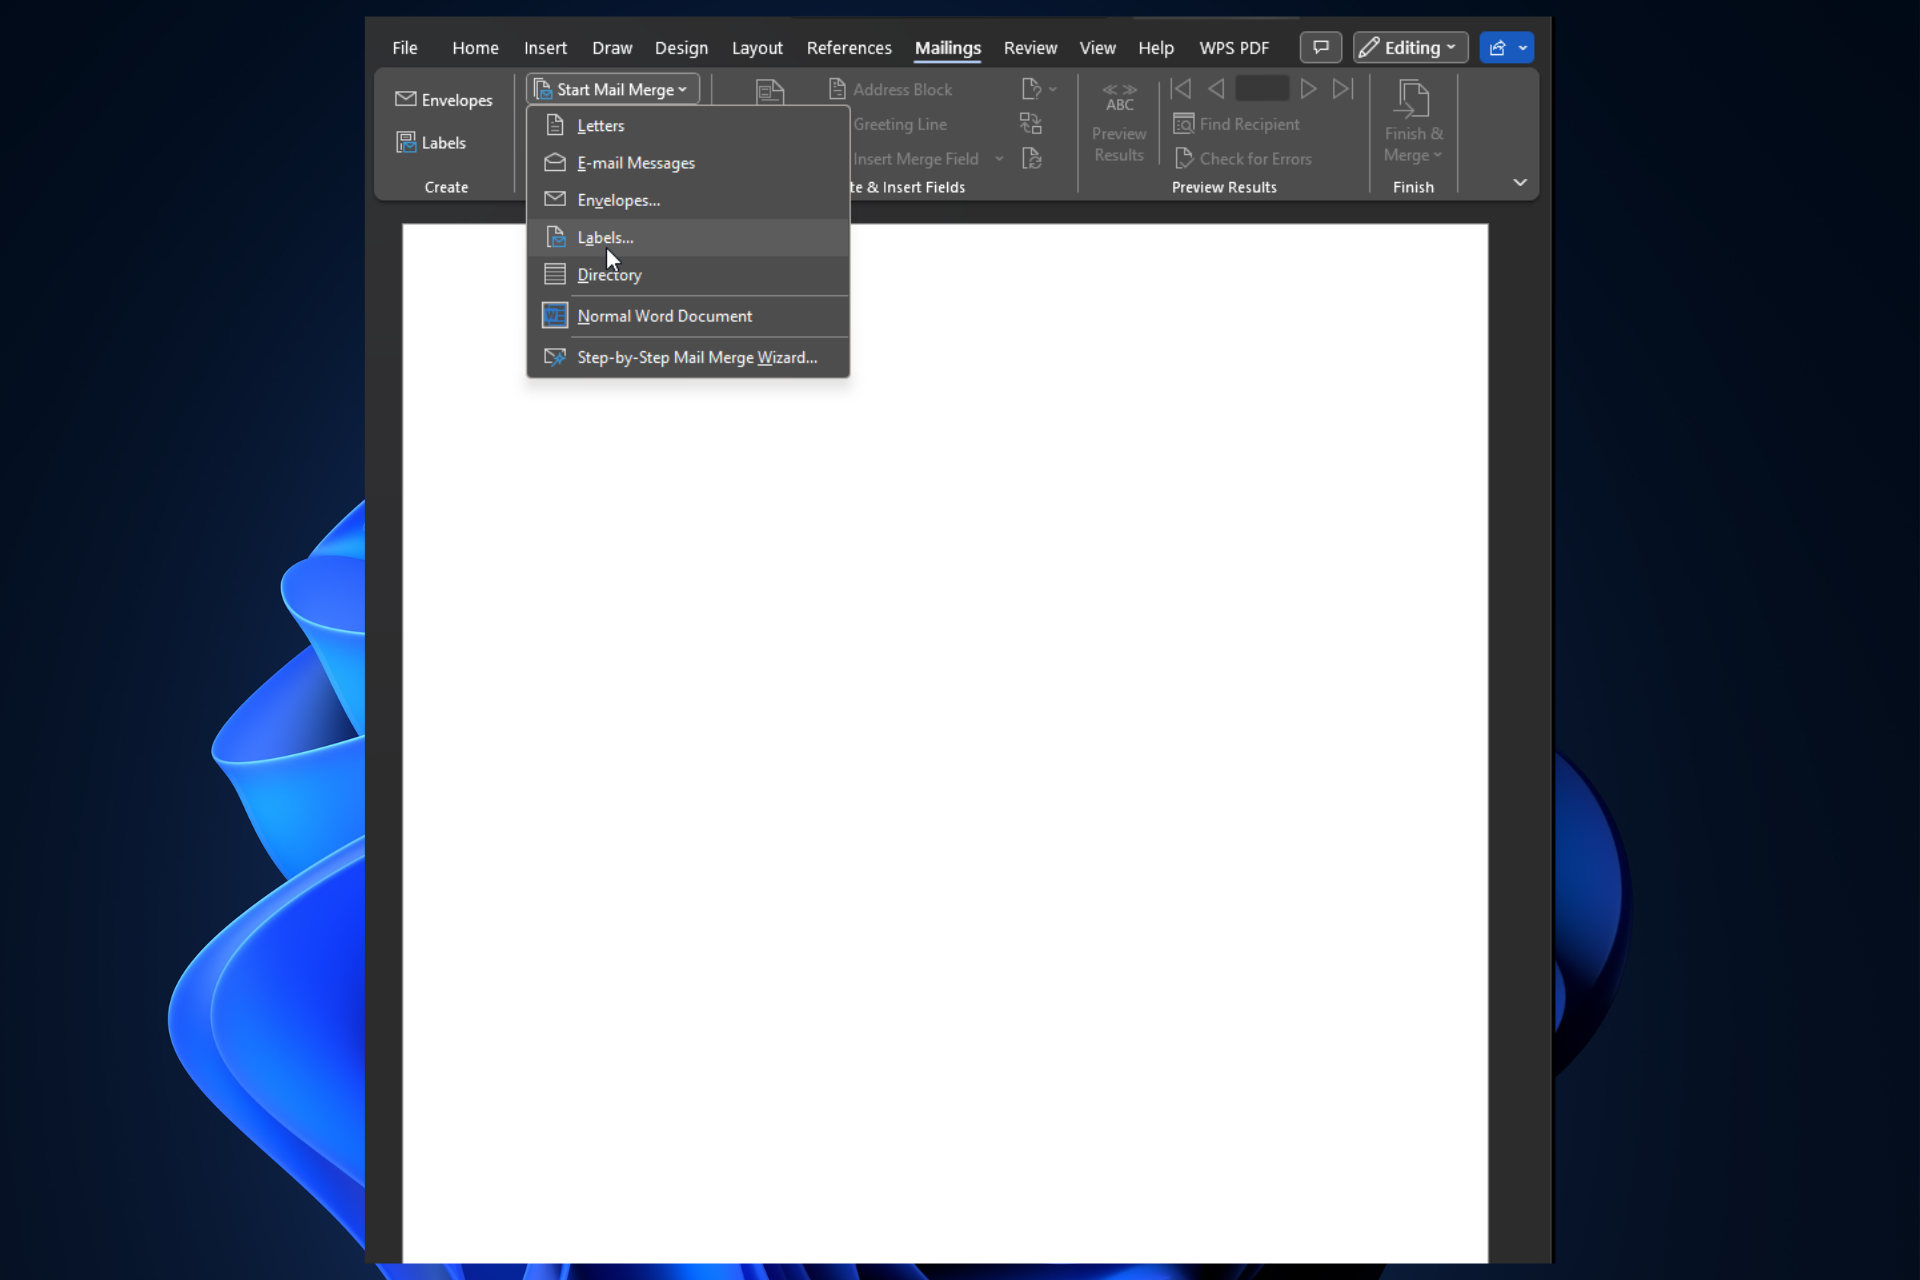
  2. Select the Mailings tab from the toolbar, click Start Mail Merge, and choose Labels from the menu.Start Mail Merge
  3. From the next window, Label vendors dropdown menu, choose the label vendor.
  4. Select a label type from the Product number list.Label options
  5. Click the New Label button and choose label dimensions.Label Details
  6. Now, click OK and OK again.

3. Connect labels and worksheet

  1. On the Word document, go to the Mailings tab and Select Recipients.
  2. Click on Use an Existing List to use that Excel sheet you created.Mailing list
  3. From the File Explorer window, please navigate to the spreadsheet and double-click on it.
  4. On the Select Table window, click on the Sheet that you want to use. Then, put a checkmark on the First row of data containing column headers and click OK.Select table

4. Add mail merge fields

  1. On labels document on Word, go to the Mailings tab, and click the Address Block option.
  2. On the Insert Address Block window, click Match Fields.Match fields
  3. Now on the Match Fields window, under Required for Address Block, make sure the entries are correct and are the same as mentioned in the spreadsheet.Match Fields 2
  4. Click OK. 
  5. Now on the Insert Address Block window, you will get a preview of the label created. Please double-check it and Click OK.
  6. In the first label on the Word document, it should say AddressBlock. Next, go to the Mailings tab, then click Update Labels. After that, all the titles will automatically display AddressBlock.Update labels
  7. On the Mailing tab, click Finish & Merge option and choose Edit Individual Documents. Edit doc
  8. On Merge to Document, Select All and click OK.Merge to new document

5. Save labels as PDFs & print them

  1. Go to File and click Save as on Word document.
  2. Select Browse, then go to Save as type, choose PDF as file type, and save it with a name. Click Save.
  3. Go to the File tab on Word and click Print.Print
  4. Select your printer from the available options and click Print.

How to print labels from Excel in Word?

You must use the Start Mail Merge feature available on Word to print labels from Excel using Word. The feature makes it easy to customize the labels and also saves time.

So, these are easy steps to print labels from Excel in no time. You can also print labels using Excel via a portable label maker, Phomemo D30, and your phone. To learn more about the device, read this guide.

Before you leave, don’t miss our latest guide to learn how to mail merge from Excel to Microsoft Word for more information.

If you have any questions or concerns about the subject, please let us know if it worked for you in the comments section below.

B1initializelibrary Failed: How to Fix Error 0xc00000BB

Trying to start your computer usually but are stuck with  b1initializelibrary failed 0xc00000bb error? It could happen if a BIOS issue or any system files were infected.

In this guide, we will discuss the reasons for the issue along with all the available fixes. Let’s get started! 

What is b1initializelibrary failed 0xc00000bb?

After researching and studying the use cases, we have made out a list of reasons which could cause the issue: 

  • Booting sequence is corrupted – If there is a booting problem, you might get the error code every time you will start your computer. You need to change the master boot record, boot sequence, and boot configuration data.
  • Secure boot is enabled – If you have cloned HDD/SSD, you might get this error at startup. In this case, you need to disable Secure Boot to get rid of the error.
  • 4G Decoding disabled – If 4G decoding is disabled, it could cause a problem. You need to enable the 4G decoding feature from UEFI firmware settings.
  • Memory Management registry key – ClearPageFileAtShutdown DWORD is also found to be the culprit of the issue. To resolve the issue, you need to modify the key from Registry Editor.
  • Corrupted system file – If there are corrupted system files, which can’t be repaired using bootrec.exe, chances are the files are the reason for your computer being stuck up on startup.

How do I fix error 0xc00000bb?

1. Enable 4G Decoding

  1. Press Windows + I to open Settings.
  2. Go to System, then Recovery.System - Recovery Windows 11
  3. Now go to Advanced startup and click Restart Now.Recovery Advanced Startup
  4. On Choose an option screen, click Troubleshoot.Choose an option
  5. Now select Advanced Options.Advanced Options
  6. On the next screen, select UEFI firmware settings and then click Restart.UEFI
  7. You will get a screen; click on the option available for BIOS Utility, like press F10 to go to BIOS utility.
  8. Navigate to 4G Decoding, and select Enabled.
  9. Go to the Exit tab, and click on Save changes & Exit to restart your computer normally.

2. Fix the Master Boot Record and rebuild the boot configuration data

  1. Go to the login screen, click the Shutdown icon, then press and hold the Shift key while choosing Restart.
  2. From the Advanced Options screen, select Command Prompt.Command Prompt Advanced Options
  3. Choose your account and enter your credentials to launch the command prompt window.
  4. Type the following commands one by one and press Enter after each command:  bootrec.exe/fixmbr bootrec.exe/fixboot bootrec.exe/scanos bootrec.exe/rebuildbcd
  5. Once the process is done, restart your computer.

3. Disable Secure Boot

  1. Press Windows + I to get Settings.
  2. Go to System, then Recovery.
  3. Navigate to Advanced startup, and click Restart Now.
  4. On the Next screen, choose Troubleshoot.
  5. Go for Advanced options, now click on UEFI firmware settings and click Restart.UEFI 2
  6. From the next screen, choose the option to enter BIOS.
  7. Go to Boot, then Secure boot and select Disabled.
  8. Switch to the Exit tab and select Save changes & Exit.

4. Make changes to the ClearPageFileAtShutdown key in Registry Editor

  1. Press Windows + R to get the Run window.
  2. Type msconfig and press Enter to open System Configuration.MS CONFIG RUN COMMAND
  3. Go to Boot, and click on the radio button beside Safe boot.Safe boot
  4. Click Apply and OK. When prompted, click on Restart.msconfig restart prompt
  5. Now, fire up the Run window again, type regedit, and press Enter.
  6. Follow this path: Computer\HKEY_LOCAL_MACHINE\SYSTEM\CurrentControlSet\Control\Session Manager\Memory Management
  7. Locate and right-click on ClearPageFileAtShutdown and select Modify.Clearpagefileatshutdown enabled
  8. Now change the Value data to 1 and choose Hexadecimal and click OK.

So, these steps you can follow to fix the b1initializelibrary failed 0xc00000bb error. If nothing worked for you, an in-place upgrade is advised. If you are stuck in the process somewhere, feel free to let us know in the comments section below, we will be happy to help! 

Class Not Registered VBA Error: How to Fix It [Excel]

Though the Microsoft Office suite is one of the best products in the category, users often come across errors in it. One such is the Class not registered VBA error in Microsoft Excel.

The error is usually encountered when trying to run a macro in Excel, though that’s not always the case. When this happens, you are unable to perform the desired function.

However, the Class not registered VBA error is not as intricate as it appears, and we have listed the best fixes for it in the following section.

How do I fix the Class not registered VBA error?

1. Repair Microsoft Office

  1. Press Windows + R to launch the Run command, type appwiz.cpl in the text field, and either click on OK or hit Enter to launch the Programs and Features window.appwiz.cpl
  2. Locate the Microsoft Office entry, select it, and then click on Change.Change to fix class not registered vba
  3. Click Yes in the UAC (User Account Control) prompt that pops up.Click Yes
  4. Now, select the Online Repair option, and click on the Repair button to start the process.Online repair to fix class not registered vba

The repair process is found to eliminate a lot of issues with Microsoft Office including the Class not registered VBA error. If this method doesn’t work, head to the next one.

2. Register critical DLL file

  1. Press Windows + S to launch the Search menu, enter Windows Terminal in the text field at the top, right-click on the relevant search result, and select Run as administrator from the context menu.Windows Terminal to fix class not registered vba
  2. Click Yes in the UAC prompt that appears.Yes
  3. Now, click on the downward-facing arrow, and select Command Prompt from the list of options. Alternatively, you can hit Ctrl + Shift + 2 to launch Command Prompt.Command Prompt to fix class not registered vba
  4. Type/paste the following command and hit Enter:cd C:\Windows\SysWOW64\Execute command
  5. Now, execute the following command to register the required DLL file:Regsvr32 fm20.dllregister dll file to fix class not registered vba

Another quick way to register missing DLL files or replace the corrupt ones is to use a reliable third-party tool. These tools will also look for corrupted files and repair the damage caused.

3. Run DISM and SFC scan

  1. Press Windows + R to launch the Run command, enter wt in the text field, press and hold the Ctrl + Shift key, and then click on OK or hit Enter to launch an elevated Windows Terminal.Windows Terminal
  2. Click Yes in the UAC prompt.Click Yes
  3. Click on the arrow at the top, and select Command Prompt from the dropdown menu. Command Promp to fix class not registered vba
  4. Now, paste the following three commands one at a time, and hit Enter after each to run the DISM tool:DISM.exe /Online /Cleanup-image /Scanhealth DISM.exe /Online /Cleanup-image /Restorehealth DISM.exe /online /cleanup-image /startcomponentcleanup
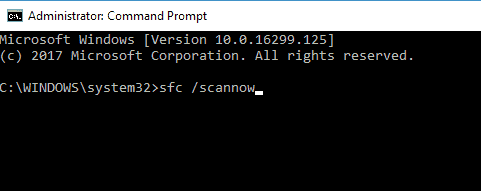
  5. Now, execute the following command to perform the SFC scan:sfc /scannowSFC scan to fix class not registered vba

The SFC (System File Checker) scan and DISM (Deployment Image Servicing and Management) tool are two effective methods to fix a bunch of issues having to do with corrupt system files or problems with the Windows image.

4. Update Microsoft Office

  1. Launch any Microsoft Office app, and open a new blank document.
  2. Now, click on the File menu near the top-left corner.File menu to fix class not registered vba
  3. Select Account from the list of options on the left.Accounts
  4. Next, click on the Update Options button under Product Information.Update options
  5. Finally, select Update Now from the options in the flyout menu.Update now to fix class not registered vba
  6. Wait for the update to install, if there’s one available.

If it’s a problem with the current version, try installing the latest version of Microsoft Office.

These are all the ways you can fix the Class not registered VBA error when trying to run macro in Excel. In case none of the methods here help, upgrade to the latest iteration of MS Office available.

Also, find out how to fix the VBA runtime error 1004.

If you have any other queries or know a method that’s not listed here, please drop a comment in the section below.

Best Windows 11 Folder Settings [Tips & Tricks]

It must be the same for your Windows computer if you want to keep things organized. Maintaining organized files and folders can be difficult if you don’t know your way around. 

This guide will discuss some nifty tips and tricks for folder settings on Windows 11 to help you adjust folder settings per your preferences. Let’s begin!

What are the best tips and tricks for Windows 11 folder settings?

1. Set default folder view to all folders

  1. Open File Explorer, and click the View button. Next, choose icon options from Extra large, Large, Medium, and Small.Folder view
  2. Now click on three dots and select Options.Folder Options original
  3. On the View tab of the Folder Options window, click Apply to Folders.Apply to Folders
  4. Click Apply and OK.

2. Open File Explorer on This PC

  1. Open File Explorer, click three dots, and select Options.
  2. Now beside Open File Explorer to, click on the dropdown and select This PC.This PC
  3. Click Apply and OK.

3. Access Advanced Folder Commands

  1. Open File Explorer.Screenshot
  2. Please select a folder, press the Shift key, and then right-click on it to open advanced commands.

4. Change the Location of User Folders

  1. Open File Explorer, right-click on the folder, and select Properties.Properties User folders
  2. Go to Location, click Move, select the new location, click Apply, and then OK.User folder edit

5. Optimize your Downloads Folder 

  1. Open File Explorer, right-click on the Downloads folder, and select Properties.
  2. Go to the Customize tab and select General items from the drop-down menu under Optimize this folder.General Items
  3. Click Apply and OK.

6. Remove recently used files from Quick Access

  1. Open File Explorer, click on three dots, and select Options.
  2. On the Folder Options window, go to the General tab under Privacy, and remove the checkmark beside the desired option.Folder
  3. Click Apply and OK.

7. Show/Hide files and folder

  1. Launch File Explorer, click on three dots, and select Options.
  2. On Folder Options, go to the View tab, under Advanced Settings, navigate to Files and Folders, then Hidden files and folders. Put a checkmark beside any of the two options accordingly.Folder Hide
  3. Click Apply and OK.

Should you feel the need to hide folders in your Windows 11, we have a detailed article on how to go about it.

8. Share files with Apps, PC, and People

  1. Open File Explorer. Locate and click on the file you want to share.
  2. Now, click on the Share icon.Share with
  3. Choose the desired option. 

9. Dock File Explorer windows side by side

  1. Open all the File Explorer windows that you want to work on.Windows Dock
  2. Hover on the square icon from the top right corner and select the number of docks.
  3. Now select the windows that you want to open.

10. Open Files with single-click

  1. Open File Explorer, click on three dots, and select Options.
  2. On the General tab on the Folder Options page, click the radio button to select Single-click to open an item.Single folder
  3. Click Apply and OK.

So, these are some of the most valuable tips and tricks to use folder settings on Windows 11 and personalize folders on your PC.

To learn more about customization, we have a great guide on how to customize File Explorer in Windows 11, so don’t miss it.

Which one do you use the most? Feel free to tell us in the comments section below.

Excel Not Printing Gridlines: Here’s Why & How to Fix It

Some Excel users need to print their spreadsheets with gridlines. Then the printed output will include cell gridlines along with their values.

However, some users have said in MS support forum posts that their printers don’t print the gridlines in their Excel sheets.

One user added that:

Borders were printing last week on older version of Excel. With 2010, gridlines and borders are not printing.

How do I make Excel spreadsheet gridlines print again?

1. Make sure the Print gridlines option is selected

  1. Check that the Print gridlines option is selected in Excel.
  2. Click the Page Layout tab shown directly below.
  3. Select the Print check box under Gridlines.
The Print check box excel spreadsheet borders and gridlines not printing

2. Reduce the scale to 99 percent

  1. At first, select the Page Layout tab.
  2. Click inside the Scale box shown directly below.Scale box excel spreadsheet borders and gridlines not printing
  3. Enter 99 in the Scale box, and press the Return button.
  4. Then try printing the spreadsheet again.

3. Deselect the Draft quality option

  1. Select Excel’s Page Layout tab.
  2. Then, click the Page Setup button shown in the snapshot directly below.Page Setup button excel spreadsheet borders and gridlines not printing
  3. Click the Sheet tab on the Page Setup window.Page Setup window excel spreadsheet borders and gridlines not printing
  4. Deselect the Draft quality check box.
  5. Select the OK option.

4. Update the printer’s driver

You’ve heard that it’s essential to have your drivers properly updated. Outdated driver versions often lead to major stability problems, so make sure this isn’t your case as well.

When you first plug in a device, Windows will often install its own generic version of the driver itself, and the devices should get basic functionality from the start.

However, you want more than that for your printer. Manually looking for the right drivers is a challenging task. Avoid it from the start by downloading and installing Outbyte Driver Updater.

This tool gives you the chance to instantly update all your drivers with a few clicks and get back to printing in no time.

No less important, before you go obsessing about keeping your drivers up to date, start using this tool to schedule driver scans. Isn’t it easier this way?

Additionally, the software helps you to automatically update old drivers individually or at one go. Plus, you will handle corrupted or missing drivers more easily with automated support at any time.

Then, using specialized aid from this program is way better than doing it manually, plus you can optimize your PC performance by properly resolving driver issues.

⇒ Get Outbyte Driver Updater

5. Select the best print quality

  1. Select the File tab.
  2. Click Print on the left of the tab.
  3. Click Printer Properties to open a window like the one shown directly below.printer properties window excel spreadsheet borders and gridlines not printing
  4. Select the tab that includes a print quality option like the one shown directly below.
    • The tab that includes that option varies between printer properties windows.Print quality settings excel spreadsheet borders and gridlines not printing
  5. Click Best if Standard is selected.

6. Select Print to PDF

  1. First of all, click the File tab.
  2. Click Print to open the options shown directly below.Excel's print options excel spreadsheet borders and gridlines not printing
  3. Select Print to PDF on the printer drop-down menu.Print to PDF option excel spreadsheet borders and gridlines not printing
  4. Click the Print button.
  5. A Save Print Output window will then open. Enter a title for the PDF file in the text box.
  6. Click the Save button.
  7. Open the spreadsheet’s Portable Document File in Adobe Reader or other alternative PDF software.
  8. Print the spreadsheet from the PDF software.

Those are some of the resolutions that can fix Excel spreadsheets’ gridlines not printing.

Remember that you can also open and print Excel spreadsheets within alternative freeware spreadsheet applications like LibreOffice Calc. A spreadsheet’s gridlines might print fine when you utilize Calc.

Which one of these fixes did the trick for you? Let us know by leaving us a message in the comments section below.

0x8007232b: How to Fix This Windows Activation Error

If you try installing Windows Enterprise using volume-licensed media, you might get an activation error code: 0x8007232b. Don’t worry; it can be fixed.

In this guide, we will discuss the available fixes after discussing the possible reasons for the issue.

What causes Windows activation error 0x8007232b?

There could be several reasons for the error to occur, some of which are listed below: 

  • KMS client unable to find KMS server – If your KMS client, i.e., your computer, cannot find KMS Server Resource Records in DNS due to network problems.
  • When activating an account using a generic product key –  If you try to activate your user account using Volume License generic product key or a product key that is not unique, this error could happen. 
  • KMS host is not on the network – If the KMS host doesn’t exist, you need to install MAK systems to eliminate the error.
  • Trying the conventional way to activate Windows – From Windows 10 onwards, using the old activation method to activate your Windows can lead to this error.

What can I do to fix Windows activation error 0x8007232b?

Before proceeding to the detailed troubleshooting, try these quick fixes: 

If that doesn’t work,  use these straightforward methods to fix error 0x8007232B: 

1. Run Network Troubleshooter

  1. Press Windows + I to get Settings.
  2. Go to System, and click Troubleshoot.Error 0x8007232B Troubleshooter
  3. Now click Other troubleshooters.Troubleshooter 2
  4. Beside Network Adapter, click Run.Network Adapter
  5. Follow the on-screen instructions to finish.

2. Change the product key from KMS to MAK

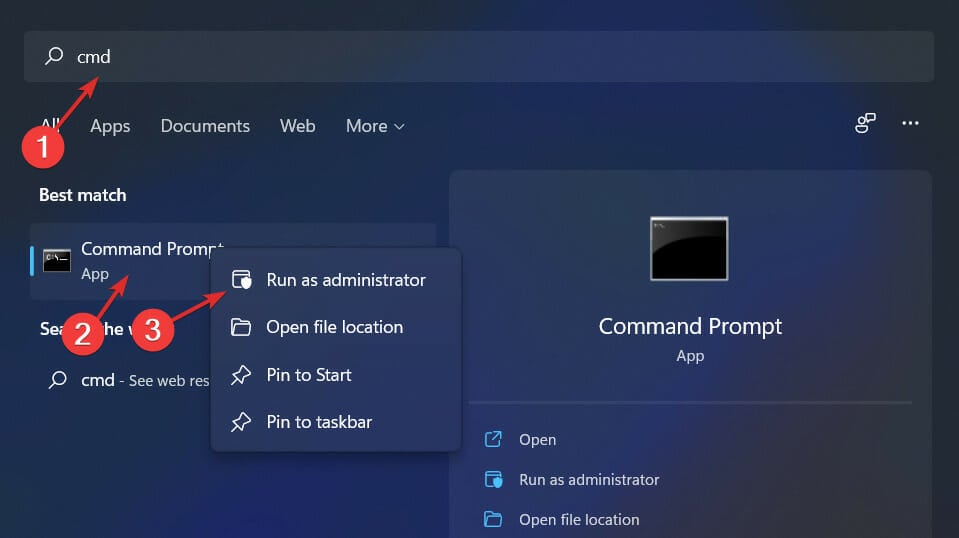
  1. Press the Windows key, type CMD and click Run as administrator to open the elevated Command Prompt.DOS COmmand Prompt
  2. Copy and paste the following command and press Enter to get your product key. You may skip this if already have a product key: wmic path softwareLicensingService get OA3xOriginalProductKey
  3. Type the following command and press Enter. Replace xxxxx with the product key you got from step 2: slmgr -ipk xxxxx – xxxxx – xxxxx – xxxxx – xxxxx

3. Use the default product key: 

  1. Press Windows + R to open the Run window.Activation Error 0x8007232B
  2. Type slui.exe 3 and press Enter. Press OK on the UAC prompt.
  3. Go to the Change product key and click Change.Activation
  4. Use the following generic product keys according to your version of Windows and click Next. Windows 11 Enterprise – XGVPP-NMH47-7TTHJ-W3FW7-8HV2C Windows 11 Pro Education – 8PTT6-RNW4C-6V7J2-C2D3X-MHBPB Windows 11 Pro – VK7JG-NPHTM-C97JM-9MPGT-3V66T Windows 11 Home – YTMG3-N6DKC-DKB77-7M9GH-8HVX7
  5. Restart your computer and try again with your product key.

4. Configuring The KMS Host Against KMS Clients

  1. Press Windows + R to open the Run window.
  2. Copy and paste the following command to install KMS and press OK: slmgr.vbs /ipkRun KMS install 0x8007232B
  3. Open the Run window again, type the command to activate KMS online, and press OK: slmgr.vbs /ato Run activate Windows
  4. In the run window, type the following command to activate Windows using the telephone: slmgr.vbs /dtiAcrivate Windows
  5. Call the Microsoft center, get the Confirmation ID, and enter it when prompted to activate.
  6. Now in the run console, type: slmgr.vbs /atpConfirmation id

5. Connecting The KMS Client To The KMS Host When DNS Is Unavailable

  1. Press the Windows key, type CMD and click Run as administrator.DOS COmmand Prompt
  2. Type the following command: slmgr.vbs /skms
  3. Restart your PC.

6. Installing MAK manually

  1. Go to Microsoft Volume Licensing Service Center.
  2. Sign in and get your keys and keys link.
  3. Press Windows + X and select Terminal (Admin) from the menu to open PowerShell.Open Powershell
  4. Type the following command and press Enter: slmgr.vbs /ipk MAKProductKey
  5. Copy and paste the command to activate your Windows online: slmgr.vbs /ato
  6. Click OK to confirm.

So, these are the methods to fix activation error code 0x8007232B on Windows 11. Try these methods and let us know in the comments section below if anything worked for you.

Stdole32.tlb Excel Error in Windows 11: 5 Tips to Fix It

When you launch Microsoft Word or Microsoft Excel, Windows makes an extremely tedious attempt to set up Office 365. And at the conclusion of the process, you may receive the Stdole32.tlb Excel error.

Because of a number of bugs that are present in the Microsoft Office suite, launching any of its products might be a living nightmare at times.

What is the meaning of Stdole32 TLB?

Microsoft developed the Stdole32.tlb file, which is also known as a Microsoft OLE 2.1 for Windows NT(TM) OS file. Its purpose was to facilitate the creation of the Microsoft OLE 2.1 for the Windows NT(TM) operating system.

The Win32 DLL (Dynamic-link library) file type category is where you’ll find TLB files if you’re looking for them.

On November 8, 2006, the first version of Stdole32.tlb was distributed alongside Windows Vista as part of the Vista operating system.

Windows 11, Windows 10, Windows 8.1, and 8 all come with the Stdole32.tlb program preinstalled as part of the software.

On what systems does the Stdole32 TLB error occur?

Users have been reporting the Stdole32.tlb error on multiple Windows iterations. Some of these are the following:

  • Stdole32.tlb excel error in Windows 11 – By repairing the Microsoft Office, or Office 365, app, you will be able to fix this issue.
  • Windows 10 Stdole32.tlb excel error – The solutions below will also work for Windows 10 users, as the two OS iterations aren’t that different at the core.
  • Stdole32.tlb excel error in Windows 7 – For Windows 7 users we recommend that you perform an SFC scan in order to fix system files.

This being said, follow along as we will show you a list of five comprehensive solutions to implement in order to fix the Windows 11 Stdole32.tlb Excel error. Keep on reading!

How do I fix Stdole32 TLB error in Excel in Windows 11?

1. Repair Office 365

  1. Open the Settings app by pressing the Windows and I keys simultaneously and go to Apps followed by Apps and features.apps-feature stdole32.tlb
  2. Here, search for the Office app, click on the three-dotted menu, and choose Advanced options.ad-office stdole32.tlb
  3. Scroll down until you meet the Repair section and click on the Repair button. This will not delete any of your existing files and will fix the Stdole32.tlb Excel error.repair-app stdole32.tlb

2. Run the SFC scan

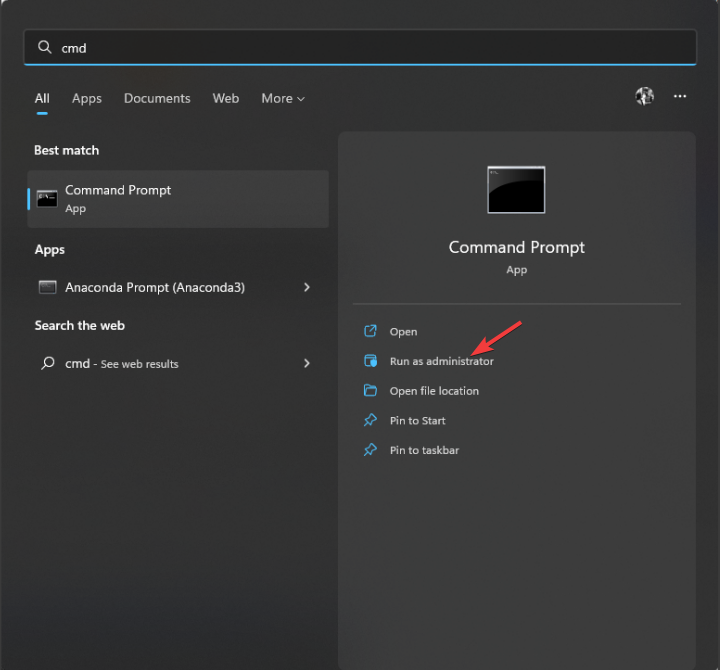
  1. Open the Windows Search function by clicking on the magnifying glass icon then type cmd. Right-click on the topmost result and select Run as administrator.cmd-search windows 11 error system thread exception not handled
  2. Next, copy-paste or type the following command and hit Enter to run it:sfc /scannowsfc-scannow windows 11 error system thread exception not handled

3. Use a 3rd party DLL fixer

It’s possible for Dynamic Link Library files, commonly known as DLLs, to get corrupted or just disappear for a variety of reasons. Including issues with the software, crashes in memory, and even broken registry files.

DLLs are critical to the operation of your computer system, even though they are vulnerable to corruption.

If you have access to a program that can detect problems even before they manifest themselves, your experience with your personal computer will be much enhanced.

These system restoration tools will repair any damaged file and their extensive collection of DLL files that have been brought up to date will be of great assistance.

4. Reinstall Office 365

  1. Open Settings as we have mentioned in the first solution and go to Apps followed by Apps and features.apps-features stdole32.tlb
  2. Enter Office in the search bar and then click on the three-dotted menu next to it in order to choose Advanced options.ad-office stdole32.tlb
  3. Find the Repair section but this time choose the Reset button in order to perform a quick reinstallation. Note that this option will delete all of your app’s data, so make sure to backup anything important before.reset-app stdole32.tlb

Take note that in addition to resetting an app, you can also control app add-ons and other downloaded material for that particular app by going to the Advanced settings menu and selecting the app in question.

5. Update Windows

  1. Access the Settings menu and navigate to Windows Update.windows-update logitech g hub not detecting mouse
  2. Click on the blue button which will either state Install now, Restart now or Check for new updates, and wait for the process to finish. This will ensure that Windows doesn’t cause the Stdole32.tlb issue.windows-update logitech g hub not detecting mouse

Have you ever questioned the significance of installing the latest Windows updates? The vast majority of them consist of security updates. Because malicious software or hackers may take advantage of them, security flaws are the worst kind of fault that could ever occur.

Check out our post on the five best antivirus software for Windows 11 that you need to install before losing any personal data to a cyber attack.

These kinds of occurrences are frequently discovered in several components of Windows, such as ActiveX and Internet Explorer, among others.

Other updates fix various faults and problems that have been found in Windows. Even while they are not to blame for any security flaws, they may nonetheless compromise the stability of your operating system. or simply be a nuisance.

Internet Explorer is the program that best exemplifies how Windows Updates may include brand-new functionality while also addressing previously discovered bugs.

For more information and potential solutions, check out how to fix the Excel runtime error 1004 in Windows 10.

Alternatively, take a look at what to do if Office 365 is not opening [Word, Excel, PowerPoint] in Windows 10.

We hope this guide was useful to you. Don’t hesitate to tell us what you think in the comments section below. Also, feel free to share additional solutions that you have in mind. Thanks for reading!

Microsoft has Blocked the Macros Because the Source is Untrusted

Many readers reported Microsoft has blocked macros from running because the source of this file is untrusted in Excel, and they are worried about this message.

When you click on the Learn More button, it simply redirects you to a website that tells you in-depth about why you are seeing this error and also provides you with the solution.

What do I do if Microsoft has blocked macros from running?

  1. 1. Change the file properties
  2. 2. Right-click on the workbook.

  3. 3. Select Properties.

    Select Properties
  4. 4. Under the General tab, make sure to check the Unblock box in Security.

    Under the General tab, make sure to check the Unblock box in Security
  5. 5. Hit the Apply button.

  6. 6. Now open the workbook.

  7. 7. You will see the error message has now disappeared.

  8. 8. Click on View on the top menu bar.

    Click on View on the top menu bar.
  9. 9. At the extreme right on the top menu bar, click on Macros.

  10. 10. In the new window that shows, hit the Run button. You will see the macros running without any issues.

    In the new window that shows, hit the Run button. You will see the macros running without any issues.

Quick Tip:

Sometimes, to fix this kind of problem, you just have to use another app. WPS Office is a replacement for Microsoft Office which has the same functionality.

Perfect for creating and editing Word documents, spreadsheets, and presentations. You won’t feel any difference since you are using the same extensions and Office.

WPS Office

Get the job done quickly and don’t put off any of the tasks.
Free Download Visit Website

Also, note that any files downloaded to the trusted location will not be blocked by default. To view which locations are trusted, you can follow the steps below.

  1. Open the workbook.
  2. Click on File.
  3. Select Options.
  4. Click on Trust Center from the left pane.
  5. Press Trust Center Settings on the right.
  6. Select Trusted Locations from the left.
  7. Here you will see your trusted locations.

What error will you get when accessing macros downloaded from the internet?

Before the update, when you used to open macros downloaded from the internet, there was a simple warning that said Macros have been disabled.

But the good thing about this warning was that there was an Enable option that would fix the problem, and actually let you enable the content.

Now, after the update, users come across the error saying Microsoft has blocked macros from running because the source of this file is untrusted when trying to run macros downloaded from the internet.

This isn’t the only security issue, many reported Office detected a problem with this file and Most of the features have been disabled messages. You may also encounter issues opening your Excel file because the personal.xlsb is locked for editing but here’s how to bypass it.

Let us know in the comments below if you were able to fix this problem using the above method or not. You can also let us know of any other alternative method that fixed the problem for you.

7 Best Tech Christmas Gifts Under $100

Without thinking about it, the holidays are already around the corner. Christmas comes with its own provisions of funfair and opportunity to share.

Eager to buy something special for friends and loved ones this season? You can actually purchase some of the best tech Christmas gifts under $100 for that special someone or friend.

The good news is that it doesn’t necessarily have to cost a fortune. With further advancement in technology, the tools for making required technology gadgets have become easier to access for manufacturers.

The consumers of technology products are the ones who stand to gain- laptops and smartphone accessories, cameras, trackers, etc. So, here are some of the best tech gifts to watch out for this Christmas!

What are the best tech Christmas gifts with a friendly price tag?

JBL Flip 4 waterproof Bluetooth speakers

  • Impressive stereo sound
  • Built-in 3000mAh rechargeable li-ion battery
  • Ipx7 waterproof
  • Links more than 100 JBL connect+ enabled speakers together
  • Dual external passive radiators
  • Charging cable random issues

The JBL Flip 4 Bluetooth waterproof speaker is just one of these perfect tech gifts for men that you can find this season at a great price.

The Bluetooth speaker allows users to connect up to two smart devices for an exciting music listening experience.

No worries about power as the speaker come with as much as 12 hours of continuous playtime from the 3000mAh rechargeable Li-ion battery.


Roku Express HD streaming media player

  • Simple setup with high speed HDMI cable
  • Intuitive navigation
  • Voice search across 1,000+ top channels
  • Tons of streaming services to choose from
  • Free Roku mobile app
  • No HBO MAX support

Roku Express is exactly what everyone needs this yuletide season to enjoy the best of TV programs. Moreover, it’s one of the most interesting tech gifts under $50 that you can find these days.

It offers over 1,000 channels, serial programs, and 500,000+ movies from Netflix, CBS, ABC News, ESPN, and more streaming live.

With an easy to install Roku Express via HDMI cables to your TV or using the Roku mobile app, you are one step away from helping your friends enjoy subscription-free entertainment.


NETGEAR R6700 Nighthawk AC1750 router

  • Recommended for up to 25 devices
  • Wired Ethernet ports included
  • Supports WPA2 wireless security protocols
  • Powerful firewall
  • Guest Wi-Fi access
  • Only supports Google Chrome 11.0 or higher

It’s time to experience unparalleled connectivity across multiple devices using the renowned Netgear R6700 dual-band Wi-Fi router.

That’s one of the most useful tech gifts for elderly people or friends of any age who like the idea to enjoy up to 1300 Mbps speed for as much as 12 smart devices without wavering speed.

With a dual-band, 1GHz dual-core processor, and strong Wi-Fi connectivity, having this device guarantees an exciting video streaming, gaming, or music experience this Christmas.


Logitech G502 tunable gaming mouse

  • Optical gaming sensor
  • Cable length - 6 feet
  • Weighty, metal wheel
  • Custom RGB lighting
  • No less than 11 programmable buttons
  • Poorly glued rubberized feet

Logitech G502 gaming mouse is one of the best tech gifts for children and gamers who dream of a stress-free gaming experience this Christmas season.

With a high-resolution capacity of up to 12,000 dpi and RBG, customized lighting, users can enjoy the best of visuals while gaming.

The advanced optical gaming sensor makes playing games fast and with much precision. Even more, the device is well-formulated and easy to install with multiple programmable functionalities.


Eco-fused universal stylus pen

get Eco-fused pen

The universal stylus pen by Eco-fused offers technology lovers an opportunity to enjoy a fun navigating experience with their smart devices.

It comes in a variety of colors plus an additional microfiber cleaning cloth to help keep your smartphone, tablet, or laptop screen dirt-free.

Eco-fused stylus pen keeps your screen safe and free of any form of scratch. It’s the best tech gift for anyone in your life this season.

⇒ Check price on Amazon


Anker ultra high capacity power bank

get Anker power bank

Enjoy uninterrupted playtime across your smart devices this Christmas using the Anker portable charger and power bank. Anker offers over 20,100mAh battery that can guarantee several hours of playing time.

The device comes with a variety of accessories to include a travel pouch, micro USB cables, etc. to ensure a smooth trip.

The plus for the Anker power bank is that it comes from a reliable brand that guarantees an exciting user experience for all those looking for the best tech Christmas gifts this season.

⇒ Check price on Amazon


COWIN E7 Bluetooth headphones

  • Active Noise Cancelling technology
  • Proprietary 45mm large-aperture drivers
  • High-quality microphone
  • NFC technology
  • Built-in 750mAh battery
  • Questionable bass

Traveling by airplane, train, and more this Christmas season can become more fun with the Cowin E7 noise eliminating Bluetooth headphones.

Users can now listen to exciting music or view interesting videos even in a noisy airplane cabin or in traffic due to Cowin E7 noise-canceling technology.

The Cowin E7 600mAh battery also guarantees no less than 30 hours of uninterrupted playtime to ensure no dull moments on your trip. It is clearly the best deal for tech Christmas gifts.


Searching for the best tech gifts for women, men, children – all your loved ones – under a certain price tag can leave one overwhelmed.

Let us remind you that the secret is to try and narrow down the search based on user preference or the person of interest.

Picking any of the above tech gifts this Christmas is a wise choice. Let us know in the comments area below if you had a splendid shopping session for the best tech gifts!

How to Fix Windows 11 Product Key Not Working Error (7 Tested Tricks)

This article will show you exactly how to fix the Windows 11 activation key error, with a code like 0xc004f050, and get your PC properly licensed.

Windows 11 activation errors are surprisingly common, especially after system upgrades, hardware changes, or clean installs. If your product key isn’t activating or Windows keeps telling you it’s not genuine, there are reliable, safe steps you can take.

What can I do to fix Windows 11 product key not working?

1. Use Command Prompt to activate Windows 

  1. Press the Windows key, type CMD and Run as administrator.
    CMD elevated
  2. Copy and paste the following command, but replace XXXX with your product key and press Enter:  slmgr.vbs /ipk XXXXX - XXXXX - XXXXX - XXXXX - XXXXX
  3. Restart your PC.

2. Use the Telephone system to activate Windows 

  1. Press Windows + R to open the Run window.
    SLui
  2. Type slui 4 and click OK.
  3. On Select your region window, select the country and click Next.
    Activation by phone 1
  4. On the next screen, you will get a few phone numbers; call on one of them, and tell them the Installation ID to get a Confirmation ID.
    Activation by phone 2
  5. Enter Confirmation ID and click Activate Windows.
    Activation by phone 3

3. Run the Activation Troubleshooter

Windows 11 includes a built-in tool to detect and fix licensing issues automatically.

activation troubleshooter
  • Go to Settings > System > Activation.
  • Click Troubleshoot under Activation state if the option appears.
  • Let the tool scan and apply fixes.

4. Sign In with Your Microsoft Account

If you’ve linked your digital license to your Microsoft account, it can re-activate your device automatically.

  • Navigate to Settings > Accounts > Your info.
  • Ensure you’re signed in with the same Microsoft account used during initial activation.
  • Restart and check if the activation status changes.

5. Check If You Changed Hardware

If you recently changed your motherboard or storage device, the digital license might no longer match.

  • Open Settings > System > Activation > Troubleshoot.
  • Select “I changed hardware on this device recently.”
  • Sign in with your Microsoft account and select the device to re-activate.

6. Make Sure Your Version Matches Your Key

Trying to activate Windows 11 Pro with a Home key (or vice versa) will fail.

  • Check your current version: Settings > System > About.
  • If your key doesn’t match the edition, you’ll need to upgrade or reinstall with the correct ISO.

7. Contact Microsoft Support

If you’ve verified all the above and the Windows 11 product key is still invalid, contact official support for validation or a replacement key.

  • Visit Microsoft Support and choose Activation & Product Keys.
  • Use the live chat for faster response, especially if you’re logged into your Microsoft account.

Why is my Windows 11 activation key not working?

There might be various reasons for Windows 11 key not activating, some of them are listed below: 

  • Incorrect key – It might be possible that you mistyped the product key. Please carefully note the product key on a notepad and copy-paste it to the enter product key field to avoid any error.
  • Server Issues – Sometimes, while upgrading Windows, you might get this error if the activation server is busy. Please wait for a couple of hours and try again. 
  • Key is of a different edition – If you have a Windows Home license key and are using it to activate the Windows Pro version, it will not work, hence the error.
  • Major hardware changes – If you have made significant changes to hardware, such as the motherboard or GPU, you might face the issue.

FAQs

Can I activate Windows 11 without a key?

Yes, you can activate Windows 11 without a key if you have a digital license. Also, please ensure the digital entitlement added to your user account should be linked to your Microsoft account.

How do I find my Windows 11 activation key?

You can find the activation key on your registered email address if you have purchased a copy from Microsoft Store. However, if your license key came with your computer, you must have a digital license linked to your Microsoft account. You can get your hands on your product key via Command Prompt.

Summary

So, these are the methods that can help you fix the Windows 11 product key not working error. If nothing worked for you, it is advised to clean install Windows 11 after the upgrade. 

If you are stuck somewhere in the process, feel free to let us know in the comments section below. 

6 Best Lightweight Browsers for Mac to Use in 2026

A web browser is one of the most used applications on a computer, regardless of the platform you’re using.

But if you want a fast and responsive browsing experience, it’s advised to use a lightweight browser.

These types of browsers are available on all platforms, and in today’s article, we’re going to show you the most lightweight browser for Mac.

Since there aren’t that many Mac versions out there, you might be looking for a browser that has no impact on your device’s performance. If you want fast response times instead of cool designs, we’ve got you covered.

What is the least CPU-intensive browser on Mac?

Our readers told us that Safari is the most energy-efficient browser for Mac and that makes sense because it’s the default option.

However, CPU usage is not the main criterion for choosing the best browser for Mac. You should be more concerned with its memory allocation.

So, if you’re wondering which browser uses the least RAM on Mac, here is a quick preview of our favorite picks:

  • Opera One – Fastest browser for Mac
  • Brave Browser – Lightest browser for old Macs
  • Vivaldi – Simple and customizable
  • SeaMonkey – Great feed detection
  • Safari – Best native browser for Mac

Safari should take the crown, but it turns out that it doesn’t. When we loaded the same 10 tabs on Opera One and Safari, the first used less memory.

To be precise, Opera One was using only 820 MB of RAM while Safari was loading roughly 860 MB.

That being said, let’s see which is the lightest browser for Mac. We also took into consideration their features and agility.

What is the best lightweight browser for Mac?

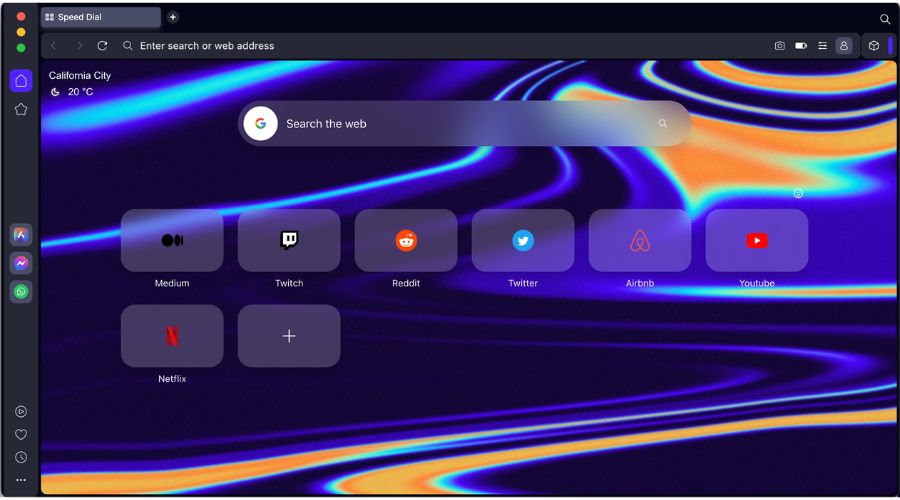
Opera One – Fastest browser for Mac

Opera One is a well-known web browser that has been around for decades. The browser is based on the Chromium engine, so it’s quite similar to Google Chrome.

It’s important to mention that it also works with Chrome extensions, so you should be able to use extensions from Chrome Web Store without any problems.

The browser has a built-in ad blocker that will block ads and tracking scripts and make your browsing experience faster and smoother than before.

As for additional features, it’s important to mention a free built-in VPN with unlimited bandwidth that will provide an extra layer of privacy for all users.

Opera One is a lightweight, fast, and secure web browser, and if you’re looking for a new browser for your Mac computer, it’s the best choice.

Here are some of Opera One’s key features:

  • AI language chats and social media apps
  • Workspaces feature
  • Advanced tab islands
  • Built-in messengers
  • Available on all desktop and mobile platforms

Opera One

If you need a fluid modular UI and secure browser for your Mac, this is the right choice to make.

Brave Browser – Lightest browser for old Macs

If you’re looking for a lightweight and secure browser for Mac, perhaps Brave Browser might be the right choice for you. According to the developers, the browser is 3 to 6 times faster than its competitors.

It’s important to mention that this browser blocks malware and tracking cookies, so you’ll enjoy a safe browsing experience. Also, Brave doesn’t store or sell your browsing data to third parties.

To ensure that your connection is secure, the browser is automatically using an HTTPS connection whenever possible.

The browser also supports Chrome extensions, so if you’re switching from Chrome, you can continue using your favorite extensions.

Brave Browser offers great privacy features, and with built-in ad blocking, it will make your browsing experience faster than before.

Brave Browser’s key features:

  • Built-in password manager
  • TOR integration for private browsing
  • Ability to block tracking scripts
  • Adblocking
  • Available on Windows, Mac, and Linux

⇒ Get Brave Browser

Vivaldi – Simple and customizable

Another lightweight browser for Mac that we need to mention is Vivaldi. This simple browser for Mac has built-in tracking protection, thus preventing websites from collecting your browsing information.

In addition, it has a built-in ad blocker so it can block ads on all websites or only on specific websites.

The browser offers tab stacking and tiling, so you can display two websites in a single tab, side by side. Of course, you can pin your favorite websites to the sidebar for quick access.

It’s worth mentioning that Vivaldi supports quick commands, so you can use the universal search feature to perform all sorts of commands in a matter of moments.

Vivaldi offers some unique features, and if you’re looking for a reliable web browser, then be sure to give Vivaldi a try.

Here are some of Vivaldi’s key features:

  • Support for Chrome extensions
  • Customizable keyboard shortcuts
  • Pop-out video
  • Instagram integration
  • Available on Windows, Mac, Linux, and Android

⇒ Get Vivaldi

SeaMonkey – Great feed detection

If you’re looking for a lightweight browser, then SeaMonkey might be the right choice for you. The browser offers a session restore feature allowing you to easily restore your previous browsing sessions.

There’s also a Data Manager feature that works as a central management interface allowing you to control site-specific data, cookies, permission, preferences, etc.

SeaMonkey supports feed detection, and it allows you to view the contents of the feed and subscribe to the feeds with just a few clicks.

The browser also has a built-in email client, so you can easily send emails to others. IRC client is also there, so you can chat with others with ease.

Overall SeaMonkey offers fewer features than other major browsers, but it makes up for it with its simplicity and light resource usage.

SeaMonkey’s key features include:

  • Lightweight
  • Support for addons
  • Popup blocker
  • Built-in email client
  • Available on Windows, Mac, and Linux

⇒ Get SeaMonkey

Safari – Best native browser for Mac

Sometimes the simplest solution is the best, and that’s the case with Safari. The browser is pretty light on your resources, and according to Apple, it’s 1.6x faster than other web browsers.

The browser offers tracking protection, and thanks to the sandboxing feature, your computer will keep the malicious threats contained in the web browser.

Of course, protection against harmful websites is also there, so you can rest assured that your browsing experience is perfectly safe. To keep your accounts secure, Safari also offers its password manager.

It’s important to mention that the browser is optimized for Mac, and it lets you browse up to 3 hours longer and stream up to 4 hours longer on your MacBook.

Safari is a core component of Apple’s ecosystem, and if you own multiple Apple devices, then Safari should be the right choice for you.

Other of Safari’s core features:

  • Available on all Apple devices
  • Faster than other browsers
  • Protection against malicious websites
  • Sandboxing
  • Tracking protection

⇒ Get Safari

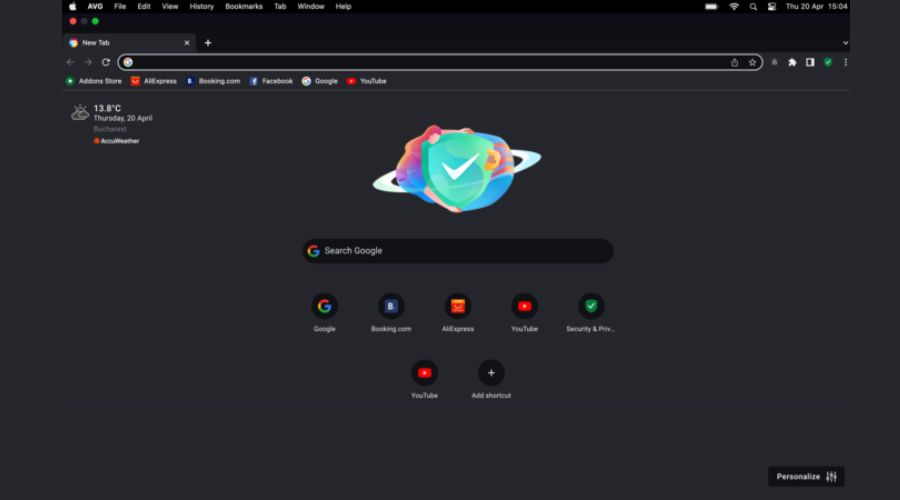
AVG Secure Browser – No resource draining

Last but not least, the AVG browser it’s a worthy solution for private navigation and low resource usage.

What you need to know about this browser is that it won’t let your down. You have fast speeds with an integrated ad blocker for clean navigation from anywhere.

Plus, it’s possible to surf the web using minimal PC resources and enjoy a lightning-fast browsing experience at all times.

When it comes to security, there are no blindspots because AVG includes anti-tracking benefits, tracking script defense, or integration with its VPN.

In addition, the resolution can take care of you with privacy cleaning tools capable of erasing browsing data, history, or cache files.

AVG Secure Browser

Try out this light usage browser for Mac and forget about freezing pages.

There are many excellent web browsers for Mac, but if you’re looking for a lightweight browser, we suggest trying out any browser from this article.

You should also look at our list including the best browsers for Mac OS X El Capitan, and get other suggestions.

What is your opinion about the lightest browser on Mac? Share your insights in the comments section below.

7 Durable Power of Attorney Software with Online Forms

A Durable Power of Attorney software is an essential consideration for many individuals. One benefit of using such software is the ability to forgo some of the hefty attorney fees involved in conventionally creating such documents.

There has been an increase in software services to help you write these documents. However, not all of these services are reliable. 

This article will go through some of the best Durable Power of Attorney Software available online and explore some of their key features. 

What is Durable Power of Attorney software? 

Durable Power of attorney software is designed to generate Power of Attorney documents. Here’s what you need to know about it:

  • Definition – The Power of Attorney is a legal document that allows you to assign someone else the power to act on your behalf in different matters due to temporary or permanent incapacitation. In the case of a Durable Power of Attorney, it is also called the Enduring Power of Attorney.
  • Included parties – The person assigning the Power of Attorney is called the Principle, while the person(s) being given these responsibilities is called the Agent or Attorney-in-Fact. A power of attorney allows the Attorney-in-Fact to perform legal business and financial affairs on behalf of the Principle. 

Download power of attorney for specific states:

What is the best durable power of attorney software to use?

Quicken WillMaker by Nolo – The most secure

Quicken WillMaker by Nolo

Quicken WillMaker by Nolo is an incredible software that will help you create various legal documents, such as comprehensive wills, letters to survivors, and Durable Power of Attorney. 

Considering the legal repercussions associated with a DPOA, you must work with reliable software for all your legal needs. 

Quicken WillMaker seems like a great idea because it has all the features that make it an ideal tool for your peace of mind. 

Some of the key features associated with Quicken WillMaker include:

  • Customized documents so you can fill out your durable Power of Attorney forms according to your specific needs. 
  • A secure data vault that allows you to store and organize your legal documents. You can also change your papers depending on your current living conditions.  
  • An easy-to-use interview format with straightforward questions allows you to fill out your document accurately and at your own pace. 
  • A legal manual that you’ll find helpful in answering questions. This is especially important if you find any questions confusing. 
  • A team of lawyer editors will guide you through creating our durable power of attorney document by your state laws. 

Nolo comes with two plans that support the durable Power of Attorney documents. These are the Plus and All-access plans. 

Quicken WillMaker by Nolo

Customized documents, secure data vault, and other great features you can use with this trustworthy app.
Check Price Visit Website

LawDepot – Easy to use

LawDepot Durable Power of Attorney

This software deals with legal documents such as Wills, Estate, and Power of Attorney. 

If you are looking for Durable Power of Attorney software but don’t want to spend too much money, the LawDepot is the correct answer because it is free. 

The templates provided are built by professionals and have been made easy to use through three simple steps. 

  • Step 1 involves answering a few questions once you’ve picked the document. 
  • Step 2 involves customizing by adding or removing content based on your specific needs. 
  • The third step is the final process of saving, printing, or downloading the document. 

One of the critical features of the LawDepot software is that your DPOA is ready in less than 10 minutes. 

LawDepot

Easy-to-use software with professional templates that can help you when it comes to legal documents.

Rocket Lawyer – Great for less experienced users

https://i.imgur.com/NnLMbmy.png

The Rocket Lawyer legal software is designed to help you get your legal documents hassle-free.

Their durable Power of Attorney document is designed with specific language to guarantee you the cover you are looking for at all times. 

This process is simple and covers all 50 states. You can also customize the document to fit your specific scenario. 

One key feature that makes Rocket Lawyers an attractive option is that it is free. The free financial power of attorney form is more convenient than conventional means. 

Rocket Lawyer

Legal software that is specially created to help you with your legal documents without effort.

LegalZoom – The most affordable

Legal Zoom Durable Power of Attorney

LegalZoom is another excellent choice for Durable Power of Attorney software. 

It promises fast, easy, and convenient services to help you get your documents in the shortest time possible. Their documents are usually ready in less than 24 hours. 

The durable Power of Attorney provided is state-specific and will help you make the best decision when planning your affairs. 

With close to a million POAs signed and delivered, this software has a fair share of great features. 

Some of them include the following:

  • An independent network of attorneys to help you through making fool-proof documents. 
  • Recognized coverage in all 50 states.
  • Flat rate fees, so you don’t have to haggle over hourly prices with anyone. 

Speaking of fees, LegalZoom offers three pricing options depending on what you are looking for. 

There is a primary POA that you can do by yourself, a Comprehensive Power of Attorney with access to attorneys for two weeks, and an Estate Plan Bundle with up to a year of legal assistance available. 

⇒ Get LegalZoom

Gentreo – Created by experienced attorneys

Gentreo attorney software

Gentreo is another excellent option for Durable Power of Attorney software. 

It enables you to decide who will take care of your financial decisions when you can’t due to any number of reasons. 

Some of the key features to expect when working with Gentreo include the following:

  • A digital vault where you can store your durable financial power of attorney forms. From here, you can share and change the contents of your documents when you need to. 
  • A coach will give you live phone or online advice regarding making your Durable Power of attorney. 
  • An up-to-date service that allows you to change the contents of your document by any changing laws. 

The software offers different pricing packages depending on the services you need. 

⇒ Get Gentreo

Total Legal – Minimalistic and easy to use

TotalLegal powers of attorney

The Total Legal Durable Power of Attorney software will help you make your legal documents in three easy steps. 

The software has an interactive interface that allows you to provide information through an online interview.  

Afterward, you will either receive the durable financial power of attorney via mail or print it before signing it, depending on the laws in your state. 

There’s also a help center with answers to questions about the Power of Attorney and other legal documents. 

⇒ Get Total Legal

FreeWill – Professional and free

FreeWill software

FreeWill software provides individuals with varying services meant to safeguard their financial power.

One of the services you will enjoy includes creating a Durable Power of Attorney software form thanks to their easy process. 

Fill out a form in less than 20 minutes, and print it out for formal signing and notarization. 

Some of the key features you can expect with this DPOA software include the following:

  • Free service. FreeWill does not charge for their legal documents allowing you to create any document for free. 
  • An online support option through their help center will answer any of your questions. 
  • The document you make covers all 50 states.

⇒ Get FreeWill

Have you used any of this software before? If you need similar tools, we recommend checking our article on living trust software.

We would love to know what your experience was or what you would recommend. Feel free to share your thoughts in the comment section below.

0x80072f8f Microsoft Store Error [Solved]

Once Microsoft introduced Microsoft Store, expectations rose high. However, even the lately revamped Microsoft Store is plagued with a large variety of errors.

It’s questionable whether this app store will reach its full potential, and a lot of its success depends on addressing the errors like 0x80072f8f.

This error commonly occurs when users try to acquire a new app or update the available ones. We enlisted the most common solutions for this and similar Microsoft Store errors.

If you’re affected by the 0x80072f8f Microsoft Store error, make sure to check the steps below.


How do I fix the 0x80072f8f Microsoft Store error?

1. Check the time and regional settings

  1. Right-click Start and open Settings from the Power menu.
  2. Select Time & Language.Microsoft store error 0x80072f8f
  3. Under the Date & Time section, enable the ‘Set time automatically‘  and ‘Select time zone automatically‘.Microsoft store error 0x80072f8f
  4. Select Region & language from the same pane.
  5. Change Country or region to ‘United States’.Microsoft store error 0x80072f8f
  6. Restart your PC and look for changes.

First things first. Due to the system’s inability to verify the server and vice versa, this or similar update-related errors might occur.

The main thing to inspect when any variation of ”ERROR_INTERNET_SECURE_FAILURE” are time and regional settings. If your system time isn’t properly configured, you won’t be able to download/update apps in Microsoft Store or even access it.

Therefore, what you’ll need to do is to make sure that both Time & Date and Regional settings are properly configured. For the sake of full access, we strongly encourage you to set your region to the U.S.


2. Run Windows Troubleshooter

  1. Press the Windows key + I to open Settings.
  2. Choose Update & Security.Microsoft store error 0x80072f8f
  3. Select Troubleshoot from the left pane.
  4. Expand Microsoft Store Apps Troubleshooter.Microsoft store error 0x80072f8f
  5. Click ‘Run this troubleshooter‘.

The built-in Windows Troubleshooter is, even though commonly neglected, a valid workaround for when things go awry in Windows 10.

Windows 10 troubleshooting tools are grouped and they cover basically everything concerning system issues. In this case, you’ll need to use Microsoft Store apps troubleshooter and move from there.

Hopefully, the troubleshooter will address the 0x80072f8f Microsoft Store error and you’ll be able to download apps from Microsoft Store without disruptive errors.


3. Run the dedicated App Store troubleshooter

  1. Download the troubleshooter by following this link.
  2. Run the troubleshooter and follow the instructions closely.
  3. After it resolves errors, restart your PC.

However, if the preinstalled Apps Store troubleshooter fails, there’s a dedicated, downloadable troubleshooter which might come in handy.

It’s rather similar, but slightly more oriented toward the Store rather than individual apps. Even if doesn’t resolve the issue, it should give you a better insight into the core of the problem.


4. Reset the Store’s cache

  1. Press the Windows key + R to open the Run elevated console.
  2. Type wsreset.exe and press Enter.Microsoft store error 0x80072f8f
  3. Access the Microsoft Store and look for improvements.

Since the Store as a concept was introduced in Windows 8, a lot of issues emerged. Sadly, a lot of problems that plagued Windows 8 users are still present on Windows 10.

For that purpose, Microsoft developers introduced a simple executable that, once run, resets Store’s cache. This should be enough to address minor bugs and update-inflicted errors.


5: Run SFC

  1. Right-click Start and open Command Prompt (Admin).
  2. In the command line, type sfc/scannow and press Enter.Windows Disk Defragmenter not working
  3. After the file check finishes, restart your PC.

When it comes to malfunctions in system features, we can’t overlook the possible corruption of system files.

Frequent updates tend to corrupt the integrity of the system files and thus provoke errors like the one with the 0x80072f8f code. In order to address this, you can turn to recovery options or, which is, initially, better choice, run System File Checker and repair affected system files.


6. Disable a third-party antivirus briefly

The relationship between Windows 10 and third-party antivirus solutions was a problem from the start. A lot of antivirus solutions collide with Windows Defender, slowing down the system in the process. However, bigger problems occur when a respective antivirus blocks Windows services. That can and will occasionally include Microsoft Store and its respective applications.

For that matter, we recommend disabling third-party antivirus for the time being and trying to interact with Microsoft Store again. Nonetheless, we wouldn’t recommend removing the antivirus for obvious safety reasons.


7. Reinstall Microsoft Store

  1. Type PowerShell in the Search bar.
  2. Right-click on the Windows PowerShell and ‘Run as administrator‘.Microsoft store error 0x80072f8f
  3. In the command-line, type the following entry and press Enter:
    • Get-AppxPackage -allusers Microsoft.WindowsStore | Foreach {Add-AppxPackage -DisableDevelopmentMode -Register “$($_.InstallLocation)AppXManifest.xml”}
  4. Wait until the Store is re-registered and close the window.

As you’re probably well aware, you can’t reinstall Microsoft Store using the conventional approach. The built-in parts of Windows 10 can, indeed, be reinstalled but with a little help from the PowerShell elevated command line.

One specific command will re-register the Store, enabling you a fresh start.


8: Check the connection

Based on all the instructions we already provided, you can conclude on your own that the 0x80072f8f Microsoft Store error is a hard nut to crack. As we already said, the problem instigator can be the connection between the system and dedicated update servers.

Because of that, it’s fair to advise troubled users to make sure that VPN and/or Proxy are disabled until the updates are completely distributed. Furthermore, you should check your connection’s functionality, and here’s what to do:

  • Use a wired connection.
  • Restart your PC, modem, and router.
  • Disable VPN and proxy.
  • Disable metered connection.

9. Reset this PC

  1. Right-click Start and open Settings.
  2. Choose Update & Security.Microsoft store error 0x80072f8f
  3. Choose Recovery in the left pane.
  4. Expand Reset this PC.
  5. Click Get started.Microsoft store error 0x80072f8f
  6. Preserve your personal data or remove it. It’s your choice.Microsoft store error 0x80072f8f

If all of the previous steps fell short, the only thing we can advise, besides the complete reinstallation is to restore your whole system to default values.

This is the preferred option since you can choose whether you want to keep your files or delete them completely. Once restored to factory settings, your Microsoft Store should work without issues whatsoever.


10. Perform a clean reinstallation

Finally, if even the factory reset can’t get you into clear and the 0x80072f8f error reoccurs, the clean reinstallation stands as the last resort. You can use the Media Creation Tool to create a bootable USB drive with the system installation. Don’t forget to back up your data, though.

If the reinstallation of Windows 10 is taboo for you, make sure to check this article and find out more.


That should conclude it. If you’re frequently experiencing the 0x80072f8f Microsoft Store error or similar errors, don’t forget to inform the responsible Microsoft team.

Also, if you have questions or suggestions, make sure to tell us in the comments section below.

Lenovo Solution Center: How to Download & Use [2026 Guide]

PC performance and overall health optimization are usually at the top of every user’s priority. For Lenovo users, Lenovo Solution Center (LSC) is one of the best tools to optimize your PC.

This guide will show the easy ways to download and use this application to get the best out of it.

What is Lenovo Solution Center and do I need it?

The Lenovo Solution Center is a software application developed by Lenovo for Think products that enable users to get the most out of their PC experience. It is preinstalled on Lenovo PCs and is a central hub for monitoring system security and health. So it can be beneficial.

With the Lenovo Solution Center in place, you can perform a backup, schedule a test for your system’s hardware, check battery health, update your software, and monitor your system for malware and firewall status.

Below are some of the benefits of the software:

  • Provides access to all Lenovo software from a central place
  • One-click access to Lenovo support
  • Shows historical system changes and performance
  • Diagnoses hardware problems
  • Keeps the computer running at peak performance
  • Automatically notifies you of apps updates
  • Windows taskbar notification if something needs attention

Lastly, it is essential to note that some vulnerabilities that attackers can exploit to execute code with system privileges were reported regarding the app. The good news is that Lenovo has fixed the issues with the new version 3.3.003.

How can I download Lenovo Solution Center?

  1. Use one of the two links below to download the app for Windows 10:
  2. Navigate to the folder where you saved the installation file.
  3. Double-click the installation file to run the application.
    set up lenovo solution center
  4. The system will display the extraction progress bar.
    extract
  5. The system will notify you once the installation process is complete.
  6. Click on Finish to finish the installation process.
    finish

This app’s download and installation process are straightforward, as shown above.

Unfortunately, Lenovo doesn’t offer support for this Lenovo Solution Center software. So although you can still download it, you won’t receive any more updates.

The good part is that Lenovo has replaced it with two better apps. This comes in the form of the Lenovo Vantage and Lenovo Diagnostic Solution.

So, it would be best if you switched to these tools to keep your PC optimized.

The Lenovo Solution Center is a handy tool that comes with your PC. However, if you can’t find it there, you can download it by following the steps in this guide.

If you need a list of third-party PC optimization software, check our detailed guide for excellent options to keep your PC running smoothly.

Feel free to let us know in the comments below if you have any problems downloading the app.

7 Best Christmas Tech Gift Ideas for Husband

The heat of Christmas and shopping for gift items for friends and loved ones has begun frantically. We live in a technology-driven world and men love their tech tools so much.

What other better time there is to show that special someone that one truly cares about than to look for some of the best Christmas deals available on the market?

This article explores no less than 7 of the best Christmas gifts for a techie spouse. Check them out with no hesitation!

What are the best Christmas gifts for tech husbands?

Fitbit Charge 4 fitness tracker

  • Built-in GPS
  • Heart rate tracking
  • Sleep and swim tracking
  • The battery lasts up to 7 days
  • The screen is not color

Help the love of your life keep fit and live his best this season with the best Christmas gifts for tech husbands in the Fitbit Charge 4.

This tiny smartwatch makes it possible to monitor your health status and whether one is catching enough sleep.

This awesome technology tool tracks daily exercise, activities, monitor heart rate, distance covered, amount of calories burnt, and then automatically syncs with a Windows computer device to help track progress.


Hercules Tuff charging station

  • Includes 6 cables: 4 Lightning, 1 Type-C, and 1 Micro-USB
  • Fast charge with 6 2.4-amps ports
  • Beautifull sleek design
  • Elegant cable management
  • Takes a lot of space

If you’re tired of cables lying everywhere and all the outlets being occupied with USB chargers, then buy him a Hercules Tuff charging station and he’s going to be really happy about it.

That’s because this elegant stand will charge up to 6 devices simultaneously: smartphones, tablets, gaming consoles, you name it.

Not only that, but it includes 4 lightning cables, one USB-C, and one micro USB cable to start with. Of course, you can also use your own USB cables in the 2.4 amps’ fast-charging ports.


LectroFan sleep-sound machine

  • Adaptive sound technology
  • 20 non-looping sound: 10 ambient noises and 10 fan sounds
  • Powered by AC or USB
  • Easy set-up
  • The design of the box is not too modern

Make sure that your husband can sleep peacefully with the LectroFan adaptive sound technology tool offering about 20 non-looping sound.

This great tech gift includes 10 ambient noises and 10 fan sounds at varying degrees to block out unwanted noise and help your hubby sleep nicely after a hard day’s work.

The sleep timer also ensures one does not exceed the desired sleep time and to keep up with other engagements.


PhoneSoap 3 UV smartphone sanitizer/charger

  • Completely sanitize your entire phone
  • You don't risk to damage your phone using any chemical substances
  • Accommodates all smartphones, even the latest models
  • Universal charging to all devices
  • The UV bulbs have a limited lifetime

Make your hubby fall in love with you again with this clearly intriguing and best Christmas gift for tech husbands.

This Phonesoap 3 UV device helps eliminate germs from any smartphone to 99% plus charge two smart devices – a smartphone and maybe your smartwatch as well.

It has a USB-C and USB port and is compatible with most smartphones for charging and sanitizing.


All-new Echo Plus (2nd Gen)

  • Alexa's intelligent assistant sleek home
  • Built-in Zigbee hub
  • Premium sound
  • Voice control your home, your music, and even your smartphone
  • Requires a full environment of devices to control

Saying the All-new Echo Plus is an exciting gift this season is clearly an understatement as this device carries much functionality any hubby would love for a long time coming!

The Echo plus puts a truly smart device in one’s hands to get almost 1 million questions answered by Alexa.

Get excellent music, weather, stocks, traffic details, news report, phone calls, and send SMS from a single device, hands-free with the installed Zigbee hub to help synchronize the device with other gadgets at home.


Thermos Beverage can insulator

Thermos Beverage can insulator

The Thermos beverage can insulator is just what a tech husband needs to keep getting his groove on – drinking on the go this holiday season.

The stainless steel beverage can hold up to 12 ounces of your best drink, keeping it hot or cold for more than 3 hours.

The insulation technology also ensures a sweat-proof can with no leaks, sweat, or water rings on the exterior of the beverage can.

⇒ Check price on Amazon


Logitech Harmony 650 remote control

When looking for convenience in manipulating program choices on TV the Logitech Harmony 650 universal infrared remote control takes the stress away as it works with over 5,000 brands and 225,000 devices.

It’s very easy to set up and synchronizes with as many as eight devices at once.

The beautiful display screen makes it easier to navigate different channels, programs, or devices with the available icons for quick manipulation.

⇒ Check price on Amazon


It doesn’t take so much to get one’s hubby so excited and all-loving again this Christmas season. Most men love their tech gifts and picking any of the above gifts for tech husbands this year can’t be out of place.

However, understanding the likes and lifestyle of one’s husband will definitely increase the appreciation for whatever tech Christmas gifts are purchased.

Have an exciting and techie Christmas with the love of your life!

Windows 11 Photos App Not Working: How to Reset It

Many reported that the Photos app is not working in Windows 11. It won’t open, it freezes, or closes unexpectedly. If all of this sounds familiar, we got good news. It’s easy to fix.

Follow along as we tackle all underlying issues that causes Windows Photos to crash.

How can I fix Windows 11 Photos app if it’s not working?

First, try restarting your PC and checking for any updates for your operating system.

If that doesn’t do the trick, check out the solutions listed next.

1. Check image file formats’ default apps

  1. Open Settings via the Start menu.nvidia share start
  2. Go to the Apps tab, and then click on Default apps on the right.default apps
  3. Locate and click the listed Photos app.photos
  4. Then look for the image file format you’re trying to open, click on it, choose Photos from the list of options, and then click on Set default.change default to fix windows 11 photos app not working

If the Windows 11 Photos app is still not working, head to the next solution.

2. Reset the Microsoft Photos app

  1. Press Windows + S to open Search, type Apps & features in the text field, and click on the relevant search result.nvidia share settings windows
  2. Choose Apps from the navigation pane, and then click on Installed apps.installed apps
  3. Next, click the ellipsis for Microsoft Photos, and select Advanced options.advanced options to fix windows 11 photos app not working
  4. Click the Reset button.reset to fix windows 11 photos app not working
  5. Again, click Reset for confirmation.reset

Resetting the app did the trick for many when Photos was not working in Windows 11. So, do try it!

3. Reinstall the Photos app

  1. Press Windows + S to open Search, type Windows Powershell, right-click on it, and select Run as administrator.powershell
  2. Click Yes in the UAC prompt.
  3. To uninstall Photos, type in this command and press Enter: get-appxpackage *Microsoft.Windows.Photos* | remove-appxpackage
    Remove Photos command photos app not working windows 11
  4. After that, click the pinned Microsoft Store app on the Start menu.Microsoft store remove command photos app
  5. Next, enter Microsoft Photos in the search box and hit Enter.
  6. Finally, select Microsoft Photos and click the Get button to install the application.
    Microsoft Photos app page photos app not working windows 11

4. Run DISM and SFC scans

  1. 1. Press Windows + S to open Search, type cmd in the text field, and then click on Run as administrator.

    cmd run as admin
  2. 2. Next, input this command and press Enter: DISM.exe /Online /Cleanup-image /Restorehealth

    cmd cleanup
  3. 5. Afterwards, type in this command and hit Enter: sfc /scannow

    cmd sfc scan
  4. 6. Wait for the SFC scan to reach 100 percent and display an outcome. It will tell whether there are corrupted files on your PC and help you get rid of them.

  5. Another method to fix the Photos app not working issue is to run deployment image and system file scans. The Photos app might not be working due to corrupted system or faulty DLL files, therefore cleaning up the PC should fix the problem.

Alternatively, you can use instead a third-party repair software that will scan your PC and fix any Windows errors.

5. Perform an in-place upgrade

  1. Go to Windows 11’s download page, and get the ISO file after choosing the appropriate responses from the dropdown menu.windows 11 ISO
  2. Double-click on the ISO file, and click on Open to confirm.open
  3. Now, run the setup.exe file.setup.exe
  4. Click Yes in the UAC prompt.
  5. Click on Next to proceed.next
  6. Select Accept to agree to the license terms.accept
  7. Once everything is in order and the setup lists, Keep personal files and apps and click on Install.in-place upgrade to fix windows 11 photos app not working

Why is my Windows Photos app not working?

Here are the reasons the Windows Photos app is not opening:

  • Corrupt app data – If the app data is corrupt, the program wouldn’t launch or even crash. In this case, repairing or resetting the apps should do the trick.
  • Bug in the OS – Windows 11 is a relatively newer iteration, and patches are being introduced for known bugs, including issues with the Photos app. So keep checking for updates.
  • Corrupt system files – When the system files are corrupt, it leads to issues with the UWP apps, as well as other Windows features.

An in-place upgrade fixes a range of issues with Windows, including problems that lead to the Photos app in Windows 11 not working. And the best part, you wouldn’t lose any files or apps in the process.

Many users also faced issues with the Photos app in Windows 10, which seemed to have found its way into the latest iteration. But things are usually easy to fix, and we will help you do that.

We realize that the revamped Photos app is worth fixing, and the resolutions above will get things running when the Photos app is not opening in Windows 11, as it did for most users.

If the issue persists, you can always try a reliable third-party image viewer for Windows 11 and wait for a patch to be released.

If you know of another solution, drop it in the comments section below. We are also available to clarify any doubts.

Error 0x87AF0001 on Microsoft Store [Solved]

Millions of users visit the Microsoft Store daily to update their favorite apps, try out the recently launched apps or download the latest games.

The Store is a very complex place, and as always, where there’s complexity, sometimes unexpected things happen. There are various errors that can occur when Windows users visit the Store, such as error code 0x87af0001.

Fortunately, there are various workarounds available for this error. Let’s find them out together.

How can I fix the Microsoft Store error 0x87af0001?

1. Reset the Windows Explorer task

The following solution work for 99% of the apps. Until Microsoft rolls out a patch to fix this bug, this workaround remains the best possible alternative.

  1. Open the Windows Store > launch the download process
  2. Open Task Manager > scroll down to Windows Processes > find Windows Explorer > right-click it and end the task
  3. Go to the Windows Store and update or download your app(s)
  4. When the download process is completed, go back to Task Manager
  5. In the upper left corner, click File > run New task
  6. Type in the word “explorer” and click ok.

On the other hand, if you’re not able to resolve the problem with this solution, we have some more for you. Of course, none of the following solutions is guaranteed to resolve the problem, but there’s really nothing you can lose if you give them a try.

2. Disable Firewall or antivirus

Even though it shouldn’t be the case by default, there’s still a chance the Windows Firewall actually blocks the Store. You can check that by disabling the Firewall. Here’s how to do that:

  1. Go to Search, type firewall, and open Windows Defender Firewall.
  2. Select Turn Windows Defender Firewall on or off.
  3. Disable Windows Firewall for both private and public networks.
  4. Confirm the selection and try updating again.

3. Reset Windows Store

The next thing we’re going to try is a good old trick that’s basically used for resolving various Store-related issues. You guessed it, the WSReset command. This command, as its name says, will reset the Store to its ‘natural’ state, and (hopefully) wipe away any potential issues, as well as the error code 0x87af0001.

Here’s how to easily reset the Microsoft Store in Windows 10:

  1. Go to Search, type wsreset, and click the WSReset.exe command.
  2. Wait for the process to finish and restart your computer.

4. Run the Store troubleshooter

If none of the previous solutions worked, let’s turn to troubleshooters. The first troubleshooter we’re going to try is Windows 10’s built-in universal troubleshooter. This troubleshooter can be used for resolving various issues, including our little Store error.

Here’s how to run the Store troubleshooter in Windows 10:

  1. Go to the Settings app.
  2. Head over to Updates & Security > Troubleshoot. 
  3. Scroll down and click Windows Store Apps.
  4. Now, go to Run the troubleshooter. 
  5. Follow further on-screen instructions and let the wizard finish the process.
  6. Restart your computer.

5. Update Windows

Even though Microsoft doesn’t push Store updates through Windows Update quite often, there’s a chance some other feature actually interferes with it.

As Windows updates are known for disrupting various Windows features from time to time, your best bet is to either install a new update or delete the latest one.

We’re going to try updating Windows first. Just in case Microsoft releases some patching update. To update your OS, simply go to Settings > Updates & security, and check for updates.

6. Delete updates

If there’s no new update, and you suspect the previous one actually messed something up, it’s a good idea to uninstall that update. In case you’re not sure how to do that, just follow these instructions:

  1. Go to Settings > Updates & Security > Windows Update
  2. Go to Update history > Uninstall updates
  3. Now, find the latest update installed on your computer (you can sort updates by date), right-click it, and go to Uninstall
  4. Restart your computer

7. Run the SFC scan

There’s one more troubleshooting tool we can try. That troubleshooter, of course, is the SFC scan. In case you’re not familiar with this tool, the SFC scan is a universal troubleshooting tool designed for resolving various internal issues within your system. And in just might be helpful in this case, as well.

Here’s how to run the SFC scan in Windows 10:

  1. Go to Search, type cmd, and open Command Prompt as Administrator.
  2. Type the following command, and press Enter: sfc/scannow
  3. Wait for the process to finish.
  4. Restart your computer.

8. Reset the Software distribution folder

And finally, if none of the above-mentioned solutions worked in fixing the 0x87af0001 error, let’s try deleting the Software Distribution folder. Here’s how to do that:

  1. Open Command Prompt as administrator (as shown above).
  2. Type the following commands, and press Enter after each one:
    • net stop wuauserv
    • net stop bits
  3. Minimize Command Prompt. Now navigate to the C:WindowsSoftwareDistribution directory and delete all files from it.
  4. After deleting all files, go back to Command Prompt and run the following commands:
    • net start wuauserv
    • net start bits

If you’ve come across other workarounds to fix the Windows Store error 0x87AF0001, list the troubleshooting steps in the comment section below.

  1. Go to Settings > Apps > Apps & features
  2. Locate the Microsoft Store app and click on it
  3. Click on Advanced options
  4. Scroll down and hit the Reset button.

Why is Microsoft Store so slow?

There are several possible reasons why the Microsoft Store app is so slow: too many processes running in the background, the app is actively installing the latest app updates, some files got corrupted, limited bandwidth, and more.

We hope you managed to solve the error 0x87af0001 in Microsoft Store using our guide. Let us know in the comments section below what you think about this topic.

Microsoft Store 0x80246019 [Solved]

Microsoft Store updates sometimes bring issues of their own. Most recently, many Windows 10 users report they can’t download and install the latest Microsoft Store updates due to the Microsoft Store 0x80246019 error.

Here’s how one user describes this problem:

Minutes after my computer finished the 1703 update, Microsoft Store stopped successfully downloading and installing apps, including Microsoft Store itself.  All attempted updates get this error message:

Something unexpected happened. Reporting this problem will help us understand it better.  You can wait a bit and try again or restart your device.  That may help. Code: 0x80246019

I can’t report the error to the feedback hub because there is an error when accessing the feedback hub as well.  I did restart the computer as suggested and it did not help at all.

There are multiple triggers related to the Microsoft Store error 0x80246019. If this error code prevents you from updating Microsoft Store, follow the troubleshooting steps listed above.

If you encounter the 0x80246019 error during a failed Windows Update installation, check out our dedicated guide instead.

How do I fix the Microsoft Store 0x80246019 error?

1. Run the WSReset script

The very first thing we’re going to try is Windows 10‘s default Store reset command. This tool is widely used when dealing with various Store problems.

As its name says, it resets the Store to its original state, resolving potential problems on the way.

Here’s how to run the WSReset command in Windows 10:

  1. Go to Search, type wsreset, and open WSReset.exe.
  2. Wait for the process to finish

2. Run the App troubleshooter

The next thing we’re going to try is running Windows 10’s built-in troubleshooting tool. You can use this tool to resolve basically any problem inside Windows you can think of.

And hopefully, it will be helpful in this case, as well.

Here’s how to run Windows 10’s built-in troubleshooter:

  1. Go to Settings.
  2. Navigate to Updates & Security > Troubleshoot.
  3. Click Microsoft Store Apps and choose Run the troubleshooter.Troubleshooting BSoD
  4. Wait for the troubleshooter to finish the process.
  5. Restart your PC.

3. Disable Windows Firewall

As the Windows Defender Firewall and the Microsoft Store are both Windows 10 elements, they’re supposed to work in harmony. However, that’s not always the case.

Sometimes, Windows Defender may block the Store, thus causing the Microsoft Store error 0x80246019. To eliminate that scenario, let’s go and disable the Firewall.

Here’s how to do that:

  1. Go to Search, type firewall, and open Windows Defender Firewall.
  2. Select Turn Windows Defender Firewall on or off.
  3. Disable Windows Firewall for both private and public networks.Customize Settings
  4. Confirm the selection and try updating again.

4. Run the SFC scan

The SFC scan is another troubleshooter we’ll try now. This is a command-line tool that basically scans your system for potential flaws and eliminates them (if possible).

Here’s how to run the SFC scan in Windows 10:

  1. Right-click on the Start Menu button, and open Command Prompt (Admin).
  2. Enter the following line and press Enter: sfc/scannow
  3. Wait until the process is done (it may take a while).
  4. If the solution is found, it will automatically be applied.
  5. Now, close the Command Prompt and restart your computer.

5. Repair Microsoft Store

If the aforementioned Store resetting didn’t get the job done and you are still getting the Microsoft Store 0x80246019 error, we’ll try to repair it. Here’s what you need to do:

  1. Press Windows Key + S and enter power, right-click PowerShell and choose Run as administrator from the menu.
  2. When PowerShell opens enter Get-AppXPackage -AllUsers | Foreach {Add-AppxPackage -DisableDevelopmentMode -Register “$($_.InstallLocation)\AppXManifest.xml”} and press Enter to run it.

6. Check Time & Date

Although it sounds banal, what if you got to date and time on your computer wrong? If that’s indeed the case, the Store simply won’t work, because it requires accurate time and date settings.

In case you’re not sure how to check the date and time on your computer, just follow these instructions:

  1. Go to the Settings app.
  2. Open Time & language section.
  3. Select the Date & time from the left pane.
  4. Enable the Set time automatically feature.
  5. Enable the Select time zone automatically feature.Date & time
  6. Now, choose Region & language from the same pane.
  7. Change Country or region to United States.
  8. Close Settings and look for changes in the Store.

If this doesn’t work to get your of the Microsoft Store 0x80246019 error, then check out the next solutions.

7. Reset Microsoft Store

And finally, if the traditional resetting didn’t get the job done, let’s try and do it manually. Here’s how:

  1. Open the Settings app and navigate to Apps section.
  2. A list of installed applications will appear. Select Microsoft Store from the list. Now click Advanced options.
  3. Click Reset to reset the application to default. Now click Reset again to confirm.Microsoft Store

We hope you found our article insightful and managed to fix your issue.

If you’ve come across other solutions to fix Microsoft Store error 0x80246019, feel free to list the troubleshooting steps in the comment section below.

Windows Activation Error 0xc004f211: How to Fix It

Activating your Windows helps verify that your copy of Windows is genuine and not used on more devices than allowed on the Microsoft Software License Terms. However, users complain about running into error 0xc004f211 during the process.

Also, there are many other Windows activation errors that you can encounter on your PC.

What is the error 0xc004f211?

Installing a new Windows or upgrading the Windows version on your PC requires activation to verify how genuine the copy of the Windows is. This activation process can result in Windows Activation errors like the error 0xc004f211 in Windows 10/11.

Furthermore, the error indicates that there’s been a hardware change on your Windows computer. When you upgrade or remove the old hardware, Windows may not be able to decide whether the product Activation key is a new one or the old one.

The error 0xc004f211 in Windows 10/11 activation can occur for many reasons. Some are:

  • Major hardware replacements – Changing hardware like the motherboard can be a problem for Windows and result in the error 0xc004f211. It means it is new to Windows and it requires licensing to activate it. So, the error 0xc004f211 can be due to hardware change.
  • Wrong Product key – Using an incorrect product key can cause an error. It makes the authentication process fail because Microsoft doesn’t recognize the product key you’re activating with.
  • Issues with the Microsoft servers – Users may encounter issues with Windows activation errors generally if there is an issue with the Microsoft server.

How do I fix the error code 0xc004f211?

Before proceeding with any advanced troubleshooting, try the following preliminary checks:

If the error 0xc004f211 in Windows 10/11 persists, proceed with the solutions below:

1. Run Windows Activation Troubleshooter

  1. Press Window + I to open the Settings app.
  2. Select the Update & Security option.
  3. Click on the Activation button, then click on the Troubleshoot link on the right pane of the screen.

Running the Windows Activation troubleshooter will find and repair issues with the Windows activation process. Check our guide about finding Windows 10 product keys on your PC.

2. Replace and generate a new product key

  1. Left-click the Start button, type Command Prompt, and click Run as administrator.
  2. Type the following and press Enter to replace the product key: slmgr -ipk current product key
  3. After replacing the product key, press Enter to submit the product key change.
  4. Wait till you see a Windows Host Script prompt informing you that the product key has been successfully activated, then close the Command Prompt.
  5. Restart your PC.

After some hours, try the  Activation process again with the new generic code. Read our guide if the Windows server change product key does not work on your PC.

3. Activate Windows through Chat support

  1. Press Windows + R key to open a Run Window, type slui x04, and press Enter to open the Installation ID screen.
  2. Select your country or region, then click Next.
  3. When prompted to call the numbers on the screen, press the Start button, search for get help and launch the Get Help app.
  4. Reply test and select No on every prompt until the Talk to a person link appears.
  5. Go to Services & Apps\Windows\Setting up, then select Chat online with a Microsoft Answer Tech. Wait while the call processes.
  6. Follow the Tech’s instructions and provide the information needed for the process. Then, the tech assistant will give you a Confirmation ID.
  7. Go to the Installation ID page, click Enter confirmation ID, and input it.
  8. Click Activate Windows and wait for the license to be reactivated.

The above steps will allow you to get direct help from a Microsoft technician to fix the 0xc004f211 error.

Conclusively, you can read about fixing Windows 10 if it won’t activate after reinstalling your PC. Likewise, you can check for solutions if Windows cannot find the Microsoft license software terms on your PC.

If you have more questions or suggestions, kindly drop them in the comments below.

QR Code Generator Software: 10 Best to Use in 2026

The square thingies that you need to scan in order to reveal their information are called QR codes and they can be used for numerous uses, from conveying a link to sharing more complex information.

It’s very important to know that not only you can scan these QR codes, but you can also create them, and, in this guide, you will discover the best apps that you can do that with.

What are QR codes and what are they used for?

A QR (Quick Response) code is an equivalent bidimensional code for the old unidimensional barcode and it consists of pixels instead of the classic bars.

It was first used by the automotive industry as an alternative to the barcode to quickly identify components and it was preferred as it stayed legible even if dirty or partially destroyed.

➡ The advantages of using a QR code

The QR code is captured by imaging devices, including a camera or smartphone, then processed digitally to read the content.

Precisely this ease of use and excellent error correction, plus high memory capacity, led to the popularity and rise of QR codes.

Smartphones can run dedicated reading software as they have camera apps, but the advantage to create your own by using the best QR code generator software is unquestionable.

➡ Types of QR codes

The codes come in either dynamic that is editable and recommended for use in today’s online world, or static type, the latter of which cannot be changed once set.

In case you want to create editable ones, we’ve also included entries that double as QR code editing software.

Even some stop codes feature QR codes and we have a guide that shows you how to read BSoD QR codes with ease.

➡ QR codes applications

You can use the code to redirect people to your website, mobile page, vCard, file download, Google Map, social pages, PayPal, or even an app store.

How to scan QR codes?

There are two ways to easily scan a QR code:

  • Using the camera of your device – You need to open a QR code scanner application and superimpose the square markings that you will see on your app with the image of the code that you see through the camera. The app will read the code and it will either perform an automatic action or give you the choice of what to perform next, depending on the content of the code.
  • From a picture or a screenshot – If you try to scan a QR code from a webpage, for instance, on a device that doesn’t have a camera, you will either have to download the image that contains the code and upload it in a QR code scanner application or use an app that can read it automatically from a webpage.

Our list includes the best software to create a QR code that you can use today. Be sure to check for features like tracking scanning activity, analytics, generation of dynamic codes, export vector formats, error correction, ad-free, and unlimited scans, and make a choice.

What is the best QR code generator software for Windows 10?

Adobe InDesign – Best for professional designers

Using QR code generator software can save you a lot of time, and the results will look professional. This is where InDesign from Adobe comes in.

This software offers a great array of useful tools that will simplify the process considerably. One of the best features of InDesign is its friendly and easy-to-understand user interface, making it our top choice.

But of course, InDesign is a lot more than its QR code generator function, it’s one of the best publishing apps that offers endless opportunities in that respect.

That is because the software comes with all the tools you need to create and publish books, magazines, eBooks, and many more.

And it’s also adapted for perfect collaboration because you can share your designs and get feedback as comments, text replacements, highlights, or strikethrough directly in InDesign.

If you’ve ever had problems with fonts, it’s not the case with this solution because InDesign finds and activates all the fonts automatically from Adobe Fonts.

Here are some other key features found in InDesign:

  • Allows for unlimited ways to create any type of visual material
  • Large library of templates and resources that save a lot of time
  • Works seamlessly with all Adobe products
  • Can export and import files of almost any format
  • Comes with a free 7 day testing period
Adobe InDesign

Adobe InDesign

Create QR codes, web pages, write HTML5 code, and more, all with this amazing tool from Adobe!
Free trialVisit website

Beaconstac – Best for G2 codes

One of the most cutting-edge and the only enterprise-ready QR Code solutions out there is Beaconstac’s QR Code Generator.

Ranked #1 as the easiest QR Code generator to use on G2, this tool can help you create both static and dynamic QR codes easily.

It stands out for its extremely easy-to-use interface from where you can measure your QR code’s performance and, if necessary, fine-tune your campaigns thanks to the dashboard’s seamless integration with Google Analytics.

You can also create custom and bulk QR codes with your business logo and brand-appropriate color scheme.

Beaconstac comes with enterprise-level SSO, GDPR compliance, and SOC2 Type 1 & Type 2 certification for ensuring maximum security to your data as you create, manage and personalize your QR codes.

You can sign up for a free trial to check out the platform’s extensive features before making the final decision.

Let’s look at some of its best features:

  • Very friendly, easy-to-use interface
  • Enterprise-level SSO
  • GDPR compliance, and SOC2 Type 1 & Type 2 certification
  • Seamless integration with Google Analytics
  • Create static and dynamic QR codes in seconds

Beaconstac

Get your QR codes right with an enterprise-ready solution that caters to your business needs.
Free trial Visit website

Visualead – Great for online usage

best software to create qr code

This is another great software to create QR codes if you look at what it has to offer and the possible results.

With Visualead, you can create branded, creative, and effective QR codes that deliver 50-400 percent more scans, mobile-optimized content, and two times more leads and social engagements.

All your QR code creation needs are fulfilled in one place, with features such as visual QR codes to create beautiful and engaging codes.

You can practically create QR codes for any purpose like redirects to URL, vCard, Facebook, coupon or text codes, and so on.

You may create and publish mobile landing pages in under a minute, track the number of scans your code gets, and thus know your audience better, plus manage your codes in your own personal dashboard.

This tool has over 20 types of possible QR codes and it comes with an analytics function, so you know exactly how many times your code has been scanned.

Of course, if you don’t have an image for your QR code, you can use one of the many free images provided within the app.

⇒ Get Visualead

QR-Code Monkey – Great design capabilities

best software to create qr code

This is an amazing QR code generator and one of the most popular with millions of people already having created codes using this tool.

Its features include unlimited scans, high-res QR codes, powerful designs, QR codes with logos, custom designs, and colors, QR code vector formats (SVG), and it is free for use in commercial settings.

Yes, all generated codes are 100 percent free, so you can use them for anything you want, including business purposes.

It’s interesting that with this tool, you can even create a location QR code, and you may customize the shape of the code to better match its purpose.

The only downside of this app is that you only create static QR codes. That means that you can’t edit their content after you’ve published them.

Do you want to print the QR code on a huge billboard in a building? No problem because with this tool, you can print the code in vector formats like SVG.

You can also print them in PDF or EPS formats but those will only be in the classic format, without design options and logo application.

⇒ Get QR-Code Monkey

QR-Code Generator – Ideal for basic needs

best software to create qr code

This QR code generator software is backed by years of experience in QR code with over 20,000 customers in over 160 countries globally, so you can trust it to improve the success of your QR code campaigns with the maximum number of scans achieved.

It also comes with a free version so you can generate different types of codes including a vCard, email QR code, text QR code, and much more.

The premium features when using the paid version give even more functionality and tools like selecting from QR code functions such as displaying PDFs to encoding multiple URLs in one code.

It also lets you change code designs, make dynamic codes with flexible content, track scans and display analytics with reports, download files in high res, plus tech support via email or phone.

Other extras include customizable short URLs, and how-to guides plus white-label options good for agencies.

You can choose from a variety of functions for your code like displaying a Facebook-like button or encoding price lists in PDF.

These will excite and surprise customers and get them to scan the codes more and more. Even better, you can customize the codes in colors and shapes, or insert your logo using ready-made templates.

And you get a flexible account-sharing option for teams such that you can invite other employees to share the account and add several users as admins.

⇒ Get QR Code Generator

QFuse – Good for beginners

best software to create QR code

If you want to give users a good reason to scan and tap, then Qfuse is the best software to create QR codes that attract, engage, and convert data.

With this tool, you can link dynamic codes and NFC tags to mobile-friendly content and derive powerful analytics and reporting to track your success, all without programming skills.

You can also analyze your scans, track user activity, download full reports, and scan by geographic location or time and device type, then get reports and engagement metrics for your sites.

The software can integrate third-party apps like Salesforce, Google Analytics, and Constant Contact.

Qfuse gives you the satisfaction that your QR codes will be placed on anything including ads, brochures, posters, mailers, business cards, and even TV displays.

With its high-quality codes that can be scanned reliably, this tool is suitable even for professional publication.

Other features include social media sharing, contacts that are a touch away, vCard download with a single click, mapping, and GPS for pinpointing physical locations.

There is a free version that only includes one QR code creation and 3 paid subscription options that offer a lot of variation in terms of features.

The Standard plan comes with 1.500 scans per month but the other two have unlimited scans and even Google Analytics reports for the codes.

⇒ Get Qfuse

Scanova – Great for customizing design

With Scanova QR Code software, you can engage your customers better and get instant online traffic from print media that are actionable and trackable.

You can also run end-to-end QR Code campaigns which you can create, design, manage and track yourself in just minutes.

Some of the benefits of this software include lead generation, visually appealing codes to attract more scans, 23 types of QR codes, and the ability to view the number of scans by date, or location.

It also has readymade landing pages you can use for campaigns and vector export in high-resolution formats for printing and editing.

Keep in mind that you can also add enterprise features like campaign management, bulk generation, multi-user access, and white labeling.

Moreover, it is possible to use the API to integrate QR code generation in your own information system or mobile app.

It’s also interesting to know that you also have the option to create a custom-designed landing page for your QR code.

The page is like a mini-website that you can customize with text, images, buttons, and custom HTML, just like on a full-fledged one.

You will find 3 subscription plans that you can apply monthly or annual payments and of course, the latter is a lot better.

⇒ Get Scanova

Unitag QR – Great for survey QR codes

This is another good QR code generator that you’ll enjoy using as it has a friendly interface and gives free instant downloads, plus a lifetime validity of usage.

Unitag lets you design, manage and track irresistible QR codes with custom colors and logos, so you can make all your campaigns interactive, and easily perceivable on mobile devices, social networks, and locally.

It is a simple and cost-effective software to create smart codes for all your needs with dynamically targeted content, and you can customize the design and URLs, plus get HD codes in bulk creation.

The software gives instant feedback for smarter decision-making as you get to reach your target audience on the go while collecting valuable insights for all your projects and building mobile surveys in minutes.

It is intuitive, and immediate, and the content is dynamic and trackable so you can get analytics plus manage and update your apps in real-time, and easily track and optimize your campaigns while measuring your ROI.

The subscription plans are based on the number of scans you get so you should match it with your planned number of visits.

⇒ Get Unitag

Codex – Great for Windows

You can also download the QR Code for Windows 10 app and generate your own QR codes. All you need to do is to enter the URL of your choice, hit the Generate button, and voila, your QR has been generated.

The app also keeps a history of your QR codes. So, if you ever need to check what codes you’ve used, click on the menu button and go to History.

Cortana support is also available. Just say QR Scan/Read and Microsoft’s virtual assistant will automatically read the code.

With its latest iteration, you can create QR codes with custom background and resolution. However, those are features available only in the Pro, paid version.

It’s also nice to know that you can also read a code directly from the Gallery or the screen and you can open the link from the decoded QR code automatically.

And most importantly, although the tool is free if you want to get rid of any ads that will bother you along the way, you need to upgrade to the Pro version.

The free version is pretty simple and you don’t have any tracking options for the codes you create but you can produce as many as you like and they never expire.

Of course, you also have the option to use the camera of your device so even if it’s a laptop or a desktop, you can scan the codes by placing them in front of the webcam.

This app is also available to use on your mobile device so you can try it now and see if it fits your needs.

⇒ Get Codex

QRTIGER – Very easy to use

QRTIGER is a very user-friendly QR Code generator software with multiple features suited for personal and professional use. It allows you to make static as dynamic QR codes with logo.

In short, QRTIGER is your one-stop-shop of QR codes for various uses in marketing. It can integrate with over 3,000+ apps through the Zapier integration or through applying their APIs.

The 24/7 customer support and intelligent tracking features make QR Tiger ideal for large businesses as well. We can say it’s the best QR code generator on our list with affordable pricing.

The publishers of this online app say that branded QR cores can get up to 40% more scans than the classic black and white codes.

And with this tool, you can easily brand and color your codes to match the identity of your brand and attract users to scan it.

As for the possibilities, you can add almost everything to your QR code, from simple documents, URLs, and photos to multiple URLs, MP3 songs, Wi-Fi login keys, YouTube clips, and a lot more.

After you customize your code with your logo from a PDF, JPEG, or PNG file, you can print it on huge billboards because you can save the result in PNG or SVG formats.

If you want to automate the code creation at some point, you will be happy to know that this tool has Zapier integration.

The simple features are free but if you want to create a dynamic QR code that you will be able to edit in time, you will have to pay for a subscription.

⇒ Get QRTIGER

Best tips on how to print QR codes

The usage mechanism is mostly the same for all the QR generators out there: you choose the type of the code (URL, photo, VCard etc.), then you enter the required info, and lastly, you publish it and deploy it.

However, we have some tips that will help you get things done better and quicker:

  • Print the right size code – A code should be at least 0.7 x 0.7 in (2 x 2 cm). Too small, and it could be difficult to read. You should also correlate the size of the code with the place you are printing it on.
  • Use only high-quality images – Even if you’re printing with minimum dimmensions, make sure that the images look great. Blurry codes can be unreadable and will frustrate anyone who would try to scan them.
  • Try using dynamic codes – Some of the apps from our list are capable of creating dynamic QR codes that you can edit even after printing. This way you can change the contents of your code. It’s important if you printed hundreds of copies of the code but the link has been changed in the meantime.
  • Make your code easily accessible – If you print your code on an outdoor banner, make sure that it’s easily scannable. If the scanning angle is too acute or the code cannot be easily observed, your code will be unlikely to be scanned by passers-by.
  • Attract people to scan your QR code – You should give people a reason why should they draw their devices to scan your code. An easy explanation about what the code leads to should suffice.

Ready to create your own QR code? We hope that our list of apps and the explanation about QR codes have got you started.

As you might have already seen, there are free tools and paid ones, and like in any other field, the ones that are free have limited options.

That is why you should first decide what volume of QR codes you need, and, more importantly, what do you need them for, where will you place them.

If you just need a simple QR-code to use conveniently as a VCard whenever you want to pass on your contact to someone else, you can easily go for a free tool.

However, if you need to create a more sophisticated one and print it on a banner that will be placed on a building, professional graphics software will make the difference.

Of course, consider the type of code you need and make sure that the software you choose can provide it for you.

Not all of them have, for instance, Bitcoin dedicated codes or can provide high-resolution vectorial output so try to test them first.

If you’ve created a business QR code, you might also be interested in our list including the best software to produce digital ads and include your newly designed code.

Share your thoughts and experiences in creating QR codes by leaving a comment in the section below.

Christmas USB Flash Drive: 4 Best Memory Sticks [Gift Ideas]

The Christmas season is around the corner and one of the best parts about this season is the gift it brings. If you are planning to gift a USB flash drive to your family and friends as a Christmas present, why not make it special by gifting a Christmas tree USB Flash drive?

Sounds cool right? Yes, and that’s why we have gathered the best deals on Christmas tree USB flash drive so that you can fill your loved one’s stocking with a special gift.

What are the best Christmas tree USB flash drives?

USB Drives Novelty USB flash drive

  • Pack of 5 drives, 8GB each
  • USB 2.0 interface
  • 12-month warranty
  • Tested before delivery
  • 8GB can be too small

The 5-pack USB thumb drives are cool storage drives that come with novelty Christmas-shaped cases. Apart from that, there are conventional USB drives that work with any USB-supported devices including a smartphone with OTG support.

They each come with 8 GB of flash storage and USB 2.0 support. They work with Windows as well as Mac OS devices. There are also variants with 16 and 32GB of storage as well.

Christmas tree USB flash drive 32GB

  • 32GB storage capacity
  • Comes with a keychain to be easily carried
  • Tested before shipping
  • 12 months warranty
  • Can be considered too big to be worn with keys

If you have some old family photos that you want to share with your family then this 32 GB USB flash drive with a Christmas tree shape can be a great choice.

The drive comes with a chain so you can wear it on your keychain. It can be a great gift for anyone.

USB Flash Drive 64GB Cartoon Santa Claus

  • High compatibility with PC, desktops, and laptops
  • Plug and Play usage
  • FAT32, exFAT, or NTFS formats drive compatibility
  • Pen drive with support for TV, car audio, and more
  • Unsustainable materials

Are you searching for a handy but Christmas festive USB flash drive? This multi-format holiday USB stick is the ideal gift for any relatives or friends due to its universal usage and purpose.

More so, you can make use of this Christmasy gift and connect it to almost any device you have, such as laptops, TVs, or car radios.

4GB Christmas Sock Shape USB Flash Drive

  • Extended compatibility with Windows and Mac
  • Water-proof and durable
  • Doesn’t collect dust
  • Backward compatibility with USB 1.1
  • Magnetic and shock resistant
  • Low storage size

In case you want something extra useful and season-related, then consider this practical USB flash drive that offers high durability and no setup requirements.

You can utilize it for multiple devices like Windows and macOS and has NTFS support with a USB 2.0 version. Thus, it will surprise your loved ones with its decoration and performance at the same time.

The Christmas Tree-themed USB flash drive can be an excellent gift for children as well as friends and family. Just make sure you add some funny, memorable moments from the past or add some cool Christmas music before sending it over as a gift to make it extra special.

Leave us a comment in the section below with your suggestions and thoughts.

Error 0x80D05001 in Microsoft Store [Solved]

The Microsoft Store is the main app and game hub for Windows 10 users. Microsoft constantly strives to make the boutique experience as smooth as possible, but it seems there’s still plenty of work to do.

Most of the time, errors occur when users want to download apps from the Store. Error 0x80D05001 is one of the most frequent Microsoft Store errors and it prevents Windows 10 users from downloading apps and installing updates.

How can I fix the Microsoft Store error 0x80D05001?

[wr_tic]

1. Reset Microsoft Store

This is basically the most common solution for all kinds of Store problems. Resetting the Store in Windows 10 is fairly easy. But if you’re not sure how to go about it, do the following:

  1. Go to Search, type wsreset, and open WSReset.exe.
  2. Wait for the process to finish and restart your computer.

2. Run the built-in Windows Troubleshooter

If resetting the Store didn’t get the job done, let’s try with a couple of built-in troubleshooters.

The first troubleshooting tool we’re going to try is Windows 10’s Troubleshooter.

This tool can be used for resolving various issues within the system, including Microsoft Store errors.

Here’s how to run Windows 10’s troubleshooting tool:

  1. Go to Settings.
  2. Navigate to Updates & Security > Troubleshoot.
  3. Click Windows Store Apps and choose Run the troubleshooter.
  4. Wait for the troubleshooter to finish the process.
  5. Restart your PC.

3. Disable antivirus and firewall 

We keep saying in our articles that third-party antivirus programs don’t go along with Windows 10 and its features.

So, it’s quite possible that your antivirus is the one blocking the Store. To see if that’s indeed the case, go and disable your antivirus for a couple of minutes.

If the Store functions without any problems, it’s the antivirus. Now you have three choices. Switch to Windows Defender, ditch the Store in favor of the antivirus, or use another antivirus solution.

Speaking of which, we recommend checking out our list of the best antivirus software available today.

Now that we’re finished investigating your antivirus, let’s turn to Windows Defender Firewall for a second.

Although it’s highly unlikely this feature will block the Store, it won’t hurt if we disable it for a few minutes just to make sure. Here’s how:

  1. Go to Search, type firewall, and open Windows Defender Firewall.
  2. Select Turn Windows Defender Firewall on or off.
  3. Disable Windows Firewall for both private and public networks.
  4. Confirm the selection and try updating again.

4. Perform an SFC scan

The next troubleshooting tool we’re going to try is the SFC scan. This is a command-line troubleshooting tool, that like Windows 10 troubleshooter can resolve various issues.

The difference is that SFC scans the whole system in search of potential problems.

So, you don’t need to pick a specific feature like in the Troubleshooter.

Here’s how to run the SFC scan in Windows 10:

  1. Go to Search, type cmd, right-click Command Prompt, and go to Run as Administrator.
  2. Enter the following command, and press Enter on your keyboard: sfc/scannow
  3. Wait for the process to finish (it can be a lengthy one).
  4. Restart your computer.

5. Change The Region Settings

There’s one detail that can disrupt the Microsoft Store without you even noticing it. And that’s the incorrect date or time.

If your time and date settings are not right, you basically won’t be able to do anything inside the Microsoft Store.

Additionally, the Store isn’t available worldwide, so there’s a chance you’re not allowed to access it.

If that’s the case, you just need to change your Region, ideally to the US, and the Store should be working again without any problems.

However, if you still encounter the Microsoft Store error 0x80d05001 when downloading on Windows, check out the next solutions as well.

6. Run DISM

The final troubleshooting tool we’re going to try is the DISM.

Deployment Image Servicing and Management (DISM) is a tool that deploys the system image all over again, resolving potential issues on the way.

Here’s how to run DISM in Windows 10:

1. Go to Search, type cmd, right-click Command Prompt, and go to Run as Administrator.

2. In the command line, copy paste these lines one by one and press Enter after each:

DISM /online /Cleanup-Image / ScanHealth

DISM /Online /Cleanup-Image /RestoreHealth

7. Repair Microsoft Store

And finally, if none of the previous solutions resolved the issue, let’s try and repair the Microsoft Store. Here’s how:

1. Go to Search, type powershell, right-click PowerShell, and go to Run as Administrator.

2. In the command prompt, enter the following command: PowerShell -ExecutionPolicy Unrestricted –Command “& {$manifest = (Get-AppxPackage Microsoft.WindowsStore).InstallLocation + ‘AppxManifest.xml’ ; Add-AppxPackage -DisableDevelopmentMode -Register $manifest}”

3. Wait for the process to finish and restart your computer.

We also have a dedicated guide on fixing the Microsoft Store Error Code 0x000001f4 that you can check out for more help when dealing with this app.

Have you also encountered the Microsoft Store error 0x80d05001? If you’ve come across a different workaround, feel free to list the troubleshooting steps in the comments section below.

Microsoft Store Needs To Be Online [Solved]

If your Microsoft Store stopped working without any apparent causes, you need to find the right fix for your particular problem.

In this article, we will see how to fix the Microsoft Windows Store app when you experience the Microsoft Store needs to be online error.

Of course, if the Microsoft Store needs to be online and it looks like you’re not, the obvious solution would be to check your connection.

However, there are cases in which you will receive the error message even when your Internet connection is working just fine.

Moreover, apply the troubleshooting solutions from below only after setting up a proper internet connection – just make sure that your device is currently connected to the Internet and your modem is working properly.


How can I fix Microsoft Store needs to be online error?

1. Run a system file check

Sfc scannow
  1. Type cmd in the search box and click on Run as administrator under the Command Prompt app.
  2. Type sfc /scannow and press Enter.
  3. Wait while the scan runs – it might take a while depending on how many files are stored on your hard drive.
  4. Type and run the following commands (press Enter after each command line): Dism/Online/Cleanup-Image/CheckHealth Dism /Online /Cleanup-Image /ScanHealth and DISM /Online /Cleanup-Image /RestoreHealth

If you received the Microsoft Store error after applying a new Windows 10 update or after installing certain software, you should run a system scan. In this way, you can search for system errors and address everything automatically.

Use a third-party system restoration app

System scans are not always the best answer to problematic files, because they won’t find all possible problems and glitches, especially when we’re talking about newly emerging issues.

A better way to scan your system for faulty files and software is actually to use a third-party repair app designed for this purpose.


2. Run the Windows Store Apps troubleshooter

  1.  Press the Windows Key + S and type Troubleshoot settings.
  2. Open it, then go to Additional troubleshooters.
  3. Scroll down the list until you find Windows Store Apps.
  4. Run the troubleshooter.

If the system scan wasn’t helpful, you should also initiate another scan that is dedicated to fixing apps and associated files. This is a Windows default troubleshooter that can also fix any related problems.

In the end, restart your device and try Microsoft Store in order to see if you still get the already discussed you need to be online to open this on this device malfunction.


3. Reset the Microsoft Store app

  1. On your device press the Win+R keyboard hotkeys.
  2. The Run field will be brought.
  3. In the Run box type Wsreset.exe and press Enter.
  4. Wait until the process is executed and reboot your Windows 10 system in the end.

4. Reinstall the Microsoft Store app

4.1 Uninstall the Microsoft Store app

  1. On your computer click on the Search button – usually, it’s the Cortana icon.
  2. There, type power shell.
  3. Right-click on the result with the same name and choose Run as administrator.
  4. From Power Shell now find the Microsoft Store entry; copy the Microsoft Windows Store name as it’s displayed in Power Shell.windows store entery power shell
  5. Type remove-appxpackage insert copied package name here.
  6. The Microsoft Store app will be now removed from your Windows 10 device.

After this, check whether the you need to be online to open this on this device issue persists. If it does, jump to the next solution.

4.2 Reinstall the Microsoft Store app

  1. Open the Power Shell command line window as explained above – you must run it with admin rights.
  2. In Power Shell type and execute the following command: Get-AppxPackage -allusers Microsoft.WindowsStore | Foreach {Add-AppxPackage -DisableDevelopmentMode -Register "$($_.InstallLocation)AppXManifest.xml"}
  3. Restart your system in the end.

5. Create a new Microsoft account

  1. Press the Win+I keyboard hotkeys.
  2. Click on Accounts from the system settings.fix the store needs to be online
  3. From the left panel choose Family & other users.
  4. Follow on-screen prompts and create a new account.
  5. Sign-in with the new account and verify Microsoft Store as there shouldn’t be any remained problems now.

Use the solutions listed above to fix any Microsoft Store issues including you need to be online to open this on this device and Microsoft Store needs to be online.


Do note that depending on your particular problem, some methods may do the trick while others won’t.

So, if you can’t get it right from your first attempt, don’t panic and just follow the rest of the troubleshooting steps listed in this guide.

If you have any problems or you would like to share another solution to the Microsoft Store needs to be online problem, feel free to write to us in the comment section below.

How to Fix Xbox Error Code 0x87e10bea

Nothing excites gamers more than launching a game on your Xbox and getting to play right away. However, for some users, this excitement is short-lived, as they get the error code 0x87e10bea when they try to launch a game.

The problem occurs because of the inability to connect to Xbox Live servers. This causes all your game downloads and updates to fail, which may result in losing important files.

Why am I getting the Xbox error code 0x87e10bea?

If you spot the Xbox error code 0x87e10bea, it could be due to one of the following reasons:

  • Network problems – The most likely cause of this error is that your console is having trouble connecting to the Internet or is unable to connect to the Xbox Live service.
  • Server downtime – It could be that Microsoft has temporarily taken down their servers because of maintenance or to fix some issues that they have identified in their system.
  • Outdated console – If it’s been a while since you last updated your Xbox console, you may experience a myriad of issues, including the error code 0x87e10bea.

How can I fix the Xbox error code 0x87e10bea?

First off, ensure you check off the following before moving to the slightly technical solutions:

  • Make sure that there are no loose connections anywhere between your router or modem and the Xbox console. 
  • Make sure that your console is connected to the internet and that there is no interference from other devices.
  • If you’re using a wireless connection, make sure that you have sufficient signal strength by moving closer to the router or by using an Ethernet cable instead.
  • Check if the cables are damaged because if the Ethernet is not working, it can also cause the same problem.
  • Try restarting your router and modem, and then try to reconnect to Xbox Live again.
  • Restart your console.

1. Update your Xbox console

If you’re using an old version of your Xbox, it may not be compatible with the latest updates and give you trouble when you try to launch some games.

On a PC, you can run Windows Update and check for new updates for both Windows and Xbox, then install and see if this fixes the issue.

2. Check the Xbox status page 

The Xbox Live Status page is an official site that shows the status of Xbox Live. If you have problems connecting, you can check the page to see if Xbox is down. You can confirm whether there are any service alerts in effect or if other people are having problems too.

If there is an alert, you’ll be able to see what’s causing it and when it might be resolved. This means that you might not need to do anything except wait until the problem gets fixed by Microsoft.

What are some of the common Xbox error codes?

Aside from the Xbox error code 0x87e10bea, you may also encounter other errors such as:

  • 0x80070102 – This error code locks out users from their accounts by preventing them from signing in.
  • 0x807a1007 – Users may be unable to use the party chat feature when this error code makes an appearance. 
  • 0x87e0000d – This error presents issues when users try to download and install games from the Microsoft Store.

Hopefully, you have been able to get past the Xbox error code 0x87e10bea using one of the fixes above.

While you’re still here, be sure to check out some of the best Xbox Live games to play if you want to shake things up a little bit.

Share any additional thoughts and comments you may have in the comments section below.

Steam Keeps Crashing When Installing Games: How to Fix It

Users can install their favorite games on the Steam client and play them on their PC. However, they often complain that Steam crashes when installing games.

Also, users report the Steam client being unable to sync files on their PCs.

Why does Steam crash when installing games?

The most common cause is an outdated Steam client on your PC. It can cause it to malfunction and get infected by bugs that can affect its functionality.

Other factors that may be responsible for the problem are:

  • Outdated Windows OS – The Steam client can run into issues if your Windows operating system is outdated. It means Windows doesn’t have access to updates and patches for fixing bugs.
  • Third-party app interference – Third-party apps like antivirus software can block the activities of the Steam client on your PC, causing it to crash when installing games.
  • Outdated graphics driver – An outdated graphics driver can cause issues with the Steam client on your computer. Steam uses lots of graphics ability, so it can crash if the graphics driver is not intact.
  • Corrupt Steam installation files – Steam can crash at will if its installation file is corrupt. It will make the Steam client malfunction and be unable to perform any action.

These causes can differ on various computers, but you can fix them by troubleshooting your PC.

What can I do if Steam crashes when installing games?

Follow the preliminary checks below:

If the problem persists, try the solutions below.

1. Clear the Steam client’s download cache

  1. Left-click the Start button, type Steam, and select the Steam app to open it.
  2. Click the Steam Menu and select Settings.
  3. Select Downloads and click the Clear Download Cache button.
  4. Click OK until Steam prompts you to log in to your account.

Try installing the game and see if the problem persists. Clearing your download cache will delete the corrupt update or download files that can cause problems with Steam.

2. Update your graphics driver

  1. Press Windows + R key to open the Run bar, type devmgmt.msc, and click OK.
  2. Expand your Display adapters, right-click on your graphics driver, then click Update driver.
  1. Select the Search automatically for drivers option.
  1. Restart your computer and check if the crash still occurs.

This would be the manual process that can help you, but if you’re looking for a simpler and faster way, then you could opt for third-party software that will automatically update your drivers, and will also offer support in long-term maintenance.

⇒ Get Fortect Driver Updater

3. Run the Steam client as an administrator

  1. Right-click on the Steam client icon on your desktop and select Properties from the drop-down.
  2. On the Steam properties window, go to Compatibility, check the box for Run this program as an administrator, and click OK.
  3. Restart your PC and launch Steam to see if the issue persists.

Running Steam as an administrator can resolve any permissions issues affecting its performance. Check what to do if you can’t run apps as administrators on your PC.

4. Disable Windows Firewall

  1. Click the Start button and type control panel, then launch it.
  2. Click on the Windows Defender Firewall option, then click Turn Windows Defender Firewall on or off from the left pane.
  3. Go to the Private network settings and Public network settings, then click the radio buttons for the Turn off Windows Defender Firewall (not recommended) option.
  4. Close the Control Panel and restart your computer.

These steps will fix any program Windows Firewall blocks on your PC, including the Steam client.

5. Check if Steam is running in Compatibility Mode

  1. Press Windows + R to open the Run dialog box, type C:\Program Files (x86)\Steam, and click OK.
  2. In the Steam directory, find the Steam.exe file, right-click on it, and select Properties from the drop-down.
  3. Click the Compatibility tab to check if the Compatibility Mode box is checked. If it is, uncheck it and save the changes.
  4. Restart the Steam client and check if the problem persists.

Disabling the Steam Compatibility Mode will solve any confusion prompting the issue.

Conclusively, if you are having difficulties running Steam on Windows 10, check our guide for fixes. Likewise, you can read about fixing Steam update downloads stuck or not downloading on your PC.

If you have more questions or suggestions, kindly drop them in the comments section below.

FIX: Driver irql_less_or_not_equal Blue on Windows 10 BSOD

Many users encountered driver irql_less_or_not_equal on Windows 10, and in today’s guide, we’re going to show you how to fix this problem.

This BSOD error appears due to issues with your RAM or drivers. In some cases, overclocking can cause this problem

How do I fix driver IRQL not less or equal error?

First, restart your PC and check if the problem persists. Keep your system up to date and remove any overclocking settings. If you have any non-essential USB devices, remove them.

Now let’s move on to advanced fixes:

1. Update your network and display adapters

  1. 1.1 Disable your driver

    1. Press Windows + X to open Power User menu and select Device Manager from the list.
      Driver_irql_not_less_or_equal ql2300.sys
    2. Expand Network adapters and or Display, locate the driver you’re currently using, right-click it and choose Disable from the menu.
      disable device to fix driver irql_less_or_not_equal windows 10
    3. Click Yes in the confirmation prompt.
  2. 1.2. Download the latest driver

    1. Open Device Manager, expand Network adapters or Display, right-click your wireless adapter and choose Update Driver Software option.
      update driver to fix driver irql_less_or_not_equal windows 10
    2. Select Search automatically for drivers option and wait until Windows installed the best driver.
      search automatically for drivers

Sometimes it’s better to download this driver straight from the manufacturer’s website. After installing the latest drivers, go back to Device Manager, and enable your wireless adapter.

Also, similarly, update the graphics driver as well as the one for the Ethernet adapter, in case you have a wired Internet connection.

1.3 Update the drivers automatically

Suppose the method above didn’t work, or you do not have the necessary computer skills to update/fix the drivers manually. In that case, we strongly suggest using a professional tool specializing in driver updates.

Fortect Driver Updater software scans your system and updates any outdated driver from its extensive database of official driver files. Simple and fast, it will ensure every driver is installed correctly, with no errors.

⇒ Get Fortect Driver Updater

2. Test the memory

  1. Press the Windows key + R and enter mdsched.exe.
  2. Select the desired option and scan your RAM.
  3. Follow the instructions on the screen to complete the steps.

Since the former doesn’t carry out extensive testing, you can also go with MemTest86+, an open-source tool that looks for issues with individual memory modules and fixes them for good. Again, though, remember the device will take a few hours to run.

4. Reinstall the problematic application

  1. Press Windows + R to open Run, type appwiz.cpl, and then hit Enter.appwiz.cpl
  2. Locate the application that triggers the error, select it, and then click Uninstall.uninstall app to fix driver irql_less_or_not_equal windows 10
  3. Follow the on-screen instructions to complete the uninstall process, and then restart the computer for the changes to effect.
  4. Once done, download and install the app from the official website or the Microsoft Store.

5. Disable on-board graphics

  1. Restart your PC and access BIOS.
  2. Go to Advanced mode and choose Settings.
  3. Now look for Internal graphics and set it to Disabled.

6. Run a SFC scan and DISM

  1. Ppress Windows Key + X and select Command Prompt (Admin)).
  2. Type the following command and press Enter: sfc /scannow.sfc scan
  3. Let the SFC scan run and repair any corrupted files.
  4. Once SFC is complete, type the following command and press Enter: DISM /Online /Cleanup-Image /RestoreHealth. dism command
  5. This DISM scan might take longer than the SFC scan. Let it complete fully.
  6. Restart your computer after both scans are finished.

SFC (System File Checker) and DISM (Deployment Image Servicing and Management) can help fix the driver irql_less_or_not_equal Windows 10 error by repairing corrupted system files that cause driver issues.

And before you leave, find out the best BSOD fixing software to eliminate the problem in no time.

This issue can appear on any version of Windows, and we have a Driver Irql Not Less or Equal in Windows 11 guide that covers this problem on the latest version.

There’s also a variation of this IRQL_NOT_LESS_OR_EQUAL, and the solutions from this guide will work for that version as well.

If you fixed the problem using another solution, drop it in the comments section below to help fellow Windows users.

How to fix Outlook error 0x80042109 in 4 easy steps

Even though we have a dozen third-party email clients nowadays, Microsoft Outlook is still a force to be reckoned with in this department.

Nonetheless, even Outlook doesn’t refrain from occasional errors, like the one with the code 0x80042109.

Users reported that they’re unable to send emails and, once they try, they are prompted with this lengthy error:

Sending reported error (0x80042109) : Outlook cannot connect to your outgoing (SMTP) e-mail server. If you continue to receive this message, contact your server administrator or Internet service provider (ISP).

Fortunately, we have prepared a few solutions to help you overcome this issue. In case you’re having a hard time with Outlook, make sure to check them out below.

What is error 0x80042109 in Outlook?

Users may typically encounter this Error Code 0x80042109 if they attempt to send emails using Outlook. Their outgoing emails are not successfully delivered to the receiver, and an error notice informing them that there are issues with the email server appears on their screen.

The error code 0x80042109 in Outlook 2013 could have been caused by any number of things. The following are some of the possibilities:

Follow our list of solutions below in order to fix this Outlook error and get back to successfully corresponding with your contacts.

How can I fix Outlook error 0x80042109 in Windows 10?

  1. Check your connectivity
  2. Change the outgoing port
  3. Reconfigure your Firewall
  4. Remove your account and add it again

1. Check connectivity

Firstly, you’ll need to confirm that your PC is properly connected to a stable network.

For obvious reasons, your email client won’t be able to reach servers and, consequently, you won’t be able to receive or send emails.

In case your connection is subpar and you are positive that it’s the culprit for the error, these are the steps you should take in order to troubleshoot your connectivity:

  • Restart your router and modem.
  • Switch to a wired connection instead of wireless.
  • Restart your PC.
  • Disable Proxy and VPN temporarily.
  • Run Windows troubleshooter.

Once you’ve regained the stable connection, the problem should be resolved. However, if that’s not the case, make sure to move on with the steps.

2. Change outgoing port

A standard outgoing SMTP (Simple Mail Transfer Protocol) port’s value is by default set to 25.

Now, it seems that many ISPs are blocking this port value and thus, you’re unable to send emails. You have two options in this scenario:

  • Change SMTP value to 26.
  • Switch to TLS port and choose 587.

The second option is non-standard port value but, nonetheless, a proven solution for this issue. Follow these instructions and we should be good to go:

  1. Open Outlook.
  2. Choose Tools.
  3. Open Account Settings.
  4. Double-click on the troubled email address.
  5. Choose More Settings.
  6. Open Advanced.
  7. Set Outgoing server SMTP port to 587 and select TLS encryption.
  8. Confirm selection and look for changes.

On the other hand, if you’re still stuck with the error at hand, continue with the troubleshooting steps below.

3. Reconfigure Firewall

Even though you configured email incoming and outgoing ports, the problem might persist. And Firewall might be the one causing the error.

It’s not common for Windows Firewall to block trusted Windows features, but, apparently, this can happen from time to time.

In order to confirm that Firewall is indeed allowing Outlook to access the internet, follow the instructions below:

  1. In the Windows Search bar, type Firewall and open Windows Firewall.
  2. From the left pane, click on ”Allow an app or feature through Windows Firewall”.
  3. Click on the ”Change settings” button.allow an app or feature through Windows Firewall
  4. Now, locate these 2 processes and enable them for both private and public networks:
    • Outlook.exe (for Outlook)
    • Msimn.exe (for Outlook Express)
  5. Once you’ve done this, confirm changes and restart your PC.

4. Remove your account and add it again

Finally, you can try and remove your account from Outlook. You can also completely reset the app by navigating to Settings > Apps > clicking on Outlook and accessing Advanced Options.

Once there just click Reset. After that, just add your account again, configure it, and wait until it fully synchronizes.

That should do it. We’re sure that you’ll be able to overcome the Outlook error 0x80042109 with the provided solutions.

Additionally, don’t forget to post your questions or suggestions in the comments section below.

  • What is Outlook error code 0x80042109?
Error 0x80042109 comes with the following message: Outlook cannot connect to your outgoing (SMTP) e-mail server. If you continue to receive this message, contact your server administrator or internet service provider (ISP).
  • How do I fix Outlook not sending emails?

First, check if you receive any error, and then check if your ISP is blocking a port. Read our complete fix guide for this problem.

[wl_navigator]

How to Transfer Games from One Xbox to Another

If you have two Xbox consoles, or if you’ve just bought a second one, then you may want to know how to transfer games from your Xbox one to your new Xbox series X.

Transferring games from one Xbox to another is a great way to get more out of your old console. You can use an external hard drive or USB flash drive to move games from one Xbox to another.

Can I transfer games from Xbox One to Xbox Series?

Yes. You can transfer games from Xbox One to Xbox Series. This is a great feature that allows you to play the same games on different platforms. However, there are some restrictions on the type of games that you can transfer and the number of times they can be transferred. 

Other factors to consider include:

  • Ensure your account is active – If the account that you are using on the old console is blocked or banned by Microsoft, you will not be able to transfer any content from it.
  • Size of the game or games – The size of the game that you want to transfer will determine whether you should use an external hard drive or flash memory drive.
  • Internet connection speed – If you do not have a good stable connection speed, it will take more time for the transfer process. You can check your internet speed before the transfer.
  • Compatibility – If you want to transfer games from one Xbox to another, ensure that the games are compatible with the other device. Some may require an activation code.
  • The storage capacity of your target console – Before transferring your games from one console to another, make sure that the storage capacity of your target console is enough for all your games.

How can I transfer games from one Xbox to another?

1. Use an external hard drive

  1. Ensure that you are using an external hard drive that supports USB 3.0.
  2. Plug in an empty hard drive on your Xbox or format one you already have.
  3. Press the Xbox button to open the Settings menu.xbox-settings
  4. Select System and click on Backup & transfer.
  5. Click on Backup my settings and select Back up to device by choosing your hard drive.
  6. Go back to Backup & transfer and select Hard drive transfer.
  7. Select the games you wish to transfer. You can copy them if you want them to remain on your Xbox or move them if you wish to clear them from the console.
  8. Wait for the transfer to finish, unplug the hard drive, and plug it into the new Xbox console.
  9. You can choose to copy or play directly from the hard drive.

If you are not sure what hard drive to go for, we have awesome recommendations of the best Xbox One USB external storage devices you can use.

2. Use a network transfer

  1. Ensure you have connected both Xbox consoles on the same network and completed the initial setup on the new one.
  2. Press the Xbox button to open the Settings menu.xbox-settings
  3. Select System and click on Backup & transfer.
  4. Click on Allow network transfer.
  5. Repeat steps 2 to 4 on the other Xbox you wish to transfer games to.
  6. You should see your old Xbox under Local consoles.
  7. Select the games you want to appear on your new Xbox and click on Copy selected. (Ensure the number of games you have selected does not exceed the storage space on your console).
  8. The transfer process will now begin.

The time taken for the transfer process to complete will depend on the number of games as well as the size of the games. Remember to keep your internet connection on all through, as any slight interruption could lead to data loss. 

The quickest way to transfer games from Xbox One to Series X depends on how many games you want to move and if the console is online or offline.

Remember that Xbox One games are also saved in the cloud and can be accessed from any Xbox One console or Windows PC. For this, we recommend you use a good browser for Xbox One. 

We may also be able to help if your Xbox is unable to choose your preferred drive for the transfer of your games.

Before we go, we also have a great guide on how to play Xbox games from an external hard drive, so don’t miss it.

Let us know which is your preferred method of transferring your Xbox games in the comment section below.

How to Monitor your Employees Using the Insightful Software

When everyone is at the same workplace, monitoring your employees is pretty easy. But when your workforce is scattered all over the world, employee monitoring software can simplify that process a lot.

These kinds of tools also help you monitor your project budget and get progress reports and Insightful is one of the best there is.

How can Insightful help me manage the workforce?

Insightful is software that helps you monitor the computer activity whether the employee is using a personal or company device.

The tool will track the activity while someone is working on a project or task, or it can be used by the employee to clock in manually.

Basically, Insightful is a time-tracking software that provides all sorts of activity reports and even screenshots whenever you need them.

It’s also a great way to assess and pay your workforce based on the amount of time and work spent on a certain task or project.

That being said, let’s see how you can use Insightful to monitor your employees easily and efficiently.

How do I monitor my employees using Insightful?

1. Create an account and add employees

  1. Go to Insightful’s official page and click on the Try for Free button.
  2. In the next windows, enter your e-mail address and hit the button below to activate your trial period.
  3. Of course, you need to create an account or use your Gmail or Slack account to start.
  4. Setting up will start and after you specify the number of employees you want to monitor; you will need to specify whether the employees are using company computers or their own devices. We chose the second option because it’s a lot more common.
  5. Then, select whether you want the employees to clock in manually or automatically when they work on a project. Also, check if you want to track time on tasks and the interval on which the tool takes screenshots of their activity.
  6. The last step is to enter all the email addresses of your employees and send them invitation messages.

After that, the employees will receive an e-mail message to log in with their e-mail address as the username and create a password.

They will also be able to download a small app to clock in, and if you have selected the manual option, they will also have the corresponding button to push when they start working.

It’s important to know that you can work on all these settings anytime from your dashboard.

2. Monitor your employees and extract reports

  1. Once you get to your admin dashboard, you will see a list of all your employees with a summary of their activity and you will be able to add new ones by hitting the top-right button on your screen.
  2. And when you click on any employee, you will instantly get a full report on their activity and productivity with working times, breaks, idle times, and more.
  3. At any time, you can click on the Apps and Websites tab from the left pane to find out which websites the employee visited and what apps is using.
  4. Of course, you may also create teams based on your departments or projects and assign certain tasks to your employees.
  5. At any time, you can download the data in CVS format by clicking on the Download icon.
  6. You or your admin can set up everything ups from the Settings menu, including app integrations, audit logs, shift scheduling, authentification, SSO, and even billing or many more.

3. Using Insightful as an employee

As an employee, using Insightful is a lot more simple than for the administrator. You only see your personal sheet with attendance and work.

Of course, you can also access the projects you are working on and the scheduled shifts that the employer has assigned for you.

The employee dashboard is a lot more simple to use

Of course, all the data is synced between you and your employer so you both see the same thing as far as you’re concerned.

That way, everything is transparent, and you may also download your personal sheets as CVS reports to confront a possible discrepancy scenario.

You may also clock in and out manually

Also, if your employee has decided on a manual clock-in and out option, you will get the small app for Mac or Windows to start and end your work time.

The best part is that apart from the clock-in app, everything can be accessed and monitored through a cloud dashboard.

That means that the admin can view and assess the situation from virtually any device that can access a browser. And of course, from anywhere with Internet access.

That’s it! We hope that our information on how to use Insight to monitor your employees was comprehensive and useful.

As we’ve shown above, Insightful can be tested with full features for 30 days so you can make your own observations before purchasing.

If you’re still undecided, you may also check our list of the best time tracking software to monitor your employees.

Best Windows 11 And 10 Tablets [This Season]

A good piece of technology always makes for a great gift, especially for holidays. And one of the best gadget choices is definitely a Windows tablet or hybrid device.

So if you consider getting one for yourself or your loved ones as a Christmas gift, this list of the best Windows tablets to get this winter will definitely help you.

Check out the tablets listed below, hit the buy button, wrap the device in a nice gift wrapping paper and hide it under the Christmas tree.

The coolest Windows tablets to buy this Holiday Season

1. Microsoft Surface Pro 9

One of the greatest devices you can approach this season is the newest Microsoft Surface Pro 9 tablet which offers a combined PC and tablet configuration with an adjustable kickstand.

In terms of performance, you have the Intel Evo platform with a 12th Gen processor, a 13 inches PixelSense touchscreen for Windows 11, a Surface slim pen 2, and a Surface integrated keyboard.

Not only that, the tablet has Thunderbolt 4 ports that allow you to connect multiple devices and run engaging local games.

In case you’re all about design, the Surface Pro 9 comes with sapphire and forest colors for a vibrant look and elegance.

⇒ Check it now on Amazon

2. Microsoft Surface Pro 8 Tablet PC

best-windows-tablets-christmas

The latest Microsoft Surface Pro version is a Windows 11 portable tablet with 2-in-1 functionality with highly advanced specifications like the Intel Core i7 processor with a 13-inch PixelSense display and a wide resolution of 2880×1920 pixels.

This device presents multiple modes for different needs. You can, for instance, use its reliable laptop performance for complex tasks like gaming or photo editing or simply utilize the tablet mode for informal tasks.

Moreover, it’s possible to extend your screen to multiple monitors using Thunderbolt 4 ports for high-res monitors. You also have the integrated kickstand for efficient navigation and a long-life battery cycle.

In terms of video and sound capacities, you have a 5-pixel front camera with stereo microphone utility for perfect calls. More than this, you can record videos in 4K with a 10-megapixel camera.

⇒ Check it now on Amazon

3. Surface Pro 6 & 7

surface-pro-6-essentials

This is the latest Surface Pro version from Microsoft. The big M released the Surface Pro 6 in 2018 and we think every Microsoft fan should own one.

This tablet is ultra-slim, ultra-portable, and extremely versatile. It also packs the latest Intel CPU for top-notch performance.

The 12.3-inch PixelSense display sports a 2736 x 1824 (267 PPI) resolution that renders crystal-clear images. Multi-touch is also supported, so you can quickly get the work done even if you forgot your mouse and keyboard at home.

⇒ Check it now on Amazon

Of course, if your budget allows it, you can get the new Surface Pro 7. This 12.3″ touchscreen 2-in-1 laptop is ultra-light and versatile. Get this device and you won’t have to worry about battery life.

⇒ Get the Surface Pro 7 from Amazon

4. Surface Go

Surface Go

If you’re looking for a Surface device of a newer generation that has a friendlier price tag than the Surface Pro 6, then the Surface Go is a very good choice.

As its name suggests, you can take this tablet everywhere you go. It comes with a 10-inch PixelSense display that’s perfect for viewing documents or watching videos. Excellent touch-screen support allows you to write on it as if you were writing on paper.

This is the lightest Surface device ever, weighing just 1.15 lbs. It has a solid 9-hour battery life that’s more than enough to power you throughout the day. The device comes with Windows 10 in S mode pre-installed.

⇒ Check it now on Amazon

5. HP Envy X360 2-in-1

best-windows-tablets-christmas

If you need a decisive convertible PC and tablet, this HP device is perhaps the best choice that you can make this Christmas. You can use the tablet in 4 different positions and bend it up to 360 degrees.

The HP Envy PC tablet has a 15.5 diagonal and Full HD and multitouch IPS display, with an AMD 5 5000 series processor, 1TB SSD memory, and 16GB speedy RAM.

Plus, the device is bundled up with a ROKC mousepad, super fast USB type-C, and a backlit keyboard.

⇒ Check it now on Amazon

6. Microsoft Surface Pro 4

Microsoft Surface Pro 4 windows 10 tablet

If you’re looking for a powerful, stable, and reliable tablet, the Surface Pro 4 is the perfect candidate. Although it comes with a higher price tag than other Windows 10 tablets, the device is worth every penny.

Microsoft Surface Pro 4 is powered by a 6th generation Intel Core M CPU and offers 128 GB of storage, 4 GB RAM, and an impressive video playback autonomy of up to 9 hours of video playback on the 12.3-inch Pixel Sense Display.

The tablet features Windows Ink, allowing you to take notes quickly with the help of a digital pen. If you work in graphics design or a complementary tool, then the Surface Pro 4 is the right tablet for you. It can run all of the professional-grade software you need, including Adobe Creative Cloud, Citrix, AutoCAD, or Visual Studio.

⇒ Check it now on Amazon

7. Fusion5 Ultra Slim Windows Tablet PC

best-windows-tablets-christmas

The newest Fusion5 Windows tablet is the ideal device if you’re looking for high-storage memory and a portable thin aspect.

When it comes to specifications, this stylish device offers an Intel Quad-Core processor, 4GB RAM memory, a 10-inch screen with IPS FHD resolution, plus the Windows 11 OS pre-installed in the tablet.

You also have considerable internal storage of 64GB to keep your favorite files regardless of the size, plus Bluetooth 4.0 support.

⇒ Check it now on Amazon

Preparing Security Options: 5 Methods You Can Use to Fix it

Windows is one of the most used operating systems, and each upgrade introduces new features and security options. But some errors seem to find their way into every iteration, and Preparing security options is one of them.

Though not strictly an error, it appears as so because of the Preparing Security Options Windows 10 blue screen message. So, let’s find out about the problem and its solutions.

What does preparing security options mean in Windows 10?

When stuck on Preparing Security Options, it usually indicates that the OS is updating security settings. It’s done to keep your computer up-to-date with the latest updates. Here are a few reasons why you are receiving the error:

  • Conflicting antivirus – In most cases, it was a conflicting antivirus that led to the problem. Usually, Malwarebytes installed Chameleon, which triggered the message.
  • Malware – A few users reported that malware or viruses caused the Control ALT-DELETE Preparing Security Options message.
  • A pending update – In case there are pending Windows updates, you may come across this message.
  • Slow computer – If the message appears for an extended period when you press Ctrl + Alt + Del followed by the actual options, it could indicate poor performance, and you will have to boost Windows speed.

How can I fix Preparing security options message?

Before we try the slightly complex fixes, here are a few quick ones that might do the trick:

  • When you see Preparing security options, hold the power button for 30 seconds or so, and verify if the message appears after the restart.
  • Unplug any non-critical peripherals from the PC. For instance, the printer, speaker, or headphones, amongst others.
  • Scan your PC for malware. For this, you could use the built-in Windows Security or go with a reliable third-party antivirus that detects all viruses and eliminates them.
  • Update Windows to the latest available version.

If these don’t work, try the solutions listed next.

1. Uninstall third-party antivirus

  1. Press Windows + R to open Run, type appwiz.cpl in the text field, and hit Enter.appwiz.cpl
  2. Select any installed antivirus, and then click on Uninstall.uninstall antivirus to fix preparing security options
  3. Follow the on-screen instructions to complete the process.

Since Malwarebytes is usually found to trigger the problem, we recommend you check for it. Also, remove the other antiviruses as well, to be sure. Finally, if the problem persists, reinstall the one you uninstalled earlier and head to the next solution.

2. Terminate non-critical tasks

  1. Press Ctrl + Shift + Esc to open the Task Manager and locate the tasks that consume a lot of Memory, CPU, or DISK.task manager
  2. Select each of them individually, and then click on End task.end task to fix preparing security options

If the computer is slow and you get the Preparing Security Options message, directly launch the Task Manager and terminate the non-critical programs to free up system resources.

3. Disable Hybrid Sleep

  1. Press Windows + R to open Run, paste the following, and click OK.control powercfg.cpl,,3power options
  2. Now, expand Sleep, and double-click on Allow hybrid sleep.hybrid sleep
  3. Next, choose Off for both On battery and Plugged in, then click OK to save the changes.disable hybrid sleep to fix preparing security options
  4. Once done, restart the computer for the changes to come into effect.

4. Uninstall recent OS updates

  1. Press Windows + I to open Settings, choose Windows Update from the navigation pane, and then click on Update history.update history
  2. Now, scroll down to the bottom and click on Uninstall updates.uninstall updates to fix preparing security options
  3. Click on Uninstall next to the update, after installing which the error first appeared.uninstall
  4. Again, click Uninstall in the confirmation prompt.confirm uninstall to fix preparing security options

That’s it. Removing the recently installed update should do the trick if the problem appears after updating the OS. You may have to uninstall a few of these before being able to identify the problematic one.

5. Perform a system restore

  1. Press Windows + R to open Run, type rstrui, and then hit Enter.system restore to fix preparing security options
  2. Now, click on Next to proceed.next
  3. Choose a restore point from the list, and again click on Next.restore point
  4. Finally, verify the restore details, and click Finish.finish

If nothing else has worked so far, performing a system restore should get things up and running when you persistently see the Preparing Security Options screen.

Also, in some cases, a failing storage drive triggered the message, so we recommend you use HDD Health Check software. Besides, find the best Windows settings for improved performance.

If you have any other queries or know of a solution not listed here, drop a comment below.

3 Ways to Fix System Update Something Went Wrong Error on PS5

Play Station 5 is one of the most used gaming consoles from Sony. That’s why a System Update is an important process for the PS5 console to keep your system up-to-date and running smoothly. It ensures you will always be able to play games without any issues or problems. 

However, sometimes there are some issues with the PS5 firmware updates that might cause errors like the Something Went Wrong error on PS5. If you are having this issue, you have come to the right place, as today we will show you how to fix this problem with ease.

What are the most common system update issues on a PS5? 

PS5 system update issues always happen, and they’re a real pain in the backside. We’ve all experienced PS5 system update problems, but what are some of the most common PS5 system update errors?

  • Connection error – If you have an unstable connection or poor signal strength, the update may fail.
  • Update failed – The PS5 may not be able to download an update, or it could take hours to complete. Slow internet speeds or a faulty disc drive are usually the main culprits.
  • Update stuck – You can get stuck on the updating screen after it has downloaded but before it starts installing.
  • Not enough storage space – If you have an extensive library of games, movies, and music stored on your console or PC, it might not have enough space left over for an update.
  • Corrupted update file – This will typically happen if you don’t download an update directly from Sony or if you use an unofficial source for it, such as a torrent.

Why does my PS5 keep saying something went wrong?

If you’re repeatedly getting the something went wrong error message on your PS5 console, it could be due to one of the following reasons:

  • Unstable internet connection – Updates usually require strong and stable connections, so if you have slow Wi-Fi,  you may face issues while trying to update.
  • Corrupted update – It’s also possible that there was a problem with the update itself or with your device.
  • Dirty/scratched disc – If there’s any dirt on the disc itself, then it won’t be able to read it properly and will report an error message. 

What do I do if my PS5 won’t update? 

1. Check your internet connection

If the issue is with your internet, you can disconnect other devices using the Wi-Fi, connect an Ethernet cable directly from your modem or router to your PlayStation 5’s LAN port, and try updating again.

Also, ensure that no other devices between your modem or router and PlayStation 5 could block or interfere with this connection.

2. Update PS5 firmware

  1. Navigate to the PS5 Settings menu.
  2. Click on System.
  3. Under System Software, select System Software Update and Settings.
  4. Select Update System Software.
  5. Hit Update and wait for the process to complete.
  6. Restart your PS5 and check if the error reoccurs.

In case you want to update your PSN console without any issues, you first need to get it in Safe mode; read this guide to learn the steps.

3. Delete and reinstall the update

If you have the option to download the update again, go ahead and do it. This will help ensure the update is working correctly, especially if the initial one has been corrupted.

Locate the update, delete it, restart your PC and PS5 console, then download it again.

What does rebuilding the database do on PS5? 

Rebuilding the database is a process that clears all game data and settings from your PS5 console. It’s like a factory reset for your PS5, but it doesn’t delete any games or apps. The rebuild database option is used to repair the PlayStation 5 database. 

If you’re having issues accessing certain features of your PlayStation 5, such as installing games, rebuilding the database can help. The process will scan the system’s database and rebuild all of the files involved in storing game information on your PS5. 

Whereas it can be helpful in fixing corrupted saved files, it should only be used as a last resort. Once the process is completed, you may notice improvements in how your PS5 console works.

If all else fails, you should reach out to the official Playstation support page for more answers. We can also help if you are experiencing the network sign-in error on your Playstation or if your PS5 is blinking orange.

Let us know if you have been able to fix this issue in the comments section below.

Windows Store Cache May Be Damaged [Solved]

Almost every Windows 10 user uses at least one app or game from the Microsoft Store. So, any potential problems with this feature may spoil the user experience.

One of the most common issues related to the Microsoft Store is the error message Microsoft Store Cache may be damaged.

This error can affect the Microsoft Store in various ways, but users cannot download games and other apps or update them most of the time. In this guide, we have gathered the surefire ways to fix the Store and get back to using it like before.

Why am I getting the Windows Store cache may be damaged message?

There are various reasons you might be getting the Windows Store cache may be damaged error. Listed below are some of the prevalent ones:

  • Activities of other apps: Some users have found the Windows Store cache and licenses may be corrupt error to be caused by apps like Movies and TV. The solution, in this case, is to uninstall the responsible app with an uninstaller software and reinstall it later.
  • Faulty Store app: In most cases, the cause of this issue is a corrupted Microsoft Store app. You can fix this by repairing the app or reinstalling it, depending on the severity of the problem.

How can I fix the Windows Store cache may be damaged error?

1. Repair the app

  1. Press the Windows key + I and select the Apps option.
    apps windows store cache may be damaged
  2. Choose the Microsoft Store app option and click Advanced options.
    advanced
  3. Now, click the Repair button and perform any recommended troubleshooting steps.

If you are getting the Windows Store cache may be damaged, it might be because the Store app is broken. Using the built-in repair tool should fix it and restore normalcy.

2. Use AppX Package and WSReset

  1. Press the Windows key + X and select the Windows PowerShell (Admin) option.
    powershell
  2. Type the command below and hit Enter:Get-AppXPackage -AllUsers | Foreach {Add-AppxPackage -DisableDevelopmentMode -Register "$($_.InstallLocation)\AppXManifest.xml"} get app
  3. Now, wait for the command to finish running and restart your PC.
  4. After your PC starts, press the Windows key, type cmd, and select the Run as administrator option under Command Prompt.
    cmd windows store cache may be damaged
  5. Type the command below and hit Enter: WSReset.exewsreset
  6. Finally, restart your PC and try using the Microsoft Store again.

Sometimes, the Windows Store cache may be damaged may be due to glitches with the app. Running the commands below will help to reset it and clear the potential causes of the issue.

3. Remove the Movies & TV app

  1. Press the Windows key + X and select Windows PowerShell (Admin).
    powershell windows store cache may be damaged
  2. Type the command below and press Enter to run it: Get-AppxPackage *zunevideo* | Remove-AppxPackageremove
  3. Wait for the command to finish running, quit PowerShell, and check if the Movies & TV app is still on your PC.
  4. Launch Windows Store and reinstall the removed app if you still need it.

Some Windows Store apps might be why you get the prompt that the cache is damaged. One prominent app that users have found responsible is the Movies & TV app.

Removing it fixed the problem for many users. So, it would be best if you tried it too.

Alternatively, you can use a specialized uninstaller tool in CCleaner to remove the app. This tool will eliminate all leftover files of the apps that can cause other problems.

4. Run the Windows Store Apps troubleshooter

  1. Press the Windows key + I to open the Settings app and select the Update & Security option.
    update and
  2. Choose Troubleshoot in the left pane and click Additional troubleshooters.
    troubleshoot windows store cache may be damaged
  3. Now, select the Windows Store Apps option and click Run the troubleshooter.
    run the
  4. Finally, apply any recommended fixes.

The Windows Store App troubleshooter is one of the built-in tools for fixing issues with the Microsoft Store and its apps. So, it might be able to fix this damaged cache issue for you.

That’s about it; we certainly hope at least one of these solutions helped you to resolve the Windows Store cache may be damaged problem.

If Microsoft Store is completely missing, check our detailed guide to get it back quickly.

If you have any comments or questions regarding the Windows Store cache may be damaged topic, feel free to let us know in the comments below.

How to Connect PS4 Controller to PC [4 Tested Methods]

If you are a console gamer and own a PlayStation 4, playing video games on Windows 10 with a controller probably feels more natural.

In this guide, we’ll show you exactly how to connect your PlayStation 4 controller to Windows 10, just like we did with our guide on connecting a PS3 controller to a PC.

Does Windows 10 support a PS4 controller?

Yes, the latest versions of Windows 10 support the PS4 controller natively. This is a welcomed development, considering that users complained that the controller is not recognized on the PC when connected directly.

Then many people relied on third-party apps to make the controller work. You can now connect it directly and play compatible games easily on your PC.

How do I connect my PS4 controller to my PC?

1. Wired connection

Connecting your wired PlayStation 4 controller to your Windows 10 machine is very straightforward, as, with the latest updates to Windows 10, it will support the DS4 controller natively.

All you’ll need to do is plug it in, and Windows will automatically install the driver and set everything up for you.

2. Wireless connection

  1. Press the Windows key + I to open the Settings app and select the Devices option.
    devices how to connect ps4 controller to pc
  2. Toggle the switch under Bluetooth forward to activate it.
    bluetooth on
  3. Press the PlayStation + Share buttons together on the controller and wait for the light to start flashing on the controller.
  4. Click the Add Bluetooth or other device option.
    add a
  5. Now, select the Bluetooth option.
    option how to connect ps4 controller to pc
  6. From here, choose your PS4 controller. It will most likely be listed as Wireless Controller.
  7. Finally, type 0000 if you are asked for a passcode to pair the devices.

That is how to connect a wireless controller to a PC. However, you might need to consider third-party connection methods to play games and use the controller.

3. Use DS4Windows

  1. Download DS4Windows.
  2. Go to downloads, right-click the zipped file and select the Extract files option.
    extract files
  3. Open the extracted folder and run the DS4Windows option.
    ds4 windows how to connect ps4 controller to pc
  4. Select whether to save the installation in Appdata or Program folder.
    appdata
  5. When DS4Windows starts, click on Step 1: Install the DS4 Driver.
    installer step 1
  6. Now, click the Install button to confirm the action.
  7. Wait till the driver installs entirely and click on Finish.
    finish
  8. Finally, go to the DS4Windows window and click the Controllers tab to connect to your PS4 controller.
    controllers how to connect ps4 controller to pc

That is how to connect your PS4 controller to your PC and play games without Steam. The DS4Windows works by tricking your PC into believing that there is Xbox Controller connected to your PC.

This allows your games to recognize the controller.

4. Use Steam

  1. You will need to disconnect if you have connected your controller to your PC using Solution 1 or 2 above.
  2. Launch the Steam client and select the Gamepad icon in the top right corner.
    gamepad
  3. Now, click the Settings icon at the top.
    settings how to connect ps4 controller to pc
  4. Select the Controllers Settings option under the Controller section.
    controller  settings
  5. From here, check the box for PS4 Configuration Support.
    ps4 config
  6. Now, connect your controller to your PC and launch any game that works with a controller after Steam detects it.
  7. Press the PS button on your controller and select the Controller Configuration option in the left pane on Steam.
    controller configuration how to connect ps4 controller to pc
  8. Finally, configure your controller’s button as you like and close the Controller Configuration window.

You must follow the steps above to connect your wired or wireless PS4 controller and play games on Steam easily. Of course, the above method only works for Steam games.

Using Steam and DS4Windows can help you fix other connectivity issues like can’t connect DualShock controllers to your PC.

Connecting the PlayStation 4 controller to a Windows 10 PC isn’t that hard. Depending on the platform you want to play games on and the extent you wish to use your controller, you can use any of the options above.

If you want to know how to set up PS4 Remote Play on Windows 10, check our detailed guide to do it quickly. To communicate with friends while gaming, check this guide on how to join PlayStation Party Chat on PC and stay connected through the PlayStation App while using your controller.

Feel free to let us know if you encounter any issues while connecting your controller in the comments below.

How to Use ReadyBoost on Windows 11 to Speed Up Your PC

ReadyBoost on Windows 11 can speed up your hard drive by caching data on your flash drive or SD card, and in this guide, we’ll show you how to enable it, so let’s get started.

It is available on Windows 11, and it works, but you need a slow hard drive and a compatible flash drive to use it.

How to activate and use ReadyBoost on Windows 11

1. Run the SuperFetch or SysMain service on your PC

  1. Press Windows + R key to open the Run dialog box, type services.msc, and press Enter to open the Service Manager.
  2. Find the SuperFetch or SysMain from the list of services, then check if it is running.
  3. If the SuperFetch / SysMain service is not running, right-click it, then click on Properties.
  4. Change the Startup type to Automatic, click on the Start button, then click OK and Apply to save the changes.

2. Enable ReadyBoost on Windows 11

  1. Plug your USB flash drive or memory card into the appropriate port and check if it appears on your desktop.
  2. Press Windows + E key to open File Explorer.
  3. Click on This PC from the left pane, right-click the USB flash drive and click Properties from the drop-down.
  4. Go to the ReadyBoost tab, then wait for Windows to check if your drive is compatible with ReadyBoost.
  5. Click the radio button for Use this device option, go to the slider for Space to reserve for system speed, and move it to the right end.
  6. Click the OK button, and click Apply to imitate the ReadyBoost feature.

How do I make my USB ReadyBoost compatible?

To avoid RedbyBoost compatibility issues like This device cannot be used:

  • Ensure your USB flash drive or memory card has a free storage capacity of at least 500 MB and a high data transfer rate.
  • The USB port key must be at least USB 2.0.
  • Ensure the USB device can do 3.5 MB/s for 4 KB random reads across the system and 2.5 MB/s for 512 KB random writes across the device.

Why is there no option for ReadyBoost in Windows 11?

Many users reported that ReadyBoost isn’t available on their PCs, which is no surprise. If you have an SSD, you won’t gain any performance boost with the ReadyBoost feature.

If that’s the case, the ReadyBoost tab will be missing on Windows 11, so you’ll have to use ReadyBoost alternatives instead.

ReadyBoost should run on your device without running into any errors. If Windows 11 is not recognizing the USB device, check how to fix it.

If you want to make Windows 11 faster, using ReadyBoost isn’t the best option, and instead you should change these Windows 11 performance settings.

Before we go, you should know that this feature isn’t new, and has been a part of Windows for a while. We also have a great guide on how to use ReadyBoost on Windows 7, so don’t miss it.

Do not hesitate to leave your suggestions or questions in the comments section.

Skyrim Failed to Initialize Renderer: 3 Easy Ways to Fix It

Skyrim, otherwise Elder Scrolls V, is a highly-rated action RPG for Windows. However, some players have posted on Steam’s forum about a Skyrim Failed to initialize renderer error that arises when they launch the game.

That complete error message states:

Your display doesn’t support the selected resolution. Please set a different resolution in Skyrim’s Launcher under Display Settings.

Let us explore all you should know about this problem.

Why causes the Skyrim failed to initialize the renderer error?

When you have this failed to initialize renderer error, it is often caused by any of the following two elements:

  • Outdated drivers – This could be, in most cases, your graphics card driver. However, it is good practice to update all your drivers.
  • Corrupted files – If your game files are bad, damaged, or corrupted, you may also expect this error to be triggered.

That said, let us explore some practical solutions.

How can I fix the Skyrim failed to initialize render error?

1. Configure Skyrim to match your PC’s resolution

  1. To fix that, open Skyrim’s launcher.
  2. Select Options to open further display settings.
    skyrim failed to initialize renderer
  3. Then select a setting on the Resolution drop-down menu that will match your PC’s current resolution.
    skyrim failed to initialize renderer
  4. Press the Apply button.

2. Delete two Skyrim game files

  1. Open the File Explorer by Pressing Windows + E.
  2. Navigate to the path below:
    C:\Program Files (x86)\Steam
  3. Right-click the appcache subfolder in the Steam folder to select Delete.
    skyrim failed to initialize renderer
  4. Next, open your Skyrim game folder, and delete the Skyrim.ini and SkyrimPrefs.ini files.
  5. Restart the PC and launch Skyrim.

3. Update your graphics card driver

  1. Right-click on the Start menu, and select Device Manager.
  2. Expand Display adapters, then right-click on your graphics card and select Update driver.
  3. Click Search automatically for drivers.
    skyrim failed to initialize renderer

The Skyrim Failed to initialize renderer error can be due to an antiquated or corrupted graphics display driver. If so, updating the graphics card driver will resolve the issue.

There are a few ways you can update a video card driver. Check out our Update graphics card driver guide for further details about how you can update a graphics card driver in Windows 10.

Outbyte Driver Updater is a highly-rated utility for updating drivers since it scans your device for missing or outdated drivers and then finds the latest versions from its vast repository.

Those resolutions have fixed the Skyrim Failed to initialize renderer error for players. Adjusting resolution settings for the game or on your VDU (Visual Display Unit) will usually set the error.

However, if that doesn’t do the trick, the other fixes might resolve the issue.