PUBG won’t launch on Xbox One [FIX]

PUBG is the battle royale shooter in the class of its own. We can’t say with certainty, but there has never been a game which can evoke so much love and hate at the same time.

Love for the impeccable concept, and hate for the underwhelming execution. Xbox One version came out first and it, seemingly, works better than a PC version.

However, there are some issues which are not glitches or bugs. Some users are unable to launch the game on Xbox One after the update.

We prepared a list of possible solutions but don’t hold your hopes high. If the issue applies only to PUBG, the Bluehole should be held accountable.

Nonetheless, it won’t cost you a thing to try out the steps we enlisted below.

PUBG won’t launch on Xbox One? Here’s what to do

  1. Reset the console
  2. Pause all downloads
  3. Check the connection
  4. Stop Game Sharing
  5. Reinstall the game

We’ve written extensively about PUBG bugs on Xbox before. Bookmark this page in case you need it later.


1: Reset the console

We don’t want to trick you into thinking that these are the fully pledged solutions. The problem is so widespread that chances are that’s one of the recent updates causing it.

However, there are various things you can do to confirm that the root of the issue isn’t on your side.

The first thing you should do whenever your console starts misbehaving is a power cycle or hard restart. This should address all minor system halts and clear the system cache. I

t’s a simple procedure and here’s how to perform it:

  1. Press and hold the Power button for 10 seconds or so.
  2. Wait until the console shuts down.
  3. After a minute, turn on the console again and look for changes.

2: Pause all downloads

Some users advised blocking all current downloads while playing the game. This implementation should work fine, but, seemingly, certain online-based games suffer because of it.

So, before you start PUBG next time, make sure to pause all active downloads. After that, just resume the downloads.

Updates-wise, you can’t either pause or cancel those, so make sure to install all updates before starting the game.

Here’s how to pause all active downloads on an Xbox console:

  1. Open My games & apps.
  2. Choose Queue.
  3. Highlight active downloads and press the Menu button.
  4. Choose Pause installation from the menu.

PUBG crashing in-game? Fix this annoying issue with our easy solutions!


3: Check the connection

A lot of talks about PUBG’s performance on Xbox One included connection and the vast plague of issues that emerged.

However, we still would say that a large part of PUBG players has more than sufficient bandwidth and conditions to play the game in a seamless manner.

The problem is, of course, on Bluehole’s side.

Nonetheless, here are some common steps you can take to ensure that your connection is up to the task:

  • Restart the console.
  • Restart the router/modem.
  • Use a wired connection if possible.
  • Run Xbox network connection test. Navigate to All settings > Network > Network settings > tap Test network connection.pubg won't launch xbox
  • Reset MAC address. Go to Settings > All settings > Network > Network settings > Advanced network settings > Alternate MAC address > tap Clear.
  • Check the NAT. Make sure that the OPEN NAT type is enabled
  • Enable QoS in router settings.

Xbox not connecting to Wi-Fi? Here’s what you need to do!


4: Stop Game Sharing

In case you’ve shared your Gamertag with someone and allowed them to access your games, try sticking with just your console. For some reason, this nifty option caused errors for a multitude of users.

After they’ve set their console as the Home console and restored the account, the errors were resolved.

This procedure is rather simple. The only thing you should do is sign-in on your console with your account and choose your console as Home.

In addition, don’t forget that you have yearly limitations on Game Sharing.

5: Reinstall the game

Finally, reinstallation of the game only can help, so we suggest reinstalling PUBG on your console. Even the more consistent platforms created for gaming run into problems from time to time.

Luckily, if it’s to be believed to recent reports, PUBG works much better than before on Xbox One. By reinstalling the game, you’ll get the latest, fully-patched version. So there’s that, too.

Here’s how to reinstall the game on Xbox One:

  1. Navigate to My apps & games.
  2. Choose Games.
  3. Select PUBG from the list and press the Menu button.
  4. Choose Manage Game and then Manage All.
  5. Select Uninstall All and then Uninstall.
  6. Navigate to My apps & games and open the ”Ready to install” section.
  7. Highlight PUBG and select Install.

That’s a wrap. Were you able to resolve the issue or it’s still there? Don’t forget to tell us in the comments and don’t forget to send the ticket to Bluehole. Every voice counts.

RELATED STORIES YOU SHOULD CHECK OUT:
FIX: No items match your search in Windows 10/11 File Explorer

The File Explorer search tool should find the vast majority of files and folders searched for providing that you enter clear and specific keywords. Yet, File Explorer’s search results might still state “no items match your search” for some users even when they are entering specific keywords for files and folders that are saved on HDDs.

If Explorer isn’t finding files and folders that you’re sure are saved on HDD, you might need to fix its search tool. This is how you can fix the File Explorer search tool when it isn’t working in Windows 10.

How to Fix File Explorer’s Search Tool

  1. Open the Search and Indexing Troubleshooter
  2. Restart Cortana
  3. Check Your Indexed Locations
  4. Rebuild the Search Index
  5. Check the Windows Search Service is Enabled
  6. Select the Always Search File Names and Contents Option
  7. Select the Allow Indexing Service Option

1. Open the Search and Indexing Troubleshooter

  • Windows 10 includes a Search and Indexing troubleshooter that you can utilize to fix the File Explorer search tool. To open that troubleshooter, press the Windows key + X hotkey and select to open Settings.
  • Enter the keyword ‘troubleshoot’ in the Settings app’s search box, and select Troubleshoot to open a list of troubleshooters.
  • Select Search and Indexing and press the Run the troubleshooter button to open the window in the image below.
  • Then select the Files don’t appear in search results check box, and press the Next button.

2. Restart Cortana

  • Some users have found that restarting Cortana, which powers search in Windows 10, can fix numerous search issues. You can do that by right-clicking the Taskbar and selecting Task Manager.
  • Select the Processes tab in Task Manager.
  • Select Cortana under Background Processes.
  • Then press the End Task button to restart Cortana.

3. Check Your Indexed Locations

  • File Explorer searches for files in indexed folder locations. So it might be the case that you need to add a few folders to the indexed locations. This is how you can check indexed locations in Windows 10.
  • Press the Windows key + R, enter ‘Control Panel’ in the Open text box and click OK to open the Control Panel.
  • Click Indexing Options to open the window in the shot below.
  • Press the Modify button to open the Indexed Locations window.
  • Then click the C: drive there to expand folders.
  • Select the folders that you need to add to indexed locations.
  • Press the OK button to index the newly selected folders.

4. Rebuild the Search Index

File search errors are often due to corrupted search index. As such, rebuilding the index is one of the best resolutions for fixing the File Explorer and Cortana search tools. You can rebuild the search index as follows.

  • Open Indexing Options as outlined above.
  • Press the Advanced button to open the window shown directly below.
  • Press the Rebuild button on the Index Settings tab.
  • A Rebuild Index dialog box window will open. Click the OK button on that window to confirm.

5. Check the Windows Search Service is Enabled

The Windows Search service provides content indexing. So you might need to switch that service on, if it’s disabled, to fix the File Explorer search tool. You can check the Windows Search service status as follows.

  • Press the Windows key + X hotkey.
  • Click Run to open the Run accessory.
  • Input ‘services.msc’ in the Open text box, and press the OK button.
  • Double-click Windows Search on the Services window.
  • Select Automatic from the Startup type drop-down menu.
  • Press the Start button if Windows Search is not running.
  • Click the Apply and OK options to close the window.
  • If Windows Search is already running, restart the service by right-clicking Windows Search and selecting Restart.

6. Select the Always Search File Names and Contents Option

File Explorer’s Always search file names and contents option is not one selected by default. However, selecting that option will ensure that the File Explorer search utility will always search file names and contents when searching non-indexed locations. You can select that option in Windows 10 as follows.

  • Press the File Explorer on the Windows 10 taskbar.
  • Select the View tab.
  • Press the Options button, and select Change folder and search options on the menu.
  • Then click the Search tab shown in the shot directly below.
  • There you can select the Always search file names and contents option.
  • Press the Apply button.

7. Select the Allow Indexing Service Option

If the File Explorer search tool doesn’t find any files or folders on a USB drive, you might need to select the Allow files on this drive to have contents indexed option for the USB storage device. That option should already be selected for the C: drive. This is how you can select the Allow files on this drive to have contents indexed option.

  • First, insert your USB flash storage device into a USB slot.
  • Open File Explorer in Windows 10.
  • Click This PC on the left of File Explorer.
  • Right-click the USB drive and select Properties to open the window shown below.
  • Select the Allow files on this drive to have contents indexed.
  • Then click the Apply and OK buttons to confirm the newly selected option.

Apart from these options, we recommend using professional third-party software with built-in character recognition technology that can help you find the data you’re searching for within seconds.

This type of tool creates an initial index of your hard disk and gives an easy-to-use search interface that returns results immediately after you enter your term.

The results are organized by file type, and they contain image thumbnails for image matches as well as highlighted keywords in the document preview.

Those are a few of the resolutions that might fix File Explorer’s search tool so that it doesn’t return “no items match your search” in its search results for saved files. Remember that there are numerous third-party search tool software that you can also utilize for searches, and some of those utilities might be better than File Explorer’s search box.

Windows 8.1, 10 App Netflix Updated to Fix Streaming Issues

The Windows Store Netflix app for Windows 10/8.1 and Windows RT users has received yet another update that seems to be fixing some streaming problems for several users. Download and install the app to get rid of them

The Windows 8.1 Netflix app has received a new update in the Windows Store that has no change log as of now. But, according to some forum postings and reviews that I’ve observed on the Windows Store, the update has been made available to fix some streaming issues that several users have been complaining about.

Netflix is one of the best movie apps a Windows 8 user could have in their collection, so it has millions of customers from all over the world. Besides solving the streaming issue, the app now seems snappier, so we suspect a performance improvement has also been made. The app’s description goes like this:

Netflix is the world’s leading subscription service for watching TV episodes and movies. Get the free app as a part of your Netflix membership and you can instantly watch thousands of TV episodes & movies. If you are not a Netflix member sign up for Netflix and start enjoying immediately with our one-month free trial.

Currently, the app is available in the following languages and countries: English (United States), Spanish, French, Portuguese, English (Canada), Danish, Finnish, Dutch, Swedish, English (United Kingdom), Norwegian (Bokmål). Download and install the updated Windows 8.1/10 Netflix app if have a Netflix movie streaming subscription and own a Windows 8.1/10 or Windows RT device.

Download Netflix app for Windows 10/8.1, Windows RT, Windows Mobile, Windows Phone 8/8.1

[UPDATE] Netflix is now available in more than 30 languages, so you can enjoy the programs in so many different countries. Still, if you wish to stream the programs from the US and you live don’t live there, find a reliable VPN to by-pass geo-restriction: Free* VPNs that work with Netflix [2018 Guide].

Many users waited patiently for PiP mode to reach the Netflix app. The good news came recently: Netflix for Windows 10 app finally received Picture in Picture mode. The Netflix app is also 4K compatible, and it has the highest bitrate in both audio and video.

If you encounter some other issues regarding surround audio or stream, you can find the quick solutions in the following articles:

Xbox sign in error 0x404? Here’s how you can fix it

If you are having an issue known as “Xbox sign in error 0x404” on your Windows 10 PC, then we are here to help. In this article we will discuss three possible solutions that you can use by yourself to resolve this problem. 

Fix Xbox sign in error 0x404

  1. Check to see if your Microsoft Store applications are automatically updating
  2. Manually update your Microsoft Store apps
  3. Check for updates for your Windows 10 PC
  4. Disable or uninstall anti-virus programs
  5. Sign in to a different user

Typically, this problem shows up when you try to sign in to the Xbox app, but you’re denied entry. After you are unable to sign in, the error code ox404 shows up. If this is the problem that you are facing, then you should be glad to know that there are several troubleshooting solutions for it. If one solution does not work, then you may want to try another. Also, it is important to note that these fixes are designed for PCs that run the Windows 10 OS.

Solution 1: Check to see if your Microsoft Store applications are automatically updating

Typically, applications from the Windows store will automatically update. That is the default setting. However, for some reason if it is not on its default setting, then you can always change it back.

Here’s how you do that:

  1. Open Microsoft Store. Usually found on the task bar or start menu.
  2. Find the more setting on the top right hand corner of the menu. It is located near the search bar and has the icon of three horizontal dots.
  3. Next click and enter the Settings option.
  4. You should see an option called App updates. Set the Update Apps Automatically settings to on. 

Solution 2: Manually update your Microsoft Store apps

Alternatively, you can manually update your Xbox application to try to fix the problem.

Here’s how:

  1. Open Microsoft Store
  2. Click on the more icon again.
  3. This time select the Downloads & updates option
  4. On this page you should see a button on the right side called “Get updates“. Click on it, then you will be good to go. (4)

Solution 3: Check for updates for your Windows 10 PC

If the two solutions above does not fix the Xbox sign in error 0x404, then you will want to see if there are any updates for your device’s OS.

  1. Open Windows Menu. You can do this by pressing on the Windows button on your keyboard or by clicking on the Windows icon with your mouse.
  2. Click on the settings icon which looks like a gear.
  3. In the settings windows select the Update and Security option.
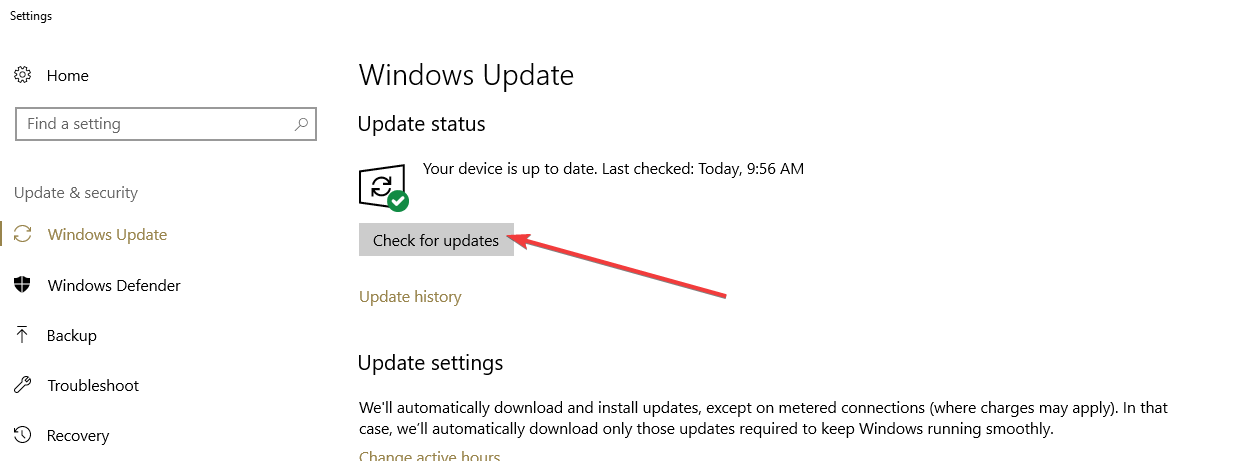
  4. There will be a Windows Update tab on the right click on it, then click on Check for updates.check for updates
  5. If there are new updates, download then install them. Note that some updates may require that you restart your computer.

Solution 4: Disable or uninstall anti-virus programs

Even though the Xbox app is an official Windows applications, sometimes a third party antivirus program doesn’t recognize it to be safe in some way. Therefore, they may block you from using the app. Therefore, depending on the anti-malware program, you may need to disable or uninstall it for your Xbox app to work.

To uninstall a program you will need:

  1. Go to the start menu.
  2. Open up settings.
  3. Go to the Apps option, then click on the Apps and features tab.
  4. Locate your antivirus program, then uninstall it.

Solution 5: Sign in to a different user

Obviously this solution will only work if you have multiple users accounts on your PC. If so, then here’s how you switch accounts:

  1. Open the Start Menu.
  2. Locate your other user account on the left side of the menu.
  3. Click on it, then try out the Xbox App.

Conclusion

Since there are several factors that could cause the Xbox sign in error 0x404, there are several different solutions. That’s why it’s recommended to try each one until you find one that works. Fortunately, the fixes for this error are relatively easy and even someone who isn’t tech-savvy should be able to use them.

Read More:

FIX: Logitech Gaming Software Doesn’t Work in Windows 10/11

More woes continue for fresh Windows users – now, it seems that some Logitech users are reporting issues with the Logitech Gaming Software in Windows

We took a break from reporting Windows 8.1 issues and problems, but we’re back at it again. According to recent forum post on Logitech’s support forums, at least one user is reporting problems in Windows 8.1 with the Logitech Gaming Software. Here’s what he said:

I recently upgraded from Windows 7 Ultimate x64 SP1 to Windows 8.1 Pro x64. This was a clean install. Everything i installed thus far is working without any problems (this includes all my other devices). I own a lot of Logitech products but for this PC (my main PC) i use a Logitech G710+ keyboard and Logitech G400 mouse. Both of them make use of the Logitech Gaming software as a driver and profile manager etc. No matter what i have tried, the Logitech Gaming software will not install correctly, and after some trying… even if it does eventually install the application will crash repeatedly and randomly all over the place. Usually the setup just crashes and freezes the entire PC during step 4 of 5 upon installation. The freeze is so severe that the only resort you have is a hard reboot of the PC.

After the posting was made on the forums, more users have confirmed getting the same issue in Windows 8.1. Some users suggest uninstalling Logitech Gaming Software, and deleting the settings.json file, then reinstall LGS. The settings.json file should normally be located here: C:Users<username>AppDataLocalLogitechLogitech Gaming Software.

For most users experience this issue, even when making a clean install, it seems to stuck at ‘Step 4 of 5’. Also, running the Logitech Gaming Software installer under the Windows 8.1 compatibility mode seems to have solved the issue only for a few users. If you’re having the same issue, let us know in the comments box and we’ll try to search for a fix together.

Quick Fixes: Logitech Gaming Software doesn’t work in Windows 10 [2018 update]

1. Try to disable (not uninstalling) Windows Defender and any antivirus or anti-malware on your system and run Logitech Gaming Software.  Some of LGS processes may be seen as harmful even if they aren’t.

2. In case this does not work for you, there is another quick fix to try: Try to launch LGS installer directly from LGS folder. You can find this folder in /user/user/AppData/ or simply search for it with Windows search feature.

3. The last solution, but ONLY for advanced users, is:
– Fix the exact time before launching LGS installer and launch it
– In case LGS restarts your system, open Event Viewer
– Search right before and after the time LGS restarted your system to see what causes the conflict

You can also try to uninstall and delete all data about LGS (we recommend a dedicated tool for that) and enter Safe mode, download it on Desktop and installing it again, that may work as well, but it really depends on your Windows version and system compatibility.

Let us know in the comments if some of these solutions worked for you.

Update – a big thank you to all of our readers who left comments with possible solutions, so just head below and have a look, just in case you might find a working fix for you.

New Nvidia 331.82 GeForce WHQL Drivers for Windows 8.1 Released

Nvidia has rolled out an updated set of WHQL Game Ready drivers for Windows 8.1 that are meant to increase the gaming performance of such games as Assassins Creed IV: Black Flag, Need for Speed: Rivals, Metro: Last Light, Crysis 3, and Battlefield 4

Those of you who have an Nvidia video card with your Windows 8.1 devices need to download the latest GeForce 331.82 WHQL Game Ready drivers that Nvidia has made available a few days ago for Windows 8.1. The drivers come bundled with GeForce Experience 1.7.1, adding support for Nvidia’s GameStream and GeForce ShadowPlay features.

The GameStream feature lets you stream PC games from the GeForce GTX-enabled PC directly to a SHIELD devicel ShadowPlay is a game recording tool. The new Nvidia GeForce 331.82 WHQL GameReady drivers offer a 50% performance boost on GeForce 400/500/600/700 series GPUs in several PC games, such as Metro: Last Light, Crysis 3, and Battlefield 4 when compared to the previous 327.23 WHQL drivers. You could also try increasing the FPS in Windows 8 for a better gaming experience.

This 331.82 Game Ready WHQL driver ensures you’ll have the best possible gaming experience in Assassins Creed IV: Black Flag and Need for Speed: Rivals. These Game Ready drivers will also provide performance enhancements in a wide variety of different games. When running at 4K resolutions, SLI performance increases by as much as 50% in key titles like Metro: Last Light, Crysis 3, and Battlefield 4.

In addition, the new 331.65 Game Ready driver is bundled with GeForce Experience v1.7.1 which includes support for two highly-anticipated new technologies. NVIDIA GameStream™ provides end users with the ability to stream PC games from their GeForce GTX-equipped PC directly to a SHIELD device. This update also introduces the Beta version of GeForce ShadowPlay™, an innovated new game capture tool with exceptional features and performance.

Read Also: Battlefield 4 Crashes in Windows 8.1 for Some Players

The nwe Nvidia GeForce R331 Drivers also come with the SLI Technology that add or update profiles in the following games Assassins Creed IV: Black Flag, Path of Exile, Natural Selection. Furthermore, it will update the following software parts, as well – new PhysX System Software 9.13.0725, new HD Audio v1.3.26.4 and the new GeForce Experience 1.7.1. Follow the links from below to download the latest Nvidia drivers for Windows 8.1

Download Nvidia GeForce 331.82 Driver 64bit
Download Nvidia GeForce 331.82 Driver 32bit

Nvidia GeForce driver updates for Windows 10 gamers

After this important update, Nvidia released many more drivers in order to support different game releases. After Windows 8.1, Windows 10 came with the best gaming setup ever known, so there were several compatibility updates coming out from Nvidia. Here are the biggest GeForce drivers updates for most played games in Windows 10:

Here are also some important updates that fixed lags, crashes, and other issues for gamers with different Nvidia GeForce models:

Download Windows 8.1 SDK [Direct Link]

If you’re interested in creating apps for Windows 8.1, then you are looking to download the Windows software development kit (SDK) for Windows 8.1. Read below to find the download links and hints to the ISO files, as well.
Creating apps for Windows 8.1 is impossible if you don’t have the Software Development Kit for that, so use the link at the end of the article, if you are the TL;DR type, to download the Windows 8.1 SDK. Made available at the middle of previous month, it contains headers, libraries, and tools to make apps for Windows 8.1, but also Windows RT and previous Windows versions, of course.

It also comes with the Windows App Certification Kit 3.1 that developers need to test their apps for the Windows 7, Windows 8, and Windows 8.1 certification programs. Unfortunately, you will have to make the ISO files yourself, if you want to, but with the SDK being so lightweight, it doesn’t make that much sense to do it.

Here’s an important change regarding the Windows 8.1 SDK that Microsoft has shared:

The Windows SDK no longer ships with a complete command-line build environment. You must install a compiler and build environment separately. If you require a complete development environment that includes compilers and a build environment, you can download Visual Studio 2013, which includes the appropriate components of the Windows SDK.

The updated Windows SDK can be used to build apps for the following Windows operating systems: Windows 8.1, Windows 8, Windows Server 2012, Windows 7, Windows Server 2008 R2, Windows Vista and Windows Server 2008. Also, you are advised to install the latest updates and patches from Microsoft Update before installing the Windows 8.1 SDK.

Windows 8.1 SDK: what’s new?

Well, now it’s time to list some of the mail tech-features that are really important for those who need Windows 8.1 SDK:

  • Exclusion of command line interface
  • Headers, Libraries, Metadatafiles and other tool provided for new Store apps builders
  • .NET Framework 4.5 needed (previous versions not working)
  • Supporting DirectX games and applications
  • Windows Dev Center updated with samples and desktop applications

Windows 8.1 SDK requirements

Here’s what you need as OS in order to develop applications:

  • Windows 8
  • Windows Server 2012
  • Windows 7
  • Windows Server 2008 R2
  • Windows Vista
  • Windows Server 2008
  • x86, x64 ARm architecture

You can also read our previous article where we detailed how to manage your Windows 8 and Windows 8.1 apps. Also, if you’re interested in establishing a Bluetooth connectivity between an Arduino device with a Windows 8.1 app, we’ve covered that, as well.

Download Windows SDK for Windows 8.1

Establish a Bluetooth Link Between an Arduino & Windows 10 App [How to]

A recent posting from Microsoft’s Developer Network explains how to establish a serial Bluetooth link between an Arduino and a Windows 8.1/10 app so you could send simple or more advanced commands.
arduino bluetooth windows 8.1
If you are a developer looking to learn how to establish a Bluetooth link between an Arduino device and a Windows 8.1 app that you’re creating, then you’re in luck as Microsoft has just shared some precious bits of advice on that. Shared on the highly resourceful Channel9, the guide to create a Bluetooth communication between Arduino and Windows 8.1 has been made available for download in C# and C++ (link at the end).

[UPDATE] If you want to make it work with a Windows 10 app, first of all, you can follow this guide on How to install Arduino software and drivers on Windows 10. And if you encounter any issues while working with that, make sure to check out this article Fix: Arduino problems on Windows 10.

How to create Bluetooth communication between Arduino and Windows 8.1/10

To be able to test the code, you will need an Arduino with Bluetooth capabilities, like Arduino Uno R3 and a JY-MCU Bluetooth module and also a Windows 8.1 device with Bluetooth capabilities. You could also attach a Bluetooth dongle if it lacks Bluetooth on its own.

You will then set up the Arduino with a Bluetooth module, two LEDs and a potentiometer, as seen in this Youtube video.

Communication with the Bluetooth module is accomplished using the SoftwareSerial.h library. The Windows 8.1 app has to declare Bluetooth serial communication capabilities in Package.appxmanifest: To deploy the Arduino code with VisualMicro, right click the Project in the Solution Explorer and select DebugStart new instance. When the Windows 8.1 app starts, you can establish a connection and control the LEDs.

Follow the link from below to download the full guide and see the entire guide on Microsoft’s Developer Network.

Download Bluetooth communication between Arduino and Windows 8.1 guide

[RELATED] You can now learn and test without any restrictions on Arduino simulators without any risk of damaging your board. You can find here a list of 7 best Arduino simulators for PC and check out their features.

Autodesk Eagle, for example, provides a complete set of PCB layout and schematic editing tools, community-driven features and library content. You can check more about these powerful and easy to use tools on Autodesk official website.

RELATED ARTICLES TO CHECK OUT:

How to Change the Windows 8, 10 Currency in Settings

Changing the currency in Windows 8 is easy if you follow the below mentioned steps. Some users have been reporting that their Windows 8 store is showing the wrong currency, so you need to do the following to fix it.
windows 8 currency settings

In Windows 8 and Windows 8.1, just like in previous versions, you can change the format Windows uses to display dates, times, currency, and measurements. Most of these things are enabled the first time when you install Windows 8 or Windows 8.1 (some might want to uninstall it already ).

However, there might be some glitches or bugs that is affecting your Windows 8 system and for a certain reason you are not getting the right currency displayed. What you need to do is follow the next steps to get the same windows as in the above displayed image.

  • Open the Search charm bar (windows logo + w or hover your mouse to the top right corner)
  • Type in the search box “change the way currency is displayed“
  • In the Region windows that will open, click on Location and change it to your country
  • If you need to further customizations, then go to Additional Settings and Customize the currency format

That’s it, as easy as that! If you’re also looking for a reliable and free way to perform currency conversions on Windows 8, desktop or tablet, then read our review of the XE Currency app for Windows 8.

Update: If you are interested in finances and currency we would like to recommend you some effective tools and information that might help you calculating and following up with the last market trends:

We hope you will find a good currency converter and will enjoy tracking different currencies right from your Windows PC. Let us know in the comments section what you found and what was useful for you.

Microsoft Azure Stack is now available in 92 countries

Microsoft is full steam ahead with the expansion of its Azure Stack service footprint across the globe.

As of yesterday, Microsoft has now brought Azure Stack to 92 countries which double the number of locales since its launch last year. To highlight the announcement, recently promoted Microsoft executive Talal Alqinawi took to the Microsoft Azure blog to post a number of customer feedback regarding the rollout of Azure Stacks over the past year.

“The inclusion of Microsoft Azure Stack services into our portfolio enhances our value proposition in a number of ways, from DevOps tools, a truly hybrid cloud offering, access for customers to Azure services like Business Intelligence and AI, to a fully managed service for any customer who wants it. Microsoft Azure Stack will bring us customers who wanted to exploit public cloud but were holding back due to data location concerns. In fact, our pipeline already includes about 60 customers we couldn’t have targeted pre-Azure Stack,” said Tiberiu Croitoru, CEO of BinBox.

“At Lenovo, we are committed to solutions that focus on performance. As Microsoft continues to expand the availability of Azure Stack across the globe, we will continue to support this with our unique, industry-leading ThinkAgile SX products and services in many of those regions,” said Per Overgaard, Executive Director, Business Unit, Lenovo Data Center Group, EMEA. “Customers will experience the simplicity of Azure Public Cloud and the reliability of Lenovo’s ThinkAgile SX for Microsoft Azure Stack.

Not only is Azure Stack being rolled out to the rest of the world, but it also comes with a few nifty updates on board such as Machine Learning (ML servers are now available, the development of Azure IoT Hub, Hybrid DevOps, and a unified Azure ecosystem.

For more info on the specifics of the recent Azure updates visit the Microsoft Azure blog.

Official Realtek app spotted in the Windows 10 Microsoft Store

According to a report from MSPoweruser, an official Realtek app has been spotted in the Windows 10 Microsoft Store. The app is not yet available for download, but it looks to be a port of the Win32 version which allows users to customize their sound profiles.

According to the app store listing, the Microsoft Store version of the app “provides the best audio experience with the Realtek Audio Codec.” Unfortunately, trying to install it will give an error code for some users, likely due to the app not yet officially being ready for all devices just yet.

Anyway, you can try the download for yourself in the link below. Once its ready it can prove to be a pretty handy app, giving you yet another (more modern) way to control your volume and sound experiences. Let us know in the comments below if you managed to download and get the app working.

Windows 8, 10 App Bitcoin Miner is Your Bitcoin Mining Help

If you are into bitcoin mining, then you’re also looking for a bitcoin mining tool on Windows 8, or Windows 10 as well. Buying and selling bitcoins, as well as mining them becomes fun and easy with the Bitcoin Miner app for Windows 10/8. Read below to find out more!
bitcoin mining windows 8To be able to get high yields when mining bitcoins, it is said that you need to have a powerful system. On Windows 8, Windows 10 you can mine bitcoins even from your tablet with the help of this clever app.

The app has also been recently updated to get full support for Windows 8.1, and Windows 10 as well. Here are some other notable improvements: enhanced connection management, support for Stratum client.reconnect and client.get_version, and support for Getwork X-Host-List and X-Switch-To extensions.

Latest version 1.51.0 has fixed the issue where audio settings wouldn’t sync to all audio sessions, while in a previous version the number of mining errors has been reduced through improved Stratum difficulty handling.

Getting started with Bitcoin Miner App in Windows 8, 10

In order to start mining bitcoins on your Windows 8, Windows 8.1, Windows 10 computer or touch device, you will need to have a worker’s account at one of the following mining pools that are supported within the app: BTC Guild, 50BTC, Slush’s Pool, Eligius, Ozcoin, EclipseMC, deepbit.net or BitMinter. Here’s how GroupFabric Inc, the developer of the Bitcoin Miner app for Windows 8 describes their tool:

Let your computer make you money with Bitcoin Miner, the FREE easy-to-use Bitcoin miner! Earn bitcoins which can be exchanged for real-world currency. Works great at home, work, or on the go. Download Bitcoin Miner and start earning bitcoins today! Bitcoin miners perform complex calculations known as hashes. Each hash has a chance of yielding bitcoins. The more hashes performed, the more chances of earning bitcoins. Most people join a mining pool to increase their chances of earning bitcoins. Mining pools pay for high value hashes known as shares.

bitcoin windows 8Among the most notable features of this awesome Windows 10, 8.1 Bitcoin app we find the following:

  • Background GPU & CPU mining
  • Lock screen and live tile mining status
  • Real-time stats
  • Resource-smart scheduler
  • Fast share submission
  • DirectCompute 11 GPU kernel
  • SSE2 x86 & x64 and NEON ARMCPU kernel
  • Easy to use interface
  • Profitability Reports
  • Night mode
  • Power saving mode
  • Mining pool support
  • DirectX 10 & 11 GPU mining
  • SHA-256d & Scrypt support

Run BitCoin Miner on HoloLens

If you own a HoloLens headset, it is worth mentioning that the device is compatible with BitCoin Miner. You can earn virtual money while enjoying the ultimate VR experience.

BitCoin Miner user reviews

bitcoin miner app
BitCoin Miner has a 4-star rating on the Microsoft Store, which means that most users are satisfied with the app.

Of course, some users wish they had the option to block the ads, but that is what happens when the product is free. Ads are part of the package. The most annoying ads are video ads as you cannot mute them.

In version 1.48.0, you can temporarily revoke the webcam permission to workaround a Microsoft Advertising camera issue. Unfortunately, this also disables Payout Address QR code scanning.

Naturally, the better the CPU, the easier and faster it gets to mine your bitcoins. If your computer is powered by a low-end CPU, perhaps it’s better to simply avoid installing the app or run it when you’re not actively using your computer.

On the other hand, if your computer sports a high-end CPU, you can run BitCoin Miner all day long, while using your computer for personal or work-related tasks.

Nevertheless, we recommend using a cooling pad, as well as a laptop cooling software when running BitCoint Miner. It will heat up your computer while it is running, so the best solution is to prevent such issues.

Patience is key when using this app. It may take a quite a while before you see any significant payout.

BitCoin Minter is easy to set up, but it only runs in an open window. If you minimize the window or you lock your screen, it will pause.

This is great for all ages and works well to invest in bitcoin early to make good money that is available in the future for education or every day life use.

Can I get rich with Bitcoin Miner?

bitcoin money
The earnest answer is no. However, you can earn a small amount of money every day provided that you have enough patience. Of course, the longer you run the app, the more money you earn.

Overall, installing and running BitCoin Miner is an interesting investment. You can make money just by running a simple app.

Taking into account the current trend, Bitcoin‘s value is only going to increase. As a quick reminder, one Bitcoin had a $1.00 value in 2011, and six years later, it already costs around $6,000 to buy one.

Install BitCoin Miner now and start collecting your bitcoins today.

Follow the link from below to download the Bitcoin Miner app on your Windows 8.1, Windows 10 device and start mining those bitcoins to make real money out of it!

Download Bitcoin Miner for Windows 8, 10
RELATED ARTICLES TO CHECK OUT NOW:

Xbox One’s Preview Beta 1806 begins testing new narrator languages

The new Preview Beta 1806 update for Xbox Insiders in the Xbox One Preview Beta Ring has now begun to rollout.

Numbered, 1806.180531-1920, this update adds more language options for the narrator feature, fixes a bug with the new Games & Apps categories feature, and improves Group navigation within the guide. Here’s the full release notes.

New Features: Additional Accessibility Options – New Narrator languages

  • Users can now enable the new Narrator languages: Spanish (es-MX, es-AR, es-CO, es-CL), English (en-AU), Portuguese (pt-BR), Polish (pl), Swedish (sv-SE), and Dutch (nl-NL, nl-NB).

Fixes

  • My Games & Apps: Fixed an issue where users were seeing multiple Games & Apps categories appearing in their category lists.
  • Groups: Fixed an issue where users would have issues navigating Groups within the Guide.
  • Localization: Various localization issues fixed in this build.
  • Search: Pressing Y button anywhere in the dashboard now will bring up search as designed.
  • Settings: Fixed an issue in which the console would turn back on after a full shutdown.
  • System Performance: Misc. performance fixes in the platform.

Known Issues

  • Groups: Enabling Groups after taking the update: Groups may not appear for you on first sign in unless you do a full console reboot after taking the system update. This is being fixed in an upcoming build and should only affect having just taken this system update.
  • The Groups tab in My games & apps may not show after sign in even though you can access Groups in Guide, or you may see “This group does not exist” on Home on first sign-in for your existing Groups.  Workaround: Sign in / out to refresh these pages.
  • Some changes might not be reflected when editing Groups between multiple consoles after coming out of connected standby. Sign in/out to fix.
  • Adding the Rewards app to Groups causes you to be unable to access your Groups. This is fixed for an upcoming build.
  • Using special characters in Group names (e.g. &,”) causes issues during Group creation or using the “Add more” flow. Note: emojis are fine. This is being fixed in an upcoming build.
  • You may see issues with Groups if you frequently switch between your non-Preview console and your Preview console. Workaround: Reset your Groups locally on the Preview console through “My games & apps” > Groups, then using the “Reset groups” button at the bottom of the page to resync from the service.
  • Profile Color: Sometimes users may encounter an incorrect Profile color when powering on the console.
  • Networking: Work continues on the stability of the Wi-Fi connectivity.  If you see any issues please report the problem for investigation by performing a Full system software via the dashboard as opposed to just pressing the Xbox Power button.
  • YouTube: Some users are encountering an issue where their YouTube account is being signed out whenever they launch the app. Workaround: Uninstall/re-install the app and sign in with your account again.

Xbox Insiders are regular Xbox One console owners who volunteer to help test operating system builds for Microsoft. Are you an Insider and have you tries this build yet? Let us know in the comments below and don’t forget to follow us on Pinterest for more Xbox content.

Xbox One’s Vampyr video game is now live on consoles

The supernatural roleplaying video game, Vampyr, is now available to play on Microsoft’s family of Xbox One consoles. The game is set in 1918’s London and casts the player as vampire in search of a cure. Here’s the official game description and trailer.

London, 1918. You are newly-turned Vampyr Dr. Jonathan Reid. As a doctor, you must find a cure to save the city’s flu-ravaged citizens. As a Vampyr, you are cursed to feed on those you vowed to heal. Will you embrace the monster within? Survive and fight against Vampyr hunters, undead skals, and other supernatural creatures. Use your unholy powers to manipulate and delve into the lives of those around you, to decide who will be your next victim. Struggle to live with your decisions… your actions will save or doom London.

Are you planning to play Vampyr on your Xbox One? Share your thoughts with the community in the comments below and make sure to follow us on Twitter for more Xbox video game news.

Vampyr
Vampyr
Developer:
Focus Entertainment
Price:
$7.99

Far Cry 5 Error Granite on Windows 10/11 [Successful Fix]

Lately, it seems hard to put ‘Ubisoft‘ and ‘well-optimized error-free game‘ in the same sentence. The latest AAA title, Far Cry 5 has its share of issues, and one of the gravest and most persistent errors bears the codename Granite.

This error completely disrupts game saves, and users are constantly forced to start from scratch. Luckily, some solutions emerged and we enlisted them below.

If you’re affected by this error, just give them a try.

How to fix Granite error (Granite:2000000) on Far Cry 5?

  1. Verify the game’s integrity
  2. Delete saved games and change Save location
  3.  Start uPlay client in offline mode and run uPlay as admin
  4. Reinstall the uPlay

1: Verify the game’s integrity

Since it seems that this error mostly plagues uPlay users (Ubisoft Launcher) and not Steam users, that’s where our focus goes.

The first obvious thing you should try is checking the game installation for corruption.

This can be done within the uPlay desktop client. Once you run the tool, it’ll check for possible corruption and replace the broken files.

Here’s how to run it:

  1. Open the uPlay client in Online mode.
  2. Choose Games.
  3. Right-click on Far Cry 5 and choose “Verify files“.far cry 5 error granite
  4. Once the procedure ends, restart uPlay and run Far Cry 5 again.

2: Delete saved games and change Save location

As the affected users probably are well aware, the Granite error breaks save game progress and users get back to the start every time. Only to get kicked off the new session and get back to start again.

For some reason, this occurs due to the game’s inability to access the Save Games folder. It looks like some limitations are imposed on it, even if that’s not the case for any other game.

In order to avoid this, you can backup your saved games and delete the save games folder.

Now, you can create it on any other location and use a configuration file to point the game in that alternative direction.

Here’s what you need to do:

  1. Close uPlay completely. If needed so, open Task Manager and kill its process.
  2. Navigate C:\Program Files (x86)\Ubisoft\Ubisoft Game Launcher\savegames and backup the Far Cry 5 saves.
  3. Navigate to Documents and locate the CPY.ini file.
  4. Open the file with Notepad. In case you’re unable to access it, open Properties > Compatibility, and tick the “Run this program as an administrator” box.
  5. Find Save location and change it. You can set any other destination for the saves — it doesn’t matter.
  6. Save the changes and restart your PC.
  7. Run the game through uPlay and look for changes.

3: Start uPlay client in offline mode and run uPlay as admin

Starting the uPlay client in the Offline mode is another thing you could try. This seemingly helped more than a few users and the Granite error was addressed.

In addition, you can give an extra boost to uPlay permissions since the game, for some reason, avoids saving the in-game progress which leads to crashes.

You can do so by giving the uPlay launcher administrative permission.

Here’s how to start uPlay in the Offline mode:

  1. Open the uPlay client for Windows.
  2. Click on the hamburger menu in the left corner.far cry 5 error granite
  3. Open Settings.far cry 5 error granite
  4. Under the General tab, scroll down and check the “Always start Uplay in offline mode” box.far cry 5 error granite
  5. Restart uPlay, start Far Cry 5 and look for changes.

And this is how to grant it the administrative permission:

  1. Right-click on the uPlay shortcut (or the ‘exe’ file itself) and open Properties.
  2. Under the Compatibility tab, check the “Run this program as an administrator” box.
  3. Confirm changes and start uPlay.

4: Reinstall the uPlay

Finally, if none of the previous steps got you out of the slump, we recommend reinstalling the uPlay client.

Furthermore, in order to avoid possible issues, it’s suggested to clear all remaining associated files and start from a scratch.

Of course, avoid deleting other games or at least move their installations to an alternative partition.

Once you’ve reinstalled the game and uPlay, sign in, point out to Far Cry 5 directory (you won’t need to download the game anew), and start the game.

That’s it. In case you have any alternative solutions or questions concerning the Granite error on Far Cry 5, feel free to share them with us in the comments section below.

RELATED STORIES YOU SHOULD CHECK OUT:

Previous Windows 10/11 version won’t restore? Here’s the fix

Backing your data and restoring it in the dire need was always an important feature of the Windows platform. However, Microsoft’s meddling with these options made things a lot more complicated. The inability to restore the previous version of files or directories from the recovery points made things a lot harder for users.

For that reason, we decided to shed some light on the matter and provided a few solutions (and workarounds). Make sure to check them out below.

Unable to restore the previous version in Windows 10? Here’s what to do

  1. Make sure that File History is enabled
  2. Check associated services
  3. Create a backup
  4. Use a third-party software

1: Make sure that File History is enabled

In order to load, access, and restore previous file versions on Windows 10, you’ll need to enable this option it in the System Settings. Of course, you’ll need an external device or a network location to backup your data. After that, plug in the external media, right-click on the file or folder you want to inspect and choose Properties > Previous Versions.

You can also use backups to restore the previous versions, but versioning (various versions of a single file) won’t be available. You’ll be stuck with a single version.

Here’s how to enable File History:

  1. Press Windows key + I to open Settings.
  2. Choose Update & Security.restore previous version windows 10 not working
  3. Select Backup from the left pane.
  4. Plug in an external drive and click on Add a drive.restore previous version windows 10 not working
  5. Choose the drive from the drop-down menu.restore previous version windows 10 not working
  6. Click on More options to select the backup schedule and folders you want to backup.

2: Check associated services

If you’ve managed to get the File History protocol up and going but it still fails to deliver, we recommend checking the Recovery points. There are two services which should concern you in this matter. Two services you’ll need to look out for are “Volume Shadow Copy” and “Windows Software Shadow Copy”. Just type Services in the Search bar, and open Services. Once there, navigate to aforementioned services and make sure they’re enabled.

Of course, before navigating to Services, make sure to inspect current System protection is enabled. Here’s where to find it:

  1. Type Create in the Windows Search bar and open “Create restore point” from the list of the results.restore previous version windows 10 not working
  2. Choose the system partition and click Configure.
  3. Enable System protection.restore previous version windows 10 not working
  4. From now on, you should be able to restore the affected files in case they get deleted or corrupted by restoring the system from a restore point.

3: Create a backup

With Windows 10, Microsoft ditched some old backup-based features which were rather useful. Luckily, it retained the option to backup everything on a local drive. This way of cautious data preservation can take a lot of storage space. But, if that doesn’t bother you, you can use this feature to backup and later restore files with rather ease.

Here’s how to create a full backup of all your digital belongings in Windows 10:

  1. Press Windows key + I to open Settings.
  2. Choose Update & Security.restore previous version windows 10 not working
  3. Select Backup from the left pane.
  4. Click on the “Go to Backup and Restore (Windows 7)” and backup your data on a data partition.restore previous version windows 10 not working

4: Use a third-party software

Finally, we’re living in the cloud era, where the storage space can be enlarged and accessed from any place. There are a lot of available services you can use to back up the most important files. Some are for Enterprises and some, like OneDrive, Google Drive, or Dropbox should be enough to keep the most important files safe and sound.

And, when it comes to interacting with local files without a cloud, we recommend ShadowExplorer. This application can read from Restore points and allow you to access older iterations of files and folders. You can download this nifty utility, here.

That should do it. In case you’re still in need of some extra information or have something to add, feel free to comment in the comments section below.

RELATED STORIES YOU SHOULD CHECK OUT:

Windows 10 April 2018 Update

What is Windows 10 April Update?

Windows 10 April 2018 Update or Windows 10 version 1803 code-named “Redstone 4”, is the fifth major update to Windows 10 and the fourth in a series of updates planned under the Redstone code-names. It carries the build number 10.0.17134.

The first preview was released to Insiders on August 31, 2017. The final release was made available to Windows Insiders on April 16, 2018, followed by a public release on April 30, and began to roll out on May 8.

Latest Updates for Windows 10 v1803

KB numberVersion (OS Build)Release dateNotes
KB5003174OS Build 17134.2208May 11, 2021Security Update
KB5001339OS Build 17134.2145April 13, 2021Security Update
KB5000809OS Build 17134.2087March 9, 2021Security Updates
KB4601354OS Build 17134.2026February 9, 2021Security Updates
KB4598245OS Build 17134.1967January 12, 2021Security update
KB4592446OS Build 17134.1902December 8, 2020Security update
KB4586785OS Build 17134.1845
November 10, 2020Security update
KB4580330OS Build 17134.1792
October 13, 2020Security update
KB4577032OS Build 17134.1726
September 8, 2020Security update
KB4571709OS Build 17134.1667
August 11, 2020Security update
KB4565489OS Build 17134.1610
July 14, 2020Security update
KB4561621OS Build 17134.1550June 9, 2020Security update
KB4556807OS Build 17134.1488
May 12, 2020Security update
KB4550922OS Build 17134.1425April 14, 2020Security update
KB4540689 OS Build 17134.1365March 10, 2020Security update
KB4537762 OS Build 17134.1304February 11, 2020security update
KB4534293 OS Build 17134.1246January 14, 2020security update
KB453071717134.1184December 10, 2019security update
KB452523717134.1130November 12, 2019security update
KB451997817134.1099October 15, 2019security update
KB452000817134.1069October 8, 2019security update
KB451605817134.1006September 10, 2019security update
KB451250117134.950August 13, 2019security update
KB450743517134.885July 9, 2019Patch Tuesday
KB450947817134.860June 26, 2019Cumulative update
KB450328817134.858June 18, 2019Cumulative update
KB450328617134.829June 11, 2019Patch Tuesday
KB449918317134.799May 21, 2019Cumulative update
KB450506417134.766May 19, 2019Fixes uk.gov website issues
KB449916717134.765May 14, 2019Patch Tuesday
KB449343717134.753April 26, 2019Cumulative update
KB449346417134.706April 9, 2019Patch Tuesday
KB448989417134.677March 19, 2019Patch Tuesday
KB448986817134.648March 12, 2019Patch Tuesday
KB448699617134.619February 19, 2019Cumulative update
KB448701717134.590February 12, 2019Patch Tuesday
KB448097617134.556January 15, 2019Cumulative update
KB448096617134.523January 8, 2019Patch Tuesday
KB448323417134.472December 19, 2018Security update to Internet Explorer
KB447132417134.471December 11, 2018Patch Tuesday
KB446768217134.441November 27, 2018Cumulative update
KB446770217134.407November 13, 2018Patch Tuesday

How to get the Windows 10 April 2018 Update?

If your Windows Update service is enabled, Windows 10 will prompt a notice when the April 2018 Update is available for your device. You can also check for updates manually as follows:

  1. Press Windows key + I and choose Update&Security
  2. Check for updates or follow the instructions on-screen.

When the update is ready, you can select a time to install it.

Another way to check is to see if you already run version 1803 on your system. To check what version of Windows 10 your device is currently running, press Windows Key + I and select System, then scroll down to About.

Windows 10 April Update problems and fixes

There have been reported many issues triggered by the latest update and we have managed to provide solutions to fix these issues. Here is a short list of the errors related to April Update:

Let us know in the comments below if you encounter any other issues.

[wl_faceted_search title=”FIND OUT MORE ON WINDOWS 10 APRIL UPDATE”]

Windows 10 version 1607

Windows 10 Anniversary Update, or Windows 10 version 1607, code-named “Redstone 1”, is the second major update to Windows 10 and the first in a series of updates planned under the Redstone code-names. It carries the build number 10.0.14393.

Latest builds for Windows 10 v1607 [Redstone 1]

KB numberVersion (OS Build)Release dateNotes
KB5004238OS Build 14393.4530July 13, 2021Security Updates
KB5003638OS Build 14393.4467June 8, 2021Security Updates
KB5003197OS Build 14393.4402May 11, 2021Security Update
KB5001347OS Build 14393.4350April 13, 2021Security Update
KB5000803OS Build 14393.4283March 9, 2021Security Updates
KB4601318OS Build 14393.4225February 9, 2021Security Updates
KB4598243OS Build 14393.4169January 12, 2021Security Updates
KB4593226OS Build 14393.4104December 8, 2020Security Updates
KB4586830OS Build 14393.4046November 10, 2020Cumulative update
KB4580346OS Build 14393.3986
October 13, 2020Cumulative update
KB4577015OS Build 14393.3930
September 8, 2020Cumulative update
KB4571694OS Build 14393.3866
August 11, 2020Cumulative update
KB4565511OS Build 14393.3808
July 14, 2020Cumulative update
KB4561616OS Build 14393.3750
June 9, 2020Cumulative update
KB4556813OS Build 14393.3686
May 12, 2020Cumulative update
KB4550929OS Build 14393.3630April 14, 2020Cumulative update
KB4540670 OS Build 14393.3564March 10,2020Cumulative update
KB4537764 OS Build 14393.3504February 11, 2020Cumulative update
KB4534271 OS Build 14393.3443January 14, 2020Cumulative update
KB4530689 14393.3384December 10, 2019Cumulative update
KB4525236 14393.3326November 12, 2019Cumulative update
KB451999814393.3274October 8, 2019Cumulative update
KB4516044 14393.3204September 9, 2019Cumulative update
KB451251714393.3144August 13, 2019Cumulative update
KB450746014393.3085July 9, 2019Cumulative update
KB450326714393.3025June 11, 2019Cumulative update
KB449917714393.2999May 23, 2019Cumulative update
KB450505214393.2972May 19, 2019Fixes an issue with gov.uk websites
KB449444014393.2969May 14, 2019Cumulative update
KB449347314393.2941April 25, 2019Cumulative update
KB449347014393.2906April 9, 2019Cumulative update
KB448988914393.2879March 19, 2019Cumulative update
KB448988214393.2848March 12, 2019Cumulative update
KB448700614393.2828February 19, 2019Cumulative update
KB448702614393.2791February 12, 2019Cumulative update
KB448097714393.2759January 17, 2019Cumulative update
KB448096114393.2724January 8, 2019Security updates to many Microsoft products
KB448322914393.2670December 19, 2018Security update to Internet Explorer
KB447132114393.2665December 11, 2018Cumulative update
KB447887714393.2641December 3, 2018Addresses an issue with SNAT
KB446768414393.2639November 27, 2018Cumulative update

What is there to know about Windows 10 Anniversary Update?

The first preview was released on December 16, 2015. The final release was made available to Windows Insiders on July 18, 2016, followed by a public release on August 2. Microsoft ended support on April 2018.

This release of Windows 10 is supported for users of the Current Branch (CB), Current Branch for Business (CBB) and Long-Term Support Branch (LTSB).

What’s new in Windows 10 version 1607?

Windows 10 Anniversary Update brought many new features, and here we will mention the most important ones that changed user’s Windows experience:

  • The Start screen was redesigned and the “all apps” menu was removed.
  • Microsoft Edge was updated with support for extensions and many other features.
  • Windows Hello can be used to authenticate to websites and apps.
  • Windows Ink was launched, a new suite of tools and apps for digital stylus users.
  • Interaction between Windows Defender and third-party antivirus software.

What issues users encounter with Windows 10 Anniversary Update?

Still, nothing is perfect, and Windows 10 Anniversary Update makes no exception.

There are several issues with it, including problems with Windows Hello and the most widespread issue appears even before you get Windows 10 version 1607 on your PC: the installation or download failed for many users.

[wl_faceted_search]


Windows 8 App Dominoes Gets Full Support for Windows 8.1, 10

dominoes app windows 10, 8.1

Dominoes players can now finally enjoy one of their favorite games in Windows 10 and Windows 8.1. The popular Dominoes app has been recently updated in the Windows Store and has received full support for Windows 8.1, 10

Let’s get something clear from the beginning – we are talking about the dominoes game, and not Domino’s Pizza. And yes, Domino’s Pizza also has the same logo that depicts the Dominoes game. But we’re talking about the popular tile-based game dominoes or, how some call it, dominos.

For those that are beginners in Dominoes, here’s its description and we can mention that the app has a built-in tutorial to learn how to play:

The traditional Sino-European domino set consists of 28 dominoes, colloquially nicknamed bones, cards, tiles, tickets, stones, or spinners. Each domino is a rectangular tile with a line dividing its face into two square ends. Each end is marked with a number of spots (also called pips or nips) or is blank. The backs of the dominoes in a set are indistinguishable, either blank or having some common design. A domino set is a generic gaming device, similar to playing cards or dice, in that a variety of games can be played with a set.

I’ve been playing this game on my Windows 8 tablet with the Dominoes app (link at the end) and have recently discovered an update that means nothing else than just the fact that it has been updated for Windows 8.1. The game is 100% free and comes with the following playing modes: muggins, block and draw. This Dominoes app lets up to four different Windows 8 or Windows 8.1 players to enjoy the game.

Dominoes app from Microsoft Store

You can also choose to play against a very smart artificial intelligence opponent if you’re lacking friends. The score is very easy to keep and the statistics that are provided are also helpful. Inside this Dominoes game for Windows 8 you will find five different domino styles and game themes. Do you like to play dominoes on Windows 8?

[UPDATE] The Dominoes app has received support in Microsoft Store and it is still a great free game to play on Windows 10, Windows 8.1, Windows 10 Mobile, Windows Phone 8.1, Windows Phone 8.

RELATED ARTICLES TO CHECK OUT:

Defraggler is the Best Solution to Defrag Windows 10

Defraggler is one of the best tools to use if you want to defrag your Windows 8 hard drive or even individual files. I’ve been using it on Windows 8.1, and you can read below what were my impressions
defraggler windows 8
Piriform is a respected company in the software world, probably most known for having released such programs as CCleaner, which is now compatible with Windows 8.1. Piriform is one of the first companies to have released support for Windows 8 for its programs, and Defraggler was made compatible with Windows 8 at the end of January, 2012, even before Windows 8 was released.

The company has respected their schedule and when Windows 8.1 was released, they made Defraggler compatible with Windows 8.1 in version 2.16. But only these days did I install Defraggler as I seriously needed to optimize my Windows 8.1 computer. I’ve used WiseCleaner’s Wise Care 365 software and have also cleaned the Windows 8 registry, but a few more improvements needed to be made.

First of all, what makes Defraggler different than other software that can defragment your system is the fact that besides tweaking your hard drive, it can also defrag individual files. The version that I have used, as I’ve mentioned before, was Defraggler 2.16. Let’s have a quick look at its main features, improvements and what it can do for your computer:

  • Organizes empty disk space to further prevent fragmentation
  • Defragments your hard drive, an entire file, a folder, or a single file
  • Defraggler uses the Windows safeguards to prevent data loss
  • Defraggler is very lightweight, the installation file is only around 3MB
  • Defraggler shows you an interactive drive map
  • Quick Defrag mode
  • Scheduled defragmentation

Using Defraggler to defrag Windows

Also, here are some of the latest improvements made to Defraggler – minimize to tray, right-click Move File to end of Drive feature, improvements to dree space calculation, fixed exclusions in df.exe, SSD drives are now handled correctly when drives are queued for defrag, improved drive map block calculation for very small drives, shortcuts are now correctly interpreted when calculating fragmentation levels, improved support for /minpercent parameter for df.exe.

With regards to the confusion surrounding SSDs and defragmentation, here’s what Martin Brinkmann from Ghacks explains:

There is still some confusion in regards to SSDs and defragmentation. The general consensus seems to be that you should not defragment Solid State Drives for two reasons: first because of the write operations that the operation causes, since it may impact a drive’s lifespan especially if it is an early generation drive. Second, because Solid State Drives can access data a lot faster than regular hard drives so that the performance gains are minimal at best. Running a Trim command or using the secure erase feature of the hard drive will improve performance by a much larger margin.

In Defraggler, look at the Media Type column to distinguish regular hard drives from Solid State Drives. It is still recommended to defrag platter-based hard drives whenever their fragmentation reaches a level that is affecting performance. Defraggler does not provide you with any recommendations, but if you spot two-digit fragmentation percentages, you should probably run a defrag on the drive in question.

When you will first run Defraggler, an interactive map of your drive will be displayed. You will be able to do the following things – analyze, defrag, quick defrag, and also to defrag folders, files and advanced option as checking the drive for errors and defrag freespace. Before running the analyze, it will ask if you want to empty the recycle bin, which, in my case, was around 20 GB (ouch!). So make sure you’ve recovered all the files you might need.

The analysis will be very swift, and will let you know about your disk’s health. After that, you can choose to view the analyzed files or to benchmark a certain drive. On my computer the benchmark lasted for about five minutes. The Windows 8 disk defragmentation will take much more time, so make sure you can keep the computer open. The time estimate will decrease, though, so don’t be afraid. You can stop the process at any time if something unoccured happens.

After the defragmentation was finally completed, I can tell you that my Windows 8.1 laptop suddenly felt faster and snappier. Therefore, I suggest Defraggler as it seems to be, at least in my opinion, the best way do perform disk defragmentation in Windows 8 and Windows 8.1. Stay tuned as we will soon talk about the performance of Speccy and Recuva programs on Windows 8 and Windows 8.1. Let’s hope that some day we will also see a Defraggler app optimized for Windows 8 touch devices, as well.

Download Defraggler for Windows 8 and Windows 8.1

Defraggler alternatives in Windows 10

Even though Defraggler might be the best solution for many users, it is not the only defrag tool on the market. In case you encounter any problems while using it, especially on a Windows 10 device, you can switch to these options:

  • Smart Defrag
  • O&O Defrag
  • Auslogics Disk Defrag
  • Puran Defrag
  • Disk Speedup

You can find more information about any of these defrag tools and download links in this dedicated article.

Tip: in order to boost your PC’s performance, you can also use a good registry cleaner and optimization tool. You can take a look at the best of them on this list.

Internet Download Manager – How to Download & Install

Internet Download Manager, or IDM, is one of the best shareware download manager software for Windows users. Now, the tool has finally received Windows 10 support, which means consumers now use it for faster downloading speeds.

Internet Download Manager has recently been updated to version 6.30, enhancing full support for Windows 10. IDM program has first been made compatible with Windows in December 2012, with version number 6.14.

The first time when Tonec Inc, the developer of IDM, has released some sort of support for Windows 10 was back in July with version 6.17 and Build 2, when the software had improved Internet Explorer 11 integration.

Now, version 6.30 of Internet Download Manager brings the following important changes – the critical bug that was affecting users in the IE integration module has been fixed, as well as compatibility issues with Google Chrome.

The video recognition in web players has been improved, and Windows 10 along with Internet Explorer 11 have received full support.

IDM will work just as well on Windows 10, 8, or Windows 8.1, so follow the link below to download it on your systems.

Download Internet Download Manager for Windows 10

Internet Download Manager key features

  • Universal browser support: IDM is compatible with absolutely all the browsers available on the market, from popular browsers such as Google Chrome and Mozilla Firefox to privacy-friendly browsers such as Vivaldi.
  • Malware scan: When you click on a download link, IDM automatically takes over and scans the respective files and folders for malware.
  • Download categories: You can quickly organize your downloads using various download categories.
  • Resume download: If your download got stuck or your internet connection dropped, IDM will resume all the unfinished downloads where they left off.
  • Download speed 5 time faster than regular downloads due to  dynamic file segmentation technology.
  • Customizable UI: You can add and remove options in the UI, or add various toolbars depending on your needs.

For more information about the complete list of features, go to Internet Download Manager official page.

If you have any other suggestions or questions, don’t hesitate to leave them in the comments section below.

Watch ABC Windows 10/11 app lets you stream ABC TV on PC

The Windows 8 ABC Live app has been updated and rebranded — it is now called Watch ABC. Read below to discover what are the improvements that this popular TV app comes with in Windows 10, 8.

User from United States should be glad to know that the update to the Windows 10, 8 ABC app finally brings live streaming. The app is also now called Watch ABC and comes with a new look and general bug fixes. The live video feature is available at the moment only for residents of Philadelphia, New York City, Chicago, Los Angeles, Raleigh-Durham, Fresno, Houston and San Francisco.

windows 8 abc app

By using the updated Watch ABC app you can watch your favorite ABC shows and also find when your favorite show is on straight from your Windows 8 tablet. Here’s how the official description of the app sounds like:

WATCH ABC is a new way to experience ABC – anytime, anywhere. Whether you’re at home or out and about, you can enjoy your favorite ABC TV shows, sports, and local news & weather on your smartphone, tablet, or computer – LIVE and ON DEMAND.

Ironically, by anywhere they mean only some cities from the United States. Watch ABC will let you watch from the comfort of your Windows 10, 8 device such shows as Marvel’s Agents of S.H.I.E.L.D., The Goldbergs, Scandal, Once Upon a Time, Modern Family, Good Morning America, The View and much more. Besides Watch ABC, there is also the ABC family app that you can use on Windows 10, 8. We are including below download links to both apps:

[UPDATE] ABC added a series of interesting new features and improvements to both apps. If something came up and you didn’t finish your episode, you can quickly pick up where you left off and resume your session. It is also worth mentioning that closed captioning is available on certain shows.

Unfortunately, many users complained about frequent crashes when the app is playing ads. App hangs also occur especially when requesting location access on Windows 10. Hopefully, the next update fix this these issues for good.

How has your Watch ABC experience been so far? Let us know in the comments below.

RELATED STORIES TO CHECK OUT:

Google Chrome update brings new features for Windows 10

A new version of Chrome is out, and it brings essential updates. To be more specific, there are 19 new features that are included in the new version of Chrome.

Google announced that Chrome 67 has just been released to the stable channel for Windows. The update is version 67.0.3369.62 and it contains a few improvements and fixes involving site isolation, sensor support, WebXR API, and WebAuthentication API.

New Google Chrome features

WebXR API

Chrome supports the new WebXR standard for web-based AR and VR applications. Developers can make use of this new WebXR APIs to target mobile devices, Daydream headsets, Windows Mixed Reality devices, HTC Vive, Oculus Rift and more.

Sensor support

Chrome 67 supports the new Generic Sensor API which will allow websites to access various sensors such as gyroscope, accelerometer, orientation sensor, and motion sensor. These are available in mobile and desktop devices.

Site isolation

The update brings Site Isolation to a more significant percentage of users. This feature enhances Chrome’s security, and it also helps diminish risks that are posed by the Spectre vulnerability.

WebAuthenticaion API

The Credential Management API used to define a framework for retrieving credentials, and these include semantics for creating, getting and storing them via two credential types: PasswordCredential and FederatedCredential.

Now, what the webAuthentical API brings new is a third credential type called PublicKeyCredential. This allows web apps to create and use strong credentials which are cryptographically attested for authenticating users.

Chrome update availability

The update began rolling out, and it will reach all Chrome users in the next few days and weeks. You can learn more about what this new version of Chrome brings further by heading over here.

Other new features and changes include slots in a flat tree, TransformStream, three new network quality client hints, send mouse back/forward buttons to JavaScript and more.

RELATED STORIES TO CHECK:

Use Miracast to mirror your Windows 10/11 screen wirelessly

The Wireless Display with Miracast technology has been made available for Windows 10 devices; read this post to discover how you could make us of it and why it really matters.

wireless display windows 8.1The wireless display technology in Windows 8.1 is one of the best new wireless network features, along with the new, faster 802.11ac Wi-Fi standard. This new technology is much more important than we realize and you need to learn more about it to know how to make use of it. Gamers especially will find the Miracast wireless display technology appealing for their “needs”

First of all, let’s explain what Miracast stands and what exactly does it mean:

Miracast is a peer-to-peer wireless screencast standard formed via Wi-Fi Direct connections in a manner similar to Bluetooth. It enables wireless or wired delivery of compressed standard or high-definition video to or from desktops, tablets, mobile phones, and other devices. Both the sending and receiving devices must support Miracast for the technology to work. However, to stream music and movies to a device that does not support Miracast, adapters are available that plug into HDMI or USB ports.

Miracast allows a portable device or computer to send, securely, up to 1080p HD video and 5.1 surround sound (AAC and AC3 are optional codecs, mandated codec is linear pulse-code modulation — 16 bits 48 kHz 2 channels). However, it works only over Wi-Fi and cannot be used to stream to a router access point. It was created by the Wi-Fi Alliance. It allows users to, for example, echo display from a phone or tablet onto a TV, share a laptop screen with the conference room projector in real-time, and watch live programs from a home cable box on a tablet.

Windows 10 brings Miracast wireless display support

The Wi-Fi Alliance group that stands behind this new technology is comprised of big companies, such as Cisco, Alcatel-Lucent, Motorola and Nokia. Some key sponsors are Apple, Comcast, Samsung, Sony, LG, Intel, Dell, Broadcom, Cisco, Qualcomm, Motorola, Microsoft, Texas Instruments, and T-Mobile. So, we can see that the entire industry has a clear interest in propelling the Miracast use to more consumers.

In Windows 10, 8.1, you can do a lot of things with the Wireless Display by wirelessly projecting your Windows 10, 8.1 device’s screen any Miracast-compatible display: TV, monitor, or projector. Here are some of them:

  • Play games on a bigger screen from your Windows 10, 8.1 and Windows RT 8.1 laptop or tablet
  • See pictures and videos that you took on your travel
  • Browse the internet, watch Youtube videos, play online games
  • See a movie thanks to your Miracast-enabled projector
  • Run Microsoft PowerPoint presentations

Now that your Windows 10, 8.1 device is Miracast-enabled and makes the most of the Wireless Display technology, you will need to make sure that the TV, projector or monitor you are planning on buying is also Miracast-compatible. Windows Server 2012 R2 users can also benefit from the same Wireless Display technology.

Check if your PC supports Miracast

Unfortunately, not all computers are fully compatible with the Miracast technology. You can quickly check if your device supports Miracast by launching dxdiag. 

  1. So, go to Start, type dxdiag  and hit Enter. Confirm any prompt that appears on the screen and simply wait for the scanning process to end.directx information
  2. Save the information file to your desktop and then open the DxDiag.txt file. Use CTRL + F to locate Miracast. You should find the Miracast: Supported/ Available.

check miracast support

For additional information about Miracast, check out the articles listed below:


FIX: Zimbra Internet Explorer issues in Windows 10

Zimbra Collaboration Suite, a groupware email server and web client, is apparently causing some problems for users trying to make it work in Internet Explorer 11 from Windows 10, 8.1. Read below to find all the details.zimbra windows 8.1
All different types of software seem to be affected by the Windows 10, 8.1 update and now it’s time to talk about Zimbra, a collaboration suite of software that work with other browsers, like Internet Explorer 11 in Windows 10, 8.1, for example. Here’s what one affected user is saying:

Zimbra don’t work on Internet Explorer 11 with Windows 8.1. It can’t read my mails on zimbra.free.fr. Free.fr says it’s your fault. Please remove the bug.

According to him, Zimbra isn’t compatible with Windows 10, 8.1 and a number of other forums postings has confirmed the same issue, albeit Zimbra developer says the app is fully compatible with Microsoft’s latest operating system version. Here’s a little more info about what Zimbra does:

The software consists of both client and server components. Two versions of Zimbra are available: an open-source version, and a commercially supported version (“Network Edition”) with closed-source components such as a proprietary Messaging Application Programming Interface connector to Outlook for calendar and contact synchronisation.

If you’re still experiencing Zimbra issues on Windows 10, 8.1, here are some troubleshooting suggestions to help you fix the problem.

Fix Zimbra bugs on Windows 10

1. Update Zimbra/ Windows 10

First of all, make sure that you’ve installed the latest Zimbra version on your computer, as well as the latest Windows 10 updates. Running outdated software versions may trigger a wide array of issue, including the problems described above. So, go ahead and update both Zimbra and Windows, then restart your computer and check if the issue persists.

2. Try a different browser

If the problem persists, try using Zimbra on a different browser. Quite a few users reported this workaround helped them solve the problem.

3. Check Zimbra’s Support Page

If the issue persists, go to Zimbra’s Support page. You can browse through Zimbra’s Knowledge Base Articles or check out the Community articles.

If you’re a Zimbra user, can you confirm that you’ve been having similar issues?

RELATED STORIES TO CHECK OUT:


Microsoft, GitHub and the price behind open source

For anyone who still refers to Microsoft using the M$ text on social media, forums or blog post, today must feel like a long-anticipated hellscape. As Microsoft declares its intentions to buy the open source developer community GitHub for $7.5 billion (USD), the screams of thousands of pseudo anti-establishment developers can be heard blaring across the internet while they gather on social media to threaten to close up shop on GitHub and rush to the comforting bells of their pre-2002 anti-Microsoft rhetoric as a basis for their wild speculation of the company’s nefarious intentions with the repository.

In a less tribalists reality, Microsoft’s rather substantial acquisition of GitHub should be seen as a move made by CEO and co-founder Chris Wanswrath to seemingly ensure the longevity of an open source developer community. As of now, Microsoft is a leading leader of open source contributions, has the financial structure and capital in place to allow a community to thrive under several different developer circumstances and is actively chasing a multi platform developer experience, by all accounts, the company appears to be a great destination for GitHub developers beyond housing the organized code repository.

Unfortunately, the Microsoft boogeyman theory of years past remains a sticking point for a vocal minority of developers.

Despite an overwhelming desire by some developers to liken Microsoft’s motives and actions to the evil Android consuming Dragon Ball Z villain, Cell, most deals the company enters into are of mutual compromise and thorough financial investigations, and not just another resource for the company to gobble up in its ambitions to become their perfect corporate form.

Fortunately, there is a small minority of resistance developers and industry observers are pointing out some of the rather obvious intricacies that are being considered in the new Microsoft and GitHub acquisition that would suggest the software giant is going into this purchase with the open source community’s best intentions in mind.

In a rather long-winded but thoroughly informative Twitter storm, developer Erick Sink succinctly illustrates why the rush to judgment of the GitHub purchase by some developers may be misplaced at this time. Similar to Sink’s twitter posts, I find Microsoft’s acquisition of GitHub is, at best, a neutral purchase that benefits both Microsoft and the open source community, and at worst, the least bad alternative. Without a viable revenue and profit platform in place, GitHub was roughly a missing round of funding away from closing up shop for many of its free-tier features. In 2016 GitHub lost $66 million during its fiscal year and in 2017, the community only brought in $110 million in revenue. In addition to its financial problems, competitors such as Atlassian and GitLab were seeing substantially better numbers YoY, putting a target on the back of the community as they began to court the same pool of GitHub’s 13 million developer congregation. Plainly put, GitHub was going to be for sale in the not too distant future, it was only a matter of time before an Amazon, Oracle, Google or IBM bought the community.

With that being said, Microsoft’s GitHub purchase isn’t without some scrutiny or questions.

What’s the company’s monetization proposition going forward? How much integration will follow? What will happen to private repositories? What is the ethical and legal standing for hosting competitor code? How do you stop developers from going to competitor communities? Can they keep Skype, its developers, and designers away from GitHub?

These are just some of the tough questions ahead of Microsoft and former co-founder and new company executive Chris Wanswrath as the two attempt to court new and currently hesitant open source developers as well as maintaining the trust for housing competitor coding. However, what most developers should do is get all the relevant information about the purchase before making rash declarative actions such as shutting down accounts or pronouncing their doom and gloom prophecies based on pre-2002 data and perceptions. Over the past handful of years, GitHub has been increasingly courting enterprise accounts as a way to stay financially viable. With enterprise, accounts come financial stability and long-term revenues for the service.

“Big enterprise software contracts can take months or longer to secure and often require hand-holding, which is where hiring a sales force comes in. Enterprises often want assurances of uptime that carry legal or financial penalties, they need certain features for security and for accountability, and they often want the ability their suppliers to have met certain audits and standards for security, operations and so on. ”  -Business Insider

Interestingly enough, Microsoft has some expertise when it comes to serving enterprise accounts. Perhaps, for GitHub to remain a free option while evolving its search, tools and indexing features, some developers will allow Microsoft to charge larger businesses for more vertically integrated experiences with its software stack? Dare we dream, Microsoft may be one of the best-suited companies to offer a set of tools, services, and software in LinkedIn and Azure that can connect hobbyist developers with needy businesses which can offer contract work or a reliable second income for some.

Again, there will be growing pains with this new announcement from Microsoft, but GitHub developers should view the landscape from 30,000 feet before they decided to do anything today, tomorrow or in the near future.

Users Report Issues with Apache OpenOffice on Windows 10

Some users have been reporting problems and difficulties with opening certain Apache OpenOffice documents in Windows 8.1; read to find more about this problem
apache open office windows 8.1
OpenOffice doesn’t have (yet) an application for Windows 8, so we are using it just like we did in previous Windows versions. What’s even worse is that now, after making the upgrade to Windows 8.1, some users have been reporting several issues while trying to open documents in Apache OpenOffice, the open-source office productivity software suite.

One user has shared this on Apache OpenOffice’s support forums yesterday:

When I downloaded Open Office 3.4.1 in my Asus Windows 8.1 laptop I cannot open any Document in Microsoft Windows.
I get this: “This app can’t run on your PC.”

And he also completes by saying:

The 4.0.1 version didn’t entirely unpack apparently because somewhat through its installation I got the message that it is on a network resource that is unavailable on my Windows 8.1

It seems that the user doesn’t even manage to complete the install in Windows 8.1, so that might be caused by some sort of software incompatibility. From what I’ve managed to find, it seems that reverting and download Apache Open Office 3.4.1 version should do the trick. Follow the link from below to download it securely from OpenOffice’s website.

If the issue persists and you can’t open Apache OpenOffice in Windows 8.1 or you can’t open documents, then, as always, let us know in the comments what your issue is and what errors are you getting and we will try to work together on a solution.

Download Apache Open Office 3.4.1 for Windows 8.1

Apache Open Office alternatives

If you do not want to switch to Office, which is obviously not free, you might consider changing to another open office suite. One of the best after Apache Open Office is Libre Office. It works well on both Windows 8.1 and 10, and it has lots of features. You may also be interested in this list of best Office alternatives to use on a Windows 10 device.

In case your personal or business documents need to be opened only with Apache Open Office from some specific reason, there is an ultimate way: uninstall the software and download the latest version in order to install it properly on your PC. If this solution does not work, just change to other open office software.

SD Card Reader not Working in Windows 10 for some Lenovo Users

Some frustrated Lenovo users have been posting lately on support forums that they are having troubles with the SD card readers on their tablets after making the upgrade to Windows 8.1
sd card reader windows 8.1
Lenovo users seem to be among the most affected users by Windows 8.1, as they have reported issues with battery drain, some touchpad problems and slow performance issues with the Yoga 13 Windows 8 hybrid device. Now, a number of users is reporting that they are having issues with the functionality of their SD card reader after upgrading to Windows 8.1.

Here’s how one Lenovo users is describing his problem:

Upgraded to Windows 8.1 and the Realtek SD drivers in the download are for the P400 Windows 8.0 does not appear to be installing…  Can’t find it in Device Manager, not being recognized when inserted.   Nothing wrong with the hardware because it works in a VM under windows 7 with no problem.  Anyone else having this problem?

Another has reported a similar issue back when Windows 8.1 wasn’t even released, and he had actually updated to Windows 8 from Windows 7. Here’s what he said at the time:

Got an issue with my card reader, bit weird, upgraded to Windows 8 from Windows 7, all worked fine before. Any how, I’ve downloaded latest drivers for my Realtek SD card for Win8. When I insert a SD card, Win8 recognises it ok and opens the folder on the card. I then “safely remove hardware” , ejecting the card. This is where the problem is. I then re-insert the SD card back in and “No response” from Win8. I go into Device Manager and everything is ok. I have to restart the laptop for it to clear. Then its fine for one time again.

I un-installed the Realtek drivers and let the Microsoft generic drivers kick in. Same again, but when i go into Device manager, there’s an exclamation mark on the card reader saying. “Windows cannot use this hardware device because it has been prepared for “safe removal”, but it has not been removed from the computer. (Code 47). My laptop is an Acer 5735z running windows 8 64bit. All was working when running windows 7 64bit

So, as we can see, Realtek seems to be the culprit, and I have researched more on this subject and, indeed, found more Windows 8.1 laptops having Realtek SD card drivers with problems. We’ll investigate more and get back to those affected when we will find more about this another annoying Windows 8.1 problem.

SD Card reader issues in Windows

Not only Lenovo users encountered SD Card reader issues. There are also many errors in Windows 8, 8.1 and 10. Multiple issues like SD card not showing up in Windows 10, Micro SD card not reading or SD card not detected on any device are giving headaches to Windows users. Happily, these errors can be fixed by trying one of our solutions from this guide.

Another fix, for Micro SD card reader errors, can help you get rid of this annoying problem.

You can now share your to-do lists with others in Microsoft To-Do

After introducing sub-tasks support in Microsoft To-Do earlier this year, Microsoft has started rolling out a new list sharing feature on all platforms today. List sharing allows you to share any list with your friends and colleagues, and you’ll see the new icon in the top right of the app for creating an invitation link.

If you use Microsoft To-Do with a personal Microsoft account, you can share your lists with anyone else with a personal Microsoft account. Those with work and school accounts will only be able to share lists with people in the same organization.

After creating an invite link, To-Do users will remain in control with options for limiting access to limiting access to current members or turn List sharing off. The Redmond giant notes that shared lists should “automatically update it in seconds,” and it’s a feature that should be really handy for both personal and work-related tasks.

Microsoft says that all List Sharing should be available to everyone this week, though as of this writing we’re seeing on all platforms except Android. Is To-Do now good enough for your needs, or do you think the app still lacks some power user features? Let us know in the comments below.

Microsoft announces its biggest Xbox sale of the year, just in time for E3

Microsoft’s E3 press briefing is now less than a week away, and this morning the company has just announced its biggest Xbox sale of the year starting on Thursday, June 7. For a limited time, you’ll be able to save big on hundreds of games and accessories, and Microsoft will also offer a $50 discount on all Xbox One consoles, including the Xbox One X.

Here are the some of the most interesting offers that will be available later this week:

  • $199 for 500GB Xbox One S console, whiles supplies last
  • $249 for 1TB Xbox One S bundles such as the the Xbox One S PlayerUnknown’s Battlegrounds Bundle, or Xbox One S Starter Bundle,
  • $449 for Xbox One X console through June 23. If you buy one before June 10, you’ll also get a free digital copy of Red Dead Redemption with your purchase
  • $10 off black, white, special edition and limited-edition Xbox Wireless Controllers
  • Up to 75% off over 300 games on FIFA 18, NBA 2K18, Assassin’s Creed Origins, Forza Motorsport 7, Destiny 2, Super Lucky’s Tale, Monster Hunter: World, PlayerUnknown’s Battlegrounds and Sea of Thieves.
  • One month of Xbox Live Gold and/or Xbox Game Pass for $1 on the Microsoft Store, or get six months of Xbox Live Gold for the price of three or save 50% off of 6 months of Xbox Games Pass at participating retailers.

We invite you to check the Microsoft Store and participating retailers on June 7 to see all the offers, which will also include discounted gaming accessories from Seagate, Turtle Beach and Hyperkin.

A Newer Version of OneDrive is Installed: 3 Fixes to Use

There are more than a few iterations of OneDrive available on Windows 10. However, using the alternatives over the pre-installed version is proving difficult, with some users getting A newer version of OneDrive is installed error.

To address this, we prepared a list of solutions. In case you’re somewhat affected by this error, make sure to check them out below.

What does A newer version of OneDrive is installed mean?

The factors that can cause a newer version of OneDrive installed error are within a close circle. Below is a couple of them:

  • Presence of the pre-installed app: The most common cause of this issue is the presence of the preinstalled OneDrive app on your PC. To fix this, you need to uninstall the app.
  • Registry issues: Sometimes, this problem might be due to some remnants of files in your registry. You need to tweak your registry to solve this.

What can I do if a newer version of OneDrive is installed?

1. Tweak the registry

  1. Press the Windows key + R, type regedit, and click OK.
    regedit a newer version of OneDrive is installed
  2. Navigate to the path below in the left pane: HKEY_CURRENT_USER\Software\Microsoft\OneDrive
  3. Now, right-click the OneDrive subfolder and select Delete.
    delete
  4. If you don’t want to delete the subfolder, you can double-click the Version DWORD in the right pane.
    version
  5. Set the Value data to 1 and click OK.
    value data a newer version of OneDrive is installed
  6. If you have a pre-installed version of the app, you should go to the path below and change the value data too: HKEY_LOCAL_MACHINE\SOFTWARE\Microsoft\OneDrive
  7. Finally, restart your PC.

If you are getting a newer version of OneDrive installed, the first thing to try is to tweak your registry. Deleting the OneDrive file in your registry removes all remnants that might prevent installation.

2. Reset OneDrive

  1. Press the Windows key + R to open the run utility.
  2. Type the path below, and click OK: %localappdata%\Microsoft\OneDrive\onedrive.exe /resetpath
  3. Now, try reinstalling the app.

If you can’t install OneDrive because a newer version is installed on your PC, you should try to reset the app. After resetting it, you can now try the installation again.

3. Uninstall the pre-installed OneDrive

  1. Press the Windows key + I to open the Settings app and select Apps.
    apps a newer version of OneDrive is installed
  2. Now, select Microsoft OneDrive and click the Uninstall button.
    uninstall
  3. Finally, follow the onscreen instructions to complete the process.

If you are unable to fix the newer version of the OneDrive installed error, you need to remove the preinstalled app on your PC. After this, you can now install the alternative app.

On that note, we can wrap it up. After you’ve successfully removed the old OneDrive, the newer version of OneDrive is installed error should be history.

If you are getting an OneDrive.exe entry point not found error, check our detailed guide to fix it.

Lastly, don’t forget to tell us whether these steps helped you in the comments below.

Fix: Google Calendar events are gone on Windows 10/11

Google Calendar is one of the best time-planning tools out there. However, even though it works rather well on the plethora of platforms, it still has a lot of strange issues plaguing it. One of the most common issues concerns disappearance of all (or some) events from the calendar. For some users, this was the problem for ages. Until it suddenly stopped. Others are still unable to solve it and, due to its gravity, they’ve decided to switch to an alternative.

Now, since a lot of users never experienced anything similar, the issue at hand might be on your side. So, make sure to follow the steps we provided below and, hopefully, find the resolution.

How to retrieve lost events from Google Calendar

  1. Check Trash
  2. Re-sync Google Calendar
  3. Clear browser cache
  4. Remove Google Calendar from all third-party applications

1: Check Trash

There are multiple reports about Google Calendar deleting events. By default, even the oldest of your events should still be kept at all times. However, these occurrences are nothing strange for Google’s native multiplatform calendar. Luckily, none of the files will get away for good. They’re, at least most of the time, easily found in the Trash Bin, where all deleted events are stored for up to 30 days.

So, before we move to additional steps, do yourself a favor and inspect Trash Bin found in the Google Calendar. Here’s how to do it:

  1. Open Google Calendar on any browser and sign in.
  2. Click on the cog icon and select Trash from the drop-down menu.
  3. Click on deleted events and restore them.

2: Re-sync Google Calendar

If you’ve made changes or created events on another device and now can’t seem to find them on your PC, make sure to re-sync Google Calendar. Even the slightest connection issue might’ve caused failed syncing, thus you’re unable to see the events. We recommend opening Google Calendar on that alternative device while being connected to a stable network.

In addition, you can reinstall the Google Calendar app on your handheld device and install it again (most devices will restore the app to factory values). After that, wait for it to sync and open Google Calendar in a browser.

3: Clear browser cache

First of all, in order to use Google’s services within a browser, you’ll need to have cookies and JavaScript turned on. That’s just Google’s policy. In addition, we suggest removing all add-ons which can, in some manner, manipulate with Google Calendar‘s web implementation.

Finally, some users suggested using Incognito mode on your browser. This might help, but even better way to address the error at hand head-on is to clear your browsing data. Browsing data, like cache, cookies, and cached images can cause issues with various applications.

Here’s how to clear browsing data on 3 most-used browsers:

Google Chrome and Mozilla Firefox

  1. Press Shift + Ctrl + Delete to open the “Clear browsing data” menu.
  2. Select “All time” as the time range.
  3. Focus on deleting ‘Cookies’, ‘Cached Images and Files‘, and other site data.
  4. Click on the Clear Data button.google calendar events gone
  5. Restart Chrome and sign in to Google Calendar again.

Microsoft Edge

  1. Open Edge.
  2. Press Ctrl + Shift + Delete.
  3. Check all the boxes and click Clear.
  4. Restart Edge and log in to Google Calendar again.google calendar events gone

4: Remove Google Calendar from all third-party applications

Since Google discontinued Google Calendar for Windows, there were a lot of alternative ways to implement it in third-party applications. For example, you can use Windows 10‘s Calendar app to sync all Google Calendars. This seems to be a viable solution, but we can’t be certain whether the third-party app caused the disappearance of Events or the Google is at fault.

For that reason, just to be safe and avoid further justification from the responsible support team, we suggest removing Google Calendar inputs from all third-party Calendar applications.

That’s it. Don’t forget to tell us whether the issue is addressed or you’re still unable to locate your valuable events. Give us your thoughts in the comments section below.

RELATED STORIES YOU SHOULD CHECK OUT:

Why Can’t I Select Songs on Spotify? Here’s the Solution

There are many ways to stream music with Spotify nowadays, especially on Windows, where you have two separate applications (you can use only one at a time) and a web player. Since the beginning, the Microsoft Store Spotify app has had issues, while the earlier-introduced desktop version is also prone to bugs.

One of those affects the song selection, where users cannot select songs – add them to their playlists, or manipulate them in any other way.

To address this, we prepared a list of possible solutions and a few workarounds. Try them out and tell us whether they worked for you.

What to do when Spotify doesn’t allow you song selection on Windows 10?

1. Sign out and sign in again

The first step might seem obvious, but it’s still worth a try. Bugs are not rare in Spotify for Windows, but they’re, most of the time, minor inconveniences. However, by re-acquiring your library data after signing in again, this bug should be a thing of the past.

In addition, open Spotify in a web browser and look for its behavior. Another thing worth mentioning is VPN. If you live in an unsupported area, try connecting through a VPN and sign in again.

If everything works fine, restart your PC and move with the steps we provided below. Hopefully, one of them will help you select songs without further issues.

2. Disable Hardware Acceleration and remove Offline devices

There are some advanced features, like Hardware Acceleration, which might cause occasional errors. Some users addressed the issue simply by disabling Hardware Acceleration under the Advanced options. When toggled On, Hardware Acceleration will use the hardware (GPU) to speed up and optimize the performance of Spotify.

If you disable it, the performance might drop marginally, but the desktop client won’t depend on possibly misconfigured hardware.

Here’s how to disable Hardware Acceleration is the Spotify for Windows 10 desktop client:

  1. Open Spotify.
  2. Click on “∨” sign beside your Profile Title and select Settings from the drop-down menu.
  3. Scroll to the bottom and expand and click on the “Show advanced settings” button.
  4. Toggle Off Hardware Acceleration.why can't i select songs on spotify (windows10)
why can't i select songs on spotify (windows10)

In addition, some seasoned users suggested disabling all Offline devices and re-enabling them again later on. By doing so, you might fix the bug that prevents you from selecting songs in Spotify’s library. Just navigate here and disable all devices you’ve enlisted for offline use.

Disabling the hardware acceleration also helps resolve issues like Spotify not playing some songs issue; read this guide to learn more.

3. Double-check the connection

Making sure that you’re properly connected is of utmost importance. Yes, Spotify can work with relatively slow bandwidth without any issues whatsoever. Of course, this can depend on the music quality you choose in Settings.

However, it requires a stable connection. This means you’ll have the best time with a wired LAN cable instead of Wi-Fi. In addition, resetting your router and/or modem won’t hurt and certainly can help.

Furthermore, we recommend disabling bandwidth-hogging background applications as an experiment. In addition, we suggest checking Windows Firewall. Spotify needs to communicate through Windows Firewall freely, so make sure to add permission. In case you’re not sure how to do it, follow the steps we provided below:

  1. Type Allow in the Windows Search bar and open “Allow an app through Windows Firewall“.why can't i select songs on spotify (windows10)
  2. Click on the”Change settings” button.why can't i select songs on spotify (windows10)
  3. Make sure that Spotify Music is allowed to communicate to the Public and Private network.why can't i select songs on spotify (windows10)
  4. Confirm changes if needed, and look for changes within the Spotify client.

4. Reinstall Spotify

There are various things that might’ve gone awry and affected the application’s performance. Spotify is, in a general sense, not a complex application, so the convoluted troubleshooting isn’t necessary or even applicable in this case. What you can do, on the other hand, is reinstalling Spotify and hope for the best.

If you’re not sure how to reinstall Spotify in Windows 10, follow the steps we provided below:

  1. Press Windows key + I to open the Settings app.
  2. Choose Apps.
  3. Under the Apps & features, search for Spotify.
  4. Uninstall Spotify.why can't i select songs on spotify (windows10)
  5. Restart your PC.
  6. Open Microsoft Store and search for Spotify.
  7. Open the app and sign in.

5. Try standard desktop version or the Store version (and vice versa)

Finally, if your variation of Spotify for Windows doesn’t work, there’s always an alternative. If you’re using the standard Desktop version, make sure to give Microsoft Store’s version a try. Of course, if the UWP version, obtained through the Store, fails you — download the alternative from the official site.

We explained how to get the Microsoft Store version in the previous solution. This is how to get and install the standard version from the official site:

  1. Download the installer for Spotify, here. The download process should commence immediately. Don’t forget to allow it if the browser decides it’s harmful.
  2. Run the installer and follow the instructions.
  3. Run Spotify and sign in.

That’s it. Hopefully, you can resolve the issue with Spotify for Windows 10. If you’re still stuck with the bug, don’t forget to send a ticket to Spotify support. Until the issue is dealt with, try web player for Spotify. Also, don’t forget to share alternative solutions in the comments section below.

Microsoft reportedly in “serious” talks to acquire GitHub

According to a new report, Microsoft is engaging in “serious” talks to acquire source-code repository service GitHub (via Business Insider). Talks have been on-and-off for a number of years, but recently it appears that the talks have become more serious, especially as GitHub’s current CEO, Chris Wanstrath, is departing the company.

Last valued at $2 billion after a $250 million funding round in 2015, Microsoft’s suggested buying price for the platform is $5 billion. This would make it one of the company’s largest all-time acquisitions.

Microsoft’s recent push into open-source code, headed by Microsoft’s CEO Satya Nadella, may help Microsoft be a welcome buyer for the startup company, as its support for Linux has grown over the years, even to the point of directly baking in support for running Linux on Windows within Windows 10.

Microsoft and GitHub declined to comment, however, it is important to state that nothing has been confirmed as yet, and that both companies are merely at a discussion stage.

What to do if Far Cry 5 won’t update

Ubisoft has its ups and downs over the last couple of years, but the Far Cry series was and still is highly regarded. Far Cry 5 is immersive and story-driven FPS, with lots of things going for it. Now, we all know how Ubisoft’s games tend to have various issues and frequent patches are more than needed. However, it seems that there’s the widespread error which stops updating the game on 90%, regardless whether it’s Steam or uPlay in question.

This can be a grave problem, especially since some users weren’t able to access the game without updating. In order to address this, we prepared a list of solutions which should come in handy. Make sure to check out our list down below.

How to fix Far Cry 5 updating issues in Windows 10

  1. Check the storage space
  2. Check the connection
  3. Create an exception for Firewall
  4. Reinstall uPlay and run it as admin
  5. Verify the game cache
  6. Reinstall the game

1: Check the storage space

First things first. Since the error occurs mostly at the end of the update (as stated by the affected users), we recommend double-checking for available storage space. This game is huge and so are its updates. So, make sure that you have enough storage space on the installation drive.

You can check for the available space in the File Explorer. If you’re in urgent need for a few extra gigabytes of memory, follow the instructions we provided below:

  1. Open This PC or File Explorer.
  2. Right-click on the partition you want to relieve of unnecessary data and open Properties.
  3. Click on Disk Cleanup.far cry 5 won't update
  4. Select the “Clean up system files” option.far cry 5 won't update
  5. Check all the boxes and click OK.far cry 5 won't update

Windows 10 tends to preserve update files (for rolling back to previous major version), so you might get tens of gigabytes here.

2: Check the connection

Connection issues are another viable reason why an update would fail. There are various factors when it comes to connection, but the silver lining is that the bandwidth speed isn’t causing issues. Moreover, the download can take for hours and still finish successfully. However, there are other reasons why a Far Cry 5 update would fail near the end.

Make sure to check these steps and confirm that everything is as intended later on:

  • Always use a wired connection. Avoid using wireless while gaming at all cost as it’s unstable and the latency spikes are quite common.
  • Restart your modem.
  • Flash DNS.
    1. Press Windows key + R to summon the Run elevated command line.
    2. In the command line, type ipconfig /flushdns, and press Enter.far cry 5 won't update
  • Restart Steam or uPlay.
  • Check the server status. Maybe others are suffering from the same network lag.
  • Check your PING on different servers.
  • Update router/modem firmware.

3: Create an exception for Firewall

Some users addressed this issue successfully by creating an exception in Windows Firewall. In order for Steam and uPlay to freely communicate through the Firewall, you’ll need to allow it first. After doing so, restart the update process and look for changes. In addition, in case you have any third-party antivirus suite with the firewall, we recommend disabling it for the remainder of the updating process.

If you’re not sure how to allow programs to freely communicate through Windows Firewall, follow the steps we provided below:

  1. Type firewall in the Windows Search bar, and open Windows Firewall.
  2. Click on the ”Allow an app or feature through Windows Firewall” in the left pane.
  3. Choose to Change settings.
  4. Make sure that Steam (or uPlay) and Far Cry 5 are allowed to communicate through Windows Firewall.
  5. Close Settings and try updating the game again.

4: Reinstall uPlay and run it as admin

Reinstalling the uPlay client for Windows 10 seems to be another viable solution. Namely, some affected users managed to address the issue by reinstalling the uPlay client on an alternative location. Once they’ve done that, the update sequence worked just fine for Far Cry 5. This client’s default location is situated on the system partition. If you’re able, install it on an alternative partition.

You can download and install uPlay by following this link. In addition, after you remove the program, clear the associated remaining files stored in App Data and Program Files. After that, install the client, right-click on the shortcut, and run it as an administrator. After that, just sign in, and try running Far Cry 5 again.

5: Verify the game cache

It’s not uncommon for game files to get corrupted or incomplete. Especially after frequent failed updates, when the mashup of files is falsely distributed. For that reason, you can use either the Steam desktop client or uPlay client, respectively. After the utility checks and verifies that the Far Cry 5 installation is in a flawless state.

Here’s how to verify the game’s cache with Steam:

  1. Open the Steam client.
  2. Select Library.
  3. Right-click on Far Cry 5 and open Properties.far cry 5 won't update
  4. Choose the Local files tab.
  5. Click on the “Verify integrity of game files…“.far cry 5 won't update
  6. This can take some time. Once it finishes, restart Steam and Far Cry 5.

And this is how to do it with uPlay client:

  1. Open the uPlay client in Online mode.
  2. Choose Games.
  3. Right-click on Far Cry 5 and choose “Verify files“.far cry 5 won't update
  4. Once the procedure ends, restart uPlay and run Far Cry 5 again.far cry 5 won't update

6: Reinstall the game

Finally, if none of the previous solutions resolved the issue at hand, reinstalling the game might get you going. This is a long shot, since the integration check is, more or less, like the reinstallation itself. However, in these matters, you can never be too sure. The reinstallation we suggest includes clearing everything, including associated files.

Here’s how to reinstall Far Cry 5 on Windows 10:

  1. Type control in the Windows Search bar and open Control Panel.
  2. Click “Uninstall a program“.
  3. Remove Far Cry 5.
  4. Delete remaining files from App Data and Program Files folders. The associated files are stored in Ubisoft folders, so you won’t have a hard time locating them.
  5. Restart your PC.
  6. Navigate to Steam or uPlay and install the game again.

That’s a wrap-up. If you’re aware of any alternative solution or have a question to ask, we encourage you to do so in the comments section below.

RELATED STORIES YOU SHOULD CHECK OUT:

You can now play Uno Card Game on Windows 10/11, 8

Those of you who are playing the famous Uno card game with your friends should now be delighted to know that a Windows 10, 8 app has been released by Gameloft. Read this post to find out more.

Up until today, there weren’t too many professionally made UNO games in the Windows Store for Windows 10, 8 users. Gameloft, one of the biggest companies that make mobile games, has launched the UNO & Friends game for Windows 10, 8 and Windows RT users and it is available to download for free in the Windows Store (link at the end).

windows 8 uno card game

The Uno card game description for Windows 10, 8 users goes like this:

Playing UNO with friends, family, and millions of fans worldwide has never been easier! Join one of the largest free online mobile gaming communities and enjoy an all-new free multiplayer experience, competitive leaderboards and fun customization options that let you shout “UNO!” on a whole new level!

You can invite your friends and play with them or choose to challenge millions of other UNO fans from all over the world. But this isn’t an ordinary “boring” Uno card game, as it will let you make use of Boosts & Super Boosts to increase your chances of winning. You can also personalize your UNO card game by changing the backgrounds, the card deck designs and even by adding some special effects.

Weekly contests are being held where you can win rewards and increase your standing in the leaderboards. What’s also awesome about the game is that the multiplayer mode isn’t restricted to Wi-Fi, there is also the possibility to play over 3G. Install the game if you’re a true UNO fan and let us know what you think about it. If you like card games, maybe you should also check out the Bridge Cards Game for Windows 8 users that we’ve compiled.

Download UNO & Friends for Windows 10, 8

It is worth mentioning that this game is not subject to Xbox Live Family Settings.

UNO & Friends received a 4.1 user score in the Microsoft Store. This means that most players are satisfied with the game. This also indicates that UNO & Friends is a great choice if you’re looking for a fun and addictive game to play with your friends.

The only downside identified by players is related to the amount of available coins. Long story short, the game is fun to play until you run out of coins.

The real card game has been recreated very well. As an uno fan, I hoped this game would be at least half decent, and it delivers. Graphics are great, little/no lag, and an overall well done game. Only downside that I see is that it’s pay-to-play. Yes, you do get coins for free, but only enough to play about one or two games an hour unless you win every game you play. This makes it hard to play this game for very long.

If you already played UNO & Friends, tell us more about your gaming experience in the comments below.

RELATED STORIES TO CHECK OUT: