If you’re on a busy schedule, it’s important not to miss any important tasks or events. This is why many wonder how to show tasks on the Outlook calendar.
Missing an important event can be detrimental, so it’s essential to know how to manage your tasks in Outlook, and this guide will show you how to do it.
Why can’t I see tasks on the Outlook calendar?
Your default mail account isn’t the same account you’ve added tasks to.
Your tasks aren’t under the main tasks folder in Microsoft To Do or in Outlook in the web task pane.
Set the default calendar in Outlook
Navigate to File and select Info.
Now choose Account Settings and select Account Settings again.
Next, navigate to the Data Files.
Select the account you use for tasks and choose Set as default.
Did you know you can download Outlook calendar? Yes, and you can use this feature to export and transfer your data quickly.
How do I show tasks on the Outlook calendar?
Move them to the Calendar manually
Open Outlook, or Outlook for Web.
Select the Calendar icon from the left pane.
From the top menu, select My Day and then To Do. Your task list will now appear.
Locate the task that you want and drag and drop it to the desired slot on the calendar. This will create cards for calendars in Outlook that you can move around.
Repeat this for all tasks that you want to show on Outlook Calendar.
This is all possible thanks to the Calendar Board feature in Outlook. If you want to learn more, we have a great guide on making Outlook calendar private, so be sure to check it out.
Although Outlook and Microsoft To Do are integrated, this isn’t perfect, and there is a place for improvement.
Microsoft To Do is available in Outlook and can be accessed on both desktop and web versions. You can also create a task from an email and check it under To Do tab on Outlook.
For desktop:
Open Outlook.
Next, choose Tasks from the reading pane.
You should see all your To Do tasks.
If needed, you can sort tasks by clicking on Tasks and selecting the Home drop-down menu.
For Web:
Open Outlook for Web.
Click on My Day.
From there, you’ll be able to see and access all your tasks.
This can be quite useful since it allows you to create tasks, delete them and add them easily to your calendar. However, To Do doesn’t automatically add your tasks to the calendar, as many would think.
Instead, you have to manually do that for every task you want to add to your task list. This can be a good or a bad thing, depending on how you use it.
Keep in mind that you might encounter issues with the service because few have reported that Microsoft To Do is not syncing properly.
We love this method, but we hope there will be an option for a complete calendar and To Do synchronization.
As you can see, it’s easy to show tasks on the Outlook calendar, but unfortunately, you can’t automatically show all of your tasks. Instead, you will have to add them to your to-do list manually.
The Windows OS is user-friendly, though it comprises various features for advanced and professional users. The Data Execution Prevention (DEP) feature in Windows versions from XP Service Pack 2 to Windows 11 is one of them.
However, different people have been concerned about knowing what the data execution prevention feature is and whether to turn it on or off. Therefore, we will discuss DEP and how to enable or disable Data Execution Prevention on Windows PCs.
What is data execution prevention?
Data Execution Prevention (DEP) is a built-in security feature in Windows designed to protect your PC against malicious code execution. It divides your computer memory into two categories: executable and non-executable. Therefore, restricting specific memory areas from being executed as code.
The key features of DEP are:
Preventing malicious code execution
Restricts specific memory parts from being executed as code
Select the Privacy & Security category and click on Windows Security.
Select the App & Browser control category. Navigate to the Exploit Protection section and click the Exploit Protection Settings link.
Then, go to Data Execution Prevention (DEP) and click the drop-down arrow.
Further, select the appropriate option to enable or disable DEP.
Note that the Data Execution Prevention will to DEP Default (ON) on your PC. You can read our complete guide about ways to fix Windows Settings not opening on your computer.
If your PC is not turning on even if you tried plugging it into another outlet and there isn’t any power outage in your area, that is usually caused by the power supply of your device.
Well, there can be multiple reasons why your computer is not turning on, which we will be discussing in this guide. Also, we will share with you the solutions that will help you fix your PC.
Why is my computer not turning on?
One of the common issues that could prevent your computer from turning on is the power supply. Chances are that the cable that you are using to power your computer is faulty.
For desktops, the internal power supply might be faulty or the battery is damaged in the case of laptops. Other times, there are issues with the display, where even though the computer is running, the display doesn’t show anything making us believe that the computer is dead.
Often it is also some issues because of the presence of malware or virus, or some important system files might be corrupt on your PC.
Your computer may also have loose components inside which are preventing it to turn on, or you have attached a faulty piece of hardware that is causing a premature shutdown.
Let us check out the different common reasons why your computer is not turning on and the solutions that can help you resolve that issue.
How can I troubleshoot my PC when it is not turning on?
1. Use a different power source
If you turn on your computer and nothing displays or absolutely nothing happens, then this could be a power failure issue.
In such cases, we would suggest you connect the computer’s outlet to a different source and then turn on your PC. Do not use the UPS and check if the different power outlet resolves your problem.
2. Replace the power cable
You can also try replacing the power cable that you are using to connect to the power source. Chances are it is faulty or worn out and isn’t delivering the required power to the PC, which is why your computer is not turning on.
We would also suggest you check the power sockets in your PC as some issues on it can also prevent perfect power delivery for the system to boot up.
3. Charge the laptop
If your computer is not turning on, then it could also mean that the battery is completely drained out. You can connect your PC to a power source and let it charge for a good 15-20 minutes.
After that, press the power button and check if this boots up the laptop or not. If that helps you resolve the problem, then you should ensure that your laptop has sufficient charge to avoid such issues.
4. Restart the PC multiple times
Hold the power button to turn off the PC.
Wait for about 10-20 seconds.
Press the power button to turn on the PC.
Repeat the process 3-4 times to fix the startup issue.
Perform the above steps and check if this helps you turn on your computer or not.
5. Connect your PC to a different display
Often the issue is not within the system but within the hardware that is connected to it. If your computer is having issues turning on, but you see that the light turns on when you press the power button, but nothing is displaying on your display, it could be a display issue.
Simply plug in your computer to a different display monitor and check if turning on shows any result on the display or not. If yes, then you should replace the display monitor and get yourself a new one.
For your convenience, we have a guide that compiles a list of some of the best monitors that you can buy. We have listed monitors from all top brands such as Asus, Acer, Dell, etc.
Moreover, if you are looking for a performance monitor for tasks such as gaming, or heavy editing, then we would suggest you take a look at our dedicated guide that lists some of the best performance monitors.
If you have connected an external hard disk, USB drive, USB keyboard/mouse, etc. devices to your computer, then we would suggest you unplug all of them from your computer and then try turning the PC without them.
When you unplug all these devices you eliminate all possibilities of malfunction caused by external devices. Also, if your computer detects an unsupported or faulty device, it will misbehave and cause such issues.
7. Check the motherboard light (Desktop only)
Unscrew the CPU cabinet and then turn on your PC. Check if the motherboard light blinks when you turn on your computer or not. If the motherboard light blinks, then the problem could be something else.
While it is pretty hard to detect what the problem is, at least you know that the motherboard isn’t at fault here.
8. Listen to the beep sound
Some motherboards generate beeping noise when they come across any issues or failures. If your computer produces multiple beep noises, then you should listen to them.
In case, the beep sound is in a particular sequence, register that sequence as they could sound like Morse code.
Check the user manual or search the internet about what that beep sequence means, and apply the solutions related to that beep noise. Do note that not all motherboards will generate a beeping noise.
9. Reset BIOS manually
Turn off your PC and unplug it from the power outlet.
Open the CPU case (if that action doesn’t void any warranty).
Find the CMOS jumper. It will be located on your motherboard and is usually labeled with CLEAR, CLR, CLEAR CMOS, PSSWRD, or a variety of other labels.
There will be three pins, and the jumper covers only two. Move the jumper to the other two pins. For example, if the jumper is attached to the first and second pins, move it to the second and third.
Press the power button. Do note that your PC won’t start because the power is turned off. However, it will discharge any remaining power stored in the capacitors. Doing this resets your BIOS.
Return the jumper back to its original state.
Close the case, turn the power on, and start your computer.
When you reset the BIOS, your data will stay intact. If you have OS installed, it will stay there, however, some of the features may not work after you reset the BIOS.
Else, you can try updating the BIOS on your computer, which you can do by following the steps mentioned in our dedicated guide on how to update BIOS.
10. Replace the graphics card
Your computer not turning on could also be the result of graphics card failure. If you have a spare graphics card available, then you can try replacing it.
Do note that perform this process only when you know what you are doing as unplugging any other components could permanently damage your computer.
11. Check your hard drive
Multiple laptop or computer users have reported that they were not able to turn on their computers because their PCs were not able to read the operating system.
This is because they had a problematic hard disk drive or it was improperly connected to the motherboard.
In such cases, we would suggest checking the connections of your hard disk drive or using a new one (SSD would be great), and then try booting your computer.
For users experiencing slow speed with their SSD, we have a guide that explains how you can troubleshoot the situation and fix the SSD issue.
12. Reinstall the RAM
Turn off the computer by pressing the power key.
Disconnect the AC power source (for desktops).
Open the cabinet and remove the RAM.
Clean the RAM connection points and connect them back to the motherboard.
Turn on your PC and check if this fixes the issue or not.
Sometimes loose RAM connection can also cause such issues where your PC won’t turn on. Follow the simple steps and check if this helps resolve the problem.
If nothing works, then as a last resort, we suggest bringing your computer to a verified service center and getting it repaired. The issue could be much worse than you might be thinking.
As a professional user, downloading tons of attachments from the emails received in Outlook can be monotonous and time-consuming.
Fortunately, you can easily download multiple attachments from one email in Outlook at once without having to hit the Save button for each of them. Furthermore, it is also possible to download multiple attachments present in multiple emails through a simple workaround.
If you are curious to know the step-by-step procedure, stay with us as we guide you through the procedure.
How do I download all attachments from an email?
1. Using the desktop app
Launch the Microsoft Outlook app on your Windows PC.
Look for and open that email in the reading pane from which you download the attachments.
Switch to the Attachments section from the top menu bar, right-click one of the file attachments in the right section, and select Save all attachments in the drop-down menu.
Press the Ctrl key and select all the attachments you wish to download in the small dialog box that opens.
Press the OK button after selecting the required attachments.
A new Save as pop-up to save your attachments will open. Browse to the folder where you want to save the attachment files and press the OK button on the bottom right to initiate the attachment download.
You can easily download all the files attached to an email at once instead of downloading each file individually.
2. Using the web app
Access the Microsoft Outlook web app using your preferred web browser and provide your login credentials when prompted to sign in.
Select the Inbox folder from the left menu bar in the Home section of the web app.
Double-click the email in question to view the email contents in a new window.
Click the Download all button to download the attachments in the form of a ZIP file.
Choose the download location and press the OK button if the Save as the dialog box opens up.
This is a straightforward method to download all the email attachments from one email if you prefer the web app instead of the Outlook app.
How do I download all attachments from multiple emails?
NOTE
You can try this method only if you are using Outlook 2019, 2016, 2013, 2010, 2007, or 2003.
1. Create a new folder
Use the Windows + E shortcut to launch File Explorer.
Navigate to the Documents folder from the left sidebar.
Right-click anywhere on the right section and choose New followed by Folder from the context menu.
Double-click the folder name and rename it as Attachments.
2. Create a VBA script
Now launch the Outlook app on your Windows PC.
Choose the File option and then select Options from the left sidebar.
Select Customize Ribbon from the left panel of the Word Options window.
Select the Developer option in the Main Tabs and press the Plus icon to add Developer mode to the Outlook ribbon menu.
Close the Word Options popup and then select Developer Mode followed by Visual Basic from the main menu.
Select Project1 displayed as default and then select Insert followed by Module to access the Module window.
Now copy and paste the following code into Module1 and close the window.
Dim GCount As Integer
Dim GFilepath As String
Public Sub SaveAttachments()
'Update 20200821
Dim xMailItem As Outlook.MailItem
Dim xAttachments As Outlook.Attachments
Dim xSelection As Outlook.Selection
Dim i As Long
Dim xAttCount As Long
Dim xFilePath As String, xFolderPath As String, xSaveFiles As String
On Error Resume Next
xFolderPath = CreateObject("WScript.Shell").SpecialFolders(16)
Set xSelection = Outlook.Application.ActiveExplorer.Selection
xFolderPath = xFolderPath & "\Attachments\"
If VBA.Dir(xFolderPath, vbDirectory) = vbNullString Then
    VBA.MkDir xFolderPath
End If
GFilepath = ""
For Each xMailItem In xSelection
    Set xAttachments = xMailItem.Attachments
    xAttCount = xAttachments.Count
    xSaveFiles = ""
    If xAttCount > 0 Then
        For i = xAttCount To 1 Step -1
            GCount = 0
            xFilePath = xFolderPath & xAttachments.Item(i).FileName
            GFilepath = xFilePath
            xFilePath = FileRename(xFilePath)
            If IsEmbeddedAttachment(xAttachments.Item(i)) = False Then
                xAttachments.Item(i).SaveAsFile xFilePath
                If xMailItem.BodyFormat <> olFormatHTML Then
                    xSaveFiles = xSaveFiles & vbCrLf & "<Error! Hyperlink reference not valid.>"
                Else
                    xSaveFiles = xSaveFiles & "<br>" & "<a href='file://" & xFilePath & "'>" & xFilePath & "</a>"
                End If
            End If
        Next i
    End If
Next
Set xAttachments = Nothing
Set xMailItem = Nothing
Set xSelection = Nothing
End Sub

Function FileRename(FilePath As String) As String
Dim xPath As String
Dim xFso As FileSystemObject
On Error Resume Next
Set xFso = CreateObject("Scripting.FileSystemObject")
xPath = FilePath
FileRename = xPath
If xFso.FileExists(xPath) Then
    GCount = GCount + 1
    xPath = xFso.GetParentFolderName(GFilepath) & "\" & xFso.GetBaseName(GFilepath) & " " & GCount & "." + xFso.GetExtensionName(GFilepath)
    FileRename = FileRename(xPath)
End If
xFso = Nothing
End Function

Function IsEmbeddedAttachment(Attach As Attachment)
Dim xItem As MailItem
Dim xCid As String
Dim xID As String
Dim xHtml As String
On Error Resume Next
IsEmbeddedAttachment = False
Set xItem = Attach.Parent
If xItem.BodyFormat <> olFormatHTML Then Exit Function
xCid = ""
xCid = Attach.PropertyAccessor.GetProperty("https://schemas.microsoft.com/mapi/proptag/0x3712001F")
If xCid <> "" Then
    xHtml = xItem.HTMLBody
    xID = "cid:" & xCid
    If InStr(xHtml, xID) > 0 Then
        IsEmbeddedAttachment = True
    End If
End If
End Function
3. Run the VBS script
Switch to the Developer Mode and then select Visual Basic from the Outlook ribbon.
Select Module1 and hit the F5 key to run the code.
Click the Save Attachment button after selecting the attachments to confirm the action.
VBA scripts enable you to automate the attachment download process in Microsoft Outlook. However, you should proceed carefully with the VBA scripts to avoid damaging your computer.
That’s all in this guide! Hope you are aware of the different ways you can easily download all email attachments from the Microsoft Outlook app.
Have you recently encountered You’re offline. check your connection error on your device while using YouTube? The error is becoming a menace preventing most users from accessing YouTube’s content.
Hence, there’s a need to look into some ways to fix the problem and get YouTube working on your device again. Thus, explore this guide to find some steps for resolving the connection error.
Why does YouTube keep saying you’re offline check your connection?
Weak internet connection or network congestion can affect connection to the YouTube servers.
Network restrictions or firewall settings might impede access to YouTube, causing the error message to appear.
Domain Name System (DNS) problems can cause the device to be unable to resolve YouTube’s server addresses.
If YouTube servers are experiencing downtime or issues, it can result in a connection error message.
Caches and cookies in the browser or app can affect YouTube when corrupted and hinder proper access.
Using an outdated version of the YouTube app can sometimes cause connectivity issues.
However, the above causes are general and can sometimes vary on several devices. This variability makes determining which factors are responsible for the error tedious. Fortunately, we have put together some general fixes for resolving the problem.
How do I fix You’re offline, check your connection error?
Before anything, we recommend you observe the preliminary checks below:
Power cycle your network devices and connect to a fast internet network to help YouTube connect to its servers.
Restart your device to help resolve temporary connectivity issues and try accessing YouTube again.
If you are connected to any VPN service, disconnect, and relaunch YouTube.
Disable background apps or others on your computer and disable any firewall service impeding YouTube connections.
If the steps above can’t fix the You’re offline; check your connection error when using YouTube, go ahead with the advanced fixes below:
1. Change your DNS server address
Press Windows + R key to open the Run dialog box, type ncpa.cpl, and press Enter to open the Network Connection page.
Right-click your network adapter and select Properties from the drop-down.
Select Internet Protocol Version 4 (TCP/IPv4) and click Properties.
Tick the box for the Use the following DNS server addresses option, type 8.8.8.8 in the Preferred DNS server, and 8.8.4.4 for the Alternate DNS server, then click OK to save settings.
Restart your PC, then check if the YouTube connection error persists.
Changing your DNS server address can help fix network issues, and the You’re Offline. Check Your Connection problem.
Right-click the date and time on the Taskbar, and click Adjust date and time settings.
Toggle off the set time automatically, and click the change button beside set the date and time manually.
Adjust the settings manually and click on the change button to save.
Further, click on the Sync now button.
Restart your PC and check if YouTube works.
Adjusting the date and time is one of the tested and most effective ways to fix YouTube connection problems.
3. Clear browser cache and cookies
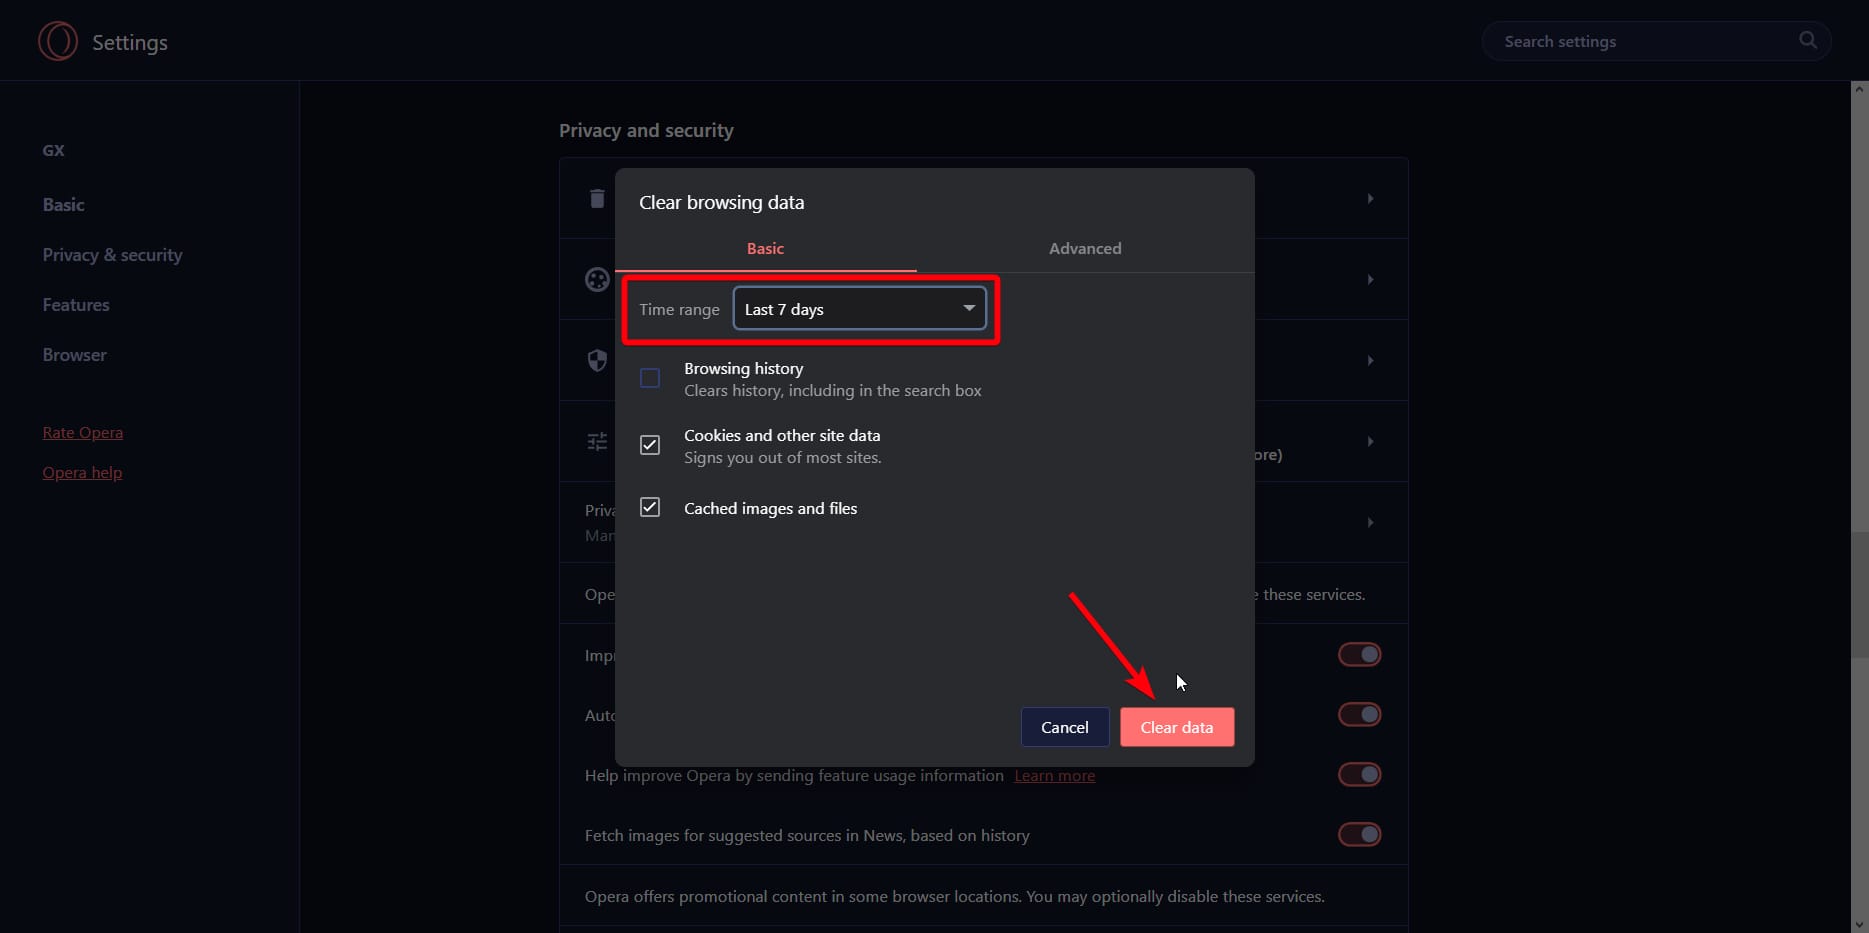
Open the browser and click the Menu option. Select More Tools and click on Clear browsing data.
Select All Time from the Time range at the top, check the boxes next to Cookies and other site data, and the Cached images and files option. Then, click on Clear data.
Relaunch the browser and check if the error persists.
Clearing the browser cache and cookies will remove all corrupt or malicious pre-store data and refresh the website. Further, you can also clear your computer cache in Windows 11.
Open the browser and click the Menu option. Select More Tools and click on Extensions.
Toggle off each Extension and check if the error persists.
Repeat this process for all Extensions to find the one causing the error.
Click Remove on the problematic extensions once figured out.
Removing the browser extensions will fix issues with ad-blocker and other extensions, causing You’re Offline. Check Your Connection error. You can read step-by-step details to view browser extensions on your device.
Though Windows has emerged as a preferred gaming platform, issues continue to plague the operating system. Game crashes and FPS drops are the simpler ones. But the Clock Watchdog Timeout BSOD while playing Valorant is a rather tricky problem.
There’s not much users can do when faced with the error, given the lack of troubleshooting measures suggested by Windows or the game. And the worst part, it leads to a loss of in-game progress. Keep reading to find out how to fix Clock Watchdog Timeout when playing games!
What causes Clock Watchdog Timeout?
The error indicates a problem in the communication between the system and the CPU. When the relay of information takes too long or the process is abruptly terminated, you see the Clock Watchdog Timeout. Here are a few reasons you are seeing the BSOD error:
Misconfigured settings: The primary reason users face the error is misconfigured settings, both in-game and on Windows.
Outdated drivers: Some users reported that the problem was linked to outdated drivers. It was different for them all, could be the drivers for GPU, controller, or another device.
Corrupt system files: For a few, it was the corrupt system files that affected the relay of information and, subsequently, triggered the BSOD.
Overclocking in play: Even a trivial issue or misconfiguration can cause an error when the PC is overclocked.
Third-party apps: There’s also the likelihood that another program is the problem. Some reported it to be Vanguard’s anti-cheat, while others found security software responsible for the error.
How do I fix Clock Watchdog Timeout BSOD when playing Valorant?
Before we move to the slightly complex solutions, here are a few quick ones to try:
Remove any overclocking. In case you are using an overclocking program, uninstall it.
Reset the BIOS. A quick way to do that is to remove the CMOS battery. If unsure of the process, check the manufacturer’s website.
Update Windows in case there are any newer versions available. Also, when the Valorant BSOD Clock Watchdog Timeout appears after updating the OS, uninstall recent Windows versions.
If none work, head to the fixes listed next.
1. Update the driver
Press Windows + X to open the Power User menu, and select Device Manager.
Expand the Display adapters entry, right-click on the graphics adapter, and select Update driver.
Now, choose Search automatically for drivers and wait for the process to complete.
Once done, restart the computer.
Driver issues, particularly corrupt or outdated graphics drivers, trigger a range of errors and also affect the system’s performance. Updating the graphics driver should fix Clock Watchdog Timeout Valorant BSOD in no time!
If Windows can’t find a newer version, you can always go to the manufacturer’s website and manually install the driver. Here are the links to the download pages:
If the problem reappears after updating the drivers, Windows is likely to install the problematic version. So, we recommend that you disable automatic driver updates.
2. Repair the corrupt system files
Press Windows + R to open Run, type cmd, and hit Ctrl + Shift + Enter.
Click Yes in the UAC prompt.
Paste the following three commands one at a time, and hit Enter after each:DISM /Online /Cleanup-Image /CheckHealthDISM /Online /Cleanup-Image /ScanHealthDISM /Online /Cleanup-Image /RestoreHealth
Now, execute this command to run the SFC scan:sfc /scannow
If it’s the corrupt system files to blame for Clock Watchdog Timeout in Windows 10 while playing games, running the DISM tool and SFC scan should get things up and running!
On the other hand, it’s more beneficial to rely on a tailored PC repair solution that offers BSoD crashes support and solves damaged system files automatically on your Windows device.
3. Check for disk issues
Press Windows + S to open Search, type Command Prompt in the text field, and click on Run as administrator.
Click Yes in the prompt.
Run the following command to identify and repair disk issues:chkdsk /r
If asked to run the scan on the next reboot, hit Y, press Enter and then restart the computer.
The Check Disk utility helps repair hard drive issues, including bad sectors. This ensures that all available game files are accessible and readable, and that the disk doesn’t trigger the Clock Watchdog Timeout Valorant BSOD.
4. Uninstall conflicting programs
Press Windows + I to open Settings, go to Installed apps from the navigation pane, and click on Apps.
Now, click the ellipsis next to the problematic apps, and select Uninstall.
Again, click Uninstall in the confirmation prompt.
When the Clock Watchdog Timeout Valorant blue screen of death appears due to a conflicting program, it’s best that you uninstall the app. Here are a few apps reported to trigger the error:
Press Windows + R to open Run, type appwiz.cpl in the text field, and click OK.
Select Valorant from the list of programs, and click Uninstall.
Follow the on-screen instructions to complete the process, and then restart the PC.
Finally, reinstall Valorant.
When faced with the error, we can’t rule out the possibility of an improper Valorant installation causing the Clock Watchdog Timeout BSOD error. And reinstalling the game should fix things in no time!
Now, click on Accept to agree to the license terms.
Verify that the setup reads, Keep personal files and apps, and click on Install to start the process.
Wait for the in-place upgrade to complete. It may take a few hours.
When everything else fails, the last option is to perform an in-place or repair upgrade. It will replace all Windows files, which could be leading to the Clock Watchdog Timeout Valorant BSOD error.
Tip
If none of the above solutions worked, a hardware issue is likely triggering the BSOD. It could be both the RAM and the CPU. And we advise that you contact a repair shop to get the hardware inspected and, if required, repaired.
So you just got yourself the best graphics card money can buy. But wait. There’s a problem. Your DirectX 12 games register low GPU usage. If you’re a gamer, you know there’s nothing as bad as your graphics card not running at full potential.
According to user reports, the GPU usage is missing or extremely low. If you’re in a similar situation, here’s how to ensure your GPU utilizes all its resources.
Why are my DirectX 12 games not using my GPU?
If you’re trying to play a game that uses DirectX 12 and your graphics card isn’t being used, below are the most common reasons why:
Multiple graphic cards – If you have both a dedicated and integrated GPU, your games may be opting to use your other GPU.
System requirements – It is possible that your GPU isn’t being used because it doesn’t meet the minimum requirements for running the specific DirectX 12 game you’re trying to play.
Outdated graphic drivers – If you are running a game built on DirectX 12, and your GPU drivers are outdated, then this may bewhy your game isn’t utilizing the GPU to its full potential.
GPU can’t be detected – At times, your PC cannot detect your GPU either because of faulty drivers or because it has been damaged.
Games don’t use the GPU – You must know that not all games require the GPU to run. If a game is not using the GPU, this should not be a cause for alarm.
Insufficient power – It is also possible that the game you’re trying to play needs more power than your current GPU can provide hence shifts the burden on other system resources like your CPU.
Older hardware – Most older hardware does not work with DirectX 12. There’s no magic around it, and in most cases, it requires a new graphics card or updated drivers.
Outdated OS – If your PC has not been updated or you’re one of those people who’ve disabled updates permanently, this is one of the consequences of your choices.
How do I know if my GPU supports DirectX 12?
If you have a relatively recent graphics card, your GPU should support DirectX 12. However, this is not the benchmark for DirectX 12 support. A more sure way of determining this is using the built-in Windows DirectX Diagnostic Tool:
Hit the Windows + R keys to open the Run command.
Type diaxg in the search box and hit Enter.
In the DirectX Diagnostic Tool window that opens, navigate to the System tab.
Here, you can see what version of DirectX is supported by your PC under System Information.
How do I get my graphics card to support DirectX 12?
Ensure you fulfill the following prerequisites before anything else:
Check the system requirements for the game against those of your PC and ensure it is up to par or exceeds them.
Next, install the corresponding drivers as saved in your USB drive as uninstalled in step 4.
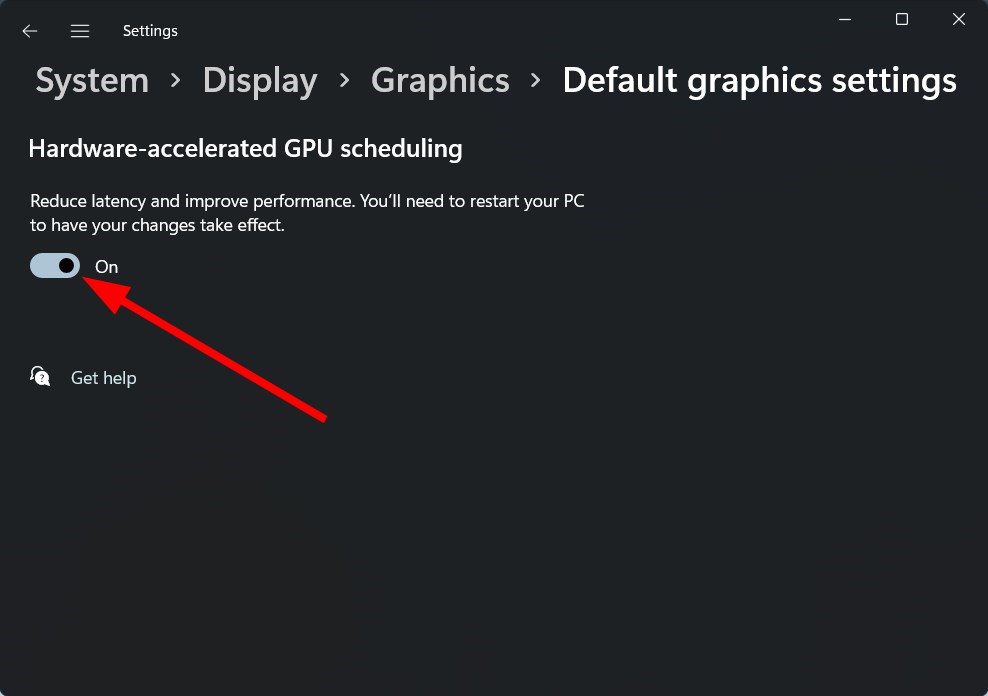
2. Enable hardware acceleration
Hit the Windows key and select Settings.
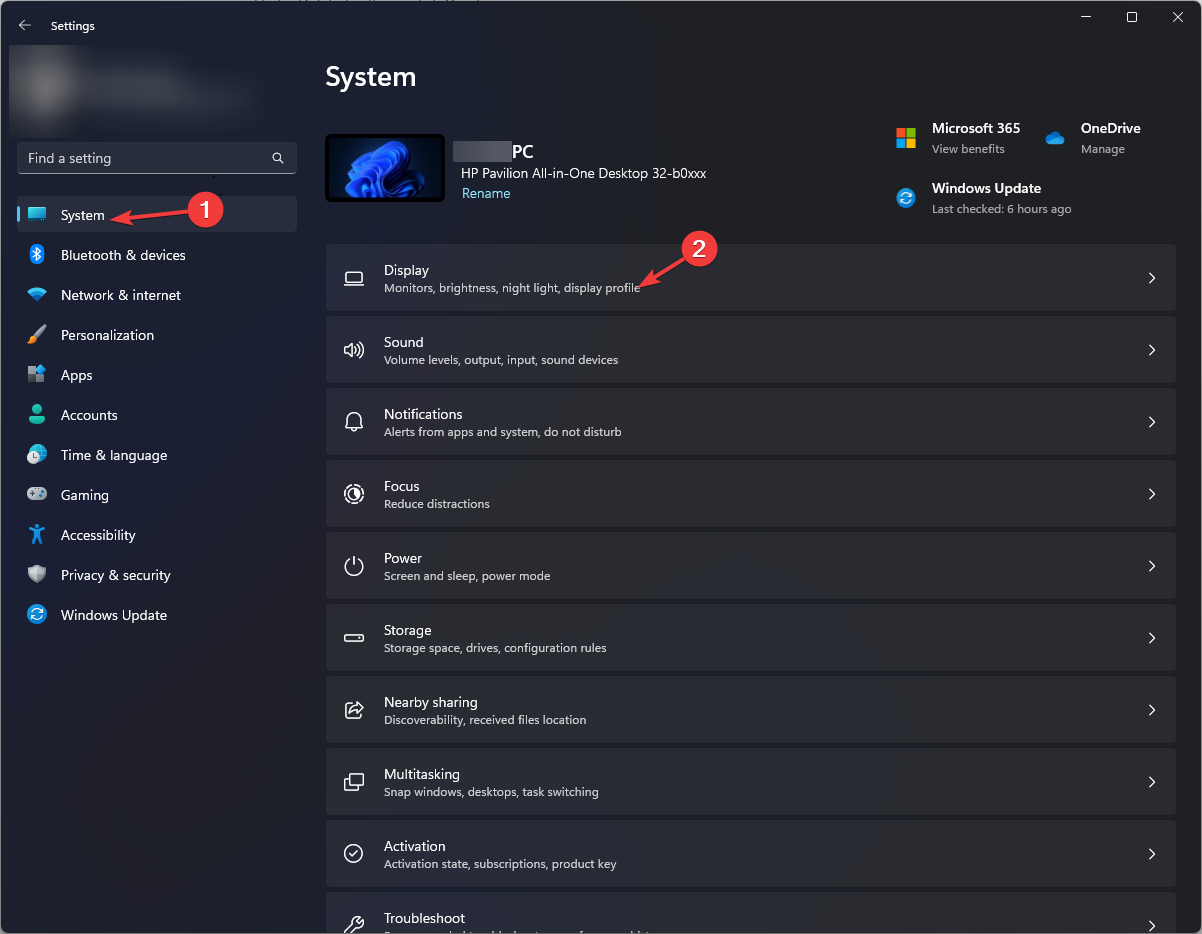
Click on System on the left pane, then Display on the right pane.
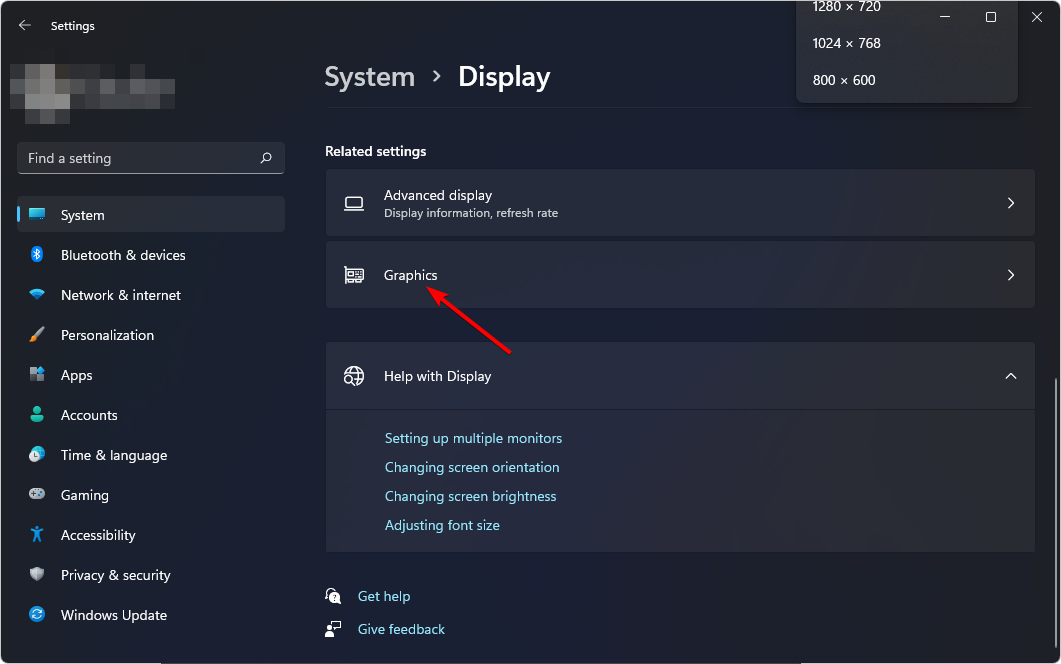
Scroll down and select Graphics.
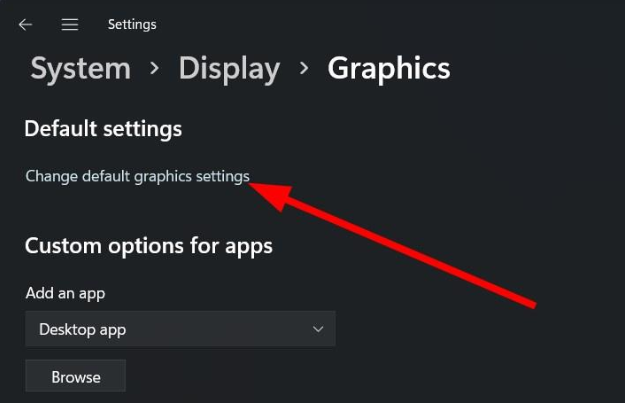
Select the Change default graphics settings option.
Now, toggle on the Hardware-accelerated GPU scheduling option.
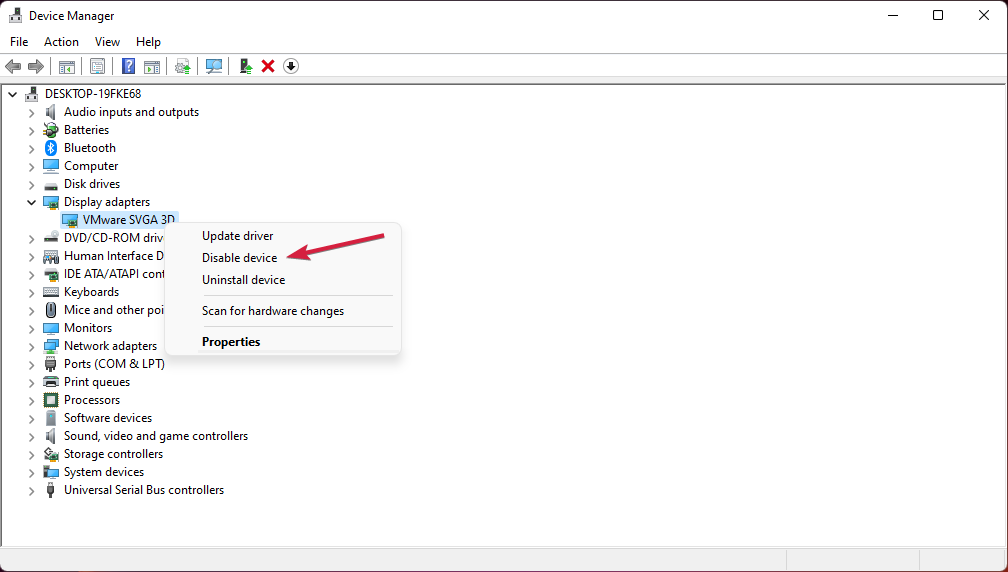
3. Disable your integrated GPU
Click on the Start Menu icon, type Device Manager in the search bar, and click Open.
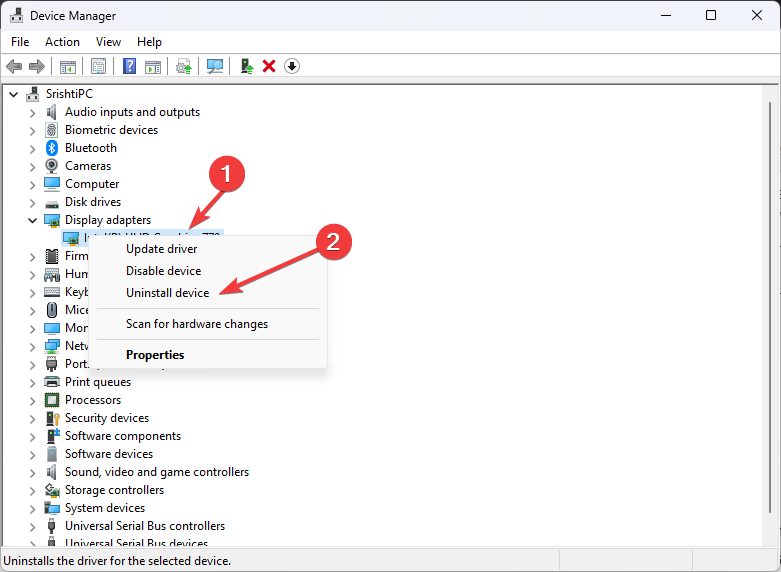
Navigate to Display adapters to expand, right-click on your graphics card, and select Disable device.
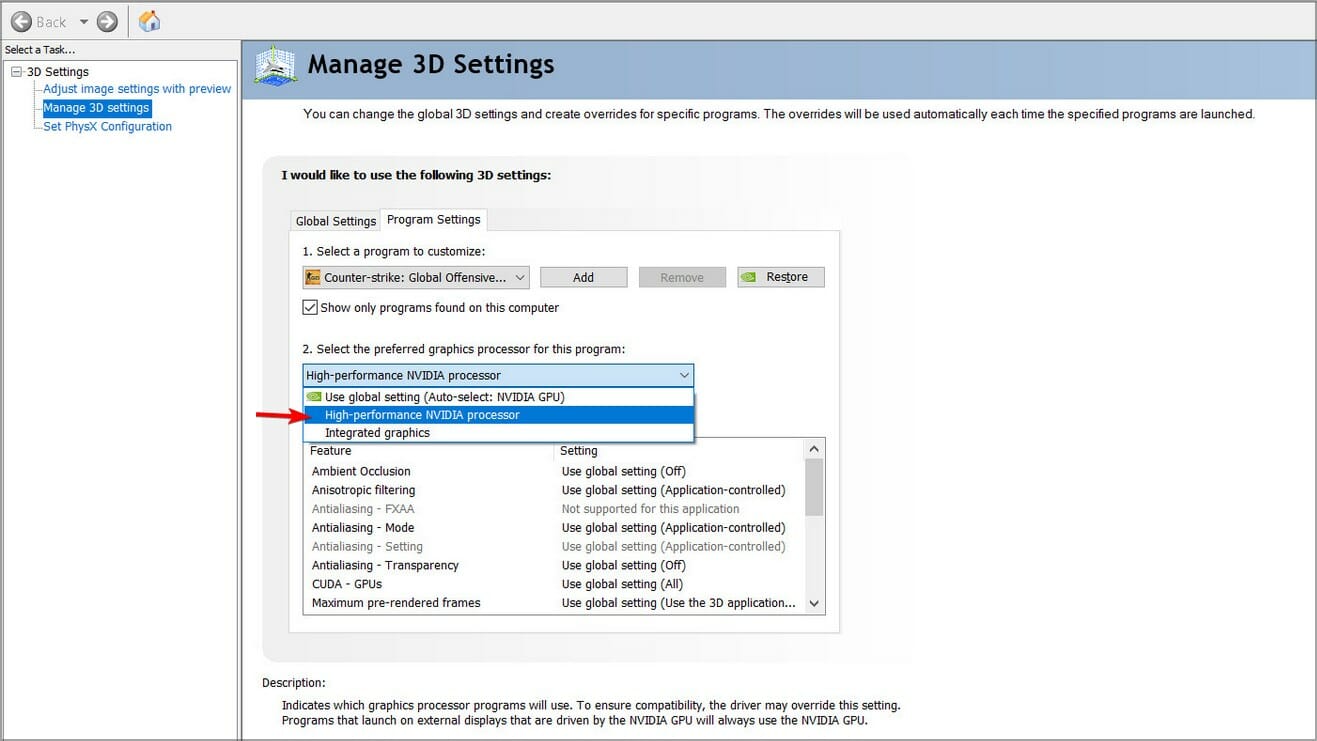
Next, launch your dedicated graphics card control panel (In this case, Nvidia Control Panel).
Select Manage 3D settings from the navigation pane on the left.
Choose a High-performance NVIDIA processor from the Preferred graphics processor dropdown menu.
Users were quick to tell us that the low GPU usage with DirectX 12 games registered in Task Manager was inaccurate. Task Manager is not considered an accurate performance monitoring tool.
All this could be true, but you can always verify these claims by seeking a second opinion. We have an excellent library of other performance monitoring tools to inform you of your GPU usage.
If the GPU is showing 0 in the Task Manager and a different figure in another platform, you can relax. However, if the results concur, the above methods are sufficient to help you ensure your GPU is not underutilized.
And that’s pretty much it. Don’t hesitate to reach out using the comment box for any additional suggestions or clarifications.
Sometimes you need to send bulk emails, which is why many want to know how to mail merge from Microsoft Outlook.
This is a rather useful technique since it allows you to send personalized mass emails to multiple recipients. So today, we’re going to show you how to use this feature properly.
What is a mail merge?
Mail merge in Outlook is a process of sending bulk emails, but each email is personalized according to its recipient.
This is achieved through placeholders, and each placeholder can utilize the data from the Excel table to customize emails.
By doing so, you can send personalized emails to multiple email addresses and perform email campaigns.
Each recipient will get a somewhat unique email message specially tailored to him.
Using this feature, you can send bulk emails and save time while having each email personalized according to its recipient.
What are the benefits of personalized emails?
By writing personalized emails, you will appear more trustworthy to your clients.
Personalized emails will also boost the engagement rate.
Your recipients might also feel more valued since they won’t get the same generic emails.
What are the fundamental steps of mail merge?
Creating an email template with placeholders.
Creating a spreadsheet or database with the necessary information.
Linking the email template with the database.
Sending bulk emails to multiple email addresses.
How do I do a mail merge in Outlook?
1. Prepare the email template in Microsoft Word
Open Word and create a new document.
Navigate to the Mailings tab and choose Start Mail Merge. Lastly, select E-mail Messages.
Now enter your message and place the placeholders at the desired locations. Placeholders are represented by curly brackets.
You should now see how your email message will look using the data from the Excel file.
You can use the arrow keys to check different messages and their data.
5. Send the messages
In Word, click on Finish & Merge and select Send Email Messages.
In the To field, select your Email column. Next, enter the desired Subject line. Lastly, set Send records to All.
Click OK to save the merge.
Go to Outlook and open the Outbox folder.
Lastly, click on Send/Receive All Folders and wait for your emails to send.
As you can see, it’s pretty simple to perform a mail merge process using the Office software.
By using this feature, you can circumvent the too many recipients error message in Outlook, so be sure to try it.
Where is mail merge located in Outlook?
The mail merge feature isn’t available in Outlook. Instead, it’s performed using Word, Excel, and Outlook.
Firstly, you need to create your email template in Word and add your data to an Excel sheet. After you link the two, you link the email template with Outlook.
This will cause all emails generated from the template to appear in the Outbox folder in Outlook, and you can send them from there.
If you ever wanted to know how to mail merge from Microsoft Outlook, this is the best and the simplest way to do it.
If you like Minecraft and Pokémon, then the Pixelmon mod for Minecraft is the ultimate mod to have. It adds all the Pokemon-related items and mobs to your Minecraft game.
So, whether you want to catch your favorite Pokémon or fight against the one you dislike the most, you can do it all with Pixelmon mod. So, which is the best server hosting for Pixelmon?
The good thing about Minecraft is that it allows you to choose between different servers whenever you want. And if you want to play Pixelmon, you will need a fast server to host the game.
In this guide, we have listed the best server hosting for Pixelmon Minecraft mod. So let’s get started.
Apex Hosting offers a simple way to create Minecraft servers. It hosts over 300,000 Minecraft servers with high-clock speed CPUs and SSD storage powering the lag-free server.
With Apex Hosting, you can install and play the best mod packs with a single click. It also offers DDoS protection, low latency due to the data center worldwide, and instant setup. There are some premade game types like Factions, McMMO, Capture the Flag, and more.
You can combine your own mods or try other popular mod packs from Feed the Beast, ATL, Voice, Wrath, Technic. Included plugins such as Essentials, World Edit, and more to use.
Other features offered by Apex Hosting include the ability to generate a new map with any seed you want or use premade worlds, a control panel to manage your server, and resources to customize your game.
Key features of Apex Hosting:
Support for Essentials, World Edit, and more plugins
100+ available modes
Premade mini-games
Free subdomain, automated backups, and control panel
Apex Hosting
Easily create, manage and edit your Pixelmon servers with this amazing software today.
Shockbyte is another popular Minecraft hosting with affordable plans and easy upgrading options. Similar to Apex Hosting, it also comes with DDoS protection, 100% uptime, free subdomains, MCPS, MCPE cross-compatibility, etc.
All the Minecraft hosting from the company support Java Edition and Bedrock Edition with one-click install, with an automatic update system. Some of the Minecraft server versions supported include Spigot, CraftBukkit, Forge, Sponge, BungeeCord, Vanilla, and Snapshots.
Additionally, all the Minecraft servers are hosted with Shockbyte support mod packs such as Feed the Beast, Technic, ATLauncher, and more. If you want to install a custom mod pack, you can access the server via the control panel to upload Minecraft server types.
Key features of Shockbyte:
Support almost all the mod packs and custom mods
Custom JAR support
Full FTP access and control panel
Java version switcher
Shockbyte
Take advatange of the features of Shockbyte while easily managing your Pixelmon servers today!
If you are looking for a host that offers a vast range of servers, Host Havoc is an excellent choice. It offers all the features of major Minecraft servers, including 99% uptime, instant setup, fast SSD storage, DDoS protection, and high-speed CPU processors.
Host Havoc offers offsite backup that contains all your configuration, content, and databases. It also supports 400+ different apps, including WordPress, Joomla, Magneto, Drupal, X Mod, MyBB with a single click.
The control panel offers access to File Transfer Protocol, Multiple PHP versions, configure modules, and view statistics and errors.
Key features of Host Havoc:
Automatic mod pack installer
Scheduled backups
DDoS protection and FTP access
Works with all modpacks
Host Havoc
Explore the wonderful world of Pixelmon on a stable server with this great software.
ScalaCube specializes in game server hosting, including Minecraft. Some of the servers offered by the host include BedRock, PocketMine, and Nukkit. Using the control panel, you can easily make your own Minecraft server.
Apart from multiple pocket edition servers, you also get a pre-installed and configured website and forum to monitor active players on the server. The servers support over 13 mini-games, such as SkyWars, TnTRun, and others.
Additionally, features by ScalaCube include Free MySQL, Plugin/Mod support, modpack support, custom PHAR and JAR, a custom launcher, and a backup system.
If you are just getting started with the Minecraft server, Aternos offers free Minecraft servers. It offers a personal Minecraft server that you can set up to play with friends without any unnecessary limits.
Aternos servers include a fully customizable server, mods and plugins support, DDoS protection, automatic backups, the ability to add adventure maps, parkour or the latest mini-games and customer support.
Aternos supports Java Edition games that include Vanilla, Snapshots, Paper/Bukkit, Spigot/Bukkit, GlowStone, etc. There are also Bedrock Edition games, such as BedRock and Pocketmine.
So, these are some of the best server hosting for Pixelmon Minecraft mod. While the free servers are good for absolute beginners, paid solutions have no-nonsense unlimited access and better support, speed, and lag-free experience.
What is your favorite server hosting for Pixelmon mod or Minecraft? Let us know in the comments.
Some of our readers get the message The Steam servers are too busy to handle your request for [game title]. Error code (53) when trying to launch a game on the Steam app.
This error code usually occurs for newly released games and restricts the user from accessing the game he intends to play and may even disrupt the online multiplayer sessions abruptly.
If you are struggling with the same problem in Steam, try the solutions listed in this guide.
Why do I get the error code 53 in Steam?
Below are the possible causes why you encounter the error code 53 when launching games on the Steam app:
Server overload – Steam servers may not be able to handle requests when there is heavy traffic during game release.
Misconfigured network settings – Incorrect network settings often lead to connectivity issues which cause problems in connecting to the game server.
Server outage – Temporary server outage for maintenance purposes may also throw the error code 53 when you try launching or updating a game.
Conflicting third-party apps – Third-party antiviruses and firewalls often restrict your system requests citing security purposes.
Now that you are aware of the possible reasons for the Steam error code 53, let’s proceed to check out the solutions.
How do I fix the error code 53 in Steam?
You are recommended to try these simple workarounds which have worked for several users before proceeding to move complex solutions.
Restart your computer to fix the trivial bugs in the system.
Switch to a more reliable internet connection, such as a mobile hotspot, and try again.
Enable a VPN service, such as Private Internet Access (PIA), to access the geographically restricted games in your location. And if you’re using a VPN while receiving this error message, try turning it off temporarily.
If you still run into the Steam error code 53 when launching or updating a game, try the solutions listed below.
1. Temporarily disable real-time protection
Launch the Settings app using the Windows + I key combination.
Switch to the Privacy & security settings from the left sidebar and then choose the Windows security option from the right side.
Next, choose the Virus and threat protection option.
Click the Manage settings option located under the Virus and threat protection settings section.
Toggle Off the switch for the Real-time protection feature.
Windows Defender often blocks the game executable files considering them to be suspicious, thus the error code 53 in Steam. Disabling the real-time protection settings will ensure that Windows Security does not restrict the game from contacting the server.
In case you have a third-party antivirus installed, you can disable it as well during the game sessions.
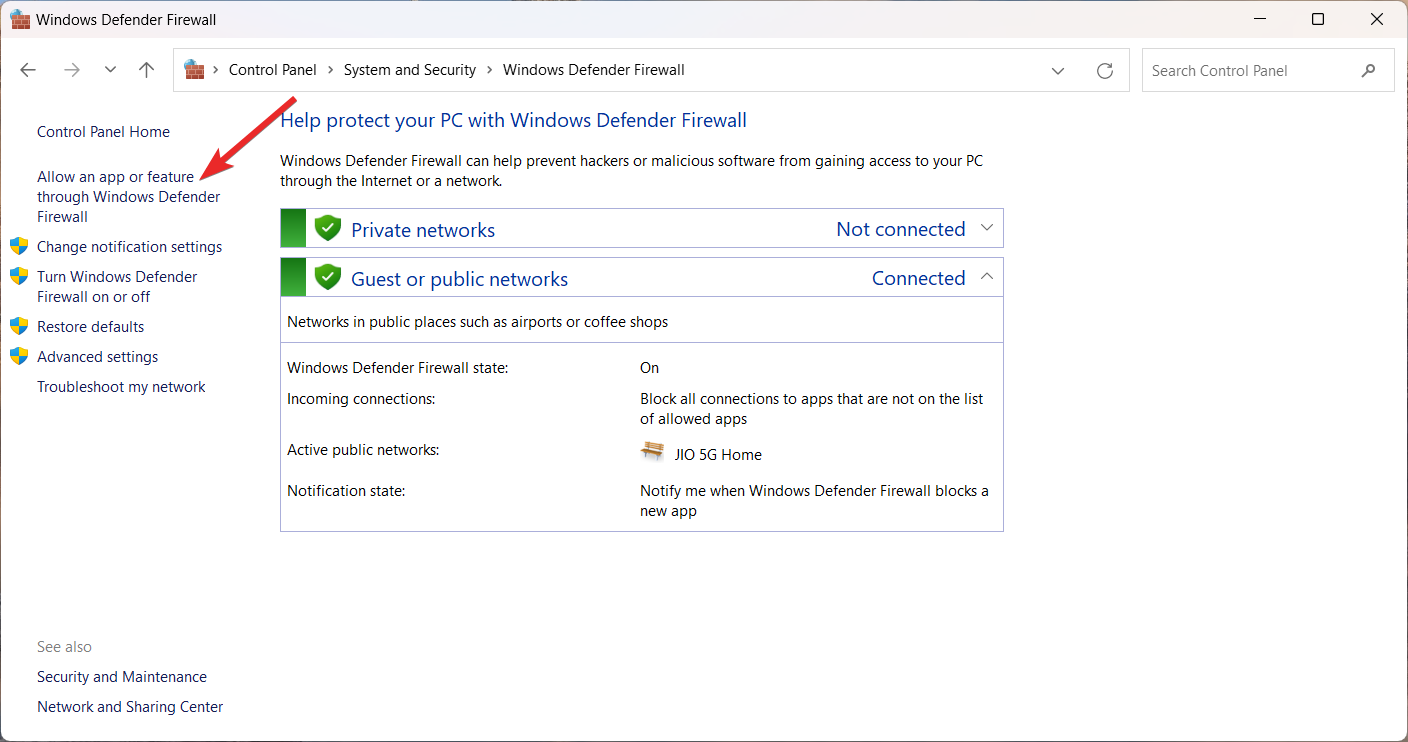
2. Allow games through Windows Firewall
Press the Windows key to launch the Start menu, type control panel in the search bar, and press Enter to quickly access the Contol Panel.
Select Category in the View by drop-down on the top right corner and select System and Security option.
Select the Windows Defender Firewall option.
Select the Allow an app or feature through Windows Defender Firewall option located on the left sidebar.
Press the Change settings button.
Scroll down the list of apps and look for the game EXE file. If the file missing, click the Allow another app button.
Browse to the location of its installation folder on the next popup, select the .EXE file, and press the Add button.
Select the checkboxes listed under the Private and Public options and hit OK to save the changes.
You may get the error code 53 when launching the games if the Windows firewall is preventing the executable file of the game from launching successfully on the Steam app. So allowing the EXE game files should fix the problem.
If you’re using a third-party firewall, use its settings to include this exception as well, or disable it temporarily.
Bring up the Settings app using the Windows + I shortcut keys.
Choose Network and internet option from the left sidebar and then select the Advanced Network settings option from the right.
Scroll down to the More settings section and click the Network reset option.
Finally, press the Reset Now button located on the new page.
As described on different forums, misconfigured networking settings often interfere with the launch of the games on the Steam app. Resetting the network settings will restore the networking components to their default values so that you do not get the error code 53 in Steam.
4. Change the download region
Launch the Steam app on your Windows PC.
Select the Steam option on the top menu bar and then the Settings option from the drop-down menu.
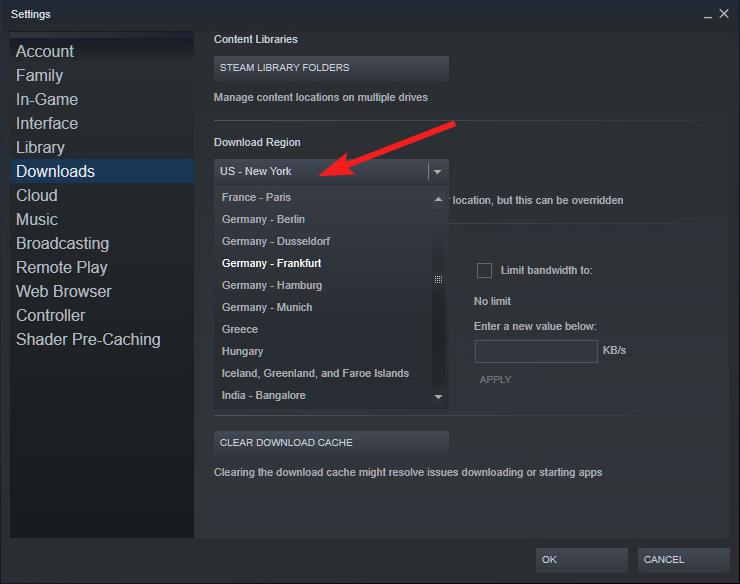
Select the Downloads option from the left sidebar.
Expand the Download Region drop-down and select a different region.
Save your changes and then restart Steam to see whether or not error 53 shows up during the game launch.
There may be some server issue in the current download region for which your request is not being processed by it. Changing the download region should improve the download speed and resolve the latency issues.
There you go! The Steam error 53 error should now be resolved so that you can enjoy your favorite games.
Usually, Windows downloads and installs the latest drivers for your PC. However, if you keep a Driver Update prompt keeps popping up, especially from Slimware Utilities, that might be adware causing troubles.
Sometimes, this message comes from an app called Driver Update. Irrespective of the format it takes, you can stop it for good with the solutions in this guide.
Why do I keep getting Driver Update popups?
The reasons you keep getting popups to update your driver are within a close circle. Below are the notable ones:
Presence of adware on your PC – The most prominent cause of this issue is the presence of adware on your PC. You might have unknowingly installed the software while downloading an app from a third-party website. You need to perform a malware scan on your PC to remove any unwanted apps.
Driver Update redirect on your browser – In some cases, this solicitation can keep showing up on your browser because you once visited the site. This is because the malicious website has already added a redirect link to your browser. You might need to reset your browser to fix this.
How do I stop the driver update prompt from popping up?
1. Uninstall Driver Update and other software
Press the Windows key + R, type appwiz.cpl, and click OK.
Right-click the Driver Update or any other Slimware Utilities apps.
Finally, select Uninstall and follow the onscreen instructions to remove it.
The first thing to do if the Driver Update message keeps popping on your PC is to remove the app causing it. According to users, the pop-ups come from either the Driver Update or any other Slimware Utilities app.
So, you need to remove these apps and other unwanted software.
2. Perform a malware scan
Press the Windows key + S, type virus, and select Virus & threat protection.
Click the Scan options link.
Finally, choose the Full scan or Microsoft Defender Offline scan option and click Scan now.
If you can’t remove the problematic app or the Driver Update request keeps popping up, it means the effect has gotten to your registry and other parts of your PC.
You need to perform a deep malware scan to remove even the most adware file. Thus, you may need to clear the risks with antivirus third-party software that can detect new emerging threats and malware.
Simply remove driver update pop-ups by running a comprehensive system scan and diagnosing it. In this way, you can terminate any phishing or malware issues on your PC.
Press the Windows key, type task, and select Task Scheduler.
Select Task Scheduler Library in the left pane.
Now, select any rare tasks in the middle and click the Actions tab.
Check the Details in the section below.
If you find any https://site.address redirect next to your browser name, right-click the task and select Delete.
If the Driver Update request keeps showing up when you restart your PC, it might be because there is a task scheduled for it in the Task Scheduler.
You need to delete the task and restart your PC to fix this.
4. Remove the Driver Update redirect
Right-click the browser shortcut you are getting the update message from and select Properties.
Click the Shortcut tab at the top.
Now, remove any https://site.address at the end of the browser path in the Target field.
Finally, click the Apply button, followed by OK.
If the Driver Update prompt keeps popping up when you launch your browser or visit a website, it is likely that the website causing the annoyance has a redirect in your browser shortcut.
You need to remove this redirect to restore normalcy on your browser.
This is because the adware might have made too many changes to your PC, making it difficult to remove it.
We have reached the end of this detailed guide. You should now be able to stop the Driver Update message to keep popping up on your PC, provided you follow the instructions above.
Similarly, if you actually need to update your drivers, check our list of dedicated driver updaters for the best software to use.
Were you able to get rid of this issue? Let us know the solution that helped you in the comments below.
If you want your bookmarks to be all organized and lined up in the browser, be sure you can fully personalize and manage bookmarks on Opera without any effort.
Bookmarks help you save your favorite web pages and quickly access them whenever you want. There are numerous ways to organize your bookmarks in Opera. You can bookmark a web page, create folders, give your bookmark a new name, and organize them so you can view them later without being a lost wanderer.
Opera focuses on browser customization, UX elements, and AI features. The browser lets you manage the bookmarks easily from the settings.
You can save your bookmarks and access them from other browsers or devices, when you’re commuting, for example. There are bookmark exporting features to keep your favorites in one place.
Opera One
Take control of the digital bookmarks and organize them seamlessly with this revamped browser.
It is certainly possible. You can simply make bookmark folders in Opera by pressing the folder icon in the bookmarks settings. Once you created the folder, it will show up inside the Bookmarks Manager panel.
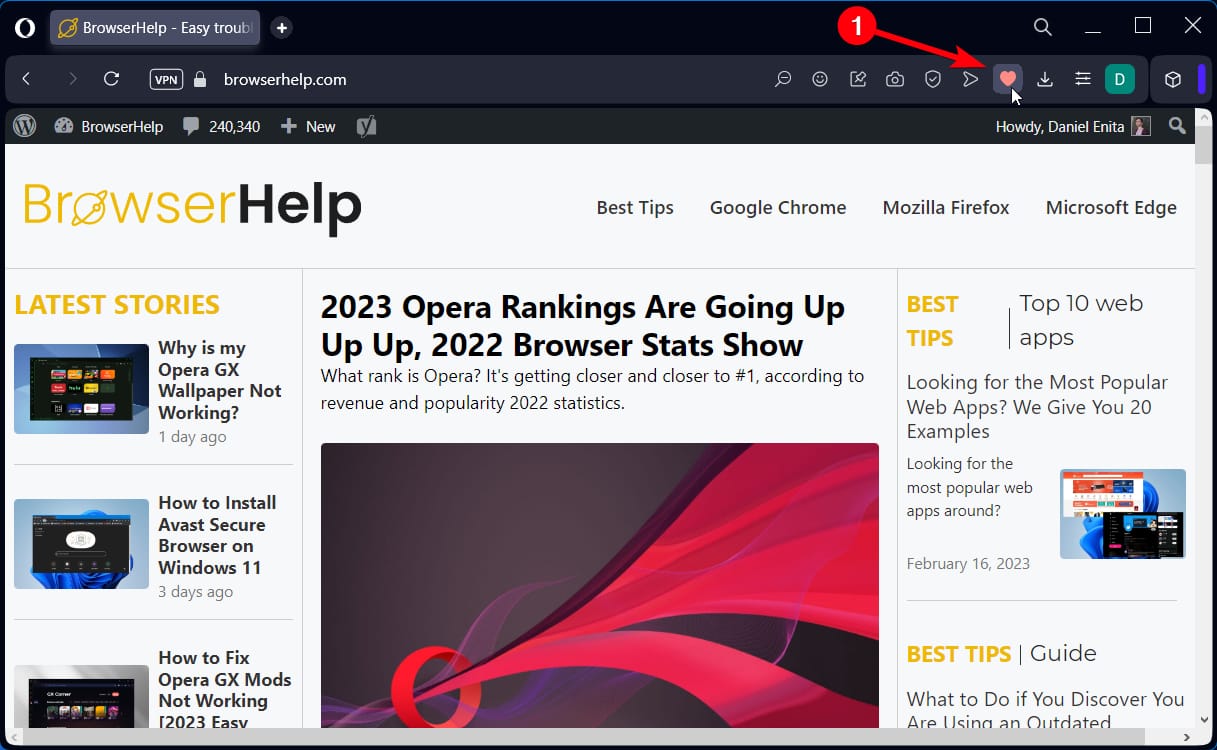
So, next time you want to bookmark any web page, you just have to press the heart icon provided in the URL section.
To create a bookmark folder. Press the heart icon in the URL of that webpage and Bookmark Manager will open up. While you’re still inside the Bookmark Bar, click on the Folder menu beside the Bookmark bar option to create a folder. Give your folder a name so that you could easily find it the next time you’re bookmarking a page.
How do I organize bookmarks in the Opera browser?
In the next part, we’re going to show some ways using which you can manage bookmarks in the Opera browser and organize your favorite web pages for quick access. Let’s get to it!
1. Access your bookmarks on Opera
1.1 From the browser sidebar
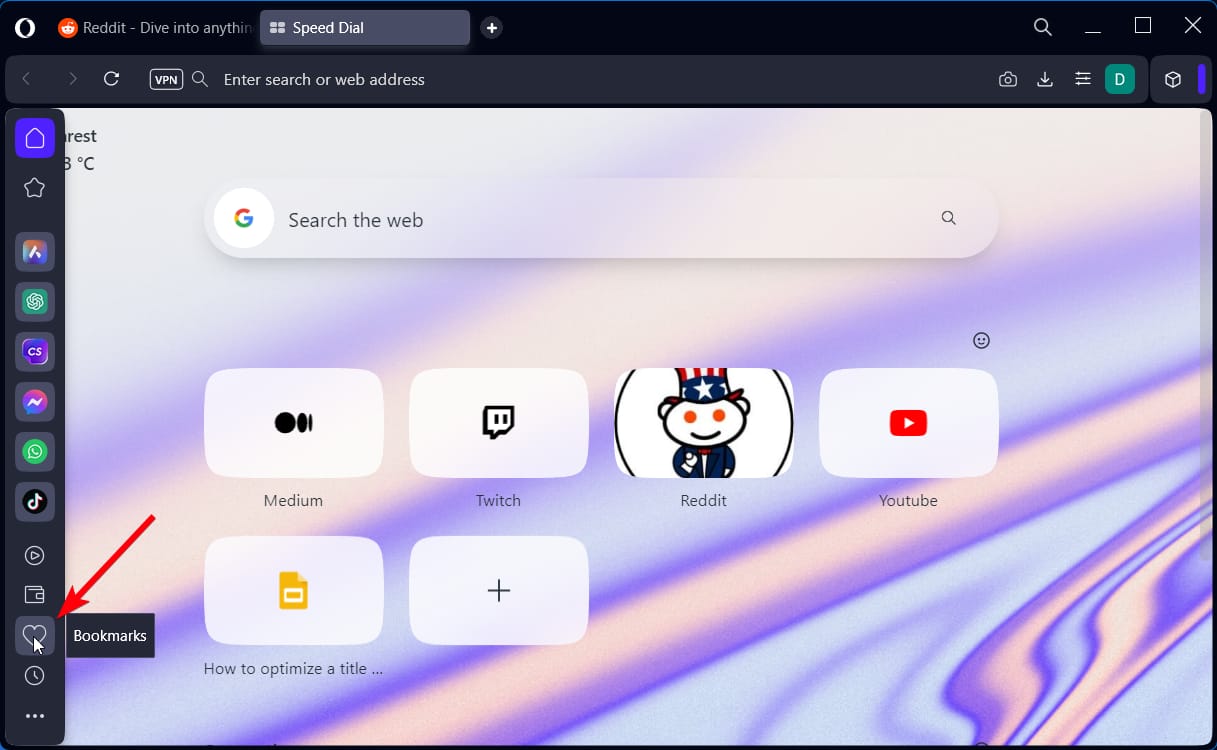
Open a new tab in the browser.
Now, hover the mouse cursor on the left side to see the sidebar.
Go to the heart icon and click on it.
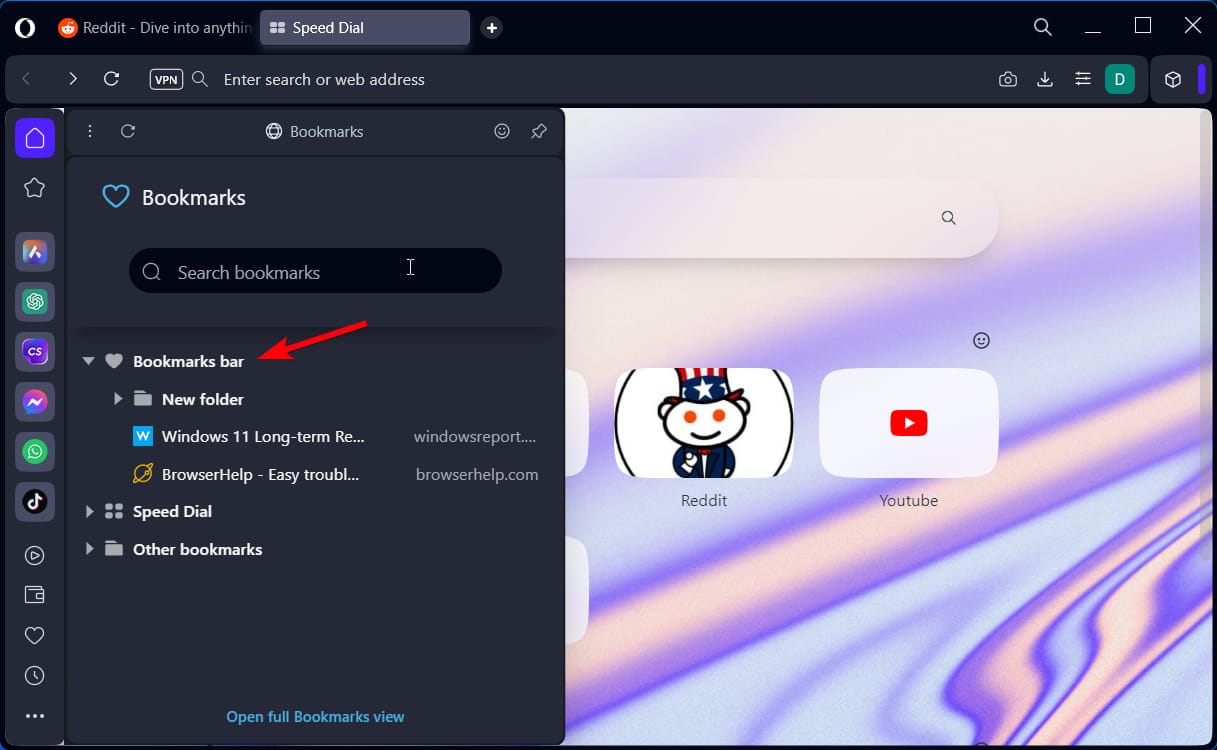
In the manager panel, click on the Bookmarks bar to expand all of them.
2.2 From the navigation bar
Click on the heart icon next to the URL bar.
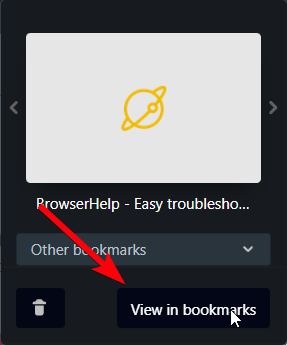
After you bookmarked the website, the dialog box will appear.
Select the View in Bookmarks button to open the tab.
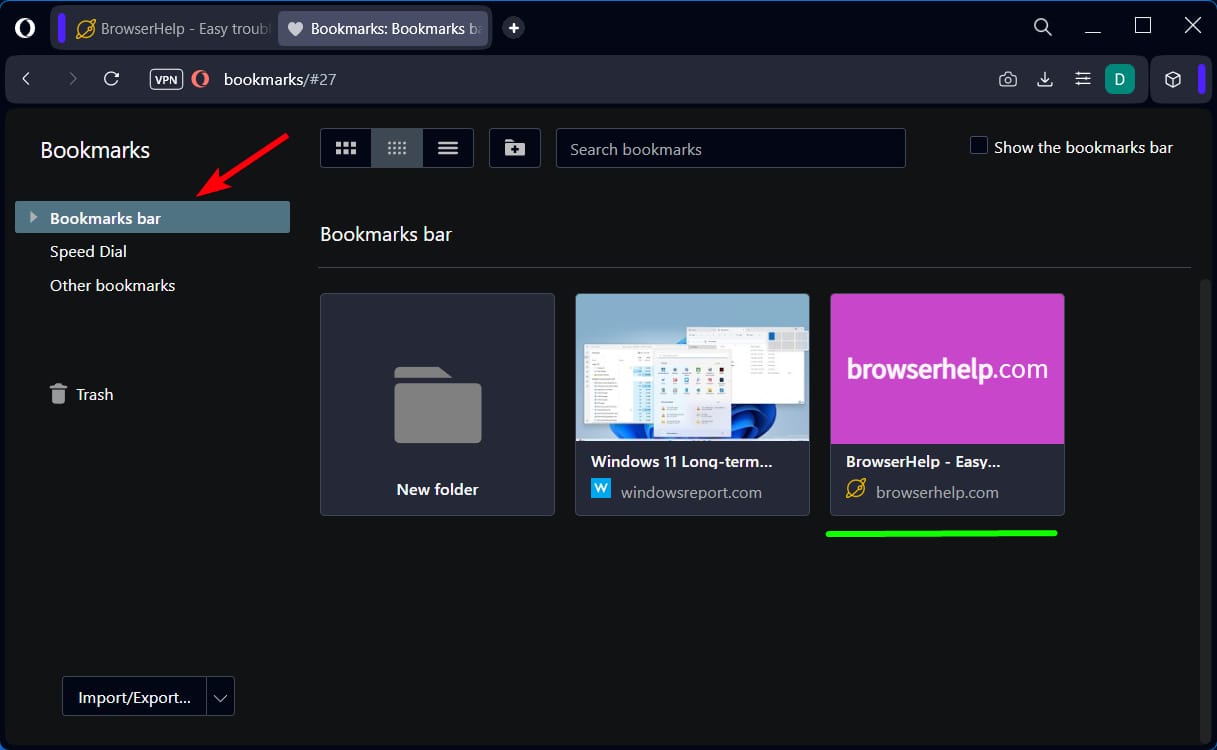
In this tab, select the Bookmarks option and to all your saved webpages
See the Speed Dial bookmarks or Other bookmarks folder below.
2. Rename bookmarks in Opera
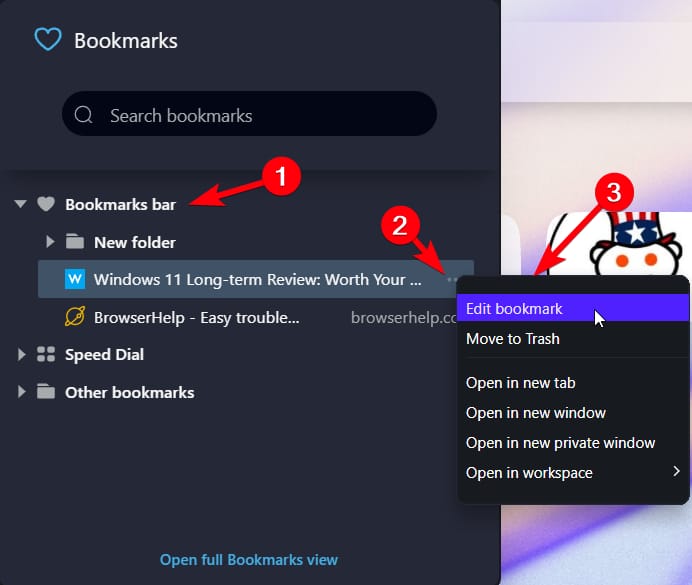
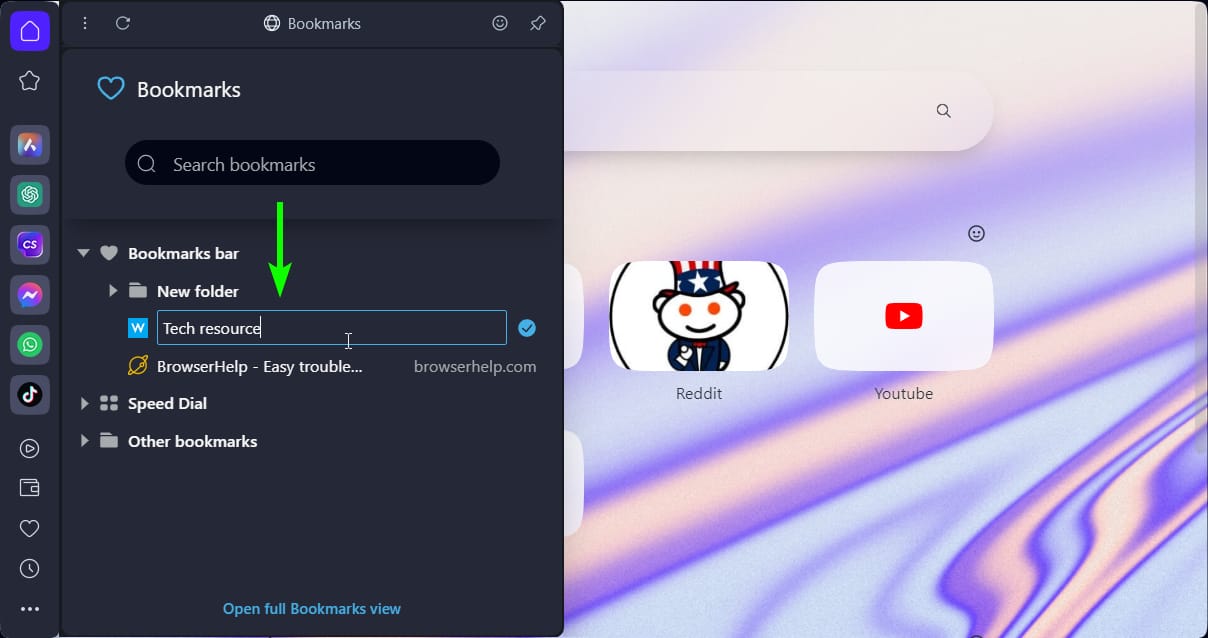
Access the bookmarks from the sidebar panel.
Go to the bookmarked website you want to rename and click the three dots.
Now, select the full text and rename it according to your needs.
Click wherever on the screen to save the changes.
3. Import or export bookmarks
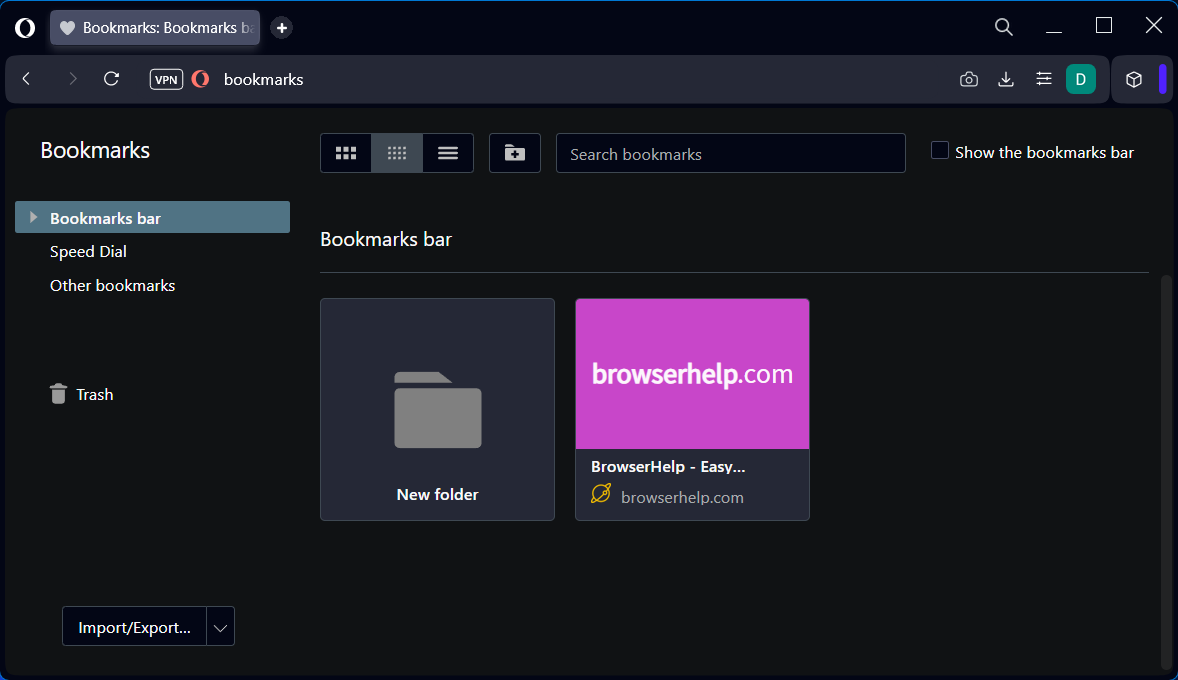
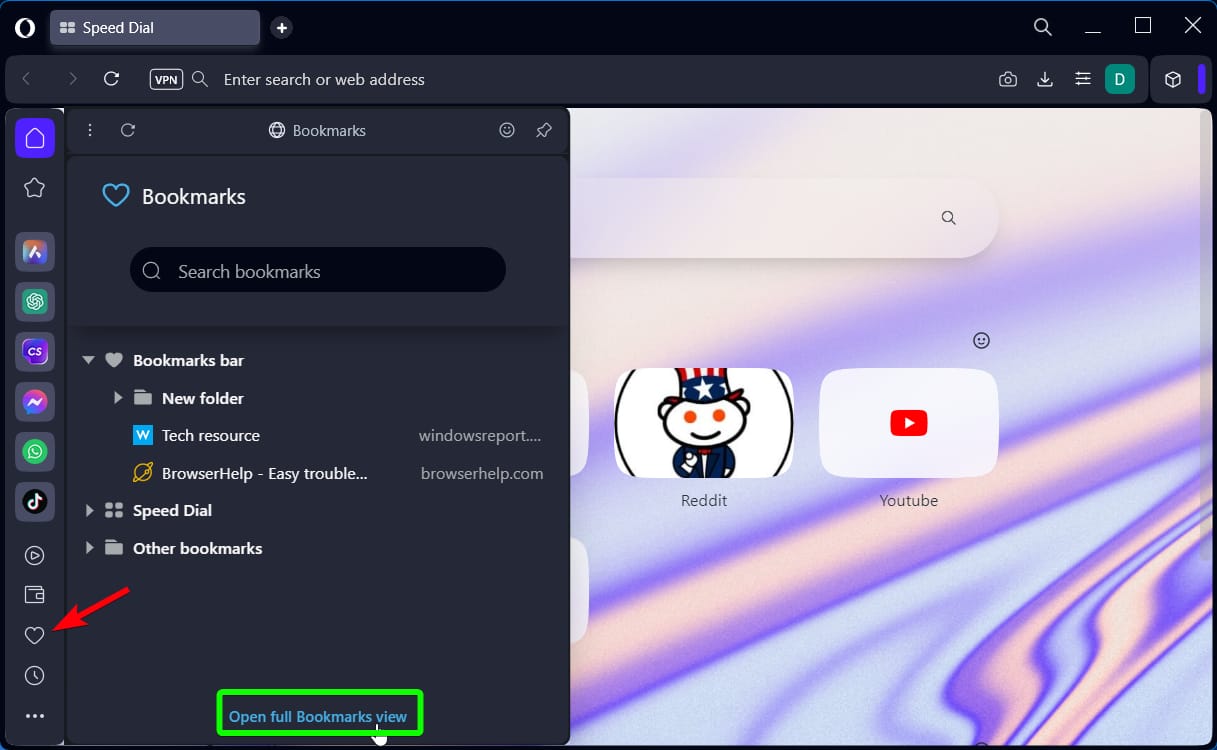
Open the full bookmarks view from the sidebar option.
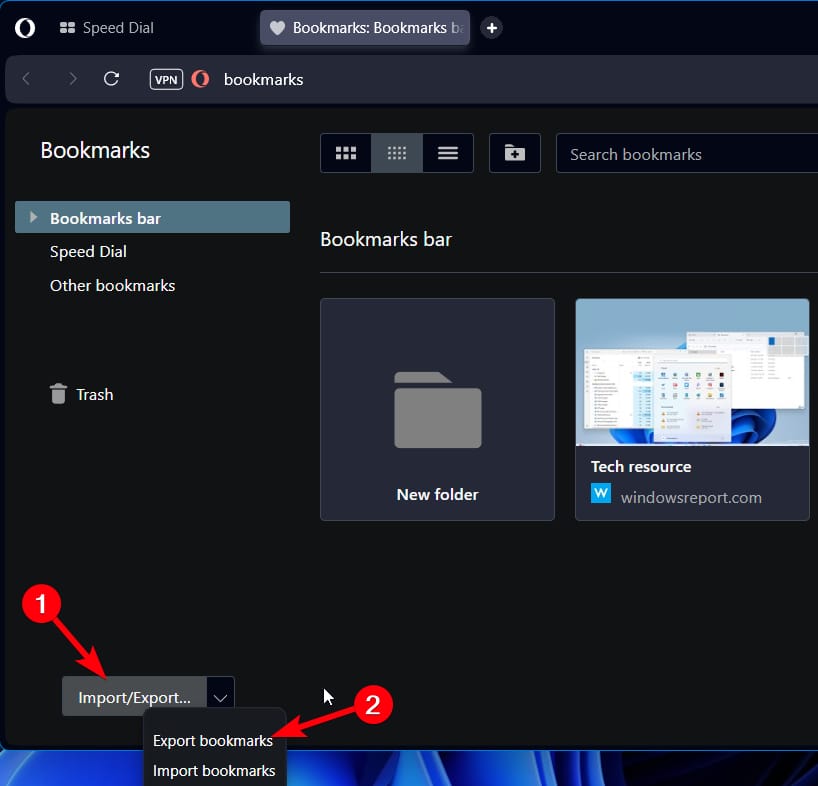
In the full view, click on the Import/Export button below.
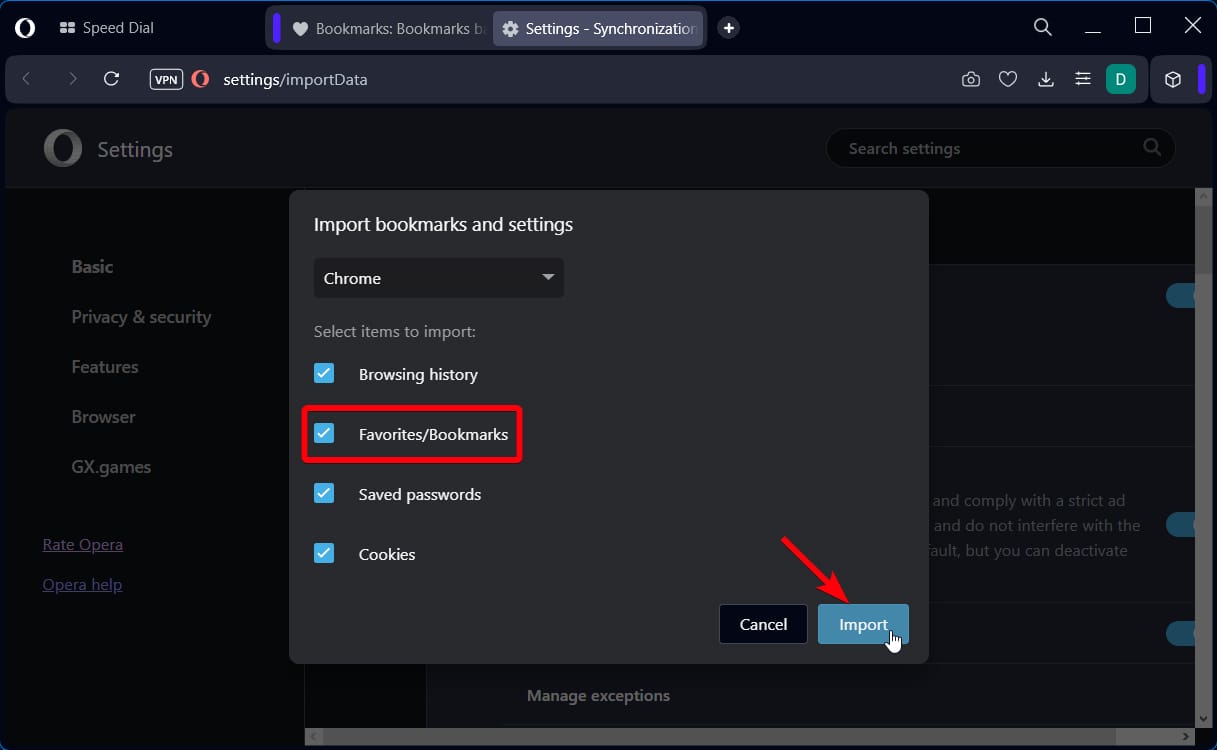
Choose Import or Export to start the process in the settings.
Tick the boxes for bookmarks and press the Import button.
Wait until all the information is transferred from another browser.
Repeat the steps for the other process.
4. Show and hide bookmarks in Opera
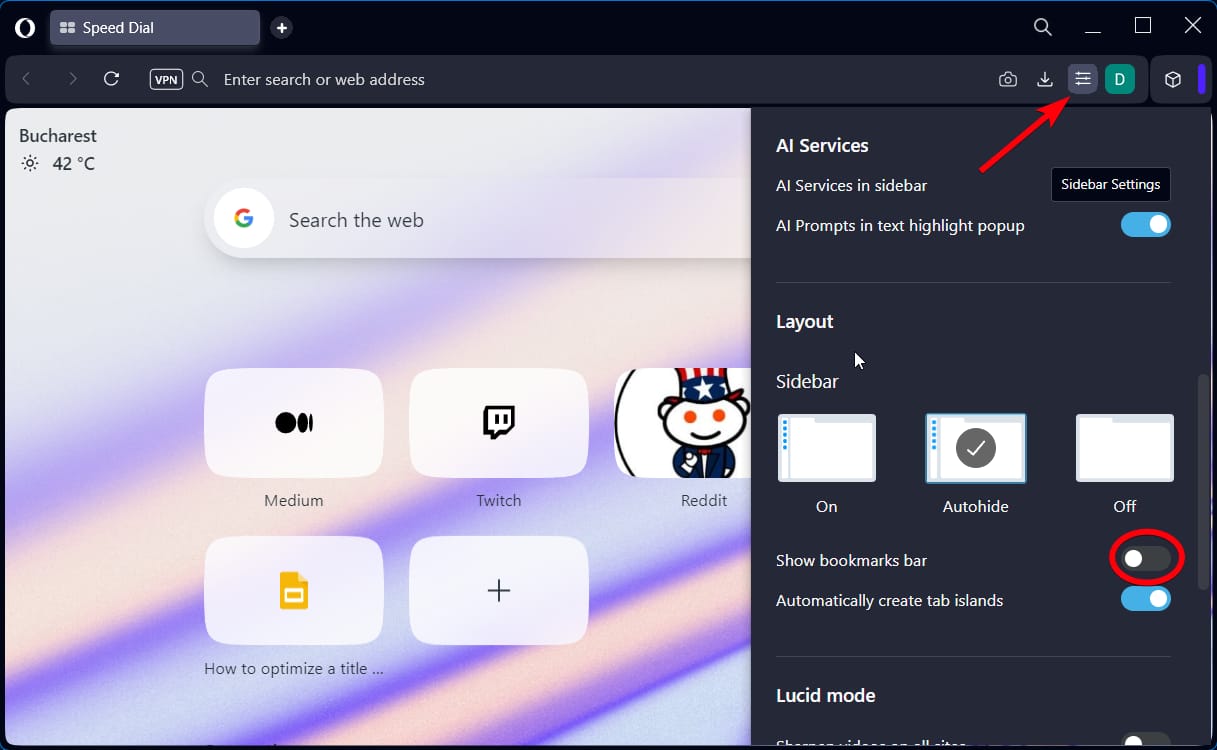
Click on the equalizer button to open Easy Setup.
Scroll down to find the Layout section and Show bookmark bar option.
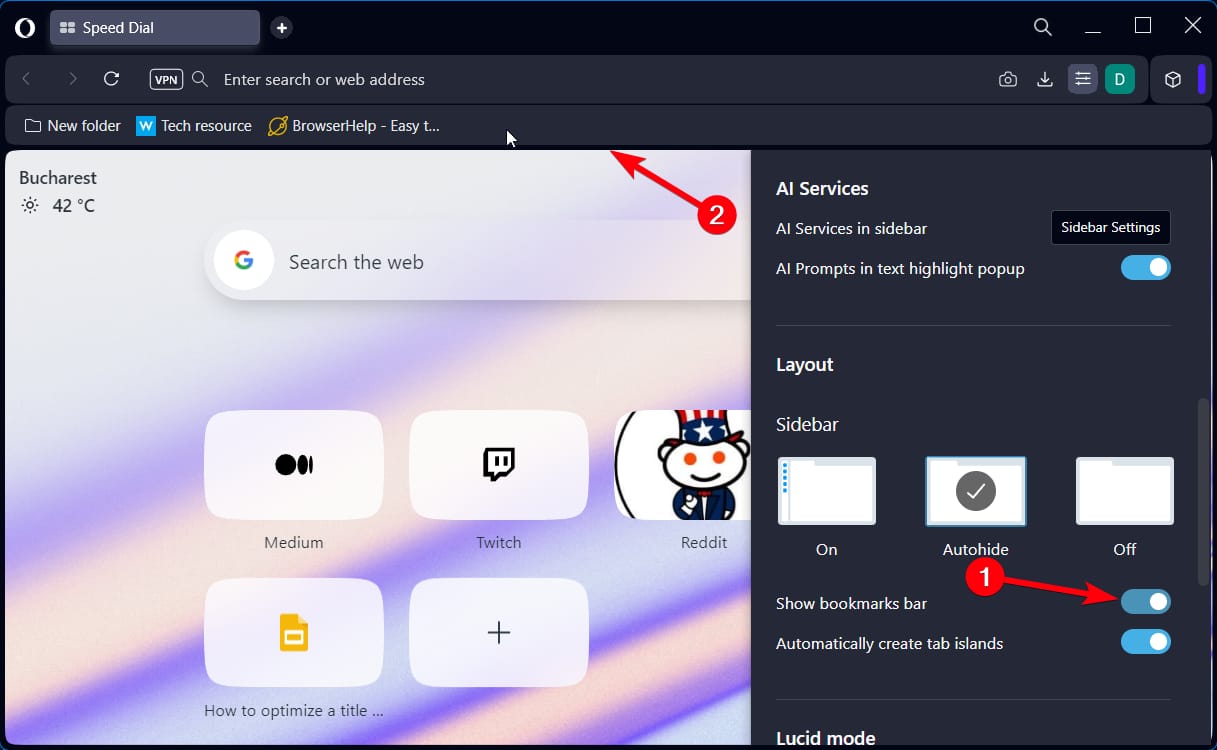
Toggle on/off depending on what you need to do.
The bookmark bar will show on the top bar with all your websites.
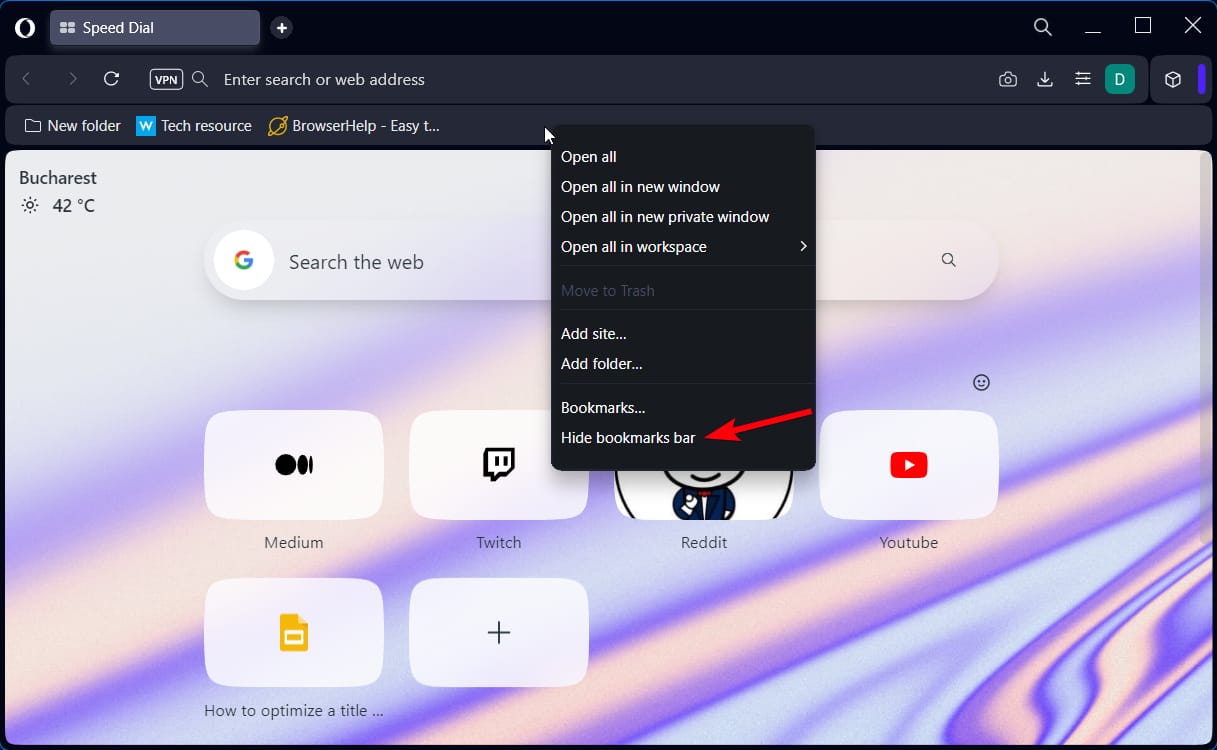
You can hide it by right-clicking on the top bar and Hide bookmarks bar.
Now you know that the Opera browser gives you plenty of methods to easily organize and streamline your bookmarks. Not only that, it now offers some AI functionalities like AI prompts using which you can transform your search queries for better results.
In case you have problems with bookmarks, we also have a guide on what to do if Opera GX bookmarks aren’t showing, so don’t miss it.
Also, don’t miss our guide on Opera favorites if you want to know how to feature works.
In the end, we wish that our guide proved helpful for your browsing needs on Opera and now you can bookmark and save your sites effortlessly. For other curiosities, you can always reach us in the comments section.
The HoloLens devices are some of Microsoft’s most underestimate products. The VR/AR headset runs on Windows 10 and Windows 11, and it’s very much of use to many professionals, including medical professionals.
Recently, Microsoft announced that HoloLens 2 will support Windows 11, and the update also brought a lot of new features to the device. The update to Windows 11 sparked a conversation around HoloLens 3, the next VR/AR headset that the Redmond-based tech giant should put out in the market.
Wipo’s Patentscope department has recently released a patent that seems very close to the HoloLens’ design. The patent, which is available online, has been ordered by Microsoft, and a team of specialists worked on it. Although it does not have a specific name, its codename is WO2023075953 – Modular Head Mounted Device. Could this be HoloLens 3?
Will Microsoft release HoloLens 3?
The patent envisioned a VR/AR headset that includes a standard interface from where you can connect it to different other devices.
The modular sensor and display module may include a standard interface for attachment to various fit systems, including, for example, headband, VR headset, glasses temples, helmet, and the like
If the patent is indeed intended for HoloLens 3, then it seems the device is far more user-friendly than HoloLens, or HoloLens 2. Plus, it is also patented to connect it and use it together with other system configurations.
According to the patent, you’ll be able to use it with your smartphones, smart watches, tablet computing devices, special-purpose hardware devices, network appliances, and so on.
Microsoft might release a more user-friendly HoloLens in light of Apple’s new Vision Pro VR/AR headset. If you don’t know, Apple will release its Vision Pro device next year, and it promises to revolutionize VR/AR headsets. However, some agree that they’re far too expensive for what they’re actually offering.
But the device did reignite the flame and the excitement around such devices, and if this patent offers any clue, then Microsoft will step into the game with a new improved HoloLens.
Considering the Redmond-based tech giant’s involvement and investments in AI research, the new Microsoft HoloLens 3 will most surely benefit from an enhanced Copilot or a similar AI tool.
Should we be excited about Microsoft HoloLens 3? Well, we should be, and rightfully so.
But what do you think about it? Let us know in the comments section below.
If you don’t activate your Windows copy, expect restrictions. Your OS will still work, but without an activation key you’ll have fewer customization options, limited updates, inability to upgrade for free, and a few other hiccups.
Below we’ll discuss all the disadvantages of not activating your Windows license, how long Windows will work without activation, and more info you need to know about this topic.
Disantvantages of not activating Windows
1. Limited personalization options
One of the biggest things you lose when your Windows license is not activated is the ability to customize your PC. There is no way to add that unique touch to your PC to make it truly feel like yours.
Below are some of the personalization features that will be unavailable to you:
Changing desktop wallpaper – If you have changed your desktop during the trial period, it will automatically change to the default one. You will not be able to change it again till you activate your PC.
Using Dark Mode – If you have not activated your OS, you cannot use Windows Dark Mode. You will only have access to the default light mode.
Changing themes – While you can download a series of themes from the Microsoft Store and other official sources, you won’t be able to apply them.
Taskbar Customization – Another personalization feature you lose is the ability to customize your Taskbar. This means you can’t hide it and change the icon sizes, among other features.
Lock screen customization – Many users like to change their lock screen background to something personal. This is absent on unactivated Windows versions.
While you will keep getting regular updates even when your Windows license is not activated, they will be limited. Sometimes, you might miss out on some important security updates.
Also, you might be late to get the latest patches for bug fixes. You might also not get updates with new features early enough or at all.
This can be problematic, especially if you encounter issues with some Microsoft apps.
3. The annoying Activate Windows watermark
After the trial period to activate your Windows license, you will automatically have a fixed Activate Windows prompt in the bottom right corner of your screen.
This will always be present on your screen, irrespective of the app or page you open. This is to always serve as a reminder that you need to activate your OS.
However, this can be frustrating, especially if you take screenshots or do other activities that require you to use the full screen.
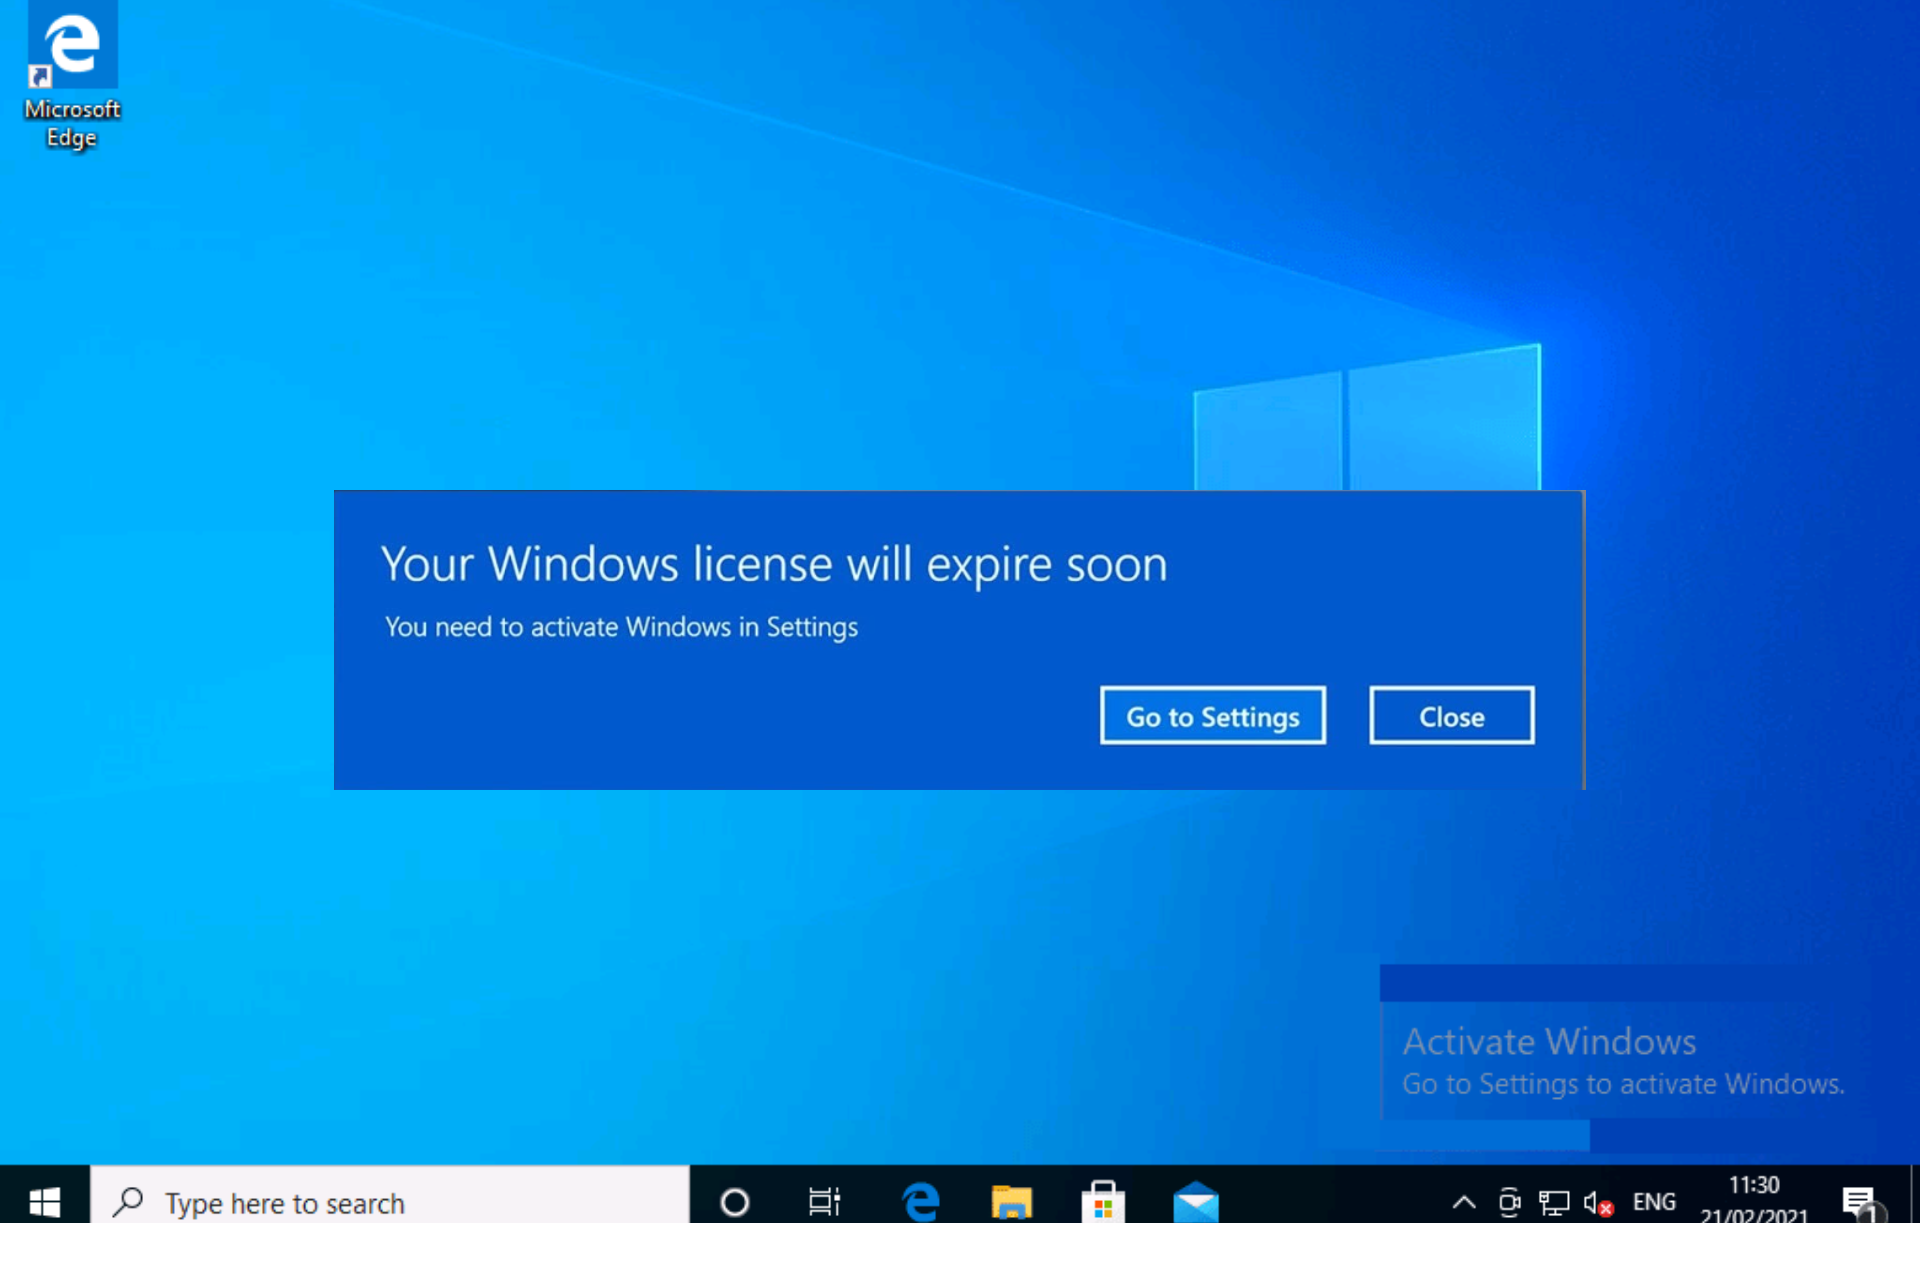
When you are nearing your trial period, you start getting your Windows license will expire soon prompts. After this, you start getting notifications in the Settings app about the need to activate your Windows license.
You can also get this notification while using other apps, which can cause distractions.
5. Inability to upgrade to another Windows version for free
Usually, you can upgrade from one version of Windows to another once it is available for free. An example is upgrading from Windows 10 to 11, provided you meet Windows 11 requirements and specifications.
However, this is only available for users that have activated their Windows license. Users with unactivated copies of the OS will need to perform a full restore even if they meet the requirements.
Let’s get right to it.
What does Windows Activation do?
Windows Activation basically confirms that your Windows copy is genuine. Also, it ensures that you are not using a single Windows copy on more than the permitted number of devices by Microsoft Software License Terms.
Aside from this, it gives you unrestricted access to everything the OS has to offer, from customization to regular updates. Finally, in most cases, if you activate your Windows license on a version of Windows, your will be able to use it on later upgrades.
Is it okay to use Windows without activation?
It is legally permitted to use Windows without activating the license. Microsoft stopped the experiment of rendering Windows useless after the trial period with Windows XP and Vista.
This is because users were constantly cracking the OS and creating pirated copies, leading to a loss of revenue for the company. Ever since users can use Windows without activation after the trial period ends, but with limitations.
How long will Windows work without activation?
You can use Windows for as long as you like without activating the license after the trial period. You will still have access to most of the features.
Also, you will be able to use your device for the most important functions. However, this will remain so provided that you never try to activate Windows with a cracked or pirated key.
These are some of the major disadvantages of not activating your Windows license. While it might be tempting to keep using the unactivated copy, it is undoubtedly better to purchase the one-time license to have access to the unlimited features the OS offers.
If your Windows 11 PC freezes when you press Alt + Tab while playing a game, or working on multiple apps, this guide can help! We will explore expert-recommended methods to fix the problem right after discussing the causes.
What causes the Alt Tab freezing on Windows 11?
There could be various reasons for the computer freezing while playing issue; some of the common ones are mentioned here:
Corrupted system files – If the system files on your PC are damaged or affected by viruses, it could cause all kinds of issues. Try running the SFC & DISM scans to restore the files.
Incompatible software – The outdated software on your computer could cause the freezing issue. To avoid that, uninstall the incompatible ones.
New Alt-Tab system – The new Alt-Tab system was introduced with Windows 11 and could be buggy. To fix it, you can use Registry Editor to revert to the old one.
GPU feature – Sometimes, GPU features like Hardware Accelerated GPU Scheduling can cause the issue. Try turning off the feature to get rid of the problem.
Virus infection – If your computer is infected with malware, it may interfere with the normal functioning of your device. Try running a deep scan using a reliable antivirus tool.
Now that you know the causes of the issue, let us check out the methods to resolve the problem.
How do I fix the Alt-Tab freezing in Windows 11?
Before engaging in advanced troubleshooting steps, you should consider performing the following checks:
As a more effective alternative, you can try an automatic repair tool to scan your PC for corrupt or missing files and replace them with fully functional elements.
3. Revert to the old Alt-Tab system
Press Windows + R to open the Run dialog box.
Type regedit and click OK to open Registry Editor.
Navigate to this path: Computer\HKEY_CURRENT_USER\Software\Microsoft\Windows\CurrentVersion\Explorer
Right-click Explorer, select New, then DWORD (32-bit) Value.
Once created, name it AltTabSettings.
To modify the Value data, double-click AltTabSettings, locate the Value data, and change the value from 0 to 1.
Click OK and restart your computer.
Once the computer is back online, launch the game and check if the issue persists.
Locate the recent update installed, and click Uninstall.
Follow the onscreen instructions to complete the process.
5. Perform a repair install
NOTE
Before moving to the steps, ensure you have backed up all your essential files.
5.1 Download the ISO file
Go to Windows 11 website, locate Windows 11 Disk Image (ISO), select the edition from the drop-down menu, and click Download Now.
Next, choose the language and click Confirm.
Click Download again to initiate the process.
5.2 Install the repair upgrade
Press Windows + E to open the Windows File Explorer.
Locate the downloaded file and click Mount. You will see a Virtual DVD drive as soon as it is complete.
Go to the DVD drive, double-click the file to start the process.
If you see a security warning, click Open.
On the following prompt, click Yes.
You will get a series of instructions on the Windows 11 Setup window; follow all of them until you reach the Ready to Install page.
Once there, click Install.
Now Windows will copy the files and reboot your computer, and once it is up, the repair upgrade will start. The process may take around half an hour, and your computer may restart multiple times, so please be patient. Once done, you will get the sign-in screen, log in and use your computer as you like.
So, these are the methods to fix the Windows 11 freeze when you press Alt–Tab and resume playing your favorite games.
If you are facing a similar issue, like Windows 11 freezing randomly, we recommend you check out this guide to find quick solutions.
Please feel free to give us any information, tips, and your experience with the subject in the comments section below.
Multiple users have found the PaceKeyChain file inside their User folder and are confused about what this file means and what should be done with this file.
In this guide, we will explain to you what the PaceKeyChain file is and whether you can remove it from your computer or not. Let us dive into it.
What is the PaceKeyChain file?
We did a lot of research and found out that the PaceKeyChain is a type of encrypted file created by a software called iLok.
iLok is a software that helps you manage authorizations. You can use this license manager which will help you activate/deactivate your licenses to manage your workflow. All iLok-enabled licenses can be easily activated using iLok USB Smart Key
Why is the PaceKeyChain file inside the User folder?
There is no exact reason why the PaceKeyChain file is inside the User folder. Chances are that someone else was using your computer and the user forgot about this software.
Also, chances are that malware has infected your computer and causing such issues on your computer. If you have recently installed new software on your PC, then you can also try to uninstall that program which will help you find out if this file was created because of a software conflict or not.
How can I remove the PaceKeyChain file from my PC?
1. Perform a virus scan
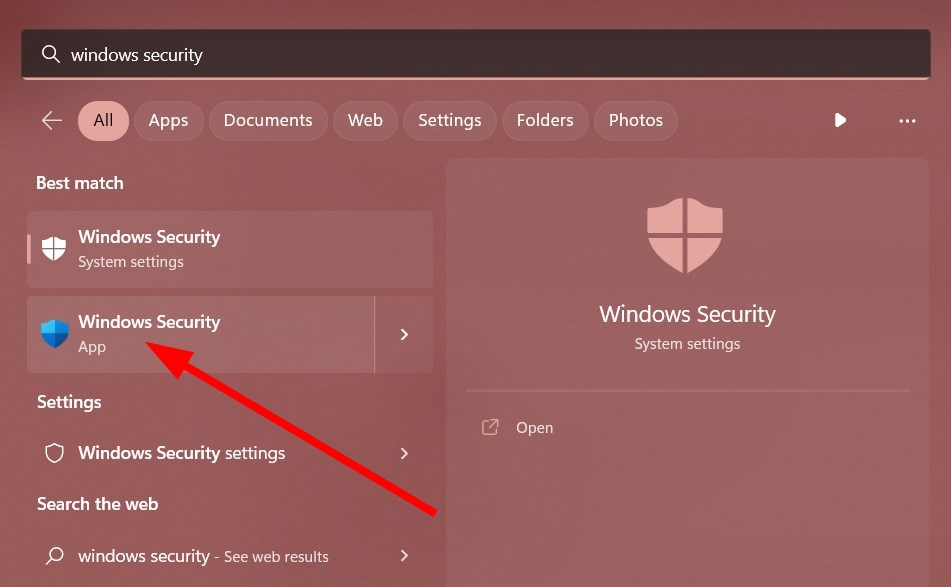
To open the Start menu press the Win key.
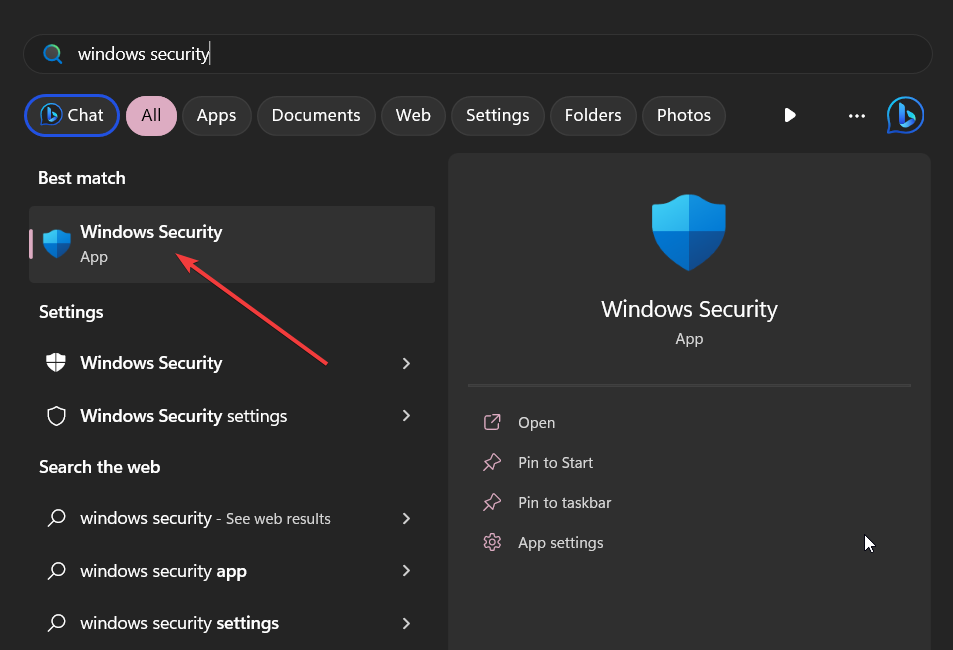
Type Windows Security and open the appropriate result.
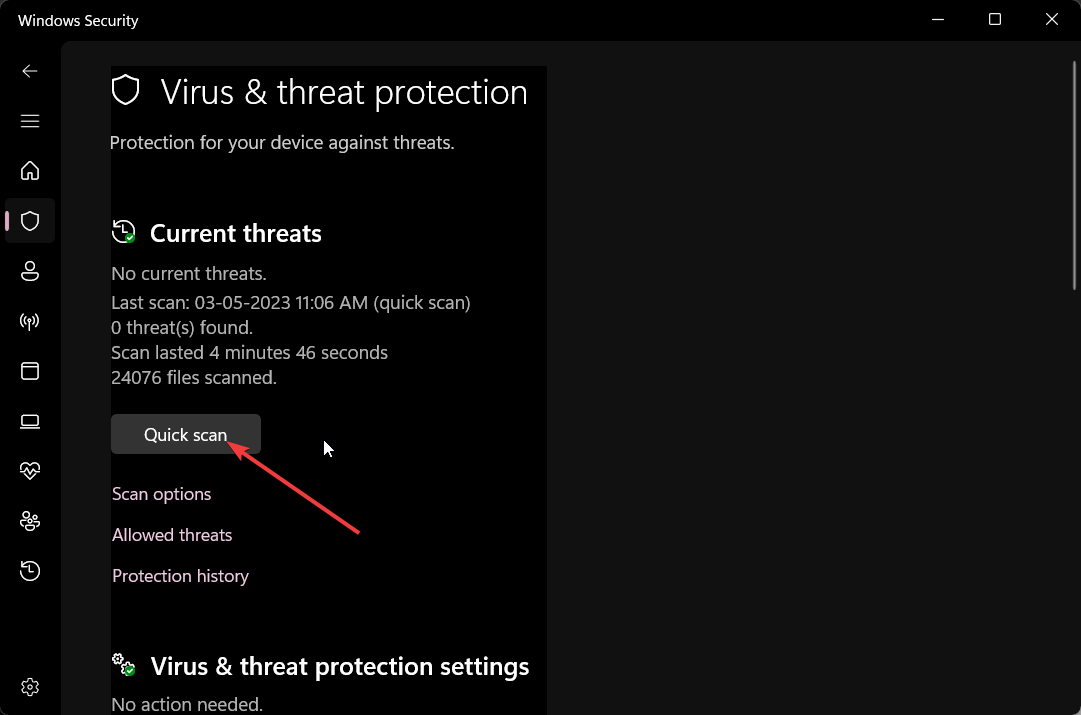
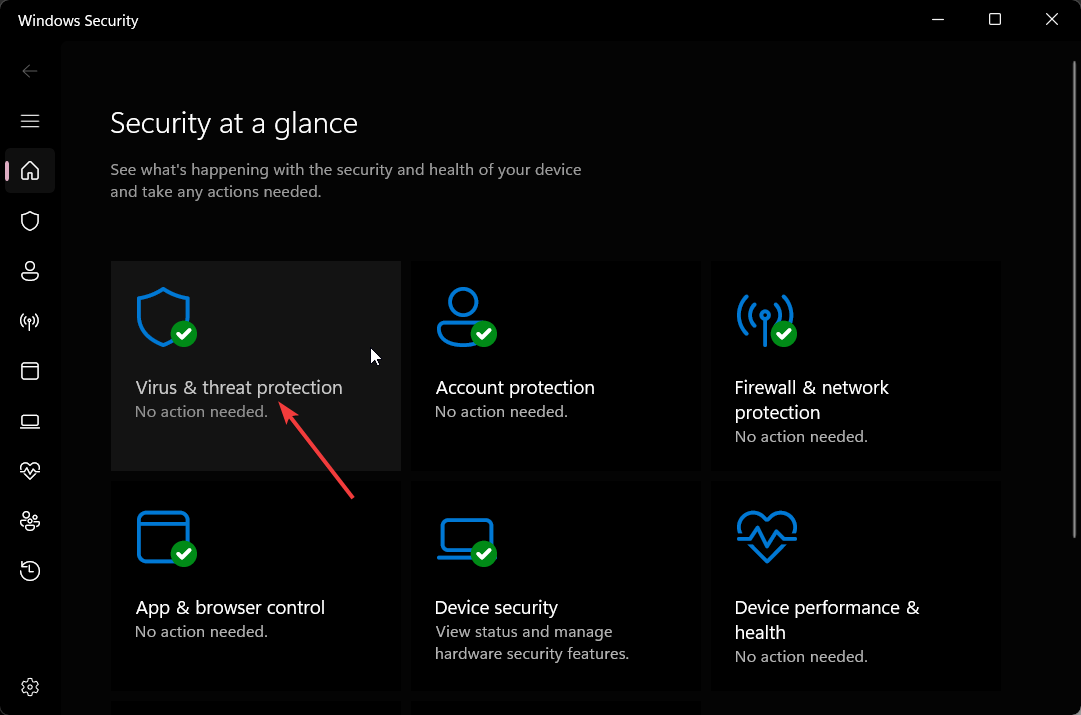
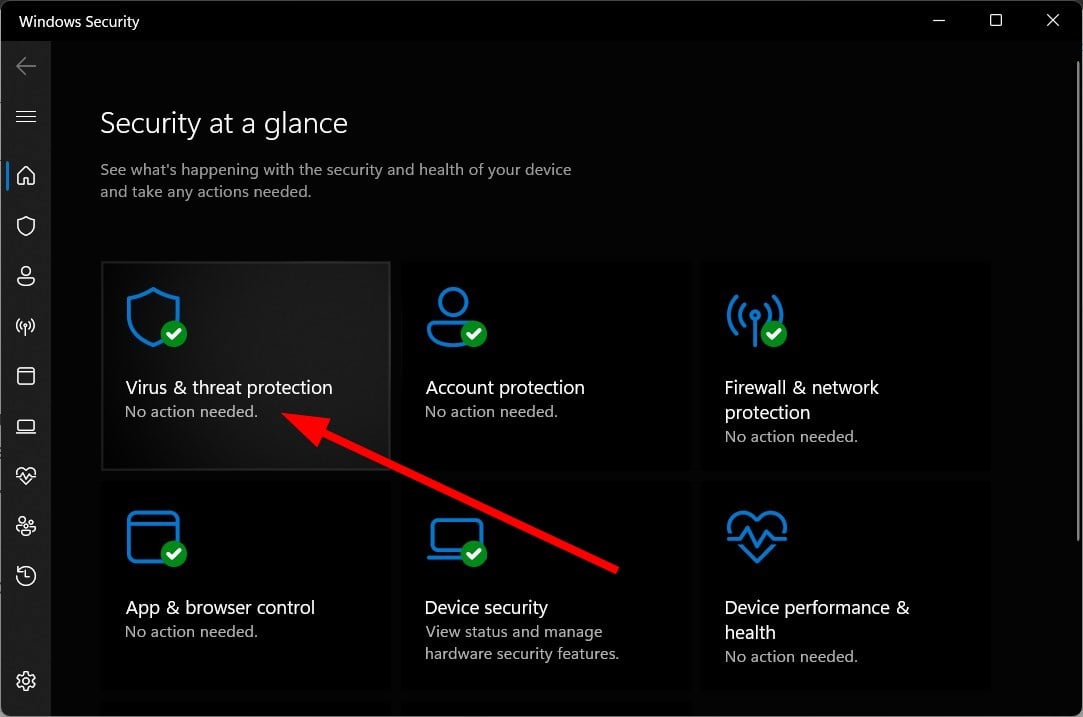
Select Virus & threat protection.
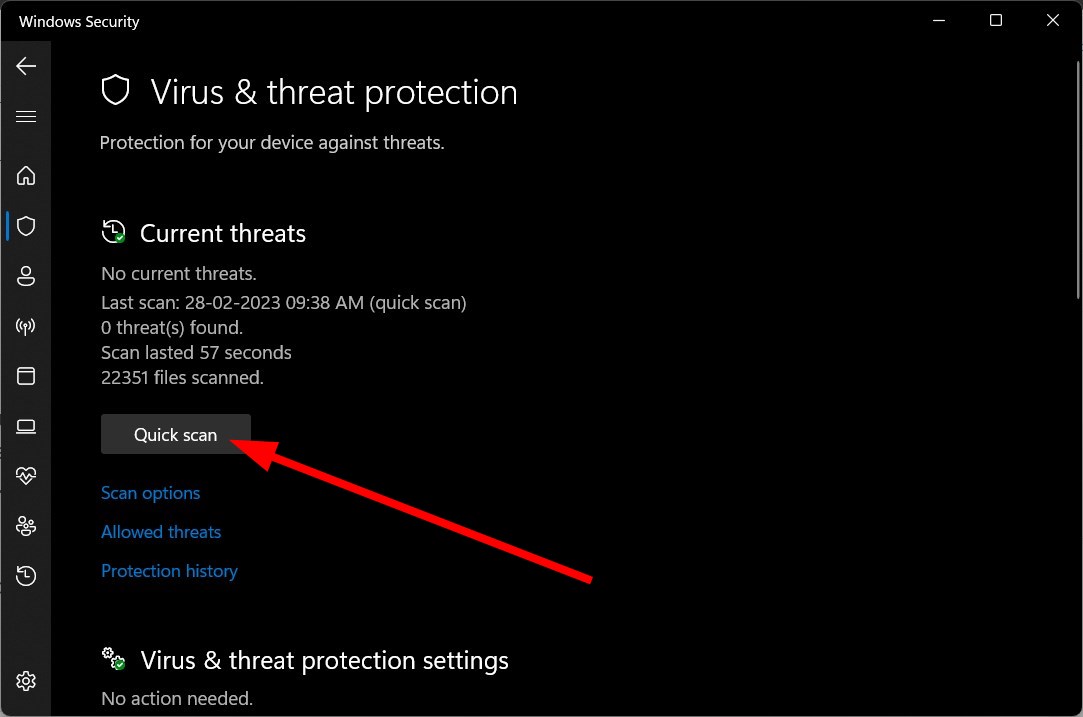
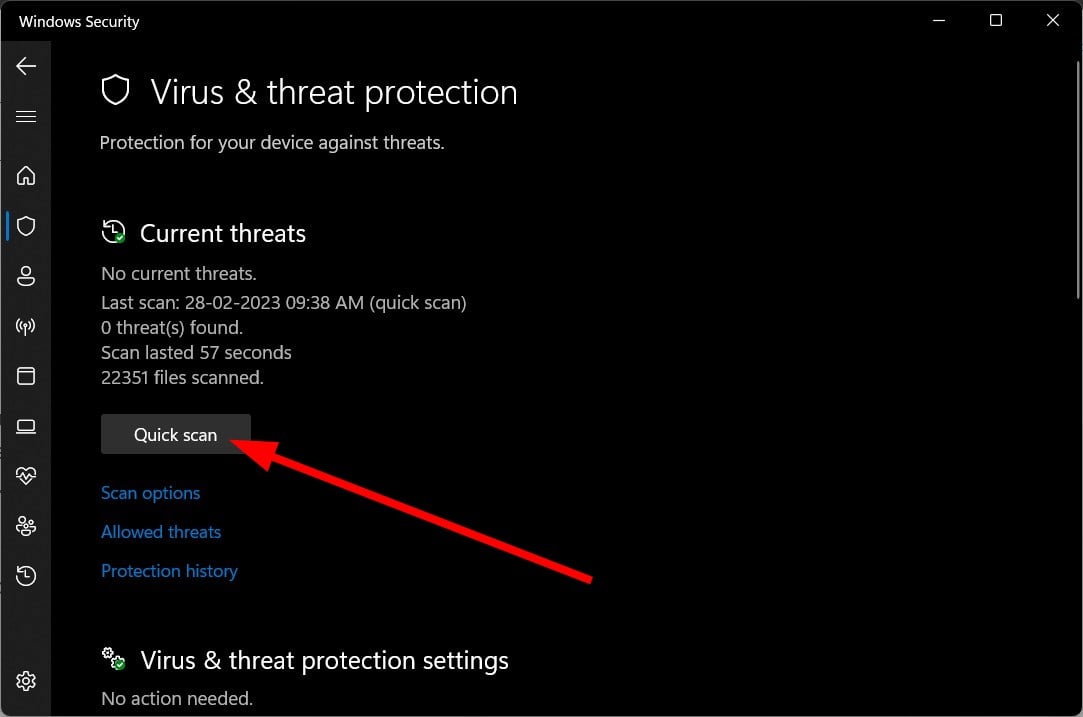
Click on Quick Scan.
Let the process complete and apply the fixes.
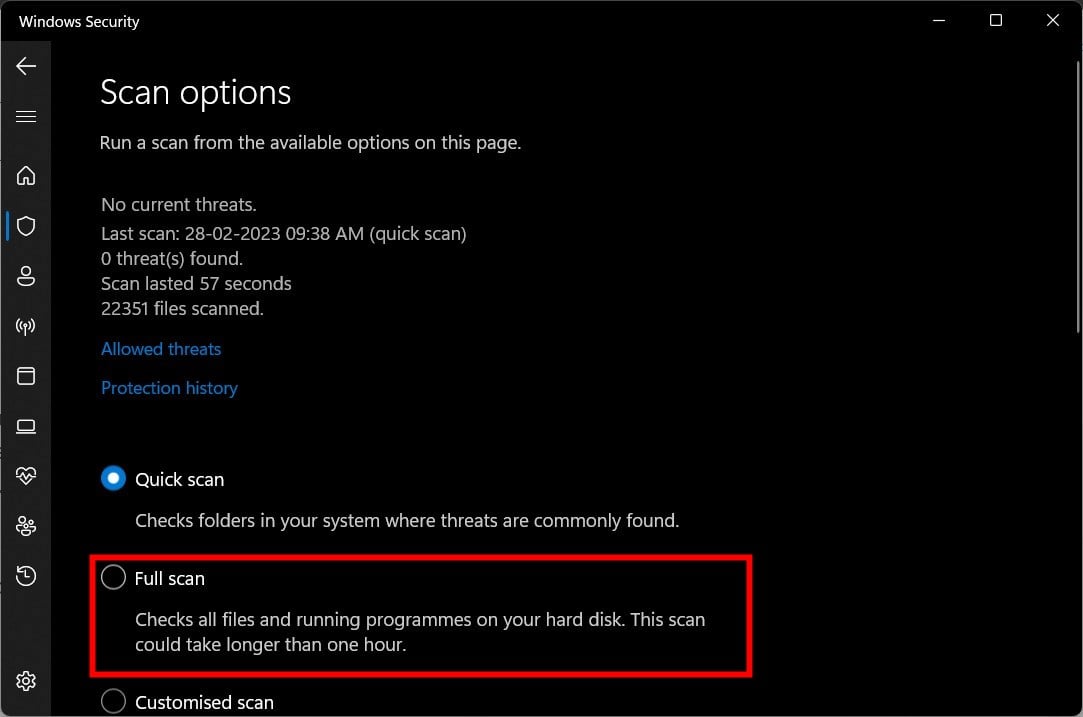
You can also choose Scan options and choose Full scan for in-depth scanning, and after that, restart your PC.
You should scan your PC frequently to ensure that it isn’t affected by any virus or malware. Because malware or virus can corrupt or delete important files and also introduce unwanted files on your computer.
Do note that the Windows Security tool isn’t that effective in tackling viruses or malware, especially modern ones.
To fix this, we would suggest you check out the TotalAV tool because it offers one of the highest detection rates and comprehensive protection and prevention.
Select iLok and hit the Uninstall button at the top.
Follow the on-screen steps to remove the program from your PC.
Restart your computer and check if the PaceKeyChain file is still there in the User folder or not.
You can also try removing the iLok program from your computer as this is the culprit for the PaceKeyChain file in your computer. Simply remove the program and check if this fixes the issue or not.
However, if someone else is using your computer and installed this tool, you will need a master password to uninstall it.
We also have a guide that lists down some of the best uninstaller programs that you can opt for on your computer.
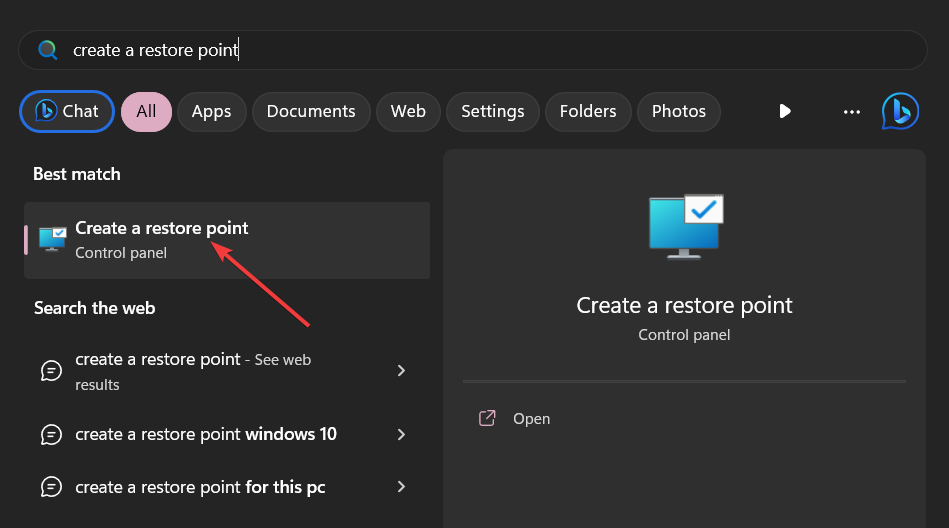
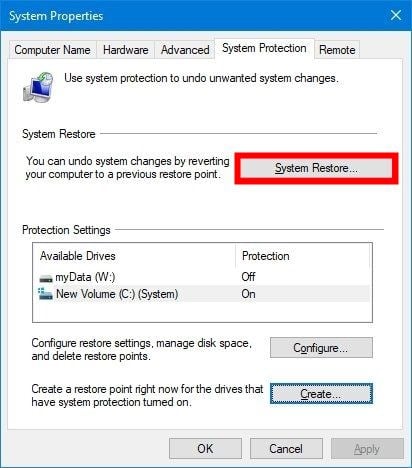
Type Create a restore point and open the appropriate result.
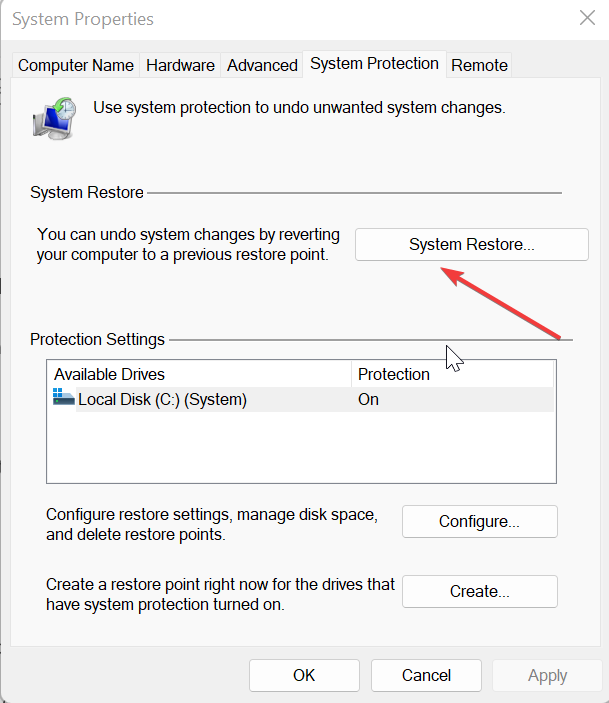
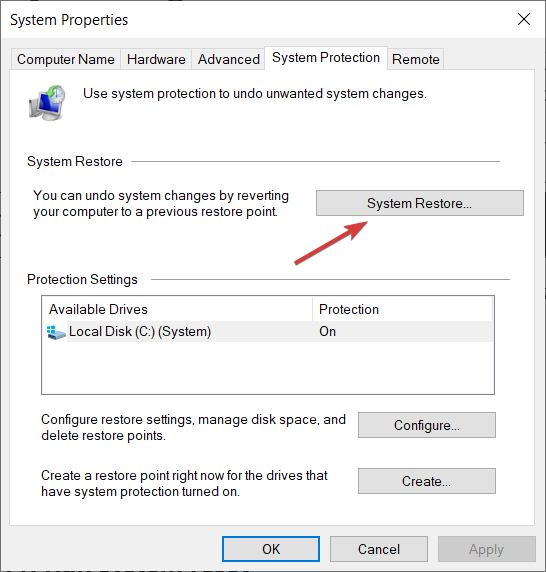
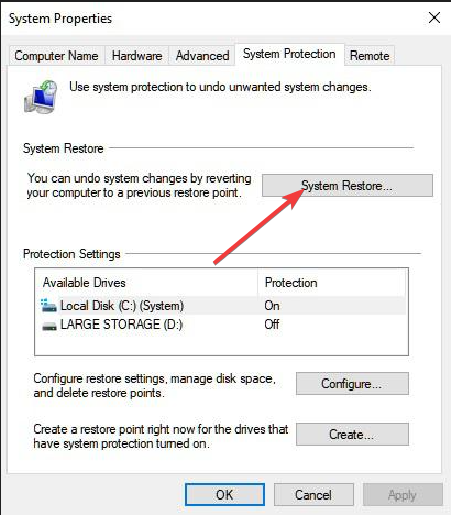
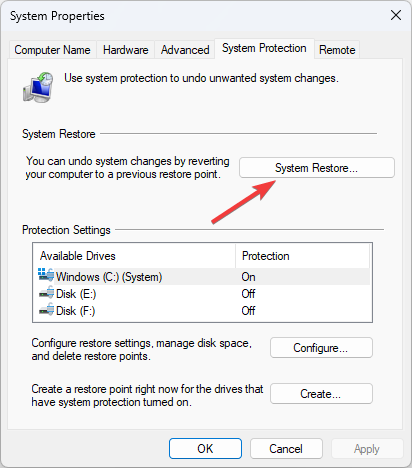
Click on the drive where you have installed the OS and choose System Restore.
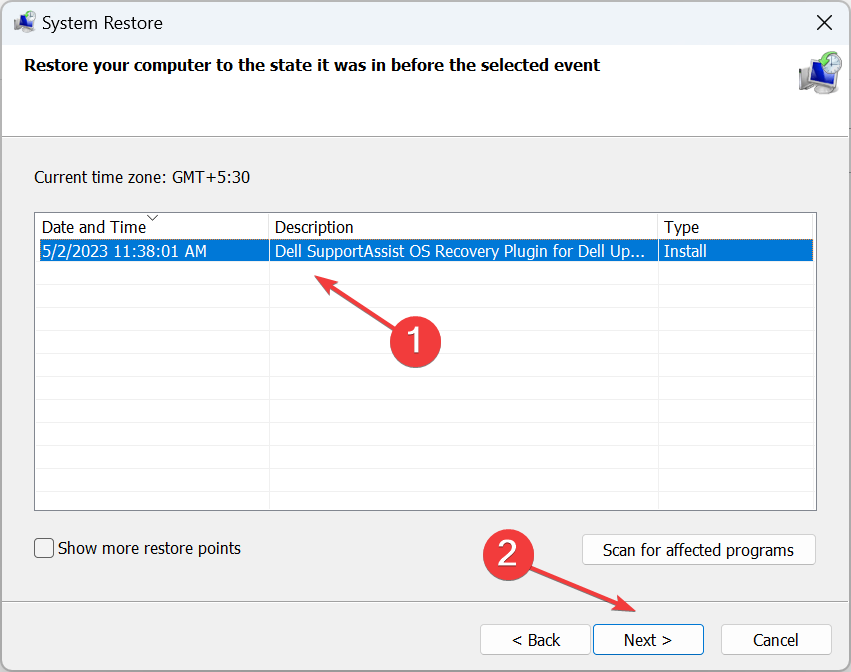
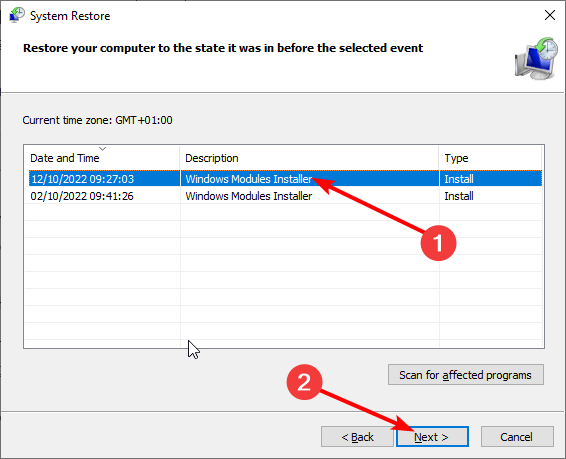
Select the restore point and select Next.
Click Finish to begin the restore process.
Well, you can also use the system restore process to take back your system to a time when the iLok program wasn’t installed on your computer.
Do note that the process will work only if you have a system restore point already created on your PC. To learn that, you can read the guide on how to create a system restore point.
If nothing works, then you would need to reinstall Windows OS on your computer. For your convenience, we have a guide that explains how you can reinstall Windows 11 in 2 easy steps.
That is it from us in this guide. We would like you to check out our detailed guide on what is view.exe file and whether or not it should be removed from your computer.
Let us know in the comments below, which one of the above solutions resolved your issue of the PaceKeyChain file.
Toshiba produces some of the best external hard drives available today. However, like most drives, it is prone to inaccessibility and operational problems. One such problem is the drive not showing up in File Explorer, preventing users from using the storage device.
If your Toshiba external drive is not showing, this article will briefly overview some of the common causes of the issue and provide steps to help you resolve it.
What causes Toshiba’s external hard drive not to show up?
Some of the significant causes preventing the drive from showing up are:
USB port malfunctionor improper connection – USB ports can get faulty due to age, dust, or hardware failure; if this happens, devices connected to those ports will not show up on your PC.
Unsupported drivers – If the drive drivers running on your PC are not supported by the OS, it can prevent connected devices from functioning correctly.
Outdated system drivers – USB ports work in sync with drivers to identify the type of the external device connected; if the drivers are outdated, the connected drive might not appear.
Corrupt external drive – If your Toshiba external drive is corrupt or faulty, it’ll likely not appear on your PC when connected.
Absence of drive letter – External drives are assigned to be recognized in File Explorer; if the drive letter is missing or incorrect, it can prevent Windows 11 from recognizing the drive.
Having identified the causes, let’s explore the solutions below.
How do I backup/recover data from a Toshiba external hard drive?
Before you can troubleshoot your external drives, you should focus on backing up the existing data on the drive. This is because once you start troubleshooting the external drive, it becomes vulnerable to disk failure, leading to complete data loss.
Therefore, before you attempt to fix the Toshiba external drive not showing up issue, you must back up the files on the drive. Our guide on how to use the backup settings in Windows 11 will help you through the process.
How do I fix Toshiba external hard drive not showing up?
Before we proceed with more advanced solutions, here are a couple of quick fixes you can attempt:
Reconnect the Toshiba drive USB cable to other ports.
If you’re using a USB hub, try connecting the Toshiba drive directly to one of the USB ports of your PC.
Connect the Toshiba drive to a different PC using the original cable to see if the problem originates from the drive or the machine.
If the error persists after applying the above fixes, try the following tweaks.
1. Reassign the letter for the Toshiba drive
Right-click on the Start menu and click on Disk Management.
Right-click the partition on your Toshiba external drive in the next window and click Change Drive Letter and Paths.
Select the existing drive letter and click Change. If there is no drive letter, click on Add.
Select a new drive letter and click OK.
Click OK to confirm your changes and restart your PC to see if the Toshiba external drive will appear.
If your Toshiba external drive appears in Disk Management but not File Explorer, reassigning the drive letter can help fix the bad sector issue.
Changing the drive letter allows Windows to re-read the unallocated space. You can also check out our guide on how to fix Disk management not loading.
2. Update your PC drivers & OS
Press the Windows key, type in Device Manager in the search box, and hit Enter.
Locate Disk drives, right-click on the drivers, and select Update driver.
Click Search automatically for updated driver software, and follow the prompts to complete the update.
Close the device manager, and press the Windows key + I to open the Settings app.
Then, click Windows Update and select Check for Updates. (If there are, Windows will install them automatically)
Close the Settings app, and restart your PC to see if the error is fixed.
If your portable drive is not recognized by Windows, you’re running outdated drivers. Running a Windows and driver update can help you fix the Toshiba external drive not showing.
You can also choose a good driver updater tool, for example, Outbyte Driver updater, to update your drivers automatically with the latest versions.
3. Initialize the Toshiba hard drive manually
Right-click on Start, and click on Disk Management.
Right-click on the Toshiba external drive in the next window and click Initialize Disk.
Select a partition style and click OK.
Close the Disk management app and restart your PC to see if the issue is resolved.
Toshiba hard drives that have not been initialized won’t appear in File Explorer; initializing the disk can help you fix the problem. However, initializing a disk can format the drive; ensure you back up your drive before attempting this step.
Right-click on Start and click on Disk Management.
Select the volume of your Toshiba external drive and click Format.
Check the Perform a quick format option and click OK.
Click OK again to confirm your actions and wait for the drive to be formatted.
If the Toshiba external drive wasn’t appropriately formatted before being inserted into your PC, it could prevent it from showing up.
In this case, you’ll need to format the drive to make it functional with your PC. Check out what to do if you get an HDD format error.
5. Turn on the USB hub & show all hidden devices
Press the Windows key, type Power Plan in the search bar, and hit Enter.
Select the Choose the Power Plan option, and click Change the Plan settings.
Navigate to change the advanced power settings, click on USB settings and expand the USB suspend settings option.
If the option is enabled, click on Disabled and Apply.
Click OK to confirm your changes, and check if the Toshiba external drive is now showing.
In some cases, the external drive might display as a hidden device preventing it from showing up in File Explorer. You can fix this by turning on a USB hub displaying all hidden devices.
Working with external hard drives is very beneficial because their portability allows you to carry so much data in a tiny piece of hardware. However, external drives can become inaccessible due to several reasons. When that happens, ensure you follow the steps in this guide to help you fix the problem.
If you’ve got any questions about your Toshiba drive or suggestions on how to fix this issue, let us know your thoughts in the comments below.
We’ve all been there. You’re trying to access a site but keep getting that dreaded message that the site can’t be reached. At first glance, it may look like a network connection issue, but after an in-depth examination, it seems Eero is blocking these sites.
If you have a large family, you know how convenient it is to use Eero instead of Wi-Fi extenders. However, blocking sites is an unwelcome side effect, but do not fret, as there is a workaround to stop it from blocking sites, as you shall see below.
Does Eero block websites?
Yes. But it’s not what you think. It’s not uncommon for your Wi-Fi to block sites, but you can easily unblock them.
The Eero network is designed to give you the best possible Wi-Fi experience. It expands your network capabilities, and you may find that some sites are blocked if suspected to be harmful.
Sites that contain malware or phishing can compromise your security and put your private information at risk.
Eero will block them by default. This acts as an extra layer of protection because we all know how the Internet can be. Even more, enhancing your Eero router’s security can be further achieved by integrating a VPN. Learn more about the top VPNs for Eero routers and how to install them in our detailed article.
If you don’t have a good antivirus in place, you have Eero to thank for keeping its eye on you to protect your system.
Furthermore, if you have young children with devices connected to the internet, you can use this feature and enable it. This way, you can limit your children’s exposure to inappropriate content, such as pornography or violent images.
Still, you can disable this setting if you want to access a website known for its poor security practices, or Eero is just blocking even harmless sites.
How do I stop Eero from blocking websites?
Launch the Eero app, preferably on your phone. The below images are from an iPhone, so on Android, the options may slightly differ.
Navigate to the Discover tab.
Tap on the Block and Allow sites option.
Since it is blocked by default, this is the first option that you will come across.
Now, to allow a site, tap on Allowed and select Allow site.
Here, you can proceed to enter the URL of the site you wish to unblock in the Domain entry.
Toggle on the Network option under Allow for.
Under Profiles, check the boxes of the users in your household you want to access the site, and the site will be unblocked.
Also, ensure to select a reason for allowing the site so Eero can collect data and avoid such mistakes, especially if it is an inaccurate block.
Depending on factors such as the speed of your Internet connection, browser cache, and PC speed, these settings may vary in the time they take to apply.
To hasten the process, you can clear the cache and cookies on your browser or restart your PC. And that’s how to allow or stop Eero from blocking your websites.
If you’d like to add another layer of protection, we recommend adding a VPN, and we have a list of the best VPNs for Eero routers.
We hope that Eero does not block any legitimate sites and that this guide has helped demystify the blocking issue.
Beyond managing blocked sites, enhancing your Eero router’s security can be crucial. Explore our guide and enhance Eero router security with these VPNs for advanced protection options.
Have you experienced this issue before? What steps did you take to bypass it? Let us know in the comment section below.
You have your snacks and cozy blanket ready to catch up on the latest trending movie, but there’s a problem. A message dubbed output device does not support HDCP appears on your screen instead of the movie.
What a bummer. Could it be an incorrect connection or a virus? And what does HDCP mean? We get to the bottom of all these questions and give you several ways to solve this error in this article.
What does it mean when my TV says it does not support HDCP?
HDCP stands for High-bandwidth Digital Content Protection. It’s a set of encryption rules that prevent digital video and audio from being copied and converted to other formats.
When you play protected content on your computer or TV, it checks if your monitor supports HDCP before allowing you to watch or listen to anything. If your monitor does not support HDCP, then the content will not play.
That’s when you’ll get a message such as Samsung tv saying this screen does not support HDCP or this display does not support HDCP.
HDCP rules can be a hassle for any device that connects to your TV via an HDMI cable, including gaming consoles and streaming devices. If your device doesn’t support HDCP, it might not work with your TV or cause screen flickering or other issues.
It’s no surprise that most streaming sites have enforced such rules because, let’s face it, it does cost money to produce these films. You have to meet halfway by covering the costs and the streaming service to bring the content to you.
Still, streaming on the wrong hardware is not the only cause of this output device does not support HDCP error. Others include:
Outdated firmware – Most people never really check for firmware updates on their TVs as long as they’re working. However, this can sometimes be detrimental when you’re trying to connect to regularly updated software.
Faulty HDMI cable – Sometimes, it’s not that serious. It may just be a bad HDMI cable that has been through wear and tear and needs a replacement.
Driver conflict – Your display drivers may be outdated, causing a conflict when you try connecting.
You are using an unsupported device – Your TV or PC may be connected to an HDMI port that does not support HDCP or needs to be upgraded to a higher version. This is common in most older TVs.
How do I fix HDCP not supported?
Perform the following preliminary checks first before attempting the solutions below:
Check your devices for HDMI ports and ensure they’re HDCP-compliant. Most will be labeled behind the TV or on the manufacturer’s booklet. It should support HDCP 2.2 or higher if you’re using an older device.
For this solution, we shall be using the TCL model.
On your TV, find your Settings.
Go to System.
Click on About then select Software update.
Select Network update and click on System update.
Now click on Check Update. Your system will scan for any available updates.
You’ll either start downloading updates or get a message that your TV is already up to date.
2. Use a DisplayPort to HDMI adapter
If your device has an HDMI port, but it’s not HDCP compliant, you may get a this TV does not support HDCP via HDMI message. You’ll need a DisplayPort to HDMI adapter. So, if you’ve been asking yourself how to make your monitor or TV HDCP compliant, this is how.
This will allow you to connect your device directly to the TV without worrying about any issues with HDCP protection or when your monitor won’t detect your HDMI. To that effect, we have the best DisplayPort to HDMI adapters recommendations that are not only pocket-friendly but also reliable.
Hit the Windows key, type Device Manager in the search bar, and click Open.
Navigate to Display adapters to expand, right-click on your graphics card and select Update driver.
Select Search automatically for drivers.
This step is for those using PCs as monitors. For TVs, your display drivers are automatically updated when you update your firmware.
If the display drivers were the issue, it is better to use a third-party driver updater tool because you’re assured that you’ll get the right drivers for your PC.
We recommend the Outbyte Driver Updater for such updates because it is comprehensive. It will scan and detect incompatible, missing, outdated, or damaged drivers. Then, from its wide database, it shall match you with the right drivers.
That’s how to resolve the output device that does not support HDCP error on your TV and computer. Elsewhere, you may experience a related error where Netflix HDCP unauthorized content is disabled. No need to worry, as we have already covered ways to bypass this issue.
We’d love to hear from you for any additional thoughts or suggestions. Drop us a comment below.
All work and no play can get monotonous at times. When you get a few minutes off work, you can take this time to connect with other like-minded people on various chat websites. Omegle is one of these, allowing you to connect to people speaking a similar language.
This is great because you can find people with similar interests with hundreds of languages available. However, a few users have complained that the language selection is a bit buggy, and they cannot connect with who they wish to be connected.
Let’s examine why this happens and how we can resolve it.
Why is the Omegle language selection not working?
If you have tried connecting to Omegle but cannot connect with people speaking a similar language as yourself, there may be a language error or an issue with the site.
So a few days ago, I logged in to omegle.com and by default Omegle was connecting with the language of the country I live in and I could connect with people speaking that language or living in that country. However, since yesterday night the functionality seems to have changed somehow and it seems that on choosing a language I am not getting connected to language speakers or people from the country where the language is spoken but rather it is translating both the messages of mine and the other participant into the chosen language.
Whereas there’s no harm in connecting with people who speak a different language, this option should be a choice for you and not forced.
Furthermore, translating messages for non-native speakers can sometimes distort the intended message and be a huge barrier to effective communication.
So why does this happen? Possible reasons include:
Browser settings – Apparently, if your browser language is set to a different language than the one you speak, Omegle detects that and prevents you from changing.
Temporary glitch – In some cases, it may just be a temporary glitch that may disappear in a few minutes.
You’ve been blocked – Omegle is actually monitored, so if you’re found doing any fishy business or going against the terms and conditions, your access to certain services may be limited.
How do I change the language on Omegle?
Start off with the following preliminary checks before any technical troubleshooting:
Check the server status and ensure it is running.
Refresh your browser.
Ensure you’re running the latest version of your browser.
Switch to your phone. For some users, the setting only works on phones and not on PC.
1. Change your browser settings
For this step, we’ll be using the Chrome browser.
Launch your Chrome browser, click on the three ellipses at the top right corner, and select Settings.
Click on Languages then under Preferred languages, you’ll find your default language. If you’d like to change and add another to connect to Omegle, click on Add languages.
Scroll through the list or search for it then click on Add.
Once added, click on the three ellipses next to your added language and select Display Google Chrome in this language.
This will make it the default language. Now go back to Omegle and refresh your browser and see if the language error persists.
2. Change language over the console
On the Omegle page, right-click on an empty space and select Inspect.
Navigate to the Console tab.
Paste the following command and hit Enter: navigator.__defineGetter__('language',function(){return 'fr';});
Remember to replace ‘fr’ with your chosen language code.
Alright, so this works, BUT: You have to do this for every tab you use (so open a tab of omegle, hit F12, enter the code
This solution appears to work, but you have to repeat this step for every Omegle tab you have open. It can become a bit tedious if you have many of these open.
Open your Chrome browser and click on the three vertical ellipses at the top right corner.
Select Settings.
Next, click on Reset and cleanup, then select Restore settings to their original defaults.
Confirm Reset settings in the next dialog box.
If nothing seems to work and you’re all out of options, it may be time to try Omegle alternatives. You may find that you like these even more. Plus, there’s no harm in getting acquainted with other sites and seeing what they offer.
That’s all we had for this article, but if you’ve encountered the Omegle language error and fixed it using a method not mentioned here, we’d love to hear about it.
Bluetooth eliminates the need for cables and makes connecting with computers, speakers, mobile phones, and other audio devices hassle-free. Wireless communication between the devices works best with better range and less interference.
In this comprehensive guide, we will understand more about Bluetooth range and explore various methods to extend the range along with other tips to boost the capacity & mitigate interference.
What determines the range of Bluetooth?
The Bluetooth range between connected devices is 10 m or 30 feet. This technology is designed to support a broad limit of feasible ranges between two devices.
The Bluetooth range mainly depends on its class, and there are three main classes of Bluetooth:
The higher the class, the lower the range; Class 2 is considered the ideal among the three.
The range is also affected by factors like Radio Spectrum, PHY (The physical layer), Receiver sensitivity, Transmit Power, Path loss, and Antenna gain.
The radio spectrum lies between 30 Hz to 300 GHz; the lower the frequency, the longer the range, but it will support a lower data rate.
Bluetooth technology uses the 2.4 GHz ISM spectrum band, which balances throughput and range nicely. It supports transmit powers from -20 dBm to +20 dBm.
As it doesn’t use the same frequency all the time and runs limited power supply & resources, as it hops between frequencies to pick channels that are not in active use, the range could be shorter than expected.
Can Bluetooth interfere with other devices?
Bluetooth works on the 2.4 GHz ISM spectrum band, and if there are other devices nearby using the same radio frequency range, it could cause interference. Here are some of the tips to mitigate the connectivity issues:
Move away from other Bluetooth devices to improve the radio signals or turn off Bluetooth for nearby devices not in use.
If you have a Wi-Fi router, it could be the biggest interference; you need to change the channel on it manually.
Don’t stand near microwaves and fluorescent lighting as they emit 2.4 GHz frequencies.
Keep the Bluetooth driver up to date.
Reconnect the devices and remove the ones you don’t use.
Ensure you are using the latest version of OS on both devices in question.
Verify Airplane mode is turned off.
If the Bluetooth settings disappeared from your device, then we suggest you go through this informative guide to get solutions.
How do I update my Bluetooth drivers on Windows 11?
If your Bluetooth is not working correctly, chances are the driver for the Bluetooth adapter is outdated or corrupt.
An outdated driver prevents you from connecting your device to another and impacts your computer’s overall functionality and performance.
Therefore, downloading the latest Bluetooth drivers to ensure seamless integration and communication is always stressed. Here we are discussing ways to update Bluetooth drivers; let us check out!
1. Use Device Manager
Press Windows + R to open the Run dialog box.
Type devmgmt.msc and click OK to open the Device Manager app.
Go to Bluetooth and click it to expand.
Locate the Bluetooth adapter, right-click it, and select Update driver.
On the next window, click Search automatically for drivers.
Follow the on-screen instructions to complete the installation of driver software.
If you can’t update the drivers manually, or the process doesn’t work for you, we recommend you use a third-party driver updater instead.
These tools scan and update the old and corrupted drivers within a few clicks, making the task easier. One such reliable tool is Outbyte Driver Updater. Here are the steps to use it:
Launch the app; it will scan your computer for obsolete and incompatible drivers.
You will get a list of drivers; choose the ones you want to update, and click Update & Apply to download & install the latest versions. Once done, restart your PC to save the changes.
How can I extend the Bluetooth range on my computer?
To get a good range, you must ensure you have a suitable device with the latest Bluetooth technology, i.e., Bluetooth 5.0
However, if that is not possible, you can get the second-best thing, a device that can enhance Bluetooth connectivity, i.e, Bluetooth booster, extender, or repeater.
These external Bluetooth adapters are supposed to boost the signal of a Bluetooth device. Here are some of the ways it can help extend the Bluetooth signal range to ensure better connectivity:
Makes the signal on your device stronger, thereby reducing transmission issues.
Connect to multiple Bluetooth devices at the same time.
Offers low latency codec
Prevents sync delay.
How can I increase the Bluetooth range on my Windows 10 computer?
You can follow the same steps and tips mentioned above for Windows 11 to extend the Bluetooth range on Windows 10 PC.
So, these are ways to increase the Bluetooth range of connectivity on your Windows 10/11 computer. To establish a stable connection, you must turn off the Bluetooth devices that are not in use, move away from other devices which could interfere, and keep in mind the limited power consumption capability of the technology.
Bluetooth is one of the popular ways to transfer files in two paired devices, including Windows 10/11 computers, in both personal and professional environments.
All mobile phones, laptops, and some desktops come with preinstalled Bluetooth. You can share different file types, including PNG, Doc, JPEG, PDF, and more.
In this guide, we will discuss how we can share files over Bluetooth on Windows 10/11 computers using your mobile device.
How can I set up a Bluetooth connection?
1. On your Android smartphone
Locate and tap Settings.
Navigate to Bluetooth, and tap the toggle to turn it on.
Next, click Pair New Device or look for a new device under Other Devices.
2. On a Windows computer
Press Windows + I to open the Settings app.
Go to Bluetooth & devices settings, and click the Add device icon.
On Add a device window, click Bluetooth.
Next, on the same window, you will get a device list, locate the Android smartphone and click on it.
A six-digit code will appear on both devices; if they match, click Pair or Connect on both devices.
You will be notified once the connection is established; click Done to complete.
If you cannot establish a connection and get an unknown Bluetooth device error on your Windows 11 computer, we advise you to read this guide to fix the issue.
How can I share files over Bluetooth from Windows 11?
Go to the system tray, click the upward arrow, locate Bluetooth, right-click it, and select Send a File.
On the Bluetooth File Transfer window, select the device and click Next.
Click Browse.
Locate the file and click Open.
Click Next.
On your Android smartphone, you will get a File Transfer notification; click Accept.
Once complete, click Finish.
In case you are wondering where the file is saved, it depends on the kinds of files you transferred. For example, if you send an image file to your Android smartphone, you need to check your gallery or Photos app for the same.
If you cannot connect via Bluetooth, chances are your computer has outdated drivers; to fix you need first to download the Bluetooth driver for your device.
Go to the system tray, click the upward arrow, locate Bluetooth, right-click it, and select Receive a File.
On the Bluetooth File Transfer window, you will see Waiting for a connection.
On your Android device, check if Bluetooth is enabled.
Choose the file or image you want to share and click the Share option.
Select Bluetooth from the options.
Choose your Windows computer as the recipient device; soon, the file transfer process will start.
On Windows, choose the location where you want to save the file, then click Finish.
So, this is how you can share files quickly over Bluetooth on your Windows 10/11 computers using your Android devices.
How can I send files from Windows 10 to other devices?
You can follow the steps mentioned for Windows 11 to connect your Windows PC to an Android device and share files between devices over Bluetooth.
Using Bluetooth’s file transfer feature to connect and share files is a simple & convenient way to send files over devices without needing an internet connection or USB cables.
Additionally, you can send or receive large files between paired devices, and the connection is secured for the transfer to complete; you need to either Accept the request or enter a PIN.
If you face issues like Bluetooth won’t turn on your Windows computer, we recommend you check out this guide to find simple solutions. In case you’re looking for more ways to send files, we have a great guide on how to connect two Windows 11 PCs.
Please feel free to give us any information, tips, and your experience with the subject in the comments section below.
Blue Screen of Death or BSoD errors are pretty frustrating as they can appear randomly and prevent you from continuing your task. Sometimes the BSoD errors do not let you boot to the system, which makes troubleshooting a difficult task.
In this guide, we will share with you multiple solutions that will help you resolve the NETwlv64.sys BSoD error on your PC. Let us check out the problem.
What is the NETwlv64.sys file?
The NETwlv64.sys file is associated with Intel Wireless Wi-Fi Link Driver and belongs to Intel Corporation. Because of this error, you will have an error message DRIVER_IRQL_NOT_LESS_OR_EQUAL.
While users have reported that after viewing this file, they were able to boot to their systems, this error again appeared after regular intervals.
Some of the other error messages related to NETwlv64.sys are:
NETwLv64.sys could not be found
NETwLv64.sys failed to load
The file NETwLv64.sys is missing or corrupt
Windows failed to start – NETwLv64.sys
If you come across any of the above NETwLv64.sys errors, then you can apply the solutions mentioned in this guide to resolve the problem.
What causes the NETwLv64.sys error?
There are multiple reasons why you can come across a NETwLv64.sys error, some of which are listed below:
Corrupt system files – Some system files might be corrupt or missing related to the Wi-Fi drivers which is causing the NETwLv64.sys error.
Outdated driver – You might have installed a wrong or unsupported version of the Intel Wi-Fi software and thus got the BSoD error.
Your PC isn’t up to date – The version of Windows update that you are running might be old and contains a bug that is causing the error.
Let us now take a look at the different solutions that will help you resolve the NETwLv64.sys error.
How can I resolve the NETwLv64.sys BSoD error?
1. Run the SFC Scan and DISM commands
Turn off and on your PC three times using the Power button to boot into the Advanced Startup environment.
Click on Next, and select the Repair your computer option.
Select the Troubleshoot option.
Choose Advanced options.
Select Command Prompt.
Type the below command and press Enter: sfc /scannow
Wait for the process to complete.
Type the below commands and press Enter after each one: DISM.exe /Online /Cleanup-image /ScanhealthDISM.exe /Online /Cleanup-image /RestorehealthDISM.exe /online /cleanup-image /startcomponentcleanup
Restart your PC.
If your PC fails to boot into the system, then you can follow the above steps to run the command prompt in the Advanced Startup environment and fix the corrupt system files using the SFC Scan and DISM commands.
In case the SFC Scan is not working normally on your PC, then you can check out the solutions mentioned in our guide that will help you resolve the problem.
2. Update the Intel Wi-Fi driver
Open the Start menu by pressing the Win key.
Type DeviceManager and open it.
Expand the Network adapters section and open your Wi-Fi driver.
Switch to the Driver tab.
Hit the Update driver button.
Select Search automatically for drivers option.
After the new update installs, reboot your computer.
Chances are that the Wi-Fi version that you have currently installed on your PC is buggy, which is why you are coming across the BSoD error.
You should try updating the Wi-Fi driver and check if this fixes the issue or not. You can also try reinstalling the driver. All you need to do is in place of Update driver, you need to click on the Uninstall device option in step 5.
Besides all this, we also encourage you to level up the driver update process using automatic support from trustworthy driver updater software.
3. Scan your PC for viruses
To open the Start menu, press the Win key.
Open Windows Security.
Choose Virus & threat protection.
Click Quick Scan.
You can also click on Scan options and select Full scan for a deep scan.
Restart your PC.
Often viruses or malware can remove important files from your system causing it to malfunction. In such cases, you can run an antivirus scan and remove the files.
For our case, we have used Windows Defender, but you can use any of the dedicated antivirus software. We have created separate guides that will help you with the list of the best antivirus software and best anti-malware that you can use on your PC.
Turn off and on your PC three times using the Power button to boot into the Advanced Startup environment.
Click on Next, and select the Repair your computer option.
Select the Troubleshoot option.
Choose Advanced options.
Choose the System Restore option and click Next.
Choose the restore point and hit the Next button.
Hit the Finish button.
You can also opt for system restore as this will help you take your PC back to the state when everything was working normally.
However, for that to happen, you should have a previously created restore point on your PC. For that, we have a guide that will help you create a restore point on your PC.
Another wave of Windows updates is upon us, and this week, the operating system is seeing some important features and improvements coming to it. Windows 11 Copilot has arrived at the Beta Channel, and now the AI tool is one step closer to being released to the general public.
But the good news doesn’t stop here: the voice access feature is now available to use on more areas in Windows, including your lock screen. So now, you can actually spell your Windows 11’s PIN and it will be enough.
How to use voice access on your Windows 11 lock screen
First things first, you have to know that this feature is only available to the Dev Channel for now. So, you won’t see the feature in your Settings if you’re not in the Windows Insider Program.
Go the Windows 11’s Settings.
Once you’re there, select the Accessibility panel, and go to the Speech panel.
Make sure the Voice Access feature is enabled, and then go below and enable the Start voice access before sign-in option as well.
Now, every time you restart your computer, before signing in, you’ll be able to use the voice access on the Windows 11 lock screen now. This is very useful because you can do it remotely, and away from your keyboard.
You’ll be able to dictate your PIN and sign in. Even more, if you say show keyboard, the voice access will then show a keyword with labels on it.
You can say the numbers on the keys to enter the letters associated with them. According to Microsoft, this will mask the actual password you are entering from being heard by anyone in your vicinity
What do you think about this new feature? Let us know in the comments section below.
Microsoft released the Windows 11 Insider Preview Build 23516to the Dev Channel this week and it comes with a lot of new features. For example, you will be able to dim your screen’s lights with your eyes, thanks to some new improvements to the new Presence Sensing feature.
Windows 11 will allow you to enable the feature very easily but your device has to support it for your to access it. On the other hand, Copilot arrived on the Dev Channel, and that can only mean one thing. Windows 11 Copilot will most probably arrive on the live Windows servers in the next Patch Tuesday updates.
Microsoft is also improving the screen casting experience in this Build, and it increased the discoverability of the PC to other devices, via the “Projecting to this PC” Settings page.
But one of the most exciting features to come with this new Build is that now you are able to set JXR files as desktop backgrounds in Windows 11. And if you have an HDR display, they will render in full HDR. Microsoft has released a package that contains JXR files to download and test your device.
Here’s how you can set JXR files on Windows 11 as desktop backgrounds
First, you’ll need to make sure your device has an HDR display or, at least, is connected to an HDR display that supports HDR.
Go to Windows 11’s Settings.
Head over to the System panel, and then select Display.
Once you’re there, go to the HDR panel and see if your device supports it.
If it does, then all you have to do is to download an HDR .JXR file to your device.
Then right-click on your desktop, choose Personalize, and then Background.
Select the .JXR file you downloaded to your device.
Quillbot is a popular writing assistant tool that has gained popularity recently thanks to its ability to rephrase sentences and paragraphs. While Quillbot is effective, it can sometimes produce awkward or unclear sentences when rephrasing text.
By exploring other writing assistant tools available today, you may discover features and functionalities that better align with your specific needs as a writer or content creator. Many alternatives offer unique benefits, such as customizable settings and integration with other applications, that could help streamline your workflow significantly.
HIX.AI paraphraser tool is one of the best alternatives to Quillbot. It is designed to rephrase or reword text like a pro.
You could use this tool to paraphrase paragraphs or rewrite articles without the risk of plagiarism. This paraphrasing tool can be beneficial in various scenarios, such as content creation, academic writing, and improving the uniqueness of text for SEO purposes.
The paraphrasing tool is just one of the features of HIX AI Writer which offers more than 120 writing tools that allow you to create any content in seconds. Whether you want to check grammar, rewrite an article, or generate slogans, you’ll find the right tool for you.
For fact-based article writing needs, HIX.AI has developed Long-Form AI Article Writer. If you are looking for an efficient way to streamline the content creation process and increase your online presence, HIX.AI is definitely worth considering.
HIX.AI is an all-in-one AI writing copilot. Apart from these writing tools, it also offers a range of products that make it easy to create engaging content quickly.
They include an all-in-one Chrome extension, HIX Editor, HIX Chat, and AI Email Writer. With its intelligent algorithms and wide range of features, this platform provides a powerful solution for businesses looking to get ahead in today’s competitive digital landscape.
Here are some of its key features:
AI-powered paraphrasing tool that delivers high-quality rephrasing text
Helps improve the quality, clarity, and coherence of your writing
User-friendly interface with intuitive features and options
Offers tone of voice and target audience selections to better customize the output
Easy to access via web APP, browser extension, and HIX Editor
Provides multiple language options, caters to non-English speakers
HIX.AI
Try the best AI paraphrasing tool to create new and exciting content for all your projects.
Paraphrasing.io is a tool that offers a side-by-side view to allow you to compare the original content with the paraphrased version.
This web app helps you reword complex sentences and make them more straightforward and clear and become more accessible to readers.
As a paraphrasing tool, it provides multiple outputs for a given text. This way, you may choose the most suitable alternative that matches your requirements.
If you want to rewrite articles or create original and unique content, Paraphrasing.io is definitely worth a try.
Here are some of its top features:
Can paraphrase lengthy passages into shorter and more concise summaries
Improves content’s readability
Easy-to-navigate interface
Supports different languages for multilingual needs
Paraphrasing.io
With this tool, you can make side-by-side comparisons of your text versions.
Paraphrase Online is an alternative to Quillbot that you may surely want to try. It uses various algorithms and techniques to analyze the input text and generate alternative versions with basically the same message.
Like Quillbot, it helps rephrase sentences or text to avoid plagiarism and improve writing clarity.
The process involves breaking down the sentence and understanding the context and providing more concise, readable, and unique versions of the given text.
Sometimes it will be successful, and sometimes you will need to boost the result with a bit of human creativity.
Here are some of its best features:
Maintains consistency in style and tone while paraphrasing a document
Paraphrases large volumes of texts efficiently and effectively
Seamlessly integrates with other writing platforms
Paraphrasing Tool AI is another great alternative to Quillbot for paraphrasing. It leverages a language model that learns patterns, grammar, and vocabulary from large amounts of text data to reword text and produce more accurate and coherent results.
You can customize the output text of the content to your needs by changing the tone and writing style.
Apart from paraphrasing, it can also help correct grammatical errors, improve sentence fluency, and enhance the overall readability of the text.
Paraphrasing Tool AI is helpful for marketers and bloggers to create content and improve their working efficiency
Let’s review some of its key features:
No plagiarism detected in the paraphrased content
Saves time by quickly generating paraphrased content
Enhances the language and clarity of the text
Paraphrasing Tool AI
Change the tone and writing style of your paraphrased text without worrying about plagiarism.
Grammarly is a leading writing assistant that offers a wide range of features, including a paraphrasing tool as an alternative to Quillbot.
Its advanced AI algorithms can assist you in rephrasing sentences effectively. It provides 4 paraphrasing options for each input sentence, so you can choose the right version for your needs.
However, Grammarly’s main feature, for which is renowned, is to improve the grammar, spelling, and punctuation of your text.
Of course, it also provides suggestions for enhancing the overall clarity and style of your writing. With its user-friendly interface and compatibility across various platforms, Grammarly is a versatile tool for anyone who wants to improve their writing.
Let’s see some of its key advantages:
Comprehensive writing assistance for grammar, spelling, punctuation, and style
Provides alternative suggestions for rephrasing sentences and expressions
User-friendly interface and compatibility across multiple platforms
Offers real-time suggestions and feedback to improve your writing on the go
Can be integrated with various applications, including web browsers, word processors, and email clients
Grammarly
This tool not only provides paraphrasing ideas but it also improves the grammar of your texts.
Jasper paraphraser is an advanced natural language processing tool that can be a viable alternative to Quillbot for paraphrasing needs.
It was designed to rephrase or rewrite sentences, paragraphs, or entire articles while retaining the original meaning.
This paraphrasing tool uses the newest algorithms to analyze and understand the context of the text, providing accurate and contextually appropriate paraphrases.
Jasper for paraphrasing can be very helpful for content creation, academic writing, and SEO optimization.
Here are some of its most important features:
Advanced natural language processing tool for accurate and contextually appropriate paraphrasing
Enhances the readability and coherence of the text
Provides alternative suggestions for rephrasing sentences and expressions.
User-friendly interface with customizable options
Offers additional features like grammar checking to improve your writing
Wordtune has a rewriting tool similar to QuillBot. It uses high-level programming to rewrite sentences clearly and smoothly while still keeping the meaning and even style of the text.
It’s perfect for paraphrasing all types of writing. For official writing, it focuses on being clear, and for informal writing, it adds a bit of flair but doesn’t stray from what you’re trying to say.
Whether you’re writing a crucial business report or creating a creative blog, this alternative to Quillbot makes it easier to rewrite text and create plagiarism-free content.
Let’s see some of its key features:
Generates grammatical-error-free texts
Provides different alternatives that users can choose from
Paraphrases a text in a simpler and easy-to-understand language
Copy.ai is a great alternative to Quillbot which uses AI to rephrase sentences and paragraphs while retaining the original meaning of the original source.
It is efficient in generating responses without plagiarism. This Quillbot alternative allows you to customize and personalize the output by adjusting several parameters.
These include the level of rewriting, desired simplicity, or keeping specific keywords or phrases.
Here are some of its best features:
Leverages AI to repurpose existing content by presenting it in a different format or style
Hypotenuse AI – Turns a few keywords into full articles
The Hypotenuse paraphrasing tool can also rival Quillbot because it harnesses the power of AI to rephrase and restate text in various styles while keeping the original meaning.
The web app employs synonym databases to find suitable alternatives for words and phrases in the original text, thereby avoiding word duplication.
This paraphrasing tool is commonly used by writers, students, and researchers to improve the clarity of their writing and simplify complex sentences.
Take a look at some of its key features:
Provides customizable settings which allow users to adjust the level of paraphrasing or choose specific writing styles
Makes content more readable and accessible by simplifying complex language or jargon+
Clarifies ambiguous sentences to make them easier to understand
The world of AI chatbots is extremely dynamic, offering a huge number of options. Each of the 10 AI chatbots has unique capabilities and features for different sets of needs.
However, HIX.AI is the best alternative to Quillbot. Check out this table that compares them in terms of features, pricing, and more.
√ (Translate, grammar check, longer, shorter, explain and more)
×
Browser Sidebar
√ (HIX.AI ChatGPT sidebar, a a more versatile Bing Sidebar alternative)
√
Chatbot Integrated
√
×
AI Email Writer
√
×
Email Templates
20+
×
Summarize Emails
√
×
Suggest & Write Replies
√
×
Accessibility
Accessible through web app & browser extension
×
Tones of Voices
13
×
Supported Languages
50+
×
However, take everything an AI paraphrasing tool has to offer with a grain of salt. These services are still in their infancy and cannot replace the talent or imagination that a human can express.
We hope that these Quillbot alternatives will help you create unique and interesting content. You may test them all and choose the one that suits you best.
If you have tested any of the AI paraphrasing tools, tell us all about your experience in the comments section below.
Webcams are important devices in today’s fast-paced world, with more importance placed on online video meetings. Usually, most webcams come with a disk that contains their drivers but most of the time, the system finds one automatically after you connect it to your device.
However, it is quite easy to lose this disk which is why you might be wondering if you use a webcam without drivers. In this guide, we will show you how to get your webcam working without the disk.
What is a driver for a webcam?
A webcam driver is an important program that helps your PC communicate with the webcam. They are present in the built-in camera on your PC, and most external cameras have them too.
In most cases, if your webcam driver is not properly installed, is outdated, or is missing, the device will not work. So, they are pretty crucial to the smooth running of your webcam, even if you have third-party webcam software installed.
Do I need a driver for a webcam?
There are plug-and-play webcams that work immediately after you connect them to your PC. There is a special driver installation needed for these types of webcams. They just use the existing ones on your PC instead.
However, if most webcams need a driver to work on your PC, in fact, a vast majority of them do. Fortunately, unlike the days when driver discs are included in the device package, most modern products install their driver when you connect them to your PC.
But if you are wondering if you can use a webcam without a driver because you lost the disk included in the package, there are ways to use the device still.
How do I install a driver for my webcam without the disc?
Check your webcam packaging for its make and model.
Launch your browser and visit the official website of the manufacturer and click the Support tab.
Now, type the webcam’s name or model in the Search box. On some sites, you will be provided a list of devices, and you only need to choose your camera.
Choose your operating system.
Click the Downloads option.
Next, click Download button before the latest software available for your webcam.
Double-click the downloaded file to run it and follow the onscreen instructions to install it.
Finally, plug your webcam into your PC and launch the software to start using your device.
With this, you should be able to install the needed driver for your webcam even when you don’t have the disc. We have used a Dell webcam in this case, but the process is pretty similar on other devices too.
We have reached the end of this guide. You now know that there are webcams you can use without a driver, while many more require them to function properly.
Microsoft released Windows 11 Insider Preview Build 23516to the Dev Channel, and it comes with some important features. Besides the Windows Copilot getting some well-deserved improvements on the channel, this build also brings a lot of improvements to the Presence Sensing feature on Windows 11.
If you don’t know, the Presence Sensing feature on Windows 11 will allow the system to detect users’ behavior near the machine. Your device needs to support Presence Sensing in order for you to use it.
And now, with the new improvements on this feature in the Dev Channel, you’ll be able to use Adaptive Dimming. This feature is on a level of its own, as it will allow you to intelligently dim your screen when you look away and un-dim when you look back. So basically, you will be able to control your screen’s lights with your eyes.
For now, the feature is in the Dev Channel, but this means it will come to the live Windows 11 servers very soon. For those of you who are in the Dev Channel, you can easily enable this feature with a few clicks. Here’s how.
How to enable presence sensing in Windows 11?
You need to go to Windows 11’s Settings via the Search taskbar.
Once you’re there, go to the Privacy & Security panel and select Presence Sensing. (Note: your device needs to support the feature, for it to appear.)
Here just make sure the Automatically dim my screen when I look away option is enabled.
And this is it. Your screen should dim its lights when you look away.
Don’t forget: for now, this feature is only in the Dev Channel, and your device needs to support the feature, for you to enable it.
According to Microsoft, Wake on Approach, Lock on Leave, Adaptive Dimming are all powered by Presence Sensing in Windows and now can be enabled via the OOBE (“out of box experience”) setup process when choosing your privacy settings for your device.
Are you excited about this feature? Let us know in the comments!
Voicemeeter is one of the most-used audio mixer applications, thanks to its ability to manage just about any audio source. However, some users are reporting an output device not working on Voicemeeter when they try to play or transmit audio.
This error is reported to show up after users update their PCs. Fortunately, you can easily get rid of the output device not working error, and we will show you how to go about it in this guide.
Why is my Voicemeeter audio output not working?
There are various factors that can cause the Voicemeeter audio output to stop working. Below are some of them:
Faulty drivers – In most cases, this issue is caused by broken drivers installed by Windows updates. This is especially true if the error started showing after updating your PC.
Wrong output settings – At times, this issue might be due to wrong settings from your end. For example, if you choose WDM instead of MME as your output type when you are indeed using an MME device, you are likely to get this error.
Now that we know the reasons behind this error, let’s fix it using the solutions below.
How can I fix the Voicemeeter output device is not working error?
Try the following troubleshooting steps before proceeding to the more sophisticated solutions below:
Restart your PC.
Remove unnecessary audio software like Sonic Studio.
If you are on Windows Insider build, switch to the stable version.
If this does not work, explore the fixes below.
1. Reinstall the audio driver
Press the Windows key + X and select the Device Manager option.
Double-click the Sound, video, and game controllers section to expand it.
Now, right-click your audio device and select Uninstall device.
Next, tick the box for Attempt to remove the driver for this device if it is available and click the Uninstall button.
Close Device Manager and restart your PC.
From here, go to your audio device manufacturer’s website to download the latest driver for your device.
Extract the download file if it is zipped.
Now, go back to the Device Manager window and right-click your audio device and select Update driver.
Choose Browse my computer for drivers.
Click the Browse button, navigate to the downloaded driver, and select it.
Finally, click the OK button, wait for the process to complete, and restart your PC.
Most users started getting the output device not working error on Voicemeeter after updating their computer. This is because the Windows update installed a faulty driver that is messing with their audio output.
This is especially prominent with Realtek audio drivers. In this case, reinstalling your driver from the manufacturer’s website should restore normalcy. Some users also got rid of the error by reinstalling their NVIDIA GPU driver. So, you can do that too.
2. Use MME as output
Launch the Voicemeeter software and click A1 at the top.
Now, select the MME option for your output device.
Finally, make sure your input device is set as MME too.
Some users have reported that they got the output device not working error on Voicemeeter when they choose WDM as their output. This is despite their output device using a WDM driver.
However, they were able to fix the issue by changing the output to MME instead.
Finally, if you have VB-Cable, repeat the steps above to uninstall and reinstall it too.
If you keep getting the output device not working error on Voicemeeter after trying the solutions above, you might need to uninstall and reinstall the latest version of the software.
This has worked for users, especially in cases where the error message sprung up after a Windows update.
With this solution, we can conclude this article on how to fix the output device not working error on Voicemeeter. You should now be able to fix the error effortlessly, provided you follow the solutions in this guide.
Like its functionality on Microsoft 365 Office apps, Copilot on Windows 11 will streamline tasks and free up your focus on creativity. It empowers multitaskers like yourself to collaborate effortlessly across multiple apps by minimizing the time required to locate and open applications.
We already know how it’ll work on Office apps, but how will Copilot work on Windows 11, and what can you do with it? Here’s everything we’ve gathered so far.
What can you do with Microsoft Copilot on Windows 11?
We all know the immense potential of Bing chat mode, so Microsoft takes it a step further by integrating its plugins that enable developers to enhance their applications within the Windows Copilot ecosystem. This integration opens up new possibilities for developers to provide a seamless and enriched experience to users, leveraging the power of Bing chat mode.
Copilot is now live for you to experience in the Windows Insider Program. Microsoft announced Build 22631.2129, and it has come with a lot of new features, including the long-awaited Copilot.
To do so, the Copilot button will live prominently on the taskbar, offering easy access to its features. Once activated, the Windows Copilot sidebar remains consistent across apps as a personal assistant that’s always ready to lend a helping hand.
How to enable Copilot on Windows 11
You can activate it by clicking on the new button on the taskbar (or WIN + C) to launch Windows Copilot. However, you should that Windows Copilot will use the same Microsoft account (MSA) or Azure Active Directory (AAD) account used to sign in to Windows.
Just like on Office, Copilot on Windows 11 also provides easy access to familiar features like copy/paste, Snap Assist, Snipping Tool, and personalization.
What’s also worth noting is that Windows Copilot goes beyond traditional operations, allowing you to request content rewriting, summarization, or explanation. From simple queries to complex tasks, you can ask the tool to provide you with quick and accurate responses to assist you in your everyday activities.
As Copilot is still in a preview phase, you will be able to submit feedback on it directly to Microsoft. Just click the … icon at the top right of the sidebar in Windows Copilot to submit feedback on any issues you run into.
Copilot is basically Bing running via Microsoft Edge
Windows enthusiast @mayank_jee has found that Copilot is Bing running via Edge. Apparently, you can inspect Copilot, and you can even change its name if you want to. Since the AI tool is web-based, you can easily do that by editing the HTML code attached to the name.
So what does this mean? Essentially, Copilot is a sort of web browser that will use the Internet to build answers and solutions to your issues. Since it’s based on Bing, and Bing itself is based on ChatGPT, it is possible that Copilot will soon be capable of having an internal database to do the work.
However, the tool is still in its early phases so you should be aware that a lot of changes are coming to it. If you don’t like the Windows Copilot and want to disable it, check out this guide to find different methods to do so.
If Edge is the problem, you can also get CoPilot on Chrome and see how that works out for you.
Another great AI assistant available in the preview for Microsoft Security Copilot, explains Microsoft is all about adapting the latest technology to help people and enterprises. And if you’re feeling adventurous, dive into Microsoft Copilot alternatives and see what’s out there.
Are you excited about the Copilot AI assistant on Windows 11? Let us know in the comments!
Back in the day, to create a content piece, writers used to do all kinds of research and rack their brains to make it interesting or worth reading. However, the task has become a lot simpler with the help of AI.
With increased efficiency and growing demand, AI writing assistants are gradually becoming indispensable for the workforce due to their ability to streamline and structure your content.
Here we will talk about one of the powerful AI-writing assistants, HIX.AI, which can help you revolutionize your content creation and comes with an efficient Chrome extension that makes it easier to use.
What are the best features of HIX.AI?
1. Helps write content like a pro
If you often find yourselves in the middle of writer’s block, HIX.AI’s AI Writer tool can help you overcome that. It has 120+ AI writing tools, including Paraphrasing Tools, HIX Translate, Content Rewriter, Content Improver, Content Summarizer, Sentence Expander, Grammar Checker, and more, plus it works in over 50 languages.
Whether you want to write an SEO-oriented article, a paper for school, an ad for a marketing campaign, social media captions, hashtags, slogans, an email body, or website content, your AI writing copilot has got you covered.
It can paraphrase, translate, rewrite, proofread, simplify, or summarize your content to improve the quality and make it captivating.
The AI writing assistant comes with its grammar and plagiarism checker, which ensures your content is original and grammatically correct.
Want to translate your message into a language you aren’t familiar with, don’t worry HIX Translate can help. Paste the content, choose the tone, and the language you want it to get translated, and click Translate.
It will automatically detect the content’s language and perfectly translate it into the chosen languages.
If you don’t want the hassle of logging in every time you want to use the tool, install the HIX.AI Chrome extension to access it anywhere and anytime.
2. Write long-form articles hassle freely
HIX.AI includes a fantastic tool, Long-Form Article, which can help write long-form content with perfection.
It has several options besides general content, including Amazon Product Roundup, Single Amazon Product Review, General Product Roundup, Product Reviews, How-to Guides, News Articles, and Product Comparison.
All you need to do is select any of the above options, provide information, like a brief about the topic, context, keywords, word count, target audience, language, and more, and click Generate Titles.
You will get an outline and title according to the brief; you can change the title and outline structure, add a heading and click Generate button to create unique, SEO-friendly, fact-based, plagiarism-free content that matches your writing standard in a few minutes.
3. Edits your document to polish your content
Proofreading content can be tiring and not mistake-proof, especially if it is long; that’s where you need help, and HIX Editor is the best option. It comes with three modes to enhance your writing and editing experience:
AI Mode – Engage the AI assistant in writing and editing the content you produce and get suggestions to improve the draft as you go.
Power Mode – Get access to 120+ AI writing tools right in the document you are editing to let this AI writing copilot help in every stage of content creation.
Chat Mode – Invoke HIX Chat, enter your query, and get tips and inspiration to create appealing content.
You can access the supercharged editor on WordPress and Google Docs via the Chrome extension, making refining, formatting, editing, and even composing content 10x faster and easier.
If you are worried about formatting and styling the content, don’t, as the tool can adjust the alignment, font size, spacing, and heading in a single click.
Once satisfied with the content generated, copy it or download it as a Word document or PDF.
To share the content, you can use the Share by Link or the Share on Social Media option to share it across various platforms, like Twitter, LinkedIn, Instagram, and more.
Moreover, you can directly export the content to Google Docs or WordPress in a single click. All you need to do is click the Download button, and under Export, select any of the two.
4. Write & respond to emails in the most innovative way
HIX Email Writer helps you compose a fresh email or generate a grammatically correct response with improved flow ten times faster. You can use the HIX.AI web app to get the web version or the browser extension to access it from your Inbox.
On the web app, click the HIX Email Writer from the dashboard, click the Compose or Reply tab, press the forward slash (/) twice, describe what content you want, and press Enter.
It comes with 13 different tones of voice and 20+ Ready to use email templates to curate customized emails or generate on-point responses to convey the message correctly.
You get options like Rephrase, Shorter, or Longer to change the suggested content the way you like. Once you are satisfied with the result, click Insert to Email to the final result on the draft.
Got a lengthy and complex email and want help understanding the core message? This AI Email Writer can help; the tool can summarize the email for you to ensure no critical details are skipped.
5. Answers your queries accurately
Whether you are curious about something, have a code to write, or have a mathematical problem to solve, HIX Chat (The ChatGPT-like Chatbot) can help!
It is powered by GPT 3.5/4 and supported by Internet data which helps it generate more accurate responses than ChatGPT at an affordable price.
Its extensive knowledge of different fields and capability to understand & respond in 30+ languages make it the perfect AI chatbot to answer all your queries on any topic with the latest information.
You can access it from the HIX Dashboard or download the Chrome extension so that this AI writing copilot can always be at your disposal.
The extension adds a Sidebar, similar to Bing AI Sidebar, to the browser to access AI chat on your Chrome at the right or left side of the browser. To invoke the sidebar, click the floating HIX.AI icon or press Ctrl + P and access HIX Chat on Google Docs, Email clients like Gmail, Yahoo & Outlook, and various social media platforms.
The add-in also includes a Toolbar that allows you to select text from any site within the browser and click Ask AI to initiate AI chat or choose options like Rewrite, Summarize, Grammar check, Translate, Explain, and more.
Unlike ChatGPT, HIX Chat also has updated AI image generation technology, so you can give instructions to generate an image to get appealing graphics instantly.
6. Access anywhere on Chrome
HIX.AI comes with a Chrome extension which helps extend its ability to your browser as it works on Google Docs, Gmail, YouTube, Twitter, Instagram, and more.
To invoke this AI writing copilot right from your browser, install the Chrome extension, type two forward slashes (//) in Google Docs, and write 100% original content like Notion AI.
This ChatGPT copilot for the web can help you write social media posts and generate impeccable comments in a single click to boost your connections.
All you need to do is type two forward slashes (//) or click the HIX.AI icon, select a tone, add some instructions on what you want to write, then click Generate, voila, and you get the results.
It also gives hashtag suggestions for your posts to increase traffic, reach, and visibility.
Want to write eye-catching subject lines, engaging emails & personalized replies right from your Gmail, Yahoo Mail, or Outlook window? This extension for email can help with just that.
It works on all popular search engines like Google, Bing, Yahoo Search, Naver, DuckDuckGo, Baidu, and Yandex to provide accurate answers to your query within the search engine interface.
Press Ctrl (Windows)/ Cmd(Mac) + P or the HIX.AI icon from the right side of the window to access the tool anywhere on Chrome.
So these are some of the valuable features of the advanced AI writing copilot that can help you in all the content creation stages.
It also has many features in the pipeline, like Grammarly Integration, SEO Score Audits, Brand Voice, Bulk Processing Chat with PDF, YouTube Summarizer, and more, making it more promising than any other AI-powered content creation tool.
Click Try for free; it will take you to the sign-up page; use your Google account or input the information asked to proceed.
Once done, HIX Dashboard will open.
On the left pane, you can see all the products available, including AI Writer, Long-Form Article, HIX Editor, HIX Chat, & HIX Email Writer. The right pane displays the most popular tools and other information related to the account, such as Words Generated, Items Generated, Tools Used, and more.
Select any listed products from the left pane, the tools from the right pane, or click Create Content to initiate.
Based on the tool you choose, you will be directed to a page wherein you will find a dialog box. Input the text or write instructions about the content.
To refine the results, select options for How to improve, Target audience, Tone of voice, and Language from the drop-down menu, then click Generate.
Once satisfied with the content, click Copy or Export to get the generated content to different platforms such as Google Docs, WordPress, or a social media platform.
2. Use the HIX.AI extension
2.1 Install the add-in
Go to the Chrome Web Store to download HIX.AI and click Add to Chrome.
Once you have the extension, click Extensions and pin it to access it easily.
Now whenever you want to use the tool within Chrome, either press Ctrl + P or click on the HIX.AI icon from the right side of the browser to get the Chatbot.
Whether you composing emails, writing content on Google Docs, or creating social media posts, press // to get the AI writing copilot activated right in your browser.
2.2 Use the extension on Google Docs
If you are using the add-in on your Google Docs, it lets you switch between theAI,Power,andChatmodes to start generating quality content or get answers to your queries. WithAI Mode, you get suggestions to improve your content.
ThePower Modebrings all the AI writing tools to your dispense; choose any of them.
Enter the instructions and clickGenerate.
Wherein theChat Modegets you the answers to your queries. All you need to do is select the mode, type in the query, and clickSendicon to get answers.
2.3 On search engines
Once you are on Google web search, press Ctrl + P to launch the Sidebar.
You will get two options, Write and Chat, to interact and create content.
On the Write tab, you can access any of the AI writing tools offered by HIX.AI, wherein Chat mode lets you ask queries.
It also shows up as a window on the right side of the search, which explains or summarizes your query.
2.4 On websites
Go to any of the websites of your choice. Select the content on the website; you will see the HIX.AIAsk AItoolbar.
Click the drop-down menu next to it to change the action you want it to perform when you clickAsk AI. By default, the action selected isExplain.
You can also change it toRewrite,Summarize,Grammar Check,Translate, or more.
HIX.AI
Generate, rewrite, summarize, proofread, & paraphrase content with a powerful AI writing assistant.
HIX.AI is a one-stop solution for generating well-crafted, plagiarism-free blogs, articles, emails, and messages in a few clicks. Here are a few advantages of using it as a copilot:
Increased productivity – With an AI writing assistant to help, you can generate content faster, saving you time and thus enhancing productivity.
Simple & intuitive interface – The dashboard has a clean interface, allowing you to navigate to various tools listed and do the work without hassle.
Improved accuracy – Spots grammatical errors and makes corrections to the formatting & structural mistakes to help you produce accurate and mistake-free content in a few clicks.
Scalability – Handles a large number of users and queries at the same time, which makes it suitable for both small and large-scale usage.
Whether you want to write fresh content, summarize your essay or paraphrase the written text, HIX.AI has got you covered.
With the 120+ writing tools and intuitive interface, you can write & edit an essay, SEO-powered articles, emails, Amazon product content, social media content, ads, slogans, prompts, and more within a few clicks.
The HIX’s powerful Chrome extension makes it better as you can access the HIX Chat, the ultimate Chatbot, and other powerful AI writing tools right where you are.
Upon testing, we found the platform to be true to all its claims and works wonders in creating & editing content and responding to queries without lag time.
Have you tried HIX.AI? If not, try the advanced AI writing copilot today and create supercharge content faster at affordable prices. If you have questions or suggestions, please mention them in the comments section below.
Outlook is a very popular email client and an all-around tool for managing your emails, contacts, and calendars. As such, you’ll find people syncing their appointments to the Outlook calendar to stay organized.
However, you may miss out on these appointments because your calendar failed to sync. But why would this happen? We get to the bottom of this in this article and provide solutions.
Why has my Outlook calendar stopped syncing?
If you’re missing out on events and important engagements because your Outlook calendar is not syncing, it could be because of one or more of the following reasons:
Internet connection is not working – If you’re having any connection issues, it will be impossible for Outlook to sync your calendar. A strong and stable connection is one of the prerequisites for successful synchronization.
Incorrect Outlook account settings – If you have changed any of your account’s settings, such as the password or username, it can lead to syncing problems for your Outlook calendar.
Older Outlook version – If you’re using an outdated version of the Outlook application, it is possible your calendar is not syncing because of compatibility issues.
You have set up the Outlook calendar to sync with another account – If you have more than one Outlook account, you may set up your calendar to sync with one of the accounts and expect it on the other.
Server issues – Since syncing depends on the server to communicate between the two apps, syncing may fail if it is experiencing downtime.
How do I force Outlook calendar to sync?
Try the following simple workarounds before moving on to the more advanced solutions:
Verify that you’re syncing to the correct Outlook account if multiple accounts are signed in.
Switch to an Ethernet connection if you are using Wi-Fi to ensure you’re getting a stronger and more stable connection.
If the Ethernet is still not providing a stable connection, switch to another Internet connection, such as a mobile hotspot.
Log out, then log back into your Outlook account.
Restart your router.
Check for any restrictions your administrator may have set if you use a work or school account.
1. Run the Windows Store Apps troubleshooter
Hit the Windows key and click on Settings.
Click on System then select Troubleshoot.
Select Other troubleshooters.
Navigate to the Windows Store Apps troubleshooter and click on the Run button.
2. Repair Microsoft Office
Hit the Windows key, type Control Panel in the search bar, and click Open.
Navigate to Uninstall a program under Programs.
Locate MS Office, click on it, and select Change.
Select the Online Repairoption and click on the Repairbutton.
Press the Windows key + I to open the Settings app.
Click on Apps followed by Apps & features.
Within the Apps & features box, seek for the Office application by typing its name into the search area and selecting it from the three-dot menu, then selecting Advanced options.
Scroll down until you reach the Reset area, and then click on the Reset button to restart the process.
4. Delete and re-add the problematic account
Hit the Windows key, type Control Panel in the search bar, and click Open.
Type Mail in the search bar and click to open.
Next, click on Show Profiles under Profiles in the Mail Setup window that pops up.
A list of Outlook profiles registered on your PC will appear. Find the one that was having problems, click on it, then select Remove.
A confirmation dialog box will appear, click Yes to confirm.
Repeat the same steps, but when you get to step 4, instead of Remove, click on Add.
Follow the on-screen prompt to re-add the account.
Although this method may work, and you’ll be able to sync again, you stand to lose all your data. This can be a rigorous process of remembering all details or important emails. To cushion yourself and avoid losing all data, you can move some of your Outlook folders to your Desktop.
In case you’re having issues with events, you can import them manually. To learn how to do that, check our how to import ICS file in Outlook guide. Even more, don’t hesitate to take a closer look at our guide on how to keep Outlook’s calendars selected.
Over onto other related issues. You may also experience other sync-related issues, such as the 0x8007274d error. Lucky for you, we’ve already discussed and come up with fixes to resolve it quickly.
Have you ever accidentally closed a tab on your browser, but when you went to restore it quickly, you couldn’t? Well, Chrome users have this as the latest headache. And while Google has built a fairly robust and powerful backup system, there are some obvious shortcomings.
Of course, you can always enable Chrome’s memory saver to avoid having to close tabs, but other factors can still raise this issue. If you have tried restoring your Chrome tabs, but it seems impossible, we’re here to make it easier for you.
Why did my tabs not restore?
If you’ve been using Google Chrome for a while, you probably know that you can restore your previous session. This feature is helpful if you close your browser accidentally or want to open up a website you were visiting earlier.
However, this is not always a guarantee. Possible reasons for this include:
Browser crash – If your Chrome browser crashed while you were in the middle of doing something, your tabs probably won’t be restored the next time you launch it.
Incognito tabs – When you close an incognito tab, it gets cleared out of memory, and any temporary files associated with it are deleted. As such, restoring incognito tabs becomes a bit difficult.
No Internet connection – If your computer is offline or there is no Internet connection, it will not be able to restore all your open tabs.
Virus infection – If some malicious programs are installed on your system, they may cause issues with saving your tabs automatically in Google Chrome.
Not enough memory – If there is not enough space available on your computer’s hard drive, then it may not be able to save all of your open tabs when you restart Chrome or shut down Windows completely.
Incompatible extensions – Some extensions may cause issues that prevent you from restoring your tabs.
Browser quota exceeded – This happens when there are too many tabs open in your browser at a particular time, and it runs out of memory while trying to restore them back again.
How do I force Chrome to restore tabs?
A few basic checks to perform before any advanced solutions include:
Restart the browser.
Use the keyboard shortcut combination of Ctrl + Shift + T and try to reopen the closed tabs.
Ensure you have enough memory in your Chrome browser by clearing the cache.
Check for any problematic extensions and disable them.
Right-click on an empty space after the last open tab on your Chrome browser.
Select Reopen closed tab.
You’ll have to repeat this step until you get to the tab you’re looking for or open all recently closed tabs.
This can be a tedious exercise if you have a lot of tabs open and are only looking to restore one. If you only want to reopen one or two tabs, proceed to the next step.
2. Restore from history
Click on the three ellipses at the top right corner of your Chrome browser.
Select History, then navigate to Recently closed.
Here, you’ll find all the tabs you’ve visited across all devices synced to your Google account.
Click on the three ellipses at the top right corner of your Chrome browser.
Select Bookmarks, then select Bookmark all tabs.
Now, whether you close a tab accidentally or your browser crashes in the middle of loading, this tab will be saved.
You can restore it using any of the methods listed above.
The downside to this method is that if you open hundreds of tabs in a day, you can imagine the number of bookmarks that will be saved. Bookmarks are ideally created to save a handful of your most visited sites or sites you want to return to, then remove them once you’re done.
Having such a high number of bookmarks can cause serious performance degradation on your Chrome browser. This is because it takes quite a significant amount of space, and you may notice some lag and freezing.
4. Restore from Journeys
Press Ctrl + H to open the History settings on your Chrome browser.
Navigate to the Journeys tab.
You’ll find tabs organized based on topics you’ve been searching for.
Click on the ones you wish to reopen.
This method of reopening closed tabs is more appropriate in situations where your search history is a bit all over the place, and you’ve accumulated a lot of history.
Journeys groups your tabs based on similar topics and based on the most recent searches. This way, you can easily jump to a section and click a tab to reopen.
So, there you have it. A Chrome browser crash can be scary, but it doesn’t have to be. With the above solutions, you can easily reopen closed tabs.
Imagine typing out a document but getting nowhere because Microsoft Word keeps deleting the text. You’ll be typing along and suddenly see that one or more letters or words have disappeared from your document. Sometimes even whole paragraphs will vanish.
The most likely reason is that some formatting applied to your document knowingly or unknowingly makes the text behave in unusual ways. So how do you get to type without having text disappear? Here’s how.
Why does Word keep deleting my text?
Have you encountered an issue where Word is automatically deleting your text? What could be the reason? We explore some possible causes below:
App crash – It is possible that your Office application has crashed in the middle of typing something, and your text cannot be retrieved from the system’s memory.
Accidental deletion – There are some shortcuts you can press while editing in Word that will delete your text. For instance, you may have intended to copy, but since Ctrl + X and Ctrl + C are so close, your fingers wandered, and you ended up deleting your text.
Keyboard malfunction – Keyboards, like any other piece of hardware, can start to act up. It could be a specific key or just the entire keyboard that automatically deletes text in your Word application.
Hidden formatting – Some documents contain hidden formatting, such as the overtype mode. This is common, especially if you’re not the document’s original author. In such instances, it can cause automatic deletion because it’s been programmed to replace anything you type.
Virus infection – We are all aware of how a virus attack on your PC can upset the status quo of your system. It has the ability to change how certain apps behave, and Word may be the casualty hence why it is automatically deleting text.
Driver errors – If your keyboard drivers are incompatible or outdated, they may cause errors.
How to stop text from erasing when typing?
Check the following first before you make any permanent changes:
Open a different Word document and observe whether the same behavior persists.
Launch your Word document, click on File, then select Options from the fly-out menu.
Click on Advanced.
Navigate to Editing options and uncheck the Use the Insert key to control overtype mode and the Use overtype mode boxes. Hit OK to save changes.
2. Clear all text formatting
Press the CTRL+ A combo to select all text on your Word document.
Click on the Clear all formatting icon.
This will reset the document to default settings and get rid of any formatting previously applied that may have been interfering with your text.
3. Run Microsoft Word in Safe Mode
Press the Windows key + R to open the Run command.
Type the following command and press Enter or click OK: word /safe
If you’re having issues with an app, try opening it while in Safe Mode and see if it works. If it does work, then one of the apps or services running in the background while using it may have been causing the issue.
Click on the Start Menu icon, search Windows Security, and click Open.
Select Virus & threat protection.
Next, press Quick scan under Current threats.
If you don’t find any threats, proceed to perform a full scan by clicking on Scan options just below Quick scan.
Click on Full scan, then Scan now to perform a deep scan of your PC.
Wait for the process to finish and restart your system.
Besides Windows Defender, we recommend our users check this antivirus program list for the highest detection scores and the best protection for their devices.
5. Repair MS Office
Hit the Windows key, type Control Panel in the search bar, and click Open.
Navigate to Uninstall a program under Programs.
Locate MS Office, click on it, and select Change.
Select the Online Repairoption and click on the Repairbutton.
6. Reinstall Microsoft Office
Hit the Windows key, type Control Panel in the search bar, and click Open.
Navigate to Uninstall a program under Programs.
Locate MS Office, click on it, and select Uninstall.
So that’s it for this post. Hopefully, you’re feeling a little less stressed about the situation now. Moving forward, make it a habit to save every few minutes such that even if your document experiences such bugs, you can restore your saved work.
Many of our readers have enquired whether they can connect multiple Bluetooth devices to their systems or not. This includes both casual users and professionals who rely on Bluetooth connectivity for their work or personal use.
By pairing multiple Bluetooth devices, they want to get stereo audio output with their wireless speakers, etc. Connecting a Bluetooth audio device to a Windows PC is simple, and in this guide, we will explain how pairing multiple Bluetooth devices on Windows works.
Can you connect multiple Bluetooth devices to Windows?
Yes. You can connect multiple Bluetooth devices to your PC. It could be two audio devices to achieve a stereo mix, or two pair of headphones to listen to movies together.
Basically, you can connect more than one Bluetooth device to a Windows 10 or 11 PC. The only condition that it must satisfy is that the devices should support Bluetooth 5.0. If the device doesn’t support Bluetooth 5.0 then you won’t be able to enjoy stereo mix.
While Bluetooth 5.0 is stable and offers stutter-free transmission of an audio signal, often it is observed that when multiple Bluetooth devices are connected to Windows, it results in frequent disconnections, recurring connection drops, audio loss, etc.
How do I connect to multiple devices using Bluetooth?
1. Using the manufacturer’s app for pairing
If you have bought a new Bluetooth device, then you should check whether the brand provides a dedicated app for pairing.
Brands like Bose, JBL, Sony, etc., offer a dedicated app for mobile devices and PCs, that will help you to pair multiple devices and change the audio settings.
Do note that not all manufacturers offer an app for Windows devices. So, you might have to do some research on which brands of audio devices offer a dedicated app.
2. Pairing devices that can connect with each other
Press the Win + I keys to open the Settings menu.
Click on Bluetooth & devices on the left pane.
Click on Add to pair a new Bluetooth device.
Select the Bluetooth option.
Connect your device.
Once the connection of the first device is complete, try connecting the other device following the same process.
After the pairing is complete, click on the Speaker icon on the Taskbar and select the Sound Settings option from the context menu.
Scroll down and select More Sound settings.
Click on the Recording tab.
Right-click on an empty space and select Show Disabled Devices.
Right-click on Stereo Mix and select Enable.
Select Stereo Mix and click the Set default button.
Again select Stereo Mix and hit Properties.
Switch to the Listen tab and check the Listen to this device box.
Select your second speaker from the Playback through this device drop-down and click OK.
Hit Apply and OK to apply the changes.
By other devices, we mean devices from the same brand or model. You must try connecting two devices of the same brand and tweak the audio settings as mentioned above, as chances are they could pair up simultaneously.
Download Voicemeeter from the official website and install the program.
Click on the Speaker icon on the Taskbar and select the Sound Settings option from the context menu.
Scroll down and select More Sound settings.
Under the Playback tab, select Voicemeeter, right-click on it, and select Set as default device.
Plug both your audio devices into your PC using the audio port, audio splitter, or USB port.
Launch the Voicemeeter app, on the right corner you will see two buttons, A1 and A2.
Click on A1 and choose the first audio device from the list.
Repeat the same steps with A2 and select the second audio device.
You can even connect two speaker systems to listen to them simultaneously.
We have used the Voicemeeter app which is free to download and use. It is an excellent virtual audio mixer that allows you to connect multiple devices and listen to their output simultaneously.
Do note that in order to use the Voicemeeter app, you need to have Windows 10 or above installed on your PC. For Windows 11 users, there is another option called the Boom 3D software to get an immersive sound or stereo sound experience.
4. Using a Bluetooth transmitter
Apart from using software for listening to dual audio and pairing multiple Bluetooth devices on Windows, you can also make use of a hardware product known as a Bluetooth transmitter.
A Bluetooth transmitter or a Bluetooth adapter is a device that lets you connect a non-Bluetooth device connect to Bluetooth devices via the USB port.
However, there might be limitations with the Bluetooth adapter that you have as not all adapters support dual audio or multiple devices streaming. Ensure that the adapter supports Bluetooth 5.0 and A2DP.
For your convenience, we have a guide that lists down some of the best Bluetooth adapters that you can try on your Windows 11.
Is there a limit to how many Bluetooth devices can connect to a PC?
You can simultaneously connect up to 7 devices and a practically unlimited number of devices can be paired. However, this is true for Bluetooth 5.0-supported devices. Older versions of Bluetooth will have some other limitations.
You customized your Opera GX browser with your favorite wallpaper but it’s not working anymore. The reason can be anything but you can resolve this issue and get back to enjoying the customization.
Opera GX is a great browser that offers a lot of customization options. You can set up animated or live wallpaper and choose from a range of different designs, abstracts, landscapes, and a lot more.
Also, if you’re a passionate gamer, you can choose Opera GX mods to elevate your gaming experience and fix mods not working issues in case you’re having some troubles already.
Applying wallpaper on a browser isn’t a big task. You just have to choose your favorite one to personalize your browsing experience. But even this simple task can start causing trouble sometimes.
Opera users have reported malfunctioning wallpapers. Sometimes, the homepage wallpapers go black, stop responding, or stop displaying entirely. But fret not! you can resolve these problems.
Why has wallpaper stopped working on Opera GX?
Well, the reasons why your custom wallpaper stopped working on the Opera GX browser are many. But you can troubleshoot the underlying issue and enjoy personalization once again!
These are the main possibilities for your Opera GX live wallpaper not working problem:
Browser extension issues
Disabled wallpapers in the settings
The battery-saver option is interfering with the wallpapers
Corrupted cache or cookies data
An unsupported operating system is also one of the issues that can stop wallpaper from working properly. Furthermore, so many background processes running in the background can cause wallpaper malfunction.
So, now you do know what’s stopping your custom wallpaper from responding. It’s time to get to the heart of the matter.
How can I fix Opera GX wallpaper not working issue on PC?
Below is the list of fixes that could resolve the issues like wallpaper not working on Opera GX browser on your Windows PC.
1. Check the browser settings
Click on the Opera logo and select Settings.
Scroll down from the top of the page to find Wallpapers.
See if the Use custom wallpaper option is enabled; if not enable it.
Open a new tab and see if the wallpaper is now working.
Shortly, this simple workaround may be a plausible cause if the custom wallpaper stopped working on Opera GX. In case it didn’t fix the issue already, check the next solutions.
2. Verify if the browser is up-to-date
Select the logo button on the top-left and choose Update & Recovery.
In this window, click on the Check for updates button.
Wait for a bit and see if the browser has the latest version.
If not, update it directly from there to fix the issue.
Opera GX
Get the latest update of the Opera GX gaming browser and fix the issue.
There is a chance to meet this problem due to corrupted extensions on your GX browser. To check this, follow these steps:
Click on the cube icon on the top-right pane to open Extensions.
Select the Manage extensions button.
Next, check each extension you use to see if it’s behaving normally.
If it blocks or it gives you glitches, disable it from the menu.
Verify if the wallpaper is now showing on the homepage.
4. Toggle off battery-saver options
Select the Easy Setup button and go to the last Full browser settings option.
Go to the search box at the top bar and write Battery saver.
The results will appear so disable the Battery saver option there.
After disabling the option, check if the wallpaper is active.
5. Clear the cache data
Click on the Opera logo button and select Settings.
Go to the Privacy & Security menu.
Now, click on the first option named Clear browsing data.
In the prompted window, select Cache images and files and set a time range.
Simply select the Clear Data button.
After applying the steps mentioned above, you should be able to finally get back to personalize your browser with your favorite wallpaper. It’s worth mentioning that these fixes work for live or animated wallpapers as well.
Be sure to apply our guided workarounds here to bring back control over this beloved gaming browser. You may be lucky and fix it with a couple of clicks. If it didn’t happen in your case, do not get stressed, and contact us in the comments section below for more help regarding wallpaper not working on Opera GX