Fix: A Technical Error has Occurred in FFXIV Launcher

If you are facing a technical error has occurred while launching the FFXIV launcher, don’t worry; you are not alone. But the good news is it can be easily fixed in no time.

This guide will discuss the reasons and methods to fix this problem with one of the most popular games, so you can play your favorite MMORPG without interruption.

What causes a technical error has occurred in the FFXIV launcher?

There could be several reasons behind this launcher error; here, we have mentioned some of the most common ones:

  • Your Square Enix and Steam accounts are not linked: If both accounts are not connected, you could face this issue.
  • FFXIV doesn’t have enough rights: The technical error might occur if the launcher is not run as administrator, try to run it as admin to avoid such issues.
  • Your Steam Username: If your Steam username has special characters, it may cause problems.
  • Network issues: If your DNS and DNS client service is not responding, this could cause the launcher issue.
  • SSL issue: If there is an SSL error while connected to the site, you could face this error.

What can I do if a technical error has occurred in the FFXIV launcher?

Before diving into the troubleshooting methods, let us check out the quick fixes:

  • Close and reopen the launcher.
  • Close and reopen Steam.
  • Restart your computer, then the game.
  • Change Steam username.
  • Click Reset System Settings for FFXIV.
  • Ensure there are no pending Windows Updates.

If these fixes didn’t solve your problem, and the launcher won’t load for you, try these detailed steps: 

1. Disable DirectX11

  1. Go to the FFXIV launcher, and click on Config.
  2. Locate DirectX 11 Support, and toggle Off the switch to disable it.DIRECT X Disable
  3. Reboot the launcher and try to log in again.

2. Delete the ETC folder

  1. Press Windows + E to open File Explorer, paste the following path in the address bar, and hit Enter: C:\Program Files (x86)\SquareEnix\FINAL FANTASY XIV - A Realm Reborn
  2. Locate the etc. folder, right-click on it, and select Delete.ETC folder delete
  3. Choose the appropriate response in case a confirmation prompt appears.

3. Disable Firewall

  1. Press Windows + I to open Settings, go to Privacy & Security, then click Windows Security.Privacy Security - WIndows security
  2. Click Firewall & network protection.Firewall - Windows Security
  3. Now click on Domain network, Private network, and Public Network one by one.Firewall
  4. Toggle off Microsoft Defender Firewall.Firewall 3
  5. Click Yes on the UAC prompt to finish.
  6. Restart your PC and try to launch the game.

4. Set the launcher to run as administrator.

  1. Locate the launcher file, right-click on it, and select Properties.
  2. Now click Advanced.RUN as admin
  3. Next, tick the checkbox for Run as administrator, and click OK.Run as admin 2
  4. Now click Apply and OK to save the changes.

5. Checkmark SSL 2.0 and 3.0 Internet Options

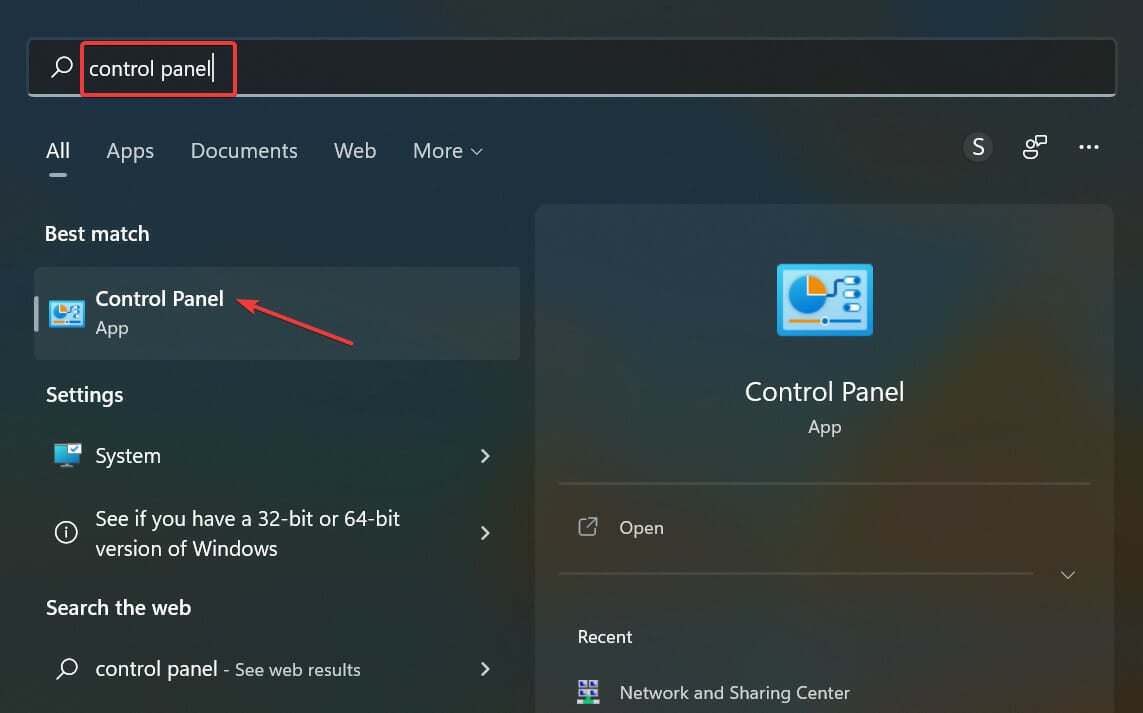
  1. Press the Windows + S to open Search, type Control Panel and click Open.Control Panel
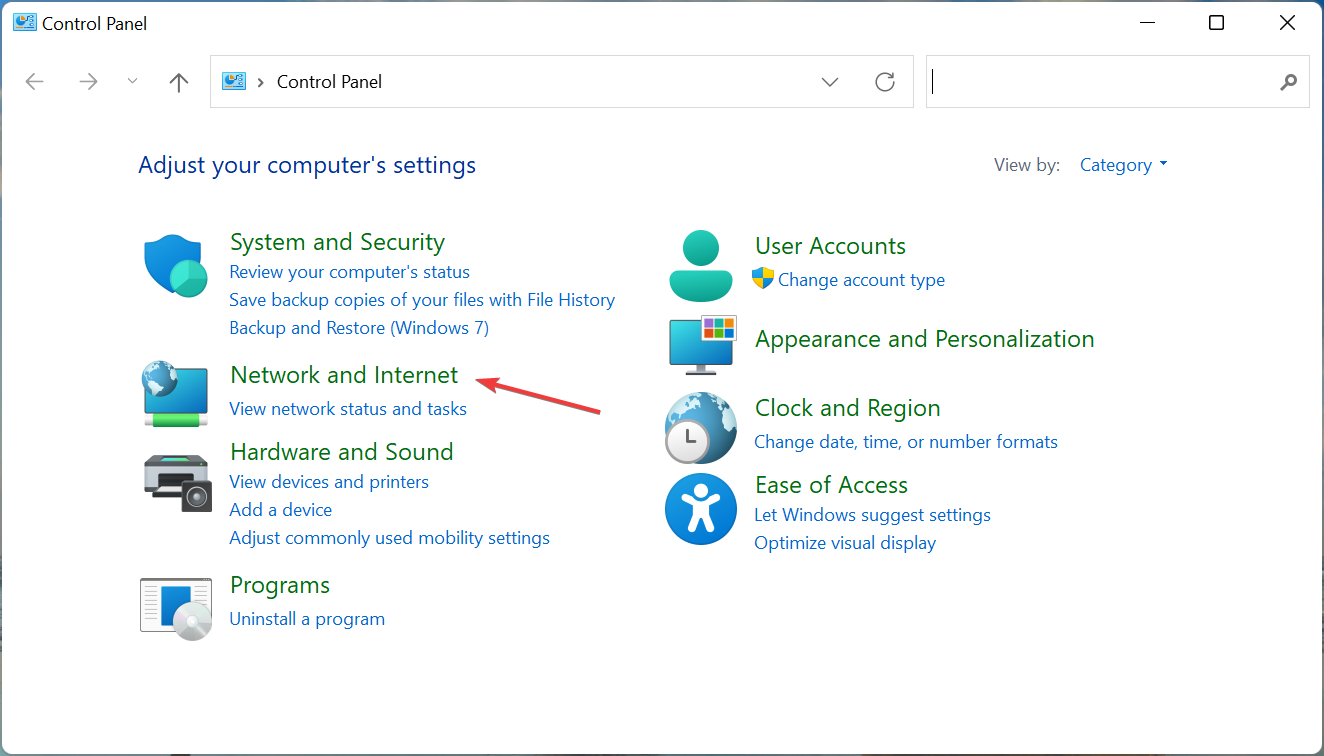
  2. Go to Network and Internet.Network & Internet Settings
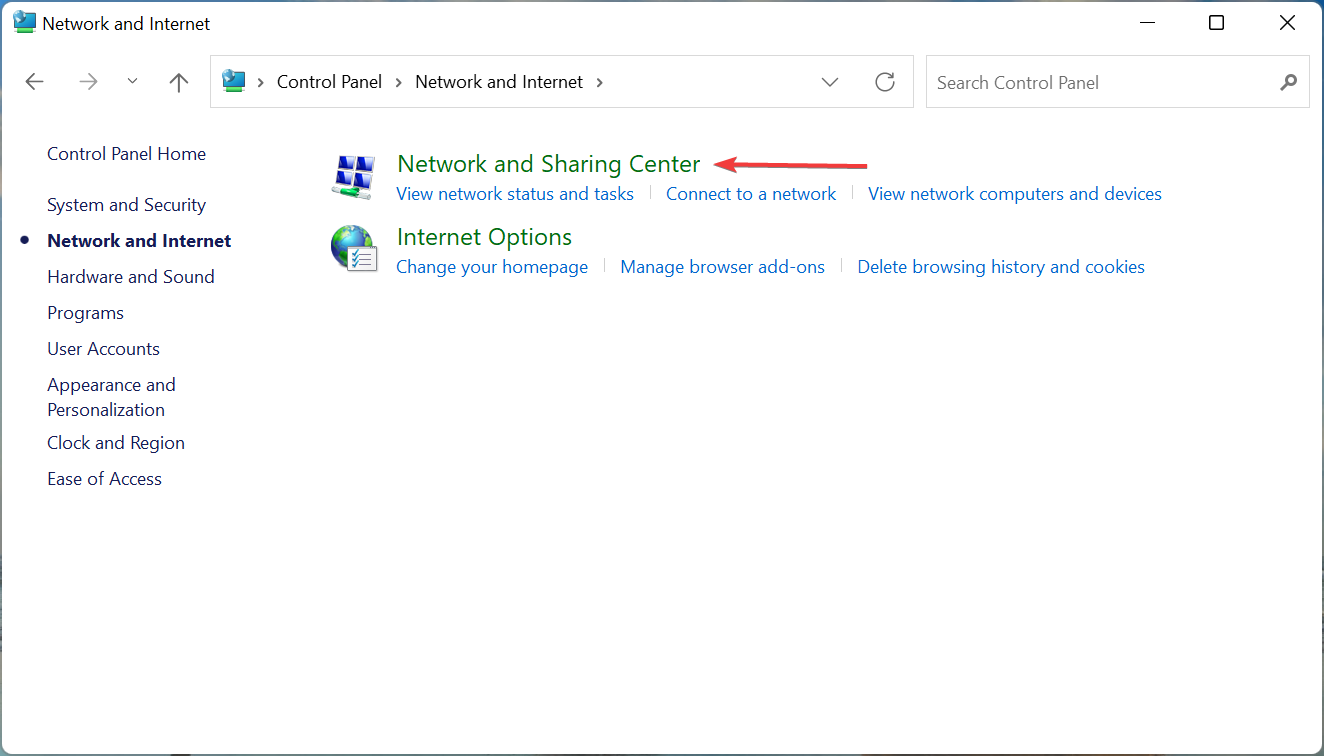
  3. Double-click on Internet Options.Internet Options
  4. Go to the Advanced tab, tick the checkbox for SSL 2.0 or SSL 3.0, whichever is available, and click Apply and OK to save the changes.Internet Properties

6. Modify FFXIV_Boot.cfg file

  1. Press Windows + E to open File Explorer.
  2. Paste this path in the address bar after replacing User with your current account name:  C:\Users\user\Documents\My Games\FINAL FANTASY XIV - A Realm Reborn
  3. Right-click on the FFXIV_BOOT.cfg file and select Open with.
  4. Now select Notepad and click Just Once.Modify settings
  5. Next, crosscheck the info mentioned below and ensure the value is the same as mentioned; if not, alter it.
    • Region 2
    • Language 1
    • StartupCompleted 1
    • EulaAgreement 1
    • ConfigReset 0
    • B4EulaAgreement 1
    • BootVersionCheckMode 1Modify file
  6. Once you are done with the changes, press Ctrl + S to save the file.

7. Change DNS Settings 

  1. Press Windows + I to open Settings, select Network & Internet, then click Advanced network settings.Network Settings
  2. Now click More network adapter options.Adapter settings
  3. From the network connection, right-click on the active network adapter, and select Properties.Network Properties
  4. Select Internet Protocol Version 4 (TCP/IPv4) and click Properties.IPv4 Properties
  5. Select the Use the following DNS server addresses option, and enter the following:
    • Preferred DNS server: 8.8.8.8
    • Alternate DNS server: 8.8.4.4.
  6. Select the Validate settings upon exit option and click on OK to save the changes.Network 5

Can I still play FF14 without a subscription?

You can’t play FF14 (Final Fantasy XIV) without a subscription, though there’s a 30-day free trial for users. Download the game from the official website, try it out, and if you feel like it’s worth the money, purchase the subscription.

Though the free trial does have some limitations. For instance, your character can’t progress beyond Level 60, and the number of characters has been capped at 8. Remember, there’s no free trial for FINAL FANTASY XIV: Endwalker.

So, these are fixes that can help you resolve technical errors has occurred while loading the game via the FFXIV launcher.

If nothing has worked for you so far, it is suggested to uninstall and reinstall the game. 

Please let us know in the comments section below if any other method worked for you.

System Thread Exception not Handled Ntfs.sys: 6 Easy Fixes

You might encounter the System thread exception not handled ntfs.sys error message appearing on your display alongside the Interrupt Exception Not Handled error.

While different factors can cause this error, it is impossible to address, as we will show in the following sections of this article.

What is the System Thread Exception not Handled error?

  • Faulty or outdated driver: Sometimes, this issue can be due to issues with some drivers on your PC. The quick way out here is to reinstall, roll back, or update these drivers to the latest version.
  • Faulty system files: In some cases, the system_thread_exception_not_handled ntfs.sys error is due to missing or broken system files. Repairing and restoring these files should do the trick here.

How can I fix System Thread Exception not Handled ntfs.sys error?

1. Power cycle your PC

  1. Shut down your PC and unplug it from the power source.
  2. Remove the battery and press and leave it for a few minutes.
  3. Now, press and hold the power button for 5 to 10 seconds.
  4. Plug the charger back without the battery.
  5. Next, power on your PC and put the battery back when it boots normally.

The thing to try is if you are getting the system thread exception not handled ntfs.sys failed error is to power cycle your PC. This has worked for some users, especially on Acer Aspire. So, it would be best if you tried it too.

2. Fix the error using third-party software

If you’re unfamiliar with such errors, this blue screen might scare you a little. However, system thread exception not handled ntfs.sys is not very common, but it can be fixed.

But you can do this the hard way by tweaking the system or using a clever repair solution that automatically clears these errors in just a few seconds.

3. Reinstall your graphics drivers

  1. Create and insert a bootable media creation tool into your PC.
  2. Now, boot your PC from the drive. If your PC does not boot automatically from the drive, restart it and press Esc, F2, or F8 to enter the BIOS and change the boot order.
  3. After booting your PC from the drive, enter your language and other information and click Next.
    language  system thread exception not handled ntfs.sys
  4. Click Repair your computer in the bottom left corner.
    repair computer
  5. Now, select Troubleshoot > Advanced options.
    advanced options
  6. Select Startup Settings.
    startup settings system thread exception not handled ntfs.sys
  7. Next, click the Restart button.
    restart
  8. Press the corresponding key to Enable Safe Mode or Safe Mode with Networking when your PC restarts.
    enable safe
  9. After your PC boots up, press the Windows key + X and select the Device Manager option.
    device manager system thread exception not handled ntfs.sys
  10. Now, double-click the Display adapters option to expand it and right-click the device there.
  11. Choose the Uninstall device option.
    uninstall device
  12. Finally, click the Uninstall button to confirm the action and restart your PC.
    uninstall button

Another effective solution to the System thread exception not handled ntfs.sys error is to reinstall your drivers. Again, this is especially effective for AMD driver users.

4. Use Command Prompt

  1. Repeat steps 1 to 5 in Solution 3.
  2. Now, select the Command Prompt option.
    command prompt system thread exception not handled ntfs.sys
  3. Type the C: in the command line and hit Enter.
  4. Now, copy and paste the command below and hit Enter: BCDEDIT /SET {DEFAULT} BOOTMENUPOLICY LEGACYbcdedit
  5. Next, type Exit and press Enter to exit the command prompt window.
  6. Finally, restart your PC.

Sometimes, the System thread exception not handled ntfs.sys issue might occur due to corrupt boot files. Running the commands above should repair these files and help to boot your PC normally.

5. Install the latest graphics drivers

  1. Repeat steps 1 to 8 in solution 3 to enter Safe Mode.
  2. Press the Windows key + R, type devmgmt.msc, and click OK.
    devmgmt
  3. Expand the Display adapters option and right-click the device there.
  4. Now, select the Update driver option.
    update driver system thread exception not handled ntfs.sys
  5. Finally, choose Search automatically for drivers and install any available update.
    search auto

A problematic graphics driver most likely causes the System thread exception not handled ntfs.sys error. So, updating your driver should fix the issue.

However, for some users, rolling back their driver did the trick. So, you can try that too.

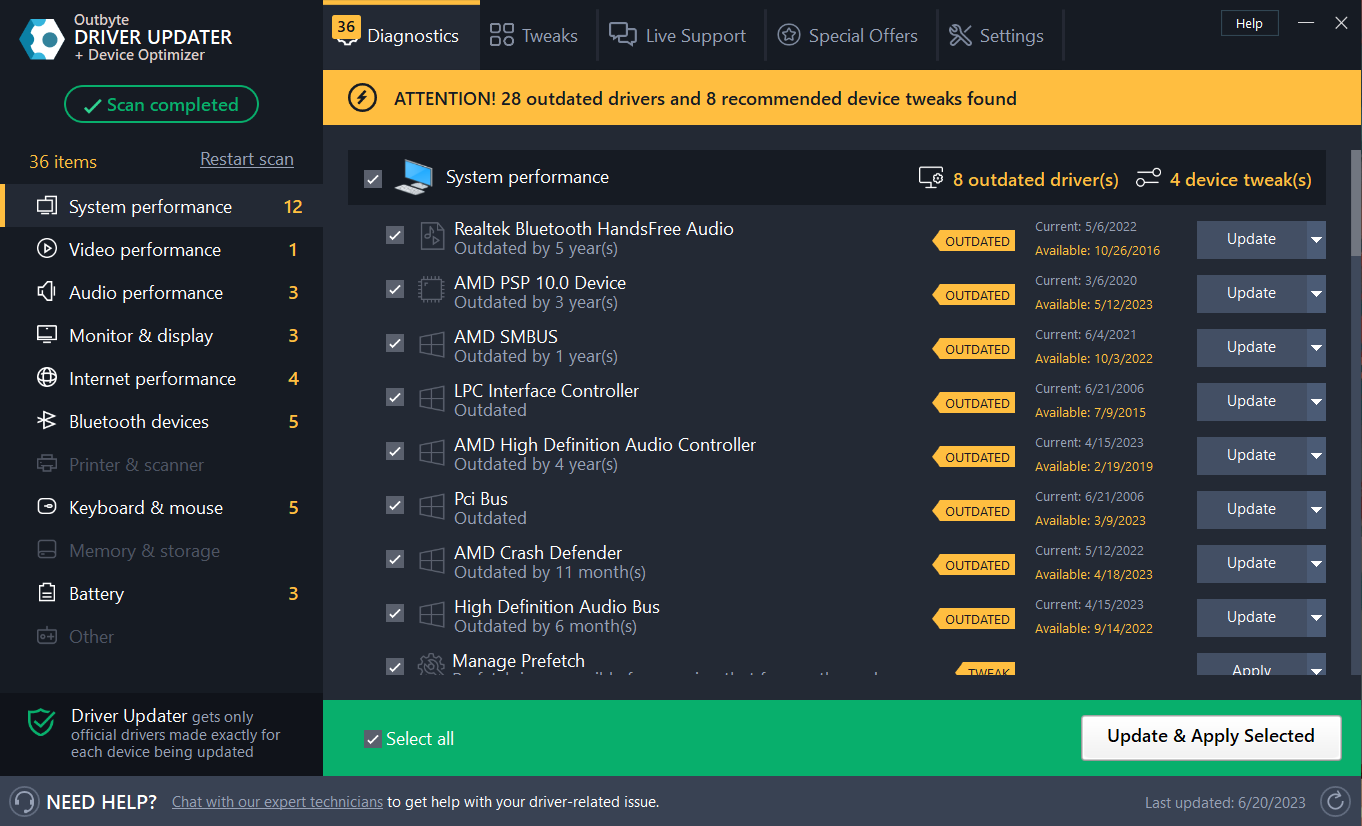
To make things easier, you can use a dedicated driver updater in Outbyte Driver Updater to automatically detect what type of graphic hardware you use and find the best driver version available. Then, in just a few minutes, your drivers will be up-to-date.

⇒ Get Outbyte Driver Updater

6. Use a Restore Point

  1. Repeat steps 1 to 5 in solution 3.
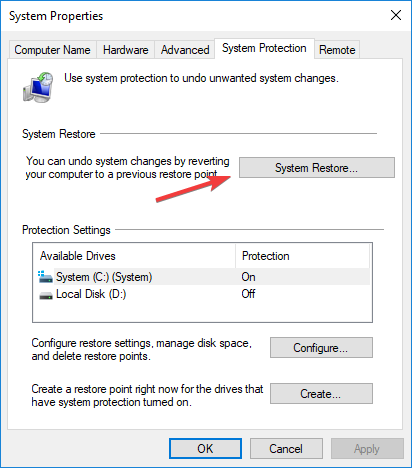
  2. Choose the System Restore option.
    system restore
  3. Now, select a restore point and click the Next button.
    restore point system thread exception not handled ntfs.sys
  4. Finally, follow the onscreen instructions to complete the process.

If the problem persists, try restoring your computer to a previous working state using System Restore. This involves installing an image of your OS before you have any issues with it.

With this, we can conclude this guide on the System thread exception not handled ntfs.sys error. Hopefully, you don’t have to exhaust the fixes in this guide before restoring normalcy on your PC.

Suppose you face a similar error in the Kmode exception not handled ntfs.sys, check our detailed guide to fix it.

Another standard error from the same error family is the atikmdag.sys system_thread_exception_not_handled error, but we also have a dedicated guide on that.

If you ever encountered System Thread Exception Not Handled ntfs.sys error on Windows 10, feel free to let us know the solution that helped you fix this issue in the comments below.

Failed to Load SteamUI.dll: How to Fix This Fatal Error

You are not alone if you encounter a failed to load SteamUI.dll error when launching Steam. This can be frustrating as it prevents you from playing games on Steam.

This guide will discuss some expert-tested methods to fix the issue after discussing the causes. 

What causes the failed to load SteamUI.dll error? 

There could be various reasons why you encountered the error. However, here are some of the common ones: 

  • Outdated device drivers – If your computer has corrupted or old device drivers, you might get this error. To fix this, you need to install the latest device drivers.
  • Steamdui.dll file is missing – If the steamui.dll file is deleted or missing, then it won’t be able to load, hence the error.
  • Incomplete Steam app updates – If the updates installed for the Steam app are incomplete or corrupted, you might face this issue.
  • Malware infection – If your computer has a virus or malware infection, it can cause many issues. You need to run a deep scan on your antivirus software to find and remove the malware.
  • Damaged Windows installation files – If the Windows installation files are corrupted, they could also cause this error. You need to check the latest update you installed and delete it, or you can repair it via Command Prompt.

What can I do to fix failed to load SteamUI.dll error? 

Before engaging in advanced troubleshooting steps, you should consider performing the following checks:

1. Repair Steam

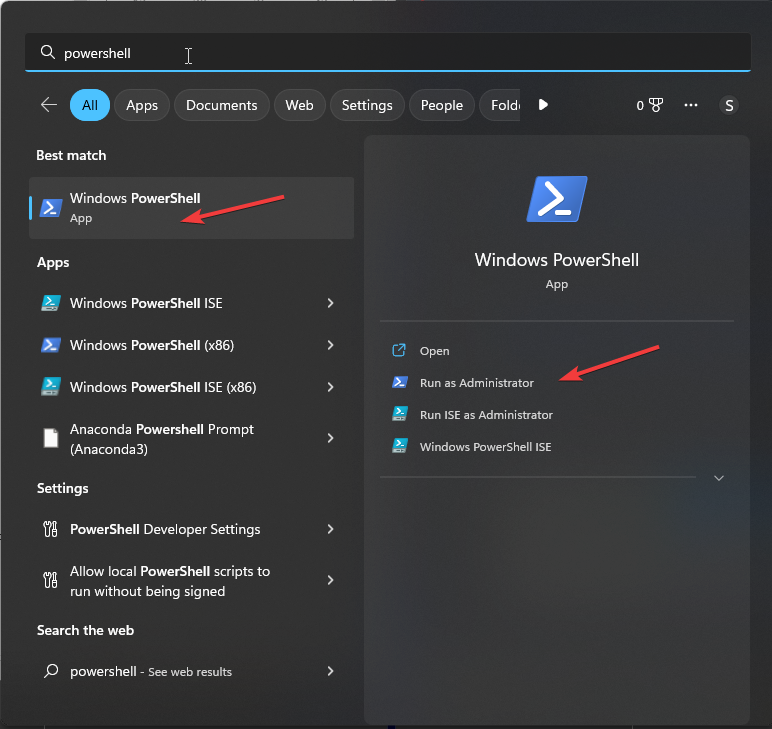
  1. Press the Windows key, type PowerShell, and click Run as administrator.Powershell 2 -failed to load steamui.dll
  2. To check the installation for errors & download new files, copy and paste the following commands one by one and press Enter after every command: cd “C:\Program Files (x86)\Steam\bin\ .\steamservice.exe \repair

2. Clear download cache

  1. Launch Steam client.
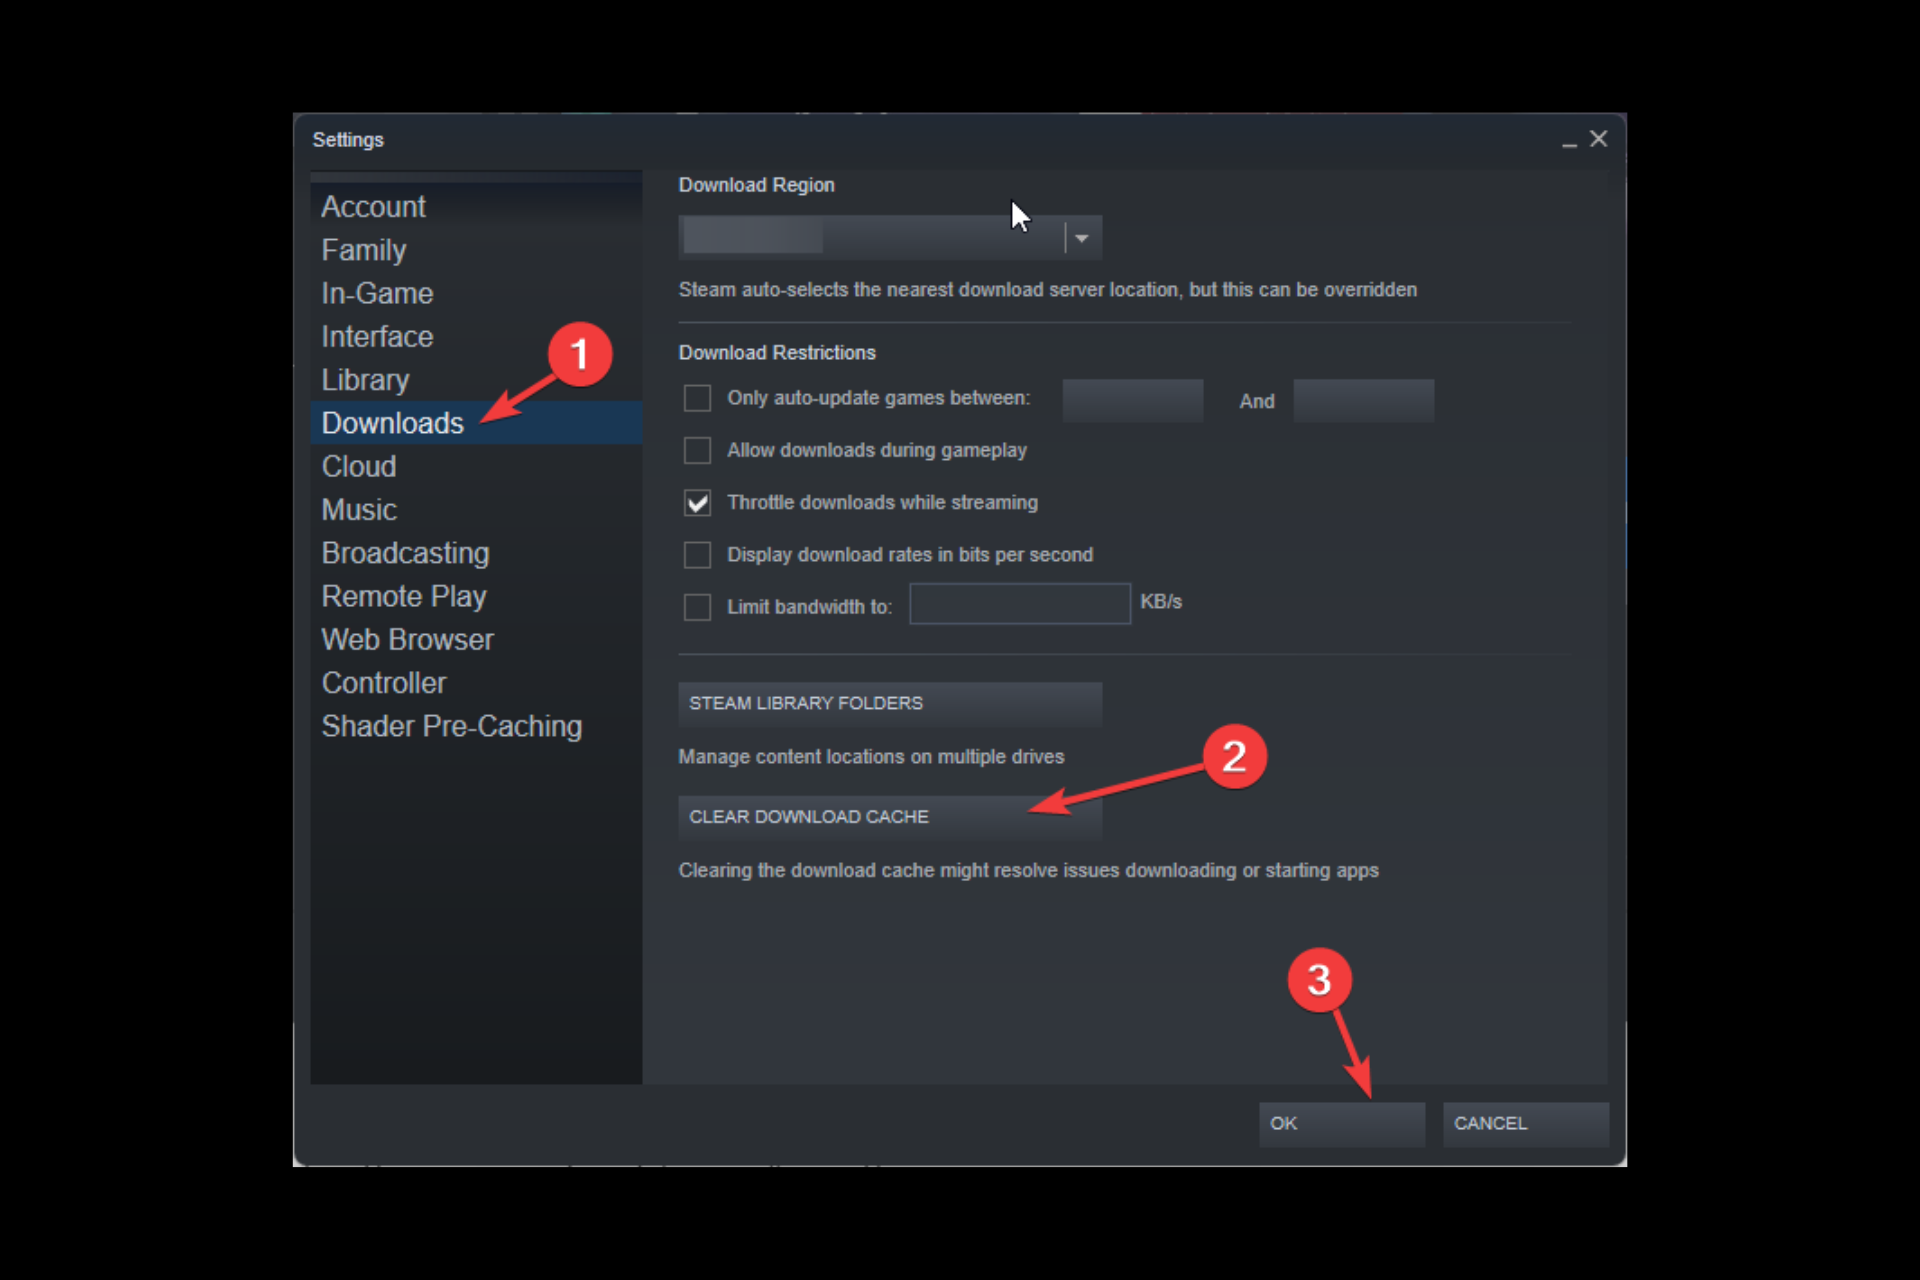
  2. Click on Steam, and select Settings from the top left corner. Settings Steam -failed to load steamui.dll
  3. On the next window, go to Downloads and click Clear Download Cache. Download clear cache
  4. Click OK. 
  5. On the next window, click OK to continue.OK download cache

3. Delete the libswscale-x.dll and SteamUI.dll files

  1. Locate the desktop shortcut of Steam, right-click on it, and select Properties. Steam properties -failed to load steamui.dll
  2. Switch to the Shortcut tab, and click on the Open File Location button. Open File Location
  3. Now in the Steam folder,  look for libswscale-x.dll, right-click it, and click the Delete icon. Delete lib Dll file
  4. Look for SteamUI.dll, right-click it, and click the Delete icon.Steamui Delete
  5. Restart Steam and check if the issue persists. 

4. Delete the beta version

  1. Press Windows + E to open Windows Explorer.Package -failed to load steamui.dll
  2. Follow this path: C:\Program Files (x86)\Steam\package
  3. Locate and right-click the file named Beta and choose the Delete icon.Beta delete
  4. Restart your computer and launch Steam to check if the problem is there.

5. Check for system errors

  1. Press the Windows key, type CMD, and click Run as administrator.DOS COmmand Prompt
  2. Type the following command to scan and fix system errors: sfc/scannowCMD DISM & SFC
  3. Then, copy and paste the following command one by one to repair the Windows image and press Enter after every command: DISM /Online /Cleanup-Image /CheckHealth DISM /Online /Cleanup-Image /ScanHealth DISM /Online /Cleanup-Image /RestoreHealth
  4. Restart your PC to let the changes take effect.

6. Update drivers

  1. Press Windows + R to open the Run console.Device Manager RUN COMMAND
  2. Type devmgmt.msc and press Enter to open Device Manager.
  3. Go to Display adapters, expand it, right-click the graphics driver, and select Update driver.Graphics Driver update -failed to load steamui.dll
  4. Click Search automatically for drivers.Update driver 2
  5. Now follow the on-screen instructions to download the latest driver.

While you can manually update your drivers and search and install the driver from the manufacturer’s website, you can also use dedicated software.

Outbyte Driver Updater is the perfect solution for the job as it is a tool specifically designed to detect outdated, missing, or malfunctioning drivers, ultimately replacing them automatically with the latest updates.

Outbyte Driver Updater

Locate the latest updates for your drivers without the hassle of choosing the right one manually.
Free Trial Download now

7. Reregister SteamUI.dll

  1. Press the Windows key, type CMD, and click Run as administrator.Register steam -failed to load steamui.dll
  2. Copy and paste the following command and press Enter: regsvr32 steamui.dll

So, this is how you can fix the failed to load steamUI.dll error. If nothing has worked for you so far, it is advised to restore your computer to the last known good configuration or reinstall Steam.

If you have any questions or concerns, feel free to mention them in the comments section below.

Fix: Failed to Load Library Steam.hdll in Dead Cells

Dead Cells is one of the best games in the action platformer genre, with Metroidvania setting and excellent fast-paced gameplay. However, users reported getting the Failed to load library Steam.hdll error message.

If you are also facing this issue, the solutions below will help you get your game up and running again in no time, so make sure you read it thoroughly.

What causes Failed to load library steam.hdll error?

Below are some of the causes of the failed to load library steam.hdll error:

  • Corrupt game files: If your game file is corrupt, you will be unable to load the Steam support library. The way out of this is to repair the game files and restart Steam.
  • Outdated app: This error might sometimes appear because the Steam app is outdated. You need to check for and install the latest updates to get past this error.
  • Missing redistributable pack: At times, the DLL pack might be missing on your PC. You need to download them and restart Steam to get back to playing your game.

After listing the possible causes of this issue, below are some of its variations, as reported by users:

  • The program can’t start because Steam.hdll is missing from your computer: Hdll is a crucial component for various Windows programs, and the error message hints that the file is either damaged or missing, which causes problems for the software.
  • Error loading Steam.hdll. The specified module could not be found: If you see the message Failed to load library steam. hdll, it indicates that either your system or game files are corrupted. This might be the consequence of changes made to the system, a false positive detected by the antivirus software, or, most commonly, an incorrect update.
  • There was a problem starting Steam.hdll: Your machine lacks the file steam.hdll, which prevents the software from starting properly.
  • Steam.hdll could not be located: This error message pops up when the file is missing. By reinstalling the game, you will be able to address the problem.
  • Cannot register Steam.hdll: Just like before, updating or reinstalling the game will ensure that its files get looked over and replaced.

That said, let’s jump into the list of solutions we provided for you to implement and fix the Failed to load library Steam.hdll issue. Follow along!

How can I fix Failed to load library steam.hdll error in Dead Cells?

1. Run a third-party DLL fixer

A dynamic link library (DLL) is a small piece of software that sits in its file and is frequently referenced by other programs. As a result, if one is missing from the Steam Library registry file, Dead Cells may experience difficulties.

The DLL is occasionally installed by something else, such as your operating system, and is just expected to exist.

This problem can occasionally be fixed by running a repair tool that looks for and replaces any missing DLLs. It also creates a backup of your registry so it may be restored at any time.

2. Install the Redistributables pack

Dead Cell, like any other game, requires specific associated applications to work optimally.

In this case, the probable reason for the error is your system’s absence of Redist C++ Studio.

This, of course, can be quickly resolved by installing the right package on your PC. You can go for the x86 or x64 versions depending on the system architecture.

In addition, we recommend installing various versions, just to be sure (install the x86 version even if you have a 64-bit Windows). If this does not fix your problem, move to the next solution.

3. Launch the game from the game folder

Instead of relying on Steam to run the game (which seems to be an issue starter here), you can always use the executable file from the installation folder.

To make things easier, create a desktop shortcut. Certain games work better when running through the Steam client, but that doesn’t need to be the case.

The game installation for Steam-based games is found in the following path: C:\Program Files\Steam(x86)\SteamApps\Common

Once there, open the Dead Cell folder and create a desktop shortcut from the deadcell.exe. Then, try starting the game and look for changes with the Failed to load library Steam.hdll issue.

4. Try repairing the game

  1. Press the Windows key, type Steam, then click on the first result.steam-search failed to load library steam.hdll
  2. From the main menu shown on the opened window, choose Library.library-steam failed to load library steam.hdll
  3. Right-click on the Dead Cells and open Properties. prop-game failed to load library steam.hdll
  4. Select the Local files tab.
  5. Click on the Verify Integrity of Game Files button.

Even though it rarely occurs, the corruption of game installation files might be why the game won’t run through Steam.

The Failed to load library Steam.hdll error means that either system or game files are not as it’s supposed to be. This might result from system changes, antivirus false positives, or, most likely, an erroneous update.

You can always rely on Steam’s built-in Verification Checker when this happens. This tool allows you to scan for changes with game files and fix corrupted or incomplete files, so use it freely in any similar unhappy events.

5. Update Steam

  1. Hit Windows, type Steam, then open the app.steam-search failed to load library steam.hdll
  2. From the window’s top-left corner, click on Steam, then choose to Check for Steam client updates.steam-update failed to load library steam.hdll
  3. Wait until the process is completed, then restart the app.

As we said in the previous step, the probable reason for the issue is recent changes made to the game or the system.

You can address this by updating again, hoping there’s a patch for the game that sorts out the issue at hand.

Note that this solution also works in the case of Failed to load library video.hdll. Making sure that the Steam client is always up to date.

Once you’ve updated Dead Cell and Steam, restart your PC and look for changes. If the issue persists, try reinstalling the game.

6. Reinstall the game

  1. Hit the Windows key, type Steam, and click on the app to open it.steam-search failed to load library steam.hdll
  2. From the main context menu, select Library.library-steam failed to load library steam.hdll
  3. Now, right-click on Dead Cell and choose Uninstall from the contextual menu.
  4. Restart your PC then, open Steam, then choose Library.
  5. Right-click on Dead Cell, then select Install. Steam.hdll will download as well.install-steam-game failed to load library steam.hdll

This would be the last resort if none of the previous steps removed the Failed to load library pop-up. Even if, in some cases, this option didn’t work, you might be lucky as some users claimed to solve today’s error in this way.

Don’t worry. Your game progress will be saved in Steam Cloud.

Why is my Steam library a black screen?

There are various potential causes of the Steam games library not loading issue. Multiple scenarios are possible, ranging from your antivirus software interfering with your Steam to bugs found inside the Steam installation.

But don’t worry, as we’ve already put together a step-by-step guide on how to fix Steam windows going black.

Is there going to be a Dead Cells 2?

If you’re a Dead Cells fan, you’re undoubtedly excited about a new and improved release. However, speaking in an interview, Dead Cells designer Sébastien Bénard was pretty honest about this subject, and his words are not too optimistic, as follows:

If you create a big hit, it’s best to use this energy to make something different. I don’t think we’ll make a Dead Cells 2. We’re more open to creating more content and opening the game up more to the community.

If we did make a Dead Cells 2, it’s because we really need the money (laughing). We don’t want to stick to the same thing though… if we did come back it would be something quite different.

In order words, we are not expecting a new Dead Cells game, but who knows? The future is unpredictable so manufacturers might surprise us.

Until then, it is best to hope they will come up with fresh content that will raise the gaming experience standards even more. Also, check out our list of the 50 all-time best games to try before Dead Cells 2 comes out.

That should do it. If you’re still stuck with the Failed to load library Steam.hdll error, consider posting the details in the comments below. We might be able to assist you.

Invalid Kernel Handle Error: Use These 9 Methods to Fix it

Blue Screen of Death errors, such as INVALID KERNEL HANDLE, can be a significant problem on Windows 10.

These errors will crash your PC, and restart it to prevent further damage. Therefore, you must know how to fix them.

What does Invalid Kernel Handle mean?

The Invalid Kernel Handle error denotes that the kernel code is attempting to reference or close a handle that is invalid to handle. There are a series of factors that can cause this error. Below are some of them:

  • Outdated drivers: One of the notable causes of this issue is a faulty or outdated driver. You can fix this by updating your drivers to the latest version.
  • Faulty system files: If some of your system files are missing or broken, you are liable to face this BSoD error. Repairing and restoring these corrupt files should solve the problem in this case.
  • Antivirus interference: Sometimes, it might just be your antivirus software messing with your processes, leading to the error message. The best way around this is to disable or uninstall your antivirus.

How can I fix an INVALID_KERNEL_HANDLE BSoD error?

1. Update your drivers

  1. Press the Windows key + X and select the Device Manager option.
    device manager invalid kernel handle
  2. Double-click the section you want to update drivers for and right-click the device there.
  3. Now, select the Update driver option.
    update driver
  4. Finally, choose Search automatically for drivers and install any available updates.
    search auto

Keeping your drivers up to date is crucial if you want to ensure that your system is stable and safe from errors.

If a particular driver is outdated or not compatible with Windows 10, your system won’t be able to recognize and use that hardware, which will cause an INVALID_KERNEL_HANDLE BSoD error to appear.

If the Windows update cannot get the latest driver, you can visit the manufacturer’s website to download it.

Alternatively, you can employ automated driver updater software in Outbyte Driver Updater to do the job for you. This scans, updates, and repairs missing, outdated, and broken drivers with the original version from its enormous database.

This saves you from the stress of having to do it all yourself.

As the process is not straightforward, we recommend using an automated tool for the job.

⇒ Get Outbyte Driver Updater

2. Uninstall your antivirus software

  1. Press the Windows key + I and select the Apps option.
    apps invalid kernel handle
  2. Now, select your antivirus and click the Uninstall button.
    uninstall
  3. Finally, follow the onscreen instructions to complete the process.

To protect your PC from malicious users, you must install antivirus software. However, they can cause issues, like the Invalid Kernel Handle BSoD error.

Hence, you need to remove any third-pat antivirus and the Windows Defender instead.

3. Run the SFC scan

  1. Press the Windows key, type cmd, and click Run as administrator under Command Prompt.
    cmd admin
  2. Type the following command and press Enter: sfc/scannowsfc scan invalid kernel handle
  3. Finally, wait for the command to finish running and restart your PC.

Sometimes, the Invalid Kernel Handle issue can be due to faulty or corrupt system files. The quickest way to repair them is to run the SFC scan, which will automatically diagnose and fix the issue.

If the SFC scan fails, you can proceed to the solution below.

4. Run DISM

4.1. Standard way

  1. Open Command Prompt as an administrator, as shown in solution 3.
  2. Paste the following command and press Enter: DISM /Online /Cleanup-Image /RestoreHealthdism restore
  3. Wait until the scan is finished.
  4. Restart your computer and try updating again.

4.2. Run DISM with Windows Installation Media

  1. Create and insert your Windows installation media.
  2. Open Command Prompt as administrator, as shown in the previous solutions.
  3. Type the following commands and press Enter after each: dism /online /cleanup-image /scanhealthdism scan dism /online /cleanup-image /restorehealthdism restore
  4. Type the following command and press Enter: DISM /Online /Cleanup-Image /RestoreHealth /source:WIM:X:SourcesInstall.wim:1 /LimitAccessdism limit invalid kernel handle
  5. Make sure to change an X value with the letter of the mounted drive with Windows 10 installation.
  6. After the procedure is finished, restart your computer.

If the SFC scan fails to fix the Invalid Kernel Handle issue, the DISM scan should do the trick. This is because the DISM runs a deeper scan and reaches more than SFC.

You can still run the SFC scan after the DISM to be sure the corrupt system file is fixed.

5. Check the hard drive

5.1. Use Bootrec commands

  1. Press the Windows key and click the Power icon.
  2. Press and hold the Shift key and click the Restart option to enter the Advanced Startup.
  3. Now, choose Troubleshoot > Advanced options.
    advanced options
  4. Select Command Prompt from the list of options.
    command prompt
  5. Next, type the following lines and press Enter after each line to run it: bootrec.exe /rebuildbcdrebuild invalid kernel handle bootrec.exe /fixmbrfixmbr bootrec.exe /fixbootfixboot invalid kernel handle

At times, the Invalid Kernel Handle issue might be due to faulty boot files. The quickest way to fix this is to repair these files running the commands above.

5.2 Use CHKDSK commands

  1. Enter the Advanced Startup, as shown above.
  2. Select Troubleshoot > Advanced options.
  3. Now, choose Command Prompt.
    command prompt
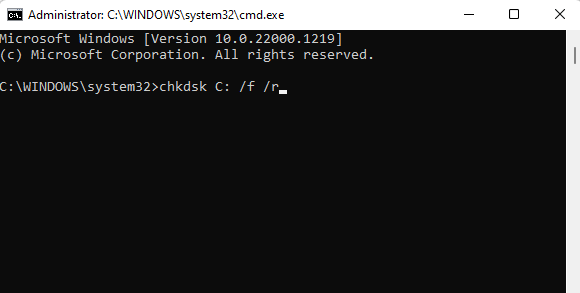
  4. Type the command (replace c with your drive letter) below and hit Enter to run it: chkdsk c: /rchkdsk
  5. Then, finally, wait for the command to finish running and restart your PC.

Some users are also suggesting that you need to run additional CHKDSK commands as well. This has fixed the Invalid Kernel Handle issue for many users. So, it would be best if you tried it too.

6. Update Windows 10

  1. Press the Windows key + I and select Update & Security.
    update and
  2. Click the Check for updates button.
    check for
  3. Finally, download and install any available updates and restart your PC.

Keeping your drivers up to date is quite important, but you must also download Windows updates.

By downloading the latest updates via Windows Update, you’ll install the latest security patches and new features. These patches also offer many bug fixes that can fix BSoD issues like the Invalid Kernel Handle error.

7. Perform a Clean boot/ enter Safe Mode

7.1. Perform a Clean boot

  1. Press the Windows key + R, type msconfig, and click the OK button.
    msconfig invalid kernel handle
  2. Click the Services tab at the top, check the Hide all Microsoft services, and click Disable all.
    services hide
  3. Click the Startup tab at the top and select Open Task Manager.
    open startup
  4. Next, right-click each of the apps there and select Disable.
    disable
  5. Finally, go back to the System Configuration window and click the Apply button, followed by OK.
    apply ok invalid kernel handle

If the error is fixed, you can start enabling services and applications by following similar steps. Be sure to promote services and applications one by one until you find the one causing this problem.

7.2 Enter Safe Mode

  1. Restart your computer a few times while it boots to enter the Advanced recovery environment. Alternatively, you can press and hold the Shift key and click the Restart button.
  2. Choose Troubleshoot > Advanced options.
    advanced options
  3. Now, select Startup Settings.
    startup setting
  4. Click the Restart button.
    restart
  5. When your PC restarts, press 5 or F5 to Enable Safe Mode with Networking.
    safe networking

When Safe Mode starts, test your PC. If the system is stable, the BSoD error is caused by specific software, so be sure to find the problematic software and disable it or uninstall it.

8. Perform a Windows 10 reset

  1. Restart your computer a few times while it boots to enter the Advanced recovery environment. Alternatively, you can press and hold the Shift key and click the Restart button.
  2. Choose Troubleshoot.
    troubleshoot invalid kernel handle
  3. Now, select Reset this PC.
    reset pc
  4. Select Remove everything.
    keep or remove
  5. Next, click on Only the drive where Windows is installed and select remove my files.
  6. Finally, click the Reset button and follow the instructions to complete the reset process.

If the INVALID KERNEL HANDLE error is caused by software, you can fix that by performing Windows 10 reset. Note that resetting Windows 10 is similar to a clean install. Therefore, back up all critical files from your C partition.

You might need Windows 10 installation media to complete this step, so be sure to create a bootable USB flash drive using the Media Creation Tool.

9. Check your hardware

The common cause for BSoD errors is RAM, so ensure your RAM works appropriately. You can use tools such as MemTest86+ to perform a detailed test of your RAM.

Bear in mind that almost any other hardware component can cause a BSoD error, so make sure that you check all other major hardware components, such as your hard drive, motherboard, etc.

The Invalid Kernel Handle error can be a big problem, but hopefully, you managed to fix this error using one of our solutions.

If you are facing a similar issue, like Kernel Mode Exception not Handled M on Windows 10, check our detailed guide to fix it quickly.

Leave a line in the comments section below if you have successfully used any other method to get over this issue.

Windows 11 is collecting more user data than you know

YouTuber PC Security Channel shows that Windows 11 system sends a staggering, unhealthy amount of its users’ data to third-party organizations.

It always seems like a debate of an eternity every time Microsoft releases a new Windows version. Some are trapped in the nostalgia train, and some always seek the better, newer version.

In the case of Windows 11, however, many users have complained about how it’s a metadata and privacy nightmare, while others have voiced their discontent against its overall performance. 

So, how does the new operating system collect its users’ data?

How is Windows 11’s users data being collected?

Just for food of thought, Windows 11 has a telemetry and data collection feature installed and activated by default albeit it’s nothing new. It aims to provide information about the device and how everything is working in the background to improve the quality of the services. 

For some users, this triggers privacy concerns like never before.

However, the YouTuber toggles this option off. Using WireShark Capture to analyze the traffic and all sorts of data that are being sent in the background, they compare two brand-new computers with freshly-installed Windows 11 and Windows X to see how the comparison bears a decade ago. 

After filtering them by DNS protocols to show names of websites that are making queries, the aggregator app shows that Windows 11 sends its data to plenty of third-party websites that have nothing to do with Microsoft and rather for marketing purposes: Bing search engine, McAfee antivirus, MSN, and even sites like ScorecardResearch and Onetrust that conduct marketing researches.

Shady enough?

You may ask, how did it look over two decades ago? Well, on the other hand, when experimented with under the same steps, Windows XP only sends data for OS update purposes. No third-party or scrappy-looking websites, nada. 

Does Windows 11 pose more privacy concerns than Windows 10?

Data harvesting has been so normalized these days that you would need to turn the telemetry option off manually, which isn’t too friendly for casual, non-tech-savvy users. 

“I’ve been telling people since day one that Win 11 is not really an improvement but rather a metadata nightmare. What did people expect from Microsoft though, privacy? Metadata tracking will only grow worse over time.”

user u/GunGoblin complains on the thread.

Compared to Windows 10 and its predecessors where you can easily create local accounts, Windows 11 Home requires its users to have a Microsoft account and an internet connection, meaning that its collection has to be a part of the package. 

Then, Edge’s aggressive advertising with its Discovery feature on the sidebar, which was released back in October 2022, and its crowded homepage could be adding another layer of concerns.

Windows 11 costs at least $139 for that version, and it may be free as an upgrade for Windows 10 users, but you know the old adage, “If you are not paying for the product, then you are the product.”

What are your thoughts about this? Let us know in the comments!

Runtime Error R6025: Fix it With These 4 Easy Solutions

Runtime error r6025 warning usually appears when specific programs or processes are being simulated to stop forcefully.

This error is typically linked to the Visual C++ framework and occurs due to incompatibility with third-party software or missing program components. This guide will show you quick ways to fix this issue for good.

What causes Runtime error R6025?

The Runtime error R6025 error can be due to various factors. Below are some of the prevalent causes:

  • Issues with the third-party app: The most common cause of the Runtime error R6025 error on Pure Virtual Function Call, Fallout New Vegas, Skyrim, Fallout 4, or Adobe edition is an issue with the affected app. The solution to this is to update or reinstall the app.
  • Faulty display driver: This problem can sometimes be due to issues with your display driver. The best thing to do here is to reinstall or update the driver.

How do I fix Runtime Error R6025?

1. Uninstalling the faulty app

  1. Press the Ctrl + Alt + Del keys to launch the Task Manager.
  2. Right-click the problematic app and select End task.
    end task
  3. Now, press the Windows key + R, type appwiz.cpl, and click OK.
    appwiz
  4. Find the problematic app and right-click it.
  5. Select the Uninstall option.
    uninstall runtime error r6025
  6. Next, press the Windows key, type cleanmgr, and hit Enter.
    cleanmgr
  7. Choose the drive to clean and click the OK button.
    select disk runtime error r6025
  8. Select the files you want clean, click the Clean up system files button, and follow the onscreen instructions to complete the process.
    clean up
  9. Finally, restart your PC and reinstall the app.

You must uninstall Bing Desktop, Visual Studio 2030, AutoCAD, or any app you are running when you get the runtime error r6025. Ideally, you should check for updates available for the app before uninstalling it.

However the safest option is to reinstall because the error denotes an internal problem with the app.

2. Update the display driver

  1. Press the Windows key + X and select Device Manager.
    device manager
  2. Double-click the Display adapters option to expand it and right-click the device there.
  3. Now, select Update driver.
    update driver
  4. Finally, choose the Search automatically for drivers option and install any available updates.
    search auto runtime error r6025

Sometimes, the runtime error r6025 can be due to issues with your display driver. So the first thing to do is to check for updates. If the Windows update can not find the latest driver, you can go to the manufacturer’s website to download it.

If this does not work, you should try rolling back the driver and even reinstalling it if everything fails.

Another option would be to use a third-party program that can scan your PC and install the display drivers for you within seconds.

Tools like Outbyte Driver Updater have comprehensive driver databases and always find the best driver version for your hardware. It is easy to use and lightweight, and you can set it up to regularly check your drivers.

⇒ Get Outbyte Driver Updater

3. Repair/reinstall C++ 2010 for Skyrim

  1. Launch File Explorer and navigate to the path below: C:\Program Files (x86)\Steam\SteamApps\Common\Skyrimpath runtime error r6025
  2. Open the folder named VCRedist.
  3. Now, double-click the vcredist_x86.exe file to run it. 
  4. Click the Repair option when prompted.
  5. If the repair option does not fix the problem, run the installer in Step 3 again and select the Remove option.
  6. Finally, wait for the process to complete and rerun the installer to clean and install the redistributable file.

If you are getting the runtime error r6025 on Skyrim, it might be because of issues with the C++ redistributable file. You need to repair or reinstall the file to fix the problem. This also helps if you are faced with Run-time error 76.

4. Perform a clean boot

  1. Press the Windows key + R, type msconfig, and click OK.
    msconfig
  2. Select the Services tab, check the Hide all Microsoft services box, and click the Disable all button.
    services hide
  3. Click the Startup tab at the top and select Open Task Manager.
    open startup
  4. Next, right-click each of the apps there and select Disable.
    disable runtime error r6025
  5. Finally, go back to the System Configuration window, click Apply, followed by OK, and restart your PC.
    apply ok

If you find it hard to pinpoint the app causing the runtime error r6025, you should perform a clean boot. This will disable all startup apps and processes and only start your PC with the necessary services.

If this fixes the issue, you must enable the apps in batches to find the faulty one.

We have come to the end of this detailed guide on fixing the runtime error r6025 – problems with the app triggering usually cause this issue. Thankfully, you should be able to fix it for good with the solutions in our guide.

If you are facing a similar issue, like runtime error r6025 in Visual C++ on Skyrim and Fallout, check our detailed guide to fix it.

Feel free to let us know the solution that helped you solve this problem in the comments below.

PC Crashes After Overclocking CPU: 3 Easy Fixes to use

Many users are overclocking their hardware to get better performance in games. However, some of them are complaining that CPU overclock is crashing games.

This can be a problem since you won’t be able to run the game properly, mainly if the crashes are regularly occurring.

Fixing this issue can be challenging, and in today’s guide, we’ll show you a couple of solutions that might help you fix this problem.

Can an overclocked CPU cause games to crash?

Yes, overclocking a CPU can cause games to crash and other issues. 

For example, overclocking involves running the CPU at higher clock speeds than the manufacturer intended, which can cause the CPU to become unstable and lead to various problems. 

Some common causes of overclocking-related crashes in games include:

  • Overheating – Overclocking the CPU increases the heat generated by the processor, which can cause the temperature to exceed the maximum safe limit. When this happens, the CPU may shut down to prevent damage, causing the game to crash.
  • Power supply issues – Overclocking the CPU can also increase the system’s power consumption, which may cause the power supply to become overwhelmed and unable to provide enough power to the CPU. This can lead to crashes and other problems, such as system freezes and reboots.
  • Memory instability – Overclocking the CPU can also cause memory instability, as the increased clock speed can cause the memory to become out of sync with the CPU. This can lead to crashes and other issues, such as data corruption and system freezes.
  • Compatibility issues – Overclocking the CPU can cause game compatibility issues, as some games may not be designed to run on a system with an overclocked CPU. This can lead to crashes and other problems, such as graphical errors and performance degradation.

What can I do if the PC crashes after overclocking the CPU?

Before jumping into solutions, you can test for overclocking using reliable overclocking stress test software.

Start the stress test and make sure that your computer can handle it. Then, to ensure everything is running smoothly, take advantage of dedicated software to change the CPU fan speed and ensure that your CPU is cooled correctly.

In case your overclock isn’t stable, you’ll need to adjust the settings and find the stable values to use.

1. Remove different overclocking and monitoring software

  1. Go to the Settings app. You can access it by quacking by using Windows Key + I shortcut.
  2. Now go to the Apps section.
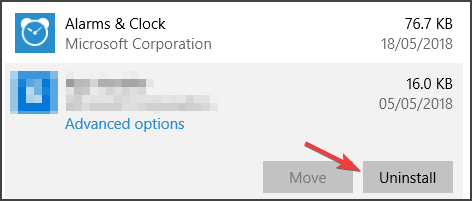
  3. Select your overclocking/monitoring software and click on Uninstall.
  4. Follow the instructions on the screen to complete the process.

According to users, it seems that different overclocking software can cause conflicts and issues such as this one, so it’s advised that you remove it.

You can use the method from above to remove the software, but if you want to be sure that the software is completely removed from your PC, we suggest using a reliable uninstaller software tool.

⇒ Get CCleaner

2. Try increasing the CPU voltage

  1. Download ThrottleStop from the official website.
    pc crashes after overclocking cpu
  2. Unzip the file and run it.
  3. Tick Speed Shift – EPP, then click the FIVR option.
    pc crashes after overclocking cpu
  4. Under CPU Core Voltage, tick Unlock Adjustable Voltage, tick CPU core, then tick Adptive.
  5. Your CPU has to be undervolted; thus, you must change the Offset Voltage. The ultimate number depends on the processor and should be done in tiny increments.
  6. Begin by adjusting your millivolt (mV) using a large value. Then tick the CPU Cache option at the top and change the undervolt to match the value set for CPU Core. Lastly, undervolt Intel GPU slightly, and click Apply.

A few users suggested increasing the voltage if the CPU overclock crashing games, so you might want to try that.

Remember to use only the recommended voltage values and slowly increase them, or else you might cause permanent damage to your CPU.

3. Reduce the overclock settings

  1. Restart your PC.
  2. After the first screen comes on, start pressing the F10 key repeatedly until the BIOS screen is displayed. For PCs built before 2006, press the F1 key repeatedly during the booting process to get into BIOS.
  3. Open your overclock settings, and reduce the CPU speed.
    pc crashes after overclocking cpu
  4. Save the changes.

Many users reported that they fixed this problem simply by slightly reducing their overclock settings, so be sure to try that as well.

Note icon NOTE
If you donu2019t know the original overclock values, you might have to reset your BIOS to the default settings.

Unfortunately, if your overclock isn’t stable, resetting it and using your CPU with the default clock values might be best.

If the CPU overclock crashes games, you must ensure that the clock is stable or try adjusting your overclock settings.

Moreover, since you want to improve your experience, check out the best software to optimize game performance on PC.

Are you still facing any overclock issues? Don’t hesitate to share your thoughts in the comments below.

Guild Wars 2 Keeps Crashing: 3 Solutions That can Help you

Guild Wars 2 is a top-rated MMORPG game with hundreds of thousands of users worldwide; now, according to some complaints, Guild Wars 2 crashes and hangs on Windows 10.

When i launch the Guild Wars 2 game my computer used to crash. I then proceeded to update my video card drivers like they proposed on the forums (I’m on Windows 8.1) but now i get these constant error messages when i want to run the game. What further steps can i take so i can play Guild Wars 2 once more?

The Guild Wars 2 player then shares a link to the exact error he is getting:

Exception: c0000005; Memory at address 7425e8a9 could not be read; App: Gw2.exe.

If this hasn’t solved your Guild Wars 2 game crashing in Windows 10, describe your issue thoroughly in the comments box, and we will quickly research more on this to find a proper fix.

Why does Guild Wars 2 keep crashing?

Guild Wars 2 can crash for a variety of reasons. Some common causes of crashes in Guild Wars 2 include:

  • Game files corruption – Over time, game files may corrupt, causing the game to crash or freeze.
  • Outdated drivers – If you have outdated graphics cards or sound card drivers, it can cause the game to crash or have other performance issues.
  • Overheating – If your computer is overheating, it can cause the game to crash.
  • Outdated game client – If the game client is outdated, it can cause compatibility issues, resulting in crashes or other performance issues.
  • System resources – If your computer is running low on system resources such as RAM or CPU, it can cause the game to crash or have other performance issues.
  • Third-party software conflicts – Some third-party software, such as firewalls, antivirus programs, and game boosters, can conflict with the game and cause it to crash.

How can I fix Guild Wars 2 if it keeps crashing?

1. Update your drivers

Guildwars is a pretty old game, but the constant updates mean that the game has evolved a lot since it was first released, and so have the system requirements for running it properly.

That being said, just because the game is from 2012 doesn’t mean a 2012 PC will cut it.

However, if your PC is that old but was top-end in those days, then a complete round of driver updates may suffice to run the latest Guild Wars 2.

However, it’s hard to find the correct drivers, especially if your hardware is older, and that is when an excellent third-party solution such as Outbyte Driver Updater makes for a great addition to your digital library.

Powered by a library of 18 million drivers, this tool will scan your PC, download whatever drivers it deems necessary, and install them for you in one go.

Outbyte Driver Updater

Update your drivers and avoid all issues while playing Guild Wars 2. Use Outbyte Driver Updater today!
Check price Visit website

2. Repair your game files

  1. Locate your Gw2.exe file; this should be located in your Guild Wars 2 install directory:
    C:\Program Files (x86)\Guild Wars 2
  2. Right-click on the file and select Create shortcut.
  3. Change the name of the shortcut to Guild Wars 2 Repair., then right-click on the shortcut and select Properties.
  4. Look at the Target line and add –repair to the end.
  5. It should now look something like this:
    "C:GamesGuild Wars 2gw2.exe" -repair
  6. Select Ok.

Your game client should start repairing itself, and Guild Wars 2 should usually launch after it is done.

3. Perform a Clean Boot

  1. Press Windows + R, type in MSConfig, and hit Enter.
    guild wars 2 keeps crashing
  2. Go to the Services tab.
  3. Check the box labeled Hide All Microsoft Services, and select Disable all.
  4. Make sure you check any critical services you need to work, even in Clean Boot, such as the applications for your peripherals or your wireless connection software.
  5. Go to the Startup tab and select Open Task Manager.
  6. Right-click on all displayed apps and select Disable one by one.
  7. Click OK, reboot your PC, then try relaunching Guild Wars 2.

Guild Wars 2 has some problems in Windows 10, such as crashes, graphical glitches, driver issues, full-screen game mode problems, and game settings lag. If you encounter one of these problems, check this fix guide and eliminate them.

Let us know which method you used to fix your Guild Wars 2 issues by leaving us feedback in the comments below.

How to Fix ExitLag Not Working or No Connection Through (Step-by-Step)

If you’re getting no connection through Exitlag, it’s most likely due to connection issues, firewall restrictions, server outages, or configuration problems.

Whether you play Fortnite, Valorant, or CSGO, these issues will prevent optimization. Luckily, with a few simple tweaks, you can fix the problem.

Follow the steps below to cut your downtime as soon as possible.

How to fix ExitLag Not Working

Before changing any settings, check if ExitLag’s servers are down using Down for Everyone or Just Me. If the service is unavailable for everyone, it’s likely a server-side issue, just wait it out. Otherwise, proceed with the fixes below.

1. Modify the ExitLag settings

  1. Launch ExitLag and navigate to the Tools tab from the top. Tools to fix exitlag not working
  2. Ensure that the Accuracy in route optimization slider is towards the extreme right, i.e., set to High.Accuracy in route optimization
  3. Next, click on the Protocol to analyze routes dropdown menu, and select UDP/TCP SYN from the list of options.UDP/TCP SYN to fix exitlag not working

After making the changes, run the game you earlier had problems with, and check if things have improved. Frequently, when the settings are incorrect, there might be no connection through ExitLag, thus giving the impression that it is not working.

ExitLag can fail because of bad routing or firewall blocks, but proper setup usually fixes it. For detailed setup steps and correct routing options, check our ExitLag usage guide.

2. Enable ExitLag after starting the game

  1. Close the game that’s not working too well, go to ExitLag, and click on the toggle near the top-left to disable it.Disable to fix Exitlagnot working
  2. Start the game again, head to ExitLag, and enable the same toggle.Enable Exitlag

Some games detect tools like ExitLag when launching them and may throw connection errors immediately. In this case, enabling ExitLag after you start playing the game will get things working, and you should not face trouble anymore. Of course, this might also work if ExitLag is not working for Steam.

3. Add an exception for ExitLag in Firewall

  1. Press Windows + S to launch the Search menu, enter Control Panel in the text field, and click on the relevant search result.Control Panel
  2. Click on System and Security from the options here.System and security
  3. Next, click on Allow an app through Windows Firewall under the Windows Defender Firewall option.Allow an app through Windows Firewawall to fix exitlag not working
  4. Click on the Change settings button.Change settings
  5. Now, click on Allow another app at the bottom.Add an app to fix exitlag not working
  6. Click Browse in the Add an app window that appears.Browse
  7. Navigate to the location of the ExitLag launcher. Select it, and click on Open.Select launcher
  8. Next, click on Add.Add
  9. Finally, click on OK to save the changes.OK

Once done, restart the computer, and ExitLag should now work fine.

4. Flush DNS

  1. Type CMD in the Taskbar and select Run as Administrator.run cmd as admin
  2. Enter the following commands one by one and press enter after each:ipconfig flush dns
    • ipconfig /flushdns
    • ipconfig /registerdns
    • ipconfig /release
    • ipconfig /renew
  3. Wait for the process to complete, restart your PC and try running ExitLag again.

5. Run ExitLag as Administrator

Lack of permissions can prevent ExitLag from routing your traffic properly.

  1. Close ExitLag completely.
  2. Right-click the ExitLag shortcut on your desktop.
  3. Choose Run as administrator.
  4. Launch your game and test the connection again.

6. Disable Conflicting VPNs or Proxies

Other network services may override or block ExitLag.

  1. Press Windows + R, type inetcpl.cpl, and press Enter.
  2. In the Connections tab, click LAN settings.
  3. Uncheck Use a proxy server for your LAN.use a proxy server disable
  4. Disable any other VPNs or proxies running in the background.

7. Reinstall ExitLag

Reinstalling removes any corrupted files and resets configuration settings.

  1. Press Windows + R, type appwiz.cpl, and hit Enter.
  2. Scroll down to ExitLag, right-click it, and choose Uninstall.
  3. Restart your PC.
  4. Download the latest version from ExitLag’s official website and install it.
  5. Run it as administrator and test the routing again.

8. Manually Change Game Routing in ExitLag

Sometimes, the default route won’t connect to the best server.

  1. Open ExitLag and search for your game.
  2. Select the game and click Apply Routes.
  3. Manually change the server region to a nearby alternative (e.g., Paris instead of Frankfurt).
  4. Launch the game and check for improvements.

9. Update Your Network Drivers

Outdated drivers can block or slow down routing.

  1. Press Windows + X and choose Device Manager.
  2. Expand Network adapters.
  3. Right-click your active adapter and choose Update driver.
  4. Select Search automatically for drivers.
  5. Restart your PC once updated.

These are all the ways you can fix issues that lead to ExitLag not working on the computer. Once you fix the problem, you can play your favorite games again without lag.

Also, find the best game booster software, and try these if ExitLag doesn’t deliver optimal results. And if you enjoy playing online games in different regions other than your own, rest assured that our tips can help you.

No less important, here are the best VPNs for Albion Online to reduce ping and rest assured, these suggestions are also great for several other games.

If you have any other queries or know of a method not listed here, drop a comment below.

Windows Media Center Download: Everything you Need to Know

Microsoft decided to cut the Windows Media Center when launching Windows 10, but many are still wondering if Windows Media Center is available for download.

Those who ignored the app don’t miss it, but those who used it knew it was one of the best media center software to manage videos and other media content and probably want it back.

It used to be possible to install Windows Media Center in some earlier Windows 10 Preview builds. However, can you still do that? Keep on reading to find out.

What does Windows Media Center do?

Windows Media Center was an all-around media solution designed to bring the living room media experience to PC. It had the following features:

  • Live TV – The software allowed users to watch and record live TV shows using a TV tuner. This allowed you to use your PC as DVR.
  • Multimedia playback – With Media Center, you could play any media stored on your hard drive or any other device.
  • Streaming platform support – The software could handle YouTube, Netflix, and similar services thanks to the available plug-ins.

Is Media Center supported in Windows 10?

Media Center was a part of Windows XP, and it was available on all versions, including Windows 8. However, that’s not the case with Windows 10. The software hasn’t been in development since 2009, and it hasn’t got any updates.

However, if you install it, it should work on Windows 10, but your results might vary.

Why was Windows Media Center discontinued?

Shortly after Windows 7 release in 2009, Microsoft decided to disband the team behind Media Center development.

According to Microsoft’s Gabriel Aul, the reason for this is decreased use.

And we’ll have to agree since during our time with Windows 7, we rarely, if ever, used Windows Media Center, and we’re not the only ones.

The software didn’t achieve the expected popularity, so it’s no wonder that Microsoft wanted to focus its resources on something more beneficial to users.

What replaces Windows Media Center in Windows 10?

The DVD Player app replaces Windows Media Center. Remember that this app is available only to users that have upgraded from Windows 8.1 to 10.

If you have performed a clean install, you’d have to purchase the DVD Player app from the Microsoft Store. Another software that was intended as a replacement for Media Center is Groove Music.

Unfortunately, the Groove Music service is discontinued. On the bright side, the new Windows Media Player is coming to Windows 10, so that’s a decent alternative you can use.

Can you still download Windows Media Center?

The Windows Media Center is no longer available. Microsoft has since removed the media player and recorder on Windows 10.

Hence, there is no official way to get it back. However, you can still use unofficial third-party sources.

How can I install Windows Media Center on Windows?

If you want to download the software from an official and reliable source, that’s no longer possible since Microsoft has discontinued this software.

However, you can still get this software from other, third-party sources. This comes with its share of problems, including the following:

  • Legal issues – Different states have different laws regarding abandonware, but usually, it’s not illegal to download it. Hosting abandonware or sharing it is illegal.
  • Security issues – Since the software is hosted by third parties, it could be altered or infected by malware.
  • Compatibility issues – The software was optimized for Windows 8, and it hasn’t received an update for more than a decade, so, likely, it won’t work properly on a modern operating system.

Since the software can’t be downloaded safely from an official source, we’ll refrain from giving instructions on how to download it.

However, if you do so, use a reliable source and scan the downloaded file for malware with reliable antivirus software.

In case you are errors on Windows Media Center, check our detailed guide for the surefire fixes to get rid of them.

If you have more questions about the installation process, don’t hesitate to leave them in the comments below.

Star Citizen Not Using GPU/Low GPU Usage: 5 Simple Ways

If Star Citizen is not using the GPU properly, it’s because you have an older or lower-end card or Windows can’t detect your GPU. This can make getting good performance out of Star Citizen a hassle.

The graphics card is the most important component of a gaming PC. It’s responsible for displaying the game on your monitor, and if you have an older or lower-end GPU, it might not be up to the task. Luckily, this guide will show you how to fix the problem quickly and easily.

Why is my GPU not being used?

Windows doesn’t automatically use your GPU because doing so would put too much strain on your CPU and GPU simultaneously. This could cause overheating problems or other issues that could damage your hardware permanently.

However, if you’re using a GPU-accelerated program and it’s not using your GPU, it can be frustrating because it seems like the GPU is being wasted.

There are several possible reasons why Star Citizen is not using your GPU:

  • Incorrect configuration – If you’re running a program that doesn’t support GPUs, nothing will happen when you start up with a GPU attached.
  • Your CPU is too weak to support the graphics card – If you have a relatively old computer, this is most likely the case why Star Citizen is not using the GPU.
  • Too many programs – If other programs compete for the GPU, it could be impossible for Star Citizen to get its share.
  • The game has not been optimized for your GPU – Some games don’t use all of your GPU’s power. This can be because they don’t require it or haven’t been optimized yet.

How can I force Star Citizen to use GPU?

First, ensure you do the following:

  • Update Star Citizen to the latest available version.
  • Ensure you play Star Citizen in full-screen mode, especially if the game keeps minimizing.

1. Adjust graphic performance to high

  1. Press Windows + I to open Settings.
  2. Click on System on the left pane, then select Display.
    display
  3. Under Related settings, click on Graphics.graphics
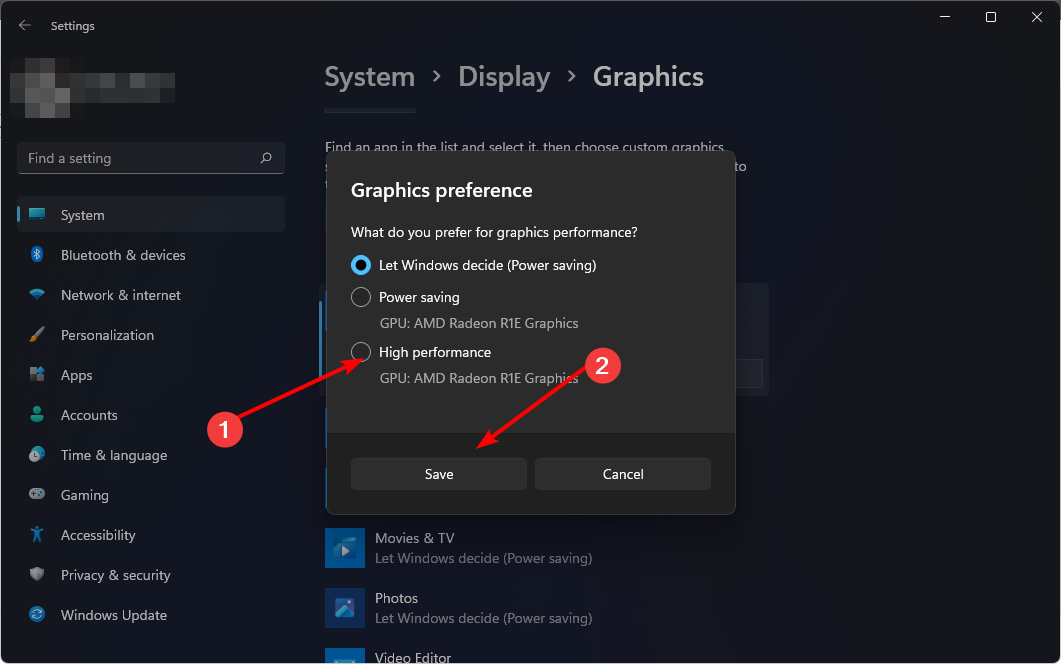
  4. Select Star Citizen from the list, and click on Options.
  5. Now, choose High Performance and click Save.

For those wondering, can I force a game to use GPU, the answer is Yes. The steps listed above will allow you to switch to the GPU instead of the integrated processor.

2. Update your graphics driver 

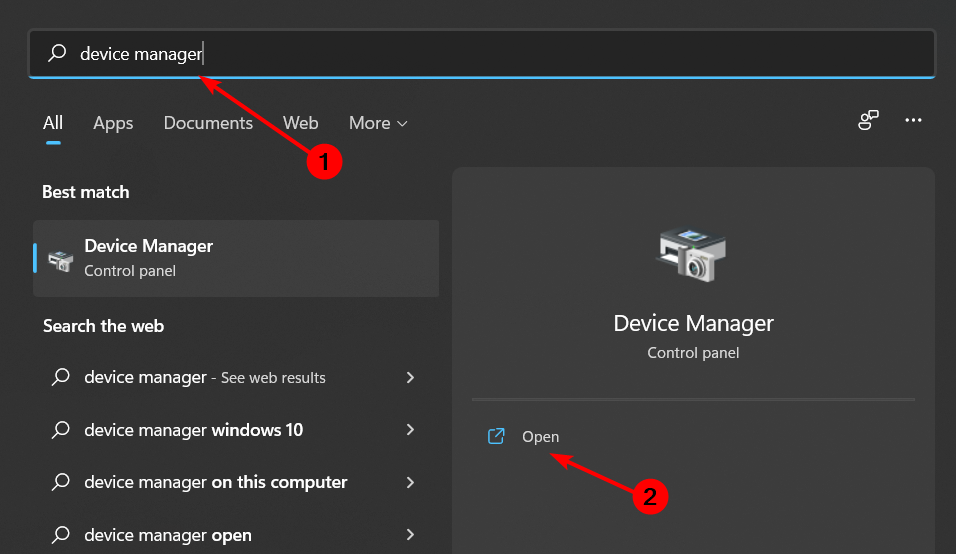
  1. Click on the Search icon, type Device Manager in the search bar, and click Open.
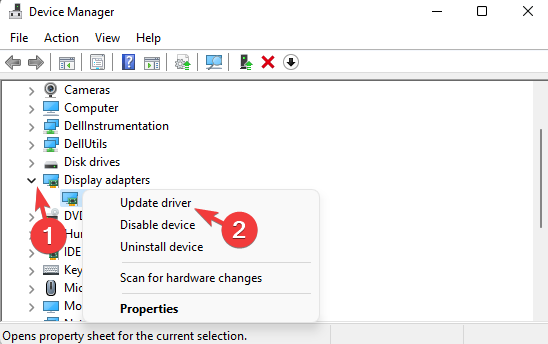
  2. Navigate to Display adapters to expand, right-click on your graphics card, and select Update driver.update graphics driver
  3. Select Search automatically for drivers.

When it comes to driver updates, drivers are a necessary evil. Even though you might not want to install them manually, the fact remains that you need them. If you don’t like to spend time on manual driver updates, you might consider using a specialized tool.

The tool will scan your system and find out which drivers are outdated. With this software, you can update your drivers professionally in one simple step. It’s quick and easy to use, so even beginners can use it without problems.

3. Configure Star Citizen to use GPU

  1. Launch your dedicated graphics card control panel (In this case, Nvidia Control Panel)
  2. Select Manage 3D settings from the navigation pane on the left.manage 3d settings
  3. Next, choose a High-performance NVIDIA processor from the Preferred graphics processor dropdown menu.nvidia to fix Select Manage 3D settings from the navigation pane on the left.

4. Disable your default GPU

  1. Click on the Windows key, type Device Manager in the search bar, and click Open.
  2. Navigate to Display adapters to expand, right-click on your graphics card, and select Disable device.disable device to fix elden ring not using gpu

Before you go for this solution, ensure you have a dedicated graphics processor. When you disable the device’s integrated graphic driver, you disable the driver of your graphics card.

This means that your computer will no longer be able to use the graphics card to display any images or videos on the screen. All applications that use graphics cards will stop working, and you won’t be able to see anything on your screen.

5. Overclock your CPU

If you’re using an integrated graphics card, there’s nothing you can do. However, if you’re using a dedicated graphics card, you can use overclocking software if you notice Star Citizen is not using the GPU.

Overclocking your CPU can help improve performance, but it also increases its heat generation, which can cause instability. If you go through this route, ensure you have overclocking monitoring software to keep tabs in real time.

What are Star Citizen GPU requirements?

Star Citizen is a demanding game, so you’ll need to ensure your graphics card is up to the task. Below are the minimum and recommended PC specs for Star Citizen:

  • A DirectX 11.1 compatible Graphics Card
  • At least 3GB VRAM

For more system requirements, be sure to check out the official page. If your graphics card is the problem, it may be time to upgrade to a new one that can handle the task at hand.

Should a game be using 100% of my GPU?

This depends on the game itself and how resource-intensive it is. While a simpler lower-end game should not use 100% GPU, an advanced one could easily do.

But a game using 100% GPU shouldn’t be a problem. Rather it signifies that the GPU is fully utilized, and you are getting the best performance. However, if the GPU consumption remains high for extended periods, you may find the computer overheating.

There are also a bunch of settings you can tweak to get the ultimate gaming performance if you can’t afford new hardware.

And it’s a wrap from us, but keep the conversation going in the comment section below.

We’re getting 30% smaller UUP updates starting with March

There has been a constant back and forth between Microsoft and its user base since the Redmond company claimed that Windows updates are quicker than before.

The tech giant also said that Windows 11 updates are about 40% smaller and a lot faster to download, to which users again smirked with discontent.

It appears that Microsoft has done a lot of work behind closed doors at Redmond, and is ready to put the money where its mouth is.

Now, the company is telling us to get ready for the first UUP on-premises updates coming in March, so we’re about to check this out together.

Get ready for the first UUP on-premises Windows updates

After Microsoft announced, back in October, the public preview of on-premises UUP (Unified Update Platform) which promises faster and smaller Windows update downloads.

That being said, fast forward four months to today, and the company says the feature is now almost ready to ship, as the first UUP on-premises updates are set to hit on March 28th.

As you can most likely see from the update workflow diagram below, the tech giant has explained how UUP can lead to smaller update download sizes for client PCs.

Of course, we are talking about after the initial one-time 10GB increase in the case of distribution points for the Windows 11 22H2 feature update.

Thus, with the help of UUP, the Redmond company is promising up to 30% smaller and hence faster downloads for everyone.

You should know that other improvements also include cumulative and feature update integrations which means less reboot time, reduced client downloads, and more.

Furthermore, in a recent Tech Community blog post, Thad Martin, a Principal Program Manager at Microsoft, explained the benefits of UUP outlining all the improvements expected from it.

According to him, we will soon be looking at:

  • Up to 30% smaller client downloads for quality updates
  • Cumulative update integration with feature updates (i.e., get current in one reboot)
  • Seamless retention of installed language packs and optional features (FOD) during feature updates
  • Reduced client downloads for feature updates (i.e., inbox app downloads are conditional)Automatic OS healing during the update process
  • End-user acquisition of language packs and FOD

So, apparently, since all quality updates will now be automatically delivered with UUP servicing, you have more choices with feature updates.

This means that you can choose to use UUP on premises for feature updates, just like for quality updates, or continue to use media for feature updates.

What is your take on this situation? You can reach out to us in the comments section below and we will get back to you.

Fix: Unique ID Not Valid Error on Conan Exiles

Canon Exiles is a Survival Action Adventure, cross-platform game. It has many features like character customization that give it a realistic feel. However, users report the Canon Exiles unique ID not valid error affecting the game.

Also, users complain about the Conan Exiles game not launching when they try to play it.

What causes the Unique ID not valid error on Canon Exiles?

The Unique ID not valid error in Conan Exiles prevents players from joining any servers available in the game. The error occurs due to bugs from the developer’s end, affecting many players globally.

However, a couple of factors can cause issues with the Conan Exile game joining any servers. Some are:

  • Network connection issues – It is common for errors like this to pop up when the network connection is unstable. Also, network congestion can prevent users from joining any available server, prompting the error to appear.
  • Issues with Conan Exile’s servers – There are times when the game servers are down, preventing players from accessing their games. It can be because of a maintenance session or a fault with the server. So, you can run into the Canon Exiles Unique ID not valid error if its servers are not working.
  • Windows Defender Firewall interference – The Windows Firewall can impede the activities of the Conan Exile game on your PC, resulting in errors. It can block the path of the game connecting to its servers and cause difficulties for players.

These causes may vary on different PCs and games. Nevertheless, we’ll take you through some fixes to get your game running.

How do I fix Conan Exiles Unique ID not Valid?

Before proceeding with any advanced troubleshooting, apply the following:

If you can’t fix the issue, proceed with the following solutions.

1. End task for Conan Exile (Conan.exe)

  1. Right-click the Start button and select Task Manager from the menu.
  2. Navigate to the Processes tab. Click the Conan Exile (Conan.exe) from the list, right-click on it, then select End Task from the drop-down.
  3. Restart your PC and check if the error persists.

Ending the Conan Exile (Conan.exe) process on your PC will kill its background activities, causing the Canon Exiles Unique ID not valid error. You can check for shortcuts to open Task Manager on your PC.

2. Add Conan Exile as an exception in Firewall settings

  1. Left-click the Start button, type firewall, and open Windows Defender Firewall.
  2. Navigate to the Allow an app or feature through the Windows Defender Firewall option.
  3. Select Conan Exile from the list of apps. Check the boxes for both Private and Public. Click OK to save the changes and restart your PC.

Allowing the Conan Exiles game as an exception in Windows Firewall prevents the firewall from interfering with its processes.

3. Verify the integrity of Conan Exiles’ files

  1. Left-click the Start button and type Steam, then double-click to open it.
  2. Select the Library tab and search for Conan Exile.
  3. Right-click the game and select Properties from the drop-down.
  4. Click the Local Files tab and select the Verify Integrity of Game Files button.

Checking the game’s integrity will verify and resolve the game’s corrupt or missing files. Check more detail on verifying the integrity of game files not working on Windows 11.

4. Reinstall the Conan Exile game

  1. Left-click the Start button, type Control Panel, then press OK to open it.
  2. Click on Programs and Features.
  3. Find Conan Exile from the program list, right-click on it, then select Uninstall from the drop-down.
  4. Follow the onscreen prompts to complete the uninstallation process and restart your PC.
  5. Download and install Conan Exile from Steam, then try playing the game.

It will delete corrupt installation files and other issues that can cause difficulties connecting to servers.

How do you report bugs in Conan exiles?

When faced with an issue with Conan Exiles or to report a bug in the game, you can always use the dedicated forum on the official website.

And pretty soon, it should either be addressed, or another community member will share a possible workaround/solution.

How do I get Conan exiles to run better?

A quick way to make Conan Exiles run better is to update the graphics driver. Also, if you have several other background processes running, terminate them to free up system resources, and the game will run smoothly.

Some users also reported that switching to the Ultimate Performance power plan can provide your PC a much-needed boost.

And for games that require connecting to the web, ensure you don’t have a slow Internet speed. Besides, eliminate FPS lags in Conan Exiles for a better gaming experience.

Do not forget to check how to fix common Conan Exiles issues they can encounter. Likewise, you can read through our article about other survival games on Steam that you can play on your PC.

If you have any queries or suggestions about this issue, kindly drop them in the comments section.

Posted in PC

5 Simple Ways to Fix Black Screen on HBO Max

Many readers have reported facing the black screen issue while streaming HBO Max. If you are among them and are looking for solutions, then this guide will help you resolve the black screen issue on HBO Max and help you get back to streaming.

What causes the black screen issue on HBO Max?

Here are a few of the most common reasons you would come across the black screen issue while streaming HBO Max content.

  • The HBO Max servers are down – Often, the official servers are down for maintenance which can cause issues.
  • The select HBO Max title might be facing some issues – There could be some internal problems with the HBO Max content that you are playing.
  • There could be temporary bugs or glitches with your account – The presence of a bug or a temporary glitch can cause issues with your account.
  • Your internet connection is faulty – If your Internet connection is unstable then it could prevent you from connecting to HBO Max’s servers.
  • You are using a VPN – If VPN is not working with HBO Max it could be why you are getting a black screen issue with a particular title on HBO Max.
  • A browser extension is causing the issue – The browser extension might be interfering with the website you are trying to stream from.
  • Your PC is infected with viruses or malware – A virus or malware will anyways hamper the smooth functioning of your PC and could also trigger multiple streaming-related problems.

Now that we know the possible causes of this problem, let’s see how we can fix it quickly.

How can I fix the black screen issue on HBO Max?

Before you go ahead and apply advanced troubleshooting solutions, perform a few preliminary checks:

  • You can use websites such as Downdetector or IsItDownRightNow to know about the current status of the HBO Max servers.
  • Sign out of your profile and login back again.
  • Try watching another show, and if the problem does not exist there, then it could be a fault of the content that you are watching.
  • Reboot your router and check if this fixes the solution or not.
  • Try switching to a different web browser. Often the issue is related to the web browser rather than the streaming website.
  • Use Fast.com or Speedtest.net websites to know about connection speed. If it is not as per your data plan, then you can contact your ISP.

If you crossed these prerequisite measures from your list, let’s apply the solutions below to fix the problem.

1. Disable the VPN

  1. Launch the VPN app.
  2. Hit the Power or Disable button.
  3. Restart your PC and check if that fixes the issue or not.

VPNs can help you access restricted content on streaming websites, and also they are good for security purposes. We have a list of some of the best VPNs that you can use for streaming.

If you are using a VPN to access the geo-restricted content on HBO Max, then this could very well be the reason you are experiencing a black screen issue while streaming HBO Max.

There are several VPNs that do not work that well and can cause interruptions when changing your IP address.

We have a guide that would help you disable VPN on your PC temporarily or permanently.

2. Disable browser extensions

  1. Open your web browser.
  2. Click on the 3-dot menu and select Settings.chrome settings
  3. From the left side, select the Extensions tab.
  4. Disable or uninstall all of your extensions and check if the black screen issue is resolved.

Often browser extensions can get in the way of the smooth functioning of a web browser. It could very well also interfere when streaming content online.

In the solution above, we showed you how to disable the extensions in Chrome but the procedure is very similar on all major browsers.

You can also try switching over to a different browser. If you are confused about which one to go for, we have a guide that lists some of the best web browsers that you can opt for.

3. Scan PC for virus

  1. Click the Search icon, look for Windows Security and open it.
  2. From the left side, select Virus & threat protection.
  3. Hit the Quick Scan button.
  4. Your PC will be scanned for viruses or malware and a report would be generated once the scan completes.
  5. The Windows Security then will prompt you to take necessary actions, if found any issues.
  6. Fix that and then check if the black screen issue is resolved or not.

The above steps are instructed for the default Windows Security antivirus tool. You can perform a virus scan using a third-party antivirus software as well.

If you do not have antivirus software installed on your PC, then you should check out our dedicated guide that will give you a list of the best tested and recommended antivirus tools from our experts to keep your PC and your data safe.

If you want an in-depth malware scan, we recommend trying TotalAV, an antivirus with advanced security and prevention features.

TotalAV

Remove any viruses that can interfere with any of your computer programs.
Free Trial Visit Website

4. Clear your browser cache

  1. Launch Chrome, click on the 3-dot icon, and select Settings.
  2. Select Privacy and security from the left pane and click on Clear browsing data on the right.
  3. Check the boxes for Cookies and other site data and the Cached images and files, then hit the Clear data button.

Often due to corrupt cache files and data, the browser would trigger multiple errors one of which is not smoothly running the websites that you visit.

Simply clear the browsing cache and check if this fixes the black screen issues on HBO Max or not.

5. Clear the HBO Max app data

  1. Tap on Settings on your Android device and navigate to the Apps menu. 
  2. Look for HBO Max and tap on it.
  3. Access its Storage menu, then hit the Clear Data button to complete the process.

If that doesn’t work, you may also check for any app updates and, finally, uninstall and reinstall the app on your device from Play Store or App Store.

Also, ensure that you have the latest firmware on your smartphone and try to sign out and back in from the application.

Some of our readers asked why is my HBO Max screen black on Apple TV. Most likely, there is a problem with your local connection, or their services are down. And if you run into a black screen on Hulu, see our guide for quick fixes.

We hope our guide helped you fix the black screen problem when streaming HBO Max content.

Do not forget to comment below to let us know which solutions fixed your problem.

How to Calculate Standard Error in Excel: 2 Quickest Ways

If you are working with a large dataset, knowing its standard deviation is handy as it will let you know the variability in the given dataset. You get to see the degree of asymmetry in your dataset and how much the data deviates from its mean value.

You can also calculate standard error in MS Excel. Here, we will guide you on how to calculate standard error in Excel quickly. Let us get right into it.

Why is calculating standard error important in Excel?

The standard deviation allows you to understand the variation in your sample. There are two varieties of standard deviation:

  • The standard deviation of a sample: In this, you get to calculate the standard error of a certain dataset or a selected sample of data. For example, you have a chart of the marks of all students in a class. Then you can use the standard deviation of a sample to know the deviation in the marks.
  • The standard deviation of a population: In this, you calculate the standard error of all entries in a table. In the above example, you can use the standard deviation of a population to know the deviation for all students.

On the other hand, a standard error lets you know the variability across the samples of the population. Using standard error you understand how a sample’s mean is accurate in terms of the true population mean.

So, to understand standard error remember that a standard error is the standard deviation from the population mean. It can be calculated by dividing the standard deviation of a sample by the square root of the sample size.

So, here’s how to find standard error in Excel using two simple methods we propose below.

How to calculate standard error or deviation in MS Excel quickly?

1. Use the formula

  1. Create a sample data or open your workbook.
  2. Click on a cell where you would like your standard error to appear.
  3. Click on the formula bar next to the fx symbol.
  4. Type the below formula in the formula bar: =STDEV(
  5. Drag and select the range of cells in your sample data. For example, in our case, it would become =STDEV(C2:C10
  6. Close the bracket for the formula: =STDEV(C2:C10)
  7. Add / symbol to the STDEV formula. =STDEV(C2:C10)/
  8. Apply the SQRT formula to the STDEV formula. =STDEV(C2:C10)/SQRT(
  9. Use the COUNT function with the STDEV formula. =STDEV(C2:C10)/SQRT(COUNT(
  10. Drag the range of cells that are part of your sample data. Close the SQRT bracket: =STDEV(C2:C10)/SQRT(COUNT(C2:C10))
  11. Press Enter to get the standard error.

This is the quickest way to calculate standard error in Excel formula, so make sure you try it.

2. Use Data Analysis ToolPak

  1. Open your workbook.
  2. Click on File and select Options from the left side pane.
  3. Select Add-ins in the Options window.
  4. Select Analysis ToolPaK.
  5. Click the Go button at the bottom.
  6. Check the box for Analysis ToolPak and hit OK.
  7. Click on the Data tab.
  8. The Data Analysis Toolpak will be added to your Excel toolbar.
  9. Click on the Data Analysis button.
  10. Select Descriptive Statistics and click OK.
  11. Select the range of cells from your sample.
  12. If your data has column headers then choose Labels in first row option.
  13. Under Output options, select New Worksheet to get the result in a new worksheet in the same workbook, or select New Workbook to get the result in a fresh workbook.
  14. Check the Summary statistics option, then click OK.
  15. You will get the result and you will see the Standard Error.

That is it from us in this guide on how you can calculate standard error in MS Excel quickly.

If you are having issues opening or running MS Excel then we would suggest you check out our dedicated guide to resolving it in no time.

You can also refer to our guide, which will help you with how you can fix the problem if the Excel toolbar is missing. We also have a guide that you can check out and learn how you can open multiple Excel files at once.

If you wish to learn how you can import data from PDF to MS Excel then you can check out our dedicated guide on it. For users having trouble inserting cells in MS Excel, they can check out our guide, which lists some of the most effective solutions to resolve the problem.

Did you know that you can quickly apply formula to entire column in Excel? That’s right, and we have a new guide that shows you how to do that.

Let us know in the comments below which one of the above two solutions you use to calculate standard error in Excel.

Check out KB5022918, out now for all Windows 11 Beta Channel Insiders

No, Microsoft has not forgotten about the Beta Channel Insiders and there is new software to be had here as well.

Before we get into it, remember to also check out the latest Dev Channel build (25295) that is now available for all Insiders.

If, by chance, you missed the previous build released to the Windows 11 Beta Channel (KB5022358), you can catch up now.

The previous build bumped your Windows 11 version from 21H2 to version 22H2, so we recommend you check out the issues that Windows 11 version 22H2 users are still struggling with.

Also, if you haven’t yet upgraded to Windows 11, remember that Microsoft has officially stopped selling licensed Windows 10 copies.

Tabs are coming to the Notepad app in Windows 11

Indeed, the time has come for another Windows 11 Beta build (KB5022918) for Windows Insiders actively testing software on this Channel.

This time around, according to Microsoft, the build numbers are 22621.1255 (with new features turned off) and 22623.1255 (with new features turned on by default).

The most important thing you should know about this Beta Insider Build is that it brings tabs to the Notepad app, so you can multitask more efficiently.

We first found out about this feature through a leak late last year, right at the end of December, when a Microsoft employee made some screenshots public.

With the risk of disappointing, we have to say that this is the only new feature that is coming to the Beta Channel for now.

The rest of the changelog, as you know by now, is made up of fixes to some of the bugs and issues, along with some known issues.

We’re about to take a closer look and see for ourselves what we should and, at the same time, should worry about after installing this build.

Fixes in Build 22623.1255

[Taskbar & System Tray]

  • Fixed an issue where Start would open behind the taskbar when entering it while using the touch keyboard.
  • Fixed an issue where the taskbar would disappear when switching from Task view to a Win32 app icon through the tablet-optimized taskbar.

[Task Manager]

  • Process names typed into the search box should no longer unexpected get spellchecked.
  • Fixed a couple of issues with how Narrator was reading out content in Task Manager.
  • Fixed an issue where the dropdowns in settings might not match your currently selected theme.
  • When using search on the App History page, results should no longer suddenly disappear.
  • If you open the Default Start Page dropdown in settings, clicking the Task Manager window should make the dropdown disappear now.

What can I do if I can’t install KB5022918?

  1. Press Win+ I to access Settings.
  2. Select the System category and click on Troubleshoot.w11 troubleshoot
  3. Press the Other troubleshooters button.other troubleshooters windows 11
  4. Press the Run button next to Windows Update.windows update troubleshooter

Also, make sure to report any other issues you might come across, in order for Microsoft to address and improve the overall OS experience for us all.

This is everything you can expect if you are a Windows 11 user. Leave a comment below if you found any issues since installing this build.

We Can’t Tell if Your PC has Enough Space [Windows 11 Fix]

When upgrading from Windows 10, you may often encounter the error, We can’t tell if your PC has enough space to continue installing Windows 11.

While this may seem like a not enough memory issue, there could be other reasons as well why you may see the not enough space error. However, with WinDirStat, you can analyze disk space and find out any anomalies.

Why does my Windows 11 say, Can’t install due to low disk space?

Some of the reasons why Windows 11 keeps saying, Windows needs more space, or Can’t install due to low disk space are:

  • Any external hard drives are connected to the PC – Sometimes, external hard drives/portable hard disks can interfere with the installation.
  • PC is not compatible/or doesn’t meet Windows 11 requirements – This is when your device does not meet the minimum requirements to install Windows 11.
  • Faulty Windows 11 ISO files – It could be possible that you downloaded a bad ISO file that shows the error, we can’t tell if your PC has enough space to continue installing Windows 11.
  • No free space in the C drive – While you may have lots of space on your hard drive, it could be possible that the C drive e is occupied.
  • Accumulation of too many junk files – When there are too many large files taking up a lot of space.

However, we do have a few workarounds that could help you to fix the error, We can’t tell if your PC has enough space to continue installing Windows 11.

How do I see what’s taking up space on Windows 11?

  1. Press the Win + I keys to launch Windows Settings, click on System on the left, and then select Storage on the right. storage settings
  2. On the next screen, under the Local Disk (C:) section, check what’s occupying space on Windows 11.check usage in C drive
  3. Next, click on the Show more categories option, and check which other files are taking up PC space, such as Videos, OneDrive, Documents, Pictures, etc.Show more categories
  4. You can also go to the Storage management section, expand Advanced storage settings, and click on the Storage used on other drives option.Advanced storage settings
  5. Next, under Local storage, select the secondary drive, and check the storage space used by the drive.select the secondary drive
  6. Alternatively, you can also use a disk space analyzer to find out the reason behind the low disk space on your PC.

Once you complete the steps, you will know what files take up most of the space on your computer.

How do I fix we can’t tell if your PC has enough space issue?

Before you proceed with the primary solutions, make sure to try these to possibly fix the issue:

  • Check if the page file is set up on another drive.
  • Make sure how much space is remaining on Drive C.
  • Remove junk and useless large files.
  • Delete files and folders from the recycle bin.
  • Remove any duplicate files from the system.
  • Run the anti-virus software for any virus or malware infection.

If none of the above methods help, it’s time you move on to try the troubleshooting procedures.

1. Run the Chkdsk command

  1. Press the Win + R shortcut keys to open the Run console, type cmd, and press the Ctrl + Shift + Enter keys together to open the elevated Command Prompt. run command prompt command
  2. Now, run the below command in the Command Prompt (Admin) and hit Enter: chkdsk C: /f /r run chkdsk command
  3. The utility will now start looking for any disk errors, and if any, it will repair them automatically.

Once done, close Command Prompt, restart your PC, and check if you can install Windows 11 without the error message.

2. Re-download the iso again

  1. Visit the Microsoft Software Download page to download the Windows 11 ISO. download windows 11 ISO
  2. Once you have confirmed the product language, make sure to Verify your download. verify your download
  3. Next, follow the on-screen instructions to use the checksum tool on the Microsoft download page to make sure both checksums match. download checksum tool

Now, you should be able to complete the Windows 11 installation successfully. You can also refer to our detailed post on how to download the Windows 11 ISO.

3. Delete the Windows.old folder

  1. Press the Win + R keys simultaneously to launch the Run console, type cleanmgr, and press Ctrl + Shift + Enter together to open the elevated Disk Cleanup. run cleanmgr command
  2. Next, select drive C: in the Disk Clean-up box and press OK. select c drive in disk cleaup
  3. You will now see the Disk Clean-up for C: drive dialog. Here, go to Files to delete, select the Previous Windows installation option from the list, and press OK.Previous Windows installation
  4. Or, you can also select Downloaded Programs, Temporary Internet Files, Thumbnails, Recycle Bin, etc, and press OK to remove them. delete Downloaded Programs, Temporary Internet Files, Thumbnails, Recycle Bin

Once done, restart your PC and check if the Windows installation still fails with the low disk space error message.

4. Transfer Free Space to C Drive

  1. Open the Run console by pressing the Win + R keys together. Type diskmgmt.msc in the search bar and hit Enter to open the Disk Management window. run diskmgmt.msc command
  2. Next, right-click on the D drive (D:) and select Extend Volume. extend volume for d drive
  3. Please note that Extend Volume only works on NTFS and RAW partitions, and not for FAT32 and other file systems.
  4. If Extend Volume is frozen, it could be either because you are not running Disk Management as an administrator, or there’s no adjacent unallocated space behind the target partition.
  5. Next, in the Extend Volume Wizard, press Next to proceed. extend volume wizard
  6. Now, go to Select the amount of space in MB, and enter how much space you want to allocate to the C drive. Press Next. Select the amount of space in MB for C drive
  7. On the confirmation screen, click Finish.
Note icon NOTE
You may also notice unallocated space right after the selected volume (check for the lower-right box as Unallocated). So, if you find another volume located between the selected partition and the unallocated area, you can delete this volume to transfer that space to the D drive. But in this case, you will lose any data on that additional volume.

You have now successfully extended the space to C drive. For more details, you can refer to our detailed guide on how to extend the C drive in Windows 11 with ease.

Restart your PC and check if you still see the error, we can’t tell if your PC has enough space to continue installing Windows 11.

5. Increase C drive space 

5.1 Increase C drive space with adjacent unallocated space

  1. Press the Win + R keys to launch the Run console, type diskmgmt.msc, and hit Enter to open Disk Management. run diskmgmt.msc command
  2. Now, right-click on the C drive (C:) and select Extend Volume. extend volume for c  drive
  3. It’s important to note that Extend Volume supports only NTFS and RAW partitions, and not FAT32 and other file systems.
  4. If Extend Volume is greyed out, it could be either because you are not running Disk Management as an administrator, or there’s no unallocated space behind the target partition.
  5. Next, in the Extend Volume Wizard, press Next. extend volume wizard
  6. In the next window, add more space to your C drive and press Next. Select the amount of space in MB for C drive
  7. Finally, press Finish.

This way, you can increase space in C Drive with Unallocated space. Now, as you restart your PC, you should be able to install Windows 11 normally without any error messages.

5.2 Increase C drive space without unallocated space

  1. To open the Run console, press the Win + R keys together, type diskmgmt.msc in the search box, and hit Enter. run diskmgmt.msc command
  2. Right-click the partition next to the C drive, (which is the D drive by default), and click on Shrink Volume.shri nk volume for d drive
  3. Input the amount of space that you want to shrink, and press Shrink.enter the amount of space to shrink in MB
  4. Next, right-click on the C drive and select Extend Volume. extend volume for c drive
  5. Now, follow the on-screen instructions to add more space to the system C drive.

6. Merge the partitions

Note icon NOTE
This solution will be efficient if you have multiple partitions on the system drive.
  1. Press the Win + R keys to launch the Run console, type diskmgmt.msc, and hit Enter to open Disk Management. run diskmgmt.msc command
  2. In the Disk Management window, right-click on D drive and then click on Delete Volume.delete d drive volume
  3. Once deleted, the D drive will now show as an unallocated volume. Now right-click on the C drive and select Extend Volume. extend volume for c drive
  4. This will extend your C drive with the unallocated space, and you will find that the original D volume has been merged with the C volume.

Alternatively, you can also use one of the disk management tools we mentioned in the list of best to merge partitions quickly.

7. Perform a clean boot

  1. Launch the Run console by pressing the Win + R keys. Type msconfig and hit Enter to open System Configuration. run msconfig command
  2. Go to the General tab, and select Normal Startup.select normal startup
  3. Next, under the Services tab, deselect Hide all Microsoft services, select Enable all, and press Apply.uncheck hide all microsoft services and enable all
  4. Now, select the Startup tab, and click on Open Task Manager.open task manager
  5. In the Task Manager window, right-click on all the startup programs one by one, and select Enable. Press OK.disable startup services one by one
  6. Now, press the restart option in the prompt to reboot your PC.

Now, you should not encounter the error message, we can’t tell if your PC has enough space to continue installing Windows 11.

Alternatively, you can uninstall Ubuntu (if using) instead of deleting the partition. Or, you can swap Install.wim for Windows 21h2 ISO with Install.wim for Windows 11 22h2 ISO.

But, if all the above methods fail to work, you can clean install Windows 11 without the refresh tool, as mentioned in our detailed post.

If you face any other issues while installing Windows 11, you can leave a message in the comments box below.

9 Best Tune-up Utilities for Windows 10/11 [Still Worth It in 2026]

Looking for the best tuneup software for Windows 10 and 11? These tools can clean junk files, repair system errors, and boost your computer’s speed in just a few clicks. Below, we break down the top PC tune-up software options available today.

What is the best tune-up software for Windows 10 and 11?

1. Fortect – Best for repairing damaged system files

fortect user interface

Fortect stands out as a system repair and tune-up utility that focuses heavily on restoring your Windows to peak condition.

Rather than just cleaning up junk, it goes deeper, replacing corrupted or missing Windows system files with clean, up-to-date ones from a secure database.

It’s an ideal choice if your PC has been acting up due to crashes, freezes, or even malware damage.Fortect can fully tune up a sluggish or error-prone PC.

Check out Fortect’s best features:

  • Detects and replaces damaged or corrupted Windows system files
  • Fixes issues caused by unstable programs and faulty Windows updates
  • Frees up storage by removing junk files and browser cache
  • Repairs damage caused by malware without affecting personal files
  • Stabilizes your system to prevent crashes and freezes
Fortect

Fortect

Say goodbye to crashes, freezes, and slowdowns. Repair Windows damage at its core so your system runs like new!
Get it now Visit website

2. IObit Advanced SystemCare – Smart maintenance solution with real-time optimization

iobit free pc optimization software

IObit Advanced SystemCare is a tool specialized in system care and maintenance. It finds all problems your system might have and solves them, so you can run at peak performance.

With AI that learns from your optimization habits, you can create a personalized plan to scan for and remove tons of junk files, unnecessary logs and files, leftovers from uninstalled apps, and more.

The perks of using IObit are:

  • Junk files cleanup in Dropbox, Steam, Java, Adobe Photoshop Lightroom, Spotify, and MS OneDrive
  • Optimize startup programs to reduce boot time up to nearly 50%
  • 30+ troubleshooter to defragment, clean junk files, leftovers, etc
  • Security vulnerability fixer with included internet speed booster
  • One-click update all outdated software on your computer
  • Real-time tune-up for maintaining peak performance

IObit Advanced System Care

Your maintenance buddy will always keep your system clean and fast.
Check price Visit Website

3. Ashampoo WinOptimizer – Versatile tuneup tool with privacy and performance tweaks

ashampoo pc tuneup utility

Don’t let time slow down your system and use special software to tweak it regularly. Proper and thorough cleaning and optimization are required for running at the highest performance.

Ashampoo also includes great features like a Process Manager, Uninstall Manager, Incon saver, Restore Manager, and many others to improve the speed of your PC.

Also, using Ashampoo WinOptimizer provides the following perks:

  • Thorough in-depth cleaning of system critical areas
  • Find and remove older versions of Windows, updates, and system caches
  • Convenient cookie manager for “safe” cookies
  • Up to 3 PCs to be optimized at all times
  • Improved overview and easier handling in link checker and context menu manager
  • Up to 75% faster cleaners

Ashampoo WinOptimizer

A great PC cleaner and tune-up tool to keep your system clean and in top condition.
Check Price Visit Website

4. Glary Utilities Pro – Comprehensive tune-up tool for junk removal and repairs

glary utilities pro screenshot

Glary Utilities Pro boasts an entire suite of PC-enhancing tools, and it offers your heavily used computer another shot at a new life.

The utility leverages a collection of more than 20 tools to kick all kinds of problems that have been bugging your system.

Take a look at the most impressive features that you will get with this utility:

  • Downloads and installs effortlessly and quickly
  • Registry repair, disk cleanup, and also junk-file removal tools
  • It comes with automatic software updates and the ability to schedule tune-up times
  • Backup and restore functionality

5. AVG TuneUp – Performance tune-up software with automatic maintenance features

avg free pc optimization software

AVG TuneUp makes sure to improve your computer’s performance by digging deep into the system to perform all kinds of processes including removing junk files, uninstalling unneeded programs, and also defragging your hard drive.

You can also install this tune-up tool on as many devices as you please.

Check out the best features that are included in AVG TuneUp:

  • The tool is able to update outdated software
  • AVG TuneUp also speeds up your PC’s performance
  • The utility frees up disk space and also fixes Windows crashes
  • It will provide your system with extended battery life
  • AVG TuneUp will make older PCs live longer, and it will help new PCs run much faster
  • It removes unwanted files that have been accumulating over the years in your system

6. CCleaner – Efficient PC tune-up tool for cleaning and updates

CCleaner is one of the best PC cleaners out there. With features that do thorough searches on your computer, it knows exactly what can be cleaned or not.

Over time, your computer collects unused files, settings, and resource-hogging applications which can make it slower and slower. A good scan will take care of all these issues in no time

This software also offers a safer browsing session. Privacy is enhanced by clearing cookies and scripts left on websites in real-time.

The key features of CCleaner are:

  • Performance Optimizer
  • Driver Updater
  • 1-Click Updates All Your Software
  • Fewer Errors & Crashes
  • Quicker Startup
  • File Recovery
  • Priority Support

Overall it makes your computer faster and safer. It will delete all unnecessary files and all plugins or scripts that can invade your privacy.

7. Norton Utilities – Powerful tune-up software boosting PC speed and stability

Norton Utilities is a useful tune-up tool that will improve your PC’s performance.

This utility is supports all versions of Windows and includes a full suite of features that help speed up, secure, and optimize your PC.

Check out the most important features that are included in this utility below:

  • Registry cleaner
  • Disk defragger
  • Startup manager
  • File recovery
  • File shredder
  • Duplicate file finder
  • Repair drives
  • Uninstaller tools
Norton Utilities

Norton Utilities

Fix system errors and speed up your PC with Norton Utilities!
Check price Visit website

8. Tweaking Windows Repair– Most computer tune-up tools included

tweaking windows 7 repair tool

Windows repair tools come in all shapes and sizes, from intricate and heavy OS boosters to lightweight utilities that provide you with just the basics, which most of the time are more than enough.

Well, Tweaking Windows Repair falls in the latter category, and while it may look a bit dated, it does more than a good enough job to warrant a place on our list.

That being said, Tweaking windows repair comes with everything you may expect from such a tool, including:

  • Error troubleshooters
  • Registry cleaners
  • RAM optimizers
  • CPU boosters
Tweaking.com

Tweaking.com

Fix stubborn errors and optimize your PC fast with Tweaking Windows Repair!
Check price Visit website

9. Iolo System Mechanic Ultimate Defense – Complete tune-up features

If your PC is not booting or if it’s loading apps at a slower pace, we recommend you download System Mechanic Ultimate Defense.

It can defrag your hard drive, repair registry, and reduce CPU and RAM usage in real-time.

Take a look at the most important features that come with this tool:

  • The Privacy Shield suite that prevents data collection
  • Removes the useless file from your system
  • LiveBoost unlocks more CPU and RAM to enhance your system’s performance
  • ActiveCare offers real-time system analysis and repair
System Mechanic Ultimate Defense

System Mechanic Ultimate Defense

Iolo System Mechanic Ultimate Defense is a great tool if you want to boost your PC’s speed. Give it a try today!
Check Price Visit Website

FAQs

What does PC tune up software do?

It scans for junk, broken registries, bloated startup programs, and other issues that slow down your computer.

Can tuneup tools really optimize Windows 10 or 11?

Yes. They can boost performance by cleaning unused data, disabling unnecessary apps, and fixing hidden errors.

Are free PC tune-up tools enough?

Free tools offer basic cleaning, but paid options usually unlock deep cleaning, repair, and auto-maintenance.

Will the tuneup software delete my personal files?

No. They target system files and cached junk, not documents or photos.

Wrapping up

hoosing the best tuneup software for Windows 10 and 11 will help with deep cleaning, registry fixing, or repairing system files. A solid PC tune up software can help you speed up, optimize, and maintain long-term performance across all types of devices.

For a closer look at other expert-tested tools, explore our curated list of the best Windows 10 optimizer software and PC maintenance software.

Why Was Voice Chat Enrollment Temporarily Disabled in Roblox?

Voice chat enrollment has been temporarily disabled, a problem many gamers have faced recently. The Voice chat feature makes it easier for players to communicate with one another and was introduced by Roblox in 2021.

For years, voice chats have been a crucial component of video games. When attempting to protect a teammate from hostile fire or trying to make fun of a target you just shot, voice communication is helpful. Now let us explore what this disabled problem is, as well as some possible fixes.

What does the message Voice chat enrollment has been temporarily disabled mean?

When you get this message, it simply means that you will no more be able to use voice chats while playing the game.

With Voice chats, you can communicate with other players during gameplay. However, to ensure this feature is not misused, it is locked behind age restrictions.

The main reasons you may get the Voice chat enrollment has been temporarily disabled message are the following:

  • Age restrictions – You need to prove that you are at least 13 years.
  • Misconfigured settings – Even though you may be at least 13 years old, you may have wrongly configured your settings.

This error is evident across many platforms, including Steam. Let us show you how to fix this issue regardless of the reasons.

What can I do if voice chat enrollment has been temporarily disabled in Roblox?

Change your age in settings

  1. Log into your Roblox account, click on the gear icon at the top right corner, and select Settings.
    voice chat enrollment has been temporarily disabled
  2. Under the Personal section, click on the Verify My Age button.
    voice chat enrollment has been temporarily disabled
  3. You should now enter your email address and click Continue.
  4. Scan the bar code using your camera app and continue the process to verify your age (Note that your will need your ID handy to complete this process).

Once the steps are completed, the Voice chat enrollment has been temporarily disabled problem should be resolved.

If you are wondering Why won’t Roblox verify my age?, it’s likely that the ID provided didn’t conform to the platform’s guidelines. In this case, you should contact their support team.

Tip icon Tip
Contacting support is essential if your age is verified but you still face the problem.
  1. On a web browser, navigate to the official support page.
  2. On this page, fill out the form, including a description of your problem, then click on the Submit button.
  3. Wait for a reply that should help you fix the problem.

For most users, as soon as the Age has been verified, they should stop encountering the problem. Even more, take a closer look at this guide on how to fix voice chat errors on Call of Duty: Warzone.

Another question we are often asked is why schools ban Roblox. It’s usually to ensure that students focus on productive activities.

Another concern raised by schools is that students can be contacted by anyone on Roblox with no screening process, thus putting them at risk. And lastly, the violent nature of games and their effect on children can’t be ignored.

We hope you can go back to playing and enjoying your favorite games on the Roblox platform.

Escape from Tarkov Error on POST: Causes and Fixes

Escape from Tarkov is a top-rated game that is packed with action. However, the Tarkov Error on POST message appears more often than wanted for gamers who try to enjoy it.

In this article, we will point out the causes of this error and provide the best solutions to fix the problem.

Why do I get the Tarkov Error on POST message?

Here are a few reasons you might be receiving the error:

  • Overloaded server: The main reason behind the error is an overloaded server, i.e., too many players trying to play the game simultaneously.
  • Issues with the server’s network: Oftentimes, problems with the server can lead to the Error on POST message in Tarkov.
  • Tarkov wipe was done: When a wipe is done, there’s a sudden increase in user activity, and as a result, the servers do not act as expected.

How can I fix the Tarkov Error on POST?

Before getting into more complicated solutions for this issue, let’s crosscheck some preliminary methods:

If the Error on POST is a server-related issue, there is nothing much to do except wait for a patch or a server fix. However, if the problem is the launcher, we have a couple of solutions below that may bring the game back to life.

1. Clear the game cache

  1. Open the Escape from the Tarkov game launcher.
  2. Click your profile name and select Clear Cache from the drop-down menu.
  3. Close the launcher and reopen it again.

If all is well, the game will have the Update option, and the loader will be fixed. This is a verified solution, so try it out.

2. Reinstall the game and the patch

  1. Click the Start button and select Settings.
  2. Select Apps.
  3. Look through the list of apps, click on Escape from Tarkov and select Uninstall.
  4. Download the game again from the official website and then the patch.

This should fix the BsgLauncher.exe file, and everything should return to normal. If that doesn’t work, try to install an older patch since the current one might be broken.

3. Try using a VPN

If a server overload causes the situation, you might try using a VPN to circumvent the problem. We have a great list of the best VPNs for gaming, but our recommendation is to use ExpressVPN.

It has super fast servers worldwide, and it can also work on PlayStation and Xbox.

Moreover, it provides you with complete data protection and security and full anonymity, so you can’t be tracked and stream content without interruptions.

All you have to do is download and install ExpressVPN from their website, open the app, and select the nearest region to get the best performance.

ExpressVPN

Get the best gaming experience and try ExpressVPN for lightning-fast servers.
Check price Visit Website

Why is Tarkov wiping?

Though strange to many, the developers of Escape from Tarkov do a clean wipe, meaning the players lose their progress and start from square one. Every information, be it inventories, levels, or reputation amongst traders, is wiped clean.

This is done periodically, but one can’t predict the exact time or day it will happen. But, it’s, more or less, done every six months.

We hope that our solutions helped you fix the Error on POST problem in Escape from Tarkov. Our first solution was proven to work for many of our readers, so you should try it out at once.

You might also be interested in our guide on how to fix the Escape from Tarkov backend error or how to fix Tarkov server issues.

We also have a guide on what to do if you get Cannot find template with ID Tarkov error.

Have you succeeded in fixing the game? Let us know all about it in the comments section below.

Windows 11 Build 25295 is now live on the Dev Channel

If you are a Windows 11 Insider conducting your business on the Dev Channel, then you might want to know that there is a brand new build for you to check out.

Before we begin, however, please keep in mind that Microsoft is planning to retire MSDT from the Windows OS, prior to the launch of Windows 12.

The company is also working on integrating the ChatGPT chatbot into the Bing search engine and also providing tools for companies and governments to create their own versions.

You can also learn about how this initiative will impact the websites from which the chatbot gets the information from.

What should I know about Windows 11 Build 25295?

Today, Microsoft has launched a new Windows 11 Insider build 25295 to the Dev Channel, so there’s plenty to look out for.

Let’s first talk about the new commercial policy to enable features introduced via servicing that are off by default in your system.

In short, this new policy allows commercial customers to enable features introduced via servicing, outside of the annual feature update.

Keep in mind that Windows update-managed devices are those that have their Windows updates managed via policy, whether via the cloud using Windows Update for Business or on-premises with Windows Server Update Services (WSUS).

Also, we will now see a copy button for quickly copying two-factor authentication (2FA) codes in notification toasts from apps installed on the PC or from phones linked to the PC. 

There is also a new search on the taskbar that began rolling out with Build 25252 and is now available for all Windows Insiders in the Dev Channel.

The rest of the changelog is pretty much made up of the usual bug fixes, with some known issues sprinkled on top.

The list isn’t that big this time around and we are about to present it to you right now, so you can see for yourself what Microsoft envisioned for this build.

Fixes

[General]

  • The issue causing repeated bugchecks for some Insiders after upgrading to Build 25284+ should be fixed now.
  • Made another fix for an issue causing Insiders to experience freezes in recent flights (specifically in this case where apps might freeze if you tried to use them while also trying to play games).
  • Fixed an issue where the Update history page under Settings > Windows Update > Update history was blank for some users after installing Build 25290.
  • Fixed an issue where some users experienced longer than expected update times installing recent builds. If you experience this issue again, please submit a new feedback item with logs in Feedback Hub.

[File Explorer]

  • Fixed an issue where the add and close tab buttons weren’t working in File Explorer if File Explorer was maximized, and you were using an Arabic or Hebrew display language.

[Input]

  • Fixed an issue which could lead to app windows becoming unresponsive after using multi-finger on screen touch gestures.
  • Fixed an underlying issue which was causing your mouse to appear like pointer trails was enabled when sharing your screen.

[Settings]

  • The Add a Device dialog should no longer have an unexpectedly big border.

[Windowing]

  • Fixed an issue which could cause certain apps to move very slowly when you dragged it across the screen.
  • Fixed a DWM crash in recent flights which could cause your screen to flash black.
  • Fixed an issue where snapped windows might not remember their positions if you disconnected and reconnected your monitor.

[Other]

  • Fixed an underlying crash impacting the ability the ability for apps using Graphics.Capture to take screen captures in recent flights.
  • Fixed an underlying issue causing crashes in certain apps when trying to print to PDFs in recent flights.

Known issues

[General]

  • The ability to show seconds in the clock on the system tray, first introduced with Build 25247, has disappeared for Insiders after updating to Build 25295. We’re aware of the issue and this will return shortly in a new flight.
  • Some AAD (Azure Active Directory joined users are now seeing “Getting ready for you” screens when signing into Windows after updating the latest builds. We are investigating the issue.
  • Some users are experiencing issues authenticating to enterprise websites that require windows integrated authentication. This will be addressed in a future update.
  • Launching Group Policy Editor may show an error about a displayName attribute not being found.
  • Using Windows Hello to sign in with facial recognition may not work on Arm64 PCs. A workaround for this is to use the Hello PIN path.
  • We’re working on the fix for an underlying issue related to combase.dll, causing crashes with multiple apps using GetKnownFolder APIs after upgrading to Build 25290, including Notepad and Windows Terminal for IME users.
  • While using Windows Recovery Environment (WinRE) or in doing a clean install of Build 25290, users may encounter rendering issues which create difficulty in using these processes. If you need to do a clean install to your device, please obtain the latest Dev Channel ISO from https://aka.ms/wipISO.

[Widgets]

  • The link for “Find more widgets” in the widgets picker currently is broken. This will be fixed and linked to the Store collection here in a future update.
  • Third-party widgets may occasionally disappear from the widgets board. They can be re-added by clicking refresh or by re-pinning them from the widgets picker.
  • Third-party widgets may occasionally get unpinned when the Microsoft account is used to sign-in multiple Windows 11 devices.
  • The undo button on the widget pinned/unpinned toast notification sometimes doesn’t work.

What can I do if I can’t install Build 25295?

  1. Press Win+ I to access Settings.
  2. Select the System category and click on Troubleshoot.w11 troubleshoot
  3. Press the Other troubleshooters button.other troubleshooters windows 11
  4. Press the Run button next to Windows Update.windows update troubleshooter

Also, make sure to report any other issues you might come across, in order for Microsoft to address and improve the overall OS experience for us all.

This is everything you can expect if you are a Windows 11 user. Leave a comment below if you found any issues since installing this build.

What is Error 0x8b108490 & How to Easily Fix It

It is normal for users to run into errors when launching or playing games on their Xbox console. These errors can occur because of numerous issues affecting the Xbox console and other components running on it.

The error 0x8b108490 is a common problem users complain about as it indicates problems with the Xbox service. Also, our readers may be interested in the error 0x80190190 on Xbox and some ways to fix it.

What is error 0x8b108490?

Error 0x8b108490 occurs when you launch a game on the Xbox console, preventing you from accessing the game. It means that there’s a problem with the Xbox service. Also, it indicates that the Xbox process you’re engaging in has encountered an unexpected error.

Furthermore, the error may appear when launching a game or in between your gaming activities. It is only common on the Xbox console.

What are the causes of the error 0x8b108490?

Many factors may be responsible for the error 0x8b108490 on Xbox. Some notable causes are:

  • Xbox Live server issues – The Xbox Live server is responsible for communication between Xbox services and the device. When there is a server maintenance session ongoing, or there’s an issue causing the server to be down, it may result in errors with the Xbox console.
  • Old or corrupt cache – Cache files help the console run games faster. However, they can become corrupt if they’ve been on the console for a long time. They can cause games and apps not to open on the Xbox console, resulting in error 0x8b108490.

Other factors may be responsible for the error on your Xbox. Hence, we’ll take you through some basic ways to fix the error.

How can I fix the error 0x86108490?

Before proceeding with any advanced troubleshooting on your Xbox console, try these quick tips:

  • Ensure that the Xbox console is connected to a stable network connection.
  • Restart the Xbox console.
  • Submit a console repair request – Go to the Device service and repair page to submit a repair request.
  • Check the Xbox servers status – You can encounter issues with Xbox servers when there is a maintenance session going on, or the servers are down. However, you can visit the Xbox server status page to check for any updates regarding the server and how to fix it.

Proceed with the solutions below if you can’t fix the problem.

1. Installing pending Xbox update

  1. Press the Xbox button to open the Menu window.
  2. Click on the Settings icon on the right pane, then click on All Settings.
  3. Click on System from the left pane menu of the screen, then click on the Updates button from the right.

The console will automatically check for available updates for your Xbox. If there is any update available, the console will prompt you to install it, then follow the onscreen instructions to complete the installation.

Read our article on fixing the Xbox update error you may encounter during the process.

2. Power cycle the Xbox console

  1. Hold the power button on the Xbox console for about ten seconds to drain all power residue.
  2. Unplug the power cable from the console, then wait for 2 minutes.
  3. Plug the power cable back into the console, then hold the power button to turn it on.
  4. After the Xbox is fully booted, check if the error 0x8b108490 appears.

Power cycling the Xbox console will fix any problems that may cause issues with the activities of your game on the console.

3. Reset the Xbox console

  1. Power on your Xbox console and press the Xbox button on the controller to open the guide overlay.
  2. Select the System menu and click on Settings.
  3. Click on System to expand and choose Console info.
  4. Click on Reset Console.
  5. Then choose between Remove everything or Reset and keep my games & apps.

The Remove everything option will clear all data and games on the Xbox console. It will reset the console to the way it came from the manufacturer.

Check how to fix the Xbox controller detected but not working if you experience it. You may also learn what to do if you can’t play games on Xbox One.

Did you manage to solve the error? Let us know in the comments area below.

Fix: OBS Failed to Load Channel Information for Twitch

Formerly known as Open Broadcaster Software, OBS is an open-source streaming app that people use to record, compose, and broadcast a live stream on whichever platform they want.

Most of the time, people use OBS for their Twitch stream. A lot of the major streamers on Twitch use this very app. There are times when OBS will fail to load a Twitch channel leading to some pretty frustrating moments.

Why is OBS saying it failed to load the channel?

Here are a few reasons OBS failed to load channel information for Twitch:

  • Bug in the current version: The issue could arise due to a bug in the installed version of OBS, and a patch for it should, most likely, be underway.
  • Lack of permissions: If OBS doesn’t have the necessary permissions, it may fail to load channel information for Twitch. Running the program as an administrator should fix things.
  • Corrupt browser cache: In some cases, a corrupt browser cache, too, could lead to the problem.

How do I fix failed to load channel information on Twitch OBS?

1. Update OBS

  1. Sometimes when you open OBS, you may get a popup window informing you that an update is available for download.
  2. There will be an Update Now button to update OBS to the latest version. If it doesn’t appear, click Help at the top of OBS.
  3. In the drop-down menu, click Check For Updates.
  4. If there are no updates available, a window will pop up informing you.
  5. The update popup that should’ve appeared initially will appear now. Click the Update Now button.

2. Start OBS with admin privileges

  1. In the Search bar, bring up OBS.
  2. Click Run as administrator on the right-hand side and this should bypass the problem you’re having.

3. Enable two-factor authentication on Twitch

  1. On Twitch, click on your profile icon and select Settings in the drop-down menu.
  2. In Settings, click the Security and Privacy tab.
  3. Scroll down under you reach the Security section. Click Set Up Two-Factor Authentication.
  4. Click Enable 2FA in the new window.
  5. Enter your phone number and click Continue.
  6. Enter the 7-digit code sent to your phone number, then click Continue.
  7. Next, you have one of two choices. You can either download an authenticator app like Google Authenticator to your phone, scan the QR code, and enter a verification code.
  8. Or, you can choose to use an SMS message. This guide will select the second option.
  9. A message will appear telling you that the next time you log in, you will need the authenticator app or enter a unique code that will be sent to your phone. We recommend choosing the latter.
  10. Click Done to close the window.

4. Clearing out browser cache

  1. We’ll show you how to clear out the cache on Opera GX, Chrome, and Firefox. These browsers are commonly used for Twitch.
  2. On Opera GX, press the Ctrl and H keys to open the history menu.
  3. Click Clear Browsing Data at the top.
  4. Click Cookies and other site data as well as Cached images and files.
  5. Click Clear data.
  6. On Chrome, enter chrome://settings/clearBrowserData into the address bar.
  7. Make sure to check the box next to Cookies and other site data and Cache images and files.
  8. Click Clear data.
  9. On Firefox, type in about:preferences#privacy in the address bar.
  10. Scroll down to Cookies and Site Data. Click Clear Data.
  11. Ensure the boxes in the popup are checked. Click Clear.

Why does OBS say failed to fetch settings from Twitch?

Just like being unable to obtain channel information, there are instances where Twitch can’t get the settings from your copy of OBS. The solutions for this problem are the same as those we just covered.

Running OBS with administrator privileges and updating the app are two of the best things you can do. We also recommend uninstalling and reinstalling OBS.

Feel free to leave a comment below if you have any questions about other apps or if you have some that you recommend. Also, feel free to leave comments about guides you’d like to see or information on other web browsers.

10 Best Mouse Settings for Improved Gaming on Windows 11

There has been a lot of talk about Microsoft’s operating system, Windows 11, and gaming ever since the OS wasn’t even released.

Windows 11 has been constantly improved since it came out, and we can now call it a much more stable and reliable experience, even if we are talking about gaming.

Even Mac users can install Windows 11 on their devices and play a game of their choice after the Windows 11 gaming improvements coming with Parallels Desktop 18.

Also, if you are interested in playing Android Games on Windows 11, we can show you everything you need to know about it.

Whether you spent a bag on gaming peripherals for your PC, such as mechanical keyboards or sensitive gaming mice, tweaking the device’s settings can improve your overall experience.

And, since we’re talking about gaming, you will surely be interested in a good gaming browser, so check out the best choices.

Do Windows mouse settings affect games?

We’re going to say that yes, they do. Sensitivity or other mouse settings can thoughtfully contribute to your overall gaming experience.

Mouse acceleration, for example, was implemented to help people feel more in control over their cursor; however, it can seriously throw you off while gaming.

For FPS players, experts recommend playing these games using a sensitivity between 400 and 800 DPI.

Yes, optimizing your mouse for gaming can significantly enhance the experience, so keep that in mind next time you want to tweak your game.

Of course, if you purchased a professional gaming mouse, you can personalize it directly from the product interface.

Where are the mouse settings in Windows 11?

If you want to access your mouse’s Windows 11 system settings, all you have to do is press Win + I, select the Bluetooth & devices tab, and then select Mouse.

Also, under this section, you will find the Additional or Advanced Mouse Settings for Windows 11.

What are the best mouse settings for gaming?

1. Personalised DPI settings

If you are into gaming or spend time around gamers, one of the first things you observe is that everyone plays with different DPI settings,

Depending on how sensitive you want your mouse to be, adjusting the DPI setting to a value you are comfortable with is essential.

If you have a gaming mouse, you can change the DPI settings from the extra button on it.

How do I change mouse DPI in Settings on Windows 11?

  1. Press Win + I to access Settings.
  2. Select the Bluetooth & devices tab, then click on Mouse.mouse settings
  3. Adjust Mouse pointer speed to your preference.mouse pointer speed

2. Disable mouse acceleration

  1. Press Win + I to access Settings.
  2. Select the Bluetooth & devices tab, then click on Mouse.mouse settings
  3. Select Advanced mouse settings.advanced mouse settings
  4. Select the Pointer Options tab and disable the Enhance pointer precision option. Also, for maximum accuracy, it’s recommended that you set the Windows 11 mouse sensitivity at 6/11.pointer precision

3. Always keep drivers up to date

  1. Search for Device Manager and open the app.device manager
  2. Expand Mice and other pointing devices.mouse driver
  3. Right-click on the mouse you are using and select Update driver.

This can also be done directly from the gaming mouse’s dedicated software, so we are showing you an alternative.

Outdated drivers are the most common reason for slow performance regarding your PC. Updating drivers by yourself can be difficult. Therefore, an automatic driver monitoring tool is a great option.

4. Boost your Polling Rate

Many gamers know that the Polling Rate is the speed at which your mouse communicates input to your gaming PC.

To help you understand, remember that the base polling rate with USB is usually 125Hz or once every 8 milliseconds.

That being said, most gaming mice typically include a 1000Hz polling rate, once per millisecond or 1000 times per second.

If you want to change the Polling Rate, you can do so directly from the mouse’s buttons, using keyboard shortcuts, or through the mouse’s dedicated software.

5. Disable Angle Snapping

Again, a fact not known by many non-hardcore gamers is that Angle Snapping is a feature that helps your mouse cursor in a straight line.

As you can imagine, that is not necessarily a good thing when we’re talking about gaming, so it can inconvenience you.
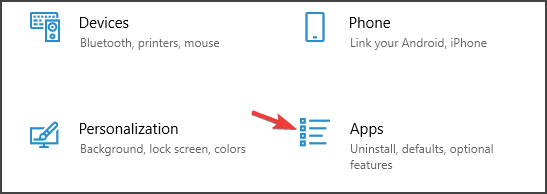
This, just as adjusting the Polling Rate, can be done using your mouse’s dedicated software, so keep that in mind.

6. Enable Game Mode

  1. Search for Game Mode Settings and open the app.game mode settings
  2. Turn on Game mode.game mode

7. Use specialized mouse software

As we said above, if you are into gaming, you are better off spending money on a gaming mouse to optimize your experience completely.

And, to get the most out of a gaming mouse, you need to download and install the corresponding software.

This way, you will have access to all the different features that the mouse comes equipped with, and you can tweak a lot more performance and visual options.

For example, if you are using a Razer gaming mouse, you will need to download the Razer Synapse to unlock the mouse’s full potential.

8. Always play games in fullscreen mode

You might now know this, but even the unimportant things can improve mouse responsiveness.

That said, after entering your favorite game, make sure you visit the Visual/Graphics settings page and make some tweaks.

For the best performance, make sure that you avoid using Windowed, or Borderless Window mode while gaming.

9. Enable Auto-HDR

It goes without saying that the HDR display is better than SDR, which means that a smoother gaming experience must be complete from all sides.

Visual quality means your mouse will move smoothly, without lag or stuttering so that you can enjoy your adventure.

If you need any help turning on Auto HDR in Windows 11, we can help you with that as well, so just relax and focus on gaming.

10. Use Raw Input

You surely know that many games nowadays have the option to turn raw mouse input on or off if you look into the settings. menu.

Typically, mouse movements are much more accurate when using raw mouse input, especially in first-person shooters.

This actually varies from game to game, but in some games with raw mouse input of the mouse, aiming will be very inconsistent, especially with higher DPI settings.

counter-strike mouse settings

Furthermore, the raw setting takes mouse input directly from the mouse instead of from the operating system, which will change the input based on things like the cursor position on the desktop, which can limit the maximum turning speed and create inconsistent turning speed.

How do I make my mouse faster in Windows 11?

This can be done directly from the mouse’s dedicated software interface, where you can tweak a lot for your mouse.

Otherwise, like we’ve shown you above, press Win + I to bring up Settings, go to Bluetooth & devices, then click on the Mouse option and modify all you want.

Should I turn off mouse acceleration for gaming?

Yes, if you are really into gaming, we strongly recommend disabling this feature for an improved gaming experience.

This won’t make all the difference in the world, but there will be a huge difference in how you control your mouse while in-game.

How do I reduce the mouse polling rate in Windows 11?

You might look at this as farfetched, but that is how you do it. Unplug the mouse from your computer. Press the numerical buttons 4 + 5 on your keyboard, and plug in the mouse.

If your mouse is properly connected, the polling rate has switched to 125 Hz. Press the numerical button 4, and plug in the mouse if you want to switch the report rate to 500 Hz.

So, if you were wondering how do I make my mouse smoother in Windows 11, you now know what to do for the best results.

Leave a comment below if you found any useful tips in this article or maybe some advice for even better gaming optimization.

Error #268D3: What Is It and How to Remove the Popup

The Windows OS is no stranger to errors, be it the dreaded BSOD or issues arising from outdated drivers. But these can usually be fixed with a little effort. However, several users reported getting the 268D3 error popup on a browser.

The error message reads, Your computer has been blocked, and prompts you to call the provided number. For some users, an audio recording of the #268D3 is also played simultaneously. So is it a legit warning or another scam? Let’s find out.

What is error 268D3?

The good news is that error #268d3 is nothing but annoying adware. So your computer is not infected by any virus or spyware trying to steal the credentials, credit card details, or email account logins. In all likelihood, the data is safe.

In most cases, it’s adware or a similar program installed on the computer that’s triggering the popup. Yet, the mere occurrence of the 268D3 error is annoying and affects the browsing experience. So, let’s find out how you can remove it.

How can I fix the 268D3 error?

Before trying the solutions here, we recommend:

  • You should disconnect from the Internet, remove the Ethernet cable or turn off the router, and then restart the computer.

1. Terminate the browser

  1. Press Ctrl + Shift + Esc to open the Task Manager, and locate the affected browser in the list of processes.
  2. Now, right-click on it, and select End task.end task to fix error 268d3

In some cases, the error 268D3 was a one-time thing and didn’t appear again after the browser was terminated. It points to a situation where it’s a website that triggers the popup and not the computer. So stop visiting that particular website from now on.

2. Run a malware scan

  1. Press Windows + S to open Search, type Windows Security, and click on the relevant search result.windows security
  2. Now, click on Virus & threat protection.virus & threat protection
  3. Choose Scan options.scan options
  4. Select Full scan and then click on Scan now.full scan to fix error 268d3
  5. Wait for the scan to complete and check if any malware was found and removed from the PC.

Windows Security, the built-in antivirus, is more than capable of identifying and eliminating suspicious programs, malware, and viruses. So, you must first scan the whole system with it. If it’s unable to fix the 268D3 error, an effective third-party antivirus will do.

Use Eset HOME Security Essential

Eset HOME Security Essential is among the best security tools to help you with this job. It offers multi-layered protection, which means its scanner is able to detect all sorts of different threats, such as viruses, spyware, ransomware, script-based attacks, and more.

The software is lightweight and very easy to use. It should work with no interruptions on any device and provide real-time protection without causing any performance issues.

Eset HOME Security Essential provides specific tools to protect your online payments, and has a powerful network inspector that detects any suspicious activity at the level of your network.

Other worthwhile features of this security tool include advanced parental controls, a powerful firewall, webcam protection, anti-phishing technology, and a system registry scanner.

If you want to run a scan with Eset, you just have to open the main window of the software and click on the Computer Scan option in the sidebar. Then select Scan your computer and wait for the process to complete.

Let the antivirus remove or quarantine any threat it finds and then restart your PC and see if your error is removed.

We also have to mention that Eset offers a free online system scan. It is a one-time solution that can be of help if you want to quickly check your PC and remove the threats as soon as possible. It is also a good way to test out the antivirus.

ESET HOME Security Essential

Keep your devices protected with advanced multi-layered protection and industry-standard online security tools.
Free Trial Visit Website

3. Remove the app triggering the popup

  1. Press Windows + R to open Run, type appwiz.cpl in the text field, and hit Enter.appwiz.cpl
  2. Now, locate any suspicious apps or adware that were installed around the same time the popup first appeared, and click on Uninstall.uninstall to fix error 268d3
  3. Follow the on-screen instructions to complete the process.

If the antivirus couldn’t locate the program triggering the 268D3 error, you can always manually remove it. And in most cases, identifying it won’t be a lengthy affair.

4. Reset the browser

4.1 Google Chrome

  1. Launch Chrome, paste the following path in the address bar, and then hit Enter:chrome://settings/reset
  2. Now, click on Restore settings to their original defaults.restore settings to their original defaults
  3. Finally, click on Reset settings in the confirmation prompt, and wait for the process to complete.reset settings to fix error 268d3

4.2 Microsoft Edge

  1. Open Edge, click on the ellipsis near the top right and then choose Settings from the flyout menu.settings
  2. Select Reset settings from the navigation pane, and click on Restore settings to their default values.restore settings to their default value to fix error 268d3
  3. Click on Reset to confirm.reset

4.3 Mozilla Firefox

  1. Launch Firefox, click on the hamburger icon, and choose Help.help
  2. Click on More troubleshooting information.more troubleshooting
  3. Click on Refresh Firefox.refresh firefox to fix error 268d3
  4. Again, click Refresh Firefox in the confirmation prompt that appears.confirm

4.4 Opera

  1. Launch Opera and press Alt + P to open Settings.
  2. Scroll to the bottom and click Advanced.advanced
  3. Again, scroll down to the bottom, and this time, click on Restore settings to their original defaults.restore settings to their original defaults to fix error 268d3
  4. Click on Reset in the confirmation prompt.reset

Once you have reset the browser, the error 268D3 should not appear again on the PC. Remember, in no case should you call on the listed number or provide any information to the scammers.

If you often run into such issues, we recommend you switch to a browser that offers a safe online experience.

Do tell us which fix worked for you in the comments section below. Also, if you know of other solutions, drop them here to help fellow users.

Fix: Core Isolation Page Not Available on Windows 11

Core isolation is an additional security feature in Windows 11 that adds an extra layer of protection. Although Windows Defender has its own set of features that make the OS secure, Core isolation offers more. However, you may find that the core isolation page is not available in Windows 11.

With core isolation enabled, if a malicious program tries to take over your system by exploiting a vulnerability in Windows, it won’t have access to other parts of the operating system, such as your files or network connections. Given its importance, let’s look at how to enable it.

Why is Core isolation page not available?

To use Core isolation, you need to upgrade your device to a newer version of Windows. You already know the stringent system requirements for Windows 11, so if your device doesn’t meet them, this feature will be unavailable.

Although you may be able to bypass some of the system requirements and install Windows 11 on unsupported devices, some of the consequences are missing out on critical features, such as the Core isolation page not being available.

Some of the must-have features include:

  • TPM – TPM stands for Trusted Platform Module. It’s a hardware chip that acts as a computer’s central security system and uses encryption to protect data stored on your hard drive and other devices connected to your computer. It also has its unique keys embedded in the hardware that allows you to access your PC without relying on passwords or other authentication methods.
  • UEFI – UEFI can be seen as a replacement for legacy BIOS functionality. It offers a more secure way to boot your Windows computer than booting in legacy mode. Legacy mode is the old style of BIOS.
  • Secure boot – Secure Boot is a security feature that helps prevent malicious software from modifying the boot process. The secure boot mechanism can be used to verify that an operating system is authentic, and it can refuse to load an operating system if it isn’t signed by a trusted certificate authority, such as Microsoft.
  • DEP – DEP is an important security feature in Windows. It helps protect your PC by preventing the execution of code that runs in the memory reserved for the kernel, the core of the operating system.

How do I enable Core isolation in Windows 11?

Before you enable Core isolation, ensure you do the following first:

1. Use Windows Security 

  1. Hit the Windows key, type Windows Security in the search bar, and click Open.
  2. Navigate to Device security on the left pane.going device security windows security
  3. Next, select Core isolation details on the right.going core isolation details windows security
  4. Go to Memory integrity and toggle it On.turning on memory integrity windows security

If you want to disable the feature, go through the same steps, but this time, toggle Off Memory integrity. In case memory integrity is greyed out, check out our article on how to fix it.

2. Use Windows Registry

  1. Hit the Windows + R keys to open the Run command.
  2. Type regedit in the dialog box and hit Enter.
  3. Navigate to the following location: HKEY_LOCAL_MACHINE\SYSTEM\CurrentControlSet\Control\DeviceGuard\Scenarios\HypervisorEnforcedCodeIntegrity
  4. In case HypervisorEnforcedCodeIntegrity is not available, right-click on Scenarios, select New Key, and rename it as HypervisorEnforcedCodeIntegrity.
  5. Also, proceed to do so on the right pane by right-clicking on a space and select New DWORD (32-bit) Value and name it as Enabled.
  6. Double-click on Enabled, and under Value data enter 1, then click OK to save changes.
  7. Restart your PC. To turn off Core isolation, simply change the Value data to 0 and save the changes. 

The registry is a vital part of Windows, and editing it can cause serious problems if you don’t know what you’re doing. If you make a mistake, you could end up with a corrupted registry and lose data. 

This is why it’s strongly recommended that you back up your computer before making any changes to the registry.

Should I turn on Core isolation in Windows 11?

Core isolation and Memory integrity protection are two security features that have been available on recent versions of Windows. 

While these features can provide added protection for your system, they are not enabled by default because enabling them may degrade system performance. In addition, there are some cases where the features do not work properly or cause problems.

Still, there are convincing reasons why you should enable Core isolation in Windows 11:

  • An extra layer of protection – Memory Integrity helps reduce the risk of a memory corruption attack. It ensures that all changes to memory are validated before they are committed.
  • Block unwanted connections between processes or applications – This prevents unwanted connections between processes or applications. In turn, it reduces the risk of data theft or corruption if one process becomes corrupted or damaged by a virus or malware infection.
  • Prevent malicious software from accessing/modifying protected files – Core isolation also isolates the app’s memory space so that it doesn’t share memory with other processes on your device. This helps prevent any malware from accessing sensitive data stored elsewhere.

Hopefully, your Core isolation page is now back up if it was unavailable. If your PC didn’t cut, we have an awesome recommendation for Windows 11 PCs that you should consider.

Also, check out some of the best Windows 11 security settings you need to enable on your PC to keep your system protected. For an additional layer of protection, we recommend installing third-party antivirus.

That’s all we had for this article, but keep us engaged by sharing any thoughts you may have in the comment section below.

Minecraft Install Error 0x80131509: 3 Simple Fixes

Getting error 0x80131509 while installing Minecraft (JAVA edition) is more common than you think. As a result, a lot of users have complained about the issue. But don’t worry, we can fix this in no time.

In this guide, we will discuss all the fixes when Minecraft is not installed right after discussing the potential causes of the issue.

What causes Minecraft install error 0x80131509?

There are a handful of reasons why you got a Minecraft to install error, and we have mentioned some of the most popular ones: 

  • Windows Updates – The error message could appear if the Windows update is pending. Download and install Windows updates and try to install Minecraft again.
  • Slow internet connection – If you are facing internet issues or your internet is faulty, then it could cause the installation to fail, and the error code might appear.
  • No Xbox Account – If you don’t have an account on Xbox or have tried to use incorrect credentials for your Xbox account, it could trigger the issue.
  • Old Minecraft launcher – If you have an old launcher along with the new launcher for Minecraft, it could conflict, hence the problem.

What can I do to fix Minecraft install error 0x80131509?

Before diving into detailed troubleshooting, let us try these quick fixes to resolve the problem: 

  • Restart your computer
  • Make sure there is no pending Windows update.
  • Check if any of the Microsoft apps need updates.
  • Use the same account on Microsoft Store and Xbox app.

1. Uninstall Minecraft Launcher

  1. Press Windows + I to get Settings.
  2. Go to Apps from the left pane and click Installed Apps.Minecraft Launcher Uninstall
  3. Locate the Minecraft launcher, click on three dots, and click Uninstall.

2. Repair Game servicing app & Xbox app

  1. Press Windows + I to open Settings.
  2. Locate and click on Apps from the left-side pane, and click Installed Apps.
  3. Locate the Xbox app, click on three dots, and click Advanced options.Xbox Repair
  4. On the next window, locate and click Repair.Xbox repair 2
  5. Follow the same steps for the game servicing app to repair it.

3. Uninstall & Reinstall Game services

  1. Press Windows + X and click Terminal (Admin) to open PowerShell.Powershell
  2. Now type the following command and press Enter to uninstall Game services: get-appxpackage Microsoft.GamingServices | remove-Appxpackage –allusers
  3. Restart your computer.
  4. Open the Xbox Game Pass app, which will prompt you to install the gaming services again. 
  5. Once done, try to rerun the Minecraft installer.

4. Run Minecraft in Compatibility Mode

  1. On Windows 11/10 computer, download the launcher compatible with Window7/8.
  2. Right-click on the launcher file and select Properties.MSI properies
  3. Go to the Compatibility tab, and put a checkmark beside Run this program in compatibility mode. Now. Set the compatibility to Windows 8. Click Apply and OK.Compatibility

5. Restore your OS using ISO 

Tip icon Tip
It is vital to back up personal files before starting the process.
  1. Go to Microsoft website for Windows 11.
  2. Under Download Windows 11 Disk Image (ISO), select Windows 11 (multi-edition ISO).Download Windows 11
  3. Select the product language and click Confirm.Windows 11 download 2
  4. Click Download and follow the on-screen prompts to complete.

What version of Java does Minecraft 1.19 use?

There are a few editions of Minecraft 1.19. While the earlier ones work fine with Java 17, the newer editions, i.e., Minecraft 1.19.2 and higher, require Java 19.

To get Java 19, head to the official website, download it, and run the setup to complete the installation process. For those having trouble, check our easy guide on installing Java in Windows.

So, these are methods you need to follow to fix Minecraft install error 0x80131509, along with all the other relevant information that might come in handy while troubleshooting.

Try them and let us know which worked for you in the comments below.

Posted in PC

Driver PNP Watchdog on Windows 11: How to Fix This Stop Code

Have you just encountered the driver PNP watchdog in Windows 11? We like to explore this error in our guide, recommend valuable fixes, and explore possible triggers.

The Driver PNP Watchdog code does not occur frequently, but it puzzles users when it does. In addition, it may show up when performing a Windows update, so it is recommended that you always use a Windows Update troubleshooter.

A BSOD error prompts the computer to restart immediately, causing you to lose all unsaved information instantly. Therefore, don’t hesitate to learn about the best Blue Screen of Death (BSOD) repair software.

What does driver PNP watchdog mean?

The Driver PNP Watchdog error has its fair share of limitations, such as the inability to install the main upgrades. However, there are a couple of reasons why the error occurs; the main ones include the following:

  • Incorrectly configured or outdated drivers – When drivers are not correctly configured or are outdated, the PNP service may struggle to complete its tasks.
  • Corruption in system files -Corruption in system files such as the registry or other essential files can cause the PNP watchdog error.
  • Malware infections – Malware infections can alter system files and cause problems with the PNP service.
  • Hardware issues – Issues with the computer hardware, such as failing hard drives or memory, can also cause the PNP watchdog error.
  • Overloaded system – An overloaded system, such as when too many programs are running concurrently, can also cause the PNP watchdog error.
  • Overclocking – Overclocking, or running the processor at a higher speed than it was designed for, can cause problems with the PNP service and trigger the watchdog error.

To date, users are still experiencing the issue as the BSOD errors keep evolving from time to time (yes, the Driver PNP Watchdog error is present in Windows 10 as well).

Despite the challenges, you still need the knowledge to bypass the Driver PNP Watchdog error if you ever encounter it. To learn how to fix this problem, follow the steps below. 

How can I bypass Windows 11’s Driver PNP Watchdog error? 

1. Repair the PC Registry by running SFC

  1. Type cmd on your search bar, right-click the command prompt, and select Run as administrator.fix pnp watchdog code error for Windows 11
  2. Type the command below and hit Enter. This will prompt the System File Checker to scan all system files.
    sfc/scannow fix pnp watchdog code error for Windows 11
  3. Wait till the scanning process is over. At this juncture, restart your PC. All corrupt files are replaced.

If your Volume Copy Service is experiencing some issues, the Driver PNP Watchdog error may be the problem.

When your system files are corrupted, it leads to immense damage to your Windows registry and the occurrence of the Driver PNP Watchdog error.

2. Inspect the Volume Shadow Copy Service (VSS)

  1. Press the Win key + R key simultaneously, which will prompt the Run dialog box. Then, key in services.msc and press Enter.fix pnp watchdog code error for Windows 11
  2. Locate the VSS in the list, then double-click on it to open its Properties window.
  3. Set the Startup type to Automatic and set Service status set to Running. Then click Apply and OK to save your changes.fix pnp watchdog code error for Windows 11
  4. Now, restart your PC.

3. Adjust the system services

  1. Type cmd in your Search bar, right-click the Command Prompt, then Run as administrator. Click on Yes when the User Account Control window pops up.fix pnp watchdog code error for Windows 11
  1. Type the following commands one after the other, and press Enter after each one:
    • net stop wuauserv
    • net stop cryptSvc
    • net stop bits
    • net stop appIDsvcfix pnp watchdog code error for Windows 11
  1. Press Windows + E to open the File Explorer, then go to the path below and rename SoftwareDistribution to SoftwareDistribution.old.
    C:\Windows\System32fix pnp watchdog code error for Windows 11
  2. Also, navigate to the path below and rename catroot2 to catroot2.old.
    C:\Windows\System32\catroot2fix pnp watchdog code error for Windows 11
  3. Open the Command Prompt window once more, then type the following commands and press Enter after each one:
    • net start wuauserv
    • net start cryptSvc
    • net start bits
    • net start msiserver
    • net start appIDsvc
  1. Exit the Command Prompt.
  2. Press the Start menu, type windows, and select Windows PowerShell (Admin) to open it.fix pnp watchdog code error for Windows 11
  1. Type the command below and hit Enter: 
    wuauclt.exe /updatenowfix pnp watchdog code error for Windows 11

System services are in place to ensure that your system functions optimally. The Driver PNP Watchdog error occurs when any service is faulty.

You can now restart the system and check whether the Driver PNP Watchdog error has been solved. If the issue is still imminent, use the following method.

4. Uninstall apps with malware

  1. Press the Win.
  2. Locate the recently installed software, right-click on it, and hit Uninstall.fix pnp watchdog code error for Windows 11
  3. Restart your system and check if the problem is still persistent.

The BSOD error may affect your device, especially if you have recently installed corrupted software. It is easy to tell, especially if the problem starts after installing the malicious software.

Your next step would be to apply the above procedure and use the best uninstaller software. Even if this is a Windows 10 guide, the software presented works without problems on Windows 11 too.

5. Restore your device to factory settings

Note icon NOTE
Another solution would be to restore your device to its factory settings. This will uninstall your services, apps, and drivers. It is worth noting that all the changes made to your system settings and preferences will be lost.
  1. Press the Win + I keyboard shortcut to open the Windows Settings window.fix pnp watchdog code error for Windows 11
  2. Select the System option on the right pane, then select the Recovery option on the left.fix pnp watchdog code error for Windows 11
  3. Select Reset PC under Reset this PC.
    fix pnp watchdog code error for Windows 11
  4. Select Keep my files or Remove everything. Take the latter as an example.fix pnp watchdog code error for Windows 11
  5. Choose the option to reinstall Windows 11.reinstall
  6. Select Just remove my files or Remove files and clean the drive.
  7. Let your device complete the reset process.

6. Use the antivirus to run a full system scan on your PC

  1. Press the Win key + I key to open the Windows Settings window.fix pnp watchdog code error for Windows 11
  2. Select Privacy & Security, then select the Windows Security option from the left side.fix pnp watchdog code error for Windows 11
  3. When the window pops up, select Virus & threat protection.fix pnp watchdog code error for Windows 11
  4. Select Scan options next to the Quick scan button.
  5. Look for Full scan, then select Scan now. Windows Defender will start to scan your PC and provide a detailed report.fix pnp watchdog code error for Windows 11

One of the main reasons the Driver PNP Watchdog error occurs is because of viruses and malware. As a result, the critical files and data stored in your PC used to interact with the hardware device by the system are affected.

The findings from the full scan will help you identify the malware and viruses present. The antivirus program provides you with a guide on how to remove them.

After successfully removing the malware, check whether the Driver PNP Watchdog error is resolved and use one of the best antivirus solutions for Windows 11.

7. Use the Windows Update Troubleshooter

  1. Press the Win key + I key to open the Windows Settings window.fix pnp watchdog code error for Windows 11
  2. Select System, then select the Troubleshoot option from the left side.fix pnp watchdog code error for Windows 11
  3. Click the Other troubleshooter option.
    driver pnp watchdog windows 11
  4. Locate the Windows Update in the list on the right and click the Run option.
    driver pnp watchdog windows 11

Whenever your Windows Update is faced with issues in performing a particular operation, the BSOD may appear. For example, you can run the Windows Updates troubleshooter to solve the Driver PNP Watchdog error.

Even if this guide is for Windows 10 users, it may also be applied to Windows 11 PCs. Finally, restart your computer and check if the problem has been corrected.

As indicated above, there are a couple of solutions that you could use to remedy the Driver PNP Watchdog error. Unfortunately, things are no different when it comes to PNP-detected fatal errors. Therefore, the answers from this Windows 10 guide are also recommended to Windows 11 users.

Microsoft has made several efforts toward the bug check value, but there are still some challenges. For example, the company plans to change the popular BSOD to Black in Windows 11.

This does not mean the causes of the error will modify, which means that the troubleshooting methods outlined above will remain for Windows 11.

If you have encountered the Driver PNP Watchdog error, which of the above methods worked for you? Let us know in the comments section below.

Windows 11 Network Sharing Not Working? How to Turn it On

Network sharing allows users to transfer and receive files with other users on a local network. It’s great for offices or people with multiple devices at home. But many users, after upgrading to Windows 11, reported that network discovery is not working.

This could be due to several reasons, including issues with the installer version of the OS. Also, misconfigured settings, absence of critical services, or lack of permissions can lead to network sharing not working in Windows 11.

Many with Windows 10 and Windows 11 devices on the local network noticed that though the device running Windows 11 could access the Windows 10 PC, the reverse is not true. Here upgrading all devices to Windows 11 may work.

So, let’s now walk you through the most effective fixes.

Why is my Network discovery not working?

Network discovery is a Windows feature that allows your computer to see other devices and shared resources on your local network. If network discovery is not working, it could be due to several reasons, including:

  • Firewall Settings – Windows Firewall or third-party firewall software could block network discovery. 
  • Network Profile – Your network profile might be set to Public, which disables network discovery. 
  • File and Printer Sharing – Ensure that file and printer sharing is enabled on your computer. This is required for network discovery to work.
  • Network adapter drivers – Outdated or incorrect drivers for your network adapter can cause network discovery problems. 
  • Router Configuration – Your router may have settings that are blocking network discovery. 

How do I turn on network discovery on Windows 11?

  1. Press Windows + I to open the Settings app.
  2. Select Network and Internet; pick your network from the list (you can share Ethernet or Wi-Fi networks) and enable it. Then click on it to open its settings panel.
    windows 11 network discovery not working
  3. Set the Network profile type to Private.
    windows 11 network discovery not working

As you can see, you can find information about each network profile directly in the settings app. Once you enable the Private profile, you can share files with other devices on that network.

How do I force network discovery?

Sometimes, changes to your system will not apply until you reboot your PC. That allows it to reconfigure and load the OS with the new setup.

So if you have not tried that already, we advise you to do it. Many users report being able to use Network Discovery without an issue after a simple restart.

Also, check all the suggestions in this guide to learn how to configure your file permissions, share settings correctly, and more. Even if Network Discovery is enabled, other settings may prevent it from working correctly.

How can I fix Network discovery if it’s not working on Windows 11?

1. Update Windows 11

  1. Press Windows + I to launch the Settings app, and select Windows Update from the tabs listed in the navigation pane on the left.
    Windows Update
  2. Click the Check for updates button on the right to scan for available newer versions.
    Check for updates to fix windows 11 network sharing not working
  3. If any are listed after the scan, click on Download & install to get them.
    Download & install to fix windows 11 network sharing not working

Often, it might be an issue with the current version of Windows 11, leading to network sharing not working in Windows 11. If that’s the case, updating the OS should fix the error.

2. Run the critical services

  1. Press Windows + S to launch the Search menu, enter Services in the text field at the top, and click on the relevant search result that appears.
    Services to fix windows 11 network sharing not working
  2. Locate the Function Discovery Provider Host service, right-click on it, and select Properties from the context menu.
    Function Discovery Provider Host
  3. Now, click on the Startup type dropdown menu, and select Automatic from the list of options.
    Automatic to fix windows 11 network sharing not working
  4. Click on the Start button if the service is not running, and then click OK at the bottom to save the changes.
    Start
  5. Similarly, set the Function Discovery Resource Publication to Automatic and run the service.

Once done, check if the network sharing not working issue in Windows 11 is fixed.

3. Reconfigure sharing settings

  1. Press Windows + S to launch the Search menu, enter Control Panel in the text field, and click on the relevant search result that appears.
    Control panel
  2. Click on Network and Internet.
    Network and Internet to fix windows 11 network sharing not working
  3. Next, click on Network and Sharing Center.
    Network and Sharing center
  4. Click on Change advanced sharing settings from the options listed on the left.
    Change advanced sharing settings to fix windows 11 network sharing not working
  5. Now, click All Networks, and then select Turn off Public folder sharing (people logged on to this computer can still access these folders) under Public folder sharing.
    Turn off public sharing
  6. Now, scroll down and select Turn off password protected sharing under Password protected sharing, and then click on Save changes at the bottom.
    Turn off password protected sharing to fix windows 11 network sharing not working

Once done, restart the computer for the changes to effect, and verify if the network sharing starts working in Windows 11.

You can troubleshoot access issues by using the Network and Sharing Center not opening guide, which helps you resolve problems that prevent the panel from launching in Windows 11.

4. Provide the necessary permissions

  1. Press Windows + E to launch File Explorer, locate the folder you are having trouble sharing, right-click on it, and select Properties from the context menu.
    Properties to fix windows 11 network sharing not working
  2. Navigate to the Sharing tab and click on the Share button.
    Share
  3. Click on the dropdown menu, select Everyone from the list of options, and then click on Share at the bottom.
    Everyone to fix windows 11 network sharing not working
  4. Click Done on the next window.
  5. Now, click on the Advanced Sharing button in the Sharing tab.
    Advance sharing
  6. Tick the checkbox for Share this folder.
    Share this folder to fix windows 11 network sharing not working
  7. Click on the Permissions button.
    Permissions
  8. Make sure that the Everyone option is selected and the relevant permissions granted. Once done, click on OK at the bottom to save the changes.
    Everyone
  9. Save the changes on all the subsequent windows, and restart the computer for these to effect.

Once done, the network sharing not working issue in Windows 11 should be fixed, and you can start sharing files with other devices on the local network.

Also, find out what to do if you cannot access the shared folder in Windows 11 since many reported encountering this issue.

Tell us which fix worked for you in the comments section below.

MSN > Windows Live Search > Live Search > Bing and now the new Bing – a short history of online search at Microsoft

Microsoft spent some time this week touting their latest attempt to gain relevance in online search with the introduction of “the new Bing.” For those of us who’ve been following Microsoft for some time, however, fanfare about improvements to search aren’t exactly new. Let’s take a look at Microsoft’s previous attempts to disrupt the search industry (read: Google):

Pre-history the early days of search

Search on the web really started back in the mid ’90s. Jerry Yang and David Filo’s “guide to the World Wide Web,” which became Yahoo! in 1994 started things off with a hierarchical web directory, a single portal to lots of links to interesting sites on the web. At about the same time, researchers at Digital Equipment Company created AltaVista, the first searchable full-text database on the web. It was later incorporated into Yahoo!, and then Digital was acquired by computer maker Compaq, who redesigned AltaVista as a web portal to compete with Yahoo.

Shortly after that, in 1998, and like Yahoo coming out of Stanford University, Larry Page and Sergey Brin introduced another funny sounding search portal, called Google. Google caught on quickly, to say the least.

MSN

Microsoft entered the search engine fray early on, too. MSN Search debuted in mid 1998, using search results from another search provider, Inktomi. A year after Yahoo introduced its own home built web crawler in 2004, Microsoft did the same in 2005, debuting its own web crawler, “the index of which was updated weekly and sometimes daily” (!!).

Windows Live Search

In late 2005, Microsoft introduced their suite of Windows Live services (and incidentally began my blogging career at LiveSide.net), and MSN Search became Windows Live Search in September of 2006, but Windows Live Search didn’t last as as long as Windows Live did.

Live Search

In March of 2007, search became too important to be constrained within the Windows Live branding, and became Live Search, as part of the Live Search and Ad Platform headed by one Satya Nadella. In late 2007, Microsoft held an event in its Mountain View California search headquarters it dubbed “Searchification,” an event not unlike Tuesday’s introduction of “the new Bing.” Reporters and analysts were invited to the private event as Microsoft unveiled what it casually dubbed “Live Search 2.0,” touting a “quantum leap” in search relevance. That leap still didn’t get Microsoft where it wanted to be in the search landscape (ie: it was still far behind Google), and next up was a rebrand.

Bing

After a short stint with the beta code name Kumo, Microsoft officially announced that the new name for online search for Microsoft was Bing, and officially unveiled the name in June 2009. They chose the name carefully:

Microsoft decided that the name was memorable, short, and easy to spell, and that it would function well as a URL around the world. The word would remind people of the sound made during “the moment of discovery and decision making”.

While much of Microsoft’s blogging efforts have been lost to time (and a reason why we keep LiveSide around), The Wayback Machine has a copy of Microsoft’s official announcement on the new name, penned by Yusuf Mehdi, who was onstage again this week with “the new Bing.”

In short, this isn’t the first time that Microsoft has somewhat breathlessly announced that they’re ready to compete with Google. We’re excited to get our hands on an AI infused Bing, but as history tells us, no matter what Microsoft has done before, it’s always been an afterthought in search. Will AI change all that? Let us know in the comments below.

Image: DALL-E 2 “a happy girl using search on a laptop outside”

Local Security Policy Missing in Windows 11: How to Add It

The Local Security Policy console is related to the Group Policy Management console. It is useful for setting up security policies for individual computers or groups of computers on your network. You can use it to configure settings such as account policies, audit policies, and much more.

It is important to note that the Local Security Policy may be missing in some older Windows versions, particularly the Home editions. If this is the case, we show you different ways to add it to your Windows 11 in this article.

Does Windows 11 have security protection?

The Windows operating system has always been a target for hackers. Windows 11, however, has been designed to be more secure than ever before. The operating system offers several security features to prevent malware from spreading and protect users from attacks.

To start, Windows 11 has a built-in antivirus and antimalware software called Windows Defender. However, there are some other security features that you can use to help protect your PC.

For instance, Windows Hello is a facial recognition feature that lets you log in using just your face instead of typing in a password or PIN every time you want to use your computer. 

We also have an in-depth comparison of Windows Hello vs Windows Hello for Business, so be sure to check that out. This feature works with many devices, including PCs and laptops, tablets, smartphones, and desktops. 

Whereas these features may enhance your Windows security, you need to take additional steps to secure your system.

These include:

  • Use a good antivirus program – Although Windows Security offers great security, it is not as comprehensive as other antiviruses.
  • Install Windows updates as soon as they are available – Security updates are critical to the smooth running of your PC. 
  • Set up a firewall to block incoming traffic from unknown sources – Firewalls will help block any potential risks from a mile away.
  • Don’t connect to public Wi-Fi networks unless you really need to – Public Wi-Fi is a no-go zone for any internet user, as cyber attackers are always lurking.
  • Keep your software up-to-date at all times – Ensure that all your programs and drivers are up-to-date so that if an opportunity to explore vulnerabilities presented itself, you’ll be protected.

How do I add a Local Security Policy in Windows 11?

Before you attempt to add the Local Security Policy to your version of Windows, it is important to ensure that your version is supported. 

To do so:

  1. Hit the Windows + R keys to open the Run command.
  2. Type Winver in the dialog box, then hit Enter. A prompt will appear with details about your OS.

Once you verify that your version of Windows can download the Local Security Policy console, proceed to the following steps to add it.

1. Use Task Manager 

  1. Hit the Windows key, type Task Manager in the search bar, and click Open.
    task manager search
  2. Click File at the top left corner and select Run new task.
  3. Type secpol.msc in the dialog box and hit Enter.
  4. The Local Security Policy window will open.

2. Use File Explorer 

  1. Hit the Windows + E keys to open File Explorer.
  2. Type secpol.msc on the address bar and hit Enter.
  3. The Local Security Policy window will open.

3. Use the Run command

  1. Hit the Windows + R keys to open the Run command.
  2. Type secpol.msc in the dialog box and hit Enter.
  3. The Local Security Policy window will open.

4. Use the Command Prompt

  1. Hit the Windows key, type cmd in the search bar, and click Open.
    cmd-run-admin-w11 unexpected kernel mode trap windows 11
  2. Type secpol.msc and hit Enter.
  3. The Local Security Policy window will open.

5. Use Powershell 

  1. Hit the Windows key, type Powershell in the search bar, and click Open.
  2. Type secpol.msc and hit Enter.

6. Create a shortcut

  1. Right-click on an empty space on your desktop and select New shortcut.
    New shortcut desktop
  2. Type secpol.msc in the dialog box, then hit Next.
  3. A new shortcut for Local Security Policy will be created on your desktop.

If you’re already familiar with creating shortcuts in Windows 11, creating a shortcut for the Local Security Policy should be easy. Shortcuts are very useful for making your life easier and more efficient. 

Creating a shortcut is the most efficient way to add the Local Security Policy, especially if you don’t want to go through multiple steps.

Consequently, when you search for the Local Security Policy using the Search icon, you can pin it to your Taskbar. This will make it appear alongside your frequently used applications and be easy to locate.

For more information on how to open the Local Security Policy, check out this guide on how to open Local Security Policy.

With all this talk about security, you may also be interested in some of the best Windows 11 security settings to ensure your system is attack-free. Remember, effective account management is just as critical to security, and you may consider enabling Local Users and Groups.

If you’ve been able to add the Local Security Policy in Windows 11, let us know which method you found easy to use in the comment section below.

18 games headed to Xbox next week, February 13-17

2023 has been a stout year for Xbox so far, with a steady stream of new releases that is set to continue next week with 18 new games. Among them are a couple of day-one Xbox Game Pass releases, and all in all it’s a pretty solid lineup with a good mix of game types, so there should be something new for everyone. Let’s check out next week’s lineup.

So which of these games has got you excited for next week? Let us know down in the comments.

Featured image via Xbox.com. 

Nvidia Display Driver Service Missing: 3 Ways to get it Back

Unfortunately, many users have reported lately that their Nvidia display driver service is missing. Also, often there is no indication or error message of what may be wrong.

Sometimes, this results from faulty or missing drivers impacting the associated software. Also, it can appear due to the latest updates or even missing registry subkeys and values.

We will explore the most efficient ways to fix the Nvidia display driver not showing issue. So make sure to keep on reading.

What is NVIDIA display driver service?

The NVIDIA Display Driver Service is a background process that runs on Windows computers with NVIDIA graphics cards.

It manages the communication between the graphics card and the operating system. Also, it updates the graphics card drivers and ensures that graphics-intensive applications run smoothly.

Features of the NVIDIA Display Driver Service include:

  • Driver Management – The service automatically updates NVIDIA graphics card drivers to ensure that the card is always running the latest version.
  • Graphics Performance Optimization – It optimizes graphics performance by managing the communication between the graphics card and the operating system. This allows graphics-intensive applications to run more smoothly.
  • Error Reporting – The service collects and reports error information to NVIDIA, helping to identify and resolve problems with the graphics card or drivers.
  • System Monitoring – The service monitors the system for graphics-related issues and takes appropriate action to resolve them.
  • Customizable Settings – Users can configure the service to their preferences, such as adjusting the graphics quality and enabling certain features.

How can I fix the Nvidia display driver service missing?

1. Unhide the NVIDIA Control Panel

  1. Press Windows + R, type control, and hit Enter.
  2. Change the View by option to Large Icons and double-click on NVIDIA Control Panel.
  3. Go to the Desktop Tab and tick Add Desktop Context Menu and Show Notification Tray Icon.nvidia display driver service missing
  4. Finally, close the NVIDIA Control Panel and see if it appears in the menu.

2. Restart the NVIDIA Services

  1. Bring up the Run tab by pressing Windows + R, type in services.msc, and press Enter.
    nvidia display driver service missing
  2. Locate NVIDIA Display Container LS, right-click on it, and select Restart.
  3. Lastly, follow the same steps for each service that start with NVIDIA.

3. Use the Device Manager

  1. Open the Run window by pressing Windows+R.
  2. Next, type devmgmt.msc and press OK.
    nvidia display driver service missing
  3. In the Device Manager window, locate and expand Display Adaptors.
  4. Right-click on NVIDIA GeForce GTX 960M and select Update driver.
  5. Select Search automatically for drivers.
  6. Install the found drivers and allow for the process to finish.
  7. Finally, make sure to restart your device at the end.

Also, you could use some information from our NVIDIA driver fix article and learn what to do if the driver is incompatible.

Additionally, you can use a dedicated third-party tool. Since most issues regarding software’s poor performance or inaccessibility are related to outdated or faulty drivers, using a reliable tool to fix them is recommended.

As you can see in the solutions presented above, several options exist to update the drivers manually, but they take much more time and are not entirely error-free.

These are the most common solutions for the NVIDIA display driver service missing or not starting, and we hope that the presented solutions have helped you fix the problem in no time.

Which one have you tried and has worked best for you? Lastly, if you have additional tips or recommendations, don’t hesitate to write them in the dedicated section below.

Desktop Window Manager Stopped Working: 6 Ways to Restore it

The DWM provides a smooth and seamless experience when opening and closing windows, switching between applications and using Aero Glass effects. However, the Desktop Window Manager stopped working for some users, causing visual glitches, freezes, or even crashes.

DWM is a critical component of the Windows operating system responsible for handling the display and visual effects of windows on the screen.

In this article, we’ll explore ways to resolve this article.

Why has Desktop Window Manager stopped working?

There could be several reasons why the Desktop Window Manager (DWM) service has stopped working. Some common causes include the following:

  • Driver issues – Outdated or faulty graphics card drivers can cause the DWM service to stop working.
  • System updates – Windows updates can sometimes cause compatibility issues with the DWM service.
  • System files corruption – Corrupted system files can prevent the DWM service from functioning correctly.
  • Third-party software – Certain third-party software, such as antivirus programs, can interfere with the DWM service.
  • Low system resources – The DWM service requires a significant amount of system resources, and if the system needs more resources, it may stop working.

You can try the recommended solutions below if you are experiencing issues with the Desktop Window Manager.

What can I do if Desktop Window Manager has stopped working?

1. Run a system scan

  1. Press the Windows Key, type command, right-click on the app, and select Run as administrator.
  2. In the command prompt, type the script below and hit Enter.
    sfc /scannow
    desktop window manager stopped working
  3. Wait for the command to run entirely, then restart your computer.

You can repair damaged Windows files by running a system scan. To perform this task, you need a Windows setup CD or DVD.

Performing a system scan is not something one should try to fix manually unless skilled, so it is best to leave these things to dedicated third-party software.

2. Enable the Desktop Window Manager

Windows Manager Session Manager
  1. Press Windows + R, type services.msc, and hit Enter.
  2. Find and then right-click Desktop Windows Manager Session Manager, and select Start.
    desktop window manager stopped working
  3. Right-click on the Desktop Windows Manager Session Manager again, and choose Proprieties.
    desktop window manager stopped working
  4. Go to the General tab, and set the Startup type to Automatic.
  5. Click OK to save changes.

3. Perform a Clean Boot

  1. Press Windows + R, type in MSConfig, and hit Enter.
    desktop window manager stopped working
  2. Go to the Services tab.
  3. Check the box labeled Hide All Microsoft Services, and select Disable all.
    desktop window manager stopped working
  4. Go to the Startup section, and select the Open Task Manager.
  5. Right-click on all displayed apps and select Disable one by one.
    desktop window manager stopped working
  6. Exit the Task Manager, and click OK on the System Configuration window.
  7. Restart your PC, and check if anything has changed.

When performing a clean boot, the system looks for conflicts between programs to identify the root causes of your technical issue.

4. Check for Windows updates

  1. Press Windows + I to open the Settings app.
  2. Click Update & Security.
  3. Click the Check for updates button.

Accessing the Windows Update Settings is easy since all you need to do is follow the above steps.

Ensuring your Windows PC is up to date means having your OS in optimal condition. In addition, the latest updates might offer repairs for errors you are dealing with.

Windows Update will find and list the most recent updates if there are any.

5. Try to create a new user account

  1. Press the Windows key + R to open Run, type netplwiz, and press Enter.
  2. In the User Accounts window, click the Add button.
  3. Select Sign in without a Microsoft account.
  4. Select Local Account, type in the details for the new account, then click Next and Finish.
  5. Restart your PC, and log in with the new account.

Creating a new account is a quick and simple alternative to reinstalling your OS. However, your user account could be corrupted, and you should try creating another account and see if it works.

6. Run a system restore

  1. Press the Windows Key + S, type Create a restore point, and select Create a restore point from the list.
    desktop window manager stopped working
  2. In the System Properties window, click on the System Restore button.
    desktop window manager stopped working
  3. Press on the Next button to proceed.
  4. Check the Show more restore points option, if available, or choose your restore point and click Next to proceed.
  5. Follow the on-screen instructions to complete the process.

If System Restore is turned off, you cannot use this feature, so be aware before starting the process.

This isn’t the only issue, and if this process stops working, it can be due to Desktop Window Manager high memory usage.

If our solutions helped you out, or you have other working solutions, feel free to leave a comment in the section below; we will be happy to check them out.

Microsoft’s year of AI continues with tentative March announcements

Microsoft is gearing up for another artificial intelligence led announcement tentatively scheduled for next month where it will showcase more OpenAI influenced technologies for its productivity suite.

During its Bing + ChatGPT announcement earlier this week, Microsoft alluded to the difference between the publicly available ChatGPT experience and a seemingly beefier version that leverages its Prometheus Model in Bing.

According to The Verge, Microsoft’s Prometheus Model powered version of ChatGPT will be in more than just Bing as the company plans to share details in March of its push into productivity with OpenAI’s language AI technologies.

It should be noted that Microsoft has already implemented OpenAI technologies into many of its productivity and enterprise tools such as Azure, Microsoft Viva Sales, Word and Outlook. The integration has been subtle until now with OpenAI powering the suggested reply function in compositions for Outlook and Word.

However, it looks like Microsoft plans to expand the current Bing sidebar integrated tools that appear alongside Office web apps into dedicated apps which could span both desktop and mobile use.

Based on The Verge reporting, Microsoft is looking to bolster its templates, suggested graphics, graphs and other visualizations in apps such as Excel and PowerPoint with more details leveraged from OpenI language models.

Microsoft appears to be stepping on the gas as a way for the company to get out ahead of similar announcements it believes Google will have in the coming months as well.

Sources tell The Verge that Microsoft was originally planning to launch its new Bing AI in late February, but pushed the date forward to this week just as Google was preparing its own announcements. Google then announced its ChatGPT rival Bard a day ahead of Microsoft’s event.

Contrary to the neck and neck pace of announcements and perceived competition, a number of Microsoft executives believe they’re ahead of Google’s development in this particular market, and that their competition may come from lesser-known rivals in the sector.

Microsoft is currently enjoying a bump in media attention and a slightly renewed interest in Bing as it saw more than 1 million sign ups for the Bing +ChatGPT waitlist and its own Bing app rank as the third most popular app in Apple’s App Store in the US this week.