A Blocked for security reasons error message appears when Gmail users try to attach certain file formats to their emails. Then the users need to find another way to send the files.
If that’s happening to you, follow the steps below to fix it fast.
What to do if Gmail is blocking ZIP files/RAR archives?
1. Use compression software
WinZip can prove very helpful if you are looking for a smooth way to solve blocked RAR email attachment issues.
The actual compression can be done quickly using this tool. It makes working with archives is convenient and will make the transfer process a lot easier when RAR archives are involved.
2. Edit the file extensions included within the RAR archive
First, press the File Explorer button on Windows 10’s taskbar.
Select the View tab shown directly below.
Select the File name extensions checkbox on that tab.
Open the folder where you’ve saved the files you need to include in your RAR archive.
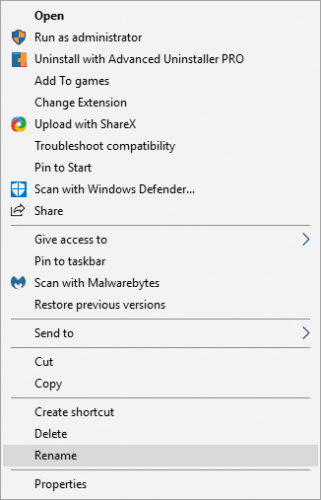
To change a file’s format, right-click it, and select Rename.
Then, change the extension at the end of the file to an alternative format, and press the Enter key (eg. change an EXE to a PNG).
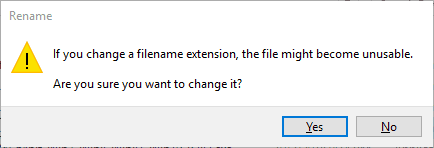
A Rename dialog box will open when you press the Return key. Select the Yes button to provide further confirmation.
Change the formats of all the files in the RAR archive to acceptable ones.
Finally, simply set up your RAR archive with the files you modified.
3. Send the RAR as a Google Drive link
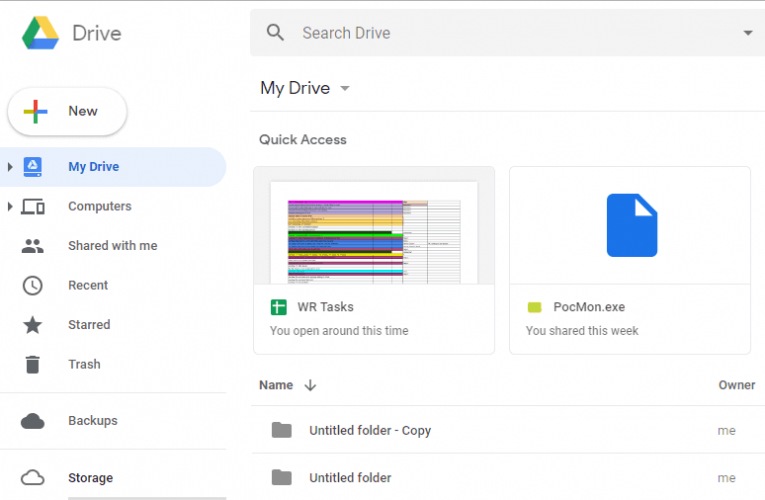
First, open your Google Drive storage in a browser.
Click the My Drive button to open the menu.
Select Upload files to open the Open window.
Then select your RAR file to save in Google Drive, and click the Open button.
Right-click the RAR you saved in Google Drive and select Share to open the window below.
Click the Get sharable link to turn on link sharing.
Then, you can also copy a link URL (with the Ctrl + C hotkey) to include in the email.
Press the Done button.
Open Gmail in your browser.
Click the Compose button to open Gmail’s email text editor.
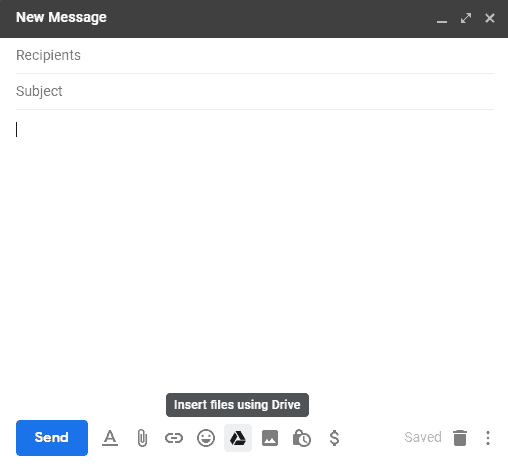
Press the Insert files using Drive button.
Select the RAR file you saved in Google Drive.
Select the Drive link option if it’s now already selected.
Click the Insert button.
Then you can send the email with a Google Drive link for the RAR. The recipient can select to download the file from the URL.
One last note, you could also save the RAR to a file host, and then send a URL for the file to the recipient. This software guide provides further details for the best file-sharing applications.
4. Try another email client
If you keep getting this error, consider switching to another email client. Our top choice in this case is Mailbird.
The app is integrated with Degoo, which is another tool that saves you the time of archiving large folders or files to send via email. Using this feature, you can upload large files with one click (or drag&drop them in the app) and just send the email. Any type of file is supported.
What’s more, you don’t have to store the file locally on your device and you don’t need to download anything to perform this action. And the receivers don’t need a special account either.
System permissions are important, and if you want to keep an eye on them, you’ll need to use NTFS permission report software.
For personal users, we recommend using hard drive activity software since it has less advanced features that are more suitable for home users. Many tools can help you monitor your permissions, but today we’ll show you the best ones you can use.
What is the best software for NTFS permissions report?
If you’re looking for NTFS permissions report software, then ADManager Plus is a must-have. The software allows you to view folder permissions with ease.
In addition, you can easily set, adjust or remove permissions to prevent unauthorized access to partitions. If needed, you can easily view reports on access control and permissions.
You can also export permissions to Excel or automate permission reporting. The software is simple to use, and you can configure your permissions from the user interface with ease.
Overall, the software offers amazing features, and as such, it’s perfect for all professionals that want to see their NTFS permissions reports.
Other great features:
User provisioning in AD, Exchange, Google Workspace, Office 365, and Skype for Business
AD bulk user management
Active directory password management
Active Directory user reports
Controlled automation
ManageEngine ADManager Plus
If you want to manage access permissions in your organization, ADManager Plus is the right choice for you.
To view the NTFS permissions report you don’t need expensive software, especially if you use tools such as Cjwdev NTFS Permissions Reporter.
The software comes with a simple and minimalistic user interface that will help you find the desired settings with ease. With it, you’ll have the ability to easily view group members as well as report permissions for any directory.
You can export your reports to the HTML format for easier viewing if you choose to do so. There’s also a Standard version that comes with certain advanced features such as additional export formats for reports.
This version also has command line support, the ability to create filters, the ability to compare reports, and email notifications once the report is finished.
Overall, it’s a simple and powerful tool, so it’s a great choice if you’re on a budget.
Other great features:
Simple user interface
Fast performance
Ability to export reports in HTML and other formats
If you need a simple tool with a sleek interface to view the NTFS permissions report, then look no further. The first thing you’ll notice about this software is its easy-to-use interface that allows you to access all the features with just a few clicks.
Using this tool, you can view permissions for all folders in a table or hierarchical tree view. Permission reports and information regarding file ownership are also available and easily accessible.
The app also supports error logging as well as HTML data export, allowing you to view your reports easily. As for the Pro version, it offers export to other formats, advanced filtering, scheduler, report compression, and command-line support.
NTFS Permission Reporter offers great features even in the free version, so it’s worth checking out.
Using this software, you can ensure that all employees have proper permissions in your company. With it, you can easily see file share and Active Directory reports and review access rights for each user.
If needed, you can always revoke certain access rights for users in your company right from the software. By doing so, you can reduce the risk of security breaches and data loss in your organization.
The software is available for free, so feel free to download it and take your company’s security to a whole new level with Netwrix Effective Permissions Reporting Tool.
Another software that deserves a mention is FolderSecurityViewer, and with this tool, you can easily generate permission reports. By doing so, you can see permissions for all folders on your PC.
The software also allows you to view share reports across all servers on your network. That’s not all, you can also view owner or folder reports for all directories. If you want to save your reports, it’s possible to export them in HTML format.
Certain features aren’t available in the free version, so if you want to view user permission reports for example, you’ll need to purchase a license. The same applies to XLS or CSV report export.
Overall, this application offers decent features, and it’s a great option if you want to view the NTFS permissions report.
Manga or Manhwa? Whichever you prefer, as long as you love both manga and technology, you can combine these two hobbies of yours for a full-screen, end-to-end delectable experience.
It’s easy! All you need is a manga reader for Windows! Soon enough, you’ll be able to read and organize your favorite manga magazines using dedicated the best Manga reader for PC.
Of course, you can use the good old trial-and-error process and test all the apps from the Store, but you’ll lose precious time.
And speaking about that, here’s a quick preview of our favorite picks, in case you want to get straight to business:
Adobe Reader – The ultimate manga reader for PC offline ?
Manga Blaze – The most popular manga reader for Windows 10 & 11 ?
Manga Z – Top manga viewer for PC with 500+ views
Comics World – Cross-device data sync, bookmark & chapter preloading
Manga Tree – Manga viewer for PC with new release notifications
Manga Bird – Free manga reader with 3000 + titles to enjoy
How can I read manga full screen on my laptop?
If you’ve made it this far you’re probably keen on discovering the best way to read manga on PC. And we cannot blame you.
You should indeed be able to get your fantasy dose on a decent size screen and fully enjoy the ride, be it manga reading or anime video binging.
So, is there a manga reader app for PC? For sure, just have a look at the listings above. Now, the best part is that most of these options can act as manga readers for PC online or offline.
This means you can download your pages locally and view them in different ways, skip chapters if you need to, and more.
Some even provide browser support, allowing you to read your favorite manga magazines directly in your browser. So, if you want to know how to read manga on PC comfortably, check out our nominees.
What is the best Manga reader for PC?
Adobe Reader – The ultimate manga reader for PC offline
Adobe Reader is a popular tool that you can use to view, edit, or convert PDF files. But did you know you can also use this versatile tool to read your favorite manga series?
To set things straight from the very beginning, you need to download your manga series in a PDF format to be able to view them using Adobe Reader.
Most manga websites allow users to select the format they want to download their mangas so this should not be an issue.
Moreover, PDF is becoming more and more popular among manga fans thanks to Adobe Reader — a free and easy-to-use PDF viewer software.
Keep in mind that Adobe Reader cannot open mangas saved under various comic book formats such as CBR, CBZ, CBT, CB7, or CBA. If you prefer, you can use a dedicated comic book viewer for that.
As far as we’re concerned, this is the best way to read manga on PC. However, if you’d rather draw and create your own mangas, use Adobe Illustrator instead.
Adobe Reader
Adobe Reader is probably the most popular document reader and many mangas come in PDF format.
Manga Blaze – The most popular manga reader for Windows 10 & 11
Manga Blaze is the most popular manga reader app for Windows and for a good reason.
This app is reliable and fast, plus it is affected by very few issues. Manga Blaze allows you to read, organize, and keep track of your favorite manga titles.
A series of useful features allow you to progress tracking, quickly resume reading from where you left off, and receive notifications when new chapters are available.
You can also download your favorite chapters and enjoy reading them offline. Manga Blaze relies on multiple manga sources in six languages: English, Italian, German, Spanish, Russian, and Portuguese.
Other features include:
Browse each source by applying various filtering criteria (genre, release year, status, alphabetical)
Update all your favorites or just a part of them
Backup your data and easily restore it if you need to
Bookmark specific pages, so that you can quickly get back to them.
You can download Manga Blaze for free from the Microsoft Store. If you need to, you can also install the paid version of the app.
One of the perks of the paid version is that you will not be interrupted by ads, you will be able to disable the safe content filter and more.
Manga Z is one of the best manga reader apps for Windows. The reading experience has been specially designed for manga fans. When using this app, you’ll feel like you’re browsing a real manga magazine.
Manga Z allows you to read manga while downloading the rest of the series in the background. You can also read manga when you’re offline and keep track of your favorite manga series using the Favorites feature.
Notifications inform you when new manga chapters are available so that you never miss any chapter.
Other features include:
History to let you track manga series you have read
Unread indicators tell you where to continue from where you have left off
Search for your manga series by name, author, and genre
Comics World – Cross-device data sync, bookmark & chapter preloading
Comics World lets you read and download thousands of comics and manga titles from more than 20 popular sources for free.
The manga series offered by this app are available in 8 languages: English, Vietnamese, Spanish, French, German, Italian, Russian, and Chinese.
Comics World supports 4 reading modes: vertical single page, horizontal single page, vertical continuous page, and horizontal continuous page, and 4 reading directions: left to right, right to left, top to bottom, and bottom to top.
Other features include:
List manga by popularity or alphabetical order
Pin manga or chapters to the Start screen
Filter titles by category, status
Sync data across multiple devices running Manga Comics
Manga Tree – Manga viewer for PC with new release notifications
Manga Tree supports today’s most popular manga scanlations. You can read the latest chapters of your favorite manga titles, bookmark pages to read later, pin your favorite manga titles to the home screen, and more.
Furthermore, you can browse and search thousands of manga titles, and create a list of your favorite manga series to browse and read.
Do you like to read in portrait or landscape? Enjoy both and customize the settings so as to get both tile and push notifications when new chapters are available from your favorite and pinned manga titles.
You can also download manga chapters for offline reading.
Manga Bird – Free manga reader with 3000 + titles to enjoy
Manga Bird offers more than 3000 manga titles you can read and download for free. The app has a very well-designed interface for the best reading experience.
Just like the apps listed before, Manga Bird supports notifications of new chapter releases and allows you to bookmark your favorite manga titles.
You can also customize the reading orientation and background colors.
However, many users complain about the exaggerated ad size from the reader page, accusing the developers they using this strategy on purpose to force users to pay more for the app.
Many use two operating systems on their PC, but that results in Grub rescue error on Windows 10
This issue occurs when Windows PC users who intend to boot their computer get stuck at the boot screen and the issue is caused by a corrupt boot directory. However, there are ways to fix it.
How do I fix Windows 10 Grub Rescue errors?
1. Set the correct partition
Connect the Windows 10 bootable media to your computer (DVD or USB flash drive)
Restart your computer to enter into ‘Automatic Repair’ mode.
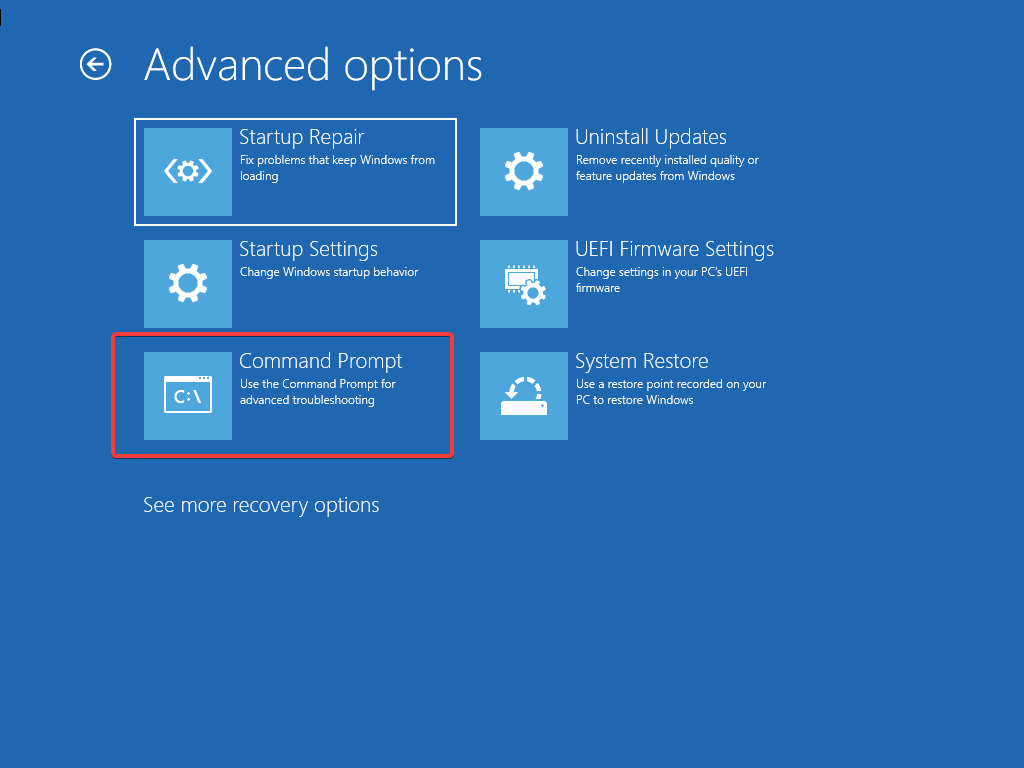
Go to Troubleshoot > Advanced Options > Command Prompt to launch the CMD.
Now, Type ‘diskpart’ without quotes and hit the ‘Enter’ key.
Type the following commands one after the other:
Then type the following commands one by one:
list disk: ( this list all hard drives in your computer)
select disk n: (n means the disk where the OS is installed. Here you can select disk 0 or any other disk where Windows 10 is installed.)
list volume: (this list all volumes on disk 0 is listed.)
select volume n: (the n implies the number of the system partitions.)
active: (this indicates the active system partition.)
From the list of the displayed system partition, determine the right partition which should be active.
Type the following command and hit ‘Enter’ after each command:
Hit the “F2” key repetitively until the system screen window come into view.(Note: BIOS function key may vary depending on your system. Check for the BIOS Function key when you switch on your PC).
Use the “Right Arrow” on your keyboard to navigate to the “Exit” menu tab.
Now, hit on the “Down Arrow” and navigate to the “Load Optimized Defaults” option.
Select the “Load Optimized Defaults” option, and then hit the “Enter” button.
3. Use Windows 10 Automatic Repair to restore the Boot Sector Code
Restart your PC few times during the boot sequence.
From the list of options, Select Troubleshoot > Advanced options > Startup Repair.
The repair process will now start.
After the repair process is complete, check if the problem is resolved.
In addition, you can also use a bootable Windows 10 DVD or USB flash drive to restore boot sector code.
Connect the Windows 10 bootable media to your computer (DVD or USB flash drive)
Restart your computer to enter into ‘Automatic Repair’ mode.
Go to Troubleshoot > Advanced Options > Command Prompt to launch the CMD.
In the CMD window, type the following command and hit “Enter” afterward:
diskpart
select disk 0
list volume
All volumes will be displayed. In the “Type” column, you will find the “DVD-ROM” value. (ensure you remember the drive letter of the Windows 10 bootable media you plugged to your PC). For instance letter E.
Now, type the following command and hit Enter afterward:
Exit
E:
cd boot
Dir
Check to see if you have bootsect.exe files in the list. If yes, enter the following command keys and hit ‘Enter’ afterward:
bootsect /nt60 SYS /mbr
Exit
Restart your PC and check to see if the problem is resolved.
Note: In case you do not see the bootsect.exe file from the steps above, you may proceed to the next step in order to rebuild BCD.
Before you proceed, download Windows 10 ISO file with the ‘media creation tool’ on another PC, and then create a bootable USB drive with it or burn it on a DVD.
Note: Ensure that the USB drive for the Windows 10 installation is 2.0 version instead of 3.0 or 3.1 and it’s at least 4GB.
6. Replace hard drive
Another alternative for fixing Windows 10 Grub Rescue issue is by replacing the hard drive. This is because the hard drive may be damaged hence resulting in the grub rescue startup problem.
Therefore, we recommend that you get another hard drive from your PC’s manufacturer websites or mainstream retail sites and then replace it yourself if you have the tech knowledge.
In conclusion, we do hope that you were able to fix Windows 10 grub rescue problem by using any of the highlighted solutions we mentioned above. However, if you have any questions regarding any of the solutions, feel free to drop us a comment below.
This isn’t the only Grub issue sadly, and many reported a deleted Grub when using Windows. If you’re on Windows 11, we have a great article on how to add Windows 11 to Grub, so don’t miss it.
An issue with the Windows update script – Chances are, that there is an issue with the Windows Update common ents itself and hence, you see the 0x80246002 error.
However, if the above steps fail to fix the Windows update error 0x80246002, we have some effective solutions below for you to try.
1. Clear the SoftwareDistribution folder
Press the Win + R keys together to launch the Run console. Type cmd and press the Ctrl + Shift + Enter shortcut keys to open the elevated Command prompt.
Run the below commands one after another in the Command prompt (Admin) window and hit Enter after each one:
net stop wuauserv
net stop bits
Now, press the Win + E keys to open the File Explorer window. Here, navigate to the below path: C:\Windows\SoftwareDistribution
Here, select all the files and folders in the SoftwareDistribution folder and hit Delete.
Once done, return to the Command Prompt (Admin) window and run the below command one after another, and hit Enter after each one:
net start wuauserv
net start bits
Restart your PC and check if the Windows update is successfully installed.
2. Manually download the update from Microsoft Update Catalog
Open the Run dialog by pressing the Win + R shortcut keys, typePowerShell, and press Ctrl + Shift + Enter together to launch Windows Powershell with admin rights.
Once the Windows PowerShell (Admin) window opens, run the below command and hit Enter: Update-MpSignature
Windows will automatically install any new updates for the Microsoft Defender.
Now, reboot your PC and check if the Windows update error code 0x80246002 still appears or if the issue is resolved.
If your Wi-Fi is not asking for password on Windows 10, you’re in the right place. This is quite a common problem among users, so we decided to help you out and look for some solutions.
Setting a Wi-Fi password is crucial if you want to block strangers from accessing your Internet connection whenever they want. In this manner, you can control who and when uses your bandwidth.
However, from time to time your modem/router may behave erratically and fail to ask users for a password as they try to access your Wi-Fi connection. Sometimes, your computer may be the culprit.
In other words, temporarily disable your antivirus protection, wait for a couple of minutes and then try to connect to your Wi-Fi network and see if your computer prompts you to enter any password.
Don’t forget to enable antivirus protection as soon as the test is over.
Additionally, you could also try an antivirus tool that offers maximum protection with minimum system interference.
Viruses and cyber crooks are continually emerging as online dangers. Many well-known organizations and home users have been the victims of internet assaults in recent years.
It is true that leaving your Wi-Fi connections unencrypted is not a wise decision so we strongly recommend switching to a different antivirus solution. Thus, is critical to have antivirus software that protects against assaults via Wi-Fi networks.
2. Update your computer
Make sure that your machine is running the latest Windows 10 OS version and driver updates.
Wi-Fi issues are very common when running outdated software versions. Checking for updates and installing the latest patches may fix this issue, so give it a try.
Go to Settings > Update & Security > click on the Check for updates button.
Additionally, you can do this much faster if you use Outbyte Driver Updater. All you need to do is download it, run it, and it will search for missing, broken, or outdated drivers all by itself.
The program is portable, lightweight, works fast, and has a library of pretty much all drivers that are in use today. Thus, if you have drivers that need fixing fast, this is the way to go.
Obviously, restarting your modem is the first workaround on the list. This simple action often works wonders and could quickly solve your Wi-Fi problem in less than five minutes.
Simply unplug the power cable from the electrical outlet and wait a couple of minutes. Then plug your modem back into the electrical outlet, press the power button to turn on the device, and check if the problem persists.
4. Change your Wi-Fi password
Go to Start > type ‘control panel’ > double click the first result
Go to Network and Sharing Center > Change adapter settings
Right-click on your wireless network > select Status
Go to Wireless Properties
Click on the Security tab and change the password
If you can’t change your password, go to your modem’s user interface and set the new password from there.
5. Delete your WLAN profile
Launch Command Prompt as an administrator and run the following commands:
netsh wlan show profile
netsh wlan profile
Add the profile name of the network you wish to delete.
If you want to delete all profiles, then run this command: netsh wlan delete profile *
Restart your computer and check if Windows 10 asks you to enter your Wi-Fi password.
Also, keep in mind that if you want Windows 10 to prompt you for the password every time, you need to uncheck the “Connect Automatically” option when connecting through the network.
Click on the Wi-Fi icon on the taskbar > click on Properties
Toggle off the option to connect automatically.
Now, if Windows 10 won’t prompt you for credentials for your Wi-Fi connection, it’s possible that the network profile is stored by the WLAN auto-configuration service.
To fix this issue, you need to delete the stored profile.
6. Ask your computer to forget the network
Go to Start > Settings > Network & Internet > Manage Wi-Fi settings
Scroll down to Manage known networks
Left click on your network > select Forget
Now, search for the network and enter your password.
There you go, we hope that these quick solutions helped you fix the problem. Let us know which one worked for you.
Some users have stated on forums that their monitors have a yellow screen after some Windows 10 updates. Does your VDU (Visual Display Unit) display a yellow screen?
If so, it could be a hardware issue, or you might just need to adjust some display settings in Windows. These are some Windows 10 resolutions that might fix yellow-screened VDUs.
One troublesome issue on all versions of windows is a Yellow Screen of Death, and this issue usually appears if you’re having driver or graphics card issues.
Sometimes you might get tinted screenshots on Windows, but that’s usually caused by additional apps that might be running in the background.
Numerous display issues can be fixed by updating the graphics card drivers so it might be worth checking to see if there’s a more updated graphics card driver. The quickest way to do that is to utilize driver updater software in Windows or use a dedicated third-party driver updater such as Outbyte Driver Updater.
Outbyte Driver Updater will help you update drivers automatically and prevent PC damage caused by installing the wrong driver versions.All the drivers that are being installed on your device are being tested for security and authority.
Outbyte Driver Updater scans your device really fast and once it detects an outdated driver it will update it. If you want to never worry about even getting to the point of having outdated drivers, then you can simply activate the auto driver update.
Outbyte Driver Updater has a large database of over 18 million driver files so it is almost certain that it will be able to find the right driver for all your hardware.
Your graphics card’s color settings might not be at their default configuration. If so, restoring color settings to default might fix a yellow screen. You can usually configure color settings with a graphics card’s configuration utility.
For example, to configure Intel color settings, you can right-click the desktop, and select Graphics Properties – Display and Color Enhancement to open the options shown directly below.
Look for similar options on NVIDIA and AMD control panels, and restore the color settings to default.
5. Check the VDU’s OSD color settings
Most desktop VDUs also include additional color control settings of some kind. Your desktop’s VDU might include contrast, gamma, hue, saturation, color temp, and color tint options on its OSD menu. So check how your monitor’s OSD color settings are configured and make the required adjustments.
Those are some of the resolutions that will probably get rid of the yellow screen. If you still can’t fix a monitor’s yellow screen, consider returning the VDU to the manufacturer for repairs if it’s still within a warranty period.
If you are interested in learning how to fix more Windows 10 errors, check our Troubleshooting Hub.
Today, we will be reviewing some of the best address book software for Windows and Smartphones alike. Contact management has gone beyond merely saving, retrieving, and organizing information from computers.
And with the advent of address book software, the process has been greatly enhanced. It is essential for people with a large number of friends/business partners/colleagues.
Since managing a wide array of contacts can be overwhelming, adopting a durable address book software would save you a lot of time and energy.
Here’s a quick preview of our favorite picks:
C-Organizer – Best address book software with contact sync & day planner
My Personal Address Book – Printable address book software
Efficcess – Address book software for Windows 7 & older versions
Free Address Book – Free address book for Windows 10 & Windows 11
Pobuca Connect – Address book app for PC with Zapier integrations
How do I create an address book on my computer?
An address book software is basically a digital database for storing the personal data of friends, acquaintances, team members and colleagues, family members, and so on.
If you already use the Office package, you could easily stick with programs such as Excel or even Word to create your own personal address book and manage your contacts effectively.
Both require a minimum of formatting such as setting up a few columns. Then, it’s all about data entry. You can even use preset templates to make things easier. However, there’s only so much you can do with a basic list of people.
If you need to juggle with people’s data a lot, then an address book manager is more likely to do you justice.
Essentially, a standard address book software synchronizes all the contact details and ensures every single one is accessible with no more than a few clicks.
Which software is used to create an address book?
C-Organizer – Best address book software with contact sync & day planner
C-Organizer is a popular address book software for Windows 10, designed by CSoftLab. It offers an extensive set of features for contact management. But you can also use it as a daily or weekly personal/work scheduler.
C-Organizer‘s extensive features are classified under specific categories, each performing a specific set of functions. These categories include General, Today, Calendar, Tasks, Password, Notes, and Events.
Check out some of the key features of C-Organizer address book software:
Password generator
Contact sync (with Google contact and others)
Day planner (with calendar)
Advanced search engine
Multi-format file support (HTML, TXT, XML, CSV, and more)
Multilingual support, text editor, and more
C-Organizer is available in three major variants: C-Organizer Professional, C-Organizer Lite, and Advanced Diary.
There is an initial 30-day free trial for every fresh download, as well as a 30-day money-back guarantee.
C-Organizer
Organize your life at work or at school with this awesome and feature-rich software!
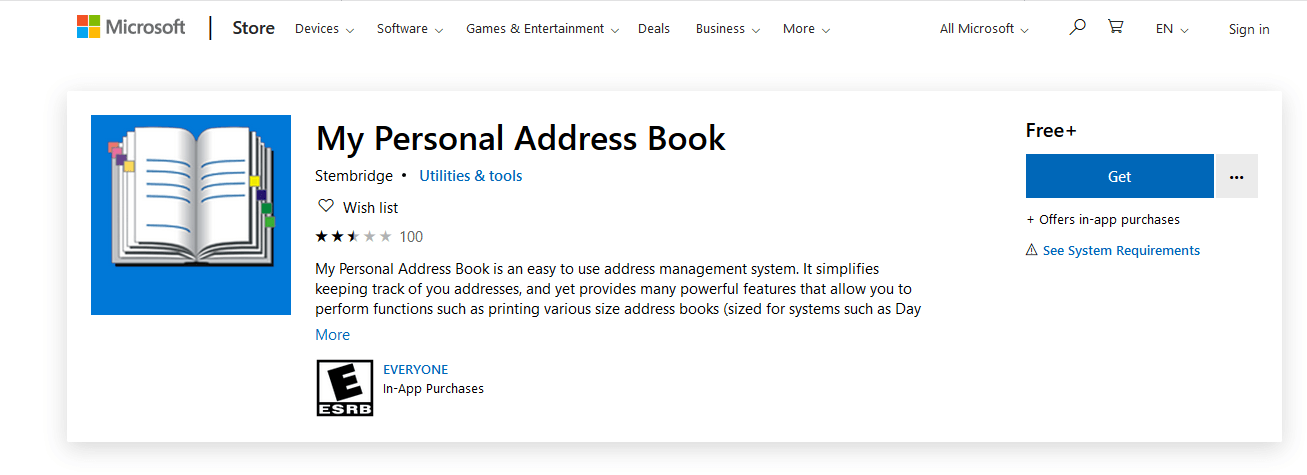
My Personal Address Book is arguably the most used address book software. It is the designated address book software for Windows PCs and is officially licensed by Microsoft.
My Personal Address Book is intuitively designed, making it fairly easy to use to store contact records, keep track of addresses, manage schedules, print data, and more.
Its versatile sets of functions make it stand out as one of the best address book software for Windows computers. The software’s integration makes it simple to use. You can easily navigate across platforms to execute certain tasks.
The program will automatically launch your e-mail app (Gmail, Yahoo Mail, Outlook) and send emails to a target address. It uses Windows Map to generate directions for a target address (upon request).
My Personal Address Book is available in two licensing editions – Standard and Premium. The Standard version is available for free, while the Premium version is paid.
Notable features of My Personal Address Book include:
Unlimited address books
Simplified printing (up to 5 standard sizes)
Integration (Windows Map, OneDrive, email, and Skype)
Data encryption, ad blocking, automatic email launching, day timer, and more
My Personal Address Book
Easily manage your emails and address data with My Personal Address Book, a great app for Windows.
Efficcess – Address book software for Windows 7 & older versions
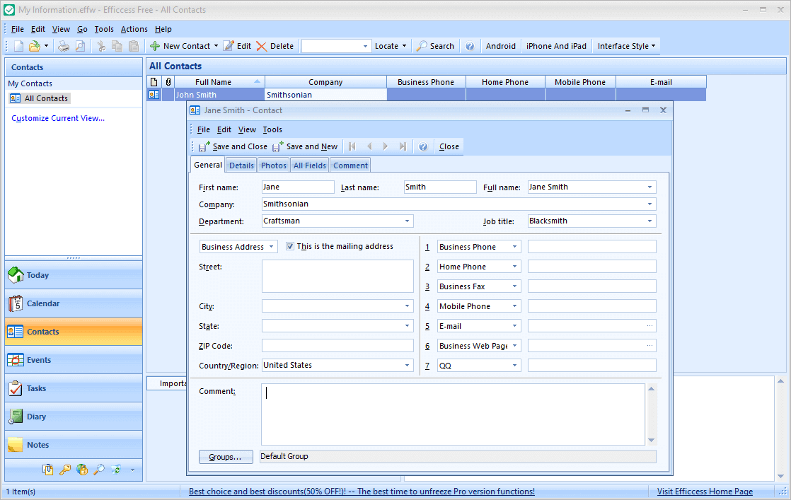
Efficcess is an all-inclusive powerful address book software, with cross-platform support for all Windows computers between Vista and Windows 10, as well as mobile iOS and Android platforms.
This software is built for versatility and its functions extend way beyond managing a contact book. It hosts a wide array of functionality, ranging from contact management to schedule/appointment management.
In fact, most of its features are automated, to help you keep track of your daily schedule.
Also, as a prominent PIM/address book software, Efficcess has a large client base that spans many countries. Hence, it offers multiple language options to its culturally diverse users.
In figures, Efficcess supports over 30 languages, including English, French, Arabic, Chinese, Portuguese, Polski, Armenian and more.
Efficcess offers a 30-day free trial to new users. And after the expiration, you can continue to enjoy the service in exchange for a one-time fee.
Some of the main features of Efficcess include:
Reminder, Password manager & Diary notes
Contact group manager & One-click contact search
Cross-platform synchronization (between PC and smartphone)
Advanced document editor, Data import/export, file printing, and more
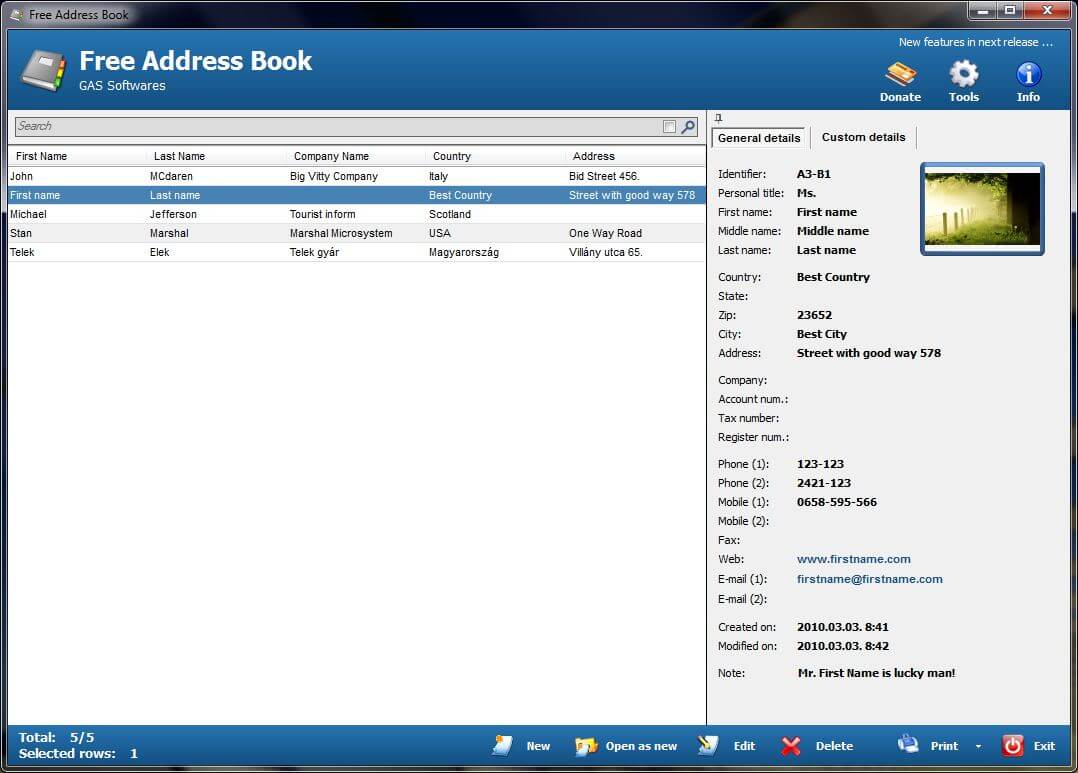
Free Address Book is one of the best address book software for Windows, designed by GAS Software.
It is a standard address book solution that is equipped to store and synchronize innumerable contact names, addresses (street number, city, and country), phone numbers, email contacts, and so on.
Besides, Free Address Book is equipped with versatile tools, for recording and tracking contact addresses with convenience. This is made possible by its intuitive user-friendly interface, which is very simple to navigate.
Hence, tasks like recording/contact details, searching for an address, or managing a database are executed without hassle.
Some of the key features of Free Address Book include:
Free Address Book, as the name implies, is a free address book software, for both personal and business/commercial uses. There are, however, various custom-priced licensing plans on offer.
Pobuca Connect – Address book app for PC with Zapier integrations
Pobuca Connect is an advanced cloud-based contact management and addresses book software, which is specially built for business/commercial purposes. The software is supported on both Windows and mobile devices.
Pobuca Connect hosts a powerful set of features that are better suited for organizing address books & contact details at organizational levels.
It’s equipped to link customers’ or clients’ address books, and automatically send updates to them.
Also, the software can be used to streamline employees’ contact details and automatically onboard new intakes. Every contact detail is secure, and can only be accessed with permission from the admin.
Some of the key features of Pobuca Connect include:
Contact import/export, Standard fields shared contact lists, and contact merging
Cross-platform synching (desktop and smartphone)
Scan business cards, activity logs, and more
Pobuca Connect is equipped with Zapier integration for Gmail, Zoho Mail, Hubspot, MS Excel, Google Contacts, Microsoft Active Directory, PBX, Asana, Pipedrive, Google Sheets, Agile CRM, and over 1000 more.
Address book software is an essential tool for improving communication among friends, co-workers, team members, and so on.
However, selecting a durable address book software could be tricky, basically because of compatibility differences, as well as variations in durability.
Nevertheless, we have compiled 5 of the best address book software for Windows, to better inform your decision on which one is most suitable for you.
According to statistics, video marketing gained a lot of popularity. It seems that after watching a video, about 70% of consumers are more than likely to buy a particular advertised product.
Over 90% of viewers who are watching videos on mobile devices will share them with others, and 70% of professional marketers believe that videos are the most powerful software for conversion.
As a business, it’s imperative to start using videos to advertise your products and services because such a marketing strategy is the best these days.
For this reason, precisely, we picked out just the best and most efficient animation tools that you can successfully use for your business, so make sure to check out their sets of features.
How do I choose the best animation software for business?
There are various tools available to edit videos online for your business, whether it is a cartoon video creator or a free animation maker for beginners. The procedure might be easy or difficult, depending on how much time and money you choose to put into it.
You can have the same effect with a free animation creator as you can with a more costly option. Your animated video has done its job if you have the proper message and it resonates with your viewers.
Solutions that provide additional tools and alternatives, on the other hand, will enable you to generate higher-quality items. You can begin with simple tools and progress as your needs dictate.
If you’re looking for the very best animation software for professional editors and creators, then let us tell you more about Adobe Animate.
This is our top recommendation for today thanks to a large number of options it offers and its unmatched precision in designing interactive animations.
You will certainly appreciate the clean, uncluttered interface and those amazing Adobe Fresco Live Brushes that let you sketch and draw incredibly expressive characters.
When it comes to the included illustrations and video animation tools, they make creating interactive web and mobile content for ads and games as simple as ABC.
This includes WebGL, Flash/Adobe AIR, HTML5 Canvas, and SVG as others may just fall in love with your artwork too.
Let’s go next through some of its key features:
Intuitive layout, so that even the common user can easily get used to it
Incredible vector brushes in all sorts of styles
Make your work visible on desktop, mobile, and even TV to reach out to a large spectrum of audiences
Creative Cloud membership allows access to all the latest features and fixes
Step-by-step tutorials if you find using it a bit difficult
Adobe Animate
Adobe Animate is the best professional animation software so if you’re an editor or a creator you will have the optimal results.
Animaker is a great tool that lets you create high-quality animations for your business.
This program includes six popular video styles, and you can even combine them to get the desired result.
Overall, the tool allows you to create 720 different types of animated videos which is really more than enough.
Check out more great features that are included in this tool:
Versatile and easy to use
Amusing for most customers
Perfect for advertising to young teens
A vast library of premade templates
Action buttons
Here are the six tools included in this software: Animaker for 2D, Animaker for 2.5D, Animaker for Handcraft, Animaker for Infographics, Animaker for Whiteboard, and Animaker for Typography.
With this program, you will get the chance of creating funny animated videos to promote your business and attract more potential customers
This tool will offer you everything you need to create studio-like animated videos.
The website’s motto is Say NO to big studios. Instead, own one and we believe that this says it all.
Head over to Animaker’s official website to check out the whole set of great features that you will get to enjoy if you decide to try this tool.
Animaker
Online video creator for animated banners and ads, perfect for presentations.
DP Animation Maker is a simple and powerful tool to create impressive animation from still images. You can add special effects and fine-tune them so they truly enhance the features of your advertised product.
The program’s toolset includes some powerful instruments. Smart Animation Brushes to easily paint over a still image and turn a picture of water, fire, or light into real-time animation.
Morphing/Deformation Brushes allow you to create spinning, wave movements, sailing, and many other smooth movements with little effort. A library of ready-to-use animations and automatic looped video generation.
The program is great for making quick animations from pre-existing elements, saving you loads of time on promoting products efficiently, and increasing your conversions.
Here’s what you can create with DP Animation Maker:
Animated videos
Animated Backgrounds
Animated pictures for multimedia products
Animated introductions for games
Music videos
YouTube videos
DP Animation Maker
This powerful but easy-to-use animation software will help you create the best advertising animations.
With PowToon, you can create excellent presentations and videos to promote your business. The best thing about this software is that it lets you create high-quality content to captivate and engage your audience.
Take a look at the best advantages that come with PowToon:
Educational purposes
Drag-and-drop functionality
Best for advertising schools and private courses
Premade symbols and animated designs
When you’re at work and don’t want to be ignored, the best solution is to use PowToon in order to grab the whole attention of your bosses and colleagues
For your business, this tool will turn out to be your best friend as it will help you promote your products and services
You can advertise your business using simple PowToons because it has already been proven that these are the best ways to grab your audience’s attention.
You will get professional-looking results in under 30 minutes via the ready-made templates with the drag-and-drop templates designed, scripted, and ready for use.
Check out more features that are packed in this fantastic software, by visiting PowToon’s official website.
With Bannerflow, you can create HTML5 banner ads without knowing any code.
With this tool, you will be able to make banners easier and quicker than ever before: from video banners to fully-featured media ads, all that you will need to know is how to use the drag-and-drop feature.
Everything is this tool is in HTML5, and it’s fully optimized for all devices. This means that your audience will always see the best part of your work and you will be able to advertise your business in the best possible way.
Check out the key features that are included in Bannerflow:
Advanced advertising software for banner creation
Suited for all industries
Help from leading experts in marketing
Print banners
Available for all media platforms
The software comes with scaling and translation features, and this means that creating alternative versions of the same banner that are customized to various audiences will be a piece of cake
Using Bannerflow, you will get the chance to launch localized banner campaigns on an international scale really quickly. You will get the opportunity to publish your ads on more than 100 networks with only a few clicks and you will not even have to copy and paste any tags or upload any files.
If you need to change something to your ad after publishing it, you will be able to edit it without having to republish it, you can update your ads in real-time.
Of course, you will also be able to publish your ads on social media for all of your followers and audiences.
Your banners can become live and relevant ads, and it’s great that you can update them live because this way your potential customers will get to see the latest and updated ads.
The team calls this tool the Bannerflow Banner Builder because this is what it lets you do: build banners.
You can check out more relevant and exciting features that come with this tool by heading over to its official website and taking a look around.
With GoAnimate, you will be able to make professional animated videos in order to promote your business best.
With GoAnimate, you will see that you can create your very first video in less than 5 minutes which is really amazing.
Using GoAnimate, you can truly engage your audience, and you can choose from lots of editable scenes in industry, activities, occupations, and concepts.
Your characters will have a voice that will be lip-synced automatically, and you can also offer a voice track to the background of the animation which will become the voiceover narration.
The flexible workflow that you will be able to enjoy while using this tool includes scripting and storyboarding, voice recording, visual greatness, publishing, and more.
It’s best if you head over to GoAnimate’s official website where you can check out for yourself the complete set of features and functionalities that you will be able to enjoy if you decide to use this handy tool.
Just take a look at what you need to know to use this great tool and what are its best features:
Drag and drop functions
Premade assets for ads and banners
Suited for jobs and project advertising
Budget-friendly
Voice and audio recording
You can get started with GoAnimate right away, and the best thing is that you don’t even need an Internet connection or set up the software.
It’s all do-it-yourself, without needing to have a massive team or budget; all you will have to use will be the software’s effortless to manage tools.
After subscribing, you will get unlimited access to everything that this tool has to offer which is quite a lot.
You will be able to add a character or swap a background for instance with a simple click of the mouse or by dragging and dropping.
On the official website of this great tool, you are even warned: that recreating yourself and your customers with its help will become really fun and addictive and we can guarantee that this is entirely true.
Animatron Studio is another fantastic way of creating animations for your business.
You will get the chance of creating explainer videos, design HTML5 banners and animations, and make stunning presentations. There is a library of more than 500K royalty-free video clips, photos, and audio.
You will get the chance to educate your leads with various explainer videos and sell more to your clients with video catalogs and all kinds of demos for your products and services
In the end, you will be able to export and download your work to the most popular media formats effortlessly. You can share content on social media straight from the platform’s editor.
Check out the best features that are packed in this excellent animation tool:
200 pre-animated sets
Whiteboard animation style
Import and edit your own photos, graphics, audio, and videos
Annotate, slice and combine
Suited for food and drinks advertising
Animatron Studio is ideal for businesses and startups, and you will be able to grab your audience’s attention if you decide to use it.
The best benefit of using Animatron Studio is that you will get to save massive amounts of money on video production.
You will be able to make content that is worth sharing, and your audience will really appreciate this.
While using Animatron Studio, you can choose from thousands of free characters, props, and backgrounds which are all pre-animated.
Building a long-term client experience is a difficult and time-consuming endeavor that needs several meetings. You may, however, considerably accelerate this process by presenting fresh and new information about your brand and its offering.
Do this through a series of animated advertisements that are released one by one on your business website or social media accounts, like an Instagram automatically posting software.
By releasing videos on the web, you can even create a communication strategy that includes a number of phases and planned engagement with potential clients.
For example, you might begin by creating a short storyboard introducing your brand. The following stage may be a captivating and exciting new product teaser. Following that, you may post a video describing all of the product’s features and competitive advantages.
After you’re done analyzing these tools’ sets of features, we believe that you will eventually be ready to make the most informed decision that will definitely bring the best advertising results for your business. Good luck and share your thoughts!
Sometimes, while trying to host a Zoom meeting, you may come across the error code 3113 if you have not enabled either the Passcode or the Waiting Room security options.
However, there could be other underlying reasons why the app triggers the error and why you failed to host the meeting.
Why do I see the Zoom error code 3113?
A passcode or a Waiting List is not enabled – Configuring a Zoom meeting often requires activating the Passcode, and if that is not yet done, the error shows up.
Outdated Zoom application – If the application is not yet updated, that’s another important reason you may see the Zoom error code.
A glitch with the Zoom app – There could be an issue with the app itself, and hence, you encounter it.
Incompatible Zoom version with Waiting Rooms – Chances are that the version of the webinar software you are using does not match the waiting room requirements.
How do I fix the error code 3113 in Zoom?
1. Set a Passcode in Zoom
Go to Zoom on your desktop, and sign in to the app.
Next, click on Meetings, select the Upcoming tab, look for the scheduled meeting, and click on Edit.
On the next page, scroll down to the Security section. Here, select Passcode and, enter a password. Press Save.
2. Enable waiting room
Sign in to Zoom on your Windows desktop.
Now, select Meetings on the left. Go to the right and click on the Upcoming tab. Here, look for the meeting, and click on Edit.
Next, go to the right, and scroll down to the Security section. Here, select Waiting Room, and click on Save.
Now that you have activated the waiting room, try hosting the meeting and check if it still shows the Zoom error code 3113.
Press the Win + R shortcut keys to open the Run dialog, type appwiz.cpl in the search bar, and hit Enter to open the Programs and Features window in Control Panel.
In the Control Panel window, go to the Uninstall or change a program section, look for the Zoom app, right-click and select Uninstall.
Once the app is completely uninstalled, visit the Download Center page for Zoom. Here, click on the Download link in blue based on your system architecture (32-bit/64-bit version).
Open the installer and follow the on-screen instructions to complete the installation.
Keep in mind that Zoom requires either a passcode or a waiting room for the following account types:
Free Zoom accounts
Accounts with a single license
Business accounts with a minimum of 10 to a max of 100 licenses
Pro accounts with two or more licenses
Government accounts with less than 100 licenses
Updating your app can also help you fix error code 4502; read this guide to learn more about other solutions.
Moreover, you must also review if the waiting rooms support the current app version you are using. This is one common reason you may see the Zoom error code 3113.
For Windows and macOS, the supported Zoom versions are v5.1.2 or higher and v5.1.2 or higher, respectively.
But if you are a mobile user, the supported Zoom versions for Android and iOS are v5.1.28652.0706 or higher and v5.1.228642.0705 or higher.
Some users have posted on Google’s forum about Gmail emails getting stuck in the Outbox. When those users try sending emails, the messages get queued in Gmail’s Outbox. Consequently, users can’t send emails when the issue arises.
Deselect the Enable offline mode checkbox if it’s selected.
2. Check the file size of email attachments
If you’re sending emails with file attachments, check the total file size. If the file size of your attachment exceeds 25 MB, then you won’t be able to send it.
These tools are able to archive any file without loss of quality, and many of them include a split option that will create smaller archives if the size of your files is too big and requires that.
This will allow you to send files through the Gmail app without any worry about size limitations.
3. Clear Gmail’s cache
To clear Gmail’s cache in Chrome, click the Customize Google Chrome button.
Select Settings to open that tab.
Click Privacy and Security on the left of the Settings tab to open the options shown directly below.
Click Cookies and other site data to open further options.
Then click See all cookies and site data to open a list of site data.
Type mail.google in the search box.
Click the Remove button for mail.google to erase that cached data.
4. Clear the Gmail app’s data
To clear the Gmail app’s data on Android mobile devices, tap Settings to open further options.
Tap Apps & notifications to open a list of apps.
Next, select the Gmail app listed.
Select the Force Stop option if you can.
Then tap Storage to open the options shown directly below.
Select the Clear Cache option.
If the issue persists after clearing the cache, select the Clear Data option.
5. Select the Allow background data usage option
To allow background data usage on Android mobiles, open Settings.
Tap the Apps tab.
Next, select Gmail on the app list.
Tap Mobile Data to open the options shown directly below.
Toggle the Allow background data usage option if it’s off.
Also, enable the Allow app while Data saver on option.
Then tap the button with three horizontal lines on it to open a menu.
Select My Apps & Games to check for updates.
Tap the Update button for Gmail. Alternatively, you can select the Update all button.
Those are some of the resolutions users have confirmed to fix Gmail emails getting stuck in the Outbox for both the mobile and web apps. So, those potential fixes are worth a shot.
Some users have been complaining about an issue regarding BitLocker encryption on Windows 10 devices, mainly, an incompatibility between a drive encrypted on Windows 7 and later used in a Windows 10 machine.
If you are experiencing this issue, then maybe this guide will give you the solution.
If you have not heard about BitLocker by now, and you want an extra layer of security for your Windows computer, then you should definitely do some research regarding what it can do and how it can protect your files.
But even with its advantages, Microsoft’s encryption feature has some issues when moving drives from Windows 7 computers to Windows 10.
We’ll consider the following scenario: you have been using BitLocker on a Windows 7 computer and you have recently bought a new Windows 10 computer and you want to install your old hard drive into the new tower.
When you try to access the encrypted partitions, Windows 10 advises you to turn off BitLocker or does not recognize your password.
There are a few ways around this problem, some being simpler than others, and it is up to you to determine which of them can be of use in your case.
BitLocker is a great way to protect your files, and in this article, we’re going to cover the following issues:
Disable BitLocker Windows 10 – Disabling BitLocker is rather simple, and the disabling process is almost identical on Windows 10.
Disable BitLocker command line, PowerShell – If you’re an advanced user, you can disable BitLocker using the command line. You can disable BitLocker with both PowerShell and Command Prompt, and in this article we’re going to show you how to do it.
Completely remove BitLocker Windows 10 – BitLocker is a built-in feature of Windows, and while you can’t remove it, you can disable it and all its related services. By doing so you’ll permanently disable BitLocker on your PC.
Disable BitLocker external hard drive, USB encryption, removable drive, USB drive – BitLocker also works with external drive and removable storage. If you want to disable BitLocker for your USB drive you can do so using any of our solutions.
Disable BitLocker to update BIOS – Few users reported that they are unable to update their BIOS before disabling BitLocker. However, you should be able to disable BitLocker after reading this article.
Disable BitLocker Windows 10 Group Policy – If you want, you can disable BitLocker simply by modifying your group policy. This method works for Windows 10.
Here’s how you disable BitLocker on Windows 10.
How do I disable BitLocker on Windows 10?
Quick Tip:
While Bitlocker may only be able to encrypt entire drives, there are situations when you don’t need that.
That being the case, if you need a tool that can encrypt only the data that you need, then give Folder Lock a try.
The program can also create encrypted backups as well, so recovery will be made easier.
Other than that, both BitLocker and Folder Lock are very similar since they both offer high levels of encryption, thus improving the security of whatever you have on your drives.
1. Disable BitLocker from Windows 10 Control Panel
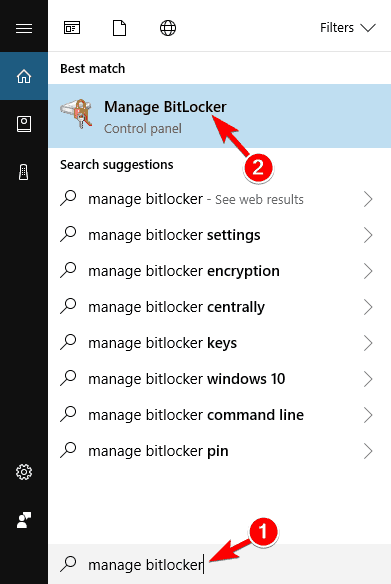
Open the Search bar and type Manage BitLocker.
Select the Manage BitLocker from the menu.
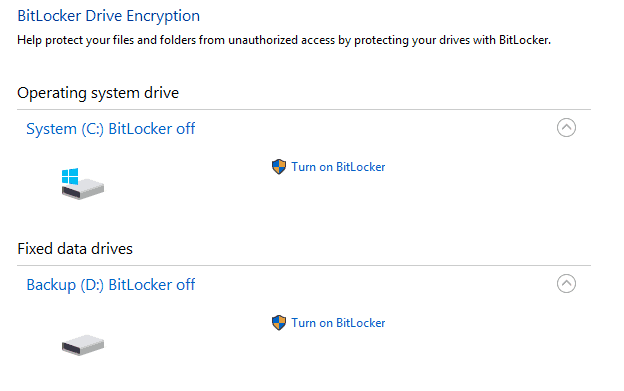
This will open the BitLocker window, where you will see all your partitions and you can either select to suspend BitLocker or completely disable it.
Select the option you want and follow the wizard.
Similarly to how you’d go about this problem in Windows 7, it might work to disable BitLocker from Control Panel, assuming you know your passkey and it still works.
After doing that, BitLocker should be permanently disabled for the selected drive.
2. Disable BitLocker from Windows 10 using the Local Group Policy Editor
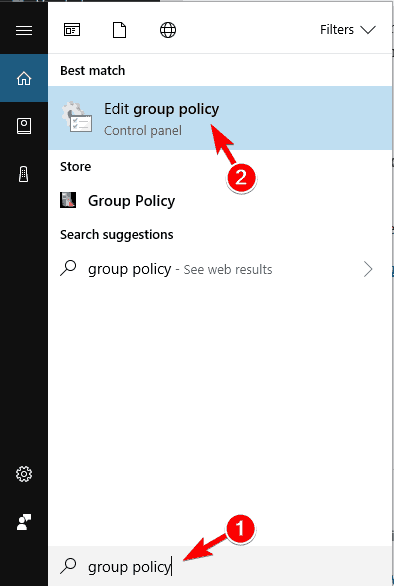
Open the Search bar and type in Group Policy, then select Edit Group Policy from the menu.
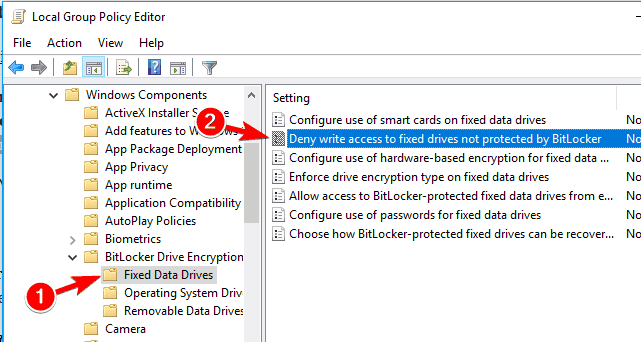
From here, navigate using the left-hand side menu to Computer Configuration -> Administrative Templates -> Windows Components – > BitLocker Drive Encryption -> Fixed Data Drives and select the Deny write access to fixed drives not protected by BitLocker option and double click it.
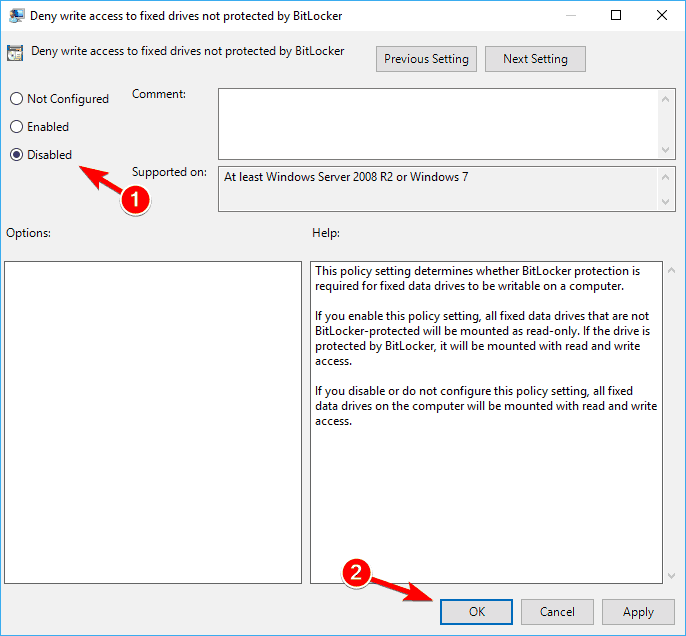
Click Not Configured or Disabled, and click on Apply and OK to save changes.
If the first method is not a viable option for you, then using the Group Policy utility (GPO) might offer the solution.
After doing that, restart your PC and your problem should be resolved completely.
3. Use another PC to disable BitLocker
If both methods have failed, then all you’re left with is installing your encrypted hard drive back to a different computer and going through the methods once again.
In this scenario, method 1 will fix your problem and decrypt your drive, allowing you to use it in your Windows 10 PC.
4. Use Command Prompt
Open Command Prompt as administrator.
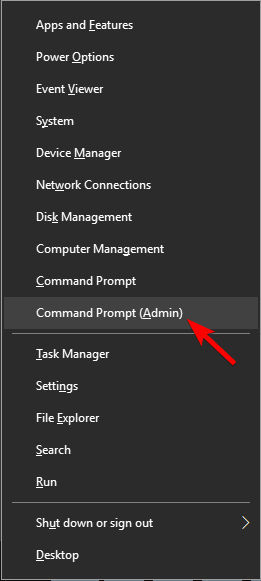
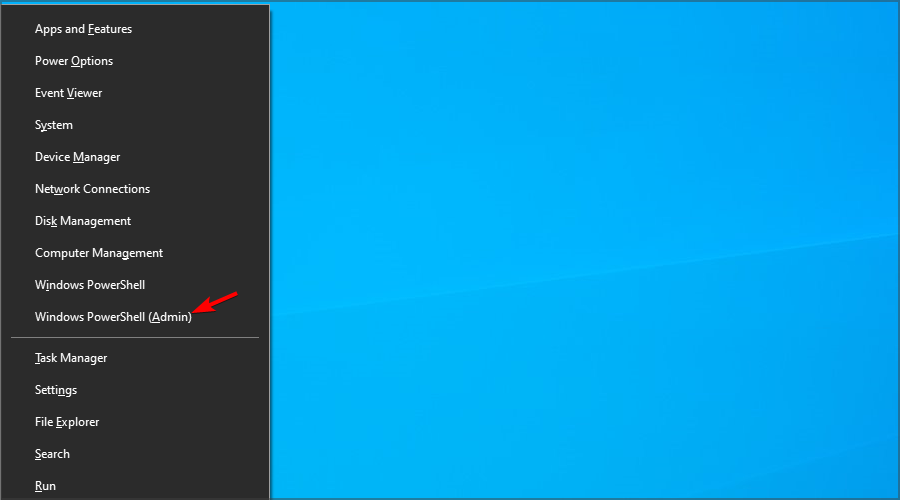
To do that quickly press Windows Key + X to open Win + X menu and choose Command Prompt (Admin) from the menu.
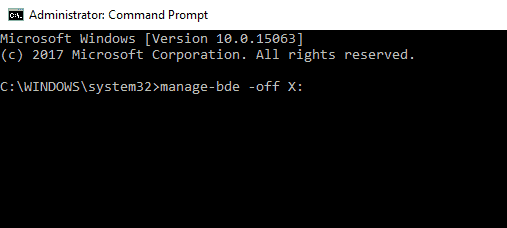
When Command Prompt opens, enter the following command, and run it:
manage-bde -off X:
Be sure to replace X with the actual hard drive letter.
If you’re an advanced user, you can turn off BitLocker by using Command Prompt.
The decryption process will now start. Keep in mind that this process can take a while, so don’t interrupt it.
After the process is finished, your driver will be unlocked and BitLocker will be turned off for that drive.
As you can see, this is a quick and easy way to turn off Bitlocker, and if you’re familiar with Command Prompt, feel free to try this solution.
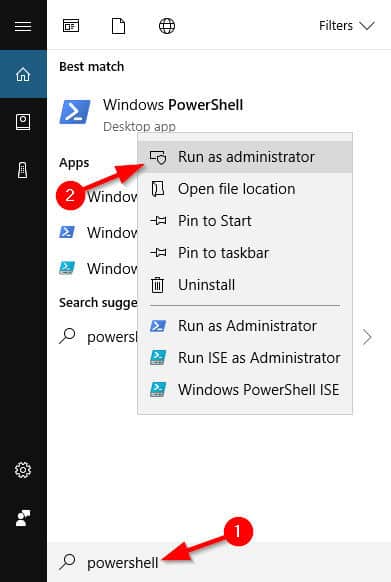
Right-click Windows PowerShell from the list of results and choose Run as administrator.
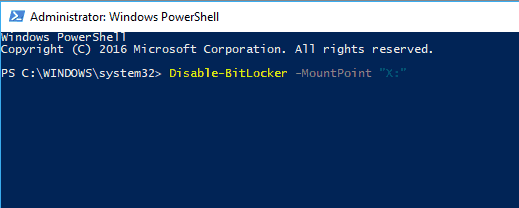
When PowerShell opens, enter this command and press Enter to run it:
Disable-BitLocker -MountPoint "X:"
Before running the command, be sure to replace X with the letter that represents your hard drive partition.
You can also turn off BitLocker for all drives on your PC using PowerShell. To do that, follow these steps:
Open PowerShell as administrator.
Now run the following commands:
$BLV = Get-BitLockerVolume
Disable-BitLocker -MountPoint $BLV
If you prefer using command-line tools, you should know that you can turn off BitLocker for specific drive simply by using PowerShell.
By running these two commands you’ll get the list of encrypted volumes and decrypt them with a single command.
Keep in mind that the decryption process can take a while, so don’t interrupt it. Once the drive is decrypted, BitLocker will be turned off for that drive.
6. Disable BitLocker service
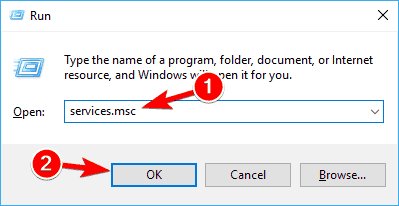
Press Windows Key + R and enter services.msc.
Press Enter or click on OK.
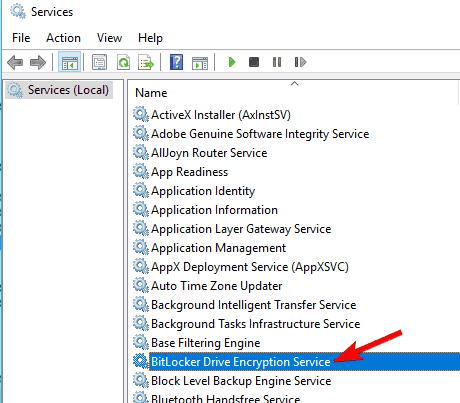
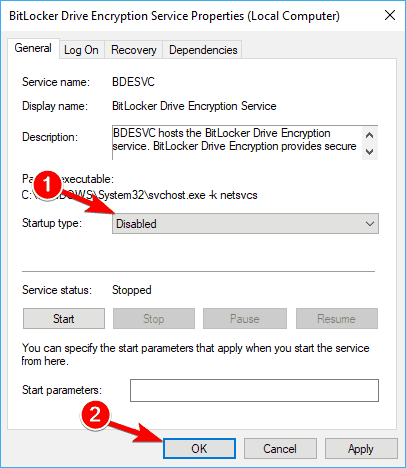
When Services window opens, locate and double-click on BitLocker Drive Encryption Service.
Set the Startup type to Disabled and click on Apply and OK to save changes.
If you want to turn off BitLocker, you can do that by disabling its service.
After disabling the BitLocker service, BitLocker should be turned off on your device.
7. Turn off device encryption from the Settings app
Open the Settings app. You can do that by pressing Windows Key + I shortcut.
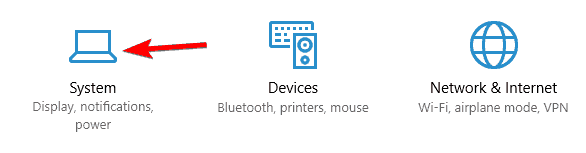
When the Settings app opens, navigate to the System section.
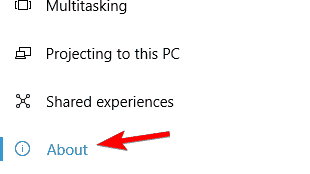
In the left pane, select About.
Now locate Device encryption section in the right pane and click on Turn off button.
When the confirmation dialog appears, click on Turn off again.
If you want to turn off BitLocker, you’ll be pleased to hear that you can do that right from the Settings app. After doing that, BitLocker should be disabled on your PC.
BitLocker can be useful if you want to protect your files from unauthorized access, but if you don’t want to use this feature, you should be able to turn it off by using one of our solutions.
Microsoft Edge’s latest version has hit the Stable Channel for everyone to download, bumping it to version 109.0.1518.49. The release comes with several feature updates and the usual reliability fixes. Here’s everything you need to know:
First up is the added ability to link a personal Microsoft account (MSA) and Azure Active Directory (AAD) account through work or school. In turn, users will now be able to earn Microsoft Rewards points for the Bing searches they conduct using Edge.
Next up are some changes that are expected to affect TLS server certificate verification in Microsoft Edge version 110. Once this version rolls out, “the certificate trust list and the certificate verifier will be decoupled from the host operating system’s root store.” Both will now ship with the browser, what’s more, the MicrosoftRootStoreEnabled policy is now available for testing to control when the built-in root store and certificate verifier are used. Though Microsoft intends to cut support for it when releasing Edge version 111.
And finally, the browser now comes with text prediction that is designed to help the user to write faster and more articulately. “Microsoft Edge provides word and sentence predictions for long-form editable text fields on web pages,” says Microsoft. It’s worth noting that this feature is currently only available in English to users in the US, India, and Australia. However, the company plans to expand it further to other regions.
Microsoft Edge should auto-update to the latest version, but if it does not, you can trigger it manually. Just head to the browser’s menu, choose Help and Feedback then About Microsoft Edge and wait for the update to download, and then restart.
Installing Windows can be a complicated process, and sometimes errors such as Windows cannot install required files can appear and interrupt your installation.
This is a big problem, and today we’ll show you how to fix it.
How can I fix Windows cannot install required files error?
Before we start, ensure that your DVD drive is clean and that the installation disc isn’t damaged. You can also try connecting your SATA drive to a different port. Also, try to install it on a drive that has two or more paritions.
Try to use the right version of Windows, since 64-bit ones can’t work on certain processors. Lastly, make sure that your RAM is working correctly. You might want to test it with MemTest86+.
1. Remove overclock settings
Restart your PC.
While it boots, keep pressing F2 to enter BIOS.
Navigate to Advanced Settings or Tweaker.
Locate the Overclocking section and restore the value to defaults.
Windows cannot install required files message will appear if Windows won’t Install on your PC, but you should be able to fix this problem by using one of our solutions.
Windows 10 comes with a series of repair tools, with the Automatic Repair being one of the most effective. Unfortunately, many users are complaining that Windows 10 gets stuck in the Automatic Repair loop.
This can be frustrating as it prevents you from booting into your PC. Fortunately, it is not an issue that is impossible to fix, and we will show you to get past it in this guide.
What causes the automatic repair loop in Windows 10?
It is usually difficult to pinpoint the reason Windows 10 gets stuck in the Automatic Repair loop. However, when considered closely, you can trace the issue to one of the factors below:
Corrupt system files: This is the most prominent cause of this issue. You can fix it quickly by repairing the broken system files in Safe Mode.
Bad memory sectors: Sometimes, this issue might be down to faulty or corrupt memory sectors. Running the CHKDSK command should fix this quickly.
What to do if You Get Stuck on the Automatic Repair Loop on Windows 10
1. Disable Automatic Repair
Power on your PC and press and hold the power button to force it to shut down. Repeat this thrice to launch the Advanced startup options. From here, proceed to Step 4.
If you can’t boot into the Advanced startup options, insert a bootable media creation tool into your PC, enter your language and other info and click Next.
Now, click the Repair your computer option in the bottom left corner.
Select the Troubleshoot option.
Now, choose Advanced options.
Next, select the Command Prompt option.
Type the command below and hit Enter: bcdedit
Check if the identifier option is set to {default} and recoveryenabled to Yes.
Now, type the command below and press Enter: bcdedit /set {default} recoveryenabled no
Finally, if the command above does not work, type the command below and hit Enter: bcdedit /set {current} recoveryenabled no
The quickest way around this issue is to disable the Automatic Repair tool causing the problem. After running the last command on the list, close the Command Prompt window and restart your PC.
2. Repair boot files and memory sectors
Repeat Steps 1 to 6 in Solution 1.
Type the command below and press Enter: fixboot c:
When the command finishes running, type the command below and hit Enter: chkdsk c: /r
Finally, restart your PC.
Since Windows 10 usually gets stuck in the Automatic Repair loop when you boot your PC, the problem might be caused by your boot files or hard disk. The solution is to repair these two important components and restart your PC.
3. Repair system files in Safe Mode
Repeat Steps 1 to 5 in Solution 1.
Choose Startup Settings.
Now, click the Restart button.
When your PC restarts, press 5 or F5 to Enable Safe Mode with Networking.
Next, press the Windows key, type cmd, and click Run as administrator under Command Prompt.
Type the command below and hit Enter: DISM /Online /Cleanup-Image /RestoreHealth
Wait for the command to finish running, type the command below, and press Enter: sfc/scannow
Finally, wait for the command to finish running and restart your computer.
In some cases, Windows 10 gets stuck in the Automatic Repair loop because it encountered an issue and it is trying to fix itself. However, the problem worsens if the system image needed for the repair is also faulty.
This is where the DISM command comes in. It repairs and restores any faulty system image. On the other hand, the SFC command helps fix any other broken or corrupt system files.
4. Disable early launch anti-malware protection
Repeat Steps 1 to 3 in Solution 3.
Press 8 or F8 to Disable early launch anti-malware protection.
Your PC should start normally if the feature is the cause of the issue.
Windows 10 has a lot of protective features to keep your PC secure. One of them is the early launch of anti-malware protection.
But some users have found this feature to be why Windows 10 gets stuck in the Automatic Repair loop. Disabling the feature should fix this problem.
5. Restore the registry
Repeat Steps 1 to 4 in Solution 1.
Type the command below and hit Enter: C:\Windows\System32\config\\rregback* C:\Windows\System32\config\
When prompted to overwrite files, type All and hit Enter.
Lastly, close Command Prompt and restart your PC.
Another possible cause of this problem is a corrupt registry. The quickest way to make sure Windows 10 does get stuck in the Automatic Repair loop, in this case, is to restore the registry to default.
Now, select your restore point and click the Next button.
Finally, follow the onscreen instructions to complete the system restore.
If Windows 10 start getting stuck on the Automatic Repair loop after making some changes to your PC, the best thing to do is to perform a system restore. This will restore your PC to a point when it was working normally.
7. Reset your PC
Boot into the Advanced startup options by restarting your PC thrice.
Select the Troubleshoot option.
Now, click the Reset this PC option.
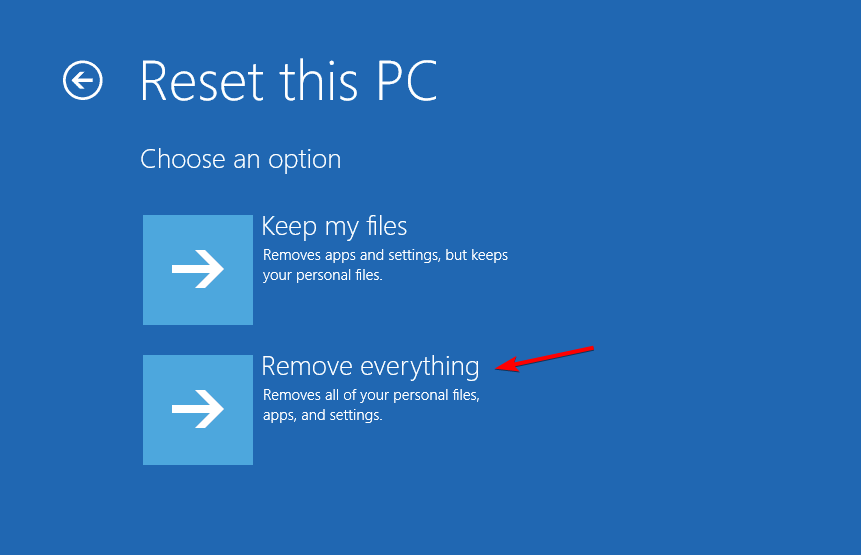
Choose whether to keep your files or remove them.
Finally, follow the onscreen instructions to complete the process.
If the solutions above fail to prevent Windows 10 from getting stuck in the Automatic Repair loop, you might have to reset your PC to default.
Fortunately, you have the option to keep your files. However, if you have a backup of your crucial files, it is advised to remove the files.
With this, we can conclude this article on how to fix the Windows 10 stuck in Automatic Repair loop issue. If you still can’t solve the problem after applying the fixes in this guide, you might need to perform a clean install of Windows 10.
Feel free to let us know in the comments below if you encountered any issues while applying the fixes in this guide.
The Autopilot.dll error occurs when there is a problem with the DLL file, or it gets corrupted due to other reasons, such as missing DLL files. It could also be caused by certain applications that are incompatible with Windows.
Most users who reported the Autopilot.dll error associated it mostly with the Event Viewer and said it was accompanied by the error code 0x80070491. We’ve already established that DLL files are important in the running of applications, so let’s have a look at how to bypass this error.
What is Microsoft Autopilot?
Microsoft Autopilot is a cloud-based service that helps you deploy and manage Windows devices. It’s a great way to automate the deployment of corporate-owned devices, including PCs, tablets, and phones.
Autopilot also offers a range of monitoring services that allow you to gain insight into how your application is performing in the production. It also provides best practices for creating high-availability architectures for your applications.
Why does the Autopilot.dll error occur?
If you spot the Autopilot.dll error, your system may be at risk, and you’ll experience frequent crashes or random shutdowns. Below are some reasons that may trigger the error:
Outdated OS – If you are using an older version of Windows on your computer, it might be possible that the Autopilot.dll file has become corrupted due to some error in its code. You need to upgrade to Windows 11 or the latest version.
Incompatible software – If you started experiencing this issue just after installing a new program, you might be facing some compatibility issues.
Overclocking your PC – Overclocking can get more performance out of your hardware, but it’s not without its risks, as you’re exposing yourself to potential damage to your processor.
Microsoft services – There may be an issue with Microsoft assistant service causing this error.
How can I fix the Autopilot.dll WIL error in Windows 11?
1. Check for Windows updates
Hit the Windows key and click on Settings.
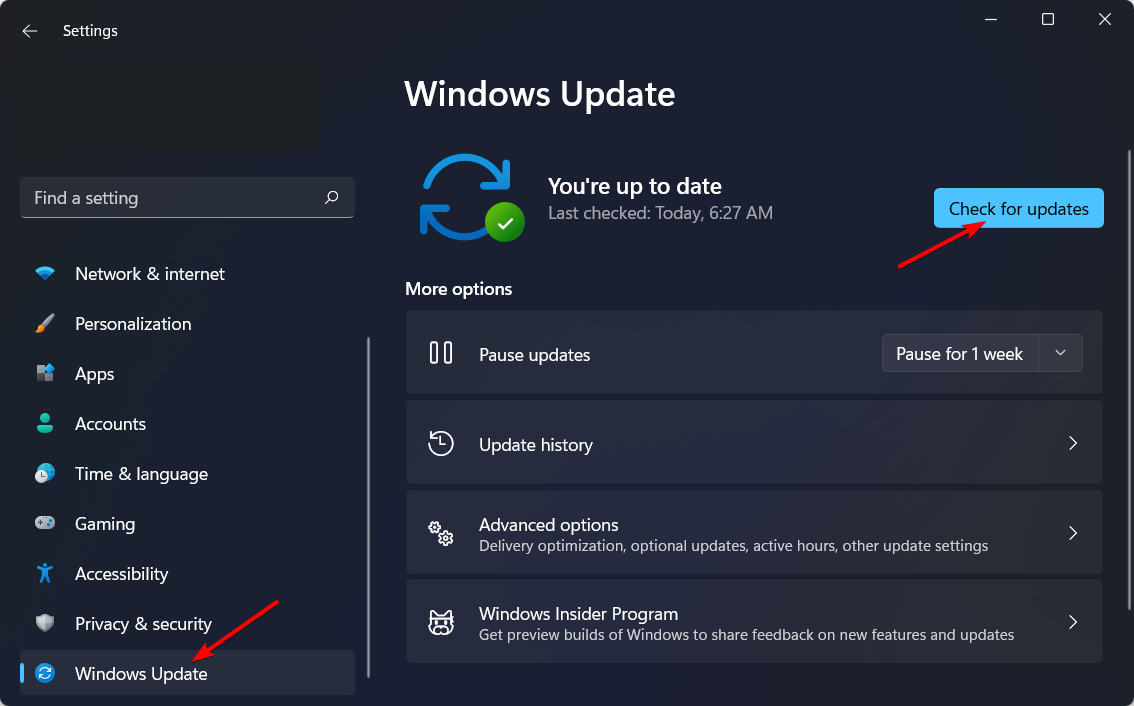
Select Windows Update on the left pane, then click on Check for updates.
Click on Download & install if available.
If there are any updates, once they finish installing, restart your PC and check whether the Autopilot.dll WIL error was reported message still appears.
2. Switch off the Microsoft Account Sign-in Assistant Service
Hit the Windows key, type Services in the search box, and click Open.
Locate Microsoft Account Sign-in Assistant Service, right-click on it, and select Properties.
Click on the Startup type, and in the drop-down, select Disabled.
Under Services status, click on Stop.
Click Apply and then OK to save the changes.
Since a section of users also reported that this error was a result of logging into Microsoft services such as Office and OneDrive, disabling the service may help get rid of the Autopilot.dll WIL error was reported message.
3. Run the DISM command
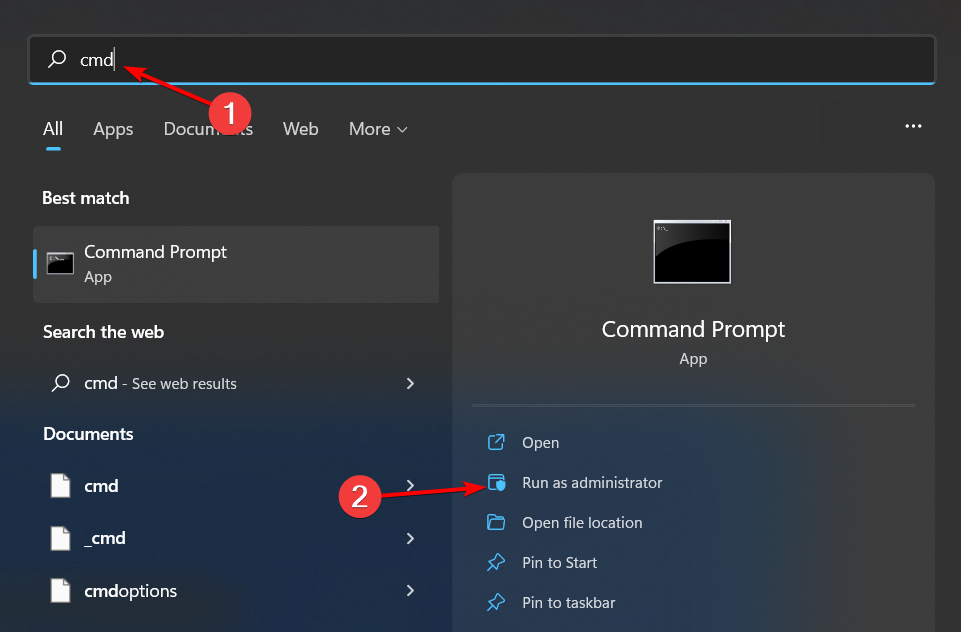
Hit the Windows key, type cmd in the search bar, and click Run as administrator.
Type the following commands and press Enter after each one: DISM /Online /Cleanup-Image /CheckHealthDISM /Online /Cleanup-Image /ScanHealthDISM /Online /Cleanup-Image /RestoreHealth
Hit the Windows key, type cmd in the search bar, and click Run as administrator.
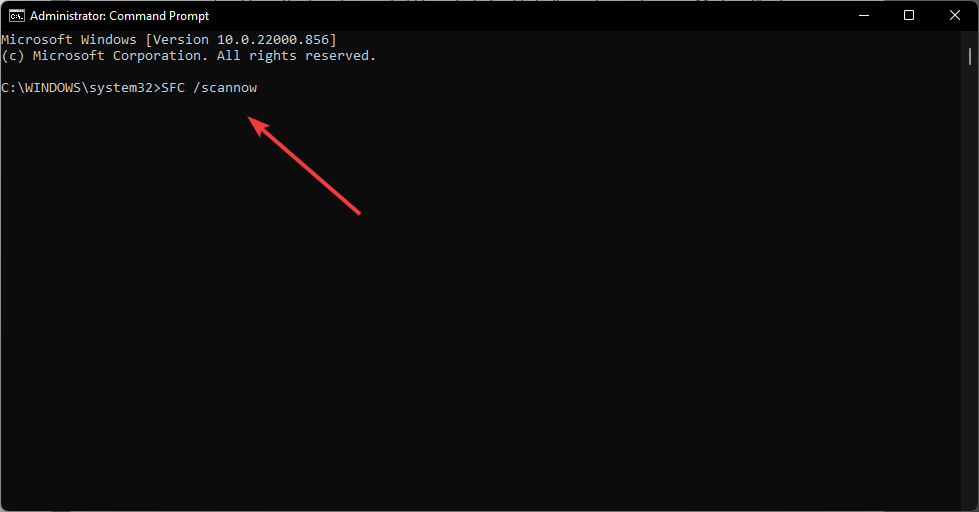
Type the following command and press Enter: sfc /scannow
Most users who went this route reported that the error was gone when they restarted their PCs. However, this birthed a new error where the computer now takes longer to boot.
Enter BIOS mode. (The specific keys are different for every manufacturer, so ensure to confirm from the official website).
Navigate to Overclocking options and locate XMP.
Disable this feature, restart your PC and check if the problem persists.
Overclocking is a process of increasing your computer’s performance by increasing its clock speed. If you use a graphics card for gaming, then overclocking might result in overheating of your system.
This, in turn, can cause software and hardware issues like the crashing of games and apps and errors in Windows 11 that make your PC unstable.
So, if you are using an overclocked graphics card, we recommend that you disable overlocking for a while until the problem is resolved completely because it might be causing this error.
6. Reinstall Windows
Sometimes, this problem is caused by corrupted files in the operating system. You may have no choice but to reinstall Windows if it is corrupted. However, before jumping ship, we recommend that you start Windows in Safe Mode and check if the issue persists.
Remember to back up all your files before reinstalling Windows to avoid losing any important files. If you come across DLL errors often, you should consider installing DLL repair tools. These come in handy as they work automatically to repair broken, corrupted, and missing DLL files.
Elsewhere, you may also come across the Vcruntime140.dll is not found error, so feel free to check out our detailed article on how to fix this issue.
In case you solved the above error with a solution not mentioned here, we’d love to hear about it in the comment section below.
As a Fed Ex customer, you can file a claim for concealed loss, visible or concealed damage, delivery or payment delays, non-delivery, or misdelivery. Obviously, you will also be able to check your FedEx claim status.
One should file a complaint within 21 calendar days. Additionally, all supporting documentation must be filed within 9 months of the delivery date.
How long do FedEx claims take?
According to FedEx, a claim will normally take no more than 7 business days to be solved. Nevertheless, the procedures are liable to take longer if additional verifications are required.
This is why we suggest you present all the necessary documents and retain the original package as well.
Submit all the necessary information: tracking number, shipment details, and personal details.
Alternatively, you can call the FedEx support number (which differs, depending on where you’re located) and ask for more information about your delivery.
If your delivery declared values were more than $100, make sure to have all the documents at hand related to your purchase/delivery.
Now, what happens after FedEx claim? After filing a complaint, you’ll receive a confirmation email, which includes a FedEx claim tracking number or as it’s widely known, a FedEx case number.
Log into your FedEx account. This is a mandatory step to view your claims, otherwise, you won’t be able to see the details.
Then go to Support > File a claim.
Click the Start a Claim button.
Select the View My Claims tab at the top. The claim FedEx claim tracking number will be necessary.
This is how you can easily request a FedEx claim status update. Again, you can call the FedEx support number and request the status of your claim, based on the claim tracking number.
FedEx settles most cases in 5 to 7 business days unless additional time for research is needed. Obviously, they will notify you if that is the case. When a claim is settled, you receive a confidential envelope with FedEx‘s official response.
If you’re checking your claim through the mobile app and it fails to load properly, see this FedEx app not working guide for quick fixes to restore access and track your claim status.
We truly hope that any claim you file with FedEx gets a satisfactory reply. If you want to share your experience with FedEx, use the comments section below.
The Bluetooth feature in your Nikoncamera is more than just a gimmick. Using Nikon‘s SnapBrdige app for the Android and iOS device, you can control your camera remotely as well as access pictures from the camera. That said, some Nikon users have reported Nikoncamera not pairing with phone issue.
This pairing problem is usually caused by a glitch in the SnapBridge app or problem with Nikon‘s Bluetooth functionality as reported in the Reddit community.
NIKON D3400 not connecting to snapbridge. Please help. I have looked at and tried other posts and nothing has worked. Please read description, all suggestions massively appreciated.
If you are also troubled by this issue, follow this guide to know how to fix the pairing issue with Nikoncamera and phone.
How to fix Nikon camera not pairing with the phone?
1. Clear and cache and force close
A bad cache can create issues while pairing your phone with the Nikoncamera. Try clearing the cache and check if that resolves the issue.
On your Androidphone, tap on Settings from the Home Screen.
Scroll down to Apps section.
Tap on Manage apps. Wait for the installed apps list to load.
Tap on the SnapBridge app to open it.
Now, tap the Clear Cache button (bottom right).
Choose Clear cache and then select Yes.
Tap the Force Close button and choose Yes to confirm the action. This will force start the app.
Now Turn on Bluetooth on your phone as well as Camera and try pairing.
At times a simple unpair and pair can fix Bluetooth connection issues.
On your smartphone, tap on Settings.
Open Bluetooth option.
Make sure the Bluetooth is enabled.
From the list of paired devices, tap on your Camera Name.
Select Unpair to forget the device.
Turn off Bluetooth on your Camera and your smartphone.
Turn the Bluetooth back On, on both the device.
Open the SnapBrige app and try pairing.
3. Uninstall and reinstall the app
If the issue persists, try reinstalling the app. Uninstalling the app should clear any conflict with your phone.
From your phone‘s home screen, tap and hold on the SnapBridge app icon.
Select Uninstall and then tap on Yes to confirm.
Restart the phone after uninstalling the app.
Download the SnapBridge app from the PlayStore and install it.
Now try pairing the device with your phone and see if that helps.
4. Try Camera Connect & Control app
The Camera Connect & Control is a third-party camera control app and a good alternative to SnapBridge. If the SnapBridge app is not working, try this app until the issue is resolved.
One big issue that arises when trying to use Adobe Illustrator is the responsiveness of the program. You will notice that this happens every time you open a file.
Illustrator is not responding and you have no other chance but to quit the program. The most probable reasons are an outdated Adobe Illustrator version, a corrupt font database, or a bad preference file.
These don’t sound that frightening, that’s true. However, the issue happens again and again, so you need to take action.
If you’re currently struggling to resolve this particular problem, here are a few solutions that will get Adobe Illustrator back on track.
Why is my Adobe Illustrator not responding?
There are many possible culprits that cause an app to not respond but when speaking about Adobe Illustrator specifically, these are the most commonly reported issues that cause your app to crash:
Corrupt or outdated GPU drivers may interfere with Illustrator and cause it to crash.
Outdated versions of the Adobe Illustrator software
Bad preference files
Your device does not meet the minimum system requirements
What can I do if Adobe Illustrator is not responding?
1. Uninstall and reinstall Adobe Illustrator
It is possible that files within your current Adobe Illustrator application may have some problems that cause them to be unresponsive.
The simplest way to overcome this is to uninstall the application and reinstall a fresh and updated version.
Uninstall Adobe Illustrator:
Type Creative Cloud in the taskbar and open the Creative Cloud Desktop App.
Under the All Apps tab, select Adobe Illustrator and choose Uninstall.
If necessary, click the More options icon to get to Adobe Illustrator and choose Uninstall.
You will get a prompt asking whether you want to keep or remove your preferences, select the option you prefer.
Once the process is complete, you can start with the reinstallation process. If you want a clean reinstallation, is advised to remove the settings and preferences as well, but it is not mandatory.
At this stage, we advise you to make sure that there are no Illustrator files left on your PC. Uninstaller wizards may leave behind registry entries and other unnecessary folders that benefit you with nothing and take up disk space.
They may even prevent you from reinstalling the app because the installer wizard may wrongfully detect that the app is already on your PC and stop the installation. To prevent this from happening, use uninstaller software.
These are safe tools that scan your whole PC for leftover files and registry entries and safely remove them, allowing you to save up precious disk space and have a clean, fresh reinstallation.
Reinstall Adobe Illustrator You can reinstall the application from the same panel in the Creative Cloud Desktop app:
Open the Creative Cloud Desktop App.
Select Adobe Illustrator from the Apps to try tab. If Illustrator is included in your Creative Cloud plan, then select Install. Otherwise select Try for the free trial or Buy to purchase the product.
Wait for the process to complete and try to relaunch the app.
Now the Adobe Illustrator application should work just fine.
Adobe Illustrator users report fixing various malfunctions by updating their GPU drivers.
Type device manager in the Taskbar and open Device Manager.
Select the Display adapters group.
Right-click on your GPU device and select Update driver.
Now Windows will automatically install new driver versions if they are available. Just wait for the process to complete and try to relaunch Illustrator.
We must mention that Windows may not be able to always detect new driver versions, even if they become available, in which case you have the option to look them up manually:
Identify your GPU card manufacturer and version.
Head to the official website of the manufacturer and download the latest driver version
Open the file and follow the installation wizard.
We advise you to double-check the version of the driver you install because a mismatched driver may cause even more errors including frequent app crashes and BSODs.
If you are not sure what driver version you need to install, you can use an automated driver installer such as Outbyte Driver Updater that can determine that by running a quick scan on your machine.
Truly forcing your unresponsive Adobe Illustrator to quit is easily accomplished via the Task Manager.
Firstly, close all adobe-related tasks and open your Task Manager by using the CTRL + SHIFT + ESC keyboard shortcut.
Next, select Adobe Illustrator, choose End Task, and close Task Manager.
The program should have closed immediately but don’t worry if it takes several seconds to do so.
This option will give the application the chance to reconfigure. Try to start it again and see if the issue is fixed.
Adobe products generally try to save up your work even when the application crashes. When you try to relaunch the app you should get the Auto-recovery dialog box that will ask you if you want to open the autosaved data. Select ok
Finding Illustrator and force to quit the process is no rocket science, and we have the right solution for you if by any chance you can’t open Task Manager.
Moreover, some of you might find it easier to use the ALT + F4 keyboard shortcut for similar results.
4. Turn your computer off and on again
If you tried the previous suggestion to no avail, then maybe it’s time to consider applying a quick restart. Adobe Illustrator may start responding again and the process is a matter of seconds, so you’ve got nothing to lose.
On the contrary, it’s recommended to shut down your computer at least once a week to reduce the possibility of getting errors like this one.
Facebook is the most popular social media platform in the world, and its video streaming platform is gaining popularity as well.
While scrolling through your Facebook feed, you may come across a video that has catchy audio.
Facebook, by default, does not allow you to download its video. However, there are third-party sites that can extract the videos from Facebook.
But, what if you only want to extract audio from a Facebook video? You can do that with the help of audio converter software.
Well, again, we turn towards third-party sites that can help you extract audio from any video on the internet, including Facebook.
In this article, we show you the five ways to extract audio from Facebook videos, but in order to do so, you will need to first know how to get the URL from Facebook.
Get a Facebook video URL
On the video that you want to download, click the three dots menu.
Select Copy link.
Now the video URL is on your clipboard. If you have multiple videos to download, copy all the URLs and save it to a Notepad file.
Now let’s take a look at the online services and offline apps that can help you extract audio from a Facebook video.
Save from is a good and accessible solution because it lets you download Facebook videos directly from your browser, without requiring you to install software to your PC.
Yes, it is a video downloader, but you can always extract audio from the videos using the best MP4 to MP3 converters.
It is very easy to use, as you will see in the instructions below. The platform lets you download MP4 and WEBM, and you can select the mpx quality for each video (up to 1080).
The downloader will process the video link and show the available download options.
Click the Download MP4 button to download the video.
Save From can be safely used on any major browser. It is also available as a Google Chrome extension.
As you download directly from the browser, the video files will go to your designated download folder, or you will have to pick it up on the spot if that’s how your browser is set up.
Another nifty feature provided by Savefrom.net is the web integration tool. It lets you create a download button for a video of your choice and place it on your website. The integration script works with YouTube, Vimeo, Dailymotion, and VK.com.
Click on Start and wait for the tool to process the URL.
Under Convert To, click the drop-down menu and select MP3.
Select the Quality of the MP3 file.
You can also trim the video by selecting the Start and End times.
Click on Convert.
Click the Download button to save the extracted audio file.
This tool is specifically created to download Facebook videos and does not work with specialized video platforms such as YouTube or DailyMotion.
It lets you download both full video formats (mp4) and audio-only formats (mp3). It offers the option to download in high quality, but also in normal quality, for smaller file sizes.
Just as in the case of Savefrom, Getfvid files will be saved in the location you picked in your browser settings.
Getfvid is free and private. It does not store any user data or place any limit on the amount of media you can download using the tool. The videos you download are not stored anywhere within the platform either.
Apowersoft Online Audio Recorder allows you to record high-quality audio from computer sound cards and microphones. This also removes the hassle of having to convert MP4 into MP3 after downloading the video from Facebook.
When prompted to download the launcher, download and run the launcher.
Double-click on the launcher to install and launch it.
Once the launcher is up and running, open a Facebook video.
Click Record on the Apwersoft Online Audio Recorder.
Now play the video on Facebook.
Click on the Stop button to save the audio.
To access the file, click the Open Folder icon.
The tool lets your rip audio from a Facebook video and also fully control when you want the recording to start, pause, resume, and end.
It is compatible with Windows and Mac computers. When it comes to the location of the files, it is dependent on your browser settings.
Apowersoft Online Audio Recorder lets you record from multiple audio inputs, including system sound, and microphone. You can also record both, simultaneously.
Apowersoft lets users save audio files in all major formats, including mp3, wma, aac, flac, and m4a.
It also lets you rename your audio files and add smart ID3 tags to them. You can add pictures, artist name, year, album, and genre.
This is a very handy feature as it will help you easily find your files when you browse your audio library on your mobile device or from a computer audio application.
So, those are the five ways to extract an audio Facebook video. While some of these are online options, we have also listed some handy offline software for convenience.
Want to learn more interesting tricks? Check out our dedicated How-To Hub.
Want to explore more Facebook-related information? Check out our dedicated Facebook webpage.
Sims 3 is one of the most played games on Windows PC. This is because of its realistic and cool gameplay that makes you always want to come back.
However, users are starting to complain that Sim 3 crashes on Windows 10 and 11. This can be annoying, but it is not an issue without solutions. In this guide, we have gathered the best fixes you can apply to eliminate this frustrating problem.
Why does my Sims 3 game keep crashing?
Below are some of the reasons the Sims 3 game keeps crashing on Windows 10 and 11:
Wrong settings: One of the major reasons your game fails to work well is wrong in-game settings. Sometimes, it might be due to the advanced rendering feature, among other settings. The solution to this is to tweak these settings until your game starts working normally.
Faulty mods: In some cases, this issue might be due to the mods you recently installed. The quickest way around this is to remove these mods and restart your PC.
How do I stop Sims 3 from crashing and freezing?
We’ve scouted the web and found some working fixes for the annoying Sims 3 crashing issues on your Windows 11 and 10 devices.
Of course, as always, you are advised to get the latest graphical drivers and make sure that you are also playing a completely genuine version of the game. First of all, we will start with a few pieces of advice that you need to follow just to see if they can be of any help.
1. Check your settings
You might not have all the required hardware specs for a decent gameplay, so consider downgrading the settings and choosing speed over quality
Try to turn off advance rendering
Try playing the game in window mode. If there isn’t a setting for enabling this, then choose the alt+enter hotkey combination
2. Uninstall recently installed mods
Uninstall Pets if you have installed it, as this has worked for some. Also, if you recently installed new mods, remove them and check if this workaround fixed the problem.
3. Turn off background apps and programs
Try to turn off background programs which could be eating up virtual memory. The quickest way to do this is to clean and boot your computer. Here are the steps to follow:
Go to Start > type msconfig > hit Enter
Go to System Configuration > click on the Services tab > check the Hide all Microsoft services check box > click Disable all.
Go to the Startup tab > Open Task Manager.
Select each startup item > click Disable
Close the Task Manager > restart the computer.
4. Update your OS
Make sure you upgrade to the latest Windows 10 Update version if you’re still running this OS. Microsoft regularly rolls out new updates to make your system more stable and fix general bugs, so check for updates.
Since Windows 10 is an old version, the best solution is to upgrade to the latest OS: Windows 11. Microsoft has greatly improved your gaming experience on Windows 11 by adding a series of dedicated gaming features such as Game DVR, a new Game Bar, and so on.
Install the latest Windows 11 version to enjoy a smooth gaming experience. For more information on how to download and install the Windows 10 April Update, you can check out this guide.
There are two troubleshooting tools that may help you fix game crashes in The Sims 3, namely the Program Compatibility troubleshooter and the Blue Screen troubleshooter (if The Sims 3 crashed with a BSOD error). Here’s how to run these troubleshooters:
Open Control Panel > type ‘troubleshoot’ in the search menu > select Troubleshooting
Click on View All to list all the troubleshooters
Select and run the troubleshooters mentioned above > restart your computer and check if you can Play The Sims3.
6. Exclude the game from Data Execution Prevention
Right-click on My Computer on Windows 8 or This PC on Windows 10 > select Properties
Click on the Advanced System Settings link on the left> click on the Advanced tab > go to Settings under Performance frame
Check the Data Execution Prevention tab and then turn on DEP for all programs and services except those you want to add the Sims 3 executable file in the exception list.
7. Additional solutions
Try to delete all cache files and thumbnails
Run the game in compatibility mode with Windows 7 or even a previous version
There you have everything you need to fix the Sims 3 if it keeps crashing on Windows 10 and 11. If Sims 3 keeps showing there was an error during startup, check our detailed guide to fix it quickly.
Feel free to let us know the solution that helped you fix this issue in the comments below.
Performing regular updates on Windows 10 is crucial for your security and system stability.
However, sometimes there might be problems with certain updates and many users reported being stuck with Configuring Windows Updates 100% complete don’t turn off your computer message on their Windows 10 devices.
According to users, Configuring Windows Updates 100% complete don’t turn off your computer is displayed and they cannot access Windows 10 at all, as if the update process is stuck.
This is a rather big problem since you won’t be able to access Windows 10 at all, but there are few solutions available that can help you fix this problem.
There are many problems that can occur with Windows Updates, and in today’s articles we’re going to show you how to fix the following issues:
Configuring Windows Updates stuck, frozen, failed, hang, very slow – According to users, the Windows Update process can often get stuck or frozen. This can be a big problem, but you should be able to fix it with one of our solutions.
Configuring Windows Updates won’t finish – This is another common problem with Windows Updates. As users claim, it seems that the update process can’t finish at all.
Failure configuring Windows Updates endless loop – Several users reported that they were unable to install a specific update. According to them, they were stuck in an endless loop.
Configuring Windows Updates every time I turn on the computer – How do I stop my computer from configuring Windows updates? If that’s your question too, you should be able to fix it with one of our solutions.
Configuring Windows Updates restart loop – Sometimes users might get this message whenever they restart their PC. This can be a big problem since you won’t be able to use your PC at all.
Configuring Windows Updates reverting changes – This message can appear if a certain update can’t be installed. However, sometimes your PC might get stuck while reverting changes.
Configuring Windows Updates taking a long time – Many users reported that this process can take a long time. In most cases, it’s best to wait for the process to finish, but if waiting doesn’t help, you might want to try some of our solutions.
How can I get past the stuck Windows Updates screen?
1. Wait for the update process to complete
Configuring Windows Updates 100% complete don’t turn off your computer message is a normal part of every Windows update.
Sometimes it can take a while in order for the update to be installed, so it’s no wonder many users assume that the update process is frozen.
The simplest solution to this problem is to wait for the update to install itself. In most cases, the update process isn’t stuck so you’ll just have to patiently wait for a while before the update is completely installed.
2. Remove any USB peripherals
If you’re stuck with Configuring Windows Updates 100% complete don’t turn off your computer, you might want to try removing your USB peripherals such as your external hard drive, printer, even your USB mouse and keyboard.
Users reported that disconnecting USB peripherals successfully fixed their problem, so try removing your USB peripherals and wait for a few minutes for the update to finish.
You can read more about how a USB peripheral can block the latest Windows 10 update in this article. In some cases, it applies to other updates as well.
3. Turn off your device and turn it back on again
Users reported that this solution works with Surface Pro devices, but you can try it with your Windows 10 PC as well. Just hold the power button for a few seconds until your device turns off.
After the device turns off completely, press the power button again to turn it on. If something doesn’t go as expected or you hear weird noises, it’s possible that you experience some power supply issues.
Don’t know how to fix power supply issues in Windows 10? Check this guide and set things right once again.
4. Try accessing Safe Mode
After you turn on and turn off your computer a few times, you should see the Advanced Startup screen.
Enter into Troubleshoot > Advanced Options > Startup Settings and click the Restart button.
Once your computer restarts again, you’ll see a list of options. Press F5 to access Safe Mode with Networking.
If you manage to install the update in Safe Mode, you can just restart your computer and access Windows 10 normally.
It’s possible that your update process is frozen due to a bad driver or a third-party application, and that’s why it’s always a good idea to try to access Safe Mode. To access Safe Mode, follow the above steps.
If the issue isn’t fixed, you’ll have to repeat the entire process all over again and choose System Restore this time.
Wait for the System Restore to complete and you should be able to go back to Windows 10.
Few users reported that they have managed to fix this problem by performing Automatic Repair or System Restore. After you turn on and turn off your PC a couple of times, you should see the Advanced Startup screen.
Once you see that screen, you’ll need to apply the above steps. If System Restore isn’t working, don’t panic. Check this useful guide and set things right once again.
6. Check your RAM
If you get stuck at Configuring Windows Updates 100% complete don’t turn off your computer screen, it might be because your RAM is corrupt.
Try swapping your RAM in order to find the faulty module. This is an unlikely cause, therefore you should try this solution if all other previous solutions don’t work.
7. Update your BIOS
If the problem still persists, you might want to try updating your BIOS. We highly doubt that this issue is caused by outdated BIOS, but a number of users are suggesting BIOS update, so you might want to try it if all other solutions fail.
If your PC won’t start after a Windows update, you can take a look at this article to solve the problem easily.
BIOS update is an advanced procedure that can cause permanent damage to your PC if you’re not careful, so make sure to check your motherboard’s instruction manual for detailed instructions.
Enter Safe Mode by following steps from Solution 4.
When you enter Safe Mode, press Windows Key + I to open the Settings app.
Navigate to the Update & security section.
Click on Update history.
Now click on Uninstall updates.
A list of recent updates will appear. Now simply find and double click the update you wish to remove.
If you’re constantly getting Configuring Windows Updates 100% complete don’t turn off your computer message, the problem might be a problematic update.
Several users reported that they fixed the issue simply by finding and removing the problematic update. To do that, follow these steps.
After removing the update, check if everything is in order. If so, you might want to prevent the update from installing. To see how to do that, be sure to check our article on how to disable Windows 10 automatic updates.
Being stuck on Configuring Windows Updates 100% complete don’t turn off your computer screen can be rather frustrating, but keep in mind that your update probably isn’t stuck, and you’ll just have to wait a while in order for it to complete its installation.
If that doesn’t work, feel free to try any other of our solutions. If you have any more questions, leave them in the comments section below.
Using a VPN is one of the best ways to increase your security and privacy. However, most VPNs don’t provide any additional security features to keep your account secure. That’s why it’s important to set up multi-factor authentication (MFA) with your VPN provider.
The best way to stay secure is to ensure your VPN has multi-factor authentication. If a hacker gets a hold of your account credentials, they’ll still need an additional code that only you know to log in and access your data.
What is VPN MFA?
VPN MFA is a technology that allows you to use a second-factor authentication (2FA) with your VPN. This means that when you log in to your VPN, a code will be sent to your phone or email. You’ll need to enter the code before logging in.
Why do I need VPN MFA?
One of the main reasons why people use VPNs is to access the internet anonymously. Other reasons include:
Extra protection – It adds another layer of protection against malicious attacks on your devices and data.
Privacy – A VPN hides your real IP address, making it harder for third parties to track your online activities.
Prevent fraud – With a VPN MFA, you can also ensure that the person using your VPN is who they say they are.
Now that you understand how important VPN MFA is, you’ll need the help of third-party tools to complete the process. Below, we look at some of the programs that offer these services.
How do I enable MFA on VPN?
Sign in to your AD account (In this case Azure portal).
Navigate to Azure Active Directory and select All users.
Click on Multi-Factor Authentication.
Select the user(s) for whom you wish to enable MFA and click Enable.
It’s important to note that the steps will differ depending on the AD tool you’re using, but with these, you get a rough picture of how it should go.
For Azure users who want to fine-tune the settings and enable MFA on an application basis, you need to upgrade to the premium license that offers conditional access.
What are some of the Active Directory tools that support VPN MFA?
ADSelfService Plus is an online service that allows you to manage your account passwords and other important information. It provides a secure way to access your computer and network resources from anywhere.
With ADSelfService Plus, you can use your Windows credentials to connect to your VPN. You don’t need to remember any passwords or follow complex setup instructions. The easy-to-use interface makes it simpler for you to connect to your VPN.
Other features include:
ADSelfService Plus is compatible with the most popular VPN services
You can enable multi-factor authentication on a number of services including Gmail, Office 365 and Dropbox, etc
Easily manage multiple accounts
ADSelfService Plus
Get the best tool to manage your accounts and passwords and connect yo your VPN!
ADAudit Plus tool allows remote VPN control and access to the network. The solution also provides the ability to enforce MFA for users that are logging into their devices using AD credentials.
In order to enable MFA for your VPN users, you need to install the Authentication Activity Monitor module on the ADAudit Plus server and configure it in accordance with your requirements.
The Authentication Activity Monitor module allows you to monitor all authentication activity performed by your users against AD resources.
Other features include:
Customizable authentication method
Allows remote access
Can analyze authentication logs from any VPN solution
ADAudit Plus
Get seamless access to your network and the remote VPN control to get monitor all authentication.
Azure AD is built on top of Microsoft Identity Manager (MIM) and leverages its multi-tenant capabilities. It provides cloud-based identity management as a service to help you manage users across your IT environment, including in the cloud.
When you enable multi-factor authentication for Azure AD, users can’t sign in unless they have an approved device, such as a phone or tablet, registered with Azure AD.
If a user attempts to sign in from an unknown device or from an unapproved device, especially for virtual machines or RDP connections, they must verify their identity by entering their username and password along with a code provided by an authenticator app.
Other features include:
Integration with Microsoft services
Passwordless authentication
Identity protection feature to detect risky behavior associated with compromised credentials
No, VPNs are not the same as MFA (Multi-Factor Authentication). Virtual Private Network (VPN) is a technology that allows you to create a secure connection to another network over the Internet.
Companies often use it to allow their employees to access internal resources such as servers, databases, and email servers securely.
MFA stands for Multi-Factor Authentication. This is a security measure that increases the security of your data by requiring more than one method of identification.
In most cases, this means that you will need to use something other than just a password for verification, like a code sent via SMS or an app on your phone.
In the question of whether a VPN is considered an MFA, VPNs are similar to MFA in that they provide an additional layer of security and identity verification. However, they aren’t exactly the same thing.
Most people who use a VPN have it configured to log in automatically. This means that anyone with access to your computer can simply start up the VPN and begin using it for their own purposes, even if you’re not around.
But by setting up MFA on your VPN, you’ll make it much harder for someone else to log in without your permission.
You may also benefit from password managers especially if you easily forget your passwords. Better yet, you can easily set up VPN for Remote Desktop if you have a large team to manage.
We’d love to hear your thoughts on how you have been able to beef up security while using VPNs in the comment section below.
Apple Calendar is an invaluable app you can utilize via the iCloud service. As Calendar is an iCloud app, you can sync it with Microsoft apps.
You can access your Apple Calendar via the Calendar, Mail, and Outlook Windows 10 apps. This is how to access Apple Calendar on Windows 10.
How can I access Apple Calendar on Windows 10?
1. Sync Apple iCloud Calendar via Settings
Press Windows 10’s Start button, and then click Settings on the menu.
Select Accounts in Settings.
Next, click the Email & accounts tab shown directly below.
Press the Add an account button there.
Next, select iCloud on the window that opens.
Input your iCloud email address and login details within the required text boxes.
Then click the Sign inoption.
Press the Done button to confirm
Thereafter, click the Calendar app on your Start menu.
Click Get started on the Calendar app window.
Press the Ready to go button to continue.
You should see an iCloud checkbox on the left of the window. Now you can view and update your Apple iCloud Calendar within the Calendar app.
If you want to access Apple calendar on Windows 10 PC, you can do that by signing it with your iCloud account and the calendar should be added automatically.
2. Install the iCloud software
Open the iCloud MS Store page (linked below) in a web browser.
Press the Get button on that page.
Click the Open Microsoft Store button in the prompt.
Press the Get button within the MS Store app to download and install the app.
Open the iCloud for Windows app.
Then you’ll need to sign in to iCloud with your Apple ID & password.
Thereafter, select the Mail, Contacts, Calendars, and Tasks (with Outlook) checkbox within the iCloudwindow.
Select the Apply option to sync the Apple Calendar.
Next, open your Outlook software.
Click the Calendar button in Outlook.
You should be able to see an iCloud checkbox in Outlook. That checkbox must be checked for you to view your Apple Calendar in Outlook.
Open the iCloud page in a browser, and sign in with your Apple credentials from there.
Then you can click Calendar within iCloud to view and update it from your Windows 10 browser.
Alternatively, you can log in to the iCloud web app to access Apple Calendar in Windows 10 by following the instructions from above.
So, it’s pretty straightforward to sync and access your Apple Calendar on Windows 10. With the iCloud syncing, you can view and update your Apple Calendar across Windows, iOS, and Android mobile and PC devices.
Did you find this guide helpful? Let us know in the comments section below.
You cannot deny it, at least once you have dreamed of modifying your voice or accent. Some just want to make jokes to their friends or funnily imitate some special effects from movies, songs, or cartoons at home.
Others want to protect their privacy. Whatever the motivation, if you want to know how to change your voice accent, you’re in the right place. We reckon the easiest way is to use accent changer software.
So, is there an app that can change your accent? Let’s find out.
Is there a software that changes your accent?
Some users wonder if changing your voice completely is even possible with specific software. So you can try it on your own and see how effectively programs can modify your voice to not be recognized at all.
There are many services and programs that manipulate audio data to turn you into a completely different person. Let’s take a look at the different services that allow users to alter their voices and accents:
Adobe Premiere Pro – Get creative with integrated apps & services
Voxal Voice Changer – Excellent accent changer for calls
AV Voice Changer Software Diamond – Real time accent changer with voice beautifying features
MorphVox – Accent stripping software with live vocal visualization
Viscom Voice Changer – Best accent voice changer for recordings
Regardless of intention, this capability can be helpful in certain situations. If you truly need to keep your identity protected, there is no better way to do so than by using a voice changer program.
Adobe Premiere Pro is one of the most popular video editing software with robust audio-oriented features.
The program has AI-driven instruments that allow you to edit your audio files in several ways, even in the post-production phase. With the Mastering tool, you can increase or decrease the ceiling of your sound, while the Lowpass option lets you muffle sounds with a simple click.
Other tools offered by Adobe Premiere Pro you can use to sound like someone else are the Surround Reverb effect, the Balance option, which creates the illusion that sound is coming from multiple directions, as well as DeNoise, a tool designed for noise reduction.
So use the Mastering tool along with other features such as surround reverb effect or balance options to completely change the sound of your input file.
You can even sample music on Adobe Stock and get creative by using other integrated apps and services.
Adobe Premiere Pro
Edit each vibration of your audio file to make voices sound different using Adobe Premiere qualitative services.
The second item on the list is Voxal Voice Changer, a software that in the name immediately specifies its goal. This is one of the best applications on the net, also because it is available for free.
The program has a friendly user interface, making use of the software child’s play. In fact, as with any type of application, having a good user interface is crucial, as it will save the user time in learning essential functions.
Voxal Voice Changer is a tool that allows you to change the voice within games, music, or any other platform, allowing you to set the tone and volume of your voice.
The only thing you need to make this application work is a microphone connected to your PC. Once you have opened the program and set your desired tone, all the items played from your computer will have the same change.
The various values that can be changed through the equalizer are volume, tone, bass, frequency, and mono or stereo output.
With Voxal Voice Changer you can have a laugh by playing a prank on one of your contacts. It can also be useful if you want to create a tutorial or publish any video on the Internet while maintaining anonymity.
The program works in real-time, which means you can edit the voice as you speak. This is obviously an excellent aspect that will allow you for example to make live calls with the modified voice. In addition, the app allows you to edit recorded messages.
If you thought this software could only distort the voice or something like that, you’re wrong. Voxal offers a fairly varied list of options for editing the entry.
We find the classic choices of changing the tone, for a slight adjustment of the natural voice, but we can also indulge in advanced options.
Users can, in fact, change their voice from male to female and vice versa, but also take the voice of a robot or an alien.
Voxal Voice Changer
Connect your microphone and change your voice in real time with bass, frequency, tone, equalizer settings, and more.
AV Voice Changer – Real time accent changer with voice beautifying
This accent changer software has many options that allow you to alter voices for all different kinds of purposes. You can change your output voice in real-time, while on an online call, but you can also edit pre-recorded materials.
It can be used for professional audio editing as it is able to improve the audio quality of your files and remove background noises.
On the other hand, depending on the results you want, you can also add background sounds and effects, they have dozens of options you can choose from.
You can cut/split/crop and apply effects and other essential editing operations on your audio files.
The advanced settings allow you to play with pitch and timbre control. For a simpler and faster experience, you can pick one of the preset voice settings. There’s also a voice beautifying feature.
The software can also be used for less serious purposes, as they provide parodic voice presets that allow you to change your voice into a funnier and less realistic sounding replacement.
AV Voice Changer Software Diamond comes with a voice recorder option. An interesting thing you can do with your recorded files is voice analysis. The software gives you details about pitch and timbre based on the file provided.
AV Voice Changer Software Diamond
Use advanced voice morphing features like pitch and timbre control to change your voice and create great audio content.
MorphVox – Accent stripping software with live vocal visualization
MorphVox follows a fairly simple principle, the person using this software will usually have three different tones of voice: man, woman, or child.
Based on this small principle, MorphVox provides the same main options for modifying the voice as previously seen, to deceive or induce someone to think of talking to a person of different sex or age.
Morph Vox can be used during live conversations, which makes it a great choice when you need to have a different voice for a particular phone call.
Morph Vox should be used for comic or entertainment purposes compared to professional use, but the software will still do a good job of changing the user’s voice based on the settings chosen.
In addition, the presented solution comes with intelligent features that add extra value. You can try backgrounds to insert traffic noises or mall background noises, performant voice-changing algorithms, live vocal visualization, and so on
On top of that, new functionalities will bring more value due to voice comparison and analyzing pre/post graphic equalizer, or powerful noise reduction.
Thereby, you can use this tool for enjoyment with your friends or for different purposes like identity safety. Either way, such a resourceful solution will deliver your voice-changing needs.
Voice Changer has its pros and cons, its use depends on what you want from your accent changer software. For example, it may not be a bad thing for everyone, but it is possible to change the voice-only on pre-recorded files, so not in real-time.
That being said, Voice Changer integrates a wide range of options and tools for editing pre-recorded files.
Unfortunately, Viscom Voice Changer offers support only for three audio formats: WAV, WMA, and MP3. It is true that these are the most used audio formats. But it would have been nice to have a wider variety of accepted formats.
Viscom Voice Changer allows you to choose from a wide array of voice editing options. The most basic option is to change the tone of the voice.
Nevertheless, this is present in its most advanced form, along with other effects to adjust the speed and frequency of the audio.
As mentioned above, this software only works with pre-recorded audio files. This means that if you need to change the voice during a live call or any type of real-time recording, you’ll have to take a look at the software mentioned above.
As you can see, you have more than one option if you want to modify your voice. Let us know which one you used from our list or if you have any other suggestions. Feel free to use our Comments section below.
The HDMI output port on the Raspberry Pi is compatible with the HDMI port of most modern TVs and computer monitors. But, many reported getting a No signal error or Missing HDMI output message on the monitor when connecting Rasberry Pi.
Raspberry Pi 4 works with either a micro HDMI-to-HDMI cable or a standard HDMI-to-HDMI cable plus a micro HDMI-to-HDMI adapter to connect to a screen. Raspberry Pi 1, 2, and 3 use a standard HDMI-to-HDMI cable.
So, let’s find out what you can do if the Rasberry Pi HDMI is not working.
Why is Rasberry Pi HDMI not working?
Here are a few reasons Rasberry Pi HMDI is not working, and you are facing display issues:
Power issues: A common problem that results in the issue is insufficient power. Though it’s enough to run the Rasberry Pi, it won’t power the HMDI connection.
Improper connection: In case the cable has not been plugged in properly at both ends, you may encounter issues with the HDMI connection.
Problems with the HDMI adaptor: Several users pointed out that their HDMI adaptor triggered the problem.
How do I force my Raspberry Pi to HDMI?
Before trying the slightly complex solutions, here are a few quick ones that did the trick for many:
Make sure the HDMI cable is properly plugged in at both ends. A simple trick is to remove the cable, blow air into the port, and then reconnect it.
Verify whether the SD card is connected right. Though the lights may turn on, there still might be issues, and you will have to verify that manually.
If you are using an HDMI adaptor, check if it works with other devices because often, the problem lies with it, and replacing the adaptor seems to be the only viable solution.
1. Force HDMI display
Insert the SD card into another device and open the boot/config.txt file with a compatible reader (nano or vi).
Look for the following two lines: #hdmi_force_hotplug=1#hdmi_drive=2
Remove the # at the beginning of each line.
Save and remove the SD card.
Mount the card in the Raspberry Pi, and the monitor should work.
If you’re using a classic monitor, not a TV monitor, you can leave out the line hdmi_drive=2.
Additionally, if the above steps didn’t work, repeat them, also removing the # from the following line: #hdmi_safe=1. This is only an alternative, as this might also affect the display quality.
This second solution can also be done directly on the Raspberry Pi, but you have to connect to the device via SSH. The modifications are the same.
2. Change the HDMI mode
Several users also reported that an incorrect frequency could lead to Rasberry Pi HDMI not working. Choosing a value between 30-60 usually works. There’s a table available in the official Rasberry Pi documentation that helps choose the right HDMI mode.
For some users, choosing 16 worked, while others managed to get things up and running with 75. Check which works for you by editing the boot/config.txt file.
VLC is a popular open-source media player that supports nearly every file format and can also stream IPTV through M3U links.
We’ve used VLC for years, and it remains a go-to for streaming TV. Setup is easy, and once you enter your IPTV URL, you’ll have access to your channels with minimal fuss.
Its open-source nature ensures regular updates and improvements.
Zoom Player Max is a feature-rich media player that’s known for its speed and customization.
We appreciate the simplicity in adding IPTV channels using M3U playlists. The lightweight interface and fast performance make it ideal for those who need a quick solution.
However, it lacks a built-in EPG, which could make channel navigation more difficult.
In this article, we explored some of the best options for watching TV comfortably using your own PC. Remember to protect your privacy while watching your favorite shows with the best VPNs on the market.
Moreover, there are a lot of great tools that will enhance your IPTV experience. We recommended the best products throughout the article. Now that you have the proper software, why not take a look at the best IPTV providers for the UK and pick one for you?
Let us know what you chose from this list in the comment section below, and don’t forget to tell us if we missed anything!
If you ever wanted to run another operating system on your computer besides Windows 10, you can do that by using virtualization software.
Virtualization and virtual machines can be extremely useful to any advanced user. As you already know, you can have two or more operating systems on your PC. This is called dual boot and to use it, you need to have a dedicated partition for each operating system.
This isn’t an issue if you’re using two operating systems, but sometimes you need to use multiple operating systems simultaneously. In that case, dual boot isn’t the best option, but you can solve dual boot limitations by using virtualization software.
How does virtualization work?
Instead of creating a new partition and installing a new operating system on it, you can install a new operating system in a virtual environment. By using virtualization software you can create a virtual hard drive and use it to install any operating system or software on it. This can be extremely useful if you’re developing an application and you need to test it on different platforms.
On the other hand, you can also use virtualization software if you simply want to test a new operating system, such as Linux, without fear that you’ll cause any problems with your current Windows installation.
Since this new operating system is stored on a virtual hard drive, it can’t affect your operating system in any way. This means that any changes to the new operating system won’t affect your main system at all.
It must be mentioned that virtualization software can be quite demanding on your PC in terms of hardware since you’ll run two operating systems on the same device.
Now that you’re familiar with virtualization, and how it works, you’re ready to explore the best virtualization software for Windows 10.
What is the best virtualization software for Windows 10?
Parallels is one great option to switch between various operating systems while using the same device, so without physically switching between devices.
The tool works with OS X, Windows 10, 8.1, and 7, Linux and Unix, and macOS Server; it supports Office 365 integration, and Bluetooth pairing for USB, USB-C, Thunderbolt, and FireWire devices.
If you’re worried about resources, Parallels comes with a CPU usage indicator, to show you exactly where each OS stands.
However, even with the basic Pallalels Desktop tool, you get some useful features to optimize the use of multiple OS:
Automatic Disk Space optimization.
Retina display support for smart resizing and independent screen resolutions for separate displays.
Real-time virtual disk optimization.
Touch Bar support, for instant access and customization.
Over 30 one-touch tools with Parallels Toolbox, which is included in the main plan.
Parallels
This app is the easiest way to switch between your PC and Mac without rebooting or changing devices.
VMWareis the leader in terms of virtualization software. The company offers various high-quality products, each with a wide range of features.
VMware Workstation Player
If you’re looking for simple virtualization software, you might want to consider VMware Workstation Player. This is free software, and you can download and use it without limitations for personal and non-commercial use.
It has a simple user interface, and you can easily create a virtual environment for your new operating system. VMware Workstation Player offers the most basic options: you can create a new virtual machine or open an existing one, and customize the resources each is using.
With VMware Player, you should be able to run almost any operating system. Unfortunately, this application doesn’t offer any advanced features such as snapshots or virtual network managers in the free version.
VMware Workstation Pro
VMware Workstation Pro fully supports vSphere, ESXi, or Workstation Pro servers. In addition, it allows you to control virtual machines remotely or to transfer virtual machines from and to vSphere environments.
Another great feature of Pro is the snapshots. You can easily revert to the previous version of the virtual machine. This is extremely useful to developers that are testing new drivers or software in a virtual environment. If any issue appears on the virtual machine, simply go back to the previous snapshot and the problem will be fixed.
It’s worth mentioning that the Pro version can work with 4K resolutions and displays. In addition, there’s support for multiple monitors with different DPI settings. You can also protect your virtual machines in the Pro version.
If you’re using a virtual machine for your work, you can encrypt it and protect it with a password. You can also disable certain actions in a virtual environment such as drag-and-drop and copy-paste. In addition, you can also disable support for USB devices thus making your virtual machine safer.
VMware Workstation Pro also supports sharing, and you can use it as a server and allow your colleagues to access virtual machines. If you need to quickly create a copy of your virtual machine, you can do that in just a few steps. The application also offers high-performance 3D graphics, and it supports DirectX 10 and OpenGL 3.3.
All your VMware Workstation Pro virtual machines can work with other VMware products. There’s also support for open standards thus making VMWare Workstation Pro fully compatible with virtual machines made with other tools.
Lastly, VMWare Workstation is simple virtualization software for beginners and home users that comes for free. It doesn’t offer many features, so it’s perfect for first-time users. By comparison, the Pro version offers a wide range of features, so it will be perfect for any professional or advanced user.
VMware Workstation
Try now this top choice for running multiple operating systems as virtual machines on a single Linux or Windows PC.
V2 Cloud is a web application that offers distinctive virtualization services, providing cloud desktop services to help everyone manage their desktop remotely at any time.
This software isspecifically designed for managers, business owners, or employees to help them create a virtual desktop for more reliability and safety for essential information.
Using this simplified Desktop as a Service platform, you will benefit from a management console dashboard that includes cloud resources, users controls or billing, security settings, and so on
Plus, you have full admin rights within a single pane and manage all your virtual machines in the dashboard without earlier training or knowledge.
In addition, it has multi-user desktops based on Windows Server OS that sustain up to 250 users on each virtual machine. With all users having a private desktop and folders but in the same virtual machine.
Published application features let you show Windows programs to an end-user on their browser without sharing the entire desktop, which can be of great help to coworkers or managers.
It’s worth mentioning that V2 Cloud is available on the web for cloud desktops on the go and directly on your desktop. Plus, you can download it on your mobile for both Android and iOS systems.
V2 Cloud
Achieve maximum freedom with this virtual machine and run your desktop regardless of location using V2 Cloud.
If you’re looking for virtualization software, VirtualBox is a also great place to start. This is a powerful x86 and AMD64/Intel64 virtualization tool, and it will be perfect for both basic and professional users alike.
Unlike many other virtualization tools, VirtualBox is completely free. As a result, it’s perfect for first-time users that are just getting familiar with virtualization.
It’s worth mentioning that this tool is available on a wide range of platforms, and it will also work on Linux or Mac without any issues. Regarding the supported operating systems, you can run a wide range of operating systems using VirtualBox.
The list of supported operating systems includes almost every version of Windows and Linux. This means that you can create a virtual machine on Mac or Linux and use it on your Windows 10 PC without any problems.
It’s worth mentioning that VirtualBox also supports Open Virtualization Format. As a result, you can run virtual machines created by other virtualization software using VirtualBox.
Unlike some other tools, VirtualBox doesn’t require hardware virtualization, so it can run on older hardware without issues. While some tools require processor features such as Intel VT-x or AMD-V, VirtualBox can work on almost any hardware.
This tool supports various additions that allow seamless integration between your PC and virtual machine. There’s mouse pointer integration, and thanks to this feature, you can use your mouse seamlessly between your PC and virtual machine.
In addition, there’s support for the Shared folders feature that allows you to share files between the virtual machine and host operating system easily.
Another great feature that VirtualBox offers is a seamless window feature. Using this feature you can show open windows in your virtual machine side by side with windows from your host machine.
VirtualBox also supports Time synchronization with the host, automated logins, and a sharedclipboard which allows you to copy data between two operating systems easily.
You also get a VirtualBox Remote Desktop Extension feature to remotely access any running virtual machine. This feature also supports various USB devices, which means that you can connect a USB storage device to the host computer and access the files on a remote virtual machine.
As you can see, VirtualBox is perfect for both basic users and professionals. This tool offers a wide range of features, and since it’s completely free, there’s no reason not to try it.
If you’re looking for virtualization software but you don’t want to download and install any third-party applications, you might want to check Hyper-V.
This virtualization software was made by Microsoft, and in fact, can be used only with Windows 10 Enterprise, Pro, or Education.
Hyper-V isn’t enabled by default on Windows 10, and if you want to use it, you need to enable it first. This is rather simple and you can do it by following these steps:
PressWindows Key + S. Select Turn Windows features on or off.
Locate Hyper-V option and enable it.
ClickOKto save changes.
Wait for a few moments while Windows installs the necessary components.
Now that Hyper-V is enabled, you can start it and create virtual machines with ease.
Note: If you can’t enable Hype-V for any reason, follow the steps in this helpful guide to fix the situation.
The application requires an x86 or 64-bit processor. More importantly, Hyper-V requires hardware assistant virtualization support. This means that you need to have a processor that supports Intel VT or AMD Virtualization features.
Regarding memory, Hyper-V requires a minimum of 2GB of RAM in order to work.
Hyper-V supports a wide range of operating systems, including both Windows and Linux. However, some Linux operating systems might not run properly on Hyper-V.
In terms of cons, certain audio issues might occur while using Hyper-V. Also, the app doesn’t support optical drives in a virtual environment, which means that you won’t be able to burn or play optical media on the virtual machine.
So these were our recommendations for the best virtual machines. Using one of the software options presented above will allow you to run various operating systems besides the main Windows installation.
Moreover, a lot of interesting recommendations and tutorials can be found in the Virtualization Hub on our website. To make the most of the apps and tools you use in your digital life, you have our Software page.
If you have alternative software suggestions, feel free to comment in the section below.
One of the most crucial elements in our laptops is the battery life, and we usually carry our chargers everywhere to avoid something unpleasant.
Most users’ darkest fears revolving around their laptops are the fact that they could remain without battery or that some horrible issue regarding the electricity might come up or that maybe the charging source of their laptop will get broken somehow.
How to become more aware of the laptop’s battery status
We bet that at least once you too may have felt the horrible creeping feeling of fear when you thought that your notebook would run out of battery at crucial times when you really need it the most.
Another annoying issue is the fact that some laptops after you have used them for a year or two, begin to loosen their performance and the battery won’t last longer than two or three hours.
We can, unfortunately, be less informed than we should about how good our laptop’s battery really is. We might assume the fact that it’s working just fine only to end up noticing that it reached the end of its usable life and we must replace it.
Windows doesn’t exactly offer you much info on your battery, and the most you will usually be able to get from the OS is an icon in the system tray, a charge percentage, and the remaining time before it is completely discharged.
Other than these details, the laptop battery status or more advanced and detailed information is pretty much non-existent. Windows is not able to give you any idea on why your battery is not holding a charge for as long as it should, for instance.
It will not be able to tell you if it is starting to show signs of wear. On the other hand, lots of laptop batteries will actually have more info to share than Windows decides to show you, and this means that all the details we told you about above are there, but you can’t reach them.
Fortunately, there are a few solutions that provide us the opportunity to extend our laptop’s battery life so that it will be able to last for more time. So, what you need are these third-party utilities to get a hold of this extra information from your laptop’s battery.
The tools included in the list below will make sure to help you remain on top of your notebook’s battery life. They will make sure to help you avoid having any potential nasty shock by becoming very aware of all the changes of your battery’s capacity over time.
They can also monitor the wear that the battery is bound to endure with any kind of heavy use.
We guarantee you that by taking these parameters into consideration, you will definitely be able to get the most out of your battery and enhance its overall lifetime. Here they are:
What are the best tools to monitor your laptop’s battery?
All of us want more battery life without having to plug the laptop all the time. This is where Battery Optimizer comes in. Via its advanced scan, battery life is able to be managed through simple optimization techniques.
The Battery Optimizer can also save and load profiles for all given situations. It is critical to get the most battery life when you are away from an outlet, and this tool is developed to do this perfectly.
This is a very easy-to-use and lightweight software that should work with no issues even on lower-end laptops. The user interface is simple and provides information about each feature included in the software, so you won’t have to go elsewhere for further clarification, it’s all in one place. Battery capacity decreases over time. Inevitably, at some point, you may have to remove your battery, but you can use this software to make sure that you take good care of your battery.
You can set the battery optimizer to notify you when the usage of your battery increases over a certain level, so you can take action immediately.
On top of that, after each battery scan is complete, you will get personalized recommendations that will help improve your specific battery issues, if any are found.
Other key features include:
Accurate estimates of battery life
Usage reports
Shows the time left when the operating system doesn’t
This software is compatible with Windows operating systems, starting with Windows Vista. It is available in multiple languages. You can buy a license or use the free trial version.
ReviverSoft Battery Optimizer
Monitor the work and extend the life of your laptop’s battery with the help of this great software utility!
IObit Advanced System Care is developed by one of the world’s leading software companies when it comes to generally taking care of PCs.
They have great river updaters and uninstallers, and now we will be showcasing their PC optimization tool.
IObit Advanced System Care perfectly balances out an efficient tool with an understandable interface, as all you need to do is click a few buttons to know everything there is to know about your PC, and also take care of it.
The same applies to your battery if you are using a laptop, and the software will also provide you with the necessary tools to also use it in a more efficient manner.
The software has an Economy mode function. When you activate it, it automatically sets your PC for high performance and minimal battery consumption. This can prolong your battery life in the long run and also extend the time it stays charged.
IObit also includes multiple speed optimization features that can help with RAM usage, optimize startup programs, manage your drives, and many more.
Other key features include:
Anti-data theft security features
PC cleaning utility
Browser optimizer for increased speed
IObit has a free trial version that can improve internet and PC speed. It also comes with premium plans that include additional features for maximum protection.
IObit Advanced System Care
Make sure that your PC is running at full capacity while maintaining healthy battery usage.
AIDA64 is the go-to benchmark tool for pretty much anyone using any type of machine, from the common user with a simple laptop to an IT expert that is using a powerful workstation.
However, we will be focusing on the first scenario, since among the many benchmarking and hardware diagnostics tools, all versions of AIDA64 also come with a battery monitor.
This allows you to use in-depth details about your battery’s maxim capacity, current status, use percentage, foreseeable lifespan, and more.
Thus, by adjusting your themes, power plans, and other power-consuming features, you get live feedback on how to extend your battery’s lifespan in the long run.
This software has reportedly one of the most accurate hardware detection rates. It has a hardware database of over 200 000 entries.
It provides very in-depth reports regarding your device’s performance. It offers information about your installed software, security apps, Windows settings, as well as hardware configuration.
Other key features include:
64-bit benchmarks
Software audit
Sensor panel
Supports external displays
Available in multiple languages
Aida64 is a licensed software, but it provides a free trial that you can use to test all its features.
The next entry on our list is yet another software tool that has the general purpose of taking care of your PC and laptop so that they can run better for a much longer time.
Besides the common features that you would expect from a PC optimization tool such as the RAM manager and the memory cleaner, Reviver Soft Total PC Care also comes with a battery monitor.
Not only do you get vital information about your battery, but you also get hints, suggestions, and even some tools that can help you extend its lifespan, or at least increase the time that you can work with it on a single charge.
More so, the tool is incredibly easy to use, so you don’t need to worry about not having any prior experience using such tools.
This utility has many additional features besides the battery monitor that can also help you with everything your device needs, including security, disk management, and more.
It can also help with registry problems. It scans your whole Windows registry for issues and has the tools necessary to repair, maintain and optimize your registry.
On top of that, it includes an installer utility that will scan and help safely install any new application. It can detect any suspicious activity in the installation software, and blocks intrusive, unwanted software.
Other key features include:
Driver management and optimization tools
Disk optimization
Privacy and security features
This is a licensed-based suite that includes all tools you need for a well-optimized and secure machine.
The first in a long line of PC and laptop optimizers is Iolo System Mechanic.
Just like the following entries, this tool provides you will all the necessary features that you could ever need to either unlock the full potential of your hardware in terms of power or manage it in a way that will give it a long-lasting life.
Since any laptop owner knows that the battery is the Achilles’ heel of the device, it goes without saying that Iolo System Mechanic caters to it as well.
The UI looks very modern and minimalistic, and all you need is basic knowledge of the English language in order to use this tool.
This comprehensive package includes the System Mechanic performance optimization tools that test and optimize PC boot time, your download speed, CPU usage, RAM memory, GPU (graphics card), and drivers. These can improve your PC’s performance and prolong your battery life.
On top of that, when it comes to security, the System Mechanic has you covered with the System Shield function. This is a powerful real-time antivirus and anti-malware utility that detects and removes all threats.
System Mechanic Ultimate Defense comes with additional protection and privacy features, including the Malware Killer which is an on-demand malware removal tool, the Privacy Guardian which secures your browsing activity, and a file recovery tool.
Other key features include:
Password manager
Drive wiping technology
Identity theft protection
Automatic cookie cleaner
System Mechanic Ultimate Defense
Take full control of your system, make it run as if it were brand new, and extend the life of your battery with the help of this reliable tool!
BatteryInfoView is a straightforward tool that provides enough battery information in a very lightweight package. The utility is a tiny freeware that will simply offer you information that is essential about your laptop’s battery.
It will be able to do this is a very simple format, and it’s split into two main components.
The first part of this tool is a screen that presents information such as the current capacity of your battery and also its wear level.
The second component is an ongoing log of the bare essentials including voltage, rate, capacity value, power state, and capacity.
All these parameters are tracked as frequently as you choose them to be and they can be exported as a text file to act as a lasting record of your battery’s performance.
Other key features include:
Search tool
Save reports in txt, csv, html or xml format
Customizable battery settings
This particular tool was definitely designed to focus on function, and the result is a very useful tool that does its job without much fuss.
Battery Status Monitor works as a little floating widget that you will be able to drag to anywhere on your desktop. It will offer you a bar and the percentage of the charge status of your battery.
All you have to do is to right-click on thewidget, and you’ll gain access to more options such as changing the power scheme,hibernating, standby, and a very useful option of quickly turning the laptop screen off.
The tool is very handy to save a bit of your battery’s life when you leave the computer for a minute or two.
This is a very lightweight software that can run in the background without taking a toll on your laptop’s performance. It is compatible with Windows operating systems starting with Windows 2000.
The battery status monitor offers reports about your battery charge level, the remaining time, and charge rate.
When your battery is completely charged, the software will display a notification that lets you know you can unplug the charger.
Other key features include:
Critical battery-level notifications
Capacity display unit in mWh or mAh
Customizable battery optimization settings
This is a free Windows utility with minimum CPU usage.
BatteryMon will present the battery capacity and its discharge rate as a graph. Over time, it’s only natural that your laptop’s battery will begin to diminish and there are all sorts of factors that are contributing to this process.
This is why it’s imperative that you stay aware of any occurring changes. BatteryMon will do exactly this in the easiest way possible by monitoring your laptop’s battery capacity and its discharge rate and by presenting the results in a graph in real-time.
It’s a very simple way to find out all the necessary info regarding the health of your battery and to track it over time.
You have the opportunity to set this to display as a small widget on your screen, or you can just choose to set up email notifications in case a particular parameter reaches a predetermined milestone.
Other key features include:
Keeps a log file of all battery reports
Supports systems with multiple batteries
Low CPU usage
By using this tool’s logging functionality for keeping records of your battery’s performance, its current capacity will be able to be compared to the data that has been collected in the past.
This is exactly the reason why it’s best if you start using the tool early in your battery’s lifespan.
Laptop Battery Savercan extend your battery’s life two times, and it performsadvanced scanson your system, taking care of the battery’s efficiency.
The Battery Saver is very easy to use, and once you launch the tool, it will automatically manage and optimize the system to get maximum performance with the greatest power.
This software includes RAM optimization features that will help your device run faster. On top of that, it includes laptop temperature optimization that will decrease laptop temperature, thus having a positive impact on your battery as well.
It is very easy to use as it displays all battery-related settings in a minimal window. You can use it to adjust screen lighting, monitor RAM usage, and more. It has an additional info feature that will provide more in-depth information about the status of your device.
Other key features include:
Real-time temperature reports
Easy configuration
Starts automatically when you turn on your laptop
The battery saver is a very lightweight solution that can prolong battery life and also optimize your PC for better speed. It is compatible with Windows operating systems.
BatteryCareis a free tool that will be able to help you recalibrate your battery gauge through international discharge cycling. In order to keep your battery working at its best possible performance, it is very important to understand the best practices regarding discharge.
More experts suggest the fact that you shouldn’t let your battery drain completely, as this can cause long-term damage. Instead, you’re advised to let it drain only partially and to recharge more frequently.
On the other hand, this kind of cycling might sometimes make it difficult for the battery’s gauge to keep track as accurately as possible of how much energy it’s storing.
This can lead to inaccurate battery readouts. This tool is designed to address this particular problem, and it will also be able to offer more info about the battery and its capacity.
Other key features include:
Automatic power plan switching
Automatic updates
Lightweight
Optimizes graphics settings for increased battery life
If you charge your battery completely and then drain it to the lowest safe level, you will be able to recalibrate its gauge and ensure accurate readouts.
You’ll notice thatPowerPanel Personal Editionis included in many CyberPower UPS products. The tool will allow you to control and monitor the use of UPS so that it can keep the system as safe as possible along with all the data, the components, and the peripherals.
The most important features of this particular tool include self-testing, runtime management, event logging, and also scheduled shutdowns.
This utility lets you make customizable power settings. You can use it to configure an automatic shutdown in case there’s a risk of data loss or power events. You can also schedule when you want to shut down or restart your computer.
The reports provided by this software include information about input voltage, runtime, battery charge, and current status.
On top of that, it offers alarm settings, self-testing features, and many more.
Other key features include:
User-friendly interface
Fast and simple installation
Can display system tray notifications
PowerPanel Personal Edition is a free software that is compatible with Windows operating systems.
BatteryBaris a lightweight toolbar utility that offers fast access to necessary battery info. Your laptop’s battery already contains a battery icon, but this will only share a minimum amount of info.
The tool offers an acceptable compromise by delivering the most significant figures on the spot without taking very much space on your screen and also without hogging your resources.
If you click on the battery icon, you will be presented with valuable data such as the level of wear that your battery has already endured and its overall capacity.
The software displays information regarding the levels of your battery. You get both time remaining and percentage reports.
It can also report on the discharge/charge rates and the capacity of your battery.
The software is highly customizable. You can pick exactly what information you want it to display/hide and what type of notifications you prefer: audio alert, popup notifications, or even both.
The battery bar informs you when your battery is running low and when it is completely charged.
Other key features include:
Power saving options
Multiple languages
Separate battery profiles
The basic version of this tool is free, but you can also pay for the Pro version that is available, and which adds all kinds of customization options. Both variants are great ways of getting the most important battery info quickly and without much hassle.
MSI Battery Calibration needs users to have Windows 7, Windows 8, or Windows 10 installed on their system to work properly. The MSI Exclusive ECO Engine power management tech provides great flexibility for the laptop’s battery.
The setup package will generally install about three files, and the program is usually about 667,3KB. It is very popular, especially in the U.S. and France. The tool is targeted at increasing the battery’s life.
This software scans and monitors your battery and displays reports about the current power level, overall capacity, and battery condition.
It can detect if your battery has physical damage, and it can also inform you if your charging system doesn’t work properly, thus draining your battery quicker than normal.
MSI Battery Calibration has a simple user interface with easy-to-understand controls. It runs in the background and it can be accessed from the system tray.
Other key features include:
Battery consumption rates of specific apps
Highly customizable
Power saving settings
Keep in mind that this utility only works on laptops and notebooks manufactured by MSI.
Battery Logger logs your battery’s percentage, and it will help you diagnose bad batteries it will also tell you how your laptop responds to battery behavior.
The app is designed to start with the computer and to record the evolution of the battery’s charging level. It’s also able to predict the total amount of supply of your battery. It’s very useful for diagnosing bad batteries.
You can get an overtime graph that shows the progression of your battery level.
The software informs you about the discharge/charge rate, the full capacity of your battery, and more.
Battery logger supports systems with multiple batteries, providing individual reports for each of them.
Other key features include:
Lightweight
Easy to use
Can be installed on 10 devices with 1 account
This software is compatible with Windows 10 version 10230.0 or higher.
Windows 10 Battery Saveris a built-in battery tool for the Windows 10 operating system. In case you’re running this latest version of the OS, you will get access to a new battery tool that was amongst the new edition of the OS.
You can access it by opening the Settings app. You will then have to go to System > Battery Saver > Battery Saver Settings and here you have to tick the box and select the desired battery level for the function to start working.
The tool was initially introduced for the Windows Phone, and it limits the background processes on your device in order to make sure that you can get the most out of your battery.
You will be able to turn it on whenever you want to but to make sure that it won’t impede your PC’s performance, it’s best if you save it only for situations when you might run out of power.
This integrated utility helps with basic power settings including screen brightness, battery saver mode, and more.
A very useful feature of this Windows app is that it gives battery usage reports for each app your run. You get a list view that shows the usage percentage of each app, starting with the app that uses your battery the most.
You can get a 24-hour battery usage report or a weekly report. This feature can help you understand what apps take the most out of your resources and help you optimize the way you use your PC for better battery life.
First things first – what is a Protected View? Protected View is a read-only mode enabled for Microsoft office documents downloaded from the internet and other potentially unsafe sources.
For instance, when you open the document with an embedded tracker, Protected View will display a message showing the document to be unsafe. The document in View-Only mode will not load or download any images to reduce risk.
Should you choose to enable editing and let the image load from the sender’s server the tracker will leak the following information from your PC: your IP address, browser, as well as OS and MS Office version.
Aside from the Web tracker method, there are also SMB Injection attacks. This time, the attacker will use UNC File path specification instead of HTTP file reference to reduce suspicion.
When Word tries to authenticate the connection, the responder on the attacker’s server will steal your credentials.
Why is my Word document opening in Protected View?
The file was opened from an internet location – Your file will open in Protected View if Microsoft Office determines the file to be opened from an internet location.
Outlook file from an unsafe sender – Microsoft Outlook will open an Outlook attachment in Protected View if your computer policy has defined the sender as unsafe.
To reduce the risk of malware attacks from Internet files, Word opens the document in Protected View. This way you can view the document while reducing the risk.
So, unless you made the necessary modifications, MS Word will (and should) open unsafe documents in Protected View by default.
However, the feature can be bothering. Some users even complained that occasionally, Word gets stuck when opening in Protected View.
Don’t worry, we will show you how to turn off Protected View in Word 2007, 2016, 2019, or 365, without any password.
How do I turn off Protected Mode in Word?
Open Word and click on the File menu.
Next, choose Options and select Trust Center.
Open the Trust Center options and select ProtectedView.
Uncheck all three options listed to disable Protected View.
Finally, click OK to save the changes.
Next time you open any Word document, Protected View will not screen the document for security issues. However, only disable Protected View if you trust the document and the source.
Alternatively, you can also disable Protected View in Office via the Registry. The process is fairly similar for all the Office apps, Word, Excel, PowerPoint, and so on.
To do that, simply open the Registry Editor and navigate to this path: Computer\HKEY_CURRENT_USER\Software\Microsoft\Office\Word\Security\ProtectedView
In the right pane of the editor, you should see 3 values: DisableAttachementsInPV, DisableInternetFilesInPV, and DisableUnsafeLocationsInPV.
Set each value to 1 to disable Protected View in Word.
⚙️ How to work with Protected View in Microsoft Office
Protected View for Microsoft Office apps offers three core settings as listed below:
Enable Protected View for Files Originating from the Internet
Enable Protected View for Files Located in Potentially Unsafe Location
Next, enable Protected View for Outlook Attachments
You can click on Enable Editing to make changes and load other content of the document like images from the Internet.
1. Reenable Protected View for Trusted Files
Open File > Options.
Trusted Center > Trusted Center Settings.
Open Trusted Documents.
Click on the Clear button to Clear all Trusted Documents so that they are no longer trusted.
Now all the files that you had enabled editing for will open in read-only mode.
If you want to reenable Protected View for the document that you may have bypassed earlier by enabling editing, follow the above steps.
Here you can add or remove the path to folders that you want to be included in the Trusted Location.
Files and folders from Trusted Location will open without bumping into the Protected View mode.
Protected View in Microsoft Word is a security feature that protects you from accidentally opening potentially harmful files that come embedded with malware or even trackers.
This is how to turn off Protected View in Word. However, make sure that you reenable it once you are done working with the documents.
Website builder software for Windows enables you to create and design sites. If you are a beginner, these programs provide the tools you’ll need to set up the website.
Some web developers could probably design a basic website by entering HTML into a text editor and then uploading the files to an ISP site host with an FTP program.
Although online web design apps have become increasingly prevalent, there is still plenty of offline freeware website builder software for Windows.
What is the difference between paid and free website builder software?
When popular free website builders for Windows are compared to paid website builders, an intriguing story emerges. Of course, most free builders are less powerful than their paid counterparts, but that doesn’t imply they aren’t helpful.
A free site builder, on the other hand, is an excellent choice if you want to use the site for a personal blog, a portfolio, or another non-monetized purpose.
Paid plans are only worthwhile if the financial benefits from the site surpass the monthly membership price. A free builder can assist you in growing a following for your new blog or starting a personal project.
Whatever you decide, selecting the best website builder for your needs is a critical first step in making your dream website a reality.
There are two types of website builder software for Windows:
HTML editors that you can manually enter HTML with and select tag options from their toolbars and menus.
WYSIWYG (what you see is what you get) editors are website builders with which you can design sites by dragging and dropping web page elements onto pages without entering HTML.
These are the best website builder software for Windows 10.
Adobe Dreamweaver is the perfect all-in-one choice for creating a website with an intuitive display adapted for each device.
You can have a website with a simple and flexible way of coding that supports web standards like Java, CSS, HTML, and more.
It is not surprising that creating such a responsive tool will allow you to rank in the top positions of Google SERP, as this tool is optimized for SEO.
We think it is an important criterion to take first in mind when you want to develop something purposeful.
Adobe Dreamweaver has some of the best design templates, Fluid Grid Layouts. It will be simple for you to visually build the pages as Adobe improved its design workflow, as well.
This tool gives you the ultimate experience in order to develop modern visual graphics in a single software environment.
Let’s quickly look at its key features:
Extensive pool of built-in templates for creating HTML emails, About pages, blogs, e-commerce pages, and more.
Adobe is included in the Creative Cloud where you can search assets from Adobe Stock in order to improve the design of your website.
Live View feature to preview your changes immediately, whether it is about editing the text or changing the image.
Free trial available to test its excellent capacities
Adobe offers an extensive set of Dreamweaver tutorials that can help new users adjust to the features of the tool. You can find information about each and every step of website building.
Adobe Dreamweaver
Experience fast and flexible coding with visual aids to build stunning websites.
Easily create the website of your dreams in just minutes with Webnode. Creating your own personal website has never been easier, and it feels like playing with blocks.
Assemble every part of the UI just the way you want to and make your vision a reality with the help of plenty of features.
You have lots of templates to choose from in order to stand out from the crowd. Uniqueness is key when it comes to Webnode.
Additionally, you can create online stores, where you can sell your products and make presentations for them, including descriptions, images, and much more.
Along with the pre-defined templates, Webnode also offers a wide range of page layouts. If you want to add a new page to your website, just browse the page library as you will probably find something that suits your plan. Besides, you can adjust it precisely to fit your preferences with the drag-and-drop functions.
You can create and edit your website directly from your browser of choice. There’s no need to install anything on your device. On top of that, you can use Webnode on mobile devices, as long as you have an Internet connection. This can be very helpful if you need to make adjustments on the go or add new materials to your website.
Webnode comes with reliable hosting services providing you with powerful servers that support a large number of visits. You can change your plan as your website grows. This means quick and seamless loading of your website with a smaller risk of crashing.
This software is also a good option if we think of accessibility. You can build your website in over 24 different languages, and you can also translate your website if it is required.
Here are some of Webnode’s key features:
Great domain names
Full customization
Mailbox to communicate with your customers
Customer support
One more reason to try Webnode is that it lets you create a free website with the Webnode subdomain. If you just want to experiment and don’t want to make any investments yet, you really don’t have to. Use the toolbox and create a free website to see how it goes for you.
Webnode
Stand out from the crowd with your unique website thanks to Webnode, one of the best website builders.
WordPress free website builder software for Windows is a one-stop shop for anybody looking to create a personal blog, portfolio, or business website. WordPress has something to meet everyone’s needs.
You may use specialized tools to install a virtual server on your Windows PC. This helps when you want to work offline and launch websites without an internet connection, while ready-made projects can be published later.
You have two options for getting started with WordPress:
Create a self-hosted WordPress website (WordPress.org)
Create a free WordPress.com account.
WordPress.com may be a good option if you only need to host a tiny personal site. A self-hosted WordPress site, on the other hand, is generally a better alternative if you’re starting a more sophisticated project.
WordPress, unlike many other website builders or web design tools, is free to download, install, and use. It was created for web developers, and there is a strong developer community that has created appealing free themes and templates, making it simple to get started quickly.
Although the WordPress platform is free, hosting and domain names are not. However, the overall cost is still less than a coffee, with a monthly cost of roughly $3 – $5.
WordPress themes are design templates that enable altering the look of your site much faster and easier. Fortunately, WordPress provides a plethora of themes to select from. The official WordPress theme directory alone has over 8,000 themes that are entirely free to use.
There are around 60,000 plugins in the official WordPress plugin directory alone that may add a variety of additional features and functionality to your site.
Let’s have a look at the main key features of WordPress:
Free hosting choice
Offline Website Creation
100% Design Customization
Professional Blogging Platform
24/7 support on forums and chat
Mobile and tablet friendly
WordPress.com makes it simple to put your work out there, with capabilities for practically every content type, from blogging and podcasting to exhibiting a portfolio or business or even delivering seminars or events. Then, share it with your friends and followers, send it as a newsletter, or syndicate it to social media and content sites.
WordPress
An open-source creation tool with thousands of powerful features, scalability, ease of use, and a well-known Content Management System.
Building a website is no walk-in part – or is it? Actually, it’s as easy as a breeze to do so with Weebly. Plus, it’s a free website-building software for Windows.
Weebly provides access to customizable webpage designs and all the tools you need to easily build your website for free. What’s more, you will enjoy extra perks such as starter guides and planning tools.
A fully customizable website builder, eCommerce tools and marketing tools, step-by-step guidance, and more bonus options, this is what you can expect from this incredible app.
Along with the easy website creation process, you get additional support with step-by-step guides that help you create professional-level websites without any hassle.
Whatever you want to integrate into your website, Weebly has you covered. It has built-in picture and video editing features, so you won’t need any additional tools if you want to add this type of media file to your website.
If you are comfortable with building with HTML/CSS and javascript, you can absolutely do that, even though you are not required to.
Weebly also offers useful statistics regarding your website visits and user activity including comments, orders, form entries, and more, depending on how you decide to design your website.
Let’s quickly look at its key features:
Professional-looking website themes and more design features to choose from
Custom domains and a full suite of SEO tools
Flexible drag-and-drop blog creation to showcase content
Free hosting infrastructure and fast loading times
Seamless integration with third-party apps
Integrated eCommerce, themes, and branding tools
Statistics tools to better understand and track performance
Weebly is available on mobile devices as well. As previously mentioned, it has a free option that comes with a Weebly branding domain, as well as various premium subscription-based plans.
Weebly
Easily build any type of website and use integrated SEO tools to get good traffic in no time.
Squarespace provides an end-to-end solution for website building and more.
It includes anything from in-built beautifully crafted templates to get you started, a one-year free custom domain name, and highly versatile CMS website builder tools.
Speaking about versatility, you can personalize your website with text, fonts, color palette, and countless stock photo options.
There is even a logo maker included to help you design your own unique logo as well as social media and email marketing tools to help propel your website in the spotlight.
Squarespace comes with email marketing tools, providing a generous set of email templates. You can surely find a template that works for your brand regardless of the industry you work in.
The email builder has easy controls for text editing, as well as image integration, clickable button integration, and much more.
You can also convert your blog posts or product pages into emails for additional consistency. You can also integrate and manage a newsletter to your website to build and grow your email list and promote your services to a larger audience.
As opposed to many other options, Squarespace integrates easy-to-follow, real-time website analytics. you can see how many people view your pages, the number of subscriptions, the number of people on your mailing lists, and much more.
Squarespace lets you create content that is optimized for social media platforms. Post your pages and listings onto your social accounts without compromising on design and appearance.
Let’s quickly look at its key features:
Extensive range of templates for every industry
Integrated commerce platform
In-built logo maker solution
CMS website builder tools with fully customizable parameters
Browser extensions support to further refining your settings
150+ layouts, designer filters, fonts, stickers, and more
Online scheduling feature available
Squarespace is subscription-based with various plans depending on the features you want to integrate.
Squarespace
Create and manage your online business with an easy website builder and various online marketing tools.
GoDaddy Inc. is one of the world’s largest web services companies. It provides a wide range of services fromweb hosting to free online website builders for Windows and Mac.
GoDaddy’s website builder has a sleek, modern aesthetic with a utilitarian, minimalistic vibe. It starts with a simple website preview to give you a broad idea of the overall layout.
The GoDaddy Website Builder only provides basic options with limited customization. Although you can change the size quite considerably, you may have difficulties if you do things like adding share buttons, inserting picture boxes next to text blocks, or resizing videos.
While assistance is essential when developing a website, we can be honest about this one. It includes a very basic architecture and simple processes.
As a result, you may never require technical assistance. But just in case, there is a technical support phone number on the official website that you may contact during their working hours.
Let’s quickly look at its key features:
Professional imagery – add your personal images or Go Daddy’s from the library
Swipe-to-style interface – easy to create and update the design of your site
Customize every part of your website’s pages by using templates
Professionally designed styles and beautifully coordinated color sets
Setup for starting an online store
Inventory manager – add up to 500 products
Support for credit cards
Blog creation without plug-ins
GoDaddy is a subscription-based service. You can choose from multiple plans, depending on the features you want to include. Each plan comes with a 30-day free trial that does not require credit card information.
GoDaddy online website builder for Windows goes above and beyond the boundaries of a conventional builder to provide additional features for constructing a good commercial or eCommerce site.
It fulfills the description of a personal site builder as well as a simple online store builder in some ways.
GoDaddy
This website builder caters to small business owners and professionals, with business functionalities.
Wix is a hosted software, despite the fact that it is a free website-building software for Windows.
The sole difference between offline software and the online software is that you don’t have to download program files and find a location to host them. You receive an all-in-one solution with pre-hosted files and real-time saving of all modifications.
Wix has also created an artificial design intelligence (Wix ADI) that can create a stunning website for you. Aside from a plethora of layouts, Wix has a plethora of free and paid applications that you may put on your website.
You may use these applications to add additional features and functionality to your website. Some are made by Wix, while others are made by third-party developers.
Let’s have a look at the key features of Wix:
Intuitive interface WYSIWYG
Free Wix App Market widget
Artificial Design Intelligence
Wix Mobile Editor
Wix is a fantastic Website Builder Tool and an all-in-one solution for an online store. It is one of the top online-selling platforms. It offers particularly developed templates and a plethora of sales options, making it an excellent choice for a small company.
Wix provides a free plan with restricted bandwidth and storage space. You may, however, utilize this plan to try out their drag-and-drop website builder.
The website builder has a reasonable price structure, with a free membership option as well as two premium plans: standard and Business/eCommerce.
It does not include a domain name, so if you intend to retain your website, you should consider upgrading to a premium plan. All Wix plans include a free SSL certificate, which you must activate for your website.
Wix
Wix is a drag-and-drop website builder with amazing functionality and designs, as well as App Market and WixADI.
What are the pros and cons of an offline website builder for Windows?
An offline website builder for Windows is a bundle of downloaded software parts. Every time you need to create a website, you have to download and install the necessary components onto Windows PC. You don’t need an internet connection to modify your website, unlike online platforms.
This aspect provides greater security and a reasonable level of backup. Your PC, on the other hand, is the sole means to access the builder. You will not be able to outsource or edit the website remotely.
Although they are more versatile than online builders, many proprietary offline website builder software products can be costly; nonetheless, there are many open-source website builders available.
There are plenty of website builders, but only a few manage to stand out as viable choices for professionals. If you are planning on investing in a website builder, you might as well get your money’s worth.
What did you think of the software above? Feel free to share your impressions with us by reaching out in the comments section below.
Are you finding it difficult to manage your team’s checklists? The ultimate solution is to automate your checklists. By doing this, you are able to save time, cost, and effort. This post by Windows Report brings you the best available automated checklist software in the market.
In a conventional business setup, employers (and employees) spend quality time preparing multiple checklists (of tasks, personnel, and clients) on a daily basis. This significantly affects productivity and impedes business growth.
However, with the adoption of a durable automated checklist software, you can easily automate your checklists and workflow.
While there are several automated checklist software (both durable and less durable ones) in the market, this post has shortlisted some of the best-automated checklist software for you, on the basis of durability, flexibility, affordability, and of course, user-friendliness. Read on!
VirtoSoftware is arguably the leading automated checklist software in the market. It is an on-premise suite of tools, specially designed for SharePoint (a prominent collaborative software).
In addition, VirtoSoftware, which is often referred to as Virto SharePoint, hosts a set of SharePoint web parts, which, altogether, ensure your checklists and workflow are conveniently streamlined and automated.
VirtoSoftware’s core features (SharePoint web parts) include Workflow Activities Kit, Forms Designer, Task/Event Calendar, Kanban Board, and Gantt Chart View, and more.
While all the above-highlighted features are essential to the checklist automation process, the workflow activities kit and forms designer take the forefront.
The activities kit is the designated feature (web part) that streamlines and automate all essential tasks, while the Forms designer is the tool for creating digitized forms, list of tasks, items, events, and so on.
VirtoSoftware is a hub of multi-functional suites, and each suite has its specific pricing package. Nevertheless, you can purchase the whole package, to get an optimized checklists/workflow automation experience.
VirtoSoftware
VirtoSoftware is not only an automated checklist but a whole integrated package with productivity tools.
Process Street is one of the most used automated checklist software in the market. It is especially known for its intuitive interface, which makes it ideal for anyone with basic tech know-how.
Process Street allows you to capture every relevant data with little or no hassle. From registering new employee(s) to scheduling tasks to setting up new clients, Process Street manages and keeps track of everything.
Some of the key features of Process Street include User-friendly Dashboard, Forms, Templates, Checklists, Conditional Logic, Groups, Activity Feed, Media, Customer Support (Live Chat, Email, and Phone), and more.
The above-outlined features not only facilitate checklist creation and management but also manage (and monitor) the entire workflow of an organization. In fact, there are dedicated features that allow you to keep track of your team’s progress, on a real-time, daily, weekly, or monthly basis.
Furthermore, Process Street, as an office utility tool, is flexibly built to integrate seamlessly with a host of other essential offices (collaborative and utility) tools like Dropbox, Gmail, Salesforce CRM, and over 1000 more.
The Zapier integration function enables you to run all work processes on a unified platform, thereby reducing cost and saving time. The end result is increased efficiency and productivity.
Process Street
Increase efficiency and productivity with the most intuitive tool.
Waybook is a training, onboarding, and learning platform designed to offer the best experience to your employees. Basically, you will have all the procedures and guides in one place.
This robust software is exactly what a business needs, namely a complete service that covers more areas, starting with the training hub where you can add materials or tests, LMS (Learning Management System), handbooks, and so on.
On the same note, you’ll be able to store all your process documents and SOPs, thus creating a universal business playbook to include the company operating procedures.
Moreover, it’s likely to create your books for training and onboarding processes toward new employees and therefore centralize the organization’s essential data in one guide.
This way, the onboarding experience will improve by simply organizing it into simple and easy-to-understand workflows. So using step-by-step guides to explain more complex processes will surely transmit clearer information.
In addition, when you have document updates all your company will see it because of the progress tracking tools, always knowing when improvements are made.
To conclude here, this feature-rich software is strongly capable to help any manager to streamline their work to get more productivity and sustainable results.
Waybook
Increase productivity exponentially while offering a great experience for your employees.
TeamworkIQ is another top-rated automated checklist software. This software is fairly easy to use; designed with the flexibility of managing checklists and workflow with only a few taps, directly from the comforts of your computer or smartphone/tablet.
TeamworkIQ, as the name implies, is specially built to enhance collaboration among team members, and one of its major functions entails checklist streamlining and automation.
The software takes control of your to-do list and ensures every task, date/deadline, progress, and so on are adequately logged and monitored.
Some of the smart features of TeamworkIQ automated checklist software include Reusable Checklists, Step by Step and Approval Workflow, Recurring Processes, Templates Library, Links, Forms, Photo & File attachments, Conditional Logic, and many others.
You can send an email to the TeamworkIQ sales team to get a suitable quote for your enterprise business.
Manifestly is a leading automated checklist software, with thousands of users across the globe. It is equipped with best-in-class tools, which enable you to create tasks/procedures, distribute/assign tasks, streamline and automate workflow, meet deadlines and ultimately improve productivity.
Some key features of Manifestly include: Checklists (unlimited), Slack Integrations, Activity Log, Folders & Tags, Zapier Integrations, Template Editor, Audit trail, and Priority Email Support. Live Chat, Mobile apps, File Upload, and more.
The above-outlined features facilitate the creation of task schedules and workflow automation, thereby ensuring you attain optimum efficiency at work.
Also, Manifestly’s Zapier and Slack integration functions enable you to integrate the software with relevant office apps like GitHub, SalesForce CRM, Zendesk, and more.
Manifestly offers a 30-day free trial to new users. And after the expiration of the trial period, users can subscribe to one of the four basic pricing packages on offer.
Last but not least on our list is Trello! Trello is originally designed as a collaborative/project management tool that enables you to gain control over your team’s workflow. One of the core functions of Trello, however, is checklists automation.
The platform’s API design enables it to integrate with other major office apps, including Dropbox, Google Drive, Process Street, and the like. Its versatile set of features allows you to schedule tasks, assign deadlines and monitor progress.
Furthermore, Trello is flexibly built to support both mobile and desktop devices. In fact, there are dedicated apps for Android, iOS, and Windows devices.
Some of the key features of Trello include Checklists (To-Do lists), Personal Boards, Team Boards, Cards, Power-Ups, Custom Backgrounds & Stickers, and more.
Trello offers freemium pricing plans to its users. The “Free plan” is designed for small teams, albeit with limited features, while the premium plan is designed for medium and large businesses, and it is of two categories – Business Class and Enterprise.
Checklists are essential to the daily workflow of every business, as they are required to create work schedules, onboard new employees, and/or register new clients.
Managing these recurring checklists could be time-consuming and at times, very expensive. Hence, automation of such checklists becomes essential.
This article has outlined five of the best-automated checklist software to choose from, to facilitate checklists (and workflow) streamlining and automation, toward enhancing productivity.
Are you a programmer or a new business owner? Do you need a unique and catchy name for your software or new business? If so, this article is for you.
Here, we will be bringing you a review of some of the best software name generators i.e. software that can be used to create unique names for new apps and startup businesses.
It is commonly the case that most programmers are not artistic, and many of them are not good with words. Hence, naming new apps and programs could be a little demanding for them.
The same goes for new business owners who are looking to get perfect names for their new ventures.
If you fall within the aforementioned classes, you need not worry, as there are now durable/reliable software name generators, which you can easily employ to generate a suitable name for your new business or program.
In the next section of this article, we’ll be showing you short reviews on five of the best software name generators out there. Read on!
What are the best software name generator for business?
Namelix is another top-class software name generator, and it is specially designed to generate unique names for new businesses and tech startups. It is an online tool that can run on any major OS platform, be it a desktop/laptop or mobile.
Namelix, though mainly developed for the generation of new business names, is highly flexible, and can be tailored to generate unique names for new products (apps) and the like.
With this, you are able to generate suitable names for your new business or app, within seconds.
The software uses a set of AI-enhanced algorithms, which automate the entire process. On your part, you’ll be required to key in certain words (keywords), usually two to four words, that are related to your startup or product(s).
Other key features of Namelix include recommendations (based on preferences), results in filtering, a simple user interface, domains, and more.
Namelix’s services are offered for free. However, certain names are not free. To select a premium name, you’ll be required to pay a token.
Namelix uses a set of advanced algorithms to generate suitable names for businesses, products, and programs.
Basically, all you are required to do is to input desired keywords (words that are related to your new business or product) in the designated box.
Fantasy Name Generator is an online name-creation platform, designed to generate unique names for new apps and programming languages.
As an online (web-based) tool, the software can be deployed on any web-enabled platform, most notably Windows PC, Macbook, and smartphones (and tablets) among others.
The tool is an all-around name generator, which can be used to name just about anything. Aside from software name generating, it can also be used to generate business names, artwork names, music titles, names of places, and so on.
To generate a name using this platform, you are provided with a direct and easy-to-use interface. All you need to do is to click on the designated “random names” icon (depending on the category) and voila! 10 to 20 random names will pop up immediately.
If you are not satisfied with the first set of names, you can check through as many names as you want until you get a desired/suitable result.
Other notable features of Fantasy Name Generator include simple UI, no installation, 100+ names (per category), Bilingual support (French & English), custom search (via Google), and more.
The software is a free license tool, and it is available to all and sundry at absolutely no cost.
BizNameWiz is similar to Namelix, in terms of operability. It uses an automated system to generate suitable names after certain keywords must have been inputted.
Also, it runs an in-depth search to check for duplicates, especially of generated domain name(s), to protect you against copyright infractions.
BizNameWiz is a cloud-based tool, so can be used on any web-enabled computer system or mobile device. It offers you a highly intuitive interface, with hundreds of possible keyword (industry-related) ideas, to generate catchy and unique names for your software.
Other notable features of BizNameWiz software name generator include cloud computing, automated name generation, secure database, 99.9% uptime, flexible platform, free domain (.com), multiple generators (up to 8), online resources, and more.
BizNameWiz is available for free. However, third-party services (like BlueHost domain hosting) are offered at varying costs.
Anadea is an all-in-one software name generator, which can be used to generate new business names, application names, and website/domain names. It is an online tool that can be deployed on any OS platform.
Anadea generates unique names that are searchable, catchy, and memorable. And like most online software name generators, it uses an AI-optimized set of algorithms that automatically generate suitable names for businesses, apps, and websites.
To generate a name using this tool, all you need to do is to type in some keywords that are relevant to your business, app, or website. Depending on the keywords provided, you are provided good suggestions within seconds.
The software is flexibly designed to generate names for different categories of businesses, ranging from real estate to healthcare to software development.
Basically, Anadea is very easy to use, and you can generate names (English or Russian) for as many categories of businesses as you want.
Interestingly, Anadea’s software name generator is offered at absolutely no cost. So you can easily navigate to the platform, and generate as many names as you want.
Many developers and new business owners often find it difficult to name their inventions and startups respectively. More often than not, they spend days or weeks brainstorming, with no real idea forthcoming.
If you are in this situation, we have proffered a solution for you in this article.
Herein, we have outlined five of the best software name generators in the market, any of which can be employed to generate names for your startup or software/app.
Creating breathtaking photography is not all about artistic sense and great talent, it also implies editing tasks that generally happen after you put down the camera.
Just like in cinematography, the hard work truly begins after the shooting is over and done with and professional photographs undertake a complex editing process to supplement their skills.
How can I choose the best photo editing software for retouching?
Ranging from resizing to color adjustments and most importantly photo corrections, the editing can be as basic or as complex, as you want.
There are plenty of dedicated tools to choose from depending on your focus, your skills, and of course, your budget.
The key to choosing the best product is to properly assess the work you’ll be performing on the photos and match it with the tools and features of certain software products.
Whatever you have in mind, make sure to pick out the very best photo correction software to truly elevate your photography with the help of our special guide below.
Adobe Photoshop is undeniably the world’s best imaging software and the standard when it comes to photo editing.
Professional photography tools make it easy to perform anything from quick edits to total image transformations across all platforms: desktop and mobile.
Crop, retouch, and combine photos or play with color gradients and stunning effects to take your photography to a new level.
The most important features of Photoshop are the possibility to work on layers and export your work in vectorial formats that match professional production technologies.
Also, with this complex app, you will be able to perform actions at an incredible level of detail with an astounding array of built-in tools.
Let’s quickly go through its key features:
Unlimited layers and masks
Lens Blur (for a realistic look when blurring an object in the foreground)
Improved Content-Aware (fill multiple areas of an image without leaving the window)
Modern presets (new gradients, patterns, layers, styles, and shapes better organized)
Object Selection tool (for fast and precise selections)
inPixio Photo Studio Pro is a photo editing and enhancement software that includes innovative automatic image processing technology.
It allows you to quickly and easily cut out or replace items and people and repair any flaws in the picture. Remove any unsightly elements and make imaginative projects with the
You can correct exposure, brightness, red-eye, and dark circles with a single click, as well as modify the color balance, lighting, focus, crop, rotate, and resize your photographs.
Let’s quickly go through its key features:
Background removal and blur
Stickers, items, and backdrops
Erase and cut out unwanted objects
One-Click Image Correction
Til-shift and soft-focus
This photo editing program is not suitable for professional photo editing for a photographer or graphic designer who wants to go the extra mile in the projects.
Although it provides good RAW editing tools, it lacks flexibility and depth of features. In addition, the lack of advanced photo toolsets is a drawback.
inPixio Photo Studio 12 Pro
This toolbox helps you to improve the appearance of your photos by applying effects, cropping them, and adjusting their contrast, brightness, and hue.
An all-in-one photo editor and graphic design software, PaintShop Pro 2022 will change the way you edit photos with its new touch-ready workspace, content-aware technology, and selection refinement.
As if its powerful built-in photo editing and design features were not enough, you can even enhance PaintShop’s capabilities with popular third-party plugins that integrate seamlessly.
Its latest version comes with effective features and tools powered by artificial intelligence and machine learning technology for enhanced photodetection.
The all-new Frame tool helps you place raster objects into shapes quickly, easily, and intuitively. Just Draw frames to use as placeholders or draw frames over an object, image, or text for a polished result.
There are also new Scratch Remover and Fade Correction tools to restore and repair old photos and enhance them quickly.
Let’s quickly go through its key features:
Retouch and restore (crop, straighten, and correct perspectives to create perfect photos)
Artificial Intelligence
360° photo editing (straighten a 360° photo with rotation, make it seem leveled, and much more)
RAW Lab and HDR effects (combine multiple exposures of the same scene to create a single, stunning, HDR photo)
Photography Workspace (touch-ready, highly simplified workspace for quick photo edits)
PhotoPad is a photo editing software designed to help you correct your photos fast and easily in any popular image format like JPG, GIF, PNG, TIFF, or BMP.
It’s stable and easy to use, and it provides powerful editing and retouching tools as well as countless effect combinations and filters.
You can fix your photos instantly and even edit directly from your DSLR Camera which can be extremely convenient for photographers.
It’s also interesting that you will be able to change the aspect ratio of an image without distorting key features using the liquid resize effect.
And if you want to bring B&W photos to life, the app uses machine learning technology and a feature called Super Color to add realistic coloring.
Let’s quickly go through its key features:
Photo Editing Features (crop, rotate, resize and flip pictures)
Retouch photos to remove blemishes and fix color
Improve photo quality and focus with blur, sharpening, and noise-reduction tools
Adjust the color balance, brightness, contrast, and more
Merge multiple exposures to create stunning HDR photographs
As the name tells, this software is designed for strong editing processes that imply photo correction, HDR conversion, and more.
Firstly, you must know that such a program is a perfect match for any artist who needs a helping hand. Photo presets and effects, re-expose or natural coloring, it’s all there.
Plus, other features permit RAW image and batch processing for your projects or natural-looking filters to perfect your imagery instantly. Using HDR styles the photos will look sharper, going beyond the eyes.
Another worth mentioning trait is regarding HDR lighting effect which lets you add natural light wherever in the picture.
More, the denoise feature helps to correct grainy photos for your nighttime sessions and restore old images that you just scanned.
Let’s quickly see its key features:
Natural image correction
One-image HDR
Advanced coloring management
Usable 40 HDR effects
HDR relight effects
Full support within the program
InPixio Eclipse HDR
Enjoy superior features and tools to correct your photos to perfection.
The hardest photos to edit are definitely the portraits and if you need a dedicated tool for this complex job, PortraitPro 22 from Anthropics is just what you need.
Mostly because this tool doesn’t work like the ordinary airbrushing and photo editing software you’re used to.
Its AI features are trained in human beauty, so you can edit your photo just as much to turn it into a masterpiece.
And you don’t need to be an expert in photo editing either because you will be able to change any face features by simply moving some sliders around.
PortraitPro has the ClearSkin 5 technology built-in so you can use it to smooth the skin without that plastic Photoshopped finish.
But if you just need to fix a few difficult spots, the Touch-Up brush will help you get rid of them directly, without applying effects to the whole face.
As for the facial features, you have a lot of sculpting tools available that can remodel the eyes, nose, hair, smile, chin, and pretty much anything you can imagine.
The app even has a full range of digital makeup based on years of research into real cosmetics, so you will be able to experiment with a wide variety of styles.
The bottom line is that PortraitPro is a great portrait editing tool but don’t take our word for it because you may test its free trial version and see for yourself.
Let’s review some of its best features:
ClearSkin 5 technology for automatic skin smoothing
Extremely easy to use by anyone, without any prior training
Pixlr is a free online photo editor that you can operate in your browser, so you don’t have to install anything on your PC.
Boasting AI-powered tools for quick, but professional edits on the most popular image formats such as PSD, PXD, JPEG, PNG, and SVG, this tool makes photo editing simple and fun.
Remove backgrounds with the bg removal tool or create a transparent image for your design with a single click or tap.
Anyone can use it because it comes with a super-friendly user interface that is organized very intuitively.
Let’s quickly go through its key features:
AI design tools (remove backgrounds, cut and crop in just one click)
Fast image editing (drag sliders from left to right to edit your photos)
Easy content creation (generous library of stickers, overlays, borders, icons, and decorative texts)
Edit your photos wherever you are (desktop and mobile compatible)
If Windows is stuck on the welcome screen, you won’t be able to access it at all, and this can be a major problem since all your files and apps will remain inaccessible.
This is a major problem especially if you’re on a deadline, but there are a couple of solutions that can help you fix this.
Why is my computer stuck on the starting Windows screen?
Problems with Credential Manager or Windows Update service.
Fast Startup is another common cause of this issue.
Recent Windows updates can also lead to problems.
Corrupted installation will often prevent you from starting Windows properly.
What do I do if my computer is stuck on the Welcome screen?
Before we try any complex solutions, we suggest performing the following checks:
Disconnect from the Internet by turning off Wi-Fi or by unplugging the Ethernet cable.
Remove any hardware that can cause issues. This includes internal SD cards, USB devices, and other hardware that was installed recently.
Try removing your laptop battery and starting your PC without it.
Remove SmartPass and fingerprint reading software from your PC since it can cause compatibility issues.
Disable the WAN adapter in BIOS. For detailed instructions, check your motherboard manual.
Open the Settings app. The fastest way to do that is to press the Windows key + I.
When the Settings app opens, go to Update & security.
Now click on Update history.
A list of all recently installed updates will appear. Memorize the names of the recent updates. Click on Uninstall updates.
Now you should see the list of recent updates. Locate the problematic updates on the list and double-click them to remove them.
If removing the updates fixes the problem, you might want to temporarily prevent Windows from installing these updates.
5. Delete the Ngc directory
Start your Windows in Safe Mode.
When Safe Mode starts, navigate to this directory: C:\Windows\ServiceProfiles\LocalService\AppData\Local\Microsoft Keep in mind that some of these files are hidden so you need to show hidden files and folders. To do that, click the View tab at the top and check Hidden item.
Look for the Ngc folder and try to delete it. By default, this folder is protected by the system, so you’ll need to take ownership of it first. To do that, right-click the directory and choose Properties from the menu.
Go to the Security tab and click on Advanced.
When the Advanced Settings window opens, click on Change in the Owner section.
Enter your user name in the Enter the object name to select and click on the Check Names button. If everything is in order, click on OK to save changes.
Check Replace owner on subcontainers and objects and click on Apply and OK to save changes.
A security warning might appear. Click Yes to continue.
After doing that, you’ll have full control over the Ngc folder. Now you just have to delete it from your PC and restart your PC.
Keep in mind that this solution works if you’re using a PIN number to sign in to Windows 10. If you aren’t using a PIN, this solution might not work for you.
6. Perform an Automatic Repair
Restart your computer a few times during the boot sequence. Click on the Advanced options button once it appears.
Now select Troubleshoot and then Advanced options. Lastly, select Automatic Repair.
Automatic Repair will now start. Follow the instructions on the screen to complete the repair.
If you can’t find the Automatic Repair option, you can use Startup Repair instead. After you complete the repair process, the issue should be resolved.
7. Use Command Prompt
Restart your computer a couple of times while your PC boots to start Automatic Repair.
Click on the Advanced options button once it appears.
Now select Troubleshoot,choose Advanced options and then Command Prompt.
When Command Prompt opens, enter the following to check for file corruption: sfc /scannow
Some users are suggesting to use the following to check your hard drive: chkdsk c: /f /r
After the scan is completed, restart your PC and check if the problem still appears.
Several users reported that you can fix this problem simply by using bootrec command. To do that, you need to start Command Prompt by using the steps above and run the following commands:
Insert your installation media and boot your PC from it.
When the setup starts, click on Next.
Next, choose Repair your computer.
Next, choose Startup Repair and wait for the process to finish.
11. Reset Windows 10
NOTE
This solution will delete all files from your system drive, so back them up beforehand.
Restart your PC a few times until you start Automatic Repair.
Choose Troubleshoot and select Reset this PC. After that, choose Remove everything.
For the next step you might be asked to insert Windows 10 installation media, so be sure to have it ready.
Now select your version of Windows and click on Only the drive where Windows is installed and then Just remove my files.
You should now see a list of changes that the reset will perform. If you’re ready to start, click on the Reset button.
Now follow the instructions on the screen to complete the reset.
How do I force restart Windows?
Press and hold the Power button for a couple of seconds to turn the PC off. Then press the same button again.
Many desktop PCs have a dedicated Restart button that you can use to quickly restart your PC.
If Windows is stuck on the welcome screen, the most likely cause is corrupted files or a bad update, but that can be fixed with our solutions. However, this isn’t the only issue and many reported that Windows is stuck on the login screen.
The NVDisplay.Container.exe is associated with NVIDIA graphics card drivers. However, many users reported that NVDisplay.Container.exe causes high CPU usage.
This can be a big problem and cause performance drops and extra strain on your PC. Thankfully, it is not the most difficult issue to fix, as we will show in this guide.
What does Nvidia Container mean?
As the name implies, the Nvidia Container is crucial for storing other Nvidia processes. Otherwise known as nvcontainer.exe, it works as an enabler that ensures all other processes run smoothly.
Can I end the Nvidia Container task?
While the Nvidia Container performs some important tasks, especially display-related ones, you can end the process if it is causing problems on your PC.
How do I fix Nvidia Container high disk, GPU and CPU usage?
1. Kill the NVDisplay.Container.exe process in Task Manager
1. Press the Windows key+ E to open File Explorer and click the Local disk (C) in the left pane.
2. Now, go to Program Files > NVIDIA Corporation > Display.NVContainer.
3. Locate and right-click the DisplayDriverRAS.
4. Select Delete.
5. Go back to the NVIDIA Corporation folder and locate and delete the DisplayDriverRAS folder under it.
6. Exit Windows Explorer and press Ctrl + Shift + Esc to open the Task Manager.
7. Go under the Processes tab, right-click the nvdisplay.container.exe process, and click the End task button to terminate it.
8. Finally, close Task Manager.
2. Install older NVIDIA driver
Open the Run dialog box: click on Windows key + R.
In the dialog box, key in devmgmt.msc and click OK.
In the next window (Device Manager), locate Display Adapters and click on it to expand underlying options.
Right-click on the NVIDIA graphics driver and select Uninstall device.
Confirm action as prompted.
After uninstalling the drivers, go to the download website of NVIDIA.
On the displayed window, fill in the required information (driver version and computer OS among others) and click on Search.
Select the appropriate option on the list of search results.
Click on Download and follow the prompt commands to save and install the driver.
Restart computer.
3. Use third-party software for drivers
To ensure your drivers function properly and benefit from the latest features, we recommend using a third-party tool that scans your PC and installs the right drivers.
You can optimize your system with a few simple clicks and let the automated tool bring your device to peak performance.
Plus, the software can manage all your drivers efficiently in just a few clicks, so you can safely install or update your PC drivers.
Press the Windows key, type GeForce, and select the GeForce Experience option.
Click the Settings icon in the top right corner and go to the IN-GAME OVERLAY section.
Now, toggle the switch before it backward to disable it.
While the in-game overlay feature is important and recording gameplay, it might be the cause of the Nvidia Container high CPU usage. So, you need to disable it to fix the issue.
Press the Windows key + R, type services.msc, and click OK.
Right-click any process that has Nvidia in it and select the Restart option.
Finally, close the System Services window and check if the problem persists.
Sometimes, the Nvidia Container high CPU usage can be caused by a malfunctioning services. The solution to this is to restart all related services.
6. Uninstall GeForce Experience
Press the Windows key + R, type appwiz.cpl, and click OK.
Right-click the GeForce Experience option and select Uninstall/Change.
Finally, follow the onscreen instructions to complete the process.
If all the solutions above prove abortive in solving the Nvidia Container high CPU usage issue, you need to uninstall the GeForce Experience app. This will remove many Nvidia processes that might be using your CPU.
There you go. These are quick and easy solutions that can help you fix NVDisplay.Container.exe high CPU usage. Usually, stopping the problematic process is enough, but if the problem keeps appearing, we advise you to try an older version of Nvidia drivers.