Windows 11 brings many changes, most notably a fresh and streamlined user interface, but the system also packs smaller changes worthy of your attention.
One of these changes is the startup sound, and even before the announcement of Windows 11, Microsoft has teased the Windows 11 startup sound.
Now that Windows 11 test builds are available to the public, we’re going to show you how can you change, disable, and enable the startup sound on Windows 11.
How do I change Windows 11 startup sound?
1. Enable the sound settings
Press Windows Key + R and enter regedit. Press Enter or click OK.
Navigate to the following key: HKEY_CURRENT_USER/AppEvents/EventLabels/WindowsLogon
Double-click the ExcludeFromCPL DWORD.
Set the value data to 0 and click on OK to save changes.
After making these changes, you have now revealed the option to change the Window Logon sound. To change the startup sound, you just need to do the following:
Open Search and type Sounds. Select Change system sounds from the list.
Make sure that the Play Windows Startup sound is checked.
Select Windows Logon from the list.
Pick the desired sound from the Sounds menu.
Now click on Apply and OK to save changes.
For broader system sound customization beyond the startup chime, check our guide to change Windows sounds in Windows 11, including schemes, events, and theme-based sound sets.
Changing the startup sound on Windows 11 isn’t enabled by default, and to do that, you need to modify the registry and reveal the option to change the Windows Logon sound.
After doing that, changing the Windows 11 startup sound is easy as changing any other sound on your PC.
If you are having trouble with the Windows system files you can always rely on a specialized repair tool to quicly fix them.
2. Disable startup sound
Open the Sounds window as we showed you in the section above.
Locate Play Windows Startup sound and uncheck it.
Click Apply and OK to save changes.
Windows 11 startup sound is enabled by default, but if you want to quickly disable it, this is the best method to use.
If this doesn’t work for you, there are two other procedures that you can try.
2.1 Use Registry Editor
Open Registry Editor.
Navigate to the following key: HKEY_LOCAL_MACHINE\SOFTWARE\Microsoft\Windows\CurrentVersion\Authentication\LogonUI\BootAnimation
Now double-click the DisableStartupSound DWORD.
Set the Value data to 1, and click OK to save changes.
2.2 Use Group Policy Editor
Press Windows Key + R and enter gpedit.msc. Press Enter or click OK.
Now go to the following location: Computer Configuration\Administrative Templates\System\Logon
Double-click on Turn off Windows Startup sound.
Set it to Enabled and click on Apply and OK to save changes.
3. Enable startup sound
Open the Sounds window.
Find the Play Windows Startup sound option and check it.
Now click on Apply and OK to save changes.
If this solution isn’t working for you, there are a couple of alternative methods that you can take advantage of:
3.1 Use Registry Editor
Open Registry Editor.
Go to the following key in the left pane: HKEY_LOCAL_MACHINE\SOFTWARE\Microsoft\Windows\CurrentVersion\Authentication\LogonUI\BootAnimation
Now double-click the DisableStartupSound DWORD.
Set the Value data to 0, and click OK.
3.2 Use Group Policy Editor
Open Group Policy Editor.
In the left pane go to: Computer Configuration\Administrative Templates\System\Logon
In the right pane, select Turn off Windows Startup sound.
Use a custom sound for startup sound on Windows 11
Yes, you can use any sound that you want as the startup sound on Windows 11. Simply go to the Sounds window, select the Windows Logon and click the Browse button.
Now select the desired sound file that you want to use as the startup sound. Keep in mind that only .wav files are supported.
If your files aren’t in .wav format, you need to use audio converter software and convert them to the required format.
Where are Windows sounds located?
You can find all default sounds located in the following directory: C:\Windows\Media This is for Windows 11 and all the previous versions of Windows. As you can see, managing Windows 11 startup sound is easier than you think.
We also have a great guide on Windows 7 startup sound, so you might want to check it out to learn more.
Did you happen to know any other method to change the Windows 11 startup sound? If so, don’t hesitate to tell us in the comments section below.
Tracking numbers are one detail that any delivery service uses to identify a package and also to allow their clients – senders or receivers – to track the delivery status of their package. But what if FedEx says the tracking number is not found?
The full message reads: No record of this tracking number can be found at this time, please check the number and try again later. For further assistance, please contact customer service.
FedEx should, at least in theory, allow you to track your package from the start of the delivery to the end. In comes the big question. Why isn’t my FedEx tracking number working? We’re about to find out.
Having a tracking number, one can easily go to the service’s webpage and without much fuss find out if the shipment is on its way or whether they can expect it to arrive on a certain day.
With FedEx, it sometimes happens that clients are trying to enter the tracking number in the search form, but the service returns a not found message.
Why can’t I track my FedEx package?
If the service tells you that your tracking number can’t be found, it usually means that your shipment hasn’t been picked up yet by the courier or the courier has not scanned it when received.
It is common for delivery services to offer a tracking number for any parcel that they process. However, it takes up to 24 hours to sort out all the packages received in one day.
Only afterward is the tracking number registered in their systems.
Let’s have a quick look at the most common issues reported by users worldwide:
FedEx tracking number not working
FedEx tracking page not found
Also, FedEx door tag number not found
eBay, Amazon, Walmart FedEx tracking number not found
FedEx return tracking number not working
FedEx tracking number not found anymore
Also, FedEx tracking number not found after delivery
Finally, it is also possible that the tracking system is dealing with an outage or even regular maintenance.
How can I find out where is my package without a tracking number?
As mentioned, you should allow 24 hours between the day the parcel was sent before searching for it in the system. Here are more methods to try:
You can also use the FedEx InSight service to track packages without a tracking number or call FedEx Customer Service to talk to one of the agents.
It’s easy to use the InSight programs, all it takes is completing the registration and setting up your account.
? Use FedEx Delivery Manager
Sign up for free and receive notifications regarding the current location of your shipment via email or text. If you’re already using this tool but it seems to act out, we’ll help you deal with the Delivery Manager not working issues in no time.
Alternatively, you can use the FedEx Mobile App for the same effect. If the app gives you errors or does not load, check this FedEx app not working guide to quickly fix the issue.
Since FedEx is one of the most reliable delivery services, you’ll surely get a positive response in the end.
Although Windows is the dominating operating system on the market, Linux is slowly gaining popularity, with Ubuntu being one of the most interesting Linux distributions.
To know more about the differences between the two operating systems, check our Windows 11 vs Ubuntu article for an in-depth comparison.
As for this guide, we will show you how to dual boot Windows 11 and Ubuntu and use the two operating systems side by side.
What are Ubuntu’s hardware requirements?
CPU: 2GHz or better
RAM: 4GB or more
Storage: 25GB or more
GPU: Graphics card with at least 256MB of memory
As you can see, Ubuntu has relatively humble hardware requirements compared to Windows 11’s requirements, and some distributions can work on PCs that are below these requirements.
Dual booting is the most viable way to have two operating systems that you intend to use regularly, and it can be done in more than one way.
Like most users, follow the procedure below if you already have Windows 11 installed on your PC. Sometimes, it is the other way around, and you can install Windows 11 after Ubuntu, too.
How can I dual boot Windows 11 and Ubuntu?
Install Ubuntu after Windows 11
1. Create a dedicated Ubuntu partition
Open Disk Management. You can do that by pressing Windows Key + X and selecting Disk Management from the list.
Now, you need to select a drive that you want to shrink. Choose one with at least 50GB of free space, but if you plan to use Ubuntu extensively, you might need even more space.
Right-click the desired drive and choose Shrink Volume from the context menu.
Set the Enter the amount of space to shrink in MB to 50000 or more and click Shrink.
Next, click the Unallocated space that you just created and choose New Simple Volume.
Set the Simple volume size in MB to the maximum value and click Next.
Finally, set the desired drive letter and label and click Finish once you’re done.
You can also give a try to Paragon Partition Manager, which is much more efficient and has other features that are useful for correctly formatting partition drives.
2. Download Ubuntu ISO and create a bootable flash drive
Click the Select button and locate your Ubuntu ISO file.
Click Start to begin the process.
You’ll be asked to format the drive, so click OK to proceed.
Wait for the process to finish. After creating Ubuntu Live drive, you can install Ubuntu.
3. Select the Ubuntu drive and install Ubuntu
Make sure that the Ubuntu flash drive is connected to your PC.
While your PC boots, keep pressing F2, F10, or F12 to access the boot menu and select your USB drive. The key might be different depending on your motherboard.
If you can’t open the boot menu, access BIOS and then set your flash drive as the first boot device and save changes.
When your PC boots from the flash drive, choose the option to Install Ubuntu.
Select the language and the keyboard layout that you want to use.
Then, select Normal installation and click Continue. You can also use Minimal installation and download the necessary updates later.
Select Something else.
Up next, select the partition that you created for Ubuntu and format it to the ext4 file system.
Click on Install Now.
Select your location.
Enter the login details for Ubuntu and click on Continue.
Wait for the installation to finish.
Click the Restart Now button.
After doing that, you just need to select the operating system that you want to boot to and that’s it. As you can see, it’s easy to dual boot Windows 11 and Ubuntu, especially if you already have Windows installed.
Open the Terminal and enter the following command: sudo apt install gparted
Press Y to proceed.
Now open GParted.
Find the partition that you want to shrink. Keep in mind that you can’t shrink the Ubuntu partition while Ubuntu is running. If you want to do that, you need to use an Ubuntu flash drive.
Right-click the partition and choose Unmount.
After unmounting the partition, click on Resize/Move.
Set the New size to 50000 or more and click on Resize/Move.
Click the Apply icon in the toolbar to save changes.
Unallocated space will now appear. Right-click it and choose New.
Set the File system to ntfs and set the maximum size for the partition. Now click Add.
Click Apply icon to save changes.
Lastly, locate the partition that you unmounted, right-click it and choose Mount.
Select the version of Windows 10 that you want to download.
Select the language and make sure to choose the 64-bit version.
Download the ISO file.
Connect a USB flash drive to your PC. You’ll need an 8GB drive, but a larger one might work better.
Open GParted and select your USB flash drive from the top right corner. It should be named /dev/sdb.
If any partitions have a key icon next to their name, right-click them and choose Unmount.
Right-click the partition and choose Format.
Set the size of the partition to the maximum value and set the file system to ntfs or exfat.
Click Apply in the toolbar to save changes.
Locate the Windows 10 ISO file, right-click it and choose Open With, and then select Disk Image Mounter.
Open the mounted ISO file.
Select all files and copy them.
Move to your USB flash drive and paste the files there.
We’ve discovered that not all users have the option to mount the ISO files in the context menu. If that’s the case, do the following:
Open the Terminal.
Now run the following commands: sudo mkdir /mnt/windows10/ sudo mount -t auto -o loop /path/to/window-10-iso /mnt/windows10/
After doing that, you should be able to access Windows 10 ISO by going to the /mnt/windows10/
NOTE
We’re using Windows 10 ISO since Windows 11 ISO isn’t officially available for download.
3. Boot from the flash drive and installWindows 10
Enter BIOS and go to the Security section. Disable Secure Boot.
Save changes and exit BIOS.
Press the dedicated key to open the boot menu and select your flash drive. If you don’t know the key, you can set the USB flash drive as the first boot device.
When you boot from your flash drive, select the desired language time format.
Select the version that you want to install and accept the terms of service.
Then, select Custom: Install Windows only (advanced).
It’s important to select the partition specifically for Windows. If you select the wrong partition, you’ll permanently lose your files.
The installation will now start. Wait while Windows is being installed.
Once the installation is finished, your PC will restart.
4. Join the Windows Insider Program and upgrade to Windows 11
Open the Settings app and head over to the Update & Security section.
In the left pane, select Windows Insider Program. Now click the Get started button in the right pane.
Click on Link an account and select your Microsoft account.
Select Dev Channel and click on Confirm.
Accept the privacy statement and click on Restart Now.
After you’ve joined the Windows Insiders program, go back to the Settings app.
Head over to the Update & Security section and click on Check for updates button.
Windows will now automatically download the Windows 11 update.
Once the update is downloaded, restart your PC to install it.
How do I repair GRUB?
Many users reported that if you dual boot Windows 11 and Ubuntu, the latter isn’t available from the boot menu at all. To fix that, you need to do the following:
Press the boot menu key and select Ubuntu from the list.
Make sure that you’re connected to the Internet.
Open the Terminal and run the following commands: sudo add-apt-repository ppa:yannubuntu/boot-repair sudo apt-get update sudo apt-get install -y boot-repair && boot-repair
After the Boot-Repair is installed, type boot-repair in the Terminal to start it.
Select Recommended repair.
After the repair is finished, check if the problem is still there.
Alternatively, you can fix this problem by doing the following:
Boot to Ubuntu, as we showed you in the previous section.
Open Terminal and run the following command: sudo update-grub2
Once the process is finished, go back to BIOS.
Head to the boot section and set Ubuntu as the first boot device.
Windows will always replace your bootloader, especially if you install it after Ubuntu or any version of Linux. Still, hopefully, this method will help you fix the problem on your own.
If you can’t access Ubuntu from the boot menu, perform these commands in the Ubuntu Live environment. Just boot from an Ubuntu flash drive and follow the above steps.
Does Ubuntu support Secure Boot?
Secure Boot is a technology that verifies the code launched by the firmware to prevent rootkits. Many Linux distributions don’t support Secure Boot, so you must disable it first if you want to install them.
Ubuntu has been compatible with Secure Boot since version 12.10, and it should work on most PCs with Secure Boot enabled.
However, only Microsoft signed the first-stage EFI boot loader, which may lead to some boot issues on certain PCs. If this happens, you’ll have to disable Secure Boot from BIOS.
What are the disadvantages of dual booting?
Regarding the disadvantages, dual booting requires a lot of space on your PC, especially if you plan to use both operating systems regularly and install various software.
This isn’t a problem with larger hard drives, but if you’re running low on storage space, you might want to free up some space or consider upgrading your storage.
Another disadvantage of dual booting is multitasking. There’s no quick and easy way to boot to the other operating system when using the dual boot.
Instead, you must restart your PC and choose the operating system you want to access. Remember that you have to do this every time you want to switch to another operating system.
This isn’t a major problem, but it can sometimes become tedious, primarily if you use both operating systems frequently.
Lastly, booting issues can occur, but this mostly happens when installing Windows after Ubuntu or any other version of Linux.
What Ubuntu distros can I dual boot with Windows 11?
Ubuntu has eight different official distributions, and they are the following: Kubuntu, Lubuntu, Ubuntu Budgie, Ubuntu Kylin, Ubuntu MATE, Ubuntu Server, and Ubuntu StudioXubuntu.
As for third-party distributions, there are about 40 of them, if not more. Regarding popularity, these are the top 3 most popular Ubuntu-based distributions:
Linux Mint
Pop!_OS
elementary OS
All Ubuntu distributions can be dual-booted with Windows 11 without any major problems, and installing them in dual-boot mode is similar for all of them.
The only issue might occur if you have Secure Boot enabled and are trying to install an older version of Ubuntu, but that can be easily fixed.
If you want to dual-boot Windows 11 and Ubuntu, follow our guide’s instructions.
Things are no different if you want to dual boot Windows 11 and Windows 7. Create a separate partition for the other operating system and follow our detailed procedure.
Now with Windows 11 Insider Preview Build 26052, you can use Sudo command in Windows 11, check out this guide to learn how to do that.
Have you ever tried Ubuntu, and are you planning to dual-boot Windows and Ubuntu once Windows 11 is released? Let us know in the comments below.
Alternatively, you can consider another email client in Mailbird to get the full experience you want in the app. This great mail client app will centralize and let you easily manage your Yahoo! Inbox.
Mailbird brings a lot of customizable features and options that are just one click away so that you can make the most of your time when using the app.
This said, not only do you get all your emails and contacts from multiple accounts in one single place. Mailbird also supports integration with other useful apps like Google Calendar, Twitter, or Asana so that you can easily manage all your tasks from the same app.
In terms of productivity, the app allows you to snooze messages for later to focus only on urgent emails, plus it lets you add customizable notifications sounds.
Mailbird
Connect your Yahoo account to easily access your inbox and manage all mail!
Yahoo Mail used to have a dedicated app for Windows PC but discontinued it for some reason. At some point, there was a u-turn, and the app sprang up again on the Windows Store.
Summary
That is all there is to know about downloading the Yahoo Mail app on Windows PC. With the information in this guide, you should know how to work around the app.
The Windows Registry is a database of configuration settings for the Windows operating system and the software that runs on it. It’s an essential part of the system, as it stores information about hardware, software, and user settings.
If you want to customize your Windows 11 computer or troubleshoot problems, you’ll need to know how to use the Registry Editor, which allows you to view and edit the Registry.
In this article, we’ll show you how to access Registry Editor in Windows 11 and provide tips for using it safely and effectively.
How do I get into Registry Editor?
Press the Windows key + R to open the Run dialog box.
Type regedit into the Run dialog box and press Enter.
How can I use Registry Editor safely and effectively?
1. Make a backup
Open the Registry Editor as shown in the above section.
Select the key or set of keys to be backed up (in the example below, we have selected HKEY_USERS).
Click the File menu and choose the Export option.
It’s crucial to make a backup of the registry before making any modifications. In the event that any issues arise as a consequence of your modifications, this will enable you to restore the register to an earlier state.
2. Modify values
Open up the Registry Editor, and navigate to the value you want to modify (The modifiable elements will be displayed on the right pane after you have selected a key).
Right-click on any of these elements and select Modify (you may also choose Modify Binary Data).
Now enter the new values needed in the Value Data text fields and click OK.
Be careful when modifying values; be sure to enter the correct data type and value. Incorrect data types or values can cause problems with the operating system or applications.
Remember to only make changes to the registry if you are sure they are necessary, since unnecessary changes can increase the risk of encountering problems.
3. Add values
Open up the Registry Editor, and navigate to any key where you want to add a new value.
Click on any empty space on the right pane, hover over New, then select any of the value types you wish to add.
Name the newly created value. Then modify it accordingly using the steps shown in the Modifying values section.
In the Find popup box, type the name of the key you need in the Find what text field and click Find Next.
The Registry Editor includes a search function that allows you to find specific keys or values within the registry. This can be helpful if you are looking for a specific setting or if you are trying to troubleshoot a problem.
5. Add Registry keys
Launch the Registry Editor.
Navigate to the path where you wish to add the new key. In our case we have navigated to the path below: Computer\HKEY_LOCAL_MACHINE\SOFTWARE\FileZilla 3\fzshellext
Right-click on the element, hover on New, and select Key.
Name the key. In our case, we call it New Key #1.
Now you can edit values for this key using the same process explained in the Modifying values section.
6. Deleting values
Launch the Registry Editor.
Navigate to the key you wish to delete. In our case we have navigated to the path below (the new key we created in the section above): Computer\HKEY_LOCAL_MACHINE\SOFTWARE\FileZilla 3\fzshellext\New Key #1
Right click on the key and select Delete.
Use caution when deleting keys, as this can cause problems with the Windows OS or applications. If you are unsure whether a key is safe to delete, do some research or ask for help before proceeding.
These pointers will help you utilize the Registry Editor to alter the registry and adjust your system in a secure and efficient manner.
Always proceed with care while making modifications to your system, and ask for assistance if necessary. It’s possible that you experience the Regedit cannot edit error that might block your Windows Registry, yet our solutions will help you.
Let us know in the comments below what you love most about the Registry Editor in Windows 11.
Windows 11 brings up a new look, being a fresh breeze of air. It is extremely user-friendly and allows you to perform a lot of improved actions.
For a more personalized experience, it seems like some users want to find out how to control sound volume for individual apps in Windows 11. You can mute certain apps, as well as configure an exact volume level for each app.
Why should I configure individual app volume control in Windows 11?
As mentioned before, changing and controlling the sound volume for Windows 11 individual apps offer you a more personalized digital environment.
In these terms, you’ll be able to set this feature according to your most used and unused applications.
You can choose to increase the apps’ music and decrease the social media ones, so you can enjoy your favorite playlists without being bothered by notifications.
Select the Volume mixer option, then will be opened the same window as in the previous solution.
As learned before, just adjust the volume for each desired app, by changing the slider.
3. Use a third-party software
Another cool option is to try the support of a dedicated tool. And what does it means? You’ll have automatic help to control each Windows app on your device.
In these terms, to turn the volume up or down, you’ll no longer need to access the standard Windows menu.
Novices in the PC area will be able to easily manage this feature without struggling through time-consuming processes.
Moreover, experienced users will be allowed to control the system volume via dedicated hotkeys or lock it against accidental modification.
Producers are now preparing the latest versions, so you’ll probably have to wait a bit more to properly use them in Windows 11.
However, do not worry! We’ll come up with the big news as soon as possible. So make sure you constantly keep an eye on our content to be the first one who discovers some of the great feats.
Also, keep in mind that some of them will be available on the new and improved Microsoft Store.
What are some common Windows 11 apps sound problems?
Even if you’re able to adjust and control the sound volume for individual Windows 11 apps, like any other digital aspect, this one can be occurred by annoying issues.
Because we want you to be prepared, we selected some of the most common related problems.
Audio service not responding – If your Windows Audio service getting into trouble, you’ll probably end up having no sound on your computer and apps.
There are no audio devices installed – Usually, it appears as an error message on your PC and most of the time it is realted to your drivers.
Computer or laptop gives no sound – This is another general issue that can affect both desktop and laptop PCs, but there are a few options that will solve it.
No sound Realtek – This one is specific to Realtek audio drivers, so the first thing to do is checking the related drivers.
As you’ve probably noticed, these are similar to what we know from the previous OS version. So, if encountering such issues, you should read our Windows 10 sound problems related article.
Starting with Windows 10 and Windows 11, TPMs are now immediately initialized and granted ownership by the operating system, making them more secure.
This is in contrast to prior operating systems, in which you would initialize the TPM and generate an owner password before proceeding.
Before you proceed to clear TPM in Windows 11, make sure that you have a backup and recovery solution in place for any data that has been secured or encrypted by it.
Although the TPM must be erased before a new operating system may be installed, the vast majority of TPM functionality will most likely continue to function correctly after the TPM has been cleared.
There are several methods for clearing Windows 11’s TPM chip, and in this post, we’ll teach you how to do it in detail.
Precautions to take before clearing TPM
NOTE
When you clear the TPM, you will lose all of the keys that have been established and associated with the TPM, as well as any data secured by those keys, such as a virtual smart card or a login PIN.
If you have any data that is secured or encrypted by the TPM, make sure you have a backup and recovery solution in place.
Remove the TPM from a device that you do not own, such as a work or school PC, unless you have been specifically ordered to do so by your IT administrator to do so.
If you have TPM 1.2 with Windows 10, version 1507 or 1511, and you wish to temporarily pause TPM activities, you can turn off the TPM by pressing the Power button. More information may be found in the section titled Turn off the TPM later in this article.
To clear the TPM, always utilize operating system functionality (such as TPM.msc) rather than third-party software. It is not recommended to clear the TPM straight from the UEFI.
Because your TPM security hardware is a physical component of your computer, you may want to consult the manuals or instructions that came with your computer, or search the manufacturer’s website, before attempting to clear the TPM security hardware.
How do I clear TPM in Windows 11?
NOTE
You need to be an administrator on the device to be able to clear the TPM
1. Use the Windows Security app
Press Windows + S on your keyboard, then type Windows Security and select the most relevant result.
From the left panel, select the Device security option.
Under the Security processor section, select Security processor details.
Click on Security processor troubleshooting.
Next, click on Clear TPM.
Lastly tap on the Clear and restart button.
In certain cases, you may be asked to confirm your decision to clear the TPM by the UEFI. All you will have to do is press a button while the computer is restarting.
After the PC restarts, your TPM will be automatically prepared for use by Windows 11.
2. Open the TPM MMC
Press Windows + S on your keyboard, then type tpm.msc and select the most relevant result.
If the User Account Control dialog box appears, confirm that the action it displays is what you want, and then click Yes.
Click on Actions and select Clear TPM.
Your computer will automatically restart after the process is done. During the restart, you might be prompted by the UEFI to press a button to confirm that you wish to clear the TPM.
After the PC restarts, your TPM will be automatically prepared for use by Windows 11.
3. Clear from the BIOS menu
Boot your computer and press the F2 key to enter the BIOS setup mode.
Locate the Security option on the left side and expand it.
Click on the TPM option nested under the Security setting, and check the Clear box.
Reboot your computer and re-enter into the BIOS menu, again by pressing the F2 key.
Ensure the Enabled radio button is checked in order to activate the TPM.
Restart your PC.
After your computer has been restarted, the TPM adjustments will take effect.
How does Windows 11 use TPM?
The Trusted Platform Module (TPM) is a cryptographic module that improves the security and privacy of computer systems.
Basic computer security functions include safeguarding data through encryption and decryption and demonstrating which program is currently operating on a system, to name a few.
TPMs are passive devices that only accept commands and respond to them. When it comes to realizing the full potential of a TPM, the OEM must properly integrate system hardware and firmware with the TPM, allowing it to receive commands from the system and respond to its answers.
The Windows 11 operating system enhances the security of the operating system’s existing security features while also introducing ground-breaking new security features such as Device Guard and Windows Hello for Business.
It integrates hardware-based security into the operating system at a deeper level than prior Windows editions, so boosting platform security while simultaneously increasing usability.
The security features of Windows 11 combined with the benefits of a TPM offer practical security and privacy benefits
When you boot a computer, TPM examines the state of the machine as well as the state of the computer’s environment to determine if the computer is secure.
Providing that the computer is in a trustworthy state (in other words, has not been tampered with), it will function correctly.
As long as the computer is not in a trustworthy condition, it will not boot, which means that there will be no way to access or extract any data from it.
In order for the TPM to function, it must generate encryption codes. In this case, removing the TPM chip from the computer would prevent the machine from booting since only half of the encryption key is kept on the TPM chip and half on the computer hard drive.
TPM is required by some firmware, such as Microsoft’s BitLocker, and until it is activated in the BIOS menu, it will remain inactive, thus it will have no effect on the computer.
Once engaged, the only difference users may notice is that the operating system’s boot-up procedure is slightly slower than before.
When Windows 11 is installed on hardware that includes a TPM, it delivers remarkably improved security benefits.
You may, however, install Windows 11 without the TPM, although we encourage that you do not do so since it provides additional security features.
We hope you managed to clear TPM in Windows 11 using our guide.
Please share your thoughts on Windows 11’s necessary condition to utilize TPM in the comments section below, as well as whether or not you have profited from this requirement thus far.
If you already upgraded to Microsoft’s latest operating system and simply wanted to binge-watch your favorite show on Netflix, you might want to hear about this.
You can’t stream anything at the moment in 4K, apparently, and nobody knows what the exact reason for this whole situation is.
Social media platforms have been bombarded with complaints of such issues, and everyone is hoping that the problem will be patched soon.
Windows 11 doesn’t allow 4K streaming on Netflix
People not being able to watch their beloved series in 4K resolution isn’t something entirely new, if we are talking about Netflix.
However, it wasn’t so complicated to moved past such issues in the past. It seems that solutions that did the trick back then will no longer work.
Basically, to be able to stream Netflix titles in 4K, all you need is the right specs on your machine, a compatible monitor or screen, and purchase the premium plan, which lets you watch everything UHD.
I noticed I don’t get 4K stream on any of my Windows 11 machines, even though I got the premium plan and perfectly capable hardware. I have tested on the following environments, and none of them get 4K stream on both Netflix app (the one you get from MS store) and Edge (Chromium based one). To check the stream quality, I played some streams and opened the overlay with Ctrl + Alt + Shift + D, and waited a few minutes to see if it goes up to 4K.
As you can see, users tried streaming through the Netflix app, available on the Microsoft Store, or directly from the Netflix website, which was accessed via a browser.
Many initially thought that this was an app problem, not a browser one. Trying it the other way around, it seems that neither the app nor browser are to blame for this erratic behavior.
Can HEVC solve this issue?
That is a really good and topic-appropriate question, and Netflix did say the HEVC extension is a must to play 4K content on Windows 10.
We know, we are now talking about Windows 11, but the principle is still the same, mostly.
To check if the HEVC extension is installed on your PC, you can record an H.265 video, transfer it to your device, and open it with the Movies & TV app.
Now, if the video starts playing right away, your machine supports the HEVC extension, else you will see a pop-up error window that says To play this video, you need a new codec and includes a link to the Microsoft Store.
But most new generation PCs already have this embedded in their system, so could this really be what’s causing this whole problem?
I even bought $0.99 HEVC extension on MS store, but no dice. Only 1080p with HDR. Displays are connected with either DP1.4 or HDMI2.1 and playback setting is set to High (though Auto doesn’t make any change). Also, when I click ‘More Info’, I only see HD, HDR, ATMOS, 5.1 markers next to its title, and no 4K marker (checked about 100 titles). However, when I do the same on some TVs with their internal Netflix apps, I often see 4K markers (even though they’re on the same networks).
Is it just me or happens to everyone with Windows 11?
Apparently not, judging by the responses of users that are now struggling with this major issue.
It’s a bizarre situation, to say the least, as many say that they were battling the same situation on Windows 10, with scenarios in which HDR wouldn’t work, but 4k streaming would.
Weird, considering that HDR needs HEVC codecs in order to offer users the high resolution they desire.
All we can do now is pretty much wait for Netflix and Microsoft to work this out and come up with a solution, especially since people are paying for Premium services and are not really receiving them.
Are you also experiencing this lack of 4k resolution while on Windows 11? Let us know in the comments section below.
Paint 3D is Microsoft’s 2D-3D hybrid graphics editor, and while it can be useful, many users reported that Paint 3D is not saving According to users, the error message Something went wrong stops users from saving their projects.
We managed to come up with a few solutions that should help you fix the Paint 3D saving issue in Windows 10.
Why can’t Paint 3D save images?
There are several reasons for this issue, and we will highlight the most important of them:
File corruption – Like any other app, Paint 3D might have corrupted files, but one of the solutions below will help you fix it.
A bug in the app – Any app can get bugged after an update, a crash, or a catastrophic failure but reinstalling it should restore things to normal.
Before getting to the solutions below, try to restart your PC and check for the latest OS updates.
How can I fix the Paint 3D Something went wrong error?
1. Run the troubleshooter for Windows apps
Press the Start button and open Settings.
Select Update & Security.
Click on Troubleshoot and select Additional troubleshooters.
Click Windows Store Apps and hit the Run the troubleshooter button.
The troubleshooter will list all the issues it found and fix them.
2. Reset Paint 3D
Press the Start button and open Settings.
Click Apps.
Select Paint 3D and click on Advanced options.
Scroll down and click the Reset button.
Following these steps, you will reset Paint 3D. See if you can save the images now.
Adobe Photoshop is such a capable program that its name has become synonymous with image editing. It can easily handle 3D objects and allow you to add realistic effects easily.
Unlike Paint 3D, Photoshop is deeply integrated with Adobe Creative Cloud, allowing you to import and export resources between the different tools easily.
This makes the production process easier and adds value to your clients by eliminating compatibility issues and improving turnaround time.
The beauty of Adobe Photoshop is that it is a tool that can be used by anyone from freelancers to fully-fledged production companies and it is available across a multitude of platforms.
Adobe Photoshop comes with Ray Tracing support for ultra-realistic shadows, OpenGL support, Image-Based Light, and a 32-bit color picker for materials and surfaces.
Adobe Photoshop
This awesome tool is the best photo editing tool for PC so it would be more than a replacement for Paint 3D.
One of our readers managed to fix the problem by saving the file as a video first. After that, he changed the format to an image, and this time, it worked.
We hope that at least one of our solutions was able to solve the problem if Paint 3D won’t save your project. If this guide was helpful, feel free to leave a comment in the comment section below.
Are you getting a message on your Windows 11 computer that reads, This file does not have an app associated with it for performing this action? It means that you can’t open a file or perform an action you need to.
The full error often reads: This file does not have an app associated with it for performing this action. please install an app or, if one is already installed, create an association in the Default Apps Settings page.
In this article, we’ll explain why you might see this message and how you can fix it. Note that users may also face this error on Windows 10 devices.
Why do I get the message this file does not have an app associated?
There are a few reasons why you might be seeing this message on your Windows 11 computer. The top of the list includes the following:
Software issues – One possibility is that you don’t have the correct software installed on your computer to open the file. For example, if you’re trying to open a file with the .docx extension, you’ll need to have Microsoft Word or a similar word processing program installed to open it.
Problems with file association – Chances are that file associations on your computer are not set up correctly. File associations tell your computer which program to use to open a specific file type.
Corrupt files – A few users have observed that damaged or corrupt apps or system files have also resulted in this problem.
From user experience, we gather that these are the primary causes. Regardless of your specific triggers, if this file does not have an app associated with it for performing this action on a Windows 11 computer, there are a few steps to take to fix the problem.
Let us now discuss them.
How to fix this file does not have a program associated with it for performing this action?
1. Install the correct software
Right-click on the file that you need to open and select Properties.
Take note of the Type of file (In the image below, it is a Text document(.txt)).
Copy this file type and do a Google search for the best programs it can be opened with.
Download one of the programs, install it and try opening your file again.
If you don’t have the correct software installed on your computer to open the file, you’ll need to install it.
While some files may be opened with multiple programs on your computer, you may need additional programs to open others.
For example, to open files with the .docx extension, you’ll need to have Microsoft Word or any other word-processing program installed to open it.
2. Set the file associations
Right-click on the file you’re trying to open and select Properties from the context menu.
In the Properties window, click the Change button next to Opens with.
Double-click on any of the apps you wish to open the file with. Alternatively, you may select Browse apps in the Microsoft Store or Choose an app on your PC. You will also have the option to Set a default application.
If the file associations on your computer are not set up correctly, you can try resetting them using the steps above.
This should fix the this file does not have an app associated with it for performing this action on Windows 11.
Right-click on the file you’re trying to open and select Open with from the context menu.
You’ll then be able to select the program you prefer to use to open the file.
If the above steps don’t work, you can use the Open with command to open the file.
By following the steps outlined above, you should be able to fix This file does not have an app associated with it for performing this action on Windows 11 computer.
If you’re still having trouble, you may need to seek additional help from a computer repair professional. Also, note that in some rare cases, this problem may result from malware, and performing a scan with a proper antivirus may come in handy.
let us know in the comments below what worked for you.
Facebook does not send notifications when someone takes a screenshot of posts, photos, Stories, Reels, or profile pages. You can freely capture almost any content on Facebook without alerting the other person. The only exception involves a specific Messenger feature called Vanish Mode.
Below is a detailed breakdown of how Facebook handles screenshots across different types of content.
Facebook does not track or notify users when you screenshot posts, images, albums, or video content. This includes anything shared on your feed or someone else’s timeline.
For users concerned about misuse, it’s worth considering some forms of Facebook screenshot protection to discourage unauthorized sharing or copying of your content.
Screenshot notification: No
Facebook Stories and Reels
Screenshots of Stories or Reels are also not tracked. Facebook does not send alerts if someone captures a Story or screen-records a Reel, even though these formats are temporary.
Screenshot notification: No
Facebook Profile or Cover Photo
You can screenshot a user’s profile page, profile photo, or cover image without triggering a notification. If the user has enabled Profile Picture Guard (where available), the image cannot be downloaded or shared directly, but it can still be captured via screenshot.
Screenshot notification: No
Regular Messenger Chats
Facebook Messenger does not notify users when screenshots are taken in regular one-on-one or group conversations. This applies to messages, photos, voice notes, or call logs within those chats.
Screenshot notification: No
Disappearing Messages in Messenger (Vanish Mode)
Messenger includes an optional privacy setting called Vanish Mode, also known as Disappearing Messages. When this is active, Facebook will notify both users if a screenshot is taken. This is the only place on the platform where screenshot alerts are triggered.
Screenshot notification: Yes (only in Vanish Mode)
To enable Vanish Mode:
Open a Messenger conversation
Swipe up from the bottom of the screen
Tap the “Turn on Vanish Mode” option
This creates a temporary chat where messages disappear after they’re seen, and screenshots are tracked.
Can You Prevent Screenshots on Facebook?
No. Facebook does not offer any system-level tool to block screenshots. Unlike Snapchat, it does not detect or restrict this action in any section of the platform. However, you can reduce exposure by limiting who can view your content.
Privacy tips:
Set post visibility to “Friends” or “Only Me”
Use the “Close Friends” option when sharing Stories
Turn off Story sharing in your settings
Enable Profile Picture Guard where available
Avoid posting sensitive material
If you manage a public page or share high-risk content, using dedicated social media protection software can provide an extra layer of defense against screenshot misuse, impersonation, or unauthorized sharing.
While these tools don’t stop screenshots, they help control who can access your content in the first place.
Conclusion
Facebook doesn’t alert users when screenshots are taken of posts, Stories, or profiles. The only time a notification is triggered is within Messenger’s Vanish Mode. While you can’t block screenshots entirely, smart use of privacy settings and third-party protection tools can help reduce misuse. If you’re sharing sensitive content, take a moment to adjust who can view it.
FAQs
Does Facebook notify you when someone screenshots a Story?
No. Facebook does not alert users when their Story is captured by someone else.
Can someone see if I screenshot their photo or post?
No. There are no notifications or indicators when photos or posts are screenshotted.
What happens if I screenshot in Messenger Vanish Mode?
Both you and the other person will receive a notification that a screenshot was taken.
Is there any way to block screenshots on Facebook?
No. Facebook does not allow you to block screenshots, but you can limit content visibility.
Windows 11 has a wide variety of services, most of which you probably won’t know exist. Services are mini-programs designed to manage very specific functions. Unlike more regular software, they run in the background and don’t require any kind of user input to operate.
Some services are more essential than others. Most third-party software services are pretty safe to disable as they only affect the software they’re for. However, there are some Windows services you shouldn’t touch. You can disable services in Windows 11 with the methods below.
Why should I disable services in Windows 11?
Services consume system resources, such as RAM (Random Access Memory), much the same as regular desktop software. Most services consume very little in the way of system resources. However, lots of services combined can stack up and waste larger amounts of RAM.
So, disabling lots of superfluous services can free up system resources for the desktop software you need to utilize. There might be quite a few active services on your PC that you don’t need. You can see what services are running, and their RAM usage, on the Processes tab in Task Manager.
Which Windows 11 services should I disable?
There are probably a lot of services enabled for Windows 11 features you never utilize. The safest services to disable are those needed for some of the most obscure features few users need. These are some of the safest ones you can disable in Windows 11:
Phone Service: This is a service primarily for the Your Phone app.
Windows Insider Service: Only users on the Windows Insider program need to have this service enabled.
Bluetooth Support Service: This is a necessary service for all users who pair Bluetooth devices with their PCs. If you don’t, however, you can safely disable this one.
Fax: A somewhat obsolete faxing service most users won’t need.
Remote Desktop Services: Disable this service if you don’t need to remotely connect with another PC.
Remote Desktop Configuration: This is another remote desktop connectivity service you can safely disable.
Windows Mobile Hotspot Service: The Windows Mobile Hotspot Service is one required for mobile hotspot, but most users probably don’t need it enabled.
Windows Error Reporting Services: This service only needs to be enabled for sending error reports.
Remote Registry: Do you need to edit your PC’s registry via a remote computer? If not, go ahead and disable this service.
Retail Demo Service: This service is needed for a Windows Retail Demo mode, which almost all home users won’t need.
WalletService: If you don’t utilize the Wallet app, you don’t need this service.
Aside from those, you can also safely disable third-party software services. Check the descriptions of such services to determine whether you need them enabled or not. Or you can uninstall third-party software you don’t utilize much to remove their services.
Disabling services will ensure they never automatically start. You can always re-enable disabled services if you ever need to utilize Windows features they’re needed for. Just make sure you check the services’ descriptions carefully before disabling anything.
How do I stop unnecessary services in Windows 11?
1. Use the Services window
Right-click your Start menu button to select Run on the menu shown directly below.
To open the Services window, type services.msc and press Enter.
Double-click an enabled service listed on that window to open a properties window for it.
Read the service’s description on the properties window to help you decide whether it’s one you need or not.
Press the Stop button for the service.
Then click the Disabled option on the Startup type drop-down menu.
Press the Apply button to disable the service.
Click OK to close the properties window.
NOTE
You need administrator permissions to disable and enable services.
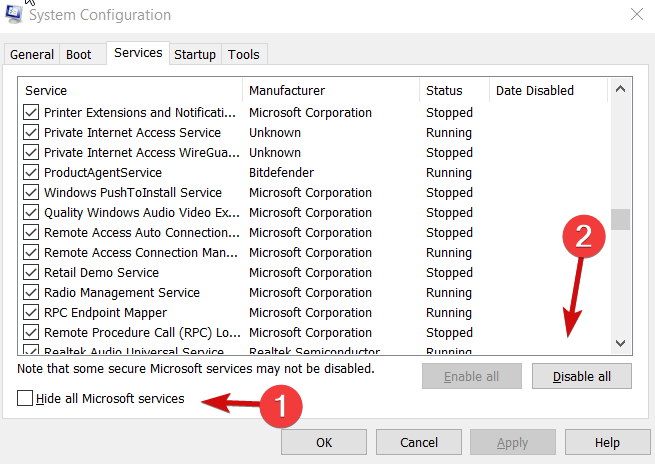
2. Use MSConfig
Press theWin + Xkeys and choose Run.
Type msconfigand click OK.
Select the Services tab within the System Configuration window shown directly below.
Deselect service checkboxes listed there.
Click Apply to save the new options.
Then press OK to exit the window.
Thereafter, you’ll be prompted to restart Windows. Click Restart on the dialog box to apply the changes.
NOTE
You can select the Hide all Microsoft services option to exclude those services. Then select to disable the remaining third-party software services listed. Clicking Disable all is the quick way to deactivate all the non-essential services.
3. Disable services via Windows Terminal
Open the search box by pressing the magnifying glass taskbar button.
Type Windows Terminal in the search box, right-click it, and choose Run as administrator.
Then click Open a newtab, and select Command Prompt there.
Enter this command within the Command Prompt tab: sc stop "service name" && sc config "service name" start=disabled
You’ll need to replace the service name in that command with the exact name of the service you want to disable.
If the services are running without any actual usage, modifying their status will surely make Windows 11 run faster, even though you shouldn’t expect a very big difference.
Another useful tip is that you can also disable widgets from the new OS, thus contributing even more to the speed of processing.
Even though not recommended, to improve the speed of your system, you can also choose to disable automatic updates, but it is worth noting that missing some important updates might expose your system to risks.
There are Windows and third-party software services. The Windows ones are there to ensure the smooth functioning of the platform. Those services are needed for things like updating Windows, printing, file sharing, scanning, etc.
Third-party services are used specifically for software packages installed on your PC. For example, the Google Updater Service is one that automatically updates Chrome. With that service disabled, you’ll need to manually update the browser.
You can disable superfluous services with any of the above methods. By doing so, you can enhance PC performance by freeing up resources for the software you utilize regularly. So, don’t let unneeded services waste system resources.
Using the Services app built into your system is one of the most user-friendly ways of achieving these results. This is closely followed by the method that uses MSConfig, while the most complicated will be to use the Windows Terminal, and write specific commands.
If you’re not sure what services you need to close, or what they do, the safest method is by far the first one, as the Services app is designed to show you information about the service you’re about to close, and thus help you make an informed decision.
You could also simply use the list we mentioned in this guide and find the specific services in the list. This method will also ensure that you can always come back to the desired service and activate it if you’ll need it in the future.
Before you leave, don’t miss our guide on Alljoyn Router service to learn more about how it works.
Don’t hesitate to share your experience with us regarding the Windows 11 services to disable topic by using the comment section found below this guide.
Why is my Bluetooth speaker paired but not connected?
There are several causes for this issue, but the following are the most common:
Bluetooth settings – In order to connect, Bluetooth needs to be configured properly. In addition, you might want to check Bluetooth capability on your PC.
Services – For Bluetooth to work, specific services need to be enabled. If they aren’t, you might get Bluetooth support service error 1079 and others.
Driver issues – Driver glitches are common, and they can lead to this and many other errors. To fix the issue, it might be necessary to uninstall and then install the Bluetooth driver on your PC.
How can I fix a Bluetooth speaker that’s paired but not connected?
1. Select the Allow Bluetooth devices to find this PC option
First, click either the search box or magnifying glass icon on the Windows 10 taskbar.
Next, enter bluetooth within the search text box. Next, select Bluetooth and other devices settings.
Toggle the Bluetooth option on if it’s off.
Click More Bluetooth options.
Select the Allow Bluetooth devices to find this PC option. Lastly, click the Apply and OK buttons to save the new option.
If the Bluetooth option is turned on, try toggling it off and then back on again.
2. Run the Bluetooth troubleshooter
To bring up Settings, press the Windows + I keyboard shortcut. After that, go to Update & Security.
Choose Troubleshoot. Next, click on Additional troubleshooters to open a list of troubleshooters.
Select Bluetooth and press its Run the troubleshooter button. Thereafter, the troubleshooter will open and might apply some fixes.
Some users have also said the Background Intelligent Transfer Service troubleshooter has helped them fix Bluetooth devices that aren’t connecting.
You can open that troubleshooter from the Control Panel by clicking Troubleshooting > View all. Then select the BITS troubleshooter from there.
Hold the Windows key down and press R at the same time. Type the following text into the Open box and click OK: services.msc.
Double-click Bluetooth Support Service in the Services window.
Click the Automatic Startup type option on the drop-down option. Next, press the Start option if the service isn’t running. Lastly, click Apply and OK to save changes.
Repeat steps the same steps for the Bluetooth Handsfree Service if available.
NOTE
If the Bluetooth services are already running, try right-clicking them and selecting the Restart options on their context menus. Then make sure those services are configured to start automatically as outlined above.
4. Select all the Bluetooth services for your speakers
Press Windows key + R and enter control. Press Enter.
Select Devices and Printers to open that Control Panel applet.
Right-click your paired Bluetooth device there and select Properties.
Click the Services tab.
Select all the Bluetooth service checkboxes for your device. Lastly, click Apply and OK.
5. Disable Bluetooth LE Enumerator
Right-click the Start button to select the Device Manager shortcut on the menu that opens.
Double-click Bluetooth in Device Manager.
Right-click Microsoft Bluetooth LE Enumerator to select Disable device.
Click the Yes option on the dialog box that opens.
After doing that, check if the problem is still there.
6. Reinstall Bluetooth drivers
Press Windows key + X and select Device Manager.
Expand the Bluetooth category by double-clicking it. After that, right-click your Bluetooth adapter and select the Uninstall device option.
Select the checkbox for the Delete the driver software for this device option on the dialog box that opens. After that, click Uninstall to remove the device.
Next, click the Action menu at the top of Device Manager and select the Scan for hardware changes option.
When Wireless Bluetooth is reinstalled, check it’s enabled by right-clicking it and selecting Enable device if needed.
7. Update Bluetooth drivers
Press Windows key + X and select Device Manager.
Double-click the Bluetooth category. Right-click Wireless Bluetooth and select Update driver.
Select the Search automatically for drivers option to see if Windows determines if the best driver is already installed.
If Windows’ Update Drivers utility doesn’t update the Bluetooth driver, consider scanning your PC with a good third-party driver utility like Outbyte Driver Updater.
That utility will tell if you need to update any Bluetooth drivers on your PC. Then you can update the Bluetooth device drivers with the software.
Outbyte Driver Updater
Try the Outbyte Driver Updater app and find the latest updates for your Bluetooth drivers in no time.
Google Drive is undeniably the most beneficial part of having a Google account. You get a whopping 15GB of free storage when signing up so you can securely store all your documents on Google servers, with options to expand storage for a fee.
What if you are unable to access a shared file due to issues with your system or bugs in the Google Drive app? Or, what if something happens and Google loses your data stored in Google Drive?
We are going to show you how you can easily move files from Google Drive to an external flash drive or hard drive so you will always be on the safe side no matter what happens.
How to move files from Google Drive to an external flash drive?
Backing up Google Drive on an external hard drive or flash drive is a great way to ensure you will never lose your documents. You might even want to send a file to someone who does not use Google Drive. To do so, simply follow the steps below:
Step 1: Plug the flash drive into a free USB port on your computer.
Step 2: Log in to your Gmail account and go to Google Docs. Locate the folder in Google Drive that contains all the files you would like to put on the flash drive.
Step 3: Select the file you want to download by clicking on it. If you want multiple files, hold CTRL, then click on all the files you want to put on the flash drive.
Step 4: Once you have selected the files, navigate to the More button, and then click Download. Once prompted, choose to save the files in the flash drive, then click save.
Step 5: Once prompted, choose to save the files on the flash drive, then click save and all your downloaded files will be saved to the flash drive.
Step 6: In the file explorer, right-click the flash drive and select Eject from the context menu. Then unplug the flash drive from the USB port.
Since we are talking about storage and most importantly, about the possibility to access your files whenever and wherever we simply must introduce you to Sync.
This powerful tool will store all your Google Drive files and more and act as a complete backup solution allowing you to store, share, and access all of your documents from any location, across all of your devices with no risk of data loss or leakage.
But Sync delivers more than storage, it also delivers best-in-class file history and recovery features.
Raising the stakes even further, Sync also acts as a powerful privacy protection tool that uses end-to-end encryption to make sure your confidential documents are completely safeguarded from unauthorized access.
The best part is that you get up to 5 GB to store all those important files in the cloud absolutely free of charge.
Google Drive enables you to access all your Google docs, spreadsheets, drawings, and presentations from anywhere. As a cloud-based storage service, Google Drive includes a host of Google’s suite of office applications, also called G Suite.
The G-Suite office applications include Docs, Sheets, Drive, Calendar, and Slides among others. As a business owner, there are many benefits to using Google Drive. Here are just a few.
Ease of access – You can access all your files from anywhere, at any time, and on any platform, be it on mobile devices or on a PC. All you need is internet access and your login credentials.
Collaboration – Once you’ve created a document, you can easily share it with others, comment, and see your colleagues editing in real time. Furthermore, you can give specific individuals permission to edit documents or choose to allow read-only access.
Google Drive offers ample storage, currently 15GB for free, so you can store a lot of files without running out of storage. In addition, documents created from within the Drive don’t count against your storage limit.
Integration – Google Drive seamlessly integrates with other popular applications, adding to the convenience factor.
If you want to access Google Docs from anywhere, at any time, from any PC, you may consider using the browser version and not the Windows 10 app. While we’re at it, take a look at these best browsers for Google Docs.
However, Google Drive is not perfect, and just like any other application, it does have some disadvantages. First, its security system is not powerful enough and hackers can remove your important data or install viruses onto your server.
The other disadvantage is its upload and download speeds, which are a bit slow. Other than that, Google Drive is a great choice for anyone who wants to increase office productivity.
The Xbox One was first launched all the way back in late 2013 as an all-in-one entertainment system. Besides playing games, you could also live stream, watch TV, and play your favorite movies.
In order to watch any movie on the Xbox One, you have to first download the free DVD player app from the online store. The catch is that you need to be connected to the internet at all times.
It’s not the old days when all you had to do to watch a movie was simply insert the disc and kick back on the couch. With the Xbox One, Microsoft forced people to connect to the internet.
And if you’re connection was out, you were out of luck. Luckily, there are ways to get around this problem so you can enjoy movies offline.
But before we get to that, it’s essential to go into detail about whether or not the Xbox One can play Blu-ray discs, and if there are any restrictions.
Does Xbox One play Blu-ray?
Yes, all Xbox One models can play Blu-Ray discs and standard-definition DVDs, USB drives, and content from streaming services like Netflix and Apple TV.
Things do get a little messy with global regions, however. Every single DVD is coded to only work on machines from specific regions. Region A DVDs only work on players from the same part of the world.
Xbox One consoles are no different. This standard was set into place by the MPAA (Motion Picture Association of America) and other similar organizations worldwide to control DVD distribution.
Blu-Ray disks are less restrictive than standard DVDs. Below is a list of the various Blu-Ray global regions.
Region A: This covers both North and South America, Japan, Hong Kong, South Korea, Taiwan, and various other Southeast Asian countries.
Region B: This region includes most countries in Europe, Africa, and Southwest Asia like Saudi Arabia, plus Australia and New Zealand.
Region C: Countries in this region include the remaining nations in Central and South Asia like China, India, and Russia.
Region Free: Blu-Rays that fall under this category can be played on any Xbox One console from any region without any trouble.
DVD regions, however, are much more detailed as there are eight in total.
Region 1 covers the United States, the US territories, Canada, and Bermuda.
Region 2 covers all of Europe (minus Russia, Ukraine, and Belarus), the Middle East, Japan Egypt, South Africa, Swaziland, Lesotho, and Greenland.
Region 3 encompasses all of Southeast Asia, South Korea, Hong Kong, and Taiwan.
Region 4 is made up of all of Central and South America, Oceania, and Mexico.
Region 5 has India, Afghanistan, Ukraine, Russia, and all of Africa, as well as Central and South Asia.
Region 6 is made up of only one country: China.
Region 7 is a strange one because most sources only refer to it as being “reserved” with its exact purpose unknown.
Region 8 is for international venues like airplanes and cruise ships.
If you’re interested in playing 4K-resolution movies, you’ll need to purchase either the Xbox One S or the One X as the base console doesn’t support such high-quality content.
Below is a table detailing all of the notable video features for each Xbox One model.
Xbox One
Xbox One S
Xbox One X
Max Resolution
1080p
4K but only for video
Native 4K
HDR support
No
Yes
Yes
Optical drive
Blu-Ray
4K UHD Blu-Ray
4K UHD Blu-Ray
Storage space
Up to 1TB
Up to 1TB
Up to 2TB
CPU
Custom 1.75 GHz AMD 8-core APU
Custom 1.75 GHz AMD 8-core APU
Custom 2.3 GHz AMD 8-core APU
Memory
8GB DDR3
8GB DDR3
12GB GDDR5
As you can see in the table, both the Xbox One S and One X models are fantastic for watching Ultra HD Blu-Ray movies. The base model just isn’t capable of handling such a high resolution.
But if you have to choose between the two, you should go for the One X. Its support for Native 4K resolution means it’s actually reaching that high quality.
This is especially important if you decide to use your Xbox One for playing video games. It ensures the quality of those titles actually reaches that high.
The Xbox One S has to use various upscaling techniques to reach 4K resolution; more so than the X model. Ideally, there shouldn’t be a difference between upscaling and native 4k, but there is.
Upscaled 4K isn’t as good. You may encounter some performance issues or graphical glitches if you try to play content at 4K resolution on the S model. For the Xbox One X, graphical issues aren’t as impactful.
Can you watch Blu-ray on Xbox One offline?
Going to the main question: yes, you can actually watch Blu-ray movies on any Xbox One console offline. Doing so will require you to go into the console’s settings and reconfigure it.
The following solutions go for all Xbox One models.
1. Go offline
On your Xbox One, scroll all the way to the left of the Home Screen, and in the new section, select Settings.
Click the General tab and open Network settings.
Next, click Go offline.
Go back to the General tab and select Personalization.
On the following page, click My home Xbox. Ignore everything else, or if you want, you can customize your console’s look.
Finally, select Make this my home Xbox.
The final few steps will solidify your Xbox profile with its configurations as the main one.
That way, you won’t have to go back into Settings and go offline every time you turn on the console and want to watch a movie. Of course, you can revert the settings any time you want.
2. Connect via hotspot
Turn on the mobile hotspot feature on your smartphone.
On the Xbox One, go to Settings again, stay on the General tab, and select Network settings.
Click Set up wireless network then choose your phone’s connection.
Enter the password of the network, then give your console a few seconds to connect to your phone.
After that, you’re ready to watch Blu-ray movies at any time you want. And you can do this with any phone too; so long as it can provide a hotspot.
Do I need to download the Xbox One Blu-ray player app?
In order to watch a Blu-ray movie on the Xbox One, you will need to download the Blu-ray player app, and it’s easy to do this. There are two ways to go about it.
The first method is simply to insert the disc into the console, at which point the Xbox will detect that it’s a Blu-ray and give you the opportunity to download the app from the Xbox Store.
Install it, and after a few seconds, the movie will begin to play automatically. The second method will have you go into Xbox Store.
Go to the Xbox Store from the Home screen. If you don’t see the Store, go to Settings and click Add more.
Find the Store tile and select Add to Home.
On the Store, type Blu-ray in the search bar, and the Blu-ray Player app should appear at the top.
Select Install to get the app.
How do I play a non-Blu-ray DVD on Xbox One?
There’s no difference between playing a Blu-ray and a non-Bluray DVD on any Xbox One model. According to Microsoft’s Xbox support page, all you have to do is insert the DVD.
The movie will begin playing automatically. You won’t even need a player app to watch standard DVDs. But if you have the Blu-ray Player app from the previous solution, it will play from there instead.
Feel free to comment below if you have questions about any of the Xbox One consoles. Also, leave comments about guides you’d like to see or information on other Xbox features or guides like this.
Instagram is one of the most popular social media platforms allowing you to use two accounts. And what is even more impressive is that Instagram Live is available to both PC and mobile users.
However, sometimes, the app might not work correctly, as you won’t be able to run it in normal conditions.
When attempting to connect, you’ll get a message from Instagram which says the following:
We’re sorry, but something went wrong. Please try again.
Users described ending up with a crashed program or not being allowed to load any posts. Moreover, from what we found, issues can also appear when sending DMs to friends, among others:
Something went wrong 6 Instagram
Instagram Ad Tools: something went wrong
Instagram boost posts something went wrong – These occur randomly or due to poor updates. You’ll not be able to upload posts, load, or view them.
We’re sorry, but something went wrong (Instagram profile)
Sorry, something went wrong creating your account. Please try again soon.
Instagram we’re sorry something went wrong blocked
We’re sorry, but something went wrong. Please try again Instagram reels
The Instagram something went wrong error was just one example, but you might encounter some other annoying issues:
Issues with Facebook permissions – If you accidentally deleted Instagram from your Facebook account, you’ll not be allowed to post from one to another.
Comment problems – Note that you’ll not be able to leave a comment that includes more than 5 username mentions, beyond 30 hashtags, or multiple times posted.
You can’t follow any more people on Instagram error – In case you rapidly try getting in touch with numerous people, Instagram may temporarily ban you for bot-like behavior.
Story problems – If Instagram is crashed, you’ll not be able to load stories.
This may cause the platform to crash or just stop you from posting on Instagram, and we understand how irritating it can be.
We selected only the best options to quickly solve this annoying issue. Make sure you keep reading our guide to find them all. But first, what does we’re sorry but something went wrong Instagram mean?
Let’s see some common reasons why the error shows up in the first place.
Why does Instagram say we’re sorry, but something went wrong?
There are two main leading causes for Instagram bugs: the service is down or there is a problem with your Internet connection.
Before assuming that Instagram has glitches, you should check whether the app is down worldwide or not. Yes, note that sometimes it faces issues globally, and other times it only affects specific regions.
However, account glitches are the most common reasons that explain the Instagram error: We’re sorry, but something went wrong appears.
Quick Tip:
Try opening the platform using Opera One. It has built-in integrations for Instagram, both for computer apps and mobile. Enter your credentials and access the feed from the sidebar.
Opera One is a secure browser, with anti-tracking features, plus a free, unlimited VPN to make sure all your private data stays protected.
Opera One
Remove errors keep track of your Instagram feed, and quickly respond to your messages directly from the sidebar!
What to do when Instagram says sorry something went wrong?
Before we dig in, here are some useful things to keep in mind:
Check your internet connection
Restart or reset the app by closing and reopening it
Restart your device
1. Make sure the Instagram server is available
Sometimes, Instagram servers can be temporarily unavailable. You can confirm this by using a live outage map online or asking your friends if they are having the same issue.
Just confirm that the problem is only related to your account and not to the entire Instagram server.
2. Login through Facebook
Open Instagram.
Click on Log In with Facebook.
Now, check if the error persists.
Note that this can only be possible if you had earlier connected these two accounts. So, it is advisable to get your Facebook and Instagram accounts connected.
Linking them can prevent them from being hacked and help quickly resolve the Sorry something went wrong Instagram error.
Since the day Facebook bought Instagram, the connection between the two of them has become extremely significant. There are even some features, like Instagram ads, that you can enjoy through Facebook.
If these options don’t work for your situation, check and try the other listed ones.
3. Use the Windows Instagram app
Open your device running the Windows 10 OS.
Hit the Windows key, then search for Microsoft Store, and open it.
Once Microsoft Store is opened, search for Instagram, then click on the first recommended option.
Now, click on the Get button.
Install the app by following the on-screen instructions.
Scroll down, then click on the Temporarily disable my account option at the bottom.
Wait for about 2-3 hours.
After waiting, enable your Instagram account and check if the problem is resolved.
We’re sorry but something went wrong Instagram errors might occur randomly, so temporarily disabling your account can clear the app from any glitches.
In case you choose to use this option, your photos, comments, and likes will be hidden until you reactivate your profile. Also, note that you can only disable the Instagram account from a computer or mobile browser.
5. Uninstall and reinstall the Instagram app
NOTE
While you’re at it, you might want to first check that you have the latest version of Instagram installed on your PC. Go ahead and check for updates within the Microsoft Store.
If there are no updates available or if the error message persists, try uninstalling and reinstalling the app.
You can quickly uninstall and reinstall your Instagram app yet keep in mind that this solution works only if you’re using the Windows Instagram app.
Uninstalling the app on your phone or computer will only delete it. All your content, like photos, tags, likes, or comments will still be there.
When you reinstall Instagram, sign back in as uninstalling it will log you out. The process doesn’t do anything to your profile and everything will be the same when you start using the app again.
Open the Windows 10 version of Instagram, then go to your profile.
Click on the Settings and more options icon marked as a gear.
Choose to Report a Problem.
Briefly explain what happened. Note that you can additionally add files with screenshots of the error.
Click on Send Report.
Even if Instagram users sometimes face random issues, this remains one of the most popular social media platforms.
According to DataReportal, Instagram is the fourth most popular social platform worldwide, after Facebook, YouTube, and WhatsApp. The 2022 study shows that Instagram has registered 1.440 billion global active users.
So, no matter how many issues it can bring up, our presented app will always be on top of the most-used social media tools.
You’ve already seen potential solutions that might help you fix the Sorry, something went wrong Instagram error.
Do you have any other questions regarding the above procedures? Feel free to share them with us by simply leaving a comment in the dedicated section below.
Screen mirroring technology can be great if you have a Roku TV and need to stream videos from a Windows 10 PC. While this might sound straightforward and easy, it actually requires you to know the steps to follow.
In this guide, we will provide you with all the needed information to mirror your PC screen to your TV and enjoy the advantage of the big screen.
How to check if your Windows 10 device is Miracast enabled
Press the Windows key + I to open the Settings app and select the System option.
Scroll down to the Multiple display section.
Now, check if the Connect to a wireless display option is available. If this option is unavailable, your PC does not have Miracast.
Typically, your Roku device should run at least Roku OS version 7.7 to mirror automatically. In any case, it is always best to ensure you are running the latest OS version.
Also, Roku Express model 3900 and Roku Express+ model 3910 support screen mirroring. Specifically, the Model 3910 support mirroring on HDMI output only and not in any other way.
How to cast Windows 10 PC to Roku?
1. Enable screen mirroring on Roku
Press the Home button on your Roku TV remote and select the Settings option.
Select the System option.
Now, select Screen mirroring when the System settings open.
Finally, choose Screen mirroring mode and select Always allow.
The first step to mirror your Windows 10 screen on your Roku TV is to enable screen mirroring on the device. This makes the process easier.
Click the message icon in the bottom right corner of your Taskbar and select the Expand option.
Select the Connect option.
Now, choose your Roku TV from the available options.
Finally, select the Allow option on your Roku TV when prompted.
With this, you can now view everything on your PC on the big screen. Lastly, if you want to cast Windows 10 to Roku without Miracast, you need to use a reliable third-party tool.
Why can’t I mirror my PC to Roku?
Below are some of the reasons you might not be able to mirror your PC to Roku:
Firewall interference
Outdated PC
Wrong TV settings
Incompatible system requirement
With this, we can conclude this detailed article on how to cast Windows 10 to Roku using the screen mirroring feature. We believe you now have everything you need to complete the task easily with the information in this guide.
Essentially, datacenters are in place to ensure that the company is able to deliver Azure, Office 365, and Dynamics 365, along with enterprise-grade reliability and performance combined with data residency. Microsoft has been making considerable strides to ensure that it is hitting these goals, which is why it has been taking elaborate measures to ensure that it’s optimizing efficiency in the datacenters.
Though the process has not been a clear path, we have seen a hold being placed on two of its new Irish datacenters because Ireland’s state-owned electrical utility provider was having a hard time keeping the lights on with its existing datacenters.
The acquisition of Fungible, an organization that majors in composable infrastructure will help Microsoft boost networking as well as storage performance in datacenters “with high-efficiency, low-power data processing units (DPUs).”
What’s more, this acquisition goes a long way to show Microsoft’s investment and dedication to ensuring that its datacenters are functioning at an optimum level. This is because latency, offloading, and server density will ultimately be improved across the datacenters which will in turn significantly cut down the cost implication the company incurs.
Learning how to prevent users from installing software on Windows 10 is easy enough, and it will take only a few minutes of your time. So, read this tutorial to the end, and you will become an expert in adding Windows restrictions in no time.
How can I prevent other users from installing programs on my PC?
1. Use AppLocker
Press the Windows + R key combination to open the Run console.
Type gpedit.msc and press Enter.
Now, expand Windows Settings from the left, go to Security Settings, and double-click on Application Control Policies.
Next, double-click or tap on the AppLocker file.
Now you should have there a few categories and depending on what you want to restrict you should choose accordingly but, in our case, we will need to right-click on the Package app Rules and select Create New Rule.
Now you should have in front of you the Create Executable Rules window; click Next.
From the Permissions page, choose the Deny feature in order to prevent users from installing software and also select the User or the group that will have this restriction.
Left-click or tap on the Next button after you finish.
You should now have the Conditions window in front of you.
You can choose your restrictions according to three conditions:
Publisher: This will restrict the software installation for a certain amount of apps that are signed by the publisher.
Path: Create this rule of restriction only for a specific folder path, everything outside the specified folder will not be affected by this rule.
File hash: You can create a rule for an application that is not signed. Note: In this tutorial we have selected the Publisher restriction feature.
Left-click or tap on the Next button.
Now, click on the Browser.. button under the Reference file: topic and select the type of app that you would wish to block. (this restriction will block all apps that are similar to the reference one you selected). Note: Go to a folder with an app that you wish to block and select it from there. You can either select the app installer or select the installed app as a reference point.
Now left click or tap on the Next button.
Left-click or tap on the Create button to create the rule that prevents users from installing software in Windows 8.1 and Windows 10
Close all the windows you have opened, log in with the user you set the restriction for and try installing an app to see if it works.
2. Block user installation rights
Type gpedit.msc in the Search Windows box and open the Group Policy Editor.
Go to Computer Configuration, then to Administrative templates, access Windows Components and doube-click on Windows Installer.
On the right, right-click on Allow user control over installs and select Edit.
Now, select Enabled, customize your settings, and choose from For non-managed applications only/ Always/ Never and hit the OK button when done.
3. Use standard user accounts
Another quick way to prevent other users from installing software on your PC is using standard user accounts.
In this manner, only the Administrator account can install and remove apps and programs on the PC.
4. Use a dedicated tool
WinGuard Pro is a very useful program that allows you to password-lock your apps and programs. With the help of this tool, you can easily disable software installation and download processes and block other users from running .exe files.
Now that you know the basics of setting the restriction levels for a specific user or a user group, you can go and modify or create new permission rules and customize them as you wish. Please write us below if something is unclear or if you need further assistance on this subject.
Tabletop Simulator is a game that allows players to create digital versions of tabletop games like Chess and poker. Steam users, however, have reported a debilitating error that won’t let them launch the title.
The game will immediately crash upon startup, making it unplayable. This is a debilitating error that fortunately is pretty easy to fix.
What causes the game to crash on startup?
Before going into the reasons behind the error, it’s important to first understand why it happens. That way, if it does happen again, you recognize the issues and can more easily address them.
Your game files are corrupted: Corrupt games will not work properly and cause many other problems, not just crashing on startup. It’s important that you clear out those files to repair them.
The computer’s antivirus software is interrupting the game: Overzealous security software can block certain apps from running. It’s recommended you add an exception to the game.
The security settings are set too high: You should lower your internet’s security options to allow Steam to function properly.
There was a Steam disk write error: This can happen during installation. If this happens, you’ll need to uninstall Tabletop Simulator, then reinstall it.
How can I stop Tabletop Simulator from crashing on startup?
There are a ton of fixes for this game crashing on startup; some of them are easy to do while others are more complex and take a bit longer to complete. The longer solutions should be considered only after the easy fixes don’t pan out:
Restart both the Steam launcher and your computer, one after the other. Most of the time, this is all you need to do.
Make sure your drivers are up to date. Not doing so can cause compatibility problems, negatively affecting software performance.
Also, be sure to update Steam regularly. Valve is consistently rolling fixes and patches for its platform.
If you’re using MSI Afterburner or similar software to overclock your computer, turn it off. Some users have discovered apps like Afterburner can interfere with a game’s performance.
1. Verify the integrity of the game’s cache
Open the Steam launcher and go to your Library.
Right-click Tabletop Simulator, then click Properties in the context menu.
In Properties, go to Local Files and select Verify integrity of game files.
Give Steam enough time to verify the files. It may take several minutes.
2. Adjust launch options
Go back to the Properties window of Tabletop Simulator from the previous solution.
Stay on the General tab and locate Launch Options.
In Launch Options, enter the following modification: -screen-fullscreen 0 -screen-width 1920 -screen-height 1080
This will cause Tabletop Simulator to open with those parameters.
3. Uninstall and reinstall Microsoft Visual C++ 2012
Expand the Windows Search bar and type in appwiz.cpl. Click the Control Panel item that appears.
Scroll down until you locate Microsoft Visual C++ 2012 Redistributable x64 and x86.
Right-click and select Uninstall for both of them.
Now go to Microsoft’s Download Center and download Visual C++ Redistributable for Visual Studio 2012 Update 4.
Download both the x64 and x86 versions.
Once downloaded, go to the file’s location on your computer and run it to begin the installation.
4. Add firewall exceptions
Open the Windows Control Panel and select Windows Defender Firewall. If you don’t see it, change the View By option to Large Icons.
In this new section, click Allow an app or feature through Windows Defender Firewall on the left-hand side.
Click the Change settings button at the top, then Allow another app at the bottom.
In the new window, click Browse.
Locate Tabletop Simulator in your computer’s C drive. It should be under the following directory: C:\Program Files (x86)\Steam\steamapps\common
Once you found the file, double-click it then select the Add button to make an exception for it in Windows Defender Firewall.
5. Disable fullscreen optimization
Go to the following directory and locate Tabletop Simulator: C:\Program Files (x86)\Steam\steamapps\common
Right-click the game, then select Properties.
In the new window, go to the Compatibility tab.
Check the box next to Disable fullscreen optimizations. Click Apply then OK.
Yes, there are several fixes for downloading errors, but there are two that we want to highlight in particular. One is what to do if the download queue keeps changing.
What happens is one game will begin downloading, but then suddenly changes to another interrupting the first one. Fixing this involves deleting the Steam download cache.
The other fix is what to do when game downloads aren’t progressing. We recommend stopping the download if you can, and then immediately update Steam.
Feel free to comment below if you have questions about addressing Steam problems. Also, leave comments about guides you want or information on other gaming issues.
Please note that paid security updates for Windows 7 via Extended Security Updates (ESUs) are coming to an end tomorrow, January 10, 2023.
Consider upgrading from Windows 7 to a supported version
This is actually really serious, so anyone still running this system should upgrade to Windows 10 soon to remain safe.
Keep in mind that free Windows 7 updates stopped being issued in 2020 but due to its popularity, Microsoft decided to offer Windows 7 ESUs for a price that extended security updates until now.
Furthermore, users that bought the extended support got updates delivered each month through Patch Tuesday when other versions of Windows were updated.
Unlike newer versions, however, Windows 7 ESU only received security updates, but not feature updates, due to the fact that it is pretty old now.
The last Patch Tuesday update for it will be released tomorrow but afterward, you need to upgrade to one of the supported versions.
And, with Windows 8.1 support ending this week as well, you’ll need to move to Windows 10 or the newer Windows 11.
For PCs that don’t support those versions of Windows, running Linux is also an option you might consider.
In case you didn’t know, Linux Mint 21.1 came out just before Christmas and it looks a lot like Windows 7 so it may be a good option if Windows 10 is off-limits.
Also, keeping updates coming for Windows 7 is something Microsoft doesn’t really want to do, as it’d much prefer to see users upgrade to newer versions of Windows.
Just to give you a basic idea, in order to make it worth its time to keep Windows 7 supported, users had to buy Windows 7 ESU SKUs each year in 2020, 2021, and 2022 if they wanted updates.
Additionally, just if that wasn’t bad enough, if you decided you want this in the second or third year, you had to pay for prior ESU years too.
To conclude, since the Redmond-based tech company is ending support for Windows 7 ESU tomorrow, please consider updating to a newer, supported version of the OS.
Taking into consideration the huge amount of cyberattacks happening lately, you should not take this advice lightly at all.
What version of Windows have yhou decided to migrate to from Windows 7? Share your opinions with us in the comments section below.
Looking for the best hidden object games (HOGs) on PC? These games are perfect for puzzle lovers who enjoy solving mysteries, uncovering secrets, and spotting clues in richly illustrated scenes. Whether you’re new to the genre or a seasoned detective, there’s something here for everyone, including free hidden object game downloads.
Mysteryville drops you into a quiet town where strange disappearances are stirring up panic. You play as a journalist investigating a case that quickly turns out to be much deeper than it seems. The puzzles are packed into vibrant scenes, and you’ll find yourself drawn into the quirky atmosphere from the start.
The game is ideal for players who enjoy straightforward detective plots mixed with colorful visuals and light humor. It’s easy to jump into but keeps you curious with every clue you find. The multilingual support is a bonus if you want to play in your native language or practice another one.
Step into a mythical world to rescue a kidnapped friend in The Secret Order. This hidden object game offers:
34 challenging minigames and 18 hidden object scenes
Beautiful hand-painted artwork
A deep, captivating storyline
The Secret Order takes you on a time-traveling quest filled with ancient artifacts, lost civilizations, and a bit of dragon lore. The game world is fully fleshed out, with each chapter offering new puzzles, characters, and beautifully illustrated scenes.
If you enjoy fantasy games with a strong story arc, this one’s for you. The hidden object scenes are smartly integrated into the narrative, and the balance between puzzles and story makes the experience feel like a fully interactive novel. It’s available on Steam and runs smoothly on most PCs.
Available on Steam, it’s perfect for players who love immersive fantasy adventures with rich puzzles.
Chase an undead pirate in this gripping hidden object adventure. Key features include:
Three difficulty modes to suit all players
Multiple player profiles
A rich, atmospheric story
Developed by Artifex Mundi, this game blends casual gameplay with a mysterious pirate plot. Nightmares from the Deep throws you into a supernatural pirate tale where you’re chasing down an undead sea captain who’s just come back to life. The game combines ghostly lore, hidden treasures, and detailed environments to create a moody, engaging experience.
What stands out here is the atmosphere. The game is darker but still approachable, with plenty of hidden object scenes that don’t feel repetitive. Whether you’re in it for the story or just want a bit of a challenge, the difficulty settings let you tailor the gameplay to your style.
Lightweight games compatible with Windows XP and newer
Built-in strategy guides and bonus content
Casual gameplay with engaging stories
The Awakening series follows Princess Sophia on her journey through a magical world filled with talking owls, enchanted castles, and ancient riddles. Each game offers a mix of mini-games, puzzles, and hidden object scenes with a soft, storybook style.
If you’re looking for relaxing gameplay that still keeps you thinking, this series is a solid pick. It’s especially beginner-friendly thanks to the built-in hints and guides. You can play them in order for the full story, or jump into any title without missing too much.
This series is excellent for beginners and fans of fairy tale adventures.
Family-friendly gameplay inspired by the hit Disney movie
Zootopia: Crime Files is perfect for players who want a light, fun hidden object game with familiar faces. You’ll join Judy Hopps and Nick Wilde as they crack open cases all around the city, each one offering new scenes and puzzles.
The game sticks closely to the tone of the movie, which means it’s playful and easy to follow, but still has enough going on to keep older players engaged. The visuals are sharp, the characters are well-animated, and the clues come together in satisfying ways. It’s a great pick for fans of the film or families playing together.
Living Legends: Bound by Wishes leans into the darker side of fairy tales. You arrive in a town that’s been twisted by the power of wishes, and as you investigate, the story unravels into something more personal and intense.
The puzzles are layered and rewarding, with scenes that push you to really pay attention. The visuals and audio do a lot of heavy lifting here, creating a moody but beautiful world that pulls you in. If you prefer your hidden object games to feel more like a novel, this is one of the most polished options around.
Highly rated for its story-driven gameplay and immersive experience.
Final Thoughts
Whether you want to download free hidden object games for PC or invest in story-rich premium titles, there’s no shortage of compelling adventures. From haunted houses to bustling cities, hidden object games deliver hours of relaxing, mind-stimulating fun.
Skype is an almost perfect VoIP software. You can make voice and video calls, conference calls, and voice and text chats over the internet.
You can even create private groups and use them as a productivity tool to keep your entire team on the same page. It is easy, fast, and reliable.
Remember, how I said almost perfect? Right, Skype for some privacy reasons does not offer the ability to record video or voice calls and save them locally.
The built-in Skype recorder saves the recorded files in the cloud, alerts every participant about the call being recorded, and posts the recording on the chat screen giving everyone access to the recording.
While Skype may have privacy concerns to blame for, not having an offline recording tool is almost a deal-breaker for many.
Fortunately, many third-party Skype recorders allow you to record voice and video calls with a click of a button.
Whether you want to record personal conversations or professional work-related conversations, recording calls can help you in many ways including legal issues.
In this article, we take a look at the best Skype recorder tool for Windows 10. These tools have been considered best keeping the ease of use and features on offer in mind. So, let’s get started.
What are the best tools to record Skype conversations?
AthTek Skype Recorder is a certified software created with the mission to help anyone to record interactions while using Skype. If you need professional help with Skype recording, this solution is probably the best choice.
Assuming you’re a recurrent user of Skype for video and audio calls, this software can help with any recording services you may need. For example, it’s possible to record video or audio with one click using the extremely simple interface.
Furthermore, the features are not very consistent but come with very practical benefits. You can record video calls automatically at high quality on both sides, and use the parental control function or advanced FTW uploader.
More so, with this easy-to-use platform, you are able to organize the call recordings and easily find any file you need. Hence the recorded calls can be found by using built-in tools, like recent audio calls or Skype calls.
Talking about tools, it includes simple buttons for the main functionalities like starting audio and video call recording, or settings configurations.
All in all, choosing this practical software means full support regarding your online meetings using Skype. Assuring the needed quality and simple usability, you can enjoy your recordings stress-free.
Athtek Skype Recorder
Record your meetings without any glitches or sound difficulties using this certified Skype recorder tool.
MP3 Skype Recorder as the name suggests is an audio recorder for Skype calls. It is available in both free and Pro versions and can only record voice calls.
MP3 Skype Recorder free version has all the features except the ability to turn off call recording alerts and one-click management of recordings, and of course, it is not for commercial use.
MP3 Skype Recorder is compatible with all versions of Windows from Windows 7 to Windows 10. The software once installed, automatically starts recording incoming and outgoing Skype calls. All the recorded files are stored on the local drive.
The app sits in the system tray monitoring your Skype call activity. It can record multiple calls simultaneously and save each conversation as a separate audio file.
All the recorded files are stored in MP3 formats for easier access and playability across devices. It can also record P2P, SkypeOut calls, and calls made to Skype online numbers.
You can manually turn on and off MP3 Skype Recorder. The user interface is simple and offers all the information on the main page. You can customize the Recorder launch option, Recording Settings, and Notification settings as per your preference.
By default MP3 Skype Recorder stores all the recordings in the installation folder, which you can change to a different location if needed.
TalkHelper is a powerful Skyper recorder tool and is focused on business users. It is a premium utility, but you can test the software using the free trial. The free trial has no limitations on the features.
It is a lightweight recorder and has little to no impact on system performance. The user interface is simple and clean.
Using TalkHelper, you can record voice calls as well as video calls. It also allows you to save and manage voicemails from Skype.
TalkHelper records high-quality video calls along with screen shares and stores them in AVI files with XVID codec support on your computer. The audio calls, on the other hand, can be saved in MP3 or WAV format with stereo and mono options supported.
With TalkHelper you can save voicemails and video messages directly to your computer. The recorder automatically starts recording all the voice and video calls as soon as they are connected. Although, you can disable the recording feature manually.
All the call recordings are shown under the Call Recording section. You can sort the call recordings based on time. Other basic features in TalkHelper include the ability to play/pause recordings, delete the recording and open them in the folder.
TalkHelper is well served for business users who can make use of the software’s capabilities and justify the price tag which is not cheap from any angle. You can download the trial version to evaluate all the features it has on offer before making a commitment.
Evaer is a Skype recording tool that can record Skype video calls, audio interviews, conferences, podcasts, and family calls. The recorded calls are saved in MP4 and AVI format for easier accessibility.
Evaer directly records the video calls data and does not act as a screen recorder hence retaining the highest video quality possible. It can record up to 10-way Skype group video calls.
All the recorded calls are saved in the local drive. You can record calls in 240p to 1080p Full HD resolution with a 4:3 / 16:9 aspect ratio.
With Evaer Pro you can change location video position in PIP mode (Picture-in-Picture), exchange video position, and dynamically switch the video during Skype calls.
One interesting feature of Evaer is the ability to use it as an answering machine for incoming Skype video and voice calls.
Evaer comes in two premium versions. The Standard version costs $19.95, and the Professional version costs $29.95. The Pro version offers some additional features such as the ability to dynamically switch the video while recording and exchange of video positions.
You can test the software by downloading the limited trial version.
Pamela is a feature-rich call recorder for Skype and comes in both free and paid versions. The free version is limited by features. You can only take 5 minutes of video and 15 minutes of audio recording.
It also does not support automatic call recording and other advanced features. The Pro, Call Recorder, and Business versions do not have these restrictions.
The user interface is clean and simple. The recent recordings appear under the Voice mail, Skype Recording, or Custom recording section.
Pamela allows you to record Skype video and audio calls automatically and save it locally on your computer drive. It can also record Skype chats and manage conference calls. The recorded calls are saved in WAV or MP3 format.
If you want to use Skype for professional and business use, Pamela offers Answer Machine and Play sound during calls features. Auto Chat reply feature replies with pre-recorded text messages as replies to customers.
Other features offered by Pamela include email forwarding, blogging and podcasting options, Skype call scheduler, birthday reminder, and contact customization.
Pamela is targeted at the business user who uses Skype for customer service purposes. However, for casual users, the limitations on call recording in the free version can feel limited.
DVDSoft Skype Recorder is a completely free voice recorder for Skype that comes with no limitations. It can record Skype video and audio calls in picture-in-picture mode. You can also record only the video of the other sides and only audio of all sides.
The user interface is intuitive making the software easy to use. To start recording, specify the mode, choose the output folder and click on Start.
The video and audio files are recorded in MP4 and MP3 formats and saved on a local drive.
DVDSoft Skype Recorder is completely free to download and use and has no limitations on the available feature.
Although, it does not have the advanced feature offered by software like Pamela, for casual users it is more than enough.
In addition, you can enjoy the advantages of high-quality video and audio recording, low CPU demands, or live broadcast recording.
Therefore, you don’t need extra libraries for this recording tool, plus it comes with a very simplistic interface to use so anybody can record meetings effortlessly.
If you don’t want to install a third-party recording tool, Skype has a built-in call recorder that allows you to record both video and audio calls.
You can only record Skype to Skype calls as of now. To record any call, once the call is connected, click the + icon and select Start Recording.
Skype will immediately start recording your call and also alert other people on the call that the call is currently being recorded by showing a recording icon beside the user profile.
You can either manually stop the recording or the recording will end once you end the call. The recorded call will be saved to the cloud. The recording will be available for download for every participant of that conversation.
Hence you can benefit from the Skype recording option and capture any video call that you need to keep stored on your PC.
The recording tools market is saturated. Hence we created this guide to save you from the hassle of trying every single recording software to find the one that works for you.
Go through the features of the recommended software and depending on your requirement, download and install any Skyper recorder tool as a free trial. You can purchase the license to unlock advanced features for your business.
If you got locked out of your Windows Server system, you would probably be looking for a way to get in. It happens that in an attempt to secure our computer system we tend to use an extra secure and complicated password to provide extra security for the system.
However, if you have newly changed the password and forgot to take a note, you are in trouble.
Fortunately, there are several ways through which you can reset Windows Server 2003/2008/2012/2016 passwords. You can use a Windows Server Setup Disk to gain access and reset the password.
If you don’t have a setup disk, you would probably need to use any of the third-party software to reset the Windows Server password.
We have already shared a way to reset the Windows server password using the setup disk.
In this article, we take a look at the best software to reset the Windows Server password on your PC. Most of the recovery software for Windows servers are premium programs. But, you can download the trial version to be sure of its working capabilities before making a purchase.
What are the best software to reset Windows Server password?
Passware Kit Standard is a premium password recovery tool that can help you to reset your Windows Server administrator password. It is a multi-purpose tool and can do more than just Windows Server password reset.
You can use it to recover passwords for MS Office documents, PDF files, financial databases, email accounts, and over 130+ file types.
Your recovered passwords are automatically saved in a password history tab. You can easily reaccess them from the Passware UI.
Passware Kit Standard supports both CPU and Hardware acceleration and is compatible with AMD and NVIDIA GPUs.
To reset the Windows Server password for both Local and Admin, you need to create a bootable CD/ USB flash drive using the Passware ISO. After creating a bootable Flash drive, insert the USB drive into your PC’s USB port and boot from the drive.
Follow the on-screen instructions to reset the Windows server password. That’s it. You have successfully recovered the Windows server password using Passware Kit.
Other key features of Passware include:
Capable to decrypt data from mobile devices
Hardware acceleration
Live memory analysis
Passware Kit Standard is a paid service, but it comes with a money-back guarantee if you are not satisfied with its performance.
Passware Kit Standard
Put your trust in password reset software that combines versatility with advanced technology.
Windows Server Password Reset is a high-quality software created to reset the login password of the Windows Server.
You can use this tool for resetting Windows administrator account passwords even in the most difficult cases, like when the Windows Server setup disk is not available.
This intelligent tool allows you to reset the passwords of servers working as Domain Controllers. If you need to change the Windows Server password with RAID configuration, this software can help you perform this action easily.
Windows Server Password Reset has an intuitive UI, suitable for users of all levels. It guides you through the recovery process, you don’t need additional help.
An important characteristic of this tool is that it supports Legacy BIOS as well as UEFI, which means that it allows you to reset forgotten passwords installed in the Unified Extensible Firmware Interface mode.
Other key features of Stellar Password Recovery for Windows servers include:
Supports Windows Server 2019, 2016, 2012, 2008, 2003 and 2000
Simple user interface
Easy to install and configure
In terms of accessibility, the software has multiple language support for English, French, German, Italian, and Spanish.
Windows Server Password Reset
Get your hands on the most powerful software for resetting passwords for Windows Server!
Lazesoft Recover My Password Server Edition as the name suggests is a password resetting tool compatible with Windows Server 2003/ 2008 / 2012/ 2016 version and can help you in resetting the password for both local and administrator account that too without re-installing the OS all again.
Similar to Passware, this tool requires the user to create a bootable flash drive or CD using the ISO file to reset the password. Some of the features of Lazesoft Recover My Password Server Edition include the ability to detect multiple operating systems, unlock user accounts, disable the password expiry option, and more.
In addition, it can also be used to recover Windows 10 and 8 OS’s OEM product keys from BIOS, although you probably won’t need that since Windows 10 running devices have their product keys bound to the motherboard itself.
The user interface is nothing fancy but gets the job done. After booting from the flash drive, select the operating system you want to reset the password for. In this case, it is Windows server edition, and clicks Next.
Lazesoft Recover My Password Server Edition will display all the user accounts created on this computer. Select the one that you want to reset the password for and click next.
Click on the Reset/Unlock button to reset the password. Click on Finish to restart the system. Make sure you remove the USB drive / CD from the computer.
Other key features of Lazesoft Recover My Password Server Edition include:
Support for removable media
Free technical support
Compatible with 32-bit and 65-bit Windows
You can now log in to the Windows server as admin and set a new password and note it down as well. The software can be used for commercial purposes making the price tag affordable.
PCUnlocker is a software utility that allows you to reset forgotten passwords for Windows administrators and users’ accounts. The software comes in three versions namely PCUnlocker Standard, Professional, and Enterprise.
While the PCUnlocker Standard version which is the cheapest of the three is good for resetting Windows administrator and user account passwords, to reset the Windows server password, you need to use the PCUnlocker Professional version, which is slightly expensive.
PCUnlocker Professional comes with all the features of the standard version along with support for the Windows server 2000 – 2016 version. To use PCUnlocker Professional, you need a CD / USB flash drive to create a bootable USB drive using the PCUnlocker ISO.
Insert the bootable USB flash drive into your computer and restart the PC. Make sure you boot from the USB flash drive / CD. If you don’t know how to do it, check how to change the boot drive in BIOS for your computer.
From the PCUnlocker Professional window, select the recovery mode. In this case, select Reset Local Admin/User Password.
PCUnlocker Professional will list all the user accounts associated with the administrator and the computer for the Windows Server edition. Select the account you want to reset the password for and click on the Reset Password button.
Other key features of PC Unlocker Professional include:
Reset passwords with a bootable C, USB drive, or network over PXE
Mount virtual hard disk
Supports RAID/SCSI/SATA drives and FAT16, FAT32, NTFS, and NTFS5 file systems
After the password is reset, close the PCUnlocker Professional window and restart your computer. You can set a new password for your Windows Server account after logging in to your PC.
Windows Password Recovery Advanced from iSeePassword is another Windows Server password reset software to consider. The software is compatible with both Windows and Windows Server versions.
It is premium software but has only one plan on offer. Using the tool you can easily reset forgotten or lost local administrator passwords instantly. You can also remove the Domain administrator password as well as create a new administrator account if needed.
The working of Windows Password Recovery Advanced is similar to that of other earlier-mentioned reset software. The only difference here is this tool allows you to create a password reset CD/USB flash drive directly from its interface.
To reset the password, download and install Windows Password Recovery Advanced on any computer. Run the program and select your USB flash drive / CD under Create a password reset USB flash drive or CD/DVD option.
Click on Burn USB / Burn CD /DVD button to create a bootable flash drive. Remove the USB flash drive and connect it to the PC with the Administrator password lock.
Make sure you boot from the bootable USB flash drive by changing the boot drive from BIOS.
Wait for the Windows Password Recovery Advanced to run. It will show all the user accounts associated with the computer. Select the user account to reset and click on the Reset Password button.
Other key features of Windows Password Recovery advanced include:
Create password resets on removable media
Support for creating new local accounts
Support for Windows Server 2008/2003/2000
After successfully resetting the password for Windows Server, restart the PC without a bootable USB flash drive.
Being locked out from a Windows Server account is scary as the OS is used as a business solution. Fortunately, one of the Windows server password reset tools in this list should be able to help you to solve this issue.
While it is only clever to use the most complicated password to protect your user account against hackers and other threats, it is sensible to use a password manager to organize all your passwords in one place securely.
We’d like to hear more about your opinion on this matter so please leave us a comment in the section below.
Can you bypass administrator password Windows 10??
How do I change administrator password without administrative privileges?
In order to perform this action correctly, we recommend you to follow our user-friendly guide on what you can do if you forgot your Windows 10 admin password.
Despite the fact that internet access has become a necessity in today’s world, ensuring connection with all the devices we have can be a difficult task.
Especially in countries where public Wi-Fi services are yet to be established. That’s why having the best possible Wi-Fi hotspot software on your Windows 10 PC or laptop is important.
Having the internet on all devices is a prerequisite as most devices nowadays come with an inbuilt Wi-Fi feature, sharing the internet via a Wi-Fi hotspot is what makes life fun and easier.
While Android-powered smartphones offer internet sharing options directly via Wi-Fi hotspots, a Windows PC, on the other hand, offers no such options.
This makes it even more challenging in places where you have a limited option of mobile phone internet.
Most of us have been made to believe that only Wi-Fi routers can create Wi-Fi hotspots in public. This is not true.
Technology has evolved and we now have some cool software that can do exactly that.
In this article, we’re going to introduce you to the top 5 best Wi-Fi hotspot software you can install to turn your Windows 10 PC into a Wi-Fi hotspot.
What are the best free Wi-Fi hotspot software for Windows 10?
There are many solutions to a hotspot on the market today, but Connectify has garnered a good audience due to its performance and simple interface.
This software is not free, but if can pinch yourself a little bit and buy it, you will surely get what you pay for. This software allows you to turn your laptop or PC into a virtual Wi-Fi router.
You can then use your laptop to share the internet with any nearby device. And if you have a USB to access the internet, you can even share your internet with your neighbors and friends.
All you have to do is request the internet for one device, and then use Connectify to covertly share it with your other devices.
Another advantage of Connectify is that you can boost the Wi-Fi range with your Virtual Router PRO and share Tethered connections, 3G, and 4G networks.
Connectify Hotspotis great when traveling – if you are in a hotel or an airplane that charges an Internet fee per device, all you have to do is buy Internet for your laptop and then use the software to covertly share it to your other devices.
Connectify Hotspot also features a strong and intelligent ad blocker that will save bandwidth (up to 55% according to their tests), time, and battery life for the devices connected to your hotspot.
And if you want to have fun – you can use emojis in the hotspot name – see the screenshot above. Don’t worry if you’re not that good with English – the software is available in 10 international languages.
We recommend you use the hotspot+signal boost combo in order to make your PC or laptop a real Wi-Fi router.
Even if you can possibly have some proximity data transfer issues, if you have multiple devices connected to your PC nearby, they should access the internet with blazing speed.
Connectify
Connect all of your devices to the Internet to eliminate network compatibility difficulties with Connectify Hotspot.
MHotSpot is a great tool that works as an internet source and effectively converts your Windows 10 device to an efficient Wi-Fi hotspot.
This software provides a friendly user interface and is also available for download at no cost.
And just like the conventional router, MHotSpot can perform many tasks and you can also customize it to your preferences.
You can assign a password, select the maximum count of clients, name the hotspot, select the internet source, and much more.
Covering only 400KB of your computer’s disk space, MHotSpot is relatively smaller than the other hotspot software. This makes it easier to download even when your internet connection is limited.
It can be shared by up to 10 users but in case you don’t want to share with many clients, you can adjust the settings to restrict the number of devices that can access your hotspot.
The other good thing about MHotSpot is that it can track all the details about the users connected to it, including their internet usage, so you can easily use it to monitor internet consumption.
MHotSpot is compatible with Windows 10 as well as all the other versions of Windows.
MyPublicWifi is another handy tool that turns your laptop into a Wi-Fi wireless access point. It is free to download and can perform many functions apart from sharing the internet.
It has a strong firewall that can be used to restrict user access to specific servers. You can also use the software to prevent some internet services such as file-sharing programs.
In addition to that, you can use MyPublicWifi to track and record all the visited URL pages on your Virtual Wi-Fi hotspot.
The Wi-Fi security feature uses WPA2 encryption and you can only set a password that is at least 8 characters long. You can also give your wireless network the name of your choice.
When sharing the internet, the software displays the device names, IP addresses, and the Media Access Control (MAC) of all the connected devices.
You can also use MyPublicWifi to check the browsing history of every device connected to this network.
It is compatible with Windows 7, Windows 8, and Windows 10.
This intelligent WiFi management tool is suitable to support multiple businesses and vendors with guest Wi-Fi hotspot access or hotel WiFi internet.
You can use this Hotspot software directly on the cloud with on-premise servers, plus access to unlimited bandwidth for all types of businesses.
This multi-vendor WiFi system can offer complete branded features. For example, it runs on your domain and also comes with free/paid Wi-Fi including vouchers, video ads, surveys, and social.
Moreover, it’s likely to benefit from the software version and cloud version at the same time. With the HotSpot software, you can install it on your PC with one payment and control the entire local network.
Plus, all your network data is stored locally, yet with low latency time. It’s also perfectly suited for mid-sized hotels in physical locations.
You can benefit from strong WiFi features for all personal and professional needs, plus easy setup with tech assistance and setup guides for hardware.
Concluding here, you should go for the Cloud Wi-fi subscription to get a cloud platform managed by Antamedia, new generation software with routers, no server hardware costs, or support for controllers.
HostedNetworkStarter is the simplest tool for sharing networks available to date. It is a free utility tool developed by Norsoft for creating a Wi-Fi hotspot.
The good thing about this tool is that it is portable, and you can store it in your USB device to use it elsewhere.
With the Wi-Fi hotspot created by this tool, you can allow any nearby device to access the internet connection available on your laptop or PC.
Hosted Network Starter supports Windows 7, Windows 8, and Windows 10 with 32 or 64-bit computers. However, there is no support for Wi-Fi-hosted networks in older versions of Windows.
Unlike other programs, HostedNetworkStarter does not require any installation process or any complicated process.
To start using it, all you have to do is run the executable file.
After running it, a ‘Hosted Network’ option will open which will allow you to choose your desired settings for hotspot configuration.
After choosing the desired settings which include your desired hotspot name and the network key, press the start button to start the Wi-Fi hotspot.
OSTotoHotspot is the most widely used hotspot software on the market today. This software is completely free to use and its simplicity makes it very popular.
The unique thing about this tool is that despite being available at no extra cost, it has no advertisements or other annoying popups that plague most applications these days.
The installation process is very easy and you can turn your Windows computer into a hotspot with just a single click.
Another important feature is that you can use this tool to easily manage all the devices connected to your hotspot.
The software is also very secure and comes with password protection that prevents unauthorized access to Wi-Fi.
It’s well compatible with Windows 7, Windows 8, Windows 8.1, and Windows 10.
But eventually, the charge will run low, putting you back in the same spot.
However, there are some tricks you can try that will keep your laptop humming. In this roundup, we will show you how you can easily charge your laptop without your charger, regardless of its brand.
Thus, you will be able to charge a Lenovo, HP, Dell, Asus, Acer, or even Microsoft Surface laptop without charger.
Can I use any charger to charge my laptop?
Not really, voltage and port requirements need to match. You can, of course, use an adapter but it won’t work on its own.
For instance, if you want to charge a laptop with HDMI, you’ll need an HDMI to USB-C adapter. The good news is that most USB-C power outputs are interchangeable.
If you want to know how to turn on a dead laptop without a charger, we’ve got some quick and easy methods for you.
The easiest way to do it is with a universal laptop charger or a universal adapter.
Remember to always check the voltage, no matter the charging solution. If that doesn’t suit you, charge your laptop from a car battery or use an external battery charger.
How can I charge my laptop without a charger?
1. Use a universal adapter
A universal adapter is perhaps the most common solution to your battery woes. These universal chargers come with multiple tips so it’s likely you’ll find one that will fit in your laptop’s charging port.
You can even buy individual tips separately. Some universal adapters even have the ability to charge your laptop from a car or from other 12V DC power points.
When plugged in, the adapter will not only power the laptop but charge it as well
However, if put in the wrong way, tips can cause improper voltage and damage to your laptop.
2. Use a power bank
Nowadays indispensable, the power bank is a useful piece of equipment to keep at hand. Just like you would charge your phone with it, you can use the power bank to charge your laptop if you lost or forget the charger at home.
There are a few things to keep in mind, though:
Your laptop must be equipped with USB-C ports (While most are, some older generations of USB-C laptops may not support this function.)
Your power bank must support at least 12v in output power (which is recommended for laptops).
The best part is that you needn’t connect the power bank to a power source as it will do just fine on its own as long as it is charged itself.
3. Use a Car Battery
If you are the kind of traveler who spends most of the time on the road than in the office, then you can use the car battery to charge your laptop.
Wiring the laptop directly to the battery can be tricky since most modern laptops have battery voltages ranging from 8V and above, while most car batteries are rated at 12V.
Even so, there are ways that you can ‘hotwire’ a laptop to a car battery even if the voltage is less than 12V. However, it’s important to be cautious as you could wind up with a dead car battery or damage the laptop in the process.
The most efficient way to adapt the power from a car battery to power or charge a laptop is by use of an inverter. Various inverters exist and are capable of generating AC current from a DC source with output power ranging from 12-24V.
When you have the inverter, you can certainly use your car’s cigarette lighter to charge your laptop. To do so, follow these 3 simple steps:
Plug the inverter right into your car’s cigarette lighter socket.
Now, plug the laptop’s AC adapter into the inverter.
If you’re one of the lucky ones that have a USB type C on your laptop, then you don’t have to worry anymore.
USB type-A port only allows for data transfer and power output, but not input. With the introduction of USB type B and, most importantly, type C, not only fast data transfers are allowed but also power input and output.
So, if you lost your laptop charger, you have a couple of options. The first one is to charge your USB C laptop from a power bank.
Also, a big power bank can supply a lot of juice to your laptop and it is also portable, so you can take it with you everywhere you go.
Another solution is to use a USB C power adapter. Modern laptops come with those in the box, but if you don’t have one, buy it along with a good USB C to USB C cable.
Learn the exact steps to turn on USB-C charging and avoid compatibility issues in this guide: Enable USB-C Charging.
The last solution, as silly as it may sound, is to use your phone to charge the laptop. Yes, you won’t get much of anything and yes, it won’t last too long, but in the urgent case when you need just 10 more minutes to save a document or send an email, this works.
You just need a phone with USB C and a USB C to USB C cable. Connect your phone and the laptop with the cable and in the USB options on your phone choose ‘supply power to the other connected device’.
That’s it. Your phone should now, for a very limited time, charge your laptop.
While the methods described above might provide a solution for charging your laptop when you don’t have a charger, keep in mind that they cost money, and require an advance purchase.
In all cases, it is economical and safer to buy a laptop charger.
Per the source, Microsoft plans to leverage this new platform to make major announcements regarding upcoming games regularly. This new showcase will not affect the roles played by both E3 and Game Awards, only that it will be used to make announcements at regular intervals thus keeping Xbox fans on new releases made rather than having them wait. Microsoft had promised Xbox fans more gaming news soon after its disappointing Games Awards presence and this could be the beginning of it fulfilling this promise.
The Developer_Direct showcase will reportedly take place on January 25 at 12 PM PT and will be streaming live on Xbox’s official channels, that is, YouTube and Twitch. It’ll be hosted by both Xbox and Bethesda, where they will likely have discussions and showcase entries like Redfall, Minecraft Legends, as well as Forza Motorsport.
Developer_Direct won’t be as comprehensive as the Games Award or E3, instead, it will only focus on a handful of exclusive entries. The source has also disclosed that Starfield might not be part of the entries released during the showcase, besides, there was an indication that it was set to be released during the International Day of Human Flight.
If you’re stuck wondering how to remove highlights in Word, especially those stubborn ones that just won’t go away, don’t worry, you’re not the only one. Sometimes Word gets glitchy, or you might’ve used background color instead of real highlighting.
In this guide, I’ll walk you through exactly how to fix it.
We’ll also cover a quick copy and paste highlight remover trick that actually works, and what to do when the Word highlight cannot be removed, no matter what you try. Let’s get into it.
How to remove highlights in Word?
1. Select the No color option for highlighting
Select the highlighted text.
Now click the Highlight icon in the toolbar. Next, choose No color.
After that, the highlight will be gone.
This is the proper way to remove a highlight in Word, but if it doesn’t work, feel free to try our other solutions.
2. Select the Clear Formatting option
NOTE
This solution works if the “highlighted” text has a background color assigned to it. It won’t remove the actual highlight, just the background color.
Select the highlighted text.
Next, click on the Clear all formatting icon.
After that, the highlighted text will be gone.
This isn’t the best method to remove highlight in Word, but it’s worth trying out.
3. Select No Color for background color
NOTE
This method will remove the background color that works as a highlight, not the actual highlight.
Select the shaded text that is seemingly highlighted.
Now choose the No Color option to remove the shading.
The highlight should now be removed.
4. Cut and paste the text back into the document
Select the highlighted text to copy and press Ctrl + C.
Press the Ctrl + X hotkey to cut the text from the document.
Then place the cursor at the position in the document where you need to paste the text.
Expand the Paste option and select the Paste Special option. Alternatively, you can use Ctrl + Alt + V shortcut.
Select the Unformatted Text option and click OK.
If you can’t remove highlighting in Word, pasting the unformatted text is a quick and simple workaround.
Click the arrow on the Paste button to select the Set Default Paste option.
Scroll down to the Cut, copy, and paste options.
Then select Keep Text Only on the Pasting within the same document drop-down menu. Lastly, click the OK button.
NOTE
This method is used to automate the steps from the previous solution, so you won’t have to manually select special paste every time.
What to do when you can’t remove highlight in Word
Even though the above-mentioned options usually work, if you’re still having trouble consider:
Opening the document in Safe mode (press the Ctrl as you open it)
While in the document, go to File> Info and if you see “Incompatibility Mode”, hit the “Convert” button
Select and copy all text and paste it into a new Word document file and try to remove the highlights from there (might help if the doc has limited permissions)
Try opening the doc with another word processor such as WPS Office and use its highlight removal tools
Most software packages are typically restricted to opening one or two types of files but support numerous formats for their file types. For example, most photo editors open JPG, PNG, GIF, BMP, TIFF, and other image formats.
Universal file openers (UFOs) are rare software that open (or display) various file types. They are programs that support a universal range of file types and most of their various file formats.
Furthermore, with a universal file opener installed, you won’t need many programs to open alternative file types. These are some of the best software with which to open all kinds of files.
What is the best universal file opener software for your PC?
When it comes to archiving files of all formats, no software tool is better than WinZip.
As a testimony to that matter, WinZip can open the following file format types in Windows 10: RAR, ZIP, ZIPX, 7Z, GZ, ISO, TAR GZ, TAR, IMG, TGZ, GZP, and XZ files. As for Mac, WinZip can manage RAR and ZIP files.
Besides the incredible versatility in terms of supported file formats, WinZip is an excellent overall file compressor, unzipper, encryption tool, password-protector, and transfer tool.
More so, this professional software is incredibly lightweight, integrates seamlessly with your Windows 10, and is accessible to users of all experience levels.
Here are some of the perks of using WinZip:
A universal archive opener
Lightweight and easy-to-use
You can try it before you buy it
Works on both Windows and Mac
WinZip
The best software solution that can open all types of archive formats is now available at a special price for a limited time only.
File Viewer Plus is a UFO with which you can open more than 300 file formats. This flexible file viewer also has a batch conversion utility for converting files to alternative formats.
File Viewer Plus users can open various file types, such as presentation, text, spreadsheet, video, audio, archive, email, web, PDF, and source code.
The great thing about File Viewer Plus is that it’s a little more than just a file viewer; you can also edit text, web, spreadsheet, and image files.
FVP includes a few image-editing options for cropping, borders, color adjustment, and quick effects, and the software is also a relatively basic word processor and spreadsheet application.
As mentioned, File Viewer Plus is a batch file converter, and you can also utilize it to extract archive files, such as ZIP, RAR, 7Z, TAZ, etc.
File Viewer Plus
Try this flexible file opener that can support more than 300 file formats.
File Viewer Lite is the same publisher’s freeware alternative to File Viewer Plus 3. As such, this software is a file viewer only.
File Viewer Lite natively supports over 150 file formats for various file types. You can open documents, audio, presentations, fonts, web pages, images, camera RAW files, spreadsheets, video, and audio file types with this universal file opener.
The software provides alternative native, hex, text, and icon views for file contents and additional file info that you can export to text files. File Identifier, which identifies unknown file types, is bundled with File Viewer Lite.
Universal Viewer is an intuitive universal file opener that can open most file types and formats.
There is little difference between them, except that the Pro version includes image conversion options, supports RAW images, and consists of a preinstalled PDF plugin.
Note that the freeware version doesn’t open MS Office documents with formatting included unless you have MS Office or one of the program’s Lister plug-ins installed. You can click Zip package on this page to download the freeware Universal Viewer.
Universal Viewer users can open an extensive range of image, audio, and video formats along with spreadsheets, PDFs, text documents, and web file types, but the software doesn’t support presentation files.
However, you can extend the software’s file type support with Lister plug-ins.
The software provides users with various viewing modes, including word wrap and encoding for text and center pictures and EXIF images. The viewer includes flips, rotate, grayscale, and sepia image-editing options.
Another good thing about UV is that it includes extensive UI, hotkey, and file display customization options on its settings window.
Ultra File Opener is software that supports more than 500 file formats. The software is compatible with 32 and 64-bit Windows platforms from XP up to 10.
This universal file opener supports various formats for text, image, audio, video, and archive file types. However, you can’t open spreadsheets, PDFs, web, or presentation files with Ultra File Opener.
This program opens fewer types of files than some alternatives, but it includes a few handy extra tools.
For instance, you can extract archive files with the software and convert file formats, and it includes a download manager with which users can resume downloads.
Furthermore, Ultra File Opener also provides extensive print settings for text and image documents with photo-printing templates included.
Those are four universal file viewers for Windows with which you can open many file formats for most file types like the hat, SDR, ENC, PA, and PIB formats, and they also include some handy additional options and tools.
WinZip is the best of the bunch as it includes more extensive editing options for text, spreadsheets, and image files than the others.
Aside from the above-listed UFO software, you can open numerous file types and formats with the DocsPal web app.
If you are suddenly encountering the server not found in Kerberos database error, you should not worry. You are not only the person encountering this problem. Right now, Kerberos is the default authorization technology used by Microsoft Windows. But you also may see its usage on macOS, UNIX, Linux, etc.
Usually, any problems or exceptions with this technology happen mostly due to some things that need to be corrected. If you are interested, learn about the browsers that support Kerberos Authentication.
What causes the server not found in the Kerberos database?
When you face any problem with Kerberos authorization and get the error message we have been talking about, it may be due to the following reasons:
Incorrect host: Usually, the Kerberos is hugely dependent on the host names. If something is wrong, you will get a server not found error.
Incorrect mapping: If mapping is not configured correctly, you may get this error.
Invalid Service Principal Name: Service principal names are important as they work as unique identifiers. So, any problem with these names may bring various errors like server not found.
DNS Lookup issues: DNS is another important factor. If the system fails to resolve any hostname or domain name required to operate the service normally, server not found in Kerberos database may occur.
What can I do if the server is not found in the Kerberos database?
Before trying the actual methods, we suggest you do the following things:
Make sure the connection is stable.
Ensure that you are not using a very old version of Windows.
After ensuring the above things, follow these methods one by one to solve the server not found in the Kerberos database.
1. Add correct PowerShell hosts
Open vRO or any similar tool.
Go to Add a PowerShell host.
Provide correct information, including host IP, port, credentials, etc.
Add the host.
In this example, we have used vRO, a tool for VMware. If it is not available for you, you can find relevant options or use some specific commands to add the PowerShell hosts.
2. Use the correct DNS
Open the command tool you prefer.
Use the following command format to set DNS: vracli network dns set --servers DNS1,DNS2
You also make sure that the IP and hostnames are correct on the Hosts file. In Windows, the file can be found in: C:\Windows\System32\drivers\etc
If you need to correct the values on the host file, you must have administrative rights. This method is helpful if you face the server not found in Kerberos database error when joining the client to a domain.
Use the following command format to set a service principal: setspn -s service/name hostname
An example can be: setspn -a host/something.com someuser
After setting the correct service principal name, you can try again. You should no longer encounter errors like server not found in Kerberos database (7) – unknown_server or similar problems.
4. Generate mapping in the correct way
Open PowerShell like before.
Use the following format for the command you are going to use: ksetup /mapuser username@realm
Make sure to replace the username and the realm name. For example, the command can be like this:
This command will generate Keytab and the mapping. It helps to troubleshoot the server not found in the Kerberos database on Windows, Linux for SQL servers, or other services.
The problem we are trying to troubleshoot is not like many other problems. The solutions may vary depending on the services and situations. For example, you may get the server not found in Kerberos database error while using Kerberos authentication to connect to an SQL server or using SSSD, etc.
So, if the suggestions mentioned above don’t solve it, we suggest you contact the relevant technical support team. It will ensure you get the best solution based on your situation.
This article has covered the most working methods to fix the server not found Kerberos database. If you have any other methods, you can let us know in the comment box.
You probably want to clear out your music library because it helps remove unwanted batches of music downloads or to establish a new library. Hence, we’ll go through how to delete the iTunes library from the PC.
Does deleting the iTunes library delete it from your computer?
Many users are curious whether deleting the iTunes library deletes the iTunes app from their computer. The short answer is no. Deleting the iTunes library doesn’t affect its client on your PC.
However, deleting the iTunes library will remove all your music, playlists, and other items available in your iTunes library.
Also, clearing out your iTunes library doesn’t affect your purchase rights on your items. You can easily download them or create a backup copy for your iTunes library somewhere.
In short, deleting your iTunes library doesn’t delete its app from your PC. Instead, it is a way to remove unwanted or clogged libraries without using software to fix your iTunes library on Windows 11.
How do I delete the iTunes music library from my computer?
Before proceeding, we recommend you check our guide on how to find and change iTunes backup location in Windows 11. It’ll help keep the library and other iTunes items intact if you encounter problems with the library delete process.
Follow the steps below to delete the iTunes music library from your PC.
1. Delete or rename the iTunes library files
1.1 On Windows
Close the iTunes app on your computer and press Windows + E key to open File Explorer.
Navigate to the Music folder, then click on the iTunes folder.
Delete the iTunes Library.itl and iTunes Music Library.xml files in the folder.
Restart iTunes and check if you have successfully cleared the library.
Deleting the iTunes Library.itl and iTunes Music Library.xml files will remove their properties on the app. Check how to fix the PC not authorized to run iTunes error if you run into it on your computer.
Renaming the iTunes Library.itl and iTunes Music Library.xml into iTunes Library.old and iTunes Music Library.old instead of just deleting them will have the same effect.
When you restart the app, it will automatically generate new library files.
1.2 On Mac
Close the iTunes app on your Mac, click on Go at the top bar of the screen, then click on Home.
Double-click the Music folder and click on iTunes.
Find and delete the iTunes Library.itl and iTunes Music Library.xml.
Launch iTunes and check if you have successfully cleared the library.
The steps will delete the iTunes library from your MacBook, and when you start the app again, it will generate new library files.
As on Windows, if you rename the iTunes Library.itl and iTunes Music Library.xml into iTunes Library.old and iTunes Music Library.old instead of just deleting them will have the same effect.
If you have found the event ID 4768, it means there was a failed attempt to validate a credential of an account. This article will help you to fix this problem.
Windows Event Viewer can store a lot of event information, including some very important security events. It helps a lot to troubleshoot various problems. A lot of users have been seeing the event ID 4768 with the message Kerberos Authentication Ticket Requested.
To solve this issue, you can follow some specific tricks. But knowing the reasons should be your first priority as it will help a lot in the troubleshooting steps.
What causes the event ID 4768?
Before going through the solution, you should know about the reasons. Usually, this problem occurs due to the following things:
A problem with Microsoft Windows: Sometimes, the Windows server may have a known bug that may prevent some users from authenticating using the Kerberos database, and that creates the event ID 4768.
Misconfiguration: Any misconfiguration on the Windows server also may trigger this problem.
Problematic update: If you start seeing that event ID after installing an update, it is most likely that the update was problematic.
How can you solve event ID 4768?
Before trying to troubleshoot this problem, we suggest you do the following things to avoid any unwanted hassles:
In recent days, people have been facing the event ID 4768 with a message Kerberos authentication ticket (TGT) was requested. Installing that specific patch should fix the problem. However, if not, search for the news if there are any other updates like KB5016693 that may help.
For example, in the past, we saw the updates KB4015547 and KB4015550 fixed a lot of issues.
We also saw that last November, Microsoft released an update that solved Windows Kerberos issues. So, these updates are important.
2. Uninstall problematic update
Open the Start Menu, type the control panel, and hit Enter.
Go to Uninstall a program.
Click on View installed updates.
Uninstall the problematic update.
This method helps when you start facing this problem after installing an update.
3. Use a Firewall
In Control Panel, go to System and Security.
Then, go to Windows Defender Firewall.
Go to Advanced settings.
Configure inbound and outbound rules.
If you are using anything else to prevent unwanted inbound requests, we strongly suggest you use the firewall instead. You can easily apply inbound and outbound rules on a Windows server. For specific users, it has fixed the event ID 4768. It also may work for you as well.
4. Enable VPN
You also can consider configuring a VPN connection for other users in your system. So, when they try to access your system, they must use a VPN to access the local network first.
In this case, Kerberos authentication can be able to verify the credentials without any other problems, and no event ID 4768 will be stored. However, this method applies to specific situations only.
This article has explained how you can solve the event ID 4768 critical security error on Windows and Windows servers. If you have any other ideas that may help others, feel free to let us know in the comment box.
Are you a fan of Final Fantasy XIV by Square Enix and you are getting an error code 601 when trying to make a payment on the mog station using your debit/credit card?
This appears to be a common issue reported by many game lovers quite often on different forums. It’s similar to the error code i2501 reported by users while making payments.
Why is my Square Enix confirmation code not working?
Error 601 usually appears during purchase. It means that your payment is rejected even before it reaches the Square Enix servers.
Some of the reasons why you may encounter Square Enix error 601 are:
Insufficient funds in the account –You may encounter a payment error if there are not enough funds in the account.
A temporary issue with your card or bank –Sometimes, payment errors may show up due to a temporary glitch with the debit/credit card or the bank.
Recurring payments not allowed –If the card does not grant permission for recurring payments.
Incorrect card details –If you entered the incorrect card details, mog station would decline your payment.
Conflicts with the browser addons or extensions –It could be possible that the Square Enix error 601 shows up due to interference caused by the browser addons or extensions.
If using VPN or proxy –If using a VPN or proxy on your system, it can interfere with the payment process.
How do I fix Square Enix error code 601?
Before you proceed with the primary troubleshooting methods, you may want to try a few preliminary checks to rule out other possibilities:
Check if your internet connection is up and running.
Being affected by high FPS drops is one of the most annoying experiences you can have as a gamer.
Why does my FPS keep dropping in games? Common causes of FPS drops include:
Problems with drivers – Outdated or corrupted GPU drivers often cause FPS drops. Updating the GPU drivers usually fixes this.
Overheating – When components overheat, performance decreases.
Connection issues – A good internet connection is essential for online gaming.
How do I fix FPS drops in games?
Before starting any advanced procedures, you should:
Check if the Internet connection is running optimally. You’ll need less than 50 ms to enjoy the online sessions seamlessly.
Ensure that the system requirements are met. To run the game and expect peak performance, you should concentrate on the column called Recommended Requirements.
1. Change the game’s graphic settings
GTA 5 in-game graphics settings
Not all graphics settings found in modern games will work for every configuration out there. So, if you have slight issues with your FPS drops, make sure to change the graphics options.
Disabling Shadow Quality and Anti-aliasing is always good for starters. Also, the VSync option will considerably affect your GPU’s capabilities.
Other settings like Texture Quality, Shader Quality, Particles Quality, etc. are other options that need to be set on lower levels to reduce the FPS drop levels.
Try different variations until you find the one that optimizes performance and quality while keeping acceptable FPS levels.
NOTE
It is important to know that changing these settings to a lower level will affect the quality of the image but will increase the FPS.
It all depends on your configuration and the ways the game is or isn’t optimized for that configuration. Sometimes even the top-notch PCs running a game will give you a hard time due to the badly optimized game engine.
2. Turn Off Game DVR
⚠️ Warning: Editing the Windows Registry can be risky. Make sure to back up your registry settings before making any changes.
Press Win + R to open the Run dialog box.
Typeregedit and clickOK to open the Registry Editor.
Navigate to HKEY_CURRENT_USERSystemGameConfigStore.
Right-click on GameDVR_Enabled and select Modify.
Change the Value data to 0.
Click OK and close the Registry Editor.
Restart your computer for the changes to take effect.
Try again to run the game that has given you headaches with the FPS.
3. Update the GPU drivers
3.1. Use Device Manager
Click the Start button and select Settings from the menu that opens.
Choose System.
Select About from the left pane.
Click on Advanced system settings.
Switch to the Hardware tab and open Device Installation Settings.
Select No in the dialog box that appears.
Hit theSave changes button.
Right-click the Start button, and select Device Manager.
Expand Display adapters.
Right-click on your GPU in the list and open Properties.
Under the Driver tab, click on Roll-back driver.
Restart your PC and check whether the issue persists.
If the Windows 10 Update feature forcibly installs another version, you can roll back the drivers and disable the automatic driver updating by following the steps above.
This should fix FPS drops and stuttering in your favorite PC games. Do ensure that after you make the changes, you restart your PC and check if things work properly.
Automated driver updating software makes this task much easier. A professional tool, such as Fortect Driver Updater is able to scan for, download, and install any outdated drivers it will find. So you will be able to return to your game in no time.
GPU drivers are a sensitive subject, especially on Windows 10 where the Windows Update feature manages drivers.
Most of the time, the generic driver won’t suffice, and we are all well aware that even the top-notch GPU will fail miserably without the proper software support.
In most scenarios, you’ll need the latest drivers provided by the OEM, but that’s not a rule. Some users resolved the GPU throttling and high FPS drops by installing an older driver’s version.
So, sadly, you have to spend some time experimenting with the available drivers until you find the right driver for your GPU.
These are the official support sites for major OEMs:
Find any programs or processes that can affect the PC performance, right-click on them and select End task.
Certain background programs are known for resource-hogging, making them quite unwelcome while gaming. Disabling their respective background processes should improve the in-game performance and reduce FPS drops.
Here’s the list of programs you should avoid while gaming:
VoIP programs like Skype
Peer-2-peer applications like uTorrent
Download managers
Browsers (Google Chrome especially)
Recording and live-streaming software
If you’re running a powerful enough PC, the majority of background applications won’t affect the framerate. The ones we enlisted are throttling your bandwidth which can be a problem, for multiplayer, connection-dependent games.
4.2. De-activate the Xbox Game bar
Press the Windows + I to open the Settings app.
Open Gaming.
Click on the Xbox Game Bar option from the left pane.
Toggle off the Xbox Game Bar option from the right pane.
Our research suggested that the FPS improved after disabling the Xbox Game Bar in Windows. You can do that easily by following the steps above.
However, you should know that some games use Game Bar for game invites so you might want to enable it back if you want to use the feature.
5. Modify the system’s power settings
Press the Win key to open the Start menu.
Type power in Windows Search and select Power & sleep settings.
Click on Additional power settings.
Select High performance.
Close the window.
6. Turn on the Game Mode
Start the Settings app by pressing the Windows + I.
Click the Gaming option.
Select the Game Mode option from the left pane.
Toggle it to On.
The Game Mode setting is turned on by default in Windows 10, but sometimes, you can find it turned off for some reason. The simple steps above will help you easily turn on the Game Mode, which will help you achieve a steadier framerate during your play.
7. Scan for HDD errors
Open the Start menu by pressing the Win button.
Type command prompt and click on Run as administrator.
Type the following command and press Enter: chkdsk /f C:
Replace C: with other partition letters if it’s named differently.
If chkdsk is giving you headaches, check out our guide on how to fix chkdsk and go through with the scanning process.
8. Check the temperature of your system
Overheating. There’s no single hardware-related problem that is a bigger threat to your PC than this element. Since today we’re discussing FPS spikes and sudden drops, overheating is probably the biggest suspect for the issue at hand.
Let’s imagine a common scenario: you start the game after the PC was idle, the game works great until some time, and then the FPS goes haywire. This is often due to the CPU and/or GPU overheating and thus underperforming.
To self-preserve themselves under the intense heat and avoid malfunctions, the main PC components start working slower. Finally, your PC should shut down forcibly if the temperatures pass the allowed limits.
So, for starters, make sure to acquire proper temperature monitoring software like CoreTemp. Above 90-95 degrees Celsius, you will start experiencing performance drops and, in the worst-case scenario, critical hardware damage.
How can I improve the cooling system and reduce the temperatures while gaming?
Firstly, you’ll need to get your hands dirty and clean the inside of your PC casing. The special focus should be on the exhaust and coolers.
Additionally, replacing the thermal paste should be done regularly, especially if you’re an avid gamer.
The paste that acts as a conductor tends to lose its functionality after a few months of usage, so make sure to apply a new layer accordingly.
NOTE
If you’re unsure how to change the thermal paste, taking your PC to an authorized computer shop is recommended to avoid causing any issues.
Furthermore, it doesn’t hurt to add some extra fans and improve the cooling of the unit. However, double-check the PSU capabilities before doing so.
If you still experience the problem first-hand, we have an article on what to do if your laptop is overheating and solve the issue before it’s too late.
9. Defragment your HDD
Press the Windows + E to start File Explorer.
Click on This PC.
Right-click on any partition and open Properties.
Select the Tools toolbar.
Click on the Optimize button below.
Analyze and defragment partitions individually if needed.
As you might expect, the efficiency of how your complex drive works is another essential part that will undoubtedly affect the overall gaming performance.
A hard drive is probably the most prone to malfunctions, and it’ll, compared to a CPU or GPU, lose its initial performance values over time.
This applies only to physical drives, not SSDs, so if you have the latter, go past this solution. If you’re interested in improving the reading scores of your hard drive, you can invest in a good SSD.
You can use alternative software if you don’t want to use the defragmentation tool included with Windows 10. Look at this great list, including our best tune-up utilities, and choose the one that fits you best.
10. Reinstall the game
Click the Start button in Windows and select Settings.
Choose the Apps option from the list.
Click on your game, and press the Uninstall button.
Reinstall the game from the installer file or media.
Finally, if none of the previous steps helped you by eliminating or at least reducing the in-game FPS, we advise you to reinstall the game.
Select a solid or static background wallpaper from the drop down menu.
One user suggested that setting up a solid wallpaper removes the FPS drop issue for games on their PC. This has notably helped several users fix the problem.
How do I fix Nvidia FPS drops quickly?
Press the Windows + R keys to open the Run dialogue.
Type in msconfig and press Enter.
Switch to the Services tab.
Check the Hide all Microsoft services box and hit the Disable allbutton.
Enable only Nvidia-related services.
Restart your PC.
If you’re using legacy GPU, make sure to install legacy drivers. It’s not of the utmost importance for those to support Windows 10. Sometimes they’ll work regardless.
How to avoid FPS drops in games?
If you managed to fix the problem with the spike FPS drops, you might also consider our tips on how to stay away from this problem in the future.
➡ Invest in a powerful GPU or choose the e-GPU route
When you use a single email account, it is easy to manage it using the official app. It becomes difficult when you have to manage multiple email accounts. This is where an email app comes in handy. You can set up email in the Outlook for Android app and manage multiple email accounts from one place.
Set up email in Outlook app on Android
Here is how you can set up email in Outlook for app.
Some smartphone companies such as Samsung ship few of their models with the Outlook app preloaded. You can open it after installing any pending app update.
2. Tap on add account to add your existing email to the Outlook app.
If you looking to create a new email account and use it on the email app then tap on create new account.
3. The Outlook app will detect any Google or Microsoft accounts used on the device. Tick the boxes for selecting the account and then tap on Continue to proceed.
Sometimes it may fail to detect accounts, then you can add an email account manually by tapping skip this account.
4. Now enter your password of the selected email accounts and then tap sign in to move forward.
5. You can either add another email account or tap maybe later to skip the process for now. You can add more email accounts later which will learn to do in the next section.
6. The inbox and other sections of your email account will appear after you have successfully set up email in Outlook for Android app. You can use it to draft, recieve and manage your emails from the app.
Add another account to the Outlook app for Android
We get the option to add another account while setting up Outlook. However we often leave it for later to understand the email client better before putting adding more accounts. Let us learn to add another account in the Outlook app for Android and here how it is done.
1. Tap on the thumbnail next to where Inbox is written. It will open up the sidebar menu from the left side.
2. Find and tap on the gear icon at the bottom of the menu. This will take you to the settings section.
3. Select ADD EMAIL ACCOUNT under the Email Accounts section, showing your existing email accounts.
4. A prompt will appear at the bottom. Select one option and move to the next step.
Add an email from a supported provider and tap continue to move forward
5. Fill in your password if its from Outlook or Hotmail.
Email accounts from other providers will open in the browser to confirm a password for adding to the Outlook app.
6. Access your email accounts by tapping on the home button at the top.
Delete email account from the Outlook app
Want to remove an email account from the Outlook app? then you can do it easily in this manner.
1. Head to the settings section.
2. Select the email account from the Email Accounts section.
3. Scroll down in Account Info and tap Delete Account.
4. Select delete in the confirmation prompt to permanently delete the email account from the Outlook app.
You can always add the email accounts back as we did in the last section. Outlook lets you add up to 15 Non-Microsoft email accounts with respect to the available cloud space for the account. There is no limit for Microsoft Sync Technology based(basically Outlook and Hotmail) but it will depend on the available space for your account.
When you plug a new device into your PC, sometimes it doesn’t function as you expect. The Microsoft Support Diagnostic Tool (MSDT) can help you on Windows 11.
The tool activates troubleshooting packs already installed on Windows to detect and fix issues with hardware and devices.
Activate MSDT on Windows 11
To activate the tool, here’s what you need to do.
Open Run or Command Prompt and enter this command: msdt.exe -id DeviceDiagnostic
At the first menu, you can click to Apply repairs automatically, otherwise, click Next.
Pick a device to troubleshoot and click Next.
Windows will provide you with a notification of what the fix is for the issue which you can click to confirm or deny.
The fix will be applied and you can click View detailed information or give Microsoft feedback, otherwise, click Close.



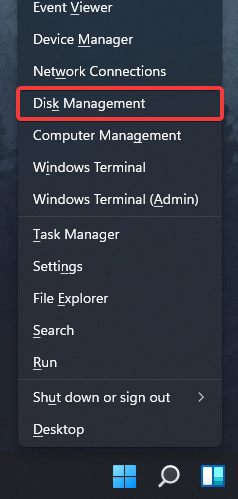
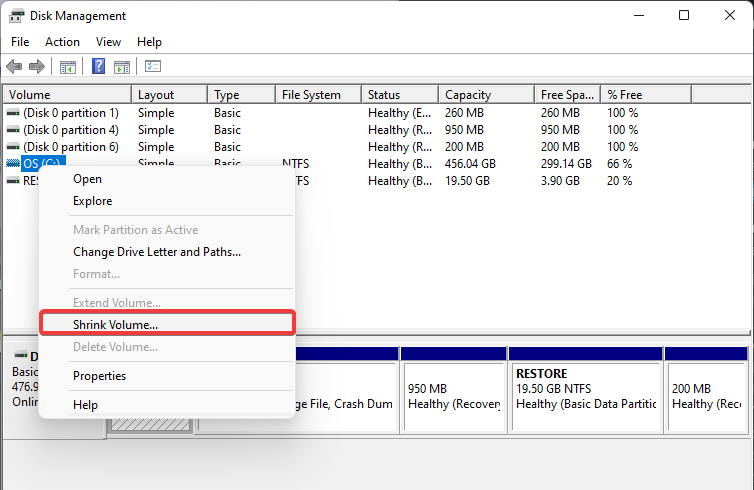


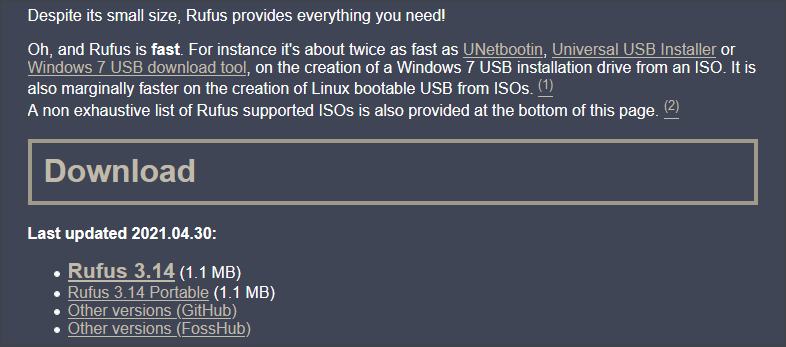
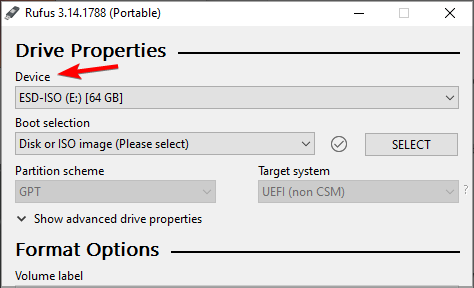
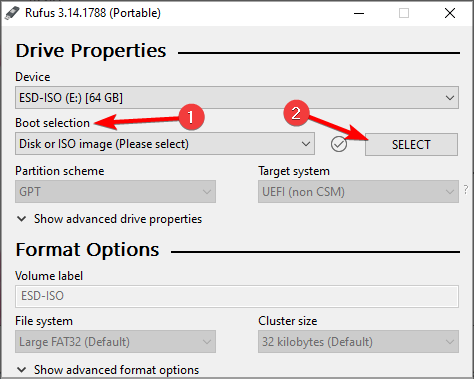
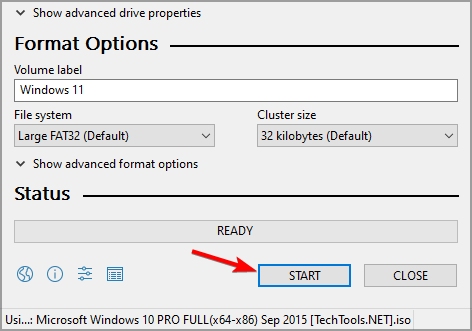
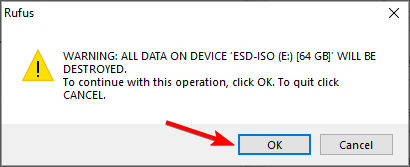
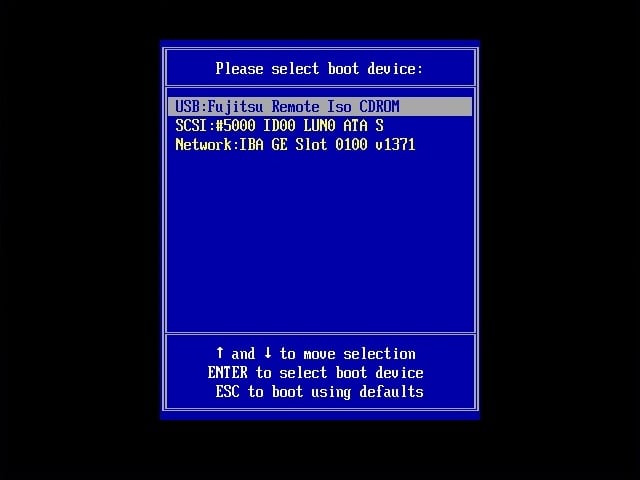

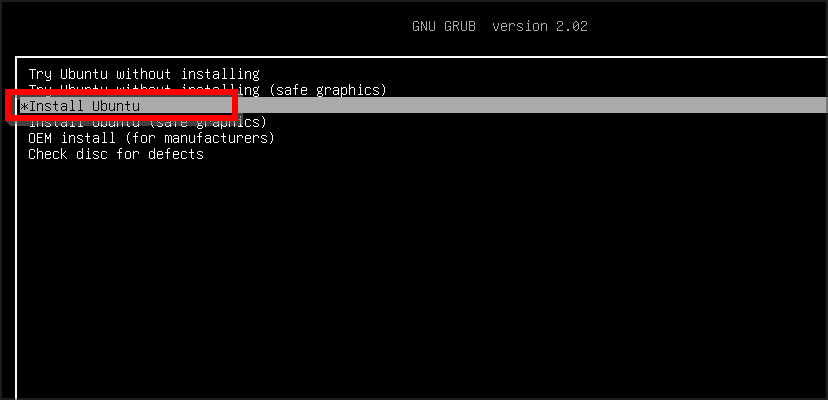


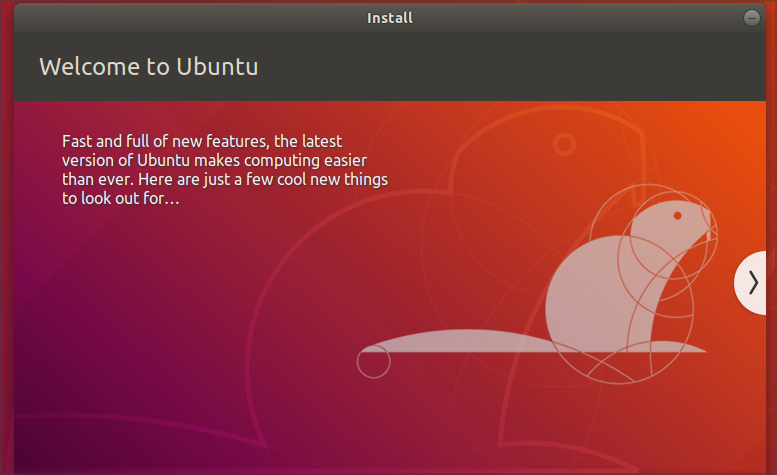


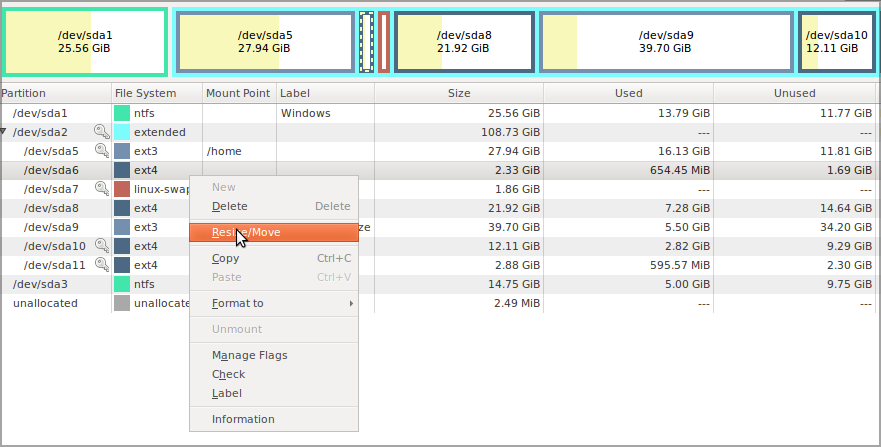

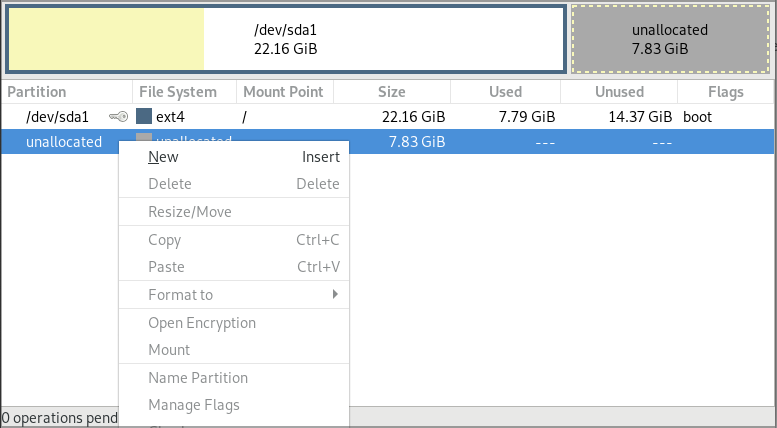

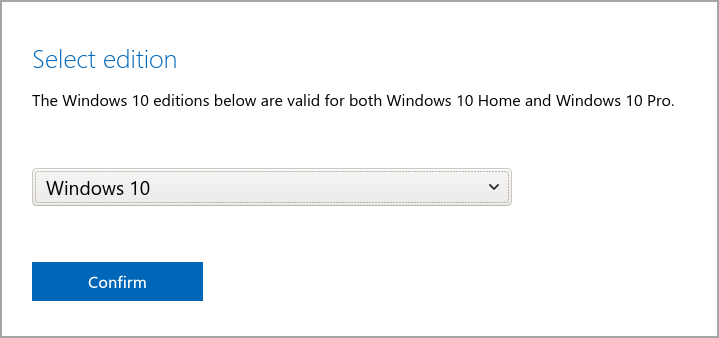

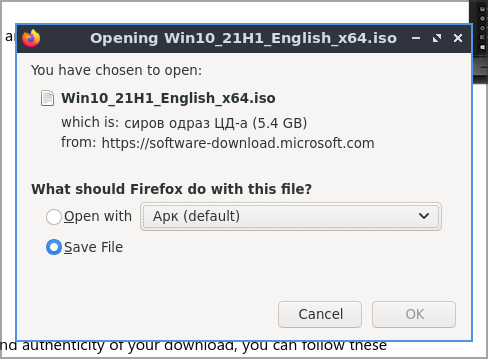
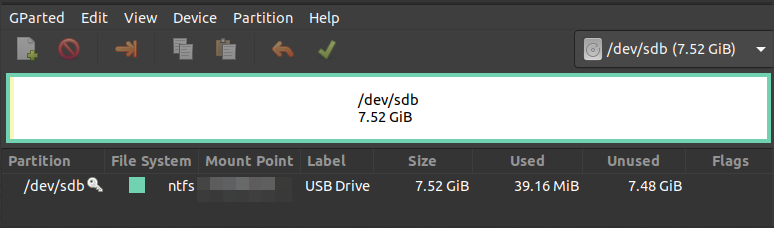


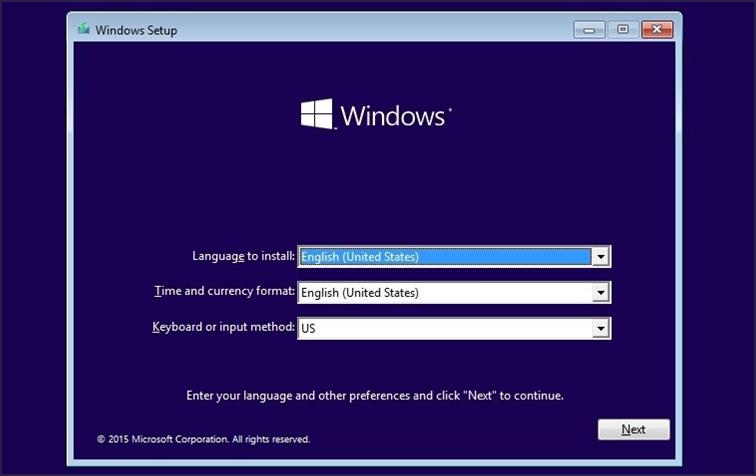


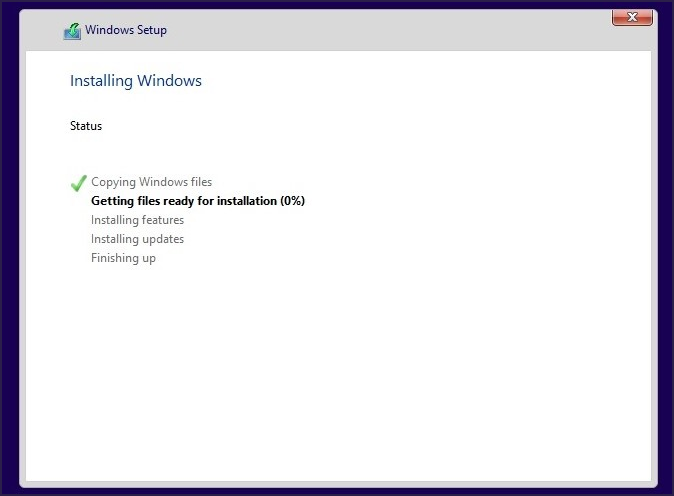
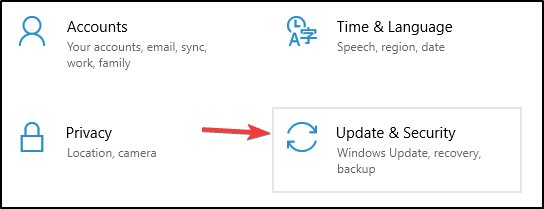
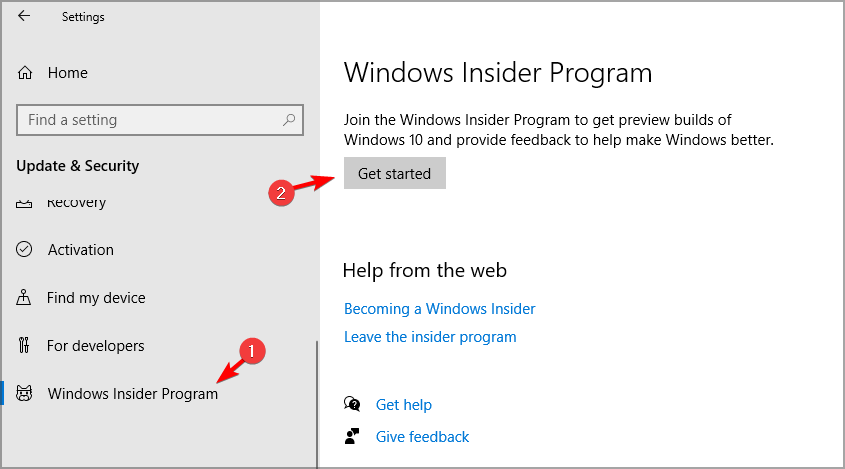
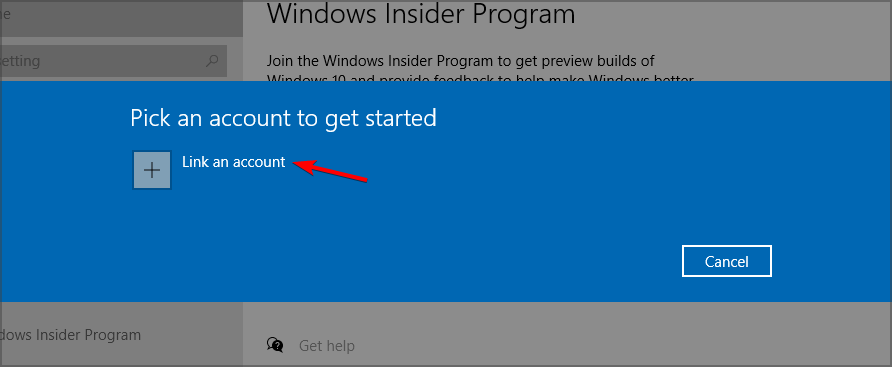
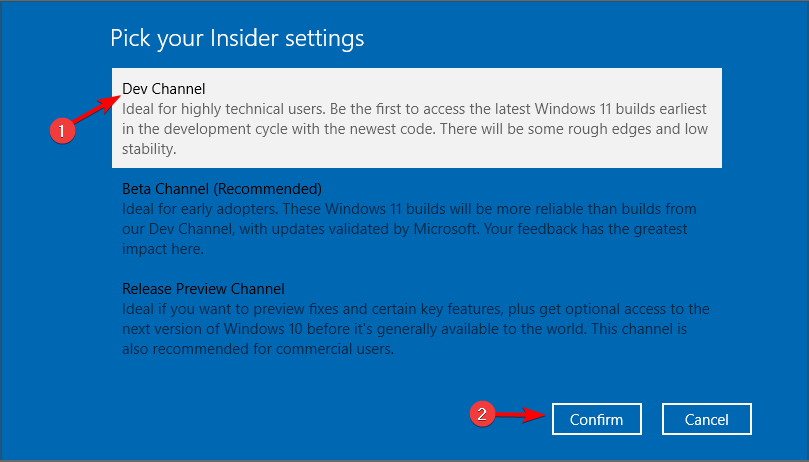
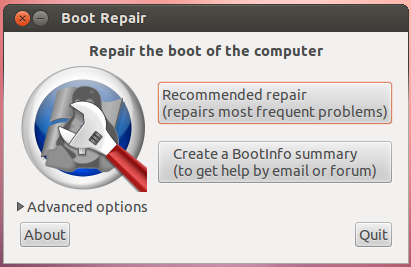





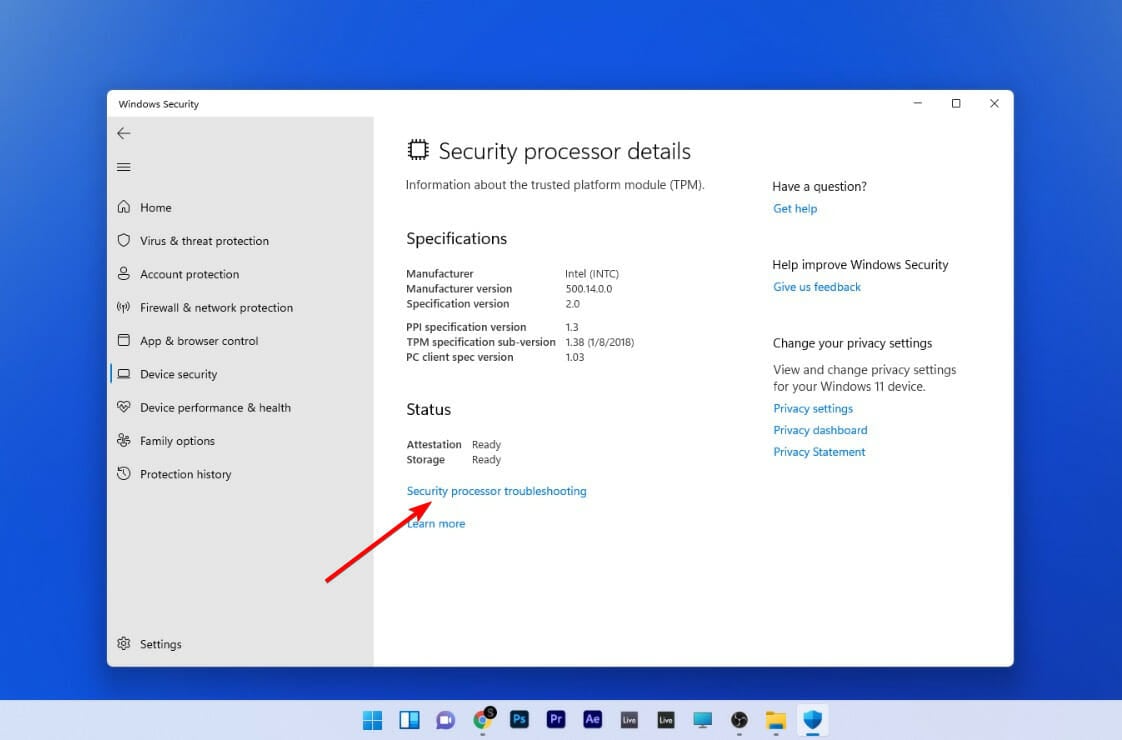


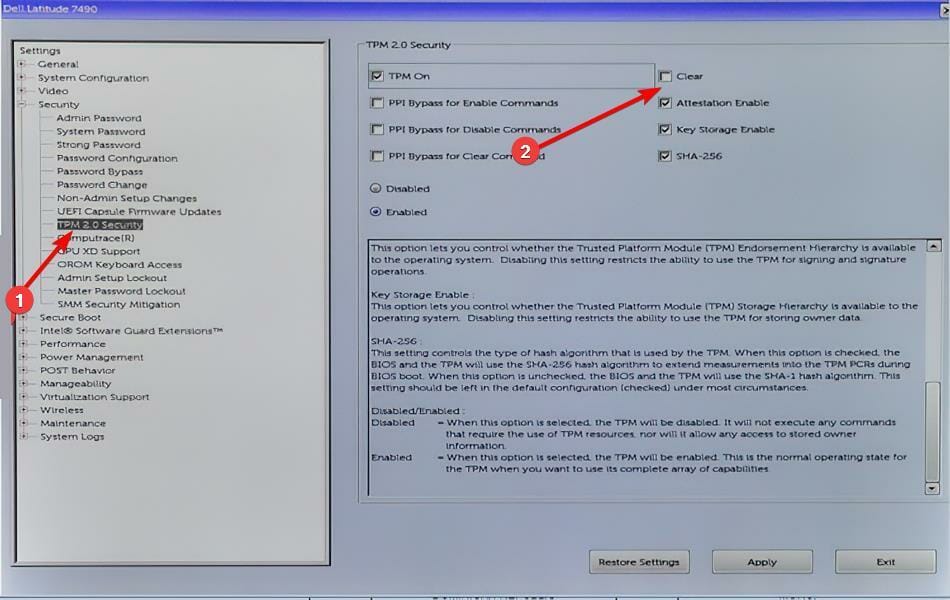













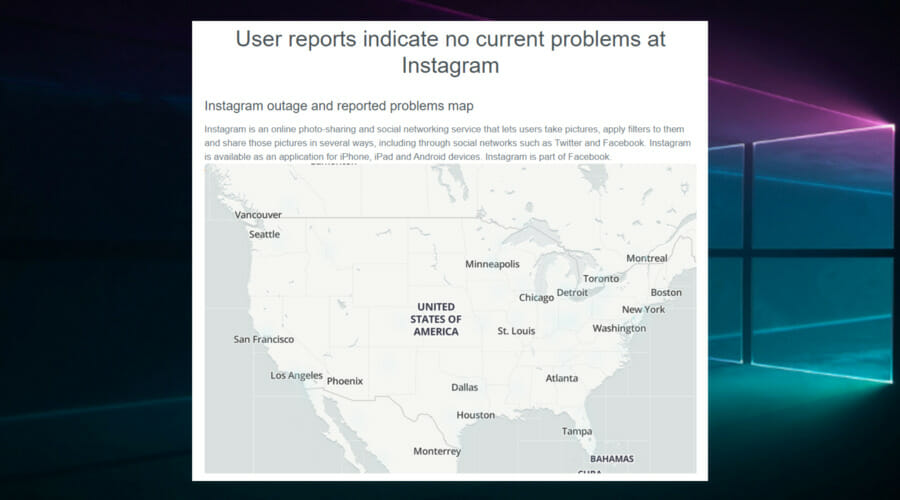


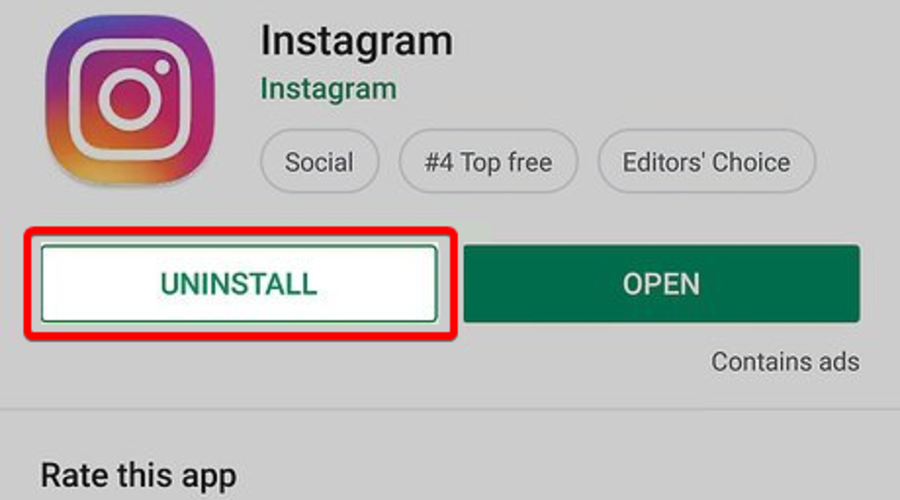







 Step into a mythical world to rescue a kidnapped friend in The Secret Order. This hidden object game offers:
 Chase an undead pirate in this gripping hidden object adventure. Key features include: