ClipSp.sys: How to Fix This BSOD Error on Windows 10 & 11

If you are greeted with a blue screen, and Your PC ran into a problem and needs to restart. We’re just collecting some error info, and then we’ll restart for you message, and the reason mentioned is ClipSp.sys, then this guide can help!

This usually occurs due to missing or corrupt Windows  System Recovery Disk or kernel mode driver. We will discuss some expert-recommended fixes to resolve this blue screen of death error.

What causes the ClipSp.sys BSOD error on Windows 10 and 11?

There could be various reasons why you ran into this BSOD error; some of the common ones are mentioned here: 

  • Malware infection  – If your computer is infected with viruses, you might get this BSOD error. To fix this, you must run a deep scan using a reliable antivirus tool.
  • Outdated Windows System Recovery disk device drivers – If Windows system recovery disk device drivers are outdated, corrupted, or misconfigured, you can get this blue screen of death error.
  • Corrupt system files – If the system files on your computer are damaged or missing, you might get this error. You need to run SFC scan to repair system files on your PC.
  • Third-party programs interference – Some third-party apps often interfere with your operating system’s default tasks and cause various issues, including this error. Uninstall all the recently installed third-party apps to check if it helps! 
  • Bad Windows update –  If the Windows update installed is corrupt or not installed correctly, then you might get this error. You need to uninstall the bad update to fix this error.

What can I do to fix the ClipSp.sys BSOD error on Windows 10 and 11?

Before engaging in advanced troubleshooting steps, you should consider performing the following checks:

1. Uninstall the Windows update

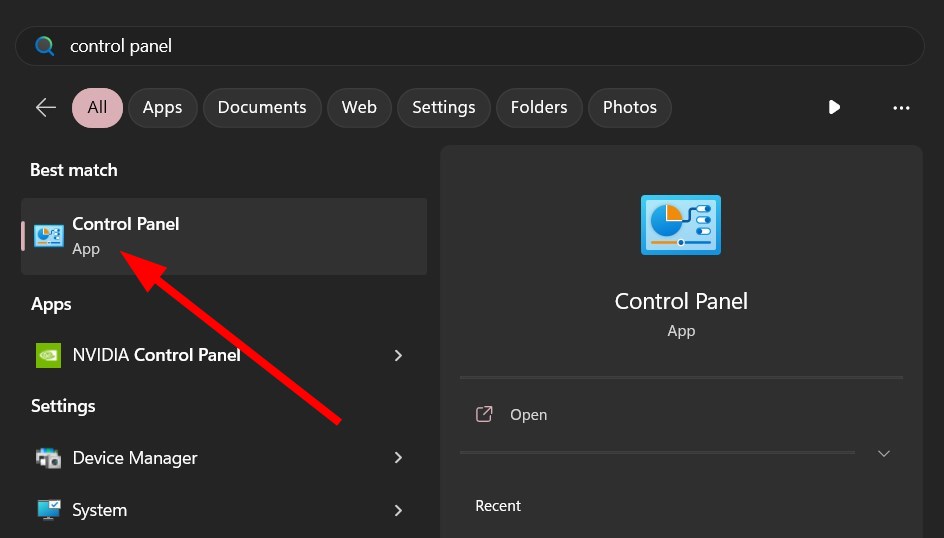
  1. Press the Windows key, type Control Panel, and click Open.CP Clipsp.sys
  2. Select View by as Category and click Programs. Programs
  3. Now under Programs and Features, click View installed updates. View installed updates
  4. Select the latest update and click Uninstall. Uninstall updates Clipsp.sys

2. Use the Command Prompt

2.1 Re-register Clipsp.sys

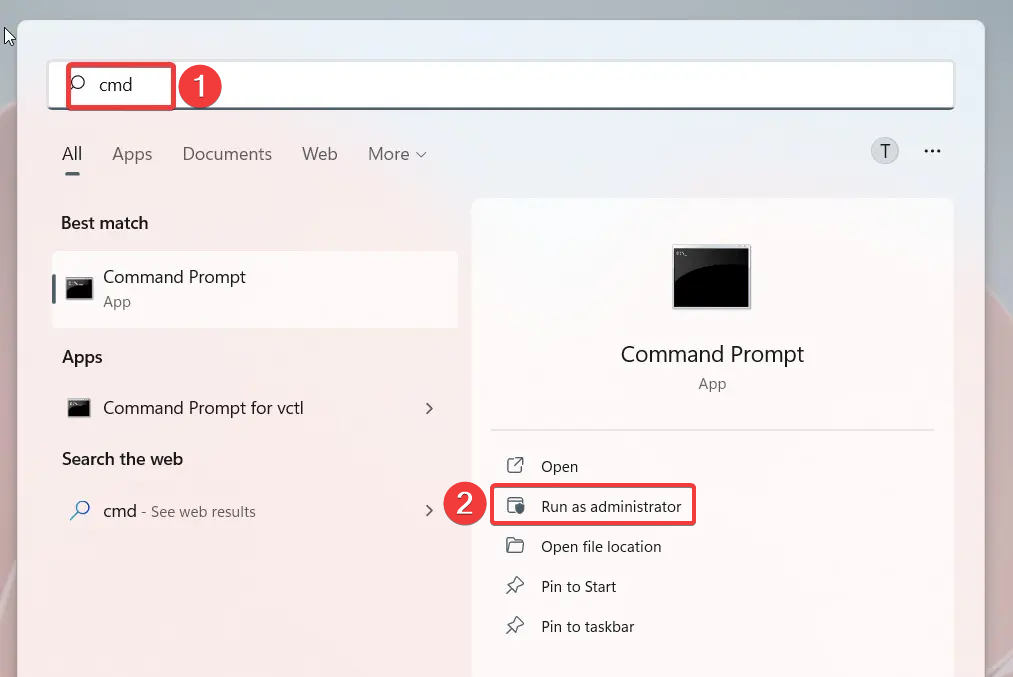
  1. Press the Windows key, type CMD, and click Run as administrator. CMD elevated
  2. Type the following command to unregister the file and press Enter: regsvr32 /u ClipSp.sys
  3. Copy and paste the following command to re-register the file and press Enter: regsvr32 /i ClipSp.sys

2.2 Run the SFC & DISM command

  1. Open Command Prompt with admin rights.
  2. Type the following command to repair system files and press Enter: sfc/scannowSFCSCANNOW CMD Clipsp.sys
  3. Copy and paste the following command to restore Windows Image and hit Enter: dism /online /cleanup-image /restorehealthRestore health
  4. Restart your computer to let the changes take effect. 

3. Run a malware scan

  1. Press the Windows key, type Windows Security, and click Open. Windows Security open Clipsp.sys
  2. Go to Virus & threat protection and click Scan options. V& T
  3. Select Full scan and click Scan now.Full scan -
  4. Windows Security will start the scan and will list all the malicious files. Delete them when prompted to remove the viruses. 

4. Use DiskCleanup

  1. Press Windows + R to open the Run console. Cleanmgr Run command
  2. Type cleanmgr and click OK to open Disk Cleanup.
  3. Select C drive on Disk Cleanup: Drive Selection and click OK. Cleanmgr 2
  4. Click Clean up system files. Cleanmgr 3 Clipsp.sys
  5. Select C drive on Disk Cleanup: Drive Selection and click OK. C
  6. Under files to delete, select all the content and click OK.Disk cleanup Clipsp.sys
  7. Now select Delete Files. Cleanmgr 5

5. Update device drivers

  1. Press Windows + R to open the Run dialog box. Device Manager RUN COMMAND Clipsp.sys
  2. Type devmgmt.msc and click OK to open Device Manager. 
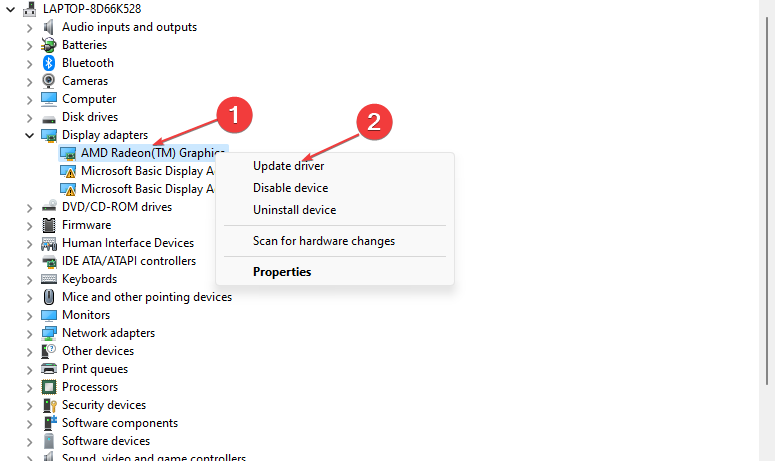
  3. Go to each category one by one and expand it. Select the driver listed one by one, right-click them, and choose Update driver.Graphics Driver update
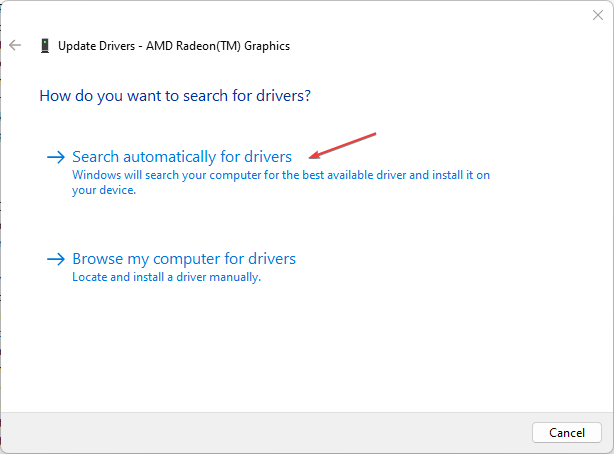
  4. Select Search automatically for drivers.Update driver 2 Clipsp.sys
  5. Follow the onscreen instructions to complete the process. 
  6. Repeat this process for the listed drivers.

6. Use the System Restore 

  1. Press the Windows key, type Control Panel, and click Open. 
  2. Select View by as Large icons and choose Recovery. Recovery Control Panel Clipsp.sys
  3. Click Open System Restore.Open system restore
  4. On the System Restore window, select Choose a different restore point and click Next. Next Choose a different restore point
  5. Select the restore point and click Next. Choose a point Clipsp.sys
  6. Now click Finish to initiate the process. Finish

7. Reset your PC

  1. Press Windows + I to open the Settings app.
  2. Go to System, then click Recovery.System - recovery Clipsp.sys
  3. Under Recovery options, locate Reset this PC, then click Reset PC.Reset now
  4. On Choose an option screen, select Keep my files.Keep my files
  5. Next, on the How would you like to reinstall Windows screen, click Cloud download.Cloud download
  6. On the Additional Settings page, click Next.additonal settings
  7. Now click Reset to initiate the process. Reset Clipsp.sys

So, these are steps that you can take to fix the ClipSp.sys BSOD error on Windows 10/11. Try them and let us know what worked in the comments section below. 

What Does Error Code 0xc0000135 Mean & How to Fix it?

Multiple user reports say that Windows 11 users are facing the 0xc0000135 on their PCs. Because of this error 0xc0000135, users are unable to open any application and use them. This error has plagued several Windows 11 users.

For such users, this guide could be of help. Here, we will share a bunch of solutions to help you fix the Windows 11 app error 0xc0000135. We will also share with you what this error means and what causes it. So let us get right into it.

What is error 0xc0000135, and what causes it?

When you come across the error code 0xc0000135, you will encounter two error messages.

The application failed to initialize properly (0xc0000135). Click OK to terminate the application.

The application was unable to start correctly (0xc0000135). Click OK to terminate the application.

After some research, we have found some of the most common reasons that could trigger the Windows 11 app error 0xc0000135.

Let us look at solutions to help you fix the Windows 11 app error 0xc0000135.

How can I fix the Windows app error 0xc0000135?

1. Reinstall the program

  1. Open the Start menu by pressing the Win key.
  2. Open Control Panel.
  3. Click on Programs and Features.
  4. Select your program and click the Uninstall button at the top.
  5. Follow the on-screen prompts to uninstall the program from your PC.
  6. Open Microsoft Store or the website from where you have downloaded the app.
  7. Download and install the program.

Some applications files might have gone missing or did not install during the previous installation. In such a case, reinstalling the application makes sense as it will load all files from scratch.

2. Renable NET Framework and Windows Communication Foundation

  1. Open the Start menu by pressing the Win key.
  2. Open Command Prompt as an admin.
  3. Type the below commands and press Enter after each one. dism /online /enable-feature /featurename:netfx3 /all dism /online /enable-feature /featurename:WCF-HTTP-Activation dism /online /enable-feature /featurename:WCF-NonHTTP-Activation
  4. Wait for the process to complete.
  5. Restart your PC.

One user shared this solution on the official Microsoft forum to resolve the Windows 11 app error 0xc0000135.

3. Download the latest version of NET Framework

  1. Visit the official Microsoft website.
  2. Select the latest version of the NET Framework.
  3. Click on the NET Framework and download the file.
  4. Install the NET Framework on your PC.

You should ensure you have the latest version of NET Framework installed on your PC. This will not only help you fix the error 0xc0000135 but will also fix other associated errors.

4. Run Windows Apps troubleshooter

  1. Press the Win + I keys to open the Settings menu.
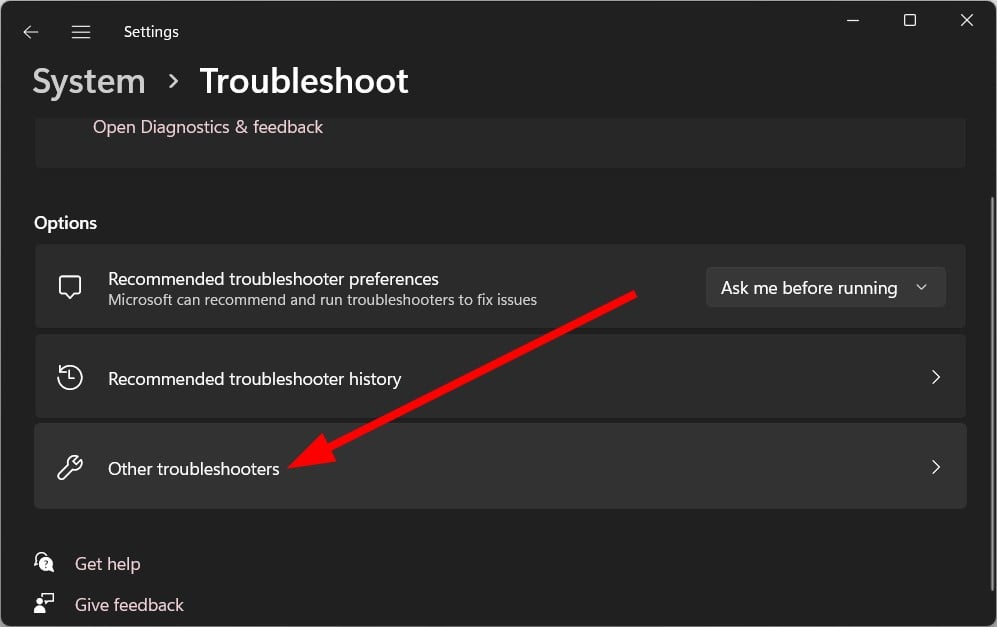
  2. Click on Troubleshoot.
  3. Select Other troubleshooters.
  4. Hit the Run next to Windows Store Apps.
  5. Apply the fixes.
  6. Restart your PC.

Often these petty problems are resolved by using the Windows troubleshooter. It is a built-in utility that provides a bunch of troubleshooting options.

5. Reset Windows Store using CMD

  1. Open the Start menu by pressing the Win key.
  2. Open Command Prompt as an admin.
  3. Type the below command and press Enter. WSreset.exewsreset
  4. Wait for the process to complete.
  5. Restart your PC.

Microsoft Store might get stuck with bugs or glitches that could trigger multiple issues with the programs downloaded from the Store.

You can quickly fix it by resetting the Microsoft Store. Moreover, this also deletes all the cache files, which can cause issues if corrupted.

6. Re-register the Store apps

  1. Open the Start menu by pressing the Win key.
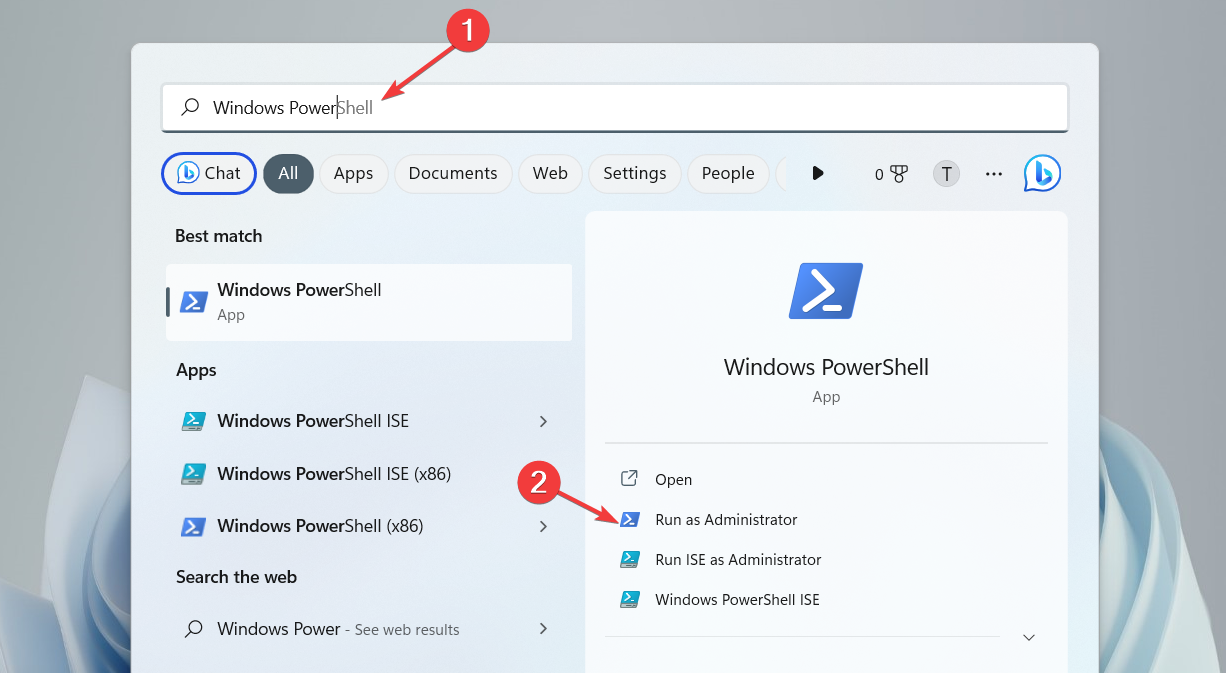
  2. Open Windows PowerShell as an admin.
  3. Type the below command and press Enter. Get-AppXPackage -AllUsers | Foreach {Add-AppxPackage -DisableDevelopmentMode -Register "$($_.InstallLocation)\AppXManifest.xml"}
  4. Restart your PC.

If you are sure that your system isn’t at fault here and the Store apps are causing issues, then you can re-register the apps.

7. Uninstall the update

  1. Open the Settings menu by pressing the Win key.
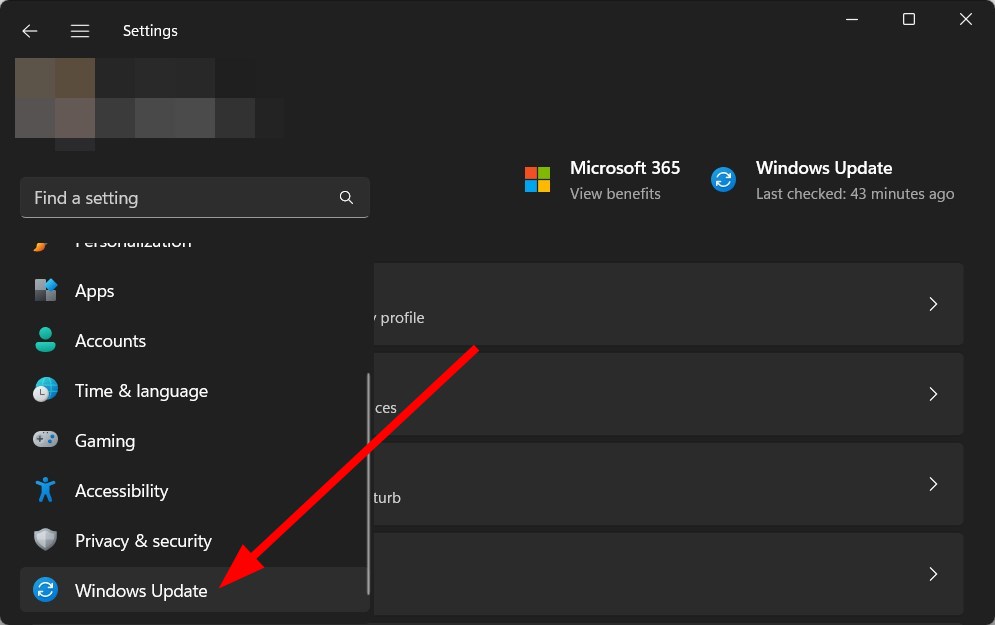
  2. Click on Windows Update on the left.
  3. Select Update history.
  4. Scroll down and click on Uninstall updates.
  5. Click the Uninstall button next to the latest update.
  6. Follow the on-screen process to uninstall the update.
  7. Restart your PC.

Windows update often contains bugs that can cause your PC to misbehave. Programs can also falter and throw up errors, such as the 0xc0000135 error code. You can try to uninstall the latest update installed on your and check whether this fixes the issue.

8. Run the app in Clean Boot State

  1. Open the Start menu by pressing the Win key.
  2. Type msconfig and press Enter.
  3. Switch to the Services tab.
  4. Select the Hide all Microsoft Services option.
  5. Click on Disable all.
  6. Click Apply and OK.
  7. Press Ctrl + Shift + Esc to open the Task Manager.
  8. Disable the processes.
  9. Restart your PC.
  10. Re-run the program and check if this fixes the issue or not.

Opening the program in the Clean Boot State ensures that any other third-party or Microsoft services don’t conflict with the program in question.

You can check if the clean boot state runs the program without any issues, which fixes the error 0xc0000135.

That is it from us in this guide. The Windows update error 0x80888002 is another standard error that is reported by users from time to time. But, again, you can check out our guide for help.

We would also like you to check out our guide on the Windows update error 0x8007000B, which explains all the practical solutions to resolve the problem.

For a comprehensive list of solutions that has helped users resolve the update error 0x8024402c, we suggest you check our guide.

Feel free to let us know in the comments below which one of the above solutions resolves the 0xc0000135 error for you.

Rome Total War Crashing? 5 Quick Ways to Fix It

Many players have encountered the Rome Total War crashing on Windows PC when launching the game or during gameplay. The issue can be frustrating, but it isn’t impossible to fix. Hence, this article will discuss ways to resolve the issue and get your game working.

Also, our readers may be interested in what stuttering in games is and & how to fix it on Windows 11.

Why is Rome Total War crashing?

Many factors may be responsible for the Rome Total War game crashing on your PC. Some are:

  • Game requirements issues – Every game has minimum and recommended requirements that determine the system specifications that can run it. So, you may be experiencing the game crash in Rome Total War due to your system not meeting the requirements for the game.
  • Outdated graphics drivers – Running outdated or faulty graphics drivers on your Windows PC can cause issues with the game, resulting in a crash on Rome Total War.
  • Corrupt or damaged game files – You can also experience the game crashing when launching or during gameplay if its installation files are corrupted. It prevents the game from accessing the necessary resources from its .exe executable file.
  • Interference from other apps – Running too many background processes on your PC can result in a crash. It is because they consume the system resources, leaving none or insufficient for the Rome Total War, resulting in the game crashing.

Irrespective of the causes, follow the steps outlined below to fix the issue and get your running smoothly.

What can I do if Rome Total War keeps crashing on Windows?

Before trying any advanced troubleshooting steps, go through the following:

  • Turn off background apps running on your PC.
  • Temporarily disable antivirus software on your computer.
  • Restart Windows in Safe Mode and check if the game crash persists.
  • Check the game’s minimum requirements –  If your PC doesn’t meet the minimum requirements, we recommend you switch to a high-end gaming PC for a better gaming experience.

If the issue persists, go ahead with the solutions below:

1. Run Rome Total War as an Administrator and in Compatibility Mode

  1. Press Windows + E to open File Explorer.
  2. Search for Rome Total War, right-click on it, and select properties from the drop-down.
  3. Go to the Compatibility tab and check the box for the Run this program as an administrator option. Check the box for Run this program in compatibility mode, then choose a Windows version from the drop-down.
  4. Click OK to save the changes.

Running the game as an administrator will fix permission issues causing it to crash and resolve compatibility issues. Check what to do if running as administrator is not working on Windows 10/11.

2. Update your Graphics driver

  1. Press Windows + R keys to prompt the Run window, type devmgmt.msc, and click OK to open the Device Manager.
  2. Expand the Display Adapter entry, right-click on the device driver, then select Update driver from the drop-down menu.
  3. Click on Search Automatically for the updated driver software option.
  4. Restart your PC and check if the game crash issue persists.

Updating the graphics driver will fix bugs affecting the game and install the latest features to improve performance. Check other steps for updating graphics drivers on Windows 11 if you have any issues.

3. Check the Rome Total War Game file integrity

  1. Left-click the Start button and type Steam, then double-click to open it.
  2. Select the Library tab, right-click on Rome: Total War, and choose Properties.
  3. Click the Local Files tab and select the Verify Integrity of Game Files button.

Checking the game file integrity will find and resolve corrupt or missing game files causing the game to crash. Read more on the ways to verify the integrity of game files not working for more advanced steps.

4. Update Windows OS

  1. Press the Windows + I to open the Windows Settings app.
  2. Click on Windows Update and click on Check for Updates. Wait for the Windows update result and click on Install Update if a Windows update is available.
  3. Restart your PC.

Updating the Windows OS will install new patches for fixing bugs affecting your game. Read about fixing Windows not connecting to the update service if the error occurs.

Alternatively, you can check our comprehensive guide on ways to fix games crashing on Windows 11.

If you have further questions or suggestions, kindly drop them in the comments section.

Google Meet for Windows 11: How to Download & Install

Google Meet is a video-communication service developed by Google that makes it easy to start a secure video conference. Hence, we’ll take you through the process of downloading Google Meet on Windows 11.

Likewise, you can read how to fix Google Meet stuck on the Getting Ready page on your PC.

How can I download and install Google Meet on Windows 11?

Before following the steps to download and install Google Meet, go through the following:

  • Ensure you’re connected to a stable network connection.
  • Free up enough memory space for the installation.

The above steps will prepare your device for the app’s installation:

1. Via Google’s Progressive Web Apps (PWA) feature

  1. Launch the Google Chrome browser on your PC and go to the official Google Meet homepage.
  2. Sign in with your Google account or create a new account.
  3. Go to the top-right side of the address bar, click the download icon, and choose to Install on the prompt.

The above steps will install Google Meet as a Web App using Google’s Progressive Web Apps (PWA) feature on your browser. However, you can create a shortcut to having a Google Meet homepage shortcut on your desktop.

  1. After step 3, click the three dots in the top-right corner to open the Menu, and choose More tools from the drop-down.
  2. Click on Create shortcut from the sub-menu, then the Create button. You can launch the shortcut to create and join Google Meet meetings.

Why is Google Meet not working in Windows 11?

Many factors can cause Google Meet not to work on Windows 11. Some are:

  • Internet connection issues – Google Meet needs a stable and fast internet connection to connect with its servers. So, network-related problems like network congestion can impede connectivity, causing Google Meet not to work. Restarting your router should fix the problem.
  • Issues with browser & Google Meet cache – The browser keeps cache files to help it run its activities faster and smoother. However, these files can become corrupt with time, preventing Google Meet from launching or working. Clearing the cache files in Google Meet storage will fix this issue.
  • Corrupt installation files – The issue may occur if the installation files for Google Meet are corrupted or not intact. It can be due to corrupt system files infecting the app files, causing them to malfunction or be unresponsive. Hence, launching the app will be futile as its .exe file is not working correctly.
  • Outdated Windows Operating System – Running an outdated Windows operating system can drastically affect the programs and processes on your PC. However, updating Windows OS on your computer will fix any bugs and resolve the issue.

Though the Google Meet app not working on Windows 11 may occur differently, troubleshooting the app and your PC should resolve it.

Installing Google Meet using Google’s Progressive Web Apps (PWA) feature is the only possible way to install the app on Windows 11. It is because Google Meet doesn’t have a dedicated native app for Windows OS.

FAQ

How do I start a Google Meet meeting on Windows 11?

Simply visit meet.google.com sign in with your Google account, and click New Meeting to start.

Can I join a Google Meet meeting without a Google account?

Yes, you can join a meeting as a guest with just the meeting link, without needing a Google account.

Can I use Google Meet without downloading it?

Yes, Google Meet works directly in most browsers without needing to be downloaded.

Does Google Meet support screen sharing on Windows 11?

Yes, you can share your screen, a window, or a browser tab during meetings on Windows 11.

Further, you may be interested in our detailed guide about Google Meet using too much CPU and effective ways to fix it on Windows 11.

Also, check some fixes for the mic being off due to the size of the call on Google Meet on your device.

If you’re looking for more ways to use Google Meet efficiently, you can also access it directly inside Gmail. Learn how to start meetings and manage them directly from your Gmail account in our detailed guide on Google Meet inside Gmail for seamless collaboration.

If you have further questions or suggestions, kindly drop them in the comments section.

Top 8 Free Photo Editing Apps for PC in 2026

We ranked the best photo editing software on the market. Whether you’re a photographer, graphic designer, illustrator, or content creator, you’ll find (at least) a few options that’ll work great for your projects.

Let’s check them out:

What is the top free photo editing software for Windows?

From professional to amateur friendly, here are the best photo editing tools for PC: (more details below)

Software nameFree versionKey features
inPixio Photo Editor✅– Masterpiece frames
– Creative effects
Adobe Photoshop Express✅
– Various themes
– Fused looks
ACDsee Photo Studio✅– Seamless search pane
– AI facial recognition tool
– Quick and simple mobile transfer
Fotor✅– Object removal & background remover
– Photo enhancer
– Batch photo editing
PicsArt Photo Studio✅– Ai image editing tools
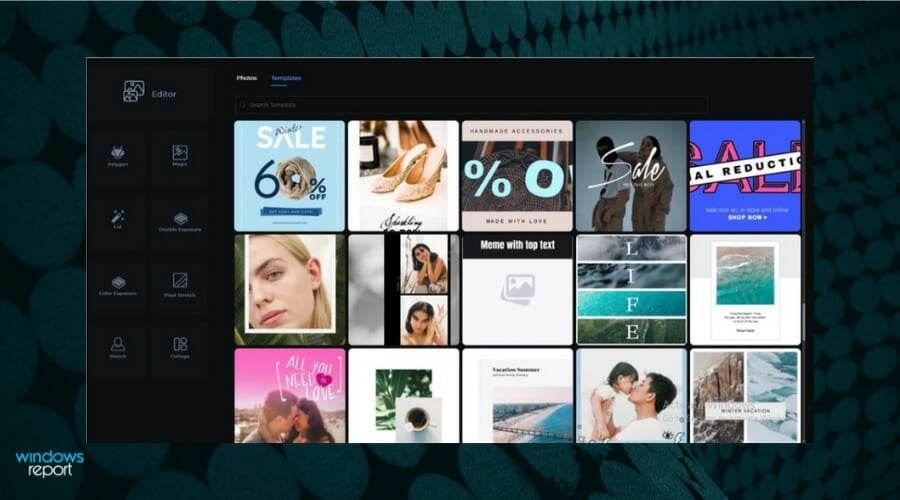
– Social media templates
PhotoWorks✅– Enhanced portrait tools
– Instant sky replacement tool
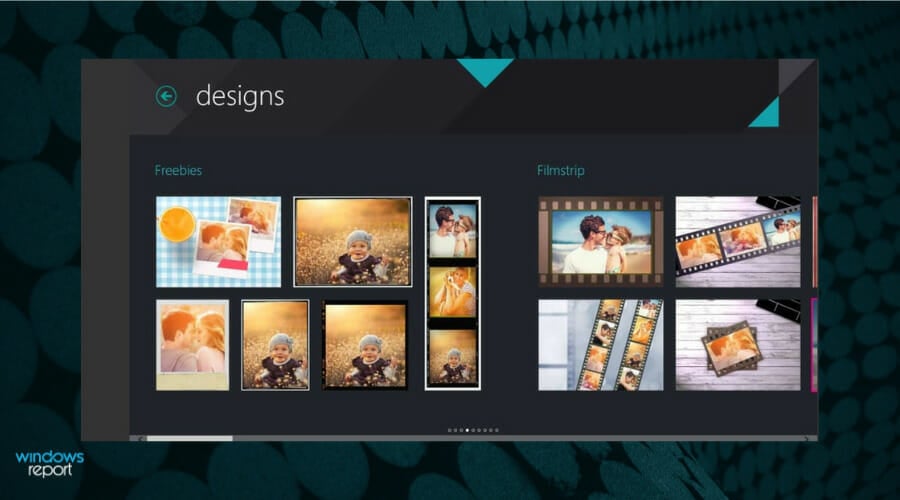
Phototastic Collages✅– 1200 themed designs
– Fine-tune editing
KVADPhoto+✅– 200+ special effects
– Lens boost

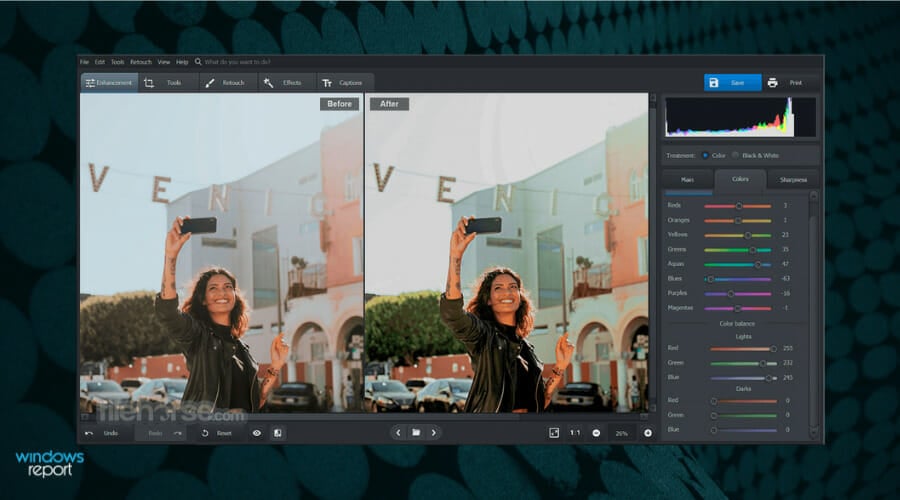
inPixio Photo Studio 12 Pro – Perfect for easy photo enhancements

What’s great about inPixio Photo Studio Pro is that it’s incredibly lightweight, and offers a wide range of filters and stamps.

The number of features is quite impressive, with the filters alone being more than 90, and they include detailed image adjustments, cropping, and more.

Once you’re done with it, showing it off to your friends and family is made easier with the direct social media integration.

Take a look at its best features:

  • Over 90 image filters
  • Social media sharing options
  • Intuitive interface
  • Detailed image adjustments
inPixio Photo Studio 12 Pro

inPixio Photo Studio 12 Pro

Unleash your inner artist with the powerful tools offered by inPixio Photo Studio.
Check Price Visit Website

Adobe Photoshop Express – Best for quick edits on RAW images, great for beginners

adope photoshop expresss

Adobe Photoshop is the most famous image-editing software in the world. The full version is expensive, but this Express is free to use.

It might not offer as many options as its big brother, but it’s still a very useful photo-editing app.

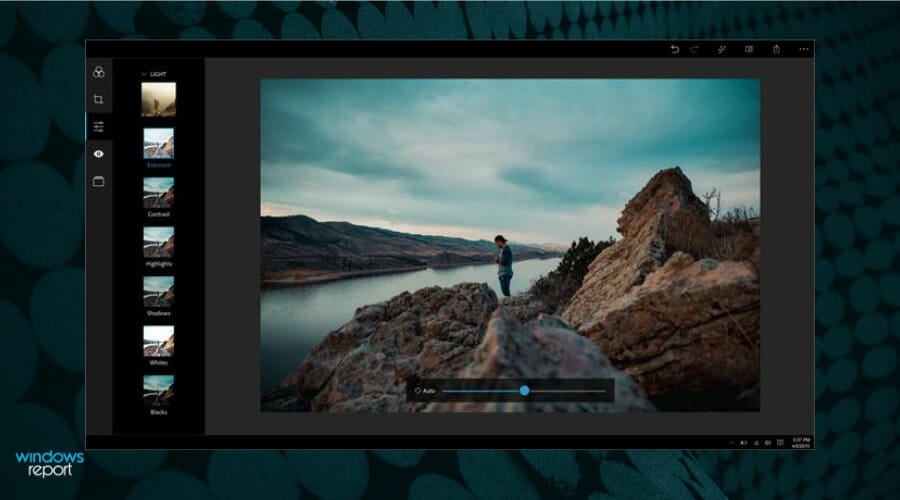
You can make tone adjustments, adjust highlights, and shadows, remove red-eye, resize, crop, and much more.

Take a look at its best features:

  • Red-eye removal
  • Very light on resources
  • Friendly interface
  • Available for PC and mobiles
  • Free to use
Adobe Photoshop Express

Adobe Photoshop Express

Explore endless creative possibilities with Adobe Photoshop Express
Free trial Visit Website

Fotor – Quick and intuitive edits with engaging effects

Fotor‘s metro design provides a user experience similar to the operating system you’re using. But its nice design isn’t the only good thing about this app.

The powerful all-in-one photo editor offers a high variety of options, from basic editing tools to great visual effects, enchanters, collages, sizing options, and more.

Besides that, it has quite a nice range of filters and effects, photo frames, stickers, and tilt-shift tools.

It also has a free online version so you can definitely use it for quick editing and basic enhancement of your images right now.

Let’s see some of its key features:

  • Great set of filters
  • Excellent visual effects and enhancement features
  • Advanced set of elements to add to photos
  • Intuitive interface
  • Crop and resize images quickly
Fotor

Fotor

Apply stunning effects and enhancements effortlessly with Fotor’s intuitive tools.

ACDsee Photo Studio – Powerful editing and organizing for free

ACDSee Photo Studio 2022 is probably the best digital asset manager on the market, and it supports more than 60 image formats, including GIFs.

In addition, you not only get to view crisp quality images on a super platform, but you also can edit, organize, manage, and even share your digital photos with your loved ones or friends from your desktop.

It offers some basic options, like cropping, rotating, flipping, red-eye removing, and adjustments of brightness, exposure, or shadows.

Let’s go through some of the most important features:

  • Great photo filters
  • Red-eye removal
  • Full list of basic tools
  • Free to use
  • Supports more than 60 image formats
ACDSee Photo Studio

ACDSee Photo Studio

Organize, edit, and share your digital assets seamlessly with ACDSee Photo Studio.
Free trial Visit Website

PicsArt – Photo Studio – Creative tools for edits, drawing, and collages


PicsArt is probably the most popular photo editing tool for portable devices and smartphones, and Microsoft now made it available for free in Microsoft App Store.

It is a three-in-one tool, as it could be used as a photo editor, drawing tool, and collage maker. Like a photo editor, PicsArt offers a huge variety of photo filters, various customizations, and photo manipulation options.

You can also create various photo collages for background or social media. And with the drawing tool, you’re able to design forms of digital art with brushes and layer options.

Let’s review some of its most important features:

  • Top trending filters and popular photo effects
  • Erase and replace backgrounds
  • Clean up pictures and remove unwanted objects
  • Add text to photos with 200+ designer fonts
  • Flip and crop photos quickly
PicsArt

PicsArt

Create dynamic collages and digital art with PicsArt’s creative suite.

PhotoWorks – Advanced editing with AI tools amateur & professional friendly

Another great entry in our list of reliable photo editors is PhotoWorks, an easy-to-use tool that is bound to become the best friend of any professional photographer.

PhotoWorks is perfectly capable of identifying the type of picture all by itself, from portraits to landscape photography, automatically applying different adjustments and enhancements.

Additionally, if you’re into photo restoration, PhotoWorks can do that as well, allowing you to bring old black & white photos into the XXI-st century.

Let’s look at some of its most important features:

  • Powerful AI technology
  • Identifies the type of picture and applies adjustments automatically
  • Complete set of image enhancement tools
  • Restores old photos back to life
  • Free trial period
PhotoWorks

PhotoWorks

Let AI power your editing and bring photos to life with PhotoWorks.
Free trial Visit Website

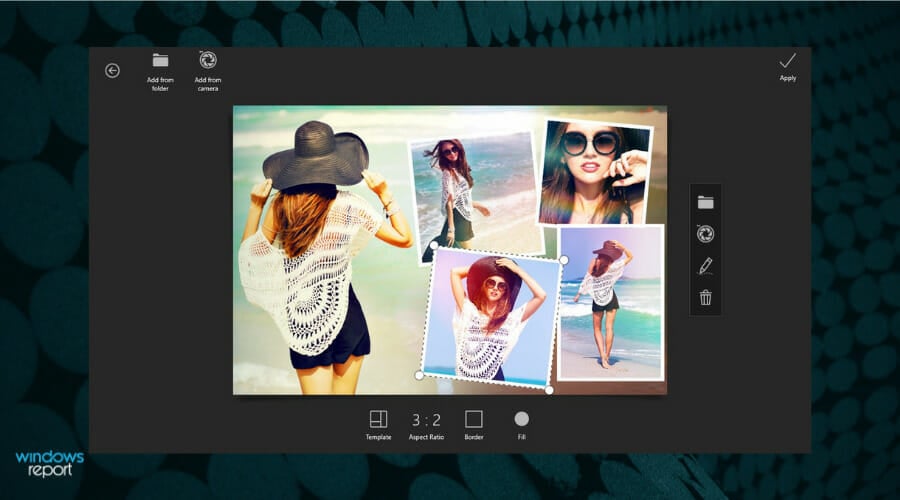
Phototastic Collages – Built-in action camera, collages & templates

Phototastic is the best and the most popular Windows app for creating beautiful collages of your existing photos.

It offers more than a hundred collage templates of various shapes and styles. You can also add some text to your collages with the built-in text and stickers feature.

Photostatic also has a built-in action camera, so you can take pictures for your collage right on the spot.

So, if you’re looking for an app that will make stunning collages of your photos, Phototastic is probably the best choice.

Note that you download it for free in Microsoft App Store, but there’s also a Pro version available, with even more templates and options.

Let’s see a couple of its best features below:

  • Friendly, simple design
  • Great tool set of basic features
  • Quick editing and enhancing options
  • Can be downloaded for free
  • The Pro version comes with additional templates and features

⇒ Get Phototastic

KVADPhoto + – Pen and ink support

If you’re looking for a powerful photo filter app, KVADPhoto + would probably be a great choice.

The specialty of this app is adding various special effects to your photos. It has the biggest base of photo filters of all apps in the Microsoft Store, offering more than 150 unique photo filters.

And these filters are divided into categories, so you can easily find the filter you want to use.

It features Sketch artistic filter, transforming your regular photo into a beautiful sketch artwork.

Although this app offers a bunch of options, you can have even more if you buy the Pro version of KVADPhoto +, but even with the regular one, you can do wonders with your images.

Take a look at its most important features:

  • More than 150 photo filters
  • Powerful all-in-one image processing application
  • Picture-in-picture effects and Clip Art stickers
  • Pen and Ink support
  • Built-in clip art editor

⇒ Get KVADPhoto +

What should I look for in a good photo editing app?

Look for an app that matches your needs: basic tools like cropping and resizing, or advanced features such as filters, AI enhancements, and batch processing.

Consider the ease of use, system compatibility, and export options. Test these top free editors to find one that aligns with your editing goals and preferences.

That being said, grab the best free photo editing software tools below, test them, and make a final choice.

Summary

These are some of the best free photo editing apps for PC and we hope that you’ve found the right one for you.

For other great tools, you should also check out these layered image editors that can also help you enhance your photos.

If you have any more suggestions or questions, feel free to leave them in the comments section below, and we’ll be sure to check them out.

How to Fix Docker Desktop Starting Forever on Windows 11

Launching the Docker Desktop tool on the PC can be challenging and time-consuming for some users. It is because they reported an issue with Docker Desktop starting forever on Windows 11. However, this guide contains some tips for fixing the problem and improving the app speed.

Also, some have reported Hyper-V and container features not enabled error while installing Docker Desktop on their PCs.

Why is Docker Desktop stuck on starting?

Many factors may be responsible for the Docker Desktop tool taking forever to start. Notable ones are:

  • System requirements issues – The minimum and recommended requirements help determine the PCs that can run it. So, if your system doesn’t meet the minimum requirements, you may have difficulty accessing the tool smoothly.
  • Issues with the Windows Subsystem for Linux (WSL) – If the WSL isn’t running correctly, it can impede the running of the Linux environment directly on Windows devices. Hence, Docker Desktop taking a long time to load can be due to the system component being unable to run the tool environment.
  • Corrupt app installation files – If the installation files are not intact, the app won’t have any base to boot from, and it can occur due to corrupt system files impacting the Docker Desktop environment.

Nonetheless, we’ll take you through some basic steps to fix the problem and get the tool working again.

What can I do if Docker Desktop is starting forever on Windows 11?

Before proceeding with any advanced troubleshooting steps, go through the following:

If you can’t fix the problem, try the solutions below:

1. Perform a clean boot

  1. Press Windows + R key to open the Run dialog box, type msconfig, and click OK.
  2. Select the Services tab and check the box for the Hide all Microsoft services option, then click the Disable all button.
  3. Go to the Startup tab and click Open Task Manager.
  4. Click on the startup programs and tap the Disable button.
  5. Restart your PC and launch Docker Desktop to see if the issue persists.

A clean boot prevents some programs from running on startup, leaving more resources and stopping any interference on the Docker Desktop tool.

You can read about removing Startup programs on Windows PC.

2. Restart Docker Service

  1. Left-click the Start button, type Services, then open it from the search results.
  2. Find the Docker Service, right-click on it, and select Restart from the drop-down menu.
  3. Close the Services window and start the Docker Desktop app to see if it works.

Restarting the service can help fix Docker startup errors and refresh the Docker host’s processing.

3. Unregister Docker Desktop

  1. Left-click the Start button, type PowerShell, and click Run as administrator.
  2. Click Yes on the User Account Control prompt.
  3. Copy and paste the following codes and press Enter after each: wsl --unregister docker-desktop    wsl --unregister docker-desktop-data
  4. Exit the PowerShell window and launch Docker Desktop to check if it loads completely.

Unregistering the Docker Desktop terminates any connection between the app and your PC, allowing it to re-establish new connections. Check ways to fix PowerShell not showing the full output on Windows 11.

4. Re-enable the Windows Subsystem for Linux (WSL) feature

  1. Press Windows + R key to open the Run dialog box, type optionalfeatures, and press Enter to open the Windows Features page.
  2. Uncheck the box for Windows Subsystem for Linux option. Click on OK to save the changes and close the Windows Features dialog.
  3. Follow the above steps and check the box for the Windows Subsystem for Linux option.

The above steps will force restart the Windows Subsystem for Linux feature and allow it to run the Linux environment smoothly on Windows 11. This will also help with the Unexpected WSL error.

5. Uninstall and perform a fresh install of Docker

  1. Press Windows + R key to open the Run dialog box, type appwiz.cpl, and click OK.
  2. Locate Docker, right-click on it, and select Uninstall from the drop-down.
  3. Follow the on-screen instructions to complete the process.
  4. Download Docker Desktop on your PC.
  5. Run the Docker Desktop Installer to open it and install it.

Reinstalling Docker Desktop will fix corrupt installation files liable to cause the issue.

In addition, our readers may be interested in fixing Windows Subsystem for Linux not enabled on Windows 11.

We also have a guide on how to install Docker on Windows Server, so don’t miss it.

If you have further questions or suggestions on this guide, kindly drop them in the comments section.

Windows 11 build 23424 further enhances the Widgets board

We’ve reached the end of the week, which means that we’ve also reached the end of the first official month of spring.

And we all know what that means, don’t we? Indeed, we are getting some updates for the Windows 11 Insider Channels.

Today, only the Canary (build 25330) and the Dev Channel received new software to play with. If you are on Windows 11 and work with large files, avoid installing KB5023778.

Let’s cut the suspense and get right into it. However, before we do, we recommend that you check out the available information on Microsoft’s new Security Copilot.

Build 23424 will help you save more power

It’s finally Friday, so Microsoft has released a new build for Windows 11 Dev Channel Insiders. The new build, 23424, adds the option to get the latest updates sooner with the help of a toggle.

Also, this new build brings full-screen widgets, improved search performance inside Settings, and much more.

It also boosts the performance of File Explorer, the company says. And, as always, there are many more bug fixes and other improvements.

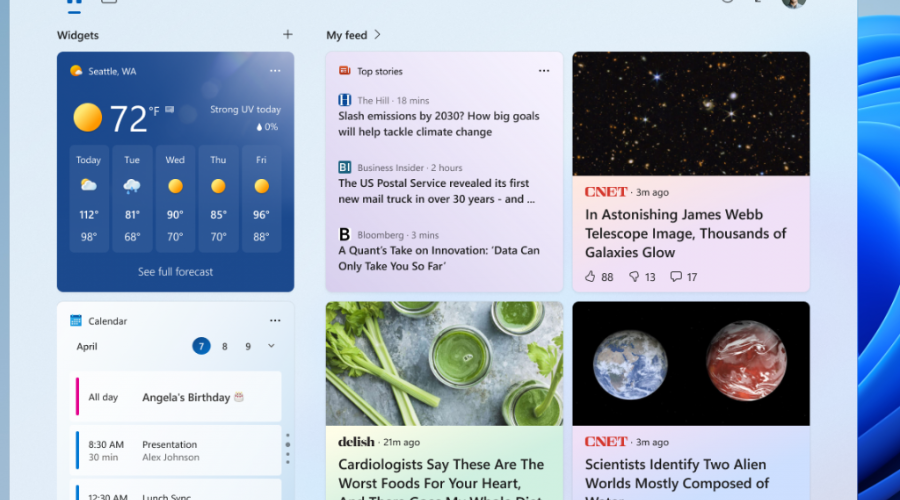
The tech giant is now beginning to preview a revamp of the widgets board, with a larger canvas and dedicated section for widgets and feed content with a clear separation between them.

If your device supports it, you can have a 3 collum widgets panel. Not all Insiders will get this feature exactly from the start.

Keep in mind that Microsoft is just beginning to roll this out, so the experience isn’t available to all Insiders in the Dev Channel just yet.

This month, we’re also looking at Content Adaptive Brightness Control (CABC), which is already a feature that most of us are familiar with.

The above-mentioned functionality in Windows 11 will dim or brighten areas of a display or monitor based on the content being displayed.

The main goal here is to strike a balance between reduced power consumption with visual experience to save battery life.

And, starting with this build, the company is allowing this feature to run on devices such as laptops and 2-in-1’s that are plugged into a charger, as well as on desktop PCs.

You should know that, for most users, this change won’t be noticeable and should reduce energy consumption.

On the same Canary Channel, last month, Microsoft added a USB4 hubs and devices page in the Settings app.

It mentioned that USB4 enables new productivity scenarios for docking, high-performance peripherals, displays, and charging.

Now, let’s take a closer look at the rest of the changelog and determine what else we are getting through this software release.

Changes and Improvements

[Input]

  • Made a change to help improve performance when using a high polling mouse while gaming.

[Settings]

  • Windows Insiders can help us preview a new experience we’re working on. Insiders will begin to see a new toggle under Settings > Windows Update for getting the latest updates as soon as they are available. This new toggle is meant to be used in the Beta Channel to allow Insiders to switch more seamlessly to the enablement package. But because the Dev Channel does not use an enablement package, turning this toggle on will not do anything for Insiders in the Dev Channel. However, by turning it on, a “Windows configuration update” will be offered via Windows Update that is designed to help us make sure this new toggle is connected to our backend services correctly before making it available in the Beta Channel. This update introduces nothing new for Insiders.
  • Improved the performance of search within Settings.
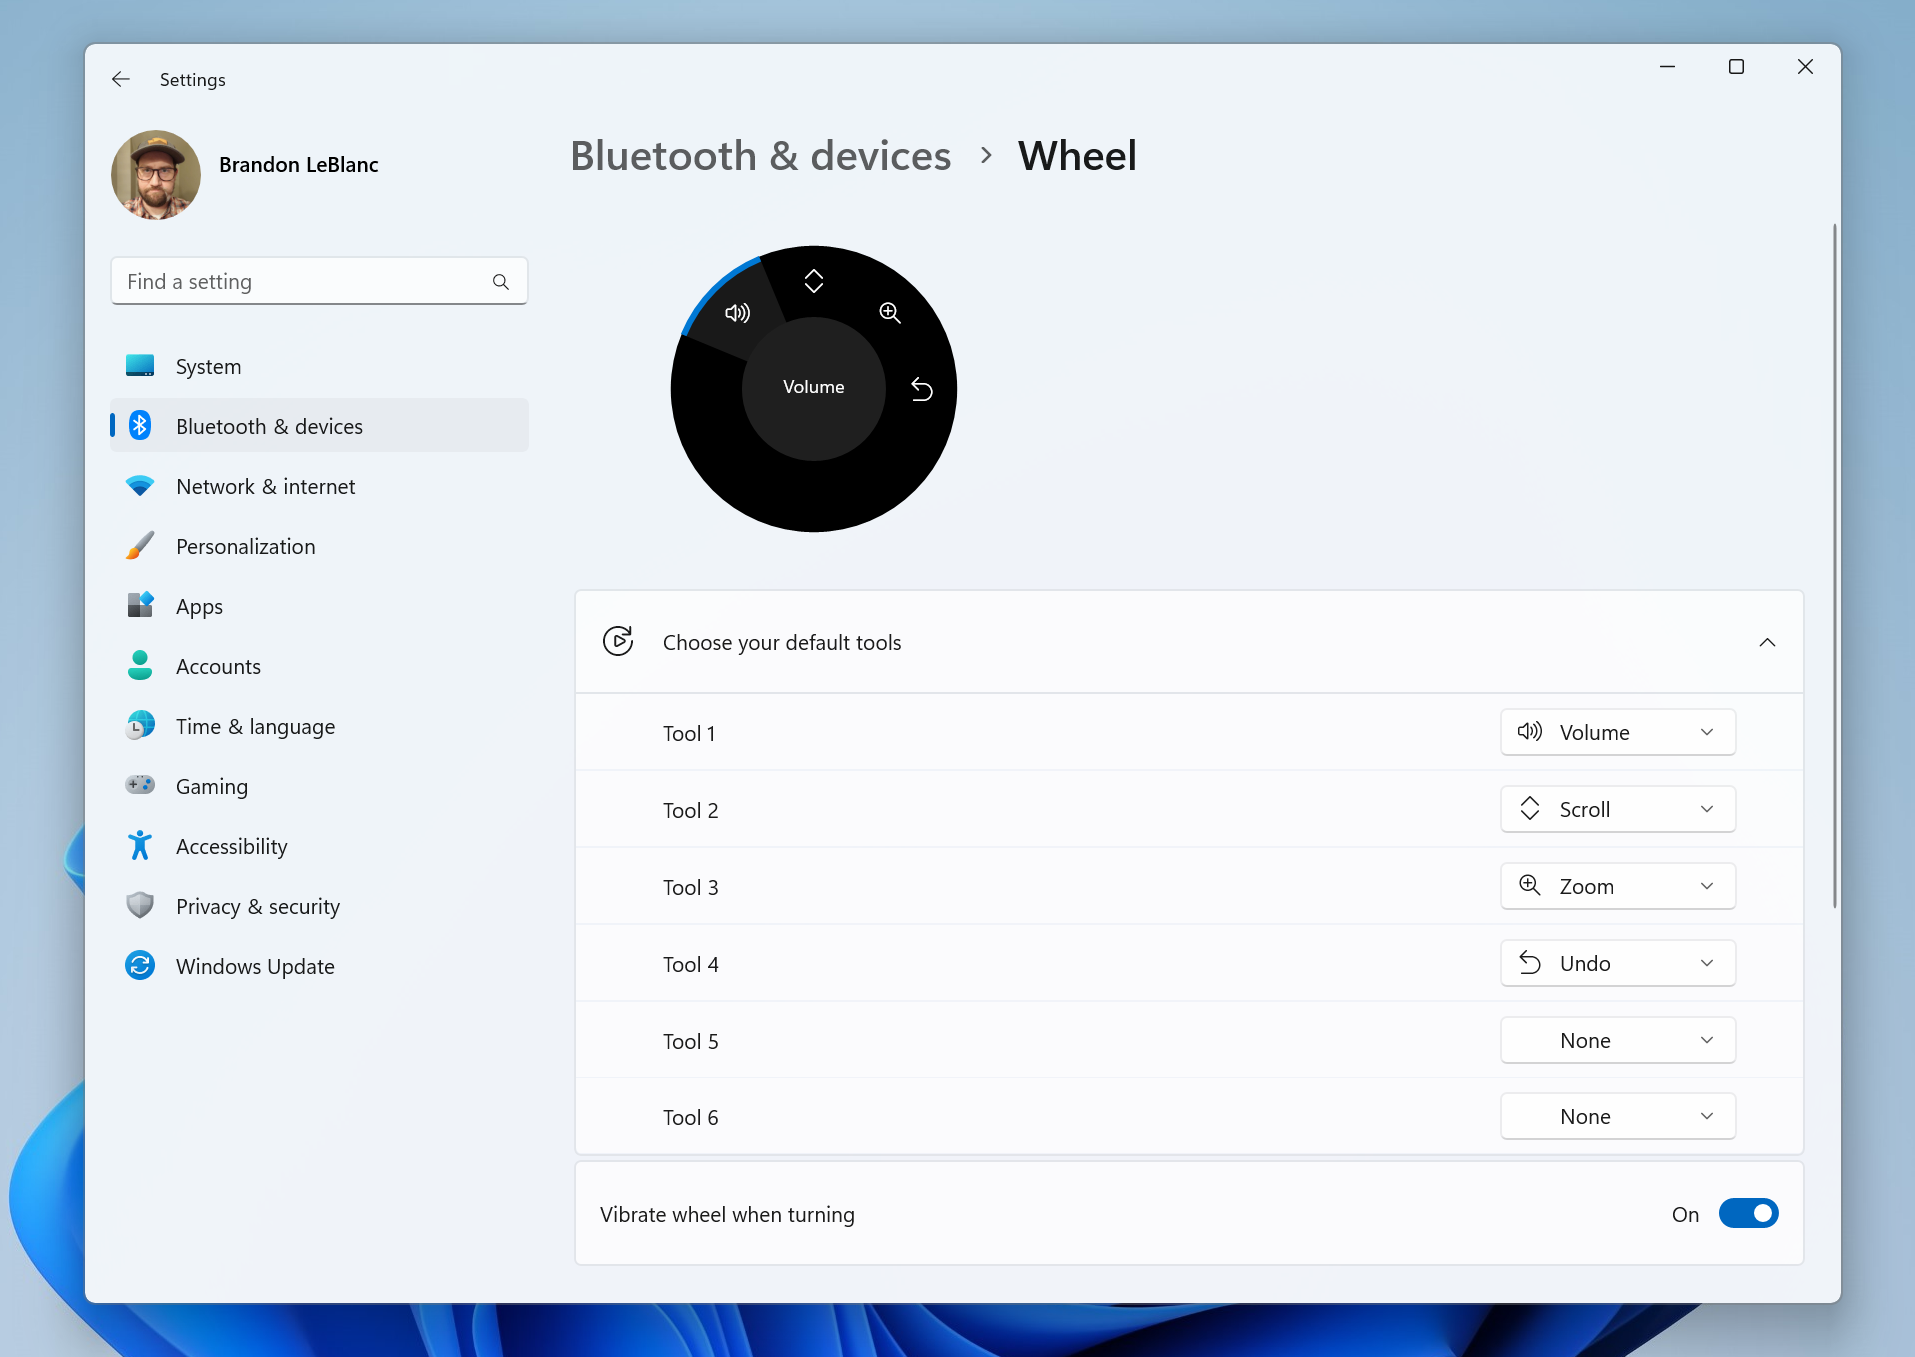
  • The settings page for wheel devices such as the Surface Dial has been updated to better match the Windows 11 design principles.

Fixes

[General]

  • Fixed an issue that was causing voice access to take some time to turn on after using the wake-up command.

[File Explorer]

  • We fixed the issue causing an error dialog to pop up when clicking on the “Open File Location” command.
  • We fixed the issue causing no action to occur when clicking on the ‘Remove from list’ command.

[Input]

  • Made a change to help improve performance when using a high report rate mouse while gaming. As a reminder, if you have gaming performance feedback, please follow these steps to file actionable feedback.

[Settings]

  • Improved the performance of search within Settings.

[Windowing]

  • Fixed an issue from the last flight where Microsoft Edge tabs would show when doing ALT + Tab even if Settings > System > Multitasking was set to “Don’t show tabs”.

[Task Manager]

  • Fixed an issue where the search icon could end up overlapping the Task Manager icon in the title bar.

Known issues

[Search on the Taskbar]

  • There is an issue where some people may not see the search box on the taskbar and/or the settings to adjust the search box experience on the taskbar after updating to Build 23403. We are aware of the issue, and we are working on a fix.
  • If you have the Bing button in the search box on the taskbar and you restart your computer, you may see the daily rotating search highlight for some time before getting the Bing button back.

[File Explorer]

  • Access keys will appear inconsistently if no button is pressed. Pressing a button will cause them to reappear.
  • Clicking on the Share command will currently bring up the Windows share sheet (non-OneDrive).

[Live captions]

  • On ARM64 devices, enhanced speech recognition support installed through the Language & Region settings page will require restarting live captions if you switch languages in the live captions Caption language menu.
  • Certain languages shown on the Language & Region settings page will indicate speech recognition support (e.g., Korean) but don’t yet have support for live captions.
  • When adding a language through the Language & Region settings page, language feature installation progress may become hidden, and you may not see install completion of “Enhanced speech recognition” (required by Live Captions). (You can use the language’s “Language options” to monitor progress.) If this happens, there may be an unexpected delay before the live caption setup experience detects this and lets you continue.
  • Captioning performance may be degraded in non-English languages and missing out-of-language filtering in non-English (United States) languages which means that incorrect captions will be shown for speech not in the caption language.

Microsoft Store Update

Windows Insiders in the Canary and Dev Channels running version 22303.1401.x of the Microsoft Store and higher will see the following improvements rolling out:

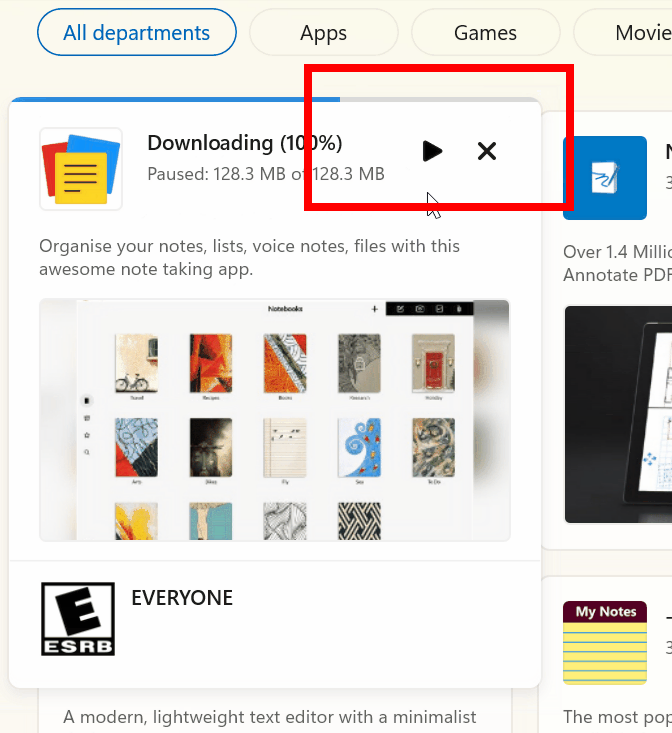
  • Install free apps and games from search results: We’ve introduced a new way to install free apps and games. Hovering over a free product on the search results page opens a new expanded card experience, where you can find a convenient install button. This will trigger the installation without having to navigate into the product page.
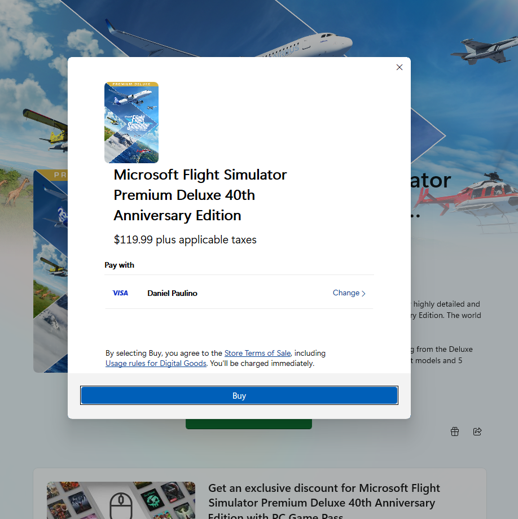
  • New design when purchasing apps and games in the Store: Discover a new and redesigned experience when purchasing apps and games inside the Microsoft Store! The purchase dialog’s styles align better with Windows 11 to bring you a more pleasant checkout experience.
  • New UX for in-app ratings dialog: Developers of your favorite apps and games often use a Microsoft Store feature that requests ratings from within the app or game. We’ve updated this in-app ratings experience to be faster, more reliable, and to better align with Windows 11 styling.

What can I do if I can’t install Windows 11 build 23424?

  1. Press Win+ I to access Settings.
  2. Select the System category and click on Troubleshoot.w11 troubleshoot
  3. Press the Other troubleshooters button.other troubleshooters windows 11
  4. Press the Run button next to Windows Update.windows update troubleshooter

Remember that Microsoft said that the new Bing Ai chat will soon feature ads in the answers it provides, which will be really annoying for some.

Make sure to report any other issues you might come across, in order for Microsoft to address and improve the overall OS experience for us all.

This is everything you can expect if you are a Windows 11 Dev Channel Insider. Leave a comment below if you found any issues since installing this build.

Valorant High CPU Usage: How to Lower if It Gets to 100%

Many Valorant players report the game using high memory or CPU when running it on their PCs. It causes the game to lag and reduces game performance. First, close any background apps you’re not using, and disable the third-party antivirus temporarily to get some extra free memory. Also, if you are playing the game in windowed-borderless mode, change it to Fullscreen from the game graphics settings.

How can I fix high CPU usage in Valorant?

1. Update your Graphics driver

  1. Press Windows + R keys to prompt the Run window, type devmgmt.msc, and click OK to open the Device Manager.
  2. Expand the Display adapter entry, right-click on the device driver, then select Update driver from the drop-down menu.
  3. Click on Search Automatically for the updated driver software option.
  4. Restart your PC and check if the black screen issue persists.

Updating the graphics driver will improve the performance of your graphics devices and fix bugs affecting your gaming activities.

Check our detailed guide about updating graphics drivers on Windows 11 if you have any issues.

2. Allow Valorant through Windows Defender Firewall

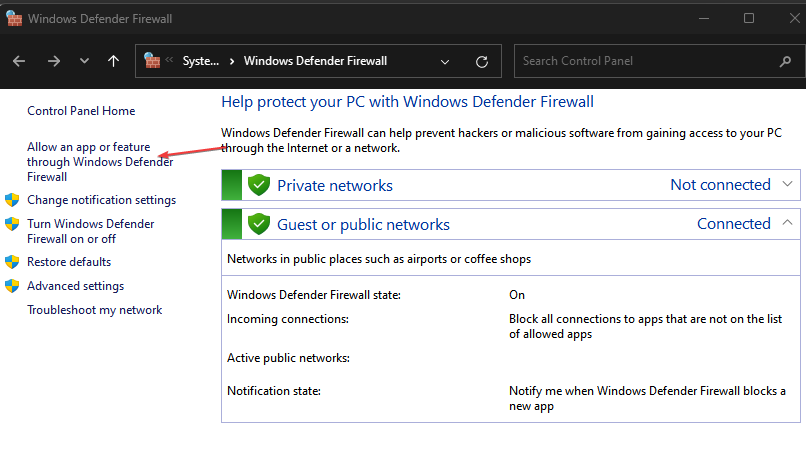
  1. Left-click the Start button, type firewall and open Windows Defender Firewall.
  2. Go to Allow an app or feature through Windows Defender Firewall.
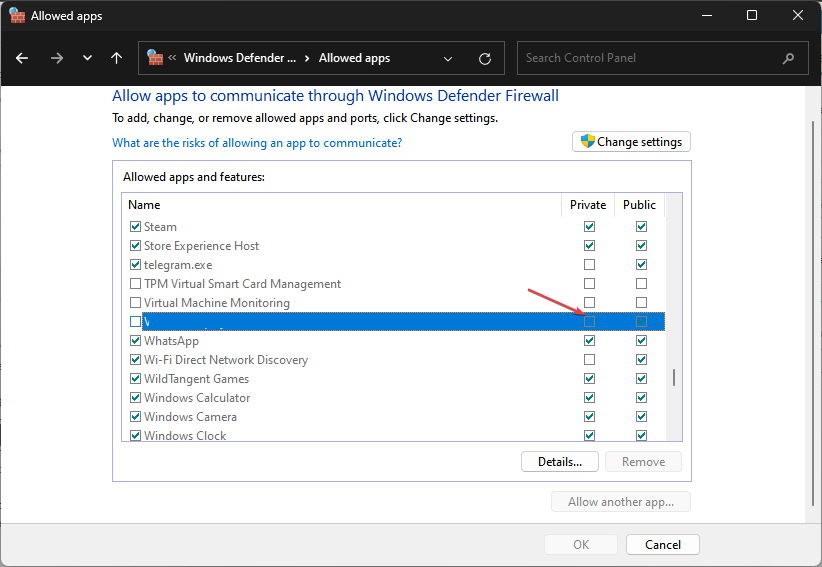
  3. Scroll down and select Valorant from the list of apps. Check the boxes for both Private and Public. Click OK to save the changes and restart your PC.

Allowing Valorant as an exception in Windows Firewall prevents the firewall from checking or delaying its processes.

Read our guide on how to fix Windows Firewall blocking other app features on your PC.

3. Disable background apps

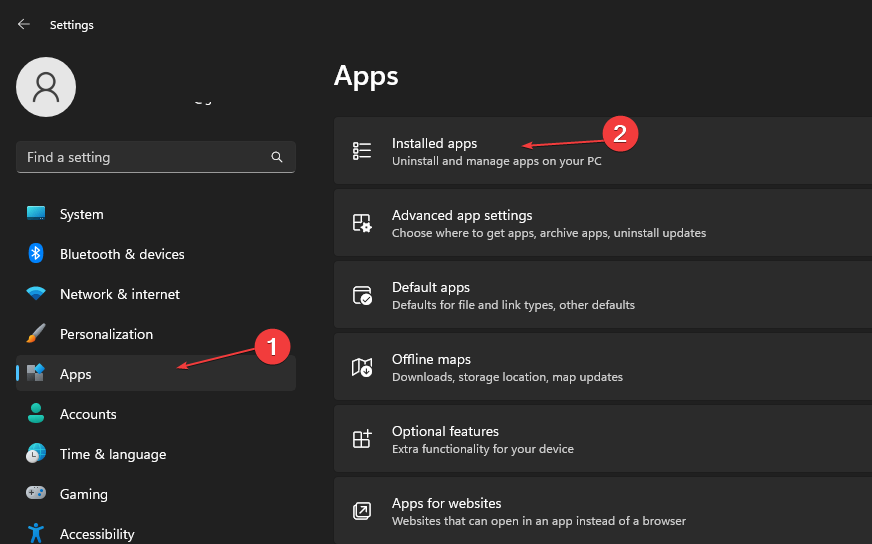
  1. Press the Windows + I key to open Windows Settings.
  2. Select Apps and click on Installed apps.
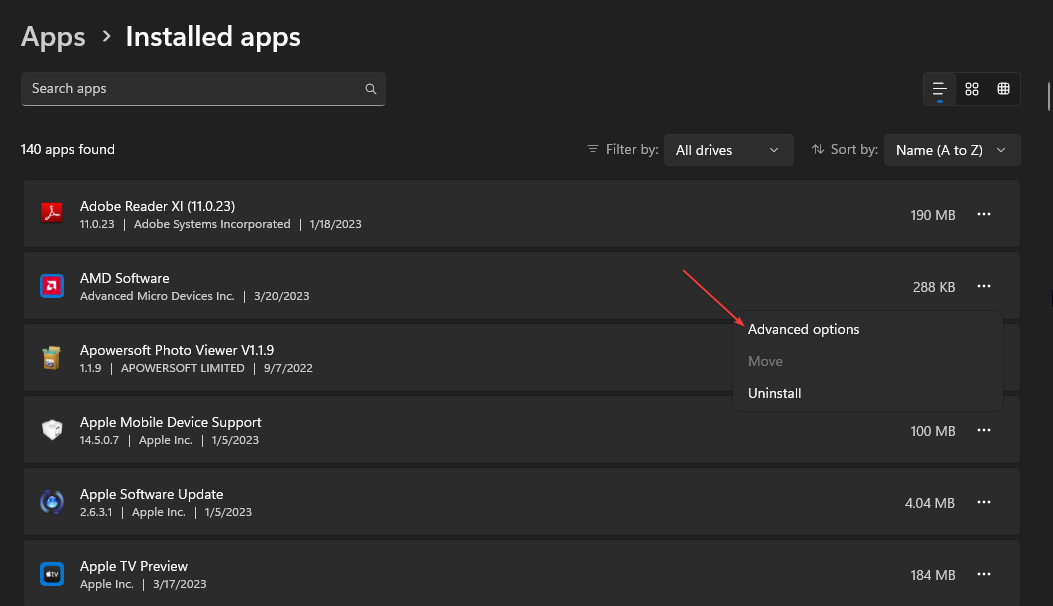
  3. Select an app, then click the three dots, and choose Advanced options.
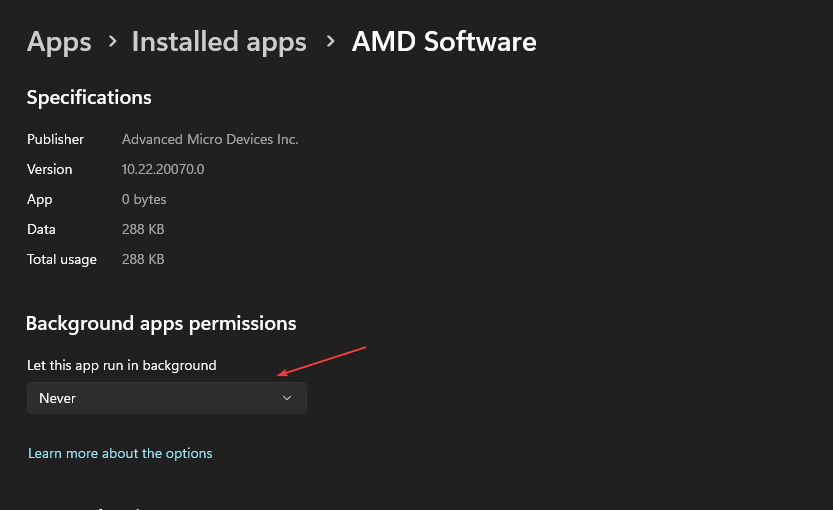
  4. Then tap the drop-down button for Background app permissions and click on Never.
  5. Repeat the same process for other apps.

Disabling apps from running in the background prevents them from using up your system resources.

Check our article for other methods to turn off background apps in Windows 11 if you have issues using the steps above.

4. Stop overclock on your PC

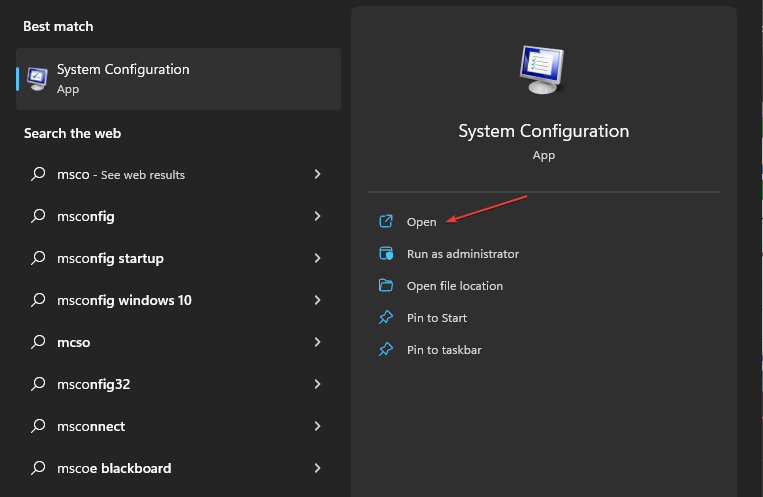
  1. Left-click the Start button, type msconfig, and press Enter.
  2. In the System Configuration window, click on the Boot tab.
  3. Check the No Overclock option. Click OK and restart your PC.

Stopping your PC from running overclocking utilities prevents Valorant from using excessive CPU. You can also check how to fix CPU overclock crashing games on your PC.

5. Set RAM priority for Valorant

  1. Press the Ctrl + Shift + Esc keys to open Task manager.
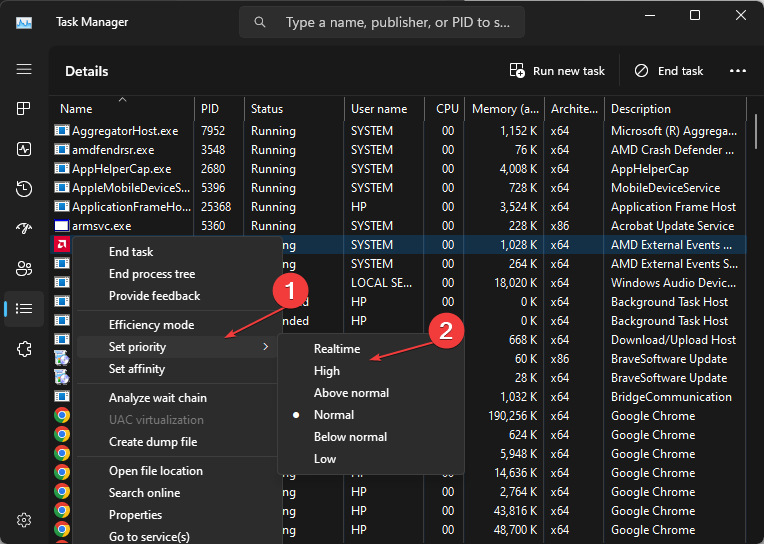
  2. Go to Details, right-click Valorant, select Set priority from the drop-down, and choose Realtime or High.
  3. Close the Task Manager and check if the high CPU usage persists.

Allowing a high or real-time priority will allocate more RAM resources and limit the CPU usage of Valorant.

What causes Valorant’s high CPU usage?

Numerous factors can cause the high CPU usage in Valorant, and some are:

  • Outdated graphics drivers – Running an outdated graphics driver on your PC can cause problems with how much system resources gaming activities will consume. It is because the graphics cards can fix bugs affecting the current version, resulting in high CPU usage in high-end games like Valorant,
  • Interference from third-party apps – The activities of other apps running on your computer can affect your game. They can take up excessive bandwidth and system resources, leaving Valorant to overwork and not give enough system resources for the game.
  • Issues with Windows Defender Real-time Protection – When you have the Windows Defender scheduled scan running on your computer, it can cause problems with the Valorant game and result in high CPU usage. The scan delays the game activities, causing it to take longer to load.

You can fix the problem by troubleshooting the game and your PC.

In addition, you can check our comprehensive guide on ways to fix Valorant not working on Windows 11. Also, you can go through some effective solutions for Valorant not updating on your PC, or our article on Valorant freezing on Windows PCs and some ways to resolve it.

If you have further questions or suggestions, kindly drop them in the comments section.

Play Solitaire: Your Favorite Card Game is now Online for Free

A lot of us remember the good times back when everyone had Windows XP, no Internet, and the only way we could entertain ourselves was with a quick game of Solitaire or Spider Solitaire.

Well, that card game never lost its charm, and there are plenty of interpretations of it available nowadays for anyone to try out, one such service being Play Solitaire, a free online solitaire game that anyone can play from anywhere.

Play Solitaire as soon as you visit the page

If you love quick gaming sessions, you’ll like how by just accessing this service’s website you are thrown straight inside a game, the only choice that you need to make being whether to play a 3-card or a single-card game.

The animation of the game is very fluid and we didn’t experience any FPS spike while playing it, and the art style is a mix between cartoonish and overly simplistic, so if you’re into 3D eye candy, this game isn’t for you.

However, if you’re just here for the gameplay, you’ll have loads of fun, especially since the website offers several tools that spice the entire experience up.

For example, you can customize the card design, as well as the background, you can send other users emails straight from the web page, and you even have detailed game statistics so you can keep track of how well you play.

The rules of Solitaire

Right under the game screen, you’ll find an entire section containing both texts and images explaining how to play Solitaire, so even if it’s your first time playing, the rules will be laid out for you in a simple manner.

They even went so far as to give players a few tips on how to get better, and we found that to be incredibly useful, especially for youngsters that haven’t dabbled in Solitaire ever.

Lastly, if you really get stuck and can’t figure out what your next step should be, they’ve included a Hint button that will light up cards and the location they should be taken to in order to progress along.

However, if the cards aren’t favorable and you get completely stuck, you can undo your last moves. More so, there’s always the option to reset the game and start completely over.

All in all, we recommend Play Solitaire.com to anyone that wishes for a quick card game, so go ahead and give it a try, it’s completely free!

Usbaudio.sys Blue Screen Error: Causes & How to Fix

The usbaudio.sys is a System32 driver file that provides driver support for audio devices. Some users have reported that they experienced blue screen error while trying to utilize their PC’s speaker.

In this article, we will discuss the usbaudio.sys BSOD error, and its causes, and provide you with steps to help resolve the error.

What causes the usbaudio.sys blue screen error?

The following are some of the most common causes of usbaudio.sys error:

  • Failed Windows Updates – Windows Updates provide users with the latest features and bug fixes. However, if the update was unsuccessful or wasn’t installed correctly, it’ll lead to a string of errors such as the Usbaudio.sys error. 
  • Forced Shutdowns – Forced Shutdowns are one of the most common causes of errors in Windows PC. This is because when the PC shuts down abruptly, services and applications are forced to close. After a series of forced shutdowns, errors like the usbaudio.sys will likely appear.
  • Corrupt or Outdated Drivers – Windows requires drivers to function. If the installed drivers are corrupt or outdated, you’ll run into system errors like the usbaudio.sys.
  • Hardware Problems -Sometimes, errors like the usbaudio.sys are triggered due to problems with your PC’s hardware. In such cases, you’ll have to take your PC to a technician to diagnose and fix the problem.

What can I do to fix the usbaudio.sys error?

If you’re currently experiencing the usbaudio.sys error, here are a couple of troubleshooting techniques you can attempt:

1. Perform a System Restore

  1. Press the Windows key, type in create a restore point, and hit Enter.
  2. In the popup window, click the System Restore button, and click the Next button.
  3. When the system pops up, select Next.
  4. Select the specific restore point you wish to revert your system to, and click Next.
  5. Click the Finish button to complete the system restore.

Before running a System Restore, you’ll need to have an active system restore. If you don’t have an existing one, here is a detailed guide showing how to create a system restore point in Windows.

2. Run the System File Checker

  1. Press the Windows key, type in CMD, right-click on the displayed result, and select Run as Administrator.
  2. In the User Account Control window, click Yes to grant the app administrative access.
  3. Type the following command and hit Enter: sfc /scannow
  4. Wait till the scan is complete, and restart your PC to check if the error persists.

The System File Checker is a Windows utility that checks for problems with files on your computer. It’s very efficient in resolving system errors, blue screen of death, etc. 

While using the System File Checker, you can run into the Windows Resource error. This error prevents the Windows utility from running. Be sure to read our guide on how to resolve the error.

3. Run a DISM Scan

  1. Press the Windows key, type in CMD, right-click on the displayed result, and select Run as Administrator.
  2. In the User Account Control window, click Yes to grant the app administrative access.
  3. Type in the following and hit Enter: DISM.exe /Online /Cleanup-Image / Restorehealth

As with an SFC scan, wait for the scan to be completed, and reboot your PC.

DISM scans help fix corrupt Windows files. If any of your PC’s system files have been damaged due to viruses, or forced shutdowns, running a DISM scan will help resolve the error.

4. Update Windows

  1. Press the Windows key + I to open the Settings app.
  2. Click on Windows Update and select Check for updates. If there are new updates, you can download and install them.
  3. Then, restart your PC immediately.

5. Update your drivers

  1. Press the Windows key, type in Device Manager, and hit Enter.
  2. In the Device Manager window, scroll through the list of Drivers, and check to see if there’s a yellow alert symbol next to any of the options. Right-click on the Driver, and select Update driver.
  3. In the next window, click Search automatically for updated driver software, and follow the prompts to complete the update.
  4. Once you’ve updated all the Drivers, restart your PC and check if the error is resolved.

While attempting to update your Drivers, you can run into the error Windows encountered a problem installing the driver. 

If you’re not satisfied with the procedure above or you just want to update your drivers as faster as it gets, then try using dedicated tools.

For instance, Outbyte Driver Updater is one of the most efficient software because it thoroughly scans your PC for outdated or malfunctioning drivers and locates the newest updates from its database.

⇒ Get Outbyte Driver Updater

This error restricts your computer from updating drivers. Be sure to read our guide on how to resolve it.

Resolving the usbaudio.sys error is pretty straightforward and requires little technical know-how. If you followed our guide, you should be able to resolve the error.

If you’ve faced the usbaudio.sys error before and you successfully resolved it. You can drop your troubleshooting techniques in the comments below.

Win32kbase.sys: How to Fix its BSoD on Windows

The Blue Screen of Death(BSOD) is one of Windows’ most frustrating errors. It can be triggered by several reasons, one of them being the win32kbase.sys error. 

Before we proceed with more advanced troubleshooting techniques, power cycle your PC and scan the device for virus and malware.

How can I fix the win32kbase.sys BSoD error?

1. Run the System File Checker (SFC)

  1. Press the Windows key, type in CMD, right-click on the displayed result, and select Run as Administrator.
  2. In the User Account Control window, click Yes to grant the app administrative access.
  3. Type the following command and hit Enter: sfc /scannow
  4. Wait till the scan is complete, and restart your PC to check if the error persists.

Sometimes, you might run into Windows Resource error while trying to run an SFC scan. This error prevents the system utility checker from operating properly.

If you want to make sure that your computer is free from corrupt or malfunctioning files, we suggest you try a third-party troubleshooter and locate healthy replacements from its massive repository.

2. Use the DISM Tool

  1. Press the Windows key, type in CMD, right-click on the displayed result, and select Run as Administrator.
  2. In the User Account Control window, click Yes to grant the app administrative access.
  3. Type in the following and hit Enter: DISM.exe /Online /Cleanup-Image / Restorehealth
  4. As with an SFC scan, wait for the scan to be completed, and reboot your PC.

Running a DISM scan will help repair corrupted Windows update files and ultimately resolve the win32kbase.sys error.

3. Update your drivers

  1. Press the Windows key, type in Device Manager, and hit Enter.
  2. In the Device Manager window, scroll through the list of Drivers, and check to see if there’s a yellow alert symbol next to any of the options. Right-click on the Driver, and select Update driver.
  3. In the next window, click Search automatically for updated driver software, and follow the prompts to complete the update.
  4. Once you’ve updated all the Drivers, restart your PC and check if the error is resolved.

4. Perform a System Restore

  1. Press the Windows key, type in create a restore point, and hit Enter.
  2. In the popup window, click the System Restore button, and click the Next button.
  3. When the system pops up, select Next.
  4. Select the specific restore point you wish to revert your system to, and click Next.
  5. Click the Finish button to complete the system restore.

If you noticed the Win32kbase.sys error after making significant changes to your PC, you can easily revert back to an earlier state of your PC where the error was absent.

However, you’ll need to have created a restore point before you apply this fix. Here is a detailed guide on how to create a restore point in Windows. 

What is win32kbase.sys?

Win32kbase.sys is a Windows driver file located in the System32 folder. The file was designed to interact with the drivers and hardware of your system.

The file is very essential and is required for Windows to run correctly. If the file gets corrupted, removed, or otherwise, you’ll trigger a host of errors, e.g the win32kbase.sys error.

What causes win32kbase.sys BSoD?

The following are some of the common causes of the win32kbase.sys error:

  • Insufficient Memory – Computers require a minimum amount of free memory to process tasks. If you’ve got too many opened background applications, you’ll eventually run out of memory; this can lead to a system crash and further a BSOD error.
  • Corrupt or Missing System Files – Windows consists of specific files and folders that enable the OS to run optimally. If any of those files are corrupt or missing, you’ll run into errors like the win32kbase.sys.
  • Virus and Malware – A PC infected with virus or malware is rendered vulnerable to attacks which can lead to a system crash and subsequently a blue screen of death. If your PC is infected with malware, it could be the reason behind the win32kbase.sys error. You can run antivirus scans using Windows Defender or third-party antivirus software.

If you’ve been struggling with the Win32kbase.sys error, this post has shown you four of the best ways to deal with the error. Resolving the error doesn’t involve much technicality; follow through our guide, and you should have your PC back to normal in no time.

If you’ve got alternative solutions that helped you resolve the Win32kbase.sys error in the past, do let us know in the comments below.

You can uninstall the Camera app in Windows 11 build 25330

It’s been exactly seven days since we received the last Windows 11 Canary build for Insiders on this specific Channel, so it was about time for some new software.

The Redmond-based tech giant has decided to give us more to work with. Before we get into it, though, you should definitely check out Microsoft’s Security Copilot.

Also, since everyone is now using ChatGPT, know that the new Bing Ai chat will soon feature ads in the answers it provides.

Now, circling back, let’s have a closer look at Windows 11 Insider Preview Build 25330 and everything that comes with it to the Canary Channel.

This build isn’t for Windows Insiders that use Arm64 devices

Today, Microsoft has released a new build for Windows 11 Canary Channel Insiders, which includes new Windows Store improvements for finding free apps and more.

As you know by now, there are many more improvements. The company also mentioned that says this build won’t be available for Windows Insiders that use Arm64 devices.

After installing this build, pressing the print screen key will now open Snipping Tool by default. This new feature can be turned off, or on, in the Settings app.

Furthermore, the settings page for wheel devices such as the Surface Dial has been updated to better match the Windows 11 design principles.

Please keep in mind that, if you have changed your primary mouse button in the Settings app, Windows Sandbox will now follow that setting.

Microsoft has also updated the Remote Desktop Connection setup window (mstsc.exe) so that it now follows the text scaling settings.

That being said, there is a scenario where, in cases where the text scaling is very large, it will show a scrollbar.

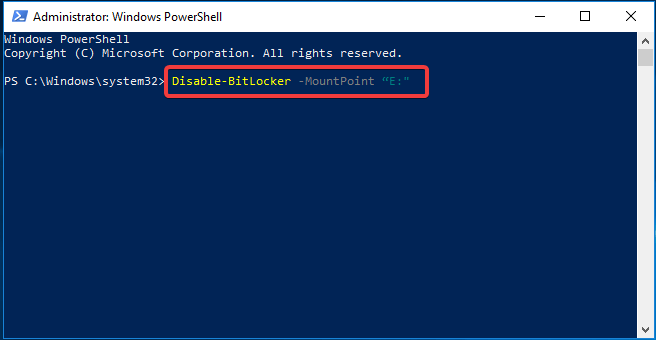
Another change is the fact that, when encrypting a drive using BitLocker, you can now minimize the encryption progress dialog.

As many of you wanted for quite some time now, after installing this build, you can uninstall the Camera app if you need to.

There’s also a Microsoft Store update in this build, and we are going to take a more in-depth look at what actually changed.

Microsoft Store Update

Redmond developers introduced a new way to install free apps and games. Hovering over a free product on the search results page opens a new expanded card experience, where you can find a convenient install button.

Of course, this will trigger the installation without having to navigate to the product page itself, which can save you a bit of time.

Quickly install free apps and games from search results in the Store.

There is also a new and redesigned experience when purchasing apps and games inside the Microsoft Store, that Microsoft really wants us to know about.

The purchase dialog’s styles align better with Windows 11 to bring you a more pleasant checkout experience.

New design when purchasing apps and games in the Store.

Another interesting fact is that developers of your favorite apps and games often use a Microsoft Store feature that requests ratings from within the app or game.

The tech giant has updated these in-app ratings experiences to be faster, more reliable, and to better align with Windows 11 styling.

New UX for in-app ratings dialog in the Store.

What can I do if I can’t install Windows 11 Build 25330?

  1. Press Win+ I to access Settings.
  2. Select the System category and click on Troubleshoot.w11 troubleshoot
  3. Press the Other troubleshooters button.other troubleshooters windows 11
  4. Press the Run button next to Windows Update.windows update troubleshooter

Make sure to report any other issues you might come across, in order for Microsoft to address and improve the overall OS experience for us all.

This is everything you can expect if you are a Windows 11 Canary Insider. Leave a comment below if you found any issues since installing this build.

0x8007000f: SCCM Task Sequence Error [Fix Guide]

Error code 0x8007000f can occur during the deployment process. It indicates the system cannot find the drive specified. Hence, we will explore the possible causes of the 0x8007000f error in SCCM task sequences and provide solutions to fix it.

Alternatively, you can read about how to upgrade from Windows 7 to Windows 10 using SCCM.

What causes the error code 0x8007000f?

Several factors can cause the error code 0x8007000f during the task sequence, and there are as follows:

  • Hidden partition – Hidden partitions are not visible and accessible to the user or the operating system. However, the task sequence cannot complete the formatting and partitioning process, resulting in an error.
  • Disk with BitLocker partition – The BitLocker provides additional encryption on drives. However, if a task sequence needs to perform an operating system deployment on a disk with BitLocker encryption, it may encounter issues during the deployment process.
  • Corrupt Disk partition – An unreadable or usable sector of the drive due to corrupt data or physical damage can cause error code 0x8007000f when the SCCM wants to perform a task sequence on this hard disk.

Nonetheless, we will examine how to fix the 0x8007000f error.

How can I fix the error code 0x8007000f?

1. Perform the chkdsk command on your SD card

  1. Insert your SD card on your PC.
  2. Left-click on the start button, type cmd and click on Run as administrator.
  3. Type in the following command and press Enter: chkdsk D:/f/r/x (The letter D refers to the drive letter you want to repair)
  4. Close the Command Prompt and check if the issue persists.

Running the chkdsk on an SD card will check and repair faulty storage sections. If the chkdsk command takes forever to run on your Windows, hop here to fix it.

2. Perform a DiskPart Clean Command

  1. Left-click on the start button, type cmd and click on Run as administrator.
  2. Type the following in the Command Prompt and press Enter: diskpart
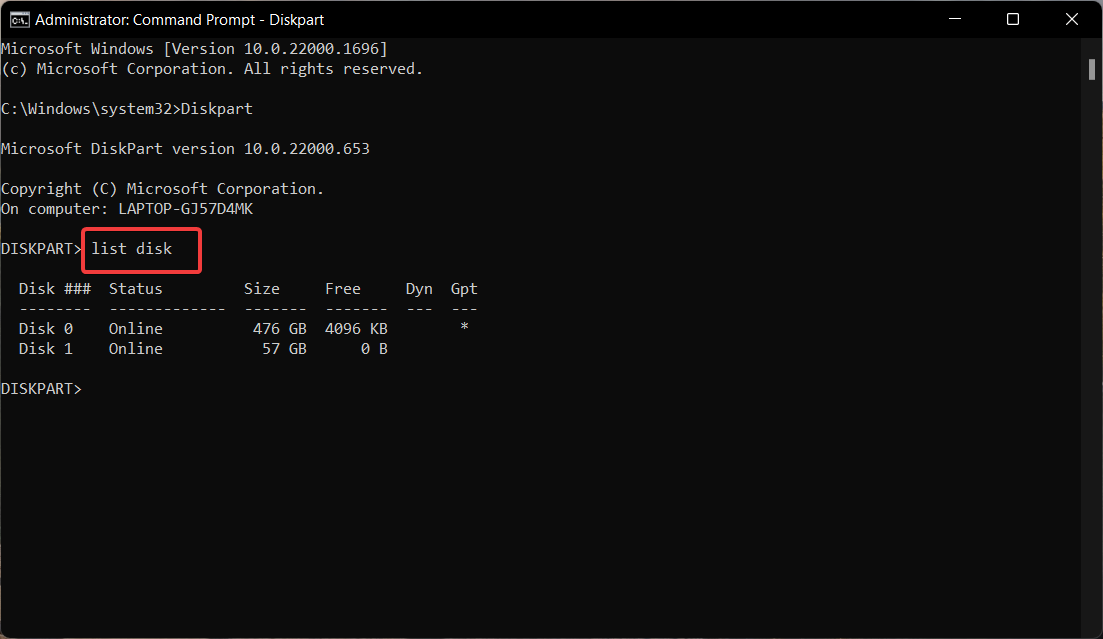
  3. Type this command and press Enter to show the disk partition: list disk
  4. Input the command and press Enter: select disk 0 {The 0 signifies the disk partition you want to clean}
  5. Type this Command Prompt and press Enter: clean
  6. Then, run the following commands and press Enter after each:
    • convert gpt
    • create partition efi size=300
    • assign letter H  (You can assign any available letter you want)
    • Format quick fs=FAT32
    • create partition msr size=128
    • create partition primary
    • assign letter=c (Assign letter C if the drive C is unallocated)
    • format quick fs=NTFS
    • exit 
  7. Restart your machine and rerun the task sequence.

Performing a DiskPart clean will clear all the drives partition and prepare it for usage. Check our guide on how to fix Command Prompt not working on your PC.

In addition, check our complete guide on the System Center Configuration Manager Technical Preview gets update 1705. Also, read about how to fix SCNotification which has stopped working on your device.

Kindly drop your suggestions and questions on this guide in the comments section.

How to Install and set up Microsoft 365 on an iPhone/iPad

Discover the seamless process of installing and setting up Microsoft 365 on your iPhone. As the digital world rapidly evolves, the need for on-the-go productivity solutions becomes increasingly essential. Microsoft 365, with its versatile suite of applications, lets you access and edit documents, spreadsheets, and presentations from virtually anywhere, including your iPhone.

We will guide you through the steps to install and configure Microsoft 365 on your iPhone, helping you to stay connected and on top of all the office or school work.

Install Office on iPhone/iPad

  1. Head to the app store and find Microsoft 365 (Office). Tap get to install it on your device.
  2. Once finished installing, launch the app.
  3. Sign in to your Microsoft account with the login credentials. If you are already signed into another Microsoft app on the phone, it will find the account and automatically log you in.

Getting started with Microsoft 365 on iPhone

Let us get started from the top of the home screen, where you land after logging in.

  • Tap on the search bar and you can find any file on the OneDrive, Teams group where you are part of. You can search in files, media, notes, and voice captures.
    There are filters by file type where you can select for all or individual for – Word, Excel, PowerPoint, PDF, Voice Captures, and Images.
    install microsoft 365 on iphone
  • Below the search bar is the vertical scrolling bar that lets you quick-access different categories like Scans, PDD, Word files, and more.
    install microsoft 365 on iphone
  • Go further down and tap Find to let Microsoft 365 search for supported files on your iPhone or iPad. All the documents and other support files will appear in the app, becoming viewable and editable(in most cases).

    setup microsoft 365 on iphone


Using the Create Button

The create button at the bottom lets you create new Word, Excel, PowerPoint, PDF files and Forms.

setup microsoft 365 on iphone
install microsoft 365 on iphone

You can also scan documents and record voice notes that will be saved to your attached OneDrive account.


PDF to Word and Back

You can convert word files to PDF documents with a single tap. Also, you can convert PDF documents to word files.

setup microsoft 365 on iphone

Sign a PDF

Sign a PDF comes in handy when you want to sign an important document, generally involving legal and other agreement matters. You can open a PDF file , then tap More and select Signature mode.

setup microsoft 365 on iphone

Next, tap on the area where you want to sign and then you will need to create a new signature.

setup microsoft 365 on iphone

And then create a signature using your fingers or a supported stylus. After that, click the check button to sign the PDF document.


Using Microsoft 365 on iPhone

You can get started with Microsoft 365 on your iPhone for free on the basic plan with limited features. And when you hit a wall with them, there is always the option to upgrade

What is Error 0x80070659 & How to Quickly Fix It

Our readers complain about encountering error code 0x80070659 during a Windows update or when updating software on their system. Thus, we’ll explore the causes of the error and provide quick solutions to help you resolve it.

Alternatively, you can read how to solve Windows updates not working or loading on a Windows computer.

What is error code 0x80070659?

Error code 0x80070659 is a Windows Update error that occurs when installing a Windows update or app update. This error code usually indicates a problem with the Windows Installer Service, which is responsible for installing, modifying, and removing software on Windows.

However, other reasons can cause the error code 0x80070659 also. Here are some common factors:

  • Corrupt Windows installer – If the Windows Installer files are missing or corrupted, you may encounter the error code 0x80070659 when installing or updating software. You should solve Windows installer errors to fix the error code.
  • Conflicting software – The activities of other software or the Windows firewalls may interfere with the Windows Installer Service and cause this error code.
  • Corrupted system files – Missing or incomplete system files due to malware or human errors can corrupt system files causing the Windows Installer Service to malfunction and result in error code 0x80070659.
  • Registry errors – Issues with your Windows Registry can also cause error code 0x80070659, especially if there are incorrect or outdated registry entries related to the Installer Service.

The factors listed above vary on different PCs. Nevertheless, we will discuss steps to fix the issue.

How can I fix error 0x80070659?

Apply the following preliminary checks:

Proceed with the following advanced procedures below if the error persists.

1. Troubleshoot the Windows Update

  1. Press Windows + I key to open the Settings app.
  2. Select System, Troubleshoot, then click on the Other troubleshooters.
  3. Navigate to Most frequent and select the Run button beside Windows Update.
  4. Follow the on-screen instructions to complete, then restart your PC to check if the error is resolved.

The Windows update troubleshooter is an in-built tool that detects and fixes Windows update issues.

Check our detailed guide on how to run Windows Update Troubleshooter on your system.

2. Reset the Windows Update components

  1. Left-click the Start button, type Command Prompt, and click the Run as administrator option.
  2. Click Yes on the User Account Control prompt.
  3. Copy and paste the following commands and press Enter after each one: net stop wuauserv   net stop cryptSvc   net stop bits    net stop msiserver
  4. Copy and paste the following command one after the other: ren C:\Windows\SoftwareDistribution SoftwareDistribution.old   ren C:\Windows\System32\catroot2 Catroot2.old
  5. Type the following commands and press Enter after each one: net start wuauserv   net start cryptSvc   net start bits    net start msiserver
  6. Exit the Command Prompt and restart your PC.

Following the process above will enable the Windows Update Services and provide updates to your Windows operating system and other software.

Read our guide about fixing Windows could not start the service on the Local Computer on your device.

3. Clean the temporary cache folder

  1. Press the Windows + X key and click Run. Copy and paste %windir%\SoftwareDistribution\Data and press Enter to open the Windows File Explorer cache folder.
  2. Press Ctrl + A to select all and delete all the files in the folder.
  3. Close the Windows File Explorer, and restart your device.

The Windows cache folder temporarily stores downloaded files. Deleting all the files will troubleshoot incomplete Windows update downloads.

Read about how to fix File Explorer Not Responding on Windows if you encounter issues.

4. Perform a system SFC scan

  1. Left-click the Start button, type Command Prompt, and click the Run as administrator option.
  2. Click Yes on the User Account Control prompt.
  3. Type the following and press Enter: sfc /scannow
  4. Restart your PC and check if the error persists.

The SFC scan command will scan and repair corrupted or missing system files on your device that can cause Office update failure.

Otherwise, you can simply try a dedicated tool for repairing corrupt system files that will detect corrupt or broken files and automatically replace them with new components from its vault.

We have a complete guide about how to fix SFC scannow not working on your Windows device.

In addition, you can read how to fix error code 0xc1900223 on your PC. Also, check our guide including quick ways to fix update bugs on your device.

Should you have further questions or suggestions, kindly drop them in the comments section.

Microsoft tries to help make sense of AI with its latest Research Podcast and portal

Microsoft Research and Incubations corporate vice president Peter Lee and distinguished scientist and managing director of Microsoft Research Outreach Ashley Llorens have come together to help kick off the first entry in the company’s new artificial intelligence research dedicated informational portal.

With all the chatter, inquisition and misinformation surrounding the blossoming topic of AI, and more specifically, Microsoft Copilot platforms, the company latest Microsoft Research Podcast entry acts as both an auditory entertainment medium but a launch point for additional subject information.

Beyond the thirty-seven-minute-long podcast featuring Lee and Llorens, the Microsoft Research Podcast page for episode 137 includes a Learn More section with links to tangential research and discussion that includes, The AI Revolution in Medicine: GPT-4 and Beyond, Benefits, Limits, and Risks of GPT-4 as an AI Chatbot for Medicine, VALL-E, as well as bridge to the company’s new Microsoft AI help & learning portal.

While the Microsoft Research Podcast volleys a myriad of technological topics, it appears that GPT, Chatbots and expanding language models will be a more recent focus of the hosts as they segment off a dedicated series to those topics.

In this new Microsoft Research Podcast series, AI scientist and engineer Ashley Llorens hosts conversations with his collaborators and colleagues about what these new models—and the models that will come next—mean for our approach to creating, understanding, and deploying AI, its applications in areas such as health care and education, and its potential to benefit humanity.

A second episode will be available soon that covers the difference that make integrating modern AI into health care a more realistic proposition as well as limits of GPT-4.

As for the AI portal, visitors are greeted with links that aim to help educate about Microsoft’s 365 Copilot and “what AI can and can’t do.” There is a dedicated search engine built into the portal to help answers some of the most common queries about AI as well as other links that help to explain Copilot for the web, most recent announcements and even walk users through using ChatGPT for content creation.

Head over to the Microsoft Research Podcast website to download, share, or subscribe to the podcast or jump straight into the AI help & learning portal here.


0x80040900 Outlook Error: 6 Ways to Easily Fix It

The Outlook error 0x80040900 is a common error when an email cannot be sent. You can access your emails using the web version, but the app just fails.

This can happen due to various reasons, such as the email account is not configured properly or there being a problem with the server. If you want to fix it immediately, this article will help you.

What is the error message 0x80040900?

Outlook is one of the most used email clients in the world. This does not mean it is devoid of issues. The Outlook error 0x80040900 is one of the most pressing issues because you can neither send nor receive emails.

It’s important to note that this problem can happen with any version of Outlook. If you’ve been wondering why you are the recipient of such an error message, below are some possible reasons:

  • Outdated version of Office – Your computer might not have an updated Office version installed, which results in errors like 0x80040900.
  • Internet connection – If you’re trying to send or receive an email, it won’t work if your computer doesn’t have internet access.
  • Virus infection – A virus may have entered your system and changed the registry settings so you can no longer access your emails.
  • Corrupt PST file – The PST file is the personal storage for all your emails, among other details. If this file becomes corrupted or damaged, you may encounter problems accessing and using it for storing or retrieving data.
  • Outlook profile corruption – Sometimes, due to any reason, your Outlook profile gets corrupted, and that causes this problem. 
  • Damaged installation files – It’s possible that the Microsoft Office installation files were corrupted or damaged during the installation or uninstallation process.
  • Incorrect Mail Server Settings – Sometimes, due to some technical glitch or other reasons, Outlook fails to recognize your email account properly, and thus it throws an error message like 0x80040900.

How do I fix error code 0x80040900?

Try the following first before any complex solutions:

  • Ensure you have a good and stable internet connection before sending or receiving emails from Outlook. Also, check for any problems with your router and other hardware devices that might be causing connectivity issues between your computer and the server.
  • Sign out, then sign in back again to your Outlook account.
  • Check that your Outlook email settings are correct. 

1. Scan for viruses

  1. Press the Start Menu, search Windows Security, and click Open.
  2. Select Virus & threat protection.
  3. Next, press Quick scan under Current threats.
  4. If you don’t find any threats, proceed to perform a full scan by clicking on Scan options just below Quick scan.Scan options
  5. Click on Full scan to perform a deep scan of your PC.Full scanFull Scan Scan Now
  6. Wait for the process to finish and restart your system.

2. Disable your antivirus temporarily

  1. Hit the Windows button, type Windows Security in the search bar, and click Open.
  2. Click on Firewall & network protection, then select Public network.league of legends black screen after champion select
  3. Locate Microsoft Defender Firewall and toggle the off button.turning off Microsoft Defender Firewall Windows

3. Repair Microsoft Office

  1. Hit the Windows + R keys to open the Run command.
  2. Type appwiz.cpl in the dialog box and press Enter.
  3. Select your Microsoft Office suite software. Then, click the Change button to open a repair utility for MS Office.
  4. Select the Quick Repair option and click the Repair button.

4. Start Outlook in Safe Mode

  1. Hit the Windows Search icon, type outlook.exe /safe in the search bar, and click Open.
  2. Try sending emails in Outlook and check whether the problem persists.

5. Create a new Outlook profile 

  1. Hit the Windows key, type Control Panel in the search bar, and click Open.control-panel-search fallout new vegas runtime error
  2. Type Mail in the search bar and click to open.
  3. Next, click on Show Profiles under Profiles in the Mail setup window that pops up.
  4. A list of Outlook profiles registered on your PC will appear. Find the one that was having problems, click on it, then select Remove.
  5. A confirmation dialog box will appear, so click Yes to confirm.

While this step doesn’t fix the issue, it will help uncover whether there’s an issue with your current profile. If it works, you can confirm that it is corrupted and move ahead with configuring the new one as the default email profile.

This will disable any add-ins or plugins that might be causing the problem. If this fixes your issue and your mail starts working again, you’ll need to figure out which add-in or plugin is causing it. You can do this by disabling each individually until you find the culprit.

6. Repair the PST file

  1. Press the Windows + E key to open File Explorer.
  2. Navigate to the following path depending on where your Outlook files are located: C:\Program Files\Microsoft Office\ OfficeXX 
  3. Double-click on the SCANPST key to launch the SCANPST.EXE utility.
  4. On the Microsoft Outlook Inbox Repair utility page, click Browse, and choose the PST file.
  5. Click the Start button to scan the PST file and check for errors.
  6. If the scan detects any error, click the Repair button.

If this sounds like a lengthy procedure, you’ll be happy to know a third-party tool can repair the PST file for you.

⇒ Get Stellar Repair for Outlook

You may also be interested in how to rebuild your Outlook profile, so check out the full details from our comprehensive guide.

For any further suggestions, leave a comment down below.

0x800700df Error: File Size Exceeds Limit [Fix]

We often move files between folders on the PC or fetch these from a cloud storage service if one is set up. But several issues may prevent the operation. One such is the error 0x800700df in Windows 11 and previous iterations.

The error arises from a file size limit in place, and the message reads, The file size exceeds the limit allowed and cannot be saved. Users generally get error 0x800700df on SharePoint, though other applications, too, are affected.

What is file copy error 0x800700DF?

The file copy error 0x800700df is common in Windows and has a dedicated Microsoft page, but the solution there doesn’t usually work, as reported by users.

Here are a few reasons you might be getting the error:

  • Misconfigured registry: There’s a key in the Registry to set the maximum file size limit, which, if misconfigured, can trigger The file size exceeds the limit allowed error in Windows 10.
  • Size limit placed by client: There’s also the likelihood that the online storage solution where you are copying the file may have placed a file size limit.
  • Incompatible file system: The debate between FAT32 and NTFS has long been ranging, with both offering specific pros and cons. However, setting the former as the file system can trigger the 0x800700df error in Windows 10.

How do I fix error 0x800700DF?

Before we head to the slightly complex solutions, here are a few quick ones to try:

  • Restart the computer and check if you can now copy or move the file.
  • When facing the error 0x800700df in online storage, use a different browser to upload or download the file.
  • If an organization manages your PC, verify whether they have placed a file size limit on copying files, downloads, or uploads.
  • Make sure you have enough storage left on the drive. In case not, free up disk space and then try again.

If these don’t work, move to the fixes listed next.

1. Modify the registry

  1. Press Windows + R to open Run, type regedit in the text field, and hit Enter.registry
  2. Click Yes in the UAC prompt.
  3. Paste the following path in the address bar and hit Enter:HKEY_LOCAL_MACHINE\SYSTEM\CurrentControlSet\Services\WebClient\Parameterspath
  4. Double-click on the FileSizeLimitInBytes DWORD on the right.dword
  5. If you can’t find it, right-click on the empty portion, hover the cursor over New, choose DWORD (32-bit) Value, name it FileSizeLimitInBytes, and then double-click it.dword to fix 0x800700df
  6. Now, choose Decimal, enter 50000000 under Value data if any other number is listed here, and click OK to save the changes.value data to fix 0x800700df

One of the fixes that worked for all was to modify the Registry and change the FileSizeLimitInBytes DWORD value to 50000000, which immediately fixed the 0x800700df error.

2. Change the file system

Note icon NOTE
This solution works only when you cannot download files to a particular drive with a FAT32 file system, which has a 4GB limit on the maximum file size.
  1. Press Windows + E to open File Explorer, and select This PC from the navigation pane.this PC
  2. Right-click on the drive that’s throwing the error, and choose Format from the context menu.format to fix 0x800700df
  3. Select NTFS from the File Type dropdown menu, untick the checkbox for Quick Format under Format options, and then click on Start.NTFS to fix 0x800700df
  4. Click OK in the confirmation prompt and wait for the process to complete.ok
  5. Once done, check if you are now able to download files to the drive you just formatted.

3. Run the WebClient service

  1. Press Windows + S to open Search, type Services, and click on the relevant result.services
  2. Scroll down, locate the WebClient service, then right-click on it, and choose Properties.service
  3. Select Automatic from the Startup type dropdown menu, and click the Start button to run the service.start to fix 0x800700df
  4. Once it’s running, click on Apply and OK to save the changes.save changes

Running the WebClient service should have helped get rid of the 0x800700df maximum file size limit error in case the previous solutions didn’t work.

Before you leave, discover some quick tips to boost Windows speed and performance and make it faster than ever.

Tell us which fix worked for you in the comments section below.

E3 won’t be taking place after all

The E3 2023 event has officially been canceled. This comes after multiple big players in the gaming industry like Nintendo, Microsoft, and Ubisoft pulled back and indicated that they were going to skip it. The event was set to make a comeback in an in-person event in Los Angeles scheduled for June 13 through to June 16.

Admittedly, E3 has been through a couple of rough patches dating back to the time when both Sony and Nintendo opted out of hosting their annual gaming showcases at the convention prior to the pandemic. And it seems that it’s not quite over the hump just yet.

According to IGN, the Entertainment Software Association sent out emails to its member yesterday indicating that the event had been canceled. The email stated that E3 2023 didn’t quite attract enough interest for the company to properly showcase its size, strength, as well as, role it plays in the industry.

The Global VP of Gaming at ReedPop, Kyle Marsden-Kish stated:

This was a difficult decision because of all the effort we and our partners put toward making this event happen, but we had to do what’s right for the industry and what’s right for E3. We appreciate and understand that interested companies wouldn’t have playable demos ready and that resourcing challenges made being at E3 this summer an obstacle they couldn’t overcome. For those who did commit to E3 2023, we’re sorry we can’t put on the showcase you deserve and that you’ve come to expect from ReedPop’s event experiences.

In the announcement, it was also highlighted that ReedPop and the ESA will continue to partner together in future E3 events. A clear indication that the cancellation of E3 2023 doesn’t necessarily mean there it won’t happen in the future.

Despite opting out of E3, Ubisoft’s plan to host its own event in Los Angeles on June 12 is still on course. Share your thoughts with us in the comments.

Xbox Friends & Family Plan is reportedly set to launch soon

Last year in August, Microsoft announced that it was working on an Xbox Friends & Family Plan designed to enhance the gaming experience for people that have multiple game players in one household. At the time, the company didn’t disclose when it was planning to make the official launch.

However, it now seems that we’re edging closer to that date according to @Jawmuncher on Twitter who shared a screenshot of an ad that appeared on his Xbox’s dashboard. Per the screenshot, Microsoft’s Xbox Friends & Family Plan will be priced at $39.95 per month. It hasn’t yet been established whether this is the New Zealand Dollar or the US Dollar.

Multiple users have also highlighted that they’ve encountered a similar experience. There was also another indication that the plan was set to launch in the US soon. This is after multiple users reported that the plan’s ads were appearing on the Xbox PC app’s home screen.

As reported earlier, the plan encourages account sharing among gamers and supports up to 5 members. This means that all 5 members get to enjoy all the Game Pass Ultimate perks under one account. However, there are several requirements that a user must meet to be part of the program.

First up, all members that want to be part of the Xbox Game Pass Family Plan must be residing in the same country. Additionally, once you join the plan, the remaining time on your membership will be converted to time in the new plan. Microsoft will base this upon the monetary value of the old membership.

It should be noted that the conversion won’t be available for invited group members. Furthermore, if you’re part of the Xbox All Access program, you won’t have access to this plan.

The news comes after Microsoft announced that it was scrapping its long-running $1 Game Pass trial promotion, and indicating that it is “evaluating different marketing promotions for new members in the future.”

via: Windows Central

Microsoft makes it easier to download free apps on Windows 11

Microsoft has made some major improvements to the Microsoft Store with its latest releases to both the Canary and Dev Channels. And one of the major changes shipping with these releases is that users will now be able to download both free games and apps from the Microsoft Store easily.

Now, instead of having to navigate to the product page, users can make downloads directly from search results. However, this only applies to free apps and games, it’s not yet clear if this new capability will be rolled out to purchased apps and games.

New design when purchasing apps and games in the Store.

According to Microsoft:

Install free apps and games from search results: We’ve introduced a new way to install free apps and games. Hovering over a free product on the search results page opens a new expanded card experience, where you can find a convenient install button. This will trigger the installation without having to navigate into the product page.

It’s also worth noting that you must be running 22303.1401.x of the Microsoft Store or higher. Additionally, the company has also incorporated a “new and redesigned experience” for users when purchasing apps from the Microsoft Store. The new fluent design aligns with Windows 11.

New design when purchasing apps and games in the Store.

The new experience also features a new UX for in-app ratings dialog which is faster, more reliable, and lastly aligned with Windows 11’s design.

New UX for in-app ratings dialog in the Store.

Share your thoughts in regards to the new changes made on the Microsoft Store in the comments below.

How to change the layout in OneNote

Microsoft continues to innovate with its products. This time, Redmond officials just rolled out a set of left-sided layout options in OneNote, and you can change it however you want, and this guide will show you how to do it.

How to change the layout in OneNote

Use the View tab

1. With your OneNote app opened, click View on your upper screen.

2. On the Tabs Layout tab, click Vertical Tabs.

Speaking on Microsoft 365 Insider blog, product manager Greg MacEachern said that the update could be a massive game-changer, especially for those working on tablets.

For those who love the left-sided layout on OneNote for the web, OneNote for Mac, and OneNote for iPad, you’ll be thrilled to hear that we’re now bringing this experience to OneNote on Windows client! Using the new Vertical Tabs layout option, you can use a navigation experience similar to other Microsoft 365 apps and services, such as Outlook and Teams.

Now, instead of having all the notebook tabs crammed up below the ribbon, you can have them placed on the left side of your screen so you can switch to whichever tab you need to access instantly.

With that said, however, Microsoft also said that only users with Version 2302 (Build 16124.20000) or later on Windows 11 devices can access this update. That means Windows 10 users may need to wait a little longer.

With that said, however, being an insider-only feature means that Microsoft is using very few select users to experiment with this functionality before rolling it out to general users.

So, if you don’t see options to change it, or you do but you also run into some uncomfortable bugs, it’s bound to happen.

FAQ

How do I switch between vertical and horizontal tabs in OneNote?

Open View, then select Tabs Layout. Choose Vertical Tabs or Horizontal Tabs based on your preference.

How do I change the page layout in OneNote?

Go to View, select Paper Size, and adjust the width or choose a predefined layout to match your needs.

How do I get the old OneNote layout back?

Switch to OneNote 2016 or enable the legacy navigation layout in the Windows app under Settings > Options > Navigation if available in your build.

How do I simplify the layout for distraction-free writing?

Open View, then turn on Immersive Reader or hide unnecessary panes using Hide Page List and Hide Navigation for a cleaner workspace.

You can learn more about customizing OneNote by checking this guide on how to move tabs to the top, which explains another layout option you can adjust on Windows.

If you’re just starting out and want a broader overview, read our complete how to use OneNote guide to learn all the basics alongside layout tips.

For more notebook management options, you can also see our tutorial on how to delete a OneNote notebook, and learn how to create a new notebook in OneNote so you can organize fresh notes whenever you need.

Do you find these tips helpful? Let us know in the comments!

Working with large files? Avoid installing KB5023778

It’s that time: Microsoft released another build on the Release Preview channel, dubbed KB5023778. Recommended for commercial users, the channel brings fixes and certain key features one step ahead of general availability.

The build, while it brought attention to a nice update for Microsoft accounts in the Start menu and addressed Notepad issues, also bears a problem, especially for those working with large files. 

As noted from its release note, transferring large files that contain multiple GBs will take longer on desktops with Windows 11, version 22H2, especially through SMB. 

Copying large multiple gigabytes (GB) files might take longer than expected to finish on Windows 11, version 22H2. You are more likely to experience this issue copying files to Windows 11, version 22H2 from a network share via Server Message Block (SMB) but local file copy might also be affected. Windows devices used by consumers in their homes or small offices are not likely to be affected by this issue.

Redmond officials, however, also provided a workaround for you to mitigate the issue, while working closely to patch it in an upcoming release. 

To mitigate this issue, you can use file copy tools that do not use cache manager (buffered I/O). This can be done by using the built-in command-line tools listed below: robocopy \\someserver\someshare c:\somefolder somefile.img /J or xcopy \\someserver\someshare c:\somefolder /J

Problems in copying large files in KB5023778: Not the first time

With that said, this wasn’t the first time a Windows 11 build bears a significant low at copying and pasting documents over SMB. 

As we reported back in October 2022 when KB5018496 cumulative update arrived, the same problem also reportedly appeared. At that time, Microsoft tested the right-click option on the taskbar to view Task Manager directly without pressing Ctrl + Alt + Del, dozens of visual and technical improvements too. 

What do you think about this bug? Have you ever encountered this after updating to KB5023778? Let us know in the comments

4 Ways to Fix DellInstrumentation.sys Blue Screen Error

Blue screen errors are rare in Windows, but when these do arise, chances are they will keep reappearing until the underlying cause is eliminated. One such is the System Service Exception error caused by the DellInstrumentation.sys file.

The error is recent and affects only the Dell devices, given that the Dell Instrumentation is failing each time. So, let’s find out why you are encountering the error and the solutions that should do the trick.

What is the DellInstrumentation.sys blue screen?

The DellInstrumentation.sys started appearing in Dell devices after a Windows update and affected many users. The error is triggered when the Dell SupportAssist software leads to the malfunctioning of other programs and devices.

Here are a few reasons you started facing the error:

  • A buggy version of the app: Most users reported that a particular version of the Dell SupportAssist app triggered the blue screen, indicating a bug in the version.
  • Conflicting Windows Update: It could also be a conflicting Windows update that doesn’t allow the Dell apps and drivers to function effectively.
  • Corrupt, incompatible, or outdated drivers: Certain devices, for instance, the biometric one, seem to trigger the error due to a corrupt, incompatible, or outdated driver.

How do I fix the DellInstrumentation.sys BSOD?

Tip icon Tip
If you are unable to turn on the PC or don’t get enough time to execute the fixes, boot Windows into Safe Mode and then try performing the steps listed here. Once done, boot Windows normally, and things should work fine.

Before we move ahead, here are a few quick checks to perform:

  • Restart the computer and verify whether the error reappears.
  • Check for any pending Windows updates and install them.

If these don’t work, head to the solutions listed next.

1. Uninstall the Dell SupportAssist app

  1. Press Windows + R to open Run, type appwiz.cpl in the text field, and hit Enter.appwiz.cpl
  2. Select Dell SupportAssist from the list of apps, and then click Uninstall.uninstall to fix DellInstrumentation.sys
  3. Click Yes in the confirmation prompt and follow the on-screen instructions to complete the uninstall process.confirm
  4. Similarly, uninstall the Dell SupportAssist Remediation and Dell Power Manager Service apps as well.

One of the simplest solutions to the DellInstrumentation.sys BSOD in Windows, which worked for all, was to delete Dell SupportAssist and other related apps.

2. Install another version of SupportAssist

The bug that triggered the BSOD was found in just one version of the SupportAssist, which wreaked havoc, and forums were flooded with complaints.

So, if you depend on the Dell SupportAssist, there’s always the option to download a previous version, 3.10.4, or head to the official SupportAssist for Home PCs webpage to get the latest version, if one is available. And this should fix the DellInstrumentation.sys error in Windows.

3. Disable affected devices

  1. Press Windows + X to open the Power User menu, and select Device Manager from the list.device manager
  2. First, expand the DellInstrumentation entry, right-click on the DellInstrumentation Device, and then select Disable device from the context menu.disable device to fix DellInstrumentation.sys
  3. Click Yes in the confirmation prompt that appears.yes
  4. Next, expand the Biometric devices entry, and then double-click on the device(s) listed under it.biometric devices
  5. Navigate to the Drivers tab, and click on the Disable Device button.disable device to fix DellInstrumentation.sys
  6. Click Yes in the prompt.device
  7. Similarly, disable any other biometric devices that are listed here.

For many users, disabling the DellInstrumentation device and all the Biometric devices did the trick and helped get rid of the DellInstrumentation.sys blue screen.

4. Turn off services

  1. Press Windows + S to open the Search menu, type Services in the text field, and click on the relevant search result. services.msc
  2. Locate all the Dell services here (listed together in alphabetical order), and double-click on one.properties
  3. Select Disabled from the Startup type dropdown menu, and then click on the Stop button.stop to fix DellInstrumentation.sys
  4. If a confirmation prompt pops up saying that another linked Dell service(s) will stop, click Yes to proceed since we anyway are disabling these later.confirm
  5. Finally, click Apply and OK to save the changes.save changes to fix DellInstrumentation.sys
  6. Similarly, disable the other Dell services that are currently running.

That’s it! If the previous solutions didn’t work, disabling the services should have helped fix the DellInstrumentation.sys blue screen on your PC.

And before you leave, check our curated list of the best PC optimization software, and get one today! These are reliable substitutes for Dell SupportAssist.

For any queries or to share a solution not listed here, use the comments section below.

How to Easily Update Visual Studio to the Latest Version

If you’re a developer, you’re probably familiar with Visual Studio. Keeping the software up to date is important, especially if you want to get the latest features, and many are wondering how to update Visual Studio on their PC.

This is incredibly easy to do with Visual Studio, and the software will usually inform you if a pending update needs to be installed.

If you’re using this code writing software, join us while we take a closer look and learn how to keep Visual Studio software up to date properly.

How often does Visual Studio update?

There are two types of updates for Visual Studio:

  • Minor updates – These are released every three months and bring new features, bug fixes, and more.
  • Servicing updates – These updates are released to fix critical issues as soon as they are discovered.

If you’re on a Preview channel, you’ll get minor updates every month, but keep in mind that some updates might not be fully stable.

How do I update Visual Studio?

1. Manually check for updates

  1. Open Visual Studio.
  2. When it opens, go to Help and select Check for Updates.
     
  3. The software will now check for available updates.
  4. If updates are available, click the Update button to download them.

This is the simplest way of checking for updates, so be sure to give it a try.

2. Use the notification

  1. Start Visual Studio.
  2. A notification will appear in the bottom right corner. Select Update on close and close the software to install the update.
     
  3. If you miss the notification, click the bell icon in the bottom right corner.
  4. Now choose Update on close and restart the software. You can also select View details to view what’s in the update and manually install it.

Visual Studio will inform you if an update is available via the notification, so you won’t miss an update.

3. Use the Visual Studio installer

  1. Make sure that Visual Studio is closed.
  2. Press Windows key + S and search for the visual studio installer. Select Visual Studio Installer from the list of results.
  3. If you see the Update button available, click it.
  4. Follow the instructions on the screen to complete the process.

As you can see, updating Visual Studio is simple and easy and can be done in a matter of seconds.

If you’re having issues updating the software, Windows Firewall may be blocking Visual Studio, but that can be easily fixed.

Before updating, you might also want to check this quick guide on how to run code in Visual Studio to make sure you’re familiar with its core features.

Keep your projects tidy after updating by learning how to format code in Visual Studio with shortcuts and Code Cleanup.

Learn how to comment multiple lines in Visual Studio to streamline testing and documentation. Read the full guide Comment Multiple Lines in Visual Studio.

What method do you use to update Visual Studio? Let us know in the comments section below.

USBXHCI.sys Blue Screen Errors: Causes & How to Fix

Some of our readers have recently complained that they encounter a usbxhci.sys Blue screen of death (BSOD) error whenever one or more external devices are connected to their computer.

If you have been wondering about what could be the cause or what fix to apply, worry less as we have compiled some potential fixes to troubleshoot the issue in this article.

What causes the Blue Screen error usbxhci.sys?

There can be several reasons behind the usbxhci.sys Blue screen errors. Before diving into the solutions, let us consider some of the most known triggers for this error:

  • Corrupt USB drivers – The most common factor that triggers this particular issue is the corrupt USB driver on the system. You can try to update or reinstall your USB drivers and see if that fixes the issue.
  • Hardware problems – Several users also encountered this issue as a result of a hardware malfunction caused by components that were not properly connected to the motherboard. The usbxhci.sys Blue screen issue can also be triggered by a sudden disconnect due to a power outage or by a damaged system component.
  • Outdated firmware – Software developers create programs called firmware that power hardware devices. The usbxhci.sys error may appear if the firmware is out-of-date. To upgrade your firmware, carefully follow the manufacturer’s instructions.

Now that you know some of the potential reasons behind the usbxhci.sys blue screen errors, let’s proceed to how you can fix this problem.

How can I fix the usbxhci.sys error?

Before seeking advanced solutions regarding the usbxhci.sys Blue screen errors, consider observing the following preliminary checks.

  • Check your computer for malware and virus with the best antivirus software.
  • Update your Windows by installing all updates.
  • Update all your drivers.
  • Disconnect external drivers and reboot your computer.

Having confirmed the above checks if you still require further assistance, you can work your way through any of the advanced solutions below.

1. Update your USB Driver

  1. Press the Windows + R keys to open the Run window, type devmgmt.msc and press Enter.
  2. Expand the Universal Serial Bus Controller section, right-click on USB Root Hub, and click on Update driver.
  3. Now, click on Search automatically for drivers and wait for the system to look for an updated version of the driver.
  4. Follow the on-screen instructions to complete the process.

Once the USB driver is updated, check if you still face the usbxhci.sys blue screen problem. If you do, you should consider reinstalling the driver.

Moreover, you can try dedicated software to update your drivers without effort, as it will automatically find the latest versions for all your outdated or missing drivers.

2. Reinstall your USB driver

  1. Press the Windows + R keys to open the Run window, type devmgmt.msc and press Enter.
  2. Expand the Universal Serial Bus Controller. Right-click on the USB Root Hub and click on Uninstall.
  3. Now, check the box next to Delete the driver software for this device and click on Uninstall.
  4. Restart your PC.

After restarting your PC, the driver will install back automatically. If the problem persists, you can run the System File Checker scanner to know and fix corrupted files.

3. Run the SFC scan

  1. Press the Windows key and type cmd in the Search box, and launch Command Prompt as admin.
  2. Type the following command in the text field and press Enter: sfc /scannow
  3. Close the Command Prompt and restart your PC.

The SFC scanner will thoroughly check your computer for potentially damaged files which may be triggering several errors. In case you encounter problems with the command prompt, you can explore our dedicated guide to fix it.

4. Perform a System Restore

  1. Press the Windows + R keys to open the Run window, type rstrui in the text field and press Enter.
  2. Select the desired restore point (preferably the most recent one) and click on Next.
  3. Click on Finish.
  4. Wait while your PC restores your system and check if the problem is fixed.

The System Restore will help to revert your PC to when it worked properly without the usbxhci.sys blue screen.

Since this is more like a lifesaver, you can explore our article to know how to create Windows 11 restore points manually.

5. Perform a System Reset

  1. Press the Windows + I keys to open the Settings app.
  2. Click on System and click on Recovery.
  3. Navigate to the Recovery options section and click on the Reset PC button.
  4. Follow the on-screen instructions to complete the process.

If all other steps do not work, hopefully, performing a system reset will fix the usbxhci.sys blue screen problem.

Alternatively, before proceeding with a system reset, you should consider getting further assistance from Microsoft Support.

Additionally, you can explore our detailed article to make use of any of the best BSOD fixers to get rid of BSOD issues for good. And that’s it on how to fix the usbxhci.sys blue screen error.

However, if you have any questions or suggestions regarding the blue screen of death errors, do not hesitate to use the comments section below.

Fix: This App Has Been Blocked by Your System Administrator

Some of our readers have recently reported that they come across an error message that reads this app has been blocked by your System Administrator while trying to launch an application on their Windows PC.

Whenever you come across this issue, it is possible that the app is harmful to the device. We’ve compiled potential fixes to avoid the error in this article.

Why is this app blocked by System Administrator?

There can be several reasons why you’re getting this app has been blocked by your System Administrator error message. Below are some of them;

  • Windows Defender or SmartsScreen has blocked the app – This error message may appear for security reasons if any application appears to pose a risk to your desktop. Your Windows PC comes pre-installed with Windows Defender and SmartScreen which scans your computer for malicious software and phishing attacks.
  • Third-party Antivirus Software – The issue is similar if you’re using a third-party antivirus program that might assume the app you’re trying to download is infected.
  • Applock enabled by Administrator – Only the Windows Professional edition is affected by this problem. It is likely that the administrator of the domain network to which your computer is linked has set specific Applock policies that limit the downloading of programs.
  • Access Restricted by Administrator – There may be restrictions on the updates and features you can use if Windows is running under the default account rather than an administrative account.
  • Outdated Application – Another reason for this problem could be that the software has been withdrawn by the developers or that the current version of Windows does not support your application.

Now that you know some of the potential reasons behind the error, the next section will provide you with simplified step-by-step instructions on how to fix the issue.

What can I do if I get this app has been blocked by your System Administrator?

Before engaging in any advanced troubleshooting or settings tweaks, users should ensure they perform the following preparatory checks;

  • Restart your PC.
  • Ensure that the application is safe to download and will not affect your PC.
  • Disable the security settings hindering the launch of the app.

Having confirmed the above checks and if you still require further assistance, you can explore the advanced solutions provided below.

1. Unblock the App from the Properties

  1. Right-click on the app and select Properties from the context menu.
  2. Once the window opens, navigate to the General tab. At the bottom of the page, check the box next to the Unblock option.
  3. Click on Apply followed by OK to save the changes.
  4. Now, launch the app.

Some files are blocked by Windows’ security function, particularly those downloaded from the internet. In this scenario, before the app launches, you must unblock your app file from Properties.

2. Disable SmartsScreen temporarily

  1. Press the Windows button, search for Windows Security, and launch it.
  2. Now, click on the App & browser control icon. Next, click on the Reputation-based protection settings link.
  3. Under Check apps and files, select off.
  4. Select off under the Smart Screen for Microsoft Edge.
  5. Under Smart Screen for Microsoft Store apps, select off.
  6. Now, try downloading the app again and check if the problem is fixed.
  7. Then, turn on the SmartsScreen following the steps above.

Disabling the SmartScreen for a period will allow for the application to download without any hindrance. However, do this only if you’re sure the app is safe.

3. Disable third-party antivirus software or make app exception

  1. On your PC’s notification tray, right-click on the antivirus software.
  2. Select Disable. Then, proceed to make an exception for your app.
  3. Launch the Windows Security.
  4. Under Virus and Threat Protection settings click on Manage Settings.
  5. Next, click on the Add or remove exclusions link.
  6. To select the file which you want to download, click on the + Add an exclusion icon.
  7. Finally, click on OK.

If turning off the SmartScreen still doesn’t let you download the app, third-party antivirus software may be blocking it. The software allows you to either disable the application or set an exception just for it.

4. Run the app as an Administrator

  1. Right-click on your app’s shortcut and click on Properties.
  2. Navigate to the General tab. Copy the path displayed as the location of the app and close Properties.
  3. Click on the Start icon and type command prompt, and select Run as administrator.
  4. Next, paste the app’s copied path by pressing Ctrl + V. Then, press Enter.
  5. Command Prompt will now launch your app as an administrator.

To fix this app has been blocked by your System Administrator, you can run the file as an administrator. In case you encounter problems with command prompt, you can explore our dedicated guide to fix it.

Also similar to this issue is a report that an administrator has blocked you from running this app. You can explore it for further assistance.

Make sure you work your way through the steps provided in this article from start to finish to know what works best for you.

If you have any questions or suggestions on what to do if users get this app has been blocked by your System Administrator error message, please don’t hesitate to use the comments section below.

What is Angle Snapping on Mouse & Why Should you Enable It

Some of our readers encountered terms like Angle Snapping that they found hard to understand while reading mouse reviews or press materials for mice. 

If no one has explained to you what it means or how to enable Angle Snapping mouse, this article will provide you with all you need to know about it.

What is angle snapping mouse?

Have you ever attempted to draw a circle or a straight line? It’s quite difficult to do it freehand unless you’ve had a great deal of practice. The same can be said when we use a mouse.

Assuming you have a (good) gaming mouse or a mouse without angle snapping, you would probably fail if you opened Paint right now and tried to draw a pixel-perfect straight line.

You would fail because it’s nearly hard for most people to draw a perfectly straight line on their first try. However, you can accomplish that with the aid of angle snapping.

Although your actual movements aren’t straight at all, an Angle Snapping mouse predicts when you want to draw a straight line and artificially maintains that line on the screen.

Why should you enable it?

Using the angle snapping feature is only beneficial for one purpose which is to gain more precision while gaming. Sometimes, the mouse cursor will fail to lock to your game and interrupt gameplay.

Angle snapping is a feature that may be enabled to reduce unnecessary movement during target snapping while playing games and is a useful tool for inexperienced players.

For instance, it can help you track your opponent as he runs across the field, keeping you scoped on the head and not sinking below or rising above.

If you want to enable the Angle Snapping feature for your mice, you can explore the steps provided below to get the help you need.

How can I enable angle snapping mouse?

Before engaging in any advanced settings tweak, you should consider performing the preliminary check below;

  • Confirm that your mice are eligible for the Angle Snapping feature. This is because most contemporary gaming mice lack angle snapping. After all, the sensors used in high-quality products nowadays are all perfect. In other words, they don’t use performance-limiting modifications like smoothing.

Since the Angle Snapping feature can only be enabled on an eligible gaming mouse, the next section will discuss how to enable it from the software of the mouse’s manufacturer.

1. Enable Angle Snapping using the Republic of Gamers website

  1. Go to the ROG Armoury II official website to download the application.
  2. Launch the program after installing it.
  3. Navigate to the Performance tab under the Mouse section.
  4. Under the Angle Snapping option, click on the straight line option to enable it.
  5. Restart your PC.

After installing the software to your PC, make sure you restart your PC for the feature to take effect.

2. Download the Lioncast Software to enable Angle Snapping

  1. Visit the official website for Lioncast to download and install the Lioncast software depending on the mouse.
  2. Launch the application and click on the Sensor tab.
  3. Then, enable Angle Snapping and scroll to adjust the limit.

You can access Angle Snapping if you purchase your gaming mouse from Lioncast.

3. Download Corsair’s (iCUE) software to enable Angle Snapping

  1. Visit Corsair’s official website to get the iCUE program.
  2. Install the program, then run it. The Dashboard menu will then appear.
  3. Choose the Home tab, move the mouse pointer over the choices, and select Device Settings.
  4. Scroll down and turn on Angle Snapping in the newly opened window.

Gamers can use the above steps to enable Angle Snapping in their mice depending on the manufacturer’s support for the model.

Installing any additional third-party software could interfere with the game’s anti-cheat features and result in a permanent ban, so we strongly advise players to stick with the supplied software.

Alternatively, if you need help with the best mouse to improve your gaming performance, you should check out these Asus gaming mice.

Moreover, having gaming-efficient keyboards could also improve your gaming performance, so check out a list of the best Razer keyboards.

If you have any questions or suggestions, do not hesitate to use the comments section below.

Fix: Teams Blue Screen When Opening Files

Many of our readers have been experiencing a blue screen in Microsoft Teams upon opening files in the app. This transparent blue screen appears when you click to access any document from the file tab. If the blue screen is causing inconvenience, this guide will provide effective solutions to get rid of it.

What causes a blue screen in Teams when opening files?

There can be several reasons why you encounter a blue screen on Microsoft Teams when opening files:

  • Corrupt cache – If the corrupt cache files of the Teams app can cause random errors like the partial blue screen in Teams.
  • Slow internet connection – An unstable or poor internet connection can result in a blue screen when opening files.
  • Buggy update – The current Microsoft Teams version can be buggy and cause a blue screen to appear every time you try opening files.
  • Hardware Acceleration is enabled – When enabled, hardware accelerated GPU scheduling can trigger the Teams blue screen error upon opening files.
  • Outdated display drivers – Obsolete display drivers are a potential cause for several display-related problems, including the Teams blue screen problem.

Now that we know the reasons for the blue screen when opening files in Microsoft Teams, let’s find out how to get rid of the inconvenience.

How can I fix the blue screen in Teams when opening files?

Before moving on to the complex solutions, we recommend trying these basic workarounds:

  • Restart your computer to get rid of the temporary technical glitches.
  • Ensure that you are signed into Microsoft Teams using the correct email account.
  • Check the Teams app for new updates and install them on your PC.
  • Connect to a different network, such as a mobile hotspot, and then access files in the Teams app.
  • Check and install the available Windows updates to resolve the underlying bugs.

If you still encounter the blue screen upon opening files in Teams, perform the actions mentioned below.

1. Restart Microsoft Teams

  1. Right-click the Windows icon on the taskbar and select Task Manager from the Quick Links menu.Teams blue screen when opening files
  2. Look for Microsoft Teams in the Processes tab, right-click it, and choose End Task from the context menu.Teams blue screen when opening files
  3. Press the Windows key, type teams in the search bar on top, and select the app from the search result.Search Microsoft Teams from Start menu

Restarting the app can help resolve the temporary bug causing the blue screen when you try opening files in Teams.

2. Clear the Microsoft Teams cache

  1. Make sure you close the Teams app.
  2. Use the Windows + R shortcut to launch the Run dialog box.
  3. Type the following command in the text box and press the Enter key to directly access the Microsoft Teams folder. %appdata%\Microsoft\TeamsTeams blue screen when opening files
  4. Use the Ctrl + A shortcut to select all the files and folders in the directory and press the Delete key.Teams blue screen when opening files

Now restart the Teams once again, and hopefully, you will no longer witness the Teams blue screen while opening files.

Like other apps, Microsoft Teams accumulates the cache data to deliver better performance. Over time, the cache folder grows in size and may get corrupt and cause random issues like the one at hand.

3. Restore the default theme

  1. Launch Microsoft Teams.
  2. Click the Menu icon (horizontal three dots) located next to your profile picture on the top, and choose Settings from the drop-down menu.Teams blue screen when opening files
  3. Select Default instead of Dark and High Contrast theme from General settings.Teams blue screen when opening files

The default theme will now be applied as soon as you make the selection.

As reported by several of our readers, the partial blue screen appears on files only when the dark or high-contrast theme is applied in the Teams app. So restoring the theme settings to default can do away with the Teams blue screen that appears upon opening files in the app.

4. Disable the hardware acceleration

  1. Press the Windows key to launch the Start menu, type teams in the search bar, and select Microsoft Teams from the search result.
  2. Click the Menu icon (horizontal three dots) located on the top right and choose Settings from the drop-down menu.Teams blue screen when opening files
  3. Enable the checkbox preceding Disable GPU hardware acceleration option under the Applications section.Disable GPU hardware acceleration

When the GPU hardware acceleration is enabled, CPU and RAM usage by Teams increases tremendously. Consequently, your PC delays responding to the requests when you double-click to access the file and displays a partial blue screen.

5. Update the display driver

  1. Right-click the Windows icon and select Device Manager from the Quick Links menu.Teams blue screen when opening files
  2. Double-click the Display adapters category to expand the list of devices.
  3. Right-click the graphics card and choose Update driver from the context menu.Teams blue screen when opening files
  4. Select the Search automatically for drivers option from the Update Drivers window.Teams blue screen when opening files

Your computer will search for the latest update for your graphics card and automatically download and install them without your intervention. Hence, Installing the latest available driver can easily fix the Teams blue screen that appears when you open any files within the app.

These workarounds can help fix the partial blue screen in Teams that appears when you try opening the different files. Also, we recommend that you go through this guide if you are unable to download files from Microsoft Teams.

Let us know if these solutions helped you get rid of the blue screen. Also, if you have any other questions or suggestions, you can leave them in the comments section.

How to Make Outlook Automatically Open Replies & Forwards

Microsoft Outlook typically opens replies and forwards in the same window by default when you click Reply or Forward from the reading pane. But, some of our readers have requested to know how to make Outlook pop out reply in a new window.

In case you have been wondering how to deal with this task in Outlook too, you can explore this guide to learn how to resolve it quickly and easily.

What does it mean to automatically pop out replies in Outlook?

In Outlook 2013, 2016, and Microsoft 365, email replies and forwards are done in line by default. This means, your reply or forward message is typed within the preview pane.

However, with the Outlook pop out reply feature, users can modify Outlook’s default configuration, which opens replies or forwards in the same window, to automatically open replies and forwards in a separate window.

In the section below, we will take you through a simplified process of how to tweak this setting.

How to configure Outlook to open replies and forwards in Pop out Window?

1. Via the Outlook app

  1. Launch the MS Outlook app.
  2. On the File tab, click on the Options button.
  3. From the Outlook dialog box that opens immediately, click Mail on the left pane.
  4. Now, scroll down to the Replies and forwards section and check the box with Open replies and forwards in a new window option.
  5. Then, click the OK button to save the changes.  

Now, when you click Reply, Reply All or Forward from the reading pane, a new window will be displayed at once.

2. Use the Outlook Web version

  1. Sign in to your Outlook account via your web browser and click on the gear icon.
  2. Now, click on Options from the menu.
  3. Under Layout, click on the Reading pane.
  4. Finally, under When writing email messages, select Type in a new window.

The setting should be automatically changed once you’ve applied the settings. You can also check our detailed guide for the best browsers to use for all purposes here.

Alternatively, if you’re having issues with opening your Outlook app in Windows 11, you can fix it in the 6 steps provided in this article.

And that’s it on how to make Outlook automatically open replies and forwards. If you have any questions or suggestions, do not hesitate to use the comments section below.

High CPU Usage on Apex Legends: 3 Ways to Lower It

Several players have recently reported encountering the Apex Legends high CPU usage issue when starting the game on a Windows PC.

If your CPU usage rate on Apex Legends has been abnormally high, do not worry. In this article, we have compiled some steps to lower it to enable the game to run smoothly without crashing.

What causes high CPU usage on Apex Legends?

  • Corrupted or damaged game files – There is a high chance that corrupted and faulty game files cause Apex Legends’ high CPU usage issue. Infected game files have a history of lowering game performance and raising CPU use on your computer. It may also trigger the Apex game logic error.
  • Outdated Graphics Driver – Out-of-date graphics and other device drivers can also trigger this problem. Therefore, update your GPU drivers if you haven’t done so in a while. By doing this, you’ll be able to eliminate any problems or bugs causing CPU usage to increase.
  • Corrupted Cache associated with the game launcher – The Apex Legends’ high CPU usage could be caused by a corrupted cache linked to the game launcher, such as Origin or Steam. To resolve the problem, try clearing the Origin or Steam cache if the scenario applies.
  • In-game overlays – In-game overlays may also be the root of the current problem. Therefore, turn off in-game overlays.
  • In-game Graphics Settings – The Apex Legends’ high CPU usage may occur if you have high graphics settings enabled. Instead of this, modify the game’s visual settings.

Now that you know some of the possible reasons behind the Apex Legends’ high CPU usage issue, let us proceed to how you can lower it.

How can I fix high CPU usage on Apex Legends?

Before engaging in any advanced troubleshooting or settings tweaks for the Apex Legends high CPU usage error, restart your PC, update your computer drivers, and close unnecessary applications or windows you have opened.

1. Run Apex Legends with Administrative privileges

  1. Press the Windows + E keys to open File Explorer.
  2. Locate the main executable file of Apex Legends. Right-click on the ApexLegends.exe file and select Properties from the context menu.
  3. Next, navigate to the Compatibility tab and check the box with the Run this program as an administrator.
  4. Then, click the Apply and OK buttons to save changes.

Running Apex Legends as an administrator has worked for several players. However, you can check the next fix if it doesn’t work for you.

2. Clear Origin or Steam Cache

2.1. How to clear the Origin cache

  1. Press the Windows + R to open the Run dialog box. Type %ProgramData%/Origin in the text field.
  2. Next, in the opened directory, delete all the folders except for the LocalContent folder.
  3. Then, open the Run command dialog box again. Type %AppData% in the text field, and clear the  Origin folder.
  4. Alternatively, open the Run command dialog again, and type %userprofile% in the box.
  5. Open the AppData folder, navigate to the Local folder, and delete the Origin folder.
  6. Restart your PC.

You can now relaunch Origin and Apex Legends to check if the problem is fixed.

2.2. How to clear the Steam cache

  1. Press the Windows + R keys to open the Run command dialog box. Type %appdata% in the text field.
  2. Locate the Steam folder in the opened location. If you can’t see the folder, you can show hidden files/folders.
  3. Next, delete the Steam folder and close File Explorer.
  4. Finally, restart your PC and launch your game1 to see if the high CPU usage problem is fixed or not.

Some users have reported that clearing the cache from Steam and Origin has helped them with the high CPU usage. You should try it too.

3. Update your Graphics drivers

  1. Press the Windows + R keys to open the Run window. Type the following in the search box devmgmt.msc, and press Enter.
  2. Choose Display adapters by double-clicking from the search results. Right-click on the graphics driver and select Update driver from the context menu.
  3. Now, select Search automatically for drivers.
  4. Restart your computer after the updating process is complete.

You can also get the latest graphics driver from the manufacturer’s website, such as Intel, AMD, or Nvidia, depending on your GPU.

Instead of manually searching and updating the drivers, which can be risky and cause other issues, you can use a secure and automatic method.

There is software that can scan your PC entirely and find outdated drivers, thus updating them with the official versions with one click.

⇒ Get Fortect Driver Updater

The issue should be fixed after updating your graphics drivers. However, if the error persists, you can explore our dedicated guide on how to fix Apex Legends if it’s not using the GPU for further assistance.

Alternatively, you can work through the steps provided in our best ways to limit the CPU usage of a process troubleshooting guide.

And that’s how to lower high CPU usage on Apex Legends. Moreover, make sure your graphics drivers & network drivers are up to date to prevent issues like Apex Legends Anticheat error.

Still, on Apex errors, ensure your time synchronization is in check to prevent issues like the clock code error.

If you have any questions or further information regarding Apex Legends’ high CPU usage issue, please use the comments section below.

4 Ways to Fix Office 365 Error Code 0x80048823

While using Office 365, some users reported that the error code 0x80048823. The error prevents Microsoft Office from working as you’ll be unable to login to the website.

In this article, we’ll take a brief overview of the Office 365 error code 0x80048823, its causes, and provide you with 4 of the best ways to resolve the error. 

What causes office 365 error code 0x80048823?

The following are some of the common causes of the Office 365 error code 0x80048823:

  • Wrong Sign in Credentials – If you’re attempting to sign into Office 365 with the wrong credentials, you’ll be unable to access the service. Errors like the 0x80048823 are likely to occur in such cases.
  • Corrupt System Files – The Windows OS consists of a host of system files and applications that enable the computer to run correctly. Sometimes, these files can get corrupted while using your PC. Forced shutdowns, viruses, etc, can all corrupt such files. If your PC has corrupt system files, it can trigger the error code 0x80048823.
  • Viruses and Malware – A PC infected with virus usually causes lots of errors and bugs. If you’re experiencing the Office 365 error code 0x80048823, your PC might be infected with malware.

How can I fix office 365 error code 0x80048823?

If you’re currently facing the 0x80048823 error code in Office 365, here are a few troubleshooting techniques you can attempt:

1. Delete the Office365ServiceV2 from the Task Manager

  1. Press the Windows key + S, type in Task Manager, and hit Enter.
  2. In the Task Manager window, locate the Microsoft Office365ServiceV2 process. Right-click on the process and select End task.
  3. Close the Task Manager window to check if the error persists.

There are times when the Task Manager may not respond. If you encounter this, do not hesitate to check out our guide.

2. Verify your Microsoft Account

  1. Locate Office from your Desktop, and double-click the icon to launch Office 365.
  2. In Office 365, navigate to Settings, and click on Email and Accounts.
  3. Check to see if your Microsoft account is synchronized properly and if it needs attention.
  4. If you see that it needs attention, click on Account, and re-enter your password.
  5. Check to see if the error persists.

3. Run a Windows Clean Boot

  1. Press the Windows key + R, type in msconfig, and hit Enter to launch the System Configuration Utility.
  2. On the General tab, select the Selective startup option, and then clear the Load startup items checkbox by clicking the checkboxes.
  3. On the Services tab, select the Hide all Microsoft services check box and click the Disable all button.
  4. Click OK, then click Restart to restart your PC with a Clean Boot.

A clean boot restricts certain third-party functionalities in your PC. If the error code 0x80048823 is triggered as a result of such third–party features, performing a clean boot can help eliminate the error. 

4. Run a Windows System Restore

  1. Press the Windows key, type in create a restore point, and hit Enter.
  2. In the popup window, click the System Restore button, and click the Next button.
  3. In the next window, select the specific restore point you wish to revert your system to, and click Next.
  4. Click the Scan for affected programs button to confirm apps that will be removed after the System Restore.
  5. Select the Close button, and click Next.
  6. Click the Finish button to complete the system restore.

System Restore is a very useful feature in Windows that enables users to restore their PCs to an earlier state which was functional and free of errors. 

If you noticed the error after making changes to Windows, you can easily revert to an earlier state of Windows using System Restore.

However, you’ll need to have created a restore point before you can utilize this fix. Here is a detailed guide on how to create a restore point in Windows. 

Resolving the error code 0x80048823 in Office is pretty straightforward and can be achieved by following the steps listed in our guide. 

If you’ve come across this error in the past, and successfully resolved it using alternative solutions, you can let us know in the comments below.

Rust keeps crashing: Causes & How to Fix It

Rust is an online multiplayer game available for Windows and other platforms. While playing the game, users have triggered the Rust keeps crashing error, preventing the game from launching.

If you’re experiencing the Rust keeps crashing error, we’ll brief you on the causes and provide you with steps to help resolve the error.

Why does Rust keep crashing?

Here are some of the common reasons why rust keeps crashing:

  • Outdated Graphics Driver – Rust like most PC games requires a graphics driver to function optimally. If your PC’s graphics card is outdated, it can cause rust to crash when launched.
  • Insufficient RAM – Background applications use a lot of your PC’s internal memory. If your PC possesses an average memory, opening too many applications at once could cause lagging which can trigger the rust keeps crashing error.
  • Low System Specs – When games are released, the developers specify a list of PC requirements needed to run the game without hitches. If your PC doesn’t meet Rust’s minimum system requirement, it can cause the game to crash when launched.
  • Outdated Windows OS – An outdated Windows OS can lead to a series of errors for the PC and applications installed on it. If you’re running an outdated Windows version, it could be the reason why Rust keeps crashing.
  • Corrupted Game Files – In some cases, the error Rust keeps crashing can be triggered when the game’s files are corrupted. Game files can be corrupted due to viruses, forced system shutdowns, etc. If any of Rust’s files are corrupted, it can trigger the error Rust keeps crashing.

What can I do if Rust keeps crashing in Windows?

Before we proceed with more advanced solutions, here are a few quick tips you can attempt:

  • Restart your PC.
  • Close and Relaunch Rust.
  • Check to see if your PC meets the minimum system requirements.

If those steps couldn’t resolve the error, here are more advanced troubleshooting techniques you can attempt:

1. Update Graphic Drivers

  1. Press the Windows key, type in Device Manager, and hit Enter.
  2. In the Device Manager window, locate Display Adapter, right-click on the device, and select Update driver.
  3. Choose Search automatically for drivers and wait for Windows to scan for available drivers.
  4. Restart your PC after the update and relaunch Rust to see if the error persists.

2. Update Windows

  1. Press the Windows key + I to open the Settings app.
  2. Click on Windows Update and select Check for Updates. If there are any available updates, click on Download and Install to initiate the update process.
  3. Restart your PC once the update is complete and check to see if the error persists.

3. Run the Steam as an Administrator

  1. Locate the Steam app icon on your Desktop, right-click on it, and select Properties.
  2. Navigate to the Compatibility tab and check the box next to Run this program as an administrator.
  3. Click Apply and then click OK.
  4. Relaunch Steam and open the Rust app to see if the error persists.

You can run most games without admin privileges but if you’re experiencing the Rust keeps crashing error, you should Run the app as an administrator to see if it’ll resolve the error.

Here is a guide showing you how to make yourself an administrator in Windows.

4. Close Background Programs

  1. Right-click on your Start button and select Task Manager.
  2. Under the CPU and Memory usage tab, check to see which processes are consuming the most resources. Right-click on the Process and select End Task.
  3. Repeat this step until you’ve closed all resource-hogging programs and relaunch Rust to see if the error persists.

Background applications use up a lot of memory and can cause apps to crash if they’re too many opened. Closing background apps ensures that your PC can allocate memory for more important tasks and help speed up your system.

5. Verify the Integrity of Game Files

  1. Locate the Steam app from your Desktop and double-click the app icon to launch it.
  2. In the Steam app, click on Library. Right-click on Rust and select Properties.
  3. Click the Local Files tab and select Verify Integrity of Game Files.
  4. Wait for the scans to be complete and relaunch Rust to see if the error is fixed.

If the game files get corrupted or missing, you’ll have to verify the integrity of the game files to determine if that’s the cause of the error.

6. Change the Power Options

  1. Press the Windows key + R to open the Run box, type in powercfg.cpl, and hit Enter.
  2. In the popup window, select the High-Performance option.
  3. Close the window, and restart your PC to see if the error persists.

The Power Option of most Windows PCs is set to Balanced. It helps conserve the battery but at the expense of reducing the performance. 

While trying to change your power options, you can run into the Power options greyed out error. Be sure to read our guide to resolve the error.

7. Reinstall Rust

  1. Locate the Steam icon on your Desktop and double-click it to launch the app.
  2. Click Library and locate Rust from the list of apps. Right-click and select Uninstall.
  3. Click Delete to complete the uninstallation.
  4. Close the Steam app.
  5. Press the Windows key + E to open File Explorer.
  6. In the File Explorer window, copy and paste this C:\Program Files (x86)\Steam\steamapps\common in the address bar, and hit Enter.
  7. Click on the Rust folder and press the Del key on your keyboard to delete the folder.
  8. Relaunch the Steam client and reinstall Rust.

Reinstalling Rust is one of the best ways to resolve the Rust keeps crashing error. In addition, a reinstall often clears other crash issues and errors that you’ve been experiencing from the game.

However, you should reinstall only when you’ve attempted all the troubleshooting techniques and the error remains unfixed.

There are tons of ways you can get rid of the Rust keeps crashing error on Windows. In this article, we’ve provided you with 8 of the best steps to help resolve the error. If you follow through carefully, you should get Rust up and running in no time.

If you’ve experienced the error in the past and have alternative solutions that helped resolve the error, you can let us know in the comments below.

Latest Dev build lets you disable annoying notifications in the Start menu

Recently, we spoke about the newest Windows 11 Dev Channel build (23419) released through the Windows Insider program.

Back then, we told you that a small change with some Windows Insiders where the Recommended section of the Start menu is changed to For you.

We know that many of you aren’t at all happy about this, so just know that there is a tiny back door you can creep through.

By that, we mean that there is a still hidden feature in the update, which will give you the possibility to turn them off.

Is Microsoft letting us disable notifications in the Start menu?

As we’ve said, the latest cumulative update preview for Windows 11 has introduced a change that sparked a lot of controversies, in the form of Microsoft Account notifications in the Start menu.

Many of the involved users agree that those notifications are nothing but native ads that bait customers to click by creating a false sense of urgency.

A lot of people are asking themselves if backing up the Documents folder really that important to place a banner in the Start menu.

After probably listening to some customer feedback, Microsoft may actually let you do just that. By just that, we mean disabling these notifications, just so we’re clear.

Windows 11 build 23419, currently available for Windows insiders in the Dev Channel, contains a hidden feature for turning on or off account-related notifications in the Start menu.

If know what you are doing, know that a little bit of digging it up allows disabling the ads by heading to the appropriate section in the Settings app.

Keep in mind that Microsoft has not announced the option, so whether it will ship it to all customers in the Stable Channel remains an open question.

As a side note, this hidden feature is only available for Dev Channel users. Not even Canary Channel Insiders have this ability.

Thus, if you are using Dev builds and want to remove Microsoft Account notifications from the Start menu, you will need the help of ViveTool for this one.

That being said, know that enabling hidden experimental changes could lead to instabilities and bugs. We highly recommend that you back up important data before using the ViveTool app.

What is your opinion on the new Microsoft Account notifications in the Start menu? Share your thoughts and opinions with us in the comments section below.

How to Remove Write Protection from Pen Drive

You may encounter a prompt that says this disk is write-protected when you attempt to modify the contents of a pen drive. This can be frustrating as you are prohibited from writing, deleting, or changing any data on the pen drive.

You may initially think that the pen drive is no longer usable, but surprisingly, it is possible to remove the write protection from your pen drive. Let’s find out how.

Why is my pen drive write-protected?

Generally, Pen drives or USBs are write-protected to prevent someone from copying or modifying the files. However, there can be other reasons as well that you should take into account:

  • Individual files have read-only attributes – A pen drive may become write-protected if a file is marked as read-only and cannot be deleted.
  • BitLocker is enabled – If BitLocker is turned on, you won’t be able to make changes to files and locked pen drives.
  • No storage space – Insufficient disk space on the USB or pen drive can also cause a write-protected error.
  • Write protection switch is enabled – The physical write protection switch on the pen drive has been enabled accidentally.
  • Virus or malware infection – A virus infection or malware attack on the pen drive can also make it write-protected.

So, if you’re struggling to access a write-protected pen drive, you should know that there are several methods to remove write protection from your pen drive or USB. This guide lists the most effective ones and explains the step-by-step procedure.

How do I remove write protection from the pen drive?

Before employing the software-related workaround listed below, make sure to perform the following:

  • Look for the physical write protection lock and move it to the off position in case your pen drive has one.
  • Scan your pen drive for viruses and malware infections using Windows Defender or any third-party antivirus.

If these simple actions could not remove the write protection from your pen drive, move on to the workarounds listed below.
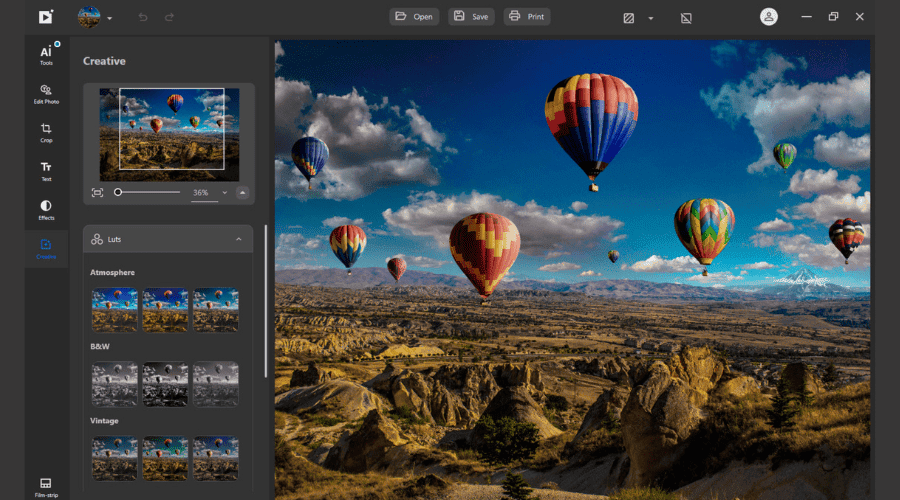
1. Change pen drive properties

  1. Insert the pen drive into a USB port on your computer and use the Windows + E shortcut to launch File Explorer.
  2. Choose This PC from the left navigation pane and locate your pen drive in the list of available drives.
  3. Right-click your pen drive and select Properties from the context menu.Remove write protection from pen drive
  4. Switch to the Security tab of the Properties dialog box and press the Edit button to modify the permissions for the pen drive.Remove write protection from pen drive
  5. In the permission window, Allow or Deny the permission to perform a write operation for each group and user name.Remove write protection from pen drive
  6. Click Apply to save the changes and OK to close the Properties window.
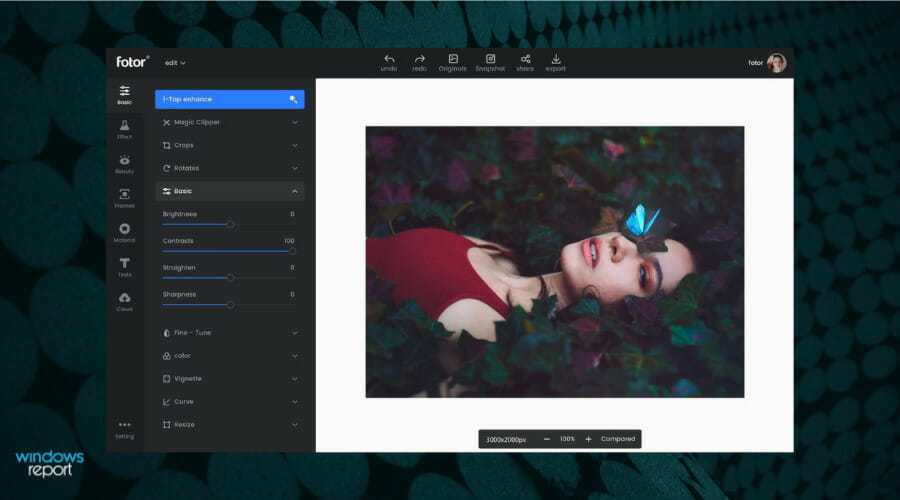
Once you’ve changed the read-write properties of the pen drive, it will no longer be write-protected, and you should be able to save, delete, and modify files on the pen drive as needed.

2. Remove read-only attributes using Command Prompt

  1. Press the Windows key to launch the Start menu, type cmd in the search bar on top, and select Run as Adminstrator from the result section.Remove write protection from pen drive
  2. Type or paste the following command and press the Enter key to execute it. Diskpart
  3. Next type the following command to view all the disks connected to the computer and note down the number representing your pen drive. list diskRemove write protection from pen drive
  4. Execute the following command and replace # with the number you copied previously. select disk #
  5. Now type the following command to disable the write protection on your pen drive. attributes disk clear readonlyRemove write protection from pen drive

When the disk attributes are cleared successfully, exit the command prompt window. The attribute command in Windows Command Prompt can remove read-only attributes from files or directories.

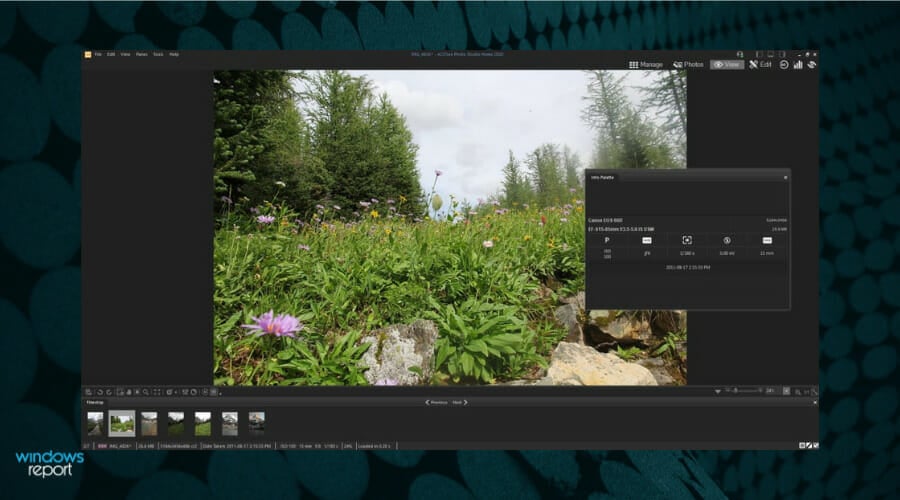
3. Modify the registry to disable write protection

Note icon NOTE
Modifying the Windows registry can be risky, so before proceeding, you should ensure you have a backup of your registry and understand the potential risks involved.
  1. Launch the Run command window using the Windows + R shortcut key, type the following command in the text box, and press the Enter key. regeditRemove write protection from pen drive
  2. Type the following path in the address path of the registry path: HKEY_LOCAL_MACHINE\SYSTEM\CurrentControlSet\Control\StorageDevicePolicies
  3. Look for the WriteProtect value, right-click it, and choose Modify from the context menu.Remove write protection from pen drive
  4. Assign 0 as the data value instead of 1 and press OK.Remove write protection from pen drive

Now reconnect your pen drive, and you will see that the write protection is eliminated.

If you don’t see the StorageDevicePolicies folder in Registry, you can create one and then follow the steps above.

4. Disable BitLocker using Windows PowerShell

  1. Press the Windows key to launch the Start menu, type powershell in the search bar on top, and choose Run as Administrator.Remove write protection from pen drive
  2. Type or copy-paste the following command and press Enter key to execute it. Make sure to replace E with the letter representing your write-protected pen drive. Disable-BitLocker -MountPoint "E:” How to remove write protection from pen drive
  3. Exit the command prompt after the BitLocker is successfully disabled on your system.

The decryption process can take several moments, depending on the contents of the pen drive. Once the process is complete, your pen drive will no longer be write-protected.

So that’s how easy it is to remove write protection from a pen drive and perform the write operation as required.

We also recommend reading another guide to repair a Kingston Flash Drive if it has become corrupt.

Let us know in the comments if any of these methods were successful in removing the write-protected limitation from your pen drive.

How to Clean a Mouse Scroll Wheel [Easiest Methods]

A computer mouse tends to get dirty very quickly, and the buildup of debris can cause it to become less responsive or even stop working. Whether you use your mouse for work or for gaming purposes, a clean scroll wheel is essential for a seamless experience.

Why should I clean the mouse scroll wheel?

There are not one but many reasons why you should consider cleaning your mouse scroll wheel regularly. Some of the obvious ones are: 

  • Cleaning your mouse screen wheel preserves the life of your computer mouse and keeps it working properly. 
  • Food particles and dead skin cells clogged in the scroll wheel can damage the internal mechanisms of the mouse. 
  • A dirty mouse scroll wheel makes it difficult to scroll the web pages and affects your productivity. 

Now that you know why keeping a mouse scroll wheel clean is necessary, let’s proceed to the different methods to clean the mouse scroll wheel without investing much time and effort.

How do I clean a mouse scroll wheel? 

1. Things you need 

  1. Compressed air can – To blow away the dust or debris stuck on and around the scroll wheel
  2. Q-tip/Cotton swab – To clean the scroll wheel with disinfectant. 
  3. Jeweler’s screwdriver – To loosen the small screws that hold the mouse panels together 
  4. Isopropyl alcohol – To disinfect the scroll wheel and clean the oil buildup.
  5. Microfibre cloth – To wipe and dry the scroll wheel and internal circuit of the mouse

2. Cleaning Process 

  1. Unplug the mouse and remove the batteries if it is a battery-powered wireless mouse.How to clean mouse scroll wheel
  2. Turn over the mouse such that its bottom faces upwards. Identify the screws that hold the panels together and use a jeweler’s screwdriver to loosen and remove them, keeping them in a safe place. Some models have a central screw instead of several screws. 
  3. Gently lift the top panel upward to remove it and reveal the scroll wheel and internal circuit. Remove the wheel and both attached springs by pulling the plastic assembly upward.How to clean mouse scroll wheel
  4. Hold the can of compressed air about four inches above the wheel and the internal circuit. Now blow short bursts of air on each side of the wheel to remove all trapped dust and debris particles. Repeat the process until the mouse looks completely clean.
  5. Dip the Q-tip or cotton swab in isopropyl alcohol and gently wipe the tip around the wheel’s circumference to clean away any oily buildup and dirt. 
  6. Use the microfibre cloth to dry the scroll wheel and internal circuit, and maintain extreme caution. 
  7. Once the internals of the mouse is completely dry, place the wheel back and reposition the assembly in the center. A small click sound will ensure that the wheel is well seated in its correct position. 
  8. Now fit the top panel back in place, flip over the mouse to replace the screws, and tighten them using the screwdriver.how to clean mouse scroll wheel 
  9. Test your mouse to make sure it works flawlessly.

How do I clean the mouse scroll wheel without taking it apart?

1. Things you need

  1. Q-tips – To clean the scroll wheel. 
  2. Microfiber cloth – To dust and dry the mouse wheel without leaving any lint behind. 
  3. Toothpick – To reach hard-to-reach areas where Q-tip won’t reach.
  4. Isopropyl alcohol or contact electronic cleaner – To sanitize and disinfect the mouse from viruses and bacteria.

2. Cleaning Process 

  1. Ensure your mouse is disconnected from your PC. If you have a wireless mouse, power it off and take out any batteries to avoid causing damage.
  2. Put your mouse under a bright light source and turn it over. 
  3. Slowly roll the scroll wheel with your hands and run a toothpick around to loosen the stubborn dust and grime stuck in the scroll wheel and surrounding areas.How to clean mouse scroll wheel
  4. If your scroll wheel feels sticky or not functioning properly, take a Q-tip dipped in isopropyl alcohol or electronic contact cleaner and carefully disinfect the scroll wheel and the ridges around it. Apply minimum pressure to avoid damaging the scroll wheel mechanism. 
  5. Use a microfibre cloth to dry alcohol or contact cleaner completely before using the mouse again.How to clean mouse scroll wheel
  6. Once the cleaning is done, reconnect the mouse to your computer and turn it back on.

It’s easy to wipe clean the scroll wheel of your mouse without taking it apart, unlike most people think. But it would be best if you exercise caution when doing so.  

That’s it! You can thoroughly clean the mouse scroll wheel by applying minimal effort. You may want to check out our guide that explains what you should do if the right click is not working on your mouse. 

If you have any queries or suggestions, feel free to contact us in the comments section below, and we’ll be in touch as soon as possible.