[Solved] Tiworker.exe High CPU and Disk Usage: 10 Ways

High disk usage is quite a common problem among Windows users. Often, this issue is caused by specific apps and programs, such as Tiworker.exe.

Tiworker.exe is an app directly related to the Windows Updates manager and will run in the background once you boot up your PC.

Tiworker.exe is an app that appeared alongside the Windows 10 operating system. Therefore, you cannot disable it because it is a Windows system feature.

More and more Windows 10 users are having trouble with this Tiworker.exe because it registers high CPU usage, sometimes up to 50 %.

This will prevent the user from playing a game that requires more hardware specs, for example, or watching a movie.

In the tutorials below, we will explain how you can fix the high CPU usage you have from Tiworker.exe.

Why does TiWorker use so much CPU?

TiWorker.exe might be causing high memory usage because your operating system is outdated. This is understandable as it is a system feature and works optimally when updated.

Also, the TiWorker.exe high disk usage could be down to the activities of third-party programs. Performing a clean boot should fix the issue in this case.

Lastly, some users notice that the TiWorker.exe issue started after installing the Servicing Stack update. In this case, you have to be patient as the service might be compressing some important update files.

What is TiWorker.exe?

TiWorker.exe is a system feature that represents Windows Update Trusted Installer Worker Process. This feature is essential to the performance of your Windows PC.

Without it, your Windows Update will not work correctly. Also, you might no longer get reliable updates for your PC. So, it is necessary and cannot be disabled.

Lastly, if you are wondering if TiWorker.exe is a virus and can cause your system to crash, you have no worries as it is completely safe.

How do I fix Tiworker.exe high CPU and Disk usage?

1. Run System Maintenance Troubleshooter

  1. Use the Windows key + S shortcut, and type in Troubleshooting.
  2. Click on the Troubleshooting icon—select View All.
    System Maintenance Troubleshooter
  3. Then, click on System Maintenance.
    System Maintenance Troubleshooter
  4. Click on Next and follow the steps presented on the screen.
    System Maintenance Troubleshooter

2. Use professional software

The solution is a straightforward way to fix the issue with TiWorker.exe high disk and CPU usage on Windows. Use professional software and make your computer healthy again.

We recommend using a complete system solution based on robust technology. These tools will secure and repair your PC bringing it into an optimized state.

Thus, make use of this software to fix corrupted system files or detect malware threats from your PC restoring its maximum performance.

3. Check for updates

  1. Press the Windows key + I to open Settings.
  2. Choose the Update & Security option.
    update and security
  3. Click the Check for updates button.
    check for
  4. Now, select Download and install to apply any available update.
    download and install tiworker high cpu usage

An outdated operating system is one of the primary causes of the TiWorker.exe high disk usage issue. The easy thing to do in this case is to update and restart your PC.

4. Perform a Clean boot

  1. Press Windows key + R, enter msconfig, and click OK.
    Clean boot
  2. Go to Services and check the Hide all Microsoft services option.
  3. Click the Disable all button.
    Clean boot
  4. Go to the Startup tab and click on the Open Task Manager.
    Clean boot
  5. Right-click the first application on the list, choose Disable from the menu, and repeat this step for all startup applications on the list.
    Clean boot
  6. Go to System Configuration, click Apply and OK, and restart your PC.
    Clean boot

After restarting your PC, check if the issue still appears. If not, you need to enable all disabled applications and services until you find the one causing this problem.

Remember to restart your PC after enabling each service or application.

You will need to perform a clean boot to the Windows 10 system to see if you have some apps interfering with the system and causing Tiworker.exe to eat up your CPU memory as it does.

If, after the clean boot in Windows, you find an app interfering with the system, you can either try to uninstall it or make an update to the app that’s causing your issue.

5. Rename the Software Distribution directory

  1. Press Windows key + R, enter services.msc, and click OK.
    access Services
  2. Locate the Windows Update service on the list and double-click it to open its Properties.
    Windows Update service
  3. Set Startup type to Manual and click the Stop button.
  4. Finally, click Apply and OK to save changes.
    Windows Update service properties stop
  5. Go to C: Windows, locate SoftwareDistribution and change its name to SoftwareDistribution.old.
    Rename software distribution folder
  6. Return to Services and double-click Windows Update.
  7. Set Startup type to Automatic and click the Start button.
  8. Now, click on Apply and OK.
    Windows Update service properties start

After that, check for updates manually, and your issue should be resolved.

According to users, sometimes your SoftwareDistribution directory can become corrupted, and that can cause high disk usage by TiWorker.exe.

To fix the problem, you must follow the steps above to rename the Software Distribution folder.

    6. Fix Tiworker.exe high CPU using CMD

    To fix the tiworker.exe high CPU and disk usage problems, you might have to perform an SFC scan and a DISM scan.

    Your files can become corrupted causing the problem to appear. The scans will find and remove any corrupted files found on your computer.

  1. 1. Press Windows key + X to open the WinX menu.

  2. 2. Choose Command Prompt (Admin) from the results.

  3. 3. Type in sfc/scannow.

    Fix error Tiworker.exe causing high CPU
  4. 4. Press Enter to execute the command.

  5. 5. The SFC scan will now start. Wait for this process to complete.

  6. 6. Once the SFC scan is finished, check if the issue still appears. If not, you might have to perform a DISM scan instead.

  7. 7. Reopen Command Prompt as administrator and type this command: DISM /Online /Cleanup-Image /RestoreHealth

  8. 8. Press Enter to run the command.

  9. 9. DISM scan will now start and try to repair your system. Keep in mind that this process can take 20 minutes or more, so be sure not to interrupt it.

  10. 10. After running both DISM and SFC scan, check if the issue is resolved.

7. Exclude TiWorker.exe from Windows Defender

  1. Press Ctrl + Shift + Esc to open Task Manager.
  2. Locate TiWorker.exe or System, right-click it and choose Open File location.
    Task Manager Tiworker.exe location on the drive
  3. Copy the location of this directory since you’ll need it for future steps.
  4. Press Windows key + S to enter defender, and choose Windows Defender Security Center.
    Tiworker.exe causing high CPU
  5. Go to Virus & threat protection.
    virus & threat protection windows defender
  6. Now click on Virus & threat protection settings.
    virus & threat protections settings
  7. Scroll down to the Exclusion section and click on Add or remove exclusions.
    add windows defender exclusions
  8. Click on Add an exclusion and select Folder from the list.
    add windows defender exclusion
  9. Now enter the location of the directory from Step 3 and save changes.

According to users, high disk usage by TiWorker.exe can be caused by Windows Defender.

Users reported that Windows Defender keeps scanning TiWorker.exe, causing this problem to appear. To fix the problem, you need to exclude this file.

After that, Windows Defender won’t scan TiWorker.exe, and its directory and your issue should be resolved.

8. Delete the Updates directory

  1. Open File Explorer.
  2. Navigate to C: Windows/Temp directory.
    windows temp
  3. Locate the Updates directory and remove it.

Sometimes, your temporary files can cause high disk usage by TiWorker.exe.

Users reported that the Updates directory was causing this issue on their PC. However, the problem was resolved after removing it, so make sure you try it.

9. Delete HP software

Many users reported that high disk usage by TiWorker.exe can be caused by HP software.

According to users, software such as HP Support Assistant can cause this problem.

To fix the issue, users recommend removing all HP software from their PCs and checking if that solves the problem.

10. Reinstall Windows to fix Tiworker.exe high CPU
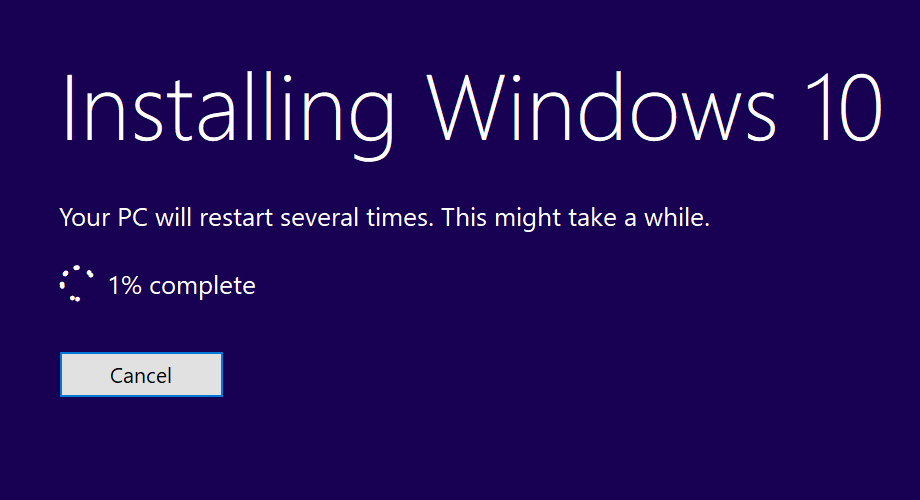
install windows 10 setup

Finally, the last resort is a clean reinstallation. Unfortunately, windows native services, like the infamous svchost.exe with CPU activity, confuse users.

And, sometimes, even though you’ve covered every possible option, it’ll still use system resources in abhorrently large volumes.

Of course, if that happens, you should consider starting from scratch and reinstalling Windows. Don’t forget to back up your data from the system partition and get to work.

How do I fix TiWorker.exe high disk usage on Windows 10?

The TiWorker.exe high disk usage issue is generic across most Windows operating systems. Hence, the causes are relatively the same.

So, to fix this issue on Windows 10, you can effectively apply any of the solutions provided for Windows 10 in this guide.

How do I stop high disk usage?

Stopping high disk usage is pretty straightforward, provided you know the cause. Then, you can effectively remove it. For example, if it is due to a problematic app.

Also, it can be because of corrupt or bad disk sectors. You can quickly fix this by performing disk cleanup and check. To get more encompassing solutions for this issue, check our 100% disk usage on Windows 10/11 guide.

This process is also associated with Windows Modules Installer Worker high CPU usage, so it’s important to fix any issues that you have with it.

There you have it, no less than ten methods to fix your Tiworker.exe, get your CPU usage back to usual operating standards, and continue playing your games without interference from outside apps.

Let us know if this guide helped you solve your issue by hitting the comments below.

How to Find & Delete Empty Folders on Your PC [3 Ways]

Unnecessary directories can clutter your hard drive, and this is why many users want to delete empty folders on their PC.

This isn’t always easy, especially if you can’t delete folders on your PC. But if you’re still determined to remove these folders, this guide will show you how to do it.

Note that you won’t be able to delete a folder if you’re not its owner or if you don’t have the necessary permissions. So take ownership of the folder or ask the administrator to give you full access.

How can I delete empty folders?

1. Search for empty folders

  1. Open This PC.
  2. Click on the Search bar and  enter size:empty.
  3. After the search ends, it will display all files and folders that do not take up any memory space.
  4. Select the ones you want to delete, right-click on one of them, and click on Delete.

This first method does not require any software to be installed but is based on a search based on size.

2. Clear Registry entries using a specialized tool

Registry cleaners can help you delete redundant items from your computer’s registry, including empty folders.

These tools perform a complete scan of your PC and provide a thorough system diagnosis within a few moments. Afterward, these tools will allow you to replace any broken or corrupted files they identify.

In case the registry keys have been damaged severely, you can replace them with new and healthy ones from its online repository.

3. Use Command Prompt

  1. Open search and look for command prompt. Select Run as administrator.
     
  2. Type the following command and press Enter: cd /
  3. In the Command Prompt, type the following command and press Enter: DIR /AD/B/S | SORT /R > EMPTIES.BAT
  4. Open the file with Word or any other editor. Word has a Find and Replace feature.
  5. Search the structure ^p and replace it with ^pRD.
  6. Save the EMPTIES.BAT file and exit from your editor.
  7. Run the file and try to delete all the folders on that list, but it will fail for the folders with content.

This method is a little more challenging to implement, but if you follow these steps thoroughly, you can do it.

Can I delete all empty folders on my computer?

While it’s possible, you shouldn’t remove all empty folders due to the following reasons:

  • System issues – Even if a folder is empty, it might have its purpose. So if you notice a You need Administrator permission to delete folder message, you’re probably working with a system directory, and you should leave it be.
  • Software issues – Just like with system directories, the software creates empty folders that it uses when needed. If you remove them, certain applications won’t start or work properly.

If you are facing other issues, like being unable to rename folders on Windows, check our detailed guide to fix it quickly.

We also have a guide on solving 2 Windows folders issue that can help you, so don’t miss it.

Please comment in the section below for more questions and suggestions.

How to Stop Excel from Changing Numbers to Dates [TESTED]

Excel users often enter values that include slashes (/) for fractions or hyphens (-) for number ranges in cells. For example, some users might enter 1/2 (for half fractions) or 8-19 (for a numeric range).

However, Excel automatically formats values entered with slashes or hyphens to the date format. Thus, the software converts 1/2 to 2-Jan and 8-19 to 19-Aug.

Why does Excel keep changing my numbers to dates?

This occurring issue can appear on Excel sheets because the program has automatic converting rules that can change all your numbers into dates.

For instance, if you insert numbers in a cell like 3/6/2000, it will be transformed into a date due to its format, changing the value as well.

How to stop Excel from converting to date?

1. Convert the cell formatting

    Users can stop Excel converting numbers to date formats by changing the category for the Excel cells to text. This can be easily done through the app’s built-in settings.

  1. 1. Open Microsoft Excel.

  2. 2. Select the range of cells that will include the numbers by holding the left mouse button and dragging the cursor over them.

    excel select cells
  3. 3. Right-click within the selected cell range and select the Format Cells option.

    excel format cells
  4. 4. Select Text on the Number tab.

  5. 5. Then click the OK button.

  6. 6. To change the cell format for a whole spreadsheet, click the square at the top left corner of the sheet shown directly below.

    excel select all cells
  7. 7. After, right-click on it and select Format Cells, then on Text.

  8. 8. Users can also change spreadsheet cell formats by clicking the number drop-down menu on the Home tab shown directly below. Select Text on that drop-down menu.

    excel number drop down menu
  9. 9. Now you can enter the numbers in the text format cells. Excel will not convert any fractional values, such as 1/2, entered in the text cells to dates.


2. Enter a Space or Apostrophe (‘) Before the Numbers to prevent the conversion

Alternatively, users can stop Excel from converting numbers to dates by adding a space or apostrophe when entering numbers.

For example, instead of entering 1/2 in a spreadsheet cell, enter ‘1/2 in the cell instead. The cell will then display the fraction without any apostrophe as in the shot directly below.

A fraction entered in Excel stop excel from changing numbers to dates

Users can also enter a space before the number to ensure Excel doesn’t convert it to date. However, the cell will still include the space entered. The number will become a fractional number in the spreadsheet cell when users enter a 0 and a space before the fraction.

So, that’s how users can ensure Excel doesn’t convert numbers to dates. Then users can enter slashes and hyphens in cells for fractional numbers and numeric ranges.

We hope you found this article useful and that it helped fix your Excel issue.

Vmmem High Memory in Windows 10: How to Fix it or Stop the Process

If you’re experiencing high memory utilization due to Vmmem in Windows 10, you should consult the Windows Subsystem for Linux (WSL) documentation (WSL and WSL2). Also, if you have a Linux VM configured in WSL2, it will cause high memory usage by Vmmem.

Vmmem is in charge of virtual machine processes and memory management so it has to use a lot of memory. Hyper-V is another process that consumes a lot of memory sometimes.

How can I fix Windows 10’s Vmmem high memory usage?

Restart WSL (Windows Subsystem for Linux)

  1. First, you must open Command Prompt by pressing Windows + S and typing cmd inside. Then, before clicking on it, right-click and choose Run as administrator.cmd vmmem windows 10
  2. Now copy-paste or type in the following command and press Enter to run the process: wsl --shutdownwsl vmmem windows 10
  3. However, if the command doesn’t work for you, press the Windows key + E to start File Explorer and navigate to the following path and open the wslconfig file: C:\Users\your-username\.wslconfig
  4. Now add this code to the file and save it: [wsl2] guiApplications=falsewsl2 vmmem windows 10
  5. Finally, restart your computer to kill Vmmem in Windows 10 completely. Note that if you make this change, you won’t be able to use Linux GUI apps without removing those lines.

That’s it! The Vmmem Windows 10 high memory issue should be solved and everything should return to normal.

Windows 10’s Vmmem – WSL connection works in that the former is a sub-process of the latter function. The Windows Subsystem for Linux is a compatibility layer that allows Linux binary executables to be run natively on Windows.

This will also work when you have a Vmmem high memory usage after closing Docker.

If you had ever pulled up Task Manager when WSL2 was running on a Windows system, you have undoubtedly seen a process named Vmmem taking up a large portion of your RAM and causing your machine to function more slowly than usual.

During the time that WSL is active, this unique process represents all of the resources that your Linux VM is using. So yes, WSL uses Vmmem.

For further information on the efficiency and high memory usage, you can look at our post on how to improve PC performance in Windows 10 and apply the tips we gave there.

Alternatively, we have prepared a guide for those whose computer is not using all RAM and want to find out how to increase usable RAM. Make sure to check it out if you face the same issue.

Lastly, for those interested in Windows 11, don’t miss out on our performance comparison between Windows 10 & 11.

You can read more about managing high memory usage by the vmmem process on Windows 11 in this helpful guide: vmmem Windows 11: What is it & How to Fix its High Memory

Do not hesitate to let us know in the comments section below if the guide proved to be helpful for you or not. Thanks for reading!

Xbox Error 8015000a: How to Fix It in 4 Steps

You may have received the 8015000a error code while trying to log in to your Xbox One console or when downloading a game. Some gamers also reported that they couldn’t sign in to the Xbox app, but we’ve already addressed the issue in our guide.

According to users, the error pops up at the worst time possible, just when your download is about to complete.

What is Xbox code 8015000a?

The error code 8015000a usually occurs after downloading a new game to your console. When this happens, the download proceeds swiftly, but as soon as the bar is filled up, the error pops up.

The error code can have a variety of different messages:

  • Sorry, there’s a problem with the credentials that you’re using to sign in.
  • The license is missing, expired, corrupted, or does not belong to the Gamertag.
  • Sorry, the Xbox Live profile cannot be downloaded right now. Try again later.

Generally, the error indicates that the license is missing or corrupted, and this can happen for different reasons, but most of them are related to other issues on your console.

Why am I getting the error code 8015000a? 

We’ve already established that the error code commonly appears when it is a license issue. Other reasons for this error include:

  • Poor connection – Your Xbox One needs an internet connection to access some of its features, so make sure that it’s working properly or check whether it’s your Ethernet that is not working.
  • Outdated console – An outdated Xbox console is at risk of bugs and infections.
  • Low storage – If there isn’t enough space on your hard drive for new content, then downloads may fail or launch slowly.
  • Xbox cache and data – Over time, your console accumulates a lot of data which can easily get corrupted and interfere with how it works.
  • Server issues – Sometimes, the error has nothing to do with you. Sometimes the Xbox servers can undergo outages.
  • Corrupted profile – A corrupted profile is a problem that can happen to any Xbox. You’ll get an error message that the profile can’t connect to the Xbox console.

How do I fix error 8015190a on Xbox?

For the steps before advanced troubleshooting:

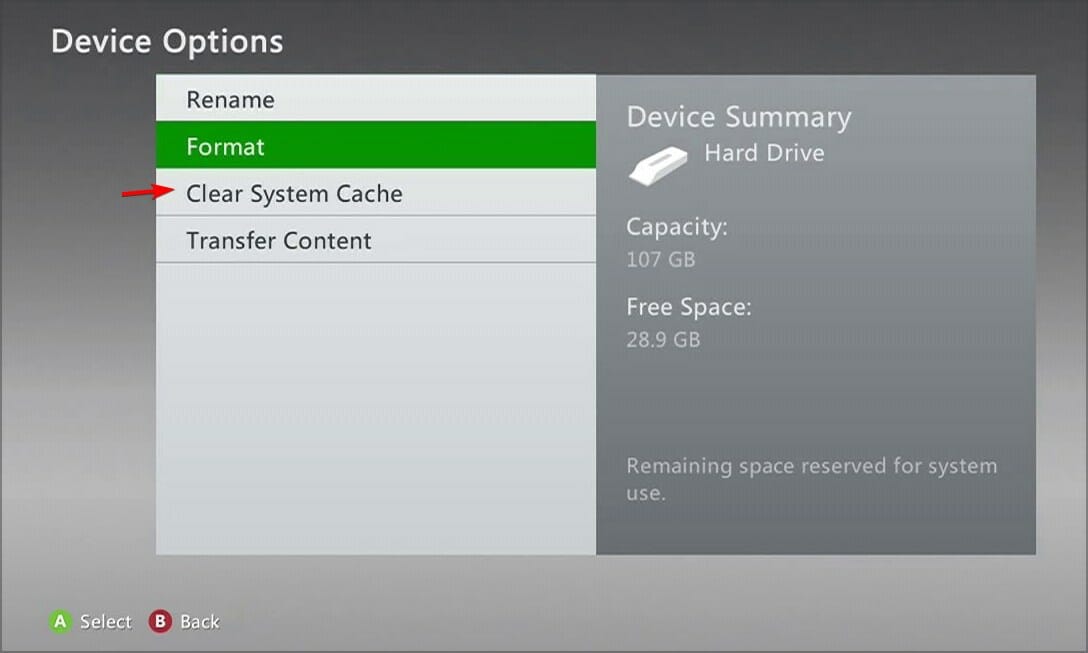
1. Clear system cache 

  1. Press the Guide button on your controller.
  2. Navigate to Settings and select System Settings.
  3. Click on Storage.
  4. Highlight a storage device then press the Y button on your controller to open Device Options.
  5. Click on Clear System Cache under the Device Options screen.
  6. Click Yes when the confirm storage device maintenance prompt pops up.

2. Rollback and reinstall system updates

  1. Press the Xbox button to open the Guide on your controller.
  2. Go to System and select Settings.call of duty errors
  3. Select Storage.
  4. Press the following buttons: X, LB, RB, X, LB, RB, X.
  5. Now click on the option to roll back all system updates that are installed. 
  6. Your Xbox console will restart automatically and the download will start again.

3. Delete the corrupted profile 

  1. Press the Xbox button on your console to open the Guide.
  2. Click on the Profile icon, then select Settings from the list.
  3. Navigate to Account and click on Remove accounts.
  4. If you have multiple accounts, they will be displayed and you can select an account to remove.
  5. Select Remove to delete the profile from your console.

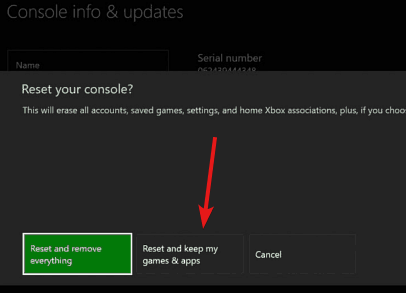
4. Reset your Xbox console

  1. On your controller, press the Xbox button, and on the menu, click the System.
  2. Select System then click on Console info and hit Reset console.
  3. Choose Reset and keep my games & apps.

You may also come across error code 0x8007010, so be sure to check out our detailed article for recommended fixes. 

Elsewhere, users also complained of getting the Check your disk error, so if you happen to come across it too, we have adequately covered steps to bypass this issue.

Feel free to drop us a comment down below on other additional solutions not mentioned here, but that worked for you.

How to Recover Corrupted Excel Files in Windows 10 [Quick Ways]

Excel is a crucial program used both by individuals and businesses to work with large amounts of data and organize it using formulas, tables, charts, and several other tools.

However, while using the program, you can encounter different unexpected problems, one of them being file corruption errors due to the system, virus infections, or other unknown reasons.

Can you repair a corrupted Excel File?

Yes, you can surely rescue your corrupted Excel files using the various methods we defined in this article. A key sign to look out for is a security concern issue message when you try to open your file.

As a shortcut, it’s possible to recover corrupted Excel files using the native repairing functionality or by erasing temporary Excel files from your operating system.

How can I repair a corrupted Excel file?

If you face this situation, you can find below several possible solutions that can help you solve the problem.

1. Check your computer for malware to repair Excel files

It is very likely that your document could malfunction due to a virus attack. In this case, it might be a good idea to run a deep systems scan using the software you have on your computer.

The program should eliminate any viruses found and you should be able to open the document. If you are looking for a security tool, you will be happy to know that some of the best antivirus software have free trial versions.

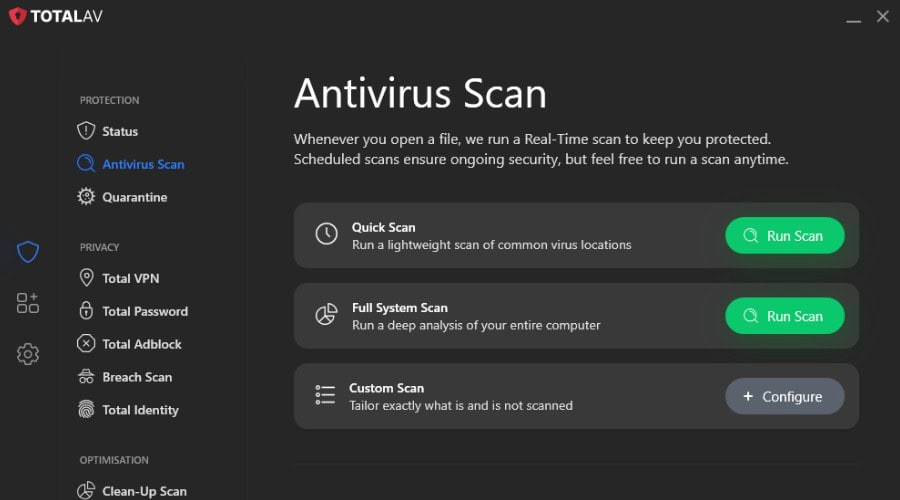
If you are not completely sure which one would be best for your own needs, you can try out TotalAV.

This antivirus has an extensive threat database and multi-layered protection to ensure that you are protected on all fronts.

It also has a transparent privacy policy, low resource usage, and non-intrusive notifications. Once you decide to install it, run a full PC scan and remove/quarantine all threats found.

⇒ Get TotalAV

2. Use third-party software to recover corrupted Excel files

Another possibility is to use professional data recovery software that can fix corrupted Excel documents.

Data recovery software scans your whole device for lost or corrupt files. They typically offer an overview of everything they can find and let you know which files can be restored.

When it comes to Excel documents, dedicated software is able to detect and eliminate the cause of corruption, thus allowing you to open your spreadsheets without any issue.

These tools are very powerful and they come with additional recovery features that can help you restore full lost disks and lost files on removable media.

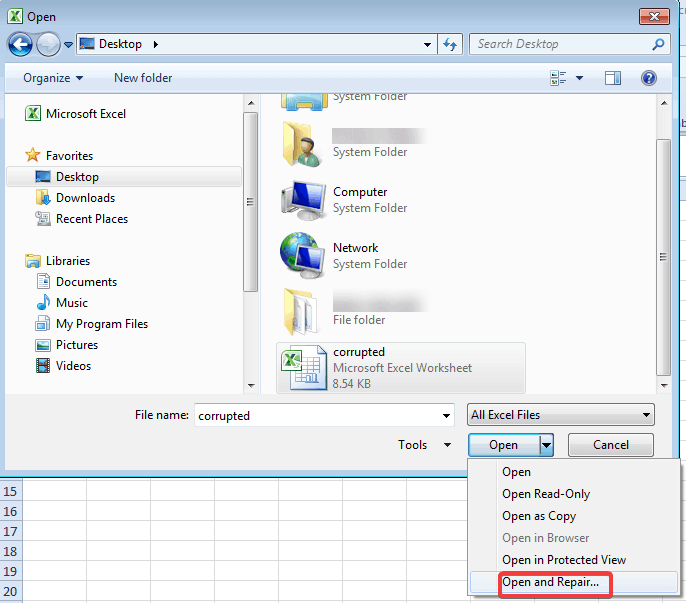
3. Use the Open and Repair tool to fix the Excel file

  1. Open a blank Excel document.
  2. Go to File and click Open.
  3. In the Open dialog box, select the corrupted file and then click on the drop-down menu next to Open to select Open and RepairOpen and Repair Excel

Note: To recover as much of the workbook data as possible, pick Repair. If Repair is not able to recover your data, pick Extract Data to extract values and formulas from the workbook.

4. Restore the corrupted Excel file to a previous version

  1. Right-click on the Excel file and select Properties
  2. Go to Previous Versions, find and select the latest version or the right version before Excel crashes, deleted or saved, and click RestorePrevious versions

Note: The workbook opens without any changes you made that might have caused the workbook to become corrupted.

5. Recover corrupt Excel files by changing the calculation method

    A corrupted Excel file could be accessed by changing the Workbook calculation method to be manual.

    This calculation is set to be automatic by default, which means the Workbook is calculated every time you try to open a file. Turning this off can help fix the error and allow you to open the corrupt Excel file.

  1. 1. Open Microsoft Excel.

  2. 2. Click on File and choose New.

  3. 3. Click Blank workbook under New.

    Blank workbook excel
  4. 4. Navigate to File and go to Options.

  5. 5. Click Manual under Calculation options in Formulas category.

    calculation manual excel
  6. 6. Press OK to apply and save the changes.

  7. 7. Try to open the previously corrupted Excel file.

6. Use external references to link to the corrupted workbook

  1. Click File and go to Open
  2. Go to the folder that contains the corrupted workbook and right-click on it.
  3. Click Copy, and then click Cancel.
  4. Click File and go to New, then open a Blank workbook.
  5. In cell A1 of the new workbook, type =File Name!A1, where FileName is the name of the corrupted workbook that you copied in step 3 (without the name extension), and then press Enter.
  6. Select corrupted Excel if the Update Values box appears and click OK.
  7. Choose the appropriate sheet if the Select Sheet dialog box appears and click OK.
  8. Select cell A1 and click Home and then Copy.
  9. Select an area, starting in cell A1 that is approximately the same size as the range of cells that contain data in the corrupted workbook.
  10. Click Home and Paste.
  11. Repeat to copy all selected cells again by clicking Home and then Copy.
  12. Click Home go to Paste and click Paste Values under Values.Paste values

Note: Pasting values will remove the links to corrupted excel and leave you only with the data by then.

By using the method, you won’t be able to recover formulas, formats, charts, macros, and so on, but recovering the data is better than recovering nothing.

7. Recover the TMP file to repair the corrupted Excel file

  1. In File Explorer, open This PC (usually C: )
  2. Double click the Users folder and then open the Default and AppData folder. (Make sure you can view hidden files.)
  3. In the Local folder, go to Microsoft. Recover temporary excel file
  4. Locate the Office folder and then go to UnsavedFiles.
  5. Locate and find the temporary excel files beginning with $ or ~ and end with .TMP
  6. Copy these files and save them to another safe spot by changing the extension from.TMP to .XLS/.XLSX

8. Delete the TEMP folder to fix corrupted files in Excel

If saving a temporary excel file did not work, another suggestion is to delete some of the temporary files and folders on your computer.

These files and folders can be found in C:/Windows/temp directory. Once you have deleted these files, restart your computer and then try opening the Excel document again.

If you can’t delete temporary files, use our guide to fix the problem.

9. Save the corrupted Excel file in HTML format to try to repair it

  1. Open the Excel file and go to Save As.
  2. Choose other formats from the drop-down menu in the Save As Type option.
  3. Then select Web Page.
  4. Make sure entire Workbook is selected and then click on SaveSave as webpage
  5. Right-click on the web file and choose Open with Microsoft Office Excel.
  6. Once the document is open, go to Save As again and choose the Excel format.
  7. Choose a different name than the original corrupted file and press Save.

10. Save the corrupted file in SYLK format to recover it

  1. Open the Excel file and go to Save As
  2. Choose other formats from the drop-down menu in the Save As Type option
  3. From the options in the drop-down list, select SYLK(Symbolic Link) (*.slk)Save as SYLK
  4. Click File and Open again, but this time choose the SYLK file.
  5. Once the file is open, click File and then Save As.
  6. Choose Microsoft Excel Workbook and click Save.

Note: Using the SYLK format only saves the active worksheet. You will have to save each worksheet individually and repeat this procedure.

11. Recover the corrupted Excel file by opening it in WordPad or Word

Another solution that we recommend is to try opening your corrupt file in WordPad. If it works, WordPad will convert everything to text but unfortunately, this method will not recover formulas.

On the other hand, the good news is that, unlike many other data recovery methods, WordPad will recover your macros.

Simply search the recovered text for Sub and Function to find them. You might also be able to open the corrupted .xls file in Word, but the results will be limited.

In order to do so, you first have to make sure you have the Microsoft Excel Converter installed. You can download it from Microsoft’s official page.

12. Use the XML format to open and recover the corrupted Excel file

  1. Open the corrupted file, go to File and click on Save As.
  2. From the list of possible formats next to Save as Type select XML Spreadsheet and then click Save.
  3. Open the document again.
  4. Go to Save As again and then save the document as an Excel Workbook by choosing Excel format from the drop-down list next to Save as Type.

13. Open the Excel file in Safe Mode to remove corruption signs

  1. Press Windows+R keys to open the Run dialogue window
  2. Type the command excel /safe and click OK
  3. Copy all of the data to a new document and open it in Normal Mode.

This method may disable your macros and Add-ins but it is a great solution because you can move the data to a new document.

14 Use newer Excel versions to try to recover a corrupter file

Although it seems like a very simple solution, you should definitely try it as well.

Try to use a later Excel version because as the versions increase, the ability for the program to recover a file increases also, so you might be able to recover your file using this simple method.

To prevent this issue from occurring, you might want to check our Excel keeps crashing guide for more information.

To recover files, it’s also important to know where are Excel autosave files stored, so don’t miss out dedicated guide that covers this subject.

So, have any of these solutions helped you to fix your corrupted Excel file? Let us know in the comments section below.

Best 6 Software to Turn Your Photo into a Painting

Do you want to transform your photos into paintings, but don’t know how? You will need photo to painting software tools to help you out.

We already covered the best digital watercolor painting software, so if you prefer using watercolors, maybe check it out.

In this article, we will explore some of the best software options that allow you to easily transform any photo into a professional-looking painting.

Is there a program that turns photos into paintings?

Yes, there are many applications that can help you turn your photos into paintings. Here are some benefits of such software:

  • Ease of use – If you’re not an artist that uses painting apps, some of these tools will be useful to you, because they allow you to easily convert any photo into a painting with a few clicks.
  • Advanced editing – Some of these apps work as advanced photo editors. As such, they can be used by digital artists and professionals alike.
Product nameBackground removalEase of use
Adobe Photoshop✅❌
Fotor✅✅
Skylum Luminar Neo✅✅
Corel PaintShop Pro✅✅
Adobe Lightroom✅❌
Colorcinch✅✅

What is the best photo to painting software?

Adobe Photoshop – Most suitable for professionals

adobe photoshop photo to painting software

This program is one of the most popular tools from Adobe. Its popularity has increased exponentially because of an incredibly wide range of features.

You can create images from scratch, apply different professional effects to your photo, and even allow you to transform your pictures into oil and watercolor paintings.

Like what you read but not sure how to proceed? Here’s a comprehensive tutorial on how to use Adobe Photoshop to transform your photos into paintings.

If you need an app to turn pictures into paintings, Adobe Photoshop is the best choice for professionals.

Let’s quickly look at its key features:

  • Stroke smoothing options
  • Variable fonts with customizable characteristics
  • Curvature pen tool
  • Custom path color and width
  • Unlimited number of effects, templates, and guides
  • Digital painting tools
  • Camera shake reduction tool

Fotor – Stunning photo effects

Fotor is another great editing app when it comes to converting your pictures into paintings as it has an AI feature that can help you do this in a second.

It can automatically analyze and transform your photo into a beautiful piece of art, without you needing to manually retouch.

With the Fotor app, you get over 50 unique painting filters and styles from which you can choose, including oil paintings, watercolors, sketches, cartoons, and many more.

Furthermore, you can enhance your image quality with its AI tool which will examine and fix any kind of color and lighting issue, increase sharpness, and remove blur in real time.

Other key features of Fotor include:

  • Photo retouching
  • Funky effects
  • Background remover
  • Photo frames to fit every occasion and add more style

Skylum Luminar Neo – A must-have for photo editing

luminar

With filter controls, neat presets, and countless photo editing features, you can achieve a wide range of creative photo effects in Luminar Neo.

Reproducing the painted look is not much more difficult than a walk in the part with this amazingly versatile and highly adaptable tool.

Luminar Neo lays artificial intelligence at your fingertips, allowing you to create stunning artwork that truly reflects your vision.

By further adding layers and textures, you can produce dramatically dynamic photography with special effects to dazzle.

Luminar Neo is perfect if you need to convert photos to watercolor painting for free, so be sure to try it out.

Let’s quickly look at its key features:

  • Customizable user interface
  • Non-destructive editing and native RAW support
  • Comprehensive editing tools
  • Batch processing, Photo Enhancer, and Color photo editor
  • Extensive library of plug-ins to further personalize  your workspace

Corel PaintShop Pro – Amazing vector and raster graphics support

paintshop pro

Corel PaintShop Pro is a greatly powerful photo editing app that has a great range of photo effects that allows you to easily transform your photo into a painting by using the automated Pic-to-Painting presets.

The Pic-to-Painting presets can be downloaded directly from the Welcome Tab found in PaintShop and then can be accessed by going to Effects, and then Plugins.

PaintShop Pro has such a wide range of features, that it is hard to choose which of them are worth presenting, but here are the most notable options.

If you need to turn a photo into a Renaissance painting, then be sure to try this tool.

Let’s quickly look at its key features:

  • Artificial intelligence processing
  • 360° photo editing
  • Great performance, stability, and features
  • User-friendly UI with easy-to-access customization options
  • Can add different textures, brushes, drawing and painting tools
  • Quick fixes for photos
  • Support for 64-bit versions of third-party plugins

Need a helping hand? Here’s a full guide on how to turn your photos into paintings using PaintShop Pro.

Adobe Lightroom – Perfect for photographers

If you need photo-to-painting software, Lightroom is just as easy as using this lightweight and user-friendly software altogether.

While Lightroom is generally perceived as a more lightweight alternative to the rather intimidating Photoshop, its powerful photo editing capacities will not fail to impress you.

Simply import the image of your choice, then unleash your creativity and play with highlights, shadows, exposure, contrast, and luminance until you are satisfied with the painting effect you achieved.

Overall, it’s a great choice if you need an app to turn photos into paintings for free.

Let’s quickly look at its key features:

  • Comprehensive toolkit
  • Versatile tools, including sliders and presets
  • Automatic savings
  • Interactive in-app tutorials
  • AI-powered imagery solutions

Colorcinch – Perfect for first-time users

Colorcinch is an intuitive photo editor that comes with hundreds of AI-powered photo effects and filters. You don’t have to be a pro to achieve stunning results. With just a single click, you can turn any photo into ultra-realistic paintings, sketches, and digital art! 

The digital effects come with different styling options -you can adjust saturation, intensity, color, vibrance, etc. You can also add texts, frames, masks, and overlays to your photos. And play around with the different blend modes and drawing tools to give them a unique touch.

Keep in mind that you can try it for free, but all your photos will have their watermark on them. If you want to remove it, you’ll have to purchase a subscription.

Let’s quickly look at its key features:

  • One-click approach to photo editing
  • Essential editing
  • Enhance photos
  • A vast library of filters and presets templated masks, overlays, and frames
  • Full-fledged text editor and freehand drawing
  • Cloud-based image and project management
  • Offline capabilities and PWA-enabled

How can I turn a picture into a painting for free?

Some apps require a license if you want to use them to convert pictures to portraits. However, not all applications require a purchase.

There are many free alternatives, especially online, that can help you convert your photos.

Because we can’t all afford to hire an oil or watercolor painter to manually transform our photos into paintings, you can use good software that allows you to do just that.

All of these applications can convert photos to canvas painting, so be sure to give them a try.

If you have the required experience and you also need a wide range of customization options and features, you might want to start with Adobe Photoshop or Corel PaintShop Pro.

This list encompasses software options with batch processing, pre-made templates, and also custom effects racks that will surely cover all your creative needs.

That was our list of photo-to-painting software, but if you want to manually paint paintings on your PC, then be sure to consider one of these painting apps for Windows.

Let us know which software you chose to use by reaching for the comments section below.

Windows Update Error 0x80080005 [Solved For Good]

Windows 10’s performance and security are largely dependent on Windows Update, especially the radical upgrades that enhance system stability. 

However, even if you want to skip updates, it’s not possible since Windows Updates are obligatory. This means that you will inevitably be exposed to an abundance of error codes.

Not all errors are alike, but some pesky ones keep re-appearing for a variety of users with different system configurations.

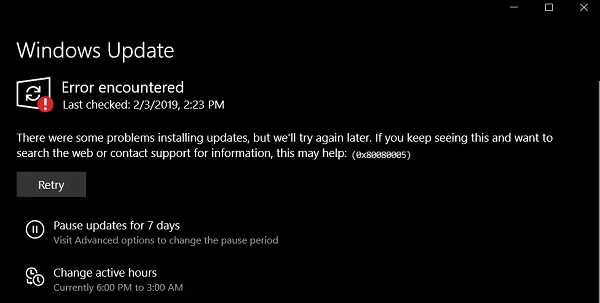
There were some problems installing updates, but we’ll try again later. if you keep seeing this and want to search the web or contact support for information, this may help: (0x80080005).

The error code 0x80080005 frequently appears in forms like the installer encountered an error or download error. It typically indicates issues with installing updates, and while we’re experienced in addressing such errors, this specific code can be challenging as it often blocks new updates.

Windows Update error when searching for new updates.

To help, we compiled a list of workarounds that should be useful while addressing this issue.

What does error code 0x80080005 mean?

During a Windows Update, if certain system services malfunction, the 0x80080005 error can arise. This error is prevalent across various versions, including Windows 8.1, 7, 10, and 11. It can also manifest in different contexts like the Microsoft Store, Xbox, and browsers like Chrome. Variations of this error include 0x80080005 – 0x90017 and 0x80080005 – 0x90018.

Main Causes:

  • Windows Update Components Malfunction: The primary cause addressed in this article.
  • Windows Update Service Issues: Less common but can be resolved via Microsoft’s update page or the Media Creation Tool.
  • Corrupted System Files: Essential for smooth device operation. Corrupted files can hinder updates.
  • Antivirus Interference: Some antivirus software can block updates, though it’s rare.

These are the primary culprits, but other factors can also trigger the 0x80080005 error. The solutions provided aim to address these root causes.

How do I fix error code 0x80080005?

1. Fix error code 0x80080005 automatically

Installing an advanced third-party program to automatically scan your PC and fix Windows tweaks is recommended. System stability issues are caused by various factors, but most of them are connected to the Windows registry.

An updated OS and a registry cleanup performed on a regular basis will improve your computer’s performance and protect it against malware.

2. Reset the Software Distribution Folder & Windows Update components

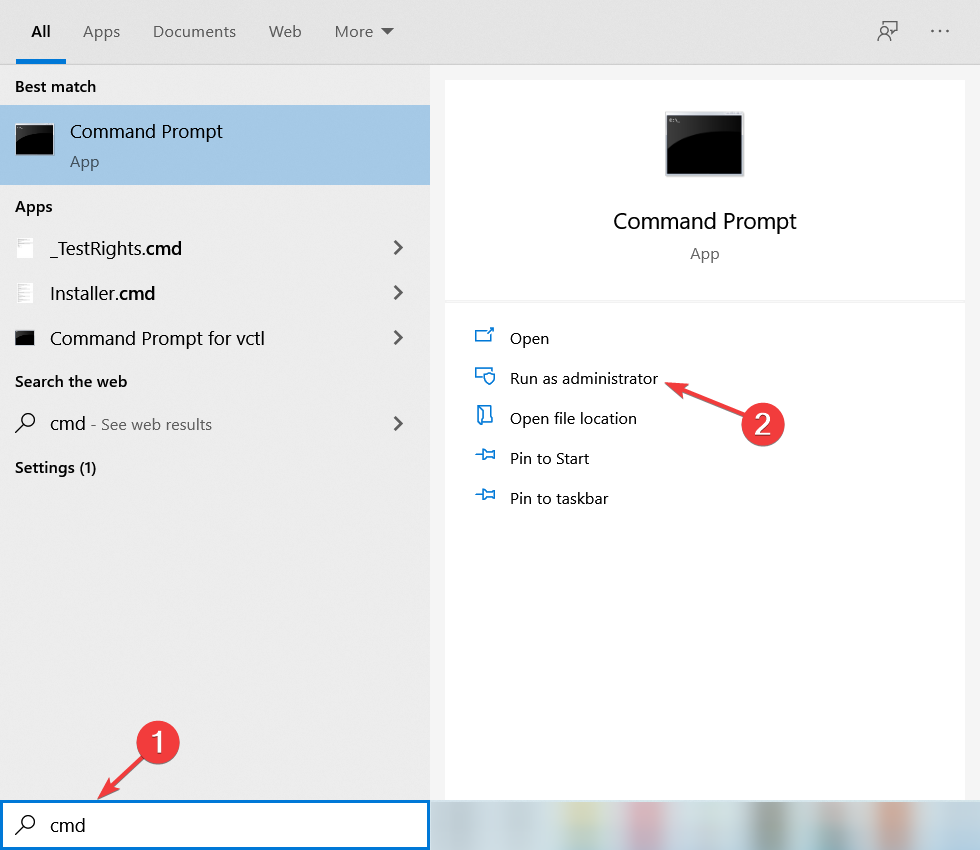
  1. Type cmd in Windows search and select Run as administrator from the list.
  2. Now type or paste the following commands one by one and press Enter after each to run it:
net stop wuauserv
net stop cryptSvc
net stop bits
net stop msiserver
ren C:\Windows\SoftwareDistribution SoftwareDistribution.old
ren C:\Windows\System32\catroot2 catroot2.old
net start wuauserv
net start cryptSvc
net start bits
net start msiserver
pause

The error 0x80080005 appears often due to issues with Windows Update components. To fix that, you need to reset the necessary components manually.

After running these commands all the necessary components will be restarted and you’ll be able to download updates again.

If you don’t want to run all these commands manually, you can always create a Windows Update reset script and use it to reset the necessary components automatically.

3. Run the Windows Update troubleshooter

  1. Press Windows Key + I to open the Settings app.
  2. Navigate to the Update & Security section.
  3. Now select Troubleshoot from the menu on the left.
  4. In the right pane select Windows Update and click Run the troubleshooter.
    Error code 0x80080005 Windows 7
  5. Follow the instructions on the screen to complete the troubleshooter.

Sometimes a minor glitch can occur and prevent you from downloading the latest updates. If you’re having an update error 0x80080005, you might be able to fix the problem using the Windows Update troubleshooter.

Windows comes with a wide range of troubleshooters, and you can use them to fix many common problems. To use Windows Update troubleshooter, check the steps above.

If you’re having trouble opening the Settings app, we have a great guide that will show you what to do if the Settings app is not starting.

4. Scan your system for issues

4.1 Run SFC scan

  1. Type command in the Search bar and click on Run as administrator to start Command Prompt with elevated permissions just like we did in the first step.
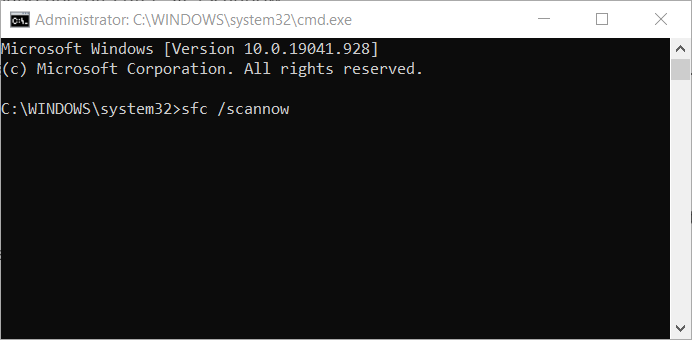
  2. In the command line type the following line and press Enter to confirm: sfc/scannow
  3. After the procedure is done, retry updating.

4.2 Run the DISM scan

  1. Press Windows key + X and select PowerShell (admin) from the menu.
  2. In the command line, type the following and press Enter: DISM /Online /Cleanup-Image /RestoreHealth
  3. If you have a Windows 10 ISO mounted on a physical media or on a virtual drive you can use this alternative command (press Enter to run it): DISM /Online /Cleanup-Image /RestoreHealth /source:WIM:X:SourcesInstall.wim:1 /LimitAccess
    • Don’t forget to replace X with a corresponding drive letter on which your Windows 10 ISO is mounted.

The process may be lengthy, so make sure not to interfere until it’s done, or you won’t benefit from the results.

Once the DISM scan is finished, check if the problem is still there. If the issue is still present, repeat the SFC scan and check if that solves the issue.

4.3 Run a chkdsk scan

  1. Open PowerShell by pressing the Windows key + X shortcut and selecting PowerShell (admin) from the list.
  2. Once the window opens, paste the following command and press Enter to run it: chkdsk /f c

This command with chkdsk will fix all the possible corrupted files on your drive so it might also take care of the error 0x80080005 so it wouldn’t hurt to try it.

5. Take ownership of the System Volume Information directory

  1. Press the Windows key + X combination and select the Windows PowerShell (Admin) from the list of options.
  2. Now enter the following command and press Enter: cmd.exe /c takeown /f "C:System Volume Information*" /R /D Y && icacls "C:System Volume Information*" /grant:R SYSTEM:F /T /C /L

Some of our readers got the error 0x80080005 while Windows was trying to access the System Volume Information directory.

It seems that Windows can’t access this directory for some reason, but you can fix that by changing system permissions.

After running this command, you’ll have full access to the System Volume Information directory and the problem with Windows Update will be resolved.

Taking ownership of a file or folder in Windows 10 shouldn’t be too complicated, and could prove useful when dealing with issues like this one.

6. Use the Registry Editor

  1. Press Windows Key + R and enter regedit. Now press Enter or click OK.
    0x80080005 – 0x90017
  2. In the left pane, navigate to the following path: Computer\HKEY_LOCAL_MACHINE\SYSTEM\CurrentControlSet\Control
  3. Right-click on an empty space in the right pane, click on New, select DWORD (32-bit) Value and name it RegistrySizeLimit.
  4. Double-click the newly created RegistrySizeLimit DWORD and set its value to 4294967295.

According to users, sometimes update error 0x80080005 can appear due to issues with your registry. To fix the problem you need to create a single value in your registry as shown in the steps above.

After saving the changes, check if the problem is still there. We also provide a very helpful guide on what to do if the Registry Editor is not opening if you find yourself in that unpleasant situation.

7. Disable the Windows Update service

  1. Press Windows Key + R and enter services.msc. Press Enter or click OK.
    0x80080005 Windows Store
  2. When the Services window opens, locate Windows Update service and double-click it to open its properties.
  3. Now set the Startup type to Disabled and click Apply and OK to save the changes.
    Error code 0x80080005 Windows 7
  4. Restart your PC.
  5. When your PC restarts, go back to the Services window, open Windows Update service properties, set Startup Type to Automatic, and start the service.

Some of our readers found out that sometimes you might be able to fix update error 0x80080005 simply by disabling the Windows Update service as indicated in the steps above.

8. Upgrade with the Media Creation Tool

  1. Download the Media Creation Tool.
  2. After Windows 10 is downloaded, accept the license agreement.
  3. Run the tool and select Upgrade this PC now.
  4. Wait while the update downloads the necessary files.
  5. Follow the instructions until you reach Ready to install screen.
  6. Click Change what to keep and select Keep personal files and apps option.
  7. Now click Next. The installation will now start. Follow the instructions on the screen to complete it.

Besides a clean reinstallation of the OS, the Media Creation Tool can be used for updates as well.

Even though we advise you to perform a clean install to fix update issues, you can preserve your files, apps, and settings this way.

Once the installation process is finished, you’ll have the latest version of Windows installed, and the issue should be resolved.

9. Disable the third-party antivirus software

If you’re having issues with error 0x80080005 on your PC, the cause might be third-party antivirus software. They may prevent some updated files from downloading or even deleting and corrupting them.

To fix the problem, you should try disabling certain antivirus features or completely disabling your antivirus before trying to install updates.

This of course depends on the antivirus software you have installed, as in some cases, you might be able to use the built-in option to simply pause the protection for a specific amount of time.

Because we use TotalAV, we have the option to pause the protection at will, choosing from a specific list of options regarding when to re-activate the software’s protection.

To enable this option in TotalAV software, follow these steps:

  1. Right-click the TotalAV icon from the taskbar, and choose Pause protection.
  2. Click the drop-down and choose the preffered option.
  3. Select Apply.

In case you’re using other antivirus software, the exact steps will be different. There might be cases in which your antivirus doesn’t offer you the possibility to pause the protection, in which case you will need to remove it from your PC by uninstalling it.

There are many great antivirus tools on the market, and you could try out the powerful TotalAV, or you can check out a great list including the best antiviruses for Windows 10.

How to prevent error 0x80080005 from occurring again

Considering that the error code 0x80080005 appears when you’re trying to update your OS, there are a few precautions that you can take to avoid it.

However, there are some general steps to take if you want to avoid Windows Update errors and this one in particular.

➡ Update your system regularly

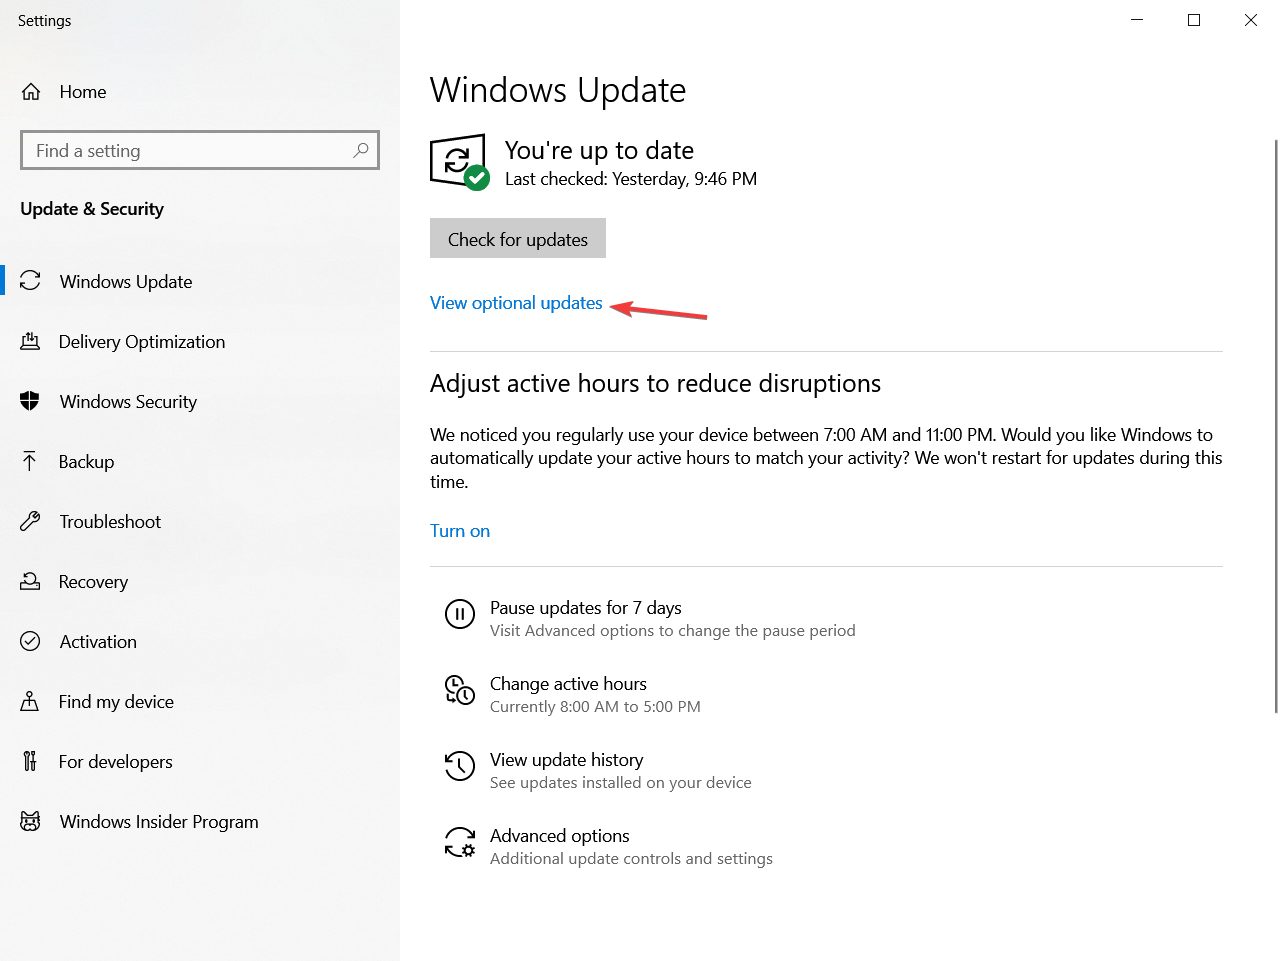
Windows is updated regularly but not all updates are installed automatically. There are also optional updates for drivers that are not installed by default.

If you want to get them, you need to Go to Settings, then click on Windows Updates, and select the View optional updates option like in the screenshot below.

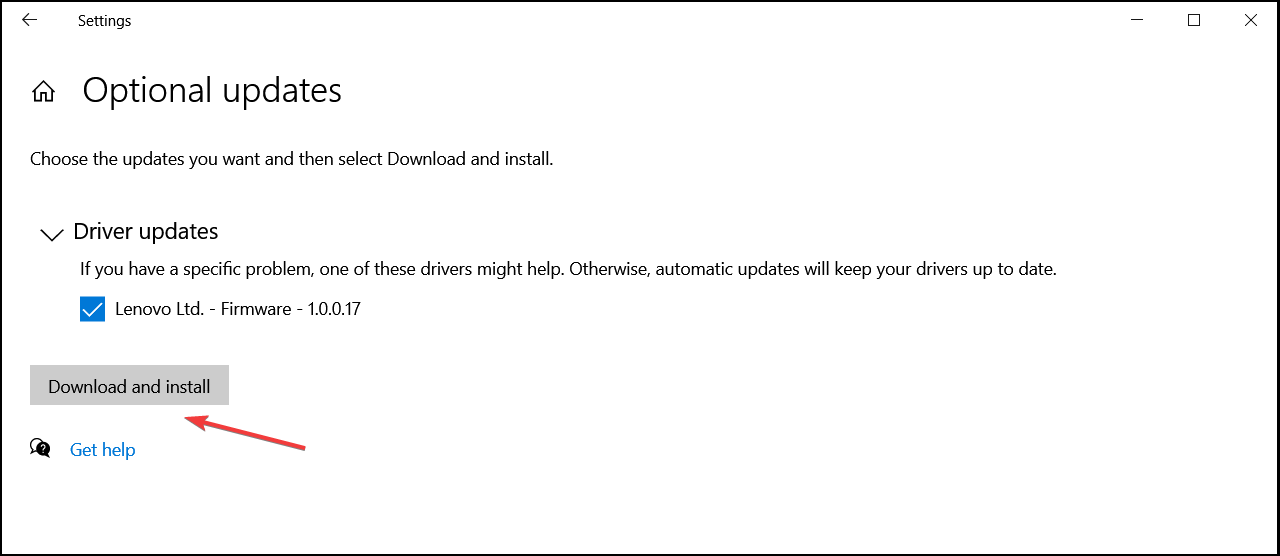
Then, clicking on the Driver updates section will reveal the available drivers. You just need to select the ones you want to install and hit the Download and install button below. You can also try dedicated PC optimizer software for the same effect.

➡ Keep your system as tidy as possible

Installing too many programs can clutter your system and that’s an invitation for corrupt system files to appear and mess up with your updates.

So, try to keep your system as clean as possible by uninstalling any necessary programs by visiting your Apps section from Settings and clearing some of the old, unused apps.

You just need to select the app that you want to get rid of and hit the uninstall button, just like in the screenshot below.

We hope you managed to fix the Windows 10 update error 0x80080005 by using one of our solutions above.

However, if you run into other such issues, you can also consult our article about how to fix common Windows update problems.

Updating your system is extremely important and that is why we also recommend checking out the latest Windows security update and staying up to date.

If you have any alternative solutions or questions regarding the ones presented, feel free to tell us in the comments section below.

Activation Error Code 0x803f7001 Windows 11 [Fixed in 3 Min]

Error 0x803f7001 is one of many activation codes that can plague Windows 11, similar to 0x87e107f9. It means that Microsoft detects something’s wrong with your copy of Windows 11.

And as a result, certain features on your computer may be disabled. This is also something that can occur on Windows 10 in an equal fashion. But don’t worry, the solutions are easy to apply.

What’s causing activation error code 0x803f7001 to appear?

But before getting into the solutions, it’s important to figure out why this error appeared. Especially if users are doing some uncouth behavior that Microsoft doesn’t like.

  • You’re using a pirated copy of Windows 11: Microsoft can, in fact, detect if you’re using a pirated copy of one of its systems and will disable features as a result.
  • Files on your system may be corrupted: A likely culprit, especially if someone went wrong during installation.
  • It’s the first time Windows 11 has been installed on your computer: To fix this, you’ll have to purchase a license to use it.
  • Something went wrong during setup to cause failure: It’s been reported that sometimes a legitimate product key will fail to validate.

How can I fix the 0x803f7001 error on Windows 11?

Fixing this error is pretty easy to do, but there are a few things you might miss that should be addressed first:

  • Disable your antivirus. This may seem strange, but antivirus apps have been known to get in the way of system processes, including the installation of an operating system.
  • Bring your computer in for repairs or to the manufacturer. Although rare, you have a production error with your Windows 11 that you can do nothing about besides repairing it.
  • Purchase a legitimate copy of Windows 11 if you got a pirated version. You can do this by going to the Microsoft Store and buying a license there.

1. Run the Activation troubleshooter

  1. Open the Settings menu and scroll down in the System tab until you find Activation.
  2. Click Troubleshoot as in the sample image to have Windows scan and see if you have a legit copy.
  3. After it finishes scanning, click Go to Store to purchase a genuine copy of Windows 11.

2. Registering after changing hardware

  1. Like in the previous solutions, locate Activation in the Settings menu.
  2. You can first try clicking Troubleshoot if you already have a digital license. From there, follow the instructions to activate Windows 11.
  3. If you don’t have the license, click Change next to Change product key.
  4. Enter the product key if you have one. If not, go to the Microsoft Store to purchase it.

This solution is aimed at people who made significant hardware changes to their Windows 11 computer, like replacing the motherboard. Windows may not be able to find the proper license.

3. Run an SFC scan

  1. Bring up the Command Prompt on the Windows Search bar and select Run as administrator.
  2. Type in the following command and press Enter: DISM /Online /Cleanup-Image /CheckHealth
  3. Give your computer time after each command to finish up.
  4. Now, enter this command: DISM /Online /Clean-Image /ScanHealth
  5. Next, enter the following: DISM /Online /Cleanup-Image /RestoreHealth
  6. And finally, type in: sfc /scannow
  7. Restart your computer to complete the process.

Aside from manually performing an SFC scan, you can use an automated repair tool that can help you run an entire system scan for corrupted or missing files to find healthy replacements for them in the final analysis.

There are two other main error codes that you should be made aware of. The first is error 0xc1900101 which pops up whenever you lack the disk space needed on your computer to upgrade to Windows 11.

You can always delete unneeded files or uninstall apps to make space, but we also recommend disabling network adapters. The other code is error 0x80242fff caused by corrupt files or badly installed updates.

Fixing the second error is trickier to do. It can be made easy by downloading a repair tool, but if you prefer a more hands-on approach, you can try resetting the components of Windows Update.

Feel free to comment below if you have questions about other installation issues. Also, leave comments about guides you’d like to see, information on Windows 11 processes, or even list guides.

Microsoft showcases 2023 Game Pass with GLHF trailer at the 2022 Game Awards

While there wasn’t much of a Microsoft presence at the 2022 Game Awards in the way of first-party showcases, Xbox fans were still treated to a montage trailer featuring a slew of games coming to Game Pass in 2023 (but by no means all of them). A total of sixteen games were highlighted in this “GLHF” (Good Luck, Have Fun) video, some of which are already available on Xbox Game Pass. Let’s have a look below.

Among the games announced for Game Pass in 2023:

  • Age of Empires IV for Xbox
  • Ark 2
  • Atomic Heart
  • Flintlock: The Siege Of Dawn
  • Forza Motorsport
  • Minecraft Legends
  • Monster Hunter Rise
  • Persona 3 Portable
  • Ravenlok
  • Redfall
  • Replaced
  • Party Animals
  • Stalker 2: Heart of Chernobyl
  • Starfield
  • The Last Case Of Benedict Fox
  • Wo Long: Fallen Dynasty

No doubt there is plenty here to whet the appetite of any Xbox gamer. Also note that many Riot Games titles like Valorant, League of Legends, and Legends of Runeterra will be landing on Game Pass in just days. 2023 is shaping up to be possibly the best yet for Xbox Game Pass, with a bevy of highly anticipated AAA titles from Xbox Game Studios and others in the pipeline. Among them: Redfall, Forza Motorsport, Lies of P, Valheim, Minecraft Legends and Starfield.

Featured image via Xbox. 

The Audio Service is Not Running [Windows 11 Fix]

If you’ve ever experienced audio suddenly cutting off in the middle of playing music, you have a problem with Windows Audio Service. You may see a little message in the corner telling you it’s not running.

Audio Service not running is actually a pretty common problem that can manifest itself in different ways. And luckily, the solutions are pretty easy to solve.

What’s causing Audio Service not to work properly?

Being such a common problem, there are tons of reasons why Windows Audio Service will stop working. So instead of going through an exhaustive list, here are the most common reasons:

  • You downloaded a faulty update: This is by far the most likely reason. The new Windows update has some problems, or something went wrong during installation. You can fix this by uninstalling it.
  • Your computer’s speakers may be broken: We recommend bringing your machine in for repairs, but before you do that, you can try modifying the registry and see if that works.
  • The default speakers aren’t correctly set: It’s possible computer audio is going to the wrong output. Change the output device, and you should be good.
  • Your computer is infected with malware: Another likely culprit. Computer viruses are often the source of many Windows problems. We recommend downloading an antivirus app to clean up.

What can I do if the Audio Service is not running on Windows 11?

There are a handful of quick solutions you can try out to mend Audio Service malfunctioning before going to the complex ones:

  • Double-check your cables and volume. Something may be loose or properly plugged in. And it’s possible you accidentally muted your computer.
  • Run Windows Audio Troubleshooter. This software tool will scan your audio devices connected to your computer, then automatically repair them.

1. Adjust settings in Control Panel

  1. Bring up the Windows Control Panel and click Sound. Make sure the View By selection is set to large icons.
  2. In the Playback tab, right-click the Speakers selection and click Enable.
  3. Right-click it again and select Set as Communications Device.
  4. Right-click Speakers one more time and select Properties.
  5. Go to the Levels tab and drag the slider all the way to the largest value.
  6. Now go to Advanced and check off the box next to Allow applications to take exclusive control of this device.
  7. Restart your computer and see if your audio works.

2. Restart Windows Audio Services

  1. Right-click the Windows logo in the left-hand corner and click Run.
  2. Type in services.msc and hit Enter on your keyboard.
  3. Scroll down and locate the Windows Audio entry.
  4. Right-click Windows Audio, then select Restart.
  5. Right-click it again and select Properties.
  6. Click the Startup Type menu. Change the entry to Automatic.
  7. Click Apply, then OK to finish.
  8. Now locate Windows Audio Endpoint Builder and do the same thing.

3. Adjust Dependencies in Windows Audio Services

  1. Reopen the Services program from the previous solution.
  2. Locate Windows Audio Service, right-click it, and select Properties.
  3. Click the Dependencies tab.
  4. Expand the services under the box titled This service depends on the following system components.
  5. Make a note of each of the entries seen there, like Remote Procedure Call (RPC) and RPC Endpoint Mapper.
  6. Locate each of the entries in the Dependencies tab on the Services program and ensure that they’re running.
  7. If not, right-click it and select Properties.
  8. Click the Start button to activate it.

4. Disable Audio Enhancements

  1. Search for Sound Settings. Click the entry that appears.
  2. Select an audio output device by clicking the right-facing arrow.
  3. Scroll down to Audio Enhancements, expand the right-side menu, and select Off.

5. Reinstall drivers

  1. Open the Device Manager.
  2. Expand Sound, video, and game controllers.
  3. Right-click your computer’s audio drivers and select Properties.
  4. In this new window, select Driver.
  5. Select Uninstall Device to uninstall the drivers.
  6. Restart your computer and Windows 11 will automatically reinstall the driver.

If your drivers didn’t update automatically, then you should visit the manufacturer’s website to install the versions manually.

We also have a quicker and simpler alternative to the above procedure and it consists in using a specialized tool named Outbyte Driver Updater that scans your PC for outdated drivers and locates the newest versions through its database.

⇒ Get Outbyte Driver Updater

If you’ve everything here, you can always try resetting Windows 11. This method should only be done as a last resort when else works because it will restore everything to its default configuration.

This means all third-party software you have installed be removed. We also recommend checking out our guide on what to do when the audio from your video game suddenly stops working. Another issue like YouTube has no sound in Windows 11 has also been addressed in our guide.

Most of the time, simply reinstalling the game will fix the audio, but you may need to adjust the audio buffer too.

Feel free to comment below if you have questions about other Windows 11 problems. And please tell us if there’s a specific guide for any Windows operating system you’d like to see.

Fix: “Disconnected from server” Xbox One error

You can play all sorts of games online with Xbox One, but sometimes issues can appear during your multiplayer sessions. Users reported Disconnected from server error message on their Xbox One, and today we’re going to show you how to fix this problem.

Xbox One “Disconnected from server” error, how to fix it?

Solution 1 – Run the speed test utility on your Xbox

There are many different factors that can affect your Internet connection, therefore before you start fixing this problem it’s advised that you run Xbox speed test utility. To do that, follow these steps:

  1. Press the Menu button on the Xbox One controller.
  2. Select Settings > Network.
  3. Now choose Detailed Network Statistics.
  4. Network information will now appear on the screen.

Be sure to check your download speed, upload speed and ping. In order to enjoy in online content on Xbox One you need at least 3Mbps download speed and less than 150ms ping. If your network connection doesn’t meet these requirements, there might be an issue with your network configuration or with your ISP. Be sure to test your connection using third-party services and on different devices. If your Internet connection doesn’t meet the requirements, you might want to contact your ISP and ask them to fix the problem.

Solution 2 – Replace your network cable

Sometimes you might get Disconnected from server error if there’s a problem with your network cable. To check if your cable is the problem you’ll have to find a different Ethernet cable and use it to connect your modem with Xbox One. After doing that, test the Xbox Live connection by following these steps:

  1. Scroll left on the Home screen to open the Guide.
  2. Select Settings > All Settings.
  3. Choose Network > Network settings.
  4. On the right side select Test network connection option.

If there are no problems with your network connection, check if the error is resolved.

Solution 3 – Try connecting your Xbox One to a different port

If you’re getting disconnected from the server, there might be a problem with your network device and its ports. If that’s the case, you might want to connect your Xbox One to a different port on your network device. In addition, be sure to unplug all other devices from their ports and try connecting Xbox One to one of their ports. After doing that, test the network connection on your Xbox One.

You can also try using the network port that connects to your PC. Simply unplug the network cable from your PC and connect it to your Xbox One. After that, test the network connection and check if the error is resolved.

Solution 4 – Restart your console and your network device

Sometimes certain network settings can interfere with your connection and cause this and many other errors to appear. One of the ways to fix this problem is to restart your network device and your Xbox One by following these steps:

  1. Press the power button on your modem or router to turn it off.
  2. On your Xbox One scroll left on the Home screen to open the Guide.
  3. Select Settings.
  4. Choose Restart console and select Yes to confirm. You can also restart the console by using its power button.
  5. Wait for a minute or two and turn on your modem or router by pressing the power button.

After that, test the connection and check if the problem is resolved.

Solution 5 – Change your modem’s firewall settings

Firewall is a key component of every modem since it protects you from malicious users. Sometimes your firewall configuration can lead to all sorts of errors if it’s not properly configured, so you’ll have to change it manually. Changing your modem’s firewall is an advanced procedure, therefore we strongly suggest that you check your instruction manual before proceeding.

Solution 6 – Use DMZ feature

DMZ feature allows your devices to have unrestricted access to Internet, and if you’re getting disconnected from the server frequently, you might want to try using this option. Before you can enable DMZ you need to assign a static IP address to your Xbox One. You can do that by changing your router’s DHCP settings. In addition, be sure to disable all UPnP and port forwarding options before enabling DMZ. To see how to enable DMZ we strongly suggest that you check your router’s instruction manual for detailed instructions.

Solution 7 – Connect Xbox One directly to your modem

Sometimes issues with network connection can occur if you’re using a router or gateway with your Xbox One. It can happen that there’s an issue with your router or gateway or that your network configuration is wrong. To avoid all these problems simply connect Xbox One directly to your modem using an Ethernet cable and check if the problem still appears.

Solution 8 – Disconnect third-party headsets

Using a wireless headset is a great way to enjoy in your favorite game, but sometimes there might be some problems with wireless headsets and your wireless connection. Wireless headsets use the same frequency as wireless routers, therefore sometimes there might be some interference. If you’re using a wireless headset, be sure to turn it off and check if that fixes the problem.

Solution 9 – Check the strength of wireless signal

Your wireless signal can be affected by interference and cause you to get disconnected from the server. To fix the problem with wireless interference be sure to move your Xbox One closer to your router. In addition, try to keep your router from other wireless devices that can cause interference with the wireless signal. Keep in mind that objects can also affect wireless signal, so if possible try to keep a line of sight between your console and your router.

Solution 10 – Forward your ports

In order to use Xbox Live and play games online on your Xbox One, certain ports need to be forwarded. To forward your ports you need to access your router’s configuration page and forward the following ports:

  • TPC: 80, 443, 27015, 51000, 55000 to 55999, 56000 to 56999
  • UDP: 33000 to 33499

There are also ports for Xbox Live that need to be forwarded:

  • TCP: 53, 80, 3074
  • UDP: 53, 88, 500, 3074, 3544, 4500

For detailed instructions on how to forward ports on your router, we highly recommend that you check your router’s instruction manual.

Solution 11 – Use Google’s DNS

Sometimes this error can occur if there’s a problem with the DNS. Users reported that they fixed Disconnected from the server error message simply by using Google’s DNS on their Xbox One. To do that, follow these steps:

  1. Press the Menu button on your controller and choose Settings.
  2. Select Network > Advanced Settings.
  3. Select DNS Settings > Manual.
  4. Now enter 8.8.8.8 as Primary DNS and 8.8.4.4 as Secondary DNS. You can also use OpenDNS by entering 208.67.222.222 as Primary DNS and 208.67.220.220 as Secondary DNS.
  5. Press the B button to save changes. If you see Everything is good message it means that the DNS is successfully changed.

After changing the DNS, check if the issue is resolved.

Solution 12 – Wait until the error is resolved

Sometimes this problem can be caused by server-side issues, and if that’s the case, you can only wait until the problem is resolved by the server administrator.

Disconnected from the server Xbox One error will prevent you from playing your favorite games online, but you should be able to fix the problem by using one of our solutions.

Fix: Scrollbar Width Not Working in Firefox

The scrollbar width is a pretty important function that can easily mess up the design of any page. So, you need to get it spot on to make your page and website look organized. But many reported that scrollbar-width is not working in Firefox.

This happens when users need to set the scrollbar-width value to none to hide the scrollbar for Firefox, one of the best cross-platform browsers. So let’s find out how you can fix things in no time.

Quick Tip:

In case you need an efficient workaround for this issue in Firefox, there is another skillful browser like Opera One.

With dozens of customization tools and integrations, it’s possible to change website settings how you prefer to get flexible and high-speed navigation. It also comes with it’s own native AI.

Opera One

Resolve this frustrating issue with your scrollbar width once and for all with Opera One!
Free Download Visit website

How do I change the scrollbar width on Firefox?

  1. Launch Firefox, paste about:config in the address bar, hit Enter, and then click on Accept the Risk and Continue. accept risk scrollbar-width not working firefox
  2. Type widget.non-native-theme in the search box, and click on the entry by the same name.
    widget
  3. Now, set the value to any number from 0 to 5, and hit Enter to save the changes.

Firefox is one of the few browsers that allows you to change the scrollbar width in-app, and this helps when it seems to be not working. If you don’t want to change the value manually, download a relevant extension from the Mozilla add-ons store.

What can I do if the scrollbar width is not working in Firefox?

1. Modify the settings

  1. Press Windows + I to open Settings, choose Accessibility from the navigation pane, and click on Visual effects.visual effects
  2. Now, enable the toggle for Always show scrollbars, and then restart the computer for the changes to come into effect.Always show scrollbar to fix scrollbar-width not working firefox

If that doesn’t work on the other end, head to the solution listed next.

2. Add a code for it

The other way to fix scrollbar width when it’s not working in Firefox, especially when you set the value to none, is to add a few lines to both the HTML and body of your code. This will help hide the scrollbar in the most recent versions of Firefox.

Below is the code to add: html, body {overflow-y: scroll; Scrollbar-width: none;} body: :-webkit-scrollbar { width: 0; height: 0;}

This code is not limited to Firefox but also works well for setting the scrollbar width to hide the scrollbar.

What is the default scrollbar width?

There is no default scrollbar width. The value ranges from one browser to another across different operating systems. 

The known range of the browsers’ default scrollbar width is from 12px to 17px. Also, most WebKit browsers allow users to change the value.

For instance, Chrome can have a custom scrollbar width depending on the user. So, the default value on your browser depends on the operating system and the app itself.

As a developer, losing control of the scrollbar width can make your website look disorganized to viewers. But with our solutions, you can get things running when the scrollbar width is not working in Firefox.

Also, find out how to fix Firefox issues on Windows and get the best browsing experience.

Feel free to let us know if you were able to solve the issue with the Scrollbar-width in the comments below.

How to Fix Windows is Activated Using Organization Activation Service

If ignored, the Windows is activated using your organization’s activation service message will trigger an activation warning. This can appear even if you’re not part of any organization. Here’s how to fix it and why it happens:

How to remove Windows is activated using organization activation service?

1. Run the activation troubleshooter

  1. Open the Start menu.
  2. Open Settings.
  3. Click on Update & Security.
  4. Select Activation tab on the left.
  5. Click on Troubleshoot.
  6. In the UAC that appears, click Yes.
  7. The activation troubleshooter will begin solving your activation problem.
  8. Click on the I changed hardware on this device recently link.
  9. Sign in with your Microsoft account.
  10. Select the device you are currently using and click Activate. Your Windows should be activated.

2. Delete the activation

  1. Open the Start menu.
  2. Run Command Prompt as an administrator.
  3. Type the below command and press Enter. slmgr /upk
  4. You will get a message Uninstalled product key successfully, and Windows will get deactivated.
  5. Open Windows Settings.
  6. Click on System & security.
  7. Your Activation state will show that your copy of Windows isn’t activated.
  8. Go back to the Settings page and click on Accounts.
  9. Most probably, you will have a local account. Click on the Sign in with a Microsoft account instead button.
  10. Enter your Microsoft account credentials.
  11. Your account should now receive activation.

This process uninstalls the product key from your PC, and then when you link your Microsoft account it fetches the digital license you might have attached to your Microsoft account and activates your copy of Windows.

3. Enter the product key manually

  1. Open the Start menu.
  2. Run Command Prompt as an administrator.
  3. Type the below command and press Enter. wmic path SoftwareLicensingService get OA3xOriginalProductKey
  4. Note down the product key of your PC.
  5. Open Windows Settings.
  6. Click on Update & Security.
  7. Select the Activation tab on the left.
  8. Click on the Change product key option.
  9. Enter the product key you have noted in step 4 and press Enter. Check if this fixes the issue or not.

If you’re having trouble finding your product key, you can use a dedicated third party tool that can help you extract it.

At last, if nothing works, and you aren’t able to fix the Windows is activated using your organization’s activation service message, then you can get in touch with Microsoft customer support.

Why does my PC say it’s managed by my organization?

This error hints that the license key for your OS is missing. It happens because licenses expire for a specific period of time, after which you have to renew them. However, if you get this error on your personal computer, it’s probably because you bought your device with a pre-installed OS that’s going to expire soon.

Let us know in the comments below which one of the above solutions helped you resolve the Windows is activated using your organization’s activation service message.

Microsoft Rewards Fluent-redesign closely resembles Windows 11

If you didn’t already know, Microsoft Rewards is a program that Microsoft runs that lets users earn points for conducting searches using Bing, shopping, and completing quests on Xbox using Xbox Game Pass Ultimate. What’s more, you can redeem your points for actual money by way of gift cards.

That said, it now seems that the platform will be getting a cool new look. If you’ve been trying to redeem your points using the platform over the festivities, you might have noticed the refreshed dashboard both on the Web and mobile.

Per the image shared by our former colleague, Arif Bacchus, an avid Microsoft Rewards fan, the redesign is inspired by the Fluent Design of Windows 11. The refreshed Microsoft Rewards dashboard now shares similar attributes with the rest of Microsoft’s services and programs.

Microsoft Rewards Fluent Design on Windows 11

We definitely like this design better, as it is more modern and sleek-looking like the new Microsoft 365 app. However, it is quite clear the dashboard still requires some touch-ups because it is difficult for mobile users to check the count of their daily points. At the moment, you need to first tap on Status, then Point history to check your daily points.

It is quite apparent that Microsoft wants to achieve some sort of consistency across its entire lineup of products and services, hence the cool new look for Microsoft Rewards. In other related news, Microsoft Rewards expanded to 38 new countries in August, making it available to a total of 58 countries now. We invite you to check out our expert guide that will help know how to get the most points out of Microsoft Rewards and earn easy money. You’ll need to sign up for the program to access these perks.

Thanks for the tip, Arif Bacchus!

5 Best Spam Filter Apps for Thunderbird to stop Junk Mail

Thunderbird is Windows’s best free email client, allowing users to manage multiple email accounts easily. It also offers offline email access, a feature missing from the built-in Windows mail app.

Additionally, Thunderbird supports third-party calendar app integration for event and appointment reminders. And for the features that are not available by default, the vast collection of third-party add-ons make up for it.

Does Thunderbird have a spam filter?

Any reliable email client includes an efficient spam filter, and Thunderbird is no exception. This open-source email client also comes with a highly-efficient built-in spam filter. The filter uses Bayesian statistical analysis to determine spam from legit emails.

Although the built-in spam filter takes some time to learn about incoming emails, it starts working efficiently once the learning process is over. 

However, for some, the built-in spam filter might be inefficient mainly because it takes time to learn about incoming emails before putting them in the spam box. If you are thinking of third-party solutions, here are some merits they may offer:

  • Implementing time – There is no need to provide them training or time to adjust to new spam levels. Using a multi-layered approach to threat detection, they can quickly isolate even the most sophisticated threats.
  • Unopened email recognition and filtering – A third-party spam filter will often detect emails you get frequently but never read (for whatever reason) and will begin filtering the undesirable information for you, ensuring that it never reaches your inbox.
  • Unwanted email protection – Before they reach your inbox, incoming emails are checked by a third-party service. Your mail server will only receive messages that pass your filter.
  • Dynamix threat protection – In contrast to the static nature of most out-of-the-box spam coverage, third-party spam solutions often use machine learning or dynamic analysis to identify emerging threats and block them before they reach your mailbox.
  • Denial-of-service attack protection – The attack is prevented by a third party checking your email before it reaches your server.

Let us now explore some of the best email spam filters for Thunderbird.

What’s the best spam filter for Thunderbird?

SPAMFighter – Great integration with Microsoft Services

SpamFighter Spam Filter for Thunderbird

SPAMFighter is a third-party spam filter that works with Thunderbird, Microsoft Outlook, Outlook Express, Windows Mail, and Windows Live Mail. It comes in two versions Stand and Pro.

Irrespective of the version, SPAMFighter is a highly-efficient spam filter that can protect users against malware, virus, and phishing attacks by filtering spam from genuine emails.

It works in real-time, scanning every incoming mail and moving the email based on the result to either your Inbox or spam folder. Also, the Spam Blocker feature allows you to tag any undetected email as spam.

Additionally, the developers have offered a multi-language user interface. Furthermore, the Blacklist feature makes blocking emails based on email IDs and domains easier and comes with an automatic whitelist management feature.

Also, the Pro users can protect multiple email IDs, have a license to use in a company, filter emails based on languages, have unlimited Black and Whitelist entries, and have no SPAMFighter footer in their emails.

While the free version may have some limitations, the Pro version is well worth the investment considering the features on offer.

Other important features:

  • Language filtering
  • Account protection
  • Statistics and reporting

    ⇒ Get SPAMFighter

MailWasher – Great mobile options

MailWasher Best Anti Spam Filter for Thunderbird

Firstly, the tool is a free anti-spam filter that works with all major email clients, including Thunderbird, Outlook Express, Windows Live Mail, and Hotmail. It comes in both free and Pro versions with a few differences.

Also, MailWasher is an effective spam filter that works on desktop and mobile computers. It also lets you preview all the incoming emails before forwarding them to your Thunderbird inbox.

Additionally, you can read emails on the server and download them to Thunderbird inbox or delete emails before they reach your inbox. One advantage of this feature is that it allows you to destroy any incoming emails with malware from getting your computer.

Furthermore, MailWasher uses the Bayesian statistical analysis technique to determine the nature of mail based on the email sender. It has comprehensive spam filter tools, including White and Blacklist, customizable filters, and an external blacklist option.

The Pro version of MailWasher costs $40 and allows you to use multiple email addresses. It also offers a recycle bin for deleted emails, a full preview pane for emails, the ability to sync with Mailwasher mobile apps, and technical support from the developers.

Lastly, the lack of country code-based spam filtering or blocking feature is something we missed on an otherwise excellent spam filter.

Other important features:

  • Real-time blocking
  • Content inspection
  • Status tracking and reporting
  • Contact list management

⇒ Get MailWasher for Thunderbird

Thunderbird’s Built-in Spam Filter – Most compatible with Thunderbird

Thunderbird has a built-in Spam filter, as discussed in the article earlier. If you don’t want to use a third-party Spam filter, it is the right time to give the built-in spam filter a fair shot.

The upside to the built-in spam filter in Thunderbird is its ability to accurately filter spam messages from legitimate emails. But, for that to happen, the user must train Thunderbird to identify junk mail by using the Junk tool button to mark a message as junk or not.

After some time, Thunderbird will automatically classify spam mail and put it in the spam box.

Thunderbird uses external classifiers like SpamAssassin, bogofilter, DSPAM, and POPFile to identify spam emails. The user can also exclude emails from the personal address book and collected addresses from being marked as spam.

For the Thunderbird spam filter to work, ensure you enable the adaptive junk mail control from the settings.

Other important features:

  • Customizable junk settings
  • Spam Assasin feature
  • Junk tool for soam training

⇒ Get Thunderbird’s Built-in Spam Filter

CleanMail – Excellent anti-spam and Anti-virus combo

CleanMail is an anti-spam and Anti-virus filter that works with Thunderbird and other email clients.

The programs can protect you from spam, malware, and phishing attacks. It uses the SpamAssassin classifier combined with the Bayes database to determine spam from other emails.

Other notable features of CleanMail include an anti-virus filter, attachment filter, DNS Blacklist, Shared Fingerprint filter, and delay filter.

Lastly, the Cleanmail plan starts at $279 for ten email addresses, but you can try the tool using a 30-days free trial.

Other important features:

  • Unwanted newsletter remover
  • Easy-to-view email organizer
  • Email task automation

⇒ Get CleanMail free trial

POPFile – Great for email classification

POPFile is an automatic email classification program that filters spam emails from your email address.

It uses categories for classification but also allows users to create their classes, like work and personal categories, for better email management.

The software uses the Bayes algorithm and requires the users to train the tool by manually classifying spam and Non-spam mail before it can effectively start organizing spam automatically.

Lastly, you can download the latest version of POPFile from the official website, which sadly was last updated in September 2015.

Other important features:

  • Spam filter
  • Virus-infected emails detection
  • Customization for custom mail headers

⇒ Get  POPFile

In this age where email scrapping tools help promoters bombard anyone with their sales pitch through spamming, it is essential to have one of these best anti-spam filters for Thunderbird to protect your interest.

If you use email accounts from Hotmail or Gmail, you don’t need spam filters as these services offer their spam filters.

However, anyone using a custom email address with Thunderbird must have one of these spam filters to keep their inbox clean.

Reconnect Your Drive: 5 Ways to Remove This Notification

Having a file backup is crucial, and thanks to the File History feature, you can easily create a backup for your files on Windows 10.

Unfortunately, certain issues with File History can occur occasionally, and you might get a notification saying that you need to reconnect your drive on Windows 10. This can be a serious problem due to the importance of your backup files.

What does it mean to reconnect your drive?

Below are some of the potential factors that can cause the File History to show reconnect your drive error:

  • Faulty Windows update: If you are getting an error saying reconnect your drive, your files will be temporarily copied after installing an update, that might be the problem. Uninstalling the update should fix this issue.
  • Outdated driver: In some cases, the problem might be due to outdated disk drivers. You need to update all related drivers to solve the problem quickly.
  • Problems with the File History folder: Some users have found the reconnect your drive notification to be due to issues with the File History folder. The solution to this is to delete the File History configuration folders.

How can I fix Reconnect your drive error?

1. Reconnect your drive and manually start the backup process

  1. Reconnect the drive, press the Windows key + I, and select Update & Security.
    update and reconnect your drive
  2. Select the Backup option.
  3. Now, click on More options.
    more options reconnect your drive
  4. Finally, click the Back up now button.

The File History feature requires an external hard drive to be connected to your PC. If for some reason, your external hard drive has been disconnected for too long, you’ll see a message asking you to reconnect your drive.

To fix this problem, reconnect your external hard drive and manually start the backup process. To manually start the backup, complete the above procedure.

In addition to manually starting the backup process, you can connect your hard drive and wait for the scheduled backup to start automatically.

2. Uninstall recent updates

  1. Press the Windows key + I and select the Update & Security option.
    update and reconnect your drive
  2. Select View update history.
    view update
  3. Now, click Uninstall updates.
    uninstall updates
  4. Finally, right-click the faulty update and select the Uninstall option.
    uninstall reconnect your drive

A lot of users complained that File History stopped working for them after installing recent Windows 10 updates, particularly KB4601319.

They managed to get the program running only after uninstalling the respective update. This is only a workaround, but it works.

3. Make sure your drivers are up to date

  1. Press the Windows key + X and select the Device Manager option.
    device manager
  2. Click the arrow next to the Disk drives option and right-click your external drive’s driver.
  3. Now, select the Update driver option.
    disk reconnect your drive
  4. Finally, choose the Search automatically for drivers option and install any available update.
    search auto

In some cases, reconnect your drive message appears if your external hard drive isn’t fully compatible with Windows 10. Following the steps above should help you update your drivers manually.

However, if you don’t want the hassle of searching for drivers on your own, you can use a tool that will do this for you automatically.

Of course, this tool won’t be useful if you cannot connect to the internet now. However, once you get online, it will help you to keep all your drivers up to date so that you won’t be in this situation anymore.

4. Delete the File History configuration files

  1. Press the Windows key + R, type %localappdata%, and click OK.
    local
  2. When the Local App Data folder opens, navigate to: Microsoft/Windows/FileHistory/Configuration
  3. After you open the Configuration folder, you should see four files. Delete them.
  4. Finally, start File History, and you should be able to create backups again.

Before trying this solution, create a backup for your files. This process might delete all the files you use for backup on your external hard drive.

So, make sure you save them somewhere safe. After you’ve saved your files to a safe location, complete the above procedure.

5. Format your external hard drive

  1. Open File Explorer, right-click your external hard drive and choose Format.
    format
  2. Click the Start button to format your hard drive.
    start reconnect your drive
  3. After the formatting process is completed, start File History again.
  4. You’ll be asked if you want to save the older version of File History. Choose No and create a new backup.

If you’re getting reconnecting your drive error message, you might want to format the external hard drive you use for backup and recreate your backup again.

Formatting your external hard drive will permanently delete all your files from that external hard drive. So, you might want to back up certain files. To format an external hard drive, follow the above steps.

There you have it: Everything you need to fix the reconnect your drive error. The solutions in this guide are simple and direct and should help you start backing your files up again.

If you want to know how to access and use the File History in the Control Panel, check our detailed guide.

Feel free to let us know the solution that helped you fix this issue in the comments below.

How to Fix Avast This File Cannot be Restored Error [Quick Guide]

Recently, some of our readers have reported that they are receiving error messages on Avast –This file cannot be restored, while trying to recover some quarantined files.

So, we’ve dedicated this article to providing you with simplified steps to restore your files. Also, some of these fixes can troubleshoot Avast if it won’t open.

Why won’t Avast let me restore a file?

The Avast antivirus software has been upgraded to protect users from malware threats and attacks. One of the features of this utility protector is that it quarantines malware-detected files in a Safe Virus Chest.

Now, the reason users are experiencing problems with restoring such files from the Safe Virus Chest is mostly because of false-positive detection.

This means that files that seem clean to a user are detected as malware by Avast, hence the difficulty in restoring such files. You can stop Avast from blocking download files since they usually are targeted by the antivirus.

Now that you know the reason behind the Avast –This file cannot be restored error message, follow the solutions below to fix it.

How do I fix Avast if it doesn’t allow me to restore files?

Before starting the troubleshooting, you should perform the following quick checks that have worked for other users:

  • Confirm that you’re running the latest Avast antivirus software.
  • Simply close and reopen the Avast Virus Chest and check if your file can be recovered.
  • Check if your Windows version is compatible with the Avast version.

After confirming the above checks, if the error persists, you can move to the next section to apply advanced solutions.

1. Reopen the Virus Chest and add file to exception

  1. Left-click the Start button, type avast antivirus, and click Open.
  2. Click on Protection on the left pane and select Quarantine.
  3. Right-click on the file that you want to restore and select Restore and add exception from the dropdown that appears.

By re-opening the Virus Chest/Quarantine, you should be able to access the files and restore them.

Also, due to the constant monitoring for threats, Avast antivirus may cause high CPU usage. So, check this guide to troubleshoot the problem.

2. Repair Avast Antivirus software

  1. Right-click the Start button, type the control panel, and click Open.
  2. Click on Uninstall a program under Programs.
  3. Locate and click the Avast antivirus, then click on Uninstall.
  4. Once the Avast Setup wizard appears, select Repair.
  5. Hit Yes to confirm the action and click Done.
  6. Restart your PC.

3. Clean install Avast antivirus

  1. Open Control Panel, then go to Programs.
  2. Navigate to Uninstall a program under Programs and Features.
  3. Choose Avast Antivirus and click Uninstall.
  4. Select Uninstall in the app uninstaller pop-up and agree to restart in Safe Mode.
  5. Once the uninstallation is complete, restart your computer, and reinstall Avast Antivirus.

Reinstalling Avast antivirus without the prior cache files might help fix the problems preventing you from restoring files from the Virus Chest.

Also, check out this guide for other ways to uninstall the Avast antivirus in Windows 11.

4. Download the latest Windows Update

  1. Press the Windows + I keys to open the Settings app.
  2. Select Windows Update and click on the check for updates button.

Sometimes, if your Windows operating system is outdated, it can also cause the Avast this file cannot be restored error.

However, if the Windows Update fails to work, then try the fixes outlined here to solve the issue.

Having tried any of the above fixes, you should be able to fix the error. In case you need help to stop Avast from blocking your file download, you can explore our article on that.

And if you come across avastui.exe application errors too, this directory is the best solution for you.

If you have any questions or suggestions, do not hesitate to use the comments section below.

AMD and Nvidia GPU in Same PC: Best Tips to use Them

The AMD and NVIDIA GPUs were created to manage graphics. Users are used to having either of them on their PCs.

However, what do you think about using AMD and NVIDIA GPUs on the same PC? This guide will show you how to install and use the two graphics cards and get the best value possible.

What do you need if you want to use AMD and Nvidia GPU on the same PC?

Unfortunately, you can’t simply use any PC with any configuration for this. That’s why we will list some of the needed requirements, so you don’t start tweaking with no results.

  • First, you will need a motherboard that supports Crossfire or SLI technologies or even both because they will boost the success rate of this experiment
  • Of course, you will need at least two PCI x16 slots for the two cards
  • Try to provide a powerful CPU, an i7 of at least 9th generation or an i5 of 10th generation because the load will be pretty high
  • Some users who experimented with this also recommend using outdated drivers for the graphics cards, although in our guide below, we went with the latest drivers
  • Make sure you supply the right amount of power to run both cards at the same time
  • Getting DirectX 12 is a must, so you need to download it before anything else
Tip icon Tip
Important notice:
This is a guide for advanced users. If you’re not tech aware, do not attempt to do this. Also, the guide requires free access to computer components, and opening the PC case might void its warranty.

How can I use AMD and NVIDIA GPUs on the same PC?

  1. Download and install the Display Driver Uninstaller.
    amd and nvidia gpu in same pc ddu download
  2. Go to the AMD website to download the latest driver for your graphics card.
    AMD
  3. Now, go to the NVIDIA support website and get the right driver for your GPU. Double-check and save them in a known location.
    nvidia
  4. Remove the LAN cable to disconnect your PC from the Internet and disconnect it from other wireless connections.
  5. Now, run the DDU software to remove both graphics drivers. If you have not used the software before, you can check the linked guide for the detailed steps to use it.
    ddu
  6. Shut down the PC and install the AMD graphics card in a slot.
  7. Next, install the AMD driver you downloaded in Step 2.
  8. After installing the drivers, restart the PC.
  9. Remove the AMD card and install the NVIDIA GPU card.
  10. Now, install the NVIDIA driver you downloaded in Step 3.
  11. After the restart, shut down the PC and install the other card, so they are together now.
  12. Power up your rig and plug back the LAN cable.

That is how you can have both AMD and NVIDIA GPU in the same PC for mining and gaming.

Note that It’s important to disconnect your PC from the Internet before uninstalling the drivers. Otherwise, the system will install some default drivers instead.

Also, when installing the NVIDIA card, don’t install the GeForce Experience software because it can cause some issues.

If you have any problems after a while, perform the steps again because the drivers might get updated automatically, which can produce some issues.

To conclude, you can have AMD and NVIDIA cards on the same mining rig, and now you know how to install their drivers on Windows 10. Again, note that this guide is for advanced users who can take responsibility for opening up their PCs.

If you’re interested in the latest graphics cards, check out our selection of the top NVIDIA GPUs for gaming that will also do a great job on mining.

Feel free to share your experience with the installation of the two graphic cards in the comments below.

Fix DVD Autorun: 5 Ways to Get DVDs to Play Automatically

The DVD Autorun is the menu that pops up when you insert a CD/DVD into the optical drive of your machine. It asks you how to handle the disk and remembers your selection for future reference.

However, some users are complaining that the DVD Autorun feature is not working. This guide will show you the seamless methods to fix the feature and get back to playing your DVDs automatically.

Why is my DVD Autorun not working?

There are several reasons your DVD Autorun feature is not working. Listed below are some of the popular causes of the problem:

  • Antivirus interference: The major cause of the autoplay DVD player feature not working is interference from your security software. Some third-party antiviruses see the feature as dangerous because it can give a free ride to malicious programs on your PC. In this case, you might need to disable your antivirus to make the feature work.
  • Disabled services: If the Shell hardware detection service is disabled, you might experience issues with the Autorun feature. The solution here is to enable the service.
  • Deactivated autoplay feature: Sometimes, the cause of this issue might not be far-fetched. It might just be that the feature is disabled in your settings. You need to enable it to get it working again.

How can I fix the DVD Autorun?

Before applying the fixes in this guide:

  • Try disabling any third-party antivirus software on your PC. This is because it might be blocking the Autorun feature from working.

If this does not work, you can now proceed to the solutions below.

1. Enable AutoPlay

  1. Press the Windows key + I shortcut to open the Settings app and select the Devices option.
    devices dvd autorun fix
  2. Now, click AutoPlay in the left pane and toggle the switch under Autoplay forward to enable it.
    autoplay
  3. Click the dropdown under Removable drive and select Ask me every time.
    ask

Sometimes, the simplest fix might be the one to fix the DVD Autorun issue. The problem might be that you have not enabled the feature. This you can do by following the steps above.

You can turn on DVD Autorun by enabling AutoPlay in Settings, and you can also follow this complete step by step guide on how to enable AutoPlay in Windows 11 to make Windows react automatically when you insert a disc.

2. Check AutoPlay settings in Control Panel

  1. Press the Windows key + S, type control, and choose Control Panel from the results list.
    control dvd autorun fix
  2. Type auto in the search bar and select the AutoPlay option.
    control
  3. Now, check the box for Use Autoplay for all media and devices.
    use  dvd autorun fix
  4. Locate the DVDs section and choose the default action for each DVD type.
  5. Finally, click the Save button to save changes.
    save

Another option to fix the DVD Autorun issue is to enable it from the Control Panel. This gives you more options and offers more specificity than the Settings app.

3. Update your PC

  1. Press the Windows key + I and select the Update & Security option.
    update and
  2. Click the Check for updates button.
    check for
  3. Finally, install any available updates.

4. Change Group Policy settings

  1. Press the Windows key + R, type gpedit.msc, and click OK.
    DVD AutoPlay not working Windows 10
  2. In the left pane, Navigate to the User Configuration > Administrative Templates > Windows Components > AutoPlay Policies.
  3. In the right pane, double-click Turn off Autoplay.
    AutoPlay not working CD Asus laptop
  4. Select Not Configured and click Apply and OK.
    CD won't autorun Windows 10

If the autoplay feature is disabled in the Group Policy, you might not be able to use it. The easy way to fix the DVD Autorun feature here is to follow the steps above to enable it again.

5. Start Shell Hardware Detection service

  1. Press the Windows key + R, type services.msc, and click OK.
    AutoPlay not working CD Asus
  2. When the Services window opens, locate and double-click the Shell Hardware Detection service.
    CD won't autorun Windows 10
  3. Set the Startup type to Automatic and click the Start button.
  4. Finally, click Apply and OK to save changes.
    AutoPlay not working windows 8

To fix issues with the DVD Autorun feature, you need to ensure the Shell Hardware Detection service is running. This is because the service is one of the components that enable the feature to work properly in the first place.

Issues with the DVD Autorun feature can be somewhat annoying, but we hope you managed to fix them using one of our solutions.

If you want to know the easy ways to manage your autoplay settings on Windows 10, check our detailed guide for the steps you need to follow.

Feel free to let us know the solution that helped you fix this issue in the comments below.

Taskbar Is Not Working: 11 Simple Ways to Unfreeze It

Problems with the user interface are common, not just in Windows 10, and many reported that Taskbar is not working for them.

So if your Taskbar is unresponsive or if it’s not working at all, this guide will help you fix it for good.

Why is my Windows 10 Taskbar not working?

There are many reasons for Taskbar issues, but the most common ones are the following:

  • System glitches – Sometimes, your operating system can encounter a glitch causing this issue to appear. So if you’re having problems with File Explorer or other components, just restart the process.
  • Corrupted components – Sometimes, Windows components can get corrupted. If this happens, you need to reinstall preinstalled apps to fix the problem.
  • System services – Windows requires certain services in order to run properly. If they aren’t working, you need to open services.msc and start them manually.

What are other Taskbar issues that I can encounter?

  • Unclickable Taskbar in Windows 10 – Many users reported that their Taskbar is unclickable. This can be a big problem since you won’t be able to use your Taskbar at all.
  • Windows 10 Taskbar frozen – Sometimes your Taskbar might stop responding. In fact, several users reported that their Taskbar is completely frozen.
  • Right click Taskbar not working – Several users reported that right click on their Taskbar isn’t working. However, you should be able to fix this problem by using one of our solutions.
  • Taskbar thumbnails not working – According to users, it seems that Taskbar thumbnails aren’t working. If you have this problem, the Taskbar preview won’t work for you at all.
  • Pin to Taskbar not working – Users tend to pin their favourite applications to the Taskbar in order to access them faster. However, many users reported that this feature isn’t working for them.
  • Lock the Taskbar, autohide Taskbar not working – Another problem with Taskbar is the inability to lock or automatically hide the Taskbar. This is a minor problem, but you should be able to fix it using our solutions.
  • Taskbar search not working in Windows 10 – Users reported that the search feature isn’t working for them. This can be a big problem, especially if you use the search feature frequently to access applications.
  • Taskbar not working on startup – Several users reported that issues with Taskbar occur right on startup. This means that you won’t be able to use your Taskbar at all on Windows 10.
  • Taskbar jump list not working – Several users reported that Jump lists aren’t working on their PC. This can be a problem if you use Jump lists frequently to open recently used files.
  • Cortana Taskbar not working – According to some users, it seems that Cortana isn’t working on their Taskbar. Cortana is an integral part of Windows 10, and not being able to use it can be a big problem.
  • Taskbar buttons not working – Another relatively common problem with Taskbar. A few users reported that Taskbar buttons aren’t working, but you should be able to fix this problem using one of our solutions.

So, let’s dive right in and see what you can do in order to fix your Windows Taskbar.

What can I do if the Taskbar is not working?

1. Check drivers

Although it seems unlikely, there’s a chance a bad driver is causing the problem. It is known that incompatible drivers can make quite a mess in Windows 10, and a disrupted taskbar is one of the possible issues.

So, make sure all your drivers are up to date and update any outdated drivers. This is a simple procedure, and you can perform it manually or automatically with specialized driver updating tools.

2. Restart Windows Explorer

  1. 1. Press Ctrl + Shift + Esc and choose to open Task Manager.

  2. 2. Navigate to the Processes tab.

  3. 3. Locate Windows Explorer in the list.

  4. 4. Right-click on it and select End task.

    end the windows explorer task
  5. 5. The task will re-launch itself after a couple of moments, so check if everything is okay with your taskbar now, after you restarted Windows Explorer.

  6. Before we get to some ‘system-messing’ solutions that include Command Prompt and PowerShell, let’s try one simpler. A simple restart of the Windows Explorer will restore the functionality of the taskbar, and other user interface features.

    So if your taskbar problem is not that serious, this solution should work just fine.

This solution might solve the problem, but only temporarily, so if the problem returns, try the solution below. Can’t open Task Manager? Don’t worry, we’ve got the right solution for you.

3. Perform a PowerShell fix

  1. Right-click on the Start Menu button and choose Windows PowerShell (Admin)
  2. Now paste the following command in press Enter key: Get-AppXPackage -AllUsers | Foreach {Add-AppxPackage -DisableDevelopmentMode -Register "$($_.InstallLocation)AppXManifest.xml"}
    Taskbar thumbnails not working
  3. Now, close PowerShell, and go to the following folder: C:/Users/your_username/AppData/Local/
  4. Locate and delete TileDataLayer folder.
    Pin to Taskbar not working
  5. Now check if your taskbar is working, you don’t even have to restart your computer.

Okay, so if restarting Windows Explorer didn’t get the job done, or it just temporarily solved the issue, you can try some more advanced solutions.

4. Reinstall apps or ShellExperienceHost and Cortana

  1. Right-click the Start Menu, and choose Windows PowerShell (Admin).
  2. Enter the following commands (each command resets one feature) into PowerShell, and press Enter: Get-AppxPackage Microsoft.Windows.ShellExperienceHost | foreach {Add-AppxPackage -register "$($_.InstallLocation)appxmanifest.xml" -DisableDevelopmentMode}
    Lock the Taskbar not working
    Get-AppxPackage Microsoft.Windows.Cortana | foreach {Add-AppxPackage -register "$($_.InstallLocation)appxmanifest.xml" -DisableDevelopmentMode}
    Taskbar search not working in Windows 10
  3. Wait for the process to finish.

If you don’t want to reinstall all of your apps, your best bet is to just re-register Cortana, and ShellExperienceHost.

5. Modify your registry

  1. Press Windows key + R and enter regedit.
  2. Now navigate to the following key: HKEY_LOCAL_MACHINE\SOFTWARE\Policies\Microsoft\Windows\
  3. Look for Windows Feed key and navigate to it. If it’s not available, right-click Windows key and choose the new Key option. Now name it Windows Feed.
  4. Once you enter Windows Feed key, double-click the EnableFeeds DWORD and set it to 0.
  5. If it’s not available, right-click the right pane and choose the option to create a new DWORD (32-bit Value) and name it EnableFeeds. The new DWORD will automatically be set to zero.

6. Perform System Restore

  1. Type Recovery in the Search bar and select Recovery from the list.
  2. Select Open System Restore.
    Cortana Taskbar not working
  3. System Restore window will now open.
  4. Click on Next to proceed.
    Taskbar buttons not working
  5. If available, check to Show more restore points.
  6. Select the desired restore point, and click on Next.
    Unclickable Taskbar Windows 10
  7. Follow the instructions on the screen to complete the restoration process.

7. Use Troubleshooter

  1. Go to the Settings app and go to Update & security section.
  2. Select Troubleshoot and then click on Additional troubleshooters.
  3. Select Windows Store apps and click on Run the troubleshooter.

8. Start Application Identity Service

  1. Go to Search, type services, and open Services.
  2. Find Application Identity service.Taskbar thumbnails not working
  3. Right-click on it, and choose Start.

There are some reports that suggest starting the Application Identity service will fix the taskbar issue.

9. Use DISM

  1. Press Windows key + X and select Windows PowerShell (Admin).
  2. Type the following command: DISM.exe /Online /Cleanup-image /Restorehealth
  3. Wait for the process to finish.

10. Create a new user account

  1. Press Windows key + I to open the Settings app. Next, go to Accounts.
  2. In right pane and select Family & other users in the right pane. Next, click on Add someone else to this PC.
  3. Choose I don’t have this person’s sign-in information.
  4. From here, select Add a user without a Microsoft account.
  5. Enter a username, password, and password hint, and click the Next button.

Once the new account is created, switch to it and check if the problem is resolved.

11. Perform a clean install

  1. Open the Settings app by using Windows key + I shortcut. Next, go to Update & security.

  2. Next, go to Recovery and click the Get started button in the Recovery section.
  3. From the list of options, choose Remove everything or Keep my files. We suggest using the latter, but if that doesn’t work, use the option to remove everything.
  4. Follow the instructions on the screen to complete the process.

What can I do if the Taskbar is not working on Windows 10 after an update?

  1. Press Windows key + I to open the Settings app.
  2. Navigate to the Windows Update section and select View update history.
  3. Now click on Uninstall updates. Uninstall Features Updates to Fix Outlook issue
  4. Locate the update you want to remove and click on Uninstall.

That’s all for this article, I hope at least one of these solutions helped you to restore the functionality of your taskbar.

This isn’t the only issue that you can encounter, and if your Taskbar is flickering, be sure to try the solutions from our dedicated guide.

If you have any comments, questions, or maybe some other solution for this problem that I didn’t manage to find, please write that down in the comments section below.

Libeay32.dll: What is It & How to Fix It if It’s Missing

There are many DLL file missing errors users can encounter when using their PC. These errors prevent you from accessing your apps or even installing Windows. The missing Libeay32.dll is a common one.

Also, users can run into Autorun.dll errors on Windows 11 when there is an issue with the file.

What is libeay32.dll?

The libeay32.dll file is a Windows Dynamic link library file for ensuring apps operate properly. It is an essential system file required by some software on the computer to run or install the software.

Furthermore, it contains a set of instructions and driver functions for programs to use, which Windows may apply.

Why is libeay32.dll missing on my PC?

The most common reason for the file missing error is the libeay32.dll file was deleted from the system. Also, you can encounter errors due to corrupt system files on your PC.

Other factors that can cause the libeay32.dll file to be missing on your PC are:

  • Malicious software – Having malicious software installed on your computer can cause it to malfunction. It can cause the libeay32.dll file not to be available on your computer.
  • Issues with the Windows registry – The libeay32.dll file missing can be due to broken registry items. When the database is not intact, it can affect Windows operations, as well as the app & services running on the Windows PC.

Though the causes may vary, you can fix the problem by troubleshooting your PC.

How do I fix the libeay32.dll if it’s missing in Windows 11?

Before trying any advanced fixes, go through the following:

Peradventure the problem persists, go ahead with the solutions below.

1. Restore Libeay32.dll from the Recycle Bin

  1. Find the Recycle Bin icon on your desktop, right-click, then select Open.
  2. Check if the Libeay32.dll file is in the Recycle Bin or search for it by using the search space at the top left corner.
  3. Right-click on the libeay32.dll file, and select Restore from the drop-down to file to its original directory.
  4. Exit the Recycle Bin.

Try using the app that prompted the libeay32.dll file missing error and check if the error appears.

Likewise, if you cleared your Recycle Bin and the file is permanently deleted, you can use file recovery software for your PC.

2. Run a System File Checker scan

  1. Left-click the Start button, type command prompt, and select Run as administrator.
  2. Choose Yes on the User Account Control prompt.
  3. Type the following command and press Enter: sfc /scannow
  4. Restart your PC and check if the libeay32.dll missing persists.

The System File Checker scan will find and repair corrupt system files that may prevent the libeay32.dll from being accessible.

Check our article about what to do if nothing happens when you select run as administrator on Windows 11.

Aside from the manual steps above, we suggest you use third-party repair software to perform this procedure automatically.

They help you run a scan of your device, then provide you with a comprehensive report of the corrupted files found, and finally locate healthy files as their replacement.

3. Run System Restore

  1. Press Windows + R key to open the Run dialog box, type control, then press Enter to open the Control Panel.
  2. Type recovery in the Control Panel search bar and select Recovery.
  3. Then click Open System Restore.
  4. Click Next after clicking Choose a different restore point.
  5. Choose the restore point you want to restore from, then click Scan for affected programs.

The System Restore will backdate your PC to an earlier point in time. It will remove apps, drivers, and updates installed after the restore point was created without affecting your files. Read how to fix Restore Point if it’s not working on your PC.

4. Reinstall the app prompting the error

  1. Press Windows + R key to open the Run dialog box, type control, then press Enter to open the Control Panel.
  2. Click on Programs, then select Programs and Features.
  3. Find the program from the list, right-click on it, then select Uninstall from the drop-down.
  4. Follow the onscreen instructions to complete the uninstallation.
  5. Download and install the program on your PC and check if it prompts the error again.

Reinstalling the concerned program should fix the problem causing the error.

You can check other steps for uninstalling apps on Windows 11 if you can’t get through the steps above.

Alternatively, our readers can check our list of the best DLL repair tools they can use for their computers.

Kindly leave your comments if you have suggestions or questions below.

Task Scheduler on Windows 11: Best 6 Scheduling Tips

For those unfamiliar with this feature, Task Scheduler is a component tool of Microsoft Windows. It allows you to schedule the PC’s programs/scripts to launch at pre-defined times or after specified intervals.

Task Scheduler is available on Windows 11, too. And because it is required to understand better how this can be used, we’ve prepared a dedicated article. However, keep in mind that you can also consider downloading additional Windows task scheduler software, but today’s subject is less time-consuming.

What does Task Scheduler do?

This is an essential utility that can help in the following:

  • Start time scheduling – As mentioned before, with Task Scheduler, you can organize when to start specific apps and programs.
  • Message delivery – You may also apply a particular time to send specific email messages.
  • Notification schedules – The utility can also be configured to send notifications automatically. This is well-known as job scheduling, which will simplify both individual and business digital work.
  • Increases planning time – By using Windows 11’s Task Scheduler, you’ll save much more planning time and won’t have to execute specific actions manually, such as opening a site at a scheduled time.

There are few limits to what it can do. If the required conditions are met, you can schedule a task to run a backup script every night or send an e-mail whenever a specific system event occurs.

You should check out the full Microsoft guide for more information about the Task Scheduler tool.

How can I use Windows 11’s Task Scheduler?

1. Schedule tasks with basic settings

  1. 1. Open the Start menu by hitting the Windows key.

  2. 2. Type task scheduler in the search box, then click on the result to open the app.

    open task manager windows 11
  3. 3. Look at the left window pane, then right-click on Task Scheduler Library and select the New Folder option.

    create new folder in task scheduler windows 11
  4. 4. Give a name to that folder, then click on OK.

    select folder name task scheduler windows 11
  5. 5. Expand the Task Scheduler Library, then right-click on the folder you’ve just created, and choose to Create Basic Task. 

    create basic task windows 11
  6. 6. Once the Create a Basic Task Wizard window is opened, enter the name and description of the task.

    set task name and description windows 11
  7. 7. After all is set, click on Next.

  8. 8. Choose when do you want the task to start, then click on Next.

    task trigger set
  9. 9. Now you will be asked to set the time for the program to start. After you set it, click on the Next button.

    daily trigger task scheduler in windows 11
  10. 10. Then, you’ll have to set the task you want to perform.

    windows 11 scheduled tasks set
  11. 11. After all is set, click on Finish.

  12. Using Windows 11’s built-in Task Scheduler is very easy and can be done by anyone. You can give your task a name and description, trigger, and many other configurations.

2. Schedule tasks with advanced settings

  1. Open the Start menu by hitting the Windows key. Type task scheduler in the search box, then click on the result to open the app.
  2. Look at the left window pane, then right-click on Task Scheduler Library and select the New Folder option.
    Task Scheduler Windows 11
  3. Give a name to that folder, then click on OK.
  4. Expand the Task Scheduler Library option, then right-click on the folder you created and choose to Create Task.
  5. Set a name and description for the task. Note that you can also change the user or group for which you want to run the task.
  6. On the same window, you’ll have other options to set, like whether to run the program when the user is logged in, whether logged in, or whether you want to run it with the highest privileges.
  7. Once done, click on OK. 

3 Manage Windows 11’s Task Scheduler Triggers

  1. Open the Start menu by hitting the Windows key. Type task scheduler in the search box, then click on the result to open the app.
  2. Look at the left window pane, then right-click on Task Scheduler Library and select the New Folder option.Task Scheduler Windows 11
  3. Give a name to that folder, then click on OK. Then Expand the Task Scheduler Library option, right-click on the folder you created and choose to Create Task.
  4. To specify the triggering condition of the task, click on the Triggers tab, then on the New button.
  5. You can run the task on a schedule, log on, idle, on an event, at task creation/modification, connected or disconnected from the session, etc.
  6. After doing so, click on OK. 

4. Adjust Windows 11’s Task Scheduler Actions

  1. Perform steps one to three of method 3.
  2. To set the task’s action, click on the Actions button, then click on the New button.
  3. You can select whether the action will start a program, send an email, or display a message. Customize the task according to your preferences.
  4. Click on OK to apply the changes.

5. Personalize Windows 11’s Task Scheduler Conditions

  1. Perform steps one to three of method 3.
  2. To adjust the task’s conditions, click on the Conditions tab, then on New.
  3. You can set conditions for idle state, power, and network. Each of them has certain specifications that should be chosen according to your necessities.
  4. Click on OK to apply the changes.

6. Take a look at Windows 11’s Task Scheduler Settings

  1. Perform steps one to three of method 3.
  2. You can personalize settings by selecting the Settings tab, then clicking on New.
  3. In this window, you can adjust additional settings affecting the task’s behavior.
  4. Once done, click on OK, and the task will be created.
Note icon NOTE
If you ever need to edit or delete the task, right-click on it and select Edit or Delete.

Windows 11 problems are usually not so different from the previous OS. So, if you experience issues with this tool, check out what to do if Windows Scheduled Tasks can not properly run on Windows 10.

Even if, like any other app, Windows 11 Task Scheduler can get into specific issues, there are plenty of solutions for each.

If you are looking for ways to enable Task Scheduler History to check information related to tasks, including the date and time of execution or status of the task, check out our guide.

We prepared this article to present its best features. Remember that it will guarantee a digital environment organization and simplify your work.

Are there other curiosities regarding this subject? Do not hesitate to leave a comment in the section below.

8 Best PUP Remover Tools to Clean the Junk Software

Today, we will show you the top Potentially Unwanted Program remover tools for Windows PC. You may be wondering what a PUP is.

What a Potentially Unwanted Program (PUP) is?

So, we will start by defining PUP. A Potentially Unwanted Program is software that gets on your system while installing another program.

The installation prompts request that you install additional bundled components, such as toolbars, programs, adware, etc., on your PC.

However, these unwanted computer programs are bundled on many freeware installers on the WWW. Hence, you need to beware of optional installs as they may be budding PUPs.

To avoid labeling downloadable programs as malware, your antivirus software labeled these unwanted programs as Potentially Unwanted Programs.

How do I get rid of a PUP?

PUPs damage your PC by replicating its process activity; some Windows users reported that PUPs increase on their PCs, especially once connected to the Internet.

These programs can wreck the PC even more than viruses; for instance, a web browser with more than ten PUP toolbars will be slow, impede performance, and even constantly crash.

You can get rid of them manually or by using specialized software. The manual process is laborious, while the software process comes with numerous advantages, including:

  • Auto-detection – You would not have to point the tool towards a direction to work on; it will automatically detect these PUPs.
  • Faster alternatives – Because the tool does all the work for you, it is a fast and convenient alternative. It also will ensure operations are no longer uncompleted because of the PUPs.
  • Multi-threat removal – Other than PUPs, because these apps are often antivirus, they protect your computer all around.

Now we have discussed these benefits, let us look at our top recommendations.

What are the best PUP removal tools?

TotalAV – Catches bundled junk before it settles in

TotalAV antivirus scan

TotalAV flags potentially unwanted programs during installation and in its scans, so toolbars, bundled ‘optimisers’ and other junk do not get a foothold.

If some has already crept in, the tune-up tools help you clear it out: an application uninstaller for the leftovers, a startup manager for the things that launch with Windows, and a browser cleanup tool for unwanted extensions and cookies. Real-time protection and WebShield cover the actual malware side.

  • Flags potentially unwanted programs in scans and on install
  • Application uninstaller for leftover junk
  • Startup manager and browser cleanup
  • Real-time protection and WebShield for real malware
TotalAV

TotalAV

Keep your computer safe from PUP with one of the best antiviruses available.
Check Price Visit Website

Bitdefender Antivirus Plus – Excellent choice for blocking PUPs

Bitdefender is the no.1 antivirus solution on the market, so it’s undoubtedly the best solution to protect you from Potentially Unwanted Programs (PUP).

You won’t need to worry about their removal, as Bitdefender will block them even before they reach your PC. However, you could have a PUP already installed on your PC without knowing.

Usually, the first scan with Bitdefender will reveal the culprits in an event, and you can get rid of it with a single click.

Lastly, Bitdefender, as a top security solution, will protect you from every single possible threat, not only PUPs but also malware, ransomware, phishing, and all other modern scamming techniques.

Important features:

  • Network threat prevention
  • Vulnerability assessment
  • Anti-fraud
  • Wi-Fi security advisor

Bitdefender Antivirus Plus

Bitdefender will remove any PUPs and protect your PC from them as a top security solution.
Check Price Visit Website

Avira – Great free option

Avira is another freeware antivirus that can protect your computer from multiple cyber threats, including these annoying PUPs.

This tool detects as PUAs (Potentially Unwanted Applications) all those which attempt to inject malicious content or request an unjustified amount of personal data.

Additionally, Avira considers PUP any payment processing app that may overcharge the user without explicit consent.

Lastly, products that require unnecessary access rights or inject unwanted advertising on the device not to mention spy or remotely controlled software, all get detected by the Avira radar.

Important features:

  • Antivirus scanner
  • Ransomware protection
  • Device optimization
  • Browsing Security

Avira

Use a great free security protection tool with radar for any Potentially Unwanted Programs.

Malwarebytes – Expert PUP and malware detection

Another Potentially Unwanted Program removal tool you can use is Malwarebytes. Unlike HitmanPro, Malwarebytes is a free utility that will scan your computer for Potentially Unwanted Programs.

Some types of malware can be difficult to identify and remove. But, that’s not something to worry about when using Malwarebytes. Its efficiency is proven against viruses, spyware, ransomware, and not only.

Lastly, we love it because it is straightforward and highly efficient.

Important features:

  • Centralized threat reporting
  • Cleans infected devices
  • Prevention tools
  • Centralized management

Malwarebytes

Get Malwarebytes for advanced malware protection and easily remove all PUPs from your device.
Free Trial Visit Website

Avast Free Antivirus – Great free antivirus and PUP remover

pup remover

Avast Free Antivirus is another excellent solution that can detect any Potentially Unwanted Programs that want to install into your system.

From the Protection category, you can modify the settings for the Core Shields. Also, you can find there a Potentially Unwanted Programs tab.

Also, you will see three options and can choose how the antivirus will treat PUP. And finally, you can choose to be fixed, ask, or ignore them.

Important features:

  • Ransomware shield
  • Core firewall functionality
  • Software updater

Avast Free Antivirus

Easily detect any PUP that tries to enter your system by using Avast’s advanced services.

IObit Uninstaller – Ideal for bundled software detection

pup remover

IObit Uninstaller is a Windows PUP removal tool. This utility program is ideal for removing stubborn software applications, such as bundled applications, and cleans up all its traces afterward.

The program is primarily an uninstaller that improves Microsoft’s standard approach to removing applications.

Lastly, programs, toolbars, and any traces in the registry or browser extensions are all deleted.

Important features:

  • Resolves hidden software permissions
  • Removes uninstallation leftovers
  • Silences disturbing notifications
  • Locates malicious extensions and software

IObit Uninstaller

A trustworthy removal tool as it can remove any stubborn software application with ease.

Zemana AntiMalware Portable – Great mobile integration

pup remover

You can also use Zemana AntiMalware Portable to scan your PC for installed PUPs. Zemana AntiMalware is a mainly free utility program that scans and removes malicious programs from your PC.

However, there is a paid option for $25. You might argue that at a price of only $25.00 per year, Zemana Antimalware is a genuinely excellent piece of software. The Zemana antimalware desktop and mobile apps are available at this low cost.

Finally, with this tool, you can remove PUP from Chrome and other standard browsers.

Important features:

  • Real-time Antivirus
  • Registry startup scan
  • Scheduled scan
  • Anti-Rootkit

⇒ Get ZemanaAntiMalware Portable

Hitman Pro – Best for use with an antivirus

pup remover

HitmanPro is a security tool that scans your Windows PC and removes PUPs from your system. It is not a standalone antivirus program; you can use it alongside your antivirus program.

We also love it because it has an excellent user interface and is pretty easy to use.

Finally, it does not offer protection to the same extent as some of the tools in this guide, but it should suffice if you want a PUP remover.

Important features:

  • Scheduled scan
  • Password dumping protection
  • Webcam protection
  • Remote session protection

⇒ Get Hitman Pro

After using any of the tools above, your PC should now be free of all PUPs, including DNS Unlocker. However, we recommend you reset your web browser to its default settings.

This will altogether remove all the PUPs leftovers on your web browser. In addition, we recommend that you run a full system scan on your Windows PC.

These tools can help you remove OneLaunch malware and other unwanted software, so give them a try.

Lastly, if you are facing PUP issues afterward (which is most unlikely), let us know by commenting below.

How to Stop Windows from Installing Apps Without Permission

Sometimes, it seems that Windows 10 has a will of its own. Many users reported that the OS ignores their custom settings and performs automatic update installs. In this article, we’re talking about how to stop Windows 10 from installing apps.

What apps is Windows 10 installing without permission?

Windows 10 automatically installs apps and gets various software from the Microsoft Store without user consent.

One such example is the Candy Crush game series. Speaking of which, check out this guide if you want to permanently remove the game from your computer.

Indeed, many users reported that their computers got Spotify installed automatically after getting the latest Windows 10 updates.

These programs either come pre-installed on Windows, or they are gradually installed with every new update.

How do I stop Windows 10 from automatically installing suggested Apps?

1. Turn off automatic app updates

  1. Start Microsoft Store.
  2. Select the Account menu and then select App settings.
  3. Under App updates, set Update apps automatically to Off.
  4. Restart your PC for the changes to take effect.

This will stop Windows 10 from downloading apps and significantly update the existing ones you don’t need.

2. Disable silent installs from the Registry

  1. Press the Windows key + R to launch the Run console, type regedit, and press Enter or click OK.
  2. Go to the following path in the Registry Editor: HKEY_CURRENT_USER\Software\Microsoft\Windows\CurrentVersion\ContentDeliveryManager
  3. Now, double-click the PreInstalledAppsEnabled and SilentInstalledAppsEnabled keys and change their values from 1 to 0 (where 1 is for enable and 0 is for disable).

If Windows 10 keeps installing games, after this solution, it will stop. If you encounter any errors after this procedure, just restore the values.

3. Disable consumer features from the Registry

  1. Use the Windows + R key combination to start Run, type regedit, then hit Enter.
  2. Navigate to the following Registry key: HKEY_LOCAL_MACHINE\SOFTWARE\Policies\Microsoft\Windows
  3. Right-click in an empty space on the right pane, choose New, then select Key, and name the new key CloudContent.
  4. Within the new key, right-click on an empty space from the right, choose New, and select DWORD (32-bit) Value. Set the new value as DisableWindowsConsumerFeatures.
  5. Double-click the new DisableWindowsConsumerFeatures value and change the value from 0 to 1 in the Value data box and then click OK.
  6. Restart your computer for the changes to take effect.

This is an efficient mode of how to stop Windows 10 from installing apps, so make sure you apply it.

We also have a useful article on how to prevent users from installing apps in Windows if that is a related issue you’re facing.

4. Block potentially unwanted apps

  1. Click the Windows Start button and select Settings.
  2. Next, select Update & Security.
  3. Choose Windows Security from the left pane and click on App & Browser control from the right.
  4. In the Windows Security window, select the Reputation-based protection settings.
  5. The Potentially unwanted apps blocking feature should be set to On by default, but if it isn’t, make sure you make the change.

This is how to stop unwanted software installation when it comes to potentially unwanted programs that try to force-install.

How do I uninstall forced installed Windows 10 apps?

  1. Right-click the Start button and select Windows PowerShell (Admin).
  2. Paste the following command into the applet and press Enter to run it: Get-appxpackage -allusers *xboxapp* | Remove-AppxPackage
  3. Now, input the following command and press Enter: Get-appxprovisionedpackage –online | where-object {$_.packagename –like "*xboxapp*"} | remove-appxprovisionedpackage –online
  4. As you might have noticed, the commands will erase the Xbox app. If you want to remove other preinstalled apps, replace xboxapp from the commands with the name of the app you want to get rid of.

You might also consider stopping Windows 10 automatic updates; however, we don’t recommend doing that for a longer period.

Some of our readers reported rightfully: Programs keep installing themselves on my computer! Well, now you know how to stop Windows 10 from installing apps and get rid of the ones you don’t need.

There are numerous apps that can be installed without permission, and man are worried about OneLaunch malware, but we tackled that issue in another guide.

If security is an issue, it would be helpful to prevent users from installing third-party apps on PC, and this guide will help you do that.

Npcap OEM: What Is It and Should I Uninstall It

Some users have posted on Microsoft’s support forum about Npcap OEM. They have noticed Npcap listed in Apps & features and wonder what exactly it is.

That’s not surprising, as unrecognized apps/programs can sometimes be viruses, and users always have the urge to uninstall them. So, in this guide, we’ll look closely at what Npcap OEM is used for.

What is Npcap OEM?

The Npcap OEM is a tool for packet capture and network analysis. It has so many benefits, and below are some of its features:

  • Helps to facilitate the capture of raw packets
  • Filters captured packets according to specified rules
  • Gathers statistical information on your network traffic
  • Compatible with WinPcap
  • Can be installed automatically with software that needs it
option

Npcap OEM is a third-party packet-sniffing driver (or library) for Windows platforms. This driver enables software to find the network adapter on your PC.

That library is needed for data capturing (intercepting data packets) on networks for packet analysis. Npcap OEM is available for download at the NMAP.org website.

A free/demo version of the Npcap library and Npcap OEM come with commercial support, regular updates, and redistribution rights. The Npcap OEM license packages are primarily for commercial organizations.

You can download the latest version of the Npcap OEM using the link below.

⇒ Get Npcap

Is Npcap OEM safe?

Npcap is not a virus but can still get installed on PCs without users knowing about it.

That’s because the Npcap library gets installed with software that needs it such as Cisco Packet Tracer and Paessler PRTG Network Monitor.

Therefore, some users might not recognize Npcap when they see it listed in apps.

What software needs Npcap?

Network protocol (or packet) analyzers are the software requiring the Npcap packet-sniffing library. Those applications enable users to monitor network data because they come with Npcap.

With a proper network analyzer tool, users can capture traffic and analyze it with reports and charts.

Wireshark is an example of one network protocol analyzer utility. That open-source software comes with the latest Npcap library version, which gets installed.

Wireshark needs Npcap to capture live traffic on a network. Our packet sniffer software guide provides details for the best network analyzer tools, so be sure to check it.

Is it OK to uninstall Npcap?

If you need to utilize network protocol analyzer software on Windows 10, you should not uninstall Npcap. However, users who don’t need to capture and analyze data packets don’t need Npcap.

So, you can uninstall Npcap if you don’t need any network protocol analyzer software manually or using an uninstaller software.

How do I uninstall Npcap?

  1. Press the Windows key + R hotkey, type appwiz.cpl, and select OK.
    appwiz
  2. Then, right-click Npcap and click Uninstall.
    uninstall npcap oem
  3. Now, press the Windows key + X and select Device Manager.
    device manager
  4. Double-click the Network adapters option and right-click the Npcap Loopback Adapter.
  5. Select the Uninstall device.
    uninstall npcap oem
  6. Finally, check the box for Delete the driver software for this device and click the Uninstall button.
    uninstall button

We have reached the end of this guide. Don’t be alarmed if you notice Npcap OEM on your desktop or laptop. You can easily remove the tool if you don’t need a data packet-sniffing library.

However, make sure not to remove it if you still need any network analyzer tools installed on your computer.

If you are looking for another network performance management software, check our detailed guide for the top options available.

Feel free to share your experience with the Npcap tool with us in the comments below.
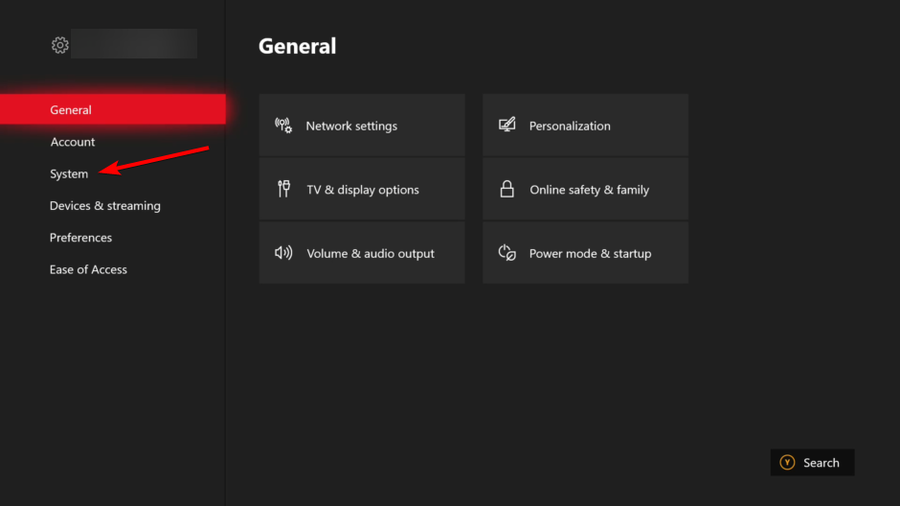
What is Windows 11 S Mode: 2026 Explainer

Windows S Mode is a streamlined version of Windows 10 and 11 designed for better security, performance, and battery life. It runs only apps from the Microsoft Store and restricts use of non-verified software, making it ideal for students or casual users.

But many wonder: Should I switch out of S Mode? Is it too limited? In this guide, we’ll explain what S Mode is, its pros and cons, and when it makes sense to turn it off.


💡 What Is Windows 11 S Mode?

S Mode is a secure configuration of Windows that:

  • Allows only Microsoft Store apps
  • Uses Microsoft Edge as the default browser
  • Blocks PowerShell, Windows Terminal, and Registry access
  • Offers faster boot time and improved battery life
  • Limits exposure to viruses and unverified apps

✅ S Mode is available on both Windows 10 and Windows 11


🔍 Should I Switch Out of S Mode in Windows 11?

You might want to leave S Mode if:

  • You need apps from outside the Microsoft Store (like Chrome, Zoom, VLC)
  • You need access to system tools (Registry, Command Prompt)
  • You work in IT, creative tools, or advanced workflows

For students, seniors, or light users, S Mode is a great default option.


👍 Pros of S Mode:

  • 🔐 More secure (no unauthorized apps or malware)
  • ⚡ Faster startup & better performance
  • 🧘 Distraction-free environment (fewer background tasks)
  • 🔋 Improved battery life

👎 Cons of S Mode:

  • ❌ Can’t install apps from the web
  • ⚙️ No access to Registry Editor, PowerShell, or Command Prompt
  • 🌐 Limited to Microsoft Edge
  • 🧩 Not suitable for power users or custom setups

📌 S Mode vs Windows 11 Home: Key Differences

FeatureWindows 11 S ModeWindows 11 Home
App installationMicrosoft Store onlyAny source
Default browserEdge only (no change)User’s choice
System tools (Registry, CMD)❌ Not accessible✅ Fully accessible
SecurityHighStandard Windows security

How can I turn off S Mode in Windows 11?

1. Via Windows Settings

  1. 1. Click on Start and open Settings.

    windows 11 settings control panel
  2. 2. Navigate to Activation.

    activation windows 11 setting
  3. 3. Look under Switch to Windows 11 Home or Switch to Windows 11 Pro. Here, the name will vary based on the version of Windows 11 you are running.

  4. 4. Select Open Store. Pay attention not to click on the Go to the Store option under the Upgrade Your Edition Of Windows. That’s a different process which will keep you in S mode.

    open microsoft store
  5. 5. On the Switch out of S mode page that will appear in the Microsoft Store, click on the Get button.

    turn off s mode switch
  6. 6. Click the Install button.

  7. 7. Follow the on-screen instructions until your receive a confirmation.

    s mode is turned off windows 11
  8. 9. You can now install apps from outside the Microsoft Store.

  9. If you want to turn off S mode because it has unwanted restrictions, you can easily do so using Windows Settings. This is a built-in menu on your Windows 11 device, that can be accessed in just a few clicks.

Sometimes you might get a message saying Try again later something went wrong on our end. To see how to fix that, move to the next solution.

2. Reset Microsoft Store

  1. Press Windows + I to open Settings, choose Apps from the left, and click on Installed apps.
    installed apps to leave windows 11 s mode
  2. Locate Microsoft Store, click on the three dots next to it and choose Advanced options.
  3. Find the Reset button and click on it.
  4. Again, click Reset in the confirmation prompt, and after the process finishes, reboot your device.
  5. Now try to exit S Mode again.

Once you have disabled S Mode on the device, you’ll be able to use any web browser and download any app that isn’t in the Microsoft Store.

But do remember that you can’t re-enable Windows 11 S Mode in Dell or other devices once you have moved out of it. So, weigh the pros and cons and make an informed decision before you proceed.

And if you choose to opt out of S Mode, here are the best applications for Windows 11 that you should install today!

If you have any suggestions or queries regarding the S Mode, let us know in the comments section below.

Jedi: Survivor pre-orders open and they include Luke, Han, and Obi-Wan cosmetics

Pre-orders for the highly-anticipated Star Wars Jedi: Survivor video game are now open ahead of its confirmed March 17th (or 16th depending on your region) release date.

A Standard and Deluxe Edition are available on Microsoft’s Xbox Series X family of consoles. Pre-ordering either will also unlock an exclusive DLC pack of cosmetics inspired by Star Wars icon, Obi-Wan Kenobi, called the Jedi Survival Cosmetic Pack.

The Jedi Survival Cosmetic Pack includes the Hermit outfit, the Hermit Lightsaber Set, and the Combustion Blaster Set. Star Wars Jedi: Survivor will feature both blaster and lightsaber customisation so these aren’t just basic skins for the weapons but likely a collection of numerous aspects that can be selected or deselected to fully change the appearance of the main weapons.

Star Wars Jedi: Survivor Deluxe Edition also includes two DLC packs with content inspired by Luke Skywalker and Han Solo. The Galactic Hero Cosmetic Pack features the Scoundrel outfit and Rugged BD-1 design plus the DL-44 Blaster Set while the New Hero Cosmetic Pack includes the Luke Skywalker New Hero outfit, the BD-Astro BD-1 Cosmetic, and the Rebel Hero Lightsaber Set.

Here’s what each item looks like:

Star Wars Jedi: Survivor pre-order bonuses

In addition to the Standard and Deluxe Editions, a special Collector’s Edition is also available. This collectible is limited to just 1,500 copies for the Xbox Series X version, will set fans back $299.99, and is expected out after the game’s release.

The Star Wars Jedi: Survivor Collector’s Edition will likely prove popular though as it includes a replica of Cal’s lightsaber, a box to hold it in, and a steelbook.

Star Wars Jedi: Survivor Collector’s Edition

A new trailer featuring Star Wars Jedi: Survivor gameplay footage was also released today. Check it out below:

Are you excited for Star Wars Jedi: Survivor? Let us know which version you’re planning to pre-order in the comments below and then follow us on Twitter for more Xbox news.


The Workbook Cannot Be Opened in Excel Online [Quick Fix]

Excel Online not working or not opening files is a common problem among Windows 10  users, but it has general workarounds that can resolve it.

However, for more specific issues, one would have to state the exact error they receive when working with the program.

As an example, multiple users reported a specific issue when they couldn’t open the workbook on Excel online because it exceeds a certain memory limit.

Other times, the issue appears if someone edits a workbook in Excel Online and then leaves the document open without making any additional changes for up to 6 hours. Plus, it might be down to worksheet protection or too many styles.

Irrespective of the cause, this guide contains proven fixes to solve the issue.

Why is Microsoft Excel Online not responding?

The Microsoft Excel Online not working is mostly down to browser issues. Also, it can be caused by the wrong settings on your workbook.

➡️ Below are some of the most prevalent causes:

  • Accumulation of corrupt browser data
  • Corrupted workbook files
  • Wrong browser settings
  • Large file size

For instance, you may encounter different error types like this: Sorry, we can’t open your workbook in Excel Online because it exceeds the 100 MB file size limit.

Another factor that causes the error can be that the workbook cannot be opened or repaired by Microsoft Excel because it’s corrupted.

Thus, you should first check these possibilities of Excel Online issues to identify the specific cause in your case.

How do you fix the Workbook Cannot Be Opened?

1. Use a different browser

If Excel Online is not working on some of the popular browsers like Chrome and Safari, it may be a good option to use a different browser. And there is no better alternative than Opera.

It’s a great error-free browser with amazing features that allow you to customize it based on your needs and help you save a lot of time.

It’s fast, reliable, and emphasizes your online security. The free VPN and built-in adblocker will keep you safe and protected. Your browsing will be much quicker due to the adblocker that will keep unwanted ads away from you.

The Workspace feature, Integrated messenger for social media, Search tab, and bookmarks management are great tools that come in handy, especially when you have a lot of tabs opened.

Opera One

Change to a reliable browser with a fast connection and a flexible easy-to-customize interface.

2. Reset the browser and clear the cache

  1. Start Internet Explorer.
  2. Go to the Tools menu.
  3. Click Internet Options.
  4. Next, click the Advanced tab.
  5. Click Reset or Restore Default.
  6. Under the Reset Internet Explorer Settings dialog box, click Reset.
  7. Select Delete personal settings.
  8. Click Close and exit.
  9. Restart Internet Explorer.

This is a general fix for the Excel Online not working or loading issue and can be applied to other browsers like Chrome, Safari, and Firefox. Thankfully, most of these browsers have in-app options for resetting them.

Lastly, clearing your browser cache and cookies is a recommended fix if Excel Online is not working on Box.

3. Try Two-Step Verification

how to sign in in microsoft 365

Two-step verification protects you by making it hard for anyone else to log in to your Microsoft account using two identification methods, including your password and contact or security information.

Whether someone else gets your password, they won’t be able to access your account without your security information. This is why having different passwords on all your accounts is important.

To set up this two-step verification, you will get a security code sent to your email, SMS via phone, or an authenticator app each time you log in on a device that is not trusted.

When this is off, you only need to verify your identity using the codes at different times, which is risky to your account.

4. Set Default File opening behavior

    This is a worthwhile solution to fix this Excel online workbook issue because it helps you open the file with a different method. See the steps below to apply it on your PC.

  1. 1. Go to the document library page where the Excel files are stored.

  2. 2. Click the Library tab.

  3. 3. Under the Settings group, select Library settings.

  4. 4. Go to the Document Library settings page.

  5. 5. Choose Advanced settings.

  6. 6. Under Advanced settings, find the Opening document in the browser.

  7. 7. Select Open in the browser and click OK.

Note: If you cannot find the Library tab or it is grayed out, ask your admin to check the library permission. To do this:

  1. Log in with an admin account.
  2. Go to the library.
  3. Click library.
  4. Click library permission.
  5. Verify the permission showing for the user who is experiencing the problem with Excel Online

5. Download file and re-save to drive

If Excel Online is not working or not opening files, download the file and try to open it using the Excel desktop application.

If this helps, save the file again, upload it to OneDrive and see if it helps fix the problem.

You can also ensure that you close all documents as you finish using them to avoid such issues and ask anyone you share the documents with to do the same.

6. Check the size of your file

Working with a large file is a potential complication on Excel Online as it may not be supported. Also, it will take too long to open, which may cause Excel Online not to work or to open files.

Usually, five to ten seconds in, your file will fully open or calculate in Excel when you download it, which may be too complex to handle. This is why you see prompts like please wait, we are still loading the workbook or couldn’t open the workbook while trying to use Excel Online.

You’d have to make the file smaller or less complex to make it work. Depending on your calculation needs, you can get the file to open by changing the calculation method to manual.

7. Try a different office suite

If you are still Excel Online is still not working on Sharepoint due to some issues with MS office after trying the fixes above, we’d recommend you give WPS Office a try. It is a great free alternative to Excel Online.

WPS Office allows you to synchronize your documents at any moment, and any change you make on your devices will be applied automatically.

Moreover, WPS Office is suitable for Windows, Mac, Android, Linux, and IOs. You can perform any editing and open all types of Word, Excel, and PDF documents, all in just one place.

It has alternatives for each tool incorporated in Microsoft Office, so you can use it to create and manage text documents, presentations, and spreadsheets.

⇒ Get WPS Office

Why am I seeing the sorry, we can’t open your workbook in Excel Online because it exceeds the 50MB file size prompt?

This error occurs because the workbook you are trying to open exceeds the file size limit in Office 365 subscription. To open the file, you need to reduce the workbook’s file size.

Also, you can open the file on the Excel Desktop client without reducing it. But the best option for ease of access is to reduce the size.

The Excel for the web not working issue can be annoying, as it can reduce your productivity considerably. Fortunately, it is not the most difficult issue to fix, as shown in this article.

Are you facing other issues like Excel cannot add new cells? Check our extensive guide on the topic to solve the problem for good.

Feel free to let us know in the comments below if any of the solutions in this guide helped you solve the issue.

Excel Crashes When Printing: 5 Quick Tips to Fix It

Microsoft Excel is a popular spreadsheet application with powerful data visualization and analysis tools. However, multiple users have reported Excel crashes while printing and Excel freeze when printing issues on their Windows devices.

This issue usually occurs if the printer drivers are outdated or if the Microsoft office files are corrupted. Many users have reported similar issues in the Microsoft community.

This is the latest version of Windows 10 and the latest versions of Word and Excel with an Office 365 Subscription.
Every time the Print screen is opened, either manually or by Ctrl+P, the program freezes and crashes.

Why does Excel crash when I try to print?

First of all, Excel crashes when trying to print may appear for multiple reasons that have to do with the Microsoft Office app itself or even with your Windows 10 operating system.

  • The printer in-use is set on pause.
  • Your printer drivers are out-of-date or corrupted
  • Due to add-ons included in your Excel program
  • The Excel version is not updated to the latest version

If you are also troubled by this issue, here are a couple of troubleshooting to fix Excel crashing when printing problems.

What to do if the Excel freezes or crashes when printing?

1. Update Microsoft Office

  1. Check if your Microsoft Office program has any pending updates. Microsoft releases updates fixing bugs in the program, so make sure it is up to date.
  2. Launch any of the Microsoft Office apps.
  3. Click on File and click on Account.
  4. Click on the Update Option and select Enable updates if it is not already enabled.
    Excel hangs while printing
  5. Again click on Update Options and select Update Now.
  6. Microsoft Office will check for any pending updates and download it. Go through the installation process.
  7. Once the update is installed, launch the Excel app again and check if the print functionality is working.

2. Start Excel in Safe Mode

    It’s very probable that accessing printer Excel freeze can happen due to corrupted files. Thus, open the program in Safe Mode to fix it.

  1. 1. Press and hold the Ctrl key on your keyboard and then click on the Excel icon.

    Excel freezes when printing
  2. 2. Confirm safe mode action when prompted.

  3. 3. Try to print any document and check if it goes through.

  4. 4. If the print job is successful, you may have a third-party app causing issues with the Excel program.

  5. 5. Check your computer for recently installed apps or add-ons for Excel and uninstall any suspicious app.

Starting the Excel app in Safe Mode can help you identify if the problem is with the program or third-party app.

3. Repair the corrupted workbook

  1. Open the Excel app.
  2. Click on File and select Open.
    Excel crashes while printing
  3. Navigate to the location where the workbook is located and select it.
  4. Click the drop-down button beside the Open button and select Open and Repair.
  5. This should resolve any issues with the Workbook and allow for printing.

4. Uninstall and reinstall the printer driver

  1. You can uninstall the printer from the Device Manager or Settings. 
  2. Type Device Manager in Windows Search bar 
  3. In Device Manager navigate to Print queques and select Uninstall device
    Excel freezes when printing 
  4. Restart your PC to reinstall the driver
  5. Reinstall the printer and check if the Excel crashes while printing error is resolved.

If the issue is with your printer, uninstalling and reinstalling the printer can resolve the issue.

In order to find your drivers more easily and install them accordingly, you can use a driver update third-party solution.

⇒ Get Outbyte Driver Updater

5. Repair Microsoft Office

  1. Press Windows Key + R to open Run.
  2. Type control and click OK.
  3. Go to Programs > Programs and Features.
    Excel crashes while printing
  4. Select Microsoft Office and click on Change.
  5. From the Repair screen, first, select Quick Repair and click Next. If that does not work, select Online Repair and try again.

So these are the best tips to help you fix Excel crashing issue while printing the documents. In case you have further issues, our Excel keeps crashing guide should be able to help you.

Do let us know which fix worked for you in the comments.

Webex Microphone is Not Working: 5 Ways to Fix It

If you are in a video conference on Webex, and your microphone is not working; then you are not alone. This issue is more common than you think and can be fixed easily.

In this guide, we will discuss all the available fixes to resolve this sound problem after discussing the causes.

What causes the Webex microphone is not working issue?

There could be various reasons for this audio-related problem. Some of the popular ones are: 

  • Outdated audio driver – If your device’s audio drivers are obsolete, you may face audio problems, such as the microphone not working.
  • Webex doesn’t have the necessary permission – The issue can occur if the Webex app doesn’t have permission to access your device’s microphone.
  • Webex settings are altered – If you have made any changes to the audio settings on the Webex app, check them; these can also cause an issue.
  • Check the physical connection – If your USB port is not working correctly, your headset connected via it will also not work properly. Unplug the headsets and plug them into another port.

What can I do to fix the Webex microphone is not working?

Before diving into detailed troubleshooting, make sure you check these quick fixes to resolve the issue: 

1. Verify Webex has the necessary permissions

1.1 Check permission from Windows Settings

  1. Press Windows + I to get Settings.
  2. Go to Privacy & Security, scroll to App permissions and click Microphone.Microphone not working Webex 1
  3. Check if the Microphone access is enabled for your computer. If not, then enable it.
  4. Ensure all the necessary apps have access to the microphone.

1.2 Check browser settings for permissions

  1. If you are using a browser to attend the meeting, open the browser you use.Microphone not working Webex 2
  2. Go to the Webex meeting page, click on the Padlock icon and check if the toggle for the Microphone is turned on.

2. Enable the automatically adjust the volume feature

  1. Launch the Webex app. Go to on Profile icon, and click Settings.Microphone not working Webex 3
  2. Select Audio from the left side of the window.
  3. Put a checkmark beside Automatically adjust volume.Webex options 3
  4. Click Save.

3. Change Webex audio settings

  1. On the app, go to Profile, then click the Settings icon.
  2. Go to Audio, and under the Microphone option, select the desired audio device from the dropdown.Webex Options 2
  3. Click Save.

4. Update drivers

4.1 Update drivers manually

  1. Press Windows + R to open the Run window.
  2. Type devmgmt.msc and press Enter to open Device Manager.Device Manager RUN COMMAND
  3. Go to Sound, video and game controllers, and expand it.
  4. Locate, right-click the audio driver, and select Update driver.Update driver
  5. Follow the on-screen prompts to complete the process.

4.2 Use a third-party tool

Keeping drivers up to date is essential for the smooth functioning of your computer. However, doing it manually can be risky and time-consuming. Therefore, it is advised to use a third-party tool like Outbyte Driver Updater. This driver updater can swiftly scan and update drivers in a few clicks. Follow these steps to update drivers: 

  1. Download and install Outbyte Driver Updater.
  2. Click Scan and let the tool find the outdated drivers.
  3. Once the scan is done, select the driver, and click Update.Outbyte Driver Updater 2
  4. The tool will download the latest compatible version of the driver.
  5. Click Install and follow the on-screen instructions to complete.

Outbyte Driver Updater

There is no faster and safer way to update your drivers than by using a specialized tool.
Free Trial Download Now

5. Troubleshoot the microphone

  1. Press Windows + I to get Settings.
  2. Go to System, then click Sound.Sound
  3. On the next page, under Input, click Microphone Array.Sound Settings
  4. Under Input settings, go to Test your microphone, and click Start test.Microphone settings

So, these are methods you can use to fix the Webex microphone not working. Try them and let us know which worked for you in the comments below.

Cannot Print From Excel Not Enough Memory: How to Fix It

If you encountered the error Not enough memory when printing from Microsoft Excel, you are not alone.

This error occurs when you’re trying to fill or copy different formulas on a huge worksheet area, or if the worksheet is extremely large.

The error message received in this case will show in different formats: Your file could not be printed due to an error there may not be enough memory available.

Why does Excel say not enough memory when printing?

Firstly, the specific reason for this error occurring is hidden in the way Microsoft Excel has been built or due to the next factors:

  • There are other applications that take too much RAM memory.
  • Your printer’s drivers are not properly installed or are out-of-date.
  • The printer device is not set as default on your computer.
  • An exceeding volume of data or formulas is copied into your Excel spreadsheets.

Every instance of Excel is limited to 2 GB (gigabyte) of memory, and also 32,760 source cells when you’re using a smart fill option.

Depending on the specific action you’re trying to perform, both or one of these limitations will cause the error mentioned above to appear.

How do I fix the Not enough memory for Excel error?

1. Update or reinstall your printer driver

    In case you want to escape from the Excel printing not enough memory error, you should update your printer drivers to make sure it’s not the cause for the issue.

    1. Open Device Manager.
    not-enough-memory-excel
  1. 2. Next, expand the Print queues section.

    not-enough-memory-excel
  2. 3. Right-click on your printer and select Update Driver.

    not-enough-memory-excel
  3. 4. Pick the Search automatically for drivers option.

    not-enough-memory-excel
  4. 5. Wait for the process to complete and restart your PC.

The Excel there is not enough memory to complete this action error should be fixed after updating the driver.

If your driver is already updated and the Excel memory error is still happening, see the next solutions to resolve it fast.

However, it’s more efficient to check for outdated drivers using a professional driver solution. This way, you can scan your PC for problematic drivers, detect them and proceed to update all of them instantly.

⇒ Get Outbyte Driver Updater

2. Close programs running in the background

  1. Open Task Manager from your Windows Search.
    not-enough-memory-excel
  2. Go to Processes to see all your running programs.
  3. Click on the Memory column to filter the most draining apps.
    not-enough-memory-excel
  4. Right-click on the high-consuming apps and hit End Task.
    not-enough-memory-excel
  5. Close the window to Save.

3. Set your printer device as the default

  1. Search for Printers and Scanners.
    not-enough-memory-excel
  2. Scroll down and uncheck the Let Windows manage my default printer.
    not-enough-memory-excel
  3. Select the Manage option to set your printer as the default.

In today’s how-to guide, we discussed the best methods to apply if you’re working with a big MS Excel file and are stopped by memory or cell limitations.

Please tell us if this guide has proven useful in your case. You can do so by using the comment section below.

VPN Works on Your Phone But Not on a Laptop? Here’s 5 Fixes

VPNs usually support all popular desktop and mobile OS, and some can even be installed on routers. 

That’s why it can be frustrating when you can’t get service on your laptop when everything’s fine on your mobile device. 

But don’t worry; we have several quick and easy fixes for that. So, keep reading to learn how to resolve one of the common VPN connectivity issues.

Why is my VPN not working on my laptop?

Let’s explore some of the possible causes:

  • Blocked ports — A port is a virtual location where specific data passes through. VPNs tend to work with 443 and 1194. If your ISP blocks the port needed to transmit data to a secure tunnel, you won’t be able to establish an encrypted connection.
  • Firewall or antivirus interference — These programs exist to disable apps considered harmful to the device. If they see your VPN as a threat, they won’t let you establish a secure connection. You can try to run it with your security programs disabled to test if that solves the issue.
  • Misconfiguration or unsupported OS — Most VPN vendors have dedicated apps for the major desktop OS. However, if your laptop runs a less popular alternative, you’ll have to explore other unconventional setup methods. OS version recency is important too, as your VPN may not support outdated editions.
  • Multiple VPNs in use — If you have other similar apps installed on your laptop, some of them may automatically run at startup and mess with each other’s connection.
  • Outdated software — VPN vendors release new app and browser extension versions to fix known vulnerabilities. If your app works on your phone but not on a laptop, it might be an indication that you haven’t updated your software.
  • Server downtime — VPN servers are specialized computers subject to routine maintenance. That’s why they can be out of service at times.
  • Split tunneling exceptions — Generally, you can select which traffic you don’t want to go throught the encrypted connection. So, if you changed your service’s settings, you may have created exceptions you forgot about.
  • Maxed-out device limit — VPNs usually place a cap on the number of devices you can protect at a time. Typically, it ranges from five to ten connections, including browser add-ons. If you exceed that limit, your most recent connections won’t work.

What to do when a VPN works on your phone but not on a laptop?

If none of the troubleshooting suggestions above helped your issue, it’s time to consider these fixes:

1. Check your base internet connection speed

If you don’t get Internet service only on your laptop, the problem is likely with that particular device.

But when you get no connection or slow download speed on all devices, your ISP may be to blame.

Here’s how to test your Internet connection:

  1. Go to speedtest.net.
  2. Click Go.
Internet speed test
  1. See the results.
Internet speed test results

If you experience a bad connection, it’s best to contact your ISP or consider changing your provider entirely.

2. Connect to a different VPN server location

Using ExpressVPN as an example, try this when you can’t establish a VPN connection or if you get a message that the server is banned.

  1. Click the hamburger icon for Settings.
ExpressVPN app settings
  1. Go to VPN Locations.
  2. Connect to another server location.
ExpressVPN US server locations
  1. Try accessing the webpage you want once the connection is successful.
ExpressVPN connected to a US server

ExpressVPN

Ensure you get the best service on all your devices by choosing ExpressVPN.
Check Price Visit Website

3. Try another tunneling protocol

Not all VPN protocols work well for every use. That’s why it’s recommended to select a different one when struggling to establish a connection.

  1. Click the hamburger icon for Settings.
  2. Choose Options.
  3. Go to Protocol.
ExpressVPN app protocol settings
  1. Choose the one you want from the options.
ExpressVPN protocol options
  1. Click OK.
  2. Connect to your chosen server location.

4. Delete cookies and cached files

To send your Chrome traffic through an encrypted tunnel with a clean slate, follow these steps:

  1. Launch the browser.
  2. Press Ctrl + H to go to History.
  3. Choose Clear browsing data.
Clear Browsing data in Google Chrome
  1. Go to the Advanced tab.
  2. Leave only the Cookies and other site data and Cached images and files boxes checked.
Clear Cookies and other site data and Cached images and files
  1. Click Clear data.

5. Test for IP and DNS leaks

To catch your VPN if it’s failing to hide your real location and online activity, do this:

  1. Click the hamburger icon for Settings.
  2. Go to Help & Support.
  3. Choose IP Address Checker, DNS Leak Test, or WebRTC Leak Test to determine whether there’s leakage.
  4. See the results.
Use IP Address Checker, DNS Leak Test, or WebRTC Leak Test

Conclusion

Desktop VPN connection issues are not uncommon, but there is always a cause for them you can fix.

So when your VPN works on your phone but not on a laptop, check our detailed guide to troubleshoot the problem. Above, you’ll find step-by-step instructions for any situation. 

Let us know how it worked out for you in the comments section.

FAQ

Can I use the same VPN on my phone and laptop?

Yes, you can, as long as you don’t exceed your VPN’s simultaneous connection limit.

Most VPNs have dedicated apps for all major mobile and desktop systems. But if your VPN doesn’t support your laptop’s OS, you may be able to set it up on your router.

How do I get VPN to work on my laptop?

You can fix any VPN troubles on your desktop device by:

  • Having a sufficient base internet speed for transmitting encrypted traffic data.
  • Making sure that the ports it requires are not blocked.
  • Stopping your firewall or antivirus from interfering with it.
  • Choosing the right installation method based on your device’s system.
  • Following your VPN vendor’s setup guide correctly when you manually configure it.
  • Not running multiple VPNs at the same time.
  • Keeping your VPN app or browser extension up-to-date.
  • Choosing a server that isn’t under maintenance or banned by the site you’re visiting.
  • Double-checking your VPN’s split tunneling exceptions.
  • Staying within your VPN’s simultaneous device connection limit.
  • Deleting cached location data on your browser.

How do I transfer a VPN from my phone to my laptop?

You can install and use most VPNs on multiple devices at the same time.

So, you should download the appropriate app for your laptop’s system and leave the one on your mobile device untouched.

However, if the VPN works on your phone but not on a laptop, you should check our recommended fixes above.

How to Reinstall Windows 10 After Hard Drive Replacement?

If your computer has undergone hard drive replacement and you are wondering how to reinstall Windows 10, then you are at the right place. 

This guide will discuss step-by-step processes to reinstall Windows using a USB flash drive. Let’s begin! 

What can I do to reinstall Windows 10 after a hard drive replacement?

Before diving into the detailed steps, make sure you check these things: 

Once you have checked these things, follow all the steps to get Windows 10 installed.

1. Create a bootable drive

  1.  Go to the Windows website. Select Windows 10 from the list.
  2. Under Create Windows 10 installation media, click Download Now.Download now
  3. Double-click on the MediaCreationTool22H2.exe file to run the setup. Then, click Yes on UAC prompt.
  4. On the setup wizard, click Accept to proceed.Windows 10 setup - How to Reinstall Windows 10 After Hard Drive Replacement
  5. Select Create installation media (USB flash drive, DVD, or ISO file) for another PC. Click Next.Setup 3
  6. Select Language, Edition and Architecture on the next page and click Next.Setup 4
  7. Now select USB flash drive, and click Next. USB flash drive
  8. It will list your USB drive; if it is the one you want, click Next. If not, click Refresh drive list, select the drive, and click Next. USB flash drive
  9. The setup will download Windows; it might take a while.
  10. Once completed, you will get Your USB flash drive ready prompt. Click Finish.USB drive ready

2. Install Windows on the new hard drive

Tip icon Tip
If your computer doesn’t boot from the flash drive, you need to enter BIOS and change the settings to allow the computer to boot from USB.
  1. Insert the flash drive into your computer with the new hard drive and turn it on.
  2. Select the language to install and other details on the setup window, then click Next.Install page
  3. Click Install Now to start.
  4. The following window will ask you to enter the product key. Enter the product key, or click the I don’t have a product key option if you have a digital license.I don’t have a product key
  5. On the next page, click Accept. Click Next.
  6. Now choose Custom: Install Windows only(advanced) for a clean install.Custom install
  7. Choose the unallocated space and click Next.unallocated space
  8. The setup tool will install Windows OS. This might take several minutes; you must wait for the process to finish. 

So, these are steps to reinstall Windows 10 after hard drive replacement. Follow these steps closely to install Windows successfully.

Please let us know if these steps worked for you or if you have any other actions that deserve to be on the list in the comments section below.

Windows Store Get Button Not Working [Solved]

The Microsoft Store app is a program that can have issues like any other program. Such would be the case with users that have reported that the Windows Store Get button is not working:

Well, as the title says, the get button doesn’t work, it just reloads the page. I was trying to download a OCR app because i need to copy a lot of text off a image. I really hope there’s a solution that doesn’t require me to edit the registry and restart, can’t do that every time windows 10 goofs, i have lots of programs open and work to do…

Since the Microsoft Store app is an integral part of using Windows 10, any issue that prevents you from using it can be quite troublesome. That is why we’ve created a step-by-step guide that will show you just how to fix this issue.

cmd wsreset

How do I fix the Microsoft Store button issue in Windows 10?

1. Sign in and out of your Microsoft account

  1. Open the Microsoft Apps Store
  2. Click on your profile picture on top right and sign-out
  3. Sign-in again.

2. Run Windows App Troubleshooter

  1. Press Start
  2. Click Settings
  3. Select Update & security
  4. Click Troubleshoot
  5. Scroll down to the bottom and click Windows Store Apps
  6. Click Run the Troubleshooter

3. Reset Windows Store through Command Prompt

  1. Type cmd in Windows Search box
  2. Right-click on Command Prompt
  3. Select Run as Administrator
  4. Type WSreset.exe and click Enter
  5. Reboot your computer

4. Re-register all Store apps

  1. Press Start
  2. Right-click on Windows Powershell
  3. Open it with Administrator rights
  4. Copy the following lines from below and right-click in Powershell to paste:
    • Get-AppXPackage -AllUsers | Foreach {Add-AppxPackage -DisableDevelopmentMode -Register “$($_.InstallLocation)AppXManifest.xml”}
  5. Press Enter
  6. Restart your computer

5. Reinstall the Microsoft Store App

  1. Press Start
  2. Right-click on Windows Powershell
  3. Open it with Administrator rights
  4. Copy the following from below and right-click in Powershell to paste:
    • Get-AppxPackage -allusers *WindowsStore* | Remove-AppxPackage
    • Get-AppxPackage -allusers *WindowsStore* | Foreach {Add-AppxPackage -DisableDevelopmentMode -Register “$($_.InstallLocation)AppXManifest.xml”}
  5. Press Enter
  6. Reboot your PC

By following these steps, you should be able to fix any issue related to the Microsoft Store App’s Get button not working.

Keep in mind that if you follow any of these steps, the data of your already installed app will not be affected, nor will you need to re-download them again.

If you want more information about fixes for common Microsoft Store issues, leave us a message in the comment section below.

RELATED ARTICLES YOU SHOULD CHECK OUT:

What is the Windows Store?

Starting with Windows 8 and onward, users could download specialized and lightweight programs called Apps via the Windows Store. These Apps can vary in functionality, from simple video players so system utility tools.

We hope you managed to fix the Windows Store Get button not working issue on your PC. Let us know how it went in the comments section below.

Microsoft Store Downloading But No Progress [Solved]

The Microsoft Store, just as everything Windows 10, occasionally oscillates between fluent workflow and a sudden problem that reduces system usability and makes you want to cry.

The bug we’re referring to today causes apps to get stuck while downloading from the Microsoft Store. Basically, the Microsoft Store is downloading an app, but no progress is being shown.

Namely, it seems that the issue affects all apps and that it was resolved with updates but it’s still present with isolated users. Nonetheless, if you’re in that group, make sure to check the enlisted solutions and address the issue.

How can I fix the Microsoft Store downloading but no progress issue?

1. Run the Windows Troubleshooter

When Windows internal issues occur, the first advised step is to turn to Windows Troubleshooting tools. Since Microsoft Store is an essential and unremovable part of Windows 10, the specialized troubleshooting tool should help you in resolving this problem.

Once you run the troubleshooter, it should restart related services, resolve the Microsoft Store stuck on starting download issue, and you’ll be able to continue with the process.

If you’re not sure how to do it, make sure to follow the instructions below:

  1. Press the Windows key + I to open Settings.
  2. Open Update & security.
  3. Choose Troubleshoot from the left pane.
  4. Scroll to the bottom and highlight Store Apps Troubleshooter.
  5. Click on Run this troubleshooter and follow the further instructions.windows store app download stuck

Once the pre-installed troubleshooting tool finishes scanning, your pending downloads should proceed with downloading. On the other hand, if you’re still stuck, make sure to continue with the steps below.

If you’re having trouble with the troubleshooter itself, here’s how to have it up and running in no time.

2. Reset the Store’s cache

As you might know, the Microsoft Store is quite similar to other third-party apps in Windows 10 platform. One of the main differences is that you can’t reinstall or repair it as you would do with other apps.

Nonetheless, for the sake of troubleshooting possible issues, Microsoft developers implemented one command that enables you to restart the Store and clean its cache.

By doing so, you’ll, hopefully, resolve the issue at hand. If you’re not sure how to run this tool in the elevated Command Prompt line, follow the steps below:

  1. In the Windows Search bar, type CMD.
  2. Right-click on Command Prompt and choose to Run as administrator.
  3. In the command line, type the following command and press Enter:
    • wsreset.exe
  4. The procedure is swift and you can immediately close Command Prompt and start the Microsoft Store again.windows store app download stuck

Unable to run Command Prompt as administrator on Windows 10? Check out this step-by-step guide.

As a quick reminder, if you don’t clean your Store cache regularly, Microsoft Store won’t open smoothly or some apps like the Realtek Audio Console are missing from the store. Do check this complete troubleshooting guide to fix the problem for good.

3. Sign out/ Sign in with Microsoft account

Some users stated that the problem with forever-pending apps in the Microsoft Store ended after they signed out and then signed in again with their Microsoft account.

Is it a bug or something else, we can’t be sure. However, it’s an obvious workaround, so make sure to give it a try.

Follow the instructions below to log out and sign in again in the Microsoft Store:

  1. Open the Store.
  2. Click on your Profile icon in the upper right corner.
  3. Click again on the active account and choose Sign Out.windows store app download stuck
  4. Close the Microsoft Store and start it again.
  5. Click on the blank icon and select Sign In.windows store app download stuck
  6. Enter your credentials and look for improvements.

4. Check time, date and region settings

Time, date and region are frequently overlooked, even though they play an important role in the Microsoft Store  Your task here is t0 make sure that:

  • Time and Date are properly set.
  • Your country and region are set to the United States.

In order to confirm both, follow the instructions below and we’ll be golden:

  1. Press Windows key + I to summon the Settings app.
  2. Open Time & language section.
  3. Select Date & time from the left pane.
  4. Enable the Set time automatically feature.
  5. Enable the Select time zone automatically feature.windows store app download stuck
  6. Now, choose Region & language from the same pane.
  7. Change Country or region to United States.windows store app download stuck
  8. Close Settings and look for changes in the Store.

5. Re-register the Microsoft Store

The re-registration of the Microsoft Store is analog to the reinstallation of any third-party app. With this procedure, you’ll be able to start from scratch, and this time, hopefully without download issues.

Additionally, re-registering won’t affect installed apps or their individual settings, so you won’t need to worry about that.

Follow the instructions below to re-register the Microsoft Store with PowerShell:

  • Right-click on the Start button and open PowerShell (Admin).
  • In the command line, copy-paste (or type) the following command and press Enter:
windows store error 0x87AFo81

"& {$manifest = (Get-AppxPackage Microsoft.WindowsStore).InstallLocation + 'AppxManifest.xml' ; Add-AppxPackage -DisableDevelopmentMode -Register $manifest}"

  • Restart your computer and look for changes in the Microsoft Store.

We reckon that this is the final solution in regards to the Microsoft Store and your problem with download stuck should be long gone.

However, sometimes the problem is hidden in the bigger picture, or in this case – in a system error. For that reason, make sure to check the final two steps and address the issue with either system file corruption or Windows Update services.

6. Run SFC scan

When it comes to system error troubleshooting, the best-suited tool for the job is System File Checker. There are a dozen different reasons why a particular system file gets corrupted.

And a dozen more negative effects corrupted or incomplete system files can have on the system behavior.

Luckily, SFC is a built-in tool that runs via an elevated Command Prompt and you can employ it by following the steps below:

  1. In the Search bar, type CMD, right-click on Command Prompt, and Run it as administrator.
  2. Type the following command in the command line and press Enter:
    • sfc /scannow
  3. The SFC utility tool will scan for system errors and resolve them accordingly.

If the Microsoft Store downloading but no progress issue is still there, jump to the next solution.

7. Restart Windows update services

Finally, if none of the previously recommended solutions got you going, there’s still one final solution. This is a usual workaround used in Windows Update issues.

Since this problem might as well be closely related to updating features, it should help you address the downloading problem, too.

Follow the instructions below and you should be able to resolve your problem:

  1. Type services.msc in the Search Bar and open Services.
  2. Navigate to the Windows Update service, right-click on it and click Stop.windows store app download stuck
  3. Now, navigate to C:Windows and locate SoftwareDistribution folder.
  4. Right-click on it and rename it to SoftwareDistributionOLD or any other name.
  5. Now, get back to Services and start the Windows Update service again.
  6. Get back to the Store and look for changes.

If you ever encounter the Microsoft We’re Having Trouble Processing Your Payment error, check out our dedicated guide for a quick fix.

That should do it. The Microsoft Store downloading but no progress being shown issue should be gone.

We certainly hope this article was informative and helpful. In addition, if you have questions or suggestions, make sure to tell us in the comments section below.