As it happens, the experience has already started shipping to some users as part of Microsoft’s latest update to the Stable Channel, Microsoft Edge version 111.0.1661.44. According to Microsoft:
New Microsoft Edge PDF experience policy. As part of the Adobe and Microsoft collaboration to re-envision the future workplace and your digital experiences, we are natively embedding the Adobe Acrobat PDF engine into the Microsoft Edge built-in PDF reader, with a release scheduled in March 2023.
We invite you to check out Microsofts’s full changelog for more details. Be sure to also check out our separate post where we share nifty tips and tricks highlighting how you can use Adobe Acrobat in Microsoft Edge such as converting your screenshots into PDFs, combining multiple files into a single PDF, and more.
Microsoft Edge should auto-update to the latest version, but if it does not, you can trigger it manually. Just head to the browser’s menu, choose Help and Feedback then About Microsoft Edge and wait for the update to download, and then restart.
Earlier this week, Microsoft Edge 111 hit the Stable Channel featuring a copilot designed to boost your productivity and efficiency by providing intelligent suggestions and insights based on the context of the web page and the user’s goals.
AWS (Amazon Web Services) is one of the most popular cloud storage services that make storing and retrieving files easy.
However, just like all the cloud platforms, it is not free from errors, and one of the common ones is an uploaded file not showing up in the S3 bucket.
In this guide, we will discuss ways to fix the issue right after talking about the causes. Let’s start!
What causes the AWS S3 uploaded file not showing issue?
There could be various reasons for the error message to come up; some of the common ones are mentioned here:
Incorrect Permissions – If the file is set to private, it may not be accessible. You must ensure that the proper permissions are set for the file.
Incorrect object key – If the object key used to upload the key is wrong, the file may get uploaded to a different location in the bucket, which makes it difficult to locate, hence the error.
Bucket policy – A bucket policy may prevent the object from being displayed. If the bucket policy doesn’t allow the object to be accessed or listed, it may not appear.
Object ACL – If the object access control list is not set correctly or doesn’t have correct permissions; you might get this error.
Wrong region – If you selected the wrong region, the uploaded file might not appear. Make sure you have set the correct region to access the file.
What can I do if the AWS S3 uploaded file not showing?
Before moving to the actual troubleshooting steps, make sure you go through these preliminary checks:
Check if the file type is supported.
Make sure the file is not too large.
1. Check the object key
The object key is the unique identifier of an object stored in an S3 bucket. If the object key used to upload the file is not correct, the file may get uploaded to a different location in the bucket, making it hard to locate. To fix this, you can follow these steps:
Double-check the object key used to upload the file to the S3 bucket. Then, use the correct object key to locate the file in the bucket.
Also, use the AWS CLI or SDKs to query the bucket for the object key.
2. Modify the bucket policy
If a bucket policy prevents the object from being displayed, you need to modify the policy to allow the object to be listed and accessed. To fix this, follow these steps:
Go to the S3 console and select the bucket where the file is stored. Next, click on the Permissions tab.
Navigate to Bucket Policy and click Edit.
Change the policy to allow the object to be accessed and listed, and click Save changes.
The Object Access control list might not be set correctly. If the object ACL doesn’t allow the correct permissions, the object may not show up. To fix this, follow these steps:
First, go to the S3 console and select the bucket where the file is stored.
Click the object that’s not showing up and switch to the Permissions tab. Next, go to Object Ownership and click Edit.
Click the radio button for ACLs enabled and click Save Changes.
Go to the Access control list, and click Edit.
Verify the permissions to ensure the correct ones are set for the object. If not, modify the ACL to allow the proper permissions. Click Save Changes.
4. Check the permissions
Make sure the appropriate permissions are set for the file to be accessed. To fix this, you can follow these steps:
Navigate to the S3 console, and choose the bucket where the file is stored.
Click on the object that is not showing up. Then, click Permissions.
Verify the permissions are set for the object. If not, change the ACL to allow the correct permissions, then click Save Changes.
5. Check the region
Ensure you are checking the correct region in which the file was uploaded. If you contain the wrong region, the uploaded file may not appear. To fix this, you can follow these steps:
Navigate to the S3 console and select the bucket where the file is stored. Next, go to the top right-hand corner and check the region displayed.
Switch to the correct region to find the file if the region is incorrect.
So, these are the steps you must follow to fix the uploaded file not showing in the S3 bucket list. Try them and let us know what worked for you in the comments section below.
Type devmgmt.msc and click OK to open Device Manager.
Go to Mice and other pointing devices and expand it.
Select the mouse driver, right-click it, and choose Update driver.
Click Search automatically for drivers.
Now follow the onscreen instructions to complete the process.
1.2 Use a third-party driver updater
Downloading and installing drivers on your Windows computer is not easy, especially when done manually. Therefore, it is recommended to use a reliable third-party app to get the job done. One such app is Outbyte Driver Updater. It can ensure your device drivers are up to date in a few clicks. Follow these steps to update drivers using this tool:
If an update is available, click Download and Install.
Save your work, as the computer might restart multiple times while installing an update.
4. Run an SFC scan
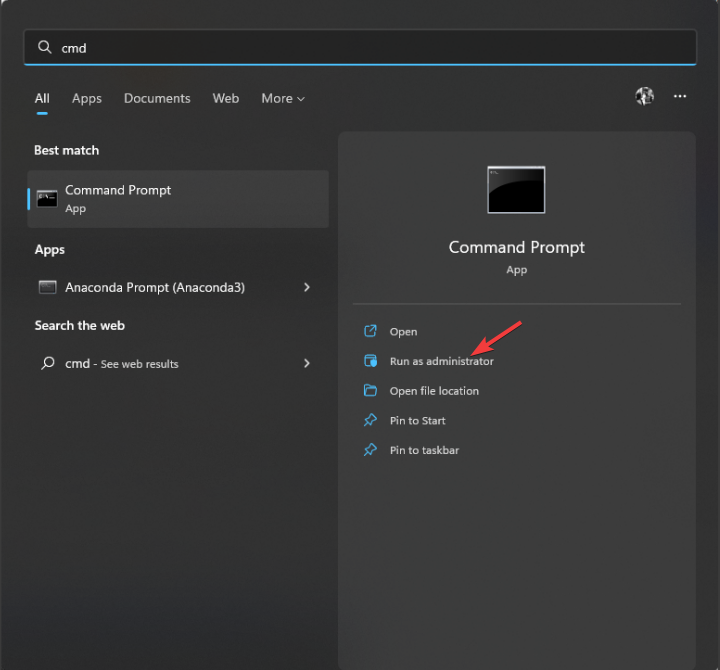
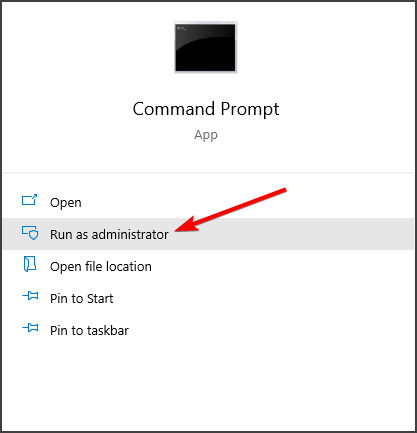
Press the Windows key, type CMD, and click Run as administrator.
Type the following command to repair system files and click Open: sfc/scannow
Wait for the process to get completed. Once done, restart your computer.
5. Perform System Restore
Press the Windows key, type Control Panel, and click Open.
Select Large icons for View by and click Recovery.
Now click Open System Restore.
On the System Restore window, select the Choose a different restore point option and click Next.
Select the restore point and click Next.
Now click Finish. Windows will go back to the previous settings in a couple of minutes.
How to fix the Roblox mouse stuck in the middle of the screen?
If your Roblox mouse is stuck, you need to restart the game. If that doesn’t work, you need to go to Settings and enable Shift Lock Switch, then disable it to fix the problem.
So, these are ways to fix the mouse stuck in the middle of the screen on Windows 11/10 computer. Try them and let us know what worked for you in the comments section below.
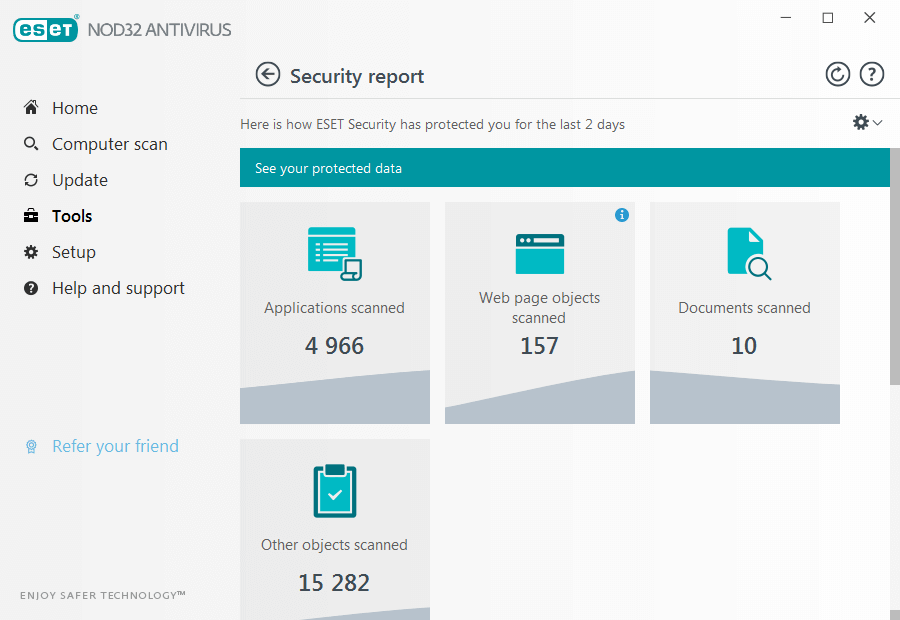
ESET NOD32 Antivirus is one of the lightest solutions out there so you can make sure that it also runs on your old Windows XP PC.
In addition to desktop versions, ESET is also available on Windows Server, so if you need antivirus software for Windows Server, ESET is the best antivirus for Windows XP devices.
Needless to say, this tool offers exquisite protection against all threats including spyware, rootkits, worms, viruses, and even adware.
And it doesn’t only protect your PC but also covers your external drives, including USB flash drives and the data contained.
And to make sure it won’t disturb you during your activities on the PC, ESET NOD32 Antivirus comes with dedicated work modes for Gaming, Presentation, or Movies.
And if you’re facing any problems, you will have all sorts of informative materials and, of course, e-mail, live chat, and phone support at your disposal.
Let’s take a look at some of its key benefits:
Very light on your PC resources
Whether you work or play, this tool will make sure you won’t be bothered
Protection against all kinds of cyber attacks
30-day free trial period
Multiple platform compatibility
ESET NOD32 Antivirus is available on multiple platforms, including your Android smartphones so give it a long try because you have 30 days to make up your mind.
ESET NOD32 Antivirus
Protect your old XP system with the best and lightest solution for your PC.
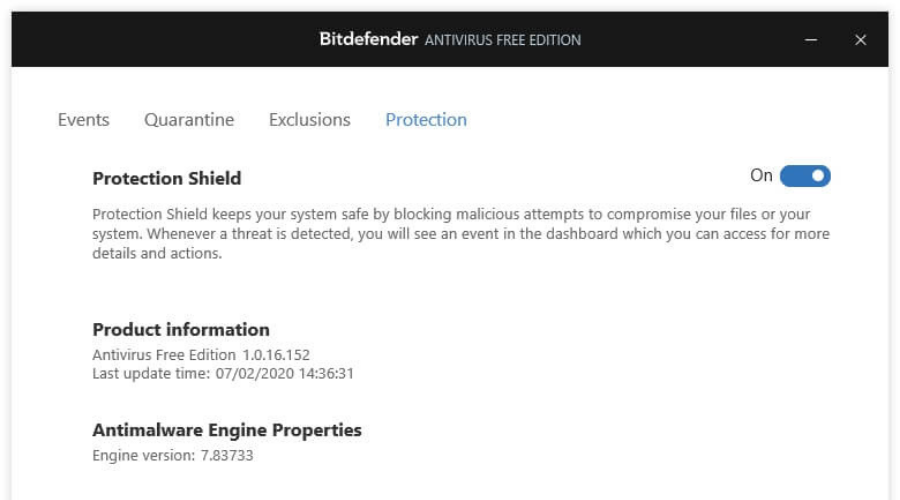
Bitdefender for Windows XP is a well-known tool that can detect and remove viruses and harmful malware in real-time. It offers cloud storage for personal document backup and restoration.
The program monitors traffic and provides continuous active virus management as well as preventive security.
It detects and prevents internet dangers such as phishing, spyware, and questionable files and components. It’s one of the best free antiviruses for Windows XP you can have and feel safe while using your PC.
The software offers a straightforward user interface that allows you to immediately grasp a large range of working tools, functions, and sections. Bitdefender’s official newest version of Windows XP is available for free download.
If you want basic security protection for your Windows-based computer, you should absolutely download Bitdefender Free for Windows Vista or Windows XP.
Let’s quickly look at its key features:
Downloads and installs in seconds
Intuitive User Interface
Offers a great gameplay experience
Powerful antivirus protection
Bitdefender adds antimalware protection support for Windows Vista (SP1 & SP2), Windows Server 2008 and Windows Small Business Server (SBS) 2008, Microsoft Windows XP, and Windows Server 2003 clients to provide a security solution while they upgrade to new operating systems.
Bitdefender Free Antivirus
Protect your Windows computer from all cyber dangers, regardless of whether you are tech-savvy or not.
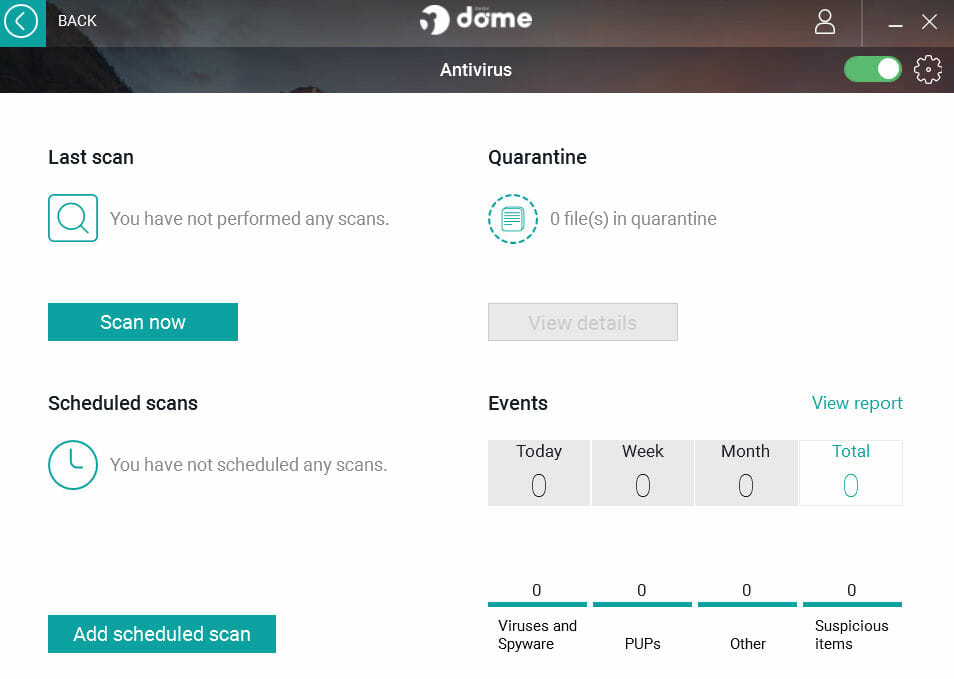
So, is there a free antivirus for Windows XP? The answer is yes, and Panda Antivirus is one of the best options out there.
This virus protection tool for Windows XP SP2 and up has a sleek-looking UI that might look too modern compared to the gradients of old XP along with top-notch protection and no noticeable performance hit.
Panda’s offering differs from many of its competitors by running scans in the cloud, meaning users will not have to deal with daily updates.
Let’s quickly look at its key features:
Great protection scores
It always keeps itself up to date instead of nagging the user to download updated files one or more times per day
Keep virus definitions up to date with no user interaction or knowledge
Does not impact the performance of your system
During startup, an automatic scan begins, which is important for checking security warnings. The newest scanning engine, EXE file scanning, and enhanced memory utilization have less impact on your Windows XP computer while completing scans quickly.
The user interface has a utility called Speed Up program for removing files that slow down your system as well as shortening the device’s running process.
Panda Dome
Panda offers real-time protection, your personal firewall, VPN, and more for your old XP computer.
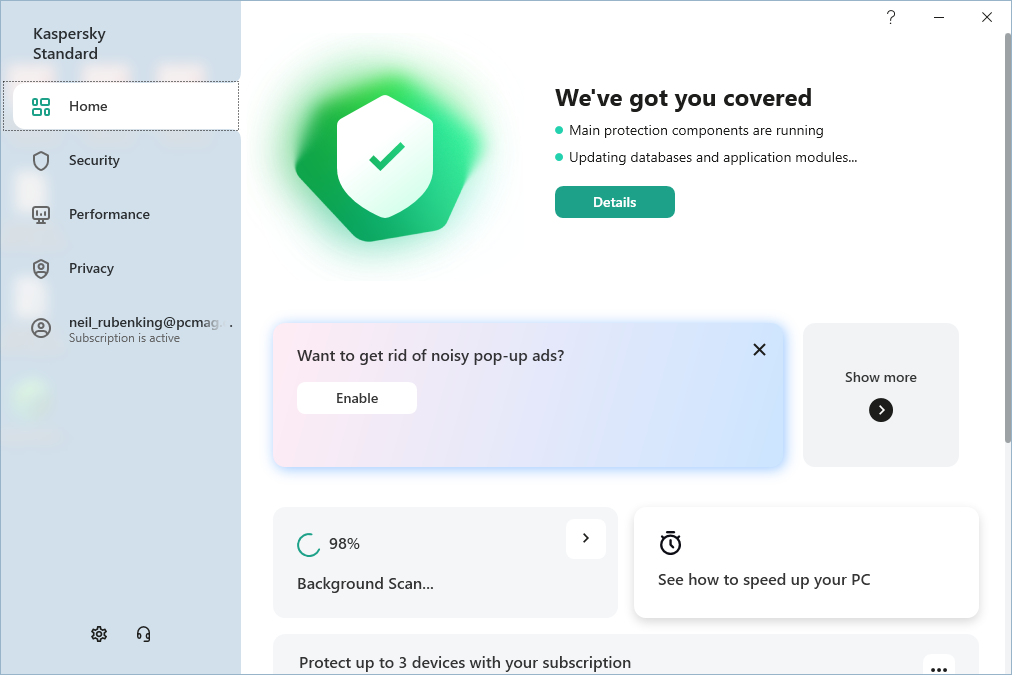
Kaspersky Lab has had a great reputation for a while now, and it will certainly not be a bad choice to secure your Windows XP SP3 machine from viruses.
With similar scores given by AV-TEST, Kaspersky‘s reputation along with low system requirements helped place it up to the number two spot.
Not taxing a computer too much to keep it protected is a big deal for Windows XP machines since many of them are underpowered.
Kaspersky for Windows XP only requires an 800MHz processor, 512MB of available RAM, and a minuscule 480MB of disk space.
This lightweight configuration gives room to breathe on most machines, especially older Windows XP 32-bit ones that tend to have 1GB of RAM and slower processors.
Let’s see some of its best features below:
Free VPN with up to 300 MB of daily traffic
Safe Money feature that encrypts your online payments and transactions
Webcam protection to block any unauthorized access
Constant lookout for device vulnerabilities and threats
Isolates and removes immediate threats
Check to see if your computer’s CPU supports the SSE2 instruction set before installing a Kaspersky program on Windows XP.
Before installing Kaspersky Lab, there are two key factors to consider. To begin, verify whether your processor supports SSE2, then install Kaspersky versions 19 and 18. If the processor does not support SSE2, only Kaspersky version 18 can be installed.
Kaspersky
Kaspersky is the perfect solution for old PCs and can handle old systems like even Windows XP.
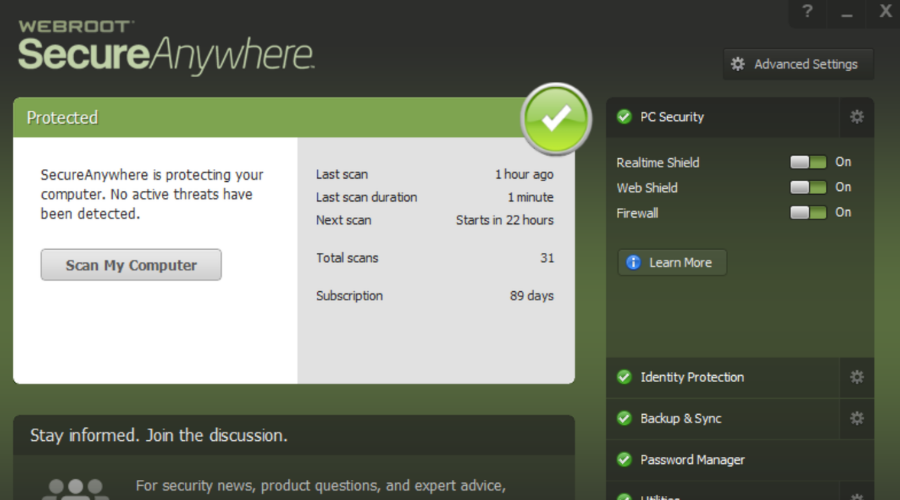
Webroot Secure Anywhere is a defense antivirus solution with an easy-to-use interface that is also reliable and trustworthy.
Webroot Secure Anywhere Antivirus is compatible with most Windows operating systems, including Windows XP and Vista, and provides assistance when problems arise.
It is compatible with both 32-bit and 64-bit versions of Windows XP and Vista, and it installs quickly and runs smoothly in the background.
Webroot antivirus for Windows XP provides protection not just against websites, but also against social networking sites, chat forums, and Voice over Internet Protocol applications, which may and frequently do transmit viruses.
Let’s quickly look at its key features:
User-friendly Interface
Lightweight and consume low resources
Mid-level privacy and security
Email Protection
Webroot antivirus tool will deliver efficient virus protection and guard your Windows XP device against complex cyberattacks.
Webroot
Protects your computer and data in real time by detecting and blocking new threats as they arise.
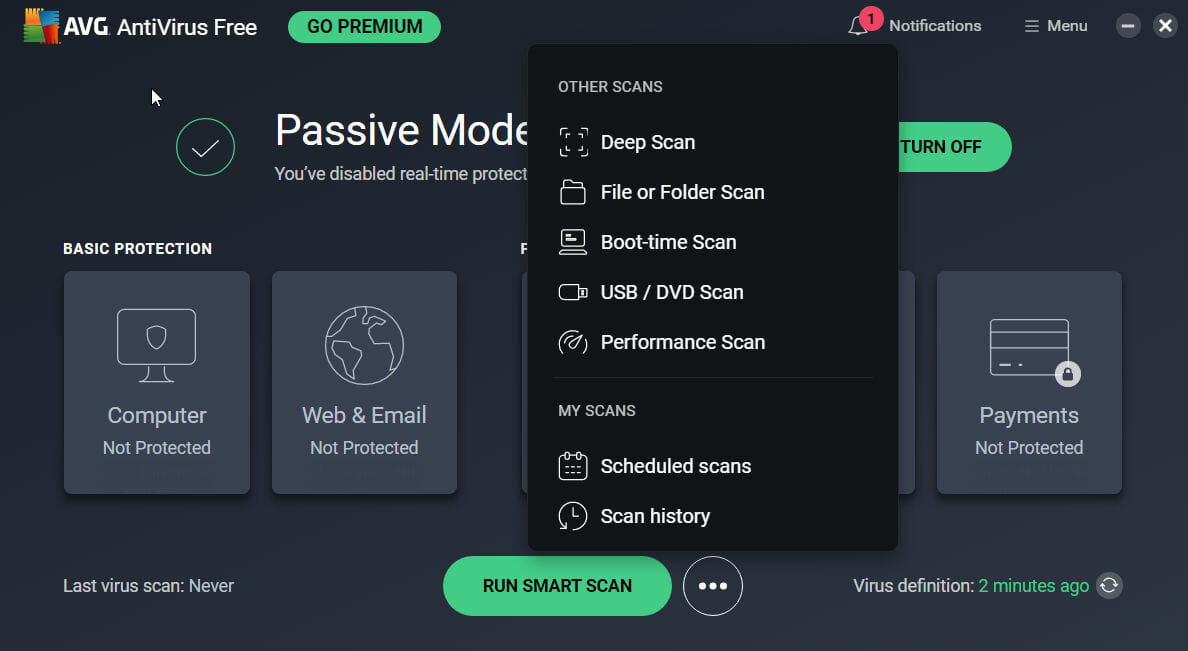
AVG AntiVirus Free and AVG Internet Security are still available for Windows XP and Vista for basic security and antivirus protection. This security software is a compatible free antivirus for Windows XP 32-bit and 64-bit.
If you are using previous versions of AVG on Windows XP or Windows Vista, you will continue to be protected and get virus definition updates.
However, AVG suggests updating to the most recent versions of Windows and AVG in order to benefit from the greatest detection rates and the most up-to-date features.
AVG Free Antivirus provides basic antivirus and antispyware protection and is available for free download. You can download AVG free version standalone Windows XP antivirus offline installer for a better experience from the AVG support page.
Let’s quickly look at its key features:
Easy installation
Real-time PC protection
Web and email protection
Stops spyware, viruses & malware.
With restricted functionality and no support for versions lower than 18, it is intended for personal and non-commercial usage only.
AVG Antivirus
A great antivirus that stops all attacks on your privacy when browsing online.
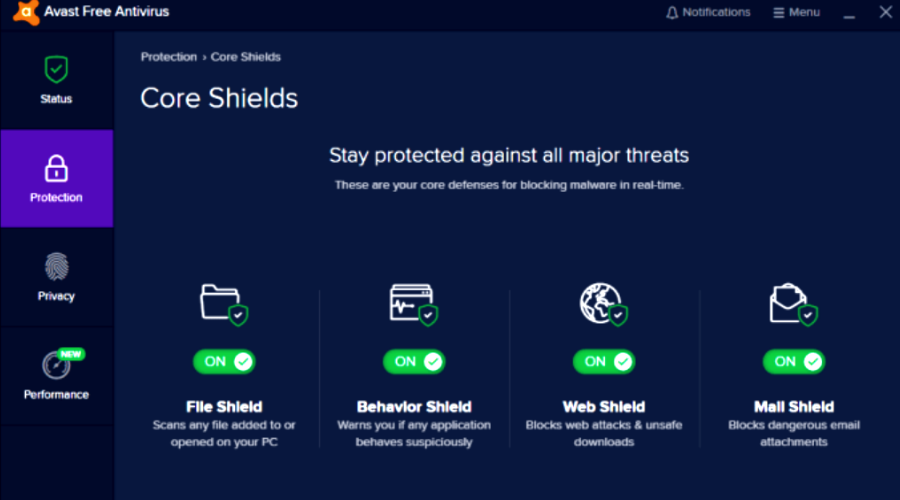
Avast Antivirus is the official home security software for Windows XP, another reason why 435 million users trust it. This security software is a compatible free antivirus for Windows XP 32-bit and 64-bit.
AV-Comparatives claims Avast Free Antivirus to be the least impacting antivirus for PC performance. In addition, it comes with advanced cleaning and optimization features for your PC to further improve its performance.
Avast Free Antivirus protects users through regular updates, and you may also safely download Windows XP antivirus offline installer.
It’s still one best free antivirus for Windows XP that won’t let you down when you need it most.
Let’s quickly look at its key features:
Advanced Ransomware protection
Do Not Disturb Mode blocks any distractions and popups
Behavior Shield feature for constant files and app monitoring
Light on your system and resources
However, the Windows XP software updates (including new features, hotfixes, or support) are no longer available due to the fact that Microsoft has stopped publishing security updates for this version.
Avast Free Antivirus
Amazing protection of data and advanced ransomware protection for a free antivirus.
If you use the unsafe Windows XP operating system, the possibilities of your computer becoming attacked by keyloggers are quite significant.
This, however, may be avoided by installing Comodo Windows XP Free Antivirus. This security tool has advanced security capabilities and delivers great protection against not only keyloggers but the whole spectrum of malware.
Comodo’s innovative Default Deny Approach, Containment, Host Intrusion Prevention System, and Viruscope security capabilities keep malware threats and zero-day assaults at bay.
Comodo is a well-known malware remover that uses cutting-edge technologies to defend your Windows XP. It’s one of the best free antiviruses for Windows XP you can have with full support.
Let’s quickly look at its key features:
Automatic denial for suspicious files
Viruscope prevention system
Advanced firewall engine
Cloud-Based malware analysis
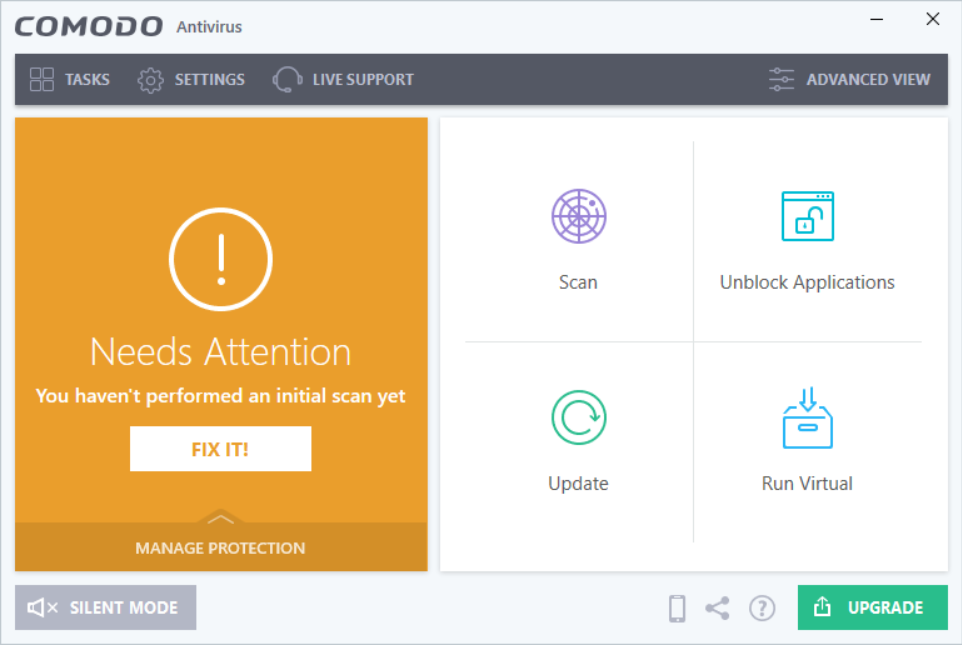
Thanks to easy-to-use UI, robust security measures, and a dashboard that shows the current status of your PC, you are covered with security. With the help of the Launch Option, you may scan your PC with a single click.
XP is more vulnerable in principle owing to its age, in practice, most hijackers are script kids using off-the-shelf software.
Windows XP was released for manufacturing on August 24, 2001, and was supported by Microsoft until April 8, 2014.
Although XP is more vulnerable in principle owing to its age, in practice, most hijackers are script kids using off-the-shelf software.
That software tends to target the most renowned operating systems, so with XP using single digits, there aren’t many people building attacks against it.
If you primarily use your computer for word processing and web browsing, you can use mouse smoothing for a more natural experience. However, it is a personal preference to enable or disable the feature.
This guide will cover what mouse smoothing is, whether you should enable it, and the steps to enable or disable the setting. Let’s get started!
What is Mouse Smoothing?
Mouse Smoothing is available in all modern Windows, Mac & other popular operating systems and mouse drivers. It uses an algorithm to analyze the movement of your mouse and adjust the cursor movement accordingly.
It results in a natural feeling of cursor movement, thereby compensating for any irregularities in the mouse movement. You can alter the settings and adjust the smoothing amount per your preferences.
How it affects gaming?
Mouse smoothing can be significant for low-precision tasks. However, it can adversely affect your gaming performance, specifically for the games that require quick reactions and precise control.
Gamers usually keep the setting disabled as it can interfere with their ability to aim and react quickly. It can introduce input lag, a delay between the move movement time and cursor movement on the screen, making it difficult to aim accurately in games and reducing your mouse’s responsiveness.
How can I enable or disable Mouse Smoothing?
Press the Windows key, type Control Panel, and click Open.
Select View by as Category and click Hardware & Sound.
Then, under Device and Printers, click Mouse.
On the Mouse Properties dialog box, switch to the Pointer Options tab.
Place a checkmark next to Enhance pointer precision.
Click Apply and OK to confirm the changes.
To disable, remove the checkmark beside Enhance pointer precision.
The mouse smoothing feature can make the cursor movement more fluid and less jarring. Therefore it can be a helpful feature for users who prefer smoother movement.
However, the feature can be detrimental for tasks that require high precision and responsiveness, including graphics work and gaming. Therefore, enabling or disabling the feature depends on your needs. Similarly, enhance pointer precision, too, plays a vital role in Windows 11.
If you have any questions or concerns about mouse smoothing, feel free to mention them in the comments section below.
Several users have reported coming across the disk boot failure error message on their PCs. This error is more prominent on Windows 10, but Windows 11 users are also affected. Because of this error message, the PC does not boot not allowing users to use their PCs.
Thankfully, in this guide, we will give you a bunch of solutions to resolve the disk boot failure error on your PC. You can apply the solutions mentioned in this guide on your Windows 10 or 11 PCs. So let us get right into it.
What does disk boot failure mean?
The complete error message you will get when you encounter the disk boot failure error is DISK BOOT FAILURE – INSERT SYSTEM DISK AND PRESS ENTER.
This error prevents Windows from loading and makes the PC unusable. Moreover, this issue occurs because the BIOS can’t find a bootable drive to start the PC.
BIOS then asks you to insert a system disk or a disk drive containing the operating system installed in it.
What causes Windows disk boot failure error?
After researching the internet, we have found a few of the most common reasons you would come across the disk boot failure error.
Incorrect boot order in BIOS: A device that doesn’t have the OS might have taken the first place in the boot sequence causing issues for the BIOS to load the OS.
Damaged operating system: Over a period of time, several system files get replaced and they either go missing or get corrupt. This could be the problem for triggering the disk boot failure error.
Unplugged hard drive: Sometimes, the hard drive on which the OS is installed might be loosely connected to your PC, which could cause this error.
Let us go through the different solutions to help you fix the disk boot failure error.
How can I fix the disk boot failure problem on Windows 11?
1. Change the Boot order
Restart your PC.
Press the appropriate key to enter the BIOS menu. It can be F2, Del, F8, F10, or F12, depending on your laptop’s brand.
Go to the Boot tab.
Change the order of the hard disk on which the OS is installed to the first position.
Save the settings.
Restart your PC.
This is one of the best solutions if you wish to fix the disk boot failure problem on your Windows 11 PC. , move the hard disk with the OS in it to the top position, and that’s it.
Insert the disk or USB containing the operating system on your PC.
On the Windows Setup page, click Next.
Hit the Repair your computer button.
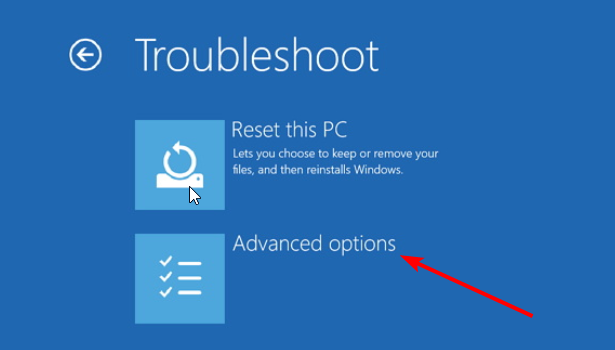
Select Troubleshoot.
Choose Advanced options.
Select the Startup repair option.
Follow the on-screen prompts to complete the process.
Startup repair is a brilliant tool as it will help you fix all startup-related problems. For example, chances are some of the essential startup-related files are missing or have gone corrupt. Using Startup repair, you can select the disk boot failure.
3. Perform a system restore
Insert the disk or USB containing the operating system on your PC.
On the Windows Setup page, click Next.
Click the Repair your computer button.
Choose Troubleshoot.
Select Advanced options.
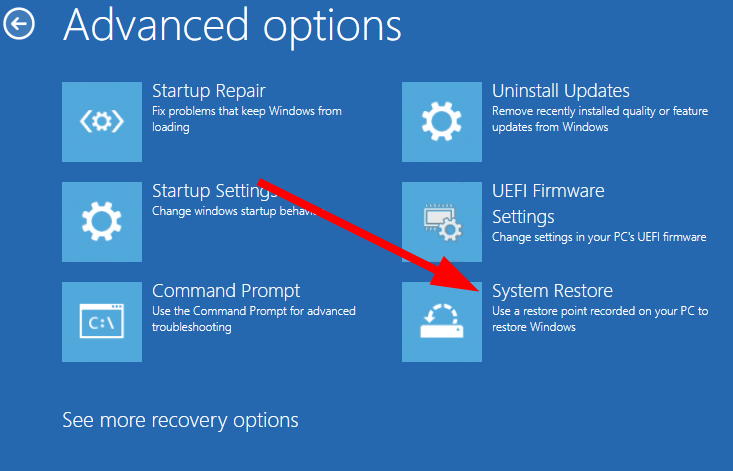
Choose the System Restore option.
Click Next.
Select the system restore point.
Hit Next.
Click the Finish button.
This will start the system restore process.
When you use the system restore option, you can take where you are not facing the disk boot failure error on your PC.
However, for the PC to restore your system to a restore point, you need to make sure that you have created a system restore point before the error.
Insert the disk or USB containing the operating system.
On the Windows Setup page, click Next.
Select the Repair your computer button.
Select Troubleshoot.
Choose Advanced options.
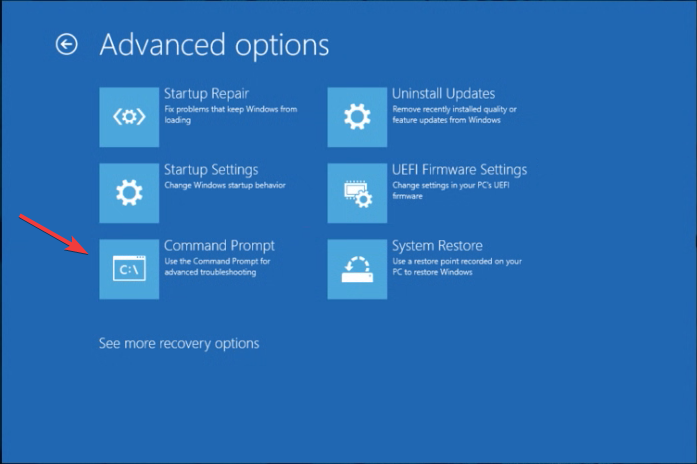
Select Command Prompt.
Type the below command and press Enter. chkdsk C: /f (You need to replace the C: with the drive letter where you have installed the operating system)
Disk boot failure can occur when the operating system or the system disk is corrupt. You can fix it by running the chkdsk utility following the above steps.
5. Reset your PC
Put the disk or USB containing the operating system inside your PC.
On the Windows Setup page, click Next.
Click on the Repair your computer button.
Select Troubleshoot.
Choose the Reset this PC option.
Select the Keep my files option to reset your PC without deleting your files.
Let the system do the rest.
If nothing works, we suggest you reset your PC following the above steps. This will bring your PC to a clean slate, and you must start over again. However, none of your files will be removed if you follow the above steps.
That is it from us in this guide. If you are coming across a No boot disk detected error, we suggest you check out our guide and fix the issue.
If your Windows 10 PC is slow to boot, then we have some solutions that will help you to fix the issue and fasten up your PC.
Your PC is an entertainment device. You do a lot of audio and visual activities on it. However, what will happen if you do not hear the sound perfectly from your Windows 11 PC? Several users have reported crackling audio issues on Windows 11.
In this guide, we have given multiple solutions that will help you to resolve the crackling audio issues on your Windows 11 PC. Audio is essential. If it isn’t there, you won’t be able to enjoy your game or movie. So let us get right into it.
Why am I getting consistent crackling audio on Windows 11?
After digging up the internet and going through multiple user reports, we have created a list of reasons that would trigger crackling audio on the Windows 11 problem.
Corrupt audio driver: If the audio driver is corrupt or some important files are missing, this can cause multiple issues with the audio device.
Playback device not set as default: Chances are that the headset or audio device isn’t set as the default device, causing the channel to switch from mono to stereo.
Third-party audio software conflict: If you are using a third-party audio enhancement software then it could be conflicting with the audio device causing the crackling audio.
The stream format is incompatible: The problem could also be with the media that you are running. The audio in the media could itself be corrupt.
Port glitch: Chances are that the 3.5 mm jack or the USB port is faulty causing the audio problem in your laptop.
System file corruption: Corrupt system files can also cause various sorts of issues on your PC, one of which is the crackling audio issues on Windows 11.
How can I fix the crackling audio problem on Windows 11?
Here are a few things that you can do before jumping over to advanced troubleshooting methods:
First, restart your PC and check if this resolves the issue.
Turn off any other Wi-Fi or Bluetooth devices to avoid any signal interruptions.
Check the audio in the media file that you are playing if that isn’t broken itself.
If the above solutions do not work, let us review the advanced solutions and hopefully resolve the issue.
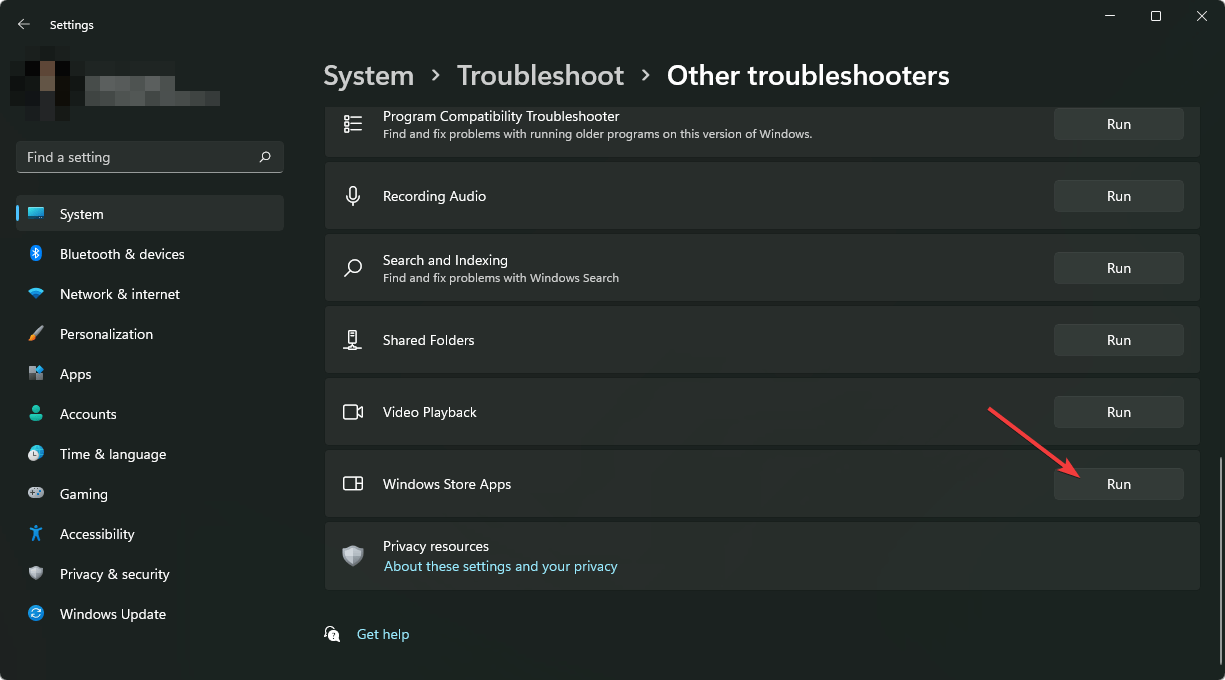
1. Run the audio troubleshooter
Press the Win + I keys to open the Settings menu.
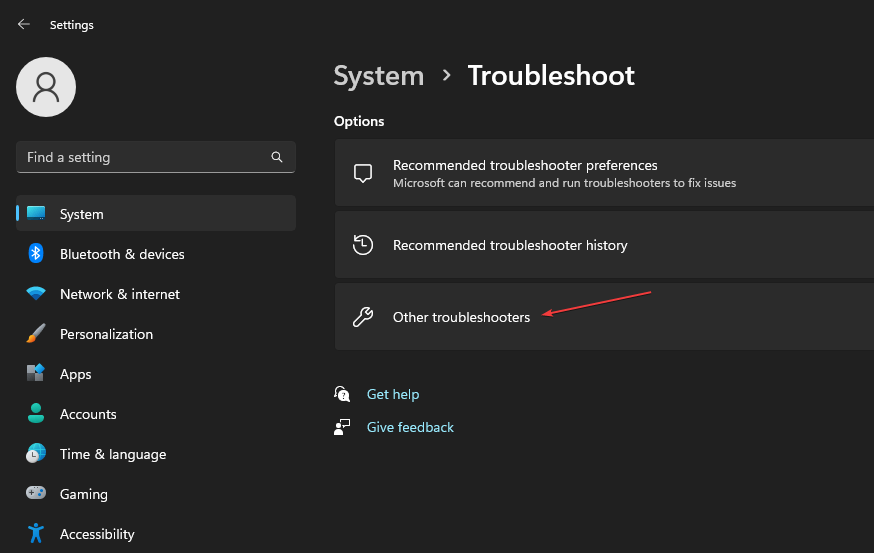
Click on Troubleshoot.
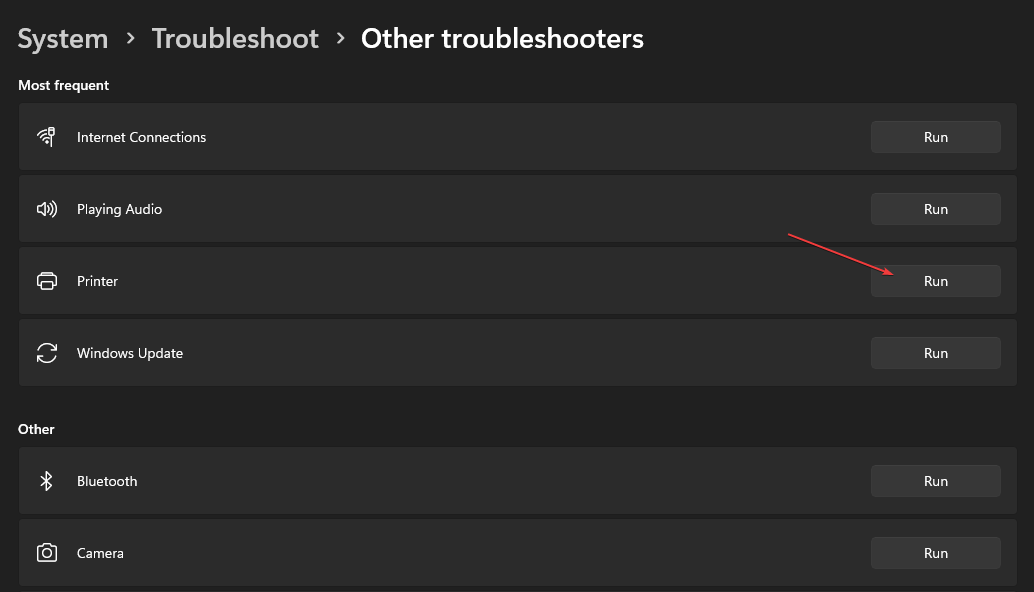
Select Other troubleshooters.
For the Playing audio option, hit the Run button.
The troubleshooter will start checking for any issues.
Select your device.
Click Next.
Apply the prompted fix to resolve the problem.
Windows 11 has many troubleshooting options that you can opt for in case you encounter any issues with the device.
You can use the audio troubleshooter and apply the fixes and hopefully fix the crackling audio issue on Windows 11.
2. Update audio drivers
Open the Start menu by pressing the Win key.
Open Device Manager.
Expand the Audio inputs and outputs.
Double click on your audio device in problem.
Switch to the Driver tab.
Select the Update driver option.
Hit the Search automatically for drivers option.
Wait for your system to automatically fetch the latest available audio drivers.
Install it and check if this resolves the issue or not.
You can follow the above usual step to update the audio drivers on your PC. However, this isn’t recommended when you want to update multiple drivers on your PC, let alone scan them.
For that purpose, we suggest you use a dedicated tool called Outbyte Driver Updater. With this tool, you can update all of the drivers on your PC, perform schedule scans, use it as a practical download manager, and much more.
Outbyte Driver Updater
Improve your device health and let Outbyte Driver Updater update your drivers with the newest options.
Type the below command and press Enter. sfc /scannow
Wait for the process to complete.
Restart your PC.
SFC Scan tool can help you fix the corrupt or missing system files on your PC, which could be one of the reasons you are coming across the crackling audio issue on Windows 11.
However, this may sometimes be less effective than a dedicated system fixer that can fix system crashes and system issues such as audio problems, DLL errors, BSOD errors, and much more.
5. Change the audio format
Open the Start menu by pressing the Win key.
Search for Sound settings and open it.
Under the Advanced section, select All sound devices.
In the Output devices section, select your device.
Under Output settings, click on the drop-down for Format and change the audio format.
Restart your PC.
6. Reset your PC
Press Win + I keys to open the Settings menu.
Click on Recovery.
Select the Reset PC option.
Choose the Keep my files option.
Follow the on-screen prompts to reset your PC.
If nothing else works, then you can opt for resetting your PC. This option brings your PC back to a state when everything usually worked.
That is it from us in this guide. If you are experiencing a static audio issue in Windows 10, check out our guide and resolve it.
Several Samsung users have reported that they can’t connect their Galaxy earbuds to their Windows 11 PCs. We have some troubleshooting steps that will help you fix the problem.
If your headset volume is stuck at zero and you are looking for solutions, then we suggest you apply the answers in our guide.
Feel free to let us know in the comments below which one of the above solutions resolved the problem for you.
We all have, one way or the other, experienced a computer freezing problem before and know how that can be annoying sometimes. Some of our readers have recently reported that their PC freezes when idle too.
Fortunately, we have gathered some potential causes of this error and fixes to apply whenever your PC gets frozen when it was idle.
Why does my PC freeze when idle?
You need to know what is wrong if you were using your PC, but you had to leave it to attend to something else while your PC remains idle, but upon your return, your PC is frozen. Below are some of the factors responsible for this error:
Running resource-intensive programs on a low-end GPU – One of the major reasons behind this problem is running multiple apps simultaneously or using resource-intensive apps. If you are using Windows 11 and a GPU that is not capable of handling the resolution you are trying to enforce, your PC may end up frozen when idle.
Outdated Graphics Driver – If you are still using outdated GPU Drivers, it can cause your PC to freeze due to incompatibility issues. The best thing to do here is to update your GPU drivers.
Limited system VRAM – Your PC can also freeze when idle if you have insufficient system RAM. In this case, extending virtual memory allocation can resolve such issues.
System file corruption – At times, if your PC freezes when idle, it might be due to corrupt or broken system files. You can use the built-in tools or dedicated software to repair and restore these files.
Since you now know some of the possible reasons why the PC freezes when idle, let us proceed to how you can fix this problem.
What can I do when my PC freezes when idle?
Before trying any of the advanced solutions below, whenever your PC gets frozen when it is idle, try to perform the following preliminary checks:
Inspect your hardware for possible issues.
Make sure the graphics card you’re using is a dedicated one.
Disconnect all USB cables and peripheral devices.
Try to restart or force shut down your PC.
Having confirmed the above checks, and none of them fixes the issue, you can explore the advanced solutions provided below.
1. Change your System’s Sleep Mode settings
Press the Start button on your Taskbar, type Control Panel, and launch it.
Set your View by to Large icon in the control panel and click on Power Options.
Then, select Edit Power Settings and click on the Change plan settings option.
Select the Change advanced power settings option.
Navigate to Sleep, then click Hibernateafter the menu item and change its value to Never for both On-battery and Plugged-in options.
Click on Apply and OK to save the changes and close the windows.
Although this is not a permanent solution, adjusting your system’s sleep mode should help you keep your PC active when it’s not in use, hence making it less idle.
2. Change your system’s resolution settings
Press the Windows + I keys to open the Settings app.
Navigate to the System tab and choose the Display option.
Then, click on the Display resolution option to view the multiple resolutions to choose from.
Choose a resolution that is lower than the current one.
Finally, click the Keep changes option on the dialog box prompt to save the changes.
It is worth noting that Windows 11 has different hardware requirements than earlier versions and this may sometimes trigger hardware issues.
Also, your screen resolution may be too high for your graphics adapter, so, try a few different resolutions to see if any of them solve the freezing problem.
3. Run the Windows Memory Diagnostic
Press the Windows, type Windows Memory Diagnostic in the search box, and launch it.
Choose Restart now and check for problems option.
Once Windows restarts, Windows Memory Diagnostic should do a scan and then provide the results.
By running this test, you’ll be able to detect any errors with your VRAM. Alternatively, you can use the Event Viewer to check the scan result in our detailed guide on Memory Diagnostic Tool mdsched.exe.
Press the Windows + S to launch the Search menu, type Device Manager in the text field, and launch it.
Double-click on Display adapters, right-click on the graphics driver and select Update driver from the context menu.
Now, select Search automatically for drivers and let Windows install the best available version.
Restart your computer after the updating process is complete.
To be on the safe side, update all your graphics drivers. However, you can visit the manufacturer’s website for dedicated display drivers such as Intel, AMD, or Nvidia.
If you’re concerned about picking the incorrect versions for your drivers, you can use a dedicated tool, such as Outbyte Driver Updater, to automatically get the right and latest driver options.
Outbyte Driver Updater
Try the Outbyte Driver Updater app to find the correct driver options for your device.
Press the Windows + R keys to open the Run command dialog, type msconfig in the text field and press Enter to open the System Configuration window.
Navigate to the Services tab, check the box next to Hide all Microsoft services, and click on Disable all.
Next, navigate to the Startup tab and click on Open Task Manager below.
Right-click each of the apps one after the other and select Disable.
Go back to the System Configuration window and click on Apply, then click on OK.
Finally, restart your PC.
To detect the cause of the problem, perform a clean-boot troubleshoot, follow the steps above, and then restart the computer after each action. Once you have identified the culprit, you can consider removing or disabling it.
Try to work your way through the steps provided in this article one after the other to know what fixes the problem.
Starting up your device in Safe Mode allows for a quick diagnosis and is also a fast way of solving system errors that are interfering with your device working correctly.
Most of the time, when troubleshooting your device, it is recommended that you use the Safe Mode option since this only loads the basic drives needed for Windows 10.
Unfortunately, though, it can happen that Safe Mode is not working, and your device keeps crashing in Windows 10, which usually indicates that something else may be severely wrong with your device.
Even though many causes are creating this problem, we will explore how you can work around the issue most efficiently in this article, so make sure to keep reading.
Why does my PC still crash in Safe Mode?
From user experience, your PC may still crash in Safe Mode for varying reasons. Top of the list is the following:
Hardware failure or incompatibility – Safe Mode loads only the primary drivers and services required for the system to function. If any of your PC’s hardware components are faulty or incompatible with your system, it may still cause issues in Safe Mode.
Corrupted system files – Safe Mode loads a minimal set of system files, but if any of those files are corrupted or missing, it can still cause issues. This can lead to error messages, crashes, and other problems.
Malware or virus infections – While Safe Mode is designed to prevent malware and viruses from running, some types of malicious software may still be able to cause problems in Safe Mode.
Driver issues – Safe Mode uses a limited set of drivers, but if any of those drivers are outdated, incompatible, or corrupt, it can cause problems.
Overheating – If your PC is overheating, it can cause crashes and other issues, even in Safe Mode.
Power supply problems – If your power supply unit (PSU) is failing or not providing enough power to your PC, it can cause issues in Safe Mode.
RAM or hard drive problems – Faulty RAM or a failing hard drive can cause crashes and other issues in Safe Mode.
Corrupted user profile – If your user profile is corrupted, it can cause issues in Safe Mode.
The solutions we recommend below would be essential in fixing crashes in Safe Mode.
How can I fix Safe Mode crashing in Windows 10?
1. Perform an antivirus scan
Type Windows Security in the Search bar, and click on the relevant search result.
Now, click on Virus & threat protection here.
Click on Scan options.
Now, select Full scan and click on the Scan now button at the bottom.
Malware or viruses on your Windows 10 device can have many adverse effects, including making it crash even when opening it in Safe Mode.
This is why performing an antivirus scan is the first thing you must do. Note that your device may not be fully protected if you only use Windows Defender.
For this reason, we recommend you try a third-party antivirus with high detection rates. The market is full of excellent antiviruses that provide many features for all types of users.
The main assets to look for when choosing your antivirus are extensive and constantly updated threat databases, online privacy features, a strong firewall, multi-layered protection, and a small footprint so you won’t compromise performance.
2. Run a file checker scan
Go to the Search box, type cmd, and click Run as administrator.
Type in the following commands and press Enter: Sfc /scannow
Once the above process is finished, make sure to restart your device.
After running this scan, the corrupted files will be repaired, so check if Safe Mode crashes on Windows 10.
3. Run a Check Disk scan
As above, open cmd and click on Run as administrator.
Type in the following command and hit Enter: CHKDSK /f /r
Next, you will see a message stating the CHDSK cannot run.
Type Y and hit Enter.
Wait for the process to complete and restart your device.
By running this command, you’ll scan your partition for damaged sectors and files. Hopefully, the scan will repair the problem, and the issue should disappear.
4. Run DSIM Command
Go to the Search box, type in cmd, and click Run as administrator.
Type in the following commands and press Enter after each one: Dism /Online /Cleanup-Image /CheckHealth Dism /Online /Cleanup-Image /ScanHealth Dism /Online /Cleanup-Image /RestoreHealth
Wait for the DSIM commands to run and finish.
Once the process is completed, make sure to reboot your device.
DISM scan should repair your installation, and after the process is finished, check if Safe Mode crashes on Windows 10.
Next, make sure to insert an empty USB stick into your PC.
Locate the imageUSB in the extracted folder and run it.
In the Step 1 section, make sure to choose your USB stick.
Now you can restart your device; the USB drive will be the main bootable device.
Lastly, follow the on-screen indications as MemTest86 will perform the memory issues check.
If MemTest86 detects any issues with your RAM, replace it since it’s faulty.
5.2 Replace the damaged RAM
It would be best to head to your laptop manufacturer’s website to find your best RAM replacement options. You would need one that is compatible with your specific laptop.
Once it is replaced, you may verify if Windows 10 Safe Mode keeps crashing.
That is about all. We hope that by following the recommendations provided in this article, you managed to successfully fix Safe Mode crashes in Windows 10.
If you have additional recommendations or suggestions, please share them with us in the comments section below.
If the screen resolution is set to anything other than the default (recommended) resolution or the Display resolution option is greyed out. You can fix the problem by following the steps outlined below.
Outdated graphics drivers, compatibility issues, hardware limitations, software conflicts, malware or viruses, as well as unauthorized changes made to the OS could be at the root of the problem.
Let’s fix them.
What can I do if I can’t change Windows 11 resolution?
1. Update the display card adapter driver
Press the Windows key + I to open the Settings app and click on the Display option.
Scroll down until you meet the Advanced display setting and click on it.
Now click on the Display adapter properties for the Display 1 option.
Navigate to the Adapter tab, then click on the Properties button.
After this, go to the Driver tab and click on Update Driver.
Windows will automatically search for the latest display driver on your computer and install it. Now you can go back to the Display settings and change your resolution.
2. Update the NVIDIA adapter
Right-click on the Start icon, then choose the Device Manager option.
Now expand the Display adapters section, right-click the NVIDIA option, and tap the Update driver option.
Click on the Search automatically for drivers option.
Now, wait for the process to end. Windows will update the driver to the latest version available. Make sure to restart your PC once the procedure is completed.
3. Reinstall the Display driver
Right-click on the Start icon, then choose Device Manager.
Now expand the Display adapters section, right-click on the Intel/AMD option, and tap Uninstall driver.
Once the operation is completed, restart your PC. While the computer is rebooting, Windows will automatically reinstall the driver.
4. Update Windows
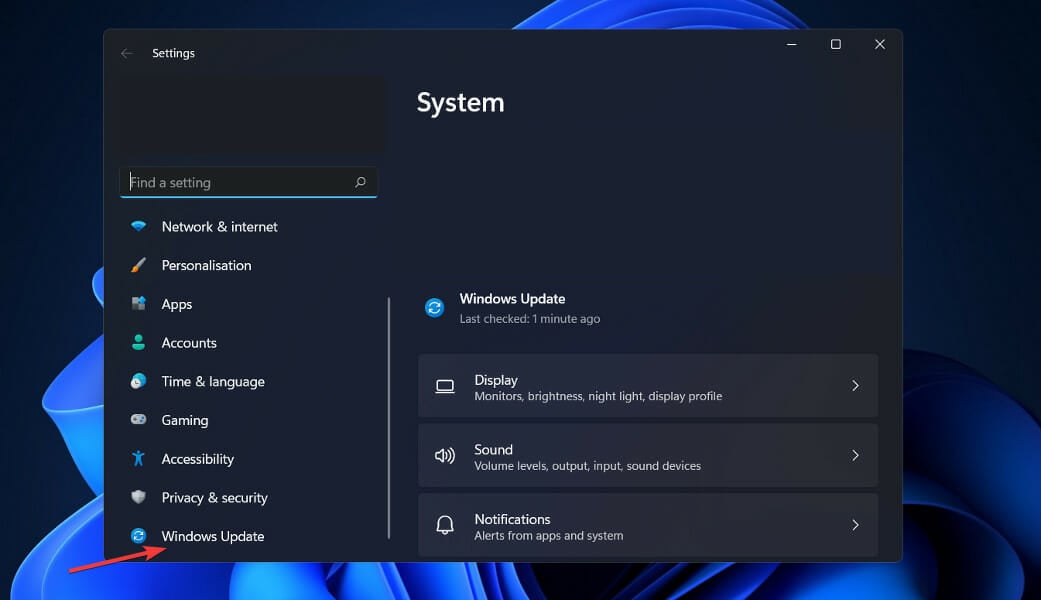
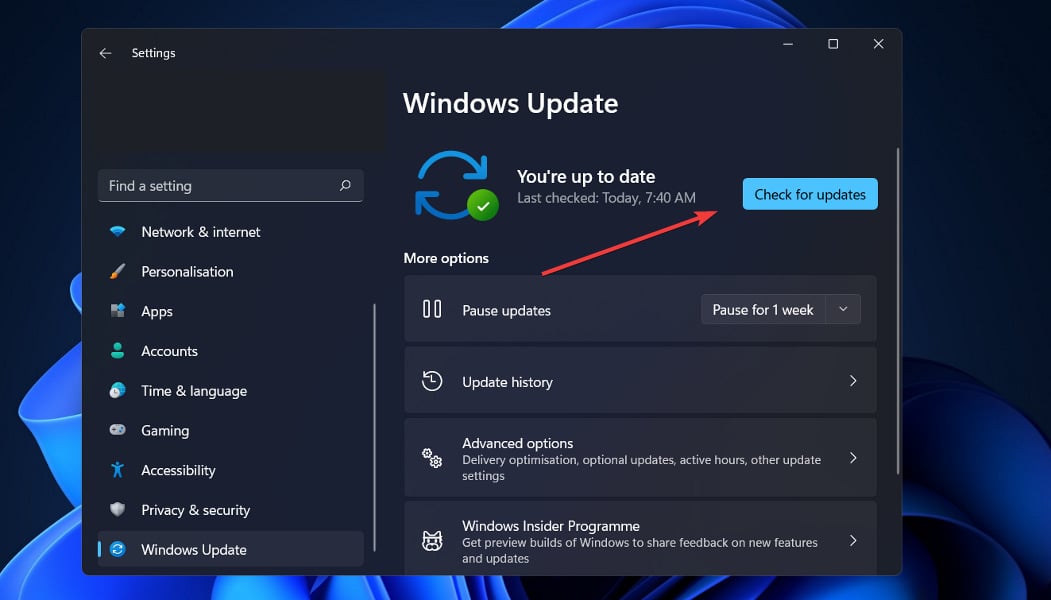
Press the Windows key + I to open settings, then click on Windows Update to access the available updates.
If you have any new updates, click on the Install now option and wait for the process to complete; otherwise, click on its alternative: Check for updates.
You may be using an older version of Windows that’s creating the issue, which may be fixed by updating the operating system. In addition, a future software release will fix the bug.
5. Update other drivers
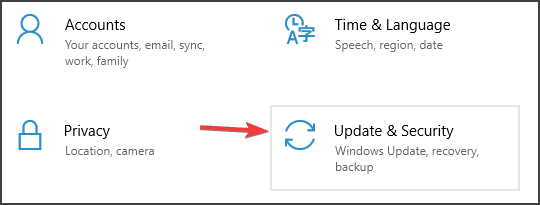
Press the Windows key + I to open the Settings app, then navigate to Update & Security, followed by Advanced options on the right side.
Now go to the Additional options section and click Optional updates to find the available driver updates.
Now click on the Driver Updates option, select all the driver updates you are presented, and lastly, click on the Download & install button.
Even though Windows is responsible for most driver updates, if you have a problem, you can manually search for updates.
Using a professional driver updater is perhaps the safest way to update all your drivers and to also make sure they stay up to date at all times.
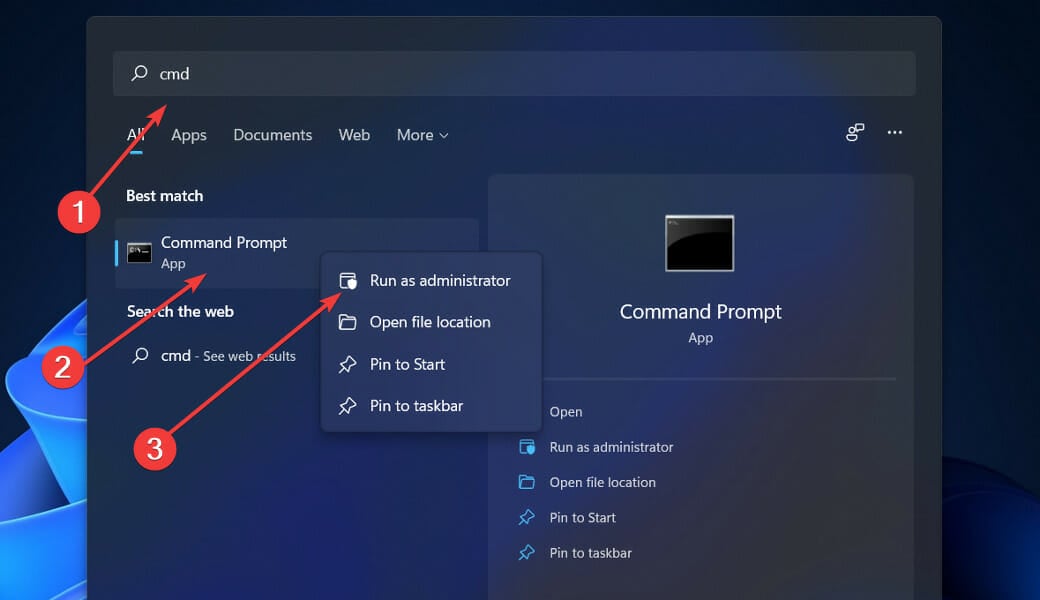
1. Press the Windows + S key to open the Search box.
2. Type cmd in it to search for Command Prompt.
3. Next, right-click on the top relevant result to run it as an administrator.
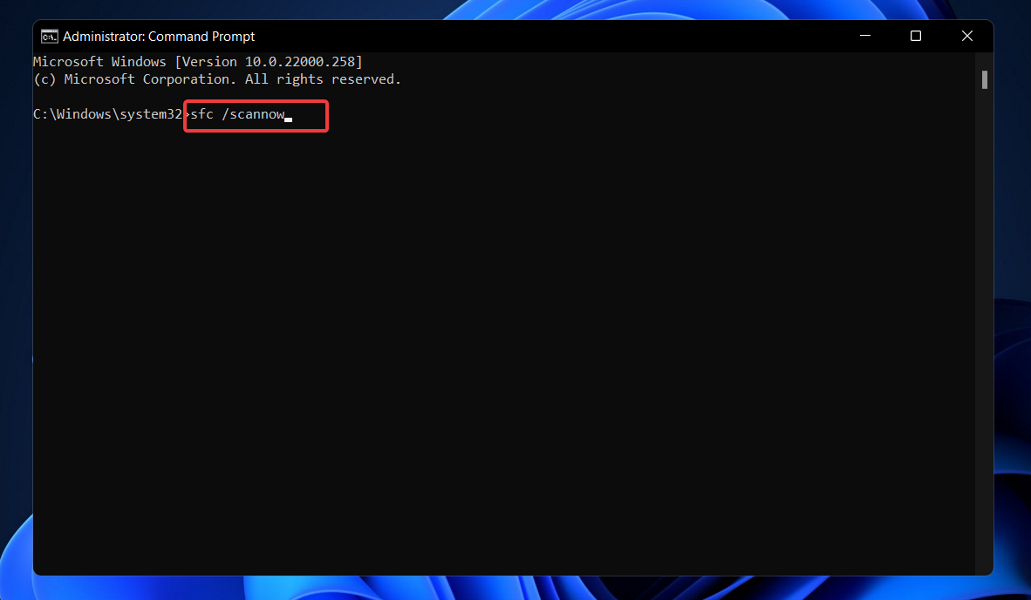
4. Type or paste in the following command: sfc /scannow
5. Press Enter to run the system file scanner.
6. Wait for the scan to complete. This can take a while.
7. After you’ve finished waiting for the procedure to finish, which may take some time, restart your computer.
If you are having issues when trying to change the display resolution on your device, system or device corruption could be to blame. This is why running a SFC scan via Command Prompt should fix the problem.
The SFC scan will find and fix any corrupted files that are causing screen scaling issues in your system.
It is also important to note that many third-party applications that allow you to select custom resolution options may not be supported entirely until Windows 11 is released in its final form.
You can find more information and potential solutions to the screen resolution issue that may apply to Windows 11 as well. Just check out our guide on how to fix the screen resolution issue in Windows 10.
Additionally, many users have benefited from reading our post on how to solve the dimming screen issue in Windows 11. So, if you are experiencing the same problem, take a look!
Let us know in the comments section below which solution worked best for you and what screen resolution you have.
As you probably know, Office 2016 has been released for a while, and many Windows 10 users have switched to it. However, there are a few reports that Outlook 2016 crashes when opening.
When launching Outlook 2016, you might receive an AppVIsvSubsystems32.dll error followed by the crash of your email client, and this can be pretty frustrating if you need to check your email.
Others describe that their Outlook 2016 crashes when opening – Event ID 1000. In one case or another, a few solutions might help you.
Why does Outlook 2016 keep crashing?
There can be several reasons why Outlook 2016 keeps crashing. However, here are some common causes:
Add-ins – Outlook add-ins are third-party tools that can enhance the functionality of Outlook. However, sometimes add-ins can cause compatibility issues and make Outlook crash.
Corrupted files – Outlook stores data in several files, including the Outlook data file (.pst or .ost) and the Navigation pane settings file. If any of these files become corrupted, it can cause Outlook to crash.
Antivirus software – Some antivirus software can interfere with Outlook and cause it to crash.
Outdated Outlook version – If you’re using an outdated version of Outlook, it may have compatibility issues with your computer’s operating system or other software.
Insufficient resources – If your computer is running low on memory or processing power, Outlook may crash frequently.
How can I fix Outlook 2016 if it crashes when opening?
Before trying any solutions, if you need to check your email, you might want to try out a different email client temporarily.
Good email clients implement additional features that help you keep your inbox organized. For example, they can help you sort your contacts into customizable categories.
On top of that, many productivity email clients come with great search features that save you a lot of time and hassle.
1. Disable antivirus
Click on the hidden access arrow in the Taskbar.
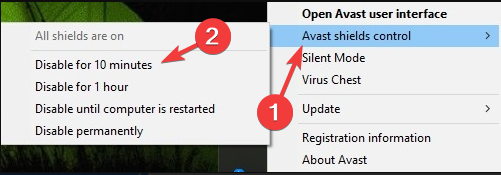
Click on your antivirus icon, hover over Avast shields Control and select Disable for 10 minutes (This step varies for different antivirus software).
We have used Avast antivirus in the solutions above. However, if you’re using McAfee Antivirus, you should know that some of its features can also cause crashes, but there’s no need to worry because you can easily disable it.
If this is a problem, you might consider switching to a different antivirus software until Microsoft or McAfee fixes this issue. There are many great antivirus solutions on the market.
The best antivirus software protects against malware, ransomware attacks, and more. On top of that, they include online protection features such as an integratedVPN.
2. Uninstall old addons for Outlook
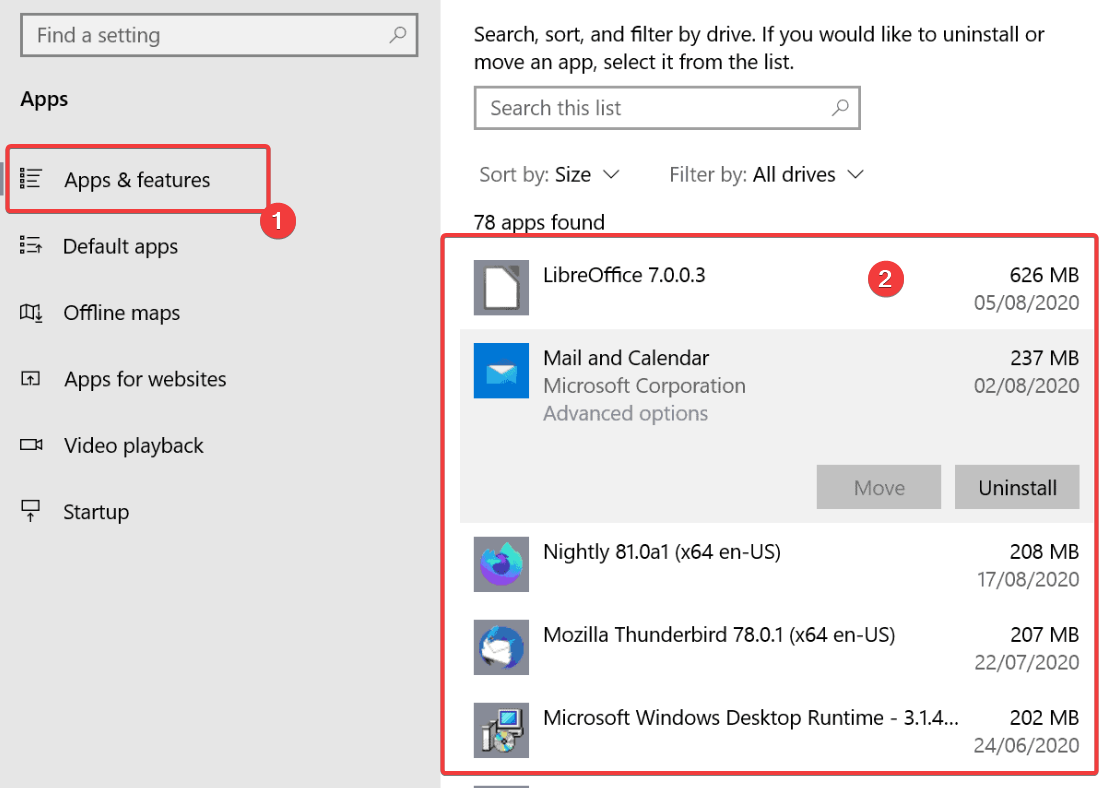
Press Windows + I to open Settings, click on System,and select Apps & features.
Wait until the list of installed apps shows.
Now search for any Outlook 2013 addons and delete them.
After deleting them, restart your computer and try starting Outlook again.
If you have used Outlook 2013, you might have some add-ons installed on your computer. If you can’t start Outlook, you might want to try starting it in Safe Mode.
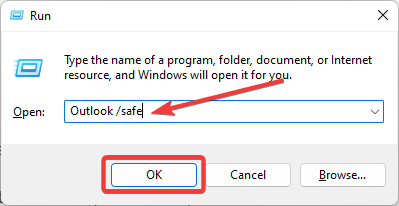
To do that, press and hold the Ctrl key and run Outlook 2016 to start it in Safe Mode. Users reported that the Kaspersky Anti-Spam add-on caused this issue, but other add-ons can also cause it.
3. Reinstall Office 2016
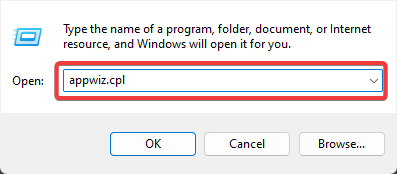
Press Windows + I, type appwiz.cpl, and hit Enter.
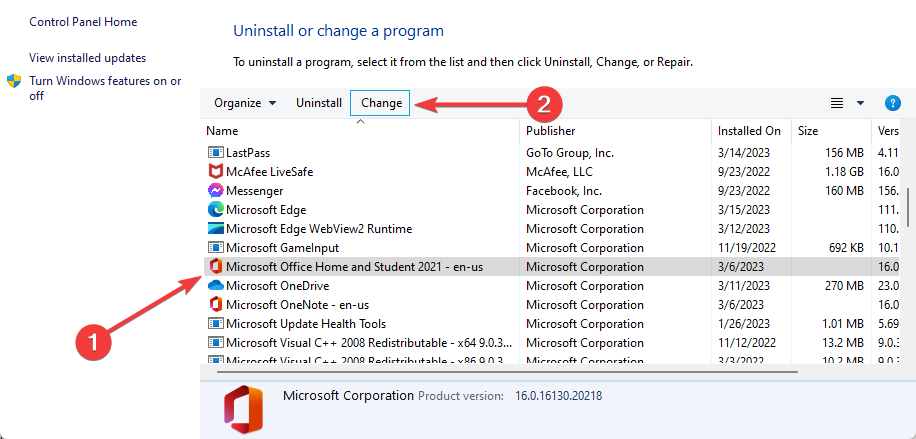
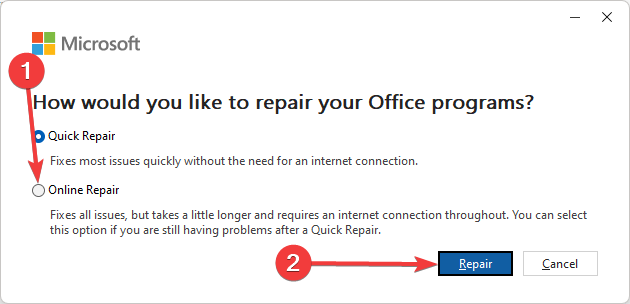
When Control Panel opens, select Microsoft Office from the list and choose Change or Repair.
Choose the Online Repair option, click Repair, and follow the instructions.
If none of the solutions above help, you might want to try uninstalling and installing Office 2013 again.
If that doesn’t help, you’ll have to wait for an official solution from Microsoft or temporarily roll back from Office 2016 to Office 2013. Check out our dedicated article about moving back to Office 2013 for more details.
Several users reported that they fixed the issue by repairing their Office installation. This is relatively simple, and you can do it by following the above steps.
After repairing your Office installation, check if the issue persists.
4. Disable hardware acceleration
Start Outlook.
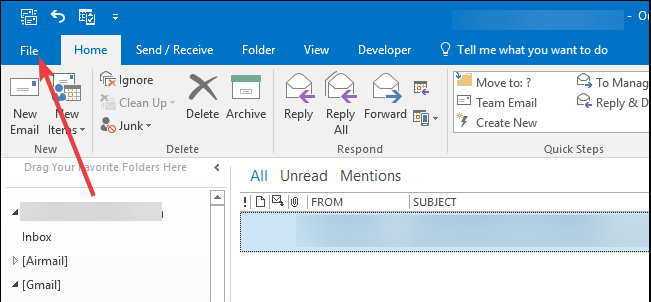
When Outlook starts, go to File.
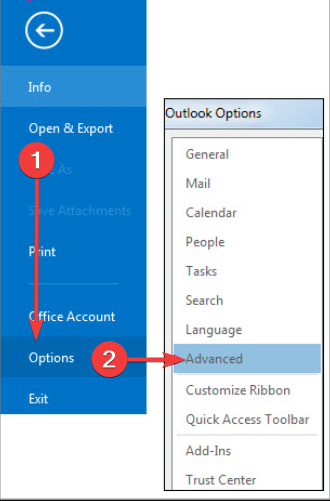
Click on Options, then Advanced.
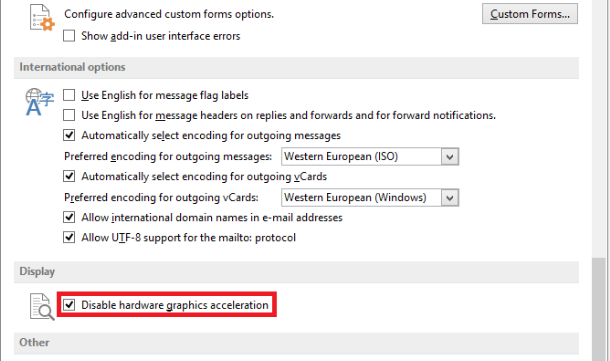
Locate the Display section and check Disable Hardware graphics acceleration.
Many modern applications use a hardware acceleration feature to provide a better performance, but sometimes this feature can cause problems.
You need to disable the issue by doing as described above to fix it. Once you disable this feature, the problem should be resolved entirely, and Outlook will start working again.
5. Start Outlook as an administrator
Locate the Outlook shortcut on your Desktop.
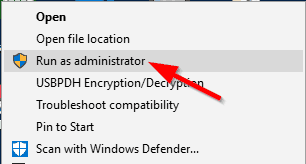
Right-click the shortcut and choose Run as administrator from the menu.
According to users, Outlook can sometimes crash if you don’t have administrative privileges. Fortunately for you, you can always try running Outlook as an administrator.
If this method works, you’ll have to use it whenever you want to start Outlook. This can be tedious, but there’s always a way to run Outlook with administrative privileges. To do that, follow these steps:
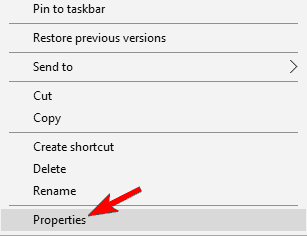
First, right-click the Outlook shortcut and choose Properties from the menu.
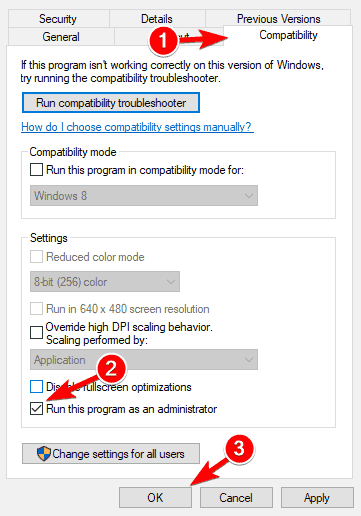
Navigate to the Compatibility tab. Now check Run this program as an administrator option. Lastly, click on Apply and OK to save changes.
After doing that, Outlook will always start with administrative privileges, and you won’t have any issues with crashing.
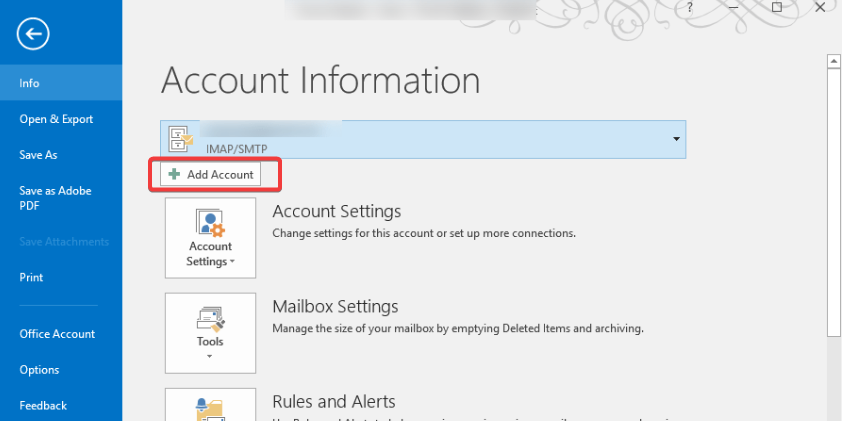
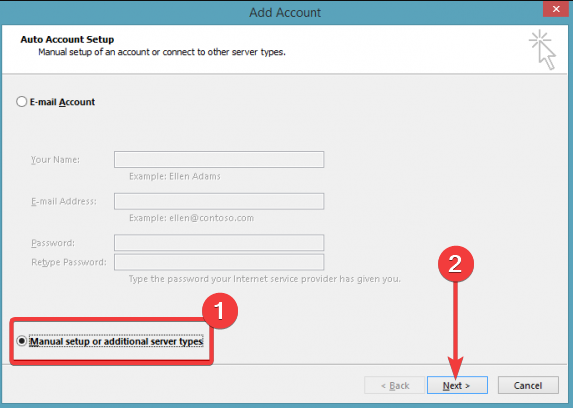
Launch the Outlook app, click on File, then Select the Add Account option.
Select the Manual setup or additional server types option, then click Next.
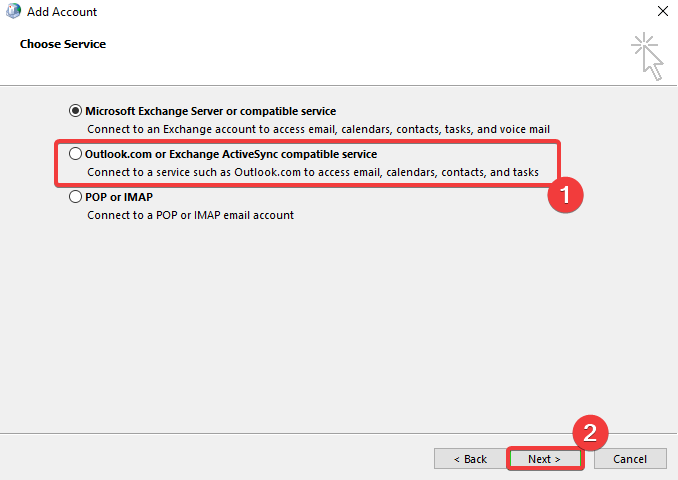
Select the Outlook.com or Exchange ActiveSync compatible service option and click Next.
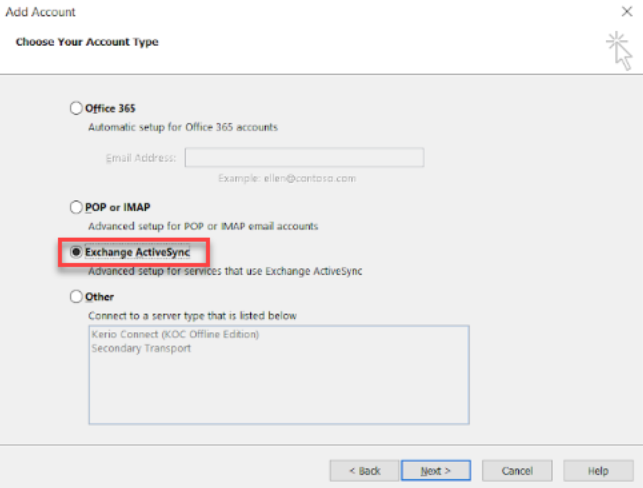
Choose Exchange ActiveSync.
Now enter your user information.
For the Mail server, you need to enter m.hotmail.com. If you’re using an Outlook address, enter m.outlook.com.
You can fix this problem simply by using manual instead of automatic configuration. Automatic configuration is faster and more straightforward, but sometimes it can cause your Outlook to crash.
To use manual configuration, you must follow the above steps while setting up a new account.
After doing that, your Outlook should start working again without any problems. Many users reported that this solution worked for them, so try it out.
That is as much as we will be discussing in this guide. However, note that you may need to update your BIOS in some extreme situations. Some users have found this an efficient fix.
Updating BIOS is a somewhat advanced procedure, so we advise you to be extra cautious. e sure to check your motherboard manual for detailed instructions.
Keep in mind that you can cause permanent damage to your PC if you don’t update the BIOS correctly, so be extra cautious.
We already wrote a short guide on how to flash your BIOS, so you might want to check it out for more information.
We hope you have found a resolution with the fixes recommended. let us know what worked for you in the comment section below.
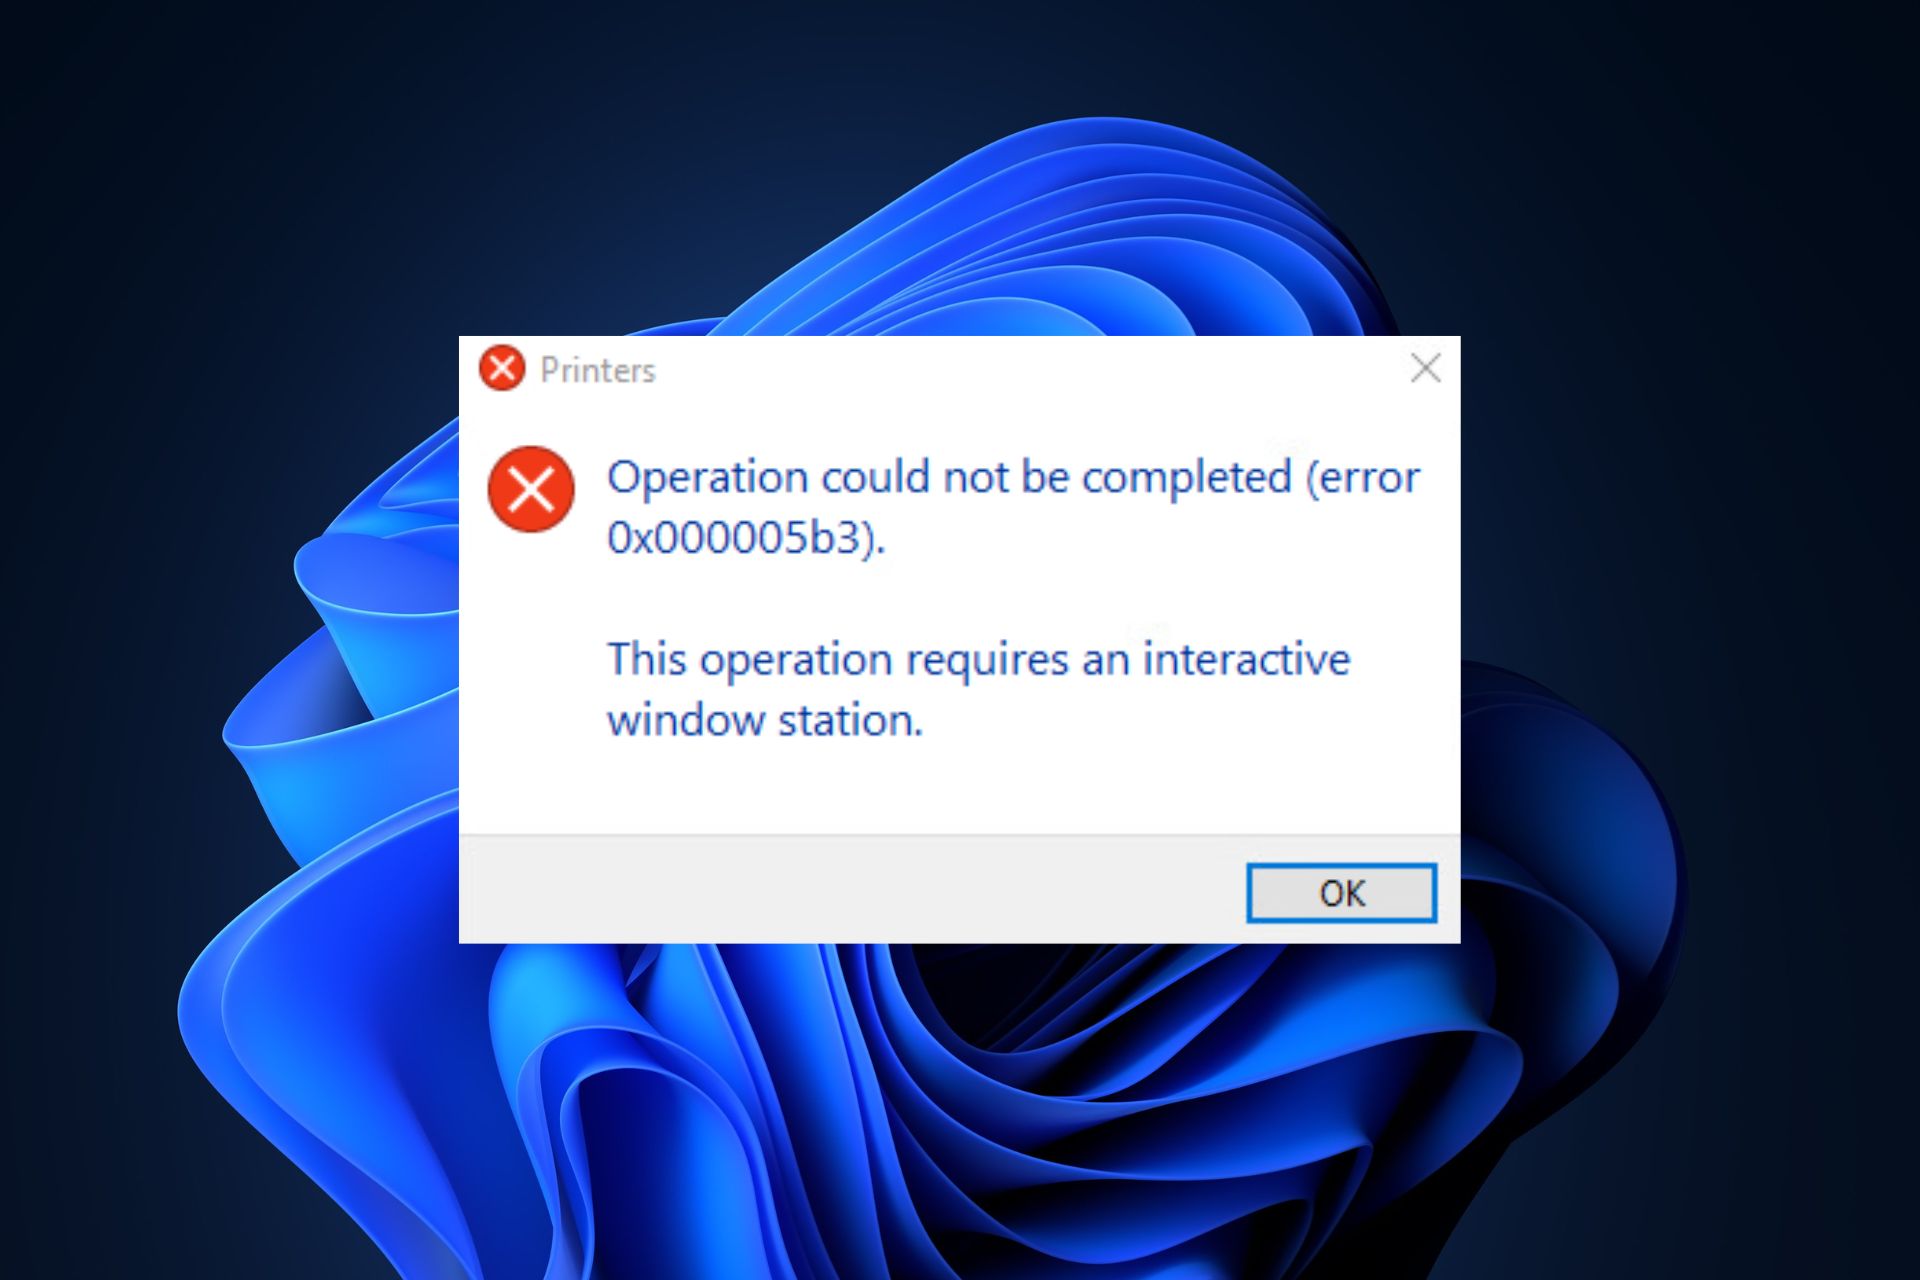
Print Spooler service is your main connector with the printer; if this service doesn’t work, you won’t be able to print your documents.
And the Print Spooler service is not working on Windows for various reasons. For example, users have been getting error messages similar to the one below:
The local Print Spooler service is not running
So, we prepared a couple of workarounds in case you have problems with the Print Spooler in Windows 10.
Why does The local Print Spooler service not running message appear?
Your Local Print Spooler Service is not running message can appear on a Windows computer when your Print Spooler service isn’t running or encounters an error while running.
The Windows Print Spooler service manages print jobs sent to a printer or print server. Some of the reasons why the Print Spooler service may not be running include the following:
Service is stopped – The Print Spooler service may have been manually stopped or stopped due to an error.
Printer drivers are corrupt or outdated – Corrupt or outdated printer drivers can cause the Print Spooler service to stop working.
Conflicts with other services or software – Conflicts with other services or software can cause the Print Spooler service to stop working.
This can be a severe problem, and for many users, the following error messages may be associated with the problem:
Print spooler service stops automatically in Windows 7 – Windows 7 users have reported in the past that the Printer Spooler service tends to stop occasionally.
Print spooler service not running Windows 10 – Issues with the Print Spooler service are also standard in Windows 10.
Error 1068 Print Spooler – Error 1068 is one of the most common problems related to the Print Spooler service you can encounter.
Print Spooler keeps stopping – It’s also possible for Print Spooler to suddenly stop working, even if you can run it in the first place.
Print Spooler Windows 10 not starting – On the other hand, you might not be able to run Print Spooler at all.
What can I do if the Local Print Spooler service is not running?
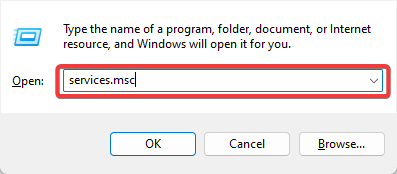
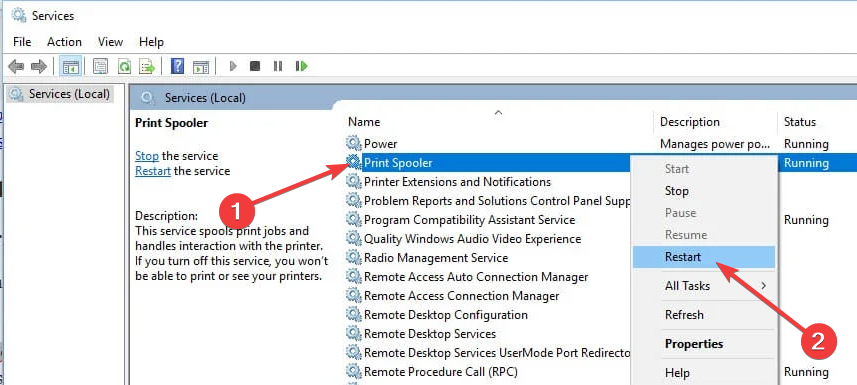
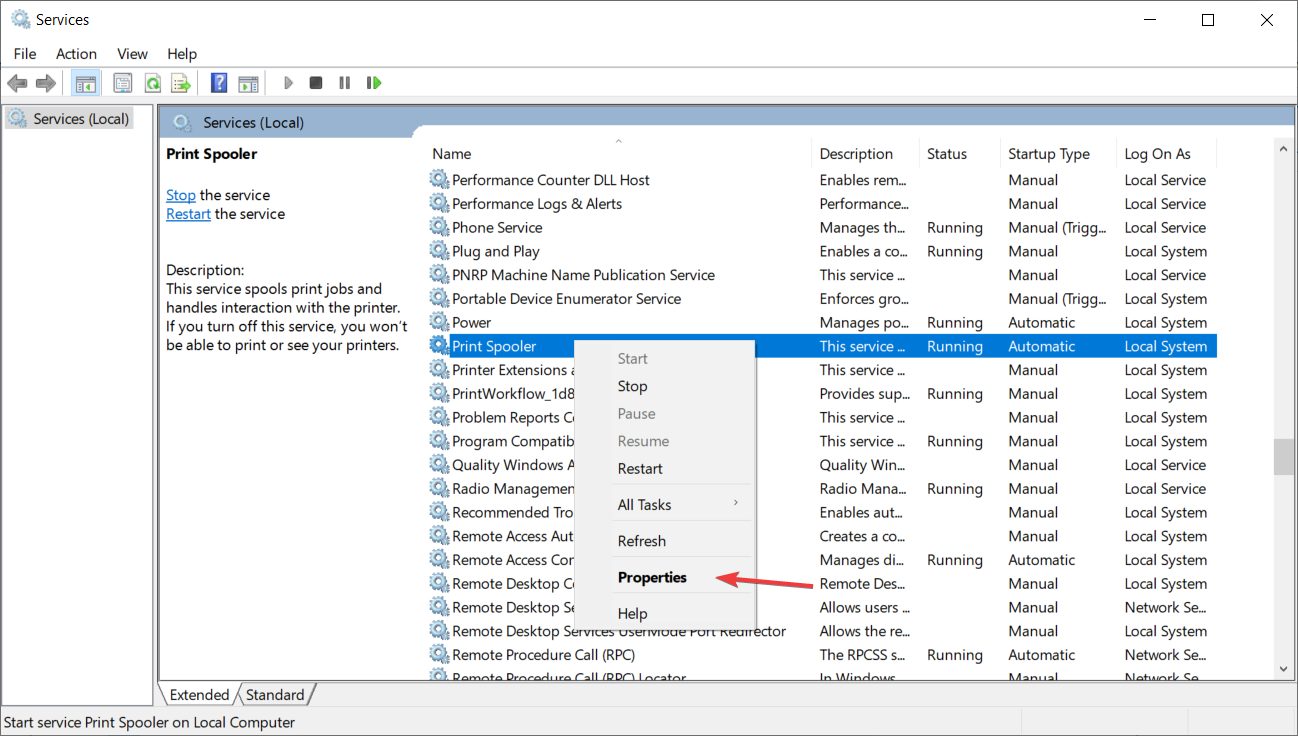
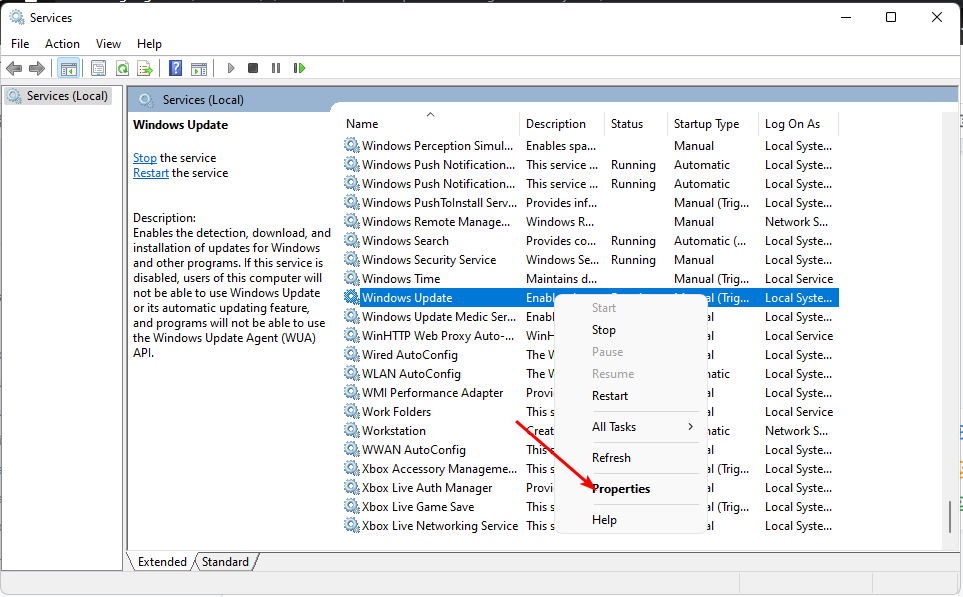
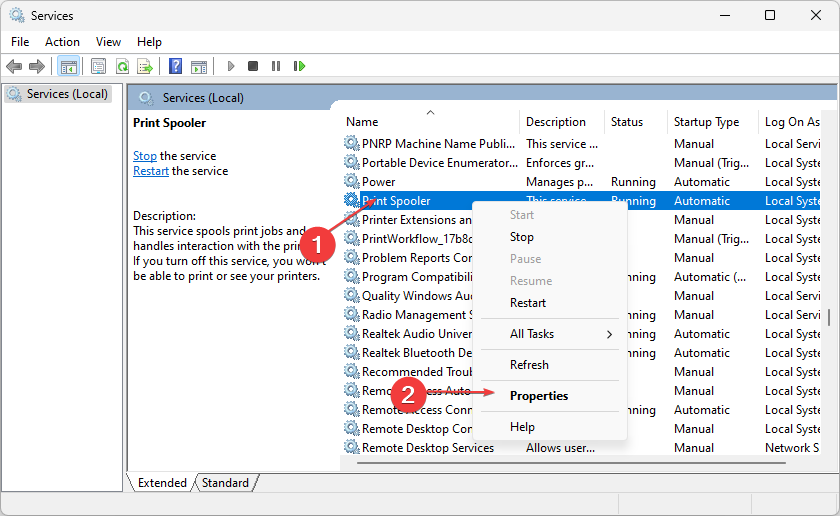
Press Windows + R, type services.msc, and hit Enter.
Find the Print Spooler service.
Right-click on it, and go to Restart,as shown in the screenshot below.
As Print Spooler sometimes stops working or has had an error occur, the first thing we should try to fix is to restart the service.
This command will restart your Print Spooler service and hopefully return to its working state. But, if restarting the service doesn’t work, try some of the following solutions.
2. Start all dependencies
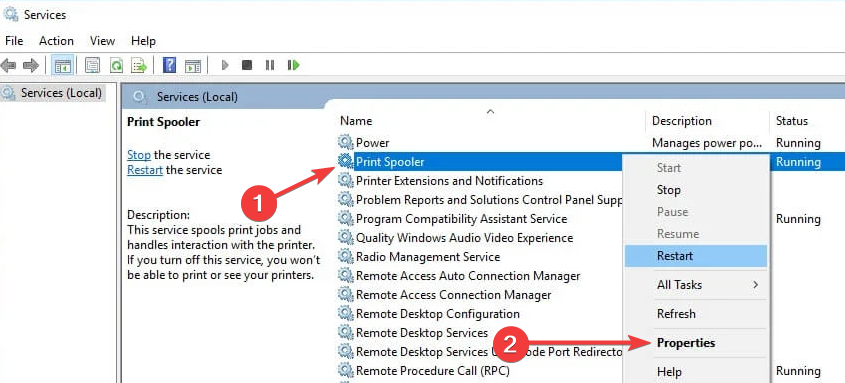
Press Windows + R, type services.msc, and hit Enter.
Right-click on Print Spooler service and go to Properties.
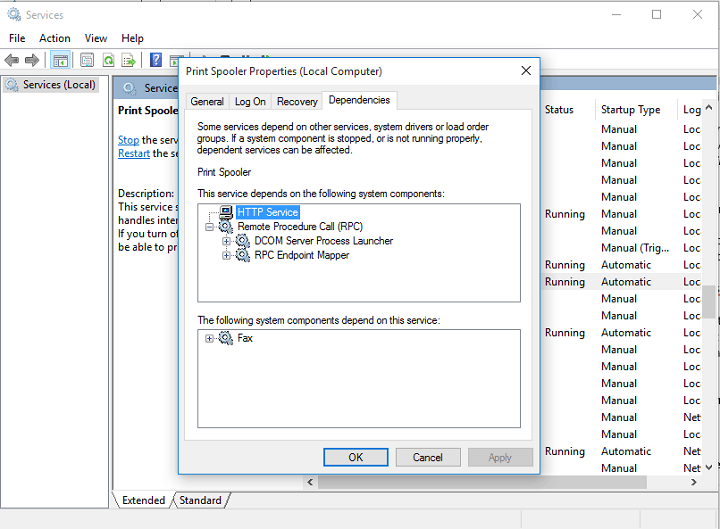
Go to the Dependencies tab and find which services are needed for Print Spooler to Run.
Now, search through Services, and make sure all dependencies are running.
Print Spooler needs some other services to run to function, and if these services are stopped, the Print Spooler service will be stopped too.
3. Update the printer drivers
3.1 Manual update
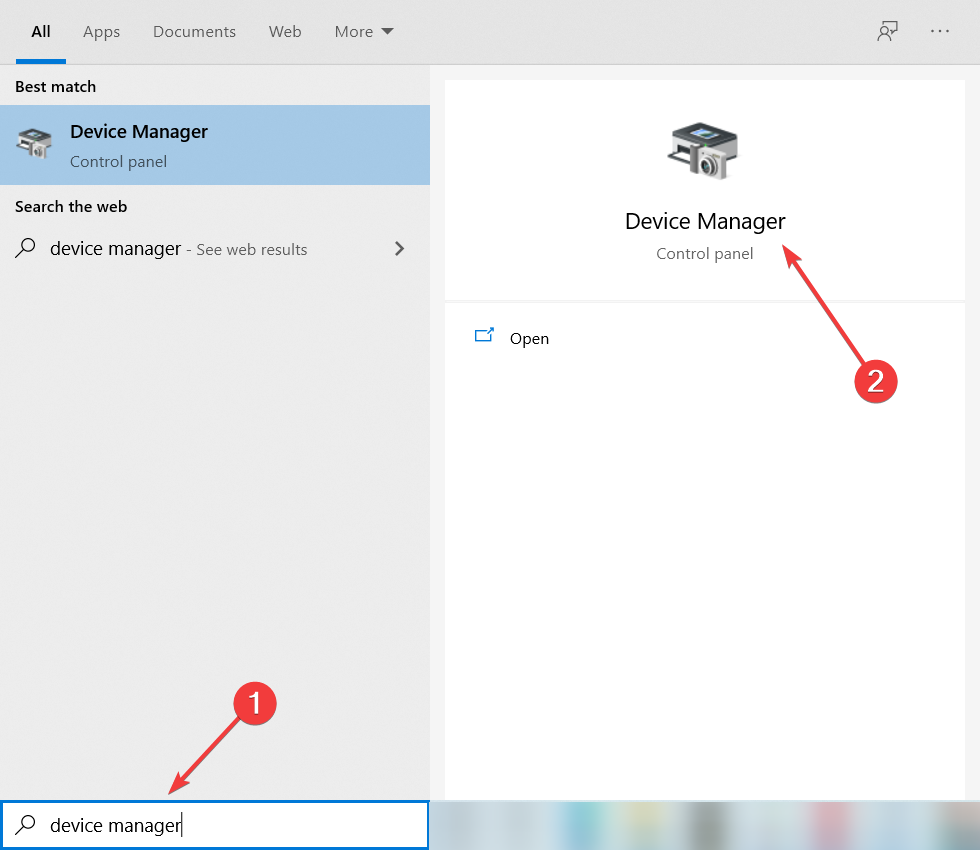
Go to Search, type devicemngr, and open Device Manager.
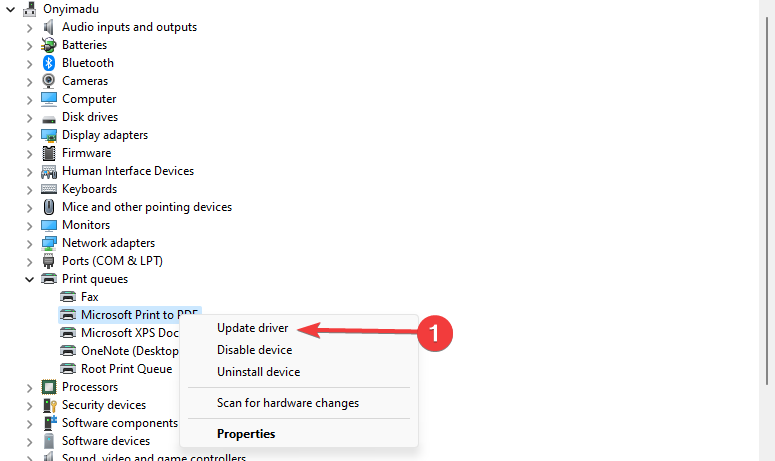
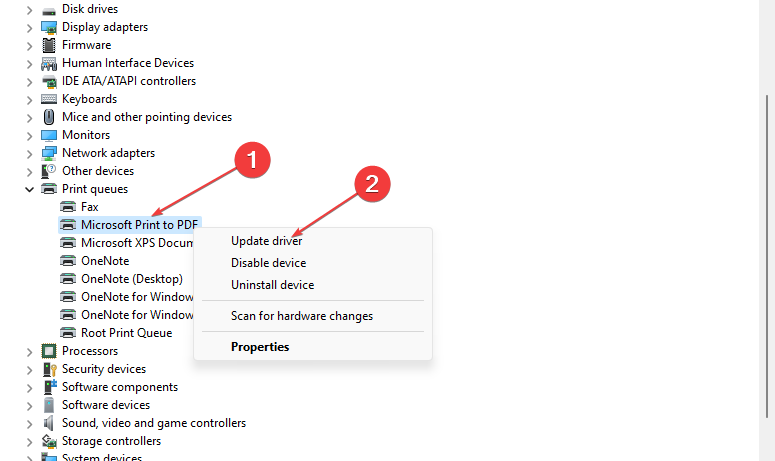
Find the printer you want to delete, right-click it and go to Update driver.
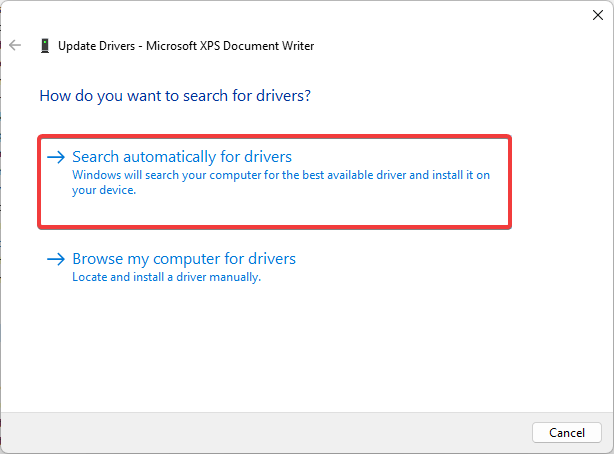
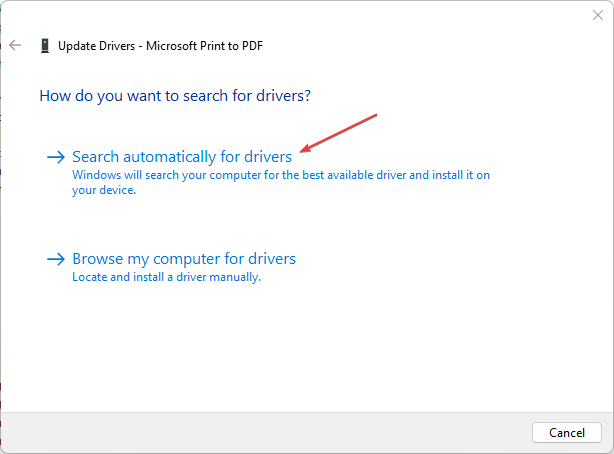
Select Search automatically for drivers and let the wizard look for new drivers.
Follow further on-screen instructions.
Restart your computer.
If your printer drivers are outdated, there’s a great chance you’ll encounter some errors when printing documents.
To remove this possibility from the equation, we will update the printer driver and install the latest version of the software.
3.1 Update drivers automatically
Suppose this method doesn’t work or you do not have the necessary computer skills to update/fix the drivers manually. In that case, we strongly suggest doing it automatically using a professional driver updater tool.
The tool is straightforward to use. First, select the driver you want to update and let it complete the process. You can also set it up to automatically check and update all your drivers regularly.
4. Uninstall unnecessary printers
Go to Search, type devicemngr, and open Device Manager.
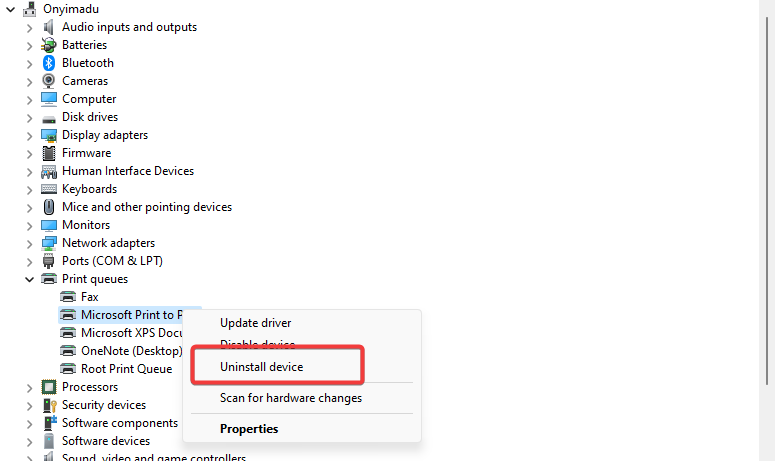
Find the printer you want to delete, right-click it and go to Uninstall device.
Follow further on-screen instructions.
Restart your computer.
If you have more than one printer driver installed on your computer, drivers are very likely to interfere with each other.
So, the best thing you can do is uninstall all unnecessary printers, so the one you’re currently using can work without interruptions.
5. Run the Printer troubleshooter
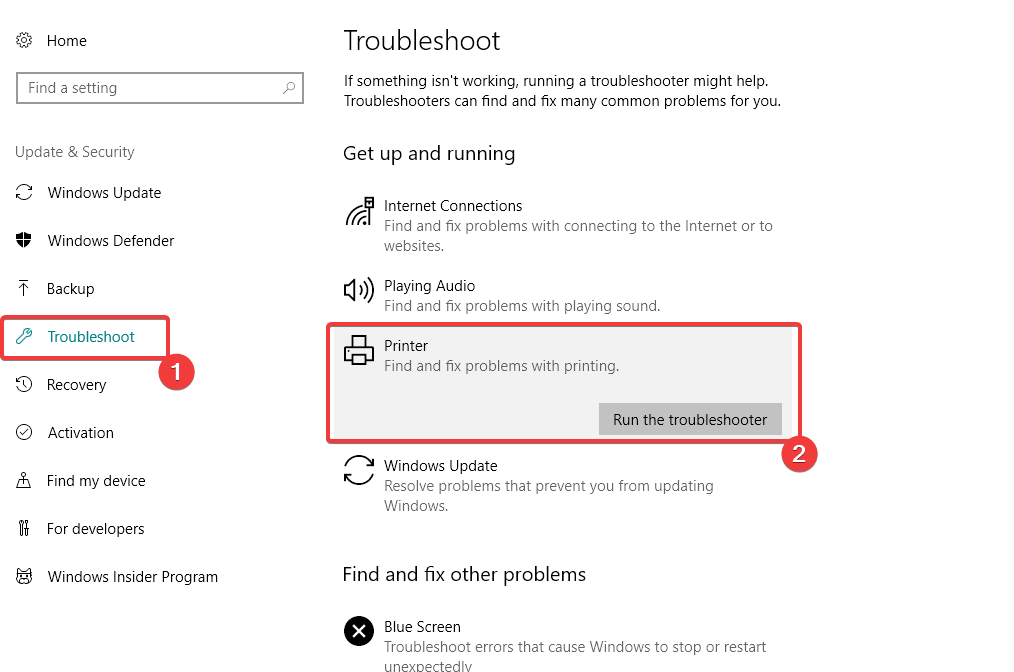
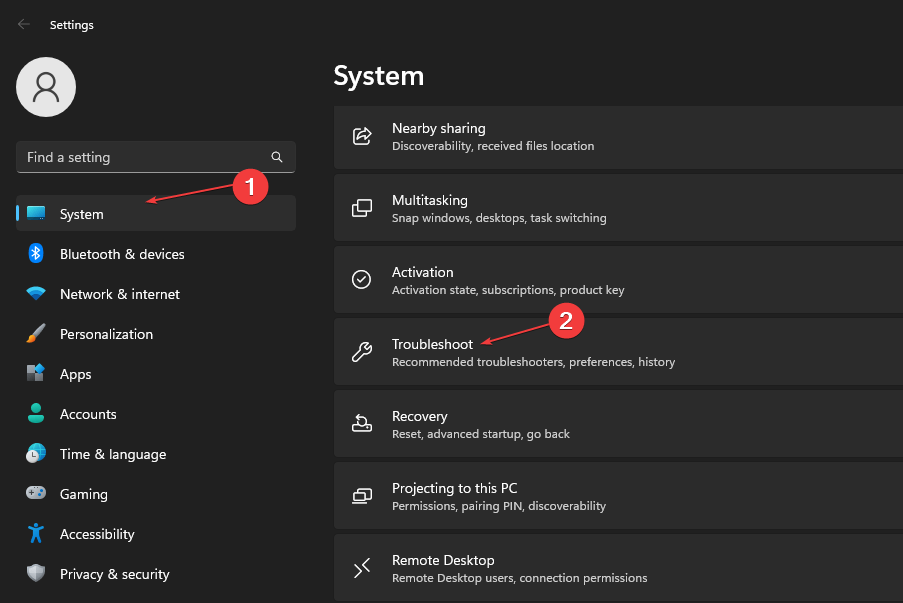
Go to Settings by pressing Windows + I.
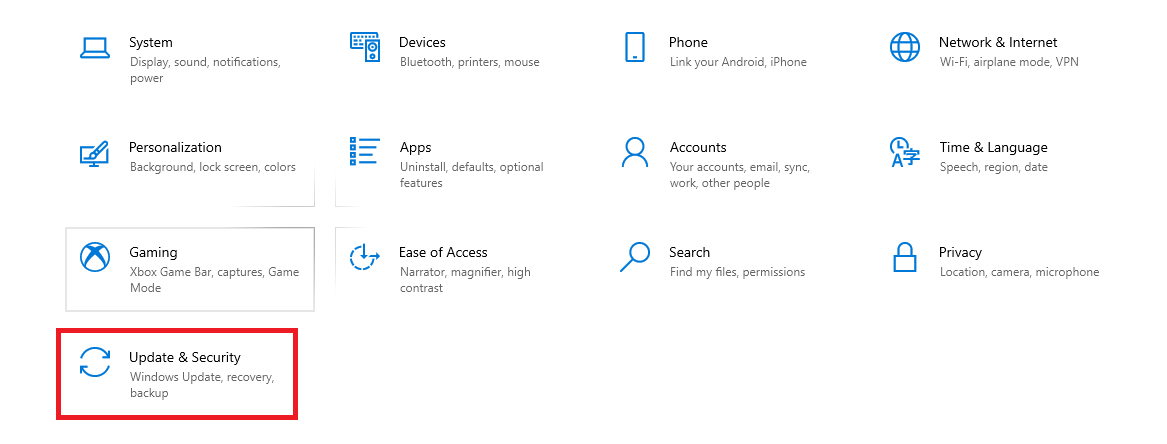
Head over to Updates & Security.
Click on Troubleshoot, click Printer, and choose Run the troubleshooter.
Follow further on-screen instructions. Finish the procedure.
Restart your computer.
If none of the solutions from above managed to solve the problem with the Printer Spooler, we will try Windows 10’s troubleshooting tool.
Microsoft introduced this tool with the Creators Update for Windows 10, and you can use it to solve various system-related errors, including Printer issues.
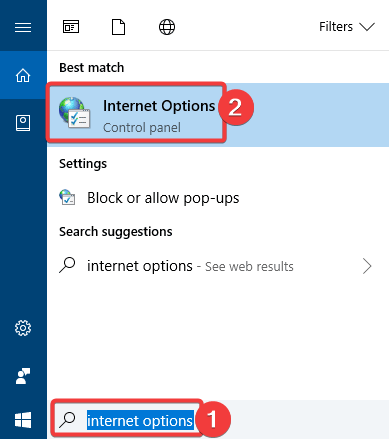
Go to Search, type of internet options, and select Internet Options from the menu.
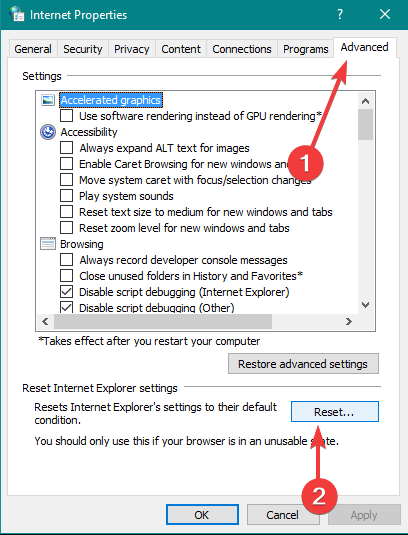
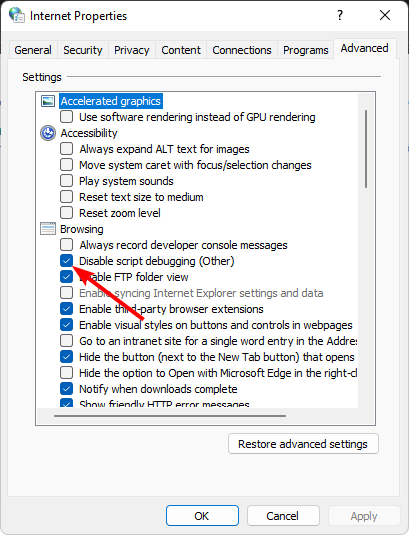
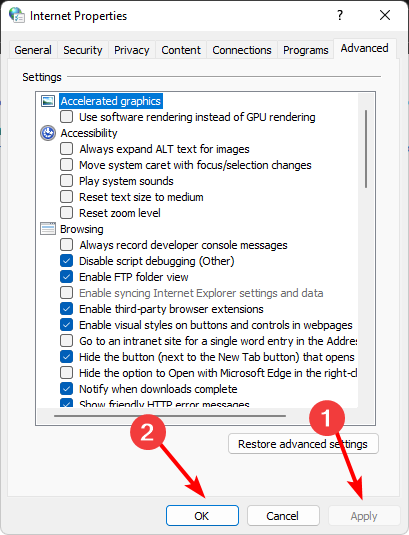
Go to the Advanced tab and click Reset.
Click the Reset button again to confirm.
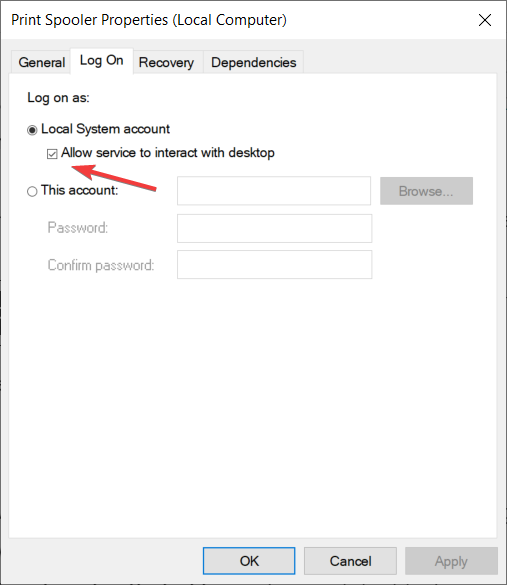
7. Disable the Allow service to interact with desktop option
Press Windows + R, type services.msc, and hit Enter.
Locate Print Spooler service. Right-click it and go to Properties.
When the Properties window opens, go to Log on the tab.
Locate Allow service to interact with desktop option and disable it.
Click Apply and OK to save the changes.
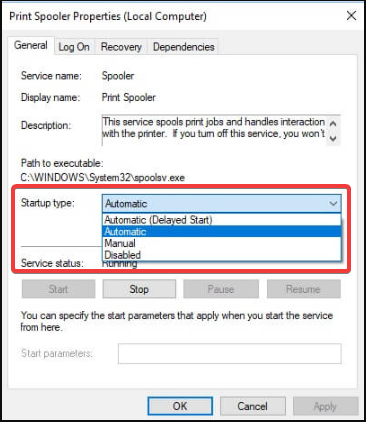
8. Set the Printer spooler on Automatic Startup
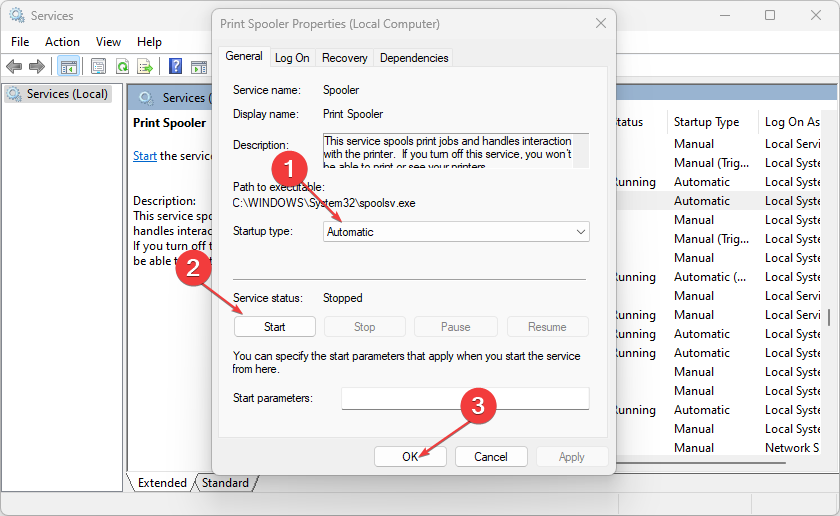
Press Windows + R, type services.msc, and hit Enter.
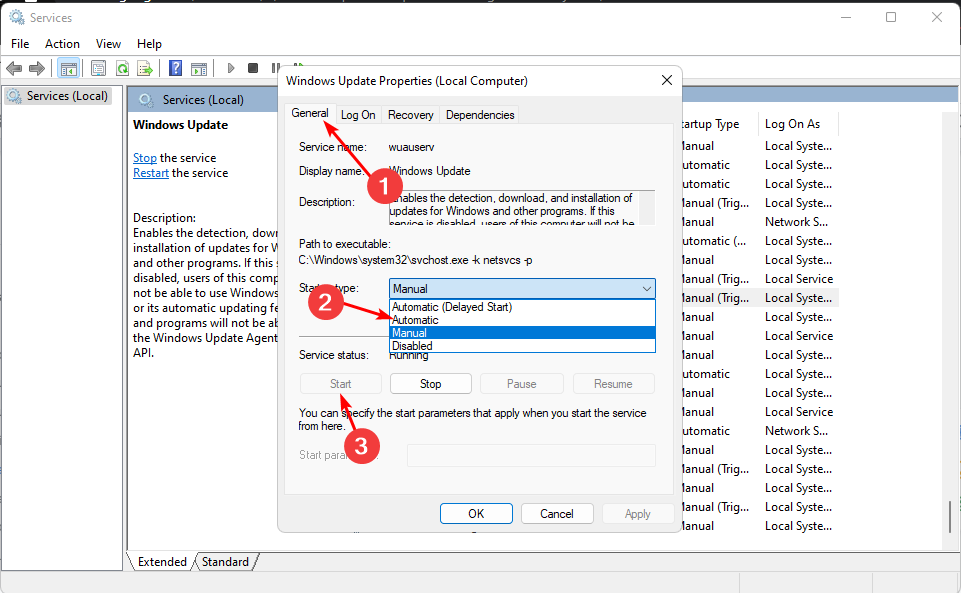
Locate Print Spooler service. Right-click it and go to Properties.
Go to Startup type and set in on Automatic Startup.
If the service does not start automatically when you boot up your computer, this may explain why the Printer Spooler service is not working on Windows.
Having to enable the service every time you start your computer manually is time-consuming. Instead, you can quickly solve this problem by setting the Printer Spooler service on automatic Startup.
That would be all. We hope these solutions helped you to solve the problem with the Print Spooler service; if you have any questions or comments, reach out to the comment section below.
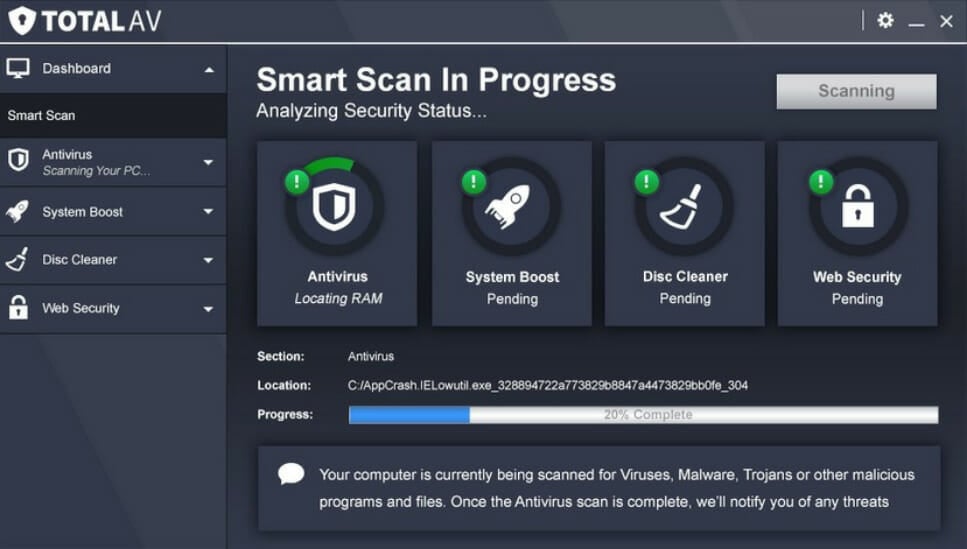
TotalAV is an award-winning antivirus known for its top-notch security and privacy features. It offers multi-device compatibility, making it ideal for your Amazon Fire tablet.
Its WebShield feature protects you from scams, fake, and phishing websites, safeguarding your personal information. Stay secure on public Wi-Fi by blocking hackers and protecting your data.
The integrated VPN enhances your anonymity while browsing. With real-time protection, TotalAV blocks phishing scams and fake websites to keep your information safe.
Check the main key features of TotalAV:
Multi-device compatibility
Public Wi-Fi privacy protection
Real-time protection
On-the-go unlimited VPN
Ad blocker for websites and videos
Data breach monitoring
TotalAV
Get the best additional layer of security on your Amazon Fire tablet.
Bitdefender Mobile Security is an excellent antivirus choice, capable of successfully protecting your Amazon Fire tablets.
Its malware scanner offers in-depth information about all kinds of digital threats. Furthermore, it has an anti-phishing system that alerts you if you access fraudulent websites.
A worth-mentioning thing about Bitdefender Mobile Security is its anti-theft feature. It lets you remotely locate, block, delete, or send a message to your device in case you lose it or if it’s stolen.
Take a look at Bitdefender Mobile Security’s best features:
Battery and performance saver
Autopilot
Scam alert
Web protection
Fast and lightweight
Bitdefender Mobile Security
Get the best protection for your Amazon Fire tablet while having minimal impact on its battery.
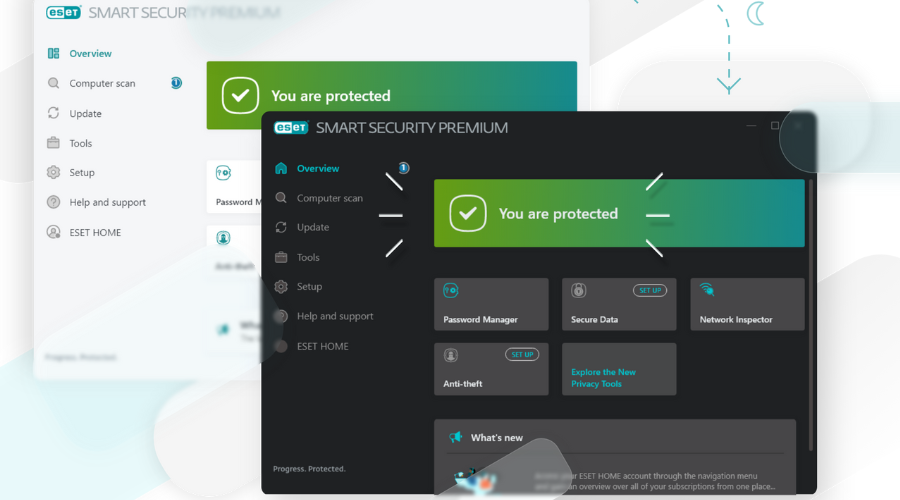
Integrated within ESET’s Home Security suite, ESET Mobile Security delivers robust protection for Android devices, including Amazon Fire tablets.
It offers advanced malware detection, anti-theft features, and app permissions control, ensuring comprehensive security for your digital life.
This integration provides a seamless defense across all your devices, including desktops and smartphones, enhancing your overall home security with reliable mobile protection.
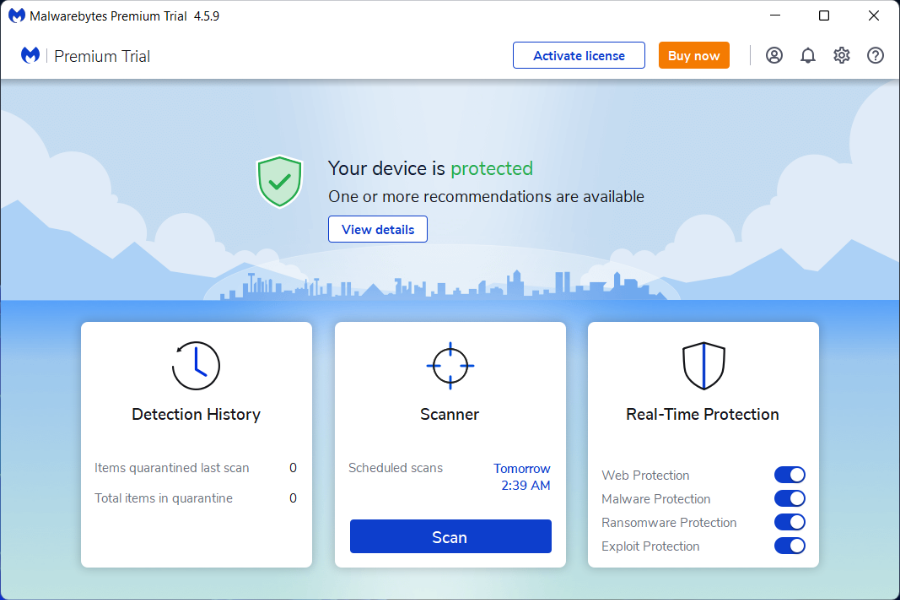
Malwarebytes is an advanced security tool that effectively detects and removes malware on your Amazon Fire device.
It guards against ransomware attacks and blocks emerging threats like spyware and hacking attempts with 24/7 real-time protection.
The Malwarebytes Browser Guard provides a secure, cleaner browsing experience by blocking malicious links and tracking ads. This comprehensive antivirus enhances the defense of your Fire tablet against cybercriminals and sophisticated phishing threats.
Take a closer look at its best features below:
Phishing URLs detection tools
Protection from corrupted webpages or browser cryptojackers
No-log VPN security for improved online privacy
Wi-Fi connection security
Privacy audit for any app
Guarding against various ransomware attacks
Malwarebytes Premium
Increase your device security and eliminate any online dangers regarding your data.
Kaspersky supports over 5 devices, including tablets and smartphones, making it ideal for home or small business use.
It delivers multi-layered protection against online and offline threats. The free VPN provides up to 300 MB of daily traffic for enhanced privacy.
The Safe Money feature secures online transactions, while the software also monitors cameras to block unauthorized access. Its user-friendly interface ensures easy management of your security.
Let’s see below what are its best features:
The Safe Money feature will protect all your online transactions
Built-in VPN with up to 300 MB of traffic per day
You can use it for up to 5 of your devices
Ideal for families or small businesses
Webcam privacy protection
Kaspersky Standard
Protect your business with the Kaspersky antivirus, and be sure that your data is safe.
One key aspect of an effective antivirus is fast, uninterrupted protection. Avast Free Antivirus excels in this area.
Its intuitive interface includes a passive mode for running multiple security products simultaneously and a Do Not Disturb Mode to block pop-ups during gaming or movie watching.
The Behavior Shield monitors apps for rogue actions, while Avast’s background protection blocks ransomware before it can cause harm.
Take a look at its most important characteristics:
Passive mode to act as a secondary security solution
Do Not Disturb Mode for blocking unnecessary distractions
Completely free
Behavior Shield monitors all the apps for any possible rogue actions
McAfee offers robust antivirus technology to protect multiple devices from malware and cyber-attacks. This award-winning software includes advanced monitoring to safeguard your Amazon Fire device from threats.
It features strong firewall support to block hackers, a password manager for secure online credentials, and built-in VPN protection for enhanced anonymity and defense against malicious sites.
Additionally, McAfee includes a file shredder, email monitoring for up to 10 addresses, and compatibility with Windows, Mac, and iOS devices, ensuring comprehensive protection across platforms.
Let’s see what its most important features are:
Web protection on your browser
VPN security license protection
Protection Score to see how safe you are
Multi-platform support
Data breach alerts
Technical assistance from specialists
McAfee Total Protection
McAfee blocks advanced cyber and malware attacks to protect your Amazon tablet.
Webroot provides comprehensive antivirus protection for your Amazon Fire devices, defending against all types of malware and viruses.
It includes a strong VPN, a password manager, and protection against hacking attacks.
The software offers predictive malware detection and rapid scans—taking about 20 seconds—for swift virus detection and malware blocking.
Webroot also features phishing prevention tools to safeguard against corrupted URLs and malicious sites, ensuring robust privacy and identity security to protect you from cyber threats.
Let’s see below what are its best features:
Support for multiple devices like Windows, Android, Mac, or tablets.
Real-time phishing website security
Network connection monitoring
Firewall support
Account credentials and password protection
Online activity removal tools
Do you need internet security on Kindle Fire?
To keep your Kindle Fire safe, using internet protection or antivirus is a smart choice. Although Amazon Fire tablets offer decent built-in security like password encryption, they’re not immune to threats like malware or phishing, especially since they’re based on Android.
Here’s how you can protect your device:
Install antivirus software to catch malware and phishing attempts before they cause harm.
Avoid shady websites and always pay attention to browser warnings about unsafe pages.
Stay cautious with public Wi-Fi—it’s a hotspot for hackers. Use a VPN if you must connect.
Say no to sketchy downloads from unknown sources, especially third-party apps, which can carry spyware or worse.
We hope that our advice and antivirus suggestions helped you secure your Amazon Fire tablet and keep you safe from any potential threats.
In case of looking for a defense system for your PC, here’s also a list including the best antiviruses with unlimited licenses. Let us know if you have any more questions.
Open-source antivirus tools offer a transparent, free-of-charge alternative to proprietary solutions. They also give users more control over their security.
In this guide, we’ll show you some of the best open-source antivirus tools for all needs – whether you like simplicity, customization, or lightweight performance, we got all you need.
MoonSecure Antivirus is simple, so even first-time users will have no issues using it on their PC. It also uses little resources, which makes it perfect for older or low-end PCs.
This software is open-source and free, and according to the developers, it’s funded by bundling the installer with other security software, so that’s something you should keep in mind.
The software is also scalable, and you can scan computers remotely. However, this feature is only available in the Enterprise version.
Overall, it’s a small but effective open-source antivirus software that you want to try out.
Armadito Antivirus can protect both computers and servers from malware. It uses signature-based malware detection and supports heuristic detection modules for binaries.
According to developers, this tool is designed so that anyone can improve the antivirus by developing its modules. There’s also a plugin system that allows users to test and implement new features.
As for regular features, you can find on-demand scanning, real-time protection, threat journal, quarantine, etc. Overall, it’s a solid antivirus, and while it’s aimed at experts, others can also use it.
Other great features:
Supports on-demand scanning, real-time protection, and other standard features.
Uses signature-based malware detection.
It is highly customizable, thanks to the plugin system.
While open-source antivirus does offer some form of protection, it might not be updated as often as the closed-source counterparts. Windows Defender or any other antivirus solution should usually be a more reliable option.
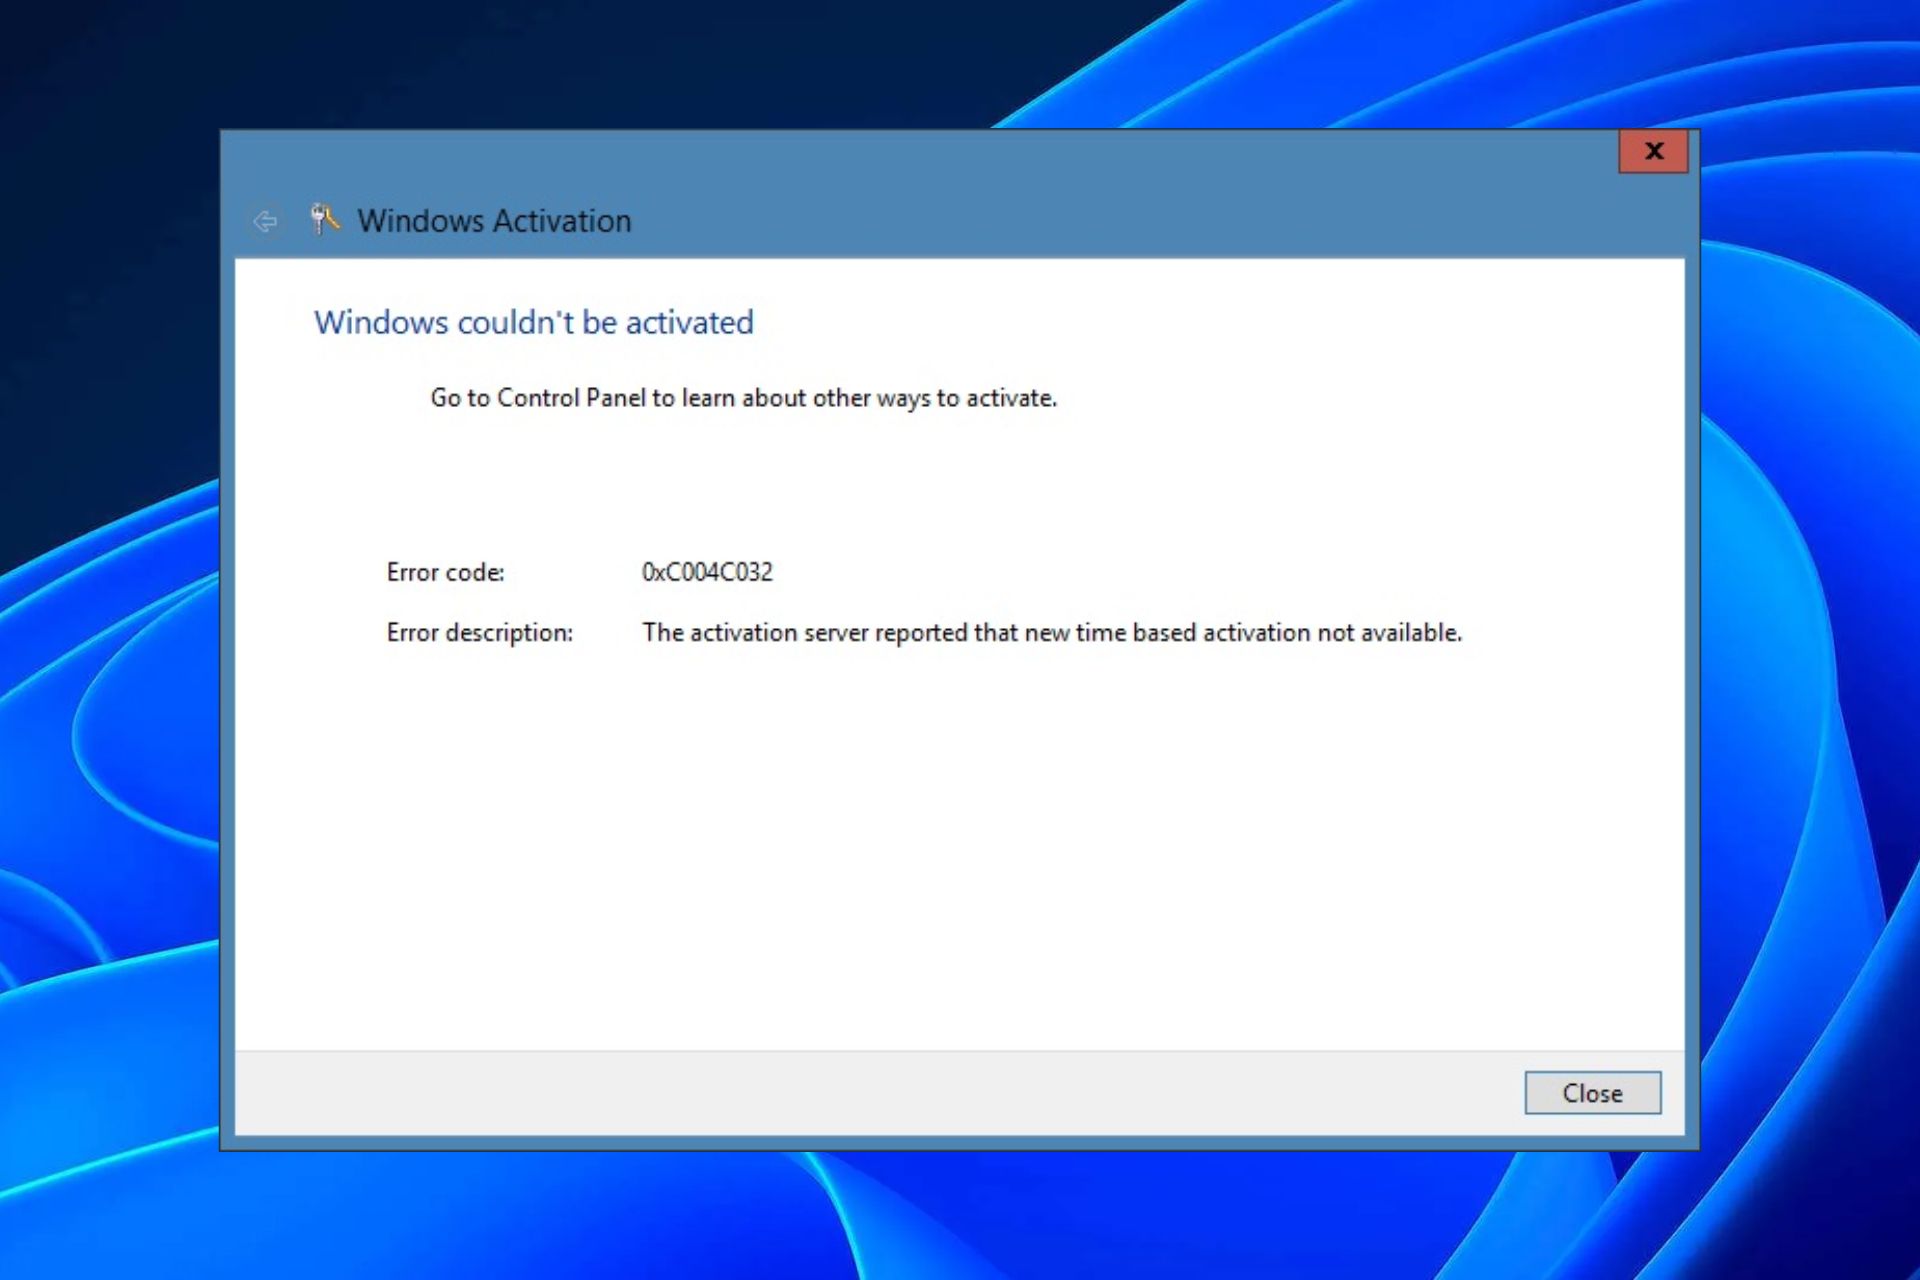
Office activation error 0xC004C032 is an error that occurs during the installation of Microsoft Office. It means the product key is invalid or missing and must be installed again. In some cases, this error can also be caused by a fault in your computer’s hardware.
While you can use the Office trial version to perform basic functions, you will need the activated version at some point. If you’re not a big fan of Office, we have other Office alternatives you can try out as you try to figure out this error.
What is Office activation error 0xC004C032?
The error code 0xC004C032 is an error that indicates that an invalid license has been detected. Many people will get this error when trying to activate their Microsoft Office Professional trial versions.
This could be because they have not installed their product key correctly or because they are using an unlicensed version of Microsoft Office Professional that has expired or been reported as lost/stolen. Most features on the trial versions are usually disabled, so you need to address this error soon.
This error can also be caused by various reasons, such as:
Older version – If you have been using an older version of Office that Microsoft no longer supports, this error may occur because your computer doesn’t support newer versions of Office.
The Office product key was not properly validated – If the Office product key has been used before and was not properly validated, then the activation error 0xC004C032 appears on your computer.
The product key was entered multiple times – You may have entered a valid product key, but it must only be used on one computer to activate Office. The activation will fail if you try to activate Office on a different computer.
Unlicensed product – If you have used an unlicensed product key to activate Microsoft Office in the past, you may experience issues with new installations.
Outdated OS – If you’re using an older version of Windows, it may not be compatible with the version of Office you’re trying to install.
Temporary glitch – Any man-made software is not exempt from glitches now and then. Sometimes, it may just be a temporary glitch that will be resolved in a few moments.
How do I fix the Office activation error 0xC004C032?
Before you attempt any complex solutions, try the following:
Check if your computer has the latest updates installed. This includes both software and Windows updates as well as hardware drivers.
Make sure that you have a valid product key and that it has not been used before.
Hit the Windows key, type cmd in the search bar, and click Run as administrator.
Type the following command and hit Enter. Remember to replace the product key with your actual product key: %ProgramFiles%\Microsoft Office\Office14\ospp.vbs" /inpkey:<product key>
Hit the Windows key, type Control Panel in the search bar, and click Open.
Click on Uninstall a program under Programs.
Find Microsoft Office and click Uninstall. If there’s more than one copy, proceed to uninstall them too.
Download Office and follow the on-screen prompts to complete the installation.
Before you reinstall the program, ensure you get rid of any software leftovers. This way, if you had installed the wrong version or it was corrupted, the files don’t get mixed up with the correct ones.
Users also reported being unable to start the Office app, which was accompanied by the error code 147-0. If you have encountered the same issue, refer to our helpful guide on how to fix it.
And that’s how to resolve error code 0xC004C032. For any additional thoughts on this topic, leave a comment down below.
Microsoft Store not updating and installing apps is an issue some of our readers complain about, and an error 0x80073cf1 usually accompanies it. However, the problem may be prompted due to many factors. As such, we’ll take you through some steps to resolve it.
Error code 0x80073cf1 appearing on your PC during a software download or update indicates that Microsoft Store is malfunctioning. It prevents you from installing update patches and performing other tasks on the app.
Furthermore, some notable causes are:
Corrupt Microsoft Store cache – Microsoft Store cache files are stored on the PC to help run its processes faster. However, they are also vulnerable to malware and viruses. Hence, this may impede apps installed from the store from running as expected.
Network connection issues – The error code 0x80073cf1 can occur if Microsoft Store can’t connect with its servers due to network congestion and other network-related issues.
Log-in errors with your Microsoft account – The error code 0x80073cf1 may be because of user account issues. Also, a corrupt user profile on the Windows computer can cause the error.
Outdated Windows OS – If you’re running an outdated Windows OS on your computer, you are more likely to encounter this error.
Fortunately, you can follow the steps below to fix the error and get your downloads and updates running on Microsoft Store.
How can I fix the error code 0x80073cf1?
Before trying any advanced troubleshooting steps, go through the following:
Left-click the Start button, type PowerShell, and click the Run as administrator option.
Click Yes on the User Account Control prompt.
Copy and paste the following lines and press Enter: Get-AppXPackage -AllUsers | Foreach {Add-AppxPackage -DisableDevelopmentMode -Register "$($_.InstallLocation)\AppXManifest.xml"}
Restart your PC and check if the Error code 0x80073cf1 appears when using the Microsoft Store app.
Left-click the Start button, type PowerShell, and select Run as administrator.
Tap Yes on the User Account Control prompt.
Copy and paste the following lines and press Enter: Get-AppxPackage -allusers *WindowsStore* | Remove-AppxPackage
Copy and paste the following lines and press Enter: Get-AppxPackage -allusers *WindowsStore* | Foreach {Add-AppxPackage -DisableDevelopmentMode -Register “$($_.InstallLocation)\AppXManifest.xml”}
Restart your PC and check if the error persists.
Reinstalling the Windows Store via PowerShell will check for corrupt installation files causing problems, then reinstall it.
ChatGPT 3 has become popular as many people use the platform to find solutions for daily problems and technical issues.
The model is trained on a massive text dataset and can produce human-like responses. Now OpenAI has released GPT 4 on March 14, 2023.
In this guide, we will discuss the difference between ChatGPT 4 and ChatGPT 3, what we can expect, and how it can be helpful for users.
Is GPT-4 better?
In a recent podcast interview, CEO Sam Altman hinted that OpenAI is working on a multi-modal model, and now that GPT-4 has launched, it is claimed to be faster, more reliable, more creative, and more accurate than its predecessor.
What’s new with ChatGPT?
With GPT-4, ChatGPT is now ChatGPT Plus, supports more parameters, and can deliver faster responses. ChatGPT Plus is available to a limited number of users and is the only way to access ChatGPT-4.
The updated version now provides more accurate answers to tough questions and can take visual input.
It will be available for customers willing to pay $20 a month, including taxes. To be able to use ChatGPT Plus, you need to fill out a form by OpenAI, which will put you on a waiting list.
What is GPT 4 capable of?
GPT-4, as expected, is a multi-modal large language model, which implies it responds to both text and images. For example, you can upload photos of your fridge content and ask what you could make; GPT -4 will suggest the recipes according to the pictures.
OpenAI tested this model on various benchmarks, including simulated human exams, and it performed better than the existing models, as you can see below.
It works well in both popular known languages, such as English, and low-resource ones, including Welsh, Latvian, and Swahili.
How many parameters does GPT 4 have?
Earlier, it was suggested that GPT 4 would also be a smaller model with 175 billion parameters. It will generate text, translate language, summarize text, and answer questions at a faster rate.
Now that GPT 4 has been released, it claims to be faster and better. However, there is still no news on how big the parameters are, and it looks like the company is keeping this information to itself for now.
GPT 3 is restricted to language and can’t respond to images and sound. Also, it doesn’t have common sense knowledge and can’t learn to reason based on that knowledge.
ChatGPT 4 vs. 3: What is the difference?
AI is evolving as we speak, and companies are working towards making artificial intelligence more useful for humans; ChatGPT is another example.
ChatGPT-4 might have a larger dataset and an equivalent number of parameters. The successor to ChatGPT-3 can generate human-like responses, creative writing, code, structured writing, and more at a much faster rate.
Let’s discuss how ChatGPT 4 differs from its predecessor in model size, compute, optimal parameter, sparsity, multimodality, and performance.
Visual inputs
GPT-4 can respond to both text and images as input and generate text outputs based on the information given. The visual input is in its nascent stage but shows similar capabilities to text-only inputs.
This model can accept text and images, unlike its predecessor, which was only a text-only model. As output, it can generate natural language text consistent with the input.
Although the visual input capability of the model is currently in the research preview stage, it has demonstrated comparable capabilities to text-only inputs.
Steerability
Steerability is an intriguing concept in AI, which means having the capacity to change behavior as per need. GPT-4 integrates steerability more natively than GPT-3.5, and users can modify the classic ChatGPT personality with fixed phrasing, tone, and style per your requirements.
With the “system” message, developers can now provide instructions that prescribe the desired style and task for their AI models. The system messages offer API users greater customization for their users’ experience within certain limits.
Increased capacity for multiple tasks
GPT-4 can perform multiple tasks simultaneously with ease and, therefore, can streamline and speed up processes for businesses that depend on AI technology.
You can use this model to automate customer service queries and quickly address multiple.
Multi-modal inputs
GPT-4, as expected, is multi-modal, which means it can understand more than one modality of information. Wherein ChatGPT and GPT-3 can only respond to text.
The newer model can take images as input and process them to find relevant information. You can ask it to explain the image as well.
The capability to process several input types can be handy for all chatbots improving user experience and engaging interaction. However, as of now, the feature is limited and under development.
GPT-4 can’t be tricked easily
Despite the advancement in AI, chatbots are easier to trick and deviate from their intended behavior.
However, GPT-4 has undergone extensive training using several malicious prompts based on the data provided by the users to OpenAI. With these prompts, the latest model exhibits significant improvements over its predecessors in factuality, steerability, and remaining within defined boundaries.
Longer memory
Large language models are trained on millions of web pages, books, and other text; there is a limit to the amount of information they can retain while conversing with users.
The limit for GPT 3.5 is 4096 tokens, and the earlier version of ChatGPT translates to roughly 8,000 words or four to five pages of a book. Beyond this threshold, the model may lose track of the last details as they recede further into its attention function.
On the contrary, GPT-4 boasts an impressive maximum token count of 32,768. This increased capacity allows the model to retain up to approximately 64,000 words or 50 pages of text, equivalent to a short story.
Therefore the latest model can recollect past discussions even if they occurred 20 pages back or more. While this explanation is a rough approximation of the attention mechanism and token count, the underlying concept is that GPT-4 possesses an extended memory capacity and the associated capabilities that come with it.
GPT-4 is imperfect and has limitations, just like the earlier GPT models. Also, this model doesn’t know events after September 2021, just like the predecessor.
With new capabilities, the AI model is safer than 3.5; however, it poses unknown risks, such as providing wrong information, buggy code, or harmful advice.
All these factors could revolutionize the digital media market as they can help writers develop creative ideas and write information in different formats and styles. Also, they could be helpful for students, designers, developers, and others.
If you have questions or concerns about GPT, please let us know in the comments section below.
Some of our readers encounter update errors like error 0x800f0806 in Windows 11. Updating Windows allows you access to updates and patches for fixing bugs, upgrading security, and adding features to Windows.
Likewise, you can encounter Windows error 0x800f0900 during an update. So, we will provide the possible ways to solve the issue.
What causes Windows 11 0x800f0806?
The most common cause of the issue is system file corruption. When system files are inconsistent or corrupt, they affect almost every part of the system, resulting in errors.
Moreover, some other factors that can cause the Windows 11 update error 0x800f0806 are:
Boot errors – These occur when there is an irregularity in how the computer is powered up. Boot errors can affect the Windows update process, resulting in update error 0x800f0806.
Issues with Windows Update services – The Windows update services on your PC can run into some problems that affect its performance.
The above causes are a few factors that can prompt Windows 11 download error 0x800f0806. As we go further into this article, we’ll take you through what you can do to get Windows update running on your PC.
How do I fix the error 0x800f0806 in Windows 11?
Fixing the Windows 11 download error 0x800f0806 is a technical process, so we recommend you observe the following preliminary checks before proceeding:
Connect your PC to a stable and fast network connection.
Stop all other download processes on your PC.
Close apps running on your computer.
Restart Windows and try downloading updates.
These preliminary checks should help you get through the Windows updates download. If you can’t fix the issues, proceed with the troubleshooting steps below.
1. Reboot your PC in Safe Mode
On the sign-in screen, press the Shift key while holding the Power button.
Hold the Shift key to open the Advanced Recovery Options page, click on Troubleshoot, then select the Advanced options.
Click on Startup Settings and select Restart.
Press 4 to Enable Safe Mode.
The computer should reboot in safe mode. Rebooting your computer in Safe Mode can fix the system’s issues, causing it not to download Windows updates.
2. Run the Windows Update troubleshooter
Press the Windows + I key to open the Settings app.
Go to the System menu, then click on the Troubleshoot tab.
Click on the Other Troubleshooters button.
Click the Run button next to the Windows Update to initiate the troubleshooting process for the error 0x800f0806.
Follow the on-screen prompts to complete the troubleshooting process. It will help you detect and fix issues causing the Windows Update error on your PC.
3. Repair corrupted system files through SFC and DISM scans
Press the Windows key, type cmd in the search box, and click on Run as Administrator.
On the Command Prompt page, paste the following in the command bar and press Enter: sfc /scannow
Then type the following in the command bar and press Enter to fix the result of the health scan above: Dism /Online /Cleanup-Image /RestoreHealth
Wait until the Command Prompt completes the process. Running SFC and DISM scans identifies the issues on your system and repairs the corrupt system files in Windows 11.
Press Windows + R keys to prompt the Run dialog box, type cmd in the text box, then press Ctrl + Shift + Enter to launch an elevated Command Prompt.
Input the following consecutively and press ENTER after each to stop Windows update services: net stop wuauservnet stop cryptSvcnet stop bitsnet stop msiserver
Delete and rename the SoftwareDistribution and Catroot2 directories using the following commands: ren C:|Windows|SoftwareDistribution SoftwareDistribution.oldren C: Windows|System32|catroot2 Catroot2.old
Run the command below to enable the earlier disabled services: net start wuauservnet start cryptSvcnet start bitsnet start msiserver
Restart your computer and check if the issue persists.
Resetting updated components will force them to generate usable and safe copies of the components.
5. Perform a system restore
Click Start and search for Create a restore point and launch it.
Press the System Restore option, select the appropriate option, and then follow the on-screen prompts.
Many of you, that tried to access the new Bing ChatGPT service, were disappointed in the fact that there was a huge waitlist that you had to sit through.
We understood the frustration and we provided a guide on how to fix the waitlist bug if you run into that problem while trying to get on ChatGPT.
However, it seems like the situation is improving, even though there’s no official confirmation from the tech giant himself.
On that note, if you have hesitated to sign up for the waitlist to try out Microsoft’s Bing Chat because you thought you would have to wait a long time, there may be good news.
Apparently, there’s word on the internet that there are no more wait times when you go sign up at the Bing Chat page.
Needless to say, no Microsoft officials have yet stepped up to confirm the wait list has been done away with so far, which is important to keep in mind.
That being said, if the wait list is truly done, it may show that Microsoft is confident enough in the current Bing Chat developer to let most anyone try out the AI chatbot.
Back when Bing chat was first launched over a month ago, some of its responses went off the rails, which forced Microsoft to put some hard chat turn limitations in place,
However, recently, the Redmond-based tech giant has expanded the chat turn limits to 150 per day, and 15 turns per session.
Furthermore, it’s also put in new features like the Tone Selector, which can alert how Bing Chat responds to an inquiry.
Don’t forget that it’s also possible that the fact that Bing Chat uses the new GPT-4 could be a factor as GPT-4 is known to be better.
Overall, it seems that Bing Chat is responding more like Microsoft expected it to do, and now it looks like anyone can try it out for themselves.
0x800706d9 is an error code that appears when installing an app from the Microsoft Store. The Microsoft Store is one of the most important apps in Windows 11 as it is the one-stop shop for all your apps.
If Microsoft Store isn’t working, you’ll be unable to update or download apps. This can affect many applications, so you need to get to the bottom of this issue immediately. Luckily, we have compiled the top solutions for you, as reported by users.
What is problem 0x800706d9?
Problem 0x800706d9 is a common error that occurs during the installation or update process of an app from the Microsoft Store. This error has many causes, but the most common ones are:
Firewall settings – If you see this message while downloading an app, it could mean your network administrator or firewall blocked the app.
Corrupt installation files – The error is usually caused by an installation package that’s corrupted or incomplete. It can also be triggered by system files that have been damaged.
Corrupted cache files – Sometimes, corrupted cache files can accumulate over time and cause this issue.
Insufficient funds – If you’re trying to purchase and download an app, the download may fail because you don’t have enough money in your account.
How do I fix error code 0x800706d9?
To resolve this error, try these basic troubleshooting steps first:
Ensure you have connected your PC to the internet, preferably via Ethernet cable instead of Wi-Fi.
Check your date and time settings. The date and time on your computer can affect how programs behave, so it’s important to make sure Windows has the correct time and date set.
Try signing out of your Microsoft account, then sign back in after 30 seconds.
Ensure that you have sufficient funds in your Microsoft account if you were trying to purchase an app.
Make sure that your credit card information is correct on file so that it matches up with what is on your screen.
Press the Windows + I keys simultaneously to open Settings.
Type Powershell in the search bar and click Run as administrator.
Enter the following command: Get-AppxPackage -allusers Microsoft.WindowsStore | Foreach {Add-AppxPackage -DisableDevelopmentMode -Register "$($_.InstallLocation)\AppXManifest.xml"
Aside from the error code 0x8007069d, you may also come across an issue where the Microsoft Store fails to download anything. This should not be a cause for alarm, as we have already covered ways to overcome this hurdle.
If you frequent the Microsoft Store, you may get bored of the default theme over time. Don’t worry, as we are here to help refresh things. Check out our impressive library of the best Microsoft Store themes that will elevate your browsing experience.
Chkdsk or Check Disk is a built-in utility for disk repairs in Windows and is often the first used by users. After each scan, it creates a log file detailing the collected information. This concerns users and they have been asking where are Chkdsk logs stored in Windows 10.
The log files are critical for various reasons, whether to identify or eliminate the problem. And that cannot be done until you can access the log file in a readable format. That’s what we will be helping you with today. So, let’s find out the Chkdsk log file location in Windows 10 and later iterations.
If you have been trying to figure out where the Chkdsk logs are stored in Windows 10, it’s the System Volume Information folder on the system drive, usually the C: drive. The folder also contains other critical information and is the Chkdsk log location in Windows 11 as well.
System Volume Information folder in Windows 10
But you can’t access the Chkdsk logs in File Explorer since the files here are protected and not accessible under default settings. Also, we don’t recommend changing these since you can have Chkdsk output to file or view them in the Event Viewer. Let’s find out how.
How do I view Chkdsk logs in Windows 10?
1. With Event Viewer
Press Windows + S to open the Search menu, type Event Viewer in the text field, and click on the relevant result.
Expand Windows Logs from the navigation pane, select Applications under it, and then click on Filter Current Log on the right.
Enter 26226, the event ID for Check Disk, in the All Event IDs text field, and click OK.
All the Chkdsk logs will now be listed. You can click on one to see a brief overview in the General tab or head to the Details tab for a comprehensive result.
You can now view the Chkdsk log in Friendly View and XML View.
Using the Event Viewer to view Chkdsk logs is probably the simplest way. But if you find that Chkdsk log is not in Event Viewer, there’s another method to export the file.
2. Via PowerShell
Press Windows + R to open Run, type powershell in the text field, and then hit Enter.
Click Yes in the UAC prompt.
To export the Chkdsk log as a text file to the desktop, execute this command:get-winevent -FilterHashTable @{logname="Application"; id="1001"}| ?{$_.providername -match "wininit"} | fl timecreated, message | out-file "$env:userprofile\Desktop\CHKDSKResults.txt"
Go to the desktop, and open the CHKDSKResults.txt file to view the logs.
That’s it! You now know where are Chkdsk logs stored in Windows 10, how to access them, and view the detailed results.
Without further ado, here is this week’s Xbox Free Play Days lineup. These games will be available via Xbox Free Play Days from March 16-19.—and in the case of Anno 1800, it will be available for a full week through March 23.
Since we have seen some questions on the Free Week… ????
We're very happy to see so many of you excited to try Anno 1800! From 5PM UTC/1PM EDT onwards you'll be able to download the free version for PC, PlayStation 5 and XBox Series X|S.
Beautify your cities with the Deluxe Edition! Includes three Cosmetic Packs: Amusements Pack, Pedestrian Zone, and Vibrant Cities to enjoy a wide variety of ornaments and skins.
A RICH EARLY ADOPTER OFFER: contains a digital art book, a digital game soundtrack*, the access to the Imperial Pack and the Console Founder Pack! A complete package that will totally immerse you in the world of the Industrial Revolution of Anno 1800™.
Welcome to the dawn of the Industrial Age in this city-building real-time strategy game. Experience one of the most exciting and fast-changing periods of all time as you discover new technologies, regions, and societies, implement your own strategy, and build a new world to your design.
Play solo or use the online mode to play PvP or co-op modes: How the world remembers your name is up to you.
With the dual stick controls, each stick represents one of your feet. You will need to learn how to control them and transfer weight, just like on a real skateboard. The physics have been developed with a focus on realism, smoothness and immersion. Just like in real life for a new skateboarder, the first hours can seem challenging, but once you have mastered the technique, you will feel the unrivalled thrill of pulling off your very first kickflip! Session: Skate Sim also includes full options customisation, so you can enjoy the perfect experience tailored to you. A full tutorial provides all the help you need to get started, and you can choose from four difficulty levels!
Travel the universe creating settlements on uninhabited planets with the sole goal of setting worlds in motion through the power of automation.
Fresh from your spaceship you must harvest stick and stone and begin your settlement building efforts. Create rudimentary crafting items from blueprints and slowly build a number of workerbots to aid in your efforts. Teach and shape their artificial intelligence with a visual programming language, then instruct them to begin the formation of your settlement. Marvel as a planet you’ve shaped becomes home to a civilisation of workerbots, happy to do your bidding!
Expand further with the creation of Folk; beings that require your assistance to survive. Push your workerbots further by introducing fishing, cooking, housing, and tailoring and help the Folk into a state of transcendence.
Wrap up
Is there anything on this week’s Xbox Free Play Days lineup that has you excited for the weekend? Let us know down in the comments. Likely many will be anxious to get in on the Call of Duty Modern Warfare 2 free-to-play-multiplayer event.
With hundreds of files format, it often becomes difficult to find a program for each. Thankfully, most apps support multiple file formats making things a bit easier for users. However, even after much effort, many can’t open WDB files in Windows 10.
This is primarily because the recommendations listed on the web don’t usually work, and the software used to create them has long been withdrawn. So, if you have been trying to open a WDB file without Works, here’s everything you need to know.
What is a WDB file?
The WDB extension is attached to files associated with Microsoft Works, an office suite developed by Microsoft. Initially released in 1988, the suite was a popular choice, primarily due to its low cost and a host of user-friendly features, until it was discontinued in 2009.
Microsoft Works
While the WDB file has features similar to Access database MDB files, it has more limitations on programs that can access it as it contains a proprietary data format that cannot be opened by most programs.
Here are the two sets of applications that generate WDB files:
Microsoft Works: We have already established the role of Microsoft Works with WDB files.
World of Warcraft: This game, too, creates WDB files that store information received from the game servers and is critical to the gameplay.
While there are a few ways to open WDB files, many prefer converting them into a format supported by other applications or the current Microsoft Office suite. So, now that you know what is a WDB file, let’s find out how to open WDB files in Windows 10.
How do I open a WBD file?
1. Download Microsoft Works
Though it was discontinued long ago, and there are no official sources to download it, you can still proceed with the Microsoft Works Database download from Archive.org. The file is in ISO format. Also, be extra cautious with the downloaded file and scan it for malware using a reliable antivirus.
After the download is complete, all you need to do is mount the ISO, run the setup, and complete the installation. In case you face issues, run Microsoft Works in compatibility mode with Windows Vista.
2. Use Microsoft Word
If you previously had Works 6.0 or a later version and the WDB files were created using it, these can easily be opened in Word or Excel (only Office 2010). For later versions of MS Office, you will need a WDB file converter to Word.
Microsoft Word
You can find several converter tools on the web, though not all of them are safe. Be cautious with it, and scan the downloaded file afterward for malware before opening.
3. With Microsoft Excel
2.1 Convert to CSV format
Some users recommended converting the WDB file to a format compatible with Excel, but that’s possible only when you have Microsoft Works installed on the same or another PC.
And that’s unlikely to be the case. Though, if you have it, you can easily convert WDB file to Excel readable format.
2.2 Use a third-party tool
If you have been wondering how to open a WDB file in Excel, many recommend using CodeAlchemist’s Work Database Convertor, but you will need to install Java for it. And even after that, it may not run and throw a security warning instead, which is often tricky to bypass.
Besides, several users reported that their antivirus flagged Works Database Convertor as a threat and prevented it from running. So proceed at your own risk.
4. Via LibreOffice
Download LibreOffice from the official website, then launch the setup and follow the on-screen instructions to complete the installation.
Once it’s set up, open LibreOffice, and click on Base Database near the bottom-left corner.
Check the settings and click Next.
Again verify the details, and click Finish.
Now, choose the File menu, and select Open from the list of options.
Head to the path where the WDB file is stored, select it, and then click on the dropdown menu next to File name.
Select Microsoft Works Document (*.wks, *.wdb) from the formats here.
Finally, click on Open.
It should now open the WDB file.
Users often ask, can LibreOffice open WDB files? The answer is Yes, though it might not work for all. Most users have, however, been able to open WDB file in LibreOffice on Windows 10 and other iterations, and with these steps, you should too.
Also, we recommend saving the file in a compatible format once done to save yourself from all the trouble the next time.
PCSX2 is a free, open-source, and popular emulator for Play Station 2 games. It has long been a favorite amongst Windows users, but of late, many reported getting the PCSX2 Runtime error.
The PCSX2 Runtime error appears after upgrading Windows for most, though some reported it arose out of the blue. No matter the case, you can always fix it with our solutions.
What causes PCSX2 Visual C++ Runtime error?
Here are a few reasons the PCSX2 game is not loading:
Misconfigured settings: More often than not, the misconfigured app settings trigger the error.
Emulator not supported on the PC: For those asking why PCSX2 keeps crashing or throwing an error, it’s likely a lack of support to blame. So, you should check PCSX2’s system requirements.
Critical files are missing: PCSX2 needs Microsoft Visual C++ and an updated DirectX to run, and if these are missing or you have the incorrect ones, PCSX2 will throw the Runtime error.
How can I fix the PCSX2 Runtime error?
Before we head to the slightly complex solutions, here are a few quick ones to try:
Restart the computer.
Make sure DirectX is installed on the computer and is updated. For Windows 11, users get DirectX updates directly through Windows Update.
In case you have a third-party antivirus installed on the PC, disable it and check whether the PCSX2 Runtime error disappears. If it does, we recommend you switch to an effective and compatible antivirus.
If nothing works, move to the fixes listed next.
1. Change plugin settings
Open PCSX2, click on the Config menu, and choose Plugin/BIOS Selector.
In the Plugins tab, select another option from the GS dropdown menu, and click OK to save the changes.
For many users, simply switching from AVX to SSE2 or SSE3 for GS Plugin did the trick.
2. Make sure Visual C++ Redistributables are installed
NOTE
PCSX2 is a 32-bit application, so when downloading the Visual C++ Redistributable packages, make sure to get the 32-bit or x86 versions.
After downloading, run the setup for each individually, follow the on-screen instructions, and wait for the installation to complete.
Similarly, install the other Microsoft Visual C++ Redistributable packages you downloaded from the website.
Missing or corrupt Microsoft Visual C++ Redistributable packages can often trigger the PCSX2 Runtime error in Windows.
Repair Microsoft Visual C++ Redistributable
You know what to do when these are missing, but if the redistributables are corrupt, there’s an option to repair them after the installation is complete.
Press Windows + R to open Run, type cmd, and hit Enter.
Click Yes in the UAC prompt.
Paste the following commands individually and hit Enter after each to run DISM:DISM /Online /Cleanup-Image /CheckHealthDISM /Online /Cleanup-Image /ScanHealthDISM /Online /Cleanup-Image /RestoreHealth
Once done, execute the following command to run the SFC scan: sfc /scannow
Running the DISM tool and SFC scan can help fix corrupt system files or issues with DLLs, which often triggers the PCSX2 Runtime error.
4. Reinstall PCSX2
Press Windows + R to open Run, type appwiz.cpl in the text field, and click OK.
Select PCSX2, and click on Uninstall.
Follow the on-screen instructions to complete the process.
Once done, head to PCSX2’s official website, and click on Latest stable to download the emulator.
Run the setup and choose the necessary settings, as you did earlier, to complete the installation process.
A reinstall should help fix things because the software package will fetch and download the relevant files that were earlier missing and which triggered the PCSX2 Runtime error.
Also, before you leave, check the best ways to boost Windows performance and get the best experience.
If you have any queries or want to share a solution with us, drop a comment below.
Today, at the Microsoft “Future of Work with AI” event, Microsoft unveiled Copilot for Microsoft 365, and a new product, “Business Chat,” along with references to as yet unreleased but announced products like Microsoft Loop and a new version of Microsoft Teams.
Copilot for Microsoft 365, including Copilot for Word, Excel, PowerPoint, Outlook, Teams, and the Power Platform will offer Bing Chat-like interactions with an AI powered back end to bring together information from the Microsoft Graph and Microsoft 365 apps to make suggestions and generate entire presentations, summaries, and action plans.
These AI generated responses are meant to be a starting point, with the ability for users and workers to analyze, edit, and amend the information, with some strong caveats from Microsoft that the user should always remain in control and not just trust Copilot to get it right the first time. It’s all powered by what Microsoft calls “The Microsoft 365 Copilot System:”
What makes Microsoft 365 compelling for work scenarios is that it is “grounded” in a business’s data, informed by the Microsoft Graph. Microsoft has been collating data for companies in the Microsoft Graph for years, keeping track of documents, emails, calendars, chats, meetings, contacts, and more. Copilot can tap into all this data, using the same security features as Microsoft 365:
Built on Microsoft’s comprehensive approach to security, compliance and privacy. Copilot is integrated into Microsoft 365 and automatically inherits all your company’s valuable security, compliance, and privacy policies and processes. Two-factor authentication, compliance boundaries, privacy protections, and more make Copilot the AI solution you can trust.
…
We know data leakage is a concern for customers. Copilot LLMs are not trained on your tenant data or your prompts. Within your tenant, our time-tested permissioning model ensures that data won’t leak across user groups. And on an individual level, Copilot presents only data you can access using the same technology that we’ve been using for years to secure customer data.
While we’ve been hearing that a new Teams client is coming soon, as early as this month, along with the long awaited Microsoft Loop client, Microsoft isn’t saying much so far about when we’ll be able to start seeing Copilot become more widely available across Microsoft 365 apps:
In the months ahead, we’re bringing Copilot to all our productivity apps—Word, Excel, PowerPoint, Outlook, Teams, Viva, Power Platform, and more. We’ll share more on pricing and licensing soon. Earlier this month we announced Dynamics 365 Copilot as the world’s first AI Copilot in both CRM and ERP to bring the next-generation AI to every line of business.
No word on pricing or availability across Microsoft 365 plans, either, so there’s still lots to learn about Microsoft’s “whole new way to work.”
The user does not have access privileges message normally occurs when you try to open a word document. This can typically happen when trying to open an existing document you created, but your account does not have access privileges.
It’s a strange case, as users who encountered this error were previously able to open their documents. However, you get locked out after some time, and Word won’t open. Stay tuned as we uncover ways to bypass this error.
Why is Microsoft Word telling me I don’t have access privileges?
There are several reasons why you may be getting this message. The following are some of the most common:
Unsupported format – You may be trying to open a document in an incompatible format.
Not enough permissions – If you’re trying to access a file in a folder that requires administrative privileges with a local account, you may get the folder access denied message.
Inaccessible location – If the file is stored in a network location that isn’t available from your computer, you’ll get this error message when you try to open the document.
File changes – If you were not the original owner of the file, the document’s owner may have unshared it and revoked access permissions.
Antivirus settings – Some antivirus software have file protection features. These can prevent you from opening the file if it is listed in the protected folder.
Corrupt file – If your document is corrupt or damaged, it could cause Word to display the user does not have access privileges message.
How do I fix user does not have access privileges?
Before you start with the slightly advanced solutions, check the following first:
If you are trying to open a file from an external drive, ensure the drive is connected.
Ensure that a password or a read-only attribute does not protect the file.
Try opening the file with another program. This will let you know whether it is protected.
Copy files to another location/drive. If the file was on your hard drive, move it to another location on another drive if available.
Finally, try restarting your PC. This could clear any temporary glitches preventing you from accessing the file.
1. Change file permissions
Locate the word document in question, right-click on it, and select Properties.
Navigate to the Security tab and look for You must have Read permissions to view the properties of this object. This will let you know you have insufficient permissions to open the file. Go to the bottom of the screen and click on Advanced.
Hit Continue in the next window that pops up.
Click on Add in the Permissions tab.
In the Permissions Entry window, click on Select a principal, enter the information required in the listed entries, and click on Advanced at the bottom.
Click on Find New, select Authenticated Users then press OK to generate a list of all users at the bottom.
Check all the checkboxes to grant permissions then click on OK to save the changes.
Try opening the file and see if the error persists. Some PCs may require a reboot to effect the changes.
2. Change deny permissions
Locate the word document in question, right-click on it, and select Properties.
Navigate to theSecurity tab.
Click on the Edit button.
Check all options under Allow to grant all authenticated users permissions, then click on Apply and OK to save the changes.
Locate the word document in question, right-click on it, and select Properties.
Navigate to the Details tab and click on Remove Properties and Personal Information.
Next, check Create a copy with all possible properties removed and press OK.
4. Change Inherit from parent entries
Locate the word document in question, right-click on it, and select Properties.
Navigate to the Security tab and click on Advanced.
Click on Disable inheritance, then click Apply and OK to save changes.
Other Word-related issues include an error where Word has unreadable content, so be sure to check out our detailed article on how to address such problems.
FPS drops are one of the major game issues affecting the gaming experience for game enthusiasts. A recent report from some of our readers is that they encounter an FPS drop after RAM upgrade.
This can be quite frustrating as FPS drops can affect even games with low specs. Regardless, we have gathered some potential fixes for this error in this article.
Why did FPS drop after RAM upgrade?
FPS drops in games are usually associated with outdated or corrupted drivers. However, we have outlined some other factors that may contribute to the FPS drop after a RAM upgrade:
RAM installation – The RAM modules were either not properly installed on the motherboard or incompatible.
Different RAM capacities – When using the RAM in Dual channel mode, they must be the same capacity. For instance, if you were using a 2 x 8 GB RAM Dual channel configuration, replacing one of them with a 16 GB module will disable the Dual channel mode and cause the FPS drop.
Windows updateissues – Another possible reason for the FPS drop after the RAM upgrade is a problematic Windows update.
Inadequate cooling system – The components’ performance tends to decline when they start to overheat due to insufficient ventilation. Check our guide for the best laptop cooling software.
Irrespective of the causes, let’s proceed to how you can fix this problem.
What can I do if FPS drops after RAM upgrade?
Before applying any tweaks, you should try some of the preliminary checks below:
Having confirmed the above checks, and if you still require further assistance, you can explore the solutions provided below.
1. Scan your RAM for errors
Press the Windows key + R to start the Run console, type mdsched.exe and hit Enter or click OK.
Now, click on Restart now and check for problems.
After restarting, the tool is going to perform a scan of your memory and it will provide a report with any errors if any are found.
If there is any problem with any of your RAM modules, this tool will find it. Also, if it’s possible, we recommend unplugging the modules, attaching them again carefully, and repeating the test.
2. Run an SFC (System File Checker) scan
Press the Windows key, type cmd in the search box, and click Run as administrator.
In the CMD window, type the following command in the text field and press Enter: sfc /scannow
The scanning process may take some time, so wait till the verification is complete and restart your PC.
The SFC scan is one of the best tools to identify corrupt system files and replace them with their cached copy stored on the system. Running the scan will enable you to know the root of the problem and likely how to fix it.
This software is capable of replacing corrupt files automatically with healthy components from its database after a thorough scan of your operating system.
3. Update your GPU drivers
Press the Windows + R keys to open the Run window, type devmgmt.msc, and press Enter.
Choose Display adapters by double-clicking from the search results, then right-click on the graphics driver, and select Update driver from the context menu.
Now, select Search automatically for drivers and let Windows install the best available version.
Restart your computer after the updating process is complete.
As an alternative, you might get the most recent graphics driver from the manufacturer’s website, such as Intel, AMD, or Nvidia, depending on your GPU.
Instead of doing this, you can manage your graphics card driver more easily using a dedicated tool.
4. Update your BIOS
NOTE
The steps to update your BIOS differs depending on the manufacturer. However, you can use the steps below for HP devices.
Select Laptop or Desktop, depending on the type of computer you’re using.
Enter the exact serial number or computer model of your device.
Now, choose your OS and OS version, then click on Submit.
Click on All drivers and then expand BIOS to check available updates. Next, click the Download icon.
Install the .exe file and follow the on-screen instructions.
Restart your PC and select Apply Update Now during startup.
Since the upgrading process is specific to the type of computer you use, you can check our detailed guide on how to update your BIOS on different Windows 11 PC.
If you already have the latest BIOS version, you may try resetting its setting to default and see if that changes the situation.
If any of the steps provided, including updating your BIOS, don’t fix the FPS drop after the RAM upgrade error, you can upgrade to using a gaming SSD which could be an effective method to improve gaming performance and solve the low FPS problem.
Alternatively, you can uninstall or reinstall the game to check if this helps you to fix the FPS drop after RAM upgrade.
Some of our readers have recently reported an FPS drop after Windows 11 update, and they do not know what fix to apply.
In case you’re also experiencing random stutters while playing some online multiplayer shooting games, or after a Windows 11 update, this article will provide you with simplified steps on how to fix the issue.
Why did my FPS drop after a Windows update?
There can be several reasons why you are experiencing frames per second drop after updating your Windows 11 PC. Below are some of the potential reasons behind the error:
Buggy Windows update – It is not uncommon to experience frame drop issues after a Windows update. In this case, rolling back the update is the best choice.
Internet connection issues – When playing an online game, you need to ensure that you have an excellent Internet connection; else, experiencing an FPS drop would be inevitable.
Inadequate cooling system – When the components begin to overheat, you will notice a performance drop in your system. You can check here for the best laptop cooling software.
The above causes are a few of the many other factors that may contribute to the FPS drop after a Windows update on your PC. Let’s proceed to how you can fix this problem.
If you’re experiencing high FPS drops, specifically on Windows 10, our comprehensive guide on how to fix high FPS drops in Windows 10 might be of help.
What can I do if FPS drops after a Windows update?
Before anything, apply the following quick checks:
Ensure that your computer meets the minimum requirements for the app you use when encountering the FPS drop issue.
Ensure that the resource consumption is not too high. You can reduce the RAM usage to decrease the strain on your CPU if it is too high.
Close any applications that you don’t need.
Check if you are properly connected to the Internet.
If, after confirming the above checks, nothing works, you can explore the advanced solutions listed below.
1. Update your graphics card driver
Press the Windows + R keys to open the Run window, type devmgmt.msc, and press Enter.
Expand the Display adapters section, right-click on the graphics driver, and select the Update driveroption.
Now, select Search automatically for drivers and let Windows install the best available version.
Restart your computer after the updating process is complete.
Alternatively, depending on your GPU, you could download the latest graphics driver from the manufacturer’s official site (Nvidia’s official website or AMD, or Intel).
2. Run the CHKDSK command
Press the Windows key to open the Start menu, type command prompt and choose Run as administrator.
Next, type the following command (replace C with your drive letter) and press Enter to run it: chkdsk /f C:
Follow the prompts that come afterward to restart your PC.
If you’re finding it difficult to run the CHKDSK scan, you can check our detailed guide on how to fix chkdsk.
3. Turn off Game DVR in the Registry
Press the Windows + R keys to launch the Run window, type regedit, and click OK.
Navigate to the following path: Computer\HKEY_LOCAL_MACHINE\SOFTWARE\Microsoft\PolicyManager\default\ApplicationManagement\AllowGameDVR
Right-click on the value in the right pane, select Modify, and change the value data to 0.
Restart your PC for the changes to take effect.
This is one of the most effective methods to troubleshoot this problem. Once the DVR is turned off, the issue should be resolved.
If you are experiencing similar issues and are wondering what it is and how they can be fixed, worry less, as this article is just for you.
What is GPU artifacting?
GPU artifacts or artifacting are the terms used when referring to artifacts caused by the graphics card or GPU.
When processing or transmitting digital data, you might suddenly notice random lines or symbols appearing on the screen/display. This is an error known as a visual artifact. It can occur in both digital photos and videos as well.
Moreover, screen flashes, odd textures, distorted colors, and haphazard lighting in video games may accompany GPU artifacting. Some other scenarios are a display of static noise, screen flickering, and blackout of the display.
These GPU artifacts can be triggered if you watch or play a lot of 3D Content, such as games or videos, under certain limited circumstances.
How can I fix GPU artifacting?
Before anything, you should consider performing the following checks as they may help prevent the error next time:
Check for physical damage on PCB.
Launch the Task Manager and see if your screen flickers on the Task Manager window. If it does, the problem is likely due to your display driver.
Check your graphics (system and application) settings, as it may push the GPU to its maximum performance.
Ensure that you are using a compatible GPU for your CPU.
If you are using any overclocking tools, disable them and see if this changes the situation.
Having confirmed the above checks, you can explore the advanced solutions below to know how to fix the issue.
1. Update the graphics driver
Right-click the Start icon, then select Device Manager from the options.
Expand Display adapters, then right-click your graphics card driver to chooseUpdate driver.
Finally, click on the Search automatically for drivers option.
Follow the on-screen instructions to complete updating the driver and restart your PC.
Alternatively, depending on your GPU, you can visit Nvidia’s official website or AMD to download the latest graphics driver for your device.
2. Underclock the CPU speed via BIOS
Restart your PC.
Once the first screen comes on, press the F10, F12, F4, or F8 key repeatedly until the BIOS screen is displayed. (For PCs built earlier than 2006, press the F1 key repeatedly during the booting process to get into BIOS).
Navigate to the overclock settings and reduce the CPU speed.
If you do not know the original overclock values, choose the option to reset your BIOS to default settings.
Sometimes if you’re experiencing GPU artifacting, it might be because of a malfunctioning VRAM.
If that’s the case, you’re left with little option than to replace your graphics card.
If none of the above solutions works, your last resort is to lower the temperature of your graphics card by changing the thermal paste on the GPU if that is an available option. Doing so might solve the problem.
Another thing you may try is to adjust the graphics settings to lower values and see if that fixes the problem.
And that’s it on how to fix the issue with GPU artifacting. Make sure you work your way through any of the above methods to know what works best for you.
Script errors are a common problem in web development, especially when working with JavaScript. Such errors are usually thrown by JavaScript code, but other scripting languages can also cause them.
Usually, when a script error occurs, the program in question cannot execute a script. Error messages are an inevitable part of using a computer, but you can avoid some of them with the right information, as you shall see in this article.
What is the reason for a script error?
This can be caused by either a syntax error or a runtime error. A syntax error occurs because you’ve written something incorrectly in the code, while a runtime error occurs because of an error with your code that has been compiled into machine code.
Some common causes of script errors include:
Badly written code – You may have missed some characters or words while writing your code, such as semicolons or quotes. This means that the code may go through, but it may not work as intended.
Incompatible plugins or browser extensions – This problem can sometimes be caused by a faulty browser extension or plugin. These can interfere with the functionality of your site’s scripts.
Outdated scripting language – Your browser may use outdated JavaScript or another scripting language.
Browser compatibility issues – If your website is incompatible with all browsers, you may face this problem. Also, if you have an older version of the browser, it might not be able to render some elements on the web page correctly.
Security software restrictions – Some security software, like antivirus software, can block scripts from running properly. This is especially true if you’re using an older version of Windows and don’t have up-to-date security software installed.
Server misconfiguration – This means that the site you are trying to access cannot be reached because of an issue with how it was set up or configured.
Slow internet connection – If your internet connection is slow or unstable, it can cause problems with how quickly your website loads.
How do you fix a script error?
Although the script errors vary, some basic workarounds that may apply to most of them include:
Check your internet connection and ensure it’s stable.
Make sure your browser supports JavaScript or whatever programming language you’re using.
Update your browser and operating system to their most recent versions.
Try turning off browser plugins and see if it works. If so, try updating or removing them individually to find out which is causing the problem.
Close your browser tabs and refresh the browser.
Check for spelling errors. If there are misspelled words in your code, your program may not be able to parse it correctly.
Make sure that you have the latest version of the script. The script must be up to date in order for it to work properly.
Check your server configuration settings. You may need to change your server configuration settings to match those of the script’s host.
Ensure that you have set up permissions so that the file has read and write permissions for all users on the server.
Try switching between different browsers until you find one that works well.
1. Clear browser cache/cookies
Launch your Chrome browser and click the three vertical ellipses in the top right corner.
Select Settings.
Click on Privacy and security, then select Clear browsing data.
Check Cookies and other site data and Cached images and files, then hit Clear data.
The above method shows how to clear temporary files when you get the script error in Chrome. Steps may vary slightly depending on the browser, but this gives you a general idea of what to expect.
2. Disable firewall/antivirus temporarily
Hit the Start menu icon, type Windows Security in the search bar, and click Open.
Click on Firewall & network protection, then select Public network.
Locate Microsoft Defender Firewall and toggle the off button.
Since Windows Firewall is built-in, these are the steps to disable it. If you have other security software installed, you also need to disable them and try running your script again.
3. Turn off Script debugging
Hit the Windows key, type Control Panel in the search bar, and click Open.
Navigate to Network and Internet.
Go toInternet Options.
Click on the Advanced tab in the Internet Properties dialog box that pops up.
Scroll down to the Browsing section and check Disable script debugging (Other).
If the Disable script debugging (Internet Explorer) option is available, uncheck it.
Now click Apply,then OK to save the changes.
Some browsers also have built-in settings where you can disable the script debugging feature, so ensure you check the documentation to confirm.
Locate the problematic app associated with the script, click on the three ellipses, and select Advanced options.
Click on Repair and try the script again. If it is executed, you can stop here, but if not, proceed to reset the application.
Go back and click the Reset option.
To avoid future problems, we recommend that you stick to browsers for developers. These browsers have extensive tools that support coding and are less likely to encounter common generic script errors.
You may also encounter a script error in Outlook, but we have already addressed this issue in our detailed guide. We also covered FFXIV script error recently, so don’t miss it.
We’d love to hear about any script errors you have experienced and your most effective way to get rid of them. Share with us in the comment section below.
While printing documents over a shared network, you can run into the 0x000005b3 error code. The error reads Operation could not be completed (error 0x000005b3). Once triggered, you’ll be unable to access the printer’s functionalities.
What causes error code 0x000005b3?
The following are some of the reasons why you’re experiencing the error code 0x000005b3:
Corrupt or incompatible printer driver – Before successfully connecting a computer to a printer, you must install the specified driver from the manufacturer. However, you can sometimes install an incompatible driver, which results in errors like the 0x000005b3.
Failed printer driver installation – If you unsuccessfully or incorrectly installed the printer’s driver on your PC, you’ll most likely trigger this issue.
Outdated drivers – If your computer runs an outdated version of your printer’s driver software, you’ll likely run into operational errors. Hence, check out the various ways to update drivers here.
Now that we know what it’s all about, we can start troubleshooting the problem using the following solutions.
How can I fix the error code 0x000005b3?
Before proceeding with more advanced solutions, here are a few preliminary checks to apply:
Restart your PC.
Turn off the printer completely, disconnect and reconnect your printer cable, then turn on the printer again.
If the error 0x000005b3 persists, try the following steps.
1. Run the Printer troubleshooter
Press the Windows key + I to open the Settings app.
Click on System, and select the Troubleshoot tab.
Select Other troubleshooters.
Click on the Run button beside the Printer selection.
Click Next, select the printer you wish to troubleshoot and click Next again.
The troubleshooting tool will automatically start scanning for errors with the printer and fix them automatically.
Sometimes, the troubleshooter might not display the desired printer in the list of available printers. If this happens, you need to disconnect and reconnect your printer to your PC.
2. Update the printer driver
Right-click the Start button and select Device Manager.
Expand the Printers section, right-click on your printer, and select Update driver.
In the next window, click on Search automatically for updated driver software, and wait for Windows to locate and install any available updates.
Alternatively, you can download the Printer driver from the manufacturer’s website and install the drivers manually. Once you’ve updated the drivers, restart your PC and check if the error is resolved.
At the same time, you can also utilize an automatic method to update the printer driver or others from your PC using automatic technology that efficiently finds the proper driver version.
More exactly, Outbyte Driver Updater is the most suitable choice to manage any drivers and update them, thus solving the 0x000005b3 error code on your printer device.
Press the Windows key + R, type in services.msc and hit Enter.
In the Services window, scroll down to locate Print Spooler. Right-click on Print Spooler and select Properties.
In the popup window, click on the drop-down next to Startup type, and change it to Automatic. Navigate to the Services tab in the popup window and select Start.
Click OK to apply and save your recent changes and restart your PC.
To print any document through your printer on a shared network, the Print Spooler service must be enabled and running. If this service is disabled, running the printer will be virtually impossible.
While using your printer, you can trigger the Print Spooler keeps stopping error, be sure to read our detailed guide on how to fix and troubleshoot the error.
4. Remove the temporary files and cache folders
Press the Windows key + E to open File Explorer.
Navigate to the following path: C:/Windows/Temp
While in the temp folder, press Ctrl + A to highlight all the folders, and press the Shift + Del keys to delete these temp files from your PC permanently.
Restart your PC once the files are completely deleted, and check to see if the error persists.
The Windows Temp folder keeps track of the application’s data and configurations. If you’ve unsuccessfully installed a printer driver in the past, the Temp folder can still keep records of such installations. Deleting the Temp folder is one way to rid your system of the 0x000005b3 error.
Usually, printers come with their printing software. We also recommend uninstalling and then reinstalling the software as well.
Fixing the 0x000005b3 error on Windows is easy and requires little to no technical know-how. You should get your printer up and running by following the abovementioned steps.
If you’ve got alternative solutions to help resolve the 0x000005b3 error code, let us know in the comments below.
Disk Partitioning is often seen as a tech-savvy process usually practiced by IT experts. This is true because most users can get by without ever needing to partition their disks. However, some users still have partitioned disks, especially on newly purchased computers.
If you’d like to delete a partition in Windows, read through this guide, and we’ll discuss quick ways to achieve this.
Should you delete partitions on Windows?
In simple terms, a partition is a portion of storage on your computer that has a drive letter assigned. Most PC manufacturers often split the drives of new computers for a host of reasons. However, not all Windows users fancy partitioning their storage drives.
Deleting a partition will lead to losing all the data on it, so we recommend performing a backup before doing that.
The system partition contains the Boot manager and Boot Configuration Data, so you can’t remove it so easily.
How can I delete the partition on Windows 11?
1. Delete a partition using Disk Management
NOTE
Perform a backup on the partition before deleting it because otherwise, you will lose all the data on it.
Press the Windows key + S, type in disk management, and hit Enter.
In the Disk Management window, right-click on the drive or partition you wish to delete and select Delete Volume.
Then, click Yes to continue to volume removal and wait for the drive to be removed entirely.
Close the Disk Management window.
After removing a partition, the storage used by that partition automatically becomes unallocated space which can be used for further operations. Here is a detailed guide showing you how to access unallocated disks on Windows.
2. Delete a partition using DiskPart
Press the Windows key, type in cmd, and click Run as Administrator.
Now, select Yes in the User Account Control window.
While in the command prompt window, type the following commands in and hit Enter (replace # with the partition number you want to delete):
diskpart
list disk
selected disk #
Then proceed to input the following cmd lines and click Enter: delete partition
Then, type the following to close the command prompt window: exit
Deleting a Partition using Diskpart completely erases all files previously stored on the partition. Backing up your local files ensures you maintain access to such files even after deleting the partition.
In some cases, you might run into the can’t delete partition error. This error is often triggered when a drive is protected. Partitions like the C drive, boot drive, recovery drive, or an OEM will prove extremely difficult to delete.
Alternatively, you can delete a partition in Windows using third-party partition software. These types of software are usually very intuitive and designed to simplify partitioning a drive.
One of the top choices of partitioning software is Tenorshare Partition Manager because it is a safe app that helps you manage disk partitions efficiently, including deleting a partition and instantly generating unassigned space.
The good thing is that the software will ensure accurate performance of your operating system and delete partitions without suffering data loss, further preventing errors from occurring.
Deleting a Partition on Windows is straightforward and can be achieved without hassle. You should be able to delete any partition on your Windows PC by following the steps listed above.
Conclusively, if you have questions or suggestions on this guide, kindly drop them in the comments section.
Outlook is an email and calendar platform within Microsoft Office 365. Users have reported that Outlook freezes when they launch the application, and they receive an invalid XML error.
Not having access to your email and calendar can be extremely frustrating and may hinder productivity. Users report receiving the error on all versions of Outlook, including Outlook 2019 and 2016.
Usually, there is a popup with the message: Cannot open the Outlook window invalid XML, the view cannot be loaded. Try the solutions offered below to quickly fix this issue.
What does invalid XML mean in Outlook?
Users may get an invalid XML error in Outlook if the XML files are damaged or corrupted. The error could also be an indicator of issues in the Navigation Pane Settings.
Outlook’s XLM is not valid error may occur if Outlook is set in compatibility mode or if you’re using an outdated version. If the XML file for Outlook is at 0 KB, then it is corrupted.
If you cannot start Microsoft Outlook and get invalid XML in Windows 10, ensure there is a space after Outlook in the command.
Running this command will clear and then reset the Navigation Pane for the current user in Outlook. Restart Outlook after the command to see if it solved the issue.
2. Delete the Navigation Panel config file
Right-click on Start and select Run.
Type %appdata%\Microsoft\Outlook, then click OK.
Select the Outlook.xml file and right-click on it.
Select Delete.
Restart Outlook.
If regenerating the Navigation Panel does not solve Outlook’s XML not valid error, then deleting it may do the trick. If you notice that the XML is at 0KB, then the file is corrupted and needs to be removed.
3. Update Outlook
Open Outlook and click on File.
Select Office Account.
Click on Update Options, then select Update Now.
Restart Outlook.
If you’re using an outdated version of Outlook, you may encounter invalid XML errors. Try running any available updates and see if that solves the issue. Be sure to keep your Office products updated to avoid future errors.
Click on Start and search Outlook.exe, then right-click on it and select Open file location.
Right-click on Outlook.exe and select Properties.
Navigate to the Compatibility tab.
Under Compatibility mode, uncheck the box next to Run this program in compatibility mode.
Click Apply, then OK.
Running in compatibility mode is another common cause of the Outlook XML not valid at this position error with MySQL error. Try disabling it and then restarting Outlook. Compatibility mode allows users to run Outlook on an older operating system.
5. Run in Safe mode
Right-click on Start and select Run.
Type Outlook /safe and click OK.
If Outlook runs normally and there are no errors, then the problem lies in a corrupted Add-in.
Running Outlook in Safe Mode will let users know if the problem results from a damaged or corrupted Add-in. If there are no errors and Outlook runs smoothly in safe mode, you will need to remove an Add-in.
Where do I find the Outlook Index Repair Tool?
Scanpst.exe is Outlook’s built-in repair tool to fix damaged personal folder (.pst) files. The location of the application is within Outlook’s installation directory, which varies depending on where you have Outlook installed on your PC.
The easiest way to locate the repair tool is by searching scanpst.exe in your Local Disk (C:) folder in File Explorer.
Hopefully, one of the above solutions helped you solve the invalid XML error in Outlook. If you’re having issues with Outlook crashing in Windows 11, we offer solutions for that as well.
Let us know in the comments below which step worked for you or if you have a suggestion for an alternative solution.
Printing technology has evolved over the years from a large stationed machine to the portable printers we have now. The common tradition of the printer market is wireless printing machines. A wireless printer allows you to connect and share with multiple devices without cables.
As appealing as it may sound, users complain about several issues when using wireless printers like Canon. Canon printers not asking for Wi-Fi passwords is one of the many problems you are likely to encounter.
However, you may encounter numerous difficulties connecting your Canon printer to the Wi-Fi.
It can be a network issue, a problem with the printer, or something else. Nonetheless, the issue is something you can fix in a few steps.
Why is the Canon printer not asking for Wi-Fi password?
Outdated/corrupt printer drivers: Many things can go wrong with your printer if its drivers are outdated on your computer. It affects how the printer interacts with the devices it connects with and prevents it from performing correctly. Likewise, you can run into issues like the Canon app can’t find printers if the printer drivers are corrupt.
Issues with the router: Users may experience difficulties with their printers connecting to Wi-Fi if the router is not working correctly. It may result in the Canon printer not asking for a Wi-Fi password which means you can’t establish a connection with the printer.
Printer errors: Internal errors in the printer can impede its connections with network devices. Printers have lots of errors users may encounter. So, not fixing these errors may cause it not to connect to Wi-Fi or not prompt Wi-Fi password.
What can I do when the Canon Printer is not asking for Wi-Fi password?
1. Update the printer drivers
Click on the Start button, search for Device Manager, and launch it.
Click on the Print queues drop-down button.
Select your printer and right-click on it.
Select Update driver and click OK.
Wait while Windows installs the update, then restart your computer. Updating printer drivers can fix the Canon printer if it’s not asking for a Wi-Fi password.
2. Perform a power cycle on the printer
Press the power button on your Canon printer for seconds to turn it off.
Unplug the printer from its power source.
Reconnect the printer to the power source and press the power button to turn it on.
Power cycling the printer can fix any errors that impede its performance and cause connection errors.
Unplug your wireless router from power for 15 seconds.
Reconnect the router to power and power it on.
It will help fix any issues on the router’s end that may affect the network shared with other devices.
How do I manually enter my Canon printer password?
You can manually enter passwords on the Canon printer using the dedicated keypad on the top panel. However, due to the absence of apparent customizations, it may seem tricky to many. Here are a few quick tips:
The * button switches between upper case, lower case, and numbers.
The # button is used to add symbols. Keep pressing it until the desired special character appears.
If you have to use the same key for successive characters, input the first one, press the Right Arrow key, and you can then put in the next.
While you type, the current alphabet or character is always visible, while the ones entered previously are masked for security reasons.
Why can’t I connect the printer to the network?
You may encounter difficulties connecting your printer to a network if the network connection is poor or slow. Sometimes, the bandwidth may not match the requirements of the printer device.
If your NVMe is not showing up in BIOS, it can be alarming, especially when you expect your system to recognize a new high-speed SSD. Problems like NVMe not appearing in my computer or an installed NVMe not showing up often stem from BIOS misconfigurations, hardware incompatibility, or missing initialization. This guide walks you through proven solutions.
The steps listed below might be different for your computer, but they should provide a basic understanding of the concept. If you are still unsure, head to the OEM’s website for the exact steps.
To access BIOS, turn on your computer and press the F or DEL keys, depending on your motherboard manufacturer. This key can be different based on your motherboard.
Next, head over to Storage Configuration.
Under SATA Configuration, click on Configure SATA as.
Then, choose IDE by pressing Enter.
Finally, press F10 to save your new BIOS settings and exit.
If you configure your SATA device to something other than IDE in BIOS, your NVME drive may not show up.
2. Disable Secure Boot
First, reboot your computer and press the dedicated key for your motherboard to get into BIOS.
Next, go to the Security tab and click on Secure Boot.
Select Disabled from the menu.
Then, head over to the Save & exit tab.
Press Save Changes and select Yes afterward. Make sure not to choose Save Changes & Exit.
Go to the Security tab again.
Choose Delete all secure boot variables and select Yes.
Reboot your PC and press the designated key for your motherboard to enter BIOS.
Select Advanced Settings. For some motherboards, you can also press F7 to access the menu.
Then, under Onboard Devices Configuration, search for PCI Express slot Bandwidth.
After that, set its value to M.2 mode if it is not already that.
Press F10 to save the changes and exit.
Setting PCIe to M.2 is one of the simplest and most effective ways to resolve the NVMe not showing in the BIOS problem.
4. Update BIOS Firmware
Download the latest BIOS version from your motherboard manufacturer’s support page.
Outdated firmware may lack proper NVMe support.
Follow the manufacturer’s instructions carefully (often through a USB stick and the built-in BIOS flash tool).
5. Switch Storage Mode to AHCI / UEFI
In BIOS, go to Advanced → Storage Configuration.
Change mode from IDE or RAID to AHCI (or UEFI if it’s in Legacy mode).
Save and reboot — this helps the BIOS properly detect NVMe drives.
6. Check Lane Sharing & SATA Conflicts
Some motherboards disable certain SATA ports when an NVMe drive uses their PCIe lanes.
Disconnect all SATA drives temporarily and check if the NVMe appears.
Then reconnect drives to different ports if needed.
7. Try a Different M.2 Slot
Many boards have more than one M.2 slot, but only one may support NVMe at full PCIe speeds.
Swap the SSD into the primary NVMe-supported slot (usually closest to the CPU).
8. Test the NVMe in Another System
Insert the SSD into another PC or use an external NVMe-to-USB enclosure.
If the drive works, your motherboard slot or settings are the issue.
If it doesn’t, the SSD may be defective.
9. Clear CMOS / Reset BIOS
Power down and remove the CMOS battery for 1–2 minutes, or use the reset jumper.
Restart with default BIOS settings and reapply the NVMe configuration.
10. Check Compatibility
Some older boards only support NVMe as a storage drive, not a boot drive, unless a BIOS update adds boot support.
Verify in your motherboard manual whether NVMe boot is supported.
Are M.2 SSDs faster than SATA SSDs?
SATA SSDs use the AHCI (Advanced Host Controller Interface) protocol and have a faster data transfer speed, nearly 600MB/S. However, this is not the case with M.2 SSDs.
Those are keyed to avoid the insertion of a card connector into a non-compatible socket. They typically use three keys which are B, M, and B+M.
If these storages use a B key, are connected to a Socket 2, and support NVMe protocol, the M.2 drive is at least three times faster than a SATA SSD.
However, if it uses an M key, is connected to a Socket 3, and supports the NVMe protocol, the M.2 drive is at least seven times faster than a SATA SSD.
One thing worth mentioning is that if you want your modern devices to be recognized by your computer, you need to keep your BIOS updated. To understand M.2 better, check out this comprehensive guide on M.2 SSDs.
If you fixed NVMe hard drive not showing up in BIOS, but now your system does not recognize your M.2 SSD, make sure to update your M.2 driver.
In this article, let’s share the best VoIP for gaming. For the online gaming community, reliable and uninterrupted communication is essential not only for coordinating during gameplay but also as a way to expand the gaming group.
Most competitive games come with their own text and voice chat services, but they are not as reliable as some third-party VoIP software developed specifically for gamers. These chat clients offer low latency, minimal system performance impact, and light on your pocket and PC.
We have tested and reviewed the best VoIP for gaming. Some of these tools are free and open-source, while some come with a limited trial, after which you may need to purchase the license for continued usage.
What is gaming VoIP streaming?
The abbreviation VoIP references an online communication method for Voice Over Internet Protocol.
Calls may be placed directly from a VoIP phone, computer, or another data device without going via the Public Switched Telephone Network (PSTN) thanks to VOIP, which turns voice into a digital signal.
Gaming VoIP is the same tech but adapted to gaming services and software. So, although certain video games in the gaming industry include built-in VOIP, gamers often utilize alternatives like Discord, TeamSpeak, and Ventrilo.
What do PC gamers use to talk to each other?
There are many of these voice chat apps that are used by gamers. A few include:
Discord
Skype
Mumble
Riot
Steam Chat
The list goes on, but without further ado, let’s get to the best VoIP for gaming.
If you’re looking for good VoIP software, you might consider using Express Talk VoIP Softphone. This application works as a softphone, and you can use it to call any other PC with a softphone installed.
In addition to calling other PCs, this software supports PC to phone calls using a VoIP SIP gateway provider. As for calling, all standard features are supported, so you can easily see the caller ID and log all calls.
Express Talk VoIP Softphone also has a built-in phone book to easily organize your contacts. Another helpful feature is full integration with Microsoft Address Book, which will be pretty handy for some users.
The application also has features that will enhance the call quality, including data compression, echo cancellation, and noise reduction. The software can be used with USB phones but also with headphones, microphones, and webcams.
As for advanced features, the software supports conference calls with up to 6 people and phone call recording. You can also transfer calls or use a Call Pickup feature to answer calls from a different location.
Overall, Express Talk VoIP Softphone is an excellent VoIP tool, and while it can perform audio and video calls, it can also work as a softphone, so it will be helpful to advanced users.
Most important features:
Ability to make free voice and video calls
Support for PC to phone calls
Caller ID and call logging
Built-in phonebook
Call Holding, Call Transfer, and Call Pickup features
Express Talk VOIP Softphone
One of the best VOIP tools for free voice and video calls, suitable for gamers and not only.
Let’s begin with the new kid in the block making all the noise for the right reasons. Discord – a free voice and text chat client made for gamers and currently among the best popular VoIP software for gaming. It’s the best voice chat app for gaming on Android.
Discord is developed by like-minded people belonging to different shades of life but sharing one passion: gaming. The app is used by around 14 Million users daily, per the developer’s statistics.
It is an open-source project which explains the free tag. But don’t let the free tag fool you, as Discord is equipped with all the tools gamers need to interact with others on the network.
The users can interact easily with others via Video calls, Voice Calls, and text messages with up to 10 users at a time. The user interface is similar to what we have seen in Slack and other VoIP applications, which is easy and practical.
It is a cross-platform application, and irrespective of the computer or handheld device, you should be able to install and use Discord from anywhere there is connectivity.
One can create and join as many Discover servers for free as a user. The server owners can customize the channels as per their needs while the servers are hosted by Discord.
Discord has all the features you need from a VoIP service, including chatting and screen sharing features. You can also use the browser version of the software if you don’t want to install the client on your PC.
If you are looking for a new VoIP software, give Discord a try, as it will cost you nothing but a few megabytes of bandwidth.
This is another popular cross-platform VoIP application with a host of features that allow you to use public and self-hosted servers to communicate with team members.
TeamSpeak client is free to download and use. However, unlike Discord, it is not entirely free. But you can download the software and connect to any public server available for free.
The self-hosted TeamSpeak servers allow you to keep 32 connections active simultaneously. However, if you have more than 32 people to communicate with or are part of MMO (Massive Multiplayer Online) games, you would need to get the premium paid plans.
The user interface is simple and easy to use. The audio quality is excellent but not the best regarding latency. For added functionality, you can use the wide range of plugins offered by TeamSpeak.
TeamSpeak claims to offer military-grade encryption for secure private communication, advanced permission controls, LAN functionality, anonymous usage, codes like CELT and Speex, Opus and GamePad, and Joystick hotkey support.
The TeamSpeak mobile app allows you to issue commands directly from your smartphone.
TeamSpeak is a secure and safe way to communicate with the online community. While the program is easy to use, setting up your self-hosted servers can be tedious for non tech-savvy users.
Mumble is known for its low-latency communication and is a popular free, open-source voice chat software that is primarily developed keeping the gaming community in mind. It is one of the best VoIP for gaming.
However, the developers don’t offer the mobile version of Mumble for the users. Although, you can download third-party apps like Mumble for iOS and Android devices.
For users, Mumble offers low-latency voice chats, encrypted communication, and public/private key.
Additionally, it features an in-game overlay, positional audio, and a wizard that guides you through the setup for the first time.
For the administrators, Mumble offers an open-source, free VoIP software with ACL ( Access Control List) for extensive user permission. You can extend the functionalities through Ice Middleware, web interfaces, and channel viewers, allowing users to authenticate against an existing user database.
Mumble is free, affordable, and offers low-latency voice chats, essential for fast-paced multiplayer games where each second counts.
If you are looking for a less resource-hungry VoIP client, Ventrilo is a good option. It is a lightweight software that doesn’t use too much of resources; as a result, running this VoIP client alongside your games will have minimal impact on system performance.
All the communications done using Ventrilo are encrypted, and the recordings are stored in your local client system. The app also does not collect any user data, offering complete privacy to the users.
Similar to other VoIP clients, Ventrilo also requires the users to have their server to use the software. If not, you can purchase the premium server plans from Ventrilo to manage 24×7 servers and be saved from the hassle of the server setup process.
Ventrilo is a multi-platform software, except that there is no Linux client for Linux users. It also opens VRF files, a proprietary file format.
The user interface is rather colorful. You can further customize the look by downloading themes from the official website, which includes Egyptian Female Ruler, Projection, and ShakenNotStired themes.
The fact that it has fewer features than other VoIP clients listed above means you have fewer functions to deal with, making it easier to learn and use.
Skype is an all-purpose VoIP software backed by Microsoft and boasts of its 300 million user base, which is impressive. It’s often said to be one of the best old voice chat programs.
However, Skype is not made for gamers only. We all have used Skype for voice chats, video calls, and even text messages at some point.
With Skype, you don’t have to worry about servers and hosting. Additionally, it is free to use, and the group chat function makes it ideal for gamers.
Skype is not as feature-rich as other software such as Discord or TeamSpeak, but if you don’t need advanced features, Skype offers all the basic functionalities you need from VoIP software to play games.
Skype supports features like call recording, Skype to phone number dialing, screen sharing, HD video calling, Live captioning, and more.
Conversely, Skype can be buggy and may face occasional crashes, and it is also a resource hog, which will impact system performance. It is one of the better apps for gamers to chat.
VoIP for gamers software like Discord and TeamSpeak has kept the VoIP market for the gaming niche alive and running.
And the growing popularity means the software is bound to make it even bigger, thanks to the ever-growing multiplayer online gaming community on mobile phones.
Apart from the one mentioned above, a few other popular VoIP software like GameVox and Curse were unfortunately discontinued for various reasons.
You must also pick a voice chat client based on your requirements. If you don’t need too many features, pick something that is light and fast and has minimal impact on your computer’s performance.