How to Fix the EFI Bootloader on Windows 11: 9 Easy Steps

The EFI (Extensible Firmware Interface) Bootloader refers to a series of files on UEFI systems that tells a computer how to boot. This is a very important function.

A malfunctioning EFI Bootloader can cause problems like having your computer boot very slowly. It is possible to fix this error, and the good news is that it’s easy to do.

What causes the EFI Bootloader error?

Problems with the EFI Bootloader are rare and don’t happen often, but it’s important to identify what causes them so you can be prepared if they do occur.

  • Your computer is infected with malware – Computer viruses are usually the number one culprit of hardware problems. Download some antivirus software like ESET to clean up your computer.
  • The MBR is corrupt – The master boot record may have gotten corrupted. You should scan the drive for errors, but if that doesn’t work, you may need to rebuild the MBR.
  • The power supply is faulty – A PSU (power supply unit) not working properly can cause all sorts of problems. Check the hardware for any defects. You may need to replace the CMOS battery.

How can I fix the EFI Bootloader?

There are several ways to fix the EFI Bootloader on Windows 11, ranging from quick and easy solutions to slightly more complex ones.

  • The first thing that you should do is restart your computer. Performing this step will fix EFI Bootloader problems the majority of the time.
  • If that doesn’t work, try using PC repair software like Advanced SystemCare. These apps can solve a variety of errors to make sure your computer runs smoothly.
  • It’s also recommended you fix the Windows 11 MBR (Master Boot Record) if it gets corrupted. This can be done by either running Windows Troubleshoot or some special software.
  • And if all else fails, reinstall Windows 11 as a last-ditch effort. Fortunately, it’s pretty easy to do. You’ll need to create a bootable drive for the reinstallation.

1. Use Start-up Repair

  1. Launch the Settings menu. Stay in the System section, scroll down, and select Recovery.
  2. Select the Restart now button next to Advanced Startup.
  3. After your computer finishes booting, select Troubleshoot in the Choose an option screen.
  4. On the following page, click Advanced options.
  5. And now select Startup Repair.
  6. Give your computer ample time to finish rebooting.
  7. Sign into your account when prompted.

For a clear explanation of what the EFI system actually does, read our complete guide on what EFI is in Windows.

2. Reassign the drive letter

  1. Launch the Disk Management app. See where the EFI System Partition is located. In this example, it’s Disk 0.
  2. In the Windows Search bar, bring up DiskPart and select the first entry you see.
  3. In the command line, enter select disk 0 then list volume.
  4. EFI will be located in the partition in the FAT32 file system. In this example, it’s Volume 2.
  5. In the command line, enter select volume, then the partition number housing EFI. For example, select volume 2.
  6. Next, type in assign letter, then add a new letter for the drive. For example, assign letter=X. It can be any letter so long as it’s not currently used.
  7. Now enter exit and run the command to exit DiskPart.

3. Boot from the installation media

  1. Begin by inserting your installation media device, be it a DVD or USB drive, into your computer. Boot from the installation media.
  2. After restarting, select Repair your computer.
  3. In the Choose an Option page, select Troubleshoot.
  4. Next click Advanced Options, then Command Prompt.
  5. Select Administrator after Windows finishes booting, enter your password, and click Continue.
  6. Enter diskpart into the Command Prompt. Run the command.
  7. As in the previous solution, type in select disk then the number of the disk with EFI. In this case, it’s select disk 0.
  8. Enter list vol and run the command. Take note of the partition running the FAT32 file system and its hidden status. It houses EFI.
  9. Next, type and run the select vol command with the number of the EFI volume after it. For example, select vol 3.
  10. Now with assign letter and give Volume 3 a new assigned letter, such as assign letter=X

If you want to know how to create Windows 11 installation media, check out our guide on the Windows Media Creation tool. It’s free for everyone to use, and it’s pretty easy to do.

4. Repair if you don’t have installation media

  1. As shown previously, launch the Windows 11 Settings menu, navigate go to the Recovery tab of the System section, and perform an Advanced Startup.
  2. And like before, select Troubleshoot then Command Prompt.
  3. Wait for a moment. When Windows reappears, choose Administrator, then enter the admin password.
  4. Just like in the previous solution, type in diskpart and enter the following commands one after the other: select disk 0 list vol
  5. Take note of where the EFI partition is located. In this example, it is in Volume 3.
  6. Type in the following commands and hit Enter on your keyboard after each one: select vol 3 assign letter=X exit
  7. It’s also recommended that you repair the boot record. First, type in cd /d D:\EFI\Microsoft\Boot\
  8. “D:” is your hard drive letter. Swap this out if your drive has a different letter.
  9. Enter the following command, then hit Enter on your keyboard: bootrec /FitBoot

5. Run Command Prompt

  1. Bring up Command Prompt in the Windows 11 Search bar and select Run as administrator.
  2. There are several commands you’ll need to run. First, enter bootrec /scanos
  3. Give Command Prompt enough time to finish its process.
  4. Next, type in the following commands and hit Enter after each one: bootrec /fixmbr bootrec /fixboot
  5. If Command Prompt denies the FIXBOOT command, enter bootsect /nt60 sys
  6. Finally, type the following: bootrec /rebuildbcd

What can I do if booting Windows 11 is still really slow?

So if you’re still experiencing slow boot-up even after fixing EFI Bootloader, there are several things that you can still do. First, you can free up some disk space on your hard drive.

Uninstalling unnecessary apps and deleting temporary files are the best ways to clear up space. Doing so should improve drive performance resulting in a speedier launch.

We also recommend testing your hard drives with diagnostic software like IoIo System Mechanic Pro to make sure that they’re running properly so you won’t experience any slowdown.

Feel free to comment below if you have questions about other important system functions. Also, leave comments about reviews you’d like to see or information on other Windows 11 features.

The Windows Insider Program is getting a Canary Channel

We constantly keep talking about the Windows Insider Program and the Channels where users get the latest test builds and new features.
However, you might not be ready for the latest announcement Microsoft made in regard to the above-mentioned Insider Program.

If you guessed that we are getting a brand new Channel introduced to the program, then you were right. No, seriously, we are getting a new one.

Dev Channel Insiders are being moved to the Canary Channel

As you know by now, Microsoft regularly makes updates to its Windows Insider Program to potentially improve the way that preview builds are seeded to members.

Today, the Redmond-based tech colossus has announced some annual changes to the program, with the highlight being the introduction of a new Canary Channel.

This Canary Channel for the Windows Insider Program will get releases much faster than the Dev, Beta, or Release Preview Channels.

As a matter of fact, Microsoft has hinted that it may get new features as soon as they are built, with incomplete documentation and validation.

Know that they may contain major modifications to the Windows kernel and APIs, requiring a longer lead time before general release, which is why the idea is to get these changes into the hand of volunteering customers for testing as soon as possible.

Please keep in mind that, previously, such features were made available through the Dev Channel, which is the most experimental of them all.

You are probably also wondering about build numbers, so know that moving forward, the build numbers for each Insider Channel will be as follows:

  • Canary Channel: 25000 series
  • Dev Channel: 23000 series
  • Beta Channel: 22000 series
  • Release Preview: Released versions of Windows 10 and Windows 11

Also important is the fact that current Dev Channel Insiders are being migrated to the Canary Channel and they will be informed of this change via an email too.

There’s a downside to it, though. Those who want to remain on the Dev Channel will need to perform a clean install, which is usually the case when switching to a lower Channel.

Furthermore, those currently enrolled in the Beta Channel but want to test out newer features are recommended to join the Dev Channel instead, with no clean install needed.

Even though the Canary Channel is supposed to get new releases and features the fastest, Microsoft has interestingly noted that the Dev Channel may still receive new capabilities earlier than Canary, due to its A/B testing process. 

Microsoft mentioned that it will control the state of individual features and experiences included in the builds released to Windows Insiders across the channels.

The company will achieve this with Controlled Feature Rollout (CFR) technology, which allows it to roll out features in stages to monitor quality and feedback in addition to trying out different variations of features.
That being said, if you are a Dev Channel Insider who does not want to be moved to Canary, follow this guide to perform a clean install.

However, if this doesn’t work, Microsoft says that in its email about the changes to the Windows Insider Program, it will also include instructions on how you can order a clean installation kit.

What is your take on this change to the Windows Insider Program? Share your thoughts and opinions with us in the comments section below.

Disney Plus 4K Quality on PC: Can You Force This Resolution

Many users wonder if there is a way to stream Disney Plus in 4K on PC, but PCs seem to have certain limitations.

Today we will take a closer look and see which resolutions this service supports and if there’s a way to stream in this quality on your PC.

Why won’t Disney Plus play in 4K on PC?

This is a licensing limitation, and most browsers can only stream in 720p or 1080p due to Google’s Widevine DRM. The same applies to Disney+ Windows Store app.

This is likely an anti-piracy measure since it prevents users from distributing content. Some users speculate that 4K resolution isn’t a standard for most PCs, so support for it is still unnecessary.

How do I force a Disney Plus 4K resolution on a PC?

Does Disney Plus have 4K on PC?

The short answer is no. The software is limited to streaming in 720p or 1080p, and you can’t force the context to play in 4K.

What resolution is Disney Plus on PC?

On the Disney support page, you can see which resolutions are supported. However, this page doesn’t offer any information regarding supported resolutions on different platforms.

However, users claim that only 720p resolution is available in both browser and the Disney+ app.

Is Disney Plus really 4K?

Yes, Disney Plus does offer 4K content. However, it’s not available on all platforms. Currently, 4K is supported only on smart TVs, streaming sticks, STBs, and gaming consoles.

How do I get 1080p on Disney Plus on PC?

It seems that Disney has removed 1080p support on PC as well. The 1080p and 2160p are a part of L1 DRM on Disney+ and browsers use L3 DRM that is limited to 720p.

In the past, the Disney+ app for Windows could handle 1080p content, but it has been converted to a browser wrapper, so it’s now limited to 720p as well.

Disney + offers a vast library of content, including movies and TV shows, however, if you want to experience it in 4K, PC isn’t the right platform to do so, due to licensing limitations.

This isn’t the only streaming problem, many reported that Disney Plus keeps buffering or that Disney Plus is not streaming in full screen.

Many also reported No valid bitrates error in Disney Plus, but we tackled this issue in a separate guide.

What was your experience with Disney Plus like? Let us know in the comments below.

Bad Boot Sector Corrupt MBR: 4 Easy Ways to Repair it

A corrupted MBR or boot sector means a lot of trouble. You’ll have difficulty booting into Windows until you deal with it.

If you’ve tried to boot into Windows 10 and the boot sector error appeared on a dark screen, this almost always points toward corrupt MBR or critical HDD failure.

We have a few ways to resolve this, so check the steps below.

What causes MBR corruption?

From user experience, we gather that MBR (Master Boot Record) corruption can be caused by various factors, including any of the following:

  • Malware or virus infections – Malicious software can damage or corrupt the MBR, making the system unbootable.
  • Hardware issues – Problems with the hard disk, such as bad sectors or disk failure, can cause the corruption of the MBR.
  • Power surges – Power surges or sudden power failures can interrupt the boot process and cause corruption of the MBR.
  • Human error – Deleting or modifying the MBR can cause it to become corrupted and prevent the system from booting.
  • Operating system errors – Errors during the installation or configuration of the operating system can also lead to MBR corruption.

Do note that the solutions we will recommend below will resolve the following related MBR issues:

  • MBR keeps getting corrupted – MBR is essential every time you start your computer. That’s why tune-up utilities such as Ashampoo Win Optimizer are mandatory for dealing with HDD issues.
  • Is MBR corrupted? Can’t use mouse/keyboard – If your PC fails to recognize them, don’t hesitate to apply the solutions detailed in this guide on how to fix mouse or keyboard not detected.
  • Power outage MBR corrupt – An improper shutdown or power glitch can easily corrupt the MBR. If the issue persists, use this guide dedicated to fixing power outage consequences.
  • Can’t boot MBR corrupt – bootrec – A confirmed solution for the issue is to use a command prompt and run the bootrec. Rebuilding MBR is described in detail above.

What can I do if a boot sector is corrupted?

  1. Use third-party optimization tools
  2. Scan for HDD errors
  3. Rebuild MBPR
  4. Perform a clean reinstallation

1. Use third-party optimization tools

This isn’t one of those common errors you’ll deal with regularly. Instead, issues with the boot sector mainly occur due to HDD corruption or misuse of specific system files.

The black screen and boot failure are pretty intimidating for an inexperienced user. However, using Ashampoo Win Optimizer can resolve them with no extra effort.

This incredible optimization is known for its great HDD scans, brand-new Defrag with minimal performance drain to worry about, and accurate analysis logs.

Ashampoo Win Optimizer

Ashampoo Win Optimizer

Ashampoo Win Optimizer is the go-to tune-up utility when facing large-scale MBR issues.
Get it free Visit website

2. Scan for HDD errors

  1. Boot with the USB installation media and press the Shift + F10 keyboard shortcut to open the Command Prompt.
  2. In the command line, type the following script and hit Enter. 
    chkdsk /f /r
    boot sector corrupted
  3. After resolving the HDD issues, restart your PC and try booting into Windows again.

A boot sector failure and MBR corruption won’t occur without any reason. This mostly happens in scenarios when your HDD is on its deathbed, and you should seriously consider replacing it.

This is, on many occasions, a clear sign that you should back up your data as soon as possible, as the HDD either has corrupted sectors or it’s malfunctioning.

On the other hand, this isn’t a rule of thumb. So before you ditch your storage, make sure to inspect it. Some errors can be repaired with the proper tools, either third-party tools or a built-in ChkDsk.

You can run chkdsk from the command line in a System Repair section if you cannot boot. This is a relatively simple task, but it still requires bootable media.

3. Rebuild MBR

  1. Insert the Windows 10 bootable media (USB stick or DVD) and restart your PC.
  2. During restart, enter your BIOS; you may do this by pressing F10, F2, F12, or F1 during restart.
  3. Navigate to the Boot menu, and set the bootable media as the primary boot device with the Windows 10 installation. Then, change the boot order by entering the Boot menu or within BIOS settings.
    boot sector corrupted
  4. Press any key to boot.
  5. The loading process of the installation file should commence.
  6. Select the preferred language, time/format, and keyboard input. Hit the Next button.
    boot sector corrupted
  7. Select Repair your computer from the bottom left corner in the following dialog box.
    boot sector corrupted
  8. Open Troubleshoot from the selection menu.
    boot sector corrupted
  9. Choose Advanced Options.
  10. Open Command Prompt. If prompted, select your account and enter the password.
  11. In the command line, type the following commands and press Enter after each:
    • bootrec /FixMbr
    • bootrec /FixBoot
    • bootrec /ScanOs
    • bootrec /RebuildBcd
  12. Exit, remove the installation drive, and try starting the system in the usual manner.

Rebuilding the MBR and fixing the boot sector error is one way to solve this problem. However, this requires specific preparations made on another PC.

You must download the Media Creation Tool and create a bootable installation drive. You can use a DVD and burn the setup files, but we prefer a USB flash drive with at least 6 GB of storage space.

4. Perform a clean reinstallation

  1. Download the Media Creation Tool.
  2. Plug in the USB flash drive with at least 6 GB.
  3. Run Media Creation Tool and accept the License Terms.
  4. Choose Create installation media (USB flash drive, DVD, or ISO file) for another PC, then hit Next.
  5. Choose the fitting language, architecture, and edition, and click Next.
    boot sector corrupted
  6. Select USB flash drive and then click Next.
  7. Media Creation Tool will download the setup and copy the installation files onto the USB flash drive.
  8. Plug the USB drive into a troubled PC and boot from it.
  9. Enter all required information and choose Install Windows only.
  10. Format the system partition and install Windows 10 there.

In the end, if you’re confident that your HDD is in good health but still unable to boot into Windows, we can only suggest a clean reinstallation.

This, of course, means you’ll lose all data from the system partition. So, if there’s any way for you to connect your HDD to another PC and back up the data – do it.

After that, we can boot with the installation media and install a clean version of Windows. That way, the problem should be resolved.

With that said, we can conclude this article. In case you have additional questions or possibly an alternative way to fix corrupt MBR, feel free to tell us in the comments section below.

5 Best Switch Port Monitoring Software to Monitor Traffic

Keeping track of switch ports in use and free is one of the most demanding and challenging tasks. While you can do this manually, it is advisable to use one of the best port monitoring software.

With this tool, you will be better equipped to have an overview of your network, including bandwidth monitoring. But with the number of port management software available, you need a detailed review such as this guide to pick the best one.

How do I monitor ports in Windows?

Windows PC has built-in port and switches monitoring tools. Below are some of the options available to you:

  • Use the Command Prompt: The most popular built-in option for monitoring ports on your PC is the netstat command on Command Prompt. This command has different variations for different tasks you may want to perform.
  • Using Task Manager: Another built-in option on old PCs is to use the Processes tab on Task Manager. This method requires sorting and filtering to know the process tied to specific ports.
  • Port monitoring software: The third option is using a dedicated third-party tool to monitor and check your ports. These tools save you the stress of managing your ports manually. Also, they provide you with an excellent interface to view and take complete control of your data.

What is the best switch port monitoring software I can use?

ManageEngine OpManager – Best switch port monitoring software

opmanager port monitoring software

ManageEngine OpManager has a great reputation and is one of the most used tools for switch port monitoring.

This tool is one of the best network management tools and comes with some fantastic features, such as auto-discovery, that will find devices and map your network to give you a uniquely customized dashboard.

Another powerful feature that this software offers is the alert functionality. It will help you identify, detect and troubleshoot network issues before becoming severe problems.

Key features of ManageEngine OpManager:

  • Monitor parameters such as temperature, power, and voltage 
  • Uses SNMP to collect hardware health data
  • Historical reports on hardware health status 
  • Alerts to quickly detect and identify network issues

ManageEngine OpManager

Monitor parameters such as temperature, power, and voltage easily with one of the best software.
Free Trial Visit Website

PRTG Network Monitor – Available on different devices

prtg

Paessler has created PRTG Network Monitor, and thanks to its excellent performance, we recommend you try it.

This tool can monitor all devices, traffic, and applications in your IT infrastructure.

PRTG Network Monitor does not rely on external modules or add-ons. Therefore, you don’t need to download and install this type of thing to benefit from the software.

Thanks to its integrated nature, the monitor software can be easily downloaded and installed on your device.

Key features of PRTG Network Monitor:

  • Temperature monitor software
  • Automatically recognizes a wide range of devices and systems
  • Can create custom maps for data display
  • Customizable alerts and notifications
  • Available for Android, iOS, and Windows phones

PRTG Network Monitor

The PRTG Network Monitor is a powerful switch port monitor software that will keep you updated with all the traffic and system status.
Free trial Visit Website

Zenoss CiscoMonitor ZenPack – Real-time port monitoring software

zenoss

 CiscoMonitor ZenPack by Zenoss is perfect for switching and routers, providing a performance monitor.

The features included that are of great use are monitoring, discovery, and class-based QoS monitoring.

This tool will allow you to monitor all your physical and virtual networks as part of a real-time model that will include all your cloud and on-premise infrastructure.

The in-depth data collection of metrics, events, logs, streaming data, and model data will allow you to see the current state of each business application.

Critical features of CiscoMonitor ZenPack:

  • Performant management platform
  • Unified monitoring of all physical and virtual systems
  • Integration and monitoring of SNMP traps

⇒ Get Zenoss CiscoMonitor ZenPack

WhatsUp Gold Network Traffic Monitor – Real-time bandwidth monitoring

whatsup gold port monitoring software

WhatsUp Gold Network Traffic Monitor allows real-time bandwidth monitoring to identify interfaces, applications, or links and how much they occupy the bandwidth.

The tool can study traffic patterns over a selected period, thanks to the built-in functionalities. After analyzing the data, it can identify bandwidth usage trends and spot potential bottlenecks.

Moreover, the software can identify security issues, such as DDoS attacks, unauthorized downloads, or other suspicious and potentially malicious network behavior, thanks to real-time monitoring.

Key features of WhatsUp Gold Network Traffic Monitor:

  • Real-time bandwidth monitoring
  • jFlow, and sFlow to monitor network bandwidth
  • ToS verification available
  • Comprehensive Top Protocols, Top Senders, and Top Application reports

⇒ Get WhatsUp Gold Network Traffic Monitor

Solarwinds Network Performance Monitor – Cloud monitoring feature

solarwinds

Our last recommendation for the best switch port monitoring software, but not the least performant, is Solarwinds Network Performance Monitor.

This software is also great for cloud monitoring, thanks to the Cisco ACI monitoring feature. This is why it is regarded as the port monitoring Cisco software.

Thanks to its fantastic features, you can quickly detect, diagnose and repair all network performance problems and outages.

This IT management software is a powerful tool to ensure you’ll have all the monitoring information needed to increase overall performance.

Key features of Solarwinds Network Performance Monitor:

  • Customizable topology and dependency-aware intelligent alerts
  • Dynamic wired and wireless network discovery and mapping
  • The capacity to forecast, alert, and report
  • Detailed monitoring of the F5 BIG-IP family of products

⇒ Get Solarwinds Network Performance Monitor

Monitoring the switch port doesn’t have to be difficult, provided you use specialized tools, such as PRTG Network Monitor, to do it.

If you need a list of the best server monitoring software, check our detailed guide for the top ones you can choose today.

Let us know in the comments section below if you have other suggestions or recommendations; we would love to hear them.

Keyboard Works in BIOS but not in Windows: 5 Solutions to Use

If the keyboard works in BIOS but not in Windows, this is mainly caused by a corrupted keyboard driver, but there are many other causes for this problem. First, if this issue manifests on a laptop, try to find an external keyboard or enable the virtual keyboard in Windows (instructions at the bottom of this article).

What can I do if the keyboard works in BIOS but not in Windows?

1. Connect an external keyboard and adjust your BIOS settings

  1. Turn off your computer completely and press the Power button again to restart the computer.
  2. Start pressing the F8 key immediately to enter the BIOS menu. Note THAT on your motherboard, it might be a different key.
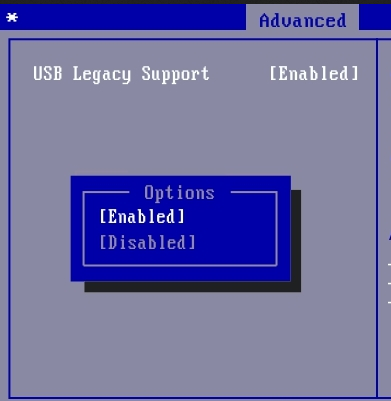
  3. Use the arrow keys and open the Advanced tab.
  4. Navigate to the USB Legacy Support and make sure it is set to Enabled.
  5. Press F10 to save the change and exit the BIOS screen. Let your PC restart.

2. Update drivers

2.1. Update manually

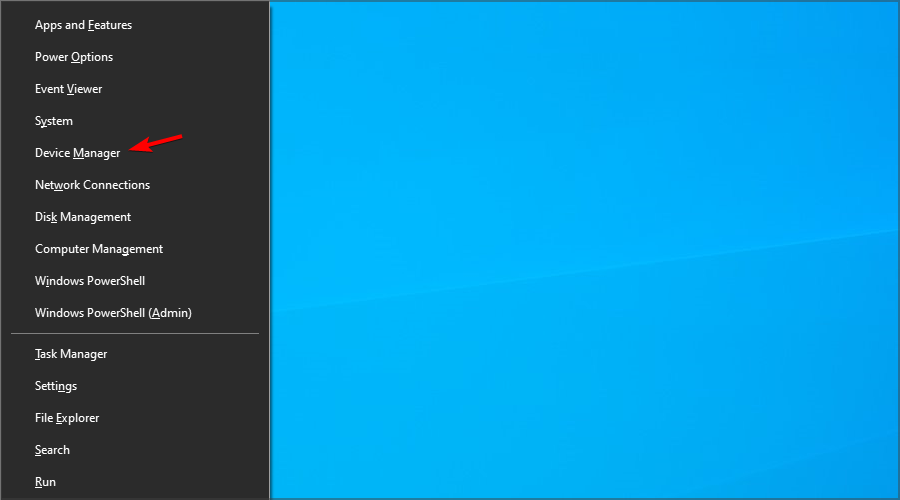
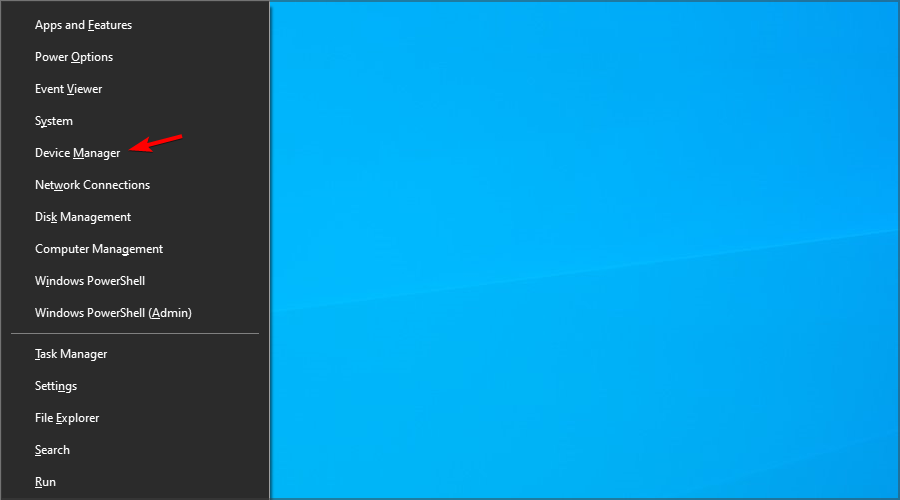
  1. Right-click the Start button and select Device Manager.
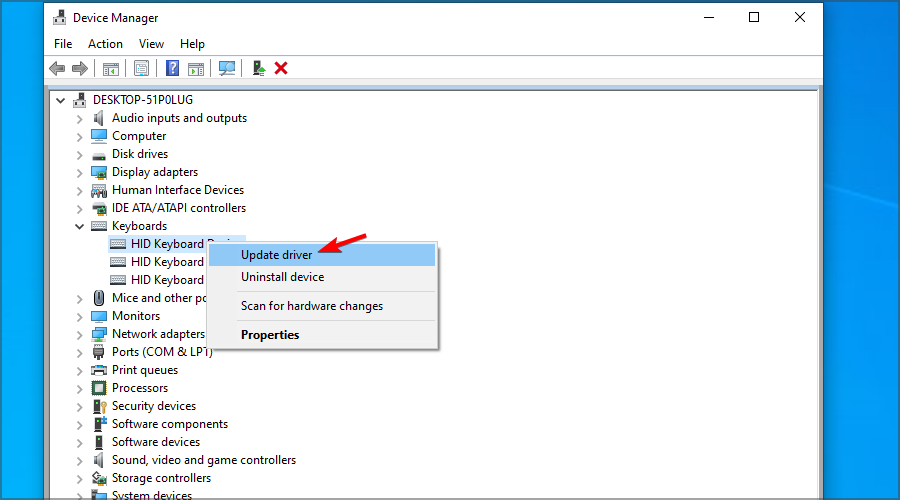
  2. Click on the device you want to update from the list. Right-click it and choose Update driver.

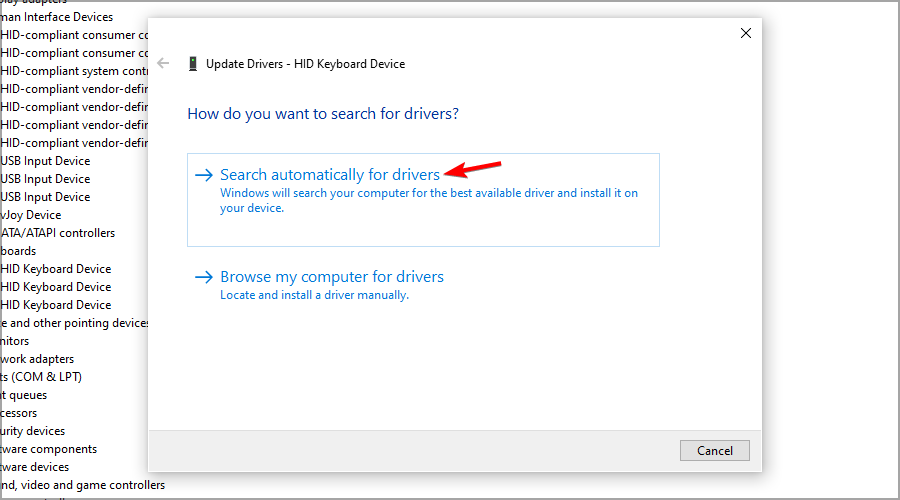
  3. Click Search automatically for updated driver software.
  4. Wait while Windows tries to update the driver.
  5. If Windows 10 doesn’t update it means you need to go to the manufacturer’s official site and download the new files from there.

One way to fix Windows 10 errors is to update the system manually. This simple method can solve some complex problems that affect other drivers.

If your Asus keyboard works in BIOS but not Windows, try updating your drivers.

2.2. Use an advanced tool

Incompatible, missing, or corrupted drivers are the common reason for keyboard and touchpad malfunction.

You can easily take care of this issue with the help of professional driver updating software. These tools will allow you to perform an entire scan of your system and update any driver in just a few minutes.

3. Disable the Intel Integrated Sensor Solutions driver

  1. Right-click Start button and choose Device Manager from the list.
  2. In Device Manager, expand the System Devices category.
  3. Locate and right-click on Intel Integrated Sensor Solutions device.
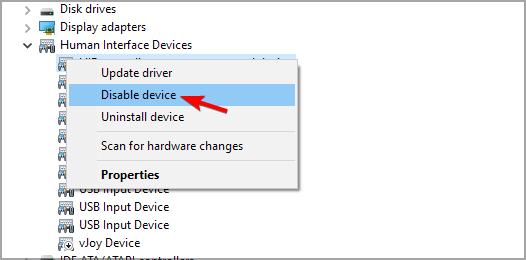
  4. Select the Disable device option. Click Yes when prompted to confirm the action.
  5. Once disabled, close Device Manager and restart the computer.

It is important to Disable the Intel Integrated Sensor Solutions device and not uninstall it.

Uninstalling the device will prompt Windows 10 to reinstall the device after the restart, so simply disable it.

After the restart, check if the keyboard and mouse not working in Windows 10 but works in BIOS issue is resolved.

This error seems to occur due to a malfunctioning sensor in the 2-in-1 touch-enabled HP devices.

Try installing the latest Windows and HP update to apply any fixes the manufacturer releases.

4. User System Restore Points for recovery

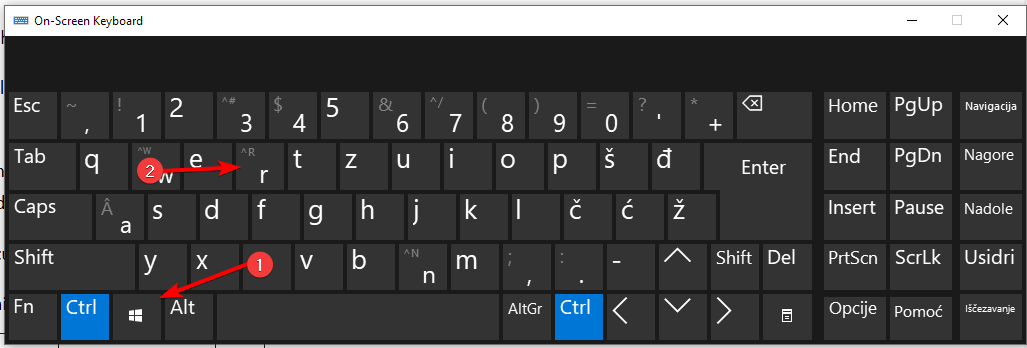
  1. On the virtual keyboard, press Windows key and then press R.
  2. Enter rstrui and click OK.
  3. Follow instructions on the screen.
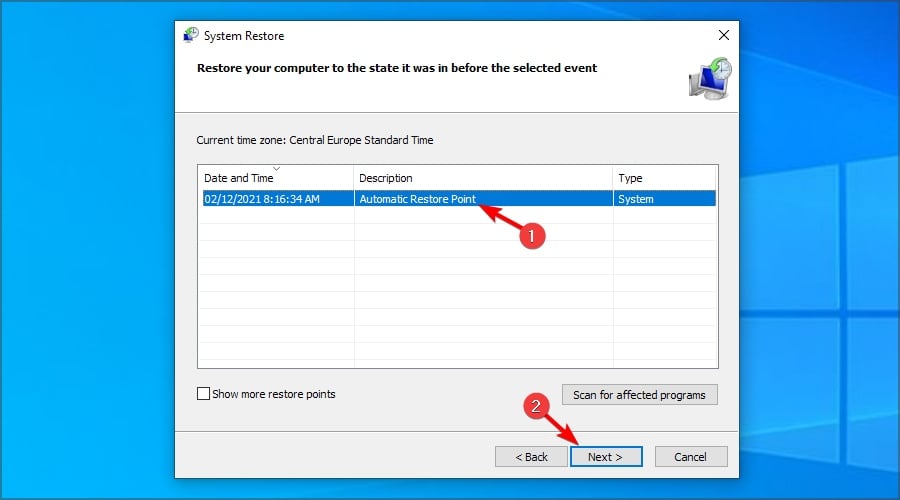
  4. Choose the most recently created restore point and then click Next.
  5. Read the description and then click Finish.

Your PC will now restart after successfully restoring your PC to the selected Restore Point. After the restart check if you can use the keyboard and touchpad on your laptop.

5. Attempt repair with Windows installation media 

  1. Turn off your computer and connect your Windows 10 bootable drive to your PC. Here’s how to create a Windows 10 bootable drive, if you don’t have one.
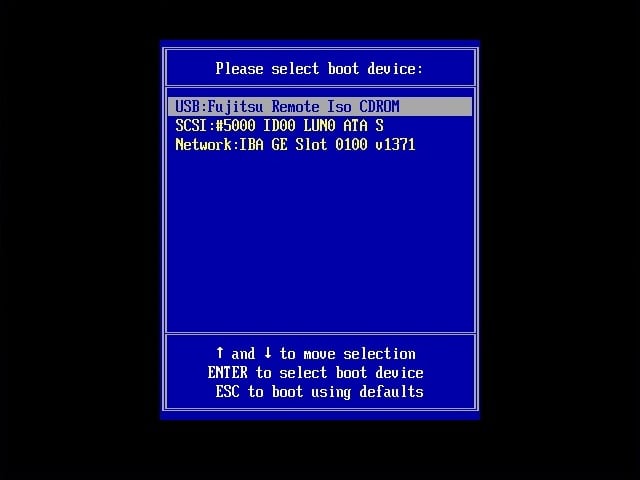
  2. Boot from your Windows 10 drive. You might need to press F4 or any other key to enter the boot menu and then select your flash drive.
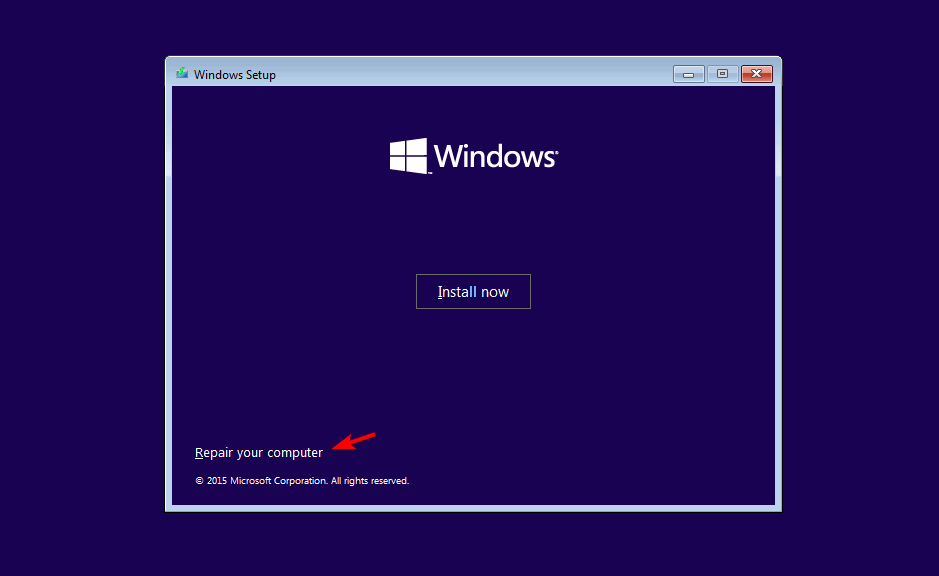
  3. Turn on the computer and wait for it to enter the Setup menu. Choose the Repair your computer option.
  4. Choose the Troubleshoot option.
  5. Select Advanced options.
  6. Click the Startup Repair option and follow on-screen instructions. You may need to select your admin account and then verify the credentials to complete the process.

Wait for the repair tool to scan the system for issues and fix them, if any. After the restart, check if the keyboard and mouse work in BIOS, not the Windows 10 problem is resolved. If not, clean installing Windows may be your only option.

How do I enable the virtual keyboard on Windows?

On login screen

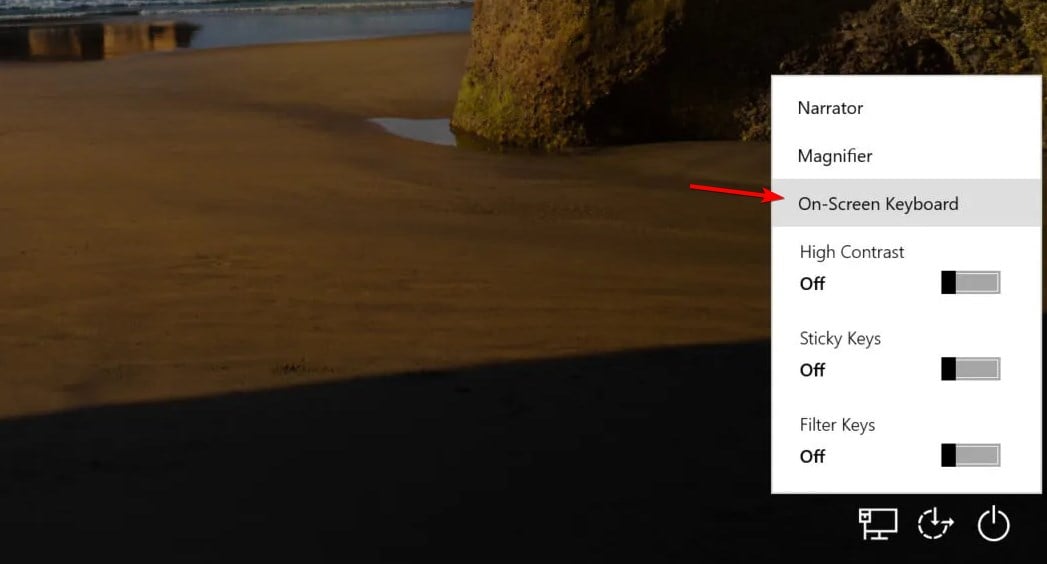
  1. On the login screen, click the Ease of Access button in the bottom right.
  2. Now choose On-screen keyboard.
  3. Enter your password.

In Windows

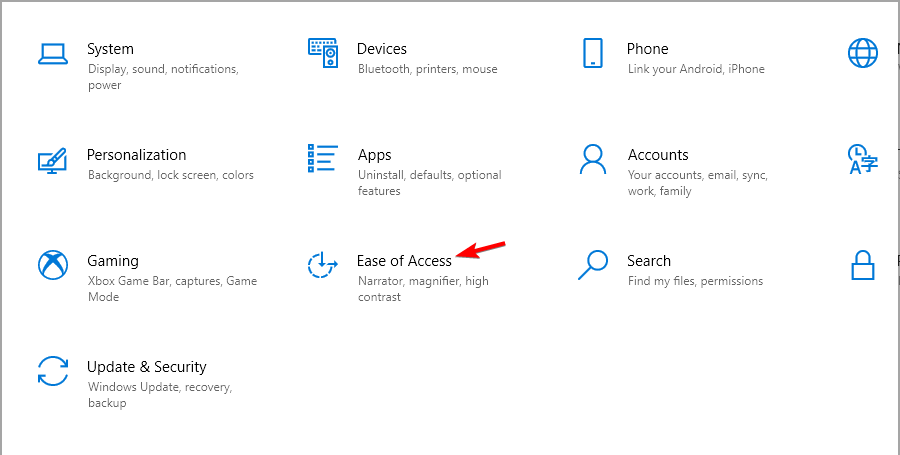
  1. Click the Start button and then choose Settings.
  2. Next, navigate to Ease of Access.
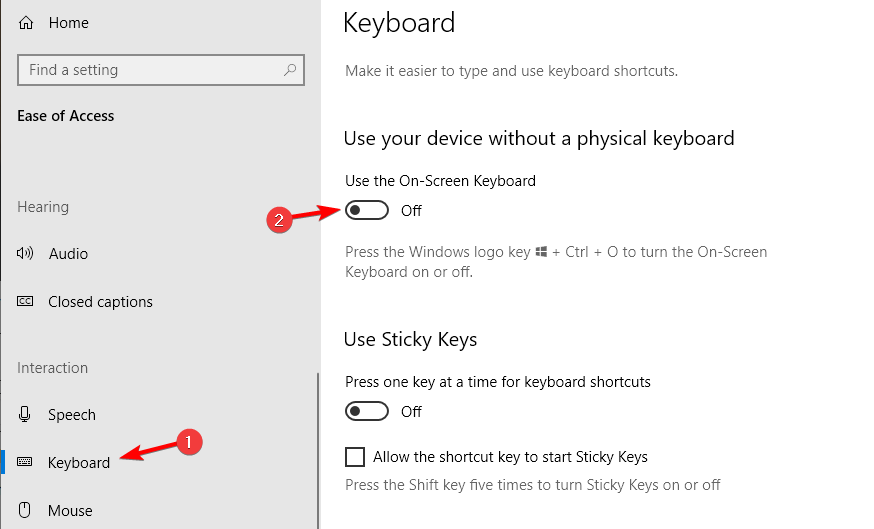
  3. In the left pane, choose Keyboard. In the right, enable Use the On-Screen Keyboard.

Once you enable virtual keyboard, use it to complete all solutions listed in this guide.

How can I clean install Windows 10?

Clean installing Windows will delete all the data in the installation drive. So, backup your valuable data before proceeding with a clean install. Follow our guide on how to clean install Windows 10 for more instructions.

The keyboard working in BIOS but not in Windows can occur due to a driver glitch or system file corruption, but hopefully, our solutions helped you fix the issue.

Did you find a different solution? Share it with us in the comments below.

7 Ways to Check Wi-Fi Signal Strength on Windows 11

If you are using Wi-Fi or a wireless router, you may want to check the Wi-Fi signal strength. This is important for your connection. The Wi-Fi signal strength is the strength of the wireless network you are connected to. 

You may experience slower speeds and more dropped connections if you have a weak Wi-Fi signal. Checking the signal strength will help you adjust your router accordingly to boost your speeds. Find out how you can check the Wi-Fi signal strength here. 

What factors influence the Wi-Fi signal strength?

It’s important to check the Wi-Fi signal strength on your computer because if you can’t connect to the internet, you might be unable to do anything. 

The strength of your Wi-Fi signal depends on many factors, including:

  • Your location – If you’re too far from the access point, you won’t get enough power to send a signal back. The further you are from the router, the weaker the signal.
  • The type of device you are using – If you have an older router, it may be having difficulties keeping up with the demand for Wi-Fi. If this is the case, consider upgrading to a newer model that has more processing power.
  • How crowded the area is – If there are many people around, or if there are lots of walls blocking signal, you’ll have trouble connecting to the network and receiving any data.

How do I check my Wi-Fi signal strength on Windows 11?

1. Use the Taskbar

The Taskbar is the easiest tell-tale sign for your Wi-Fi signal strength. When you click on the signal bar at the bottom right, the Wi-Fi menu will pop up along with other available connections. Opening this window shows you how strong your connection is. 

If the bars are full, it means you have a strong connection, but if the bars are one or two, you may have trouble connecting to the Internet. If the signal strength is low, it could mean that you’re not getting enough power from your router or modem. 

2. Use Task Manager 

  1. Hit the Windows key, type Task Manager in the search bar, and click Open.
  2. Navigate to the Performance tab and click on Wi-Fi.
  3. You should be able to check the Wi-Fi signal at the bottom. Again, the strength of the connection is dependent on how full the bars are.

3. Use the Settings app 

  1. Hit the Windows key and click on Settings.settings windows 11
  2. Navigate to Network & internet, then click on Wi-Fi.
  3. Your available networks will be listed, each with its status bar. The fuller the bars, the stronger your connection. 

4. Use the Control Panel 

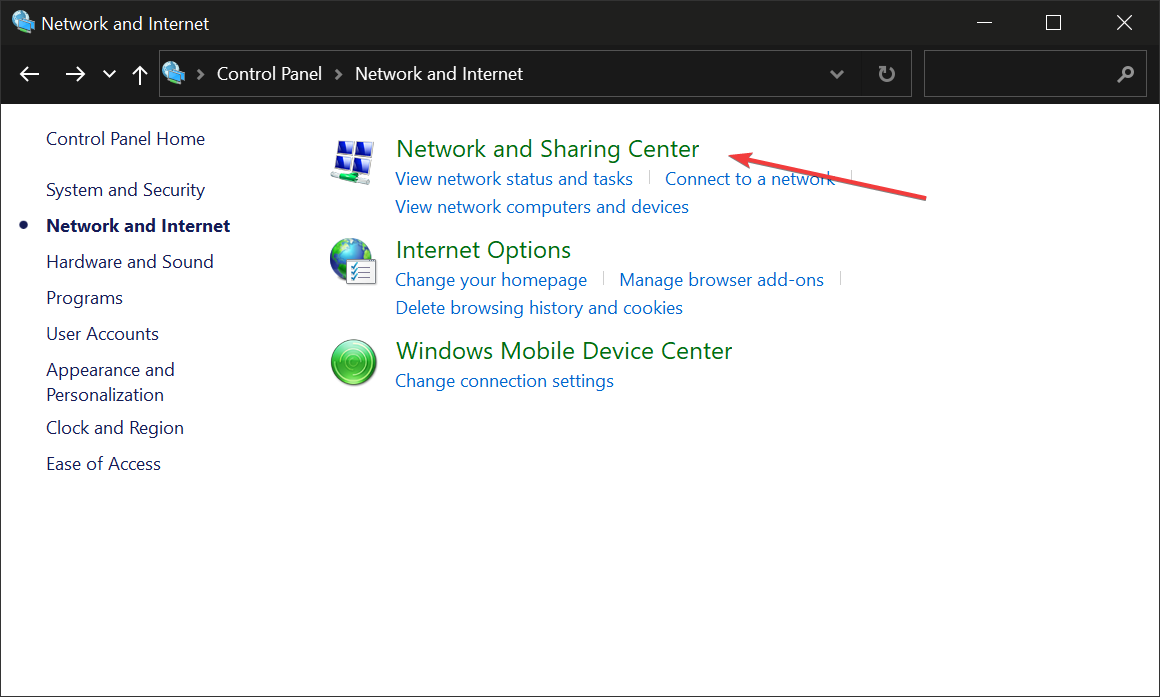
  1. Hit the Windows key, type Control Panel in the search bar, and click Open.control-panel-search fallout new vegas runtime error
  2. Navigate to Network and Sharing Center.
  3. Your active connections will be listed, and beside each will be a status bar that shows your Wi-Fi signal strength.

5. Use the Command prompt 

  1. Hit the Windows key, type cmd in the search bar, and click Run as administrator.cmd-run-admin-w11 unexpected kernel mode trap windows 11
  2. Type the following command, then press Enter: netsh wlan show interfaces
  3. Your Wi-Fi signal strength will be listed in form of a percentage. The higher the percentage, the stronger your connection.

6. Use the Powershell Command 

  1. Hit the Windows key, type Powershell in the search bar, and click Run as administrator.
  2. Type the following command, then press Enter: (netsh wlan show interfaces) -Match '^\s+Signal' -Replace '^\s+Signal\s+:\s+',''
  3. Your Wi-Fi signal strength will be listed in form of a percentage. The higher the percentage, the stronger your connection.

7. Use third-party tools

While the built-in Wi-Fi settings on Windows options will give you a rough estimate of the Wi-Fi signal strength, they are not always accurate. As you can see above, each option has a different reading for the same connection.

If you want more detailed information about your Wi-Fi connection and connectivity, you can use third-party tools. Wi-Fi analyzer tools will be useful to get a comprehensive report on your Wi-Fi performance.

They can also help you troubleshoot many connection problems you might be facing. Speed tester tools are also worth checking out if you want to monitor your speeds closely.

One of the third-party tools we recommend you try is PRTG Network Monitor, as it can monitor not only your network connections but all your systems, devices, apps, traffic, and others, basically your entire IT infrastructure.

PRTG Network Monitor

Keep track of your WiFi signal strength with this easy-to-use monitoring expert.

How do I boost the Wi-Fi signal on a Windows 11 laptop?

When you’re trying to boost your Wi-Fi signal, it’s important to remember that not all Wi-Fi routers are created equal. Still, there are some tweaks you can do to boost the Wi-Fi signal, such as:

  • Use wired connections – If you have an Ethernet cable, you can connect it directly to an available port on your router.
  • Update your network drivers – These drivers will allow your computer to communicate with the wireless adapter, increasing signal strength.
  • Change your network bands – Changing from 2.4GHz to 5GHz band on your wireless router settings will provide more bandwidth for faster internet speed.
  • Use a Wi-Fi extender/repeater – You might also want to consider using a wireless repeater or extender. These are devices that boost the signal for longer distances.
  • Use a Wi-Fi antenna booster – There are several types of antenna boosters available in the market. They work by boosting the Wi-Fi signal of your laptop by amplifying it with a specific frequency. 

And that’s how to check your Wi-Fi signal strength in your Windows 11.

That’s all we had for this article, but keep the conversation going in the comment section below. Let us know your tips to keep your Wi-Fi signal strength stable.

Paramount Plus Keeps Buffering: 3 Quick Ways to Fix It

For some of our readers, Paramount Plus keeps buffering, interrupting their viewing. We have compiled a list of solutions to this problem and other streaming issues you might face.

Why is Paramount Plus always loading?

Here are the reasons why your Paramount Plus keeps buffering:

  • An outdated paramount plus account – Make sure that your account is still valid
  • Unreliable or slow Internet connections can cause buffering issues and error codes like 3205
  • Paramount servers can be down when there’s a lot of traffic on the site or when the servers are experiencing technical difficulties

How do I fix buffering issues on Paramount Plus?

Before trying the slightly complex solutions, we recommend restarting your device and the router. Sometimes, the problem goes away like magic.

1. Log out and re-sign into your account

  1. Go to the Account tab.
  2. Select the Sign Out option.
  3. Next, re-sign into your profile account.

The buffering issue could also be because you haven’t updated your Paramount account. To fix this, you must sign out of your account, re-sign, and provide new account details. This will also help when Paramount Plus is skipping episodes.

2. Disable ad blockers and VPN

  1. Click the Menu icon (the three vertical dots) in Chrome, select More tools, and pick Extensions.
  2. Now, disable or remove the problematic extensions.

Ad blockers and VPN could be the cause of Paramount loading issues. Disabling the ad blocker and disconnecting the VPN could improve streaming quality if this is the case.

3. Stream on a different device

It’s possible that the device you’re using isn’t compatible if Paramount Plus is buffering on a smart TV. So, verify that.

Also, restarting the device or installing the latest app updates should fix things when Paramount Plus keeps buffering on LG smart TVs.

If you’re accessing Paramount Plus from your browser, you can switch to a better browser. We suggest a trustworthy and practical browser suitable for streaming on any device due to its VPN and modern features.
➡️ Get Opera One

What can I do if Paramount Plus freezes on my TV?

Some readers reported issues with Paramount Plus buffering and freezing on their smart TVs. This problem is mostly happening on Samsung TV,  Vizio TV, and LG TV, so here is what you can do:

Samsung TV

  • Press and hold the Power button on the Samsung TV for 5 to 8 seconds to force restart the TV.
  • Once the TV is back on, relaunch the Paramount+ app.

Visio TV

  • After closing the Paramount Plus app, hold the Back button on your remote to restart the app. If you short-press it, it will display the exit menu. After this, relaunch the app.
  • Perform a soft restart of the TV. To do that, go to System, select Reset admin, Soft Power Cycle, and Yes.
  • Clear the cache of the app. To do so, press the Home button from the remote, go to Settings, then Apps, select System Apps, and select Paramount+. Then, choose Clear Cache and select OK.

LG TV

  • Turn off the TV and unplug it from the power source for 30 seconds. Then, reconnect it to power, turn on the TV, and start the Paramount+ app.

VIDAA TV

  • The solution here is to power cycle your TV again. To do that, unplug the power cord from the power source, then hold the power button of the TV for 15 to 30 seconds to drain all residual power.
  • Now, connect the TV back to the mains, turn on the TV, and launch the Paramount Plus app.

Also, restart the router/modem for all the TVs and ensure you have a steady internet connection.

What Internet speed do I need?

Most users ask: How can I speed up my Paramount Plus? But first, what Internet speed do you need for Paramount Plus to stream without a hitch?

It would help if you had a minimum internet speed of 4-5 MBs to stream Paramount Plus shows. But if you’d like to stream in 4K, HDR 10, and Dolby formats without interruptions, you need at least 25 MBs of Internet speed.

You can check your Internet speed on the Speedtest website. If your Internet speed is low, you speed it by:

  • Restarting your Wi-Fi
  • Changing the router position
  • Reconnecting the router cables

Is there a problem with Paramount Plus now?

To determine whether Paramount Plus is facing streaming issues today, head to the dedicated Paramount Status page. It will list whether the servers are facing an outage or are under maintenance. Sometimes, too much traffic on the site could lead to buffering or error 3002.

You can also use a reliable service like Downdector and identify if there’s a problem with Paramount Plus at the moment.

These simple fixes should help you have an easy streaming experience without any hitches. You now understand why Paramount Plus Keeps buffering and should solve any of these issues independently.

You should also check our guide on how to fix Paramount error code 3005 because it’s a similar problem or what to do in an error code 1100 situation.

Other solutions you can try to fix the Paramount Plus buffering issue

  • A quick workaround shared by a user involved playing another episode of the same show for a while and then loading the initial one. This has worked for several shows, including Tulsa King, SWAT, and CSI Vegas, on devices like VISO TV, Chromebook, and Windows.
  • When Paramount Plus is buffering on TV, it could be the dedicated app to blame. To verify this, check whether Paramount Plus keeps crashing on TV. Also, you can now connect your laptop to the TV via a reliable HDMI cable and enjoy buffer-free streaming.
  • If Paramount Plus keeps buffering on Firestick, reconnect it or install the latest updates.
  • The little you can do is check the Paramount Plus status page to see if there are any reported outages. You can also check their Twitter account for updates on when the servers will be back up.
  • If you don’t have a good connection, decreasing the video quality or increasing the Internet speed can fix the buffering issues.
  • Alternatively, try restarting your router. You may need to contact your Internet service provider if that doesn’t work.

If you are still experiencing Paramount loading issues after trying our solutions, contact the Paramount team for assistance.

Before you leave, do not forget to find out how to get Paramount Plus for free.

Write any other questions, suggestions, or concerns in the comments below. 

Best Antivirus For Windows 10: Top Protection Software In 2026

Looking for the best antivirus for Windows 10? You’re in good hands. In this piece, we’ll break down the best options to keep your PC safe.

Reigning supreme among 65% of Windows users, Windows 10 comes with Windows Defender, which does a decent job. However, a third-party antivirus will give you that extra layer of protection.

You can find the best defense against zero-day threats, be it malware, phishing scams, or ransomware in the anti-virus options below:

Best antivirus for Windows 10:

Here’s a quick look at the best options on the market. You can find more detailed information down below.

Antivirus Features Price
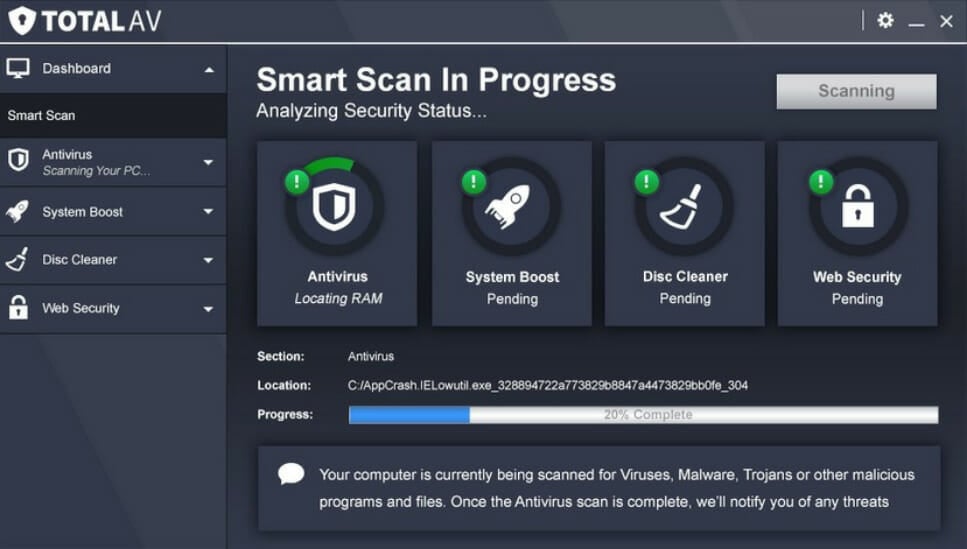
Total AV Excellent malware detection, real-time protection, minimal system impact Paid
Bitdefender Antivirus Plus Lightweight, real-time protection, built-in VPN Paid
Malwarebytes Excellent malware detection, real-time protection, minimal system impact Free and paid
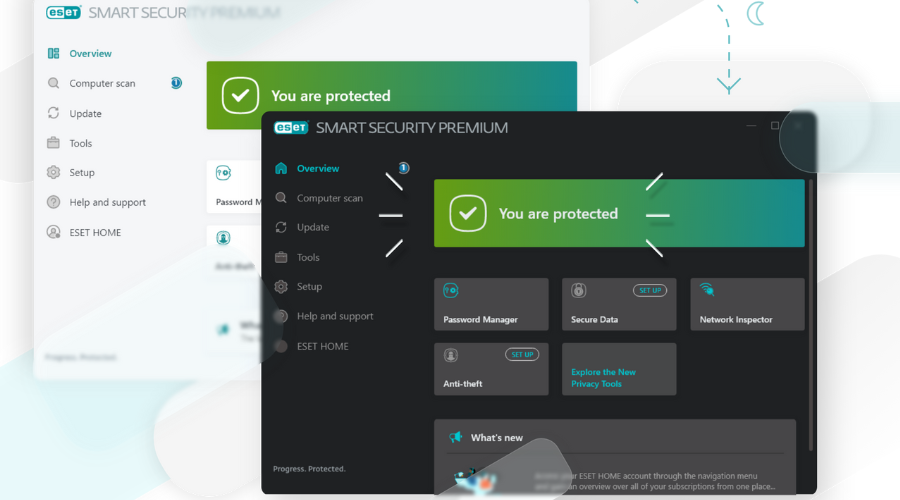
ESET HOME Security Essential Minimal system impact, phishing protection, strong online defense PFree trial
Guard.io Device optimization, cross-platform support, user-friendly Free trial
Intego ONE Real-time protection, low system impact, ransomware defense Paid
Norton Antivirus Plus Low system impact, cloud backup, built-in VPN Paid
Vipre Robust real-time protection, email security, data loss prevention Free trial
Kaspersky Top-tier protection, low resource usage, cross-platform Paid
Avast Free Antivirus Strong free protection, behavior shield, silent mode Free
Avira Antivirus Premium Strong web protection, privacy tools, good detection rates Paid

Need more information? Keep reading!

1. Total AV – Great for browsing security

best antivirus for windows 10
PROSCONS
✅Boost up PC with device optimization tools
✅ Cross-platform compatibility
✅ Excellent real-time protection
✅ WebShield for browser
✅ Built-in ad blocker
✅ User-friendly UI
✅ Data breach monitoring
❌ Expensive renewal pricing
❌ VPN is a separate paid feature

Total AV offers virus protection, safe web surfing, block tracking cookies, as well as verification for breach attempts. Thus we ranked it as one of the best antivirus for a Windows 10 Home user.

It also provides WebShield in your browser to browse the web safely and securely. Hence, it is a defense against fake, scam, or phishing websites that exploit unknowing users. Also, this means that Total AV lets you take control of the browsing experience for browsers.

Total AV

Total AV

A simple solution for a complete package of protection.
Check Price Visit Website

2. Bitdefender Antivirus Plus – Most security features

best antivirus for windows 10
PROSCONS
✅ Cutting-edge lightweight technology
✅ Real-time protection
✅ Low system impact
✅ Excellent malware detection rates
✅ Built-in VPN (limited)
✅ Password manager included
✅ Protection against unauthorized use of your microphone and webcam
✅ Anti-theft features for your devices’ protection
✅ Gives you anonymity on public Wi-Fi
✅Built-in browser protection
❌ VPN limited to 200MB/day
in basic plan
❌ Additional tools like file
shredder and parental controls are missing

Bitdefender has an excellent antivirus technology approach proven to be a cutting-edge solution on Windows. You will soon see why we ranked it as the best antivirus for Windows 10 that doesn’t slow down your computer.

It’s an award-winning antivirus developer that has garnered wide appraisal over the years. This is thanks to its efficiency in fighting off malware balanced with a low system impact.

Bitdefender Antivirus Plus

Bitdefender Antivirus Plus

Secure all your devices with one plan using this reliable antivirus!
Check price Visit Website

3. Malwarebytes – Straightforward tool with award winning security

PROSCONS
✅ Excellent malware detection rates
✅ Real-time protection
✅ Low system impact
✅ Free version
✅ Anti-theft features
✅ Built-in browser protection
✅ Simple, intuitive interface
❌ Lacks a built-in firewall
❌ Limited advanced features in free version
❌ No VPN in free version

Malwarebytes is known for its lightweight software, but don’t be fooled—it’s packed with powerful tools. It combines cutting-edge tech like anti-malware, anti-phishing, and ransomware protection, all with a simple and easy-to-use interface.

It runs quietly in the background with real-time protection, keeping your system safe without slowing it down. Further, it’s fairly affordable and includes a free version.

Malwarebytes

Malwarebytes

Get grade-A protection without breaking the bank or slowing down your system!
Check price Visit website

4. ESET HOME Security Essential – Best Windows 10 antivirus overall

PROSCONS:
✅ Minimal power usage
✅ Gamer Mode
✅ Strong web-browsing and online payment protection
✅ Excellent phishing defense
✅ Military-grade encryption for passwords
✅ Install & forget the antivirus model
✅ Active web-browsing protection
✅ Ransomware and spyware shield
✅ Online banking & payment protection
✅ Suitable for Windows, macOS, and Linux

❌ UI can feel outdated
compared to competitors

ESET HOME Security Essential is ranked as one of the best antivirus for Windows 10. It protects against malware, including viruses, ransomware, worms, as well as spyware.

Additionally, it offers military-grade encryption for all your passcodes when your device is lost or destroyed, so nothing leaks or gets stolen.

ESET HOME Security Essential

ESET HOME Security Essential

A lightweight antivirus that offers just the protection all your devices need against the latest malware.
Free Trial Visit Website

5. Guard.io – Best for internet browsing

best antivirus for windows 10
PROSCONS
✅ Super lightweight browser extension
✅ Effective phishing and malicious site blocking
✅ Very easy to install
✅ Good privacy tools for web browsing
✅ Prevents browser-based data breaches
❌Limited protection outside of the browser
❌ No mobile device support

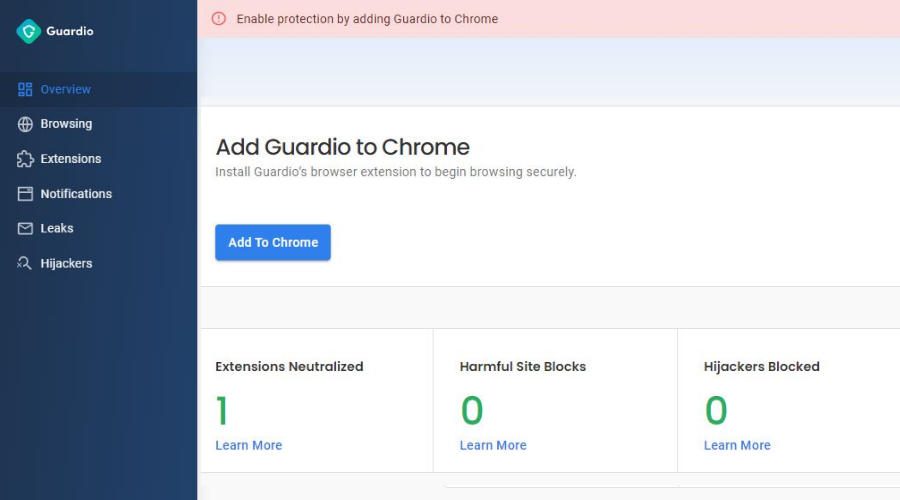
Firstly, Guard.io is a lightweight Chrome extension that basically works like an antivirus for your browser. It takes seconds to add, and provides immediate online security.

Harmful sites will be blocked immediately, while advanced anti-phishing protection will prevent all attempts to steal your data. Its machine learning and cloud infrastructure, and security research bring state-of-the-art web browsing protection.

Guard.io

Guard.io

Your browsing bodyguard for any online threats.
Free Trial Visit Website

6. Intego ONE – Most descriptive AV report

PROSCONS
✅ Full bulletin virus report on Windows & Mac
✅ Excellent real-time protection
✅ Low impact on system performance
✅ Great ransomware protection
✅ Full system cleanup tools
✅ Advanced reports on malware activities
✅ Cross-platform (Windows & macOS)
❌ No mobile app support
❌ Lacks advanced features like VPN or parental control

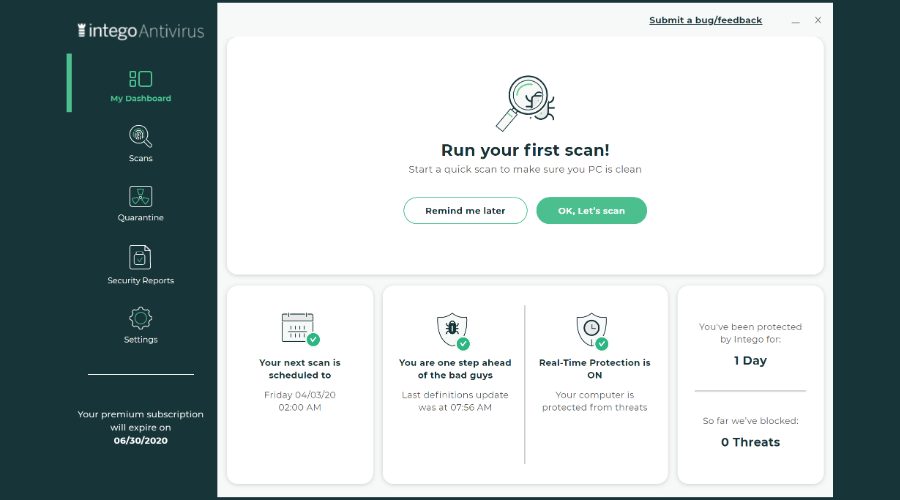
Intego ONE is the next tested antivirus and it delivers competitive antivirus technology with real-time virus prevention. This antivirus will generate a complete report with every security aspect, and provide cutting-edge tools for malware removal.

You can thereby stop complex cyber threats like Zero-day or phishing attacks that put your Windows PC at risk.

Intego

Intego ONE

Keep threats away using Intego’s advanced security system!
Check price Visit website

7. Norton Antivirus Plus – Best for home PC

best antivirus for windows 10
PROSCONS
✅ Low system impact
✅ Frequently updated
✅ Excellent real-time malware protection
✅ Cloud backup (2GB) included
✅ Built-in VPN and password manager
✅ Dark web monitoring (premium tiers)
❌ Can be expensive
on a per-device basis
❌ VPN and cloud storage
are limited in basic plans
❌ Intrusive notifications

Norton works silently in the background, having minimum impact on your system’s resources. It has a multi-layered approach that covers all bases: antivirus, email scan, anti malware, and cloud backup.

You receive up to 2GB of cloud backup space to save and defend essential files and documents from hard disk failure and hardware theft. The drawback of Norton is that it is pricey per device.

Norton AntiVirus Plus

Multi-layered, smart encryption helps safeguard your devices from arising from various malware threats.
Check price Visit Website
PROSCONS
✅ Robust real-time protection
✅ Excellent email protection (great for business users)
✅ Low system impact
✅ Data loss prevention features
✅ Good for home and business environments
❌Lacks features like VPN
or parental controls
❌ Some users find the UI
to be too basic
❌ Limited mobile device
support

Does Windows 10 need antivirus on top of Windows Defender?

Yes, Windows 10 certainly needs an antivirus. Even though Windows constantly updates the OS for better security, you’ll always need to use an antivirus that can quickly detect, block, and remove threats. 

Such tools can block access to malicious sites, stop intrusive pop-ups, prevent/detect spam, and protect your privacy against spyware, data theft, hackers, and phishing attacks.

Good cyber hygiene also goes a long way, but no matter how well-versed you are in online security, you can never be too sure. New threats arise daily.

Summary

That concludes our list of the best antivirus tools for Windows 10. We will update the list once more information is uncovered to provide you with the most updated and relevant information.

If interested, check out our guide on Antivirus statistics to know more about the importance of security tools. And finally, check out our antivirus market share report to find out which antivirus is topping the charts.

Did you download the best antivirus for Windows 10? Let us know by leaving your feedback in the comments below.

Couldn’t Connect to Your Device to Samsung TV: 7 Ways to Fix

If you can’t connect your PC to your Samsung TV, this guide will help you. Microsoft’s Cast to Device. feature allows connectivity between Windows devices and Smart TVs.

However, people report frequent issues with it. The most common one is simply the inability to connect. Improper connection, poor internet, and faulty settings can all contribute to this problem.

Here is how you fix it:

How can I fix Couldn’t connect to your device to Samsung TV message?

Before you go into these solutions, try the following workaround:

  • Disable your antivirus software.

If after this the problem persists, you may continue to more detailed solutions below.

1. Connect Windows device to Samsung TV properly

  1. Ensure you have connected your Samsung TV and Windows 10 device to the same WiFi/Local Area network.
  2. Press Windows + I on the keyboard to open Settings.
  3. Go to Bluetooth & devices.going bluetooth devices windows 11 settings
  4. Click on Add device.
  5. Select Wireless display or dock.
    connecting wireless display or dock windows add a device
  6. Windows will scan for the wireless display. Select the Samsung TV when it is found.

2. Make sure to have your network card drivers up to date

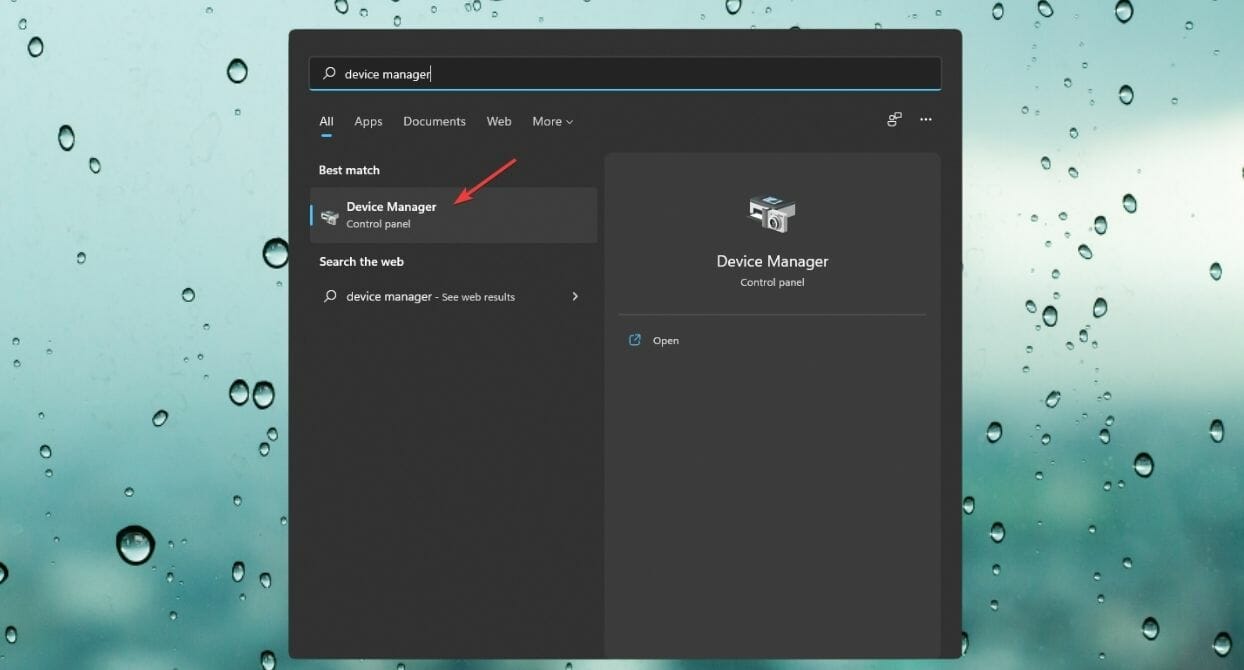
  1. Open the Start Menu, type Device Manager, and hit Enter.opening device manager windows 11
  2. Expand Network adapters.
  3. Right-click on your network driver and choose Update driver.choosing update driver for network driver
  4. Select Search automatically for updated driver software and go ahead.

Now, check whether it has been fixed or couldn’t connect to your device.

3. Check if you have the network-sharing feature enabled

  1. Open the Start Menu, type Control Panel, and press Enter.
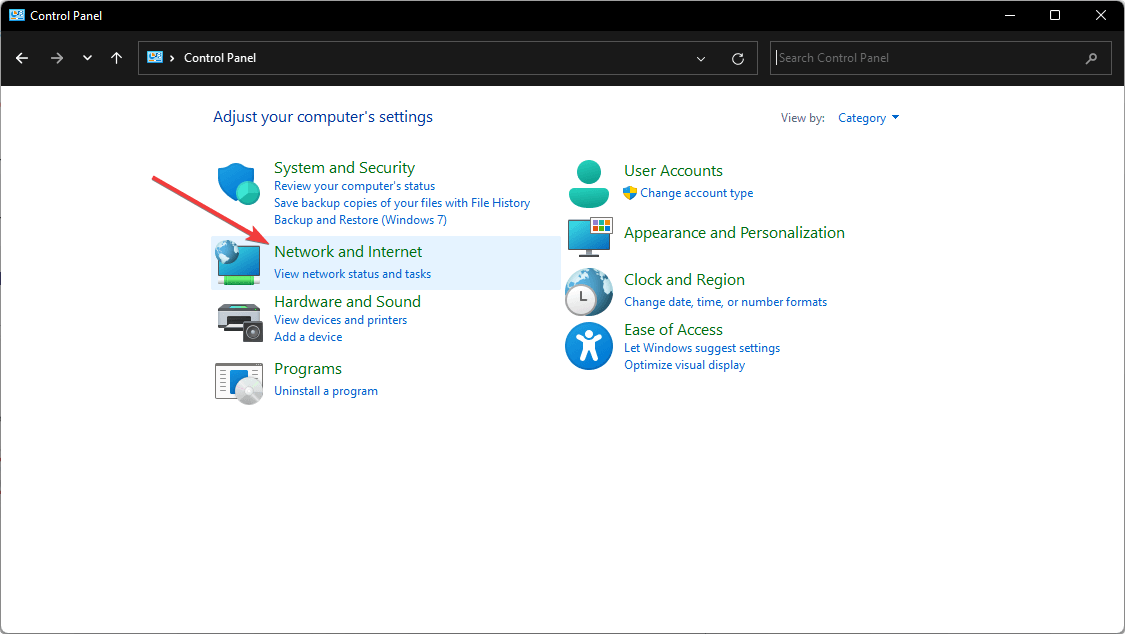
  2. Go to Network and Internet.going network and internet control panel
  3. Go to Network and Sharing Center.going network and sharing center control panel
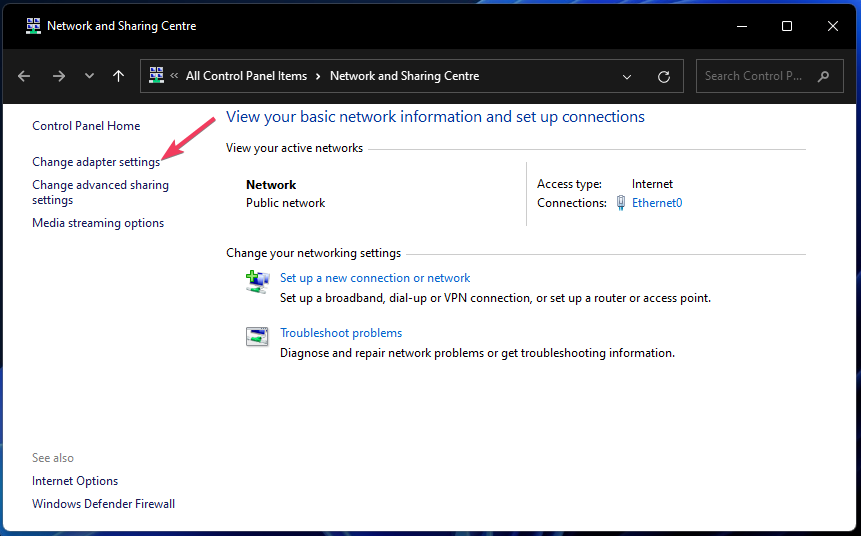
  4. Click on Advanced sharing settings, as shown in the screenshot.going advanced sharing settings control panel
  5. Enable network sharing for Network discovery and File and printer sharing.enabling network sharing control panel windows
  6. Click on Save changes.

If your Samsung TV is not discoverable on Windows 10 or 11, the problem is most likely related to the aforementioned settings.

4. Make sure Media Streaming is enabled

  1. Like the previous method, go to the Network and Sharing Center.
  2. Click on Media streaming options.going media streaming options control panel windows
  3. Click on Turn on media streaming.turning on media streaming control panel windows
  4. Now, click on OK.

If you can’t connect your laptop to the TV via a wireless network, it’s possible that the media streaming feature wasn’t enabled.

5. Reset the Stream Permission on the Windows 10 device

  1. Open the Start Menu, type Windows Media Player, and hit Enter.
  2. Click on Stream and check Automatically allow devices to play my media.enabling automatically allow devices to play my media windows media player

Resetting the Stream Permission on the computer is an effective solution. For some users, it has worked like magic when Windows 10 can’t connect to TV using wireless means.

6. Make sure that certain services are not disabled

  1. Press Windows + R on the keyboard to open Run.
  2. Type services.msc in the Run box and hit Enter.
  3. Search for the following services. Double-click each service and set its Startup type accordingly:
    • DNS Client – Automatic (Triggered)

    • Function Discovery Resource Publication – Manual
    • SSDP Discovery – Manual
    • UPnP Device Host – Manual

Sometimes specific services are disabled in the system, such as DNS Client, Function Discovery Resource Publication, SSDP Discovery, and UPnP Device Host. Find these services and make sure they are not disabled.

7. Factory reset your TV

Note icon NOTE
Remember that resetting your TV will remove installed apps and revert all your settings to default.
  1. Navigate to Settings and pick All settings.
  2. Next, go to General & Privacy.
  3. Select Reset.
  4. After doing that, enter your PIN. It should be 0000 by default.
  5. Select Reset once again to confirm.

We hope the above solutions help eliminate the Couldn’t connect to your Samsung TV error. You may also find helpful our guide on addressing browser not supported on Samsung TV. For additional streaming fixes, see our guide on YouTube not working on Samsung TV.

Keeping your privacy protected is important, and if you want to do that, we suggest using the best VPN for Samsung TV. A VPN can also help if Samsung TV Plus is not working, so be sure to give it a try.

If your Samsung TV is not connecting to your PC via HDMI, there’s a possibility that the HDMI port is not working properly. This isn’t the only issue you can encounter, and we recently wrote about LG error code 106 in a separate guide, so don’t miss it.

If you have any other suggestions, leave them in the comment section below.

Cisco AnyConnect Authentication Failed: How to Fix it

Using a VPN is one of the best ways to protect your privacy online, however, many users received a Cisco AnyConnect authentication failed message.

As a result, they are denied access to the VPN tool. However undesirable this situation is, tweaking a few settings should restore everything.

It’s worth mentioning that the same error was reported by the users of the following VPN clients:

The causes are, in most cases, similar and refer to either some antivirus settings, VPN settings, or even a corrupt VPN installation. Whatever the cause, take each solution presented below in turn.

Hopefully, you’ll get back access to your VPN tool before reaching the end of this article. So, let’s dig in.

How do I fix a Cisco AnyConnect login failed?

  1. Check your antivirus and firewall
  2. Disable your firewall
  3. Try switching to a different VPN client
  4. Check your login credentials
  5. Check the number of connections
  6. Make sure that your service is paid for
  7. Change your username and password
  8. Reinstall your VPN client
  9. Perform a Clean boot

1. Check your antivirus and firewall

One of the most common causes when getting a VPN authentication failed message is your antivirus or firewall.

The antivirus sometimes blocks VPN clients, detecting them as false positives.

To fix the problem, it’s advised that you check your antivirus settings and make sure to whitelist your VPN client. Additionally, you can try disabling certain antivirus features or disable your antivirus altogether.

If that doesn’t solve the problem, try uninstalling your antivirus. If you’re on Windows 10, you’ll be protected by Windows Defender even if you remove your third-party antivirus, so there’s no need to worry about your safety.

Once you remove your antivirus, check if the problem is still there. If the issue doesn’t appear anymore, it may be time to consider a different antivirus software.

You can find many good Windows 10 compatible antivirus software that won’t interfere with your VPN. Moreover, many worthwhile tools come with integrated VPNs, so you won’t have to invest in two apps.

2. Disable your firewall

According to users, sometimes VPN authentication failed message can appear if your firewall is blocking the VPN client. To fix this problem, users suggest to temporarily disabling your firewall and checking if that solves your problem.

To disable your third-party firewall, you’ll have to open its settings page and find the disable option.

However, Windows also has its own firewall, and you might need to disable it as well in order to troubleshoot this issue.

  1. Press Windows Key + S and enter firewall. Select Windows Firewall from the list of results.
    vpn authentication error firewall search
  2. Choose Turn Windows Firewall on or off from the left pane.
    vpn authentication error turn firewall on or off
  3. Select Turn off Windows Firewall (not recommended) for both Public network and Private network profiles. Now click the OK button to save changes.
    vpn authentication failed disable firewall

After doing that, your firewall will be completely disabled. Bear in mind that disabling the firewall isn’t advised since it can leave your PC at risk.

However, if disabling the firewall fixes the problem with the VPN, the issue is most likely related to your firewall settings, so you’ll need to adjust them accordingly.


3. Try switching to a different VPN client

If other solutions couldn’t fix the VPN authentication failed error message, perhaps the problem is related to your VPN client. If that’s so, it’s advised to switch to a different VPN client.

Consider a VPN provider with a large number of servers across the whole globe, because these can generally ensure a good connection at all times, regardless of the specific online activity you engage in.

Another feature to look for when picking your VPN client is the privacy policy. Get a VPN that has transparent rules and is compliant with the regulations applicable in your area.

The best VPNs for Windows 10 should ensure that there’s no data leakage even if the connection drops, so make sure to look for the kill switch feature as well.

4. Check your login credentials

how do i fix VPN access error

If your firewall or VPN isn’t the problem, perhaps you should check your login credentials.

It’s possible that you mistyped your username or password, and that might be causing your problem. To fix the issue, be sure to double-check your login information and make sure that it’s completely correct.

Be sure to check for uppercase and lowercase letters since they can be the common problem for login issues.


5. Check the number of connections

VPN multiple connections

Many VPN clients allow you to have a limited number of VPN connections at a time, and if you exceed the number of these connections, you might get the VPN authentication failed message.

To fix the problem, be sure to check all the devices that are using your VPN.

If you have multiple PCs and phones using the same VPN service, try disabling the app on certain some of them and check if that solves your problem.


6. Make sure that your service is paid for

Make sure that your service is paid for

If you’re unable to use your VPN due to the VPN authentication failed error message, it’s possible that the problem is caused by unpaid service.

Sometimes, you might forget paying for the VPN service, and that can lead to this and many other problems. So log in to your VPN account and make sure that your service is paid for.

If everything is in order in terms of payment, you can proceed to the next solution.


7. Change your username and password

change username and password

If you’re having issues with your VPN credentials, try to change them. Even if you’re certain that these are correct, you can try changing them to refresh the connection.

It’s possible that there’s a glitch with your VPN client, but you might be able to fix it this way.


8. Reinstall your VPN client

Reinstall your VPN client

According to users, sometimes you can encounter a VPN authentication failed message simply because the VPN installation is corrupted. So the only workaround is to reinstall the client.

This is fairly simple to do, and the best way to do it is to use uninstaller software first. You can also remove it with Windows Settings, but many users reported that the Windows uninstaller utility leaves behind leftover files.

Uninstaller software are specifically configured to find and remove everything related to the app you want to delete. This will ensure that you will be able to seamlessly reinstall your VPN.

Once you remove your VPN client completely, install it again and check if the problem is still there.


9. Perform a Clean boot

  1. Press Windows Key + R to open the Run dialog. Enter msconfig and click OK or press Enter.
    msconfig run dialog vpn authentication error
  2. Navigate to the Services tab and check Hide all Microsoft services Now click the Disable all button to disable all these services.
    disable services vpn authentication error
  3. Head over to the Startup tab and click Open Task Manager.
  4. Right-click the first application on the list and choose Disable from the menu. Repeat this step for all startup applications on the list.
    disable applications vpn authentication error
  5. Once you disable all startup applications, go back to the System Configuration Now you just have to click Apply and OK to save changes and restart your PC.

A clean boot should stop any interference of other applications or processes upon the VPN. So once your PC restarts check if the problem is still there.

If the issue doesn’t reappear, it’s possible that one of the startup applications or services was causing it. To find the cause, you need to enable all disabled applications and services one by one until you manage to recreate the issue.

Bear in mind that you’ll need to restart your PC or at least log out and log back in to apply the changes. Once you find the problematic application or a service, disable it or remove it from your PC.

Although the VPN authentication failed error can be quite problematic, we hope that you managed to solve it by using some of our solutions. In some cases, it might be necessary to download Cisco AnyConnect on Windows 11 again to fix this issue.

We’d like to hear if this article helped. Feel free to drop us a line in the comments below.

[wl_navigator]

Fix Audio Static in Windows 10 Permanently in 6 Easy Steps

Static audio is one of the few annoying things you notice if the sound is not working well in Windows 10. This problem can be down to various factors, from hardware faults to software issues.

Irrespective of the cause, this guide will show you to fix this and restore your audio quality permanently.

Why am I getting static audio on Windows 10?

When you get static or sometimes buzzing noise on your PC, it could be because of the following reasons.

  • Wrong power setting – If you get static audio on the Realtek driver on Windows 10, it could be because your power setting is not optimized. The fix is to choose the high-performance power option.
  • Outdated chipset driver – If you are wondering Why does my audio sound static?, outdated drivers could be the underlying cause. You can solve this by updating the drivers from your PC’s manufacturer’s website.
  • Wrong sound format – Some users complained that a wrong sound format caused this issue. By adjusting the sound format, many were able to fix the Windows 10 USB audio static and other forms of the issue.

How can I fix the audio static on Windows 10?

Before we head to the slightly complex solutions, here are a few quick ones to try:

  • Restart the computer.
  • Ensure the connection is in order and the cable is not damaged.
  • If you have plugged the audio device into a USB 3.0 port, disconnect it and then connect it to a USB 2.0 port on the PC. Some devices do not yet function optimally with the latest major version of Universal Serial Bus and may cause Windows 10 USB audio static.
  • In case you have a program that modifies the sound parameters or properties, uninstall the app and verify whether the problem is resolved.

If none work, head to the fixes listed next.

1. Download the correct Standard SATA AHCI Controller

  1. Press the Windows key + X and select Device Manager.
    device manager audio static windows 10
  2. Click the arrow next to IDE ATA/ ATAPI Controllers option to expand it and right-click the driver there.
  3. Choose the Properties option.
    properties audio static windows 10
  4. Now, click the Details tab at the top and click the Property dropdown, and select Hardware Ids.
    hardware ids
  5. From here, right-click the top item and select the Copy option under the Value section.
    copy
  6. Now, search for the device ID on Google to download the correct version of the driver for your device.
    google

The Standard SATA AHCI Controller comes as the default driver for IDE ATA/ ATAPI Controllers. However, some users have found it to cause the audio static issue on windows 10.

This is because the available version cannot do the required job. Hence, it is important to download the latest version from the manufacturer’s website.

Also, outdated or corrupt drivers could cause Windows 10 sound cracking with Realtek. In this case, you will need to install the latest Realtek audio driver in Windows 10.

However, we recommend you use Fortect Driver Updater(100% safe and tested by us) to update your drivers automatically. You might also need to update other drivers, like the sound driver, to fix the issue. And doing this manually will be stressful and time-consuming.

This is a tool specialized in driver updates. It automatically scans your PC, finds outdated drivers, and updates them to their latest versions.

⇒ Get Fortect Driver Updater

2. Run the sound troubleshooter

  1. Press the Windows key + I and select Update & Security.
    update audio static windows 10
  2. Click Troubleshoot in the left pane and select Additional troubleshooters.
    troubleshoot
  3. Finally, choose Playing Audio and click the Run the troubleshooter button.
    run troubleshooter

Windows 10 come with various troubleshooters that are handy when it comes to fixing issues. The Playing Audio troubleshooter has proven to diagnose and recommend potential solutions to the audio static windows 10 issue.

3. Change the Minimum Processor State

  1. Press the Windows key, type power and, and choose the Power & sleep settings option.
    power audio static windows 10
  2. Choose Additional power settings under Related settings.
    additional power setting
  3. Now, select the Change plan settings option.
    change plan
  4. Click the Change advanced power settings option.
    change advanced
  5. Now, expand the Processor power management option and followed by Minimum processor state.
    minimum-power audio static windows 10
  6. From here, click the On battery and Plugged in options and set their values to 100%.
  7. Finally, click the Apply button, followed by OK to save the changes.
    hundred

Sometimes, the reason you are getting static audio on Windows 10 is insufficient power allocation. The steps above help to fix this and restore your sound quality.

4. Switch power plan

  1. Press the Windows key + S, type power plan and select Choose a power plan.
    choose audio static windows 10
  2. Select Create a power plan in the left pane.
    create plan
  3. Now, tick the radio for High performance and click the Next button.
    high audio static windows 10
  4. Finally, click the Create button to save your new power plan.
    create button

Sometimes, the Balanced option might not be enough to power the speakers and the audio outputs connected to your PC. This might lead to the audio static on Windows 10 issue.

It should be noted that the High performance plan will drain your battery fast. However, it has proven to solve the issue for many users. Also, changing the power plan will fix audio static in Windows 11.

5. Change the audio format

  1. Press the Windows key + S, type control, and select Control Panel.
    control panel
  2. Choose Hardware and Sound from the options.
    hardware audio static windows 10
  3. Select Sound.
    sound
  4. Double-click your speaker to open the properties.
    speakers
  5. Now, choose the Advanced tab at the top, click the dropdown under Default Format and choose the 16 bit, 44100 Hz (CD Quality) format.
  6. Click Apply, followed by OK to save your settings.
    format audio static windows 10

Some users confirmed that changing the audio format to 16 or 24 bits fixed static audio on Windows 10 issue. So, you can alternate between these two formats and see the one that works for you.

6. Change the display resolution

  1. Press the Windows key + I and select the System option.
    system audio static windows 10
  2. Click the dropdown under Scale and layout and choose the recommended setting.
  3. Finally choose the recommended setting for the Display resolution too and restart your PC.
    display resolution

Sometimes, when you tamper with the display resolution and layout, you might have sound issues on your PC. This is because when you watch a video with a higher resolution than advised, it increases the video load. Consequently, this affects the sound quality.

There you have it. We believe you should be able to fix the audio static on Windows 10 issue with the information in this guide.

Also, find the best audio drivers for Windows, and get a finer audio experience.

Please, feel free to let us know if you could fix this issue with any of the solutions in this guide.

Windows 10 Taskbar Icons Missing? Restore Them in 8 Steps

If your taskbar icons are missing on Windows 10, this guide can help! We will cover all the available fixes to quickly resolve the problem after discussing the causes. Let’s begin! 

What causes missing taskbar icons on Windows 10? 

There are various reasons why your taskbar icons are missing on Windows 10; some of the common ones are:

  • Corrupted or missing system files – If the system files of your computer are corrupt or missing, then you might face this issue. You need to repair the system files to fix the issue.
  • Bad Windows update – If the recent Windows update is corrupt or missing some files, the icons might get missing from Taskbar. To fix it, you need to uninstall the latest Windows update.
  • Taskbar is malfunctioning – If the taskbar is not working correctly, it might not display all the icons.  
  • Outdated drivers – If your computer has obsolete or old display drivers, then your taskbar icons might be missing. You must update the drivers on your computer to resolve the problem.
  • Icons are hidden – Another possibility could be the icons are hidden from view, hence causing the issue. You need to check Taskbar settings to be sure. 
  • Malware infection – If your computer is infected with viruses, your system files might be damaged. This could cause a lot of issues, including this one. 

What can I do if taskbar icons are missing on Windows 10?

Before moving to the troubleshooting steps, make sure you go through these preliminary checks: 

  • Remove all the external peripherals except the default ones.
  • Install Windows Updates.
  • Run a malware scan.
  • Press Ctrl + Shift + Esc keys to open Task Manager, right-click Windows Explorer, and select Restart. 

1. Run the SFC and DISM command

  1. Press the Windows key, type CMD, and click Run as administrator. Command Prompt Windows Run as Administrator
  2. Type the following command to verify the Windows system files’ integrity and press Enter: sfc/scannow 
  3. Copy and paste the following commands one by one to repair the Windows image and press Enter after every command:  DISM /Online /Cleanup-Image /CheckHealth DISM /Online /Cleanup-Image /ScanHealth DISM /Online /Cleanup-Image /RestoreHealth
  4. Once the process is complete, restart your computer

2. Use the Settings app

2.1 Change the taskbar settings

  1. Press Windows + I to open Settings. 
  2. Go to Personalization. Personalization windows 10 taskbar icons missing
  3. Choose Taskbar from the left pane; turn off the toggle for the Automatically hide the taskbar in tablet mode option.Taskbar 1 windows 10 taskbar icons missing
  4. Now, go to the Notification section and click Select which icons appear on the taskbar.Notification
  5. Turn on the toggle for the icons you want to add. 

2.2 Disable Tablet mode( if using multiple screens) 

  1. Open Settings and go to System.System Windows 10 windows 10 taskbar icons missing
  2. Click Tablet from the left pane. 
  3. Select the Never use tablet mode option from the right pane. Tablet mode
  4. Restart your computer and check if the problem persists. 

3. Update the display driver

  1. Press Windows + R to open the Run dialog box. Device Manager RUN COMMAND
  2. Type devmgmt.msc and click OK to open Device Manager.
  3. Locate and expand the Display adapters list.
  4. Right-click the driver listed and click Update driver.  windows 10 taskbar icons missing
  5. Click Search automatically for drivers.Update driver 2
  6. Follow the onscreen instructions to complete the process.

A different method to manage all the drivers automatically, without any complicated steps, is using an expert driver updating tool capable of updating all drivers at once and solving your Windows issue.

4. Run the Disk Cleanup tool 

  1. Press Windows + R to open the Run window. 
  2. Type cleanmgr and click OK. Cleanmgr Run command
  3. On the Disk Cleanup: Drive selection window, select drive and click OK.Cleanmgr 2 windows 10 taskbar icons missing 
  4. Click Clean up system files.Cleanmgr 3
  5. Again on the Disk Cleanup: Drive selection window, select drive and click OK. 
  6. Select all the content from the Files to delete and click OK. Cleanmgr 4
  7. Click Delete Files on the window. Cleanmgr 5

5. Delete the Icon Cache

  1. Press Windows + R to open the Run console. 
  2. Type %appdata% and click OK. Appdata windows 10 taskbar icons missing
  3. Go to the View tab on Windows Explorer and select Hidden items. 
  4. On the AppData folder, locate IconCache.db and click the Delete icon. ICON
  5. Restart your computer. 

6. Use the Registry Editor

  1. Press Windows + R to open the Run console. REGEDIT RUN COMMAND
  2. Type Regedit and click OK to open the Registry Editor. 
  3. Follow the path: Computer\ HKEY_CLASSES_ROOT\Local Settings\Software\ Microsoft\Windows\CurrentVersion\ TrayNotify
  4. Locate and delete IconStreams. Regedit
  5. Also, locate and delete pasticonstreams
  6. Restart your computer. 

7. Reinstall Taskbar

  1. Press the Windows key, type PowerShell, and click Run as administrator.Windows Powershell windows 10 taskbar icons missing
  2. Copy and paste the following command and press Enter: Get-AppxPackage -AllUsers| Foreach {Add-AppxPackage -DisableDevelopmentMode -Register “$($_.InstallLocation)\AppXManifest.xml”}
  3. Restart your PC and check if the issue persists. 

8. Use the system restore point to restore system settings 

  1. Press the Windows key, type Control Panel, and click Open. CP windows 10 taskbar icons missing
  2. Select Large icons from View as and click Recovery. Recovery Windows 10
  3. Now select Open System Restore. System restore
  4. On the System Restore window, click Next. Next Restore point
  5. On the next window, select the restore point and click Next. Restore your computer
  6. Now click Finish to let Windows restore your system settings to the chosen point. Restore

So, these are the methods you must follow to fix the taskbar icons missing issue on Windows 10. Try them and let us know what worked in the comments section below. 

How to Enable/Block 3rd Party Cookies in Chrome Incognito Mode

If you’re wondering how to not accept cookies on websites, Chrome has a great option for private browsing that makes it easy for you to block third-party cookies in Incognito.

By default, the Incognito mode does not save browsing history, cookies, site data, or information entered in forms. Speaking of that, you may also choose to manually delete autofill entries from Chrome. However, some users want to allow or enable cookies in Incognito mode.

Many people prefer private browsing because it prevents trackers and protects browsing data. In fact, you can even choose to hide bookmarks made in Incognito for enhanced privacy.

But what are third-party cookies in Incognito anyway? Besides being yummy, cookies, in general, are meant to facilitate your online experience by retaining particular information such as content or ad preferences, sign-in information, and so on.

The ones created by a particular website that you visit are called first-party cookies, while the ones generated by complementary sites (such as the ones providing the ads visible on the particular page you visit) are called third-party cookies.

Now that that’s out of the way, let’s see how to enable cookies in Chrome Incognito mode or block them, as per your needs.

Does Incognito mode use existing cookies?

By default, Chrome Incognito is set to not use existing cookies or other data previously saved in your browser or device. This allows Chrome to act as if you have never visited a particular webpage before whenever you launch it in a new Incognito session.

And speaking of Incognito sessions, all cookies and site data are automatically cleared after ending one in Chrome.

However, users can adjust their settings to enable cookies in Incognito mode if they wish. Users can also:

  • customize the sites for which they want to enable cookies
  • choose to block all third-party cookies or all cookies, including first-party cookies
  • enable cookies for one site and disable them for another
  • delete all cookies for a preferred time range and more

How do I enable/block third-party cookies in Incognito mode?

  1. Enable/Block from New Tab Page
  2. Adjust browser settings
  3. Should I block third-party cookies in Incognito?

1. Enable/Block from New Tab page

  1. Open Chrome and click on the three dots in the top right corner. Open the Google Chrome menu.
  2. Select New Incognito Window (or press Ctrl + Shift + N). Select new incognito window.
  3. Toggle Block third-party cookies to Off in order to enable cookies in Incognito Mode. Set the switch back to On in order to block third party cookies in Incognito.Toggle block third party cookies to off to allow cookies.

This is the quickest and most convenient way to allow or disable cookies in Incognito mode. If you want to customize which sites allow cookies, have a look at the following method.

2. Adjust browser settings

  1. Open Chrome and click on the three dots in the top right corner.
  2. Select Settings. open Chrome settings.
  3. Under Privacy and security, click on Cookies and other site data. Under privacy and security open cookies settings.
  4. Select Allow all cookies.
  5. Alternatively, if you only want to allow cookies from a specific site, you can add the URL under Sites that can always use cookies.
  6. Finally, you can choose to check the box next to Block third-party cookies in Incognito or simply Block third-party cookies.

That is the main difference between the two options: block third-party cookies in Incognito vs block third-party cookies.

3. Should I block third-party cookies in Incognito? ?

If you block third-party cookies, some website functions may no longer work as expected. This happens because many sites rely on these cookies to function properly.

Take for instance session cookies, video controls, sign-in credentials for specific accounts, and so on. Now, you can block third-party cookies in Incognito and there is no specific restriction against this as long as it works well for you.

However, blocking all cookies is not recommended, just as it is clearly indicated in the browser’s settings.

You should now know how to enable cookies in Chrome Incognito or how to allow only cookies from specific sites while browsing privately.

Let us know in the comments below if you had any difficulty or issues when allowing cookies in Chrome Incognito mode.

Disable IPv6 Windows 11: Why & How to Change It

IPv6 stands for internet protocol version 6, the next generation of internet addressing. It was developed to replace the current Internet Protocol (IPv4). IPv6 is integral to networks because it provides many benefits over its predecessor.

Not every user has warmed up to IPV6, given how long its adoption took. Even though Windows 11 comes with new features that make it ideal for the IPV6 protocol, some still prefer to disable it. If you’re one of them, we show you how to go about it.

Should you disable IPv6 Windows 11?

In the world of the internet, such as gaming and streaming, IPv6 is necessary for the smooth running of a website or application. However, there are some applications where IPv6 is unnecessary, so disabling it can improve your internet speed and security.

It all depends on your hardware and what you need it for. Some advantages of using IPV6 include:

  • Increased security and privacy – IPv6 provides increased protection against many network attacks.
  • Better efficiency – The routing tables in IPv4 are very large and thus inefficient, increasing the overhead required for each packet. In contrast, routing tables in IPv6 are much more compact and, thus, more efficient.
  • Improved management of traffic – IPv6 allows for more control over access to the Internet. This can be used for improved quality of service, such as faster website response times or better bandwidth allocation to specific users.

IPV6 has its disadvantages as well:

  • Limited availability – The first disadvantage is that IPV6 is not widely used. It’s still considered an experimental protocol by most countries.
  • Lack of interoperability with older systems and protocols – To support the new version of the Internet Protocol (IP) standard, many older applications and devices must be modified or replaced.
  • Hardware limitations – Not all routers support IPv6, so you won’t be able to use these devices with IPv6 addresses. You must buy new hardware to use IPv6 on your network.

How do I change IPv6 on Windows 11?

1. Use the Control Panel 

  1. Hit the Windows key, type Control Panel in the search bar, and click Open.
    control-panel-search fallout new vegas runtime error
  2. Click on Network and Internet.
    going network and internet control panel
  3. Navigate to Network and Sharing Center.
  4. Select Change adapter settings.
  5. Right-click on the connection you wish to disable IPV6 and select Properties.
  6. On the Network properties dialog that pops up, uncheck the box beside Internet Protocol Version 6 (TCP/IPv6), then click OK.

2. Use the Command Prompt 

  1. Hit the Windows key, type cmd in the search bar, and click Run as administrator.
    cmd-run-admin-w11 unexpected kernel mode trap windows 11
  2. Type the following commands and press Enter after each one: netsh interface teredo set state disabled netsh interface ipv6 6to4 set state state=disabled undoonstop=disabled netsh interface ipv6 isatap set state state=disabled

3. Use Powershell

  1. Hit the Windows key, type Powershell in the search bar, and click Run as administrator.
  2. Type the following commands and press Enter: Get-NetAdapterBinding -ComponentID ms_tcpip6
  3. Take note of the network adapter you wish to disable in 2 above. Next, type the following command and hit Enter. Remember to replace Ethernet with the name noted in 2: Disable-NetAdapterBinding -Name "Ethernet" -ComponentID ms_tcpip6
  4. If you’d like to confirm whether the command was successful, type the following command. The corresponding entry should be False: Get-NetAdapterBinding -ComponentID ms_tcpip6

4. Use the Registry Editor

  1. Hit the Windows + R keys to open the Run command.
  2. Type regedit in the dialog box, then hit Enter to open the Registry Editor.
  3. Navigate to the following location: HKEY_Local_Machine\SYSTEM\CurrentControlSet\services\TCPIP6\Parameters
  4. Right-click on an empty space on the right pane, select New DWORD (32-bit) Value, and rename it as DisabledComponents.
  5. Double-click on DisabledComponents and enter FFFFFFFF as Value data, then click OK. 
  6. Exit the Registry Editor and restart your PC. IPv6 will be disabled.

Don’t forget to create a restore point before you edit the registry so that you can always roll back to a previous point in case an error happens.

How do I know if IPv6 is enabled in Windows 11?

IPV6 comes enabled by default in Windows 11, but if you want to make sure of its status, you can do so by following the steps below:

  1. Hit the Windows key, type Powershell in the search bar, and click Run as administrator.
  2. Type the following command and press Enter: Get-NetAdapterBinding -ComponentID ms_tcpip6
  3. If the corresponding entry next to your Wi-Fi connection is True, then IPV6 is enabled.

You can re enable the protocol at any time by following this guide on enabling IPv6 on Windows 11.

Although IPv6 offers much more robust security features such as authentication, privacy, and security, it’s still not widely accepted. It’s great, but if you don’t have the requisite hardware to accommodate it, you’ll experience various problems.

If you are encountering issues like IPv6 no internet access, check out this guide to find quick solutions.

The most common one is that your router cannot handle a load of routing packets from all the devices on your home network. When this happens, some of your devices will become unreachable, and others will have intermittent connectivity issues.

For more on IPV6, check out our exciting article on how you can enable IPV6 on your Xbox One.

Have you enabled IPV6 on your Windows 11? If so, we’d love to know your experience thus far. Drop us a comment down below.

Remove Virtual Drive on Windows 10: 2 Simple Ways to Do It

Virtual drives are virtualized hard drives that operate much the same as additional external hard disk drives with their partitions. Although they can be useful for virtual machines, some users remove virtual drives in Windows 10 when no longer needed.

The process of deleting a virtual drive is different from creating it. And to free up storage space if the virtual drive is not required, deleting it is the best way to proceed. So, let’s find out all about it.

What is a virtual drive?

A Virtual Drive is similar to a regular one and can be created on a connected storage drive. It usually has two extensions, .vhdx and .vhd, with distinct features and individual sets of pros and cons.

To any program or application on the PC, the virtual drive appears as a real/physical device and is used as such. Here are some of the key features of a virtual drive:

  • Easy to create: Virtual drives are easy to create and can be built on an existing storage drive, all in a matter of minutes.
  • Can be quickly moved: A major benefit of virtual drives is the enhanced portability, meaning they can be moved quickly and easily from one system to another.
  • Used by Virtual Machines: Virtual Drives are mostly employed by Virtual Machines to store the OS, programs, and data. So, once done with the latter, you can remove the virtual drive in Windows 10.
  • Slower than regular drives: One of the aspects users often complain about is the slow speed of drives that were created virtually. And there’s ain’t much you can do because that’s how the way it works.

How can I remove the virtual drive on Windows 10?

Tip icon Tip
Many recommend removing the Virtual Drive via the Uninstall Device option in the Drivers tab in its Properties. But, the method wouldn’t work. As soon you restart the computer, the virtual drive will reappear, given that Windows automatically installs the missing driver.

1. Using Disk Management

  1. Press Windows + X to open the Power User menu, and select Disk Management from the list.disk management
  2. In Disk Management, locate the Virtual Drive, right-click on it, and choose Detach VHD.detach VHD to remove Virtual Drive in Windows 10
  3. Click OK in the confirmation prompt to remove the Virtual Disk in Windows 10.ok

This is the simplest method to remove the virtual drive in Windows 10, and it shouldn’t take more than a few seconds. But, if you prefer the command line over GUI, we have a solution for that as well.

2. With Diskpart

  1. Press Windows + R to open Run, type cmd, and hit Ctrl + Shift + Enter.command prompt
  2. Click Yes in the UAC prompt.
  3. Paste the following command and hit Enter:diskpartdiskpart to remove virtual drive windows 10
  4. Next, execute this command while replacing Path of the VHD file with the actual one on your PC:select vdisk file=”Path of the VHD file”virtual drive
  5. Finally, run this command to delete Virtual Drive in Windows 10:detach vdiskdetach to remove virtual drive windows 10

The Virtual Drive has now been removed from Windows 10. Also, you could head over to the file path and delete the .vhd or .vhdx file to free up storage space in case there’s no data on the Virtual Drive.

Besides, if there’s critical data on the virtual drive, we recommend you use a reliable backup tool to store it and only then remove the drive.

How to delete a virtual hard disk on VirtualBox?

  1. Launch VirtualBox, right-click on the Virtual Machine, and select Settings.
  2. Now go to the Storage tab.storage
  3. Right-click on the virtual drive and select Remove Attachment from the context menu.remove attachment
  4. Once done, click OK to save the changes.

If you were wondering how to remove the virtual CD drive, it could be done via the VirtualMachine settings in no time.

These are all the ways you can remove a Virtual Drive in Windows 10 and even on VirtualBox. And while we are on the subject, check our curated list of the best Virtual Machines in Windows.

If you have any queries or want to share additional information on the subject, comment below.

Halo 5 Crossplay: Is it Possible on PC? Everything We Know

Halo 5 is a popular First-person Shooter (FPS) game with several modes and exciting features. It has a tremendous user base and is the first choice of a large section of the gaming community. But many wonder if Halo 5 supports crossplay.
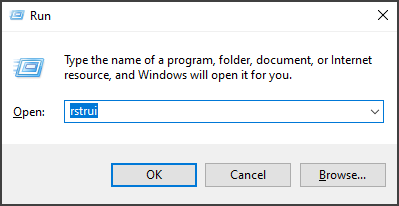
Given the massive appeal and popularity, one would expect Halo 5 to be cross-platform, but the answer comes as a surprise to many. So let’s find out.

Does Halo 5 have crossplay?

No, Halo 5 doesn’t support crossplay. As per recent reports, while the team has not outright denied the idea, there are no immediate plans for it. So, Halo 5 won’t support crossplay, at least in the foreseeable future.

But if you are looking for an alternative, Halo 5: Forge is the best option on Windows. The Forge mode is not new. It has existed in Halo 5: Guardians on Xbox One since its release. It lets you forge levels and invite users from the friend list to play in the Custom game mode.

Is Halo 5 on PC?

Halo 5: Guardian is currently available only on the Xbox platform and not on Windows PC. And it wouldn’t be listed for download on PC for some time now, given the company’s denial of any plans to do so.

In case you were planning to play Halo 5 on PC, the wait is going to be a lot longer. If and when it’s available, we will update the guide with the instructions to download it. So bookmark the page and keep checking it regularly.

What are the requirements to play Halo 5: Forge on PC?

First, let’s see if your PC meets the system requirements for playing Halo 5: Forge on your rig. So we’re listing the required specifications below:

➡ Minimum specs

  • CPU: Intel Core i5 @ 2.3Ghz or AMD FX 6350
  • Memory: 8 GB RAM (2 GB VRAM)
  • GPU: AMD R7 260x or GeForce 650 Ti
  • HD Space: 40 GB
  • DirectX 12

➡ Recommended specs

  • CPU: Intel Core i5 -3570K@ 3.4Ghz / AMD FX 8150
  • Memory: 12 GB RAM (4 GB VRAM)
  • GPU: AMD Radeon R9 380 / GeForce GTX 970
  • HD Space: 40 GB
  • DirectX 12 4K

➡ Ultra specs

  • CPU: Intel Core i7 -4770K@ 3.4Ghz / AMD FX 9370
  • Memory: 16 GB RAM (4+ GB VRAM)
  • GPU: AMD Radeon R9 Fury X / GeForce GTX 980 Ti
  • HD Space: SSD + 40 GB
  • DirectX 12

Supported OS: Windows 10 Anniversary (v.1607) or newer

How can I get Halo 5: Forge on PC for free?

  1. Press Windows + S to open Search, type Microsoft Store, and click on the relevant search result.microsoft store
  2. Now, type Halo 5: Forge in the text field and click on Halo 5: Forge Bundle.halo 5 forge
  3. Click on the Get button.halo 5 forge crossplay
  4. Once the download is complete, you can start playing the game.

With a download size of 31 GB, Halo 5: Forge on Windows supports resolutions up to 4K and has an online multiplayer mode that lets you invite your friends as long as they are also on the Windows. Plus, it even lets you change your keyboard control bindings.

How do I use Halo 5 crossplay?

Here’s everything you need to know about Halo 5 crossplay on Windows and Xbox platforms:

  • Ability to create content: The most exciting feature is Halo 5 is the ability to create content using powerful tools in the game creation suite.
  • Content shared across platforms: The content you create on Windows using Halo 5: Forge or on Xbox One using Halo 5: Guardians is shared across both platforms. That means that whether you play the game on Windows or your Xbox console, there will be the option to play the same levels.
  • Can’t play at the same time: Although you get to play the same levels, you won’t be able to play Halo 5 at the same time as Xbox users.
  • Support for mouse and keyboard: While the Xbox controller remains the first choice for many, with Halo 5: Forge on Windows, gamers can finally use their keyboard and mouse to play the game.
  • Halo app comes bundled: When you download Halo 5: Forge, it comes bundled with the Halo app, which offers the latest developments on the platforms, video tutorials, community content, update notes, and a lot more, all in one place.

What more should I know about Halo 5: Forge?

Halo 5: Forge on Windows 10 also comes with all of the original 15 pre-made Arena maps, essentially giving you much of the Halo 5 multiplayer for free. This also means you can host your own custom Arena matches as well and invite your friends for a game.

It’s not all dandy! There are quite a few issues still with the PC release. To name a few, there are quite a few people with mouse input latency issues and frame rate capped at 60 at the moment. And there is no way to find a game since there is no server browser or matchmaking.

Even the interface – while modified for PC – was originally designed for consoles and thus has massive thumbnails and large text.

Halo 5: Guardians cross-platform play

Even if you can’t cross-play Halo 5: Forge on PC and Xbox, you can do so with Halo 5: Guardians.

The Anvil’s Legacy expansion introduced the Content Browser that allows both Xbox One and PC gamers to join custom matches in progress, pretty much like a server browser.

Until then, there is a Discord servers website where like-minded PC players seem to have gathered to organize a few matches themselves.
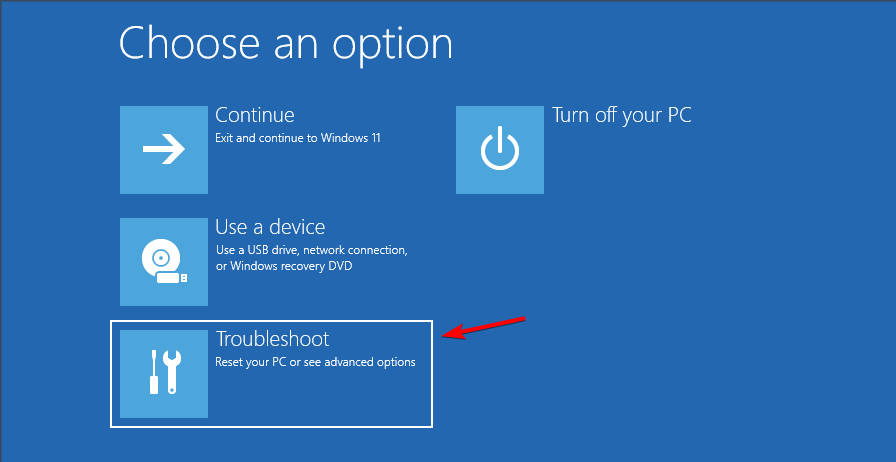
Many users are complaining that the gameplay is very different on PC from the Xbox console, and the reasons are pretty obvious. That is why not many players want to mix the two worlds together, and the PC multiplayer servers are pretty deserted.

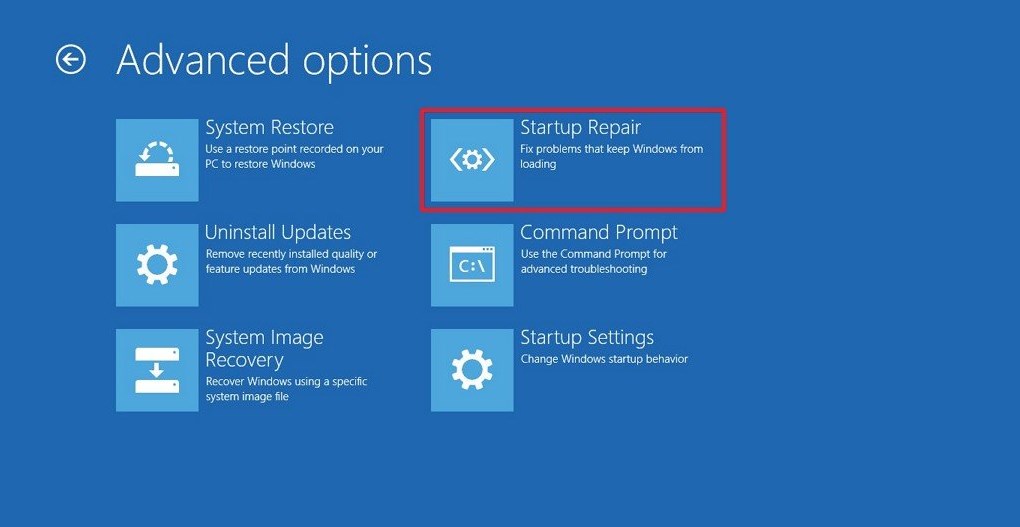
That’s all there’s to Halo 5 crossplay on Windows and Xbox, and by now, you should have a fair understanding of how it works.

Also, if you are a fan of PC games, discover some quick tips and tricks to boost Windows gaming performance.

For any other queries or to share any information we may have missed, drop a comment below.

MSI Dragon Center Not Installing: 6 Methods to Force Install

MSI Dragon Center is one of the tools preferred by gamers using computers manufactured by MSI. And it generally comes preinstalled. But, several users who either uninstalled it or didn’t receive the tool reported that MSI Dragon Center is not installing.

Other users even reported that MSI Dragon Center kept crashing and the Gaming mode is not working in MSI Dragon Center, which we have covered separately. But don’t worry! Read the following sections to find out why MSI Dragon Center is not downloading or installing and the solutions for it.

Why I can’t install MSI Dragon Center?

Here are a few reasons MSI Dragon Center is not installing in Windows:

  • Issues with the setup file: Oftentimes, the setup itself is partially downloaded, amongst other issues, leading to a failed installation.
  • Software already exists on the computer: If you already have MSI Dragon Center installed on the computer, that, too, a more recent version, another will not install.
  • Missing permissions: The software requires administrative privileges, in the absence of which, MSI Dragon Center will not work or even install.
  • Installed blocked by another application: A third-party antivirus or firewall can be blocking the installation attempt. Even if you somehow bypass that, the MSI Dragon Center Firewall error may appear.

What does MSI Dragon Center do?

MSI Dragon Center allows users to monitor the computer’s performance and optimize it. There’s also the option to control the RBG effects or use the mobile app to oversee and make the necessary modifications to the PC.

Besides, it allows users to control the fan speed, thus eliminating overheating in Windows. In all, it serves as a great optimization tool for laptops manufactured by MSI.

How do I fix MSI Dragon Center not installing?

Before we head to the slightly complex solutions, try these quick ones first:

  • Restart the computer.
  • Make sure you are installing the latest version of MSI Dragon Center. Head to the official website to verify the same.
  • Check for any pending Windows Updates and install them. Once done, verify whether MSI Dragon Center is still not installing.
  • Update the BIOS. The exact steps for it can be found on the manufacturer’s website, but we recommend you be cautious during the update and make sure there’s a steady power supply.

If these don’t work, move the fixes listed below.

1. Run the installer as an administrator

  1. Right-click on the installer, and select Run as administrator from the context menu.Run as administrator to fix msi dragon center not installing
  2. Click Yes on the UAC prompt.Click Yes
  3. Next, follow the on-screen instructions.

If you find that the MSI Dragon Center package installation is not completed, it could be due to a lack of required permissions. To fix that, just run the setup as an administrator.

2. Terminate non-critical processes

  1. Press Ctrl + Shift + Esc to open Task Manager and locate all the non-critical processes.terminate task to fix msi dragon center not installing
  2. Select them individually and click on End task.
  3. Similarly, disable the other background process background tasks as well.

Often, a conflicting background process is the reason MSI Dragon Center is not installing in Windows. So, terminate all non-critical programs, processes, and tasks and then run the setup.

3. Disable the antivirus

  1. Press Windows + S to open Search, type Windows Security, and click on the relevant search result.windows security
  2. Click on Virus & threat protection.Virus & threat protection
  3. Click on Manage settings under Virus & threat protection settings.manage settings
  4. Disable the toggle for Real-time protection.disable antivirus to fix msi dragon center not installing
  5. Click Yes in the UAC prompt.
  6. Finally, you can try running the MSI Dragon Center setup to install the software.

Another common reason why MSI Dragon Center is not installing is the antivirus. With these steps, you can disable Windows Security in case it’s the one erroneously identifying the software as a threat.

For other antiviruses, you will have to check the built-in option to find the setting to disable it. Or you could simply uninstall the app for now and get it again after the installation goes through.

4. Update the graphics driver

  1. Press Windows + X to open the Power User menu, and select Device Manager.device manager
  2. Expand Display adapters, right-click on the graphics adapter here, and select Update driver from the context menu.update driver to fix msi dragon center not installing
  3. Now, select Search automatically for drivers and let Windows install the best available one.search automatically for drivers

Running an outdated driver for the graphics adapter can lead to issues installing MSI Dragon Center, as reported by some users. So, make sure you update the graphics driver.

Remember, the Device Manager will only look for newer driver versions on the computer. So, you might have to manually install the drivers through the manufacturer’s website.

Moreover, an easier and faster solution is using a specialized driver updating tool that can help you automatically locate the latest driver options from its substantial vault.

5. Reinstall the MSI Dragon Center

  1. Press Windows + R to launch the Run command, enter appwiz.cpl in the text field, and click OK.appwiz.cpl
  2. Select the MSI Dragon Center entry, and click on Uninstall at the top.Uninstall to fix msi dragon center not installing
  3. Follow the on-screen instructions to complete the process. Similarly, uninstall the MSI SDK file.
  4. Press Windows + E to open File Explorer, paste the following path in the address bar, and hit Enter:C:\Program Files (x86)\MSIpath
  5. Click on the View menu, hover the cursor over Show, and select Hidden items.hidden items to fix msi dragon center not installing
  6. If any files appear, press Ctrl + A to select them, and then hit the Delete key.
  7. Next, go to the MSI Dragon Center’s official website, and click on the Download Now button to get the MSI Dragon Center offline package.Download now
  8. Once completed, right-click on the downloaded file (Zip format), and select Extract all.Extract all
  9. Click on Browse if you want to change the location, tick the checkbox for Show extracted files when complete, and then click Extract.Extract
  10. Double-click on the Dragon Center folder.MSI Dragon Center
  11. Launch the setup for it.Launch setup to fix msi dragon center not installing
  12. Click Yes in the UAC prompt.Click Yes
  13. Select the installation language, and click OK.select language
  14. Click on Install and wait for the process to complete.Install

If nothing listed previously has worked, completely uninstalling and then reinstalling MSI Dragon Center would be a viable solution. In case the error doesn’t go away, you can also try an effective software uninstaller to remove MSI Dragon Center in Windows 11 before reinstalling it.

6. Install MSI Center from Microsoft Store

  1. Press Windows + S, type Microsoft Store, and then click on the relevant search result.microsoft store
  2. Search for MSI Center, and click on the Get button for the software.MSI Dragon center not installing
  3. Wait for it to finish installing, and you should now be able to run MSI Center.

If MSI Dragon Center is not installing in Windows, a simple solution is to install MSI Center from the Microsoft Store. It will be an alternative when MSI Dragon Center is freezing on Windows.

MSI Center is designed to combine all the features offered by the various MSI tools into a single platform and allows users to access and configure the settings quickly.

These are all ways to fix things when MSI Dragon Center is not installing. Also, these would work if you come across the Dragon Center is found. This installation will be canceled error or the This system is not supported.

Besides, find out what to do if Gaming Mode is not working in MSI Dragon Center. If you managed to fix the problem, now you can go ahead and update BIOS using MSI Dragon Center.

Tell us which fix worked for you in the comments section below.

How to Find Large Files on Windows 11: 3 Different Ways

Large files are often stored on your hard drive and can take up a lot of space. Sometimes, you may want to find large files on your PC to free up some hard drive space or move them elsewhere. Other times, files and folders have disappeared, and you want to locate them.

Large files commonly cause slow speeds and performance issues in a PC. When you have large files on your computer, it takes longer for programs to load and for your hard drive to access the data. So, if you’ve been looking for a way to locate them, we show you several ways to find them.

How do I find large files on my PC?

1. Use File Explorer 

1.1 Use the search filter 

  1. Hit the Windows + E keys to open File Explorer.
  2. Navigate to This PC and enter the asterisk * on the search bar.
  3. Once the search is complete, click Search options to sort by size. You can now select the size of the large files you’d like to find, ranging from large to gigantic.

1.2 Use the hidden files feature

  1. Hit the Windows + E keys to open File Explorer.
  2. Click on View, select Show from the drop-down menu, and ensure the Hidden items has a checkmark next to it.
  3. Proceed to repeat the steps in 1.0 above and see if you can find more files.

You can also check out File Explorer’s comprehensive feature list and find out how to expand its functionality to make it work.

2. Use third-party tools

Most of the time, these files are located elsewhere in your computer, and they might be hidden somewhere. File finder software can help you find large files. These programs can scan your computer for all the files larger than a certain size and then list them for you.

Copernic Desktop Search is one such tool. It is a powerful program that can help you identify and locate large files on your PC. This search engine searches your entire hard drive and finds all kinds of files, including photos, videos, and documents.

⇒ Get Copernic Desktop Search

3. Use Command Prompt 

  1. Hit the Windows key, type cmd in the search bar, and click Run as administrator.cmd-run-admin-w11 unexpected kernel mode trap windows 11
  2. Type the following command prompt to specify the location you want to find the large files. You can replace the drive letter with the corresponding one for your PC where your files are stored: cd C:\
  3. Next, type the following command and hit Enter. Remember to replace size (bytes) with the size of the file you’re looking for. For instance, if you’re looking for files larger than 1GB, your command should be: forfiles /S /M * /C "cmd /c if @fsize GEQ <size (bytes)> echo @path > largefiles.txt" forfiles /S /M * /C "cmd /c if @fsize GEQ 1073741824 echo @path > LargeFilesList.txt"
  4. Windows will create a .txt file where all the large files will be listed.

Finding large files on Windows 11 can be frustrating if you don’t know where to look. Hopefully, you’ve been able to use one or more of our recommended methods above to locate them. If you’re in the same predicament but on Windows 10, we also have a similar article on how to find large files.

Also, if you want to find and get rid of duplicate files, we have amazing tools to remove duplicates. You may also find File Manager software a must-have to keep your files and folders well organized. This will help you save time as you already know where the large files will be.

Knowing how to find large files is crucial if you want to clean the C drive without formatting, so be sure to use it to free up space.

You can always sort files by size in Windows 11 if you want to find the largest file in a specific directory, and we have a special guide that tells you how to do that.

Let us know your preferred method to locate your large files in the comment section below.

Virtual Disk Service Error: The Operation Timed Out [Fix]

While using the DiskPart utility to partition a hard drive, you might run into The operation timed out error. When this error is triggered, users will be unable to create new partitions on their hard disks.

If you’re experiencing the Virtual Disk Service error, this article provides all the necessary steps to help resolve the issue.

What causes Virtual Service error: the operation timed out?

Here are some of the most common causes of the virtual disk service error in Windows computers:

  • Missing Volume.inf File – Inf files contain information used to install drivers on a PC. If the volume.inf file is missing, it can lead to disk errors such as the Virtual Disk Service error.
  • System Crash – If your system is overburdened with huge tasks, it can lead to a system crash. This can trigger a host of errors like the Virtual Disk Service error: The operation timed out.
  • Forced Shutdown – If your system unexpectedly shuts down while Windows writes registries for a newly created volume, it can lead to the Virtual Disk Service error.

Now that we know the reasons behind this error, let’s fix it by using the solutions below.

How do I fix the Virtual Disk Service error if the operation timed out?

Before tweaking the settings on your system and apps, let’s apply these quick steps:

  • Close DiskPart and restart your PC.
  • Install all pending Windows updates.

If the error persists, the solutions below should help you fix the problem quickly.

1. Use the RESCAN command

  1. Click the Search button, type in command prompt, and click on Run as administrator.
  2. Click Yes in the User Account Control window to proceed.
  3. In the command prompt window, type the following and hit Enter: DiskPart
  4. Type this and hit Enter: Rescan
  5. Relaunch the DiskPart utility.

The Rescan command is used to locate newly added discs in a computer. Running this command can help you detect changes in your disk configuration.

2. Delete any unknown devices from Device Manager

  1. Right-click the Start button and select Device Manager.
  2. In the Device Manager window, click on the Storage Volumes tab to expand it.
  3. If the option of Storage Volumes isn’t displayed, click on View and select Show Hidden Devices.
  4. In the expanded tab, locate any Unknown device, right-click on it, and select Uninstall device.
  5. Close the Device Manager window and relaunch the DiskPart utility.

When a new volume is created, it is displayed in the Device Manager. When the virtual service error occurs, the error message usually points to an unknown device.

Uninstalling them in Device Manager is one sure way to help fix the virtual service error.

3. Check if the volume.inf file is missing

  1. Press the Windows key + R, type in the following, and hit Enter: %Systemroot%\inf
  2. When you enter this command, the inf folder will open. You’ll have to check if the volume.inf file is present there.
  3. If not, press the Windows key + S, type in command prompt, right-click on the displayed app, and select Run as Administrator.
  4. In the User Account Control window, click Yes to continue.
  5. Type in the following command and hit Enter: sfc /verifyonly
  6. If you see the message problems were found after entering the above command, type the following command and press Enter: sfc /scannow
  7. Repeat the step above to open the inf folder. Once you’re in the folder, check to see if the volume.inf file is now present there.

If the volume.inf file is still missing after running the above commands, your last option is to copy the volume.inf file from a healthy computer running the same operating system version as your PC.

Alternatively, you can try automatic repair tools that can help you find healthy parts as replacements in no time for your corrupt, damaged, or missing system files.

Resolving the Virtual Disk Service error isn’t a complex task. With the steps listed above, you should be able to rid your system of the error in no time.

You may also be interested in how to fix the Virtual Disk Service: The operation failed to initialize error.

If you’ve got alternative solutions that have helped you resolve the virtual service error, you can let us know in the comments below.

Local search ads come to Microsoft Bing

Microsoft is introducing Local Search Ads for Bing, designed to help businesses build regional visibility and gain enhanced visibility in localized Bing search results.

Businesses can start leveraging local search ads today by activating location extensions and creating an account with Microsoft Advertising.

What are local search ads from Bing and how will businesses benefit from them?

Microsoft local search ads are created to empower businesses to gain increased visibility in search engine results. Individuals who use Bing to locate local businesses will be shown the local search ads, positioned in similar proximity to other search results. With these ads, companies can effectively promote their products and services to potential customers in the nearby area. The ads also provide important business information, for example, the company’s location, contact number, and hours of operation.

For businesses that depend on the patronage of customers who visit them physically, this feature is of exceptional help. With all the important information readily available, local companies can create a simpler way for potential customers to find their location and make a purchase.

You can also integrate Call Extensions into your localized ads, providing a tap-to-call function on mobile devices so users can contact your business instantaneously. Furthermore, this convenience is extended to offline users as well, who can dial your number using either their landline or mobile device. Additionally, tablet or PC users can just click your ad in the search results for a free in-browser Skype call.

To use the local ads feature, you must first create an account with Microsoft Advertising and activate location extensions.

Enabling Location Extensions will help you attract more customers and provide them with useful information. Customers will see your address, phone number, and a link to directions next to the advertisement, making it easier for them to get to your front door.

What do you think of the local search ads feature by Bing? Let us know in the comment section below.

via Search Engine Journal

Microsoft Backup Software: 5 Best to Use in 2026

In this article, we are going to look at the best backup software by Microsoft but we also have some alternative third-party software for you to consider.

The one thing to note here is that they are all different, so what you want to use will very much depend on what you want to do.

How to choose the best backup software for your needs?

It all depends on your needs so you should first think about what you want to use the software for.

If you’re just looking to back up the wedding or family photos and videos, the regular backup function or Microsoft’s OneDrive cloud storage solution might be enough.

However, for system full backup with full management control and advanced storage options, you definitely need to opt-in for a professional solution like Microsoft Azure.

Just for good measure, we added a small guide on how to use the Windows Backup tool and some bonus tools that may help you.

What are the best Microsoft backup software tools for Windows?

OneDrive – Dedicated cloud storage

OneDrive is probably the best-known backup software by Microsoft. This solution may be the best for you if you want to share files and folders, which Windows 10 Backup above can’t do.

OneDrive allows you to store all your files and folders in one location. As with many cloud storage solutions, it also allows you to work on individual files wherever you are.

This means that the old days of having to email yourself a document and remember which document is the most recent, are long gone.

You can work on a file no matter where you are, and with apps for iOS, Android, and Windows, feel free to work on the go using any mobile device you own.

Note that you may also use OneDrive to collaborate with other people. This means that multiple users can work on the same document, allowing everyone to see instant updates, and to comment on those updates as and when necessary.

As with Windows 10 Backup, OneDrive is a free service if you only need 5 GB of storage. If you need more, you will have to pay.

It is worth noting that OneDrive is not the solution you want if you are looking to backup everything all on your computer.

Let’s see some of OneDrive’s best features:

  • 5GB of free cloud storage
  • Already available installed on your system
  • Online collaboration
  • Easy to use
  • Syncs with all your Windows devices

OneDrive

This tool comes with your Windows system and ensures up to 5 GB of storage for all your files and folders.

Microsoft Azure – Professional-level backup

According to Microsoft, Microsoft Azure is an ever-expanding set of cloud services to help your organization meet your business challenges. It’s the freedom to build, manage, and deploy applications on a massive, global network using your favorite tools and frameworks.

Microsoft Azure is our first option that you can use to backup everything. In fact, Microsoft Azure provides virtualized computing over the Internet (IaaS or Infrastructure-as-a-Service).

That means everything you are doing: storage, hosting, computing, networking, is on the cloud and, to a certain extent, already backed up.

That’s not to say you don’t need to make your own backups when using Microsoft Azure.

To guard against accidentally deleting everything, the ever-more-popular ransomware, and the corruption of your data, you still need to make backups of your own.

Microsoft Azure is a natural next step if your organization is already using Microsoft products as it is a fairly seamless transition to go from onsite or server-based computing to cloud computing using Azure.

With IaaS and PaaS capabilities, and a huge range of services and features, Microsoft Azure is probably not for you if you are a one-man show or a small company.

Let’s review some of Azure’s key features:

  • Virtualized computing
  • IaaS and PaaS capabilities
  • Perfect for businesses
  • Back-up all your processes, not only the data
  • Great integration with the Windows environment

Microsoft Azure

Azure is not just a cloud backup solution but a very reliable virtualized computing platform.
Free trial Visit website

What are the best alternatives to Microsoft backup?

As you can see, Microsoft is offering some very good options to back up your files, system, or other data, both free and paid.

However, we also included some of the best backup software as alternatives so you can definitely find the right solution for your needs.

1. Paragon Backup & Recovery – Quick automatic backups

While all the above have their advantages and disadvantages, when it comes to fully protecting your data, there is no easy-to-use option that covers everything you need.

If that is what you are looking for, Paragon Backup & Recovery is worth considering. It is not developed by Microsoft but it’s perhaps the best backup tool to use on Windows 10.

This tool will protect your data and PC safe from crashes, hard drive failures, and system errors after program updates, to even more worrying threats such as viruses and ransomware.

On top of all that, the software is available as a free trial so you can test it before committing to purchase.

All you need to do with Paragon Backup & Recovery is download the software, and then follow the instructions. You can back up hard drives, partitions, folders, and files with a few clicks of a button.

But even better, you can back up your entire Windows system, which will allow you to recover everything, even in the event that your OS will not work.

There are a couple of extra things you need to do to back up your Windows system, but it is still not difficult to do.

Let’s go through some of its most important features:

  • Set automated back-ups quickly
  • Select different parameters like backup type, frequency/scheduling, retention, and more
  • Automatically delete old backup images based on specified value
  • Manage your backups and recover what you need
  • Backup files, folders, disks, OS, restore from file and point 
Paragon Backup & Recovery

Paragon Backup & Recovery

Use this professional software to protect all your data from hard drive failures and system errors.
Free trial Visit website

2. Acronis Cyber Protect Home Office – Very easy to use

If you’re interested in full control over the backup operation, then you can’t pass on the opportunity to give Acronis Cyber Protect Home Office (formerly known as Acronis True Image) a try.

It’s a complex data backup software solution, ideal for experienced experts but also for casual ones, thanks to its very modern and friendly interface.

The software has advanced backup settings, but it also provides extra security tools, like safely running tests on your computer without worrying about data corruption or malware.

It actually enables you to back up exactly what you want, from full system images to some important files, and then store them locally or to the Acronis cloud.

In fact, you can even perform cloud-to-cloud backups of your Microsoft 365 account, with all the emails and attachments from the Outlook mailbox and the files in your OneDrive.

And if for some reason, you need to interrupt a backup process, don’t worry because it will resume from where it stopped without any file loss or duplication.

When you run out of space, the backup cleanup dedicated utility will help you review the backup files and select the ones you don’t need for deletion.

Take a look at some of its best features:

  • Full control over the back-up process
  • Incremental and differential backups
  • Microsoft 365 backup
  • Advanced security features
  • Friendly and comprehensive interface
Acronis Cyber Protect Home Office

Acronis Cyber Protect Home Office

With full Microsoft 365 and cloud-to-cloud backup, this tool is one of the best whether you are a pro or not.
Free trial Visit website

3. AOMEI Backupper – Great for unexperienced users

Designed for Windows PCs (even Windows 11) and Servers, AOMEI Backupper will keep OS and files on your machines safe and will retrieve them in catastrophic situations.

This solution is embedded with backup, restore, and cloning features and that makes it a professional Windows backup software.

In case of system crashes and other problems, you can quickly and easily restore your system to its normal state.

It’s also possible to use it to deploy system images to dissimilar hardware and the cloning features of AOMEI Backupper help a lot in migrating the OS or upgrading the hard drive for a successful boot.

You will benefit from multiple choices to use as backup storage, from local resources to external drives, flash drives, NAS, network share, and cloud storage.

There are automated backup modes available and a dedicated Scheme feature will automatically delete old backups.

The tool is sufficiently complex for professionals but can also cater to the needs of every user with a simple and intuitive interface that allows you to perform any action with just a few clicks.

Let’s review some of its key features:

  • Full, differential and incremental backups available
  • Easy OS and data transfer
  • Flexible data recovery
  • Automated scheduled backups
  • Simple and intuitive interface
AOMEI Backupper

AOMEI Backupper

Use this complete solution to back up and protect your system, server, and data with multiple storage options.
Free trial Visit website

How can I use Windows 10 Backup?

If you are looking for the simplest solution to back up your files, Windows 10 Backup is the right one for you. It’s also the easiest to set up.

One of the most obvious advantages of using this is that it is completely free. All you need is an external hard drive or even a USB thumb drive, and you are ready to go.

Here’s how you can use this tool to perform a backup:

  1. Click the Start button and select the Settings option.
  2. Now, choose Update & Security.
  3. Next, select Backup from the left pane and make sure that Back up using File History is turned ON. You will also notice that if you’re using OneDrive, it will show up as a backup option.
  4. If you want to set up what files to back-up, click on More options (the action will take a little bit of time as the system is actually checking the files and folders).
  5. Here, you will be able to perform a back up immediately, set the back up interval, how long to keep the backups and what folders you want to store.
  6. And if you scroll down, you can also exclude some folders or stop using OneDrive if you want to choose an alternative.

Please note that like OneDrive below, this option will not allow you to restore your entire hard drive but just some folders.

With that being said, consider your needs first and try to match them with the software from our list.

As with all software, what is best for you is entirely subjective. Think about what you can use easily and quickly, with little to no training required, and that is probably the best option for you.

If you need something less complex and far less costly, check out our guide on how to backup apps data in Windows 10 for a range of software that will meet your needs.

For any other questions or if you want to suggest other tools, tell us all about them in the comments section below.

Xbox Series S Toaster: real or just an early April Fools’ joke?

No doubt you’ve seen the Xbox Series X mini fridge—the appliance inspired by Microsoft’s ninth-generation gaming console. The ironically hot item (it initially sold out within minutes of going on sale) is basically a super-sized replica of the Xbox Series X gaming machine, with all the functionality you’d find in any other mini-fridge. We couldn’t think of a cooler way (no pun intended) to keep your beverages nice and cold while getting your game on.

In fact, a YouTuber even made a full-size, working Xbox Series X refrigerator for his YouTube channel.

It looks like the popularity of this novelty appliance isn’t lost on Microsoft, at least if the latest rumors are to be believed. “Leaked” images of an Xbox Series S toaster have been making the rounds online. Originally “leaked” by Twitter user @GyoJvfr the images are supposedly from a pre-order promotion.

If this rumored fully-licensed product is real, then it appears it will retail for $63.66/ £53/ AUS$94.61/ €60.  Believe it or not, this would not be the first console toaster. That distinction would go to the Nintoaster, which was a modified appliance that could play NES cartridges that loaded into the toaster’s slots.

While the purported price of $63.66 USD may seem steep for a toaster, if Microsoft were to bring Xbox Cloud Gaming to this thing, they might just have winner here.

Via Pure Xbox. 

Featured image via Game Hub. 

5 steps to earn free Robux with Microsoft Rewards and Edge right now

Microsoft Rewards and Edge are two powerful tools that can help you earn free Robux, the virtual currency used in the online gaming platform Roblox. By following a few simple steps, you can start earning free Robux with Microsoft Rewards without spending any money. There’s a special offer available for Microsoft Rewards members where you can get 100 free Robux. In this guide, we will walk you through how to earn free Robux with Microsoft Rewards and Edge.

#1: Earn free Robux with Microsoft Rewards

free robux with microsoft rewards

The first step in earning free Robux with Microsoft Rewards is to sign up for the program. Microsoft Rewards is a free program that allows you to earn points by searching with Bing using the Edge browser, completing quizzes, and other activities. Once you earn enough points, you can redeem them for free Robux. To sign up for Microsoft Rewards, go to the Microsoft Rewards website and click on the Join now button. You will need a Microsoft account to sign up for the program.

#2: Download and use Microsoft Edge

free robux with microsoft rewards
Download Edge via QR code

Microsoft Rewards offers bonus points for using Microsoft’s Edge browser for all of your web browsing needs. So, make sure that you set your default browser to Edge on your desktop, Android, and iOS devices to earn more points that you can use to redeem for free Robux with Microsoft Rewards.

#3: Complete daily quizzes and offers

free robux with microsoft rewards

One of the easiest ways to earn points with Microsoft Rewards is by completing daily and weekly quizzes. These quizzes cover a wide range of topics, from pop culture to science and technology, and are designed to be fun and informative. You can always check your points breakdown to see how many Microsoft Rewards points you can earn daily. You can earn up to 150 points daily, 5 points per search on PC. If you only use only Microsoft’s Edge browser, you can earn an addition 600 points for free each month (20 points daily) when you search Bing using Microsoft Edge exclusively.Make sure you complete these quizzes and offers every day to maximize your points and earn free Robux; it only takes 1,500 in Microsoft Rewards points to get 100 Robux for free.

#4: Search the web with Bing

Another great way to earn points with Microsoft Rewards is by searching the web with Bing. By using Bing instead of other search engines, you can earn points for every search you make, up to a maximum of 100 points per day on mobile devices. To start earning points with Bing, simply visit the Bing website and start searching. You can also download the Microsoft Rewards extension to make it even easier to earn points.

#5: Redeem your points for free Robux

free robux with microsoft rewards

Once you have accumulated enough points, you can redeem them for free Robux. To do this, simply log in to your Microsoft Rewards account and click on the Redeem tab. You can use the search box to search for the item you want. Click REDEEM REWARD and you can select the amount of Robux you want to redeem and complete the transaction.

Earning free Robux with Microsoft Rewards and Edge is easy and can be done right now. Sign up for Microsoft Rewards, use Microsoft Edge, complete daily quizzes and offers, search the web with Bing, redeem points for free Robux and refer your friends and family to sign up for Microsoft Rewards to earn even more points! With a little effort and dedication, you can accumulate enough points to redeem for free Robux and enjoy all the perks that come with being a Roblox player. Happy earning!

Teams becomes user-friendly for people with hearing impairment

On March 6, Microsoft announced the availability of a new feature in Microsoft Teams meetings dubbed Closed Captions in PowerPoint Live. The feature is specifically designed to promote the inclusivity of users with hearing impairment by allowing them “to better understand the auditory content being shared”.

The feature will also come in handy in case you are joining the meeting while in a noisy space, have a problem processing auditory information, or if you’re not conversant with the language being used to communicate in the meeting.

thumbnail image 1 captioned Closed captions in PowerPoint Live

You can easily catch up with the information being passed on during the meeting by enabling the closed captions feature. It should be noted that the video must also feature a closed captions file.

According to Microsoft:

PowerPoint users who are looking to create accessible presentations can easily add closed captions to any embedded PowerPoint video directly from within PowerPoint for Windows and macOS.

What’s more, once you’ve enabled this feature, the video closed captions will pop up at the bottom of the slide. The feature is individual-specific, this means if you have it enabled it will only be available for you and won’t affect other attendees.

In related news, Teams’ Schedule send suggestions feature also hit broad availability to further enhance communication, especially for users that work asynchronously across different time zones.

Error Code 50058: What is it & How to Fix it

When the Office credentials are wrong or corrupted, you will encounter an error code 50058 with Microsoft Office 365 and MS Outlook. Several users have reported facing the error code 50058 and are looking for solutions to fix the issue.

In this guide, we will give you a bunch of solutions that will help you resolve the error code 50058. We will also explain to you what are the leading causes of the issue so that you can ideally troubleshoot it faster if it occurs again. Let us get right into it.

Why am I getting the error code 50058?

Here are some of the most common reasons as well as the official reasons, given by Microsoft because of which you will face the error code 50058.

  • You are not using the correct ID: Chances are you are not signed into Outlook with the same ID as Microsoft Office 365 or vice versa.
  • The SSO is not valid or corrupted: If you have set SSO (Single Sign In) and if it is not valid or corrupted, you will get error code 50058.
  • Your Windows profile is corrupt: If an employee used the Office application before, then if they leave the organization, their profile could get corrupt and thus cause the issue.
  • The password has expired: When your account has limited time access then your account might get terminated after a certain amount of time when entering an expired password.

How can fix the error code 50058?

1. Fix using the Credentials Manager

  1. Open the Start menu by pressing the Win key.
  2. Type Credentials Manager and open it.
  3. Click on Windows Credentials.
  4. Locate Office items.
  5. Click on the drop-down icon next to the Office item.
  6. You will see the username and password in encrypted form.
  7. Click Edit.
  8. Re-enter the Office 365 credentials.
  9. Restart your PC.
  10. Launch Office 365 or Outlook and check if this resolves the issue or not.

The Credentials Manager stores the password to allow users to access their accounts without the need to log in every time they access the application.

In case you have recently changed the password or your account has been audited, then some information that is changed will cause issues and ultimately throw errors such as error code 50058.

2. Create a new user account

  1. Open the Settings menu by pressing the Win + I keys.
  2. Click on Accounts.
  3. Click on Other users.
  4. Select Add account.
  5. Enter the email or phone.
  6. Click Next.
  7. Hit Finish as your Microsoft Account is good to go.
  8. Log out of the current account.
  9. Login to your PC using a new account.
  10. Try login into your Outlook or Microsoft 365 apps using the Office account and check if this fixes the issue or not.

Often the issues associated with your local account can cause issues with your Office account. Try creating a new account and logging in to your Office account and check if this fixes the error code 50058 or not.

3. Log out of all your SSO tools

If you are using an SSO or Single Sign On tools such as Azure or ManageEngine Identity Manager Plus, then we would recommend you log out of all the SSO tools and sign back in.

This solution works because an issue with the associated program could trigger the error code 50058. Frequent sign-in prompts or error codes are also the results of such problems.

That is it from us in this guide. To fix error code 135011 Your organization has disabled this device, you can check out our guide.

Besides, there are a bunch of other issues related to Microsoft Office 365. We have compiled a bunch of solutions for commonly known issues.

Is Office 365 slowing down your PC? If so, then you can check out our guide which lists some of the best solutions to fix the issue.

Several users have reported facing an error message We’ve run into a problem with your Microsoft 365 subscription. You can check out the solutions in our guide to resolve the problem.

Feel free to let us know in the comments below, which one of the above solutions resolved the error code 50058 or not.

Microsoft Teams Profile Picture Not Showing: 5 Quick Ways to Fix

For some users, the Microsoft Teams profile picture does not show and your account may appear as an unknown user or just initials. This issue is usually caused by a corrupted Teams cache, but it may also be due to some app bugs. Here’s how to fix it quickly.

What can I do if Microsoft Teams is not showing profile picture?

1. Clear Microsoft Teams cache

  1. Press the Win + R keys to open the Run dialogue.
  2. Type %appdata%\Microsoft\Teams and press Enter.
  3. Press Ctrl + A to select all Folders.
  4. Press the Delete button.
  5. Restart your PC.
  6. Launch Microsoft Teams and check if your profile picture is showing or not.

Several users face the issue of Microsoft Teams not showing their profile picture. However, most of them resolved the problem by clearing the app cache and relaunching the app.

2. Disable GPU Hardware Acceleration

  1. Launch Microsoft Teams.
  2. Click on the 3-dot menu.
  3. Select Settings.
  4. Open the General menu.
  5. Check the box for Disable GPU hardware acceleration.
  6. Restart Microsoft Teams and check if the profile picture shows up or not.

Often, the GPU acceleration can malfunction, and the things it should force to perform well do not function as expected.

In such a case, we advise you to disable the GPU acceleration and check whether this resolves the issue.

3. Update Microsoft Teams

  1. Launch Microsoft Teams.
  2. Click on the 3-dot menu icon at the top-right.
  3. Select Check for updates.
  4. If a new update is available, Teams will prompt you to install it.

Often new updates bring new changes and features, but they also get bug fixes for several issues existing in the previous version of the app.

It is always better to keep the version of the app you are using up to date to ensure that such petty issues don’t come your way.

4. Reinstall Microsoft Teams

  1. Press the Win key to open the Start menu.
  2. Locate the Microsoft Teams app.
  3. Right-click on Microsoft Teams and select Uninstall.
  4. Visit the official website.
  5. Download Microsoft Teams on your PC.
  6. Launch the EXE files and let the installer load them.

Chances are that some files did not get installed during the previous installation, which is why Microsoft Teams is not showing the profile picture. You can uninstall and reinstall the program and check if this resolves the issue.

5. Use Microsoft Teams web

If you are experiencing the issue on the Microsoft Teams desktop app, you can try using the Microsoft Teams web app. You can change your Microsoft 365 profile picture and wait for it to reflect on your Teams account.

Chances are that the current version of the Teams app is faulty, which is why the profile picture isn’t showing up. Microsoft Teams on the web is free from such bugs, and the bugs are mostly related to the browser.

Why is the Microsoft Teams profile picture not showing?

After some digging, we found the common reasons why the Microsoft Teams platform does not show your profile picture.

  • The Microsoft Teams cache is corrupt: Chances are the profile image cache that Microsoft Teams locally stores on your PC are corrupt and causing the issue.
  • Microsoft Teams is having some issues: Also, chances are during your current session, some critical files failed to load, ultimately causing the Microsoft Teams profile picture not showing problem.
  • The Profile Picture cache has passed its 60 days deadline: Officially, as per Microsoft Teams, some data, such as display name and telephone number, can be cached for up to 28 days in the client. Profile photos can be cached up to 60 days.
  • There is some bug in the current version: Because of a bug, Microsoft Teams can often fail to function correctly, thus causing the problem.

That is it from us in this guide. If you are getting a Caa70007 error with Microsoft Teams, check out our dedicated guide to fix the problem.

We also have a guide that lists some solutions to recover deleted chats in Microsoft Teams. Several users encounter an issue where Team asks them to sign in every time.

Did you know that you can integrate and enable ChatGPT in Microsoft Teams? If not, you can refer to our guide and allow the functionality.

Feel free to let us know in the comments below which one of the above solutions helped you resolve the Microsoft Teams not showing profile picture issue.

4 Ways to Remove Weather From Taskbar on Windows 10

It is always good to have some information about the weather and the latest happenings in your region to know what to do and what not.

However, Microsoft’s Windows 10 handles the weather and news widgets differently and shows on the taskbar at the bottom. During some like the placement, some find it eating up the space.

In this guide, we will show you how you can remove weather from the taskbar on Windows 10. Here, we will explain 4 different ways to remove the weather and news from the taskbar. So let us get right into it.

How to get News and Interests widget in Windows 10?

With Windows 10, Microsoft introduced News and Weather information as a News and Interests widget.

It showed automatically on the taskbar. The widget showed the current temperature for your location, the weather forecast, and the news around your location.

You can easily enable it by following the below steps.

  1. Right-click on the taskbar.
  2. Select News and interests and click on the Show icon and text.
  3. The weather widget will show up on the taskbar.

Now, let us check out the different ways to remove weather from the taskbar on Windows 10.

How to remove weather from the taskbar Windows 10?

1. Remove from the taskbar

  1. Right-click on the taskbar.
  2. Select News and interest and click on Turn off.
  3. The widget will be removed from your taskbar.

This is the most basic way to remove weather from the taskbar on Windows 10. However, there are a few other ways as well.

2. Remove from Registry Editor

  1. Press the Win + R keys to open the Registry Editor.
  2. Type regedit and press Enter.
  3. Navigate to the below path. HKEY_CURRENT_USER\Software\Microsoft\Windows\CurrentVersion\Feeds
  4. Double-click on the ShellFeedsTaskbarViewMode entry on the right side.
  5. In the Value data field, type 2.
  6. In the Base, select Hexadecimal.
  7. Click OK to save the changes.
  8. Close the Registry Editor.
  9. Restart your PC.

Once you restart your PC, you won’t see the weather widget on the taskbar.

3. Remove using Group Policy Editor

  1. Press the Win + R keys to open the Run dialogue.
  2. Type gpedit.msc and press Enter.
  3. Click on Administrative Templates.
  4. Expand Windows Components.
  5. Double-click on News and Interests on the right.
  6. Right-click on Enable news and interests on the taskbar and select Edit.
  7. Click Disabled.
  8. Click Apply and OK.

4. Show icon only

  1. Right-click on the taskbar.
  2. Select News and interest and click on the Show icon only.
  3. The widget will be removed, and only the icon will appear on your taskbar.

This method helps you keep a tap on the news and weather without eating up a lot of space on the taskbar on your Windows 10 PC.

That is it from us in this guide. You should check out our guide if you are looking for ways to enable the network icon on the Windows 10 taskbar.

Several users have reported that the File Explorer icon is missing from their Windows 10 Start menu. This can be easily fixed by the solutions mentioned in our guide.

For users who want to customize their Windows 10 PC, we have a guide explaining how to change the boot logo on Windows 10 with easy steps.

Feel free to let us know in the comments below which one of the above methods you used to remove weather from the taskbar on Windows 10.

Printer not Printing Full Page: 4 Ways to Print Entire Page

Your printer is capable of printing single-page or multi-page documents, but many users reported that the printer is not printing the full page.

While this issue can be frustrating, it is not the most difficult to fix, just like the printer not printing all pages issue. This guide will show you quick ways to get your printer working normally in no time.

Why is my HP printer not printing the full page?

Listed below are some of the reasons your printer might not print the entire page:

  • Outdated printer software: If your HP or Canon printer is not printing everything on the page. It might be because of issues with your printer software. You can fix this by uninstalling the software and reinstalling it.
  • Outdated firmware: This problem is sometimes down to outdated firmware. Downloading the latest version of the firmware from the manufacturer’s website should do the trick here.

It is important to note that the above causes are not limited to HP printers only. They are the general causes of this issue on other brands.

Where does this error occur, and what can I expect?

  • All major manufacturers are impacted (HP/ Canon/Epson/Brother/Ricoh/Xerox printer not printing everything on page).
  • Only specific page sections were impacted (Printer not printing the middle of the page/printer only printing the middle of the page/half the page, etc.).
  • Only specific formats or specific printing sizes were impacted (Printer not printing A4/all text/entire image).
  • Thermal printers are not printing a full page.

If your printer is also having these issues, here are a couple of troubleshooting tips to resolve this problem.

What can I do if the printer is not printing the full page?

1. Reinstall the printer software

  1. Press the Windows key + R, type appwiz.cpl, and click OK.
    appwiz.cpl printer not printing full page
  2. Right-click your printer software and select Uninstall.
    uninstall
  3. Now, follow the onscreen instructions to complete the process.
  4. Finally, go to the manufacturer’s website to download the latest software.

If your Canon or Epson printer is not printing the entire page, it can be due to faulty printer software. Uninstalling and reinstalling the software should clear up the glitches causing it.

Also, the problem can be due to an outdated printer driver sometimes. To fix this, we recommend using a dedicated driver updater tool to complete the job.

Outbyte Driver Updater

Install the printer driver in just a few seconds automatically and continue printing with this tool.
Free trial Download now

2. Restart the Printer

  1. Turn the printer off and disconnect the power cord.
  2. Unplug the power cord from the power outlet and wait for 60 seconds.
  3. Now, plug the printer again and restart it.

Sometimes, this problem might be due to minor issues with your printer. The best thing to do here is to restart your printer; things should be expected.

3. Check the Printer Preferences

  1. Press the Windows key, type printer, and click on Printers and scanners.
    printers and scanners
  2. Select your printer and click the Manage button.
    manage  printer not printing full page
  3. Now, choose Printing Preferences under Manage your Device.
    preferences
  4. Select the Paper or Paper/Quality tab.
  5. In the Type or Paper Type field, make sure that Plain Paper is selected.
  6. Next, click the Print Quality field and set it to Draft or Normal, or click on the Graphics tab and select Standard for Quality.
  7. Finally, click OK to save the changes.

Sometimes, the printer not printing full page issues can be due to wrong settings. You must follow the steps above to make the necessary changes to get your printer to work normally again.

4. Update the printer firmware

Another effective solution to this problem is to update your printer’s firmware. And the manufacturer’s official website is the best place to download the latest version.

Thankfully, most firmware is easy to install with simple onscreen instructions.

We have reached the end of this comprehensive guide. However, if you follow the steps above carefully, your printer should print the full page of your document. Alternatively, you can tweak your printer settings to adjust paper sizing for custom prints.

If your printer is not printing the actual size, check our detailed guide to solve the problem.

Feel free to let us know the solution that helped you fix this issue in the comments below.

File History Doesn’t Recognize This Drive: How to Fix It

File History is a valid Windows tool that allows you to back up your files on another drive and helps you to restore them whenever necessary.

If you are facing the file history doesn’t recognize this drive error, this guide can help! We will discuss some of the tested ways to fix the issue after talking about the causes of the problem. Let’s start!

What causes the file history doesn’t recognize this drive error?

There could be various reasons why the file history is not able to recognize the drive; some of the common ones are: 

  • File History is disabled – If you have mistakenly disabled the File History option, you won’t be able to find the drive. 
  • External drive damaged – If the drive connected or configured is damaged, then File History won’t be able to find the drive. 
  • Improper connection – If the drive connection is incorrect or the USB port is not working, you might get the File History failure to identify the drive error. 
  • Old File History backups – If you have old File History backups in your drive, then it could make your drive unidentifiable. You may get the there are no previous versions available error.
  • File indexing disabled – If File indexing is disabled, then you might get this File History error. To fix it, make sure file indexing is enabled.

How can I fix the file history that doesn’t recognize this drive error?

Before moving into the actual troubleshooting steps, make sure you go through these preliminary checks: 

  • Restart your computer. 
  • Use a different USB port.

1. Check if File History is enabled

  1. Press the Windows key, type Control Panel, and click Open. CP
  2. Navigate to System and Security.Category and System & Security -file history doesn't recognize this drive
  3. Under File History, select Save backup copies of your files with File History. File history 1 file history doesn't recognize this drive
  4. Under Keep a history of your files, click Turn on. History off

2. Reconnect your USB drive

  1. Unplug the USB and plug it into another port. Next, go to File History, and click Advanced Settings.Advanced Settings 1
  2. Scroll through the options and select Stop using this drive.
  3. Click Select drive.
  4. Choose the drive and click OK.Select Drive file history doesn't recognize this drive windows 11

3. Select another drive

  1. Go to File History and click Select another drive.Another drive file history doesn't recognize this drive
  2. Select the drive you want to use and click OK. Select Drive 1

4. Enable the File History service

  1. Press Windows + R to open the Run console.Services Run Command
  2. Type services.msc and press Enter to open Services.
  3. Locate and double-click the File History Service to open Properties.
  4. For Startup type, select Automatic; for Service status, choose Start.Services start -file history doesn't recognize this drive
  5. Click Apply and OK.
  6. Go to the Windows Search service and follow the same to Start the service.Windows search

5. Delete the File History configuration folder

  1. Press Windows + E to open File Explorer. Click View and select Hidden items.Hidden items
  2. Follow this path: C:\Users\[username]\AppData\Local\Microsoft\Windows\FileHistory\Configuration\Config
  3. Delete this file and check if the File History is fixed.

So, you can follow these steps to fix the file history that doesn’t recognize this drive error. Try them and let us know what worked in the comments section below.

Stop Steam From Opening on Startup: 5 Ways to do it

Many users wonder how to stop Steam from opening on startup simply because it can be annoying to close it manually every time. Steam is set to start automatically in the settings and Task Manager, but sometimes, bugs can also force the app to start automatically.

Before we start fixing the issue, update the Steam client to the latest version to ensure a bug isn’t causing this issue and try joining the beta client participation. You can do that from the Interface settings in Steam.

How can I stop Steam from running on startup?

1. From within Steam’s interface

  1. 1. Press on the Windows key, type Steam in the search box, then click on the first result to open the app.

    open steam from search box
  2. 2. From the top-left corner of the window, click on Steam.

    navigate to steam settings
  3. 3. Go to Settings.

    navigate to settings menu
  4. 4. From the left window pane, navigate to the Interface tab.

    interface tab steam
  5. 5. Uncheck the box that says Run Steam when my computer starts.

  6. 7. Click on OK to save the changes.

  7. If you are looking to stop Steam from auto-starting when you turn on your PC, you should first try to do this via the app’s built-in Settings. From there, you can enable or disable the feature in a few clicks.

2. Disable Steam’s auto-startup from the Task Manager

  1. Use the following keyboard shortcut to open Task Manager: Ctrl + Alt + Del.
  2. Select Task Manager.
  3. Go to the Startup tab.
  4. Click on the Steam client, then select Disable.

You can disable this service via Task Manager if you want to block Steam from starting when your computer boots.

3. Change the startup page to Library

  1. In Steam, go to Settings.
  2. Next, navigate to Interface.
  3. Set Favorite window to Library.

4. Modify the launch parameters

  1. Press Windows key + R and enter shell:startup.
  2. Locate the Steam shortcut, right-click it and choose Properties.
  3. Next, in the Target field add -silent after the quotes.
  4. Click Apply and OK to save changes.

5. Reinstall the app

  1. Use the following keyboard shortcut: Ctrl + R.
  2. Type in control.exe in the box, then press the Enter key.
  3. Select Uninstall a program.
  4. In the shown list, locate Steam, click on it, then select Uninstall.
  5. Now, go to the Steam download page.
  6. From the top-right corner of the window, click on Install Steam.
  7. Follow the on-screen instructions to reinstall Steam.

These are the best solutions to try if you want to stop Steam from opening on startup. So, apply them, and the app should stop auto-starting.

If Steam VR opens by itself on your PC, check our detailed guide to stop it from starting automatically. We also have a great guide on how to remove startup programs on Windows, so don’t miss it.

Feel free to let us know the solution that helped you fix this issue in the comments below.

Can’t set word wrap as default on Notepad: How to fix it

Microsoft launched the long-awaited 2H22 update for Windows 11, bringing a lot of new features and nice improvements to life. Dubbed ‘Moment 2,’ Redmond officials revamps the volume mixer option after a few months of sitting on hidden, search on taskbar functionality, and more. 

One of the recent changes that were spotted is the tab feature on Notepad. While it had been rumored for months since December 2022, the update is finally here. Now, you can open a new tab on the app without having to open a new window. 

Some people are happy with this addition, but several users have reported that the update also came with its flaws. As noted by user u/nton27, plenty of other features have gone missing. There were situations where you could not set word wrap off as default, names of opened files aren’t visible when switching between windows with the Alt + Tab shortcut, new Notepad windows appear in no-fixed place, etc.

With that being said, some users are reportedly unhappy with this change and want to go back to the previous version.

In this article, we’ll talk more about how to set word wrap as default, and how to use the old version of Notepad, if the latest version is still not up to your satisfaction.

How to set word wrap as the default

1. With your Notepad app open, go to View ➜ Word wrap.

How to use the old version of Notepad

1. Open File Explorer then go to C.

2. Go to Windows.old.

3. Go to WINDOWS.

3. Scroll down then click on Notepad.

4. Ignore the pop-up that says A new version of Notepad is available. Click X to dismiss.

It’s a weird issue indeed, considering that word wrap is always turned on by default. Nevertheless, we’ve already explained to you a few workarounds you can try to use, should you encounter this problem again.

What do you think about this bug? Let us know if you have any questions!

Driver Backup Software: 9 Best We Tested in 2026

If you’re a Windows PC user, you can take extra measures to protect your data and keep your drivers safe as well.

This can be done using the best Windows driver backup software that not only keeps your drivers tucked away in a good place but safeguards the files and installers of the drivers.

What driver backup software should I use?

There are a variety of commonly used cloud-based driver backup solutions in the form of apps, but you can also find other backup tools pretty useful such as those we’ll discuss in this article.

It is important to back up your drivers as you need a copy of your drivers so as not to lose data, or not have installation for your drivers, which affects your computer’s performance.

For better results, always keep your drivers updated (you can turn on automatic updates), and look for added features in the tools below.

You can also take a copy of third-party drivers and be keen on 32-bit and 64-bit updates – don’t confuse the two.

Check out our top favorites for Windows driver backup software.

What’s the best driver backup software to get?

Outbyte Driver Updater – Best for driver update and repair

Backing up your drivers is an excellent way of making sure you have something to roll back to if an update goes wrong. That is why Outbyte Driver Updater takes the top spot on our list, as it both updates your drivers, and keeps the old versions in case something bad happens.

The program is extremely lightweight to the point where it is actually portable and does not require any setup process. More so, the interface is extremely minimalist and modern, so navigating around it is no problem at all.

As for the update process per se, simply launch the program and it will begin scanning your system automatically. Once that is done, you get to choose which drivers to install, update, or repair.

The driver backup feature is something that you can turn on and off from the Settings menu, but it is mostly recommended that you keep it turned on.

All in all, Outbyte Driver Updater is your go-to solution for installing, updating, or repairing broken drivers.

Here are some of the perks of using Outbyte Driver Updater:

  • Comes with an immense library of drivers
  • Performs system scans automatically
  • Installs, repairs, and updates drivers
  • Completely portable
  • Easy-to-use

Outbyte Driver Updater

Update and back up your drivers with the help of this very simplistic PC utility.
Free Trial Download now

Acronis Cyber Protect Home Office – Great backup & protection

High on our list is Acronis Cyber Protect Home Office (formerly True Image), a complete cyber protection solution from Acronis.

Combining reliable backup with anti-malware technology, the software safeguards all of your data, apps, and systems.

The threats are more and more complex, so you need to stay updated with the latest protection solutions.

Acronis Cyber Protect Home Office promises over 100 new enhancements and features and among those, we mention first the Automated Dual Protection.

That means that the software automatically performs local and in-cloud backup so you’ve always got a secure off-site copy for recovery.

You also get a Tray Notification Center. Messages are pushed to your desktop tray and that will help you to monitor the status of backups.

Here are some great advantages of using this tool:

  • Easy to use
  • Backup on select Wi-Fi of your choice
  • Improved cloud restores for easier navigation
  • Fast cloud backups (13x faster than the competition)
  • Cloud-to-cloud Office 365 backups

Acronis Cyber Protect Home Office

This software is a very efficient backup software that also helps you protect your data.
Free trial Visit Website

Driver Fusion – Simple to use

Another reliable choice is Driver Fusion, one of those tools that prove how your driver’s health has a major impact on your entire PC functionality.

This is a comprehensive tool that quickly updates your computer; do note that its automatic driver updater ensures you always receive the latest drivers.

Not only does it do so with ease, but it also restores or even installs drivers at your convenience.

You’ve got an extensive driver database to pick the drivers you like – it includes more than ten million drivers at the moment and the numbers are growing.

Key features that Driver Fusion brings to the table:

  • Convenient Scheduler to automatically identify issues
  • Automatic updates
  • Extended manufacturer compatibility
  • Device monitor and Device Control features
  • Extensive reports for every driver installed in your PC

Driver Fusion

Driver Fusion is an optimum solution for performing Windows drive backups and updates.

Paragon Software – Good for driver backup

This Windows driver backup software offers a free solution with professional functions to back up your drivers, by creating backups of individual files, partitions, or the whole operating system in a few seconds.

And this is while giving you flexible restoration in worst-case scenarios.

It is reliable, flexible, and easy to use, keeping your PC and data safe from eventualities like defective hard disks, sudden system errors, PC viruses, and other threats affecting your data.

Paragon’s intuitive interface is easy to use and understand, with the simple set and run, and backup planning which is done once, and the rest is executed automatically.

It is a comprehensive and robust backup and recovery app that allows you to carry out incremental backups on your drivers, external storage, disks, or hidden partitions.

It also comes in handy to prevent data loss and avoid program reconfiguration in the event of a system failure.

Features include disk backup, differential backup, incremental backup, backup for jobs, flexible restoration, and the WinPE-based recovery environment.

This will create a full-fledged Windows-based recovery environment and store it in bootable media.

⇒ Get Paragon software

DriverMax – Automatic driver updates

This Windows driver backup software is a great solution for backing up your drivers while downloading the updated versions of the same drivers, simultaneously.

With a collection of more than two million drivers of NVidia, Microsoft, Intel, and many others, you can be sure it will be compatible with any version of Windows currently in use, plus you get automatic driver updates.

It comes in a free or paid version.

The latter goes for about $10 annually, and you will enjoy features such as a wide range of compatible drivers and added security for safe driver backup.

You will also benefit from automatic updates, a system productivity boost with timely updates, and unlimited download features (PRO version).

The benefits of using DriverMax include driver updates that are easily automated and restored for more than 2.3 million devices, scheduled scanning, and full device driver backups any day or week or even month.

Your PC will also experience increased productivity as it reduces system freezes and malfunctions while serving the latest and best updates.

For maximum security for your updates, DriverMax tests each new driver automatically prior to installation, to ensure it functions properly.

It also backs up current drivers and creates a system restore point so you can roll back the installation quickly.

⇒ Get DriverMax

Driver Magician – Quick driver update

This is an all-in-one Windows driver backup software that is compatible with all functioning and leading Windows versions.

It has automatic updates, driver detection, installer cloning, and back up for essential documents, plus it is available for free, but for the premium benefits, you’d have to pay $29.99.

Driver Magician identifies your hardware, extracts associated drivers from your hard disk, and performs the backup of the drivers to your desired location.

When you format and reinstall or upgrade Windows, you can restore the drivers just like you would if you had the original driver disks.

⇒ Get Driver Magician

Win Driver Backup – Old school UI

If you’re looking for a Windows driver backup software you can trust with your data and system, this is one of your best bets.

Win Driver Backup helps you back up all system drivers to keep them safe and restore them in case of system failure or driver crashes.

This tool backs up all system drivers instantly, including audio, video, and network drivers, so you won’t struggle or worry during system crashes, reinstallations, or other accidents you didn’t plan for.

You can also restore them in a few clicks back to your hard drive, plus you need not dig through your old drawers for driver CDs or websites to find compatible drivers.

This software frees you from such annoyances by creating driver backups of your choice.

It is an all-around backup utility that intelligently saves drivers, and arranges them neatly in folders with flexible backup methods and comprehensive information about the drivers.

Besides backing up drivers, it goes further to back up web browser cookies, Internet Explorer favorites, and your registry, for easy recovery.

It is free, specialized, and can back up all major system drivers in your PC at zero cost.

Additionally, it has a clean and elegant interface and any user can master it, plus resolve future driver issues.

All you need to do is launch Win Driver backup, scan the driver/drivers, and select the driver/drivers you want to back up, then back them up and you’re all set.

⇒ Get Win Driver backup

DriverDoc

This is one of the best Windows driver backup software that comes at a decent price and updates your drivers automatically.

It is available with a GUI and command-line interface and restores your drivers from the existing backup.

You can use it if you need to reinstall Windows or find and install missing drivers to make your hardware function. It is also portable and highly efficient.

We all know that corrupt or outdated drivers can produce performance problems for your PC. DriverDoc constantly updates your drivers so that these kinds of issues don’t even happen.

DriverDoc uses the One-Click Update technology. First, it scans your hardware and identifies the latest Microsoft Windows drivers for your components.

The next step is to download them from a huge database of over 16 million drivers. Finally, the tool updates each driver automatically and ensures that there are no hardware conflicts.

⇒ Get DriverDoc

Free Driver Backup – Fast and customized scan

This is a user-friendly and fast Windows driver backup software, which backs up Windows drivers and third-party drivers, which can be restored later to your PC with no struggle at all.

Driver Backup comes with three ways of backing up your drivers. You can back up all drivers, only OEM drivers, or only third-party drivers.

It is open source so you can use it freely and redistribute, plus it needs no installation, has an integrated command-line interface, and is compatible with 32-bit and 64-bit operating systems.

Features include device recognition, command-line switches, automatic generate autorun files to restore drivers, offline backup, and backup/restore of Windows drivers.

⇒ Get Driver Backup

We hope that our selection of backup and restore drivers software will help you fix any driver-related issues. If you’re on a tight budget, rest assured that some of the above picks are perfect for you.

You might also be interested in our list of the best driver update software for your PC.

Now that you know the best Windows driver backup software, we’d like to hear from you on which ones you use from this list, or others not mentioned. Leave a comment in the section below.

6 Best Mirror Backup Software to Use in 2026

Your hard drive will fail eventually, so you must have a backup ready. There are different types of backups, but the mirror backup might be the best choice for most users.

The mirror backup process entails cloning all your hard drive information from the PC. Hence, you can always have the exact replication of the entire system to be relaxed.

Why should I use the mirror backup software?

It can be more beneficial to back up data using mirroring to have a complete copy of your system, not only specific files or folders. So, unlike a regular backup, you will have your complete information ready.

Therefore, if you experience unfortunate PC crashes, this backup method is more than suited to stay protected against all digital threats.

Either you need stability for business data on your PC, or require security on personal files that need a reserved copy in case of worst-case scenarios.

There are many backup applications, and in this article, we’re going to focus on mirror backup software and show you our top picks.

What is the best mirror backup software?

Acronis Cyber Protect Home Office – Great for local backup

If you’re looking for mirror backup software, we have to mention Acronis Cyber Protect Home Office, formerly Acronis True Image. The software will make an exact copy of your system while in use without interfering with your daily tasks.

If needed, you can also upload your local backup to the Acronis’ hybrid cloud and make sure you have an extra copy of your backup available.

AES-256 encryption is available, so you can rest assured that your data is always perfectly safe. Thanks to the Acronis Survival Kit feature, you can boot your system from an external drive.

The software also has a built-in antivirus scanner and a web filtering feature that will protect you against malicious websites.

Acronis Cyber Protect Home Office is great backup software, and it’s a perfect choice if you need mirror backup software for your PC or Mac.

With all being said, you can benefit from genuine cyber protection by assuring your digital data with this proficient backup and antivirus tool.

Acronis Cyber Protect Home Office features:

  • Support for full mirror backups
  • Ability to create backups in the background
  • AES-256 encryption
  • Support for Acronis hybrid cloud backup
  • Built-in antivirus scanner

AOMEI Backupper Professional – Fast incremental backup

Another great mirror backup software that we want to show you is AOMEI Backupper Professional. The application supports the system, UEFI, GPT to MBR, and customized cloning.

The software can perform system, disk, partition, and file backup. File synchronization and mirroring features are also available, so you can rest assured that you have an exact copy of your files.

AOMEI Backupper Professional supports both incremental and differential backups, and there’s also a command-line backup feature for advanced users.

Speaking of file backup, it’s important to mention that the software supports local/external drives, optical discs, NAS, and cloud storage as backup destinations.

Overall, AOMEI Backupper Professional offers great features, and it’s a great mirror backup software, so be sure to try it out.

Therefore, you can have a complete backup service and secure data all-around from your system, disk, or partitions on your PC.

AOMEI Backupper Professional features:

  • Support for disk, partition, and file backup
  • File synchronization and mirroring
  • Support for incremental and differential backups
  • Can back up file to local/external drives, NAS, cloud storage
  • Command-line support

Aomei Backupper

Aomei Backupper is a backup software that allows you to perform full system backup as well as mirror backups.
Check price Visit website

Handy Backup – Very easy to use

Another great mirror backup software that you might want to consider is Handy Backup. The software allows you to back up your files to local/external drives, NAS, FTP server, and cloud storage.

Regarding the backups, the software supports full, incremental, and differential backups. Compression and encryption are available as well, so your backups will remain completely safe and small in size.

It’s worth mentioning that the software supports both synchronization and data mirroring, so you can rest assured that all your files are completely synchronized and backed up.

The software also comes with email notifications and extensive logging, so you can be alerted if there are any issues with the backup process.

Moreover, this software will be of real help regarding backup of any of your files, from photos or folders to email apps or even website data.

Hence, you’re able to store your saved information with the FTP service, USB external drives, or cloud providers such as Google Drive or OneDrive.

Overall, Handy Backup offers great features, and if you need mirror backup software, you might want to consider it.

Handy Backup features:

  • Ability to perform full, incremental, and differential backups
  • Compression and encryption support
  • Support for synchronization and data mirroring
  • Email notifications
  • Ability to back up to local/external drives, NAS, cloud storage, FTP server

EaseUS – Good data leakage protection

EaseUS is a flexible solution to restore your data or schedule backup sessions to be protected all the time from data leakage.

This referred software can deliver efficient backup services for every system or business alike. So, it addresses high-standard data protection for businesses of all sizes.

With four different editions, the program comes equipped with one-stop backup services designed to cover the necessities for various areas.

Furthermore, it runs automatic admin backup tasks and delivers reliable information stability for more environments such as simple workstations or enterprises with different platforms.

In addition, it’s likely to keep your business always running with automated backup according to professional needs. Hence, you can build a bootable device with a WinPE bootable disk and avoid disruption while data are saved.

Another worth mentioning feature lets you clone all your system information on other devices very fast, with no interruption or Windows reinstallation require.

Therefore, have a try with this backup provider to integrate all tools in one simple interface that will clone your PC data in the blink of an eye.

Backup4All – Great backup method selection

Backup4All is a mirror backup software that can perform full, differential, incremental, and mirror backups. Thanks to the smart backup feature, the software will choose the best backup method.

It’s worth mentioning that the software backs up blocks of data, so it will back up only the small parts that have been modified since the initial backup.

Backup4All allows you to include or exclude files that you want to back up or schedule your backups and automate the entire backup process.

Regarding the files, it’s important to mention that you can back up files that are open or locked, so the software won’t ever interfere with your day-to-day activities.

Backup4All also has a compression feature, and with mirror backup support, it’s one of the backup applications that you need to consider.

With this being said, this program can automate backup tasks whenever you have to save valuable data, backup to or from the cloud, use incremental backup, and much more benefits.

Backup4All features:

  • Support for full, differential, incremental, and mirror backups
  • Ability to include or exclude certain files
  • Can back up open and locked files
  • Built-in compression feature
  • Backup scheduling

⇒ Get Backup4All

FreeFileSync – Great file synchronization

If you’re looking for a free backup/sync software, then FreeFileSync might be just what you need. To sync your files, just select the source and the destination folder and select the synchronization button.

As for the designation drive, you can use both network or local drives, Google Drive, or FTP server. It’s also important to mention that there’s no limit regarding the number of files that you’re syncing.

The application also supports automated syncing as batch jobs, and there’s extensive support for the command line which can be useful to advanced users.

Email notifications are also available, so you can get notified of your backup status with ease. Of course, detailed error reporting is available as well.

FreeFileSync is a great synchronization tool, but it can also work as a mirror backup software. Since the tool is completely free, there’s no reason not to try it out.

You should thus prioritize important data as fast as possible and create an exact copy of your PC to never worry about information loss again.

All in all, with this powerful program you profit from the interactive platform when it comes to file synchronization, plus add-free interaction at any time.

FreeFileSync features:

  • Completely free
  • Can synchronize files to local/network drives, Google Drive, or FTP server
  • Command-line support
  • Email notifications
  • Detailed error reporting

⇒ Get FreeFileSync

Mirror backup software can be incredibly useful, especially if you want an exact copy of your files.

You might also be interested in the best local backup software that you may use on your PC. In case you don’t want to use third-party software, you can always create a mirror volume on Windows with built-in tools.

Did we miss your favorite backup software? Let us know in the comments below.

HP Envy not Charging: 4 Fixes if There’s no Light Indicator

The HP Envy not charging issue is one of the major problems users face on the otherwise excellent laptop. According to them, the battery fails to charge despite connecting the charger to a power source.

If you also face this issue, this guide contains quick and easy ways to fix it.

Why is my HP Envy battery not charging?

There are a series of reasons your HP Envy laptop might not charge. Listed below are some of the prominent ones:

  • Faulty driver: If your HP Envy is not charging when plugged in, it might be because of faulty or outdated battery drivers. You need to reinstall or update your driver to solve the problem.
  • Overheating: If your battery is overheating, the battery might not charge to prevent damage. In this case, you must allow your PC to cool down before charging it.
  • Faulty hardware: Sometimes, your HP Envy laptop might not be charging with no light showing due to issues with your cord or adapter. You need to check if your charger is working well and replace it if necessary.

What can I do if HP Envy is not charging?

1. Uninstall and reinstall battery drivers

  1. Press the Windows key + X and click on Device Manager.
    device manager hp envy not charging
  2. Double-click the Batteries option to expand it and right-click the device there.
  3. Now, select the Uninstall device option.
    uninstall device
  4. Finally, click the Uninstall button and restart your PC.
    uninnstall button

If your HP Envy 15 or x360 is not charging, it might be because of issues with your drivers. You can eliminate this problem by uninstalling and reinstalling your battery driver.

Alternatively, you can update your driver to the latest version to fix this issue. To do this, we recommend using an automatic driver updater to quickly update all outdated drivers on your PC.

2. Check your charger

Sometimes, this problem is down to issues with your charger adapter or cord. To be sure this is not the case, disconnect your charger from the power source and check if the charging pin is not bent.

Also, it would be best if you tried the adapter with another cord and the cord with another adapter. You might need to replace your charger if any of these combinations work.

3. Update your PC

  1. Press the Windows key + I and select Update & Security.
    update and
  2. Click the Check for updates button.
    check for hp envy not charging
  3. Finally, download and install any available updates.

Sometimes, your HP Envy battery is not charging because of an outdated operating system. The quickest way around this is to update your PC to the latest version.

4. Check your battery

If the solutions above fail to get your HP Envy laptop charging, you need to check if the battery is not declining.

You might need some tools to unscrew your PC and remove the battery. If you are unsure of what you are doing, we advise seeking the help of a professional to prevent further damage to your PC.

Also, you can try to perform a BIOS reset to see if this will solve the problem. You can do that by following our comprehensive guide.

With this, we can conclude this guide on fixing an HP Envy laptop that is not charging. We believe you now have the needed information to resolve the issue, provided you follow the steps carefully.

If your laptop battery is not charging above 80%, check our detailed guide to fix it quickly.

Let us know the solution that helped you fix this issue in the comments below.

How to change the search box color on Windows 11

The time of the month is here: Microsoft announced the latest Insider Build for Windows 11 with a bunch of slight tweaks in features, live on the Dev Channel.

Just like what the Redmond tech giant did by revamping the volume mixer feature and migrating File Explorer to WinAppSDK in Insider Build 25309, devs on the channel have figured out that you may be able to change the color of your search box in future Windows 11 stable releases.

As noted by Windows enthusiast @PhantomOnEarth, the feature is available in the recent build, but some users reported that they didn’t like the appearance that much and wanted to revert to the old style.

With this feature, you can change the color of the search box on your taskbar and from the start menu. It’s not that big of a feature but it’s still a nice addition, especially if you want to fit it to your desktop wallpaper’s aesthetics.

Though, you can still disable the functionality with a few registry tweaks via the third-party app ViVeTool.

Read along to find out how to enable/disable the color change of the search box in Windows 11.

How to enable/disable the color change of the search box in Windows 11

1. Make sure to join the Windows Insider Program and have the latest Windows 11 Insider Build installed in your system. If not, head over Settings ➜ Windows Update ➜ Install all.

2. Head over to GitHub to download the latest version of ViVeTool.

3. Once downloaded, click Extract all, select the location where you want to extract it by clicking Browse, then hit Extract. In this case, we extract it at C:\Users\WindowsReport\Documents\Tools\ViVeTool-v0.3.2.

4. Hit ? on your keyboard, then type “cmd” and right-click on Command Prompt -> Run as administrator.

5. Type in cd + the directory where we extracted ViVeTool. In this case, it’s at C:\Users\WindowsReport\Documents\Tools\ViVeTool-v0.3.2, then hit Enter.

6. If you want to disable the feature, type the following command then hit Enter.

vivetool /disable /id:42922989

7. Reboot the computer.

In the meantime, it’s still worth noting that being an insider-only feature that isn’t out for primetime yet, you may be running into some performance problems here and there, so, patience is a virtue.

Are you excited about this upcoming feature? Let us know in the comments!