Cisco Webex Service High CPU Usage: 3 Ways to Stop it

The fixes in this guide are confirmed adequate for the Cisco Webex Service’s high CPU usage and do not need any technical know-how.

How do I fix high CPU usage on Webex?

1. End the process

  1. Press the Windows key + X and select the Task Manager option.
    task manager cisco webex service high cpu usage
  2. Right-click the Webex service and its associated components and select End task.
    end task
  3. If the service starts with your PC, click the Startup tab at the top and right-click it.
  4. Finally, click the Disable option.
    disable

If you are experiencing the Cisco Webex Service’s high CPU usage when you are not using the app, the best thing to do is to end the task in the Task Manager. This has fixed the issue for many users.

2. Enable hardware acceleration

  1. Launch the Cisco Webex Service app and click your profile picture.
  2. Choose the Preferences option.
    preferences cisco webex service high cpu usage
  3. Now, select the Video tab at the top.
  4. Finally, check the box for Enable hardware acceleration.
    enable hardware

If the Cisco Webex Service is registering high CPU usage during video calls, you might need to enable the hardware acceleration feature to make it normal. This feature help encode your self-view video better, thereby balancing the CPU usage.

However, it is essential to note that hardware acceleration is only available on Intel and Mac CPUs. So, if you can’t find it on your PC, know it is unavailable.

3. Uninstall and reinstall the app

  1. Press the Windows key + I and select the Apps option.
    apps
  2. Select the Cisco Webex Service app and click the Uninstall button.
    uninstall cisco webex service high cpu usage
  3. Now, follow the onscreen instruction to complete the removal.
  4. Finally, go to the official website to download the latest version of the app.

Many users have been able to fix the Cisco Webex Service’s high CPU usage by simply reinstalling the app. So, if the earlier fixes do not work, you should go for the jugular too.

That’s about for this frustrating high CPU usage issue. Feel free to let us know the solution that helped you solve it in the comments below.

Keyboard Typing Backwards: Causes & Quick Fixes

Typing backwards is a common issue if you use Windows. Some faulty settings could be to blame for this issue, which means it can go away within minutes.

We’ll show you all the ways to get your keyboard typing as you want it. Do read this guide to the end to learn all about it.

How can I fix the keyboard typing backwards issue?

1. Restart your machine

For troubleshooting minor software issues, restarting your computer should be your first course of action. If your keyboard is typing backward due to a software conflict or malfunctioning process, a simple reboot will fix it.

Further, you may also want to disconnect and re-connect your external keyboard, if that’s what you use. After restarting your PC and reconnecting your external keyboard, if the keyboard is still typing backward, continue to the next solution.

2. Run the Keyboard Troubleshooter

troubleshooter-keyboard-typing-backward
  1. Press the Windows key and search for troubleshoot.
  2. Click on Troubleshoot settings from the search results.
  3. Scroll down the right side and click on Keyboard.
  4. Select the Run the troubleshooter option.
  5. Follow the on-screen instructions to fix the keyboard typing backward.

3. Change your system’s region

  1. Click on the Start menu.
  2. Search for control panel and open Control Panel from the results.
  3. Go to Region.
  4. Navigate to the Location tab.
  5. Click on the dropdown menu for Home location and select the United States.
  6. Hit the OK button to save the settings.
  7. Restart your machine.

4. Re-install your keyboard driver

uninstall-keyboard-driver-typing-backward
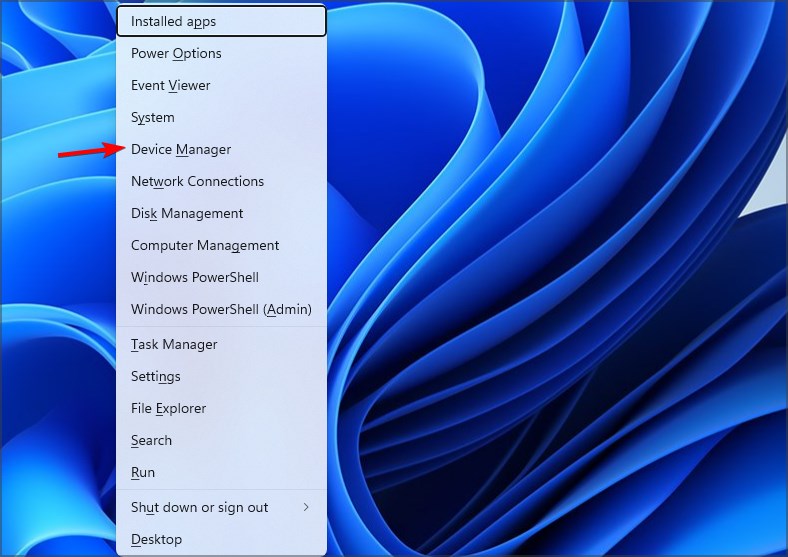
  1. Press the Windows key + X combination.
  2. Go to Device Manager.
  3. Expand the Keyboards item on the list.
  4. Right-click on Standard PS/2 Keyboard.
    Note: The name of the keyboard will differ based on your computer’s model.
  5. Select Uninstall driver.
  6. Follow the steps to uninstall the driver.
  7. Restart your computer.

You can also use dedicated driver updater software to scan for missing, outdated, or corrupt drivers. We recommend Fortect Driver Updater—it safely identifies the exact drivers your hardware needs, helping you avoid issues caused by mismatched or incompatible updates.

5. Change your keyboard typing direction

The Windows operating system allows you to change how you type between left-to-right typing and right-to-left typing. Sometimes, if your keyboard is typing backward, it may mean that you’ve accidentally changed this setting.

  • For right-to-left typing, press CTRL + right SHIFT.
  • For left-to-right typing, press CTRL + left SHIFT.

This is a quick fix for users who experience that their Teams app types backwards. Speaking of, an application restart should also fix the issue for them.

How can I type backwards on my keyboard?

Basically, if you want to type backwards on a keyboard, you need to use the CTRL + right SHIFT hotkey on your PC.

Your keyboard typing backward is a known issue, and as you can see, it’s more likely to be caused by wrong system settings than by a virus or bug. You can follow the above fixes in any order.

Also, for the fifth solution, be sure to remember what you’ve set so that you don’t complicate the issue.

Other keyboard issues might include auto-typing, clicking sounds without input, constant beeping, blocked double letters, or unexpected language switches.

For step-by-step fixes, check out these guides: keyboard typing automatically, clicking noise but not typing, keyboard keeps beeping, double letters not working, and keyboard switching language automatically.

We’d love to know the solution that worked for you to fix the keyboard typing backwards issue. If it’s not on this list, don’t hesitate to let us know in the comment section.

Outlook Only Opens in Safe Mode: 4 Solutions That can Help

The KB3114409 update (from late 2015) triggered an Outlook error in which the email software only starts in Safe Mode for some users. Consequently, some users can’t open Outlook in its standard mode.

The software starts without custom toolbar settings or extensions in Safe Mode, and users can’t save preferences or templates. These are some of the resolutions that might fix Outlook applications that only start in Safe Mode.

Why does Outlook only open in safe mode?

From what we gather from other users, there are a few things that may trigger it, and here are the top factors.

  • Add-ins – A faulty add-in or extension for the software is a common reason for Outlook’s inability to load in any mode other than safe mode.
  • Outdated tools – Some users may experience this problem using outdated outlook software.
  • Windows update – In some instances, you may get the error because of a broken Windows update.

The solutions we discuss will help if Outlook 2016 opens in safe mode, Outlook 365 only opens in safe mode, or for other versions like 2013 or 2007.

What can I do to fix Outlook when it only starts in Safe Mode?

  1. Turn Off Outlook Add-ins
  2. Roll Back Windows 10
  3. Run a Scanpst.exe Scan
  4. Deselect the Run this Program in Compatibility Mode Setting

1. Turn Off Outlook Add-ins

  1. Click the File tab in Outlook.
  2. Select Options to open an Outlook Options window.
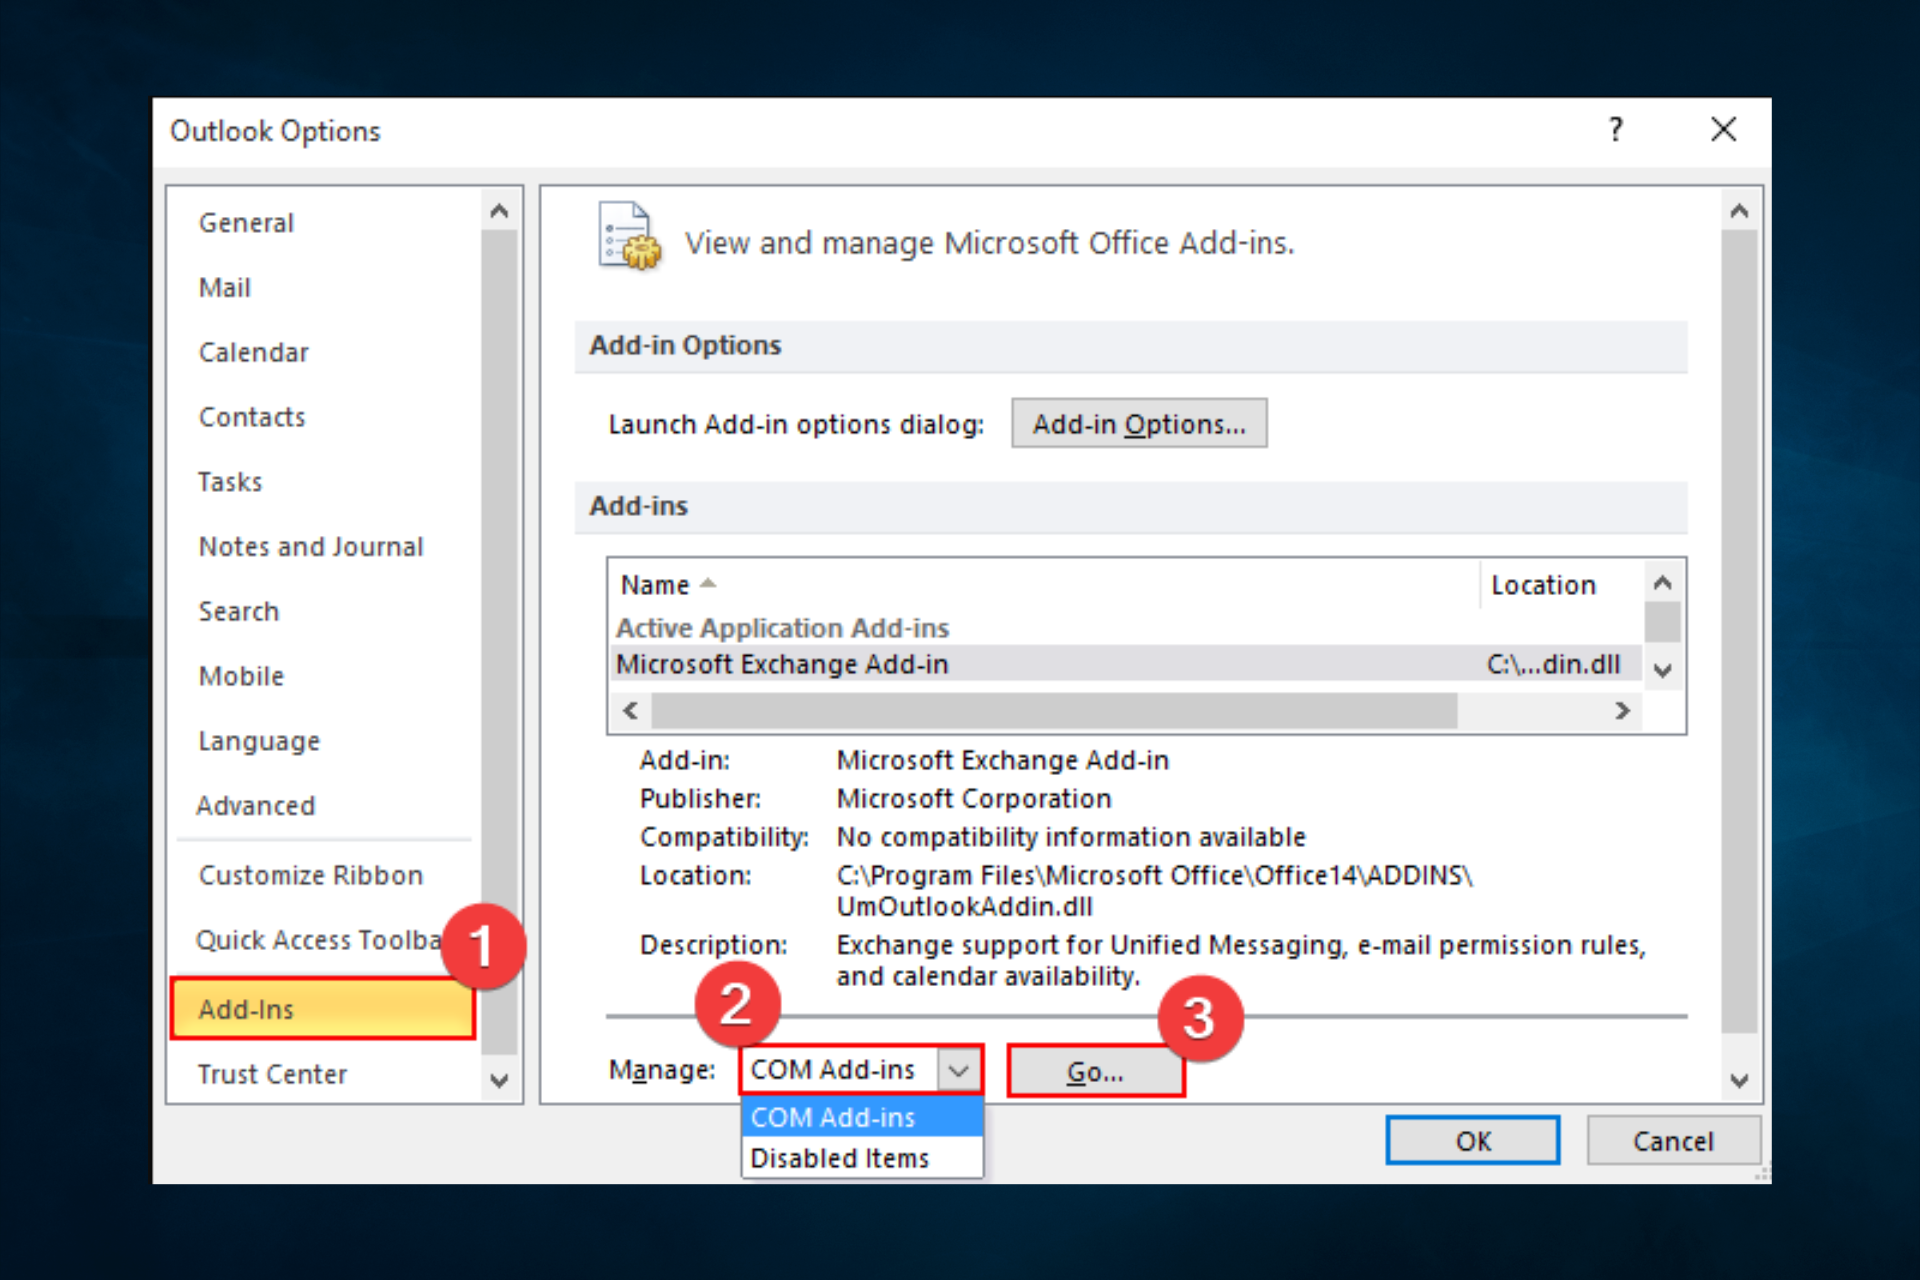
  3. Click Add-Ins on the left of the window, select Com Add-on on the Manage drop-down menu, and press the Go button.
    outlook only opens in safe mode
  4. Deselect all the add-ins listed on the COM Add-ins window, then press the OK button.
  5. Finally, restart Outlook.

Outlook might start in Safe Mode when antiquated add-ins conflict with the software. Therefore, turning Outlook add-ins off might fix the software starting in Safe Mode.

2. Roll Back Windows 10

  1. Press Windows + R, type rstrui, and hit Enter.
    outlook only opens in safe mode
  2. Click Next on System Restore.
    outlook only opens in safe mode
  3. The System Restore window might include a Choose a different restore option. If it does, select that option; and click the Next button.
  4. Select the Show more restore points checkbox to get the complete list of restore points, then select a restore point that might restore Outlook to a time when it didn’t always open in Safe Mode.https://i.imgur.com/JFt9UiS.png
  5. Select the Next option, and then click Finish. Windows will then roll back to the restore point and fix the Outlook opening in safe mode issue.

As updates are known to be responsible for Outlook starting in Safe Mode, rolling back Windows 10 to an earlier date is another potential resolution. That will undo both Windows and application updates after a selected restore point.

3. Run a Scanpst.exe Scan

  1. Close the Outlook app.
  2. Open File Explorer by pressing the Windows key + E hotkey.
  3. Navigate to any of the paths below depending on your Outlook version:
    C:\Program Files (x86)\Microsoft Office\root\Office16
    C:\Program Files (x86)\Microsoft Office\Office15
    C:\Program Files (x86)\Microsoft Office\Office14
    C:\Program Files (x86)\Microsoft Office\Office12
  4. Double-click on SCANPST.EXE to start the repair tool.
  5. Click the Browse button to select the PST file. The PST files are usually in the DocumentsOutlook files folder for an Outlook profile.
    outlook only opens in safe mode
  6. Press the Start button to initiate the scan, and select the Repair option to fix a corrupted PST.

Outlook might start in Safe Mode if its PST file is corrupted. Users can fix corrupted PST files with the Scanpst.exe utility for Outlook.

4. Deselect the Run this Program in Compatibility Mode Setting

  1. Open File Explorer by pressing the Windows key + E hotkey.
  2. Open the Office folder in File Explorer, which will probably be in the path below.
    C:\Program Files (x86)\Microsoft Office
  3. Then right-click Outlook.exe in the Office folder to select Properties.
    outlook only opens in safe mode
  4. Select the Compatibility tab shown in the snapshot directly below, and deselect the checkbox for the Run this program in compatibility mode for option.
    outlook only opens in safe mode
  5. Finally, select the Apply option and OK to close the window.
  6. After that, click Outlook.exe in the Office folder to launch the application.

Some users have confirmed that deselecting the Run this program in compatibility mode option fixed Outlook starting in Safe Mode.

So, if Outlook has been configured to run in compatibility mode, that resolution might fix the matter.

Those are some of the best resolutions that might fix Outlook starting in Safe Mode. In addition to those resolutions, setting up a new Outlook user profile might also fix the issue.

Before you go, don’t hesitate to check our guide on what to do if Outlook email view has changed.

Let us know in the comments below what worked for you.

Realtek Sound not Working in Windows 10: How to Fix it

Sound issues are not new in Windows operating systems. Almost every new version of Windows brought sound problems to some users, and Windows 10 is no different.

So, because you can’t usually use your computer without sound, here’s a solution that might help.

As I said, some users might experience flaws in their sound settings, especially no sound with their Realtek sound card, which can prevent Windows 10 from playing any sound.

This flaw won’t be fixed even if your sound drivers are updated. The article will also cover this issue: Realtek speakers not working with Windows 10.

So to fix this issue, you can follow the solutions mentioned in this guide to help you overcome the no sound with the Realtek sound card on Windows 10 problem. So let us get right into it.

Why does my computer suddenly have no sound?

After some research, we have deduced a list of common reasons you may experience no sound from your PC.

  • Your sound card is faulty. – Because of wear and tear, your sound card might have stopped working.
  • Audio settings might have been tweaked. – A third-party program or yourself might have tweaked some necessary sound settings.
  • Some important driver files might have been deleted or corrupted – Problematic installation, a third-party app, or a virus might have deleted or removed essential driver files.
  • Your audio driver is out of date – You haven’t installed the latest version of the audio driver.
  • There is some bug with your audio driver – The latest update might have changed some internal audio settings or a bug, which can be fixed using a troubleshooter.

Why is my Realtek audio not showing up?

Well, if your PC comes installed with a Realtek sound card and you are facing Realtek audio problem on your PC, then below are some of the common reasons why you will come across this error.

  • The sound driver is outdated.
  • You haven’t installed the latest Windows version.
  • There is a third-party application interfering with the sound card.
  • There is a bug in the Realtek audio driver.
  • The latest version of the Realtek driver is problematic.

How do I fix the audio not working on Windows 10 PC?

1. Install the latest drivers

    In case you need to install or update your drivers manually, the guide below explains this process with simple steps for your Windows 10 device.

  1. 1. Right-click on the Start menu.

  2. 2. Select Device Manager from the list.

    windows-10-no-sound/
  3. 3. Expand the Sound, audio, and game controllers option.

  4. 4. Right-click on your sound driver and select the Update driver option.

    windows-10-no-sound
  5. 5. Select the option to check for updates over the internet.

  6. 6. After the update is installed, reboot your PC and check if this fixes the issue or not.

According to users, sometimes sound problems can occur due to outdated drivers. Sometimes, the generic driver can’t fix the problem, and your only option is to download and install the latest drivers.

You can either follow the above steps to manually install the latest drivers on your PC or use a reliable third-party tool that will update all device drivers in one go.

2. Change the default sound format

  1. Right-click the sound icon in your Taskbar.
  2. Choose Open Sound settings from the menu.
    Windows 10 no sound Realtek
  3. In the Sound section, click on Device properties.
    No sound coming from computer
  4. Go to the Advanced tab, and change a Default sound format to one of the following options:
    • 24bit/44100 Hz
    • 24bit/192000Hz
      • Depending on your speaker configuration
        Windows 10 no audio devices are installed

Since the Technical Preview, the wrong sound format has caused audio errors in Windows 10. So, just change the default sound format to get your sound back.

If the issue is still unresolved, you can try the following method and restart the sound drivers.

3. Re-install your sound drivers

  1. Press Windows + X to open the Start menu settings.
  2. Now choose Device Manager from the list.
    Windows 10 no sound Realtek
  3. Locate your audio device, right-click it, and choose Uninstall device from the menu.
    Windows 10 no audio devices are installed
  4. Once the driver is uninstalled, click on the Scan for hardware changes icon.
    Audio services not responding Windows 10

Sometimes your current drivers might be buggy, and in some cases, it might be better that you use the default driver instead. To do that, first, you need to uninstall your current driver.

After that, Windows will install the default audio driver, and the issue should be resolved.

4. Make sure that the proper output device is selected

  1. Open Sound settings by right-clicking on the sound icon on the action pane of the taskbar.
  2. Make sure to set Speakers or Headphones as the output device.
    Audio services not responding Windows 10

If you’re getting no sound on your Windows 10 PC, the problem might be because the wrong output device is selected.

This isn’t a significant problem; you can fix the issue simply by changing a single setting.

After making these changes, your default output device will be changed, and the issue should be permanently resolved.

5. Use a Generic High Definition Audio Device driver

  1. Open Device Manager.
  2. Locate your audio device, right-click it, and choose Update driver from the menu.
    Windows 10 no audio devices are installed
  3. Choose the Browse my computer for driver software option.
    Audio services not responding Windows 10
  4. Now select Let me pick from a list of available drivers on my computer.
    No sound Windows 10 red x
  5. Select High Definition Audio Device driver from the list, and click Next.
    No sound coming from computer

In some cases, you might be able to fix sound problems in Windows 10 simply by switching to the generic driver.

Your current driver might not be fully compatible with Windows 10, leading to various sound issues.

To fix the problem, you need to install the generic driver. Once you install the default driver, check if the sound issue is resolved.

6. Check the Windows Audio service

  1. Press Windows + R, and enter services.msc.
  2. Now press Enter or click OK.
    Audio services not responding Windows 10
  3. Locate Windows Audio, and double-click it to open its properties.
    No sound Windows 10 speakers
  4. Set the Startup type to Automatic.
  5. Click the Start button to start the service.
  6. Now click Apply and OK to save changes.
    No sound coming from laptop
  7. If the service is already running and set to Automatic startup type, you need to restart it to fix the problem.
  8. To do that, locate the Windows Audio service
  9. Right-click it and choose Restart from the menu.
Windows 10 no sound Realtek

You must ensure that the Windows Audio service is enabled for your audio to work correctly. So if you’re getting no sound on Windows 10, the most likely cause is the Windows Audio service.

7. Disable the audio enhancements

  1. Open Control Panel.
  2. Select Sound.
  3. Select your sound card and hit the Properties button.
  4. When the Speaker Properties window opens, go to the Enhancements tab.
  5. Now check the Disable all enhancements option.
  6. Click Apply and OK to save changes.
    No sound Windows 10 red x

The issue might be related to audio enhancements if there’s no sound on your Windows 10 device. Of course, many users like to use them to get better sound, but sometimes they can lead to specific issues.

Once you disable the enhancements, the issue should be entirely resolved, and the sound will start working again.

8. Check if your speakers are correctly connected

The issue might be your cable if you’re getting no sound on Windows 10. To diagnose the problem, check if your speakers are correctly connected.

Sometimes you might connect your speakers to the wrong port on your PC, which can lead to many other problems.

Inspect the cable for damage if your speakers are connected to the correct port. Lastly, check the power supply cable and ensure it’s properly secured.

9. Check if your speakers are muted

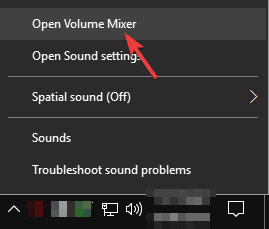
  1. Right-click the speaker icon in your Taskbar, and choose Open Volume Mixer from the menu.
    Windows 10 no sound Realtek
  2. Now make sure that the Speakers and System Sound channels are turned up.
    Windows 10 no audio devices are installed

Sometimes if you’re getting no sound on your Windows 10 PC, the issue might be volume control. In some instances, your speakers might be muted, which can lead to many other problems.

To check if the volume control is the problem, check your speaker’s volume knob. Next, you must check your audio mixer to see if the volume is up.

In addition, if you have another software for volume control, you should also check and see if the volume control is configured correctly.

Specific drivers will install their volume control software, so check it out.

10. Enable Onboard Audio in BIOS

  1. Turn on your PC, and press the designated key to enter BIOS (It’s usually F1, F2, or Del, but you should also see the proper key before the Windows booting process).
  2. Use the arrow keys to navigate to the Advanced submenu.
  3. Select Integrated Peripherals, and look for Onboard Audio.
  4. Enable the option using the + key or as instructed in your BIOS.
  5. Press the F10 key to save the modifications and exit BIOS.

Enabling the Onboard Audio from BIOS has worked for some of our readers, so make sure you try it. Feel free to revert to this setting if it doesn’t work for you.

That’s it; we hope these solutions helped you to get your sound in Windows 10 back. However, check out our best fixes if you also experience no sound from headphones in Windows 10.

Best Virtual Audio Mixer Software for Windows PC [2026]

Nowadays, an ever-growing public turns to streaming services for gaming, music, or just chatting. If you are one of them, this should come in as a treat.

We’re here to help you find the best possible audio mixer software tools for streaming. Not sure what to make of it? Allows us to shed light on this topic.

Audio mixer tools can not only record and edit audio but also forward it to other streaming services. And some of them support live streaming, too.

What voice software do streamers use?

Adobe Audition for example is a wonderful tool for Twitch and Discord if you want to generate YouTube videos from your streams. The utility allows you to record audio in multi-track mode and then separate it afterward in editing without creating weird sound gaps.

Do I need an audio mixer for streaming?

Yes. If you want the best audio mixer software for streaming, you will need an audio mixer that handles this function separately for each sound.

An audio interface is a piece of hardware that enhances a computer’s sound capabilities by reproducing more and higher quality sound and is also used for recording.

For optimum sound performance and quality, you will require the best audio interface software and suitable audio mixer software for these reasons:

→ No latency

Latency is the time it takes between playing audio and receiving it via your speakers; the audio interface features drivers that can minimize latency to almost nothing. A specialized tool like MixPad can help you mix any sounds without hearing any long noises or short disturbances.

→ Higher audio quality

A sound card in a computer is meant to perform numerous duties; nevertheless, the audio quality does not compare to that of an audio interface. Furthermore, a program like WavePad can adjust and tweak your voice so that you have a crystal sound output when speaking to your followers.

In this article, we will be looking at some of the best audio mixer software solutions that can be used with streaming services

What is the best audio mixer software?

Adobe Audition – Best virtual audio mixer for vlogging

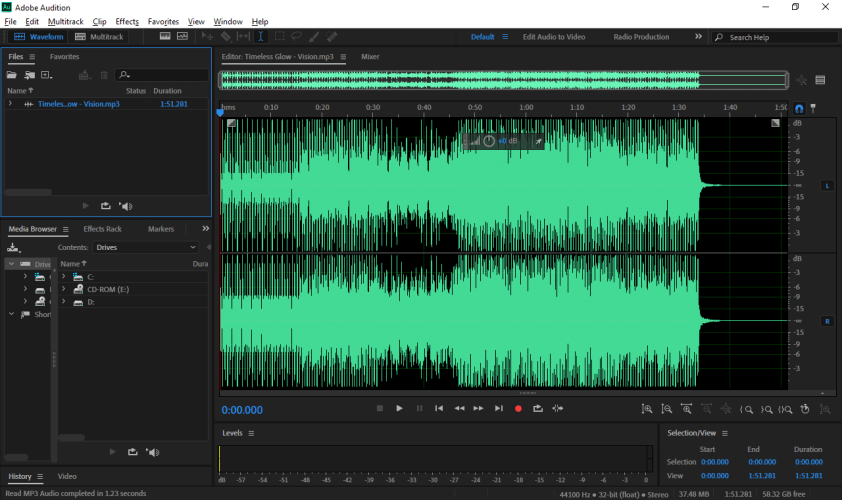
The Adobe Audition main window

Adobe Audition is a DAW software solution that allows you to record sound in multi-track mode, make changes to the audio without leaving permanent scars, as well as restore audio content.

You can also edit the waveform while keeping in mind that, unlike mixing mode, this can make modifications to the original sound.

Featuring a sleek and sophisticated interface, Adobe virtual mixer comes with a lot of practical audio mixing and mastering tools that you can freely explore at your own pace.

You can set the music to the required length automatically with Adobe Sensei and adjust the volume level with an auto-ducking tool.

This tool allows to make changes to the amplitude in waveform editing mode, get rid of white noise with the Spectral Frequency Display function.

feel free to use more than 50 effects and analysis tools or apply custom audio effects. Create podcasts and stream live from Twitch, OBS, and any other streaming service.

Adobe Audition

Adobe Audition

Looking for an audio mixer tool to boost your streaming experience? Get your hands on this tool!
Free trial VIist website

WavePad – Best voice recognition

NCH WavePad main window

WavePad is a powerful professional audio and music editor available for both Windows and Mac. This software allows you to capture and edit music, voice, and other audio recordings for interviews, video narration, and podcasts.

You can cut, copy, and paste segments of recordings when editing audio files, and then apply effects like echo, amplification, and noise reduction.

WavePad may be used to edit wav or mp3 files, but it also supports vox, gsm, WMA, real audio, au, aif, and FLAC files.

New audio can be recorded or added at any point in an existing file’s timeline. This is useful for editing or recording lengthy parts in a single file one section at a time.

When audio is recorded, played, chosen, or modified, there are clear visual cues. You don’t have to guess what’s going on or what you choose.

However, the ability to store files directly to microSD is not accessible, nor is the ability to save files in MP3 format in the free edition. Another third-party app may be required for this. Other tools are available from HCH Software Solutions to do similar tasks.

WavePad

WavePad

You may use the program to record and edit speech, music, and other audio files and recordings.
Free trial Visit website

MixPad Multitrack Recording Software – Best for multitrack recording

NCH developed, the MixPad is one powerful audio mixer that delivers studio features to enhance your streaming experience without the hassle.

This feature-rich software allows for multi-track recording and mixing with unparalleled ease of use thanks to its uncluttered and intuitive interface.

What’s more, you can enjoy all these perks free of charge if you’re using the software for non-commercial purposes. It’s almost too good to be true!

You can mix an unlimited number of audio files (music, voice tracks, sounds, and more) and record single or multiple tracks at the same time.

Enjoy the VST plugin support for studio effects and instruments. Burn to CD (high compression formats available to save space) or upload to SoundCloud, Dropbox, or Google Drive

MixPad Multitrack Recording Software

MixPad Multitrack Recording Software

MixPad is one of the most powerful audio mixers that come with studio features. Try it now!
Free trial Visit website

Audacity – Open-source editing tool

The interface of Audacity

Audacity is an open-source tool created for anyone who wishes to freely utilize audio recording and editing software and share their work with others.

Audacity may be used for a variety of purposes like recording, editing, mixing audio clips, adding effects, discussing audio files, and more. So, if you’re a podcaster, YouTuber, audio producer, video producer, or just deal with sound, this is a fantastic tool for you.

Users may cut, copy, paste, duplicate, trim, and organize several clips on the same track when editing. Furthermore, the envelope tool allows for the addition of bespoke fades.

In terms of effects, Audacity comes with a vast collection of basic effects straight out of the box. Simple Bass and Treble adjustments are available, as are high- and low-pass filters.

It’s relatively light and can operate on a variety of operating systems, even older PCs. Anyone can assist with documentation, translations, user support, and testing the latest code for Audacity.

The Audacity community is constantly evolving, with plenty of support and tools to improve the overall user experience.

⇒ Get Audacity

Traktor Pro 3 – Advanced mixing for DJ sets

Traktor Pro 3 is a DJ software tool for mixing audio professionally. It features four decks for audio playback. With a stylish and customizable interface.

It can be used as powerful audio mixer software for streaming services, including live streaming.

The program can detect beats, align the track grid, synchronize the track tempo, and control the grain on its own.

This live audio mixer software comes with sampling and looping modes, together with waveform viewing mode for DJs who prefer visual mixing.

As far as effects are concerned, Traktor Pro 3 boasts many options like flanger, delay, and filter.

Then, you can adjust the recording level and begin streaming. The tool uses the Icecast streaming protocol, which means that you must connect to a remote computer that runs as an Icecast server.

⇒ Get Traktor Pro 3

Serato DJ Pro – Advanced music production tools

Serato DJ Pro is another professional audio mixing program for DJs. It’s delivered in a dark-themed interface and contains easy-to-use functions for those interested in mixing, recording, and streaming their music.

The application can be synced with other devices, typically in your local area network.

You can explore up to 46 effects to add flavor to your music, analyze the key of your tracks, and play a set with up to eight samples. iTunes is supported.

The waveform displays different colors so that you can easily tell apart the bass (red) from the mids (green) and the treble (blue).

By placing eight cue points on each track, you can quickly spot them in waveform mode and control them using your hardware.

Moreover, you can activate auto, saved, or manual loops. The local and streaming audio files are counted separately so that you can easily keep track of them.

Serato DJ Pro integrates SoundCloud and Tidal, thus giving you the possibility to stream music using these two services.

⇒ Get Serato DJ Pro

Voicemeeter Banana – Manage separate audio sources

The main window of Voicemeeter Banana

The application with the smallest size on our list is Voicemeeter Banana, an advanced virtual audio mixer available for free on Windows systems.

It can be used in association with various streaming services, including OBS, Twitch, and Discord. The tool has a clean graphical interface that reveals five input and five output channels.

Three out of each five channels are for hardware like microphones, speakers, headphones, and virtual cables, while two of each five channels are virtual for computer playback.

To set up Voicemeeter Banana with a streaming application, you must pick a virtual output channel that flows through the input channel of your streaming tool.

Once the connection is successful, the streaming program should receive all audio generated by Voicemeeter Banana, such as voice or computer sounds.

Then, you can tinker with the various sound settings supported by Voicemeeter Banana.

For instance, you can reduce the background noise or split channels so that you can listen to music on your computer without also forwarding it to the streaming service.

⇒ Get Voicemeeter Banana

What software do streamers use for microphones?

A microphone software for streaming is essential if you often use more than one microphone, play music, or use game recording software for YouTube. It allows you to change the levels of all your audio sources to ensure uniformity.

Look for audio mixers with channel, compression, and equalization controls. EQ sliders are often things like bass, treble, and so on, and they assist you in making the sound that the audience hears match the sound that goes into the microphone.

You must pair your virtual mixer for streaming with the proper microphone. If you regularly plug a USB microphone straight into your computer, be sure the mixer you choose has a USB audio interface for streaming.

With the right tool, you can effortlessly integrate audio mixer software solutions with streaming services so that you can play with your friends, chat with your YouTube followers, or mix music.

We’d like to know ore from you on this subject so leave us a comment in the section below.

Steam ‘Your Transaction Cannot Be Completed’: How to Fix

Many users reported Your transaction cannot be completed because you have another pending transaction on your account on Steam. However, there are ways to fix this issue.

What causes the Steam Your transaction cannot be completed because you have another pending transaction on your account issue?

Other pending transactions or connection errors will cause this issue. Your VPN software can also be responsible for this issue.

How can I fix the Steam pending transaction error?

1. Check whether Steam is down

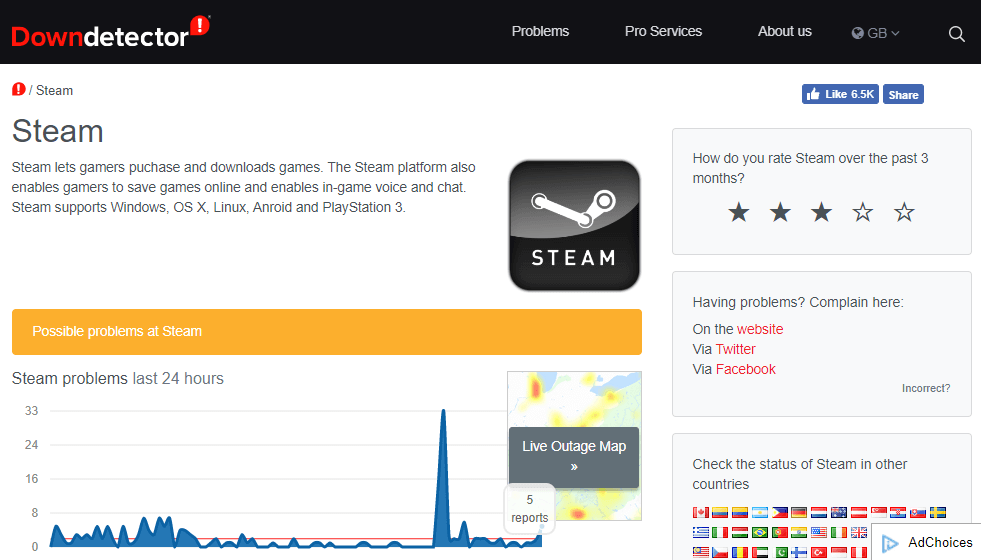
  1. Open the Downdetector website and select a country in the drop-down menu.
  2. Enter Steam in the search box on that site to open the page directly below, which provides further details pertaining to Steam server outages.

The pending transaction error might be due to a Steam server outage. OK, that’s not a common scenario, but it might still be worth checking if this service is down.

2. Cancel other pending transactions

  1. Open Steam and click your user account name.
  2. Click the Account details option.
  3. Then click the View purchase history option to open a list of Steam transactions.A game transaction list steam Your transaction cannot be completed because you have another pending transaction on your account
  4. If there are multiple pending purchases, select one of the pending purchases.
  5. Then select the Cancel this transaction option.
  6. Click Cancel my purchase.

You can also cancel your pending transactions by accessing your account on the Steam website. The process is identical. This will give you free access to your new transaction.

Tip icon Tip
After you cancel other pending transactions, think about a different payment method too. There could be an error in processing the payment so try using another credit or debit card.

3. Try purchasing via the Steam website

  1. Navigate to Steam’s website.
  2. Log in and select the game that you want.
  3. Add it to your shopping cart and try to complete the purchase.

4. Disable the VPN and the IP proxy software

  1. Right-click the Start button and select Task Manager from the list.
  2. Select VPN or IP proxy software on the Processes tab and click the End task button.
  3. Select the Startup tab, then right-click the VPN or IP proxy software and select Disable.

Steam transaction errors can also be caused by the VPN and IP proxy software so ending its process and disabling it from the Startup list will prevent it from opening.

On the other hand, you could always try using a VPN service like Private Internet Access that is more stable and causes fewer issues with your Steam client and purchases.

How can I unlock all the features in my Steam account?

To prevent any possible fraudulent actions, Steam imposes some limitations on newly created accounts:

  • You are not allowed to buy or sell items on the Steam Community Market
  • Can’t add friends on Steam
  • You’re unable to create a group on the Steam Community
  • Also, there are no options to produce any reviews or rating any artwork from other members, screenshots, workshop content, or Greenlight submissions
  • There is also impossible to use the Friends chat in your browser or on a mobile device

All these limitations can be removed if you spend at least $5 in Steam by buying a game, taking advantage of a gift card, or just including the amount in your Steam Wallet.

Does pending mean that money has been taken out?

We also need to clarify the fact that if you receive the your transaction cannot be completed because you have another pending transaction on your account error, it means that no money has been drawn from your account.

A pending transaction is one that awaits to be completed so, for some reason, the payment has not been issued.

This concludes our guide, and we hope that it provided the fixes you were looking for. You can also set up a Steam support account to send a support ticket if further resolutions are needed.

Even more, we’ve noticed that another annoying problem with this software is that sometimes after you purchase a game, it’s not starting. Well, we have an excellent article on what to do if the Steam game is not launching.

This isn’t the only payment error you can encounter, and many reported that PayPal is not working on Steam. Many also reported There was a problem adding this product to Steam, so don’t miss our guide that tackles this issue.

Before you leave, don’t miss our guide on Error initializing or updating your transaction guide for more information.

If you have any other questions or suggestions about issues such as the Steam pending transaction error, don’t hesitate to use the comments section below.

Your DNS Server Might Be Unavailable Windows 11 [Fixed]

Multiple components must work properly for your Windows 11 PC to connect to the Internet, including your network adapter and drivers.

However, components such as DNS servers are crucial to access any website. Unfortunately, certain users face different DNS issues on Windows 11, such as:

When one of these Windows 11 DNS issues appears, you won’t be able to access any website, so you must fix it as soon as possible.

Why does my computer keep having DNS issues?

There are a series of factors for DNS issues on Windows 11. Below are some of the prominent ones:

  • Antivirus interference: One of the notable causes of the DNS server not responding on the Windows 11 issue is the interference from your antivirus. This might be because the security software does not trust the website you are trying to visit. The solution here is to disable the antivirus.
  • Problems with the proxy server: In some cases, issues with your proxy server might prevent you from connecting to the internet. The quick way out is to disable it.
  • Issues with the network: If you are getting a DNS address that could not be found prompt on Windows 11, the problem might be with your internet connection. Running the built-in troubleshooter should clear up any glitches causing the problem.

How can I fix the DNS server unavailable error on Windows 11?

1. Use the built-in troubleshooter

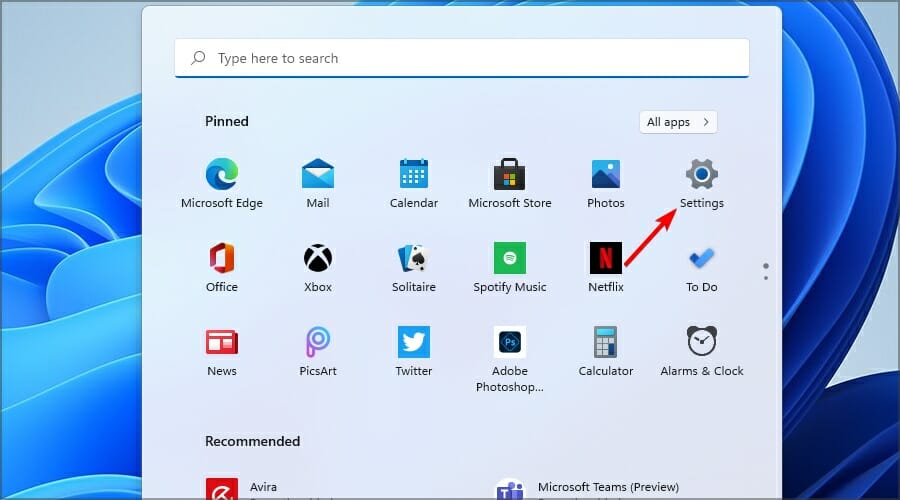
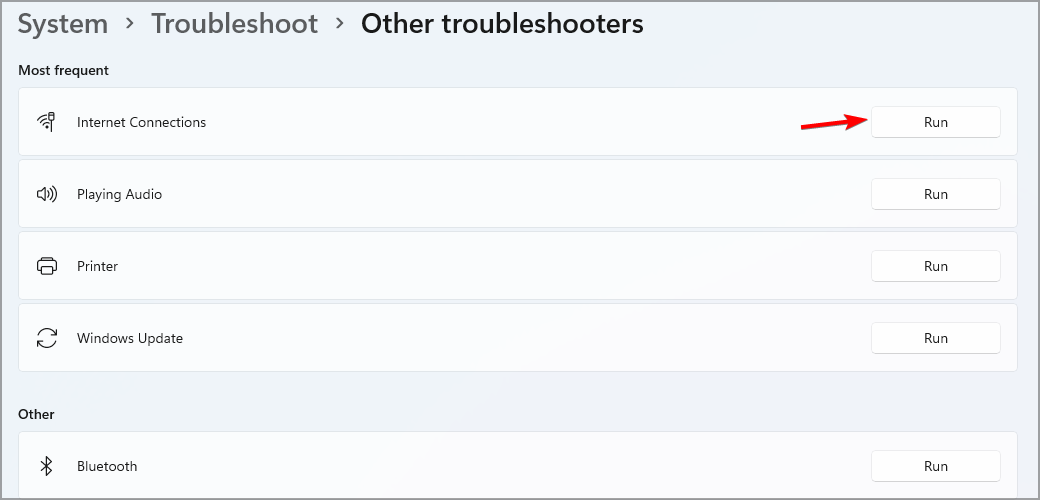
  1. Open the Start Menu and choose Settings.
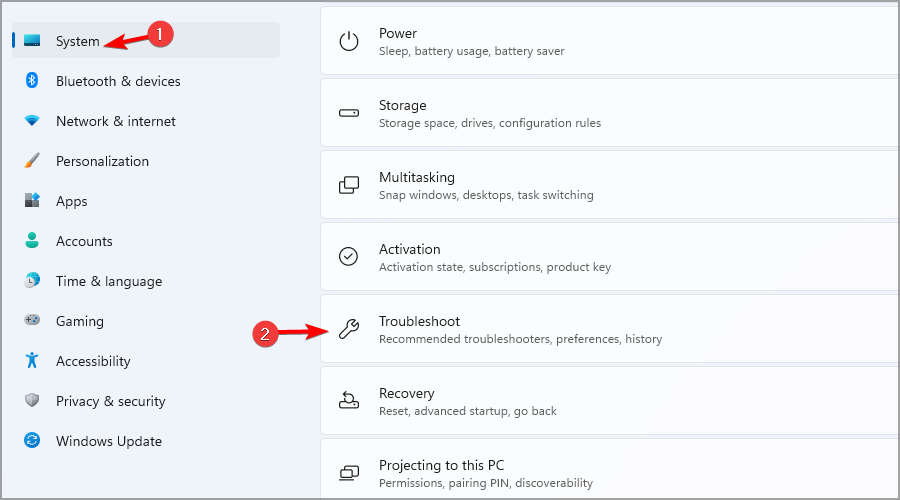
  2. In the left pane, go to System, and in the right pane, select Troubleshoot.
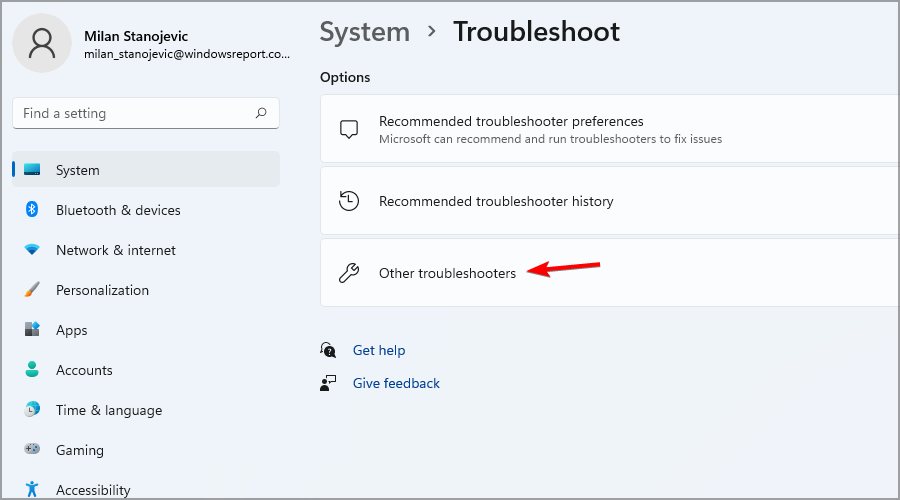
  3. Select Other troubleshooters.
  4. Click the Run button next to the Internet troubleshooter.
  5. Wait for the troubleshooting process to finish.
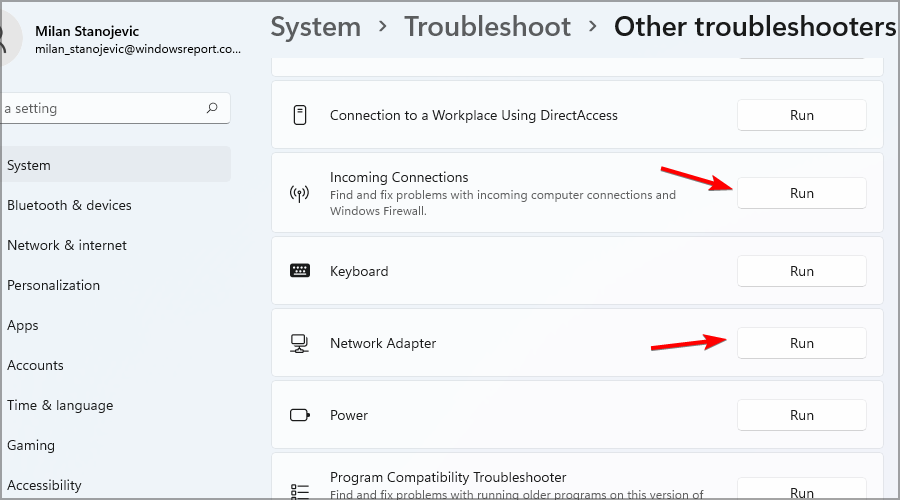
  6. If the problem persists, run the Network adapter and Incoming connections troubleshooters.

If you cannot open the Settings app, look at our article on what to do if the Settings app crashes for some quick solutions.

2. Use the command line

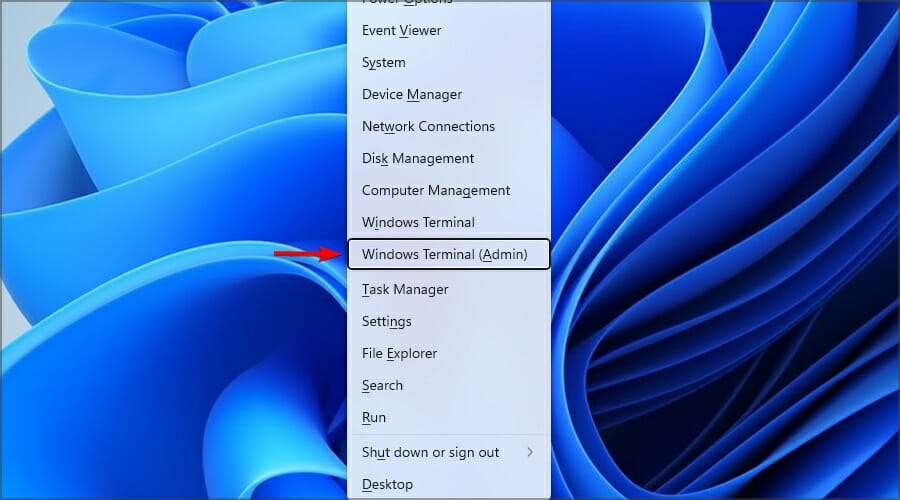
  1. Press the Windows key + X and select Windows Terminal (Admin) from the menu.
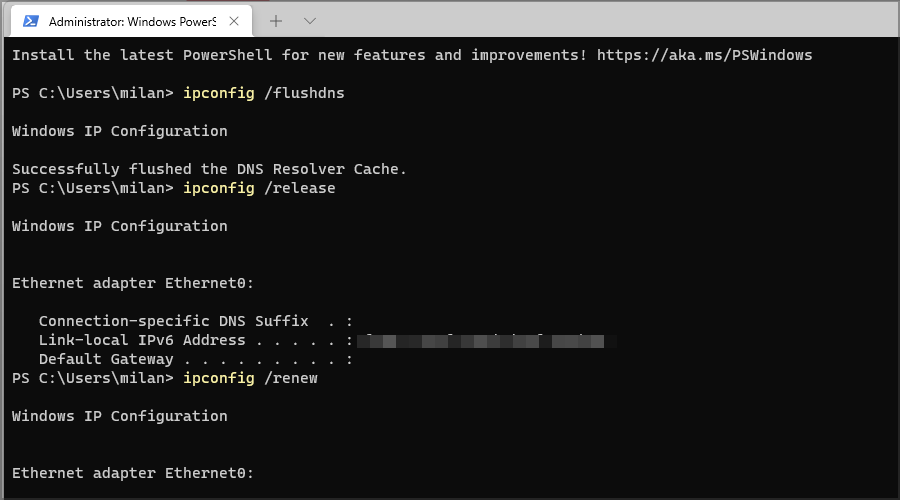
  2. Now run the following commands one by one:
    ipconfig /flushdns ipconfig /release ipconfig /renew

3. Change the DNS

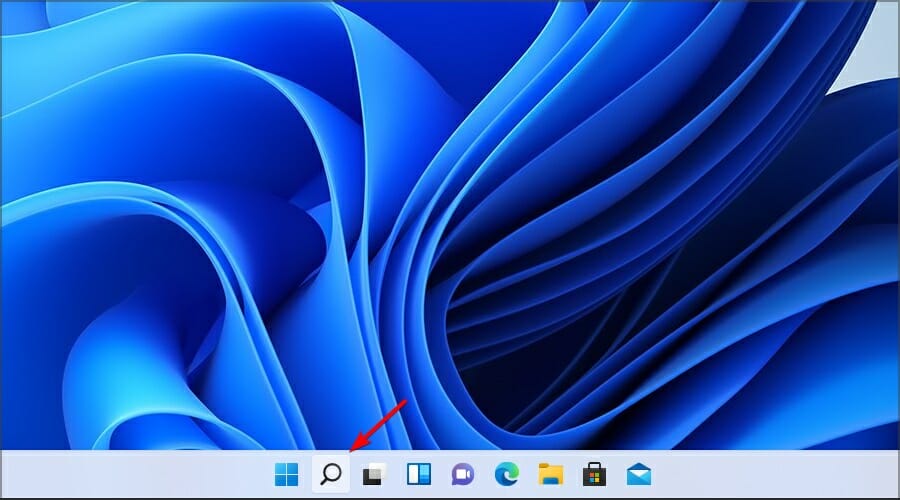
  1. Click the Search icon in the Taskbar.
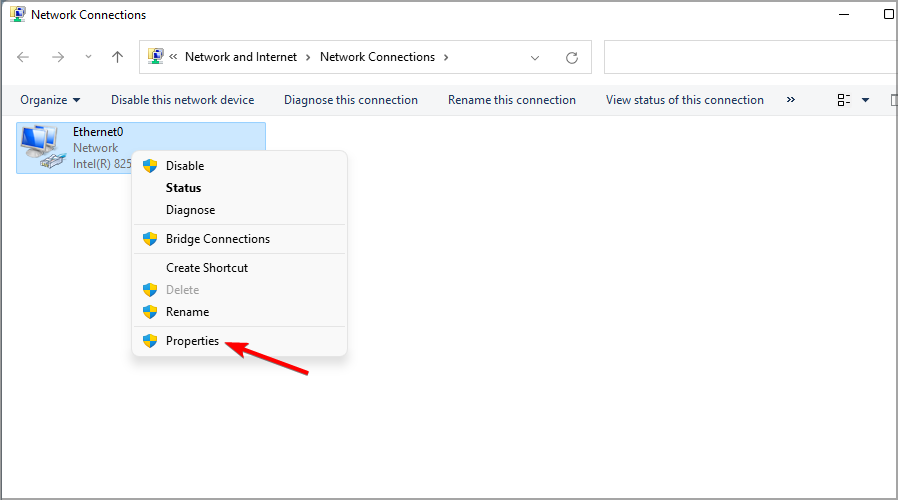
  2. Enter network connections and select View network connections.
  3. Right-click your connection and select Properties.
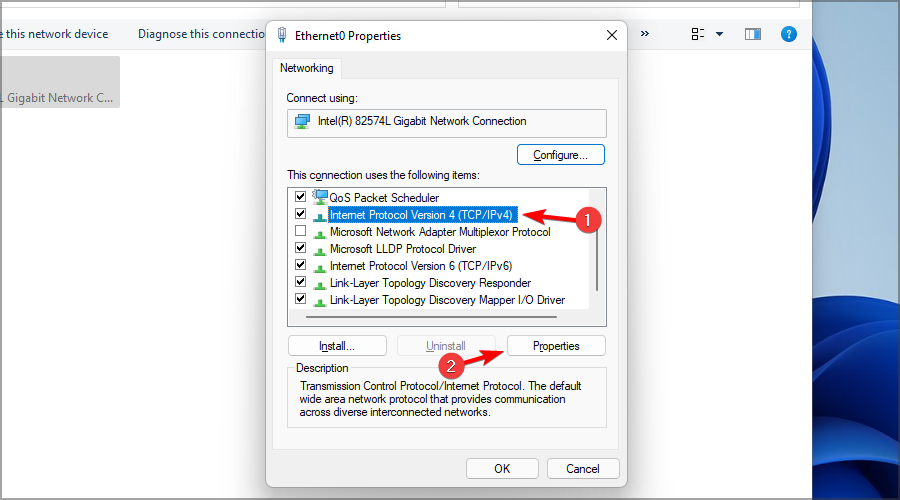
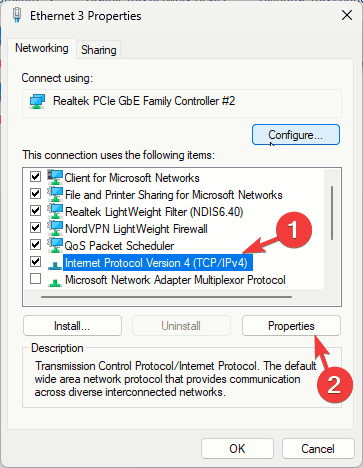
  4. Select Internet Protocol Version 4 (TCP/IPv4) and click on Properties.
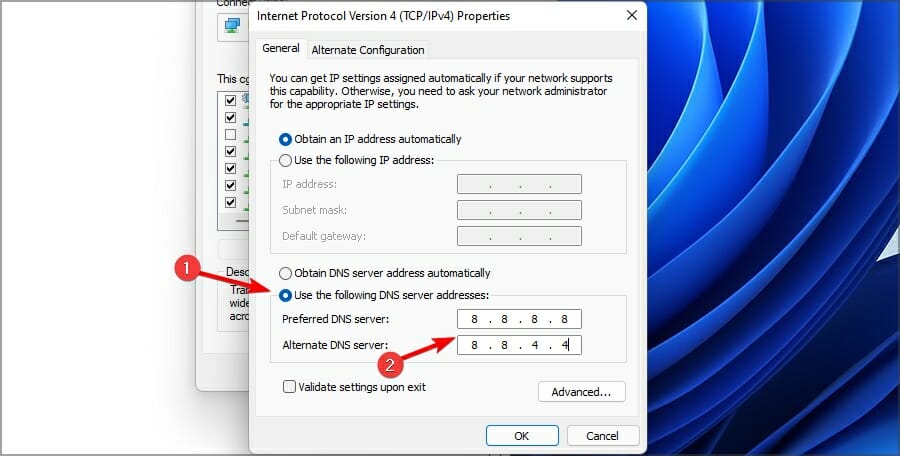
  5. Now select Use the following DNS server addresses and set the following:
    • Preferred DNS server: 8.8.8.8
    • Alternate DNS server:8.8.4.4
  6. Click OK to save changes.
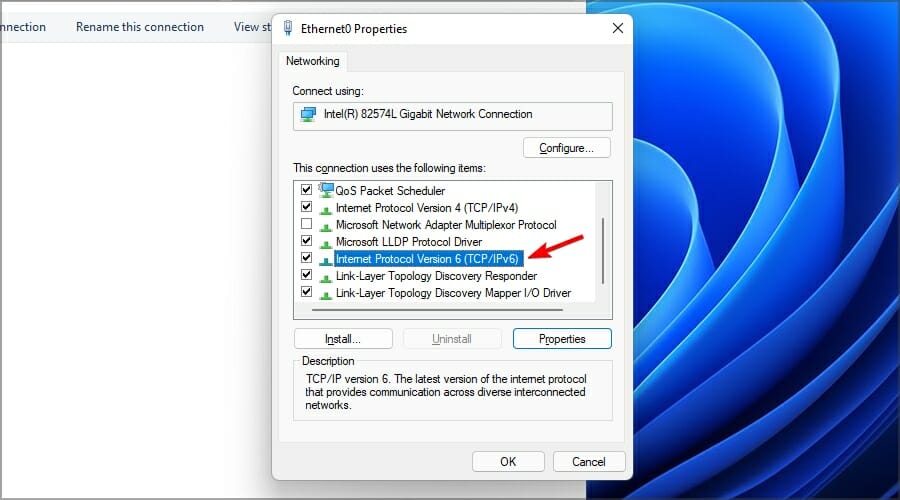
  7. Select Internet Protocol Version 6 (TCP/IPv4) and change the DNS server like in the previous steps.

If you’re having problems using the search feature, our Search bar not working guide will help you, so don’t hesitate to look closer.

4. Restart the DNS services

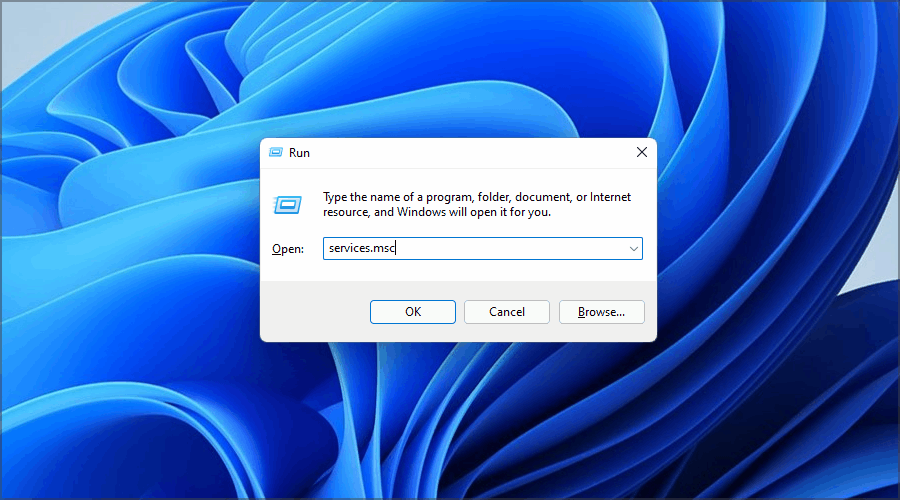
  1. Press the Windows key + R and enter services.msc. Next, press Enter or click OK.
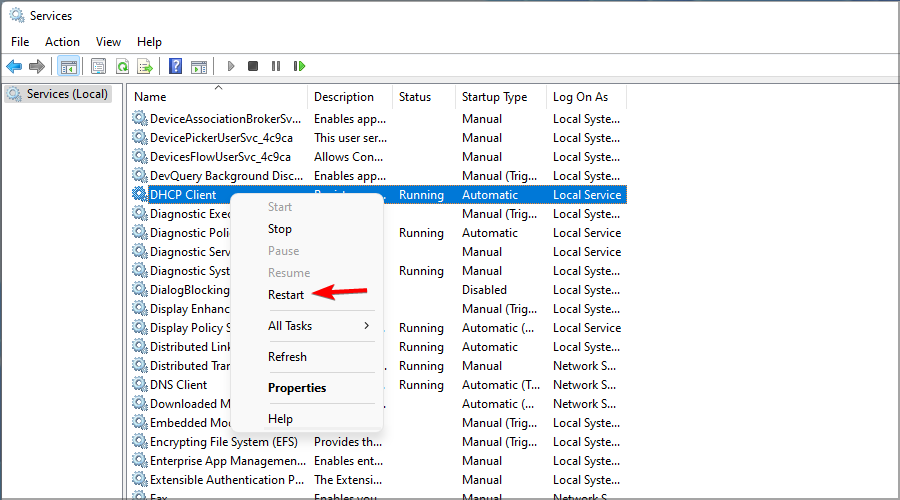
  2. Locate the DHCP Client service, right-click, and choose Restart from the menu.
  3. Finally, right-click DNS Client service and choose Restart if available.

5. Disable the proxy

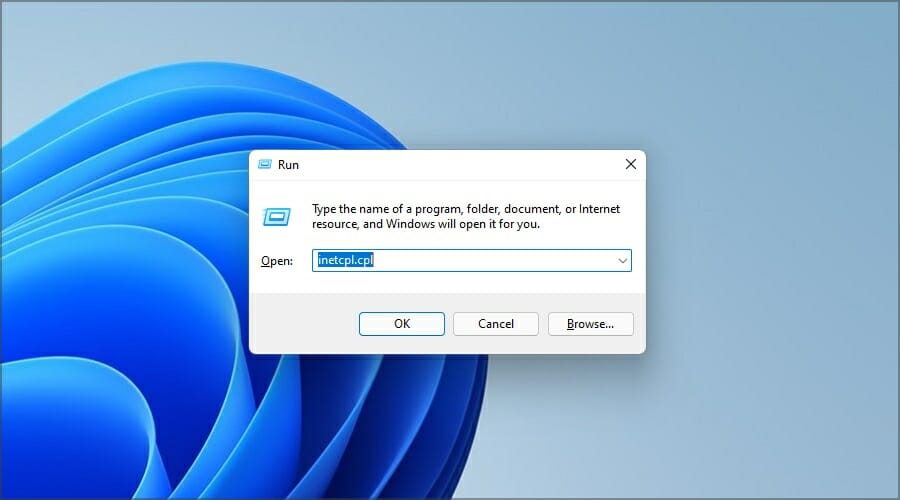
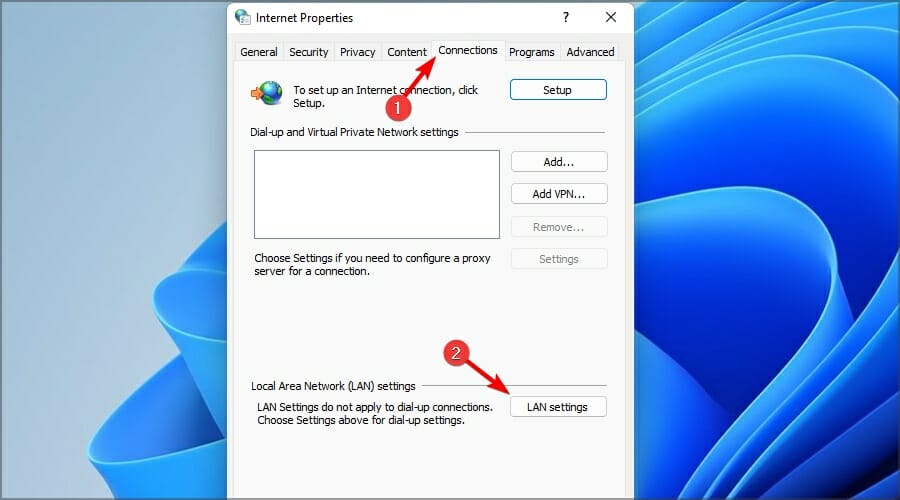
  1. Open the Run window by pressing Windows Key + R.
  2. Type inetcpl.cpl and press Enter.
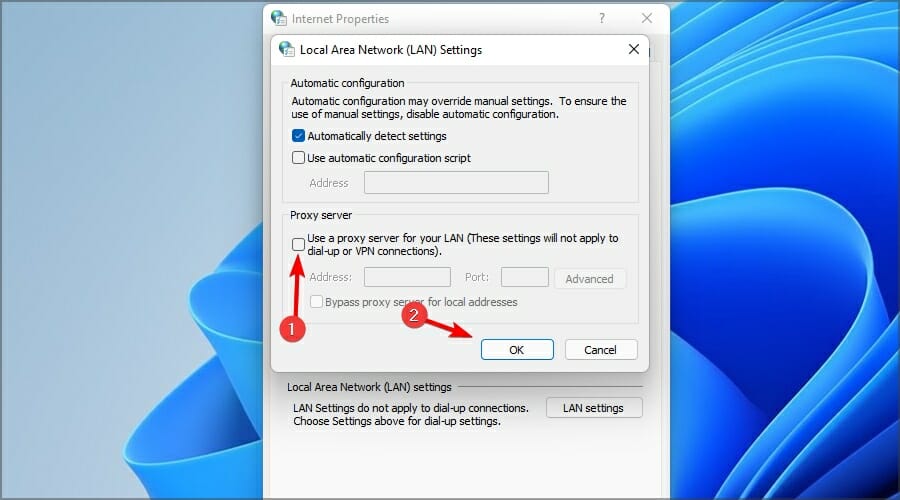
  3. Navigate to the Connections tab and click on LAN settings.
  4. Uncheck Use a proxy server for your LAN and click OK.

6. Disable your antivirus temporarily

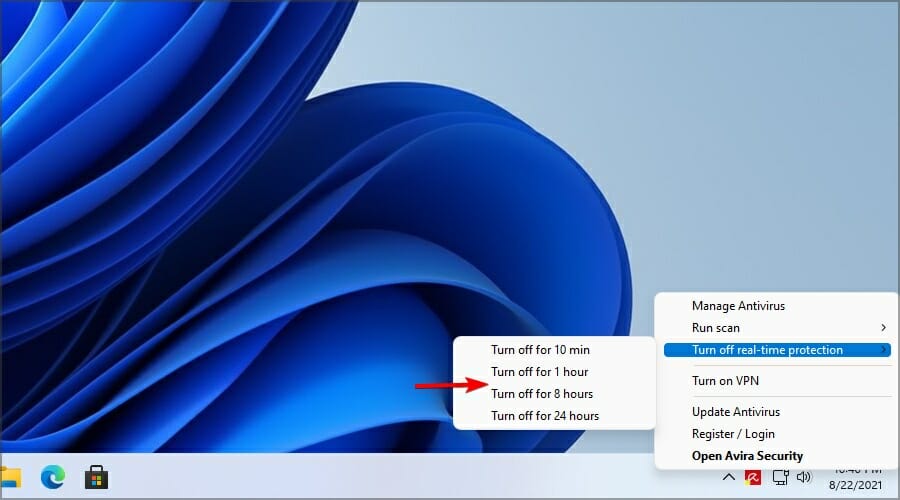
  1. Locate your antivirus icon in the system tray.
  2. Right-click it and choose the option to turn off real-time protection.

Once the antivirus software is disabled, check if the problem is still there. If the issue doesn’t appear, the antivirus configuration interferes with your network connection, so adjust it accordingly.

Alternatively, you can consider switching to a different antivirus compatible with Windows 11. Making an informed choice when it comes to protecting your PC can be difficult, considering the wide range of options available, so we’re sure you’ll find our top picks useful.

DNS issues such as the Your DNS server might be unavailable Windows 11 error will prevent you from browsing the web, and many reported that DNS problems are responsible for TypingClub not working. However, you can fix this problem in most cases simply by using the command line or changing the required network settings.

If you are facing DNS server issues after installing a Windows update, check our detailed guide on how to fix that too.

Feel free to let us know the solution that helped you fix this your DNS issues in Windows 11 in the comments below.

How To Set Process Priority In Task Manager: Quick Guide

All processes on your PC share the CPU power equally, but did you know that you can give higher priority to specific applications?

That’s right, and in this guide, we’re going to show you how to set priority in Task Manager on a Windows PC. We also cover setting a high priority using other tools such as Command Prompt and PowerShell.

How can I set priority in Task Manager?

1. Set priority from the Details tab

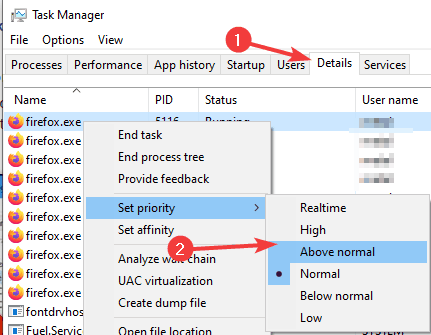
  1. Press Ctrl + Shift + Esc to start Task Manager.
  2. Go to the Details tab, right-click the desired process, choose Set Priority and select any value that you want.
    set priority task manager task manager set priority windows 10
  3. When the confirmation dialog appears, select Change priority.
    change priority task manager set priority windows 10

This is the easiest way to set priority in Task Manager, and the priority for that process will remain changed until you end the process or turn off your PC.

2. Change priority in Task Manager using Command Prompt

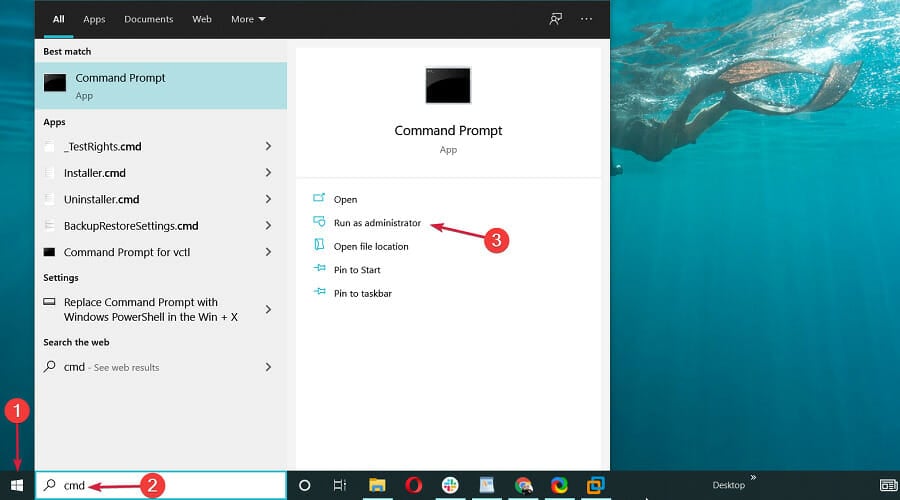
  1. Press Windows Key + S and enter command prompt. Select Run as administrator.
    command prompt admin task manager set priority windows 10
  2. When Command Prompt starts, run the following command:

wmic process where name="firefox.exe" CALL setpriority "Above normal"

Alternatively, you can set priority by using a numerical value like this:

wmic process where name="firefox.exe" CALL setpriority 32768

Keep in mind that in order for this command to work, the process needs to be running beforehand. Of course, be sure to change the process name and priority level as needed.

You can find the list of priority values in the table below.

RealtimeHighAbove normalNormalBelow normalLow
25612832768321638464

3. Use PowerShell to set priority

  1. Press Windows Key + X and select Windows PowerShell (Admin) from the list.
    windows powershell task manager set priority windows 10
  2. When the PowerShell starts, run the following command:

Get-WmiObject Win32_process -filter 'name = "firefox.exe"' | foreach-object { $_.SetPriority(32768) }

Of course, be sure to replace the process name and the priority level as needed. You can find the numeric values from the priority list below.

RealtimeHighAbove normalNormalBelow normalLow
25612832768321638464

4. Start applications with a specific priority with cmd

  1. Start Command Prompt.
  2. Now run the following command:

start "" /AboveNormal " C:\Program Files\Mozilla Firefox\firefox.exe"

This will start Firefox with the Above Normal priority. Of course, you can use any other priority levels to start any application you want, as long as you enter the correct path to it.

To set priority in Task Manager, you just need to go to the Details tab and make the changes from there. If you’re an advanced user, you can always use Command Prompt or PowerShell to change the priority.

Outlook Emails Stuck in Outbox: 3 Solutions to use

Not every day do you get your Outlook emails stuck in your outbox. But when they do, it is painful and frustrating, as you cannot send or receive other emails.

Outlook emails stuck in the outbox indicate that the message has not been sent nor received on the other end. Therefore, they remain in your outbox despite you moving them to the recipient.

Knowing how frustrating this Outlook error can be, we have prepared this guide to help fix it quickly.

Why are my emails going to my outbox and not sending?

Various factors can cause your Outlook emails to get stuck in your outbox. Listed below are some of the prevalent causes:

  • Large attachments: If your Outlook emails are stuck in the outbox and not sending, the first thing to check is the size of your attachments. If this exceeds the limits, you will not be able to send the email, and sometimes Outlook might not attach the files. You must remove the attachment and try sending the email again to get past this.
  • Wrong password: If you typed the incorrect password while trying to send your email, you might experience this issue. You need to type the correct Outlook password to send the email.
  • Antivirus interference: Sometimes, Outlook 365 emails are stuck in your outbox but are already delivered to you or sent because your antivirus is scanning them. This is usually due to the anti-spam feature of your security software. You might need to disable the software and consider switching to one of the best antivirus apps for Windows PC that won’t mess with your activities.

If Outlook emails are stuck in your outbox on your account or PC, use the solutions below to fix them.

What can I do when Outlook emails are stuck in my outbox?

Below are some general troubleshooting solutions to start with when you find Outlook emails stuck in the outbox:

  • Check your internet connection
  • Try sending the email again
  • Ensure that Outlook is online

If these preliminary fixes don’t help, try the solutions below.

1. Clear the stuck email

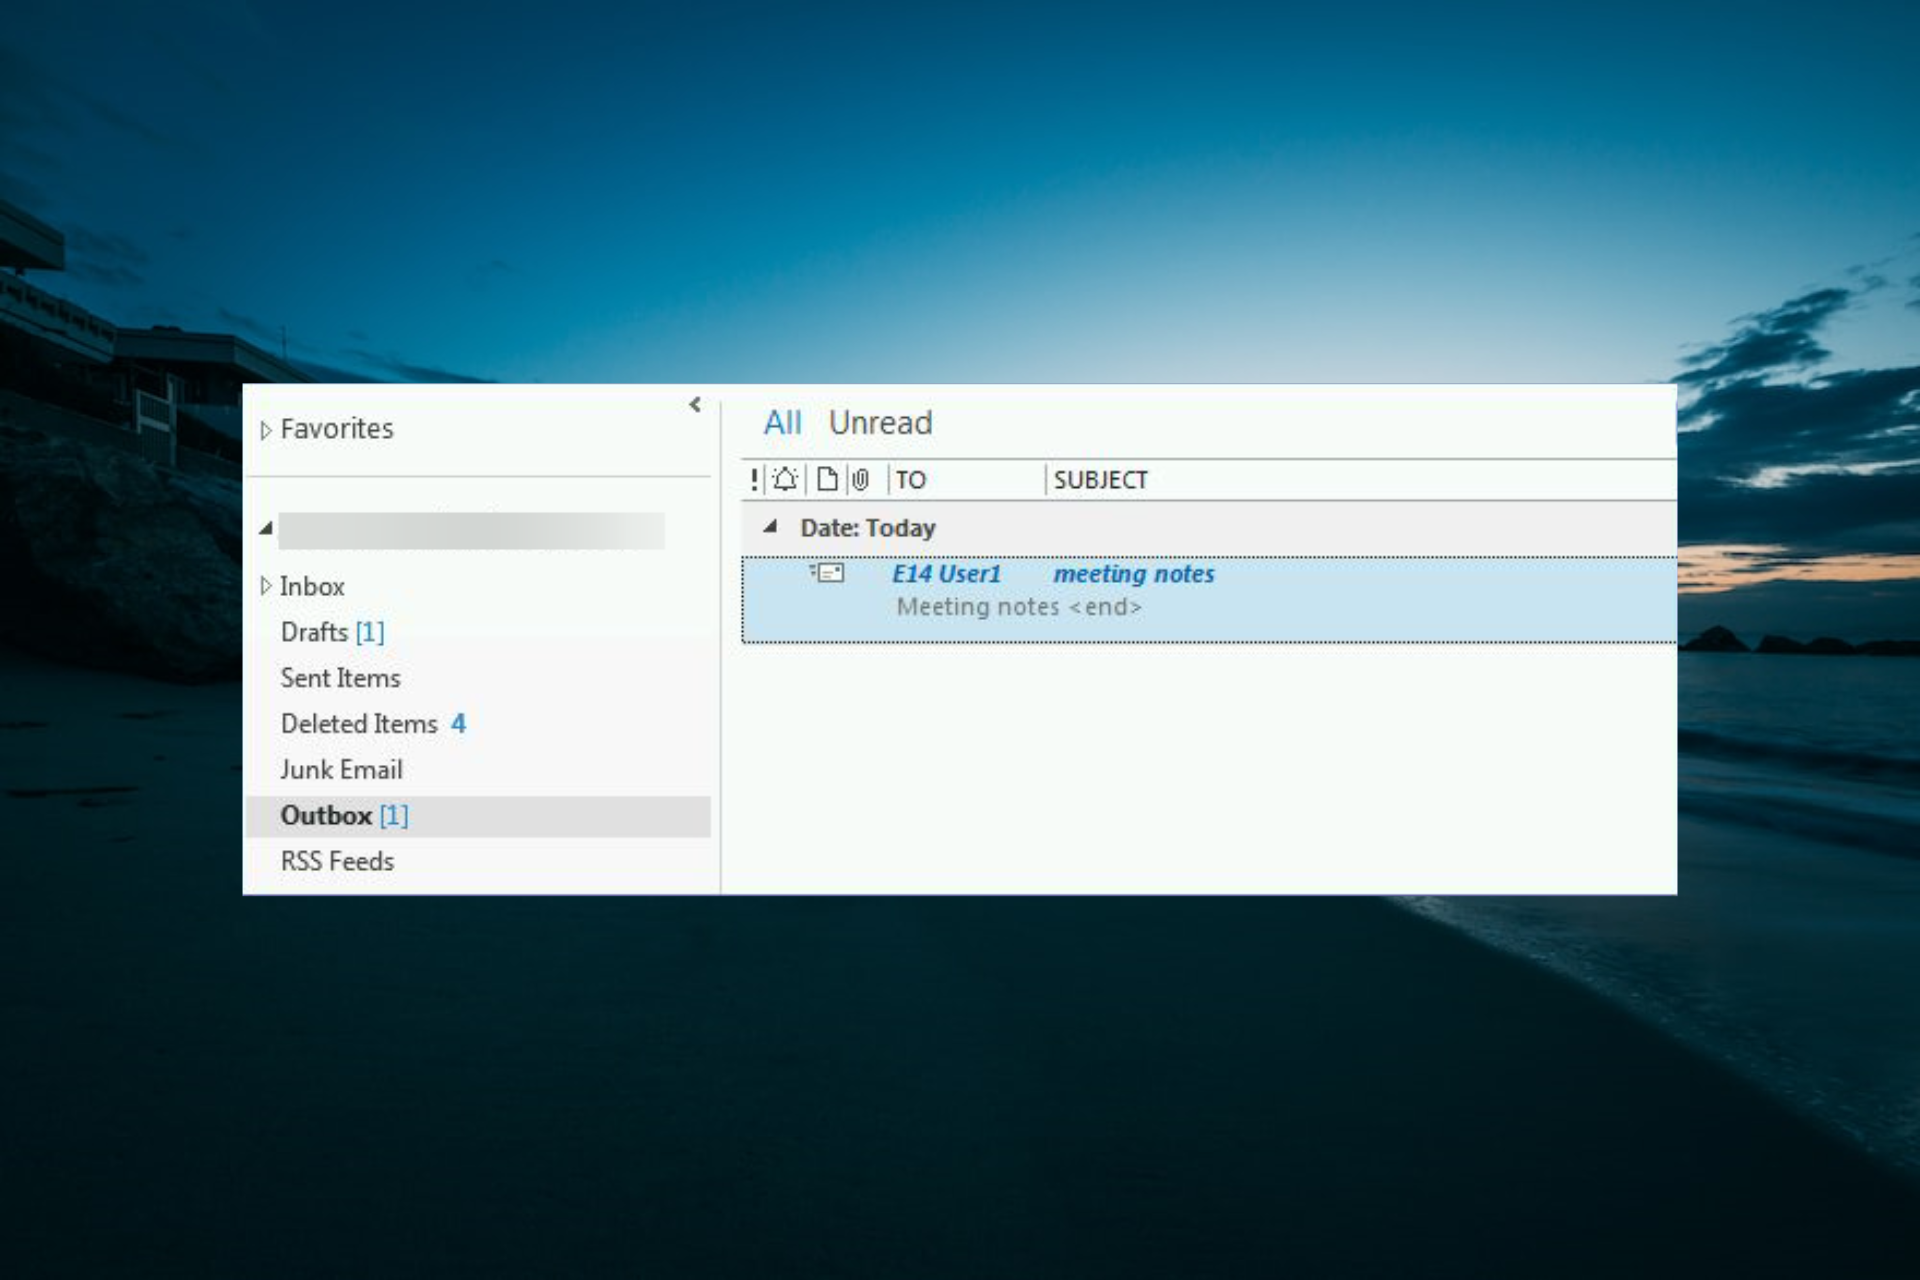
  1. Open Outlook and select the Send/Receive tab.
  2. Select Work Offline to stop Outlook from trying to send all emails.
    offline outlook emails stuck in outbox
  3. Now, select the Outbox option.
  4. Move the email to the Drafts folder to open the large email message, and remove, resize, and re-attach before resending the email.
  5. Alternatively, you can right-click the message and select Delete.
  6. Select the Send/Receive tab, and then select Work Offline to de-select it. This restarts your connection.

The first thing to do if your Outlook emails are stuck in your outbox is to remove emails with attachments that exceed the size limit set by the mail server. This will help push the email through.

If you need to send the attachments, you can put the large file on a local network share or SharePoint site with a link to its location. Using OneDrive to store or send large files is also an option.

Finally, if you get a message saying Outlook is transmitting the message, you can close it on Task Manager.

Did you know you can avoid accidentally sending messages in Outlook? We have a guide that addresses this issue, so be sure to check it out.

2. Change your password

  1. Open Outlook and select File.
    file
  2. Click Account Settings.
    account settings
  3. Highlight the account you want to change the password for and click Change.
    change outlook emails stuck in outbox
  4. Now, enter your new password.
  5. Finally, click the Next button, then click Finish.

One of the reasons you find Outlook emails stuck in your outbox, even with no attachments, is that the password for your email account doesn’t rhyme with the Outlook account password. So, if you changed the email address password, you will have to change the Outlook password too.

But if you have an Exchange account, consult your Exchange administrator on how to change your password.

3. Use another email client

If errors persist, you may want to try an alternative email client. Good options with a similar setup to Outlook are available, so you won’t have to spend too much time learning how to use them.

We recommend you take a look at what Mailbird has to offer. It is an up-to-date email client with an easy-to-use interface that allows you to log all your email accounts and check your inbox from just one window.

The features provided by this email client include advanced attachment search, speed reader, app integrations, undo send, customizable appearance, and offline access.

⇒ Get Mailbird

This is just about it for the Outlook emails stuck in the outbox issue. All that you have to do is follow the detailed steps carefully, and things should turn normal again.

If you are facing other issues like Outlook running on slow, check our detailed guide to speed it up quickly. Even more, with the idea of productivity, you can learn how to delay sending an email in Outlook.

Were you able to get your Outlook emails from your outbox? Please share with us by leaving a comment in the section below.

How to Move a Mouse That Won’t Go to Second Monitor

If you find that your mouse won’t go to the second screen of your dual-monitor setup, you are not alone. It’s a common bug affecting people who are trying to setup a new display.

The most common reasons your mouse won’t show up on your secondary display are mismatched resolution settings or a display setup that places your monitor in a different position than it actually is.

Here’s how you can fix it.

How to force mouse go to second display

  1. 1. 1. Change your display settings

    1. Press the Win + X keys on your keyboard -> select Settings.

  2. 2. Click on System -> then choose Display from the left-side menu.

  3. 3. Select Identify in order for Windows to identify your displays.

  4. 4. Drag and drop display 1 to the left side, and display 2 to the right side (or however your dual display setup is located in real life).

  5. 5. Under the Multiple displays section -> click on the drop-down list -> make sure Extend these displays option is selected.

Some users reported that the issue was gone after aligning the bottom edges of all displays in display settings, so try moving monitors horizontally in the settings to do that.

2. Reinstall your display drivers

  1. Press the Windows key + X and choose Device Manager.
  2. Locate your display driver, right-click it, and choose Uninstall device.
    Uninstall graphics driver -the ue4 game has crashed fatal error
  3. If available, check Attempt to remove the driver for this device and click Uninstall.
  4. Restart your PC and install the necessary drivers again.

We hope you found this guide helpful and easy to follow. Please feel free to let us know if the method presented here managed to help you solve the issue of your mouse not moving between screens.

Dual-monitor setups can have problems, and many reported that their laptop is not detecting second monitor. We also have a guide on how to move a game to a second monitor, so don’t miss it.

Other common issues include the mouse cursor disappearing, mouse lag, the mouse jumping around the screen, or when your mouse keeps clicking on its own.

You can do so, by simply leaving a comment in the section found under this article.

Fix: Microsoft Compatibility Telemetry Uses too Much CPU

Microsoft Compatibility Telemetry, a service meant to share the PC’s performance feedback with Microsoft, is often found to be using high CPU in Windows.

How do I fix Microsoft Compatibility Telemetry high CPU usage?

1. Disable from Task Scheduler

  1. Press Windows + R to open Run, type taskschd.msc, and then hit Enter.taskschd.msc
  2. Now, expand Task Scheduler Library, choose Microsoft, and double-click on Windows.Microsoft
  3. Select Application Experience, right-click on Microsoft Compatibility Appraiser and choose Disable from the context menu.disable to fix microsoft compatibility telemetry high cpu

That’s it! Once done, restart the computer for the changes to effect, and the Microsoft Compatibility Telemetry high CPU in Windows 11 should be fixed.

Remember that the task may be recreated after a while, so you must repeat the same steps. A more straightforward option would be to make more substantial changes, and Registry Editor helps do just that.

2. Edit the registry

  1. Press Windows + R to open the Run command, type regedit in the text field, and click OK.regedit
  2. Click Yes in the UAC prompt.
  3. Paste the following path in the address bar and hit Enter:HKEY_LOCAL_MACHINE\SOFTWARE\Policies\Microsoft\Windows\DataCollectionpath
  4. Right-click on the empty portion, hover the cursor over New, and then choose DWORD (32-bit) Value, and name it AllowTelemetry.allow telemetry DWORD to fix microsoft compatibility telemetry high cpu
  5. Once done, double-click on the entry, enter 0 under Value data, and click OK to save the changes.0 to fix microsoft compatibility telemetry high cpu
  6. Finally, restart the computer for the changes to come into effect.

After making the changes, the task shouldn’t be created again, and the high CPU usage issue would be resolved for good. However, in case it persists, it heads to the next solution.

3. Modify settings

  1. Press Windows + I to open Settings, choose Privacy & Security from the navigation pane, and then click on Diagnostics & feedback.diagnostic & feedback
  2. Now, disable the toggle for Send optional diagnostic data.disable to fix microsoft compatibility telemetry high cpu
  3. Next, expand Tailored experiences and then disable the toggle under it.tailored experiences
  4. Once done, verify whether the problem is resolved.

If the Microsoft Compatibility Telemetry continues to use a high CPU level, head to the following method.

4. Delete the file

  1. Press Windows + E to open File Explorer, paste the following path in the address bar, and then hit Enter:C:\Windows\System32paste
  2. Right-click on the CompatTelRunner.exe file and select Properties.properties to fix microsoft compatibility telemetry high cpu
  3. Navigate to the Security tab, and click Advanced.advanced
  4. Now, click on Change.change
  5. Click on Advanced.advanced
  6. Choose the Find now button.find now to fix microsoft compatibility telemetry high cpu
  7. Select the current user account from the list, and click on OK.choose
  8. Click OK on all subsequent windows to save the changes.
  9. Again, head to Advanced security properties for CompatTelRunner, choose the administrator account from the list and click Edit.edit
  10. Make sure all the available checkboxes are ticked and click OK to save the changes.full control to fix microsoft compatibility telemetry high cpu
  11. Finally, click OK on all the previously opened Windows.
  12. Once done, select the file, and hit the Del key.delete CompatTelRunner
  13. After CompatTelRunner.exe is deleted, restart the computer for the changes to effect.

That’s it! If Microsoft Compatibility Telemetry used high CPU no matter what, deleting the file should do the trick.

Also, if you ever want to get the file back, locate it on another PC running the same iteration, edition, and version of the OS, and transfer the file.

5. Check for other issues

If nothing worked, it could be another issue with the PC causing Microsoft Compatibility Telemetry high CPU usage in Windows 11. So first, we recommend you check for corrupt system files—many fixed things by running the DISM tool.

As a last resort, you can always factory reset Windows 11 or reinstall the OS, the latter being a far more effective troubleshooting technique, fixing many issues with the PC.

Once you have resolved the Microsoft Compatibility Telemetry high CPU usage problem, find out how to make Windows 11 faster than ever. If you have any queries or know of a solution not listed here, drop a comment below.

Sound Not Working on Dual Monitor in Windows (Fix Guide)

Having sound not working on dual monitor setups in Windows is a common issue. It usually happens when the wrong audio output is selected or the monitor lacks built-in speakers. Here’s how to fix it step by step.

How do I get sound to work on dual monitors?

Before we start, check your speakers and ensure they are properly connected and configured.

1. Reconfigure the Default Audio Playback device

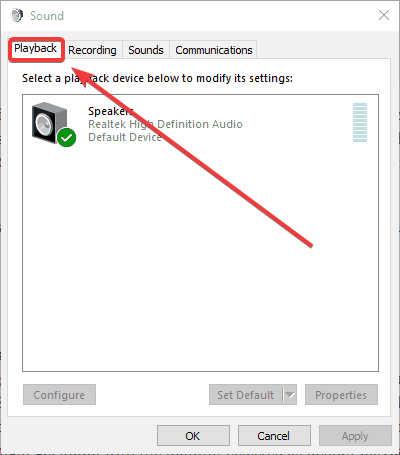
  1. First, right-click the speaker icon on the Windows system tray and select Playback devices to open the window in the snapshot directly below.
  2. Select the speakers that are usually your default playback device.
  3. Then press the Set Default button.
  4. Alternatively, you can right-click a playback device and select Set as Default Device on the context menu.
  5. Press the Apply and OK buttons to confirm your newly selected default playback device.
  6. If your secondary VDU does include built-in speakers, try unplugging the speakers and connecting the monitor with a secondary audio cable. Then you might get audio with the monitor selected as the default playback device.

It is often the case that audio is lost after connecting a second VDU because the connected monitor automatically becomes the default playback device.

2. Update or reinstall the Sound Card Driver

2.1. Update drivers with a dedicated tool

The easiest way to fix sound card driver issues is to let a trusted tool do the work for you. Fortect Driver Updater scans your PC, finds outdated or missing drivers, and installs the correct updates in minutes.

Here’s how to do it:

  1. Download and install Fortect Driver Updater.
  2. Launch the program and click Scan.
  3. Wait for the scan to finish. Outdated drivers will be listed.
  4. Click Update All to install the latest versions automatically.
  5. Restart your PC if prompted.

This method is fast, safe, and avoids the risk of installing the wrong driver.

2.2. Update drivers manually on Windows

  1. First, you’ll need to get the latest driver from the sound card manufacturer’s website. If you’re not sure what website to open, press the Win key + X hotkey and select Device Manager.
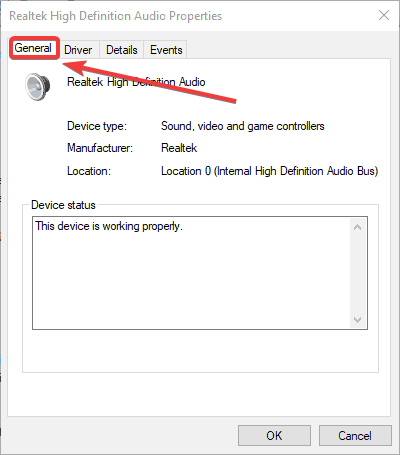
  2. Double-click Sound, video and game controllers, right-click your listed sound card, and select Properties to open the window in the snapshot directly below. The manufacturer for your sound card is listed on the General tab.
  3. Open the sound card manufacturer’s website in your browser.
  4. Next, open a driver or download section on the manufacturer’s website.
  5. Then search for the required sound card driver by entering the sound card in a search box or selecting it from drop-down menus on the website.
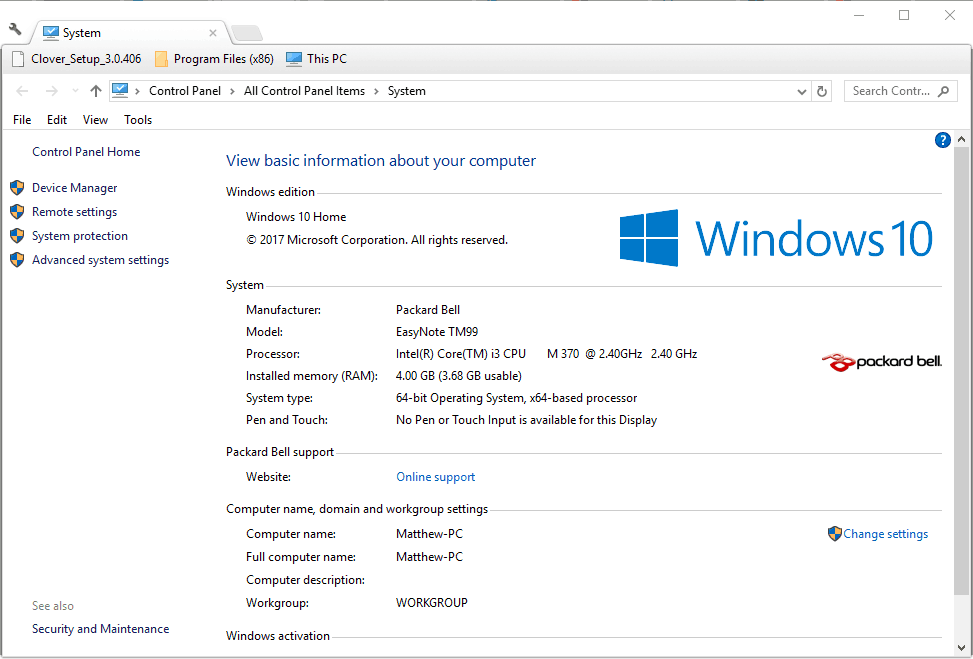
  6. Download the most updated driver for your sound card that’s compatible with your Windows platform. To check your system type, enter the keyword system in Cortana’s search box and select System to open the window directly below.
  7. After downloading the sound card driver, open Device Manager again, right-click your listed sound card, and select Update driver.
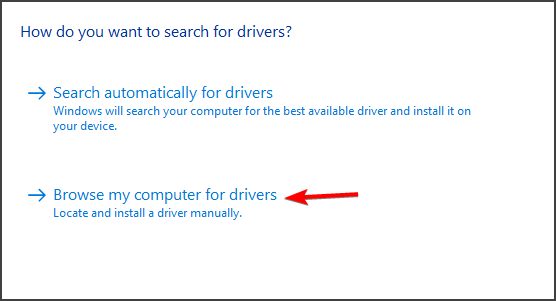
  8. Select the Browse my computer for driver software to manually browse for the saved driver.
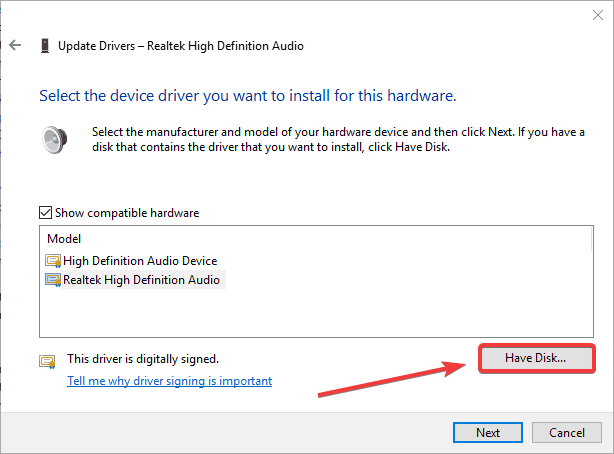
  9. Click the Let me pick from a list from a list of available drivers button, and then press the Have Disk button in the shot directly below.
  10. Click Browse, select the driver you downloaded, click Open, and then press the Next button.

2.2 Update drivers automatically

Manually updating the drivers can be a long task that implies a little bit of skill. That’s why, if you don’t want any headaches, we recommend updating your drivers automatically by using a dedicated, third-party tool.

The solution recommended below will update and repair all your drivers in one swift action, quickly and with the minimal implication from you.

3. Open the Volume mixer to check the audio settings

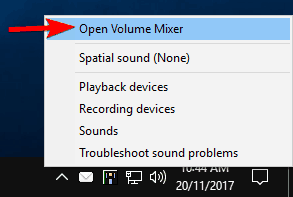
  1. Right-click the volume icon in the bottom right corner and choose Open Volume Mixer.
     Windows 10 Volume Control disappeared
  2. Make sure that the volume isn’t muted.
  3. Raise all speakers to at least 70% and check if the problem is still there.

If dual monitor sound is not working, the lack of sound doesn’t have anything to do with the audio level settings. If the volume control doesn’t work in Windows 10 we’ve got a guide on volume control not working to help you fix it.

4. Open the Windows Playing Audio Troubleshooter

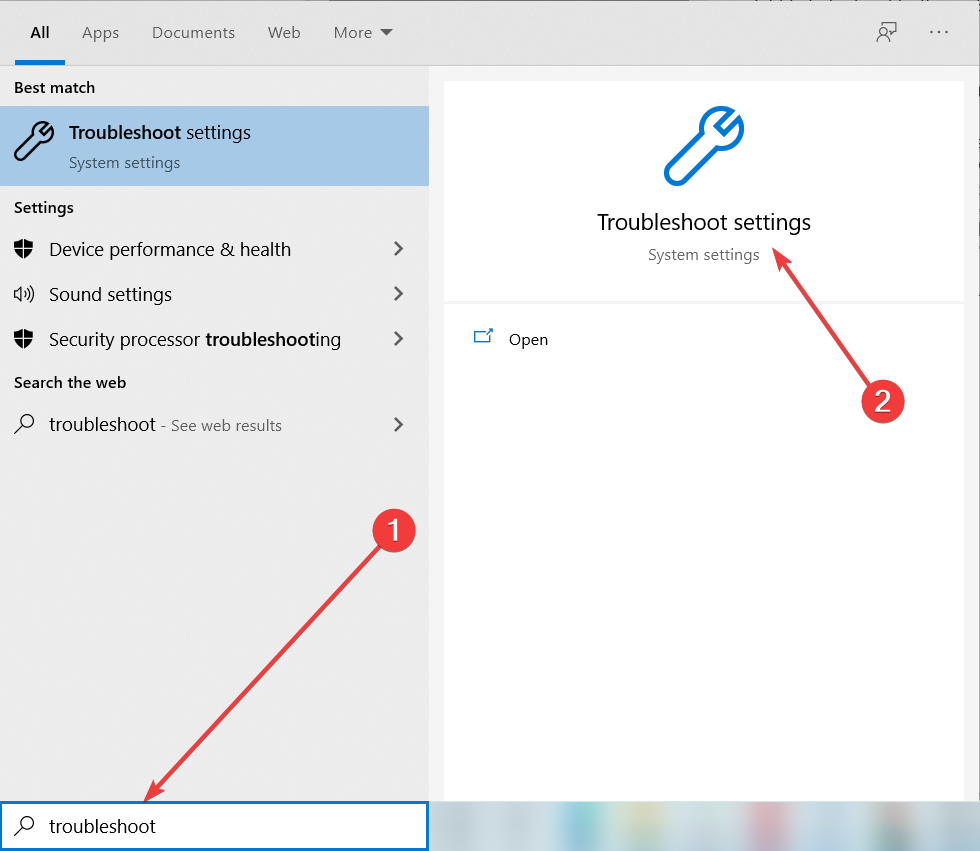
  1. Type troubleshoot in the Windows search box.
  2. Click Troubleshoot settings to open the system settings shown directly below.
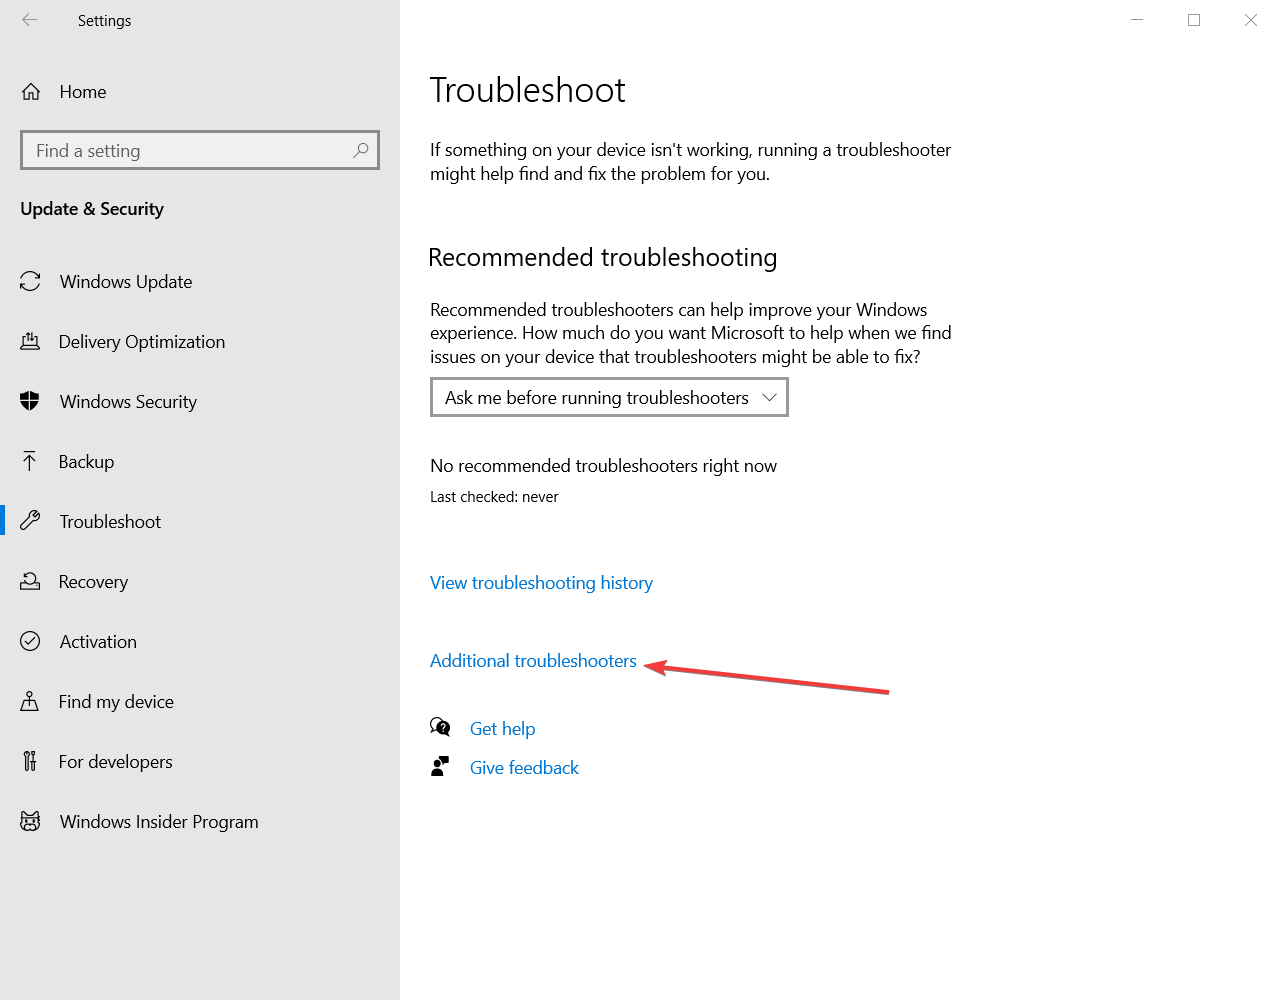
  3. Click on Additional troubleshooters.
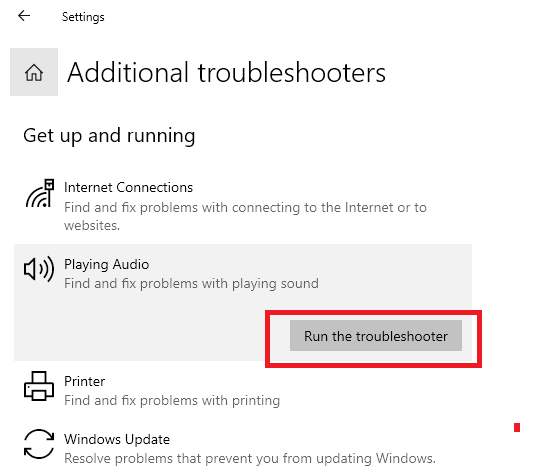
  4. Select Playing Audio and press its Run the troubleshooter button.high definition audio has a driver problem
  5. Now go through the troubleshooter’s suggested fixes to fix the sound.

5. Set the Correct Audio Output on Each Monitor

  1. Right-click the sound icon in the system tray (bottom-right corner of the screen).
  2. Select Open Sound Settings.
  3. Under the Output section, click the dropdown menu next to Choose your output device.
  4. Select the correct monitor (or speakers) that should be outputting the sound. If you’re using multiple monitors, make sure the correct one is chosen for audio output.

6. Check HDMI or DisplayPort Audio Settings

  1. Right-click the sound icon in the system tray.
  2. Select Open Sound Settings.
  3. Under the Output section, look for devices like “HDMI” or the name of your second monitor.
  4. Select the correct monitor that should play sound.
  5. If the HDMI or DisplayPort option isn’t listed, you may need to adjust the settings in your graphics card software (e.g., NVIDIA Control Panel or AMD Radeon Settings).

7. Enable Audio on Second Monitor

  1. Right-click the sound icon in the system tray and select Sounds.
  2. In the Playback tab, right-click on an empty area and select Show Disabled Devices.
  3. Look for your second monitor listed here (often named “HDMI” or the monitor model).
  4. Right-click the second monitor and select Enable.
  5. Set the second monitor as the default playback device by right-clicking and selecting Set as Default Device.

8. Check Monitor Settings

  1. On your second monitor, use the buttons or menu to open the monitor’s settings.
  2. Navigate to the Audio or Sound section in the menu.
  3. Make sure the volume is up and audio output is enabled.
  4. If there’s an audio mute setting, ensure it’s turned off.

9. Disable Stereo Mix

  1. Right-click the sound icon in the system tray and select Sounds.
  2. Go to the Recording tab.
  3. Look for Stereo Mix in the list of devices. If it’s enabled, right-click on it and select Disable.
  4. Click OK to save the settings.

These steps should resolve sound issues with dual monitors on your Windows PC.

That’s it! We hope that our solutions restore the lost sound for dual-monitor setups and benefit again from the signal out of your second display.

For more information, you can visit our no sound on Windows 11 guide. We also have an article that shows you what to do if HDMI audio isn’t working, so don’t miss it.

If you have any other questions, feel free to drop them in the comments section below.

Unable to Edit Word Document? Try These Fixes

Are you suddenly unable to edit a Word document? This issue is more common than you think, especially with files opened from email, downloads, or older formats. If you’re wondering why you can’t edit your Word document anymore or how to make a Word document editable, follow the practical solutions below.

What can I do if I can’t save a Word document?

1. Start Word in Safe Mode

  1. Make sure that Word is completely closed.
  2. Now, you have to locate the Word shortcut. To do this, hit the Windows key, type Word, then right-click on the first result and choose to Open file location.
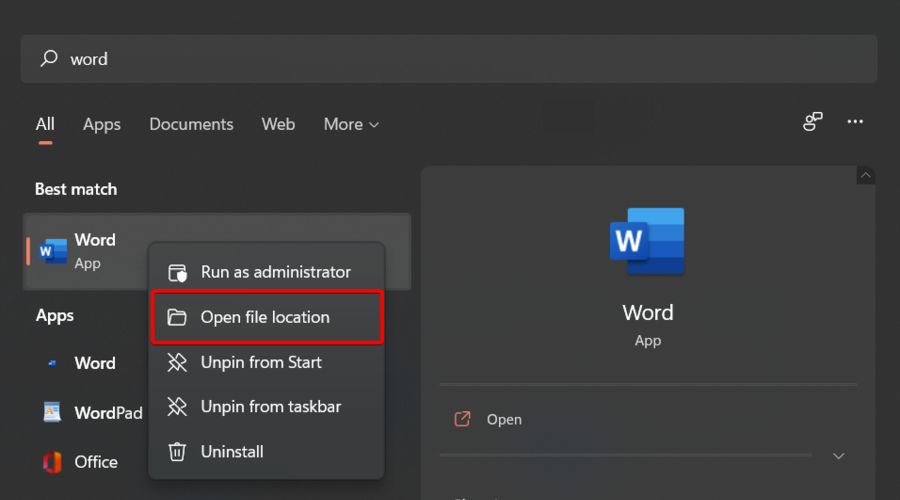
  3. Locate the Word shortcut, press and hold the CTRL key while double-clicking on Word.
  4. You’ll be asked to confirm that you want to start Word in Safe Mode.

If Word won’t save your documents to your desktop or any directory on your PC, perhaps the issue is related to one of the add-ins.

To fix the problem, users are suggesting starting Word in Safe Mode. If the issue doesn’t appear in Safe Mode, the problem is most likely related to your add-ins.

You can fix that by finding and disabling the problematic add-ins. This is quite simple, and you can do it by following these steps:

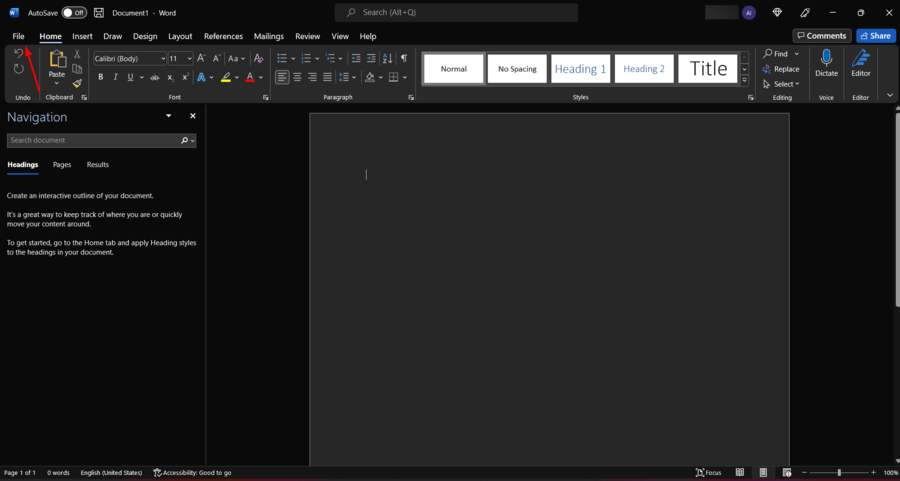
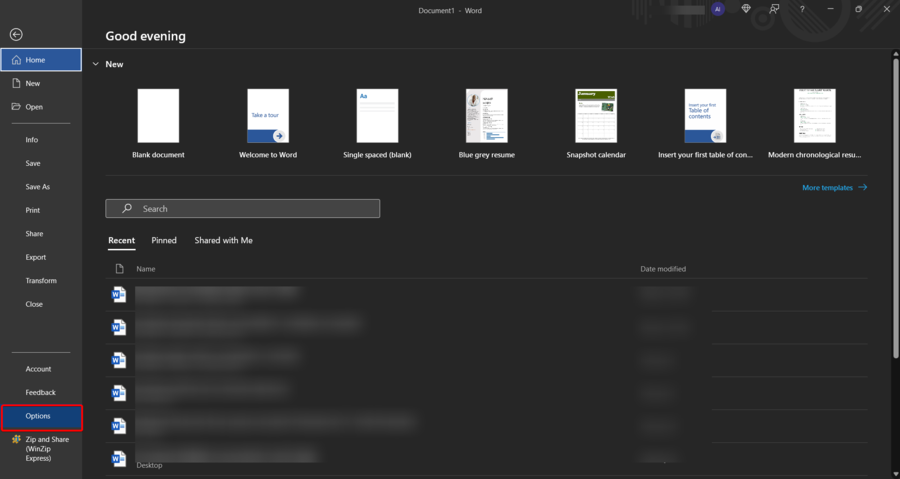
  1. In Word, go to File.
  2. Navigate to Options.
  3. Now, select Add-ins in the left pane, then click the Go… button next to Manage COM Add-ins.
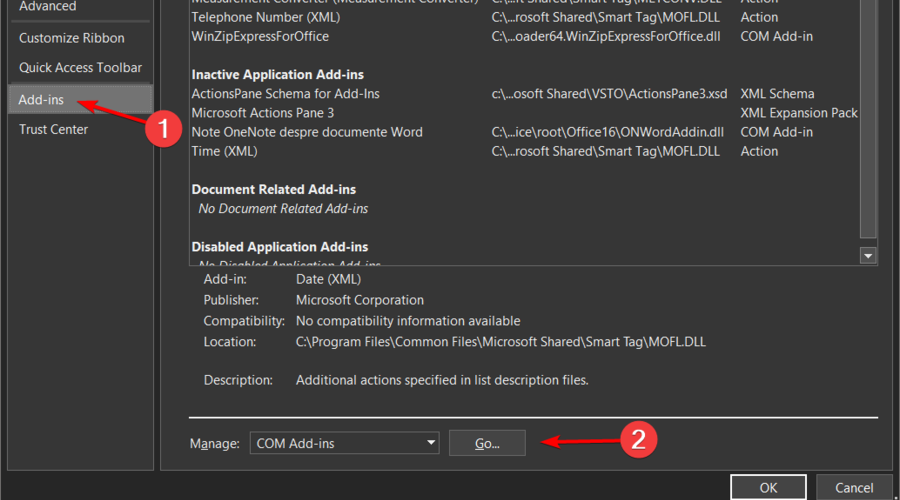
  4. Locate the problematic add-ins and disable them. Usually, the problem is related to the Send to Bluetooth Add-in, but others can also cause the problem.

After you disable the problematic add-ins, check if the problem is still there.

2. Rename Normal.dotm template

  1. Use the following keyboard shortcut to open the Windows run dialog box: Windows + R.
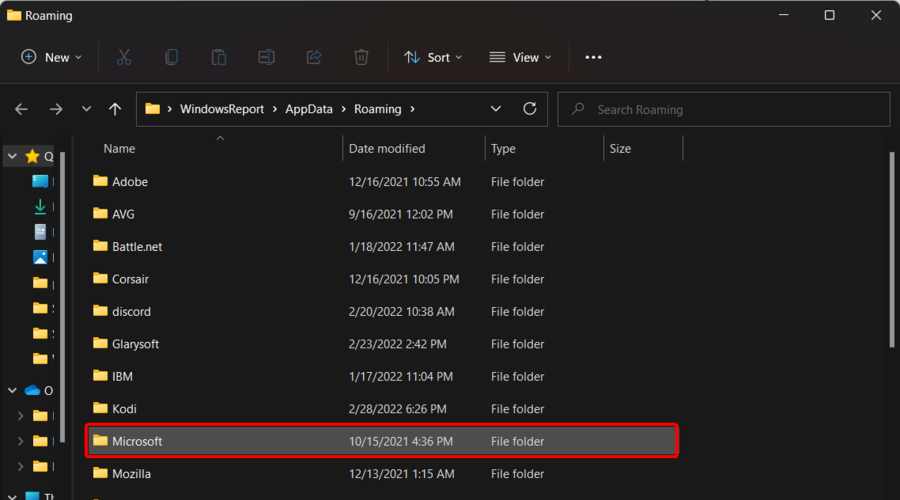
  2. In the opened window, input %appdata%, then hit Enter.
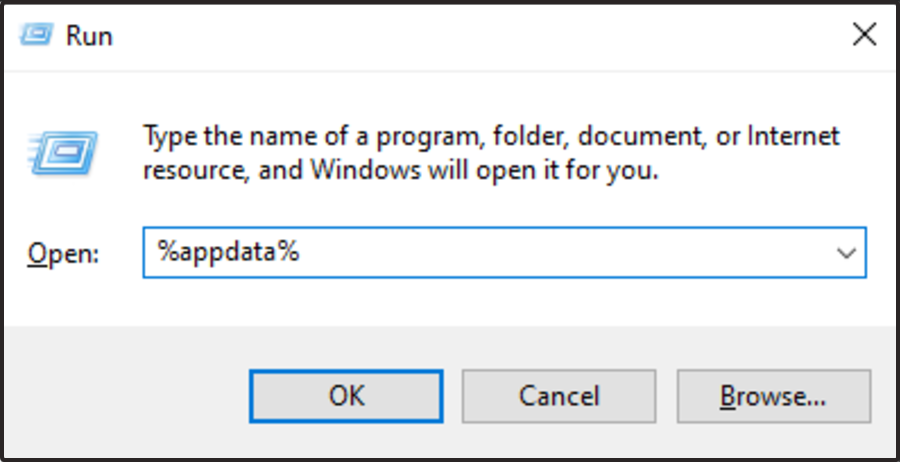
  3. Navigate to the Microsoft.
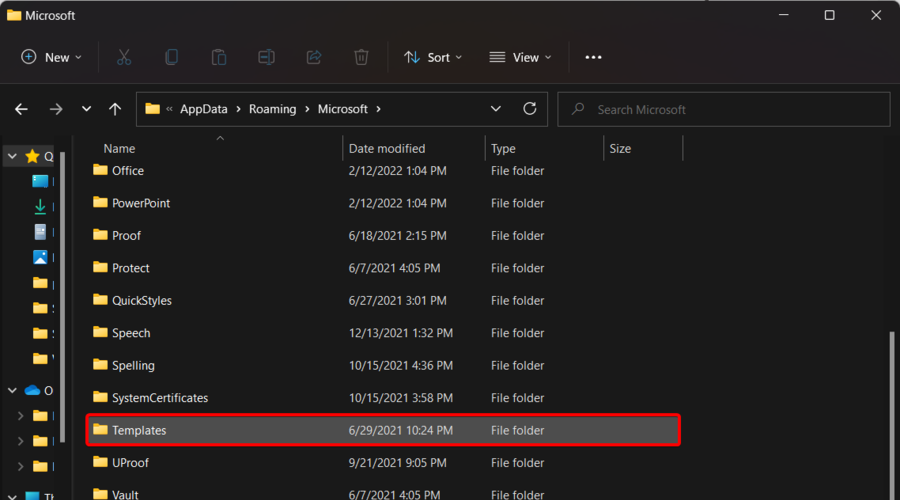
  4. Now, go to Templates.
  5. In there, you should see Normal.dotm file.
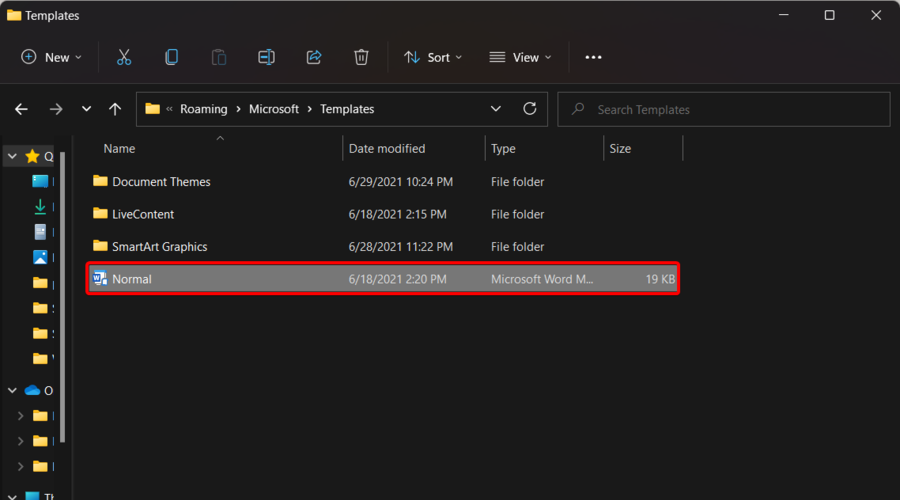
  6. Rename the file to OldNormal.dotm.

According to users, sometimes the problem can be caused by your template file. For example, if the default template file is damaged or corrupted, you’ll be unable to save Word documents on your PC.

However, you can easily recreate the template file on your own. This is quite simple to do, and you can do it by following these steps:

After doing that, you’ll force Word to recreate the new default template file. Once you recreate the template file, the issue should be resolved entirely.

Many users reported that this method worked for them, so we encourage you to try it out.

3. Disable Controlled Folder Access

  1. Press simultaneously on the following keys to open Windows Settings: Windows + I.
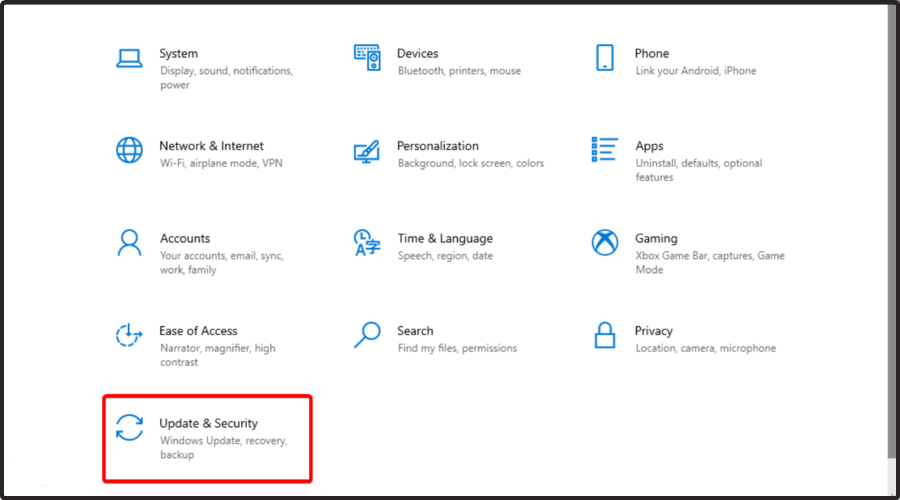
  2. Navigate to Update & Security.
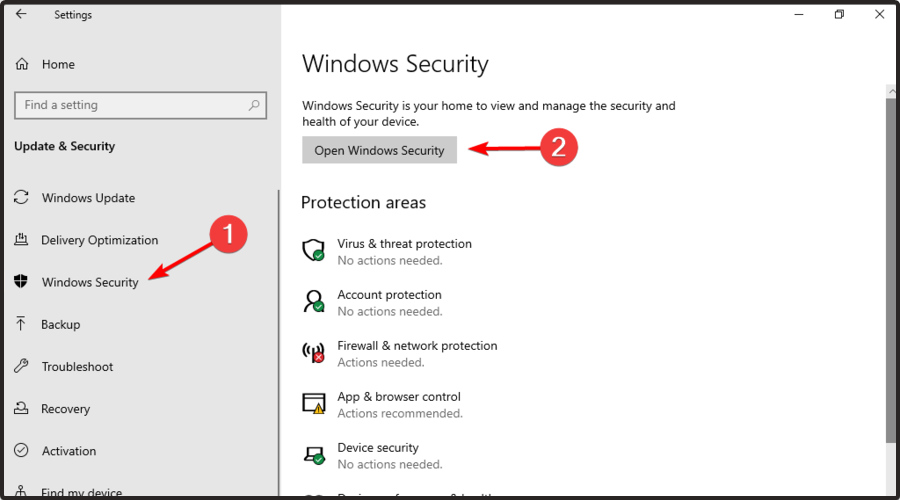
  3. Select Windows Security from the menu on the left, then choose to Open Windows Security from the right pane.
  4. Navigate to Virus & threat protection.
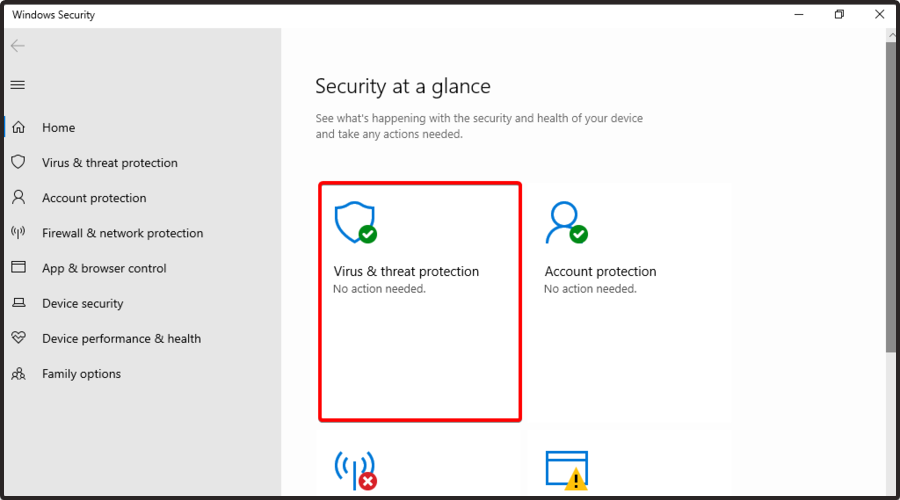
  5. Now select Virus & threat protection settings.
  6. Scroll down until you reach the Controlled folder access section. Then, click on Manage Controlled folder access option.
  7. Make sure that the Controlled folder access feature is disabled.
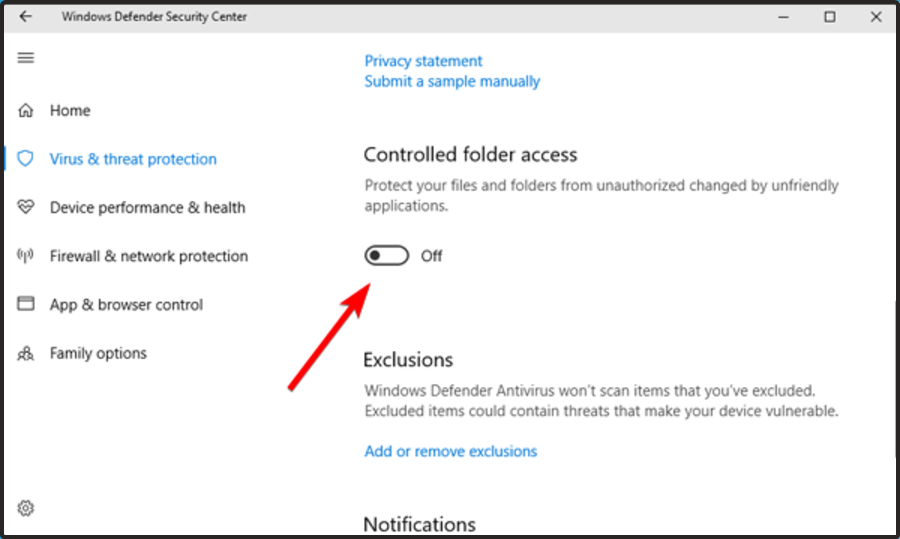
Windows Defender and other antivirus software can be why Word won’t save your document.

This is because it has a built-in folder protection feature; if this feature is enabled, you won’t be able to save files into specific directories. To fix this problem, it’s advised that you disable this feature altogether.

4. Check the save location

According to users, sometimes this problem can occur due to your saved location. For example, according to users, Microsoft Word doesn’t work well with long file paths, and if you’re saving your document in a path between 180 and 255 characters long, you might encounter this issue.

To fix the problem, it’s advised that you try saving in a different path, closer to the root directory, and check if that solves your problem. In addition, be sure to remove any special characters from the file path.

Word seems to have some issues with memorable characters, such as apostrophes and similar ones, so be sure not to have them in the file path or the file name. After making these changes, the problem should be resolved entirely.

5. Remove the Word Data registry key

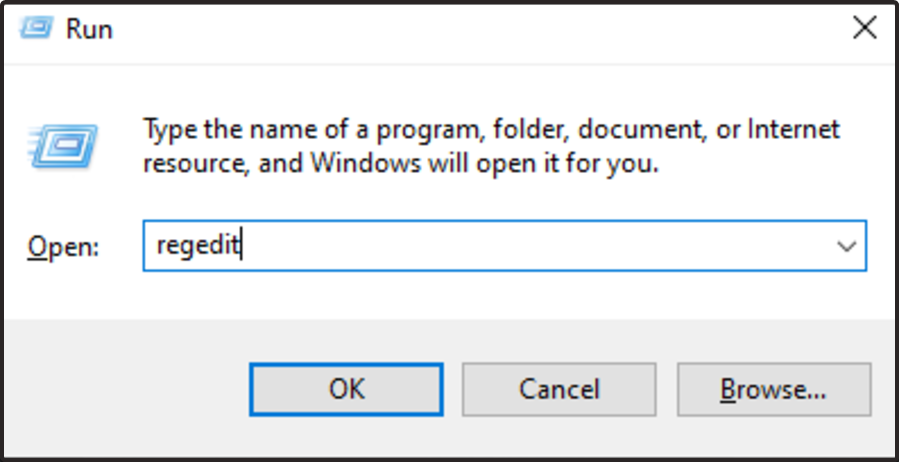
  1. Press the Windows key + R, type regedit, and press Enter.
  2. When Registry Editor opens, input this location in the search box: HKEY_CURRENT_USER\Software\Microsoft\Office16.0\Word\Data
  3. Remember that this key might be slightly different depending on the version of Office you’re using.
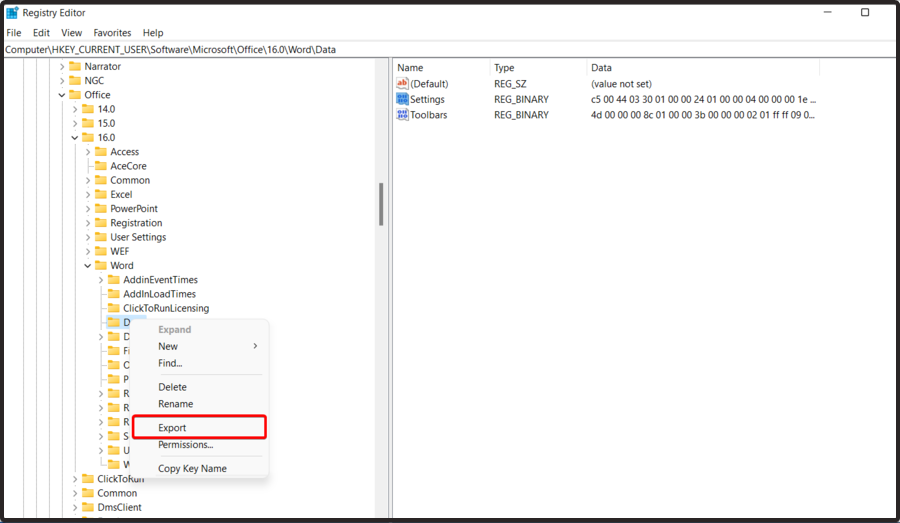
  4. Right-click the Data key and choose Export from the menu.
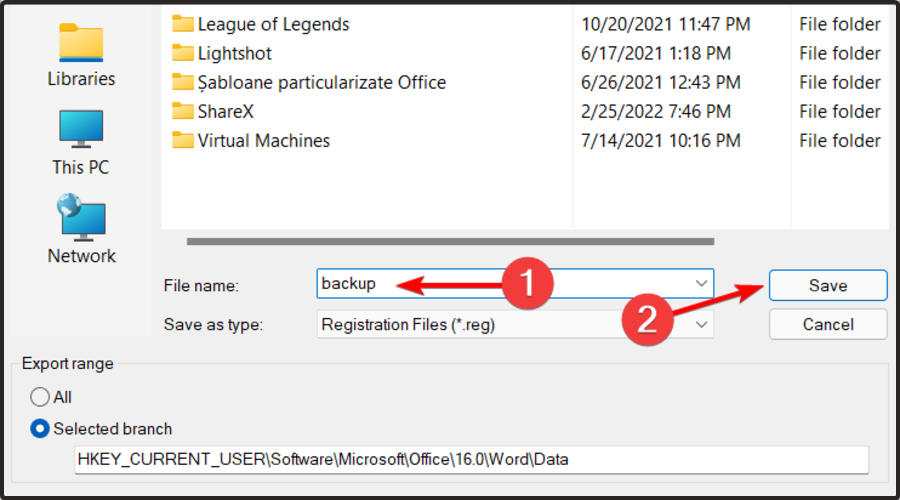
  5. Select the desired location, enter backup as the File name and click the Save button.
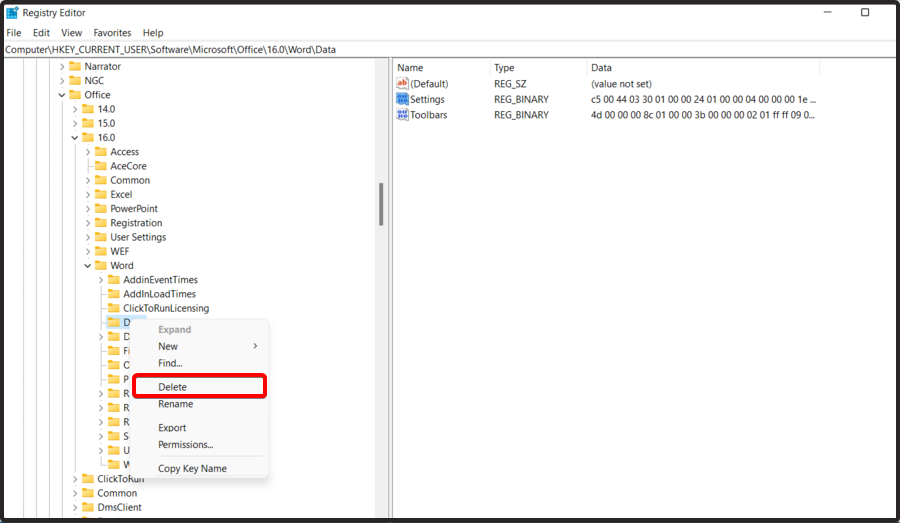
  6. Right-click the Data key and choose Delete from the menu.
  7. When the confirmation menu appears, click the Yes button.

According to users, if you’re unable to save Word documents on your PC, perhaps the problem is related to your registry.

Your registry can cause this issue; you need to remove a single key to fixing it. To do that, follow the above steps.

After that, start Word again and check if the problem is still there. If the issue is still present, run the backup.reg file you created in Step 4 to restore the registry to its original state.

6. Make Sure Microsoft Word Is Activated

If your Microsoft 365 subscription or Office license has expired or isn’t properly activated, Word may open files in read-only mode.

  • Open Word and go to File → Account
  • Under Product Information, check if the product is activated

If it’s not, sign in with your licensed Microsoft account or renew your subscription.

7. Save the Document Locally

Files opened directly from emails or browsers often open in Protected View or temporary storage.

  • Choose File → Save As
  • Save the document to your Desktop or Documents folder
  • Close the file, then reopen it from the saved location

This often solves the issue, especially if you’re working on files from Teams or Outlook.

8. Convert to a Standard File Format

If the file uses formats like .dot, .dotx, or .doc, it may be locked by default.

  • Open the document
  • Go to File → Save As
  • Select Word Document (*.docx) as the format

This creates a fully editable copy using the latest standard.

9. Disable Add-ins That Might Interfere

Some COM add-ins can block editing features without warning.

  • Go to File → Options → Add-ins
  • In the Manage dropdown, select COM Add-ins and click Go
  • Uncheck all listed add-ins and restart Word

If editing works, re-enable them one by one to identify the culprit.

10. Repair Microsoft Office

If Word files won’t allow editing despite being locally saved and in the right format, the Office installation might be corrupted.

  • Open Settings → Apps → Installed apps
  • Locate Microsoft Office, click the three-dot menu, and choose Modify
  • Select Quick Repair or Online Repair and follow the prompts

A clean repair can restore normal document behavior.

11. Turn Off the File Explorer Preview Pane

When the preview pane is enabled, it can lock documents, preventing edits.

  • Open any folder
  • Go to the View menu
  • Select Show → Preview pane to turn it off

Now reopen the document and try editing it again.

12. Update Microsoft Word

An outdated version of Word may have bugs or compatibility issues.

  • Go to File → Account → Update Options → Update Now

Once the latest updates are installed, try opening the file again.

13. Check Antivirus or Security Software

Some security tools block Office applications from modifying files as a precaution.

  • Temporarily disable real-time protection in your antivirus
  • Try editing the document

If it works, add Word to your antivirus exception or trusted apps list.

As you can see, many issues can prevent you from saving Word documents. And if you can’t save, recent documents won’t show up. Additionally, you can learn how to turn off the AutoSave feature.

Similarly, if you can’t edit your Word document, check our detailed guide for expertly curated fixes to solve the problem.

If you’re still having trouble saving your Word documents, it might help to look into other common issues, like when Word highlights can’t be removed, the annoying “Word can’t do this because a dialog box is open” error, or Word not opening in Windows 11. Each has a fix, and you might find your answer there.

Were you able to solve this issue using any of the solutions above? Please, let us know in the comments below.

W3wp.exe High CPU Usage: 5 Ways to Fix it for Good

Internet Information Service is critical for running web apps and is a w3wp.exe process, issues with which can cause high CPU usage and are detrimental to effective functioning.

How can I fix w3wp.exe high CPU usage?

1. Check if the traffic is higher than usual

  1. Launch a fast web browser, and go to Similarweb, a website that monitors online traffic.
  2. Type the web address in the search box and hit Enter.check traffic
  3. Similarweb will now list the monthly traffic. Remember, Similarweb only provides data for web pages with more than 5k monthly traffic.

The CPU usage for a web app increases with the web traffic, and if it’s considerably increased in a short span, chances are that’s why w3wp.exe has high CPU usage.

You can also use a comprehensive network monitoring tool to identify in real-time if there’s a sudden surge in traffic on a particular URL. If that’s the case, deploy more resources to handle the increased demand and get the CPU usage under control.

2. Identify errors in the web app

Another likely reason behind the problem is poorly written code leading to errors and triggering w3wp.exe high CPU usage.

Remember not all errors are visible to the end user. Some of the more complex ones usually occur in the background, leading to high CPU usage, with nothing being reasonably evident.

To combat this, either review the code or use Windows Event Viewer and IIS logs to identify the errors. Once done, take the necessary corrective measures to fix things, and there won’t be a w3wp.exe high CPU in Server 2016 anymore.

3. Terminate the w3wp.exe process

  1. Press Windows + R to open Run, type powershell in the text field, and hit Ctrl + Shift + Enter.power shell
  2. Click Yes in the UAC prompt.
  3. Now, execute the following script to terminate the w3wp.exe process: $p = get-process w3wp* | where-object {$_.cpu -gt 50000} stop-process -inputobject $p Ycommand to fix w3wp.exe high cpu

This is an effective fix, but it’s more of a workaround than a solution. Also, IIS will automatically restart the process with reduced CPU consumption.

Besides, remember that you can change the value in the command depending on the computer’s configuration.

If this fixes the w3wp.exe high CPU, create a batch file, add it to the task scheduler, and set it to run every hour or so.

4. Move the folder you are making the changes to

If you are getting w3wp.exe high memory or CPU while creating subfolders or modifying the existing ones, a quick workaround would be to move the folder (where the files are being written) out of the web application’s main folder and then make the changes.

Remember that this is a workaround and should only be used in the short run. Ultimately, you will have to identify and eliminate the underlying cause.

5. Check the antivirus

A few users reported that their antivirus conflicted with w3wp.exe and led to high CPU consumption. First, check if the antivirus has a buffer overflow protection feature and disable it.

If there isn’t an option to disable it or you can’t figure it out, uninstall the virus for a while and confirm whether the CPU usage comes to normal levels. If it does, we recommend installing the previous stable version or using a more reliable antivirus.

That’s it! With w3wp.exe high CPU fixed, you can continue running the web application effectively. Also, check our favorite web apps for drawing and editing. In case of any queries, reach out to us via the comments section below.

Folders & Files Disappeared on Windows 10 [Solved]

Windows 10 issues aren’t common, but some issues are rather unusual. According to users, files and folders are disappearing on Windows 10.

If your files disappeared on Windows 10, this is a big problem and interferes with your work, therefore, it’s crucial to fix it.

Why did my files suddenly disappear?

  • Files disappeared from Desktop (Windows 10) – If you can’t see the icons on your Desktop, you’ve probably just hidden them accidentally. This can be solved with a few clicks. Otherwise, a virus or malware attack could be the culprit.
  • Folder disappeared on Windows 7 – The same thing applies to Windows 7.
  • User folder missing in Windows 10 – If you cannot find the user folder in My Documents, just follow the solutions below.
  • Folder disappeared from Desktop in Windows 8 – Once again, the drill is identical in Windows 8.
  • Files missing after Windows 10 update – If your files are missing after installing a certain update, the best solution would be to uninstall the troublesome update.

How do I recover files that disappeared on Windows 10?

1. Show hidden files and folders

  1. Press Windows Key + S and type File Explorer. Choose File Explorer Options from the list.
    file-explorer-options
  2. When File Explorer Options window opens, go to View tab. Locate Hidden files and folders option and select Show hidden files, folders, and drives.
    file-explorer-options-view
  3. Click Apply and OK to save changes.

If your files and folders disappeared, maybe you should check for hidden files and folders.

Sometimes, files and folders might appear missing, but they are actually hidden. To show hidden files and folders, follow the above steps.

After you’ve changed this option, try searching for the missing files and folders on your computer. In most cases, the files should be in the same folder where you left them.

Need more info on hidden files and folders? Read our comprehensive guide to learn more about opening them.

2. Switch to your old user account

  1. Click the Start Button and click your username at the top.
  2. You should see another account available on the list. Click it to switch to it.
  3. After you switch to it, all your files and folders should be available to you.

In some cases, files and folders might disappear when you upgrade to Windows 10 because Windows 10 creates a new account for you by default.

Your old account is still present, but it’s not set as the default account, so you have to switch to it.

3. Search different hard drive partitions for your files

After you upgrade to Windows 10, your hard drive letters might get changed for some reason. For example, if you used to store files on your C drive, they might be moved to D:UsersYour_username folder on any other hard drive partition.

In order to locate your missing files and folder, make sure to check all hard drive partitions thoroughly.

Many users encountered that the second hard drive is not detected. Here’s a quick guide to solve this annoying issue and fix the files disappeared on Windows 10 issue.

4. Check the Users folder

  • Search for missing files and folders manually

After Windows 10 upgrade, certain files might be missing from your computer, however, in most cases they are just moved to a different folder. Users report that most of their missing files and folders can be found at This PC > Local Disk (C) > Users > User Name > Documents or This PC > Local Disk (C) > Users > Public.

  • Use a dedicated file finder

In case the missing files and folders are not located in the path mentioned above, you will have a hard time searching them.

In this case, we recommend you use file-finder software that will run multiple searches on all active storage elements of your system. We strongly recommend you Copernic Desktop search.

This tool will search not only all components of your system but also your mails, USBs, and external HDDs.

The software can also help you index files from your cloud storage platform so you can easily find anything on your drive.

On top of that, it can find scanned documents as it integrates OCR (optical character recognition) technologies. It is an overall advanced search tool that can help you find virtually anything on your PC.

⇒ Get Copernic Desktop Search

5. Turn off Fast Startup

  1. Press Windows Key + S and type Power Options. Select Power Options from the list of results.
    power-options
  2. Click on Choose what the power button does.
    power-options
  3. Click Change settings that are currently unavailable and scroll down to Shutdown settings.
    power-options-2
  4. Uncheck Turn on fast startup (recommended) and click Save changes.
    power-options-3

Users reported that Fast Startup can sometimes be responsible for disappearing files and folders on Windows 10. In order to fix this issue, some users suggest disabling Fast Startup by following the above steps.

6. Change Indexing options

  1. Press Windows Key + S and type Indexing Options. Select Indexing Options from the list of results.
    indexing-options
  2. When Indexing Options window opens, click on Advanced.
    indexing-options-advanced
  3. Go to Index Settings tab, and in Troubleshooting section click the Rebuild button.
    indexing-options-rebuild

If random files and folders are disappearing on Windows 10, you might want to change Indexing Options.

7. Backup your data before making changes

In case you haven’t yet upgraded to Windows 10 or done some important changes to your system, we strongly recommend you to make a backup copy of your system.

For that, you will have to use a backup software to make a copy of your files and store it in a safe place at your choice: USB or external HDD.

Dedicated software solutions are also great for regular use. You can set them up to create backups on a schedule, so you have all your data securely stored without having to do it yourself.

Many backup software includes cloud storage space, which is a good alternative to physical removable media because they are easier to access, you need your credentials.

8. Set the folder temporarily to hidden and read-only

  1. Find the folder with missing files and right click it. Choose Properties from the menu.
    open-properties
  2. In General tab go to Attributes section and check Read-only and Hidden.
    read-only-hidden
  3. Click Apply and OK.
  4. Right click the same folder again, and uncheck Read-only and Hidden options.
  5. Click Apply and OK to save changes.
  6. Enter the folder and the missing files should appear.

When files and folders disappear from a certain folder, sometimes setting that folder to hidden and read-only can fix the issue.

Before you set your folder to hidden, you need to make sure you can view hidden files and folders. In order to see hidden files and folders, check the second solution for detailed instructions.

9. Check the AppDataTemp folder

Sometimes, files that disappear might get moved to AppDataTemp folder. In order to recover the missing files and folders, go to the C:UsersAppDataLocalTemp folder.

Users reported that missing files were located in jbtempx-7895.ixx folder, but they will probably be located in a different folder on your computer, so you might have to do some manual searching.

We have to mention that you’ll have to reveal hidden files and folders in order to access AppData folder. For detailed instructions, also check the second solution.

10. Check your hard drive

  1. Open This PC and locate your hard drive. Right click it and choose Properties.
    hard-drive-properties
  2. Go to Tools tab and click Check Now button. Your hard drive will be scanned for errors. After the scan is completed, hidden files and folders should be restored.
    check-hard-drive

Files and folders can sometimes disappear if the drive index gets corrupted. In order to fix this, it’s advised that you check your hard drive.

Disappearing files and folders can cause a lot of problems, and if you have experienced similar issues, feel free to try some of our solutions.

Let us know whether you managed to get back the files that disappeared on your Windows 10 PC in the comments section below.

Windows 10 Installation Has Failed [Easily FIXED]

Upgrading from one version of Windows to another is usually seamless, you start the process and wait for it to finish. And while that’s usually the case, update issues can sometimes occur.

Namely, lots of users, after seemingly completing the installation, were prompted with the Windows 10 installation has failed error. They had to start again but the results were the same.

This can be a problem, especially if you’re eager to try the new version of Windows, but luckily, there are several methods you can use to fix it in no time.

To address this, we prepared a list of possible solutions that can come in handy. In case you’re still stuck with this installation error, make sure to check the steps we provided below.

What to do if Windows 10 installation has failed when using the Media Creation Tool?

If Windows couldn’t be installed, then the issue is most likely your installation media. In that case, we recommended that you download the ISO again and recreate the bootable drive.

Many reported their Windows 10 installation has failed in safe OS phase, and this occurs because certain installation components are damaged, so they’ll need to be created again.

Why Windows 10 installation failed?

There are several reasons why you might encounter this error message, and it usually appears due to installed components or security software.

Connected peripherals can also be a problem, so be sure to remove them before trying to install Windows. Lastly, file corruption could be the cause of this problem as well.

How do I fix Windows 10 installation failed?

As mentioned, many different factors can cause this error. Before we move on to tested ways you can fix this error, we recommend you run some preliminary checks, just to make sure the issue isn’t actually way simpler than you thought.

  • Restart your device – although frequently overlooked because it’s so simple, restarting gives your system a chance to close off any unnecessary processes and reconfigure, allowing it to work a little better
  • Clean your disk – use the Disk Cleanup utility to get rid of temp or system files that can take up space or interfere with your updates
  • Make sure you meet the system requirements, otherwise, the installation cannot be completed:
    • RAM: 1GB for 32-bit and 2GB for 64 bit
    • Hard disk space: 16 GB for 32-bit and 20 GB for 64 bit
    • CPU: 1GHz or faster
    • Screen resolution: 800 x 600
    • Graphics: Microsoft DirectX 9 or later with WDDM 1.0 driver
    • Internet access

1. Unplug all peripheral devices

Before starting the update disconnect all your nonessential peripherals. This includes printers, gamepads, external drives, and similar devices.

After disconnecting them, start the upgrade process. If the process is successful, connect your devices again.

2. Uninstall the language pack

  1. Press Windows key + I.
  2. Navigate to the Time & Language section.
    windows 10 time and language
  3. Go to the Language in the left pane. In the right pane, select all non-English languages that you have and click on Remove.
    windows 10 remove language
  4. After removing all of them, check if the problem is resolved.

If you’re having any issues with this solution, be sure to visit our guide and see what to do if you can’t remove keyboard language.

3. Uninstall third-party antivirus

  1. Press Windows key + X and select Apps and Features from the menu.
    windows 10 apps and features
  2. Select your antivirus software and click on Uninstall.
    windows 10 uninstall IP scanner
  3. Follow the instructions on the screen to remove it.
  4. After removing the software, try to perform the upgrade again.

4. Choose to keep only files when asked

  1. Start the upgrade process.
  2. Follow the instructions on the screen until you reach the Choose what to keep screen.
  3. Select the option to Keep personal files only.
    windows 10 keep personal files setting
  4. Follow the instructions to complete the process.

5. Rebuild BCD

    Another way to fix Windows installation failure is to rebuild the Boot Configuration Data. You can do this via the built-in command-line tool called Command Prompt.

  1. 1. Open the Start Menu and click the Power button.

  2. 2. Press and hold the Shift key and select Restart.

    windows 10 restart button
  3. 3. Choose the Troubleshoot option.

    windows 10 click troubleshoot
  4. 4. Select Advanced options.

    troubleshoot advanced options
  5. 5. Open Command Prompt. Select your account and enter the password if asked.

    troubleshoot advanced options
  6. 6. Run the following commands one by one:
    bootrec /FixMbr
    bootrec /FixBoot
    bootrec /ScanOs
    bootrec /RebuildBcd

  7. 7. This should finalize the repair procedure and you should be able to upgrade your PC without any problems.

6. Upgrade Windows 10 with installation media

  1. Download the Media Creation Tool.
    windows 10 media creation tool open
  2. Once the application is downloaded, run it.
  3. Accept the terms of service.
    windows 10 accept media creation tool
  4. Choose the option to upgrade your PC.
    media creation tool upgrade this PC option
  5. Wait while Windows downloads the necessary files. This can take a while depending on your Internet speed.
  6. Follow the instructions on the screen to complete the upgrade process.

7. Perform a clean install

  1. Download the Media Creation Tool and run it.
  2. Connect an empty USB flash drive to your PC.
  3. Select the option to Create installation media.
    windows 10 create installation media
  4. Choose your flash drive from the list.
  5. Wait for the process to complete. This can take a while depending on your Internet speed.
  6. Restart your PC.
  7. Now keep pressing the boot menu key while your PC boots. The key is different for each motherboard brand, and it’s shown briefly while the PC starts.
  8. Select your USB flash drive from the list.
    windows 10 boot menu
  9. Follow the instructions on the screen to complete the process.

What to do if Windows installation has failed on Windows 11?

  1. Restart your PC and keep pressing F2 to enter BIOS.
  2. Once you enter BIOS, navigate to the Security section.
  3. Look for PTT of TPM option, and enable it.
    windows 10 and configuration
  4. Optional: You can also enable Secure Boot.
  5. Save changes and try to perform the installation again.

For more information, we suggest visiting our guide on how to enable TPM in different versions of BIOS.

What are Windows 11’s requirements?

windows 11 system requirements
Windows 11 requirements (Source: Microsoft)
  • CPU: 1Ghz, dual-core, 64-bit compatible processor
  • RAM: 4GB
  • Storage: 64GB or more
  • Firmware: UEFI with Secure Boot support
  • TPM: TPM 2.0

If needed, you can even install Windows 11 without TPM, but this might be a security risk, so it’s not recommended.

Which versions of Windows are affected by this issue?

Windows installation has failed message is a generic error, and as such, it can appear on almost any version of Windows.

All editions seem to be affected by this issue, and many have reported Windows 11 installation problems, so even the latest version is affected by this issue.

What is a clean install?

A clean install is a process in which you use Windows 11 installation media to reinstall your operating system from scratch.

Usually, a clean install means that you’ll format your system drive to have a fresh start without any applications or files. If you choose to do this, we strongly advise you to back up your files beforehand.

Fixing the Windows 11 installation has failed installation error is relatively simple, and you should be able to fix it using our solutions.

In case the issue is still there, your only option might be to create a bootable flash drive and clean install Windows.

We also have a guide on what to do if Windows cannot install the required files during the setup, so don’t miss it.

Did you find a different solution for this issue? If so, feel free to share it with us in the comments section below.

Excel Sort Is Not Working: How to Properly Fix It

Microsoft Excel is a powerful tool that helps you manage and sort a huge dataset into meaningful information. However, several Microsoft Excel users have reported that for them the Excel sort is not working, and they are facing issues creating their spreadsheets.

If you are also one such user facing the Excel sort not working problem, then you are in the right place. Because this guide will give you a bunch of solutions to resolve the problem at your end. Let us get right into it.

Why is Excel sort not working properly?

After some research, we have created a list of reasons why the Excel sort is not working properly for you on your Windows PC:

  • Non-printable characters: If there are non-printable characters, such as paragraph marks, tab characters, optional hyphens, etc., in your Excel sheet, then the tool will have problems sorting data.
  • Hidden rows or columns: The presence of hidden rows or columns can also prevent you from applying a sort or filter.
  • You have already sorted data: By mistake, you might have already applied sort to your data which is why the formatting isn’t applying again.
  • File corruption: You should also ensure that the file that you are working with isn’t corrupt.

How can I fix the Excel sort not working problem?

Here are a few things that we would advise you to do before applying the advanced troubleshooting solutions:

  • A simple restart can fix multiple issues related to your PC. Chances are that Microsoft Excel is facing some temporary glitch or bug that is causing the problem.
  • Check if the MS Excel that you are working with is up to date as new updates often bring fixes for bugs.
  • Make sure that the file that you are working with isn’t corrupt.

Let us check out the advanced solutions to resolve the problem.

Note icon NOTE
We will be showing different examples for each solution to make you understand how the errors can affect the sort and filter process in Excel.

1. Delete any blank cell

  1. Select the entire dataset on your spreadsheet.
  2. Click on Sort & Filter in the Home tab and select Custom Sort.
  3. Select Total in Order by and Order as Smallest to Largest.
  4. Click OK.

When you press OK, you will see the blank cells will be placed at the bottom of the dataset after applying the sort tool, which isn’t the correct way. Here are two things that you can do to fix the Excel sort not working problem:

  • You need to remove the blank cells from your dataset.
  • Fill in the blank cells with data values and then apply the sort tool.

2. Remove leading/trailing space before cell values

  1. In the below dataset, you can see that there is leading space in cell values in the A2, A4, A6, and A7.
  2. Click on Sort & Filter in the Home tab and select Custom Sort.
  3. Select Sort by as Region.
  4. Press OK.

Once you apply the sort, you will see that the cells with leading spaces in their values are placed at the top ahead of the other cells.

To get rid of this problem, you need to remove the leading spaces from the highlighted cells and then apply the sort function.

3. Remove mixed data type

  1. In the below dataset, you can see that cells E6 to E9 contain Text values.
  2. So, to fix this issue, select the dataset and click on Sort & Filter.
  3. Select Custom Filter.
  4. In the message that pops up, select Sort anything that looks like a number, as a number option.
  5. Hit OK.

Often when you copy and paste data from another sheet or from the internet, it does not get pasted in a proper format. So, there could be some cells in your dataset containing text values in place of numbers.

In such a case, you can follow the above steps and ensure that the sorting function applies correctly to your spreadsheet.

4. Select a valid date format

  1. Select the cells that contain dates.
  2. Press Ctrl + 1 on your keyboard to open the Format Cells menu.
  3. Switch to the Number tab.
  4. Click on Date under Category.
  5. Select the appropriate date type inside the Type box.

These are a few ways you can make the sort function work properly for your dataset. Well, this isn’t the only problem MS Excel users come across.

We have a guide for users that are facing Excel won’t scroll down errors. You can also check out our guide on the Excel toolbar missing to fix the issue.

You can also check out our guide that gives you detailed steps to open two Excel side by side to improve efficiency. Also, did you know that you can open multiple Excel files at once, if not, then check out our guide.

Some users have reported that they aren’t able to open Excel on their Windows 11 PCs. Fortunately, we have a guide that lists some solutions to resolve this issue.

Windows 10 Media Creation Tool Not Working: How To Fix

Software distribution is nowadays mostly digital, and even Microsoft changed its approach with Windows 10. However, Windows 10 Media Creation Tool, the best tool for the job, isn’t as flawless as one would imagine.

Occasionally, it prompts users with the There was a problem running this tool message in Windows 10. The error is mostly followed by the alphanumeric error code which varies.

?Why is Windows Media Creation Tool not working?

The Windows media creation tool not working on a USB flash or the .exe file for various reasons. Some of these reasons include:

  • Lack of required privilege – Some programs require administrative privileges to run. And this is one of them. So, if the Windows media creation tool is not opening, try running it as an admin.
  • Interference from antivirus – Antiviruses can sometimes raise false alarms and flag a totally safe file. This might be why you are getting the Windows 10 Media Creation Tool, there was a problem running this tool error message. To solve this, you need to disable your antivirus temporarily.
  • Insufficient storage space – To make the jump to Windows 10, you need to have enough space on your PC and make sure all the requirements are met.

Moreover, here are some variations of the error that you may encounter:

  • Windows 10 media creation tool not working error code 0x80072f8f – 0x20000
  • Windows 10 media creation tool not compatible
  • Media creation tool there was a problem running this tool
  • Windows 10 media creation tool not working on Windows 7 – media creation tool 21h2 not working Windows 7
  • We’re not sure what happened but we’re unable to run this tool on your pc

Why Media Creation Tool is not opening?

Problems with Media Creation Tool not opening can be caused by the error 0x80072f8f – 0x20000, which is triggered by the TLS 1.2 being turned off.

If you can’t even get the app to launch, it’s either because the app files are corrupt, in which case you’ll have to fix/restore them.

Another common issue that prevents Media Creation Tool from opening is not having the correct permissions. Some apps require admin right to run properly.

Consider changing your background apps as well. Sometimes an app may not launch because it has not closed properly and is still running in the background.

How do I fix Windows Media Creation Tool if it’s not working?

➡️ Before exploring the fixes in this guide, don’t hesitate to precheck:

  • Ensure that you have no external device connected to your PC.
  • If that does not fix the issue, check that you have enough space and maybe try the Media Creation Tool on another PC.

If these do not work, you can now proceed to the fixes below.

1. Run the Windows Media Creation tool as Admin (worked for most users ✅)

    Certain programs need special permission in order to access and change system-related settings. Now, even though the Media Creation Tool is provided by Microsoft, just a simple double-click won’t suffice. Especially on older Windows versions.

    In order to avoid the Windows Media Creation Tool not working error code 0x80072f8f – 0x20000, ensure to run it as an administrator.

    1. Download the Media Creation tool installation file.
  1. 2. Right-click the setup file and open Properties.

    properties media creation not working
  2. 3. Click the Compatibility tab at the top and choose Run this program in compatibility mode for under Compatibility mode.

  3. 4. From the drop-down menu, choose Windows 7.

    compatibility
  4. 5. Now, check the Run this program as an administrator and click Apply followed by OK to save the changes.

    run

Of course, you will have to provide the administrator credentials for this solution to work.

2. Disable your antivirus

  1. Click the Start icon, type virus, and select Virus & threat protection.
     media creation tool not working
  2. Choose the Manage settings option.
    manage settings
  3. Now, toggle the switch for Real-time protection backward to disable it.
    real time

Sometimes, your antivirus might be the one preventing the Media Creation Tool from working. The steps above will help you disable the built-in security tool on Windows.

If you have a third-party antivirus, it is advised you disable it within the app or remove it completely. However, it must be noted that it is not safe to use your system without security software for long.

So, make sure you enable it as soon as you finish running the Media Creation Tool.

3. Enable the required services

  1. Press the Windows key + R, type services.msc, and click OK.
    services media creation tool not working
  2. Right-click the Windows Update service and select Start.
    Windows start
  3. If the service is running, choose the Restart option instead.
    restart
  4. Repeat the Steps 2 and 3 for the services below:
    • Background Intelligent Transfer Service (BITS)
    • Server
    • IKE and AuthIP IPsec Keying Modules
    • TCP/IP NetBIOS Helper
    • Workstation

Many users turn to Media Creation Tool when they want to speed up the upgrade to a major build.

Now, this tool, just like the Windows Update feature, uses update-related services and it heavily depends on their performance. Services like BITS are of utmost importance, even for a non-native application like Media Creation Tool.

So, you need to keep these services running to prevent any issues.

4. Tweak the Registry

  1. Press the Windows key + R, type regedit, and hit Enter.
    regedit
  2. Choose File in the Menu bar and click Export to backup your registry.
  3. Now, follow the path below in the left pane: HKEY_LOCAL_MACHINE\SOFTWARE\Microsoft\Windows\Current Version\WindowsUpdate\Auto Update
  4. Right-click on the empty space and choose New > DWORD (32-bit).
  5. dword
  6. Name the new dword AllowOSUpgrade, double-click it, and set its Value data to 1.     
  7. Click OK and restart your PC.
    value data media creation tool not working

Try running the Media Creation Tool again and see if it works. Follow the steps above carefully to avoid generating more errors. Corruption in the registry can cause BSoDS and app crashes.

In case something like that happens, we got you covered with our guide on how you can restore the registry without a backup. It is not difficult, but it may take some time.

5. Try a third-party tool instead

Finally, if you’re in possession of a Windows 10 ISO file, but can’t use Media Creation Tool to create bootable media, there’s always an alternative.

Most users would immediately turn to Rufus, which is a small, portable third-party tool.

With it, you should be able to create a bootable media USB and avoid the aforementioned errors with Media Creation Tool.

The Media Creation Tool is a great way to create operating system backups that will help you restore your data in case anything happens to your PC. So, when this tool stops working, it affects a lot of people.

We hope you were able to fix this problem with the solutions in this guide. Also, if you are facing the Media Creation Tool access denied ISO to USB issue, check our detailed guide to fix it quickly.

In case you have questions or alternative solutions regarding the Media Creation Tool error, it would be nice to share them with us in the comments section below.

Windows 11 Education Themes: How to Get & Enable

Windows 11 22H2, also known as the 2022 Update, contains many new features and utilities that users were waiting on for quite some time now.

Today, we are going to show you one that has most likely evaded your watchful eye, one that your offspring will surely appreciate.

Furthermore, there are quite a few hidden additions and unannounced for regular customers changes, such as the education themes in Windows 11 22H2.

Windows 11 has some hidden education themes embedded

In case you didn’t already know,  Microsoft recently published a support article detailing education themes in Windows 11 22H2.

And, like any other Windows theme, education themes in Windows 11 let users quickly personalize their devices using pre-set backgrounds, accent colors, cursors, and sounds.

Please note that administrators can prepare themes for schools and send them to some of the other managed devices.

The tech giant has also preloaded a couple of themes with neat space, Surface, and Windows 11-like backgrounds in its operating system.

So, if you want a fresh coat of paint for your computer, we can also show you how to enable hidden themes in Windows 11 22H2.

How can I enable the hidden Windows 11 themes?

  1. Press Win + R, type regedit and open it.
  2. Paste the following into the address and press Enter: Computer\HKEY_LOCAL_MACHINE\SOFTWARE\Microsoft\PolicyManager\current\deviceregedit step 1
  3. Right-click the device key and select New, then Key.new key
  4. Rename the new key to Education.
  5. Select the Education key and click Edit, then New, and create a DWORD (32-bit) value.new dword value
  6. Rename the new value to EnableEduThemes.edu themes
  7. Open the EnableEduThemes value and change its value data from 0 to 1.dword value
  8. Restart your PC and wait several minutes for Windows 11 to download hidden education themes.
  9. Launch the Settings app and go to Personalization, then Themes.

That is pretty much all you need to know on the topic so far, so go ahead and activate these hidden themes if you want to see what they’re all about.

Remember that this feature is still experimental and, therefore, not yet released to the wide public. However, enabling them won’t jeopardize your PC.

Have you managed to activate these hidden education themes for Windows 11? Share your experience with us in the comments section below.

How to Fix the Hashtag Key if it’s Not Working on Keyboard

The # key, commonly known as the hashtag key, or pound, sharp, or number key, is widely used today on social media, but for many of our readers, the hashtag key is not working on their keyboards. This is usually due to using a different language or layout on your keyboard. Press the Windows + Space keys to change it.

What do I do if the hashtag key is not working on the keyboard?

1. Try the on-screen keyboard

  1. Click Start and select Settings.
  2. Click on Ease of Access.
  3. Choose Keyboard.# key not working
  4. Toggle the On-Screen keyboard to ON.# key not working
  5. The keyboard will be displayed, try and check if # key works when using the on-screen keyboard.

Does this fix the # key not working problem? If not, go to the next solution.

2. Change language in Control Panel

  1. Click Start and select Settings.
  2. Click Time and Language.# key not working
  3. Click Region and Language.# key not working
  4. Under Country or Region, click on English (United Kingdom), and if not there, you can add it using Add a Language button.# key not working
  5. Click Windows display language.# key not working
  6. Select Options.
  7. Check what keyboard is selected under the Keyboards option.# key not working
  8. Change the input language to English for your location

Did this resolve the # key not working problem? If not, try the next solution.

3. Update chipset drivers from the computer manufacturer’s website

You can find drivers from the manufacturer website’s support section for your laptop type.

Here’s how to update and install drivers from the manufacturer website:

  1. Go to the Software and Drivers sub-section (depending on the laptop brand this name can change), or search for drivers using Google so you can get a direct link to your device’s manufacturer website.
  2. Once you’re on the website, find and download
  3. Install the appropriate drivers missing from your laptop that can cause # key not working

Alternatively, you can use dedicated software such as Outbyte. It is safer because it finds the corresponding version of your driver with no mistake and you can schedule automatic driver updates and fixes.

⇒ Get Outbyte Driver Updater

Check if this fixes the # key not working problem. If not, go to the next solution.

4. Run in Compatibility mode

  1. Right-click Start and select Device Manager from the list.
  2. Find Keyboards and click on it to expand the list
  3. Right-click on the keyboard driver and select Uninstall.
  4. Go to the Software and Drivers sub-section (depending on the laptop brand this name can change), or search for drivers using Google so you can get a direct link to your device’s manufacturer website.
  5. Once you’re on the website, find and download.
  6. Install the appropriate drivers missing from your laptop that can cause # key not working.
  7. Right click on the driver.
  8. Select Properties, then pick the Compatibility tab.
  9. Check the box Run this program in Compatibility Mode for.
  10. Select the Windows 10 operating system from the drop-down.
  11. Click on Apply, then click OK and run the file to install it

Does this fix the # key not working problem? If not, go to the next solution.

5. Use a different keyboard

You can connect a different keyboard to your laptop and check if the # key works. If you’re planning to buy a new keyboard, we recommend looking into the best PC keyboards because they will serve you well in the long run.

You can find a good keyboard for your own personal preferences.  You can find light wireless options that are great for everyday use.

If you use your keyboard for gaming, you should consider a product with smooth key inputs as well as backlighting and programmable keys.

Most worthwhile keyboards can be used on multiple operating systems and include keys for all major controls you may need.

6. Disable the Filter keys settings

  1. Click the Start button, type control and select Control Panel from the results.
  2. Select Ease of Access.
  3. Click on Change how your keyboard works.
  4. Find the checkbox for Turn on Filter Keys.
  5. Uncheck it if it has a mark, and check whether your keyboard works again.

Check if this fixes the # key not working problem. If not, go to the next solution.

7. Uninstall and reinstall the keyboard driver from the manufacturer’s website

  1. Right-click Start.
  2. Select Device Manager.
  3. Search for Keyboards and click on it to expand the list.
  4. Right-click on the Keyboard driver and select Uninstall.
  5. Go to the Software and Drivers sub-section (depending on the laptop brand this name can change), or search for drivers using Google so you can get a direct link to your device’s manufacturer website.
  6. Once you’re on the website, find and download
  7. Install the appropriate drivers missing from your laptop that can cause # key not working problem.

Did any of these solutions help you fix # key not working issue? Let us know in the comments section below.

HP Printer Not Printing Black [Solved For Good]

Hewlett-Packard printers usually print documents without any hiccups. However, some users have stated on forums that their HP printers don’t print black ink.

Most users will, at first, no doubt assume that their printers have run out of ink. However, the printers don’t print black, even though the cartridges still include some black ink.

There are some easy methods to fix the HP Printer not printing black issue, so be sure to check them out below. We have solutions for when your printer won’t print in black but has ink.

How can I fix the HP Printer not printing black issue?

1. Clean the printhead

HP printers with clogged printhead nozzles don’t usually print black ink. Thus, cleaning the printhead is a solution discovered by some users whenever their HP Printer won’t print black.

Note that you might need to do that a few times to fully restore print quality. How you clean a printhead can vary slightly between different HP printer models.

You can usually select a Deep Cleaning or Clean Printhead option from a Printer Maintenance menu on an HP printer’s control panel.

Selecting that option might then print a page showing some pattern output for various colors.

So make sure there is some paper loaded in the printer before selecting to clean the printhead. Check out your printer’s manual for more specific details on how to clean its printhead.

2. Open the Printer troubleshooter

  1. Windows 10 users can open the Printer troubleshooter by clicking the Cortana Type here to search button on the taskbar.
  2. Enter printer in the search box, and select Printers & scanners.
  3. Select Troubleshoot your printer, and click Run the troubleshooter.
  4. Choose your HP printer model listed in the troubleshooter’s window.
  5. Then press the Next button to fix the printing with the troubleshooter.

Windows includes a Printer troubleshooter that can come in handy for fixing printers when they don’t print as expected.

So that might provide some fixes for the HP Printer black ink not working issue. Follow the guidelines above to open the Printer troubleshooter.

3. Fix the printing with HP Print and Scan Doctor

  1. Download the HP Print and Scan Doctor software’s setup wizard.
  2. Click HPPS.dr.exe in the to install HP Print and Scan Doctor.
  3. Select Start to choose your HP printer, and then press the Next button.
  4. Select the Fix Printing option.
  5. Thereafter, the software might display wrench icons that highlight it fixed something. If so, close the troubleshooter and try printing again.
  6. Alternatively, you might see an X icon. If so, continue with the troubleshooter and follow the instructions it provides to fix the issue.

Alternatively, Hewlett-Packard printer users can also utilize the HP Print and Scan Doctor utility to fix printing.

That’s a troubleshooter more specifically designed for Hewlett-Packard printers. Users can fix printing with HP Print and Scan Doctor as follows.

Also, if your HP Envy printer doesn’t print after Windows 10 upgrade, take a closer look at our guide to fix this issue in no time.

4. Add a genuine Hewlett-Packard cartridge to the printer

Third-party ink cartridges don’t always work so well on Hewlett-Packard printers.

As such, replacing a third-party cartridge with a more official Hewlett-Packard cartridge might fix an HP printer that’s not printing black ink.

The HP website includes a search box where users can enter their printer models in a search box to find compatible ink cartridges for them.

Also note that there are fake, counterfeit HP ink cartridges. This might explain why your HP Printer won’t print in black ink.

So it might be worth checking if your cartridge is a fake.

HP printer users can check for fakes by scanning the QR codes on the cartridges with a QR scanner or SureSupply app.

Alternatively, users can enter serial numbers on the cartridge labels at the Hewlett-Packard verification page to validate them.

5. Replace cartridges that are low on ink

This goes without saying, but, if you experience that your HP Printer is not printing black, it might just be out of ink or low on it.

Most users will probably check the ink levels when a printer stops printing black ink. However, some users might overlook replacing a cartridge if it’s not completely out of ink.

It would help if you replaced the black ink cartridge when it’s very low on ink, but not necessarily completely out of ink. An exclamation mark on the ink level indicator highlights when a cartridge is running low on ink.

So replace the black ink cartridge if you see an exclamation mark for it on the printer control panel’s ink level indicator.

6. Align the printhead

A printer might not print black ink if it has not been calibrated. Thus, calibrating an Hewlett-Packard printer by aligning its printhead might fix its printing.

Most HP printers will include an Align Printhead option on their Printer Maintenance or Tools control panel menus that users can calibrate with.

Selecting that option will then calibrate the printer and print an alignment page. HP printer manuals will provide more specific printhead alignment guidelines for their respective models.

The above resolutions will probably fix HP printers so that they print black ink. If the above resolutions still don’t fix the printing, the printer itself might need repairing.

One of our readers also pointed out that this issue might be caused by a malfunctioning sensor that wrongly detects that the cartridge still has ink although in reality there is none left.

The solution to this problem is actually to install a new black ink cartridge on the printer.

Users can return HP printers that are still within their warranty periods to the manufacturer for repairs. So check the warranty period of your printer to see if you can return it to Hewlett-Packard.

We hope you managed to fix your HP Printer not printing black issue with our methods. Also, for more solutions or other questions, please access the comments section below.

Games Won’t Go Full Screen on PC: 9 Quick Ways to Fix

Some users report that they are unable to run games in fullscreen mode on Windows. According to them, the game just switches to desktop and stays that way while game sounds play in the background.

Since we’ve had this problem ourselves, here’s what you can do if the game won’t switch to full screen.

What do I do if Windows is not running games in full screen?

1. Set display scaling to 100%

  1. Open the Settings app and go to System > Display.
    Windows 10 not using full screen
  2. Find the Change the size of text, apps, and other items and set it to 100%.

You might have to sign out of your account and sign back in order to apply the changes, so be sure to do that. Up next, check if your games are working again.

Even more, there’s a game booster that will get rid of low FPS, freezes, lags, and other issues while playing. If you like the idea of a better gaming experience, don’t hesitate to give it a try as well.

⇒ Get Game Fire

2. Change your main screen

  1. Right-click on your Desktop and choose Display settings from the menu. display settings windows 11
  2. When the Display settings window opens, you should see two monitors labeled with numbers.
  3. In the Display settings window, click Identify.  click Identify to know the screen number and choose Show only on 1 or Show only on 2
  4. A number should appear on your screen.
  5. Now in Display settings set the monitor with the same number you got as the main monitor.

Save the changes and try running games in fullscreen. This is a simple trick confirmed by users, so give it a try too.

3. Change Nvidia Control Panel settings

  1. Open Nvidia Control Panel.
  2. Go to Manage 3D settings > Global settings.
    Windows 10 not playing games full screen
  3. Change Preferred graphics processor from Auto-select to High-Performance Nvidia processor.
  4. Click on Apply to save the changes and try running games in fullscreen mode.

If you own both integrated and dedicated graphic you might need to change few Nvidia Control Panel settings to fix this issue.

Certain users reported that they fixed the problem simply by adjusting their desktop size and position in Nvidia Control Panel. To do that, follow these steps:

  1. Open Nvidia Control Panel.
  2. Go to Display > Adjust desktop size and position.
    Windows 10 not playing games full screen
  3. Locate the scaling option and set it to No scaling and click on Apply to save changes.
    Windows 10 fullscreen games keep minimizing

After making these changes, you should be able to run games in fullscreen without any problems. If you use AMD graphics, you should be able to find similar options in Catalyst Control Center.

Can’t open Nvidia Control Panel on Windows 10? In such a case, rest assured that this detailed guide will help you fix the issue in no time.

4. Use the Compatibility mode

  1. Locate the problematic application, right-click it, and choose Properties from the menu.
    Games won't go full screen Windows 10
  2. Navigate to the Compatibility tab and check Run this program in compatibility mode for an option. Now select the desired version of Windows, then click on Apply and OK to save changes.
    Windows 10 full screen not working

5. Restore your Taskbar to the default position

  1. Press Windows key + I keyboard shortcut to open the Settings app.
  2. Now navigate to the Personalization section.
    Windows 10 fullscreen games keep minimizing
  3. From the menu on the left select Taskbar. Now in the right pane, enable Automatically hide the taskbar in desktop mode option.
    Windows 10 full screen games black screen

If Taskbar is not working, do not hesitate to take a look at our quick guide to find out how to solve the issue with ease.

As you can see, solving full-screen issues on Windows 10 is relatively simple, and we hope that you managed to solve this problem using one of our solutions.

Let us know if you managed to fix all your fullscreen game issues in Windows 10. Make sure to use the comments area in that regard.

Download the Standard VGA Graphics Adapter Drivers [Windows 7]

When you install a fresh copy of Windows 7 on your PC, then you might need to install certain drivers manually. While the process is often taken care of by the system itself, sometimes they aren’t.

If you are also searching for answers to how you can download the standard VGA graphics adapter drivers for your Windows 7 PC then you have landed in the right place. Because in this guide, we will share with you some solutions that will help you download the drivers. Let us get right into it.

What is the standard VGA graphics adapter on my PC?

In simple terms, the in-built or onboard graphics adapter is known as the standard VGA graphics adapter.

Most of the daily tasks that you do on your PC, such as copy/paste, viewing media, browsing the web, etc., are taken care of by the standard VGA graphics adapter.

When you play games or do other resource-intensive tasks, then your dedicated graphics adapter kicks in.

It is important to keep all drivers, including the standard VGA graphics adapter up to date, as it is responsible for most of the normal tasks on your PC. Also, updated drivers make sure that your PC is performing smoothly and optimally.

How can I download standard VGA graphics adapter drivers in Windows 7?

1. Use the support website

  1. Visit the Acer support website. Similarly, you can visit the support website for your laptop’s brand.
  2. Enter your device’s serial number, SNID, or model number, and press Enter.
  3. The support page will load all the drivers compatible with your PC.
  4. All you need to do now is to locate the VGA driver and hit the Download button.

The above example is for an Acer-branded laptop. You can visit the Dell website, HP website, etc., and download the standard VGA driver for your Windows 7 laptop or PC.

2. Use Device Manager

  1. Press the Windows key and open the Start menu.
  2. Type Device Manager and open it.
  3. Click on any collapsible entry one time.
  4. Click on the Action button at the top Menu bar.
  5. Select Add legacy hardware from the context menu.
  6. Click Next.
  7. Select Install the hardware that I manually select from a list (Advanced) option.
  8. Click on Display adapters.
  9. Click Next.
  10. Select your standard VGA graphics adapter in the Manufacturer box, and select the brand’s name in the Model box.
  11. Click on Next.
  12. Windows will download that device for you.

This is another way of adding legacy or standard VGA graphics adapter on your Windows 7. This is an easy way to install the missing driver.

3. Use a dedicated tool

Using one of our recommended driver updating tools will allow you to not only install missing drivers on your PC but also keep all drivers up to date.

They are pretty easy to use and help you keep your system performance optimal by keeping all drivers up to date with just a few clicks.

Apart from updating and downloading missing drivers, you can use it to schedule scans, create driver backups, and fix broken drivers.

How to update the VGA driver on Windows 7?

1. Use Device Manager

  1. Press the Windows key and open the Start menu.
  2. Type Device Manager and open it.
  3. Expand the Display adapter section.
  4. Right-click on your graphics adapter and select Update driver software.
  5. Select Search automatically for updated driver software.
  6. Let the system search the internet for updated drivers.
  7. If found, follow the on-screen prompts to install the latest VGA driver.

2. Use a dedicated Tool

  1. Download Outbyte Driver Updater.
  2. Install it on your PC.
  3. Once the application installs, run the program.
  4. Wait for the program to scan your PC for the missing drivers.
  5. Select the drivers that you wish to download, in our case, it is the VGA graphics adapter.
  6. Hit the Update button at the top.
  7. Follow the on-screen prompt to install the driver.
  8. Reboot your PC.

3. Use Intel Driver & Support Assistant

  1. Visit this website.
  2. Download the Intel Driver & Support Assistant on your Windows 7 PC.
  3. Install it.
  4. Launch the program.
  5. It will open a web page and automatically scan your PC for updated drivers.
  6. If it detects one, it will prompt you to install them.
  7. Install the latest graphics driver.
  8. Reboot your PC.

That is it from us in this guide. We have a guide that lists some of the best browsers that you can install on your Windows 7 PC.

Since Windows 7 is an old operating system and Microsoft has already ended its support for the OS, it becomes pretty essential to keep your Windows 7 PC protected from viruses or malware.

In such a case, we would suggest you check out our guide that lists some of the best and tested antivirus tools that will help you with the protection. The antivirus software is lightweight and won’t hog your old PC’s resources.

Let us know in the comments below which one of the above methods you used to download and update the standard VGA graphics adapter drivers on your Windows 7 PC.

How to Run a JAR File on Windows: 5 Easy Methods

A JAR file is a Java archive package format that might include a Java program within it.

While you can extract JARs with archiving software, you can’t run a pure Java JAR app as you would with other programs in Windows.

Since that’s the case, we’ll cover how you can run a pure Java app JAR file in Windows.

What are JAR files?

A JAR file allows Java runtimes to enclose an entire application, together with its classes and resources, in a single source.

Moreover, the elements inside a JAR file can be compressed, and that translates to shorter download times but also less space allocated on your drive.

In other words, JARs are more sophisticated archives that work in a Java environment on your PC. Missing JAR files can lead to the WebDriver cannot be resolved to a type compilation error.

How can I run a JAR file?

1. Add Java to Windows

  1. Type cmd in the Windows Search tab and click on the Command Prompt app.
  2. Next, input the following command and press Enter to run it: java -version
  3. The current version of Java is Version 8 Update 311.
  4. If you don’t have Java or the most up-to-date version, you can download it for free. After you get the file, hit the Install button.
  5. Run through the Java setup wizard and close the window after the installation process.
  6. Then, open your browser to verify that the program is working.

The crucial thing you need upfront is to have Java installed. It helps you open JAR files. Without it, Java apps aren’t going to run in Windows.

2. Use Java (TM) Platform SE binary

  1. Press the Windows key + E to start File Explorer and the folder that includes the file you need to run.
  2. You should right-click the JAR file and select Open with from the context menu, then select Choose another app.
  3. Sselect to open it with Java(TM) Platform SE binary.
  4. Click the Always use this app to open JAR files check box, then press the OK button to close the menu.
  5. Now you can run the selected JAR, and all other JARfiles will also be associated with Java.

3. Download a JAR file opener

  1. Go to the File Viewer Plus website and click on the Download Now button.
  2. After you download and install the app, hit the Finish button.
  3. Now click on the Open a file button or just drag-and-drop the JAR file in its window.
  4. You will instantly see the contents of the JAR file and you will be able to click the Extract All button to get them on a location on your drive.

You can open JAR files with a lot of apps out there but we strongly recommend File Viewer Plus because it can open and display over 300 different file types.

The new updated version has a plethora of features that will save you big time on opening, viewing, or editing files.

Keep in mind that the app supports the most popular text, audio, or video file type, as well as archive, source code, or web files.

Another popular JAR file opener is JAR Runner, by KIllerApplets.com. You can check it out if you prefer.

4. Run a JAR file in cmd

  1. 1. Input cmd in the Search tab.

  2. 2. Select Run as administrator to run Command Prompt with full privileges.

    search for cmd
  3. 3. Then input the following command (replacing pathtofile from the example with the actual path of the file you need to run): java -jar c:\pathtojarfile.jar

    command to open jar file
  4. 4. Press Enter.

  5. 5. That will open the executable JAR file so long as it contains a manifest file to specify the application’s entry point (the developers should have already included that in the archive.)

    If you develop your own Java programs, you’ll need to convert the JAR to an executable format.

  6. Another easy option is to run a JAR file in cmd, your PC’s built-in command-line tool. All you need to do is input a command while running the app with admin rights, and the file will be opened.

The command-lie app is crucial for debugging and installing apps but if it doesn’t work, learn how you can fix Command Prompt in Windows.

5. Add a third-party JAR executor to Windows

  1. Visit the JARX website and click on the Jarx-1.2-installer.exe file to download it.
  2. Download and click on the file to start the installation, then select the Close button when it’s finished.
  3. Now you can just double-click any JAR file to start it like a normal executable file. The JAR file will be executed.

There are also executor programs for Windows like JARX that enable you to run .JAR files the same as any other program.

How to get a JAR file for your favorite app?

There are lots of websites that offer free JAR versions of any application you can think of and we’re going to provide a simple example for Instagram.

  1. Go to a website that offers JAR file downloads like JAR Download. Proceed with caution because not all such websited offer clean content so you should double-check it with an antivirus and scan the files on arrival before using them.
  2. Click on the Java version of the app you’re looking for. In our case, the Instagram Java.
  3. Now hit the Download button and by using our guide above, you already know how to open the JAR and use the contents.

If you’re having trouble or you receive an error, learn what to do if you’re unable to access JarFile on Windows 10.

We hope that our guide helped you with all the information needed to run JAR files in Windows or even convert them if needed.

For any other issues, we also have another guide that will help you if JAR files are not opening on Windows 10.

If you have any other suggestions on how to run a JAR file or questions about the topic, leave them in the comments section below and we’ll be sure to take a look.

Fix: Audio Device You Selected is Currently Turned Off

Did you stumble upon the error message the audio device you selected is currently turned off in Windows? We have prepared all you need to know.

Audio is a big part of our multimedia experience, but audio problems can occur on Windows 10.

Users reported the Audio device is disabled message on their PC, and today we’re going to show you how to fix this problem on Windows 10.

Why am I getting The audio device you selected is currently turned off in Windows error?

There are a few reasons why a user might encounter this error message. However, in most cases, it is because of any of the following:

  • Disabled devices – This is an obvious trigger. You actually may have accidentally disabled your sound device on Windows 10.
  • Configuration issues – It is also possible that the device can no longer be enabled because of some wrong configurations.
  • Outdated drivers – In some cases, you may struggle because you have obsolete or corrupted audio drivers.

The solutions we will explore will include enabling an audio device on Windows 10 and other valuable tips to ensure you can fix this problem.

So, let us go right to them.

How can I fix The audio device you selected is currently turned off in Windows error?

  1. Use Command Prompt
  2. Use Registry Editor
  3. Make sure that your audio device is enabled
  4. Check if the audio device is enabled in the Device Manager
  5. Uninstall your audio driver

1. Use Command Prompt

  1. Press Windows Key + X to open the Win + X menu and choose Command Prompt (Admin).
  2. When Command Prompt starts, you need to enter the following commands and hit Enter after each one:
    • net localgroup Administrators /add networkservice
    • net localgroup Administrators /add localservice
  3. Lastly, close Command Prompt and restart your PC.

Command Prompt is a powerful command-line tool that allows you to change your system quickly. For example, if you are getting an Audio device is a disabled error message, you might be able to fix it by using Command Prompt.

2. Use Registry Editor

  1. Press Windows Key + R and enter regedit, then Press Enter.
    regedit run window Audio device is disabled
  2. When Registry Editor opens, in the left pane, navigate to the key below:
    HKEY_LOCAL_MACHINE\SOFTWARE\Microsoft\Windows\CurrentVersion\MMDevices\Audio\Render
  3. Then, Right-click Render and choose Permissions from the menu.
  4. In the Group or user names section, select ALL APPLICATION PACKAGES group and check Full Control in the Allow column.
  5. Now select the Users group and check Full Control in Allow column. Click Apply and OK to save changes.
  6. Expand the Render key, and you’ll see several subkeys with their names inside curly brackets. Right-click the first subkey; in our example, it’s {0abe5e3b-b3d6-4c81-99fb-cf015df6aba6}, and choose Permissions. Then repeat steps 4 and 5.
  7. Now expand the first subkey, {0abe5e3b-b3d6-4c81-99fb-cf015df6aba6} in our example, and change the permissions for FxProperites and Properties keys as we showed you in Steps 4 and 5.
  8. Repeat these steps for all subkeys that are inside the Render key. Also, change the permissions of all FxProperties and Properties keys.
  9. Finally, close Registry Editor and restart your PC.

According to users, you can fix the Audio device is a disabled message by modifying your registry. Certain groups don’t have the necessary permissions to access some keys in your registry, and that can cause this error to appear.

Before you start modifying your registry, we have to warn you that modifying the registry can be potentially dangerous.

We strongly recommend exporting your registry and using that file as a backup in case anything goes wrong.

3. Make sure that your audio device is enabled

  1. Right-click the Volume icon in the bottom right corner of the Taskbar and choose Playback devices from the menu.
  2. When the Sound window opens, right-click the space and choose Show Disabled Devices.
  3. Finally, check if your Playback device appears on the list. If your audio device is grayed out, it’s disabled. To enable the device, right-click it and choose Enable from the menu.
    enable device Audio device is disabled on Windows 10

4. Check if the audio device is enabled in the Device Manager

  1. Press Windows Key + X and choose Device Manager from the list.
  2. When Device Manager opens, locate your audio device and ensure it’s enabled. If not, right-click the device and choose Enable device from the menu.

After enabling your audio device, the problem should be resolved entirely.

Device Manager allows you to disable your devices quickly, so you might want to check in Device Manager if your device is disabled.

5. Uninstall your audio driver

  1. Press Windows Key + X and choose Device Manager from the list.
  2. Locate your audio device, right-click it and choose Uninstall device from the menu.
    the audio device you selected is currently turned off in windows
  3. Select Uninstall when the confirmation dialog appears.
    the audio device you selected is currently turned off in windows
  4. Lastly, close Device Manager and restart your PC.

After your PC restarts, the default audio driver will be automatically installed. However, if the issue persists, go to your motherboard or sound card manufacturer’s website and download the latest driver for your audio device.

So, if you’re getting the Audio device is disabled error message, you might be able to fix it by uninstalling your audio driver. However, your audio driver can become corrupted, and that can cause this error to appear.

Sometimes Audio device is disabled error can appear because you installed an update to your PC or if you made a specific system change. If your computer started showing this error recently, you might use System Restore to restore it. This usually would not be necessary in most cases.

Also, for extreme situations, you may perform a Windows 10 factory reset.

The Audio device is disabled error can prevent you from enjoying multimedia on your Windows 10 PC. However, one of our solutions can quickly solve this error.

Ethernet Doesn’t Have a Valid IP Configuration (Windows 10 Fix Guide)

If you’re seeing “Ethernet doesn’t have a valid IP configuration” on Windows 10, your PC can’t get a proper IP from the router. This error stops your system from accessing the internet and may also affect Wi-Fi.

How to Fix “Ethernet Doesn’t Have a Valid IP” on Windows 10

1. Restart Your Router and PC

  • Power off your router and unplug it for 30 seconds.
  • Restart your Windows 10 PC and reconnect the Ethernet cable.

If the issue persists, check for firmware issues using this guide on how to update your router firmware.

2. Release and Renew Your IP Address

  • Press Win + R, type cmd, and press Enter.
  • In Command Prompt, run: ipconfig /release ipconfig /flushdns ipconfig /renewipconfig flush dns
  • Restart your PC and test the Ethernet connection again.

3. Set a Static IP Address

  • Go to Control Panel > Network and Sharing Center.network and sharing center control panel
  • Click Change adapter settings.adapter settings
  • Right-click your Ethernet connection > Properties.Network Connections window, locate & right-click the ethernet connection and select Properties
  • Select Internet Protocol Version 4 (TCP/IPv4) > Properties.
  • Choose Use the following IP address and enter:
    • IP address: 192.168.1.100
    • Subnet mask: 255.255.255.0
    • Default gateway: 192.168.1.1
  • Save changes and reboot.

4. Reset the Network Settings

  • Open Settings (Win + I) > Network & Internet > Status.
  • Click Network reset at the bottom.
  • Restart your PC after the reset completes.

5. Disable Fast Startup

  • Open Control Panel > Power Options.
  • Click Choose what the power buttons do.
  • Select Change settings that are currently unavailable.change settings that are currently unavailable
  • Uncheck Turn on fast startup and click Save changes.

6. Reinstall Your Ethernet Adapter

  • Open Device Manager (Win + X > Device Manager).
  • Expand Network adapters.network adapters in device manager
  • Right-click your Ethernet adapter > Uninstall device.
  • Restart your PC to reinstall the driver automatically.

If your adapter isn’t listed, this fix for missing Ethernet adapter in Device Manager may help.

7. Check for Driver Updates Automatically

Manual Method:

  1. Open Device Manager.
  2. Expand Network adapters and right-click your Ethernet driver.
  3. Click Update driver > Search automatically for drivers.
  4. If Windows finds a new driver, install it and restart your PC.

See this driver update tutorial for Windows 10 for more detailed methods.

Automatic Method:

➡️ Want to skip the hassle? Use Fortect Driver Updater to update all your drivers in one click.

  1. Download and install the tool.
  2. Launch it and click Scan Now.
  3. Click Update All or just the Ethernet driver.
  4. Restart your PC once updates are complete.

Why This Fix Works

This error is often tied to DHCP failures, bad driver installs, or buggy configurations. It may also show up during random Ethernet disconnections on Windows 10 or if you’re using specific hardware like a Dell docking station with Ethernet not working.

FAQs

Why does Ethernet say it doesn’t have a valid configuration?

The system can’t assign a valid IP from the router. This could be due to DHCP failure or outdated network drivers. Check for other Windows 10 Ethernet problems.

Can I use Wi-Fi and Ethernet together to avoid this issue?

Yes. Learn how to use Wi-Fi and Ethernet simultaneously for a backup.

Is high Ethernet usage in Task Manager related?

It might be. Check this Ethernet spiking Task Manager fix to reduce background load.

How do I fix driver errors showing for Ethernet?

Start with this guide on resolving driver problems for Ethernet adapters.

Conclusion

The “Ethernet doesn’t have a valid IP configuration” error on Windows 10 is a common but fixable issue. Whether it’s caused by drivers, settings, or hardware conflicts, the steps above should help restore your connection.

Unable to Type in Excel: Common Reasons & How to Fix It

If you’re unable to type in your Excel cells, you should check your editing options and rule out hardware graphic acceleration problems. In this article, we’ll show you how to do all that + other simple tricks to fix the inability to type in Excel.

What can I do if I can’t type in Excel?

Go through the following before trying any advanced troubleshooting steps:

  • Ensure you change your cell font color to black.
  • Turn off background apps running on your computer.
  • Close and reopen Excel.
  • Restart your PC and check if you can type in Excel.

If you can’t fix the problem, proceed with the following solutions.

1. Start Excel in Safe Mode and disable the Excel Add-Ins

  1. Press Windows + R key to open the Run dialog box, type excel.exe /safe, then click OK to start Microsoft Excel in Safe Mode.
  2. Go to File in the top menu bar, then select Options from the menu on the left.
  3. Select Add-ins on the right, select Excel Add-ins, then click on the Go button.
  4. Uncheck the boxes next to the active Add-Ins and click OK to save the changes.
  5. Restart Excel and check if the error persists.

Starting Excel in Safe Mode fixes third-party app interference while disabling the Add-ins will fix any issues for corrupt add-ins.

2. Verify the editing options settings

  1. Open Excel, click on Files in the top menu bar, then select Options from the menu on the left.
  2. Select the Advanced option and check the box for Allow editing directly in cells.
  3. Close Excel and reopen it, then check if you can now type.

The Allow editing directly in cells checkbox is most likely unchecked. Checking the box will fix the problem.

3. Repair Microsoft Office

  1. Press Windows + R key to open the Run dialog box, type appwiz.cpl, and click on OK to open Programs and Features.
  2. Right-click on Microsoft Office and click on Change from the drop-down.
  3. Click the Quick Repair option on the new windows, and tap the Repair button.
  4. Try the Online Repair option if Quick repair can’t fix it.

Repairing Microsoft Office will resolve missing or corrupt app files that may cause you unable to type in Excel.

You may be interested in adding the Run command to the Start menu in Windows 11.

4. Disable the hardware graphics acceleration

  1. Launch Excel, click on Files in the top menu bar, then select Options from the menu on the left.
  2. Select the Advanced option.
  3. Go to Display, check the box for Disable hardware graphics acceleration, and click on OK to save the changes.
  4. Close and restart Excel, then try typing and see if you can.

Disabling the hardware graphics acceleration will fix graphics issues that may cause you to be unable to type in Excel.

5. Download the latest updates for Excel

  1. Launch Excel and click on Files in the top-right corner.
  2. Click on Account from the menu on the left, click Update Options, then tap on the Update Now option.
  3. Restart your PC and check if the save function in Excel works.

The most common reason why you can’t type in Excel is cell formatting. Make sure the font color isn’t set to white, making the text invisible. Other factors include hardware graphic acceleration, which can prevent text from displaying properly, interference from other apps and corrupt system files.

Following the above-mentioned steps should help you get rid of all these issues.

Also, users complain about not being able to access Excel toolbar for some reason.

If any update is available, it will automatically install it. Updating Excel will fix bugs that may be causing issues with it and install the latest features for Excel.

In conclusion, you may be interested in the ways to fix the Excel file that could not be found error on your computer. Also, our readers can check our article about Excel file format and extension not matching and how to fix the problem.

For more questions or suggestions on this topic, kindly drop them in the comments section below.

Shut Down Windows 10 Without Start Menu: 6 Ways to Do It + Video

The Windows Shut down option has always been on the Start menu. However, sometimes the shutdown can be missing. This isn’t a problem because you can shut down Windows 10 without a Start Menu.

First try these manual shutdown options that don’t imply the Start menu:

  • Using the shutdown button – This is the most common method that the majority use. However, sometimes the shutdown button is not working, so you need to look for alternative methods.
  • Using the power button – Many users prefer using the Power button to turn off their PC. Be sure to check your power settings and make sure that everything is properly configured before using it.
  • Keyboard shortcuts – You can turn off your PC with keyboard shortcuts. You can even create a shutdown shortcut if needed.

How do I shut down Windows 10 without Start Menu?

1. Use the Windows 10 shutdown dialog box

  1. Minimize or close all windows.
  2. Press the Alt + F4 combination on your keyboard.
  3. Select Shut down from the drop-down menu and click OK.
Note icon NOTE
Few users reported that this method didn’t work for them. If you experience any issues, make sure that all active windows are minimized before trying it.

2. Use Windows Win + X menu

  1. Right-click the Taskbar or press Windows key + X.
  2. Expand the Shut down or sign out section and select Shut down.
  3. Optional: Instead of Step 2, press U then U again on the keyboard to turn the PC quickly off.

3. Use Windows PowerShell

  1. Press the Windows key + X keyboard combination.
  2. Next, select Windows PowerShell (Admin).
  3. Type the following command and press Enter to run it: shutdown /s/f/t 0

Using the command above in Windows PowerShell will immediately turn off your laptop or desktop.

4. Add a Shut down shortcut to the Desktop

  1. First, right-click the desktop and select New, then choose Shortcut.
  2. Type the following line in the location box and click the Next button: shutdown.exe -s -t 00
  3. Enter Shutdown in the Type a name text box, and click Finish.
  4. Right-click the Shutdown shortcut and select Properties, then hit the Change Icon button.
  5. Select a shortcut icon from the Change icon window and click OK.
  6. Click the Apply and OK buttons to add the new icon to the shortcut.

You can also add a keyboard hotkey to the shortcut that will shut Windows down when you press it. From the shortcut’s Properties, click on the Shortcut key box and press S to add a Ctrl + Alt + S hotkey.

Now, whenever you click the Shutdown shortcut, the system will start the Shut down process and close your machine.

5. Schedule an Automatic Shut Down

  1. Open Run with the Windows key + R keyboard shortcut, then type taskschd.msc and click OK to open Task Scheduler.
  2. Click the Action tab and select Create Basic Task.
  3. Enter a title in the Name text box (we suggest Shutdown), and click the Next button.
  4. Select the Daily option, and press the Next button.
  5. Select a start date for the scheduled task and enter a time for Windows 10 to shut down at. We recommend setting it closer to the present time if you want to shut down your PC faster.
  6. Select the Start a program option, and click the Next button.
  7. Input the following line in the Program/script text box and enter /s in the Add arguments box, then click Next: C:\Windows\System32\shutdown.exe
  8. Click Finish. Now Windows 10 will shut down at the time you selected for the scheduled task.

If you can’t follow the solution, we have a complete guide on how to schedule an automatic shut down that you might find a lot more descriptive.

6. Set up a Shutdown Batch File

  1. Click the Windows Search tab, enter notepad, and open the app from the results.
  2. Copy the following batch code with the Ctrl + C hotkey and paste it using Ctrl + V in the notepad window: @echo off
    shutdown /s /f /t 0
  3. Click File and then Save as.
  4. Select All Files from the Save as type drop-down menu, then type Shutdown.bat in the text box and hit Save. We selected to save it on the desktop but you can use other locations.
  5. You can click the batch file to shut down Windows 10 when required.
  6. You can set up a batch file to restart Windows instead of shutting it down. To do that, enter shutdown -r -t 00 in the batch file instead. Then the batch file would look like the one shown directly below.

Is it safe to shut down my PC by pressing the Power button?

No, it is not safe, and you can use this method only if you run out of every other alternative because turning off the PC by pressing the Power button can cause serious file system damage.

The file system and its processes are running even if you are not doing anything. The normal shut down procedure closes them in a certain order, leaving everything in working order.

Turning off the power switch it’s almost equivalent to an electrical power loss that will interrupt important threads and leave your computer in an inoperable state.

So, now you have plenty of alternative ways to shut Windows 10 down without clicking the Start button. You can also explore ways to start your PC with a keyboard if your mouse isn’t working or encounter a power button lockout message.

But these are only workarounds. For more solutions, read our guide on how to fix laptop that won’t shut down.

If you have any additional questions or suggestions, please let us know by using the comments section below.

Fix: There was a Problem Authenticating Ownership of This Product

Ubisoft game owners reported experiencing an annoying issue when trying to launch their favorite games. Although they purchased their games via their Steam accounts, the error message There was a problem authenticating the ownership of this product prompts when you try to launch the respective games.

This issue is usually known to be triggered by Uplay errors, but we know how to fix it.

How do I fix the There was a problem authenticating ownership of this product in Uplay

1. Restart both clients

  1. Close both Steam and Uplay apps
  2. Launch them again and see if this fixed the issue.

2. Re-log into Uplay

  1. Click the account username in the top right corner of Uplay > select Log out
  2. Enter your email and password associated with the Uplay account and log back in.Uplay Login

3. Change the Uplay password

  1. Log out of the Uplay client
  2. Sign in to your account using your browser
  3. Go to the account management section > change your passwordubisoft account information settings
  4. Log back in using Uplay and try to see if this fixed the issue.

4. Open the game in Uplay

If the game does not open through Steam, make sure to open it using Uplay. If this fixes the issue, you should then be able to open the game through Steam as well.

5. Contact Ubisoft Support

If you’re using Steam Share and receive the error message, you should contact Ubisoft Support.

Verify your account information and the account you’re sharing the game with.

We hope you were able to fix the Uplay authentication issue using one of our solutions. If you found this article helpful, leave a comment in the comment section below.

Excel Not Responding When Saving: 5 Ways to Get It to Work

Being able to document your work or do other things after using Excel on your PC can become an impossible task. A common problem users report is Microsoft Excel not responding when saving.

Also, users complain about running into the Microsoft Excel out-of-memory error that appears when using the app.

Why is Excel not responding when saving?

Many factors can cause issues with Excel when saving files as pdf, saving files to a network drive, saving to OneDrive, etc. One of the factors is corrupt program files. Corrupt program files can cause Excel not to respond to its functions.

Other factors that are liable to cause Excel not responding when saving are:

  • Outdated Excel program – An outdated program indicates that it can’t access updates and patches for fixing bugs and improving performance. So, it can sometimes contribute to Excel not responding when saving.
  • Other activities running on Excel – Other processes or tasks running in the background on Excel. These processes can prevent it from being able to use the save function when invoked.
  • Issues with Excel Add-ins – Add-ins on Excel can become malicious or run into problems, causing issues with Excel. So, Excel may not respond when saving due to a faulty Add-in on the app.

Nevertheless, you can fix the problem by troubleshooting the Excel app and your device.

What can I do if Excel fails to respond when saving?

Before proceeding with any advanced steps to fix the problem, try the following:

If you still run into problems with saving on Excel, proceed with the solutions below.

1. End task for Excel on your computer

  1. Right-click the Start button and select Task Manager from the menu.
  2. Navigate to the Processes tab, select the Excel app from the list, right-click on it, then click End Task from the drop-down menu.
  3. Click on OK to confirm and restart your computer to help it sync the changes effectively.

Ending tasks for Excel on your PC will kill any background activities on the app interfering with the save function. You can check for shortcuts to open Task Manager on your PC.

2. Repair Microsoft Office

  1. Press Windows + R key to open the Run dialog box, type appwiz.cpl and click on OK to open Programs and Features.
  2. Right-click on Microsoft Office and click on Change from the drop-down.
  3. Select the Quick Repair option on the new windows, then click the Repair button.
  4. If Quick repair can’t fix it, select Online Repair.

Repairing Microsoft Office will fix any missing or corrupt app file issues that may cause Excel not to respond when saving to OneDrive or Network drive.

You may be interested in adding the Run command to the Start menu in Windows 11.

3. Download the latest updates for Excel

  1. Open Excel and click on Files in the top-right corner.
  2. Click on Account from the menu on the left, select the Update Options, then click on the Update Now option.
  3. Restart your PC and check if the save function in Excel works.

If any update is available, it will automatically install it, fixing bugs and installing the latest features for Excel.

4. Use the Save as option to change the file location

  1. While on the file you want to save on Excel, on File in the top menu bar.
  2. Click on Save as from the menu on the left to prompt the available locations.
  3. Try saving the file in a different location and check if it works.

The issue may occur if there is a problem with the location the file is trying to store. So, using Save as to change location will fix Excel not responding when saving to a network drive or saving to OneDrive.

5. Start Excel in Safe Mode and disable the Excel Add-Ins

  1. Press Windows + R key to open the Run dialog box, type excel.exe /safe, then click OK to start Microsoft Excel in Safe Mode.
  2. Click on File in the top menu bar, then select Options from the menu on the left.
  3. Click on Add-ins on the right, select Excel Add-ins, then click on the Go button.
  4. Uncheck the boxes next to the active Add-Ins and click OK to save the changes.
  5. Restart Excel and check if the error persists.

Starting Excel in Safe Mode fixes third-party app interference, while disabling the Add-ins will fix any issues for corrupt add-ins.

Alternatively, you can read about fixing too many different cell format errors using Excel. Also, we have a guide on how to fix Microsoft Excel if it can access files.

Microsoft to open source Soundscapes, the audio navigation research project

Starting January 3, 2023, the Soundscape source code is going to be available as open-source software so that anyone can continue to build on it.  For the last six years, Microsoft has developed Soundscape as a research project. Soundscape was designed to use augmented reality and three-dimensional audio to deliver information about a person’s location and points of interest.  Augmented reality has been used to guide people to unfamiliar locations.

Also on January 3, 2023, the IOS app will no longer be available for download while the existing installs will function until the end of June 2023. Microsoft learned that Soundscape helped power mobility instructors, and adaptive sports, and has been a great asset to low-vision individuals.

Documentation on how to build and use the system will be available from the Soundscape GitHub page that will be shared on January 3, 2023.

How to disable a microphone on Windows PC

Your microphone settings on Windows PC can be easily tweaked per your needs. In fact, if you consider ever-shifting cybersecurity crises, it makes even more sense to keep your microphone disabled unless needed.

In this article, we go into precisely that. So, let’s explore how you can easily disable the microphone settings on your Windows.

How to disable the microphone on Windows 10 or Windows 11

Whether you want to stay safe from the possibility of hackers snooping on your conversations unbeknownst to you or for some other personal reason, the easiest way to go about this is through the Settings app.

1. Settings

Here’s how you can disable the microphone on your Windows PC:

  • Press the Windows key + I to launch the Settings menu.
  • From there, select System > Sound.
  • Scroll down and select Microphone.
  • Click on Device Properties and select Disable.

sound settings

Do this, and your microphone will be successfully disabled.

2. Use Device Manager

We’ve previously covered many tips and tricks for using Device Manager on your Windows. For instance, you can use Device Manager to update your device drivers and disable your in-built Windows camera.

A free applet from Microsoft, the Device Manager aims to give you a firm view and control of your computer’s hardware. You can also use it to disable microphone settings on your Windows PC.

Here’s how you can disable your Windows microphone with it:

  • Head to the Start menu search bar, type in ‘device manager,’ and select the best match.
  • Click on Audio inputs and outputs.
  • Right-click on Microphone and select Disable.
  • Click on OK.

device manager

That’s it; your microphone will get disabled. Of course, when you want to enable it again, all you’ve to do is enable it again from the Device Manager, and you’ll be good to go.

Disabling the microphone on your Windows PC

Follow the steps above, and you can easily tweak your microphone settings. While you might not have needed to stay on your toes back in the early days of the internet, things couldn’t be more different in the 21st century. Whether it’s AI-enabled deepfake photos or the ever-growing ransomware scams, make sure you’re using all the measures to keep your security defenses up.

0x87e105dc Xbox Error Code: 5 Ways to Fix It

Launching games or apps on the Xbox console can be impossible sometimes because of some issues with the console. These issues result in the 0x87e105dc Xbox error code users report nowadays. However, users can report problems via the Insider and Report a problem app on Xbox to get help.

What causes the 0x87e105dc Xbox error code?

Difficulties accessing games and apps on the Xbox console can be many factors, resulting in the error code 0x87e105dc. The most common cause of the error issues with the Xbox Live server. When the server is down, it can prevent the apps and games on the console from launching.

Furthermore, you encounter the error due to other factors such as:

  • Xbox Live verification issues – You may run into the error code 0x87e105dc in Xbox if there’s an issue with Xbox Live verifying the downloaded games and their licenses. So, it can impede the game’s permission to play.
  • Old or corrupt cache – Cache files can become corrupt if they’ve been on the console for a long time. They may cause games and apps not to open on the Xbox console, resulting in error code 0x87e105dc.
  • Incorrect Alternate MAC address – When there is a problem with the Alternate MAC address in Xbox network settings, it can sometimes cause difficulties with running your games.

The listed causes are a few of the likely reasons for error code 0x87e105dc in Xbox. Nevertheless, there are a couple of fixes you can try.

How do I fix the error code 0x87e105dc in Xbox?

Before proceeding with any advanced troubleshooting on your Xbox console, try these:

  • The first thing to do before any troubleshooting is to check if Xbox Live servers are up and running. If the servers are down, the core services supporting the Xbox console won’t work. Go to the Xbox Live status page and check for details on the status of Xbox features and functionality. Read our guide on Xbox Live networking service missing and ways to fix the problem.
  • Restart the Xbox console.
  • Ensure that the Xbox console connects to a stable network connection.

Proceed with the solutions below if you can’t fix the problem.

1. Test network connection

  1. Press the Xbox button to open the Menu window.
  2. Click on the Settings icon on the right pane, then click on General and select Network settings.
  3. Navigate to the Troubleshooting tab and click on the Test network connection option.

Wait for the troubleshooting process to complete, then check the result to know if it’s a network connection issue. If there’s any concern, refresh your network router or modem, then restart the Xbox console.

2. Install pending updates

  1. Press the Xbox button to open the Menu window.
  2. Click on the Settings icon on the right pane, then click on All Settings.
  3. Click on System from the left pane menu, then tap on the Updates button from the right.

The system will automatically check for available updates for your console. If there is any update available, you will be prompted to install it, then follow the onscreen instructions to complete the installation.

Read about fixing the Xbox update error you may encounter during the process.

3. Clear the Alternate Mac Address

  1. Press the Xbox button to open the Menu window.
  2. Click on the Settings icon on the right pane, then click on General and select Network settings.
  3. On Network settings and click on Advanced Settings.
  4. Select Alternate MAC Address.
  5. Click on Clear, then click on the Restart option to apply the changes.

4. Reset the Xbox console

  1. Power on your Xbox console and press the Xbox button on the controller to open the guide overlay.
  2. Select the System menu and click on Settings.
  3. Click on System to expand and choose Console info.
  4. Click on Reset Console.
  5. Then choose between Remove everything or Reset and keep my games & apps.

Removing everything will clear all data and games on the console, resetting it to the way it came.

You can check how to fix the Xbox controller detected but not working if you can’t navigate with it.

In conclusion, you can read about fixing the Xbox error code 80153048 on your console. Also, you can check our guide about not being able to download games from the Xbox game pass and how to fix it.

If you have further questions or suggestions, kindly drop them in the comments section below.

What causes Xbox 360 error code 8015190e and How to Fix it

Several Xbox One and Xbox 360 users report struggling with the Xbox 360 error code 8015190E. They usually get the Your console can’t connect to Xbox Live message accompanied by the error code 8015190E and they are suddenly unable to connect to the Xbox Live servers.

If that’s happening to you as well, we’re sure you’re wondering if there’s anything to do about this situation. This should only take a couple of seconds of your time, so access the official Xbox Live Status page. If you see any alerts, you just need to wait until the service is up and running and then try again.

However, if none of the services on the Xbox Live status page look suspicious, this means that you’re ready to try some more drastic options to fix the 8015190E error code.

How to fix Xbox 360 error code 8015190e?

1. Reboot your Xbox console

  1. Press the Guide button on your controller.
  2. Find your way to the system menu by pressing the right bumper three times.
  3. Select Restart console.
  4. Then, select the Restart option from the next window.

As you can see, turning your Xbox off and on again is a fairly easy process. Rebooting it quickly often clears out messages like yours, but you may also choose to go through a full shutdown. You could start by pressing the Xbox button on the console for approximately 10 seconds. The console will immediately turn off.

Unplug the console’s power cable and wait at least 10 seconds to reset the power supply. Plug the console power cable back in. Finally, turn the console on by pressing the Xbox button.

2. Enable UPnP on your router

Status UPnP
  1. To begin the procedure, verify that your console is connected to the router that you’re about to access.
  2. Type 192.168.1.1 or 192.168.0.1 in your default browser and press Enter to open up the router settings page.
  3. These are the most commonly used default IP addresses. If they don’t work for you, find the IP address of your router. Launch the Command Prompt first, then, type: ipconfig /all and hit Enter.
  4. Once you arrive at the initial login page, insert the credentials of your router. They are, by default, admin and 1234.
  5. Go to the Connectivity page.
  6. Select the Administration tab.
  7. Make sure you tick the corresponding checkbox.
  8. Restart the router first, then your console to make sure all the necessary ports are opened.
  9. Once the next startup is complete, launch the game again and see if the issue is now resolved.

Another great troubleshooting procedure for the Xbox 360 error code 8015190E message is to enable the Universal Plug and Play option on your router/modem. This should help your networking device to forward the ports required by your Xbox console and get rid of the error, so apply the above steps.

3. Perform a hard reset

reset option
  1. Press the Xbox button to open the guide.
  2. Select System > Settings > System > Console info.
  3. Select Reset console.
  4. Choose the desired option to reset the console: Reset and keep my games and keep my games and apps or Reset and remove everything.
  5. You may also choose to cancel if you do not wish to restore your console to the factory state.
  6. Now, wait for a while as the console restores itself back to its factory settings.

In the event the above steps don’t fix the problem you’re facing, it might be worth performing a hard reset. Restarting your console isn’t always enough for purging the excess data. You might need to go a little further to make sure this happens.

Plenty of Xbox users have already confirmed this method for being effective in allowing them to sign in to their account once again without encountering the 8015190E error any longer. If you’re ready to reset your console to the factory default settings, follow the above steps.

Just keep in mind that resetting your console to its factory settings erases all accounts, saved games, and settings, so you should better sign in and connect to Xbox Live if you want your data synced up. And if you happen to have trouble opening the Xbox One guide, check out this quick procedure to fix the issue is no time.

If you found this article helpful, let us know in the comments section below.

Files Copied to USB Drive Disappear: 3 Ways to Get Them Back

It is not an entirely unusual scenario for files copied to a USB drive to mysteriously disappear. Users have stated on forums that they can’t find files on USB drives that they’re sure they copied to them.

In this guide, we will show you the easy ways to recover your files and do with them whatever you wish.

Why do copied files disappear from the USB?

There are several reasons your copied file might disappear from your USB drive. Listed below are some of the causes of the issue:

  • Presence of malware: Your copied files can mysteriously disappear because malware has corrupted them. The solution here is to scan the drive with an excellent antivirus app.
  • Hidden files: Sometimes, your file might just be hidden and not missing on your USB drive. You need to show the hidden files in File Explorer.
  • Broken drive: Some users have found this problem due to problems with the USB drive. You can fix this by checking the drive using the CHKDSK command.

What can I do if files copied to a USB drive disappear?

Before proceeding to the fixes in this section, we recommend performing the following preliminary checks:

  • Restart your PC. If the computer is stuck on restarting, do not hesitate to correct the issue right away.
  • Try another USB port.
  • Try the drive on another PC.

If you can’t make the drive work, you can now explore the fixes below.

1. Use a file recovery software

A virus might have erased it even if you’re sure you haven’t deleted files on the USB drive. Nevertheless, you can still restore deleted files with file recovery software.

Our recommended solution is so powerful that it can recover files from a formatted or corrupted drive. It’s very useful for data recovery from all storage types: classic hard drives, SSDs, SD cards, and USB drives.

It can search and recover different file types, including music, videos, photos, PDFs, documents, etc. You’ll like the ability to preview any recoverable files found to be sure it’s the right one you’ve been looking for.

In 3 easy steps, you can solve the issue of the files that disappeared from the USB drive:

  1. Open the software and select the file types you are looking for (you can select all if you like).
  2. Make sure the USB drive is plugged-in, and select it from the Connected Drives section.
  3. Click the Scan button and wait. Select any or all files found and click on the Recover button to save the data.
Stellar Data Recovery

Stellar Data Recovery

Use this powerful tool to recover all the files that disappeared from your USB drive.
Free trialVisit website

2. Show hidden files

  1. Open File Explorer by clicking the folder icon on the Windows 10 taskbar.
  2. Click the View tab and select Options.
    view option copied files disappear usb drive

  3. Now, click the View tab at the top and tick the radio button for Show hidden files, folders, and drive.
  4. Finally, click the Apply button, followed by OK.
    view ok

File Explorer doesn’t display all files when the show hidden files option isn’t selected. This might be why the files copied to your USB drive disappear from your view.

3. Run CHKDSK

  1. Press the Windows key, type cmd, and select Run as administrator under Command Prompt.
    cmd admin
  2. Type the command below (replace C with the letter of the drive) and hit Enter: chkdsk c: /r
    chkdsk
  3. If you get any prompt, press Y to continue.

Sometimes, if your files are copied to a USB drive disappear, it might be because some partitions are faulty. The CHKDSK command will help detect the problems and fix them if possible.

If you can’t view your files on a USB because they suddenly disappeared, the fixes above should help you get them back. If everything proves futile, you might have to format the drive or replace it.

Should Windows fail to format the drive, check the linked guide to push it through.

Feel free to let us know the solution that helped you solve the problem in the comments below.

Desktop Icons Blank: 5 Fixes to Use if They Aren’t Showing

Some users have posted on Microsoft’s support forum about blank desktop icons. For those users, the Windows 10 desktop displays blank, white icons instead of software icons. Today’s guide will explore this issue and discuss how to fix blank icons in Windows 10.

Why do my desktop icons have no picture?

Regarding this problem, we have gathered users’ more common causes. These include:

  • Corrupted files – This is a cause of many Windows problems. You may need to redownload or repair the files.
  • Windows Explorer glitch – This error could result from a simple glitch in Windows Explorer. A restart might fix it.
  • System bugs – These may happen more often than you imagine but are usually fixed with new update releases.

In some instances, Windows icons are not showing, but this issue can be quickly resolved by following the instructions from this guide.

Note that these solutions will work if the desktop icons show a blank page, blank squares, and for cases of Steam desktop icons blank, OneDrive desktop icons blank, and more.

How can I fix blank desktop icons?

1. Manually change icons

  1. First, try manually changing the blank icons on the desktop by right-clicking their software shortcuts and selecting Properties.
    desktop icons blank
  2. Click the Change Icon button on the Shortcut tab.
    desktop icons blank
  3. Then you can select an alternative icon on the Change Icon window.Change Icon window windows 10 blank icons
  4. Alternatively, click Browse to choose a downloaded icon.
  5. Click the OK button.
  6. Select the Apply option. and press the OK button to exit the window.

2. Run DISM and System File Checker scans

  1. Click the Windows Start menu, input cmd, and select Run as administrator.
  2. Type the following command and press Enter:
    DISM.exe /Online /Cleanup-image /Restorehealth
  3. Then also, input the following command followed by Enter.
    sfc /scannow
    sfc /scannow command windows 10 blank icons
  4. Wait for the system scan to finish. Restart Windows if it repairs system files.

Also, you can use a tool to run this scan more thoroughly. Using a specialized tool is faster and will repair damaged or corrupted files.

3. Rebuild the icon cache

  1. Open File Explorer by pressing the Windows key + E keyboard shortcut.
  2. Click the View tab, and select the Hidden items checkbox.
  3. Open the following path:
    C:\Users\(your user folder)\AppData\Local folder
  4. Click the IconCache.db file and press Shift + Del.
  5. Restart Windows 10 after deleting the IconCache.db file.

This process will automatically rebuild the icon cache and restore your icons, so the problem should be solved.

4. Disable the tablet mode

  1. Press Windows + I and select System.
  2. Click Tablet mode on the left of the Settings window, and if tablet mode is selected, select Use desktop mode on the When I sign in menu.
  3. Restart Windows after selecting Use desktop mode.

5. Restart Windows Explorer

  1. Press Ctrl + Shift + Esc to open the Task Manager.
  2. Look for the Windows Explorer process and click on it.
  3. Click on the Restart button from the bottom right corner.

This procedure will reload the icon cache from File Explorer and its components. Consequently, your desktop icons should return to their original colors.

The above resolutions are among the most likely fixes for blank desktop icons. Many users have been able to fix desktop icons with the System File Checker or by rebuilding the icon cache.

If any of your icons are corrupted, check out our detailed guide on the topic. And do not forget to go through some easy ways to save the desktop layout in Windows.

If these fixes aren’t enough to resolve the problem, we recommend that you try restoring or resetting Windows 10.

Let us know which solution worked for you in the comments area below.