Some users have posted on Microsoft’s forum that theinformation store could be opened error that arises when they try to launch Outlook.
There are a few variations of that error message for the different Outlook versions. However, for Outlook 2019 and 2016 users, the entire error message states:
Cannot start Microsoft Outlook. Cannot open the Outlook window. The set of folders cannot be opened. The information store could not be opened.
Here is all you should know about this error.
What causes The information store could not be opened error?
We have gathered from a user experience that a few things may trigger this error. At the top of this list of causes, we have the following:
Wrong settings – This plays a significant factor. Among the top causes are incorrect navigation settings.
Compatibility – Some versions of Outlook should run in compatibility mode in some OS editions to prevent this error.
Corrupted files – Some critical files will trigger the error message if not repaired.
With that said, let us discuss some variations and causes of the error.
Where and when does this error occur?
Here are some more related issues reported by our readers. Review the list and see if any of these cases apply to you.
Outlook 365/Office 365The information store cannot be opened – This is a variant of the 365 services.
Specified default store cannot be opened – This error will be triggered on specific files you try to access. Sometimes, it may affect a set of folders.
The information store could not be opened Exchange 2016/2013 – Here is another variant that is specific to exchange servers.
The information store could not be opened Outlook 2016/2019/2013/2007 – Users of these editions of Outlook may experience this variant of the error.
However, numerous potential fixes for the information store cannot be opened error. Check out some of the resolutions below to fix the information store issue.
How can I fix the Information Store Error?
1. Open Outlook in Safe Mode
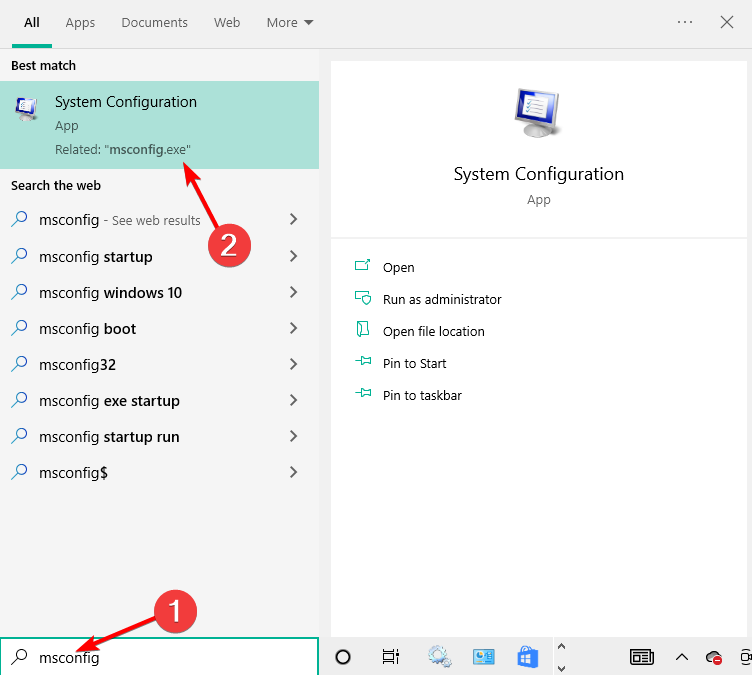
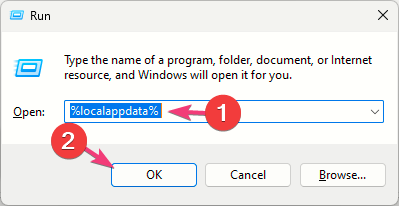
Press Windows + R, type msconfig, and hit Enter.
Navigate to the Boot tab, tick Safe boot, select Minimal, then click Apply and OK.
Finally, select Restart when prompted.
The OS with boot into safe mode, and you can try opening the application.
2. Deselect the Compatibility Mode Option
Right-click the Outlook icon and select Properties.
Select the Compatibility tab, and deselect the Run this program in compatibility mode check box.
Lastly, click Apply and OK.
3. Fix the Navigation Pane File
Press Windows + R to open the Run dialog.
Type in the script below and hit Enter. outlook /resetnavepane
One of the many problems that might arise from a broken Outlook navigation pane is an inability to access the data repository. If the information store cannot be accessed on Outlook because of a problem with the navigation pane file, fixing the file makes sense.
Open File Explorer by pressing the Windows key + E keyboard shortcut.
Open the Outlook folder in File Explorer. The default folder path for Outlook 2019 and ‘16 is: C:\Program Files (x86)\Microsoft Office\root\Office16
Double-click SCANPST.EXE to open the Microsoft Outlook Inbox Repair Tool, click Browse to select an Outlook PST file, then click Repair.
Press Start to scan.
Finally, select a Repair option if the scan detects errors.
5. Clean Boot Windows
Press Windows + R, type msconfig, and hit Enter.
Click Selective Startup to select theLoad system services and Use original boot configuration options on the General tab. Uncheck the Load startup items option.
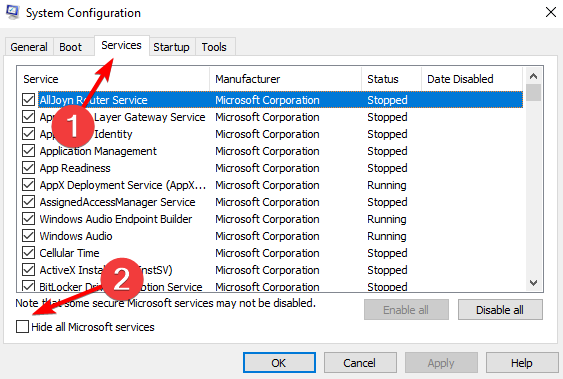
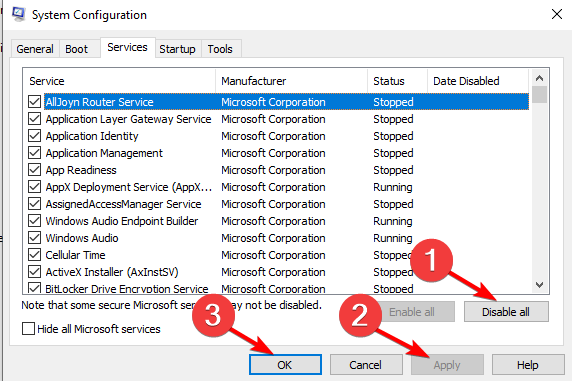
Select theHide all Microsoft services option on the Services tab, and click the Disable all button.
Click the Apply button.
Lastly, press the OK button, and select the Restart option.
These resolutions will fix the information store cannot be opened error for lots of users.
It’s amazing how a 3D pen is similar to a portable 3D printer, but they differ in utility. Like desktop 3D printers, it has a heating element and an extruder.
Unlike desktop 3D printers, which are controlled by motors and computer software, the movement of the 3D pen is controlled by your hands.
To be more specific, the plastic is heated and pushed out of the pen’s nozzle tip. When the plastic is ejected, it is in a molten state and may be shaped in any way.
After a few seconds, it cools and takes on the shape that was sculpted into it. And there you have it! A nice miniature 3D sculpture, a cool asset for the artist in you, or for the children.
The developers of 3D Pens have not forgotten about their offerings, including some discounts on Amazon. There are many other 3D pens available, but the offers listed here are the nicest available in 2022.
Note: All the prices and offers in this article are subject to change, so be sure to check the official product page to get the latest deal. If the product or offer you’re looking for is no longer available, you can try to find it on its official manufacturer page or get another one from our list.
We feel that those 3D Pens, at such a low price and in such great bundles, would be excellent gifts this season for both youngsters and adults who wish to participate.
So be crafty, utilize your imagination, and make a child happy this season.
What do you think of 3D pen crafting? Please leave your thoughts in the comment section below.
As you surely know by now, Microsoft will terminate support for the Windows 8.1 operating system early next year, which means you will have to take some measures on your end.
Security-wise, the Redmond-based tech company strongly recommends an upgrade to one of the later, supported operating systems.
Users that still haven’t upgraded to Windows 11, or Windows 10 for that matter, are already being bombarded with notifications.
How can I prepare for Windows 8.1 end-of-service?
Yes, this isn’t a joke, and Microsoft will terminate all Windows 8.1 support on January 10th, 2023, so right after the new year.
For those of you thinking that you can ride this train a bit longer, just know that Microsoft will not be offering an extended support package for Windows 8.1.
If you are a Windows 8.1 user, you surely know that Microsoft originally retired all Windows 8 support in 2016, but the updates will completely stop starting with January 2023.
So, you either purchase a new PC, if the one you are using is only good for obsolete versions of Windows or officially pay to upgrade to either Windows 10 or Windows 11.
Furthermore, businesses won’t be able to pay for additional security patches and will have to upgrade or accept the risk of running software without security updates.
That being said, know that it’s not just Windows, either. The tech giant encourages users to subscribe to Microsoft 365, which continually offers updates, patches, and new features, as part of an ongoing subscription.
With that in mind, Microsoft will stop providing both patches and new features for Microsoft 365 users running Windows 8.1.
So, you can see how the implications exceed simply having to deal with annoying notifications and deadline reminders.
What should I know about upgrading from Windows 8.1?
Some of you were probably thinking about upgrading directly to the last version of Windows, which is Windows 11, so we’re going to have to shed some light on that.
First of all, Microsoft was adamant about the new system requirements for Windows 11, so an upgrade from Windows 8.1 to 11 is pretty much out of the question.
Also, as the Redmond company stated, upgrading directly from Windows 8 to Windows 11, if it even works, will overwrite your hard drive, erasing its contents.
There’s something to think about when considering such a huge operating system leap. Creating a backup of your data is highly recommended.
Instead, an in-place upgrade, which will preserve your data, is possible when upgrading from Windows 8.1 to Windows 10.
You can then move further and upgrade from Windows 10 to the last operating system released by Microsoft, Windows 11.
However, there’s no need to upgrade to Windows 11 if you don’t feel like it right now, or don’t have the resources to upgrade your rig.
Keep in mind that Windows 10 will continue to receive support until October 14, 2025, so there really isn’t any rush.
Mafia is one of the most popular game series in recent times, and they received a little bit of extra attention a while back with the release of Mafia: Definitive Edition.
While the game was well-received, not too many players swarmed in to buy it since most were probably waiting for the first chance to get it at a discount price
Well, that time is now, since Mafia: Definitive Edition is up for sale. People are already looking for the best buy, so what are you waiting for?
Note: All the prices and offers in this article are subject to change, so be sure to check the official product page to get the latest deal. If the product or offer you’re looking for is no longer available, you can try to find it on its official manufacturer page or get another one from our list.
How much does Mafia: Definitive Edition cost on sale?
Play as a would-be mafioso and stake your claim on 1930s LA in this fantastic game that is basically a remaster from the ground of the game with the same name from 2002.
However, you now get to see what the game looks like with real 2022 graphics, and the city of LA has never looked more beautiful.
A lot of games are on discount now that Christmas is here, with many websites offering up for grabs in either physical form or via a Mafia: definitive edition CD key.
Mafia: Definitive Edition
See what it’s like to work for the Mafia in the city of Lost Heaven during the 1930s and make a name for yourself in the criminal underworld.
This concludes our list of great Mafia: definitive Edition deals that you can get during the holidays.
Know of other places that have even better Mafia deals? Let us know by leaving your feedback in the comments section below, and we will update this article accordingly.
A dual-channel dash cam is one that comes with one front-facing camera and a second camera that faces and records simultaneously the rear of the vehicle.
It can be tempting to purchase a front and rear dash cam that can record video from every angle of your vehicle in the event of an accident. This is in contrast to a single dash cam, which will only display your footage from the front of the vehicle.
In the event that you’re debating whether or not a dual-channel dash cam is worthwhile, our suggestion is that if you drive a vehicle, a dual-channel system is highly recommended.
Designed to record the view in front of and behind your vehicle, a dual-channel dash cam records both views simultaneously.
Many traffic accidents occur at moderate speeds and involve rear-end collisions, which is a common occurrence.
Even when you believe you have a clear view of the road ahead of you, there are situations when you fail to notice what has actually transpired in an accident.
Permit us to begin by taking a look at some of the most tempting offers that are currently available on the market.
Note: All the prices and offers in this article are subject to change, so be sure to check the official product page to get the latest deal. If the product or offer you’re looking for is no longer available, you can try to find it on its official manufacturer page or get another one from our list.
In most dual-channel systems, you can capture clear traffic behind you in 1080p Full HD, which is ideal for video surveillance.
Many of these back cameras are equipped with a Sony STARVIS image sensor, which provides crisp images in all lighting conditions, including low-light conditions and at night.
When installing your dash cam, make sure to place the rear camera at the upper center of the rear windshield. From left to right, this location provides the most expansive view possible from this place. Avoid placing the dash cam directly on the defrost grid wires if at all possible.
In addition to providing an additional layer of security, a rear dash camera may prove to be the most effective tool in resolving insurance disputes and claim disputes.
This error occurs when you try installing Windows on a disk with an incompatible partition style. Partition styles are used to define the layout of the hard disk partitions. There are two main types: MBR (Master Boot Record) and GPT (GUID Partition Table).
MBR is used in Windows XP and earlier versions of Windows, while GPT is used in Windows Vista or later versions. So if you’re installing Windows on a computer with a newer version of BIOS, then it should automatically use GPT instead of MBR when creating partitions.
Why am I getting the Windows cannot be installed to this disk error?
If you’re wondering why you’re getting the Windows cannot be installed to this disk error, below are some possible causes:
Bad hard drive – The error message Windows cannot be installed to this disk is usually caused by bad sectors on your hard drive. The hard drive can have bad sectors due to any number of reasons such as an electrical glitch, physical damage or even a software issue.
The selected disk already contains a version of Windows – You cannot install another version of Windows on the same disk without deleting the existing installation first.
Corrupt/damaged partition table – A corrupted or damaged partition table can cause problems with Windows installations. Also, your computer’s hardware may not support booting to GPT disks.
Incompatible partition style – The most likely reason is that your hard drive has an MBR partition table and the Windows version you want to install requires GPT or vice versa. On EFI systems, Windows can only be installed to GPT.
The disk doesn’t have enough free space – Check how much free space is available on the disk where you want to install Windows. When installing or upgrading, Windows 11 needs at least 4 GB among other system requirements.
How can I fix the Windows cannot be installed to this disk error?
1. Convert MBR to GPT
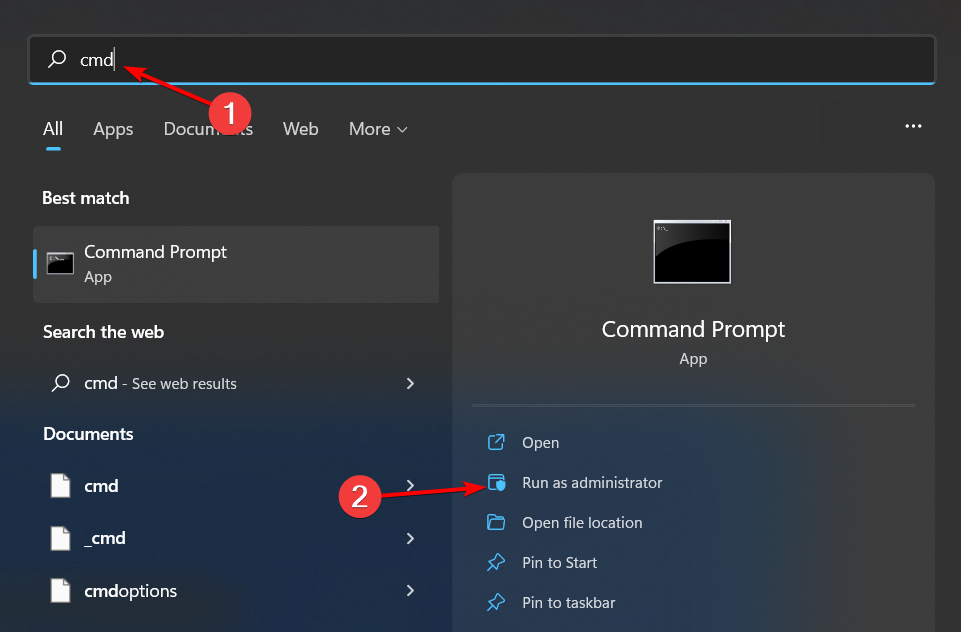
Hit the Windows key, type cmd in the search bar, and click Run as administrator.
Type the following command and hit Enter: diskpart
Next, type and press Enter: list disk
A list of hard drives on your PC will appear. Type select disk X replacing the X with the number beside the disk you want to work on.
Type clean and press Enter.
Next, write convert gpt and press Enter.
This method will erase all partitions in your hard drive, including all files. It is, therefore, essential to back up any critical files before embarking on this process. Also, it would be best if you were sure that the hard drive you have selected is the correct one to avoid any data loss.
If you have a PC made in the last decade, you’re almost certainly using the Master Boot Record (MBR) partition scheme. Unfortunately, while this legacy scheme has served users for many years, it’s well past its prime.
The main problem with MBR is that it can only support four primary partitions and up to 2 terabytes of hard drive space. These limits are easy to hit if you install other software that requires multiple partitions. Also, check our guide for more ways to convert MBR to GPT.
2. Change the boot configuration settings
Restart your PC and enter BIOS mode by pressing Delete + F10. The same keys may vary depending on your PC’s manufacturer.
Now, switch to the Boot tab. Then, under Boot Configuration, select Boot mode and change UEFI to Legacy Mode.
Save changes and exit BIOS mode.
Restart your PC.
If you want to convert MBR to GPT without data loss, we recommend a third-party application that will do the job for you. EaseUS Partition Master does the heavy lifting, especially if you’re not tech-savvy.
Comcast is one of the largest cable and internet providers and one of the top streaming services providers, including Xfinity Stream. Unfortunately, these services often experience issues.
TVAapp-00116 is a common error you can encounter while using your Xfinity TV app. The error code means something wrong with the connection between your device and the Xfinity TV app. As such, you can’t access any of the channels for viewing.
Why is Xfinity Stream not working?
If you see the error TVApp-00116 display on your Roku, it could be because of the following:
Unstable internet connection – If there are disruptions in your home such as other people using the internet or electrical interference, they can cause a slow Wi-Fi connection.
The channel is unavailable – If you are unable to access your favorite channels, it may be because the channel is not currently available on Xfinity.
Unsupported device – You may have installed the app on an unsupported device. Ensure your device is under the list of supported devices for Xfinity or try other streaming devices.
No valid subscription – If you’re having trouble accessing channels on Xfinity Stream, it’s likely because you don’t have a subscription to that channel.
Channel is blocked – If a channel is blocked, it’s likely because the channel is not part of your TV package or you’re experiencing location issues hence the geo-restrictions.
Outdated software – If you are wondering: Why is my Xfinity app not working on my Roku? It’s likely because you’re running an outdated version of the Xfinity app.
You’re using a beta version – If you’re using a beta version, it may have some bugs and you can’t access all the channels available in the full version yet.
How can I fix the TV App-00116 streaming error?
Before you move to any technical solutions, check off the following first:
Restart your device and try again. It’s possible that the issue was just a temporary glitch, so restarting may resolve your problem.
1. Update your Xfinity app
Open the Google Play Store app on your TV or Roku device.
Click on the three ellipses at the top right corner.
Select My Apps.
Scroll to the Xfinity app and click Update if an update is available.
Try reaccessing the channel.
2. Clear Comcast cache
Press the Xfinity button on your remote.
Click on the gear icon and press OK to go to Settings.
Scroll to Privacy and press OK.
Locate Locally stored data and press OK.
Press OK to clear locally stored data.
When you clear all data, your apps are reset, and you will be signed out of all accounts. If you’re using Xfinity on a browser, clear your browser cache and cookies. Clearing your browser cache and cookies is different for each browser.
If you aren’t already, try using a VPN. There’s no denying the immense benefits of using a VPN client while streaming. A VPN works by masking your IP address with an external server’s address so that any website or app that restricts access based on location cannot tell where you are.
A VPN can solve this issue if the TVApp-00116 error is because of a geo-restriction. This is because a VPN allows users to access any website or app they want, regardless of their physical location.
ExpressVPN is an excellent solution for this task. This software comes with servers in 105 countries and also very high connections speeds, that makes it a great choice for watching your favorite TV shows at high quality and also bypass any geo-restrictions you may encounter.
ExpressVPN
Don’t let errors and geo-restrictions stoop you from enjoying watching TV.
Open the Google Play Store app on your TV or Roku device.
Click on the three ellipses at the top right corner.
Select My Apps.
Scroll to the Xfinity app and click Uninstall.
Now go back and click Install.
If you are getting an error on your Xfinity app, it is recommended that you uninstall and reinstall the app. This usually fixes all issues related to the app crashing or freezing up.
You will also have a fresh start with no data stored from the previous usage of the application that may have corrupted the app.
If all else fails and the TVApp-00116 error still appears on your screen, you should consider resetting your network. This should help solve any connection issues, primarily if the problem lies with your internet.
This isn’t the only issue with streaming services, many users also reported an F1 TV BM1300 error, but we covered that in a separate guide.
When using Xfinity, we recommend installing a secure antivirus that will help you block any threats. Should you encounter any other issues, such as the Xfinity VPN not working, we have adequately addressed various fixes.
Let us know if you can fix this issue in the comment section below.
If you’re seeing the Realtek Audio Driver Failure !! [Error Code: -0001], it means your system is unable to support the driver you’re trying to install. It can prevent you from getting your Realtek audio drivers working on Windows 10 or 11.
Don’t worry, this guide will show you 5 ways to fix Realtek Error Code 0001. Whether you need to manually install the driver, address outdated drivers, or troubleshoot issues with your Realtek Audio Manager, we’ve got solutions that will help you get your sound back on track.
Plus, if you’re dealing with existing driver conflicts, we’ll cover how to safely overwrite and update them.
How do I fix Install Realtek Audio Driver Failure Error Code 0001?
1. Update Windows
Click on the Start button and select Settings from the options.
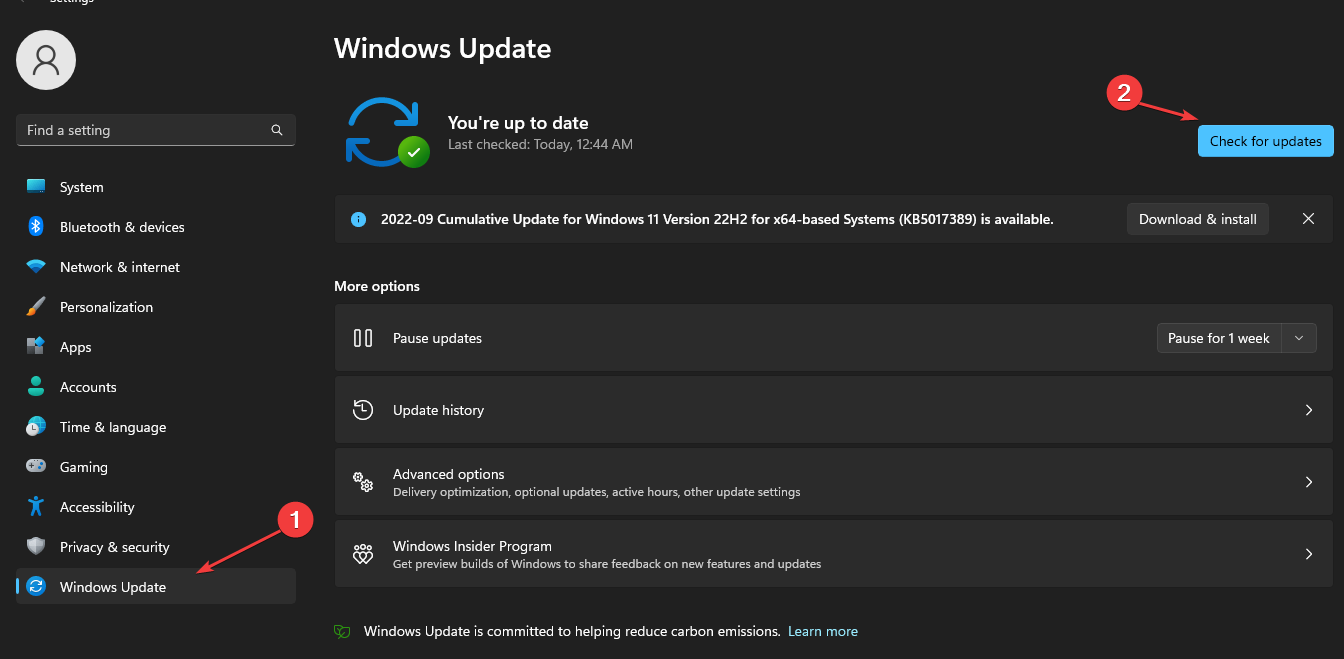
Click on Windows Update, then select Check for updates (Windows will automatically search and download updates if any are available for your PC).
Updating your operating system will fix bugs that may cause the error code 0001. However, we recommend you read about what to do if the Windows update is not working on your device.
2. Add legacy hardware
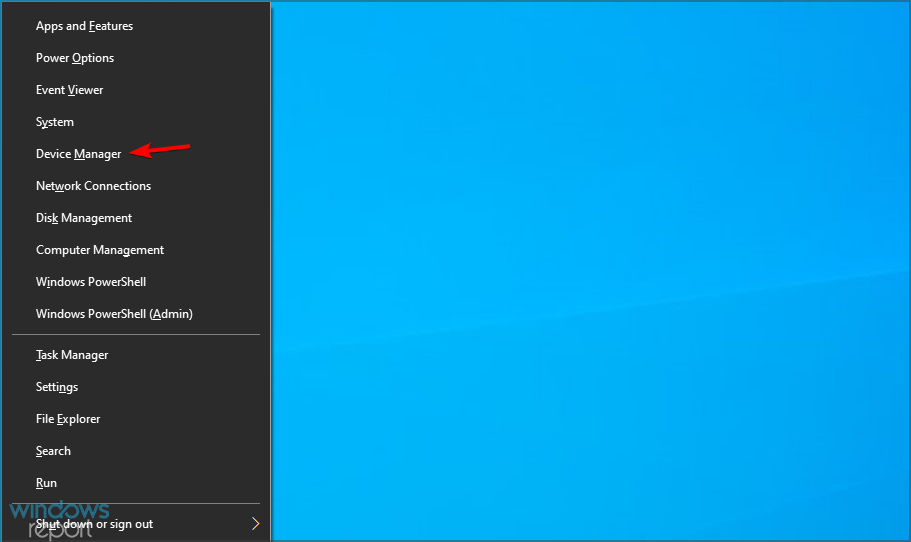
Right-click the Start button, then select the Device Manager.
Expand the Audio inputs and Outputs to check if the Realtek audio device is missing (if the audio device is unavailable, continue with the steps below).
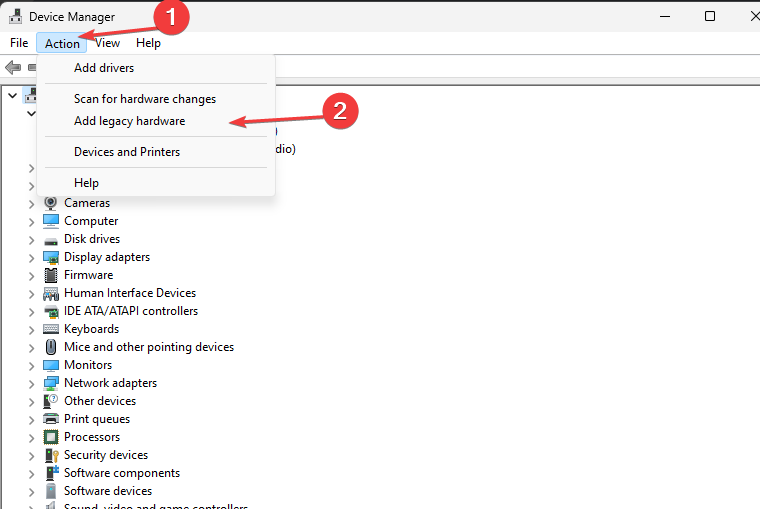
Click on Action at the top bar, select the Add legacy hardware option and click OK.
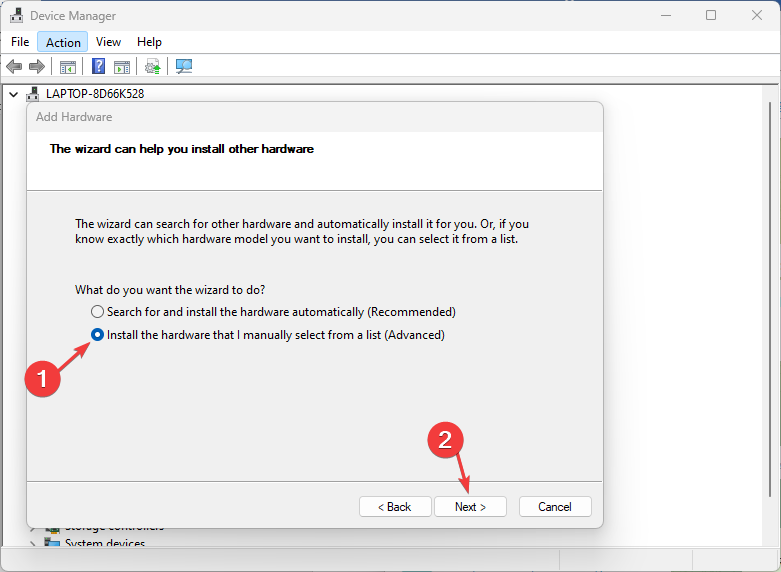
On the Add Hardware window, select the button to Install the hardware I manually selected from a list (Advanced), then click Next.
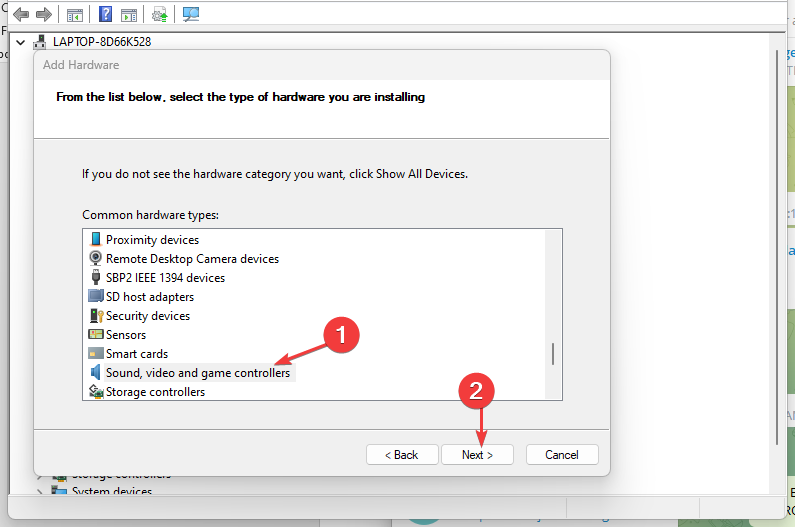
Click the Sound, video, and game controllers options and click Next.
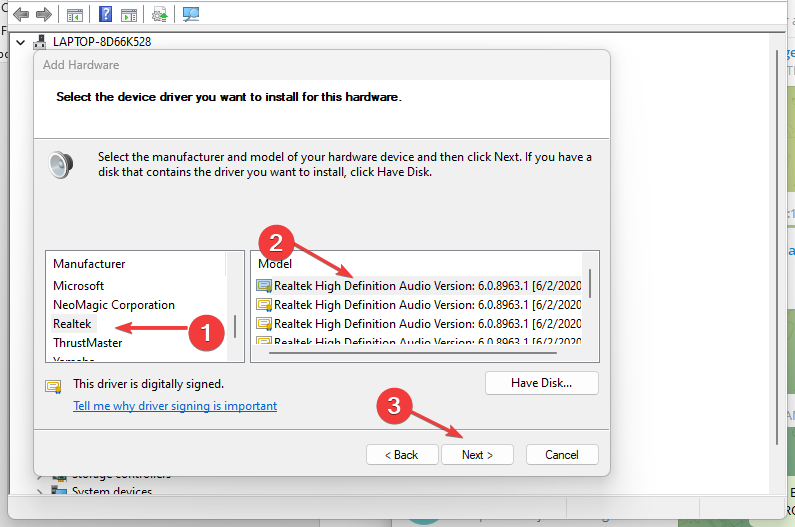
Select Realtek from the Manufacturer tab on the left and select the latest version from the Model tab on the right.
Click Next to continue the process. (Follow the on-screen instructions to complete the hardware installation)
Right-click the Start button and select the Device Manager.
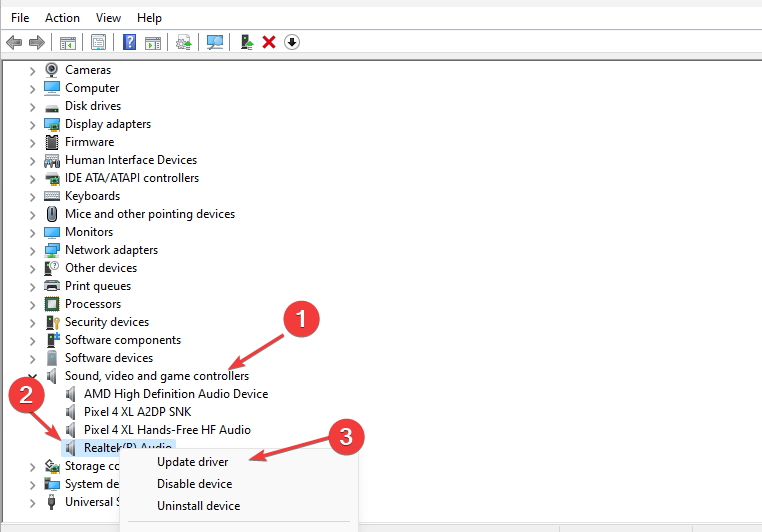
Expand the Sound, Video and Audio controller, select the Realtek audio, and right-click on it.
Select Update driver from the options.
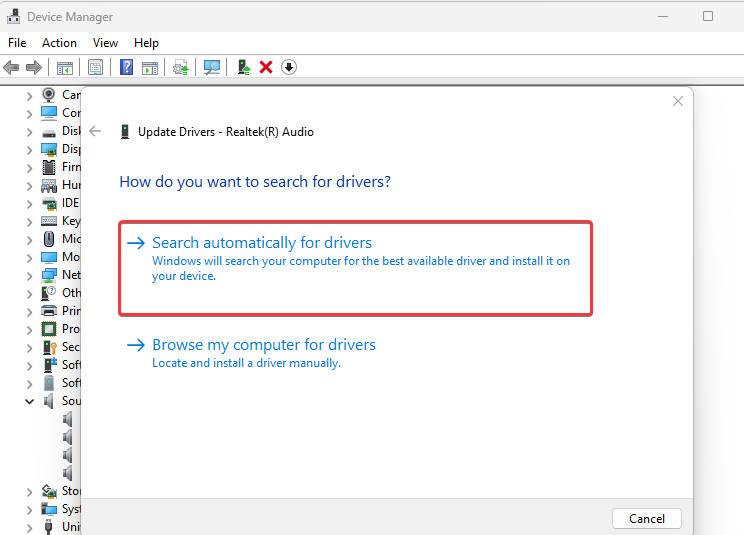
Then select Search automatically for drivers.
If there are any updates, the installation wizard will install them automatically. Restart your computer after the installation is complete, and Realtek Audio Driver can install Windows 11.
Users complain about having some sound issues on their computers after audio driver updates. However, we have a detailed guide on the no sound after the Realtek driver update on your PC.
Alternatively, we recommend you use Fortect Driver Updater to automatically download all the latest drivers on your device with a single click. This saves the manual effort of downloading individual drivers one at a time.
Right-click the Start button and select the Device Manager.
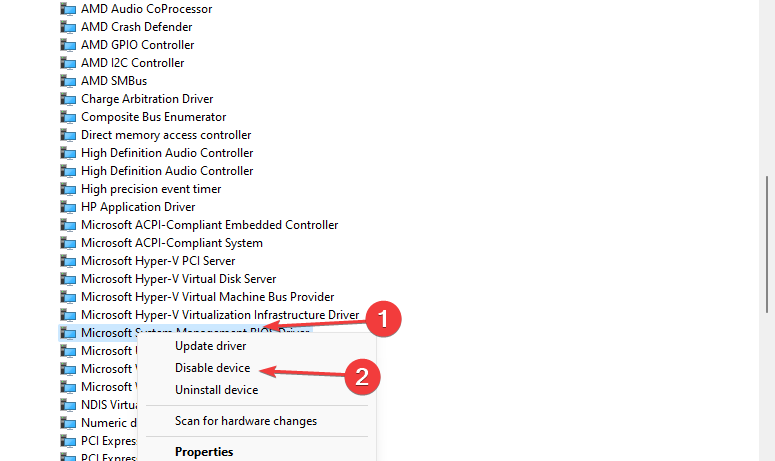
Expand the System Devices option in the Device Manager.
Right-click on the Microsoft UAA Bus Driver for High Definition Audio driver, then select Disable from the drop-down.
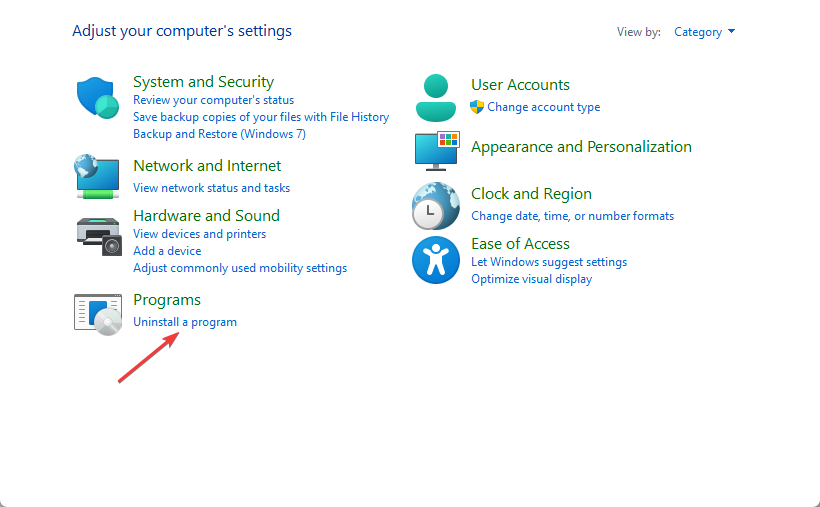
Click on Start, type Control Panel in the search box, and press Enter.
Select the Control Panel from the search result and go to the Uninstall a Program tab.
Select Programs & Features, then find the Realtek HD audio driver entry and right-click on it.
Click Uninstall from the drop-down.
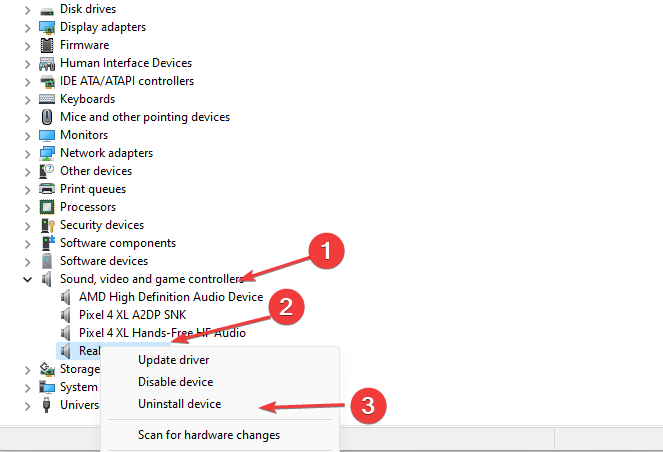
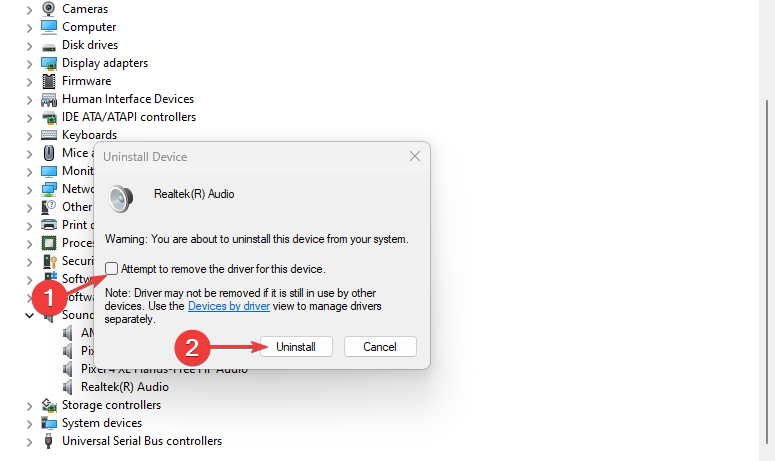
Go back to the Device Manager and uninstall the Microsoft UAA Bus Driver for High Definition Audio driver.
We recommend you reboot your computer to allow the changes to sync smoothly. Then, try installing the Realtek audio driver and check if the error code 0001 persists.
We hope you have been able to fix the install Realtek Audio Driver failure 0001 on your Windows 11 or Windows 10 PC.
Avid Pro Tools is a powerful and popular music production software that will help you turn that song idea into a real hit for the charts.
With this tool, you will have all the options needed to compose, record, edit, mix, and share tracks easily, without any music engineering training.
In fact, Avid Pro Tools has 3 versions depending on your needs. As its name hints, the standard version called Pro Tools Artist is designed for artists – singers, songwriters, and musicians who need the most important audio recording features.
Pro Tools Studio is a more complete toolset, focusing on professional music production.
The Pro Tools Ultimate version is dedicated to audio and production pros that need unlimited resources and extended features.
Now, Avid has prepared a huge discount on all versions so you can save a lot of money in the process.
Note: All the prices and offers in this article are subject to change, so be sure to check the official product page to get the latest deal. If the product or offer you’re looking for is no longer available, you can try to find it on its official manufacturer page or get another one from our list.
What are the best Avid Pro Tools deals?
? The standard Pro Tools Artist software comes with a 25% discount, taking the price down to 74.99 per year (instead of 99).
? The Pro Tools Studio version comes with a 33% discount, taking the price down to 199 per year (instead of 299).
? Finally, the Avid Pro Tools Ultimate has an entirely new and most-appealing price and you can grab it now for 599 per year.
However, the offers are available only if you pay for a full, one-year license on any of the programs. Click the link below to get this limited offer!
Though Windows 11 supports DS4, many report that the PS4 controller is not recognized by their PCs. This may be due to outdated drivers or faulty settings.
Let’s see how you can fix it.
How do I get my PS4 controller to work on my PC?
1. Update Bluetooth drivers
Your PS4 controller should suddenly work again after updating the Bluetooth drivers. You can either complete this task manually using Device Manager or automatically by utilizing a driver updater program that makes your work easier.
Here’s the steps of how to correctly update Bluetooth manually:
1.Click on the magnifying glass icon to bring up the search bar.
2. Search for theDevice Manager.
3. Click on the entry that appears.
4. In the Device Manager, search for theBluetoothentry if your computer can connect via Bluetooth.
5. Click it to bring down the drop-down menu.
6. Right-click the entry that appears and a small window will appear.
7. SelectUpdate driverin that small window.
8. A window will appear.
9. SelectSearch automatically for drivers.
10. Your Windows 11 computer will automatically download and install the drivers.
11. If you have multiple entries, it’s recommended that you update the drivers for all of them.
12. Then open theSettingsmenu.
13. SelectBluetooth & deviceson the left-hand side.
14. Ensure that Bluetooth is enabled by clicking the switchOn.
15. Hold theShare and PSbutton on your PS4 controller until it starts blinking rapidly. This blinking means that it’s searching for a connection point.
16. Then selectAdd device.
17. SelectBluetooth.
18. SelectWireless Controller.
19. Your PS4 controller is now connected to your Windows 11 computer and there should be no issue.
20. Conversely, you can go to theWindows Updatetab in the Settings menu and click onCheck for updatesto see if there are new drivers.
If you’re looking for a more time-efficient way to update your drivers, you can do so automatically with Outbyte Driver Updater. It’s an app that scans your PC for missing or out-of-date drivers and fixes them for you.
Outbyte Driver Updater
Let this tool automatically find and update your Bluetooth driver along with other outdated drivers.
You can also try running DS4 Windows as an administrator.
Return to the DS4 Windows directory and right-click the app to bring up the context menu.
Select Properties.
Click the Compatibility tab.
Click the checkbox next to Run this program as an administrator.
Click on the Apply button and then OK to save the changes.
Now DS4 Windows should run just fine.
5. Re-enable Controller
Click on the magnifying glass icon to bring up the search bar.
Search for the Device Manager.
Locate and click on Human Interface Devices in the Device Manager.
Locate the HID-compliant game controller and right-click the entry.
Select Enable device in the small context menu. If it’s already enabled, click Disable device instead.
Restart your computer.
After your computer restarts, open DS4 Windows.
Go to the Settings tab.
Click on Hide DS4 Controller.
Reconnect your PS4 controller to DS4 Windows.
Click on the Controllers tab to see if your controller is there. If not, uncheck Hide DS4 Controller in the Settings and check it again.
What you can also do is uninstall the controller drivers as well.
Right-click the drivers to bring up the context menu.
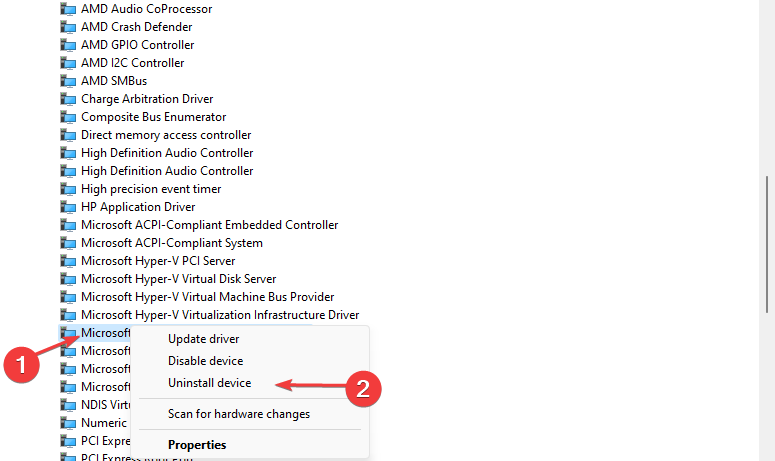
But this time, select Uninstall device.
A window may appear warning you of what you’re about to do. Select Uninstall.
Restart your computer and connect your PS4 controller when it turns on again.
Your Windows 11 computer will automatically check for missing controller drivers and install them.
What else should I know about Windows 11 and gaming controllers?
Gamers in the past have also had issues with their PS5 controllers not functioning properly as Windows 11 won’t connect to their device. Fixing PS5 controller connectivity is similar to the PS4 and shares similar steps.
DS4 Windows itself has had its issues as well. Majority of the time all you have to do is update the app by downloading the latest version. In other cases, you have to check the controller status on the Device Manager.
For Xbox controller owners, you may be interested in learning about what to do if your gamepad suddenly switches to player 2 on a PC. Solutions involve running the troubleshooter and deleting a specific driver.
Feel free to leave a comment below if you have any questions on other Windows 11 apps. Also, leave comments about guides that you’d like to see or information on other Windows 11 features or list guides.
Ever got the Windows Update error 0x80070002 on your PC? This is an update error and it will prevent you from installing updates.
When this issue occurs, you’ll likely get a Windows couldn’t complete the requested changes message on your screen. Users have reported encountering this error on both Windows 10 and Windows 11.
Let’s quickly see why the install error – 0x80070002 occurs and how to fix it now!
How can I fix the install error – 0x80070002?
1. Stop the Windows Update service
NOTE
In order to do this, you need administrator privileges. If you already have this, log on and then do the following:
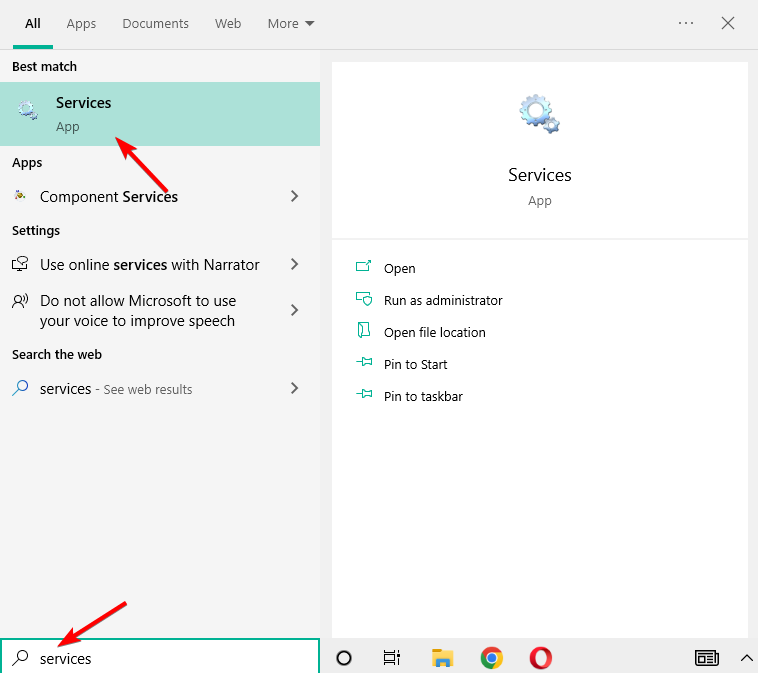
Press the Windows key then type services and open the first result.
Here, look for the Windows Update service, right-click it and choose Stop.
2. Delete temporary update files in the Software Distribution folder
Open File Explorer, followed by the C drive where Windows is installed.
Click on the Windows folder, then open the Software Distribution folder.
Click the DataStore folder to open it.
Delete everything in the DataStore folder by selecting the contents, right-clicking and choosing Delete. Once you’re done, the 0x80070002 the system cannot find the file specified error will be fixed.
3. Restart Windows Update service
Tap the Windows keyboard button then type services and access the top result.
Search the Windows Update service, right-click it and select Restart. That’s it!
4. Check the updates installed on the computer
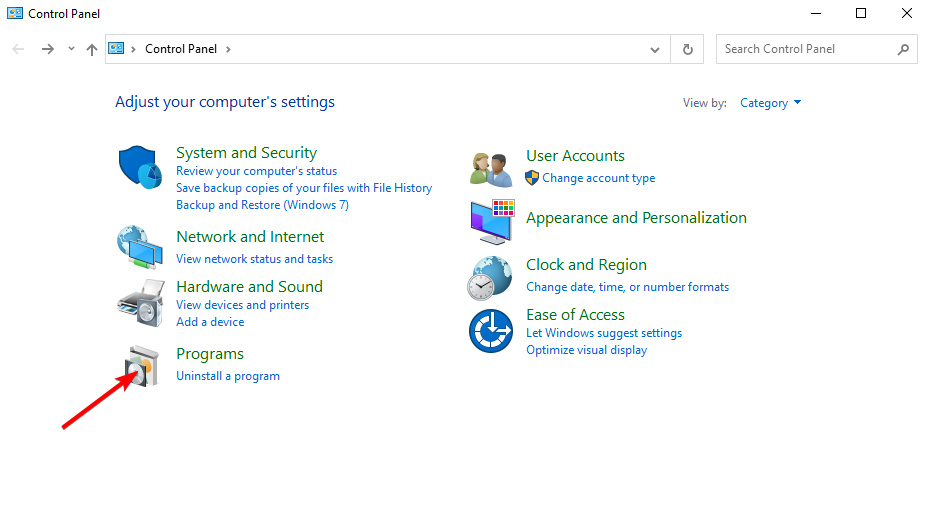
Press Windows then type control and select Control Panel.
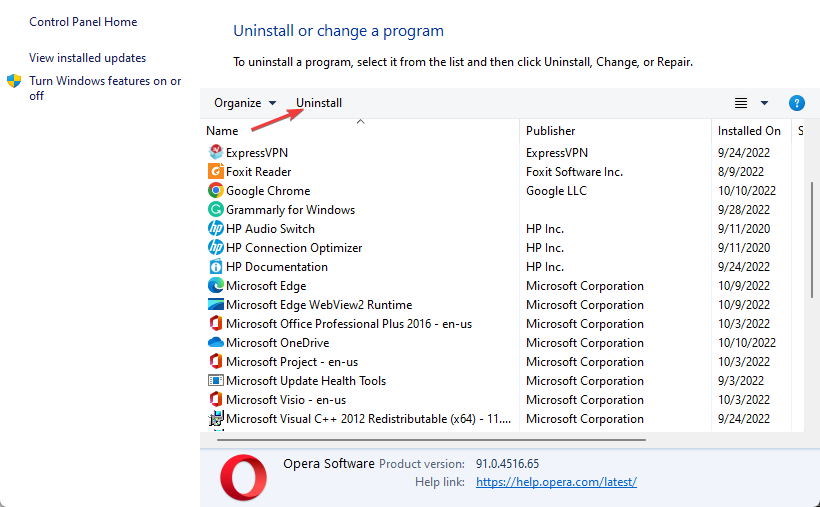
Click Programs followed by Programs and Features.
Lastly, select the View Installed Updates option and uninstall the latest one if you need so, by clicking it followed by the Uninstall button.
5. Use DISM or System Update Readiness Tool
If the download error 0x80070002 issue persists even after performing steps 1-4 above, use the DISM tool, or Deployment Image Servicing and Management tool.
You can also use the System Update Readiness tool to fix Windows Update corruption errors.
Most Windows Updates are set to automatic, especially in Windows 10. However, if you’re running an earlier version of Windows, want to learn more about upcoming upgrades, or are having a specific problem, you’ll need to know how to set it.
Now, if the quick solutions listed above didn’t fix the problem, proceed with the following methods.
6. Run the App Troubleshooter
To fix the DISM error 0x80070002, press Windows then type control and select the top result.
Go to the top right corner and change View by option to Large icons.
Click Troubleshooting.
Click on View all option on the left panel.
Select Windows Store Apps then click on Next and follow the on-screen instructions to run the troubleshooter.
7. Perform a clean boot
Performing a clean boot for your computer reduces conflicts related to software that can bring up the root causes of the slow game loads issue.
These conflicts can be caused by applications and services that start up and run in the background whenever you start Windows normally.
How to perform a clean boot
In order to successfully perform a clean boot on Windows 10, you have to be logged on as the administrator, then follow these steps:
Press Windows then type msconfig and select System Configuration.
Find the Services tab and select Hide all Microsoft services.
Click Disable all followed by Apply and OK then reboot your PC.
You will have a clean boot environment after all these steps are carefully followed, after which you can try and check if error 0x80070002 is still there.
8. Temporarily disable your antivirus security software
You can uninstall third-party software on your computers such as computer cleaners or antivirus.
For antivirus, temporarily disable it because you need it to prevent your computer from security threats. Immediately after you’re done fixing the 0x80070002 Windows 11 or Windows 10 error, re-enable your antivirus or opt for another one, that won’t interfere with your Windows processes.
9. Disable proxy connection
Press Windows then type Internet Options and access the top result.
Click Connections followed by LAN settings.
Then uncheck the Use a proxy server for your LAN box.
Click OK. That’s it!
10. Sign in with Local Account
Press Windows then type manage your accounts and select the top result.
Click Sign in with local account instead.
Follow the wizard instructions then log in again.
Hope this works to fix error 0x80070002 on your computer, as most users say this fixed the chop for them.
11. Run SFC (System File Checker) Scan
Press Windows then type cmd and select the Run as administrator option.
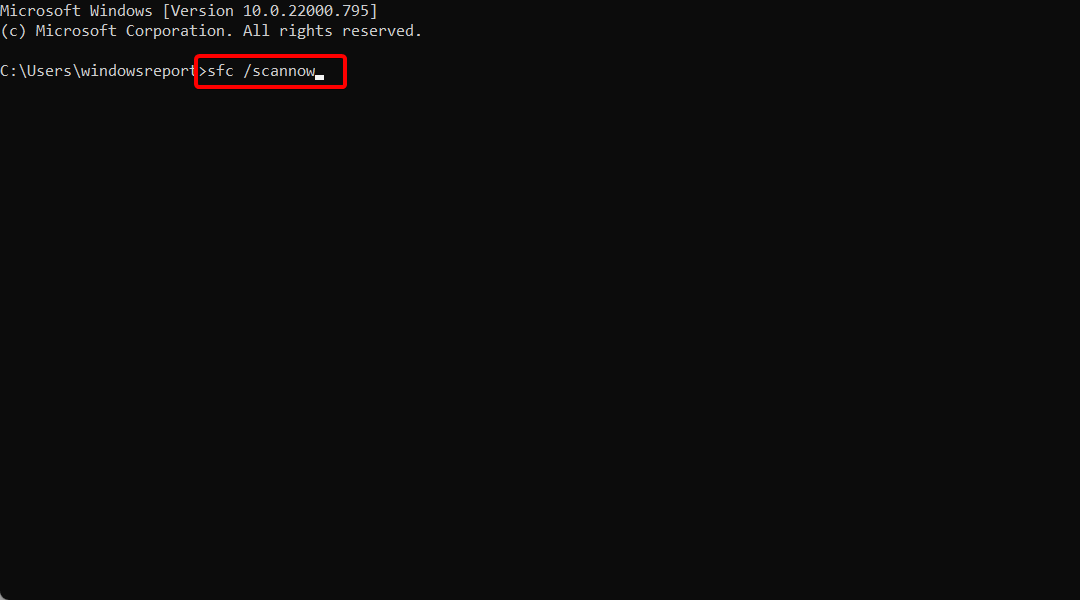
Here, type the following command and press Enter. Wait for the process to finish and that’s it! Your DLL files as well as system files will be fixed: sfc /scannow
Windows Sandbox error 0x80070002 has also been reported, and if it occurs, your only option is to repair the system files or reinstall the update that caused the issue.
What is causing 0x80070002 error?
The 0x80070002 Windows Update error is usually caused either by:
Corrupt apps
Issues with Windows updates – some files are missing despite the update having been downloaded and extracted properly. You may notice a red X sign next to the failed Windows Update.
This error message may appear on your screen if the system does not have sufficient free space to download the update.
Maintaining the most recent version of your operating system is of the utmost significance. Microsoft regularly releases new updates for Windows 11 and Windows 10 in order to address bugs, introduce new features, and further improve the operating system’s performance.
These updates may either help your computer work better and more smoothly, or they can patch up critical security gaps and lessen the danger of exploits being used against it.
Why is my Windows Update disabled?
There have been reports of antivirus software causing compatibility issues with a variety of different products. This occurs when the antivirus software on your computer sees an application as having a threat level that is not actually there.
Turning off the antivirus software is the first step you should do in order to determine whether or not this resolves the issue. In that case, we suggest that you think about uninstalling the antivirus program and giving a chance to another better antivirus software.
The Windows Update service has the potential to be another factor contributing to the issue. This might be due to the fact that the Update service does not start correctly or that the Windows Update folder contains a file that has been damaged.
If you restart the Windows Update components as described in the first solution of this article, but pick the Restart option rather than the Stop one, you should be able to remedy these difficulties very fast in most cases.
We hope the five quicksteps or the other six solutions worked for you to fix the error 0x80070002 on your computer. Let us know in the comments section.
Got an internal hard drive not showing up in Windows 11? Whether it’s missing from File Explorer or Disk Management, the problem could be unallocated space, driver issues, or a buggy update.
Here’s how to detect and fix the problem step by step.
What can I do if my hard drive is not showing up on Windows 11?
1. Uninstall recent Windows updates
Press Windows + I to launch the Settings app.
Select Windows Update from the tabs listed in the navigation pane on the left.
Click on Update History.
Next, click on Uninstall updates.
Select the recently installed Windows update from the list and click on Uninstall.
Click Yes on the confirmation box that appears.
If you encounter the hard drive not showing up in Windows 11 issue after upgrading to a newer version, the simplest solution is to uninstall that particular update.
It’s likely an issue with the update, and Microsoft should release a patch for it in the subsequent versions. Once a newer version is out, install it to keep your system up-to-date.
Enter Device Manager in the text field at the top and click on the relevant search result.
Locate and double-click on the Disk drives entry to view the drives connected to the system.
If the drive appears here, right-click on it and select Uninstall device from the context menu.
Next, click on Uninstall in the confirmation box that appears.
After uninstalling the hard drive, restart the computer, and Windows will automatically detect and list the hard drive.
Check if you can now access the drive via Windows Explorer.
In many cases, a corrupt hard drive driver is causing the device not to show up. Here, you can uninstall the device, restart the computer, and Windows will automatically install a fresh set of drivers.
Right-click on the hard drive from the list and select Update driver from the context menu.
Select Search automatically for drivers from the Update Drivers window to let your system scan the computer and install the best available driver.
Alternatively, you can use a reliable third-party tool if the above method sounds too intricate. We recommend Fortect Driver Updater, a reliable tool that will scan the web for the latest driver updates and keep the installed ones up-to-date.
4. Run a quick SFC scan
Press Windows + S to launch the Search menu.
Type Windows Terminal in the text field at the top, right-click on the relevant search result and select Run as administrator from the context menu.
Click Yes on the UAC (User Account Control) prompt that appears.
Click on the down arrow at the top and select Command Prompt from the list of options.
Type the following command and hit Enter the run the SFC scan:sfc /scannow
Wait for the scan to complete, and then restart the computer.
After running the scan, check if the hard drive appears in Windows 11. File system issues and corrupt system files can also prevent drives from being recognized properly.
5. Change Power Management settings (for external drives)
Launch the Device Manager as discussed earlier.
Click on the View menu at the top and select Show hidden devices from the list of options.
Scroll down to the bottom and double-click on the Universal Serial Bus controllers entry.
Double-click on the USB Root Hub device mentioned here to launch its properties.
Navigate to the Power Management tab, untick the checkbox for Allow the computer to turn off the device to save power, and click on OK to save the changes.
Similarly, change the power management settings for all the USB ports.
An external drive connected to the computer via the USB port could be the power management settings behind the issue. After making the earlier changes, the hard drive should appear in Windows 11.
External drives can sometimes vanish due to aggressive power-saving settings. If you’re troubleshooting a WD external hard drive that’s not showing up, disabling USB suspension may fix the problem.
6. Initialize the drive
Press Windows + S to launch the Search menu.
Enter Disk Management in the text field at the top, and click on the Create and format hard disk partitions search result that appears to launch the utility.
Check if the hard drive that is not showing up Windows 11 has a black bar at the top. If that’s the case, its space is unallocated, which is why it does not show up. Here, all you have to do is to allocate the space or create a new volume on the drive.
Right-click on the drive at the bottom of the window and select New simple volume from the context menu.
Click Next on the New Simple Volume Wizard window.
Next, choose the maximum size for the volume and click on Next. The entire disk space is mentioned above it.
Assign a drive letter from the dropdown menu and click Next.
Now, choose a File system for the drive from the dropdown menu, enter a name in the text field next to the Volume label, and click on Next.
Finally, verify the settings and click on Finish to create a new simple volume on the drive.
Creating a new volume on the disk should fix the hard drive missing in Windows 11 issue if that’s the underlying cause. If that doesn’t resolve the error, likely, the drive has not been assigned a drive letter. So head to the next fix for that.
If your drive shows up in Disk Management with unallocated space, it needs to be initialized and formatted.
Launch the Disk Management utility, as discussed earlier.
Right-click on the drive near the bottom and select Change drive letter and paths.
Next, click on Add in the Change Drive Letter and Paths for New Volume box.
Click on the dropdown menu and select the desired drive letter.
Now, click on OK to save the changes.
If a letter weren’t assigned to the hard drive, it would be missing from Windows Explorer. Although it’s not directly related to updates, the problem may be encountered after installing a newer version of Windows.
After changing the drive letter, the missing hard drive error in Windows 11 after the update should be fixed.
These are all the ways you can solve the hard drive not showing up issue in Windows 11. The fixes are pretty much the same for the previous OS as well.
Let us know which fix worked to solve the Windows 11 not detecting hard drive issue in the comments section below and the type of drive you had problems with.
When we say Xbox, all everyone can think of is amazing graphics, awesome design, a wide range of colorful controllers, and the best titles.
Die-hard fans of these gaming consoles and you were hunting for a bargain for some time now, you will surely appreciate what we have prepared for you.
Now that the holidays are gone, we have browsed the available offers, just to get an idea of how to manage our funds and prioritize what we need the most.
Of course, these deals aren’t just about Xbox consoles and accessories, and we’ve prepared many more such articles for you, all here at the touch of a button:
Note: All the prices and offers in this article are subject to change, so be sure to check the official product page to get the latest deal. If the product or offer you’re looking for is no longer available, you can try to find it on its official manufacturer page or get another one from our list.
If you’ve got a huge game library, then you also need some extra storage space to save all your games and game-related content.
This amazing console gives you up to 512GB of storage, and it comes with some great features. As one of the world’s most powerful gaming consoles, we are sure that you will be pleased with its performance.
We know that these next-gen consoles are in really high demand and we weren’t expecting any retailers to cut prices, but it’s happening.
You can save up at Walmart and other stores that still have this bad boy in stock, so make sure you don’t waste any time.
Yes, you’ve read correctly. There are retailers right now selling the Xbox Series S for only $249.
Equipped with AMD’s Zen 2 and RDNA 2 architectures, DirectX ray tracing delivers true-to-life lighting, shadows, and accurate reflections to create dynamic, living worlds.
The Xbox Series X delivers sensationally smooth frame rates of up to 120FPS with the visual pop of HDR. Immerse yourself with sharper characters, brighter worlds, and impossible details with true-to-life 4K.
Did we mention that the Series X is only $499 right now? No, it’s not a joke at all, just some unbelievable price reductions prior to Christmas.
For those of you who haven’t used it before and don’t really know what this is about, the Design Lab allows you to completely customize your next Xbox controller.
Featuring a plethora of color options, for each region and part of the controller itself, you can create an awesome and, more importantly, unique design.
So, if you were looking to gift yourself or someone else a controller that is truly unique, design one yourself right now.
You can play with your friends and build an imaginative world together. Solve quests that require you to complete matches that require quick thinking and fast reflexes.
Xbox Live Gold will definitely take your game to the next level, regardless of being competitive or cooperative gameplay on your console.
The .NET Framework 3.5 is an essential feature for running many Windows applications, but some users reported that they can’t install it on Windows 10.
This can be frustrating, as the feature provides the necessary functionality for apps to run normally. Thankfully, there are many ways to install the .Net Framework 3.5, and we will show them in this guide.
Why can’t I install NET Framework 3.5 on Windows 10?
There are several reasons you can’t install the .NET Framework 3.5 on Windows 10. Listed below are some of them:
Missing system files: If you are missing essential system files or these files are corrupt, you might not be able to install the Framework on your PC. Running the DISM scan should repair these files and allow you to complete the installation.
Outdated PC: Another reason you can’t install the .NET Framework is an outdated PC. In this case, you need to download and install the latest updates before installing the feature.
Wrong installation source: If you can’t install the .NET Framework 3.5 on Windows 10 using DISM, it might be because you specify the wrong source for the installation media. The solution here is to specify the correct source and rerun the command.
What can I do if .NET Framework 3.5 is missing on Windows 10?
1. Install .NET Framework 3.5 as a Windows feature
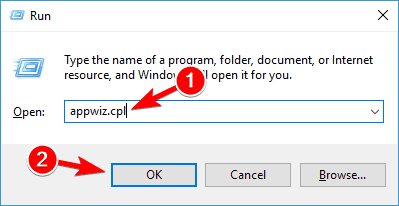
Press the Windows + R to open the Run command. Type appwiz.cpl and then press Enter.
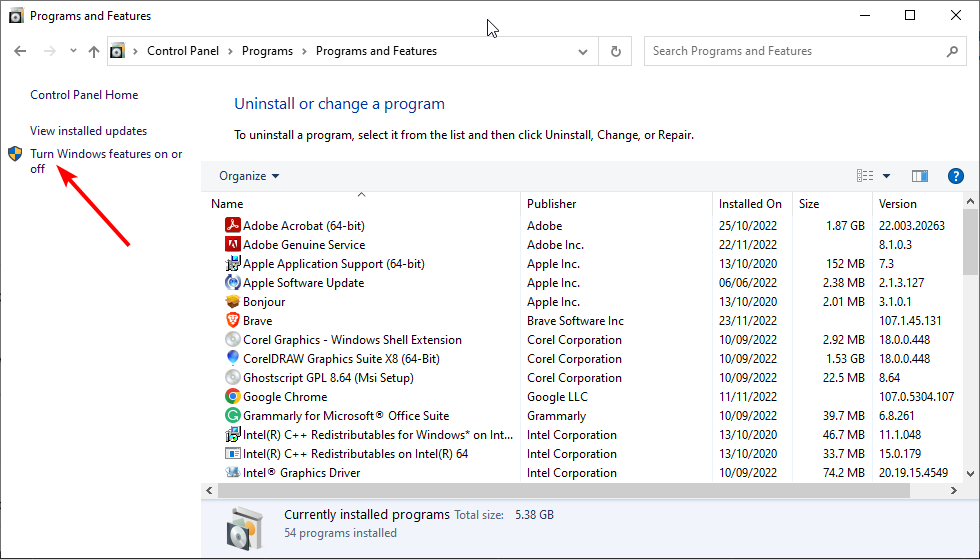
In the Programs and Features window, click on the link Turn Windows features on or off.
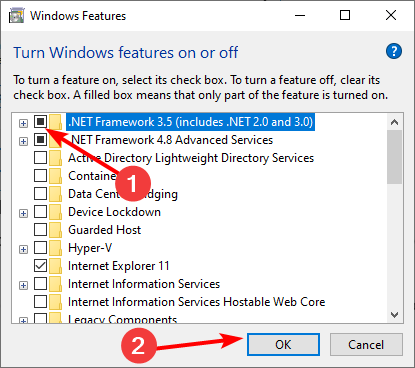
Check if the .NET Framework 3.5 (includes .NET 2.0 and 3.0) option is available. If yes, then enable it and then click on OK.
Follow the on-screen instructions, complete the installation and restart the computer if the process requests that from you.
After that, the .NET Framework should start working again without any problems.
You can also get .NET Framework 3.5 from Microsoft.
2. Install .NET Framework 3.5 on-demand
Besides installing .NET Framework 3.5 through the Control Panel, you can also install it on demand.
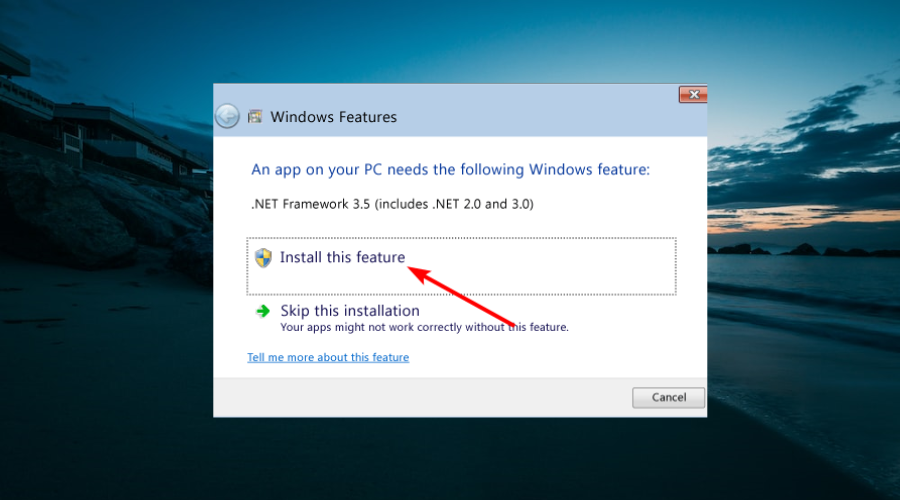
If a particular app requires the .NET Framework 3.5, but this feature isn’t enabled on your computer, the installation wizard will display the prompt for installing .NET Framework 3.5 on demand.
To install .NET Framework 3.5, choose the Install this feature option in the prompt, and .NET Framework 3.5 will be automatically installed on your computer.
3. Use the DISM command to install .NET Framework 3.5
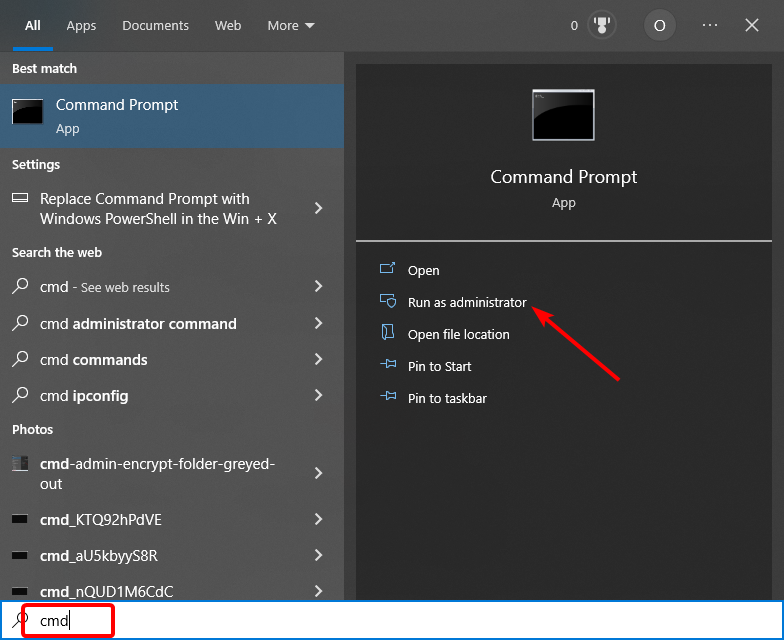
Press the Windows key, type cmd, and select Run as administrator under Command Prompt.
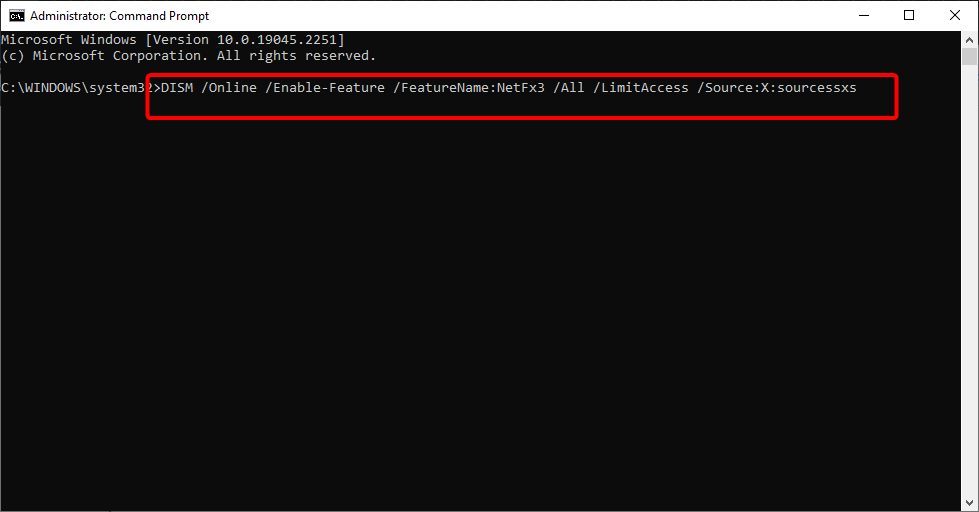
Paste the following command (replace X in the command with the drive letter of the installation media) and hit Enter to execute it: DISM /Online /Enable-Feature /FeatureName:NetFx3 /All /LimitAccess /Source:X:sourcessxs
After running the command above, you should restart your PC, and you will find the Framework installed on your PC.
Note that the drive letter of the installation letter must be correct. Else, you will get the can’t .NET Framework 3.5 with either error 0x800f0906, 0x800f0922, or 0x800f081f. Also, for the command to run successfully, you must run Command Prompt as an admin.
4. Install the missing updates and try again
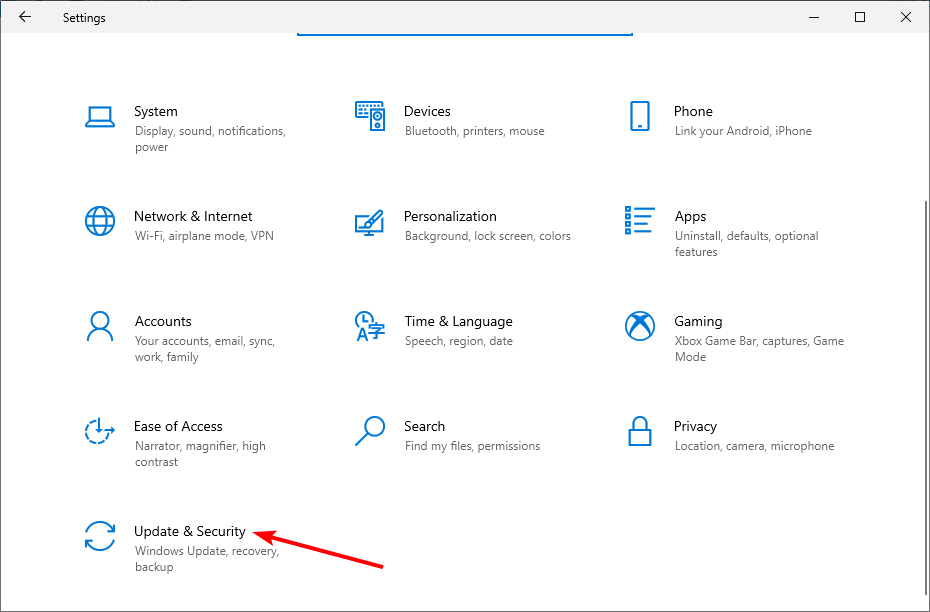
Press Windows + I to open the Settings app and navigate to the Update & Security section.
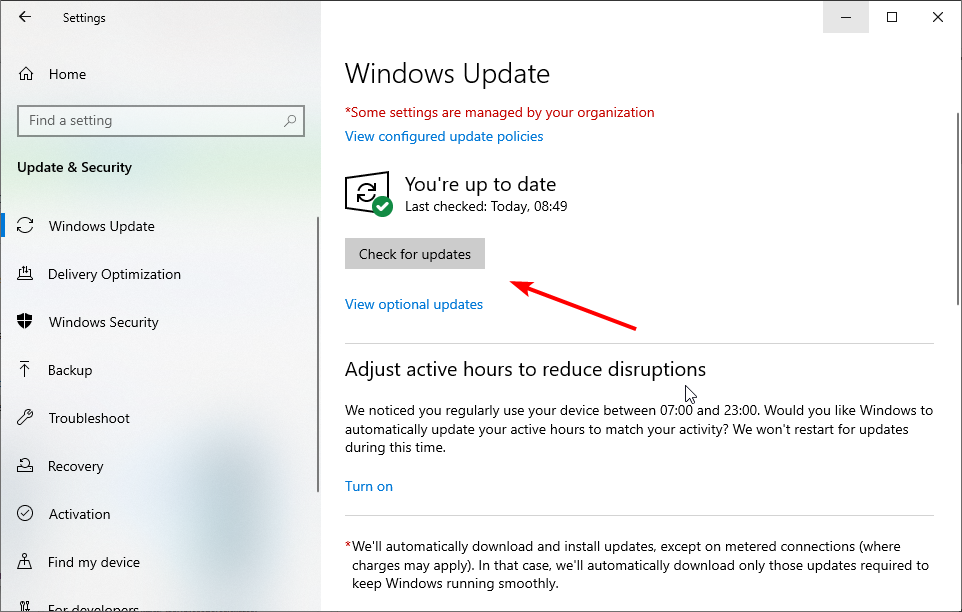
Next, click on Check for updates button.
Windows 10 will now check for available updates and download them in the background.
After downloading and installing the latest updates, you should try to install .NET Framework 3.5 again.
If .NET Framework 3.5 is missing in Windows 10 and you can’t install it, you might be able to fix the problem by downloading the latest Windows Updates.
Sometimes bugs can prevent specific components from installing, but you should be able to fix them by updating Windows 10.
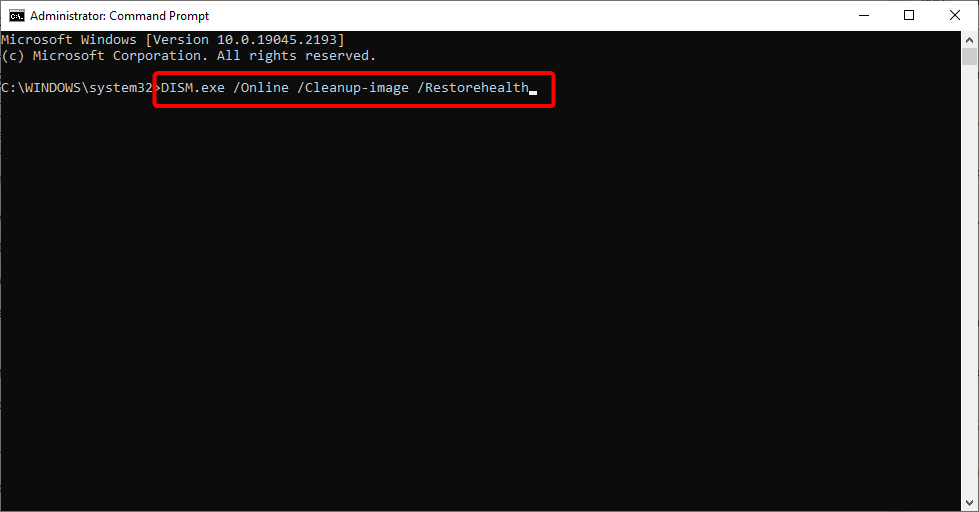
Now paste the following command and hit Enter: DISM /Online /Cleanup-Image /RestoreHealth
DISM scan will now start. The scan can take more than 15 minutes, so be sure not to interrupt it.
Once you complete the DISM scan, try to install .NET Framework 3.5 again. Users reported that the DISM scan worked for them, but if you still can’t install .NET Framework, repeat the SFC scan and check if that solves the problem.
6. Change your Group Policy
Create an installation media for your PC version and insert the bootable media.
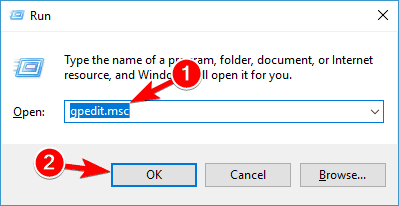
Press Windows + R, and enter gpedit.msc in the text field. Now press Enter or click OK.
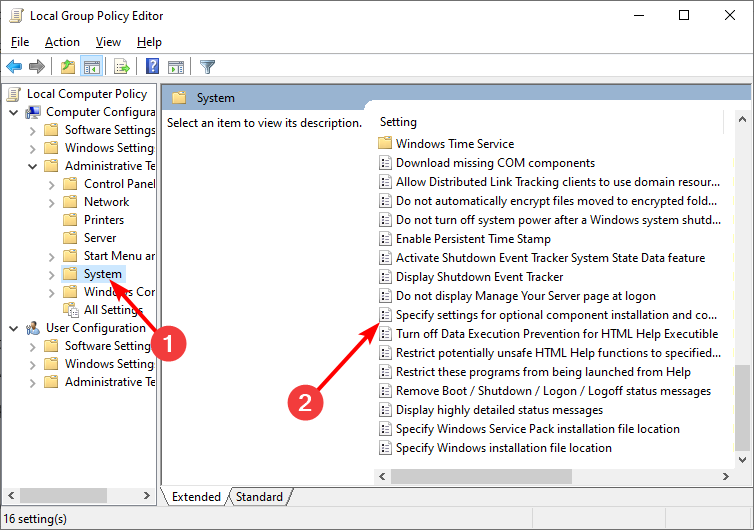
When Group Policy Editor starts, navigate through Computer Configuration > Administrative Templates > System in the left pane.
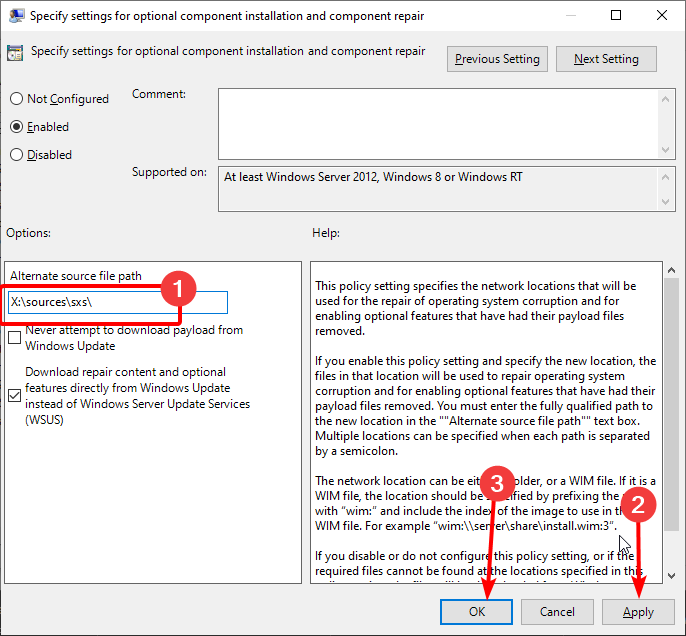
Double-click on Specify settings in the right pane for optional component installation and repair.
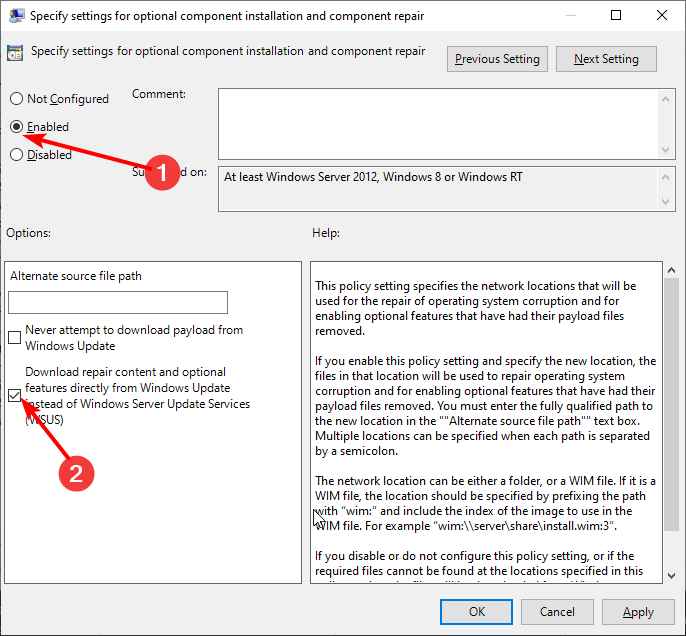
Next, select Enabled.
Check the box for Download repair content and optional features directly from Windows Update instead of Windows Server Update Services.
Type the command (replace X with the letter of the installation media) below into the Alternate source file path: X:\sources\sxs\
Now, click Apply, followed by OK to save the changes.
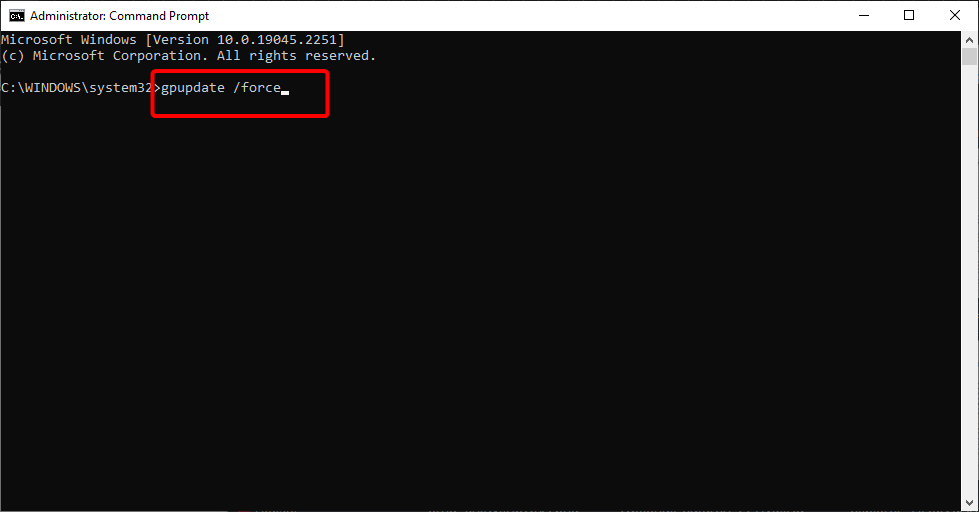
After making these changes, you need to start Command Prompt as administrator and run the following command to apply the changes: gpupdate /force
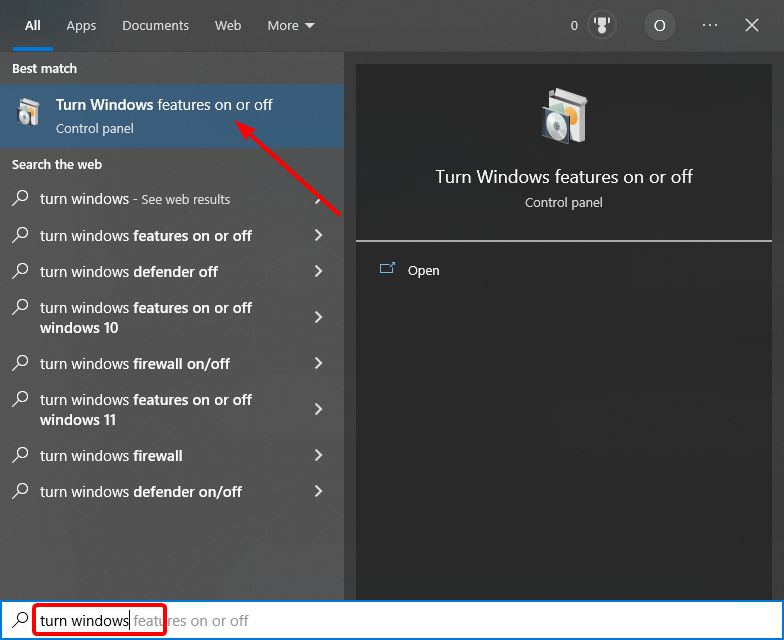
After the update, press the Windows key, type turn windows, and select Turn Windows features on or off.
Finally, enable the .NET Framework 3.5 and click the OK button.
If you have been facing the can’t install .NET Framework 3.5 with either error code 0x800f0906, 0x800f0922, or 0x800f081f on Windows 10, no matter the method you try, this fix has proven to fix all causes of the error.
Just follow the instructions carefully, and you will get it right.
There you have: Everything you need to fix the can’t install .NET Framework 3.5 on Windows 10. If you follow the instructions in this guide carefully, you should be able to get past the error and restore normalcy on your PC.
Quality gaming is all about how much you can immerse yourself in the world where you are currently on an adventure. And what better way to completely be overwhelmed by your environment than hear every little noise?
This being said, if you were in the market for a new pair of gaming headphones, you might be able to reward yourself earlier than you thought.
? Logitech, HyperX, and Razer headphones are on sale!
Note: All the prices and offers in this article are subject to change, so be sure to check the official product page to get the latest deal. If the product or offer you’re looking for is no longer available, you can try to find it on its official manufacturer page or get another one from our list.
What headphones should I buy for gaming?
When you talk gaming headphones, one of the brands that are an all-time favorite among the community is, of course, Razer.
Owning a pair of Kraken Tournament headphones shouldn’t be if an earlier, equally tempting opportunity arises, especially if you can save up.
Razer has early deals on some of its products so it’s definitely something you will want to keep an eye out for.
Razer Kraken Tournament Edition (Wired)
THX Spatial Audio breaks the boundaries of defined 5.1 and 7.1 channel surround to deliver seamless 360° positional audio for a more natural and lifelike experience.
The solid, durable aluminum frame is built to withstand the blows of daily use. With that being said, it doesn’t mean you should throw them around just because one of your teammates threw the game.
The microphone it has is detachable, noise-canceling, and also TeamSpeak and Discord certified, so you can chat with your friends and your callouts will be heard loud and clear
HyperX Cloud II
Exceptionally comfortable memory foam ear cushions and padded leatherette headband help keep you focused on gaming
There are so many companies that make these gadgets right now that all you need to do is imagine a pair of headphones and, if you Google it, you surely already find a pair just like that one.
However, some brands stand out when it comes to these devices. So, if you’re more of a Logitech fan, here’s an early deal that will most likely interest you.
The G733 Lightspeed wireless headset is light, looks really good, and offers a sound experience that will one hundred percent make every gaming moment memorable.
Logitech G733 Lightspeed
Total freedom with up to 20-meter wireless range and Lightspeed wireless audio transmission.
The JBL Quantum 400 gaming headset incorporates a flip-up boom microphone with echo-canceling technology, allowing users to focus on their teammates’ voices rather than background noise.
Another great feature that differentiates these headphones from the others is the integrated Discord-certified game-chat balance.
If you fancy longer stretches of gameplay, know that the memory foam ear cushions on the JBL Quantum 400 headset are covered in soft PU leather, providing comfort for marathon sessions.
JBL Quantum 400
Features JBL Quantum Surround sound technology which is engineered for accuracy and delivers immersive gaming audio for a competitive edge.
A fan of the HyperX brand? You don’t have to worry, because such headphones are also a part of this early discount wave.
This lightweight headset, with 90-degree rotating ear cups, provides a snug fit and high audio fidelity, which is really all you need in order to enjoy yourself.
HyperX Cloud Stinger
HyperX shape and signature memory foam provide maximum comfort during extended use, so you can concentrate on winning.
Let’s talk Triforce Titanium 50mm High-End Sound Drivers. Yes, these headphones are outfitted with cutting-edge, 50mm drivers divided into 3 parts for individual tuning of highs, mids, and lows.
The detachable Razer Hyperclear Cardioid Mic is tuned to have a more focused voice pickup area, and get the most out of the mic with advanced voice tweaking options via Razer Synapse 3.
And the best part is that you get to save on this headset, so pretty much a win-win situation.
Razer BlackShark V2
Provides industry-leading audio realism for in-game immersion by providing accurate spatial audio information beyond standard 7.1 surround sound directional cues.
This is an upgraded version of the crowd-favorite PC37X, the latest collaboration with Sennheiser is more comfortable, more detailed, and more stunning than the original.
Featuring new drivers, the PC38X delivers higher fidelity and better frequency response, if that’s what you were looking for in a pair of gaming headphones.
The headband has been updated with a new, breathable mesh-knit pad, keeping you cooler and better support for long sessions.
Drop + Sennheiser PC38X Gaming Headset
Works great with Xbox One, Xbox Series X|S, Sony PS4 & PS5 controllers with 3.5mm jack, as well as PC, Mac, and mobile/tablets with 3.5mm connection.
Constructed for enduring comfort through long gaming sessions with breathable microfiber mesh fabric and plush memory foam earpads, these headphones are the choice of many gamers out there.
Communication is important during gaming, so an omnidirectional microphone picks up your voice with exceptional clarity, with a flip-up mute function and a built-in LED mute indicator is really all you need.
Corsair Void RGB Elite
Hear everything from the lightest footstep to the most. Thundering explosion thanks to the premium, custom-tuned 50-millimeter high-density neodymium Audio drivers.
Turtle Beach’s exclusive Superhuman Hearing sound setting lets you hear subtle, game-changing sounds so you can live up to 20% longer and win more.
Optimized to deliver immersive surround sound with Windows Sonic, Dolby Atmos, and DTS Headphone: X. However, Dolby Atmos and DTS X may require additional purchases, app downloads, and supported hardware.
But, all-in-all, this is an awesome choice if this season, your wishlist contained a brand-new gaming headset.
Turtle Beach Stealth 600 Gen 2
Refined earcup acoustics and expertly tuned 50mm speakers are powerfully driven to give you accurate, immersive audio.
Widely recognized as the best mic in gaming, the Discord-certified ClearCast microphone delivers studio-quality voice clarity and background noise cancellation.
And guess what? These SteelSeries Arctis 5 headphones have it equipped. If that wasn’t reason enough, you can also save up some pennies on this early sale.
SteelSeries Arctis 5
Benefit from this cutting-edge audio technology with a certified gaming microphone that has studio-quality voice sound, combined with independent game and chat controls.
This pair of industry-leading noise-canceling, with Dual Noise Sensor technology, is the perfect gift for yourself, or for someone who you know appreciates well-done things.
And the feeling of saving $101.99 on this purchase will also ignite the Christmas spirit in you early. And they have up to 30-hour battery life, with quick charging (10 min charge for 5 hours of playback)
Hesh Evo is the unrivaled everyday headphone for people who want to keep it simple. Along with the outstanding sound, they’re engineered with just the right amount of added features to make your life a little easier.
It is a pair of wireless headphones, so you don’t have to worry about constantly messing up the cable.
These are only some of the early deals that are already available, prior to the major Cyber Monday event. There are plenty of models to choose from, you just need to decide how much you want to spend on such a device.
But if you miss this window, don’t worry, because a lot of discounts will continue throughout November, so if you really want to add to your collection, this is the month to do so.
What other gadgets are you planning to get on this Cyber Monday? Share your thoughts with us in the comment section below.
High CPU usage can indicate various problems. For example, if a program is eating up your whole processor, there is a high chance that the program is not behaving correctly.
If this continues, it will lead to crashes and other issues in the long run. Thus, you must clear up the apps or processes registering high CPU usage.
To make things easier, we have gathered the best CPU usage clean software that will help boost your PC performance in this guide.
How do I clean up my CPU usage?
There are different ways to clean up CPU usage spikes, depending on the factors causing the issue. Below are some of the most effective methods:
Restart PC: One of the easiest ways to clean up high CPU and even memory usage is to restart your PC. This will reset the processes and apps that might be misbehaving.
End process in Task Manager: The first point of reference where you notice unusual CPU or high disk usage is the Task Manager. You can also end the processes causing the issue from here by right-clicking them and selecting End task. This should restore normalcy quickly.
Uninstall unnecessary apps: Another quick way to clean up your CPU usage is to remove the apps causing the issue. You can do this quickly with one of the best uninstaller software.
Use CPU usage cleaner software: The most effective method is to use specialized software to normalize your CPU usage. These tools are excellent PC maintenance software built to tackle all causes of high CPU usage. So you won’t need an additional tool with them.
What’s the best CPU usage cleaner?
Fortect – Comprehensive System Repair and CPU Usage Optimizer
Fortect is a versatile PC optimization tool that is excellent at identifying and fixing issues leading to high CPU usage.
It performs a deep scan of your system to detect and repair problematic areas, such as corrupted files and missing system components, which can cause your CPU to overwork.
This tool not only cleans up your registry but also optimizes your entire system for better performance.
Fortect is user-friendly, making it accessible for both beginners and advanced users. It automatically backs up your system before applying fixes, so you can always revert to a previous state if necessary.
In addition to managing CPU usage, Fortect also addresses other performance-related issues by removing junk files, repairing damaged DLLs, and restoring stability to your system.
Some Key Features of Fortect:
Repairs damaged Windows files.
Optimizes system performance by reducing CPU load.
Automatically backs up system files before changes.
Easy-to-use interface with automated repair functions.
Fortect
Lower CPU usage of your computer with this powerful optimizer.
This utility provided by AVG comes with full support for all significant sources of high-CPU usage. This is the reason it is considered an excellent CPU usage cleaner.
AVG TuneUp cleans all your drive of junk files. It precisely identifies installers, temporary system files, and cache files that provide no benefits.
Alongside the disk cleaner, this utility for Windows also has a browser cleaner. It is compatible with all browsers and only removes unwanted data.
Another common issue that can slow down PCs is unwanted software. AVG TuneUp Utilities has a powerful uninstaller feature to identify and remove programs you no longer use.
It also has a Sleep Mode feature that is especially useful for low-end computers. This is because it lets you keep all the necessary apps without compromise. However, it disables them when they are not in use.
This ensures that no unnecessary processes are running in the background.
Other key features include:
Removes cookies
Fixes registry issues
Available in multiple languages
This software is compatible with Windows operating systems starting from Windows 7. It has both a free trial version and a premium, full-featured version.
AVG TuneUp Utilities
Optimize your PC with great app& file management features, disk cleaners, and other optimization tools.
EaseUS Partition Master Free it’s a very easy to use tool that works great with Windows 10 Creators. Since sometimes the disk can cause high CPU usage, you could try this tool in order to optimize it.
This software will let you fix errors that might appear on disk after an update, also it provides you with the tools to help you maintain your system in the long term.
You can use EaseUS Partition Master even before updating your system, as it allows you to create copies of your disk or just of a partition and then convert it without loosing any data.
You can change format of the partitions between NTFS/FAT32 and MBR/GPT without formatting the disk. Also, you can merge or extend a partition without loosing any data.
The EaseUS Partition Master Free lets you fix file system errors and clean up junk files. Plus, it’s surface test can help you monitor partition health and fix bad sectors.
All these tools make EaseUS Partition Master a great tool to help you maintain your disk and so make sure that is not the cause for your high CPU issues.
Here’s a list of the critical features of this handy tool:
It is completely free
The software helps you create, resize, clone, move, merge, and format partitions
Trusted by over 10.000.000 users worldwide
It has been on the market for over ten years now
Allows you to change clutter size and 4k align your SSD
EaseUS has an upgraded pro version and an enterprise version with additional features such as OS migration support, intelligent partition adjustment, and managing dynamic volumes.
EaseUS Partition Master Free
Let EaseUS minimize your CPU usage by fixing file system errors and cleaning up junk files.
This CPU usage cleaner normalizes your CPU usage in just three simple steps. The software will also speed up your PC. High CPU Usage Fixer is a complete computer error fixer and Windows registry cleaner.
It can fix various Windows registry issues effortlessly. You will also be able to use a few manual fixes for all of your system’s problems.
This is a significant piece of software that can clean your system and improve usability and performance with just a few clicks of your mouse.
High CPU Usage Fixer comes with a straightforward interface that will turn out easy to understand and use even for beginners.
This software can diagnose and fix various system errors with its error knowledge base.
It can manage startup items, browser objects, Internet browser clutter, and more. Smart CPU Usage Fixer also cleans registry files and has Internet security and privacy features.
This tool is designed to provide users’ computer systems with enhanced optimization, and this will result in better management of startup items, desktop, browser objects, system service, and the Internet
Check out the best features that are included in this tool:
With this tool, you can instantly fix computer errors
High CPU Usage Fixer will speed up your system and Internet as well
The system’s settings will be fine-tuned to maximum performance
All the sophisticated utilities included in this tool will ensure that your system is tuned up to run at its optimal state.
It’s also important to note that the app is an excellent Windows registry cleaner. Check out more functionalities and advantages of this software on their site.
Process Tamer is a CPU usage cleaner software that runs on your system and watches the CPU usage of all the running processes on your computer.
The software has a built-in process usage viewer that lets you see what is using the CPU and what priority is running.
When this utility detects an operation that has exceeded a particular threshold of the CPU usage, it temporarily reduces the priority level of that operation until the CPU usage returns to normal levels.
After the usage level drops below a certain level, that foremost priority will be restored. As a result, your system will run smoothly and lag-free again.
This feature is handy in most instances, enabling your PC to run smoother. However, you can quickly turn it on and off if you don’t want to change process priorities for certain operations.
Therefore, the process can be told to force run a set priority every time or to be ignored by the software and continue running at its standard levels.
It’s important to note that the Ignore rule will be handy, especially when programs such as burning apps or media players might set their priorities high to avoid being interrupted.
Check out other essential features of this tool:
Simple UI with intuitive controls
Balloon tooltip notifications of any real-time adjustments
Very lightweight
Process Tamer comes with a few configuration options. This includes changing the trigger point for low and high CPU usage, smoothing the usage average over time, and controlling the behavior of background processes
This is another helpful CPU usage cleaner tool that can automatically adjust process priorities. It also can alter which processor cores are used.
This will be achieved via a technique that is called Process Balancing. This process will prevent processes from hogging your system’s resources and reducing your computer’s levels of responsiveness.
This is a more advanced tool with many functions and various effects. So, it would be best if you had a high level of patience to enjoy this excellent tool.
Process Lasso is a powerful and efficient utility, so you might check it out.
Check out some other great features of this handy tool:
One of the most powerful features is the sheer amount of options that are available for controlling processes
You will find a lot of configurations and context menu entries that might be more beneficial for advanced users rather than beginners
The main window shows some nice graphs, and loads meters, and the central area is a process viewer and manager
Power plan automation
Provides detailed log reports
Process Lasso has a free and a Pro version. The software is compatible with Windows operating systems, starting with Windows 7. You can also use it on Windows servers, versions 2012-2019.
These are the best tools you can find online to fix high CPU usage-related issues. After looking at their features, pick the one that most fits your needs and give it a go.
When Windows 10 encounters, severe functioning issues can sometimes display an Orange Screen of Death.
This error is far less standard than the famous Blue Screen of Death or the new Green Screen of Death errors, but it does occur. Also, it is not as dangerous as the dreaded BSOD, but it still means that there is a critical issue with your device.
This guide will show you practical solutions to quickly fix your PC’s Orange Screen of Death. Then, you only follow the instructions to the letter, and your PC will return to normal.
What causes the Orange Screen of Death?
Various factors could lead to the Orange Screen of Death. Below are some of the prevalent causes:
Faulty driver installation: If your PC is showing an orange screen with white lines or just the plain Orange Screen of Death, it might be because of an outdated or faulty driver. Updating your driver from the manufacturer’s website should restore normalcy here.
Issues with external devices: In some cases, you might have connected one too many external devices with your PC. One of these devices might be faulty or incompatible with your system, leading to this issue. The solution here is to disconnect all unnecessary devices.
Activities of third-party apps: Some users have found third-party apps like SoftOSD to cause this problem. You need to uninstall any app that gives you the orange screen with one of the best uninstaller software to restore normalcy.
PC overclocking: If you get the Orange Screen of Death while gaming, it might be because you have overclocked your PC. To solve this, you need to undo all overclocking settings and remove your overclocking software.
How can I fix the Orange Screen of Death?
There are some preliminary troubleshooting steps you need to try before proceeding to the fixes in this guide. Note that these steps have fixed this issue for some users, so you should go through them quickly.
Force shutdown your PC by pressing and holding the power button for some seconds
Disconnect all unnecessary external devices
Undo all overclocking settings and remove overclocking software
If you still can’t fix this problem with these steps, you can now proceed to the solutions below:
1. Remove the softOSD software
Press the Windows key + I to open the Settings app and select Apps.
Find softOSD on the list, select it and then click the Uninstall button.
If you’re prompted to remove sds64a.sys, skip that step.
Some users have reported that softOSD.exe can cause the Orange Screen of Death issue on Windows 10. Remove the softOSD software and restart your PC to solve the problem.
To be sure that all software components are removed, we will advise using a dedicated uninstaller tool in CCleaner. This excellent software digs through your PC to remove even the most stubborn leftovers of the program you want to uninstall.
This prevents further problems from occurring soon.
2. Update your drivers
2.1. Update driver manually
Right-click the Start button, and select Device Manager from the list.
Right-click your graphics card, and select Update driver.
Select Search automatically for updated driver software.
Finally, install any available updates.
If the Windows driver updater cannot find the drivers to fix the Orange Screen of Death issue, you need to go to your driver manufacturer’s website to download and install the latest driver.
It should be noted that other drivers aside from the display drivers can cause this. If you recently updated any driver or found any entry with a yellow exclamation mark in Device Manager, it might cause a problem. So, you need to update it too
2.2 Update the drivers automatically
Updating your drivers manually can be a hassle, and if you don’t install the correct driver, you’re back to square one.
It’s much simpler and easier to use a dedicated tool that can do that automatically. The software recommended below updates and repaired your drivers in just a few seconds.
Outbyte Driver Updater
Have all your old drivers updated so you won’t experience any more crashes.
Press the Windows key + R, type control, and hit Enter.
Choose the Hardware and Sound option.
Click the Devices and Printers option.
Now, right-click any needless device there and select the Remove device option.
Finally, click the Yes button when prompted to confirm the action.
Some users have found that having too many multimedia devices, especially TVs, connected to your PC can lead to the Orange Screen of Death error. Unfortunately, removing these devices and restarting your PC is the only way to fix this.
If the Orange Screen of Death appears on bootup, type your Bitlocker password, and hit Enter.
Your computer will receive the input even if you don’t see a case to type your password.
After login, press the Windows key +S, type cmd, and select Run as administrator under Command Prompt.
Type in the following command: BCDEDIT /Set {default} bootmenupolicy legacy
The steps above are for users using BitLocker or other encryption services. After running the command above, it will turn BitLocker’s pre-boot screen into a character mode display, eliminating the Orange Screen of Death issue.
5. Update Intel Graphics Command Center
One of our readers detected that this OSoD issue might come from the fact that you’re using an old Intel Graphics Command Center version.
You can uninstall the app like any other; for that, you may use the procedure listed in Solution 2. After that, download the app from the Microsoft Store and reinstall it.
We hope that some solutions listed above helped you fix the OSoD errors you encountered.
Windows 10 orange screen errors are not the same as their more dangerous BSoD counterparts, but the solutions are often the same.
Witcher fans feel like they have been waiting forever for CD Projekt Red to finally release next-gen versions of their latest game, ever since this was announced back in 2020.
And, if the wait wasn’t long enough already, developers recently announced another delay, which will surely test the patience of even the most resilient gamer.
CD Projekt Red made it known that an upgraded and enhanced version of its hugely popular fantasy RPG didn’t even have a new release window, leaving many concerned.
We have decided to have our in-house development team conduct the remaining work on the next-gen version of The Witcher 3: Wild Hunt. We are currently evaluating the scope of work to be done and thus have to postpone Q2 release until further notice. 1/2
The story has now changed and we can all rejoice in knowing that this version of the beloved triple-A title is right around the corner.
Witcher 3 The Wild Hunt announced for December 14, 2022
Many fans were eagerly waiting to relive all the adventures that Geralt of Rivia engaged in while playing The Witcher 3: The Wild Hunt.
Seeing cities such as Beauclair, Oxenfurt, or Novigrad in the new resolution, with all the new graphics tweaks, is surely a treat for all fans.
However, all the anticipation that lead us to this moment simply dissipated, as developers dropped the ball on this major project.
We have decided to have our in-house development team conduct the remaining work on the next-gen version of The Witcher 3: Wild Hunt
By reading this statement, one would understand that CD Projekt Red entrusted the process to someone else while working on the next Witcher game, and it all went downhill from there.
The company responsible for the Witcher game franchise was taking matters into its own hands and trying to deliver as soon as it can.
Now, two years after the original announcement and multiple delays, the next-gen enhanced version of The Witcher 3: Wild Hunt is almost here.
CD Projekt RED has just shared details on the project’s features as well as gameplay footage for the first time.
CD Projekt Red is now touting ray-traced global illumination support across all current-gen platforms with this update.
Some of the other graphical additions include screen space reflections, dynamic resolution scaling, as well as texture and foliage upgrades.
For console players, quality and performance modes (60 FPS) are being introduced, while PlayStation 5 players will be happy to know that haptic feedback and adaptive triggers support is incoming.
The game will also feature Netflix show-inspired content that includes a new mission and its recognizable Nilfgaardian armor.
We can pause during cutscenes, we get HUD customization, a photo mode, a new camera, and even features from popular mods on PC.
Also, cloud-based cross-save support across all platforms is here too, allowing players to pick up the adventure where they left off from PC, Xbox Series X|S, or PlayStation 5.
Everyone who already owns the current versions of the game is getting the upgraded content for free, and CD Projekt will be releasing The Witcher 3: Wild Hunt – Complete Edition as well.
The complete edition will contain the base experience plus all post-launch content, from the free DLC to the story expansions – Hearts of Stone and Blood and Wine.
Only a digital release for the beloved title will be available at first, with a physical edition coming at a later, yet unknown date.
This last-generation version still available on PlayStation 4, Xbox One, and Nintendo Switch aren’t being completely left behind either.
CD Projekt Red said that it plans to bring gameplay improvements and the Netflix show-themed add-ons to these platforms later.
People were actually expecting companies like Activision Blizzard to postpone games after huge blunders, not CD Projekt Red.
But, after the Cyberpunk 2077 disaster, pretty much everything is possible. There’s not much to do except wait for the games to become available.
Please keep in mind that the studio is also working on remaking The Witcher (2007) using Unreal Engine 5, and also on the new Witcher game saga.
Eager to try out the new and improved next-gen versions of The Witcher 3: The Wild Hunt? Share your thoughts with us in the comments section below.
Many Windows 10 users reported that the Your system requires SMB2 or higher error message occurs on their PCs when they try to transfer specific files.
In case you’re unfamiliar, SMB stands for Server Message Block, a protocol for sharing files, and it has two versions, the SMB1 and the SMB2; the latter is the more secure one.
SMB1 protocol is vulnerable, and your system will give you a warning message saying that it requires SMB2, but don’t panic, because there are some helpful solutions.
This error message can be annoying, but it can be fixed in minutes with our solutions, so let’s get started.
Why am I getting Your system requires SMB2 or higher message?
As we explained, this version 2 is a latter model of the file-sharing protocol. Therefore, if you are shown this message on your computer, it is because of the following reasons:
You are running on SMB1 – Most modern systems require at least SMB2. So, this could be a missing pointer on your computer.
Disabled SMD2 – Other than missing on your computer, it may also not be enabled, and in this case, you will need to allow it to access some shared files.
Users have been confronted with these messages, your system requires SMB2 or higher on Windows Server 2019 Impacket and Synology. Note that the solutions discussed will come in handy in all these cases.
How can I fix the Your system requires SMB2 or higher error?
1. Turn on the Windows feature
Start PowerShellas administrator by pressing the Windows Key+ X and selecting PowerShell (Admin).
Type the following line in Windows PowerShell, and press Enter: Get-SmbServerConfiguration | Select EnableSMB2Protocol
If the result is True, your system can run the SMB2 protocol.
Type windows features in the Windows Search box, and select the Turn Windows features on or off option.
Once the Windows Features window opens, check the SMB1/CIFS File Sharing Support option, and hit OK.
Restart your PC, and check if the problem with SMB2 is resolved.
Many users have confirmed that you can run the SMBv1 protocol on Windows 10 by temporarily re-enabling the SMB service.
Start PowerShellas administrator by pressing the Windows Key+ X and selecting PowerShell (Admin).
Enter the following command, and press Enter: Set-SmbServerConfiguration –EnableSMB2Protocol $true
Press Y to confirm.
By performing this action, you will enable the SMBv2 protocol and get rid of the error message Your system requires SMB2 or higher once and for all.
These two simple solutions can help you fix the annoying Your system requires SMB2 or higher error. For more suggestions or other questions, please access the comments section below.
Millions of people use Microsoft’s built-in antivirus, Windows Defender, to protect their computers. But, unfortunately, sometimes it can’t do its job because of various errors.
One of the most common Windows Defender error messages is the following: Group Policy turns off this app.
We will discuss the causes of this problem and some of the most trusted solutions available.
Why does Group Policy block Windows Defender?
Windows Defender is a reliable built-in antimalware for the OS. If the Group Policy blocks it, there are a few common suspects, including:
Third-party antivirus – This message appears if you installed another antivirus program or an anti-hacking tool that isn’t fully compatible with Microsoft’s built-in antivirus.
Malware – If some malware infects the computer, it is possible you will get the message. Malware accessing your computer’s administrative tools may then deactivate Windows Defender through Group Policy.
Bad configurations – If there are faulty configurations on your Settings app, or the Group Policy, you may anticipate some problems, including Why does Group Policy block Windows Defender?
While there may be other triggers, these are the culprits in most cases.
Windows Defender is a solid antivirus, but sometimes issues can occur. Speaking of Windows Defender issues, here are some problems that users reported:
Group Policy blocks Windows Defender Windows 10 – This issue can occur on Windows 10 and prior versions. Even if you don’t use Windows 10, you should be able to apply most of our solutions to the older versions of Windows.
Turn Windows Defender on via Group Policy – If Group Policy turns your Windows Defender off, you can easily fix this problem. Simply change a couple of values in Group Policy, and Windows Defender should start working again.
Group Policy blocks Windows Defender – If your Group Policy blocks Windows Defender, you might be able to fix the problem simply by making a few changes in your registry.
Unable to start Windows Defender Group Policy – If Group Policy blocks Windows Defender, you can solve the issue simply by starting Windows Defender from the Settings app.
What can I do if This app is turned off by Group Policy?
1. Make sure that old third-party antivirus tools are removed
Windows Defender is designed to turn itself off once you install a third-party antivirus. If you had a third-party antivirus on your PC, it’s possible that the issue was caused by it.
Even if you remove your antivirus, sometimes there might be some leftover files or registry entries. These files can also interfere with Windows Defender and cause this issue to appear.
To fix the problem, removing those files from your PC is essential. The best way to do it is to download a dedicated uninstaller for your antivirus. These tools will remove any leftover files and registry entries and completely remove any application from your PC.
Also, consider switching to a different third-party antivirus. Unlike Windows Defender, third-party antivirus tools offer advanced features that many users will find useful, such as online banking protection and privacy insurance.
If you want extra security on your PC, you should consider the tool recommended below. One hundred ten million users trust it for a good reason – it offers excellent protection from malware.
TotalAV
An excellent antivirus solution that offers multi-layered protection to keep your computer safe from cyber threats.
Press Windows Key + R shortcut, type regedit, and hit Enter.
Go to the following path: Computer\HKEY_LOCAL_MACHINE\SOFTWARE\Policies\Microsoft\Windows Defender
Finally, delete the value in the DisableAntiSpyware key.
3. Disable settings in Group Policy
Press Windows + R, type gpedit.msc in the Search bar, and hit Enter.
Go to the following path: Local Computer Policy\Administrative Templates\Windows Components\Micorsoft Defender Antivirus
Select Windows Defender, then in the right-hand panel, double-click Turn off Windows Defender Antivirus.
Lastly, in the new window, select Disable, then click Apply and OK to save the settings.
Want to use Group Policy on your Windows 10 Home edition? Find out how to get it by using this quick guide.
4. Turn on Windows Defender from the Settings app
Press Windows + I to open the Settings app.
When the Settings app opens, navigate to the Update & Security section.
Select Windows Security from the menu on the left, and in the right pane, click Open Windows Security.
Now select Virus & threat protection.
Navigate to Virus & threat protection settings and click on Manage settings.
Lastly, locate Real-time protection and enable it.
If you’re getting a message that Group Policy deactivates Windows Defender, you might be able to fix the problem simply by turning it on from the Settings app.
5. Check if the Microsoft Defender service is running
Press Windows Key + R and enter services.msc.
Now press Enter or click OK.
A list of services will now appear.
Scroll down and double-click the Microsoft Defender Antivirus Service to open its properties.
Finally, set the Startup type of the service to Automatic, click the Start button to start the service, then click Apply and OK to save changes.
If you’re getting a message saying that Group Policy deactivates Windows Defender, the problem might be the disabled Windows Defender service.
However, you can easily enable this service and fix the abovementioned problem. There you go. Use one of these methods, and the Group Policy will no longer disable Windows Defender.
The auto-login feature on Windows 11 enables users to access a computer without the need to input any login credentials, passwords, or pins. It saves users time and allows them to access Windows quickly.
In this piece, we’ll show you a few different ways to do that:
How do I enable auto login in Windows 11?
1. Use the system’s Settings
Click the Start button and select Settings.
Select Accounts from the left pane and click on Sign-in options from the right.
Now look down, right under Additional settings, to turn off the Windows Hello sign-in for Microsoft accounts. If the option is greyed out, log out and log back into your account.
You will be prompted to enter the password, then hit the Yes button.
Press the Windows key + R to start Run, type netplwiz, and press Enter or click OK.
Now uncheck the box writing Users must enter a username and password to use this computer.
After you click Apply.
Next time you restart the PC, you will automatically log in without entering a password.
If you couldn’t follow these steps because there was no checkbox in netplwiz, we have a special guide that addresses that.
Press the Windows key + R to start Run, type regedit, and press Enter or click OK.
Got to the following path in the Registry: HKEY_LOCAL_MACHINE\SOFTWARE\Microsoft\Windows NT\CurrentVersion\Winlogon
Click on Edit on the top menu, select New, choose DWORD (32-bit) Value and name it AutoAdminLogon.
Double-click the key to edit it and give it the value 1.
Now click again on Edit, select New, choose String Value and name it DefaultUserName.
Double-click the value and change the Value data with your user name.
Next, click on Edit, select New, then String Value and name it DefaultPassword.
Fill in your password, then click OK.
Of course, if you change your mind and want Windows 11 to ask for the password again, repeat the first two steps and delete the AutoAdminLogon, DefaultUserName, and DefaultPassword keys.
Summary
With the auto login feature enabled, you drastically reduce the security of your PC. This means that anyone who has physical or remote access to your PC can access it without restrictions. If you’re not sure which authentication method to use, check out our password vs PIN comparison to get you started.
It’s worth mentioning that this feature is available on older versions, and we wrote about enabling auto login on Windows 10 in our previous guides.
Many Windows 11 users reported that Opera GX is not responding and this can be a major problem and negatively impact your browsing experience, so let’s see how to fix it.
Why is Opera always not responding?
This can happen if your browser installation is bugged or if Opera is stuck while syncing data.
What can I do if Opera GX is not responding?
If the Opera browser is not responding, try waiting for it to finish setting up and syncing. This can sometimes take up to a few hours.
1. Update the browser
Open Opera GX and click the Menu button in the top left corner.
Choose Update & Recovery.
Wait while Opera GX checks for updates and downloads the latest version.
If you can’t launch the browser, just do the following:
Press Windows key + R and enter %localappdata%.
Next, navigate to Programs\Opera GX
Select navigate to the folder that matches the latest version and run the installer.exe file from it.
Alternatively, you can just download the latest setup file from Opera’s website and run it force the browser to upgrade.
2. Disable syncing
Open Opera GX and head to Settings.
Select Privacy & security and locate Synchronization.
Next, disable this feature or choose the sign out option.
If you’re importing files from another browser, go to Import bookmarks and settings.
Try disabling certain features such as bookmarks or browsing history.
A PC without a functioning keyboard or mouse is unusable for most users. Hence, it’s vital to fix issues related to those components as soon as possible.
Some reported certain problems with specific keyboard keys after the system upgrade; according to them, the left Shift key is not working. However, since this is essential for everyday typing, we have prepared some solutions for you.
Why is my left Shift key not working?
There are various reasons the left Shift key might not work with some letters on your keyboard. Below are some of the common ones:
Outdated driver: The left Shift key might be working on your laptop because your keyboard driver is outdated. The solution is to update your driver to the latest available version.
Sticky keys feature: The Sticky key feature enables only one key to work at a time. Hence, if the left Shift key is not working for symbols or capitalization, it might be because the feature is enabled. You need to turn off the Sticky keys to get your keyboard working normally again.
Impact of dirt on keyboard: Sometimes, your keyboard might be dusty and dirty. Also, debris might have found its way into it. This can cause the keyboard to misbehave, leading to this issue.
Activities of third-party apps: If you have an app related to keyboard use, it might mess with the device. In this case, you need to remove the app and its components using one of the best uninstaller software.
What are common problems with the Shift key?
Here are some problems that users reported:
Shift key not working Windows 10: This issue can appear on any version of Windows, and older versions aren’t an exception. Even if you’re not using Windows 10, you should be able to apply all solutions to older versions of Windows.
Keyboard Shift key not working properly: According to users, sometimes the key won’t work correctly on your keyboard. This can sometimes be caused by malware, so perform a full system scan.
Left Shift key not working: Sometimes, just one Shift key can be affected by this issue. If that’s the case, check if your Shift key is stuck. You might need to press it to unstuck it or clear the key socket to fix the problem.
HP laptop Shift key not working: If this problem occurs on your laptop, it’s possible that your keyboard isn’t correctly connected. You must remove your keyboard and connect the ribbon cable tightly to your motherboard to fix it.
Shift key won’t capitalize: This is another common problem on your PC. However, you should be able to fix this issue by using one of our solutions.
How can I fix the left Shift key if it’s not working?
Before applying the fixes listed in this section, we recommend performing the following prerequisite checks:
Remove dust and dirt from the keyboard and turn it upside down to eliminate debris
Try to use an external keyboard if it is a laptop
Ensure there is no key stuck on the keyboard. If there is any, press it firmly to unstick it
Connect the external keyboard to another PC
1. Make sure you have the latest drivers
Press theWindows key + X and select Device Manager from the list.
Find Keyboard in the driver’s list. Double-click on your device to open its properties.
Click Details and choose HardwareID from the drop-down list. Then, copy the first line and paste it into your web browser.
Find the official driver support and download the drivers.
Install and restart the PC.
Updating drivers manually can be tedious, especially if you don’t know where and how to find the necessary drivers. However, you can automate this process using specialized tools such as Outbyte Driver Updater.
2. Check for malware
Press Windows key + X and type defender. Select Windows Security.
Select Virus & threat protection and click on Quick scan.
Wait for the scan to finish.
Sometimes, the presence of malware can cause the left Shift key not working issue. Scanning for malware with the built-in security app should help fix this.
If Windows Defender is not giving you the desired result, you might consider a top-notch antivirus in TotalAV. This software offers complete online and offline security against viruses.
TotalAV can detect and eliminate even the most hidden malware quickly. To make things better, it is lightweight and does not mess with your activities.
TotalAV
A lightweight antivirus program with high-detection scores and strong protection to keep digital threats away from your PC.
Press the Windows key + I and select the Update & Security option.
Select Troubleshoot in the left pane and click the Additional troubleshooters option.
Now, select Keyboard and click Run the troubleshooter.
Sometimes, minor glitches might be why the left Shift key is not working. In this case, you must run the keyboard troubleshooter to diagnose and fix it.
4. Uninstall third-party software related to keyboard use
Press the Windows key + X and select Apps and features.
Now locate the keyboard software that you have installed.
Please select it and click on Uninstall.
Follow the instructions on the screen to remove it.
To ensure that the application you’re trying to remove is completely uninstalled, we suggest using uninstaller software in CCleaner since it will remove all files and registry entries associated with the software.
We live in an age where you can literally make money by sitting at home, and all you need to do is trade stocks, watch the market, and make judicious predictions of what might happen next.
Of course, their requirements limit the number of people who can actually do it, except if you use dedicated software or an online service like TradingView.
Since its purpose is to make you money, why not spend less on it now, while they are having their Cyber Monday sales?
How to save up to 70% on TradingView annual plans?
For those of you who haven’t used the platform yet, TradingView is an online web-based trading service that provides you with real-time data and browser-based charts.
Do not be afraid of all that complicated data you have on the charts. The tools will help you understand its UI/UX and come with great support.
These let you do your research from anywhere since there are no installations or complex setups and all you need is an Internet connection.
To be more precise, the Tradingview platform is a technical analysis tool with a plethora of functions. Tradingview offers paper trading with a preset virtual balance of $100,000. It keeps track of all paper trading orders and shows how much profit or loss is made on the trades you make.
Tradingview also has a screening feature that allows you to shortlist companies based on both fundamental and technical factors.
Depending on the toolset you plan on taking, there are currently 3 subscription plans:
Essential
-30% off ⇒ save $53.40/year
Pro+
– 40% off ⇒ save $143.40/year
Premium
– 70% off ⇒ save $502.44/year
And to make things even better, all the plans also include 1 free month.
TradingView
Start trading like a pro and see your finances grow with the help of this highly intuitive and resourceful online service!
At first, online trading may seem scary, but if you have a reliable tool by your side, there’s nothing to worry about. More so, since you can now get TradingView at such a massive discount, you can end up making money with half the initial investment as before.
Also, Trading View is an excellent place to simply learn about the markets in real-time and get a lot of useful data that will help you understand the investing world.
Does this Cyber Monday deal make you want to try your skills in online trading? Let us know in the comments section below.
DNS Unlocker is not a virus but is categorized as PUP, which might install malicious programs, such as toolbars, adware, etc., on your computer. This could slow your browsing speed and your PC.
This guide will talk about all the possible methods to remove ads by DNS Unlocker without harming your computer.
How can I remove ads by DNS Unlocker?
1. Remove DNS Unlocker by uninstalling
Press Windows + R to get the Run window
Type appwiz.cpl and press Enter.
Locate DNS Unlocker from the list of installed programs, right-click on it and select Uninstall.
The app will start to uninstall; follow the instructions on the prompts if they appear. You will be notified once the app is uninstalled.
Put a checkmark beside Obtain an IP address automatically and Obtain DNS server address automatically.
Click OK and then again click OK.
4. Run an antivirus scan
Press Windows + R to get the Run console.
Type windowsdefender: within and press Enter to open Windows Security.
Click Virus & threat protection.
Now click Scan options.
Select Full scan.
Your computer will scan your computer for threats, and it may take a while.
5. Use a third-party app
A third-party security tool like Hitman Pro can quickly scan your Windows PC and remove PUPs. It comes with advanced malware scanning and removal tools. Moreover, it works well with any antivirus program installed on your computer. To remove ads by DNS Unlocker via Hitman Pro, follow these steps:
Launch the app and click the Next button to start the scan.
After completing the scan, you will get a list of PUPs on your computer. Click Next to remove all of them.
Tip
It is advised to download apps from the official website. Also, while installing, check the installation wizard properly. Furthermore, always select Custom Install to avoid getting any PUPs installed on your computer.
So, these are the easiest and most secure ways to remove ads by DNS Unlocker from your Windows computer. Try them and let us know what worked for you in the comments section below.
You will face the VCRUNTIME140_1.dll not found error on your Windows PC when you play a program that does not have the particular file in the directory. Because of this error, either the game or program won’t open or will stop working mid-way. Here is the full error message;
The code excution cannot proceed because vcruntime140_1dll was not found. Reinstalling the program may fix this problem.
Users encounter this error with games or any third-party program that uses the VCRUNTIME140_1.dll file. This guide will give you a bunch of solutions that will help you resolve this error.
What causes the VCRUNTIME140_1.dll file not found error in Windows?
Here are some of the most common reasons that could trigger the VCRUNTIME140_1.dll file not found error in Windows.
The VCRUNTIME DLL file is missing: The error could be genuine and the program associated with it doesn’t have the DLL file in the directory.
The program isn’t installed correctly: Due to interrupted installation, several programs may skip important files only to throw up errorsafterward.
Your PC is infected by a virus or malware: A virus or malware can not only steal your personal info but it could also damage the system and program-related files. Check out our best antivirus for Windows 7 guide.
Uninstall any program you have recently installed, after which the issue started.
Let us go through the advanced solutions to resolve the error.
1. Manually register the VCRUNTIME140_1.dll
Open the Start menu.
Open Command Prompt as an administrator.
Type the below command and press Enter. regsvr32 /u VCRUNTIME140_1.dllregsvr32 VCRUNTIME140_1.dll
Restart the PC and check if this resolves the issue or not.
If running a program throws up a VCRUNTIME140_1.dll file not found error, then you can try to manually register the file by using the above commands on your PC.
2. Reinstall important VC Runtimes
Press the Win + R keys to open the Run dialogue.
Type appwiz.cpl and press Enter.
Locate the VC runtime installed on your PC and uninstall it.
Restart your PC and check if this resolves the issue or not.
DLL files are a part of the Microsoft Visual C++ Redistributable packages. If the file goes missing, you need to uninstall it and then reinstall it on your PC to fix the error.
Type the below command and press Enter. sfc /scannow
Your system will run a scan and will look for corrupt or missing system files. They will be fixed during the process.
Once the process completes, type the below command and press Enter. DISM /Online /Cleanup-Image /RestoreHealth
Restart your PC and check if this resolves the error or not.
Running the SFC and DISM commands will scan and fix the corrupt or missing system files, which could be triggering the VCRUNTIME140_1.dll file not found error.
4. Run a third-party DLL fixer
There are a lot of DLL fixers available on the internet that you can take help from to fix the VCRUNTIME140_1.dll file not found error.
These can help you fix DLL errors and enable you to repair any corrupt or missing system files on your PC.
Windows 7 is an ancient operating system, but some users across the globe are still using it. Several users’ reports on various forums confirm that after installing a bunch of updates, they randomly receive Windows update error 80244019 on their Windows 7 PCs. Here is one such user report;
I’m using windows 7 there is an update error 80244019. I’m unable to solve it and I have another problem my pc shut down while I’m working on it. please give me suggestion to solve it.
This error also pops up when a user tries to update their PCs. If you are facing the Windows update error 80244019 on your Windows 7 PC and are looking for solutions, then you can follow the fixes in this guide to fix the problem.
What causes the Windows update error 80244019 on Windows 7?
After some research, we have come up with a list that shows some of the most common reasons that trigger the Windows update error 80244019 on Windows 7;
Corrupt DLL files: The presence of faulty or corrupt DLL files can often trigger multiple system errors on your PC.
Malware or virus: If your PC is infected with a virus or malware, then it will misbehave and cause issues with normal processes as well. Check out our best antivirus for Windows 7 guide.
Windows Update service is problematic: If the Windows Update service ran into an error, then this could trigger issues related to it.
Third-party app conflict: Often third-party apps conflict with the system-related apps and cause issues with them.
How can I fix Windows update error 80244019 on Windows 7?
Here are some preliminary fixes you can apply before advancing the advanced solutions.
Check if restarting your PC fixes the issue for you. Temporary glitches or errors can be easily fixed by performing a simple restart.
Scan your PC for viruses. Performing a system scan will allow you to see whether your PC is infected with a virus or malware.
Close all the unwanted background apps using Task Manager.
Now let us take a look at the advanced solutions.
1. Turn on Data Execution Prevention
Open the Run dialogue by pressing the Win + R keys.
Type sysdm.cpl and hit Enter.
Switch to the Advanced tab.
Under the Performance section, select Settings.
Select Data Execution Prevention.
Choose Turn on DEP for Essential Windows Programs and Services only option.
Click Apply.
Restart your PC and check if this resolves the issue or not.
According to several users, turning on the Data Execution Prevention feature fixes the Windows update error 80244019 on their Windows PC. This prevents other processes on your PC from interrupting the Windows update process.
2. Restart Windows Update Service
Press the Win + R keys to open the Run dialogue.
Type services.msc and hit Enter.
Locate the Windows Update service and right-click on it.
Select Stop from the context menu.
After a while, right-click on the Windows Update service and select Start.
Close Services.
Restart your PC and check if this resolves the issue or not.
There are chances that the Windows Update service is currently facing some issues. You can restart it by following the above process. Some users reported that because the service was stopped by default for them, starting it fixed the problem.
Search for the command prompt and run it as an administrator.
Type the below command and press Enter. sfc /scannow
Your system will look for corrupt system files and will fix them in the process.
Restart your PC.
SFC Scan is an in-built tool that allows you to scan for corrupt or missing system files. Chances are that some critical Windows Update-related files are missing from your PC. You can quickly fix it with the SFC Scan command.
4. Run the Windows Update troubleshooter
Open the Start menu.
Type troubleshoot and open it.
Under System and Security, select Fix problems with Windows Update.
Click Next.
The troubleshooter will detect the errors and prompt you to apply solutions to resolve them.
Windows Update troubleshooter is another great in-built way to fix the problems related to Windows updates.
5. Limit Windows update
Open the Start menu.
Open Control Panel.
Click on Windows Update.
Select Change settings.
Uncheck the option Give me updates for other Microsoft products when I update Windows.
Click OK.
In case the box was already unchecked, then tick the box.
Click OK.
Restart your PC.
That is it from us in this guide. But, unfortunately, Windows 7 update error 80244019 isn’t the only update error troubling its users.
LOTRO is a short form for Lord of The Rings Online multiplayer game. Unfortunately, there are multiple user reports highlighting the fact that Windows users aren’t able to play the game on their PCs. Here is one of the user reports;
Brand new computer, brand new install of Lotro via Steam. It won’t launch. A launch window appears for all of one second and then goes away and that’s it. I’ve uninstalled and reinstalled a fresh one multiple times.
While the launcher opens successfully, the login happens successfully, but nothing happens. If you are a LOTRO player looking for solutions to fix LOTRO won’t launch issue, then continue reading this guide for fixes.
What causes LOTRO won’t launch in Windows issue?
After some research, we have deduced a list containing some common reasons that trigger the LOTRO won’t launch in Windows.
Not enough permissions: You need to make sure that you are giving sufficient permission to the game in order for it to access the resources it needs to run.
Missing DLL files: If there are some important DLL files missing, then you will face multiple issues one of which is the LOTRO won’t launch problem.
DirectX isn’t up to date: DirectX is required to render the LOTRO game. Chances are that the DirectX on your PC is running an older version.
Corrupt LOTRO installation file: Due to interrupted installation, chances are some important game files are missing, which is causing the problem.
The game is running on integrated GPU: If there is a dedicated GPU on your PC, then if the game makes use of the integrated GPU then the game will have some issues.
What can I do if LOTRO won’t launch on Windows?
Before you jump and go ahead with the advanced troubleshooting solution, you can try out the solutions below and check if this resolves the issue.
Check if restarting the game works. Often the game glitches because of a temporary error. However, a simple restart can usually do the trick.
Make sure the internet connection is working fine. Since the game is online-based, it will require a connection to the internet.
Install DirectX from the official website to get the latest version of it.
Now let us check the advanced solutions to fix LOTRO won’t launch in Windows.
1. Run in compatibility mode
Right-click on the main EXE file and choose Properties.
Click on the Compatibility tab.
Check the box associated with Run this program in compatibility mode.
Select Windows 7 from the drop-down menu.
Click Apply to save the changes.
Run the launcher and check if this resolves the issue.
While the game runs without any issues on Windows 10 or 11, some users facing the LOTRO won’t launch issue fixed the problem by running it in the Windows 7 compatibility mode.
You can follow the above steps and run the LOTRO EXE file in Windows 7 compatibility mode to see if this resolves the problem.
2. Run the launcher as an admin
Right-click on the LOTRO launcher’s EXE file.
Select the Run as administrator option.
If this fixes the issue, then not providing sufficient privileges was the main reason you came across this problem.
To always open it as an administrator, follow the steps below.
Right-click on the LOTRO launcher EXE file.
Select Properties.
Click on the Compatibility tab.
Check the box for Run this program as an administrator.
This solution applies to the LOTRO game, but you can try this solution with other games facing similar issues.
Often tweaking the in-game graphics settings can lead to multiple errors. You can revert back to the original graphics settings and check whether this resolves the issue.
4. Check the integrity of the LOTRO game files
Launch the Steam client.
Click on the Library tab.
Right-click on the LOTRO game and select Properties.
Switch to the LOCAL FILES tab.
Click on Verify integrity of game files.
Steam will begin verifying the game files and repair missing or corrupt game files that might trigger the black screen issue.
Verifying the integrity of the game file performs a check. It checks all the files you have on your computer and the ones on the official Steam servers.
5. Reinstall the game
Open the Start menu.
Open Control Panel.
Select Programs and Features.
Locate the LOTRO installation and click on it.
Select Uninstall from the top.
Follow the on-screen prompts to uninstall the game.
Run the game and check if this resolves the issue or not.
That is it from us in this guide. Let us know in the comments below which one of the above solutions resolves the LOTRO game won’t launch issue on your PC.
Deleting files is critical to clear storage space and make the computer run faster. But, several users reported that deleted files keep coming back in Windows 10.
The error, though not very common, can be encountered by some. But with a systematic and thorough approach, you can always fix it.
Read the following sections to find out what to do when a file reappears after deleting it.
Why do deleted files keep reappearing after deletion?
Here are some of the reasons why deleted files keep returning after deletion:
Using a cloud storage service with sync enabled – One of the most common reasons behind the problem is using a cloud storage service with the sync feature enabled.
The file/folder is critical to a program – In many cases, users later realized that the deleted file/folder belonged to a particular program, and it kept creating it.
Presence of malware – Oftentimes, the issue arises due to the presence of malware on the system.
Corrupt Recycle Bin – If the recycle bin is corrupt, the deleted files may keep coming back in Windows 10.
Misconfigured permissions:– Though uncommon, several users managed to resolve the issue by reconfiguring the permissions.
Also, here are a few cases when the deleted files may keep coming back in Windows 10:
Deleted files keep coming back when using an SD card – Check for malware on the SD card and verify if it’s corrupt.
Deleted files keep coming back on OneDrive – The problem is largely linked to the sync feature on OneDrive. Changing the sync settings fixes the problem in this case.
Deleted files keep coming back (USB) – It’s usually an issue with the USB drive, and a complete format should get things running.
What can I do if deleted files keep coming back on Windows 10?
Before we head to the slightly complex solutions, here are a few quick fixes that resolved things for many users:
Check if you have any third-party file manager or cloud storage software installed, and disable them all.
Make sure you are running the latest version of the OS.
Empty the Recycle Bin after deleting the files.
Run a full system scan for malware and virus.
In case the deleted folder or file still keeps coming back in Windows 10, try these methods next.
1. Disable Sync on OneDrive
Locate the OneDrive icon in the System tray, and click on it.
Now, click on the gear icon and select Settings.
Click on the Choose folders button in the Action tab.
Next, uncheck all the folders you don’t want to sync and click on OK to save the changes.
Once done, the deleted files should not keep coming back in Windows 10. In case these still do, the problem likely lies elsewhere. So, try the next solution.
2. Fix a corrupted Recycle Bin
Type Command Prompt in the Search bar, and click on Run as administrator.
Click Yes in the UAC prompt.
Paste the following command and press Enter: rd /s /q C:$Recycle.bin
Once done, restart the computer and now delete the files that reappeared earlier.
3. Change permissions
Right-click on the folder where the problematic file/folder that keeps reappearing is stored, and select Properties.
Navigate to the Security tab, and click on Advanced.
Now, click on Change.
Type Everyone in the text field, and click on Check Names and then on OK.
Once done, click on Apply and then on OK to save the changes.
That’s it! After you have changed the ownership of the folder, the deleted files wouldn’t keep coming back in Windows 10. If that’s not the case, the next method will certainly help you.
Instead of deleting with the usual Windows options, try erasing files that reappear with third-party file deletion software.
Dedicated, file shredding software enables users to delete selected files and folders more thoroughly. So, files might not reappear after they’re deleted with that software.
When Windows 10 deletes a file, it doesn’t actually remove it but only marks the space that was taken by the file as free. File shredding software gets rid of the file for good.
Easy File Shredder
Erase any file or folder with this third-party file shredder software with just a few clicks.
Those are a few resolutions that will ensure that deleted files don’t keep coming back in Windows 10. Also, these work for shortcuts and can be used on the latest iteration, i.e., Windows 11, as well.
You will come across An error that has occurred in the script of this page error mostly with programs using Internet Explorer scripts. There are a lot of programs, such as Microsoft Teams, that make use of Internet Scripts.
This issue isn’t specific to a particular version of Windows and occurs on all recent versions, including Windows 10/11. In this guide, we will give you a bunch of solutions that will help you resolve the An error has occurred in the script on this page error. So let us get right into it.
What causes An error has occurred in the script on this page issue?
After investigating multiple user reports, we have deduced a list of the most common errors that could trigger the An error has occurred in the script on this page error on your PC.
An extension is causing the issue: An installed extension is causing conflict if you have previously enabled third-party extension for Internet Explorer.
DLL is missing or unregsitered: In case an important DLL file goes missing or corrupt, you will come across multiple errors on your PC.
Script-related apps are running: Since the error is related with programs using Internet Explorer scripts, such apps running in the background can throw up such error notifications.
Some Internet Explorer settings are conflicting: Some of the internet settings might have been accidentally tweaked which could cause the problem.
How can I fix An error has occurred in the script on this page error message?
Here are a few solutions you can apply before jumping over with the advanced method to fix this error message.
To fix temporary issues or glitches, you can restart your PC, as it will load all the files from scratch which might have been missed during the previous session.
Scan your PC for viruses. Often a virus or malware can trigger multiple errors on your PC. Therefore, it is always a safe bet to scan your PC from time to time.
Under the Browsing section, uncheck the Enable third-party browser extensions box.
Click on Apply to save the changes.
Restart your computer and check if this fixes the issue or not.
Extensions are meant to provide you with a few extra features while browsing. However, these extensions can often misbehave and cause issues with the internet.
3. Regsiter the urlmon.dll file
Press the Win + R keys to open the Run dialogue.
Type Regsvr32 urlmon.dll and hit Enter.
If the registration is successful, you will see a message DllRegisterServer urmon.dll succeeded.
Click on OK.
Multiple user reports confirm that An error has occurred in the script on this page error message was fixed by registering the urlmon.dll file on your PC.
You can also try doing so by following the above steps and checking if this fixes the issue or not.
Under the Browsing section, uncheck the Display a notification about every script error box.
Click on Apply to save the changes.
Restart your computer and check if this fixes the issue or not.
A simple way to eliminate the script error notification is to disable it by following the above steps. This will prevent any script error notification from appearing on your PC.
5. Reset Internet Explorer
Open the Start menu.
Type Control Panel and open it.
Click on Internet Options.
Select the Advanced tab.
Click on the Reset button at the bottom of the page.
Check the box for Delete Personal Settings.
Click on the Reset button.
If nothing works, you can reset the Internet Explorer settings on your PC by following the steps mentioned above.
Windows Media Player is the default media player app for Windows OS. It was replaced by Media Player in Windows 11. However, many still prefer the Windows Media Player for playing their media files. There are a bunch of user reports that claim that for them the Windows Media Player won’t open.
If you are one of such users and are looking for solutions, then you have landed in the right place. Because in this guide, we will give you a bunch of solutions that will help you fix the Windows Media Player won’t open problem. Let us get right into it.
How to use the old Windows Media Player in Windows 11?
Open the Start menu.
Type Turn Windows features on or off and open it.
Expand Media Features.
Check the box for Windows Media Player.
Click OK to install it on your PC.
Restart your PC.
Open the Start menu.
Search for Windows Media Player and open it.
Now you can use the old media player on your Windows 11 PC.
Using the steps mentioned above, you can enable the old Windows Media Player on your Windows 11 PC.
In case, you are facing issues running it or it isn’t opening on your Windows PC, then follow the solutions mentioned below.
How can I fix Windows Media Player won’t open problem?
Before applying the advanced solutions, check out some preliminary fixes and hopefully resolve the Windows Media Player won’t open problem.
Reboot your PC as it could fix multiple temporary glitches that your PC might be facing.
Check if you are using Windows Media Player as the default player to open the media file or not.
Enable Windows Media Player on your Windows 11 PC by following the steps mentioned above.
Now let us jump to the advanced solutions below.
1. Run the troubleshooter
Press the Win + I buttons to open Settings.
Select Troubleshoot from the right side.
Click on Other troubleshooters.
Scroll down and hit the Run button for Video Playback.
The troubleshooter will begin the process and will prompt you to apply solutions to fix the error.
Windows comes with a built-in troubleshooter that will help you tackle most of the common errors and glitches on your PC.
You can follow the above steps and run the troubleshooter to fix the Windows Media Player won’t open problem.
2. Re-register the DLL
Open the Start menu.
Search for the command prompt and run it as an administrator.
Type the below commands and press Enter after each one. regsvr32 vbscript.dllregsvr32 wmp.dllregsvr32 jscript.dll
Open the Windows Media Player and see if this resolves the issue or not.
If the Windows Media Player-associated DLL files are missing, then you will come across multiple issues. In such a case, we would suggest you follow the above steps and re-register the DLL files, and check if this resolves the problem or not.
Once the computer reboots, follow the steps again and this time, check the Windows Media Player box to install it on your PC.
After the installation is complete, you can open it and see if this resolves the error or not.
4. Restart the Windows Media Player process
Right-click on the Start menu and select Task Manager. You can also open it by pressing Ctrl + Shift + Esc buttons.
Under the Processes tab, locate the Windows Media Player process.
Select the Windows Media Player process and hit the End task button.
Open the Windows Media Player again and check if this resolves the issue or not.
5. Clear Windows Media Player database
Press Win + R to open the Run dialogue.
Type the below command and hit Enter. %LOCALAPPDATA%\Microsoft\Media Player
Press Ctrl + A to select all the files in the folder.
Hit the Delete button on your keyboard to delete all the files. You can alternatively, right-click on any file after selecting them all and select Delete from the context menu.
Restart the Windows Media Player and check if it fixes the issue or not.
Several users have suggested that clearing the Windows Media Player Library helped them fix the Windows Media Player won’t open issue on their PC.
Did you know that the mouse you’re using may be causing you more harm than good? Using a basic computer mouse for extended periods of time can increase the risk of developing carpal tunnel syndrome.
In case you’re experiencing pain in your mouse hand or maybe you just want to plan ahead, we recommend investing in a vertical ergonomic mouse.
Is a vertical mouse better for carpal tunnel? When compared to their flat counterparts, vertical computer mice sport a natural handshake shape which helps reduce pressure on the wrist and forearm.
So, if you’re looking to give your wrist rest this month, then you’ve come to the right place. Below, we’ve listed 4 of the best vertical computer mice for you.
Note: All the prices and offers in this article are subject to change, so be sure to check the official product page to get the latest deal. If the product or offer you’re looking for is no longer available, you can try to find it on its official manufacturer page or get another one from our list.
You can tell that the Anker team cooks up their tech with love when it comes to manufacturing computer mice.
Possessing a sleek matte finish, Anker’s new vertical mouse comes shaped with a cozy angle for your palm and fingers, minimizing the stress placed on your wrist and elbow.
If that isn’t enough to get you excited and snatch one up yourself, the mouse also comes with a hefty 18-month warranty and is backed up by an amazing customer service team.
Logitech baked this mouse with stress injury care as one of the main ingredients.
Finding the middle ground between ergonomics and performance, the 57-degree angle of this vertical mouse is specifically designed to decrease muscle strain and pressure on the wrist by 10%.
On top of this, the mouse comes with a 4000 DPI high-precision sensor for hyper-efficient tracking; thus, minimizing unnecessary hand movement.
Lastly, this vertical mouse comes with a rechargeable battery that can stay powered for up to 4 months after being fully charged.
Have you ever wanted to know what it feels like to hold the future in the palm of your hand?
If you want to know what the future of ergonomic design truly feels like, the team at J-Tech Digital has developed a vertical mouse just for you.
This mouse comes with Wi-Fi and Bluetooth connectivity options for your wireless needs, a rechargeable battery and, to finish it off, 20 degrees of customizable adjustment so you can discover your own ergonomic sweet spot.
Why go see penguins at the zoo when you can have one sitting on your desk?
This vertical mouse isn’t great only because of the ambidextrous tuxedo design, it was also designed to combat three major health risks associated with basic, flat computer mice:
Repetitive strain injury (RSI)
Carpal tunnel syndrome (CTS)
Static muscle strain (SMS)
As an added bonus, you can share your Penguin vertical mouse with friends/family/colleagues since it’s also antimicrobial and will inhibit the growth of bacteria.
Vertical mice are a great alternative to basic, flat mice because they provide a natural hand-shake grip that reduces stress in the wrist and elbow, helping prevent potential problems in the future such as Carpal Tunnel Syndrome.
Ultimately, investing in a vertical mouse is a clear choice when wrist health comes to mind, just remember that some vertical mice compromise on mobility in the favor of comfort and health.
And if you choose to go wireless, then consider investing in a rechargeable battery.
Today, we’ll walk you through 4 easy ways to check the Blue Screen log on Windows. This will help you figure out what type of errors crash your PC. Once you know that, you can easily address and fix them.
1. Press Windows + X to open the Power User menu, and then click on Event Viewer to launch the app.
2. Hover over the Actionmenu, and then click the Create Custom View link.
3. Select a time range from the Logged dropdown menu when the BSoD happened, and tick the Error checkbox in the Event level section.
4. Select the Event logs menu, and tick the Windows Logs checkbox.
5. Once done, click on OK to proceed.
6. Give the custom view a name, and then press OK. (The Event Viewer will now show the information based on the filters you applied.)
7. Sort the information by date using the Date and Time header.
8. Look at the error events at the time of your last BSoD. For more details regarding the error, click on the Detailstab.
You can use Event Viewer to see a Blue Screen log file. Windows Event Viewer shows a log of application and system messages.
This includes errors, information messages, and warnings, and it is a useful tool for troubleshooting all kinds of different Windows problems. So, if you were wondering how to see blue screen log, this is probably the most effective method.
You can view detailed BSOD entries through Event Viewer, and you can follow this guide to find BSOD logs in Event Viewer for a clearer look at the crash details.
2. Via the Control Panel
Press Windows + S to open Search, type Control Panel in the text field, and click on the relevant search result.
Click on System and Security.
Next, choose System and Maintenance.
Click on Maintenance here, and then select View reliability history.
Now, locate the red cross marks, since these are critical errors, including BSOD.
To view the log file, simply click on an event at the bottom.
Control Panel also allows you to view the critical errors encountered on the PC, and it’s slightly easier than Event Viewer, but not as detailed.
3. Use your Registry Editor
PressWindows+ R to open Run, type regedit,and then click OK.
Paste the following path in the address bar and hit Enter: HKEY_LOCAL_MACHINE\System\CurrentControlSet\Control\CrashControl
Right-click on the right side, hover the cursor over New, select DWORD (32-bit) Value, and name it DisplayParameters.
Type 1 under Value data, and click OK to save the changes.
Once done, restart the computer.
If you were unable to view the Blue Screen Event ID or other relevant information in the error log, making changes to the registry should fix things.
If all of the steps mentioned above seem too complicated, then you could make use of a third-party event viewer. These apps will usually do the exact same thing as the Windows Event Viewer, but with fewer steps.
The tool scans your systems for the BSoD crash file and returns the information in one single table, so you can easily analyze it. This way, you’ll easily see the cause of the event and the location.
5. Use Reliability Monitor
Press Windows + S, type Reliability Monitor, and select View reliability history.
Look for red X marks indicating system crashes.
Select the event to see details, including the stop code and failure type.
6. Check Windows Error Reporting (WER) Logs
Open File Explorer and go to: C:\ProgramData\Microsoft\Windows\WER\ReportArchive
Inside the folders, you’ll find text reports and crash details created during Blue Screen events.
To learn more about how Windows logs and stores these reports, check out what a CBS log file is and how it helps track system repair and update details.
7. Review Memory Dump Files
Navigate to: C:\Windows\Minidump
Open the .dmp files using WinDbg (from the Windows SDK) or simpler tools like BlueScreenView to analyze crash details.
8. Use PowerShell or Command Prompt
Run this PowerShell command to pull Blue Screen events:
Trying to launch your Virtual Machine but stopped by VT-x is disabled in the BIOS for all CPU modes (verr_vmx_msr_all_vmx_disabled) warning on Windows 10? Don’t worry; we have got you covered.
This guide will discuss why the warning message appears and how we can fix it. Let’s start!
Why is VT-X disabled in the BIOS for all CPU modes on Windows 10?
Reasons for this warning message coming up can be many. Some of the popular ones are:
Virtualization disabled – For a virtual machine to work, Virtualization Technology must be enabled from BIOS. If it is disabled, the virtual machine won’t launch.
Your PC is not compatible with VT-X / AMD-V – If your computer is old, it might not be able to support virtualization, and you won’t find VT-X / AMD-V.
Physical address extension – If PAE & NX are disabled, it could cause the issue. However, configuring the virtual machine to run with Physical Address Extension & NX can resolve it.
Third-party apps conflict – There could be chances that your antivirus conflicts with your virtual machine. To resolve this, you need to add the virtual machine as an exception or turn off real-time protection for a while.
Allocated RAM size is too low – If you have not allotted enough RAM, this could cause a problem.
What can I do if VT-X is disabled in the BIOS for all CPU modes on Windows 10?
Before performing the detailed troubleshooting steps, make sure you check these:
Check your system information to ensure it is x64-based.
All Amazon Echo iterations are quite popular for a variety of reasons. Once you catch the drift, Alexa can be of much assistance in your everyday life for both you and your family.
We made sure to provide you with the best deals at this point in time, so make sure to check them out below.
Note: All the prices and offers in this article are subject to change, so be sure to check the official product page to get the latest deal. If the product or offer you’re looking for is no longer available, you can try to find it on its official manufacturer page or get another one from our list.
It was only a question of time before the smart home speakers find their way into your car. All-new Echo Dot (4th Gen) Smart speaker with Alexa is a worthy car companion with 50k and more skills.
Once you set it up, every interaction is by voice, so the device is completely hands-free. Just ask Alexa to play the song onSpotify, call someone, or find the closest gas station and it’s done.
The top-of-the-line speaker, as far as Amazon speakers go. The most distinctive feature is the built-in Echo Show 8 which allows you easier control over all smart devices in your household.
Beyond that, the mere size of the device brings out better audio output.
If you don’t want to go for the Echo Spot or Echo Show Smart displays, these are the best of the speakers your money can buy.
This small device will be great for home use in setting alarms, reminders, and timers, or connecting with other smart devices from your home.
You can plug it directly into an electrical outlet and just use it. It easily connects with Alexa, if you have the app downloaded. And if you do, setting up this device should not take more than a few minutes.
The standard Echo option and the most popular one. It has some valuable advantages over the Echo Dot, but it all falls to the speaker’s loudness.
Besides that, it brings all the usual jazz, with full access to Alexa and a few smart home devices your options are limitless. These options are great for when Alexa keeps stopping. It could mean your device has given out, and it’s time for a new one.
What smart Echo speaker is the best deal for you? Don’t forget to tell us in the comments section below.
A good display is critical for an optimal Windows experience, and users often spend dearly on a high-quality monitor. But many reported that their computer screen turned black and white.
In a few cases, the change appeared when users inadvertently hit a couple of keys, which modified the display settings. But that’s not the only reason. So let’s find out why the computer screen is flashing black and white and the solutions for it.
Why is my screen suddenly black and white?
Here are some of the reasons the laptop display changed to black and white:
A buggy update – Some users reported the issue after updating Windows, which pointed to either a buggy update or an automatic reconfiguration of settings.
Outdated or corrupt display drivers – Corrupt or outdated drivers are just as likely to cause the problem.
Hardware malfunction – If you have a malfunctioning display, it will lead to display issues in Windows.
What can I do if my computer screen is black and white?
Before we proceed to the solutions here, let’s try a few quick fixes that did the trick for most users:
Restart the computer.
Update Windows to the latest available version.
If you use a PC or an external display, make sure the connections are in order. Also, you may connect the external display to another computer to identify if the problem lies with it or the previous PC.
In case the problem appears after you install a new program that could modify the display or accessibility settings, uninstall the app right away.
If nothing so far worked, the solutions listed next would surely fix things when the computer screen goes black and white.
1. Disable color filters
Press Windows + U to open the Accessibility settings, and click on Color filters.
If the toggle for Color filters is enabled, click on it to turn the setting Off.
Also, Windows + Ctrl + C can switch enable/disable the color filters. To disable the shortcut, simply turn off the toggle for Keyboard shortcut for color filters.
That’s it! For most users, this should fix things. But the computer screen is still black and white, so head to the next solution.
2. Disable high contrast settings
Press Windows + U to open Accessibility settings, and choose Contrast themes.
Select None from the Contrast themes dropdown menu, and click Apply.
3. Update the display drivers
Press Windows + R to open Run, type devmgmt.msc in the text field, and hit Enter.
Now, expand the Display adapters entry, right-click on the active graphics card, and select Update driver.
Select Search automatically for drivers, and Windows will automatically identify and install the best available version.
In a few cases, the black and white computer screen monitor resulted from issues with the drivers, and updating the graphics driver fixed things like a charm. Unfortunately, though, in some cases, you must manually install the driver when Windows can’t look one up.
An alternative to the manual procedure is choosing dedicated software to help you automatically find the correct updates because of its regularly revised database.
Press Windows + I to open Settings, and click on Recovery in the System tab.
Click on Reset PC under Recovery options.
Please choose whether you want to keep personal files or remove them. The former makes more sense in a reset.
Now, click on Local reinstall.
Verify the reset settings, click Next, and follow the on-screen instructions to complete the process.
Once Windows is reset, you won’t see black stripes on the computer screen. However, if the problem persists, the underlying cause is a hardware component, likely the display, and you will have to get it checked by a technician.