Internet Explorer Not Connecting to Internet: Fixed

While you can still find Internet Explorer 11 on Windows 10, there is no way to use the old Internet Explorer as a standalone browser in Windows 11.

With that out of the way, we promise the most confusing part of this guide is done, and from now on, things will only get a lot easier.

So, Windows 11 comes with Edge pre-installed as the default browser, which is also why you will notice that Internet Explorer opens Edge instead.

You can still use the IE compatibility mode in Win 11 to open legacy sites and apps, but not the IE 11 itself as an autonomous desktop app.

That’s why conventional manipulations such as resetting IE settings, reinstalling, disabling add-ons, clearing cookies, and other similar techniques you’d apply to fix IE crashes in Windows 10 don’t really work as they simply no longer apply.

Don’t worry, we have a few tricks you can try. Here are 3 simple ways to make Internet Explorer connect to the Internet again, plus a little something on top.

So, let’s not waste any more time and get straight to it, shall we?

Why is Internet Explorer not connecting to the Internet?

There are a bunch of reasons why Internet Explorer is not connecting to the Internet. It could be the misconfigured browser settings or the network settings on your computer to blame.

Also, the installed add-ons have been found to affect the browser’s abilities if Internet Explorer 11 won’t load pages but Chrome will, though that’s a rare scenario. In which case, disabling these is the only way forward.

Besides, if you have a proxy set up or are using VPN software, it could be responsible for Internet Explorer not connecting to the Internet.

Will Internet Explorer still work after June 2022?

Though Internet Explorer will work for a while after the June 2022 deadline, it will start redirecting users to Edge, Microsoft’s recommended browser. Also, Edge offers an IE mode to access websites that have been developed for Internet Explorer and haven’t yet made the transition to the new browsers.

When you open Internet Explorer initially after the June 2022 deadline, it will display a prompt asking you to switch to Edge. This will continue for a while before Internet Explorer completely stops working on your computer.

If Internet Explorer is not connecting to the Internet, but Chrome does, the issue is clearly not related to any connectivity flaws, and resetting your network will have no impact.

Adding to the fact IE’s days are counted (and we mean that in a literal way, as the old browser will be officially retired in June 2022), it may be the right time to start looking for a new one.

Thus, switching to Opera One makes perfect sense. It’s a modern browsing instrument with enhanced rendering capabilities, serious performance optimizations, tons of customization options, and all the privacy and security features you could dream of.

Moreover, you can import all your preferences, passwords, settings, and so on and sync them across all your devices seamlessly. Also, it comes with built-in AI, VPN, Ad blocker.

Opera One

Why bother to fix connection problems in Internet Explorer when you can enjoy error-free browsing?
Free Download Visit website

How do I fix Internet Explorer not connecting to the internet?

1. Reenable Internet Explorer mode on Windows 11

  1. Press the Windows key + I on your keyboard to quickly open Settings.
  2. From the left pane, select Apps and go to Optional features.
  3. Use the search field under Installed features to locate the Internet Explorer mode.
  4. Press the arrow to unfold the options and select Uninstall.
  5. To reinstall the IE mode, simply return to the Optional features screen.
  6. Now, press the View features button next to the Add an optional feature listing.
  7. Search for Internet Explorer mode and choose Install.

If you see This page cannot be displayed but are connected to the Internet, this method will help fix the error.

2. Troubleshoot and reset your network

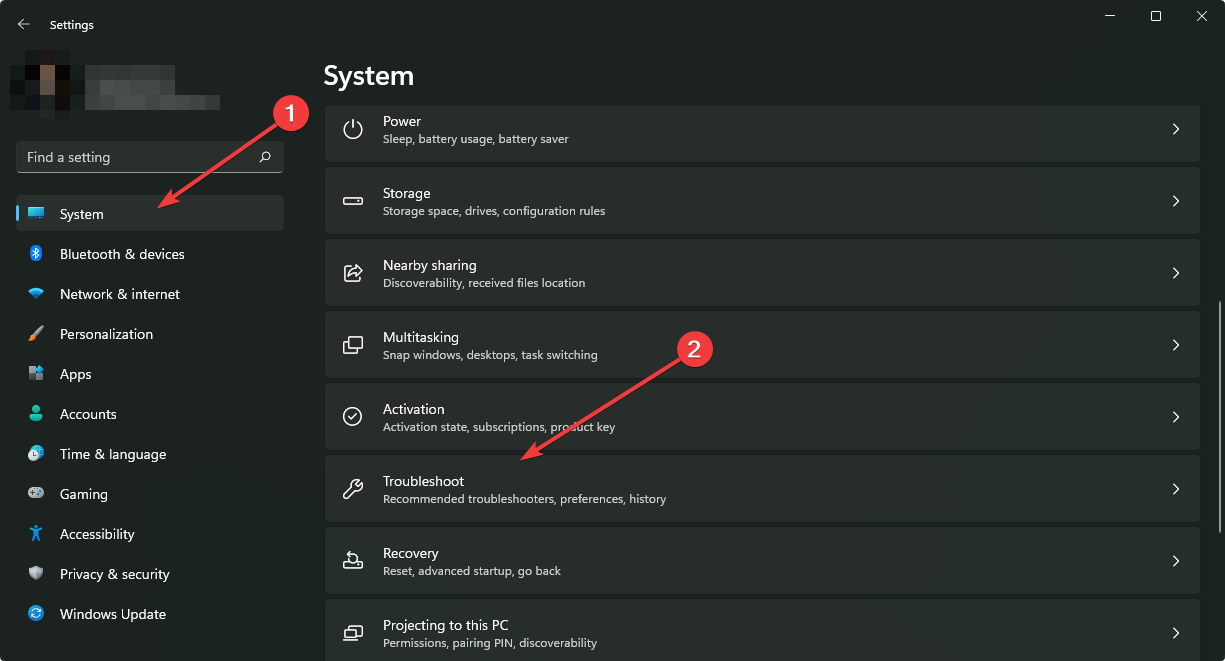
  1. Open the Settings once again and remain on the System tab.
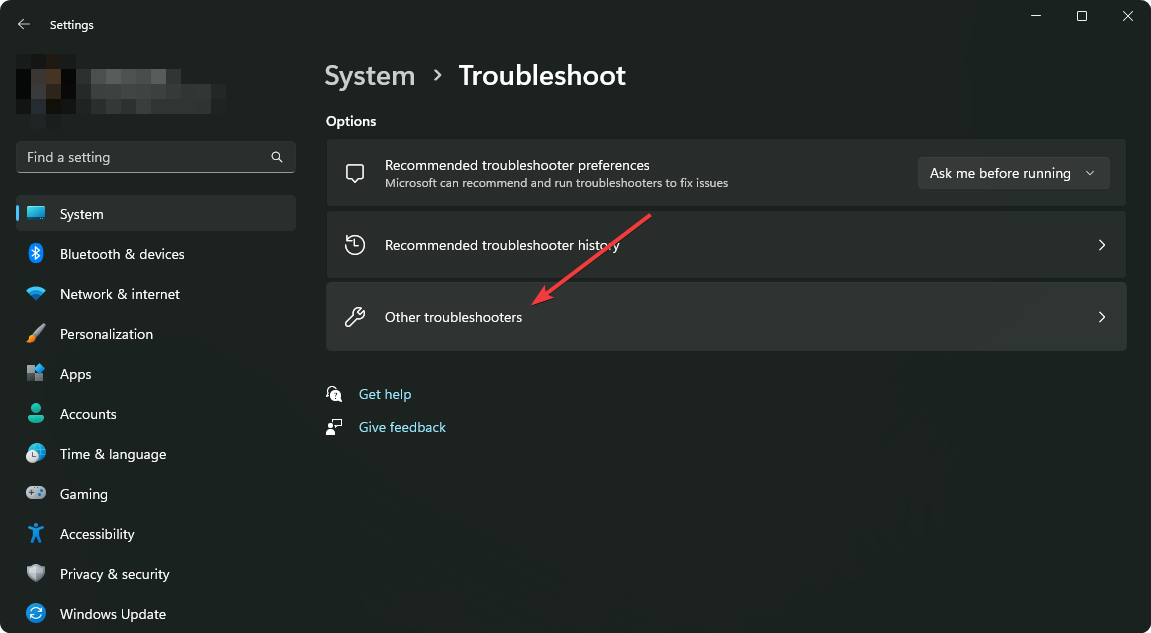
  2. In the main area, select Troubleshoot.
  3. Extend the Other troubleshooters section.
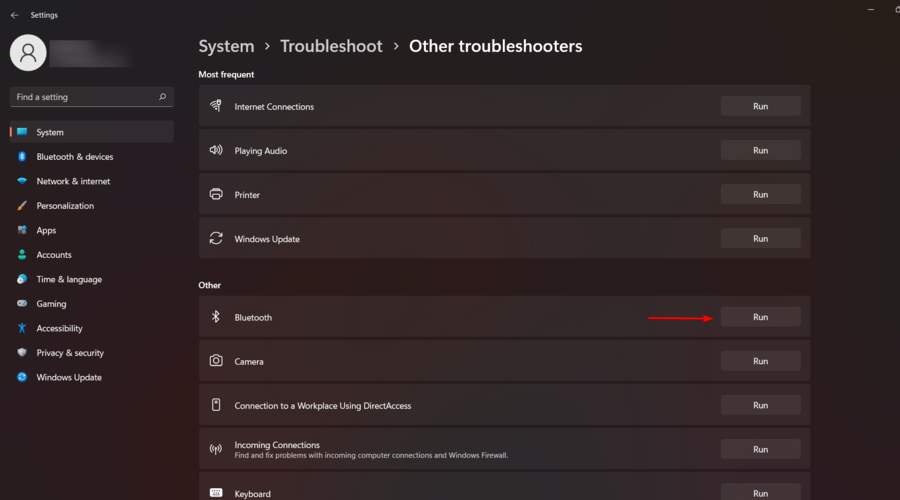
  4. Hit the Run button next to Internet Connections. In the new window, select Troubleshoot my connection to the Internet.
  5. If there is no recommended fix, resetting your network can set the records straight.
  6. Return to the main Settings screen and this time, select Network & internet from the left pane.
  7. On the main area, click on Advanced network settings.
  8. Scroll until you see the More settings section and click the arrow next to Network reset.
  9. Finally, press the Reset now button.

If Internet Explorer cannot display the webpage in Windows 10, it could be the network settings to blame, and things should be up and running after the reset.

3. Tweak the Internet Properties

  1. Use the search field on your taskbar and type in internet.
  2. Select Change the search provider in Internet Explorer from the list of results.
  3. Here, you first need to select the Connections tab. Click LAN settings.
  4. In the new windows, click Automatically detect settings and press OK.
  5. Now, select the Advanced tab and check the box corresponding to the Use software rendering instead of GPU rendering option under Accelerated graphics.
  6. Press OK and restart your device.

In case you cannot access some websites in Internet Explorer 11, reconfiguring the Internet Properties might work.

If Internet Explorer is still not connecting to the Internet, you might be dealing with interferences caused by overzealous security software. Check the following solution for that.

4. Check your security software

Antivirus, firewall, and VPN – this is the holy trinity of cybersecurity and despite the obvious advantages, each of these apps can cause interferences and end up blocking legitimate programs while trying to keep you safe.

Permanently eliminating them is not recommended. However, you can determine if any of them are at the source of the problem and take further appropriate measures.

To temporarily disable the Microsoft Defender firewall, follow the steps below:

  1. Open the Settings and select Privacy & security in the left pane.
  2. Next, click on Open Windows Security.
  3. Choose Firewall & network protection.
  4. Head to Public network and switch the Microsoft Defender Firewall off.

To temporarily turn off your VPN, follow the steps below:

  1. Open the Settings and select Network & internet in the left pane.
  2. Now, choose VPN in the right-side menu.
  3. Finally, locate the VPN connection and select Remove from the menu.

If your VPN turns out to be the culprit, you can further prevent Internet Explorer not connecting to the Internet problems by switching to a more versatile privacy program.

Private Internet Security boats impenetrable confidentiality and uncompromised encryption for your data, online activity, and traffic. And it does so without getting in your way or interfering with other apps (as long as they are trustworthy and authentic, of course).

What about antivirus? Can I prevent IE from connecting?

Finally, the same goes for your antivirus solution. You don’t need to delete it, simply disable it for the time being and check if Internet Explorer is able to load web pages.

If so, use a specialized uninstaller tool to make sure no software leftovers remain to plague your system and proceed with the removal of your current security program.

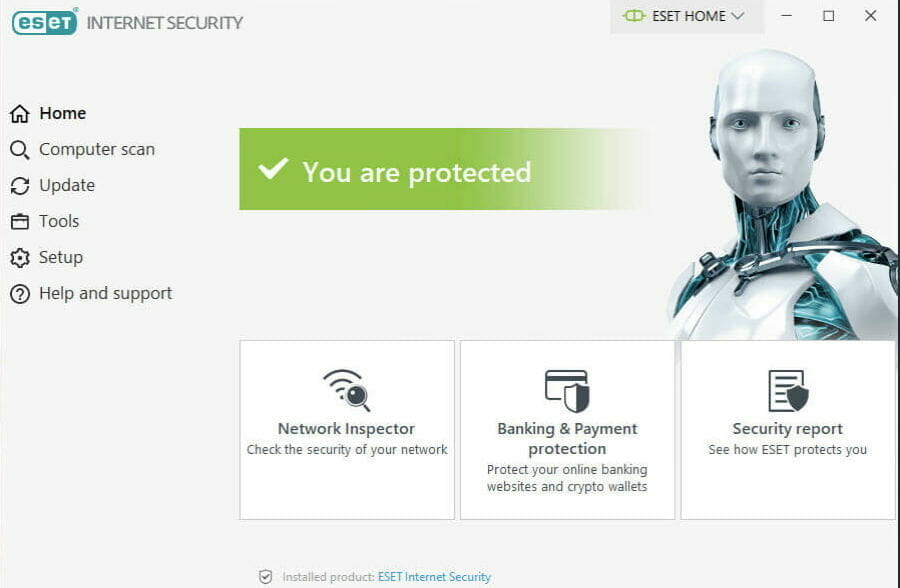
Eset antivirus windows screen

Of course, leaving your system exposed to vermin, bugs, or hacking attacks is not the answer. Instead, you can download and install ESET HOME Security Essential.

This tolerant and lightweight software boats a modular architecture that allows you to seamlessly collaborate with other security programs without messing up your settings or complicating your life in any way. What’s not to like?

What is replacing Internet Explorer?

Microsoft Edge will be replacing Internet Explorer after the latter is discontinued. Microsoft officially ended support for IE on June 15, 2022.

Edge is a user-oriented browser with a bunch of great features for the best browsing experience. Also, the browser is not as resource-hungry as Chrome, so the computer’s performance won’t be affected. Besides, you may read a detailed review of Edge listing all the latest features.

That’s all there’s to the Internet Explorer not connecting to the Internet problem and about the browser being discontinued for good.

Also, find out what to do if Internet Explorer opens Microsoft Edge every time you launch the browser.

Tell us which fix worked for you in the comments section below.

Windows Sandbox Cannot Be Installed: 5 Ways to Fix It

Can’t enable Windows Sandbox from the Control Panel as the option is greyed out? When you hover over the option, it says Windows Sandbox cannot be installed virtualization is disabled in the firmware. No need to panic; this could be fixed in no time.

This post will discuss how to resolve this error in five easy ways. Let’s start!

What are the minimum requirements to run Sandbox on Windows?

  • Your machine should have either Windows 10 Pro, Education build 18305, or Enterprise. Windows Sandbox will not appear in the optional features if you have Windows Home Edition.
  • Virtualization enabled in BIOS.
  • Free disk space of at least 1 GB, preferably SSD.
  • Minimum two cores (Four CPU cores with hyperthreading recommended).
  • Minimum 4 GB RAM (8 GB RAM recommended).
  • AMD64 or ARM64 architecture.

How can I fix Windows Sandbox cannot be installed error?

1. Check if your device supports virtualization

  1. Press Windows +  R to get the Run console.
  2. Type taskmgr and press Enter.TASKMGR
  3. Go to the Performance tab, click CPU and check the processor name from the top.

2. Check if virtualization is enabled

  1. Press Windows +  R to get the  Run console.
  2. Type taskmgr and press Enter.TASKMGR
  3. Go to the Performance tab, and click CPU to check the Virtualization status under the CPU graph.Taskmgr Virtualization Enabled
  4. You will see Enabled or Disabled beside Virtualization.

3. Enable hardware virtualization from BIOS

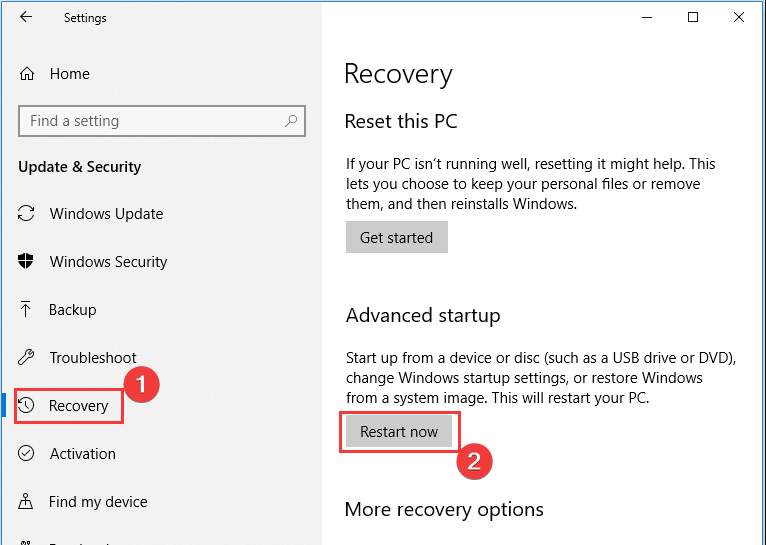
  1. Press Windows + I to open Settings.
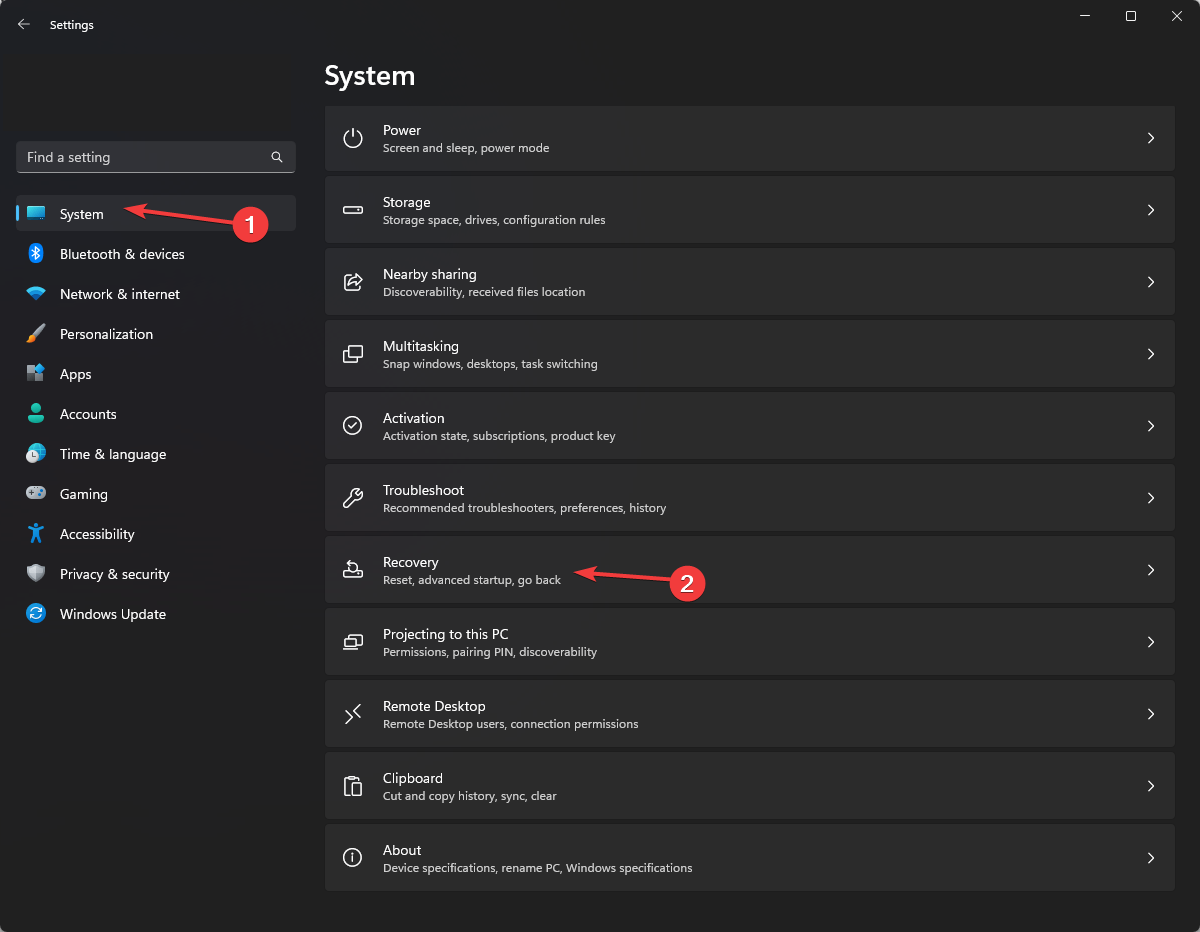
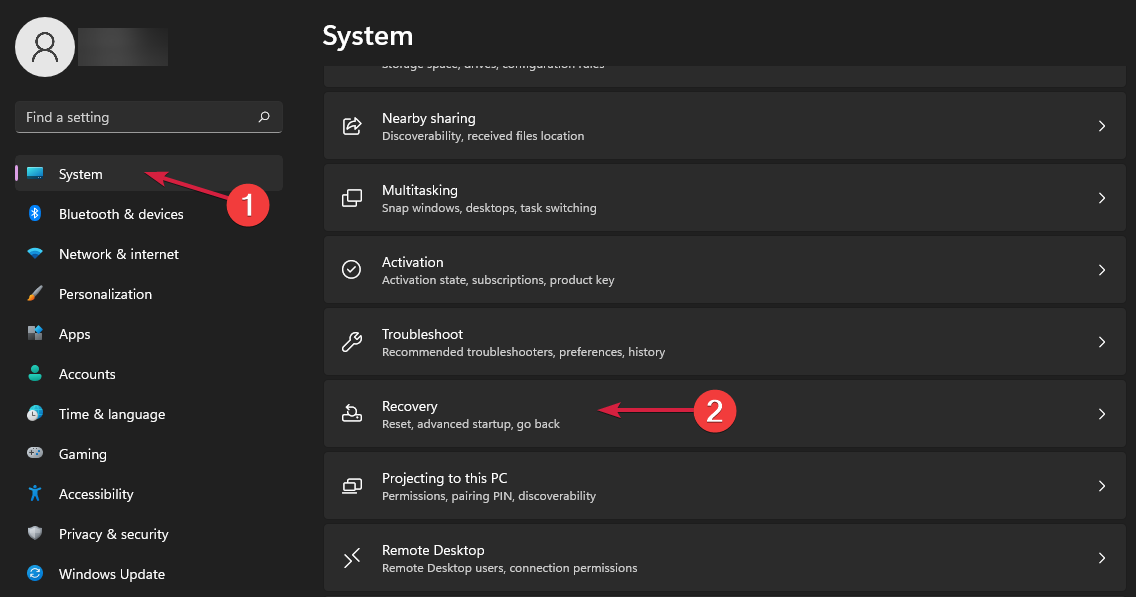
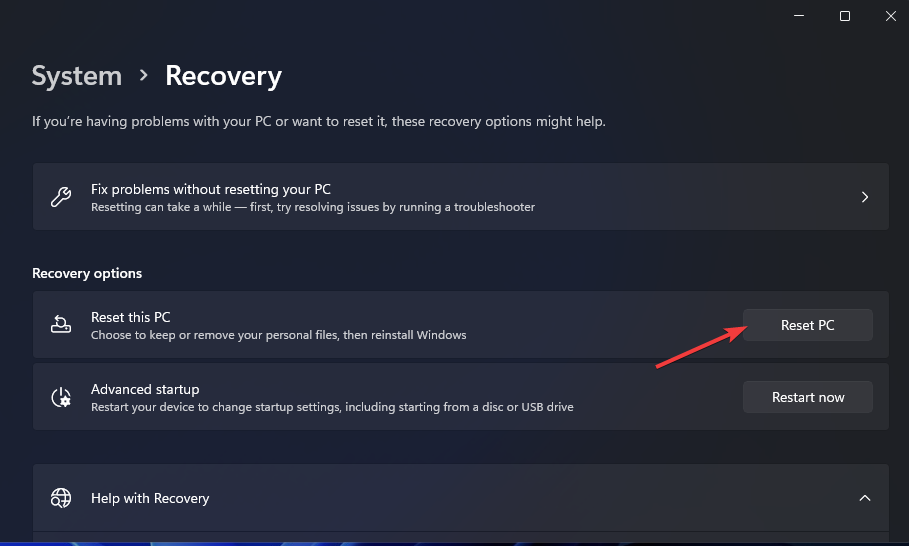
  2. Click System, then Recovery.
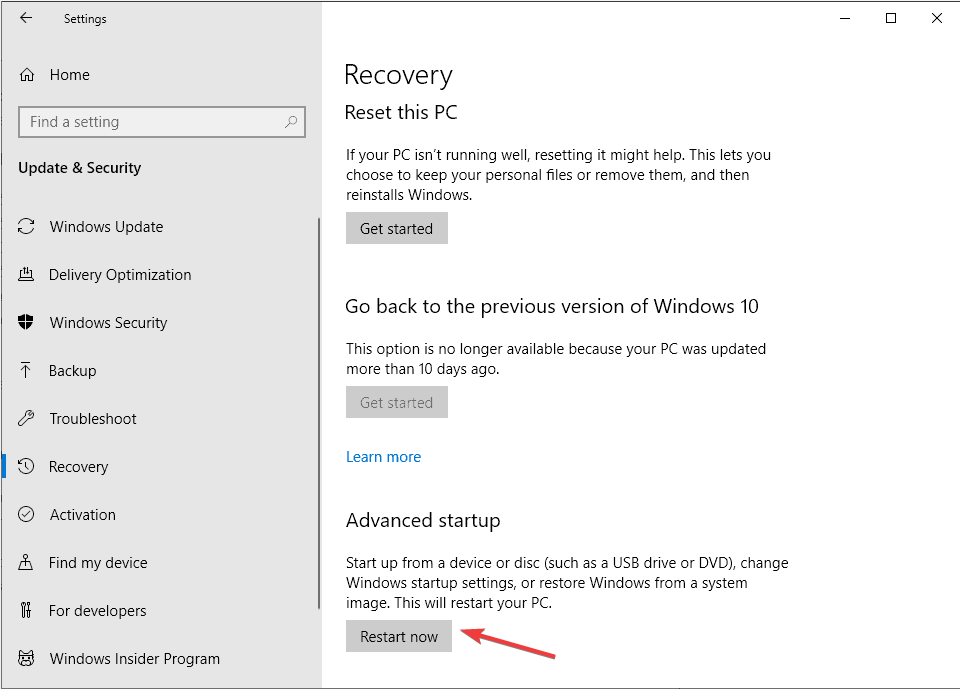
  3. Navigate to Advanced Startup, then click Restart Now.
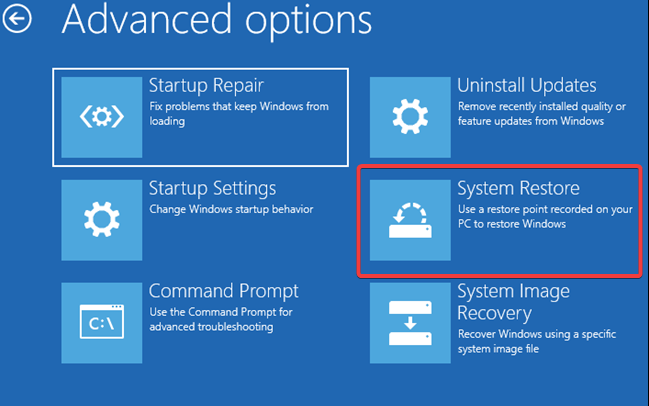
  4. From Choose an option screen, click Troubleshoot.Troubleshoot
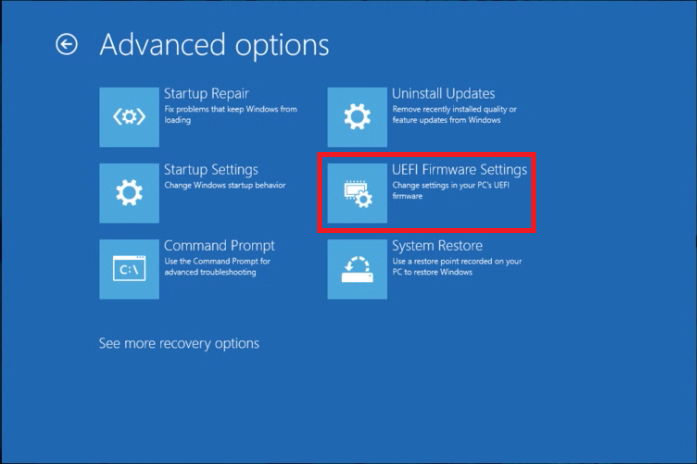
  5. Click Advanced Options.Advanced options
  6. Click UEFI Firmware Settings.UEFI
  7. On the UEFI Firmware Settings page, Click Restart.restart_boot_settings_uefi
  8. Press the Function key as per your device to enter BIOS Setup. 
  9. In BIOS Setup Utility, click Configuration, navigate to Virtualization Technology, and select Enabled.Virtualization Enabled
  10. Go to the Exit menu and choose Save changes and Exit.

4. Disable Hyper-V

  1. Go to the Start menu and type Windows features on or off.Windows Features on or off
  2. Click Open under Windows features on or off.
  3. Navigate to Hyper-V and uncheck all the boxes under it.Disable Hyper V
  4. Restart the computer to complete the process.

5. Enable the virtualization option if not available in BIOS

If the virtualization option is unavailable on BIOS, your device doesn’t support the feature.

However, you can check for BIOS updates using the device manufacturer app on your computer. For instance, if you have an HP computer, you can use the HP Support Assistant app to check for BIOS and other updates. If an update is available, update BIOS Setup Utility, and you might get the virtualization option.

Does Windows Sandbox require virtualization?

Virtualization feature is an essential part of the Sandbox because Windows Sandbox runs on an elevated space, so it can’t access advanced components like the Graphics processing unit. Therefore, it is vital to enable virtualization to bridge the gap and provide hardware acceleration in a virtual environment.

So, these are the fixes to resolve the Windows Sandbox not installed or greyed out issue. Try them to eliminate the problem so you can use Windows Sandbox to run apps in isolation.

If the Windows Sandbox copy paste is not working, this guide will help you fix the problem.

If there are other fixes we may have missed, then please mention them in the comments below.

How to Fix HTTPS Sites not Working/not Opening in Chrome

The HTTPS error can occur for numerous browsers, preventing websites with SSL certificates from opening. And when HTTPS is not working on Chrome, it could hamper your progress.

The HTTPS error message varies in alternative browsers. For example, the NET::ERR_CERT_AUTHORITY_INVALID and SSL Error Cannot connect to the real (website URL) HTTPS error message tabs open in Google Chrome.

Then, you’ll also see a red line crossing out the HTTPS text in the website’s URL in Chrome. These are a few potential fixes for the HTTPS error, specifically for Chrome. Why are HTTPS sites not opening in Chrome?

Why are HTTPS sites not opening in Chrome?

When HTTPS is not working in Chrome, it could be a problem at your end or that of the website’s administrator. On your back, it could be a VPN, an extension, or a program that has modified the network settings.

Also, certain antivirus or firewall software are known to label HTTPS links as suspicious and insecure. Besides, an outdated or corrupt DNS (Domain Name System) cache is as likely to lead to HTTPS not working in Chrome.

How do I fix HTTPS error on Chrome?

1. Clear the SSL Cache

  1. Press Windows + S to launch the Search menu, enter Internet Options in the text field, and click on the relevant search result.Internet options
  2. Navigate to the Content tab.Content
  3. Click the Clear SSL state button.Clear SSL state to fix https not working in chrome

We understand that having a tailored browsing experience due to cookies might be convenient and organized, but cookies do need to be cleared from time to time.

A PC optimization utility keeps your computer running as fast and efficiently as much as possible, and among other important tasks, it removes unnecessary cookies.

Because cookie cleaning software automates the process of eliminating unwanted files and apps, it makes cyberlife much safer.

Those cleaners will analyze your computer and show how much space it can recover and what you may safely erase. A cache and cookie cleaner is an excellent tool that may be the answer for fixing HTTPS errors in Chrome.

2. Flush the DNS Cache

    If you need to access HTTPS websites without any issues, a great method would be to flush the DNS cache. You can learn how to accomplish it with the next steps.

  1. 1. Press Windows + S to launch the Search menu, enter Terminal in the text field, right-click on the relevant search result, and select Run as administrator.

    https-error-google-chrome
  2. 2. Click Yes in the UAC prompt that pops up.

    https-error-google-chrome/
  3. 3. Press Ctrl + Shift + 2 to launch Command Prompt in a new tab.

  4. 4. Now, paste the following command and hit Enter to flush the DNS cache:ipconfig /flushdns

    flush dns to fix https not working in chrome

If the HTTPS sites are still not opening in Chrome, head to the next method.

3. Adjust the date and time settings

  1. Press Windows + I to launch the Settings app, and select Time & language from the tabs on the left.Time & language to fix https not working in chrome
  2. Click on Date & time on the right.date & time
  3. Click on the Change button next to Set the date and time manually.Change
  4. Use the dropdown menus to set the correct date and time, and then click on Change to save it.Change

Setting the correct time on your computer can also help you avoid the errors related to gws_rd=ssl; read this guide to learn more.

4. Update Google Chrome

  1. Click on the ellipsis near the top-right corner, hover the cursor over Help, and select About Google Chrome.About Google Chrome
  2. If there are any updates available, they will be automatically installed.Update to fix https not working in chrome
  3. Click the Relaunch button after the update for the changes to come into effect.

5. Disable VPN Software and third-party antivirus software

A VPN or a third-party antivirus is just as likely to be behind HTTPS not working in Chrome, and disabling these two, if you have them, has worked for a lot of users.

Simply open the programs and look for a toggle or setting to disable them. Once done, verify if the error is fixed. In case it’s not, you can re-enable the two.

Also, we recommend using an effective antivirus and a secure VPN for the best experience and to prevent such errors.

6. Reset the Chrome Browser

  1. Paste the following path in Chrome’s address bar and hit Enter:chrome://settings/reset
  2. Click on Restore settings to their original defaults.Restore settings
  3. Now, click on the Reset settings button.Reset settings to fix https not working in chrome

Resetting the browser would help if HTTPS is not showing in Chrome. Also, resetting the host file might do the trick here.

Resetting your Chrome will erase your bookmarks and history, but don’t worry, we got your back with these tools.

How to fix the HTTPS not secure message in Chrome?

Certain websites have a red padlock at the top-left corner in Chrome and throw the Not secure error message. The administrator hasn’t gotten the SSL certificate if the website doesn’t employ HTTPS.

A quick fix would be to enter https in the URL instead of http since some websites offer support for both. Or, you could try using a different browser, in case it’s a problem with the current one causing the error.

That’s all there’s to the HTTPS not working in Chrome issue, and by the time you reach this part, the problem will be long gone. These methods would also help fix the ERR_SSL_CLIENT_AUTH_SIGNATURE_FAILED error in Chrome on Windows 10.

Also, find out what to do if you keep getting the error message This website is not allowed. Tell us which fix worked for you in the comments section below.

Civ 5 is Not Launching? 5 Ways to Fix it

Civ 5 has been in the top 10 of every gamer as one of the best strategy games ever made. However, it seems that for some users, Civilization V is not launching or crashing on startup in Windows 10.

Users report that Civilization V won’t even run, they get the error message, and the application crashes.

Why is Civ 5 not opening?

Your computer may be missing specific DirectX files. DirectX is a visual component, and the appropriate version of the API should be installed.

Alternatively, corrupt game files are a tried-and-true explanation, which may be why a number of games cannot start up.

Civilization 5 is a great game, but sometimes specific errors can occur. Various problems can prevent you from running it, and users reported the following issues:

  • Civ5 is not launching – Try running the game in Compatibility mode and check if that solves the problem.
  • Civ 5 won’t launch after DirectX selection – This can occur if you don’t have the necessary DirectX files. Repair your Civilization 5 installation or install the required DirectX components.
  • Windows 10 Civ 5 won’t start – Update your graphics card drivers and check if that helps.
  • Civilization V quit unexpectedly – The problem might be your installation or third-party software. Repair your game and remove any incompatible software.
  • Civilization V is unable to start correctly – This is most likely caused by missing DLL files, which can be fixed by one of our solutions below.
  • Steam Civ 5 is not working – Users have recommended running the game in windowed mode and deactivating anti-aliasing.
  • Civilization V keeps crashing – Fix it by using one of our solutions, as they have been written explicitly for this situation.
  • Civilization 5 not running – It is recommended that you play Civilization 5 in compatibility mode.
  • Civ 5 not opening in full screen – A button labeled Full-screen resolution may be clicked from the game’s settings.
  • Civ 5 crashes on startup – This CIV 5 crashing issue might manifest itself if you are using an incorrect driver or one that is not up to date.

Keeping your Windows 10 up to date can fix this issue, so we advise you to update your OS first. If updating doesn’t help, you might want to try some of these solutions.

How do I fix Civ 5 not launching?

1. Update your graphics card driver

    According to users, you might experience issues with Civilization 5 if your graphics card drivers are outdated. Look into the practical steps below to update your graphics driver successfully. 

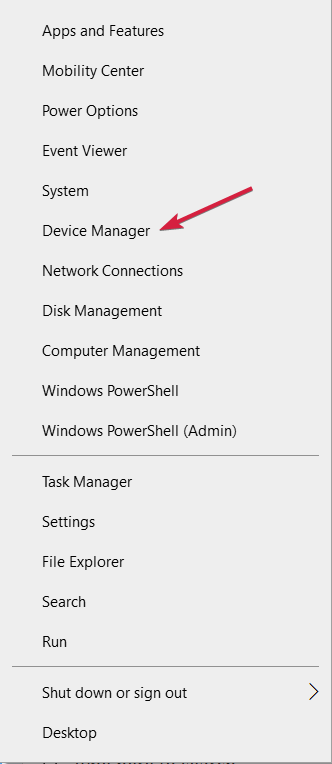
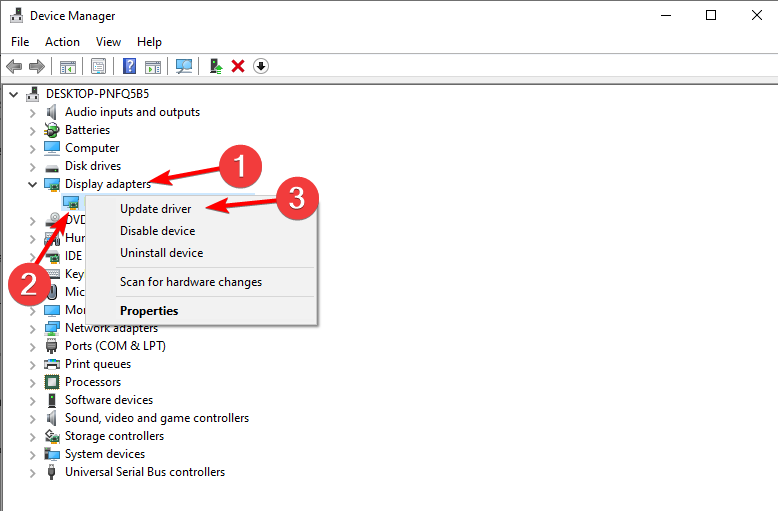
  1. 1. Open Device Manager from the Start Menu.

    Launch Device Manager to fix discord mic not working windows 11
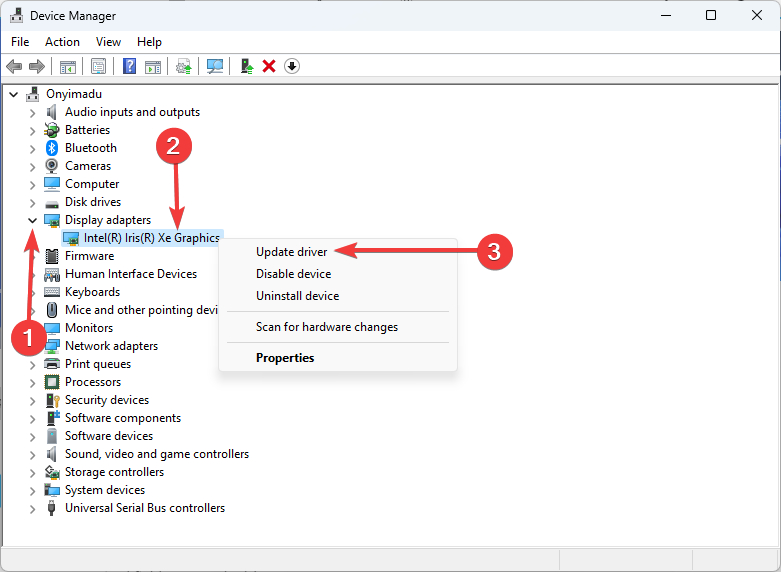
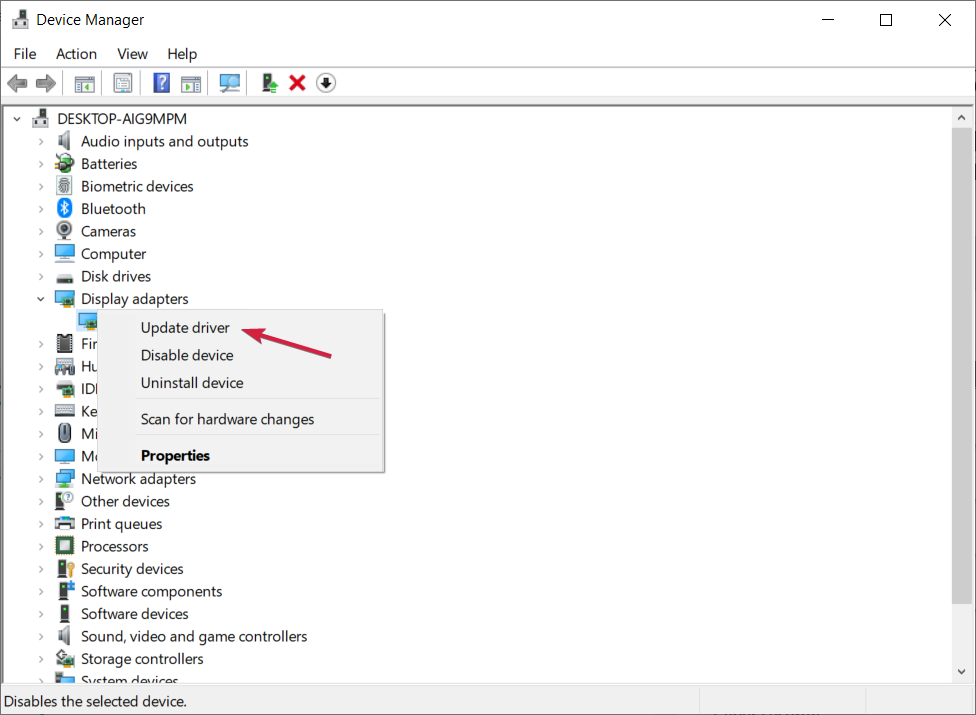
  2. 2. Find the Display adapters section and expand it to find your driver.

    display adapters
  3. 3. Right-click on the driver device and select Update driver.

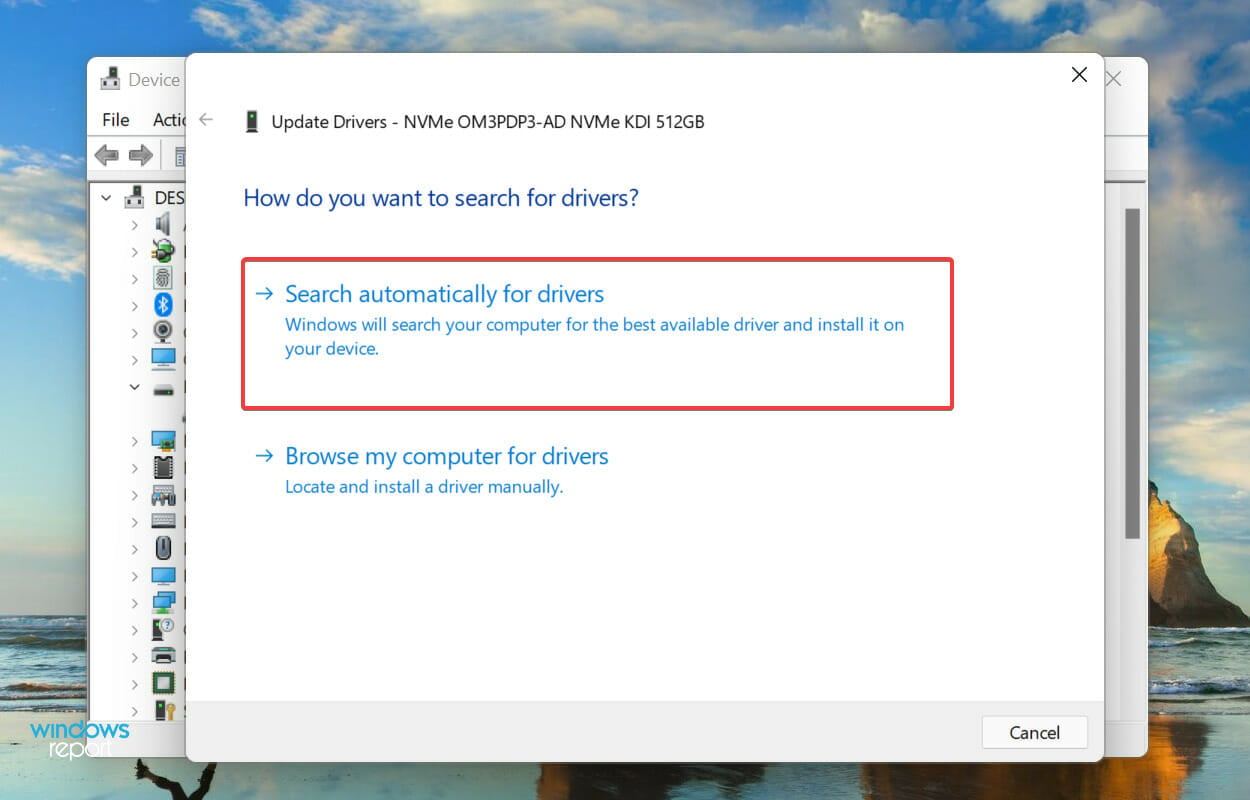
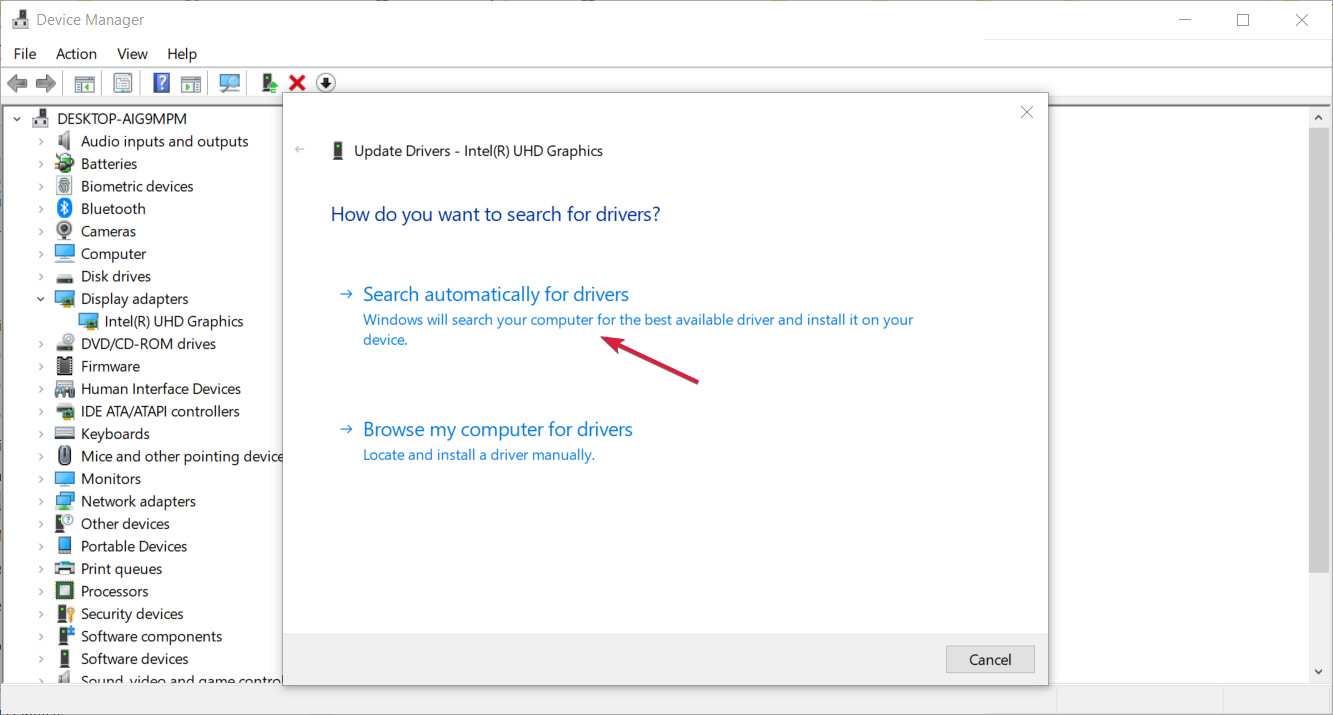
  4. 4. Choose the Search automatically for drivers option.

  5. 5. Wait for the drivers to be updated and then restart your PC.

Of course, the issue can be fixed by downloading and installing the latest drivers. Visit your graphics card manufacturer’s website, find your model, and download the latest drivers.

Although it sounds simple in theory, sometimes it’s more complicated, and you may do more harm by installing the wrong driver on your system.

The safer and easier solution is to automatically download and install Outbyte Driver Updater, a specialized solution that will automatically update and fix your drivers in a couple of seconds.

You don’t even have to click on anything because after installing; it will start working by scanning your system for driver problems or updates.

When the process finishes, you will see a complete list of the driver’s situation.

The only input required from you is to either click on the Apply & Update button or each box from the left of the driver names and hit the Update button from their right.

⇒ Get Outbyte Driver Updater

2. Remove Lucid Virtu

According to users, you might experience problems with Nvidia graphics if you have Lucid Virtu installed.

This solution applies only to Nvidia owners, so if you don’t own Nvidia graphics, you can skip this solution and try something else.

Many users fixed things when Civ 5 was not launching simply by removing Lucid Virtu from their PC.

Alternatively, you might be able to fix the problem by switching to the older version of Nvidia drivers.

To remove Lucid Virtu entirely, along with its associated files, it’s recommended to use a dedicated removal tool. Uninstalling from Windows Settings will leave behind leftover files. These will clutter your PC and may cause additional errors in the future.

Uninstaller software is created to find and remove all files associated with the app you want to delete. So you just select what you want to uninstall, and the software will automatically find and completely uninstall that app from your PC.

3. Uninstall your display driver

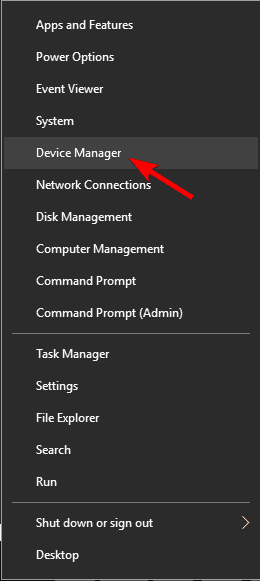
  1. Right-click the Start icon from your Taskbar, then select Device Manager.device-manager-w10 amd driver install problems
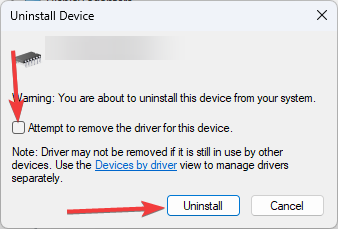
  2. Expand the Display Adapter section, find your Display Device driver, right-click it, and choose Uninstall device.
    Civ5 not launching
  3. Restart your computer.

Windows will now install the default driver for your graphics card, and the issue should be resolved.

4. Run Civilization V in compatibility mode

  1. Find the Civilization V shortcut and right-click it, then choose Properties from the menu.
    Civ 5 Windows 10 won't start
  2. Go to the Compatibility tab, check Run this program in compatibility mode, and select Windows 8 from the list. Next, click Apply, then OK to save the settings.
    Civ5 not launching

5. Update your BIOS

If Civ 5 is not launching, it can be an issue with the onboard graphics or an onboard and dedicated graphics card.

It can happen that BIOS doesn’t support Windows 10, and this can create a particular issue, so you might want to try updating it.

Before you start, we must warn you that updating the BIOS is an advanced technique, and if not done correctly, it can cause permanent damage to your computer.

If you don’t know how to do that, please, take your computer to the official repair center and ask them to do it for you. Otherwise, make sure to check out our guide on how to update your BIOS.

6. Verify the integrity of the game’s cache

  1. Open Steam, locate Civilization 5, right-click it and choose Properties.
    Civilization V quit unexpectedly
  2. Go to Local Files and click on Verify Integrity of Game Cache.local-files civ 5 not launching

When Civ 5 is not launching on Steam, a quick solution is to verify the integrity of game files. Keep in mind that this process can take a couple of minutes, so don’t interrupt it.

7. Install DirectX

According to users, problems with Civilization 5 can occur if you don’t have the necessary version of DirectX.

To fix the issue, you need to download and install the necessary version of Civilization 5. You can download the required DirectX right from Microsoft’s website.

Alternatively, you can check Civilization 5’s installation directory for the DirectX directory.

In there, you should find the DXSetup file. Then, the issue should be resolved by running the setup and installing DirectX.

8. Run the game in windowed mode and turn off Anti-aliasing

Many users reported issues while using Civilization 5 and DirectX 11.

According to them, the game cannot start, and the problem seems related to the anti-aliasing feature. So, to fix the issue, you need to check the game’s settings.

According to users, set the game to run in Windowed mode and turn off anti-aliasing. After that, the game should run without any issues on your PC.

It might not be necessary to run the game in windowed mode, so you can try disabling anti-aliasing.

9. Make sure that your Steam client is up to date

  1. Start Steam, then click on Steam in the top right corner and choose the Check for Steam Client Updates option.Civilization V keeps crashing
  2. The Steam client will check for available updates and install them automatically.

In case Civilization 5 is not working in multiplayer mode, updating the client should help.

Check out our guide on what to do if the Steam client update is stuck so you can get this fixed along the way.

10. Try running the game in Offline mode

  1. Start Steam, then click Steam from the toolbar and select Go Offline.
    Civ 5 Windows 10 won't start
  2. Click Restart in Offline Mode.
    Civ 5 won't launch after DirectX selection
  3. Once the Steam restarts, try rerunning Civilization 5.

11. Copy the missing DLL files

  1. Try running Civilization 5 from its installation directory.civ-5 civ 5 not launching
  2. Write down the name of the missing file. For example, it should be d3dx9_42.dll, but it can be a different file on your PC.
  3. Navigate to the DirectX directory and find that file. In our example, the file should be d3dx9_42_x86 or d3dx9_42_x64 (these files can sometimes have a prefix before them, such as Aug2009 or Dec2005).directx civ 5 not launching
  4. Run the file matching your system architecture (32 or 64-bit).
  5. You should see a list of files. Next, locate the missing file; in our case, that would be d3dx9_42.dll and copy it to the Civilization 5 installation directory.

What are the Civilization V system requirements?

When a hardware or software application runs smoothly and efficiently, the system requirements are the configuration the system must have for it to do so.

Failure to achieve these prerequisites can result in installation and performance issues. Thus the minimum system requirements for Civ V are as follows:

  • Operating System: Windows® XP SP3/ Windows® Vista SP2/ Windows® 7 
  • Processor: Intel Core 2 Duo 1.8 GHz or AMD Athlon X2 64 2.0 GHz 
  • Memory: 2GB RAM 
  • Hard Disk Space: 8 GB Free 
  • DVD-ROM Drive: Required for disc-based installation 
  • Video: 256 MB ATI HD2600 XT or better, 256 MB nVidia 7900 GS or better, or Core i3 or better-integrated graphics 
  • Sound: DirectX 9.0c-compatible sound card 
  • DirectX®: DirectX® Version 9.0c

The recommended requirements to run the game smoothly are:

  • Operating System: Windows® Vista SP2/ Windows® 7 
  • Processor: 1.8 GHz Quad Core CPU 
  • Memory: 4 GB RAM 
  • Hard Disk Space: 8 GB Free 
  • DVD-ROM Drive: Required for disc-based installation 
  • Video: 512 MB ATI 4800 series or better, 512 MB NVIDIA 9800 series or better 
  • Sound: DirectX 9.0c-compatible sound card 
  • DirectX®: DirectX® version 11

If you think your computer’s specifications suffice for the game to be installed and launched, then let’s move on to how you can make it work again.

Does Civilization V work on Windows 11?

Yes, Civilization V works on Windows 11. The game requirements are met by the platform. This is also confirmed on the GOG official website.

Why is Civ 5 not launching from Steam?

It must communicate with various other modules to get a game up and running.

Games have difficulty keeping up with the fast-paced environment of regular upgrades made by Microsoft and other graphics manufacturers. This makes it difficult for games to remain in sync with one another.

We recommend that you look at our guide with 8 methods to try if Civ VI is not launching from Steam.

For more information and potential solutions to this error, we recommend you check our post on Civ 5 video settings not saving.

We hope this guide helped you to run Civilization V on your Windows 10 computer. If you have any comments or questions, contact the comment section below.

How to Boot Your Surface Pro from USB: 3 Tested Ways

Booting your Surface Pro using a USB flash drive is a bit complicated but we’ve got you covered. Before diving into the solutions, back up any important data if possible.

How do I boot Surface Pro using a USB flash drive?

Before trying any steps, create a working bootable USB drive, make sure that the device is charged, and unplug any other USB devices except for the keyboard and mouse. If your Surface Pro is frozen or can’t boot up Windows, press and hold the power button till the Microsoft logo appears. Then, press the Windows logo, followed by the Ctrl + Shift + Win + B key combination.

1. Boot Surface Pro using a USB drive

➡ For Windows 11

  1. Insert a bootable USB flash drive into the USB port.
  2. Press Windows + I to get Settings.
  3. Go to System and choose Recovery.System recovery Surface Pro USB boot

4. Navigate to Advanced startup and click Restart Now.Surface Pro Boot from USB

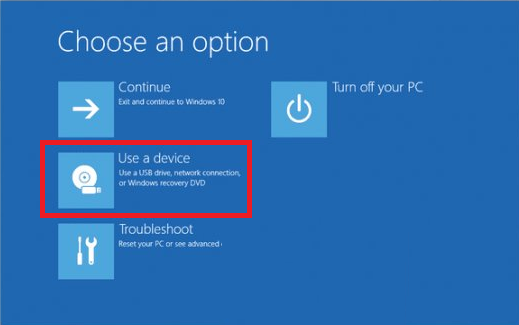
5. You will see Choose an option screen; click Use a device>USB storage. Choose-an-option

Tip icon Tip
For Windows 11, if you don’t have the keyboard connected, on the login screen, locate the Accessibility icon and click on it. Choose On-Screen Keyboard.

➡ For Windows 10

  1. Press Windows + I to get Settings.
  2. Go to Update & Security.
  3. From the left pane, click Recovery.
  4. Under Recovery, navigate to Advanced startup and select Restart Now.Surface Pro Boot Restart Now

5. You will see Choose an option screen; click Use a device>USB storage.

Tip icon Tip
For Windows 10, if you don’t have the keyboard connected, locate the Ease of access icon on the login screen and click on it. Choose On-Screen Keyboard.

2. Configure the boot device order

  1. Turn off your Surface.
  2. Press and hold the Volume Up button
  3. With the Volume Up button pressed, press & release the Power button.
  4. Keep holding the Volume Up button till you get the Microsoft logo, or the Windows logo disappears.
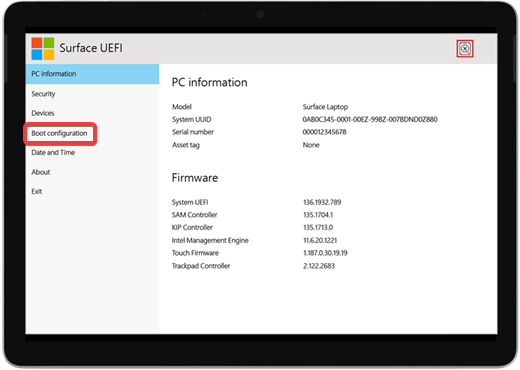
  5. You will get Surface UEFI.
  6. On Surface Pro UEFI from the left pane, click Boot configuration.Surface pro
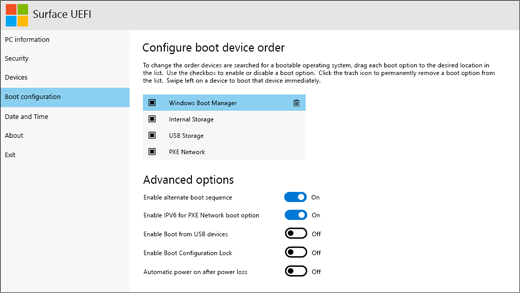
  7. Select USB Storage, drag it, and place it on top of the list.Change the order
  8. Click Exit, then Restart Now.

While adjusting UEFI boot settings, it is useful to confirm your exact device model. Here is a quick guide on how to tell what version of Surface Pro you have so that boot configuration steps match correctly.

You can access more startup options on your device by following this guide on how to get to the Surface Pro boot menu for clear steps.

3. Format USB as a bootable drive

  1. Take a USB drive (at least 16 GB) and plug it into your Surface Pro’s USB slot.
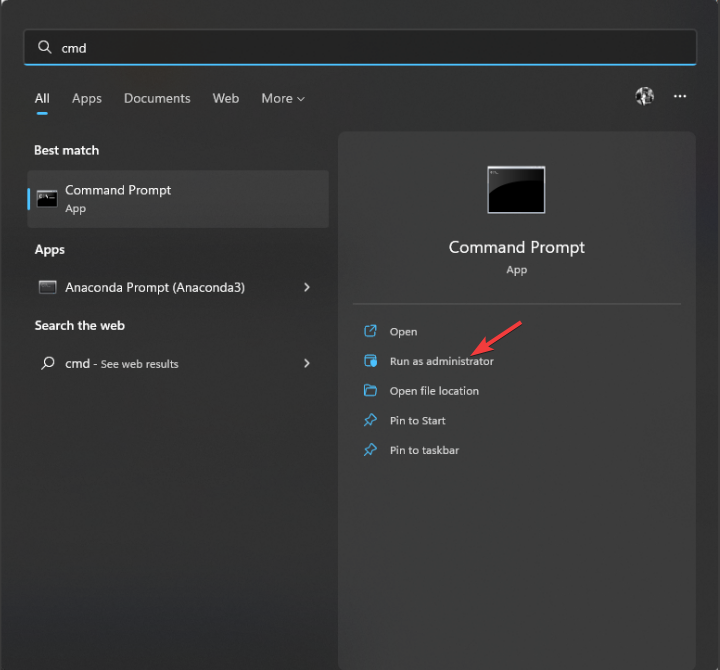
  2. Press the Windows key and type CMD and click Run as Administrator.CMD elevated
  3. On the Command Prompt, type the command mentioned below and hit Enter : diskpart
  4. Next, paste the command mentioned below and hit Enter. This will show you all the disks on the computer. list disk
  5. Type the following command and hit Enter (where X is the drive letter or number assigned to the USB drive). select disk X
  6. Type the following commands and press Enter after each of them: clean create part pri select part 1 format fs = fat32 quick active

FAQ

How do I boot a Surface device from a USB drive?

Shut down the Surface, press and hold Volume Down, tap Power, and keep holding Volume Down until the Surface logo appears.

Why does my Surface not recognize the USB boot drive?

Create the USB using FAT32, use a properly made bootable image, and plug it into the Surface’s USB port before powering on.

How do I enter the Surface UEFI menu?

Hold Volume Up, tap Power, and keep holding Volume Up to open UEFI. You can change boot order or enable USB boot here.

Why does Secure Boot block USB boot on Surface?

Secure Boot blocks unsigned images. Open UEFI, go to Security, and turn off Secure Boot so the Surface can load external boot media.

That’s it. This is how you can make your Surface Pro boot from a USB drive. Try these steps and let us know in the comments section below if the methods worked for you.

Once Windows loads again, learn how to use Surface Pen to write text for faster input and note taking.

5 Ways to Fix Printer has Experienced Configuration Problem

Printers are useful devices that allow us to get a hard copy of almost anything on the computer. But they are more prone to errors than you would imagine. A common one reported by users is, Your printer has experienced an unexpected configuration problem.

But like most printer-related errors, for instance, the printer not printing full pages or not responding to requests, this too is easily fixable. And we will walk you through these to get things up and running.

What is an unexpected configuration problem?

An error with the printer usually arises due to corrupt or outdated drivers. Also, several users reported that their spooler files led to it.

There are several variations of the error, each with a different error code. Here are a few of these:

  • 0x80070002 Your printer has experienced an unexpected configuration problem – A common problem encountered by many users.
  • 0x80070570 Your printer has experienced an unexpected configuration problem – The error code appears alongside the error message and helps identify the underlying cause.
  • 0x80040003 Your printer has experienced an unexpected configuration problem – Updating the driver usually helps fix things.
  • 0x8007000d Your printer has experienced an unexpected configuration problem – One of the many error codes, but our solutions would help.
  • 0x800705b4 Your printer has experienced an unexpected configuration problem – If you encounter the error, try running the built-in troubleshooter first.
  • 0x8007007e Your printer has experienced an unexpected configuration problem – Clearing the spool folder may do the trick.
  • 0x80004005 Your printer has experienced an unexpected configuration problem – Another error code that often troubles users.
  • 0x800706ba Your printer has experienced an unexpected configuration problem – It could be the DLL files to blame, and we have a solution.

What can I do if my printer has experienced an unexpected configuration problem?

Before we head to the slightly complex solutions, here are a few quick ones to try:

  • Restart the computer. Often, a simple restart would eliminate the bug responsible for the error.
  • Install the latest version of Windows. If the issue appeared after updating the OS, it’s likely a bug in the installed version, and installing the next one should fix things.
  • If you have trouble printing from a particular program, uninstall the app, and download it again.
  • Check if the printer manufacturer offers a diagnostic tool, download it, and let it fix problems. For instance, HP provides the Print and Scan Doctor diagnostic tool for such issues.

If these two don’t work, head to the ones listed below.

1. Clear the spooler files

  1. Press Windows + R to open Run, type services.msc in the text field, and then hit Enter.services
  2. Locate the Print Spooler service, right-click on it, and select Stop.stop service to fix your printer has experienced an unexpected configuration problem
  3. Now, press Windows + E to open File Explorer, paste the following path in the address bar, and then hit Enter:C:\Windows\System32\spool\PRINTERSdelete spooler files to fix your printer has experienced an unexpected configuration problem
  4. Next, press Ctrl + A to select all the files, and then hit the Del key.
  5. Then, again, head back to Services, right-click on the Print Spooler service, and this time, select Start.start

Once done, check if the Your printer has experienced an unexpected configuration problem error is eliminated. This is a simple and quick method and has worked for many.

2. Update the printer drivers

2.1 Update drivers manually

  1. Press Windows + X to open the Power User menu and select Device Manager.device manager
  2. Expand the Printers section, right-click on the driver throwing the error, and select Update driver.update driver to fix your printer has experienced an unexpected configuration problem
  3. Now, select Search automatically for drivers and wait for the best available one to install.search automatically for drivers

Drivers are a critical component and help the OS interact with connected devices. And an outdated driver can trigger issues, including the error that your printer has experienced an unexpected configuration problem.

Other than this method, there are a few more ways you can update the printer driver. But using a dedicated tool is, by far, the best option.

2.2. Use a professional tool

You can also bring your updates to date with a tool that automatically scans your device for programs that need to be updated and provide you with an accurate report on the matter.

3. Move the DLL files

  1. Press Windows + R, type cmd, and then press Ctrl + Shift + Enter.cmd
  2. Click Yes in the UAC prompt.
  3. Paste the following command and hit Enter:net stop spoolerstop spooler
  4. Press Windows + E to open File Explorer, paste the following path in the address, and hit Enter:C:\Windows\System32\spool\drivers\navigate
  5. Look through the folders here to locate the PrintConfig.dll file. Once found, right-click on it, and select Copy.PrintConfig.dll file to fix your printer has experienced an unexpected configuration problem
  6. Now, navigate the following path and paste the file here:C:\Windows\System32\spool\drivers\x64\3file
  7. Head back to Command Prompt, and execute the following command:net start spoolerstart spooler to fix your printer has experienced an unexpected configuration problem

Moving the PrintConfig.dll file fixed the Your printer has experienced an unexpected configuration problem error for many, so make sure to try it. Also, if you can’t find the DLL file, download one from the web. Just be cautious and use a trusted website.

4. Turn on printer sharing

  1. Press Windows + R to open Run, type control printers, and hit Enter.control printers to fix your printer has experienced an unexpected configuration problem
  2. Click on Printers & scanners.printers and scanners
  3. Now, choose the printer that throws the error.printer
  4. Click on Printer properties.printer properties
  5. Navigate to the Sharing tab, tick the checkbox for Share this printer, and click on OK to save the changes.turn on sharing to fix your printer has experienced an unexpected configuration problem

5. Add the printer all over again

  1. Press Windows + I to open Settings, navigate to Bluetooth & devices from the left, and click on Printers & scanners.printers & scanners to fix your printer has experienced an unexpected configuration problem
  2. Now, click on the problematic printer.printer
  3. Click on the Remove button.remove to fix your printer has experienced an unexpected configuration problem
  4. Next, click Yes in the confirmation prompt.confirm change to fix your printer has experienced an unexpected configuration problem
  5. Once done, unplug the printer, restart the computer for the changes to apply, and then replug it.
  6. Finally, head back to Printers & scanners settings, click Add a device and follow the on-screen instructions to complete the process.add a device

Once you are done adding the printer, the printer has experienced an unexpected configuration problem error will be gone for good.

For good measure, ensure you manage your device and printer settings to avoid common printer issues. Also, if you plan to upgrade to a better one, do not forget to check the best printers compatible with Windows 11.

Please tell us which fix worked for you in the comments section below.

PC Won’t Stay in the Sleep Mode: Use These 5 Simple Fixes

The PC won’t stay asleep issue takes away an elementary part of Windows systems. This is because many users prefer the option of shutting down their PCs and starting everything over.

If your computer keeps waking up from sleep on Windows 10, there might be a problem with Sleep mode. It can also be down to some settings or apps on your PC.

No matter the cause, this guide will show the surefire fixes needed to solve the problem.

Why won’t my PC stay asleep?

There are various reasons your PC won’t stay asleep when you set it to do so. Below are some of the common ones:

  • Wake timer activities: The first to check if your computer is not going to sleep or keeps waking up on Windows 10 is the wake timer. If you have them active, then your PC will wake up at the designated time. To prevent this, you need to disable the feature in your power options.
  • Network adapter wake properties: Another possible cause of this issue is the Wake On Magic Packet and Wake On Pattern Match features of your network adapter. These features allow your adapter to wake your PC from sleep at intervals. The solution here is to disable them.
  • Activities of third-party apps: Some third-party apps or processes can also cause this reason. This can be because they need your PC resources to run some operations. Finding and disabling these apps should help solve the sleep issue in this case.

What can I do if the PC won’t stay asleep?

1. Disable network adapter wake properties

  1. Press the Windows key + I and select the Network & Internet option.
    network pc wont stay asleep
  2. Select VPN in the left pane and click Network and Sharing Center.
    vpn
  3. Click on your active network.
    wifi
  4. Now, click the Properties button in the next window.
    properties pc wont stay asleep
  5. Click the Configure… button.
    configure
  6. Select the Power Management tab at the top and uncheck the box for Allow this device to wake the computer.
    power mgmt pc wont stay asleep
  7. From here, click the Advanced tab at the top.
  8. Select Wake on Magic Packet and choose Disabled from the dropdown under value.
    wake on magiic
  9. Choose the Wake on Pattern Match option and the Disabled option from the value dropdown.
  10. Finally, click the OK button to save your changes.
    wake on pattern

The PC won’t stay asleep issue can be down to some features that help speed up your connectivity. Unfortunately, these features need to be disabled to solve the problem completely.

2. Disable wake timers

  1. Press the Windows key, type power plan, and choose Edit power plan.
    edit power pc wont stay asleep
  2. Click Change advanced power settings.
    change advanced
  3. Click the + sign next to the Sleep option to expand it and do the same for Allow wake timers under it.
    sleep allow
  4. Now, click the dropdown before the On battery and Plugged in options and choose Disable for both.
  5. Finally, click the Apply button followed by OK to save the changes made.
    apply ok

The wake timers are the most prominent cause of the PC won’t stay asleep issue. This is because they can wake your PC based on the parameters they are on at intervals. However, with the steps above, you should be able to restore normalcy.

3. Disable specific devices from waking up your PC

  1. Press the Windows key, type cmd, and click Run as administrator under Command Prompt.
    cmd admin
  2. Type the command below and press Enter: Powercfg -devicequery wake_armedpowercfg command pc wont stay asleep
  3. This command will list all devices which can wake your PC from sleep.
  4. Now, type the command below for each device on the list. Again, remember to replace the devicename in the command with the actual device name. Powercfg -devicedisablewake "devicename"
  5. Close the elevated Command Prompt and restart your PC.

Some devices and apps can wake up your PC from sleep. This might be because they need resources to run some processes. The steps below should help disable them and fix the issue of the PC won’t stay asleep.

4. Run the troubleshooter

  1. Press the Windows key + I to open Settings and choose Update & Security.
    update and security
  2. Select Troubleshoot in the left pane and click Additional troubleshooters.
    additional trouble
  3. Choose the Power option and click the Run the troubleshooter button.
    run troubleshooter pc wont stay asleep

At times, a bug or minor power glitches might cause your PC not to stay asleep. The Power troubleshooter should find the causes of this issue and recommend potential fixes.

5. Disable Fast Startup

  1. Press the Windows key, type power plan, and select Choose a power plan.
    choose a power
  2. Click Choose what the power buttons do in the left pane.
    choose what pc wont stay asleep
  3. Now, click Change settings that are currently unavailable.
    change settings
  4. Uncheck the Turn on fast startup (recommended) box and click the Save changes button.
    turn on fast pc wont stay asleep
  5. Finally, restart your PC.

The Fast Startup, as the name implies, helps to improve your PC’s startup time. However, it might be why your PC won’t stay asleep. So, you need to disable it and restart your PC to fix the issue.

The PC won’t stay asleep issue can be frustrating, as it drains your computer quickly. But with the detailed solutions in this guide, you should be able to fix it for good.

If you are facing other issues like if the computer shuts down instead of sleeping, check our detailed guide for solutions to retake control of your PC.

Feel free to let us know the solutions that helped you solve this issue in the comments below.

SSD Not Showing up in Windows 11: How to Get it Detected

Several users have reported that SSD is not showing up in Windows 11 or it’s not recognized. If you connect the SSD for the first time, probably the disk is either not yet initialized or formatted. But for SSDs already in use, the problem lies elsewhere.

Before trying anything else, connect the SSD to another port, or try connecting it to another PC or port.

What can I do if SSD is not showing up on Windows 11?

1. Initialize the SSD

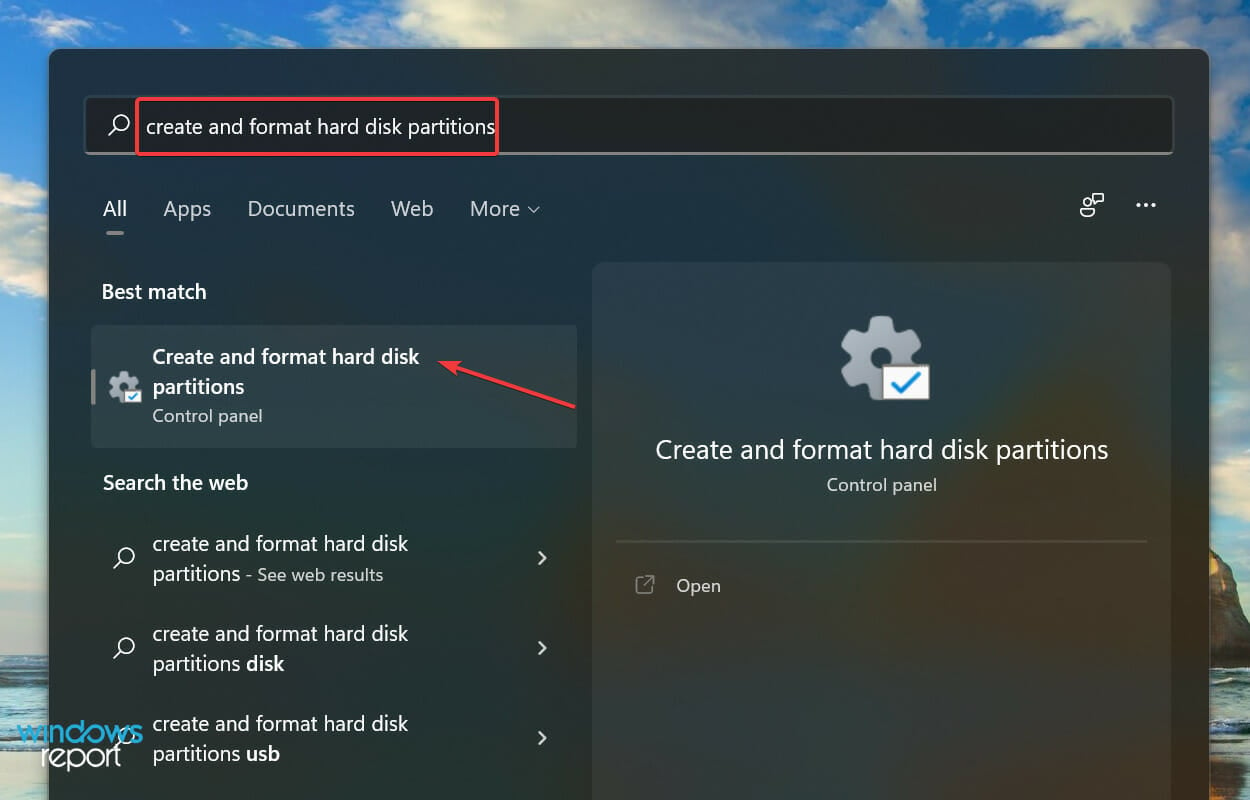
  1. Press Windows + S to launch the Search menu, enter Create and format hard disk partitions in the text field at the top, and click on the relevant search result that appears.Create and format hard disk partitions to fix windows 11 not recognizing ssd
  2. Check if the problematic SSD has a black bar at the top and says Not Initialized. If that’s the case, right-click on it and select Initialize Disk from the context menu.Initialize disk to fix windows 11 not recognizing ssd
  3. Select the desired partition style, i.e., either MBR or GPT. We recommend selecting GPT since it allows you to create more partitions, but there’s a drawback, too; it’s not recognized by Windows 8 and earlier versions.Choose partition style to fix windows 11 not recognizing ssd
  4. Once the SSD is initialized, right-click and select New simple volume from the context menu.New simple volume to fix windows 11 not recognizing ssd
  5. Click on Next to proceed.Next
  6. Enter the volume size in MB. We recommend you leave the default entry as is since it’s the maximum volume size and click Next.Choose volume size
  7. Choose a drive letter from the dropdown menu, and click Next.Choose drive letter
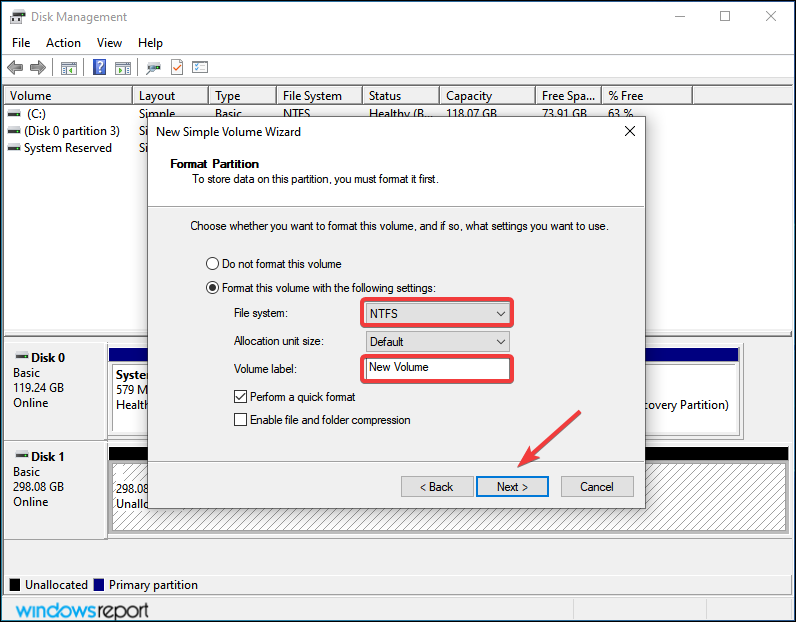
  8. Next, select a file system and volume label for the SSD, and click Next. If you are creating a volume for the first time, we recommend using the default entries on every step.Choose file system and volume label
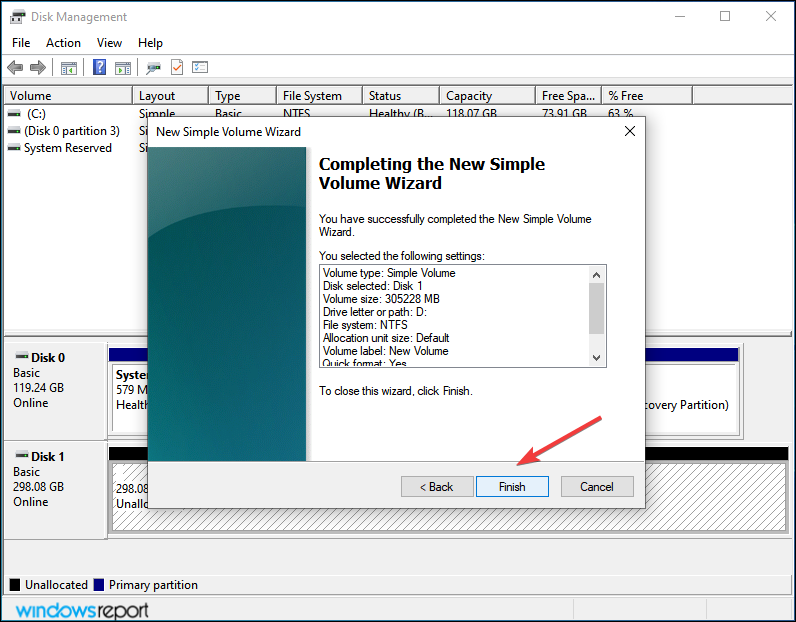
  9. Finally, verify the details and click Finish.Finish

If an SSD has not been initialized or the data on it has corrupted for some reason, Windows 11 won’t recognize the drive. In this case, initializing the drive and creating a new volume would help fix the issue.

2. Assign/change the drive letter

  1. Press Windows + S to launch the Search menu, enter Create and format hard disk partitions in the text field, and click on the relevant search result.Create and format hard disk partitions to fix windows 11 not recognizing ssd
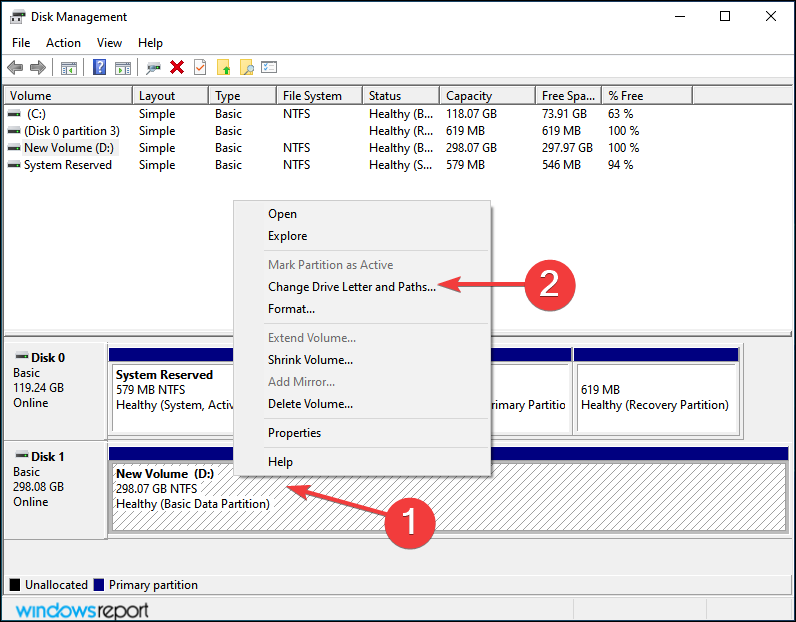
  2. Right-click on the SSD volume, and select Change Drive Letter and Paths from the context menu.Change drive letter and paths
  3. Next, click on the Add button. Finally, click on Change if the drive already has a letter assigned.Add drive letter to fix windows 11 not recognizing ssd
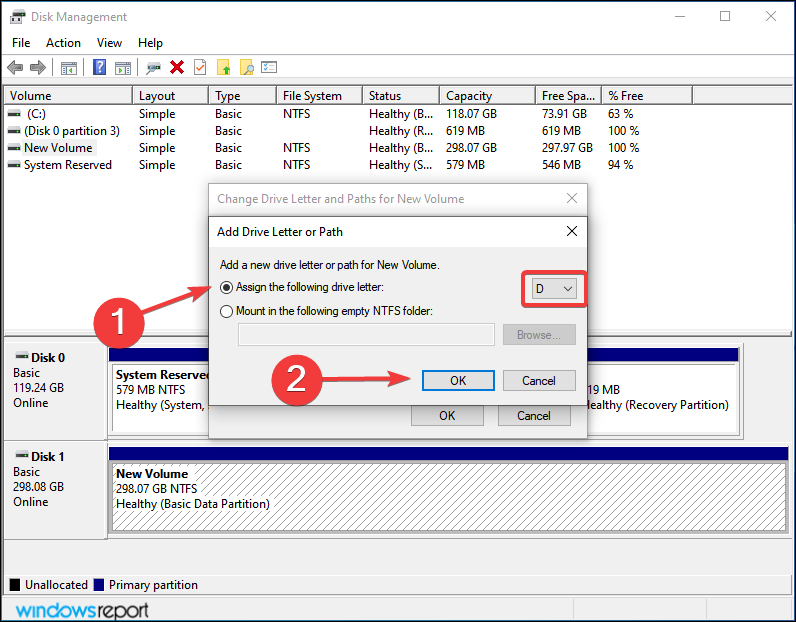
  4. With the Assign the following drive letter option ticked, select the desired Drive letter from the dropdown menu and click on OK to assign it.Assign new drive letter to fix windows 11 not recognizing ssd

If the volume on the SSD has not been assigned a letter yet, it wouldn’t be listed in the File Explorer. In this case, assign a drive letter using the above steps, and Windows 11 will now recognize the SSD.

Even if it has been assigned one but has some issues, changing it should help.

3. Check BIOS settings

Note icon NOTE
The steps listed here might be different on your computer, but they will give you a fair understanding of the process. Check the support or FAQ section on the manufacturer’s website to find the exact steps.
  1. Shut down your computer, and then turn in back on. When the display lights up, hit Del or F12 key or the relevant key for your system manufacturer to enter the BIOS settings.
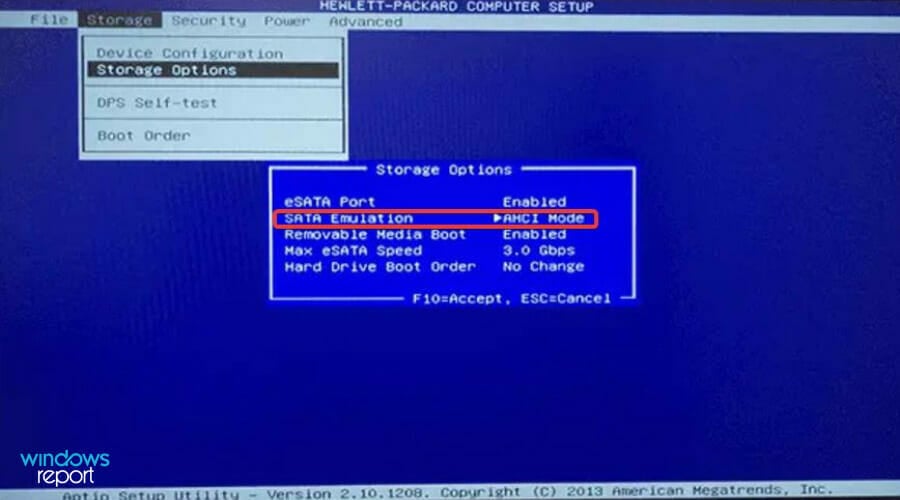
  2. Locate and click on Storage and then select the Storage Option entry.Storage options to fix windows 11 not recognizing ssd
  3. Now, set the SATA Emulation to AHCI Mode and save the changes.AHCI mode

Once done, boot Windows 11, and the SSD should now be recognized. In case it’s still not listed, head to the following method.

4. Update the SSD driver

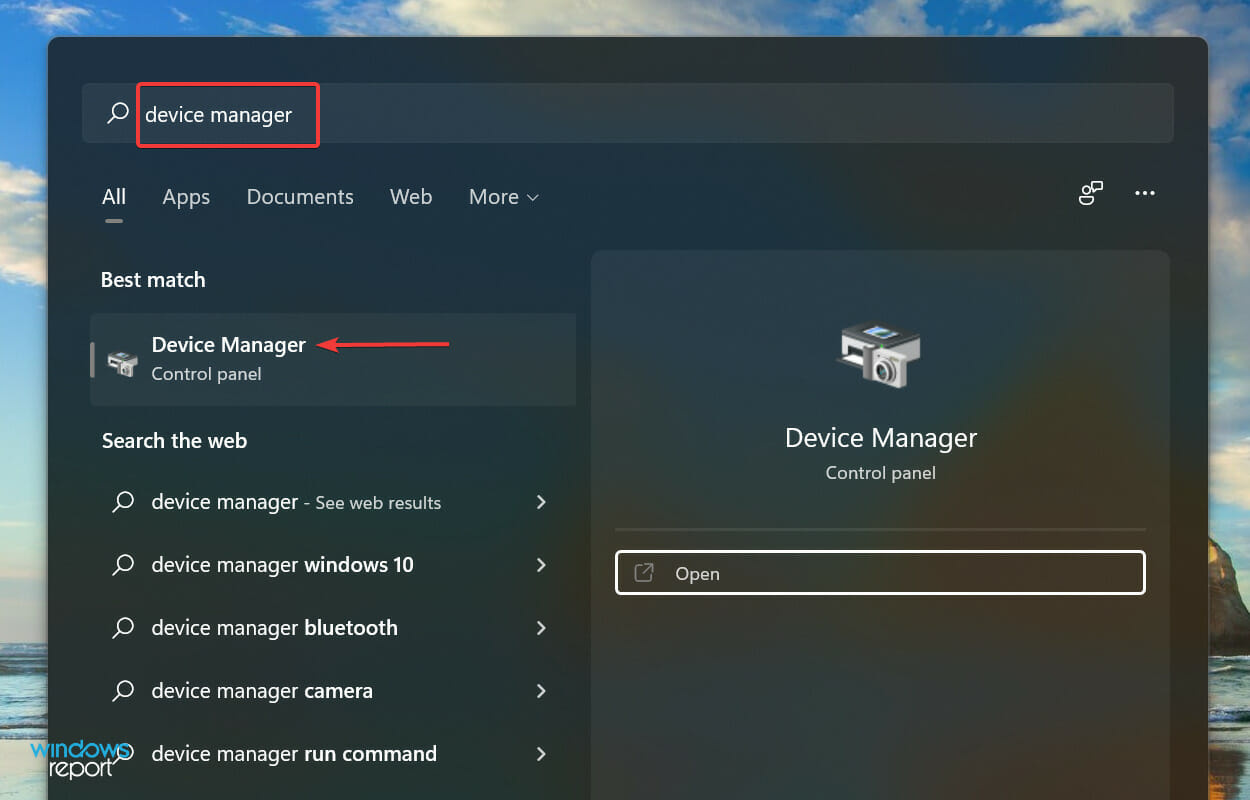
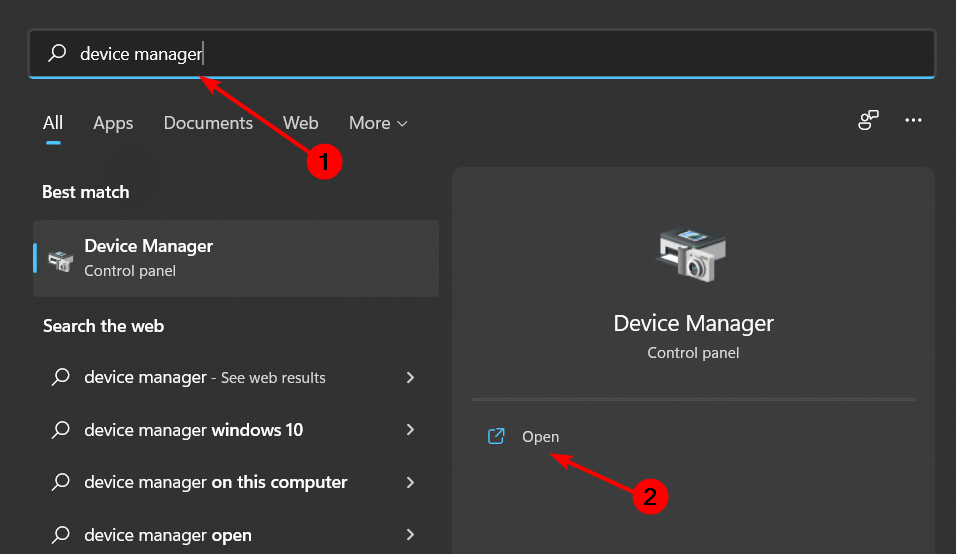
  1. Press Windows + S to launch the Search menu, enter Device Manager in the text field at the top, and click on the relevant search result.Launch Device Manager
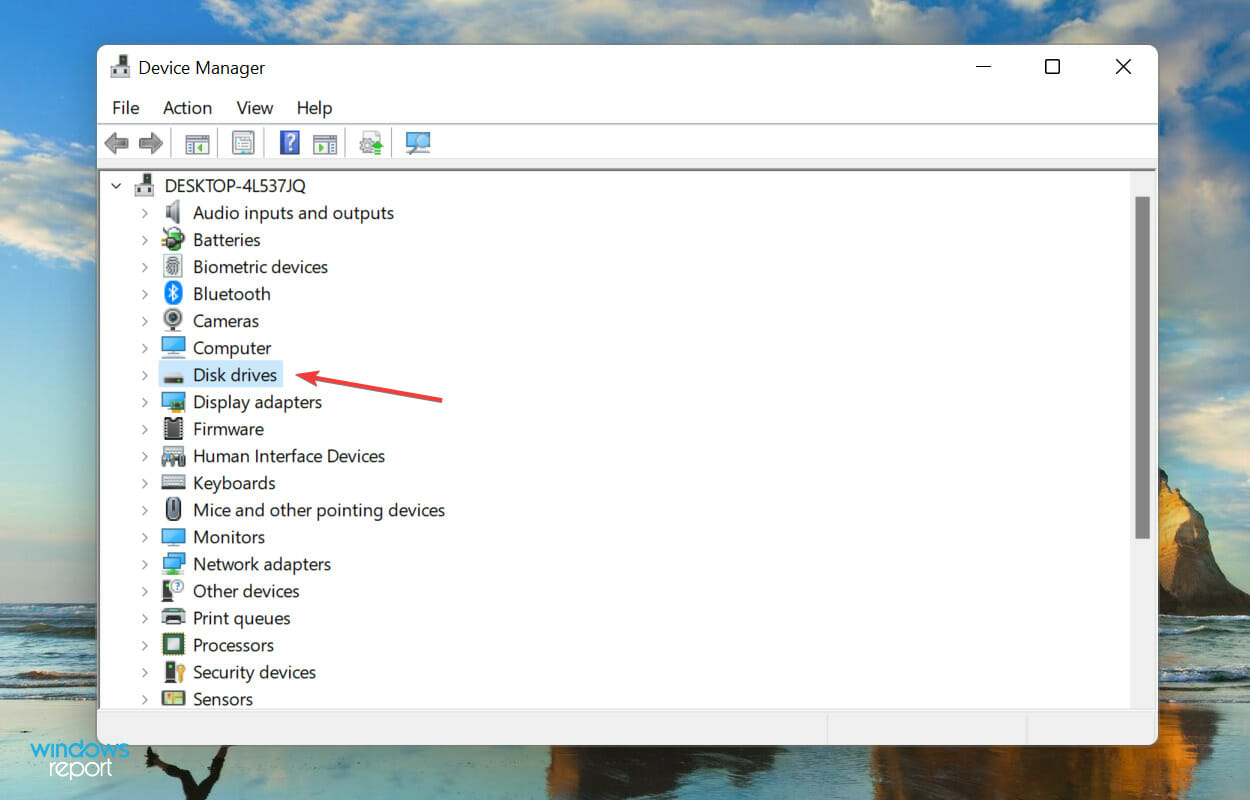
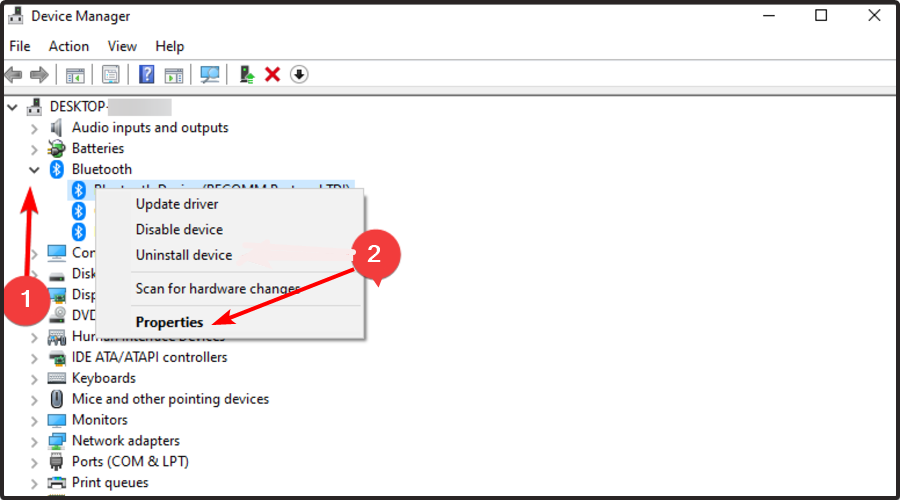
  2. Double-click on the Disk drives entry to expand and view the problematic SSD.Disk drives
  3. Right-click on the SSD not being recognized and select Update driver from the context menu.Update driver to fix windows 11 not recognizing ssd
  4. Next, select Search automatically for drivers from the two options in the Update Drivers window.Search automatically for drivers to fix windows 11 not recognizing ssd
  5. Your computer will now scan for the best available driver on the system and install it for the SSD.

Outdated drivers are known to cause several issues with the device, the SSD. Updating the driver enhances the device’s performance apart from introducing new features and eliminating previously known errors.

But, one of the drawbacks of using the Device Manager to install the driver manually is that it only scans the drivers stored on the system. So, the update process might not go through if you haven’t downloaded a newer version.

You can always use a reliable third-party app if the whole process sounds like too much trouble. We recommend using Outbyte Driver Updater, a dedicated tool that automatically scans the available sources for the latest version and keeps the installed drivers up-to-date.

Outbyte Driver Updater

Avoid serious PC issues and keep all your device drivers up to date with Outbyte Driver Updater.
Free Trial Download now

The above methods will eliminate any issues leading to Windows 11 not recognizing the SSD. By reaching this part of the article, either the error will be destroyed, or you will have discovered that the SSD is faulty.

Why is Windows 11 not recognizing the SSD?

We went through several forums where users shared the problem and their valuable input. And based on that, we identified several issues as to why the SSD is not recognized in Windows 11. They are listed below:

  • Improper connections: The first thing to check if your SSD is not recognized on Windows 11 is the connection. If the SSD or the USB, in the case of an external drive is not connected correctly, you will encounter this issue.
  • Disk space unallocated: Another reason for SSD not being detected on Windows 11 issue is unallocated disk space. This denotes that your programs cannot write on the drive. You can fix this by creating a new partition on the drive.
  • No drive letter assigned: The drive letter is essential for your OS to communicate with your hard drive. So if Windows 11 setup doesn’t detect your SSD, you might need to assign or change its drive letter.
  • Misconfigured BIOS settings: Sometimes, your BIOS settings might be set to the old IDE compatibility mode. This can cause the new SSD to not show up in Disk Management on Windows 11. The solution here is to change the SATA mode to AHCI.
  • Outdated SSD drivers: Outdated drivers are the chief cause of many issues. So, it is not surprising that you can face this issue if your SSD drivers are not up-to-date; you need to update your drivers to get past the problem here.

Suppose you are, by any chance, able to identify the problem from the list, head to the appropriate method, and execute it. Otherwise, follow the steps in the sequence listed for quick troubleshooting.

Also, if you notice the hard drive missing after updating Windows 11, learn how to fix the problem.

Do not hesitate to tell us which fix worked or was the SSD was faulty in the comments section below.

Windows Cannot Run Disk Checking on This Volume [Fix]

Windows could not run disk checking on this volume because it is a write-protected error generally occurring when a book or the drive is damaged, corrupted, or in Read-Only mode. This implies that you can access the files stored in the drive but cannot make any changes.

This guide will help you fix this disk error with five simple troubleshooting steps.

Why can’t Windows run disk checking on this volume?

CHKDSK, the command-line utility, is used to check errors on a disk drive and possibly repair them. If any of the drives that you scanned comes with the CHKDSK write-protected error, these could be the reasons:

  • Your hard drive has a write protection tab, and it is enabled.
  • The USB drive has a physical switch to set it to Read-Only, and it is turned on.
  • Virus infection or hardware errors damaged the partition file system.
  • The attribute of the drive is selected as Read-Only.
  • Windows Registry Key value is incorrect.

Now that we know the situation, let us move on to the fixes.

What can I do if Windows cannot run disk checking on this volume?

1. Remove disk errors

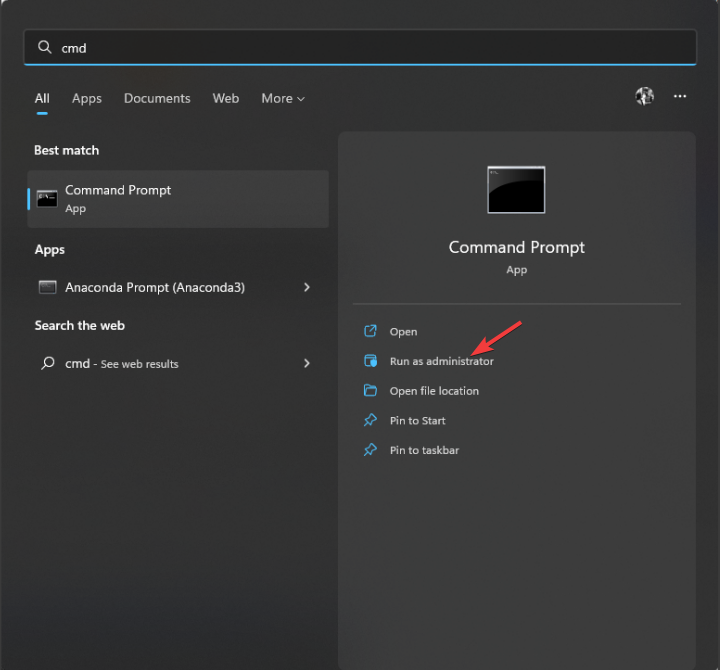
  1. Press the Windows key and type CMD, and select Run as Administrator.CMD elevated
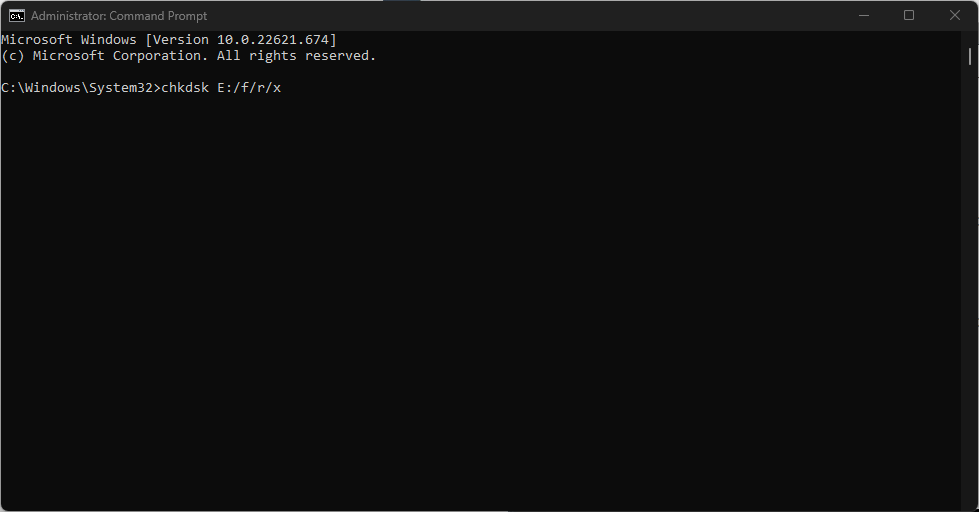
  2. Paste the following command and press Enter:

chkdsk E:/f/r/x

 Note: E represents the drive letter; change it accordingly.

2. Remove Write Protection via Diskpart Command

  1. Press the Windows key and type CMD, then select Run as Administrator
  2. Type the command mentioned below and press Enter: diskpartDiskpart
  3. Paste the following command and hit Enter. You will get the list of disks attached. list disk Windows Cannot Run Disk Checking on This Volume
  4. Type the command mentioned below and press Enter. Replace 0 with the number that your drive is listed under. select disk 0Windows Cannot Run Disk Checking on This Volume
  5. Copy and paste the command and hit Enter: attributes disk clear readonlyWindows Cannot Run Disk Checking on This Volume

3. Modify Read-Only settings in Registry Editor

3.1 If the StorageDevicePolicies key is present

  1. Press Windows + R to get the Run console
  2. Type Regedit to open Registry Editor.
  3. Paste the path mentioned below in the address bar: HKEY_LOCAL_MACHINE\SYSTEM\CurrentControlSet\Control\StorageDevicePoliciesRegedit
  4. Locate and right-click on the WriteProtect key and then click Modify.Regedit 2
  5. Edit the DWORD value, set the Value data to 0, and click OK to confirm.

3.2 StorageDevicePolicies key  is not present

  1. Press Windows + R to get the Run console.
  2. Type Regedit to open Registry Editor.
  3. Paste the path mentioned below in the address bar: HKEY_LOCAL_MACHINE\SYSTEM\CurrentControlSet\Control
  4. On the right panel, right-click in space and select New, then Key. Now, double-click on the key and name it StorageDevicePolicies.Add Key
  5. Select StorageDevicePolicies and go to the right panel, right-click and then select DWORD (32-bit).Regedit add key
  6. Name the new DWORD as WriteProtect and click Modify and set the Value data to 0.Write Protected

4. Scan your drive

  1. Navigate to This PC.
  2. Locate the drive, and choose Properties from the context menu.Disk Properties
  3. Go to the Tools tab.
  4. Under Error-checking, click Check. Please wait till the scan completes.Scan Disk

5. Format the volume via Disk Management to make it reusable

  1. Press Windows + R to get the Run console.
  2. Type diskmgmt.msc to open Disk Management.
  3. Select the partition you want to format, then right-click to choose Format.Disk Management
  4. Rename the Volume label, Allocation unit size, and File system, then click OK.

Note: Ensure there is a checkmark beside Perform a quick format.

So, these are fixes you can perform if you encounter Windows cannot run disk checking on this volume because it is write-protected. 

Let us know if any other solutions not mentioned here worked for you in the comments section.

Second Life Keeps Crashing: 2 Easy Fixes To Use

Second Life is an online virtual life simulator that can be accessed by personalizing your 3D avatar.

A good number of Second Life users have been reporting crashing issues with Windows 10, and the program isn’t opening for some of them. This guide will show you how to fix all varieties of this issue quickly and effectively.

Why does Second Life keep crashing?

There are a series of reasons Second Life keeps crashing or freezing on your PC. Some of the possible causes are listed below:

  • Outdated graphics driver: The Second Life not responding or crashing issue can be due to obsolete or faulty display drivers. This is especially common with users using NVIDIA drivers. You can fix this by updating the drivers.
  • Insufficient system resources: Second Life is demanding and takes its toll on your PC. So, you need enough RAM space, for example, and other system resources to run the game successfully.
  • Activities of third-party apps: Some apps might be interfering with Second Life either by drawing too many resources or running a counter-program to it. In this case, you need to perform a clean boot to stop the crash.

How can I fix Second Life crashing on PC?

Below are some preliminary troubleshooting steps to try before proceeding to the fixes in this section:

  • Clear out dust from your PC to prevent overheating
  • Ensure that your PC meets the requirement to run the program
  • Download the new test viewer

1. Clean boot your computer

  1. Press the Windows key + R, type MSConfig, and click the OK button.
    msconfig second life keeps crashing
  2. Select the Services tab at the top, check the box for Hide all Microsoft services, and click Disable all.
    services
  3. Click the Startup tab and select Open Task Manager.
    startup
  4. Right-click each of the processes there and select Disable.
    disable second life keeps crashing
  5. Go back to the System Configuration window and click Apply, followed by OK to save the changes.
    apply and ok

If you’re running too many apps and programs at the same time, this might impact the resources allocated to running Second Life.

Try using a clean boot to launch your PC with the required apps and processes.

2. Check your drivers

  1. Press the Windows key + X and select Device Manager.
    device manager
  2. Double-click the Display adapters option to expand it and right-click the driver there.
  3. Select the Update driver option.
    update driver second life keeps crashing
  4. Choose the Search automatically for drivers option and install the latest driver available.
    search auto

If your graphics card drivers are outdated, Second Life will keep crashing in Windows 10. If you don’t want to use the built-in driver updater, you can download the latest update to your driver manufacturer’s website.

Restart your computer and then relaunch the game.

Alternatively, you can download the latest drivers without stress using an automatic driver update.

⇒ Get Fortect Driver Updater

The Second Life keeps crashing issue is a problem many users face, especially those using old PCs. Thankfully, you can fix it quickly using the solutions in this guide.

If you need a general guide on how to fix game crashes on Windows 10, check our excellent guide for encompassing solutions you can always use.

If not, describe your issue in the comments box, and we’ll try to search more about this.

Can’t Encrypt A Folder? Here’s What to Do

File encryption is one of the best methods to protect your files, which is no secret. However, many users reported that the encrypt folder option is greyed out on their PCs.

The reason why your encrypt folder option is greyed out is most likely a wrong Windows version, a disabled encryption service or corrupt system files.

Follow the steps below to re-enable it:

How can I fix the encrypt folder option if it’s greyed out?

Make sure you use the Windows 11/10 Pro Version. The Home version doesn’t support folder encryption. If you do, but the option still isn’t working, follow the steps below:

1. Modify the registry

  1. Press the Windows key + R, type regedit, and click OK.
    regedit folder encrypt grayed out
  2. When Registry Editor opens, navigate to this key in the left pane: HKEY_LOCAL_MACHINE\SYSTEM\CurrentControlSet\Control\FileSystem
  3. Then, double-click the NtfsDisableEncryption DWORD in the right pane to open its properties.
    nftsdisable encrypt folder greyed out
  4. Set the Value data to 1 and click OK to save changes. If this value is already set to 1, change it to 0.
    value

After making these changes, restart your PC.

2. Enable the Encrypting File System (EFS) service

  1. Press the Windows key + R, type services.msc, and click OK.
    folder encrypt grayed out services run window
  2. Double-click the Encrypting File System (EFS) option to open its properties.
    can't encrypt services
  3. Set the Startup type to Automatic and click Apply and OK to save changes.
    folder encrypt grayed out properties

File encryption relies on the Encrypting File System (EFS) service. So, you need to enable it and restart your PC.

3. Repair system files

  1. Press the Windows key + S, type cmd, and select Run as administrator under Command Prompt.
    cmd admin encrypt folder greyed out
  2. Type the command below and hit Enter: sfc /scannowsfc scannow
  3. Wait for the command to finish running, type the command below, and press Enter: DISM /Online /Cleanup-Image /RestoreHealthdism
  4. Wait for the command to finish running and restart your PC.

Repairing system files can be easily done with specialized software. Tools such as Fortect will greatly simplify the process and allow you to repair any broken system files in a matter of minutes.

➡️ Try Fortect

4. Enable EFS with the fsutil command

  1. Press the Windows key, type cmd, and choose Run as administrator under Command Prompt.
    cmd admin encrypt folder greyed out
  2. Type the command below and hit Enter: fsutil behavior set disableencryption 0ftusil encrypt folder greyed out
  3. Now, restart your PC after running the command.

Another option to enable the Encrypting File System (EFS) service is to run the fsutil command. This should make the encrypt folder option available again on your PC.

Feel free to let us know the solution that helped you solve the encrypt folder being greyed out problem in the comments below.

How to Password Protect a Windows 11 Folder (Step-by-Step)

If you want to password-protect a folder on Windows, there are several ways to do it. While only Windows 11 Pro offers a built-in feature to lock folders with a password directly, users of other versions can still secure their folders using reliable alternatives. These include built-in tools, file compression with password protection, and trusted third-party software.

How to lock folder with password in Windows 11?

1. Use a Password-Protected ZIP Archive

One of the easiest ways to secure a folder is by compressing it into a ZIP file and adding a password using WinZip.

Steps:

  1. Download and install WinZip from the official website.
  2. Right-click your folder and select WinZip > Add to Zip file.
  3. In the Add window, check Encrypt files and choose AES-256 encryption.
  4. Set your password and click Add to finalize.

Windows’ default ZIP feature doesn’t support password protection. WinZip offers a secure and user-friendly alternative compatible with both Windows 10 and 11.

For advanced options like file splitting or secure sharing, WinZip also includes premium features. If you’re on Windows 11, follow this guide for password protecting ZIP files to explore more.

👉 Download WinZip and start protecting your folders with strong encryption.


2. Create a Lock Script Using Notepad

  1. Open Notepad on your PC.
  2. Copy and paste the script below:
cls
@ECHO OFF
title Folder Locker
if EXIST "Private" goto UNLOCK
if NOT EXIST Locker (
md Private
echo Folder created successfully
)
:CONFIRM
echo Are you sure you want to lock the folder? (Y/N)
set /p "choice="
if /I "%choice%"=="Y" goto LOCK
if /I "%choice%"=="N" goto END
echo Invalid choice
goto CONFIRM
:LOCK
attrib +h +s Private
echo Folder locked
goto END
:UNLOCK
echo Enter password to unlock folder:
set/p "pass="
if NOT %pass%==YOURPASSWORD goto FAIL
attrib -h -s Private
echo Folder unlocked
goto END
:FAIL
echo Incorrect password
goto END
:END
  1. Replace YOURPASSWORD with your actual password (no spaces).
  2. Click File > Save As, set Save as type to All Files, and name it:
  3. locker.bat
  4. Double-click the locker.bat file. A new folder named Private will appear.
  5. Add your files inside the Private folder.
  6. Run locker.bat again and press Y to lock the folder. It will disappear.
  7. To unlock, run locker.bat, enter your password, and the folder will reappear.

You can also password protect the Notepad file itself if you want to secure the script.

This method is simple but not foolproof. It doesn’t offer strong protection against experienced users.

3. Use Built-In Folder Encryption (Windows Pro Only)

If you use Windows 10 or 11 Pro, you can use the built-in Encrypting File System (EFS) to secure folders.

  1. Right-click the folder, select Properties.
  2. Click Advanced, then check Encrypt contents to secure data.
  3. Apply and confirm the changes.

This links folder access to your Windows user account instead of a password. For network sharing, make sure password-protected sharing is turned off in Windows 10 or Windows 11 as needed.


4. Use NordLocker to Lock Folders with a Password

The easiest way to fully password-protect a Windows folder is by using a trusted encryption tool from the makers of NordVPN.

How to use NordLocker:

  1. Download and install NordLocker from the official website.
  2. Create your Nord Account and set a secure master password.
  3. Launch the app and drag your folder into the NordLocker window.
  4. Your folder is now encrypted and locked with your password.
  5. To access it, just open NordLocker and log in with your password.

Why choose NordLocker:

NordLocker offers strong end-to-end encryption, works seamlessly on Windows 10 and 11, and supports both local and cloud-secured folders. It includes a free 3GB plan, with upgrades available for more storage and features.

👉 Try NordLocker for free and start protecting your sensitive folders today.

If you’re working with external storage, also check out USB stick password protection software for compatible options.


Final Tips

  • Windows does not natively support password protection for folders.
  • ZIP compression with encryption is the easiest workaround.
  • For stronger security, use trusted third-party tools like NordLocker.
  • Avoid hiding folders as a substitute—it offers no real protection.

FAQs

Can you password protect a folder without extra software?

No. Windows doesn’t offer native password protection for folders. You’ll need to use ZIP encryption or third-party apps.

Does NordLocker work offline?

Yes. You can encrypt and access files locally without cloud syncing.

What’s the best free folder lock for Windows?

NordLocker offers a free 3GB plan and is one of the most secure and user-friendly options available.

Is password protecting a ZIP file secure?

Yes, if you use AES-256 encryption with tools like 7-Zip or WinRAR.

How Does Windows Power Management Affect Overclocking?

Overclocking can boost your performance, but does Windows Power Management affect overclock? Remember that CPU overclock can crash games and cause other issues.

In this guide, we will find out how and if your power settings affect overclock performance.

How does Windows Power Management work?

Power Management (also known as Power Options on newer models) allows users to adjust how their computer uses power. For example, it will enable you to change the following settings:

  • Sleep timers – By adjusting certain settings, you can put your hard drive, display, or PC to sleep after a specific time to save power.
  • Power saving – Your USB devices, wireless adapter, and PCI Express devices can be configured to use a power-saving mode. By doing so, they’ll use less power if you’re not actively using them.
  • Multimedia settings – Optimize multimedia playback for high performance and quality or power saving.
  • Processor power settings – By changing these settings, you can adjust the maximum and minimum CPU state. You can also pick between different cooling methods.
  • GPU settings – Adjust the GPU settings for maximum performance or battery saving.

What’s overclocking, and should I do it?

Overclocking is when you adjust your hardware’s core frequency and voltage to improve performance. Unfortunately, the process produces extra heat, and if you’re not careful, your PC won’t turn on due to overheating.

If you decide to overclock your computer, download some stress test software to do benchmark tests on your PC and see what your device can handle.

Once you’ve done the benchmark tests, get some overclocking software because that’s the easiest way to do it without going into the BIOS firmware.

Does Windows Power Management affect overclocking?

Not really. In our findings, Windows Power Management doesn’t affect overclock, so you won’t get an FPS or a performance boost if we use a High-Performance power plan.

However, using the High-Performance plan will consume more electricity and generate more heat, putting unnecessary strain on your hardware.

You might get some performance improvements using High-Performance mode, but usually, they aren’t noticeable.

Are there any differences?

With the Power Saver plan, the stress test ran at a steady 16 FPS (frames per second), and the GPU ran at around 1030 Mhz, among other things.

With Balanced, we didn’t see any actual performance. The only thing that increased was the internal temperature. After that, it got hotter, and that’s about it.

And the High-Performance plan is the same as before: higher temperatures but no significant changes to GPU or CPU performance.

Unfortunately, we didn’t test the settings in the Ultimate power plan, but we expect to see similar results.

windows power management overclock overclock performance

Does Windows power plan affect performance?

No, the Windows power plan has minor effects on your performance; if it does, you probably won’t even notice them.

You can only notice a difference when using a laptop for gaming or other intensive tasks.

Looking at these basic tests, it doesn’t appear that a Windows computer’s power plan affects overclocking. However, we would probably see significant changes if we changed the fan limits. To learn more about that, visit our fan control on Windows 11 guide.

We hope that this guide adequately answers your question. Feel free to comment below if you have questions about computer performance.

The System Battery Voltage is Low: 4 Methods You Can Use

Errors with computers are common and are usually easily fixable. But one that baffled a lot of users was the System battery voltage is low message when they turned on the computer. The message is followed by another that reads, Battery is low Strike F1 to continue.

The message only highlights a problem with the battery voltage but doesn’t provide any context or steps to troubleshoot the problem. So, let’s find out what worked for others.

What does the system battery voltage mean?

The low system battery voltage indicates an issue with the CMOS (Complementary Metal Oxide Semiconductor) battery and that it doesn’t provide the required voltage. The battery plays a critical role in your PC by giving power to the BIOS firmware.

In most cases, the system throws this error when the battery is worn out after years of use. However, there is a high likelihood that the battery is defective or not properly seated.

The System battery voltage is low message on Dell devices is the most common, and here’s a list of the affected ones:

  • System battery voltage is low – Dell OptiPlex – A common setup known to throw the error.
  • System battery voltage is low – Dell OptiPlex 760 – Many users encountered the error message on this device.
  • Alert System battery voltage is low Dell OptiPlex 780 – In this case, you may also find the system clock falls behind.
  • System battery voltage is low – Dell OptiPlex 755 – Another dell device that throws the error, and updating the BIOS worked for many.
  • System battery voltage is low Dell OptiPlex 380 – Check our solutions to quickly fix the problem on Dell OptiPlex 380.

Can I replace the CMOS battery?

Yes, users can easily replace the CMOS battery in the computer. First, purchase one either online or from a local store. These are readily available and wouldn’t burn a hole in your pocket. A CMOS battery is the size of a coin.

Once you have it, check the computer’s manual or head to the OEM’s website for the exact steps and precautions.

You would find the steps posted in several forums, but we would still recommend you stick to those on the manufacturer’s website since these are specific to your device. For example, here’s a guide on replacing the CMOS battery in Dell desktops.

What can I do if the system battery voltage is low?

Before we move to the slightly complex solutions, here are a few quick ones you can try:

  • If the computer is still new, you shouldn’t receive the System battery voltage is low message. So, ignore it for a day or two and check if it disappears.
  • Dell has confirmed to some users that a surge protector can cause the problem. So, if you are using one, remove it, and plug the PC directly into the socket.
  • Please remove the battery and place it back in firmly. In some cases, it was a loose connection to blame, and adequately seating the battery did the trick.

If the three methods didn’t work, head to the ones listed next.

1. Replace the battery

While many would recommend this as the last solution, it works almost whenever you receive the Alert System battery voltage is low error, so you should try it first. In addition, the battery is cheap and readily available in most local shops.

The voltage rating of a CMOS battery is usually in the range of 3-3.5 Volts. So check that before purchasing a new one and follow the instructions available in the computer’s manual to replace it.

Just copy the BIOS settings or click a picture of every page since it will automatically reset after replacing the battery. This way, you can quickly revert to the previous settings.

2. Check the other components

Many users also reported issues with components attached to the motherboard or the connections themselves being responsible for the error.

check connections to fix system battery voltage is low

So, if you can open the computer without damaging the fragile and sensitive components, look and ensure everything is alright. Then, disconnect the parts one at a time and then plug them back in.

3. Update the BIOS

If the methods listed previously didn’t work, an outdated BIOS could trigger the error for no reason. And in this case, users reported that updating the BIOS fixed things.

However, remember that this is a complex process, and even a minor lapse could ruin the PC. Again, you can head to the computer’s manual for the exact steps to complete the update.

4. Take your PC to a repair shop

If nothing else helps fix the System battery voltage is low error in Windows 10, it could be a significant problem with one of the components or the CMOS battery holder.

The best option, in this case, is to take your PC to a repair shop and get it checked. The repair, if required, shouldn’t take long and the computer would be up and running in no time.

By now, the error should be fixed; for most of you, replacing the battery would do the trick. But since many had to resort to other methods, do give those a try.

Also, find out the best PC repair tools to automatically identify and, if possible, eliminate problems with the computer.

Please tell us which fix worked for you in the comments section below.

Focus Assist is Missing From Settings: 5 Ways to Get It Back

Focus assist is one of many features in Windows that helps you focus on what you’re doing without being distracted. Although you can disable notifications in Windows 11, this feature automatically blocks them from popping up or making sounds when you’re using an app in full-screen mode.

While it is a great feature, users have complained that it is conspicuously missing from Settings. Unfortunately, this happened after they upgraded to the latest version of Windows.

Why is Focus assist missing from Settings?

If the Focus assist feature is missing from Settings, it is probably because of one of the following reasons:

  • Buggy update – If you’ve recently upgraded to a new version of Windows, the feature may disappear because the latest update is problematic.
  • You’re running an old OS – If you’re using an older version of Windows, then Focus assist won’t appear in the Settings. You need to upgrade to Windows 11 or run an OS where the feature is supported.
  • Antivirus settings – You can check whether your firewall is blocking a program/feature. This can happen if it flags it as a security threat to your system.
  • Windows Update hasn’t been configured correctly – Another possible reason why Focus assist isn’t showing up in Settings could be because it hasn’t been configured correctly yet.

How can I get Focus assist back if it is missing from Settings?

First, let’s explore some basic steps before proceeding to any advanced troubleshooting:

  • Make sure that you haven’t accidentally turned off Focus assist in Settings.
  • Try restarting your PC.

1. Disable and enable Focus assist with Group Policy

  1. Hit the Windows + R keys to open the Run command.
  2. Type gpedit.msc in the dialog box, then hit Enter.gpedit-msc gpedit msc windows 10 home
  3. Navigate to the following location: User configuration/Administrative Templates/Start Menu and Taskbar/Notifications
  4. Double-click on Turn off Quiet Hours.
  5. Select Disabled, then Enabled again.

2. Disable the firewall temporarily 

  1. Hit the Windows button, type Windows Security in the search bar, and click Open.
  2. Click on Firewall & network protection, then select Public network.
  3. Locate Microsoft Defender Firewall and toggle the off button.Turn off firewall if canon printer driver not installing.
  4. Restart your PC and check if the issue persists.

3. Update Windows 

  1. Hit the Windows key and select Settings.settings windows 11
  2. Click on Windows Update, then select Check for updates.check-updates-w11 windows 11 blue screen
  3. Download and install if any are available.

4. Roll back to the previous Windows update 

  1. Press the Windows + I keys simultaneously to open Settings.settings windows 11
  2. Navigate to Windows Update, then go to Update history.windows-update-history logitehc unifying not working
  3. Click on Uninstall updates.uninstall-updates-w11 computer-recognize-logitech-unifying-receiver
  4. Select the most recent update, then click Uninstall.

5. Reset Windows 

  1. Hit the Windows key and select Settings.settings windows 11
  2. In the left window pane, select System, then click on Recovery on the right pane.
  3. Click on Reset PC from the right side.reset
  4. Choose the type of factory reset you need. You can keep your files or completely delete all the files, apps, and settings on the PC.keep-files sfc scannow not working
  5. Select the option you want to reinstall Windows: Cloud download or Local reinstall.choose cloud download windows 10
  6. Click on Next.verify details
  7. Finally, press the Reset button.

If the Focus assist feature was missing from your Settings page, we hope that you have been able to restore it with one of our solutions. Still, if the solutions don’t bear any fruit, we recommend checking out our top productivity apps to boost your productivity and help you stay focused.

You may also run into a problem where Windows 11 Power settings are missing, but we have already covered numerous ways to bypass this issue.

Also, check our guide on what to do if the Microsoft Store is missing from Windows.

Do let us know what solution worked for you in the comment section below.

OBS Not Capturing Game Audio: 7 Quick Fixes

OBS Studio is the software of choice for many players who record game streams. However, some users have posted on the OBS forum about the software, not recording game audio.

Consequently, their recorded game footage has no sound. There are a few potential fixes for OBS, not recording game audio.

How can I fix the OBS not recording game audio issue?

1. Use Adobe Audition instead

First, remember that there is alternative software you can record game audio with. Adobe Audition is among the best audio-recording software for Windows, offering an incredible array of easy-to-use features that make recording audio at a professional level easy.

With Audition, you can record your game sound, and also offers you the possibility to add commentary to the audio stream. The audio recording can then be merged with the recorded game clip, making the possibilities of editing your clips almost endless.

Using Adobe Audition if you can’t fix your OBS software, not being able to start a recording session is the first thing you should consider. The features contained in this app give you all the required tools to avoid audio issues.

Adobe Audition

This software ensures that you’ll never have audio quality problems with any of your recordings, and also allows you to mix and master your creation easily.
Free Trial Visit website

2. Check your OBS audio settings

  1. 1. Open the OBS software.

  2. 2. Click Settings to open that window.

  3. 3. Select the Audio tab shown directly below.

    settings window
  4. 4. Click the Desktop Audio Device drop-down menu if the right device is not selected there. Then select the right desktop audio device.

  5. 5. Then click the Microphone/Auxiliary Audio Device drop-down menu to select the right device there if required.

  6. 6. Alternatively, you can select the Default options on those drop-down menus to configure the software for your default sound devices.

  7. 7. Press the Apply button, and click OK to close the window.

  8. Users with multiple audio devices should check that OBS is correctly configured for the ones you’re actually utilizing.

    This should fix the game audio not recording issue in no time. Simply follow the steps above.

3. Set the speakers as the default audio device

  1. Try recording with your speakers as the default playback device instead of headphones. To do that, right-click the Speakers system tray icon and select Open Sound settings.
  2. Click Open Sound Panel in Settings to open the window shown directly below.
    Sound window obs not recording game audio
  3. Select Speakers on the Playback tab.
  4. Select the Set Default option.
  5. Click the Apply button.

4. Adjust the Encoding Settings

  1. Some users have confirmed they’ve fixed OBS audio recording by adjusting their encoding settings. Open the Settings window in OBS.
  2. Click Encoding on the left of the window.
  3. Select 128 on the Bitrate drop-down menu.
  4. Enter 3500 in the Max Bitrate box.
  5. Deselect the Use CBR option. Then your Encoding settings should exactly match the ones shown directly below.
    Encoding tab obs not recording game audio
  6. Press the Apply and OK buttons.
  7. Close and restart OBS to ensure new settings take effect.

5. Remove Nahimic

  1. Users have confirmed that the Nahimic audio manager software can conflict with OBS. To uninstall the Nahimic Windows 10 app, click Settings on the Start menu.
  2. Select Apps to open Apps & features.
    The Apps & features tab obs not recording game audio
  3. Select the listed Nahimic app.
  4. Press the app’s Uninstall button.

6. Check if OBS is muted

  1. Check if the OBS software has been muted in Volume Mixer. First, open the OBS software.
  2. Right-click the speaker icon to select Open Volume Mixer.
    Volume Mixer obs not recording game audio
  3. Then click the muted speaker icon for OBS if it’s muted.

7. Check audio track settings

  1. Sound can disappear from OBS recordings when you have multiple tracks selected. To check that, click Files in OBS.
  2. Click Output on the left of the window.
  3. Select Recording on the Output tab.
  4. Then make sure you have the same tracks selected for recording.

Our last fix for the OBS not picking up the game audio problem is to check your audio track settings. If the other solutions didn’t work, this one should do the trick instead.

Those are some of the confirmed resolutions to fix the OBS, not recording game audio. They’re not necessarily guaranteed fixes, but the above resolutions have fixed the issue for some users. Moreover, if you need some tips regarding noise gate settings, we have just the guide for you!

GTA San Andreas Download for Windows 11 [Full Guide]

Users have been wondering if GTA San Andreas is compatible with Windows 11 and to that, we say yes! Grand Theft Auto: San Andreas is a video game developed by Rockstar North and published by Rockstar Games on October 26, 2004.

It is the seventh installment in the Grand Theft Auto series and the third game in the 3D Universe title of series. Also, it’s the sequel to Vice City and the prologue to Liberty City Stories and Grand Theft Auto III.

San Andreas is by far the largest and most intricate playing area available in any 3D Universe game. It is comprised of three fully-realized cities: Los Santos, San Fierro, and Las Venturas, as well as extensive expanses of farmland, forests, a desert, and even a mountain and other hills.

Follow along as we will show you how to download it on Windows 11, right after we see if Windows 11 is suited for gaming as this was one of your most asked questions. Keep up with us!

How can I download GTA San Andreas on Windows 11?

  1. First and foremost you will need to download the Rockstar Games Launcher which you can acquire from their official website. Simply click on the Download for Windows button, then follow the steps displayed.rockstar-launcher gta san andreas download windows 11
  2. Now head to Rockstar Games’ page dedicated to GTA. Here you will only be able to buy the trilogy which includes GTA III, Vice City, and San Andreas. You can’t buy San Andreas individually. Make sure you select PC, then click on the Buy now button and proceed with the payment steps.buy gta gta san andreas download windows 11
  3. Next, you will find the game titles inside your Launcher form which you will be able to run them as you please.

This is the recommended way to go about performing a GTA San Andreas PC download on a Windows 11 device. It is safe and puts your PC or laptop at no risk whatsoever.

How can I download GTA San Andreas for free on my PC?

GTA San Andreas is a non-free-to-play game, therefore it comes with a price tag. There are free downloads for the game on the internet, however, they come from illegal sources and can put your PC at great risk.

The GTA Trilogy was available for free for a limited period of time on the Rockstar Games launcher, however, it is no longer redeemable.

Another way in which you used to be able to play GTA San Andreas The Definitive Edition for free was via the Xbox Game Pass. This offer expired as well.

Will there be a GTA VI?

Despite the fact that the game’s developer, Rockstar Titles, hasn’t officially revealed it, GTA VI is one of the most highly awaited games out there. The popularity of Grand Theft Auto 5 and GTA Online is virtually unrivaled.

It’s been more than eight years since the game’s original release on Xbox 360 and PlayStation 3 that we’ve all been clamoring for a new Grand Theft Auto game to come out.

There is an abundance of GTA rumors and gossip swirling around the title, including alleged leaks and further details about the game’s storyline, setting, features, and other aspects, amongst other things.

Michael de Santa (Source: Rockstar Games)

Because of the development timeline, it is almost certain that the game will be released on the PlayStation 5 and Xbox Series X systems, and the release of a remastered version of Grand Theft Auto V in March 2022 suggests that we may be waiting quite a while for a new title.

To cut a long story short, if Rockstar had announced GTA VI the day after Red Dead Redemption 2 was released which was back on October 26, 2018, then, based on previous delays between console GTA announcements and release, we’d be waiting around 22 months, or August 2020.

Rockstar, of course, did not act in this manner. We have no information about the game because it was still in the early stages of development as of April 2020, and we don’t know what happened to it. As a result, predicting any sort of release window is extremely difficult.

According to the most recent rumors, the release date for it will be somewhere around 2025. That comes with the caveat that the game is set in a modern-day version of Vice City, which will grow and change over the course of the game’s development.

Until then you can still enjoy the trilogy that you have or will download that includes Vice City, Grand Theft Auto III, and San Andreas.

Is Windows 11 good for gaming?

By releasing Windows 11, Microsoft is effectively inviting gamers to update, even going so far as to state that if you’re a gamer, this OS was made for you and describing it as the greatest Windows for gaming that the company has ever created.

And, certainly, there are a number of features that gamers should take into consideration when deciding whether or not to upgrade from Windows 10 to Windows 11, some of which are minor, while others could be game-changers.

You may look forward to a couple of gaming-related features that have been borrowed from Microsoft’s most recent game consoles, the Xbox Series S/X, and the Xbox One.

gaming mode windows 11 gta san andreas download windows 11

DirectStorage is the first of these. By making use of fast NVMe SSDs, it is able to significantly shorten load times and improve texture loading while also significantly reducing the CPU strain on those operations.

Despite the fact that it is now available on Windows 10 as well, and that it is no longer necessary to utilize Windows 11 in order to benefit from it, the enhanced storage stack in the operating system allows DirectStorage to perform to its fullest potential.

There’s also Auto-HDR, which uses machine learning and artificial intelligence to automatically add an HDR setting to any game, regardless of whether or not the game itself supports it. Of course, in order to make use of it, you’ll need a monitor that supports High Dynamic Range.

As an added bonus, Windows 11 is tightly integrated with the Xbox app, allowing users to play Xbox Game Pass titles on their PC if they have a Game Pass Ultimate subscription, as well as access to the Cloud Gaming feature, where they can access and play their favorite games.

Users that have already been playing San Andreas, reported that their mouse is not working as it should. To this, we have responded with an article on how to fix GTA San Andreas mouse not working. Make sure to check it out as well!

As a bonus, you can take a look at our performance comparison between Windows 10 and 11 to see how the latter stands up next to the former.

And lastly, you will definitely benefit from reading our post on 11+ best new features in Windows 11, to use the operating system to its full potential.

Was this article helpful? Let us know in the comments section below. Thanks for reading!

Fix: That Didn’t Work, Bluetooth Device is Not Discoverable

Have you ever had a problem with your PC displaying That Didn’t Work, Bluetooth Device is Not Discoverable after connecting to your computer? Or perhaps you’ve followed a step-by-step guide for setting up a Bluetooth device, only to be met with the same message.

You can try to make your Bluetooth devices auto connect, but sometimes this is not always possible. If your Bluetooth device is not discoverable, we will attempt some fixes below to help you.

Why is my device not discoverable?

If your device has been paired with another device, but it is not showing up in the list of devices to which you can connect, then there may be a few reasons for this:

  • The device is not in range – Bluetooth works over short distances and does not transmit through walls or other obstructions. 
  • A passkey is required – If you can’t add a Bluetooth device to Windows, it may have been paired with a device that requires a passkey to pair. 
  • Malfunctioned device – Sometimes, your Bluetooth is not working because your device is faulty. If it malfunctions, it cannot communicate with other devices.
  • Interference – There could be some kind of interference from other devices. Try moving your device to another room or turning off all other wireless devices in the area.
  • Outdated/corrupt drivers – A Bluetooth device is not discoverable if it has outdated drivers. This can happen if the drivers are damaged or corrupted. It can also occur if you have installed a new OS version that does not support the old driver version.

What can I do if the Didn’t work Bluetooth device is not discoverable error keeps appearing?

Before any advanced troubleshooting, check the following:

  • Make sure that the Bluetooth device has enough power to be discoverable.
  • Ensure adequate signal strength between your computer and the Bluetooth device.
  • Try connecting your Bluetooth device to another (if available) to establish whether you have a faulty device on your hands.
  • Finally, try restarting your PC. This may clear any problematic temporary files.

1. Run the Bluetooth troubleshooter

  1. Press the Windows key and select Settings.settings windows 11
  2. Click on System on the left pane, then Troubleshoot on the right pane.going system and troubleshoot windows 11 settings
  3. Select Other troubleshooters.going other troubleshooters win11
  4. Locate the Bluetooth troubleshooter, and click on the Run button next to it.

2. Roll back to previous drivers

  1. Press the Windows key, type Device Manager, and click Open.
  2. Right-click on your Bluetooth device under Bluetooth and select Properties.
  3. Navigate to the Driver tab, then click the Roll Back Driver button.
  4. Select a reason for rolling back the driver.
  5. Restart your PC

3. Set up a new user profile

  1. Hit the Windows + R keys to open the Run command.
  2. Type netplwiz and press Enter.run netplwiz command
  3. Click Add in the User Accounts window.
  4. Select Sign in without a Microsoft account (not recommended).sign in without microsoft account
  5. Click on the Local account button.create local account
  6. Enter a username, password (optional) for the new user account, and a hint in case you set a password. Once done, click on Next.

Although it is not common, a corrupt user profile can interfere with how Bluetooth works. 

4. Start your PC in Safe Mode

  1. Press the Windows key and select Settings.settings windows 11
  2. Click on System, then select Recovery.
  3. Navigate to the Advanced startup option and click on the Restart now button.Advanced startup Restart now Windows 11
  4. Your computer will reboot and then show the Advanced options screen where you can select Troubleshoot.
  5. Click on Advanced options.
  6. Select Startup Settings.bluestacks crashing pc
  7. Click on the Restart button.restart-startup-screen mouse loading icon won't go away
  8. Press the F4 key to get into Safe Mode.

How do I make sure my Bluetooth device is discoverable?

That didn’t work. Make sure your Bluetooth device is still discoverable, then try again error may happen frequently if you ignore your connections. To ensure your Bluetooth device is always discoverable, keep the following in check:

  • Ensure your Bluetooth is turned on – The first step to using a Bluetooth device is to make sure the device is discoverable. You can do this by turning the Bluetooth radio on. Bluetooth may not be finding devices because it is off.
  • Use a passkey – If the device doesn’t have an option for discoverability, or if you want more security from others connecting to your Bluetooth device, you can set a passkey on it. This way, you will have to enter that passkey before pairing can be completed.
  • Keep the device in close range – Ensure your device is close enough to the Bluetooth devices so they can connect easily. Also, to improve performance, turn off devices that are not being used and move the remaining ones closer together.
  • Update your Bluetooth drivers – Drivers allow your computer to communicate with the hardware components. Your Bluetooth device may not be discoverable if it doesn’t have the latest software or drivers installed. Check your device manufacturer’s website to download and install the latest Bluetooth drivers.

And that’s how to quickly fix the That didn’t work, make sure your Bluetooth device is still discoverable then try again error. If none yield the desired results, you can try to roll back from Windows 11 to Windows 10 and see if this fixes the issue.

Do share your thoughts on this topic in the comment section below.

3 Solutions to Use if HP Support Assistant is not Opening

If you rely on your HP Support Assistant tool that comes pre-installed on HP computers to get update notifications and other things, not being able to use HP Support Assistant can be annoying. Is the HP support assistant not opening? Let us show you all you need to know to fix it.

Many users have reported similar issues in the Microsoft community forums.

After I upgraded my laptop (HP Notebook 2000) to Windows 10 from 8.1, I can’t open HP support Assistant. It gives a message saying ” HP support assistant has encountered a problem and will shut down”.
Could someone help suggesting a solution to this. Will remain grateful.

Why is HP Support Assistant not working?

When your HP Support Assistant is not working, there are a few common triggers that may be responsible for this, including:

  • Corrupted files – You may require a new assistant installation if you have corrupted system files.
  • Driver problems – If you have updated drivers, in some cases, they may affect Windows Assistant.
  • Anti-virus – There may be a possibility of restrictions imposed by your antivirus. This may be the case if you do not use Windows-compatible antivirus applications.

Regardless of the trigger, you should be able to use our solutions to fix your HP assistant.

Is HP Support Assistant necessary?

You don’t typically require this program. Instead, you can update drivers using the Device Manager included in Windows.

Other tools, such as Windows system information, the DirectX Diagnostic Tool, the BIOS, etc., may include information about your computer. However, the hard drive, HP battery, and optical drive diagnostic tools could sometimes be necessary.

If your HP Support Assistant will not open as well, here are a couple of troubleshooting tips to help you resolve the issue.

How do I fix HP Support Assistant if it’s not opening?

1. Uninstall and Reinstall the assistant

1.1 Uninstall

  1. Click the Start menu, type control panel, and select Uninstall a program.
  2. Click on HP Support Assistant and select the Uninstall option.
    hp support assistant not opening
  3. Follow the wizard to complete the uninstallation.

1.2 Reinstall

  1. Download the HP Support Assistant installer from the link.
  2. Click the downloaded file to run the installer and click Yes when asked to confirm.
  3. Proceed with the installation, following the wizard.
  4. Reboot the computer if prompted by the PC.
  5. After the restart, check if the app is working again.

2. Uninstall or disable the antivirus

  1. Click on the remote access arrow in the Taskbar.
    hp support assistant not opening
  2. Click on your antivirus icon, hover over Avast shields Control and select Disable for 10 minutes (This step varies for different antivirus software).
  3. Try reaccessing the HP Support Assistant.

3. Update your drivers

  1. Right-click Start, and select Device Manager.
  2. Search for drivers with the tiny yellow badge. These are often outdated.
  3. Expand the category, then right-click on the driver and select Update driver.
  4. When prompted to choose How do you want to search driver, select Search automatically for updated driver software.

The HP Support Assistant usually works without any issues; however, if you face any problems, this guide should help you resolve them.

You should be able to apply these solutions if the HP support assistant is not working or starting, fails to extract cab, or if it was not installed successfully with error 2.

For those also experiencing similar issues on Dell when the Dell SupportAssist is not working, check out our fix guide. And for issues with the HP Smart App, especially on Windows 11, find helpful solutions in our guide on troubleshooting HP Smart App Windows 11 not working error.

Do let us know how you fixed the HP Support Assistant won’t open issue in the comments.

8 Best Clipping Software That Doesn’t Affect FPS [Low-End PCs]

Playing video games on PC is already a resource-intensive task or should I say a graphics-intensive job, and if you want to record the gameplay on top of it, your PC would need at least 20% extra power to record gaming sessions in all its glory. That is because the game recording software does take its share of processing ‘cake’ to get the work done.

Unfortunately, not everyone has a gaming beast either due to budget constraints or because they failed to justify the hefty price tag that gaming PC components are tagged with (courtesy of crypto miners).

Irrespective of the reasons, a low-end PC or laptop is bound to have a hard time recording game sessions without hampering the computer’s performance resulting in lower FPS and semi-smooth gameplay.

Fortunately, there is quite a few game recording software for low-end PCs that can capture gameplay with minimal impact on your PC’s performance.

We have previously written on best game recording software for YouTube and game recording software for PC topics, but this guide is precisely for low-end PCs.

We have gathered the best game recording tools for slow PCs that will help you mitigate the slowing down of your computer.

This guide consists of both free and paid game recording software, but most of them do offer 15-30 days free trial. Make sure you give these tools a shot before committing to the one that meets your requirements.

How do you record clips on low-end PCs?

Just make sure you use the right tools. Although it can be more challenging to record on lower-end PCs, it’s not impossible.

You need to make sure you have good and lightweight recording software that is compatible with your hardware. Luckily, there are plenty of options available.

Which is the best recording software for low-end PC?

Movavi Screen Recorder – best lightweight screen capturing software

Movavi is a screen recording software with robust features that are available both offline and online.

The program allows you to record system sounds and it can also capture the sound from your microphone, even separately, making it a great choice in case you want to speak while you stream or add the audio later.

Movavi offers you full freedom to draw on the video while you record or show your keyboard and set up the mouse display. Moreover, you can record two streams simultaneously with one click.

With Movavi you can stay well organized as it has a scheduling feature. You can choose a day and a time for the screen recording to start and set a time limit for capturing.

It is easy-to-use, plus it offers built-in tips and tricks about how to use the features. You can always enable or disable these features, depending on how comfortable you feel with using the software.

Other key features of Movavi include:

  • Keystrokes and mouse views
  • Draw on Videos
  • Only audio recordings
  • Webcam recording and overlay
  • Various interface languages
  • Useful online support center

The screen recording software has a free version with certain limitations, but you can opt for the premium version once you test its capabilities.

Movavi Screen Recorder

Record all your games and use the easy editing features to deliver professional results.
Free trial Visit website

Bandicam – easy-to-use recording software that doesn’t lower FPS

Bandicam is featured in our earlier game recording software guides and makes an appearance here as well. It is a game recording software that offers 4K UHD recording at 144 FPs. The tool can be used to record anything on your screen and not just games. Bandicam is premium software but does offer a trial version with limited features.

This lightweight game recording tool supports games based on DirectX/OpenGL/Vulkan graphics technologies. You can record either full screen or a selected area, add doodles, record both game sound and your own voice. It also has webcam support if the user wants to add a webcam overlay to the video.

There are no editing tools, but you can add your logo and mouse effects while recording. For slower PCs, Bandicam offers customization options where the user can change the recording resolution, FPS, and codes for better-optimized gameplay recording.

To reduce the lag, tune down the recording options in the Video Options. Apart from lowering the resolution and refresh rate, you can record in Window mode as well.

Furthermore, go to the video tab, and select Half Size in Size section, change the video and audio codec options, and also play with the quality numbers.

Bandicam

Bandicam

Record your screen in UHD, overlay your webcam footage, and more with Bandicam.
Free trialVisit website

Dxtory

Dxtory is one of the lightest game recording tools available for PC and has minimal impact on PCs performance as it records from the surface memory buffer.

This clipping software is premium but offers a trial version, and it works great with low-end PCs. It comes with limitations that include a Dxtory watermark in recorded videos.

Dxtory can record games in 1080p resolution at 60 FPS. The recorded files are usually large but smaller than Fraps in comparison. You can further use video encoders to compress the files if needed.

The recording options can be tweaked from the setting panel. Users can record audio from the game as well as external mic and audio streams are saved separately for easier editing. You can further change recording resolution and frame rate along with file format for video recording and screenshot capture.

Other key features of Dxtory include:

  • Supports third party VFW codecs
  • Recordings accessed as video source in the DirectShow menu in the UI
  • Compatible with Windows 10, Windows 8, Windows 7, Windows Vista & Windows XP

As mentioned above, Dxtory has a premium, license-based version. One license can be installed on more computers.

⇒ Get Dxtory

FBX Game Recorder

FBX Game Recorder is a new tool but does offer impressive features, and it costs nothing, at least for now. It can record gameplay at 144FPS in 1440p resolution.

It is also one of the lightest game recording tools I have ever used. FBX uses hardware acceleration to record the gameplay, as a result, it has minimal impact on the game performance.

FBX only works with games. To use it, launch a game and press Ctrl + F12 to start recording. Press the same hotkey again to stop the recording. For low-end PCs, the settings can be tweaked to reduce CPU usage. In the video tab, change the encoder, FPS, quality, and resolution option as per your need.

The audio can be recorded from both the game and the microphone. It also supports webcam capture, custom hotkeys, markers, and the ability to select instant gameplay save duration.

Other key features of FBX Game Recorder include:

  • Can add stickers, sounds, text captions to your footage
  • Video Speed up and Slow motion
  • Freeze Frame
  • Integrates Giphy GIFs
  • Assisted livestream to different platforms

FBX has a free and a Pro version. You can get the Pro version by purchasing a lifetime license or an annual subscription.

⇒ Get FBX Game Recorder

NVIDIA ShadowPlay

nvidia shadowplay banner

NVIDIA ShadowPlay is the game recording software made by NVIDIA for GeForce owners. It now comes integrated with GeForce Experience. As you may have guessed, it only works with NVIDIA GPUs.

ShadowPlay comes with its own unique set of features like Instant Replay Mode that automatically saves the last 30 seconds of GamePlay whenever the user hits a hotkey.

This is one of the best clipping software and supports up to 4K resolution recording at 60 FPS, even on low-end PCs.

Being a hardware-accelerated program, it does reduce the impact on your PC’s performance.

For game broadcasters, it offers easy live broadcasting options to Facebook Live, YouTube Live, and Twitch along with custom graphics overlay support for a personalized live stream.

ShadowPlay comes bundled with an NVIDIA Geforce experience suit which is about 100MB in size and is available on the official website.

Other features of NVIDIA Shadowplay include:

  • Automatically captures key moments like clutch kills and match-winning plays
  • Captures GIFS and 8K screenshots

Shadow Play by NVIDIA is an easy-to-use, free software created specifically for video game recording.

⇒ Get NVIDIA ShadowPlay

MSI Afterburner

MSI Afterburner is not specifically designed as a game recording tool, but it’s considered the gold standard of overclocking utilities.

Apart from the overclocking features, however, Afterburner offers FPS checking, benchmarking, and game recording. Thus, it’s a must-have on the list of best game recording tools for low-end PCs.

Afterburner is free to download and use. It works with graphics cards from all brands.

With Afterburner you can easily record gameplay in 1080p resolution at 60 FPS. However, lowering the resolution and frame rate can give better performance on low-end PCs. The recorded videos are saved in .WMV and .AVI format.

Other video recordings and editing features provided by MSI Afterburner include:

  • Lets you set the quality of the image in percentages (as opposed to low-medium-high)
  • Record both game sounds and microphone
  • Adjust frame size and frame rate

MSI is free software, compatible with Windows 10, 8, 7, Vista, and Windows XP.

⇒ Get MSI Afterburner

D3DGear

D3Gear is another lightweight yet functional game recorder that can be used on Low-end PCs to record gameplay.

It can record gameplay in 1440p resolution at 120 FPS on maximum setting. Its compatibility with even the old version of Windows OS makes it the best game recording software for Windows XP and Vista if you are still running it.

The functioning of D3Gear is pretty straightforward with a start and stop button to capture and save crisp videos. The videos are compressed in real-time to reduce the file size but do preserve quality.

Other usual features supported by D3Gear include internal and external audio recording, hardware acceleration, live streaming on YouTube, Facebook Live, and Twitch and webcam support.

D3Gear looks like an underdog but is one of the best game recording software for low-end as well as high-end gaming PCs with a simple user interface and all the necessary options on disposal. D3Gear comes with 15 days free trial, which lets you get the full experience of the software, so you can see how it works for you.

⇒ Get D3Gear

Mirillis Action Game Recorder

Mirillis Action is a gameplay recording software and is ideal for low-end PCs. It can record both Desktop screen and gameplays in 4K quality at 120FPS. It also supports live streaming for the broadcaster to Facebook Live, YouTube and Twitch and comes with a game benchmarking tool as well.

There is a green screen mode that lets you cut out the background from the webcam footage when recorded with a solid color background and replace it with some cool still graphics.

Selected Application recording is another interesting feature that only records the pre-selected screen providing complete privacy. Just like ShadowPlay, Action uses hardware acceleration to provide smooth gameplay with minimal impact on performance.

The Action game recorder offers all the features needed in a game recording software and also provides a fully functional trial version for 30-days with a watermark. The software is a one-time purchase.

⇒ Get Mirillis Action Game Recorder

How to deal with large game-recording video files?

Despite the fact that most of these game recording software use real-time compression the end videos are mostly in GBs, making it that much more difficult to upload to YouTube if you have a slower internet connection. Then there is the editing and rendering task as well.

This problem can be solved with the help of a video transcoder like HandBrake. It is a free open-source encoding tool that lets you compress videos in web-optimized settings without having to compromise on quality.

HandBreak may not the most user-friendly tool to use, but if you are into visual content creation, this is a must-have video and audio encoding tool.

Conclusion

These are some of the best game recording software for low-end PCs that we have tested and found to be working. Do let us know your go-to software for game recording on PC in the comments below.

How to Fix Blue Screen Loop on Windows 10: 5 Simple Ways

BSoD is one of the dreaded computer complications that Windows users face and blue screen loops restricts access to login, making it all the scarier. Such issues may be caused by corrupted system files, hardware issues, bad or corrupted drivers or applications compatibilities.

How can I fix the blue screen loop on Windows 10?

1. Uninstall Drivers in Safe Mode

1.1 Access Safe Mode

  1. Access Windows Recovery by rebooting the system three times using the power button.
  2. After your PC restarts to the Choose an option screen, select Troubleshoot.
    blue screen loop Windows 10
  3. Now select Advanced options, and in Startup Settings, select Restart.
  4. After your PC restarts, you should see a list of options. Press 4 or F4 on your keyboard to start the PC in Safe Mode.

Once you enter Safe Mode, you need to start Device Manager and remove the problematic drivers. This is quite simple to do, and you can do it by following these steps:

1.2 Uninstall drivers

  1. Press Windows Key + X to open the Win + X menu. Now select Device Manager.
  2. Expand the category for the driver you want to uninstall, right-click on the driver, and select Uninstall driver.
    blue screen loop Windows 10
  3. When the confirmation dialog appears, check Attempt to remove driver software for this device, if available. Now click the Uninstall button.

After you remove the problematic drivers, restart your PC and check if the problem is still there. Accessing safe mode is the safest option to troubleshoot other BSoD issues like Aswhdske.sys blue screen; read this guide to learn more.

2. Repair your installation of Windows 10

2.1 Create an installation media

  1. Visit the Windows 10 download website to download the media creation tool.
  2. Double-click the tool to run it, and click the Accept button on the license page.
  3. Choose to Create installation media for another PC on the What do you want to do page and click Next.
    blue screen loop Windows 10
  4. Select your language, system version, and architecture, and click Next.
  5. Choose the USB flash drive option and click the Next button.
  6. Select your USB drive and click Next.
    blue screen loop Windows 10
  7. Click Finish once it is done.
    blue screen loop Windows 10

2.2 Repair the PC with the installation USB

  1. Insert the installation USB in your PC and reboot it (it should ask you if you want to boot from the boot device, if it for some reason does not – open your BIOS and find the settings for boot order, then put your DVD drive or the USB stick on top of the boot order and reboot once again).
  2. Once you have booted into the Windows installation, you will see an option to troubleshoot in one of the corners; click that.
  3. Now click on Repair your Computer and go to Advanced Options.
  4. Now click on Startup Repair and follow the onscreen instructions.

In some cases, you might be able to fix the problem simply by using a Startup Repair feature.

This is a relatively simple procedure, and it might help you if you’re getting a blue screen on restart continuously in Windows 10.

3. Use a dedicated repair software

Fixing BSoD errors is quite challenging because you need to pinpoint the exact cause of the problem. This can be hard to do manually, but luckily, there are specialized tools that can help you.

4. Check your antivirus

  1. Press the Windows key + I button on the keyboard simultaneously, and then you will see the settings window pop up.
  2. Now in this window, go to Update & Security. 
    blue screen loop Windows 10
  3. Now navigate to the Recovery section. In the Advanced Startup, click on Restart Now.
  4. After your PC restarts to the Choose an option screen, select Troubleshoot.
    blue screen loop Windows 10
  5. Now select Advanced options, and in Startup Settings, select Restart.
  6. After your PC restarts, you should see a list of options. Press 4 or F4 on your keyboard to start the PC in Safe Mode.
  7. Click on Cortana, type control panel, and select Uninstall a program.
    blue screen loop Windows 10
  8. Click on your antivirus from the app list and select the Uninstall button.
  9. Follow the wizard to complete the uninstallation.

If removing your antivirus solves the problem, you should consider switching to a different antivirus solution.

To do that consciously, you can select an antivirus that will cause no functional trouble on your PC. Hence, choose from the best antivirus software for low-end computers.

5. Try performing a System Restore

  1. Restart your PC a couple of times during the boot sequence.
  2. Now go to Troubleshoot.
    blue screen loop Windows 10
  3. Navigate Advanced options, then System Restore.
  4. Please select your account and enter its password.
  5. The System Restore window will now appear. Click Next to proceed.
    Blue screen loop Windows 10
  6. If available, check the Show more restore points option, select the desired restore point, and click Next.
    Blue screen of death boot loop Windows 10
  7. Finally, follow the instructions on the screen to complete the restoration process.

Once the restoration process is finished, the problem should be resolved, and your PC will start working again.

Other blue screen loop issues encountered

Blue screen loops can be problematic and prevent you from accessing your system. Speaking of blue screen issues, here are some common problems that users reported:

  • Blue screen reboot loop – Sometimes accompanied by a System Service Exception error, the reboot loop can be a big problem. However, you can fix it by finding and removing the problematic driver.
  • The Blue screen infinite loop error – Sometimes, you might get stuck on your PC’s endless loop. To fix the issue, we advise you to perform a Startup Repair and check if that solves the problem.
  • Blue screen loop Windows (11, 10, 7) – This problem can appear on almost any version of Windows, and even if you don’t use Windows 10, you should be able to apply most of our solutions to your version of Windows.
  • The Blue screen of death boot loop in Windows 10 – The blue screen is also known as the blue screen of death, and if you can’t access Windows due to this error, be sure to try some of our solutions.
  • Blue screen automatic repair loop – Sometimes, you might get stuck in the automatic repair loop. If that happens, try reinstalling Windows 10 and check if it helps.
  • Asus blue screen loop – This is another variation, and the solutions listed below will work.

You should have successfully fixed the error if you have read to this point. Lastly, note that none of these solutions have been written in any particular order. So, we only recommend that you try what seems the most applicable.

Let us know in the comments what worked for you.

5 Methods to Fix Intel Display Audio if it’s not Working

Some Windows users reported getting Intel display audio not working prompts while playing games or accessing online multiplayer games.

This audio could be very annoying and reduce user experience on many computer activities.

Here is all you need to know if you belong to this category.

What is Intel display audio?

To transfer sound to a monitor connected through a DisplayPort that can play audio or HDMI, you must choose Intel Display Audio or a similar option when choosing your audio device.

Intel display audio, in a nutshell, sends audio through a video adapter to be used with any video interface.

Why is Intel display audio not working?

This error prevents users from hearing background music and sometimes makes apps unresponsive. There are a few reasons for your Intel display interface to stop working. Among these include:

  • Incompatible drivers – On Windows 10, drivers are essential for connecting software to hardware; if faulty, you may expect errors like this Intel display problem.
  • Broken or bad Registry – The registry may sometimes include some damaged Registry Items. These things are often corrupted or destroyed registry entries that might remain after a file has been removed or uninstalled.
  • Bad system files – System files are essential to properly running a computer. If they are bad, they may trigger the audio problem.

Sound problems have always been recorded in several Windows versions, and Windows 10 is no exception.

Here are some practical solutions if you’re experiencing issues with the Intel display audio driver in Windows 10.

How can I fix the Intel High Definition Audio not working problem?

  1. Run the SFC and DISM scan
  2. Reinstall your sound drivers
  3. Manually update Intel audio drivers
  4. Run a Windows Audio service check
  5. Run Windows update

1. Run the SFC and DISM scans

1. 1 Running the SFC scan

  1. Right-click on Start and select Command Prompt (Admin).intel display audio not working
  2. Type the script below and hit Enter.
    sfc /scannowintel display audio not working
  3. Wait for the scanning process to complete, then restart your computer. All corrupted files will be replaced on reboot.

The aftermath of malware or virus infection can lead to missing system files leading to Intel display audio not working.

Even though antivirus software may be used to remove the corruption, the system files could be overwritten, corrupted, or even damaged.

So, to repair the critical system files that will prevent the Intel display audio driver from working, you need to run a System File Checker (SFC) scan.

System File Checker utility program checks for the authenticity of all system files and fixes problematic files afterward.

In addition, you can also run DISM to repair Intel display audio driver issues in Windows 10. Finally, deployment Image Servicing and Management can also fix corrupt system files.

To make sure that the SFC didn’t miss anything, we recommend using a specialized repair tool that can scan, find, and repair any corrupted or damaged files.

1.2 Running the DISM scan

  1. Right-click on Start and select Command Prompt (Admin).intel display audio not working
  2. Copy and paste the following command on the command line and hit Enter:
    DISM /Online /Cleanup-image /Restorehealth
    Intel display audio not working
  3. If the DISM can’t obtain files online, try using your USB or DVD installation. Insert media and type the following command, and hit Enter:
    DISM.exe /Online /Cleanup-Image /RestoreHealth /Source:C:RepairSourceWindows /LimitAccess
  4. Be sure to replace the C:/RepairSourceWindows the path of your DVD or USB.

2. Reinstall your sound drivers

  1. Press Windows Key + X to open the Win + X menu.
  2. Select Device Manager from the list.intel display audio not working
  3. Locate your audio device, right-click it, and choose Uninstall device from the menu.
  4. Once the driver is uninstalled, click the Scan for hardware changes icon.intel display audio not working
  5. After doing that, Windows will install the default audio driver
  6. Restart your computer to confirm the changes

If you have a corrupt Intel audio driver on your Windows 10 PC, it is more likely that you’ll experience the Intel display audio not working problem.

Therefore, you need to reinstall the drivers to their default state from Device Manager.

After reinstalling the drivers, the Intel display audio not working issue should be resolved after following the steps above.

3. Run a Windows Audio service check

  1. Press Windows Key + R.
  2. In the Run menu, type services.msc, press Enter, or click OK.intel display audio not working
  3. When the Services window opens, locate Windows Audio and double-click on it to open its Properties.intel display audio not working
  4. Set the Startup type to Automatic, and click the Start button to start the service.
  5. Click Apply and OK to save changes.intel display audio not working
  6. Restart the PC afterward.

Sometimes, the Windows Audio service may be disabled, leading to the Intel display audio not working prompt.

Therefore, you need to check whether the service is disabled or not; but if it is disabled, you have to enable it.

4. Manually update Intel audio drivers

  1. Download the Intel audio drivers from Intel official website.
  2. Extract the downloaded driver to a specified folder on your PC.
  3. Press Windows Key + X and select Device Manager from the list.intel display audio not working
  4. Locate the device you want to update, right-click, and choose Update driver.intel display audio not working
  5. Select the Browse my computer for driver software option. This option will enable you to install the driver software manually.intel display audio not working
  6. Choose the Let me pick from a list of device drivers on my computer option.intel display audio not working
  7. Click the Have Disk button.intel display audio not working
  8. The Install From Disk window will now appear. Click the Browse button and locate the driver on your hard drive. After you select the driver, click the OK button.Intel display audio not working
  9. After doing that, the driver will be automatically installed on your PC.

Since outdated system drivers can cause the Intel display audio not working problem, you should update your Intel audio drivers.

Note: You need to download the driver from the Intel official website and then extract it to any folder on your PC before you proceed.

Alternatively, you can use automated tools to update Intel drivers to fix the Intel display audio not working problem.

We strongly recommend Outbyte Driver Updater automatically download all the outdated drivers on your PC.

⇒ Get Outbyte Driver Updater

5. Run the Windows update

  1. Press Windows Key + I to open the Settings app.
  2. Now navigate to the Update & Security section.intel display audio not working
  3. Click the Check for updates button.intel display audio not working

Microsoft frequently releases Windows updates to improve the OS and fix various driver issues, such as Intel audio drivers.

Therefore, you can run a Windows update to solve Intel display audio not working problem.

Remember that you can use the workarounds presented in this article to solve driver issues, not just the ones we addressed today.

If you have any questions or suggestions, let us know in the comments below.

7 Best Automated Pricing Software to Find the Right Price

Online shopping is as popular as traditional shopping these days. In fact, sometimes it’s more popular than traditional shopping due to the convenience.

Another major reason for its popularity is the opportunity for consumers to look for any product with the best price.

This has been possible due to the pricing comparison engines also known as the automated pricing software. These engines help consumers to browse through online stores and look for products.

The majority of the consumers primarily search for products online based on price. This helps the e-commerce sector set dynamic pricing strategies that eventually help them find out their position in the market.

How do they achieve that? They come to know the prices and changes of their competitors using the software. This way they can convert the customers with a doubtful and price-inclined mindset to buying customers.

From evaluating market demand to maximizing profit, these automated dynamic pricing solutions manage e-commerce business effectively.

How to choose the best pricing software?

Whether you have selling, a distribution, or production business, you need to follow your products and keep a close watch on the pricing.

The market offers a lot of automation tools for that but you need to pick the right one for your line of work and business, so here are a few tips on how to choose the right one.

  • Monitor the right platforms – Some of the tools below can monitor any website for any products; others just focus on the biggest ones like Amazon and eBay. Make the decision based on the right platforms for your business.
  • Get as many tools as possible – You should test all the tools from a solution and get as many as you can for the price; for instance, Competera has a Market test tool to determine your exact needs.
  • Check the confidentiality methods – If you want to monitor the competitor’s products, you might not want them to know that; there are tools on our list that scan their websites without leaving any traces.
  • Determine the number of products to track – Most tools have offers based on the number of products you want to track so make a list before getting a plan so you know how much you can invest.

It all goes down to knowing your business very well and that will help you determine exactly what solution to get for your needs and budget.

Here are some of the price-tracking software programs that maximize conversions and help you grow your business.

What are the best automated dynamic pricing tools?

Price2Spy – Best for prices comparision

Price2Spy is an all-in-one price monitoring service that provides robust solutions for both small and large eCommerce professionals.

Some of its main capabilities include price comparison, price change alerts, and identifying repricing opportunities.

The platform’s Price Matrix report will offer you a full market overview, allowing you to use the data to your advantage even in the most competitive market conditions.

Price2Spy has a customizable dashboard, so you’ll be able to organize the reports to match your business objectives.

Moreover, it has API integration and built-in alerting mechanisms that enable you to act promptly whenever there’s an important price change.

The software uses stealth IP traffic, a unique method that makes it impossible for system administrators to distinguish regular traffic from the one generated by Price2Spy to monitor their prices.

Right from the start, the app is tailored to your needs and you can add all your products and sites that you need to monitor.

Let’s review some of its best features:

  • Large volume of products to monitor
  • Automation features
  • Bulk function to add more products at the same time
  • Untraceble stealth IP traffic
  • Built-in price allerting mechanisms

Price2Spy

Enhance your business techniques with this versatile pricing software!
Check price Visit website

PandaDoc – Best for marketing management

PandaDoc is ideal for salespeople that need to write a range of documents, such as contracts, unique proposals, and quotations. It also has a variety of pre-built templates that you may use to speed up the document production process, especially if you don’t already have one for your organization.

PandaDoc’s dynamic content is one of its most popular features. You may generate quotations automatically by using dynamic price tables and data from product catalogs.

This allows your salespeople to provide consumers the choice of selecting the items and corresponding costs that are most appealing to them while still keeping document generation simple and straightforward.

Here is what you can use in PandaDoc:

  • Themes that have unique and engaging designs
  • Features of enterprise-level security
  • Pre-made templates
  • eSignatures that are legally binding
  • Document generator that is simple to use
  • Automation of documents
  • Analytics in real time
  • Tools for advanced cooperation

PandaDoc also has a free version, making it ideal for individuals and companies who do not yet have a budget for an electronic signature solution.

⇒ Get PandaDoc

Prisync – Pricing trends and analytics

E-commerce businesses looking for completely automated pricing software can vouch upon Prisync. It’s one of the leading price tracking applications that serves companies of all sizes around the world.

Among its major advantage is that it requires no integration or setup. Users can launch the account and begin optimizing prices, in a matter of minutes.

Since it’s fully automated, users do not need to track it manually. The best part is that it updates the prices 4 times a day, and offers dynamic reports of preferred products.

It also delivers regular email alerts and instant notifications of price/stock change. What’s more?

Prisync API stores all the data that shows up on its web application, alerts, and reports to help businesses easily make custom applications.

These applications further integrate data into their internal systems and generate automated pricing and more. This price tracker is powered by detailed and fresh market data collected several times a day.

Besides, it comes with advanced analytics power and a dynamic pricing module that allows profit-making price optimization.

Take a look at some of its best features:

  • Updates prices 4 times a day, automatically
  • Generates automated prices based on market info
  • The interface is simple and friendly
  • Dynamic reports of your desired products
  • No integration or setup is required

⇒ Get Prisync

Amazon Repricer by Repricer Express – Best for Amazon sales

Amazon Repricer by Repricer Express is one of the best Amazon repricing solutions around that comes equipped with a full suite of competitive tools.

This helps users beat their Amazon competitors with aplomb. The software offers a full view of the current product prices across all the listings and marketplaces.

The tool will allow you to take a quick jump to the listings of Buy Box winners or among the top 20 merchants.

It also shows you the number of products that changed prices in the last hour, in 24 hours, or in the past seven days. Moreover, users can quickly filter data using clickable results for each market.

Besides, it offers a look at the last repricing time and when the latest listings were last imported. That’s not all, as users can also view the minimum, maximum, and lowest prices of products in a single click.

View of Amazon channel standings, an option of powerful filtering, bulk editing, or quick links for inventory views are among its other major features.

Let’s see what are its top features:

  • Focused directly on Amazon and eBay
  • Helps you set your price to get you closer to Amazon’s Boy Box
  • Advanced automation functions
  • Easy setup and configuration
  • Flexibility in customizing the prices

⇒ Get Amazon Repricer

Skuuudle – Competitor price monitoring

Skuuudle brings you the technology and the intelligence that helps users to create smart strategies and find the perfect price.

It helps improve the pricing and advertising strategy for users through business-ready competitive skills. Moreover, it offers high-quality intelligence that’s always on time with a complete service level agreement.

The best part is this automated pricing software offers human quality guaranteed data. All the reports generated by the software are evaluated by an experienced QA analyst at the final stage.

This helps you focus on the decision-making process. Furthermore, it offers dedicated account managers who are intelligence experts.

They are ready to help with trusted information, allow you to act with confidence, and win against the opposition.

Coming back to the software, it collects competitor data from any source and location whenever you want and as many times as you want so that you can have a clear picture of the market.

Take a look at Skuuudle’s best features:

  • Human input analysis for evaluation
  • Collects competitor information from any source
  • No installation or implementation required
  • Expert and personalized support
  • Automatically links identical or similar competitor products

⇒ Get Skuuudle

Informed – Competitive repricing platform

The sole intention of Informed is to help increase profits for an e-commerce business and help the consumers stay in the buy box.

This automated price optimization software is especially useful for sellers looking for easy setup and manual support.

It’s known to automate price revisions with tried and tested planning and make use of analytics to delve into new possibilities.

The program has been simplifying the complex process of repricing for around a decade. It can be set up quickly and integrates easily with marketplaces and prices.

It also helps businesses fix a preferred profit margin and observe where the majority of the revenues are coming from.

The tool comes with pre-developed algorithms that help users take over the Buy Box fight. It also helps maximize the users’ private label listing prices.

The software comes with a set of customs regulations that confines the competition using the completion technique, the rating of the sellers, and more.

Best of all, it syncs with the eCommerce wizards and extracts actionable reports to find growth possibilities.

Here are a few of this tool’s best features:

  • Optimized especially for sellers
  • Automates price revisions
  • Uses analytics to provide acurate reports
  • Special algorithms to determine the correct price points for winning the Buy Box
  • eCommerce wizards synchronization to extract reports

⇒ Get Informed.co

Competera – Best for setting optimal prices

Competera helps retailers reach business goals by providing competitive data scraping, price optimization, and pricing automation solutions that help omnichannel retailers manage and adjust pricing at the category level for any number of SKUs.

It is built using Deep Learning algorithms and ensures tangible uplifts up to +9% for the bottom line.

This software provides fast, flexible, and coherent pricing, carefully defined by workflows and comprehensive cause & effect analysis.

With Competera, users can interpret any pricing move made in the past and understand how it will affect the business in the future. 

Therefore, your business will benefit from a tailored pricing logic that will harmonize prices across all channels and product categories. 

Competera will also reduce pricing efforts by more than 50%, as well as eliminate human factors and errors from the process.

You will also be able to set up prices faster, in concordance with the internal or external triggers like changes on the market, internal pricing structure, and formations, vendors’ terms.

Depending on the pricing engine, your prices can be rule-based, i.e. recalculated upon external data changes or be optimized by Deep Learning algorithms that take into account price elasticities and cross-product dependencies.

At the same time, every Competera solution helps to shift to a portfolio-level approach, with the category goals being a top priority.

The pricing platform has a user-friendly interface that is comprehensive and built for pricing and category managers to manage repricing in 4 clicks.

Such a smooth user experience reduces the usual repricing time spend from 60 to 4 hours weekly. 

Custom export formats will ensure full compatibility with all of your current systems, so support is not an issue when it comes to Competera. 

Here are the software’s main features: 

  • Self-service pricing configuration that has customizable or preset rules
  • Optimal workflows for users with different roles 
  • Batched or real-time repricing triggered by cost change, competition, and other factors 
  • Forecast projection, SKU-level price interpretation, and what-if scenarios 
  • Recommendations can be exported in any format to easily integrate with current systems 

⇒ Get Competera

Best tips for a successful eCommerce business

If you are running an eCommerce business, optimizing profits is one of the crucial aspects not to be missed.

However, there are a lot of aspects that you need to focus so here are our recommendations.

➡ Start a loyalty program

Rewarding your customers for their repeated purchases is one of the most important things to do if you want to increase your sales and number of customers.

Develop a loyalty program to provide incentives for customers. Not only they will be happy about the incentives but they will also recommend your store to others.

To build even stronger loyalty, explore real retail reward systems such as Kroger digital coupons which show how big brands successfully motivate customers through personalized savings.

According to a study led by Superoffice.com, the customer experience is the most important focus for businesses in the next 5 years.

➡ Communicate with the customers

Although automation and pricing software gives you a head start, these tools will let you focus on the most important things.

And communicating with your customers on all possible platforms is one of the key ingredients for a successful business. Answer all their questions and requests as quickly as possible.

➡ Focus on the experience

Whatever product you’re selling, you’re not doing just that, you’re selling an experience of the customer with the product.

So, focus on that, not on the product itself, and try to differentiate your product from the competitors.

Use any of the above best automated pricing software tools to help your customers find products with the best price. This will not just help you win convert customers, but also win their trust.

And as your venture grows, you might be interested in the best automated hiring software to get the best staff for your business.

Have you tried any of these tools? Tell us about your experience in a comment on the dedicated section below.

Civ 6 Not Launching: How to Get it to Work Again on Steam

Some players have said on Steam’s support forum that Civilization VI installed with Steam doesn’t launch for them. To be more precise, those players can’t start Civilization VI to play that game.

Assuming that’s your issue as well, chances are to feel frustrated. Keep in mind that some players have been able to fix this issue and we’ve gathered all these resolutions for you.

Take a look below, apply them one by one, and you’ll most likely be able to solve this annoying issue as well.

Why is Civ 6 not launching?

It appears that there is an odd Civilization VI crash, which causes the game to linger on for as long as it takes to load from the Windows 7, Windows 10, or Mac epic launchers. Yes, that’s true, users even reported that Civ 6 won’t start on Mac.

windows defender civ 6 won't start mac

The reason for this, according to other users, is due to Windows Defender or any other protection system, which, when Civilization VI is included, has a tendency to scan the entire game in real-time when it is installed and hinder the process.

How do I repair Civ 6 if it won’t launch?

1. Update your PC’s graphics adapter drivers

    In this section, we will explain how to update graphics drivers for Windows 10. You can also check how to update drivers for Windows 11 in our detailed guide.

  1. 1. Right-click on Start and open Device Manager.

    open device manager in windows 10
  2. 2. Expand the Display Adapters section and right-click on the graphics card driver. Select Update Driver.

    update drivers w10
  3. 3. Click on Search automatically for updated driver software.

  4. 4. After the drivers’ update, you need to restart the PC in order to fix the CIV 6 won’t launch 2k error. launcher

Updating graphics card drivers could fix the Civ 6 running but not open errors for some players. You can see if your PC’s graphics card driver needs updating by scanning with driver updater software.

Then, if you want to enhance your graphics drivers and play the game smoothly, updating drivers with automated tools will certainly improve the system. Sometimes you may need to update more than one display adapter for the graphics card drivers to function properly.

By choosing to get the latest drivers with this software, you will benefit from an effortless process and improved drivers from a rich database.

Outbyte Driver Updater

Update drivers in minutes from a large database with the most compatible display adapter drivers.
Free trial Download now

2. Configure the Civilization VI launch options in Steam

  1. Open the Steam client software and navigate to the Library tab.library civ 6 won't start steam
  2. Right-click Civilization VI and select the Properties option.prop-steam civ 6 won't start steam
  3. Then enter the following launch configuration in the Launch options box to fix the CIV 6 not launching in Windows 11/Windows 10: <full Civilization VI game path> %command%launch-opt civ 6 won't start steam

You’ll need to replace <full Civilization VI game path> in the above launch configuration with the actual installation folder path of your Steam game.

That full directory path must include the drive and the EXE game file like the example shown directly below:

"C:Program Files (x86)SteamsteamappscommonSid Meier’s Civilization VIBaseBinariesWin64SteamCivilizationVI_DX12.exe" %command%

3. Run Civilization VI as an administrator

  1. Select the Library tab in your Steam client software.library civ 6 won't start steam
  2. Right-click Civilization VI and select its Properties context menu option.prop-steam civ 6 won't start steam
  3. Next, select the Local files tab and click the Browse Local Files button.
  4. Then right-click the Civilization VI EXE (executable) file and select Properties.
  5. Select the Compatibility tab and click the Run this program as an administrator checkbox to select that option.Compatibility tab civ 6 won't start steam
  6. Press the Apply button to save the new settings. Thereafter, restart your Steam client software to fix the CIV 6 not launching through Steam error.

4. Set up a new Windows user account with a different name

  1. First, open the search box in Windows 10 by clicking the magnifying glass button on the left side of the taskbar then enter add, edit, or remove other users within the search text box and select the top result.add-user civ 6 won't start steam
  2. Press the Add someone else to this PC button.
  3. Click the I don’t have this person’s sign-in information option.i dont have civ 6 won't start steam
  4. Then select the Add a user without a Microsoft account option to open an account setup window.add-user-new civ 6 won't start steam
  5. Enter a new user name in the first text box that does not include any @, #, $, %, ^, and & special characters. Fill out the password fields then press the Next button to finish.
  6. Select the new user account you just set up in Settings, and press the Change account type button.
  7. Then choose the Administrator option on the drop-down menu.
  8. Thereafter, sign out of Windows 10 and log in to the new Windows account you set up.

2K Support has confirmed Civ 6 won’t launch in Windows 10 when the characters @, #, $, %, ^, and & are in your Documents path.

So, those characters must not be in your Windows account user name. If your current user account name doesn’t include those characters, this resolution might not fix the issue.

5. Verify Civilization VI’s game cache

  1. Open your game library in the Steam client software.library civ 6 won't start steam
  2. Right-click the listed Civilization VI game and select Properties.prop-steam civ 6 won't start steam
  3. Next, select the Local Files tab and press the Verify Integrity of Game Files button there.

6. Try running Civilization VI with a different DirectX version

  1. Press the Windows key and E shortcut at the same time to open the File Explorer window.
  2. Open the folder that includes your Civilization VI game. The default Civilization VI directory path for Steam is: C:Program Files (x86)SteamsteamappscommonSid Meier’s Civilization VIBaseBinariesWin64Steamciv windows update not working windows 10
  3. The Civilization folder includes CivilizationVI.exe (DirectX 11) and CivilizationVI_DX12.exe (DirectX 12) game files. If you were previously trying to start the game with CivilizationVI_DX12.exe, try clicking CivilizationVI.exe for the DirectX 11 version.

7. Reinstall Civilization VI

  1. Open the Library tab within your Steam client software.library civ 6 won't start steam
  2. Right-click the Civilization VI game to open the context menu for it then go to Manage and select the Uninstall context menu option.manage-game civ 6 won't start steam
  3. Click the Uninstall button to confirm.
  4. Restart Windows 10 after you uninstalled Civilization VI.
  5. Thereafter, open Steam and its Library tab again.library civ 6 won't start steam
  6. Then select the Install option for Civilization VI via the Library tab.

You can also uninstall Civilization VI and fully eliminate leftover residual files from that game with reliable third-party uninstaller software.

If you don’t know what programs perform better, we advise you to get informed about the best uninstaller software available on the market.

8. Close or disable conflicting software

Make sure there aren’t any conflicting game launchers, such as Epic Games, running in the background before you try to start Civilization VI with Steam. Alternatively, close Steam if CIV 6 won’t launch through Epic Games.

Check if your system try includes any icons for other game client software. If so, right-click the client software and select the Exit or Close option for it.

Third-party antivirus software can also potentially conflict with Civilization VI. Right-click any third-party antivirus utility icon in your system tray and select a disable option for it.

Then select to disable the antivirus shield for a few hours before you try to start Civilization VI.

Those are some of the resolutions players have confirmed can fix Civilization VI not launching from Steam. So, there’s a good chance the potential tips above will kick-start the game for most of you.

How do I fix my Civ 6 launcher?

Launcher problems are a regular issue, and most of the time, the cause may be traced back to your antivirus program.

When you try to run Steam games, you could find that you are unable to progress past the Preparing to launch prompt. In the event that this occurs, make sure that the necessary Visual C++ components are installed.

For more information, check out the solutions from our Steam games not launching. After all, quite a few users claim that this happens on many other games too.

For further information and potential solutions to the above error, we recommend that you take a look at our post on how to fix frequent Civilization VI issues to address the CIV 6 not launching on PS5 and Xbox error.

Alternatively, users reported that Civilization VI issues limit the gaming experience, so if you happen to face the same error, don’t miss out on the guide linked.

If you happen to know any other tricks to fix the CIV 6 running but is not open error, don’t keep them to yourself. Share them with us and the other readers in the comments area below.

Easily switch between viewing modes in Microsoft Word

Have you ever been concerned about your document accidentally getting modified when sharing it with your colleagues? Today, Microsoft has made it easier to switch between viewing, reviewing, and editing modes in Word for Windows.

You can use viewing mode to make sure there’s no interaction with the document while reading it. Reviewing mode is available for tracking changes and making notes on your document and of course, editing mode allows full editing.  See below to easily take advantage of these new modes.

  1. Open any Word document that you have permission to edit.
  2. In the ribbon, click the editing button that’s in the top right corner next to the share button.
  3. To switch back to editing the document, select the button again and choose editing from the drop-down

A couple of tips and tricks to keep in mind for your workflow, enabling Track Changes does automatically put the document in Reviewing mode. If you open a document you don’t have permission to edit, you can still view it, but you will be blocked from making any changes.

This feature is already available for Word on the Web users and is rolling out in the beta channel version 2206 (Build 15314.10000) or later.

Image Via Microsoft

Windows on Steam Deck gets big improvement with latest APU driver update

Those who choose to run Windows on their Steam Deck should be quite pleased with a new APU driver update released on November 8th. The update delivers compatibility, security, stability and performance improvements for Windows on Steam Deck. The driver can be downloaded straight from the Steam site, along with other Windows drivers.

Both Windows 10 and 11 can be installed on Steam Deck, though doing so wipes the device. Dual boot is currently not available with Steam Deck, though it is reportedly coming in a future update.

Those who would rather keep the default Linux-based SteamOS that the device ships with can still take advantage of Xbox Game Pass and Xbox Cloud Gaming. In fact, going this route—and having all the advantages of running Steam games natively while having access to Xbox Cloud Gaming within a browser—is pretty close to ideal.

Microsoft Create is now in preview, set to provide a unified creative experience

Microsoft Create is a website that lets users create videos, graphic design documents, presentations, and more.  And on Monday, Microsoft announced that the website is now available in preview. This means that users with Microsoft 365 subscriptions can now access creativity tools such as PowerPoint and Clipchamp all under one convenient location.

With Microsoft Create, there is no cap to what users may want to come up with, that is from social video posts, work presentations, and birthday gift cards to resumes. Microsoft has provided a ton of templates that users can apply to their designs.

You can head on over to the Microsoft create website, where you can kick-start or enhance your creativity with the array of tools available on the platform. That said, you can also make use of the Learn & grow section to brush up on your designer skills.

However, the website comes with two known issues. First up is that it is currently available in English only. And finally, users are required to sign up for early access to Microsoft Designer while it is in preview, which will in turn allow them to customize some templates.

Be sure to check out Microsoft’s blog post for the whole gist of how to make the most out of this tool. Share your experience with Microsoft Create below.

via: Windows Central


More power-saving features could come to Microsoft’s Xbox consoles

With this new Xbox console generation, we have seen greater efforts on the part of Microsoft to make its gaming machines more energy efficient than ever. Back in March this year the company detailed how the Xbox team was endeavoring to stay green as part of its annual sustainability report. And just last month we reported that the Xbox Insiders Alpha Skip-Ahead group was testing a new power options settings page where users could view how much power was being used in both standby and energy saver modes.

Some recent surveys making the rounds in the Xbox Insider Program suggest that the Xbox team may be set to go even further with the effort to reduce Xbox energy consumption. Specifically, we could see the inclusion of opt-in energy saving features that make performance sacrifices such as lower framerates and resolutions.

Via Windows Central.

As you can see in the questionnaire above, the Xbox team is clearly interested to know what percentage of gamers would even be interested in energy saving graphics modes. And of course these surveys don’t necessarily mean that these features will see the light of day. But it would be neat of gamers were given these options.

Fix: Display Settings Has No App Associated in Windows 10

Sometimes, while trying to access Display Settings or the Personalize option on your Windows 10 PC, you may encounter an error.

The error message reads, ms-settings:display – This File does not have a Program Associated with it for performing this action.

What causes ms-settings:display app association error?

If you encounter the no app associated display settings error on Windows 10, it could be due to:

  • Corrupted system files – System file corruption is one of the most common reasons you may encounter display settings errors.
  • UWP apps crashed or did not start properly – Chances are that the Windows apps crash unexpectedly or stop working due to a glitch.
  • Virus or malware infection – If your PC is attacked by a virus or infected by malware.
  • The user profile is corrupted – It could be possible that your current user profile is corrupted and needs to be fixed or changed.
  • A glitch with the .NET framework – Sometimes, you may experience the no app associated error when trying to open display settings due to a damaged .NET framework.

How do I fix this file that does not have an app associated with it?

Before you proceed with the main troubleshooting methods below, try the preliminary checks to fix the display settings with no app-associated issue on your Windows 10 PC:

  • Restart your device
  • Open the file with File Explorer
  • Download the latest Windows update
  • Run a virus scan
  • Open the file with a different app

But, if you still see the no app associated message for display settings on your Windows 10 PC, you can try the below troubleshooting methods for a fix.

1. Reset default apps

  1. Press the Win + I keys simultaneously to open Windows Settings.
  2. Next, select Apps on the left, and click on Default apps on the right. default app settings
  3. Now, scroll down on the Default apps page, go to Reset all default apps, and click on Reset. reset all default apps

Once all the default apps are successfully reset, restart your PC and check if you can now access the Display Settings or the Personalize option.

2. Re-register the UWP apps

  1. To open the Run console, press the Win + R keys together.
  2. In the search field, type powershell and press the Ctrl + Shift + Enter to open elevated Windows Powershell. run powershell command
  3. Run the below command in the Powershell (Admin) window and hit Enter: Get-AppXPackage | Foreach {Add-AppxPackage -DisableDevelopmentMode -Register "$($_.InstallLocation)\AppXManifest.xml"}re-register apps command
  4. As the command is successfully executed, all Windows apps for all accounts will be re-installed and re-registered automatically.

Now, close the PowerShell window, restart your PC and check if you can open the Display settings on your Windows 10 PC.

3. Add the user account to your Administrator account

  1. Launch the Run console by pressing the Win + R keys, type netplwiz, and hit Enter. run netplwiz command
  2. This will open the User Accounts window. Here, under the User tab, double-click on the user name from the list. select user under user accounts
  3. In the Properties dialog, go to the Group membership tab and select Administrator. Press Apply and OK to apply the changes and exit.

Now, log off and log in with the user id you just made the administrator, and you should not face any issues while trying to open Display Settings like the no app associated error on Windows 10.

4. Run the Windows File and Folder Troubleshooter

  1. Visit Microsoft’s official web page for the File and Folder Troubleshooter, and click on Download. file and folder troubleshooter download
  2. Click to run the winfilefolder file. Then, in the File and Folder Troubleshooter window, click on Advanced. file and folder troubleshooter - advanced
  3. Now, select Apply repairs automatically and press Next. apply repairs automatically
  4. The troubleshooter will now start looking for problems. Follow the on-screen instructions to fix the issue automatically.

Once done, close the troubleshooter, restart your PC, and you should now be able to open Display Settings on your Windows 10 PC without the no-app associated error.

5. Reset the Windows Store cache

  1. Press the Win + R keys to open the Run console.
  2. Type WSReset.exe in the search bar and hit Enter. run WSReset.exe command
  3. Once the Reset is complete, the Microsoft Store will open automatically.

Close the Store window, and check if you can now access the Display Settings or Personalization to make the changes.

If the above methods fail to work, you can repair and restore the corrupted system files using the SFC and DISM tools.

Alternatively, you can repair the Microsoft .NET Framework using the dedicated tool and fix any possible corrupted installations of the .NET framework.

But, if none of the above works, you can perform a system restore using a restore point, try an in-place upgrade, or create a new user profile to fix the error possibly.

If you have any other queries related to errors associated with Windows 10, you can let us know in the comments section below.

Subway Surfers Unblocked: How To Play It Online in 2026

Subway Surfers is one of the most popular platform games in the world, with millions of users across the world.

However, a lot of players are looking to play Subway Surfers unblocked because they can’t enjoy it at school or at work.

How can I play Subway Surfers without downloading?

Subway Surfers was initially created for mobiles and you can still get it from Google Play.

Of course, you can play the game on a PC as well by using an Android emulator for Windows. And if you’re running Windows 11, you can run the APK directly.

Quick tip:

If the game does not work at the capacity you want, you can try the Opera GX browser that outlines the concept of gaming.

The browser includes unique features such as CPU, RAM and network limiters to help you get the most out of both gaming and browsing.

We recommend Opera GX because it can brings the gaming lifestyle to your PC and you mobile. Also, you can browse safely and load pages faster with built-in security features.

Opera GX

Get the most out of both gaming and browsing, use this faster and advanced browser designed for gamers!

There are lots of websites where you can play the game without downloading anything on your PC, some of the best ones are the following:

  • Watch Documentaries – Our readers told us that the best website where you can play Subway Surfers unblocked 66 is Watch Documentaries. Simply access the website and enjoy the game!
  • Unblocked Games World website – This is another reliable website where you can play the school-unblocked Subway Surfers game version. Once you visit the site, wait for about a minute until the game loads, then start playing.
  • iounblockedgames – Yet another gaming platform that gives gamers the ability to play Subway Surfers online on their computers, and bypass the school policies.

Does Subway Surfers drain battery?

Some of our readers complained that the mobile app is draining the battery of their devices. That may be because in some cases, the app continues to run even after you close it.

So, it’s important to make sure it closes completely. Every mobile has a built-in function of automatically closing all apps.

As for the online iteration, there is no need to worry because it runs into the browser and when you close that, it will stop consuming energy.

Does Subway Surfers end?

That’s the beauty of this game. It’s an endless runner video game so it all comes to who lasts longer in the game, getting the most points or coins.

Although Subway Surfers doesn’t end, it does become more challenging while progressing. The trains run faster, the obstacles are more difficult to tackle, etc.

If you get bored, check out our list including the best browser games to play with friends and you will get lots of ideas.

Did you manage to play Subway Surfers unblocked? Tell us all about your experience in the comments section below.

Gmail Not Receiving Emails? Here’s Why & How To Fix

Some users have said on Google forums that their Gmail accounts aren’t receiving any emails. Those users might still be able to send emails, but they don’t receive any.

In some specific cases, even though you receive emails, Gmail may be loading slowly, or you might not even be able to sign into it.

Why is my Gmail not receiving emails?

First of all, check if the Gmail services are online because Google suffered from outages from time to time. We explain below exactly how to do that.

You might not receive Gmail messages due to filters, insufficient account storage, antivirus firewalls, or simply some browser settings.

In other more extreme cases, these same elements have been reported to cause Gmail not to load at all. So, read below about the most important fixes for a Gmail account not receiving emails.

Moreover, the email issues occur on different devices, and from different sender, such as the following:

  • Gmail is not receiving emails on iPhone/Android phone – After checking Gmail’s server status, take a look at its storage to see if it is full.
  • Gmail is not receiving emails from one sender, Outlook, Instagram – It might be that you have reported these senders as spam, thus rendering them unable to contact you anymore. You can undo this by going to the Spam folder and labeling those senders as Not spam.

Join us as we explore the list of potential issues so that you can find more efficient answers to your problems as we go!

What should I do if my Gmail is not receiving emails?

If your Gmail account isn’t receiving emails, open it in a different browser and check if the problem is still there. You can use any other browser for this purpose, but we would recommend you Opera One.

This browser is built on the Chromium engine, but unlike Chrome, it won’t send your data to Google.

It’s worth mentioning that this browser has built-in AdBlock, VPN, privacy, tracking, and malware protection, so it’s one of the most secure browsers online.

Opera One

A web browser that will guarantee fast webpage loading speeds and an error-free Gmail experience.

1. Check Gmail’s server status

Gmail outage page gmail account not receiving emails

If Gmail is not receiving emails but you can send them, it might be the case that the Gmail service is temporarily down. To check if that is the case, open the Downdetector website in a browser.

Enter the keyword Gmail in that website’s search box and press the Return key. Then click Gmail to see if there’s an outage. If so, wait for Google to fix the outage.

    2. Check the Spam folder

    Gmail has a pretty good spam filter but sometimes, even harmless messages from trusted senders can reach the Spam folder, so it’s only logical that if you’re missing some messages, to check that storage.

    1. Log into your Gmail account and click the More option from the left pane.
    gmail more
  1. 2. Now, select the Spam folder and check if the emails you were waiting for are into the list. You should know that emails don’t stay in this folder for more than 30 days because after that, they are deleted.

    gmail spam
  2. 3. If you find a useful email you were looking for, click on it, then hit the Report not spam button. The message will be recovered and transferred into the Inbox folder and the next time you receive an email from that address, it will not be considered spam anymore.

    gmail report not spam

You might also want to take a look at our guide on how to stop emails from going directly to trash in Gmail.

3. Check the Gmail storage quota

  1. Open Google Drive and log into your account.
  2. The maximum freely allocated storage space for all the Google services is 15 GB combined and in the lower left part, you will see exactly how much is occupied.
  3. If you have reached the 15 GB storage mark will need to free up some space. To do that, open Gmail in a browser.
  4. Then select some emails to delete and click the Delete button.
  5. Click More on the left of Gmail’s tab, click the Thrash bin to open it, and select the Empty Thrash now option.
  6. Thereafter, you will start receiving Gmail emails again.

You can’t receive emails when you don’t have any free Gmail space, and if that happens, you’ll encounter Gmail storage full not receiving emails problem.

The solution above is temporary but you might also consider buying more storage space.

Also, if you’re tired of Gmail’s problems, we suggest that you try a third-party e-mail client instead since this service is far more stable and features less downtime.

Mailbird acts as a general hub for all of your email addresses (Yahoo, Gmail, etc), allowing you to have better control over your emails.

⇒ Get Mailbird

4. Delete the email filters

  1. While you’re logged into your Gmail account, click the Settings button and selecting See all settings.
  2. Click Filters and Blocked Addresses, select all filters listed on that tab, and press the Delete button to erase the filters.

The reason why you can’t receive some emails from certain people is that somehow, you blocked them by creating a filter, but this solution will remove any such blockage.

For a complete iPhone-specific walkthrough, see our guide on Gmail not working on iPhone.

5. Turn off email forwarding

  1. Click the Settings button in Gmail and select the See all settings option.
  2. Select Forwarding and POP/IMAP to open that tab, then click the Disable forwarding option there.
  3. Click the Save Changes button on the bottom of the page.

6. Turn off or configure firewalls

  1. Right click the taskbar and select Task Manager.
  2. Click on the Startup tab, then right click the antivirus from the list and select Disable.

Some antivirus software also includes firewalls that can also block Gmail emails. So, try removing antivirus utilities from the system startup, which will stop them from running when users start Windows.

If you receive Gmail messages after restarting Windows, the antivirus software must have blocked the emails when it was running.

Alternatively, users can configure the antivirus utilities’ settings to stop it from blocking emails or you may uninstall the antivirus and use a Windows 10 compatible antivirus.

Gmail not receiving emails from one sender

Check if the email was delivered

  1. Sign in to your Google Admin console.
  2. Enter your username and password.
  3. Now go to Reports and select Email Log Search.
  4. Select the desired date range from the Date section.
  5. Now enter the search information for that message.
  6. Check the messages and their delivery status.
  7. If the message was delivered, try the solutions mentioned above to fix it.

Gmail not receiving emails from Outlook

This issue can occur due to problems with the Outlook server or your Gmail settings. We covered a similar issue in our Gmail emails not being delivered to Outlook guide, so be sure to check it for more solutions.

If the problem persists, you might have to contact Gmail or Outlook support team since the issue is probably server-side related.

Gmail not receiving emails but can send

In case your storage quota has been exceeded, it’s a good idea to check it and free up some space. We described this issue in Solution 3, so be sure to check it if you haven’t already.

If that method doesn’t work for you, be sure to try other solutions mentioned in this guide.

Gmail not receiving emails after deleting emails

This problem is closely associated with the previous one, and if you have deleted emails and freed up space, but Gmail isn’t working, you need to clear files from Google Drive.

Gmail and Google Drive share the same storage space, so if you have uploaded a lot of files to Google Drive, it’s possible that’s using up most of your storage space.

Gmail not receiving emails on iPhone

1. Switch accounts

  1. Open the Gmail app.
  2. Now tap your profile picture in the top right.
  3. Make sure you have the correct account selected.

2. Renable account access

  1. Visit Google’s Unlock Captcha page.
  2. Tap on Continue.
  3. Now try logging in back to your Gmail account.

3. Enable background refresh

  1. Open Settings.
  2. Select General.
  3. Now go to Background App Refresh.
  4. Enable Background App Refresh.
  5. Make sure it’s enabled for Gmail.

After enabling this feature, check if the problem is still there.

4. Sign out of Gmail app

  1. Tap your profile icon in the top right.
  2. Next tap on Manage accounts on this device.
  3. Now tap Remove from this device.
  4. Once the account is removed, repeat the steps from above, but this time select Add another account.

Gmail not receiving emails on Android

Check IMAP and POP settings

  1. Go to your POP/IMAP page.
  2. Locate POP and IMAP settings and make sure they are enabled.
  3. Save changes.

You can also try logging out of your account and logging back in or disabling port forwarding, as we showed you in Solution 5.

Those are the most probable resolutions if Gmail stopped receiving emails, so be sure to try them all.

The problems that your users have reported regarding using Gmail can be extremely varied, including emails disappearing, or seeing the more common Something went wrong error.

Feel free to share your experience with us and if you have any suggestions by using the comments section found below this guide.

Roblox High Ping: How to Reduce & Prevent It [Step-by-Step]

In this piece, we’ll show you how to reduce high ping in Roblox so you can build and explore seamlessly.

We’ll cover tips on optimizing your network settings, choosing the best servers for Roblox, and making system tweaks.

How to lower ping in Roblox?

If you haven’t already, start with a speed test. If your connection has high ping and is slow, contact your ISP and consider using Ethernet instead of WiFi.

But if Roblox ping is high but your internet connection is good, try the following:

Running outdated software on your PC can mean various technical issues, including but not limited to high ping. Consider updating:

  • Your operating system: the backbone of your PC, keeping it up to date ensures everything, including Roblox works seamlessly. On Windows, go to Settings> Windows Update> Check for Updates> Install any new updates found.
  • Game files: files and required patches are essential if you want Roblox to work without ping.

2. Check your security software

If you have several security programs installed on your PC, we recommend you check if Roblox has full permission on all of them. Most of the time, the Windows Firewall blocks various programs or limits their online interaction.

That also applies to antivirus and antimalware software that might not necessarily prevent you from accessing some online services but can apply limitations based on their judgment.

? Also, if your antivirus consumes a lot of resources while scanning, avoid playing Roblox and running a full virus scan at the same time.

3. Use a VPN service

If the ping is caused by: ISP throttling or overloaded game servers in certain regions, a VPN can help:

  1. Sign up for a reliable VPN for gaming. We recommend ExpressVPN for its fast servers that won’t let you down in Roblox.
  2. Install the VPN app on your device.installing expressvpn
  3. Open the app and connect to a server. Just click on the ellipsis to open the server list and choose a country.expressvpn connect to us server
Note icon NOTE
*Choose a VPN server that matches the location of your game server (or the closest location to it). For instance, if the game server is located in the USA, connect to a US VPN server.
  1. Once connected, go back to Roblox and check if the issue persists.

ExpressVPN

Use this professional VPN to remove high ping and fully enjoy Roblox.
Check Price Visit Website

4. Lower your graphics settings

    6. Update your graphics and network drivers

    Graphic and Network Cards drivers have an important role in maintaining a good Ping and avoiding lags. Once updated, your gaming experience will highly improve.

  1. 1. Right-click the Start icon then select Device Manager.

  2. 2. Click the Display adapters section, then right-click your graphics card driver, and select Update driver.

    update-driver-w10 amd driver install problems
  3. 3. Select the Search automatically for drivers option and wait for the process to finish.

    automatically-search bluetooth not working windows 10
  4. 4. Then, go back to Device Manager and expand the Network adapters section, right-click the wireless driver in there and select Update driver.

    update-network how to fix roblox high ping
  5. 5. Select Search automatically for drivers once again and reboot your system afterward.

6. Flush your DNS

  1. Press Windows then type cmd and open the Command Prompt result as an administrator.cmd-run-admin 0x80070002 windows update
  2. Type the following commands in the CMD, in this precise order, and press Enter after each:

ipconfig /flushdns
ipconfig /registerdns
ipconfig /release
ipconfig /renew
netsh winsock reset
flush-dns how to fix roblox high ping

Sometimes, cached data build-ups can interfere with your connection’s performance, and flushing your DNS is an easy way to get rid of them. Make sure you also restart your PC after successfully executing the last command.

Additionally, you can switch from your ISP-assigned DNS to free public DNS servers. We’ve tested Google Public DNS and Cloudflare’s DNS servers and we were impressed, performance-wise.

7. Terminate bandwidth-heavy apps and services

  1. To fix the Roblox high ping spikes, press Ctrl + Shift + Esc to open Task Manager and click the Network column header.network-task how to fix roblox high ping
  2. The top processes will now be the ones that are using the most bandwidth, click any of them and select End task.end-task-slack how to fix roblox high ping

If you have other apps that may use a lot of bandwidth running on your PC, it’s a wise thing to force-close them before running Roblox if you want lower ping.

For instance, torrenting clients can easily sponge up large chunks of your bandwidth without you even noticing it.

8. Try a dedicated game booster software

Every gamer should be interested in game-boosting modes to play smoother games. So if you enjoy smoother games, consider specialized tools to boost your gameplay immediately.

More precisely, you will enhance your game by increasing your internet connection or FPS score, and all that by choosing the best game booster software for Windows 10.

Note that currently, Roblox isn’t on the official list of supported games. However, the program enables you to load other games, as well, by using a custom path to the executable.

Why is my ping so high in Roblox?

High ping can have an assorted variety of reasons for occurring:

  • Network congestion – is caused by too many devices on a network that isn’t designed to carry that big of a load.
  • Roblox may occasionally have server status issues and may even be prone to scheduled maintenance.
  • Roblox may use graphics settings that are too high for your system, causing your GPU to overheat and slowing down gameplay performance.

Summary

There’s a lot you can do about Roblox ping issues, ranging from flushing your DNS to using a VPN for Roblox or even updating your system drivers.

Now that the ping problem is gone, here’s how to join your friend’s Roblox private server.

Try applying our suggested fixes one by one. We’re quite confident you’ll eventually reach one that does the trick for you.

New Mass Effect 5 video game image and sound teasers released

The long-awaited fifth main entry in the Mass Effect video game franchise is still a ways off but the game’s project director, Mike Gamble, still decided to give fans a tease of things to come with a brief message, an image of a location players can expect to see, and an encoded audio file.

“In the nearly 15 years since the release of the first Mass Effect, the biggest reason we still love working on it is the warmth, dedication, and passion of this community,” Gamble says. “There are some of you who have been with us through everything. We’ve grown together, sacrificed Ashley together, (Editor’s Note: Or Kaidan, Mike! We all make different choices.) faced difficulties together…and laughed until our Faces Were Tired…together! And for those of you who are new to Mass Effect (thanks, Legendary Edition!), welcome! I can promise that many years of fun, adventures, and characters you’ll fall in love with are still ahead.

“Regardless of when you joined us, through four games and more expansions, I can say with certainty that we’re in this because of you, and every N7 Day is a wonderful reminder of that. As we look forward, each week is a fun and exciting challenge for the team. We love bringing this universe to life, and although there’s much more we want to share with you, that’ll have to be for another time. For now, there is something we want you to have a look at. We’ve intercepted some strange footage from one of the monitoring stations in known space. It could be nothing, but…”

The image that accompanied the above message can be seen below.

Mass Effect 5 concept art

An encoded audio file was also shared with fans. While it just sounded like static originally, numerous Twitter users quickly decoded it to reveal that it’s actually a message from the character Liara. She says, “I can see it. How did we miss this? Exactly, the Council will be furious, although they should know by now not to underestimate human defiance. It always was their most defining characteristic.”

Mass Effect 5, which has yet to be given an official title, was announced back in 2020. Little is known about the game beyond the fact that it’ll continue the story established in previous entries in the main series and that it’ll run on Unreal Engine.

Want more Mass Effect news as it breaks? Follow us on Twitter.

Cyberpunk 2077 adds support for AMD FidelityFX Super Resolution 2.1 on Xbox and PC

With Cyberpunk 2077’s latest update, Patch 1.61, the video game now has support for AMD’s FidelityFX Super Resolution 2.1 technology on Windows PC and Microsoft’s Xbox Series X family of current-gen Xbox consoles.

AMD FidelityFX Super Resolution 2.1 is an AI-powered graphics tool that allows for visual upscaling and supercharged performance to make games look better and play faster. It’s worth pointing out that this tool hasn’t been enabled on the last-gen Xbox One console family so those playing Cyberpunk 2077 on one of those Xbox consoles shouldn’t expect any visual improvements in the near future, at least not any made as a result of FidelityFX Super Resolution 2.1.

In addition to support for AMD FidelityFX Super Resolution 2.1, this latest Cyberpunk 2077 video game update also added a variety of new umbrellas for NPCs to carry, unlocked the Heat-resistant aramid-weave fixer shirt for non-Street Kid players, and fixed a significant number of bugs and glitches.

Here’s the full release notes:

QUESTS & OPEN WORLD

  • Fixed an issue where spamming the Interact button to loot containers could cause various NCPD Scanner Hustles to not be completed properly.
  • Reported Crime: Another Circle of Hell, Lost and Found, Blood in the Air, Disloyal Employee, Don’t Foget the Parking Brake!, Comrade Red – fixed an issue where quest wasn’t completed after looting the goods.
  • Fixed an issue where some Assault in Progress missions in Northside, Rancho Coronado, Coastview and Badlands weren’t completed despite fulfilling the objective.
  • Fixed an issue where some Suspected Organized Crime Activities weren’t completed despite fulfilling the objective.
  • Fixed an issue that could disable all Drop Points, blocking progress in various gigs.
  • Fixed an issue where it wasn’t possible to complete an Assault in Progress in Charter Hill because the evidence didn’t spawn.
  • Cyberpsycho Sighting: House on a Hill – fixed an issue where it wasn’t possible to reach the Cyberpsycho because the garage door didn’t open.
  • Cyberpsycho Sighting: Where the Bodies Hit the Floor – fixed an issue where the quest was stuck on the “Find the Cyberpsycho” objective after defeating the Cyberpsycho and sending information to Regina.
  • Gig: Error 404 – fixed an issue where the gig didn’t trigger after approaching the area.
  • Gig: Freedom of the Press – fixed an issue where it wasn’t possible to proceed inside the TV station building because the doors were closed.
  • Gig: Greed Never Pays – fixed an issue where it was impossible to complete the “Search the hidden room” objective because the computer was unpowered.
  • Gig: Last Login – fixed an issue where the gig didn’t trigger after approaching the area.
  • Gig: No Fixers – fixed an issue where the gig didn’t trigger after approaching the area.
  • Gig: Old Friends – fixed an issue where the gig didn’t trigger after approaching the area.
  • Gig: Playing for Keeps – fixed an issue where it wasn’t possible to speak to the bartender if combat started inside the bar, blocking progress.
  • Gig: We Have Your Wife – fixed an issue where Lauren wasn’t reacting after coming to rescue her, blocking progress.
  • Automatic Love – fixed an issue that could block progress to further main quests after leaving Clouds.
  • Fortunate Son – fixed an issue where it wasn’t possible to progress past the “Return to the Aldecaldos camp” objective.
  • I Fought the Law – fixed an issue where after meeting up with River, he teleported to an unreachable area underground, blocking progress.
  • Small Man, Big Mouth – fixed an issue where the truck in the garage could be despawned, blocking progress.

VISUAL

  • Night City NPCs will now carry umbrellas in various colors and shapes.
  • Fixed multiple instances of missing collisions that could result with player falling off the map.
  • Corrected various floating or displaced objects on the map.
  • Fixed the issue where V’s breasts clipped through clothes after changing their size at a Ripperdoc.
  • Fixed an issue where after changing nail length from long to short using the mirror, the change wasn’t reflected in-game until reloading a save.
  • Fixed an issue where cars could glitch after bumping into them.

GAMEPLAY

  • Fixed an issue where Headhunter and Blue Fang Iconic knives would not appear in vendor’s inventory if player visited the vendor before the 1.6 Patch.
  • Crit Damage and Quickhack Cooldown Reduction bonuses in clothing should now work properly.
  • It should be now possible to craft the Legendary variant of the Amnesty Iconic revolver.
  • Fixed an issue where it was possible to use consumables during fist fights.
  • Fixed an issue where weapons with explosive damage were dealing less damage than intended.
  • Fixed an issue where slotted mods disappeared from an item after selling it to a vendor, leaving and then coming back to the same vendor.
  • Fixed an issue where putting a corpse into a container or a trunk, walking away and then coming back could give a player an infinite amount of money.
  • The Heat-resistant aramid-weave fixer shirt will now be also available for non-Street Kid players.
  • Fixed an issue where firing some weapons when falling could cancel fall damage.

UI

  • The Beast in Me – fixed an issue where player’s position could be shown as 1/6 despite coming second.
  • Fixed an issue where reverting key bindings back to default was not reflected in the game until restart/reload.
  • Fixed an issue where the inventory menu could rapidly scroll up and down after disassembling or dropping an item.

PC-SPECIFIC

  • Fixed the issue with temporary FPS drops when exiting menus.
  • Addressed the issue where achievements in Epic Games Store were not granted despite meeting the requirements. Note that in cases where the conditions were met before in a given save, it might be required to try on a new playthrough or from an earlier save where the conditions were not met yet.
  • Load Menu should no longer get stuck when playing the game on GOG without internet connection.
  • Fixed an issue where upgrading an item into a higher tier rarity crashed the game.

CONSOLE-SPECIFIC

  • Fixed an issue where Cross Progression saves from the Xbox One family weren’t transferred to PC or PlayStation.
  • Fixed an issue where after logging in to GOG on PlayStation, My Rewards section displayed an error.

STADIA-SPECIFIC

  • Fixed an issue where the game didn’t pause when gameplay was suspended.

MISCELLANEOUS

  • Added support for AMD FidelityFX Super Resolution 2.1 (PC and next-gen consoles only).
  • Fixed an issue where in specific circumstances Judy could disappear from the game while in her apartment.
  • Fixed an issue where the Wardrobe interaction in the Nomad Camp was duplicated after skipping time there.
  • It will no longer be possible to play on arcade machines that are placed horizontally.

After more Xbox news? Give us a follow on Twitter.

Cyberpunk 2077
Cyberpunk 2077
Developer:
CD PROJEKT RED
Price:
$29.99

Microsoft’s new Xbox Letterman Jacket is now available

Xbox Gear Shop, Microsoft’s official Xbox merchandise store, has updated with a plethora of new clothes and collectibles recently.

Among the more noteworthy additions to the online storefront isthe Xbox Letterman Jacket, a varsity-inspired jacket with a subtle black Xbox logo on the front, Xbox written on the back, and a bright green inner lining.

“The long-awaited Xbox Letterman Jacket is now available,” the official description reads. “This subtly executed varsity jacket features monochromatic styling with tactile chenille lettering on front and back, and faux leather sleeves. Spirit stick sold separately.”

Other new Xbox Gear Shop items worth checking out include the Age of Empires 25th Anniversary card deck, the new Xbox Green Icon Light, and the Xbox Puffin Drinkware “The Hoodie.”

After more Xbox news? Follow us on Twitter and Facebook.

Fix Access Denied Errors with Ease [CMD, Hard Drive, Folder]

Access is denied message can appear while trying to access certain directories or applications thus interfering with your work. If access to a network share, an Intranet, or the Internet is being refused to you and you are seeing the message above, then you do not have the authorization to access the resource in question and will need to use another account.

How do you fix Access Denied errors on Windows?

1. Take ownership of the directory

1.1 Automatically assign permissions

    The problem is present on all versions, so you can get Access denied message on Windows 11 as well. Luckily, we have solutions that will help you regardless of the version you’re using.

    This error usually appears when you try to access a file or a directory while having insufficient privileges. This happens if you’re not an administrator or if you don’t have ownership over a folder.

    To fix the problem you just have to assign ownership to your account, and you can do that by following these instructions:

  1. 1. Locate the problematic folder, right-click it and choose Properties from the menu.

    click on properties
  2. 2. Navigate to the Security tab and then click the Advanced button.

    click on advanced
  3. 3. Locate the Owner section at the top and click on Change. The Select User or Group window will now appear.

    click on change
  4. 4. In the Enter the object name to select field enter Administrators or your user name, then click the Check Names button. If everything is in order your input will change.

    enter object name
  5. 5. Click OK to save changes. The owner section will now change.

  6. 6. Check Replace owner on subcontainters and objects and click Apply and OK to save changes. Some users are suggesting to check Replace all child object permission entries option, so you might do that as well.

    check the replace owner option

1.2 Manually assign permissioms

In some cases, you might have to manually assign permissions to your account. To do that, follow these simple steps:

  1. Navigate to Advanced Security Settings.
  2. A list of all users will appear. If your user account isn’t listed, click the Add button.
  3. Click on Select a principal.
  4. Now enter your user account name, click Check Names, and then OK. We already showed you how to do that in Step 5 above, so be sure to check it out.
  5. Set Type to Allow and Applies to This folder, subfolders, and files and check Full control. Now click the OK button.

If your user name is already available, simply double-click it and perform Step 5.

1.3 Use Command Prompt to take ownership

Another way to take ownership is to use Command Prompt. To do that, start Command Prompt as administrator and enter the following lines:

  • takeown /f “path_to_folder” /r /d y
  • icacls "path_to_folder" /grant administrator:F /T

Of course, be sure to replace path_to_folder with an actual path to the inaccessible folder. After running these two commands you should have full access to the problematic folder, and thus fix the Access is denied error with Command Prompt.

2. Add your account to the Administrators group

Sometimes Access is denied message appears if you try to access a folder while not having administrator privileges. This can be a problem, but you can fix it by adding your account to the Administrators group.

To do that on Windows 10, follow these steps:

  1. Press Windows Key + X to open Win + X menu. Select Computer Management from the list.
  2. When the Computer Management window opens, navigate to Local Users and Groups followed by Users. Now double-click your account in the left pane.
  3. Navigate to the Member Of tab and click the Add button.
  4. In Enter the object names to select field enter Administrators and click Check Names. If everything is in order, click OK.
  5. Select Administrators and click Apply and OK.
  6. After doing that, restart your PC and check if the problem is resolved.

3. Enable the hidden Administrator account

Windows 10 by default has a built-in Administrator account that you can use. By using this account you should have unrestricted access to your PC.

Due to security measures, this account isn’t easily accessible, but you can enable it by doing the following:

  1. Press Windows Key + X and select Command Prompt (Admin) from the menu.
  2. When Command Prompt starts, run the following command and press Enter. By doing so you’ll unlock the administrator account: net user administrator /active: yes
  3. Now log off of your account and switch to the newly enabled Administrator account. From there you should be able to access your files without any problems.
  4. After you’re done using the Administrator account, go back to your main account and start Command Prompt as administrator again. Now enter the following command to disable the Administrator account: net user administrator /active: no

Keep in mind that after switching back to your main account the issue might still persist. If needed, you can use the Administrator account to make the necessary changes to your system and fix the problem.

4. Check your permissions

Sometimes you’ll get Access is denied message if you lack certain permissions to access the desired directory. However, you should be able to fix the problem by following these steps:

  1. Locate the problematic directory, right-click it and choose Properties from the menu.
  2. Navigate to the Security tab and click the Edit button.
  3. Select your user name from the list and make sure that you check Full control for Allow column in Permissions section.

This is a simple solution, but if your user name isn’t on the list you’ll have to add it manually and then change its permissions.

Several users reported that you need to grant Full control to both Administrators and Users over the problematic folder, so be sure to try that as well.

In some cases, you might even want to give Full Control to Everyone in order to fix the problem.

5. Use Command Prompt to reset permissions

According to users, you might be able to fix this problem simply by using Reset Permissions tool. Simply download the tool, run it, select the problematic directory, and check all available options.

After doing that, you should be able to access the directory without any problems, otherwise, OneDrive may be causing this issue, so to fix it you need to do the following:

  1. Right-click OneDrive icon in the bottom right corner and choose Settings from the menu.
  2. Go to Auto Save tab and set both Documents and Pictures to This PC only. Click OK to save changes.

If that doesn’t solve the problem, you’ll need to perform the following steps as well:

  1. Start Command Prompt as administrator.
  2. When Command Prompt opens, enter the following commands:
    • cd /users/Your_Username
    • icacls Pictures /reset /t /q
    • cd /<path to OneDrive folder>
    • icacls Pictures /reset /t /q
  3. After doing that, restart your PC.

If the problem still persists, you might have to repeat this solution and disable OneDrive until Microsoft fixes the problem.

6. Set your account as administrator

If you’re getting Access is denied message, you might be able to fix it simply by setting your account as an administrator. This is rather simple and you can do it by following these steps:

  1. Press Windows Key + R and enter control userpasswords2. Press Enter or click OK.
  2. User Accounts window will now appear. Check Users must enter a user name and password to use this computer. Now select your account and click on Properties.
  3. Navigate to the Group Membership tab. Select Administrator and click Apply and OK.
  4. After doing that, restart your PC and check if the issue still persists.

7. Close Google Drive and reinstall it

Access is denied message sometimes appears while using Google Drive. To fix the issue, you need to completely close Google Drive and end all processes associated with it. To do that, follow these steps:

  1. Press Ctrl + Shift + Esc to open Task Manager.
  2. When Task Manager opens, locate all Google Drive processes, right-click them and choose End Task from the menu.
  3. After ending all Google Drive processes, uninstall the application.
  4. Now press Windows Key + R and enter %localappdata%Google. Press Enter or click OK.
  5. Locate the Drive folder and rename it to Drive.old.
  6. Install Google Drive again and check if the problem is resolved.

8. Edit your registry

According to users, this error message can appear if you try to access a network-shared directory. This can be a big problem, but you can resolve it by making a few changes to your registry.

Modifying the registry can cause certain issues, so be extra cautious and export your registry just in case. To modify your registry, do the following:

  1. Press Windows Key + R and enter regedit. Press Enter or click OK.
  2. When Registry Editor opens, in the left pane navigate to this key: HKEY_LOCAL_MACHINE\SYSTEM\CurrentControlSet\Services\LanmanWorkstation\Parameters
  3. In the right pane, right-click the empty space and choose a New followed by DWORD.
  4. Enter AllowInsecureGuestAuth as the name of the new DWORD.
  5. Double-click the newly created AllowInsecureGuestAuth DWORD to open its properties. Set Value data to 1 and click OK to save changes.
  6. After doing that, restart your PC and check if the problem is resolved.

Keep in mind that this solution only applies to network-shared folders, so it won’t work with local folders.

9. Turn off User Account Control

User Account Control is a useful feature that will prevent applications and users from running commands that require administrative privileges.

This is a useful feature, but sometimes it can cause Access is denied message to appear, especially when installing new software. To fix the issue, you need to do the following:

  1. Press Windows Key + S and enter user accounts. Now select User Accounts from the list of results.
  2. When the User Accounts window opens, click on Change User Account Control settings.
  3. Move the slider all the way down and click the OK button to save changes.
  4. After doing that, try to install the application again.

10. Disable your antivirus software

Antivirus software is rather important, but sometimes third-party antivirus can cause this error to appear.

According to users, they got Access is denied message while trying to install certain applications, and the cause was their security software.

To fix this issue you just need to temporarily disable your security software and try to install the application again.

If the problem doesn’t appear, it means that the issue was caused by your antivirus software, so you should consider updating or replacing it.

There are multiple efficient antivirus programs that will not interfere with other applications on your PC. Then, discover them and choose from the best antiviruses compatible with Windows10.

11. Change ownership or permissions of Temp and Installer folders

When installing new software its temporary files are usually moved to Temp or Installer folders. However, if you don’t have the necessary permissions, you might not be able to install the desired application.

If this error message appears while trying to install applications, be sure to check if the following folders have the necessary permissions

  • C:\Windows\Installer
  • C:\Users\Your_username\AppData\LocalTemp

If needed, you might have to change ownership or permissions in order to fix this problem.

12. Check environment variables

In some cases, Access is denied message can appear while trying to create a zipped folder in Windows.

This is usually because the %TEMP% variable isn’t properly set. To fix this problem, you need to configure environment variables by doing the following:

  1. Press Windows Key + S and enter advanced system settings. Select View advanced system settings from the menu.
  2. Click on Environment Variables button.
  3. Locate TEMP on the list and check if its value is set correctly. If not, double-click the TEMP and set its value to: %USERPROFILE%AppDataLocalTemp
     
  4. Save changes and restart your PC.

After doing that, navigate to the %TEMP% folder by entering %TEMP% in the address bar in File Explorer. Once you open the Temp folder, try to create a new folder and delete it.

If you can’t create or delete a folder, you’ll need to take ownership of the Temp folder or change your permissions.

13. Fi Access is denied on Windows 10 cmd

1. Pin Command Prompt to Start Menu

If you’re getting Access is denied message while trying to start Command Prompt, you might want to try pinning it to Start Menu.

  1. According to users, this workaround solved the problem for them, so you might want to try it. To do that, simply press Windows Key + S and enter command prompt.
  2. Right-click Command Prompt from the list of results and choose Pin to Start from the menu.
  3. After doing that, try launching Command Prompt using the Start Menu shortcut.

2. Run Command Prompt as administrator

Sometimes Access is denied can appear in PowerShell or Command Prompt while trying to run a certain command.

This message indicates that you don’t have the necessary privileges to access a specific file or to perform a specific command. However, you can fix this issue in most cases simply by running Command Prompt as an administrator.

We already explained how to start Command Prompt with administrative privileges in one of our previous solutions, so be sure to check them out.

14. Fix Access is denied on Windows 10 hard drive

1. Change your permissions

If you can’t access a hard drive partition due to Access is denied message, you might want to try changing your permissions or the owner.

We already explained how to do that in our previous solutions, so be sure to grant Full Control to your user account in order to access your hard drive partition.

Several users reported that you can fix the problem by giving Full Control to Everyone group, so try that as well. Keep in mind that you might have to add the group manually if it’s not available on the list.

It’s crucial to remember that you shouldn’t change the permissions of your system drive. If you have problems accessing your C: drive, you might want to try a different solution.

We have to mention that this solution can be potentially dangerous, so keep in mind that you’re using it at your own risk.

2. Change the sharing settings

According to users, if this error appears while accessing external hard drive you can fix it simply by changing a few settings. To fix the issue, due to the following:

  1. Open This PC, locate your external hard drive, right-click it and choose Properties from the menu.
  2. Navigate to the Sharing tab and click on Advanced Sharing.
  3. When the Advanced Sharing window opens, check the Share this folder option and then click on Permissions.
  4. Select Everyone from the list and check Full Control in Allow column. Click Apply and OK to save changes.
  5. After saving the changes, check if the problem is resolved.

3. Check if USB drives are blocked

Sometimes you might not be able to access an external hard drive due to Access is denied message. This can occur because USB drives are blocked by your registry.

Before we start fixing the problem, we have to mention that this solution can be potentially dangerous, so be extra cautious. To search your registry, do the following:

  1. Open Registry Editor.
  2. Select Computer in the left pane and press Ctrl + F. Enter RemovableStorageDevices, and click Find Next.
  3. If you find RemovableStorageDevices values, set Deny to 0 and save changes.

Keep in mind that these values might not be available on your PC, so if you can’t find them you should probably skip this solution.

4. Uninstall HP Device Manager

If you’re having this error while accessing a hard drive partition on an HP device, you might want to try removing HP Device Manager software.

Several users reported that this application prevents them from accessing their hard drive, so be sure to remove it and check if that solves the problem.

15. Fix Access is denied on Windows 10 Notepad

1. Run Notepad as administrator

This error message can appear sometimes while starting Notepad. If you have the same problem, you should try running Notepad as an administrator.

To do that, simply locate the Notepad shortcut, right-click it, and choose Run as administrator. If that solves the problem, you should set Notepad to always run with administrative privileges.

To do that, follow these steps:

  1. Locate the Notepad shortcut, right-click it, and choose Properties from the menu.
  2. Go to the Shortcut tab and click the Advanced button.
  3. Now check Run as administrator option and click the OK button.
  4. Click Apply and OK to save changes and try to start Notepad using the shortcut. If you did everything right, Notepad will always start with administrative privileges.

2. Change how files open

Access is denied message can appear if Notepad starts automatically with Windows. This is usually caused by .ini files, but you can easily solve this issue. To do that, follow these instructions:

  1. Go to your C: drive.
  2. Click on View and check Hidden files and File name extensions.
  3. Now locate any .ini file in C: directory, right-click it to choose Open with followed by Choose another app.
  4. Select the Provisioning package runtime processing tool and click OK.
  5. Restart your PC.

After your PC restarts, check if the problem is resolved.

3. Delete desktop.ini files

If Notepad and Access is denied message appears every time you start your PC, you might want to try deleting the desktop.ini file.

This file is located in these directories:

  • C:\Users\Your_Username\AppData\Roaming\Microsoft\Windows\Start Menu\Startup
  • C:\Program Data\Microsoft\Windows\Start Menu\Programs\Startup

Visit both directories and remove desktop.ini files from them. Keep in mind that this file can be hidden, so be sure to reveal hidden files and folders. We already showed you how to do that in our previous solution, so be sure to check it out.

After deleting desktop.ini files, the problem should be completely resolved and Notepad won’t start anymore along with Windows.

Why is Access denied when I am the administrator?

User Account Control is a helpful security feature that is included with Windows 10. The purpose of this feature is to alert you anytime you or an application tries to carry out an action that needs administrator capabilities.

Even if you are logged in with an administrative account, you can get a notice saying that access is forbidden when you try to use this function. You may get around that however by turning off the User Account Control option on your computer.

To find out more solutions, check out our guide on how to fix Access denied on Windows 10/11 administrator account.

You might also want to read our article on what to do if the default save location couldn’t be set for more information.

Another variation of the access denied error is an error occurred while attempting to create a directory when you attempt to install a program. This message usually means that you don’t have the proper privileges to access this directory. Sometimes, you might even get Access denied message on administrator account.

In other instances, you’ll get You need permission to perform this action error. In most cases, switching to a proper account or taking ownership of the folder in question will fix the problem.

Access is denied message can affect both files and folders, and it can even prevent you from installing new applications. This can be a big problem, but we hope that you manage to solve it by using one of our solutions.