Recently, several users have started facing a weird History is temporarily unavailable error with ChatGPT. This error pops up when someone tries to use the ChatGPT platform. They are thrown an error message History is temporarily unavailable. We’re working to restore this feature as soon as possible.
This may be caused by a server outage, corrupt browser cache, local network issues or problems with your ChatGPT account. Before anything else, try restarting your browser or open ChatGPT on another browser, check if your network connection is working fine and, most importantly, check the ChatGPT server status.
How can I fix the History is temporarily unavailable error with ChatGPT?
1. Clear your browser cache
1.1. Google Chrome
Launch your web browser.
Click on the 3-dot menu icon at the top right.
Select Settings.
Click on Privacy and security.
Hit the Clear browsing data option.
Check the boxes for Browsing history, Cookies and other site data, and Cached images and files option.
Hit the Clear data button.
Restart your browser.
Visit the website and load ChatGPT history.
1.2. Mozilla Firefox
Click on the 3-line menu icon.
Select Settings.
Choose the Privacy & Security tab from the left.
Locate Cookies and Site data section.
Click the Clear data button.
Select both Cookies and Site Data and Cached Web Content boxes.
Click the Clear button.
Browser caches are often the main culprit when they go corrupt or are missing. Cache files store your website data to load the pages faster with your applied settings.
If they get corrupt then it can cause issues such as the History is temporarily unavailable error with ChatGPT. Clear the browser cache and check if this fixes the issue or not.
2. Open the old history link of ChatGPT
Launch your web browser.
Click on the 3-line menu icon.
Select History.
Locate the old links of your visit to the ChatGPT website.
Open the previous links in a new tab and check if this lets you load the history.
Log in with your credentials and check if this history is available or not.
There might be some issues with your ChatGPT login account. This could be the reason why you are coming across the History is temporarily unavailable error with ChatGPT.
Try logging out and re-logging back in with your credentials and check if this fixes the issue or not.
If nothing works, then as a last resort, you can contact OpenAI support for further assistance. Apparently, the error is from their end if the above solutions aren’t helping you. You can visit the website mentioned above, explain your issue, and hope to get a resolution soon.
That it is from us in this guide. We also have a guide that explains how you can fix The Conversation is Too Long ChatGPT Error.
If you are coming across the ChatGPT Bad Gateway issue, then you should apply the solutions in our guide and fix the issue at your end.
For interested readers, if you wish to understand the differences between Bing AI vs ChatGPT 4, then you can check out our guide that lists some major differences between the two.
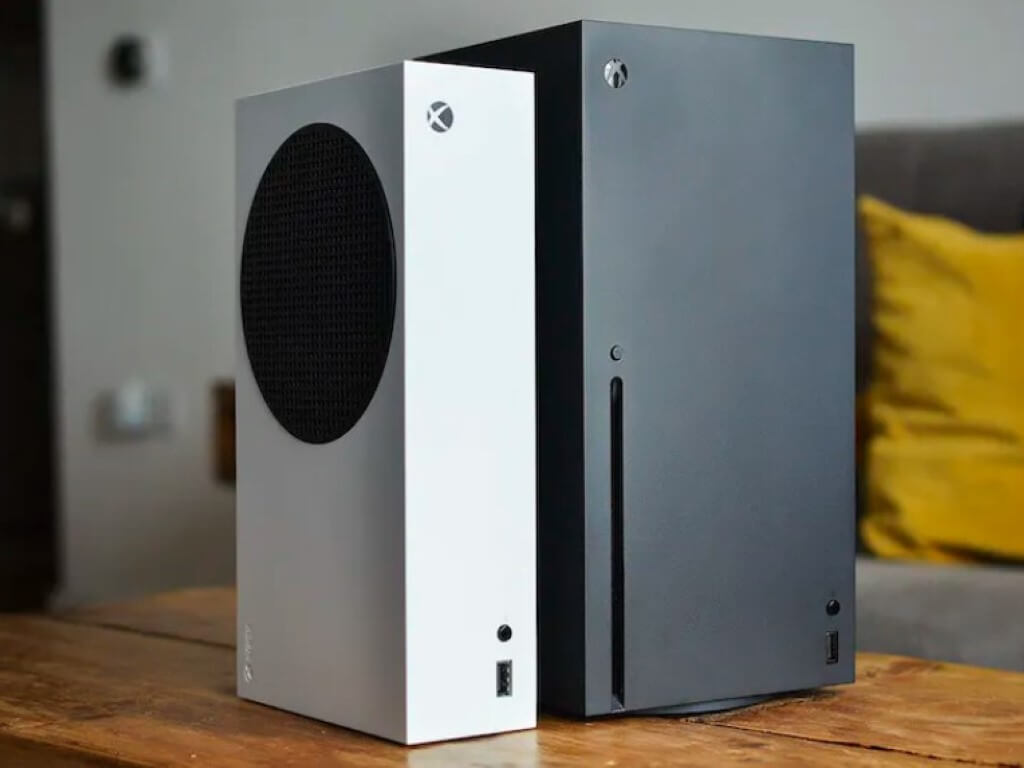
The latest custom console giveaway is here and this time it is none other than Sony’s MLB The Show being featured. That’s right: a custom Xbox themed around a PlayStation Studios game. Which makes this particular custom Xbox all the more exciting just for the sheer irony of it.
You won’t find this MLB The Show Xbox Series S in stores. But you can enter for a chance to win just by following the official Xbox Twitter account and retweeting the sweepstakes post with the hashtag #XboxMLBSweepstakes.
When it comes to cloud storage applications, Dropbox is at the helm. However, this doesn’t exclude it from the occasional errors here and there. One such error is Dropbox error 404. It prevents you from clicking a shared link and displays the error message instead.
This can happen when you try to access a file that has been deleted or moved by another user or if the link provided in your email doesn’t work anymore. Let’s find out more about this error code and possible solutions.
What is Dropbox error 404?
If you see a 404 error when you click on a link in Dropbox, it means that the file or folder you are trying to access does not exist. This can happen for several reasons:
The file has been moved – The most common cause of this error is that the link was moved to a new location, and the user has not informed you.
Outdated app – You may have an outdated version of Dropbox installed on your computer.
You’re accessing the link from another account – If you’re accessing files on another computer or mobile device which are not connected to your account, the link may be protected.
The file or folder you’re trying to access does not exist anymore – The link was likely changed or updated.
Outdated link – Sometimes, users share timed links that expire after a certain period. If you click on the link after its expiry, you cannot access it.
You may have typed the URL incorrectly – If you copy or type the link elsewhere, it is possible you may have copied it incorrectly.
Try accessing the folder from within Dropbox’s web interface. Sometimes the problem is within the Desktop app, but the link works fine on the web version.
Clear browser cache and cookies if using a browser.
Open the link in an incognito/private tab.
Verify whether your link has been banned from the Dropbox website and the subsequent steps to resolve it.
1. Run the Windows Store Apps troubleshooter
Hit the Windows key and click on Settings.
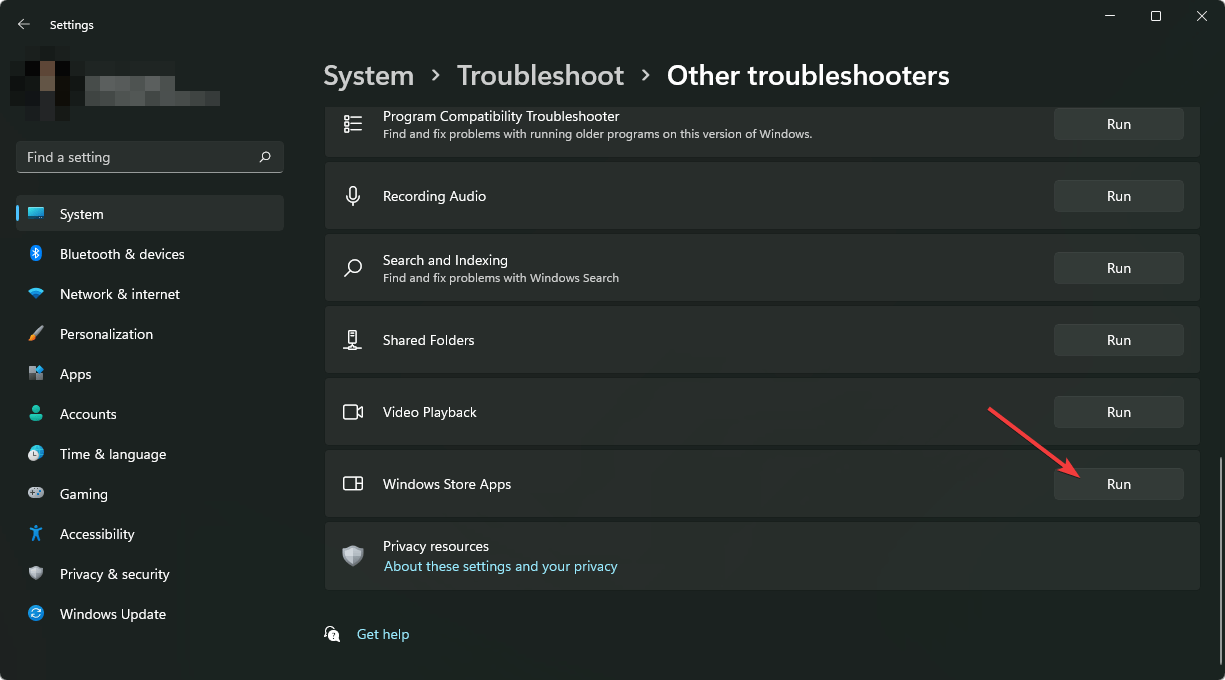
Click on System on the left pane, then Troubleshoot on the right pane.
Select Other troubleshooters.
Scroll down, locate Windows Store Apps, and click the Run button.
2. Disable Firewall/antivirus temporarily
Hit the Start Menu icon, type Windows Security in the search bar, and click Open.
Click on Firewall & network protection, then select Public network.
Locate Microsoft Defender Firewall and toggle the off button.
3. Clear the Dropbox cache
Press the Windows + E combination to start File Explorer.
Navigate to the cache using the following or paste it to the search option: %HOMEPATH%Dropbox.dropbox.cache
Press CTRL + A to select everything in the folder.
Click on the Delete icon and click OK, to remove everything from the folder.
Press the Start Menu, search Windows Security, and click Open.
Select Virus & threat protection.
Next, press Quick scan under Current threats.
If you don’t find any threats, proceed to perform a full scan by clicking on Scan options just below Quick scan.
Click on Full scan to perform a deep scan of your PC.
Wait for the process to finish and restart your system.
5. Repair/reset the Dropbox app
Hit the Windows key and click on Settings.
Click on Apps on the left pane, then Apps & features on the right pane.
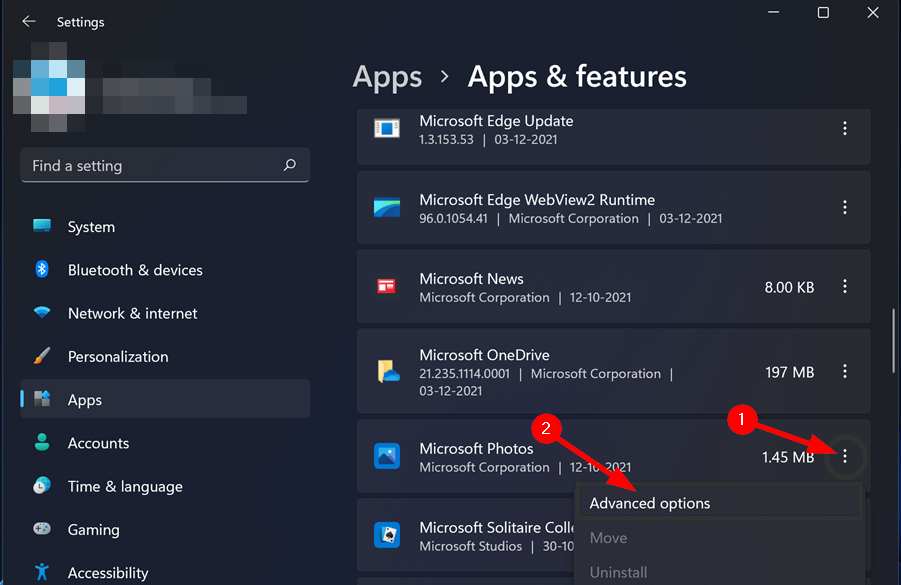
Locate the Dropbox app, click on the three vertical ellipses, and select Advanced options.
Click on Repair.
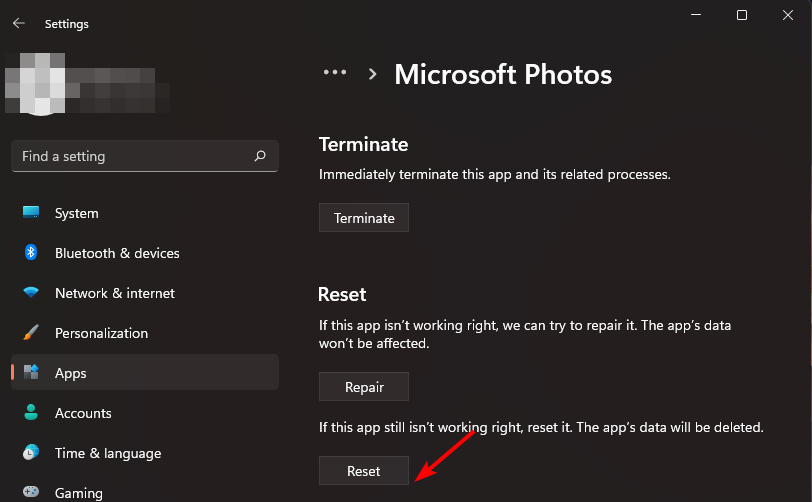
Go back and click on Reset.
6. Reinstall Dropbox
Hit the Windows key and click on Settings.
Click on Apps on the left pane, then Apps & features on the right pane.
Locate the Dropbox app, click the three vertical ellipses, and select Uninstall.
If none of these work, you may have to contact Dropbox support for further assistance. Your Dropbox app may also fail to open, but do not worry; we have curated a few steps to help you avert such crises.
Do let us know of any additional comments, suggestions, or queries you may have on this topic in the comment section below.
Excel has many features on its toolbar that allow you to perform loads of operations. The features are plenty, so some users may not notice that some are missing. However, for others, some features, such as the stock data type, may not be showing on your toolbar.
Excel is not new to errors, as the toolbar has also been known to make a disappearing act at times. Still, if you desperately need to use this function, you’ll need a quick fix, and here is how this article comes in.
Why is the Excel stock data type not showing?
If you’re wondering why your Excel stock data type is not showing, below are some possible reasons:
Older version – This can occur if you use a workbook created in an older version of Excel. You may find that data types are not in Excel 2016 but are in newer versions.
Add-ins – The problem may also occur if you have recently installed an add-in that changes how the stock data type is displayed.
App failure – Sometimes, apps are prone to failure, especially after a recent update.
Microsoft servers – Most Microsoft products need to reach the server to load all functions. If there’s a problem reaching them, your Excel stock data type may not be showing.
Expired subscription – You need a Microsoft 365 subscription to use Office products. If yours has expired, you may not have access to all features.
Interrupted connection – If your network connection is experiencing issues, Excel will have trouble connecting to the Microsoft servers and hence can’t load the files.
Incompatible data – It is also possible that the data you are trying to enter into your spreadsheet is not compatible with the Excel stock data type.
What can I do if Excel stock data type is not showing?
We advise that you check the following and ensure they are in place before trying out any advanced troubleshooting:
Ensure your Microsoft 365 subscription is current.
Ensure you are using a version of Excel that is compatible with your version of Windows.
Check that you don’t have multiple versions of Microsoft Office installed on your computer.
Finally, restart your PC to clear out any temporary files that may prevent the stock data type from showing.
1. Run Excel in Safe Mode
Click the Search button from the taskbar, type Excel, then right-click on it and select Open file location.
Press and hold the Ctrl key and double-click the Excel executable file.
Click Yes when you’re prompted if you want to open Excel in Safe Mode.
2. Use a VPN
For users who might be in geo-restricted areas, using a VPN can help you bypass internet restrictions that may be blocking your Excel from reaching Microsoft servers.
3. Disable Excel add-ins
Launch Excel, and click on the File menu.
Click on More, and then select Options from the flyout menu.
Go to the Add-ins tab, and with Excel Add-ins selected in the Manage dropdown menu, click on Go.
Now, uncheck all the add-ins listed here, and click OK to save the changes.
Again, go to the Add-ins tab, choose COM Add-ins from the dropdown menu, and click Go.
Go back and disable any remaining Add-ins.
4. Repair Microsoft Office
Right-click the Start Menu icon and click on Settings.
Type Control Panel in the search bar and click Open.
Go to Programs and select Uninstall a Program.
Now, click Microsoft Office and select Change.
Finally, click Online Repair, then select Repair.
Alternatively, you can click on Windows Settings, select Apps, then click on Apps & features.
Locate Microsoft Excel/Office, click on the three ellipses and select Advanced options.
Next, click on Repair.
Once the repair process completes, restart your computer and check whether the issue still occurs or not.
It looks like a slightly less-overpriced storage option is on the horizon for Xbox Series X|S owners. As reported by The Verge and others, a listing for a new Series X|S expansion card from Western Digital was spotted on Best Buy’s website. The listing has since been removed, but fortunately images of the card have been made available online.
As you can see above, the Western Digital 1TB card is priced at $179.99 USD, making it $40 cheaper than Seagate’s 1TB offering at $219.99.
More storage options are much needed, especially for the 512GB Series S (which only affords the user about 364GB, with the rest reserved for the system). Considering that many modern games require upwards of 50-60 or even 100GB, that 364GB proves scarcely adequate for many gamers.
With Seagate as the sole manufacturer for Series X|S expansion cards, prices have refused to budge even though the console is in its third year on the market. Maybe the arrival of a new competitor on the scene in Western Digital will change that. Note that neither Western Digital or Microsoft have commented on the listing, and there has been no official announcement regarding the new product.
Microsoft has integrated its Bing Search Engine with ChatGPT, effectively combining the strengths of both platforms. The merged version, Bing Chat, delivers accurate answers while displaying relevant search results simultaneously. One Redditor offered some tips on getting better Bing Chat results and how to leverage the platform for more effective research paper searches. Here’s what we learned:
What is Bing Chat?
Bing Chat is an artificial intelligence-enabled chatbot that comprehends the nuances of your inquiry and provides human-like responses. Microsoft has efficiently integrated this attribute into its Bing Search platform, making it a comprehensive solution for search inquiries and AI-driven responses. The rollout of Microsoft’s Bing AI is currently underway for all users, following its initial introduction as a limited beta feature. Initially, a waitlist was in place for users to access the AI-powered chatbot, comparable to the popular ChatGPT chatbot.
How to access Bing Chat?
Proper login authentication requires you to have a valid Microsoft ID. For new users, the prompt to join the wishlist might still appear. If you choose to join, logging in with your Microsoft ID will allow you to obtain fast access. It’s worth noting that some users have received access to Bing Chat roughly two weeks after joining the waitlist.
Here’s how to access the chatbot:
Open The New Bing and select Chat.
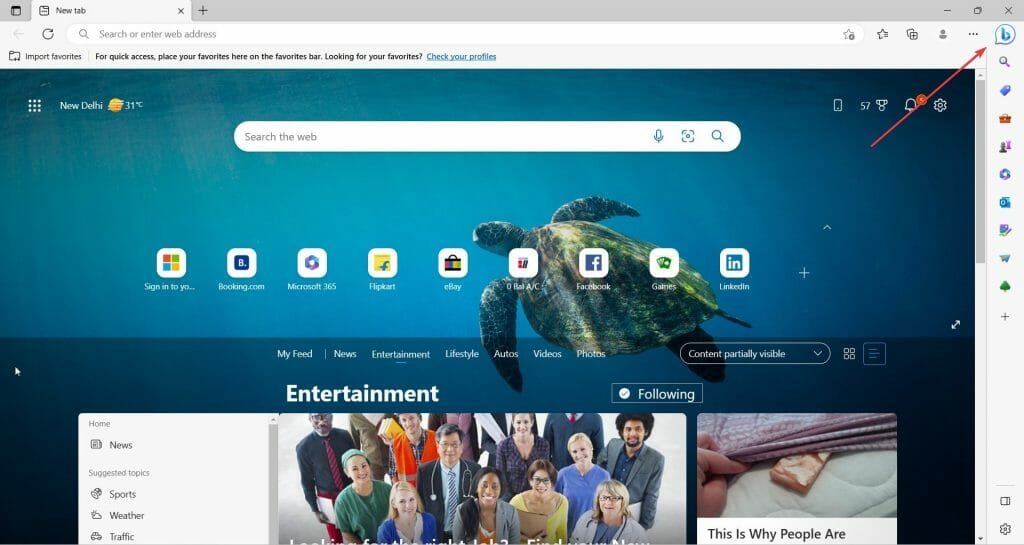
We have observed that the feature appears to function effectively on the Edge browser, here’s how:
Open Microsoft Edge and navigate to the B ICON.
Select the B icon on the top left.
Upon being granted access, ChatGPT-4 can technically be used by users for free. OpenAI, the creator of ChatGPT, recently introduced GPT-4 LLM, which is currently only available to ChatGPT Plus subscribers. Concurrently, Microsoft, a fellow investor in OpenAI, has integrated GPT-4 technology with its proprietary ranking tools to enhance Bing Chat. This means that Bing users can utilize GPT-4 free of charge.
The advanced LLM technology can deliver refined and precise responses to user queries. Additionally, OpenAI has claimed that GPT-4 can effectively analyze images, which may aid users in recognizing objects or translating image texts. While this feature is still not widely accessible and is currently being tested with a single partner, OpenAI continues to pursue its development.
How to use Bing Chat to provide better research paper search results
If you want to achieve optimal results when conducting research papers using Bing Chat, it is imperative to be precise and provide intricate details. For instance, when requesting peer-reviewed studies on the correlation between ‘Sleeping Hours and Academic Performance,’ ask Bing Chat the details of three different studies, each citing the date of publication, a concise overview of the abstract and conclusion, the main author, and an MLA citation, all presented in a bullet point format. Furthermore, you must maintain a professional tone throughout the process.
Moreover, it is essential to enable the precise mode for Bing AI to avoid inaccurate results, as it may generate information that does not correspond to the available web data while attempting to answer your query.
Is there anything else that we could help you with, please let us know in the comments section below.
The month of March has officially come to an end, and just like every other month, Microsoft has highlighted all the neat features that it released to Microsoft Teams for the month of March. Here’s everything you need to know:
Teams (free) on desktop and web
Microsoft has made it easier for Teams users to keep up with everything going on in the platform. This applies to chat or channel notifications and even new features making their debut on the platform.
These kinds of notifications will be characterized by a little red dot on the taskbar. You can also check for new features under the three dots menu in the top right-hand corner as ‘What’s new’ when using Windows 11 Chat.
Additionally, Microsoft is also making it easier for users to play videos in a community. Whenever a video is shared and the user clicks play, the video will play in line with the community.
What’s more, Teams users now have the capability to invite users to meetings via SMS. All you need to do is, enter the user’s phone number as a recipient and they’ll automatically receive a text message that features a link to join the meeting.
As for Teams mobile users, Microsoft is making it easier for them to share content with communities using the native sharing options on mobile. “When you want to share something, your recent communities are shown, and you can just pick one to share the content to,” says Microsoft.
Moreover, the company is also enhancing security for communities. Communities on mobile are now protected by safeguards to shield them against malicious content.
Whenever malicious content is detected, automated mechanisms get rid of it and leave a placeholder indicating that the content was removed.
And finally, whenever a community invite is sent to you by a community owner, the invite will be featured in the mobile app. The decision is entirely up to you to decide whether or not you’ll accept the invite.
Xbox remote play is a great feature that enables gamers to play their favorite games on smartphones, laptops, and more without being in front of their console.
This feature is quite convenient; however, some users have reported experiencing sound crackling while using Remote Play. It can be a frustrating issue and spoil your gaming experience.
In this guide, we will discuss some potential causes of the problem and the steps to fix the issue so that you can enjoy playing games without disruption.
What causes the crackling audio issue on Xbox remote play?
There could be various reasons why you facing this sound-related issue; some of the common ones are:
Xbox is outdated – If your Xbox has pending updates to be installed, then you might face all sorts of issues, like this one. Install the update to prevent all the issues.
App cache – Sometimes, the Xbox app cache on your device, including tablet, laptop, or mobile, can cause such issues. To fix it, clear the app cache from your device.
Alternate Wireless MAC address – If you have selected an Alternate Wireless MAC address on your console, then it could cause sound issues. You need to clear it to fix the problem.
Weak internet connection – If your internet connection is not stable, the game you are playing might able to establish a proper connection, hence the issue. Check your internet connection to ensure that’s not the case.
How can I fix the crackling audio issue on Xbox remote play?
Before engaging in advanced troubleshooting steps, you should consider performing the following checks:
Restart your router.
Switch to an internet connection with higher bandwidth.
Power cycle your Xbox console.
1. Clear Alternate MAC address
Press and hold the Xbox button on the controller to get to the guide menu.
Go to System, then click Settings.
Click General, then select Network Settings.
Under Network, click Advanced Settings.
Choose the Alternate Wireless MAC address and click Clear.
Restart your console.
2. Restart the Console using your smartphone
Launch the Xbox app on your smartphone.
Locate the Console icon from the top right corner and tap it.
Choose your console from the list.
Tap the Open remote control option.
Locate three vertical dots from the top right corner and tap them.
If any of the services relevant to the issue is down, wait until the service is live again.
So, these are methods that you can use to fix the cracking audio issue on Xbox remote play and enjoy seamless remote play sessions on your device. Try them and let us know what worked in the comments section below.
A common problem many players complain about is the Sea of Thieves crashing on their computers. The game can go blank, close abruptly, or become unresponsive on startup or during gameplay. Fortunately, the issue isn’t fatal, and we’ll take you through the steps to fix it.
Many factors may be responsible for crashing the Sea of Thieves game on your PC. Some are:
Outdated GPU drivers – PC gaming activities use lots of graphics resources and power. So, running outdated or faulty graphics drivers can cause issues with the game, resulting in the Sea of Thieves crashing on your PC.
System requirements issues – Sea of Thieves has minimum and recommended system requirements that determine the device’s specifications that can run it. Hence, you may experience the game crashing on your computer due to your system not meeting the requirements for the game.
Interference from background apps – Running too many background processes on your PC may cause issues with your gaming activities. These background apps can consume the system resources and leave the Sea of Thieves game to use insufficient resources.
Corrupt or damaged game files – The game crashing on your computer can occur when launching or during gameplay due to its installation files being corrupted.
Moreover, these causes are liable to vary in different PCs. Regardless, you can follow the steps below to fix the issue and get your game running smoothly.
What can I do if Sea of Thieves keeps crashing on my PC?
Before trying any advanced steps, go through the following:
If the issue persists, proceed with the solutions below:
1. Run in Compatibility Mode
Press Windows + E to open File Explorer.
Go to the installed Sea of Thieves directory, right-click on it, and select properties from the drop-down.
Select the Compatibility tab and check the box for the Run this program as an administrator option. Check the box for Run this program in compatibility mode, then choose a Windows version from the drop-down.
Click OK to save the changes.
Running the game as an administrator will resolve permission and compatibility issues causing it to crash. Check what to do if running as administrator is not working on your PC.
2. Update your Graphics driver
Press Windows + R keys to prompt the Run window, type devmgmt.msc, and click OK to open the Device Manager.
Expand the Display adapter entry, right-click on the device driver, then select Update driver.
Click on Search Automatically for the driver software option.
Restart your PC and check if the game crash issue persists.
Updating the graphics driver will fix bugs affecting the game and install the latest features to improve performance. Check other steps for updating graphics drivers on Windows 11 if you have any issues.
Alternatively, you can update not only your graphics driver but all outdated ones faster and more effectively with a specialized tool.
Outbyte Driver Updater is one of the driver updaters we suggest because it analyzes your computer to find outdated or malfunctioning drivers and update them with the latest options.
Left-click the Start button and type Steam, then double-click to open it.
Select the Library tab. Right-click on Sea of Thieves from the left pane and choose Properties.
Select the Updates tab and click on Always keep this game up to date. Steam will automatically search for the available update.
Restart your PC.
Updating the Sea of Thieves games will install new patches for fixing bugs affecting its performance. Check for solutions if you are unable to update Sea of Thieves on Windows 11.
Left-click the Start button and type Steam, then double-click to open it.
Select the Library tab, right-click on Sea of Thieves, and choose Properties.
Click the Local Files tab and select the Verify Integrity of Game Files button.
Verifying the game file integrity will resolve corrupt or missing game files causing the game to crash. Read more on how to verify the integrity of game files not working for more advanced steps.
In addition, you can check our article about ways to fix games crashing on Windows 11 for more effective solutions.
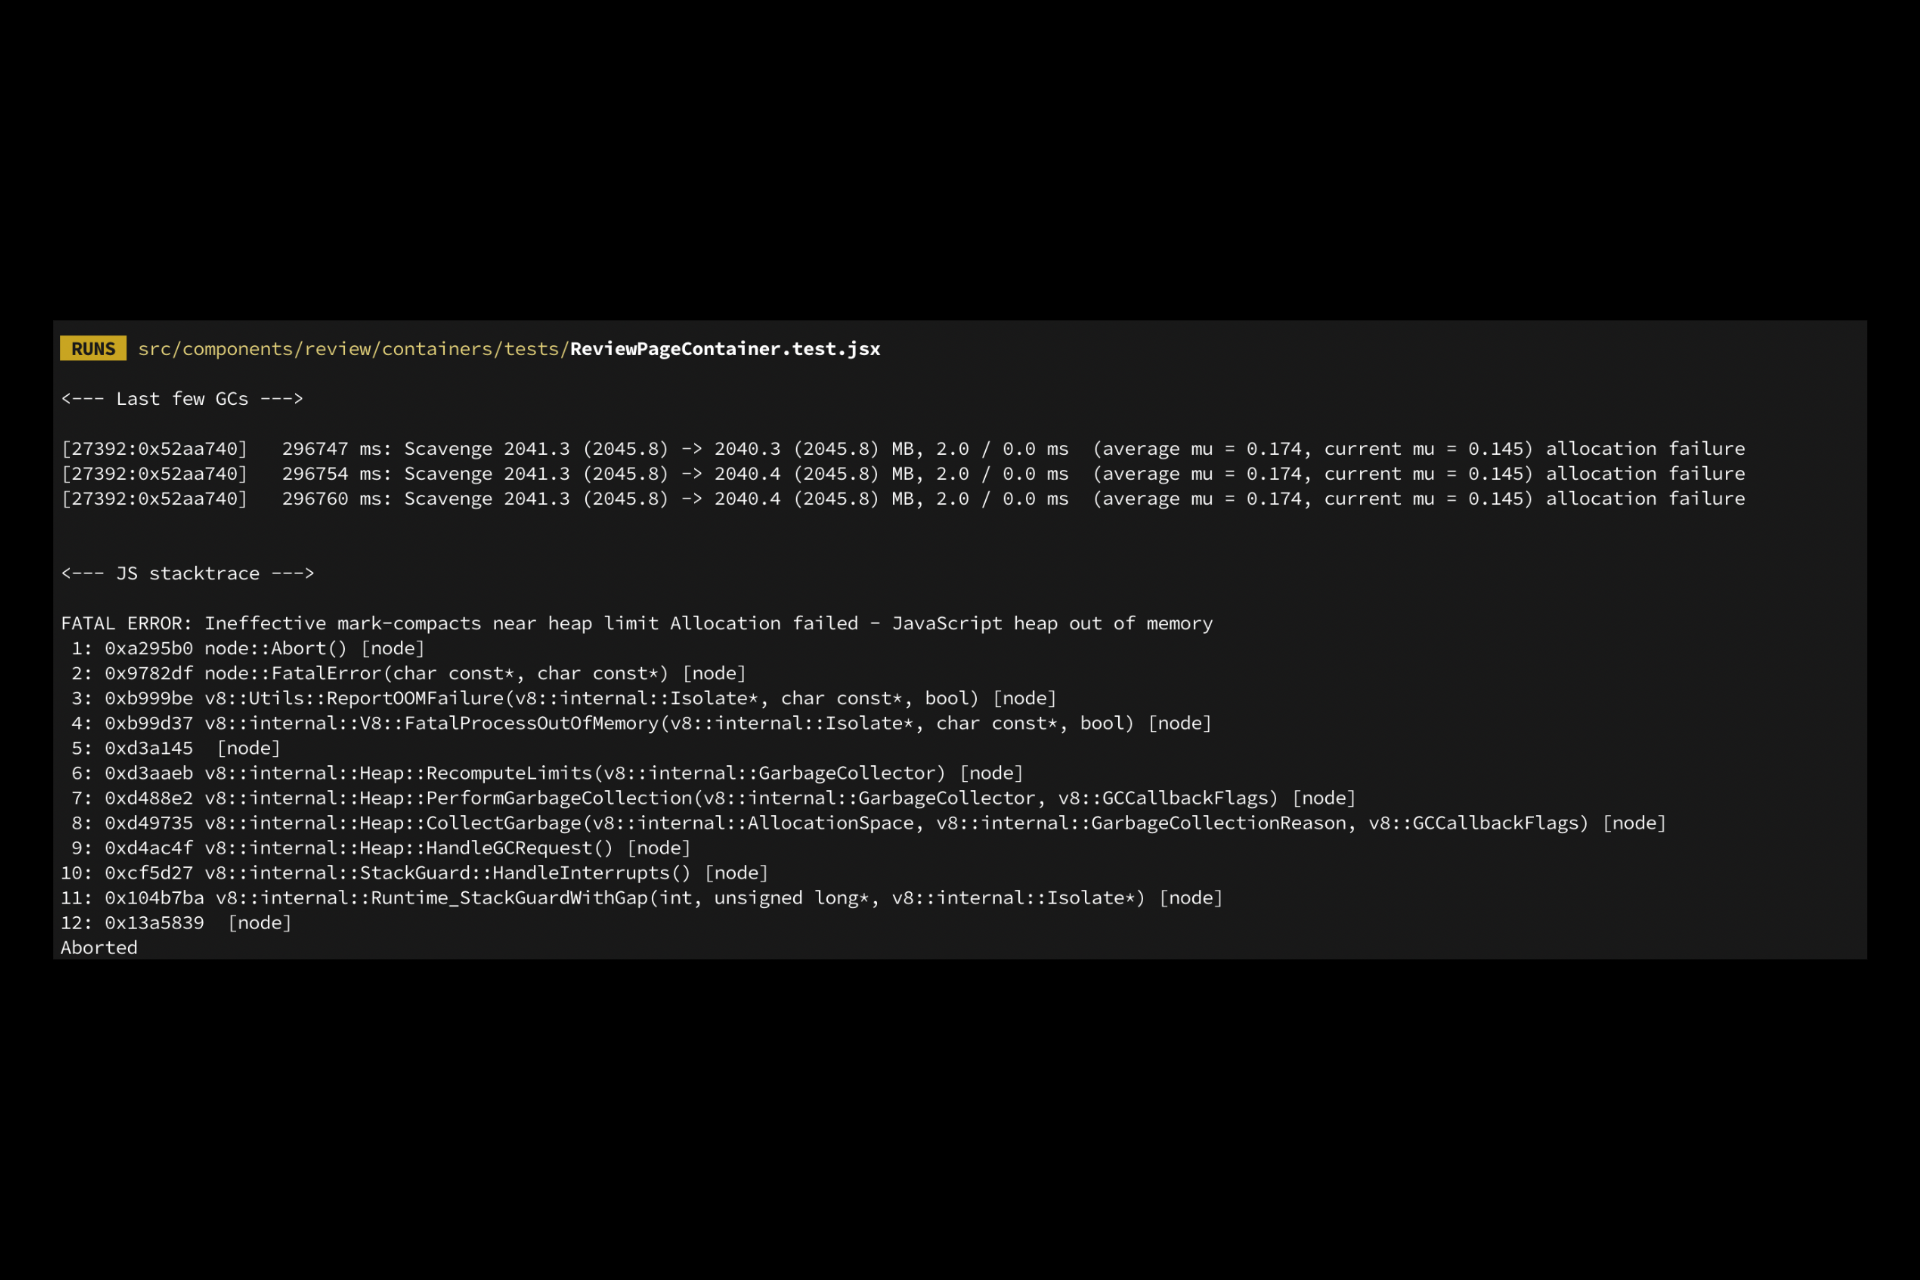
If you have encountered the JavaScript heap out-of-memory error, this guide can help! This often happens if the application runs out of memory. We will cover all the available fixes right after discussing the causes of the same. Let’s start!
What causes the JavaScript heap out of memory error?
There could be various reasons why the project crashed and presented you with this error; some of the common ones are mentioned here:
Large objects present – If the code has a lot of large objects, then memory consumed by those objects collectively leads to an overload, hence the error.
Insufficient amount of memory allocated – If the default amount allocated by Node.js is insufficient to complete a command, you might encounter this error.
Memory leaks – As the app grows, it is important to delete some objects you don’t need; if not done, you might get this error.
Large data structures – If you work with large data structures such as arrays or matrices, it can consume a lot of space, causing this error. Additionally, when working with arrays, ensuring efficient use of array methods is crucial. Learn more about fixing Array.prototype.map() Expects a Return Value in JavaScript to optimize your code and prevent memory issues.
Infinite loops – Infinite loops use memory pretty fast, and it might cause this error.
What can I do to fix the JavaScript heap out of memory error?
1. Use the Control Panel
Press Windows + E to open Windows Explorer.
Go to This PC, right-click it, and select Properties.
From the next page, select Advanced system settings.
Switch to the Advanced tab, and click Environment Variables.
Click New on either System variables (changes apply to the entire computer) or User variables ( applies the changes to a user account).
On the next window, for the Variable name: enter Node_Options.
Now for Variable value: –max-old-space-size=4096
Click OK. You can change 4096 to 8192 as well to allocate more space.
On the Environment Variable window, click OK.
Now click Apply and OK to save the changes.
2. Use PowerShell
Press the Windows key, type PowerShell, and click Run as administrator.
Copy and paste the following command and press Enter: env:NODE_OPTIONS="--max-old-space-size=4096"
To temporarily solve the issue, you can type the following command and press Enter before opening the app: set NODE_OPTIONS=--max-old-space-size=4096
So, these are methods to fix the JavaScript heap out-of-memory error. To avoid this error in the future, it is advised to split your data into smaller chunks and delete the objects that are no longer needed. Try them and let us know what worked for you in the comments section below.
Security is essential and two-factor authentication (2FA) has become common to keep accounts secure. However, some Microsoft users have reported not receiving their security code. Therefore, we will examine why Microsoft is not sending security codes and how to fix the issue.
Likewise, you can read about how to set up two-factor authentication in Windows to prevent hijacking your account.
Why is Microsoft not sending a security code?
There are several reasons why Microsoft may not be sending security codes which are:
Incorrect contact information – The security code message will not be delivered if there is a mistake with the contact information linked to your Microsoft account.
Spam filter – You may not receive the security codes in your email if your email provider filters the message as spam or junk. So check your Spam or Junk folders regularly.
Service outage – In some cases, a temporary service outage or maintenance on Microsoft’s end can affect the delivery of security codes.
The factors stated above vary in different circumstances. Regardless, we will discuss how to fix Microsoft not sending security codes.
What can I do if Microsoft is not sending the security code?
Before taking any significant steps to fix the issue of Microsoft not sending security codes, try these:
Many of our readers have complained about struggling to connect their PS5 console to an internet connection like Wi-Fi or Ethernet network. They report the error indicating the PS5 console can’t obtain an IP address within the time limit. However, this article will discuss basic steps to fix the issue.
Why is my PlayStation failing to obtain an IP address?
Several factors may be responsible for the PlayStation5 not obtaining an IP address for the internet connection. Some notable ones are:
Router connection issues – The most common cause of the PS5 console failing to obtain an IP address is a faulty or unstable router. An outdated router firmware can cause your network connection to fail due to bugs and compromised components.
DNS error – The error may occur if the DNS server running on the console is not working. It can be because the DNS settings are not correctly configured, causing PS5 to fail to resolve the IP address from the server or requested resources.
Issues with PS5 console network settings – You may experience internet issues if your console’s network configuration impedes its connection to network devices like routers and Ethernet. Hence, it causes the PS5 redirect error, preventing it from obtaining any IP address.
Nonetheless, you can fix the problem by troubleshooting your network device and the PS5 console.
What can I do if my PlayStation fails to obtain IP address?
Before trying any advanced troubleshooting steps, go through the following:
Reconnect the console to the network device.
Restart the PS5 console and check if the problem persists.
Power cycle your Router or Modem.
Check for Router Firmware updates – Using the router for a long time can cause its firmware to become outdated and infected with bugs. You can read our article on router Firmware updates for more steps.
If you can’t resolve the error, proceed with the solutions below:
1. Change PS5 console DNS Settings
Launch the PlayStation Settings from the Home Menu.
Click on Network from the drop-down window.
Select Setup Internet Connection and choose the connection type like LAN or Wi-Fi.
Click on the Custom button and set the IP Address field to Automatic.
Click on the Do Not Specify for the DHCP Host Name field and select Manual for DNS under the DNS Settings.
Type in the following DNS values:
Primary DNS: 8.8.8.8
Secondary DNS: 8.8.4.4
Click the OK button.
Restart your console if the PS5 can obtain the IP address and connect smoothly.
Changing the PS5 DNS server’s configuration allows it to quickly translate the web addresses and read IP addresses.
2. Run a Network test on the PS5 console
Select Settings from the console’s Home Menu.
Click on Network from the drop-down window, then select Connection Status.
Select Test Internet Connection and wait till the test completes.
Follow the on-screen instructions and check if the IP address error persists.
Backing up your files is important, and many reported error 0x8078011e while using Windows Backup. If this issue occurs, you won’t be perform a backup at all.
In case you’re not familiar with this tool, it allows you to set up automatic backups on Windows, so it’s great for protecting your data.
However, there are several methods that you can use that will help you fix this issue once and for all, and today we’re going to show them to you.
What is error code 0x8078011e?
This is a Windows Backup error code, and the full error states the following: Windows Backup failed to get an exclusive lock on the EFI system partition (ESP). Regarding the causes, here are the most common ones:
Conflicting software – Sometimes certain applications can interfere with Windows Backup and cause this issue. To fix it, you need to remove them manually or by using uninstaller software.
Antivirus settings – In some instances, your antivirus will protect certain directories, thus causing this issue.
How can I fix the 0x8078011e error?
1. Uninstall third-party antivirus software
Press Windows key + X and choose Apps and Features.
Locate your antivirus software and click on Uninstall.
Follow the instructions on the screen to remove it.
Many users reported that Avast was responsible for this issue, so if you use it, uninstall it and check if that solves the problem. For more information, visit our how to uninstall Avast Antivirus guide.
Keep in mind that other antivirus software could cause this issue as well.
2. Remove Armoury Crate software
NOTE
This method only works if you’re using an ASUS motherboard and have Armoury Crate software installed.
Locate Armoury Crate Uninstall Tool and click the Download button.
Wait for the software to download.
Once it’s downloaded, start it and follow the instructions on the screen to complete the uninstall process.
3. Add exclusions to your third-party antivirus software
NOTE
Keep in mind that the instructions will vary depending on your antivirus of choice.
Open your antivirus software.
Open Settings and click Edit in the Exclusions section.
Now click Add and the dots icon next to thePath.
Add the following paths: \Device\HarddiskVolume1\EFI\Microsoft\Boot\BCD \Device\HarddiskVolume1\EFI\Microsoft\Boot\BCD.LOG \Device\HarddiskVolume1\EFI\Microsoft\Boot\bootmgfw.efi %WINDIR%\system32\winload.efi
WebEx and Zoom are some of the best PC conferencing software on the market, but which one is better for you? To help you decide, we’ve confronted their features in a WebEx vs Zoom comparison battle.
How do I choose the right conferencing software?
Video conferencing software is a key component to performing meetings within your organization, especially if the workforce is scattered worldwide. They can be used for business or personal purposes, but here are some of the key elements when choosing such an app:
Quality audio and video – This part mostly depends on your connection but the app itself may also influence the audio and video quality and testing them individually may be the best way to determine which one is better for your needs.
Document and file sharing – The best video conferencing tools allow you to share documents and files in real-time with your participants.
Implementation & integration – If you’re using the conferencing tool for business purposes, make sure you can integrate it with your other tools for scheduling meetings and task management.
Security – Especially if you’re using it for business, the app should encrypt all your communication, including file transfers.
Easy of use – Last but not least, the app should be simple to install and use by anyone at any time.
Now, that we know some important aspects of web conferencing tools, let’s see how WebEx and Zoom deal with them.
WebEx vs Zoom: which one is the best for you?
WebEx
Developed by Cisco, WebEx Meetings will get you very good services for corporate needs. The app allows you to add up to 100 participants in video calls.
Moreover, you can create webinars of 100 to 10.000 participants if you need to do that.
This solution goes way beyond audio-video meetings. It comes with document management tools, great screen sharing, messaging, remote control, and a lot more.
For instance, WebEx Meetigs has instant translation in over 100 languages and after the meeting, you get detailed recorded transcripts that you may use to create meeting reports with only a few clicks.
Cisco is a leader in voice and video communication so it goes without saying that WebEx Meetings applies the best possible standards in that department.
However, you can’t make something out of nothing. If you already have Cisco devices implemented in your organization, everything will work flawlessly.
But if you have a low-end webcam and mic or an unsteady internet connection, the results will shift accordingly.
The app does have an excellent denoising feature so at least the voice communication will be excellent.
Zoom – Can be laggy sometimes
You should know that Zoom also has VoIP calling services and they obviously can be integrated with the Zoom web conferencing app.
If you will go for the business plan for Zoom, with their solutions, or just use top equipment and cam, as well as a good internet connection, everything will go perfectly.
However, a lot of our readers complained about the microphone not working on Zoom laggy or freezing video, and a lot of mishaps.
But most of those problems were mainly due to an inconsistent connection so we can’t really blame the app itself.
With WebEx, you can drag-and-drop any document useful for the presentation or meeting. You can send it to everyone at the meeting or for everyone.
It sends the document instantly and it’s as easy to do so from a PC, a mobile, or a tablet, wherever you access the meeting from.
All communication is end-to-end encrypted so you don’t need to worry about any security issues.
Zoom – All sharing needs are met
With Zoom, you can’t just drag-and-drop files, but you’ve got all the file transfer option features in the Chat window.
There, you can send documents and file from your device or from any of your cloud storage accounts.
You may even make screen captions on the spot and share them as well. The feature is not as sophisticated as in WebEx, but it’s still very easy and efficient.
3. Implementation & integration
WebEx – Seamless integration within the WebEx Suite
We need to mention that WebEx Meetings is only the web conferencing tool within the WebEx Suite. You may also get the Calling, Polling, Webinars, Events, Whiteboarding, and Vidcast tools.
However, WebEx integrates with over 100 third-party apps as well. Productivity, document management, scheduling, calendars, analytics, you name it, this app can integrate it.
Zoom – The king of integrations
At the moment we wrote this article, there were 2,363 apps in the Zoom app marketplace and 2,142 of them were for Zoom Meetings.
There is no way you won’t find the integration you need in that selection. From Google Workplace to Slack, Salesforce to Zylo, and Xyte, you will find any area you might be interested in.
4. Pricing
Both WebEx and Zoom have free versions that allow up to 100 attendees and have text, audio, and video communication for 40-minute meeting sessions.
However, here are the paid plans for each:
WebEx
With $14.50/license/month, with WebEx you get up to 200 attendees, and a 24-hour meeting time. You also get 10GB of cloud storage for meeting recordings, closed captions & meeting highlights, live polling, and Q&A by Slido.
You may also join overlapping meetings at the same time. It makes sense because you can record one of them. If you need more features, you can negotiate an Enterprise license and customize your required options.
Zoom
Zoom has a $14.99 Pro account that offers 5 GB of cloud storage, 30-hour meetings with up to 100 attendees, and some premium apps for free for 1 year.
You will also get 3 whiteboards and Mail & Calendar. There are also the Business and Enterprise plans where you will find lots of other benefits.
WebEx vs Zoom conclusion
Both WebEx and Zoom are great web conferencing apps and while WebEx is clearly focused on enterprise needs, Zoom is more user-friendly oriented.
The excellent part is that both have free versions you can try them extensively to understand which is better for your needs.
For a slightly smaller price, WebEx offers professional support but Zoom obviously has a lot more integrations to its side.
We hope that our article helped you put WebEx vs Zoom in balance and decide which one is best for you.
Managing files on your Windows computer can feel like a full-time job. Nowadays, people are downloading massive files, and it can be overwhelming trying to figure out where everything is.
There are many methods you can try to clear up your hard drive, like using Recycle Bin cleaners to get rid of unnecessary files. There’s another most don’t commonly try, and that’s merging drivers.
Why would I need to merge two drives?
Before going into how to merge the C: and D: drives, let’s go over why you want to do this in the first place. Believe it or not, there are various benefits to doing so:
It frees up a lot of space on your computer – This is, by far, the biggest benefit of fusing the two drives. Sure, you can uninstall apps one by one, but merging is a faster method.
It aids in organizing your hard drive – Wiping out a hard drive using some software can be a rather extreme method. Combining drives is a more controlled method of organizing things.
Merging can create more space – At some point, you’re going to run out of space on your hard drive. Combining can solve this problem even if you can’t make a new partition.
How do I merge your C and D drive on Windows?
There are only a handful of ways to merge the two drives, which can be pretty tricky. There are no easy solutions. We will, however, recommend that you do a few things first before merging:
The first thing that you should do is update your system. Install any fixes Microsoft has recently rolled out. They can save you from dealing with corrupt files later on.
It is also strongly recommended that you back up your files. There are two ways to do it: either through the native Windows 11 feature or through some third-party software.
1. Back up files
Launch the Settings app and go to the Accounts tab.
Next, click Windows backup.
On the following page, you can allow OneDrive to save your folders and which app logins will be remembered. To configure it all, select Manage sync settings.
In the new window, select which folders you want to back up to OneDrive. Click Startbackup when ready.
Backing up your files needs to be the first thing that you do. If you make any mistakes, files become corrupt, or something goes wrong, you can restore the old files and start again.
2. Extend volume via Disk Management
Launch the Disk Management app from the Windows search bar.
Right-click the partition you want to extend.
If the entries are greyed out, there isn’t any space available. You can make space by first selecting Delete Volume.
Right-click the partition again and select Extend Volume.
Click Next in the Extend Volume Wizard.
On the following window, select how much drive space you want to use for extending volume. It’s recommended that you use all available space.
Click Next when done and then Finish on the window after that.
What can I do if the hard drive isn’t showing me its full capacity?
Some users have complained that their hard drive doesn’t show its total capacity in the Disk Management app. This serious problem could indicate faulty software or something damaged internally.
If it’s a software problem, it’s recommended that you update the hard drive driver and reformat it. But if it’s damaged, it’s best to take it back to the manufacturer or repair it somewhere.
Additionally, you should learn about the best defrag software. Fragmented files can cause all sorts of performance problems. Defragmenting reorganizes them to improve performance.
Some of the best ones include Iobit Smart Defrag and CCleaner. Note that the apps work for Windows 10 and 11, so don’t worry if the software only indicates the former.
Feel free to comment below if you had other hard drive questions. Also, leave comments below about reviews you’d like to see or information on other hard drive issues for Windows 11.
Sticky Notes is a native, note-taking app for Windows 11 that’s pretty good for quickly jotting down reminders to yourself and ensuring you don’t forget anything.
But say, you accidentally delete some notes and are looking for a way to get them back. You can check the Recycle Bin, but there’s a chance it’ll be empty. Fortunately, there’s a way to restore the notes.
What causes my Windows 11 to delete Sticky Notes?
Sticky notes can be lost for a variety of reasons. It’s not just because you deleted them. There may be something wrong with your computer that you’ll need to diagnose quickly.
Your computer is infected with malware – Malware can mess with a computer’s operation. For this, it’s recommended that you get some antivirus software to clean everything.
Files on your system are corrupt – As a result of malware, your computer’s files can become corrupted and unusable. You’ll need to run an SFC scan to clear up the corruption.
You lost the notes because of a system crash – System crashes can also corrupt files, and if it happens repeatedly, they can cause serious damage. You may have a problem with the RAM.
Your notes may be hidden – Double-check if you accidentally hid the notes. Right-click the app in the taskbar and select Show All Notes. They should be there.
A faulty Windows update erased them– Microsoft has a series of steps on how to uninstall a Windows update if you got a faulty patch.
How can I restore the Sticky Notes?
There are many ways to recover lost Sticky Notes files from third-party apps to native tools on Windows 11. If the easier solutions don’t work out, try one of the more complex fixes.
Use some data recovery software to recover the notes. Apps like Kernel Data Recovery and Disk Drill are great choices for bringing up lost or deleted files.
Double-check your notes list. With Sticky Notes open, right-click the app on the Windows 11 taskbar. Select Notes List. See if your list note is on there.
Whenever you delete something from Sticky Notes, the files may be found in the Deleted Items list on Outlook. From there, you can restore the discarded notes to the app.
Run the Windows Store Apps Troubleshooter. You can find the tool in the Troubleshooter sections of the App tab in Windows 11 Settings. Just be sure to give it enough time to finish.
Update the Sticky Notes app. New patches can be downloaded from the Microsoft Store or the Windows Update tab in the Settings menu. The latter will update other apps too.
And if all else fails, reinstall the Sticky Notes app. Head over to the Apps section of the Windows 11 Settings menu. You can uninstall the app from there and re-download it from the Microsoft Store.
1. Double-check the Sticky Notes file
Launch File Explorer and go to open your username’s main folder. It should be on the Home tab.
Open the following folder in order: AppData > Local > Packages.
In the Packages folder, locate the folder titled Microsoft.MicrosoftStickyNotes_8wekyb3d8bbwe. Open it once found.
Open the Local State folder. You should see StickyNotes.snt or plum.sqlite.
If you don’t see either one, make sure Hidden Items is enabled under View.
Click StickyNotes.snt or plum.sqlite, whichever one appears, and open it in NotePad. Your previous lost Sticky Notes should be there.
If that doesn’t work, right-click the file and select Show More Options.
In the context menu that appears, click Restore previous versions.
2. Reset the app
Launch the Settings menu. Go to the Apps, then select Installed apps.
Locate Sticky Notes under Installed Apps. Click the three dots to the right and select Advanced Options.
Scroll down in this new window. Click the Reset button once you find it.
Resetting should be enough, but if the notes don’t come back, select the Repair button.
Bring up Windows PowerShell in the search bar. Select Run as administrator to have admin-level rights.
Copy and paste the following command into PowerShell: PowerShell -ExecutionPolicy Unrestricted -Command "& {$manifest = (Get-AppxPackage *MicrosoftStickyNotes*).InstallLocation + '\AppxManifest.xml' ; Add-AppxPackage -DisableDevelopmentMode -Register $manifest}"
Press Enter on your keyboard to run the command. Give PowerShell enough time to re-register Sticky Notes.
When it’s finished, restart your computer.
4. Reset the Microsoft Store cache
Similar to the previous solution, launch the Command Prompt with admin-level permissions.
Enter the following command and run it: wsreset
Wait for the process to finish. Once it’s done, the Microsoft Store will automatically open.
5. Prevent notes from being deleted
Launch Sticky Notes and click the gear icon in the upper right-hand corner to open the Settings menu.
Toggle the switch next to Confirm before deleting in order to turn it on.
Turning on this alert will make a window appear before deleting a note warning you about what you’re about to do. It’s an extra step to make you think twice and, hopefully, save you some headaches.
What can I do if Sticky Notes continues not to work properly?
Sticky Notes can be a fickle app. The solutions listed earlier should work to solve any problem with the software, but there may be one or two that persist.
For consistent issues, there are a couple of things that you can do. First, disable the Insights feature on Sticky Notes. It’s in the Settings menu above the toggle for deletion warnings.
And the other fix is to create a new user account. The profile you’re using may be corrupt or malfunctioning in some way. Making a new one solves this problem altogether.
While we have you, be sure to check out our list of the best Sticky Notes alternatives for Windows 11. Many complain the app malfunctions, from not taking down notes to users being unable to sign in.
In case you want to get rid of this feature permanently, we have a great guide on how to remove Sticky Notes Preview, so don’t miss it.
Feel free to comment below if you have other Sticky Notes problems. Also, leave comments below about reviews you’d like to see or information on other native Windows 11 software.
Microsoft Photos is the default photo viewer on Windows PCs. It has undergone various facelifts in its lifetime that respond to today’s modern user. Sometimes, when the Photos app is not working, a quick reset can help you resolve the issue.
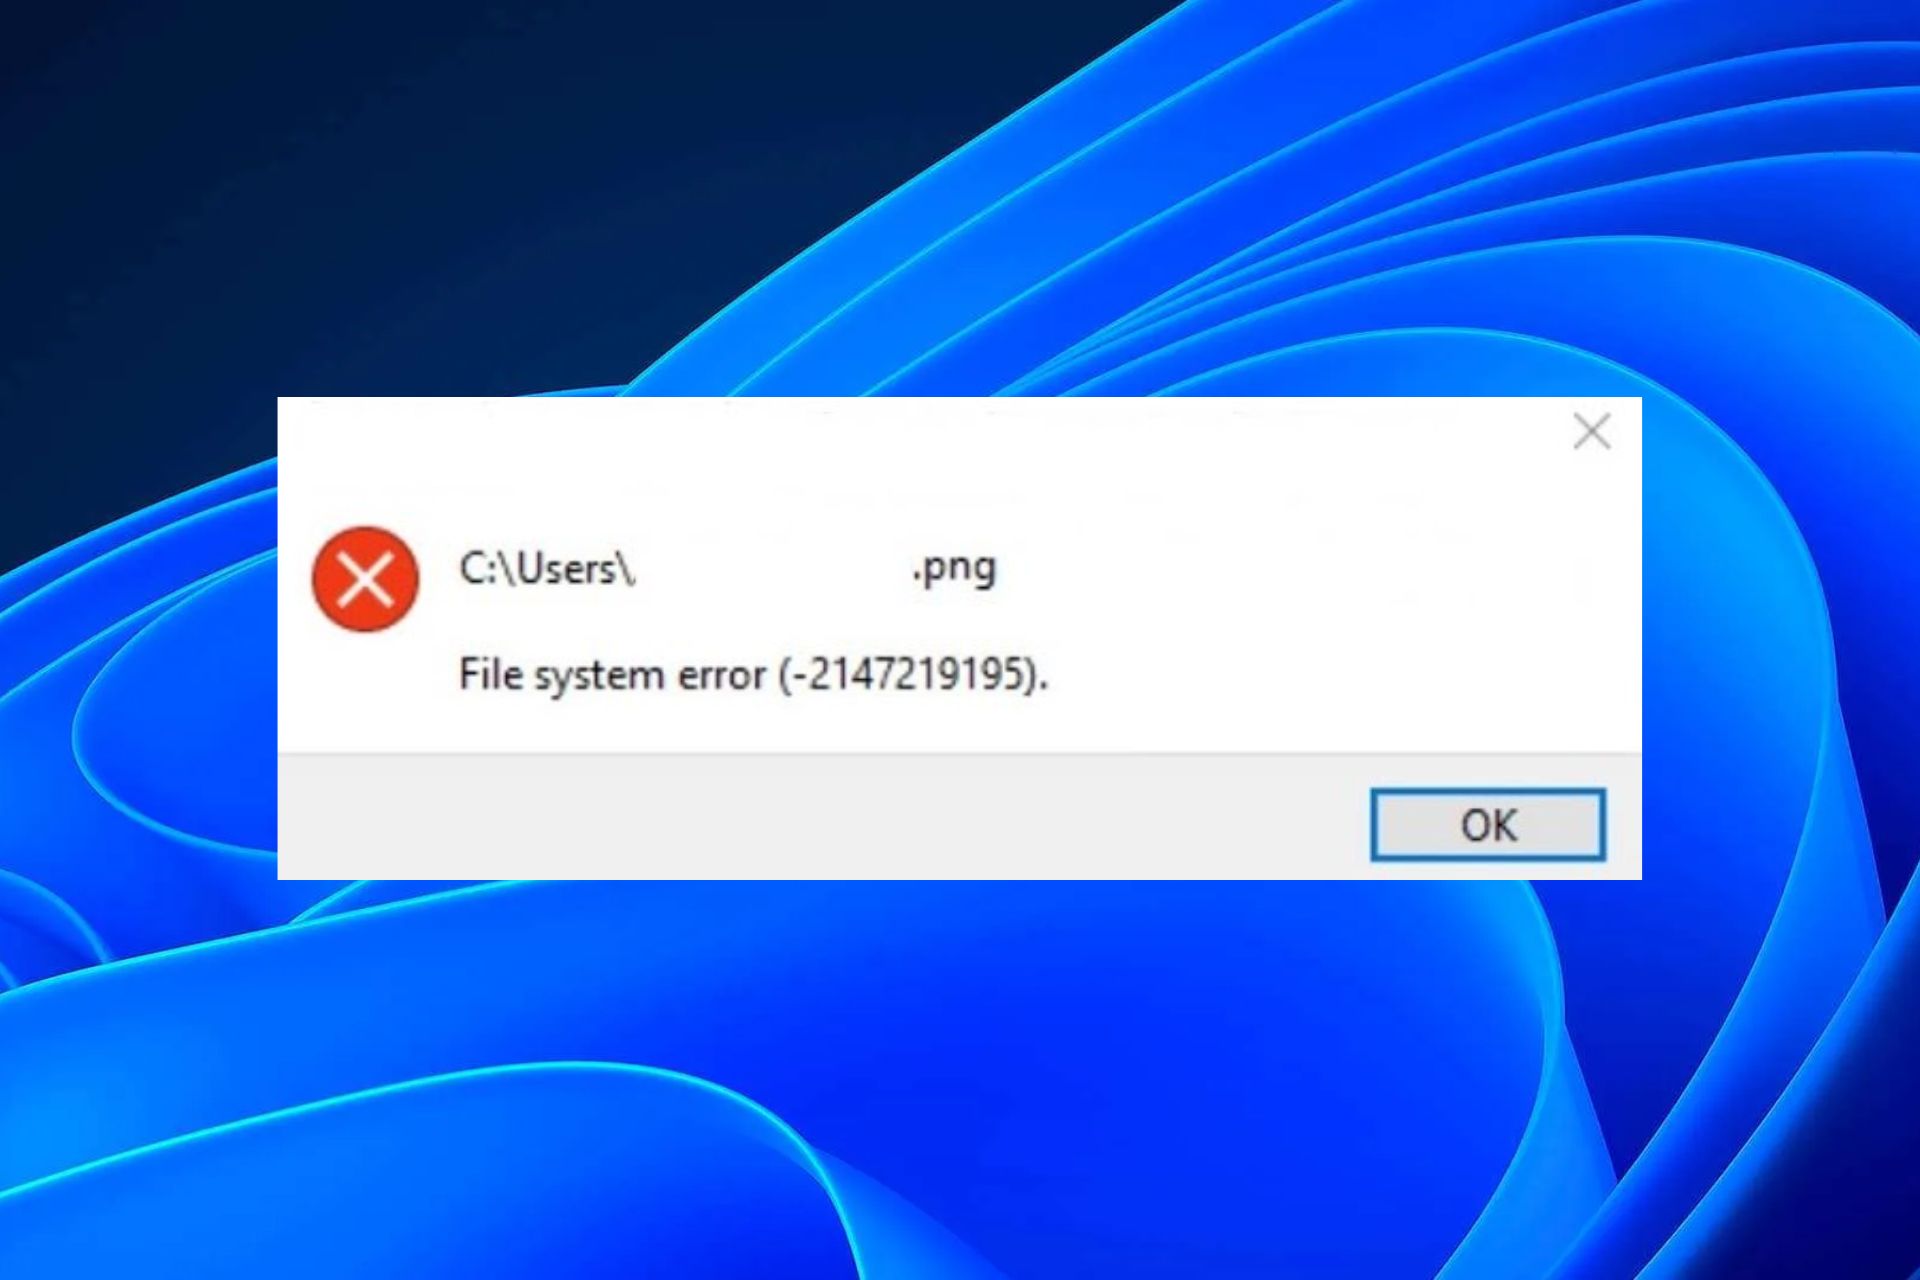
However, when you cannot open any pictures, it becomes a more severe problem that requires more than a reset. That is the latest headache for Windows users, dubbed the File System Error (-2147219195). Let’s take a closer look at this error, shall we?
What is a file system error (-2147219195) in Windows 11?
According to users, the File system error (-2147219195) in Windows 11 started appearing after a Windows update. Previously, users could open their pictures and music files normally, but after the update, they kept getting this error.
Possible causes include:
Problematic Windows update – Windows updates don’t always fix bugs. Sometimes, they bring about more issues, and this could be one of those times they mess up with your Photos app.
Corrupt app – It is possible that your Photos app has gotten corrupted over time, especially if there’s a lot of build-up cache.
Conflicting app – It could also happen if you have recently installed new hardware or software, and this caused a conflict with existing software on your computer.
Corrupt system files – A corrupted or damaged file system can cause this problem, which means the files and folders on your computer are damaged and can’t be read.
How do I fix the file system error (-2147219195)?
A few basic steps that may salvage the situation before you try any advanced troubleshooting include:
Perform the SFC and DISM scans to check for any corrupted system files.
Click on System on the left pane, then Troubleshoot on the right pane.
Select Other troubleshooters.
Scroll down, locate Windows Store Apps, and click the Run button.
2. Repair the Photos app
Hit the Windows key and click on Settings.
Click on Apps on the left pane, then Apps & features on the right pane.
Locate the Photos app, click the three vertical ellipses, and select Advanced options.
Click on Repair.
3. Reset the Photos app
Hit the Windows key and click on Settings.
Click on Apps on the left pane, then Apps & features on the right pane.
Locate the Photos app, click the three vertical ellipses, and select Advanced options.
Click on Reset.
4. Re-register the Photos app
Hit the Windows key, type Powershell in the search bar, and click Run as administrator.
Type the following command and hit Enter: Get-AppXPackage -AllUsers | Foreach {Add-AppxPackage -DisableDevelopmentMode -Register "$($_.InstallLocation)\AppXManifest.xml"}
Hit the Windows key, type Powershell in the search bar, and click Run as administrator.
Type the following command and hit Enter: get-appxpackage *Microsoft.Windows.Photos* | remove-appxpackage
Now go to the Microsoft Store, search for the Photos app, and install it.
Performing a clean boot could resolve the issue for users for whom these solutions did not work. Clean boot is preferred because you can take charge of the startup programs and services.
Alternatively, you can always opt for another image viewer if the built-in one is not letting up. Sometimes, the app needs a few moments, and the issue may resolve quickly.
Feel free to try out others while you wait for that to happen. Chances are that you may end up liking them even more and be a convert.
You may also come across a similar error File system error (-2147219196) in the Photos app, which also prevents you from opening the program. If so, try out the fixes outlined in our helpful guide.
That’s all we had for this error. Leave us a comment below on which solution fixed this issue for you.
Memory problems are the worse on your PC as they can slow down your PC and impact its performance. In such a case, running the Memory Diagnostic Tool on your Windows PC is advisable to fix any memory-related issues.
While this tool is a saver, users can run into trouble opening this tool. So, in this guide, we will share many quick methods to run a memory test on Windows 10 using the Memory Diagnostic tool. So, let us get right into it.
How can I run a memory test on Windows 10 using the Diagnostic Tool?
1. Use the Start menu
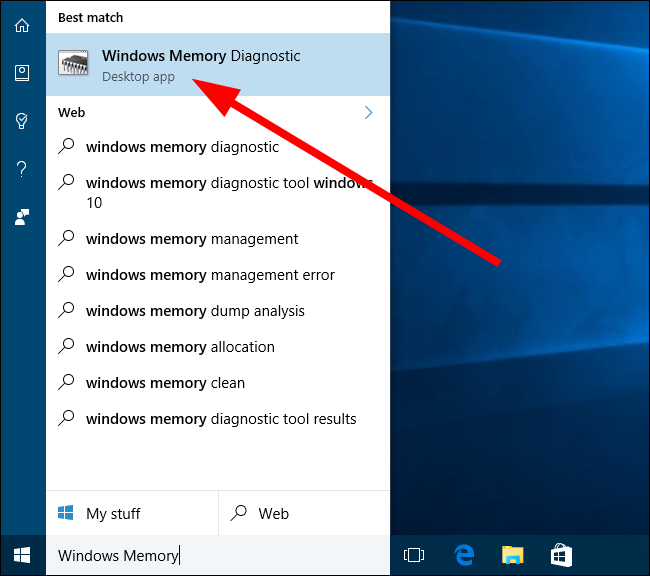
Press the Win key to open the Start menu.
Type Windows Memory Diagnostic and open it.
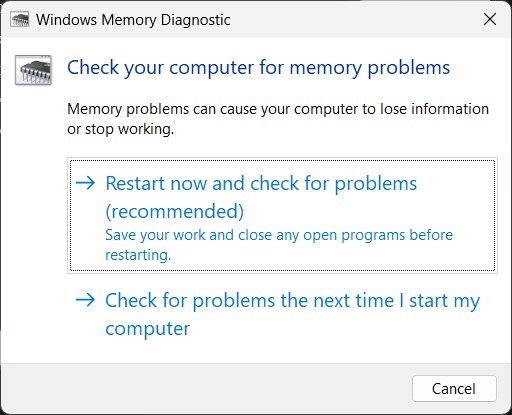
You can select from the two below options:
Restart now and check for problems (recommended)
Check for problems the next time I start my computer
The tool will find any issues and fix the problem.
This is the easiest way to access the Windows Memory Diagnostic tool on your Windows 10 PC. But, of course, you can also follow the same steps for Windows 11.
2. Use Windows Search
Press the Win + S keys to open the Windows Search.
Type Windows Memory Diagnostic and open it.
Select from the two below options:
Restart now and check for problems (recommended)
Check for problems the next time I start my computer
The tool will find any issues and fix the problem.
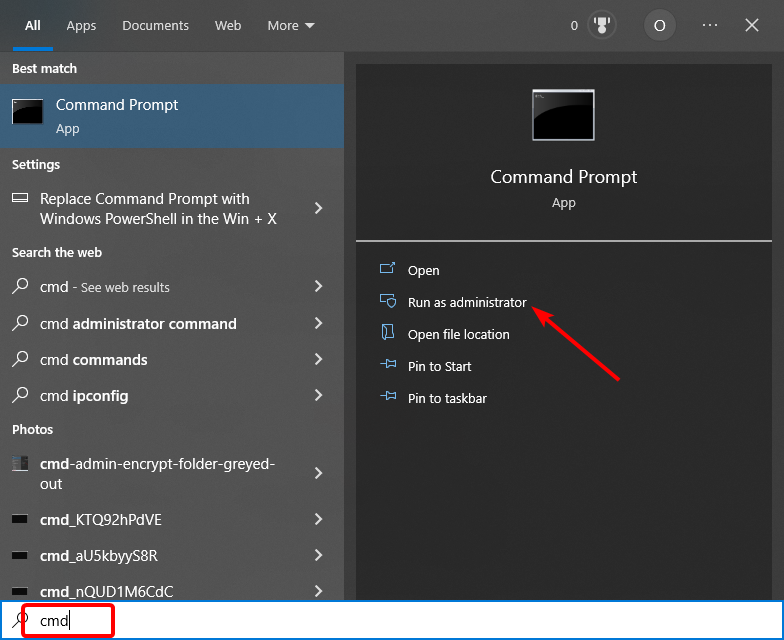
To run the memory test on Windows 10, you can also run the Windows Memory Diagnostic tool from the Windows Search.
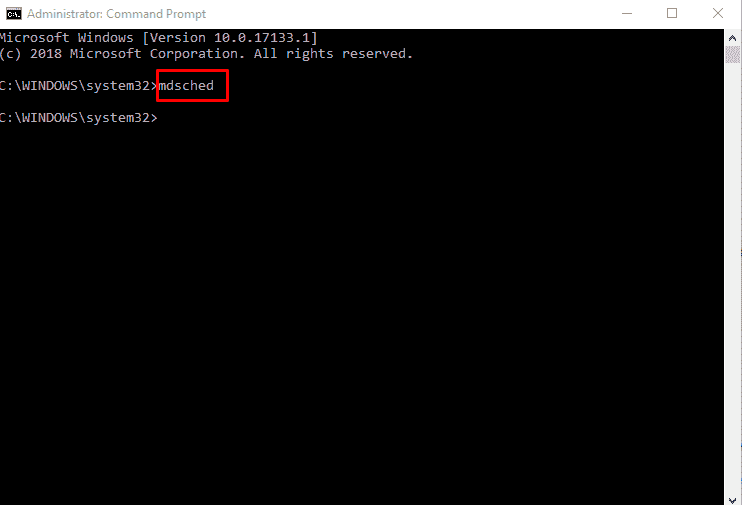
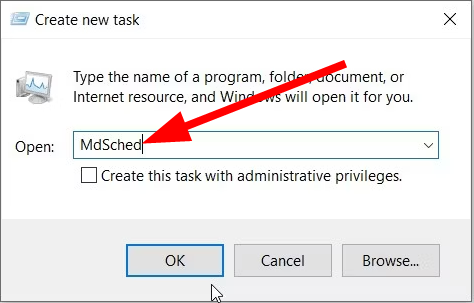
Type the below command to run the Windows Memory Diagnostic tool and hit Enter. MdSched
Choose any of the two below options:
Restart now and check for problems (recommended)
Check for problems the next time I start my computer
The tool will find any issues and fix the issue.
Command Prompt is another way to help you run a memory test on Windows 10. This method could come in handy when your PC isn’t booting.
In that case, you can access the recovery mode, open the command prompt, and run the tool to fix memory issues.
4. Use the system settings
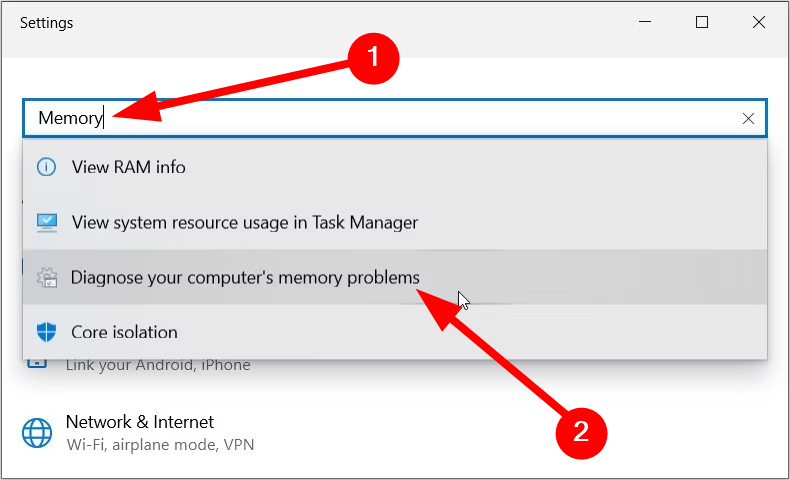
Press the Win + I keys to open the Windows Settings.
Type memory in the search field and click on Diagnose your computer’s memory problems option.
Select any of the two below options:
Restart now and check for problems (recommended)
Check for problems the next time I start my computer
The tool will find any issues and fix the issue.
As the name suggests, Windows Settings includes all the settings you can tweak on your PC. Using the Memory Diagnostic Tool from settings, you can also run the memory test on your Windows 10 PC.
5. Use the Control Panel
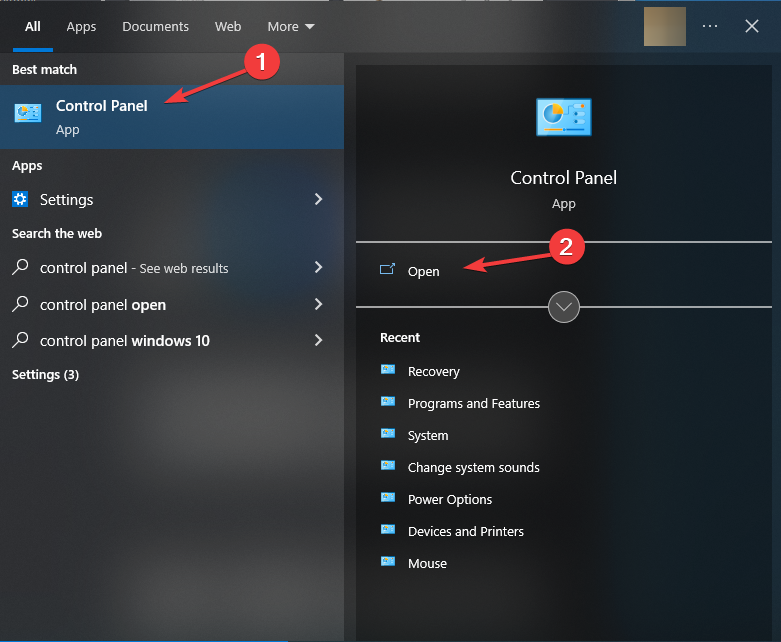
Press the Win key to open the Start menu.
Open Control Panel.
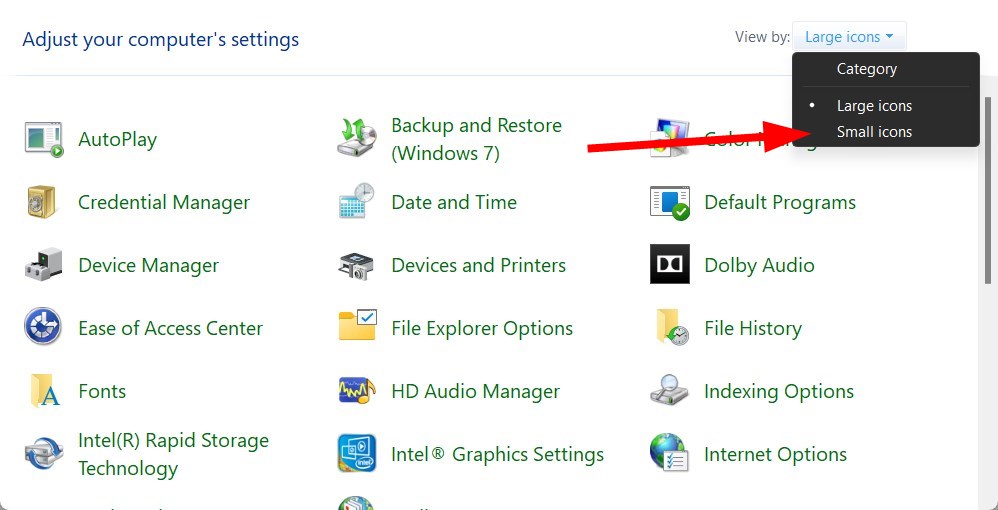
Click View by and select Small icons.
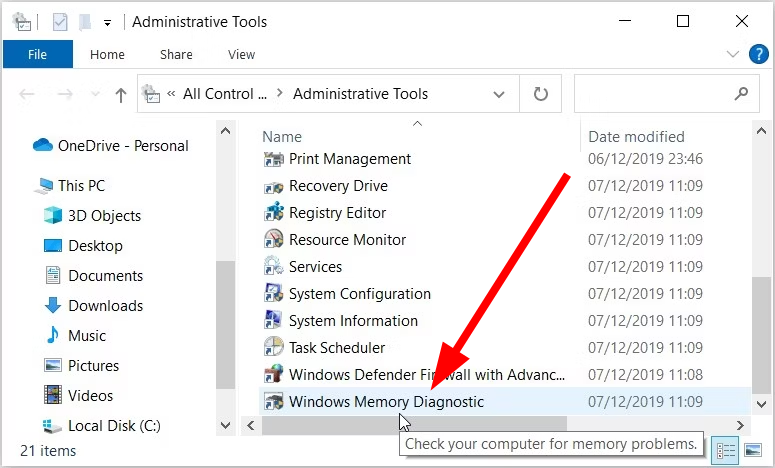
Select the Administrative Tools option.
Choose Windows Memory Diagnostic.
Click any of the two below options:
Restart now and check for problems (recommended)
Check for problems the next time I start my computer
The tool will find any problems and fix the issue.
Control Panel is another option for running the memory test on Windows 10 using the Diagnostic Tool.
6. Use File Explorer
Open the File Explorer.
In the address bar, type MdSched and hit Enter.
Choose any of the two below options:
Restart now and check for problems (recommended)
Check for problems the next time I start my computer
The tool will find any problems and fix the issue.
7. Use the Task Manager
Press the Ctrl + Shift + Esc buttons to open the Task Manager.
Click on the File tab.
Select the Run new task option.
Type MdSched and press Enter.
Select any of the two below options:
Restart now and check for problems (recommended)
Check for problems the next time I start my computer
The tool will find any problems and fix the issue.
It is a bit complicated to run the memory test on Windows 10; however, it can come in handy when all you have access to is the Task Manager.
8. Use the Run dialogue
Press the Win + R key to open the Run dialogue.
Type MdSched and press Enter.
You can choose from any of the two below options:
Restart now and check for problems (recommended)
Check for problems the next time I start my computer
The tool will find any problems and fix the issue.
You will find multiple user reports confirming the NET HELPMSG 2221 error code. This appears when your account isn’t the administrator anymore. According to users, their accounts automatically were revoked of admin rights.
If you are also experiencing this issue, we suggest you apply the solutions in our guide and fix the NET HELPMSG 2221 error. There are many ways to get the admin rights back to your account. Let us get right into them.
What is the NET HELPMSG 2221 error?
When you are not the admin of your PC, you cannot use elevated programs. So, for example, you won’t be able to run the command prompt, Windows PowerShell, or any other program that requires admin access on your PC.
After going through several user reports, users who tried to access the gpedit.msc command via the Run dialogue where thrown a Windows cannot find ‘gpedit.msc’ error message.
Moreover, running the lusrmgr.msc showed them an error message the snap-in has been restricted by policy. Contact your admin for details.
Trying to run an elevated command in CMD yields an error message. The user could not be found. More help typing NET HELPMSG 2221.
How can I fix the NET HELPMSG 2221 error?
1. Regain administrator rights
Press the Win + I keys to open the Settings menu.
Click on Recovery.
Click on Restart now for the Advanced startup option.
In the Advanced startup window, select Troubleshoot.
Then choose Advanced options.
Select Command Prompt.
Type the below command in CMD and press Enter. regedit
Highlight the HKEY_LOCAL_MACHINE branch.
Click on File and select Load Hive.
Navigate to the below location. system root drive > Windows > System32 > config
Locate the SAM file.
Open the SAM file.
Provide a name to the hive.
Click OK.
Head over to the below Registry location. HKEY_LOCAL_MACHINE\REM_SAM\SAM\Domains\Accounts\Users\000001F4
On the right, open the F entry.
Highlight the 000001F4 key, and place the cursor on line 38 on the right side of 11.
Press the Delete key and type 10.
Click OK.
Close Registry Editor and Command Prompt.
Restart your PC.
The above steps are confusing, but if followed correctly will help you fix the NET HELPMSG 2221 error. We suggest following the steps carefully to reset the administrator rights for your account.
Type the below commands and press Enter to boot into Safe Mode. shutdown /r /o
In Safe Mode, open the Start menu by pressing the Win key.
Open Control Panel.
Select User accounts.
Click on Manage another account.
You will have two accounts.
Select the new account that you created.
Click on the Change account type option.
Select Administrator.
Hit the Change account type button.
Restart your PC.
This is another way of resetting or restoring the administrator account. Doing so will help you fix the NET HELPMSG 2221 error.
3. Perform a System Restore
Press the Win key to open the Start menu.
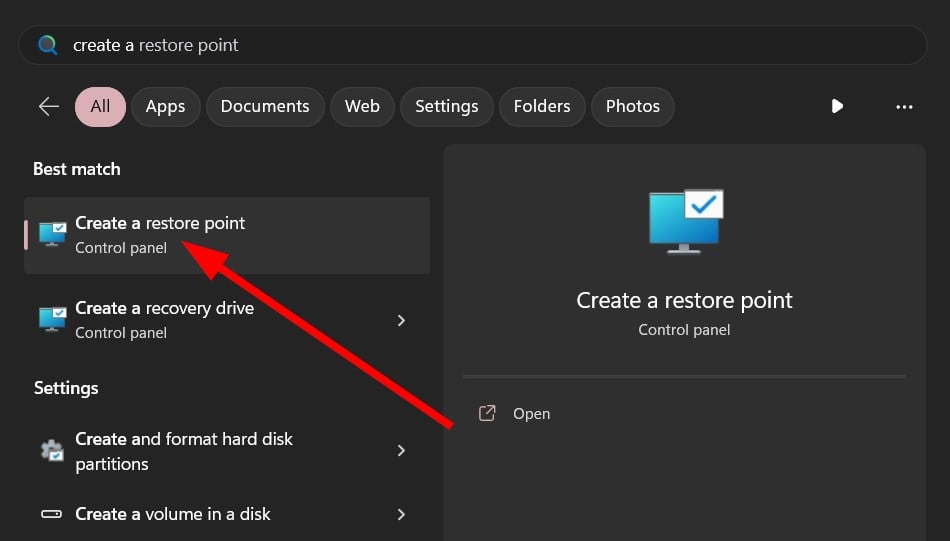
Open Create a restore point option.
Hit the System Restore button.
Click the Next button.
Select the restore point.
Click Next.
Click the Finish button.
This will begin the system restore process on your PC.
If the above solutions did not help you resolve the NET HELPMSG 2221 error, you should perform a system restore.
When you perform a system restore, it will help you take your PC back to a state where everything is usually working.
However, note that the system restores will work only when you have previously created a system restore point. Our guide explains how to create a system restore point in Windows 10.
The above procedure may seem overwhelming. Therefore, we suggest dedicated software as a straightforward alternative that will scan your computer in-depth to detect corrupt, damaged, or missing files, ultimately replacing them with brand-new Windows files from its online repository.
For users facing the NET HELPMSG 2184, you can refer to our guide, which gives you many solutions to resolve the problem on your PC.
You can also check out our guide that explains all the different solutions to resolve the NET HELPMSG 3521, a Windows update error.
We also have a guide explaining how to fix your PC’s NET HELPMSG 2185 error quickly. If you are coming across the NET HELPMSG 3534 error message, then you should refer to our guide, that not only gives you the solutions but also explains what the error is all about.
Feel free to let us know in the comments below which one of the above solutions helped you resolve the NET HELPMSG 2221 error.
Windows comes with various pre-setted commands that help you perform multiple functionalities. One such command is the WSreset.
However, if these commands do not do what they are intended to do, then it could be problematic and quite frustrating.
Several users have reported that for them, the WSreset is not working. If you are experiencing the same problem, we have a guide that will explain how you can fix this issue.
We will also share what the WSreset command does. So let us get right into it.
What is the WSreset command and how to use it?
WSreset command is an inbuilt Windows OS command used to clear the Microsoft Store cache. The Microsoft Store is where you download all the apps and games on your PC.
The Microsoft store can often run into trouble and trigger multiple issues. In such a case, one of the solutions to fix the problem is to clear the Store cache, which can be quickly done by running the WSreset command.
As an administrator, you can run the WSreset command using the Run dialogue or the command prompt. After the command completes its execution, you will get a message that the MS Store cache has been cleared.
How can I fix the WSreset command is not working error?
1. Run the Windows Store troubleshooter
Press the Win + I keys to open the Windows Settings menu.
Click on Troubleshoot.
Select Other troubleshooters.
Click on the Run button next to the Windows Store Apps option.
Follow the on-screen steps to begin the troubleshooting.
Apply the prompted fixes.
Restart your PC.
Running the Windows Store troubleshooter can fix specific underlying issues with the Microsoft Store. This could also be the reason why the WSreset command is not working. Try this solution and check if this fixes the problem or not.
Type the below command and press Enter. sfc /scannow
Wait for the process to complete.
Type the below command and press Enter. DISM /Online /Cleanup-image /RestoreHealth
Restart your PC.
You can run the above SFC Scan and DISM commands to help you fix the corrupt or missing system files.
However, a dedicated system fixer can do wonders in such scenarios. Using such software, you will be able to fix missing system files, fix system crashes, fix BSOD errors, fix DLL errors, and much more.
3. Reset Microsoft Store
Press the Win + I keys to open Settings.
Click on Apps from the left pane.
Select Installed apps.
Locate Microsoft Store.
Click on the 3-dot icon next to Microsoft Store and select Advanced options.
Scroll down and select Reset.
Follow the on-screen prompts to reset the app.
Restart your PC.
Resetting the Microsoft Store can help resolve multiple errors associated with the program. You can also try repairing the Microsoft Store and check if that helps fix the Wsreset not working error.
4. Reinstall Microsoft Store
Open the Start menu by pressing the Win key.
Open Command Prompt as an admin.
Type the below command and press Enter. Get-AppXPackage -AllUsers | Foreach {Add-AppxPackage -DisableDevelopmentMode -Register "$($_.InstallLocation)\AppXManifest.xml"}
Restart your PC.
Chances are that the Microsoft Store is misbehaving because of a problematic file, which is why the WSreset command is not working.
To fix this, we suggest you reinstall the Microsoft Store on your PC and check whether this resolves the issue.
5. Reset your PC
Press the Win + I keys to open the Settings menu.
Click on Recovery.
Click the Reset PC button for the Reset this PC option.
Select the Keep my files option.
Follow the on-screen prompts to complete the Reset process.
If nothing works, then as a last resort, we suggest you reset your PC. When you reset your PC, follow the above steps, as this will prevent deleting your files.
That is it from us in this guide. If the Microsoft Store isn’t working on your Windows 10 or 11 PC, then you should check the solutions in our guide to fix the problem.
Users have reported coming across the error 0x80004003 related to Microsoft Store. You can quickly resolve the error by applying the solutions mentioned in our guide.
If you received the shadow copy provider and had an unexpected error while trying to process the specified operation(0x8004230F) when creating a system restore point, or system image, this guide can help!
We will discuss some of the potential fixes to resolve the issue right after talking about the causes. Let’s get started!
What causes the 0x8004230f shadow copy provider error?
There could be various reasons for the error; some of the common ones are mentioned here:
VSS provider issue – If the VSS provider for the system or volume being backed up becomes damaged or stops working, then the VSS may fail to create a backup.
Corrupted system files – If the system files needed for VSS to function correctly are damaged, then the VSS may not be able to create a backup. You need to repair system files using Command Prompt to fix the issue.
Third-party software interference – Some third-party software can conflict with the Volume Shadow service and cause it to fail. Look for apps you installed just before the error appeared and remove them to check if it helps.
What can I do to fix the 0x8004230f shadow copy provider error?
Before engaging in advanced troubleshooting steps, you should consider performing the following checks:
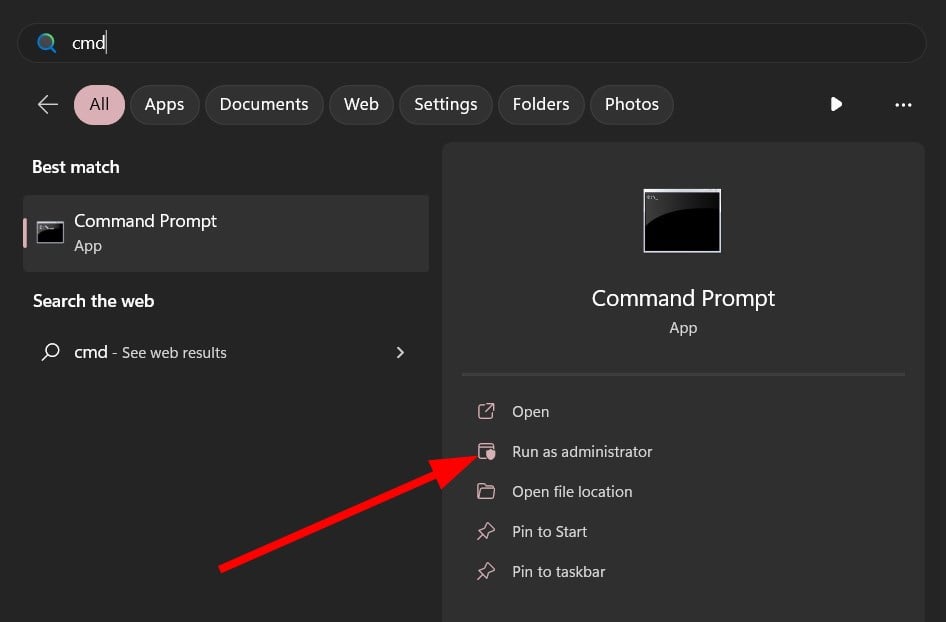
Press the Windows key, type CMD, and click Run as administrator.
Type the following command to repair system files and press Enter: sfc/scannow
Restart your computer.
5. Run the VSSADMIN tool
Press the Windows key, type CMD, and select Run as administrator.
Type the following command to get the list of third-party VSS providers and press Enter: vssadmin list providers
If there are any, locate the unnecessary ones and close Command Prompt.
Press Windows + R to open the Run dialog box.
Type regedit and click OK to open Registry Editor.
Go to File, then click Export. Save the .reg file to an accessible location to back up registry entries.
Navigate to this path: Computer\HKEY_LOCAL_MACHINE\SYSTEM\CurrentControlSet\Services\VSS\Providers
Double-click Providers to expand it. You would find three keys, ENUM, and two GUIDs.
Select the first GUID listed, double-click the Default string, and check if it is Microsoft Software Shadow Copy provider 1.0. If yes, check the other GUID and delete it.
Open the Run console and type services.msc, and press Enter.
Locate, right-click Volume Shadow Copy, and choose Restart.
To ensure there are no third-party providers, open CMD with administrator rights and type the following command: vssadmin list providers
6. Contact Microsoft Support
If nothing has worked for you, you must contact the Microsoft Support team. Explain to them the scenario and what steps you took to fix the issue. This will help them understand the situation and speed up the troubleshooting process.
So, these are methods that you need to follow to fix the 0x8004230f shadow copy provider error. Try them and let us know what worked in the comments section below.
You might have noticed that the toolbar previously present at the bottom of the mail composer is missing from Outlook web and desktop app.
The absence of the bottom toolbar from email composer makes it hard to change fonts, colors, layouts, and even attach files. Stay with us as we explain the steps to bring back the missing toolbar in Outlook in this detailed guide.
How to unhide the missing Toolbar in the Outlook app?
Launch Microsoft Outlook on your computer as a stand-alone app or on your preferred web browser.
Stay in the Home tab and click the New Mail button present on the ribbon to access the mail composer window.
Switch to the Format Text tab from the menu bar on top of the mail composer and click the downward arrow located on the extreme right of the top toolbar to access the Layout options.
Choose Simplified Ribbon instead of Classic ribbon from the drop-down menu.
Click the Menu icon (three dots) on the right of the toolbar to access alignment, indentation, and other paragraph formatting options.
Switch to the Message tab from the menu bar on top and click the Menu icon (three dots) on the right to access various add-ins like insert pictures, tables, and more.
As you can see, the toolbar of the Outlook mail composer, which was previously present at the bottom, is now available on the top in place of the classic Outlook ribbon.
With the new Outlook update rolled out by Microsoft for the desktop and web app, the mail composer has been revamped, and the missing bottom toolbar in Outlook email composer has been integrated into the top toolbar.
How to enable the missing Outlook toolbar on the top?
Launch Outlook as a desktop or web app.
Click the New Mail button present on the top menu of the Home tab to open the Outlook mail composer window.
Switch to the Options tab from the top menu bar and click the Menu icon (three dots) and select Switch to HTML option present under the Action section.
Now switch to the Format text tab from the menu bar on top to access the formatting options.
If the mail composer toolbar of Outlook is available on the top, but all the formatting options are greyed out, switching to HTML instead of plain text will enable all the elements of the toolbar.
Note that these steps will help you access the missing bottom toolbar from the email composer in the newest version of the Outlook app.
The bottom toolbar having text formatting and file attachment options, is now available at the top as a part of a new feature update.
Microsoft is slowly rolling out this update to Microsoft 365 customers, and you can manually check for Office Updates.
Moreover, the steps to bring back the missing toolbar and enable its formatting options can vary slightly in the Outlook web app, depending on your browser version.
We hope you can now access the missing toolbar in Outlook, which is now available on the top to enhance the user experience.
Though installing updates on a Windows PC is a straightforward task, you are likely to run into several errors while attempting to do so. One such fatal error code is 0xc1900401, which occurs when the Windows update fails to install on your PC for several reasons.
What is the 0xc1900401 error code in Windows?
If you receive the error update error code 0xc1900401 when the installation process is unsuccessful on your computer, several factors can be behind it. We are providing the list of the most common ones below:
Poor internet connection – Slow or unstable internet connection is the most likely reason you encountered the error code 0xc1900401 while installing the update.
Insufficient storage space – If there is insufficient space on the disk to successfully install the update, error code 0xc1900401 might follow.
Corrupt system files – If the Windows cache folder gets corrupted or there is any glitch in the system files or components, you may face the mentioned error code.
Disabled System Update service – If the system update is not operating in the background for some reason or has run into an issue, error codes like 0xc1900401 can occur.
Third-party antivirus – Though this may sound weird, a third-party antivirus software if not configured properly, can also interfere with the Windows update and lead to the 0xc1900401 error.
Now that you know about the potential causes of this error code, you can perform the workarounds discussed in this guide to get rid of the update error 0xc1900401 and install the latest Windows update successfully.
How do I resolve the Windows Update Error 0xc1900401?
Before implementing the mainstream fixes discussed later on in this guide, perform the following actions:
Make sure that the internet connection is strong and has enough bandwidth to download the internet connection. You can run an internet speed test to verify the performance.
Disconnect all external devices, such as a printer, webcam, speaker, or USB hub if connected, to avoid any driver conflict with the update process.
Once these requirements are met, go ahead and employ the fixes lined up below.
1. Disable the metered connection
Use the Windows + I shortcut to bring up the Settings app.
Choose Network & Internet from the left navigation panel and choose Wi-Fi or Ethernet, depending on the network you are connected to.
Next, select Wi-Fi properties.
Look for the Metered connection option and turn the toggle next to it in the Off position.
When the connection is metered, Windows is restricted from downloading large files over the network to conserve the data. Disabling this feature ensures that the internet is available at full throttle, and you no longer get the 0xc1900401 error.
2. Run the Windows Update troubleshooter
Use the Windows + I shortcut to access the Settings app.
Scroll down the System settings and choose Troubleshoot from the right section.
Next, select Other troubleshooters.
Locate the Windows Update troubleshooter under Most Frequent and press the Run button next to it to initiate the troubleshooting process.
Microsoft offers a handy Windows update troubleshooter that is capable of diagnosing and resolving problems with Windows Update, including the 0xc1900401 error code, without much effort.
Use the Windows + R shortcut to launch the Run dialog box, type the following command in the text box, and press the Enter key. services.msc
Locate the Windows Update service in the list of services running on your Windows PC, and double-click it.
Look at the Service status in the General tab. If it says Stopped, press the Start button to start the service.
Press the Apply button to save the changes and OK to exit the properties window.
Now double-click the Windows Update Medic Service located underneath, and if this service is not running, press the Start button for it as well.
Exit the properties window after making the changes and restart your PC.
Windows Update services play an instrumental role in ensuring that the installation of system updates happens smoothly. If these services are not running in the background, Windows Update will not be successful, and you will experience the update error code 0xC1900401.
4. Clear the Windows Update cache
Use the Windows + R shortcut to bring up the Run dialog box.
Type or paste the following path in the text box and press the OK button to navigate to the given location. C:\Windows\SoftwareDistribution\Download
Use the Ctrl + A shortcut to select all the files in the download folder and press the Delete icon on the toolbar.
Windows stores all the system configuration and update related files on the local disk in the folder known as SoftwateDistribution. If the content of this folder becomes corrupt during the download process, Windows Update will not be successful.
Deleting the content of these folders ensures that the corrupt update files will no longer cause the 0xC1900401 error during the updation process.
These are the proven ways to ensure that you will no longer run into the error code 0xC1900401 when updating Windows-operated systems to the latest available versions. You can go through our guide to resolve the Windows update error code 0x80240004 if the error code frequents during the Windows update process.
Which of the solutions provided above helps you resolve the Windows update error 0xC1900401? Let us know in the comments section.
A blue screen of death screen appears if there is a serious software or hardware problem that causes Windows to shut down or restart. If the BSOD error on the screen is linked with Fwpkclnt.sys, then this guide can help!
Fwpkclnt.sys is a Windows IPsec Kernal-Mode API file and is essential for your computer. It is usually found in the C:\Windows\System32\drivers\ folder. If it is missing or corrupted, it could lead to all sorts of issues.
We will discuss the methods to fix the issue right after explaining the causes of the issue. Let’s start!
What causes the Driver_IRQL NOT LESS EQUAL FWPKCLNT.SYS error?
There could be various reasons for this BSOD error to appear; some of the common ones are:
Corrupted driver files – If the driver file related to any of the computer components (RAM, hard disk, video card, USB, or more) is corrupted or outdated, it can cause the blue screen error. You need to reinstall or update the device drivers to fix the issue.
Faulty hardware components – Damaged hardware components, such as hard drives or RAM, can cause the blue screen error. If you have recently installed a new hardware part, check if it is properly seated or working.
Software conflicts – Conflicts between software programs can also lead to the fwpkclnt.sys BSOD error. Therefore, check for recently installed programs and remove them if not in use.
Malware infection – Malware or virus infections can damage system files, including the fwpkclnt.sys driver file. To fix this issue, you need to run a malware scan.
What can I do to fix the Driver_IRQL NOT LESS EQUAL FWPKCLNT.SYS error?
Before engaging in advanced troubleshooting steps, you should consider performing the following checks:
Check all the hardware components to ensure everything is properly seated and in place.
1. Update drivers
1.1 Update drivers manually
Press Windows + R to open the Run dialog box.
Type devmgmt.msc and click OK to open Device Manager.
Go to each hardware component, such as Network Adapters, Display Adapters, etc. Here we are taking an example of the Display Adapters.
Double-click it to expand, right-click the driver listed and select Update driver.
On the next screen, click Search automatically for drivers.
Follow the onscreen instructions to complete. Now follow the same for all the hardware components.
1.2 Use a third-party tool
Keeping drivers up to date is important for your computer’s health and also prevents BSOD errors. Updating them manually can be a time taking process; therefore, it is advised to use a third-party driver updater tool.
One such reliable tool is Outbyte Driver Updater. It scans your computer for outdated drivers and updates them with the latest ones in a few clicks. Follow these steps to use this tool:
Press the Windows key, type Control Panel, and click Open.
Select Large icons as View by and click Recovery.
Click Open System Restore.
On the System Restore window, select Choose a different restore point and click Next.
Now select a restore point from the list and click Next.
Click Finish to complete the process. Windows will be restored to the chosen point.
So, these are methods that you can use to fix the Fwpkclnt.sys blue screen of death error. If nothing worked for you, it is advised to perform a clean installation of Windows. If you have any questions related to this BSOD error, feel free to mention them in the comments section below.
Office add-ins are powerful tools that can help streamline your work and enhance productivity when using Word, Outlook, Excel, and PowerPoint. There are several plugins available to enhance functionality, automate repetitive tasks, and improve collaboration with colleagues.
However, choosing the one that suits you can be difficult. Therefore, we have compiled a list of the best Office Add-ins available, which can help you accomplish more in less time, ultimately making your work more efficient and effective.
How can I install Office Add-ins?
Download the add-in you want to install. Open any of the Office apps.
Boomerang can be a great addition to your Outlook as it can help you schedule emails, set follow-up reminders, and share your calendar availability with users on any platform.
This plugin comes with an AI assistant which helps you write responsive emails. Also, it lets you schedule recurring messages to save time.
It comes with a powerful calendar assistant that helps you incorporate your real-time calendar availability into an email that functions smoothly on various email platforms, including mobile.
Key features of Boomerang:
Allows you to know if your emails are read with read receipts feature
Pexels is a free Word, and PowerPoint add in which allows you to search their vast libraries of stock images.
The plugin provides free and legal images for your presentation or document. To find the image, you need to type a word or relevant phrase to find images tagged to them.
You can also search for images based on the color dominant in an image. It works with PowerPoint 2013 or later on Windows but is available for PowerPoint 2016 or later on Mac.
Key features of Pexels:
Allows you to save images as favorites for easy access
Works with Microsoft 365 as well
Can access it using Work/School or a Microsoft account
DocuSign is an important plugin for those who deal in legal documents and have to sign digital documents more often.
This Office add-in enables you to sign or request signatures on documents created and edited using Word 2013 or later.
It allows you to edit a document via Microsoft Word and use DocuSign to specify the signing process that directs the document to the right individuals in the correct order.
Key features of DocuSign:
Available for SharePoint, Teams, and Outlook, as well
Allows you to sign in using Office 365 or Microsoft account credentials
Can be accessed from the Office Ribbon
Provides an option to sign email attachments from your Outlook inbox
Woodpecker Word add-in helps you create or draft a legal template or document with no or fewer errors saving you plenty of time. This reduces risk, increases profits, and you will be able to take on more clients.
This add-in comes with shareable online questionnaires, which help you populate your legal documents automatically, saving you from manually entering the values.
It also allows you to reuse the client data to generate new documents without asking for the same information again.
Key features of Woodpecker:
Can connect to your other programs with full Zapier integration
Has an open API
Allows you to store all templates in one place for easy access
Online intake forms automatically create documents for you
Data Prep Toolkit is a useful Excel add-in that helps you clean, transform, format, query, and export data in the easiest way possible.
This plugin can transform crosstab tables to flat lists, combine & split worksheets, add, delete, sort, rename or reorder workbooks, and combine data & merge cells in seconds.
With Data Prep Toolkit, you can query and transform your Excel tables using SQL. With its intuitive query editor, it can display all available tables & highlight syntax.
Key features of the Data Prep Toolkit:
Allows you to export CSV, PDF, or TXT
Can split the workbook and save the sheets separately as XLS files.
Uses Mail Merge to send personalized emails to your Excel contact list
Enables you to select alternate rows, every other column, or another recurrent pattern
Pickit is one of the best Office add ins that provides you unlimited access to the public, licensed images, & clipart. It works with Word, PowerPoint, Teams, and OneNote.
With this plugin, you can create impactful presentations with legal and compliant images within a few minutes.
It allows you to add unlimited photos or clipart with a single click. You can search images by name and metadata or browse the images by category or collection.
Key features of Pickit:
Allows you to upload and share logotypes, company assets, and product shots in Office
Gives you tips and suggestions for designing your slides
Seamless integration with Microsoft 365, Google Workspace, and more
With the Sharing feature, distribute important info to team members and external suppliers
Zoom for Outlook is one of the best Office add ins, as it allows you to schedule and join Zoom meetings from the Outlook app.
You can configure your settings, & the meeting URL and other information will be added to the body of your calendar event.
You can log in to Zoom either by using the Basic (free), or Pro (paid) Zoom account. It also gives you the option to use an existing Google account, Apple, or Facebook account.
Key features of Zoom for Outlook:
Add a Zoom meeting to any new or existing calendar event
Works with Outlook 2016 or later on Mac, Outlook 2013 or later on Windows
Also available for Teams, OWA, and Microsoft 365
Offers the best video, audio, and screen-sharing experience
Another useful Office add in, Writing Assistant, can help those whose native language is not English. It helps transforms your writing into professional standard English.
It allows you to translate different languages, such as Spanish, Chinese, Japanese, and more, into English with ease.
The plugin is free for most of the features but requires a premium subscription for full access, along with an account to sign in.
Key features of Writing Assistant
Comes with Grammar and spell checker
Is powered by AI to flag errors in your writing
Can adapt to your context and offer suggestions
Available for Microsoft 365, Word 2013, or later on Windows, 2016, or later on Mac
So, these are some of the best Office add ins that you can use to make your productivity. Try them and let us know what worked for you in the comments section below
There are multiple user reports that claim that they are coming across Elden Ring’s high CPU usage issue. This problems usually occurs due to lack of resources, or due to fullscreen optimization issues. We also remind you to run the game using a dedicated graphics card and to select a power plan that maximizes performance.
1. Check if your PC meets the minimum requirements
Before playing any game or running a resource-intensive program on your PC, you should ensure that you have all the necessary equipment in your arsenal; in our case, it is the PC.
In case you are wondering where I can find the minimum PC requirements or the required configuration to run Elden Ring without any issues, you can check out the official Elden Ring’s Steam page.
If your PC isn’t meeting the requirements, especially the graphics category, then you should upgrade it immediately if you wish to play the game without issues such as Elden Ring’s high CPU usage.
2. Disable full-screen optimizations
Right-click on the Elden Ring desktop icon.
Click on Properties.
Click on the Compatibility tab.
Check the box for Disable fullscreen optimization option.
Click Apply and OK.
Restart your PC.
You should enable the fullscreen optimization feature to improve the gameplay. However, some features do not work as intended and worsen it for you.
The Elden Ring’s high CPU usage issue might result from fullscreen optimizations not working correctly. Therefore, you should disable the fullscreen optimizations and check whether this resolves the problem.
3. Change the display settings
Press the Win + I keys to open the Windows Settings menu.
Select Display.
Click on Graphics.
Click on Desktop app from the Choose an app to set preference drop-down.
Select the Elden Ring EXE file.
Click on Options for the game.
Select the dedicated GPU.
Click Save.
Restart your PC.
You should ensure that the Elden Ring game isn’t running on integrated graphics but on dedicated graphics. This ensures that sufficient resources are available. Hence, there won’t be Elden Ring high CPU usage issue.
4. Edit the power plan
Press the Win key to open the Start menu.
Open Control Panel.
Select Power Options.
Click on the High-performance power plan.
Restart your PC.
Often the power plan that you have selected might be pushing your PC to save more battery, reducing the usage of its resources to their full potential.
In such a case, we suggest you check the power plan settings on your PC and set it to high performance and check if this resolves the Elden Ring high CPU usage issue.
Press Ctrl + Shift + Esc buttons to open the Task Manager.
Click on the Processes tab.
Select the unwanted processes, one by one, and hit the End task button at the top.
When running multiple apps in the background, your PC ensures to divide the resources among each one.
In such a case, Elden Ring might not be getting sufficient resources to run smoothly and is putting pressure on your CPU, resulting in high CPU usage. First, try closing all the unwanted programs and check whether this resolves the issue.
After researching the internet, we found the best gameplay graphics settings you should opt for when playing Elden Ring.
Texture Quality: Medium
Antialiasing Quality: Low
SSAO: Medium
Depth of Field: Off
Motion Blur: Off
Shadow Quality: Medium
Lighting Quality: Medium
Effects Quality: Medium
Volumetric Quality: Medium
Reflection Quality: Medium
Water surface Quality: Low
Shadow Quality: Medium
Global illumination Quality: Medium
Grass Quality: Medium
That is it from us in this guide. Is the controller not working when playing Elden Ring? Do not worry; we have a guide to sort that out for you.
Several users couldn’t switch to the widescreen mode when playing Elden Ring. Our guide explains how you can quickly fix that without affecting performance.
Sometimes you need to find the exact version of your graphics card, and to do that, you need to know how to check the GPU BIOS version. To learn how to do that, keep on reading.
How do I find my GPU firmware version?
1. Via Windows Settings
Press the Windows + I key to open the Windows Settings.
Click the System and select Display.
Click the Advanced display settings and select the Display adapter properties for Display 1.
The GPU details are below the BIOS Information category from the pop-up menu.
The procedure above will allow you to access your GPU BIOS info from the display settings.
2. Via Nvidia Control Panel
Right-click the blank space on your desktop top to open the context menu and select the Nvidia control panel from the options.
Select the System information menu and navigate to the Video BIOS version.
GoToMeeting and Zoom are very good web conferencing tools, and both can be used for personal or business purposes. But if you’re choosing between GoTo Meeting vs Zoom, in this article, we will try to present all the key elements to help you make the right decision.
What should I look for in web conferencing software?
The best quality of a web conferencing tool is reliability. A tool that you can trust is better than anything, but there are a few other key elements you should consider:
Audio & video quality – Although the equipment and internet connection are paramount for audio and video quality in a meeting, the app should be optimized to get the best from what you’ve got.
File sharing capability – Sharing files during a meeting is extremely useful to convey a message. Without this feature, you need to go back to the old email, which can be a little frustrating.
Seamless integration – It’s a great advantage to integrate third-party apps into your web conferencing tool because you can get myriads of other uses connected to scheduling, recording, translation, and transcripts, along with other CRM and productivity tools.
Encryption – Although we left it in the last position, security is one of the most important aspects of meeting software because otherwise, important information might leak out.
Now that we understand some key aspects, let’s see how GoToMeeting and Zoom can help you.
GoTo Meeting vs Zoom: which one is better in 2023?
GoTo Meeting
GoTo Meeting is a web conferencing tool with a very simple interface but plenty of features to go around whether you decide to use it for personal or corporate needs.
It is focused on security, so the screen-sharing data, keyboard/mouse control data, and text chat information are TSL-encrypted in transit and AES 256-bit encrypted at rest.
Also, they use an SRTP with AES-128-HMAC-SHA1-based protocol to encrypt video and audio data and keep them secure at all times.
You may launch meetings directly from Slack, Outlook, Chrome, or Salesforce, and there are a lot of integrations to go around.
Zoom is definitely a much more popular web conferencing software than GoTo Meeting. The key elements that made it so loved by the users are that it has a free version and the UI are very easy to use.
However, the best part of Zoom is the integration with over 2000 third-party services and apps that can transform it into a proficient communication tool for everyone.
It comes with recording, presentation modes, file transfer, and even live transcripts that can be used for later meeting reports.
Even with a free version, you can host and participate in video meetings of up to 100 people.
GoTo says that their conferencing tool, Meeting, has crisp sound and excellent video quality.
GoTo Meeting provides up to 25 webcam streams, and the resolution depends on how many attendees are in the session. A single webcam stream can be up to 1280x720px (720p).
However, if you go 1 on 1, you can use the Full HD resolution of your webcam without any issues. But in the end, it all comes down to your internet connection and the webcam quality.
GoTo Meeting doesn’t have a file-sharing capability, which can be frustrating for a meeting. Of course, that can save a lot of bandwidth, but it’s still pretty inconvenient to rely on other tools.
Zoom – File sharing within chat
With Zoom, you have file transfer option features in the Chat window. Send documents and file from your device or your cloud storage accounts with just a few clicks.
There is even a captioning tool available to instantly share something on your screen.
3. Seamless integration
GoTo Meeting – Only essentials
GoTo Meeting has only 28 third-party app integrations, among which we can highlight the Office 365 apps, Salesforce, Slack, and Calendly as the most important.
That is because GoTo Meeting is pretty new in this market, and the publishers want to keep things as simple as possible.
Zoom – The integration master
There are 2,363 apps in the Zoom app marketplace, of which 2,142 are just for Zoom Meetings. We declare Zoom the clear winner in this department.
There is little chance of not finding the integration you need. There are apps from absolutely all categories including financial, productivity, CRM, communication, office, and many others.
4. Pricing
While Zoom has a free version, GoTo Meeting only has a 14-days demo for the product.
GoTo Meeting has a professional plan starting from $12/organizer/month which can set the limit to 150 participants per meeting.
Zoom has a $14.99 Pro account that offers 5 GB of cloud storage, 30-hour meetings with up to 100 attendees, and some premium apps for free for 1 year.
Both have additional plans that you can explore further on their respective websites.
GoTo Meeting vs Zoom conclusion
Both apps are great for web conferencing, but GoTo Meeting lacks file transfer capabilities.
Also, Zoom has a free version that can be used for personal needs, while GoTo Meeting only comes with a limited demo.
Also, GoTo Meeting lacks a lot of integrations, and Zoom excels in that department. However, GoTo Meeting has advanced encryption capabilities, making it great for corporate usage.
Overall, Zoom comes up as a winner, but it all comes down to testing them yourself and finding the best match for your needs.
Blue Screen of Death errors can cause many problems, and often a single file, such as portcls.sys, can cause BSOD to occur. We also have an extensive guide to BSOD causes that might provide useful information.
If this happens, your PC will crash and restart, and you’ll lose any unsaved data. The main problem is that these errors can occur randomly, so fixing them can be tricky.
In today’s guide, we will focus on fixing errors caused by portcls.sys, so join us while we take a closer look.
Why does portcls.sys blue screen occur?
There are several causes for this issue, with the following ones being the most common:
Bad drivers – An incompatible driver will cause this issue to appear. Updating or removing that driver usually fixes this problem.
Incompatible software –In some instances, certain software will cause this issue to appear on your PC. Once you remove the software, the issue will be gone.
How can I fix errors caused by portcls.sys?
1. Update your audio drivers
Visit your motherboard or sound card manufacturer’s website.
Locate the model of your device and go to the Drivers & Utility section.
Now locate the audio drivers and click the Download button.
Once the driver is downloaded, run the setup file to install it.
Many reported that Realtek devices are the problem, so if you have them, be sure to update Realtek audio drivers to the latest version to fix this issue.
In order to do so, you can always count on Outbyte Driver Updater to manage and update any drivers from your PC and thus solve Blue Screen issues like this one.
It will practically scan the Windows system and then detect the broken or outdated driver. Afterward, you can just press a button and update them right away.
2. Uninstall problematic drivers
Press Windows key + X and choose Device Manager.
Now locate the device that you want to uninstall. Right-click it and choose Uninstall device.
Next, check the Remove driver software for this device if available and click on Uninstall.
Restart your PC.
According to users, an audio driver can cause this problem, but sometimes the Oculus Rift S drivers can also be responsible. If you’re using Oculus Rift, keep it disconnected or download the latest driver.
Press Windows key + X and choose Apps and features.
Locate the Armoury Crate software on the list and click Uninstall.
Follow the instructions on the screen to remove it properly.
Uninstalling Armoury Crate can help you fix other issues like AsIO3.sys; read this guide to learn more solutions.
Do keep in mind that other software can also cause this issue, so if you have updated or installed any new software recently, remove it and check if that solves the problem.
As you can see, portcls.sys crash can be easily fixed as long as you find the culprit. In most cases, updating your drivers or removing the software is enough.
This Operation Requires an Interactive Window Station is a rather strange error. Software windows allowing users to interact with an app are not opening, and you’ll need to enable them.
Before getting into how to fix this error, it’s important to list what causes it. That way, you can take the necessary steps to ensure it doesn’t happen again.
Corrupt files are messing with your computer’s files – Corruption can be caused by a variety of things from malware to power outages. It’s recommended that you run an SFC scan.
You have an overzealous antivirus app – Antivirus software can sometimes block other apps from working properly. You may need to either temporarily disable the software or uninstall it.
The latest Windows 11 update is faulty – To solve this, it’s recommended that you roll back the last Windows update until Microsoft fixes it. The company has a series of instructions on how to do this.
Your profile has insufficient permissions – If your user account doesn’t have the correct administrator-level permissions, several functions will be disabled for you.
How do I fix this Interactive Window Station error?
There are many different ways you can try out to tackle the Interactive Window Station error. If the easier ones don’t work, try out one of the complex solutions:
The first thing you should do is disable your antivirus software, as mentioned earlier. See if that works. And if does, your best bet is to uninstall the app and get something else instead.
Assuming you have a backed-up version of Windows 11, we recommend performing a System Restore to bring your computer back to that earlier build.
You can also try resetting Windows 11 back to its factory settings, but this should only be done as a last-ditch effort. It is possible, however, to save your files so nothing gets lost in the process.
1. Modify default driver installation behavior
Launch the Windows 11 Registry Editor. Select Yes if a User Access Control window asks if you want to make changes.
Under HKEY_LOCAL_MACHINE, open the following folders: Software, Policies, then Microsoft.
Open the Windows NT folder, then expand Printers and PointAndPrint right after.
Right-click the RestrictDriverInstallationToAdministrator D-Word and select Modify.
Change the set value to its opposite. If it’s 1, switch the value 0. If it’s 0, change it to 1.
Setting the value to 1 forces the computer to require administrator permission to install print drivers. Setting it to 0 gets rid of this requirement. See if changing the value solves the problem.
2. Gain admin permissions through File Explorer
Launch the File Explorer. Copy and paste the following address to the window: c:\Windows\System32
Locate the drivers folder, right-click it, and select Properties in the context menu.
In the Properties window, go to the Security tab. Click the Advanced button at the bottom.
Click Change next to TrustedInstaller.
In the textbox at the bottom, enter administrators. Then click the Check Names button.
Next, click OK. On the following window, select Apply, then OK.
Close the Properties window by selecting OK.
Do the same thing to the DriverStore and DRVSTORE folders.
3. Gain admin permissions via Command Prompt
This is an alternative to the previous solution. First, bring up the Command Prompt in the Windows 11 Search bar. Select Run as administrator.
Run the following command: takeown /f "C:\Windows\System32\drivers" /r /d y
Give Command Prompt enough time to finish.
Next, run the following command: icacls "C:\Windows\System32\drivers" /grant administrators:F /T
It’s possible to do the same to the DriverStore and DRVSTORE folders. For the former, run the following commands back to back: takeown /f "C:\Windows\System32\DriverStore" /r /d yicacls "C:\Windows\System32\DriverStore" /grant administrators:F /T
For the DRVSTORE folder, run these commands: takeown /f "C:\Windows\System32\DRVSTORE" /r /d yicacls "C:\Windows\System32\DRVSTORE" /grant administrators:F /T
Uncheck Load startup items, then go to the Services tab.
In the Services tab, click the box next to Hide all Microsoft services and the Disable allbutton.
Now go to the Startup tab. Click Open Task Manager.
Inside Task Manager, disable all startup items currently enabled.
Close the Task Manager to return to the System Configuration window.
Click OK, then restart your computer.
After the clean boot, re-enable the startup apps one by one. See if the problem returns. If it does, uninstall that app or contact your computer’s manufacturer.
5. Reinstall drivers
Launch the Device Manager.
Right-click the entry for the problematic device. Select Scan for hardware changes. Give your computer enough time to finish up.
Once done, expand that entry and select Update Drivers.
What can I do if I get the Blue Screen of Death after installing drivers?
If you get the Blue Screen of Death after an update, you probably have some faulty drivers. Immediately roll back the drivers, which you can do via the Device Manager.
It’s also recommended that you run an SFC scan to clear any corruption that might have occurred. And if you’re a gamer, try not to overclock your computer, as this is another cause.
Speaking of the Blue Screen of Death, you should learn how to resolve Error Code 0x00000024. Conflicting apps can cause this. Perform a clean boot, identify the problematic software, and uninstall the
Feel free to comment below if you have other Sticky Notes problems. Also, leave comments below about reviews you’d like to see or information on other native Windows 11 software.
Microsoft offers different versions of operating systems, including Windows and Windows Server. These operating systems are similar as they share the same code but are used for distinct tasks.
This guide will explain what Windows Server is, compare Windows vs. Windows Server, and explore their differences.
What is Windows Server?
Windows Server is a server operating system designed by Microsoft. It can run on servers and provide a platform for running applications, managing network resources, and storing data.
It offers a range of features, including file and print services, web server services, directory services, and virtualization.
Organizations of different sizes use this operating system version to support several business apps and services, such as web apps, cloud services, databases, and more. The latest version of Windows Server is Windows Server 2022.
Windows vs. Windows Server What are the differences?
1. User Interface
One of the most significant differences is the user interface of Windows 10/11. The latest Windows version is specifically for personal computers. It has a graphical user interface optimized for touch and keyboard/mouse input.
However, Windows Server manages servers remotely using Windows tools such as PowerShell and Remote Desktop. The user interface of this operating system is not user-friendly and specifically designed for administration. It is ideal for server administrators who prefer a command-line interface.
2. Hardware support
Windows 10 is designed to run on low-end laptops and high-end gaming PCs. It is consumer-oriented and optimized to use graphics cards and gaming peripherals.
On the other hand, Windows Server is optimized for server-class hardware, like large amounts of RAM and high-end processors. It also supports hardware features such as hot-swappable hard drives and redundant power supplies, which are not available with the Windows 10 version.
3. Workloads
Windows Server is precisely developed for server workloads. Therefore it includes tools and features such as Hyper-V( create and manage virtual machines), which are not available with Windows 10/11.
Windows Server also has tools to manage Active Directory, which organizes user accounts, security groups, and other network resources.
In contrast, Windows 10 is primarily used for personal computing tasks, such as browsing the web, running productivity applications, and playing games.
4. Licensing
Windows 10/11 is a standalone product with one license per device. However, the license for Windows Server is based on the number of processors and cores of the server, with a minimum of eight cores required per processor. So, the cost of licensing Windows Server is relatively high compared to Windows 10.
5. Security
Windows 10/11 has basic security features such as Windows Defender and BitLocker encryption. However, Along with these basic features, Windows Server also comes with some additional features such as Credential Guard(protect against pass-the-hash attacks), Just Enough Administration(delegate administration for anything managed by PowerShell), and NAP( enforce compliance with network health policies) to secure the servers.
Microsoft regularly releases monthly updates for Windows 10/11, which aim to fix bugs, introduce new features, and enhance performance. The Windows Update feature in the Settings app automatically installs these updates.
Windows Server also receives regular updates but is not frequently released as they require more testing before being installed in the production environment. Also, Windows Server has a longer support lifecycle than Windows.
For example, you can review the official Windows Server 2016 end of life timeline to understand how Microsoft handles extended support for its server products.
7. File sharing
Windows comes with basic file-sharing features allowing users to share files and folders over a network. In addition, it supports the SMB protocol for file sharing, which enables users to access shared files and folders from any device on the network.
Windows Server comes with advanced file-sharing features, including Access-based Enumeration (allows users to see only the files and folders they have permission to access), Distributed File System (creates a logical view of file shares distributed across multiple servers as a single shared folder), and File Server Resource Manager( manage and classify data stored on file servers)
8. Storage
Windows has basic storage capabilities, and it supports NTFS and FAT file systems for storing data on hard drives and external storage devices. In addition, it provides essential software-based RAID support for data redundancy.
Windows Server provides more advanced storage capabilities. For example, it comes with Storage Spaces (which create virtual disks by grouping physical disks together), Storage QoS (which manages the performance of storage resources), and Data Deduplication (which removes duplicate data).
9. Scalability
Windows is scalable, but you can only use it on a single device. You can install it on a wide range of hardware but only for personal and home use.
In contrast, Windows Server is highly scalable, allowing businesses to add or remove hardware resources easily. In addition, you can install it on multiple servers and use it to manage large-scale networks and data centers. This makes it ideal for businesses that require flexible IT infrastructure.
10. Remote access
Windows has essential remote access tools designed for home and personal use. An inbuilt feature is Remote Desktop Protocol (RDP), which enables you to access computers from remote locations and connect to other devices via the Internet.
On the other hand, Windows Server provides robust remote access capabilities through Remote Desktop Services (RDS). The feature enables administrators to securely manage and deliver remote desktops, applications, and services to users over the Internet or a corporate network.
Further, Windows Server also comes with other remote access features, including Virtual Private Network (VPN) and DirectAccess, delivering secure remote connectivity to corporate networks. If you’re just starting out, you can check out some of the cheapest Windows servers.
In conclusion, Microsoft developed Windows and Windows Server, which are two distinct operating system versions for different purposes.
In conclusion, Microsoft developed Windows and Windows Server, which are two distinct operating system versions for different purposes.
They share a few similarities but significantly differ in workload, features, functionality, licensing, and support timelines. If you are planning a migration, it helps to review our full guide on Windows Server 2019 EOL to better prepare for the upcoming changes.
They share a few similarities but significantly differ in workload, features, functionality, licensing, etc. If you have any questions or concerns about Windows vs. Windows Server, please mention them in the comments section below.
Multiple user reports regarding the NET HELPMSG 2250 pop-up when a user tries to map network drives for a user account. The full message reads The network connection could not be found. More help is available by typing net HELPMSG 2250
Follow the steps below to fix it and check out possible reasons why it might happen:
How can I fix the NET HELPMSG 2250 error?
Start by restarting your PC and router and make sure your PC is properly connected to the network. With these out of the way, let’s get right to it
1. Restart the Server service
Press the Win + R keys to open the Run dialogue.
Type services.msc and press Enter.
Locate the Server service.
Double-click to open it.
Under Startup type, select Automatic from the drop-down menu.
Under Service status, select Start.
Click Apply and OK.
Restart your PC.
Whenever there is a network-related issue, such as the NET HELPMSG 2250 error in Windows 10 or other OS versions, you should ensure that the Server service is running without any issues.
Navigate to the below path. HKEY_CURRENT_USER\Software\Microsoft\Windows\CurrentVersion\Explorer\MountPoints2
Delete the server registry subkey.
Close Registry Editor.
Restart your PC.
This solution was suggested by one user on a forum and has helped several users fix the NET HELPMSG 2250 error in Windows 10 PC.
You can also try to delete the said registry key. However, you should ensure that you have taken a registry backup to always revert to the normal state in case things go south.
Select the Startup type as Automatic from the drop-down.
Also, hit the Start button for Service status.
Click Apply and OK.
Restart your PC.
The workstation service ensures smooth communication between the local computer and the network servers. You should make sure that the Workstation service is running.
4. Disable Windows Firewall
Press the Win key to open the Start menu.
Type Windows Defender Firewall and open it.
Click on the Turn off Windows Defender Firewall on or off option from the left pane.
Check the radio buttons for Turn off Windows Defender Firewall (not recommended) options for Public and Private networks, respectively.
Click OK.
Restart your PC.
Several users were able to fix the network-related issues, such as the NET HELPMSG 2250 error on their Windows PCs. Often the Firewall can block certain network-related activities as it seems there are chances of threat injection.
We would suggest you run on the Defender Firewall once the operation is completed, as this will protect your PC from foreign virus attacks.
5. Restore your PC
Press the Win key to open the Start menu.
Type Create a restore point and open the appropriate option.
Select the System Restore button.
Click the Next button.
Choose the restore point.
Click Next.
Click Finish.
This will begin the system restore process on your PC.
If nothing works, it is better to revert to the normal state when everything was working smoothly, and you aren’t facing the NET HELPMSG 2250 error.
You can use the System Restore process and follow the above steps to restore your PC. Note that the system restores will work only when you already have a system restore point. You can refer to our guide explaining how to create a system restore point.
Server instability: The server that you are trying to map isn’t available at the moment or the server might be inactive.
Network connectivity issues: Since the NET HELPMSG 2250 is a network connectivity-related problem, there are chances that the network between your PC and the remote device isn’t perfect.
Firewall is conflicting: Often, Firewall or third-party antivirus software can cause issues with the network and block certain operations.
That is it from us in this guide. You can also check out our guide that explains how you can easily fix the Net Helpmsg 3547 error.
If you are facing the NET HELPMSG 2184 error, our guide lists many solutions that will help you fix the problem.
Our guide on resolving the NET HELPMSG 3521 error has helped several users facing the issue on their PC. It is a Windows update error.
If you have encountered the Zoom plugin for Outlook not working issue, this guide can help! We will discuss some of the tested fixes to resolve the issue right after examining the causes. Let’s start!
Why is the Zoom plugin for Outlook not working?
There could be several reasons for the plugin not working; some of the common reasons for the same:
Outdated Outlook app – If your Outlook desktop app is outdated, you might face all kinds of issues, including this one. Make sure the app doesn’t have pending updates.
Plugin not installed properly – If the plugin is not installed correctly, chances are you can use it. However, it is advised to reinstall to ensure that it is working.
Plugin is not compatible – If the addin installed is incompatible with the version of Outlook, then you might face this error. Check updates for the plugin installed and make sure they are installed.
Conflict with other addins – One or more plugins installed for your Outlook might prevent the Zoom plugin from working. Ensure all the unnecessary plugins are disabled.
Zoom plugin disabled – If the plugin is added but is not enabled, then you might be able to use it. Make sure the plugin is installed and enabled.
Internet connection or firewall settings – If there is an issue with firewall settings or network connection, the plugin might not be able to establish a connection with the Zoom servers, hence the issue.
What can I do if the Zoom plugin for Outlook is not working?
Before moving to the troubleshooting steps, make sure you go through these preliminary checks:
Check for internet connection and firewall settings.
Restart your computer
Restart Outlook
If you are using OWA, then make sure you are not using the incognito mode of the browser.
Under Connected Experiences, locate Turn on all connected experiences and place a checkmark next to it.
Click OK and restart Outlook.
6. Contact Outlook Support
If nothing has worked for you so far, you must contact the Outlook Support team and explain your issue. Also, tell them about all the steps you took to resolve the issue; this will help them understand the situation. They can help you with other troubleshooting methods to fix the problem.
You can follow these methods to troubleshoot the Zoom plugin for Outlook not working issue. If we have missed something that helped you fix the error, please mention that in the comments section below.
When it comes to development, Visual Studio Code stands as the most popular cross-platform code editor, especially for web developers. However, many wonder how Atom compares to Visual Studio Code.
Both applications share many similarities, so this comparison comes naturally for users. Picking the best software isn’t always simple or easy, and this is where this guide might come in handy.
So join us while we compare these two applications to determine which is better for you.
Is Atom still relevant?
Unfortunately, Atom isn’t in development anymore, and the developers announced last year that the project will get archived on December 15, 2022.
Although the software is still available for download, it’s not under active development, so don’t expect to get new features or updates.
Why is Atom shutting down?
According to the developers, the software had no significant feature development for several years. In addition, with the development of cloud-based tools, community involvement declined significantly.
As a result, developers decided to abandon the project and focus on GitHub Codespaces.
Atom vs Visual Studio Code, here are the biggest differences
User interface
The first thing you notice when you start Atom is its simple user interface. You have the folder tree on the left, and your open files on the right. The interface is minimalistic and it will allow you to focus on your code.
The software also has integrated GitHub support, and you can access GitHub from the hidden pane on the right. Thanks to this feature, you can easily host files on GitHub. We found Atom’s interface useful but a bit basic for our needs.
On the other hand, Visual Studio Code has a similar interface with the folder tree on the left and open files on the right. The software also has a panel on the bottom that can be used for debugging or as a terminal.
Overall, although both applications offer great user interfaces, we found Visual Code to offer more features and customization options.
Performance
In terms of performance, both applications were light on our resources and didn’t cause any performance issues on slowdowns.
As for memory usage, Visual Studio Code with multiple extensions did use a bit more memory, but the memory usage difference is negligible.
In terms of performance, we can say that both applications are evenly matched, but Atom can get sluggish after installing multiple plugins.
Functionality
As for functionality, both applications offer similar features. However, Visual Studio Code has several benefits.
For starters, it has a built-in debugger, IntelliSense for code competition, and code hinting. Of course, there’s also GitHub integration available.
On the other hand, Atom doesn’t have a debugger or IntelliSense available out of the box, and if you want to use those features, you’ll need to add them using extensions.
However, GitHub support is available out of the box. Atom seems minimalistic in terms of features, whereas Visual Studio Code is more of an out-of-the-box solution that requires less configuration.
Extensions
Both applications support extensions and themes, allowing you to customize the software in functionality and appearance.
You can search for extensions from the left sidebar with Visual Studio Code. The marketplace has thousands of extensions, and you’ll surely find anything you seek.
Once you select the desired extension, you can read its description in the right pane to learn exactly what it does and how to configure it.
If you don’t prefer using the sidebar, you can also visit Visual Studio Marketplace in your browser and search for the desired extensions there.
As for Atom, during our testing, we couldn’t search for or download any extensions. The software supports them, but we encountered issues while searching for them.
It’s worth mentioning that Atom extensions offer much more in terms of functionality, and this is why many have dubbed it a hackable text editor.
However, due to the simplicity and multiple ways to install extensions, we have to mention that Visual Studio Code seems like a better option in this regard.
Should I use VS Code or Atom?
Both applications have similarities, and in a way, Atom was a spiritual predecessor of Visual Studio Code. Visual Studio offers a better interface and more features out of the box, and in our opinion, it’s a better choice for all types of developers.
Another deciding factor is the active development, and since Atom has been discontinued and won’t be getting any new features or improvements, Visual Studio Code remains the only option.
Many of our readers have reported the error 0x8004100E appearing on their PCs at intervals while performing tasks on it. The error indicates the Microsoft BitLocker Administration and Monitoring (MBAM) client has failed. Hence, this article will help fix the error 0x8004100E.
Several factors can cause the error code 0x8004100e to appear on your PC. Some are:
BitLocker WMI class (win32_encryptablevolume) is not registered – The error can occur due to the BitLocker WMI class not being configured on your PC. It prevents the services relying on it from accessing and causes the computer not to communicate with the MBAM server. Hence, it fails to send the encryption status data.
Cluttered Windows Registry – A clustered or unorganized Windows Registry can cause errors. It prompts the registry keys needed for the communication between the MBAM server and the computer to be unreadable.
Faulty entries of non-existent programs – Improper software uninstallation can cause missing or corrupt entries from the non-existent program. Also, it can cause missing files that were accidentally deleted from the registry to corrupt system files and cause the system to malfunction.
These factors may vary on different computers. Nevertheless, this guide will take you through effective ways to resolve the 0x8004100e error message on your PC.
How can I fix Error 0×8004100e?
Before proceeding with any advanced troubleshooting steps, go through the following:
Install a Registry cleaner – Use registry cleaner software to scan for clustered keys if the above steps are not working.
If you can’t resolve the error, try the solutions below:
1. Perform a clean boot
Press Windows + R key to open the Run dialog box, type msconfig, and click OK.
Select the Services tab and check the box for the Hide all Microsoft services option, then click the Disable all button.
Go to the Startup tab and click Open Task Manager.
Click on the startup programs and tap the Disable button.
Restart your PC and check if the error persists.
Performing a Clean Boot prevents selected programs and services from running on startup. Hence, it resolves any interference they may cause the Microsoft BitLocker Administration and Monitoring (MBAM) client.
The battle between password managers is heating up as competition rises. A LastPass vs. RoboForm debate has been brewing, and the jury is still out on who wins.
So, we decided to dig in for ourselves, and after a series of tests, we have some news good enough for anyone who is split between password managers.
In this article, we will show you all our findings, and hopefully, it will inform your decision. Straight off the hat, let’s tell you, it may be a difficult choice since they both have some exciting, valuable features.
What is LastPass?
LastPass, developed by LastPass Inc., is a tool that helps users generate, store, and securely manage passwords and other confidential data.
Its design makes it easy for users to generate complex, secure passwords and credentials for all their online accounts. It uses a vault secured by a Master Password and other forms of authentication to store all of this information.
Like LastPass, RoboForm is also a Password Manager, and it helps users store, generate, and secure their passwords and online credentials.
It stores all this information in a secure vault protected by a master password. Besides passwords, some of its private data could include credit card information and personal identification documents.
Its key features include the following:
One-click logins
Offline access
Auto password capture
Multi-factor authentication
This only scratches the surface of these two robust tools, but before we dive into our comparisons, let us introduce you to how we tested them.
LastPass vs. RoboForm: Our testing methodology
You may wonder how we got to these conclusions. We used a set of key factors that helped us come to reasonable conclusions as we evaluated each Password Manager.
Some of the elements we focused on were:
Compatibility – Since we know you would need the tools for a range of devices, we devised to install them on several devices, watching out for bugs and evaluating the ease of use and the general user experience.
Security – As you can imagine, this comes tops in priorities for a tool that manages your passwords. So, we assessed their effectiveness and strength, especially regarding their audits, authentication, and security features.
Ease of use – No one wants to be stuck with a powerful tool that is not easily manipulated. So, we evaluated essential functions like secure sharing, filling login forms, and creating and managing credentials.
That said, here is all we found evaluating both password tools.
LastPass vs RoboForm: How do they stack up against each other
1. Security
As a Password Manager, you may expect security to determine whether it is worth a second thought. We, however, have split this into 3 essential groups that we discuss now.
1.1 Encryption
Both tools use the AES-256 encryption standard. This is as good as it can get as far as securing private data and passwords is concerned. This standard is the symmetric block cipher deployed by the United States to encrypt classified data.
They, however, take this a step further. RoboForm adopts PBKDF2 with a hundred thousand iterations in generating each unique key for your data. On the other hand, LastPass has adopted PBKDF2-SHA256 and salted hashing.
It was hard to fault this encryption, so we are split here.
1.2 Third-party security auditing
Numerous individual bodies, including NCC Group and Cure53, have separately done security audits of Lastpass. They have unanimously given the password manager a good ranking for their privacy and security. However, LastPass notified users on their official blog about a security incident where a malicious actor obtained technical information and source code.
RoboForm also completed a third-party security audit and penetration test by Secfault Security, and the results were positive. They have covered all aspects of the RoboForm platform, including the Windows and macOS desktop client, the Android and iOS mobile apps, the web portals, and the browser extensions.
1.3 Privacy policy
We consider both tools to have a very robust privacy policy. Most users skip over going through this long reading, but we could say that they both perfectly outline how your data is collected, stored, and used.
TrustArc awarded LastPass the TRUSTe Privacy Certification after they subjected the company to a full privacy audit. So if you are using LastPass, this should help put your mind at ease.
In RoboForm’s privacy policy, you have a clear outline of robust protection of data as well as very elaborate laws to show restrictions in data sharing with third parties.
2. Usability
They both have very friendly user interfaces. They are easy to navigate, and even as a first-timer, it feels intuitive enough to locate features and other vital functions easily.
You can create and manage passwords easily, regardless of your device. Both services’ automatic fill-in form removes the stress of creating or storing passwords after use.
We, however, concede a slight edge to LastPass because its auto-fill and password-generating functions seem to work better across more browsers and devices.
3. Password-sharing functions
If you work in an organization, password-sharing becomes increasingly important, especially when users are on shared accounts across different services.
Both services offer secure password sharing for friends, families, or trusted entities. However, again, LastPass edges its competitor in this aspect. It offers the ability to have different access levels to a single password and the possibility of revoking a shared credential.
This sort of administrator status often comes in handy when many people need access to a password, but you need it for specific periods.
We touched on this factor a bit when we discussed ease of use. We should start by saying that LastPass and RoboForm offer services over various platforms and devices.
You should have a good experience regardless of the service you pick on Windows, Mac, Android, and iOS devices. But you may expect more features from LastPass on different devices.
5. Price
Finally, we come to the pricing, which is a very practical factor, because no matter how badly you want it, if you can not afford it, it would not matter.
LastPass comes in 3 plans. The first is the free plan. This is probably the most used plan. As you can expect, it comes with a limited set of features, but often, these features may be enough to get by.
Some features in the free plan include unlimited passwords, 1 user account, access on 1 device type, save and autofill passwords, etc.
The paid plans start at $3.00 per month, billed annually for the Premium plan, and $4.00 per month, billed annually for the Families plan. The features you need should determine if you go for a free or paid subscription.
On the other hand, we have RoboForm, which offers two different pricing categories, a Personal and a Businesses category.
The Personal category has a free plan where you should be able to enjoy features like Unlimited logins, Fill web forms, Multi-platform support, Strong encryption, etc. The Businesses category ranges from $25.95 to $39.95 per year/user.
The winner of this category is your budget and what you consider better value for money.
Ultimately, we believe these are two solid password managers anyone should be interested in. We, however, think that LastPass slightly edges its competitor in this LastPass vs. RoboForm debate.
It may be your choice if you think your work is across multiple devices or platforms. Ultimately, we also love the pricing flexibility of RoboForm and believe that this is a strong enough attraction for its services.
That is as much as we will be sharing in this guide. We are, however, very curious to know what decision you will make. Please keep us informed in the comments section below.