Fix: 0xc190011f Windows Update Error [6 Ways]

There are numerous Windows Update error codes that users have discussed on the Microsoft support forum. Error 0xc190011f is another of those errors that stop Windows 10 updates.

In this case, users have said that error 0xc190011f can arise for more specific build version updates as well as patches. Do you also need to fix that issue? If so, check out these potential fixes for error 0xc190011f.


How can I fix the Windows Update error 0xc190011f?

1. Open your Windows Update troubleshooter

  1. The Windows Update troubleshooter isn’t guaranteed to fix all update issues, but it does fix some. To open that troubleshooter, press the Windows key + S hotkey.
  2. Enter the keyword troubleshoot in the Type here to the search box that opens.
  3. Click Troubleshoot settings to open the Settings window as in the shot directly below.
    The Troubleshoot tab Windows Update Error 0xc190011f
  4. Click Windows Update and the Run the troubleshooter button.
    Windows Update troubleshooter Windows Update Error 0xc190011f
  5. Then select the Apply this fix option if the troubleshooter presents a potential fix.

2. Run a system file scan

  1. Some users have confirmed that running a System File Checker scan fixed 0xc190011f. First, press the Windows key + R keyboard shortcut, which will open Run.
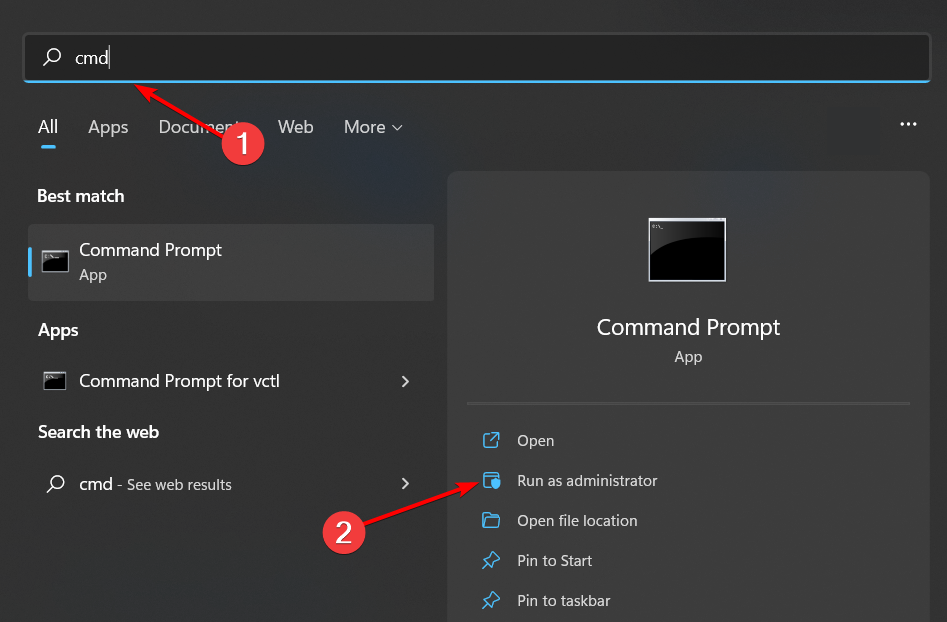
  2. Type cmd in Run’s text box. Press the Ctrl + Shift + Enter key to open an elevated Command Prompt.
  3. Click Yes if a UAC dialog box window opens.
  4. First, enter the DISM.exe /Online /Cleanup-image /Restorehealth command; and press the Return key.
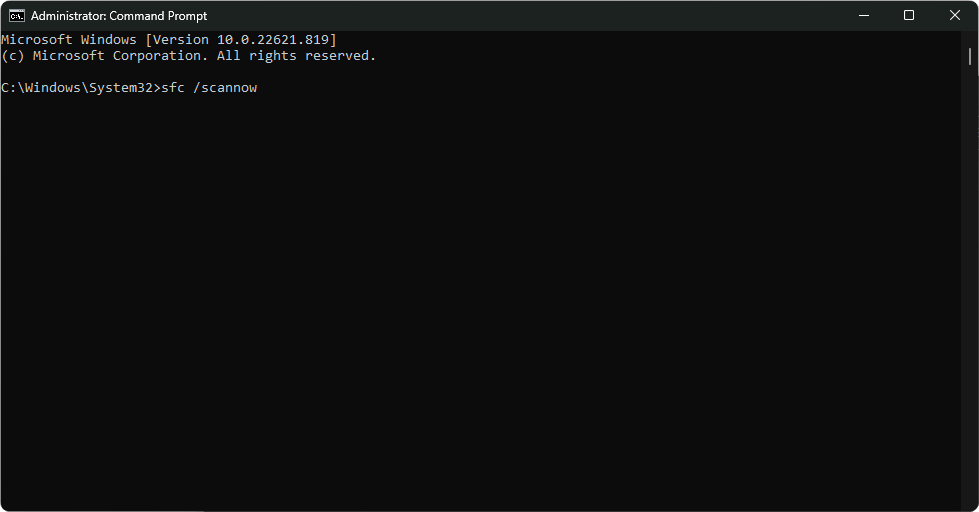
  5. Then input the sfc /scannow command, and press the Enter key.
    sfc /scannow command Windows Update Error 0xc190011f
  6. Wait for the scan to finish. Restart the PC if the SFC scan repairs something.

3. Check your regional format

  1. Check that your desktop’s or laptop’s regional format matches your actual region. To do that, enter the keyword Region settings in the Type here to search box.
  2. Click Region settings to open the window shown directly below.
    Region settings Windows Update Error 0xc190011f
  3. Select your country in the Country or region drop-down menu.
  4. Select your actual region on the Regional format drop-down menu if it’s not selected there.

4. Uninstall VPN software

  1. Error 0xc190011f can also be due to VPN/proxy software, such as Checkpoint VPN. To uninstall VPN software, open Run.
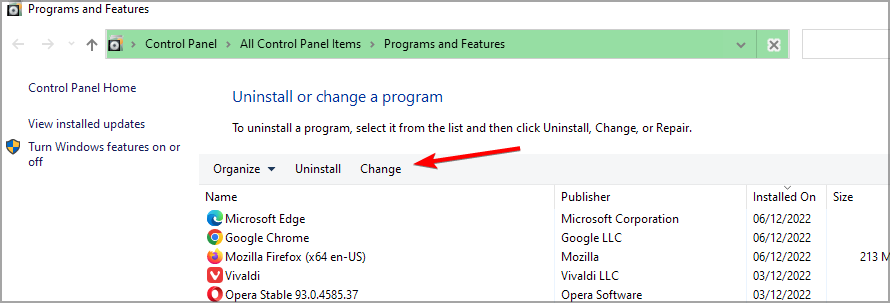
  2. Then input appwiz.cpl in the Open box and click OK to open the Control Panel applet shown directly below.
    The uninstaller window Windows Update Error 0xc190011f
  3. Select your VPN software there.
  4. Click the Uninstall option to remove the VPN software.

5. Clear the SoftwareDistribution folder

Clearing the SoftwareDistribution folder, which will effectively clear the Windows Update cache, might also fix error 0xc190011f. The Delete the SoftwareDistribution folder post provides full details for how you can do that.

SoftwareDistribution folder Windows Update Error 0xc190011f

6. Reset Windows 10

  1. As a last resort, try resetting Windows 10. To do so, click the taskbar’s Type here to search button.
  2. Input reset as the search keyboard.
  3. Click Reset this PC to open the window shown directly below.
    The Recovery tab Windows Update Error 0xc190011f
  4. Press the Get started button.
  5. Select the Keep my files option.
    Keep my files option Windows Update Error 0xc190011f
  6. Click the Next button to continue, and then select the Reset option.

Those are some of the most probable fixes for error 0xc190011f. Some of resolutions above might also fix similar update errors. For other Windows Update fixes, check out the Windows Update error codes page.

[wl_navigator]

Run Apps as Different User on Windows 11 [4 ways]

A lot of Windows apps and programs require administrator permissions to run on your system. This is a security measure to ensure that you don’t accidentally delete or modify important files, which could cause your computer to crash or become unusable.

However, if you want to run an app as a different user for example, if you’re the administrator for your home computer but not for your work computer, then this can be a problem. Fortunately, there are ways around this issue as you shall see below.

Why do I need to run apps as a different user?

There are a number of reasons why you might want to run an application as a different user. The following are the most common:

  • Test an app – If you have installed a new piece of software that doesn’t seem to be working, running it as a different user can tell you if it works properly for that person.
  • Better performance – If you need to test an app, but your administrator account is using too much memory, a user account with more memory can yield better performance.
  • Keep your personal data safe – This is especially for trying out a new piece of software. You want to prevent apps from accessing potentially sensitive data they shouldn’t have access to. 
  • Prevent crashes – One of the biggest reasons why people run applications as different users is because it helps prevent crashes and errors. Conflicts between apps or conflicting permissions can cause these. 
  • Limit app permissions – Many apps and games request permission to access your data when installed, but they don’t always need it.
  • Security – You want to protect yourself from hackers who may gain access through software vulnerabilities.
  • App isolation – When you run an application as a different user, it doesn’t have access to your data and settings. This means that any malware or viruses on the computer won’t be able to access your private data.

How do I run an app as a different user in Windows?

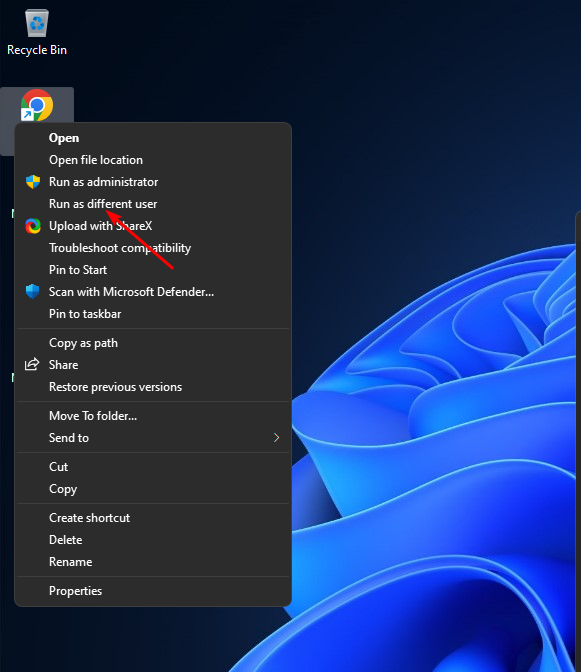
1. Use the context menu

  1. Locate the app you want to run, either on the Taskbar or Desktop.
  2. Hold down the Shift key and right-click on it to bring up the context menu.
  3. Select Run as a different user.
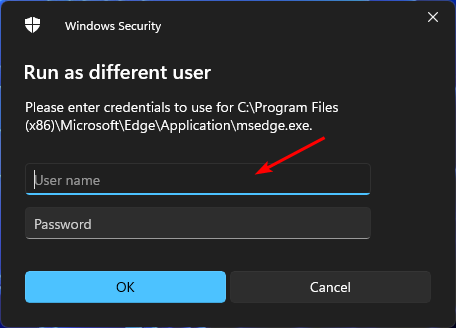
  4. You’ll be prompted to enter the username and password credentials of the user account to continue.

2. Use the Group Policy Editor

  1. Hit the Windows + R keys to open the Run command.
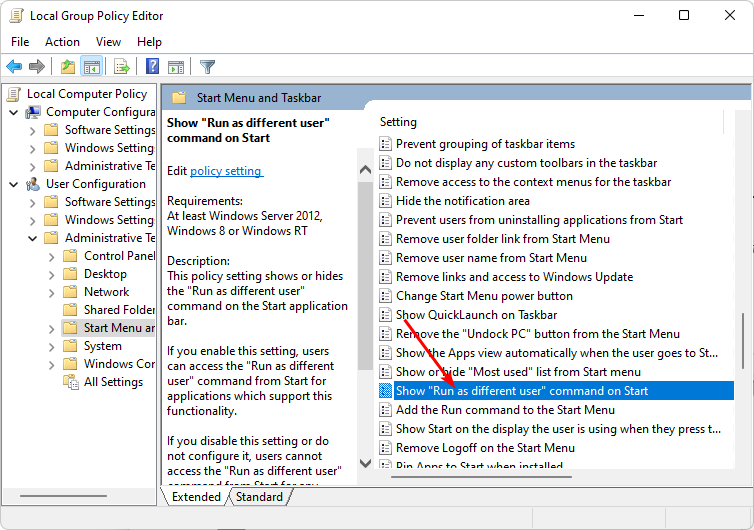
  2. Type gpedit.msc in the dialog box and hit Enter to open the Group Policy Editor.GPEDiT.msc -Windows Remediation Service Failed to Start?
  3. Navigate to the following location: User Configuration/Administrative Templates/Start Menu and Taskbar
  4. Double-click on Start Menu and Taskbar and select Show “Run as different user” command on Start.
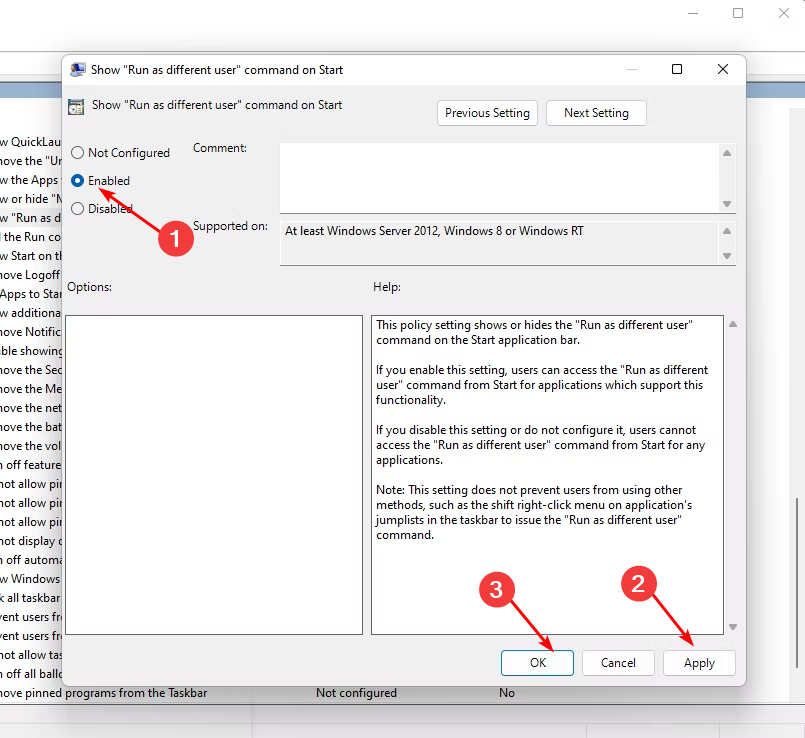
  5. In the new window, check the Enabled box then click Apply and OK to save changes.

3. Use the Registry Editor

  1. Hit the Windows + R keys to open the Run command.
  2. Type regedit in the dialog box and hit Enter to open the Registry Editor.
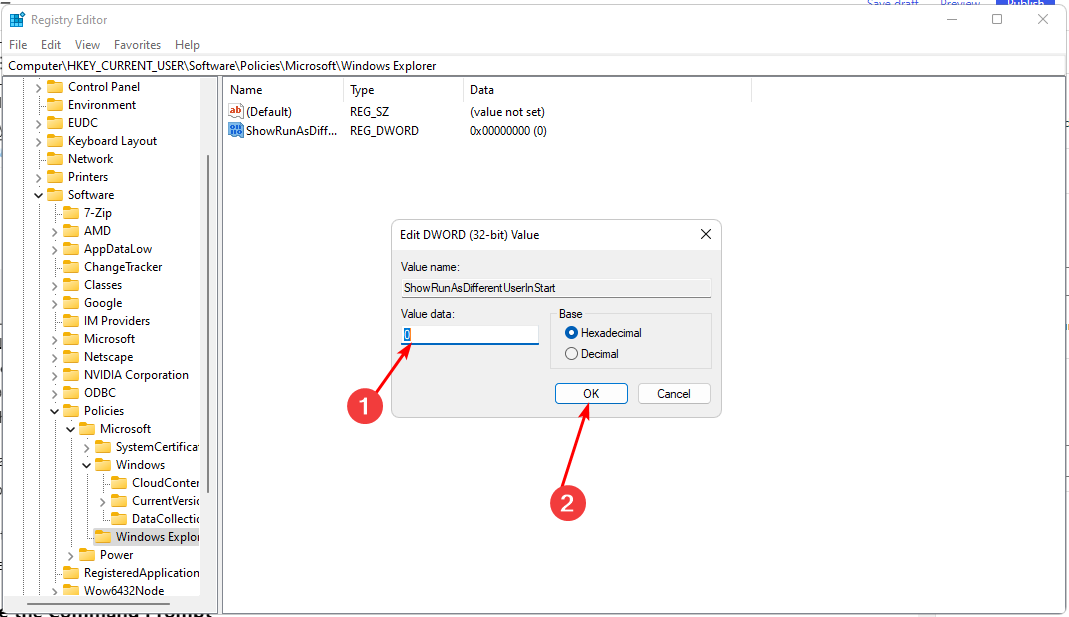
  3. Navigate to the following location: Computer\HKEY_CURRENT_USER\Software\Policies\Microsoft\Windows\Explorer
  4. Double-click on ShowRunAsDifferentUserInStart, set the Value data as 1 then click OK to save the changes.

Generally speaking, you shouldn’t need to edit the registry unless there’s a problem with something that can’t be resolved with other tools. 

While this can be risky if done improperly, you can always create a restore point. This will allow you to restore your PC to a previous state before making any changes.  

4. Use the Command Prompt

  1. On your desktop, find the app you wish to run as a different user. Alternatively, you can search for it from Settings.
  2. Right-click on it and select Open file location.
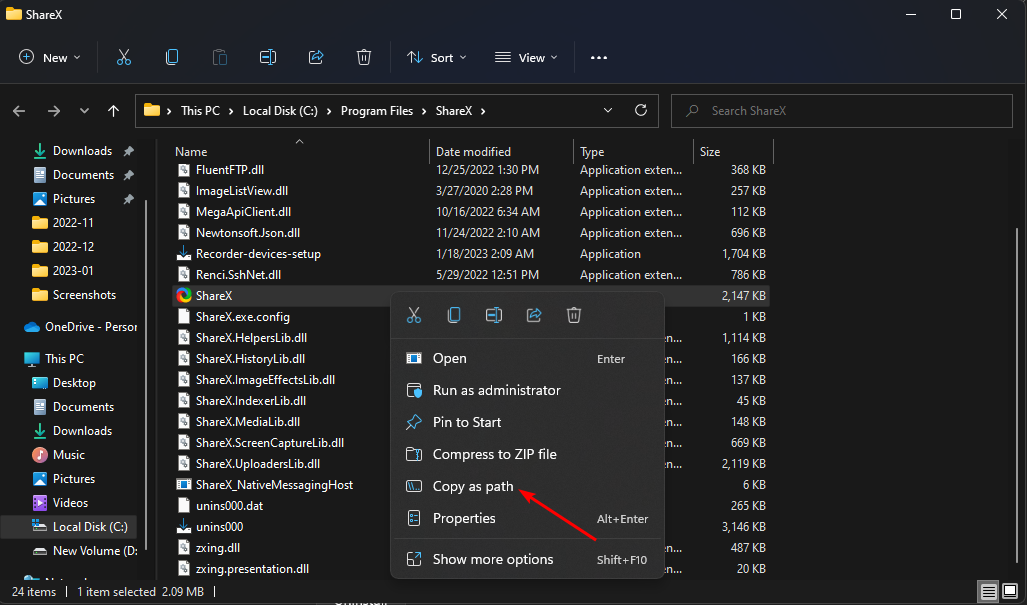
  3. Once in the file location, locate the .exe file, right-click on it and select Copy as path. Keep this information close to be used in the next steps.
  4. Hit the Windows key, type cmd in the search bar and click Run as administrator.cmd-run-admin-w11 unexpected kernel mode trap windows 11
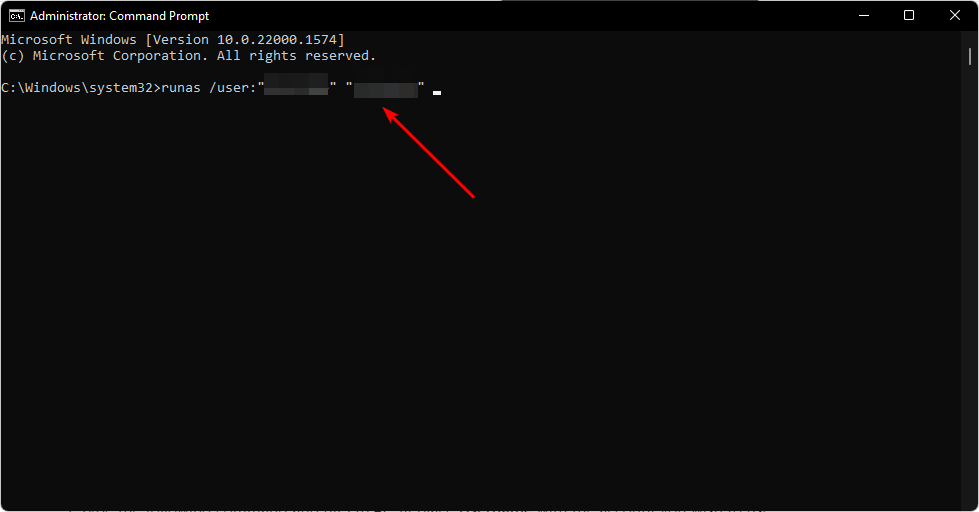
  5. Type the following command and hit Enter. Replace Username with the account you wish to use and FilePath with the information copied in 3 above: runas /user:"Username" "FilePath"​
  6. You’ll be prompted to enter the password for the user account to proceed.

And that’s how to run apps as a different user using Windows 11 cmd. If you get an error like this app can’t run on this PC, feel free to check out our detailed guide for quick fixes.

We also show you how to run iOS games on Windows PCs, so don’t hesitate to visit our article.

Keep in mind that this feature does have certain issues, and we wrote about run as a different user Access denied error or run as a different user option is missing. Make sure to check them out if you have any problems.

To learn more about this feature, don’t miss our guide on how to Run as a different user without a password.

Let us know your preferred method to run apps as a different user in the comment section below.

How to Enable USB Port Blocked by Administrator [4 Ways]

Many users utilize USB drives for transferring data between PCs and storing software. However, users can’t utilize USB storage devices on PCs with blocked USB ports. And that’s why you need to know how to enable a USB port blocked by an administrator.

If you’re sharing a PC with somebody else, an administrator account can block access to USB ports. So, let’s find out how to enable USB ports blocked by administrators with the methods below.

What is a USB port?

A USB port is a Universal Serial Bus connection interface for USB devices. All desktop and laptop PCs include ports for connecting external drives and peripherals.

There are various types of USB connection ports. USB Type A is the most common port, but some PCs also include USB Type B, Type C, and USB 3.0 slots to connect devices.

How can I enable blocked USB ports in Windows 11?

1. Unblock USB ports with Device Manager

  1. Press Windows + X to open the Power User menu, and select Device Manager.
    Device Managerhow to enable usb port blocked by administrator
  2. Expand the Universal Serial Bus controllers category.enable device
  3. Right-click the USB controllers listed there and select Enable device, if the option is listed there.enable device to fix ddkmd.sys

2. Unblock USB ports by editing the Registry

  1. Press Windows + S to open Search, type regedit in the text field, and click on the relevant search result.
    Registry Editor search how to enable usb port blocked by administrator
  2. Input this registry path inside the address bar and hit Enter: ComputerHKEY_LOCAL_MACHINESYSTEMCurrentControlSetServicesUSBSTOR
  3. Double-click the Start DWORD on the right.
    Start DWORD how to enable usb port blocked by administrator
  4. Clear the Value data field, input 3, and select OK to save the changes.
    Edit DWORD how to enable usb port blocked by administrator

After you are done, restart the computer for the changes to completely come into effect. If you were wondering how to enable USB port in Windows 10 blocked by administrator, this method should work on the previous iteration as well.

3. Unblock USB ports with Group Policy Editor

Note icon NOTE
The Group Policy Editor feature is not available in Windows 11/10 Home editions. However, you can easily u003ca href=u0022https://windowsreport.com/enable-gpedit-windows-11/u0022 target=u0022_blanku0022 rel=u0022noreferrer noopeneru0022u003eenable Gpedit.msc in Windowsu003c/au003e with a series of commands.
  1. Press Windows + R to open Run, type gpedit.msc in the text field, and click OK.The OK button how to enable usb port blocked by administrator
  2. Next, expand the Computer Configuration category, choose Administrative Templates, and then double-click on System on the right.administrative templates
  3. Now, select Removable Storage Access.remove storage access
  4. Double-click the All Removable Storage classes: Deny all access policy setting.
    All Removable Storage classes policy how to enable usb port blocked by administrator
  5. Select the Not Configured or Disabled radio button if that setting is enabled.disabled to fix how to enable usb port blocked by administrator
  6. Similarly, disable Removable Disks: Deny read access and Removable Disks: Deny write access policy settings.

4. Unblock USB ports with Windows USB Blocker software

  1. Bring up the USB Blocker page on Softpedia, and click on Download Now option.download on how to enable usb port blocked by administrator
  2. Go to whatever directory includes the WindowsUSBBlocker ZIP.
  3. Then double-click WindowsUSBBlocker, and select the Extract all option.
    Extract all button how to enable usb port blocked by administrator
  4. Click Show extracted files to select that option within the ZIP extraction tool.
  5. Now, click on Extract to open up an extracted WindowsUSBBlocker folder.
    Show extracted files option how to enable usb port blocked by administrator
  6. Then double-click the Setup_WindowsUSBBlocker.exe to open the program’s setup wizard.
  7. Click on the Install button.
    Install button how to enable usb port blocked by administrator
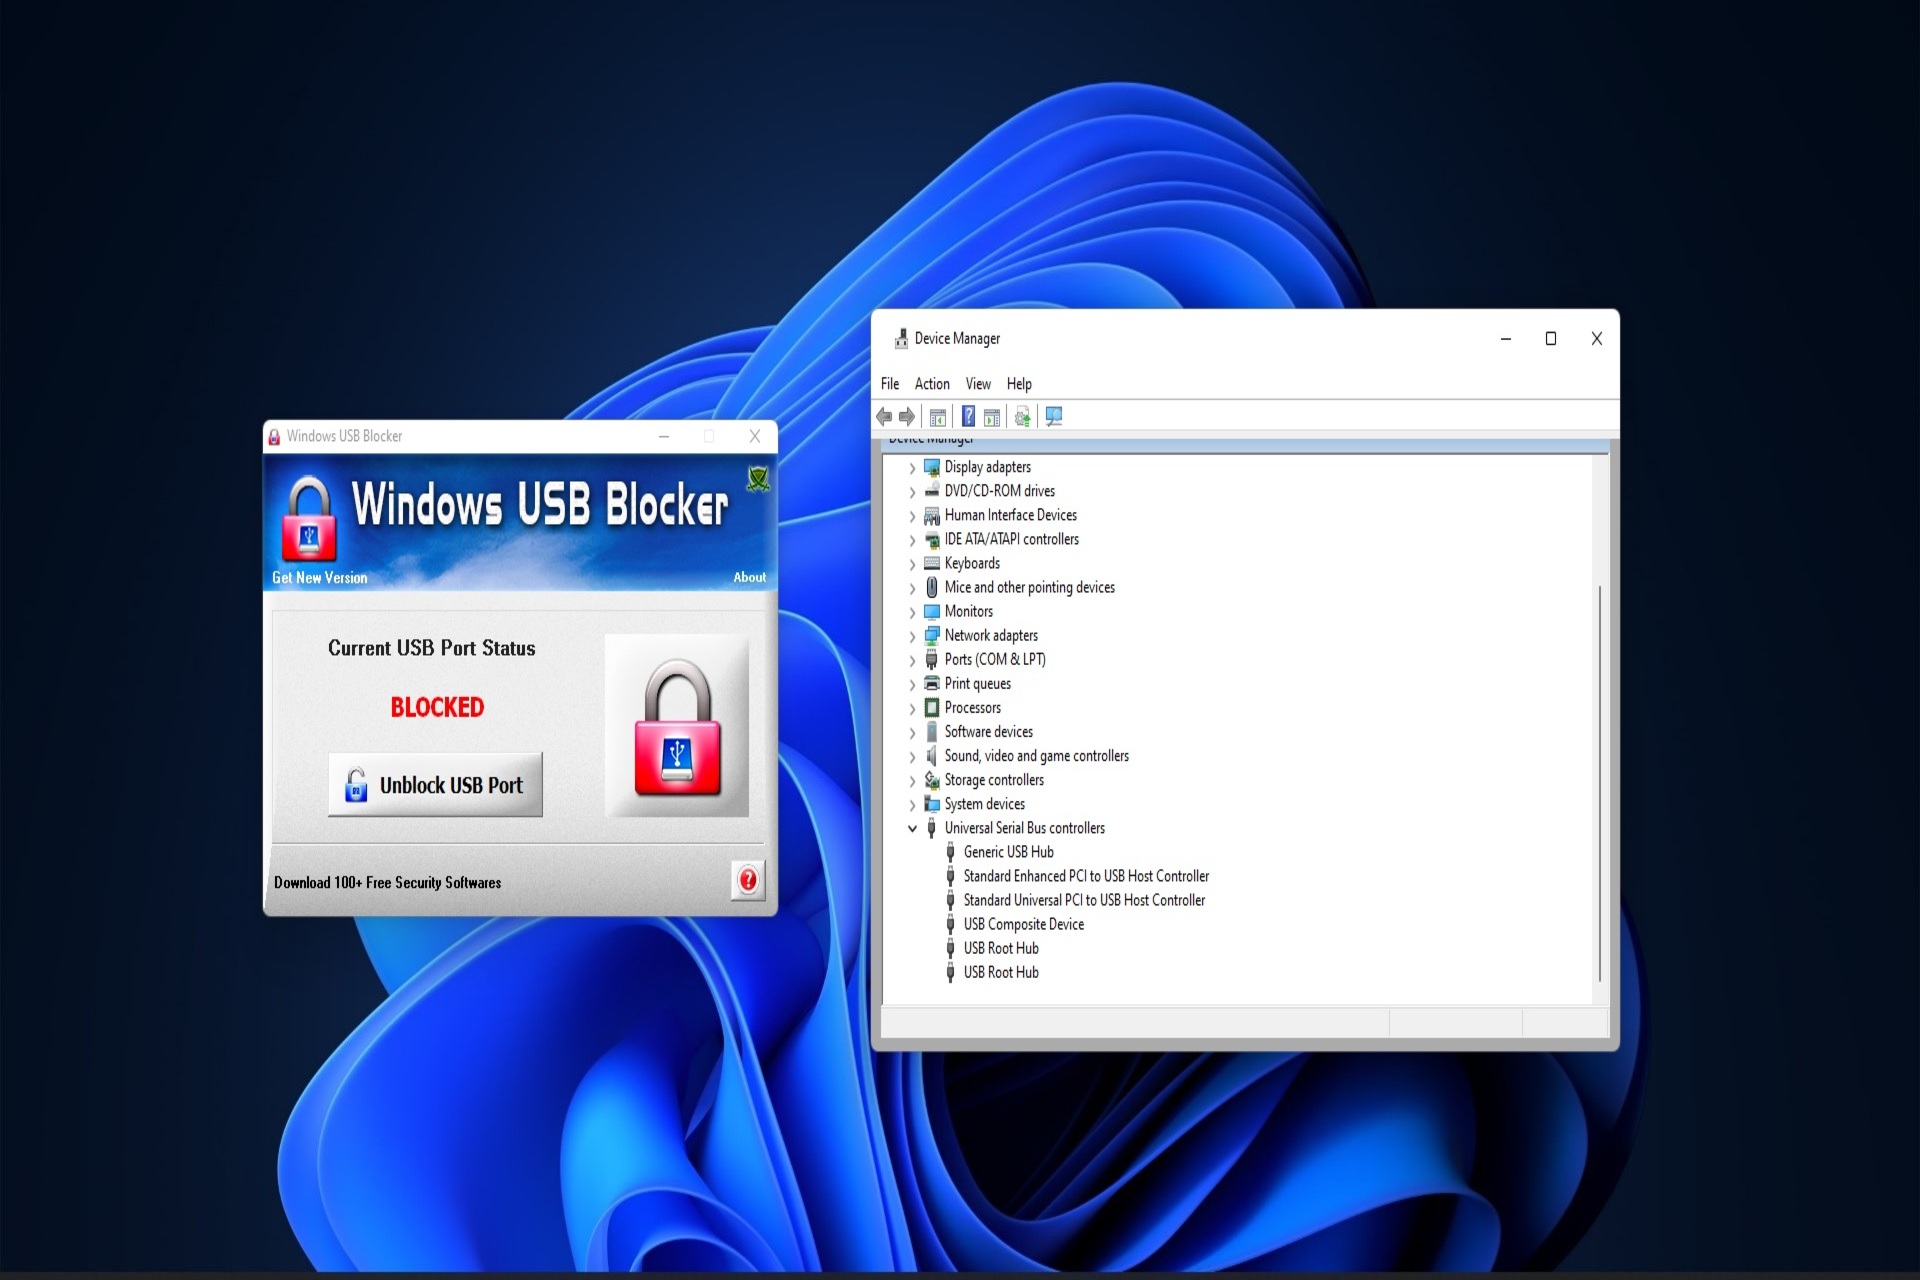
  8. Open the Windows USB Blocker software.
    Windows USB Blocker how to enable usb port blocked by administrator
  9. Click the Unblock USB Port option if the port status is blocked.

What should I do if those methods for unblocking a USB port don’t work?

If you can’t unblock a USB port with those methods, an administrator might not have blocked the port. Some third-party antivirus utilities can also block USB ports.

Disable or even uninstall any third-party antivirus software installed on your PC. Also, find out all about unblocking USB ports blocked by antivirus software.

How do I unlock a USB port blocked by antivirus software?

The method to unlock a USB port blocked by an antivirus is different for all. For some, simply replugging the USB drive should provide an option to allow it. While for others, you may need to modify the settings or reconfigure the policies.

Unlocking the USB port on BitDefender

Though a quick solution would be to disable the antivirus or uninstall the program altogether. It will automatically unlock all the USB ports blocked by the antivirus software.

How to transfer files if USB is disabled?

This is a question many have asked when unable to block USB ports on the PC. And the simplest way to do that would be to use a reliable cloud storage service. You can easily upload the files to cloud storage from one PC and download them on another.

Also, if the USB device you are trying to connect is a phone or supports network connectivity, use Wi-Fi file transfer software to share data between devices seamlessly.

That’s all about unblocking USB ports blocked by administrators and other vital information. With USB ports unblocked, you’ll be able to utilize external storage devices on your PC again.

We don’t recommend users try unblocking USB ports on PCs within organizations’ networks without permission. Consider asking a network administrator for permission to utilize your USB drive on a network’s workstation instead.

In case you plug in a lot of devices to the PC, consider buying a reliable USB hub for enhanced connectivity and performance.

If you have any other queries, drop a comment below, and we get respond at the earliest.

CMD Window Opens and Closes Randomly? Fix it in 7 Steps

The Command Prompt is a tool used by the Windows operating system to execute commands and run programs. It’s a simple and effective way to run programs directly from Windows.

But even though it’s useful, sometimes you might find that the Command Prompt opens and closes randomly and sometimes on startup. For some, even other apps keep closing automatically. If this happens often enough, it can be highly frustrating.

Why does my CMD randomly pop up and close?

When the Command Prompt opens and closes randomly, it may indicate a problem with your computer. The following are some of the reasons why this issue might occur:

  • Too many programs open at once – If you have other programs running simultaneously, they could be interfering with each other and causing issues with the Command Prompt.
  • Virus infection – Viruses are able to infect any part of your computer, including the Command Prompt. That’s why a great antivirus solution that is up-to-date should always be installed on your PC.
  • Maintenance tasks – Some maintenance tasks will automatically open a Command Prompt window as part of their routine. If this is the case, you don’t need to worry about it.
  • Third-party interference – If you’re using a third-party program to open the Command Prompt, such as a batch file or a script, the command used in the file may be causing issues with the Windows Command Prompt.
  • Corrupt system file – A damaged Windows system file or corrupted Windows registry entry can make it difficult for some programs to run correctly, such as the Command Prompt.

What can I do if the Command Prompt is opening and closing randomly?

Before attempting the slightly technical steps, try the following:

  • Close any other applications before opening up another one this way and see if that helps solve the problem.
  • Close all Command Prompt windows that may be open before trying again.
  • Finally, try restarting your PC and see if the Command Prompt behaves the same way. If your PC fails to restart, refer to our guide.

1. Run the netstat command

  1. Hit the Windows key, type cmd in the search bar, and click Run as administrator.cmd-admin hp printer won't scan
  2. Type the following command and press Enter: cmd /k netstat

2. Scan for viruses

  1. Press the Windows key, search Windows Security and click Open.
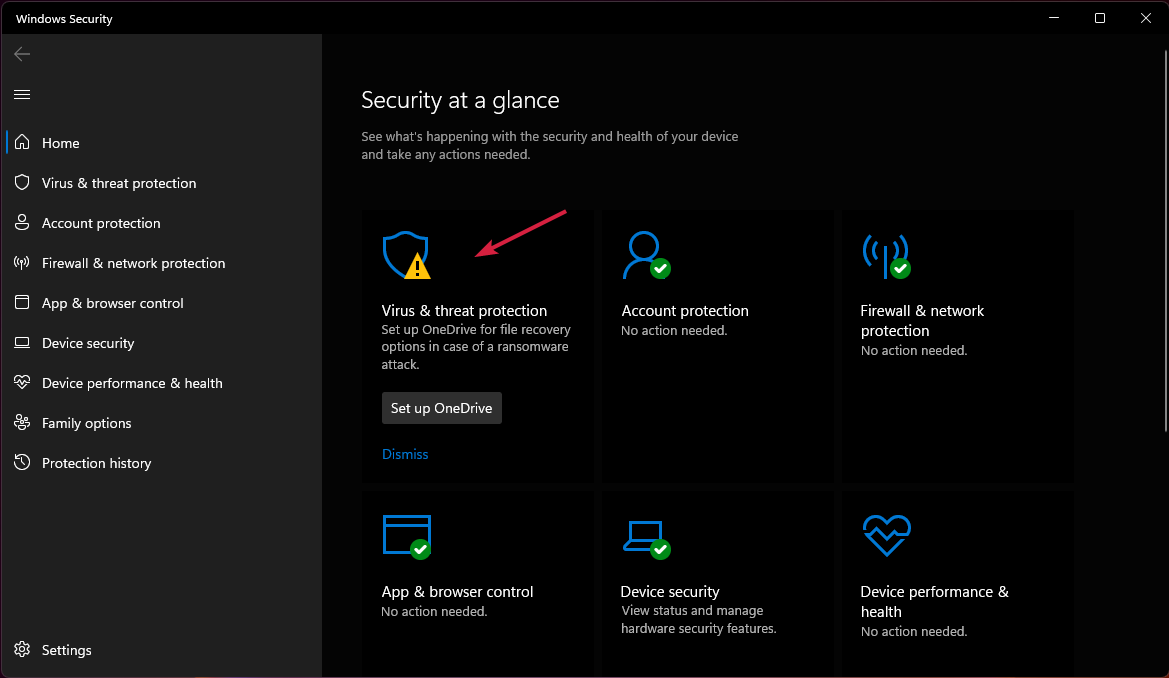
  2. Select Virus & threat protection.
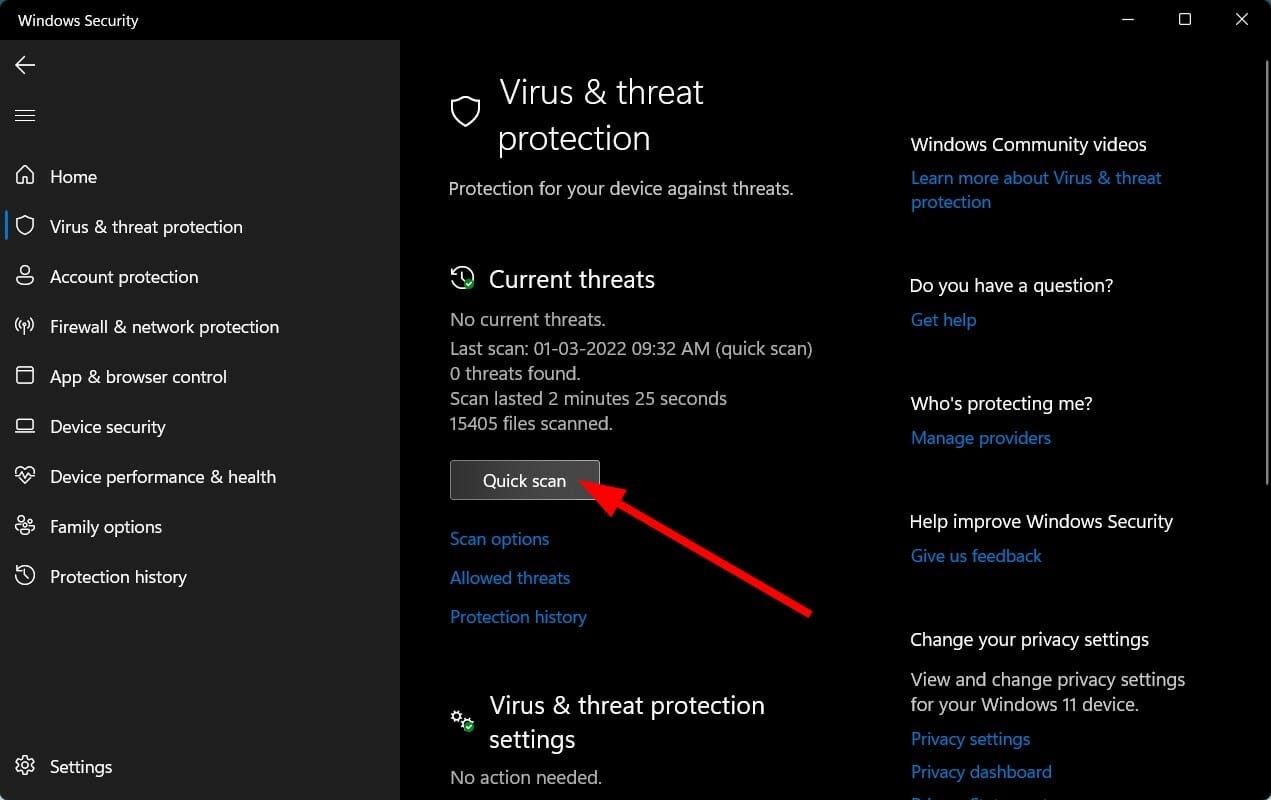
  3. Next, press Quick scan under Current threats.
  4. If you don’t find any threats, proceed to perform a full scan by clicking on Scan options just below Quick scan.
  5. Click on Full scan to perform a deep scan of your PC.Full scan
  6. Wait for the process to finish and restart your system.

Running a scan is found to fix things when the Command Prompt opens and closes immediately due to a virus.

If you want to get a thorough PC scan of malware, we recommend using a third-party antivirus because it has some of the most advanced malware security features.

⇒ Get TotalAV

3. Run the DISM and SFC commands

  1. Hit the Windows key, type cmd in the search bar, and click Run as administrator.cmd-admin hp printer won't scan
  2. Type the following command and press Enter: Dism /Online /Cleanup-Image /RestoreHealthdism
  3. Wait for the command to be executed then type the next one and hit Enter: Sfc /scannowsfc scannow command

4. Run the CHKDSK command

  1. Hit the Windows key, type cmd in the search bar, and click Run as administrator.cmd-admin hp printer won't scan
  2. Type the following command, replace the C letter with your drive’s letter, and press Enter: chkdsk C: /fchkdsk

5. Disable Task Scheduler triggers

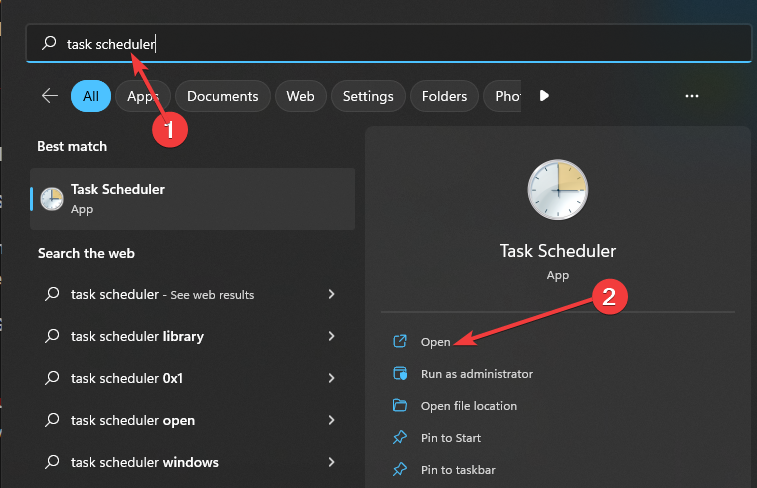
  1. Hit the Windows key, type Task Scheduler in the search bar, and click Open.
  2. Navigate to Task Scheduler Library on the left.
  3. Check for any suspicious triggers. (Most users complained OneDrive was a common trigger). 
  4. Right-click on it and select Disable.
  5. Restart your PC.

Task Scheduler is a Windows component that lets you schedule tasks such as booting up to Command Prompt. You can use Task Scheduler to run programs or scripts at scheduled times. However, by default, this feature is enabled with a number of triggers that launch on boot or when you log in.

These triggers may be required for some applications, but if you don’t need them, disabling them can free up resources and improve performance.

6. Update System Environment Variable

  1. Hit the Search icon, type environment in the search bar, and click to open the Edit the system environment variables.
  2. The System Properties dialog will pop up, click on the Advanced tab and select Environment Variables at the bottom.
  3. Under System variables, navigate to path and click on Edit.
  4. Now click on New to create a new entry and add C:\Windows\SysWow64\, then click OK.
  5. Restart your PC.

7. Perform a clean boot

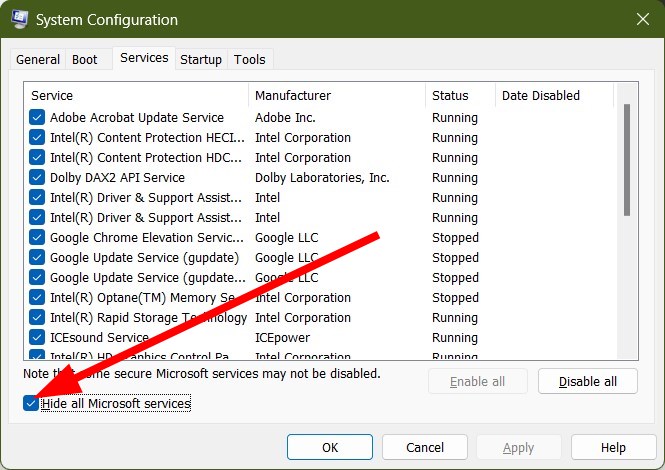
  1. Hit the Windows key, type msconfig, and open System Configuration.
  2. Switch to the Services tab.
  3. Select Hide all Microsoft services.
  4. Click on the Disable all button then hit the Apply button to save the changes.
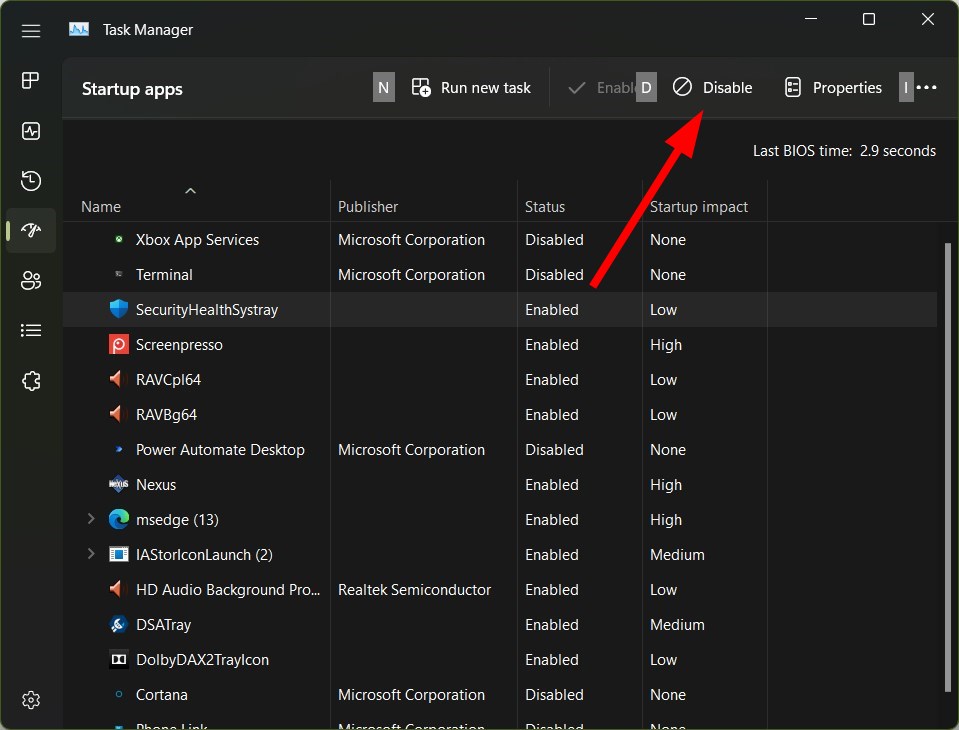
  5. Go back and click on the Startup tab and select Open Task Manager.
  6. In the Startup tab of the Task Manager, Disable all the Enabled startup items.
  7. Close Task Manager and restart your PC.

If you suspect that another application or program is why Windows 7 Command Prompt opens and closes immediately, a clean boot can help. It disables the software and allows Windows to run without it.

Alternatively, if your computer is having trouble starting up normally, then starting it in Safe Mode can help identify what’s causing the issue.

How do I stop a command block spam?

To stop the command block spam and play Minecraft without any unnecessary prompts and messages that affect not just the gaming experience but also the chat, run these two commands:

/gamerule commandblockoutput false /gamerule sendcommandfeedback false

While the first one here disables the commanblock messages, the other will disable feedback.

Hopefully, the annoying Command Prompt opening randomly is long gone, and your computer has been restored to normalcy. Elsewhere, users complained of not being able to run CMD as administrator, so if you were experiencing this issue, don’t hesitate to refer to our helpful guide.

Also, if the CMD prompt keeps popping up, we have a remedy for the situation in our dedicated article.

We love your feedback, so don’t hesitate to comment below on what solution worked for you.

Microsoft thinking about ditching DirectUI for XAML & WinAppSDK

Last week we have presented all the changes that Microsoft envisioned when it released build 25300 to all Windows 11 Insiders on the Dev Channel.

In that changelog, we found out that the Redmond tech giant added a lot more languages to the Windows 11 Live Captions feature.

There were also a bunch of fixes, as always, and one detail that might have escaped your keen eye when checking out the changelog.

Don’t worry, we’re here to show you what you might have missed when perusing the release notes of build 25300.

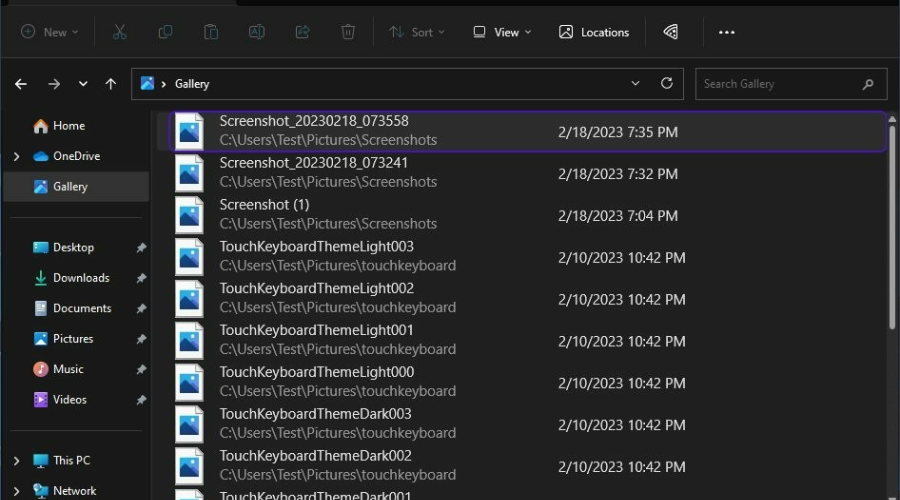
New Gallery app changes leaked over Twitter

Now, we all know that the Dev Channel builds are where Microsoft introduces the newest experimental features for the Windows OS.

However, besides the announced features, these Insider builds often come with hidden features as well, which gives us an idea about upcoming additions as well.

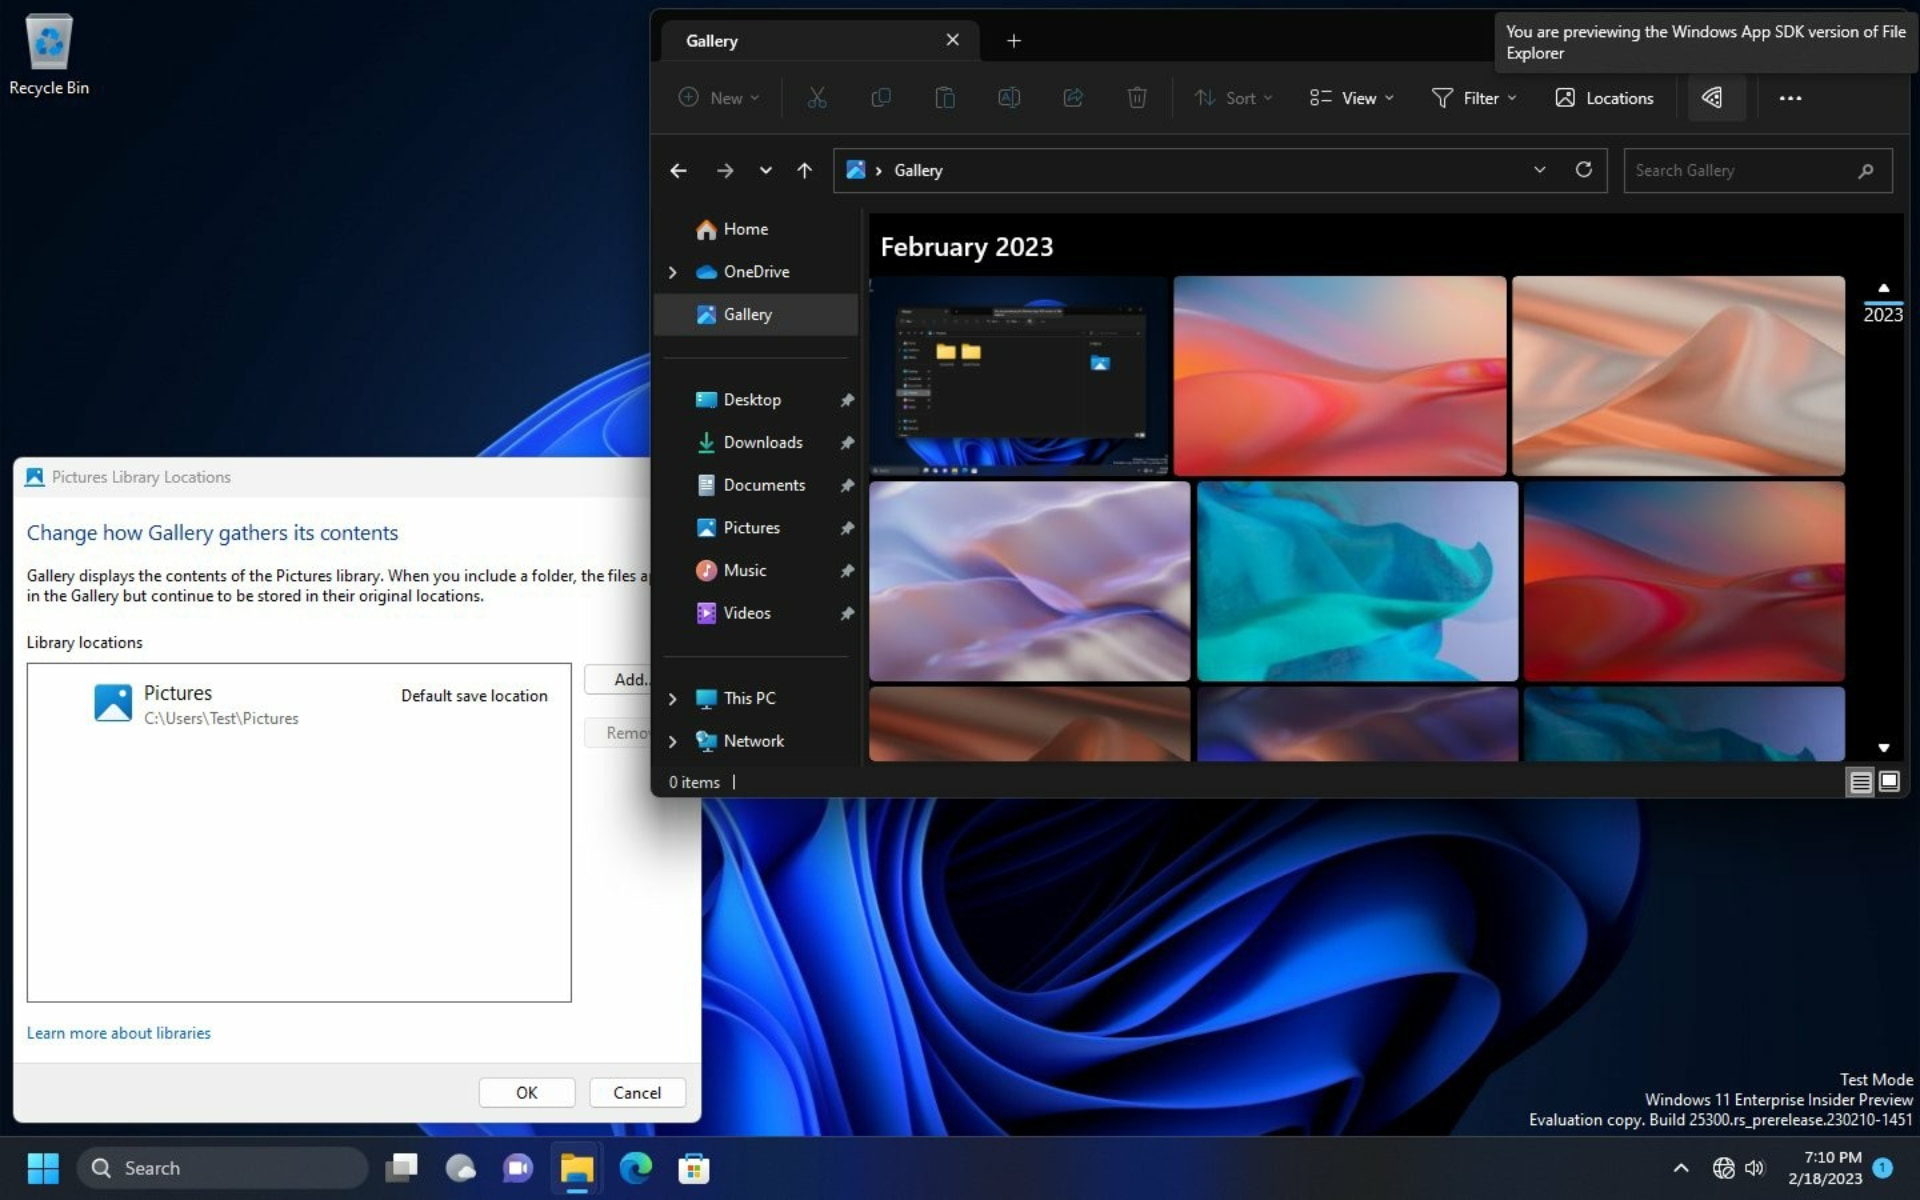
As we mentioned, the latest Dev channel build 25300 gives us another look at the new Gallery app, which was uncovered in a Dev build last year.

And, while we already had a preliminary idea of what it may be like, we now know a bit more about the Gallery application.

Twitter is a great place to learn new stuff about your OS, and it didn’t disappoint. New speculations point out that Microsoft could be looking to move on from DirectUI and onto XAML.

The screenshots are an early version of Windows App SDK-based File Explorer. Basically, all this is meant to lead towards the overall Windows 11 fluent design goals and consistency.

That being said, while this is certainly exciting news, the user that spotted the changes warned that the new XAML-based implementation is quite unstable and can crash.

Thus, until Microsoft makes the experience more stable, we don’t really recommend enabling it for the time being.

Don’t forget to check out the February 2023 Patch Tuesday security update release. Also, remember that we’re getting 30% smaller UUP updates starting in March.

We also covered the latest Beta Channel build for Windows 11 if you are an Insider conducting business there.

We’re going to be back soon with coverage of the upcoming Dev and Beta builds for Windows 11 as well, so make sure you keep an eye out for it when it comes out.

Have you enabled this still experimental feature? If so, be sure to share your experience with us in the dedicated comments section below.

How to Audit Group Policy Changes [5 Best Tools]

The Group Policy is an essential security tool in the Active Directory. It provides a central control system for all the computers and users in the network. However, unauthorized changes to the Group Policy can result in fatal damages. So, it is essential to use Group Policy Auditors to monitor its changes.

Also, users can check what to do when they run into Group Policy errors on Windows PC.

What are Group Policy Auditors?

Group Policy Auditors are tools for monitoring and checking the changes made in the Group Policy. They deliver complete visibility into the changes made to Group Policy objects.

Likewise, they show the current state and settings of the Group Policy, allowing you to compare them to the standard.

How do I audit Group Policy changes?

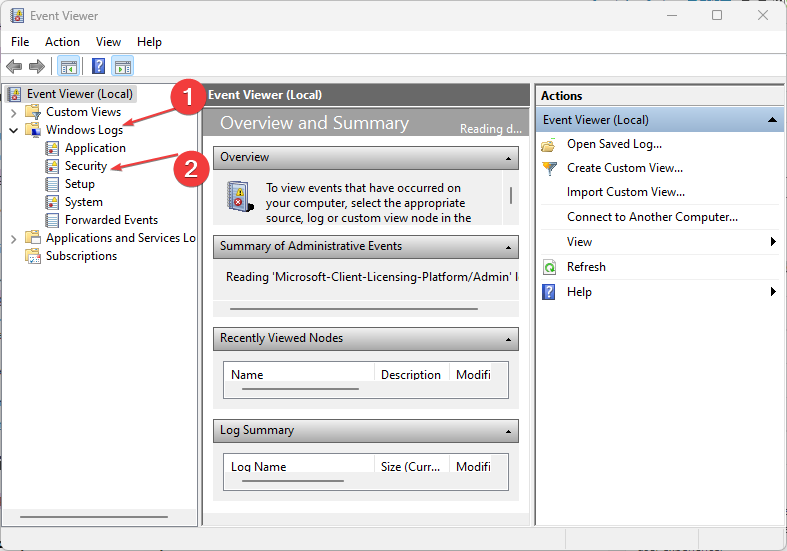
Follow the steps below to audit the Group Policy changes using Event Viewer:

  1. Left-click the Start button, search for Event Viewer, and click to open it.
  2. In the left pane, navigate to Windows Logs, then select Security.
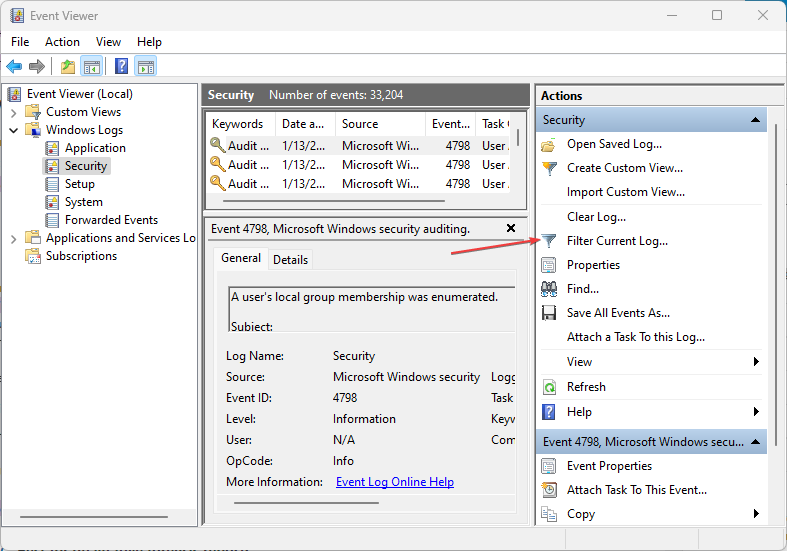
  3. In the right pane, click Filter Current Log.
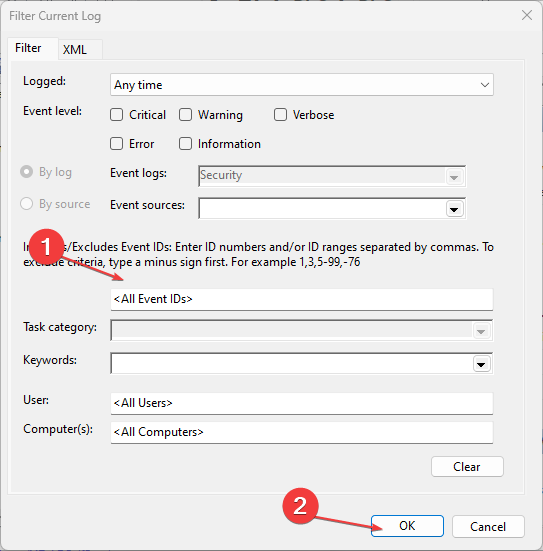
  4. Then, enter the desired Event ID in the field labeled. Click OK to prompt the list of changes of the Event ID entered.
  5. Double-click an Event ID to view its properties.

The steps above will show the details logged in the Event ID selected. The Event is logged when a Group Policy object is created. Read our guide on Windows Event Viewer and how to use it on Windows 11.

What are the Best Group policy auditors for policy changes?

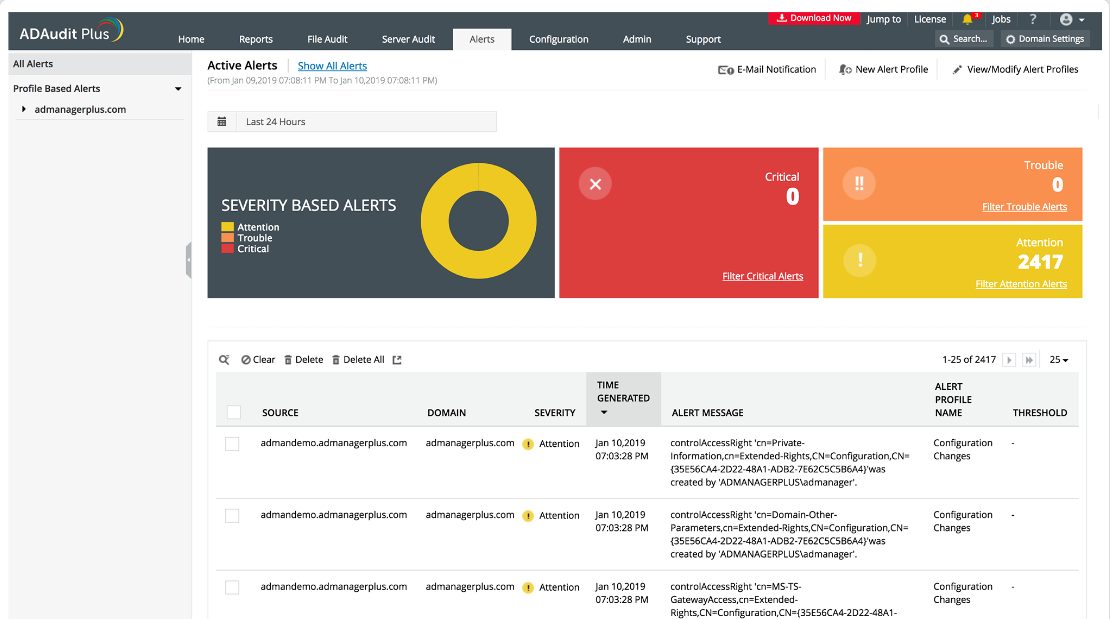
ADAudit Plus – Best for threats mitigation

ADAudit Plus

ADAudit Plus is a UBA (User Behavior Analytics)-driven auditor. It keeps track of the activities in your Active Directory. It helps transform your event log data into readable reports.

Also, admins can get a list of the changes and updates made on your Windows Server environment, like the Group Policy.

Some great features of the ADAudit Plus include:

  • Offers an instant alert that notifies users about the changes in the Windows Server environment
  • Provides a detailed overview of the changes made to the Group Policy and the overall Domain by privileged users
  • Secures and mitigates insider threats by enforcing the UBA (User Behavior Analytics) and limiting access to the Domain
  • Tracks changes regarding login activities and detects Active Directory account lockouts
  • Monitors and logs workers’ active and idle time across their workstations

ADAudit Plus

Keep track of all Active Directory behavior on your network from a single console!
Free trial Visit website

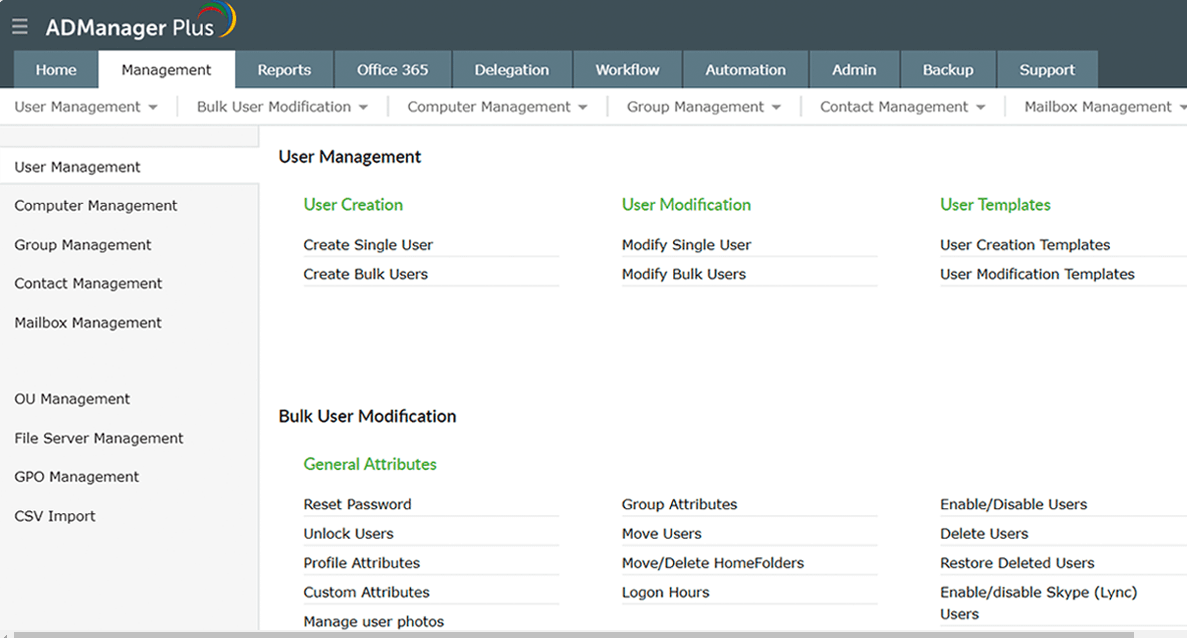
ManageEngine ADManager Plus – Best for multi-activities

ManageEngine ADManager Plus

ManageEngine ADManager Plus has a simple user interface that makes it easy for users to access.

Also, it is an auditing tool for monitoring and reporting changes in the Active Directory and Group Policy. It has a central web-based User Interface for managing bulk user accounts.

Other notable features you can look out for include:

  • Easy-to-use interface making it usable for different operators and purposes
  • Provides insightful reports of the changes and activities in the Group Policy object, such as password change or expiration
  • Uses extensive filtering and drilling mechanisms for in-depth analysis of the events in the Group Policy
  • Monitors other functions like CPU usage and memory management and displays reports in graphs or dashboards

ADManager Plus

Manage all your endpoints and permission with a complete network management solution!
Free trial Visit website

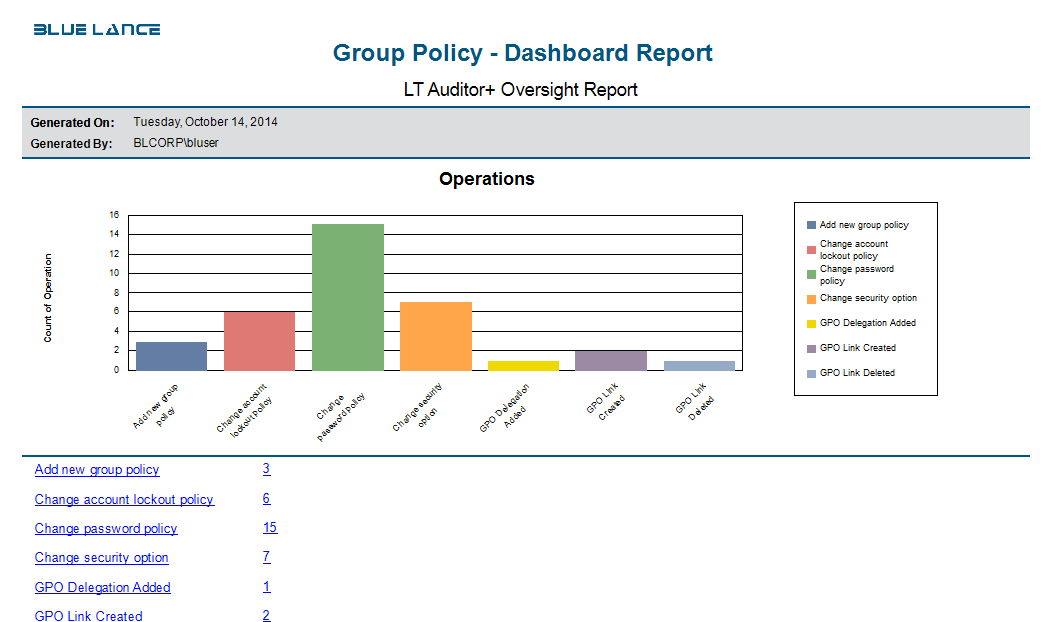
LT Auditor+ for Group Policy – Best for qualitative forensic reports

LT Auditor+ for Group Policy

LT Auditor+ for Group Policy is a tool that organizations use for improving incident response time.

Further, it provides comprehensive audit reports of every change and improvement in the Event log. Likewise, it ensures confidentiality, integrity, and privacy in the database.

However, some notable features of the LT Auditor+ for Group Policy are:

  • Monitors every activity and change made in the audited Group Policy object and a cast record of the before and after values
  • Provides a reliable and qualitative analysis of who did what from where and when
  • Provides real-life alerts whenever any critical policy changes occur for any Group Policy object
  • Changes that involve the Domain Controller audit policies, Account Password, or Account Lockout policies will trigger the notifier
  • Access, audit, and monitor the Group Policy objects across numerous Active Directory platforms from a single console

⇒ Get LT Auditor+ for Group Policy

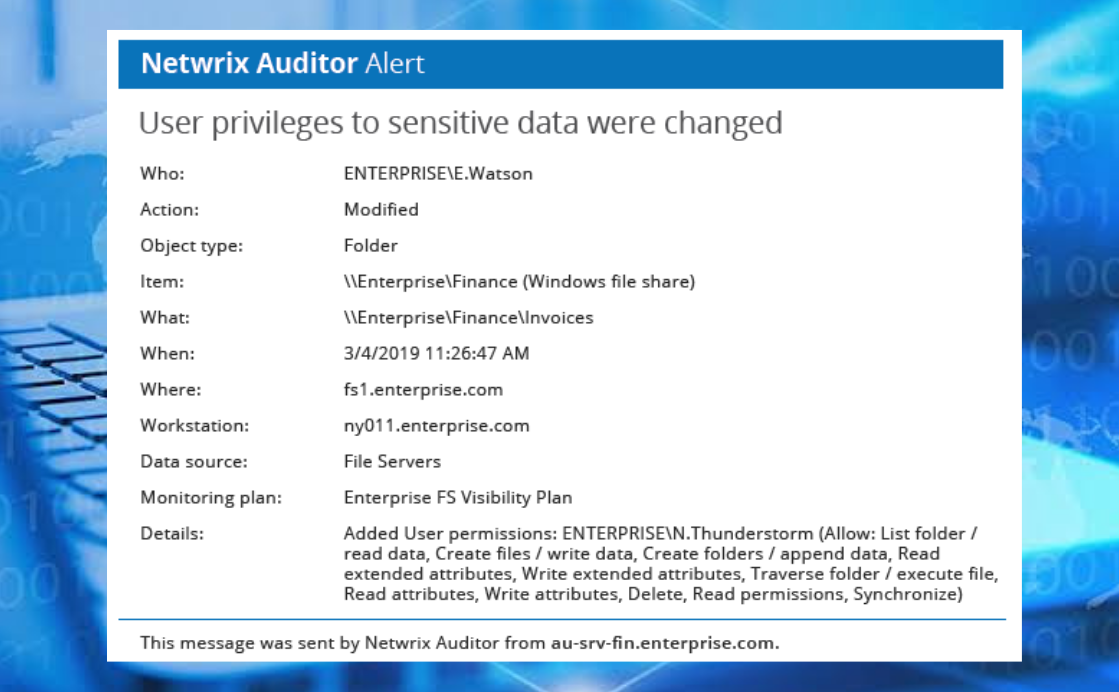
Netwrix Account Auditor – Best for account lockouts detection

Netwrix Account Auditor

The Netwrix Account Auditor offers an insight into what’s going on in the Active Directory and the Group Policy. It tracks and reviews the data collected from the activities on your Domain.

Also, it is a tool for providing swift resolution for account lockout issues with Active Directory.

Netwrix Account Auditor has many great features:

  • Easy-to-use user interface that allows users to deploy and use the tool
  • Reports real-time updates regarding issues affecting Active Directory and the Group Policy
  • Gives a detailed report of changes to the Group Policy
  • High-quality and in-depth forensic reports of Group Policy activities
  • Real-time insight into risks from Group Policy settings

⇒ Get Netwrix Account Auditor

Adaxes – Processes data for real-live analysis

Adaxes

Adaxes is a tool for auditing Group Policy changes and reporting real-live analysis of all events in the Domain and Windows environment. It is easy to navigate as it uses a single web-based interface.

Furthermore, some interesting features of Adaxes are:

  • An extensive report about the changes made in the Group Policy and offers threat notifications
  • Provides Active Directory management capabilities to users without granting them domain administrator rights
  • Versatile services ranging from monitoring the Domain, auditing the activities and changes on it, and reporting
  • Organizes an authorization check that reviews the rights and privileges given to users
  • Prevents over-privileged users from accessing sensitive data

⇒ Get Adaxes

We hope that our selection of Group Policy Auditor software helped you pick the best tool for your needs.

In conclusion, our readers may be interested in our guide on how to edit Group Policy without damaging it. Likewise, you can check how to check the crash log in the Windows Error log.

Please let us know your pick in the comments section below.

r_

Mailto Not Opening in Outlook: How to Enable It

Outlook is a widely used email client that has been around for a long time. Millions of people and businesses around the world use it. However, there are times when you may encounter issues with Outlook and its Mailto feature.

The Mailto protocol is a Windows shortcut that you can use to create an email message in your default email program. It’s useful for sending messages to people without opening the mail app, but it’s not always enabled in Outlook. In this article, we show you how to enable it.

Why is Mailto not working?

The Outlook Mailto link can be used in any email application, such as Microsoft Outlook, Gmail, and Yahoo Mail. However, if you’re using Outlook and the Mailto link isn’t working, there are several reasons why this could be happening:

  • Server issues – The server may be down for maintenance, or maintenance work is being done at that moment.
  • Outlook version – If you are using an older version of Outlook, it may not be compatible with the Mailto functionality.
  • Internet connection – If you are using an internet connection that is slow or unstable, this could also prevent you from properly using this feature on your computer.
  • You have not added the email client as a trusted site – If you have never added your email client as a trusted site, then it is possible that you are seeing this error because of this reason.
  • Outlook account settings have been changed – If your Outlook account settings have been changed, then this problem can occur.
  • Missing add-ins – Outlook might be missing some required add-ins that allow users to open links in their email client directly, and that’s why the Outlook Mailto link opens in a browser.
  • Outlook add-ons -There are many third-party add-ons for Outlook that can cause issues like this one.
  • Unsupported file types – If you’re trying to send a file type that Outlook doesn’t support, then it won’t work as expected. Instead, you’ll find that Mailto links are opening in Chrome instead of Outlook.
  • Incorrect browser settings – If you are using a third-party browser to connect to your email account, it could be that the browser settings are set to block the use of the Mailto protocol.

How do I enable Mailto in Outlook?

First off, we recommend that you try the following steps:

  • Make sure that your email address is correct in your Outlook profile.
  • Check your internet connection and see if there are any issues with it.
  • Outlook is available in different versions, including Outlook 2016, Outlook 2013, and others. If your version doesn’t support the Mailto link, try installing another version that does support it.
  • Check your browser settings for any sort of security setting or add-on that might block links from opening automatically in emails sent through browsers.
  • Try closing and reopening your browser. Sometimes this will reset any issues that may have come up with the Mailto link while using your browser in general. 
  • Update your OS. Outlook uses the Windows operating system as its base platform. So any updates will automatically be integrated into the Outlook application and solve all its problems, including the Mailto hyperlink issue. 
  • If you have recently made changes on your PC, try clearing the cache or deleting cookies. This may have interrupted the Mailto link’s ability to function correctly.

1. Use Settings

  1. Hit the Windows key and click on Settings.settings windows 11
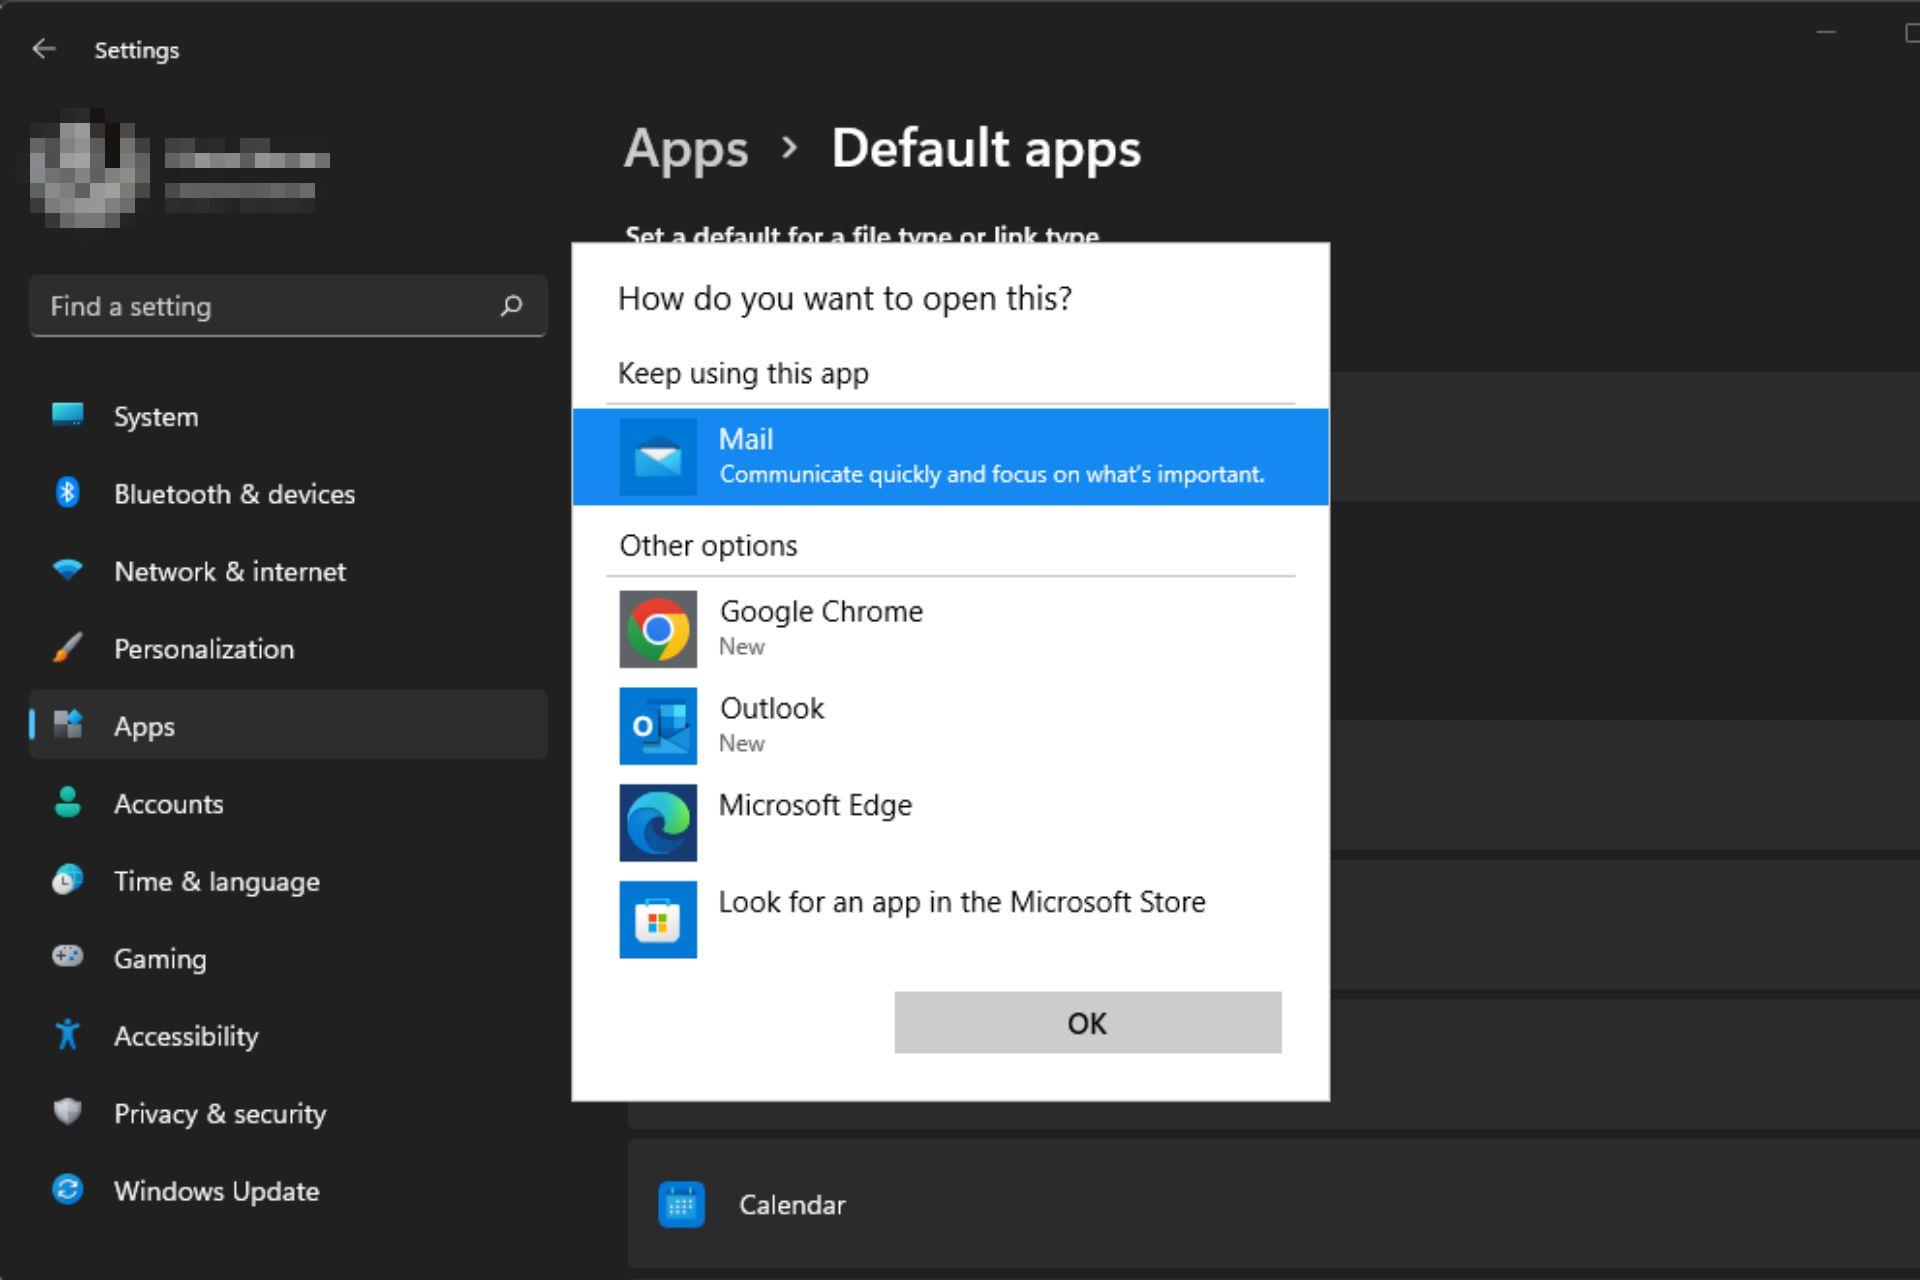
  2. Select Apps on the left pane then click on Default apps.
  3. Search for Mailto and click on it.
  4. Select Outlook from the listed options.

If Outlook is not listed, download it from the Microsoft Store first.

2. Use the Control Panel

  1. Hit the Windows key, type Control Panel in the search bar and click Open.control-panel-search fallout new vegas runtime error
  2. Type Default Programs in the search bar then click on it to open.
  3. Select Associate a file type or protocol with a program.
  4. Search for Mailto and click on it.
  5. Select Outlook from the listed options.

Finally, if neither of these steps solves the issue, we recommend reinstalling Outlook. Your version may be corrupted or outdated. Also, creating a new profile in Outlook may help. This may clear any problems between the browser and the program being used.

We may also be able to help in case your Outlook is not sending emails. Don’t hesitate to check out our guide on that. Elsewhere, users also complained of deleted Outlook emails making a comeback, so make a quick visit to our dedicated article to fix this issue.

Let us know whether you have been able to open Mailto links in Outlook in the comment section below.

Remote Desktop Error Code 0x104: 5 Easy Ways to Fix It

RDP or Remote Desktop Protocol, as the name suggests, allows users to access another computer remotely, i.e., without being physically present. But the connection is not as stable as many would imagine, with Error code 0x104 frequently encountered by some.

This poses a major problem, given that the feature to remotely gain access to the PC has gained prominence over the years. Though there are several third-party apps to establish remote access, let’s first try to fix the Error code 0x104 with Microsoft remote desktop.

What is error code 0x4 in Microsoft Remote Desktop?

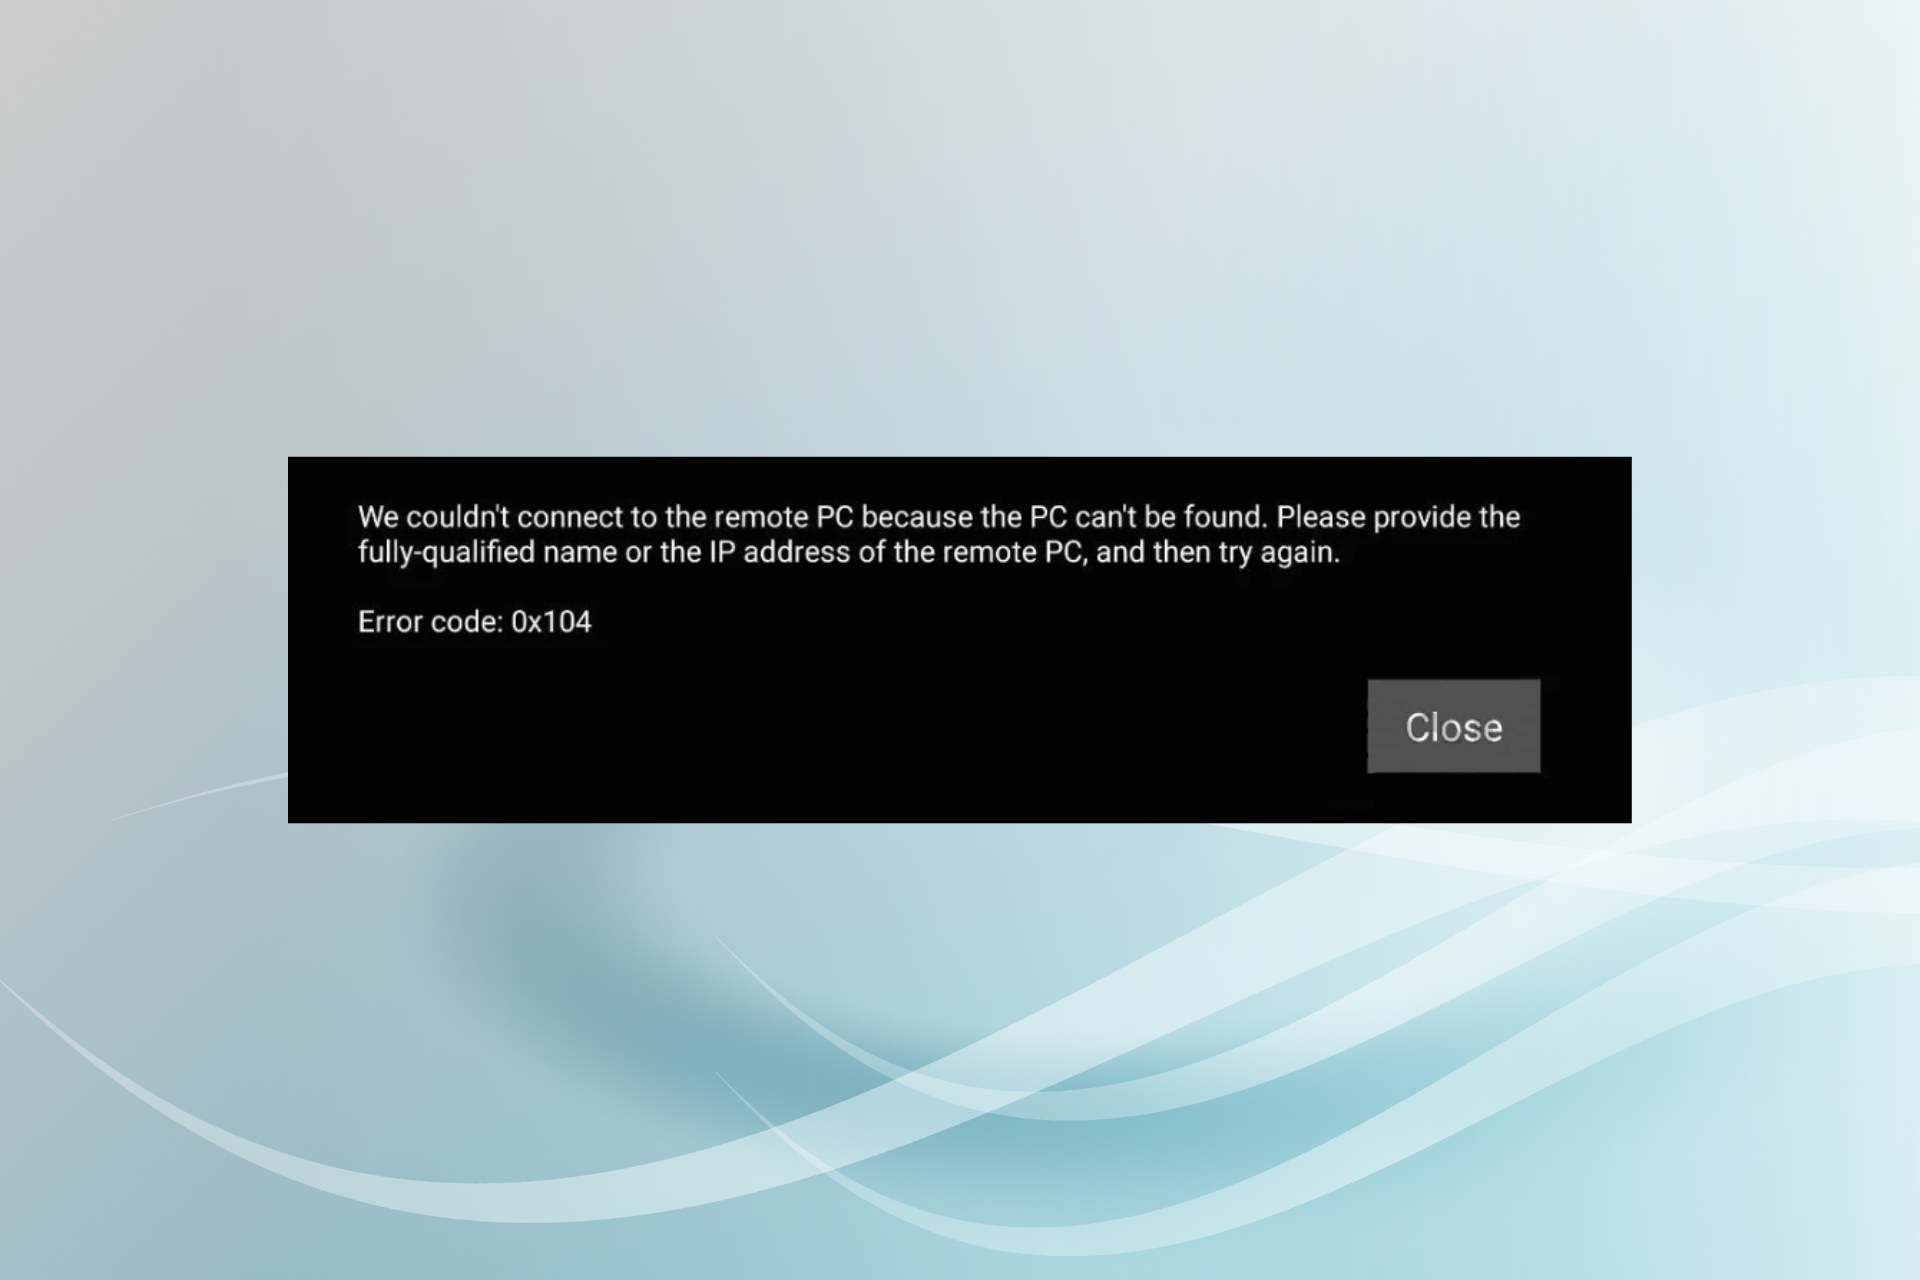
As per the error message, Error code 0x104 arises when Windows can’t find the remote PC, and subsequently, the connection cannot be established. Here are a few reasons you might be getting the error:

  • The Remote Desktop feature is disabled: For the feature to work, you must first enable Remote Access in Windows. And if it’s disabled, the error will show up.
  • Misconfigured firewall settings: You may come across Error code 0x104 if the firewall settings are misconfigured.
  • Network Discovery is turned off: Enabling Network Discovery is critical for your PC to identify others on the network and remotely connect to them.
  • Incorrect DNS server: An incorrect DNS is just as likely to trigger the error, but this can easily be fixed.

How can I fix error code 0x104?

Before we head to the slightly complex solutions, here are a few quick ones to try:

  • Turn on the Airplane Mode on the device you are using to connect to the remote desktop, disable it in 15-30 seconds, and then try establishing a connection.
  • Change the name of the exchange server to something simple in case the current one is lengthy or intricate.
  • When remotely connecting to the desktop via a mobile phone, try switching the network type. Say, if you are one 4G, try 3G, 4G LTE, or 5G if available.
  • Try establishing a connection using the PC’s IP address (check in the desktop settings) instead of the PC name, and verify if Error code 0x104 is fixed.
  • Make sure Port Forwarding is enabled on your router, and contact the ISP (Internet Service Provider) to help configure a port forwarding rule for mapping an external port using TCP 3389.
  • If you are using a VPN while trying to remotely access the PC, disable it.

If these don’t work, move to the ones listed next.

1. Make sure Remote Desktop is enabled

  1. Press Windows + I to open Settings, and in the System tab, click on Remote Desktop on the right.remote desktop
  2. Now, enable the toggle for Remote Desktop.enable to fix error code 0x104

If the Remote Desktop feature was disabled recently, you might get Error code 0x104 while trying to remotely access the PC.

2. Enable Network Discovery

  1. Press Windows + I to open Settings, select Network & Internet from the navigation pane, and click on Advanced network settings.advanced network settings
  2. Click on Advanced sharing settings on the right.advanced sharing settings
  3. Now, make sure Network discovery is turned on under both Private networks and Public networks.enable to fix error code 0x104

3. Modify firewall settings

  1. Press Windows + S to open Search, type Windows Defender Firewall in the text field, and click on the relevant search result.windows defender firewall
  2. Click on Advanced settings on the left.Advanced settings
  3. Choose Inbound Rules from the navigation pane, right-click on Remote Assistance (RA Server TCP-In), and choose Enable Rule.enable rule to fix error code 0x104
  4. Similarly, enable Remote Desktop – User Mode (TCP-In) and Remote Desktop – User Mode (UDP-In) rules, while making sure the Ports column next to both reads 3389.

After you have made the changes, check whether the Error code 0x104 while using Remote Desktop is fixed. If not, head to the next solution.

4. Run the critical services

  1. Press Windows + R to open Run, type services.msc in the text field, and hit Enter.services.msc
  2. Locate the Remote Desktop Services entry, right-click on it, and choose Properties.properties
  3. Now, select Automatic from the Startup type dropdown menu, click on the Start button, and after the service starts running, click OK to save the changes.run service to fix error code 0x104
  4. Similarly, run the Remote Access Auto Configuration Manager service and configure it to run automatically at startup.

5. Change network settings

  1. Press Windows + R to open Run, type ncpa.cpl, and click OK.ncpa.cpl
  2. Right-click on the active network adapter and choose Properties.properties
  3. Select Internet Protocol Version 4 (TCP/IPv4), and again click Properties.IPv4 properties
  4. Choose the Obtain DNS server address automatically option, and click OK to save the changes.automatic DNS to fix error code 0x104

That’s it! If the previous solutions didn’t work, settings the DNS service to automatic should help fix Error code 0x104 in Windows.

Also, do not forget to check the best remote desktop software for gaming without any lags or drops in FPS. For regular use, most recommend Mikogo, a popular and easy-to-use alternative. It has many useful features, like hosting meetings, a session scheduler, and session recording.

Do tell us which fix worked for you in the comments section below.

Registry Filter Driver Exception Blue Screen: 6 Ways to Fix

BSOD errors are one of the worst to affect Windows, and as the name suggests, the crash is followed by a blue screen listing the error code. One such BSOD frequently encountered is the Registry Filter Driver Exception with a bug check value of 0x00000135.

Many users shared their concerns on several official and other channels. While there are a few workarounds, the complete absence of concrete solutions makes the situation particularly tricky to troubleshoot. So, let’s find out all about the error.

What is Registry Filter Driver Exception?

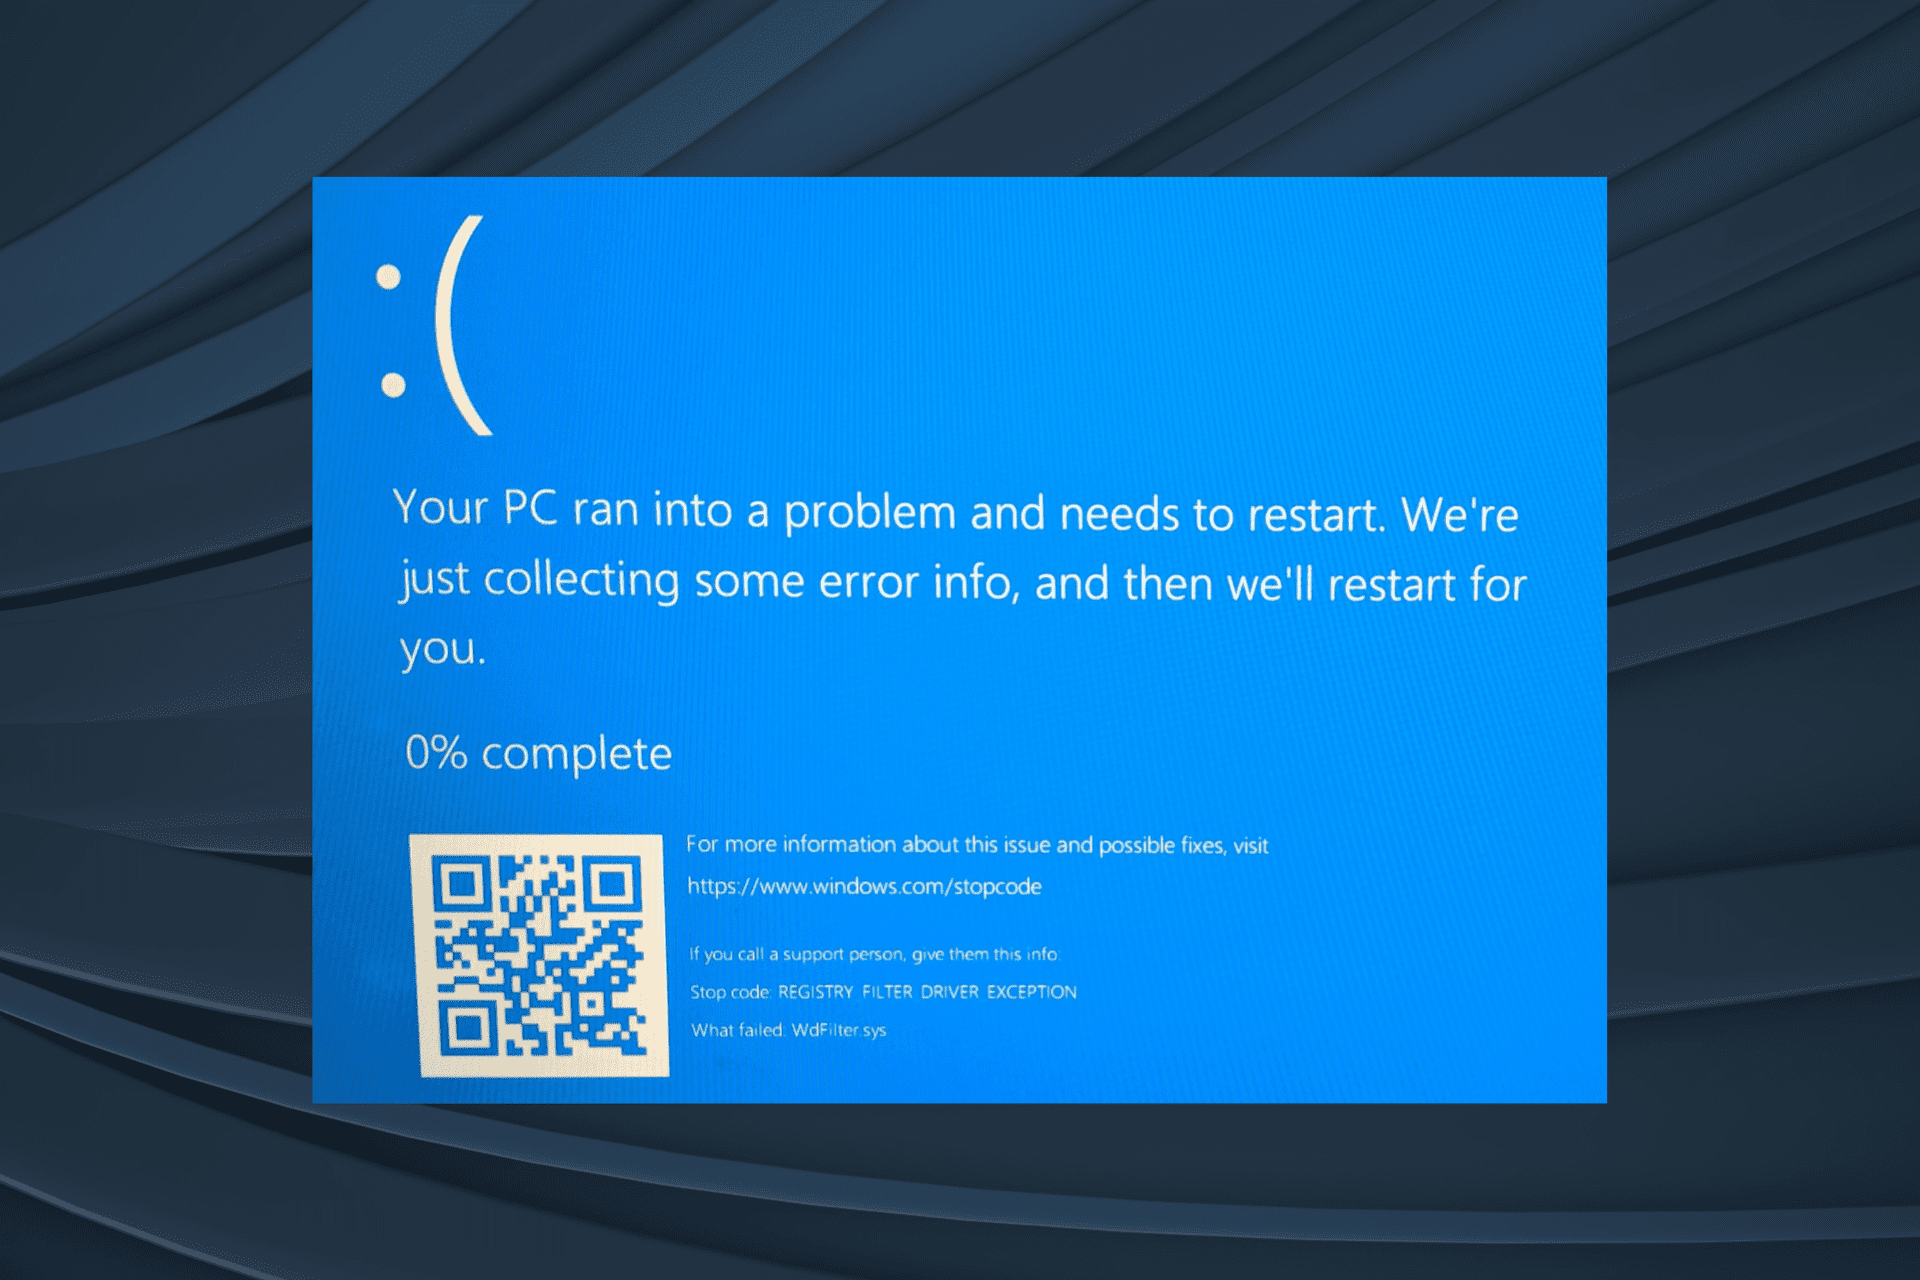
The Registry Filter Driver Exception occurs due to an unhandled exception in a registry filtering driver, freezes Windows for a minute or so, and subsequently leads to a crash. Here are a few reasons you get the error:

  • Incompatible hardware: If you recently connected a new peripheral or device to the PC and it’s incompatible, that could be the reason you are getting the error.
  • Corrupt or outdated drivers: In many cases, it was corrupt or outdated drivers that triggered the error.
  • Problems with the RAM: Issues with the RAM or memory allocation to the different processes are major reasons behind the Registry Filter Driver Exception error.
  • Issues with the recent Windows Update: Some users reported that the error first appeared after updating Windows, which points to a bug in the latest version.
  • Third-party app conflicts: Third-party apps are often found to conflict with critical processes, thus leading to this error.

How can I fix Registry Filter Driver Exception error?

Note icon NOTE
If you cannot normally turn on the computer, boot Windows into Safe Mode (with networking in some cases) since most of the solutions here require accessing the OS.

Before we head to the slightly complex solutions, try these quick troubleshooting tips:

  • Remove all non-critical peripherals connected to the PC, restart it, and verify whether you still encounter the error.
  • Check for Windows updates, and if any are pending, install them.
  • Make sure all the components are getting the required power supply. Any power shortage to the motherboard or the SSD can trigger the Registry Filter Driver Exception BSOD.

If these didn’t work, move to the fixes listed next.

1. Repair system files

Outdated system files and missing DLL files are the most common reasons for the Blue Screen of Death errors in Windows computers.

To resolve the Registry_Filter_Driver_Exception error, use an automatic system repair tool.

These PC performance repair and optimization utilities can detect malware threats, detect suspicious websites, improve performance, free precious disk space, and even replace damaged Windows files.

2. Uninstall conflicting programs

  1. Press Windows + R to open Run, type appwiz.cpl in the text field, and hit Enter.appwiz.cpl
  2. Locate any programs installed or updated around the same time the error first appeared, select them, and click Uninstall.uninstall to fix registry filter driver exception
  3. Now, follow the on-screen instructions to complete the process.

One of the easiest ways to fix the error is to identify the program causing the problem and disable or uninstall it. In most cases, the error screen will list the file responsible for Registry Filter Driver Exception, and you can take the necessary action. Here are a few cases:

  • atc.sys Registry Filter Driver Exception – BitDefender antivirus
  • swin.sys Registry Filter Driver Exception – McAfee antivirus
  • mfehidk.sys Registry Filter Driver Exception – McAfee antivirus

3. Update the drivers

  1. Press Windows + X to open the Power User menu, and select Device Manager.device manager
  2. Expand Display adapters, right-click on the active adapter, and select Update driver from the context menu.update driver to fix registry filter driver exception
  3. Now, select Search automatically for drivers.search automatically for drivers
  4. Wait for the OS to find and install the best available drivers.

The graphics driver is one of the most critical on the PC, and issues with it are responsible for a range of BSODs, including Registry Filter Driver Exception. So, make sure you update the graphics driver. If the simpler methods don’t work, manually install the latest driver.

Also, update all the other drivers on the computer. In case Windows is unable to update one, check the manufacturer’s website for the latest driver version.

4. Test the memory

  1. Press Windows + R to open Run, type mdsched in the text field, and click OK.mdsched
  2. Choose the Restart now and check for problems (recommended) option.windows memory diagnostics to fix registry filter driver exception
  3. The PC will restart and automatically check for issues with the RAM.

Windows Memory Diagnostic is a built-in tool that automatically identifies and eliminates issues with the RAM, though it has a limited scope.

So, if it doesn’t work, run MemTest86+, an open-source tool that performs a wide array of tests on individual RAM modules, locates the problem, and, if possible, fixes it.

5. Disable Windows Security

  1. Press Windows + S to open Search, type Windows Security, and click on the relevant search result.windows security
  2. Click on Virus & threat protection.virus & threat protection
  3. Now, click on Manage settings under the Virus & threat protection settings option.manage settings
  4. Turn off the toggle for Real-time protection.disable to fix registry filter driver exception
  5. Click Yes in the UAC prompt.

If you are getting the Registry Filter Driver Exception wdfilter.sys error, it’s due to Windows Defender, and disabling it should do the trick. Remember not to leave your PC unprotected and get the best antivirus for Windows.

6. Reinstall Windows

In case none of the fixes listed earlier helped get rid of the Registry Filter Driver Exception BSOD, another effective solution is to reinstall Windows. This will help when a software problem leads to this error.

All you have to do is create a bootable USB for Windows and then reinstall the OS using it. All the data on the PC will be wiped clean, but you can use a cloud storage solution to create a backup before starting the process to save important files.

Tip icon Tip
If these solutions don’t work, you may need to replace the malfunctioning hardware, usually the hard drive or the RAM modules. Before you do, consult a professional and get these two thoroughly checked for faults.

That’s it! The Registry Filter Driver Exception error should have, in all likelihood, been fixed by now. Besides, you can always use a BSOD repair tool for easy and quick troubleshooting.

Also, before you leave, find out how to speed up the performance of Windows.

Tell us which fix worked for you in the comments section below.

0xa00f4243 Camera Reserved by Another App: 6 Fixes to Use

The Camera app helps capture photos and record videos with the built-in or attached webcam, though many use third-party video recorders. But several users who rely on the app reported the 0xa00f4243 Camera reserved by another app error.

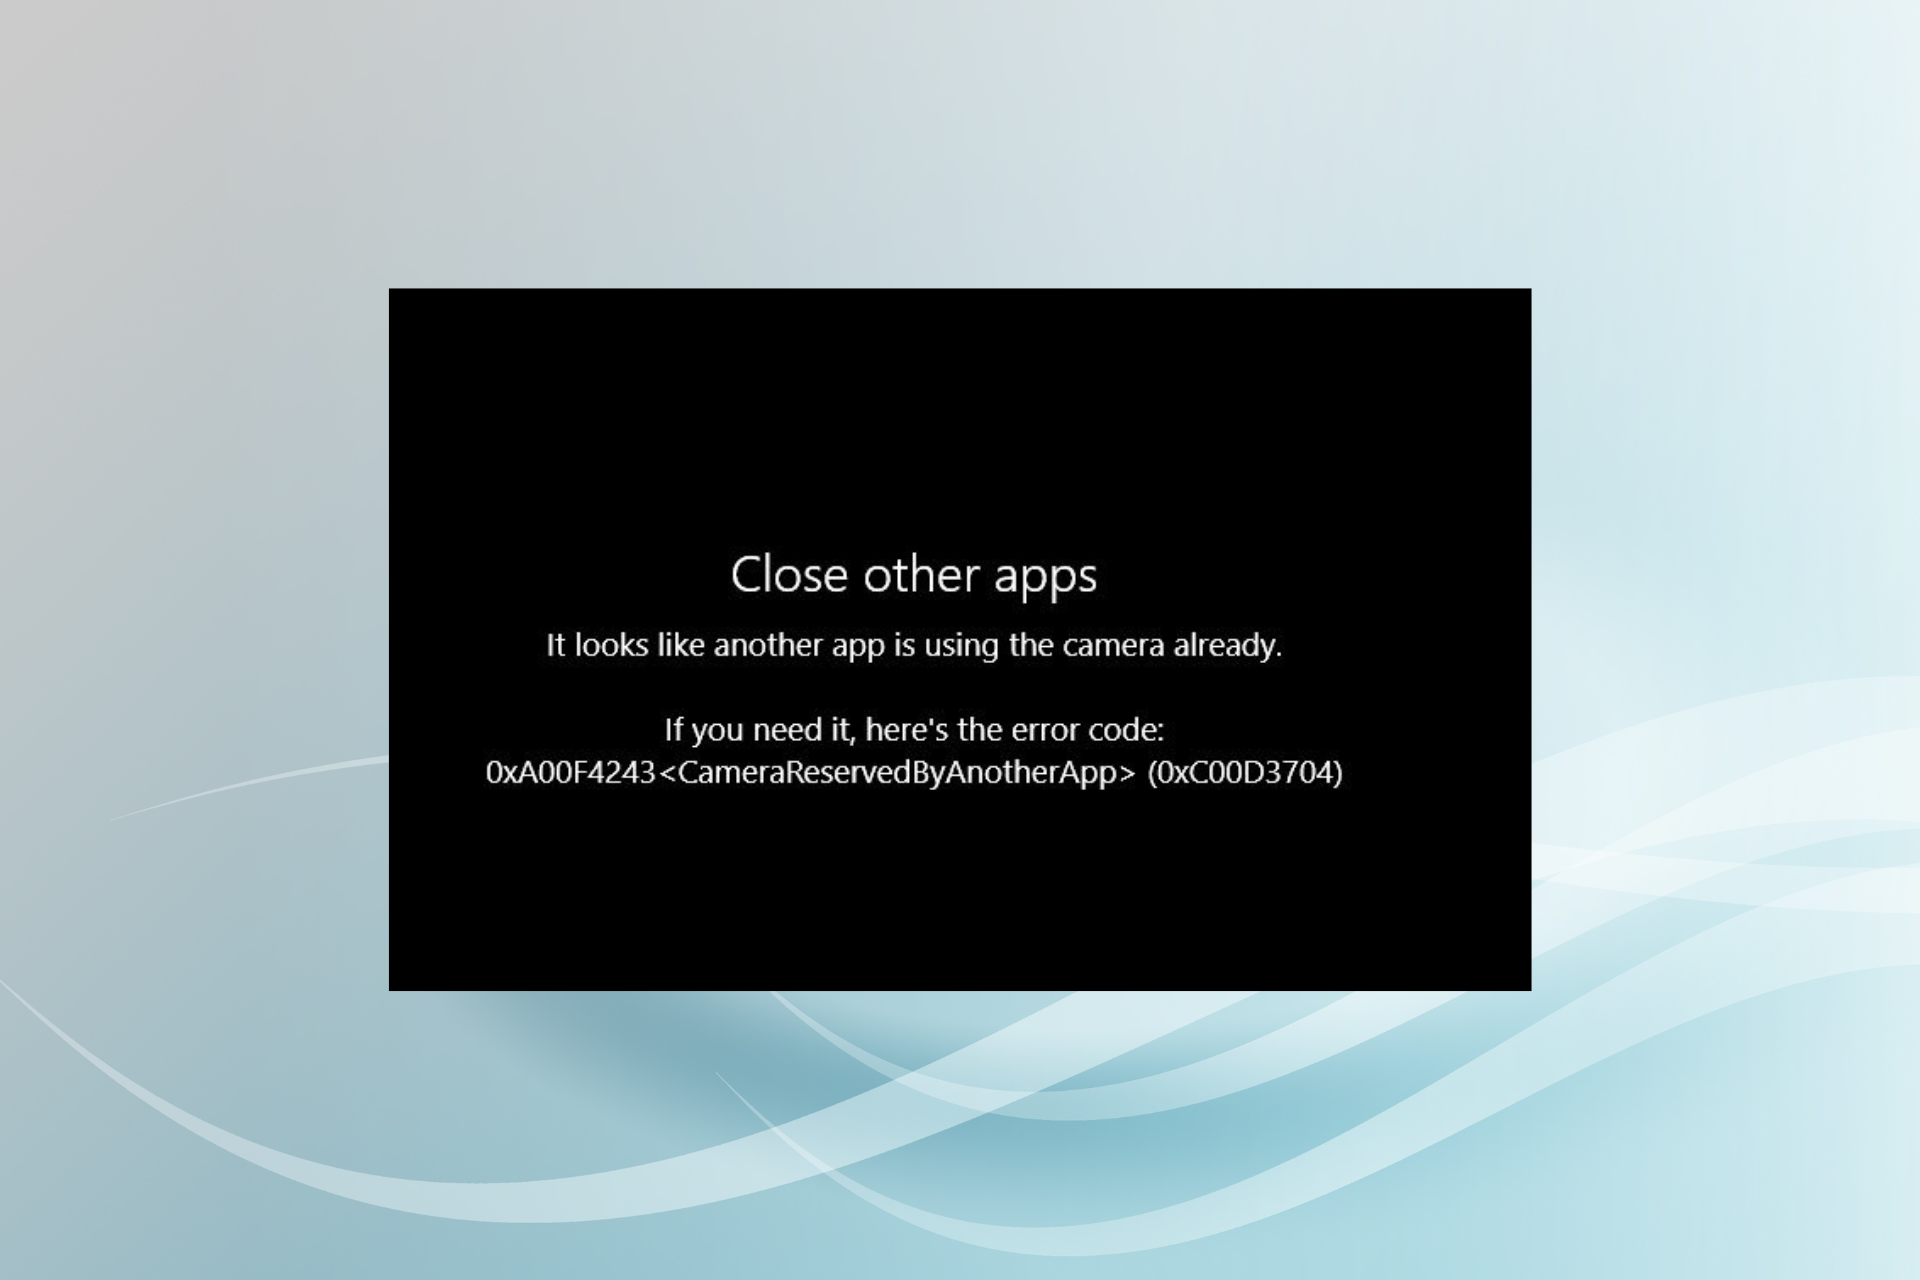
The error appears when opening the Camera app, and the message reads Close other apps. It looks like another app is using the camera already. If you need it, here’s the error code: 0xA00F4243<CameraReservedByAnotherApp> (0xC00D3704). So, let’s find out all about it.

Why does it say my camera is being used by another program?

Here are a few reasons you might be getting the error:

  • Privacy settings: If the webcam’s privacy settings are misconfigured, you may get the error.
  • Corrupt system files: When the system files are corrupt, the camera might not function effectively, and even throw the Your webcam is blocked by another application error.
  • Problems with the driver: A corrupt or outdated driver is just as likely to cause this error.
  • Issues with the connection: For many users, it was an improper connection or a problem with the port that triggered the error.
  • Another app using the camera: The possibility that another app on the PC is using the camera can’t be ignored, and you will have to verify that as well.

How can I fix 0xa00f4243 Camera reserved by another app (0xc00d3704) error?

Before we start making major changes, let’s try a few quick troubleshooting tips and tricks:

  • If it’s an external webcam plugged into a USB hub, remove it and directly plug it into a USB port on the computer.
  • Terminate any applications that might be using the camera from the Task Manager.
  • Check for Windows updates and install any pending ones.
  • Disable any antivirus installed on the computer and verify whether the 0xa00f4243 Camera reserved by another app error is fixed. If yes, we recommend you switch to an effective third-party antivirus for enhanced security and a better Windows experience.

If these don’t work, head to the solutions listed next.

1. Run the Hardware and Devices troubleshooter

  1. Press Windows + R to open Run, paste the following in the text field, and hit Enter:msdt.exe -id DeviceDiagnostichardware and devices troubleshooter
  2. Now, follow the on-screen instructions and make the recommended changes to complete the process.troubleshooter to fix 0xa00f4243 camera reserved by another app

To eliminate the possibility of a hardware problem triggering the 0xa00f4243 Camera reserved by another app error, you can run the Hardware and Devices troubleshooter. It will automatically identify and eliminate the issues if any are found.

2. Check the privacy settings

  1. Press Windows + I to open Settings, and click on Privacy.privacy
  2. Head to Camera from the navigation pane, and make sure the toggle for the Camera app is enabled. Also, disable the toggle for all the other apps if you don’t use them.enable to fix 0xa00f4243 camera reserved by another app

After changing the privacy settings, you should be able to get rid of the 0xA00F4243 camera reserved by another app on Lenovo and other devices.

3. Reinstall the camera driver

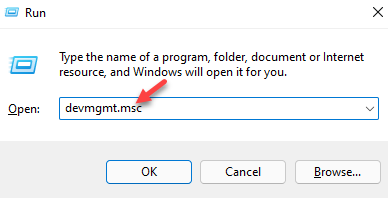
  1. Press Windows + R to open Run, type devmgmt.msc in the text field, and hit Enter.devmgmt.msc
  2. Expand the Cameras section, right-click on the connected webcam, and choose Uninstall device.uninstall device to fix 0xa00f4243 camera reserved by another app
  3. Click Uninstall in the confirmation prompt.uninstall
  4. Once done, restart the computer, and Windows will install a fresh copy of the driver.

You will encounter issues with the camera when its driver is corrupt. And a quick fix is to simply reinstall the device.

4. Update the camera driver

  1. Press Windows + X to open the Power User menu, and select Device Manager.device manager
  2. Locate your webcam under Cameras, right-click on it, and choose Update driver.update driver to fix 0xa00f4243 camera reserved by another app
  3. Now, select Search automatically for updated drivers.search automatically for drivers
  4. Wait for Windows to install the best available driver for the webcam.

Another solution when getting the 0xa00f4243 Camera reserved by another app error is to update the camera driver. Also, if the automatic options don’t work out, you can manually install the driver, though it’s both time-consuming and risky.

Update drivers automatically

While there is always the alternative of using Windows Update, it doesn’t always find your dedicated drivers and installs generic ones instead.

However, the software will make that operation much simpler, allowing you to identify, download, and install the right drivers with just a click of a button.

5. Enable the critical services

  1. Press Windows + R to open Run, type services.msc, and click OK.service.msc
  2. Locate the Capability Access Manager Service, right-click on it, and choose Properties.properties
  3. Select Automatic from the Startup type dropdown menu, click on Start to run the service, and then on OK to save the changes.run service to fix 0xa00f4243 camera reserved by another app
  4. Make similar changes to Intel(R) RealSense(TM) Depth Camera Manager Service as well, if available.

6. Reset the camera app

  1. Press Windows + I to open Settings, and click on Apps.apps
  2. In the Apps & features tab, click on Camera, and then on Advanced options.advanced options
  3. Click the Reset button.reset to fix 0xa00f4243 camera reserved by another app
  4. Again, click Reset in the confirmation prompt that appears.reset

If the previous solutions didn’t work, it could be an issue with the app itself, and resetting it should fix the 0xa00f4243 Camera reserved by another app error.

Tip icon Tip
In case nothing works, we recommend you update the BIOS. Before you proceed, make sure to check the exact process on the manufacturer’s website to avoid running into issues.

Also, if it turns out to be a hardware issue and you plan to get a new camera, check the best webcams for Windows.

For any other queries or to share a solution that’s not listed here, drop a comment below.

How to Export CSV in Powershell on Windows

CSV stands for Comma Separated Values, a file format that allows you to easily import data from one application into another. It’s easy to export and import data with a CSV file as long as you know how.

This article will show you how to use the PowerShell command line interface to export CSV files. We’ll also discuss other options available when exporting data using this command line tool.

Which PowerShell script is used to export all processes into a CSV?

A CSV file is a data table where each row is a set of values in the same order. It’s often used to export data from databases, spreadsheets, and other text-based files.

Export-CSV is a cmdlet that can be used in PowerShell to export the result of a command into a CSV file. This is useful when you want to export data from your PowerShell script into a format that can be easily imported into another application or database.

The Export-CSV cmdlet creates a CSV file, or comma-separated value (CSV) text file, that contains one or more named pipes in the file format. This file can be imported into other applications, such as Microsoft Excel, or used as input to a program that uses the CSV format.

The export-csv cmdlet will export the specified objects into a CSV (Comma Separated Values) file. The resulting CSV file will contain one object per line. If the Export-CSV command is run with no parameters, it will export all of the currently installed modules in your system.

You can specify an item name or ID as parameters if you only want to export specific items.

How do I export a CSV file from PowerShell?

We shall be using Windows Powershell ISE as it gives you more control over your CSV files. It gives you much more flexibility in how your CSV file is formed. The ISE has some built-in functionality that makes it convenient to use when creating or editing a script.

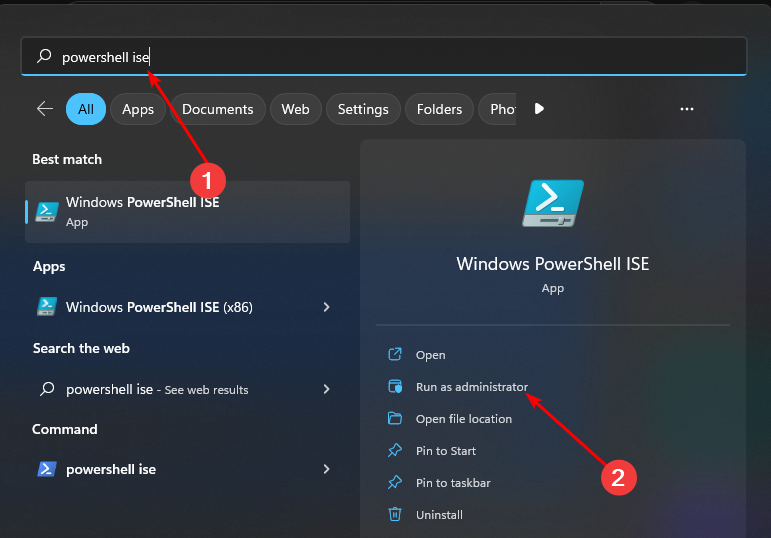
  1. Hit the Windows key, type Powershell ISE in the search bar, and select Run as administrator.
  2. The general syntax for the export-CSV in Powershell is: Get-Variable -name [variable name] | Export-CSV [path-to-file].csv

The first parameter is the path where you want to save your file. This can be a local drive or network location. If you don’t specify this parameter, Export-CSV will create the file in the current directory of your PowerShell session.

The second parameter specifies whether you want to append data to an existing file or create a new one. If you specify -Append, PowerShell will append data to whatever is already in that file. In omit -Append, PowerShell will create a new file in that location and write all of your data into it.

The third parameter specifies the literal pathname of the output file if it’s not in the current directory (-LiteralPath). Otherwise, it’s optional and defaults to “c:\temp” (or whichever directory you are currently working in). 

As a PowerShell export-CSV example, we will export a list of users on the Azure directory. We’ve already looked at how to export a list of users in a group, so let’s look at how to export CSV.

  1. Hit the Windows key, type Powershell ISE in the search bar, and select Run as administrator.
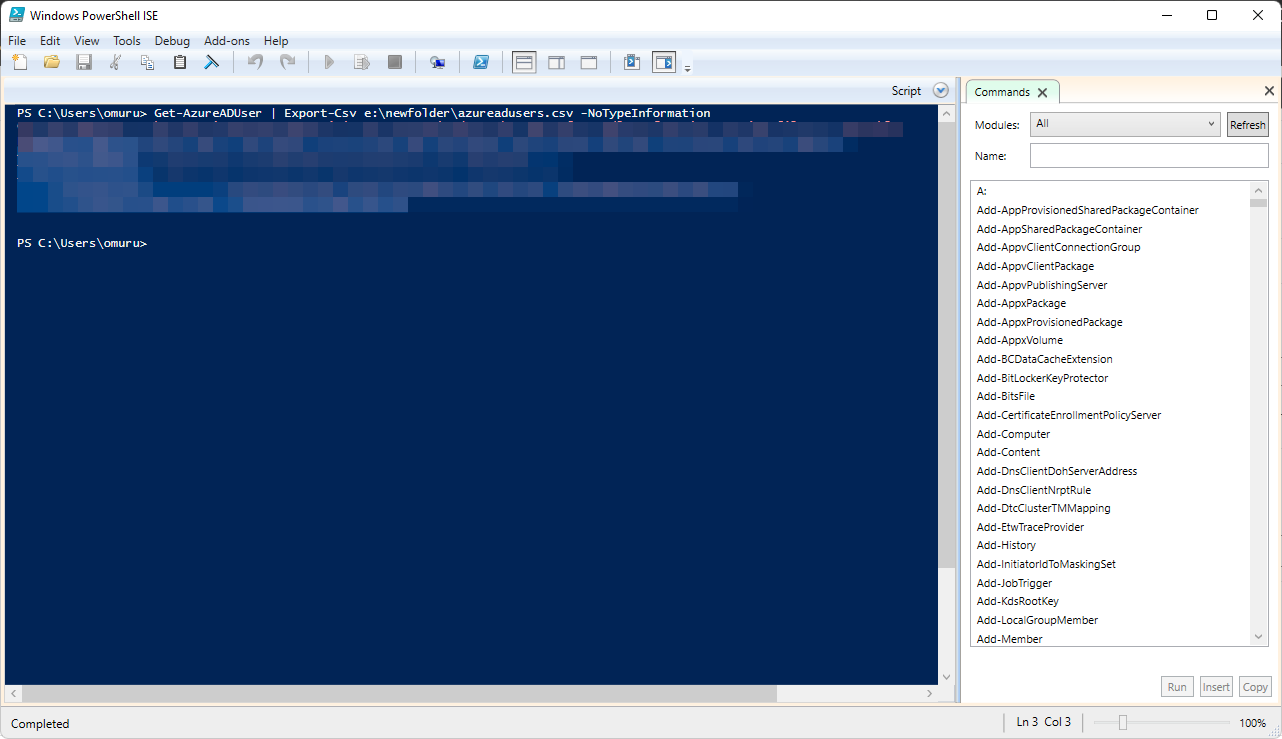
  2. Type the following command and hit Enter: Get-AzureADUser | Export-Csv e:\newfolder\azureadusers.csv -NoTypeInformation

How do I export a string to CSV in PowerShell?

When you use the Export-CSV cmdlet to export objects to a comma-separated values (CSV) file, the first line of the file contains column headers. You can suppress column headers by using the NoTypeInformation parameter.

To further clean up your data, you need to use the Delimiter parameter to specify the information needed. As such, you will use the delimiter character, usually the comma. 

For instance, in our case example above, we can modify the command to: Get-AzureADUser | select username, email, department | Export-CSV e:\newfolder\azureaduser.csv -NoTypeInformation

This will bring up the same information, but the PowerShell export-CSV will be in different columns with the specified parameters.

The CSV (Comma Separated Values) file format does not need any introduction to users committed to data processing. A CSV file has fields and records which are separated by commas. In case your CSV file is corrupted, we also have a detailed guide on how to fix it.

Aside from exporting CSV, we also share how you can print environment variables in PowerShell, so be sure to check that out too. If this process seems too complicated, perhaps you’ll find our CSV file viewer software helpful.

We also have a great guide on how to convert Excel to CSV file, so don’t miss it for more information.

Hopefully, this helps someone out there. If you have any tips or tricks to share, please do so in the comment section below. 

Microsoft Account Unusual Sign-in Activity: Should I Worry?

Microsoft has put together a robust security system to protect its users. The email alert for unusual sign-in activity on your account represents this system well. This makes sure that nobody except you can sign in to your account.

It is even more important when hackers run phishing campaigns to get the password to your Microsoft account. Unfortunately, this alert security system is now the focus of attackers. 

Users now receive fake Microsoft accounts and unusual sign-in activity alerts as spam emails. Hackers usually send this to get access to users’ accounts.

This guide will show you how to identify the spam Microsoft account sign-in activity email and how to protect yourself.

When does Microsoft send an unusual sign-in activity email?

Microsoft sends the unusual sign-in activity email for your account to protect you. The login attempt does not necessarily have to be from an unsafe device before you get this alert.

Whenever it notices a strange pattern in your login activities, you will get the unusual sign-in email and an SMS alert just to be sure you are the one trying to access your account. 

This will be sent to the email and phone number you provided during registration for security. Hence, you must keep the details updated in case you change them.

Below are some of the situations where you get the unusual sign-in activity alert:

  • When you sign in with a device you have never used to access your account
  • When you sign in from a different location than the usual
  • If you give an app or software access to your account
  • When you sign in with an unknown IP address

If you didn’t do any of the above and you get the security alert, it is likely that the email is from spammers and may contain a phishing link.

Quick Tip:

Scams mainly happen when scammers steal your personal information without your permission and use it to their advantage, which is typically spamming your email.

We highly suggest using Incogni, an automated personal data removal service that prevents data brokers from selling your information to others.

Incogni

Use Incogni to delete personal data from the internet!
Check price Visit Website

What can I do when I get the Unusual sign-in email from Microsoft?

If the unusual sign-in activity email you get is truly from Microsoft, your sign-in will be blocked, especially if it is a new device. To continue, you need to follow the instructions on the sign-in page and provide a security code that will be sent to one of your security contacts.

Without the security code, you cannot access your Microsoft account. This is all to keep your account safe.

How can I recognize a spam account activity email disguised as a Microsoft email?

1. Check the sender

check sender

As much as spammers and hackers try copying Microsoft’s unusual sign-in activity email format, they can’t forge the official email address. Check the sender’s email to ensure the alert you got is legit.

Microsoft’s account team’s official email is [email protected]. 

Ensure that every letter in the email is correct, as the hacker may use similar addresses with few differences. If the email is different, know it is spamming to bait you.

2. Investigate the format 

fromat microsoft account unusual sign-in activity spam email

The hackers sending the fake alert email for phishing majorly feed on people’s fear and vulnerability. Hence, they leave some loopholes in the format of the messages.

An example is the popular Microsoft unusual sign-in activity spam email received by users signed off by The Microsoft Security Essentials, Microsoft Team office Center.

This format is so flawed that a quick check will tell you it is fake. Foremost, the original unusual sign-in activity email is always signed off by The Microsoft account team.

The Microsoft Security Essentials written in the fake email is the name of the built-in security features in the old Windows operating systems. Also, Microsoft Teams is a product, and there is nothing like the Microsoft Team office center.

Hence, ensure you look at the format carefully, and you will find pointers showing the email as fake.

3. Note where the action link takes you

fake microsoft account unusual sign-in activity spam email

Most phishing emails disguised as the Microsoft unusual sign-in alert have an action link or button mostly tagged Review recent activity. If you click this link, it will take you to a fake Microsoft login page.

original

The first thing to note here is the address. The original Microsoft login address is denoted as login.live.com/. But if it is a fake link, the address will be distinctively different.

What should I do when I get a spam email?

1. Do not enter your detail

If you could detect the spam Microsoft unusual sign-in activity email before clicking any link, you only need to ignore or trash it. However, if you only got to know after clicking the link, ensure you do not enter any of your details.

This is especially important if it takes you to a login page that requires you to enter your Microsoft account password.

2. Check the Microsoft recent activity page

If you didn’t perform any unusual sign-in activity and got the alert, log in to your Microsoft account from the official website. This is the best place to check your recent login activities to know if someone else is tampering with your account or if the email you received is fake.

3. Contact Microsoft

If the email persists despite not noticing any unusual activity in your account, you can choose to report the email for further investigation or contact the official Microsoft support. This is to verify if there is any problem with the system or if the messages are spam.

Also, if you entered your details on the fake login page, the support team will tell you what to do to secure your account.

Phishing and data theft are the order of the day on today’s internet. The Microsoft unusual sign-in activity spam email is one of the latest methods hackers use to get people to submit their account details. 

But with this guide, you should be able to identify fake emails and protect your account.

Are you getting a scam verification email for Eversend? Then read our guide to learn about the scam and how to protect yourself.

Feel free to share your experience with the fake sign-in security alert in the comments below.

Monitor Changes BRightness On Its Own: How to Fix

If your Windows 10 brightness slider isn’t working, it’s likely due to outdated display drivers or incorrect power settings.

In this guide, we’ll show you how to fix these common causes and restore your brightness controls quickly.

How do I stop my monitor from auto-adjusting brightness?

Before applying any advanced steps:

  • You can try connecting your monitor to another Windows system to see if it works. If the monitor shows the same problem after connecting to another device, this means the monitor is damaged. You may have to repair it or replace it with the new one.

1. Change brightness settings

  1. Press the Windows and I keys together to open the Settings app.
  2. Ensure you are on the System page by clicking the option on the left menu.
  3. Select the Display option on the System page.

    In system menu, open Display


  4. Click the Brightness option under the Brightness & color section at the top of the Display page.


  5. Now uncheck the Help improve battery by optimizing the content shown and the brightness checkbox.


  6. Once done, close the Display page after changing the settings.

2. Disable the Adaptive brightness settings from Control Panel

  1. Press the Windows key and type the control panel.
  2. Select the Control Panel app from the search results by clicking on it.


  3. Click Category from the View by option.
  4. After selecting it, click Hardware and Sound.


  5. Click Power Options to view all the power plans.


  6. Select Change plan settings by clicking on it.


  7. Now click Change advanced power settings.


  8. Once the Power Options window opens, double-click on the Display option to expand it.
  9. Also, expand the Enable adaptive brightness option by double-clicking on it.
  10. Change the Settings option to Off from its dropdown.


  11. Once done, click OK.

3. Update the graphics driver

  1. Open the Run command box by pressing the Windows and R keys together.
  2. Type devmgmt. msc in the textbox of the Run box and press the Enter key.

    Windows 11 touch screen won't calibrate

  3. Once the Device Manager window opens, double-click on the Display adapters option to expand it.
  4. Right-click on the graphics card and click Update driver from the context menu.


  5. The update driver window gets popped up on the system.
  6. Select the Search automatically for drivers option by clicking on it.


  7. This starts updating the graphics driver on the system.
  8. Once it is done, you can close the device manager window.

If manual updates didn’t work, you could use a specialized tool to scan, find and update outdated drivers automatically, safely, and fast. Our top choice for this is Fortect Driver Updater because it offers a user-friendly interface, reliable driver detection, and ensures you get the latest official updates without risking compatibility issues.

4. Turn off the auto-dimming feature while in battery saver mode

  1. Right-click the Start button on the taskbar and select Settings from the context menu.


  2. This opens the Settings app window on the system.
  3. Click System on the left panel.
  4. Select the Power & battery option on the System page on the right side of the Settings app.


  5. Select the Battery saver option by clicking on it once, which is located at the bottom of the Power & battery page.


  6. This expands the section, and you need to uncheck the Lower screen brightness when using the battery saver checkbox.


  7. When you are done, close the Settings app window.

5. Run the Power Troubleshooter

  1. Type control.exe /name Microsoft.Troubleshooting in the Run box and then press the Enter key.


  2. Click the Other troubleshooters option.


  3. Scroll down the page and click the Power option’s Run button.


  4. This starts the troubleshooting by detecting the issues associated with the power and trying to fix them.
  5. Follow any onscreen instructions and complete the troubleshooting process.

6. Change the screen resolution settings

  1. Press the Windows key and type settings.
  2. Click the Settings app from the results.


  3. In the Settings app page, click System on the left menu and click Display on the right side of the page.

    In system menu, open Display

  4. Under the Scale & layout section, select the 1920 x 1080 (Recommended) option from the dropdown list of the Display resolution.
  5. Also, ensure the Scale option is set as 125%, which Windows recommends.


  6. When done, you can close the Settings page.

Why does my screen brightness keep changing in Windows 11?

Many users are facing this constant problem with the brightness of their screens. They say the screen’s brightness keeps changing even after upgrading their system to Windows 11, the latest possible version. The potential causes for this issue on any Windows system are listed below:

  • Outdated graphics driver – The graphics card is primarily responsible for how you see things on the screen. The better the graphics card specifications, the better will be the appearance. So if the graphics driver is not updated, it might cause such problems.
  • Adaptive brightness enabled – There is a feature called Adaptive brightness in the Windows system, which lets the screen brightness change according to the surrounding lights.
  • Auto-dimming feature – When the system is in battery saver mode, it changes the brightness to dull to save power consumption if this feature is enabled.
  • Screen resolution – If the screen resolution is not set to the recommended value, it might create issues like those discussed in this article above.
  • Damaged screen – This type of issue happens when the screen or monitor gets damaged internally or externally.

Why does my LCD screen become dim or sometimes flicker or brighten intermittently?

If the screen’s brightness changes randomly, it could be due to variations in the amount of light around the device. The sensors in the display adjust the brightness according to these changes. In case the display brightens intermittently, the sensors are likely broken.

For regular flickering in the monitor, it’s usually faulty connections, corrupt or outdated drivers, or a broken display to blame.

Other similar issues include your monitor brightness adjusting on its own because of adaptive settings, and brightness control buttons failing due to hardware or driver problems. Check out our guides on how to stop automatic brightness changes and fix non-working brightness buttons for solutions.

How can I calibrate my monitor in Windows 11?

Users can calibrate the monitor in Windows 11 by launching the Settings app page. Then navigate to the Display page and select the HDR option.

Next, you need to turn on the HDR video streaming option by enabling its toggle button. Next, under the Display calibration for HDR video, click Calibrate for previewing and adjusting HDR video on the monitor.

I hope you found this article to be informative! Please leave us comments below for any queries.

System Error 6118 in CMD: 6 Easy Fixes That You Can Use

The Net View command allows the users to view the various devices on the network and is often employed by users with several PCs connected. But many reported getting System error 6118 when running the command.

The complete message reads System error 6118 has occurred. The list of servers for this workgroup is not currently available. So, let’s find out all about the error.

What is System error 6118 in CMD?

System error 6118 prevents users from viewing the network devices, domains, and shared resources and puts them in a tricky situation. Here are a few reasons you may receive the error:

  • Firewall or antivirus affecting the connection: The built-in or third-party firewall and antivirus can often conflict with the connection and prevent you from viewing or accessing the network devices.
  • Misconfigured network settings: If the network settings are misconfigured, you might get System error 6118 in cmd with net view. A quick reset of the network settings usually does the trick.
  • Critical services are not running: There are a few services that need to be running for network discovery to work, and when these are disabled, you get the error.

How can I fix System error 6118 has occurred message?

Before making changes to the system, try these quick tips, tricks, and workarounds:

  • Make sure the WorkGroup name on all the systems is the same.
  • If you use an extender in the network, remove it and connect the devices to a single host. Or if the setup consists of several extenders, add them one at a time until the problematic one is identified.
  • Make sure the DNS is correctly set. If not, set it to the modem’s default DNS address.

If none of the solutions worked, move to the ones listed next.

1. Modify network setting

  1. Press Windows + R to open Run, type Control Panel, and hit Enter.control panel
  2. Click on View network status and tasks under Network and Internet.network and internet
  3. Click on Change advanced sharing settings.change advanced sharing settings to fix system error 6118
  4. Now, make sure both Network discovery and File and printer sharing are enabled for Private networks and Public networks, as the case may be.enable network discovery to fix system error 6118

2. Change the firewall settings

  1. Press Windows + S to open Search, type Allow an app through Windows Firewall in the text field, and click on the relevant search result.allow an app
  2. Click on Change settings.change settings
  3. Make sure the Private and Public checkboxes are ticked for File and Printer Sharing.file and printer sharing
  4. Similarly, verify the same for Network Discovery, and then click OK to save the changes.enable network discovery to fix system error 6118

If enabling File and Printer Sharing and Network Discovery fix System error 6118, make sure they are allowed through the built-in Firewall. If you use a third-party firewall, enable the two there as well.

3. Enable the critical services

  1. Press Windows + R to open Run, type services.msc, and click OK.services
  2. Locate the Computer Browser service, right-click on it, and choose Properties.properties
  3. Select Automatic from the Startup type dropdown menu, click on Start to run the service, and then OK to save the changes.enable service to fix system error 6118
  4. Similarly, configure the Function Discovery Provider Host service to run automatically.function discovery provider host

4. Run the SFC scan

  1. Press Windows + S to open Search, enter Command Prompt, and click on Run as administrator.command prompt
  2. Click Yes in the UAC prompt.
  3. Paste the following command and hit Enter:sfc /scannowsfc scan to fix system error 6118

For the Enumerating domain A system error has occurred 6118 issue, running the SFC scan should get things up and running. If that doesn’t work, run the DISM tool as well.

5. Reset the network stack

  1. Press Windows + R to open Run, type cmd, and then hit Ctrl + Shift + Enter.cmd
  2. Click Yes in the prompt that appears.
  3. Now, paste the following commands individually and hit Enter after each:ipconfig /release ipconfig /flushdns ipconfig /renew netsh winsock reset netsh interface ipv4 reset netsh interface ipv6 reset netsh winsock reset catalog netsh int ipv4 reset reset.log netsh int ipv6 reset reset.log netsh advfirewall reset

That’s it! In all likelihood, resetting the network stack should fix System error 6118 in Windows and allow you to view the devices on the network.

6. Disable the firewall

  1. Press Windows + S, type Windows Defender Firewall, and open it from the search results.windows defender firewall
  2. Click on Turn Windows Defender Firewall on or off from the options on the left.turn off to fix system error 6118
  3. Now, select the Turn off Windows Defender Firewall (not recommended) option under both Private network settings and Public network settings, and then click OK to save the changes.disable firewall
  4. Once done, run the command to view the devices on the network.

If the previous solutions didn’t work, disabling the firewall is the last alternative, but one that would fix the System error 6118 for good. Though we do not recommend disabling it for long since it leaves your PC unprotected.

While meddling with the network settings, find out how to speed up the Internet in Windows.

For any other queries or to share a solution apart from the ones here, drop a comment below.

What’s going on with Outlook.com spam?

If you use Outlook.com for a personal account, you’re probably already aware that spam email has become quite the problem in the last couple of months, and that it got significantly worse today. I had 27 emails in my inbox this morning, with some 22-23 of them spam. The issue appears to be widespread, and The Verge posted on it this morning. They’ve reached out to Microsoft, as have we and hopefully we’ll get an explanation and some relief soon.

As The Verge notes, you might want to turn off notifications on your phone for your personal accounts, or risk getting notifications for these spam messages, which could end up being quite bothersome.

Microsoft has been quiet so far on why Outlook.com has been serving so much spam recently, when it’s pretty apparent that these messages are indeed spam and should have been caught by spam filters.

Hopefully we’ll get answers soon.

How to Compare Two Word Documents on Windows 11: 3 Easy Ways

Most users have encountered a lot of stress and difficulties when comparing two Word documents. Users often resort to shuffling reading between the two documents to be able to make comparisons between them, and this guide will show you how to do it.

How do I compare two Word documents on Windows 11?

1. Use the Microsoft Word built-in compare function

  1. Launch Microsoft Word on your PC.
  2. Select the Review tab on the Microsoft Word Ribbon. Click the Compare drop-down button in the Review tab and select the Compare option.
  3. Click the drop-down button below the Original document to choose the original document you want to compare. If you can’t find your documents from the list, click on the folder icon to navigate it.
  4. Under the Revised document, click the drop-down button or click the folder to select it.
  5. In the Label changes bar, input what you want to appear next to the changes.
  6. Click on OK to display the result of the comparison.

The above steps will open a four-panel window with the compared document in the middle and highlight all changes in red. After going through the changes, the user can accept or reject changes made and save the revised version as new.

Read our guide on how to open & use Word in your browser for easy online access.

You can compare two Word documents for differences by using steps from above, especially if you’re tracking and accepting changes.

Need a quick refresher on tabs, commands, and the Ribbon? Check our Microsoft Word how-to guide for clear steps.

2. Use the Side by Side comparison in Word

  1. Launch Microsoft Word on your PC and open the documents you want to compare.
  2. Select the View tab from the ribbon and click on the View Side by Side option. It will open the two documents side by side in your Window.
  3. When more than two documents are opened, it will prompt the Compare Side by Side window where you can select the document to compare and click OK.

This is a quick method to compare two Word documents side by side. The view and compare option allow you to compare and review the documents conveniently.

3. Online comparison using Google Docs

  1. Open the Word document you want to compare in Google Docs.
  2. Navigate to Tools on the ribbon and select Compare document.
  3. Click on My drive from the pop-up to choose the Word documents to compare.
  4. Click on the Attribute difference to the bar, type the name to attribute the difference, and select the Compare button.
  5. It will prompt that your comparison is ready, then click Open to see the comparison.

Google Docs comparison tool offers a quick way to compare two Word documents and highlight differences online.

Another option is to use third-party apps designed for this function to identify their differences. Likewise, you can read our article on the best software to compare PDF documents for more details.

So, this is how to compare two Word documents for changes. We hope that you found our solutions comprehensive.

FAQs

How do I compare two Word documents for differences?

You can use Microsoft Word’s built-in Compare feature. Go to the Review tab, select Compare, then choose your original and revised documents. Word will display both files with all edits highlighted.

Can I view two Word documents side by side?

Yes. Open both documents in Word, then click the View tab and select View Side by Side. This lets you scroll through and compare the contents visually without merging them.

Is there a way to compare Word documents online?

You can upload both Word files to Google Docs, go to Tools → Compare documents, and view the highlighted changes directly in your browser.

Are there third-party tools to compare Word documents?

Absolutely. Several document-comparison apps are available that can analyze and highlight differences more precisely. You can also explore dedicated tools for comparing PDF or text files for more flexibility.

You can read our complete guide on the best document compare software to spot all the changes on your PC.

In conclusion, you can check out our complete guide on software that you can use to compare documents and how to compare folders and copy missing files.

Tell us in the comments section below if you know other ways of easily comparing Word documents.

How to Print Environment Variables in Powershell: 4 Easy Tips

Windows is a vast Operating System with many features and built-in components that coordinate its processes and information.

These processes store the operating system’s information in the Environment Variables. Hence, we’ll take you through how to use PowerShell to print Environment Variables.

What is an environment variable?

Environment variables store information about the operating system’s and other programs’ data. It contains information about the operating system path and location of the Windows installation files. Also, it stores details of processes used by the operating system and other programs.

Furthermore, environment variables are usually stored in strings and can’t be empty. Likewise, environmental variables, unlike other variables, can be inherited by child processes. Hence, they store values essential and needed in both parent and child processes.

However, in any supported operating system platform, PowerShell can access, manage, and change environment variables. Also, the environment provider in Windows PowerShell allows you to get, clear, change, add, clear, and delete environment variables in the current console.

How do I print all environment variables in PowerShell?

1. Use the ls env command

  1. Left-click the Start button, type PowerShell, and click Run as administrator.
  2. Click Yes on the User Account Control prompt.
  3. Copy and paste the following line and press Enter: ls env:

The above command will provide the console’s PowerShell print path environment variable with their name and values sorted by the name field.

2. Use the GetChildItem Env command

  1. Left-click the Start button, type PowerShell, and click Run as administrator.
  2. Select Yes on the User Account Control prompt.
  3. Copy and paste the following line and press Enter: Get-ChildItem Env: | Sort Name

The above command in PowerShell will print all environment variables, sorted by name.

Once you get the list of environment variables list, you can easily edit them to customize your system settings. To know how to do that, read this detailed guide on viewing environment variables in Windows.

3. Use the dir env command

  1. Right-click the Start button and select PowerShell (Admin) from the list.
  2. Type or paste the following command and press Enter: dir env:
  3. This command will print the environment variables with the environment name and environment variable value path.

4. Print all environment variables values to a file

  1. Left-click the Start button, type PowerShell, and click Run as administrator.
  2. Click Yes on the User Account Control prompt.
  3. Copy and paste the following line and press Enter: gci env: | sort-object name| Export-Csv -Path D:\env_variables.txt -NoTypeInformation
  4. Then use the Export-Csv command line to print all environment variables to the file. Copy and paste the following Export-Csv syntax and press Enter: Export-Csv      -InputObject <PSObject>      [[-Path] <String>]      [-LiteralPath <String>]      [-Force]      [-NoClobber]      [-Encoding <Encoding>]      [-Append]      [[-Delimiter] <Char>]      [-IncludeTypeInformation]      [-NoTypeInformation]      [-QuoteFields <String[]>]      [-UseQuotes <QuoteKind>]      [-WhatIf]      [-Confirm]      [<CommonParameters>]

The above command in PowerShell gets all environment variables with their name and values sorted by the name field. Then, use the Export-CSV to convert the objects into a series of Character-Separated Value (CSV) strings. After, it prints all environment variables to a file.

You can also check our guide on how to copy files to Remote Computers with PowerShell on Windows 11.

Moreover, we have a detailed guide about PowerShell not showing the full output and some fixes to get it working on Windows 11.

Do not hesitate to let us know which of the above methods also worked for you.

5 Best Exchange Server Management Tools [Expert-Tested]

Microsoft Exchange Server is deployed on the Windows Server OS. Organizations can use Exchange Server Management tools to implement administrative needs to improve the performance of the Active Directory.

Our readers can check our article about the best backup software for the Exchange Server on Windows 11.

What does an Exchange Management tool do?

The Exchange Management tool offers an all-in-one user management console that allows admins to manage the Exchange Server and Active Directory from a single console.

Also, it enhances mailbox management delegation, Exchange mailboxes deletion or disabling, creating resource mailboxes, etc.

Furthermore, the Exchange Management tool is software for implementing administrative needs into features. Also, it functions as a monitor and controls Windows Active Directory and Exchange to improve its performance.

Many tools are available for managing and monitoring your Exchange and Windows Active Directory. Our best picks are the ones below.

What are the best Exchange Server Management tools?

ADManager Plus – Best for easy administration of Exchange Servers

ADManager Plus

The ADManager Plus is an Exchange management tool that sets mail properties like mailbox size and recipient.

Also, it manages mailbox recovery while creating mailboxes for users and reduces the stress associated with monitoring the Exchange.

However, the tool has some notable features that set it above others:

  • Manage the Exchange Server and Windows Active Directory from a single console
  • It manages the number of accesses to the server
  • Set an offline address book for users in a few clicks
  • Set bulk offline address books by printing and importing a CSV file
  • Create and set mailbox properties during user creation in the Active Directory
  • Eliminates the need to use Exchange Management Console and Exchange Management Shell

ADManager Plus

Manage the Exchange Server and Windows Active Directory seamlessly from a single console.
Free trial Visit website

ManageEngine Exchange Reporter Plus – Database health monitoring

ManageEngine Reporter

ManageEngine Exchange Reporter Plus is an Exchange Management service that provides over 100 reports on each aspect of the server environment. Also, it is a web-based reporting and analysis tool. It provides the administrator with precise, detailed, and usable data.

The following are the most significant features of the ManageEngine Exchange Reporter Plus:

  • It can be used for on-premise and cloud Exchange activities
  • Comprehensive dashboard that shows details of alert counts, the most recent server exchange and their severity, and servers using the most CPU and system resources
  • Provides insight into mailbox sizes and growth, allowing you to compare the data against quota limits and track the entry and exit of emails alongside their content
  • It offers a log monitoring system for viewing the database health and tracking metrics like memory usage, disk IO, and cache status
  • Provision of live exchange metrics and automatic detection method for new Exchange servers

⇒ Get ManageEngine Exchange Reporter Plus

ManageEngine OpManager – Best alerting system

ManageEngine OpManager

ManageEngine OpManager is a network monitoring tool with built-in Microsoft Exchange functionalities.

It has an advanced alerting mechanism that notifies you immediately when there is a problem with any sector of the Exchange server. Also, it makes it easier for admins to identify and rectify irregularities.

Furthermore, some great features that come with the management tool are:

  • Consistent and precise alerting system
  • Built-in reporting formats and support for customized reports on data collected
  • Easy-to-use user interface and friendly functionality to navigate
  • Increases performance by monitoring the mailbox performance counters, active and inactive mailboxes, and deleting inactive mailboxes to clean up the system
  • Creates live inventories by using automatic network discovery while using network maps to allow administrators to track assets and network sizes
  • Suitable for large and small networks

ManageEngine OpManager

Increase performance by monitoring your network and exchange servers with this powerful software.
Check Price Visit Website

SolarWinds Server & Application Monitor – Dashboard customization

SolarWinds server & application monitor

SolarWinds Server & Application Monitor supports physical and virtual servers and provides advanced Microsoft Exchange management and monitoring services. It helps to detect and investigate issues through its dashboard.

Some key features that come with SolarWinds Server & Application Monitor are:

  • Easy to set auto-discovery process
  • Easy-to-use user interface that shows stored data and stats in a graph or table format
  • Notifies users of issues by sending out alerts regarding problems detected on the server
  • Customizable dashboard with drag-and-drop functionality
  • Uses the data from alerts on free space, database use, transaction history, and the average mailbox to plan mailbox capacity

⇒ Get SolarWinds Server & Application Monitor

Paessler PRTG Network Monitor – Best for tracking workload

Paessler PRTG Network monitor

The Paessler PRTG Network Monitor is a network monitoring service that provides detailed information about your IT infrastructure. It includes pre-configured sensors dedicated to the Microsoft Exchange server. Also, it enhances a swift response to issues by sending quick alerts.

Some great features of the Paessler PRTG Network Monitor are:

  • It continuously monitors the Microsoft Exchange server activities and how they operate.
  • Tracks the workload and database capacity and ensures that emails deliver on time without delay
  • Instant alerts through email, SMS, or push notifications in the app
  • Drag-and-drop editor to customize and build views and reports on the app
  • Built-in monitoring service that covers logins and later emails, mailbox sizes, and capacities, the number of emails in the mail queue, and the Microsoft Exchange server’s public folders

⇒ Get Paessler PRTG Network Monitor

We hope our selection helped you choose the best Exchange server management tool for your needs.

You may also be interested in our selection of the best backup software for Exchange servers.

Which product did you choose? Join the discussion in the comments section below.

6 Best Active Directory Security Tools [2026 List]

Active Directory stores information about objects on the network, making it available for administrators and users to find and use. Sadly, hackers are infiltrating the Active Directory, attacking the network it controls.

Due to the increasing incidence, the need for Active Directory security tools is essential. However, our readers can check our article about the best Open Source Network Monitoring tools they can use.

Is Active Directory a security tool?

Active Directory (AD) is not a security tool. It is Microsoft’s proprietary directory service designed to run on Windows Server.

It allows administrators to control remote computers, manage permissions, and access network resources.

However, there are third-party tools that organizations can employ to make it easier and faster to audit and secure the Active Directory. Also, they can help with monitoring, managing, and reporting on the AD.

Check our guide on what to do if Windows Server Manager is not opening on your PC.

Many Active Directory security tools are available for securing AD, but not all are reliable. Hence, we’ll take you through our pick of the best and most reliable Active Directory security tools to use.

What are the best Active Directory security tools?

ADAudit Plus – Best for Logon active tracking

ADAudit Plus security tool

ADAudit Plus is the number one choice of Active Directory security tool because of its ability to secure Windows servers.

It protects its ecosystem and keeps it compliant by providing comprehensive visibility into all activities.

Furthermore, some notable features of the ADAudit Plus security tool are:

  • Monitors logins by tracking user logon activities at all times
  • It audits the login processes, such as login failure, success, and other data related to the login history
  • Uses a UBA (User Behavior Analytics)-driven change auditor to secure the Active Directory and keep the Windows Servers ecosystem compliant
  • Manages and tracks the changes in the operating system, programs, and other local files on the PC
  • Offers a real-time change notification service that tells who made a change and when it was made and specifies where in your Windows Server environment
  • Audits privileged use, limiting access to only admins and privileged users

ADAudit Plus

Check all the logon activities and manage all the failed attempts on your endpoints quickly.
Free trial Visit website

PAM360 – Best for Privileged Access Management

PAM360

ManageEngine’s PAM360 is a privileged access management (PAM) platform for securing, controlling, and monitoring high-level access to critical systems across complex IT environments. Rather than treating privileged accounts as scattered risks, it centralizes them into a single, policy-driven framework.

The tool integrates with Active Directory to import users, authenticate logins, and manage domain accounts. It can also help control AD privileges. E.g., just-in-time access or group management, when integrated with other AD Tools.

However, PAM360 is designed to secure privileged accounts across many systems, not just Active Directory.

At its core, PAM360 acts as a secure vault and control layer for sensitive credentials. It stores privileged passwords, SSH keys, and certificates in an encrypted repository, while enforcing strict access controls such as role-based permissions and just-in-time (JIT) privilege elevation.

All privileged sessions can be monitored, recorded, and audited in real time, with analytics to detect unusual behavior.

Other notable features include:

  • Secure remote access – Password-less, controlled access to servers, endpoints, and network devices.
  • Granular control over admin rights across systems.
  • Zero Trust enforcement – Policy-based, risk-aware access controls and trust scoring
  • Endpoint privilege management – Removes unnecessary admin rights and enforces least privilege on devices.
  • Integrations & APIs – Connects with cloud platforms, apps, and DevOps pipelines via APIs and connectors.

Semperis Directory Services Protector – Blocks unauthorized access

Semperis Directory Services Protector

Semperis Directory Services Protector is a Windows and Azure Active Directory Service security tool. It secures the Active Directory by preventing access to the Active Directory and monitors the login activities.

More so, some distinctive features of the Directory Services Protector (DSP) by Semperis are:

  • Notifies the admin of any changes or activities that bypass security logs
  • Tracks login successfully and failed attempts on the Server
  • Blocks unauthorized access to the Active Directory and analyzes lockouts
  • Offers a detailed retrieval of Active Directory settings for later usage
  • It helps produce reports of modifications and aid in locating and modifying AD attributes
  • Finds and removes unwanted Active Directories

⇒ Get Semperis Directory Services Protector

Varonis For Active Directory – Best in communicating risks

Varonis For Active Directory

Varonis For Active Directory is a security software that helps you to fish out and instantly fix Active Directory loopholes that hackers can exploit.

It enforces strict security that prevents unauthorized access that may result in data loss.

Furthermore, some notable features of the Varonis For Active Directory security tool are:

  • Notification system for Active Directory reporting, especially on security threats
  • Flags risky Active Directory accounts that attackers may exploit
  • Detects and fixes misconfigurations in the Active Directory and provides a comprehensive security search for changes on the AD
  • Offers a consistent auditing service and reports any potential threat in the process
  • Sends alerts regarding behavior anomalies and malicious actions

⇒ Get Varonis For Active Directory

Tenable One security tool – Best for cloud-based threat detection

Tenable One security tool

Tenable One is a fully integrated cloud-based security platform. It uses the exposure management approach to ensure Taft all activities across your Server are visible and secure.

Also, it offers an accurate view of your organization’s cyber risks and ways to curb them.

The platform comes with many features that make it more secure than others. Some features are:

  • Detects vulnerabilities and provides remediation guidance to fix them
  • Real-time Active Directory and cloud security, protecting your organization’s assets
  • Web app security framework for setting up web app scans and assessment
  • Responds to Active Directory attacks by analyzing the kill chain of threats such as DCShadow, DCSync, and brute force
  • Detects any changes to the Active Directory, provides auditing for the activities and reports the changes to the proper authorities

⇒ Get Tenable One security tool

Netwrix StealthAUDIT – Includes great monitoring features

Netwrix StealthAUDIT

Netwrix StealthAUDIT is an Active Directory security tool for mitigating threats and risks around sensitive data.

It automatically collects and analyzes the data needed to reduce attacks, intrusion, and other security vulnerabilities.

However, some notable features you can utilize in the Netwrix StealthAUDIT are:

  • Detects threats and alerts the admin about attacks against sensitive data
  • Reduces the risk of data loss and a breach by reducing access to a minimum and allocating privileges to a few users
  • More than 40 built-in data collection modules that cover cloud-based and on-premise platforms

⇒ Get Netwrix StealthAUDIT

There are other tools you can opt-in for when considering an Active Directory security tool. You may be interested in our article about the best auditing software for your devices.

Also, you can read about how to demote a dominant controller on Windows Servers in a simple way.

Let us know about your product choice in the comments area below.

How to Stop Amazon Assistant From Popping Up: 3 Fixes to use

Amazon Assistant is a browser extension that helps you make better shopping decisions, but many are wondering how to stop Amazon Assistant from popping up.

Although the application is useful, judging by recent user reports, it appears that the Amazon Assistant also features an annoying malware-like behavior.

Users report that the assistant keeps installing itself despite multiple attempts to permanently remove it.

I have no clue where Amazon Assistant came from. I have not had any updates/downloads, that I have noticed, that had anything extra piggy backing on it. My main problem is that I have tried, many, many times, to uninstall, but it keeps automatically downloading nearly as soon as I open IE! This is on my work computer. I have absolutely no use for it. How in the ever loving heck do I get the thing to uninstall and STAY uninstalled???

Amazon Assistant keeps coming back – What are the most common issues?

Amazon Assistant might be useful for some users, but for most, it just causes problems. Speaking of Amazon Assistant issues, here are some common problems reported by users:

  • Amazon Assistant uninstall grayed out – Many users reported that the uninstall button is grayed out. This can be a problem, but you can fix the issue using the Change button instead.
  • Amazon Assistant aa.hta keeps popping up – If you have problems with Amazon Assistant, you might be able to fix them simply by uninstalling it from Safe Mode.
  • Amazon Assistant keeps installing itself, coming up – Amazon Assistant can sometimes be hard to remove, and if you have problems removing this application, be sure to try using uninstaller software.

How do I stop Amazon Assistant from popping up?

1. Uninstall the application

  1. Press Windows key + S and enter the control. Select Control Panel from the list.
  2. When Control Panel opens, select Programs and Features.
    Amazon Assistant keeps installing itself
  3. A list of all installed applications will now appear. Locate Amazon Assistant on the list and double-click it to remove it.
  4. Follow the instructions on the screen to complete the process.
  5. Alternative: Click the Change button and then select the remove option to remove the software.

Keep in mind that Amazon Assistant can leave certain leftover files on your PC, and that can cause the issue to reappear. To completely solve the problem, it’s recommended to remove all files and registry entries associated with Amazon Assistant.

This can be pretty hard to do manually. However, many users reported that they managed to remove the application along with all its files by using an uninstaller software that is fully compatible with Windows 10.

As mentioned above, an excellent uninstaller software we strongly recommend is IObit Uninstaller because it can remove unwanted or stubborn apps alongside their files from your PC, which instantly increase its performance.

2. Remove the extension

  1. Start your web browser.
  2. Click the Extension icon in the top right. Next, choose Manage extensions.
  3. Locate Amazon Assistant extension and click the Remove button to remove it.

If you’re using a different browser, you should know that the removal process is more or less the same.

3. Disable the application and delete all of its files

  1. Press Ctrl + Shift + Esc to open Task Manager.
  2. Go to the Details tab.
  3. Select each Amazon process and choose End task.
  4. Repeat this for all available Amazon processes on your PC.

After disabling the processes, try to uninstall the application by following the steps from Solution 1.

The uninstall process might fail, but even if that happens, try to manually delete the files by doing the following:

  1. Open File Explorer.
  2. Navigate to Amazon Assistant installation directory. By default, it should be: C:\Programs Files (x86)\Amazon\Amazon Assistant
  3. Once you enter the directory, delete all files and folders from it.

If you were unable to remove the files or uninstall the software, try repeating these steps from Safe Mode.

To access Safe Mode, do the following:

  1. Open the Settings app and go to the Update & Security section.
    Amazon Assistant uninstall grayed out
  2. Now go to Recovery section in the left pane. In the right pane scroll down to the Advanced startup and click Restart now button.
    Amazon Assistant uninstall grayed out
  3. When your PC restarts, choose Troubleshoot, after that, pick Advanced options.
  4. Click on Startup Settings. After that, click the Restart button.
  5. Select the desired option by pressing the corresponding keyboard key.

Once you enter Safe Mode, repeat the steps from this solution in Safe Mode.

Amazon Assistant can cause problems on your PC, but we hope you managed to solve them by using one of our solutions.

In case you weren’t able to remove the software, try using file deleter software to completely remove it from your PC.

If you know of other solutions, post them in the comments section below and let us know what worked for you.

How to Set Permissions in Active Directory for Users

The Active Directory is a tool for managing remote computers by users with Administrative access and granting permissions to users. It allows users with permission access to privileges not allowed for other users. Hence, we’ll take you through how to set permissions in Active Directory users.

What are permissions in Active Directory?

Access to use and make changes in the Active Directory is limited to a specific set of people with privileges that allow them access to them. These access privileges are permissions in the Active Directory granted to users or groups that permit them to interact with objects.

Furthermore, there are Standard and Special types of permissions in Active Directory. Standard permission allows users to read, write, and have total control.

In addition, special permissions allow the user to modify object permissions or owners, change settings, etc. Check our guide about the best practices for Active Directory to apply now.

How do I set permissions in Active Directory for users?

1. Use the Group Policy Management Console (GPMC)

  1. Press Windows + R key to open the Run dialog box, type gpmc.msc, and click OK to open the Group Policy Management console.
  2. Right-click on the Group Policy Objects icon and select New from the drop-down.
  3. Input a Name, set the Source Starter GPO option as none, and click OK.
  4. Right-click on the new GPO and select Edit GPO from the drop-down.
  5. On the Group Policy Management Editor window, go to the following path: Computer Configuration\Windows Settings\Security Settings\
  6. Right-click on File System, then select Add File from the drop-down.
  7. Locate and click on the folder you want to assign permissions, then press OK.
  8. On the Database Security page, click the Advanced button.
  9. In the Permissions tab, click Add to create and assign permission to a new user, select an existing user you want to assign permission to, and press Edit.
  10. On the Permission Entry for Users window, view the list of permissions you can choose, then check the box for Allow or Deny against a Permission.
  11. Click the drop-down button against the Apply onto option, then select where you want to apply the permissions.
  12. Press OK to save the permissions settings.

The above steps will assign the selected privileges to the user and allow access to the selected folder or credentials without requesting permission.

2. Set Permissions for Delegated Authentication

Note icon NOTE
This solution is applied in the Active Directory of Windows Server.
  1. Press Windows + R key to open the Run dialog box, type dsa.msc, then press OK to open the Active Directory Users and Computers.
  2. Right-click the user, group, or organizational unit (OU) to delegate, then click the Delegate Control button.
  3. Click Next on the Delegation of Control wizard and click Add.
  4. On the Select Users, Computers, or Groups dialog box, enter the username or group name you want to grant permissions to configure delegated authentication.
  5. Click Check Names to verify that the user or group has been created in Active Directory, click OK, then click the Next button.
  6. Select the Delegate the following common tasks option, then select the Reset user passwords and force password change at the next logon option.
  7. Click Next, then click Finish.
  8. Right-click on the modified user or group and select Properties from the drop-down.
  9. Select the Security tab, and then click Advanced.
  10. Click the Add button on the Advanced Security Settings.
  11. On the Permission Entry wizard, click Select a principal, enter the username or group name granted the reset permission, then click OK.
  12. Select Descendant User objects on the Applies to the field to show the list of permissions allowed for the user account.
  13. Scroll down, enable Read lockoutTime, and Write lockoutTime, then click OK.
  14.  Click OK to end the setup.

The above steps grant the user account permission to change the passwords of all the user objects in the administrative directory.

Read our guide on enabling Active Directory users and computers in Windows 11 if you can’t access it with step 1.

3. Use a reliable third-party tool

  1. Sign in to ADManager Plus.
  2. Navigate to AD Mgmt, select File Server Management, then click on Modify NTFS permissions.
  3. Choose which folders you want to enable a user or group to access.
  4. Go to the Accounts tab and choose the users or groups you want to grant permission to access the folder.
  5. Click the Modify button to save the permissions changes.

Administrators can use third-party Active Directory management tools to manage permissions delegation to objects in the Active Directory.

Our best recommendation for a third-party Active Directory permissions management tool is

ManageEngine ADManager Plus.

ADManager Plus

Manage all your endpoints and their permission with a complete solution that makes it all easier!
Free trial Visit website

We hope that our guide offered you comprehensive information on how to set permissions in Active Directory users.

Further, you can check how to install Active Directory on Windows Server if you don’t have it already installed.

Also, we have a detailed guide on how to demote a dominant controller on Windows Servers in a simple way and a guide on An account with the same name that exists in Active Directory error.

In conclusion, these are the best ways to set permissions in Active Directory. Should you have further questions or suggestions, kindly use the comments section.

5 Best Power Banks for Raspberry Pi 4 to Keep It Powered

Raspberry Pi is a handy little computing device, and many are looking for the best power bank for Raspberry Pi 4.

By connecting a power bank to their Pi, they can use it remotely without having to connect it to a power outlet. In addition to a power source, there are other components for a Raspberry Pi kit, depending on your needs.

In this article, we have listed the best UBS power bank to power your Raspberry Pi project on the go, and all models on this list support 3A 5V output that Pi 4 uses.

Deals are subject to change. Keep in mind that the price tag often varies. We recommend going to the vendor’s website to check the price. Some of the products may be out of stock by the time you’ve made your purchasing decision. So, hurry up and hit the buy button.

What is the best power bank for Raspberry Pi 4?

Anker PowerCore 26800 – Best overall

  • 26800mAh
  • Can charge up to 3 devices simultaneously
  • Two micro USB ports for recharging
  • Can recharge fully in 6 hours
  • No USB-C port for charging

Anker PowerCore 26800 is a high capacity power bank designed with advanced technology to offer fast charging for all USB compatible devices. It is a 28600mAh power bank and can easily power your Raspberry Pi.

Anker PowerCore 26800 comes with dual-micro USB Input for faster recharging. It supports high-speed universal charging and offers 3 USB ports to charge up to 3 devices simultaneously.

Charmast Portable Charger – Slim design

  • 26800mAh capacity
  • Slim design
  • 1x USB-C, 3 USB-A output ports
  • 3 out of 4 ports will deliver 3A and 5V
  • Might feel a bit heavy

If you’re looking for a USB power bank for Raspberry Pi, consider this model.  The device has a slim design, and it comes with a 26800mAh capacity.

The battery has 3 inputs, so you can easily recharge it with any type of USB cable. The charging process takes about 9 to 16 hours, depending on your connection.

Regarding the output, there are four ports, a single USB-C and three USB-A ports. Three out of four ports will provide 5V and 3A, so it should be enough to power the latest Raspberry Pi.

SmilePowo Power Bank – Extra durable

  • 26800mAh battery
  • Aluminum casing, LCD
  • Type-C and micro-USB for input, 6 recharge time
  • Type-C and two USB-A output ports, 3V 5A each
  • Can feel bulky or heavy

Just like the previous entries on our list, this model comes with a 26800mAh capacity, so it should be able to power up all your devices.

This battery comes with an aluminum case, so it’s extra durable. It uses Type-C and micro-USB for input, and it takes about 6 hours to fully recharge.

Regarding the output, there are two USB Type-A and a single Type-C port. Of course, each port can deliver up to 3A and 5A, which is enough for Raspberry Pi or any other device.

QiSa Solar Power Bank – Extremely durable

  • 38800mAh capacity
  • Designed for outdoor conditions
  • USB-C and micro-USB input
  • Type-C and two Type-A output ports, up to 3A and 5V each
  • Solar panel and wireless charging support

If you need an outdoor battery pack, then this model might be perfect for you. It has an extensive 38800mAh battery, which should be enough to power any device.

Regarding inputs, this device has USB-C and micro-USB ports, and the charging process takes up to 13 hours. It’s worth mentioning that this model also has a solar panel built-in, so you can charge it while being outside.

Regarding the output, there’s one USB-C port and two USB-A ports. As for the power, each port will provide up to 3A and 5V. Overall, this is an extremely durable battery pack with great features, so it’s perfect for outdoor projects.

VRURC Portable Charger – For less demanding users

  •  20000mAh battery
  • USB-A and Type-C ports for charging
  • 4 built-in cables
  • 3A 5V only on Type-C cable
  • Feels a bit heavy
  • Capacity could be better

This power bank comes with a 20000mAh capacity, so it’s not as powerful as previous entries on our list. The device comes with a built-in USB-A cable for charging, but there’s also a Type-C input port available.

Regarding the charging speed, the process takes about 6 hours. The device can recharge four devices at the same time, and it has 4 built-in cables. Keep in mind that only a USB-C output cable can deliver 3A and 5V.

The battery pack also has an LCD so you can keep track of your battery level at all times. This might be as powerful as other entries on our list, but with a single USB-C cable, it should be able to power your Raspberry Pi without issues.

Being a small computing device, the Raspberry Pi does not consume too much power and can be easily powered by a compatible power bank.

Since this is such a versatile device, you can even run Windows 10 on Raspberry Pi, or you can use it for any other project.

In this article, we have listed massive capacity powerful power banks that should comfortably power your computing device on the go. Moreover, if you’re looking for the best power bank of 25000mAh, we can help you out.

Your Account Is Set to Close Microsoft Email: Explained

If you’ve received an email from Microsoft saying that your account is set to close, there’s a good chance that you’ve been hacked. More often than not, you may receive emails that appear to be from Microsoft but aren’t. 

These messages can contain links that lead to malicious websites or download malware onto your computer. Whereas you need to be wary of scam messages, there exist legitimate messages such as We need to fix your account that needs your attention.

Read on to find out what the Your account is set to close Microsoft email means and whether it is a scam.

Why did I get the Your account is set to close Microsoft email?

If you get an email saying your account is closed, it is likely because of one of the following reasons:

  • Device requirements – You’re trying to sign in to your Microsoft account on a device that does not meet the minimum hardware requirements.
  • Account linking – You may have associated your account with another person’s Microsoft account, and they’ve changed their password or deleted their account.
  • Security threat – If Microsoft suspects suspicious activity, they may lock your account temporarily. There may be an unusual sign-in activity, and you must act swiftly. Someone else may have tried to sign in to your device with an incorrect password too many times.
  • Account has been compromised – If you have requested to delete your Outlook account because it was compromised or hacked, Microsoft may send this message.
  • Inactivity – If your account has been inactive for a long period, Microsoft may notify you of its plans to close it.
  • Account violation – Microsoft has some Terms and conditions that every user must adhere to. If you have violated any of these terms, your account may be closed.

How do I know if an email is really from Microsoft?

1. No unsolicited messages

Microsoft does not send unsolicited emails to customers or partners. If you receive an email from Microsoft about a problem with your account or a request for personal information, likely, it’s not from Microsoft. Such is the case with the Your account is set to close Microsoft email message.

Such messages are scams, and you should delete them without opening them. When you receive a message from someone claiming to be from Microsoft, it’s important to verify the sender’s identity before clicking any links or attachments.

2. Urgent call to action or threats is not Microsoft’s style

If the email contains an urgent action, such as click here or reply now, it’s probably a scam. Microsoft will never send these kinds of messages. If something needs your attention, Microsoft will likely send a notification from within the settings.

Scammers typically use this email to get you to click on a link or download an attachment. To stay protected, hover around the link and check whether it displays Microsoft’s official page.

3. Microsoft never asks for your password

If you received an email from someone claiming to be from Microsoft asking for your password or other personal information, that email is not authentic. Microsoft never asks for your password, online banking information, or other private information through email.

There may be times that you may receive an email asking you to change your password, especially if a threat has been detected. Such are usually from Microsoft, and you should do so at your earliest convenience. Also, if you haven’t already, you should set up and use multi-factor authentication software.

4. Microsoft does not hide Email IDs

Microsoft’s support team does not use the email address (email protected). Scammers use this trick to try and fool you so that you cannot verify the email ID used.

Legitimate emails from Microsoft will include the official email address indicated on the support page. You can verify this information by accessing the official website.

5. Incorrectly addressed emails

If the email you receive does not mention your name or address you directly, it may not be from Microsoft. The subject line should also be related to the text of the message. If not, it may also not be from Microsoft.

Examine the email closely and check for all possible hints. The smallest details could save your account from hackers.

6. Poorly written and bad grammar emails

Check for grammar mistakes. If there are spelling or grammatical errors in the email, it isn’t from Microsoft. Many phishing emails include spelling or grammatical mistakes to make them appear legitimate. Microsoft doesn’t make these kinds of mistakes in their communications.

Regarding Microsoft products and services, scammers are not running out of ideas soon. The Windows Defender order scam is yet another phishing attempt to get users to surrender their personal details.

Does Microsoft email you about the suspicious activity?

Microsoft does send emails about suspicious activity to users every time a login attempt is flagged. Along with the email, many also receive an SMS on their mobile phones.

Remember that emails concerning suspicious activity are always received from the official ID, i.e., [email protected]. So, the sender’s section will help identify whether the email is genuine or a phishing attempt.

Hopefully, you can decipher legitimate Microsoft emails from phishing and scam emails using the tips provided above. If you get the message that your account is set to close from Microsoft email, you can rest assured that it is not real.

Elsewhere, users also noted another elaborate Norton 360 email scam. If you’ve not heard of it, we have discussed in detail how you can easily spot such scams from a mile away in our guide.

We hope you got to know everything there was to know about the Your account is set to close Microsoft email message.

Do let us know of any other tips that you use to weed out scam emails in the comment section below.

FIFA 22 lag: Make it Smoother With These 5 Solutions

FIFA remains one of the most popular and most played games in the world, even to this day. But, unfortunately, many reported FIFA 22 lag on their device.

And, as always, the online play remains one of the critical elements of this beloved game. The game has millions of players get together and match their football skills.

Constant lag, FPS drops, and stuttering or freezing are a few of the issues that can cause problems when playing online and wreck your experience.

We explore navigating through this in this guide.

Why is my FIFA so laggy?

There are several possible reasons why your FIFA game might be laggy. Here are some common causes:

  • Slow internet connection – A slow internet connection can cause lag in online matches. Try connecting your device to a faster and more stable internet connection to see if that solves the issue.
  • Low system requirements – Your device might need to meet the minimum system requirements for FIFA, causing the game to run slowly. Check the system requirements for FIFA and make sure your device meets them.
  • Too many background processes – If you have too many programs or processes running in the background while playing FIFA, it can cause lag. Close any unnecessary programs before starting the game.
  • Overheating – Overheating your device can cause it to slow down and affect game performance. Make sure your device is adequately ventilated and not overheating.
  • Graphics settings – If your graphics settings are too high for your device, it can cause lag. Try lowering the graphics settings to see if that improves performance.
  • Outdated drivers – Ensure your device’s graphics and sound drivers are up-to-date. Outdated drivers can cause performance issues.
  • Game files corruption – It is a possibility that some game files are corrupted. Try verifying the game files on your platform (Steam/Origin etc.) to check for errors and fix them.

How can I fix FIFA 22 lag?

Before jumping into any complex fixes, we recommend changing your internet connection since a slow connection is one of the significant causes of lag.

Additionally, you should ensure your device is adequately ventilated to reduce the risk of lag due to overheating.

1. Close background processes

  1. Press Ctrl + Shift + Esc to open the Task Manager.
  2. Go through the list of processes and click on any that may not be needed, then select End Task.
    fifa 22 lag
  3. Repeat step 2 for as many processes as possible.

2. Update drivers

  1. Open Nvidia Geforce Experience from the hidden menu of the Taskbar.
    fifa 22 lag
  2. Click on the Drivers tab to check for new drivers, and click Download if there are any.
    fifa 22 lag
  3. Wait for the download to complete, which should help fix the problem.

3. Adjust Windows performance

  1. Search for performance in Windows search, click on the Adjust the appearance and performance of Windows option.
  2. Click the Adjust for best performance option.
  3. Select OK.

4. Change 3D settings

  1. Go to Nvidia Control Panel, found under the Taskbar’s hidden icons.
    fifa 22 lag
  2. Click on Manage 3D settings and select Program Settings.
  3. Click the Add button.
  4. Select browse and add the FIFA exe file.
  5. Change the values of Anisotropic filtering and Antialiasing – Mode to Off.
    fifa 22 lag
  6. Also, change the value of the Power management mode to Prefer maximum performance.
    fifa 22 lag
  7. Click Apply to save the changes.

5. Set Game priority to High

  1. Press Ctrl + Shift + Esc to open the Task Manager.
  2. Click on the Details tab.
  3. Search through the processes, right-click on your FIFA platform, and set the priority to High.
    fifa 22 lag

Last but not least, try alternating between fullscreen and windowed settings to see if there are any differences.

However, our priority should be checking your internet connection before you go through all the steps we listed.

This can be the cause you are experiencing these problems most of the time. We hope that after using these methods, you can return to enjoying FIFA 22 the way it was meant to.

If you can’t start the game, maybe the solutions from our FIFA 21 doesn’t launch guide can help you.

If you face issues with the companion experience, you can also check our dedicated NFL Fantasy Football app not working guide for step-by-step fixes.

Was this article helpful to you? Let us know in the comments section below.

How to Update Router Firmware: Use These Simple Methods

Almost every hardware device has software that is embedded in the device itself. This software controls how your device behaves and allows you to configure it.

New firmware versions often bring new features and security fixes, so keeping your firmware up to date is essential.

We already explained how to update BIOS in one of our older articles, and today, we’ll show you how to update the router firmware.

How do I know if my router needs a firmware update?

Several signs may indicate that your router needs a firmware update:

  • Security vulnerabilities – The manufacturer may release firmware updates to address vulnerabilities discovered in the router’s software.
  • Performance issues – If you’re experiencing slow internet speeds or other performance issues, a firmware update may help resolve these problems.
  • New features – Manufacturers may release firmware updates to include new features to the router, such as better parental controls or support for new technologies.
  • Compatibility issues – If you’ve recently upgraded your devices or software, you may find that your router is no longer compatible. A firmware update can resolve these compatibility issues.

To determine if your router needs a firmware update, check the manufacturer’s website for any available updates. You can also check your router’s user manual or settings to see if there is a built-in update feature. Some routers may even notify you when a firmware update is available.

Do routers automatically update the firmware?

Most routers do not automatically update their firmware by default. However, some routers may have an Auto-update or Automatic firmware update feature that you can enable in the settings. 

If this feature is enabled, the router will check for firmware updates periodically and download and install them automatically.

It’s important to note that enabling the automatic firmware update feature can also have some drawbacks, such as:

  • Compatibility issues – A firmware update may not be compatible with your router’s hardware or software configuration, which can cause problems.
  • Security risks – If the automatic update feature is enabled and the router’s firmware is outdated, it may be vulnerable to security risks until the update is installed.
  • Unwanted changes – A firmware update may introduce new features or settings you don’t want or may change existing settings, which can be inconvenient or undesirable.

Therefore, we recommend manually checking for firmware updates and reading the release notes before installing them; significantly, the update may be impacted if you have customized settings or use specific features.

How do I update router firmware?

1. How to access and update a router in general

1.1 Find the router IP

  1. Press Windows Key + X and select Network Connections from the menu.
    how to update router firmware
  2. Network & Internet window will now appear. Under your connection, click on Proprieties.
  3. Then scroll down, and you will see a Proprieties section.
  4. Locate the IPv4 DNS server and memorize the IP address.find ipv4 address to update router firmware

Before you can update your router firmware, you need to access your router. You need to enter a specific address in your browser to do that.

Most routers will have this address and the login details in the instruction manual. However, following the above steps, you can also find this address manually.

1.2 Update using the router IP

  1. Connect to your router using the Ethernet cable. Establishing a stable connection with your router is recommended to avoid damage during the update process.
  2. Open your web browser.
  3. Enter your router’s IP address in the address bar, like below. The IP is just an example.
  4. Now you’ll be asked to enter a username and password. You can find the login information in your router’s manual. You can also find the login information for your router online from third-party sources.
  5. Once you log in, locate the Firmware or Router Upgrade option. Usually, you can find this option in Administration, Utilities, or Maintenance section.how to update router firmware
  6. Once you locate this section, you should see the current version of your firmware and its release date.
  7. You must visit your router manufacturer’s website and navigate the Support section. Next, locate your router model and check if any firmware updates are available. If so, be sure to download them. Some routers have a built-in option to take you directly to the manufacturer’s website.
  8. After downloading a router update, extract it to your Desktop or any other folder on your PC.
  9. In your router’s Update section, a Browse or Choose File button should be available. Click the button and locate the router update file on your PC. Then, please select the file by double-clicking it.
  10. After choosing the update file, start the upgrade process.
  11. Wait for the process to finish. Remember that the update process can take a few minutes, so be sure to wait patiently and not interrupt the process. Interrupting the upgrade process can cause irreversible damage to your router, so caution.
  12. After the update process, your router will restart, and you’ll have the new firmware installed.

After obtaining the router’s IP address, you can use it to log in to your router and update its firmware. To update your router firmware, do the steps above.

2. Update the firmware for a Netgear router

  1. Open your web browser and navigate to https://www.routerlogin.net.
  2. Enter admin as username and password as the password.
  3. Once you access your router settings, go to ADVANCED, then Administration.
    how to update router firmware
  4. Choose the Firmware Update or Router Update button.
  5. Click the Check button. The router will now check for available updates. If updates are available, you’ll be asked to download them.
    how to update router firmware
  6. Click the Yes button to download and install the updates. Make sure that you don’t interrupt the upgrade process in any way. Don’t close your browser, open any pages, or perform any Internet-related activity. The update process can take about 5 minutes, so be patient.
  7. After the update process is completed, your router will restart.

If you own a Netgear router, you can update your firmware by following the above steps. As you can see, updating the firmware is quite simple since you can download and install it automatically.

If you can’t download the update automatically, you can install it manually. Visit NETGEAR Download Center, enter your router’s model, and download the latest firmware. 

Follow the above steps from 1-4,  and once you are logged in, click the Choose File or Browse button. Then, please select the file and make sure it doesn’t interrupt the update process.

3. Update the firmware for a Linksys router

  1. Visit the Linksys Support Site. Enter your router’s model and check if a firmware update is available. If so, download the update file.
    how to update router firmware
  2. Open your web browser and enter 192.168.1.1 in the address bar. Press Enter.
    how to update router firmware
  3. When the login screen appears, enter admin as username and leave the password field blank.
  4. Once you log in, click on Administration, then Firmware Upgrade.
  5. Now click the Browse button, select the downloaded update file, and double-click it.
  6. Click the Start Upgrade button.
  7. Now the progress bar will appear. Please wait for the process to complete, and don’t interrupt it.

Updating the firmware on a Linksys router is quite simple. However, to perform the update safely, we advise you to connect your PC to your router using an Ethernet cable. 

To ensure the upgrade process is successful, don’t open any new pages or perform any Internet-related activity. 

Linksys’ security can also be enhanced with a VPN solution.

4. Update the firmware for a D-Link router

  1. Download the latest firmware update for your router from D-Link’s support page.
  2. After downloading the file, unzip it and save it in a location you can easily access.
  3. Open your web browser and enter 192.168.1.1 in the address bar.
  4. When the login screen appears, enter admin as username and password.
  5. Once you log in, go to the Tools tab, select the Firmware option, and select Upload.
    how to update router firmware
  6. Once you locate the file, double-click it and click the Update Gateway button.
  7. Wait patiently for the update to complete. Don’t interrupt the update or close or open any tabs.
  8. After the update process is finished, the router will restart itself.

In some cases, you need to reset your router before you can use it. To do that, press and hold the Reset button on the back of your router for 10 seconds.

Remember that you’ll need to configure your settings again after the reset.

5. Update the firmware for a TP-Link router

  1. Visit TP-Link’s website and look for your model in the Support section. Be sure to select the correct hardware version and model.
  2. Open your web browser and access 192.168.1.1, 192.168.0.1, or https://tplinkwifi.net. Keep in mind that this address can vary depending on your router model. You can always check the label on the bottom side of your router to see the correct address. tp link firmware update on windows 10
  3. When the login window appears, enter admin as username and password.
  4. After you log in, click Advanced on the left side-list System Tools, then Firmware Upgrade. how to update tp link firmware
  5. Click Browse or Choose File button and locate the firmware update file. Please select the file by double-clicking it. Now click the Upgrade button to start the update process.upgrade firmware tp link windows 10
  6. Please wait for the process to complete, and be sure not to interrupt it in any way. Interrupting the update will cause permanent damage to your router, so be careful.
  7. After the update, your router might be restored to factory settings, so you’ll have to reconfigure it again.

Before you update the firmware of your TP-Link router, you need to check its model and hardware version. To do that, check the label on the back of your device.

In addition, we also advise you to connect your PC to your router using the Ethernet cable to ensure that your connection is stable.

6. How to perform an ASUS router firmware update?

  1. Launch your browser and navigate to https://router.asus.com/.
    how to update router firmware
  2. Enter the login name and password, then click Sign In.
  3. Select Administration, then Firmware Upgrade, then click Check to see if there is an available upgrade.
  4. Click on Firmware Upgrade.
    how to update router firmware
  5. Wait till the update is completed.

7. How do you update the Huawei router firmware?

  1. The router IP address using the steps in solution 1.1.
  2. Under the More functions option, select Manage updates.
  3. Click on the Update now option.

8. How to update router firmware Spectrum?

  1. Find your router’s model number and version. You can usually find this information on a sticker on the bottom or back of the router.
  2. Go to the Spectrum website and log in to your account. Then go to the Support section and search for your router model.
  3. Look for the firmware update for your router model and download it to your computer.
  4. Connect the PC to the router with an Ethernet cable.
  5. Open your web browser and enter your router’s IP address in the address bar. The default IP address for Spectrum routers is usually 192.168.1.1.
    how to update router firmware
  6. Enter your router’s username and password to log in. Spectrum routers’ default username and password are usually admin and password, respectively.
    how to update router firmware
  7. Look for the Firmware update section in the router’s web interface under the System or Administration tab. Then, click the Choose File or Browse button to select the firmware update file you downloaded earlier.
  8. Upload the upgrade, and do not turn off or unplug your router during the update process.
  9. Once the firmware update is complete, restart your router to apply the changes.

Do Wi-Fi routers need to be updated?

Wi-Fi routers should be updated regularly to ensure they remain secure and operate efficiently.

Updating your Wi-Fi router’s firmware can help fix bugs, address security vulnerabilities, and improve overall performance. However, failing to update your router’s firmware can sometimes leave it vulnerable to security exploits, potentially compromising your network.

As you can see, updating a router’s firmware is relatively simple, and newer routers can automatically download and install the firmware updates.

We must mention that upgrading firmware brings new features and improvements but can also permanently damage your router if you’re not careful.

Although firmware updates can sometimes fix network-related issues, we advise you to perform a firmware update as a last resort.

You can learn how firmware works in this simple guide that explains what firmware is before you start updating your router.

If you have more questions about updating a router’s firmware on Windows 10, don’t hesitate to drop them in the comments section below.

This Document Might Contain Unsafe Content: 3 Ways to Fix it

Getting the security warning message This document might contain unsafe content isn’t a pleasant surprise.

Pop-ups are a nuisance, but as you undoubtedly know, attackers increase their creativity when infecting people’s devices. So, analyzing potentially malicious PDFs or WhatsApp files becomes a necessary task.

Staying ahead of the competition isn’t an easy thing to do, and for that reason, WhatsApp had to introduce the facility of sending documents via its platform.

Editor’s note: To keep hackers at bay, ensure you only run the official Acrobat Reader software.

What does This document might contain unsafe content message mean?

The this document might contain unsafe content message typically appears in web browsers and email clients when the system or software suspects that the content in a document, file, or website may be potentially harmful or malicious.

There are several possible causes for this warning message, including:

  • Malware or virus – The document may contain code or scripts that could infect the user’s computer with malware, viruses, or other malicious software.
  • Phishing – The document may be a phishing attempt to steal the user’s personal or financial information by mimicking a legitimate website or email.
  • Suspicious or unverified sources – The document may come from an untrusted or unknown origin, or the website or email that contains the document may have a poor reputation or be known for distributing malicious content.
  • Potentially harmful content – The document may contain content that could be harmful or inappropriate for some users, such as explicit or violent content.
  • Outdated or unsecured software – The user’s web browser or email client may be outdated or using an unsecured connection, making it more vulnerable to attacks and malicious content.

Users should exercise caution when downloading or opening documents from unknown sources to avoid potential risks. Any of the solutions we highlight below will also be helpful.

How can I fix This document might contain unsafe content error?

Before going through our solutions, consider using a reliable PDF reader. To keep hackers at bay, ensure you only run the official Acrobat Reader software.

As you might know, hackers are pretty resourceful when it comes to crafting new and, dare we say, creative ways to infect PCs, and hiding malware in PDFs is just one of them.

Installing Acrobat Reader only from the official page can stop these malicious programs from tampering with your documents.

Plus, you get to enjoy the latest version of the software with all the new features and enhancements that come with it.

Adobe Acrobat Reader

The best way to stay safe is to use official software, and Adobe Acrobat Reader is the best for handling PDF documents.

1. Disable conflicting browser extensions

  1. Launch your browser.
  2. Navigate to the following path:
    chrome://extensions/
    this document might contain unsafe content
  3. Click the Remove button for any suspected extension.
    this document might contain unsafe content

Extensions may be the main trigger, so removing specific extensions may be ideal. However, you must note that the warning is sometimes a malware alert. Hence it would be best to use this solution after confirming that there is no malware.

2. Block the download

  1. Open the web location of the download.
  2. Verify if the site is trusted. This can be done by ensuring it has the secure padlock icon or is a site you have used.
  3. Once you have the warning message and an option to download, click on the Block option.
    this document might contain unsafe content

3. Run a virus scan

  1. Type Windows Security in the Search bar, and click on the relevant search result.
  2. Now, click on Virus & threat protection here.
    this document might contain unsafe content
  3. Click on Scan options.
  4. Select Full scan and click the Scan now button at the bottom.

This security warning is just one of the many received on a PC; chances are, you usually click out of it without a second thought. It is irritating, but it’s there to ensure you can identify malware threats.

Are you willing to keep on ignoring such warnings and eventually putting your personal information at risk? Share your thoughts in the comments section below.

Meta launches Meta Verified to help creators “establish their presence”

Meta CEO, Mark Zuckerberg took to Facebook to announce the launch that the company is currently testing a new subscription service, Meta Verified. Much like the Twitter Blue subscription, the new offering will grant users a verified blue badge, ultimately increasing their visibility across Facebook and Instagram.

Here’s everything you’ll get when you sign up for the service:

  • A verified badge, confirming you’re the real you and that your account has been authenticated with a government ID.
  • More protection from impersonation with proactive account monitoring for impersonators who might target people with growing online audiences.
  • Help when you need it with access to a real person for common account issues.
  • Increased visibility and reach with prominence in some areas of the platform– like search, comments and recommendations.
  • Exclusive features to express yourself in unique ways.

What’s more, the service will also grant users access to exclusive stickers that they can use while creating Reels and posting Stories. Creators will also receive 100 free stars per month, the digital currency used to tip creators on Facebook.

The subscription will cost you $11.99/month on the web or $14.99/month on iOS and Android. The service is rolling out to users in New Zealand and Australia this week, and will gradually get to other countries.

It is worth noting that the Meta Verified badge isn’t available to businesses yet. You’ll also need to go over the verification process all over again when you want to change your username, profile picture, or birthday.

To sign up for this service, you must be able to meet the minimum activity requirements, be 18 years and above and submit a government ID that matches both the username and photo you’re using on either your Facebook or Instagram account. Meta further indicated that no changes will be made to accounts that had already been verified using its previous requirements.

Meta further indicated:

Long term, we want to build a subscription offering that’s valuable to everyone, including creators, businesses and our community at large. As part of this vision, we are evolving the meaning of the verified badge so we can expand access to verification and more people can trust the accounts they interact with are authentic.

What are your thoughts on this new Meta subscription service? Let us know below.

Outlook Not Blocking Junk Mail: 3 Easy Ways to Filter Emails

Outlook has a Junk Email folder for spam messages users have no interest in reading. When Outlook’s filter works correctly, it blocks spam from your inbox by sending it to that folder. But for many, Outlook is not blocking junk mail, filling up the primary inbox.

There are also instances when Outlook keeps sending emails to the junk folder on its own, which points toward a misconfiguration in the email client’s settings.

When Outlook isn’t blocking junk emails, users’ inboxes fill up with unwanted spam messages. Then, users have to erase more unwanted mail manually.

Has your Outlook inbox filled up with junk mail? If so, this is how you can fix Outlook when it’s not blocking spam.

Why is Outlook not blocking my junk mail?

Here are a few reasons the Outlook spam filter is not working:

  • Misconfigured settings: If you are wondering why isn’t my junk filter working in Outlook, the common reason is that its filtering has not been correctly configured. Reconfiguring the settings here should do the trick.
  • Sender uses a masked identity: Many senders often use a masked identity or one different from what you have blocked. So, you will have to identify and block each manually.
  • A temporary glitch in Outlook: Bugs in the latest version or a temporary server issue can also lead to a malfunctioning Outlook junk mail settings. Some also users deleted emails reappearing due to a glitch.

You may also block the no-sender emails in Outlook, but right now, let’s focus on blocking junk mail.

How do I permanently block junk mail in Outlook?

Tip icon Tip
The problem with Outlook not filtering and blocking junk email has been widespread of late and is probably an issue at the backend, which should be resolved soon. If you have been facing this for a long time, the solutions below will help.

Before we start changing the Outlook settings, here are a few quick tips you must try:

  • Sign out of Outlook, then log back in and verify whether the problem is resolved.
  • Hit the F9 key to perform a refresh. This also works when the Outlook sender’s email address is not showing.
  • Make sure you are running the latest version of Outlook. To verify, check for updates, and if any are found, install them.
  • If you have both email filtering software and Outlook filter settings set up, these often conflict with one another. So, it’s recommended that you either uninstall the program used for filtering or disable the Outlook settings.
  • Wait a while, and verify whether Outlook then blocks junk emails since it could be a glitch triggering the problem. These usually are resolved in a few hours.

In case none work, head to the solutions listed next.

1. Set Junk Email Protection to High

  1. Open Outlook, then in the Home menu, click on the Junk option, and select Junk E-mail Options.junk email options to fix outlook not blocking junk mail
  2. Select the High: Most junk email is caught, but some regular mail may be caught as well. Check your Junk Email folder often option, and tick the checkboxes for Disable links and other functionalities in phishing messages and Warn me about suspicious domain names in email addresses.high junk email protection
  3. Once done, click on Apply and OK to save the changes.save changes

By default, the Outlook app junk mail settings are set to No Automatic Filtering, and you have to configure it manually. So, if Outlook is not blocking junk mail, your primary approach should be to set the Junk Email Protection to high.

Outlook also recommends checking the Junk folder periodically because some other emails may be incorrectly flagged as junk and moved to the dedicated folder.

Besides, you could try the Safe Lists Only setting, given you have added Safe Recipients and Safe Senders.

2. Manually block specific senders

  1. Launch Outlook, click on Junk, and select Junk E-mails Options.junk emails option
  2. Navigate to the Blocked Senders tab, and click on Add.blocked senders to fix outlook not blocking junk mail
  3. Now type an individual email address or a domain name, and then click OK. For instance, if you want to block emails from Facebook, entering @facebook.com in the text field should do the trick.enter name to fix outlook not blocking junk mail
  4. Again, click on Apply and OK to save the changes.apply changes

If Outlook isn’t automatically detecting certain senders as spam, you can manually add them to the Blocked Senders list from the Junk Email settings in Outlook 365 and fix things when it is not blocking junk mail. Emails from blocked senders or domains will always be treated as junk.

3. Create a new rule

  1. In Outlook, click on Rules and choose Manage Rules and Alerts.rule to fix outlook not blocking junk mail
  2. Click on New rule.new rule
  3. Choose Apply rule on messages I receive and click Next.apply rule on messages I receive
  4. Tick the with specific keywords in the body checkbox, and click on the specific words hyperlink underneath.specify words to fix outlook not blocking junk mail
  5. Enter the desired word (one you want to block) in the text field, and click Add.add
  6. Click on OK to proceed.Ok
  7. Now, click on Next.
  8. Choose delete it from the list of options, and click Next.delete it action to fix outlook not blocking junk mail
  9. Set an exception if required, and click on Next to proceed.set an exception
  10. Verify the rule settings, and click on Finish to create it. If you want the existing emails to come under the rule, tick the checkbox for Run this rule now on messages already in “Inbox”.rule to fix outlook not blocking junk mail
  11. Finally, click Apply and then OK to enforce the rule.apply changes

Rules are one of the best ways to sort out the inbox on Outlook. And not just this, you can also set some to turn off junk mail in Outlook 365.

We have only listed the steps to create one, but you can create several: one to test the subject, another to test the sender’s name, and a last to check the body. You should create a few straightforward rules to filter spam emails in Outlook, though make sure they don’t conflict.

If you were wondering why my junk mail is going to my inbox in Outlook, you now know why and the steps to eliminate the problem. Further, you can go ahead and report phishing emails and inform Microsoft of potential attacks.

Also, before you leave, find out how to set an Outlook vacation message.

Comment below if you have any queries or want to share another solution.

0xc1900104 Windows Update Error: How to Fix & Causes

Windows updates are important to keep your PC running smoothly. However, installing these updates is not usually straightforward, with users usually experiencing issues like the 0xc1900104 error.

This error can be caused by issues with the Conexant audio device or insufficient System Reserved partition space. Irrespective of the cause of the error code, the solutions in this guide will help you fix it quickly.

How do I fix error 0xc1900104?

1. Uninstall the Conexant audio device

  1. Press the Windows key + X and select the Device Manager option.
    device manager 0xc1900104
  2. Double-click the Sound, Video, and Game Controllers option to expand it, and right-click the Conexant audio device.
  3. Now, select the Disable device option.
    disable device
  4. Click the Yes button to confirm the action.
    yes
  5. Next, right-click the device again and select Uninstall device.
    uninstall device 0xc1900104
  6. Finally, check the box for Delete the driver software for this device box and click the Uninstall button.
    uninstall delete

Most users have found the 0xc1900104 due to issues with the Conexant audio device. Disabling and uninstalling the device should fix this issue quickly.

After removing the device and its driver, you can install the Windows update. The update also comes with an updated version of the Conexant device, and you should be able to use it.

2. Use the Windows Update Troubleshooter

  1. Press the Windows key + I to open the Settings app and select the Update & Security option.
    update and
  2. Choose Troubleshoot in the left pane and click Additional troubleshooters.
    troubleshoot  0xc1900104
  3. Now, select the Windows Update option and click Run the troubleshooter.
    run the

Sometimes, the 0xc1900104 error can be due to glitches with the Windows update components and services. Thankfully, the Windows Update troubleshooter can clear up these glitches and restart the needed services.

3. Update BIOS

BIOS is important in the monitoring and management of your hardware devices. Hence, you need to keep it updated to prevent issues.

This is because an outdated BIOS can cause all sorts of issues, including the 0xc1900104 error. To update it, you should your PC’s manufacturer’s website.

4. Use third-party tools to change partition size

If your system partition doesn’t have https://windowsreport.com/partition-manager-software/enough free space, use a third-party tool to extend it. You can fix this by deleting some files to create the space needed to install the update.

If you don’t want to go through the stress of deleting files yourself, you should use one of the best third-party partitioning tools. This should fix the 0xc1900104 Windows update error.

5. Perform in-place upgrade

  1. Visit the Windows 10 download website to download the media creation tool.
  2. Double-click the tool to run it, and click the Accept button on the license page.
    accept
  3. Choose Upgrade this PC now on the What do you want to do page and click Next.
    upgrade 0xc1900104
  4. Now, follow the onscreen instructions to complete the process.

If the solutions above do not fix the 0xc1900104 error, you need to perform an in-place upgrade. This helps you force through the Windows update without losing any files.

There you have everything needed to fix the 0xc1900104 error. You only need to follow the instructions in this guide to update your PC successfully.

If you face other issues like Windows update 0xc1900204, check our detailed guide to fix it quickly.

Feel free to let us know the solution that helped you fix this issue in the comments below.

Failed to Locate Framework.dll: How to Fix This Error

There are many system files responsible for the numerous services running on the computer. These system files have DLL file (Dynamic Link Library format) extensions. However, users report DLL file errors they encounter on their PCs, and Framework.dll is missing on your computer is a common one.

Hence, we’ll see how to fix the failed-to-locate Framework.dll issue. You can also go through our guide on the best DLL repair tool you can download to fix DLL errors on your PC.

What causes failed to locate Framework.dll?

Many factors can prompt the Framework.dll is missing on your computer error on your computer. It occurs when a DLL file needed by a specific program is inaccessible and can’t run the program. Hence, you’ll receive an error message on your computer.

Furthermore, some causes of the error are:

  • Corrupt system files – When some essential files on your computer are corrupted, they can impede the performance of the services running on the PC. So, corrupt system files can prompt the failed to locate Framework.dll error.
  • Issues with the program – Sometimes, the error Framework.dll may occur due to the program you’re using. If it is outdated or its installation files are not intact, it can impede its functionality and prevent it from accessing the file.
  • Malware or virus infection – Malware or viruses may block the functionality of the programs trying to use the Framework.dll file on your computer. It can prevent system files, including the Framework.dll file, from being visible when invoked by programs.

There are other likely reasons for the error, but you can fix them by trying some troubleshooting steps.

How can I fix failed to locate Framework.dll?

Try the following preliminary checks before attempting any advanced steps:

If the issue persists, go ahead with the solutions below:

1. Download and replace the Framework.dll file

Note icon NOTE
We don’t recommend downloading from third-party sites. However, our expert has tested this process and confirmed its safety.
  1. Launch your browser and visit this DLL site.
  2. Depending on your Windows operating system, choose a 32-bit or 64-bit file version and select the latest version.
  3. Double-click the downloaded zip file to open it, click the Extract icon at the top bar, and select Desktop for a location to extract the DLL file.
  4. Restart your PC and check if the error persists.

Downloading a new copy of the Framework.dll file will replace the missing copy and it should fix the file not located error.

2. Run an SFC scan

  1. Left-click the Start button, type Command Prompt, and click the Run as administrator option.
  2. Click Yes on the User Account Control (UAC) prompt.
  3. Type the following and press Enter:  sfc /scannow
  4. Restart your PC and check if the error persists.

An SFC scan will find and repair corrupt system files causing the failure to locate the framework.dll error on your computer. Check how to fix the run as administrator option if it’s not working on your PC.

Another effective solution to fully diagnose your Windows PC for DLL issues is a dedicated repair app.

3. Re-register the DLL

  1. Left-click the Start button, type Command Prompt, and click Run as administrator.
  2. Click Yes on the User Account Control (UAC) prompt.
  3. Type the following and press Enter, then Wait for Windows to register the DLL: regsvr32 framework.dll
  4. Restart your PC and check if the error persists.

Re-registering the framework.dll file will rewrite and prompt it to appear when initialized by dependent programs.

4. Run System Restore

  1. Press Windows + R key to open the Run dialog box, type control, then press Enter to open the Control Panel.
  2. Type recovery in the Control Panel search bar.
  3. Click on Recovery, then Open System Restore.
  4. Click Next in the Restore system files and settings page.
  5. Choose the restore point you want to restore from, then click Scan for affected programs.

Running a System Restore backdates your PC to an earlier point in time. It removes any apps, drivers, and updates installed on your PC after the restore point.

You can read how to fix Restore Point if it’s not working on your PC.

In conclusion, our readers may be interested in the Autorun.dll error on Windows 11 and its fixes. Also, check the steps for uninstalling apps on Windows 11 if you can’t get through with the app.

If there are further queries or questions, kindly drop them in the comments section.

Fix: Device Security Page is Not Available in Windows 11

The Windows Defender is an in-built Windows components antivirus app that protects users from malware in real-time. Users on different platforms complain about issues with the Windows Defender device security page not being available.

Also, you can read about Windows Defender not working on Windows devices.

What causes the device security page not available error?

Various factors can lead to the device security page error; the causes of these errors are.

  • Group Policy settings – Windows Group Policy provides a way to enforce policies that control the behavior of the Windows operating system, applications, and user settings. Thus, the organization’s security Group Policy settings can affect the Windows Defender security page.
  • Third-party antivirus app interference – Many antivirus programs will disable the Windows Defender automatically during the installation to prevent conflicts and avoid duplicating functionality. Therefore, Windows Defender may encounter device security errors and not provide any protection due to this reason.
  • Outdated firmware or software – Outdated firmware will not allow Windows Defender to communicate with the operating system and other hardware. Hence, it affects the performance of Windows Defender, as it can cause compatibility issues and security vulnerabilities.

The above-listed factors can cause a device security page. This factor varies on different PCs.

How can I fix device security page errors?

Do not hesitate to perform these preliminary checks:

Proceed with the following advanced steps if you can’t resolve the issue.

1. Repair and restart the Windows Security app

  1. Press the Windows + I key to open the Settings app.
  2. Select Apps and click on Installed apps.
  3. Click on the Windows Security app on the left side menu, click the three dots, and select Advanced options.
  4. Click on the Repair button, then restart and check if the error persists.
  5. If the error persists, click the Reset button in step 4.

Resetting the Windows Security app will restore the app to default and fix all settings errors. You can check our guide about the best repair software tools for your device.

2. Fix Device Security errors via Group Policy

  1. Press the Windows + R key to open the Run dialog box, type gpedit.msc, and press Enter to open Group Policy.
  2. Double-click on Administrative Templates to expand and select Windows Components.
  3. Click on Microsoft Defender Antivirus from the drop-down menu and select Turn off Microsoft Defender Antivirus on the right side pane.
  4. Click on Disable from the pop-up menu and select OK to confirm your selection.
  5. Double-click on Client Interface under the Microsoft Defender Antivirus folder.
  6. Double-click on Enable headless UI mode on the right side pane.
  7. Click on Disable and select OK to confirm your selection.
  8. Close the Windows Group Policy and restart your PC.

Users can also check how to fix Group Policy errors in the Windows operating system.

3. Uninstall third-party antivirus app

  1. Press the Windows + I key to open the Settings app.
  2. Select Apps and click on Installed apps.
  3. Then, find the third-party antivirus app, click the three dots beside it, and click Uninstall.
  4. Follow the on-screen prompt to uninstall it.

Installing various antivirus apps on a device causes the Windows Defender to malfunction and lead to the Windows Device Security page not being available. Thus, users are advised to have one trusted antivirus software.

Read about the top best antivirus software to protect your device from malware.

4. Run the SFC and DISM to repair damaged system files

  1. Left-click the Start button, type Command Prompt, then select Run as administrator.
  2. Click Yes on the User Account Control (UAC) prompt.
  3. Then, type the following and press Enter: sfc /scannow
  4. Type the following command and press Enter after each: DISM /Online /Cleanup-Image /RestoreHealth
  5. Restart your PC.

Running an SFC/DISM scan on your PC will locate and fix the Corrupt Registry, and it will fix things when Windows 11 device security is not working.

In addition, read about how to fix a missing Windows Defender on your Windows device. Also, check our guide about a quick fix for Windows Defender error code 0x80073b0: 4 on your PC.

Conclusively, this guide should help you if your device security page is not available. If you have more questions or suggestions, kindly drop them below.

Location is Not Available on Windows 11: How to Fix It

The storage of data, processing and retrieval of information at a needed time is a vital attribute of a computer. However, various users have complained about issues with the device’s hard disk location not being able to access data. Hence, we’ll take you through fixing the storage location not available error on Windows 11.

Likewise, you can read about how to fix the desktop unavailable for the location on this PC error.

Why is a location not available in Windows 11?

There are several reasons why you may encounter a location is not available error in Windows 11. Some of the most common causes include:

  • Virus infections –  Viruses on your device will exploit vulnerabilities in your system, applications, or software. It can cause your system files, folder, and hard disk to malfunction or be inaccessible.
  • Damaged partition – The system’s hard disk has various sections. These separate sections of the Hard disk act as independent drives. A damaged partition can be physical or logical and can result in a folder or file location not available error.
  • Corrupt Registry – the Windows Registry is a database that stores settings and configuration information for the operating system and installed software. A corrupt Windows Registry, however, can make folders and file locations inaccessible.

These factors may differ on various computers. As we go further, we’ll discuss basic steps to fix the issue.

How do I fix the location is not available in Windows 11?

Try the following preliminary checks:

If these preliminary checks do not resolve the issue, you can proceed with the following solutions:

1. Restart the File Explorer process

  1. Press Windows + X key and left-click on the Task Manager from the list to open it.
  2. Click on More details and navigate to the process tab.
  3. Right-click on Windows Explorer and select End task from the context menu to end the process.
  4. Right-click on the File at the top left of the Task Manager and select the Run new task option.
  5. Type explorer.exe  in the address bar and press Enter to open the File Explorer.

Performing these steps will reset and troubleshoot the issues with the File Explorer. You can read about how to fix SFC scannow not working on Windows devices.

2. Take Full Control of the Folder

  1. Right-click on the folder with the error and select Properties from the context menu.
  2. Click on the Security tab and select the Username you want to grant access
  3. Click on the Edit button to change permission.
  4.  Enable the Full Control option and click on OK.
  5. Close the Properties menu and Restart your PC.

Users should identify the folder generating this error and perform the listed process to fix it. Read about how to fix errors by creating a new folder on your device.

3. Perform a Check Disk Command with Command Prompt

  1. Left-click on the Start button, type cmd and click on Run as administrator.
  2. Type in the following command prompt and press Enter: chkdsk c:/f/r/x
  3. The letter C refers to the drive letter you want to repair.
  4. Close the Command Prompt and check if the error persists.

Users should replace the letter C command strings with the drive letter the user wants to repair. Check our guide on how to fix Command Prompt not working on your PC.

4. Restore the system to the previous point

  1. Click on the Windows search icon, type in system restore and select Create a restore point from the search results.
  2. Check if the Available Drives protection settings are On, then click on the System Restore button.
  3. Click on Next on the System Restore Windows.
  4. Select the restore point you wish to restore your device from the list and click Next.
  5. Select Finish from the new window and click Yes on the pop-up confirmation window to confirm your selection.
  6. Wait while your PC restarts and restore to the previous point selected.

Restoring your system to the previous point will reverse all settings errors that could affect the user file and folder.

In addition, our readers can check how to fix the Open file option that is missing on Windows devices. Also, you may be interested in how to open file locations on Windows 11.

Should you have further questions or suggestions about this guide, kindly provide them in the comments section below.

How to Enable API Key Availability in Microsoft Teams

One of the key features of Microsoft Teams is that it allows you to communicate via chat or video calls. It also provides a robust set of APIs that allow developers to build applications that integrate with Teams. When an application integrates with Microsoft Teams, it needs an API key. This article shows you where to find your API key and how to enable its availability so that other applications can use it.

How do I enable API key availability in Teams?

  1. Navigate to your browser and Log into your Microsoft Teams admin center. 
  2. Click on the three ellipses and select Settings.
  3. Go to Privacy and select Manage API under Third-party app API.
  4. Toggle on the Enable API button and click on Generate if API access box is empty.
  5. Hit Save to effect the changes.

You can now use this API key with the third-party app you’d like to integrate with Microsoft Teams. The first step is identifying which APIs you want to enable and what resources they use. This could include the database, storage, and other services consumed by your application.

Is there an API for Microsoft Teams? 

Microsoft Teams is a chat-based workspace in Office 365. Teams is not just a chat application but also a platform that can create apps on top of it.

Microsoft Teams has an open API that lets you integrate your applications with the Microsoft Teams ecosystem. The Teams API is designed to let developers build solutions that integrate with or extend the capabilities of Microsoft Teams. 

With the Teams API, developers can create new experiences that enable their customers to create, collaborate on, and share content in Teams.

You can use the Microsoft Teams API to build apps that add rich functionality for your end users.  For instance, you can use the Teams API to create bots or apps that interact with your team and your team members’ conversations.

You can use the Teams API to build a variety of experiences on top of Microsoft Teams, such as:

  • Integrate your custom apps with Teams – You can use the Teams API to integrate your existing apps into Teams.
  • Create custom chatbot experiences – You can create chatbots and deploy them directly into your team’s channel. Bots are a great way to provide quick answers to common questions.
  • Automate business processes – You can automate complex workflows within Microsoft Teams through third-party app integration. For instance, you can use a Microsoft Teams API to send a message. A combination of bots, webhooks, and shared resources, like files and images, are some of the tools you can use.
  • Take more control of Teams – By enabling API keys, developers and IT pros who want more control over their integrations with Microsoft Teams can create their custom solutions using APIs and other tools like PowerShell.

You should also consider whether you’ll need to expose any additional information about your data or services through the API. In general, the documentation for each API should provide specific instructions on how to enable it. Nevertheless, you should be prepared for:

  • Registering the API – You’ll need to register your API with the provider. It can be signing up for an account with the app or registering a domain name.
  • Adding users to your account – You’ll need to create an account for each person using the API on your website or app and add them as authorized users.
  • Creating an application key pair – The next step is creating a key pair: a public key and a private key. These keys are what you will use for authentication and encryption/decryption for requests made to the API.
  • Creating an access token – Depending on the number of users, you may need to create one for each user that you want to be able to access the API from their devices or browsers.

You can learn more about third-party API access from our article on Gmail and ChatGPT integration. And that’s how to enable API key availability teams. For integration with Microsoft 365 apps, check Microsoft Graph Command Line tools.

We’re curious, so engage us in the comment section below with the apps you’d integrate with Teams.

Incorrect PSK Provided for Network SSID: 4 Error Fixes

Users connect their devices to the network via wireless networks with pre-shared keys (PSK) commonly used in home and small office Wi-Fi networks. However, users report the error message incorrect PSK provided for network SSID indicating the Wi-Fi password or PSK you entered is incorrect.

It prevents your device from connecting to the network. Alternatively, you can read what a Pre-Shared Key is and how to get it on Windows OS.

What does incorrect PSK for SSID mean?

The error message incorrect PSK provided for network SSID indicates the device is unable to authenticate with the network because the PSK does not match the one set by the network administrator.

Furthermore, the error could be due to several reasons listed below:

  • Network interference – Any disturbance to the normal functioning of your network router can cause unwanted signals. Also, data like electromagnetic and radio frequency interference can cause PSK connection to SSID error.
  • Router malfunction – When the networking device that forwards data packets between computer networks is not functioning correctly, it can affect the PSK connections.
  • Network configuration changes – modifications to network protocols, IP addresses, subnet masks, gateways, DNS settings, firewalls, and other network infrastructure components can cause a PSK connection error.

These factors can vary on different computers. So, we’ll discuss the basic steps to fix it.

How can I fix an incorrect PSK provided for the network SSID?

Before trying an advanced fix, here’s what you should do:

  • Restart your network router.
  • Check the name of the network you are connecting to on your device.
  • Double-check the typed-in password.
  • Update your router firmware.

If the error persists, here are some advanced fixes.

1. Remove the Existing Wireless Network Profile

  1. Press the Windows button, type Network and Internet Settings, and press Enter to open it.
  2. Then, click on the Wi-Fi tab from the left side pane and select Manage known networks on the right side pane.
  3. Click on the network name you want to remove and select the Forget button.
  4. Try to reconnect to the network.

Reconnecting to an existing wireless network will reset the network connection and fix connection errors. Check out how to remove network names for Wi-Fi in Windows OS.

2. Update the Network driver

  1. Press Windows + R to open the Run dialog box, type devmgmt.msc, and press Enter to open the Device Manager.
  2. Then, click on the network adapter drop-down button to expand it. Right-click on the network and select Update driver from the context menu.
  3. Select Search automatically driver from the pop-up window.
  4.  Now, select Search for an updated driver with Windows update if the system prompts that The best drivers for your device are already installed.

Updating network drivers can fix the issues affecting the communication between a wireless network and the router hardware. You can read about how to update network drivers on Windows if you have difficulty doing so.

Moreover, you can update your network drivers by using dedicated applications that can perform this assignment automatically.

3. Connect to the Wireless Network manually

  1. Press the Windows button, type Control Panel, and press the Enter button to open it.
  2. Then, click on the Network and Internet.
  3. Select Network and Sharing Center on the new window and click on Set up a new connection or network.
  4. Select Manually connect to a wireless device network and click the Next button.
  5. Fill in the Network name for the network you want to add, set the Security type to WPA2-Personal and the Encryption type to AES.
  6. Input the correct Security Key used for the new network you want to add. Click on Next and select Use the existing network.

Connecting to a wireless network connection manually aids security and troubleshooting a wireless network connection. Read our complete guide on how to connect to Wi-Fi on Windows 11 PCs.

4. Connect to existing Wireless Network Profile with Administrator Rights

  1. Press the Windows button, type cmd, and select Run as administrator.
  2. Type the following command and press Enter: netsh wlan show profiles
  3. Find the name of the network you want to connect to, then type the following and press Enter: netsh wlan connect name= network profile name
  4. Replace your wireless network name with the network profile name in the above-stated command.
  5. Close the Command Prompt windows and check if the error persists.

Connecting to an existing wireless network on your device will help identify where the error is.

Users can check how to fix the network Security Key that isn’t correct on Windows 11. Also, we have a detailed guide on how to fix error saving wireless profiles on Windows PC.

For any other queries on the topic, do leave a message in the comments box below.

Wfs.exe: How to Download It When It’s Missing

The wfs.exe file is a component of the Windows Fax and Scan feature which is one of the many features users enjoy in the Windows operating system. However, users complain about the wfs.exe missing error appearing on their PC recurrently.

Our readers can check our guide about the Windows Fax and Scan could not complete scan error and how to fix it on Windows 11.

How can I fix and use the wfs.exe when it’s missing?

Go through these preliminary:

If you can’t fix the wfs.exe issue, proceed with the troubleshooting steps below:

1. Install the Windows Fax and Scan

1.1 Via the Settings app

  1. Press Windows + I key to open the Windows Settings app.
  2. Select Apps and click Optional features on the right pane of the screen.
  3. Click View features.
  4. On the Add an additional feature window, type scan in the search bar and check the box for Windows Fax and Scan (8.87 MB).
  5. Click Next and Install.

Reinstalling Windows Fax and Scan will download missing files causing issues with its activities.

1.2 Via the Command Prompt

  1. Left-click the Start button, type Command Prompt, then select Run as administrator.
  2. Click Yes on the User Account Control (UAC) prompt.
  3. Type the following command and hit Enter: dism /Online /Add-Capability /CapabilityName:Print.Fax.Scan~~~~0.0.1.0
  4. Restart your PC.

2. Run the SFC and DISM to repair damaged system files

  1. Left-click the Start button, type Command Prompt, then select Run as administrator.
  2. Click Yes on the User Account Control (UAC) prompt.
  3. Type the following and press Enter: sfc /scannow
  4. Type the following commands and press Enter after each: DISM /Online /Cleanup-Image /RestoreHealth
  5. Restart your PC and check if the wfs.exe missing issue persists.

SFC and DISM scans will detect and fix corrupt system files causing network driver issues on your PC. Check our guide on what to do if Command Prompt keeps crashing on your PC.

3. Copy wfs.exe from another PC

  1. Insert a flash drive into your PC that has wfs.exe running on it.
  2. Press the Windows + E key to open File Explorer.
  3. Navigate to the following location: C:\WINDOWS\system32\WFS.exe
  4. Copy the wfs.exe file and paste it onto the flash drive.
  5. Eject the flash drive and insert it into the concerned PC.
  6. Copy the wfs.exe file from the flash drive and go to the following location, then paste the file into the directory: C:\WINDOWS\system32
  7. Restart your PC and check if the wfs.exe missing issue persists.

Why is wfs.exe missing?

The wfs.exe file missing on your computer will cause the Windows Fax and Scan feature not to function properly and result in an error. However, many features may be responsible for the wfs.exe missing. Some notable factors are:

  • Corrupt system files – It is common for users to encounter issues with the services and features on their computers due to corrupt system files impeding the process. It can corrupt the wfs.exe executable file, causing it to be inaccessible and infected, or affect a file its service depends on.
  • Issues with the Windows Fax and Scan feature – When the Windows Fax and scan feature is not running correctly on your computer, it can affect its files and the ability to communicate properly with the system. So, several issues affecting the feature can cause the wfs.exe file to be missing on your computer.
  • A faulty Windows update – If you install an update that is not working properly on your PC, it can affect the executable files installed on it and impede its performance. Hence, a faulty or corrupt Windows update installation can prompt the wfs.exe file missing error.

Other factors may be responsible for the error appearing on your PC.

Users who face boot problems caused by winload.exe 8 can follow this dedicated winload.exe repair guide to restore normal startup.

FAQs

What is wfs.exe?

wfs.exe is a Windows system component related to file services. It helps manage storage features, sharing functions, and certain system level operations.

Why is wfs.exe missing on my PC?

The file may be removed by antivirus tools, corrupted during a Windows update, or damaged by system file errors.

How do I fix the wfs.exe missing error?

Run System File Checker using sfc /scannow, repair components with DISM /Online /Cleanup-Image /RestoreHealth, or install pending Windows updates.

Can I download wfs.exe from the internet?

No. Downloading standalone system files is unsafe and may infect your PC. Use Windows repair tools or update your system to restore the original file safely.

In addition, our readers may be interested in our guide on how to fix Windows Fax and Scan not detecting Scanner on Windows 11. Also, you can fix Windows Fax and Scan fatal errors by following the steps in this article.

Do not hesitate to let us know which solution worked in the comments area below.

Intel Unison For Windows 11: Download, Install & How to Use

In recent years, Microsoft Windows users have connected their phones to their PC with the Microsoft Phone Link app. However, in September last year, Intel corporation announced working on an Intel Unison app that gives users an alternative to connecting their device to their PC.

Thus, this article will provide a step-by-step guide on Intel Unison for Windows 11 and how to download, install and use it.Also, you can read about how to connect your mobile devices to Windows OS.

What is Intel Unison?

Intel talked about the features of its 13-generation system processors and spoke about the Intel Unison. This app is similar to the Microsoft Phone Link app on Windows PC.

Intel Unison allows users to connect their Android and iOS mobile devices to their computers, making it easy to transfer files from PC to iPhone.

Furthermore, the app offers a wide range of features different from existing software allowing file transfer, answering calls, and reading text on their computer. Intel intends to minimize distraction by giving users the right to reply to texts and answer calls on their PC without having to pick up their mobile devices.

However, these features give Intel Unison an advantage over other mobile connectivity apps in the market right now.

Although there has been speculation that the app will only be compatible with computers with Intel microprocessors, the app has been installed and run on PCs with different microprocessors.

How can I download, install and use Intel Unison?

Users should apply the following before downloading and installing Intel Unison on their PC:

You can proceed with the following steps after the preliminary checks.

1. Download, install, and connect Intel Unison on your devices

  1. Click on this Microsoft Store Page to open the Intel Unison page.
  2. In the Microsoft store app, click the Get button to start the downloading process.
  3. Follow the on-screen command to install it, then launch it on your device.
  4. Then, download the Intel Unison app from the Google Play store on your android device or App Store on your iPhone device.
  5. Navigate the Intel Unison app on your PC to the pairing screen, go through the onboarding screen on your phone, and select Scan QR code.
  6. Scan the QR code on your PC to automatically start the pairing process.
  7. Confirm the code displaying on both your system screen and mobile device. Once successful, click on Get Started on your smartphone.
  8. Your phone will be connected to your PC and can now access and transfer images and videos, find SMS, make and receive calls and reply to notifications.

Users should ensure that their devices meet the system requirements to be able to install Intel Unison.

2. Set up the Intel Unison app notification

  1. Click on the notification button from the left sidebar of the Intel Unison window.
  2. From the pop-up window, select the Open Phone Settings button at the right-hand bottom to open Notification settings on your phone.
  3. Allow Intel Unison to access notifications on your phone.

Setting up the notifications app allows users to receive real-time notifications on their PC.

3. Set up phone calls

  1. Click on the Call button from the left sidebar of the Intel Unison window.
  2. From the pop-up window, select the Show me how to button.
  3. You will pair your phone with Bluetooth to make or receive calls.

Connecting the devices through Bluetooth or Wi-Fi will allow users to make and receive calls on the PC.

In addition, you can read how to fix the Intel Unison app not working on your Windows device and how to fix broken phone linking features on Windows OS.

This guide should help you to download, set up and use the Intel Unison on your Windows 11. If you have further questions or suggestions, kindly drop them in the comments section.