How to Fix Event ID 7034: 4 Easy Steps

Many users encountered Service Control Manager Event ID 7034, and many are concerned by this message. Event ID 7034 indicates that the service terminated unexpectedly and it’s caused by corrupted registry keys or a bad update. Third-party software can also cause this issue.

Before we start, try turning off all background apps. You can also access Safe Mode and check if this issue appears there as well. Also, reinstalling the Dell Digital Delivery Program fixed the problem for many Dell users so should try it too.

How can I fix the event ID 7034?

1. Perform a clean boot

  1. Press Windows + R key to open the Run dialog box, type msconfig, and click OK to open System Configuration.
  2. Select the Services tab and check the box for the Hide all Microsoft services option, then click the Disable all button.
  3. Go to the Startup tab and Open Task Manager.
  4. Select the startup programs and tap the Disable button.
  5. Restart your PC and check if the event ID 7034 error persists.

2. Run an SFC scan

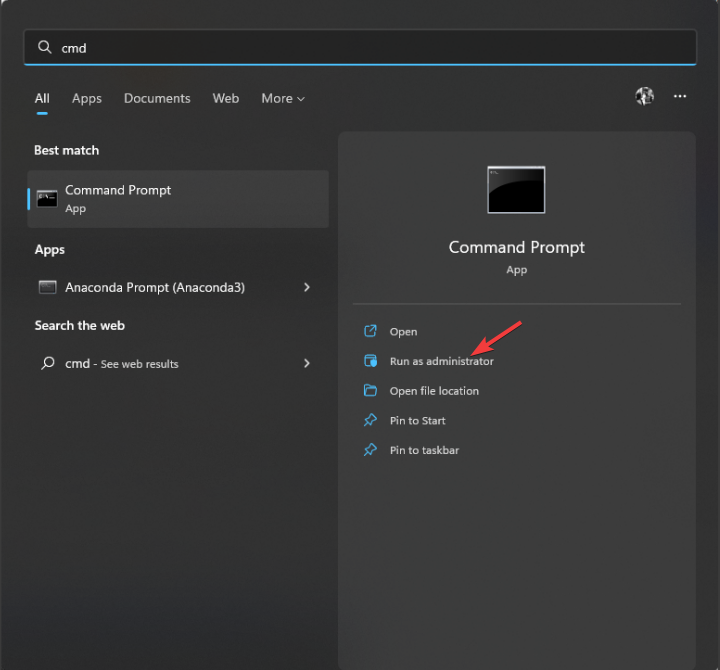
  1. Left-click the Start button, type Command Prompt, and click the Run as administrator option.
  2. Click Yes on the User Account Control prompt.
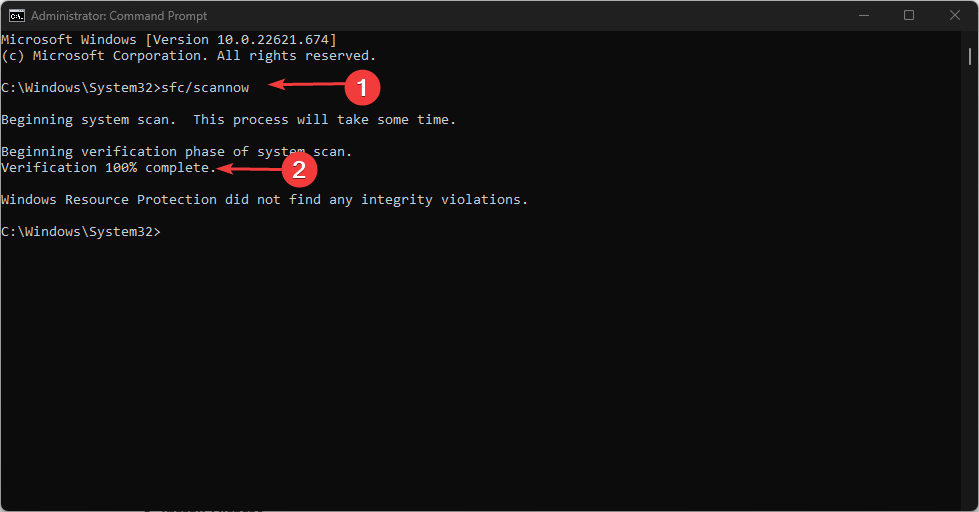
  3. Type the following and press Enter:  sfc /scannow
  4. Restart your PC and check if the error persists.

3. Uninstall recent Windows updates

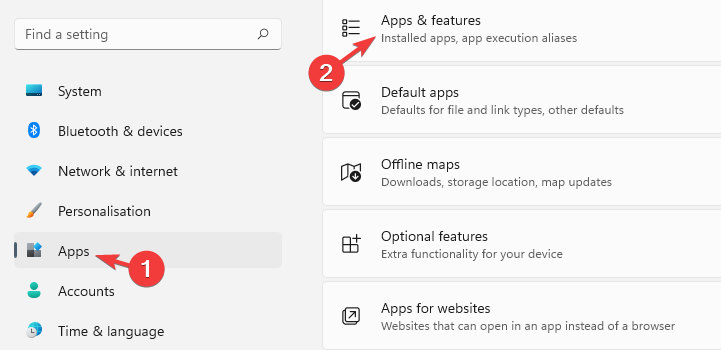
  1. Press Windows + I key to open the Settings app.
  2. Click Windows Update and select Update history.
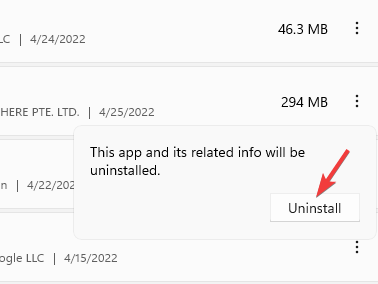
  3. Click the Uninstall updates button and select the most recent update.
  4. Tap on Uninstall to confirm the process.

Uninstalling the recent Windows update will remove any corrupt updates from the last build, causing the error to occur. Check our guide on how to uninstall updates on Windows 11 for more steps.

4. Run System Restore

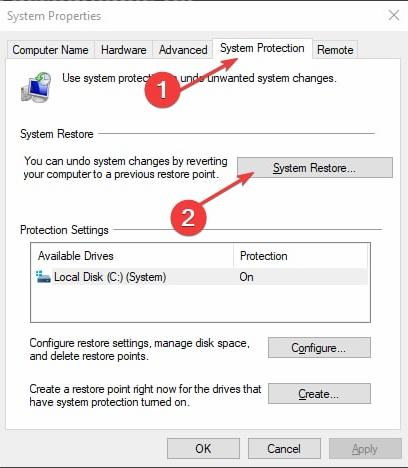
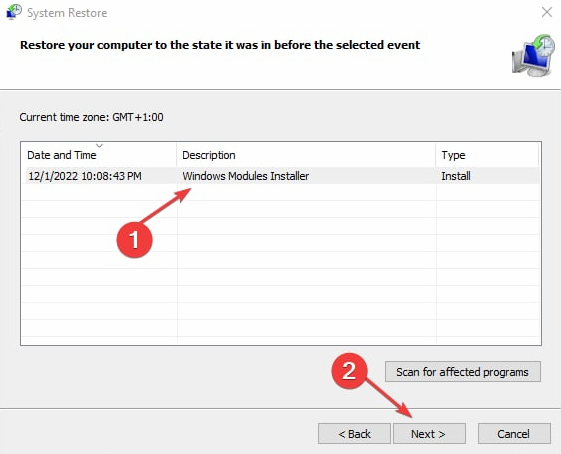
  1. Left-click the Start button, type Restore, and click on Create a Restore Point.
  2. Then the System Protection tab, and click System Restore.
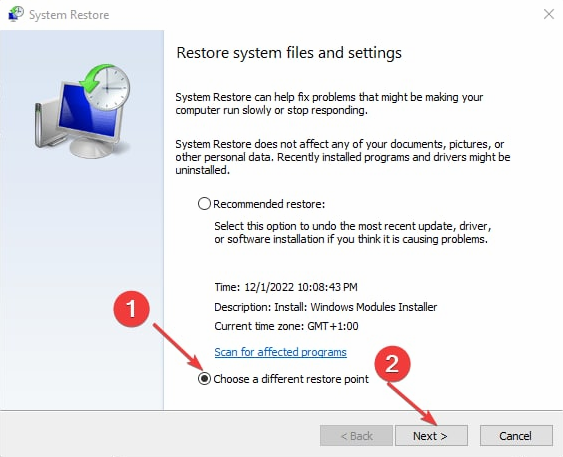
  3. Choose a different system restore and click Next to select a specific Restore Point.
  4. Select the last time you were able to install updates on your PC, and click Next.
  5. Click the Finish button.

System Restore backdates your system to the selected restore point and fixes issues causing the event ID 7034 errors.

Our readers may also be interested in our guide about the Event ID 7023 Error on Windows 11 as well as Event ID 16.

We also have a guide on Event ID 1001, and a special article dedicated to Event Viewer, so don’t miss them.

If you have further questions or suggestions regarding Service Control Manager event ID 7034 kindly drop them in the comments section.

Event ID 7036: What It Is & Fix

The event ID 6036 error in Windows means a service unexpectedly started or stopped. It’s linked to the Service Control Manager and may arise from issues like corrupt system files, problems with the Cpmmon.dll file, or full log files.

Below, we’ll walk you thorugh the steps that address those causes. By the end of this article, you’ll be able to get rid of this error for good.

How can I fix the event ID 7036?

First, turn off background apps running on your PC, disconnect external devices and restart Windows in Safe Mode and check if the event ID 7036 persists. If it’s still there, follow the more advanced steps below.

1. Perform a clean boot

  1. Press Windows + R key to open the Run dialog box, type msconfig, and click OK.
  2. Select the Services tab and check the box for the Hide all Microsoft services option, then click the Disable all button.
  3. Go to the Startup tab and Open Task Manager.
  4. Select the startup programs and tap the Disable button.
  5. Restart your PC and check if the event ID 7036 error persists.

A Clean boot prevents programs liable to cause the error from launching when you start the system.

2. Run an SFC scan

  1. Left-click the Start button, type Command Prompt, and click the Run as administrator option.
  2. Click Yes on the User Account Control prompt.
  3. Type the following and press Enter: sfc /scannow 
  4. Restart your PC and check if the error persists.

An SFC scan will find corrupt system files causing the event ID 7036 error on your PC. You can check how to fix the run as administrator option if it’s not working on your PC.

3. Delete the local policy registry subkey

  1. Press Windows + R key to open the Run dialog box, type regedit, right-click on the Registry Editor and select Run as administrator.
  2. Locate the following subkey in the Registry Editor, then press Enter: HKEY_LOCAL_MACHINE\SOFTWARE\Policies\Microsoft\Windows\IPSec\Policy\Local
  3. Right-click and select Delete from the drop-down.
  4. Click Yes to confirm that you want to delete the subkey and quit the Registry Editor.
  5. Restart your computer.

Tweaking the registry keys allows you to remove the faulty subkey causing the error. Read our guide if you encounter the Registry Editing has been disabled by Your Administrator error when using it.

4. Enable the File and Printer Sharing option

  1. Press Windows + R key to open the Run dialog box, type firewall.cpl, and click OK to open Windows Defender Firewall.
  2. Click on the Allow an app or feature through Windows Defender Firewall option.
  3. Tap the Change settings button.
  4. Check the box for File and Printer Sharing and click OK to save the changes.

Checking the box for File and Printer Sharing can resolve and prevent the event ID 7036 on your computer.

With the steps above you should be able to put an end to the Event ID 7036 error.

Our readers can also check our guide on fixing the security log is now full – Event ID 1104 on Windows 11. Also, our readers can read about the Event ID 7023 Error on Windows 11 and some fixes to resolve it.

If you have further questions or suggestions, kindly drop them in the comments below.

Teams Call Keeps Ringing: How to Make It Stop

According to some Teams users, while in a meeting when they try to call an attendant, it keeps ringing even after they answer the call.

You can hear the ringing sound on Teams even after the call is terminated on the other end. Also, you can experience this on the Teams desk phone, Teams mobile app, or even on the Teams desktop app.

But if Microsoft Teams won’t connect to a meeting, here’s what we recommend you can do to fix the issue.

Why do Teams call keep ringing?

If Teams call keeps ringing when you try to make a call, it could be due to either of the reasons below:

  • Connection issue – It could be possible that the ringing sound on Teams is due to an issue with the internet connection.
  • The call is being forwarded to another device or number – If the meeting call is being forwarded to another number, that is often the reason behind the issue.
  • Glitch with the call – Chances are that there is a problem with the call itself, and hence, you hear the ringing sound on Teams.
  • Call forwarding enabled – If you have enabled the call forwarding feature in Teams, that could be why the Microsoft Teams call still keeps ringing.

But, if the Microsoft Teams calls are not ringing, even the outgoing calls, you can refer to the solutions in our detailed post for a fix.

How do I stop my team from ringing when calling?

Here’s what you should do first:

  • Try restarting your device or checking your internet connection to see if that resolves the issue.
  • You can try ending the call and then starting a new one to see if that fixes the problem.
  • Check the Teams call settings to check if the call is being forwarded to another device or number.
  • Make sure that you’re using the correct phone number.

However, if none of the above methods work, here we have some quick workarounds to help you stop the Teams call that keeps ringing.

1. Disable call forwarding

  1. Launch Teams, click on the three dots (…) next to your profile picture on the upper right, and click on Settings. Teams settings
  2. Next, on the Settings screen, click on Calls on the left. Now, on the right, under Call answering rules, select Calls ring me instead of Forward my calls. select calls ring me
  3. Alternatively, while in the Calls area, you can select Don’t forward in the lower-left of Teams. select don't forward

Once you have disabled the call forwarding option, restart Microsoft Teams and check if you still hear the ringing sound.

2. Change Teams call forwarding settings

  1. Open Teams, go to your profile picture on the upper right, and click on the three dots (…) next to it. Here, click on Settings. teams settings
  2. On the Settings screen, select Calls on the left.
  3. Now, go to the right, and under Call answering rules, check if the call is being forwarded to another number. check if calls getting forwarded to another number
  4. If the call is being forwarded to another number, disable the Call-Forwarding feature.

Once done, restart your PC, launch Teams, and now try making the call. The Teams call keeps ringing issue should be resolved now.

3. Delete files from AppData

  1. Press the Win + R keys simultaneously to launch the Run dialog.
  2. Here, type in the below locations one by one in the search bar and hit Enter after each one:
    1. %AppData%\Microsoft\teams\application cache\cache
    2. %AppData%\Microsoft\teams\blob_storage
    3. %AppData%\Microsoft\teams\databases
    4. %AppData%\Microsoft\teams\cache
    5. %AppData%\Microsoft\teams\gpucache
    6. %AppData%\Microsoft\teams\Indexeddb
    7. %AppData%\Microsoft\teams\Local Storage
    8. %AppData%\Microsoft\teams\tmpcheck for teams files in appdata
  3. Select all the files in each of these locations and hit Delete.

Once done, restart Teams, try making the call, and check if the call still keeps ringing or if the issue is fixed.

4. Check Teams volume in Windows settings

  1. Go to the taskbar, right-click the sound icon, and select Open volume mixer. open volume mixer
  2. Now, go to the right, scroll down, and under Apps look for the Microsoft Teams volume bar.
  3. Here, you should see two volume bars, and neither one of them should be greyed out. You can move the sliders to adjust the volume. adjust the microsoft teams volume

Now that you have successfully fixed the issue by adjusting the volume bar, try making a call on Teams and check if you still hear the ringing sound.

But, if the Microsoft Teams audio is not working, here is a detailed guide to help you fix the issue.

5. Reinstall the Teams app

  1. Press the Win + I keys together to open the Windows Settings app.
  2. Next, click on Apps on the left and then click on Apps & features on the right. Click on Apps & features in App settings
  3. On the next screen, go to the right, and under the Apps list, look for Microsoft Teams. Here, click on the three dots next to it and select Uninstall. uninstall microsoft teams
  4. Now, click on Uninstall again to confirm the action. Click Uninstall again in the confirmation prompt

Besides, keep the Jabra Evolve headset quiet in the MS Teams desktop app. It could be possible that the Jabra headset is interfering with the call.

Alternatively, you can visit the Teams Web App website to open Teams in a browser and check whether the call keeps ringing.

At the same time, make sure that you have quit the Teams app completely (channel meeting/if asked to join a meeting).

If you still hear the ringing sound, then you may try joining the meeting on Teams, and then leave to check if it helps fix the issue.

Alternatively, you can also sign out of the Teams app and sign in back again to ensure that the issue is resolved.

For any other queries related to the Microsoft Teams app, do leave a message in the comments section below.

How to Change the Registered Owner Name in Windows 11

Windows 11 is a powerful operating system that provides users with numerous features and options to customize their experience. However, users might need to change the registered owner name for various reasons.

Therefore, this article will discuss the step-by-step process to change the registered owner name in Windows 11. Also, you can read about how to fix missing or corrupt service registration in windows.

Can I alter the registered owner name in Windows 11?

Yes, you can alter the registered owner name in Windows when selling or buying a used PC. The registered owner’s name is the information used by the operating system to identify the person or organization using the computer.

The registered owner personalizes the user experience and provides information about the user installation and software usage. Changing the Registered Owner’s details is a simple process and can be completed in just a few steps.

How do I change a registered owner name in Windows 11?

Use the Registry Editor

  1. Press the Windows + R button to open the Run dialog box, type regedit in the Run address dialog box and press Enter to open it.
  2. Select Yes to confirm the User Account Control prompt window.
  3. Copy and paste the following path into the path address bar and press Enter: HKEY_LOCAL_MACHINE\SOFTWARE\Microsoft\Windows NT\CurrentVersion
  4. Right-click on the RegisteredOwner and select the Modify option.
  5. Type the new owner name in the Value Data bar and click on OK to change the Registered Owner name.
  6. Right-click on the RegisteredOrganization and select the Modify option.
  7. Type the new organization name in the Value Data bar and click on OK to change the Registered Organization name.
  8. Close the Registry Editor window and restart your PC.

 Registry Editor gives users access to Renaming the Registered Owner details in Windows 11 and allows users to modify relevant information. You can read about how to fix a corrupt registry on Windows.

In addition, users can also read how to fix settings managed by organisation errors on their PC.

In conclusion, this is how to change Windows 11 owner via the Registry Editor. Should you have further questions or suggestions concerning this guide, kindly drop them in the comments section.

Stop Start Menu From Resetting to Default Automatically

The Start menu is the home for all the apps and features on your computer. Many users complain about their Start Menu resetting to default automatically when they reboot their computers. It is annoying because it discards earlier set Start menu customization.

Also, users report the critical error Start menu isn’t working on a Windows PC. Check our guide for ways to fix it.

Why does the Start Menu reset to default automatically?

The Start menu resetting to default whenever you restart your system can be due to many factors. Some factors liable to cause the issue are:

  • Corrupt system files – System files aid the response and interaction between the system and its components. However, corrupted system files can affect how the Start Menu works and infect the registry files responsible for its operation.
  • Corrupt or faulty update – Sometimes, users can install faulty or corrupt updates during the normal Windows update process. It causes the system to malfunction and can result in the Start Menu resetting to default whenever you restart your system.
  • Third-party apps interference – You may experience issues with the Start menu disappearing or malfunctioning on your computer due to interference from apps not compatible with the system.

Other factors not mentioned above can cause the issue. We’ll take you through some basic steps to fix the problem.

How can I stop the Start Menu from resetting to default automatically?

Go through the following before trying any advanced troubleshooting steps:

If you can’t fix the problem, proceed with the solutions listed below:

1. Run SFC and DISM scans to repair system files

  1. Left-click the Start button, type Command Prompt, then select Run as administrator.
  2. Click Yes on the User Account Control (UAC) prompt.
  3. Type the following and press Enter:  sfc /scannow
  4. Type the following commands and press Enter after each: DISM /Online /Cleanup-Image /RestoreHealth
  5. Restart your PC and check if the Start menu issue persists.

Running the SFC and DISM scans will detect and repair corrupt system files causing the issue on your PC. Read about how to fix the run as administrator option if it’s not working on your PC.

2. Uninstall recent Windows updates

  1. Press Windows + I key to open the Settings app.
  2. Go to Windows Update and select Update history.
  3. Click the Uninstall updates button and select the most recent update.
  4. Click on Uninstall.

Uninstalling the recent Windows update will delete the last build causing the Start menu to reset. Read our guide on how to uninstall updates on Windows 11 for more steps.

3. Re-register the Start Menu

  1. Left-click the Start button, type PowerShell, and click Run as administrator.
  2. Click Yes on the User Account Control prompt.
  3. Copy and paste the following lines of commands and press Enter: 0Get-appxpackage -all *shellexperience* -packagetype bundle |% {add-appxpackage -register -disabledevelopmentmode ($_.installlocation + “\appxmetadata\appxbundlemanifest.xml”)}
  4. Close PowerShell and restart your PC.

Re-registering the Start menu will refresh its processes and fix issues affecting it. You can check our guide about PowerShell not showing the full output and some fixes to get it working if you experience it.

4. Run System Restore

  1. Left-click the Start button, type Restore, and click on Create a Restore Point.
  2. Then the System Protection tab, and click System Restore.
  3. Choose a different system restore and click Next to select a specific Restore Point.
  4. Select the last time you were able to install updates on your PC, and click Next.
  5. Click the Finish button.

System Restore backdates your system to the select restore point and fixes issues causing the netfilter2.sys errors. Check how to fix Restore Point if it’s not working and if you have any issues running it.

Additionally, you can try an alternative to the manual process above, such as dedicated repair software to solve this situation in no time.

It is a safe and automatic program that helps you repair your device by removing malfunctioning files detected during the scan and replacing them with fresh Windows files from its substantial database.

5. Create a Start menu backup

  1. Left-click the Start button, type Command Prompt, and click the Run as administrator option.
  2. Click Yes on the User Account Control (UAC) prompt.
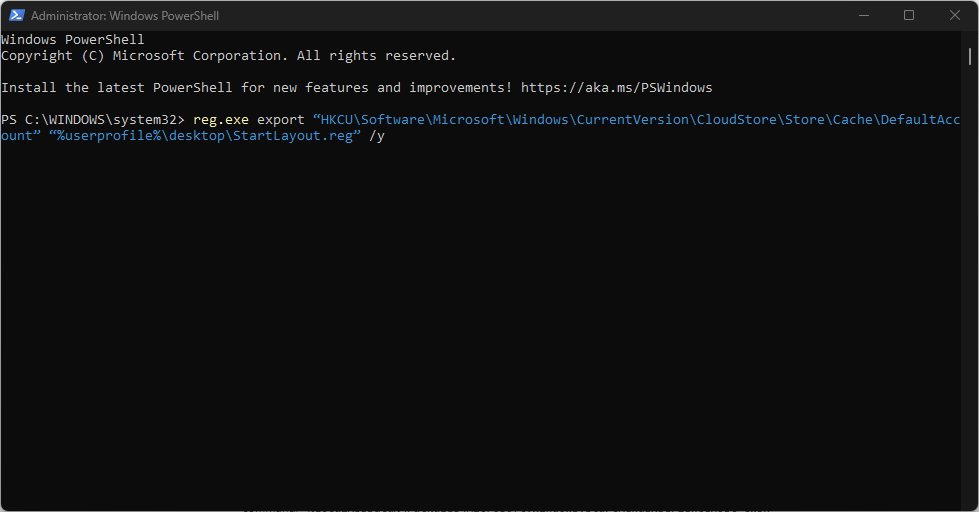
  3. Type the following lines of commands and press Enter to run them: reg.exe export “HKCU\Software\Microsoft\Windows\CurrentVersion\CloudStore\Store\Cache\DefaultAccount” “%userprofile%\desktop\StartLayout.reg” /y
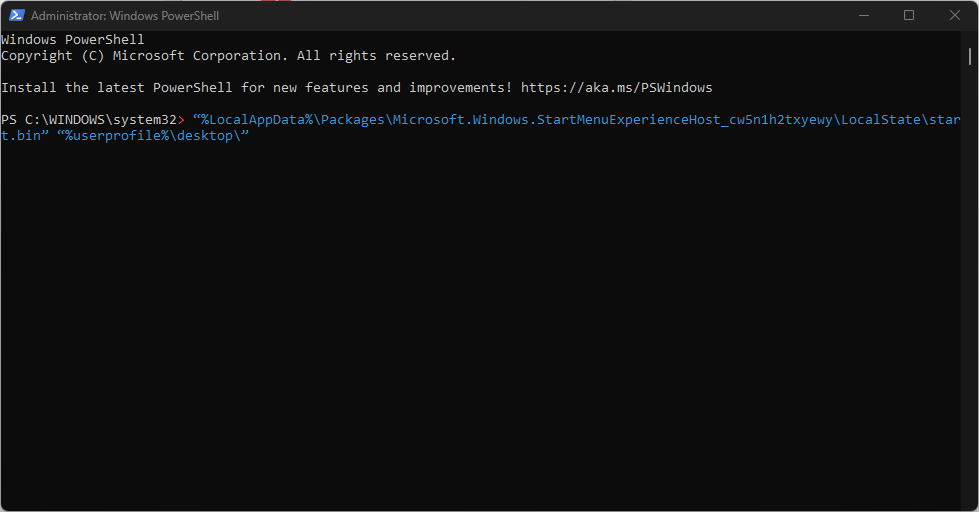
  4. Run the following command: “%LocalAppData%\Packages\Microsoft.Windows.StartMenuExperienceHost_cw5n1h2txyewy\LocalState\start.bin” “%userprofile%\desktop\”
  5. Close the Command Prompt and restart your PC.

The above commands will create a backup of your Start Menu and allow you to refer to it whenever needed.

Read our guide on what to do if Command Prompt keeps crashing on your PC.

Conclusively, our readers can check our fixes for the Start menu not working on Windows 11. You can also read how to customize the Start Menu in Windows 11.

Windows PowerShell Keeps Popping Up: 7 Ways to Stop It

PowerShell is a powerful tool in Windows PC that helps run commands and carry out tasks in an automated manner. It is usually available only when invoked by running a command or launching the program.

However, users complain that Windows PowerShell keeps popping up when not invoked, and it interrupts the user’s activities. Even more, you can read through our guide on What PowerShell is and how to use it on Windows PC.

Why does PowerShell keep popping up?

The Windows PowerShell popping up repeatedly on your PC makes it hard to use or work on. The issue can occur for some notable reasons. Some are:

  • Issues with the Startup configuration – You can run into PowerShell repeatedly appearing on your computer if it is set as a startup program. It allows it to launch immediately when the system is booted and runs as an essential component. So, it can cause it to keep appearing even when not prompted.
  • Corrupt system files – The computer can malfunction when you have corrupt system files interfering with the activities of its programs. They can infect the needed components for running PowerShell, causing it to malfunction and appear at will on the computer.
  • Outdated Windows OS – Running an outdated Windows operating system can affect performance. It indicates the system can’t access the needed patches and updates to fix bugs and improve its functionality. So, these bugs can impede the ability of PowerShell.
  • Interference from other programs – Windows PowerShell can malfunction and keep popping up if another program is using its services. It can override the operating behavior of the tool, resulting in PowerShell constantly appearing without being invited.

Fortunately, we have some basic steps prepared to help you fix the issue and get your system running correctly.

What can I do if Windows PowerShell keeps popping up?

Before attempting any advanced troubleshooting steps, we recommend you go through the following:

  • Turn off background apps running on your PC.
  • Temporarily disable antivirus software on your computer.
  • Restart your PC and check if the issue persists.

If you can’t fix the issue, proceed with the troubleshooting steps below:

1. Run the SFC and DISM to repair damaged system files

  1. Left-click the Start button, type Command Prompt, and click the Run as administrator option.
  2. Click Yes on the User Account Control (UAC) prompt.
  3. Type the following and press Enter: sfc /scannow
  4. Type the following commands and press Enter after each: DISM /Online /Cleanup-Image /RestoreHealth
  5. Restart your PC and check if PowerShell continues to appear repeatedly.

Running an SFC scan will detect and repair corrupt system files causing PowerShell to keep popping up. Check how to fix the run as administrator option if it’s not working on your PC.

2. Restart Windows in Safe Mode

  1. Press Windows + I key to open the Settings app.
  2. Click on System and click Recovery. 
  3. Go to Advanced Startup, then click Restart now.
  4. Windows will automatically restart into the Choose an option window, then click on Troubleshoot.
  5. Click Advanced Options and click on the Startup Settings option.
  6. Press the F4 key to Enable Safe Mode.

Restart windows in Safe Mode will resolve startup issues liable to cause the issues with how Windows PowerShell works and appears.

Read our guide on how to fix the Safe Mode not working on Windows 11.

3. Update Windows OS

  1. Press the Windows + I to open the Windows Settings.
  2. Select the Windows Update and click on Check for Updates. Wait for the Windows update result and click on Install Update if a Windows update is available.

Updating the Windows OS will install patches for fixing bugs affecting your computer. Read about fixing Windows not connecting to update service if the error occurs on your PC.

4. Disable the PowerShell Startup Status on the Task Manager

  1. Press Ctrl + Shift + Esc keys simultaneously to open the Task Manager.
  2. Go to the Startup tab.
  3. Right-click on the Windows PowerShell option and select Disable from the drop-down.
  4. Close the Task Manager and restart your PC to check if PowerShell continues to appear repeatedly.

The above steps will disable PowerShell from the startup menu and prevent it from running when the computer boots.

5. Perform a clean boot

  1. Press Windows + R key to open the Run dialog box, type msconfig, and click OK.
  2. Select the Services tab and check the box for the Hide all Microsoft services option, then click the Disable all button.
  3. Click the Startup tab and open Task Manager.
  4. Click the startup programs, then the Disable button.
  5. Restart your PC and check if the issue persists.

Performing a clean boot can fix background apps actions causing issues with how PowerShell works on your PC.

6. End tasks for background apps via Settings

  1. Press the Windows + I key to open the Settings app.
  2. Select Apps from the left pane and click on Installed apps.
  3. Choose the apps to end the task, then click on the three dots and select Advanced options.
  4. Go to Background app permissions, click the drop-down button, then select Never.
  5. Repeat the steps for all apps you want to restrict background permissions.

Ending tasks for background apps will fix the activities of programs that may prompt PowerShell to appear repeatedly on your computer.

Check ways to turn off background apps in Windows 11 if you have issues using the steps above.

7. Temporarily disable Windows PowerShell

  1. Left-click the Start button, type Command Prompt, and click the Run as administrator option.
  2. Click Yes on the User Account Control (UAC) prompt.
  3. Type the following commands and press Enter: Dism /online /Disable-Feature /FeatureName:"MicrosoftWindowsPowerShellV2Root" 
  4. Wait for the process to complete, and then restart your PC.
  5. Repeat steps 1 & 2, then run the following commands to enable PowerShell: Dism /online /Enable-Feature /FeatureName:"MicrosoftWindowsPowerShellV2Root"

Disabling and reenabling Windows PowerShell helps refresh its process. Check our guide on what to do if Command Prompt keeps crashing on your PC.

Conclusively, our readers may be interested in how to use PowerShell ErrorAction on Windows PC. Also, you can check our guide on how to print Environment Variables in PowerShell.

For further questions or suggestions, use the comments section below.

What is Event ID 4624 (Logon ID 0x3e7) & How to Fix It

Many activities run on the system simultaneously or consecutively to help it perform at its best. These activities are stored in numerous Event IDs, identifying which services they are providing info. However, users report the Event ID 4624 occurring on Windows PC, appearing repeatedly and interrupting user activity.

Also, our readers can read about the Event ID 7023 error on Windows 11 and some fixes to resolve it.

What causes the event ID 4624?

The Event ID 4624 Logon ID 0x3E7 occurs when a logon session is created on the destination machine. It is generated on the computer that was accessed. Also, it indicates the type of logon and other fields like Anonymous logon and Impersonation level.

Some factors that can cause the event ID 4624 on the Domain controller are:

  • Corrupt system files – You can encounter event ID 4624 irrelevantly when your system files are corrupted or missing. It causes miscommunication between the system and the services depending on the faulty files.
  • Issues with Event Viewer service – Users may experience the event ID appearing on the PC due to the Event Viewer malfunctioning. It causes the event logging process to work incorrectly, displaying the wrong event details on your computer.
  • Faulty Windows updates – Installing a recent update can cause issues with the event ID 4624. If the update is corrupt, it blocks the activity of the services running on your PC. So, the event ID can be logged if you have a faulty or corrupt update installed.

Other factors not highlighted above can cause the event ID. Nonetheless, we’ll take you through some steps to fix it.

How do I fix event ID 4624?

Before trying any advanced troubleshooting steps, go through the following:

If you can’t fix the event ID 4624, proceed with the troubleshooting steps below:

1. Perform a Clean boot on your PC

  1. Press Windows + R key to open the Run dialog box, type msconfig, and click OK.
  2. Click the Services tab and check the box for the Hide all Microsoft services option, then click the Disable all button.
  3. Go to the Startup tab and click OpenTask Manager.
  4. Select the startup programs and click the Disable button.
  5. Restart your PC and check if the event ID 7034 error persists.

A Clean boot stops services interfering with other essential features on your PC from running when you start the system. It can resolve the event ID 4624.

2. Run a System File Checker (SFC) scan

  1. Left-click the Start button, type Command Prompt, and click the Run as administrator option.
  2. Click Yes on the User Account Control prompt.
  3. Type the following and press Enter: sfc /scannow
  4. Restart your PC and check if the event ID 4624 persists.

Running an SFC scan on your system will detect and repair corrupt system files causing the event ID to occur. Check how to fix the run as administrator option if it’s not working on your PC.

3. Restart Windows Event Log Service

  1. Press Windows + R key to open the Run dialog box, type services.msc, and press Enter to open the Service manager.
  2. Find the Windows Event Log service in the services list, right-click on it, and select Restart from the drop-down menu.
  3. Restart your PC and check if you can fix the event ID 4624 that occurs.

Restarting the Windows Event Log service will help stop and refresh its activities. Also, it will clear off event logs incorrectly logged, causing it to run into errors.

4. Uninstall recent Windows updates

  1. Press Windows + I key to open the Windows Settings app.
  2. Go to Windows Update and select Update history from the right pane.
  3. Click the Uninstall updates button and select the most recent update you installed.
  4. Click on Uninstall to confirm the removal of the update.

Uninstalling the recent Windows update should help fix any issue with the last build causing the event ID. Check our guide on how to uninstall updates on Windows 11 for more steps.

In addition, our readers can check our article on fixing Application popup event ID 1060 on Windows 11. Also, we have a detailed guide on fixing the Security log is now full – Event ID 1104 on Windows 11.

Should you have further questions or suggestions about this guide, kindly drop them in the comments section below.

Event ID 4662: What Is It & How to Fix This Security Error

Windows logs its activities in event IDs displayed in the Event Viewer. These event IDs hold different information and indications regarding the concerned service. Windows Security Log Event ID 4662 is one of the events users encounter.

However, it can become annoying to repeatedly run into the event ID or for it or appear when not warranted. Also, you can check our guide about the Event ID 7023 Error on Windows 11 and some fixes to resolve it.

What causes Event ID 4662?

The Windows Security Log Event ID 4662: An operation performed on an object is generated when a user accesses an Active Directory object. It is logged when a user creates, modifies, and deletes any objects in a Domain Controller.

However, many factors can cause the event ID 4662 to replicate or occur on your PC. Some are:

  • Event Viewer service not working – The event ID 4662 can occur on the PC due to the Event Viewer issues causing it to replicate or display at will. Moreso, it causes the event logging process to be inconsistent and displays incorrect event details on your system.
  • Corrupt system files – The event logging process may be impeded by the activities of corrupt system files on your computer. The file responsible for the event ID 4662 property change may be infected, causing it to malfunction.
  • Third-party app interference – The activities of other programs running on your computer can cause the event ID 4662. If an app interacts with a property on your computer, it can trigger the event ID logged in the Active Directory.

These factors may vary on different computers. Nevertheless, we’ll discuss how to fix the Event ID and get your system to work correctly.

How do I fix event ID 4662?

Go through the following before trying any advanced troubleshooting steps:

If you can’t fix the error, proceed with the troubleshooting steps below:

1. Perform a clean boot

  1. Press Windows + R key to open the Run dialog box, type msconfig, and click OK.
  2. Click the Services tab and check the box for the Hide all Microsoft services option, then click the Disable all button.
  3. Go to the Startup tab and click OpenTask Manager.
  4. Select the startup programs and click the Disable button.
  5. Restart your PC and check if the event ID 4662 persists.

Performing a clean boot can fix the event ID by refreshing the PC and disabling startup apps that can cause the Property change event.

2. End tasks for background apps via Settings

  1. Press the Windows + I key to open the Settings app.
  2. Select Apps from the left pane and choose Installed apps.
  3. Select the apps to end the task, then click on the three dots and click on Advanced options.
  4. Go to Background app permissions, click the drop-down button, then select Never.
  5. Repeat the process for all apps you want to restrict background permissions.

The above steps fix the activities of programs that may interfere with the Event Viewer activities. Check ways to turn off background apps in Windows 11 if you have issues using the steps above.

3. Run an SFC scan

  1. Left-clicLeft-click the Start button, type Command Prompt, and click the Run as administrator option.
  2. Click Yes on the User Account Control prompt.
  3. Type the following and press Enter: sfc /scannow
  4. Restart your PC and check if the event ID 4624 persists.

Running an SFC scan will detect and repair corrupt system files causing the event ID 4662 on your PC. Check how to fix the run as administrator option if it’s not working on your PC.

Another optimal method to repair system files is using a specialized third-party repair tool that can run an exhaustive scan of your device to detect corrupt, damaged, and missing components and eventually replace them with healthy files.

4. Restart Windows Event Log Service

  1. Press Windows + R key to open the Run dialog box, type services.msc, and press Enter to open the Services.
  2. Find the Windows Event Log service in the services list, right-click on it, and select Restart from the drop-down menu.
  3. Restart your PC and check if you can fix the event ID 4662 that persists.

Reinitiating the Windows Event Log service will help refresh its activities and improve performance.

You can check our guide on how to clear off event logs causing issues with the Event Log on your PC.

Alternatively, our readers can check our article about what Event ID 4769 is and how to fix it. Likewise, you can read about fixing Event ID 4663 on your PC.

In conclusion, kindly comment below if you have further questions or suggestions concerning this guide.

Word Document Is Blank When Opened (Fix It Without Reinstalling)

Is your Word document blank when opened even though you know it contains content? You’re not alone. Many users report that their Microsoft Word documents open blank or appear empty after saving. In this guide, we’ll walk through practical fixes without relying on add-in removals, file repair tools, or Office reinstalls.

Why is the Word document blank when opened?

Microsoft Word documents not showing content when opened can occur for many reasons. Some factors that may be responsible for the issue are:

  • Corrupt Word documents – The Word document you’re trying to access might be corrupt, causing it not to be intact. It can affect its appearance and sometimes result in the document not opening.
  • Text format or color – You may run into the document being blank and all white due to text formatting errors. For instance, setting the text color to white can cause texts to appear blank because it has matched the white background. Also, hidden text can cause the Word document to appear blank.
  • Issues with the Word app – Running an outdated Word app on your PC can cause it to malfunction and cause the document to appear blank. Also, faulty or missing installation files can impede the app’s functionality.

Other factors not highlighted above may also be responsible for the Word document being blank when opened. Nonetheless, we’ll discuss how to easily fix the issue.

How can I fix a Word document if it’s blank when opened?

Before trying any advanced troubleshooting steps, go through the following:

If you can’t fix the issue, proceed with the troubleshooting steps below:

1. Turn Off Add-Ins

  1. Left-click the Start button, type Microsoft Word into the search box and click on it to launch it.
  2. Click on File and click on Options.
  3. Navigate to the Add-Ins tab and select the Go button.
  4. Uncheck all the add-ins on Word and check if the black document issue persists.

Disabling the ads-ins on the Word app can resolve any interference they’re causing the app.

2. Run an SFC scan

  1. Left-click the Start button, type Command Prompt, and click the Run as administrator option.
  2. Click Yes on the User Account Control prompt.
  3. Type the following and press Enter:  sfc /scannow
  4. Restart your PC and check if the blank Word document issue persists.

Running an SFC scan will detect and repair corrupt system files causing the Word document not to show content. Check how to fix the run as administrator option if it’s not working on your PC.

You can as well try specialized repair programs that automatically replace your system’s corrupt or missing files after thoroughly scanning your device, which instantly ensures a better PC performance.

3. Repair corrupt Word files

  1. Left-click the Start button, type Microsoft Word into the search box and click on it to launch it.
  2. Click on File and select Open on the left side of the screen.
  3. Scroll down and select Browse.
  4. Select the file you want to open and click the drop-down arrow next to the Open button.
  5. Select the Open and Repair option to allow Microsoft Word to repair the corrupt file impeding its performance.

Repairing the corrupt Word file will resolve errors impeding the file. You can read about the best tool for fixing corrupt documents in Microsoft Word.

4. Update Windows OS

  1. Press the Windows + I to open the Windows Settings.
  2. Click on the Windows Update and click on Check for Updates. Wait for the Windows update result and click on Install Update if a Windows update is available.

Updating the Windows OS will install necessary patches for fixing bugs causing issues with the Word app.

5. Repair or reinstall Microsoft Office

  1. Left-click the Start button, type Control Panel, then select it from the result.
  2. Click on Programs and navigate to the Programs and Features tab.
  3. Then find Microsoft Office from the list and click on Change.
  4. Select Quick Repair from the options, then Repair.
  5. Click on Repair in the new prompt for confirmation.
  6. Repeat steps 1-4, click three dots at the front of Microsoft Office, and select Uninstall from the options, then OK.
  7. Restart your computer and install the latest Microsoft Office version available for Windows.

6. Try Opening the Document in Draft or Outline View

If your content isn’t displaying normally, the default view mode might be hiding it. Try switching views to force Word to re-render the document.

  • Open Microsoft Word.
  • Click View on the ribbon.
  • Select Draft or Outline.
  • Check if the text now appears.

This can help reveal content that’s present but not visible in Print Layout view.

7. Use the Open and Repair Option (Without Full Repair)

Word includes an Open & Repair function you can use directly without launching a full Office repair.

  • Open Word.
  • Go to File > Open.
  • Browse to the affected document.
  • Click the dropdown arrow next to Open, then choose Open and Repair.

This method fixes small file issues that can cause Word documents to appear empty after saving.

8. Check Font Color and Formatting

In some cases, the text is actually there but set to white font or hidden by formatting. Here’s how to check:

  • Press Ctrl + A to select all content.
  • Go to the Home tab.
  • Change the Font Color to black.
  • Click the Clear All Formatting button (eraser icon).

If your Word document went blank because of formatting issues, this will bring the text back.

9. Disable Hardware Graphics Acceleration

Display problems in Word can sometimes result from hardware graphics acceleration. Turning it off may resolve the issue.

  • Go to File > Options > Advanced.
  • Scroll down to the Display section.
  • Check Disable hardware graphics acceleration.
  • Click OK and restart Word.

This can help especially when free Word documents open blank or show unusual rendering glitches.

10. Copy Content to a New Word Document

If the document still appears blank, copying its content into a new file may help:

  • Open the document and press Ctrl + A, then Ctrl + C.
  • Create a new blank Microsoft Word document.
  • Paste the contents using Ctrl + V.
  • Save the new file and try reopening it.

Restore field content like a table of contents or captions in one go by updating every field: How to update all fields in Word.

11. Test with Another User Profile

User-specific settings can sometimes interfere with Word. Testing from another Windows user account helps isolate the problem.

  • Log out of your current Windows account.
  • Log in to a different local or admin account.
  • Open the affected Word document and see if it still appears blank.

If the issue is gone, your original profile may have corrupted settings.

12. Check for Document Recovery Backups

If your Word document is blank after saving, Word may have created a backup version that you can recover.

  • Go to File > Info > Manage Document.
  • Click Recover Unsaved Documents.
  • Open any available backup files and verify if the content is intact.

This option can be useful after crashes or unexpected shutdowns.

13. View the File in WordPad or Notepad

As a final check, open the file with a simpler text editor to confirm whether it actually contains any content.

  • Right-click the file.
  • Choose Open with > WordPad or Notepad.
  • Look for any readable text or formatting code.

This helps determine if the issue is with Word or if the file itself is truly empty.

FAQs

Why does my Word document open to a blank page?

Corrupt add ins, a damaged Normal.dotm template, or hardware graphics acceleration can prevent content from rendering even though text exists.

How do I fix a blank Word document quickly?

Start Word in safe mode with winword /safe, open the file, then disable add ins (File > Options > Add ins) and restart normally.

The issue keeps returning. What else should I try?

Rename Normal.dotm to force a fresh template, turn off File > Options > Advanced > Disable hardware graphics acceleration, reset DDE (Options > Advanced > General), and run Online Repair from Microsoft 365 Apps.

What if only this one file opens blank?

Open Word, go to File > Open > Browse, select the file, click the arrow on Open, choose Open and Repair; also try changing View to Print Layout and toggling Draft off.

Uninstalling Microsoft Office will fix issues affecting the Word app. Also, it’ll help update Microsoft Office to the latest build.

Alternatively, you can check how to fix Most of the features have been disabled because this product needs an update error.

Let us know which solution worked in the comments area below.

0x8004de44: What Is It & How to Fix This Error

Error code 0x8004de44 is a common error for OneDrive users. The message appears when they try to log in. It might happen for a few reasons. Your antivirus software might be blocking OneDrive, or a weak internet connection could be causing access issues.

Problems with your account, incorrect login credentials, or using an unrecognized device—especially with multi-factor authentication can also lead to this error.

Here’s how you can fix it:

How do I fix error code 0x8004de44?

1.  Run the Windows Store apps troubleshooter

  1. Hit the Start Menu icon and click on Settings.settings windows 11
  2. Click on System on the left pane then Troubleshoot on the right pane.Open system troubleshooter
  3. Select Other troubleshooters.other troubleshooters
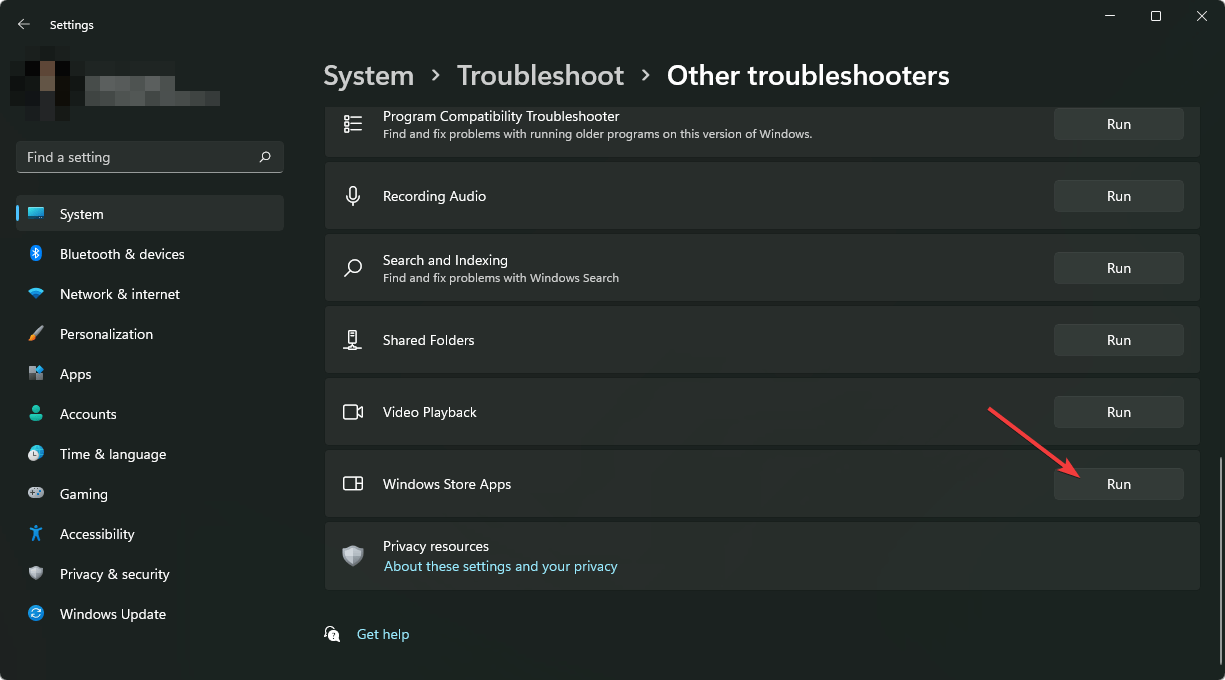
  4. Scroll down, locate Windows Store Apps, and click the Run button.clicking run windows store apps troubleshooter

2. Reset OneDrive

  1. Hit the Windows key and click on Settings.settings windows 11
  2. Click on Apps on the left pane then Apps & features on the right pane.
  3. Locate the OneDrive app, click on the three vertical ellipses, and select Advanced options.
  4. Click on Reset.

When you reset an application in Windows, it removes all of the information and settings for that app. The reset process can be used to fix a misbehaving application or to return it to its default state.

3. Reinstall OneDrive

  1. Hit the Windows key and click on Settings.settings windows 11
  2. Click on Apps on the left pane then Apps & features on the right pane.
  3. Locate the OneDrive app, click on the three vertical ellipses, and select Uninstall.
  4. Confirm Uninstall in the next prompt.

Also, when uninstalling, ensure you remove any software leftovers. There may be corrupt files present that could interfere with a fresh install of the application and cause the same issues.

It is also possible that the issue is application-based, so we recommend trying a web browser. For faster signing in, you need a user-friendly and modern browser with interactive features such as Opera.

If you’re still experiencing problems signing in, it’s possible that your account has been disabled or something else is wrong. In this case, it is best to get in touch with Microsoft support and report the issue.

We also have answers on what to do if your OneDrive gets full, so don’t hesitate to check out our detailed article to that effect.

In case you got around the issue with a solution not mentioned here, we’d love to hear about it. Share with us in the comment section below.

Windows 11 Computer Management: How to Open It in 8 Steps

There are many features and services running on Windows PC that allows users to make the best of it. They are spread across the system and are not usually accessible in a single place.

So, the need for Windows 11 Computer Management is essential as it lets you access a collection of Windows administrative tools to manage the computers.

What is Computer Management Console?

Computer Management is a pack of administrative tools on a Windows PC that Microsoft provides for managing local and remote computers. It allows users to access numerous administrative tools like Task Scheduler, Event Viewer, Device Manager, Disk Management, Services Manager, etc.

Furthermore, every administrative tool in the Console Management is encapsulated and organized into a single console. It makes it easy for users to view administrative properties. Also, it enhances easy access to the tools necessary for performing Computer Management tasks.

How can I open Computer Management Console on Windows 11?

1. Via the Search menu

  1. Left-click the Start button, type computer management or compmgmt.msc, or compmgmt in the search box, then press Enter.
  2. Then, click on the best match.

Check our guide on what to do if you can’t type in the Windows Search bar on your computer.

2. Use the Quick Link menu

  1. Press the Windows + X key to open the Quick Link menu, or right-click on the Start button to display a list of Apps and features.
  2. Click on the Computer Management tool to open it.

3. Via Windows File Explorer

  1. Press Windows + E shortcut key to open File Explorer.
  2. Right-click on This PC on the left pane, then select Show more options from the drop-down or press Shift + F10.
  3. Click on Manage from the tab to open Computer Management.

Our readers may be interested in what to do if they encounter issues with File Manager not showing files on their computers.

4. Use the Command Prompt

  1. Left-click the Start button, type Command Prompt, then select Run as administrator.
  2. Tap Yes on the User Account Control (UAC) prompt.
  3. Type the following in the command box and press Enter to open the Computer Management Console: compmgmt.msc

Check our guide on what to do if Command Prompt keeps crashing on your PC.

5. Via the Run Dialog box

  1. Press Windows + R key to open the Run dialog box, type compmgmt.msc, and press Enter or click OK to open the Computer Management Console.

6. Via Desktop Shortcut

  1. Right-click on any free space on the desktop and select New from the drop-down menu, then click on Shortcut.
  2. On the Create Shortcut wizard, type compmgmt.msc in the location of the item box, then click Next.
  3. Type Computer Management in the box for the name of the shortcut, then click the Finish button.
  4. You’ll see a shortcut icon of Computer Management on the desktop, double-click it to access the Console.

7. Via Windows PowerShell

  1. Left-click the Start button, type PowerShell, and click Run as administrator.
  2. Click Yes on the User Account Control prompt.
  3. Copy and paste the following line and press Enter to open the Computer Management Console: compmgmt.msc

Read our guide on how to fix PowerShell not working on your PC.

8. Via the Control Panel

  1. Left-click the Start button, type Control Panel, then select it from the result.
  2. On the Control Panel window, click the Category and select Large Icons from the drop-down.
  3. Scroll down and click on the Windows Tools option.
  4. Double-click on the Computer Management icon to open it.

In addition, our readers may be interested in our guide about the best CPU Temperature Monitoring Software available in 2023.

Likewise, we have a detailed guide on the best Windows Utility tools to Tune-Up your PC.

Also, we have a detailed article on how to get to Advanced System Settings on Windows 11.

In conclusion, this guide should help you to open Windows 11 Computer Management. If you have further questions or suggestions, kindly drop them below.

Fix: Windows 11 Battery Time Remaining Not Showing

The battery utility lets users know the battery’s health and the remaining time left on their PCs. Also, it provides battery-saving information that can help reserve energy like the Power saver.

However, it can be difficult to access the battery utility if the Windows 11 battery time remaining is not showing, making it impossible to know how much time it would last.

Our readers may be interested in our guide on the Power settings in Windows 11 and how to utilize them to improve battery health.

Why is the battery time not showing on Windows 11?

When the comprehensive remaining battery time is not showing on Windows 11 PC, it means an estimate of the time remaining for you to be able to use your system. This issue may occur for many reasons. Some are:

  • Incorrect configuration of the battery settings on the system – The remaining time left on your battery may not show when you hover the mouse over the battery icon in the system tray if there’s an issue with its configuration. It is possible that you’ve deactivated the feature, preventing you from monitoring the battery usage on the system.
  • Outdated Windows operating system – You must install timely updates and patches for your Windows PC to help it perform better. Its inaccessibility to these updates prevents it from fixing bugs that can cause issues like the battery remaining time not showing.
  • Startup issues – If the system is not properly booted from startup, it can affect and impede the performance of services running on it. So, you can experience issues accessing the time remaining on your battery due to startup issues.

Other factors may also contribute to the battery time remaining function not working issue. Hence, we’ll take you through ways to get it fixed.

What can I do if battery time is not showing on Windows 11?

Before trying any advanced troubleshooting steps, proceed with the following:

If you can’t fix the issue, try the solutions below:

1. Restart Windows in Safe Mode

  1. Press Windows + I key to open the Settings app.
  2. Select System and click Recovery.
  3. Go to Advanced Startup, then click Restart now.
  4. Windows will automatically restart into the Choose an option window, then click on Troubleshoot.
  5. Click Advanced Options and click on the Startup Settings option.
  6. Press the F4 key to Enable Safe Mode.

Restart windows in Safe Mode will resolve startup issues liable to cause the battery functions not to work. Read our guide on how to fix the Safe Mode not working on Windows 11.

2. Update Windows OS

  1. Press the Windows + I to open the Windows Settings.
  2. Click on Windows Update and select the Check for Updates button. Wait for the Windows update result and click on Install Update if a Windows update is available.

Updating the Windows OS will install patches for fixing bugs and fixing battery issues.

3. Edit the Registry

  1. Press the Windows + R button to open the Run dialog box, type in regedit, and then press Enter to open the Registry Editor.
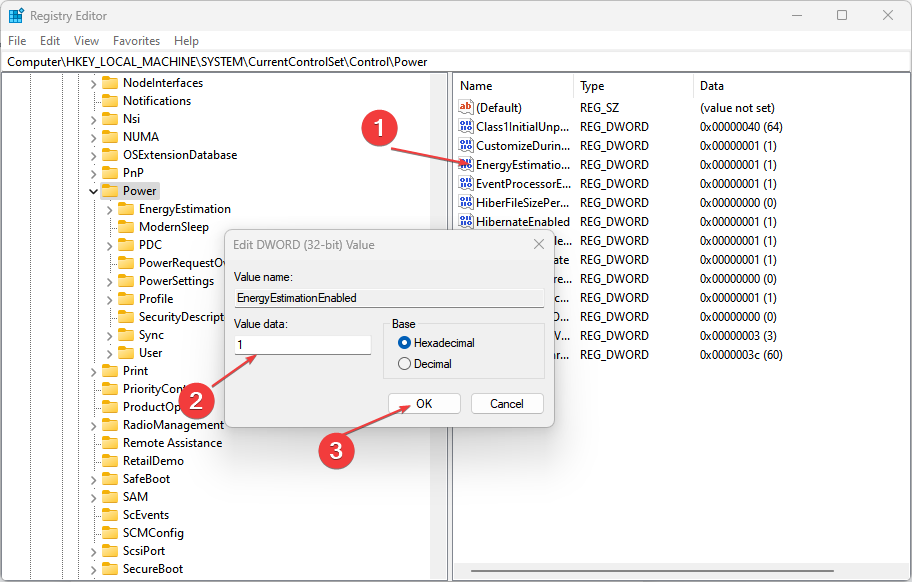
  2. Copy the following path and paste it into the Registry Editor’s address bar and press Enter: Computer\HKEY_LOCAL_MACHINE\SYSTEM\CurrentControlSet\Control\Power    
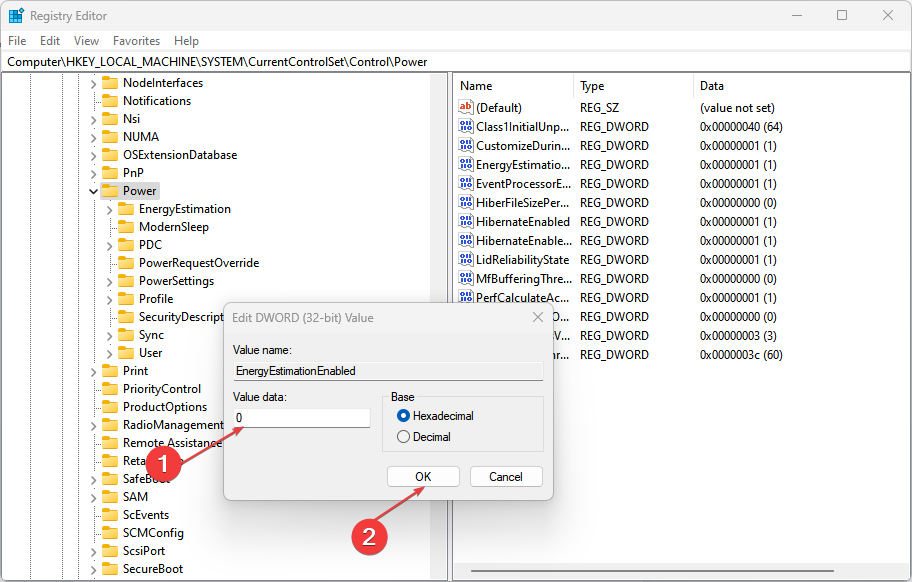
  3. Find and double-click the EnergyEstimationDisabled key and change its Value data to 1.
  4. Find and double-click the UserBatteryDischargeEstimator key and change its Value data to 1.
  5. Right-click anywhere on the right pane, select New from the drop-down, then DWORD (32-bit) Value.
  6. Rename it as EnergyEstimationDisabled and change its value to 0.
  7. Close the Registry Editor and restart your PC.

Tweaking the power folder in the Registry Editor gives you access to data you can modify to fix the issue. You can read about how to fix a corrupt registry on Windows.

4. Check the remaining time from the Settings

  1. Press the Windows + I key to open the Windows Settings.
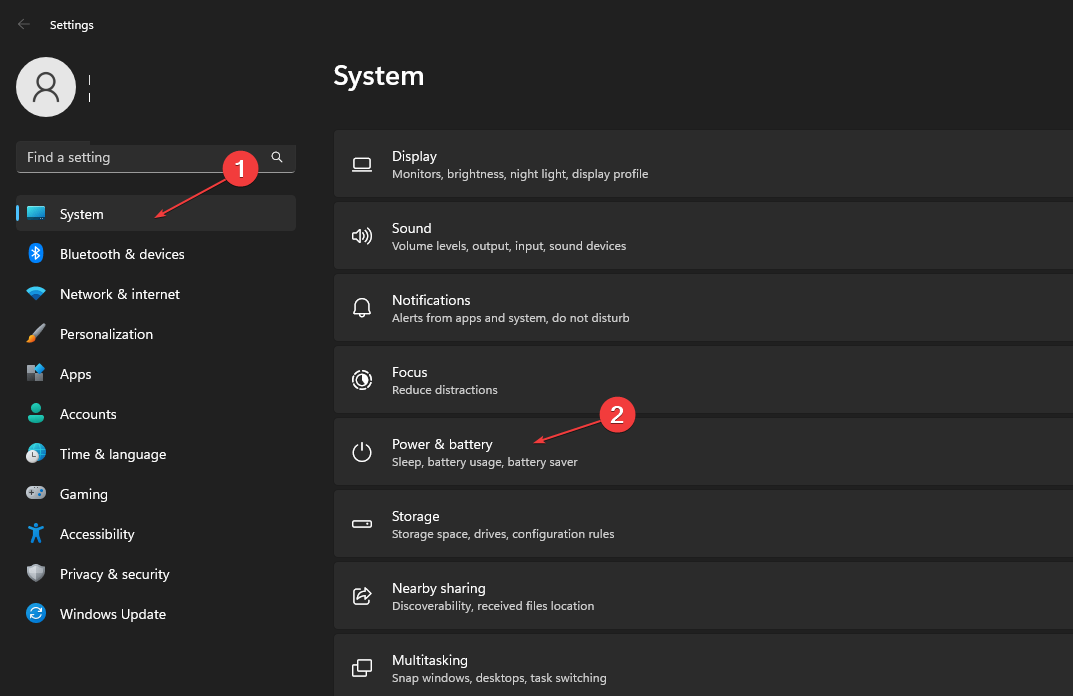
  2. Click on System from the left pane and click on Power & battery.
  3. You should see the remaining time beside the Time until fully charged option.

You can go to the Settings app to check the remaining time if it persists.

In addition, our readers may be interested in how to uninstall battery driver on their PCs. Also, we have a detailed guide on what to do if your laptop battery drains when off on Windows 11.

In conclusion, if you have further questions or suggestions after reading this guide, drop them in the comments section.

How to Dual Boot on Separate Hard Drives: 5 Easy Steps

Installing two OS on a computer creates many clustered partitions for running them that can be a mess on the hard drive. Hence, we’ll discuss how to dual boot on separate hard drives on your PC.

Do I need two hard drives for dual boot? Dual booting on your computer doesn’t necessarily require you to have two hard drives available for the process. So, you don’t compulsorily need separate drives, for instance, when dual booting Windows and Linux OS on a single PC.

However, we recommend using two separate hard drives to make the operation easier and smoother. It has many advantages that give it an edge over dual booting from a single drive. Using two drives creates a less cluttered partition table for the two operating systems.

Also, it eradicates the stress of backing up data for the current OS. It prevents partitioning issues liable to occurring.

In short, dual booting by partitioning a single driver doesn’t harm its performance and stability. However, allowing each operating system to have a designated drive to partition makes it more organized.

How can I dual boot on separate hard drives?

Before proceeding with the steps for dual booting on separate hard drives, follow these:

  • Get the bootable drives available to be inserted into the PC.
  • Ensure you have 50 GB of free space on both drives for an optimal experience.
  • Connect to a stable internet network for downloading the ISO image and live USB-creating tool.
  • If you don’t want to lose your files in the reset process, create a system image backup to avoid data loss.
Note icon NOTE
The steps below are for dual booting Windows 10 and Windows 11. However, they are applicable for dual booting other operating systems.

1. Set a new partition for the new OS installation

  1. Press Windows + X key and select the Disk Management window.
  2. Find and right-click on the largest partition volume and choose Shrink Volume from the drop-down.
  3. Go to Enter the amount of space to shrink in MB, enter 102400, and tap Shrink, then 100 GB Unallocated appears.
  4. Right-click on the Unallocated volume and select New Simple Volume from the drop-down to create a new partition.
  5. Click Next without modifying any key until you complete the wizard instructions.

Creating a new partition frees up enough disk space for the operating system to be installed.

2. Create a bootable USB for the new OS installation

  1. Plug in a USB drive to your computer.
  2.  Download the OS installation media creation tool from the official website and run it on your PC.
  3. On the Setup screen, accept the applicable conditions and license terms, select language and edition, then click the Next button.
  4. Choose the connected USB drive to create an installation media for the OS, then wait until the installation media is successfully created.

Using the Media creation tool to create a bootable USB drive allows users to download and store the install file for Windows 11.

You can read our article about how to create a bootable USB drive for more steps to take on Windows 11.

3. Install the Operating System on the new partition

  1. Insert the bootable USB flash/pen/key drive into your computer
  2. Restart your computer and repeatedly press the F12 to Choose Boot Device.
  3. Select your USB drive and press Enter, then the computer will boot from the USB drive.
  4. Follow the on-screen instructions to set up your operating system step by step.

The steps for installing and setting up different operating systems on your PC may vary. So, we recommend you consult a professional for the specific steps for your operating system.

4. Set default operating system for startup

  1. Press Windows + I key to open the Settings app.
  2. Go to System and click on the About tab from the left pane.
  3. Navigate to the Related links menu and click on Advanced system settings.
  4. On the System Properties window, go to the Startup and Recovery tab, then click the Settings button.
  5. Click the drop-down button for the Default operating system and choose your preferred OS.
  6. Check the box for Time to display list of operating systems and set it to 30 seconds, then click OK to save the changes.

Setting the default operating system and a time limit to display the list of operating systems allows you to access the dual boot menu. It prompts the select operating system boot menu where you can easily switch between OS on startup.

If you’re interested how to remove Ubuntu from dual boot on Windows 11, the highlighted guide will provide all the solutions.

5. Disable the Windows Fast Startup option

  1. Left-click the Start button and type control panel, then open it.
  2. Click on System and Security, then select Power Options.
  3. In the right pane, click on the Choose what the power buttons do option.
  4. Click on Change settings that are currently unavailable.
  5. Under Shutdown Settings, uncheck the Turn on fast startup (recommended) option.
  6. Click the Save changes button.
  7. Restart your computer and select a preferred OS from the dual boot menu.

Disabling Fast startup allows your PC to bypass loading the default operating system from the boot and shows the boot menu for selecting Operating Systems. Read how to disable fast startup on Windows 11 for more steps.

In conclusion, our readers can check how to Dual Boot Windows 11 and macOS on a single PC.

Likewise, our readers may be interested in our guide on how to Dual Boot Windows 11 and Linux Mint on one PC. Also, you may be interested in our guide on fixing PC stuck on Choose an operating system prompt.

Mouse Flickering in Windows 11: How to Easily Stop It

Some of our readers complained about mouse flickering issues on Windows 11. Aparently, the mouse pointers keep on flickering in Windows 11.

Is your mouse pointer also flickering all the time in Windows 11? If that’s the case, this is how you can fix this annoying issue.

Why does my mouse pointer keep flickering in Windows 11?

Before trying to fix regular mouse flickering, it’s worth considering what can cause it. These are some of the potential reasons for mouse flickering in Windows 11:

  • A driver issue: Your graphics or mouse drivers could be faulty. Follow our guide on how to update the mouse driver on Windows 11.
  • Windows Explorer issues: The mouse pointer starts flickering because of an issue with the File Explorer process. Restarting the app will likely resolve the flicking in such a scenario.
  • System file corruption: Windows file corruption may cause the mouse pointer to flicker.
  • Software conflicts: A conflicting background app or service is causing the cursor to flicker.

Now that we know the possible causes for this issue, let’s go to the actual solutions below.
How can I fix my mouse pointer flickering?

1. Scan System files with SFC

  1. Click the Search icon from the taskbar, type cmd, and select Run as administrator from the results.
  2. Type the following command and press Enter to run it: sfc /scannow
  3. Wait for the scan to finish and accept the changes if there are any.

Windows 11 has a System File Checker tool you can repair corrupted system files with. So, try running that tool as covered in Windows Report’s guide to repairing system files.

2. Run the Hardware and Devices Troubleshooter

  1. Click the Search icon, and type command prompt in the menu’s search box.
  2. Select Run as administrator for opening the Command Prompt app with admin rights.
    Run as administrator option mouse flickering windows 11
  3. To launch the Hardware and Devices troubleshooter, input and execute this command: msdt.exe -id DeviceDiagnostic
    hardware and devices troubleshooter command mouse flickering windows 11
  4. Select Next in the Hardware and Devices troubleshooter.

3. Disable the touchscreen driver

  1. To access the Power User menu, press the Windows logo + X keys on your keyboard.
  2. Select Device Manager to open that utility’s window.
    Device Manager option mouse flickering windows 11
  3. Double-click Human Interface Devices to extend that category.
    Human Interface Devices category mouse flickering windows 11
  4. Right-click HID-compliant touch screen and select its Disable device option.
    Disable device option mouse flickering windows 11
  5. Click Yes to confirm you want to disable it, then see if the mouse pointer flickering still persists.

4. Reinstall the mouse and graphics drivers

  1. Right-click the Start button and select Device Manager.
  2. Double-click the Mice and other pointing devices category.
    Mice and other pointing devices category mouse flickering windows 11
  3. Then right-click HID-compliant mouse and select its Uninstall device option.
    Uninstall device option mouse flickering windows 11
  4. Select the Attempt to remove the driver for this device checkbox and click the Uninstall button.
    Uninstall button mouse flickering windows 11
  5. Click the arrow for the Display adapters category.
  6. Then repeat steps four to five for your PC’s graphics adapter card.
  7. Bring up the Start menu and select Power, then choose Restart.
    Restart option mouse flickering windows 11

After rebooting your PC, the system will automatically detect and install the correct drivers for your mouse.

If your mouse came with installation media, try to reinstall the software or the driver from it. Another solution would be to visit the manufacturer’s website of your device and download the correct drivers for your system.

5. Perform a clean boot

  1. Press the Windows key + R to launch the Run console, type msconfig, and press Enter or click OK.
  2. Uncheck the selected Load startup items checkbox on the General tab.
    The Load startup items checkbox mouse flickering windows 11
  3. Switch to the Services tab and select Hide all Microsoft services there.
  4. Click Disable all to deselect the checkboxes for all remaining third-party services starting with Windows.
    Hide all Microsoft services option mouse flickering windows 11
  5. Select Apply to save the new Windows startup settings.
    Apply button mouse flickering windows 11
  6. Click OK to close out of MSConfig.
  7. Select Restart when prompted to reboot.

If this solution works, the mouse cursor will probably start flickering again if you fully restore the original boot configuration. So, you’ll need to try to identify what conflicting app or service is causing the issue and leave it disabled.

A flickering mouse cursor isn’t exactly something you can ignore if it keeps flicking. The solutions in this guide will likely address the most common causes of regular mouse flickering in Windows 11.

However, that doesn’t necessarily mean they’ll fix mouse flickering for everybody. There could be more ways to fix that issue.

You might be also interested in reading our guide on how to customize the mouse cursor in Windows 11.

If you have fixed flickering mouse cursors with different methods are welcome to share their resolutions below.
Event ID 36887: What Is It & How to Fix It

Secure Channel, also known as Schannel, is responsible for sending and receiving encrypted signals from the client and the server. It contains a set of security protocols that provide identity authentication and secure private communication through encryption.

However, the Schannel Event ID 36887 is one of the common Schannel errors that indicate an SSL fatal alert. We also have a detailed guide on fixing a fatal error occurred when creating a TLS Client Credential on your PC.

What causes event ID 36887?

The Schannel Event ID 36887 A fatal alert was received from a remote endpoint. Fatal Alert 42 error message can occur on your computer for many reasons. Also, it can be accomplished by different Fatal Alert codes 40, 42, & 72.

The following are the notable causes of the error:

  • A faulty Windows update – Users complain about encountering the Event ID 36887 on their PC after installing a corrupt Windows update. It blocks the connection between the client and the server, causing issues with SSL/TLS sessions on the server. So, the event ID can be logged in to the Event Viewer if you recently updated your PC.
  • Missing EventLogging value in Registry – The error may occur due to the EventLogging value in Registry being unavailable for logging processes of its kind. So, it returns the error 36887, meaning there’s a fatal error in the SSL authentication process.
  • Antivirus software interference – Some features in the antivirus software allow it to scrutinize and analyze every Secure channel process. So, it can’t impede the processes if it senses or picks up any threatening signals, even when it is wrong.

Other factors may cause the event ID 36887 in the Event Viewer. Nevertheless, we’ll take you through some fixes to resolve the problem.

How can I fix event ID 36887?

Go through these preliminary checks:

If you can’t fix the error, proceed with the troubleshooting steps below:

1. Perform a clean boot

  1. Press Windows + R key to open the Run dialog box, type msconfig, and click OK.
  2. Select the Services tab and check the box for the Hide all Microsoft services option, then click the Disable all button.
  3. Go to the Startup tab and Open Task Manager.
  4. Select the startup programs and tap the Disable button.
  5. Restart your PC and check if the event ID 7036 error persists.

Performing a Clean boot on your PC prevents services that can cause the event ID 36887 from running when you start the system.

2. Run an SFC scan

  1. Left-click the Start button, type Command Prompt, and click the Run as administrator option.
  2. Click Yes on the User Account Control prompt.
  3. Type the following and press Enter:  sfc /scannow
  4. Restart your PC and check if the error persists.

An SFC scan will detect and repair corrupt system files causing the event ID 36887 error on your computer. Check how to fix the run as administrator option if it’s not working on your PC.

3. Uninstall recent Windows updates

  1. Press Windows + I key to open the Settings app.
  2. Click Windows Update and select Update history.
  3. Click the Uninstall updates button and select the most recent update.
  4. Tap on Uninstall to confirm the process.

Uninstalling the recent Windows update will fix any issue with the last build impeding the Schannel process and causing the error to occur. Check our guide on how to uninstall updates on Windows 11 for more steps.

4. Add the EventLogging Registry key

  1. Press Windows + R key to open the Run dialog box, type regedit, and press Enter to open the Registry Editor.
  2. Navigate to the following path: HKEY_LOCAL_MACHINE\System\CurrentControlSet\Control\SecurityProviders\SCHANNEL
  3. Right-click on the empty space on the right pane, then select New from the drop-down and click on DWORD and enter the Value name as EventLogging.
  4. Double-click on EventLogging and set the Value Data as 1 and click OK to save the changes.
  5. Restart your PC and check if the event ID 36887 persists.

Adding the EventLogging Registry key can fix any problems with the EventLog that is causing the error. You may be interested in how to customize the Registry Editor on Windows 11.

Alternatively, you can read about the Event ID 7023 Error on Windows 11 and some fixes to resolve it.

Likewise, you may be interested in fixing the Event Viewer reboot event ID error on Windows 11.

In conclusion, this guide should help you troubleshoot Event ID 36887. If there are further questions or suggestions, kindly drop them in the comments section.

Fix: Discord Keeps Asking to Switch Audio Device

Discord is a popular communication platform that allows users to voice and text chat with friends while playing games.

However, many users have reported that Discord keeps asking to switch audio devices, which can be a nuisance during gaming sessions. In this article, we will discuss the reasons behind this issue and provide potential solutions to help resolve the problem.

Why does Discord keep asking to switch audio devices?

Discord apps can keep asking to switch audio devices for various reasons. Some of them are:

  • Audio device issues – a faulty audio device or jackpot can cause Discord to keep asking to switch audio device errors. Also, motherboard audio issues can cause the microphone not to work.
  • Outdated driver – the system driver allows the Windows OS to communicate with the device hardware. Therefore, an outdated driver may not be compatible with the Discord app, causing Discord to keep asking to switch audio devices.
  • Interference from other programs – If another program uses the same audio device that Discord is trying to use, it might cause this issue.
  • Multiple audio devices – For users with multiple audio devices connected to their computer, Discord might keep asking you to switch to another device because it’s uncertain which audio device to use.

The listed factors are various reasons causing this problem and can vary on different devices.

What can I do when Discord keeps asking me to switch audio devices?

Users can perform these preliminary checks to resolve issues:

You may proceed to the following advanced steps If these preliminary checks do not resolve the issue.

1. Choose the exact input and output device

  1. Launch the Discord app, and navigate to the app Settings.
  2. Scroll down through the left side pane and select Voice & Video. Select the Voice Settings on the right side pane.
  3. From the Input and Output device options, click the drop-down menu and select the device you want to use from the list.
  4. Close Discord and restart your device to check if the error persists.

Selecting the input and output device for the Discord app will force Discord to use the selected device only.

2. Turn off the secondary output/input device

  1. Right-click the Speakers icon on the taskbar and select Sounds.
  2. Navigate to the Playback tab.
  3. Find the secondary audio device, right-click on it, and select Disable.

Users can turn off the secondary output/input device to fix the Discord keeps asking to switch audio device error.

3. Clear Discord AppData and LocalAppData

  1. Press Windows + R keys to open the Run dialog box, type %appdata% in the text box, then press Enter.
  2. Select the Discord folder, right-click on it, and click on Delete to clear the folder.

Clearing Discord data can help fix corrupt files that are prompting problems. In addition, the following steps will help fix the Discord keeps asking to switch audio device error.

Likewise, you can read about how to fix the Discord mic not working on Windows, as it is a common issue reported by users.

Also, users can read about how to fix the Discord app not opening and loading on their devices and Discord causes high CPU usage on users’ devices.

In conclusion, this guide should help if Discord keeps asking you to switch audio devices. Should you have further questions or suggestions, kindly drop them in the comments section.

Event ID 4672: How to Fix This Special Logon Error

The Active Directory auditor will show you different activities and processes running on your computer in the form of Event Log IDs. The Windows Security Log Event ID 4672 is one of these event IDs. It lets you know whenever an account assigned any Administrator equivalent user rights logs on.

However, this guide will discuss the event ID 4672 from appearing recurrently on your device. Check our guide on fixing the security log is now full – Event ID 1104 on Windows 11.

What causes event ID 4672 Special Logon error?

The Event ID 4672 Special logon prompt should appear on your computer just once without interrupting your activities. Experiencing the Special logon notification popping up on your screen from time to time indicates that something is wrong with its process. Some probable causes are:

  • Issues with Event Viewer service – You can experience the event ID appearing often on your PC or why it prompts it to open due to the Event Viewer malfunctioning on your PC.
  • Issues with the GPU driver – The GPU drivers are responsible for the graphics processing of your computer, and they need to be stable for the system to work correctly. However, issues with GPU drivers can cause the Event ID to keep appearing and interrupt your work.
  • Issues with the processors on your PC – Processors provide the instructions and processing power the computer needs to do its work. So, if they are not intact or running correctly, it can affect the Active Directory event log processes on your PC.

Other factors like faulty Windows update may also cause the error. Nonetheless, we’ll guide you through fixing the Event ID 4672 Special logon error.

How can I fix event ID 4672?

Before trying any advanced troubleshooting steps, go through the following:

If you can’t fix the error, proceed with the troubleshooting steps below:

1. Restart Windows Event Log Service

  1. Press Windows + R key to open the Run dialog box, type services.msc, and press Enter.
  2. Find the Windows Event Log service in the services list, right-click on it, and select Restart from the drop-down.
  3. Restart your PC and check if you can fix the error.

Restarting the Windows Event Log service will help refresh its log and clear off event logs incorrectly logged, causing it to run into errors.

2.  Uninstall recent Windows updates

  1. Press Windows + I key to open the Settings app.
  2. Go to Windows Update and select Update history.
  3. Click the Uninstall updates button and select the most recent update.
  4. Click on Uninstall to confirm the process.

Uninstalling the recent Windows update should help fix any issue with the last build causing the error to occur. Check our guide on how to uninstall updates on Windows 11 for more steps.

3. Update your GPU drivers

  1. Press Windows + R keys to prompt the Run window, type devmgmt.msc, and click OK to open the Device Manager.
  2. Click on the drop-down button to expand the Display Adapters option. Right-click your GPU and select the Update driver option.
  3. Select Search automatically for drivers.
  4. After the update is complete, restart your device and check if the error persists.

Updating the GPU driver will fix bugs affecting them and install the latest features to improve system performance.

Check other steps for updating drivers on Windows 10 if you have any issues.

Besides updating your drivers manually, which can sometimes be not as straightforward for some users, you can opt for dedicated software to execute this action automatically.

4. Update your BIOS

Note icon NOTE
The BIOS updating process varies on different PCs. However, the steps below are specifically for HP laptops.
  1. Go to the HP driver and software download website, select your product from the list, then input your serial number or exact computer model.
  2. Click the plus (+) button against All drivers, then click the (+) button against BIOS to expand it and see available updates, then click on Download.
  3. Double-click the downloaded file to install the .exe file, then follow the on-screen instructions to complete the installation.
  4. Restart your PC, then select the Apply Update Now option during the startup to implement the installed BIOS update.

Updating the BIOS will fix the Event ID 4672 Special logon error and enhance system stability. You can check our guide on how to check and update BIOS on various laptops.

Alternatively, our readers may be interested in fixing the Event Viewer reboot event ID error in Windows 11.  Also, we have a detailed guide on fixing application popup event ID 1060 on Windows 11.

In conclusion, this article should help you troubleshoot event ID 4672. If you have further questions and suggestions, kindly drop them in the comments below.
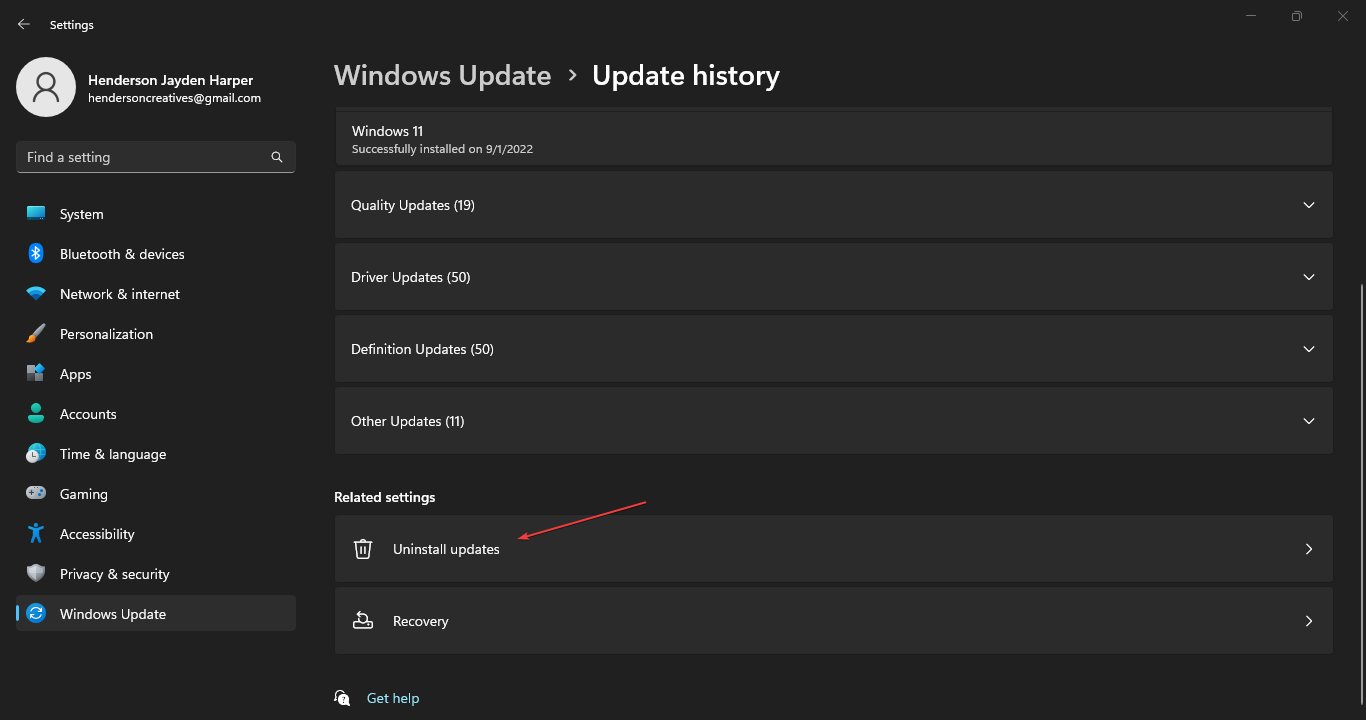
Enable Ping Windows 10: How to Set Up Firewall to Allow It

Ping is the primary TCP/IP command for troubleshooting connectivity, reachability, and name resolution on Windows. It helps users verify IP-level connectivity to another TCP/IP computer by sending Internet Control Message Protocol (ICMP) echo Request messages.

However, users can encounter issues enabling ping on Windows 10 if the Windows Firewall blocks ping requests. Likewise, you may check our guide on what to do if you are getting a destination host unreachable error while trying to ping a host.

What causes ping not to work?

As said earlier, Ping verifies whether a particular IP address is available in the network. The ping request may not be able to send to the IP address or receive corresponding Echo Reply messages. Hence, it results in the request to return futile.

However, a couple of factors may be responsible for the problem. Some are:

  • Windows Defender Firewall interference – You may experience issues with pinging if the Windows Defender Firewall is impeding the process. Ping does not work when Windows Firewall does not allow the File and Printer Sharing app to run. Also, ping may not work when Firewall blocks all incoming connections on your network path.
  • Host or destination IP does not exist – If the IP address you want to verify for availability is not identified or does not exist, the ping request won’t work. So, you may encounter problems with ping if the host or target IP does not exist.

Other factors not highlighted above may also be responsible for ping not working. Hence, we’ll help you with steps to fix the issue and enable ping on your device.

How can I enable ping in Windows 10?

1. Use Windows Firewall with Advanced Security

  1. Press Windows + R key to open the Run dialog box, type firewall.cpl in the text field, and click OK to open Windows Defender Firewall.
  2. Click on Advanced settings from the right pane.
  3. Click on Inbound Rules, find and right-click on File and Printer Sharing (Echo Request – ICMPv4 – In) that has a Public Profile, then click on Enable Rule from the drop-down.
  4. To know if you have successfully enabled File and Printer Sharing (Echo Request – ICMPv4 – In), check the Enabled tab and confirm if it says Yes.

Enabling the File and Printer Sharing (Echo Request – ICMPv4 – In) option will allow your computer to ping and whether a particular IP address is available in the network or not.

Check our guide on Firewall disabled but still blocking apps on Windows 10 for more information.

2. Allow File and Printer Sharing through Windows Firewall

  1. Press Windows + R key to open the Run dialog box, type firewall.cpl in the text field, and click OK to open Windows Defender Firewall.
  2. Click on the Allow an app or feature through Windows Defender Firewall option.
  3. Click the Change settings button.
  4. Check the box for File and Printer Sharing, and click OK to save the changes.

Checking the box for File and Printer Sharing enables the ping functionality on your computer.

3. Use PowerShell

  1. Left-click the Start button, type PowerShell, and click Run as administrator.
  2. Click Yes on the User Account Control prompt.
  3. Copy and paste the following lines of commands and press Enter:  netsh advfirewall firewall add rule name="Allow ICMPv4" protocol=icmpv4:8,any dir=in action=allow   netsh advfirewall firewall add rule name="Allow ICMPv6" protocol=icmpv6:8,any dir=in action=allow

The above commands will enable the ping functionality, allowing your Windows PC to respond to ping requests.

You can check our guide about PowerShell not showing the full output and some fixes to get it working if you experience it.

4. Use the Command Prompt

  1. Left-click the Start button, type Command Prompt, and click the Run as administrator option.
  2. Click Yes on the User Account Control (UAC) prompt.
  3. Type the following lines of commands and press Enter to run them: netsh advfirewall firewall add rule name="ICMP Allow incoming V4 echo request" protocol=icmpv4:8,any dir=in action=allow
  4. Close the Command Prompt and restart your PC.

The above commands will create two exceptions to allow traffic through the firewall and allow ping requests.

Read our guide on what to do if Command Prompt keeps crashing on your PC.

In addition, our readers may be interested in ways to fix Cannot Ping computers on the same Network on Windows 10.

If you have further questions or suggestions concerning enabling ping on Windows 10, kindly drop them in the comments section.

Caps Lock Reversed: 6 Ways to Get It Back to Normal

Users can control how the keyboard functions as Caps Lock works. For instance, when the Caps Lock key is on, the keyboard is meant to type capital letters. In the same way, when it is off, the keyboard types small letters.

However, some users complain about the Caps Lock keys working in reverse order on their PC. It makes it confusing to type correctly. Also, you can read our guide on Caps Lock and Num Lock keys becoming stuck after a recent Windows update.

Why is my Caps Lock reversed?

Many factors may be responsible for the Caps Lock working in reverse on the computer. Some notable causes are:

  • Hardware issues with the Keyboard – The keyboard may suffer physical damage causing it to malfunction. Also, some keys not working on the keyboard can interfere with other keys. So, you can experience Caps Lock functioning in reverse if the Shift key or Caps Lock is stuck.
  • Connection issues – The keyboard may malfunction if it is not connected correctly to your computer. It can cause it to be unresponsive or impede some of its functionality, resulting in issues like Caps Lock not working.
  • Outdated Keyboard device driver – Users may experience issues with the Caps Lock key on their keyboard if the keyboard driver is outdated. It prevents the keyboard from performing efficiently, resulting in problems.
  • Issues with the keyboard settings – Some configurations in the keyboard settings can cause some of its keys not to work. So, Caps Lock may not function if there’s a settings issue affecting it.

These causes may vary on different computers. Nonetheless, we’ll take you through how to fix the issue and get your keyboard to work properly.

What can I do if my Caps Lock is reversed?

Try the following preliminary checks:

If the issue persists, go ahead with the solutions below:

1. Check if the Caps Lock key is stuck

  1. Left-click the Start button, type on-screen keyboard in the text box, then click on the best match.
  2. Find the Caps Lock key and check if it is highlighted in blue. If it is, then it means it’s stuck.

The Caps Lock key on your keyboard can sometimes malfunction if the key is stuck. So, check if the key is stuck. You can do this by pressing the key to feel if it’s hard when you push it down.

Also, if you’re not sure of the texture of the key, try the steps above. You can also repeatedly tap on the Caps Lock key to repair a stuck Caps Lock key and check if it helps.

2. Run the Keyboard Troubleshooter

  1. Press Windows + I key to open the Settings app.
  2. Select the System and click Troubleshoot.
  3. Select Other troubleshooters on the right pane.
  4. Click on the Keyboard and select the Run button beside it.
  5. Follow the on-screen instructions, then restart your PC to save these changes.

Running the Keyboard Troubleshooter will find and repair issues affecting the keyboard device. Check how to fix mouse and keyboard issues on Windows 11 for more steps.

3. Configure the Keyboard settings via the Ease of Access Center

  1. Left-click the Start button, type Accessibility, then click on the Accessibility Keyboard settings.
  2. Select the Keyboard option under the Interaction tab on the left.
  3. Toggle off the switch for the Use Filter Keys option.
  4. Close the page and check if the Caps Lock reverse issue persists.

The Use Filter Keys option is an accessibility feature that tells the keyboard to ignore brief or repeated keystrokes. So, disabling it allows the keyboard to obey and perform the key functions as it is pressed.

4. Run the SFC and DISM to repair damaged system files

  1. Left-click the Start button, type Command Prompt, and click the Run as administrator option.
  2. Click Yes on the User Account Control (UAC) prompt.
  3. Type the following and press Enter: sfc /scannow 
  4. Type the following commands and press Enter after each: DISM /Online /Cleanup-Image /RestoreHealth
  5. Restart your PC and check if the Caps Lock reverse issue persists.

Running an SFC scan will detect and repair corrupt system files that may be causing the problem. Check how to fix the run as administrator option if it’s not working on your PC.

5. Update your Keyboard drivers

  1. Press Windows + R keys to prompt the Run window, type devmgmt.msc, and click OK to open the Device Manager.
  2. Expand the Keyboards entry, right-click on the Keyboard devices, then select Update driver from the drop-down menu.
  3. Click on Search Automatically for the updated driver option.
  4. Repeat the procedure for other drivers on your PC.

Updating the keyboard driver will fix bugs affecting the device and install new features to improve its performance. Check our guide for more steps for updating drivers on Windows 11 if you have any issues.

Another possibility for updating your keyboard driver is using third-party software that automatically obtains the latest updates from its repository after a comprehensive scanning process.

⇒ Get Outbyte Driver Updater

6. Reinstall the keyboard device

  1. Press Windows + R keys to prompt the Run window, type devmgmt.msc, and click OK to open the Device Manager.
  2. Click the Keyboards entry, right-click on your Keyboard device, and then select Uninstall device from the drop-down menu.
  3. Click Uninstall in the confirmation box and wait for the process to complete.
  4. Restart your PC to automatically install the missing driver.  

Uninstalling the keyboard device will resolve corrupt files and data, settings issues, and other keyboard-related issues that may cause the Caps Lock reverse problem.

In Conclusion, our readers may be interested in how to fix the keyboard not allowing double letters when typing on Windows 11. Also, we have a detailed guide on keyboard typing numbers instead of letters and how to fix it.

If you have more questions or suggestions, kindly drop them in the comments section.

Xbox LFG Not Working: How to Access It

The Xbox console allows users to play their favorite Xbox games by themselves and with other players. The feature responsible for this is the Looking For Group in Xbox. It allows you to connect with other available players online.

Sadly, players report that the Xbox LFG (Looking For Group) is not working on their consoles, preventing them from accessing other players. Likewise, we have a detailed guide on ways to fix Your Account doesn’t match your Dev Environment error on Xbox.

Why is the Xbox LFG not working?

The Looking For Group feature in the Xbox console not working has no definite cause, but some speculative factors that may be responsible for it are:

  • Network connection issues – To connect with other players online, you must connect to a stable and fast network connection. So, issues with the network connection on Xbox can prevent the console from accessing the Looking For Group network, resulting in the error.
  • Xbox server issues – The Xbox servers are responsible for the connection between the console and its Xbox database. If the communication can’t establish itself, it can cause the Looking For Group feature not to work and other issues.
  • Old/corrupt Cache – Players can encounter the Xbox Looking For Group unable to send request error due to corrupt cache files on their console. It affects how the console works and can cause it to malfunction.

Nonetheless, we’ll help you with some basic steps to fix Xbox Looking For Group not working.

How can I fix Xbox LFG if it’s not working?

Before proceeding with any advanced troubleshooting steps, go through the following:

  • Check the Xbox servers status – We recommend you check for the Xbox server status to know if there’s any official statement regarding the issue. You can visit the Xbox server status page to check for any updates regarding the server and how to fix it.
  • Fix network congestion on your PC.
  • Restart your PC and Xbox console.
  • Check for Router Firmware updates – Go through your router manual for router Firmware update procedures. Likewise, you may contact the manufacturer for guidance on how to update your router.
  • Submit a console repair request – Navigate to the Device service and repair page to submit a repair request and wait until you get a response.

If you can’t fix the error, follow the steps below:

1. Restart Windows in Safe Mode

  1. On the sign-in screen, tap the Shift button while pressing the Power button.
  2. Press the Shift button to open the Advanced Recovery Options window.
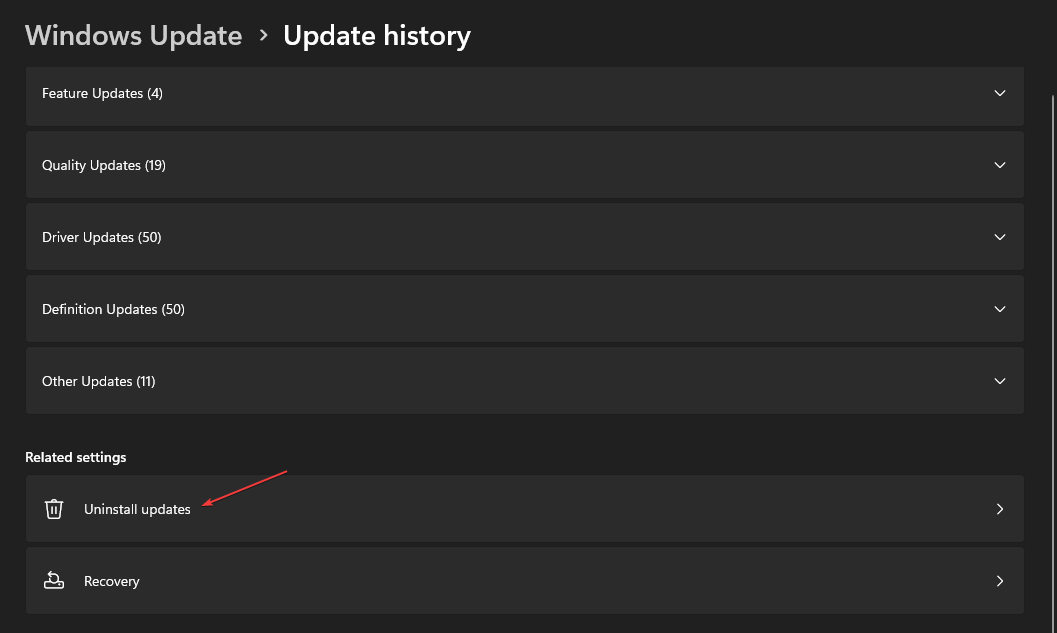
  3. Select Troubleshoot, then select the Advanced options.
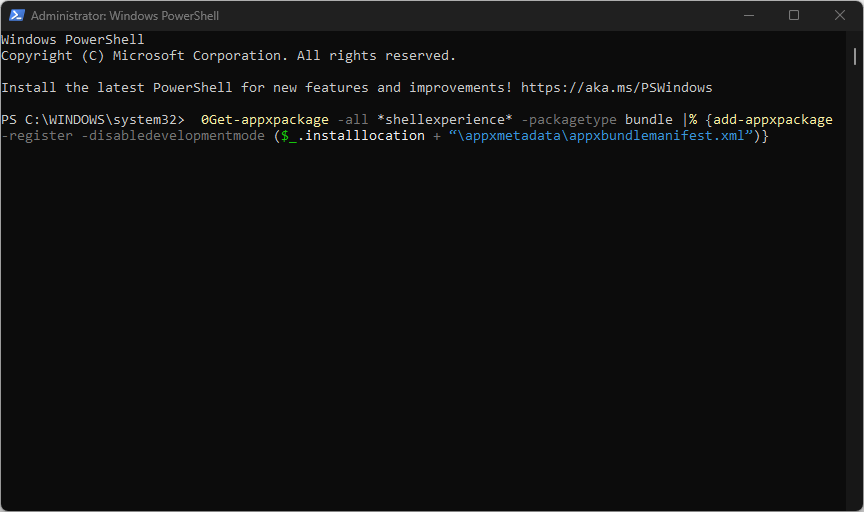
  4. Click on Startup Settings and select Restart.
  5. Press 4 to Enable Safe Mode.

Restarting Windows in Safe Mode will resolve startup issues that may affect the Xbox app on your PC.

2. Reset the Xbox console

  1. Power on your Xbox console and press the Xbox button on the controller to prompt the guide overlay.
  2. Select the System menu and click on Settings.
  3. Click on System to expand it and select Console info from the drop-down.
  4. Click on Reset Console.
  5. Choose between Remove everything or Reset and keep my games & apps.

The Remove everything will delete all data and games, while the Reset console option will restore default factory settings.

In addition, we have a detailed guide on what to do if you can’t add a user to a friends list on Xbox. Also, our readers may be interested in the Xbox error code 80153048 and how to fix it.

Conclusively, the solutions outlined in this guide should help troubleshoot Xbox LFG not working problem. Should you have further issues after this, kindly drop a comment in the section below.

0x800b0003: What Does It Mean & How to Fix It (7 Ways)

Error code 0x800b0003 is a Windows Update error code that can occur when you try to install Windows updates manually. This error indicates a problem with the digital signature verification of the downloaded update file. 

In this guide, we will discuss the methods to get rid of the error right after talking about the causes of the issue. Let’s start! 

What causes the error code 0x800b0003 on Windows 11? 

There could be several reasons for this error code to appear; some of the common ones are:

  • Internet connectivity – If your computer is not connected to the internet or if you have a slow internet connection, then the system may not be able to verify the digital certificate, hence the error.
  • Corrupted or missing system files – If the system files important for the digital signature verification process are damaged or missing, the error code may appear.
  • Digital certificates outdated – The digital certificates can become obsolete, or their associate certified authority can be revoked, causing the error.
  • Security software interference – The antivirus software can interfere with the digital certificate verification process, causing the error to occur.

What can I do to fix the error code 0x800b0003 on Windows 11?

Before engaging in advanced troubleshooting steps, you should consider performing the following checks:

  • Restart your computer.
  • Remove unnecessary external peripherals.
  • Check your internet connection.

1. Run the Windows troubleshooter

  1. Press Windows + I to open Settings.
  2. Go to System, then click Troubleshoot.System - Troubleshoot - 0x800b0003
  3. Now, click Other troubleshooters.Troubesshooter
  4. Under the Most frequent section, go to Windows Update and click Run.Windows Update Run
  5. Follow the on-screen instructions to fix the error.

2. Reset the Windows Update service

  1. Press the Windows key, type CMD, and click Run as administrator.DOS COmmand Prompt
  2. Copy and paste the following commands one by one and press Enter after every command: net stop wuauserv net stop cryptSvc net stop bits net stop msiserver Ren C:\Windows\SoftwareDistribution SoftwareDistribution.old Ren C:\Windows\System32\catroot2 Catroot2.old net start wuauserv net start cryptSvc net start bits net start msiserver
  3. Restart your computer once the process is complete.

3. Use the Disk Cleanup

  1. Press Windows + R to open the Run console.Cleanmgr Run command -0x800b0003
  2. Type cleanmgr and press Enter to open Disk Cleanup.
  3. On the Disk Cleanup: Drive Selection dialog box, select the drive and click OK.Cleanmgr 2
  4. Next, click Clean up system files.Cleanmgr 3
  5. Again on the Disk Cleanup: Drive Selection window, select the drive and click OK.
  6. Click OK on the next window.Cleanmgr 4
  7. Next, click Delete Files.Cleanmgr 5

4. Update drivers

  1. Press Windows + R to open the Run window.Device Manager RUN COMMAND
  2. Type devmgmt.msc and press Enter to open Device Manager.
  3. Check all the devices and look for the yellow exclamation mark next to them. 
  4. If there is an exclamation mark, right-click on it and select Update drivers.Graphics Driver update
  5. Click Search automatically for drivers on the next window.Update driver 2 -0x800b0003
  6. Follow the on-screen prompts to complete the process.

5. Disable Antivirus software temporarily

  1. Press the Windows key, type Windows Security, and click Open.Windows Security open
  2. Go to Virus & threat protection.
  3. Under Virus & threat protection settings, click Manage Settings.Manage settings -0x800b0003
  4. Toggle off the switch for Real-time protection.Real time protection off

6. Launch Windows in safe mode

  1. Press Windows + I to open Settings. 
  2. Go to System, then click Recovery.System - recovery
  3. Now, under Advanced startup, click Restart.Advanced Startup -0x800b0003
  4. On the Choose an option window, click Troubleshoot.Choose an option - Troubleshoot
  5. Click Advanced Settings on the Troubleshoot page.Advanced options
  6. On the Advanced Settings page, select Startup Settings.Startup settings
  7. Click Restart.
  8. On the next screen, you can enter Safe mode; select the designated key.
  9. Once in safe mode, try to install the update again.

7. Restore the PC using System Restore

  1. Press Windows + R to open the Run window.restore point run command - 0x800b0003
  2. Type rstrui and press Enter to open the System Restore window.
  3. Select Choose a different restore point on the System Restore window and click Next.Next Choose a different restore point - 0x800b0003
  4. Select the restore point from the list and click Next.Choose a point
  5. Click Finish, and Windows will restore your computer to the chosen point.Finish Restore point

So, these are methods you need to take to get rid of error code 0x800b0003. If nothing worked for you, try reinstalling your Windows on your computer to fix the problem. If you have questions or concerns, please let us know in the comments section below.

TCPIP.sys on Windows 10: How to Fix This Blue Screen Error

Tcpip.sys is a driver file associated with Transmission Control Protocol over Internet Protocol. It is a library of rules for connecting various devices over the internet. This system file allows internal hardware components to communicate with other programs and operating systems. If this file gets corrupted or incompatible, it can cause system errors, including TCPIP.sys blue screen error. 

This guide will cover all the methods to fix the issue after discussing the causes. Let’s get started!

What causes the tcpip.sys blue screen error on Windows 10?

There are several reasons for this blue screen error on Windows 10; some of the common ones are: 

  • Improper installation of software – If software installation is interrupted in between, it might not work correctly and can cause errors like this. To fix this error, reinstall the application.
  • Outdated driver – If the network drivers are corrupt or outdated, you might see this BSOD error. To fix this, you need to update the drivers on your computer.
  • Conflicting antivirus settings – If you use third-party antivirus, and some of the settings are incompatible, you might get this error. 
  • Windows update – Sometimes, a newly installed bad Windows update could cause issues, including this BSOD error. You need to uninstall it to fix the problem.

What can I do to fix the tcpip.sys blue screen error on Windows 10?

Before engaging in advanced troubleshooting steps, you should consider performing the following checks:

1. Reset the TCP/IP 

  1. Go to the search bar, type CMD, and click Run as administrator. Command Prompt Windows Run as Administrator
  2. Click Yes on the UAC prompt. 
  3. Copy and paste the following command and press Enter: netsh int ip resetcmd_netsh -tcpip.sys windows 10
  4. The process will take some time to finish; restart your computer to let the changes take effect. 

2. Run the troubleshooter

  1. Press Windows + I to open Settings. 
  2. Go to Update & Security.Update security -tcpip.sys windows 10
  3. From the left pane, select Troubleshoot.
  4. Under Find and fix problems, locate Blue Screen and click Run the troubleshooter. The troubleshooter will look for errors and issues. windows-10-BSOD-troubleshooter - tcpip.sys windows 10
  5. If any errors are found, the troubleshooter will automatically fix them. Once done, restart your PC. 

3. Update the network driver 

3.1 Update drivers manually

  1. Press Windows + R to open the Run console. Device Manager RUN COMMAND - how does power outage affect computer
  2. Type devmgmt.msc and press Enter to open Device Manager.
  3. Locate the Network adapters section and expand it. You will get a list of drivers, right-click on the first one and select the Update driver. Update driver Network Adapters - tcpip.sys windows 10
  4. On the next window, click Search automatically for drivers. Search automatically for drivers
  5. Follow the onscreen instructions to complete the process. Then, repeat the process for all the drivers listed under the Network adapter section. 

3.2 Use a third-party tool

Updating drivers manually can be time-consuming and troublesome. Therefore, it is advised to use a third-party driver updater to keep the drivers updated. One such reliable driver updater tool is Outbyte Driver Updater. It can efficiently scan your computer to find outdated drivers and download the latest ones within a few minutes. To update drivers using Outbyte Driver Updater, follow these steps: 

  1. Download and install Outbyte Driver Updater.
  2. Launch the tool and click Scan. 
  3. Once the scan is complete, it will show you the list of outdated drivers. Select the driver you want to update and click the Update driver. Outbyte Driver Updater update driver
  4. The tool will then download and install the compatible drivers. 
  5. Follow the onscreen prompts to complete the process. 

4. Disable web protection in Antivirus 

  1. Launch your antivirus tool from the system tray or shortcut. For demonstration purposes, we are using Avira antivirus.
  2. Click Security from the left pane. Security -tcpip.sys windows 10
  3. Go to the Protection options module. 
  4. Now under Web Protection, click OFF to disable it. Web protection

5. Update BIOS

5.1 Check the BIOS version

  1. Press Windows + X to open the context menu and select Command Prompt(Admin). 
  2. Type the following command and press Enter: wmic bios get smbiosbiosversionBIOS -tcpip.sys windows 10

5.2 Download BIOS update 

  1. Locate the device model or serial number and go to your manufacturer’s support page or download center.
  2. For demonstration purposes, we have used HP support. The steps may vary for other devices. Product selection -tcpip.sys windows 10
  3. Enter the serial number; when the product is detected, go to the Software and Drivers tab. 
  4. Click All Drivers, locate the BIOS file, and check if it is the same version as shown in Command Prompt. If not, download the file.Software drivers
  5. If it is a zip file, extract it and copy it to a USB flash drive. 

5.3  Update BIOS

  1. Connect the USB drive and boot your computer. 
  2. Press Windows + I to open Settings. 
  3. Go to Update & Security. Update security
  4. Click Recovery, then under Advanced startup, click Restart now. Recovery Restart -tcpip.sys windows 10
  5. On the Choose an option screen, click Troubleshoot.Choose an option - Troubleshoot- tcpip.sys windows 10
  6. On the next screen, click Advanced options. Advanced options
  7. Now click UEFI Firmware settings.UEFI 2
  8. Click Restart. UEFI Restart
  9. Choose an appropriate option to enter BIOS.
  10. Once in BIOS, look for the BIOS update option and select it.BIOS update process
  11. Now select the file from the USB drive and start the update process.

6. Perform a memory test.

  1. Go to the search bar, type Windows Memory Diagnostic, and click Open.
  2. On the next window, select Restart now and check for problems.restart now
  3. Your computer will restart automatically, and the Windows Memory Diagnostic tool will run.memory-diag-tool -tcpip.sys windows 10
  4. When the process completes, your computer will restart again.
  5. You will get an error report once you are logged in.

So, these are methods that you need to follow to fix the TCPIP.sys BSOD error on Windows 10. Try them and let us know what worked for you in the comments below.
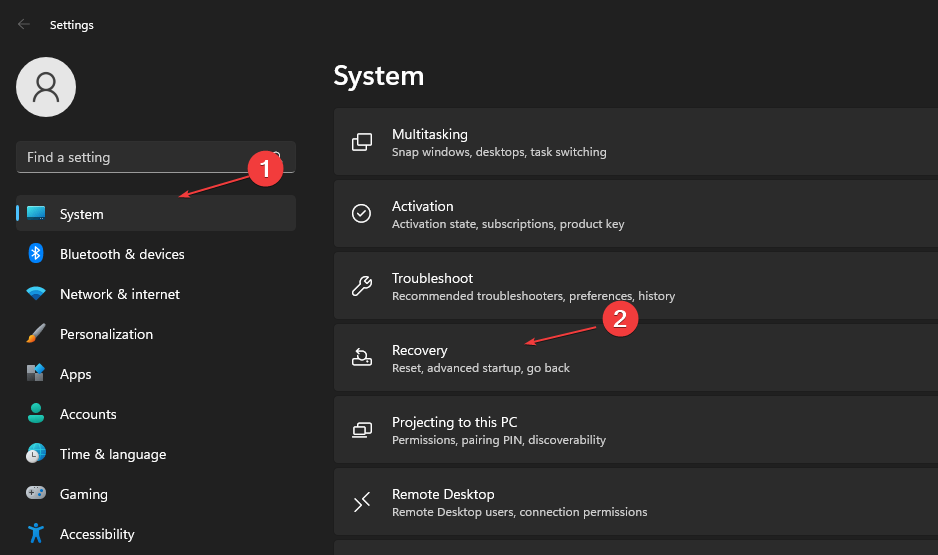
How to Show Seconds in System Clock on Windows 10

The system clock on Windows computer shows hours and minutes by default. However, if you want it to show seconds as well, it can be done.

This guide will discuss two ways to configure the system clock to show seconds on Windows 10. Let’s get started! 

What can I do to configure the system clock to show seconds on Windows 10?

1. Use the Command Prompt

  1. Go to the Search bar, type CMD, and click Run as administrator.Command Prompt Windows Run as Administrator -show seconds in system clock windows 10
  2. Copy and paste the following command and press Enter: powershell.exe Set-ItemProperty -Path HKCU:\Software\Microsoft\Windows\CurrentVersion\Explorer\Advanced -Name ShowSecondsInSystemClock -Value 1 -Force
  3. If you don’t see the changes immediately, then restart your PC.

2. Use the Registry Editor

2.1 If the ShowSecondsInSystemClock DWORD is present

  1. Press Windows + R to open the Run window.REGEDIT RUN COMMAND
  2. Type regedit and press Enter to open Registry Editor.
  3. Follow the path: Computer\HKEY_CURRENT_USER\Software\Microsoft\Windows\CurrentVersion\Explorer\Advanced
  4. Locate and double-click ShowSecondsInSystemClock DWORD and change the Value data to 1.Advanced value data
  5. Click OK. Restart your computer to let the changes take effect.

2.2 If the ShowSecondsInSystemClock DWORD is not present

  1. Press Windows + R to open the Run window.Regedit -
  2. Type regedit and press Enter to open Registry Editor.
  3. Navigate to this path: Computer\HKEY_CURRENT_USER\Software\Microsoft\Windows\CurrentVersion\Explorer\Advanced
  4. Right-click on the right pane, select New, then click DWORD(32-bit Value).New key 1 -show seconds in system clock windows 10
  5. Now, right-click the DWORD and select Rename. Name the DWORD ShowSecondsInSystemClock.Rename the DWORD
  6. Double-click the DWORD and change the Value data from 0 to 1.Value data change
  7. Click OK. Restart your computer to let the changes take place.

So, these are methods that you can follow to show seconds in the system clock on Windows 10. Try them and let us know which worked for you in the comments below.
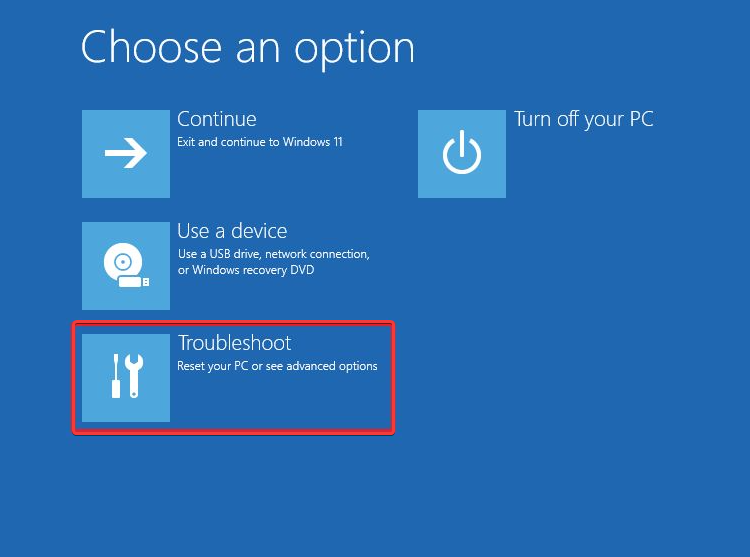
SharePoint Edit Web Part Not Allowed: How to Enable It

Microsoft SharePoint is one of the most popular team collaboration tools, which enables users to create and manage websites, lists, document libraries, etc. No matter how useful the platform is, it is not free from errors.

One such error that users generally encounter is the edit web part option not available or grayed out. This means you are not allowed to edit certain web parts on the SharePoint site. This guide will cover all the possible solutions to fix the issue along with the reasons for its occurrence. Let’s get started! 

What causes the SharePoint edit Web Part not allowed error?

There are several reasons why the option is not available for your account; some of the popular ones are mentioned here: 

  • Browser cache and cookies – If the permissions for your user account were changed recently and you can’t access the option. The reason why the SharePoint website is not showing the edit web part option could be browser cookies and cache. To fix this, you need to clear cookies and cache.
  • Permission issues – Every user account needs certain permissions to access the SharePoint site and make changes to it. If don’t have the necessary permissions to customize or edit the web part, you won’t get the option to edit it.
  • Locked or customized web parts – If the web part you are trying to edit is locked or customized, then you might not get the option to edit it.
  • Browser extensions – Certain extensions on your browser can interfere with the SharePoint site, which could make the option unavailable. To fix this, you need to remove the conflicting ones.

What can I do to fix the SharePoint edit web part not allowed error?

1. Verify permissions

  1. Go to SharePoint and log in with your user account.
  2. Click the gear icon to open the Settings menu from the top right corner.Settings menu
  3. Select Site settings.
  4. Under Users and Permissions, click Site permissions.Site settings page -Sharepoint Edit Web Part not allowed
  5. On the Permissions tab, click Check Permissions.Check permissions 1
  6. Under the User/Group field, enter a name or email address and click Check Now to check the permissions levels for the site.Check NOW
  7. If you don’t have the necessary permissions, proceed to the next step.Check permissions
  8. Go to Permission Levels.Permission levels
  9. Click Add a Permission Level and add the permissions accordingly to enable the edit web part option for your user account and click Create. If you can’t access these settings, contact the admin.Add Permission level

2.  Check if the web part is locked or customized

  1. Go to the site where the web part which you want to edit is located.
  2. Locate and click the Edit option from the right corner to open the website in Edit view.Edit option
  3. Now, hover over the web part you want to edit. You will see the options to Move, Edit, Duplicate, and Delete the web part.Edit web part -Sharepoint Edit Web Part not allowed
  4. If you see the web part is locked or customized, then you need to have it unlocked to edit it. For that, you need to contact the SharePoint site admin or the person authorized to customize the web part.

3. Delete browser cache and cookies 

  1. The steps to delete browser cache and cookies for browsers are similar. Here, we will demonstrate the steps for Chrome.
  2. Click on three dots, and click Settings.Settings CHrome
  3. Go to Privacy and security and click Clear browsing data.Clear cache -Sharepoint Edit Web Part not allowed
  4. On the Clear browsing data pop-up, select Cookies and other site data, & Cached images and files. Now, click Clear data.Clear data
  5. If the issue persists, restart your browser or open the SharePoint site on a different browser.

4.  Disable browser extensions

  1. Launch Google Chrome. Click on three dots, and select Settings.
  2. Go to Extensions.Extensions
  3. Disable or remove extensions one by one and check if the issue persists.Remove extensions -Sharepoint Edit Web Part not allowed

5. Activate SharePoint Server Publishing Infrastructure and SharePoint Server Publishing

  1. Click the gear icon to access the Settings menu.
  2. Go Site settings.Settings menu
  3. On the Site settings page, locate Site Collection Administration.Site collection -Sharepoint Edit Web Part not allowed
  4. Now click the Site collection features link.
  5. Go to the SharePoint Server Publishing Infrastructure option and click Activate.Infrastructure Activate
  6. Now go back to the Site settings page, and locate Site Actions.
  7. Click the Manage site features link.Site features
  8. Go to the SharePoint Server Publishing option and click Activate.Server publishing

6. Contact SharePoint admin or Microsoft admin center

If none of the above steps worked for you, contact your SharePoint administrator via email or other means provided by the company for further assistance. Explain the complete scenario, along with the steps and relevant details that you have taken to fix the issue. This helps them understand the situation better and help you efficiently.

You can also go to the Microsoft Admin Center Support page and raise a service request to fix the issue if there is nothing wrong with the settings

So, these are the steps that you need to take to fix the SharePoint edit web part not allowed on SharePoint. If you have any questions or concerns about SharePoint, feel free to mention them in the comments section below.
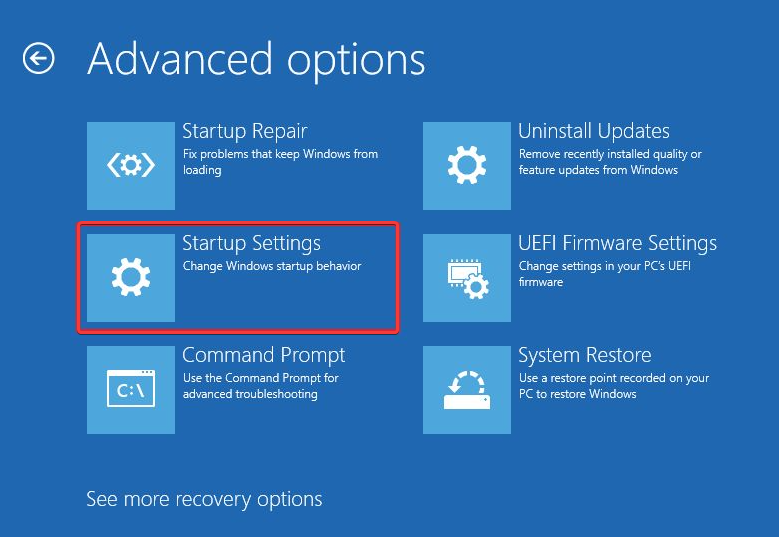
Imm32.dll: What is It & How to Fix It If It’s Missing?

You are not alone if you have encountered an imm32.dll missing error when launching apps or games. In this guide, we will discuss what imm32.dll is and what we can do to fix the missing DLL error. Let’s get started! 

What is imm32.dll? 

The imm32.dll is a DLL file used by the Microsoft Windows Input Method Manager program. The DLL file controls various input methods, including input commands from your mouse/keyboard on your computer, and turns them into actual processes on your device.

Like other DLL files, it is helpful for your Windows computer, and it is advised not to delete the imm32.dll file. Without it, your computer might not be able to access some files and throw you an error, such as imm32.dll is missing.

What causes the imm32.dll is missing error?

There could be various reasons why your computer can’t find imm32.dll; some of the common reasons are:

  • Malware infection – When your computer is infected with viruses or malware, it could cause the DLL to get corrupted or deleted. To remove the infection, run a malware scan using a reliable antivirus tool.
  • Deleted accidentally – If you have uninstalled a program that used an imm32.dll file, it is possible that file got deleted. Hence the error.
  • Bad sector on the hard drive – Bad sectors on the hard drive cause a lot of issues; one such issue could be the DLL file missing.
  • The DLL file got corrupted – If the DLL file got corrupted or damaged, you might not be able to use the file. So, when you try to launch an app or game that uses the DLL file, you may get the error.

What can I do if imm32.dll is missing? 

Before engaging in advanced troubleshooting steps, you should consider performing the following checks:

1. Run a malware scan

  1. Press the Windows key, type Windows Security, and click Open.Windows Security open -imm32.dll
  2. Go to Virus & threat protection and click Scan options.V& T
  3. Now select Full scan and click Scan now.Full scan -
  4. The app will scan, find the infection, and will prompt you to remove it.

2. Run an SFC scan

  1. Press the Windows key, type CMD, and click Run as administrator.CMD elevated
  2. Type the following command and press Enter: sfc/scannowSFCSCANNOW CMD
  3. Once the process is complete, restart your computer.

A practical alternative for this Windows process is to run a dedicated repair application that can totally diagnose your PC and repair imm32.dll missing issues like a charm.

3. Reregister the DLL file

  1. Press the Windows key, type CMD, and click Run as administrator.
  2. Copy and paste the following command and press Enter: regsvr32 IMM32.DLLIMM32DLL register
  3. Restart your PC and launch the application to see if the issue persists.

4. Download the DLL file manually

  1. Go to the DLL website.
  2. Select the version that works for your Windows computer.ZIP FILE DOWNLOAD imm32.dll
  3. Download the zip file. Once downloaded, extract the zip file and save it to an accessible location.
  4. Now navigate to this path: C:\Windows\System32
  5. Locate imm32.dll; if present, rename it as imm32old.dllimm32dll locate
  6. Copy and paste the newly downloaded DLL file.
  7. Now open CMD with admin rights using the step mentioned in method 2 or 3, type the following command, and press Enter: regsvr32 IMM32.DLL
  8. Restart your computer.

5. Restore your computer to the last good known configuration

  1. Press the Windows key, type Control Panel, and click Open.Control Panel
  2. Select View by as Small icons or Large icons and click Recovery.Recovery Control Panel
  3. Under Advanced recovery tools, click Open System Restore.open system restore imm32dll
  4. On the System Restore window, click Next.Click Next
  5. Place a checkmark beside Show more restore points. 
  6. Select the restore point and click Next.System restore Show more restore points
  7. Click Finish to complete the process. Your computer will restart and restore to the point chosen.

6. Reinstall the Microsoft Visual C ++ Redistributable package

  1. Press Windows + R to open the Run box.Appwiz.cpl
  2. Type appwiz.cpl and press Enter to open Programs and Features. 
  3. Go through the list, select Microsoft Visual C ++ Redistributable, and click Uninstall.C++ 2015 imm32dll
  4. Delete all the other variants. Go to the Microsoft website to download the Microsoft Visual C ++ Redistributable.C++ new install
  5. Download the file and double-click it to run the installation file.
  6. Follow the on-screen instructions to complete the process. 

So, these are the methods you can follow to fix the imm32.dll missing error. Try them and let us know what worked for you in the comments section below. 
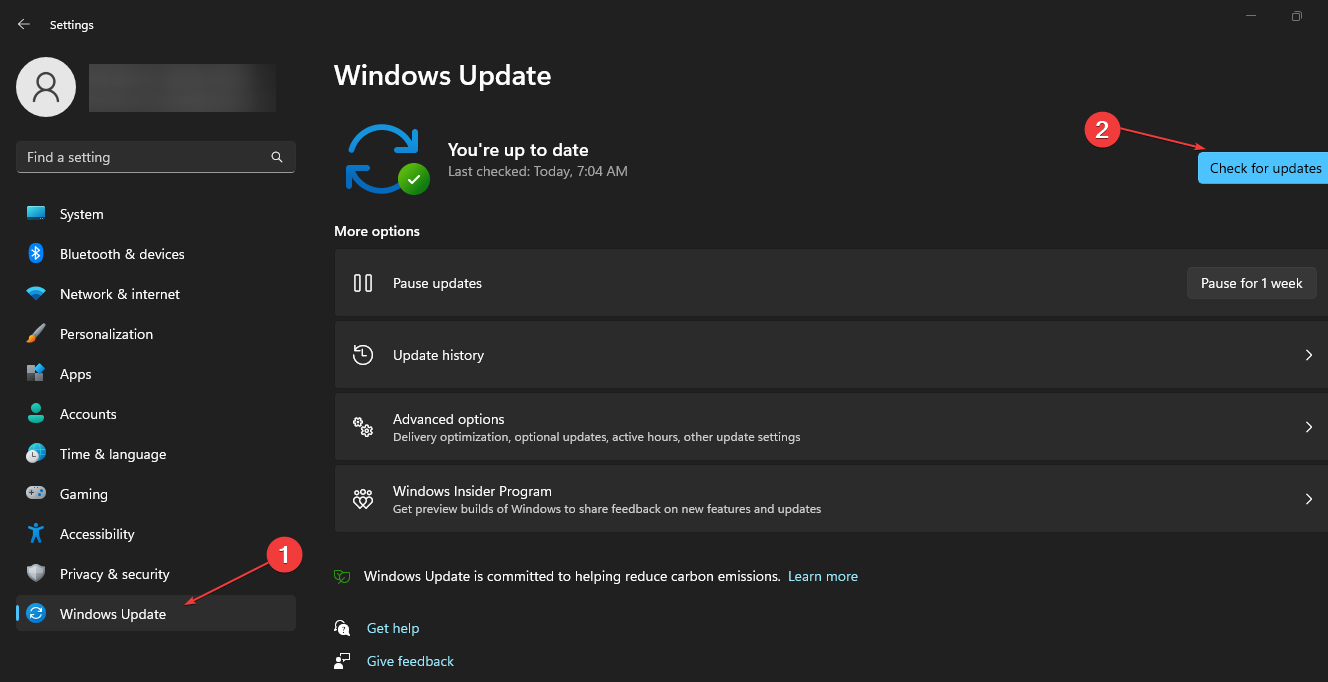
Memory Refresh Timer Error: How To Fix It in 4 Steps

Memory refresh is a process that allows you to maintain the data stored in DRAM (dynamic random-access memory) by reading and writing it over a period of time. It is a background maintenance process that is important for the functioning of DRAM. 
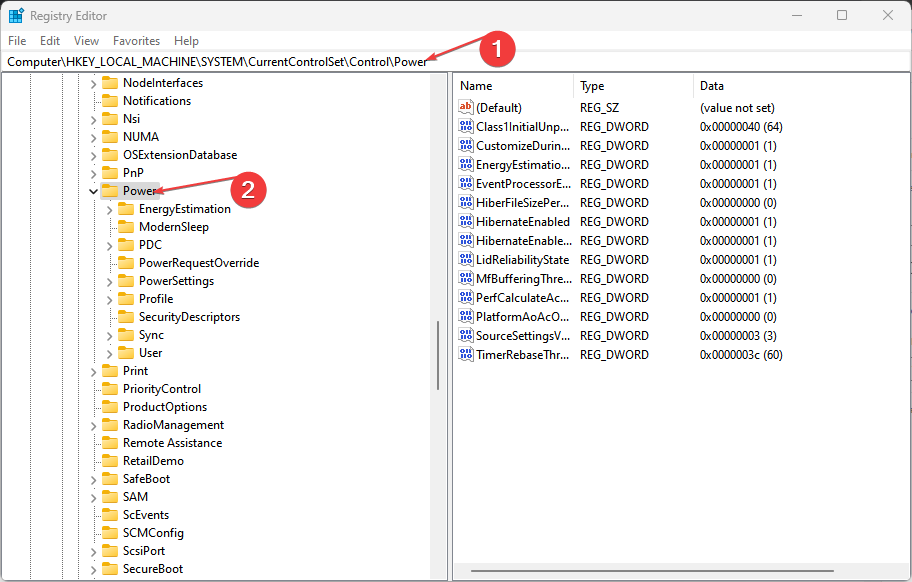
A memory refresh timer error occurs in the computer memory when the memory controller in the computer fails to refresh the DRAM cells within a period. In this guide, we will help you identify the causes and provide you with solutions to fix the issue.

What causes the memory refresh timer error? 

There can be various reasons for the error; some of the common ones are mentioned here: 

  • Corrupted RAM – If your RAM is corrupted or damaged, it could cause a refresh timer error. You can run a memory diagnostic tool to check the problem.
  • Motherboard issue – A motherboard controls the refresh timer, and if it malfunctions, it can cause an error.
  • BIOS issue – If the BIOS is not up to date or has a problem with BIOS, then a refresh timer error can appear.
  • Overheating –  If the computer is overheating, you can face all kinds of issues, including this error.
  • Power supply issue – If your computer is not getting a proper power supply, it could result in a refresh timer error.

What can I do to fix the memory refresh timer error? 

Before engaging in advanced troubleshooting steps, you should consider performing the following checks:

  • Check your computer for physical damage
  • Check the power supply unit and power cable
  • You should also check all the ports for connection.
  • If your computer can still boot to Windows, backup before starting the process.
  • An uninterrupted power supply is important, as any interruption could cause BIOS corruption.

1. Check hardware issues 

memory timer refresh error - memory module

If the error has occurred due to hardware issues, you need to check the computer for overheating. First, ensure no dirt or debris on the computer fan; if present, clean it. Also, inspect if the fans are working correctly and if there is adequate ventilation. 

Next, clean the memory module and slot, as the dirt can prevent the connection between the memory module and slot. If this doesn’t solve the issue, you might need to replace the memory module.

2. Update your BIOS

2.1 Download the BIOS file

  1. On a different computer or laptop, go to your motherboard or computer manufacturer’s website and look for the support page or download center. Enter your device model number. For demonstration purposes, we have used the HP support page and entered the product’s serial number.Product selection
  2. Once the product is detected, you will be directed to a different page. Go to the Software and Drivers tab.Software drivers -memory refresh timer error
  3. Click All drivers and download the BIOS file. If it is a zip file, extract it and move it to a USB drive.

2.2  Update BIOS

  1. Connect the USB drive to your faulty computer and boot your computer. If performing these steps on a laptop, ensure the charger is plugged in.
  2. To enter BIOS, press F2, Delete, F8, or the key designated by the manufacturer to enter BIOS.BIOS update
  3. In BIOS, select the option to update BIOS and select it.
  4. Now choose the BIOS update file from your USB flash drive and wait while the BIOS updates. The BIOS firmware update process can differ from manufacturer to manufacturer; you need to check the manufacturer’s website.

3. Perform a memory test 

3.1 If your computer starts up – use Windows Memory Diagnostic

  1. Press the Windows key, type Windows Memory Diagnostic tool, and click Open.Windows diagnostic tool -memory refresh timer error
  2. On the next window, click Restart now and check for problems.restart now
  3. Now your PC will restart automatically, and the Windows Memory Diagnostic tool will run.memory-diag-tool
  4. Once the process is complete, your computer will restart; log in to your computer, and you will get an error report.

3.2 If your computer doesn’t boot – perform a memory test via BIOS

  1. Restart your computer and press the designated key F2, Esc, F10, or DEL, depending on your device manufacturer, to enter BIOS.
  2. Once in BIOS, look for a menu related to System Diagnostics. Under the tab, look for System Test or Memory Test.memory refresh timer error
  3. Follow the on-screen instructions to initiate the test. The memory test will run and check all the areas for errors; this process could take a few minutes to a couple of hours.
  4. Once the test is complete, you will get the result. You may have to replace the memory module if there are any errors. However, if there are no errors, exit the BIOS and proceed to the next step.

4. Reinstall the operating system

You might have to reinstall the operating system to fix the problem if nothing has worked for you. To reinstall the operating system, you can follow these steps: 

4.1 Create an installation media

  1. On a different computer or laptop, go to the Download Windows 11 page on Microsoft website.
  2. Under Create Installation media, click Download now.Create Windows installation media
  3. Double-click the downloaded file and click Yes on the UAC prompt.
  4. Insert the USB drive, and make sure the USB drive has 8 GB of space.
  5. The Windows 11 Setup page will appear; click Accept to agree to the license terms.Accept the terms memory refresh timer error
  6. On the Select language and edition window, choose Language, Edition, and click Next.Windows 11 edition
  7. On the Choose which media to use window, select USB flash drive and click Next.Click Next media
  8. Follow the on-screen instructions and click Finish.

4.2 Reinstall Windows 11 on your PC

  1. Insert the USB drive and restart your computer. 
  2. The computer will start, press the designated key for BIOS; it could be F2, Esc, F10, or DEL, depending upon the device manufacturer.
  3. When prompted, change the boot order and choose it to restart using USB. You will be instructed to press any key to continue booting.
  4. Once your computer restarts, you will get the screen to install Windows 11.
  5. Choose the Language to install, Time and currency format, and keyboard or input method. Once you have made a choice, click Next.English US
  6. Follow the on-screen instructions, and click Install on the last screen to start the installation. Please wait for a few minutes to complete the process.Install nowv-memory refresh timer error

So, these are the steps you need to follow to fix the memory refresh timer error. Try them and let us know what worked for you in the comments below.

ChatGPT will include customization in the future

Microsoft-financed OpenAI addressed the future of its ChatGPT product & its customization in a blog post. The AI research laboratory said that it’s working on a feature to let users customize the way they use the chatbot in the wake of the controversy surrounding its political bias.

“This will mean allowing system outputs that other people (ourselves included) may strongly disagree with. Striking the right balance here will be challenging–taking customization to the extreme would risk enabling malicious uses of our technology and sycophantic AIs that mindlessly amplify people’s existing beliefs.”

Previously, ChatGPT faced accusations of anti-Trump biases and a leftist propaganda tool. When users asked the bot to write a poem admiring the former president, the chatbot rejects the request, but when a similar command is directed towards Joe Biden, it wrote every word flawlessly. 

The news arrived amidst an attempt to improve the world’s first AI-powered search engine Bing by Microsoft, which invested in the start-up company at least $1 billion back in 2019.  

How will customization work in ChatGPT?

Answers on ChatGPT are developed in two phases. After the bot trains using large Internet text datasets, human reviewers review smaller data with guidelines, which they’re still struggling with. 

“We believe that AI should be a useful tool for individual people, and thus customizable by each user up to limits defined by society. Therefore, we are developing an upgrade to ChatGPT to allow users to easily customize its behavior.”

This new update will rely on public input on defaults and system behaviors, and its extensive collaboration with external bodies to conduct third-party safety audits. 

What do you think about this controversy? Let us know in the comments!

Microsoft caps Bing Chats at 50 per day and 5 per session

After a flurry of incidents where researchers and journalists were able to get Bing Chat to become “emotional,” spill internal information, or just get confused, Microsoft has made a notable change in the new Bing “based on feedback from you all:”

Starting today, the chat experience will be capped at 50 chat turns per day and 5 chat turns per session.  A turn is a conversation exchange which contains both a user question and a reply from Bing.

Our data has shown that the vast majority of people find the answers they’re looking for within 5 turns and that only ~1% of chat conversations have 50+ messages.  After a chat session hits 5 turns, people will be prompted to start a new topic. At the end of each chat session, context needs to be cleared so the model won’t get confused. Just click on the broom icon to the left of the search box for a fresh start. As we continue to get feedback, we will explore expanding the caps on chat sessions.

While disappointing, it’s probably most surprising that Bing Chat didn’t start out locked down this way as it’s still in its very early stages and prone to maybe not so much abuse but over-curiosity, at least.

While Microsoft may be over-compensating for what are probably a few well publicized glitches in an otherwise promising new technology, it’s good to see the company get an early handle on the issues as it plans to ramp up entry into the program. Bing Chat is still a long way from being ready for the world, as promising as it is, and these kinds of adjustments are not only necessary but expected.

Are you in the “Copilot for the web” Bing Chat preview? Let us know in the comments below.


Virtual Disk Service Error Delete is Not Allowed [Fix]

The Virtual Disk Service Error: Delete is not allowed error message can appear when you try to delete a protected volume from a hard drive on Windows.

The system volume includes boot volume, crashdump volume, pagefile volume, and hibernation volume.

These are vital for your operating system’s function, and deleting them could make your PC unbootable. 

This guide will discuss the expert-recommended fixes to resolve the issue after discussing the causes.

What causes the Virtual Disk Service Error: Delete is not allowed?

There could be various reasons why the error appears; some of the common ones are:

  • Deleting protected system volume – If you are trying to delete boot, crashdump, pagefile, and hibernation volume, then you will get this error.
  • Wrong disk partitions – If you have marked a wrong volume as the boot, system, pagefile, or crashdump, then this error could appear.
  • Disk errors or corruption – If there are errors on the disk or if the disk is corrupted, it could cause the Virtual Disk Service to fail and display the error message.
  • Disk management software issue – If you have an incompatible disk management software on your computer, then this error may appear. You need to uninstall the disk management tool.

What can I do to fix the Virtual Disk Service Error: Delete is not allowed?

Before engaging in advanced troubleshooting steps, you should consider performing the following checks:

  • First, remove your HDD and place it back in the slot.
  • If you input the wrong volume, retry to delete partitions again with the correct volume number.
  • Create a restore point.

1. Use the Command Prompt

  1. Press Windows + R to open the Run console.CMD 1
  2. Type cmd and hit Ctrl + Shift and Enter together to open Command Prompt with administrator rights. 
  3. Copy and paste the following command and press Enter to boot your computer into Windows Recovery Environment: reagentc /boottoreReboot virtual disk service error delete is not allowed
  4. Restart your computer.
  5. On the Choose an option window, click Troubleshoot. Choose an option - Troubleshoot
  6. Now select Advanced Options. Advanced options
  7. Click Command Prompt. 
  8. Enter the recovery key to proceed. 
  9. Now on the command prompt window, type the following commands one by one and press Enter after every command: diskpart List disk Select disk 0 List partition Select partition 1 Delete partition Exit

2. Change the boot order

  1. Press Windows + I to open Settings.
  2. Go to System, then click Recovery.System - Recovery Window -virtual disk service error delete is not alloweds 11
  3. Under Recovery options, next to Advanced startup, click Restart now.Recovery Advanced Startup
  4. On Choose an option window, select Troubleshoot.Choose an option - Troubleshoot
  5. On the Troubleshoot page, click Advanced options.UEFI Restart
  6. Now select UEFI firmware settings from the Advanced options.UEFI
  7. Click Restart.UEFI Restart
  8. Choose the appropriate option to enter the BIOS.
  9. Go to Boot Configuration, then click Boot sequence.
  10. Select the connected hard drive or SSD.
  11. Now, go to Exit and click Save changes & Exit.

3. Disable the paging file

  1. Press Windows + R to open the Run window.System properties
  2. Type sysdm.cpl and press Enter to open System Properties.
  3. Go to the Advanced tab, under Performance, and click Settings.Performance Settings -virtual disk service error delete is not allowed
  4. On the Performance Options window, switch to the Advanced tab, and under Virtual Memory, click Change.Change
  5. Remove the checkmark next to Automatically manage paging file size for all drives.
  6. Select the drive partition and click the radio button next to No paging.No paging
  7. Click Set and then OK.
  8. Then, on the Performance Options window, click Apply and OK.Apply
  9. Click OK on the System Properties window to confirm the changes.

So, these are the steps you need to follow to fix the Virtual Disk Service error: Delete is not allowed on the current boot, system, pagefile, crashdump, or hibernation volume. Try them and let us know what worked for you in the comments section.

AI Content Detector: 8 Best That You Can Use Today

AI content detectors are one of the latest development in Artificial Intelligence, which helps you monitor and analyze your digital content efficiently. These tools can flag potentially incorrect, fake content and protect your brand from misuse. 

In this guide, we will discuss some of the best AI content detectors so that you can make an informed decision.

What are the advantages of AI content detectors?

  • Efficient – AI content detectors can process extensive volumes of data in real time and accurately analyze large amounts of content.
  • Content Moderation – These tools can help you moderate user-generated content on websites and social media platforms.
  • Protects Copyrights – The tools can detect & remove unauthorized copies and reposts to help you protect your content.
  • Consistent – AI content detectors consistently provide results and eliminate human error and bias in content analysis.
  • Highly customizable – You can set the AI model to particular data sets for preferred output. For example, you can fine-tune a plagiarism detector on academic papers to keep your literary writing style intact and effectively point out fake content.

What are the best AI content detectors? 

Originality.AI – Most accurate

Originality.AI best AI content detector

This AI content detector comes with a plagiarism checker and an AI detector that can help keep your content plag-free and original. Originality.AI uses ML tech and linguistic analysis to analyze the structure and language of any article to determine its originality.

The platform shows the AI Detection Score in percentage and can even detect the content written by ChatGPT with great accuracy. It doesn’t offer a free trial, so you must sign up and buy the credits to use it. You need to spend $0.01 per credit, and one credit scans 100 words.

It is simple to use as you need to paste the article’s link or the content and choose both AI content detection and Plagiarism options or either to scan. You will get scores between 0-100% to improvise the content to make it user-generated.

More about Originality.AI

  • Allows you to add or remove team members and manage access levels via the Team Management feature.
  • Enables you to keep a complete record of team members’ activity on the tool.
  • Offers a Google Chrome extension and can scan Google Docs for originality.

⇒ Get Originality.AI

Content at Scale – AI-content creator & detector

Content at Scale

Content at Scale has been trained on billions of data pages to accurately predict the text and word strings created by AI generators. Therefore, it can easily detect whether the content is natural or AI, even if you use ChatGPT.

The free AI content detector platform uses ML technology and linguistic analysis to determine whether the content is fake (AI-generated) or real (written by humans). Whether it is SEO content, educational content, academic content, or marketing content, this AI content detector scans the content and displays the results in a few seconds.

The platform is simple to use; you can copy and paste the content and click Check for AI Content to know if the content is real. Content at Scale also has a content creation tool with the same name and uses 3 AI engines, NLP, and semantic analysis to generate content.

More about Content at Scale

  • The tool is reliable as its accuracy falls between 80-85%.
  • Comes with multiple language support.
  • Uses different NLP models to detect AI-generated content.

⇒ Get Content at Scale

GPT Zero -Suitable for educators

GPTZERO - AI CONTENT DETECTOR

GPTZero is a simple and free AI content detector built especially for educators, as it can accurately scan university essays and academic work and detect AI-generated content.

You can choose a file or add text to the box, agree to the terms of service, and click Get Results to learn about your content. It displays scores on the basis of Average Perplexity and Burstiness and highlights the text detected as written by AI.

You can upload multiple files to scan and detect AI-generated content on this AI content detector, and it can give you results for each of them, thus saving you time.

More about GPTZero

  • Uses variables like perplexity to fingerprint AI-generated content.
  • Offers easy-to-use API for organizations.
  • Provides setup and integration support

⇒ Get GPTZero

Writer’s AI Content Detector – Best known for its simple interface

Writer AI Content Detector

The popular AI content generator company Writers developed an AI content detector to skim fake content. This free platform has a simple interface and easily differentiates between AI-generated and human-written content.

You can either paste a URL for an already live blog in Add a URL field or the content in Add some text box and click Analyze text. The tool can analyze only 350 words at a time and provides results in percentage. The AI content detector can be used as a standalone from its website or with the Writer AI content generator plan. The plan starts at $18 per user/month.

More about Writer

  • Comes with dedicated customer support.
  • Has an accuracy of about 80%.
  • It doesn’t require signing up.

 ⇒ Get Writer AI Content Detector

Hugging Face – Best for developers

Hugging Face

Hugging Face is an open-source platform that allows developers to discover and create in the Machine Learning field. This AI detector platform is designed for free use and testing purposes. To test the content for originality, you need to copy and paste the content and hit Submit. The platform will tell you whether it is Fake or Real.

This AI content detection tool is suitable for people who want to test long-form content. It uses a Robustly Optimized BERT Pre-training Approach (RoBERTa)base detector to analyze your content.

More about Hugging Face

  • The tool has a simple interface and is easy to use.
  • It is available for free and open-source.
  • Detects the GPT2 NLP output accurately.

 ⇒ Get Hugging Face

GLTR – Best for analyzing content in depth

GLTR AI Content detection tool

GLTR (Giant Language Model Test Room) is an AI content detector that can visualize the footprint of AI-generated content. It works well in detecting text generated by GPT2 and uses color coding to show the probability of machine-generated content.

To use it, you can enter the text you want to scan and click analyze. It will then display results by highlighting the words in green, yellow, red, and purple colors.

The text most likely generated by AI is displayed in green, followed by yellow. However, if you have more red and purple highlights in the results, then it indicates that it is human-written. With color coding and graphs, understanding the results and analyzing them could be a bit complicated for a normal user.

More about GLTR

  • Works perfectly for detecting GPT2-created text.
  • Can scan scientific abstracts to detect AI content.
  • Enables you to scan GRE text to find AI-generated content

 ⇒ Get GLTR

Copyleaks – Multi-lingual

Copyleaks, a popular plagiarism detector, now has the best AI content detection tool, which can easily detect AI-generated content, including ChatGPT, in different languages, including English, French, Spanish, German, and Portuguese. Also, it can determine the source code and platform used to generate the content.

You can input or paste your content and click the Check button. If the content has AI-generated text, it will be highlighted in red, with the message AI Content Detected written in red.

Copyleaks can detect content generated using almost every NLP model and display it much faster. Also, it has a simple interface, is free, and can be accessed without signing up.

More about Copyleaks

  • Allows you to integrate different types of LMS
  • It has a Google Chrome extension, making it easy to use everywhere.
  • Doesn’t show the results in percentage.

 ⇒ Get Copyleaks

Crossplag – Suitable for SEO

Crossplag works on NLP and machine learning to detect AI-generated content and supports several languages. In addition, it has a bar that shows whether your content is human-written, AI-generated, or a mix of both.

This AI content detector can predict the text’s origin with the help of natural language processing and machine learning algorithms. The tool is trained with a vast data set of content, including both human-written and AI-generated content. This makes it easy for it to check the pattern and characteristics of both and determine the originality of the content.

It works best for educators, publishing houses, and SEO. To check the content’s originality, sign up, paste the text, and click Check. You will get the scores on the bar with the percentage.

More about Crossplag

  • Supports LTI integrations.
  • Comes with an inbuilt plagiarism checker.
  • Simple tool with moderate accuracy

 ⇒ Get Crossplag

So, if you’re looking for the best AI detector, you will definitely find it in the list above. Some are free and don’t need you to sign up to use them. Try any of them, and let us know what worked for you in the comments section below.

Windows Developer Platform CVP Kevin Gallo to leave Microsoft

If you’ve watched a Windows “Developer Days” webcast in recent years, you know who Kevin Gallo is. As the face of the popular webcasts touting the latest developer tools and services for building on top of Windows, Gallo is familiar to the developer community, and in a LinkedIn post today he’s announced that he’s leaving after 30 years:

After nearly 30 years working for Microsoft, I made the tough decision this past week to take some time away from my desk at Microsoft. It has been such a great honor and privilege to work with so many amazing people – where together we have invented the technology that everyone uses in their daily lives.  Never in my wildest dreams did I imagine that I could be a part of this all. We’ve made some wonderful products and platforms together – and worked with so many great customers, partners, and developers.  I am so proud of all that we have accomplished. I just sat and stared at some of my Ship It awards – amazed at just how many teams I have been blessed to be a part of – who built products that seemed impossible to create when we started.  Together, we gritted it out, and made something our customers loved.

Whether this move is related to Microsoft’s recent layoffs announcements or not, it’s been a bit of an end of an era to see so many familiar faces move on, and Gallo probably won’t be the last. We wish Kevin all the best (and apologize for the 2016 image!).

Via Mary Jo Foley

Fix: The Function Attempted to Use a Name That is Reserved (0x80071a90)

Several of our readers have reported the error code — the function attempted to use a name that is reserved for use by another transaction. This error has been reported to appear when Windows can’t be installed or during the installation of the .NET framework in Windows.  

What causes the Windows error 0x80071a90?

The error code 0x80071a90 can be triggered by a myriad of reasons. The error can manifest when trying to add the Hyper-V feature in Windows 10 as -Hyper-V the function attempted to use a name that is reserved for use by another transaction– error message.

Other causes responsible for this error are:

  • Running incompatible programs simultaneously – Runtime errors can be triggered when programs capable of hindering the Windows Update are being run in the background. Closing some of these programs should fix the error.
  • Corrupted Memory – If your operating system or graphics driver has virus infections, it can result in a runtime error.
  • Abrupt system shutdown – When the power supply is interrupted due to a power failure, it can also cause the problem.
  • Deletion of essential files – When you accidentally delete a necessary system file or system element entry, it can cause a Windows Update error. You should consider restoring the deleted files before conducting another Windows Update.

Having confirmed any of the above possible causes of the error will make it easy for you to fix the problem by trying the recommended solutions.

What can I do if the function attempted to use a name that is reserved for use by another transaction?

Before engaging in any advanced solutions, you should consider performing the following:

  • Make sure you have enough storage disk space.
  • Disable or uninstall your antivirus software.
  • Disconnect all peripheral devices.
  • Restart your PC.

Having confirmed the above checks, if the problem persists, you can explore the solutions provided below.

1. Run an SFC/DISM Scan

  1. Left-click the Start button, input cmd, and choose Run as administrator.
  2. Type the following command and click Enter: sfc /scannow
  3. Wait for the successful prompt. Then, type the following command and press Enter: DISM /Online /Cleanup-Image /RestoreHealth
  4. Restart your PC after the DISM scan is completed.

After the SFC scan, check if the problem has been fixed. If it persists, you should perform a DISM scan. Alternatively, if you have any issues running the DISM scan on Windows 10/11, check here.

If you want to automate this process, we suggest you try a dedicated tool because it will handle the situation for you.

2. Perform a clean boot

  1. Press the Windows + R keys, input the msconfig, and click OK to open the System Configuration.
  2. Select the Services tab, check the Hide all Microsoft Services box, click Disable all, and select OK.
  3. Click the Startup tab and click Open Task Manager.
  4. Right-click each of the third-party apps and click End task.
  5. Then restart your PC.

If you are unsure about the cause of the error, performing a clean boot might be the best option. You can also check our guide detailing various ways to perform a clean boot on your computer.

3. Run Windows Update Troubleshooter

  1. Press the Windows key + I to open the Settings app.
  2. Next, click on Update & Security.
  3. Select Troubleshoot from the left pane and click Additional troubleshooters.
  4. Expand the Windows Update troubleshooter and click on Run the troubleshooter.
  5. Apply all the fixes discovered by following the on-screen instructions.
  6. Restart your PC.

Running the troubleshooter should fix the Windows Update error code 0x80071a90.

However, if it does not fix your runtime error, you can explore our guide on what to do if you have problems installing updates.

What is the difference between a reserved word and a user-defined identifier?

A reserved word in programming has a specific and defined feature associated with it. There are several of these, for instance, 32 in total in the C language.

An identifier, on the other hand, is generated by the user/programmer to name variables, functions, and arrays. While a reserved keyword can only contain alphabetical characters, an identifier can comprise alphabets, numbers, and underscores.

You can try any of the fixes provided in this article or opt for the suggestions given to fix The function attempted to use a name that is reserved for use by another transaction error in Windows.

Also, before you leave, do not forget to check some quick tips to boost the performance of Windows.

If you have questions or comments, do not hesitate to use the comments section below.

How to activate split screen in Microsoft Edge

Microsoft has some good news for Edge users. Besides the new AI-powered Bing that’s being tested, Edge is currently experimenting with a new split-screen feature. 

When the feature comes to fruition, you can expect the browser to declutter its user interface by grouping pages into one, letting you pair windows together or place them side-by-side & holding just two windows per tab. With only one address bar and several navigation keys on the screen, the update means a much simpler face for the browser. 

Earlier this year, this split-screen feature came to Edge Canary users before making its way to the stable version. 

With that being said, however, it’s safe to say that you can expect to run into some problems. As an experimental functionality in the latest Edge build 110.0.1587.49, some users who’d tried reported that they were not able to drag a tab into another split window and it wasn’t a smooth experience overall. 

If you’re still curious, however, read along to find out how you can activate this feature in the meantime, before the rollout of its general availability. 

How to activate split screen in Microsoft Edge

1. With your Edge browser open, go to the address bar and type edge://flags

2. Scroll down until you find Microsoft Edge Split Screen ➜ Enabled in the dropdown.

3. Hit Restart. 

4. Once restarted, click on the split screen button to try.

5. You can start a tab search or open a new tab. 

6. Now, you can easily switch between the sites!

Do you think this new split screen feature on Edge will help you multitask better? Let us know in the comments!

Fix: You Exceeded Your Current Quota Error on ChatGPT

ChatGPT is a chatbot built on OpenAI’s GPT-3 family of large language models that can understand your conversations and provide meaningful responses. However, our readers complain about Error Code 429: You exceeded your current quota, please check your plan and billing details.

Also, they report the ChatGPT not available for your country error they encounter with the app.

Why do I get the exceed your quota error on ChatGPT?

Many errors affect the ChatGPT program, causing ChatGPT not to work and other issues. You exceeded your current quota, please check your plan and billing details in ChatGPT occurs when you exceed your daily limits.

Furthermore, factors that may cause the error are:

  • The allotted amount of API requests exceeded – The app allocates a certain number of API requests per user on a time frame basis. Hence, if the daily quota is exceeded, the error message appears.
  • Network issues – ChatGPT network error may occur when the app cannot communicate with its servers due to local or server-side problems.
  • Bugs in ChatGPT – The app is fairly new and has yet to undergo a long period of user testing. So, you can encounter the current quota exceeded error on ChatGPT if there’s a bug.

These causes may vary on different computers. However, we have some easy fixes you can use to resolve the error and get ChatGPT.

What can I do if I get you exceeded your quota error on ChatGPT?

Let’s go through some preliminary checks:

  • Fix network congestion on your PC.
  • Close and reopen the ChatGPT app.
  • Restart Windows in Safe Mode and check if you can get past the error.
  • You could also wait for the quota to reset and refill. It will help you use another quota set for the current day.

If the error appears again, proceed with the following solutions.

1. Try using a VPN

  1. Go to Google Chrome Webstore, search for VPN, and select your preferred option. For this example, we opted for ExpressVPN.
  1. Click Add to Chrome and select Add Extension from the pop-up window.
  1. Click the Extensions icon at the top right corner and select your VPN extension. Then power it on and reload the ChatGPT.

A Virtual Private Network connection will create a new proxy and server for the user to browse. It can help fix your exceeded quota error on ChatGPT and allow users to use more API requests.

Our example focuses on Google Chrome due to its popularity, but you may opt for a browser that already has a built-in VPN.

2. Clear your browser’s cache and cookies

  1. Launch your browser. Click three dots to open the Menu, click on More tools, and select Clear browsing data.
  2. Choose a time range for the data to be cleared, then select All time to delete everything.
  3. Check the boxes for Cookies and other site data and Cached images and files, then click Clear data.
  4. Restart the Chrome browser and check if ChatGPT starts working without running into any errors.

Clearing browser caches and cookies will delete the corrupt files interfering with ChatGPT activities.

Alternatively, you can switch to another browser and check if it fixes the ChatGPT you exceeded your current quota error.

Further, you may be interested in fixing ChatGPT’s too many redirects error on your computer or how to up your boosts on Microsoft Copilot.

Recently, many have encountered Too many concurrent requests error in ChatGPT, but we have a dedicated guide that can help you fix it.

Conclusively, if you repeatedly exceed your quota on ChatGPT, you can always try the above fixes. Hence, do leave a comment if you have any questions or suggestions.

0x80248007 Windows Update Error on Windows 11 [Fix]

Microsoft releases updates for the Windows operating system and other components, such as drivers, to improve performance and resolve bugs. Users can download and install these updates on their devices by updating their OS.

However, the process can encounter issues, resulting in error code 0x80248007 and other errors. Since many of our readers have reported this kind of problem, we decided to devise some solutions to solve it for good. So let’s dive in.

What causes the error code 0x80248007?

The error code 0x80248007 on Windows is an update error that occurs when there’s an interference with the download process. Some factors that may be responsible for the error are:

  • Buggy or missing update packages – When the update you’re trying to install is buggy or corrupt, it can cause your system to run into errors during the process. Also, an essential component may be missing in the update package, causing issues with the update process.
  • Issues with Windows update services – The error can occur due to issues with Windows Update services not running correctly on your device. The services involved may have a pending process running, causing it not to interact with the needed components.
  • Unidentified Microsoft Software License Terms – You can run into the error when the update cannot find the Microsoft Software License Terms. It makes it impossible for the update to identify the necessary documents needed for the update process.
  • Corrupt system files – Corrupt system files can cause the update download error to occur on your computer. They impede the smooth installation process.

Also, you may be interested in the Windows Update Error 0x80073701 and ways to fix it.

How can I fix the error code 0x80248007?

Before proceeding with any advanced troubleshooting steps, fix network congestion on your PC, temporarily disable antivirus software, and restart Windows in Safe Mode to check if the error code 0x80248007 persists.

1. Reset the Windows Update components

  1. Left-click the Start button, type Command Prompt, and click Run as administrator.
  2. Click Yes on the User Account Control (UAC) prompt.
  3. Type the following lines of commands and press Enter to run them:  net stop wuauserv  net stop cryptSvc  net stop bits  net stop msiserver
  4. Run the following command one after the other: ren C:\Windows\SoftwareDistribution SoftwareDistribution.old   ren C:\Windows\System32\catroot2 Catroot2.old
  5. Type the following commands and press Enter after each one: net start wuauserv  net start cryptSvc  net start bits  net start msiserver
  6. Exit the Command Prompt and restart your PC.

Resetting the Windows update process helps fix problems causing the Windows update services not to download updates.

2. Run Windows Update Troubleshooter

  1. Press Windows + I key to open the Settings app.
  2. Select System and click Troubleshoot.
  3. Select Other troubleshooters.
  4. Click the Run button beside the Windows Update.
  5. Follow the on-screen instructions and restart your PC.

The troubleshooter will find and repair issues causing the Windows update error code 0x80248007 on your PC.

If you can’t use the steps above, check other ways to run the Windows Update troubleshooter in Windows 11.

3. Verify that the Windows Installer is running

  1. Press Windows + R key to open the Run dialog box and type services.msc, then press Enter to open Services.
  2. Go to Windows Installer and right-click, then select Properties from the drop-down.
  3. Set the Startup type to Automatic and click the Start button. Click the Apply button and OK.
  4. Restart your PC and check if the error persists.

Verifying that the Windows Installer service is running allows the PC to install new programs and updates smoothly.

4. Clear Windows Update cache via Run

  1. Press Windows + R key to open the Run dialogue box, and type services.msc, then click OK to open the Services app.
  2. Double-click Windows Update and select Stop.
  3. Open the File Explorer, and go to the C:\Windows\SoftwareDistribution\Download folder
  4. Press Ctrl + A to highlight every file, then delete.
  5. Press Windows + R key, and type services.msc, then press Enter.
  6. Find and double-click on Windows Update, then click Start.
  7. Restart your computer.

Disabling Windows Update services and clearing the distribution directory will clear the cache file.

5. Verify the relevant Windows Update services

  1. Left-click the Start button, type services.msc, and press Enter.
  2. Double-click the Windows Update service.
  3. Click on the General tab. Ensure the Startup Type is set to Automatic or Manual. Click the Start button under the Service Status bar.
  4. Double-click Background Intelligent Transfer Service (BITS).
  5. Then click on the General tab. Make sure the Startup Type is set to Automatic or Manual, then click the Start button under the Service Status bar.
  6. Restart your PC and check if the error persists.

The above steps will help verify and fix issues with Windows Update Service and the Background Intelligent Transfer Service if they aren’t working.

6. Run an SFC scan

  1. Left-click the Start button, type Command Prompt, and click the Run as administrator option.
  2. Click Yes on the User Account Control prompt.
  3. Type the following and press Enter:  sfc /scannow 
  4. Restart your PC and check if the Windows update error persists.

An SFC scan will find and repair corrupt system files prompting the error code 0x80248007. You can check how to fix the run-as-administrator option if it’s not working on your PC.

7. Disable Windows Firewall

  1. Left-click the Start button, type control panel, then press Enter to open the Control Panel.
  2. Select the Windows Defender Firewall option.
  3. Click the Turn Windows Defender Firewall on or off option.
  4. Go to the Private and Public network settings, then click the radio buttons for the Turn off Windows Defender Firewall (not recommended) option.
  5. Exit the Control Panel and restart your computer.

Disabling the Windows Defender Firewall will fix any problems the firewall is causing in the Windows update process.

8. Run System Restore

  1. Left-click the Start button, type Restore, and click on Create a Restore Point.
  2. Go to the System Protection tab, and click System Restore.
  3. Choose a different system restore and click Next to select a specific Restore Point.
  4. Select the last time you were able to install updates on your PC, and click Next.
  5. Click the Finish button.

System Restore backdates your PC to the Restore Point and fixes issues affecting it. Check how to fix Restore Point if it’s not working and if you have any issues running it.

Conclusively, our readers can check our article for fixing slow Windows updates on Windows 11. Also, we have a detailed guide on Windows Update error 0x8007045b and some fixes.

You might also be interested in our guide on resolving Windows 11 update error 0x8024d001.

Let us know which procedure worked for you in the comments section below.

Invalid Plugin Detected in Adobe Reader: How to Fix it

Adobe Acrobat is one of the best PDF reader applications, and it is available for various operating systems. Lately, users report an error message they encounter when launching Adobe Acrobat Invalid plugin detected. It can sometimes prevent the app from launching.

Also, users complain about the Adobe Acrobat Readers DC not responding on their PC.

What does Invalid Plugin detected mean?

Many plugins and programs on your PC can cause problems with other apps. It can indicate that the services of two programs conflict with each other, resulting in errors.

However, running into the Invalid plugin detected, Adobe Reader DC will quit error on Windows 11 means the process of another program installed on your computer is impeding Adobe Reader from launching.

Also, it may indicate that Adobe is having issues with some of its components.

Why do I get the Invalid plugin detected error?

The Invalid plugin detected Adobe Acrobat Reader DC error popping up when launching the app can be due to some factors other than issues with other programs on the PC. Some of these factors are:

  • Corrupt app files – When essential Adobe Reader installation files are missing or corrupt, it can prevent it from launching or cause Adobe Acrobat internal error to occur.
  • Third-party app interference – Other apps similar to Adobe Reader on your PC can cause the Invalid plugin detected error to appear or other issues.
  • Outdated Adobe Acrobat software – App updates come with patches to fix bugs and improve the app’s performance, and if you don’t install them, that may lead to such errors.

Other factors not mentioned above can cause the error. Nonetheless, we’ll take you through some easy steps to fix it and get Adobe Acrobat working again.

How can I fix Invalid plugin detected Adobe Reader will quit error?

If Adobe Reader still prompts the Invalid plugin error, apply the solutions below.

1. End task for Adobe Acrobat Reader on your computer

  1. Right-click the Start button and select Task Manager from the menu.
  2. Go to the Processes tab. Click on the Adobe Reader app from the list, right-click on it, and click End task from the drop-down menu.
  3. Restart your computer and launch Adobe Reader to check if the error persists.

Ending tasks for the Adobe Reader app on your PC will stop any background process interfering with its functionality. You can check for shortcuts to open Task Manager on your computer.

2. Update the Adobe Reader client

  1. Launch Adobe Reader or Acrobat app on your PC.
  2. Click on Help, then click on the Check for Updates link.
  3. Follow the steps in the Updater window to download and install the latest updates.
  4. After the update is complete, restart Adobe Reader and check if the error persists.

Updating Adobe Reader or Acrobat will fix any bug in the previous version that can cause the error. Also, it will add new features to improve performance.

3. Perform a clean boot

  1. Press Windows + R key to open the Run dialog box, type msconfig, and click OK.
  2. Go to the Services tab and check the box for the Hide all Microsoft services option, and then click the Disable all button.
  3. Go to the Startup tab and click Open Task Manager.
  4. Click on the startup programs and tap the Disable button.
  5. Restart your PC and check if the Adobe Reader error persists.

Performing a clean boot will prevent all startup running programs that can cause the error from running when you start the system.

4. Remove the ComposerPlayerControl.dll file

  1. Press Windows + E to open File Explorer.
  2. Go to This PC and navigate to: C:\Program Files (x86)\Adobe\Acrobat Reader DC\Reader\plug_ins
  3. Find and right-click on the ComposerPlayerControl.dll file, then select Delete from the drop-down.

The ComposerPlayerControl.dll file is known to be a culprit causing issues in the installation file. So, uninstalling it can resolve the error. If the File Explorer sidebar is missing on Windows 11, you may not gain access to This PC.

5. Uninstall the Babylon translation tool

  1. Press Windows + R keys to open the Run window, type appwiz.cpl, and click OK.
  2. Find the Babylon translation tool and click Uninstall.
  3. Confirm your action and wait for it to complete. Then restart your PC.

Uninstalling the Babylon translation tool can fix the error. The Babylon translation tool is a common program that causes issues with Adobe. They conflict when they are installed together on the same PC.

Further, our readers can check our guide on how to fix Adobe Reader not installing on Windows 11.

In conclusion, these steps will help troubleshoot invalid plugin detected in Adobe Acrobat. Should you have more questions or suggestions, kindly drop them below.