Can You Still Play Games on Windows Live on Windows 11?

Games for Windows Live was a service and software developed by Microsoft. It allowed players to use their Xbox Live account on the PC. The service had run for a few years before Microsoft opted for the Xbox GamePass.

Microsoft is constantly updating its services and products to meet today’s gamers’ needs. With Windows 11 being rated as the best gaming OS yet, Games for Windows Live on Windows 11 doesn’t seem to be worth the trouble.

Can you still use Games for Windows Live?

The Games for Windows Live service was officially retired in July 2014, but as with all online services, the platform continued to work and you could access the owned games for a few years after.

In 2020 they took things a step further, by removing the download page from their server, hence making it unable to install the Games for Windows Live client anymore.

You can still access Games for Windows Live in Windows 11 if you are willing to download the last version of the client from a third-party source. You will also need to have the activated games already installed and access them directly because the client won’t open as it doesn’t have any server to connect to.

Some of the Windows Live games are still online, but playing them through the Games for Windows Live on Windows 11 would be just like playing them offline but having the old GFWL overlay.

Is it worth it to use Games for Windows Live?

Though it’s not officially supported, some users have figured out how to still use Games for Windows Live. If you’re feeling sentimental and want to play a section of these games, you can. But you won’t have any support from Microsoft and you have to download the app from a third-party unverified source.

In 2024 Microsoft has become bigger than ever in the gaming industry and they offer a great deal of games through their Microsoft Store. The store is connected to the Xbox Network and so it allows you to play any games you could find on the platform.

Xbox Game Pass is a very affordable service that you can easily access from your Windows 11. You can certainly find all the games that were once part of the Games for Windows Live Marketplace on this new platform. There’s also no mention of Games for Windows Live in Windows 11 support for the future.

With today’s modern game requirements, it’s much better to play on regularly updated platforms such as Steam to avoid crashes and glitches. 

Can I use Windows 11 for gaming?

Yes, Windows 11 is a great operating system for games. Microsoft has improved a lot based on the lessons learned from Windows 10. This operating system is properly optimized and will allow you to play even older games without hiccups.

Windows 11 can run games you would have found on the old Games for Windows Live flawlessly. Not only that but the degree of connectivity is amazing when it comes to games. You can easily add Xbox games to Steam, or use any other gaming platform you might think of.

Windows Game Mode which was launched with Windows 10 is also present. Although seemingly unchanged since that iteration, it comes with better integration with other gaming services.

That’s about it, but we’d love to continue the conversation in the comments section below. Share your thoughts on Games for Windows Live and how it compares to Steam or any other service you use.

Failed to Determine Source Edition Type: 5 Ways to Fix It

When trying to install a Windows update, some users receive the error message, Failed to determine source edition type.

This error is especially seen when trying to upgrade Windows 10 to 21H2. It indicates that the upgrade process fails to identify the edition type of the current version of Windows.

Why do I see failed to determine the source edition type error?

Some of the reasons why you may encounter the Failed to determine source edition type error as you try to install Windows update are:

  • Corrupted Windows installation files – It could be possible that there’s a virus or malware infection, a hardware failure, or a power outage; hence, you see the error.
  • Incompatible software – Incompatible software programs may interfere with the upgrade process and trigger the Failed to determine source edition type error.
  • Conflicting hardware – If the hardware is not compatible with the latest version of Windows, this could affect the upgrade process.
  • Windows registry data is missing – Sometimes, you may encounter a Windows update error due to a missing registry key.
  • Corrupted system files – In some cases, the error may arise during the update installation due to damaged and missing system files.
  • Incorrect time and language settings – Chances are that the time language settings on your PC is not correct.

How do I fix the failed to determine source edition type error?

Before you move on to the main troubleshooting methods below, you may want to try the following:

If the above methods fail to fix the Windows update error, we have a quick rundown of some of the best solutions.

1. Reset Windows update components

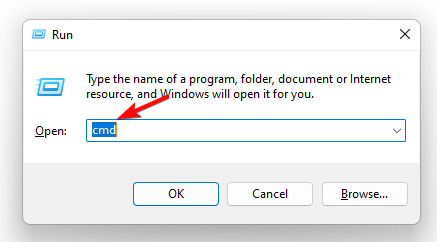
  1. Press the Win + R shortcut keys to launch the Run console. Type cmd and press the Ctrl + Shift + Enter keys together to open the elevated Command Prompt. run cmd command
  2. Now, run the below commands one after another in the Command Prompt (Admin) window and hit Enter:
    • net stop bits
    • net stop wuauserv
    • net stop cryptsvc
    • Del “%ALLUSERSPROFILE%\Application Data\Microsoft\Network\Downloader\qmgr*.dat”
    • Ren %Systemroot%\SoftwareDistribution\DataStore DataStore.bak
    • Ren %Systemroot%\SoftwareDistribution\Download Download.bak
    • Ren %Systemroot%\System32\catroot2 catroot2.bak
    • sc.exe sdset bits D:(A;;CCLCSWRPWPDTLOCRRC;;;SY)(A;;CCDCLCSWRPWPDTLOCRSDRCWDWO;;;BA)(A;;CCLCSWLOCRRC;;;AU)(A;;CCLCSWRPWPDTLOCRRC;;;PU)
    • sc.exe sdset wuauserv D:(A;;CCLCSWRPWPDTLOCRRC;;;SY)(A;;CCDCLCSWRPWPDTLOCRSDRCWDWO;;;BA)(A;;CCLCSWLOCRRC;;;AU)(A;;CCLCSWRPWPDTLOCRRC;;;PU)
    • cd /d %windir%\system32
    • regsvr32.exe atl.dll
    • regsvr32.exe urlmon.dll
    • regsvr32.exe mshtml.dll
    • regsvr32.exe shdocvw.dll
    • regsvr32.exe browseui.dll
    • regsvr32.exe jscript.dll
    • regsvr32.exe vbscript.dll
    • regsvr32.exe scrrun.dll
    • regsvr32.exe msxml.dll
    • regsvr32.exe msxml3.dll
    • regsvr32.exe msxml6.dll
    • regsvr32.exe actxprxy.dll
    • regsvr32.exe softpub.dll
    • regsvr32.exe wintrust.dll
    • regsvr32.exe dssenh.dll
    • regsvr32.exe rsaenh.dll
    • regsvr32.exe gpkcsp.dll
    • regsvr32.exe sccbase.dll
    • regsvr32.exe slbcsp.dll
    • regsvr32.exe cryptdlg.dll
    • regsvr32.exe oleaut32.dll
    • regsvr32.exe ole32.dll
    • regsvr32.exe shell32.dll
    • regsvr32.exe initpki.dll
    • regsvr32.exe wuapi.dll
    • regsvr32.exe wuaueng.dll
    • regsvr32.exe wuaueng1.dll
    • regsvr32.exe wucltui.dll
    • regsvr32.exe wups.dll
    • regsvr32.exe wups2.dll
    • regsvr32.exe wuweb.dll
    • regsvr32.exe qmgr.dll
    • regsvr32.exe qmgrprxy.dll
    • regsvr32.exe wucltux.dll
    • regsvr32.exe muweb.dll
    • regsvr32.exe wuwebv.dll
    • netsh winsock reset
    • net start bits
    • net start wuauserv
    • net start cryptsvc

Once the commands have been executed successfully, the Windows updated files are fixed. Now, exit Command Prompt, restart your PC, and check if the Windows update error is gone.

2. Pause Windows updates

  1. Press the Win + I keys simultaneously to launch the Windows Settings app.
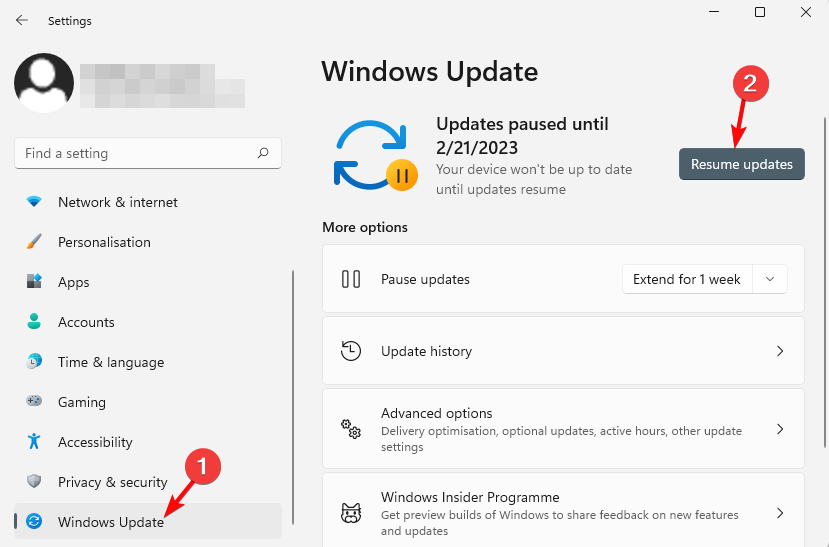
  2. Now, click on Windows Update on the left, and then, on the right, click on Resume updates (if you have already paused the updates). resume windows updates
  3. Reboot your PC, and again open the Settings window (press Win + I ).
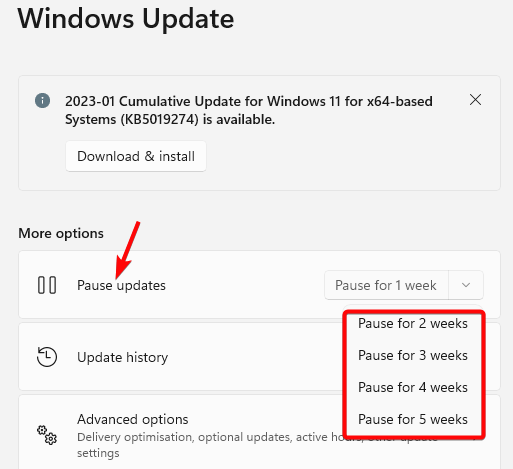
  4. Next, click on Windows Update on the left and go to Pause updates under More options.
  5. Here, select the pause duration from the drop-down, for example, Pause for 1 week, Pause for 2 weeks, etc. pause updates

Once you have paused the Windows updates, close the Settings app, and restart your PC.

Now, check if you can now install the Windows update without seeing the failed to determine source edition type error.

3. Change the Time and Language settings

  1. To open the Settings app, press the Win + I keys together.
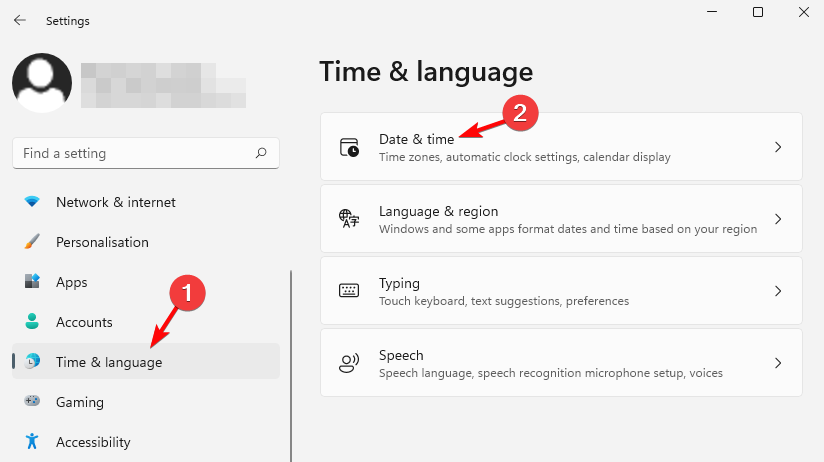
  2. Select Time & language on the left, and on the right, click on Date & time. date and time settings
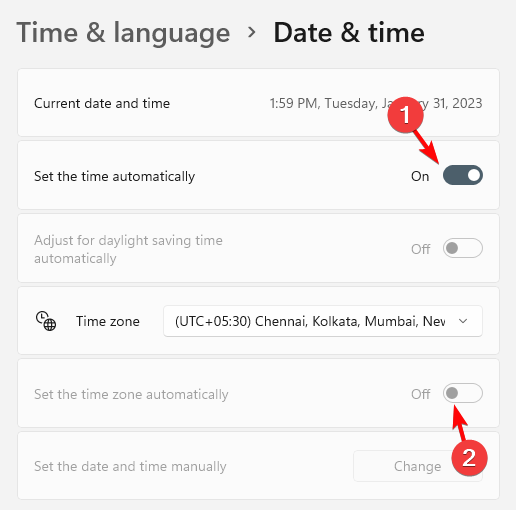
  3. Next, on the right, turn on both the Set the time automatically, and the Set the time zone automatically options. Set the time zone automatically
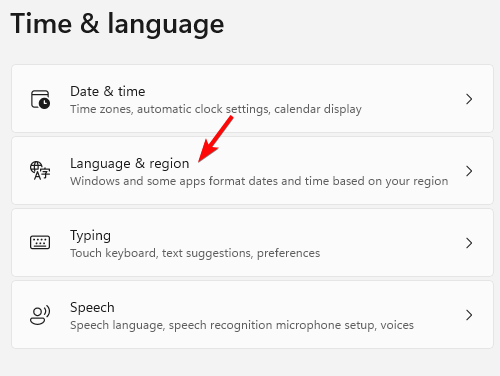
  4. Return to the Time & language page and select Language & region. language and region settings
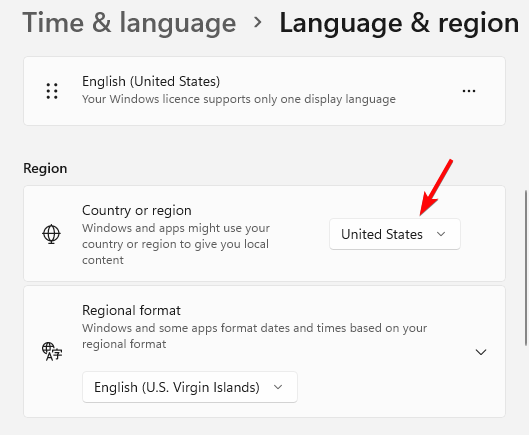
  5. On the next screen, go to Region, and select the correct Country or region. set country or region

Now that you have successfully changed the time and language settings, you should not encounter the Windows update error anymore.

4. Manually delete your Windows Update files

  1. Reboot your PC in Safe Mode. Then press the Win + E shortcut keys to open the File Explorer.
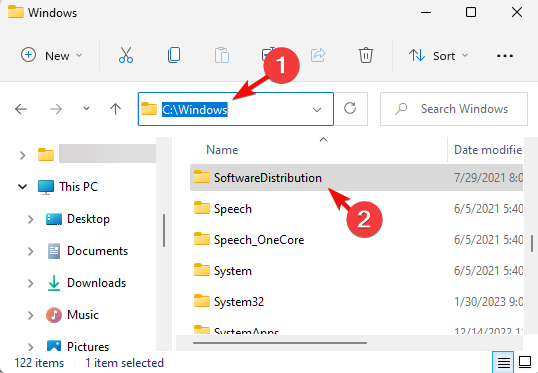
  2. Here, navigate to C:\Windows\.
  3. Now, look for the SoftwareDistribution folder, select it, and hit Delete. delete softwaredistribution folder

Now, close File Explorer, restart your PC, try installing the Windows update, and check if you still encounter the error.

5. Modify the registry settings

Note icon NOTE
Make sure to create a backup of the registry data before you make any changes to the settings.
This will help you to recover any data lost accidentally during the modification.
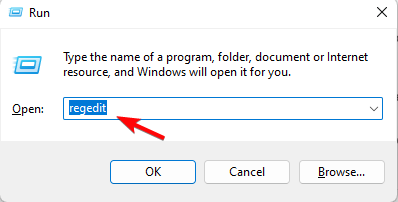
  1. Press the Win + R keys together to open the Run dialog, Here, type regedit and hit Enter to open the Registry Editor. run regedit command
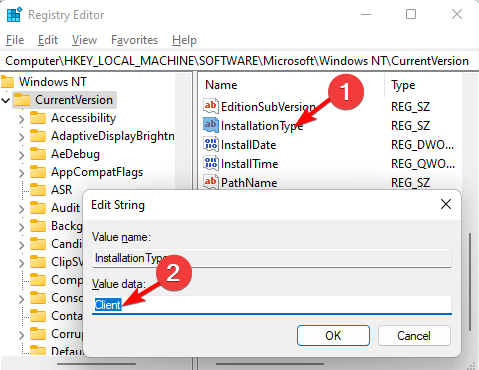
  2. In the Registry Editor window, navigate to the below path: HKEY_LOCAL_MACHINE\SOFTWARE\Microsoft\Windows NT\CurrentVersion
  3. Double-click on the Installation type string and set the Value data field to Client. Press OK. set installation type to client
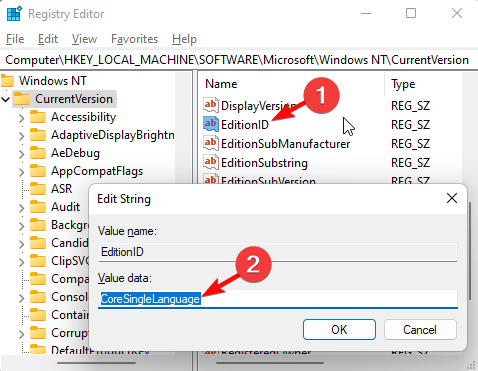
  4. Now, double-click on the EditionID, and set the Value data field to the supported value based on the edition (for example, CoreSingleLanguage in my case). Press OK. set editionid to current edition value

List of supported values for EditionID based on the current Windows edition

Supported ValuesOperating System SKU
BusinessNWindows 10/11 Professional N (49)
CloudEditionCloudEdition (Windows 11 SE (203)
CloudEditionNCloudEditionN (Windows 11 SE N (202)
CoreWindows 10/11 Home (10/111)
CoreCountrySpecificWindows 10/11 Home China (99)
CoreNWindows 10/11 Home N (98)
CoreSingleLanguageWindows 10/11 Home single language (100)
EducationWindows 10/11 Education (121)
EducationNWindows 10/11 Education (122)
EnterpriseWindows 10/11 Enterprise (4)
EnterpriseEvalWindows 10/11 Enterprise Evaluation (72)
EnterpriseGWindows 10/11 Enterprise G (171)
EnterpriseGNWindows 10/11 Enterprise G N (172)
EnterpriseNWindows 10/11 Enterprise N (27)
EnterpriseNEvalWindows 10/11 Enterprise N Evaluation (84)
EnterpriseSWindows 10 Enterprise LTSC (125)
EnterpriseSEvalWindows 10 Enterprise LTSC Evaluation (129)
EnterpriseSNWindows 10 Enterprise LTSC N (162)
HolographicWindows 10 Holographic (136)
IoTUAPWindows 10 IoT Core (123)
IoTUAPCommercialWindows 10 IoT Core Commercial (131)
IoTEnterpriseWindows 10/11 IoT Enterprise (188)
PPIProWindows 10 TeamOS (119)
ProfessionalWindows 10/11 Professional (48)
ProfessionalEducationWindows 10/11 Professional Education (164)
ProfessionalEducationNWindows 10/11 Professional Education N (165)
ProfessionalWorkstationWindows 10/11 Professional for workstation (161)
ProfessionalNWindows 10/11 Professional for workstation N (162)
ProfessionalSingleLanguageWindows 10/11 Professional Single Language (138)
ServerRdshWindows 10/11 Enterprise multi-session (175)

Besides you must also check if your internet connection is stable. Because if the network is poor, it can cause issues while downloading and installing Windows updates.

Alternatively, change the DNS server to Google’s Public DNS address and see if this helps you eliminate the Failed to determine source edition type error.

Or, you can run the system file checker utility to repair any corrupted system files or replace any missing files.

If none of the above methods works, you can perform a repair upgrade of Windows 10, which should fix the Windows update error.

For any further queries related to the Windows update process, do let us know in the comments section below.

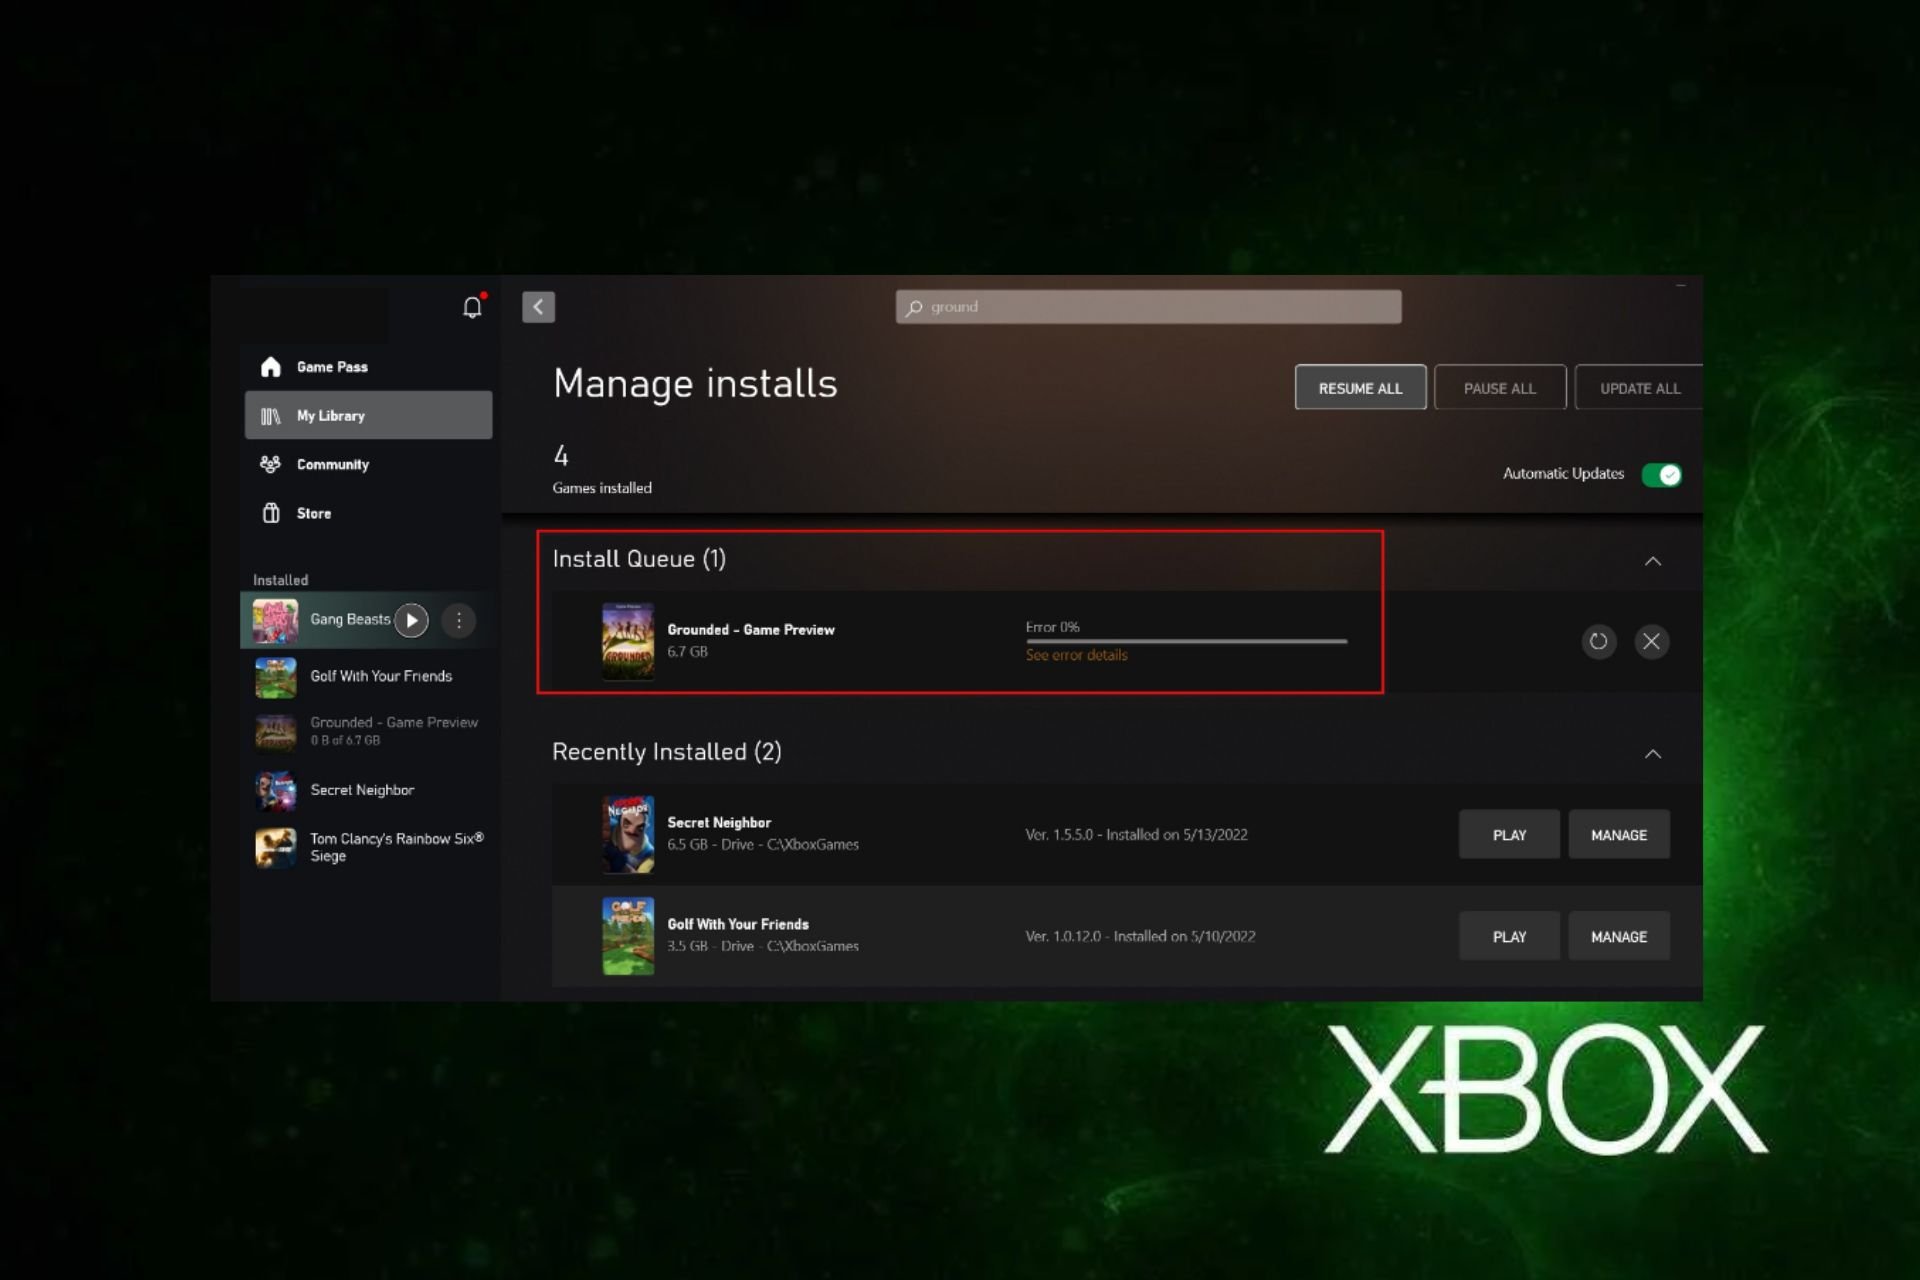
Slow Downloads in Xbox App: How to Speed Them up

The Xbox app for PC allows Windows operating system users to access and play Xbox games on their PCs. Users can download their favorite games and other items on the Xbox app to improve their game experience.

However, many users complain about the Xbox app’s slow download when trying to install games. Also, our readers can check our guide on easy fixes for Xbox App not launching games on Windows 11.

Why is the download speed slow on my Xbox app?

The Xbox app not downloading at full speed on Windows 11 can occur for many reasons varying from issues with the Xbox app and your PC. Some probable causes are:

  • Network connection issues – Having issues with network congestion on your computer can slow down the download process on the Xbox app. Connection issues like network congestion can impede download speeds and result in errors.
  • Other download processes running in the background – When you have more than one download process simultaneously running on your computer, it can cause the Xbox app to download items slowly. Also, other download processes can use the bandwidth available, leaving little or none for the Xbox app.
  • Outdated Xbox app and other issues with the Xbox app – Running an outdated Xbox app on your PC can affect its performance, causing it to malfunction and not interact with the system. Also, issues with the Xbox Insider Program and Game services on your PC can cause slow download on the Xbox app.

These factors may vary on different devices. Hence, we’ll take you through some basic steps to speed up Xbox app downloads on your PC.

What can I do to increase the download speed on my Xbox app?

Before proceeding with any advanced steps, try the following:

  • Close other programs running on your computer.
  • Restart the Xbox app and retry the download.
  • Power cycle your router or modem.
  • Restart Windows in Safe Mode and check if the slow download persists.
  • Check for Router Firmware updates –  we recommend you go through the router manual and check the process for router Firmware update. Also, you can contact the manufacturer for help on how to update your router.

If you can’t fix the issue, proceed with the solutions below.

1. Restart the Xbox services and Gaming Services

  1. Left-click the Start button, type Services, and click on the app from the search results.
  2. Find the Gaming Services, right-click on them and select Restart from the drop-down.
  3. Find the following Xbox services in the list: Xbox Live Auth Manager, Xbox Live Game Save, and Xbox Live Networking Service, right-click, and select Restart from the drop-down.

Restarting Xbox Services and Gaming Services refreshes your PC’s Xbox and gaming components. Read our guide on downloading the Xbox gaming services app on your PC.

2. Update the Xbox app

  1. Right-click the Start button and select the Microsoft store.
  2. Click on Library in the bottom left corner, then click on the Get Updates option.
  3. Check if any update is available, then download and install the update.
  4. Restart the Xbox app and check if the issue persists.

3. Turn Off/On downloads from other PCs

  1. Press Windows + I key to open the Settings app.
  2. Select Windows Update from the menu and select Advanced options.
  3. Click on Delivery Optimization.
  4. Toggle off the Allow downloads from other PCs option.

The Delivery Optimization feature can perform different functions on different devices depending on the circumstances. So, turn it off if it’s running on your computer or vice versa.

Conclusively, our readers can read about the  Xbox app not launching games in Windows 11 and how to fix it.

Browser Not Working on Windows 11: How to Fix This

Surfing the internet is one thing we all engage in our day-to-day activities. It allows us to use web apps to access more features and functionality and browse new ideas and the latest content. However, many users complain about the browser not working on their Windows 11 PC, preventing them from using the internet.

Alternatively, our readers can check our guide on the best lightweight browsers for Windows 11.

Why are browsers not working on Windows 11?

Many factors may be responsible for browsers not working on Windows 11. They can range from issues with your computer to browsers. Some notable factors that can cause the issue are:

  • Network connection issues – When you’re experiencing difficulties connecting to the internet on your PC, it can cause apps like browsers to stop working. Also, network congestion can cause the browser not to access the necessary web data to connect to URLs. Hence, the browser may launch but not connect to the internet.
  • Outdated browser app – Running an outdated Web browser app on your computer can cause issues with its activities. It is due to bugs and old components in the browser causing it not to respond or work. So, if the browser can’t access needed updates and patches, it can cause issues with its functionality.
  • Interference from extensions – If your web browser has extensions not compatible with its current version, it can affect its performance. Also, the web browser not being supported by the add-ons you just installed can cause it to be unresponsive and not work.
  • Corrupt system files – If there’s a corrupt file on your computer, it can affect the activities of the browser. Corrupt system files may impede the browser’s access to the necessary resources on your PC, causing it not to work as expected and may sometimes result in a crash.

Other factors, like faulty installation files, may be responsible for the browser not working on your PC. Nonetheless, we’ll take you through some fixes to get your browser working on Windows 11.

What can I do if browsers are not working on Windows 11?

Before proceeding with any advanced troubleshooting steps, try the following:

  • Power cycle your router and reconnect your computer.
  • Temporarily disable third-party antivirus software on your PC.
  • Restart Windows in Safe Mode and check if your browser works.

If you can’t get the browser to work or respond, proceed with the following solutions.

1. Perform a clean boot

  1. Press Windows + R key to open the Run dialog box, type msconfig, and click OK.
  2. Go to the Services tab and check the box for the Hide all Microsoft services option, and then click the Disable all button.
  3. Go to the Startup tab and click Open Task Manager.
  4. Click on the startup programs and tap the Disable button.
  5. Restart your PC and check if your browser works.

Performing a clean boot on your PC will prevent apps running on startup that can cause the error from running when you start the computer.

2. End tasks for background apps using the Windows Settings

  1. Press the Windows + I key to open the Windows Settings app.
  2. Select Apps from the left menu and select Installed apps.
  3. Select the apps to end the task, tap on the three dots, and click Advanced options.
  4. Go to Background app permissions, click the drop-down button, and select Never. Repeat the process for all apps you want to restrict background permissions.

The above steps end the activities of other programs running on your computer that may interfere with your browser performance. Check ways to turn off background apps in Windows 11 if you have issues using the steps above.

3. Update your browser

  1. Launch the browser on your PC, click three dots to open the Menu and select Settings.
  2. Then, click on About Chrome. Click on Update Google Chrome. If there’s an update available, it’ll update automatically.

Updating Google Chrome will fix bugs causing the browser not to work and install the latest features to improve its performance.

Note icon NOTE
The above steps may differ on other browsers. Hence, consult your browser’s customer support for the procedure to update the browser.

4. Disable browser extensions

  1. Open the browser on your PC and click three dots to open the Menu. Go to More tools and then click on Extensions.
  2. Disable all extensions by toggling off the switch for each.
  3. Restart your browser and check if the browser functions perfectly.

We recommend you enable your Chrome extensions one after the other to find the faulty one.

5. Troubleshoot Network Adapter

  1. Left-click the Start button, type in Troubleshoot settings, and click on it to open the Troubleshooter.
  2. Click on Other troubleshooters.
  3. Select the Network Adapter and click on Run beside it.
  4. Select a network from the Select the network adapter to diagnose tab, then Next.
  5. Wait while it runs. Check the diagnosis and see if it identifies the problem.

Troubleshooting the network adapter on your PC helps detect any network-related issues and suggests possible solutions to get it working.

6. Clear your Browser’s Cache and Cookies

  1. Launch the browser on your PC and click three dots to open the Menu. Navigate to More tools and select Clear browsing data.
  2. Choose a time range as All time to delete everything. Check the boxes for Cookies and other site data and Cached images and files, then click Clear data.
  3. Restart your browser and check if the browser works.

Clearing your browser caches and cookies will delete the corrupt files interfering with the browser’s performance and preventing it from working on Windows 11.

7. Update Windows Operating System

  1. Press Windows + I key to open the Windows Settings app.
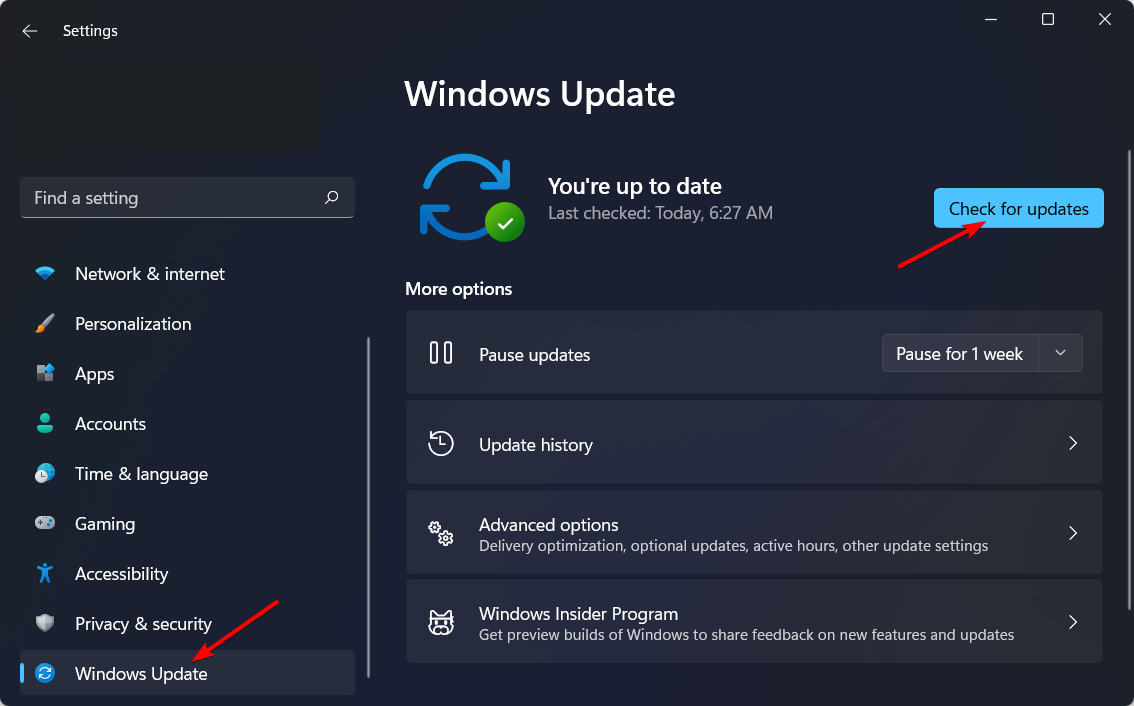
  2. Click on Windows Update and tap on the Check for updates button. If there are any updates available, it will search for and install them.

Updating Windows helps fix the bugs affecting the system’s performance and resolves compatibility issues that may cause issues with the browser. Read about fixing Windows not connecting to update service if the error occurs on your PC.

8. Reinstall the browser

  1. Press Windows + I key to open the Windows Settings app.
  2. Select Apps from the Settings menu and select Installed apps.
  3. Navigate to the browser, select the three dots, and then click Uninstall.
  4. Download the browser from a trusted store and install it on your PC.

Reinstalling the browser will fix the faulty or corrupt installation files causing issues with its functionality.

9. Run an SFC scan

  1. Left-click the Start button, type Command Prompt, and click the Run as administrator option.
  2. Click Yes on the User Account Control (UAC) prompt.
  3. Type the following and press Enter: sfc /scannow 
  4. Restart your PC and check if the issues with your browser persist.

Running an SFC scan will find and repair corrupt system files causing issues with the browser, preventing it from working as expected.

Check how to fix the run-as-administrator option if it’s not working on your PC.

10. Disable Windows Firewall

  1. Left-click the Start button, type the control panel and open it from the results.
  2. Click on the Windows Defender Firewall option.
  3. Select the Turn Windows Defender Firewall on or off option.
  4. Go to the Private and Public network settings, then click the radio buttons for the Turn off Windows Defender Firewall (not recommended) option.
  5. Restart your PC.

Disabling the Windows Defender Firewall resolves any interference it’s causing the browser on your PC. You can read about how to disable windows defender if you encounter issues with it.

In addition, our readers can switch to another browser to save time from repairing the faulty browser. Hence, we recommend you read through our articles about the 20 best browsers with the highest support for HTML for Windows.

This guide should help if your browser is not working on Windows 11. If you have further questions or suggestions, kindly use the comments section.

Fix: Your Account Doesn’t Match Your Dev Environment

The availability of an Xbox app for Windows allows players to play Xbox games on their PCs running on Windows OS without having any issues.

However, users complain about many errors when playing games on the Xbox app. We couldn’t sign you into Xbox Live, your account doesn’t match your dev environment error is prominent.

Also, we have a detailed guide on the current Profile is not allowed to play error on Xbox Live and how to fix it.

What causes your account doesn’t match your dev environment?

Running into the below error message while trying to play games on the Xbox app on your PC can be due to many factors impeding the process.

If you’re in the right sandbox and environment, switch to a Microsoft account for that sandbox. To keep using this account, change the registry’s sandbox and environment.

Some notable factors that may cause the error are:

  • Issues with Xbox Live servers – Players may be unable to play games on the Xbox app on their PCs if the Xbox Live servers are down. It prevents the Xbox app from connecting with the needed authorities, resulting in errors.
  • Outdated Xbox app and Windows OS – Microsoft releases updates to fix bugs likely to cause issues in the Xbox app and improve its performance. So, you can run into several errors when using the app if it’s not updated. Also, an outdated OS can impede your activities on the Xbox app.
  • System requirements issues – The Xbox app has system requirements that determine the devices that can run it. So, you can experience the dev environment error if your PC doesn’t meet the system requirements.

Other issues like network congestion and corrupt game data can also cause the error. Nevertheless, we’ll take you through how to resolve the error.

How do I fix my account that doesn’t match your dev environment?

Before proceeding with any advanced steps, try the following:

  • Fix network connection issues on your PC.
  • Restart Windows in Safe Mode and check if the error persists.
  • The issue can occur when there is maintenance going on or the servers are offline. Please visit the Xbox server status page to check for any updates regarding the server and how to fix it.

If the Xbox app error persists, go ahead with the solutions below.

1. Restart the Xbox services and Gaming Services

  1. Left-click the Start button, type Services, and click on the app from the search results.
  2. Navigate to the Gaming Services, right-click and select Restart from the drop-down.
  3. Locate the following Xbox services in the list: Xbox Live Auth Manager, Xbox Live Game Save, Xbox Live Networking Service. Right-click on them, and select Restart from the drop-down.

Restarting these Xbox Services and Gaming Services will fix any activities affecting your gaming activities and refresh the Xbox components on your PC. Read how to download the Xbox gaming services app on your PC.

2. Update Windows Operating System

  1. Press Windows + I key to open the Windows Settings app.
  2. Click on Windows Update and tap on the Check for updates button. If there are any updates available, it will search for and install them.

Updating Windows on your PC will fix bugs impeding Xbox app functionality and improve compatibility issues that may cause the error. Likewise, updating Windows OS installs available updates for the drivers on your PC.

You can read about fixing Windows not connecting to the update service if the error occurs on your PC.

3. Clear the local Xbox identity data

  1. Press the Windows + E key to open File Explorer on your PC.
  2. Copy and paste the following address in the address bar: %userprofile%\AppData\Local\Packages\Microsoft.XboxIdentityProvider_8wekyb3d8bbwe\AC\TokenBroker
  3. Check if there are any Accounts and Cache folders available in the directory. If so, select the folders and delete them.
  4. Close File Explorer and restart the Xbox app to see if the error message appears.

Clearing the local Xbox identity data removes corrupt cache files causing issues with the Xbox app. It fixes the account not matching the dev environment error.

You may also check our article about the Xbox app not launching games in Windows 11 and some fixes to get it working. Likewise, read our guide if you cannot sign in to the Xbox account on your PC.

Let us know which solutions worked for you in the comments area below.

How to Password Protect ZIP Files in Windows 11 (Step-by-Step)

Password-protecting ZIP files in Windows 11 is a great way to keep your personal or work files safe from unwanted access. However, Windows doesn’t let you add a password to a ZIP file by default. To do it, you’ll need to use tools like WinZip or NordLocker, or a basic manual workaround.

Here’s how to protect your files the right way.

Method 1: Use WinZip (Quick and Reliable)

WinZip is one of the most popular tools for creating ZIP files with password protection.

Step-by-Step:

  1. Download and install WinZip
    Visit winzip.com and download the latest version.
  2. Open WinZip
    Launch the app and choose Create/Share from the top menu.
  3. Add your files or folder
    Click Add to select the files you want to zip.
  4. Enable password protection
    Click the Encrypt option, then set a strong password.encrypt password protect winzip
  5. Choose ZIP format and encryption
    Select ZIP as the format, and make sure AES-256 encryption is selected.
  6. Save your ZIP file
    Click Save As, choose the folder, and you’re done.

This is the easiest way to create a password protected ZIP in Windows 11. It also works on Windows 10.


Method 2: Use NordLocker (For Extra Security)

NordLocker lets you encrypt files and folders before zipping or sharing them. It’s more secure than basic ZIP protection and works locally or in the cloud.

Step-by-Step:

  1. Download and install NordLocker
    Go to nordlocker.com and get the Windows app.
  2. Set up your account and locker
    Create a free account and choose a strong master password.
  3. Add files to your locker
    Drag your files or folder into the encrypted locker.
nordlocker upload files
  1. Export or share as needed
    Right-click any file inside the locker and choose to export as ZIP or share securely.

NordLocker is perfect if you’re storing sensitive documents or backing up files to the cloud. It uses strong encryption and is easy to use, even for beginners.


Method 3: Manual Workaround with Folder + ZIP

Windows doesn’t let you add a password directly to a ZIP file, but you can create a workaround using a locked folder first.

Step-by-Step:

  1. Create a new folder
    Right-click on your desktop > New > Folder > Name it.
  2. Move your files into the folder
    Drag and drop everything you want to secure.
  3. Lock the folder manually
    Use a password protection method for folders (like encryption or third-party folder lock).
  4. Compress the folder
    Right-click the folder > Send to > Compressed (zipped) folder.

This method is helpful if you just want basic protection, but it doesn’t fully encrypt the contents. It’s best combined with a proper tool like WinZip or NordLocker.


Why Windows Doesn’t Support ZIP Passwords Natively

The built-in ZIP feature in Windows 11 can compress files but doesn’t offer any option to add a password. To truly protect a ZIP folder with a password, software like WinZip or NordLocker is required.

If you’re sharing over a local network, check your password sharing settings to make sure everything is secured.


FAQs

Can I add a password to a ZIP file without using extra software?

No. Windows 11 does not support password-protected ZIPs by default.

Is WinZip safe to use?

Yes. WinZip is trusted and widely used for secure compression.

What’s the best way to protect sensitive documents?

Use NordLocker for encrypted storage or WinZip with AES-256 for sharing protected archives.


Conclusion

If you need to password protect ZIP files in Windows 11, don’t rely on built-in tools—they don’t offer encryption. Instead, use WinZip for fast and simple protection or NordLocker for top-level security and encrypted backups. Both are beginner-friendly and reliable.

Microsoft Bookings Is Not Working: How to Fix It in 5 Steps

Is the Microsoft Bookings not working for you, and you cannot schedule an appointment? If so, then you are not alone. Fortunately, in this guide, we will give you a bunch of solutions that will help you fix the Microsoft Bookings not working problem. Let us get right into it.

Why is Microsoft Bookings not working?

Well, just every other problem, especially with Microsoft Office products, there are multiple reasons why Microsoft Bookings is not working for you.

  • The browser cache is causing issues: There might be an issue with the browser cache. Chances are that it has stored corrupt cache files, which are conflicting with the smooth performance of Microsoft Bookings.
  • There are some issues with your browser: There could be a browser bug that is causing the problem. Third-party extensions can also cause certain problems.
  • Microsoft Bookings is having some issues: The program itself might be going through some issues, such as the server of the Microsoft 365 might be down.
  • Your Microsoft Office account has some issues: Some glitches or bugs in the Microsoft account can also cause multiple problems.

What can I do to make Microsoft Bookings work?

Before you go ahead with the advanced troubleshooting methods, we suggest applying the below-mentioned quick ones:

  • Close all the background apps and check if this fixes the issue or not.
  • Make sure that your Microsoft 365 license associated with the Microsoft account you are using is valid.
  • Restart your PC, as several big issues can be resolved by a simple restart.
  • Check the Microsoft 365 status. If the server is down or under maintenance, then the products associated with Microsoft 365 won’t work.
  • There could be an issue with the version on your browser, and the feature that should work seamlessly, might not work as intended. In such a case, you should change your browser.

Now, let us check out the advanced solutions that will help you possibly resolve the problem.

1. Relogin to Microsoft Office

  1. Visit the Microsoft Office website.
  2. Click on the Profile icon.
  3. Click on Sign out.
  4. Choose your valid account on the login page.
  5. The Microsoft Bookings will reload.

A temporary glitch or bug with Microsoft Office products is often known to hamper the user experience. Chances are that there is a glitch with your Microsoft account, which is why Microsoft Bookings is not working or why you keep getting a bad request error.

To fix this problem, we would suggest you make sure to use your valid Microsoft Office account that has the necessary license to log in and see if this resolves the issue or not.

2. Use Incognito mode in your browser

  1. Open the browser on your PC.
  2. Click on the 3-dot menu icon at the top-right.
  3. Select the New Incognito window. Alternatively, press the Ctrl + Shift + N to open it.
  4. Go to the Microsoft Bookings website.
  5. Use your login credentials to log in to the Microsoft Bookings portal.

Incognito mode in your browser is there to help you access the internet without you worrying about your activity data getting saved on your device or the Google account you are signed into.

Another great benefit of using Incognito mode is that it disables all third-party extensions. Chances are some extensions might be conflicting with the online web apps. To avoid all these conflicts, you can simply use the Incognito mode and resolve issues related to web apps.

3. Turn on Microsoft Bookings in the admin portal

  1. Open the Microsoft 365 website on any browser.
  2. Log in with your credentials to the admin center.
  3. Select Settings in the admin center.
  4. Select Settings again.
  5. Click on the Bookings option.
  6. Checkmark the box for Allow your organization to use Bookings. This will enable or disable the Bookings for your organization.
  7. Click on Save changes.

4. Sign in using Outlook

  1. Visit this Outlook website.
  2. Sign in with your credentials.
  3. Access Bookings by visiting the website.

This basically navigates you via a different route, i.e., using the Outlook website to access the Bookings portal.

5. Contact Microsoft support

  1. Go to the admin center and log in. (If you get a message that says you don’t have permission to access this page or perform this action, you aren’t an admin)
  2. Click on Support.
  3. Select New service request.
  4. Type a description of your issue, enter other details, such as your contact number and email address, and select your preferred contact method.

That is it from us in this guide. You can also check out our guide that will help you fix the not being able to zoom in MS Word problem that has been troubling multiple users.

One of the most common errors, i.e., product activation failed error, can also be easily fixed by following our dedicated guide that contains some effective solutions.

We have a guide that gives you steps to remove recommended documents in Microsoft 365. If you are facing temporary server issues with MS Office, then you should refer to our guide, which gives you a bunch of solutions to resolve the problem.

There are several users that have reported facing an error that says This email address is already connected with Office 365. Fortunately, we have some solutions to fix this problem in our dedicated guide.

If you are looking for ways to whitelist an email in Office 365, then look no further, as our guide will help you do that in easy steps.

High CPU usage is another issue that users face from time to time because of Microsoft Office or Office products. You can sort it out by checking out our guide on how to fix Excel’s high CPU usage issue.

Feel free to let us know in the comments below, which one of the above solutions resolved the Microsoft Bookings not working problem.

Fix: Microsoft Bookings Not Sending Confirmation Email

Microsoft Bookings is a platform that lets you track and manage all of your meetings with your appointments. You can create a new booking and prep for the scheduled appointment using the Microsoft Bookings app.

However, there are a bunch of users who have reported that Microsoft Bookings not sending a confirmation email. Those who book a meeting with someone, aren’t getting any confirmation mail of any sort. This could be pretty annoying as there is no way to conclude whether the meeting has been confirmed or not.

Why is Microsoft Bookings not sending a confirmation mail?

After some research and going over several user reports, we have created a list, which could potentially be the reasons why Microsoft Bookings is not sending a confirmation mail.

  • The feature isn’t enabled in Microsoft Bookings: It could be a genuine problem where you might not have enabled the feature in Microsoft Bookings.
  • The browser cache is causing issues: The browser that you are using might have stored corrupt cache files, which might be conflicting with the smooth performance of Microsoft Bookings.
  • There are some issues with your browser: Chances are that there is a browser bug that is causing the problem. The installed third-party extensions might also cause the problem.
  • Microsoft Bookings is having some issues: The program itself might be going through some issues, which is why Microsoft Bookings is not sending a confirmation mail to the recipient.

What can I do if Microsoft Bookings is not sending a confirmation mail?

Before you go ahead with the advanced troubleshooting methods, we would suggest you apply the below-mentioned quick solutions:

  • Close all the background apps and check if this fixes the issue or not.
  • Make sure that your Microsoft 365 license is valid and that you are using the correct Microsoft account with it.
  • If you are experiencing the same issue with the browser that you are using and the feature is working seamlessly in another browser, then it is time for you to change your browser.
  • Restart your PC, as several big issues can be resolved by a simple restart.

Let us go through the solution that will probably help you resolve the problem.

1. Relogin with your Microsoft account

  1. Open the Microsoft Office website.
  2. Click on the Profile icon on the top right.
  3. Select Sign out.
  4. Select your valid account.
  5. Wait for a moment for Microsoft Bookings to load.

There might be some temporary glitch with your Microsoft account that could be causing the problem where Microsoft Bookings is not sending confirmation mail. Simply log in with your valid Microsoft Office account and see if this resolves the issue or not.

2. Use Microsoft Bookings in Incognito mode

  1. Launch the browser that you are using. In our case, it is Google Chrome.
  2. Click on the 3-dot menu icon.
  3. Select New Incognito window. You can alternatively, press the Ctrl + Shift + N to open Incognito mode.
  4. Visit the Microsoft Bookings website.
  5. Login with your account and check if this fixes the issue or not.

When you switch on the Incognito mode or use the browser in Incognito mode, not only it helps a bit with your privacy but also disables all the third-party extensions that might be conflicting with the online web apps.

Often Incognito mode has helped resolved several issues related to web apps, and you can try it out.

3. Turn on the setting in Microsoft Bookings

  1. Visit the Microsoft 365 website.
  2. Login with your account.
  3. Go to Bookings.
  4. Select the Bookings Page.
  5. Under the Email notifications section, check the boxes for Notify the business via email when a booking is created or changed and Send a meeting invite to the customer, in addition to the confirmation email options.
  6. Select Services from the left pane.
  7. Click on the corresponding service.
  8. Under Reminders and Confirmations, select Send reminder to Customer.
  9. Make sure both the Notify the business via email when a booking is created or changed and Send a meeting invite to the customer, in addition to the confirmation email options are checked.

For a feature to work properly, you first need to enable the feature, which you might have missed.

4. Re-enable Microsoft Bookings in the admin portal

  1. Visit the Microsoft 365 website.
  2. Login to the admin center.
  3. Select Settings in the admin center.
  4. Click on Settings again.
  5. Click on Bookings.
  6. Check the box for Allow your organization to use Bookings. This will enable or disable the Bookings for your organization.
  7. Click on Save changes.

That is it from us in this guide. We also have a guide on what to do when you get a bad request in Microsoft Bookings and another that will help you fix the not able to zoom in MS Word problem that has been reported by multiple users.

For those who are confused about which version of MS Office will work on their Windows 11 PC, then they can check out our guide and install the compatible version on their Windows 11 PC.

You can also check out our guide on MS Office disappeared from your PC, which will help you resolve the issue in no time. You can also refer to our guide and fix one of the most burning issues of Olicenseheartbeat.exe stopped working.

One of the most common errors, i.e., product activation failed error can also be easily fixed by following our guide.

Feel free to let us know in the comments below, which one of the above solutions helped you fix the Microsoft Bookings not sending confirmation email problem.

This Location Isn’t Set up For Installing Games [Xbox App Fix]

If you’re trying to install games on an Xbox, but for some reason, you’re getting the This location isn’t set up for installing games message, you may have run out of storage space. As a gamer, you must know that games are heavy in size and can take up a lot of space.

The more games you have, the less room for other games. So, if your Xbox app is running out of space, it will not be able to install any new games. Still, there are a few tips up our sleeves that can help you install your favorite games.

Why won’t my game install on the Xbox app?

If you’re having trouble installing games on your Xbox and keep getting the This location isn’t set up for installing games message, below are some possible reasons why:

  • Your console is offline – You can’t download or play games when your console is connected to the internet, or you’re using an unsecured Wi-Fi connection.
  • Insufficient storage space – If you have a limited amount of storage space, you might not be able to install all of your games on the Xbox app.
  • You haven’t purchased the game yet – If you haven’t purchased it, it won’t be available for download through the Xbox app.
  • Geo-restriction – If you are trying to download a game on the Xbox app, but it hasn’t been approved for your country, it might be a problem. You can install a VPN and try again.
  • Incompatible game – A common reason your game won’t install on the Xbox app is that it’s incompatible with the current version of Windows.
  • Corrupt hard drive – Games may not install if your hard drive is corrupted. This can happen if you have a virus or other malware on your system.
  • Outdated console  – Xbox app requires an updated console to work properly. If your console was released more than six months ago, then it may not support the latest version of the app. 
  • You’re not signed into your Xbox Live account – If you are having trouble installing a game due to a failed authentication, make sure that your console has been set up correctly with Microsoft.

How do I fix the Xbox app installation error?

As always, a few preliminary checks could save you the trouble of going through the advanced solutions, so ensure you check the following:

  • Check for any available Windows updates and install them if available. Also, see what to do if Windows Update is not showing.
  • Verify that your game is compatible with your version of Windows before downloading.
  • Restart your Xbox app and check if the problem persists.
  • Try restarting your PC to clear any temporary files that may be blocking downloads.

1. Change the default storage location

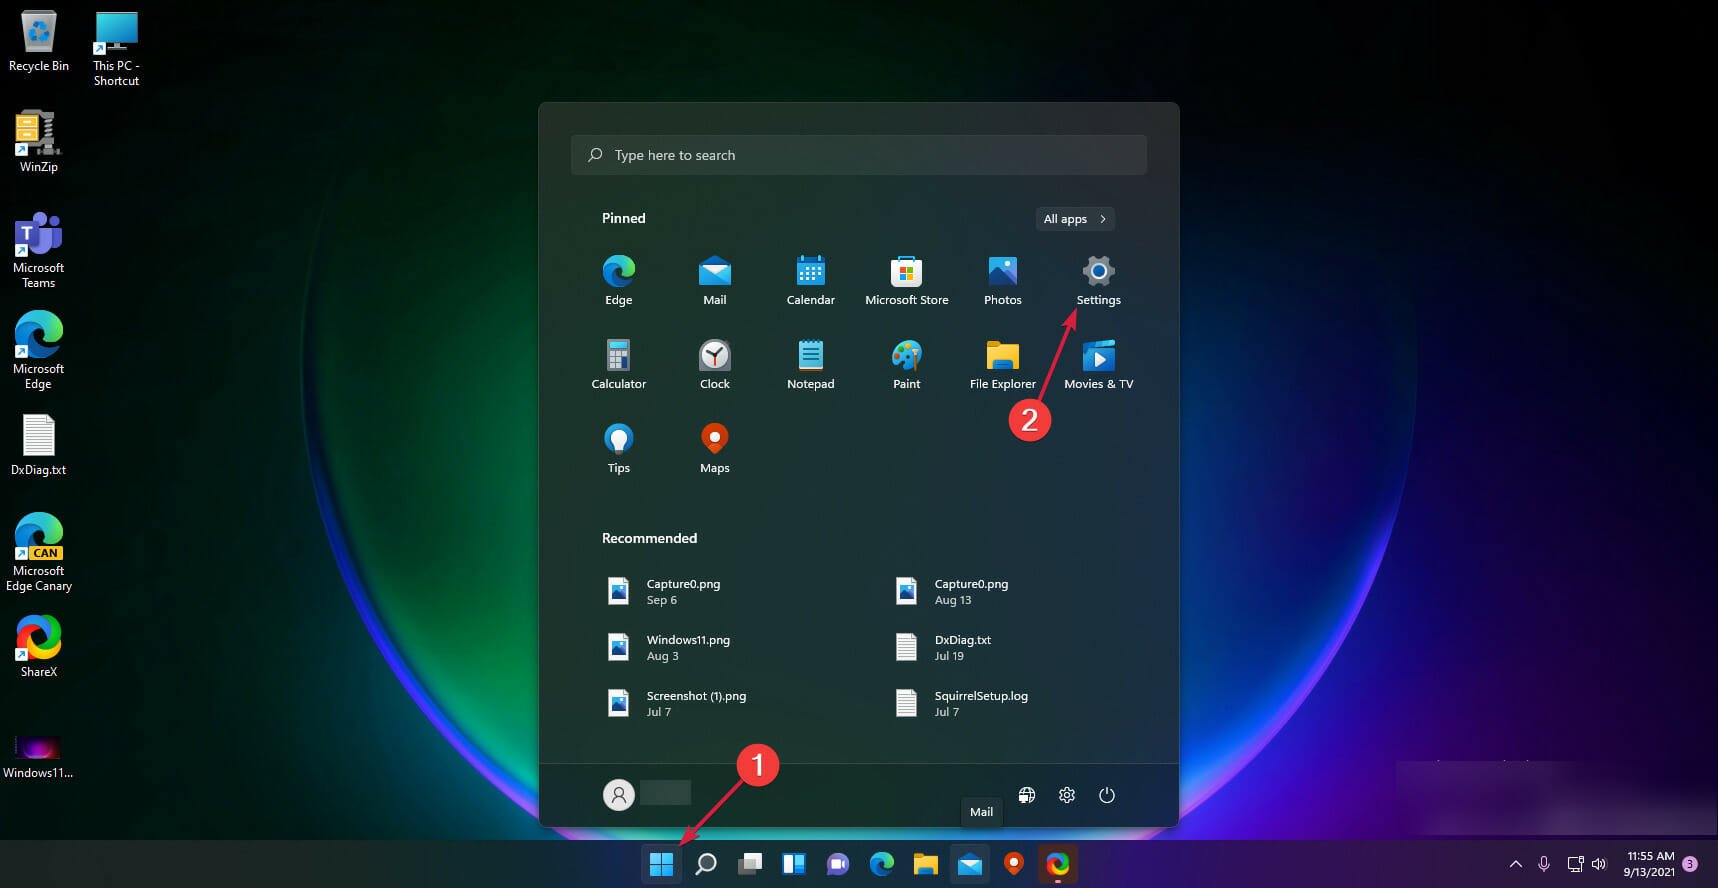
  1. Hit the Start Menu icon and click on Settings.settings windows 11
  2. Click on System on the left pane then select Storage on the right pane.going storage settings Windows 11
  3. Scroll down and select Advanced storage settings.
  4. Go to Where new content is saved and under New apps will save to the drop-down menu, select a drive that has enough storage space to accommodate all your game downloads.

For a section of users, after changing the storage location, they were hit with a new error code: this location isn’t setup for installing games 0x80070005. If you get the same message, it means that there is a need to create new partitions.

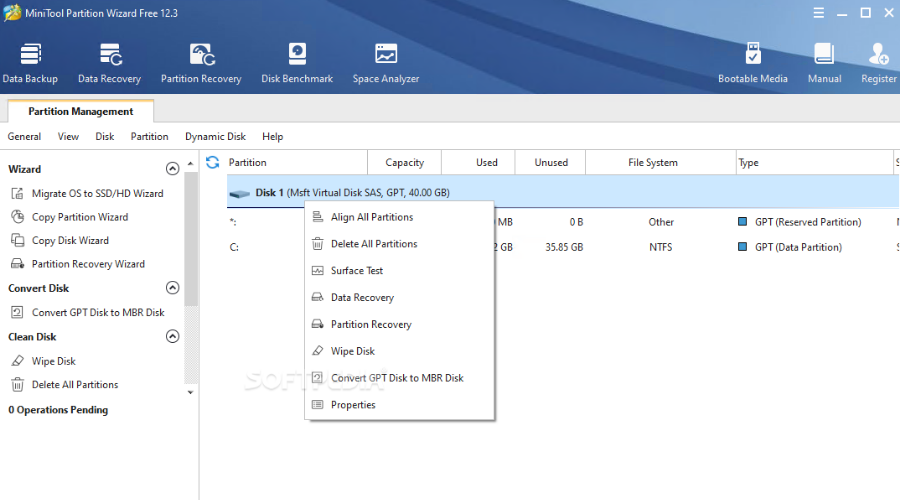
Once you are able to create partitions on your hard drive, try selecting one of them as the new storage location and see if the issue persists.

2. Update permissions for the Windows folder

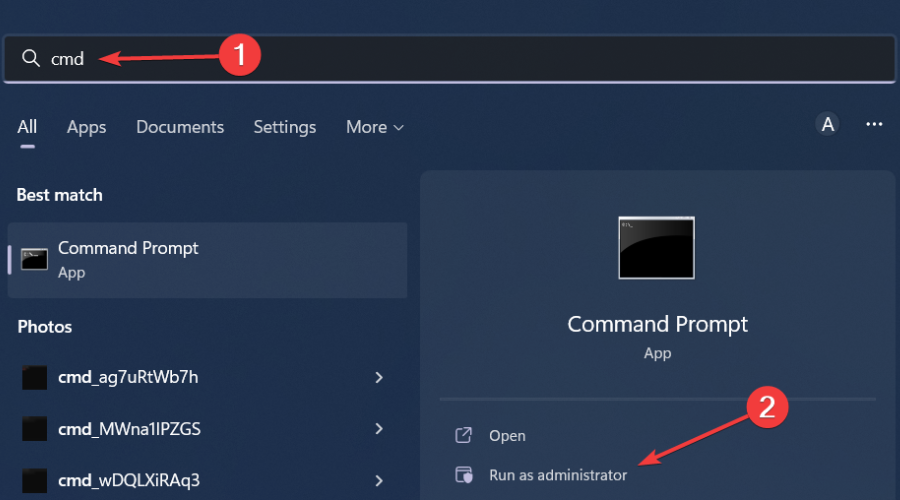
  1. Hit the Start Menu icon, type cmd in the search bar, and click on Run as administrator.cmd
  2. Type the following command and hit Enter. Remember to replace r with the corresponding drive you’d like to take ownership for: takeown /f "<path>" /r
  3. Navigate to the following location and delete the folder: C:/Program Files/WindowsApps
  4. Also, go to the Recycle bin and delete the folder permanently.
  5. Restart your PC and check if the issue persists.

The WindowsApps folder is a special folder in Windows that contains the applications that you have downloaded from the Microsoft Store. You cannot access these files unless you have administrator rights on your computer.

Most users who had this problem had upgraded to Windows 11 but the OS failed to recognize the folder on the particular drive that they were trying to install your game.

3. Reinstall Gaming Services

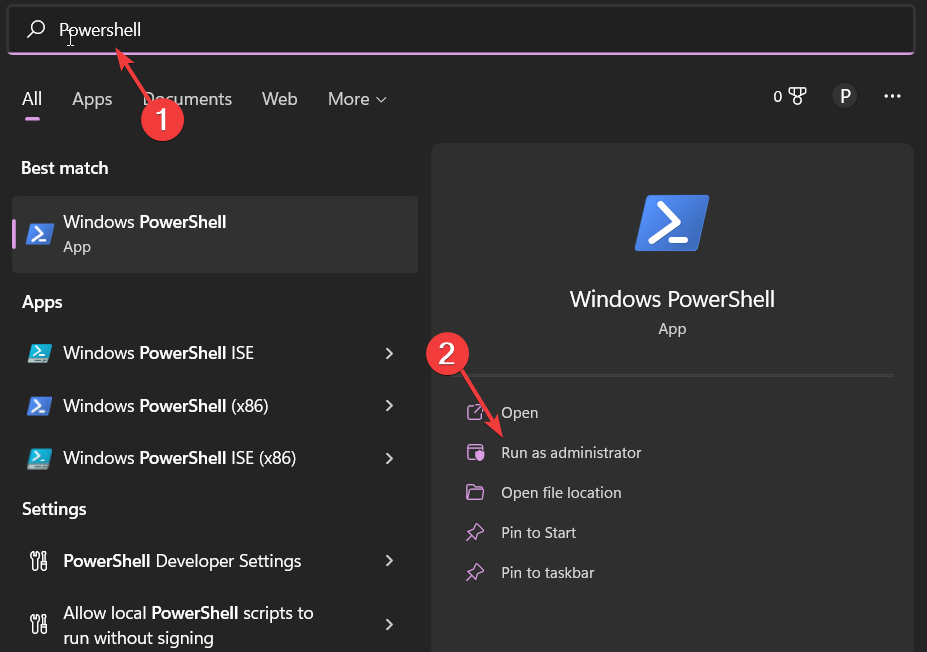
  1. Hit the Windows key, type PowerShell in the search bar, and click Run as administrator.
  2. Type the following command and hit Enter: Get-AppxPackage *gamingservices* -allusers | remove-appxpackage -allusers
  3. Restart your PC and check if the issue persists.

4. Repair/reset the app

  1. Hit the Start Menu icon and click on Settings.settings windows 11
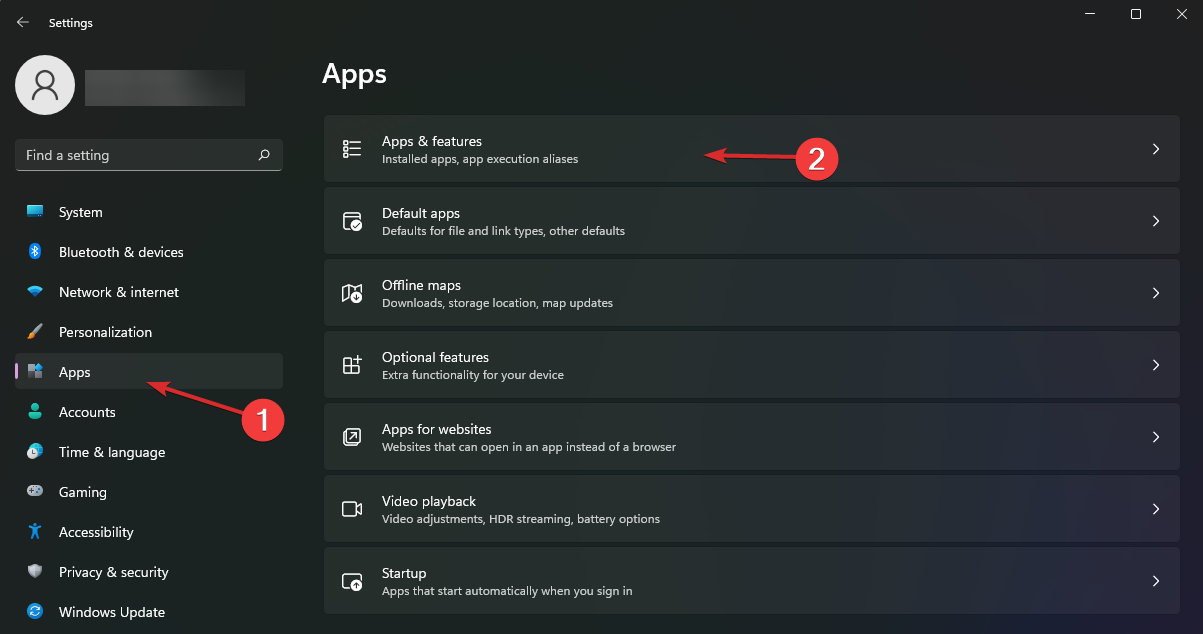
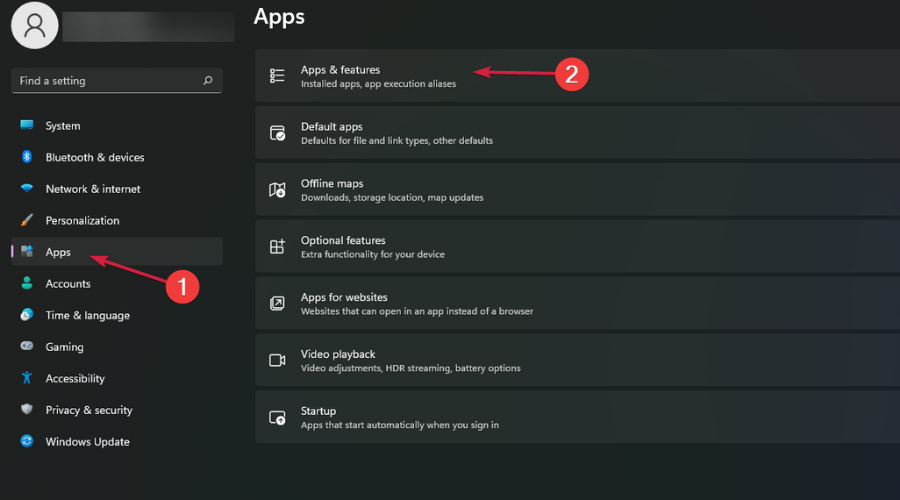
  2. Click on Apps on the left pane then select Apps & features on the right pane.
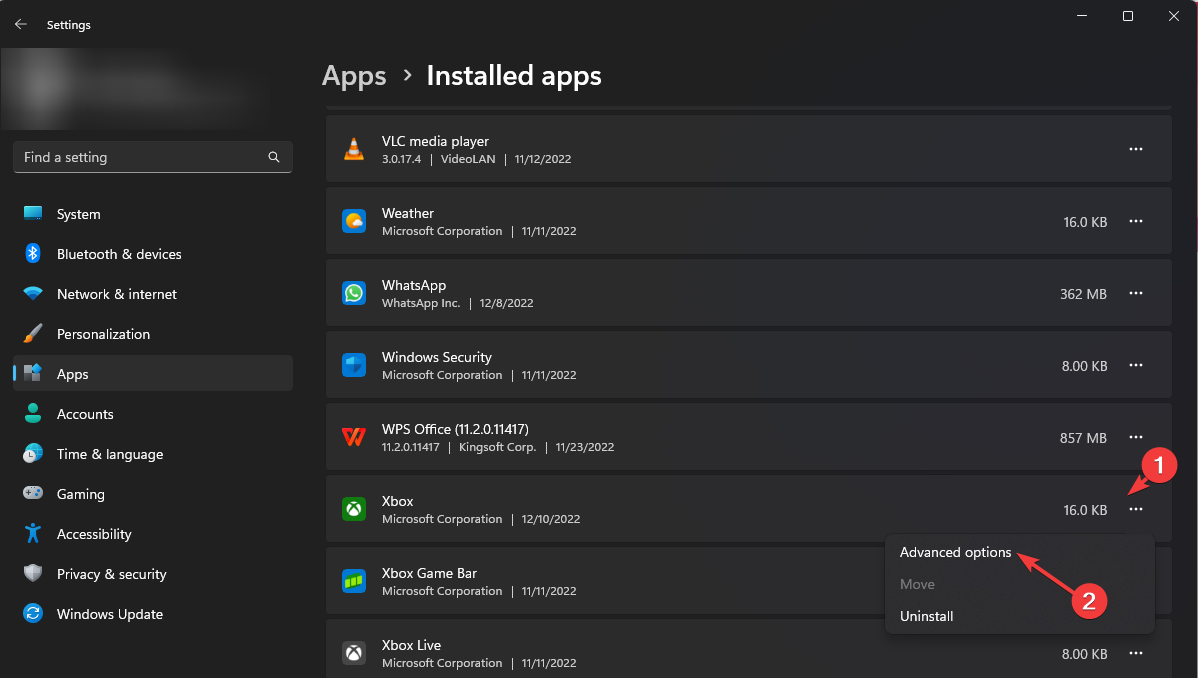
  3. Locate the Xbox app, click on the three ellipses, and select Advanced options.
  4. Click on the Repair button.
  5. Check if the issue is resolved then go back and click on the Reset button.

5. Reinstall the Xbox app

  1. Hit the Start Menu icon and click on Settings.settings windows 11
  2. Click on Apps on the left pane then select Apps & features on the right pane.
  3. Locate the Xbox app, click on the three ellipses, and select Advanced options.
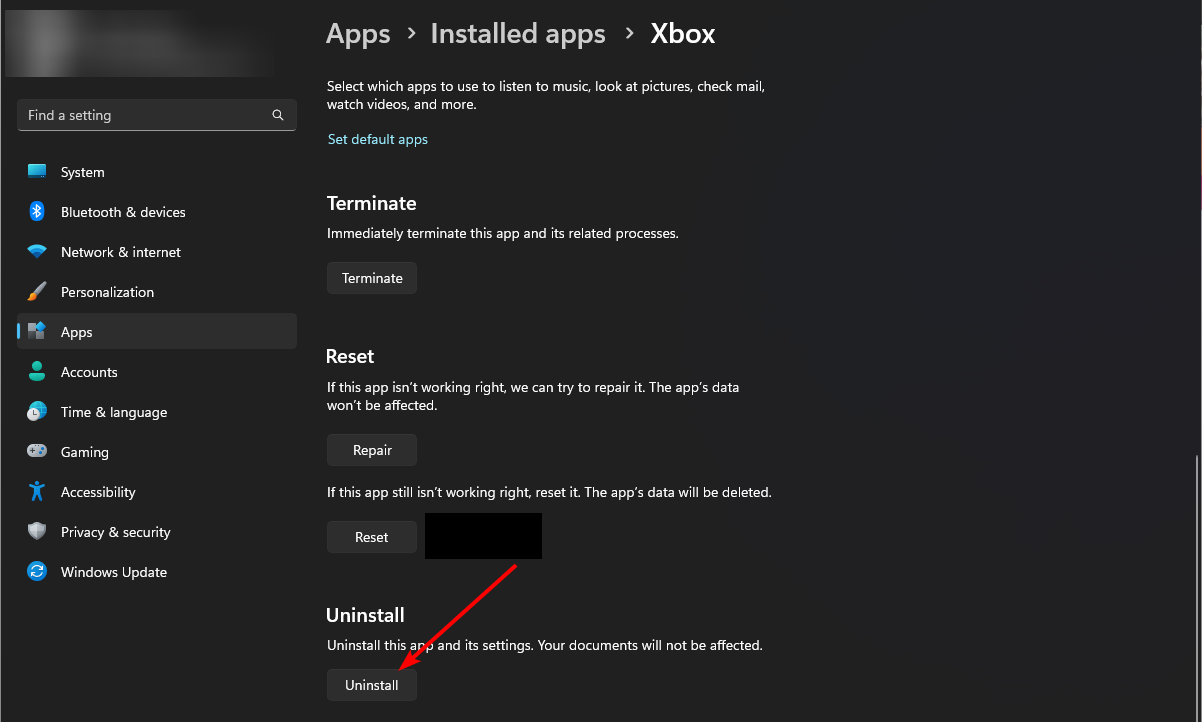
  4. Click on the Uninstall button.
  5. Go to the Microsoft Store, search for the Xbox app and install it.
  6. Try downloading your game and see if the issue persists.

While you’re still here, also check out our expert article on what to do if Xbox is not launching games. We also may be able to help if you have issues with Xbox not syncing data.

Let us know what method helped you bypass the issue above in the comment section below.

Best Windows Settings For DAC To Optimize Your System

Follow this article if you want to apply the best Windows settings for DAC. We have found the most recommended adjustments and featured them in this post.

The complete form of DAC is Digital to Analog Converter. It converts the digital audio signal to analog, so you can play and listen to digital audio. Your PC, TV, and audio devices all have DAC built-in. However, no audio enhancers can boost performance if the built-in DAC has a problem.

However, you may consider having a stand-alone DAC to eliminate low-quality audio playback issues. You also can consider using any of these best stereo receivers with DAC.

How does DAC improve audio quality?

From this part, we are talking about the stand-alone USB/External DAC. Usually, when users are unsatisfied with their PC’s Audio, they prefer an external digital-to-analog converter. Your computer audio may have distortion, noise, and jittering issues. In this situation, such a device can bring a cure.

Usually, a DAC improves the sound quality in these ways:

  • Powerful chip: An external DAC comes with more resolution and quality that can handle high-quality audio more efficiently.
  • More bit depth: Most built-in DAC is limited to support around 16 or 24-bit audio. But the external ones can support 32-bit PCM or even better Audio.
  • More formats: Many audio formats can output excellent-quality sounds. Your PC can play it. But, a good DAC can give you the best when you play these high-quality formats, for example, FLAC.

Settings and configurations that can affect DAC playback on Windows

Though an external DAC boosts audio quality, it may create a problem if something is wrong with the settings. Here are some factors you need to check out:

  • Driver issue: Keep in mind that drivers play a significant role in audio playback on Windows. If it has a problem, it may affect DAC performance.
  • Wrong selection: If you don’t select the DAC as an output device, you may not hear anything or hear sounds on the faulty device.
  • Wrong output from the source: The source output should be digital. Otherwise, this device will not serve its purpose.
  • Improper settings: Some settings are not ideal when using a digital-to-analog converter. There is no general rule for this. Usually, using poor-quality audio software may create problems with Windows sound settings. It has a direct impact on DAC’s performance.
  • Wrong input: Some external DACs may have multiple inputs. In this case, you need to choose that input using software or a physical switch. Otherwise, no sound will be produced.

Otherwise, your sound card also may significantly impact the performance. Don’t get confused with a DAC and an external sound card. If needed, check out these best sound cards for Windows PC.

How to get optimum performance by applying the best Windows settings for DAC?

You need to apply the proper settings to use a DAC with Windows. Before knowing about them, we suggest you do the following things:

  • Update all of your audio drivers to the latest version. Consider using Outbyte Driver Updater to update and install drivers automatically.
  • Make sure that the port where DAC is connected has no problem.
  • Ensure that no audio enhancement software is active in the background temporarily.
  • Optionally, update Windows to the latest version.

Now, follow these steps to make your DAC work perfectly:

1. Set it to default

  1. Press Win + I on the keyboard to open Windows Settings.
  2. Navigate to the System and then Sound.going sound settings windows 11
  3. Click on the output device representing the DAC to open its properties.going speaker properties windows 11 settings
  4. Choose Use as default for audio next to the Set as default sound device.setting default audio output device windows 11 settings

While clicking on the audio output device, make sure you click on the right one. Don’t get confused with other options.

2. Choose bitrate

  1. Go to the DAC properties from Windows settings like before.
  2. Under Output settings, next to the Format, choose the quality you prefer. It is most likely the highest one.changing audio format bit rate windows 11 settings

If changing creates a problem, choose the one which was already selected.

3. Enable Audio enhancement

  1. Open the DAC properties, as shown in methods 1 and 2.
  2. Scroll down and find the Audio enhancements option.
  3. Choose Device Default Effects or whatever you prefer other than Off.enabling audio enhancements windows 11 settings

Now, you will notice a significant difference in sound quality.

4. Tweak audio enhancements

  1. Press Win + R on the keyboard to open Run.
  2. Type the following command and click on OK to open Sound properties: mmsys.cplopening sound properties using run command
  3. Go to the Playback tab and double-click on the DAC device.
  4. Navigate to the Enhancement tab.
  5. Check Bass Boost, Virtualization, Loudness Equalization, etc.headphone enhancements
  6. Save the settings.

You can keep any specific option disabled if that creates a problem.

5. Apply the correct configuration

  1. Open the Sound properties like before.
  2. Select the DAC device from the Playback tab.
  3. Click on Configure.clicking configure for speaker sound properties
  4. Choose the correct channel according to your speaker’s specifications and click Next.choosing audio channels speaker setup windows
  5. Go ahead and complete any onscreen steps.

6. Use an audio software

  1. Download the recommended software for your DAC.downloading realtek audio console
  2. Open it.
  3. Tweak various settings based on your requirements.

If your DAC has no recommendations, consider using the best audio equalizer software for Windows.

Most of the settings mentioned in this article are also available in this type of audio software. However, you should always know what you are changing in these tools. Otherwise, it may create problems rather than help you.

If you are interested, learn more about how to improve sound quality on Windows using an equalizer.

This article has featured the best Windows audio settings for DAC. If you have any questions or suggestions, feel free to let us know in the comment box.

How to Use PowerShell ErrorAction? (A Guide with Examples)

When a command fails to execute, PowerShell displays an error based on the value set in ErrorActionPreference.

However, the ErrorAction parameter on PowerShell allows you to specify how to handle terminating errors if a command fails. The options available to handle a command’s execution are Continue, Ignore, Stop, Inquire, SilentlyContinue, and Suspend(works for PowerShell workflow only).

In this guide, we will discuss how to use PowerShell ErrorAction with its variables using examples. Let’s start!

How can I use PowerShell ErrorAction? 

1. Continue 

It is the ErrorAction parameter’s default preference. This action informs the host about the error, and the script continues to execute. You can look at this example to understand better:

  1. Press the Windows key, type PowerShell, and click Run as administrator. Windows PowerShell
  2. Copy and paste the following command and hit Enter to execute: Get-ChildItem C:\nonexistentfolder -ErrorAction Continue
    Write-Output "This line will be executed even if an error occurred."
    Continue PowerShell

2. Ignore

This option doesn’t inform the host about the error and continues the execution of the script. Look at the example to understand:

  1. Open PowerShell using the same method used above.
  2. Type the following command and press Enter: Get-ChildItem C:\nonexistentfolder -ErrorAction Ignore
    Write-Output "This line will be executed even if an error occurred."
    Ignore

3. Stop

If the error has occurred, this action stops the execution of the script. To understand better, check this example:

  1. Open PowerShell with admin rights.
  2. Type the following command and press Enter: Get-ChildItem C:\nonexistentfolder -ErrorAction Stop
    Write-Output "This line will not be executed because an error occurred."
    Stop command

4. Inquire

With this option, when the error occurs, the user gets choices and prompts to determine the appropriate action. Let’s take a look at the example:

  1. First, launch PowerShell with admin rights.
  2. Copy and paste the following command, and press Enter: Get-ChildItem C:\nonexistentfolder -ErrorAction Inquire
    Write-Output "This line will be executed only if you confirm the error message."
    Inquire -powershell erroraction

5. SilentlyContinue

Like the Ignore command, it will not report the error to the host and will continue the execution. However, unlike Ignore, it will add the error to the $Error variable. To understand the action better, let’s take a look at an example:

  1. Open PowerShell with administrator privileges.
  2. Type the following command and press Enter: Get-ChildItem C:\nonexistentfolder -ErrorAction SilentlyContinue
    Write-Output "This line will be executed even if an error occurred."
    Sliently continue -powershell erroraction

So, this is how you can use PowerShell ErrorAction to specify what to do if the command fails to execute. If you have any questions or concerns about the parameter, feel free to let us know in the comments below. We will be happy to help!

Strict NAT Type: Fix it & Increase your Internet Performance

Imagine you’re in the middle of an intense gaming session, and suddenly you are unable to join your friends on another server due to a Strict NAT type. Frustrating, right? Don’t worry; we’ve got you covered with a solution.

Say goodbye to connectivity issues and hello to seamless online gaming! This guide will explain the Strict NAT type and how to change it to Open, allowing you to connect with other devices and enjoy an enhanced gaming experience.

What does the Strict NAT type mean?

Strict NAT is a firewall configuration that stops all data from traveling through a local network. It makes initiating connections with the computer difficult.

Also, it might restrict the computer’s ability to connect to other devices on the internet, which can cause difficulties with online gaming, video conferencing, and file sharing, among other activities.

This is the safest type of NAT type as it could prevent attacks, thereby keeping your computer secure. However, if you are a gamer, you might not like this configuration as it stops you from joining other servers and sharing files, and you might also experience lags when playing games.

For a better gaming experience, you need to change it to Open NAT type. You can follow this detailed guide on how to change NAT type on Windows 11 to improve connectivity and fix multiplayer issues.

How can I change the NAT type from Strict to Open?

Before moving to the advanced troubleshooting steps, you should consider performing the following:

1. Enable UPnP (Universal Plug and Play) on your router

UPnP allows devices on your network to discover and communicate with each other, improving connectivity automatically.

  1. Login to your router. Here we are taking TP-Link Router for demonstration purposes.
  2. Go to Forwarding and select UPnP. You need to look for UPnP in your router settings.
    Enable UPNP -strict nat type
  3. Click Enable, then Refresh to check the status.

2. Port Forwarding

  1. Login to your router.
  2. Go to Forwarding, then click Virtual Server.
  3. Click Add New. 
    Forwarding - Virtual Server - strict nat type
  4. Enter Service Port, IP Address, and Internal Port. Now under Protocol, select All, and under Status, select Enabled.
    Virtual Server
  5. Click Save.

3. Enable Network discovery

  1. Press the Windows key, type Control Panel, and click Open. 
    CP Control Panel
  2. Select Category for View by, and click Network & Internet. 
    Network and Internet -strict nat type
  3. Now click Network and Sharing Centre. 
    Network and Sharing Center
  4. From the left pane, click Change advanced sharing settings.
    Change advanced Sharing settings
  5. Under Private networks, toggle on the switch for Network discovery.
  6. Also, place a checkmark next to Set up network connected devices automatically.
    Network discovery

4. Change IPv4 properties and enable DMZ

4.1 Change the IPv4 properties 

  1. Press the Windows key, type CMD, and click Run as administrator.
    DOS COmmand Prompt -strict nat type
  2. Type the following command to get the IPv4 address and press Enter: ipconfig
    ipconfig
  3. Press Windows + R to open the Run window.
  4. Type ncpa.cpl and hit Enter to open Network Connections.
    ncpa.cpl
  5. Right-click on the connection, and select Properties.
    Ethernet Properties -strict nat type
  6. From The connection uses the following items, locate and double-click Internet Protocol Version 4 (TCP/IPv4) to open Properties.
    IPv4
  7. Click the radio button next to Use the following address and enter the IPv4 address, Subnet mask, and Default gateway. 
    IPv4 address
  8. Now, click OK.

4.2 Enable DMZ

  1. Login to your router.
  2. Go to Forwarding, and select DMZ.
  3. Now, choose Enable for DMZ. 
    DMZ status strict nat type
  4. For DMZ Host IP Address, enter the IPv4 address you got from Command Prompt.
  5. Click Save.

5. Make changes to the Configuration file 

  1. Go to your router page and log in. Here, we use TP-LINK.
  2. Click System Tools, then click Backup and Restore.
    System Tools - Backup & Restore - strict nat type
  3. Click on Backup to download the configuration file. 
  4. Double-click the file to open it and locate last bind. 
  5. Under the last bind, type the following after replacing 5555-5555 with your port number: bind application=CONE(UDP) port=5555-5555
  6. You can add open several ports if you like. Once done, click Save. 
  7. Now go to the router page, navigate to System Tools, and then click Backup and Restore.
  8. Click Choose File, and upload the modified Configuration file.
    Choose File
  9. Now click Restore and restart your router.

So, this is how you can change the NAT type from Strict to Open. If you’re still experiencing issues, consider switching from public to private network type, which will allow you to share files across devices,

Also, if you happen to be an Xbox One user and the Double NAT detected error is bothering you, the solutions from our guide can help.

Please let us know in the comments section below if you have any questions or concerns about NAT type. We will be happy to help! 

Dropbox Keeps Opening on Startup: How to Stop It

Dropbox is a cloud storage solution that lets you store files on it and access them from wherever you want. By default, Dropbox runs right at the startup, i.e., when your PC boots up. This is done to give you the best experience. However, not everyone wants to access Dropbox all the time, and that too right from the startup.

If you want to know how to stop Dropbox if it keeps opening on startup, you have landed in the right place. In this guide, we will show you several ways to stop Dropbox if it keeps opening on startup.

Should I disable Dropbox on Windows 11 startup?

Dropbox is set by default to run during the startup. This is done in order to sync the changes between the Dropbox files on your PC to everywhere where you access your files from.

But in some cases, it is known that Dropbox running during the startup can cause issues with other necessary programs that also boot up during startup. So, in such a case, you can simply disable Dropbox from opening at startup and use the sync feature manually to sync your files.

How can I stop Dropbox if it keeps opening at startup?

1. Disable auto startup

1.1 From the Dropbox settings

  1. Right-click the Dropbox icon on the taskbar on the right and click on your profile icon.
  2. Select Preferences.
  3. Under System, uncheck the box for Start Dropbox on system startup.
  4. Click Apply and OK.

1.2 From Windows Settings

  1. Select the Start button, and select Settings.
  2. On the left-hand side of the window, select Apps, then select Startup at the bottom of the window.
  3. Now, look for Dropbox and toggle it Off.

These are the usual ways of stopping Dropbox if it keeps opening on startup. You can restart your PC and check if Dropbox is still open on startup.

2. Use Task Manager

  1. Press the Ctrl + Shift + Esc buttons to launch the Task Manager.
  2. Switch to the Startup apps tab.
  3. Select Dropbox.
  4. Hit the Disable button.
  5. Alternatively, you can right-click on Dropbox and select Disable.
  6. Restart your PC and check if this stops Dropbox from opening at startup.

This will stop Dropbox from running on Windows 11 startup. In order to start Dropbox, you will have to do it manually from the Start menu.

3. Delete the Dropbox Registry key

  1. Press the Win + R keys to open the Run dialogue.
  2. Type regedit and press Enter.
  3. Navigate to either of the two below-mentioned paths and press Enter. HKEY_CURRENT_USER\Software\Microsoft\Windows\CurrentVersion\Run HKEY_LOCAL_MACHINE\SOFTWARE\Wow6432Node\Microsoft\Windows\CurrentVersion\Run
  4. You will see the Dropbox registry key.
  5. Right-click the Dropbox key and select Delete.

Unchecking the startup option from the Dropbox settings menu only quietly closes it. But Dropbox creates a registry key responsible for running it at the Windows 11 startup. You can easily delete this registry key mentioned above and disable Dropbox from opening at startup.

Many of our readers have reported that the DbxSvc.exe process is still running in Taskbar even if they uninstalled the software. If you want to get rid of it completely, you should navigate to the following path and delete the file manually: C:\Windows\System32

However, after that, Dropbox won’t work anymore so consider that.

That is it from us in this guide. If you are confused about whether to go for Sharepoint or Dropbox, then we have a guide to clear your confusion.

Also, several users have asked how they can remove files from Dropbox and not delete them from their PCs. For that, we have a guide to help you with the process.

We also have a guide that will help you recover deleted Dropbox files. Windows 11 users have had their fair share of problems with Dropbox, one of which is the Dropbox app not opening on their PCs. You can quickly fix the issue by following our guide.

You can also safeguard your Dropbox folder by protecting it with a password. If you have difficulties uninstalling Dropbox from your PC, you can check out the solutions mentioned in our guide to resolve the problem.

Feel free to let us know in the comments below which one of the above solutions helped you fix the Dropbox running on startup problem.

Fix: This Page Isn’t Eligible to Have a Username [Facebook]

Facebook allows page owners to create a custom URL for their business page. While the process itself is easy, at times the user may encounter the This page isn’t eligible to have a username error.

You are most likely to encounter one of these errors:

Username Isn’t Available
This Page isn’t eligible to have a username.

Why am I not eligible to create a username on Facebook?

This error can occur due to several reasons including your Facebook page not meeting the minimum requirement of having 25-page likes, lack of administrative privileges as well as page verifications issues.

According to Facebook, the new page may not immediately be able to create a username. To be able to create a username the page must meet two requirements.

It must have at least 24-page likes and at least one post. Once you have met the requirements, try to create a user name for your page.

If the requirements are not met you will most likely see that This page isn’t eligible to have a username error.

If you are also troubled by it, here is a detailed step-by-step guide to help you resolve the this page isn’t eligible to have a username error on Facebook.

How can I fix the Facebook page username not available?

This Page isn’t eligible to have a username
  1. Open Facebook and log in with your main account.
  2. Go to Settings and open Page Roles.
  3. In the text box under Assign a new Page role, enter the name or email of the person to be added as an admin.
  4. Select the profile from the list.
  5. Click on the Editor option and change it to Admin. Click Add.
  6. Now login with the account of the person who you made the admin.
  7. Click the arrow icon on the top-right corner and select the Manage Pages option.
  8. Select the page that you want to manage.
  9. Click on About and select Create a page @username.
  10. Enter the username that you want to assign to your page.
  11. Click Create a username.

The simplest solution for this issue is to make your friend or your own alternate account as an admin of the page and then try to create a custom URL. Here’s how to do it.

That’s it. Now you have successfully created a custom URL without the Facebook error this page isn’t eligible to have a username error.

This error can be resolved by assigning an alternate account as admin and then making the necessary changes.

While the exact reasons behind the error are still unknown, this workaround seems to have worked for many users with similar errors.

How to Install Software Without Admin Rights on Windows 11?

Installing software without administrator rights is tricky and not advised due to security reasons.

However, there are times when you want to install software on a device with access to the standard user account.

Fortunately, workarounds are available to install software without admin rights on Windows 11.

This guide will cover all the available workarounds to install software without admin privileges on a Windows computer.

How can I install software without admin rights on Windows 11?

1. Use the Microsoft Store

  1. Launch Microsoft Store.Install VLC -how to install software without admin rights windows 11
  2. Look for the application and click Get to install the app. 

2. Disable the UAC

  1. Press the Windows key, type Control Panel, and click Open. CP Control Panel
  2. Select View by as Category and click System and Security.System and Security - how to install software without admin rights windows 11
  3. Go to Security and Maintenance and click Change User Account Control settings. Change User Account Control settings
  4. Click Change User Account Control settings.Change user account control settings 2
  5. On the User Account Control Settings window, drag the slider down to Never notify. Never notify
  6. Click OK to save the changes.  

3. Create a .bat file

  1. Download the software you want to install from the official website.
  2. Create a folder on the desktop and drag the installer file into the folder. 
  3. Now in the folder, click New, then select Text Document.Text Document-how to install software without admin rights windows 11
  4.  Open the .txt file and copy and paste the following command to the notepad after replacing Software_name with the exact software name: set _COMPAT_LAYER=RunAsInvoker Start <Software_name>VLC
  5. Go to File, and click Save as. 
  6. Rename the file as AdminRights.bat or BypassUAC.bat, and for Save as type, from the drop-down, select All Files. AdminRights
  7. Click Save. Now, run the installation file and install the app without UAC prompts. 

4. Use the in-built admin account

  1. Press the Windows key, type CMD, and click Run as administrator. DOS COmmand Prompt -how to install software without admin rights windows 11
  2. Type the following command and press Enter: Net user Administrator /active:yesUser Admin Yes
  3. Now install the software.
  4. Once done, copy and paste the following command to disable the account and press Enter: Net user Administrator /active:noNet user Administrator NO

5. Use the Windows PowerShell 

  1. Press the Windows key, type PowerShell, and click Run as administrator. Windows PowerShell -how to install software without admin rights windows 11
  2. Copy and paste the following command and press Enter: Enable-LocalUser -Name “Administrator”Admin yes
  3. Install the software you want. 
  4. Once installed, on the Windows PowerShell window, type the following command to disable the inbuilt admin settings and hit Enter: Disable-LocalUser -Name “Administrator”Admin no

So, these are methods that you can use to install software without admin rights on a Windows 11 computer. If you have any questions or concerns related to the topic, feel free to mention them in the comments below. 

Can’t Download Netflix On Laptop: How to Fix

Wondering why you can’t download Netflix on your laptop? It’s most likely because your Microsoft cache is piling. Another possibility is that your firewall and antivirus is blocking the connection.

The good news is that with a few simple tricks, you’ll put an end to this and finally download Netflix on your Windows PC. Follow the steps below to get started:

How do I download Netflix on my laptop?

1. Run Windows Store app troubleshooter

  1. Open Settings.
  2. Choose Update & Security.
  3. Select Troubleshoot from the left pane.
  4. Expand the Windows Store Apps troubleshooter.
  5. Click Run the troubleshooter.apps troubleshooter

2. Reset the app

  1. Press the Windows key + I to open Settings.
  2. Choose Apps.
  3. Expand the Netflix app and open Advanced options.netflix app fix
  4. Click Reset.reset netflix app.

3. Uninstall the app and reset Store’s cache

  1. In the Windows Search bar, type Netflix.
  2. Right-click on Netflix and choose Uninstall from the contextual menu.uninstall netflix
  3. Press Windows key + R to open the elevated Run command line.
  4. In the command line, type wsreset.exe and press Enter.
  5. Now, reboot your PC.

4. Run a script to remove the Netflix app and reinstall it

  1. Download the utility/script, here.
  2. Extract it from the ZIP file and run either 64-bit or 32-bit version depending on your Windows 10 architecture.
  3. Click on the Get Store Apps to allow the tool to access the list of all installed apps.
  4. Click on Netflix to highlight it and then click Remove Selected Apps.remove netflix app
  5. Reboot your PC.
  6. Navigate to Microsoft Store and search for Netflix.
  7. Try downloading the app again.

5. Reset Update services and update Windows 10

  1. Download the script, here.
  2. Extract the files from the ZIP file.
  3. Right-click on the ResetWUEng.cmd and run it as admin.
  4. Now, navigate to Settings > Update & Security and check for updates.check for updates

6. Run SFC and DISM

  1. In the Windows Search bar, type cmd.
  2. Right-click the Command Prompt and run it as an administrator.
  3. In the command line, type the following command and press Enter:
    • sfc /scannow
  4. After it’s done, in the same window, type the following commands and press Enter after each:
    • DISM /online /Cleanup-Image / ScanHealth
    • DISM /Online /Cleanup-Image /RestoreHealth
  5. Reboot your PC when everything ends.

7. Use recovery options

  1. Open Settings.
  2. Choose Update & Security.
  3. Select Recovery from the left pane.
  4. Under the Reset this PC section, click Get started.reset this pc

Finally, if none of the previous steps helped you out and you’re still unable to download Netflix from the Microsoft Store, there are only recovery options and system reinstallation left on the list.

The best choice to go with is the System Restore. If you have a restore point dating to a time when the Netflix app was working. If that’s not an option, try resetting your PC to factory settings.

With that, we can conclude the list. In case you have any alternative solutions we forgot to mention, be so good to tell us in the comments section below. We look forward to hearing from you.

Chroma Connect not Working: Enable it With These 4 Methods

The Razer Chroma is one of the best gaming keyboards you can buy, but many users reported that the Connect is not working on Windows 10.

This can become highly frustrating because you won’t be able to play your favorite games; therefore, in this article, we will explore some of the best methods to deal with this issue.

Here’s how a user described the issues he experienced with the keyboard:

I just recently purchased a Blackwidow Chroma v2. On the date of purchase, the lighting for Overwatch was working fine, but after Windows updated to the Fall Creators Update two days after, the lighting in-game quit, on both my keyboard and my Deathadder Elite!

It remained in Chroma Apps, but now has somehow managed to disappear. I’ve contacted Razer support multiple times, and they are unfortunately no help whatsoever. I’ve also uninstalled and re-installed Synapse a number of times to no avail. Does anyone know a way to fix this?

Why is Chroma connect not working?

There could be several reasons why Chroma Connect is not working. Here are some possible causes and solutions:

  1. Outdated software – Make sure you have the latest Chroma Connect installed. Updating to the newest version may resolve the issue.
  2. Compatibility issues – Check that Chroma Connect is compatible with your operating system and hardware. 
  3. Driver problems – Make sure that the required drivers are installed and updated. 
  4. Connection issues – Ensure that your computer is connected to the internet and that there are no network issues, as your connection is often the trigger.
  5. Conflicts with other programs – Some programs may interfere with Chroma Connect. 
  6. Chroma Connect server problems – If the issue persists, it may be a problem with the Chroma Connect server. 

And now, let’s see how to troubleshoot the problem.

What can I do if Razer Chroma is not working with games?

Before going into any solutions discussed in this article, we recommend you unplug and replug your keyboard or peripherals.

1. Toggle Chroma Apps On/Off

  1. Open Synapse.
  2. Click on Chroma Connect.chroma connect app razer chroma doesn't work
  3. Toggle Chroma Apps Off and then On.chroma apps disable razer chroma keyboard problems
  4. Try to see if this fixes your problem.

2. Update Razer Synapse to the latest version

  1. Open up the Razer app, and select Apps from the top menu; then, in the app list, you can choose either the Check for updates button or the Update button next to the service.razer chroma check for updates razer chroma doesn't work
  2. Follow the on-screen instructions.
  3. After the update process is completed, try to see if your keyboard works as it should. If it doesn’t, follow the next step.

3. Re-create your Razer config profile

  1. Open the Razer Synapse software, then find the profile you want to recreate and delete.
  2. Go to the Profiles tab in the Razer Synapse software and click on the Create a new profile button.
    chroma connect not working
  3. Customize your new profile with the desired settings and configurations. You can change the lighting, macros, and other settings to your liking. Finally, save it.

4. Remove the keyboard from Windows and reinstall it

  1. Press Windows + X and select Device Manager.
    chroma connect not working
  2. Expand the Keyboard section, right-click on your driver, and select Update driver.
  3. Click the Uninstall button to confirm.
    uninstall confirm razer chroma doesn't work
  4. Restart your PC to reinstall the driver.

We hope this guide helped you solve your issue with the Razer Chroma keyboard. Note that we have not written these solutions in any particular order. Instead, we recommend you try the fixes that feel most appropriate.

Generally, they should also help if Razer Chroma Connect is not working and give you an idea of fixes for Asrock, Genshin, and Chroma studio.

Please feel free to let us know in the comment section below.

How to Fix Trust This Computer Not Showing Up on iPhone & Mac

iPhone offers many great security features. And speaking of that, you need to set your computer as a trusted device before the iPhone can connect to it.

Obviously, this is not a Windows-exclusive feature. In fact, you are bound to see this notification whenever you want to connect a device – be it Windows or Mac – to an iPhone or Ipad for the first time.

If you decide to go ahead and trust the computer, both your iPhone settings and your data will be made available to the authorized device.

Your choice will theoretically be remembered until you modify the trust settings or remove the device from the list. But that’s not always the case.

In fact, many users complained about their iPhone not asking to trust a computer even if it is the first time they are trying. In comes the big question: why doesn’t my iPhone say trust this computer? So, let’s find out togehter.

Why my iPhone is not showing trust this computer?

You could be dealing with a temporary glitch, in which case, restarting your devices should do the trick. By devices, we mean both your iPhone and your computer.

A weak Internet signal or other network-related issues can also be responsible for the trust this computer not showing up issue. Make sure you reset your router while you’re at it!

It’s also possible you’re using an outdated iTunes version or even an outdated OS. Try to update them to the latest versions and see if that solves the issue.

As always, app and/or file corruption can create havoc, so you might want to reset your Trust settings and add the device to the list of trusted apps again.

Whatever the root cause, this can be a big problem, but we’ll show you how to make your iPhone trust your computer again. So, read on!

How do I fix iPhone trust this computer not showing up?

1. Make sure that your system and iTunes are up to date

  1. Open the Settings app and go to Update & Security.
    update and security trust this computer not appearing
  2. Now click on Check for updates.
    check for updates trust this computer not appearing

To update iTunes, just do the following:

  1. Open iTunes.
  2. Now select Help > Check for Updates.
  3. Follow the instructions on the screen to complete the update process.

On Mac, you can check for updates by doing the following:

  1. Open the Apple menu and choose System Preferences.
  2. Navigate to the Software Update section.
  3. If any updates are available, click on the Update Now button to install them.
    software update trust this computer not appearing

After updating your computer OS and iTunes, check if the problem is still there.

2. Restart your computer and your iOS device

  1. Try disconnecting and reconnecting your iOS device to your computer.
  2. Restart your computer and check if the problem is still there.
  3. Restart your iOS device and try to connect it again.

3. Reset your Trust settings

  1. On your iOS device go to Settings > General > Reset.
  2. Now select Reset Location & Privacy.
    reset location and privacy trust this computer not appearing

After doing that, all your trusted devices will be erased and you’ll be able to set them up again.

4. Reset Network settings

  1. On your iOS device go to Settings > General.
  2. Now select Reset > Reset Network settings.
    reset network settings trust this computer not appearing

Once you complete these steps, all your saved network settings will be restored to the default, and hopefully, Trust this computer message will appear again.

Not being able to see Trust this computer message can be a big problem since you won’t be able to connect your iOS device to your computer, but we hope that you fixed this problem with our solutions.

Error Code 3304 on Paramount Plus: 3 Ways to Fix it

Paramount Plus is a reasonably popular streaming service, but like any other, it has shortcomings. This article will discuss the Paramount Plus error code 3304 and how to resolve it.

It will help you comprehend the Paramount Plus error code 3304, why it occurs, and how to quickly fix the issue so that you may resume playing all your favorite applications.

What is error code 3304 on Paramount Plus?

The Paramount Plus error code 3304 indicates the program’s improper operation. This is because the Paramount Plus app cannot connect to the server. As a result, when trying to stream material on the app, you can run into latency or buffering problems and a black or blank screen.

Several reasons can cause this:

  • Improper connection – The Paramount Plus error code 3304 stipulates that the app cannot connect to the server, either caused by a local problem with the Internet connection or the Paramount server is unavailable. Check the Paramount Plus service status.
  • Outdated browser – Make sure your browser is updated to the latest version because an old one might be causing this problem. Alternatively, get the best browser for watching videos.
  • Ad blocker is interfering – These tools may disrupt the connection to the service you’re trying to reach, in this case, Paramount Plus.
  • Corrupted files – Whether there are corrupted files within your system or the app itself, they may prevent the normal functioning of the streaming service.

Now that we know the causes for the Paramount Plus error code 3304 let’s proceed to the actual solutions.

How do I fix error code 3304 on Paramount Plus?

Before getting into the more complex tweaking, there are a few quick measures you can take to fix the problem:

  • Restart the Paramount Plus app and your system. As simple as it sounds, it may solve the issue.
  • Disconnect your router from the device, power it off, wait for at least a minute, then reconnect and power it up again. This may solve the connection issue.
  • If you’re using Paramount Plus in your browser, ensure it’s updated to the latest version.

Let’s proceed with the solutions below if none of these preliminary methods worked.

1. Disable hardware acceleration

On Chrome

  1. Launch Chrome, click the three menu buttons at the top right, and then go to Settings.Chrome Settings
  2. Select System on the left-hand side menu.Chrome System - paramount plus error code 3304
  3. Turn off. Use hardware acceleration when available.Use hardware acceleration

On Mac

  1. Open Settings and choose System.
  2. Look for and disable Use hardware acceleration when available.

2. Disable ad blocker

  1. Launch Chrome, click the three menu buttons at the top right, and then go to Settings.Chrome Settings - paramount plus error code 3304
  2. Click on Privacy and Security on the left.Privacy and Security
  3. Select Site Settings at the bottom of the list that is presented.Site Settings - paramount plus error code 3304
  4. Open Additional Content Settings by scrolling down.
  5. Select Ads.Additional Settings
  6. Set the preference to All sites that can show any ads to you.All Sites Ads - paramount plus error code 3304

We have shown you how to disable the add blocker on Chrome, but the method is very similar on all other popular browsers. If you use a third-party, stand-alone ad blocker, access its menu to disable it. And once done, the Paramount Plus error code 3304 should be gone for good. It could also help you with other error codes like 3205.

3. Disable your antivirus/firewall

If you use a third-party antivirus with a firewall, you should try to disable it temporarily because it might interfere with Paramount Plus. There have been various cases where the firewall blocked programs or services.

The solution is different for any antivirus, but to disable it, you should access its settings and look for an ON/OFF switch for its protection and/or firewall.

If the situation doesn’t change, turn back on the antivirus because your PC will be exposed to threats.

How do I force quit the Paramount Plus app?

Occasionally, if the Paramount+ app stops or you encounter a black screen, Paramount Plus buffering, or loading pictures when watching content, you might need to close the app to fix streaming problems.

Press and hold the Power button on Samsung TV for 5 to 8 seconds. Then, reopen the Paramount+ app after the TV has turned back on. 

On PS4, visit the home page (or press the PS Home button on your remote). To choose the Paramount+ app for closing, highlight it. Keep holding down the PS button. Click on Close Application. The Paramount+ app may now be launched once more. 

On Xbox, to access the instructions, press the Xbox button. In addition, the user manual can be accessed from any other screen on the console by pressing the Xbox button. After choosing Settings, choose Restart Console. To confirm and restart your device, select Yes.

Also, if Paramount Plus keeps buffering, this is usually related to a poor Internet connection, and we’ve got several solutions.

You should also check our guide on how to fix Paramount error code 3005 for further solutions.

We hope this article has given you insight into the Paramount Plus error code 3304 and that you can now resolve this problem using one of our simple fixes. If you still have issues with the app, you can contact Paramount+ directly via email or social media.

Browser Download Speed is Slow: 5 Ways to Increase it

We download files daily, but some users reported slow browser download speeds. This can be a hindrance, especially if you’re working on an important project and need to download files quickly.

Many users reported slow internet speed as the leading cause of this issue, but we covered that in a separate guide, so be sure to check it out.

There are several causes of this problem, and in today’s article, we’ll show you how to fix this issue for good.

Why is my browser download speed so slow?

There could be multiple reasons why your browser’s download speed is slow:

  1. Internet connection speed – If your internet connection is slow, your download speed will also be slow.
  2. The number of connected devices – If multiple devices are connected to the same network and are consuming bandwidth, it will slow down the download speed for all devices.
  3. Download server’s location and speed – The closer the download server is to your location, the faster the download speed will be. The speed of the server also affects the download speed.
  4. Browser and computer performance -The performance of your browser and computer can also impact the download speed. Make sure to keep your browser and computer updated and free from malware.
  5. Firewall or antivirus settings – Firewall or antivirus software may slow down download speed by blocking or limiting the speed of specific downloads.
  6. File size – Larger files will take longer to download than smaller ones.

How do I fix a slow download speed on my browser?

Before you go to the solutions we list in this article, you may want to do the following:

  • Check download speeds on other devices – If you check the download speed recorded on other devices against your current device, you can tell if the problem is with your device or the ISP.
  • Restart your computer – This workaround is useful in ending some problematic processes that may be ruining your download speed.
  • Change your browser – This means you do not need to troubleshoot this problem on the current browsers. Instead, we recommend a change to Opera One, as it is very reliable and will help you avoid many browser-related issues.

Opera One

Enjoy surfing the Web at lightning-fast speeds using one of the world’s most modern and secure browsers!

1. Use netsh command

  1. Press Windows key + X and select PowerShell (Admin) from the menu.
    powershell administrator slow browser download speed
  2. Run the following command: netsh int tcp set global autotuninglevel=disabled
  3. Check if the problem is still there.
  4. If the issue is still there, run the following command: netsh int tcp set global autotuninglevel=normal

Users reported that using one of these two commands fixed the problem, so try them both.

2. Disable your antivirus

  1. Click on the hidden access arrow in the Taskbar.
    browser download speed slow
  2. Click on your antivirus icon, hover over Avast shields Control and select Disable for 10 minutes (This step varies for different antivirus software).
  3. Check if the internet speed improves.

This may be a helpful solution if your browser triggers the download speed issue. However, it would be best to remember that the disabling process might differ for your specific antivirus program.

3. End some processes

  1. Press Ctrl + Shift + Esc to open the Task Manager.
  2. Select the processes tab, click on a process, and select End.
    browser download speed slow
  3. Check if the browser download speed has improved.

4. Close other applications and tabs

  1. Close other tabs that you aren’t using. Multimedia tabs can negatively affect your download speed, so close them first.
  2. Disable any unused applications. Applications that are connected to the Internet might be slowing down your connection.
  3. After doing that, check if the problem is resolved.

5. Contact your ISP

If you have tried all the possible solutions to resolve the slow download speed on your browser and nothing has worked, contacting your Internet Service Provider (ISP) can help.

The slow download speed may be due to issues with your ISP’s network or equipment rather than your computer or browser. The ISP can diagnose and fix any issues on their end, such as network congestion or a problem with the connection to your home, which may affect your download speed.

They may also be able to offer you a faster plan if your current plan is not sufficient for your needs.

Additionally, they can check if any planned maintenance or upgrades that may be causing temporary slowdowns. Finally, contacting your ISP is a good step if you’ve ruled out other potential causes for slow download speed.

How do I increase my browser download speed further?

  • Use a fast internet connection: Make sure you have a high-speed internet connection. An immediate connection will allow you to download files quickly.
  • Disable extensions: Some browser extensions can slow down your download speed. Try disabling them temporarily to see if this helps.
  • Use a download manager: A download manager can increase your download speed by using multiple connections to download a single file.
  • Clear cache and cookies: Clearing your browser’s cache and cookies can free up disk space and improve your download speed.
  • Disable background activities: Close any running background applications or tabs, as they can consume bandwidth and slow down your download speed.
  • Change your server location: It can take longer to download if you download a file from a remote server. Try changing the server location to one that is closer to you.

These universal solutions will work if the browser download speed is slow on Firefox or any other browser.

If browser downloads are slow on your PC, try all the solutions listed in this guide.

Sometimes, your browser can lag for other reasons, and we covered this in detail in our Chrome is slow guide, so be sure to check it out.

Last but not least, if you need more help or have any recommendations regarding this issue, please feel free to use the comment section & let us know!

Disk Benchmark Tool: 12 Best to Test HDD Speed in 2026

A Hard Disk Drive (HDD) is an important PC component that influences the speed of your device. If it’s slow, your computer will lag regardless of how much memory you have or how high-performing the CPU is.

High-performing HDDs will improve your PC performance and this is why they are highly demanded by many users. And this is where disk benchmark tools come in. So, what is disk benchmark?

Disk benchmarking is the operation of running a tool that accurately measures the rate of transfer or the transfer speed under various disk access scenarios (sequential, random 4K, deep queue depth, etc.).

Now, there are many factors that determine the speed of an HDD such as:

  • a driver’s rotation or memory chips
  • mainboard chipset and controller drivers settings
  • SATA/AHCI mode and RAID configuration
  • the speed of CPU and RAM

For this purpose, software developers created disk or hard drive benchmark software to test the HDD in your computer. The process is called Benchmarking.

How do I benchmark my disk performance?

If you want to perform a disk speed test on Windows 10 or Windows 11 or evaluate how much one adjustment impacts your computer, we recommend these capable tools:

  • AIDA 64 Extreme – Multi-threaded engine for comprehensive disk benchmark
  • MiniTool Partition Wizard – Easily perform a disk speed test on Windows 10
  • HD Tach – Portable disk benchmark (discontinued, but still reliable)
  • Crystal Disk Mark – Free disk benchmark (donation-supported)
  • ATTO Disk Benchmark – Excellent Windows disk benchmark (works for SSD)

The purpose of this testing is to figure out in the terms of MBPS the speed and summarise the speed characteristic of the disk.

Along with deep clean hard drive software, the best disk benchmark software can be very useful for anyone who wants to maximize the performance of their PC.

What is a good HDD benchmark?

AIDA 64 Extreme – Multi-threaded engine (complete disk benchmark)

The benchmark pages of AIDA64 Extreme provide a variety of ways for testing system performance and running hard drive benchmarks.

The CPU benchmarks are based on the multi-threaded AIDA64 Benchmark Engine, which can support up to 1280 parallel processing threads.

It is also compatible with multiprocessor, multi-core, and HyperThreading systems. It may appear complicated to use, yet AIDA64 Extreme offers everything in terms of automation.

The CPU AES Benchmark evaluates CPU performance by encrypting data with AES.

You can use the Disk Benchmark module to test the performance of the PC’s storage devices, such as (S)ATA or SCSI hard disk drives, RAID arrays, optical drives, solid-state drives (SSD), USB drives, and memory cards.

Other key features of AIDA 64 Extreme include:

  • Diagnoses installed programs on your PC
  • Assessment of Windows settings
  • Stress testing
  • Software audit

It also enables you to write tests, which aids in the detection of counterfeit items and problems on the devices. To obtain reliable benchmark results, make sure that all background programs are closed.

AIDA 64 Extreme

The multi-threaded Benchmark Engine can handle up to 1280 concurrent processing threads.
Free trial Visit website

MiniTool Partition Wizard – Easily perform a disk speed test on Windows 10

ssd management software

Mini Tool Partition Wizard is a lightweight but very well-equipped partition management software.

It integrates several disk performance features that let users see in-depth reports on their hard disks and information on how they can improve their performance.

You can use it to create new partitions, move existing partitions, and convert or split them. It is a secure and fast alternative to performing these actions manually.

This software is suitable even for users that are not very familiar with disk management practices, as it is very intuitive and error-proof.

It saves time and ensures that all actions are done safely, without the risk of data loss or other system problems.

MiniTool Partition Wizard has performance assessment features as well, with a disk benchmark option included.

If you are not sure how to start out, you can check the benchmark tutorial directly from the benchmark tab within the UI.

Mini Tool Partition Wizard is able to measure the transfer speed of your disk in sequential scenarios, random scenarios, and more.

Other key features of Mini Tool Partition Wizard include:

  • Disk/partition surface test
  • Space analyzer
  • Merge partitions
  • Partitions and disk copy

Partition Wizard

Take care of your hard disk with easy-to-use partition & performance management tools.
Check price Visit website

HD Tach – Portable disk benchmark (discontinued, but still reliable)

HD Tach is a reliable software solution that lets you perform HDD benchmarks. Despite the fact that the software has been released a long time ago, in 2004, it continues to provide good results.

Even though the technology has progressed tremendously, the software is still able to work on recently released drives.

Note that in order for this software to work on new operating systems, you will have to run it in XP compatibility mode.

HD Tach allows long and short block tests to be run on the HDD and then shows the results through a pop-up window.

It has a good processing speed due to which it takes only one to two minutes to finish up the whole process.

HD Tach displays the result as a graph or as a chart, specifying the read performance, burst speed, and information for CPU utilization, average access time, and average read speed.

Other key features of HD Tach include:

  • Easy configuration
  • Lets you save benchmark results in a local file
  • Keeps track of all past benchmarks

⇒ Get HD Tach

Crystal Disk Mark – Free disk benchmark (donation-supported)

best hard drive benchmark

Crystal Disk Mark is prevalent nowadays as a tool for benchmarking because it has multipurpose and it has a good rate of generating results.

This tool works for about anything from USB drives to RAM, SSD drives to Mechanical hard drives. It is very easy to operate for users who do not possess advanced knowledge.

You can run more passes to find out relatively more accurate results.

Crystal Mark Drive has an extra option for SSD drives which is considered to be very useful as it allows the user to select whether to fill the data randomly or with 0s or 1s.

This option affects the result on drives with hardware compression. Crystal Disk Mark also has portable and installer versions. This light disk benchmark software is fully compatible with Windows OS.

Other key features of Crystal Disk Mark include:

  • Multi-language support
  • Easy-to-use interface
  • Multiple interface themes

⇒ Get Crystal Disk Benchmark

ATTO Disk Benchmark – Excellent Windows disk benchmark (works for SSD)

best hard drive benchmark tools for Windows 10/11

ATTO is also one of the most famous portable tools which are being used by many hardware review websites. Some manufacturers also recommend this disk benchmark software to test the SSD drives for speed.

All of the tests performed are sequential and are taken for reading and write operations using block sizes of 512 bytes up to 8MB with a test file length between 64KB and 2GB, all selectable from drop-down menus.

Leaving Direct I/O enabled and the Overlapped I/O option selected will rule out odd results due to any system caching.

Users of this free software say that it provides a very easy and reliable method to test out the speed of your hard disk.

The user interface is clean and easy, with straightforward menus and options.

Results obtained through this software can be saved and can again be loaded when required. You can get it for free from the link below or sent to you through email via the official site.

Other key features of the ATTO Disk Benchmark include:

  • Timed mode for continuous testing
  • Test RAID controllers and storage controllers
  • Compatible with all Windows versions starting with Windows XP

⇒ Get ATTO Disk Benchmark

AS SSD Benchmark – 6 synthetic tests + 3 copy tests for SSD benchmark

This software is primarily developed to benchmark SSD drives and is very popular. It’s used by many hardware websites to compare different products on their sites and share the results.

This software uses incompressible data due to which some of the SSDs show lower score results than if they compress their data.

Sequential and 4KB read and write scores are displayed along with access times and a final general overall score. The overall view can be changed to IOPS according to the user’s preference.

AS SSD is also completely portable, so you can quickly test out hardware performance without having to install it.

The tool can test out your solid-state drivers with six different synthetic tests and three copy tests.

The user interface is very minimal and easy to use with information about the read and write speeds for sequential, 4k, 4k-64 correspond tests, and access time tests.

Other key features of AS SSD Benchmark include:

  • Support for multiple languages
  • Compatible with Windows operating systems starting with Windows XP
  • Lightweight

ASS SSD Benchmark is a free software supported by donations.

⇒ Get AS SSD Benchmark

HD Tune – Can run a disk speed test on Windows 10 & Windows 11

This is the most widely known hard drive benchmark tool. It also has a diagnostic utility. The free version has some issues and is old, but benchmarking works fine.

As a result of the test performed, the graph will show the minimum, maximum, and average read speed along with the average access time in milliseconds and the burst rate.

The block size can be changed in the options from 512 bytes up to 8MB, and a slider can move between faster or slower and more accurate test speeds.

The current pass can be specified and there is added support for Windows 10 and Windows 11.

Although light and with a very simple user interface, this software is capable of offering in-depth assessments of your hard drive.

It runs full benchmarks and can display SMART attributes, depending on the manufacturer and version of your hard drive.

Users can view real-time information about their hard disks and quickly see the minimum, maximum, and average transfer rates. You can explore similar benchmarking features by checking our guide on HD Tune software, which offers detailed drive health and speed testing.

Other key features of HD Tune include:

  • Can autosave screenshots between tests
  • Enables AAM to favor low HDD noise
  • Support for data wiping

⇒ Get HD Tune

Anvil’s Storage Utilities – Disk benchmark to download for Windows 7

This utility is very comprehensive compared to the other tools and utilities. It runs all the tests and also displays all the results including response time, speed in MB/s, and also IOPS.

Although older, this performance measurement tool is still very capable to provide comprehensive information about hard drives and solid-state drives.

The tool can run multiple performance tests and display read and write rates for all of them in an easy-to-follow table view.

Anvil’s Storage Utilities can run an SSD benchmark, endurance testing, threaded IO/write and read, as well as threaded mixed IO.

If you want to keep track of the testing results and check overtime progress, you can copy them to the clipboard and save them to a document file.

Other key features of Anvil’s Storage Utilities include:

  • Portable application
  • Information about the Windows Management Instrumentation
  • Available for 35-bit and 64-bit PCs

⇒ Get Anvil’s Storage Utilities

Disk Thruput Tester – Free and light HDD benchmark software

Disk Thruput Tester is a small and portable disk testing software that analyses write and read scores.

The tool uses Windows core read and write functions t write a temporary file to the specified drive, then reads it back sequentially and randomly to get three resulting scores.

The test file can be between 10 MB and 100 GB with a block size to test of 1KB up to 8MB.

The user interface is simple. All options necessary to conduct disk testing are displayed directly in the main window, as you open the application.

Disk Thruput Tester is able to assess the performance of personal computers that run on 32-bit or 64-bit builds.

Other key features of Disk Thruput Tester include:

  • Compatible Windows XP or higher
  • Frequent updates
  • Customizable test paths

⇒ Get Disk Thruput Tester

Roadkil’s Disk Speed – Beginner-suited hard drive benchmark tool

Roadkil’s Disk Speed is a simple utility that’s suitable for beginners. It does the expected job of analyzing the disk’s capability and speed to transfer data.

It provides information regarding linear reads, random reads transfer rates as well as the seek time of the drive. However, it only runs read tests and displays the score ranging from 512 bytes to 1MB blocks.

At the end of the benchmark, the tool displays an overall score. This can be helpful if you want to keep track of your drives and compare different brands of drives.

The tool detects and displays information about the hardware version such as firmware revision, size, model, file system, and more.

Other key features of Roadkil’s Disk Speed include:

  • Lightweight
  • Simple interface
  • Download packages for multiple versions of Windows

Roadkil’s Disk Speed is free software that can be downloaded and used on pretty much any Windows-operated computer. 

⇒ Get Roadkil’s Disk Speed

HD Speed – Disk benchmark with NTFS & FAT32 format support

It’s mostly like Roadkil’s tool, small and portable yet simple in nature, but HD Speed has more configuration options for different kinds of storage devices.

It even has more modes than Roadkil’s: Read+write and Read+Write+Verify. This software however destroys any data that is being tested in writing mode.

Block size can be left at Auto or changed from 1KB up to 16MB, a log file can also be created to review the results.

This tool is able to test multiple storage devices such as hard disks, DVDs, and CDs and supports NTFS and FAT32 formats for hard disks.

The results are displayed in a comprehensive graph paired with quick information regarding bytes/sec, current and average speed rates, and more.

HD Speed is freeware compatible with Windows operating systems. The user interface is a little outdated, but the tool itself is still very reliable and capable to analyze the performance of your hard disk.

Other key features of HD Speed include:

  • Easy to use
  • Lightweight
  • Can test removable media

⇒ Get HD Speed

DiskMark – HDD Benchmark with performance graphs

It is a tool that displays plenty of information after a test about average, maximum, minimum, and last read and writes scores.

The scores are projected as a raw number form and as a graph, as well. Configuring this software for tests is really a difficult task, mainly changing the set size.

The tool uses multiple options that help you determine the performance level of your hard drive.

You can set up test parameters yourself. Just select the disk you want to test, the buffer size, and the number of the file size written on the disk.

The tool provides a performance graph where average values are displayed along with any fluctuations, and minimum and maximum read and writes rates.

DiskMark is free software that is compatible with PCs that run Windows XP or higher versions of the OS.

Other key features of DiskMark include:

  • Lightweight
  • Open Source
  • Compatible with 32-bit and 64-bit builds

⇒ Get DiskMark

As you can see, there are many hard drive benchmarking tools and more are being developed every day. We covered the most important ones and their features.

If you are looking for a benchmarking utility for your Surface tablet, check the Disk Benchmark official app from the Microsoft store.

Don’t forget to tell us in the comments section below what is your favorite disk benchmark tool and how often you use it.

5 Ways to Fix Hyper-V Audio Not Working on Windows 11

Microsoft’s Hyper V or hypervisor lets users create and manage virtual machines on their Windows PCs. We have a guide to help you understand how to enable Hyper V in Windows 11.

If the audio is not working on your Hyper V virtual machine, we provide multiple solutions to fix the problem.

What causes Hyper V audio not working issue?

  • You haven’t installed the latest version of Windows update: Not keeping Windows updated constantly causes multiple issues.
  • The audio service isn’t running or is disabled: If the audio service isn’t running, then it could trigger the Hyper V audio not working issue.
  • Your speaker is faulty: Well, if the speakers themselves are faulty, then there is no point in applying any troubleshooting method. Instead, it would be best if you simply replaced them.
  • The connection ports aren’t working correctly: Problematic ports or loose connections can also raise this issue.
  • Your audio drivers aren’t updated: Audio drivers should be up to date as they fix multiple bugs or glitches because of the previous update.
  • The audio device isn’t selected as the default speaker: You should ensure that you have chosen the correct speaker or output device as your default speaker.
  • Audio enhancements are incompatible with your output device: Often, all speakers don’t support specific enhancements. Try disabling them and check if this fixes the issue.
  • The latest version of the Windows update might have popped up a bug: Sometimes, the latest Windows update version brings along bugs that could trigger multiple problems. In such cases, roll back to the previous update.

Now that we know the causes of this problem let’s get to the actual solutions and fix them.

What can I do if Hyper V audio is not working?

Before you go ahead with the advanced solutions, here are a few preliminary checks that we advise you to go through:

  • Restart your PC: Temporary files can often pile up and cause multiple problems. So, restart your PC and check if this fixes the issue.
  • Install the latest available Windows update: Check if a new Windows update is available; if yes, then install it.
  • Check your speaker connection: Check if the ports you are using to connect your speaker are proper and if there is damage or fault.
  • Check if the mute option is enabled: Make sure that the quiet option isn’t enabled or that you turned down the volume all the way down.

If you’ve gone through the checklist above, let’s start troubleshooting the problem with our solutions below.

1. Install the latest audio driver

  1. Click the Search icon, type device manager, and select Device Manager.
  2. Expand the Audio output and input devices section.
  3. Right-click on your audio driver and select the Update driver option.Update audio drivers
  4. Select the option Search automatically for drivers option.search and update drivers automatically
  5. Install the latest update if available.

You must update all the drivers on your device to ensure they are working fine.

We have a complete guide on how to update your drivers on Windows 11 that will offer more information.

While the above steps let you update your driver, you need to check for each driver manually. To ease the process, you can take the help of a dedicated tool called Outbyte Driver Updater.

Using Outbyte Driver Updater, you can update old drivers, fix broken or faulty ones, find missing ones, and much more with just a button.

Outbyte Driver Updater

Keeping all your drivers up to date will reduce the chances of additional or other problems.
Free Trial Download Now

2. Restart the audio service

  1. Press Win + R to open the Run dialogue, type services.msc, and hit Enter.deploying services screen
  2. Locate Windows Audio, right-click on it, and select Restart.
  3. Right-click again and select Properties.
  4. Set the Startup type as Automatic.
  5. Apply the same procedure for the Windows Audio Endpoint Builder service.
  6. Press Apply and OK to save the settings.

3. Run the audio troubleshooter

  1. Click the Search icon, type troubleshoot, and click on Troubleshoot settings.
  2. Press the Other troubleshooters option.
  3. Click on the Run button for the Playing audio option.
  4. Follow the on-screen instructions to go through the troubleshooting and fix the problem.

4. Roll-back sound drivers

  1. Press Windows + R to open Run, type devmgmt.msc, and click OK to open Device Manager.Devmgmt
  2. Expand the Audio inputs and outputs category, right-click on your audio driver, and select Properties.
  3. Switch to the Driver tab and click the Roll Back Driver button.
  4. In the Driver Package rollback window, select any reason and click Yes.
  5. If the option is grayed out, you don’t have any older drivers to roll back to.

5. Uninstall the Windows update

  1. Press Win + I to open Settings.
  2. From the left side, select Windows Update, then click on Update history on the right.
  3. Select Uninstall updates.
  4. Choose the latest update that you installed and hit the Uninstall button.

If the problem started after you installed a new Windows update, then chances are there are some bugs in the latest Windows update version that is causing the issue.

In such a case, we suggest you roll back to the previous version of the Windows update by uninstalling the latest one following the above steps.

Also, you can try system restore and bring back your PC to a state where everything is working fine. There are chances that a third-party program might have messed up the system settings.

How do I get audio on Hyper-V?

Note icon NOTE
This solution only works when you connect to Windows 7 or Windows Server 2008 R2 and only with RDP version 7.0, which is part of Windows 7.

Unfortunately, Hyper-V doesn’t offer a virtual audio device. For audio, you have to use RDP (Remote Desktop Protocol) to start the virtual audio support.

For that, press the Windows + R keys to launch Run, type regedit, and press Enter. Then, navigate to the following key: HKLM\SYSTEM\CurrentControlSet\Control\Terminal Server\WinStations\RDP-Tcp

Now, edit the value fDisableAudioCapture and set it to 0 because the value 1 disables the microphone redirection.

SFC Scan and DISM commands are always helpful in fixing system-related errors as they select missing or corrupt files that may be causing the problem.

If nothing helps, then you can go for resetting your PC. This will help fix the corrupt or missing system files because you face Hyper-V audio issues.

That is it from us in this guide. Let us know in the comments below which one of the above methods helped you fix the problem.

Is Your USB Port not Working in Car? Here are 5 Ways to Fix

We all love listening to our favorite songs in the car, but what can you do if your car stereo USB port doesn’t work?

One option is to use a Bluetooth audio receiver, but that’s not the most elegant solution, although it works decently.

However, there are ways to fix this problem, so be sure to keep on reading.

What can I do if my car stereo USB port stopped working?

1. Use another USB cable

  1. Remove the current USB cable that you’re using.
  2. Get a new one and connect it to your stereo USB port.
  3. Check if it works.

This is a simplest solution if USB port is not working in car and you’re trying to connect a device via cable.

2. Try another USB drive with your defective port

  1. Disconnect your USB device from the USB port.
  2. Next, try connecting a different one to the USB port.
  3. Check if the issue is still there.

It’s possible that your USB device isn’t configured properly, or that it’s faulty, so replacing it is a great way to diagnose the issue.

3. Check for any compatibility issues between devices

  1. Disconnect your USB drive.
  2. Connect it to your PC.
  3. Press Windows key + E to open File Explorer and go to This PC.
  4. Right-click your flash drive and choose Format.
  5. Make sure to set File system to exFAT or FAT32 and click Format.
  6. Once the drive is formatted, add your files to it and try again.

Many car stereos don’t work with NTFS drives, so always use exFAT or FAT32 drives on your car stereo and other non-Windows devices.

4. Update firmware for both devices

  1. Locate the model of your car stereo.
  2. Download the latest firmware.
  3. Check the instruction manual on how to properly install it.

If the car USB port not working, it’s possible that firmware might be the cause.

5. Try using a USB drive with a smaller storage

  1. Disconnect the USB drive.
  2. Get a different smaller size drive.
  3. Transfer all your files to it and try it.

Sometimes a larger drive might not be fully compatible with your car stereo, so you’ll have to use a smaller size USB.

As you noticed, the issue with your car stereo USB not working can have a variety of reasons – compatibility, size of the disk, the power outage, a defective cable, and ultimately a defective USB port.

Check them all out and find the source of your problem with the help of our steps. If need to replace your flash drive, be sure to check out our guide on the best flash drives that you can buy.

We would love it if you would share your experience with us. Do you have any troubleshooting suggestions? Leave a comment in the section found below this article to contact us.

Fix: Brother Printer Scanner Not Working/Connecting to PC

Brother printers are known for their being reliable, desk-friendly, space-saving, and functional, as you can not only print but also copy, scan, or fax. But many reported that their Brother printer won’t scan in Windows 10, and for some, even in the latest iteration.

The issue has become far, too, common with several users pointing out that Brother’s is not offering a Full Driver and Software Package for Windows 11, as it did for Windows 10. There’s a lot of confusion in this regard, but we have a few solutions that work for users.

Why is my Brother printer working but not the scanner?

Here are a few reasons why the Brother printer is not scanning and only printing:

  • Issues with the network configuration: If the printer or computer’s network configuration is incorrect or is so set that the printer is not recognized, you will have trouble scanning.
  • Running an outdated driver: A corrupt or outdated driver is a likely reason your Brother printer won’t scan in Windows.
  • Firewall is blocking the connection: In a few cases, users found out that it was their firewall that blocked the connection and, as a result, it wasn’t scanning.

How do I get my Brother scanner to scan to my computer?

Before heading to the slightly complex solutions, we recommend trying these quick ones first:

  • Power off both the computer and the Brother’s printer for a minute, turn them on again and then verify whether the problem is resolved.
  • Make sure you have the Brother Control Panel installed on the PC.
  • To ensure the printer is working fine, connect it via a USB cable, and check if it works.
  • If you have problems printing when connected via a USB cable, replace the cable with a new and compatible one.
  • When Brother printer scanner won’t scan on Windows 10, check if you can do it via the dedicated Brother iPrint&Scan app available on the Microsoft Store.
  • Make sure two devices are not using the scanner functionality simultaneously since Brother printers don’t offer it yet.

If nothing here works, head to the fixes listed next.

1. Run the printer troubleshooter

  1. Press Windows + R to open Run, type msdt.exe -id DeviceDiagnostic in the text field, and hit Enter.
    hardware and devices troubleshooter
  2. Now, follow the on-screen instructions to fix issues with the printer.
    troubleshoot

The built-in troubleshooters are quite effective at handling things when the Brother printer won’t scan in Windows. Besides, you could also run the Printer troubleshooter.

2. Allow Brother Network Scanner in Firewall

  1. Press Windows + R to open Run, type control panel, and click OK.
    control panel
  2. Click on System and Security.
    system and security to fix Brother printer won't scan Windows 10
  3. Now, choose Allow an app through Windows Firewall under Windows Defender Firewall.
    allow an app through firewall to fix Brother printer won't scan Windows 10
  4. Click the Change settings button.
    change settings
  5. Make sure both the Private and Public checkboxes are ticked for Brother Network Scanner (and other entries related to the printer), and then click on OK to save the changes.
    allow

If it’s the firewall that’s conflicting with the connection, allowing the printer to operate through it should do. If you have a third-party firewall installed, make sure to allow the Brother Network Scanner through it similarly.

3. Reinstall the Brother printer’s driver

  1. Press Windows + X to open the Power User menu, and choose Device Manager.
    device manager
  2. Expand the Printers section, right-click on your Brother printer, and choose Uninstall device.
    uninstall device to fix Brother printer won't scan Windows 10
  3. Now, click on Uninstall.
    uninstall
  4. Once done, restart the computer, and Windows will automatically install the best available drivers.

4. Install drivers directly from Brother’s website

Note icon NOTE
Before manually installing the drivers, uninstall the current one, as illustrated in the previous solution. But instead of restarting the computer, download and install the required one from the website.

If the OS couldn’t find the right ones, Brother offers drivers for both Windows 10 and Windows 11. All you have to do is head to the official website, choose the product and the iteration of Windows, and it will then provide the relevant drivers.

For Windows 10, we recommend installing the Full Driver and Software Package for your printer since it’s bundled with the relevant tools that help simplify the process of scanning and printing. If the Brother printer still won’t scan, head to the next solution.

If you own the Brother MFC-L2710DW model, you can follow this Brother MFC-L2710DW driver installation guide to download the correct package for Windows and fix scanning issues quickly.

5. Manually set the IP address for the printer

  1. Open the Control Panel, search for Scanners, and then click on View scanners and cameras.
    view scanners and cameras
  2. Choose your scanner from the list, and click the Properties button.
    properties to fix Brother printer won't scan Windows 10
  3. Click Yes in case a UAC pops up.
  4. Navigate to the Network Setting tab, select Specify your machine by address, enter the IP address you confirmed earlier, and click OK.

6. Perform an in-place upgrade

  1. Head to Microsoft’s official website and download the Windows 10 Installation Media.
    windows 10 installation media
  2. Once downloaded, run the tool, and click Yes in the UAC prompt.
  3. Now, click on Accept to agree to the license terms.
    accept
  4. Wait for the setup to get things ready.
    getting a few things ready
  5. Next, select Upgrade this PC now and click Next.
    upgrade this PC now to fix Brother printer won't scan Windows 10
  6. Wait for the download to complete and follow the on-screen instructions to complete the process.
    complete

Several users, after spending quite a while with the Brother support team, were informed that it was a problem with Windows 10 and, therefore, the printer won’t scan. Even otherwise, if the previous solutions didn’t work, this is a likely cause.

And the best option, in this case, is to perform an In-place Upgrade. It fixes a range of intricate issues with the OS without deleting the data stored on the PC.

That’s it! These solutions should have helped you fix things when the Brother printer won’t scan in Windows 10. If the problem persists and you are looking for another device, check the best printer scanner in the market.

Did the solutions here help you fix the problem? Let us know in the comments section below.

Prepare for annoying, unskippable Microsoft 365 trial ads on your PC

We all like to see some ads from time to time, especially for our favorite products and gear, but we don’t like it when companies force those ads on us.

And, as we all know, Microsoft is good at shoving stuff in people’s faces when we least expect it and is gearing up to do so again.

So, in case you were missing a bit of inappropriate and annoying publicity, know that some people have been experiencing difficulty getting to their Windows desktops.

Why? Let’s just say it is due to an unskippable ad for Microsoft 365, the Redmond tech giant’s suite of productivity and collaboration software.

Unable to access desktop until you agree to Microsoft 365 trial

Aside from sparking worldwide privacy concerns among the Office user community, Microsoft is again working hard on bringing ads to the Windows OS.

Reddit users started flooding the website with photos of their Windows 10 PCs displaying a full-screen Microsoft 365 Family trial ad during the out-of-box experience (OOBE).

One unhappy user said that Windows 10 is preventing him from booting into the desktop without first non-consensually being forced to accept their free trial and $100 monthly thereafter.

Many were even joking saying that Microsoft and Blizzard would be a perfect family since both sell useless dreams for ridiculous sums.

So, it seems that Windows 10 users are being blocked from accessing their desktops by full-screen trial offers for the Microsoft 365 productivity suite, formerly Office 365.

The only options we are presented with when this trial ad pops up are Try for free and No, thanks, in case you were wondering.

Know that, after choosing No, thanks, the user gets sent to a Confirm your payment option screen where the only option left is to Start trial, buy later.

We know that, while such screens are shown after doing clean Windows installs and installing feature updates, they usually contain the Skip for now option on the bottom left side of the display.

However, this time around, Microsoft has replaced that button with a Privacy and Cookies link, to make it seem like everything is ordinary.

It appears that Microsoft is testing other layouts and pushing different offers since others have reported seeing 50% promos with Next and No, thanks displayed buttons at the bottom.

Clicking on the No, thanks button would take them to a new screen where they’re asked to enter their payment information and are only given the option to Buy now.

Rest assured that you can cancel after entering the credit card information required to enable the Microsoft 365 Family subscription trial you were forced to pay to access your Windows 10 desktops.

If you choose not to or forget to do it until the trial expires, you will be charged $109 per month while the subscription remains active.

If you want to avoid receiving this offer, you should start the installation process without an Internet connection, which will also allow you to create a local account if you don’t want to link the desktop to your Microsoft account. 

Please keep in mind that Microsoft has also stopped selling licensed Windows 10 copies, and you can only buy them from local retailers or Amazon.

Have you received this annoying Microsoft 365 ad? Let us know in the dedicated comments section below.

Turn Windows into DLNA Media Server: Best Tools in 2026

Life today is media-centric, and there’s never a dull moment. At least not with a DLNA server allowing you to stream unlimited video, music, audio, and photos to your entertainment devices.

You will, however, need the best DLNA server to turn your computer into a media server that is safe and robust.

So, what is the DLNA server? What devices support DLNA? Is it the same as Bluetooth? Does DLNA work over the Internet? These are all legitimate questions that we shall try to address accordingly.

A DLNA server stores media content and avails it across a network wirelessly. The server is generally a DLNA-enabled PC or a NAS (network-attached storage).

Once active, the server lets you conveniently browse the entire media collection from multiple devices through a home network.

And there are indeed numerous devices that support DLNA, such as computers and gaming consoles, mobile devices, digital cameras, media players, and other IoT products.

How do I turn my computer into a media server?

  1. Open the Control Panel and go to Network and Internet.
  2. Under Network and Sharing Center, click on Media Streaming options.
  3. Turn on the Media Streaming button.

That’s one way to set up a DLNA server on Windows 10. You can also use a NAS and connect your new media server to the network via Ethernet or Bluetooth from the Devices screen. And you can similarly enable DLNA in Windows 11.

As you can see, you can set up a home network media server by enabling the native Windows 10 technology. However, most users find using third-party DLNA software more straightforward.

A DLNA server software is an application that allows you to share the burgeoning library of movies, audio, and pictures in your computer with your other DLNA-compatible devices.

Have a look at our favorite picks:

  • Playon – DLNA software + record content for offline entertainment
  • Ampache – Top-notch DLNA streamer (works with any client & media player)
  • Plex – Complete DLNA media server solution (file management included)
  • Kodi – DLNA server software with support for game controllers
  • Jellyfin – Free DLNA server for Windows 10

Once installed, the DLNA software instantly sets up your PC as a media streaming center, opening up a sea of thrilling and personalized entertainment choices.

Inter-device connectivity is established through the handy DLNA protocol and the software makes the whole process simple and direct.

What is the best DLNA server software for Windows?

Playon – DLNA software + record content for offline entertainment

Playon is a full-feature media portal that integrates all your media streaming services into one media library. 

The platform is easy to use. You can either download it on your computer or directly to a media streaming device such as Roku.

The software is easy to navigate. You get a grid view of all your streaming platforms in the home menu and recommended content based on your history.

One major plus of using Playon is the recording feature. You can capture all types of media for offline enjoyment. 

Playon is a subscription-based service with monthly charges. You can try it for free for 7 days and get to download 7 media recordings.

Other key features of Playon include:

  • Full HD 1080 recordings
  • Instant ad skip
  • Cast videos on TV
  • Auto records new episodes
  • Downloaded content has no expiration

Playon

Access all your favorite media platforms and channels from one library, and more.
Free trial Visit website

Ampache – Top-notch DLNA streamer (works with any client & media player)

Ampache is an open-source web-based streaming app and file manager that works with almost any internet-enabled device so capturing and casting shows from a desktop, tablet, or phone is a breeze.

If you want highly reliable, and secure DLNA server software, Ampache has very few equals.

Ensuring a fantastic user experience, this tool lets you stream movies, music, and shows from Hulu, Netflix, HBO, Amazon, and countless other streaming sites and channels with no hidden catch.

It has countless customization options, such as various authorization methods, listing metadata sources by preference, importing custom metadata, ordering album art sources by preference, and many more.

There is no DLNA/UPnP with a premium subscription, as Ampache already has all of those features by default for free.

Let’s quickly look at its key features:

  • Powerful API and streaming to any client (VLC, WinAMP, Foobar2000, Windows Media Player, Subsonic API, UPnP/DLNA, and DAAP with iTunes)
  • Flexible catalogs (scan music straight from your local filesystem or use other sources to add to its database)
  • Support for multiple users, and user registration
  • Music streaming (stream your music to your preferred player, or listen on the web page with an HTML5 player)

⇒ Get Ampache

Plex – Complete DLNA media server solution (file management included)

Plex is a multimedia management software that allows you to access and stream TV channels and streaming platforms’ content and lets you organize all your personal media files into one library.

This platform works worldwide, allowing you to stream content from all major on-demand media services.

Plex is compatible with multiple media hardware such as Amazon Fire TV, Android TV, and Roku. So, is Roku a DLNA device? If you were wondering about this possibility, there’s your answer – it can be!

Plex can also run on Android and iOS mobile devices and Windows or macOS computers.

Plex allows you to download content to access it without an Internet connection. You can sync downloaded media to all your devices so you can enjoy it wherever you are.

Other key features of Plex include:

  • Automatic LyricFind lyrics for music content
  • Custom sharing restrictions
  • TV-show intro skip

⇒ Get Plex

Kodi – DLNA server software with support for game controllers

Kodi is another popular option for users that want to connect and access all their media content from one place.

It provides completely free media library management features that integrate your TV channels, on-demand platforms, audio files, pictures, and more. 

Besides passive media content, Kodi lets you connect your games to the app. You can add stand-alone games, or connect emulators.

It also offers support for game controllers, so you can set it up as a one-stop entertainment center.

You can use this DLNA server software to record live TV video content. Just press the record button while streaming and you’ll be able to reaccess it whenever you want.

Kodi can be used on Windows, macOS, and Linux computers. It also comes as a mobile app for Android and iOS.

Key features of Kodi include:

  • Live TV playback
  • Customizable UI
  • Metadata-based library organization
  • Digital pictures/image display
  • Supports most media file formats

⇒ Get Kodi

Jellyfin – Free DLNA server for Windows 10

The media server software has also been hailed for its sleek performance. And would you believe you can get all this bliss without paying a dime?

Even without digging too deep into its technicalities, this is one of the best choices for anyone searching for a smashing performance from a free DLNA server for Windows 10.

Unsurprisingly, its advanced design enables the server to produce one of the sweetest streaming experiences amongst the top contenders.

Let’s quickly look at its key features:

  • Collect, manage, and stream your media to any device from your own server
  • Store your entire media collection and organize it neatly
  • Make playlists
  • Watch Live TV and set automatic recordings to expand your library
  • Apps on your Android, iOS (including AirPlay), Android TV, or Fire TV device, or via Chromecast or Kodi
  • No centralized tracking of your data
  • Completely free to download

⇒ Get Jellyfin

MediaPortal

Powerful but very easy to use, MediaPortal puts up a strong show when pitted against the rest of the DLNA servers for Windows 10.

It streams a large variety of media files with surprising precision and at impressive speeds.

MediaPortal handles just about every device and is a powerful entrant to our unique selection of DLNA media server tools that gives a reliable, simple, and seamless streaming experience.

Let’s quickly look at its key features:

  • Watch, schedule, and record live TV
  • Play videos, movies, DVDs, and Blu-ray discs
  • Stream media, radio, and TV to any HTPC / PC connected to your network
  • Use a remote to control your HTPC
  • Check the weather, news, and more
  • Access from the web or mobile devices
  • Hundreds of plugins and skins available (to stream or download web TV, Apple Trailers,
  • YouTube videos, or internet radio)
  • Complete media solution for free

⇒ Get Media Portal

Subsonic – Cross-platform compatibility & extended format support

Subsonic is another popular UPnP media streaming service whose main claim to fame is its unique ability to transcode a huge variety of media formats. Whatever you want to share, the tool is always up to the task.

Your Xbox, smartphone, and practically every other device work excellently as soon as you hook them up with this DLNA server software that also boasts apps for Android, iPhone, Windows Phone, Chrome, and many more.

Its compatibility prowess goes even further as it supports pretty much any network-enabled media player from Winamp, iTunes, XMMS, VLC, and MusicMatch to Windows Media Player.

Plus, it has an embedded Flash player. This DLNA server software also supports all media formats (MP3, OGG, AAC, and any other audio or video format that streams over HTTP).

Let’s quickly look at its key features:

  • Clean web interface optimized for constrained bandwidth environments
  • Displays cover art, assigns ratings and comments to albums and tracks
  • Create your own playlist and manage the play queue
  • Customizable user experience (28 languages, 30 different themes, personal avatar, etc.)
  • Works with any number of users
  • Integrates with the best web services through an open API

⇒ Get Subsonic

Emby – Can store your content in multiple resolutions

Emby is one of the most feature-rich DLNA media servers that works like a charm across a plethora of rendering devices and is a joy to stream with.

Whether it’s stand-up comedy, soaps, Formula 1, or blockbuster movies, this has gotten rave reviews for its polished performance.

This DLNA software automatically converts and streams your personal content on any device. It can store your content in multiple resolutions, enabling direct streaming from any device.

Furthermore, you can sync your personal media to smartphones and tablets for easy offline access. Emby apps are available for Android, iPhone, iPad, Windows Phone, and tablets.

The innovative idea of a pleasant user interface and media auto-detecting technology is lovely to users seeking painless streaming.

Let’s quickly look at its key features:

  • Parental Controls (monitor and remote control sessions as you need to)
  • Send videos, music, photos, and Live TV to Chromecast with ease
  • Sync your personal media to the cloud for easy backup, archiving, and converting
  • Edit metadata and images, search for subtitles, and more.
  • Automatically detects DLNA devices on your network
  • Powerful web-based management tools (to manage your content, users, sharing, security, and more)

⇒ Get Emby

To enjoy your rich media library across multiple devices, you have to turn your computer into a media server, and the best way to do this is by using DLNA server software.

The thing with these thoughtful tools is that they’re not equal, meaning you need to take your sweet time evaluating your options.

If you have any suggestions or questions, feel free to leave them in the comments section below.

Windows 11 Cursor: How to Change & Customize it

The cursor is the arrow that shows you what is on your screen. It’s like the real one but moves around with your mouse. When you’re using a computer or laptop and want to highlight something and don’t know how the cursor is often what you want. 

Windows 11 has many new features and changes that might be difficult for some users. The cursor, for one, has several hidden features, and you can make it work for you. This guide will show you how to change and customize the Windows cursor.

What is the best cursor for Windows 11?

The cursor is a very important part of the user interface. It is one of the two significant elements that make up the visual design of a computer program. The other element is text. One of the first things you need to know about the cursor is that it can be anything you want.

The best cursor for Windows 11 depends on what kind of experience you want out of your computer. You may be wondering whether you can change the color of your mouse pointer in Windows 11. The answer is yes.

This is a very handy feature, as it allows you to customize your cursor’s appearance on the screen. If you want an easy-to-use cursor to help you navigate through your computer without much hassle, then the default Windows 11 cursor will do it for you.

However, if you’re looking for something more, many different options are available. Check out our recommended list of mouse cursor options in case you want more variety.

How do I customize my computer mouse?

1. Change the cursor theme

  1. Hit the Search icon, type Mouse Settings, and click Open.
  2. Click on Additional mouse settings.
  3. Navigate to the Pointers tab in the Mouse Properties window that pops up.
  4. Click on the drop-down menu under Scheme and select an option you prefer.
  5. Select Apply, then click on OK to save changes.

2. Change the color of the mouse pointer

  1. Hit the Windows key and click on Settings.settings windows 11
  2. Select Accessibility on the left pane and select Mouse pointer and touch.
  3. Click on the last mouse pointer and select a custom color from the options.

3. Change the size of the mouse cursor

  1. Hit the Windows key, type Control Panel in the search bar, and click Open.Open Control Panel
  2. Navigate to Ease of Access Center.
  3. Click on the Make the mouse easier to use option.
  4. Under Mouse pointers, select an option you prefer.
  5. Alternatively, you can change your cursor from Settings.settings windows 11
  6. Select Accessibility on the left pane and select Mouse pointer and touch.
  7. Hover the mouse from left to right to adjust the size.

If the default pointer is too small or too large for you, you can adjust its size to your liking.

4. Change the cursor speed

  1. Hit the Search icon, type Mouse Settings, and click Open.
  2. Click on Additional mouse settings.
  3. Navigate to the Pointer Options tab in the Mouse Properties window that pops up.
  4. Under Motion hover the mouse to a speed of your preference.
  5. Also, click the checkbox next to Enhance pointer precision to stabilize the cursor.

If you prefer a fast-moving cursor on your PC, you’ll be happy to know that you can adjust the pointer speed and configure Enhance Pointer Precision.

5. Change the mouse cursor icon

  1. Hit the Search icon, type Mouse Settings, and click Open.
  2. Click on Additional mouse settings.
  3. Navigate to the Pointers tab.
  4. Under Customize, scroll down until you find an icon of your liking.
  5. If you don’t like the provided options, click on Browse. This will take you to a pack of downloaded cursors. You can now select an option, go back then click on Apply and OK to save the changes.

Windows allows you to have a custom mouse cursor. You can do so if you’d like a double-sided arrow, a hand selection, or any other option listed. 

That’s all there is to it! Pretty easy, right? The key takeaway from this should be that you should feel free to change the cursor of your mouse as you like.

There’s no reason for it not to be customized; this isn’t some super complicated process. If you don’t feel like experimenting, look at the default cursor and decide if it’s good enough for your needs.

If, for some reason, your mouse pointer is missing, we tell you how to get it back in our detailed article. We also have answers for when your mouse keeps glitching, so feel free to check that out.

What are your thoughts on the Windows 11 mouse cursor model? Share them with us in the comments section below.

Windows Fax and Scan Could not Complete Scan: 4 Fixes to use

Some Windows users encountered the error Could not complete scan when scanning their documents using the Windows Fax and Scan feature.

If you are also facing this inconvenience and you are searching for a solution to fix the error, you can find below a couple of solutions that may help you improve your problem:

Why is my Windows Scan not working?

There could be several reasons why your Windows Scan is not working. However, some common causes include the following:

  1. Outdated or corrupted drivers – Outdated drivers always cause problems for computing devices, which could be why the Windows scan is not working.
  2. Connectivity issues – Ensure that your scanner is connected correctly, as a bad connection between devices can trigger some problems.
  3. Third-party software interference – In most cases, this is the antivirus software. It may conflict with other tools and cause a connection problem.
  4. Scanner settings – Ensure the correct scanner is selected in the scanning software and the correct settings are selected.
  5. Windows updates – Windows updates can sometimes cause compatibility issues with specific scanners.

If Windows fax and scan will not scan or cannot open the document for viewing, the solutions below should help.

How can I fix Windows Fax and Scan could not complete scan error?

  1. Update the drivers for your scanner
  2. Run the Hardware troubleshooter
  3. Repair corrupted system files
  4. Perform Windows update

1. Update the drivers for your scanner

  1. Press the Windows key + R.
  2. Type control and press Enter.
    run-control
  3. In the Control Panel, click Uninstall a program.windows fax and scan could not complete scan
  4. Right-click on your scanner’s driver from the program list, select Uninstall, then restart your computer.
  5. Download the scanner drivers from the device manufacturer’s website
  6. Right-click on the driver setup file and click on Properties.
  7. Click on the Compatibility tab and check the box Run this program in compatibility mode for and select Windows 10 from the drop-down menu and proceed with the installation.
  8. Restart your computer.

2. Run the hardware troubleshooter

  1. Press the Windows key to open the Start menu, type troubleshooting in the search box, and click the tool.
  2. Click on the Troubleshooting tab, select Hardware and Device option, and click Run the troubleshooter.
    troubleshoot-hardware-and device
  3. Follow the Wizard to complete the troubleshooting.

3. Repair corrupted system files

3.1 Running the SFC scan tool

  1. Click Start and type Command Prompt in the search box, right-click Command prompt, and click Run as administrator.
    command prompt run as administrator
  2. When the Command prompt opens, enter the script below and hit Enter.
    sfc/ scannowcommand prompt SCF scannow
  3. Wait for the process to complete and check if the error is solved.

System File Checker is a utility in Windows that allows users to scan for corruptions in Windows system files and restore corrupted files.

Could not complete scan error can occur if specific components of your operating system are damaged or corrupted, and to fix them, you can use an SFC scan.

3.2 Run the DISM utility

  1. Click Start and type Command Prompt in the search box, right-click Command prompt, and click Run as administrator.
    command prompt run as administrator
  2. Type the script below and hit Enter: 
    DISM /Online /Cleanup-Image/RestoreHealthcommand prompt DISM Restore Health
  3. DISM scan will now start, and make sure you do not interrupt it

Once the scan is finished, please check if the problem is solved. If the issue is still there or you could not run an SFC scan before, a good solution now would be to repeat the SFC scan.

4. Run the Windows update

  1. Go to Start, and in the search field, type Windows Update.
  2. Click on Windows Updates Settings from the search results.windows update settings
  3. Install the latest Windows updates.

To have a healthy computer, you must keep updating Windows to the latest release and drivers. This also helps you solve any issues or difficulties you may be experiencing.

Did any solutions help you fix the Could not complete scan error? Your experience is always important to us, and you can share it by leaving a comment below.

Feel free to list additional troubleshooting solutions as well.

Quick Fix: Logitech Keyboard Stopped Working

We all know how annoying it is to turn on your computer to get some work done or play games and suddenly realize that your Logitech keyboard has stopped working.

This can be the result of physical damage or a driver-related issue, which usually happens after a Windows 10 update. That said, it might just be that your keyboard has reached the end of its life.

We have a few ways to fix this, so don’t worry!

Why is my Logitech wireless keyboard not working?

The following are some of the reasons why you may be experiencing this error:

  • Function keys not working – This often happens if you have tampered with the keyboard function settings or configurations, yet rest assured that our first solution will help you.
  • Outdated drivers – The Logitech keyboard might become unresponsive when you have outdated drivers, so take a closer look at our below steps to uninstall/reinstall keyboard drivers and keep your drivers up to date.
  • Logitech wireless keyboard connection issues – Also consider that the Logitech keyboard might get stuck because of general problems with the connection. Yet our preliminary checks will help you rule out this possibility.

You might also be asking: Why is my Logitech keyboard not working after changing batteries? You should check the keyboard manual to see the correct type of batteries to include.

How do I fix my Logitech keyboard if it stopped working?

Consider performing these preliminary checks:

  • As a first step, to avoid unnecessary work, please check the keyboard, its cable, and the USB port into which it’s plugged. If the cable is frayed or has any cuts, it could mean that the wires inside are no longer connected as they should be.
  • To ensure we also eliminate the possibility that the USB port isn’t working anymore, plug the keyboard into a different one.
  • If the issue persists, try connecting it to another PC or laptop.

If you’re asking: Why is my keyboard not working even though it is plugged in? The following solutions will answer that question and help you fix the issue.

1. Run the troubleshooter

  1. Press the Windows key + I to bring up the Settings menu.
  2. Select Update & Security.
  3. Select the Troubleshoot tab and click on the Additional troubleshooters option.
  4. Under Find and fix other problems, select Keyboard.
  5. Click on the Run the troubleshooter button and follow the on-screen instructions.

This tool will automatically detect any errors that may affect your keyboard drivers and fix the problem. It’s a quick and straightforward process that can save you a lot of headaches.

2. Uninstall/reinstall keyboard drivers

  1. Press the Windows key + R to start the Run console, type devmgmt.msc, and press Enter.
  2. Expand the Keyboard category. Please select your device, right-click on it, and select Uninstall device.
  3. Restart the device and start Device Manager again.
  4. Expand the Keyboard category. Please select your device, right-click on it, and select Update driver.
  5. Click on Search automatically for drivers.
  6. The system will install the latest drivers, if any are available.

Another option would be to visit the Logitech official website and download the drivers for your specific device.

Besides these, there is also an automatic alternative for you to try because it will be a faster and more efficient process.

3. Restart HID (Human Interface Service)

  1. Press the Windows + R keys to start Run, type services.msc, and press Enter or hit OK.
  2. From the menu that appears, select Devices.
  3. Right-click on Human Interface Device Service and select Properties.
  4. Select the Startup type to Automatic from the drop-down menu.

After you restart this service, please re-plug your device and see if that has solved the issue.

HID is responsible for anything with human input. This software is known to fix problems related to hotkeys on Logitech keyboards. Thus, restarting this service might take care of this affair.

4. Roll back the driver

  1. Press the Windows key + R to launch the Run console, type devmgmt.msc, and press Enter.
  2. Expand the Keyboard category, select your device, and click on Properties.
  3. Select the Driver tab and click on Roll back driver.
  4. If the option is grayed out, you don’t have a previous driver to return to.

As the last step, if all the options listed above did not solve the issue, you could roll back the driver if the problem started after a Windows update. This feature will uninstall the recently installed driver and re-install the previous one.

We hope that the steps we listed above were of help and that you’ve managed to restore the functionality of your keyboard.

You might also be interested in our guide on what to do if Windows 11 is not detecting your keyboard.

Let us know which solution worked for you in the comments area below.

Windows 11 KB5023008 was just released to the Beta Channel

Last week, we took a more in-depth look at what was, at the time, the most recent Windows 11 Insider Preview build for the Beta Channel (KB5022358).

Back then, Microsoft began to roll out the screen recording feature in Snipping Tool to Windows Insiders in the Beta Channel.

And, as part of the most recent Snipping Tool update, the tech giant also added the ability to pause while recording and you should notice improved performance and reliability.

However, the time has come to move on and look forward to the new Beta Channel build that has been released to Windows 11 Insiders.

Today, Microsoft has just released KB5023008 to Insiders conducting their business on the above-mentioned Channel.

What should I know about builds 22621.1250 and 22623.1250?

Yes, folks, it’s time for twin builds again! The tech giant known as Microsoft released builds 22621.1250 and 22623.1250 (KB5023008) to the Beta Channel for Windows 11 Insiders.

Just remember that Insiders who were previously on Build 22622 will automatically get moved to Build 22623 via an enablement package.

Of course, this enablement package artificially increments the build number for the update with new features getting rolled out and turned on to make it easier to differentiate from devices with the update with features off by default.

Wondering what to expect from it? Microsoft is finally adding a new policy for IT administrators to manage how the search box on the taskbar appears in their organizations

Don’t forget to check out the latest version of Windows 11 (22H2) and the complete list of bugs and issues that still plague it.

Also, if you haven’t upgraded to Windows 11 yet, know that Microsoft has permanently stopped selling Windows 10 licenses to anyone.

Fixes in Build 22623.1250

[Task Manager]

  • Typing F in the search box should work again now.
  • Fixed an issue where Narrator wasn’t reading out some of the text in dialogs.
  • Dragging the window using the search box area should work now (like other areas of the title bar).
  • If you do a search and then press the down arrow, keyboard focus should now move from the search box into the results.
  • Fixed an issue where ending processes in the Details tab wasn’t showing a confirmation dialog.
  • Increasing the text scaling should no longer result in a “see more” button appearing with no contents.
  • Fixed an issue where focus might not get set properly to search, leading to Narrator not saying that focus was on the search box.
  • If you have a contrast theme enabled and select one of the rows in the Processes page, that row should now show that it’s selected.

[Search on the Taskbar]

  • Fixed an issue where the search box would randomly disappear sometimes when you clicked it (leaving a blank space on the taskbar).
  • Fixed an issue where the search box was shifting to the side slightly when you clicked it.
  • If you have the taskbar set to auto-hide and press the Windows key and start typing, the taskbar should no longer unexpectedly hide.

What can I do if I can’t install KB5023008?

  1. Press Win+ I to access Settings.
  2. Select the System category and click on Troubleshoot.w11 troubleshoot
  3. Press the Other troubleshooters button.other troubleshooters windows 11
  4. Press the Run button next to Windows Update.windows update troubleshooter

Also, make sure to report any other issues you might come across, in order for Microsoft to address and improve the overall OS experience for us all.

This is everything you can expect if you are a Windows 11 user. Leave a comment below if you found any issues since installing this build.

Alarm Clock for PC: 6 Best We Tested [2026 List]

There are so many ways to keep time and manage your schedule these days in the digital age, especially for those with PCs and other smart devices.

In fact, there’s no need to spend money on old-fashioned alarm clocks anymore. Whether you’re timing the perfect cuppa or counting down to your next bio break, you’re sure to find an alarm clock for pc that works for you.

And speaking of that, here’s a quick preview of our favorite picks:

  • ?️ Alarm Clock Pro – Excellent alarm app for PC with musical reminders
  • ⏱️ Cool Timer – Classic desktop alarm clock with counter & graphic visuals
  • ? Music Alarm Clock – Digital alarm clock for PC free download
  • Alarm Clock HD – Best alarm clock for Windows 10 (Facebook & RSS feeds)
  • Free Alarm Clock – Run this alarm software from a portable device or USB
  • Kuku Klok – Online alarm clock for PC with day & night modes ??

Can I set an alarm on my PC?

You certainly can and it couldn’t be easier! Have a look at our selection, choose the very best alarm clock for your PC, download and install it, then enjoy its features as you see fit.

Some alarm apps for PC allow you to set alarms easily, with features such as playing audio or video files at the specified alarm time, setting alarms once, daily, weekly, monthly, or even annually, opening files, running programs, sending emails, and much more.

You can also customize the user interface and use the snooze option – one that many of us like to use in the morning when we’re not ready to wake up just yet.

What is the best computer alarm clock?

Alarm Clock Pro – Talking alarm clock for PC with musical reminders

This particular software is a multi-functional solution designed to set your alarm and wake you up lively with music. You can schedule reminders, email reminders, or take screenshots every time you need them.

Moreover, you can organize your time in a fun way with musical reminders. For instance, to use your music library as reminders tones you can connect your iTunes playlist and pick your favorite tracks to ring.

More so, you have on-screen notifications with built-in jingles, stopwatches and timers, web radio, etc.

Thus you can benefit from various ways to always be on time and complete your tasks before deadlines.

Plus it offers multiple automated tasks for PC, such as sending text messages or emails, taking screenshots, or calculating differences between time slots. Finally, it can run on both Mac and Windows.

Alarm Clock Pro

Stay on top of your daily workload and manage time from your PC easily.
Free trial Visit website

Cool Timer – Classic desktop alarm clock with counter & graphic visuals

With an easy-to-adjust counter and support for multiple preset times, Cool Timer stands out among the best alarm clock for Windows 10, 7, and more.

You can load your own sound files like MP3, or use the built-in sounds, and set the timers which also have accompanying notices to remind you why you set the time.

People with kids can use it so their kids know when it is time for them to wake up or go to sleep.

The Cool Timer Deluxe version has a new, sleek, and simple interface, background selections, unlimited alarm clock alarms, and recording of your own sounds to use as alarms.

It also has more powerful and versatile timing solutions and features such as different modes of use (countdown, alarm clock, or stopwatch), optional graphical visualization of time passage, and built-in alarm sounds.

You can set your alarm clock to 1000 hours in countdown mode, time digits for easy viewing, set alarm clock mode for certain days of the week, and automatically unmute the system volume before the alarm sounds.

So choosing this user-friendly app as your organizing tool can make a difference due to its practical features or rich time-tracking functionality.

⇒ Get Cool Timer

Music Alarm Clock – Digital alarm clock for PC free download

This alarm clock for PC keeps you on top of your schedule by playing your favorite sound files.

It has a simple and straightforward, modern interface, with buttons you can easily navigate through to set your alarms and manage audio playlists.

You can also set as many alarms as you like, and run them once, daily, on a specific date or specific day of the week.

It is possible as well to use the settings to repeat/shuffle the playlist, customize the interface, and fade the alarm music.

The built-in media player lets you add or remove MP3, WAV, and WMA audio files. It also displays the track’s title as each song plays along, and has a five-minute snooze.

Its newer versions have a shuffle/repeat playlist feature, customizable alarms, an enhanced interface with user-defined colors, and transparency, minimization to the system tray, fade-in alarm music, and a five-minute snooze button.

Using this app you sure can impact your time management by setting up personalized alarms for a rigorous schedule. It is also free, and you can let it wake you up using its default alarm.

⇒ Get Music Alarm Clock

Alarm Clock HD – Best alarm clock for Windows 10 (Facebook & RSS feeds)

Alarm Clock HD is the number one free alarm clock app for Windows. It has unlimited alarms, world clocks, weather, currency exchange rates, a music and radio player, plus Facebook and RSS feeds, picture themes, and much more.

It can wake your device from sleep, plus it has other features like accurate alarms – built-in or custom, toast notifications, weather, live tile clock, and room light sensor. You can even get the radio to wake you up.

The alarms can be set daily or on specific days, plus it has snooze duration settings, content to be reminded about, and an alarming picture for each individual alarm.

You can set it to wake you gently using the alarm fade in the duration settings. You can also customize each component with settings and options available for almost all features.

The app has a responsive design for different sizes and devices, or you can resize it to full-screen or Window mode. If you don’t like the digital clock face, you can opt for one of the five beautiful analog clocks faces.

This multi-purpose alarm software can be a good friend for any person who needs to program their time.

⇒ Get Alarm Clock HD

Free Alarm Clock – Run this alarm software from a portable device or USB

Free Alarm Clock is a free, full-featured, and user-friendly alarm clock software for your PC.

It allows you to set as many alarms as you want, like one-time or repeat alarms, and activate only from Monday to Friday, with a chance to sleep in over the weekend.

You can also label the alarms to show activities you must do at the sound of the alarm, set the time and sound for each alarm, and use text fields to write notes as reminders of the purpose of each alarm.

It plays MP3 music files and you can select the sound you want to wake up to.

It comes with several tones plus full access to your own music library, wakes your system from sleep mode, and turns on the volume automatically if it was on mute by accident.

Run it from your portable device or USB, so your alarms will always be with you.

Therefore, using this free app it’s like having a complete mobile alarm service on your PC. Literally, you can do anything clock-related and manage time perfectly.

⇒ Get Free Alarm Clock

Kuku Klok – Online alarm clock for PC with day & night modes

Kuku Klok is one of the best alarm software for your PC and has generated many user reviews because of its effectiveness.

It is simple, and you can use it to set a time for your alarm to go off, a sound to wake up to, and it even goes off when your Internet connection drops.

You can add a selection of sounds to wake up to, and it has no spyware or adware, no flashing gizmos or other floaters, just an alarm clock service.

The only downside is you have to leave your computer on and there’s no snooze button. It is made by the Swiss, who are the greatest watchmakers in the world, but Kuku Klok is one of their coolest alarm clock software as well.

Its bright yellow screen and simple layout will ensure you wake up happy. It also has day and night modes so you can switch to the night scenes and gaze at the stars.

Therefore this online alarm clock doesn’t require any extra effort and you only have to choose the waking up sound, from many like military or cockerel, and set it accordingly.

⇒ Get Kuku Klok

As you can see, it’s easy to use your PC as a personal alarm clock. So, did your favorite alarm app for your Windows PC make the cut?

If you’re looking for similar software, we have a great guide on the best desktop clock widgets for Windows 10, so don’t miss them.

If not, let us know which one you use, or which you like from this list, by leaving a comment in the section below.

5 cool things you can do with Microsoft Edge flags

Microsoft Edge flags are experimental features that allow you to customize and enhance your browsing experience. By enabling or disabling specific flags, you can change the way Microsoft Edge works, making it better suited to your needs.

In this guide, we will explain how to enable Microsoft Edge flags and introduce some cool things you can do with them.

Enable Microsoft Edge flags

If you need a refresher, here’s how to enable or disable flags in Microsoft Edge.

  1. Open the Microsoft Edge browser.
  2. Type edge://flags in the address bar and press Enter. This will open the flags page.
  3. Use the search bar to search for the flag you want to enable or disable. You can also scroll through the list of flags to find the one you want.
  4. Once you’ve found the flag you want, click the drop-down menu next to it and select Enabled or Disabled. microsoft edge flags
  5. After making changes to the flags, a popup with appear at the bottom of the browser. Click it to restart Microsoft Edge as you need to do so for the changes to take effect.

Once you get the hang of how to enable and disable flags, you can browse and search for other Microsoft Edge flags that suit your needs.

Try these Edge flags

Here are 5 Microsoft Edge flags that you can try:

  1. Smooth Scrolling: Enable smooth scrolling for a more fluid and natural scrolling experience in the browser or for viewing PDF files.
  2. Auto Dark Mode for Web Contents: Automatically enable the dark theme on web content displayed in the browser.
  3. Parallel downloading: Download multiple files at once. microsoft edge flags
  4. Force color profile: Choose a specific color profile to be used by Microsoft Edge.
  5. Fill passwords on account selection: Enters your password information when an account is selected by the user rather than completing your credential information when the page loads. microsoft edge flags

Conclusion

Microsoft Edge flags allow you to customize and enhance your browsing experience. By enabling or disabling specific flags, you can change the way Microsoft Edge works, making it better suited to your needs. From enabling smooth scrolling to accessing experimental web platform features, there are many cool things you can do with Microsoft Edge flags.
microsoft edge flags

Just remember that flags are experimental features and may not work as expected, or cause stability issues in Microsoft Edge. Use them at your own risk.

To learn more about flags, don’t miss our article on how to use edge://flags page properly.

Windows 11 Color Management Not Working? How to Fix it

Color management plays an important role for photographers, graphic designers, videographers, publishers, and those in related fields. But, after upgrading to Windows 11, many users have reported that the Color Management option is not working.

We went through several forums where users shared problems with color settings along with their concerns and possible fixes for them.

But, more often than not, it was found to be a problem with the OS, which is most likely to affect Adobe Photoshop and Google Chrome. So, let’s find out how you can get things up and running in this case.

How does Color Management work in Windows?

Every monitor is not identical and will show slight variations in color depending on the connected graphics card. Though it’s not noticeable to most, photographers and graphic designers often find it an issue since color accuracy is of prime importance to them.

This is where color management comes into the picture. To have identical colors on all devices or monitors, users must install the same color profile on each. You can get these color profiles both from the monitor manufacturer and from other third-party sources.

While there’s also the option to go for display calibration hardware, color profiles, ICC (International Color Consortium), or ICM (Image Color Management), which are perfectly capable of providing optimal color accuracy.

Now that you know the basics, let’s walk you through the most relevant methods to eliminate the Color Management not working problem in Windows 11.

What can I do if Color Management isn’t working in Windows 11?

Before you try the solutions listed below, here are a few quick things you can do:

  • Head to the app’s or device’s website that has problems with the color profile and check if they are compatible with Windows 11. If not, wait until they are or reinstall the previous iteration.
  • Reinstall the color profile that you want to be activated.

If these don’t work, move to the fixes listed next.

1. Update Windows 11

  1. Press Windows + I to launch the Settings app, and then select Windows Update from the list of tabs in the navigation pane on the left.update Windows 11 to fix color management not working
  2. Click on Check for updates to scan if any newer versions of the OS are available.Check for Update
  3. If an update appears after the scan, download and install it.

After a lot of research, we identified that the initial versions of the OS had problems with color calibration. Thus it’s recommended that you update Windows 11 to the latest version and check if color management starts working.

2. Switch to your monitor’s profile

  1. Press Windows + R to open Run, type colorcpl in the text field, and hit Enter.colorcpl
  2. Now, head to the Advanced tab, and choose a different profile from the Device Profile dropdown menu.switch profile

This is a workaround that did the trick for some users with a single monitor setup when Windows 11 Color Management was not working. So, do give it a try.

3. Reset the problematic app

  1. Press Windows + I to launch the Settings app, and select the Apps tab from the navigation pane on the left.Apps tab to fix windows 11 color management not working
  2. Next, click on Apps & features on the right.Apps & features
  3. Locate the problematic app, click on the ellipsis next to it, and then select Advanced options from the menu.Advanced options to fix windows 11 color management not working
  4. Click on Reset.Reset app to fix windows 11 color management not working
  5. Again, click Reset in the prompt that pops up.Confirm reset

4. Update the graphics driver

  1. Press Windows + S to launch the Search menu, enter Device Manager in the text field, and click on the relevant search result that appears.launch Device Manager to fix windows 11 color management not working
  2. Locate and double-click on the Display adapters entry to expand and view the devices under it.Display adapter
  3. Right-click on the graphics adapter, and select Update driver from the context menu.Update driver to fix windows 11 color management not working
  4. Next, select Search automatically for drivers.Search automatically for drivers
  5. Now, wait for Windows to find the best version of the driver on the system and install it.

The Device Manager method listed above has a major drawback. It only scans for newer versions on the system, thus acting as an offline update.

If you haven’t previously downloaded it, try manually installing the latest driver to fix things when Color Management is not working in Windows 11.

If that feels like too much work, there’s always the option to go with a reliable third-party app. We recommend using Outbyte Driver Updater, a dedicated tool that will scan all available sources for driver updates and keep the installed ones up-to-date.

Outbyte Driver Updater

Quickly update your drivers with the best options by using the Outbyte Driver Updater app.
Free Trial Download now

5. Switch to the Dev channel

If the problem lies with the current version of the OS and a patch for it hasn’t been released yet, you could switch to the Dev channel. Features and bug patches are first released for users on the Dev channel to be tested and only then launched for other users.

Though, you may encounter some instabilities since the features are in the early stages and might need some polishing. But whenever a patch is released, you will be amongst the first ones to get their hands on it and will have color management working in Windows 11.

6. Revert to Windows 10

Many users are hesitant about joining the Dev channel, which is perfectly understandable. In this case, we recommend that you roll back to Windows 10 for the time being until Microsoft releases a patch for the latest iteration.

Though reverting to Windows 10 might seem like a hassle, it’s the best available fix for now. Once you do, check this page for updates in case Microsoft eliminates the bug preventing color management from working in Windows 11.

How can I change the color of various elements in Windows 11?

Windows 11, along with the previous iterations, allows you to change the color of various elements. You can easily change the color of the Taskbar. In case you are looking to explore further, check out how to change the mouse cursor’s color.

And it’s not just limited to that. You can also set the taskbar to appear transparent in Windows 11. Also, learn how to activate dark mode in Microsoft Teams.

These are all the ways you can fix issues that lead to Color Management not working in Windows 11. By the time you reach the end of the article, the problem should be long gone and your system back up and running perfectly.

Do not forget to check our curated list of the best display color calibration software.

Finally, do not hesitate to tell us which fix worked for you in the comments section below.

Advapi32.dll Not Found: How to Fix It or Reinstall It

The Advapi32.dll file is a Windows core system file that belongs to the Microsoft Windows Operating System. This makes it a critical file as various programs depend on it to function properly. It may be missing for various reasons, such as virus infection and corruption. 

A missing or damaged Advapi32.dll file can cause major problems with your computer, including the inability to start programs and apps, the inability to open required applications, and more. If you have encountered this error, keep reading to find a possible solution.

What is the Advapi32 dll file?

Advapi32.dll is a system file that belongs to the Microsoft Windows Operating System. This DLL file contains several important functions that are used by the operating system to handle security, user authentication, and other basic functions.

So, where is my Advapi32.dll? Most DLL files are usually located in the system folder. You can find it in: 

Windows\system32 folder

Why is the Advapi32.dll file missing?

If you can’t find the Advapi32 DLL file, it may be because of one or more of the following reasons:

  • Accidental deletion – You may have accidentally deleted this file from your system. You can use Windows’ search tool to locate your missing files and folders.
  • Antivirus settings – Your antivirus software may have flagged it as a virus or malware and deleted it from your hard drive hence why you’re getting the Advapi32.dll not found error.
  • Corrupt update – If you recently installed an update, it may have caused an error during installation, especially if the update files have a problem. This can prompt Windows to reboot itself automatically and cause more issues.
  • Bad install/uninstallation – An improper uninstallation caused by an error when trying to remove an old version of Windows from your hard drive can also bring about this error.
  • Improper shutdown – DLL files may also get corrupted due to improper shutdown of your system. Since Advapi32.dll plays a role in shutdowns, it may have gotten corrupted in the process.

How do I fix Advapi32.dll missing?

A few preliminary checks include:

1. Run a virus scan

  1. Press the Start Menu icon, search Windows Security, and click Open.
  2. Select Virus & threat protection.
  3. Next, press Quick scan under Current threats.
  4. If you don’t find any threats, perform a full scan by clicking on Scan options just below Quick scan.Scan options
  5. Click on Full scan to perform a deep scan of your PC.Full Scan Scan Now
  6. Wait for the process to finish and restart your system.

You can also run your third-party antivirus if the Windows Security feature misses anything.

2. Run the System File Checker command

  1. Hit the Windows key, type cmd in the search bar, and click Run as administrator.cmd-run-admin-w11 unexpected kernel mode trap windows 11
  2. Type the following command and press Enter: sfc /scannowsfc scannow isdone.dll error
  3. Restart your PC.

3. Check for Windows updates

  1. Hit the Windows key and select Settings.settings windows 11
  2. Click on Windows Update on the left pane, then select Check for updates.check-updates lenovo-ideapad-keyboard-not-working
  3. If available, click on Download & install.download and install option in the settings

4. Repair Windows Registry

The most common reason for this error is that the Windows registry has become damaged. This can happen if you have recently installed new software or have made changes to the registry without backing it up first.

If you are experiencing problems with your computer, you should try to repair any issues with your registry using a registry cleaner program. These programs help to fix problems with the registry so that it will be able to run properly again.

5. Run a Startup Repair

  1. Hit the Windows key and click on Settings.settings windows 11
  2. Select System and click on Recovery.
  3. Navigate to Advanced startup and click on Restart now.
  4. Click on Troubleshoot.troubleshoot Driver Power State Failure
  5. Select Advanced options.
  6. Choose the Startup Repair option.
  7. Wait for some time until the diagnosing process is complete.
  8. Restart the PC and try again.

You can also start your PC in Safe Mode and check whether the error still appears. If all else fails, consider running a DLL fixer tool. This will scan your system and find out if there are any problems with your DLL files and then repair them accordingly.

Similarly, you may also come across the Dsound.dll file missing, so don’t hesitate to check out our recommended solutions.

If you have any additional thoughts on this topic, please comment below.

Error 0x80190190 on Xbox: 4 Quick Ways to Fix It [+PC Tips]

Xbox users seem to have another problem at hand. Gaming fanatics on the platform are reporting that the error code 0x80190190 is frequently appearing on their screens, especially when playing Persona 5 Royal.

While the error does not cause the game to crash, it can be an annoying pop-up if it appears every few minutes disrupting your game.

What is the error code 0x80190190?

Error code 0x80190190 is an error that happens to Xbox One and Xbox series users whenever they are playing Persona 5 Royal or other games.

The error suddenly pops up but when you click OK, it disappears. A few minutes later it reappears, and it becomes an unending cycle.

What causes the Xbox Error Code 0x80190190?

The Xbox error code 0x80190190 can be caused by many reasons but we will highlight the most important:

  • Network connection issue – If your network connection is not stable, you may witness this error code on your Xbox. Switching from Wi-Fi to a cable connection might resolve this problem.
  • The Xbox Live service is not working – This can be caused by a server outage on Microsoft’s end. Check the Xbox Live status to see if that’s the reason.
  • Corrupted game files – Although it’s less likely, if some of the game files are corrupted or missing, you will encounter this error.
  • Incorrect Xbox network settings – After an update of the console firmware, the network settings might be messed up but one of the solutions below will help you fix the issue.

It could also be a glitch with the Persona 5 Royal game. You can check the server status and see if there is any undergoing maintenance. If not, you can also report the issue to Xbox and wait for a fix to be availed.

How can I fix the error code 0x80070570 on Xbox?

First things first, let’s ensure you check off the basics:

  • Restart your console by holding down the Power button for 10 seconds until it turns off, then turn it back on again.
  • Turn off network functions on your console or PC. This means disabling your internet connection or wireless adapter (if available). Restart your game after that.
  • Make sure your Xbox is connected directly to the router using an Ethernet cable. Wireless connections can cause problems with certain games and apps.
  • Ensure that your Xbox is running the latest system update.

If none of these prerequisite measures worked, proceed with the solution below.

1. Delete the saved files 

  1. Go to Home on your Xbox.
  2. Click on My games & apps.
  3. Locate your game, right-click, and select Manage game and add-ons.
  4. Scroll and click on Saved data.
  5. Click on Delete all.
  6. Confirm and select Delete from console.

If you’ve been playing the same game for a long time, it’s possible that your saved game has become corrupted. The files saved on your computer may have become outdated.

Deleting them will ensure that there are no errors present in any of your saved items or files and hence once you restart everything will work perfectly fine.

2. Clear the MAC address

  1. Go to Home on your Xbox.
  2. Navigate to Profile & system.
  3. Select Settings.
  4. Go to Network settings.
  5. Click on Advanced settings.
  6. Select Alternate MAC address.
  7. Hit Clear on the next page.
  8. Click on Restart console.

3. Power cycle your console

  1. Press and hold the Power button for 10 seconds to turn off your console.
  2. Disconnect the power cable from the back of the console and from the outlet.
  3. After a minute, reconnect the power cable, then wait another minute to power up your console.

4. Uninstall and reinstall the game

  1. Press the Xbox button and select My Games & Apps.
  2. Select the Games menu.
  3. Select the game, press the Start button, and choose Uninstall.
  4. Go back to My Games & Apps, and select All owned games.
  5. Select the game you just uninstalled and select Install again.

As a last resort, you can try uninstalling the game and then reinstalling it. It is possible that the gameplay file has been corrupted hence the frequent errors.

Ensure when you uninstall the game you also clear out any residual files before reinstalling it again so that if there was a problematic file, it doesn’t resurface.

How do I Repair/Reset the game on PC?

  1. Press Windows + I to open Settings.settings windows 11
  2. Select Apps then click on Apps & features.
  3. Navigate to your game, click on the three dots on the right, and select Advanced options.
  4. Scroll down and click on Repair.
  5. Go back and click Reset.
  6. Reboot your PC and check if the issue persists.

You may also encounter the Xbox error 0x87dd0006 but we have already covered various fixes to that effect.

In some instances, the Xbox app may fail to launch on your Windows 11 so be sure to check out our guide on how to bypass this issue.

Let us know of any other solutions that you may have tried that have worked for you in the comment section below.

5 Music Arranger Software That Will Save You a Lot of Time

Looking for standard music arranger software? This article got you covered! In this piece, we’ll be reviewing five of the best music arranger software for PC.

This software falls under the music software category, and it will help you organize live performances or help you learn to play a specific instrument.

So without further ado, let’s get started, shall we?

What are the best music arranger software tools?

Magix Music Maker – Best overall

This is a simple but extremely powerful music maker software, which is great for both beginners and professionals. The app has drum tracks with up to 32 steps and dynamic velocity.

Of course, it’s possible to fine-tune your songs with the built-in equalizer, and you can enhance audio clips with various effects.

The software has its arranger, and you must drag and drop your loops and clips and arrange them any way you please.

It’s important to mention that there’s support for MIDI controllers and instruments, so you can start recording and producing music instantly.

Overall, this is a great software for all types of users, so be sure to give it a try.

Other great features:

  • Great for beginners and more demanding users
  • Build-in equalizer
  • Various sound effects
  • Easy-to-use interface

Magix Music Maker

Arrange your clips and create amazing songs with Magix Music Maker.
Free trial Visit website

FL Studio – Wide variety of mixing tools

The second entry on our list is another digital audio workstation called FL Studio.

Boasting the same graphical user interface based on a pattern-based music sequencer, it will have old-fashion DJs get used to it quickly enough.

The base program is quite simplistic, but it has extensive plug-in support, allowing you to customize your experience depending on what project you are working on.

For example, if you want to rearrange songs in a mix, FL Studio is an excellent tool for the job since the task itself is simple, as long as you have the original file.

Advantages of using FL Studio:

  • Exists in 4 different versions, including a free one
  • The one-time purchase gives you access to a lifetime of free updates
  • Wide variety of audio editing/mixing tools
  • Easy-to-use
  • Affordable

FL Studio

One of the best tools to create music can also be used to rearrange songs in a mix.
Free trial Visit Website

Soft Arranger – Simple style setup

Soft Arranger is a renowned MIDI/music arranger software with a large global client base. The software is flexibly built to support both Windows PC and macOS computers.

It provides you with a simple yet powerful user interface, which allows you to arrange your musical flow, to deliver near-perfect live music performance to your audience.

Similarly, you can easily employ the tool during rehearsal or practice before hitting the studio to record a song.

Typically, Soft Arranger is equipped to enable you to modify a song’s chorus, slow down or hasten up a tempo, play songs in different chord combinations, and modify styles as you desire.

In a nutshell, it allows you to customize your music as you like, to deliver top-quality performance on stage or to your audience, as the case may be.

Some of the main features of Soft Arranger include a MIDI editor, 16 MIDI channels, a Simple style setup, 30+ patterns (per style), Preset freestyles, High contrast UI, Optimized arranging speed, and more.

Soft Arranger works in sync with several plug-ins and standalone tools. These tools are basically six in number, and they include LoopMIDI, Java, Reaper, Presets, Tx16Wx, and SWS/S&M extension.

You can download all the above-listed support tools for free.

Other great features:

  • Simple to use
  • MIDI editor
  • 16 MIDI channels
  • 30+ patterns

⇒ Get Soft Arranger

ChordPulse – Simple design

ChordPulse is probably the most popular music arranger software in the market.

It is an all-around band-backing tool to facilitate songwriting, music improvisation, practice, intonation modification, and many more.

The tool is supported on all notable Windows versions, from Windows XP to Windows 10.

This software offers you a myriad of music styles to furnish you with good musical ideas and get you going in minutes.

ChordPulse works as a versatile tool, executing various functions like music arrangement, chord modification, music timing, and lots more.

ChordPulse offers a 14-day free trial package to new users, after which they can upgrade to a licensed edition.

Other great features:

  • Works on all versions of Windows
  • Low hardware requirements
  • Compatible with MIDI software
  • Hardware synthesizer compatibility

⇒ Get ChordPulse

vArranger 2 – Auto fill-in

vArranger 2 best music arranger software

vArranger 2 is a full-featured music arranger software specially designed for Windows PC. The tool is supported on all 32-bit and 64-bit Windows OS, from Windows XP to Windows 10.

vArranger 2 hosts a powerful set of music arranger tools, which are built on a highly intuitive and customizable interface.

With this, you can modify your music sequence, melody, chord, chorus, and style as you would like.

Furthermore, you are afforded the opportunity of producing backing tracks within minutes, with unimaginable convenience.

Other key features of vArranger include:

  • Auto fill-in
  • Tempo lock
  • Fade in/out, Split point
  • Bass modifier
  • MIDI monitor and optimized MIDI guitar
  • Multiple styles format support and preset styles
  • Automatic accompaniment,

vArranger, while being one of the most durable music arranger software, is lacking in affordability. The software is one of the most expensive music arrangers, with a fixed price of €349.

⇒ Get vArranger 2

This article aims to enlighten you on the best music arranger software for Windows, better to inform your decision on the music arranger solution.

Have you ever thought about making your own music? If you choose to do so, consider using music production software.

Please feel free to leave us a comment if you have any suggestions or if you use any of the tools recommended in this guide.