Flushing the DNS cache helps you fix the various network issues that might trigger on your PC. While flushing the DNS is a nice process, you should know it to take advantage of it. In fact, there is not just one way, but 6 different ways to completely flush DNS in Windows 11.
Here, we will give you a complete explanation of how to flush DNS in Windows 11. We will list the various ways to flush the DNS cache in Windows 11. Let us get right into it.
What does DNS flush & reset do to your PC?
Before we go ahead with the guide on how to flush the DNS cache in Windows 11, you should first understand what the DNS flushing or resetting would do to your PC.
DNS, or Domain Name System, is the index of all public websites and their IP addresses. Windows stores a local copy of these indexes to speed up the loading of these websites in the form of a DNS cache.
If the DNS cache gets corrupted, you will face a slow network connection and other network-related problems. In such a case, flushing or resetting the DNS cache would help fix the problem.
How can I completely flush the DNS cache in Windows 11?
1. Use CMD
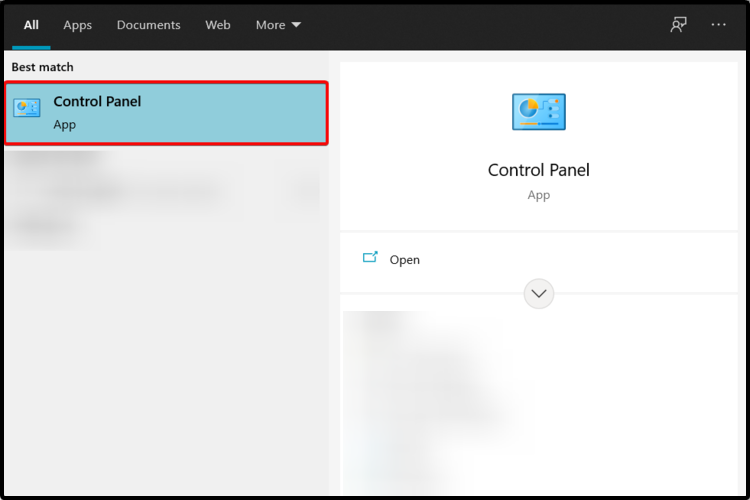
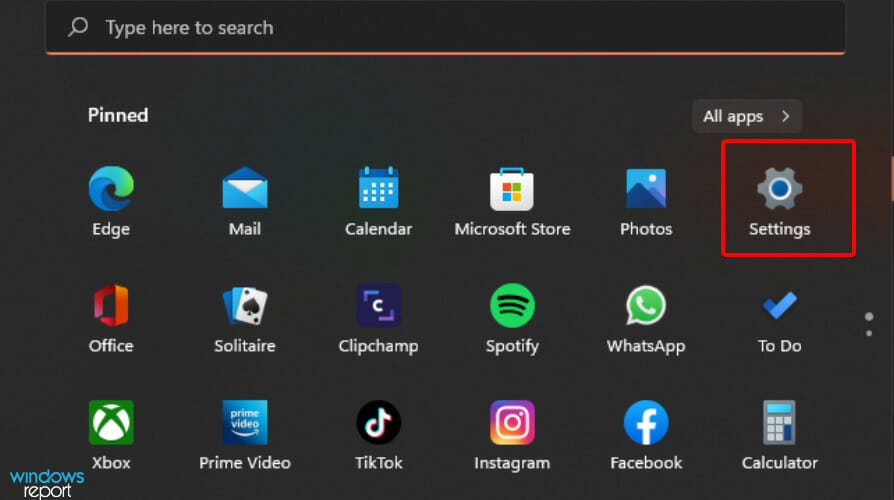
Press the Win key to open the Start menu.
Open the command prompt as an admin.
Type the below command and press Enter. ipconfig /flushdns
You will get a confirmation message that the DNS cache has been flushed.
2. Use PowerShell
Press the Win key to open the Start menu.
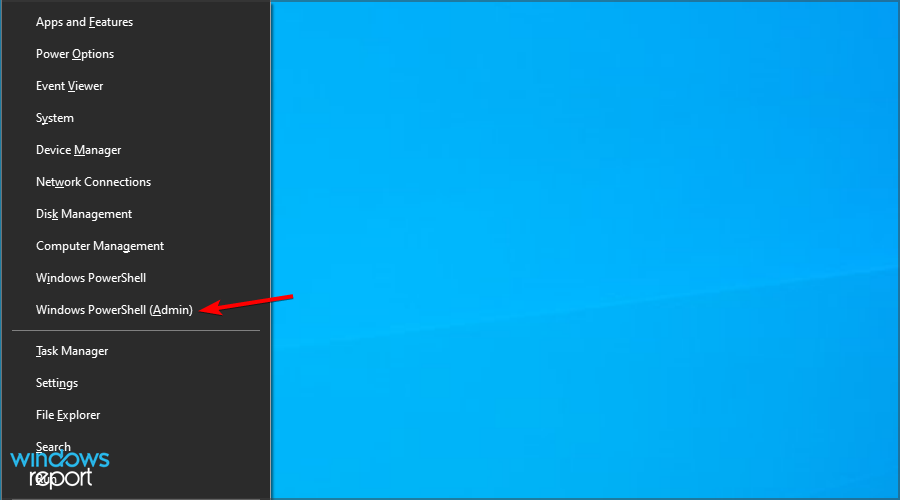
Open PowerShell as an admin.
Type the below command and press Enter. Clear-DnsClientCache
Restart your PC.
We have a guide that will help you fix the problems related to Windows PowerShell not working or opening. Our guide lists 5 of the most effective ways to fix the issue.
In the Run dialogue, you must use the same command as in the Command Prompt.
4. Create a Batch file
Press the Win key to open the Start menu.
Open Notepad.
Type ipconfig /flushdns in the notepad.
Click on File.
Select Save as.
In the Save as type drop-down, select All files.
Give the batch file a name and keep the file extension as .bat.
Click on Save.
To clear the DNS cache, simply run the Batch file.
Creating a batch file may look like a bit-long process, but it could come in handy if you do not want to clear the DNS cache that often. If you need to do it, you can simply run the batch file by double-clicking on it, and voila! The DNS cache will be cleared.
5. Reset Winsock settings
Press the Win key to open the Start menu.
Open the command prompt as an admin.
Type the below command and press Enter. netsh winsock reset
You will get a message for its successful completion.
Restart your PC to complete the process.
If the DNS cache methods mentioned above do not work, you should not get frustrated. Because you can easily clear the Winsock settings. Winsock facilitates communication between Windows network software and network services.
When you clear Winsock, it clears or flushes the DNS cache, which is what we wanted.
6. Clear DNS cache automatically
Open the Start menu by pressing the Win key.
Open registry editor.
Navigate to the below-mentioned path. HKEY_LOCAL_MACHINE\SYSTEM\CurrentControlSet\Services\Dnscache\Parameters
Right-click on the empty space on the right and select New, then click DWORD (32-bit) Value.
Name the newly created value as MaxCacheTtl.
In the Value data field, enter 86400.
Click OK.
Right-click on the empty space on the right side.
Select New and then select DWORD (32-bit) Value.
Name the newly created value as MaxNegativeCacheTtl.
In the Value data field, type 5.
Click OK.
Close registry editor.
Restart your PC.
When you create the registry as mentioned above, then you are making sure that the DNS cache will reset automatically after 86400 seconds or 24 hours. This way, you do not need to flush the DNS cache by running any command or anything.
Browser games garner traction by the day because of their dynamism and ease of access. How about a browser flight simulator? You’ll be pleased to know there are some good options on the market.
These games are now far more than the boring ones of the past. One necessary type that is now especially popular is the browser flight simulator or browser plane games.
With the history of airplane games going as far back as possible, it is not surprising that the browser version is thriving. But not any web-based flight simulator is worth your time.
To ensure maximum fun and engagement, we have gathered the best browser plane games to give you the real pilot experience:
GeoFS – The most realistic browser flight simulator
Fractal Combat X – Challenging browser plane game (fighter jet-based)
Air Warfare 3D Fighting Game – Browser flight sim with the best 3D aircraft war
Airplane Fly Simulator – Easiest to control web-based flight simulator
Does Google have a flight simulator?
You were probably wondering if the tech Giant is represented in this department as well. Sure thing, you have none other than Google Earth.
And if you don’t feel like installing it on your machine and controlling it with a joystick, you’ll be pleased to know that there is also a Google Earth web version.
That’s right, you can enjoy the browser flight simulator and easily control it with your mouse or even keyboard. So, what games can you play in a browser? Well, we believe that the sky is the limit (pun intended).
You can play the best tower browser games, airplane games, and many more. Just make sure you are playing from a secure website.
What is the best browser flight simulator?
GeoFS – The most realistic browser flight simulator
GeoFS is a renowned browser airplane and simulator game that offers a realistic physics engine. It is a real flight simulator with dynamics centered around the laws of physics.
It offers players 20 varying aircraft to fly, making it even more enjoyable. Also, it uses real-time atmospheric conditions to make you feel connected to the game.
This stunning browser airplane flight simulation game puts your piloting skills to stern tests. It allows you to pilot a very difficult-to-control 747-passenger airplane.
To survive in this game, you must overcome some tough challenges. Some of these tasks include safe landing and piloting through tricky checkpoints.
If you are ready to experience the life of a pilot, this is the game you must play.
The Fractal Combat X gives you the experience from the cockpit of a fighter jet. It provides different spaceships for you to take care of stern and determined enemy pilots.
With every task, you complete in this game comes a credit reward. This reward will be needed to upgrade your ship, engines, weapons, shields, and other tools.
This is another intense browser airplane game that requires you to pilot a fighter aircraft. Air Warfare is interesting because the battlefield is chaotic with your enemies going all out on you.
You must take out as many enemy planes as possible and dodge their attacks before you eventually crash or run out of ammo. It is just a game you won’t want to miss out on.
Airplane Fly – Easiest to control web-based flight simulator
The Airplane Fly Simulator is one of the new aircraft browser games. Your task is to drop passengers at the correct point on time.
Your job is tricky as you need to fly through some challenging waypoints. Every successful waypoint passage gives you points while missing too many of them signals the end of the journey.
Your browser shouldn’t just be boring, and you can spend your break online with interesting airplane games. While there are many online, the five in this guide will give you that edge-of-your-seat experience.
Are you looking for more adventure like the best browser horror games? Then check our article for some juicy and challenging options.
Feel free to let us know the game that puts your airplane flying skills to the ultimate test in the comments below.
Skype is an incredibly useful tool used by several individuals and organizations for messaging and video conferencing. Though many users reported that Skype installs every time they open it.
The problem is strange, and there’s no sure-shot way to fix things. But users have shared a few solutions that worked for them, and we will present them to you as well, along with other vital information.
Why is Skype installing automatically?
Here are a few reasons Skype installs automatically on the PC every time you open it:
Running an outdated version of Skype: In case you are running an outdated version of Skype, chances are that it is trying to install updates.
Issues with the existing installation: If Skype wasn’t installed properly on the PC, it could be trying to install the missing files.
Corrupt system files: When the system files are corrupt, applications, including Skype, and even some system components may not work properly.
Third-party conflicts: Some third-party apps may also try to install Skype, leading to the issue.
What can I do if Skype keeps installing every time I open it?
Before moving to the complex solutions, here are a few quick ones to try:
Simply uninstall skype in case you don’t need the application. Several users reported that Microsoft pushed the application in one of the updates, and once uninstalled, the app didn’t appear again.
Disable any third-party antivirus or similar security software on the PC, and check whether that fixes the problem. If it does, we recommend you switch to a more friendly and reliable antivirus solution.
Uninstall apps that were added around the same time the problem first appeared in case it’s a third-party conflict.
If these don’t work, head to the solutions listed next.
1. Reset Skype
NOTE
This method only works if you installed Skype from the Microsoft Store. If you got it from the official website, skip to the next solution.
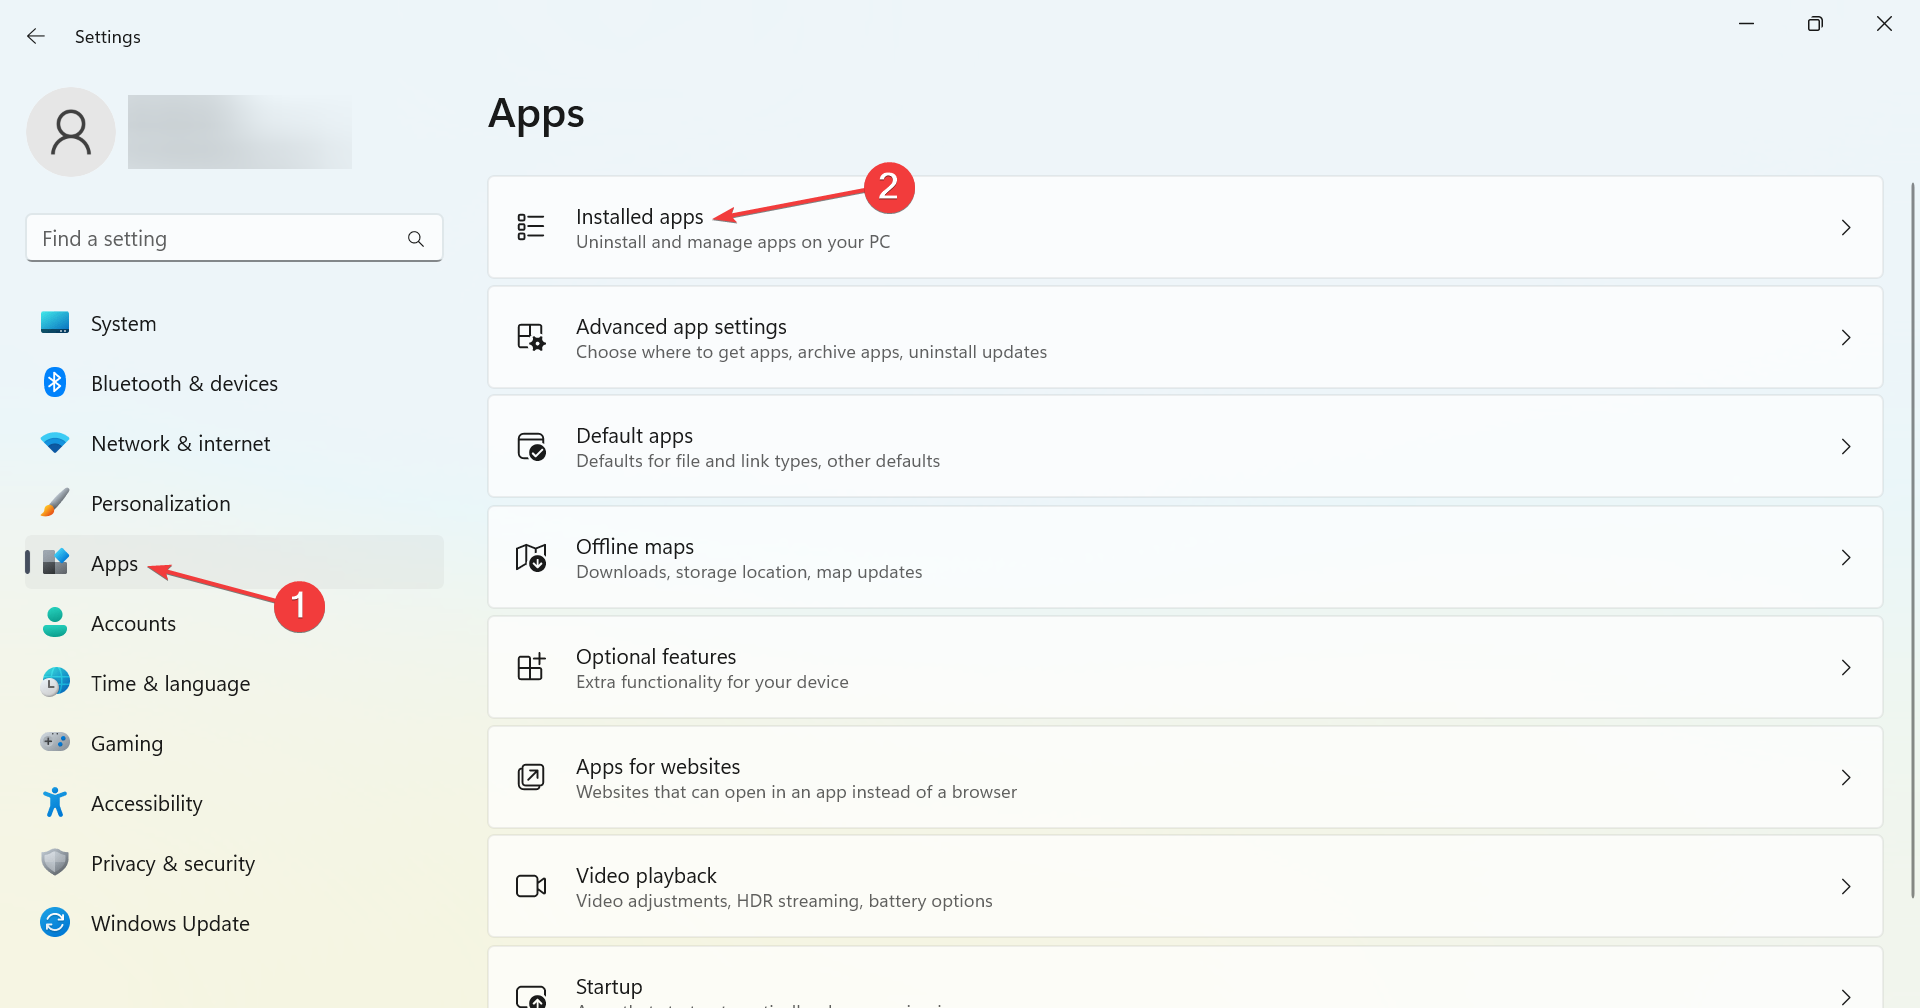
Press Windows + I to open Settings, select the Apps tab from the navigation pane, and click on Installed apps on the right.
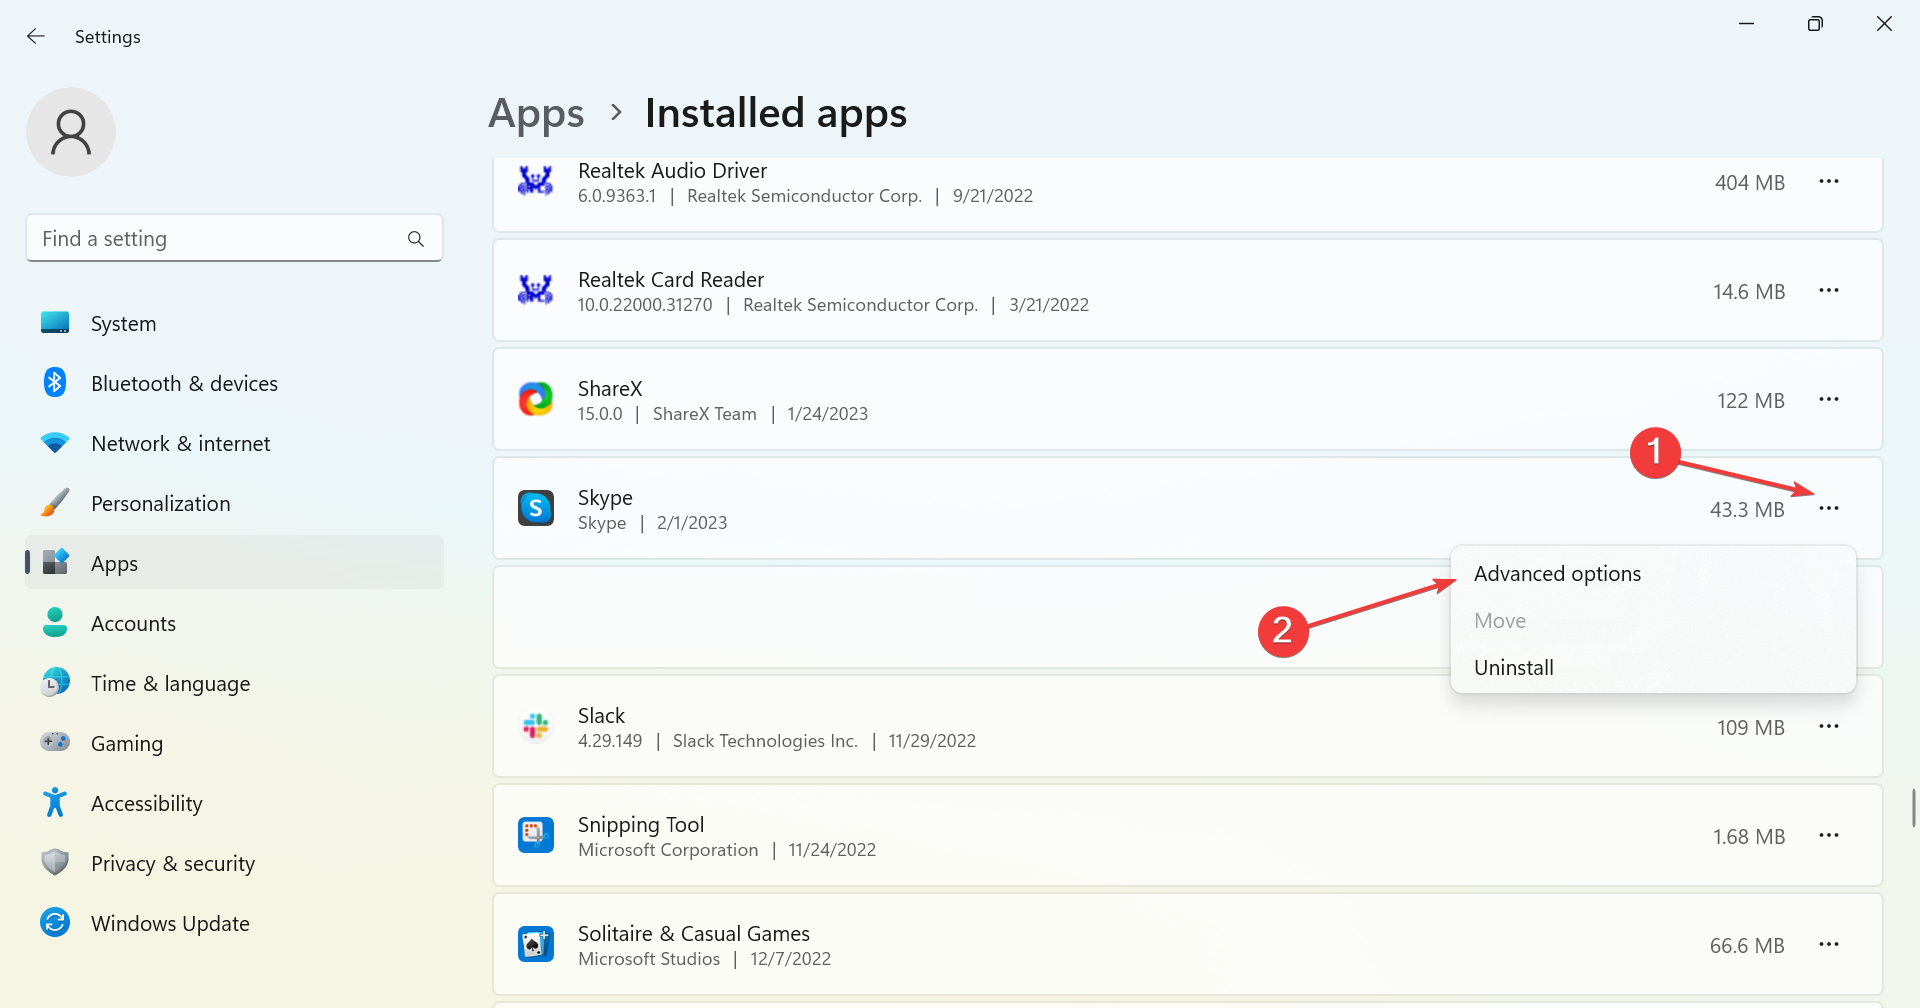
Locate Skype, click on the ellipsis next to it, and choose Advanced options.
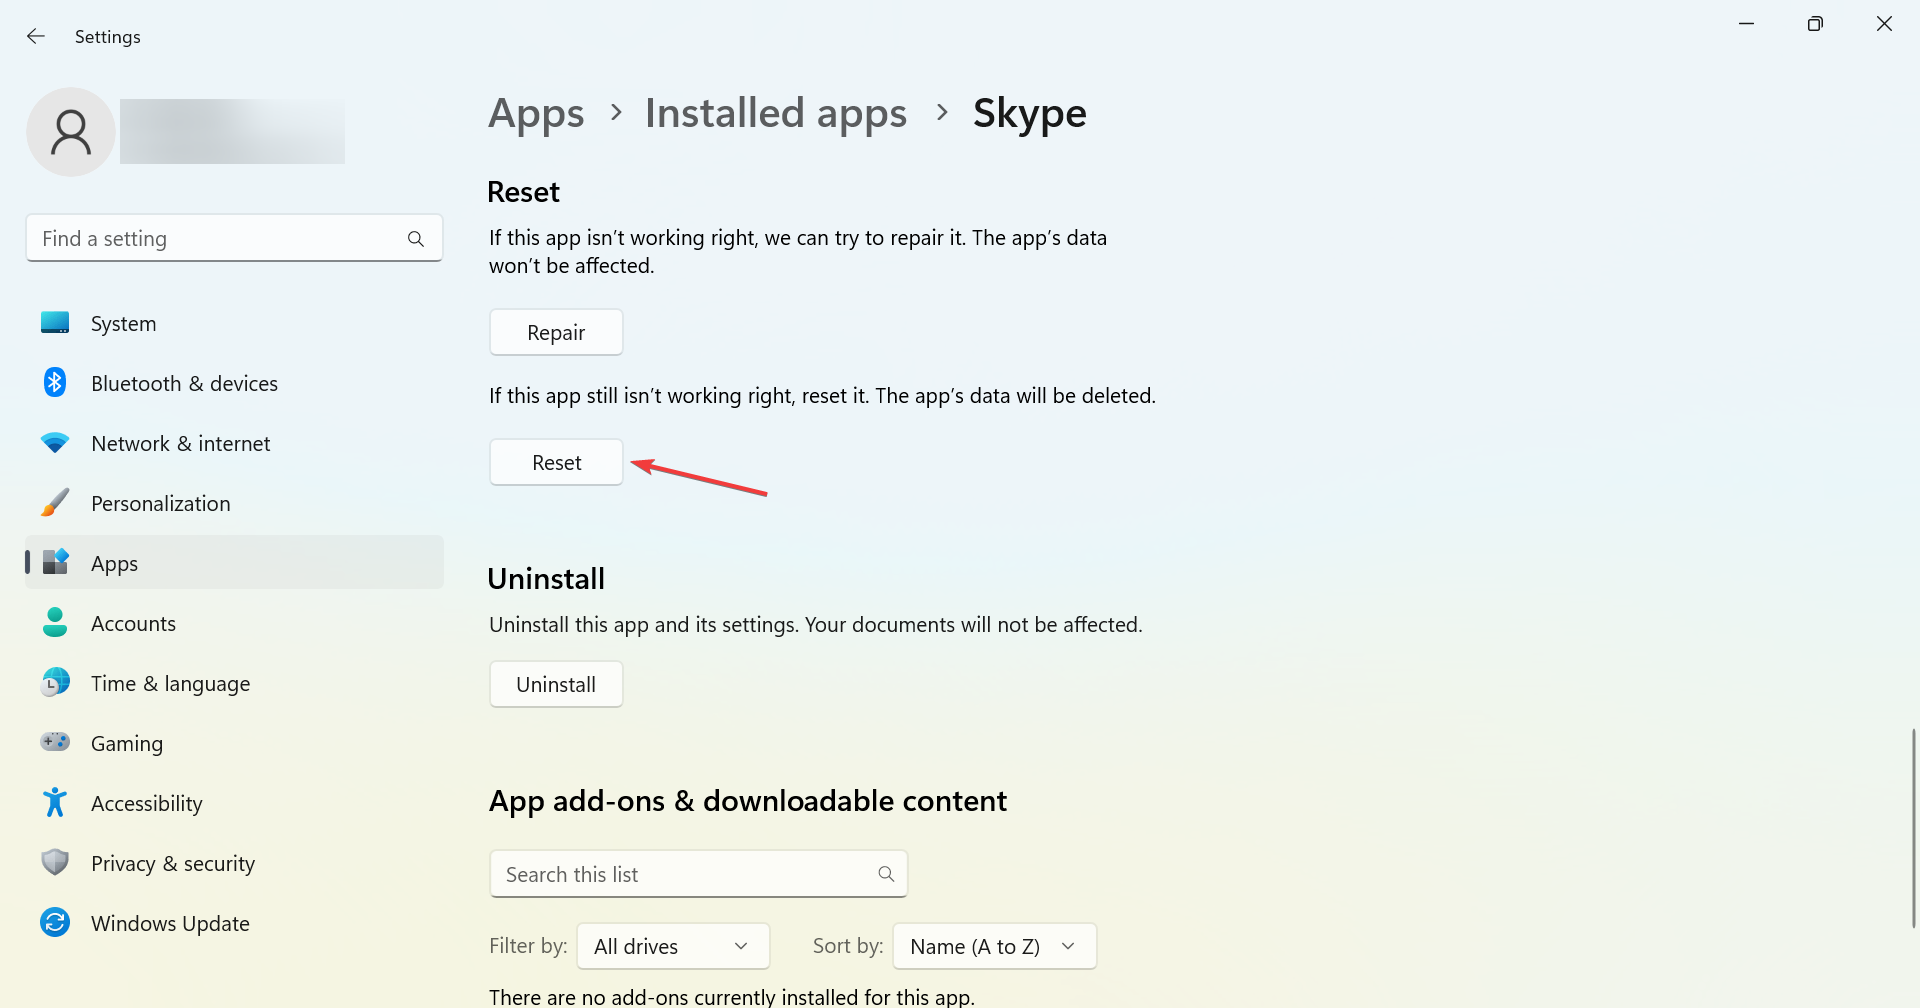
Now, click on the Reset button.
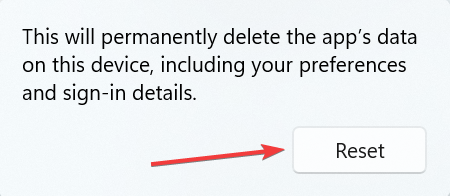
Again, click Reset to confirm.
A quick way to fix things when Skype installs every time you open it is to Reset the app. Once done, the problem should be resolved.
2. Delete Skype data
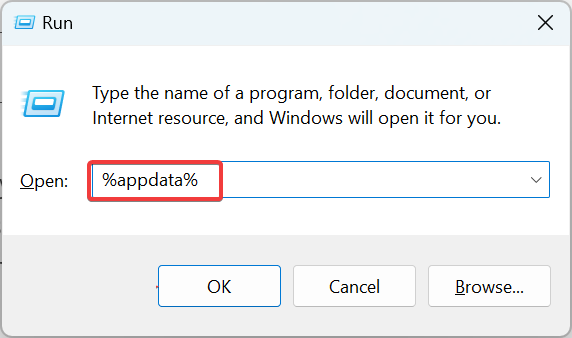
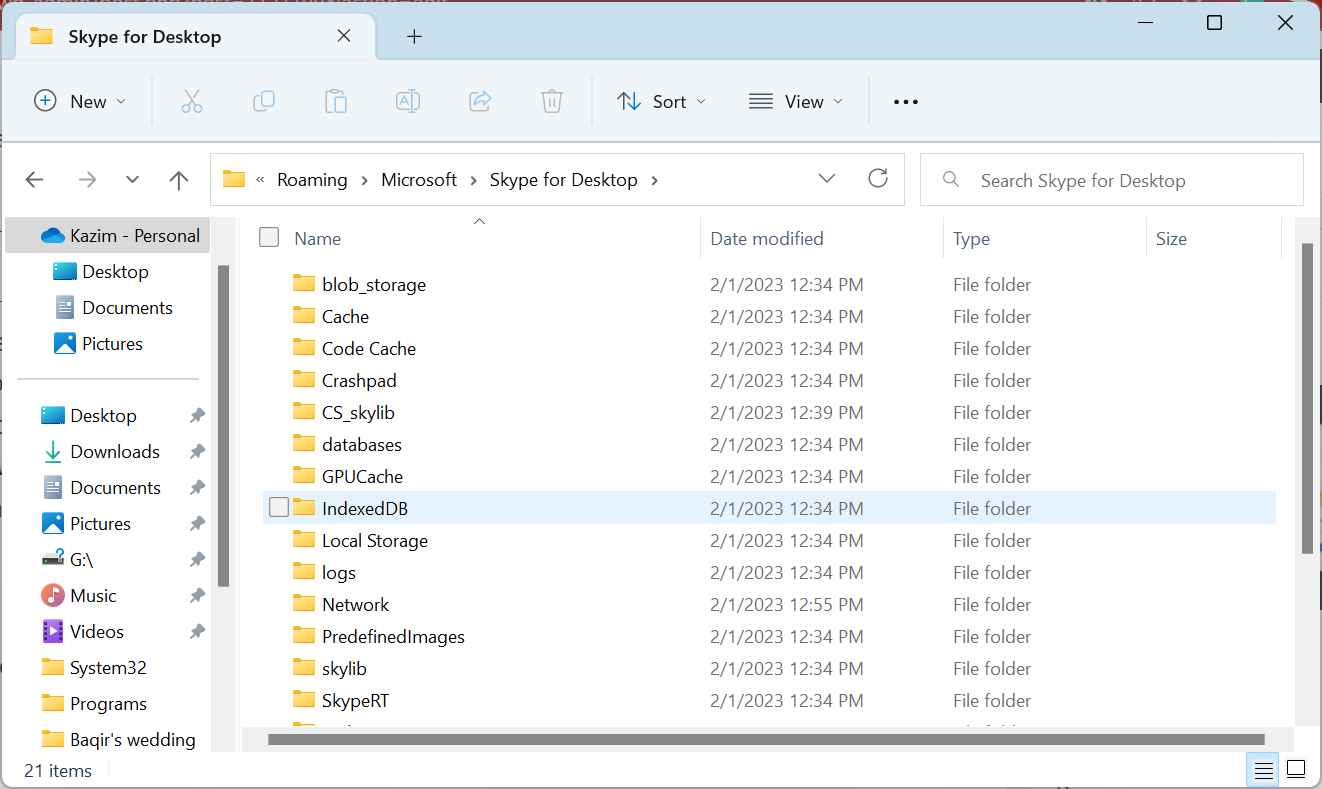
Press Windows + R to open Run, type %appdata%, and hit Enter.
Locate the Skype folder here and delete it.
Now launch Skype, and it shouldn’t throw the message again.
3. Uninstall the previous version of Skype
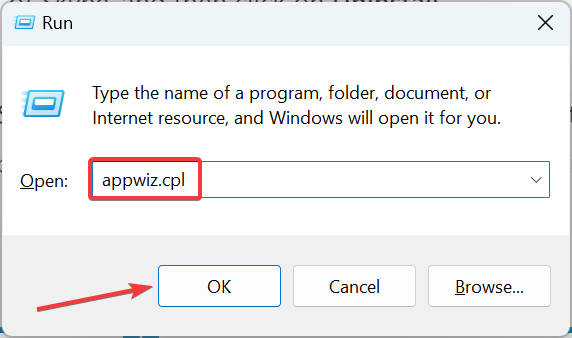
Press Windows + R to open Run, type appwiz.cpl in the text field, and click OK.
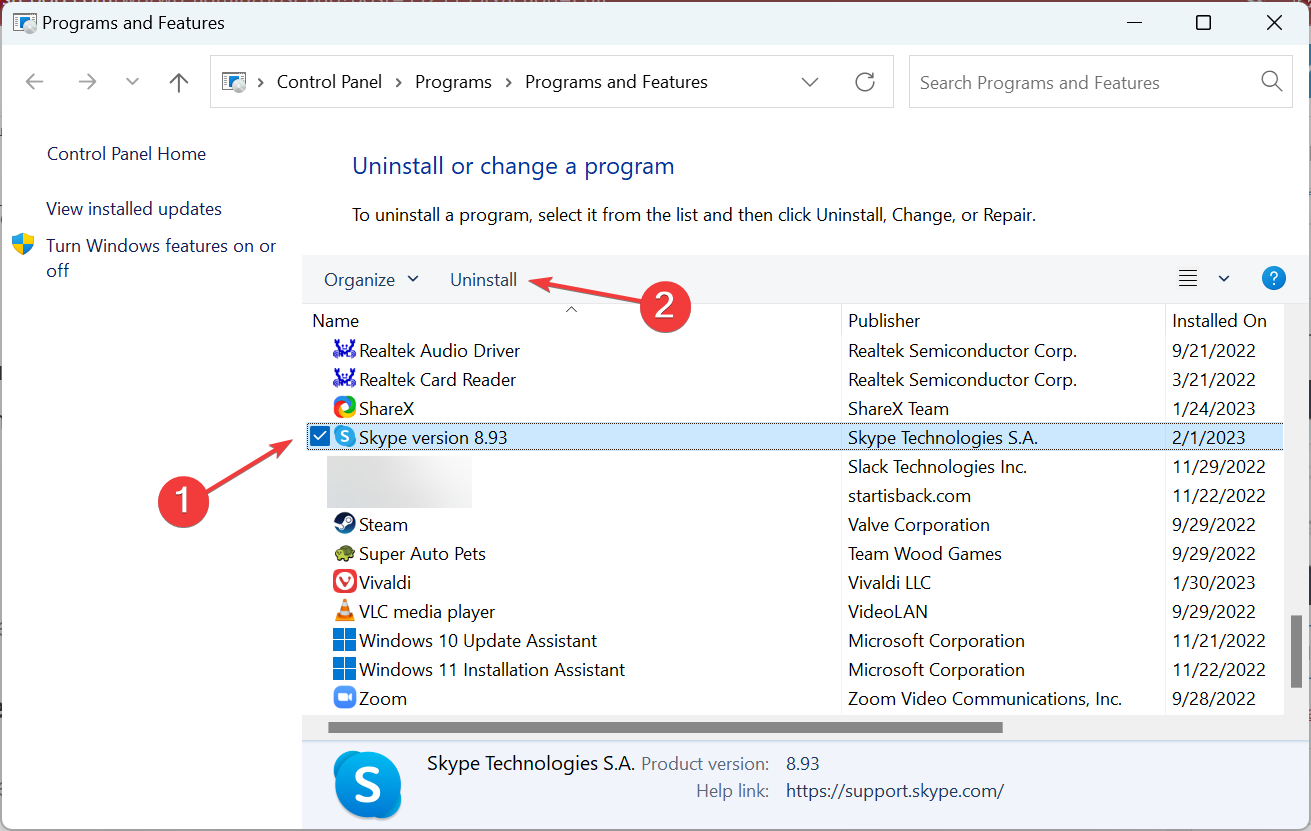
Locate and choose the older version of Skype, and then click on Uninstall.
Follow the on-screen instructions to complete the process.
In a few cases, users had two versions of Skype on the PC when an update instead of neutralizing the previous version installed as a separate application. And in this case, uninstalling the older version should do the trick.
4. Modify permissions
Uninstall Skype from the PC.
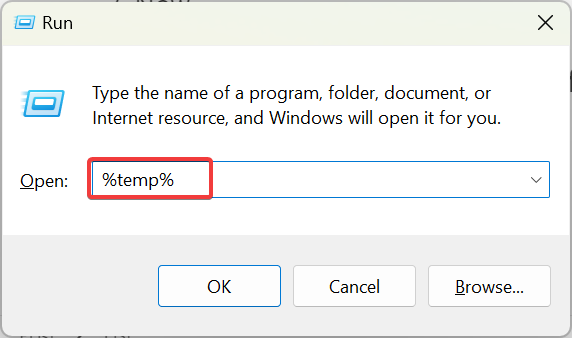
Press Windows + R to open Run, type %temp%, and hit Enter.
Now, locate any Skype folder/files here, and delete them.
Next, again press Windows + R, enter %appdata%, and click OK.
Find the Skype folder and delete it. Also, make sure to check in the Microsoft folder as well for any related files/folders.
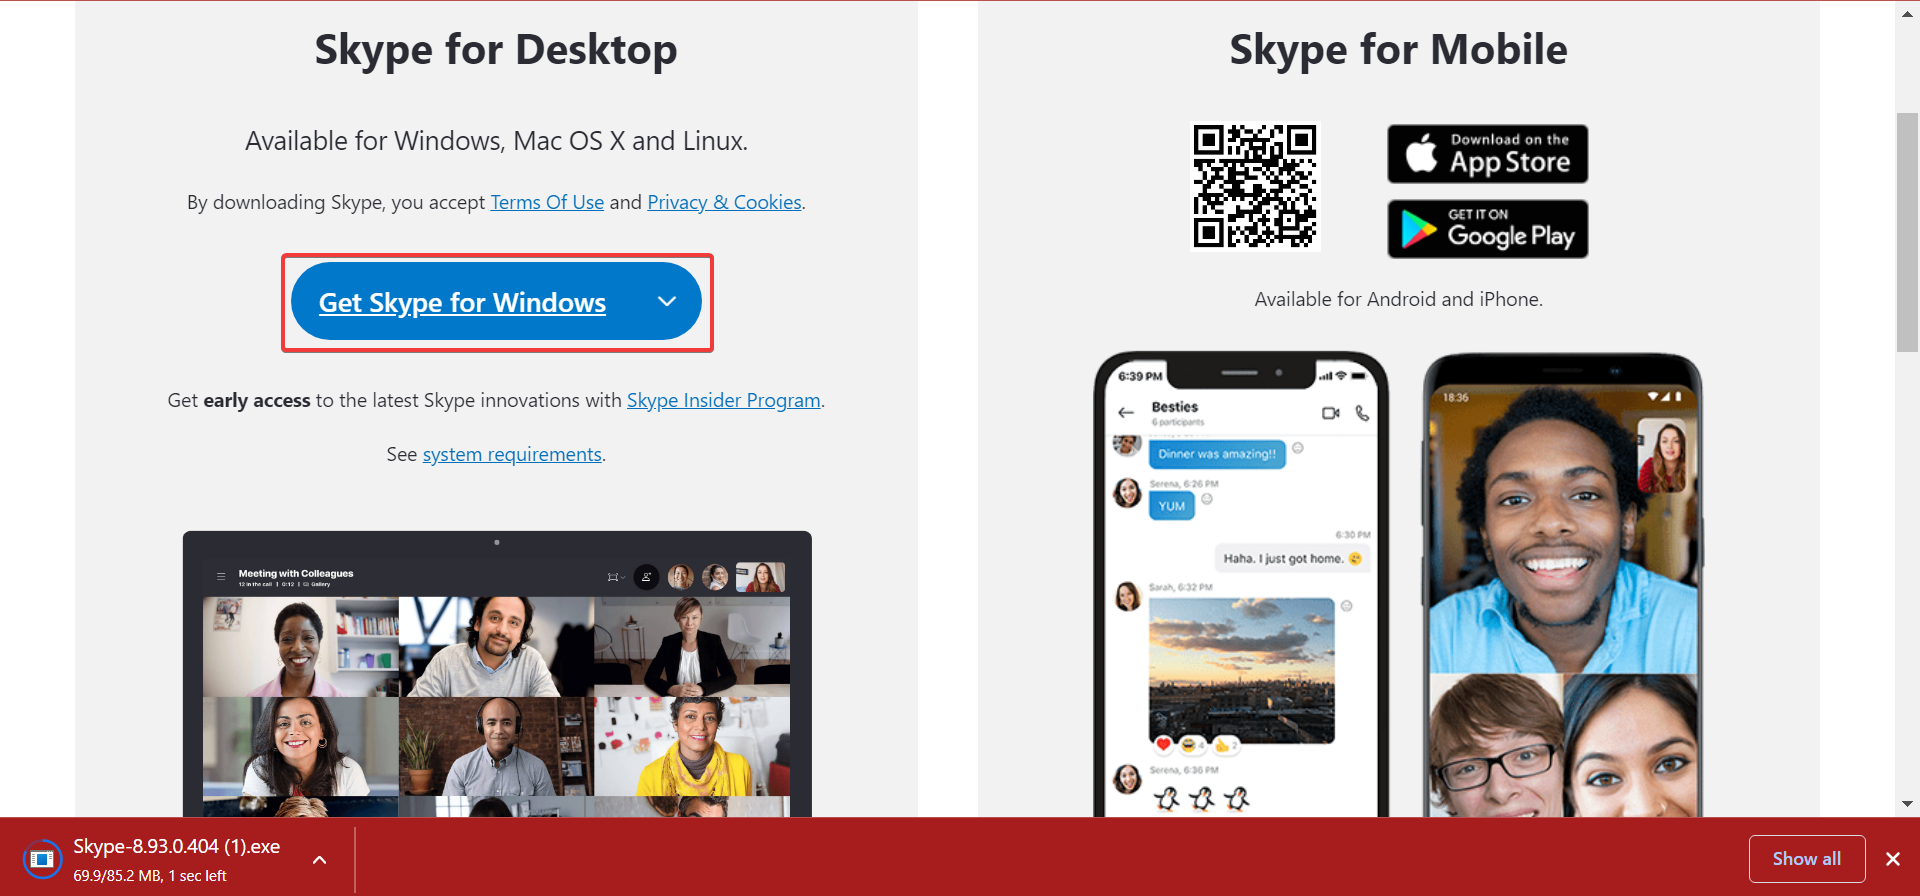
Once done, head to Skype’s official website, choose Get Skype for Windows, and the setup will download automatically.
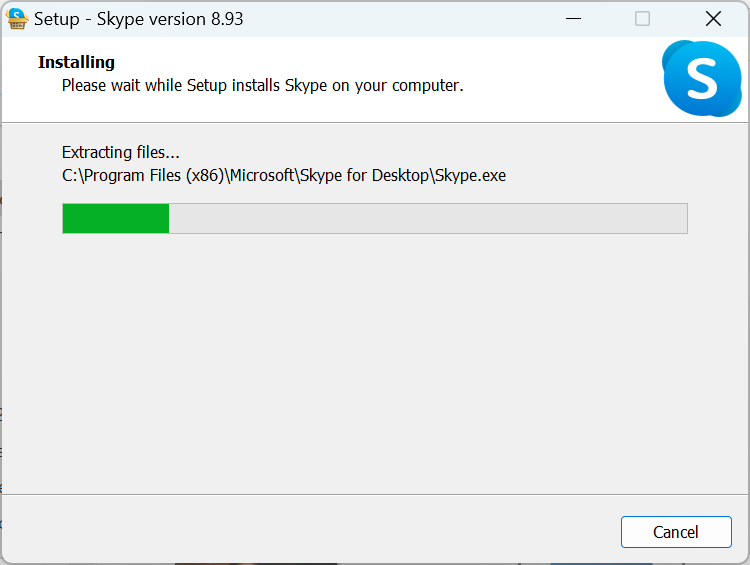
Run the setup, and choose the appropriate response when prompted to complete the installation process.
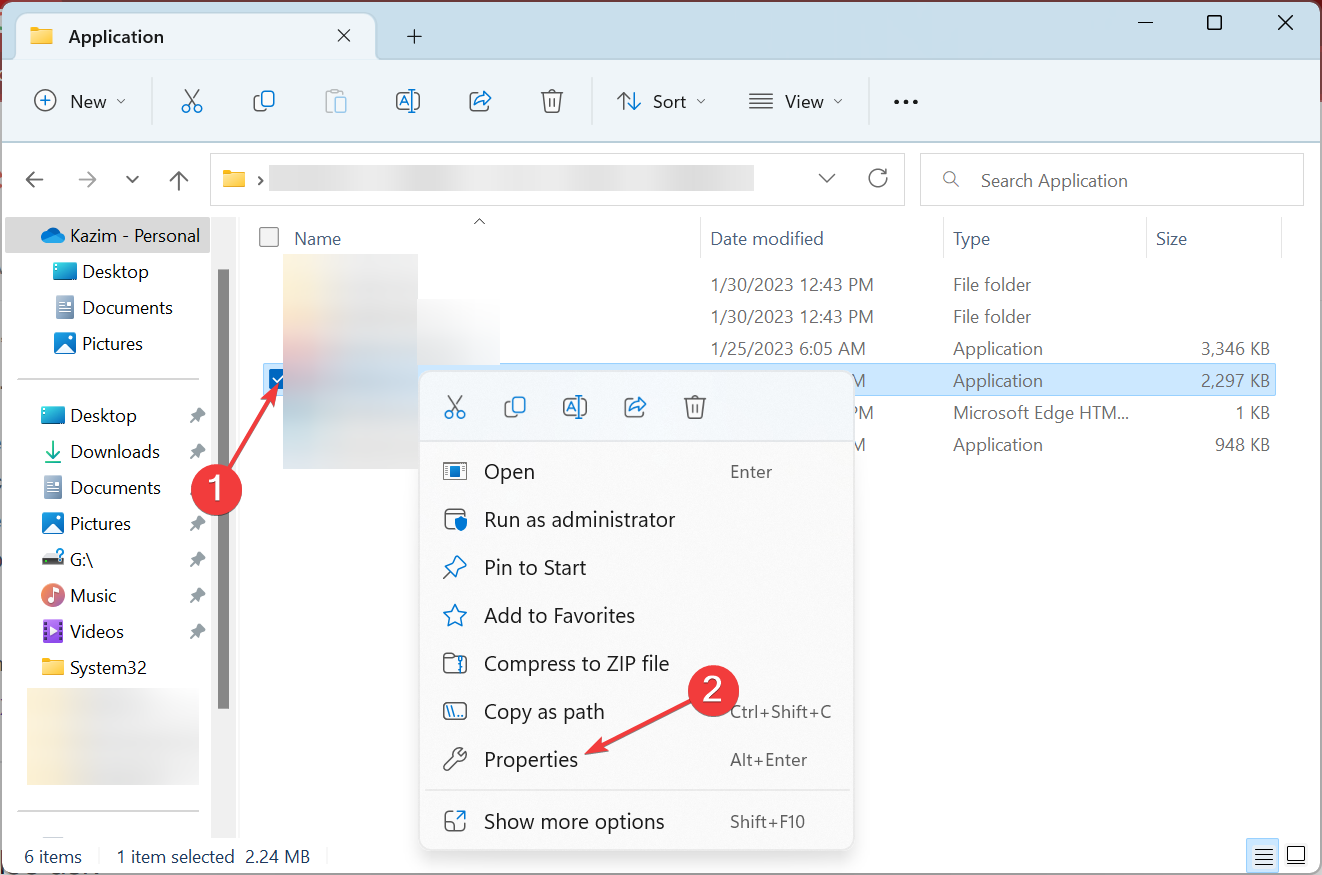
After you have installed Skype, again head to the %appdata% folder, and delete the skype.exe (or any related file).
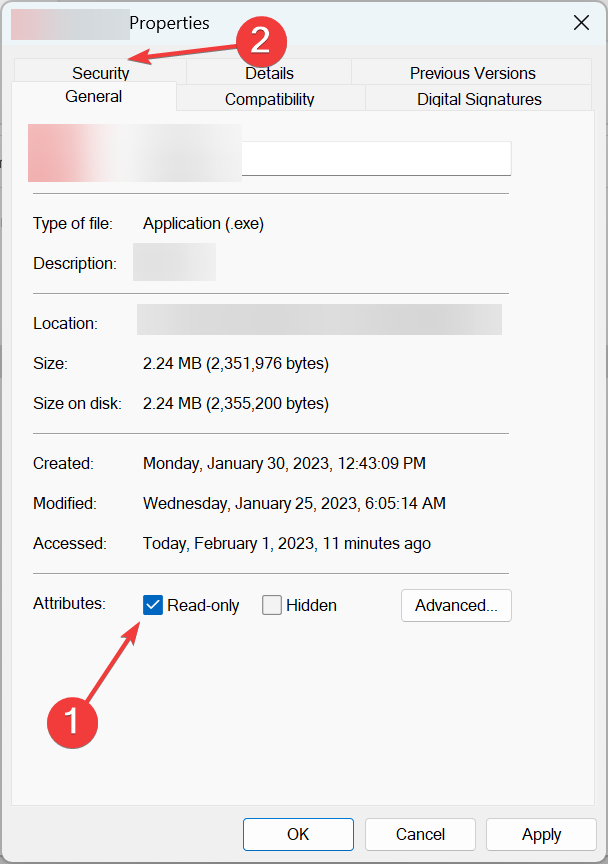
Now, create a file with the same name as the one you deleted earlier, right-click on it, and choose Properties.
Now, tick the checkbox for Read Only, and head to the Security tab.
Next, ensure all the users listed here have minimum permissions, and then save the changes.
That’s it! One of these solutions should help get things running on the PC, and Skype shouldn’t install anymore every time you click on it.
If the problem remains as it is, the last option is to get the application from the official website and remove the one downloaded from the Microsoft Store.
Also, if you are looking for an alternative, there is a wide range of video-conferencing apps that are secure and perform exceptionally well.
If you know of any other solutions that work, do drop them in the comments section below.
Windows 10 has a bucket load of errors that trouble users from time to time, and a recent one is the error code 0xc00007b. This error shows up when users try to open an app, and it fails to start.
This can be exasperating, as the app will be useless until you resolve the issue. Therefore, this guide will show the surefire ways to fix the 0xc00007b error for good on your PC.
What is the reason for the 0xc00007b error?
Below are some of the factors that can cause the Your pc needs to be repaired error code 0xc000007b message to appear on Windows 10:
Faulty app: In most cases, the major cause of the 0xc00007b error on Windows 10 64-bit is a faulty app. This can happen if you download the app from an unauthorized source. The easiest way out of this is to remove the app using an uninstaller software and reinstall it.
Bad memory sector: Sometimes, this problem can be caused by a bad memory sector. The solution to this is to run the CHKDSK command to fix your PC memory,
Missing DLL files: Another known cause of this problem is a missing DLL file. This can be fixed by downloading the required files and copying them to the Syswow64 folder.
How do I fix error 0xc000007b on Windows 10?
Below are some preliminary troubleshooting steps to try before exploring the solutions in this guide:
Right-click the downloaded file and select Extract files.
Now, copy the extract files and paste them into the SysWOW64 folder by following the path below: C:\Windows\SysWOW64
Click the Copy and Replace button if you get any prompts.
Finally, restart your PC and try to relaunch the faulty app.
The first thing to try if you are getting the 0xc00007b error on Windows 10 is to get the needed DLL files. This has fixed the issue for many users. Note that reinstalling the DirectX is a good practice using the link provided earlier in this article.
Also, some users have fixed this error by pasting the DLL files into the immediate directory of the executable with this error. So, you can try that too.
2. Reinstall the latest version of the problematic app
Press the Windows key + R, type appwiz.cpl, and click OK.
Right-click the problematic app and select Uninstall.
Now, follow the onscreen instruction to complete the process.
Finally, visit the official website to download the app again and restart your PC.
In some cases, the 0xc00007b error on Windows 10 is caused by issues with the app. This can be due to some missing files or incomplete downloads.
The easiest way to fix this is to redownload the app.
3. Run the CHKDSK scan
Press the Windows key, type cmd, and select Run as administrator under Command Prompt.
Type the command below and hit Enter: chkdsk c: /r
Finally, press Y if prompted and wait for the command to finish running.
Your hard drive memory sector can get corrupted from time to time and can be the cause of the 0xc00007b error on Windows 10. Running the command above should fix this issue quickly.
Another possible cause of the Windows 10 0xc00007b error is a faulty or outdated Microsoft Visual C++ file. Users have found the Microsoft Visual C 2012 (x64), Microsoft Visual C 2012 (x86), and Microsoft Visual C 2010 x86 Redistributable to be especially culpable.
So make sure you remove them and reinstall them using the links provided. Note that if you use a 64-bit processor, you need to download the x86 and x64 files.
Finally, some users have reported that using an all-in-one installer fixed this issue for them too. So, you can try it.
5. Install or repair .NET framework
Press the Windows key, type turn windows, and select Turn Windows feature on or off.
Tick the box next to .Net Framework 3.5 (includes .NET 2.0 and 3.0) and click the OK button.
Wait for the installation to complete and restart your PC.
The .NET Framework is important for smoothly running apps on your PC. If this feature is disabled, you might experience the 0xc00007b error on Windows 10.
There you have it: everything you need to fix the 0xc00007b error on Windows 10. You only need to follow the steps carefully, and you should be able to open your apps normally again.
If the solutions above fail to fix the issue, you might need to reinstall Windows 10.
For those users who may have lagging mouse issues, lost mouse, damaged mouse, and those who prefer to use shortcuts. It is possible to right-click or left-click without a mouse using the keyboard and specific key combinations.
Whether you are working on a desktop or a laptop. Thus, this guide will show you steps to help you perform the click actions without a mouse. You can also read about ways to fix mouse cursor jumping around in windows.
Can I use my PC without a mouse?
Yes, it is possible to use a PC without a mouse. Most users prefer to use a Mouse to navigate and control their System. However, a keyboard shortcut is another common alternative to a mouse, as they allow users to perform various tasks like opening and closing applications, scrolling, copying, pasting, and other functions.
Furthermore, some laptop users also use a touchpad, similar to a mouse in terms of functionality. More so, the Windows operating systems have Accessibility Options that help users navigate their computer without a mouse. Therefore, without a mouse, users can carry out their work and tasks on their PC with other input devices or keyboard shortcuts.
How can I right-click or left-click without using the mouse?
1. Use the Keyboard shortcut solution
Press the Tab button to highlight the objects on Windows Desktop.
Use the arrow buttons to navigate and press the Enter button to do a left-click.
Press the Context between the Ctrl button as a right-click or press shift + F10.
Without configurations, the shortcut keys on the system have been a way to navigate through the Windows OS fast and with ease. Note that the shortcut keys vary on different versions of Windows.
Need touchpad help on notebooks? See our guide on how to right click on a laptop for quick two finger and corner tap steps.
2. Configure the numerical keypad to perform keyboard functions
Left-click the Start button and select Settings.
Navigate to the Accessibility Options using the arrow key and press Enter.
Select the Mouse tab under the Accessibility properties of Windows using the Tab button, the Keyboard Arrow keys, and Enter.
Press the Alt + M button to Activate Mouse Keys and press Alt + A to make changes.
Turn on NumLock to be able to move around using the Numeric pad.
You can use 6 to move right, 4 to move left, 2 to move up, and 8 to move down on the numeric keypad.
To perform a single left click, press the number 5 key on the numeric keypad.
You can perform a double left-click by pressing the plus sign+ on the numeric keypad.
To right-click, press the minus sign- and press 5.
By default, the number 5 key will remain as a right-click until you press the slash/ on the numeric keypad, which will switch it back to standard clicking.
Configuring your device to use the Numeric pad is one of the solutions available to users in place of a mouse. However, this is only possible for devices with numeric tabs.
If you have any questions or suggestions after going through this guide on how to right-click or left-click without a mouse, then drop them in the comments section.
If you are a Windows user, you know that December 2022’s Patch Tuesday (KB5022083) came with a security update for .NET and .NET Framework.
This actually changed how Windows Presentation Foundation-based (WPF) applications render XPS documents for multiple versions of the Windows OS.
What you probably didn’t know is that it also caused many users to experience issues as XPS documents that leverage structural elements like tables and hyperlinks will not display correctly in WPF-based readers.
However, Microsoft fixed the situation with an update it just released for all the affected versions of Windows.
Microsoft issues permanent fix for .NET problems
Before we get into it, make sure you check out the latest version of Windows 11 (22H2) and all the bugsand issues that you will have to face.
Circling back to the issue at hand, moreover, some inline images may not display correctly in XPS documents or throw Null reference exceptions in WPF-based readers.
Even though Microsoft issued a couple of temporary workarounds involving PowerShell scripts and Windows registry configurations, the tech giant has now rolled out a more permanent fix through an out-of-band (OOB) update.
According to Redmond, this update provides help to mitigate an issue when after installing the December 13, 2022, security updates for .NET Framework and .NET.
If you were wondering what platforms the update is meant for, allow us to shed some light on the matter. Basically, you are covered, regardless of OS version.
If you want the standalone package for these out-of-band updates, search for the KB number in the Microsoft Update Catalog and download it from there.
Furthermore, You can manually import these updates into Windows Server Update Services (WSUS) and Microsoft Endpoint Configuration Manager.
Also, it is extremely important to understand that this OOB update is not being delivered through Windows Update.
As a result, if you want to install it, you should navigate to the Microsoft Update Catalog and search for the various KB numbers mentioned in Microsoft’s support document.
Keep in mind that, now that this permanent fix is available, you can also revert any temporary workarounds you may have applied as they are no longer needed.
Have you encountered any other issues after installing this OOB update for your affected version of the Windows OS?
If Google Pay says this card can’t be verified right now, you’re in for a nasty time. The worst part is you can stumble upon this error on numerous services and platforms besides GPay.
For instance, you can just as well get this card cannot be verified right now error on PayPal, AIB, Chrome, Apple Pay, and so on.
Now, Google Pay offers a safe way to transfer money to friends or family and to pay for purchases conveniently on your phone or desktop.
The app uses encryption and facial recognition to keep your account safe when you use it. However, as many have experienced by now, it is possible to encounter issues on the platform.
At times, Google Pay can stop working abruptly. There’s a chance that you might not be able to send or receive money. The reasons behind this issue can be numerous.
If you experience problems such as This card can’t be verified right now and similar ones, there are ways to solve these issues.
Why can’t my card be verified?
? A common error usually occurs when Google thinks that the device running the app is rooted or compromised in any way that might be harmful to your security. The transaction may fail or you may get an error code U13 indicating the bank servers have an issue.
When you root your phone, Google prevents you from logging in to protect you from hackers who can remotely access your details and later use them to get into your account.
You have to unroot your phone before you try accessing the page again.
? Make sure the mobile number registered with your bank is already inserted in your phone for auto SIM verification.
If you don’t have a SIM card registered with the bank, your card cannot be verified.
? Ensure you receive the SMS on the same mobile number you used when registering with Google Pay and your bank account.
? Check whether Google Pay has access to your contacts. Check if any restrictions are placed by any third-party security apps installed on your phone.
You can try removing any third-party security app to see if it interferes with your accounts.
? Do not use VPN and private browsing mode while downloading an app from the Google Play Store, as it can be interpreted as suspicious activity.
If none of the above works, use another mobile phone. Also, make sure that the other phone isn’t rooted or has any modified version of Android OS installed in it.
How do I fix verify card on Google Pay?
1. Manually save your CVV and billing address
Open a new tab and go to pay.google.com.
Next, click the Payment Methods tab and select the problematic card that G Pay refuses to verify.
Click Edit and manually register the CVV/CVC code and the billing address again, even if they did not change.
Finally, update and refresh the page.
Many users confirmed that this solution worked for them, so you might want to give it a try before anything else. It’s easy!
Some users complained that Google Pay started saying that this card can’t be verified right now after they updated their payment methods.
Others mentioned that the credit card autofill option suddenly stopped after updating the Google Pay app.
Finally, some users claim not to have made any changes at all only to be served with the nasty this card can’t be verified at the moment notification.
2. Temporarily disable your firewall
Hit the Windows key and click on Settings.
Select Privacy & security.
Click on Open Windows Security.
Select Firewall & network protection.
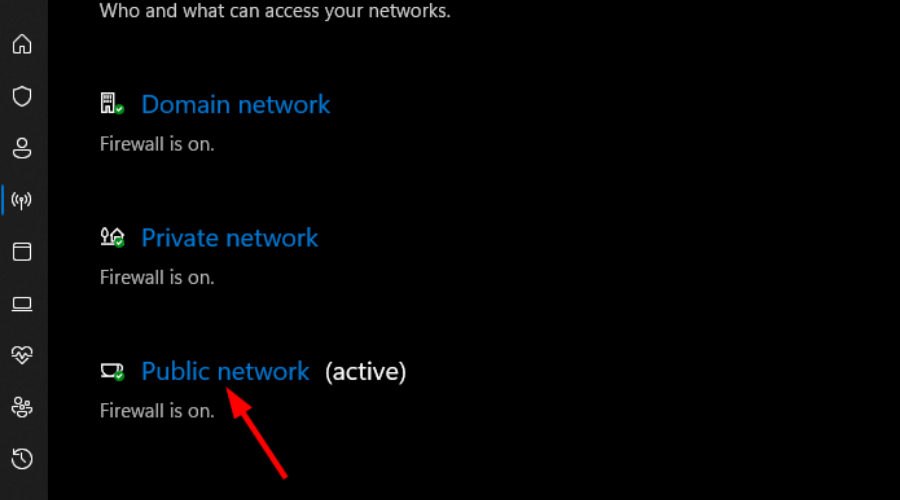
Click on Public network.
Next, toggle Microsoft Defender Firewall off.
Try accessing the page again.
3. Turn off your VPN
Press the Windows key and select Settings.
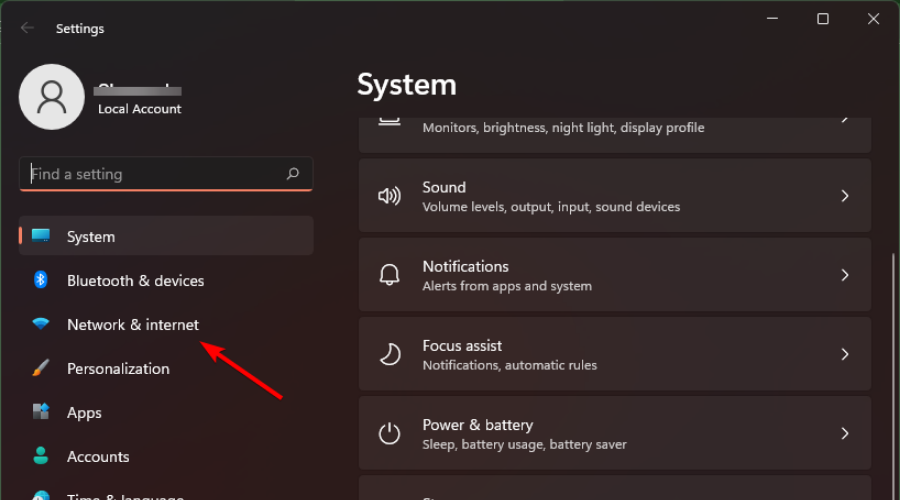
Next, select Network & Internet.
Select VPN on the right-side menu.
Select the VPN connection you want to disable, click on the drop down and select Remove.
Try accessing the page again.
4. Unroot your phone to fix verify your card on Google Pay
With all the breaches that have been in the news lately, you’re probably worried about your credit card information getting hacked. It’s smart to be concerned. Data breaches have become increasingly common.
It’s important to know whether the hackers got credit card numbers, personal information, or both. When hackers get this data, they could use it to open accounts in your name and ruin your credit.
Although a breach is never good, it’s not the end of the world. If you have a credit card (or two), there are steps you can take to help protect yourself.
Sometimes, you may want to add an extra layer of protection when using your debit and credit card online.
Here’s how to protect your credit/debit card from hackers:
✅ Avoid having too many cards online – Although the Internet is an excellent source of information and convenience, it’s also a dangerous place for your data.
The purpose is to have only one card with a limited amount at any time so that you can keep track of your online activity.
✅ Create unique passwords – Ideally, you should use different passwords for every account, but that can get complicated. You need some way of generating strong passwords that are easy to remember.
✅ Only purchase from trusted sites – If possible, purchase from an established retailer’s website.
Look for security features like secure sockets layer (SSL) technology, which encrypts your information as it is stored and transmitted over the Internet.
You can usually tell whether or not a site is using SSL by looking at the URL.
✅ Avoid using public Wi-Fi – Hotels, restaurants, and coffee shops all offer free Wi-Fi. But, in most cases, the data traveling over these networks is not encrypted.
If you use your credit card on a public Wi-Fi network, someone may be able to steal your credit card information.
In case you are stuck with the Transaction failed due to security reasons message on your PhonePe app on your Android or iPhone, check the bank server status, your account balance, and your internet connection first; read this guide to learn more.
We hope that you were able to bypass the card verification error with at least one of the solutions provided. And if debit cards give you grief, you can turn to mobile payment through DCB association for a more seamless payment approach.
As for other payment issues, we have an informative guide on Google Chrome temp charge, so don’t miss it for more information.
We’d love to hear from you in the comments section below if you have any comments, queries, or suggestions.
Messing with your Windows Registry might end up with a bricked Windows system. But there are ways to perform Windows 10 registry repair with Command Prompt.
Usually, you can get a corrupt registry error after making changes within the Registry Editor. That’s why it is more than recommended to back up your registry before changing anything, as there you have all the internal settings of your Windows 10 system.
How do I know if my registry is corrupted?
There are many ways to know that the Windows Registry is corrupted, but mainly, the PC gets slow, crashes, freezes, and sometimes, you get a BSoD.
More importantly, we need to know what are the leading causes of registry corruption:
Hard drive issues – There may be issues with the hard drive, such as corrupt sectors that result in data loss which is a primary source of registry corruption.
Incorrectly installed software – The most common cause of registry corruption is incorrectly uninstalled software that leaves behind registry entries that interfere with the startup.
Virus and malware infection – Viruses create registry entries that are exceedingly challenging to remove manually, viruses, Trojan horses, and spyware are also known to generate registry issues. Good antivirus software is always a must.
Now, let’s see how we can fix this problem with the below solutions.
Insert the installation media and reboot your device.
When prompted, press any key to boot from DVD/USB. If the prompt doesn’t show up, we have a guide on how to boot from a USB media.
Now from the Windows installer menu, go for Startup Repair and follow the on-screen prompts to fix your Windows 10 system – the data will not be erased as the OS system will be restored to a stable state.
This procedure will also repair the registry.
2. Install a Registry cleaner
If that isn’t working, you can also use registry software. There are many dedicated tools that you can use to fix missing or corrupt registry keys.
3. Run a SFC scan
Go to Start, type cmd, and select Run as administrator.
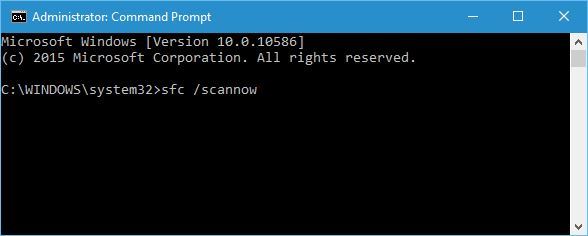
In the cmd window type the script below and hit Enter. sfc /scannow
Select Reset This PC section, and then choose Keep My Files.
Follow the on-screen instructions.
If these methods didn’t fix your Registry problems, then you probably will have to install Windows from scratch eventually.
5. Run the DISM command
Go to Start and launch Command Prompt as Administrator.
Type the following command and hit Enter:DISM /Online /Cleanup-Image /ScanHealth
Wait until the scan process completes.
This is one of the simplest ways to perform Windows 10 registry repair with Command Prompt, so be sure to try it.
Some of our readers asked: Does resetting Windows 10 fix the registry? The simple answer to this is yes. A reset will completely set your Registry to its original state. In fact, this is a recommended last resort for registry problems.
So, if all attempts have proved abortive, you should try a complete system reset, which should work well enough.
If you’ve got additional tips and suggestions on how to fix corrupt Registry keys on Windows 10, you can list them in the comments below. Also, you can leave there any other questions that you may have.
Are you curious about the user base of the latest Windows iteration? This article features the current state of the market share of Windows 11 in 2023, the iteration set to replace Windows 10, one of the most successful to date.
If one were to read the Windows 11 review, it would be evident that the latest iteration seems like an upgrade. However, the new OS was criticized, particularly for the strict system requirements and design inconsistency.
Despite all that, users are still upgrading to this new OS. Now, the question is, how many people have finally upgraded to the latest iteration, and how is Windows 11 fair in terms of market share?
Windows 11 stats
On June 24, 2021, Microsoft, to everyone’s surprise, revealed Windows 11 and released the first build within a few months on October 5, 2021. In a virtual event, Panos Panay announced the latest OS.
But, a few weeks before the official announcement, the media got a whiff of something big happening and speculated the release of a new iteration. The initial builds of Windows 11 were relatively unstable, but that was expected, and things did improve.
After a week, Microsoft released an update, 22000.258, which included patches to some bugs. Currently, the latest iteration has more than a dozen updates. Also, the first major update for Windows 11, 22H2, was released in September, though it had a few bugs.
Windows 11 certainly isn’t the success many might have imagined, but it’s slowly catching up. Besides, a major reason behind the slow growth is the requirement for TPM and Secure Boot, something missing in most older PCs.
According to Statcounter’s November 2022 report, which shows the latest data about operating systems and browsers, the newest iteration is doing quite fine.
Windows market share by version
Windows is the first choice for most PC users worldwide because of its flexibility, software availability, compatibility, and larger community. Therefore, we have taken two sources to know the market share of this OS. Here is what we have found:
StatCounter data:
According to StatCounter, around 75.11% of computers will run Windows in 2022. The figures for individual iterations may surprise many, given that many users are still running the older ones.
Here is an overview of Windows market share by iterations in 2022:
Windows Market Share by Iteration
Here’s a table depicting the market share of Windows 11 and the previous iterations as of Nov 2022, using the data sourced from Statcounter.
Windows OS
Market Share in %
Windows 11
16.13
Windows 10
69.75
Windows 8.1
2.53
Windows 8
0.79
Windows 7
10.25
Windows XP
0.4
Other versions
0.15
We can see that Windows 10 is still the most used iteration, followed by Windows 11 and Windows 7. The other iterations have a fairly low market share, further decreasing over time.
Based on some versions, a graph compares the Windows version market share over the last ten years (2012-2022).
Windows market share by versions (last ten years). Click to enlarge.
Each release of a new version of Windows has a significant impact on the market share stats. Similarly, with the release of Windows 11, the share of Windows 10 continues to decline, as is evident through the various graphics presented here.
Judging from what Statcounter had to say, in November 2022, Windows 10 dipped below the 70% mark for the first time in history.
But even though Windows 10 remains king of the hill, its market share is slowly decreasing as its successor becomes increasingly popular.
In fact, Statcounter claims Windows 10 now sits at a 69.75% mark, representing a 1.51-point decrease compared to the previous month.
As for the newest operating system (Windows 11), know that it’s not breaking any speed records, but it still gains more and more ground, keeping a relatively slow but steady pace.
This November 2022 report indicates that Windows 11 is now at 16.13%, with a 0.68% change compared to October.
If you are also wondering about the older Windows versions, know that Windows 7 remains the third most popular operating system, with a market share of approximately 10.24% (+0.62).
The Redmond tech giant plans to end the Extended Security Updates program for Windows 7 early next year, so expect the OS’s market share to go down a little faster.
Windows 8.1 and 8 have 2.53% and 0.79% market shares, respectively, at the moment. Remember that these versions are going out of service in January 2023, so you better prepare.
Let’s move on to Windows XP, a now eight-year-old dead and unsupported OS, which still holds strong with a 0.4% market share.
With more than 1.5 billion active devices, Windows is still not the most popular operating system, which in fact, is Android, with a 43.43% (market share.
Windows comes in second with 29.3%, and iOS is in third with 17.22%. These numbers are changing each month, by the way, so we’ll keep an eye out.
AdDuplex data:
AdDuplex is also monitoring the Windows 10 and 11 market share. According to their latest data, Windows 10 has nearly 76.1% market share, and Windows 11 (including Insiders build) has 23.9%.
Windows OS
Version
Market Share in %
Windows 11
21H2
23.1
Windows 11 (Insiders)
0.8
Windows 10
21H2
38.2
Windows 10
21H1
23.9
Windows 10
20H2
3.8
Windows 10
M20U
5.2
Windows 10
N19U
2
Windows 10
M19U
1
Windows 10
O18U
2
AdDuplex data also indicates that the usage percentage of Windows 10 is pretty impressive. However, it doesn’t show any Windows 11 market share by version, unlike Windows 10.
They do not show any Windows 7 market share statistics in 2022. So, as a result, StatCounter data is more acceptable if we talk about this desktop OS usage percentage based on the versions.
How much market share does Windows 11 have?
As of November 2022, Windows 11 has a 16.13-23.9% market share per different available data sources. However, achieving this took over a year, which cannot be ignored. But there are several factors at play here.
According to recent news, 1.4 billion devices are running Windows. But how many people are using Windows 11 right now? Unfortunately, we cannot give you an exact number.
Based on the total Windows users and the latest market share stats, there may be an estimated 0.226 billion or almost 226 million devices running Windows 11. In contrast, Windows 10 is running on over a billion computers.
Remember, this is an estimate based on the data, not the actual number. One individual may have multiple devices. So, it is tricky to estimate the number of users.
We saw that PC users rapidly upgraded to Windows 7 and 10 after their release. So, Windows 11 is not doing well compared to its successful predecessors? Let’s see.
Windows 11 adoption rate in 2022
Since its release, the latest OS has been well-received by users. But, because of the strict system requirements, many thought it might have difficulty achieving a decent user base. But, in reality, it is doing slightly better than the prediction.
Though Windows 11 was released in October 2021, many people started upgrading in January. It might be because they waited to be sure it was not another VISTA or Windows 8.
Since then, it has been slowly gaining a user base. If we compare the month-to-month market share percentage of Windows 11, we get the following:
Windows 11 Market Share Increase by Month
Month
Market Share in %
January 2022
2.6
February 2022
7.89
March 2022
8.45
April 2022
8.91
May 2022
10.08
June 2022
10.96
July 2022
11.77
August 2022
13.08
September 2022
13.61
October 2022
15.45
November 2022
16.13
We can see that in January-February, Windows 11 got the new users at the highest rate. However, the AdDuplex data indicate a different thing. But, one thing is common. According to both data sources, the adoption rate of Windows 11 has slowed a lot in recent months.
In March and April, the Windows 11 market share increased by an almost insignificant amount, contrary to Windows 10 21H2, which got 6.5% new users.
Windows 11 usage rate by the gamers:
If we compare the usage of gamers, the data is a bit different. Windows 11 has been attracting more gamers since its release. To get an idea, we have looked at the Steam survey.
According to the latest data, almost 27.98% of Steam users have upgraded to the latest Windows OS until November 2022, and usage is increasing rapidly. If we look at the data since December, we get the following results:
Month
Usage %
Dec 2021
10.55
Jan 2022
14.10
Feb 2022
16.18
March 2022
17.44
April 2022
19.66
According to the available data, PC gamers are upgrading to the latest iteration more than general users and that could be due to the optimized gaming performance in Windows 11.
What are the factors that affect the market share?
Some significant facts played a substantial role in the market share statistic. After doing some research, we have found the following:
1. Strict hardware requirements
As Windows 11 has a stringent hardware requirement, many users could not upgrade. At least 4 GB RAM, 1 GHz dual-core processor, UEFI, Secure Boot capable firmware, and DirectX 12 compatible graphics are necessary to run the new operating system.
This is not the only story. It would be best to have at least an 8th-generation Intel processor or a 2nd-generation AMD Ryzen processor. Microsoft later added some specific models of Intel’s 7th gen processors to the supported CPU list.
Even if you have better specs, it doesn’t mean you can run this OS because of the security processor requirement.
TPM 2.0:
Windows 11 requires a security processor (TPM 2.0 or Microsoft Pluton) on the computer. Unfortunately, many modern computers have become incapable of running this OS just because these systems don’t have the TPM 2.0.
The performance played a significant role in the market share. We saw that many people upgraded to this latest OS and returned to Windows 10 again due to performance issues on their systems.
3. Compatibility
We are talking about software compatibility. Many users continue using older operating systems like Windows 7 or Windows 10 due to some compatibility issues.
Some discontinued software that does not get any more updates from the developer becomes obsolete in the modern operating system. As a result, users who need these for professional use have not considered upgrading to Windows 11.
Besides, hardware incompatibility is another issue that prevents most users from upgrading.
4. Reliance on other Windows versions
Different people have different viewpoints. Parts of Windows users do not like the changes. They do not consider an upgrade if a version works well for them and serves their purpose.
It happened with every new Windows iteration. Even in 2022, people are relying on Windows 7. Therefore, many have decided to stay on Windows 10 for more years.
5. Waiting
Most Windows 10 users who depend heavily on PCs for their work are waiting and monitoring the news and feedback about Windows 11. However, as this OS was a bit buggy and less performing on some systems after the release, some people decided to wait until it got better stability than Windows 10.
6. Features
Featurewise, this OS has some changes if we compare Windows 11 vs. Windows 10. It played a role in its usage market share.
The new Windows 11 has some additional features, including some for gaming and business, which attract some users to this OS. Particularly, gaming functionalities and benefits attracted more gamers to this OS.
On the other hand, some valuable features were missing in the initial release. Unfortunately, that also prevented many users from accepting Windows 11 as their primary operating system.
7. Design
Windows 11’s design and UI are other things that affect the market share. However, it is one of the best OS in terms of visual quality.
The modern outlook and better consistency in design language compared to Windows 10 have brought some passionate users to this new version of Windows.
Unlike many other Windows operating systems, Microsoft has promised to support Windows 10 for a long time. It will get regular updates and security patches till 2026. So, many users decided to stay with this OS for a few more years.
These factors are directly affecting not only the Windows 11 market share statistics but also that of Windows 10.
Windows 11 future updates
Microsoft has been responding to users’ feedback with the highest priority. Even though the initial Windows 11 release lacked some key features that power users need, Microsoft has promised to bring them in the future update.
Some essential features include drag and drop in the taskbar, app folder in the start menu, tweaking the recommendation section of the start menu, etc., will be available after the next major update.
Besides, using the Windows Insider channel, we can already see a few more features that may come in future updates. Here is the complete list of features that have already been introduced or will be in the Windows 11 future update:
Tabs feature in File Explorer
App folders in the Start menu
Spotlight wallpaper
New Task Manager app
Touch & gesture improvements
Better animation
Better OneDrive integration
Resizable pinned area in the Start menu
Android app support
MS has been working on some other minor but noticeable feature changes in addition to these, and we will keep an eye out for them and inform you of their release.
Microsoft has been bringing fluent design to its existing built-in apps and tools. Recently, MS has updated the design for Notepad, Paint, and Photos. However, some parts of Windows 11 are still inconsistent and use the previous designs.
The Settings app is getting more features, and the traditional Control Panel is going away. For instance, Windows now only allows users to uninstall updates from Settings rather than the Control Panel. More such changes are expected in the future.
This new OS will get one major update each year, unlike Windows 10, which gets multiple updates every year. But, users will regularly get minor updates for security and performance improvements.
We have noticed that each new minor or major update has significantly improved Windows 11. As a result, it is now a very stable and well-performing OS. If it continues to happen, we will see a considerable improvement in Windows 11 market share. Another popular product by Microsoft is Outlook, and if you want to check out its market share and user base, read this post.
What we’re about to tell you right now is really important and should be treated as a priority, especially if you value your online safety.
If you are still interested in buying a licensed Windows 10 copy, you’d better hurry because Microsoft will stop directly selling Windows 10 licenses by the end of the month.
The operating system will still be supported until 2025, but licensed versions of the popular OS will no longer be sold.
No more Windows 10 licenses from Microsoft
January is over, and if you try and navigate to the purchase webpage for Windows 10 Home or Windows 10 Pro, you will be redirected to the Get Windows 11 page.
Once there, you’ll find that there is only a single license purchase link that only allows you to purchase the latest operating system, Windows 11.
To help you out a bit, there is also a list of vendors from where you can buy a Windows 11-compatible PC and there are FAQs for customers who are not tech-savvy too.
However, while Microsoft is no longer selling Windows 10 licenses through its website, you can still buy these at third-party retailers like Newegg and Amazon.
Not to mention the fact that, if you are lucky, you might also find physical copies of Windows 10 in brick-and-mortar stores.
Please keep in mind that, according to notices posted to the Windows 10 Home, Pro, and Workstation pages on Microsoft’s site, the company will stop digital downloads of Windows 10 on Jan. 31, 2023.
As we previously mentioned, Microsoft will still support Windows 10 for a few more years, but we won’t be able to buy a Windows 10 license except through existing stores of licenses at third-party retailers.
Remember that some versions of Windows 10, such as 20H2, have already reached end of support. That’s why we recommend that you upgrade to Windows 10 22H2, the last version of the OS.
In the above-mentioned post, Microsoft says that January 31 (2023), will be the last day this Windows 10 download is offered for sale.
For those of you that didn’t quite catch it, the elimination of the Windows 10 license basically means that Windows 11 will not only be the operating system that Microsoft wants you to buy.
Allow us to rephrase and say that it’s also the only operating system that Microsoft will allow you to buy, therefore the obvious choice.
Don’t worry, we’ll see this again in a few years when the Redmond-based tech colossus will release Windows 12 to the public.
That being said, just because Microsoft won’t sell them anymore, doesn’t mean you can’t still get your hands on a licensed copy of Windows 10.
In fact, the alternative for those wishing to buy a Windows 10 license will be to turn instead to third-party retailers that still have the product in stock.
Keep in mind that OEM copies of Windows 10 are still available at Amazon, although the Windows 10 product listing lacks any indication that Microsoft itself will soon stop selling Windows 10 licenses.
There’s also the option to install Windows 10 on your machine without paying for it, but you will lose the ability to personalize your PC and we don’t recommend it at all.
There will also be a watermark on your desktop asking you to activate Windows, so yet another reason to go official.
On that note, know that this is pretty much the beginning of the end for Windows 10, seven and a half years after it launched, as Microsoft continues to pivot strongly towards Windows 11 as the preferred OS.
A lot of new functionalities are primarily being added to Windows 11 and it’s also being pitched as the most secure version of Windows.
Have you already migrated to the newer Windows 11? Share your experience with us in the comments section below.
Network drive mapping is one of the Windows 10 features that ensure ease of access, consistency, and network setup efficiency.
However, most users reported that, after updating from v1909 to v2004, Windows 10 couldn’t map the network drive. So, this article will show you a series of solutions to help you fix this issue.
Why can’t I see my mapped network drives?
Below are some of the factors that can cause the can’t map network drive error on Windows 10:
Outdated PC: The first thing to check when facing this error is if you are using the latest version of Windows 10. If you are still using the 2004 version, you must update your PC to the 22H2 update.
Missing registry value: Another cause of this issue is a missing ProviderFlags registry value. You need to tweak your registry and add the value accordingly.
Now, let’s see the correct procedure to map a network drive in Windows 10.
How do I manually map a drive in Windows 10?
Press the Windows key + E to start File Explorer.
Select This PC from the left pane, then go to the Computer tab and select Map network drive.
Select the drive letter, then, in the Folder box, type the path of the folder or computer, or select Browseto find the folder or computer.
Select Reconnect at sign-in if you want to map that drive every time you sign in, then click Finish.
If the issue still persists, perform the solutions below to fix the drive mapping problem in Windows 10.
What can I do if Windows 10 can’t map the network drive?
1. Update to the 22H2 version
Press the Windows key + I to open the Settings app and select Update & Security.
On the left side, select Windows Update, then click the Check for updates button.
Look under View optional updates and click on Download and Install.
Click on the Restart now button.
2. Add the ProviderFlags registry value
Press the Windows key + R, type regedit and click OK.
Locate the following in the left pane: HKEY_CURRENT_USER\Network\
Now, right-click the space in the left pane and choose New > DWORD (32-bit).
Type ProviderFlags as the name and double-click it.
Next, set its Value data to 1 and click OK.
Finally, close the Registry Editor and restart your PC.
3. Use Local Group Policy Editor
Press the Windows key + R, type gpedit.msc and press Enter.
Once you’re inside the Local Group Policy Editor, select Local Computer Policy.
Extend Computer Configuration, then click on Administrative Templates.
Look at the right side and double-click on the System section from the shown list.
Scroll down to Logon and double-click on it.
Click on Exclude credential providers, then, on the left side, on policy settings.
Checkmark the Enabled option.
Click on Apply and then on Ok.
Restart your computer, wait for the next startup to complete, and try to access it again.
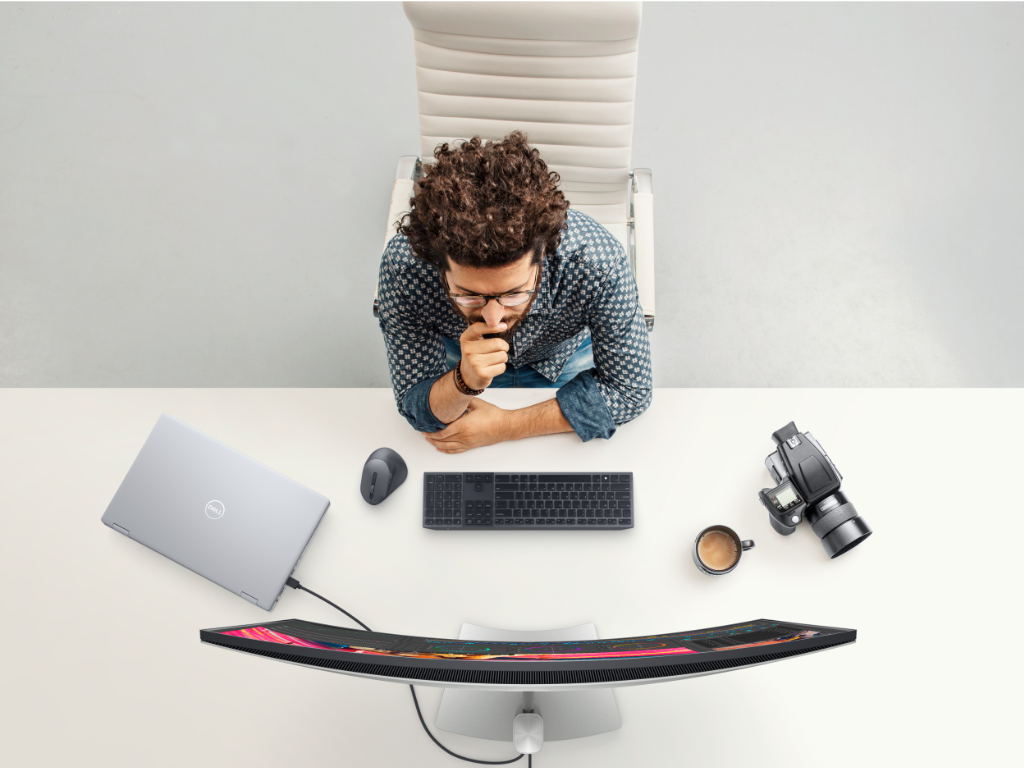
In addition to gaming, Dell is dropping news about its prosumer peripherals for business and casual use such as a new keyboard, 43-inch monitor with USB-C hub, rechargeable mouse and 34-inch curved monitor.
Dell UltraSharp 34 Curved USB-C Hub Monitor
Starting at $1,259.99
The new UltraSharp 34 Curved is as marketed, with a 34-inch WQHD (3440 x 1440) IPS screen with 2,000:1 contrast ratio and 98% DCI-P3 color space support.
Dell’s new selling point for its latest monitors is a productivity hub built-in and the UltraSharp 34 comes with a streamlined USB-C Hub that helps the display support 2 HDMI ports, RJ45 Ethernet, 2 Type-C upstream ports, display port, Audio line out, 3 downstream USB-A 3.2 10Gbps, 2 Type-C downstream ports, and Kensington Security lock.
Dell UltraSharp 43 4K USB-C Hub monitor
Starting at $1,297.99
Dell UltraSharp 43 4K USB-C Hub monitor offers a similar feature set as its curved 34-inch cousin but flattens its viewing angles and offers 42.5-inches of display surface as well as comes in with 4K resolution and support for up to four FHD partitions.
The standout feature for the UltraSharp 43 4K is the ability to connect and control up to 4 PCs at one time through a KVM connector. The KVM connector enables switching through four separate picture-in-picture displays portioned off in their own corner of the screen.
Port selection on the 43 4K monitor offers 2 Display Port ins, 2 HDMI ports, 2 USB-C upstream ports, USB-A 3.2 Gen2 port, RJ45 ethernet connector and audio line out.
Dell Premier Collaboration Keyboard
Starting at $129.99
The Collaboration moniker comes as the Dell Premier Collaboration Keyboard becomes the world’s first Zoom-certified keyboard on the market.
The low-profile keyboard puts mute, unmute, chat, screen share, and video toggles right on the keyboard for easier controls during Zoom meetings.
Beyond that, the 2-point connecting Bluetooth enabled, USB-C charging, and backlit keyboard presents as many other with a quieter typing experience thanks to its scissor-switch key design. Users can connect a third device to the keyboard via RF dongle if necessary.
Dell Premier Rechargeable Mouse
Starting at $109.99
Dell’s contoured designed mouse adds a horizontal scroll wheel near the thumb placement in addition to the one placed at the middle of the mouse in addition to its adjustable DPI increments to support configurations between 800 and 8000 by increments of 200.
The Rechargeable mouse also supports RF 2.4Ghz and Bluetooth 5.1 connectivity for two devices and a third via RF dongle.
Dell claims the Rechargeable mouse can last up to 3 months on a charge and can be recharged via USB-C.
FlashFXP is one of the most powerful FTP and FTP clients available for download. Wrapped up in a friendly interface with great online tutorials, FlashFXP is a great way to manage your websites professionally.
The interface is intuitive and offers a high degree of customization, allowing you to change almost every element on the interface, from the toolbar to fonts to color.
Apart from the standard FTP, FlashFXP offers support for SFTP and FTPS along with strong password encryption and other high-end security features.
You will find superb features in every section, from connectivity to interface, transfers, and performance. There is also an inbuilt file scheduling system and other webmaster-oriented tools.
However, all this does not come for free. There is a thirty-day trial period after which you buy the program.
Other great features:
High-performance file transfer
MODE Z on the fly compression
Supports popular file transfer protocols
Server to server transfer
FlashFXP
FlashFXP offers unique and complimentary advanced features for client configuration
WS_FTP is software that will simplify your work with its efficiency and friendly-user concept. We will list some of its strong points below.
You can easily find and transfer files directly from your desktop search engine. The search can be customized by file type, date, and size. It allows you to drag and drop these files from your computer to a remote FTP server or between servers if you have more of them.
WS_FTP has rong security, protecting your files during the transfer using multiple crytpographies (256-bit, AES, FIPS 140-2) and also an Open PGP file encryption (well, that’s a security monster!)
It allows you to make your action schedule and keeps safe the files that you scheduled to be transferred. It also can backup, synchronize, schedule, compress, and even notify by mail.
WinSCP is another open-source FTP client that supports the encrypted SFTP, SCP, and WebDAV. It features a dual-panel interface that simplifies transferring files between your computer and the remote server.
Just as the first three letters suggest, WinSCP is only compatible with the Windows platform, and it comes with other premium features such as remote editor capabilities, integrated text editor, and many more.
Talking of the UI, WinSCP has a file manager interface that resembles Windows Explorer or the Norton Commander.
Using the software is simple and straightforward; drag and drop feature makes it easy to upload files, and the program also supports a host of other operations such as changing properties, duplication, moving, and directory synchronization.
WinSCP is a great and versatile program that you get free of charge, and you can choose from one of the 38 languages available.
Easy to use and bursting with premium features, Cyberduck is one of the best free FTP clients for Windows 10. Featuring a minimalistic user interface, Cyberduck offers support for both Windows and Mac OS X.
If you care a lot about the looks of the FTP client you use, then Cyberduck might be of great interest to you. It offers unlimited support for FTP, SFTP, Amazon S3, WebDAV, and OpenStack Swift.
It also offers support for Google Cloud Storage and Rackspace Cloud Files, comprehensively covering all you need to manage your site.
Cyberduck has one of the most impressive Graphical User Interface. There is a handy Quick Look feature that enables you to quickly access the files, while the support for editors feature helps you edit the files instantaneously.
Just like FileZilla, Cyberduck is super easy to use. To transfer a file, all you have to do is click the upload option, and Cyberduck will take it from there.
Cyberduck is convenient as you can even view the file transfer progress through the ‘Transfers’ section.
Other handy features of Cyberduck include synchronization of local and remote directories, desktop notifications, history logs, and bookmarks.
If you’re looking for software that can perform file transfer easily, then WebDrive might be what you need. The software allows you to connect to SFTP and FTP servers easily. You can even map servers as a drive letter for quick access.
Cloud storage services are also supported, and you can access them easily with this tool right from your File Explorer.
The list of supported services includes SharePoint, OneDrive, Box, S3, GoogleDrive, Dropbox, and many more.
The software allows you to preconfigure it before installation. This is perfect if you need to install it quickly on several devices in your network.
Overall, this is a great tool, especially if you plan to use cloud storage services along with FTP servers, so be sure to give it a try.
When the SSD is not recognized or is simply dead, you don’t just lose precious data but will also have to shell out quite a few bucks for a replacement drive.
Most usually go with the latter without much thought. But what if you can get the SSD working? Read ahead to find out.
What are the symptoms of drive failure?
While the SSD (Solid State Drive) and HDD (Hard Disk Drive) are completely different in storing data, a common aspect is that both fail sooner or later. Though the former has a considerably longer life span.
An SSD can last 10 years or more if well -maintained, while an HDD usually wears out after 4-6 years. The reason is that SSDs have no moving parts, as opposed to HDDs.
But you must identify the signs of a failing SSD before it’s completely dead for several reasons. Here are a few things to look out for:
Get errors while reading or writing files: When a drive is about to fail, it will throw errors when accessing or saving files to certain locations.
Computer slows down: A slow computer could be a sign of a falling SSD, though remember, that’s not the only reason.
Issues booting the PC: If you are unable to boot Windows and get an error frequently, chances are the SSD is to blame.
Applications start to crash: In many cases, the applications crash when the SSD is dead, and you must fix things to run them again.
Make sure the connections are in order. Remove the SATA cable from the SSD and then plug it back in just to be sure.
Unplug other non-critical peripherals from the PC, and then connect the SSD.
Plug the SSD into another computer to verify whether it’s dead or the previous PC couldn’t read it. If it’s the latter, replace the cable and check the ports. For the former, the other solutions here will help.
Update the BIOS since it could be an issue there that’s giving the impression that the SSD is dead.
If you can’t figure things out, move to the next fixes.
NOTE
The solutions here are for an SSD that has gone dead over time and is not damaged in any way. If it’s the latter, we recommend you immediately take it to a repair center.
1. Keep the SSD in an idle state
Turn off the PC and unplug the data cable from the SSD, but leave the SATA power cable connected.
Please turn on the PC, enter the BIOS, and let it sit idly for 30 minutes. Do not use the computer during this period.
Now, turn off the computer, disconnect the drive, and wait for 30 seconds.
Again, connect the drive using the SATA power cable, turn on the computer, and wait 30 minutes.
Repeat the process 2-3 times, then connect the drive normally, and it should appear.
Though strange, this is one of the most common techniques to fix a dead SSD. The idea here is to let the SSD be idle for an extended period to get it to work. If that doesn’t help, head to the next solution.
2. Reset the BIOS
NOTE
The steps to reset the BIOS are different for every manufacturer, and the process listed below is only to provide an understanding of the concept. We recommend you look through the manufacturer’s website for the exact steps.
Power off the computer, turn it on, and repeatedly hit the relevant key (depending on the manufacturer) to enter the BIOS. It’s usually F1, F2, F10, F12, or Del.
Once in the BIOS, navigate through the various tabs and look for an option that says Load Optimal Defaults, Load Setup Defaults, Load Default Options, or something similar, and select it.
Confirm the reset, and wait for the process to complete.
Once done, turn on the computer, and it should recognize the SSD.
Oftentimes, an issue with the BIOS makes us think that the SSD is dead, and resetting it helps fix things in no time.
3. Update the SSD’s firmware
Press Windows + X to open the Power User menu, and select Device Manager.
Expand Disk drives, right-click on the SSD, and choose Properties.
Head to the Details tab, choose Hardware Ids from the dropdown menu, and note the one for the SSD.
Now, search for the Hardware ID using Google or another search engine and open the firmware update webpage on the manufacturer’s website.
Download the firmware and run the setup to complete the installation process. Since we are running a Dell computer, we went to its official website. In your case, it might be different depending on the manufacturer.
After downloading and installing the firmware update, check if it can fix the dead SSD. For many users, it did the trick, and we recommend you update the SSD firmware.
Press Windows + R to open Run, type devmgmt.msc in the text field, and hit Enter.
Now, expand Disk drives, right-click on the dead SSD, and choose Update driver.
Next, select Search automatically for drivers and let Windows install the best one.
Updating drivers is critical for the effective functioning of every device, including the SSD. So, make sure you have the latest ones. If Windows doesn’t find an update, you can always manually install the latest drivers, though it’s more time-consuming.
Alternatively, you can use dedicated updater software such as Fortect Driver Updater that automatically scans your PC for outdated drivers and installs the corresponding version for your hardware.
5. Run the Check Disk utility
Press Windows + S to open Search, type Command Prompt, and click on Run as administrator on the right.
Click Yes in the UAC prompt.
Now, paste the following command while replacing C: with the letter for SSD, and hit Enter:chkdsk C: /f
If asked to start the scan after a restart, press Y, then hit Enter and reboot the computer for Check Disk to run.
That’s it! One of the solutions presented here should have helped you fix the dead SSD drive. If the problem persists, we recommend you contact the official manufacturer or a local technician to get the hardware inspected.
Also, if there are critical files on the drive that you would like to salvage, check the best data recovery tools to retrieve them.
If you have any queries or want to share a solution that worked for you, comment below.
If you are one of the people who are tired of seeing tiny text in Windows 11 and want to change the display scaling in Windows, you can easily check DPI and adjust the settings to your preference.
When you have a high-DPI display, you might find that some desktop apps are blurry when you compare them with newer Universal apps.
This makes it difficult to use older applications on Windows 11 because the text is hard to read and images are blurry.
The default display scaling may not always be ideal for what you’re viewing. Some things will appear too small and others are tough to read.
While Windows 11 does its best to adjust DPI scaling automatically, it doesn’t always get it right. Luckily, it’s easy to manually adjust DPI scaling in Windows 11.
Why is DPI important?
If you’re a gamer, the DPI of your mouse can be crucial to your success. A higher-DPI mouse will allow you to move the cursor on the screen further per inch of movement than a lower-DPI mouse. This is why gamers often go for a mouse with a higher DPI.
To know exactly how far your mouse moves on the screen compared to how far you move your hand, you can calculate the DPI of your mouse.
DPI and sensitivity are closely related but not identical. For example, you can have a high-quality gaming mouse set to a low DPI, and it will still be able to track movement with high accuracy.
However, using a low DPI can make it harder to keep your cursor on the screen when moving quickly.
A mouse with a higher DPI setting detects and reacts to smaller movements. A lower DPI setting on a mouse means that you’ll need to physically move it more in order to make the cursor move across the screen.
Choosing the best mouse DPI setting is all about finding that sweet spot between control and speed.
If you play on a high-resolution desktop monitor, consider using a mouse with high DPI so you can take advantage of the extra space. If you have smaller monitors or play on laptops, stick with low to medium DPI.
Click and hold the mouse until you reach the 1 inch mark.
The value you get is your DPI.
Can I change DPI scaling on Windows 11?
Your screen resolution is the number of pixels on your screen. If you have a low resolution, as many users do, and you try to use applications designed for a higher resolution, they won’t be designed properly to fit on your screen.
Instead of showing everything at a size that’s easy to read and use, they’ll either be very small or you’ll have to scroll around too much to see the content.
Windows uses scale factors to compensate for this mismatch between application design and monitor size.
When scaling is 100% (the default setting), the dots in an image are displayed at their native size onscreen – one dot per pixel. In other words, images will appear with the same clarity on all screens (but not necessarily the same size).
To change DPI scaling, follow the steps below:
Press the Windows + I keys simultaneously to open Settings.
Tap on System and select Display on the right pane.
Under Scale & layout, open the drop-down and select your preferred scaling.
What can I do to fix Windows 11’s DPI scaling issues?
If you are using a higher resolution for Windows 11 4L scaling, make sure that you have the recommended display resolution. If you’re not, your DPI scaling may be off, which can cause blurry text, apps, and other items.
While using two or more monitors is a great way to get more work done, it’s not without its problems.
One issue that you may run into involves scaling. Windows will attempt to adjust your programs and apps automatically so that they look good on the monitor that you’re currently using.
For instance, if your main monitor is 4K and the second one is 1080p, set the first to 200% scaling and the second to 100%.
This will improve your experience when working with apps that span across two or more monitors, but it may also cause some apps to stop responding or appear blurry on one of your displays.
Also, if you are using an old monitor, you may run into problems. Older monitors tend to have a limit on their display capacity. You can log out and log back in to resolve the issue.
Can I disable display scaling on high DPI settings in Windows 11?
While using Remote Desktop, you may also face Windows 11 RDP scaling issues because the device cannot be detected. To work around this issue, check and verify that you are connected to the Internet.
You can also disable DPI settings for a program if it appears blurry. To disable, follow the steps below:
Right-click on the program and select Properties.
Click the Compatibility tab and press OK.
Select Change high DPI settings.
Under Program DPI, check Use this setting to fix scaling problems for this program instead of the one in Settings and under High DPI scaling override, check Override high DPI scaling behavior then press OK.
We hope you were able to check your DPI and found some useful information from this article. If you have any suggestions, please leave a comment down below.
If you’re running Windows 11, and your screensaver isn’t working properly, it might be because you have an older version of Windows installed or have recently upgraded to a newer version. Windows screensavers are a great way to add some personalization to your desktop.
They can be used as a cool backdrop for your computer or as a way to get rid of all the clutter on your screen. So, if you are searching for a solution to fix your Windows screensaver not working, then you are at the right place.
Why is my screensaver not working in Windows 11?
If you’re lost on why the screensaver is not working on your Windows 11, below are some possible causes:
Virus infection – It’s possible that there’s a bug in Windows 11 that causes the screensaver to stop working after a few minutes of use.
Corrupt user profile – You might have a corrupted user profile, especially if you didn’t create it correctly or tampered with some settings.
New Windows updates – When a new version of Windows is released, there are usually some changes that can sometimes cause issues with your screensaver.
Outdated/missing drivers – In some cases, if you’re using an older driver or have missing drivers, they may not be compatible with the latest version of Windows.
Configurations – You may have incorrectly configured the screensaver settings.
How do I trigger the screensaver in Windows 11?
As usual, before you apply any of the slightly technical solutions listed below, we recommend you start with the following:
Remove all connected peripherals such as mice, USB drives, or printers.
Clean your mouse and mouse pad to ensure it doesn’t accidentally trigger the screen.
Verify that you have enabled the screensaver settings.
Check if you have recently installed any new software and uninstall it, especially an app that is also a screen saver or program that might interfere with the screen saver.
Try restarting your PC.
1. Update the display drivers
Hit the Windows key, type Device Manager in the search bar, and click Open.
Navigate to Display adapters and find your graphics card.
Right-click on your graphics card and select Update driver.
Select Search automatically for drivers.
If you have a Windows 11 screensaver that is not working and doesn’t want to go through the long method, you can try to update the display drivers using a third-party tool.
Outbyte Driver Updater scans your system for corrupted, missing, or outdated driver versions. Once it finds a faulty driver, it will download and install an updated version.
Outbyte Driver Updater
Quickly update your drivers with the newest versions and give Outbyte Driver Updater a try.
If your screensaver is not working in Windows 11, it is possible that your current user account is corrupted. To get around this, the next time you log in, switch to a different user profile or copy your profile to a new one.
You can also create a new profile if you wish to do so. If this works, you will have confirmed that the previous profile is corrupted and needs to be repaired.
You can also personalize your display by following our guide on using Photos as a screen saver in Windows, which shows how to turn your favorite pictures into a slideshow.
Do let us know of any additional solution not mentioned here that may have worked for you in the comment section below.
When images on a website aren’t displayed in Google Chrome, you’ll usually get a broken image icon. This red x or broken image icon highlights a missing picture on a page.
While some users also reported that images don’t load in Chrome, in this case, there’s a broken image icon that signifies something wrong with the browser or its settings. So, let’s find out all about it.
Your settings can also cause this problem, so ensure images are allowed to load. A corrupted cache can also cause this issue, so make sure to clean it regularly.
However, this issue can be fixed easily, and in this guide, we’ll show you what to do if images are not loading in Chrome.
Speaking of image problems, users reported the following issues:
Broken image icon in Firefox, Internet Explorer – According to users, you might experience this issue in other browsers, including Firefox and Internet Explorer. If the problem appears in other browsers, the issue is related to your system or the network configuration.
Pictures not loading on websites in Chrome – Many users reported that pictures aren’t loading on websites in Chrome. To fix the problem, be sure to check your Chrome settings and disable your antivirus.
Images won’t load in Chrome – Sometimes, this issue can appear if JavaScript is disabled in your browser. If that’s the case, simply enable JavaScript, and the problem will be resolved.
Chrome showing broken images – In some cases, extensions can lead to this problem, and if you notice that the images are missing, simply disable or uninstall your extensions and check if that solves the problem.
Quick Tip:
Try loading the same pages with a different browser. It’s no secret that Chrome tends to use a lot of resources, and that can sometimes lead to page-loading issues, including the broken image error.
Troubleshooting may take time, so switch to a lightweight browser. Opera One is a great alternative, with a modular design UI and extra features like tab islands, AI tools, and a free VPN.
Opera One
Open as many pages as you like and enjoy their images with this browser’s smooth experience.
Before making changes to the browser, we recommend you try these quick fixes:
Restart the computer and then load the website showing the broken image icon in Chrome.
Disable any third-party antivirus or other security software installed on the computer. If the problem is resolved, we recommend you rely on the built-in Windows Security or install a reliable third-party antivirus.
Open the website in another browser to verify whether the problem lies with Chrome or the website itself. If it’s the former, one of our solutions would help, while in the case of the latter, you should contact the developers.
If nothing earlier worked, head to the solutions listed next.
1. Check if the Show all images option is selected
First, you should click the Customize Google Chrome button at the top right of the browser and select Settings.
Some websites use JavaScript to display content, so if pictures are not loading on websites then you need to enable it from Chrome’s settings.
3. Switch off your extensions
Press the Customize Google Chrome button and then go to More tools, and then click Extensions.
Turn off the toggle for all the individual extensions to disable them.
Now restart the browser for the changes to come into effect.
If you see broken images in Chrome, it might be because of your extensions. There’s a wide array of extensions available for Chrome, and certain extensions can interfere with your browser and cause this issue.
You could just select every check box there. If you want, you can go to the Advanced tab and select all options there as well.
Press the Clear data button, and restart the browser.
The cache stores browsing data, and if you’re getting broken image icon emoji, your cache may be the problem. However, you can fix that with the steps from above.
5. Reset the browser
Enter the following in Chrome’s address bar and hit Enter:chrome://settings/
Scroll to the bottom of the page, and click Reset and clean up.
Click Restore settings to their original defaults.
Click on Reset to confirm.
If none of the above solutions have fixed the broken image icon with png files, then you need to reset the browser. This will effectively restore its original settings and delete all installed extensions, plug-ins, etc.
6. Use Google’s DNS
Click the network icon in your Taskbar. Now select your network from the menu.
Select Status from the left, and then navigate to Change adapter options.
A list of network connections will appear. Right-click on your network and choose Properties from the menu.
After that, select Internet Protocol Version 4 (TCP/IPv4) and click on Properties.
Select Use the following DNS server addresses, enter the following information, and click on OK to save the changes:
Preferred DNS server: 8.8.8.8
Alternate DNS server: 8.8.4.4
If your browser isn’t showing images, it might be because of your DNS issues. Sometimes there might be a problem with your ISP or network connection leading to this issue. To fix the problem, you might want to try using Google’s DNS.
After doing that, check if the problem is resolved. Remember that switching to a Google DNS might make your connection slower, but it should fix the problem with images.
7. Update Chrome
Open Chrome and click the Menu icon in the top right corner. Choose Helpand then select About Google Chrome.
A new tab will now appear, and Chrome will check for updates. If any updates are available, they will be downloaded and installed automatically.
Once the updates are installed, restart your browser.
If you’re having issues with Google Chrome and broken images, it might be because the software is outdated. Usually, Chrome checks for updates automatically, but you can also check for updates manually.
Once Chrome is up to date, check if the problem is resolved. The latest updates usually fix major problems, so keep your browser up to date.
8. Rename Chrome’s data folder
Firstly, make sure that Google Chrome isn’t running.
After that, press Windows + R, type %localappdata%, and click OK.
Navigate the following path:Google\Chrome\User Data
Next, locate the Default folder and rename it.
According to users, if you see a missing image icon in Chrome, the issue might be related to Chrome’s data folder, and renaming it should do the trick.
Tip
If the problem persists, we recommend you switch to the Beta or Canary version of Chrome. It would help when there’s a bug in the browser since these versions usually receive patches sooner than the stable ones.
It’s worth noting that broken images might have more to do with the web pages than your Google Chrome settings. The images might have been removed without updating the site page. So make sure you check that beforehand.
If you want to know how to show date and time on your Windows taskbar, you’re in the right place.
Maybe you’ve been making changes to your computer, like installing a clean copy of your OS, and now you want your taskbar organized. With a few tweaks, you can show essentials like date, time, and system icons in a compact view.
How to display date and time on the taskbar in Windows 10?
Right-click on an empty spot in the Windows taskbar and choose Taskbar settings.
Under Notification area, click the Turn system icons on or off option.
Now, look for Clock in the list and make sure you toggle the switch to On.
If this is already the case, try toggling the option to Off and then On again.
Now, when it comes to preferences, different users want different options – some like a cleaner desktop, and others want everything handy.
And while you can hide or make the taskbar not transparent in Windows 10, the topic of modifying the taskbar width and the size of the icons or displayed details is still a very hot one.
How can I show the date in the taskbar with small icons?
NOTE
The method may work for PCs that support higher resolutions. Users reported that both the date and time are visible when set to small icons for resolution at 1920×1080 and DPI set to 100%. For others, the date won’t be visible.
Right-click anywhere on the taskbar, and chose Taskbar settings.
2. In the settings windows, look for Use small taskbar buttons and enable the toggle for it.
4. Once done, the taskbar icons will automatically change to small ones.
This action can, of course, be undone, and you can always choose to make the taskbar icons bigger. While you’re in the taskbar settings menu, you can also look around and adjust other features as you like.
More and more apps are added to the Microsoft Store daily, along with regular updates to keep them running efficiently. But, several users reported Microsoft Store errors, including 0x80070005.
The error is encountered when you try to update apps already on the PC or install new ones from the Microsoft Store. And the list of people affected by it is growing each day.
So, let’s find out what the Microsoft Store 0x80070005 error is and the solutions that would fix things for you.
What is the Microsoft Store error 0x80070005?
The error usually appears when a DLL file is denied permission, so it is most likely a result of an update that messed up your Microsoft Store files. One other cause could be a lack of file or registry permission.
Users also mention these connected issues:
Microsoft Store download error 0x80070005 – This happens mainly when downloading games and these apps are the most likely to be impacted.
Forza Horizon 4 0x80070005/Sea of Thieves 0x80070005/Forza Motorsport 7 is currently not available in your account make sure you are signed in to the Microsoft Store and try again – The text of this error points towards the fix for it, which is to sign into your Microsoft Store account.
Xbox app error code 0x80070005 – This means that there could be a problem with the Xbox Live service, or that the item you’re trying to launch might be faulty
0x80070005 GamePass – As in the case of the previous error variation, this is also a clear issue with the Xbox Live service, or your ISP might have encountered issues.
App installation failed with error message: error 0x80070005: opening the package from location microsoft.windows.pchealthcheck_x64.msix failed. (0x80070005) – In this case, the installer can not reach the online resource it needs in order to download and install the service, so it might be an issue with the internet connection.
This drive has apps from another device 0x80070005 – This can be caused by issues encountered during the Windows Update process, and the moving or renaming of documents.
How do I fix error code 0x80070005 in Microsoft Store?
Before we head down the complex solutions to fix Microsoft Store 0x80070005 error, here are a few quick workarounds that may do the trick for you:
Restart the computer.
Make sure you have the correct date and time set on the computer.
Access Microsoft Store through another Microsoft Account if you are currently using a local one.
Disable third-party antivirus or other security/privacy apps. If that works, we recommend you switch to another effective third-party antivirus that doesn’t conflict with the OS.
If these don’t work, check the next section for more solutions.
1. Gain complete control over the Packages folder
One of the solutions that worked for people who faced Microsoft Store 0x80070005 error before was gaining complete control over the Packages folder in AppData.
1. Press Windows + R to open Run, type %localappdata%, and press Enter.
2. Now, find the Packages folder, right-click on it, and go to Properties.
3. Go to the Security tab, and click on Advanced.
4. Now, click on Add.
5. Click Select a principal.
6. Next, enter PC Name/Users in the text field while replacing PC Name with the one for your computer, and then click on Check Names.
7. Now, click on OK.
8. Tick the checkbox for Full control and then click OK at the bottom.
9. Save changes on all the previous windows for these to apply.
10. Once done, reboot your computer.
2. Restart critical services
Press Windows + R to open Run, type services.msc in the text field, and click OK.
Locate the Background Intelligent Transfer Service, right-click on it and select Stop.
Similarly, stop the Sysmain and Windows Update service if these two are running.
Next, press Windows + E to open File Explorer, paste the following path in the address bar, and hit Enter: C:\Windows\SoftwareDistribution\Download
Now, press Ctrl + A to select all the files and hit Del.
Once done, head back to the Services window, right-click individually on the services you disabled earlier, and select Start. Make sure to enable all three:
Background Intelligent Transfer Service
Sysmain
Windows Update
Finally, reboot the computer.
This is a proven solution for the Microsoft Store 0x80070005 error and has helped many fix the problem. So, we recommend you try it early and see if things improve.
3. Reset the Microsoft Store cache
Press Windows + R to open Run, type wsreset.exe in the text field, and hit Enter.
Now, wait for the process to complete. Microsoft Store will automatically launch after the reset.
Press Windows + I to open Settings and select Apps from the left.
Click on Installed apps on the right.
Locate Microsoft Store, click on the ellipsis next to it, and select Advanced options.
Scroll down and click on the Reset button.
Again, click Reset in the confirmation prompt.
If resetting the cache doesn’t work, you can revert everything to default by resetting the Microsoft Store app. Once done, verify if the Microsoft Store 0x80070005 error is resolved, which it should, in all likelihood, by now.
5. Run the built-in Windows Troubleshooter
Press Windows + I to open Settings, and click on Troubleshoot on the right.
Select Other troubleshooters.
Now, locate the Windows Store Apps troubleshooter and click on the Run button next to it.
Follow the on-screen instructions and choose the necessary response when prompted to complete the process.
6. Use a third-party repair app
Being plagued by errors while using your device can be pretty irritating, so you need a program that keeps your system healthy.
A third-party repair app will keep your computer files in pristine condition and stop malware from ruining your system.
7. Update Windows
Press Windows + I to launch Settings and select Windows Update from the navigation pane.
Now, click on Check for updates on the right.
If any updates are listed after the scan, click on Download & install to get them.
Once done, restart the computer for the new version to complete the installation, then check whether the Microsoft Store error 0x80070005 is gone.
How do I open Microsoft Store as an administrator?
You cannot open Microsoft Store, or any UWP (Universal Windows Platform) app for that matter, as an administrator.
This is a part of a security feature to ensure that your data or other critical parts of the OS are not compromised.
Can I reinstall Microsoft Store?
Yes, you can reinstall Microsoft Store and the seamless process. All you have to do is run an elevated Windows PowerShell and execute the following command: Get-AppxPackage -allusers Microsoft.WindowsStore | Foreach {Add-AppxPackage -DisableDevelopmentMode -Register "$($_.InstallLocation)\AppXManifest.xml"}
But remember, you cannot uninstall Microsoft Store in Windows. So even if you find a third-party tool that does the job, Microsoft recommends against it since the only way to get back the application would be to reinstall the OS.
If you’re running an outdated Windows version, this may explain why you’re getting the Microsoft Store 0x80070005 error. First, update the OS and then check if the problem persists.
Microsoft regularly rolls out updates to improve the operating system’s stability and fix the bugs reported by users.
Perhaps the latest Windows updates feature dedicated Microsoft Store improvements and patches that could help you fix the Microsoft Store 0x80070005 error.
That’s about it for this article. We hope all of these solutions helped you solve the error message. Also, find out the best offline games on Microsoft Store to play today!
Feel free to share any feedback regarding the subject in the comment section below.
When the Error 0x80004005: Unspecified occurs, a dialog box window pops up stating: An unexpected error is keeping you from renaming (or copying or deleting) the folder.
If you’re getting this error, keep reading. Our team figured out exactly what you need to know to fix it in no time.
How do I fix error 0x80004005?
1. Run the Windows Update troubleshooter
Press the Windows key + I and select the Update & Security option.
Click Troubleshoot in the left pane and select Additional troubleshooters.
Now, select the Windows Update option and click Run the troubleshooter.
If you face the error code 0x80004005 while trying to update your PC, the first thing to do is run the built-in troubleshooter. This will clear up the possible cause of the problem and restart the required services.
This next solution gives you a practical tool to identify and repair system errors like the error 0x80004005 only by using the built-in tool PowerShell.
1.Press the Windowskey +Xand chooseWindows PowerShell (Admin).
2. Run the following command:DISM.exe /Online /Cleanup-image /Restorehealth
3. Now run this command:sfc /scannow
4. The SFC scan might take about 20-30 minutes to complete. Restart your desktop or laptop if the scan does repair a file.
If you’re having issues completing this process, check our guide on what to do if DISM fails on your PC.
You can use a dedicated repair program to scan your PC extensively for any issues and try to fix or replace each broken element.
5. Take ownership of the folder
Locate the directory that is giving you this error. Right-click it and choose Properties.
Navigate to the Security section and click on Advanced.
Click on Change next to the Owner name.
In the Enter the object name to select enter the name of your user account. Click on Check names and OK.
Now check Replace owner on subcontainers and objects and click on Apply and OK.
If you failed to open a file due to the 0x80004005 unspecified error, it might be because you have the required privileges. In this case, taking ownership of the files should solve the issue.
6. Clean boot Windows
First, open the Run accessory with the Windows key + R hotkey and enter msconfig.
Select the Selective startupoption on the General tab. Deselect the Load startup items checkbox.
Navigate to the Services tab and click the Hide all Microsoft services checkbox. Press the Disable all button. Now click Apply and OK.
Press the Restart button on the System Configuration dialog box that opens.
After doing that, check if you still get the 0x80004005 unspecified error when logging in on Windows 10. If you want, you can enable services one by one until you manage to find the cause of the problem.
Press the Windows key + X and choose Windows PowerShell (Admin).
Navigate to the folder by using the cd command. In our example we used this command: cd C:\Users\WindowsReport\Music\
Now use the ren command like this: ren WindowsReport WindowsReport_new
After renaming the directory, check if the problem is resolved.
8. Use a different user account
Press the Windows key + S and enter users. Select Add, edit, or remove other users.
Choose Add someone else to this PC.
Select I don’t have this person’s sign-in information.
Select Add a user without a Microsoft account.
Enter the desired user name for the new account.
Switch to the new account and check if the problem is resolved.
What is 0x80004005 unspecified error?
An Unspecified Error usually means that the underlying cause of the error is unknown or cannot be identified by the computer. In some cases, you may get an Unspecified Error, while Windows lists the problem in others.
Below are some of the causes of this issue:
Corrupt system files – When you get the 0x80004005 unspecified error while trying to copy files or at login, it might be down to broken or corrupt system files. You must restore and repair these system files to get past this issue.
Lack of ownership – To open or edit some files and folders, you need ownership. In this case, you need to take ownership of this file to fix the issue.
Interference from third-party apps – Sometimes, it might be a third-party app, like an antivirus, preventing you from opening a file, leading to the 0x80004005 error. The best way to circumvent this is to perform a clean boot.
Issues with the user account – Glitches with your user account might be the cause of this issue at times. To know for sure, create a new account and repeat the task that brought about this error code.
Also, it is important to mention that there are different variations of this issue, as shown below:
0x80004005 Ethernet – This has to do with your network settings and connection. A quick way around this is to run the network troubleshooter.
Parser returned error 0x80004005 – This is a variation of the issue that shows up on Startup. You can fix it by performing a clean boot.
0x80004005 SQL – This issue has been reported to show up when users try to install a custom instance of an SQL server.
Visual Studio error code 0x80004005 – In this case, a system file is broken or missing.
Error 2147500037 0x80004005 and 0x80004005 SCCM are also reported by users, yet the below solutions are just what you need.
[…] has failed with the error code 0x80004005 in the task sequence step, unspecified error Windows 10 login – Run the SFC scan in order to solve any system file conflicts or corruption.
Error 0x80004005 unzip – Take ownership of the folder, or run this command as an administrator.
Error 0x80004005 while sharing a folder – Clean boot Windows in order to fix this.
Error 0x80004005 ZIP file – Many times, this error appears when you’re trying to unarchive a ZIP file, and it requires a password.
Error 0x80004005 Outlook – This error might appear out of nowhere when using the Outlook email client, but one of the solutions below will help you fix it as well.
Now that we know about all causes and variations of this error, let’s fix it using the solutions below.
How can I fix error code 0x80004005: Unspecified error in Windows 11?
Disable your antivirus
Press Windows key + S and type defender. Select Windows Security from the list of results.
Navigate to Virus & threat protection and click on Manage settings.
Disable Real-time protection.
Keep in mind that the steps mentioned in this solution apply only to Windows Defender. If you’re using a different antivirus, you’ll have to use different methods to disable it.
NOTE
Disabling your antivirus isn’t advised as a long-term solution, so be sure to turn it back on.
Some of those resolutions will probably fix the 0x80004005 Unspecified error that pops up when users delete, rename, copy, or extract folders and files within File Explorer.
Some users are complaining that Run as administrator is not working. The option is either not showing or the app launches without administrative privileges.
The reason why you can’t run a program as an administrator could be due to corrupt system files or third-party software interference. Here’s how to fix it:
How can I fix Run as administrator if it’s not working?
1. Remove the problematic applications
Press Windows + I to launch Settings, and select the Apps option.
Select the problematic app and click the Uninstall button.
Apps like QuickSFV or Express Zip replace the Run as administrator option with their own context menu items. Uninstalling them should fix the problem.
To make sure there’s no trace of those apps left, you can use a dedicated uninstaller tool such as IObit Uninstaller:
Open IObit Uninstaller and select the All Programs tab.
Then, type the name of the app in the search bar and click on the Trash icon to uninstall it.
It’s quick to act and simple to install. Once you get on your PC, you can use the uninstall feature to remove undesirable, obsolete, or problematic programs and delete leftover files with this powerful program.
IObit Uninstaller
Remove unwanted and stubborn programs in no time with the IObit Uninstaller tool.
Use Windows + R to open the Run dialog, type msconfig, and clickOK.
Navigate to the Services tab at the top, check the Hide all Microsoft services box, and click the Disable all button.
From here, click the Startup tab at the top, and then choose Open Task Manager.
Right-click each of the applications there and select Disable.
Now, head back to the System Configuration window, click Apply and OK to save changes, and restart your PC.
Now your PC will start only with essential apps. If Run as admin is now working, you can re-enable apps one by one. This way, you can identify which one is causing the conflict.
Press Windows + I to open the Settings app, and select the Update & Security option.
Click Recovery in the left pane, and then click the Restart now button under the Advanced startup section.
Choose Troubleshoot and then select Advanced options.
Next, click on Startup Settings and then on the Restart button.
After your PC reboots, you should see a list of options.
To boot into Safe Mode with Networking, press 5 or F5.
4. Create a new user account
Open the Settings app and head over to the Accounts section.
Select Family & other people in the left pane.
Choose Add someone else to this PC.
Please select I don’t have this person’s sign-in information.
Now, click on Add a user without a Microsoft account.
Enter the username you want to use for the new account and click Next.
After creating a new user account, it’s a good idea to upgrade your new account to an administrative account. To do that, follow these steps:
First, open the Settings app, choose Accounts, and then navigate to Family & other people.
Next, select the newly created account and choose Change account type.
Set the Account type to Administrator and click OK.
Once done, Run as administrator should now start working in Windows. Remember, you will need to move all your files to the new account and start using it instead of your old one.
5. Check Registry settings
Open Settings, remain on the System tab, and select Recovery.
Click the Restart now button under Advanced startup.
Select Troubleshoot and click Advanced options.
Next, select Command Prompt.
Once the CMD opens, type the following command and hit Enter: net user administrator /active:yes
If Run as administrator is still not working, reaccess the CMD (using the same steps).
Paste the following command and hit Enter to open the Registry Editor:regedit
Locate and select the HKEY_LOCAL_MACHINE key from the navigation pane.
Select File from the upper menu bar and click on Load Hive.
Go to the following path: C:Windows\System32\config
C: is usually the drive containing the Windows installation, but it can be a different letter there.
Select the SAM file and click Open.
Use the Load Hive dialog box to type REM_SAM as the name of the key and click OK. (This will load the hive into the HKEY_LOCAL_MACHINE branch).
Now, look in the left pane of the registry one more time and locate this key: HKEY_LOCAL_MACHINE\REM_SAM\SAM\Domains\Accounts\Users\000001F4
In the right pane corresponding to the 000001F4 key, double-click the F Dword (REG_BINARY) to modify it.
Place your cursor on line 0038 (1st column), replace the value 11 with 10, and click OK.
Close everything and reboot your Windows 11 PC.
This should help you recover your administrative privileges if somehow the admin account became disabled along the way.
How do I force an app to run as administrator?
Press the Windows key, type cmd, and select the Open file location option.
Right-click on Command Prompt and select Properties.
Click the Advanced button in the Shortcut tab.
Check the box for Run as administrator box, and click OK to save the change.
If nothing happens when you click Run as administrator in Windows 10 or if Windows 11 Run as administrator is not working, it’s usually a third-party application to blame.
Microsoft is working toward incorporating a neat utility tool dubbed Mouse Jump to PowerToys which is based on FancyMouse. The feature will enhance navigation for users as mouse movements across large and high-resolution screens will be swift rather than having to scroll down several times thus helping you stay on track.
Michael Clayton, the developer further explained that:
On a modern laptop that uses an Ultra-Wide external monitor you could easily have a desktop in the region of 8000+ pixels wide, and that’s a lot of ground for your mouse to cover.
What tends to happen is you end up swiping the physical mouse as far as it will go, then lifting, moving back to the start and swiping again – sometimes half a dozen times just to get to the other side of the screen. During this process you quite often lose track of where the mouse is and spend precious seconds trying to find it again.
The developer further indicated that the utility is “functional and ready” for its first design review, however, there are certain aspects of the tool that still require a bit of refinement before it is released.
To access this feature “a hotkey or spare mouse button can be configured to activate the FancyMouse popup, and the pointer only needs to be moved a tiny amount on the preview thumbnail. A single mouse click then teleports the pointer to that location on the full-size desktop. The visual cue tells you exactly where the pointer will end up so you can find it easily without needing to search for it.”
This feature will probably hit broad availability in the future via an update. Be sure to also check out Microsoft Powertoys’ January update that shipped with self-contained .NET 7 in case you missed it.
Just encountered the Windows cannot find uninstall.exe file? The .EXE file type allows you to run (execute) a program or to install a new app on your PC If you cannot find uninstall.exe on your Windows PC, it’s likely due to a corrupted installation, accidental deletion, or hidden files. Here’s how to locate or recreate it and safely remove the program.
Some of them reported that the error occurs when trying to uninstall almost any kind of program. The most commonly received message opens in a dialogue pop-up window with the message Windows couldn’t uninstall the app because we couldn’t locate the file filename.exe.
There are a few reasons you might not be able to uninstall a program on your computer. Here are some causes you should keep in mind:
Permissions issues – If you are not the computer administrator, you may not have the required permissions to uninstall the program.
Uninstaller compatibility issues – Try using the built-in uninstaller for the program. Most programs have their uninstaller that can be accessed through the Control Panel.
These are the most common triggers, but you should find some success using the solutions we recommend.
How do you uninstall if there is no uninstall exe?
Before you go into any complex fixes:
We recommend restarting the device. A reboot will force some difficult processes to end and may be the best way of solving an uninstallation problem.
1. Use Programs and features
Click on Search, type Control Panel, and select the application.
Click on the Programs and Features option.
Search for the app you want to remove.
Right-click on it and go to Uninstall.
2. Uninstall from Apps and features
Click on Start and select the Settings icon.
Click on the Apps button.
On the left pane, click on Apps and features.
Search for the program you want to remove from the list, click on it and select Uninstall.
3. Use third-party software
Open Revo Uninstaller; you may do this by searching for revo and selecting the app’s Open option.
Go to the Uninstaller button.
Double-click on the program you want to remove, and after the window opens, click Continue.
Click on the Scan (notice you can select the scanning mode level).
One more efficient way that allows you to uninstall your programs is using third-party software instead of wasting time with other programs and features.
This time, we recommend Revo Uninstaller as a saver for our issue.
Revo Uninstaller Pro
If you need an efficient alternative for when your built-in uninstaller fails, we strongly recommend Revo Uninstaller Pro.
Microsoft is currently testing a new feature in its browser Edge. The feature will allow users to open PWAs directly from the address bar as first spotted by Leopeva64-2 on Reddit.
If you have a website installed as an app on your device, Edge’s suggestion dropdown list in the address bar will now feature an option that will let you open the site in the app. Here’s an illustration of how this neat feature works:
The feature is currently available to users using the Canary version of the browser. Aside from the new capability, Canary users also have access to a new “Install app” button in the address bar which is in place to facilitate quick installation of web apps.
Opera GX is one of the best gaming and all-purpose browser. Here’s how to set Opera GX the default browser on your Windows machine.
How can I set Opera GX as default browser?
1. Click Opera’s Make Default option
Launch Opera.
Click the O at the top left of Opera and select the Settings option.
Scroll down to the Make opera the default browser option and click the Make default button.
2. Try selecting Opera GX by link type
First, press the Windows key + I hotkey, which will open Settings.
Next, select Apps, then choose Defaultapps.
Scroll down and click on Choose default apps by link type.
Then click the HTTP and HTTPS protocols there, and select Opera GX as default.
After you change the default settings, any HTTP or HTTPS link will be opened by default with the Opera GX browser. You may also do that by choosing Choose defaults by file type and find http and https on the list.
Run the installer and install the correct version for your system. Also, install the browser for all users of the Windows device and select the option to make it default.
The dreaded Blue Screen of Death is one of the most annoying Windows errors. Some BSOD error messages reference the win32kfull.sys file, which is a kernel-mode device driver file. Win32kfull.sys issues can arise when users try to utilize certain hardware devices or software.
This guide is for users affected by the win32kfull.sys BSOD error as here, we have listed some effective solutions that will help you fix the win32kfull.sys error. Let us check out the potential resolutions below.
What causes the win32kfull.sys BSOD error?
Here are a few reasons why you would come across the win32kfull.sys BSOD error on your Windows PC;
Outdated drivers: If you don’t have updated drivers installed on your PC, then your system will have a hard time communicating with the hardware, ultimately throwing the Driver Verifier Detected Violation win32kfull BSOD error.
Compromised RAM: The win32kfull.sys BSOD error is also known to be triggered your RAM is compromised or corrupt.
Pending Windows Updates: Your PC should always be kept updated to fix the errors because of the previous version and resolve bugs that would trigger multiple issues, including the Windows blue screen win32kfull.sys error.
Note that the solutions below will also fix the win32kfull.sys system_service_exception, win32kfull.sys kernel data in page error, and the win32kfull.sys bsod page_fault_in_nonpaged_area issues.
How can I fix Windows 10’s win32kfull.sys BSOD error?
1. Update drivers
Open the Start menu.
Type Device Manager and open it.
Expand any component, right-click on it, and select Update driver.
Select the Search automatically for updated driver software.
If a driver update is available, your PC will prompt you to install it.
You can follow the above steps to update each of your drivers. This will take time and requires a good chunk of manual input.
Alternatively, you can use a third-party tool called Outbyte Driver Updater, which will update your drivers in just a few clicks. Apart from updating drivers, it can help you create driver backups and also perform scheduled scans.
Type the below command and press Enter: sfc /scannow
Once the process completes, type the following command and press Enter: DISM /Online /Cleanup-Image /RestoreHealth
Windows comes with built-in SFC Scan and DISM tools that will help you to scan corrupt system files or replace the missing ones. You can run a simple command to execute both the system tools and fix corrupt or missing system files.
3. Use a dedicated BSoD repair tool
BSoD causes can be hard to identify and fix, a specialized BSoD repair tool will greatly simplify this whole process. These tools allow you to scan, identify, and replace problematic files with just a few clicks.
Hence, this third-party repair utility will help you fix system errors, BSOD errors, DLL-related issues, and much more. They are easy-to-use programs and will surely help you fix the win32kfull.sys BSOD error.
4. Update Windows 10
Press the Win + I keys to open Settings.
Select Update & Security.
Select Windows Update from the left pane.
Click Check for updates to scan for available updates.
Hit Download and install if there is any available update.
To check out optional updates, click View optional updates.
Select all optional updates listed, and click Download and install.
If there’s a Windows 10 build version you can install, click the Download and install option for it.
Windows will boot in the Windows Memory Diagnostics environment, and the tests will start in Standard mode.
After the PC restarts, the win32kfull.sys BSOD error should be fixed.
NOTE
If the WMD utility detects RAM issues, you’ll probably need to replace RAM modules within your PC to fix the BSOD error.
6. Verify the hard drive with a Chkdsk scan
Open the Start menu.
Run Command Prompt as an admin.
Type the below command and press Enter: chkdsk /r c:
After the process completes, restart your PC.
7. Uninstall the Windows 10 KB5000802 update
Press the Win + I keys to open Settings.
Select Update & Security.
Click the View Update history option.
Then click Uninstall updates to open the window in the screenshot directly below.
Select KB5000802, KB5000809, KB5000808, or KB5000822 update if you find any of those patches listed.
Press the Uninstall button.
NOTE
This resolution is more specifically for fixing an APC_INDEX_MISMATCH win32kfull.sys error caused by the aforementioned Windows 10 2021 updates. Microsoft also rolled out optional hotfix Windows 10 updates to resolve that issue.
8. Roll back Windows 10
Press the Win + R keys to open the Run dialogue.
Type rstrui and click OK.
Select Choose a different restore point.
Click the Next button.
Select a restore point.
Press the Next button.
Click Finish to initiate the system restoration.
Restoring Windows 10 to a previous time will uninstall software installed after a selected restore point date. You can select a restore point and click Scan for affected programs to see what programs get removed for it.
9. Reset Windows 10
Open the Start menu.
Type recovery and open Recovery options.
Click Get started.
Choose the Keep my files option to only remove apps and settings but save all your personal files.
Follow the onscreen prompts till your PC is reset.
Resetting Windows 10 will uninstall software that wasn’t preinstalled on your PC. Therefore, this resolution is recommended as a last resort only.
As BSOD errors are Windows system issues, it’s best to contact Microsoft support for further guidance. You can select to chat with a Microsoft support agent at the Contact Microsoft Support webpage.
If you decide to contact MS support about the issue, note down some details from the BSOD error message. Note down the file referenced, in this case, win32kfull.sys, and the stop code for the BSOD error. Then you can give those details to a customer support agent.
The potential resolutions above will probably fix win32kfull.sys BSOD for most users.
BSOD errors are some of the worst since these not just crash the OS but also point to a critical underlying cause. One such is the KERNEL AUTO BOOST INVALID LOCK RELEASE error.
In technical terms, the error arises when a lock tracked by AutoBoost gets released by a thread without its ownership. So, let’s find out all about MSDN bug check KERNEL_AUTO_BOOST_INVALID_LOCK_RELEASE!
What is KERNEL AUTO BOOST INVALID LOCK RELEASE?
The KERNEL AUTO BOOST INVALID LOCK RELEASE is a BSoD error that arises when a kernel thread (might that be an interrupt handler or process) is trying to release a lock that is not owned by it.
But more importantly, it is not what the error is but why it occurs on your PC.
What causes the Kernel Auto Boost Invalid Lock Release error?
Here are a few reasons you might be encountering the error:
Overclocking – One of the primary reasons behind the KERNEL AUTO BOOST INVALID LOCK RELEASE is overclocked PC, so refer to our below solutions.
Incompatible or outdated drivers – In many cases, it was incompatible or outdated drivers that triggered the error, and checking the log files should provide insights.
Bug in Windows update – Several users had the error after updating Windows, which points to a bug in the installed version.
Connected hardware creating conflicts – Hardware devices can, too, conflict with the functioning of the OS and lead to KERNEL AUTO BOOST INVALID LOCK RELEASE in Dell PCs.
Now that we know why this happens, let’s go through with the solutions to fix it.
How to fix KERNEL_AUTO_BOOST_INVALID_LOCK_RELEASE?
Before we head to the slightly tricky solutions, here are a few quick ones you should try first:
Disconnect all non-critical peripherals, including printer, phone, speaker, and headphones, amongst others.
Check for Windows updates and install the latest available version.
Remove any overclocking which may be in place and uninstall programs meant for the same since these could create issues. Many had the KERNEL AUTO BOOST INVALID LOCK RELEASE due to ThrottleStop.
In case these don’t work, head to the solutions listed next.
1. Update the drivers
Press Windows + R to open Run, type devmgmt.msc in the text field, and hit Enter.
Expand the Display adapters entry, right-click on the graphics adapter, and select Update driver.
Now, select Search automatically for drivers and wait for Windows to install the best ones.
Similarly, update the other critical drivers, such as those for network adapters, Bluetooth, and storage devices.
Updating the driver fixes both issues due to running an older version or using an incompatible driver. It should get things running in the case of KERNEL AUTO BOOST INVALID LOCK RELEASE in Ryzen 3600.
Also, in some cases, Windows wouldn’t be able to find a better version, so you will have to locate and manually install the driver.
To better perform this process and save time, you can try using a dedicated tool to scan your computer for outdated drivers and automatically update them with brand-new versions.
Press Windows + R to open Run, type appwiz.cpl, and click OK.
Now, locate any Bluetooth software (not the driver) here, select it, and then click on Uninstall.
Follow the on-screen instructions to complete the process.
Many users claimed that it was a conflict between a third-party Bluetooth software and a built-in one that caused the error. And the easiest way to fix things would be to remove the third-party option. It’s usually Broadcom, so if you find it, remove the application.
3. Uninstall Windows updates
Press Windows + I to open Settings, choose Windows Update from the left, and then click on Update history.
Now, scroll to the bottom and choose Uninstall updates.
Click on Uninstall next to the update after installing when the error first appeared.
Again, click Uninstall to confirm the change.
Another effective solution to fix the KERNEL AUTO BOOST INVALID LOCK RELEASE when it started after updating Windows is to revert to the previous stable version.
BSOD errors often arise due to issues with RAM, and running a few tests will help identify if that’s the case. But before you do that, make sure the RAM modules are properly seated in the slots.
If the built-in option doesn’t work, we recommend using MemTest86+, a free, open-source RAM testing tool that does a wide range of extensive tests and eliminates most issues. Though remember that it would take a few hours to run completely.
5. Get the hardware inspected
If nothing previously worked, it’s most likely the hardware to blame for the BSOD error. It could be the motherboard or the CPU since we already had the results on RAM modules in the previous solution.
With these two, it’s best that you let a hardware expert test them, and check for issues, say with the voltage and connections. Many got KERNEL AUTO BOOST INVALID LOCK RELEASE due to undervolt. So get that verified as well.
You might have to replace the problematic hardware component depending on its problem.
That’s it! With the KERNEL AUTO BOOST INVALID LOCK RELEASE error fixed, you can continue using the PC, and it shouldn’t crash again.
Many Windows 10 users reported that they could not access the shared folder. This can be a real issue, as it prevents sharing of valuable information.
While there are various factors that can cause this issue, we have prepared detailed solutions that can help you fix things when the shared folder can’t be accessed.
Why is the shared folder not accessible?
Below are some of the factors that can cause the shared folder not to be accessible:
Wrong network settings: If the network discovery feature is disabled on your PC, you will not be able to access a shared folder. You only need to enable the feature, and the issue will be resolved.
Unavailability of folder sharing setup: Sometimes, you might be experiencing this issue because you don’t have the setup to access the shared folder on your PC. This feature should be available on your PC by default, but you can install it if it is not.
What to do if the shared folder is not accessible on Windows 10?
1. Check the availability of the folder-sharing setup on your PC
Press the Windows key + I to open the Settings app and select Network & Internet.
Now, click on Change adapter options.
Locate your network connection, right-click on it, and select Properties.
Navigate to the This connection uses the following items area and then locate the File and Printer Sharing for Microsoft Networks.
If the option is available, simply check the box next to it; otherwise, proceed.
Click on the Install.
Afterward, click OK.
Exit the window and restart your PC.
If you cannot access a shared folder on Windows 10, the first thing to do is check your system to ascertain if the File Sharing setup is available. Normally, this setup is built-in on Windows; thus, it is usually present.
2. Enable network discovery
Press Windows + I to open the Settings app and select Network&Internet.
In the left panel, click either Wi-Fi or Ethernet (depending on your connection type) in the left pane.
Under the Related Settings menu, click on Change advanced sharing options.
Tick the radio button for both the Turn on network discovery and Turn on file and printer sharing options, and then click on Save changes.
If you are experiencing the Windows 10 unable to access shared folder error, it is recommended you check if your PC’s network is discoverable by other computers.
3. Check your PC’s credentials
Press the Windows key, type control, and select the Control Panel.
Select the User Accounts option.
Now, choose Credential Manager.
Locate and click on Windows Credentials.
Select Add a Windows credential.
Add the relevant details like username, password, and hosting PC‘s IP, and then click OK to save the changes.
If you cannot access the shared folder on your PC, you may have issues with credentials.
4. Enable all Network services
If you cannot access the shared folder on your PC, ensure that you enable all relevant network services on your PC. So, check the Services app and verify that there are running.
Services
Below is a list of relevant services that should be enabled and run automatically for file sharing to work:
Press the Windows key + I and select Update & Security.
Select Troubleshoot in the left pane and click Additional troubleshooters.
Now, choose the Shared Folders option and click Run the troubleshooter.
A designated troubleshooter on Windows 10 is specially designed for fixing errors such as this. If you’re still unable to access shared folders, running the troubleshooter might be helpful.
There you go. These are a couple of solutions that might help you fix things when unable to access a shared folder in Windows 10. The solutions are as detailed as possible, and you only need to follow the steps carefully.
Skype is a nice video calling and messaging application that many use to accomplish work-related tasks or for casual chatting. Since receiving notifications is one of the most important functions of Skype, one could understand the frustration if Skype is not making notification sounds.
You will find multiple user reports about the same Skype not making notification sounds problem. If you are also experiencing the same issue, this guide is exactly for you.
Why is Skype not making notification sounds on my PC?
After some research, we have found a bunch of common reasons that are particularly responsible for Skype not making notification sounds error:
You are not signed in: If you are not live or not signed in to your Skype account, then you will not receive notification for new messages.
Focus assist is turned on: Windows 10 or 11 users might have left the Focus Assist turned ON, because of which you aren’t receiving notifications for new messages.
Check notification settings: You might have disabled the notification settings on your PC, which is why you aren’t getting notification sounds.
The Skype notification sound is turned off: Often, we, by mistake, tweak the in-app settings, which could result in such a petty issue.
Now that we know the possible causes of this issue, let’s fix it with the solutions below.
What can I do if Skype is not making notification sounds on my Windows PC?
Before going ahead with the advanced troubleshooting methods, here are a few quick fixes that you can apply:
In case you have set Do not disturb as your Skype status, then Skype will not disturb you and will not send any notifications your way. While anyone can message you, you won’t be alerted. Click on your profile picture and set your status as Active and check if you can receive notification sounds.
Try restarting your PC, as this could resolve many temporary glitches or bugs that might be causing the issue. Here’s what to do if the computer keeps restarting randomly.
You can also try turning the volume up to check if the sound wasn’t muted.
Relaunch the Skype app. Often, the previous session might have failed to load all the important files.
Sign in to the Skype application and check if you are getting notifications or not.
Let us check out the advanced troubleshooting method that will help you resolve the issue.
1. Allow Skype to run in the background
Press the Win + I buttons to open Settings.
Click on Apps on the left.
Click on Installed Apps from the right.
Locate Skype, click on the 3-dot icon and select Advanced options.
Under the Background apps permissions drop-down, select Always.
Close the Settings menu and see if this resolves the issue or not.
If you have not allowed the Skype app to run in the background, then this could prevent you from not only getting messages from your contacts, but Skype will not make any notification sounds.
2. Check notification settings
Press the Win + I buttons to open Settings.
Select Notifications from the right side.
Turn on the Notifications toggle.
Click on the down arrow next to the toggle for Notifications.
Check the box for Allow notifications to play sound option.
3. Turn off Focus Assist
Press the Win + I buttons to open the Settings menu.
Click on Focus on the right side.
Click on the Stop focus session button to turn off Focus Assist.
Focus assist helps you curb the distractions such as notifications, etc. from disturbing you while you are working on something important.
There are chances that you have left the Focus Assist on, which is why Skype is not making notification sounds.
You can run into errors for many reasons when using the Zoom client on your computer. These errors can make the Zoom client inaccessible, preventing you from joining meetings. The Zoom install error code 10004 is one of such that users report.
The Zoom update error code 10004 is related to update issues with the Zoom client. The error appears while users are on Zoom calls, causing difficulties accessing Zoom meetings. It is due to the Zoom client having trouble connecting with the Zoom servers.
Furthermore, the error can occur on various operating systems, including Windows and macOS. Factors that can cause the error are:
Zoom client auto-update failure – When Zoom cannot update to the latest version, it can prompt an error.
Network connection issues –When there is network congestion or a poor network connection, it can cause an error on Zoom.
Zoom may not be able to connect to its servers if maintenance is in progress or if the servers are down. So, you should check Zoom’s social platforms for updates about the issue.
you can contact Zoom Support for help with the inability to install updates, error code 10004.
If the error persists, proceed with the solutions below. They will also address the Zoom error code 10004 Ventura, and Zoom update install error code 10004 issues.
1. Update the Zoom client on your PC
Left-click the Start button, type zoom, and click Open from the options to launch it.
Click on the Profile icon in the top-right corner and select Check for Updates.
If there’s any update available, follow all on-screen prompts to install it. Updating the Zoom client on your PC will fix any bugs that may stop it from connecting to its servers.
2. Allow Zoom through Windows Firewall
Press the Windows key, type windows security, and click Open.
Tap the Virus & threat protection option, scroll down, and click on Manage ransomware protection.
Click on the Allow an app or feature through Firewall option.
Click on Change settings, check the box for Private and Public beside Zoom,and click OK.
Restart your computer and check if the error persists.
On your Mac, click the Finder icon to launch the app.
Click on Applications from the left pane and select Zoom from the list of installed apps.
Press the menu button at the top bar, then click on Move to Bin to uninstall the Zoom app on your Mac.
Click on the Bin icon on your taskbar, click on the deleted Zoom app, press the Menu button at the top bar, then click Empty Bin to delete the Zoom app permanently.
A widget helps users interact with apps better since they can access certain information from them without necessarily having to launch the app thus enhancing efficiency and effectiveness. Last year, Microsoft added the capability to install third-party widgets via the Microsoft Store as well as a plethora of nifty features designed to enhance its user experience, such as notifications in widgets.
Microsoft is now testing a new feature that will help you do more with widgets. As spotted by PhantomOfEarth on Twitter, users will get a notification when a new widget is available via the Widget Panel in form of a small banner. It should be noted that this applies to the apps installed on your Windows 11 device.
The Widgets panel will show a small banner when a new widget becomes available for an app (through a Store update while it's running, for example) pic.twitter.com/aB1bpyR2xf
You are likely to get a notification highlighting the availability of a new widget for an app after updating it. The feature is currently available to Windows Insiders, perhaps, Microsoft will roll it out to general availability via an update in the future.
Microsoft seems to be laying more emphasis on this front as it released an Insider build for the Dev Channel featuring a new widget for Messenger. However, if you don’t fancy widgets, we invite you to check out our expert guide which will help you disable widgets in Windows 11.
While the first Xbox console came equipped with a 233MHz Custom NVIDIA NV2A GPU, the latest Xbox Series X has a custom-designed GPU based on AMD’s latest RDNA 2 architecture. You might be interested in knowing what the PC equivalent of the GPU used on the Xbox One is to build you one gaming PC.
If that is the case, then in this guide, we will share with you all the information that you need to know about what graphics card is in the Xbox one. As GPUs are the heart and soul of a gaming PC, if you wish to build a PC equivalent to the Xbox One, then this guide is very important for you.
What are the GPUs used in different versions of Xbox consoles?
To understand it better and also to know about how the GPUs have evolved in Xbox consoles, let us take a look at a comparison table below:
Xbox versions
GPU
XBOX
233MHz Custom NVIDIA NV2A
XBOX 360
500MHz custom ATi design
XBOX One
AMD Graphics Core Next (GCN) GPU
XBOX One X
AMD Scorpio graphics processor
XBOX One S
Durango 2 graphics processor
XBOX Series S
Lockhart GPU based on TSMC’s 7nm process node
XBOX Series X
Custom-designed based on AMD’s latest RDNA 2 architecture
What graphics card is in the Xbox One?
Since the Xbox gaming console was introduced by Microsoft, it has been using AMD’s GPU for most of its generations. On the Xbox One, there was an AMD Graphics Core Next (GCN) GPU.
The latest and the most powerful Xbox gaming console that you can purchase as of now is the Xbox Series X. The Xbox Series X console makes use of the custom-designed based on AMD’s latest RDNA 2 architecture, a significant Xbox One graphics card upgrade.
Speaking of the specifications, it can deliver up to 12 Tera Flops or TFLOP of peak performance and is considered to be the most powerful console GPU to be ever created.
To understand, TFLOP is a mathematical measurement of a computer’s performance which is expressed as the ability to perform 12 trillion floating point operations in one second.
Apart from such an impressive GPU performance core, the Xbox Series X also features advanced AMD Radeon Rays tracing acceleration technology. This ensures real-time lighting and shadowing in supported games.
On the other hand, the cheaper Xbox Series S features a Lockhart GPU based on TSMC’s 7nm process node. Its PC equivalent is the NVIDIA GTX 1060 3GB GPU or the AMD Radeon RX 5500 XT.
For those wondering about the Xbox Series S’s TFLOP numbers, it can output up to 8.013 TFLOPS, making it slightly slower than the NVIDIA GTX 1660. However, it features ray tracing, which is absent on the PC equivalent.
What graphics card is comparable to Xbox One X?
Microsoft has replaced the Xbox One X with the Xbox Series X console. To build a PC with Xbox One X equivalent GPU, you must install NVIDIA RTX 2060 Super.
You can play games on 4K with ease, as it can give you an output of up to 30FPS on certain native 4K games. Xbox One X has 6 Teraflops, while the NVIDIA RTX 2060 Super has 7.2. For AMD users, you can opt for the AMD RX580.
If the Xbox One graphics card is going bad, you should consult our guide on how to detect GPU failure.
Nevertheless, you can find the Xbox One graphics card on PC, minus the Ray Tracing feature, so you need to know what to do.
What graphics card is comparable to Xbox Series X?
As mentioned in the table above, the Xbox Series X comes with a Custom-designed based on AMD’s latest RDNA 2 architecture. Since it is the most powerful Xbox console, you will get unprecedented performance from this gaming console.
If you wish to build a PC equivalent to the GPU inside the Xbox Series X, then install the NVIDIA RTX 3060 Super. The NVIDIA GPU is at par with the Xbox Series X performance as it can output 13 TFLOPS.
Speaking of the AMD equivalent, you need to install AMD Radeon RX 6700 XT also has a similar performance output of 12.4 Teraflops. The performance of NVIDIA RTX 3060 may seem similar to Xbox Series X on paper, but in reality, you may feel a lot of differences.
It would be better if you would go for the AMD Radeon RX 6700 XT for 1440p gaming, as both the Xbox One X and Radeon RX 6700 XT are based on the same RDNA 2 architecture.
But in the real world, the NVIDIA RTX 3060 and AMD Radeon RX 6700 XT aren’t a match for the Xbox Series X GPU, as they cannot handle modern 4K titles in 60FPS unless the in-game settings are tweaked significantly. The difference is that individual games are optimized for consoles since it is easier compared to differently-spec PCs.
For optimal 4K gaming, we recommend you use the NVIDIA RTX 3080 and 3080 Ti that come with 10GB and 12GB of RAM, with a throughput of 29.77 TFLOPS. In the AMD, you can opt for the Radeon RX 6800 XT, which comes with 16GB of GDDR6 RAM.
So, now that you have a clear mind of what is the PC equivalent of the Xbox Series X GPU, if you are facing an Xbox error update, worry no more as you can check out our guide and resolve the issue.
If you want to rotate PDF on Windows, there are several options you can use. The obvious choice is the software synonym with PDFs.
One way to do that is using PDF reader apps, but what if your software doesn’t support rotation? Well, there are other methods you can use, and we’re going to explore them in this guide.
So join us while we take a closer look at the best ways to rotate PDF documents on your PC.
How do I rotate a PDF and save it permanently?
1. Use Adobe Acrobat Reader
To rotate the PDF in Adobe, first, open the program on your PC. After that, choose the PDF file you want to open.
Go to Tools. After that, select Organize Pages.
Select the pages you want to rotate.
Now use the rotate buttons to rotate the desired pages.
Lastly, save the changes.
This is how you rotate a PDF in Windows 10 and save it permanently. Of course, the same works if you want to rotate the PDF in Windows 11. In Edge or Chrome, you can only rotate it in the view mode, it won’t be saved how you rotate it.
Tip
u003cstrongu003eRotate PDF shortcut:u003cbru003eu003c/strongu003eu003cbru003eIf we were to compare, working with PDFs in Edge is horrendous compared to using the tool developed specifically for PDFs. You can even use shortcuts to rotate PDFs on Windows easily.u003cbru003eu003cbru003eHow do I rotate a PDF X degrees clockwise? – Use the u003ckbdu003eShiftu003c/kbdu003e+u003ckbdu003eCtrlu003c/kbdu003e+u003ckbdu003ePlusu003c/kbdu003e shortcut on your keyboard.u003cbru003eHow do I rotate a PDF X degrees counterclockwise? – Use the u003ckbdu003eShiftu003c/kbdu003e+u003ckbdu003eCtrlu003c/kbdu003e+u003ckbdu003eMinusu003c/kbdu003e shortcut on your keyboard.
Adobe Reader has come a long way since its inception nearly 30 years ago. Nowadays, it is a complete package that lets you edit PDF documents and even convert them to other formats.
Adobe Acrobat Reader
Probably the best PDF reader because you can also make changes, rotate, edit, and save PDF documents.
u003colu003ern tu003cliu003eTo u003cstrongu003eRotate a PDFu003c/strongu003e, click on the document and click u003cemu003eRotate right u003c/emu003eor press u003ckbdu003eCTRL+]u003c/kbdu003e.u003c/liu003ernu003c/olu003e
2. The u003cstrongu003eChange Layout featureu003c/strongu003e helps you to switch between the One Page and Two Page layouts. Click on the document and click u003cemu003eLayoutu003c/emu003e.
3. u003cstrongu003eRead Aloud u003c/strongu003eis another new feature that let one of the 3 narrators read aloud the content of the document. You can choose between the 3 voices and regulate reading speed.
4. u003cstrongu003eShare PDFu003c/strongu003e is a great feature for fast and simple sharing of documents via Mail, Twitter, Skype, and others. Also, you can cast it to OneDrive or OneNote in one click.
5. With the u003cstrongu003eAdd Notes u003c/strongu003eoptions, you can use the physical pen on the touchscreen or add notes with your mouse. The choice is yours.
This is another simple method to rotate PDF on Windows, so don’t hesitate to try it out.
Any of them will work, and all you have to do is add your file, then download it locally on your PC and save it.
Since you no longer wonder if you can permanently rotate PDF Files and if you plan to work more with PDF files, we suggest using PDF to Word convertors since they might offer similar functionality.
In case you have additional questions or suggestions concerning PDF viewing, rotating, and editing, make sure to tell us in the comments section below.
This post will highlight key features that made it to Excel this past month. Here’s everything you need to know:
Excel for the web
First up is the added capability that allows users to check the source data for a PivotTable value cell thus allowing them to better understand how values in the table were calculated.
To access this feature, simply “Double-click or right-click and choose Show Details from a value cell in your PivotTable to create a new sheet with the detailed rows for that cell”. Microsoft has also incorporated a new button that lets you achieve the same from the PivotTable tab of the ribbon.
Excel for Windows
Microsoft has added a new capability that allows users to automate their tasks using the Power Automate tab. This feature lets users create and modify scripts that will in turn automate repetitive tasks using Office Scripts. What’s more, you can link apps like Microsoft Teams or SharePoint to build workflows with Power Automate.
Next up, is the Action Recorder which lets you automate repetitive worksheet tasks. Previously, users were heavily dependent on the Office Scripts Code Editor to create and modify automation using JavaScript and TypeScript.
And finally, you can check your formula with the new value preview tooltips by selecting any part of the formula that you want to review. Excel will automatically show you a tooltip that features the current value of the specific section you selected.
Excel for Mac
The Mac client is also getting the same features as the Windows client, that is, the Action Recorder feature, the capability to automate tasks using the Power Automate tab as well as the new value preview tooltips for formulas.
To get information on which features are available to you or find which version of Microsoft Excel you’re on, you can visit the Excel Features Flyer site. That’s it for the month of January folks! Be sure to also check out December’s recap post in case you missed it.
Since its release, Windows 11 has been praised for its functionality and innovative new features. There are many editing options available that help you create your perfect video.
One popular editing option available is cropping a video. Cropping a video allows you to zoom in on the section of the frame you want, or remove sections you don’t want to be included anymore.
What can I use to crop videos?
There is a multitude of available video editing software on the internet that you can choose from. Some come with Windows 11 built-in, such as Photos and Clipchamp.
Whether you work as a content creator or want to crop your home videos, you need to know your options. We will show you in this article the best methods for cropping a video in Windows 11.
How can I crop a video in Windows 11?
1. Use the built-in Video Editor
1. Press the Windows button on your taskbar to open the Start menu, then type in Video Editor.
2. When the app opens, click on New video project. You’ll be prompted to enter a name for the project. You can do this now or later.
3. Press on Add to import the videos you want to crop. You will be able to choose where to import them from this PC, from my collection, and from the web. You can choose one or more videos at once.
4. Drag the imported files to the Storyboard at the bottom of the App’s screen.
5. Now you can crop the video. To remove the black bars from it, you need to click on the frame-shaped icon.
If you want to change the video’s aspect ratio, you need to click on the three-dot icon in the top right corner of the screen and change it from 16:9 to 4:3.
6. Export the video to your computer or your preferred cloud service and save it.
If you simply need to crop out black bars from a video or change its aspect ratio, then the built-in Video Editor is the best choice.
It is a native video editor that comes along with the Windows 11 OS and is included in the Photos App. Windows Video Editor is free and easy to use, and you can create beautiful cropped videos within a few clicks using it.
For more advanced cropping, such as video frame cropping, you should check out the solutions below.
2. Through VLC Media Player
2.1. Crop a video for viewing
Open the Start menu and type VLC. In the preview for the official VLC Media Player page, click on the button Download now.
Install the App.
Launch VLC and click on Media, then on Open File. You will be able to choose the video clip you want to crop from your PC.
Click on Tools, then select Effects and Filters.
In the Adjustment and Effects box, select Video Effects and then Crop.
Input in the text boxes how many pixels you want to remove from the screen’s top, bottom, left, and right sides.
Preview the results.
If you wish to save the results, move on to the next guide.
2.2. Crop a video permanently
Launch VLC and click on Tools, then select Preferences.
Check the box All under Show Settings in the lower left corner of the screen to access Advanced Preferences.
Select Video, then Filters.
Click on Croppadd to access the cropping settings for the video.
Input the desired values for pixels you wish to crop out of the video in the input text boxes.
Save the file to your PC.
Another great free app that allows you to crop a video on Windows 11 is VLC Media Player. Although it is better known as a media player that can play videos, it has video editing features as well.
Moreover, VLC has two options: you can crop a video for viewing or you can crop it permanently.
Read more about this topic
3. Crop the video using Clipchamp
Open the Start menu and type Microsoft Store to search for the app.Click on the result.
Type clipchamp in the search box and press Enter. You will be directed to the Clipchamp app page.
Click on Get to download Clipchamp to your computer and open an account.
Log into the account with your credentials. You need to be logged in to use the app.
Click on Create a Video. The button is at the top right corner of the screen.
Press the + button on the left side of the screen. You will be able to select a video to load into the project from your computer or cloud services such as Google Drive.
Drag and drop the loaded video into the project’s timeline. It is situated on the right side of the screen.
Click the Crop icon and choose your desired setting. You can tweak the video’s aspect ratio or you can crop out a video frame. The aspect ratios you can choose from are 16:9, 9:16, 1:1, 4:5, 2:3, and 21:9.
After you are finished cropping the video, click on Export in the top right corner of the screen. You will need to select the desired video quality and display resolution.
Save the file to your computer or a cloud service after the exporting process is finished.
An excellent editing tool is Clipchamp, which will soon be available as an inbox App for Windows 11 users. Although it is not free to use all of its features, the free version comes in handy when it comes to cropping.
Clipchamp is a user-friendly platform that offers you a wide selection of editing options to choose from and is the most recommended for advanced editing.
The drawback when using Clipchamp to crop a video in Windows 11 is that the free basic subscription has limitations. You cannot export videos under a large resolution, for example.
What is the difference between trimming and cropping a video?
When it comes to editing a video, you can adjust multiple different things according to your desires. The terms trim and crop often come up and can sound similar, but they have different meanings and accomplish different goals.
Trimming a video means editing sections from it. For example, you can remove the last seconds of it and make it shorter.
On the other hand, cropping a video refers to focusing on a particular video frame by zooming in on it.
Another editing term is split. When you split a video, you divide it into two separate videos, which you can then edit separately.
You can opt out of complicated editing tools if you simply need to split or trim a video. The Photos App is your best choice in this matter. Aside from videos, you can crop images in Windows 11 using built-in tools or the apps mentioned in this article.
We hope the solutions in this article helped you edit your videos according to your needs and preferences.
You may have noticed that a specific program is running but not showing on the screen in Windows. This article has the solution for this issue and other relevant information.
It instantly becomes visible when you open an application on Windows 11 or any other version. However, sometimes, it may appear in the taskbar and the Task Manager but not on the screen.
If you are getting precisely the same problem, keep in mind that you are not alone. A lot of users have already been reporting this problem on various forums.
Why is a program running in the background but not appearing on screen?
If you see that the program is active in the taskbar as well as the task manager but is not visible on screen, it may be because of the following things:
Corrupted installation files: If the installation files of an app become corrupted, that app may not show up on the screen.
Windows problem: Some internal Windows bugs also may trigger this issue.
Incompatible app: An outdated and incompatible program may go through this type of issue.
Display issue: Incorrect display settings or other problems related to the display can cause this problem.
Third-party services: Third-party services are also responsible for this type of problem.
If you still encounter the same problem after doing the above things, go through these below-mentioned troubleshooting methods to fix the program running but not showing on the screen:
1. Restart Windows Explorer
Right-click on the taskbar and choose Task Manager.
Go to the Processes tab if its window is not there by default.
Right-click on Windows Explorer and choose Restart.
Now, try to open the problematic app and see if it helps.
2. Maximize from the taskbar
Press and hold Shift on the keyboard and right-click on the problematic program icon on the taskbar.
Choose Maximize.
It should bring the problematic app window to the screen. This method works great when a program opens in the taskbar but not on the screen of Windows 11.
3. Move the program manually
Press and hold the Shift button again and right-click on the problematic app on the taskbar like before.
Click on Move.
Use the arrow keys on the keyboard to move the app until it is visible to your screen.
One thing to remember is that the app icon must represent that the app is active but not appearing. Otherwise, the options mentioned above will not appear.
Press Win + I on the keyboard to open Windows Settings.
Go to System and click on Display.
Expand Multiple displays.
Uncheck Rember window locations based on monitor connection.
If it is a multimonitor setup, change the display to Show only on 1 or 2 or so on.
Restart your PC.
Verify if the problem has been solved or not.
Now, change back to your monitor settings.
Users who have multiple displays or have recently disconnected the second display may get this problem. They may see a program running but not visible in Windows 11.
It is because Windows may have remembered the X and Y coordinates of the app window, which is not accurate with the current situation. This method will help you in this type of situation.
5. Re-install the program
Go to Windows 11 Settings.
Go to Apps and click on Installed apps.
Click on the three vertical dots next to the problematic app and choose Uninstall.
Restart your PC.
Download the app from the official source.
Install it on your PC again.
6. Clean boot
Press Win + R on the keyboard to open Run.
Type the following command and Enter: msconfig
Go to the Services tab.
Click on Hide all Microsoft Services and click on Disable all.
Click on OK.
Restart your PC.
If a clean boot solves the problem, there is a problematic third-party service. Identify it and keep it disabled or remove the related software.
From now, you should no longer face Windows 11 apps open but not visible on the screen. However, if the problem persists, you can consider resetting Windows or doing a clean installation.
This article has explained what you should do when you face a program running but not showing on-screen or similar problems. If you have any questions or opinions, write them in the comment box.