Error Code 0x801901f4 on Xbox: 4 Quick Ways to Fix It

Some of our readers have recently reported that they encounter the Xbox error code 0x801901f4 when trying to update their Xbox consoles.

To fix this error, we have gathered some possible fixes that worked for other users and believe should work for you too. Also, these solutions are also applicable to the Xbox error 0x97e107df.

What causes the Xbox error code 0x801901f4?

If you do not know the reason behind the Xbox error code 0x801901f4, the following are some of the major factors responsible:

  • Connection problems – Whenever you come across the Xbox error code 0x801901f4, this might mean your console is experiencing connection issues to the Live servers.
  • Corrupt system update – If the Xbox error code 0x801901f4 is new on your system, there is a possibility that you have installed a corrupt update. Hence, it may fail to read profiles.

Now that you know some of the causes, we can go ahead and talk about how you can fix the problem.

How can I fix the error code 0x801901f4 in Xbox?

Before engaging in advanced troubleshooting steps, you should consider performing the following:

  • If the servers are down, the core services supporting the Xbox console won’t work. Go to the Xbox live status page and check for details on the status of Xbox features and functionality. Read our guide on Xbox Live networking service missing and ways to fix the problem.
  • Remove your Xbox profile.
  • Create a new Microsoft account.

Having confirmed the above checks, if the problem persists, you can explore the solutions provided below

1. Restart your Xbox Console

  1. Press the Xbox button on your controller to access the guide.
  2. Now, navigate to Profile & System and select Settings.
  3. Under General, click on Power mode & startup.
  4. Select Restart now.

On many occasions, restarting the console can temporarily solve issues. In that case, when you run into Xbox error code 0x801901f4, you can follow the above steps to perform a restart.

2. Update your console

  1. Press the Xbox button on your controller to access the guide.
  2. Now, navigate to Profile & System and select Settings.
  3. Click on System from the left pane menu, then tap on the Updates button from the right.

If there is any update available, you will be prompted to install it, then follow the onscreen instructions to complete the installation.

You can read about fixing the Xbox update error if you encounter such during the process.

3. Power Cycle your Xbox

  1. Press and hold the Xbox button on your console for about 10 seconds to turn off your console completely.
  2. Next, disconnect the power cable from your console for at least one minute.
  3. Plug the power cable back in and press the Xbox button to turn on your console.

If restarting your device doesn’t fix the problem, power cycling your Xbox console is another possible solution to apply as it sometimes helps solve systems update issues.

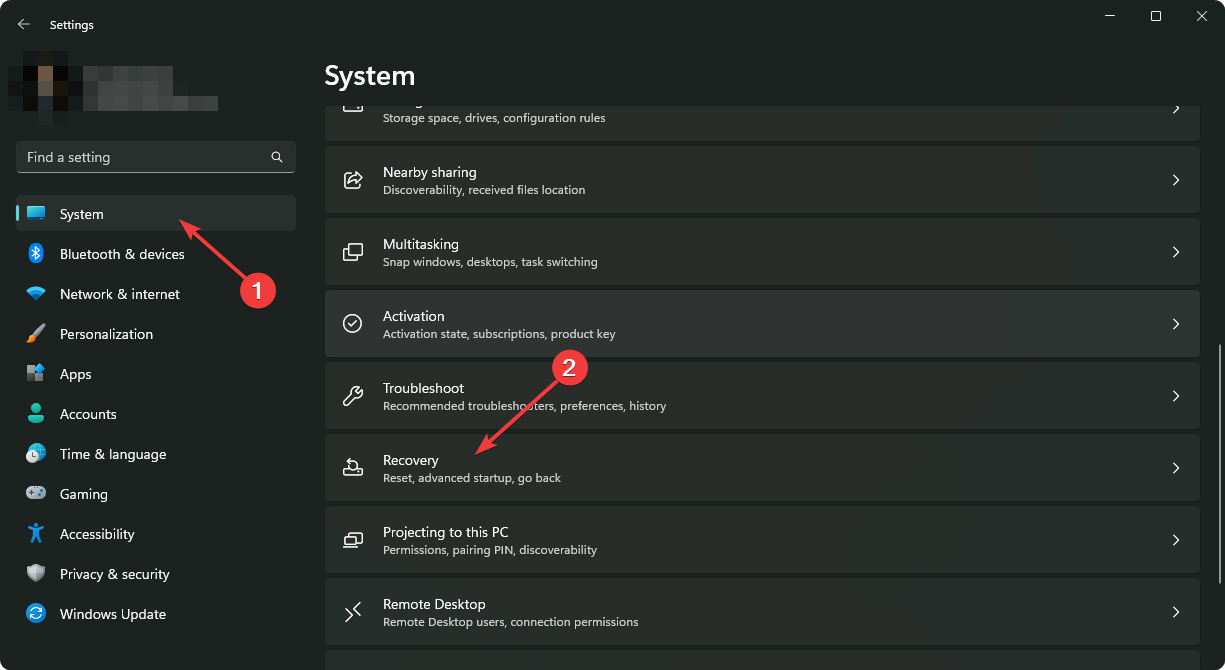
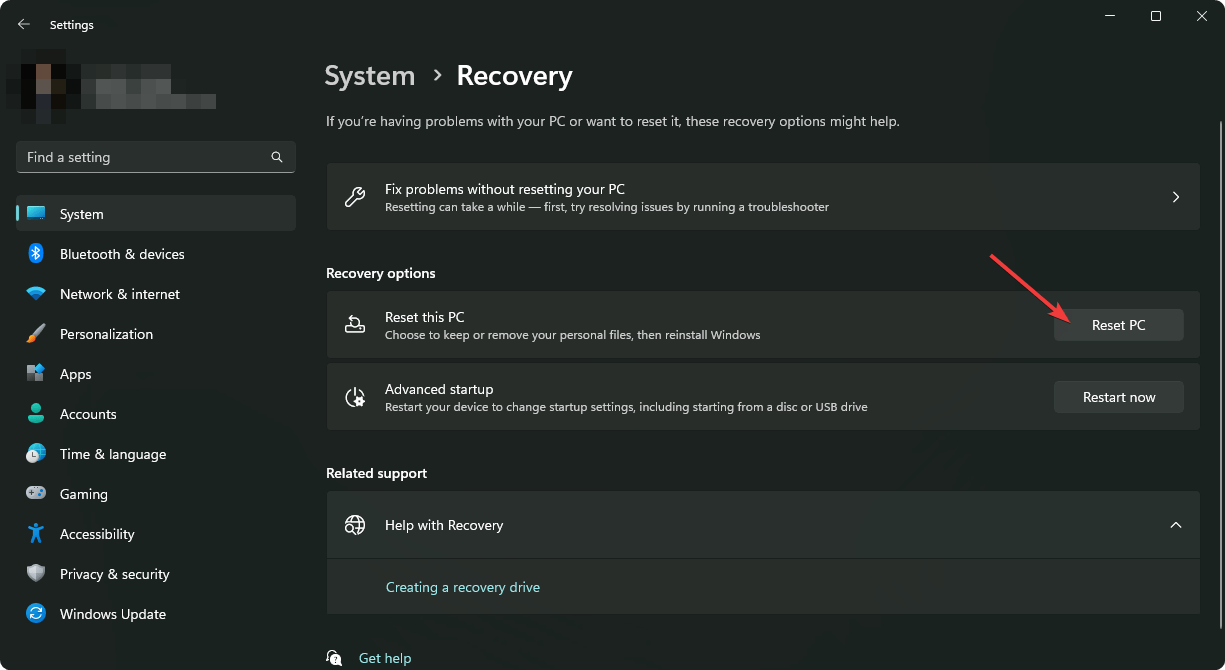
4. Reset your Xbox console

  1. Press the Xbox button on your controller to access the guide.
  2. Now, navigate to Profile & System and select Settings.
  3. Click on System to expand and choose Console info.
  4. Click on Reset Console.
  5. Then choose between Remove everything or Reset and keep my games & apps.

Removing everything will clear all data and games on the console, resetting it to the way it came. You can check how to fix the Xbox controller detected but not working if you can’t navigate with it.

Make sure you work your way through the provided fixes to know which will work for you.

If you have any questions or suggestions, do not hesitate to use the comments section below.

80070308: How to Fix This Windows Update Error

Is the Windows update process stuck due to an error code 80070308? This article is the place where you will get the most precise solutions.

Usually, Windows updates downloading and installation process should work smoothly. But, sometimes, it doesn’t happen due to some errors. This type of problem may occur in modern Windows 11, 10, and even in old Windows 7 systems. One of the most common issues is the error code 80070308.

Why does the update error 80070308 occur?

Usually, this type of problem occurs due to the following reasons:

  • Corrupted Update component: Windows maintains some components which are responsible for handling the update process. If some of these things get corrupted, you will encounter update errors.
  • Bad internet connection: Sometimes, a bad internet connection also can cause the update error 80070308.
  • Third-party Antivirus: Third-party AV programs are often responsible for creating unexpected Windows update-related problems.
  • Internal Windows problems: Some internal problems with Windows can also be why you are getting the update error.

How can I fix the Windows update error code 80070308?

Before trying out solutions, we recommend a few things. These are:

If, after doing these things, you are still getting the same Windows update error 80070308, go through these methods to fix your problem.

1. Run the Update troubleshooter

  1. Press Win + I on the keyboard to open Windows Settings.
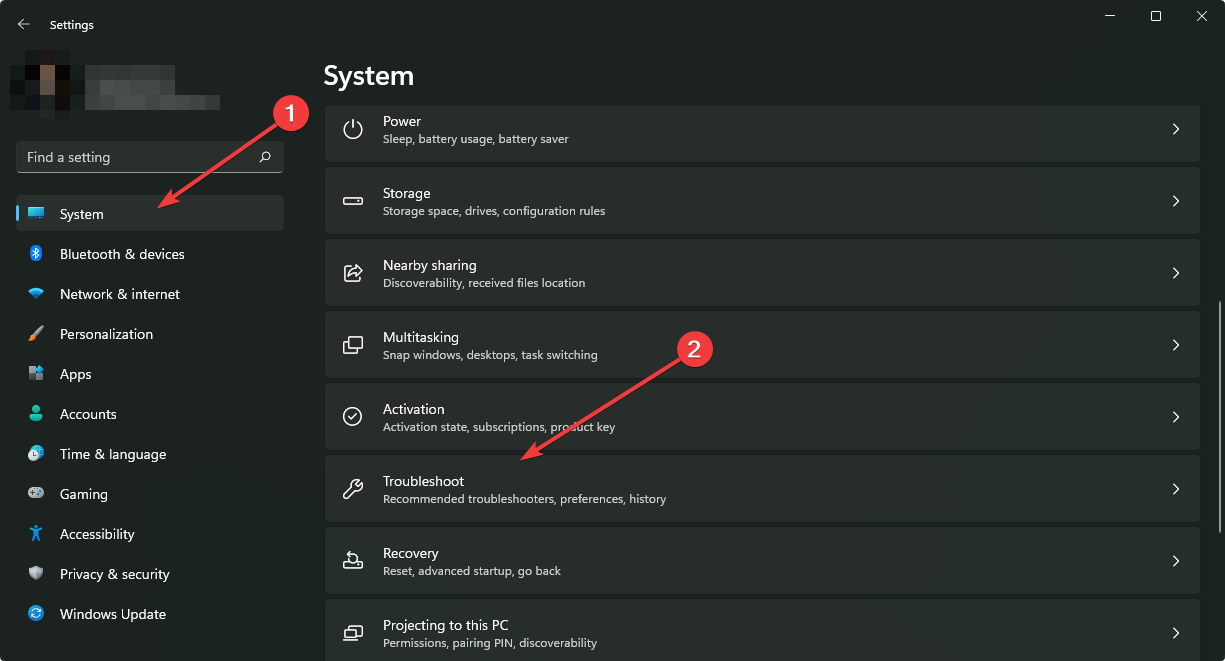
  2. Go to System and click on Troubleshoot.going system and troubleshoot windows 11 settings
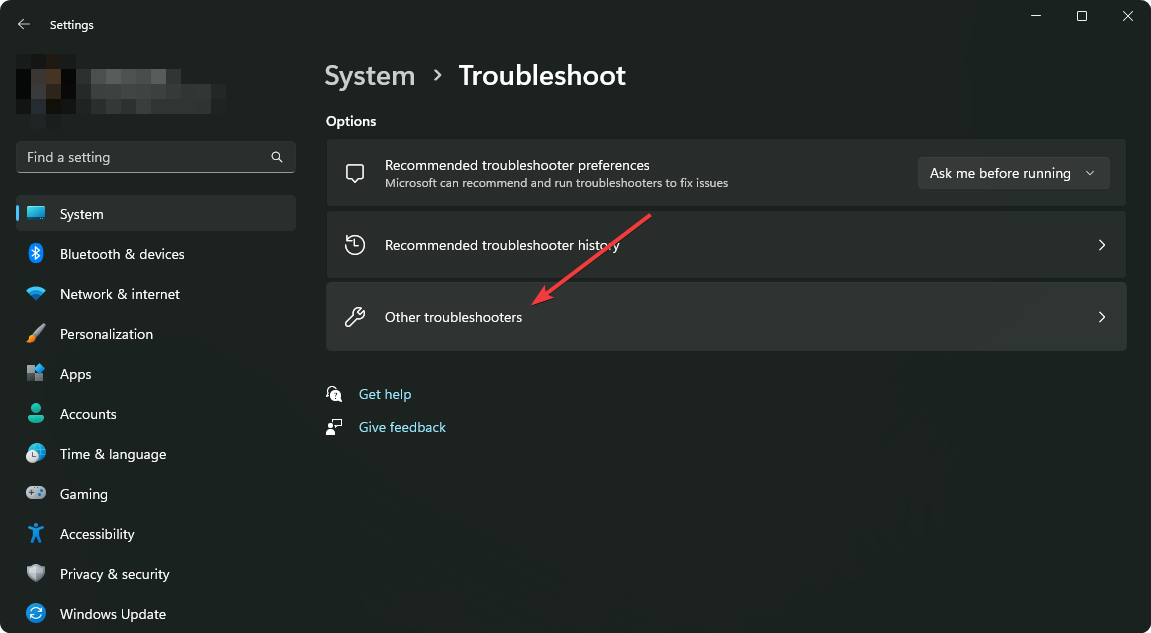
  3. Click on Other troubleshooters.going other troubleshooters win11
  4. Now, click on Run next to the Windows Update.running windows update troubleshooter windows 11
  5. Go ahead and complete any on-screen suggested steps.
  6. Restart your PC.

Troubleshooting is a ubiquitous way to solve update error code 80070308 on Windows. If you are using an old Windows OS, you will need to find the troubleshooting option on Control Panel.

2. Reset update component

  1. Open the Start Menu and type CMD.
  2. Right-click on Command Prompt and choose Run as Administrator.
  3. Run the following commands one by one: net stop wuauserv
    net stop cryptSvc
    net stop bits
    net stop msiserverrunning net stop cryptSvc cmd
  4. Now, navigate to the following location using File Explorer: C:\Windows\
  5. Find the SoftwareDistribution folder.software distribution folder windows
  6. Rename the Software Distribution folder to something like SoftwareDistribution.bak.
  7. Similarly, go to the following location: C:\Windows\System32
  8. Rename the Catroot2 folder.
  9. Now, run these commands: net start wuauserv
    start stop cryptSvc
    net start bits
    net start msiserver
  10. Restart your PC.

3. Repair .Net component

  1. Press Win + R to open Run.
  2. Type the following command and hit Enter: optionalfeaturesoptionalfeature windows run command
  3. Uncheck the .Net Framework-related services and click on OK.disabling dot net optional feature windows
  4. Restart your PC.
  5. Again, open the optional features Window and re-enable these services.
  6. Restart Windows again.

Often, resetting the .Net components solves update-related problems like update error 80070308. So, you can try it.

4. Try fixing using the registry

  1. Open the Start Menu, type Regedit, and hit Enter.
  2. Go to HKEY_LOCAL_MACHINE and expand Components.components hklm regedit windows
  3. Now, find the DWORD value called pendingrequired and delete it or rename it to something else like pendingrequired.bak.
  4. Restart your PC.

If you don’t find that DWORD value, skip this method and follow the next ones.

5. Update manually

  1. Go to the Windows Update Catalog page.
  2. Find and download the relevant update.downloading windows update manually from update catalog
  3. Install it on your PC.

In this way, you will be able to bypass the annoying Windows update error code 80070308. If you are facing this issue on Windows 7, learn how to download Windows 7 updates manually.

6. System Restore

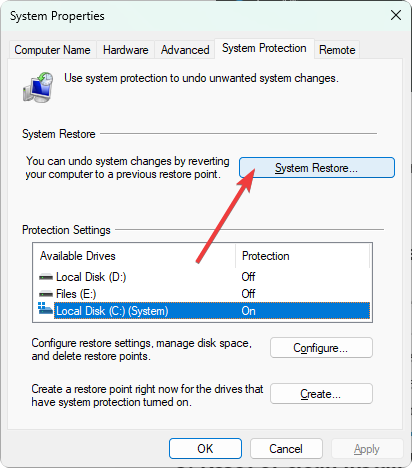
  1. Open the Start Menu, search for Create a restore point, and click on System Properties.
  2. Click on the System Restore.clicking system restore
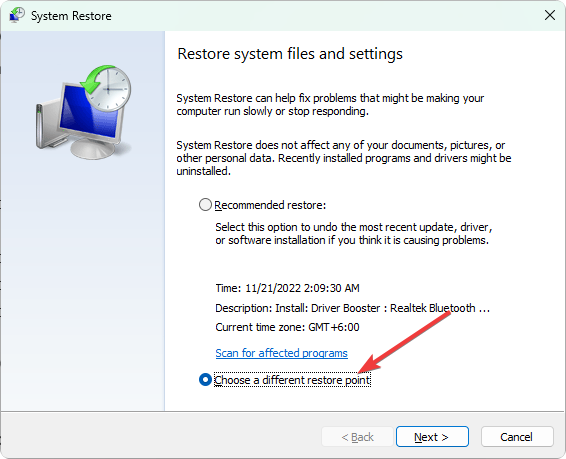
  3. Check the Choose a different restore point and click on Next.clicking-choose-a-different-restore-point
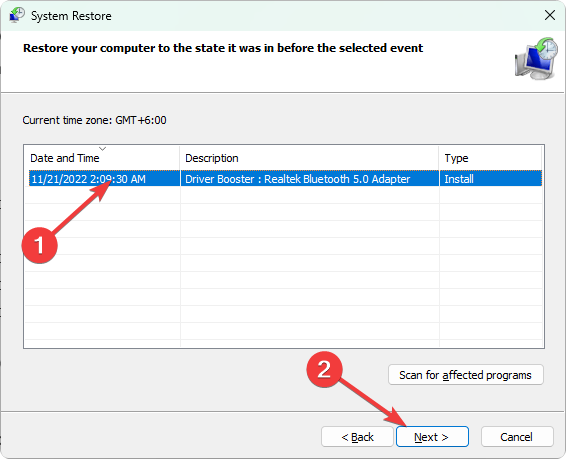
  4. Select the restore point and click on Next.choosing system restore point clicking next
  5. Click on Finish.
  6. Go ahead and follow the onscreen steps to complete the process.

If necessary, learn how to solve if the restore point is not working on Windows. Additionally, you also can take steps to repair corrupted Windows system files using SFC and DISM commands. It will help if any internal system file problems cause this update error.

Is the problem still bugging you? You can consider installing the latest Windows build manually using the media creation tool. If you are using Windows 7 or other old operating systems, We suggest you upgrade to the latest ones if your PC hardware can support it.

Microsoft has stopped supporting these operating systems. So, consider upgrading to Windows 11 or at least 10.

Is your Antivirus program the main culprit? You can switch to a different one, as you should not leave the system unprotected. We suggest you try any of these best Antivirus and Security programs.

This article has shown you how you can fix Windows update error code 80070308. Do you know any other method that can help others? You can let us know in the comment box.

0x80070001: Windows Can’t Install Required Files [Fix]

Sometimes, you may encounter an error message, Windows cannot install required files with an error code – 0x80070001.

This error may often arise after a Windows Update, or while performing a Windows backup and restore.

What causes error code 0x80070001?

Some of the reasons why you may come across the 0x80070001 error code on your Windows 11 are as below:

  • After a Windows update – It can be initiated by a problem with the Windows update components or malfunction in your system.
  • A Windows software not installed correctly or failed to install – When a Windows software is incorrectly installed or it did not install at all, you may see the 0x80070001 error.
  • Corrupted system files – It’s when the Windows system files are missing or corrupted, you can bump into this error.
  • Damaged programs and apps – When the programs and apps on the system are damaged, it can trigger the 0x80070001 error code.
  • Corrupted USB or DVD drive – Sometimes, you may see the error message if the installation media is damaged.

What does error code 0x80070001 mean?

If you see the age, Windows cannot install required files message with the error code – 0x80070001, which means, it’s an invalid function.

According to Microsoft, you often encounter this issue when you try to back up a specific library or when you accept the default settings in Windows Backup and Restore.

How do I fix error 0x80070001?

Before you try the primary troubleshooting methods below, here are a few checks you may want to perform:

If none of the above methods helps fix the issue, you can try the below workarounds to fix the 0x80070001 error.

1. Clear the Windows Update cache

  1. Press the Win + R shortcut keys, type services.msc in the search bar, and press Ctrl + Shift + Enter keys simultaneously to launch the elevated Services window.run services.msc command
  2. On the right, under the Names column, locate Windows Update. Right-click on it, then click Stop.stop windows update service
  3. Again, open the Run dialog by pressing the Win + R keys together.
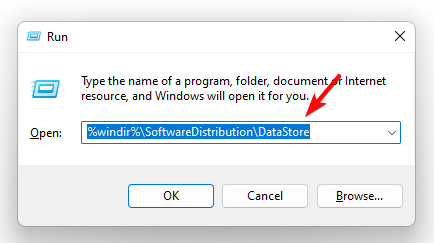
  4. Type this command and hit Enter: %windir%\SoftwareDistribution\DataStoreopen windws update download folder
  5. This will open Windows Update’s download folder. Select all the contents in this folder and hit Delete.delete contents in Windows Update’s download folder
  6. Now, press the Win + R keys again to launch the Run console, type services.msc, and hit Enter to open the Service manager window. run services.msc command
  7. On the right, under the list of services, look for Windows Update, right-click on it and select Start. start windows update service

You have successfully cleared the Windows update cache, and you should not see the 0x80070001 error code again.

2. Reset Winsock Library

  1. To open the Run dialog, press the Win + R keys together.
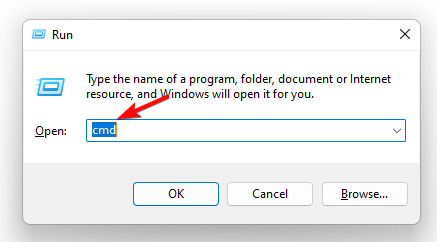
  2. Type cmd in the search bar, and press the Ctrl + Shift + Enter keys simultaneously to launch the elevated Command Prompt. run cmd command
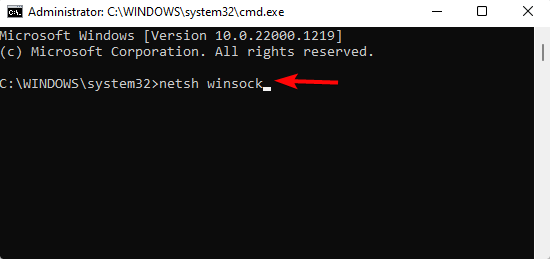
  3. Next, run the below command in the Command Prompt (Admin) and hit Enter: netsh winsockrun netsh winsock command

Once the command has been successfully executed, restart your PC and now check the status of your connection. The Windows Update service should be running fine without any errors.

3. Re-install the TCP/IP Stack Protocol

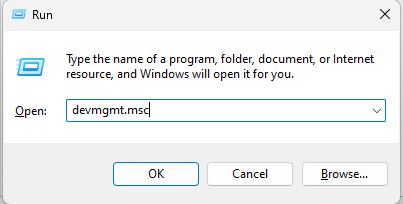
  1. Press the Win + R shortcut keys to open the Run dialog, type Device Manager, and hit Enter to open the Device Manager window. run dev mgmt.msc command
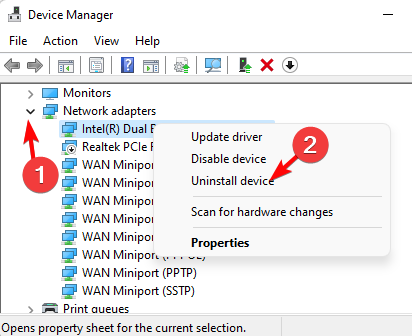
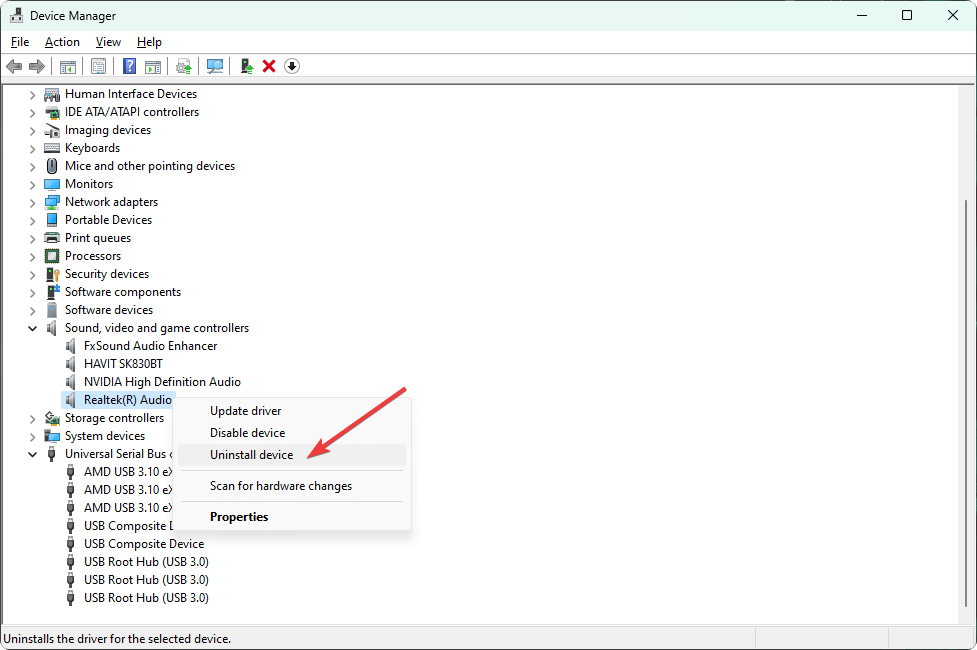
  2. Next, expand the Network adapters section, right-click on your adapter, and select Uninstall device.
  3. Press Uninstall again in the confirmation prompt to continue. uninstall netwlork adapter
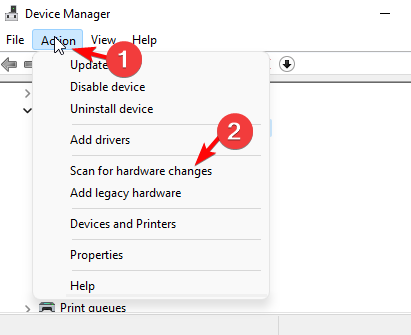
  4. Now, go to the Action tab in the toolbar, and select Scan for hardware changes. Windows will now scan for the latest version of the network adapter, and re-install the device automatically. Scan for hardware changes

Now, restart your PC and check if you still encounter the message, Windows cannot install required files with the error code – 0x80070001.

You can also repair and restore corrupted system files on your PC using the methods shown in our detailed guide, which is also applicable to Windows 11.

Alternatively, you can also disable the hibernation mode in Windows 11 to increase storage space.

You may also run the disk clean-up tool on Windows 11 to free up disk space and fix the 0x80070001 error.

If you have any other queries related to Windows 11 installation, do leave a message in the comments box below.

0x903f9008 Xbox Error Code: 4 Ways to Fix It

Error code 0x903f9008 on your Xbox might come up sometime when you try to start a game. This could be caused due to a server issue or a settings change. 

In this guide, we will walk through the steps to fix the issue right after discussing the cause of the error. Let’s started!

What causes the error code 0x903f9008 on Xbox?

There could be various reasons for this error. Some of the popular ones are listed below:

  • A glitch in the Xbox account – If your Xbox console is offline due to a server problem or a small setting issue. You need to check the internet connection.
  • The server is offline – If one of the Microsoft live servers are offline, this could cause the issue.

What can I do to fix error code 0x903f9008 on Xbox?

Before following the below-mentioned troubleshooting steps, please make sure you perform these fixes: 

  • Restart your Xbox.
  • Restart your router.
  • Check the Xbox Live servers’ status. You need to visit the Xbox status page, scroll through all the services listed on the page, and expand them if there are any alerts. Check the notifications, and don’t forget to sign in to get notified once the service is up and running.
  • Clear the system cache.
  • Log out from your Xbox account.

If these tricks didn’t work for you, try these methods one by one to resolve the issue and see if one of them works.

1. Make the console primary for your Xbox account

  1. Sign in through the account with the license for the game in question.
  2. Press the Xbox button on the controller to access the guide menu.Controller Xbox one
  3. Go to System, and click Settings.System - Settings Xbox -0x903f9008 xbox error code
  4. Select Personalization, and click My home Xbox.Personalization - 0x903f9008 xbox error code
  5. Now select the Make this my home Xbox option. Make this my home Xbox

2. Connect to Xbox Live

  1. Press and hold the Xbox button on the controller to get to the guide menu.Controller Xbox one
  2. Select System, and click Settings.
  3. Go to General, and select Network settings.General Network Settings
  4. Choose Setup wireless network.Set up wireless network
  5. Go to your wireless network from the available networks list.
  6. Enter the password for your wireless network.

3. Check your internet connection

  1. On the controller, press the Xbox button.Controller Xbox one
  2. Go to System, and click Settings.
  3. Select General, then click Network settings.General Network Settings
  4. Next, click Test network connection.Test network connection

4. Hard reset your Xbox

  1. Press and hold the console’s Xbox button for 10 seconds. Release the button once the console shuts down.Console button
  2. Remove the power cord from the console. Wait for three minutes, then plug it in.
  3. On the controller, press the Xbox button to restart your console and controller.

So, these are the methods you can follow to get rid of error code 0x903f9008 on your Xbox. Try them and let us know which worked for you in the comments section below.

Microsoft news recap: partners on Google Maps competitor, crypto mining banned on Microsoft’s online services, and more

Microsoft news recap is a weekly feature highlighting the top Microsoft news stories of the past week. Sit back, grab some coffee, and enjoy the read!

Microsoft partners with Amazon, Meta and The Linux Foundation on Google Maps competitor

Microsoft, Meta, Amazon Web Services, TomTom, and The Linux Foundation, are partnering to create an alternative to Google Maps and Apple Maps. The companies are to form the Overture Maps Foundation, aiming to create new apps based on open-source mapping solutions.

Google maps on a phone in hand

Microsoft bans crypto mining from its online services

As of December 1, Microsoft has restricted crypto mining on its online services, including Azure. Explaining the move, Microsoft says it’s to enhance the security of customers’ accounts.

Microsoft Logo On Building

Microsoft promises more gaming news soon after disappointing Games Awards presence

At the Game Awards 2022, big players in the gaming industry received awards and announced new games, but to the surprise of some, Microsoft wasn’t at the forefront of this. Now, the company has promised that there will be more gaming news coming soon.

Microsoft promises more gaming news soon after disappointing Games Awards presence - OnMSFT.com - December 12, 2022

GitHub releases AI powered Copilot for Business at $19/mo

GitHub’s AI-powered Copilot for Business has launched, for a price of $19/m per user. Copilot is described as being an AI pair programmer, with GitHub saying “Trained on billions of lines of code, GitHub Copilot turns natural language prompts into coding suggestions across dozens of languages.”

GitHub Copilot logo and background

That’s it for this week. We will be back next week with more Microsoft news.

FuboTV is not working on your device? Why and How to Fix this?

It can be frustrating if FuboTV encounters issues when you are watching your favorite TV show or sports. If your FuboTV is not working, it can be due to several reasons.

Streaming issues can occur due to server issues, unstable internet connection, temporary glitches, or hardware issues with the streaming device.

If you are also experiencing issues with your FuboTV service, here are a couple of troubleshooting tips to help you resolve the FuboTV not working problems with your streaming service.

Why is my Fubo not loading?

If Fubo is not loading, it means that there is a network error. First, check the servers to see if they are online, then go straight and check your internet connection to see if everything is in order.

This can also be caused by cached data that takes all the memory and will create issues such as when Fubo is not loading properly.

What do I do if my FuboTV is not working?

1.   Check for server issues

Sometimes the servers can be offline for short periods of time, so this issue shouldn’t last more than an hour.

  1. You can check the FuboTV status page to see if the service is experiencing any issues.
  2. Open the FuboTV status page.
  3. Check if the page displays any information about server issues.
  4. If everything is running smoothly, it should show the Game on! FuboTV is running smoothly message.
  5. However, if the page displays any issues, you can only wait till FuboTV fixes the problem and gets the service online.

2. Check your internet connection

FuboTV not working
  1. Make sure your internet connection is stable and working with other devices.
  2. Use any speed testing tools to check the internet speed.
  3. Try accessing the internet on other devices that you have to check internet connection stability.
  4. Restart the stream by changing to another channel and then back to the one you were having an issue with.
  5. If you are experiencing an issue with a streaming device like Roku or Apple TV, try accessing FuboTV on your computer to see if you are having the same issue.

While your internet is working fine, continue with our other solutions if order to solve the FuboTV not working issue.

3. Restart your streaming device or computer

FuboTV troubleshooting

A quick restart can make wonders. If the issue is just a glitch in on your system, a simple restart will do the trick.

  1. If the issue persists, try restarting your streaming device or computer.
  2. Follow your device manufacturer’s instructions to perform a power cycle or hard reset.
  3. Most streaming devices can be hard reset with a simple power off, followed by disconnecting and reconnecting the cables.

4. Restart your modem or WiFi Router

FuboTV not working
  1. Turn off your modem or WiFi router.
  2. Unplug the cables from the power outlet.
  3. Leave the device idle for a minute.
  4. Reconnect the cables and turn on the power supply.
  5. Reconnect to the modem and check for any improvements.

Restarting your modem or router will clear any data that is residual and can create problems making FuboTV not working.

5. Uninstall and reinstall the FuboTV app

FuboTV troubleshooting
  1. If the issue persists, try uninstalling and reinstalling the device.
  2. Refer to your device’s manual to uninstall apps from your device.
  3. You can reinstall the apps from the Apple Store, Play Store, or any other options available on your device.

Most of the issues with the FuboTV not working can be resolved with the common troubleshooting steps listed above. If you still experience the issue, contact FuboTV support.

Microphone is Not Working on Chromebook: 6 Ways to Fix It

If the microphone on your Chromebook is not working, it can be annoying and lead to delays in meetings and reaching deadlines. However, it can be fixed with some simple solutions.

In this guide, we will walk you through some popular fixes to resolve the issue after discussing the reasons behind the issue. 

What causes the microphone not to work on Chromebook?

There can be a lot of reasons for the issue. Some of the most popular ones are:

  • Denied permissions – If you have not provided permissions to an app or browser related to your microphone, you might face this issue. Please make sure you have provided the necessary access to resolve the issue.
  • Incorrect audio settings – This issue can occur if you select the wrong input source or your microphone is disabled from Chromebook Settings. Check your audio settings to ensure the microphone is on.
  • Faulty software – If the software that you are using a microphone for is not installed properly or has bugs, you might have to face the issue. Try another video conference app and check if the problem persists.
  •  Bugged updates – If there is a faulty ChromeOS update installed on your Chromebook, it might affect your microphone functionality.

What can I do if the microphone is not working on Chromebook?

Before diving into serious troubleshooting steps, make sure you perform these easy fixes: 

  • If using an external microphone, unplug and replug it.
  • Click on the right side of the System shelf, and click the Shut Down icon. Wait for a couple of minutes and turn on your Chromebook as usual.
  • Check the USB port is working.
  • Disconnect Bluetooth devices.
  • Use any other web conferencing app.

1. Check microphone settings from the System shelf

  1. Go to the notifications area located on the right side of the taskbar.
  2. Navigate to the volume slider and click the Audio settings arrow.Audio settings
  3. Under Input, check or adjust the microphone volume slider. The microphone is working if there will be a checkmark in a circle near the icon.Microphone settings 1

2. Reset Chromebook hardware

  1. Go to the System shelf bottom-right corner and click it.
  2. Click the Shut Down icon.Shutdown icon
  3. Press and hold the Refresh button and while pressing the button, press the Power button as well.Refresh
  4. When your Chromebook is turned on, release the Refresh button.

3. Troubleshoot Chrome

3.1 Remove extensions

  1. Launch Chrome browser.
  2. On the Toolbar, look for Extensions and click on it.
  3. Click Manage Extensions.Extensions 1
  4. On the Extensions page, go to any extension, and click Remove. Now check if this resolves your issue.Extensions 2
  5. If not, then try this with every extension and check whether it resolves the problem.

3.2 Delete cache

  1. Click on three dots from Toolbar and select Settings.Settings chrome
  2. Go to Privacy and security from the left pane and click Clear browsing data.Settings 2
  3. Put a checkmark beside Cache image and files & Cookies and other site data, then click Clear data.Clear data

3.3 Reset Chrome

  1. Open Settings on Chrome, and go to Reset and Cleanup.reset 1
  2. Click Restore settings to their original defaults.
  3. Click Reset Settings.Reset 2

3.4 Update Chrome

  1. Go to the Settings page of Chrome, then click About Chrome.Settings About chrome
  2. Click Check for updates. If there is an update, Chrome will install it and click Relaunch to finish.

4. Allow permission to access the microphone in Chrome

  1. Click on the three dots on the Toolbar, and select Settings.Settings chrome
  2. Go to Privacy and security, then click Site settings.Site settings
  3. Click Microphone.microphone
  4. Under default behavior, look for Sites automatically follow this setting when you visit them option; click on the radio button for Sites can ask to use your microphone.Microphone
  5. Also, check the Not allowed to use your microphone list to ensure the site on which you want to use the microphone is not mentioned.

5. Update your Chromebook

  1. Locate and click the Clock from the bottom right side of the System shelf. 
  2. On the extended menu, click Settings.Settings Chrome
  3. Go to About ChromeOS.
  4. Click on Check for updates.

6. Reset Chromebook with Powerwash

Tip icon Tip
Powerwash will set your device to its default factory settings. That means it will remove all your user accounts and make your device how it used to be when bought.
  1. Go to the System shelf and locate the Clock; click on it. Select Settings from the menu that appears.Settings
  2. Select Advanced to expand. Click Reset settings.
  3. Now click the Reset button.Reset Chromebook1
  4. Next, click the Restart button on the next window.Restart
  5. Follow the on-screen instructions to complete the Powerwash process.

So, these are some of the available fixes to resolve the microphone not working on the Chromebook issue. Try these methods individually, and let us know which worked for you in the comments section below.

4 Ways to Turn On or Off Live Caption on Windows 11

Live Captions is a new feature available in specific Windows 11 builds that converts the system’s audio to text-based transcriptions displayed on the screen.

This article provides some quick steps if you want to know how to enable or disable Live Caption on Windows 11. 

What is Live Caption?

Live Caption is a text-based transcription of the audio produced from a video file. The feature is pretty new to Windows 11, but it’s been around in earlier versions of Windows using Microsoft Teams phones. 

Live Captions help users better understand the audio by displaying a text-converted version of the audio on the screen. 

How do I turn on or off Live Captions on Windows 11?

Before proceeding to explore methods on how to turn on or off Live Caption on Windows 11, you should ensure the following:

  • Make sure you are running the latest Windows Update for Windows 11.
  • Follow the prompts to download language captions files if you’re using them for the first time.

After confirming the above, you can proceed to the steps provided below to learn how to turn on or off Live Caption on Windows 11.

1. Via the Quick Settings

  1. Press the Windows key + A to open Quick Settings and click on the Accessibility option.
  2. Click on the Live Captions toggle button to turn it On or Off.
  3. Press the Windows key + A to close Quick Settings.
  4. Play the video and check if the Live Captions is active.

This is one of the fastest ways to get the Live Captions activated in Windows 11. If Quick Settings isn’t functioning on your PC, we have a detailed guide on how to fix Windows 11’s Quick Settings. 

2. Use the Settings app

  1. Left-click the Start button and click on the Settings app.
  2. On the left side of the Window, click on Accessibility and select Captions under the Hearing category on the right pane.
  3. Click on the toggle button beside the Live Captions to turn if on or off.
  4. Close the Settings app and check if it’s working.

Should you want to use other features, you can check our guide to know the new changes in the Windows 11 Accessibility settings.

3. Use the keyboard shortcut

Another viable way is to use keyboard shortcuts to activate or remove the Live Captions in Windows 11.

Press the Windows + Ctrl + L keys simultaneously to launch Live Captions. Also, you can disable Live Captions if it was enabled. 

4. Use Task Manager

  1. Left-click the Start button, type task manager, and click Open.
  2. Click on either the Processes or Details tab. Select Live Captions or Livecaptions.exe, and click on End task at the top of the Window.

This method only works when you wish to disable Live Captions. Here is a detailed guide on some of the best ways to open Task Manager in Windows 11. 

How many languages are supported in Live Captions?

Since this is a new feature on Windows 11, only the English language(US) is actively supported. Also, you have to download the necessary files needed to use Live Captions first before it can work on your PC.

Live Captions remain one of the best features on Windows 11. If you run Windows 11, this is one feature you’d love to keep on as it provides a better understanding of the system audio.

Toggling this feature on or off requires little to no technical know-how; if you follow through with our guide, you should get Live Captions up and running in no time. 

If you have any suggestions or questions on this guide, please leave them in the comments section below.

Event ID 1002: How to Fix This Application Hang Error

Event ID 1002 is an error that occurs when an app just sort of hangs there. It doesn’t do anything, nor does it register any interaction before suddenly crashing.

This is actually a pretty common problem, and it can affect a wide variety of apps like Microsoft Outlook. And because it’s so common, there are a ton of fixes with this guide focusing on the best ones.

What causes Event ID 1002 to appear?

Before going into the weeds of the solutions, it’s important we break down what actually causes the problem in the first place.

Because Event ID 1002 is such a generic error, it’s pretty difficult to pin it down to exactly one. However, here are the likely culprits:

  • Your computer is infected with malware: Fixing this will require you to use antivirus software, but the question is, which one? There are six particular antivirus tools, such as TotalAV, which reign supreme.
  • Something on your Windows machine is corrupt: The problem either be corrupt files or an entire directory. Regardless of what it is, there are tools you can install to clean up your PC.
  • Windows Firewall may be interrupting the process: If an app comes from a third-party source, your firewall may think it’s not legit. We recommend giving the app firewall permissions to bypass this.

How can I fix and stop Event ID 1002 from appearing?

There are a handful of things you can do before diving into the more complex solutions. This first batch can honestly be all done in a few seconds; several minutes at most:

  • Restart your computer. This is the tried and true method of fixing the vast majority of problems on any Windows machine. Try this out and see if the problem is gone. Take immediate action if your PC is stuck on restarting.
  • Disable your antivirus. As important as having an antivirus app is, it’s been reported that it can actually interrupt important processes.
  • Reinstall the offending app. If there’s one particular app that’s constantly hanging, something may have gotten corrupted during the initial installation.

1. Adjust virtual memory in the Settings menu

  1. Open the Control Panel and click System. Make the View By entry in the upper-right corner set to Large Icons.
  2. In the new window that appears, take note of how much RAM you have installed on your computer. In this case, it’s 16 GB (16,000 MB).
  3. Click Advanced system settings under Device Specifications.
  4. Go to the Advanced tab, then click Settings under Performance.
  5. Go to the Advanced tab in this new window, then click the Change button under Virtual Memory.
  6. In this new window, deselect the box next to Automatically manage paging file size for all drives in if it’s enabled.
  7. Click Custom size. You will now have to enter the megabyte amount for the paging file.
  8. Enter the amount of RAM you have times 1.5 in Initial Size. In this example, it’s 24,000MB.
  9. For Maximum, enter triple the amount of RAM.
  10. Click OK, then restart your computer.

2. Run ipconfig commands in the Command Prompt

  1. Bring up the Command Prompt on Windows Search and select Run as administrator.
  2. Type in the following commands, and after each one, press Enter: ipconfig /release ipconfig /renew

This particular solution is mainly meant for DHCP-enabled computers. You can still use it on other types of machines to see if that works.

3. Run SFC and DISM commands to clean up

  1. Open Command Prompt again and run it with the same administrator permissions as before.
  2. Type the following commands, and after each one, press Enter: DISM /Online /Cleanup-Image /CheckHealth DISM /Online /Clean-Image /ScanHealth DISM /Online /Cleanup-Image /RestoreHealth
  3. Once done, enter the following command to finish up: sfc /scannow

Another great method is to run this scan using a third-party tool that specializes in system file checking.

4. Disable Add-ins on Outlook

  1. Open Outlook and click File in the upper-left corner.
  2. Click Options in the bottom left.
  3. In the Outlook Options window, click Add-ins on the left.
  4. Click the Go button next to the Manage section.
  5. Highlight one of the Add-ins and select Remove on the right.

Microsoft Outlook gets a specific solution to itself because it’s known to commonly have the hanging problem, and the other fixes don’t always work. We also recommend reinstalling Outlook.

What are other Windows 11 Event IDs and how can I fix them?

Windows 11 has a variety of Event IDs for specific errors. One of which is Event ID 1000, which is very to 1002 because of its generic nature.

It appears whenever apps crash, but it’s exactly what causes it. Either way, we recommend scanning the registry and reinstalling the Microsoft NET Framework to fix this problem.

Then there’s Event ID 7023, which is caused by the Connected Devices Service terminating and causing a system crash. You can run an SFC scan, as seen in this guide, or perform a clean boot to address this.

Feel free to comment below if you have questions about other Windows 11 errors. Also, leave comments about guides you’d like to see information on other Windows 11 Event IDs or features.

No Sound After Sleep Mode: Enable It With These 3 Solutions

You have found this guide because you are experiencing no sound after sleep mode on your Windows 10 PC. Let us show you how to resolve it.

Sound issues aren’t exactly an alien concept on the Windows platform, which also applies to the Windows 10 operating system. And a common problem experienced on Windows 10 PCs is the device going dumb each time it wakes up from sleep.

Curiously, the sound issue is non-existent when the device returns from hibernation or after a restart. Somehow it is only when the device is out of the sleep cycle that it tends to lose its audio abilities.

All of this makes it not too big of an issue, but one that can drive you nuts nonetheless; more so if you are a music buff and can’t resume your listening post-sleep mode.

Why is there no sound after Sleep Mode?

From what we gather from users who have passed through this problem, a few things may trigger this issue. At the top of these are the following:

  • Outdated drivers – In most cases, this may be the case if the audio driver is outdated.
  • Hardware problems – In some instances, this may be a sign of issues with your computer speakers.
  • Problems with settings – Windows sound enhancement settings, for example, may trigger this problem. You should ensure that you have the best settings for all audio devices.

Here are some practical solutions, and they will also come in handy if the sound stops working after sleep mode, your HDMI audio stops working after sleep, or with brands like Dell, LG, HP, etc.

How can I fix no sound on Windows 10 after sleep mode?

Before you try any of these solutions:

  • Try restarting the device. A restart will force problematic processes to stop and could fix the problem.
  • You may also sign out of the account and sign back in. But if any of these do not work, go through these fixes.

1. Update the audio adapter

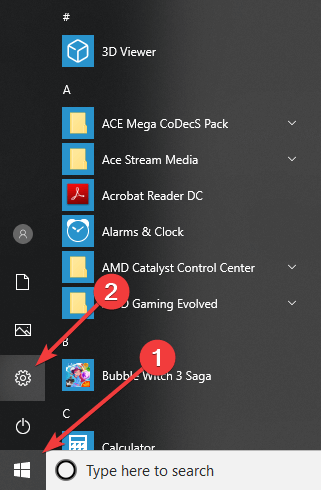
  1. In the Search box, type Device Manager and click on the app.
    no sound after sleep mode
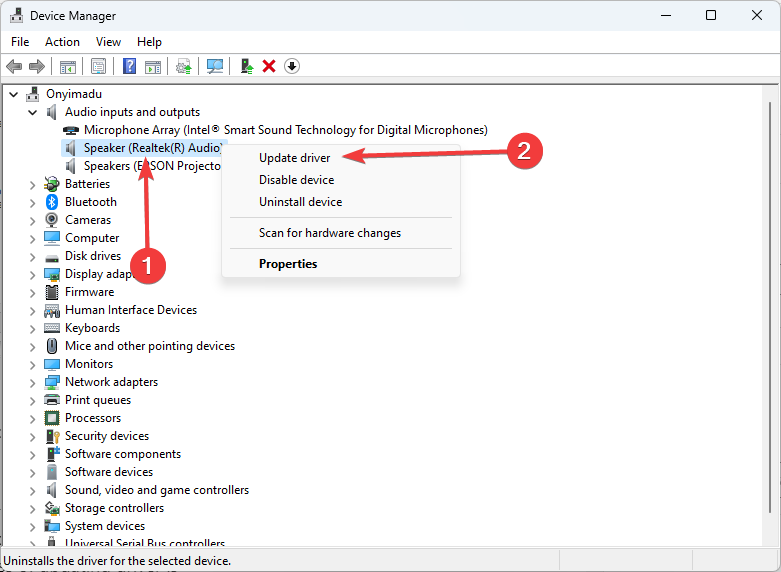
  2. From the list, click on Audio inputs and outputs.
  3. Right-click on the audio driver and hit Update Driver.
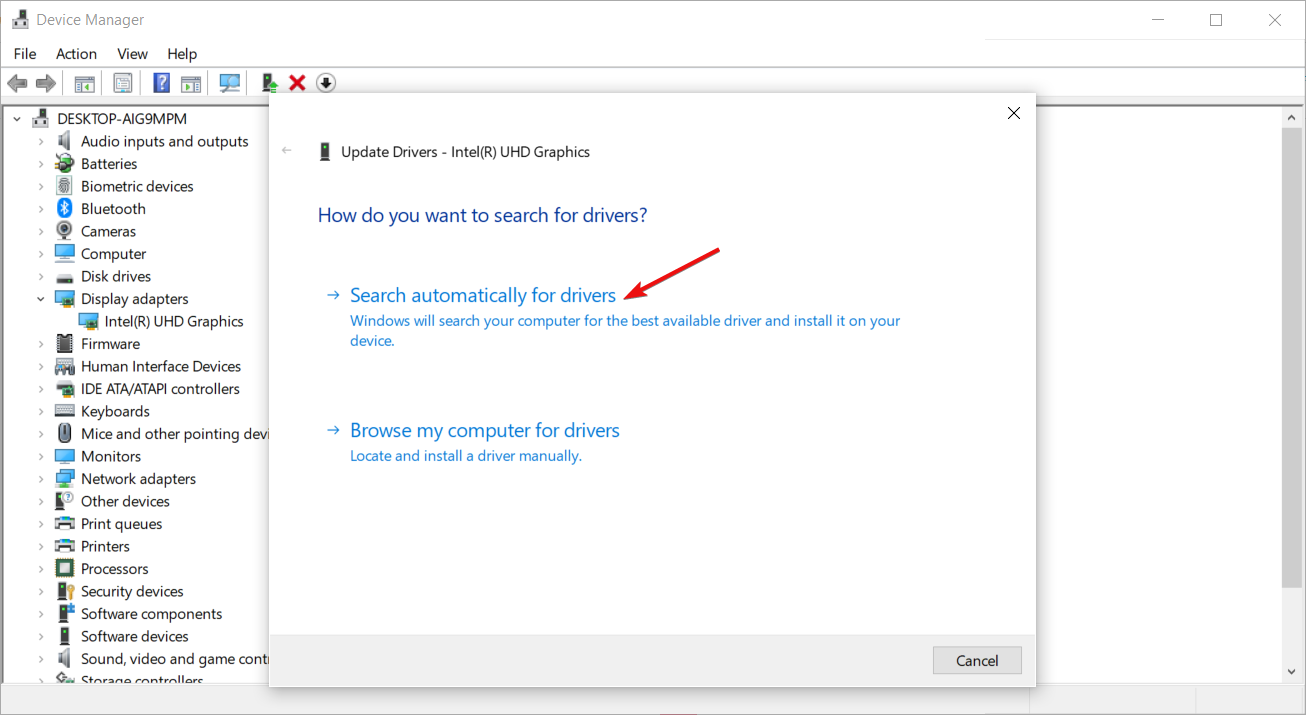
  4. Select Search automatically for drivers.

If you’re looking for a way to simplify the process, a third-party driver updater like Outbyte Driver Updater should do the trick.

All you need to do is run it, and it will instantly start scanning your PC for outdated, broken, or even missing drivers.

Once you’ve selected which drivers you want to fix, it will download and automatically install them for you.

Once that is done, you must finish it with a system restart to apply the changes.

See if this works. An outdated or corrupted driver is the most likely cause for your audio to malfunction, so explore all options to ensure your system is running the latest drivers.

Outbyte Driver Updater

Fix your drivers easily and locate the latest updates with the Outbyte Driver Updater software.
Free Trial Download now

2. Run the Sound troubleshooter

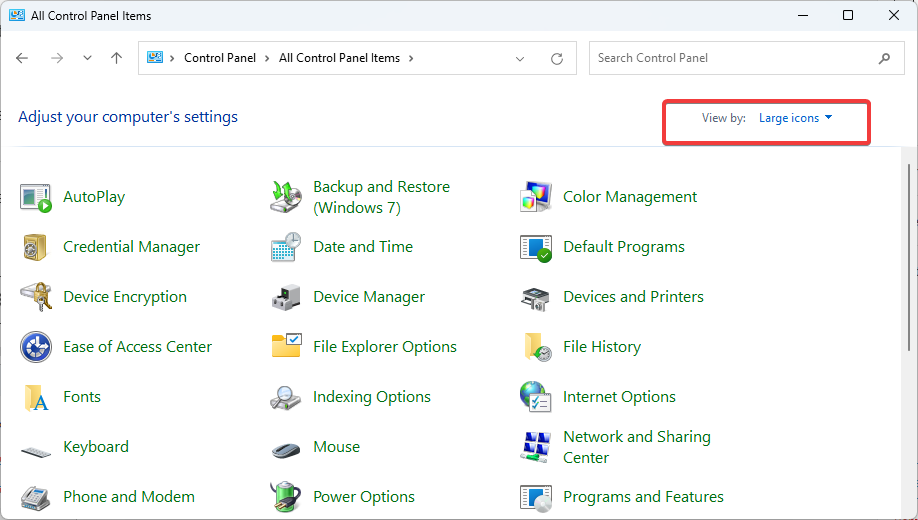
  1. Press Windows + R, type control panel, and hit Enter.
    no sound after sleep mode
  2. Change the View by option to Large icons.
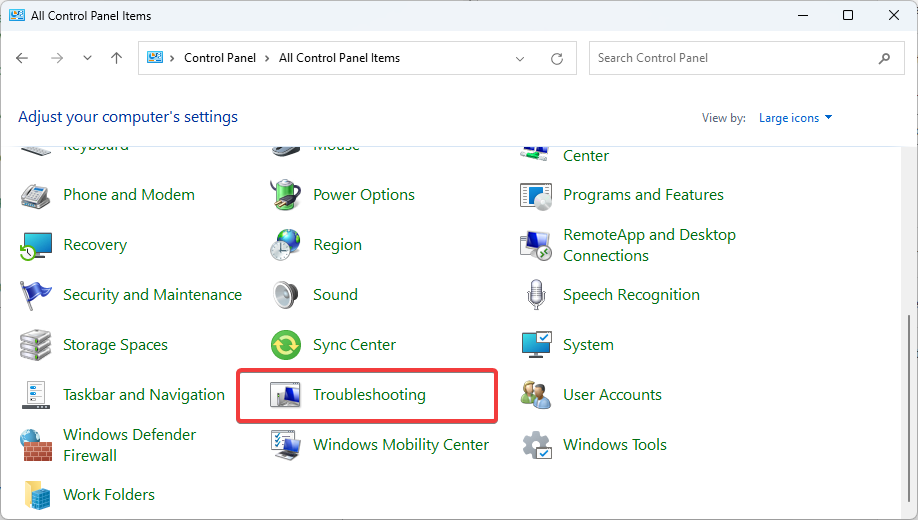
  3. Click on the Troubleshooting option.
  4. Select View all on the left pane.
    no sound after sleep mode
  5. Click the Playing audio troubleshooter.
  6. Now, click Next and follow the recommendations.

3. Change system memory value

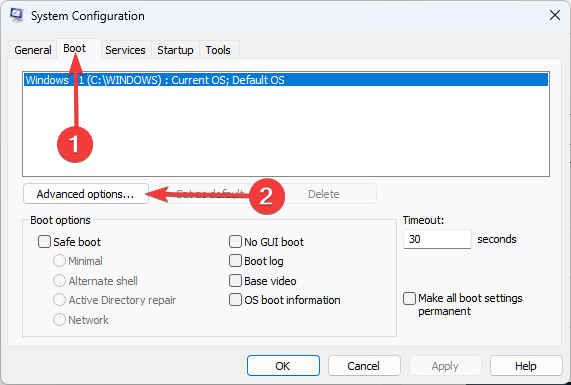
  1. Press Windows + R, type msconfig, and hit Enter.
  2. In the System Configuration window, select Boot tab followed by Advanced options...
    no sound after sleep mode
  3. Check Maximum memory and set the value at 3072.
  4. Click OK to close all open windows, including the System Configuration
  5. Restart your PC, and the audio should be back.

This is especially applicable to those notebook devices that have an installed memory of 4 GB.

However, if the issue isn’t resolved, you might also want to check if a Windows 10 update is available. Do a virus scan as well as with the latest version of your antivirus software.

Get in touch with the audio component manufacturer and see if they can provide an update to solve the issue.

Let us know in the comments below what worked for you.

Mouse Settings Keep Resetting on Windows 10: 4 Fixes to Use

If your mouse settings keep resetting in Windows 10, we have prepared all you need to know. A good wired mouse, a wireless mouse, or even a touchpad can be enough to make your life easier. But what do you do when your mouse is not correctly set up?

Many users report that they changed the mouse settings to fit their needs, and after a PC restart or a Windows 10 update, those settings reverted.

This common issue is well-known by Microsoft and is addressed in every new update. However, you’ll have to do it yourself when the problem doesn’t solve itself through an update.

Why do mouse settings keep resetting on Windows 10?

We gather that a few elements can trigger the problem from users who have registered this problem. Here are some that you should take note of:

  • Outdated drivers – Drivers are essential to linking hardware with software, but when outdated, you may expect some issues.
  • Outdated OS – If the Windows on your PC is old, it may conflict with other drivers and OS modules, which might result in the mouse settings being reset again.

While this is not a comprehensive list, it makes up the built-up of causes. However, the solutions we suggest will help if the mouse settings reset by themselves on Windows 10, if they won’t save, or if Windows 10 mouse settings reset on every login.

What can I do if mouse settings keep resetting on Windows 10?

1. Run Windows troubleshooter

  1. Go to Start and select the Settings app.
    start settings mouse settings reset
  2. In the Settings window, choose Update & Security.mouse settings reset update & security
  3. Click on Troubleshoot.mouse settings keep resetting windows 10
  4. A list of options will appear. Choose one depending on your mouse connection (wired/wireless/Bluetooth).
  5. Run the troubleshooter and check if the problem was solved.

In many instances, the mouse drivers could be partially installed or defective. To solve these kinds of problems, you can run Windows’ troubleshooter.

2. Update the mouse drivers

  1. In the Search box, type Device Manager and click on the app.
    device manager windows 10 mouse settings reset
  2. From the list, click on Mice and other pointing devices.mice and other pointing devices mouse reset windows 10
  3. Right-click on the mouse driver and hit Update Driver.update driver mouse settings reset
  4. Select Search automatically for drivers.
    mouse settings keep resetting windows 10
  5. Wait for the process to finish and restart your PC.

Furthermore, you can uninstall the drivers, disconnect the mouse, restart your PC, reconnect the mouse, and wait for Windows to reinstall the proper drivers.

If that does not work, we recommend trying Fortect Driver Updater. This is a specialized tool that will scan your PC and update any missing or outdated drivers. This software also allows you to set up scheduled scans so you can be sure your drivers are always updated.

⇒ Fortect Driver Updater

3. Use Registry Editor

  1. Press Windows + R, type regedit, and hit Enter.
  2. In the Registry Editor, navigate to the path below:
    Computer\HKEY_LOCAL_MACHINE\SOFTWARE\Synaptics\SynTP\Install
  3. You will find a key called DeleteUserSettingsOnUpgrade. Double-click it and change its value to 0.
  4. Close the Registry Editor, go to the mouse setting, and change them how you see fit.
  5. Finally, restart your computer.

If you have Synaptics drivers, this solution will work for you, as it worked for many users.

Modifying registry keys can be a bit complicated and cause problems, so be sure to change the keys as stated in the guide.

4. Perform a clean boot

  1. Press Windows + R, type msconfig, and hit Enter.msconfig mouse settings reset
  2. The System Configuration window will appear. Select the Services tab. Check Hide all Microsoft services and then click Disable all.system configuration mouse reset windows 10
  3. Go to the Startup tab and click on Open Task Manager.task manager mouse settings reset by itself
  4. In the Task Manager, Disable each startup item.startup task manager mouse settings reset
  5. Restart your PC.

Windows uses only a minimum number of drivers and startup programs in the Clean Boot state. Doing this lets you identify if any third-party applications or startup items are causing the problem.

Note that the previously detailed solutions also work if you encounter the following errors:

  • Mouse pointer speed keeps resetting in Windows 10 – Many users describe how mouse options reset every time they restart or turn off the PC. In such a case, you’re entitled to suspect a driver issue or hardware conflict.
  • Mouse DPI keeps resetting – Mouse DPI continuously resetting is also a common bug. If you have Synaptics drivers, changing their settings in the registry often does wonders.

We hope that these solutions worked for you. Additionally, you can try some quick common fixes like checking the mouse hardware and changing the USB connection port.

Installing the latest updates for Windows 10 could help you out this time too.

If you have questions regarding the process or don’t understand a specific step, please post in the comments section below.

Slui 4 Not Working? Here’s How to Fix It

If Slui 4 isn’t working and you are getting an error on your screen when you try to activate your copy of Windows, it could be because you have an invalid license key. Recent hardware changes can also be at fault.

To put an end to these errors, follow the step-by-step instructions below.

What can I do if Slui 4 is not working in Windows?

To start with, try restarting your PC. Then, ensure your time settings are correct and that you’re using an account with admin rights to activate your copy of Windows. If activation still fails, follow the steps below.

1. Enter the OEM license

  1. Hit the Windows key, type cmd in the search bar, and select Run as administrator.cmd-run-admin-w11 unexpected kernel mode trap windows 11
  2. Type and Enter the following command to find your original Product key: wmic path SoftwareLicensingService get OA3xOriginalProductKey 
  3. Now go back to Settings.
  4. Select System and click on Activation.
  5. Click on Change Product key and enter the code on 2 above.Change product key

2. Run DISM and SFC scans

  1. Hit the Windows key, type cmd in the search bar, and select Run as administrator.cmd-run-admin-w11 unexpected kernel mode trap windows 11
  2. Enter the following command: DISM.exe /Online /Restorehealth 
  3. Allow for the command to be executed then type in the next one: sfc /scannow

This tool scans your system files and replaces any corrupt file with a good one if found on your PC.

Another reliable option is to use a specialized repair tool that helps you scan your computer for malfunctioning files and replace them immediately with healthy parts.

3. Use the automated Telephone system

  1. Press Windows + R to open the Run window.
  2. Type slui 4 and hit Enter.
  3. In the Select your region window, select the country and click Next.
  4. Call one of the numbers displayed on the screen to get a Confirmation ID.
  5. Once you get the confirmation ID, enter it and click Activate Windows.

Ensure that you have administrative privileges in order to access the Command Prompt. While you can get away with running a number of commands without administrative privileges, some, like the Slui command, require administrative privileges to be able to run this command line utility.

4. Access online activation from CMD

  1. Type command prompt in the search bar and select Run as administrator.run cmd as admin
  2. Enter the following command: slmgr /ato and press Enter.
  3. When the process is complete, you’ll get a confirmation prompt:product activated successfully

You can apply similar steps if Slui 4 is not working in Windows 7, 10, and 11. If Slui 4 cannot activate by phone or none of these solutions work, resetting Windows can help in resolving this issue.

You can even create a system restore point before resetting Windows. This will help you in restoring your system back in case something goes wrong during the resetting process.

Slui 4 may not work when your internet connection is unstable, the product key is invalid or locked, or even when you have a damaged or corrupt hard drive.

Remember that if you make hardware changes to your PC, you may have to reactivate your copy of Windows.

We may also be able to help if your copy of Windows suddenly lost activation, so be sure to visit our guide on how to bypass this issue.

For any additional thoughts on this topic, feel free to drop us a comment down below.

Windows Update Service Not Running [SOLVED]

As a veteran Windows user, I can assure you that Windows updates are important for the smooth running and security of your PC. However, there are times when the Windows update won’t work and delivers a prompt saying that the service is not running.

The full error message states: Windows Update cannot currently check for updates, because the service is not running. You may need to restart your computer.

This can prevent you from installing important updates and make your PC vulnerable. Fortunately, as I have also dealt with this issue before, I can help you with a few tips and tricks that I have learned over the years.

How can I fix the Windows Update service not running issue?

Before exploring the sophisticated fixes in this section to make the Windows Update service run, below are some general troubleshooting steps you should try:

  • Restart your PC. Read our guide to learn what you can do if Windows won’t restart.
  • Disable or remove the third-party antivirus software.

1. Run the Windows update troubleshooter

  1. Press the Windows key + I to open the Settings app, and select Update & Security.
    update and - windows update service not running
  2. Select Troubleshoot in the left pane and click Additional troubleshooters.
    troubleshoot windows update service not running
  3. Now, select Windows Update and click Run the troubleshooter.
    run trouble windows update service not running
  4. Finally, apply any recommended troubleshooting steps.

The Windows Update troubleshooter is one of the best tools for fixing update issues, including the service not running error. After running the troubleshooter, try checking and installing updates again.

2. Disable or remove problematic services

2.1. Enable Clean boot

  1. Press the Windows key + R, type msconfig, and click OK.
    msconfig
  2. Click the Services tab at the top, check the Hide all Microsoft services box, and click Disable all.
    services windows update service not running
  3. Now, choose the Startup tab at the top and click Open Task Manager.
    startup task
  4. Right-click each service there and select the Disable option.
    disable
  5. Go back to the System Configuration window, click the Apply button, followed by OK, and restart your PC.
    apply windows update service not running
  6. Now, press the Windows key + R, type service.msc, and click OK.
    services
  7. Double-click the Windows Update service to open its properties.
    option
  8. Finally, set its Startup type to Automatic, choose the Start option, and click the Apply button, followed by OK.
    start windows update service not running

The first step to disabling any problematic app or process that could be causing the Windows update service not running issue is to clean boot your PC. If the issue is fixed after restarting your PC, you need to find the service or app that could be causing the problem.

You can do this by enabling the disabled services in batches. One service that users have found to cause this issue is the StopUpdates10Guard service. Below are the steps to follow to disable or remove it.

2.2. Disable or remove faulty service

  1. Press the Windows key + R, type services, and click OK.
    services
  2. Double-click the StopUpdates10Guard service to open its properties.
  3. Now, set its Startup type to Disabled and click the Stop button.
  4. From here, click the Apply button, followed by OK.
    stopupdate windows update service not running
  5. To remove the service completely, download the Autorun tool.
    download
  6. Unzip the file, right-click the Autorun 64-bit (for 64-bit system) option, and select Run as administrator.
    run autorun windows update service not running
  7. Finally, look for any reference to the StopUpdates10Guard service, right-click it, and select Delete.

With this, you should be able to fix the Windows update service not running issue.

3. Clear the update cache

  1. Press the Windows key + R, type services.msc, and click OK.
    services
  2. Right-click the Background Intelligence Transfer Service and select the Stop option.
    stop background windows update service not running
  3. Now, right-click on Windows Update and then click Stop.
    stop
  4. Press the Windows key + E to open File Explorer and navigate to the path below: C:/Windows/SoftwareDistributionsoftware distribution
  5. Now, delete the contents of the SoftwareDistribution folder.
  6. Finally, go back to the Services app, right-click the BITS and Windows Update services, and select Start.
    start option

Restart your PC after applying the steps above. You can now check if you are still getting the Windows service not running error.

Why is the Windows Update service stopped?

Below are some of the factors that can cause the Windows update service not running error:

  • Faulty apps and services: One of the main causes of Windows could not start the Windows Update service on the Local Computer prompt is problematic apps. In some cases, it might be your third-party antivirus or service that is running in the background. The solution is to disable or remove the program using one of the best uninstaller software.
  • Corrupt update cache: If you get the Access denied prompt while trying to install a Windows update or restart the service, it might be down to a corrupt cache. You need to clear the update cache and restart the needed services again to fix this.

With this, we have come to the end of this guide. You now have everything to fix the Windows update service not running error on your PC. All you need to do is follow the detailed instructions, and everything should be back to normal.

If you are facing other issues like Windows update not showing, check our detailed guide to restore it. We also have a guide dedicated to the 0x8024001e error in Windows Update, so don’t miss it.

Feel free to let us know the solution that helped you solve the problem in the comments below.

iTunes Not Opening in Windows 11? Here’s How to Make it Work

Many users who have been using iTunes for quite some time have reported that it’s not opening anymore in Windows 11. Some encountered the problem after an update, while others had it out of the blue.

This makes it difficult to pinpoint the issue causing the error. But there are a bunch of methods that will help you easily fix it, no matter the cause.

So, we’ll see what you should do if iTunes is not opening in Windows 11, and we will also discuss some common causes.

Why is iTunes not launching?

From what we gather from users, a few things may stop the application from launching. Some of these include:

  • Bad iTunes installation – Sometimes, you may be dealing with a bad installation. In this case, you would need to get and use a fresh copy of the application.
  • Old or corrupted iTunes files – Corrupted files are a significant source of many Windows issues. You can expect a few problems and errors if an app file is corrupted.
  • Firewall or antivirus settings – Some antivirus may stop apps from opening. This is why we recommend only the most compatible antivirus applications.
  • Peripheral devices – Some users have highlighted that specific peripherals, especially Bluetooth and USB, may cause this problem.

Regardless of the trigger, our solutions will help if iTunes is not loading or working on Windows 11, or if it takes forever to open.

What can I do if iTunes is not opening on Windows 11?

1. Restart the iTunes app

  1. Press Ctrl + Shift + Esc to launch the Task Manager, locate the iTunes process, select it, and then click on End task at the bottom.End task to fix itunes not opening windows 11
  2. After you have terminated the application, relaunch it.

It’s probably the most straightforward method that would fix several trivial issues behind iTunes not opening in Windows 11. So, first, try restarting the app before you proceed to the other methods here.

2. Update iTunes

  1. Press Windows + S to launch the Search menu, enter Microsoft Store in the text field at the top, and select the relevant search result that appears.Microsoft Store
  2. Click on the Library icon near the bottom-left corner to view all the installed apps.Library
  3. Now, click on the Get updates button to scan for any available newer versions of the apps installed from the store.Get updates to fix itunes not opening windows 11
  4. If an update is listed for iTunes after the scan, wait for it to download and install.

In case it’s an issue with the current version of iTunes that leads to it not opening in Windows 11, updating the app should work. Whenever there’s a bug with a particular version, users report it to Apple, and a patch for it is released in the subsequent versions.

Also, this method will only work when iTunes is downloaded from the Microsoft Store. In case you downloaded it from the official website, click on the Help menu, select Check for Updates, and if any new version is available, install it.

3. Change the system language to English

  1. Press Windows + I to launch the Settings app, and select Time & language from the tabs listed in the navigation pane on the left.Time & language
  2. Next, click on Language & region on the right.Language & region to fix itunes not opening windows 11
  3. Make sure you have English selected as the Windows display language here.Check language
  4. If another language is set, click on the Add a language button.Add a language
  5. Enter English in the text field at the top, select the appropriate option from the search results, and then click on Next.Search for English
  6. Now, tick the checkbox for Set as my Windows display language and click on Install at the bottom.Install to fix itunes not opening windows 11
  7. Once done, restart the computer for the changes to come into effect.

There was a bug in the 12.12.0.6 version of the iTunes app that led it to not opening in Windows 11 if the display language was not set to English. Most users were able to fix the error by simply changing it.

4. Reinstall an older version of iTunes

  1. Press Windows + R to launch the Run command, enter appwiz.cpl in the text field, and either click OK or Enter to launch the Programs and Features window.appwiz.cpl to fix itunes not opening windows 11
  2. Select iTunes here, and then click on Uninstall at the top.Uninstall iTunes to fix itunes not opening windows 11
  3. Click Yes in case a confirmation prompt pops up.yes
  4. Now, go to the iTunes section on Apple’s website, and click on the Download button for an older version of iTunes.Download iTunes
  5. Once the setup is downloaded, double-click on it to launch the installer and follow the on-screen instructions.launch installer

If the issue lies in the current version and no update is available, you can uninstall the app and reinstall an older version of iTunes. Though this should be the last resort.

5. Use a dedicated third-party app

If nothing else has worked, don’t lose hope! There are a bunch of third-party apps that work the same way as iTunes, and some even offer a tad more features.

We recommend Tenorshare iCareFone, a dedicated app that allows you to delete stuff selectively, offers the option to create data backups, lets you quickly transfer files, and comes with a diagnostic tool to identify and eliminate issues.

⇒ Get TenorShare iCareFone

By this time you reach this part of the article, the iTunes not opening in Windows 11 error should most likely be eliminated. In case it persists, you can try performing a system restore.

Also, find out what to do if Windows 11 is not recognizing your iPhone, since it too could be related to problems with the iTunes app.

Finally, tell us which fix worked and the version of iTunes you faced the issue within the comments section below.

How to Clear Scratch Disk in Photoshop on Windows: 5 Methods

Photoshop is an incredibly powerful application with great features. But while the program interface is overly intuitive, the same can’t be said about dealing with its bugs.

The most common Photoshop error is that the scratch disk is full. Some users get it when they try to start the program, and others when they try to perform a specific action.

What is a scratch disk?

Here is what you need to know about the photoshop scratch disk:

  • It is used for storage while photoshop is launched since the running app requires memory to store temporary project files.
  • If the program doesn’t have enough RAM to store something temporarily, it uses the hard disk space as a temporary virtual memory holder.
  • This hard disk space is called working volume (scratch disk).
  • If both the memory and the working volume become full of temporary files, you’ll get an error message that says Scratch Disk is full.

In the following lines, you will find practical solutions to empty the scratch disk in Photoshop.

How do I clear scratch disk in Photoshop on Windows?

1. Free up enough disk space

  1. Open Photoshop, go to Edit, then select the Preferences menu.
    how to clear scratch disk photoshop windows
  2. Click on Scratch Disks and check which drives are used as the working volume.
  3. Make sure you have at least 40 GB of free space available.

This is a helpful solution if you are wondering how to clear the scratch disk in Photoshop on Windows devices.

Make sure you have enough space in the drive partition where the working volume is located. The C:/ drive is automatically selected as the working volume if you do not specify it.

2. Delete the temporary files

  1. Click the Start menu and past the path below, then hit Enter.
    %LocalAppData%\Temp
  2. Delete everything in this Temp folder.

If you habitually forcibly close the program without giving it enough time to close projects properly, a large portion of the temporary files will be left behind.

If you do this often enough, your temporary folder becomes full of Photoshop files. But these files are easy to identify and delete. Usually, their name starts with PST or Photoshop Temp.

You can safely delete them without affecting the system.

If you’re having problems deleting your temporary files, check out the simple solutions from this handy guide and get rid of them once and for all.

3. Change the location of the working volume

  1. Start Photoshop, then press Ctrl + Alt to see the menu for Scratch Disk Settings.
  2. Select another partition from the drop-down menu, and click OK.
    how to clear scratch disk photoshop windows
  3. Your Photoshop should know to reboot without the scratch disk being full.

This is a nice shortcut that you can use to change scratch disk settings in case your Photoshop shows you the scratch disk is full before you get into the settings.

4. Increase the amount of memory allowed by Photoshop

photoshop increase ram
  1. Open Photoshop, go to Edit, then select the Preferences menu.how to clear scratch disk photoshop windows
  2. Click the Performance menu, then adjust the sliders under Memory Usage to increase the amount of RAM Photoshop can access.
  3. Do not set the 80% threshold, which will cause your PC to run slower.

This is a helpful solution if you are wondering how to clear the scratch disk in Photoshop on Windows devices.

By default, Photoshop is programmed to use 60% of all RAM. However, you can use it even more, as mentioned above.

5. Customize your working drives

  1. Open Photoshop, go to Edit, then select the Preferences menu.how to clear scratch disk photoshop windows
  2. Click on Scratch Disks and tick all your drives.
  3. Restart Photoshop.

By default, only your C:/ drive is selected as a working volume, but you can allow all your partitions to share this load.

Experienced Photoshop users sometimes set up a special hard disk partition to prevent a problem like this from occurring.

If you were wondering how to clear the scratch disk in Photoshop on Windows devices, we hope this guide has been helpful.

Don’t forget to leave any other questions or suggestions that you may have in the comments section below, and we’ll be sure to check them out.

Why Can’t I Insert a Row In Excel? 5 Ways to Unlock it Again

Not being able to add new rows in Excel can be a massive problem, and if you’re wondering why can’t I insert a row in Excel, this guide will tell you everything you need to know.

Why is Excel not allowing me to insert rows?

This can happen if your bottom rows aren’t clear, or if rows are protected. Add-ins and sheet protection can also cause this issue.

What can I do if I can’t insert a row in Excel?

If you’re in a hurry, you can copy data from one sheet to another as a quick solution.

1. Delete bottom row values

  1. Select the next row after end of your table.
  2. Press Ctrl + Shift + ↓ (Down arrow) keys on your keyboard to select all the cells out of your dataset range.
  3. Click on the Home tab.home tab excel
  4. Click on Editing.
  5. Select the Clear option.clear icon excel
  6. From the Clear drop-down menu, select Clear All.excel clear all
  7. Entries from the selected cells will be removed.
  8. Try inserting a new row and see if this resolves the issue or not.

You can also use the following shortcuts to do it quickly:

  1. Shift+Spacebar to select the entire row.
  2. Shift+Ctrl+Down Arrow to select all rows on the sheet.
  3. Ctrl+- to delete all selected rows.

2. Unfreeze panes

  1. Locate any frozen panes in your worksheet.
  2. Highlight the panes with your cursor.
  3. Click on the View tab on the top toolbar.view tab excel
  4. Click on Freeze Panes option.freeze panes
  5. Select Unfreeze panes option.unfreeze panes
  6. Now try to insert a row in your worksheet.

3. Remove protection

  1. Open your workbook.
  2. Click on the Review tab on the top toolbar.review tab excel
  3. Click on Unprotect Sheet and then Unprotect Workbook options.unprotect sheet excel

4. Disable MS Excel add-ins

  1. Open your workbook.
  2. Click on File from the top toolbar.file excel
  3. Select Options.options excel
  4. Click on Add-ins.add-ins excel
  5. Make sure all the add-ins are disabled.
  6. Go back to your workbook and check if you can add a new row or not.

5. Repair your file

  1. Launch MS Excel.
  2. Click on File.
  3. Choose Open.open excel
  4. Click Browse.browse excel
  5. Select the file and click on the Open and Repair option.open and repair excel
  6. In the prompt that appears, click on Repair.
  7. A message will show up that the repair is complete. Click on Close.
  8. Check if you can insert a row in Excel or not.

If your file is corrupt or has incompatible data, then you need to repair it before you can use it.

That is it from us in this guide. We also have a guide on how to remove empty rows in Excel as well as how to switch columns and rows in Excel.

You can also check out our guide and learn how you can delete multiple rows in Microsoft Excel at once.

Let us know in the comments below which one of the above solutions helped you with your issues of can’t insert a row in Excel.

If you’re having problems with cells, don’t miss our guide on what to do if you can’t insert new cells in Excel.

JPG File Not Opening in Windows 11: 6 Ways to Fix it

Though JPG files are fairly error-free, some people have trouble with them not opening in Windows 11. This might be due to an outdated Photos app, damaged system files, or, as scary as it sounds, malware.

In this quick guide, we’ll explain all you need to know to tackle underlying issues so you can quickly get back to opening JPGs.

What can I do if JPG files are not opening in Windows 11

1. Check the file names for JPG images

  1. Open Explorer’s window by clicking the taskbar button below.
    File Explorer button unable to open jpg files in windows 11
  2. Click View to select the Show option.
  3. Select the File name extensions setting on the submenu.
    File name extensions option unable to open jpg files in windows 11
  4. Next, bring up your folder with an image that doesn’t open.
  5. Right-click the file and select the Rename icon.
    Rename option unable to open jpg files in windows 11
  6. Enter a new title for the file, and ensure it includes .jpg at the end.

2. Reset or repair the Photos app

  1. Click your taskbar’s Start button and open the Settings app.
    jpg file not opening in windows 11
  2. Click on Apps and select Installed apps.
  3. Scroll down to Microsoft Photos, and click the three-dot button for that app.
  4. Select Advanced Options to view settings for Photos.
  5. Click Reset to clear app data for Photos.
    Reset button
  6. You can also try pressing the Repair button there as well.

3. Reregister all MS Store apps

  1. Open Windows 11’s Start menu, input PowerShell within the search box, and select Run as administrator.Windows PowerShell search unable to open jpg files in windows 11
  2. Input the command below and hit Enter:
    Get-AppXPackage | Foreach {Add-AppxPackage -DisableDevelopmentMode -Register "$($_.InstallLocation)\AppXManifest.xml"}
    Reregister apps command unable to open jpg files in windows 11
  3. Restart your device.

4. Update the Photos app

  1. Open Microsoft Store from the Start menu.
  2. Click Library in the MS Store app.
    Library tab unable to open jpg files in windows 11
  3. Press the Get updates button.
    The Get updates button unable to open jpg files in windows 11
  4. Wait for MS Store to download and install available updates.

5. Run a System File Checker scan

  1. Type cmd within the Start menu’s search box, then to launch Command Prompt with elevated rights, click the Run as administrator option for that search result.
    A Command Prompt search unable to open jpg files in windows 11
  2. Enter this command for a Deployment Image scan and press Enter:
    DISM.exe /Online /Cleanup-image /Restorehealth
    Deployment image scan unable to open jpg files in windows 11
  3. Type this command for a System File Checker scan and press Enter:
    sfc /scannow
    An sfc scan unable to open jpg files in windows 11
  4. Then wait for the SFC utility to complete the scanning process.

6. Repair a corrupted JPG file with dedicated software

Try opening more than one JPG file in Windows 11. You might find that it’s only one JPG file you can’t open. If so, that one JPG file you can’t open could be corrupted.

You can fix a corrupted JPG file with photo repair software. Tools like Stellar Photo Repair can restore your JPG file to its original qualities and allow them to open without issues. It also fixes any damage caused by corruption, be it pixelation, distortion, or other.

⇒ Get Stellar Photo Repair

JPG is one of the most prevalent file formats for images alongside PNG. It’s a lossy compression image format that’s ideal for websites. Therefore, many users save or convert images to JPG format.

Remember, you can try opening JPGs with third-party image viewer alternatives instead. Windows 11 won’t automatically open JPG files with different software unless configured. You’ll need to select a third-party image viewer as the default JPG software.

The potential fixes above will likely resolve most issues for opening JPG files with Windows 11’s default software.

If you have questions about fixing JPG files not opening in Windows 11, you can add them to the comments section below. Feel free to discuss JPG files not opening in Windows 11 there.
Store Data Structure Corruption: 5 Methods to Fix This Error

BSOD errors can appear on any PC, and one BSOD error that users reported is the Store data structure corruption error.

The error will crash your PC and cause you to lose any unsaved data, but there’s a way to fix this issue, and today we’ll show you how to do it. But first, let us discuss some possible triggers.

What causes store data structure corruption?

Like many other PC errors, this error can be triggered by several elements. From user experience, here are the top ones to be aware of:

  • Outdated drivers – The video card driver is the culprit most of the time and would need to be updated.
  • Third-party tools – For some users, it may be because of some conflicting software. In such cases, the crashes will continue until the software is uninstalled.
  • OS problem – In rare cases, users have noticed that it may be an OS problem triggering data structure corruption.

Note that this data critical structure corruption happens across different brands, including Dell and HP.

Let us now explore some solutions.

How do I fix Store data structure corruption error?

1. Use specialized repair software

Fixing Store data structure corruption error on Windows 10 doesn’t have to be a hassle, especially if you’re using specialized BSOD repair software.

2. Perform a clean boot

  1. Press Windows + R, type msconfig, and hit Enter.
    store data structure corruption
  2. The System Configuration window will appear. Select the Services tab. Check Hide all Microsoft services and then click Disable all.
  3. Go to the Startup tab and click on Open Task Manager.
  4. In the Task Manager, Disable each startup item.
    store data structure corruption
  5. Restart your PC.

If this method helped stop the Store data structure corruption error, you need to enable services one by one until you replicate the issue.

By doing so, you should be able to find the problematic service or software.

3. Update your video card driver

Occasionally, your graphics card can cause Store data structure corruption on Razer Blade or any other PC. To fix this problem, it’s advised to update your drivers.

To do this accurately, you should manage your drivers using specialized software that can provide essential support for installing or updating any driver.

⇒ Get Outbyte Driver Updater

4. Run Windows Memory Diagnostic

  1. Press Windows key + R, type in mdsched.exe, and hit Enter.
  2. Select Restart now and check for problems (recommended).
  3. If installed, run a hardware diagnostic tool from the manufacturer.

This solution can be helpful if the Store data structure corruption due to undervolt issues. If you overclocked your memory, reset the clock settings to fix the problem.

5. Uninstall problematic software

Certain users have reported on forums that specific software programs may cause the blue screen of death store data structure corruption error.

If you have installed Daemon Tools, Intel HAXM (Hardware Accelerated Execution Manager), Alcohol 120%, or Mac Driver, they may be responsible for this issue.

We recommend you find that specific software on your computer and update it to the last version or remove it.

To completely remove specific software, it’s recommended to use the best uninstaller software due to its powerful functionalities of removing undesirable apps from your PC.

If none of the solutions was unsuccessful, you have one reliable solution: reinstall Windows 10.

After you have reinstalled your Windows 10, the store Data structure corruption error will not appear again.

BSOD errors can create many problems, but they can be fixed with specialized tools in most cases.

Did our solutions help you fix Store data structure corruption error? Let us know in the comments below.

Disable Fast Startup on Windows 11: How to Safely do it

Fast Startup, a critical feature in Windows, is unknown to most people. This is because it is usually enabled by default.

Users generally come across the concept when they want to speed up their PC, or encounter an error. Hence, we have dedicated this guide to help you understand Fast Startup and to disable it in Windows 11.

Should I disable fast Startup Windows 11?

The decision to disable or enable the Fast Startup feature on Windows 11 depends on what you use your PC for. It is usually advisable to keep the feature as it considerably increases your boot time.

However, the feature is known to cause issues at times. One of the main problems is issues with Windows updates. This happens when you completely shut down your PC to install an update.

But with the Fast Startup feature enabled, your PC will not shut down totally, and that affects the installation of the updates.

Also, you can experience issues with this feature if you use dual boot on your PC. This is because Windows locks your PC and overrides the dual boot. With this, your PC will always boot to Windows 11 automatically.

Finally, the Fast Startup feature can always lead to Blue Screen of Death errors. This is because your Windows kernel and drivers are stored in a session and are loaded in a hibernation file.

This hibernation file will be loaded into your PC on the next boot, thereby increasing the startup time. Unfortunately, loading the same kernel session every time can create mismatches between the original software components and the cache.

This can happen after updating your PC or drivers, leading to the dreaded BSOD. To round it up, if you are not facing any issues on your PC or using a dual boot, you might want to keep the Fast Startup feature.

How do I disable Fast Startup on Windows 11?

    1. Using the Control Panel

  1. 1. Press Windows + S to launch the Search menu.

  2. 2. Enter Control Panel in the text field at the top, and click on the relevant search result that appears. This will open the Control Panel app.

    Launch Control Panel to disable fast startup windows 11
  3. 3. Click on System and Security.

    System and Security
  4. 4. Next, select Power Options.

    Power options
  5. 5. Click on Choose what the power buttons do from the list of options on the left.

    Choose what the power buttons do to disable fast startup in Windows 11
  6. 6. Press on Change settings that are currently unavailable.

    Change settings that are currently unavailable
  7. 7. Now, untick the checkbox for Turn on fast startup and then click on Save changes.

    Untick checbox to disable fast startup in Windows 11
  8. 8. The Fast Startup feature in Windows 11 will now be disabled.

2. Use the Registry Editor

  1. Press the Windows key + R, type regedit, and click OK.
    regedit disable fast startup windows 11
  2. Navigate to the path below in the left pane: HKEY_LOCAL_MACHINE\SYSTEM\CurrentControlSet\Control\Session Manager\Power
  3. Now, double-click the HiberbootEnabled option.
    hiberboot
  4. Finally, set its Value data to 0 and click OK.
    value data

That is how you can disable the Fast Startup feature on Windows 11 using the Registry Editor. It must be stated that you need to be careful while making changes to your registry. So, make sure you follow the instructions above, as written.

3. Use the Group Policy Editor

  1. Press the Windows key + R, type gpedit.msc, and click OK.
    gpedit
  2. Navigate to the path below in the left pane: Computer Configuration > Administrative Templates > System > Shutdown
  3. Now, double-click the Require use of fast startup option in the right pane.
    shutdown disable fast startup windows 11
  4. Finally, tick the Disabled radio button and click Apply, followed by OK.
    disabled

The steps above show you how you can quickly disable the Fast Startup feature on Windows 11 using the Local Group Policy Editor (GPO). After applying them, the feature will be disabled till you come back to enable it again.

4. Use CMD

  1. Press the Windows key, type cmd, and select Run as administrator under Command Prompt.
    cmd
  2. Now, type the command below and hit Enter: Powercfg -h offpowercfg
  3. Finally, wait for the command to finish running and close CMD.

Finally, another method is to disable the Fast Startup feature on Windows 11 using CMD. This is the simplest and fastest of all the methods listed.

That’s all there is to Fast Startup and how you can disable it on Windows 11. In the above sections, we have shown the pros and cons of the feature and the decision to disable it or not should be easier now.

In case you are unable to disable Fast Startup, this detailed guide will help you force it through.

Feel free to tell us your experience with the feature in the comments below.

AltGr Not Working: Enable It with These 3 Fixes

AltGr is essential when you want to customize your keyboard to type in another language, for instance, Spanish. But users are reporting that the key is not working, making accessing certain characters rather difficult.

If you’ve been searching for a solution to this issue, you’ve come to the right place. This guide contains step-by-step fixes that will solve the problem convincingly.

Why is AltGr not working?

There are several reasons why the AltGr key is not working on Chrome, Visual Studio, Excel, and other apps. Below are some of the known causes:

  • Remote Desktop Connection: If AltGr is not working when Remote Desktop Connection is active, it is likely due to a bug. This bug has been around for long, and most users found it to be the cause of this issue. The solution here is to close the Remote Desktop window.
  • Malfunctioning hardware: Sometimes, this problem might be due to hardware glitches. You need to run the Hardware and Devices troubleshooter to fix any underlying issue.

How can I fix the AltGr key if it’s not working?

1. Bring RDP to the foreground

  1. Bring any of your Remote Desktop windows to the foreground.
    remote alt gr not working
  2. Press the Alt + Enter keys and check if the AltGr key is now working.
  3. If it is not working, close the Remote Desktop, and the issue should be fixed.

As reported by users, the Remote Desktop Protocol is one of the reasons AltGr might not be working on your PC. Following the steps above has fixed this issue for many users.

Also, note that the steps above work if you have Hyper-V opened too.

2. Run the Hardware and Devices troubleshooter

  1. Press the Windows key, type cmd, and select Run as administrator under Command Prompt.
    cmd alt gr not working
  2. Type the command below and hit Enter to run it: msdt.exe -id DeviceDiagnosticmsdt
  3. Finally, wait for the command to finish running.

If you don’t have RDP or Hyper-V opened, and the AltGr key is not working, the issue might be a minor hardware glitch. Running the Hardware and Devices troubleshooter should restore normalcy here.

3. Use Alternative keys

If, after applying the fixes above, the AltGr key is still not working on your Lenovo laptop, you might need to consider some alternatives.

According to some users, any of the following key combinations can fix the issue or replace the AltGr key:

  • Left Shift + Caps lock + AltGr
  • Left Shift + Caps lock + Alt
  • Ctrl + Alt as an alternative to AltGr

There you go. We hope our solutions helped you fix the AltGr not working issue. While some of the solutions might seem weird, they are the best.

If the Num Lock doesn’t stay on your PC, check our excellent guide to fix it and restore normalcy.

Feel free to share the solution that helped you fix this issue in the comments below.

Gmail Attachment Failed: 4 Easy Methods to Fix This Issue

You must have found this article because your Gmail attachment has failed. We have prepared everything you need to know about this subject.

For some users, whenever they try to attach a file to an email, Gmail returns an error message stating:

Attachment failed. This may be due to a proxy or firewall

Consequently, they can’t attach files to emails. Here are a few potential fixes for the Attachment failed issue.

Why is my attachment failing in Gmail?

We have gathered that a few factors may cause this problem. At the top of the list are the following:

  • Size – If you try to add files larger than 25 MB, it will fail because this exceeds the limit of attachments.
  • Browser issues – While most browsers support the service, there is the off chance that you are using an unsupported browser.
  • Extension compatibility – If you use other third-party services, you may face a compatibility issue from its extension.
  • Outdated cache – While the cache is an important time-saving function, old cache files may affect the running of some other services.

Now let us consider some practical resolutions if your Gmail attachment failed.

How can I fix Gmail attachment failed error?

Before going through the solutions, you must ensure that:

  • Your attachment is less than 25MB. You may have to make it smaller if it is not before it works.
  • Also, instead of going through these solutions, you should know that using another browser may work in most cases. While this does not fix the problem, it is a practical workaround.
  • Lastly, it may be a good idea to try other email clients. Email client software provides many advanced features that help you manage your emails across multiple platforms.

1. Grant Gmail permissions

  1. Navigate to Gmail.
  2. Click on the padlock icon and select Site Settings.
    gmail attachment failed
  3. Ensure Gmail has been allowed all necessary permission.

The first thing to do and which might be causing the problem with the attachments are browser extensions and permissions.

That’s why we encourage you to disable all browser extensions temporarily (the focus is on adblockers) and check whether the Gmail web client has all permissions.

2. Update the browser

  1. Launch your browser.
  2. If you are using Chrome, enter the path below in your address bar and hit Enter (Note this will be different for other browsers):
    chrome://settings/help
  3. Wait for the browser to update, and click on the Relaunch button if required.
    gmail attachment failed

You should also check for browser updates to ensure you’re using the latest version. Gmail attachment errors are more likely to occur in outdated browsers.

3. Disable the Proxy Server

  1. Click Search, enter internet options, and click the app.
  2. Click the Connections tab and press the LAN settings button.
  3. Deselect the Use a proxy server for your LAN setting, and press the OK button.
    gmail attachment failed

The Attachment failed error message states that the issue could be due to a proxy server. As such, switching the web browser proxy off, if selected, might fix the error.

4. Switch off Firewalls

  1. Open Run by pressing the Win key + R hotkey, enter firewall.cpl in the text box, and press the OK button.
    gmail attachment failed
  2. Click Turn Windows Defender Firewall on or off.
  3. Select both the Turn off Windows Firewall options on the Customize Settings tab.
  4. Press the OK button to close the tab.

Your third-party anti-virus software might also have its firewall. You can switch a third-party firewall off by right-clicking the anti-virus software’s notification area icon and selecting its disable or turn off option.

The Attachment failed error message also hints that a firewall might be responsible for the issue.

To ensure there’s no firewall interference for email attachments, you can temporarily switch them off.

Those resolutions will probably fix the Attachment failed error so that you can attach files to Gmail emails again.

However, you can also report the issue to Google with the Gmail support contact form if further fixes are required.

Let us know in the comments section what worked for you.

Steam Download Goes On and Off: 4 Methods to Fix It

Some Steam users reported noticing an issue regarding the download process on the online gaming platform. Downloads stop for no reason and resume automatically.

This is just one of the many download issues on Steam, but it is one of the most annoying. To fix this issue, we devised a series of solutions listed below.

Why are my Steam downloads fluctuating?

Below are some of the reasons your Steam download goes on and off:

  • Slow internet: Sometimes, your Steam download might be cutting in and out because your internet connection is slow. The solution here is to restart your connection and probably change to a better one.
  • Firewall interference: Some users have found that Steam is downloading intermittently in bursts because the Windows Defender Firewall is interfering with the process. You can fix this by limiting bandwidth, especially when Steam download suddenly drops to 0 bytes
  • Issues with download region: Sometimes, this issue is caused by your download region. This seems weird, but users have been able to get past it by changing their download region to a faraway location.

What can I do if the Steam download goes on and off?

Before moving to the fixes in this section, try the following prerequisite checks:

  • Use the wired instead of wireless connection on your PC.
  • Reboot your router/modem and the PC.
  • Disable VPN and proxy services temporarily.

If these do not solve the problem, you can proceed to the fixes below.

1. Change the download region

  1. Hit the Windows key, search for Steam, and open the desktop client.
  2. Click the Steam tab in the top left corner and select Settings.
    settings steam download goes on and off
  3. Navigate to the Downloads tab, click on the Download region drop-down menu and select a different region.
    download region
  4. Click on OK.
  5. Check to see if downloading is now done properly.

The download region has surprisingly been the major reason the Steam download goes on and off. Users have been able to fix it by switching to faraway and weird regions.

Seoul in Korea and Frankfurt in Germany are the two most used regions. So, you can try them too.

2. Limit the download bandwidth

  1. Press on the Windows key, type Steam, and open the app.
  2. When the app opens, click on Steam in the top left corner and select the Settings option.
    settings steam download goes on and off
  3. From the left side of the window, click on the Downloads tab, and check the box for Throttle downloads while streaming.
  4. Now, checkmark the Limit bandwidth to tab and choose the speed you’d like.
    limit
  5. Click the Apply button to confirm the changes and restart Steam.
    apply steam download goes on and off
  6. Try to see if the changes had any effect. If not, restore it to No limit.

Some users have found joy in fixing this issue by throttling their downloads and limiting the bandwidth. This is because the automatic setting can be why the Steam download goes on and off when your network fluctuates.

Hence, setting it to a fixed value should fix the issue, unless you’re dealing with a Steam download limit setting that doesn’t apply correctly, in which case further tweaks may be necessary.

3. Disable DiagTrack

  1. Press the Ctrl + Shift + Esc keys to launch Task Manager.
  2. Click the Services tab at the top and right-click the DiagTrack option.
  3. Finally, select the Stop option.
    diagtrack

The DiagTrack service is a Windows process that collects data on functional issues and has occasionally interfered with visible updates, like when a Steam download is not showing progress.

It’s also worth noting that this fix has helped some users whose Steam downloads keep restarting randomly, often due to background services interrupting connectivity.

4. Allow Steam to run through Windows Firewall

  1. Click on the Windows key, type Control Panel, and open it.
  2. Navigate to System & Security.
  3. Under Windows Defender Firewall, choose to Allow an app through Windows Firewall.
  4. Click Change settings.
  5. Find the Steam app and make sure it has both Public and Private boxes ticked.
  6. Try reloading Steam and see if it works.
  7. Temporarily disable your antivirus or make sure that Steam is whitelisted.

If the solutions above fail to fix the Steam download goes on and off issue, your firewall might be blocking the connection. In this case, you need to whitelist Steam to restore normalcy.

That’s about it for this issue. We hope that at least one of our solutions can help you fix your fluctuating Steam download.

In the same vein, if your Steam download is slow, check our detailed guide to speed it up. Alternatively, if you’re instead facing issues with the Steam demo download button not working, that requires a slightly different troubleshooting approach. Check our dedicated guide.

Feel free to let us know the solution that helped you fix this issue in the comments below.

Event ID 196: How to Fix This USB3 Power Draining Error

Is the USB3 device draining system power, and it shows an error Event ID 196 in the Windows Event Viewer? If yes, go through this article to learn about this issue more and get the steps to fix it.

Usually, we are not very concerned about USB devices like Pendrive, Card Readers, etc. But, sometimes, these may suck your laptop’s battery even though your computer is in an idle state. When you view in Event Viewer, you may get the following type of messages:

Event 196, USB-USBHUB3
Task Category: Surprise Removal
Level: Warning
USB device draining system power when system is idle.

Before fixing the problem, you should know a bit more information.

What is Surprise Removal?

Surprise Removal is a state that occurs when a user removes a device from a Windows computer without using the Safely remove the device option or the device manager. Your computer should be able to handle this sudden disappearance of the device smoothly.

Usually, in this type of situation, the system destroys any objects related to the removed USB device. But, if there is something wrong, you will get errors.

How can I fix Event ID 196: USB3 Power Draining error?

Now, you will learn about the methods that can help you to get rid of the problem. Before that, we would like you to do these things:

If everything is OK, follow these methods to solve the Event ID 196 power-draining issue.

1. Update all drivers

  1. Open the Start Menu.
  2. Type Device Manager and press Enter to open Windows Device Manager.opening device manager windows 11
  3. Right-click on the driver you prefer and choose Update.updating usb driver
  4. Choose the preferred method to update.
  5. Update all other drivers in this way.

A faster way to update the drivers is using an automated driver updater. These tools can update all outdated drivers and install any drivers automatically or with a single click.

2. Change Power Management for the USB Controller

  1. Open the Device Manager, as shown before.
  2. Right-click on the USB Root Hub (USB 3.0) and go to its Properties.
  3. Go to Power Management and check Allow the computer to turn off this device to save power.allow the computer to turn of usb device to save power
  4. Save it.
  5. Restart your PC.

This method is very useful to solve USB device draining system power when the system is idle.

3. Scan with antivirus

  1. Open your Antivirus program.
  2. Click on the System Scan button.clicking system scan bitdefender
  3. Wait for the result.
  4. Delete any viruses it finds.

4. Uninstall recently installed software

  1. Go to Windows Settings by pressing Win + I on the keyboard.
  2. Go to Apps and click on Installed apps.going installed apps windows 11 settings
  3. Click on the three horizontal dots next to the software you want to uninstall and click on Uninstall.uninstalling fxsound audio software windows 11
  4. Now, restart your PC and see if it has fixed the problem or not.

5. Uninstall the recent Windows update

  1. Open Windows Settings like before.
  2. Go to Windows Update and click on Update history.going update history windows 11
  3. Go to Uninstall updates.
  4. Click on Uninstall next to the update you want to remove.
  5. Restart your PC after completing the process.

6. Re-install the USB driver

  1. Open the Device Manager like before.
  2. Right-click on your preferred driver and choose Uninstall device.uninstalling usb driver
  3. Check Attempt to remove the driver for this device and click on Uninstall.
  4. Restart your PC.

Restarting the PC should automatically install the USB driver again. If not, use Outbyte Driver Updater to install the missing ones. Re-installation is a very effective way to solve event ID 196: USB-USBHub3 surprise removal or similar type of errors.

7. Disable Fast startup

  1. Open the Start Menu, type Control Panel, and hit Enter.
  2. Go to System and Security.going system and security control panel
  3. Go to Power Options.going power options control panel
  4. Click on Choose what power buttons do.clicking choose what the power buttons do control panel
  5. Click on Change settings that are currently unavailable.
  6. Uncheck Turn on fast startup and click on Save changes.disabling fast startup control panel windows
  7. Restart your PC.

8. Disable the selective suspend setting

  1. Go to Power Options like before.
  2. Click on Change plan settings next to the selected power plan.
  3. Click on Change advanced power settings.
  4. Expand USB settings and disable Selective suspend setting.disabling selective suspend setting power options
  5. Save it.
  6. Restart your PC.

9. Update BIOS/UEFI

  1. Turn off your PC.
  2. Power it on and keep pressing F2 or F12, or Del, depending on the motherboard you are using when it shows the logo on the screen.
  3. Find out the option like Flash Utility, Updater, etc., and go there.accessing asus ez flash 3 utility
  4. Update your BIOS.

For more details, learn how to update BIOS properly.

Different brands have different ways to access BIOS. But, updating the firmware can fix the USB device draining system power when the system is idle, no matter whether it is a Dell laptop or Lenovo or any other bands like ASUS, MSI, etc.

10. Reset or re-install Windows

  1. Open the Windows Settings like before.
  2. Go to System and then Recovery.going recovery win11 settings
  3. Click on Reset PC.clicking reset PC win11 settings
  4. Go forward and finish the process.

You also can consider reinstalling Windows. It may fix the USB-USBHub3 USB device draining system power when the system is idle.

According to some sources, if a write-protected USB storage device is connected when the PC is idle, it also may cause a problem. So, you also should keep this in mind.

This article has featured the methods that can help to get rid of Event ID 96: USB3 power draining error. If you have any other ways to troubleshoot this problem, feel free to let us know in the comment box.

Cold War Multiplayer is Not Working? 5 Easy Solutions

Call Of Duty: Black Ops Cold War players often reported that the multiplayer mode is not working. In most cases, the game is disconnecting or displaying connection errors. 

Since the issue has been reported by many, and in most cases, the problem seemed to be at the user’s end, troubleshooting shouldn’t be tricky. So, let’s find out how you can get things running.

Why is multiplayer not working on Cold War?

Here are a few reasons why you might be facing the issue:

  • All the content is not downloaded – One of the primary reasons you are getting the error is that all the content required for multiplayer gaming is not downloaded and is currently unavailable.
  • Bug in the current game version – Many reported Cold War multiplayer is not working after the update, which points to a bug in the current version.
  • The game installation didn’t go through correctly – This, too, has been a known underlying cause, and uninstalling the game and all associated files and then reinstalling it from scratch did the trick.

What can I do if the Cold War multiplayer is not working?

Before we head to the slightly complex solutions, we recommend you give these quick ones a try:

If none of these worked, the solutions listed next surely would.

1. Download all packs

As stated earlier, not having all packs installed can trigger issues and lead to multiplayer gaming not working in the Cold War. Also, many users reported that their multiplayer pack was uninstalled after updating Cold War, so you may have to install it again.

download packs to fix cold war multiplayer not working

Some users reported that even a missing High-Resolution Assets pack could trigger the error, so get that as well, along with every other pack that’s listed as Install Content.

2. Run the game as an administrator

  1. Locate the game client, i.e., Battle.net launcher, right-click on it and choose Properties.properties
  2. Navigate to the Compatibility tab, tick the checkbox for Run this program as an administrator and click on OK to save the changes.run as administrator to fix cold war multiplayer not working
  3. Once done, restart the computer and check if the error is fixed.

3. Add an exception to the firewall

  1. Press Windows + S to open the Search menu, type Allow an app through Windows Firewall, and click on the relevant search result.allow an app through Windows firewall
  2. Click on Change settings.change settings
  3. Click on Allow another app.allow another app to fix cold war multiplayer not working
  4. Now, click on Browse.browse
  5. Navigate to the folder where the Battle.net launcher is stored, choose it, and then click on Open.choose app
  6. Click on Add.add
  7. Finally, make sure the checkboxes for Private and Public are checked, and then click on OK to save the changes.save changes
  8. Similarly, add Cold War to the list of exceptions to the firewall.

This is an effective way to fix things when Cold War multiplayer is not working on a Windows computer. All you have to do is add it as an exception to Windows Firewall or a third-party firewall if you are using one, and it should work. This also helps with the Grounded Hosting Game Error.

4. Restore the license (for PlayStation)

If the Cold War multiplayer is not working on a PlayStation, restoring the license should do the trick. All you must do is head to the Restore Licenses option in the Account Management settings.

It shouldn’t take long and won’t affect the game data or any other files on the PC. Besides, it will also fix issues with the other installed games.

5. Reinstall the game

If nothing has worked, your last option is to reinstall the game. This helped when the previous installation did not go through successfully and some critical files were missing.

In case a complete reinstall does not work, some users suggest only downloading the necessary packs, i.e., the game, Multiplayer, and Zombie packs.

That’s it! With these quick and easy solutions, you should be able to fix things when Cold War multiplayer is not working, whether on Xbox, PlayStation, or Windows.

For those playing Cold War on a PC, find the best ways to optimize Windows for gaming and get the best performance.

If any other solution works for you, drop it in the comments section below and help fellow Cold War players.

Fortnite Settings Not Saving: 3 Simple Ways to Fix It

Fortnite is one of the most popular games in the world, with millions of players. However, many reported that Fortnite settings are not saving.

This isn’t the only error, and many reported Invalid game executable in Fortnite, but we covered that issue in a separate guide.

In today’s article, we focus on Fortnite settings and show you how to force your game to save them permanently.

Why are my Fortnite settings not saving?

There are several reasons for this, but the most common ones are the following:

  • File permissions – Certain files can be set to read-only, and that will cause issues with settings saving. However, sometimes folders keep reverting to read only thus causing additional problems.
  • Corrupted installation – If your installation is damaged, you need to uninstall Fortnite and then install it again.

What can I do if the Fornite settings are not saving?

1. Change the Game User Settings properties

  1. Press Windows key + R and enter %localappdata%. Click OK.
  2. Go to the following location: \FortniteGame\Saved\Config\WindowsClient\
  3. Right-click on the GameUserSettings. ini, then select Properties.

  4. Uncheck the Read-Only box, then click on OK.

Now you should be able to save your Fortnite settings by accessing the game and setting them up.

2. Uninstall and reinstall the game

Uninstall

  1. Open Settings with the Windows key + I shortcut and go to Apps.
  2. From the left window pane, select Apps & Features.
  3. On the right side, scroll down to the Search this list bar, then type the game’s name.
  4. Locate and select your game, then click on Uninstall.

Reinstall

  1. Access the Epic Games Store.
  2. Choose with which OS you want to play Fortnite and click on it.
  3. Follow the on-screen instructions to install the game.

If your game settings are not saving even after uninstalling and reinstalling Fortnite, it can be related to an unknown bug. Thus, you should consider contacting the game’s support team for extra detailed solutions.

Simply access the Epic Games Technical Support & Customer Service websit., scroll down and under How can we help you, click on Fortnite. Scroll down again and click on the blue Contact us button, then log in with your Epic Games credentials.

We hope that you know how to fix Fortnite settings not saving after reading this guide.

Also, if you notice weird situations with your games, we strongly recommend you check a full guide about how to fix game crashes in Windows 10.

For any other additional questions, feel free to leave a comment in the section below.

Deployment Failed With HRESULT: 0x80080204 [Fix]

The Add-appxpackage is part of a command line that is used to reinstall applications in Windows devices. It is a faster and more straight-forward method for users who appreciate just how powerful the Command Prompt and Powershell utilities are.

However, it now seems that executing the command does not bring desired results and users are hit with a add-appxpackage : deployment failed with hresult: 0x80073cf6, package could not be registered message.

Why does the Add-appxpackage Deployment Failed With Hresult error occur?

If you’re trying to execute the reinstalling an app command, but it keeps returning a failed result, below are some possible causes:

  • Corrupt files – There’s a chance that one or more of your system files may be corrupted and preventing other operations from taking place.
  • App remnants – Uninstalling an app often leaves behind some software leftovers that need to be removed such as the application’s installation files and registry entries which prevent the reinstallation process from succeeding.
  • Incompatible software – Some software may not be compatible with your OS. This is a common issue, as there are many different types of software available for use. 
  • Corrupt user profile – If the user profile on your computer has become corrupted then it may prevent some programs from running correctly.
  • Windows Update issues – If you have recently installed new updates and noticed this issue, it could be a problematic update. You can choose to uninstall the updates or check whether there are newer updates to fix the bug.

This error is not exclusive to Windows as Xbox users too have expressed concern after the Xbox live error code 0x80073cf6 appeared on their consoles especially after installing a game.

How do I fix deployment failed with Hresult?

Before performing any advanced solutions, try the following:

  • Check the command again and ensure you’re typing it correctly.
  • Close any background apps.
  • Restart your PC and here’s what to do if your computer won’t restart.

1. Run the Windows Store troubleshooter

  1. Hit the Windows key and click on Settings.settings windows 11
  2. Click on System on the left pane then Troubleshoot on the right pane.troubleshoot - App
  3. Select Other troubleshooters.
  4. Scroll down, locate Windows Store Apps and click the Run button.

Running the Windows Store Apps troubleshooter can help you identify any errors related to the Microsoft Store so that you can establish whether the issue is with the app you’re trying to install or the store.

2. Run the DISM and SFC scans

  1. Hit the Windows key, type cmd in the search bar, and select Run as administrator.cmd-run-admin-w11 unexpected kernel mode trap windows 11
  2. Type and Enter the following command: DISM.exe /Online /Restorehealth 
  3. Allow for the command to be executed then type in the next one: sfc /scannow

If the issue was corrupt or missing files, the SFC scan will be able to address this issue. The DISM and SFC commands are two useful tools that can help you repair your system and fix this problem.

The DISM scan will check for any problems with your system files and fix them if they exist. The System File Checker scan makes sure that all of the necessary system files are in place and are working correctly.

If you worry about performing the SFC and DISM scan by yourself, you can use an automatic repair tool because it scans your PC for corrupt files and finds healthy replacements from its database.

3. Reset the Windows Update components 

  1. Hit the Windows key, type Powershell in the search bar, and select Run as administrator.
  2. Type in the following commands and press Enter after each one: net stop wuauserv net stop cryptSvc net stop bits ren C:\Windows\SoftwareDistribution SoftwareDistribution.old ren C:\Windows\System32\catroot2 Catroot2.old net start wuauserv net start cryptSvc net start bits netsh winsock reset
  3. Restart your PC.

4. Check for Windows updates 

  1. Hit the Windows key and click on Settings.settings windows 11
  2. Select Windows Update and click on Check for updates.check-updates-w11 windows 11 blue screen
  3. Download and install if available.

5. Create a new user profile

  1. Hit the Windows + R keys to open the Run command.
  2. Type netplwiz and press Enter.
  3. Click Add in the User Accounts window.
  4. Select Sign in without a Microsoft account (not recommended).Sign in without a Microsoft account
  5. Click on the Local account button.create local account
  6. Enter a username and password (optional) for the new user account, and a hint, in case you set a password. Once done, click on Next.enter username and password
  7. Click on Finish to create the Local account.

Should all these fail, as a last resort, consider resetting your PC. This will delete all files stored on your computer and restore the operating system to its factory settings. If you decide to reset your PC, we recommend creating a backup of your files before you reset your PC.

For the 0x80073cf6 Xbox One fix, the same solutions listed above could be used where applicable. Otherwise, check the Xbox Live server status or reset your console.

There are a bunch of other Microsoft Store errors that you may come across so feel free to check out our detailed guide on how to solve them.

Let us know if you’ve been able to solve this issue in the comment section below.

4648: A Logon was Attempted Using Explicit Credentials [Fix]

Event ID 4648 isn’t an error, per se, as it’s the intended result of someone trying to enter a network server using different or new credentials. It’s supposed to block you from entering; that’s its purpose.

This Event ID is a problem because it’s a sign that someone has or is trying to hack into your computer. To help out, we’ll show you what you can do to address this problem and beef up security.

How can I protect my computer when Event ID 4648 appears?

1. Check event logs

  1. Open the Windows Search bar and bring up Event Viewer.
  2. Expand Windows Logs in the left-hand menu and select Security.
  3. Scroll through the various logs and locate one with Event ID 4648. This guide doesn’t have that but let’s say it does as an example.
  4. Once you locate a log with Event ID 4648, make note of the Account Name that attempted to log in.

This solution and the next one go hand in hand. The purpose of the first is to do a bit of threat hunting, or in other words, figure out who is trying to gain access.

2. Remove account credentials

  1. Bring up the Control Panel and ensure the View By entry in the upper right corner is set to Large Icons.
  2. Select User Accounts.
  3. Click Manage your credential on the left-hand side.
  4. Select Windows Credentials in the new window.
  5. Expand the user account you don’t recognize or no longer want. In the dropdown, click Remove to get rid of that user.

This solution is meant to remove users from a network that you no longer want them to have access to. External people or bad actors require another approach.

3. Change your Wi-Fi password

  1. Open up Control Panel and change the View By entry to Category.
  2. Select Network and Internet, then Network and Sharing Center.
  3. Click Change adapter settings.
  4. Right-click your Wi-Fi connect, and in the context menu, select Status.
  5. Click the Wireless Properties button then go to the Security tab in the following window.
  6. Enter a new password in the Network security key entry. Click OK to finish.

4. Disable Remote Access

  1. Open the Settings app, stay on the System tab, and scroll down to Remote Desktop.
  2. In this new section, toggle the switch next to Remote Desktop in order to disable the feature.
  3. To disable the feature, first, open the Registry Editor. Select Yes if the User Account Control asks if you want to make any changes.
  4. Enter the following in the Registry Editor and press Enter: HKEY_LOCAL_MACHINE\SYSTEM\CurrentControlSet\Control\Terminal Server
  5. Double-click fDenyTSConnections to open it.
  6. Set the value data to 1, then click OK to finish up.

You can also:

  • Turn on your firewall. That is the easiest thing that you can do. Can’t turn on Windows Firewall? Check out these fixes and get things back to normal.
  • Download the latest Windows update so your computer has the latest protections available. Microsoft consistently cracks them out.
  • Limit the number of people who can access your network. The more people on the network, the higher the risk a bad actor will gain access.
  • Move the Wi-Fi router to a different part of the house. If it is by a wall, someone from outside will have an easier time gaining access to your house network.

How can someone gain access to my Windows 11 computer?

A lot of the time, whenever people wonder how a hacker got into their machine, they usually think that person cracked open the computer’s tough defenses.

That’s certainly possible, but the more likely reason is that your computer’s or network’s own security is rather lacking.

  • Your router’s firmware is out of date: Make sure to keep all of your systems up to date. Updating a router’s firmware requires you to connect it directly to your computer.
  • Your router’s firewall is turned off: This is by far the worst gap you can have in your network’s security. Turn the firewall quickly, but be aware you have trouble accessing the router’s page.
  • The computer is out of date: Every month, Microsoft has a Patch Tuesday where it rolls out a variety of fixes. We recommend staying up to date with those patches to protect your computer.
  • You have too many people connected to the network: Not everyone will stay mindful of their device’s security. Perhaps you should clear out some users to keep things secure.

Event ID 4648 is just one of many different warning notices on Windows 11. There are two in particular that we want to shout out specifically. The first one is Event ID 157: Disk has been surprise removed.

This warning occurs when interrupts your computer’s communication with a disk and can render a virtual drive unusable. Fixing this may require you to tweak the computer’s registry a little.

The other one is Event ID 7000 which indicates some software services cannot start. We recommend either adjusting with the Group Policy Editor or restarting the offending service.

For fixes and logon errors, you can check our Navigating the Logon Balancing Error 88 in SAP GUI: Our step-by-step solutions guide.

Feel free to comment below if you have questions about other Event IDs. You can also leave comments about guides that you’d like to see or information on other errors.

AVG Antivirus Not Compatible with Windows 10: 5 Fixes to Use

AVG Antivirus is among the most popular antivirus software, but many reported that AVG Antivirus is not compatible with Windows 10.

Those incompatibility issues prompted Microsoft to block Windows 10 build updates for PCs with old AVG Antivirus versions installed, and today we’ll show you how to fix that.

Is AVG compatible with Windows 10?

Yes, AVG is compatible with Windows 10, but if you encounter issues the likely cause is the following:

  • Outdated version – AVG antivirus 19.5 and older aren’t compatible with Windows 10. If you try to use that version AVG won’t install at all.
  • Leftover files – If you have any AVG files on your PC, that can cause this issue to appear. To fix it, you need to remove software leftovers from your PC.

How can I fix AVG Antivirus Windows 10 incompatibility?

1. Uninstall AVG Antivirus

  1. Press the Windows key + X and choose Apps and Features.
  2. Next, select Avast on the list of applications and click Uninstall.
  3. Follow the instructions on the screen to remove it.

If your current version of AVG Antivirus is not compatible with Windows 10, your only option is to remove it.

2. Run AVG’s uninstaller utility

  1. Visit the AVG Remover page and download the software.
  2. Once the application is downloaded, start it.
  3. Follow the instructions on the screen to complete the process.

3. Search for and delete all copies of avgui.exe

  1. To bring up the search tool, press the Windows key and S simultaneously.
  2. Input avgui.exe within the search box.
  3. Right-click any avgui.exe file found in search results and select Open file location.
    avgui.exe search  avg antivirus not compatible with windows 10
  4. Then right-click avgui.exe files in File Explorer and select Delete to erase them.
  5. Click the Recycle Bin desktop shortcut.
    Empty Recycle Bin avg antivirus not compatible with windows 10
  6. Select the Empty Recycle Bin option.
Note icon NOTE
This resolution is primarily intended for users who don’t have AVG Antivirus installed. You can also search for leftover avgui.exe files with File Explorer’s search tool. Make sure you search for and delete all avgui.exe file copies on all your PC’s drive partitions.

4. Delete leftover AVG folders

  1. First, press the Windows and E keys simultaneously to bring up File Explorer.
  2. Next, open this folder path: C:\Program Files (x86)
  3. If you can find an AVG folder there, right-click it and select Delete.
  4. Open this folder in File Explorer: C:\Program Files
  5. Select any AVG folder you find there, and click the Delete button on the Home tab.
    The Delete button avg antivirus not compatible with windows 10
  6. Thereafter, open the Recycle Bin.
  7. Click Empty Recycle Bin to clear it.

In case AVG Antivirus is not compatible with Windows 10, you might have to manually remove all its files.

5. Clean the registry

Note icon NOTE
Clearing the registry manually is dangerous and can lead to issues with your system if not performed properly.
  1. Press Windows key + R and type regedit. Press Enter.
     
  2. Now press Ctrl key + F and type AVG.
  3. Once you find the desired keys or DWORD, delete it.
  4. Repeat steps 2 and 3 until all entries are removed.

There are plenty of third-party registry cleaners available that can make this task a lot easier. CCleaner is a highly-rated registry utility that’s recommended with additional hard drive cleaner and uninstall tools.

⇒ Get CCleaner

If AVG Antivirus is not compatible with Windows 10, then these steps should surely help you with the problem.

In case you have further issues, our AVG Antivirus won’t update or uninstall guide will surely help you fix that.

What method did you use to fix this problem? Let us know in the comments below.

Fix: Can’t Hear Voice Chat in Modern Warfare on Xbox

Call of Duty: Modern Warfare is a great game, but many reported that they can’t hear voice chat in Modern Warfare for Xbox.

This isn’t the only issue, and packet loss in Modern Warfare is also a common one. In today’s guide we’re going to show you how to fix all your voice chat issues.

Why can’t I hear anyone in game chat in Modern Warfare on Xbox One?

There are multiple reasons of this problem, with the following being the most common:

  • Audio settings – Features such as Mic Monitoring and other settings can cause this problem, so you might have to adjust them.
  • Privacy settings – Your settings can sometimes cause this issue. If you don’t fix it, you might get Party chat is blocked by network settings or similar errors.

What can I do if I can’t hear voice chat in Modern Warfare on Xbox?

Before we try more complex solutions, we advise you to perform a quick check:

  • Check your audio settings – On your Xbox, go to audio settings and check the voice chat settings. Make sure that headphones are set as the output device.

1. Change in-game settings

  1. Start your Modern Warfare game.
  2. Click the Options button.
  3. Select the Audio tab shown directly below.
    Audio tab settings modern warfare can't hear voice chat xbox
  4. First, make sure Voice Chat is enabled. If it isn’t, select Enabled for the Voice Chat option.
  5. Lower the Open Mic Recording Threshold setting. Some players have confirmed setting that option to 0.00 can fix the game’s voice chat.
  6. Select No Effect for the Voice Chat Effect setting.
  7. Next, click the Account tab.
  8. Enable the Crossplay option.
  9. Raise the Voice Chat Volume and Microsoft Volume settings if they are less than 100.
  10. Save the new settings, and restart the game.
Note icon NOTE
If voice chat is already enabled, try disabling its option and restarting the game. Thereafter, enable the Voice Chat option. 

2. Adjust communication and multiplayer settings

  1. Press the Xbox button on your control pad.
  2. Select the System tab on the sidebar.
  3. Next, select Settings and go to Account.
    The Account options modern warfare can't hear voice chat xbox
  4. Go to and select the Privacy & online safety option.
  5. Input your passkey if required.
  6. Select Xbox Live privacy to bring up the options shown directly below.
    The Custom option modern warfare can't hear voice chat xbox
  7. Next, select the Custom radio button.
  8. Select View details & customize and select Communication & multiplayer to open the options in the screenshot directly below.
    The Communications & multiplayer options modern warfare can't hear voice chat xbox
  9. Now select Everybody and Allow for all the options there. The You can join multiplayer games and You can play with people outside of Xbox Live settings need to be allowed.

The potential resolutions above will likely fix Modern Warfare’s voice chat not working for most Xbox players.

This isn’t the only issue, and many reported mouse lag in Modern Warfare, but we tackled that in a separate guide.

Did you find a different solution for this problem? Let us know in the comments section below!

New World High CPU Usage: 5 Ways to Lower It Down

Many gamers have complained about high CPU and disk usage while playing the New World game. This affects the game performance and PC functionality as well. 

In this guide, we will walk you through the troubleshooting steps to fix the issue. Let’s get started!  

What causes high CPU usage while playing New World?

  • Windows is outdated – If your Windows shows pending updates, it could show high CPU usage. To fix, download and install the updates.
  • Your system doesn’t meet the minimum requirements – If your computer doesn’t meet the minimum requirements, your computer might show high CPU usage.
  • A lot of background processes running – If you see a lot of background processes in the list, close the unnecessary processes to retrieve space.

What can I do to fix high CPU usage while playing New World?

Before diving into the troubleshooting steps, try these quick fixes to resolve the issue:

If you still see high CPU usage due to New world, try these advanced fixes.

1. Update your drivers

  1. Press Windows + R to open the Run box.Device Manager RUN COMMAND
  2. Type devmgmt.msc and hit Enter to press Device Manager.
  3. Go through the list of drivers, expand the list, and click Update driver.choose update driver for NVIDIA graphics card device manager
  4. Follow the on-screen instructions to complete.

Keeping drivers up to date is important for your PC’s smooth functioning. Doing it manually can be a cumbersome task. Therefore, using a third-party driver updater utility such as Outbyte Driver Updater is recommended.

The driver updater tool scans your computer for outdated or missing drivers and downloads the latest versions with just a few clicks.

Outbyte Driver Updater

Give Outbyte Driver Updater a try to install the latest drivers for your device without any effort.
Free Trial Download now

2. Change Power Plan

  1. Press Windows + I to get the Settings window.
  2. Go to System, then click Power.Settings-System-Power-New-World-HIgh-CPU-usage.
  3. Now select the  Best performance option from the drop-down menu for Power mode.Power mode -new world high cpu usage

3. Allow high graphics performance for the game

  1. Press Windows + I to open Settings.
  2. Go to System, and click Display.Settings - System - Display High CPU usage New World
  3. Under Related settings, click Graphics.Display Related Settings
  4. Click the Browse option.Browse Option
  5. Follow this path to find the NewWorld.exe file: C:\Program Files (x86)\Steam\steamapps\common
  6. Once you have added the file, click on it and select Options.Options
  7. Click on the radio button beside High performance and click Save.Settings Graphics

4. Run the System File Checker command

  1. Press the Windows key, type CMD, and click the Run as administrator option.DOS COmmand Prompt
  2. Type the following command and press Enter: sfc/scannow
  3. Once the process is completed successfully, restart your PC.

5. Modify in-game settings

5.1 Adjust settings

  1. Launch the game.
  2. Go to V-sync and change the in-game graphics settings to Off.V-sync turned off.
  3. Do the same for Video quality settings, Anti-aliasing, and Shadow quality.

5.2 Verify the integrity of game files

  1. Launch Steam and go to Library.Steam Library
  2. Scroll through the games list, select and right-click New World.
  3. Choose the Properties option.
  4. Go to Local Files, and click on Verify Integrity of games files button.Verify Integrity of games files
  5. The process might take a while to complete. Once done, relaunch the game to see if the issue persists.

So, these are the simple steps you need to follow to resolve high CPU usage due to New World. Try these methods one by one, and don’t hesitate to let us know which worked for you in the comments section below.

Turn Off Narrator in Minecraft: 4 Easy Ways to Do It

Minecraft is one of the best adventure game out there but many users are wondering how to turn off narrator in Minecraft.

Fixing this issue is simple as changing the Narrator settings, and in this guide, we’re going to show you how to do it in Minecraft.

What does the Minecraft narrator do?

Narrator in Minecraft is an accessibility feature that reads the following:

  • All messages – This includes both system and chat messages in the game.
  • Chat – Only reads the chat messages from other players.
  • System – Only reads system messages that are generated by the game.

How can I turn off narrator on Minecraft?

1. Use the shortcut key

  1. Start the game.
  2. Now press the Windows key + B.
  3. The narrator will now be disabled.

2. Change settings on Xbox

  1. First, press the Xbox button, which will open the guide window.
  2. Next, click on the System option.
  3. From the displayed options navigate to Settings.
  4. Next, click the Ease of Access option.
  5. Finally, select the Narrator to turn it off.

This will turn off the narrator in Minecraft on Xbox One.

3. Disable UI Screen reader on PS4

  1. Start Minecraft.
  2. Next, go to Settings.
     
  3. Then, select Accessibility.
  4. Lastly, disable Enable UI Screen Reader.

As you can see, it’s pretty simple to turn off Minecraft narrator on PS4.

4. Change accessibility settings on iPad

  1. Navigate to Settings.
  2. Next, select Accessiblity.
  3. Turn off Enable UI Screen Reader.

Now you know how to turn off Narrator on Minecraft for iPad.

Well, this is about all the steps you need to make in order to disable the narrator on Minecraft. As you can see it will only take you a few minutes to solve the problem.

If you have additional problems, make sure that you update Minecraft to the latest version in order to prevent them.

As always, we would love to read your thoughts on the subject so don’t hesitate to write us a comment in the dedicated section below.

Intel Wireless AC 9560 is Not Working: 5 Tested Solutions

Some readers reported that the Intel Wireless AC 9560 is not working, causing it not to support the integrated wireless 802.11ac solutions from Intel.

The main reason behind this issue is a hardware problem with the Intel Wireless AC 9560 adapter. However, outdated network drivers can also be the culprit, but we don’t exclude network congestion or faulty OS updates and corrupt system files.

In rare cases, the problem may also be that the WLAN AutoConfig service is not running because it can also cause Intel(r) dual-band wireless AC 3168 not to work.

What can I do if the Intel wireless AC 9560 is not working?

1. Power cycle your PC

  1. Disconnect every external device plugged into the PC.
  2. Hold the power button for 10 seconds to drain the residual energy, then unplug the power cable from the PC.
  3. Wait 1 minute, connect the PC to a power source, then press the power button to turn it on.
  4. Connect other peripherals and check if the Intel Wireless AC 9560 adapter works.

Power cycling the computer will fix power issues and other hardware issues that may cause the problem.

2. Re-enable the AC-9560 adapter

  1. Press Windows + X key to open the Quick Link menu, then select Device Manager.
  2. Expand the Network adapters category, right-click Intel(R) Wireless-AC 9560, then select Disable device from the drop-down.
  3. Restart your PC and repeat step 1.
  4. Expand the Network adapters category, right-click Intel(R) Wireless-AC 9560, then select Enable device from the drop-down.

The steps above will refresh your PC’s Intel(R) Wireless-AC 9560 processor and help improve performance. Check what to do if Windows can’t find a driver for the Network adapter on your PC.

3. Enable the WLAN AutoConfig Service

  1. Press Windows + R key to open the Run dialog box and type services.msc, then click OK to open the Services window.
  2. Locate the WLAN AutoConfig, right-click on it, then select Properties.
  3. Set the Startup type to Automatic, and then the Service status should be Running.
  4. Click Apply, then OK to save the changes.
  5. Restart your PC and check if the Intel Wireless AC 9560 adapter works.

Enabling the service will fix WLAN AutoConfig errors and allow the adapter to run its services and support your network.

4. Check the Power Management Settings

  1. Right-click the Start button, then select Device Manager.
  2. Double-click Network adapters to expand it, right-click on Intel Wireless AC 9560, then select Properties from the drop-down.
  3. Click the Power Management tab, uncheck the box for Allow the computer to turn off this device to save power, then click OK.
  4. Restart your computer and see if the problem persists.

It will resolve power issues causing the system to disable the Intel Wireless AC 9560 service. Read our guide if the Network adapter is missing in your Device Manager.

5. Try resetting your Network Components

  1. Left-click the Start button, type Command Prompt, and click Run as administrator.
  2. Click Yes on the User Account Control prompt.
  3. Type the following commands into the Command Prompt and press Enter: ipconfig/flushdns  ipconfig /release  ipconfig /renew   netsh winsock reset   netsh int ip reset
  4. Restart your PC after the process is complete.

Try connecting to the internet and check if Intel Wireless AC 9560 works.

Alternatively, our readers can check our article on Intel dual-band wireless-AC 7260 disconnecting and how to fix it.

Likewise, users complain about the Intel RST platform not supported error after upgrading their Windows.

If you have any questions or suggestions, leave us a note in the comments section below.
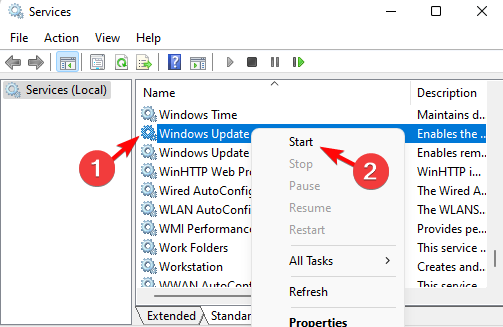
How to Fix Voice Chat Not Working in Call of Duty: Warzone

In a battle royale game like Call of Duty: Warzone (or any entry in the series, for that matter), being able to talk to your teammates is vitally important. Having voice chat not working is tantamount to losing.

Or at least it can be. Either way, it’s something that should be fixed as soon as possible so you can fully enjoy the game. And similar to loading screen issues, fixes center around tweaking system settings.

What is causing the voice chat errors on Call of Duty: Warzone?

Before getting into the weeds, it’s important to talk about what’s causing the voice chat errors in the first place:

  • Your computer’s audio drivers are out of date: As it’s a common source for gaming problems, updating drivers should be done as soon as possible from the Settings menu.
  • Too many apps are currently open: Having a ton of other windows or apps open can cause CoD: Warzone to lag and interrupt the voice chat. Be sure to close everything that’s non-essential.
  • The game is plagued by Dev Error 5476: This error can be caused by corrupt game files, corrupt drivers, or issues with cross-play.
  • In-game or computer settings are interfering: The system configurations may be set up in a way that messes with the game, so you’ll need to change them.

How can I fix voice chat errors on Call of Duty: Warzone?

The complex solutions will involve you going into the Settings menu for Windows 11 and Call of Duty: Warzone. But before you do, there are some fixes that you can try out:

  • Double-check if your mic is muted. This is, by far, the most common reason why the voice chat isn’t working. You may have accidentally muted, or you just plain forgot.
  • Close and reopen Call of Duty: Warzone. This will refresh the game and clear out any bad data that may be lingering.
  • Reboot your computer. Similarly, restarting the entire system will free up memory so Warzone can play much more smoothly.
  • Double-check the settings on your antivirus software. It’s possible that the antivirus is blocking the game from running. It’s recommended you disable it before playing.
  • Contact Activision support. This is the last resort option if you’ve done every single solution in this guide, and none of it worked.

1. Change audio settings

  1. Bring up Sound Settings using the Windows search bar.
  2. Scroll down to the Input section and make sure the correct audio device is chosen. Then increase the Volume as far as it can go.
  3. Next, click Privacy & Security, scroll down to App Permissions, and select Microphone.
  4. Toggle the switches next to Microphone access and Let apps access your microphone.

2. Adjust the microphone in Control Panel

  1. Bring up the Control Panel and select Sound. Make the View By entry in the upper-right corner is set to Large Icons.
  2. Double-click the microphone or headset you plan on using for gaming.
  3. Click the Advanced tab, and under Exclusive Mode, deselect Allow applications to take exclusive control of this device.
  4. Click Apply, then OK, and close the window.
  5. Also, right-click the entry and make sure the device is the default for your computer.
  6. If not, right-click it and select Set as Default Device.

3. Change Warzone settings

  1. Open Call of Duty: Warzone and click the Settings icon in the upper right-hand corner.
  2. Select the Audio option.
  3. Ensure that the Voice Chat feature is enabled in the options.
  4. Make the microphone device is the correct one.
  5. If not, click Default System Device and switch the option to the microphone you want to use.
  6. You should also change the Game Voice Channel to a different one and see if that works.

If you also play on an Xbox console and Warzone voice chat is not working, this solution will work there too.

Does CoD: Warzone have other problems that can hamper gaming sessions?

There are two you should be aware with both being quite common. One is Error Code Torch which means the game will not start because of either a bad internet connection or corrupt files.

Restarting your computer can fix Error Code Torch, but so can switch from a LAN cable to WLAN. The other one is Error Code 5476, which has recently popped up.

It’s unknown what causes 5476, but we know it usually appears after a recent update. Strangely enough, it’s been discovered that changing your in-game calling card and emblem actually works.

For additional help with communication issues, you can also check our guide on Peak voice chat not working and compare solutions.

Feel free to comment below if you have questions about other gaming errors. Also, leave comments about guides you’d like to see information on Call of Duty or any other game.

Rebuild BCD on Windows 10 & 11 [Commands & Best Practices]

You may need to rebuild BCD to fix any startup issues arising from missing or corrupted Windows boot configuration data (BCD), or when it’s not correctly configured.

While there are quite a few commands you can run to get the desired output, the bootrec command helps you to rebuild BCD easily and quickly. But, if your Windows 11 PC is not booting, you can follow our post to resolve it with the tested solutions as described.

How to rebuild BCD (Boot Configuration Data) in Windows?

Before you proceed to rebuild BCD, you need to boot your PC into Safe Mode in Windows 11, following any of the methods mentioned in our detailed post.

1. Additional Windows installations in BCD are found

  1. As your PC boots into safe mode, it will take you to the Choose an option screen. Here, click on Troubleshoot. choose an option
  2. On the next screen, click on Advanced options. advanced options
  3. Now, in the Advanced Options screen, click on Command Prompt. Command Prompt in Advanced options
  4. Type the below command, and hit Enter: bootrec /rebuildbcdbbotrec /rebuildbcd
  5. The bootrec command will now start looking up Windows installations not included in the BCD and then ask you if you’d like to add one or more to it.
  6. You should see one of the following messages at the command line:
    • Scanning all disks for Windows installations. Please wait, since this may take a while… Successfully scanned Windows installations. Total identified Windows installations: 0 The operation completed successfully.
    • Scanning all disks for Windows installations. Please wait, since this may take a while… Successfully scanned Windows installations. Total identified Windows installations: 1 [1] C:\Windows Add installation to boot list? Yes/No/All:
  7. If you see the first option, move on to the next section. It means that Windows installation data in the BCD store is present, but bootrec couldn’t locate any additional installations of Windows on your PC to add to the BCD.
  8. Now, type the attrib command and hit Enter: attrib c:\boot\bcd -h -r -srun attrib c:\boot\bcd -h -r -s command
  9. Execute the ren command to rename the BCD store: ren c:\boot\bcd bcd.oldrun ren c:\boot\bcd bcd.old command
  10. Now, run the below command to rebuild it, and hit Enter: bcdedit /export c:\bcdbackup run bcdedit /export c:\bcdbackup command
  11. Next, execute the below command to rebuild the BCD again, and hit Enter: bootrec /rebuildbcdrun bootrec /rebuildbcd enter
  12. You will now see the second result as shown in Step 6 ( Add installation to boot list? question). Type Y (Yes) and hit Enter. Add installation to boot list?
  13. You should now see the success message below: The operation completed successfully.

2. Additional Windows installation in BCD not found

  1. After you follow Steps 1 through 6 in the above method, if you see result 2, then type Y to the Add installation to boot list? question. Add installation to boot list?
  2. Next, you would see the success message, The operation completed successfully, and a blinking cursor at the prompt.
  3. Since the BCD store exists and lists a Windows installation, you’ll delete it manually and then try to rebuild it again.
  4. Next, type the below command and hit Enter: bcdedit /export c:\bcdbackuprun bcdedit /export c:\bcdbackup enter

Once you see the success message, you have successfully built BCD on your Windows 11 and fixed the boot issue.

Note icon NOTE
Please note that you may need to choose your account name and input your password to open Command Prompt.

Which command in Windows RE can you use to rebuild the BCD file?

If rebuilding the BCD store doesn’t fix the startup issue, you can export and delete the BCD store and then use the Bootrec.exe tool.

This will help you completely rebuild the BCD store and resolve any boot issues. You can execute the following commands at the Windows Recovery Environment (RE) Command Prompt:

bcdedit /export C:\BCD_Backup

c:

cd boot

attrib bcd -s -h -r

ren c:\boot\bcd bcd.old

bootrec /RebuildBcd

You can also use these commands to rebuild the boot partition on Windows 11 easily. You can refer to our detailed guide for more information.

What does rebuilding BCD do?

Rebuilding the Boot Configuration Data (BCD) helps you find and fix missing and corrupted BCD store, and even repair it when it’s not properly configured.

For example, you can also rebuild BCD when bootrec is not recognized in Windows 11, as explained in our guide.

It basically recreates the bootloader configuration store and adds copies of Windows found on your PC to the BCD bootloader.

But if you are facing issues like Bootrec/Fixboot access is denied, follow the instructions in our manual to fix the error.

If you have any other queries related to rebuilding BCD, you can feel free to let us know in the comments box below.

Excel Formula Disappears After Saving: 5 Ways to Fix It

Excel formulas are a great way to automate calculations in your spreadsheet. But if you’re not careful, it’s all too easy to accidentally delete them — and then spend hours trying to figure out how to get them back.

One issue that’s got users on edge is that after crafting a formula in Excel, it disappears even after saving. This is a strange behavior and in this article, we explore various ways to maneuver around this problem.

Why does my Excel formula keep disappearing?

If you’re seeing a formula disappear from an Excel worksheet, there are a few reasons why this could be happening:

  • Accidental deletion – You may have accidentally typed over the cell where the formula was originally placed or deleted the original cell.
  • Formula exceeds memory capacity – Your formula may be too complex and is exceeding the memory capacity of your computer’s processor. This is why the Excel cell contents disappear. 
  • Autocomplete feature – Excel’s AutoComplete feature can be a huge help when you’re entering formulas, but it can also be a pain if it keeps overwriting your formulas. 
  • Too long/complex formula – Formulas may also disappear if they are too long or complex. Excel may not display it properly on screen due to restrictions on screen size.
  • Copy/paste – When you copy a formula from one cell to another, sometimes Excel will automatically update it with any changes made in the original cell.
  • Protected sheet – It is possible that the sheet has been protected and the formula is in a locked cell.
  • Error in the function – When you create a formula in Excel, and it keeps disappearing, there could be a problem with the formula itself, and that’s why Excel is not evaluating the formula.

How do I save Excel without losing formulas? 

1. Use Paste Special

If you are using the regular Paste feature to paste values into cells containing formulas, there is a possibility that your formulas will no longer work properly.

When you copy data from another source without including its formatting, Excel assumes that you want to copy both its contents and formatting in one go. To avoid this problem, select Paste Special from the Home tab or press Ctrl+Alt+V after pasting data into your worksheet. 

2. Clean up your worksheet

Another possible cause of this problem is that your worksheet may contain too many formulas. This forces Excel to recalculate all of them every time you save it.

To fix this, try cleaning up your workbook and removing unnecessary formulas. Ensure you remain with only the ones that are needed to remain visible on your screen at all times.

3. Save the file in the Excel binary workbook

  1. On the Excel file, navigate to File.
  2. Select Options.
  3. Click on Save, and under Save workbooks, select Excel Binary Workbook.

When you save an Excel file, you can choose between two formats: .xlsx or .xlsm. The main difference between the two formats is the amount of data you can save on each. The .xlsm file extension is compressed by default and allows for more complex calculations and functions.

Also, if you save an Excel document as .xlsm, it will be impossible for someone who doesn’t have the newest version of Excel to open it without editing it first.

4. Delete file protection 

  1. Click on the Review tab and select Protect Sheet or Protect Workbook. 
  2. Select Unprotect Sheet or Protect Workbook and enter the password.
  3. Clicking Unprotect Sheet automatically removes the password from the sheet.

If you don’t know the password for the sheet, it means you’re not the owner of the sheet. In such instances, you have no choice but to create a new sheet.

5. Use a different sheet for solving formulas

If nothing seems to work, your last resort may be to try a different sheet for your formulas. Your current sheet may be corrupted, preventing you from saving any formulas.

If all of your formulas are disappearing after saving, it’s probably because the workbook contains hidden cells. It could also be that there is other data that Excel can’t see.

When you start a new sheet, you eliminate any hidden errors or hidden formulas that could have been the issue.

Aside from formulas disappearing in Excel, the program may present its own problems. Users recently complained of Excel not opening files, and if you’re in the same predicament, we’ve got you covered.

In other instances, you may find that Excel is using too much CPU, so don’t hesitate to visit our helpful guide to solve this issue once and for all.

Let us know if you have been able to solve these issues using any of our solutions above in the comment section below.

Memory Error 19-1367: How to Fix This Modern Warfare Error

Modern Warfare is one of the most popular and successful first-person shooter games in history. Many players have been playing this game for years, and sometimes, errors such as Call of Duty: Modern Warfare 2 not working are common when playing.

Another of these errors is memory error 19-1367. Many users have reported this error when playing Modern Warfare 2. Apparently, the users get kicked off at the end or just before the end of every match and have to restart the game.

Why does my Call of Duty keep saying memory error?

The memory error is a common problem, and it can be caused by several things, including:

  • Outdated graphics card – If you have an older or budget graphics card, it may not be able to cope with the demands of the game. Overclocking software may be an option.
  • Insufficient RAM – This is a common issue with older systems that don’t have much memory or hard drive space left. You can limit RAM usage to improve performance.
  • Faulty memory – If you have recently added more RAM to your computer, you should check that the extra RAM has been seated properly and is not loose in its slot.
  • Background programs – The game may use shared resources instead of dedicated ones. You can use PC performance monitor software to address such problems.
  • System requirements – Some older PCs may be unable to handle newer games like Call of Duty. You can determine which graphics cards are compatible by checking the system requirements.
  • Hardware issues – If the hardware is too hot, your console or PC may overheat and cause issues with games running correctly.

How do I fix the memory error 19-1367 on Modern Warfare?

To ensure you cover all the bases, start off with the preliminary checks:

  • Ensure your computer meets the minimum system requirements for playing the game.
  • Close all background programs or processes that may be competing for resources.
  • Check that you’re running the latest update of Call of Duty.
  • Restart your console and rest it for a while if it is overheating.

1. Update your graphics card driver

  1. Hit the Windows key, type Device Manager in the search bar, and click Open.
  2. Navigate to Display adapters and find your graphics card.
  3. Right-click on your graphics card and select Update driver.update-graphics-driver video memory management internal windows 11
  4. Select Search automatically for drivers.

If you’re like most people, you probably don’t update your computer’s drivers very often. That’s understandable; it can be pretty tricky to find the right driver for your system, and even if you do find one, there’s no guarantee that it will solve any issues you might be having with your PC.

2. Check for OS updates

  1. Hit the Windows key and click on Settings.settings windows 11
  2. Select Windows Update and click on Check for updates.check-updates-w11 windows 11 blue screen
  3. Download and install if available.

3. Disable antivirus temporarily

  1. Hit the Windows button, type Windows Security in the search bar, and click Open.
  2. Click on Firewall & network protection then select Public network.
  3. Locate Microsoft Defender Firewall and toggle the off button.Turn off firewall if canon printer driver not installing.

4. Scan for viruses

  1. Press the Windows key, search Windows Security and click Open.
  2. Select Virus & threat protection.
  3. Next, press Quick scan under Current threats.
  4. If you don’t find any threats, perform a full scan by clicking on Scan options just below Quick scan.
  5. Click on Full scan to perform a deep scan of your PC.
  6. Wait for the process to finish and restart your system.

5. Verify game files

  1. Launch Steam on your PC.
  2. Click Library in Steam.
  3. Right-click on Call of Duty, then select Properties.
  4. Select the Local files tab then hit Verify integrity of game files.Verify Integrity of Steam Files
  5. Restart Steam.

The memory error on Modern Warfare is normal, even for a high-end PC. A combination of a good antivirus program and a firewall program helps prevent many memory errors you may encounter while playing.

While you’re still here, check out how to deal with Modern Warfare packet loss or server errors like mw3 error code 14515 in our dedicated guide.

You may also experience mouse lag in Call of Duty, so don’t hesitate to refer to our comprehensive article on how to address this issue.

Let us know whether these solutions have been of any help to you in the comment section below.