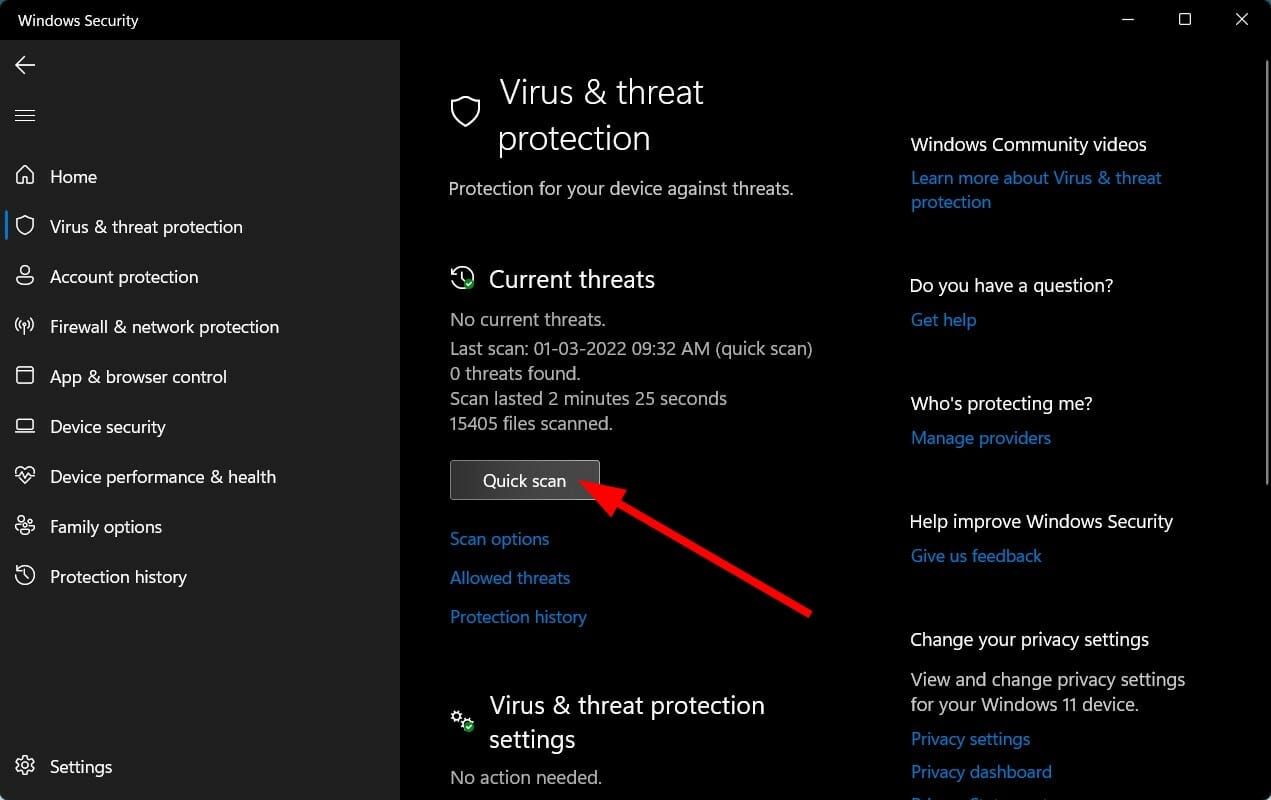
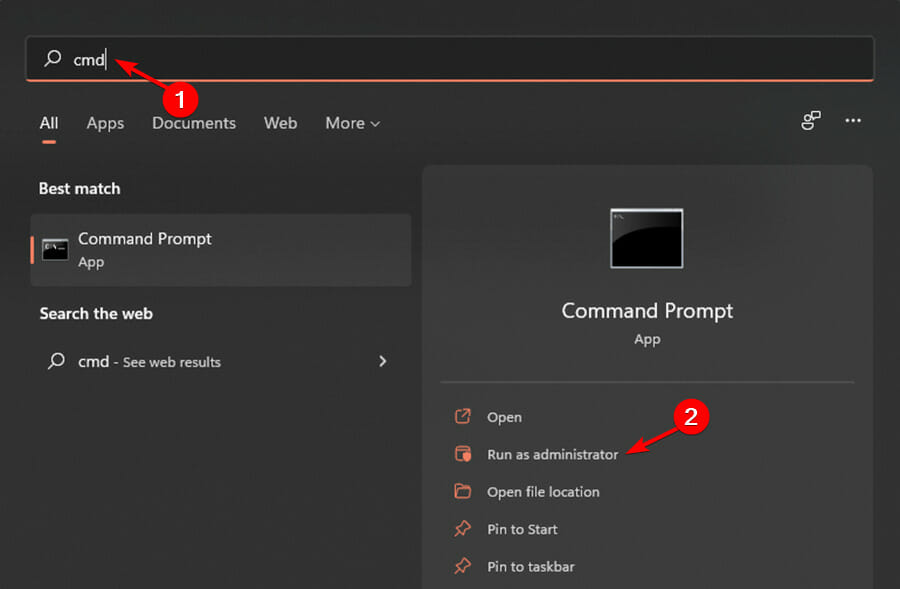
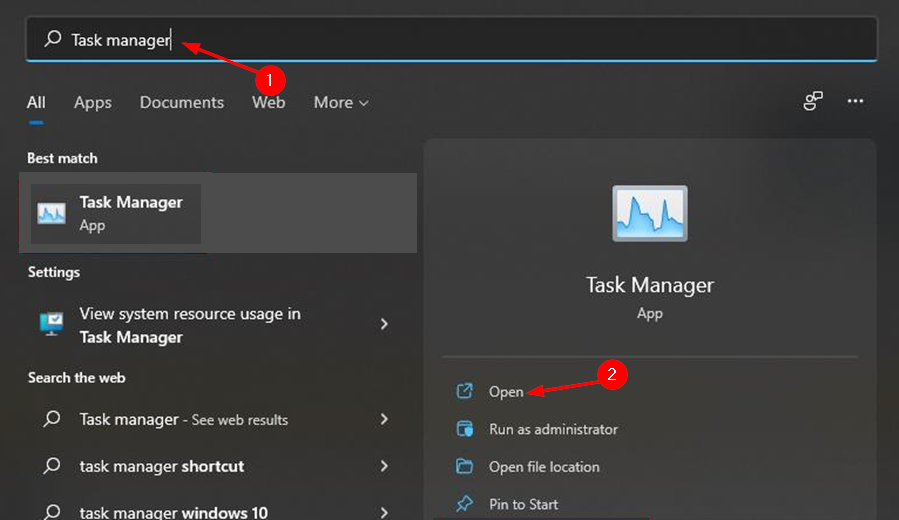
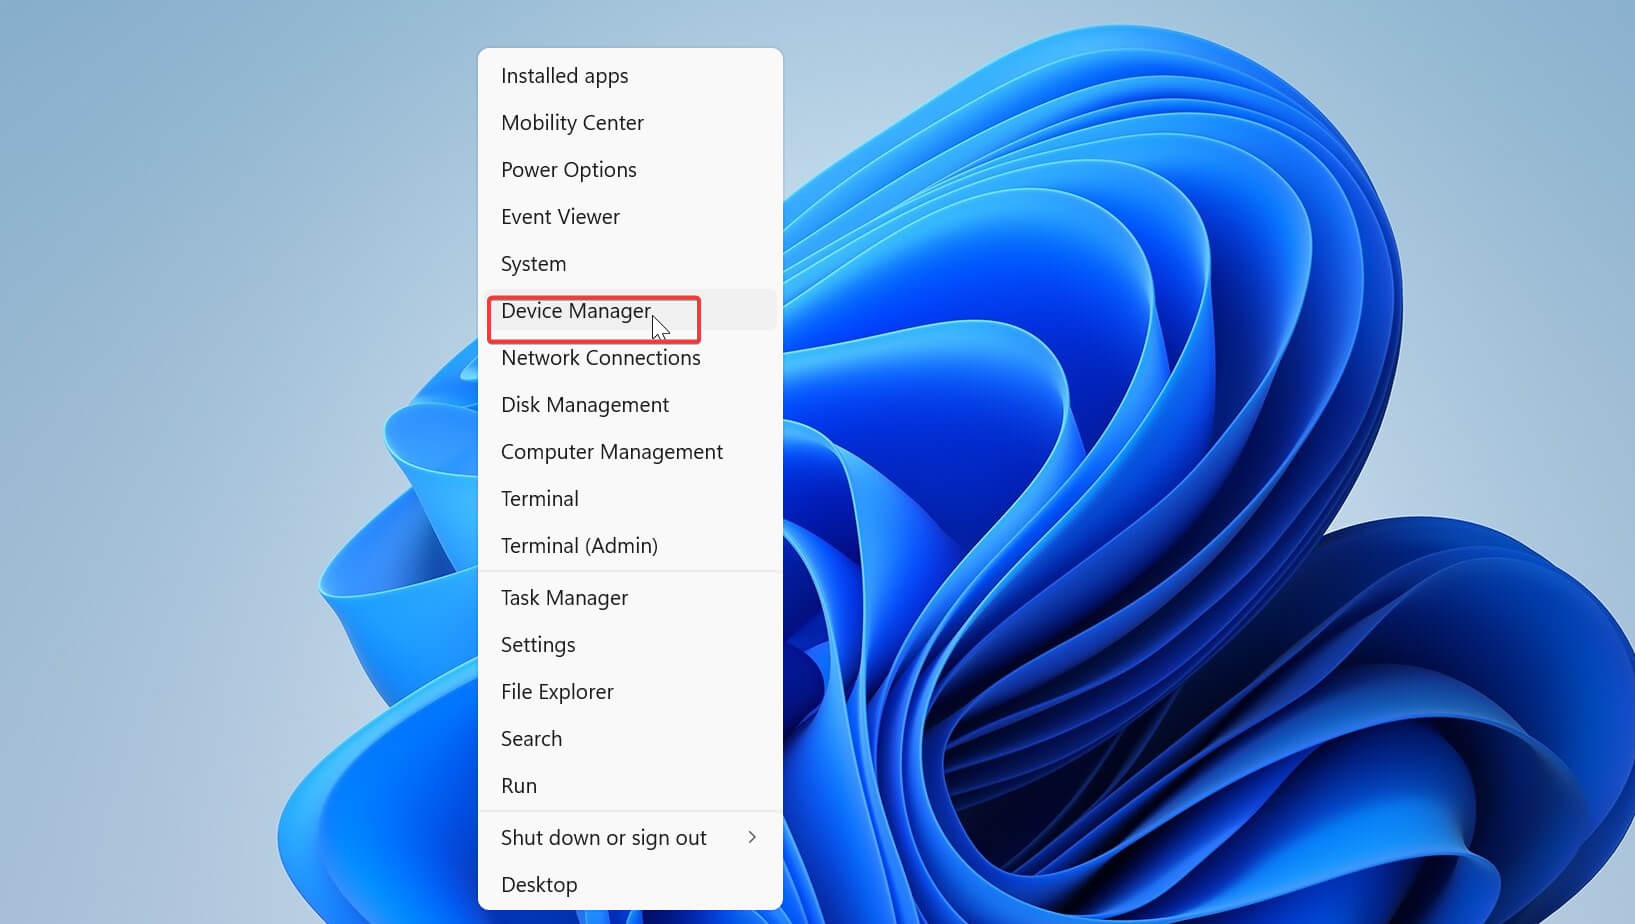
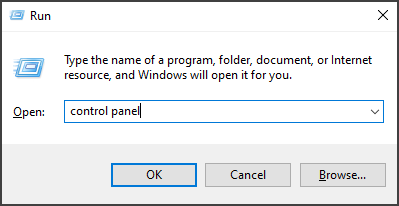
Numerous files get installed on Windows either through updates or download files. These files can be legitimate, while some are malware or viruses. However, the updates.exe file is one of those files users should take note of.
Many users complain about seeing the updates.exe file on their computer and don’t know what it means or does. It is an executable file for the Windows Operating System because of the .exe file extension against it.
Furthermore, Trojan:Win32/Sulunch!gmb or Trojan:Win32/Tookibe.B!bit (detected by Microsoft), and Trojan.Win32.Scar.fwsf or Trojan.Win32.Scar.lpco (detected by Kaspersky) has been identified to share this name.
Is updates.exe different from update.exe?
The updates.exe file is slightly different from the update.exe file. Their basic differences are:
The difference in spelling – Most users don’t notice the difference in spelling. However, the two files are different and mean different entities, though similar in some cases.
A variance of different apps – They are different in that update.exe is a variant of the IRCBot family of worms and IRC backdoor Trojans. It appears as an error message. While the updates.exe file is a Windows executable file, as said earlier.
Nevertheless, updates.exe and update.exe only have one thing in common: they can be malware or viruses. That is, their presence can be dangerous to your computer.
How do I fix the updates.exe error?
Go through the following before proceeding with any advanced troubleshooting:
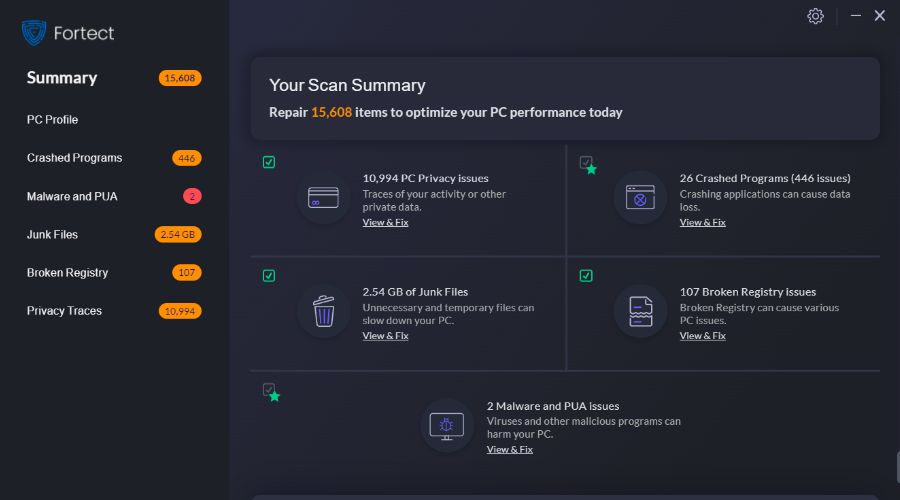
Sometimes, performing the SFC and DISM scan manually can take some time, thus we also recommend you try using a dedicated repair tool to do that automatically.
This software can help you scan your device and offer you a detailed report afterward with your missing or corrupt system files and then proceed to locate healthy parts as replacements.
2. Run System Restore
Left-click the Start button and type Restore, then click on Create a Restore Point.
Go to the System Protection tab and select System Restore.
Choose a different system restore and click Next to select a specific restore point.
Select the last time your PC worked perfectly, and click Next.
Click the Finish button.
System Restore backdates your PC to the last time it functioned properly, removing the corrupt files like updates.exe. Check how to fix the Restore point if it’s not working and if you have any issues running it.
Press Windows + R keys to open the Run dialog box, type appwiz.cpl, and click OK to open Program and Features.
Go to Add Or Remove Programs Option, select the program to remove, and then click the Uninstall button.
Follow the on-screen prompt to complete the process, then restart your PC.
The updates.exe file can be a file for an app recently installed on your PC. So, uninstalling the app should fix it. Read about other ways to uninstall applications on your PC.
4. Update Windows OS
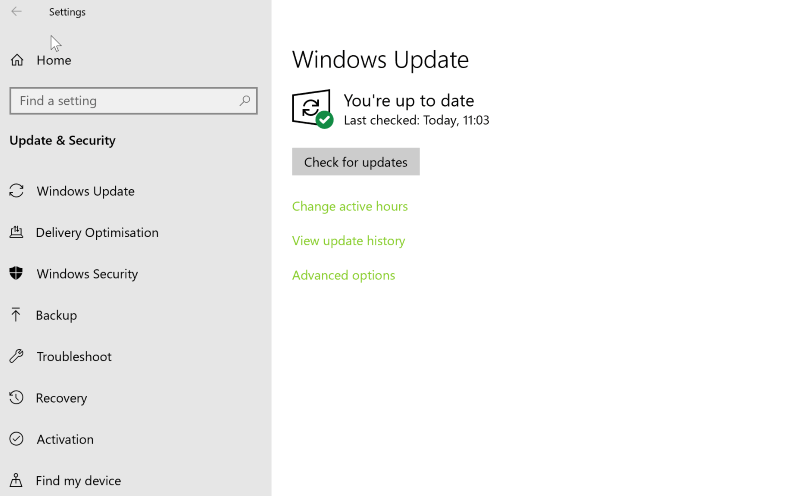
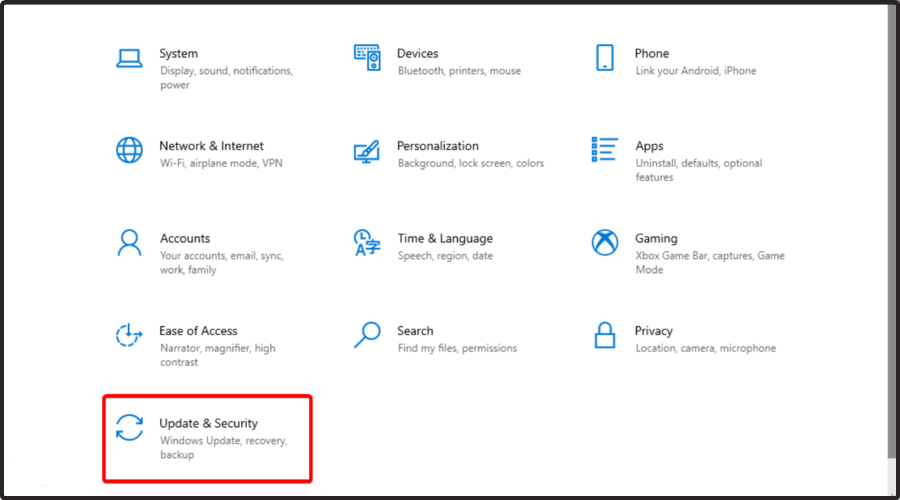
Press Windows + I key to open the Windows Settings app.
Select Updates & Security.
Click on Windows Update and select Check for updates.
If there are any updates available, it will search for and install them.
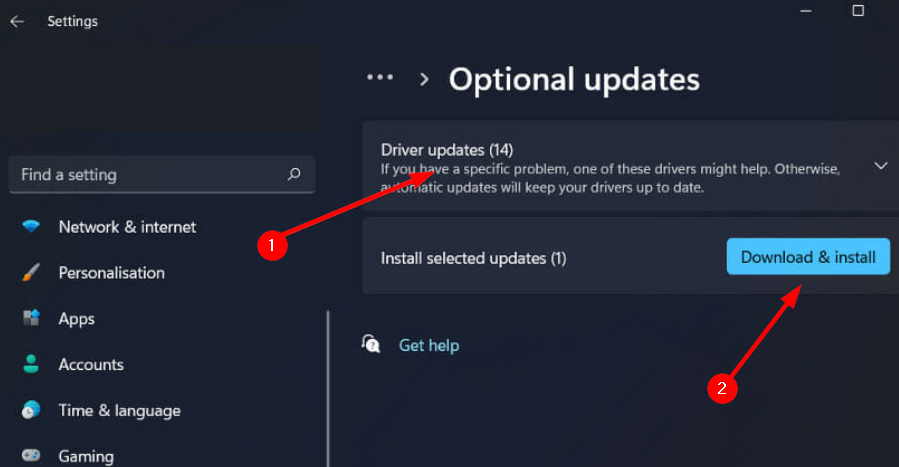
Updating Windows OS will fix bugs on your PC and update your drivers. It can resolve the updates.exe error. Read about fixing Windows not connecting to update service if the error occurs on your PC.
Conclusively, our readers can check the best antivirus software for Windows PCs to protect their computers. We also have a guide on App_updater.exe, so you might want to check it out.
Let us know which solutions worked for you in the comments area below.
Having the latest drivers installed on your Windows 10 PC is crucial if you want to ensure maximum performance and stability.
However, sometimes issues with drivers can emerge, and you might have to remove certain drivers from your PC.
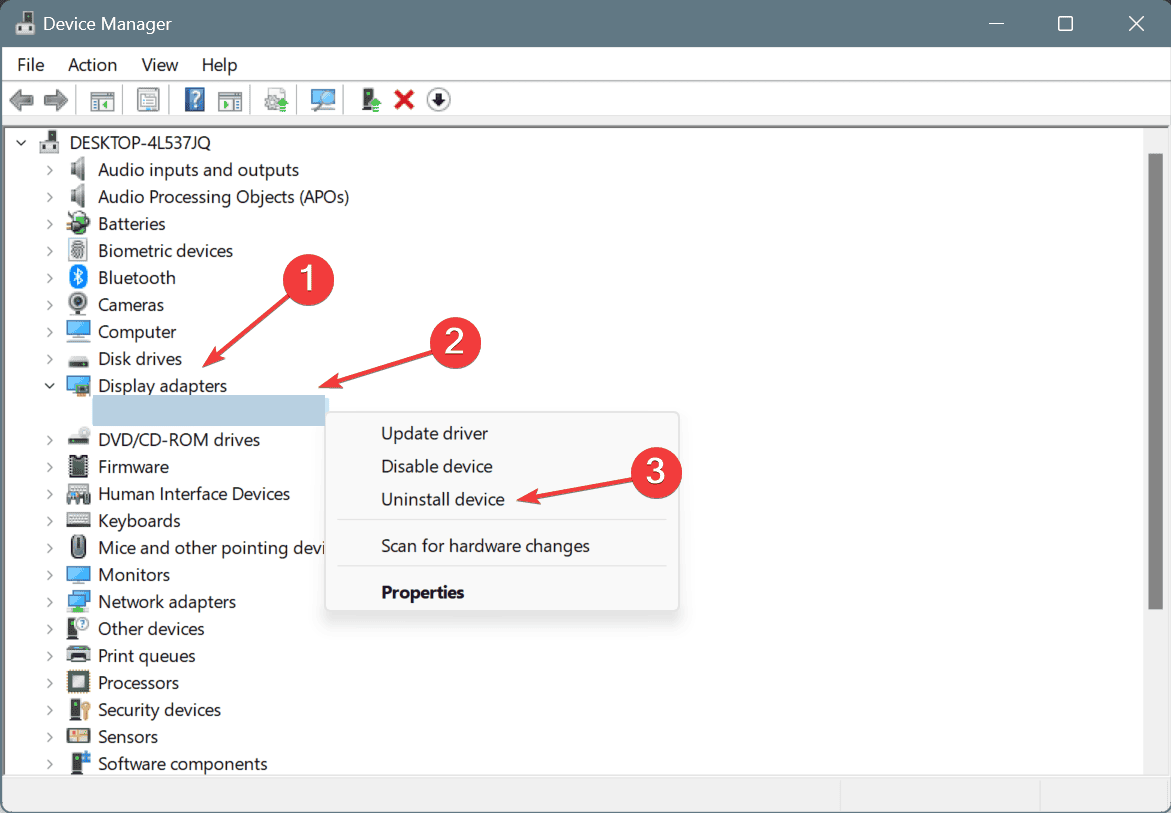
If you’re having problems with your graphics card and you need to remove its drivers, you might be interested in a tool called DDU: Display Driver Uninstaller.
Is DDU available for download?
Yes, this software is available for download, and you can use it if you need to uninstall Nvidia drivers completely from your PC. The software will remove the drivers and all their traces from your computer.
It’s also possible to use this software if you want to roll back NVIDIA drivers to the older version if the current one is giving you issues.
It’s important to mention that you can use this tool to uninstall AMD drivers and any other type of GPU drivers, so be sure to give it a try.
Display Driver Uninstaller is a great tool and, in this article, we’re going to cover the following issues:
Uninstall Nvidia drivers Windows 10 – If you have problems with your Nvidia drivers, you should be able to completely uninstall them using this tool.
How to use DDU – Display Driver Uninstaller is a simple to use a tool, and in this article, we’ll show you how to use it properly.
Display Driver Uninstaller AMD, Intel, Nvidia – DDU can remove almost any graphics card driver from your PC. The tool fully works with AMD, Nvidia and Intel drivers.
Display Driver Uninstaller Safe Mode – Sometimes in order to remove a certain driver, it’s advised that you remove it from Safe Mode. Display Driver Uninstaller can automatically enter Safe Mode and remove the problematic driver from your PC.
Nvidia display driver deletion of old versions – If you want to completely delete old versions of Nvidia drivers, DDU might be the perfect tool for you.
Display Driver Uninstaller portable – Display Driver Uninstaller is a fully portable application and you don’t have to install it in order to run it.
AMD display driver uninstall clean – If you’re having any problems with the AMD display driver and you want to completely remove it from your PC, DDU is the perfect tool for you.
Should I use DDU before installing new GPU?
When doing a driver upgrade, it is not necessary to run DDU prior to installing newer drivers on top of the previous versions of the drivers.
If you are experiencing problems that are related to your graphics card, you can use DDU to check and make sure that there are no hidden files that are influencing the drivers.
How do you use DDU 2022?
Display Driver Uninstaller is a freeware third-party application designed to remove your graphics card drivers.
Sometimes you might experience issues with your graphics card. In order to fix those issues, you might have to reinstall the graphics card drivers.
What does DDU do?
You can always remove the graphics card driver from Device Manager or by using its dedicated uninstaller.
However, the Display Driver Uninstaller allows you to thoroughly remove the driver from your PC. As you might have noticed, certain drivers can leave installation packages or registry entries once you uninstall them.
The Display Driver Uninstaller will remove all files associated with your graphics card including the installation packages and registry entries.
Sometimes it can occur that you can’t uninstall the graphics card driver due to a certain error in Windows 10, and this is why tools such as DDU can be helpful.
If you’re worried that the currently installed driver is causing any issues on your system, you can completely remove it from your PC by using this tool.
Since this is such a powerful tool, it’s recommended that you create a System Restore point before using it.
In case anything goes wrong while removing the driver you can easily restore your system by using the System Restore point.
If you’re interested in more info on how to create a restore point and how would that help you, take a look at this simple article to find out everything you need to know.
It’s also recommended that you add DDU to the list of exclusions in your antivirus software so it can have full control over your system while removing the driver.
Can I use DDU in normal mode?
Yes, you can. But if you wonder If you wonder how to use DDU in Safe Mode, you can follow the steps above, right after you enter Safe Mode.
How to use DDU
In order to remove drivers using DDU, all you have to do is download and install the app. Then, select the desired removal option.
Display Driver Uninstaller works with Nvidia, AMD, and Intel drivers.
2. The installer tool for DDU will be downloaded as a 7zip archive. Locate the downloaded file and double-click it.
3. Now you’ll be asked to extract the tool. Choose the extract location and click Extract.
4. After the tool is extracted, double click the Display Driver Uninstaller icon to start it.
5. You should see a warning message saying that it’s recommended to use this tool in Safe Mode. You can boot to Safe Mode simply by choosing the Safe Mode option from the Launch option menu.
6. After selecting Safe Mode click theReboot button. You can also run the application without using the Safe Mode simply by choosing theNormaloption from theLaunch optionmenu.
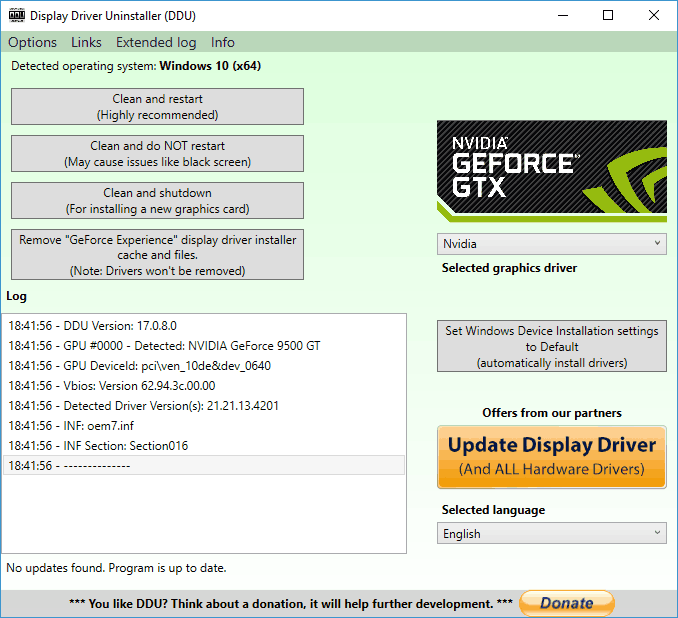
7. When Display Driver Uninstaller opens, the log will show you the information regarding your graphics card. You can also choose the graphics card driver from the menu on the right, but in most cases, Display Driver Uninstaller should automatically detect your graphics card driver.
8. You’ll see three buttons available on the left side. If you’re installing a new driver for your graphics card, simply select Clean and restartbutton.
9. If you’re installing a new graphics card, you can use Clean and shutdown button to remove the driver and turn off the PC.
10. There’s also an option to clean the driver without a system restart, but this option can sometimes cause some minor issues with your PC.
11. After selecting the desired option, wait while Display Driver Uninstaller removes the driver.
After the PC restarts, your display driver will be completely removed, and all driver-related issues with your graphics card will be resolved.
Now you just need to install a new driver for your graphics card and check if the problem is resolved.
If you don’t manage to access Safe Mode from Display Driver Uninstaller, you can run the tool directly from Safe Mode by performing the steps above.
And if Windows won’t boot into Safe Mode from the first try, don’t panic. We will help you overcome any booting problems that might come along.
As you can see, the Display Driver Uninstaller is a simple yet powerful tool. You don’t even need to install it on your PC to make the most of it.
Needless to say, this means that you can easily run the tool on any PC.
As far as compatibility is concerned, Display Driver Uninstaller will seamlessly work with older versions of Windows, plus it supports both 32-bit and 64-bit systems.
We also have to mention that this tool has support for multiple languages, so it’s quite possible that your native language is available in the list of translations.
Alternatively, you can go for an even better-equipped program such as expert driver removal software to get the job done.
Simple, yet highly effective, DDU will be useful to both advanced and rookie-level users. So, make sure you give it a go.
If you are trying to make an in-app purchase on Microsoft Store but are stuck with PEX-Catalog Availability Data Not Found error message, you are not alone. Unfortunately, it is pretty standard and can be fixed in no time.
Here, we will walk you through the methods to get rid of this error message right after discussing the causes for the same.
What causes the PEX-Catalog Availability Data Not Found error?
There can be a lot of reasons for this error to come up. We have listed some of the common ones here:
Slow internet connection – If the internet connection is flaky or is not working correctly, you might get the error when accessing Xbox Game Pass.
Incorrect date and time – While connecting to the server, the app checks your region, date, and time. If the date and time are not set according to your region, you might get the error. Change the date and time and try again.
What can I do to fix the PEX-Catalog Availability Data Not Found error?
Before diving into the troubleshooting steps, please go through these preliminary checks:
Restart your computer.
Check for Windows Updates.
Set time and date according to your region.
1. Update Store apps
Go to Search, type Microsoft Store, and click Open.
On the app, in the left-hand corner, click Library.
Now click Get updates.
If any update is available, click Update all, select an individual app, and click Update.
2. Reset the Microsoft Store app
Press Windows + I to open Settings.
Go to Apps, then click Installed apps.
Locate the Microsoft Store app, click three dots and select Advanced options.
Type wsreset.exe and press Ctrl + Shift + Enter to run as Admin.
You might have to run this a few times.
5. Use the Registry Editor
Press Windows + R to open the Run window.
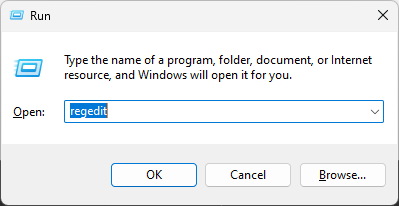
Type regedit and press Enter.
Follow this path: HKEY_LOCAL_MACHINE\SOFTWARE\Microsoft\Windows NT\CurrentVersion\NetworkList\Profiles
Right-click on Profiles and select Permissions.
Now on the Permissions for Profiles window, click Advanced.
Place a checkmark beside Replace all child object permission entries with inheritable permission entries from this object.
Click Apply and OK.
On the Permissions for Profiles window, click Apply and then OK.
Close Registry Editor and restart your PC
6. Reregister Microsoft Store
Press Windows + X to open the context menu, and select Terminal (Admin).
Copy and paste the following command and press Enter: Get-AppXPackage *Microsoft.WindowsStore* | Foreach {Add-AppxPackage -DisableDevelopmentMode -Register "$($_.InstallLocation)\AppXManifest.xml"}
Once done, launch the Microsoft Store.
So, these are the methods to fix the Xbox Game Pass PEX-Catalog Availability Data Not Found error. Try them and let us know which worked for you in the comments section below. Also, if you are facing another Microsoft Store error while accessing an app, check this out.
Most users received Windows 10 as a free upgrade through Windows Update. Other users prefer to install the new operating system from a physical drive like a USB flash drive.
In this article, we will show you how to create a USB flash drive with Windows 10, which can be installed on UEFI-based computers.
If you’re not the one who really needs to install Windows 10 on a UEFI-based computer, but you’re reading this article just for education, you may not be familiar with the term UEFI.
UEFI is the replacement for BIOS, so it’s a new firmware that starts the computer and loads the operating system. And more and more new Windows PCs are coming with it.
Yes, Rufus can create a UEFI bootable USB. Rufus is a free and open-source utility that allows users to create bootable USB drives for various purposes, including booting and installing operating systems such as Windows, Linux, and others.
In the guides below, we will present how to create a Windows 10 bootable USB drive from ISO in just a few steps, using Rufus and Media Creation Tool.
Another method to create a bootable USB on Windows 10 is to use the Rufus USB image writer. It is a third-party standalone utility, so you don’t have to install it, just download and open it.
3. Select the USB flash drive you want to create an image on.
4. Select the GPT partition scheme for UEFI (leave cluster size to default). Make sure you have the option Create a bootable disk usingISO Image selected from the dropdown menu.
5. Add your Windows ISO file (you can download your Windows 10 ISO files fromfrom Microsoftfor free), and click Start.
6. Wait until the process is finished.
7. Now just restart your computer and install the system normally.
2️⃣ Use the Media Creation Tool from Microsoft
Make sure you have an active Internet connection.
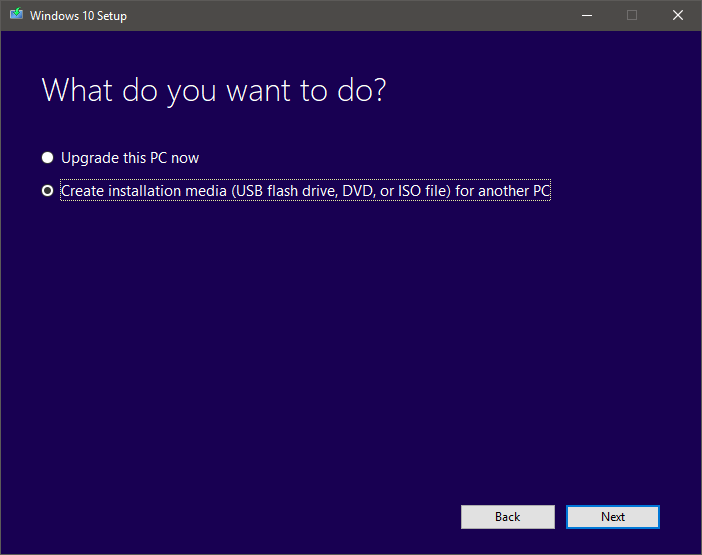
Select Create installation media (USB flash drive, DVD, or ISO file) for another PC option and click Next.
Select the language, architecture, and edition of Windows 10. It’s important to choose the correct architecture, 64-bit or 32-bit or you can simply select both.
Select the USB flash drive option.
Select the removable drive you want to use from the list.
Wait until the download is over.
Besides Rufus, the Media Creation Tool is the most recommended tool to create a USB bootable Windows 10 system. Before you start, please download the updated file.
After the Windows 10 installation files have been downloaded, your computer will create a bootable USB that will be compatible with devices using UEFI or BIOS.
The Realtek HD Audio Driver is one of the most common pieces of software for changing and tweaking audio settings on your PC. However, there are some difficulties that might cause Windows 11’s Realtek audio driver to stop functioning properly.
A variety of factors might contribute to Realtek HD Audio Driver issues. The majority of the challenges may be addressed by taking the steps outlined in this guide. Keep up with us!
Is Realtek audio driver compatible with Windows 11?
Realtek HD Audio Driver is the most user-friendly audio driver software that enhances sound quality and provides Dolby or Surround sound support via a sound card.
This driver is completely compatible with Windows 11, and this is not the cause of different issues with the driver. Here are the most common causes:
Outdated drivers – Driver updates go hand in hand with OS ones. Thus, if your OS will update but your drivers won’t, it might cause miscommunications across your device. In this case, it is advised to update your Realtek audio driver.
Enhancement audio settings – There are multiple audio enhancement software and settings that may cause issues with the driver. Thus, we will show you below how to disable them.
Corrupted drivers – Corrupted drivers are another reason which causes your OS to unsuccessfully communicate with your driver. By reinstalling the driver or installing another one, you will be able to fix this issue.
Wrong port connections – Make sure that you connect the audio cable to the right port and not the one for an audio input, which is usually pink.
How do I fix my Realtek audio driver in Windows 11?
Before moving on to more complex troubleshooting solutions, make sure to do the following:
Check the audio output, unplug and reconnect the device, then connect it to another system to test its functionality.
Click on the Volume icon in the Taskbar. Alternatively, you can press Windows + A to launch it.
In the Quick Menu, click on the carrot arrow icon next to the volume level.
It will prompt you with a list of audio devices connected to the system. Select the desired device.
If selecting the desired device did not resolve the audio issue, it is possible that other system faults, for which we have provided alternative solutions, were the source of the problem.
2. Restart the Audio service
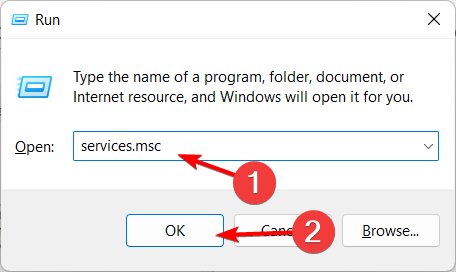
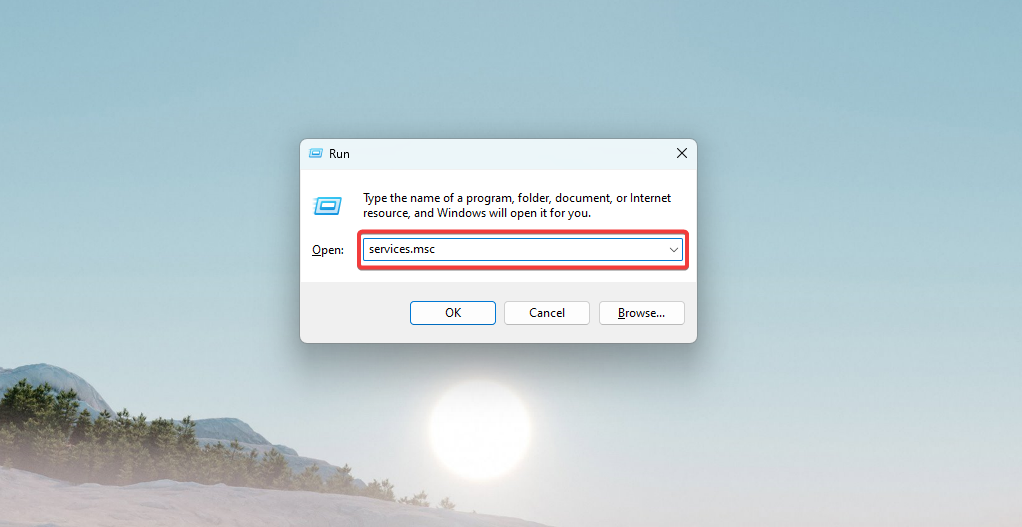
Press the Windows key + R, which opens Run. Then enter services.msc in the open box, and click the OK button.
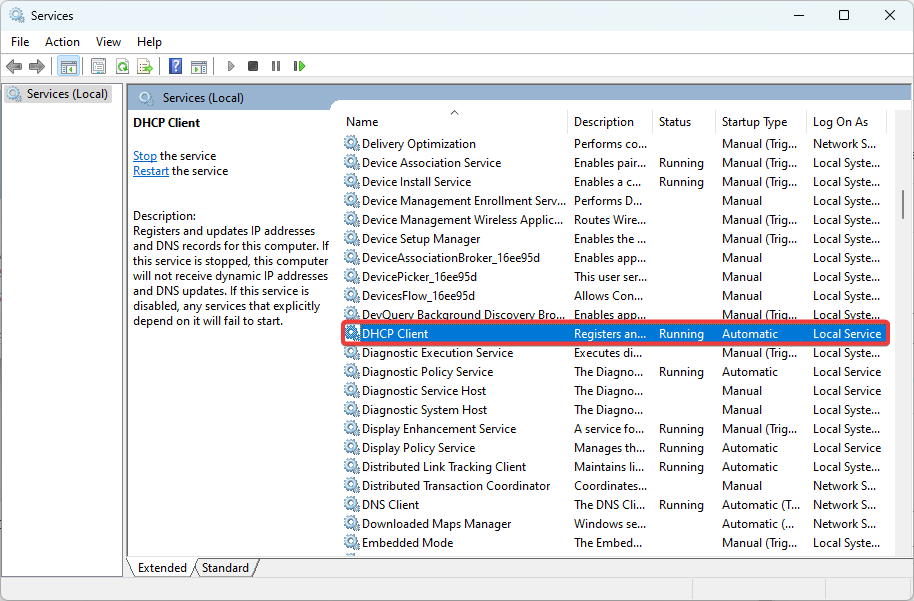
Find the Realtek audio service, right-click it and select Restart.
3. Update the driver
If it isn’t constantly updated, the Realtek HD Audio Driver may stop functioning correctly. Follow these easy steps to correctly update the driver and fix the issue!
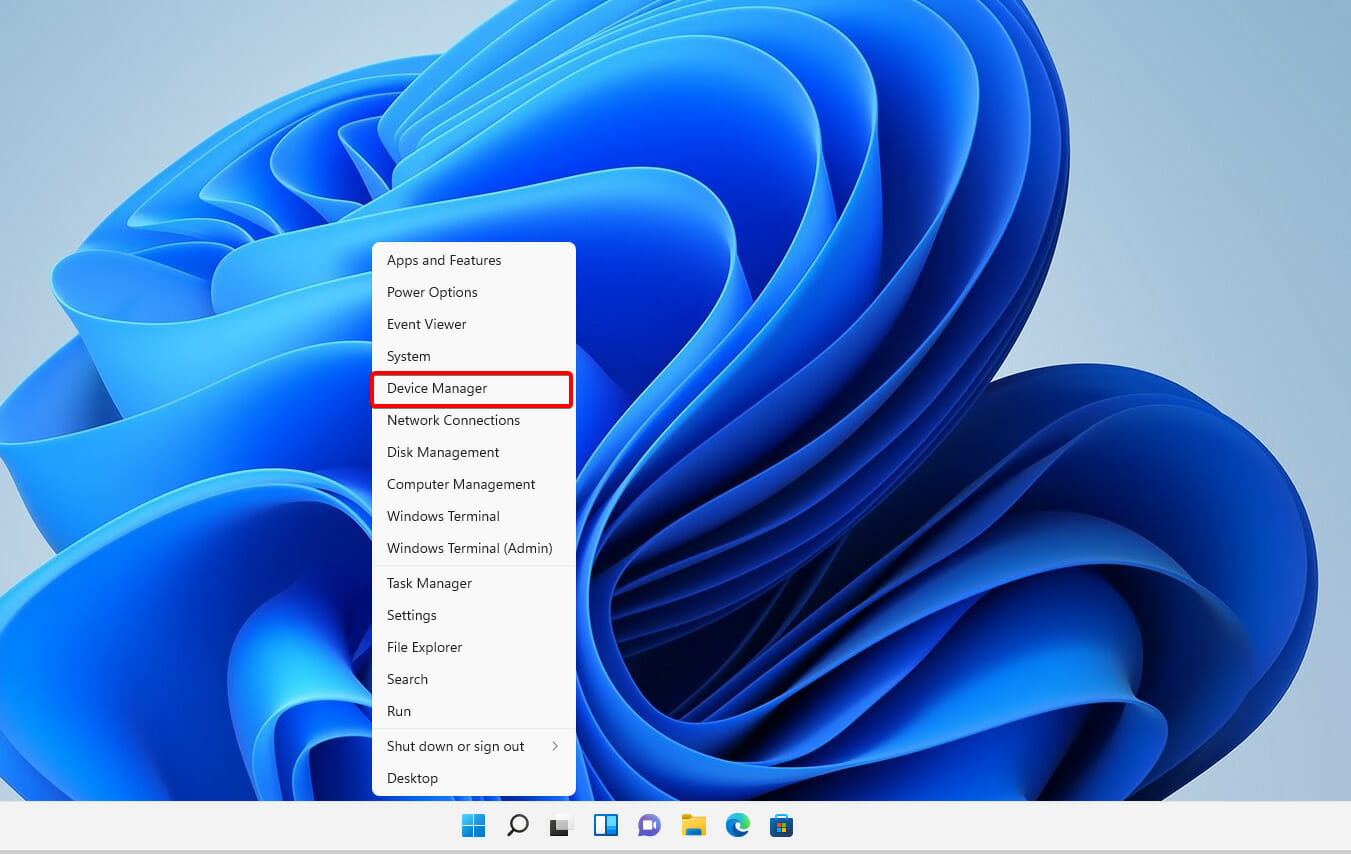
1. Right-click on theStart iconin the Taskbar or pressWindows+Xto launch theQuick Accessmenu then selectDevice Manager.
2. Locate and double-click theSound, video, and game controllersoption. Right-click on theRealtek Audio deviceand selectUpdate driverfrom the context menu.
3. Select theSearch automatically for driversoption as Windows will find the best drivers on your system. Reboot your PC afterward.
We strongly advocate using a specialist program such as Outbyte Driver Updater to do automatic scans for out-of-date drivers.
Outbyte Driver Updater
Safely update the Realtek driver as well as all other outdated drivers on your system.
4. Reinstall the Realtek driver or use your manufacturer’s
Right-click on the Start icon in the Taskbar or press Windows + X to launch the Quick Access menu. Select Device Manager from the list of options displayed.
Locate and double-click on the Sound, video, and game controllers option. Right-click on the Realtek Audio device and select Uninstall device from the context menu.
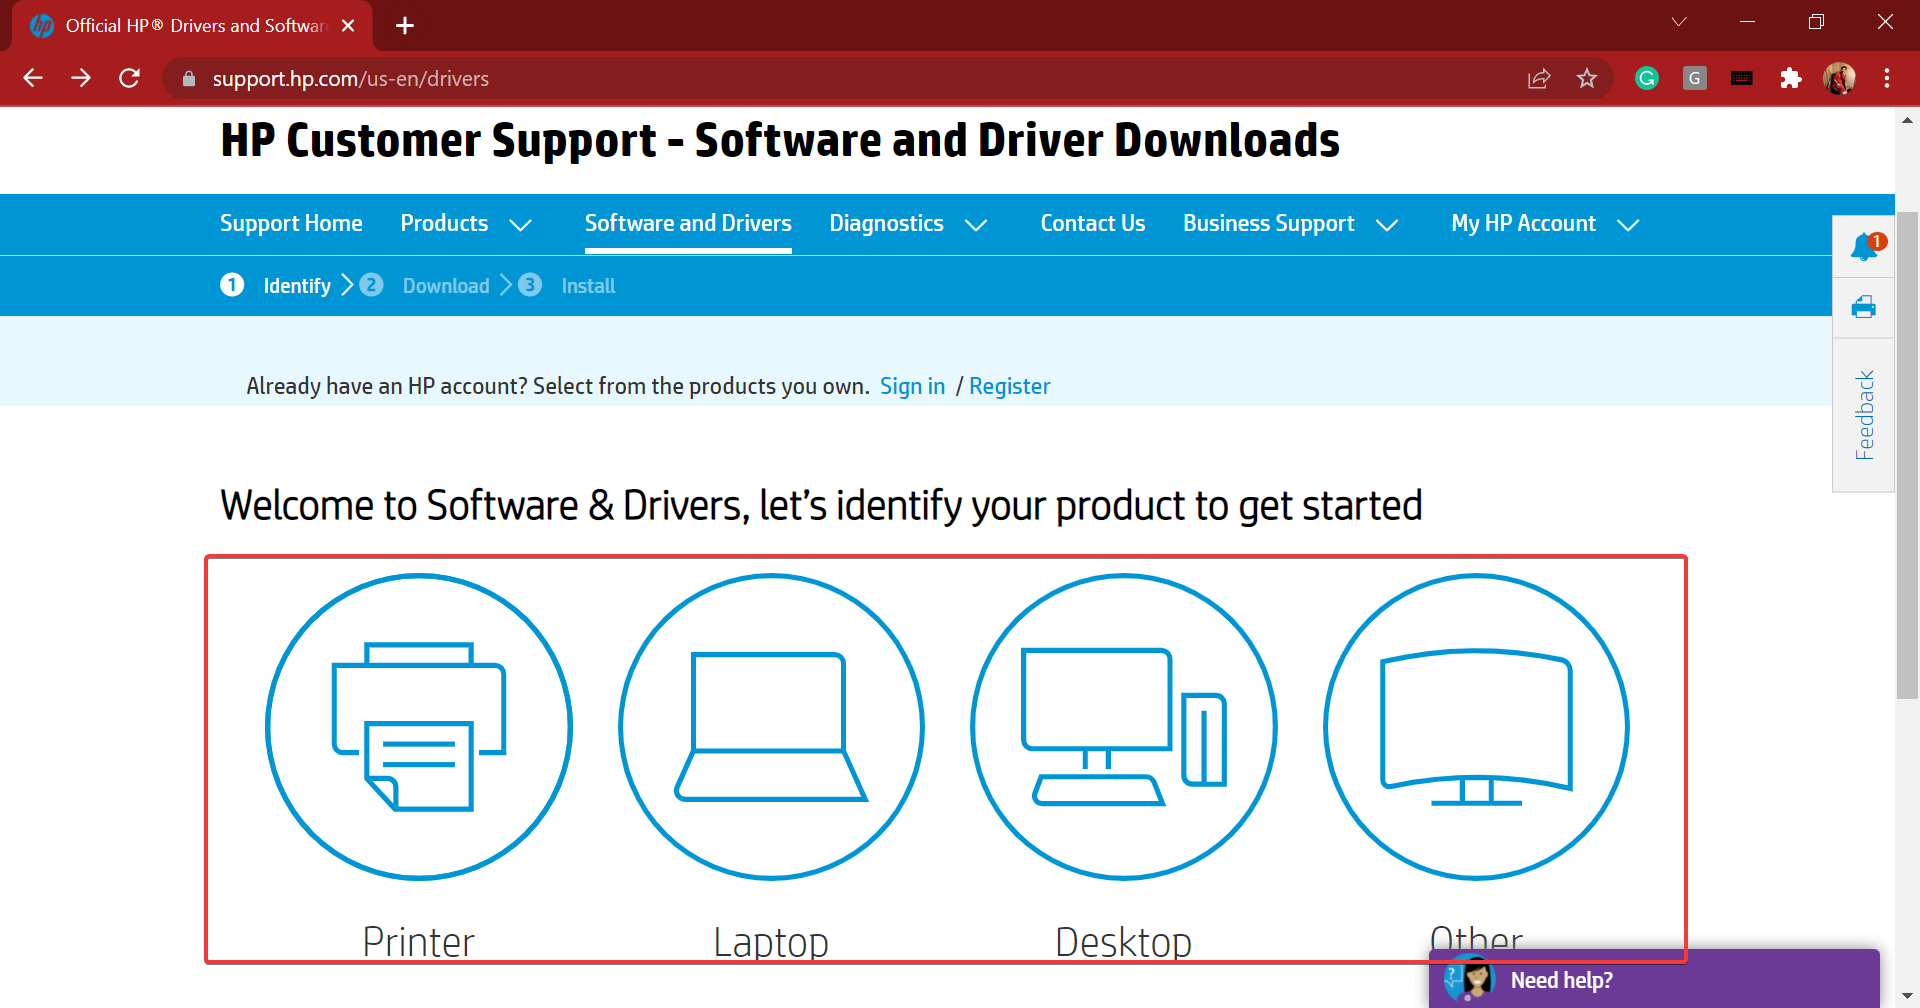
You can now either reboot your PC to automatically reinstall the Realtek driver, or head to your manufacturer’s website and search for an audio driver and download it. For example, here is Lenovo’s support page where you can find all drivers.
After you have completed the procedures outlined above, restart your computer. Windows will automatically update the driver to the most recent version available. It will also remove any corrupted driver files that may have been present.
Press on the Windows key + S, and search for Change system sounds.
Inside the Sound panel, navigate to the Playback tab, then select the speaker you are having trouble with, and click on Properties at the bottom.
Click on the Enhancementstab, then tick the checkbox for Disable all enhancements, and click the OK at the bottom to save the changes and close the window.
6. Run the Audio Troubleshooter
Right-click on the Start icon in the Taskbar or press Windows + X to launch the Quick Access menu. From the list of options, select Settings.
The System tab will be open by default. Scroll down on the right side of the window and select Troubleshoot from the list of options.
Tap on Other troubleshooters.
Locate the Playing Audio troubleshooter and click on Run next to it.
Select the audio output device you are having issues with and click on Next at the bottom.
Windows will now identify any issues with the device or configured settings and fix them. Instructions will be displayed once the errors are found, so make sure to follow them carefully.
7. Run System Restore
NOTE
System Restore will not delete any files on the system, however, recently installed applications, changes in settings, and driver updates may be removed.
Press on the Windows key + S, search for Create a restore point, and click on the relevant search result.
The System Protection tab will automatically open. Click on System Restore under it.
The Recommended restore point will be selected by default, but you can select another one by clicking on the Choose a different restore point option. After this, click on Next at the bottom.
If everything looks fine, click on Finish at the bottom.
After your system has been successfully restored, the Realtek audio problem will be immediately repaired by the operating system. In case you don’t have a restore point created, check our guide on how to create a restore point in Windows 11.
8. Update Windows
Press Windows + I to open the Settings app. Click the Windows Update section then click Check for updates on the right.
Reboot your PC afterward. The Realtek audio driver not working in Windows 11 issue will be fixed.
What to do if there’s no sound at all?
If you notice your sound has been missing altogether after installing Windows 11, you might want to check in with Microsoft’s help center.
The help service will offer you more actions to take in order to solve the sound issues at hand. To talk with its support team, click the Get support link on the Contact Microsoft Support page. Thereafter, click the Contact Support button after entering a description.
However, if you try all of the above-suggested options or read our post on how to solve no sound in Windows 11, you may not need to call any support service.
The previous solutions will be insufficient if no output devices are identified in Windows 11. Instead, check our article on Windows 11 not recognizing output devices, to get a different list of quick remedies.
We hope that these methods were helpful in resolving your Realtek HD Audio Driver issues. Let us know what you think in the comment section below, and which solution worked best for you!
This guide shows you how to download and install the Realtek audio driver for Windows 11 64-bit, either manually from your PC brand’s website or using an automatic tool.
Why does it matter? This driver powers your sound speakers, headphones, and microphones across apps and devices. Without it, you’ll get poor audio or none at all.
Let’s get it working.
How can I install the Realtek audio driver in Windows 11?
Now, enter the product name or serial number in the provided text field, and click the Submit button.
Click on the All drivers entry to check out the various available ones. Also, ensure that the latest iteration is selected as the operating system. If it isn’t, click on Choose a different OS and select Windows 11.
Now, locate the Realtek audio driver, and click on the Download option next to it.
You can now download the install assistant or click on No thanks, I will download and install manually. We choose the latter.
Once the setup is downloaded, click on it to launch the installer.
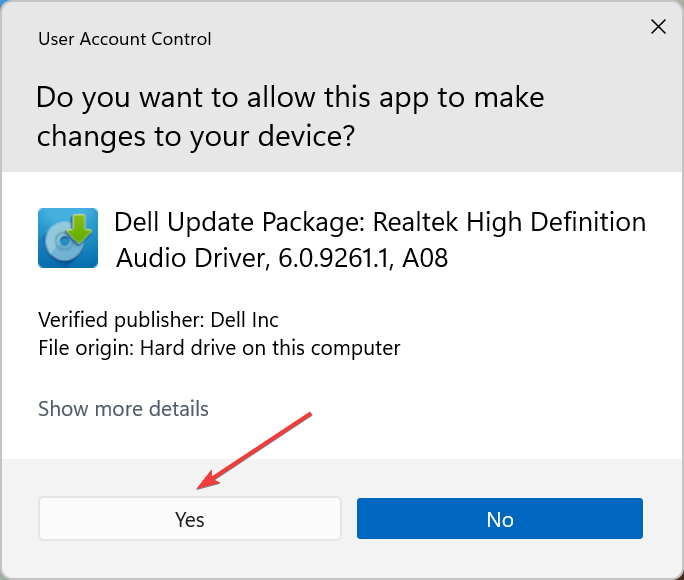
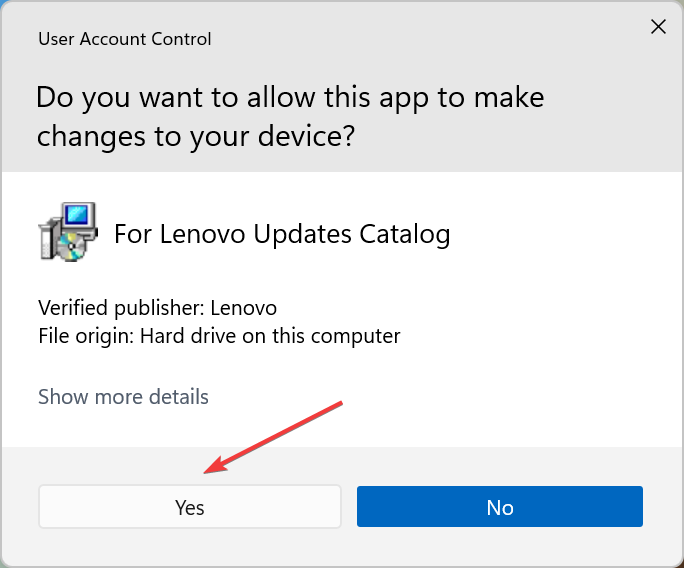
Click Yes on the UAC (User Account Control) prompt.
Now, follow the on-screen instructions to complete the installation process, and restart the computer once it’s done for the changes to come into effect fully.
Once done with the steps listed here, you will have the Realtek audio driver downloaded and running in Windows 11.
Also, if you don’t want to go through the trouble of manually searching for the driver, use a reliable third-party app. A good option in that category is Fortect Driver Updater.
2. Realtek audio driver for Dell in Windows 11
Go to the driver downloads section on Dell’s website, enter a product identifier in the designated text field, and click Search.
Now, click the Find drivers option to search for the Realtek audio driver manually.
Enter Realtek audio in the Keyword text field and choose Windows 11 from the Operating system dropdown menu.
Now, scroll down and click the Download button next to the Realtek audio driver.
Once the setup is downloaded, click on it to launch the installer.
Click Yes on the UAC (User Account Control) prompt.
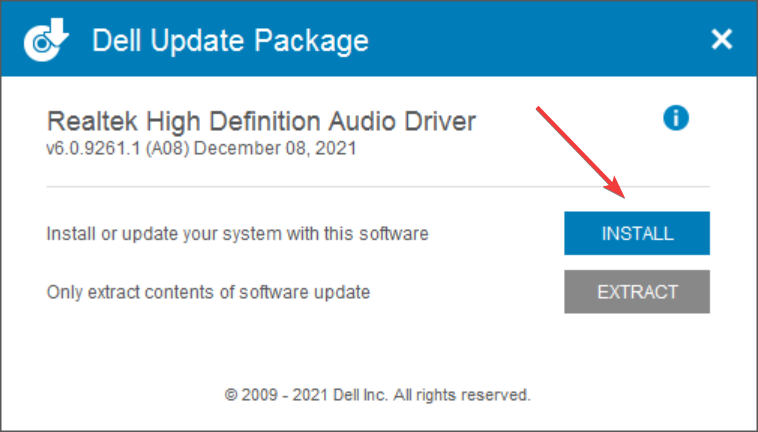
Next, click Install and follow the on-screen instructions to complete the process.
Once you have downloaded and installed the Realtek audio driver in Windows 11, restart the computer for the changes to effect, and you are good to go.
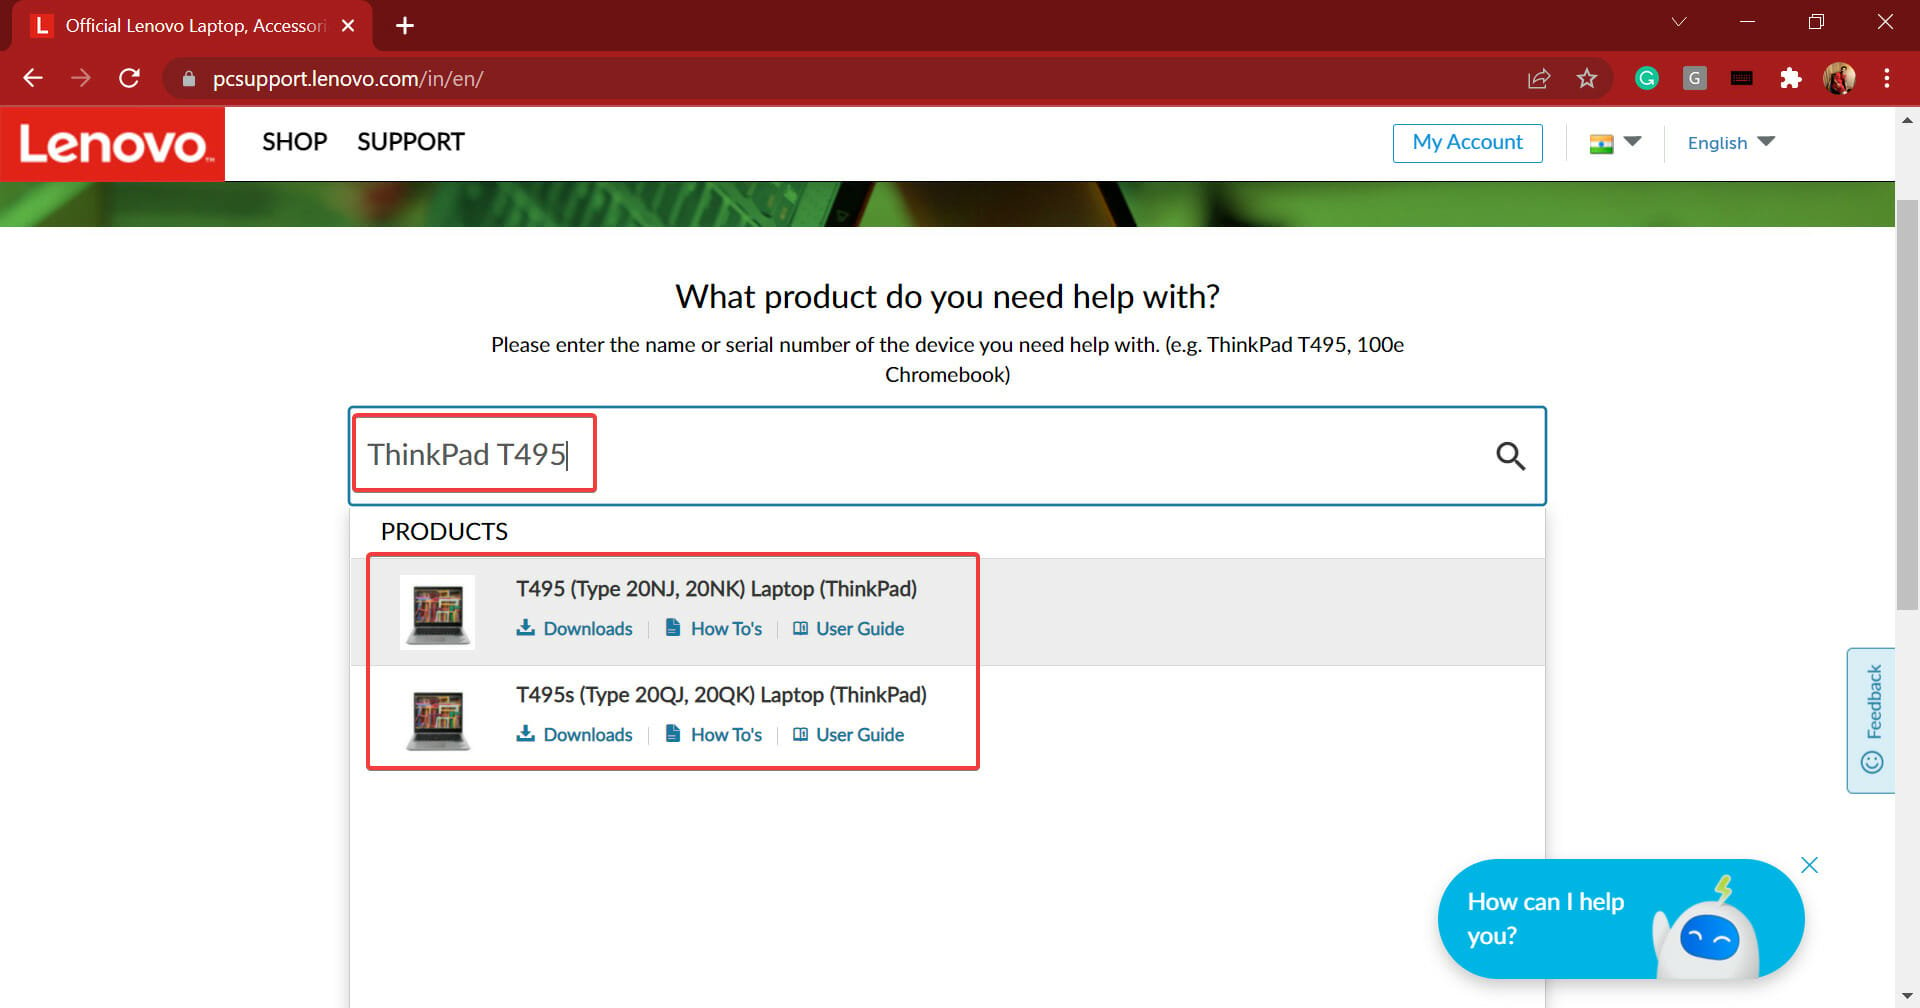
Now, enter the device name in the designated text field and select the appropriate option once it appears in the search results.
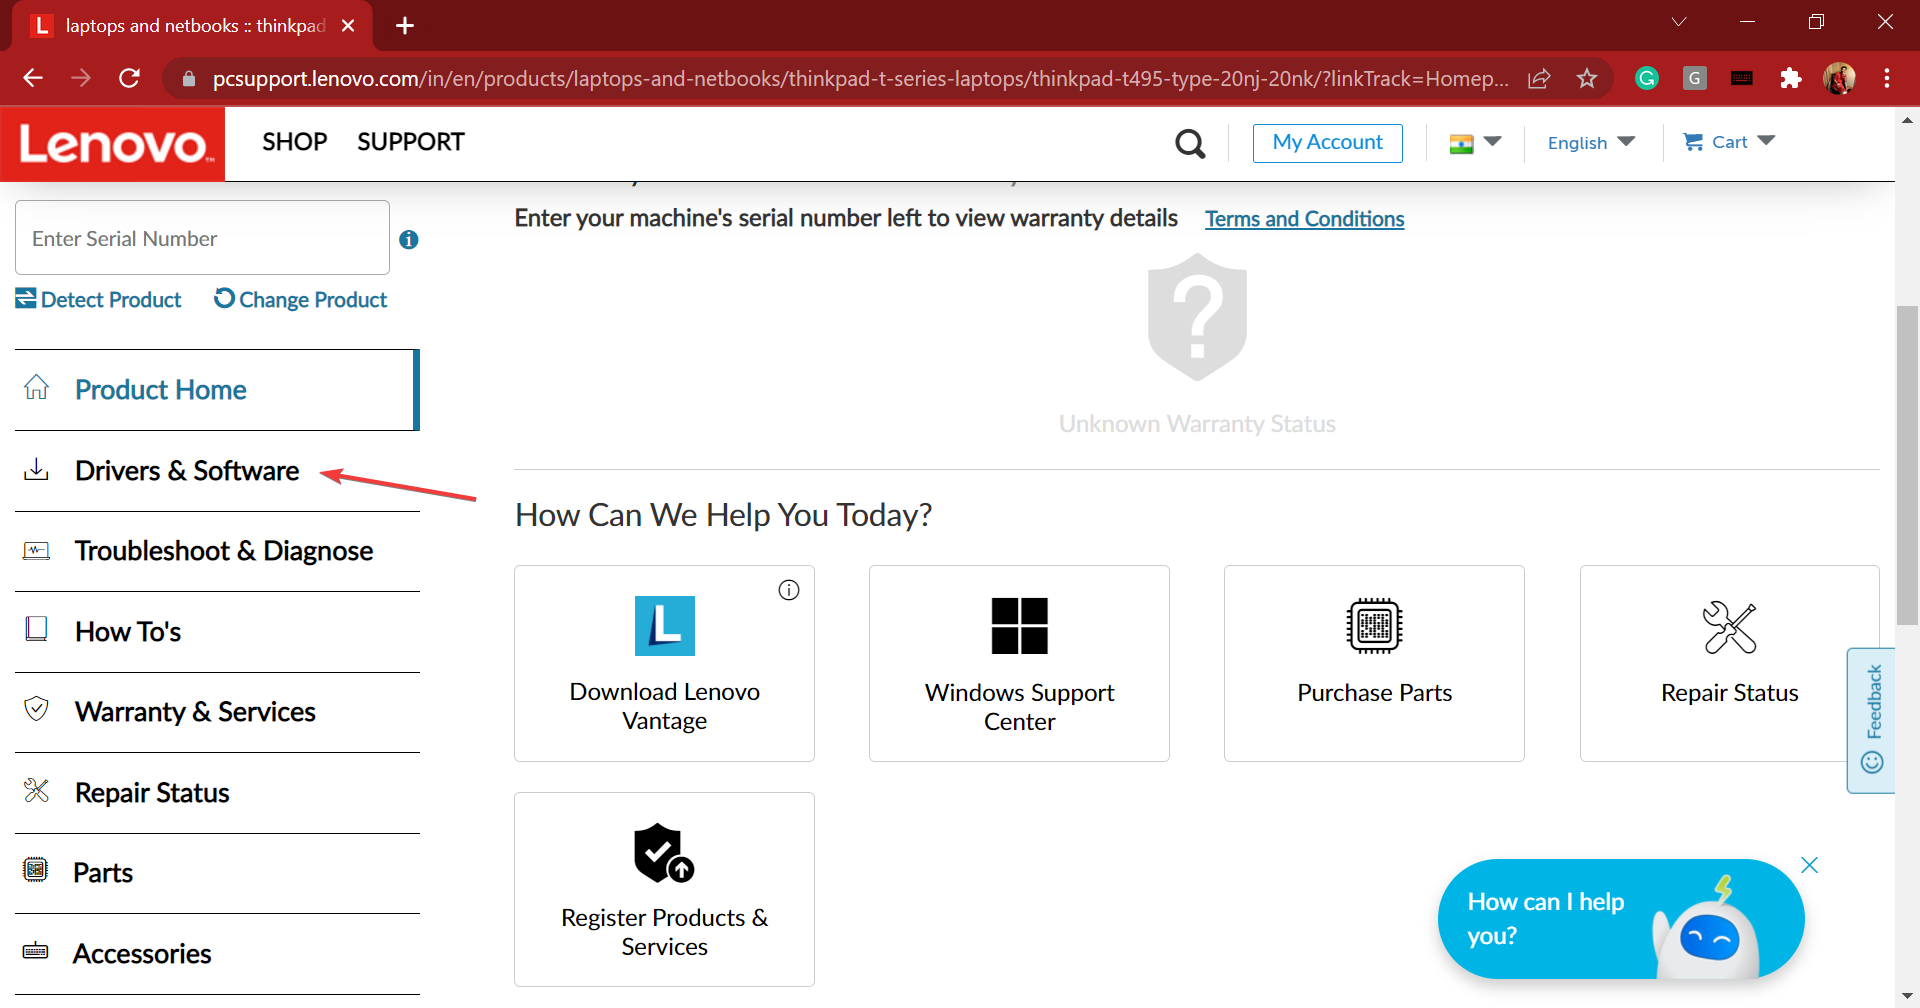
Select Drivers & Software from the navigation pane on the left.
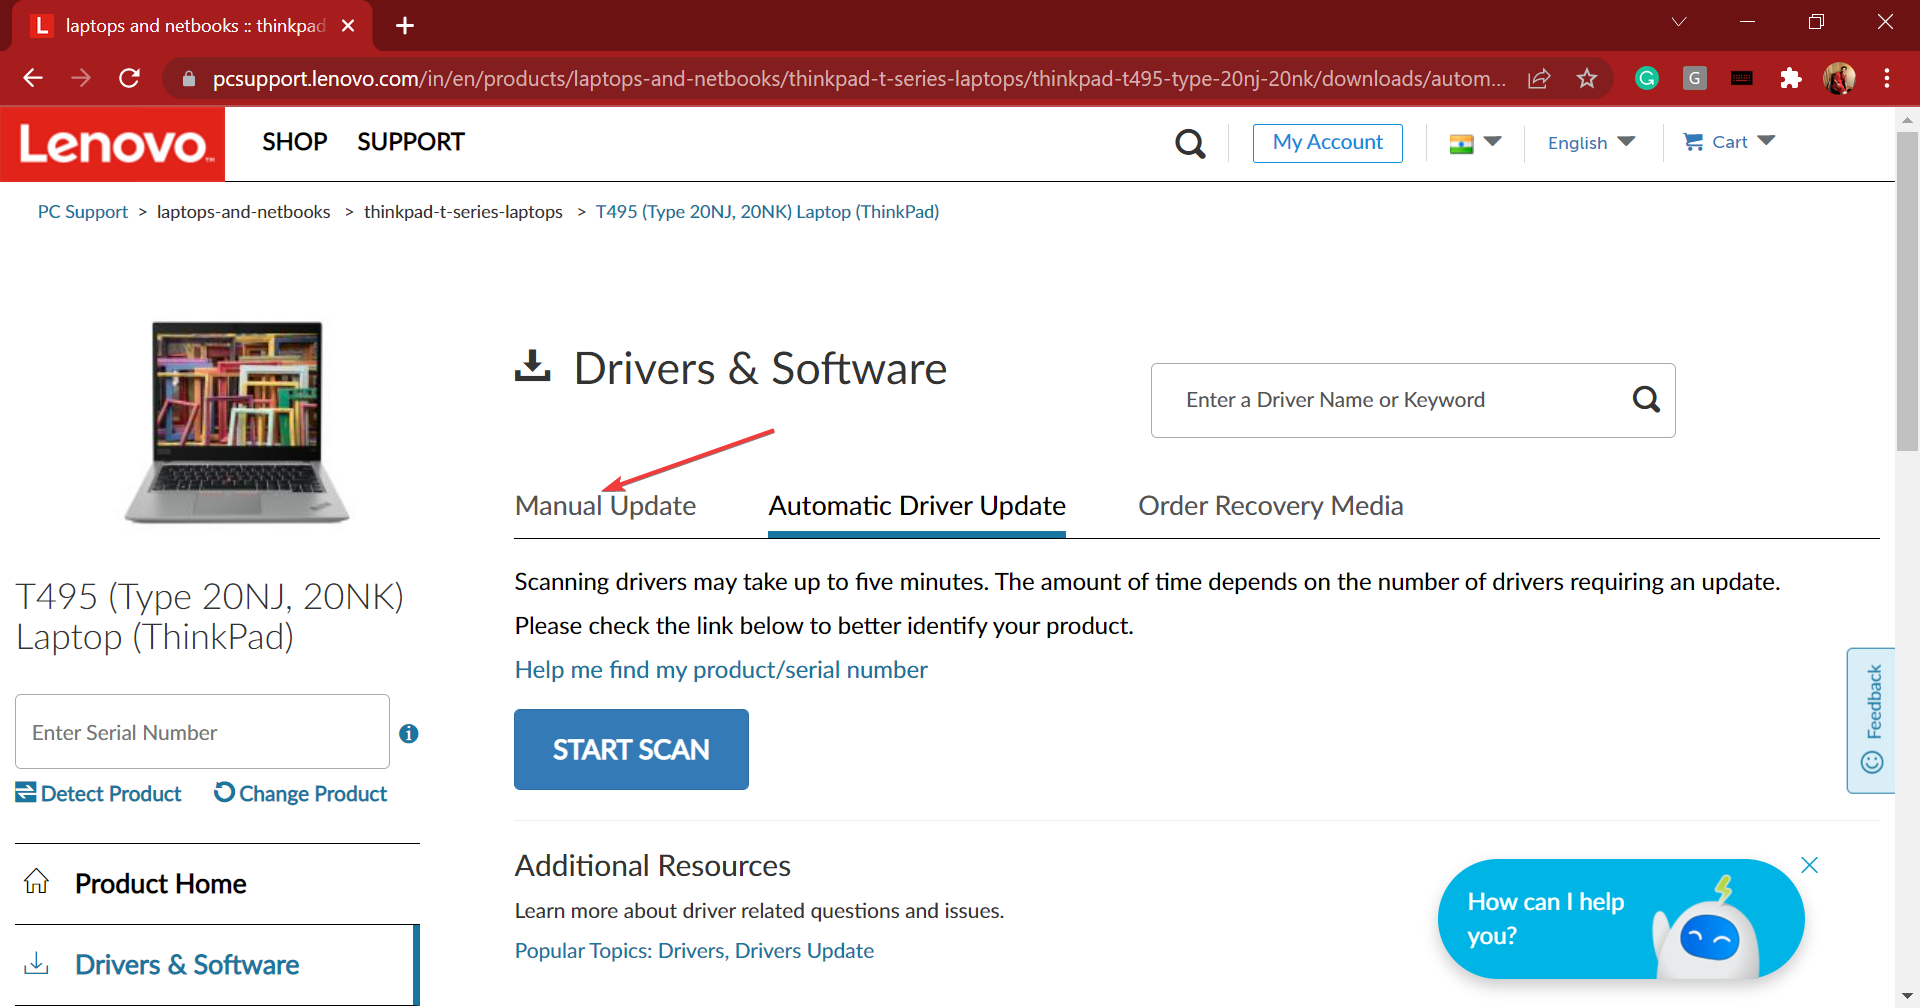
Now, select the Manual update tab.
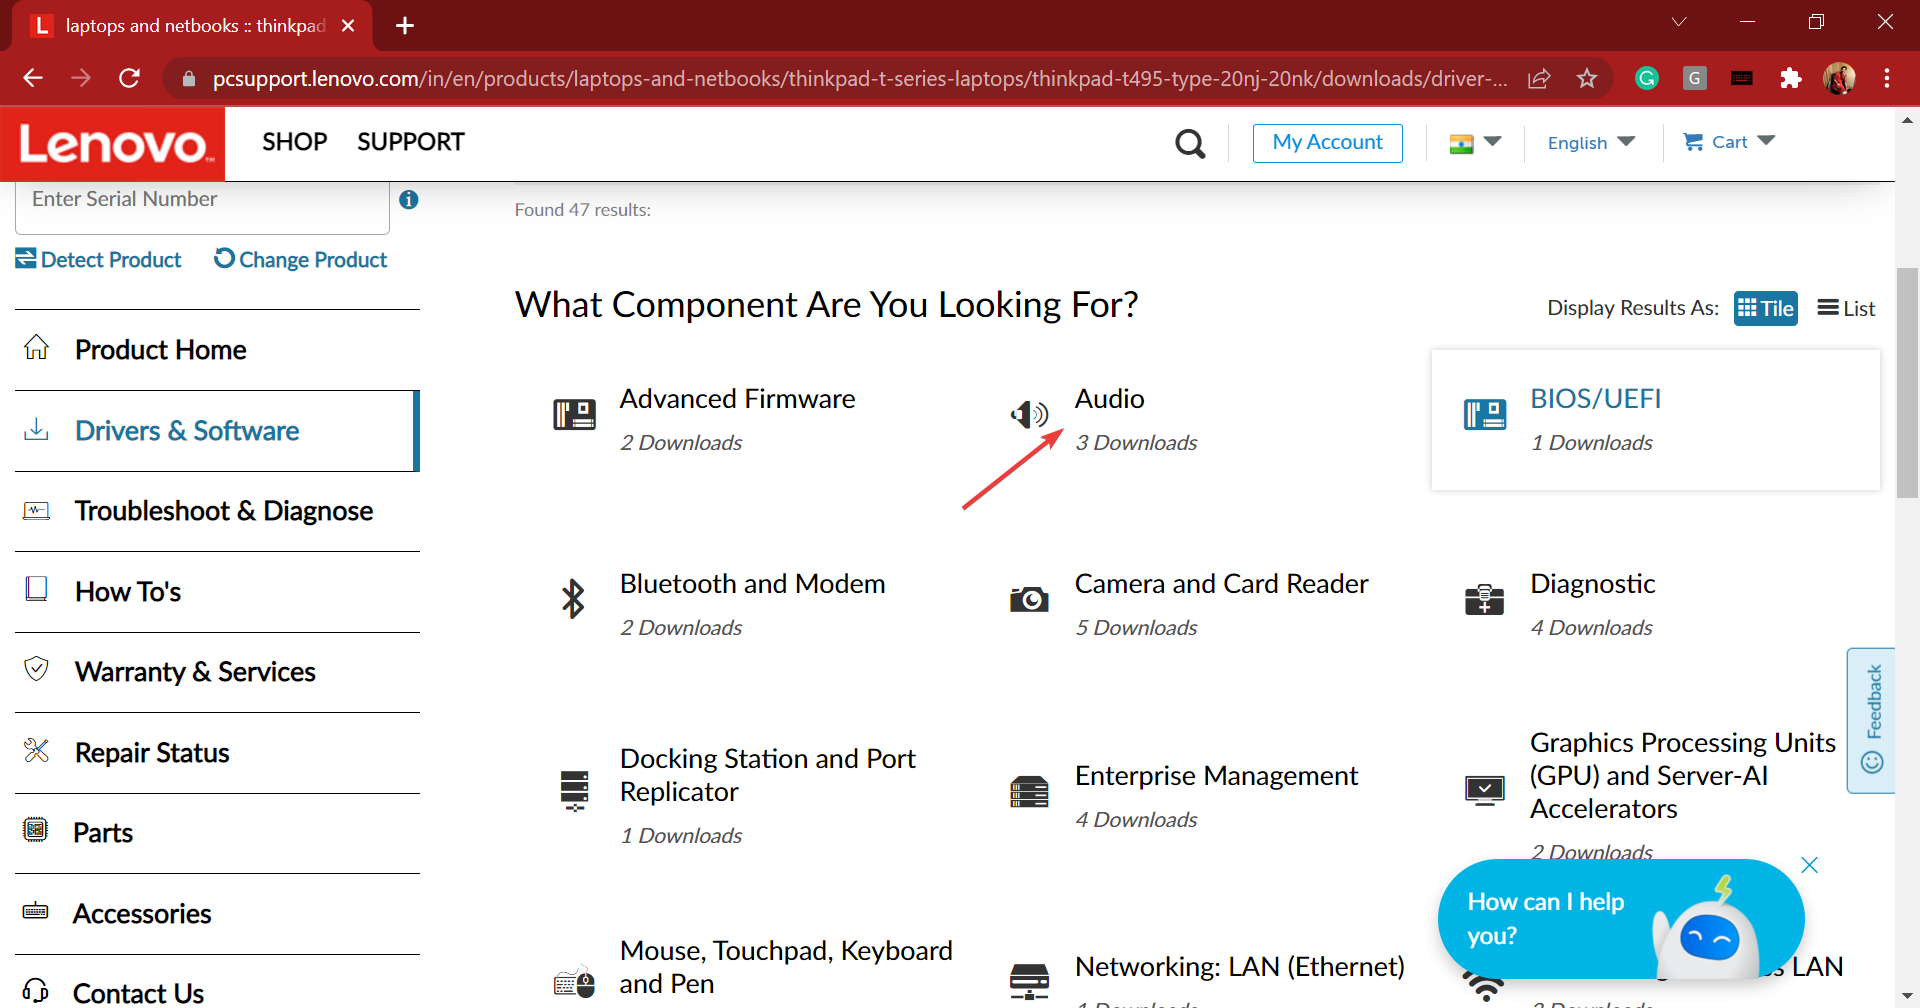
Click on the Audio entry from the various components listed here.
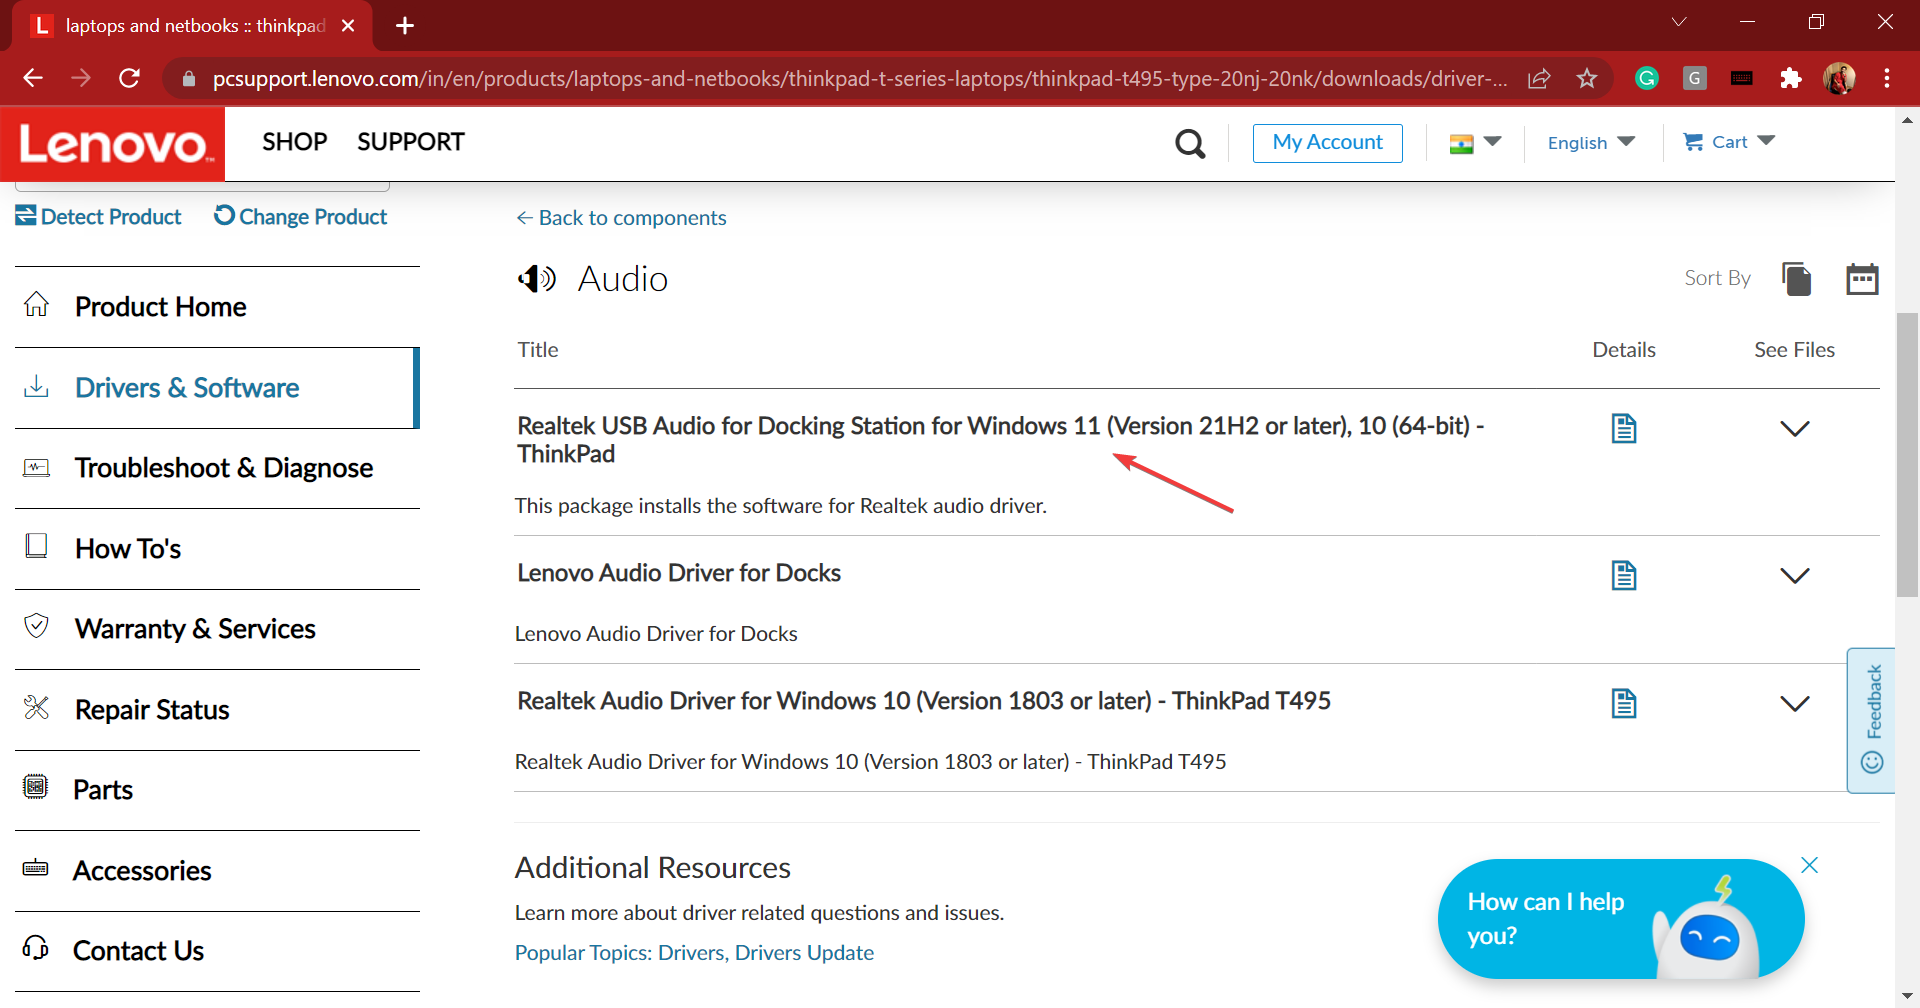
Next, click on Realtek audio driver for Windows 11.
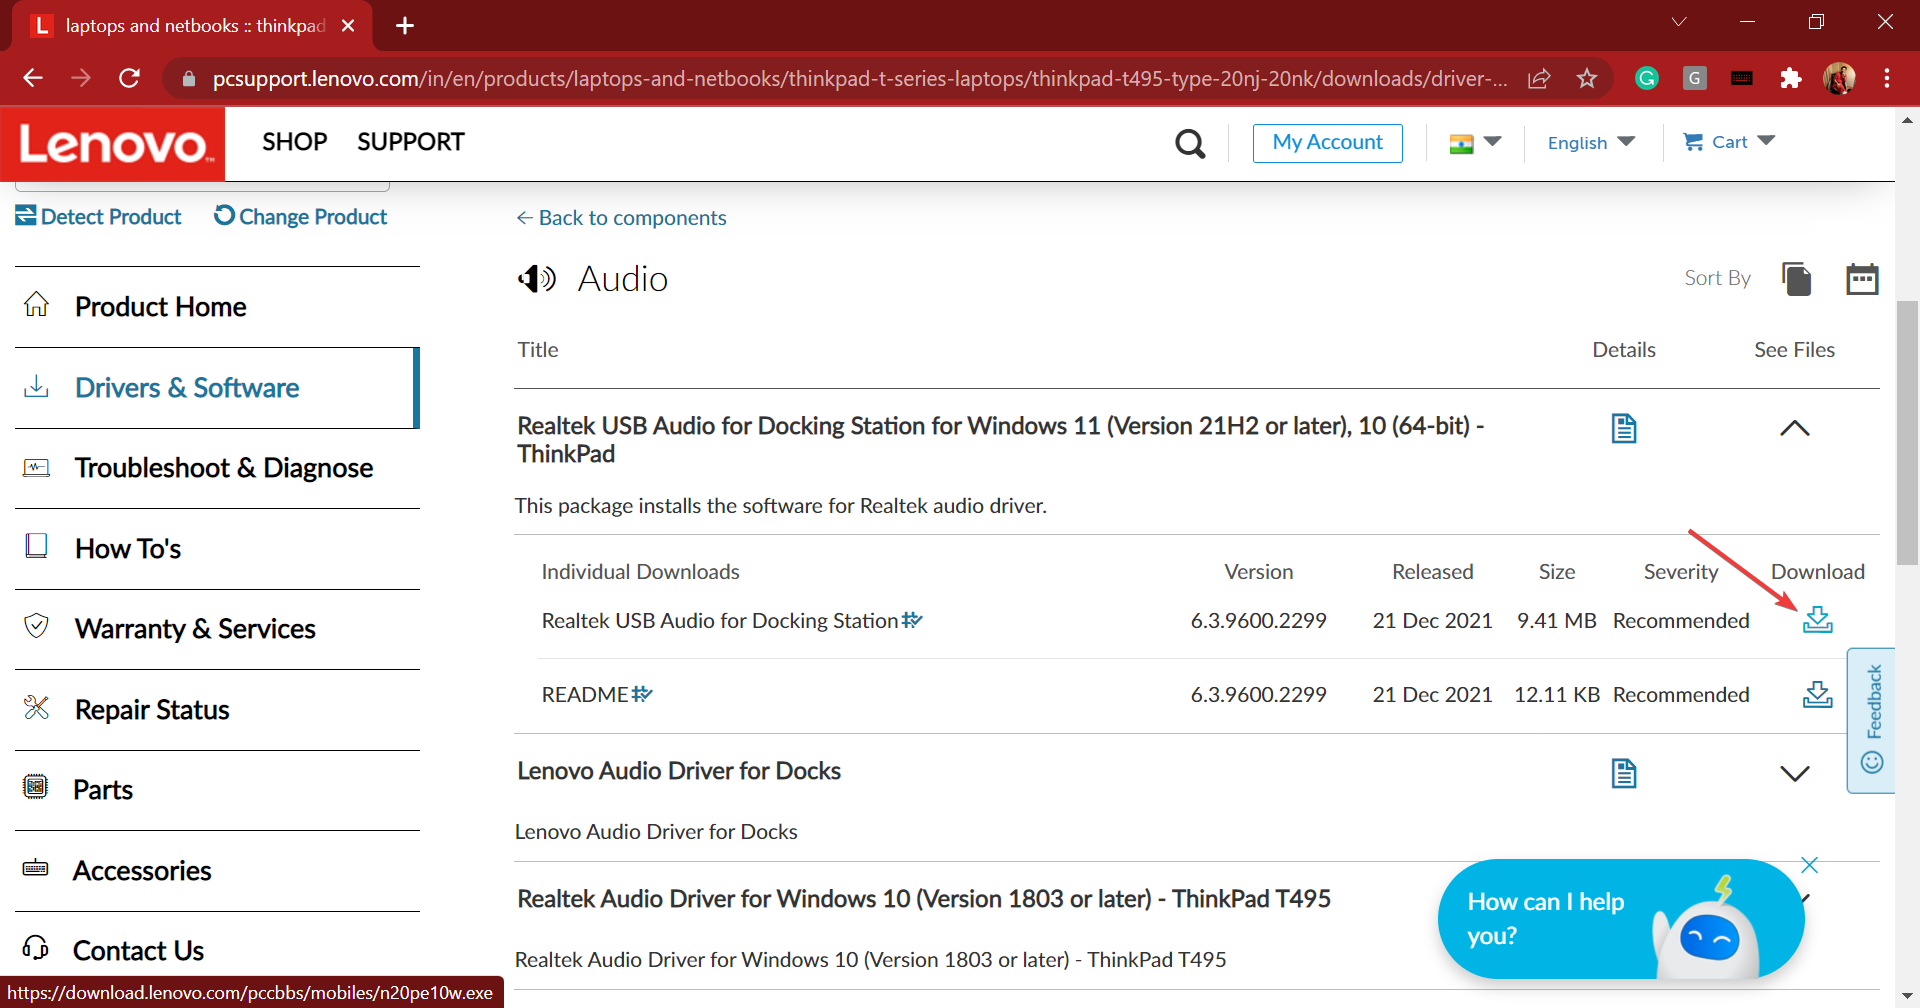
Click on the Download icon next to the Realtek audio driver.
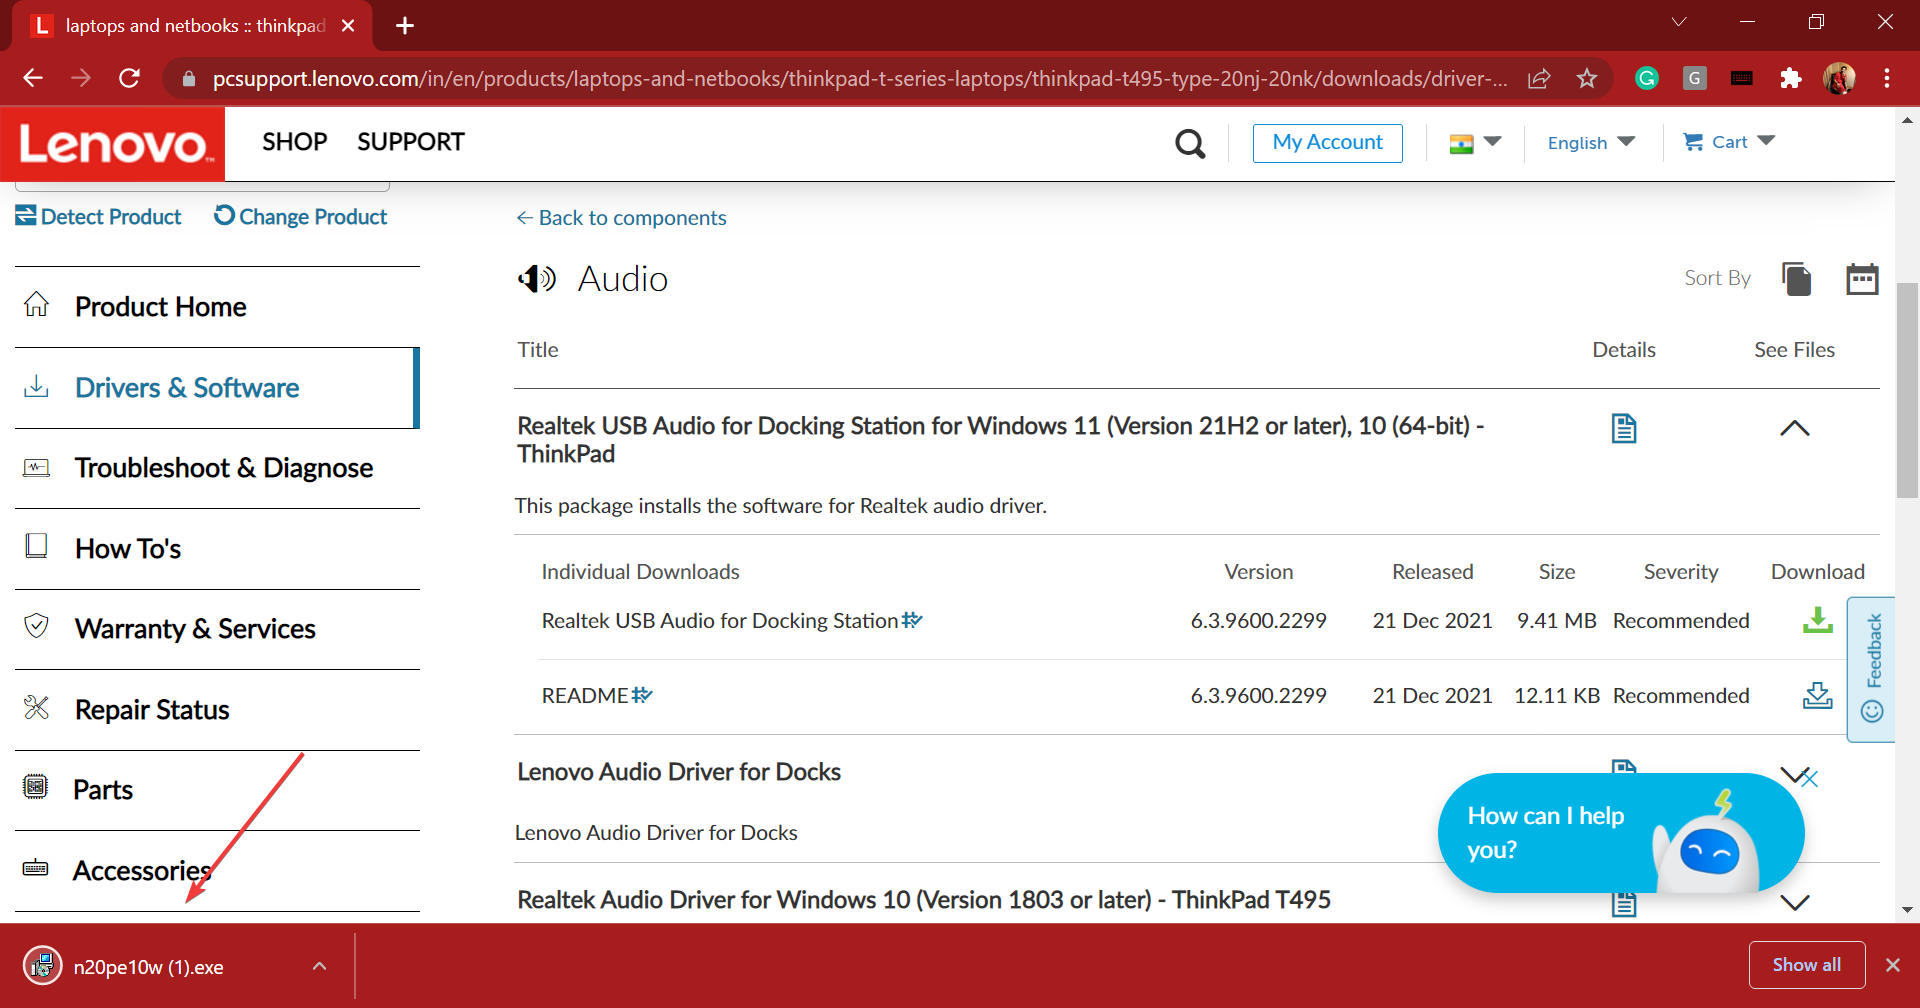
Once the setup is downloaded, click on it to launch the installer.
Click Yes in the UAC (User Account Control) prompt that pops up.
Now, follow the on-screen instructions to complete the installation process.
Once done with the download and installation of the Realtek audio driver in Windows 11 on a Lenovo device, restart the computer for the changes to effect.
4. Realtek audio driver for ASUS
Go to Asus support and either enter the model name and select the appropriate option from the search results, or you can manually find your product.
Click on the Driver & Utility option on the right.
Select your model name from the dropdown menu and click Okay if prompted.
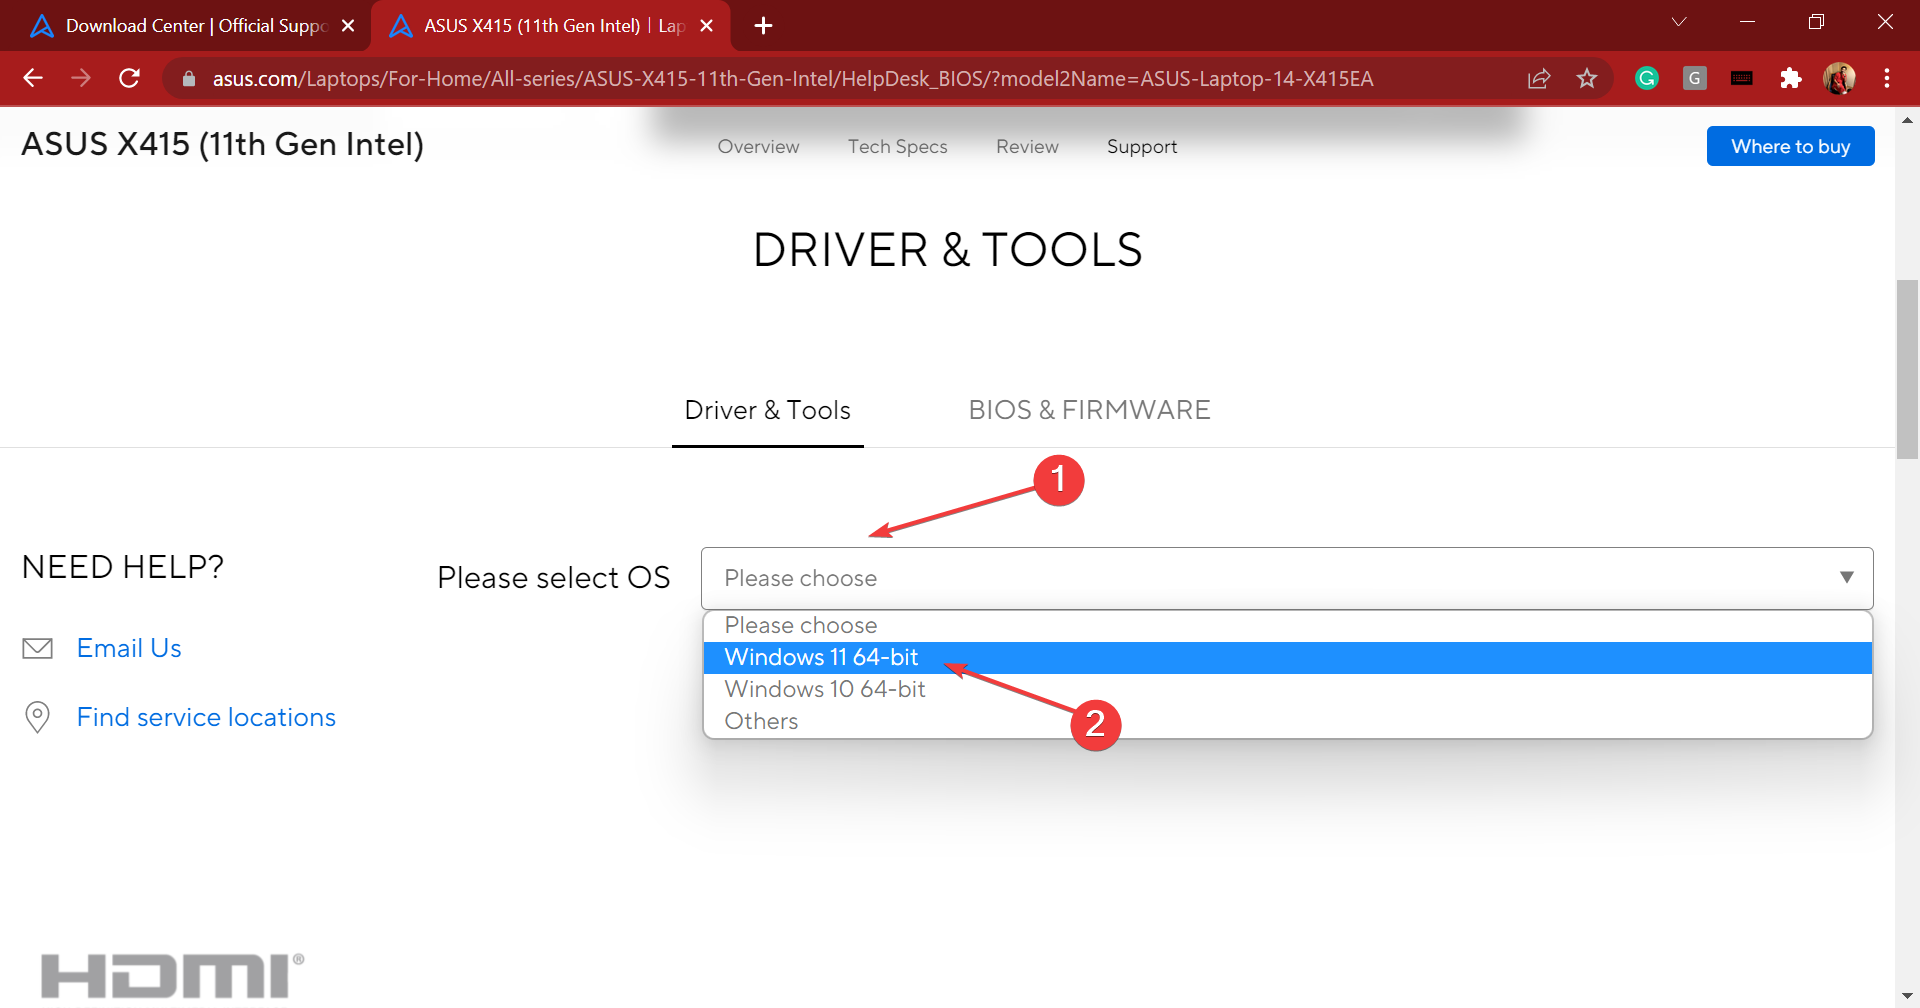
Scroll down, click on the Please select OS dropdown menu, and fix Windows 11 from the list of options.
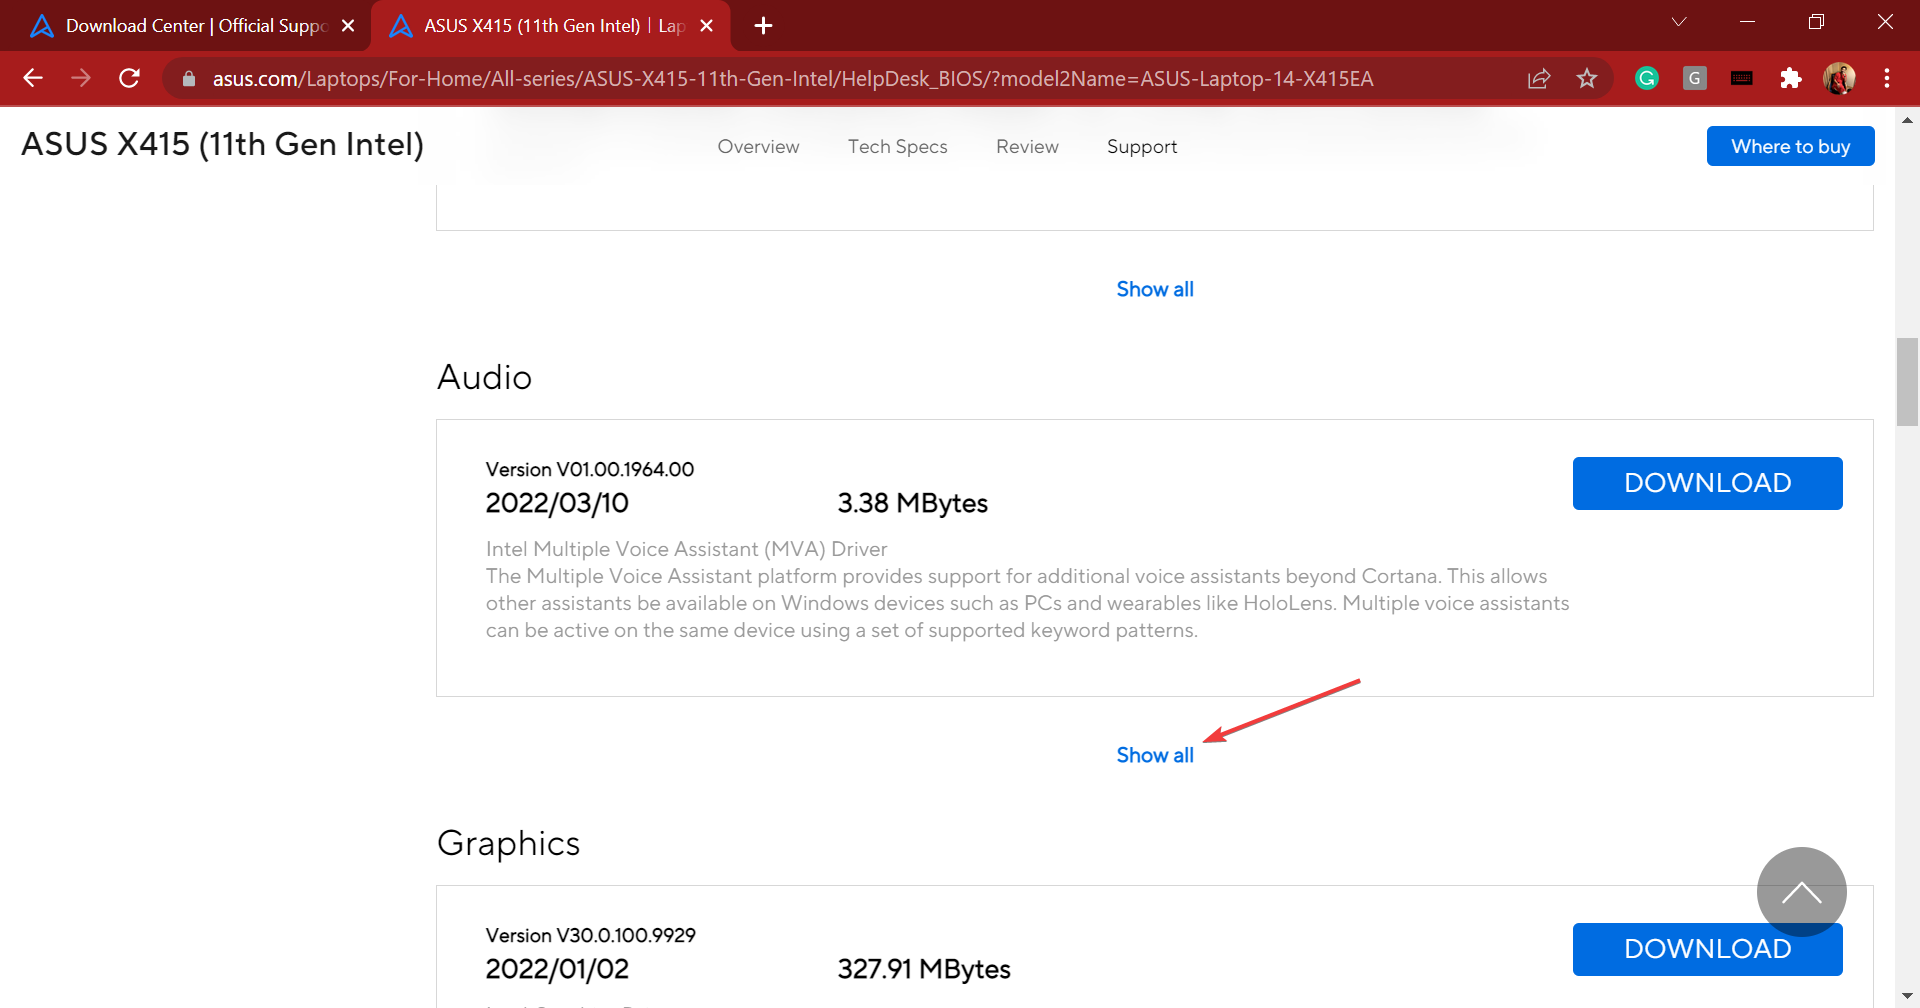
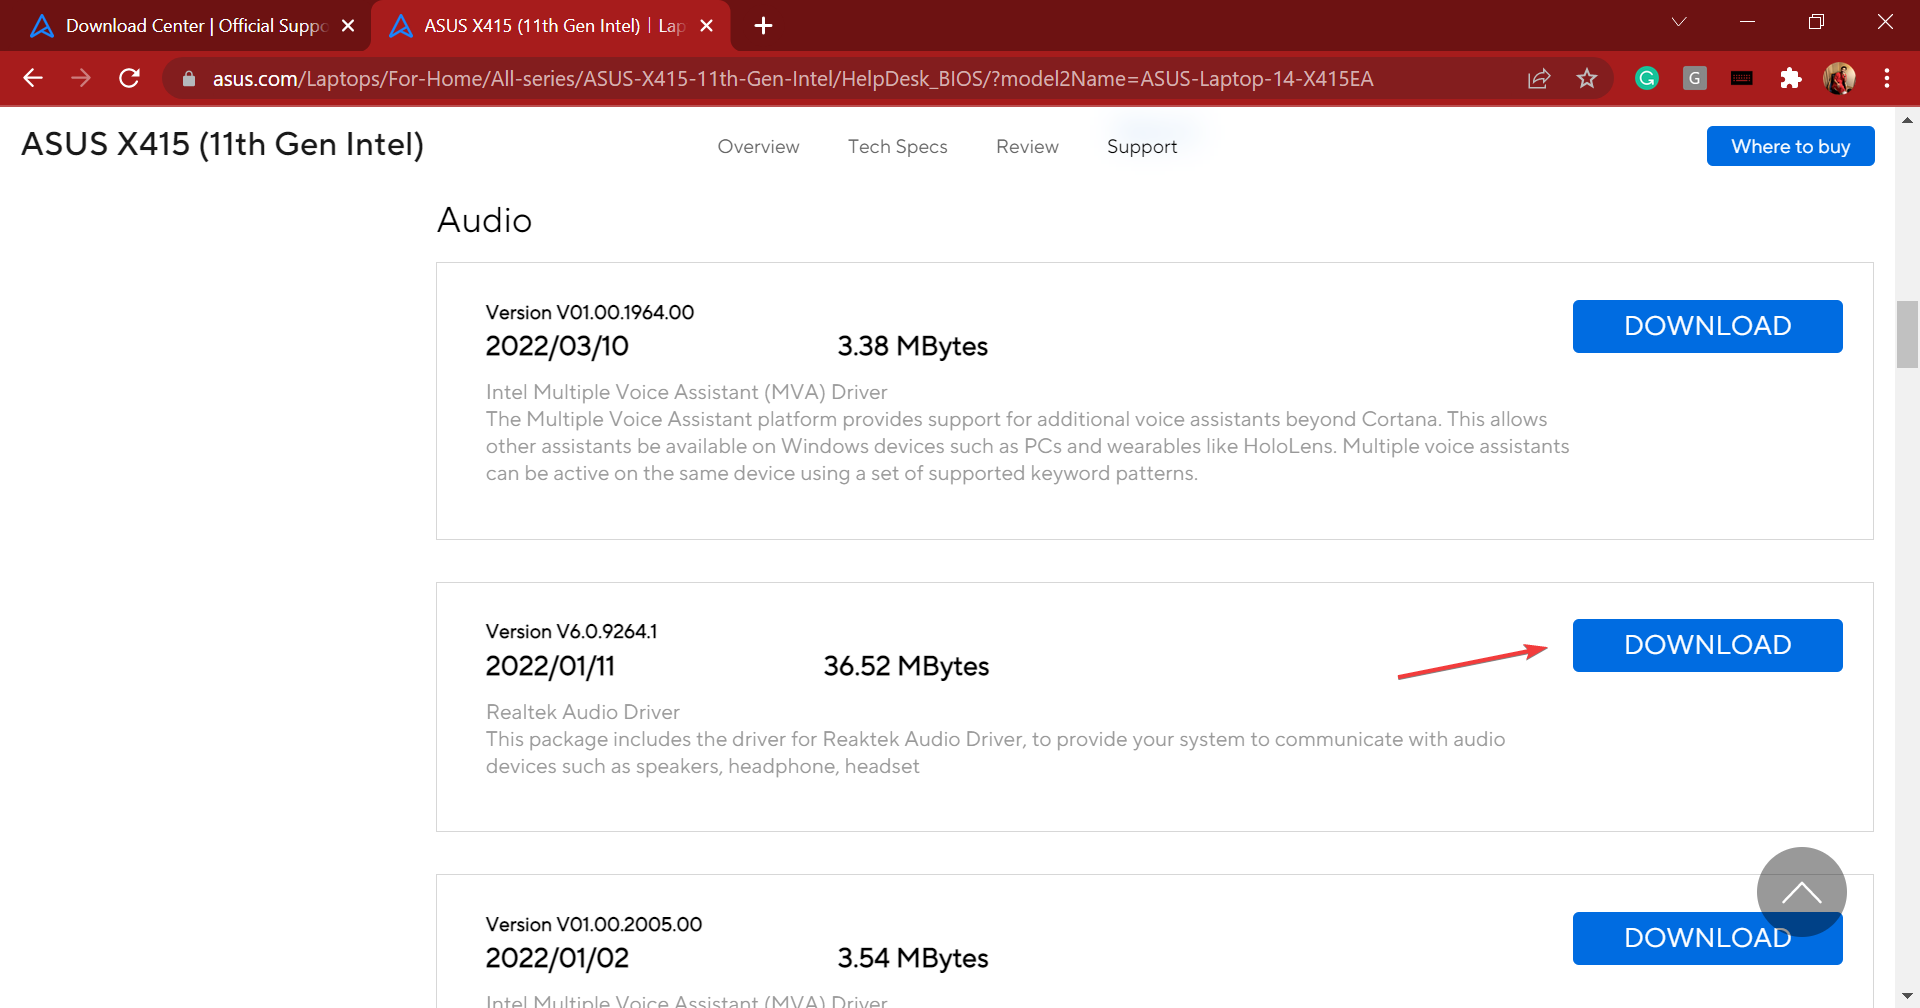
Again scroll down, and click on Show all under the Audio section.
Click on the Download button next to the Realtek audio driver entry.
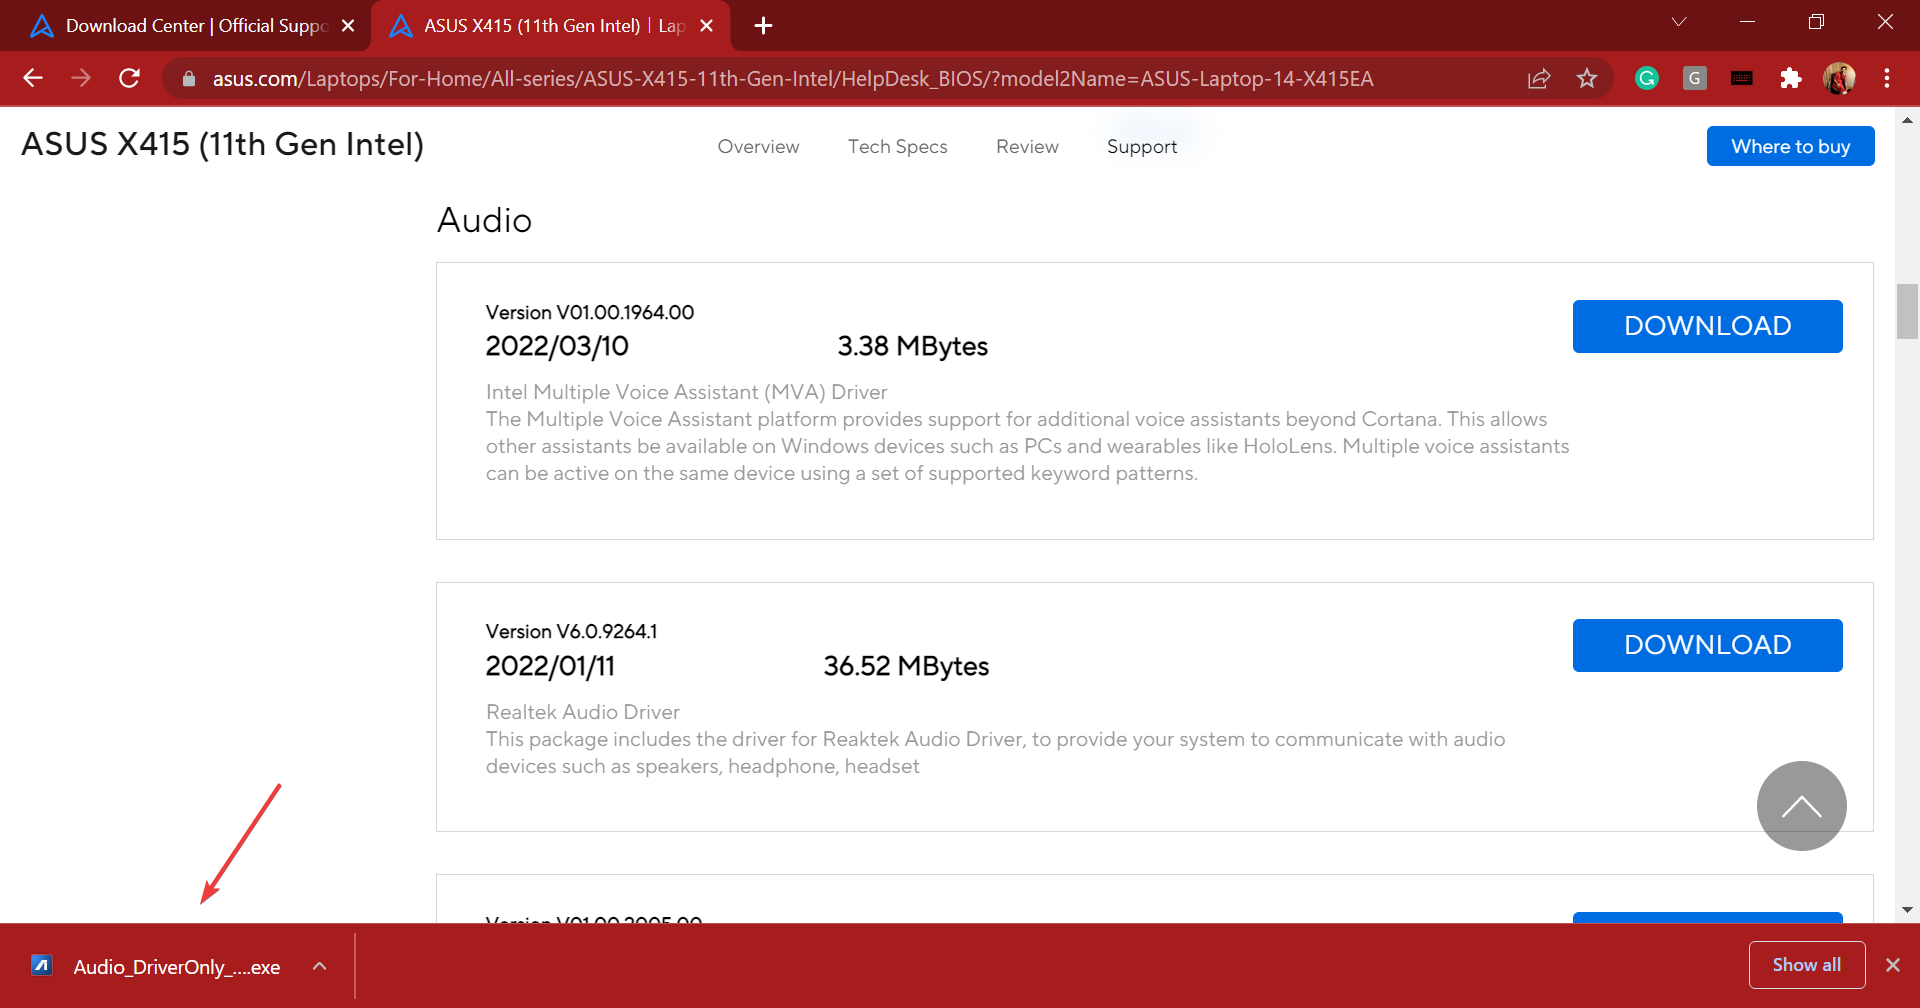
Once you have the setup downloaded, click on it to launch the installer.
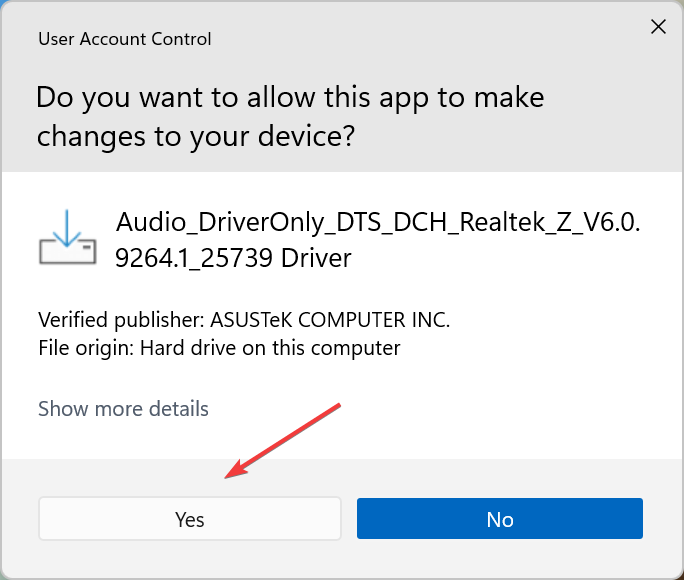
Next, click Yes in the UAC (User Account Control) prompt that pops up.
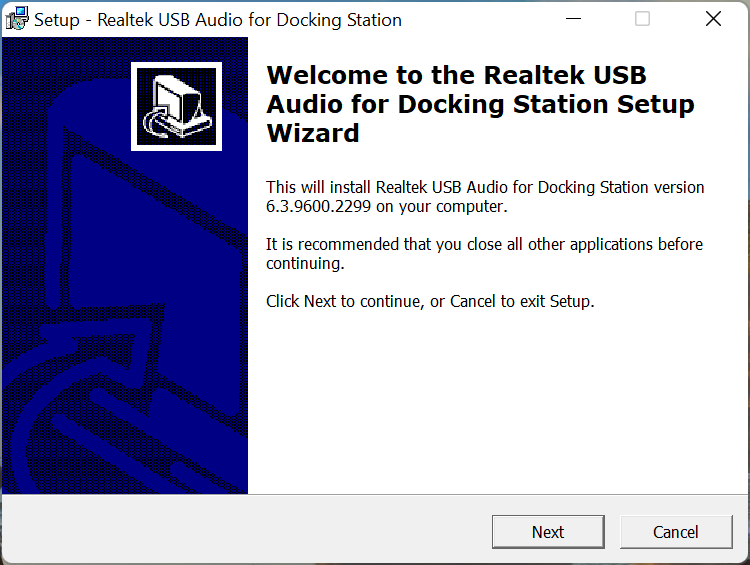
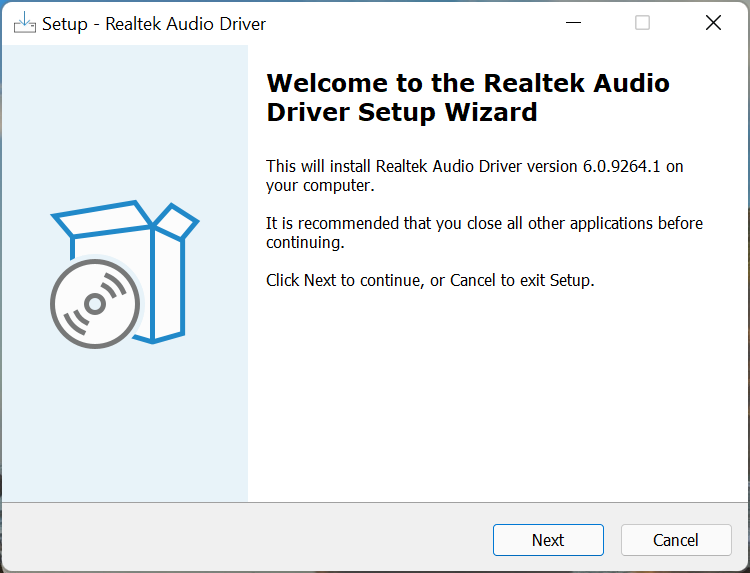
After the installer is launched, follow the on-screen instructions to complete the installation process.
Once done, restart the computer to bring the changes into effect.
That’s it! This is how you can download and install the Asus Realtek audio driver on Windows 10 64-bit and Windows 11. If you want to be sure, verify this with the Device Manager.
Besides, the OEM’s website is the best source, even for the Asus Realtek audio driver for Windows 7.
How does installing the Realtek audio driver help in Windows 11?
First of all, Realtek audio drivers deliver high quality audio on Windows 11. And that goes beyond the built-in speakers and microphones – it works great with external devices too. All while being user-friendly.
Second, you are unlikely to encounter issues with the connectivity. On the contrary, the driver would help improve it. Also, you will likely see better performance and patches for previously known bugs with each driver update.
How can I fix issues with the Realtek audio driver in Windows 11?
Besides, check for misconfigured sound settings and disable audio enhancements. If nothing else works, you can always perform a system restore in Windows 11 and get your PC back to a healthy state.
Want to go beyond drivers and actually bring back Realtek’s full control panel? Our tutorial on downloading Realtek HD Audio Manager in Windows 11 walks you through every step to restore the classic interface.
You now know how to manually download the Realtek audio driver in Windows 11 and fix issues with it. Feel free to use your manufacturer’s tools for identifying drivers or use a third-party tool to update them.
Adobe’s forum includes posts about a This document could not be printed error that pops up for some users. That error message pops up for Adobe Acrobat users when they try to print PDF documents.
Consequently, the users can’t print any Portable Document Format with the software. This is how Acrobat users can fix the This document could not be printed error.
Why is Adobe saying the document could not be printed?
Before we attempt to fix the issue, we have to rule out what’s causing it. Here are some of the most common culprits:
The document is corrupt
Your printer drivers are out of date
The document contains images or fonts that cannot be rendered
You opened the Adobe document in a browser and not in the native Adobe app
How do you fix the document that could not be printed?
1. Reinstall Adobe Acrobat
If you are unable to print PDF documents, your current Adobe Acrobat Reader might be corrupted. The easiest way to fix this issue is by reinstalling the software altogether.
By doing so, you not only fix your printing situation, but you also benefit from the latest enhancements and newest features that come with the Reader’s most recent version.
Long story short, that’s your chance to easily convert web pages and Microsoft Office documents (Word, Excel, PowerPoint) to PDFs and compress them for a smaller size.
Even more, you can scan and print to PDF, split, merge and compare PDF files, or even edit them (manage data in scanned tables, rearrange, delete and rotate pages in a PDF).
2. Update the printer driver
The document could not be printed error could be due to an outdated or corrupted printer driver. If so, updating the printer driver will probably resolve the issue.
The simplest way to install, update, or fix a third-party driver is to use a dedicated tool such as Outbyte Driver Updater to do the job for you.
Without such a tool, you would have to manually go to each manufacturer’s website and download each driver separately.
Unfortunately, this leaves room for errors such as downloading the wrong drivers, or not getting the latest one yet.
However, those will just be a problem of the past if you use Outbyte Driver Updater since all of the above will be done automatically by the program.
Outbyte Driver Updater
Keep your printer driver in check to prevent printing errors from happening again.
First, open the PDF document that doesn’t print in Acrobat.
Click File and Print to open the window shown in the image directly below.
Press the Advanced button to open further options.
Select the Print As Image option on the Advanced Print Setup window.
Click the OK button.
Then press the Print button.
Some Acrobat users have confirmed that selecting the Print As Image option fixes the An error occurred while printing the document error. A PDF document might contain images and fonts that can’t be rendered.
Selecting Print As Image prints the PDF as a rasterized image of the document instead. Acrobat users can select the Print As Image setting as described above.
Open Cortana by clicking Type here to search on the taskbar.
Enter the keyword printer in the search box.
Then click Printers and Scanners to open the window shown directly below.
Select the printer you’re trying to print the PDF with.
Press the Open queue button to open the window directly below.
Click Printer and choose Cancel All Documents if there are documents in the queue.
Restart Windows after clearing the print queue.
There might be some documents stuck in the printer queue. If so, emptying the print queue could help if Adobe cannot print documents. Follow the guidelines above to clear the print queue in Windows 10.
5. Turn off PDF/A View Mode
To do that, click Edit and choose Preferences in Acrobat.
Click Documents on the Preferences window to open the settings shown directly below.
Select Never on the PDF/A View Mode drop-down menu.
Then press the OK button.
Open and print the PDF in Acrobat.
Turning PDF/A View Mode off has fixed the document could not be printed error for some Acrobat users, so be sure to try it.
6. Open the document in Google Chrome or alternative PDF software
This resolution is more of a workaround than a fix. Remember that you can print the PDF from alternative software.
So, try opening the document in Google Chrome or another browser that supports the PDF format.
To do that, right-click the PDF file you need to print and select Open with > Google Chrome. That will open the PDF in Chrome. Then users can click the Print button to print out the document.
Alternatively, users can print from alternative PDF software. Foxit Reader, PDF Annotation Lite, and Xodo are three notable alternatives to Adobe Acrobat.
Click the Free Foxit Reader Download button on Foxit’s website to save the installer for that software. Then open the Foxit Reader’s setup wizard to add the software to Windows.
This is a workaround, but it could fix An error occurred while printing the document message, so feel free to try it.
Press the Upload Files button to select a PDF to convert.
Then select Download All to save the new DOCX document to a folder.
The document downloads as a compressed ZIP.
Users can extract it by opening the ZIP in File Explorer, clicking Extract all, and pressing Extract.
Thereafter, open the DOCX document in a word processor and print it from there.
Acrobat users can also convert the PDFs they need to print to Word DOCX documents. Then users can open the documents in MS Word, or other word processors, to print them.
This is a workaround, and you’ll have to repeat it for every affected document, but it’s still useful if Adobe cannot print the document.
Those are some of the best resolutions for fixing this error.
Let us know which one of the solutions enlisted solved The document could not be printed error for you in the comments section below.
Stellar offers a variety of software solutions to repair corrupted files across multiple platforms. Their tools are designed to fix issues with Outlook, PowerPoint, Access, and other file types like Word and Excel.
Each software provides advanced recovery features to restore your files with minimal data loss, including the ability to handle encrypted or password-protected files.
Stellar has several plans available, each tailored to different needs, but they all provide high-quality repair options. You can preview files before repairs and ensure everything is recovered as expected.
Recoverit is yet another exciting software entry on our list primarily because it does not only repair a file, but it can also perform the recovery process that usually precedes the repairs.
With its ability to restore from pretty much any type of media and its support for over 1000 file formats, Recoverit is a top contender in the file repair market.
It can also handle data that was previously on lost partitions, and you can even recover data even if the PC doesn’t boot or if it constantly crashes.
Recoverit
Recover and repair your lost or damaged files effortlessly with Recoverit!
Unlike most of the other entries on our list explicitly targeted just one category of files, the Hetman File Repair software was created to solve issues with JPEG, TIFF, PSD, and ZIP files.
The tool can repair file headers and rebuild the internal structures of many types of files.
With no more structural errors, these files can now finally be viewed and edited at will.
The most common scenario to use Hetman File Repair is after a data recovery session when many files tend to come back damaged or incomplete.
File Repair is a free tool designed to fix corrupted files by extracting data into a new file.
It supports a wide range of formats, including Word, Excel, Zip, RAR, PDF, Access, PowerPoint, images (JPEG, PNG, GIF, etc.), and audio files (.mp3, .wav).
The application can address issues caused by power failures, network interruptions, viruses, and system errors. It features a simple user interface, making it ideal for basic users, and is completely free to download and use.
PowerPoint Repair Toolbox specializes in repairing damaged PowerPoint files on Windows 7 and newer systems. It recovers text, objects, and other file elements while preserving the file’s structure.
However, media files and images are saved separately and must be re-added to the presentation manually.
The tool is easy to use but cannot repair password-protected files. It requires PowerPoint to be installed on your PC.
This tool is designed to repair Office files, including Access, Excel, Word, and Outlook. It features a simple interface where you select the file type to recover and can handle single or multiple files.
While functional, the slightly outdated interface may not appeal to all users. It’s not free, but a demo version is available for testing without restrictions.
Zip Repair is a simple tool for fixing corrupted .zip files. It lets you repair single or spanned Zip files, extract content, and even perform batch repairs.
It supports the Zip64 format and archives larger than 2GB, addressing issues like CRC errors.
While effective, its outdated interface may not appeal to everyone. The tool isn’t free, but an evaluation version is available for trial.
Repairing files is simple; you must select the corrupt archive you want to repair. After that, set the filename you want to use for the repaired file and start the repair process.
After the scan is complete, the tool will extract partially damaged and restored files.
DiskInternals ZIP Repair is a simple tool that will repair all your corrupted zip files without any problems. In addition to being simple to use, this application is also free, so that you can use it without any restrictions.
Besides ZIP files, many users use RAR files to create file archives. RAR files can also become corrupted, and to repair a corrupted RAR file, you might need a tool such as Recovery Toolbox for RAR.
According to the developer, this tool can help you if the corrupt archive is in an unknown format or damaged. In addition, these tools are helpful if you’re getting a CRC check failure message due to file corruption.
The tool can also help if the RAR file header is corrupted or the RAR archive is improperly compressed.
To fix a RAR file, select the damaged file and follow the instruction wizard. We have to mention that this tool can work with files up to 4GB.
Regarding compatibility, this tool should work on all versions of Windows, including Windows 10. The device is available as a free demo, but if you want to continue using this tool, you’ll need to purchase a license.
There are many great PC repair software options, some of which are free. Depending on the file type, you may need specialized tools. We’ve already covered the best software to repair ZIP files, so check that out.
If system recovery leaves you with damaged files, there are ways to recover corrupted files.
A good Windows repair tool should:
Repair system files
Recover deleted items
Ensure high-quality file recovery
How do I fix corrupted files on Windows 10 for free?
Press the Windows key + R and type cmd.
Click the OK button to launch Command Prompt.
Type the command below and hit Enter. sfc/scannow
You can run an SFC scan to repair corrupted files on Windows 10 for free. If this tool fails, you can use the built-in DISM to improve the SFC tool and the broken files. Lastly, there is free dedicated software that you can install for this purpose.
As you can see, there are many different tools that you can use to repair your files, and depending on the type of file that you want to improve, you might have to use other tools.
We must mention that sometimes your files can’t be repaired, so you should keep that in mind before trying these tools.
Feel free to let us know the tool you enjoy using on our list in the comments below.
Windows Terminal is an open-source terminal app that lets you use command-line tools, including Command Prompt, PowerShell, and more. It has many useful features, and it gets easier to work on if you know a few shortcuts.
This guide contains a list of all the essential Windows Terminal shortcuts that you should know.
What are the most valuable shortcuts for Windows Terminal?
1. Opening Windows Terminal
ShortcutKey
Actions
Windows + Number (profile index: 1-9)
Call it from Taskbar if you have it pinned on Taskbar
Wt + Enter
Type this on the File Explorer address bar to open Windows Terminal
Wt-d. + Enter
To open the current directory on Terminal from File Explorer
Ctrl + Shift + N
Open a new Terminal window
2. Moving between tabs
Shortcut Key
Actions
Ctrl + Shift + T
Open a new default tab
Ctrl + Shift + Number (profile index: 1-9)
Open a new tab by pressing any number between 1 to 9
The DNS server is a crucial component of the Internet. Its a sort of phonebook that connects your browser with the website you want to access. Unfortunately, DNS issues on Windows 10 are often encountered, with users reporting a DNS server is not responding error message on their PCs.
What causes a DNS server not to respond?
Below are some of the common causes of DNS server not responding on your Windows PC:
How do I fix the DNS server not responding Windows 10 error?
What to do if the DNS server is not responding in Windows 10?The quickest fix is to change the DNS server settings manually. Then disable your firewall, reset your router, and test the connection again. Let’s get to the list of methods to fix it, starting with the video below.
1. Change the DNS server manually
Press Windows key + R, type ncpa.cpl, and click the OK button.
Right-click your network and choose Properties.
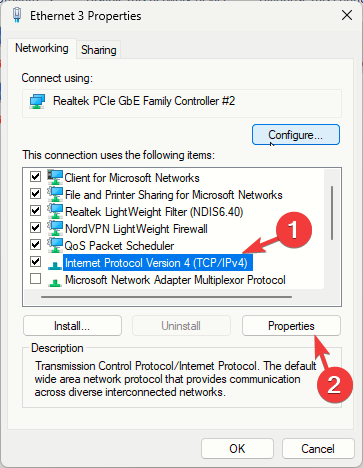
Select Internet Protocol Version 4 (TCP/IPv4) and click the Properties button.
Now, select the Use the following DNS server addresses option.
Set the Preferred DNS server to 8.8.8.8. and the Alternate DNS server to 8.8.4.4.
You can also use 208.67.222.222 as Preferred and 208.67.220.220 as the Alternate DNS server.
After you’re done, click OK to save the changes.
Optional: Disconnect from the Internet and connect back again.
When you try to access a particular website, you’ll automatically connect to your ISP’s DNS server.
However, it can happen that your DNS server is not available. If that’s the case, you’ll see the DNS server is not responding error on Lenovo and other PCs.
One way to fix this problem is to change your DNS server to OpenDNS or Google DNS. This is a simple procedure that you can perform it by following the steps above.
After changing the DNS server, check if the problem is resolved. You should be able to browse the Internet without any issues.
Remember that changing your DNS server might make your Internet connection a bit slower depending on your location, so you might want to experiment with different servers.
Changing the DNS server can help you fix network problems when playing games, like the Dark and Darker server error; read this guide to learn more.
2. Enter your MAC address manually
2.1. Locate the physical address of your PC
Type cmd in the search tab and click on Run as administrator under Command Prompt.
Enter ipconfig /all and press Enter.
Locate the Physical Address and write it down.
Close Command Prompt.
2.2. Configure your network connection
Open the Network Connections window.
Locate your connection and open its properties.
When the Properties window opens, click on Configure.
Go to the Advanced tab and select Network Address from the Property list.
Now select Value and enter the MAC address you got from Command Prompt (Be sure not to enter any dashes while entering your MAC address).
Click OK to save the changes.
According to users, you can sometimes have DNS failure simply by manually entering your network adapter’s MAC address.
This is a simple procedure. To enter your MAC address, you need to find it first. To do that, follow the steps above.
Users report that this solution works best after switching to Google DNS or OpenDNS, so be sure to try it.
Press Windows key + X and choose Device Manager from the list.
When Device Manager opens, locate your network adapter, right-click on it and choose Uninstall.
If available, click on Delete driver software for this device, followed by Uninstall.
After you delete the driver, restart your PC.
When your PC restarts, the default network driver will be installed.
Your network adapter relies on drivers to work correctly, and if you have any problems with it, it might be due to your drivers.
To fix DNS server errors on Windows 10, you need to visit your network adapter manufacturer’s website, download the latest drivers and install them on your PC.
If you can’t access the Internet at all, it might be caused by the DNS server not being unavailable, so download the drivers on a different device and install them on your PC.
Some users also recommend uninstalling your network drivers before installing the new drivers.
3.2. Update drivers automatically
Downloading drivers manually can cause damage to your computer in case you download the wrong version. We strongly suggest doing it automatically by using a third-party driver updating tool.
These tools are exceptionally light and will automatically repair or update your drivers in just a few seconds and in just one go. You only need to invest a few clicks, and the problem will disappear.
4. Disable your antivirus and firewall
Antivirus and firewall solutions are necessary to protect your PC from malicious users, but sometimes your antivirus and firewall can interfere with your Internet connection.
To fix DNS server connection issues on Windows 10, try temporarily disabling your antivirus and firewall client.
Remember that your PC will still be protected by Windows Defender even if you disable your antivirus, so there’s no need to worry about your safety.
If your antivirus or firewall client was causing this issue, be sure to change its configuration or switch to a different client.
Users reported that Bitdefender Total Security could sometimes cause this problem to appear. If you’re using Bitdefender, you need to go to Firewall settings and disable the Block Internet connection sharing option.
After that, the problem should be resolved. Users reported that Avast could also cause this problem. To fix it, open Avast settings and disable the Secure DNS option.
You can also try disabling the firewall on your router. This is a bit advanced and potentially dangerous solution, so keep that in mind. By disabling your router’s firewall, your PC will be completely vulnerable.
If you decide to do that, temporarily disable your router’s firewall and check if that fixes the problem.
If the problem was your firewall, you need to turn it back on again and check your firewall configuration for the source of the problem.
To see how to disable your router’s firewall, be sure to check its instruction manual.
5. Update your router’s firmware
A few users reported that DNS servers might not respond while using wireless networks like WiFi. However, you can fix that simply by updating your router’s firmware.
We must warn you that this is an advanced process, so you must be extra cautious to avoid causing damage.
Before updating your router’s firmware, you must back up its settings. We advise you to check your instruction manual to see how to update the firmware correctly.
If your DNS server is not responding on WiFi/wireless, you may also want to check the channels you’re using.
6. Use the netsh command
Open Command Prompt as administrator.
Type the commands below and press Enter after each: netsh int ip resetnetsh winsock resetipconfig /flushdnsipconfig /renew
After all the commands are executed, restart your computer.
According to users, you can fix DNS failure simply by running a few commands from Command Prompt. To do that, follow the steps above.
You’ll reset your IP and clear the DNS cache by performing these commands, so be sure to try this method.
7. Restart your modem
One way to fix the DNS server not responding error on Windows 10 is by restarting your modem. To do that, press the power button on your modem to turn it off.
Wait 30 seconds and press the power button again to turn it on. Wait until the modem turns on entirely and check if the problem persists.
8. Start your PC in Safe Mode
Open the Start Menu and click the Power button.
Hold down the Shift key on your keyboard and click Restart.
Choose Troubleshoot.
Select Advanced options, select Startup Settings, and click the Restart button.
When your PC restarts, you’ll see a list of options available. Select Safe Mode with Networking by pressing F5 on the keyboard.
Safe Mode will now start.
Sometimes third-party applications such as antivirus or VPN can interfere with your Internet connection.
To fix the DNS server not responding error on Windows 10, try accessing the Internet from Safe Mode.
If you’re not familiar, Safe Mode is a special mode in Windows that runs only with essential software and drivers.
When Safe Mode starts, check if your network connection is working. If there are no problems with your Internet connection in Safe Mode, third-party software interferes with your network connection.
You need to find and remove the problematic application from your PC to fix this issue.
9. Disable Microsoft Virtual WiFi Miniport Adapter
Open Device Manager.
When Device Manager opens, go to View and select Show hidden devices.
Locate Microsoft Virtual W-iFi Miniport Adapter, right-click it, and choose Disable. Repeat this step for all available Virtual Miniport Adapters.
After you’re done, close Device Manager and check if the problem is resolved.
If the DNS server is not responding on WiFi connections, the problem might be caused by Microsoft Virtual WiFi Miniport Adapter. To fix this issue, you need to find and disable these adapters.
10. Disable Internet Protocol Version 6
Open Network Connections.
Right-click your connection and choose Properties.
Now, locate Internet Protocol Version 6 (TCP/IPv6) and unmark it.
Click the OK button to save changes.
There are two types of IP addresses, v4 and v6. If your DNS server is not responding on your PC, you might be able to fix it by disabling Internet Protocol Version 6.
Disabling IPv6 won’t affect your computer negatively, but hopefully, it should fix the problem with the DNS server.
11. Disable all additional connections
Open the Network Connections window.
Right-click the connection that you want to disable.
Choose Disable from the menu.
You might have multiple connections on your PC, which can sometimes cause DNS server issues while using WiFi connections.
To fix this issue, you need to disable those connections from the Network Connections window.
12. Check for third-party applications
Some third-party applications can affect your DNS and cause this problem to appear. Users reported that their DNS changes automatically to a specific address.
The problem was caused by a third-party application called ColdTurkey.
Remember that almost any network-related or security application can interfere with your DNS, so keep a close eye on all installed applications.
13. Change the DNS address on your router
According to users, you might be able to fix this problem by setting a different DNS address on your router. To do that, you need to access your router’s configuration page and look for the DNS setting.
Change the DNS server to Google DNS or OpenDNS and check if the problem is resolved. For detailed instructions on how to change your DNS, be sure to check your router’s instruction manual.
14. Reset your router
Your router configuration can sometimes cause DNS problems to appear. If the DNS server is not responding on the router, you need to reset your device to default settings.
To do that, you need to open your router’s configuration page and select the Reset option.
You can export your configuration if you want, so you don’t have to configure wireless networks again.
Another way to reset your router is to hold the reset button on it for a few seconds. Both methods work the same, and you should use the one you’re most comfortable with.
If you’re unsure how to reset your router, check your instruction manual for step-by-step instructions.
15. Turn off the peer-to-peer update feature
Open the Settings app by pressing the Windows key + I.
Navigate to the Update & security section.
Click on Advanced options.
Click the Delivery optimization option.
Toggle the switch for Allow downloads from other PCs backward to set it Off.
Windows 10 has a great feature that allows you to download updates using peer-to-peer technology.
This feature allows you to download Windows updates directly from other users in your area.
This is a valuable and innovative feature, but it seems that this feature can sometimes cause DNS failure. One potential solution for DNS problems is to disable this feature.
After turning this feature off, check if the problem with the DNS server is resolved.
16. Wait for your ISP to fix the problem
Sometimes DNS server is not responding error can be caused by your ISP. Your ISP might have some problems, so you might have to wait a few hours while your ISP resolves technical difficulties.
The DNS server is not responding error will prevent you from accessing the Internet, but you should be able to fix it by using one of our solutions.
17. Fix Comcast DNS server not responding
We noticed many reports about the Comcast DNS server not responding when users try to get online using WiFi.
To fix this issue as quickly as possible, go to the GW GUI, select Troubleshooting and then Reset/Restore Gateway. Reset your WiFi router and check if the problem persists.
What can I do if Windows 11 DNS server is not responding?
The DNS server is not responding on Windows 11 issue is caused by issues with antivirus and drivers. Also, it might be caused by problems with your DNS server address.
You can fix the issue effectively by applying the solutions listed guide.
Is it safe to flush DNS cache?
Any invalid addresses, whether they are obsolete or have been altered, will be removed by clearing the DNS server. It’s also crucial to remember that clearing the cache has no unfavorable consequences.
So yes, if you are wondering how safe it is, it is indeed safe.
How do I find my DNS server?
Press the Windows key + R to open the Run utility.
Type cmd and hit Enter.
Type the command below and press Enter: ipconfig/all
Check the ISP column if it contains the correct DNS.
If the DNS shown on the site above is correct, it means your DNS is working perfectly. Using Command Prompt as admin, you can also check whether your DNS server is working.
You only need to run the command below: nslookup <client name> <server IP address>
Note that you need to replace the client name and server IP address with the correct value. If the command returns Request to server timed outor No response from server, your DNS server is probably not working.
That’s it! We hope you fixed the DNS server not responding error on Windows 10 by using one of our solutions.
Windows Modules Installer Worker high CPU usage can cause various problems, and it can negatively impact your performance.
However, this problem can be resolved, and in today’s guide, we’re going to show you the best ways to do that.
Why is Windows Module Installer using 100% CPU?
Issues with Windows Update or corrupted system files are the most common culprits for this issue.
How do I fix Windows Modules Installer Worker with high CPU usage?
It’s possible that high CPU usage is caused by an update install in the background, so waiting is the best option. If the problem persists after an hour or so, try using one of the following solutions.
1. Delete the SoftwareDistribution folder
1.1 Stop Windows Update service
1. Press Windows key + R to open Run. Type services.msc and hit Enter.
2. In the Service window, look for Windows Update service.
3. Right-click on Windows Update service and select Stop.
1.2 Delete the SoftwareDistribution folder
Open File Explorer and navigate to the following directory: Local Disk (C:) > Windows
Look for the SoftwareDistribution folder. Right-click on it, and select Delete.
Reboot your PC.
Press Windows + I and click on Update & security.
Finally, click the Check for updates button.
2. Stop this process from running
Press Ctrl + Shift + Esc to open Task Manager.
Navigate to the Details tab.
Locate TiWorker, right-click it, and choose End Task.
3. Prevent automatic Windows updates
Press the Windows key + R, type services.msc, and click OK.
Right-click the Windows Modules Installer option to open its properties.
Now, set its Startup type to Manual and click Apply, followed by OK.
Go back to the Services window and double-click the Windows Update service.
Set its Startup type to Manual and click the Apply button, followed by OK.
Why is Windows Module Installer Worker always running?
This service is closely related to Windows Update service, and if Windows Update service is running, the Module Installer Worker will run as well.
And with this, we can conclude this guide on how to solve this high CPU usage issue. We believe you have everything to fix the issue for good and get your PC working again.
Many users having AMD graphic cards on their computers reported experiencing an issue with the GPU scaling. It seems that after updating their graphics cards to a specific version, the GPU scaling stops working. This issue is usually caused by incompatible installed drivers.
If you’re encountering this frustrating issue, make sure to follow our fixes.
How to enable GPU scaling on AMD?
1. Update Windows
Press the Start button > open Settings.
Click Update & Security.
Select Windows Update.
Click Check for updates.
If it finds any updates, let it complete the process and restart your computer.
After rebooting your PC, check if updating Windows fixed the issue.
2. Change monitor settings
Go to Settings and select Display
DisableGPU scaling
Open the monitor options and see if it offers the option to Preserve aspect ratio. If it does, enable this option and see if it fixes the issue.
Make sure to use this function, as it expands the images according to the full size of the monitor and maintains their aspect ratio. Meanwhile, even if it is similar, the Center option disables image scaling and centers the image for non-native resolutions, causing black bars to appear around it.
Open the download location and run AMDCleanupUtility.exe
When asked if you want to run the utility in Safe Mode, choose Yes.
Select OK when asked to remove all AMD components.
Wait for the process to finish and choose between View Report or Finish to exit the setup.
When asked to reboot the PC, choose Yes.
Go to the AMD official website and input your GPU details in order to download your necessary drivers.
Install the drivers and see if it fixed the issue.
An easier solution would be to use a professional driver updating tool that takes care of this process automatically. Within minutes, it can look for suitable GPU drivers and it installs them just as fast.
With just a few clicks, you can set it to perform this procedure in a safe way, without harming your user data.
4. Perform a System Restore
Press the Start button > open Settings
Go to Update & Security > Recovery
Under the Advanced startup option, click Restart now
Wait for the computer to restart
In the Choose an option screen, go to Troubleshoot > Advanced options
Select System Restore > Choose your account and enter the password if needed > press Continue
Choose a restore point and start the process.
We hope that our solutions helped you fix this issue. If you found this article helpful, leave a comment in the comment section below.
There were several occasions that found ourselves in a scenario where “My laptop won’t open anything.” This includes apps, programs, browsers, File Explorer, or any other software. Even Task Manager won’t open.
Besides that, this inconvenient system issue may affect multiple laptop brands. For instance, the users reported problems such as Lenovo, Acer, or HP laptops won’t open anything.
It’s also helpful to be aware of the utilities or programs that don’t open. So, it happens that the laptop won’t open anything including Start menu, laptop won’t open anything including the Internet, or including the Task Manager.
Why is my laptop not opening anything?
Though it’s hard to tell exactly why your laptop won’t open anything, these few events are often culpable:
Malware issue
Perhaps some malware may have taken over your laptop’s operating system.
Software conflict
It might be that a program you have installed recently isn’t compatible with one of your resident apps and is triggering this strange habit.
Registry issues
It’s also possible that some of your system files are damaged, missing, or mixed up causing these problems.
Stretched system resources
Your CPU or RAM could be suffering from high resource usage problems such as the taskhost.exe high CPU usage issue.
Luckily, and after a lot of trial and error, we have discovered some working fixes.
How do I fix a laptop that doesn’t open anything?
✅ Pre-check Step: Restart your laptop
This is a simple solution, but rebooting helps clear up any settings that may be causing this issue to appear. After restarting, inspect if everything goes back to normal.
1. Boot into Safe Mode and Restore your PC
If your laptop refused to load anything after a recent hardware/software change, boot into Safe Mode and restore your PC back to a restore point when everything was working.
1. Hold down your Power Button for about 10 seconds. This shuts down your device.
2. Turn on your laptop by pressing the Power button once more.
3. While Windows 10 boots, shut it down by holding the Power button.
5. In the displayed Choose an option screen, click on Troubleshoot.
6. Then select Advanced options.
7. Now choose Startup Settings then Restart.
8. After your laptop restarts, select 4(or F4) to start it in Safe Mode.
9. ClickStartthen chooseSettingsas soon as Safe Mode loads.
10. Type System Recovery in the settings search box.
11. ClickCreate a restore point.
12. In the next System Properties window, select System Protectionand then tap on System Restore.
13. The Restore window opens as shown below.
14. Click on one of the displayed restore points then follow the remaining steps.
You can as well try to run a thorough virus check while in Safe Mode just to be sure.
2. Repair your laptop using PowerShell
PowerShell can also help you recover the Windows components in charge of launching applications such as the Start Menu, Search, Settings, Cortana, Microsoft Edge, and more.
Click Start then type cmd within the Windows 10 search box.
Choose cmd then right click it and select Run as administrator.
Click Yes when promoted by UAC.
Enter the following command then hit the Enter key:
PowerShell -ExecutionPolicy Unrestricted
Go ahead and type the below command then hit Enter:
Resetting Windows 10 helps free your laptop from rogue apps and drivers and may restore normal functionality.
Select the Start button and then proceed to press and hold the Shift key.
While holding the Shift key select the Power icon then choose Restart. This restarts the PC into Recovery Mode.
Once it restarts, choose Troubleshoot > Reset this PC.
Wait for the process to complete.
4. Complete OS reinstall
If the issue is still there and your laptop won’t open anything, you might have to reinstall Windows 10. This procedure will delete all files and folders from your system drive, so be sure to back them up beforehand.
Even though wireless technology has gone above and beyond offering blazing fast speed in the past years, the Ethernet cables still provide the most stable and highest speed connectivity possible.
However, at times you may have to rely on wireless technology because the Ethernet cable won’t reach your device.
Why do I need an Ethernet cable extender?
This is where an Ethernet cable extender comes in handy. It extends the reach of an existing Ethernet cable that is too short to reach a router or other devices at your home or office. You can use it for Wi-Fi without any issues.
In this article, we have listed the best Ethernet cable extender that you can buy for longer, unlimited, and reliable connectivity.
Note: Deals are subject to change. Keep in mind that the price tag often varies. We recommend going to the vendor’s website to check the price. Some of the products may be out of stock by the time you’ve made your purchasing decision.
Ruaeoda Ethernet Extension Cable offers up to 25 feet range. It is compatible with all the LAN network components including PCs, laptops, servers, printers, and switch boxes.
Ruaeoda Ethernet Extension Cable offers 550Mhz upload and download speed for high-speed data transfer for server applications, cloud computers, video surveillance, and online video streaming.
J&D offers Cat6 Ethernet extender cable that is backward compatible with Cat 5, 5e cable making it compatible with your old Ethernet cables. With up to 15 feet range, it is a perfect solution to extend your current Ethernet cable reach.
J&D Ethernet Extension Cable supports bandwidth up to 550MHz and transmits data speed up to 1000Mbps making it ideal for online competitive gaming, video streaming, and data transfer.
UGREEN’s Ethernet extension cable is a Cat6 extension patch cable RJ45 cord shielded male to female connector. This also allows you to extend the reach of your Ethernet cable to switch boxes, network printers, and NAS devices.
Similar to other Ethernet couplers in this list, UGREEN’s ether cable also supports up to 550 MHz of bandwidth offering high-speed data transfer for server applications, cloud computers, video streaming, and low ping in competitive games.
All the Ethernet cable extenders listed in this article are Cat6 cables. These cables also offer backward compatibility making them compatible with older Cat5 and Cat5e cables.
We hope you managed to choose the best Ethernet cable extender for you from our list. Let us know your pick in the comments section below.
You are not alone if you get a pop-up box with HiRezLauncherUI.exe Application Error when trying to launch the program related to Hi-Rez Studios Games.
Here we will talk about Hirezlauncherui.exe and how to fix system errors related to the same. Let’s begin!
What is Hirezlauncherui.exe?
Hirezlauncerui.exe is an executable file that is a part of the Hi-Rez Studios Games program developed by Hi-Rez Studios. It is a legit file and can be located here: C:\Program Files\Hi-Rez Studios\HiRezLauncherUI.exe
What causes the Hirezlauncherui.exe application error?
Some of the most popular reasons for this error are listed below:
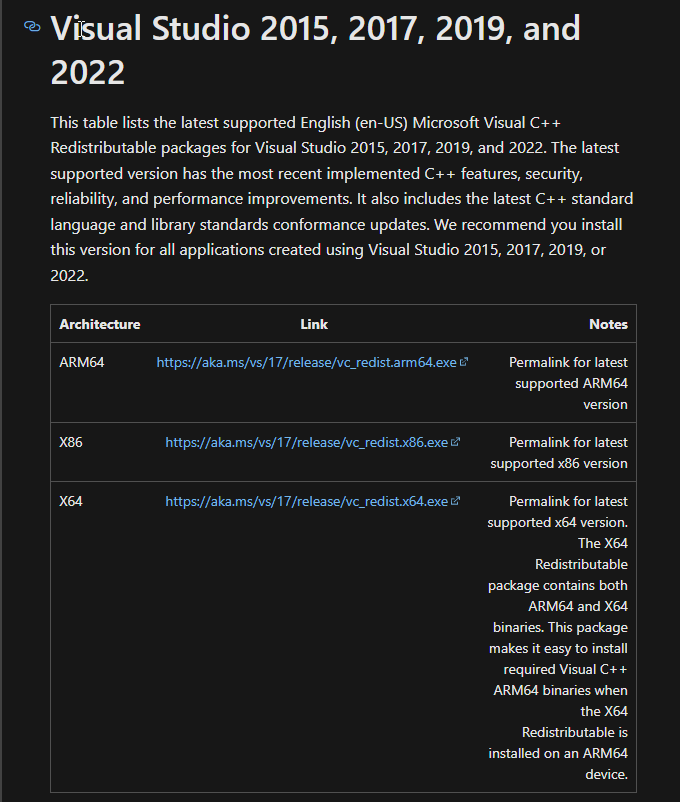
Microsoft Visual C++ Redistributable – If your computer’s Microsoft Visual C++ Redistributable file is corrupted or missing, you could see the error. You need to reinstall it.
Program installed incorrectly – If any of the Hi-Rez Studios games are installed on your computer incorrectly, it could be the reason for the error. Try reinstalling the program.
What can I do to fix the Hirezlauncherui.exe application error?
Before moving to the detailed troubleshooting methods, here are a few preliminary checks you should do:
Follow the on-screen instructions to complete the installation.
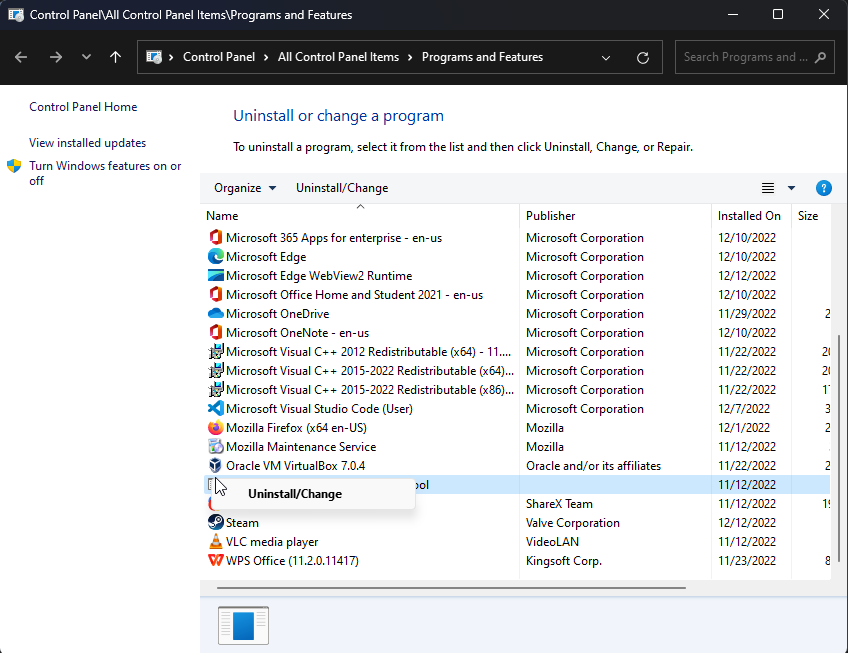
3. Reinstall the program
Press Windows + R to open the Run window.
Type appwiz.cpl and press Enter.
Locate the program, and right-click on it to select Uninstall.
Download the game file from the official website.
Run the file and initiate the installation. Follow the on-screen instructions to complete.
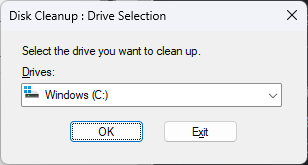
4. Run Disk Cleanup
Press Windows + R to open the Run window.
Type cleanmgr and hit Enter.
On Disk Cleanup: Drive Selection window, click OK.
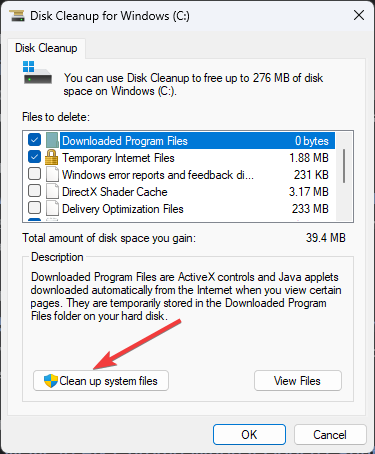
Click Clean up system files on the Disk Cleanup window.
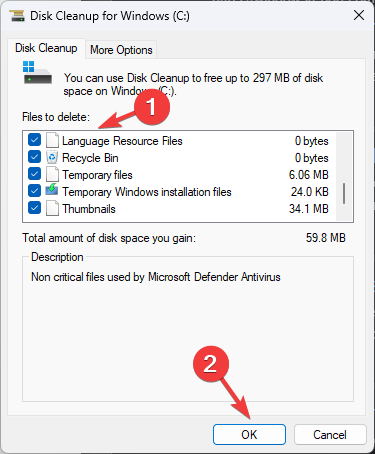
On the next window, click OK.
Under Files to delete, select all the items and click OK.
On the next prompt, click Delete Files.
5. Use the Command Prompt
Press the Windows key, type CMD and click Run as administrator.
Type the following commands one by one and press Enter after every command: sfc/scannowresmon
Copy and paste the following command and press Enter: DISM.exe /Online /Cleanup-image /Restorehealth
Restart your PC once the scan is complete.
6. Restart the Windows Update service
Press Windows + R to open the Run window.
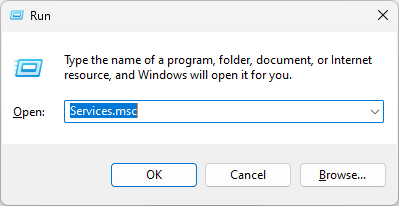
Type services.msc and hit Enter.
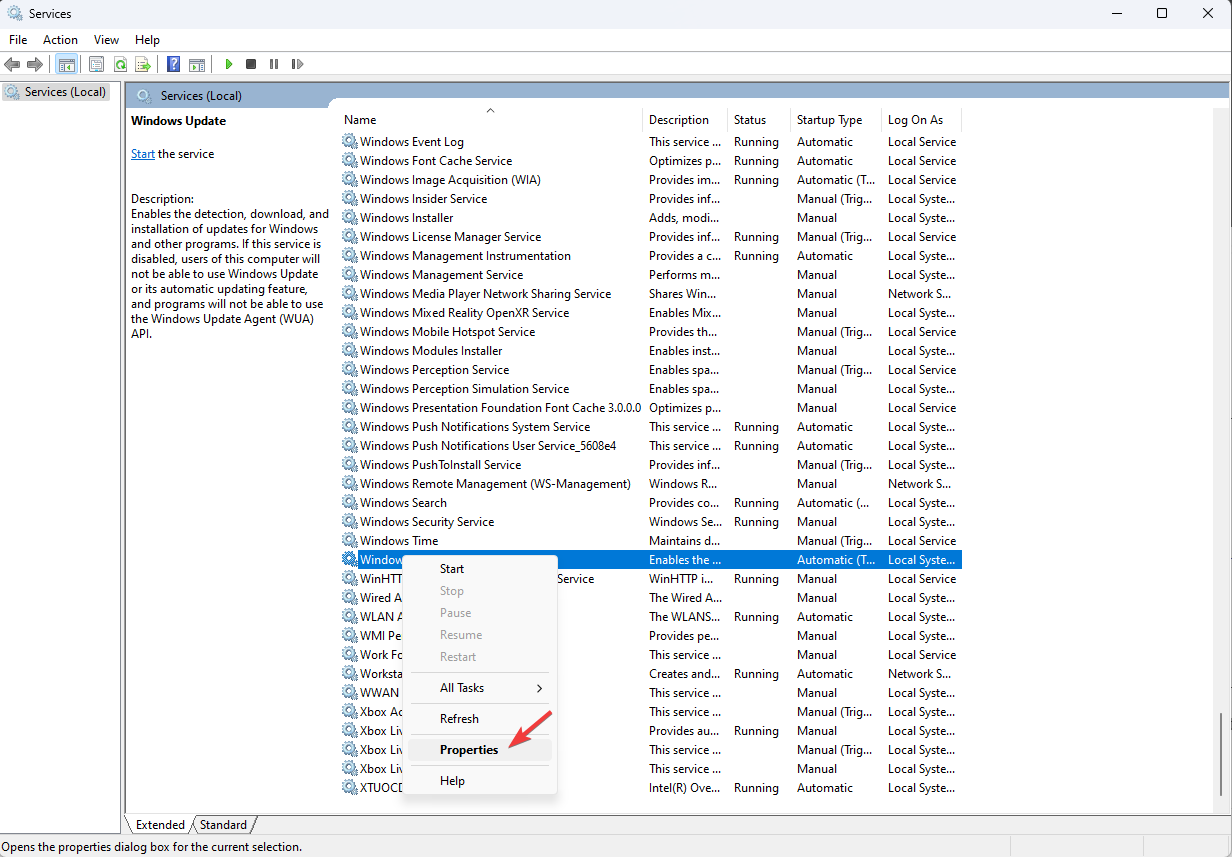
Locate and right-click Windows Update and select Properties.
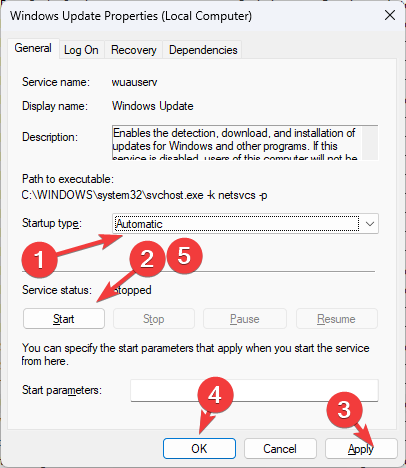
Change the Startup type to Automatic, and under Service status, click Start.
Click Apply and OK.
So, these are the methods to fix the hirezlauncherui.exe application error. Try them and let us know which worked for you in the comments section below.
NVIDIA‘s Shield TVs come with Internet connectivity because they work as gaming consoles and media streaming devices.
That said, some users have reported that their Nvidia Shield is not connecting to the Internet via Ethernet. Moreover, others said that their Nvidia Shield TV keeps losing Ethernet connection.
Why is my Nvidia Shield Ethernet not working?
The Nvidia Shield Ethernet not connectederror seems to be occurring after the recent update which changes the IP Settings to Static by default.
While some of the users have reportedly fixed the issue by changing the IP Settings, the issue can vary depending on the user.
In this article, we discuss how to fix the Ethernet connection to the Shield TV if it’s not working properly.
How can I fix the Nvidia Shield Ethernet not connected issue?
Before trying out more complicated solutions, ensure that the Ethernet cable is properly plugged in. For some users, trying to force the cable deeper inside fixed the issue.
1. Change the IP Settings
Turn on your Nvidia Shield TV.
From the Home screen, go to Settings.
Select the Network option.
In the new window, select IP Settings.
By default, it is set to Static. Change it to DCHP.
Don’t change the IP address or Gateway setting. But make sure the settings are the same as Network Prefix Length and DNS fields.
Save and exit the IP setting window.
Try connecting to the internet and check if the error is resolved.
If the error persists, make sure change the IP setting back to Static and try again.
2. Change router DNS settings
Note: These steps are for Linksys routers. If you are using a different make, read the user manual to find the right way to change the DNS settings for your router.
Open a web browser and sign in to your Linksys router’s web-based admin page.
Go to Setup from the top menu.
Select the Basic Setup option.
In the Static DNS 1 field enter the primary DNS IP address. We are using the Cloudflare Open DNS address. Enter the following in the DNS 1 field. 1.1.1.1
In the Static DNS 2 field enter the following DNS IP address. 208.67.222.222
Alternatively, you can also use other public DNS addresses from Google and other providers.
Leave the Static DNS 3 field blank.
Click on the Save Settings button at the bottom to apply the changes.
Click on the Continue button to proceed.
Restart your Linksys router,
Restart NVIDIA Shield TV.
Connect to your network and check if the error is resolved.
3. Uninstall third-party apps
Start Nvidia Shield TV.
Click on Settings from the Home Screen.
Select Apps. It will list all the apps installed on the system.
Look for the most recently installed app like ES File Explorer and uninstall it.
Restart Shield TV and check for any improvements.
Some third-party apps like ES File Explorer have known to cause some issues and removing the app has reportedly fixed the Ethernet is not connected error for the users.
4. Reset Shield TV
From the Home screen, navigate to the Settings menu.
Select the Device Preferences option.
Select Reset.
Next, select Erase everything.
Nvidia Shield TV will erase all the data and reset the device to factory settings.
Restart and try to connect to the Internet. Check for any improvements.
A factory reset should always be used as the last resort. Resetting the device will erase all the data including apps.
5. Use a different cable
If the Nvidia Shield Ethernet port not working issue still persists, check your Ethernet cable. If you are using Cat5 cable, consider upgrading to Cat6 for better connectivity.
If you have any other questions or suggestions regarding the Nvidia Shield Ethernet not connected/losing connection issue, don’t hesitate to leave them in the comments section below and we’ll be sure to check them out.
There’s a reasonable explanation for Disney’s Plus not streaming full-screen problems. For instance, first episodes of The Simpsons weren’t designed for widescreen. Back in its early days, the 4:3 aspect ratio was the industry standard for old-school televisions.
So, when the first 19 seasons get converted to the current 16:9 standard, you are missing parts of the images. The good news is that we’re expecting a function to switch the episodes back to their original 4:3 aspect ratio shortly.
The top and bottom black bars are either cut off or occupy too much space and these little things could ruin the viewers’ experience. However, there are some nifty tricks you can apply until this happens.
How do I get Disney Plus to fit my screen?
1. Use some quick controls
Things aren’t at all complicated if you’re no stranger to similar media apps and own a device that comes with a keyboard attached.
Some useful keyboard shortcuts work on all supported PCs and laptops, including Chromebooks.
This time, you just need to press F to enter fullscreen mode and Esc to exit. As convenient as these shortcuts may sound, note that keyboard controls don’t work with the Disney Plus Android app on phones and tablets at the moment.
2. Switch to a different streaming device
Sometimes, 21:9 titles (as most movies on Disney Plus are) will have bars on top and bottom. They simply aren’t compatible with the aspect ratio that your device can display. Try switching to a different compatible device.
It’s disappointing when you cannot enjoy the full size of your ultrawide monitor, but things could be different on your tablet or phone. Just log in with your details and see if you can enjoy a better viewing experience.
3. Change your current browser
If nothing else worked so far, an efficient way to fix Disney+ issues is to watch it from another browser.
A great solution in this regard is Opera GX as your enhanced browser that offers faster navigation and supports better streaming quality for multiple platforms.
In addition, you have RAM and CPU limiter tools that are ideal for getting higher browsing and streaming results by just using less of your system resources.
Opera GX
Get the most out of your streaming on Disney+ and consider this featured browser to fix any irritating issues.
On the old Simpsons World app from FXX, you could toggle between 16:9 and 4:3 aspect ratios. It’s a bit of a shame that we’re still waiting for this feature on Disney Plus, but that’s why checking for updates in your streaming device’s app store is recommended.
When the long-wanted feature finally rolls out, you don’t want to be the one missing it. No less important, in addition to making streaming full screen enjoyable again, this should also fix the fuzzy look of all these episodes that got cropped and expanded to fill a large screen.
Why does the aspect ratio change on Disney Plus?
The first reason you have a different aspect ratio on Disney Plus movies is that many Disney productions were created for screens like the theater or old tube TV.
So, you may find content on Disney+ that doesn’t offer the 16:9 aspect ratio due to format reasons.
If you have other suggestions for tackling this problem, let us know by using the comments section below so that other users can try them as well.
Whether you have a photo studio or just need a great professional portrait shot, PhotoDiva is the tool you need.
It’s specialized in fixing or improving portraits and does that with just a few clicks thanks to its content-aware AI technology.
This software makes the photo retouching process completely automatic. It smoothens the skin, gets rid of blemishes, whitens teeth, and even applies digital makeup.
Right now, in the Christmas Sale deal, the tool is only $16.80 down from $56 which is really a bargain.
If you have old photos with your family and friends, don’t let them get destroyed and lost. The PhotoGlory app can help you restore them as if they were taken yesterday.
With this AI enhancement tool, you can erase scratches, stains, ink splotches, and tears, or even colorize old photos in much more vivid tones.
Moreover, you may even restore torn photos that may seem lost and apply over 100 one-click photo effects.
You can get this tool right now for only $22.40, down from $56, and restore all those kind memories.
A calendar is not only a source of information but also a great artwork piece and the Photo Calendar Creator app is here to help you personalize it to your liking.
The tool comes with more than 250 wall, booklet, desk, and pocket calendar templates that will get you started.
However, you can always use your own photos, highlight holidays, birthdays, and special events, then print them for any purpose.
Photo Calendar Creator is just $29.75, down from $85 but you may also download it for free and test it before buying.
It’s an all-in-one video editor for beginner filmmakers that you may use to create Full HD videos in more than 20 formats and upload them to YouTube in seconds.
The software even comes with Chroma Key, and over 160 effects & filters that will make your clip look professional.
This professional video editor for beginners is a bargain at $29.75 (down from $85) on this year’s Christmas Sale offer.
Your PC’s network adapter card connects your PC to the Internet. If you’ve ever wondered what your network card connection speed amounts to, there are various ways to check its link speed.
Follow along as we will show you how to check your network card speed and answer some of your most asked questions.
Let’s see how you can check your network card speed in Windows 10 without additional software without further ado. Keep on reading!
How can I check my network card speed?
1. Use Network monitoring software
Some network-monitoring software includes monitoring tools that provide network card speed details. For instance, Paessler PRTG is a highly-rated network monitor with a Windows Network Card sensor. It can help you test your network speed very easily.
That sensor is handy for monitoring bandwidth and provides extensive network card stats.
Aside from its wide range of network sensors, PRTG has extremely flexible alerting features. For example, it incorporates 13 alert mechanisms for unusual metrics detected.
PRTG users can choose email, SMS, SNMP trap, push notifications, and slack messaging messages, among others, to keep them notified.
Other useful Paessler PRTG features
Its users can utilize web-based or desktop PRTG apps
PRTG enables users to view network data with real-time maps
Provides in-depth reporting for its users with historical data reports
This software also allows users to access multiple networks with remote probes
PRTG
Check your network speed and monitor your traffic like a PRTG software pro.
Press Windows + X, then choose Windows Powershell (Admin).
Input this command into PowerShell’s window: Get-NetAdapter | select interfaceDescription, name, status, linkSpeed
Press the Enter keyboard key to view network adapter details.
Check your network card’s speed specified within the LinkSpeed column.
The above methods for checking network card speed provide valuable insight into your network card’s theoretical maximum speed and other technical specifications.
How can I change LAN speed from 100 to 1000 on Windows 10?
Press Windows, then type Ethernet and select Ethernet settings.
Here, select Change adapter options.
Double-click Ethernet.
Here, you will see the speed setup.
To change it, click Properties followed by Configure.
Please navigate to the Advanced tab, scroll down until you find the Speed and Duplex option, select it, and set the value to 1.0 Gbps Full Duplex.
The Gigabit Ethernet protocol, much like its predecessor, supports operation in either the half-duplex or full-duplex mode.
When using the full-duplex mode, frames move in both directions concurrently across two channels on the same connection. This results in an aggregate bandwidth twice as large as in half-duplex mode.
The speeds attained through an Ethernet connection are often constrained by the particular Ethernet cable installed.
The maximum data transfer rate for a Cat5 connection is 100 Mbps, while the maximum data transfer rate for a Cat5e and Cat6 connection is 1,000 Mbps, and the maximum data transfer rate for a Cat6a connection and above is 10,000 Mbps.
The type of Ethernet cable you choose will not have a significant effect on the overall performance of your home network, and this is true for the vast majority of home networking setups.
How do I find my network card specs?
Press Windows, then type system info and select the top result.
From the left panel, click the plus button next to Components, followed by Network, then select Adapter.
You will find all the network card specs you need on the right side.
If you’re a gamer, it’s almost sure that you have run into a d3d11-compatible GPU required to run the engine error.
This is a prevalent issue in the PC gaming world and takes away time you could use playing games.
The most common source of D3D11 errors is a faulty d3d11 file in the DirectX software, but the errors might also indicate a registry or virus issue.
If you have run into this error, read till the end to find out how to bypass it.
What is a D3D11 GPU?
The GPU is widely utilized in graphics and video processing because of its parallel processing capabilities.
While the terms GPU and graphics cards are used similarly, there is a difference. A graphics card is an add-in board that houses the GPU, just like a motherboard. You’ll also find the slew of needed components to power and install the GPU within this board.
The Direct3D card acts as a library for accessing the card for graphics and hardware-accelerated processing.
In recent times, D3D11 is now commonly used. This new library variant includes updated features and can increase visual clarity.
How do you check your GPU?
Click on Windows + S.
In the search bar, enter Device Manager.
Open the control panel.
Click on the Display Adapters dropdown to view the GPU in the new window.
Double-click the result to see extra details.
After checking whether it’s activated, you’re advised to update your GPU drivers. In the next section, you’ll learn how to go about it on Windows 11. Read on.
In the new window, click on the Display Adapters dropdown to view the name of the GPU.
Right-click on the GPU.
Click on Update Driver.
In the new window, select Search automatically for drivers.
To save time and prevent having outdated drivers in the future, you can use Outbyte Driver Updater. It uses a comprehensive driver database to check your drivers and install new versions as soon as they are available.
Click on download and wait for the program to install.
After downloading, right-click on the .exe file.
Select run as administrator.
Try relaunching the game after a PC reboot.
Alternatively, it could be that you need to replace the GPU entirely. If it’s older than five years, it’s probably time to change it, as the game engine uses different graphics components.
➡ Windows 10
Select settings from the start menu.
Windows Update & Security will appear as a menu option on the following window. Here, you can search for new updates.
Any GPU that needs to be installed will be done automatically.
➡ Windows 7
Click on the control panel by opening the Windows start menu.
Tap on system and security.
Tap on Windows update.
Check for available updates.
If you can’t find any available updates, tap on check for updates.
Check for graphic card drivers. You can find them in the main view or optional updates section.
When you find a graphic card driver, click on it to install and wait for it to finish installing.
How do I fix Fortnite not compatible graphics card
Ensure that your PC fulfills the hardware requirements for playing the game.
Update your graphics card driver.
Reboot your PC
D3D11 compatible GPU Fortnite
To play Fortnite, you need a compatible D3D11 component installed on your device. If you don’t, you may encounter some errors. A solution to fixing the error is to update your Windows version. Alternatively, you can also read this piece to learn how to update GPU drivers.
Thank you for reading this article, and don’t forget to share your thoughts in the comments section.
The dark theme has been an attractive feature of the Windows operating system. In the past, when you enabled the dark mode on Windows 10 or early releases of Windows 11, the Task Manager remained light.
However, Microsoft has changed this in the Windows 11 22h2 update as part of the many features to improve the aesthetic of the already stunning OS. So, for those wondering does Windows 11 have dark mode Task Manager, the answer is yes.
So, with this, you can quickly turn it on and off on your Windows. While this looks easy, you still need to know how to do it, and we will take you through the steps in this guide.
How can I turn dark mode on/off in Task Manager on Windows 11?
Press the Windows key + I to open Settings and select the Personalization option in the left pane.
Select the Colors option.
Now, click the dropdown before Choose your mode and select the Custom option.
Click the dropdown before Choose your default Windows mode and select Dark.
Now, click the dropdown menu before Choose your default app mode and select Dark.
Press the Shift + Ctrl+ Esc keys to launch the Task Manager; it should have changed to black with the other parts of your PC.
Finally, repeat Steps 1 to 2 to turn off the dark mode and select the Light option in Step 3 instead.
That’s how you can get dark-themed Task Manager on Windows 11. Also, you can turn it off by reverting to the default settings.
And if it appears that Windows 11 Task Manager dark mode is not working, restart the computer once for the changes to effect fully.
How can I turn dark mode on/off in Task Manager on Windows 10?
NOTE
Since the dark mode feature for Task Manager came with the Windows 11 22h2 update, there is a workaround that can get the dark mode on Task Manager on Windows 10.
Press Windows + I to open the Settings app.
Go to Ease of Access.
Now from the left pane, select High contrast.
Under Use high contrast, click the toggle switch towards On for Turn on high contrast.
For Choose a theme, select High Contrast Black.
Press Ctrl + Shift + Esc to open the Task Manager and see the results.
The process to enable Task Manager dark mode in Windows 10 is quite complex compared to the latest iteration.
If you have been experiencing the Xbox error code 807b0193, which indicates that the Live service is down or there is a problem with your Live profile, you don’t have to worry, as you’re not the only one in this. Hence, this guide will provide possible fixes for the error.
Why do I get the Xbox error code 807b0193?
There can be several reasons you are experiencing the Xbox error code 807b0193. According to some of our readers, the following are the common reasons behind the error:
The Xbox Live service is down temporarily – If the Xbox Live service is temporarily out of service, you may get the Xbox error code 807b0193. For this, you simply need to be patient for a couple of hours till the service is restored.
Outdated Xbox console – If your Xbox console has not been updated in quite some time, you likely may receive this error code.
Now that you know the potential reasons behind the Xbox error code 807b0193, let’s proceed to how you can fix this problem.
How do I fix the Xbox error code 807b0193?
Before engaging in any advanced troubleshooting or settings tweaks, you should ensure they perform the following:
Press and hold the Xbox button on your console for about 10 seconds to turn off your console completely. Next, disconnect the power cable from your console for at least one minute. Plug the power cable back in and press the Xbox button to turn on your console.
Make sure there is a proper connection anywhere between your Xbox console and router or modem for good internet.
Wait a few hours for Microsoft to complete their maintenance before you try again.
However, after confirming the above checks and you can’t seem to fix the Xbox error code 807b0193, you can explore the advanced solutions below.
High disk and CPU usage problems in Windows computers is nothing new. While the high disk usage can be usually fixed by installing a high-speed SSD, the high CPU usage problem is not hardware-based.
Windowshost process rundll32 high CPU and disk usage is one such issue annoying many Windows users.
The DLL extension is used to store common application logic accessed by other common applications.
High disk and CPU usage by Windowshost process rundll32 can occur due to scheduled tasks or if the computer has malware issues.
This article explores a few troubleshooting steps to help you resolve the Windowshost process rundll32 high disk / CPU usage problem in Windows 10.
How can I fix Windows host process rundll32 high CPU usage?
1. Disabled items from the Task Scheduler
Press the Windows key, type administrative tools, and open it.
In the File Explorer window, scroll down and launch Task Scheduler.
In Task Scheduler, expand the Task Scheduler Library and navigate to the Task Scheduler Library then select Microsoft. Expand the Windows section and select Customer Experience Improvement.
On the right pan, right-click on Consolidator.
Select Properties.
Open the Triggers tab.
Select the OneTime trigger and click on Edit.
In the Edit Trigger window, uncheck the Enabled box under Advanced Settings.
Click OK to save the changes.
Now go back to the Item list, right-click on the following items one by one, and select Disable. The items that you need to disable are following:
Consolidator
UsbCeip
Note: After you’ve performed these steps, don’t forget to restart your computer.
After the restart, check if the WindowsHost process rundll32 high CPU usage is gone.
If not, make sure to reverse the changes made in the earlier steps to enable Consolidator from the properties and item list.
2. Use specialized repair software
DLLerrors are somewhat common, and fixing them manually can be a hassle, especially if you can’t find the culprit of the problem.
Therefore, to fix issues with WindowsHost process rundll32 and other software, we suggest using specialized third-party tools.
3. Disable Telemetry services
Press the Windows key + R to open the Run dialogue box.
Type services.msc and click OK.
In the Services window, search for Connected User Experienceservice.
Righ-click on the service and select Properties.
Click the Stop button to stop the service.
Set the Startup Type to Disabled.
Click Apply and OK to save the changes.
Close the Services window and restart your computer. Open the Task Manager to check if the high disk and CPU usage issue is resolved.
Microsoft’s User Experience service is also known to cause high disk and CPU usage problem.
Disabling the service seem to have resolved the problem with WindowsHost process rundll32.
GSvr.exe is an executable file, and these types of files are vital in your computer. On the one hand, because they run operations or perform functions.
However, that is also the danger with executable files, because viruses can come in the form of executable files and perform harmful operations to damage your system. So, should you keep or remove this file? Read this post to the end to find out.
In this case, GSvr.exe is part of GIGABYTE’s Energy Saver Advance program, or so it should be. However, a virus or malware can mask as a legitimate file and cause you to have problems such as high CPU usage when it runs in the background.
Is GSvr.exe safe or a virus?
With GSvr.exe, you are in a tricky situation. On the one hand, this executable file may be a critical process for Energy Saver. On the other hand, it could be a virus that can damage your hard drive.
Before you decide to remove it, here’s how to confirm that the GSvr.exe is malicious.
First is the location of the GSvr.exe process. If you find it residing in any directory other than the following path, it may be a virus.
C:\Program Files\GIGABYTE\EnergySaver\essvr.exe
Next, check the size of the file. You can compare the sizes using Task Manager. The size of the legit GSvr.exe should be around 16.9 MB. If the file on your system is larger or smaller than this, you should delete it.
How do I fix high CPU usage on GSvr.exe?
1. Use a security tool in Safe Mode
To prevent an infection of your PC, you have to make use of a professional security tool, such as Malwarebytes.
In some instances of this problem, users reported that the GSvr.exe file itself prevented the deletion. The way to disable the process to be able to remove it is by running the tool in Safe Mode.
To boot your PC into Safe Mode, follow the steps below:
Go to Windows Settings by pressing the Windows + I keys
Next, click on Update & Security.
Next, choose the Recovery option.
In Recovery, select Advanced startup.
Next, select Restart now. Your computer will now reboot.
When the PC’s screen lights up, you will be taken to the Choose an option screen. Here, go to Troubleshoot.
Next, click on Advanced options and navigate to Startup > Settings > Restart.
If you set BitLocker, you will now have to enter your BitLocker recovery key.
Finally, when the machine comes on, you will be on a screen where you need to choose a startup type. Here, press 4 or F4, and your PC will boot into Safe Mode.
In Control Panel, find the Uninstall a Program option under Programs and select that. This button is called Add or Remove Programs in earlier Windows versions.
On the next page, you have a list of programs currently installed on your computer. Locate and right-click on Energy Saver Advance B9.0316.1.
From the context menu select Remove or Change/Remove.
This opens up the uninstall wizard for Energy Saver Advance B9.0316.1.
Follow the instructions by this wizard to uninstall the program.
Lastly, restart your computer to get rid of the GSvr.exe file completely.
The GSvr.exe file is safe to remove from your system, unlike most other executable files that may be crucial to the functioning of your machine.
You can also get problems on your computer, such as a high CPU usage, thanks to the GSvr.exe file.
In this article, we’ve explored the GSvr.exe file and given a brief overview of this executable, and also covered ways to tell if the file is safe or malicious.
Windows 11 has a built-in widget platform and can contribute to high CPU usage. These widgets can be used to display the weather forecasts, sports scores, and clock.
Whereas they may be useful to some extent, some users complained that Windows 11 Widgets are using too much CPU. This widget issue is most common on Windows 11 devices, but older versions of Windows can also experience this problem.
The widgets are a useful feature that provides you with information at a glance. But, sometimes, when the Widget panel is open, it starts consuming CPU or memory and the system performance drops down.
The CPU is the brain of your computer. It performs all the calculations and processes that your machine needs to function, so if it’s running unusually slow, you may want to investigate the issue.
If a widget is using up most of your computer’s resources (CPU, memory, disk space, etc.) then you should turn it off because that means it is using up all of the resources that could be used by other processes, thus slowing down your computer.
There are several causes of high CPU usage. It may be that you have installed too many programs on your computer and they are taking up too much space. The best solution to this problem is to uninstall some of those programs from your computer.
It is also possible that there has been an infection on your system that has caused the files to become infected with viruses or spyware. This will cause the computer to run more slowly and use more resources than normal
Does Windows 11 use more CPU than Windows 10?
Windows 11 is more demanding than its older siblings. This is quite evident in the minimum system requirements.
The OS has also been designed with security in mind. It includes built-in antivirus and firewall protection, as well as a host of other security features.
The size of Windows 11 itself is demanding. Its download size is more than 4GB which means that you may need more hard drive space than you would with other versions of this operating system, which also leads to higher consumption of memory by default.
Another reason why Windows 11 uses more CPU is that it has several features that were not possible with Windows 10. The inclusion of new application programs has been designed for use only with Windows 11.
With the widgets on Windows 11, it is likely to take up more CPU than Windows 10. If you want to stop your CPU from using too much energy, you will need to turn off some of the features that cause it to do so.
For example, you can tweak the Power Management settings which allow the computer to turn off when it’s not in use.
What can I do to fix Windows 11 widgets high CPU usage?
1. Disable widgets from Task Manager
Hit the Windows key and select Personalization.
Scroll down and click on Taskbar.
Toggle the widgets button off.
2. Update drivers
Press the Windows key, search Check for updates, and click Open.
Select Advanced options.
Go to Optional updates.
Select Driver updates and proceed to Download & install then restart your system.
You can also choose to go for convenience and use a third-party tool. With Outbyte Driver Updater, you don’t need to worry about making a mistake when installing. A wrong driver can cause serious system problems, but with Outbyte Driver Updater you don’t have to worry about anything. This smart software will do everything for you.
The tool also works in the background and keeps your drivers always up-to-date. It automatically scans your PC for devices and checks if there are new versions of their drivers available.
3. Run a system scan
Press the Windows key, search Windows Security, and click Open.
Press the Windows key, typecmd on the search bar and click Run as administrator.
Type in the following command then press Enter: DISM /online /cleanup-image /scanhealth
Restart your PC for the changes to take place.
5. Run SFC command
Press the Windows key, type cmd on the search bar, and click Run as administrator.
Type in the following command then press Enter: sfc /scannow
How can I check for CPU usage in Windows 11?
At some point, the performance of your PC will prompt you to check what is consuming too much CPU so you can disable it.
There are many reasons why Windows 11 runs slow, and there are many possible solutions. For example, some programs may require more system resources than others. It is possible that your computer might be running slow because it has an outdated driver or software.
To get to the root of the problem, you will need to check the CPU usage. Here’s how to check your CPU usage in Windows 11:
Hit the Windows key, type Task Manager in the search bar, and click Open.
Select the Perfomance tab and click on CPU.
The apps consuming too much CPU can be found at the top.
Do widgets drain battery?
Apart from CPU consumption, another common question that comes up often is whether widgets drain batteries.
Most obviously, if you run more software, the more work your computer will do, and so the faster its battery will drain.
If you are using a widget, it’s a good bet that the app that created it is running in the background, occasionally waking up to update itself.
Depending on what the widget does, and how often it does it, this can use up more battery than you want. If the widget is a clock, for example, the app might be waking up every couple of minutes to update its display.
While it isn’t necessary to delete all of your widgets, it’s best to keep only those that you absolutely need. If you have widgets for weather apps or social media apps that you don’t use very often, consider deleting them from your home screens.
If your widgets were consuming a considerable amount of CPU, we hope this article has offered efficient solutions and your PC’s performance has improved.
As always, we love hearing from you so don’t forget to share your thoughts in the comments section below.
Many users rerported issues with their Internet connection, and they have encountered Can’t reach the DHCP server the network connection quality might be low error message. This can be a problem, but there are ways to fix it.
Why is the DHCP server not reachable?
There are several reasons, including outdated network adapter drivers, wireless adapter settings or glitches with DHCP.
How can I fix the Can’t reach DHCP server error?
Before trying anything else, try restarting your router or modem. Also, try disconnecting the network cable from the router/modem. Inspect network cables for hardware damage.
1. Update or reinstall your network drivers
Press the Windows key + X, and select Device Manager.
Select a category to see names of devices, then right-click on the one you’d like to update.
Select Update driver.
Click on Search automatically for updated driver software.
Once it’s done updating you’re all set.
To reinstall your network drivers, follow these steps:
Open Device Manager again.
Locate your network device, right-click it and choose Uninstall device.
Check the Remove driver software for this device option.
Select Uninstall.
Click the Scan for hardware changes icon.
Windows will now try to install the default driver.
2. Change wireless adapter settings
Open Device Manager.
Locate your wireless adapter and double-click it.
Navigate to the Advanced tab.
Locate 802.11a/b/g Wireless Mode and set it to any 2.4GHz value.
This is a simple solution if you can’t reach DHCP server on WiFi, but keep in mind that 2.4GHz connection is slower.
3. Register your DNS via cmd
Type cmd in your Start Menu. Open Command Prompt.
Enter ipconfig /registerdns
Type exit in Command Prompt.
Restart your PC.
4. Enable or disable DHCP
Search for View network connections and select the first option.
Double-click the active network connection. Next, select Properties.
Click on Internet Protocol Version 4. Select Properties.
Click on Use the following IP address.
Enter the values for your IP Address, Subnet Mask, etc. And check if that works.
If DHCP is disabled, click on both Obtain an IP Address automatically and Obtain DNS Server Address Automatically and save changes.
This method can be useful if you can’t reach DHCP server via Ethernet on Windows 11.
OneDrive is an online cloud storage service from Microsoft. It allows users to store files and access them from anywhere on any device. The primary purpose of using this service is to sync files between multiple devices so that you can access your documents from anywhere you want.
However, sometimes users face issues with this service and its performance. Sometimes the error code 0x800701AA may appear on your computer screen when downloading files from your OneDrive account.
Why am I getting the error 0x800701AA in One Drive?
Below are some possible causes of why you aren’t able to download files from One Drive:
Unstable internet connection – If your device doesn’t have an active internet connection at all times then you won’t be able to download any files from OneDrive until it does.
Insufficient storage – If you’re trying to download a large file and don’t have enough storage space on your device, you may get this error code.
Corrupt file – If there’s a problem with the file you’re trying to download, it may present some issues.
The file is too large – If you’re trying to retrieve an extremely large file, OneDrive may not be able to handle the process.
Server error – If Microsoft servers are undergoing maintenance, their services may also experience downtime, and you’ll get The Cloud operation was not completed error message.
The folder is inaccessible – It is also possible that the folder containing the file is not accessible at the moment.
How can I fix the error 0x800701AA in One Drive?
As you attempt to find a fix, try the basic checks first:
Close any background apps.
Check whether you have enough hard drive space to accommodate the download.
Ensure you are signed in to OneDrive and sync any pending files/folders.
Open OneDrive, locate the file you want to download and copy its location.
Press Windows + E to open File Explorer.
Navigate to Network on the left pane and click on Map network drive.
Select Connect to a Web site that you can use to store your documents and pictures in the dialog box that appears and click Next.
In the Specify the location of your website dialog, paste the location copied in 1 and click Next.
Select a name for the new location.
Hit the Windows key, type Powershell in the search bar, and click Run as administrator.
Type and Enter the following command: {$_.FullName Get-Content -Path $_.FullName -first 1 | Out-Null}
4. Uninstall and reinstall OneDrive
Hit the Windows key and click on Settings.
Click on Apps on the left pane then Apps & features on the right pane.
Locate the OneDrive app, click on the three vertical ellipses and select Uninstall.
Now launch the Microsoft Store by clicking its icon in the taskbar.
Search for OneDrive.
Click on the Get button to install OneDrive.
And that’s how to fix the 0x800701AA. A section of those who use Apple services on Windows also complained of the iCloud error 0x800701AA. If so, you can use the same steps to resolve it.
Elsewhere, users also complained that at times, they encountered an error where they couldn’t access OneDrive. If you experience something similar, don’t hesitate to check out our helpful guide on the same.
Another annoying habit is that you may find that OneDrive is constantly syncing so be sure to refer to our article on how to solve this issue.
Share with us in the comment section below any other solution not mentioned here that was able to help you resolve this error.
1. Press the Start button and input the keyword troubleshootwithin the search text box.
2. Next, click on Troubleshoot settings to open that tab within Settings.
3. Next, click on Additional troubleshooters to open the troubleshooter list in Settings.
4. Select Network Adapter in Settings, and press the Run the troubleshooter button.
5. Select theEthernetoption in the Network Adapter troubleshooter, and clickNextto go through any suggested resolutions.
If your Ethernet keeps disconnecting, you have a built-in troubleshooter on your PC that you can use to fix the problem.
Windows has a Network Adapter troubleshooter that will scan your device for issues and recommend solutions to your specific problem within seconds.
2. Update your Ethernet adapter driver
You might need to fix an outdated or faulty Ethernet driver to resolve the Ethernet cable that keeps disconnecting Windows 10 or Windows 11 issue. You can quickly and easily update drivers with driver updater software.
A driver updater utility will scan your PC and list devices you need to update drivers for. Fortect Driver Updater is excellent for this, plus, this tool will also help you keep your drivers up to date by regularly scanning and informing you of their status.
Open the search tool by pressing Windows, then type the keyword network into the search tool’s text box. Finally, click View network connections to open it.
Right-click your listed Ethernet connection there to open its context menu.
Then select the Enable option if Ethernet is disabled.
5. Try a different Ethernet cable
If the Ethernet keeps disconnecting on Windows 10, check the condition of your Ethernet cable. If it’s not in OK shape, consider replacing your Ethernet cable with a new one.
In addition, try connecting your Ethernet cable to different ports on your router and check if that helps.
6. Disable the Windows firewall
Press the Windows keyboard key and S simultaneously to open the search utility.
Input firewall in the search box to find Windows Defender Firewall. Then, click the Windows Defender Firewall applet in the search results.
Then click Turn Windows Defender Firewall on or off on the left of the open applet.
Select both the Turn off Windows Defender Firewall options within Customize Settings.
You can usually disable a third-party antivirus utility by right-clicking its system tray icon and selecting a disable (turn off) shield setting of some description.
Open Windows 10’s a search box, and type the keyword Internet Options in the search tool’s text box. Next, click Internet Options to open the Internet Properties window.
Select the Connections tab. Now click the LAN settings button.
Then click the LAN settings button to open a Local Area Network (LAN) Settings window.
Deselect the Use a proxy server checkbox if that option is selected.
Click OK to exit the Local Area Network window.
8. Reset your network
Open Settings with the Windows key + I hotkey, then click Network & Internet to open a Status tab in Settings.
Then click the Network reset option.
Press the Reset now button to confirm and restart your PC.
9. Disable VPN software
It’s also recommended that users disable any VPN software installed on their desktops or laptops. Our guide on how to turn off VPN provides further details on how you can disable a VPN connection permanently or temporarily.
If you have a VPN browser extension enabled, make sure you also disable it. You can do that by opening the extensions tab in your browser and toggling the VPN extension off there. Alternatively, you can altogether remove the extension.
What can I do if my Ethernet keeps disconnecting on Windows 11?
Resolving this issue is not very different from the resolutions presented in this guide. The steps are mostly the same, with very slight changes when it comes to the things you need to click on.
Can I use Ethernet and Wi-Fi at the same time?
Yes, a personal computer can use both Wi-Fi and Ethernet simultaneously, provided that the computer’s network settings are adjusted to give equal weight to each connection.
And that they are programmed not to disconnect from either connection when the other reference is made. For more information, check out our post on how to combine Internet connections on Windows 10.
So, various potential resolutions can help you fix if Ethernet keeps disconnecting on Windows 10.
Now that we know what variations this error has been presented in, we can discuss another important topic -where does this issue occur?
For more information on this topic and potential solutions, please look at our article on Ethernet not working in Windows 10/11 to learn what to do about it.
Also, find out what to do when you get the unidentified network error message from our dedicated article.
If none of the resolutions stabilize your Ethernet connection, consider contacting your ISP support line for further assistance.
If you’re looking to buy a new USB C to Ethernet adapter and you’re wondering which are the best deals available right now, then you’ve come to the right place.
We will tell you which products are in vogue right now and what they offer you. They are all available to buy on Amazon.
Without further ado, let’s find out together our top picks for the best USB C to Ethernet adapters at the moment!
What are the best USB C to Ethernet adapter deals?
The Type-C to LAN Gigabit Ethernet (RJ45) Network Adapter is the best adapter for streaming large videos, playing games online, or downloading your favorite stuff at maximum speeds without interruption.
Enjoy fast data transfers, and better security compared to most wireless connections.
It is a plug and play, so you don’t need any drivers or to install any – simply insert the cable and start using the adapter.
The LENTION LAN Adapter offers up to 1000 Mbps gigabit ethernet connection. It is a great competitor on the list of the best USB C to Ethernet adapter.
Now you can enjoy faster HD video streaming, gaming, browsing, and storage over a secure connection compared to Wi-Fi alternatives, and it automatically connects and detects the speed and works accordingly.
It is also good to look at what with its sleek aluminum metal finish, plus there’s no need for driver installation as it is a plug and play adapter.
CableCreation’s USB-C Gigabit Ethernet adapter is designed with a Gigabit Ethernet port so you can access superfast network speeds.
It is easy to use, supports plug and play meaning no installation software is required, plus it has an LED status light so you know whether it’s working properly or not.
Enjoy fast data transfers, better security, and the manufacturer’s promise of a top quality cables, and a lifetime warranty on the adapter.
This is the best USB-C Gigabit Ethernet adapter when you need multiple ports as it comes with USB 3.0 ports plus HDMI/VGA video ports that support 4K UHD over HDMI, with a single USB-C connection.
The USB type C cable is a reversible, user-friendly connector, so you can use it from whichever end you want.
However, with this adapter, you may need an updated BIOS or firmware drivers from the manufacturer.
Gigabit Ethernet translates to high speeds with a maximum data rate of about 1Gbps (or gigabit per second, an equivalent of 1000Mbps).
In today’s digital world, Gigabit Ethernet has been made possible thanks to different technologies that support effective and fast data transfer via cable.
If you want to know whether your computer or device supports Gigabit Ethernet, it may not show at face value by looking at it physically.
Still, the cables usually have the information based on the standards they support. This can let you verify whether it can operate at gigabit speeds or not.
For most modern computers, connecting to such high speed networks requires using the best USB-Cto Ethernet adapter.
These devices also come with USB type C connector or port. This is reversible, user friendly, and lets you connect to your device from whichever direction.
What is a Gigabit Ethernet adapter?
A Gigabit Ethernet adapter is a small but compact gadget that connects from the USB port on your computer with an RJ-45 port that supports the 10/100/1000Base-T networks.
If your internet connection speed exceeds the 100Base-T, you may not be able to enjoy the high performance connection immediately. Still, it will be useful for future purposes.
USB-CGigabit Ethernet adapters harness the Ethernet where there is inconsistent, non-existent or over extended wireless connectivity.
So, you can connect seamlessly, and enjoy fast, uninterrupted, and reliable speeds.
Have you found the best USB-C Gigabit Ethernet adapter for yourself among these six?
Let us know your choice, or if you know a good USB C to Ethernet adapter that deserves to be on this list, share with us in the comments section below.
Are you one of the users getting error code 0x80072efd in Windows 10 while trying to update your device to the latest build?
It seems that many Windows 10 users cannot connect to the Windows update servers, Cortana, and also Internet Explorer.
When they try to update the operating system, they get the error above.
Before you try to install the latest Windows 10 version on your device, you need to install the latest Windows updates and Optional Updates.
Also, you can run the Windows Update Troubleshooter which will find and fix any issues regarding the Windows 10 operating system.
What does 0x80072EFD mean?
In most cases, this error means that you have an Internet connection issue when trying to update Windows because of the firewall protection that blocks the server connection.
As well, you can meet another issue such as The error code is 0x80072efd, in case you need it. This error message occurs on the Microsoft Store app due to Internet network connections.
How do I fix error code 0x80072EFD in Windows 10?
1. Update Windows 10
Go to Start > Navigate to Settings > Click on Update & Security
Click on the Windows update button
Now click on the Check for Updates option
Wait for the scanning process to finish
After the scan is completed and the updates have been installed, return to Windows Update
This time, go to the Advanced option and check Give me updates for other Microsoft products when I update Windows
When you finished the installation process, reboot Windows 10 computer
After the device starts, check again if you still get the error code 0x80072efd.
2. Run the Windows Update troubleshooter
Go to Settings > Update & Security > navigate to Troubleshoot
Select the Windows Update troubleshooter > run it
Follow the instructions on the screen and finish the troubleshooting process
Restart your Windows 10 computer
Check again if you still get error 0x80072efd.
3. Clean boot Windows 10
Go to Start > in the search dialog box enter msconfig without the quotes
Press the Enter button on the keyboard
Click or tap on the msconfig icon > the System Configuration Window should be visible
Click on the Services tab
Check the box next to Hide all Microsoft Services.
Click on the Disable all button.
Now click on the Startup tab located on the upper side of the window.
Select Open task Manager
In the Task Manager window go to the Startup tab.
Left-click or tap on each item on the list > select Disable
Close the Task Manager window > click OK
Reboot your Windows 10 machine.
Check if you can install the updates without getting error 0x80072efd.
4. Disable your antivirus/ firewall
If you keep getting this error, this can indicate that your firewall, antivirus or anti-spyware software is preventing Windows Update Services (SVCHOST) from accessing the Internet.
In this case, temporarily disable your security tools (yes, all of them) and try to install the latest updates.
If this method works, don’t forget to enable antivirus protection as soon as you finished updating your computer.
Make sure that your Windows Time service configuration is correct. If this service isn’t properly configured, you may experience various issues, including update errors.
Go to Start > type Services > ChooseServicesfrom the results.
On the Services window, locateWindows Time service and double click it.
Check theStartup typesection and set it toAutomatic.
Now, restart the service by clickingStopand then click Startagain. If the service isn’t running, click theStart button to start it.
ClickApplyandOK.
6. Disable Proxy
Go to Start > type inetcpl.cpl
Go to Connection > select LAN Settings.
Check the box ‘Automatically detect settings’
Under Proxy server, uncheck the box ‘Use a proxy server for your LAN’.
7. Reset Windows Update components
Before you reset Windows Update, don’t forget to back up your Registry. In case anything goes wrong, you will be able to restore a working Windows version.
Go to Start > launch Command Prompt as administrator
Type the following commands and hit Enter after each one:
net stop bits
net stop wuauserv
net stop appidsvc
net stop cryptsvc
8. Rename the Software Distribution folder
Renaming the Software Distribution folder may help you fix error 0x80072efd.
To do this, launch Command Prompt as administrator once again and run the following commands one at a time hitting Enter after each one:
9. Delete the content inside the Software Distribution folder
If renaming the Software Distribution folder didn’t help, try deleting all the files and folders from the respective folder.
To do this, go to C:WindowsSoftwareDistribution and open the folder. Simply delete the content available inside that folder.
If your system’s Datastore and Download folder are no longer synced, this may cause Windows Update to fail to work correctly.
As a result, you will encounter various issues, errors included, when checking for updates or installing them.
The files and folders that you deleted will get automatically downloaded again when you reboot your computer.
However, keep in mind that you will lose your Windows Update History and Windows will take longer to detect updates the next time you run Windows Update.
Error code 0x80072efd Windows 11
If you encounter this update error on your Windows 11 OS, the reliable workaround to fix it is with Windows Update troubleshooter. Follow the next steps to apply it:
Type Troubleshoot settings in the search bar.
Go for Other troubleshooters.
Find Windows Update troubleshooter and click Run.
Wait for the process to find your issue.
Accept the suggested repair, if you have it.
And there you have it, these methods will help you get rid of error code 0x80072efd in Windows 10 so that you can update the OS.
If you get an Excel error message saying that your formula omits adjacent cells when you try to enter it, your Excel spreadsheet has probably been modified.
This could mean that the cell has no data, no longer exists, the range has been changed, or there are blank cells in between each cell that you want to include in your formula.
Find tested fixes below:
What can I do if the Excel error formula omits adjacent cells?
1. Uncheck formulas that omit cells
Launch your Excel sheet and then click on File.
Navigate to Options and then select Formulas.
Look for Error checking rules and uncheck Formulas which omit cells in a region.
Click OK.
2. Switch from absolute to relative reference
Open the Excel sheet and select the cell that contains the formula.
Navigate to the formula bar at the top and press F4 until you get the relative reference option.
Absolute and relative references in Excel formulas are two ways to refer to cells in your spreadsheet. They both have their purpose, and sometimes you may find yourself using them interchangeably.
Absolute cell references are the default in Excel. However, there are times when using an absolute reference is not the best option. This type of notation is not always intuitive because it does not take into account the position of the cell that contains the formula.
When you update the formula to include the cells that you want to reference, Excel can properly evaluate it and display its result properly.
The caveat to this method is that if you have a very large spreadsheet with many formulas, then it can be difficult to track down which cell is causing the problem.
If nothing seems to work, you can opt to ignore the error or seek help from the help task pane in Excel. The built-in tool diagnoses some problems and may be able to recommend a solution.
Excel errors are in no shortage as you can expect to encounter a few hiccups when you’re working with sheets and formulas. We have crafted a dedicated article to help you in case you want to recover a corrupted Excel file so that you don’t have to lose all your work.
In other instances, you may be unable to type in Excel, but we know what you can do to keep things moving as you shall see in our expert guide. To learn more about Excel, don’t miss our guide on how to add a new line in cell in Excel.
Let us know of any other tricks you used if you were in a similar predicament in the comment section below.
Users have reported encountering the error message Recovery drive is full on Windows 10. This should not be confused with the low disk space message.
The first error code deals with the specific Recovery drive, and the second message relates to the general space availability on your PC’s hard drive.
The Recovery drive is a separate partition stored on your PC that contains all the files needed for you to be able to fully restore your PC if your system becomes unstable for some reason.
This article will explore the best methods to deal with this issue. Please follow these steps closely to avoid causing any other problems to your system.
Why is my Recovery D drive so full?
Users have reported a few elements that contribute to this problem, some of them include:
Writing data – When users continually write data to this drive, it will eventually be filled up, which is the leading cause of the issue. Only data connected with system recovery should be saved to this drive.
Malware – If the Recovery drive is full, but no files are written on it, you may suspect malware on the computer. We always recommend using the best antivirus systems.
Whichever the case is, you should try the solutions that we suggest below. This problem cuts across different brands as users have experienced Recovery drive full on HP, Dell, ASUS, etc.
What can I do if my Recovery drive is full?
1. Manually move files from the Recovery drive
Press the Win + I keys on your keyboard and select System.
Scroll down and select System info.
Select System protection from the menu on the left side.
Choose the specific Recovery drive inside the System protection window, then Configure.
Select Disable system protection and click Ok.
Press Windows + E, click the View tab and select the Hidden files checkbox.
Double-click your Recovery drive to open it, select the files you want to move, and copy them to another drive with free space.
Delete all the other options by using the key combination Shift + Delete.
This should have fixed your low disk space issue for your Recovery drive.
Note: Make sure not to delete files associated with system recovery. These include: $RECYCLE.BIN, boot, hp, EFI, Factory Update, preload, Recovery, RM_Reserve, system.sav, bootmgr, RMCStatus.bin, BT_HP.FLG, CSP.DAT, DeployRp, HP_WSD.dat, HPSF_Rep, language, or RPCONFIG.
Press the Win + R keys on your keyboard, type cleanmgr, and hit Enter.
Select the Recovery partition and click Ok (for this example, we’ll use the C: partition).
Wait for Windows to calculate the amount of space you will be able to free up.
Select the files you want to delete by clicking the respective boxes, then press OK and wait for the process to be completed.
3. Run a full scan
Type Windows Security in the Search bar, and click on the relevant search result.
Now, click on Virus & threat protection here.
Click on Scan options.
Now, select Full scan and click on the Scan now button at the bottom.
The first two solutions cover all possibilities, but there is also a third scenario that you might encounter and we dare say it’s even more frustrating. It happens when the Recovery drive is said to be full, but you cannot find any files to delete or remove.
Checking for malware becomes a viable alternative.
In this article, we explored some quick methods to ensure you’ll never get the Recovery drive is full error ever again.
Follow the steps presented in this article closely to avoid deleting any useful backup files from your Recovery drive.
We would love to know if this guide helped you solve your issue. Please feel free to let us know by using the comment section found below.
The Group Policy is integral to Windows 10 as it is in charge of many advanced settings and is used to fix several issues. However, some users are complaining of an error on the feature, which can be pretty concerning.
Though there are different causes for this, it is not as complicated as it seems. This guide will show you how to fix the Group Policy error and help you regain control of the critical feature.
What causes Group Policy errors in Windows 10?
Below are some of the causes of the Group Policy error:
Corrupt system files: Corrupt system files are one of the leading causes of the processing of group policy failure. Windows attempted to retrieve the new group policy settings error message. You need to fix the corrupt system files using a dedicated tool or the built-in file fixers.
Faulty registry files: According to some users, issues with the registry.pol and secedit.sdb files can cause this error too. The solution to this is to delete or move these two files.
Issues with the OS: In some cases, it might be hard to trace the cause of this problem. You can only assume that your OS is faulty. To get past this, you need to perform a system restore.
How can I fix the Group Policy error in Windows 10?
1. Delete or move the registry.pol file
Open File Explorer and paste the path below in the address bar: C:\Windows\System32\GroupPolicy\Machine\
Now, locate Registry.pol file and move or delete it. A safer option would be to move it to your desktop because you might want to restore this file if any new issues occur.
After moving or deleting this file, you’ll need to run one command in Command Prompt to recreate this file and restore the original group policy values. To do that, follow these steps:
Press Windows key + S, type cmd, and select the Run as administrator option under Command Prompt.
Type the command below and hit Enter to run it: gpupdate /force
Finally, restart your PC.
Once your PC restarts, the registry. The pol file will be recreated, which should fix the Group Policy error in Windows 10. Many users reported that this solution fixed their problem with corrupted local group policy, so try it out.
2. Move or delete secedit.sdb file
Launch File Explorer and navigate to the path below: C:\WINDOWS\security\Database
Locate secedit.sdb file, and move it to your Desktop.
Now, restart your PC.
Another fix for the Group Policy error on Windows 10 local group policy is to move or delete the secedit.sdb file. Deleting this file will reset your group policy settings to the default.
3. Use Command Prompt
Launch Command Prompt as administrator.
Type the commands below and press Enter after each: RD /S /Q %WinDir%\System32\GroupPolicyUsersRD /S /Q %WinDir%\System32\GroupPolicygpupdate /force
If you’re facing the Group Policy error on Windows 10, you might be able to fix the problem simply by using Command Prompt. The commands above will help you reset the Group Policy.
4. Perform DISM and SFC scans
Start Command Prompt as an administrator.
Type the command below and hit Enter to run it: sfc /scannow
Wait for the SFC scan to finish running. Then, if it fails or the problem persists, type the command below and hit Enter: DISM /Online /Cleanup-Image /RestoreHealth
DISM scan will now start. The scan takes about 20 minutes, so don’t interfere with it.
As mentioned earlier, corrupt system files can cause this issue. However, running the commands below will help you fix the files causing the Group Policy error in Windows 10.
Alternatively, you can use a third-party system file fixer to repair the broken system file. These tools are pretty fast and require no command to get going.
With just a few clicks, they will fix your files and restore normalcy on your PC.
5. Restart the Group Policy client
Press the Windows key + R, type services.msc, and click OK.
Double-click the Group Policy Client to open its properties.
Now, set its Startup type to Automatic and click on the Start button.
Click the Apply button and OK to save changes.
Finally, launch Command Prompt as admin, type the command below, and hit Enter: netsh winsock reset
Sometimes, all you need to fix the Group Policy error on Windows 10 is to restart the necessary services. The steps should help you take care of this quickly.
Press the Windows key + S, type system restore, and select Create a restore point.
Click the System Restore button.
Now, click Next to proceed.
Check Show more restore points option, if available. Select the desired restore point and click Next.
Follow the instructions on the screen to finish the process.
If the Group Policy error on Windows 10 persists, you might be able to fix the issue simply by performing a System Restore. This feature will help your return your PC to an earlier date when everything is working well.
The Group Policy error on Windows 10 can cause many issues, but we hope you solve them using one of our solutions. However, if you still cannot get the feature to work well, you might need to take a risk and perform a clean install or an in-place upgrade.
We are well aware that the main focus right now is on Windows 11 and Windows 10, but we never allow ourselves to miss an occasion to revisit the older versions of the Windows OS.
That being said, be sure to check out the latest versions of Windows 10, which is 22H2, and also Windows 11, which has also reached version 22H2.
And, as you surely know by now, the Redmond-based tech colossus also releases security updates for some of the obsolete operating systems, during Patch Tuesday.
That means that not only Windows 10 and 11 users will receive updates during this time. We’re also looking at Windows 7, Windows 8, and various Server versions as well.
We’ve already presented the 52 new updates that became available, along with the official download links, so all that remains is going a bit more in-depth.
Without any further ado, let’s take a closer look at what Windows 7 and Windows 8 users were given to work with on the December 2022 Patch Tuesday.
What should I know about the December 2022 Patch Tuesday?
The Redmond-based tech colossus has just released Patch Tuesday updates for Windows 8.1, in the form of KB5021294, and Windows 7, in the form of KB5021291.
Keep in mind that they each come with a whole host of improvements and known issues with some pretty neat workarounds.
By order of the Fijian government, Fiji will not observe daylight saving time (DST) in 2022. Therefore, clocks do not change by an hour at 02:00 on November 13, 2022.
A memory leak in the Local Security Authority Subsystem Service (LSASS.exe) occurs on Windows domain controllers. This issue is known to occur after installing Windows updates dated November 8, 2022, or later.
Known issues
After installing this update and restarting your device, you might receive the error, “Failure to configure Windows updates. Reverting Changes. Do not turn off your computer”, and the update might show as Failed in Update History.
After this update or a later Windows update is installed, domain join operations might be unsuccessful and error “0xaac (2732): NERR_AccountReuseBlockedByPolicy” occurs. Additionally, text stating “An account with the same name exists in Active Directory. Re-using the account was blocked by security policy” might be displayed.
After installing this update, apps which use ODBC connections through Microsoft ODBC SQL Server Driver (sqlsrv32.dll) to access databases might not connect. Additionally, you might receive an error in the app, or you might receive an error from the SQL Server.
By order of the Fijian government, Fiji will not observe daylight saving time (DST) in 2022. Therefore, clocks do not change by an hour at 02:00 on November 13, 2022.
A memory leak in the Local Security Authority Subsystem Service (LSASS.exe) occurs on Windows domain controllers. This issue is known to occur after installing Windows updates dated November 8, 2022, or later.
Known issues
After this update or a later Windows update is installed, domain join operations might be unsuccessful and error “0xaac (2732): NERR_AccountReuseBlockedByPolicy” occurs. Additionally, text stating “An account with the same name exists in Active Directory. Re-using the account was blocked by security policy” might be displayed.
After installing this update, apps which use ODBC connections through Microsoft ODBC SQL Server Driver (sqlsrv32.dll) to access databases might not connect. Additionally, you might receive an error in the app, or you might receive an error from the SQL Server.
Yes, you have forgotten your iPhone passcode and it’s pretty frustrating, but the FoneGeek iPhone Passcode Unlocker tool will unlock it quickly.
In fact, it can remove various iPhone/iPad/iPod Touch locks to help you regain control over your device.
What is iPhone Passcode Unlocker and how can it help?
iPhone Passcode Unlocker, developed by FoneGeek, is a dedicated Windows software that can unlock your iPhone or any other iOS device.
It can remove 4-digit or 6-digit passcodes, Face ID, Touch ID in just 3 easy steps. It also helps you remove the Apple ID from iPhone/iPad without a password.
The tool fixes disabled iPhone/iPad/iPod touch devices without the need for iTunes or iCloud.
Don’t worry about anything because it works well with iOS 16/iPadOS 16, iPhone 14/13/12, and a lot more.
This procedure will erase all the data from your iOS device and the iOS version will be upgraded to the latest one. Also, make sure that your device has enough power.
Start iPhone Passcode Unlocker and click on Unlock Screen Passcode.
Make sure that your iOS device is connected to your computer and click the Start button.
You will receive instructions on how to set your device in DFU mode. On iPhone 8 or later, the sequence is to press the Volume up, then Volume down, and lastly the Power button until the screen goes black.
Then, press the Power and Volume down buttons for 5 seconds, release the Volume down button and keep the Power button pressed for another 10 seconds.
Once your device is in Recovery or DFU mode, the tool will identify the device model and all available system versions. Choose your preferred version and click Download to get the firmware package.
Now, all you need to do is to click the Start Unlock button.
Lastly, you will receive a message that your device has been unlocked and it will restart. You will start fresh with your mobile device.
As you probably noticed, we outlined the recovery process for iPhone 8 and later devices but iPhone Passcode Unlocker also works for iPhone 7 and other iOS devices.
Also, this method also works if you want to solve problems like fixing disabled iPhone/iPad/iPod touch devices or removing Face ID and Touch ID.
iPhone Passcode Unlocker is incredibly easy to use by anyone because all the instructions are readily supplied.
How much do I pay for iPhone Passcode Unlocker?
The tool is one of the cheapest software for this purpose on the market. You only need to pay $23.95 to unlock up to 5 devices for one month.
You may also opt for a yearly plan of $33.95 to unlock up to 5 devices from one PC and a lifetime license is only $45.95.
However, if you hurry up, you can benefit from a 10% OFF Code: RFPAIR10 and get it even cheaper.
So, whether you need to fix a one-time problem or ensure that you never have problems with your iOS devices, the FoneGeek tool has got you covered.
UNetbootin is a popular Windows utility to create bootable USB flash drives for Ubuntu and other Linux distributions. At times UNnetbootin is not working on Windows 10, and this is usually followed by the Failed to start error.
The full error reads Windows failed to start A recent hardware or software change might be the cause. This error is usually triggered if the Live USB was not created properly, and in this guide, we’ll show you how to fix this issue.
How do I fix UNetbootin error?
1. Change BIOS Setup
The reliable workaround for the UNetbootin Windows failed to start error is to modify your BIOS setup as shown below.
1. Press the Windows key + I to open Settings.
2. Go to Update & Security.
3. Open the Recovery tab from the left pane.
4. Scroll down to Advanced startup and click the Restart Now button.
5. After the Restart, select the Troubleshoot option.
7. Under Advanced options, choose UEFI firmware settings.
8. Confirm the restart. This will allow you to enter BIOS on your Windows 10 PC.
9. After entering the BIOS, open the Boot tab.
10. Set UEFI/BIOS Boot Mode to Legacy.
11. Save the changes and exit BIOS.
Restart your PC and try to boot with the live USB. Check if the UNetbootin not working in Windows 10 error is resolved.
2. Disable Secure Boot
Power off your PC. Restart and then start pressing F2 to access the BIOS.
In the BIOS, open the Security tab.
Highlight and choose Default Secure boot on and set it as Disabled.
Save the changes and exit BIOS.
Reboot the computer with live USB connected and check if the failed to start UNetbootin error is resolved.
If the error persists, disable Fast startup in Windows 10. Fast Startup is a feature designed to reduce boot time. However, it prevents the computer from completely shutting down, which can lead to compatibility issues.
3. Disable Fast Startup
Press the Windows key and type cmd.
Now select Run as administrator.
In the Command Prompt window, type the following command and hit Enter: Powercfg -h off
This will turn off Fast Startup. Reboot the computer and check for any improvements.
4. Create a new Live USB
One of the common reasons for Windows failing to start – A recent hardware or software change might be the cause is a corrupted Live USB drive created using UNetbootin.
To make sure the Live USB was created properly, create a new bootable drive using the existing ISO file. This would eliminate any chances of error that may have triggered due to missing or corrupt files in the drive.
If the UNetbootin is still not working after creating a new live USB, check your ISO image for errors. Incomplete download or corrupted files may cause the installation to file.
Download the latest version of the ISO image available from the official source. Then create a new bootable drive and check for any improvements.
Alternatively, try using boot repair software. If you are experiencing an error on an existing installation, boot repair tools can fix computer booting issues and repair corrupted files.
Make sure you have the latest ISO installed, and the USB is connected to your PC.
Launch the Rufus application.
Select your flash drive under the device.
Next, choose your ISO, partition scheme, and target system as BIOS or UEFI.
Choose the Format option and leave the other options as default.
Click Start to create a bootable drive.
Rufus is a popular utility to create bootable USB flash drives. If UNetbootin is not working, Rufus is an excellent alternative with a uncomplicated interface.
Next, select Advanced Option and choose Command Prompt.
In the Command Prompt, type the following command one by one and hit enter: diskpart sel disk 0 list vol
Make sure the EFI System Partition is using the FAT32 file system.
Run the following command to assign a drive letter to the partition that is not in use. sel vol <number of volume> assign letter <drive letter>: Exit
To repair the boot record, run the following command: Cd /d <drive letter>: \EFI\Microsoft\Boot\ Bootrec /fixBoot
Wait for the command to find and fix issues with the bootloader. Restart the PC once the repair is complete.
The UNetbootin not working in Windows 10 Failed to start error is triggered due to faulty bootable drive or corrupted ISO image. Try changing the BIOS setup to fix the error. If not, use an alternative flash drive creator utility like Rufus.
Did you find a solution to this problem on your own? Don’t be shy and share it with us in the comments section.