Office 365 comes with antimalware and antispam protection as Microsoft introduced the world to the Advanced Threat Protection feature for Office 365.
Some of the benefits that came with this new solution include antimalware protection, real-time protection against malicious links, as well as rich reporting and tracking capabilities for URLs.
If you’re an Office 365 user with mailboxes hosted on Microsoft Exchange Online, then your email messages, both incoming and outgoing are automatically protected from spam and malware.
Office 365 has a built-in antispam filtering feature that protects inbound and outbound emails from malicious software and spam. This technology is enabled by default.
However, if you still feel the need for another antivirus for Office 365, there are myriad options you can choose from to suit your needs.
What is the best antivirus for Office 365?
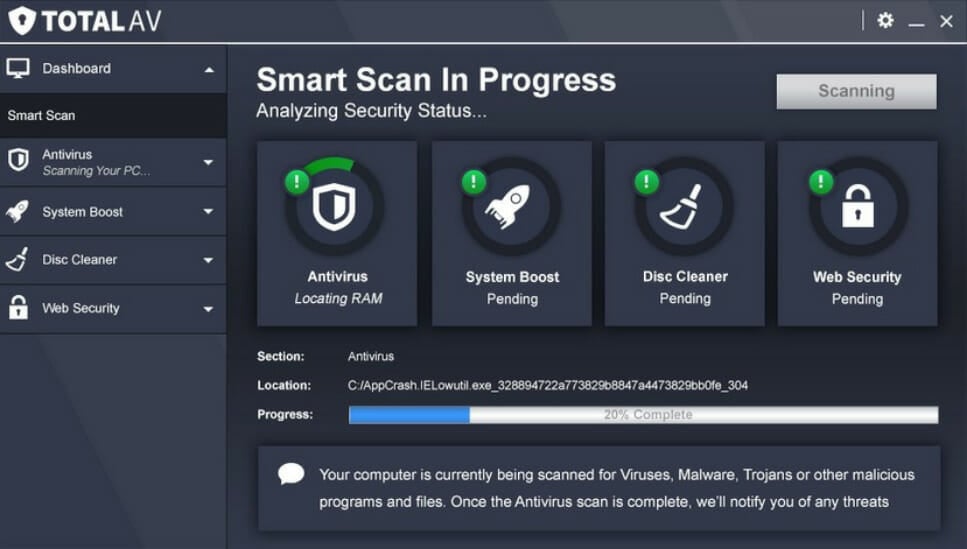
TotalAV – Best browsing security and system maintenance
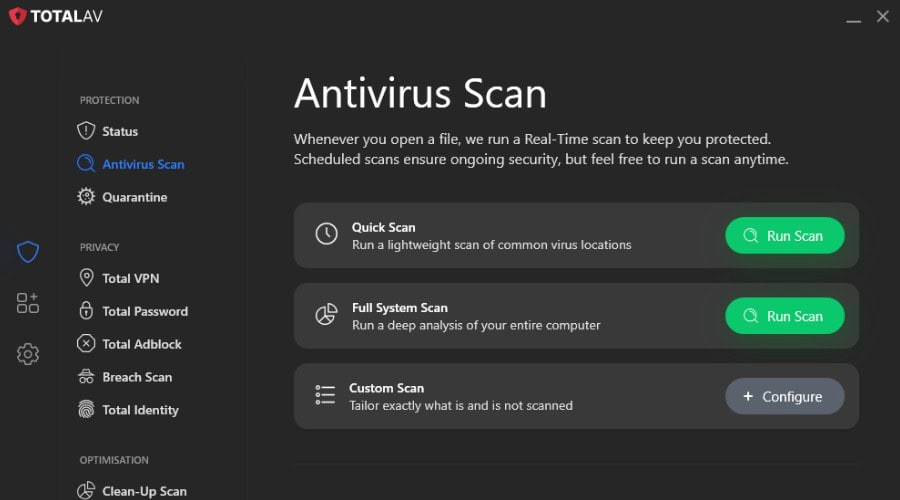
TotalAV is an award-winning antivirus and security software created to protect and maintain your PC running at the highest performance. It offers antivirus protection, safe web browsing, blocking of tracking cookies, and intrusion prevention detection.
All downloads, installations, and executables are checked before opening to prevent malicious scripts from accessing your computer. Reliable protection in real-time.
The software uses Total AV and its intelligent protection system to protect you from viruses, malware, ransomware, and phishing software that try to attack your data.
Total AV offers WebShield in your browser so you can browse the internet safely. WebShield is a line of defense against fake, deceptive, or phishing websites designed to take advantage of unsuspecting users.
For browsers, Total AV also allows you to take control of your browsing experience. Never see annoying ads again with our built-in ad blocker for websites and videos.
Also, the key features of TotalAV are:
Great real-time protection
WebShield for browser protection
Data breach monitoring
Compatibility with Mac, Android, and iOS
Blocking of tracking cookies
Smart protection for all your devices with simple yet clever antivirus online and offline protection across the internet.
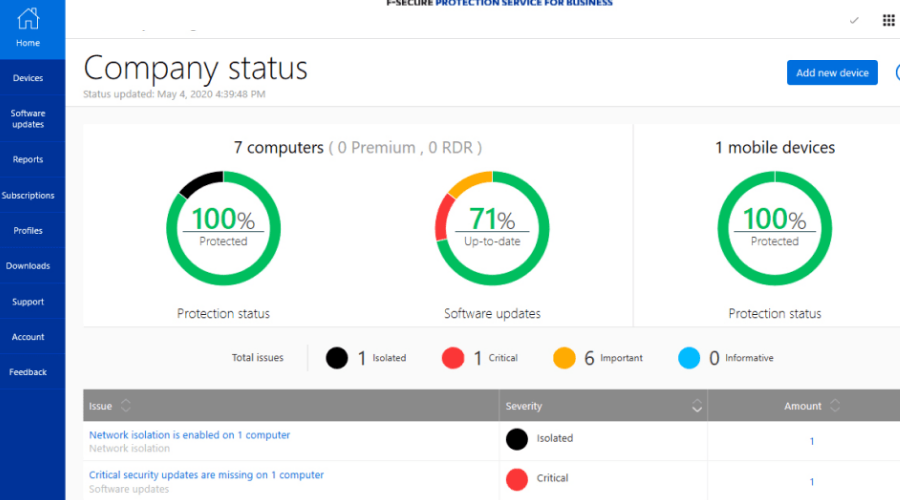
TotalAV
Try this complete package of protection and security with plenty of additional features.
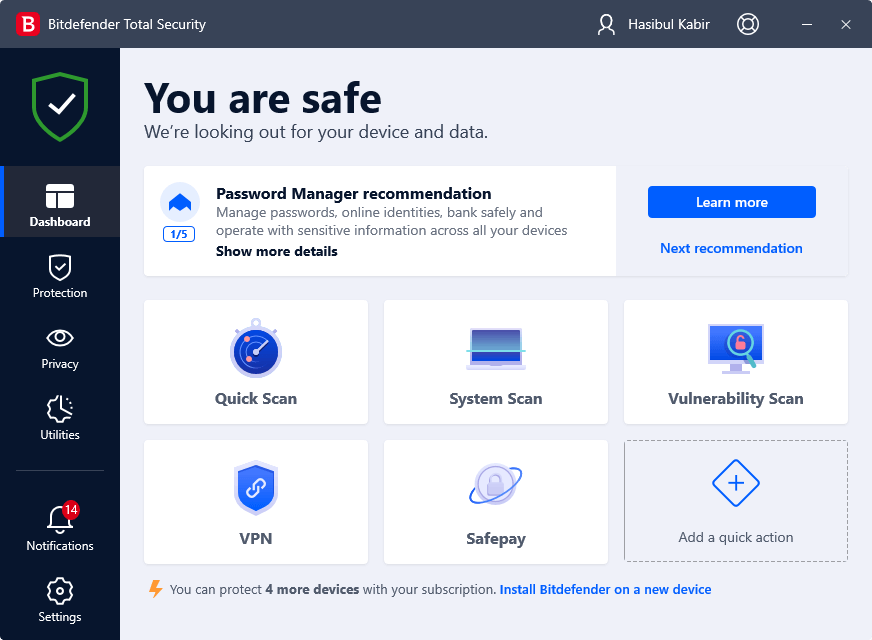
Bitdefender is the leading antivirus for Office 365, which protects against any sophisticated threats. It is powerful, simple, and ideal for business use, plus it has consistently ranked first in independent tests.
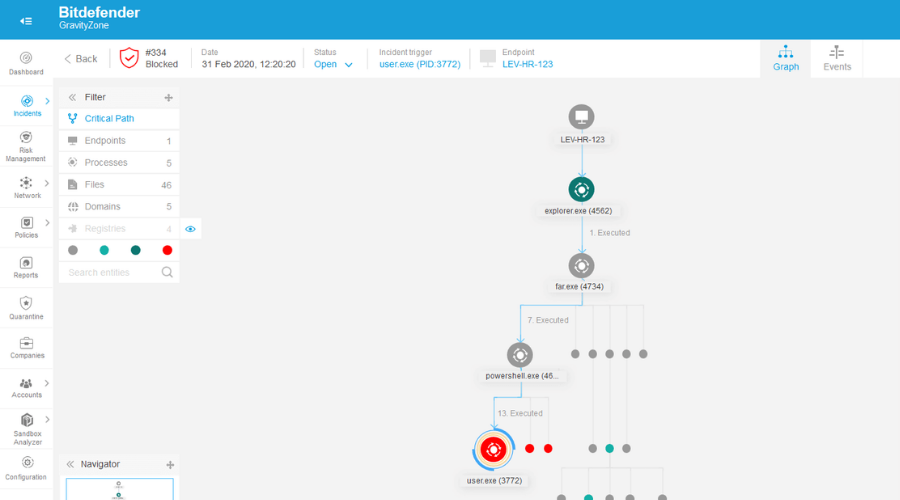
The GravityZone tool is adaptive, layered endpoint security designed for cloud and virtualization, that protects from advanced targeted attacks.
The GravityZone feature executes its protective functions through its monitoring and revolutionary hypervisor introspection architecture.
This endpoint protection against cyber threats can detect advanced persistent threats, offers protection from ransomware, and defeats exploits, and zero-day attacks.
Check out more key features of Bitdefender:
Heuristic monitoring
Regular updates on malware definitions
Autopilot features to adjust defensive posture.
Immunize important files from ransomware attacks
Password Manager
You’ll find it easy to install and monitor remotely from a single, powerful cloud console, plus it is also very cost-effective.
Bitdefender Total Security
Use this powerful antivirus compatible with Office 365, with a VPN included and great customer support.
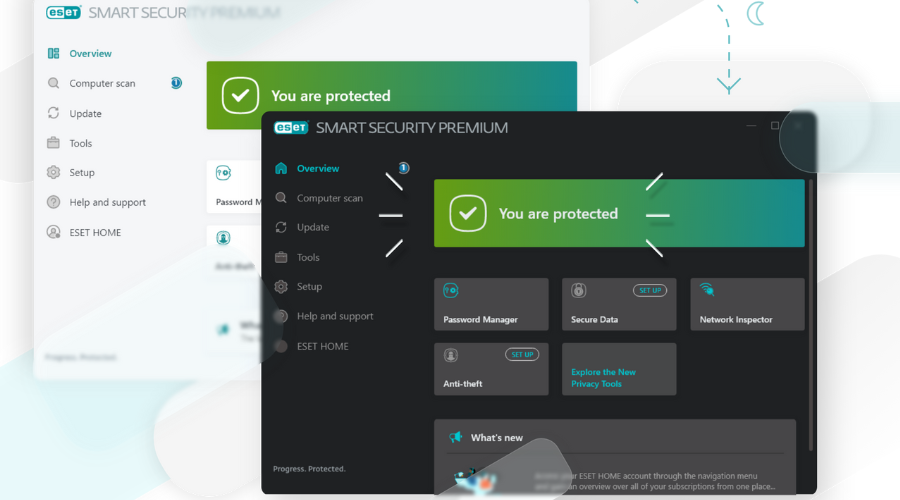
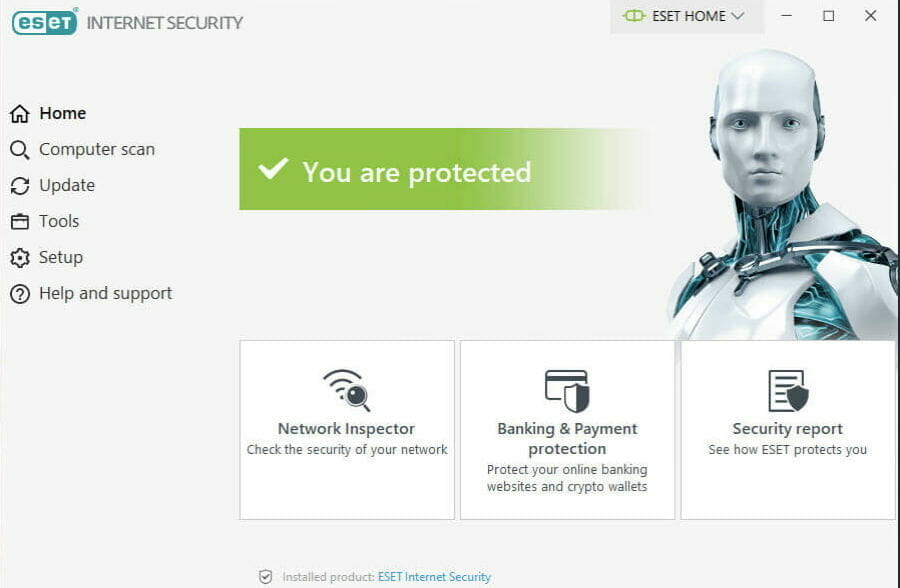
ESET HOME Security Essential is the best choice one can make, to secure all online activities and as well the Office 365 account.
It is a modern multiplatform solution, that can be used to secure all your devices with a single license. No matter if you run on a Mac, Windows, Android, or Linux.
The Anti-Phishing tool protects your privacy and assets against attempts by fraudulent websites to acquire sensitive information such as usernames, passwords, or banking details.
This is a great plus because it protects you from fake news from seemingly reputable sources, and homoglyph attacks (replacing characters in links with ones that look similar but are actually different).
Here are the perks of using Internet Security:
Active web-browsing protection
Ransomware and spyware shield
Gamer Mode
Online banking & payment protection
Suitable for Windows, macOS, and Linux
The software is available in three extensions: antivirus, basic internet security, and smart security.
Once installed, the solution is lightweight, discreet, and efficient. ESET HOME Security Essential protects your online operations, monitors your connected devices, and works continuously in the background to ensure seamless protection.
ESET HOME Security Essential
Protect your Office 365 with comprehensive security and online privacy solutions from ESET.
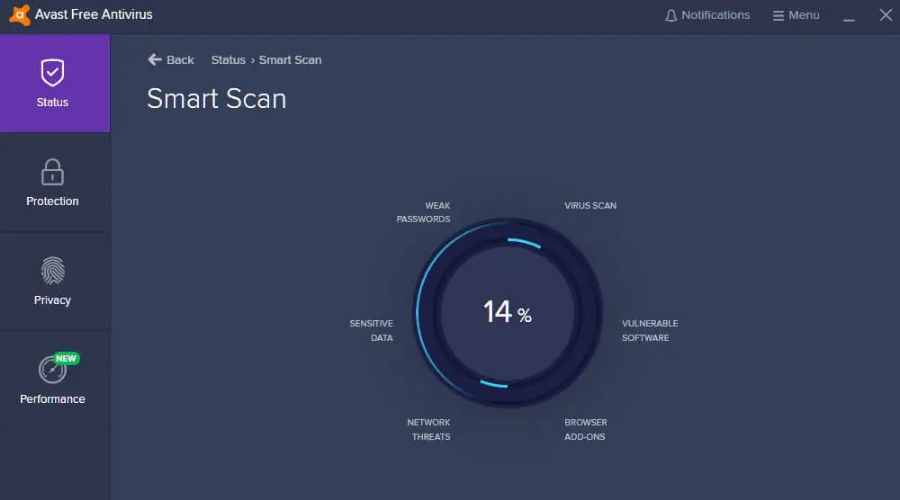
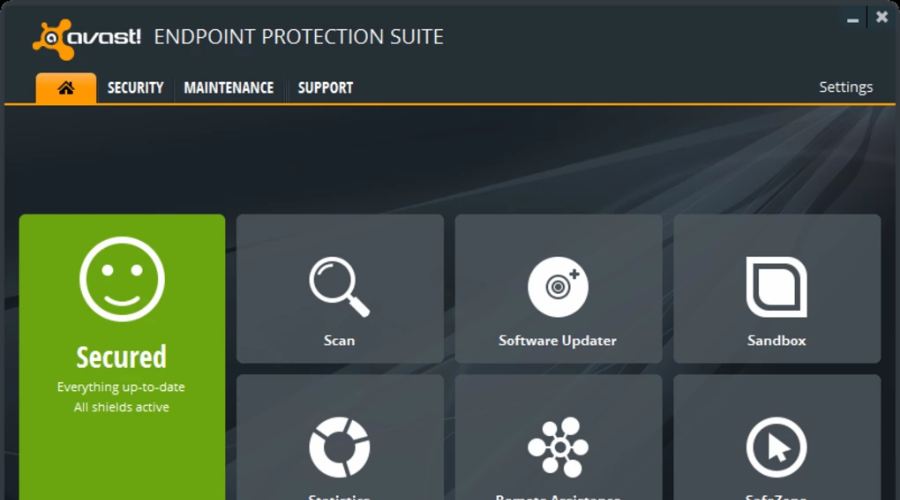
Avast Free Antivirus is a solution to protect your computer and Office 365 account, against viruses, malware, and your home network against intruders.
This antivirus protects your devices against havoc-wreaking ransomware so you don’t become the victim of digital extortion.
One of the most interesting features is Behavior Shield. With this feature, Avast monitors the behavior of individual apps on your computer to counter any suspicious activity.
Avast Omni, Premium Security, and Free Antivirus have a CyberCapture feature that automatically detects suspicious files and sends them to the cloud for inspection.
The Game Mode now called Do Not Disturb Mode, will block distracting popups whether you’re gaming, watching movies, or presenting a PowerPoint document on full screen.
Here are Avast’s key features:
Protection of public Wi-Fi and threat prevention
Limited resource footprint
Tune-up tools for your computer
AntiTrack for protecting your privacy online
Works silently during gaming and movie-watching sessions
Avast scores first in malware blocking and anti-phishing testing, as well as scanning the network.
Avast Free Antivirus
Protect your Office 365 with a free solution against viruses, malware, and network intruders.
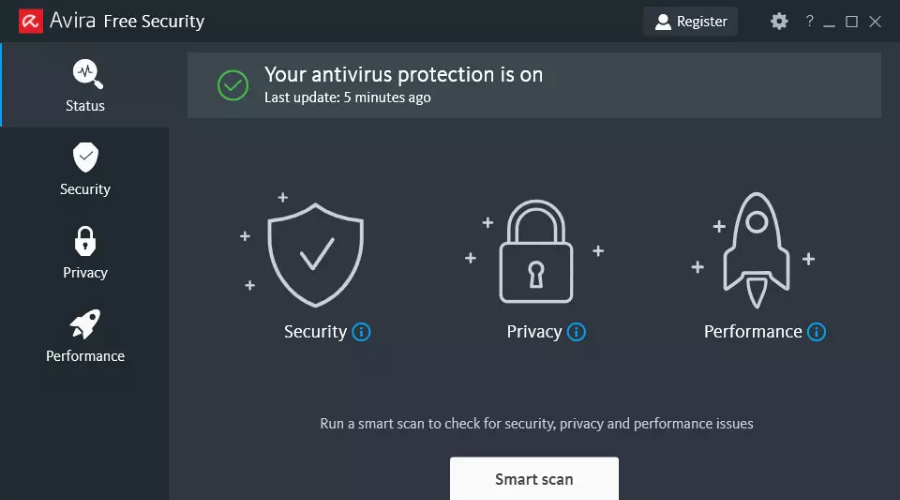
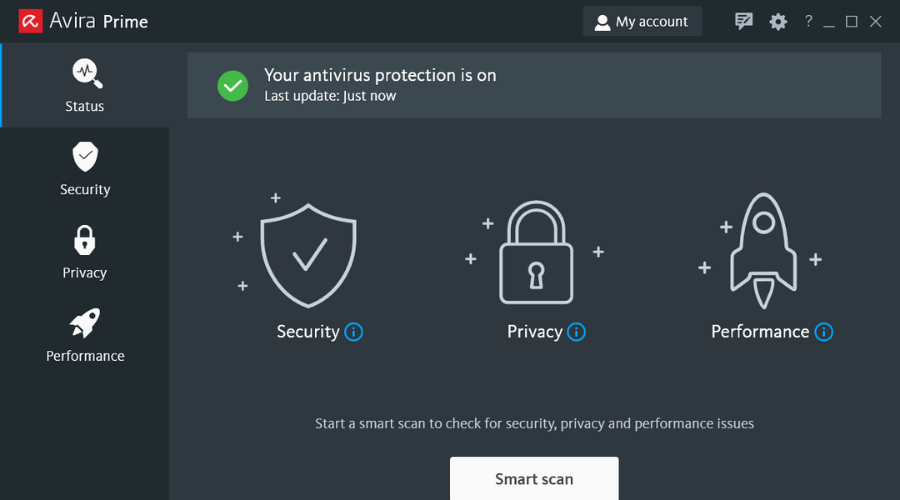
Avira antivirus is another freeware security solution that will protect you from online scams, identity theft, and any possible risks that you might be exposed to when online.
Avira takes free protection to another level, offering VPNs, ad blockers, even password managers, and system backups. Plus, it blocks all online threats like malware, ransomware, and spyware.
In addition, it has a comprehensive interface, which was designed for non-tech enthusiasts that have no background knowledge, having a pretty simple and integrated interface.
Your Office 365 mailbox as well as your social network accounts will be protected from phishing with the Anti-Scam tool.
Let’s have a look at Avira’s main features:
Premium tune-up tools
Integrated Free VPN and ad-blocker
Advanced web & ransomware protection
App locker
Avira also has a built-in PC Cleaner that erases your digital footprint from your browsers and apps so no one can track you.
Overall, Avira Free Security offers real-time protection with very low memory usage. Optimize some aspects of your PC and protect against all threats.
Avira
Check this amazing free antivirus with a great anti-scam feature for your Office 365 mailbox.
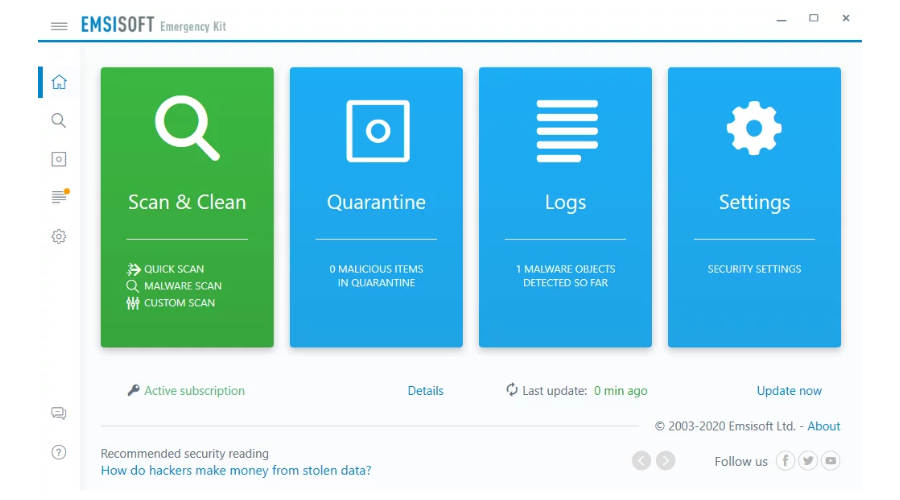
Emsisoft Anti-Malware is the perfect security extra-layer for your PC or laptop. It works perfectly on any hardware configuration and supports both x32 and x64 platforms.
This tool has a dual-engine scanner that keeps safe all your files and reacts instantly when a file has an unknown modification or source.
Its anti-malware and anti-ransomware security will keep you safe while surfing. Another great feature is its Behaviour Blocker. This tool detects even not-yet-known threats and unknown signatures.
Emsisoft Anti-Malware is a great tool that comes at a great price, around $20, which is a better price than other popular antiviruses.
Some of Emsisoft’s main key features are:
Web protection that blocks any malicious website
File guard so every downloaded file is scanned
Behavior Blocker to detect and block new malware
Finds and removes unwanted programs
Remote management
It also has great rankings in many independent tests. You can find more information and download it in the link below.
Emsisoft Anti-Malware
With multiple protection layers, Emsisoft will block any online threats and protect your Office 365 app.
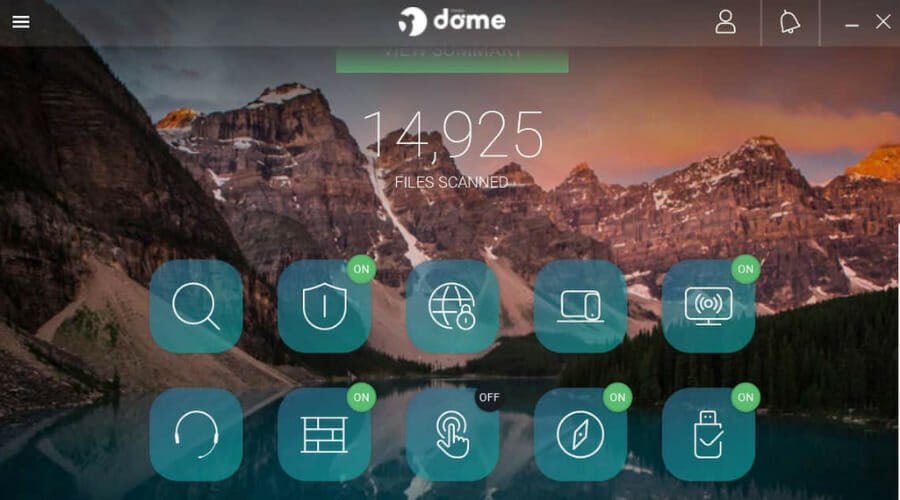
Panda’s Cloud Protection is an antivirus for Office 365 that comes with endpoint cloud-based antimalware and firewall protection, plus email traffic filtering.
It also guarantees the highest protection for endpoints and emails, using its collective intelligence tool that ensures files are constantly and automatically updated.
The firewall is personal or managed, plus it has cloud-based antispam filtering.
It is easy to use, has minimal maintenance costs, and optimizes the consumption of bandwidth and endpoint resources while avoiding inoperative traffic and minimizing server load.
Features include a hosted web console, profile-based protection, flexible installation, detailed email reports, vulnerability and threat assessment, plus management delegation among others.
Check out more impressive features that are included in Panda antivirus:
URL, web monitoring, and filtering
Automatic USB protection
Lightweight and easy on the system’s resources
Antispyware and antivirus engines
Parental control
It supports multimedia mode and gaming as well
For email protection, you get hosted email spam filtering, guaranteed availability, quarantine management, unlimited domain alias, plus so much more.
Panda Dome
Keep your Office 365 secure with real-time monitoring and personal firewall from this great antivirus.
AVG Antivirus – Great scanning options and virus prevention
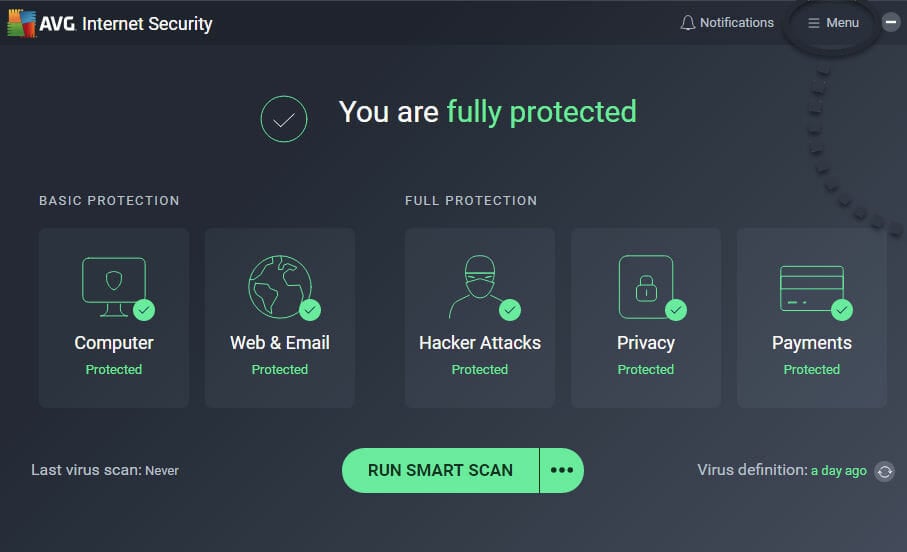
Another solid antivirus software that you might want to consider is AVG Antivirus. This antivirus offers protection against standard threats including viruses, spyware, and ransomware.
In addition, this tool will block unsafe links, downloads, and malicious email attachments. It also supports real-time security updates, and it can even scan your PC for performance problems.
Another great feature available is an Enhanced Firewall, so you can easily monitor your online traffic and choose which applications have access to the Internet.
AVG Internet Security also has anti-phishing protection so it can easily detect malicious websites and prevent them from stealing your data.
It’s worth mentioning that this tool is available on the Android platform as well, so if you need to protect your Android device, you might want to consider this tool.
The benefits of using AVG are:
Verify any Wi-Fi network security and connect safely to it
Block all unsafe websites before entering them
Improve storage and performance with built-in tune-up tools
Use the AVG VPN to maintain your privacy when browsing
Block any phishing attempts
Overall, AVG Antivirus offers solid features, and if you’re looking for basic protection, you might want to try the Free version. But if you need full system protection along with some advanced features, you might want to consider getting the Internet Security version.
AVG Antivirus
AVG will block unsafe links, downloads, and email attachments, assuring great protection for your Office 365.
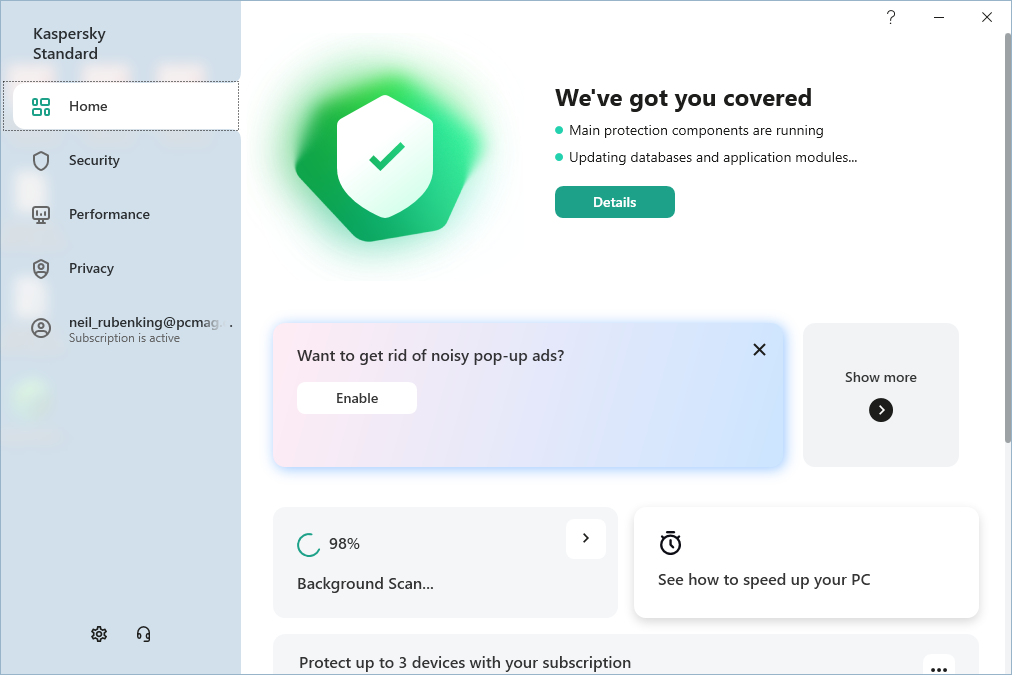
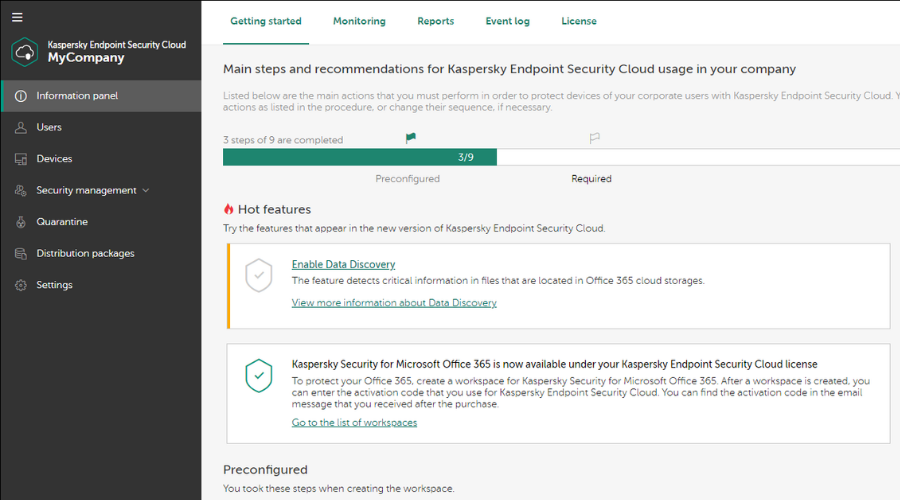
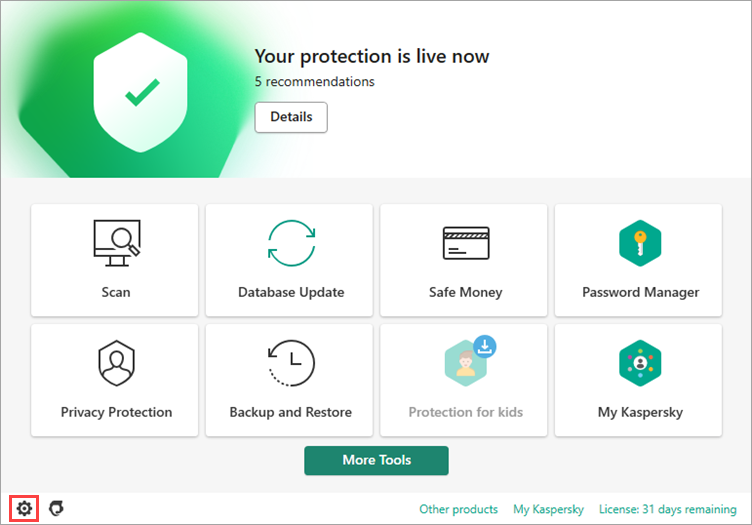
With Kaspersky antivirus for Office 365, you are able to protect your mailboxes managed through this cloud app.
Your email messages are also scanned for viruses and other malware threats that may be transmitted via email, including spam and phishing.
Kaspersky for Microsoft Office 365 features antivirus, antiphishing and antispam protection, and attachment filtering.
It can scan incoming and outgoing mail for malware, filter spam from user mailboxes, scan email messages for phishing and malicious links, and filter attachments in email messages.
The perks of using Kaspersky are:
Light resource usage
Transaction protection
Built-in password manager
Works for PC, Mac, and mobile devices
Ease-of-use and intuitive interface
Additionally, it will move messages to backup to prevent data loss risks, notify the system admin about messages with malicious objects or filtered attachments, and display app activity statistics.
Kaspersky Standard
Use this reliable antivirus for your Office 365, and prevent crypto mining malware infections from affecting your device.
This antivirus for Office 365 protects your sensitive data from loss or theft, protects user accounts, prevents threats in your emails, and blocks advanced attacks.
It works quietly in the background, minimizing the strain on your system’s resources. This can be verified with tools such as Task Manager.
Besides, it allows you to respond quickly to security incidents with comprehensive log data.
What sets Norton apart is its multi-layered approach to protecting your device from attacks by identifying dangerous files, preventing downloads, and removing viruses, and malware such as worms and Trojan horses.
Here are some of the perks of using Norton antivirus products:
Efficient real-time protection
Built-in VPN to enhance privacy
Parental control features
Built-in password manager
Low system impact
There is a VPN included to protect your privacy while surfing online and also multiple layers of protection for your devices, game accounts, and digital assets.
Norton
With continuos malware scanning and a power eraser that blocks suspicious files, your Office 365 will always be safe.
Primarily, yes. You can benefit from integrated anti-malware, phishing attack protection, or no spam shield.
Is Microsoft Defender free with Office 365?
Yes, you have Microsoft Defender included in specific subscriptions but not in all of them. It is possible to get it for free if you purchase the plans that include it.
Are you ready to secure your business with any of these best antiviruses for Office 365? Share your favorite and why by leaving a comment in the section below.
Microsoft is in the midst of reorganizing its flagship productivity suite while simultaneously invoking a rebranding of its software stack across platforms with a new single Microsoft 365 app.
If you’re scratching your head at yesterday’s Ignite announcement about a rebranded Office 365 app and thinking “hasn’t Microsoft already used the Microsoft 365 brand ubiquitously with its various Office and cloud services?”, you’d be correct.
Roughly two years ago, Microsoft began identifying its paid Office 365 users as part of its Microsoft 365 family, which mainly highlighted the subscription base of the platform. However, it seems Microsoft is ready to make a bigger play at rounding up all its services under an easier to understand grouping and simply identifying a single service as Microsoft 365, ala Amazon Prime.
Microsoft now states that “Microsoft Office is changing to Microsoft 365,” and what that means for Office users is that along with the seemingly odd naming convention, there will be a new consolidated experience in organizing and communicating across a larger suite off Microsoft software experiences.
In the coming weeks, Microsoft will rebrand the recently launched Office 365 app on Windows and mobile to simply Microsoft 365 and invoke a new logo to represent the consolidation. Along with the subtle visual change to the new Microsoft 365, users are expected to gain more features that include:
New types of content creation and templates: Create is your place to quickly start on projects across several Microsoft 365 apps either from blank templates or try recommended templates for quicker inspiration. The Create module is already available to all users on the web, Windows, and mobile, with more template types arriving for consumers next year.
New Apps module: Discover, launch, and pin the tools you use the most across Microsoft 365. Available next month to all users on the web and Windows, and on mobile in the coming months.
Welcome Badging: Allows you to see your Microsoft 365 subscription status and track storage usage in one easy place. Available next month to consumer users on the web and Windows.
My Content: A popular feature for business customers, now available for personal use, My Content is a central location to view and access all your content – created by you or shared with you – regardless of where it’s stored. Available next month to all users on the web and Windows.
Feed: Relevant content based on who you work with and what you work on is surfaced through an easy-to-digest interface to simplify your workflow. Available today for commercial users on the web, Windows, and mobile.
Tagging: A new way to group and organize your content with custom tags across all types of content. Available today for commercial users on the web and Windows.
Adding a cherry on top, each of the old Office 365 apps will be bestowed with their own refreshed icons to signify their accension to Microsoft 365 status. The first visual changes to the Office 365 apps are scheduled for some time in November and will first appear on the web with Windows, iOS, and Android following.
As previously mentioned, Microsoft’s move to umbrella its Office 365 apps under this larger brand also works in highlighting disparate app situations like Teams and Stream as part of the ecosystem family and may help boost cross app engagement.
At the end of the day, “Office”, “Office 365”, or “those damn Microsoft products,” will colloquially remain the same for most people. The changes announced yesterday are more or less a positioning for Microsoft’s future where the company can consolidate more of its product categories under easy to recognize brands while also bundling even more services together.
Judging by yesterday’s announcement, it appears Microsoft envisions a future where people will simply have “Microsoft 365” subscriptions that bundles products such as the Office suite, any future creative apps, Azure, a transferable virtual Windows license and Game Pass for various pricing tiers.
During yesterday’s Surface event Microsoft showed off iCloud Photos integration with Xbox and Windows 11. The rollout of the new Photos app with iCloud integration has begun for Windows Insiders in the Dev channel (version 2022.31100.9001.0).
The Microsoft Photos app allows you to view, share, and organize all your photos from your PC and Onedrive. This update adds your Icloud photos alongside photos from other sources in the redesigned “All Photos” gallery view. You can also see a dedicated page of your iCloud photos from the navigation pane. To get started follow the easy steps in the Photos app, You will need to make sure you have the iCloud for Windows App, you’re signed in and all photos are selected.
Dropbox is a cloud storage service you can utilize entirely within your web browser. However, you can also add a Dropbox folder to File Explorer.
That folder will then sync with Dropbox so that you can drag and drop files into your cloud storage via Explorer.
There are also a few other ways you can integrate Dropbox with the Explorer file manager in Windows, and we will tell you all about them in our article.
Where is the Dropbox folder on my PC?
After you install Dropbox, you should see the app in File Explorer. However, in case you changed its name or installed it in a different location other than its default one, you might have trouble finding it.
You can find the Dropbox app’s file location by opening File Explorer and typing the following in the address bar: %HOMEPATH%/Dropbox
How can I get Dropbox in File Explorer on Windows 10/11?
1. Install Dropbox on your Windows PC
To add Dropbox to File Explorer, you’ll need the app for it.
If you don’t already have a Dropbox account, open the DB login page.
Click the create an account page link.
Fill in the required text boxes for the user account setup.
After setting up an account, you’ll be prompted to download the Dropbox software.
Click Download Dropbox to do so.
Then run the installer to add the Dropbox software to Windows.
If you already have a DB account but haven’t installed the software for it, open the Dropbox app’s download page in a browser.
Then you can download the app from there to install it.
2. Add files and folders to the Dropbox folder
Press the Windows key + E keyboard shortcut to open File Explorer.
Now you’ll see a Dropbox folder on the left side of File Explorer’s window.
Click that Dropbox folder to open it.
Drag-and-drop files into the Dropbox folder to add them to your cloud storage.
You can add new folders to Dropbox in Explorer by right-clicking within the DB folder and selecting
New. Then select the Folder option.
3. Add the Dropbox folder to File Explorer
1. Press the Windows key + E keyboard shortcut for File Explorer.
2. Now you’ll see a Dropbox folder on the left side of File Explorer’s window.
3. Right-click on the folder to bring up a menu with multiple options.
4. Select Pin to Quick access.
5. Dropbox is now added to File Explorer.
After yo
If you want to get Dropbox in File Explorer, you can easily add it to the latter’s Quick Access section. You can do this by right-clicking on the DB folder and selecting the Pin to Access option.
4. Change the Dropbox folder path
You can change the path location of your Dropbox folder.
To do so, click the Dropbox system tray icon to open its system tray menu.
Click the Access and manage Dropbox settings button at the top right of that system tray menu.
Select the Preferences option.
Then click the Sync tab shown directly below.
Click the Move button.
Then select an alternative path for Dropbox on the Browse for Folder window, and click the OK button.
Press the Apply button.
5. Add Dropbox to File Explorer’s Send to menu
To further enhance Dropbox’s File Explorer integration, add it to the Send to submenu on the context menu.
To do that, open File Explorer.
Enter %APPDATA%/Microsoft/Windows/Send To in File Explorer’s path bar, and press the Return key.
That path will open the SendTo folder shown directly below.
Left-click the Dropbox folder on the left of File Explorer and hold the mouse button.
Then drag Dropbox into the SendTo folder, and release the left mouse button.
Now you’ll find Dropbox on the Send to submenu.
Right-click a file in Explorer and select Send to on the context menu.
Then select to move the file to Dropbox on the Send to menu.
Now your Dropbox cloud storage will be an extension to File Explorer. With Dropbox added to File Explorer, you can move files into and out of the cloud storage without opening a browser.
2. Select the desired Windows 10 Update version, and double-click on it.
3. The system will check if the update has been installed before or not. If it’s available on your PC, the installation will begin. All you need to do is follow the on-screen instructions.
4. After the installation, restart your PC.
5. After the installation, restart your PC.
A great method you can use to update Windows 10 offline is to make use of Windows 10 .msu/exe update files, available for download on the Microsoft website.
This will ensure that you can install the OS without requiring an internet connection, in a very short period of time.
2. Install Windows 10 offline update with the Portable Update
This method requires the user to install a freeware called Portable Update.
The advantage is that you can install the same update files on multiple PCs or on one PC multiple times.
The program will use the standard Windows Update API Service for updating.
If you don’t like the updated Windows 10, you can roll back to your previous Windows system.
What are the advantages of updating Windows offline?
Offline updates are more stable lowering the chance of the update failing to install. These types of updates are often faster and can be completed at any time.
Do keep in mind that you’ll need to download the update file first, but the installation process won’t require an Internet connection.
In this article, Windows users found detailed instructions for an easy and safe Windows 10 offline update. We also have a guide on how to manually install Windows 10 updates, so don’t miss it.
When Windows throws an error, most of us just click it away. But your error logs quietly record everything: what failed, when it happened, and which program caused it.
Learning to read these can help you fix crashes faster, avoid repeat issues, and even spot deeper problems before they get worse.
How do I view error logs in Windows 11?
Here are a few ways to see error logs in Windows 11:
DIFFICULTY
Easy
DURATION
4 minutes
WHAT YOU NEED
Windows 11, Event Viewer
It’s pretty simple and quick to access the error logs on your Windows 11 OS, but in case you didn’t used before, the steps below will surely help you find them.
1. Press Windows + S to launch the Search menu, enter Event Viewer in the text field at the top, and click on the relevant search result.
2. Double-click on Windows Logs in the navigation pane on the left.
3. You will now find the five different categories. Select any of these, and all the error logs under it will be listed on the right.
4. Now, click on any of the error logs to view all the relevant information about them.
You now know how to check the Windows 11 error logs, but just knowing that won’t suffice. To better understand the logs you are viewing, take a look at what a CBS log file is and how it stores information about Windows updates and system repairs.
There’s still a lot out there to understand before you can actually make some sense out of these logs, and use them to your advantage.
How to understand Windows 11 error logs?
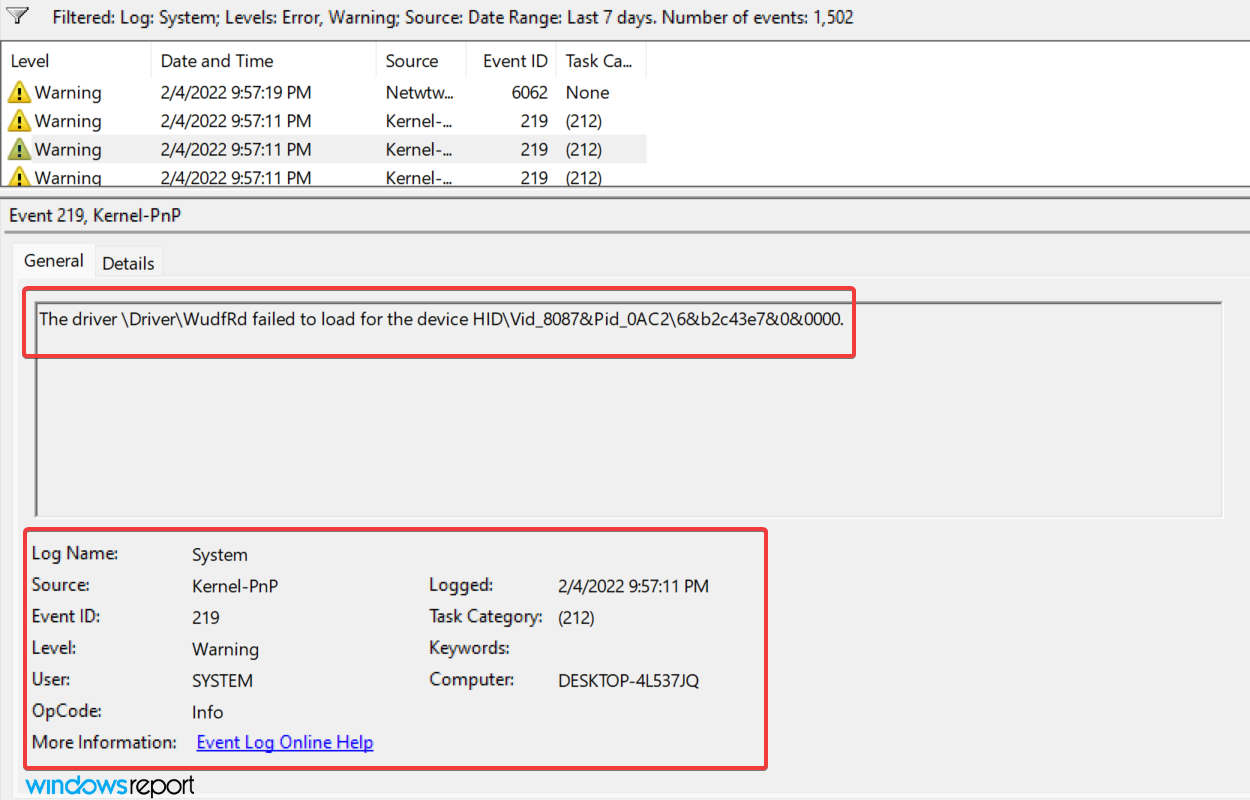
When you view a Windows 11 crash log, the general details and the Event ID is critical in identifying and eliminating the error. Apart from that, there’s an Event Log Online Help link at the bottom, which may provide some valuable insights.
For instance, here’s a Windows 11 error log when the relevant driver for a device failed to load.
Log in Event Viewer
The 219 Event ID helped find out a lot of information along with the relevant fixes for the problem.
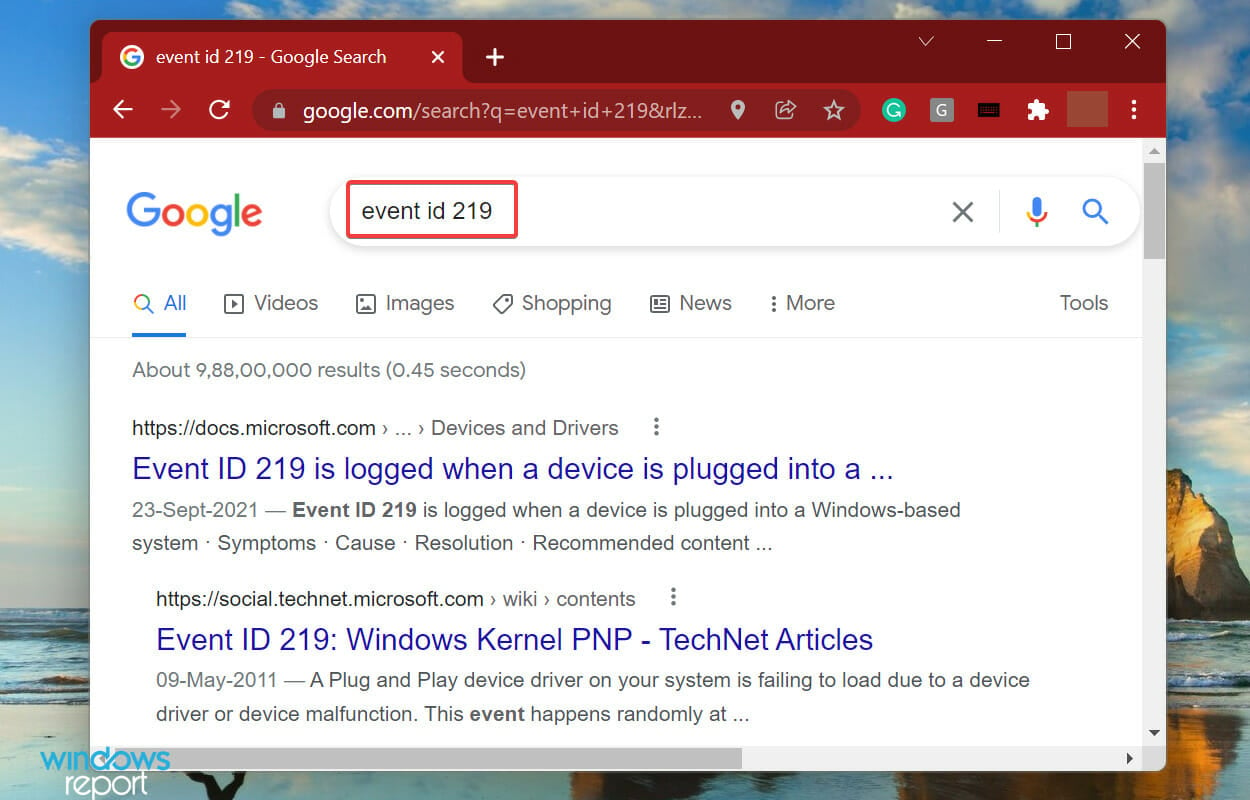
We just did a Google search for this Event ID and there were a plethora of results. But this requires a proper understanding of Windows 11 error logs.
But, it’s important to mention here that not all error logs will be as descriptive. Some might have things that you wouldn’t be able to comprehend or use jargon excessively. No matter the case, a simple Google search would suffice.
When you go through the Windows 11 error logs, there are three important categories, referred to as Event Level, under which these are placed.
And, the categories define the severity of the event for which the log is created. The three categories are as follows:
Information: These are created when an operation goes through successfully. For instance, when a driver is loaded or an application is launched without encountering any issues.
Warning: These are created when the OS finds an issue with the system. These issues do not pose an imminent risk, but could be problematic in the future. For instance, if you are running low on disk space, a log will be created.
Error: These indicate a major problem, though most of the time, Windows takes care of these as well. For example, an error log will be created if a driver or service does not load. But, these are the most critical ones of all.
If you are identifying problems with the PC, ignore the Information logs, go through the Warning logs, but pay special attention to the ones categorized as Error, since these are most likely to record the problem you are looking for.
When you open the Event Viewer in Windows 11, it will list out all three. The view will remain the same if you have not changed the Windows 11 Error Reporting logs location in the in the Group Policy.
However, identifying all logs for one of these levels will take up a lot of your time. This is where filtering error logs come to your aid. Check the next section to find out how you can do that.
How can I filter error logs?
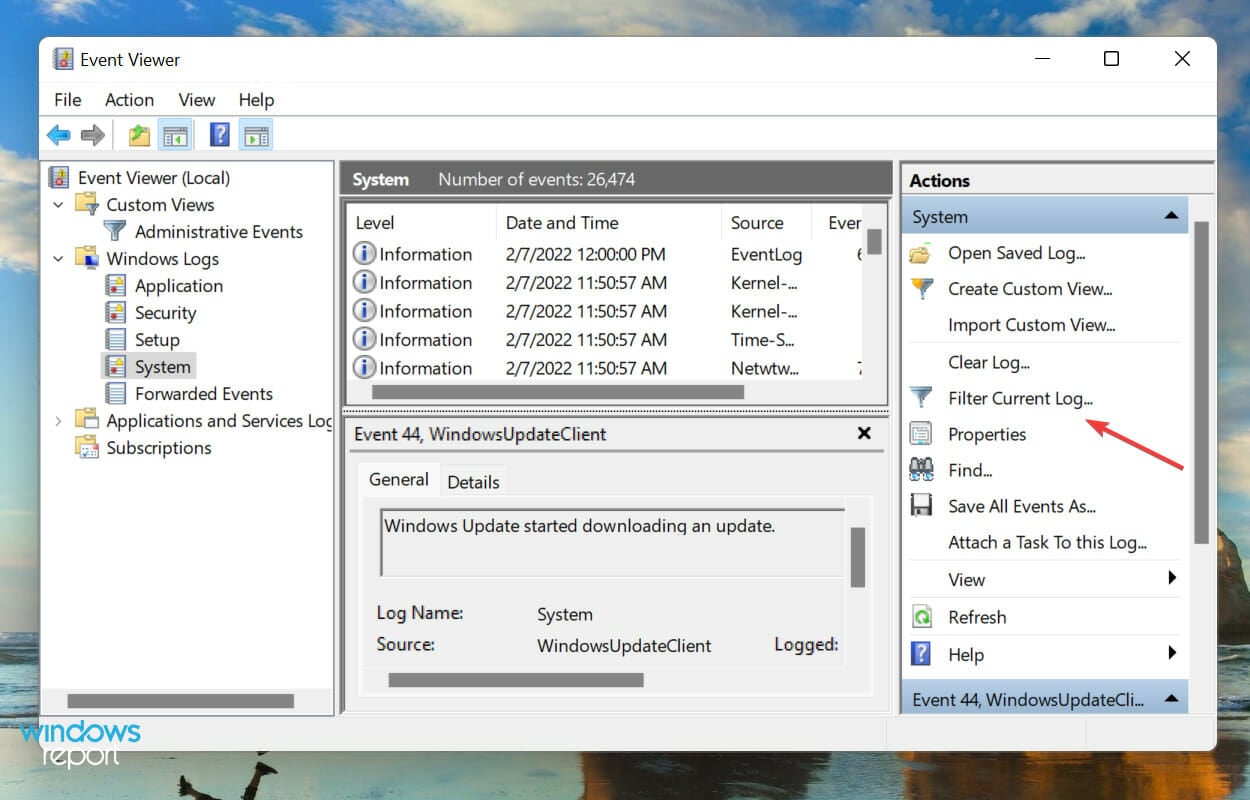
Open the Event Viewer, navigate to the particular category of logs from the left, and then click on Filter Current Log on the right.
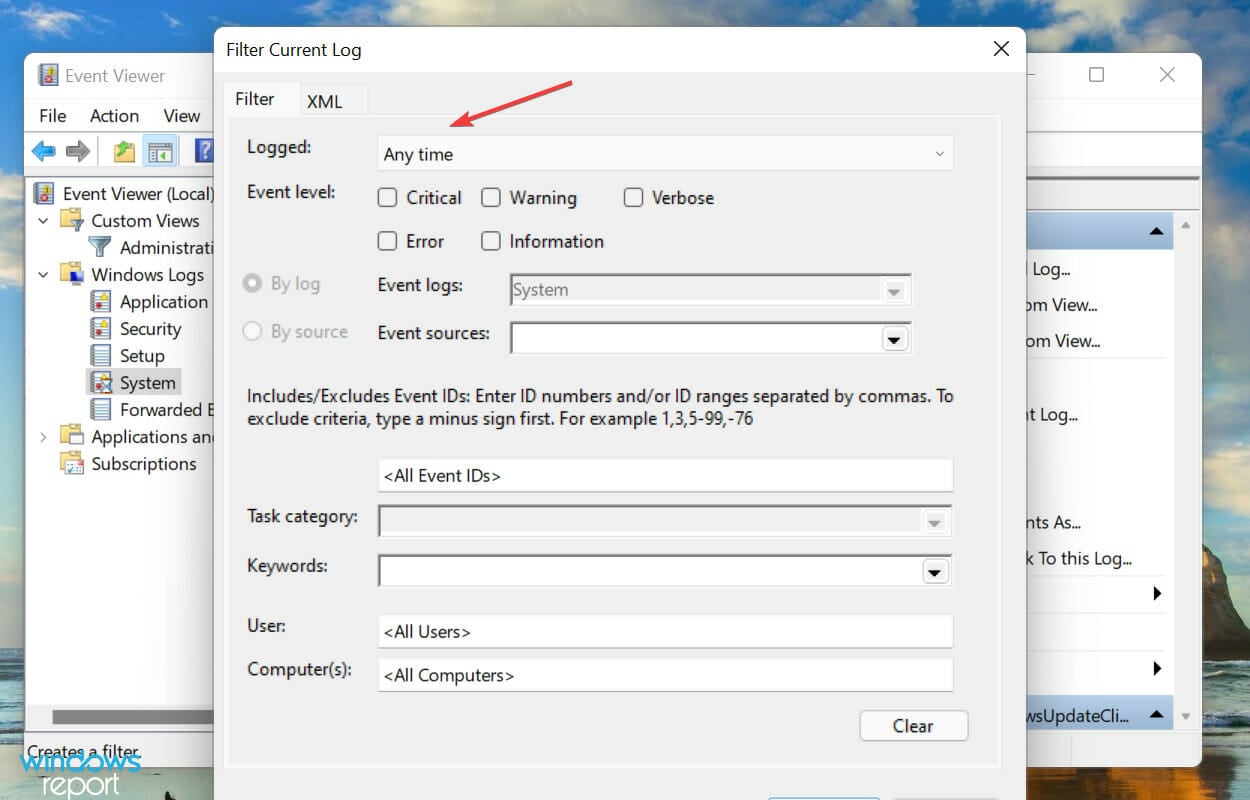
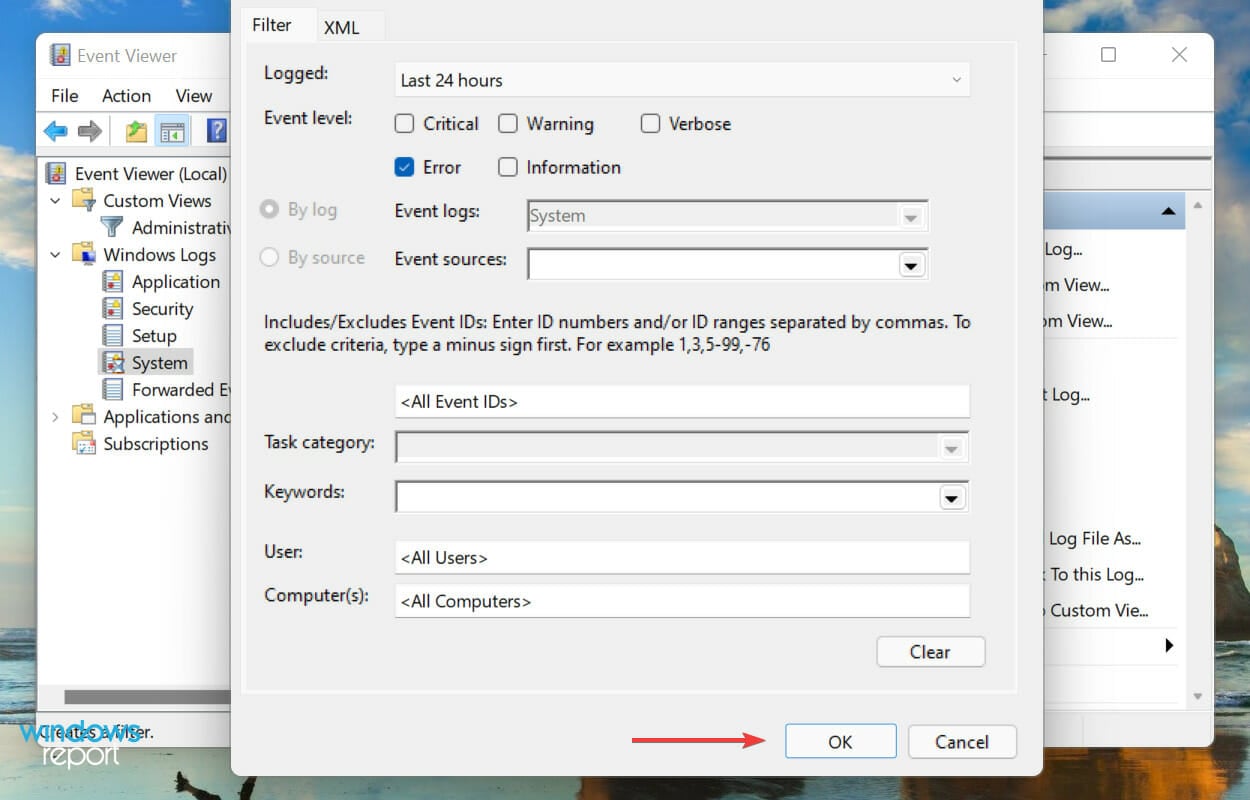
Next, click on the Logged dropdown menu to select the duration for which you want to check the logs.
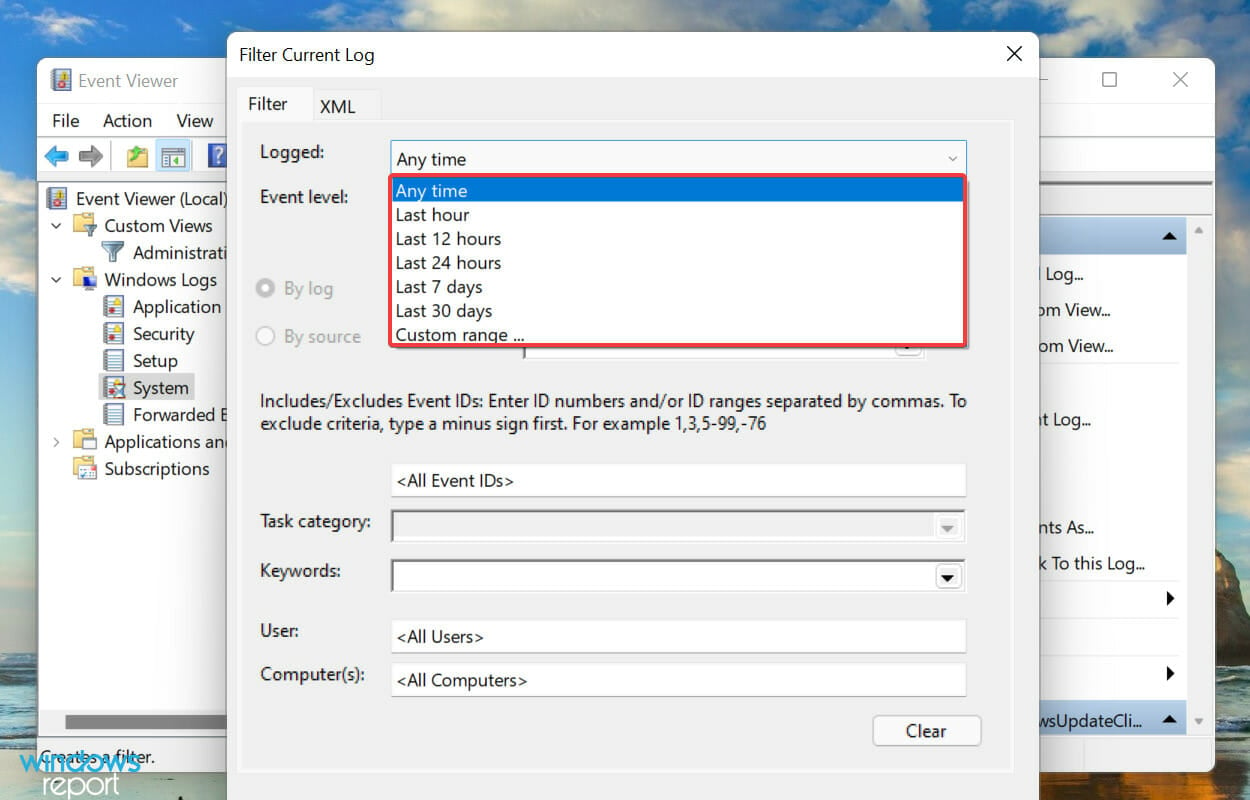
Now, select a time duration from the list of options. You can also choose the last option to create a custom range.
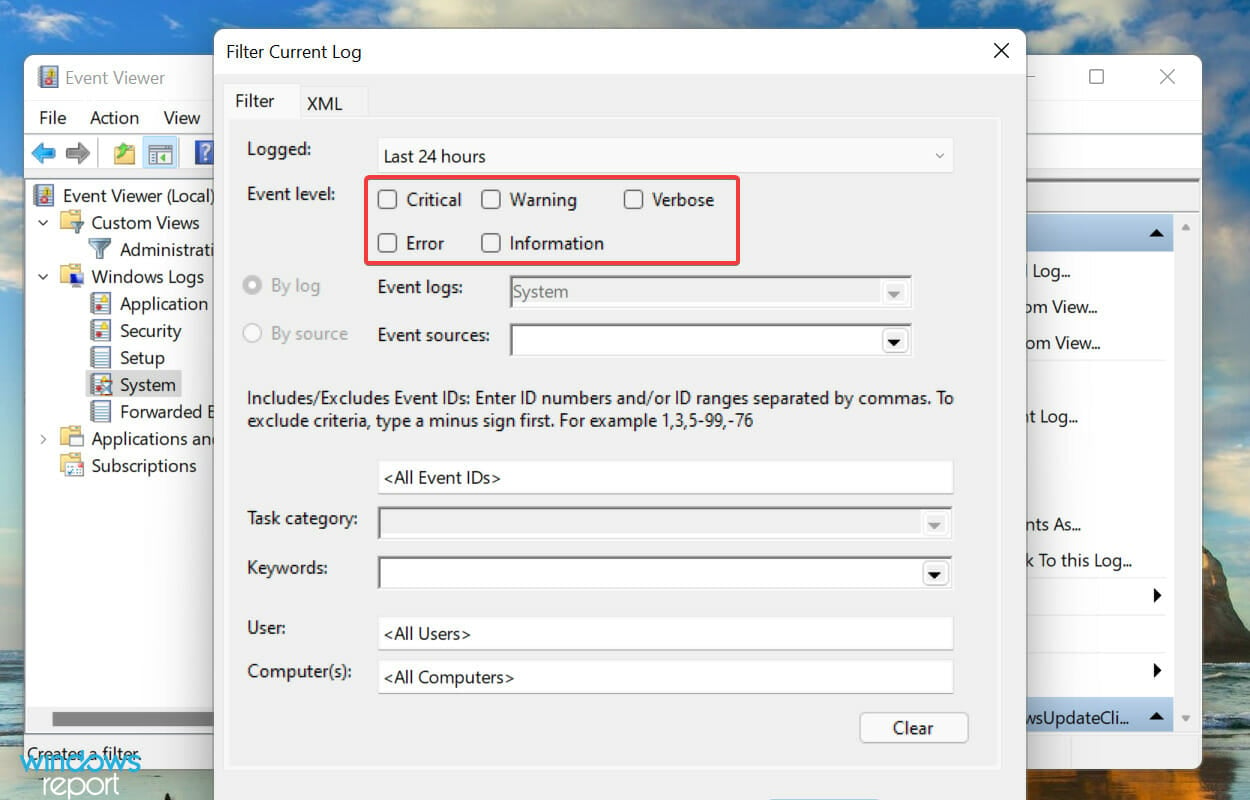
Once done, tick the checkboxes for the EventLevels that you want to filter.
Finally, click on OK at the bottom to filter the error logs.
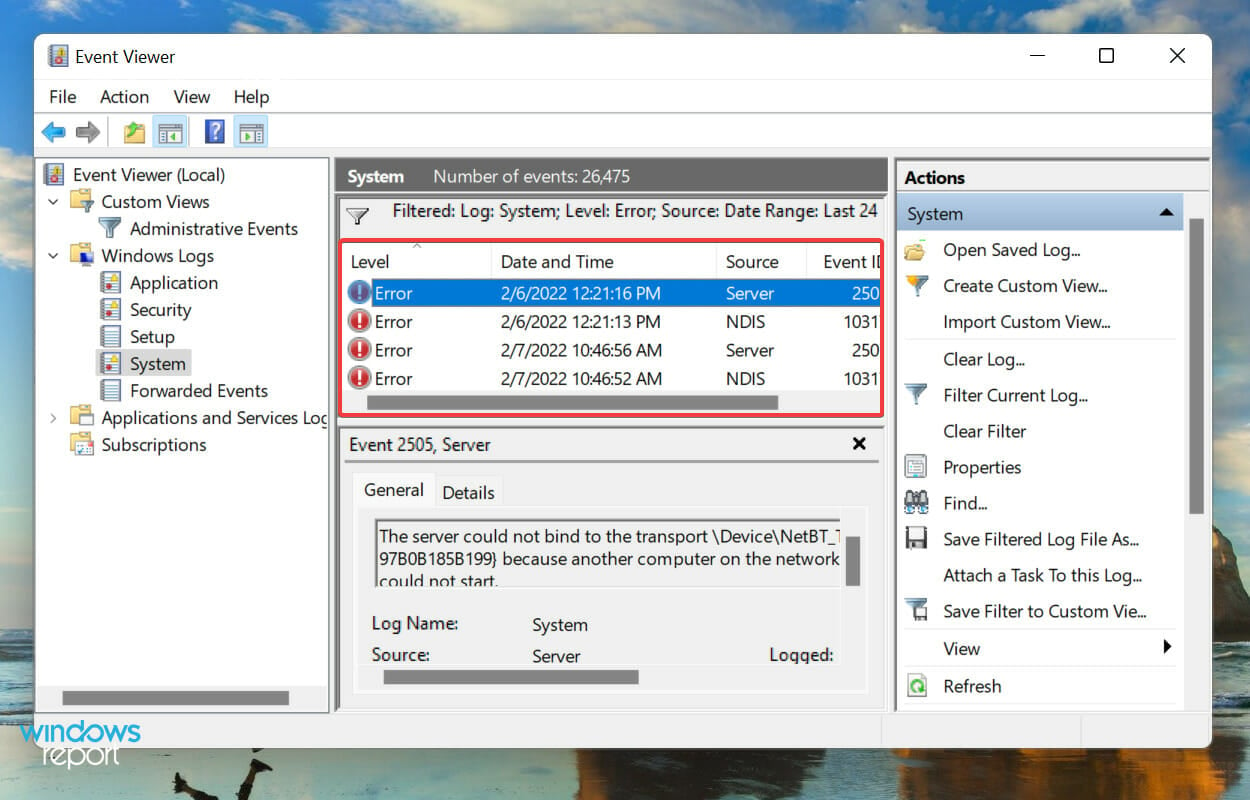
All the errors logs that fall under the choosen filters will now be listed.
We selected the duration as 24 hours, and level as Error, and filtered the logs. Event Viewer then listed the four Windows 11 error logs that were created during that time.
How to create a custom view to check a particular category and level of logs in Windows 11?
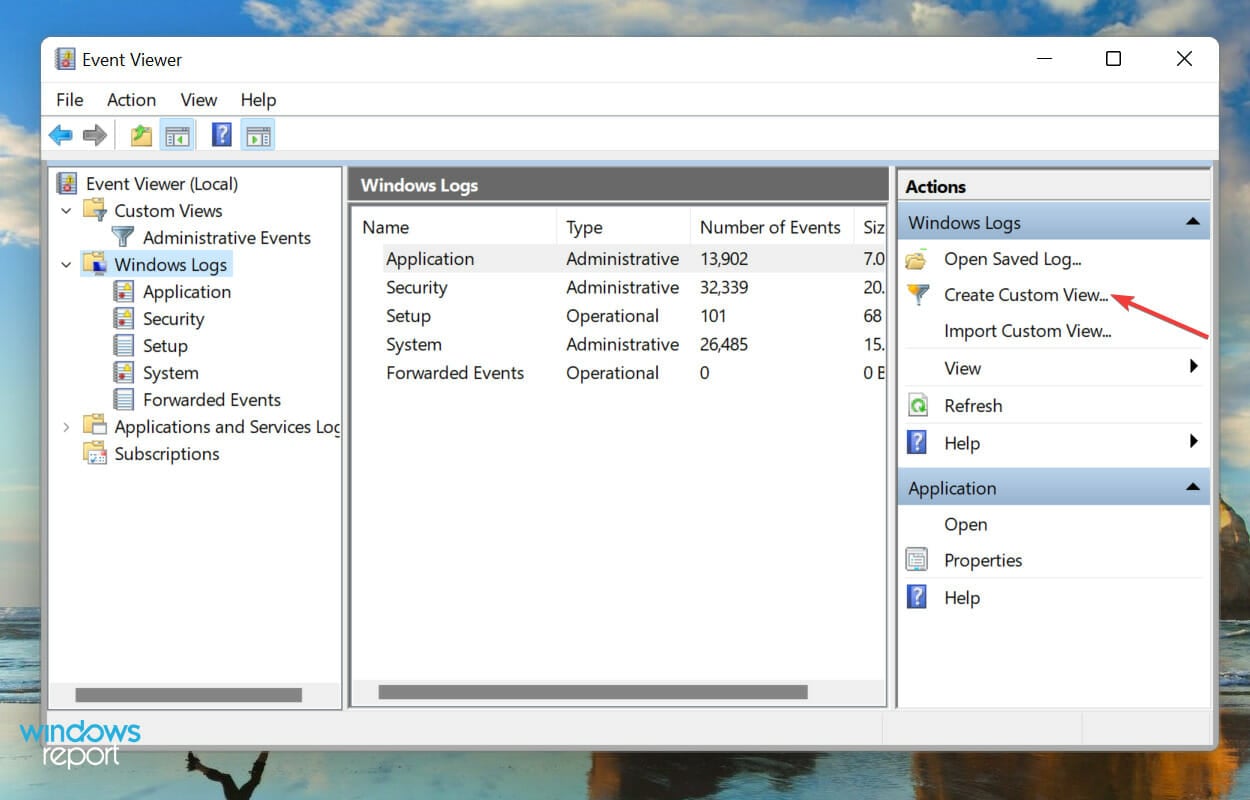
Open the Event Viewer and click on Create Custom View on the right.
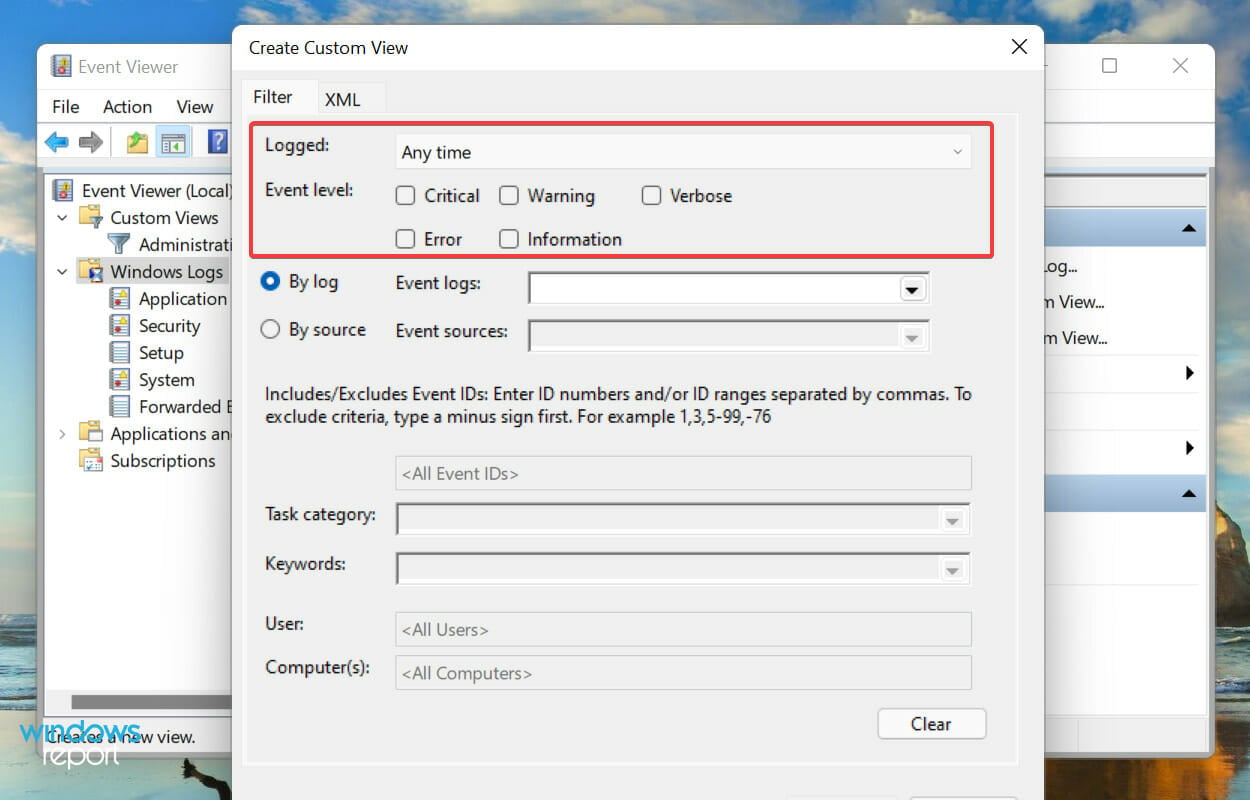
Next, select the duration and Event Level, as you did earlier when creating a filter.
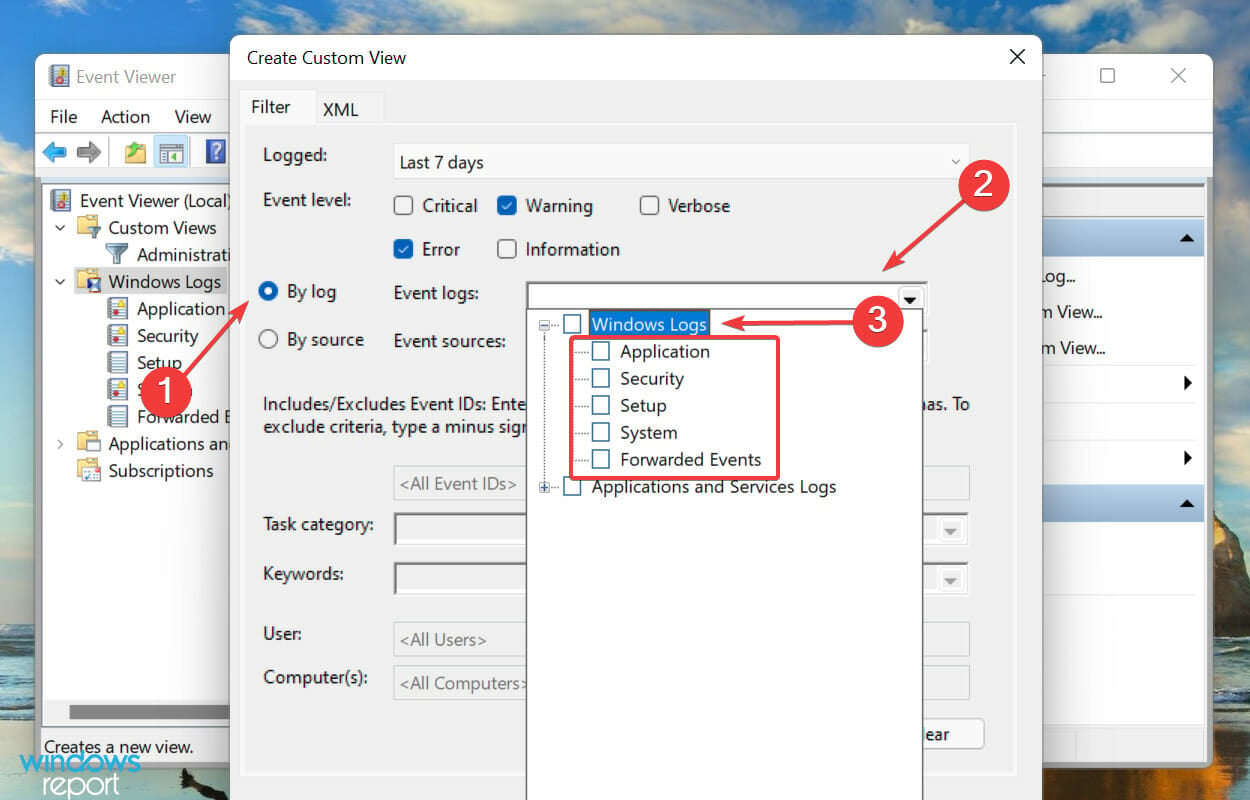
With the By logs option selected, click on the Event logs dropdown menu, double-click on the Windows Logs entry to expand and view the various categories, and tick the checkboxes for the desired ones.
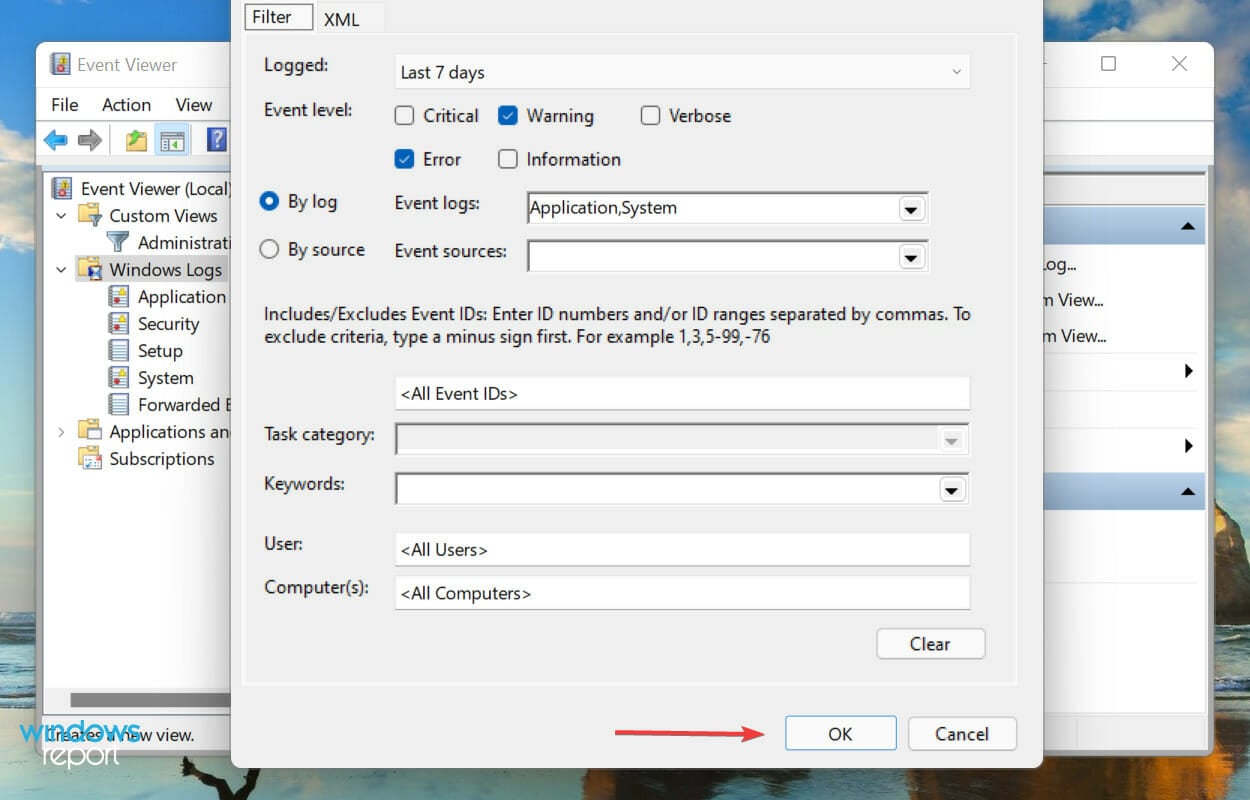
Now, click on OK at the bottom to set filters for the new custom view.
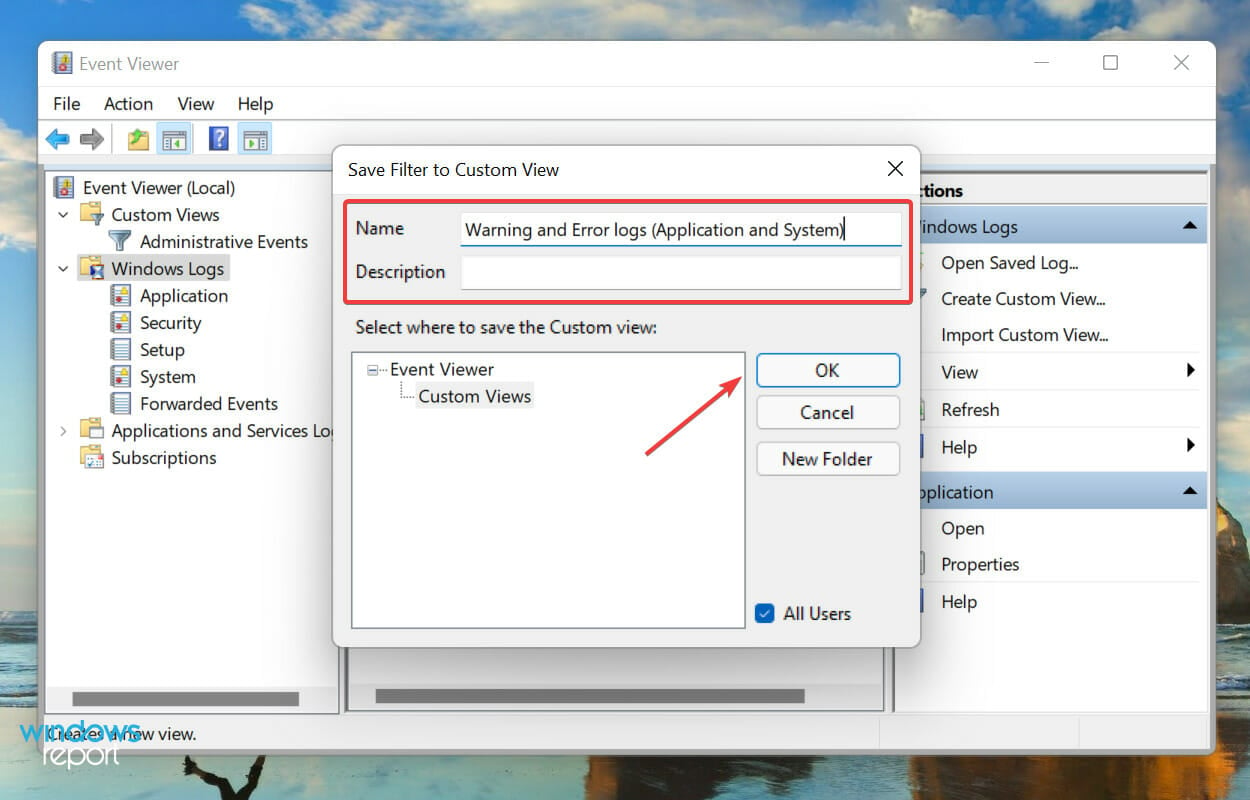
Enter a Name and Description for the custom view and click on OK.
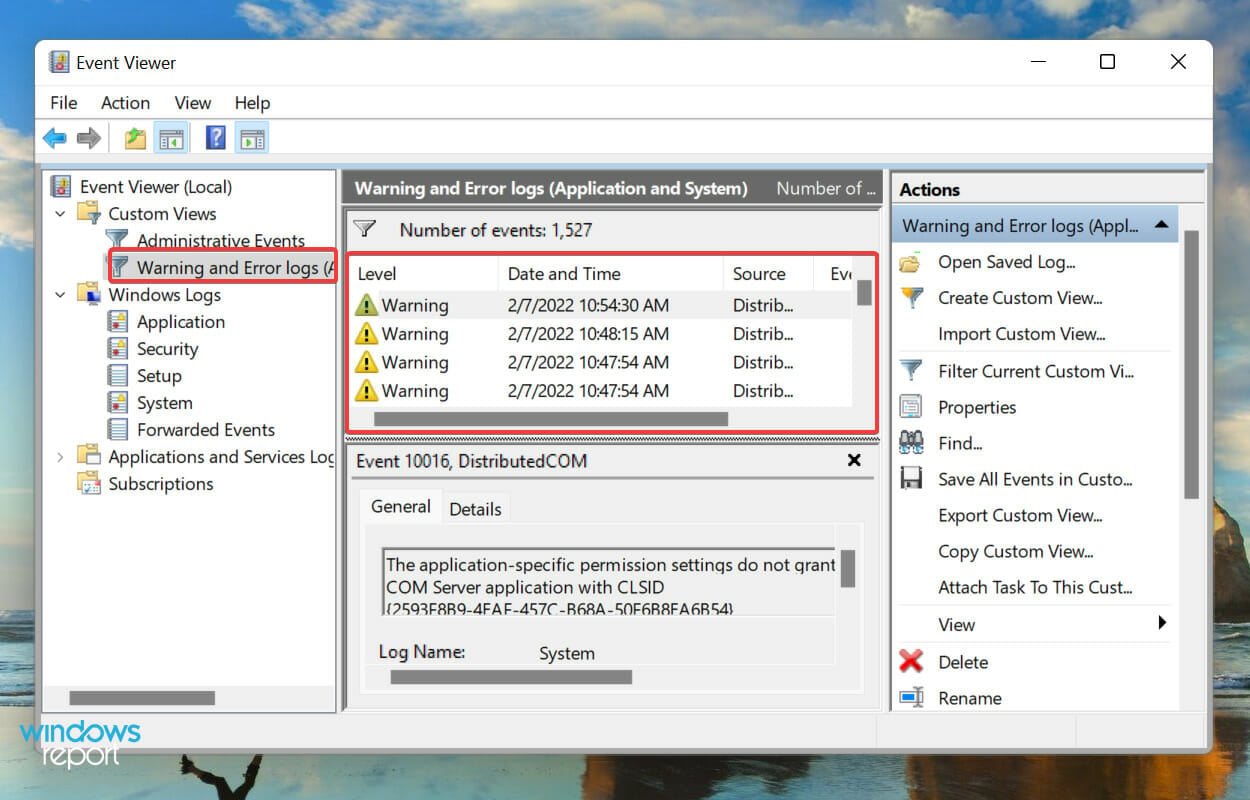
The new custom view will now be listed on the left, and all logs falling under it on the right.
How can I clear error logs in Windows 11?
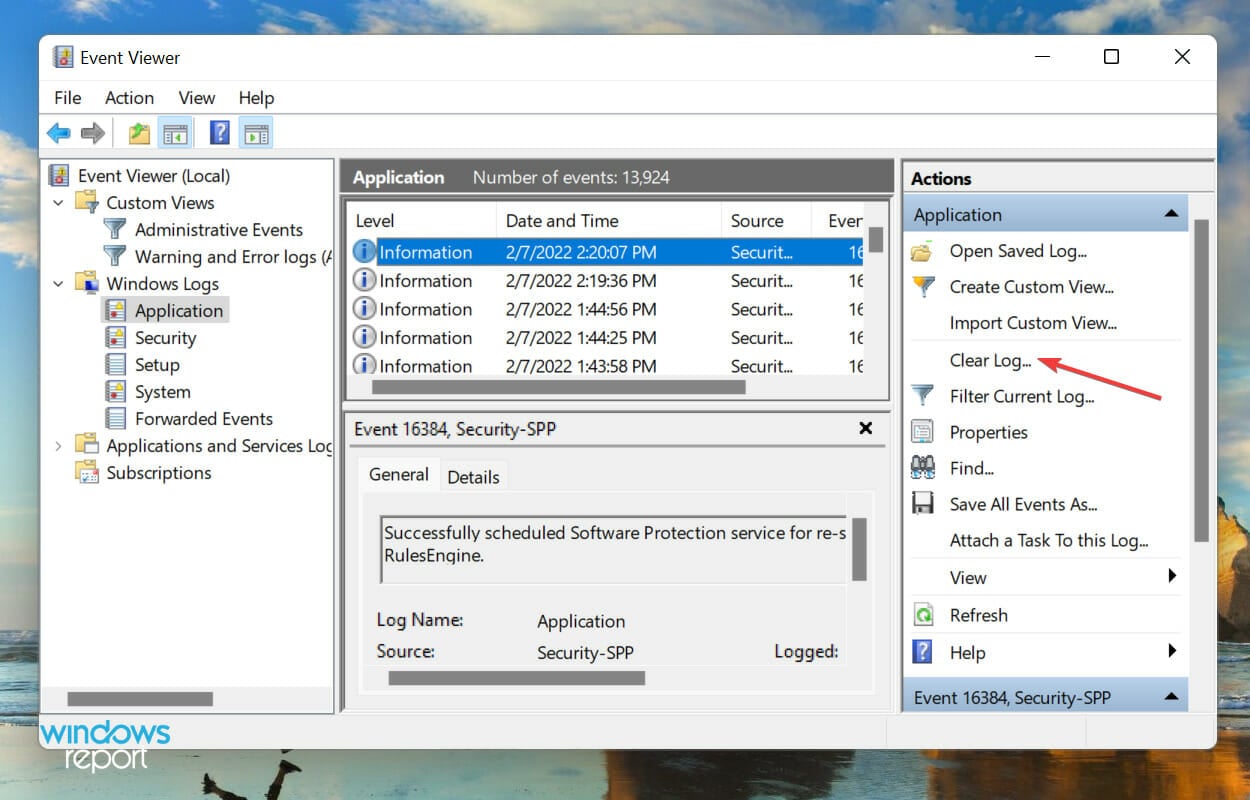
Launch the Event Viewer, navigate to the relevant category, and click on Clear Log from the list of options on the right.
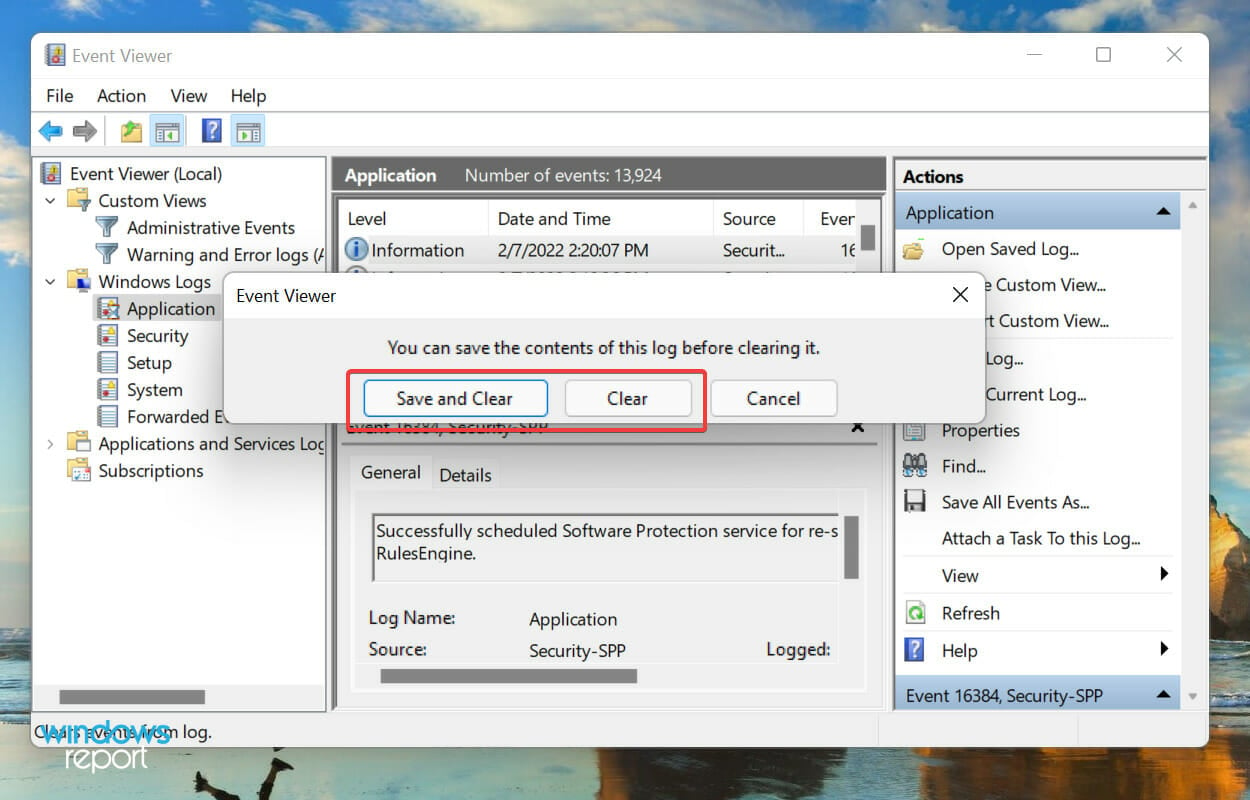
You now have two options, either Save and Clear the error logs or directly Clear them. Choose the desired option.
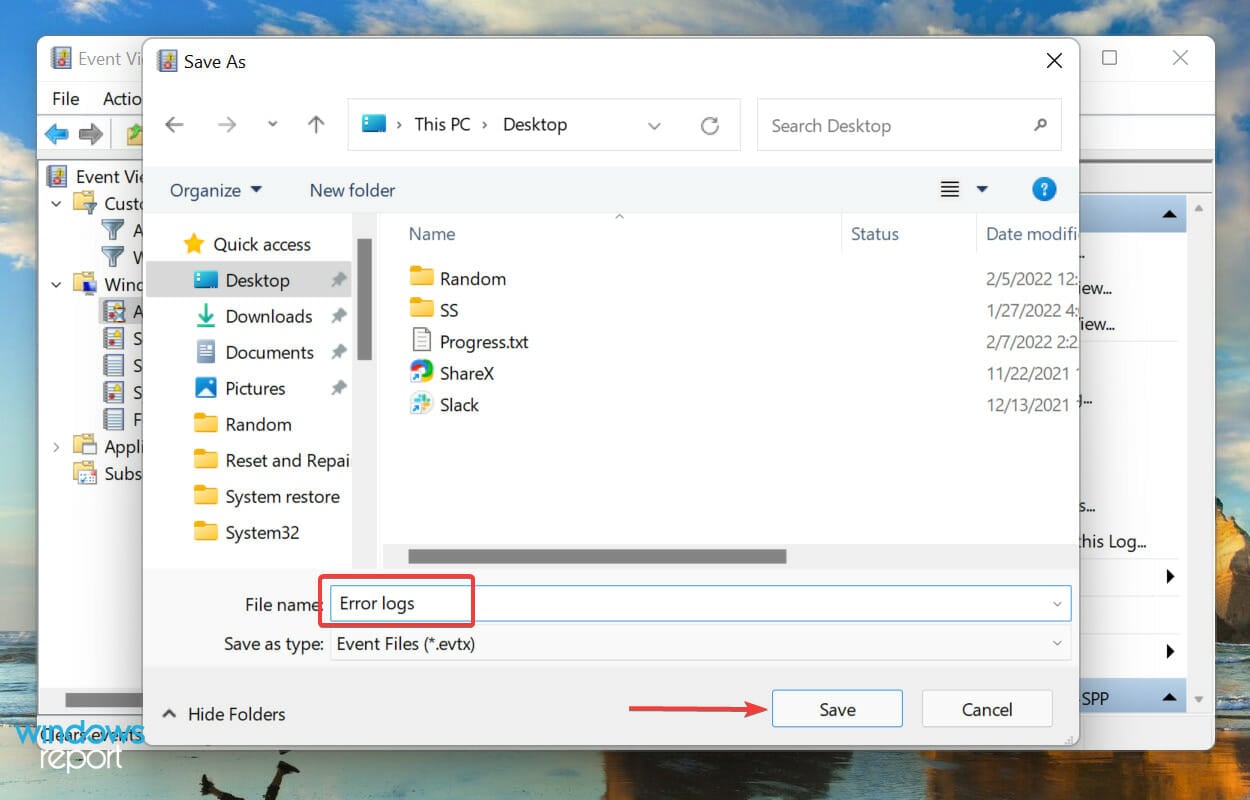
If you selected Save and clear, choose the location for the file, add a name for it and click on Save.
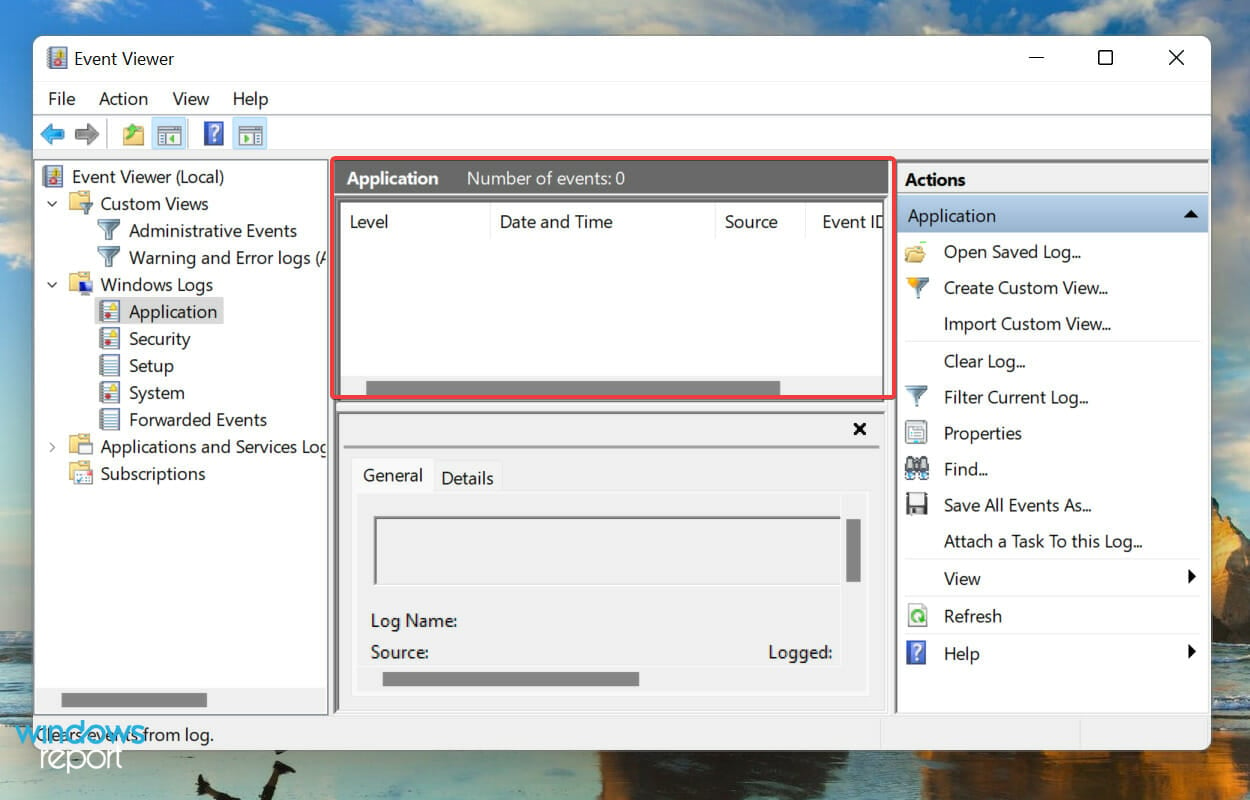
Once saved, they error logs will be cleared right away and there will be none listed under that particular category.
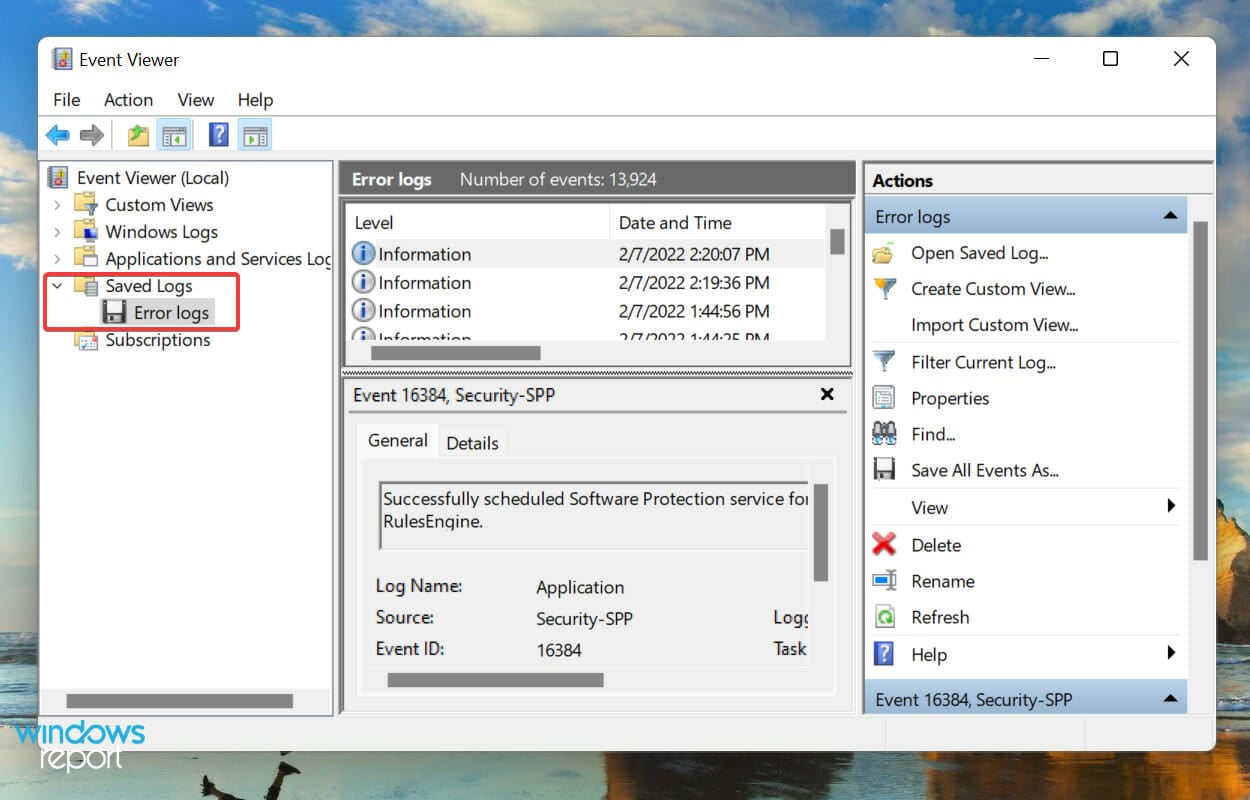
In case you saved the error logs before deleting them, these can be found under Saved Logs in the navigation pane on the left.
The OS creates thousands of logs for each type of event, be it the successful launch of a driver and service or the most fatal errors. Like any other file, these too consume space on your hard disk, no matter how small it is.
So, if you are running out of space, or just want a more organized Event Viewer, clearing the Windows 11 error logs may help.
Checking the error logs can help you understand the BSoD errors like 139, and point you in the right direction to fix it.
How do I create my own log file in Windows 11?
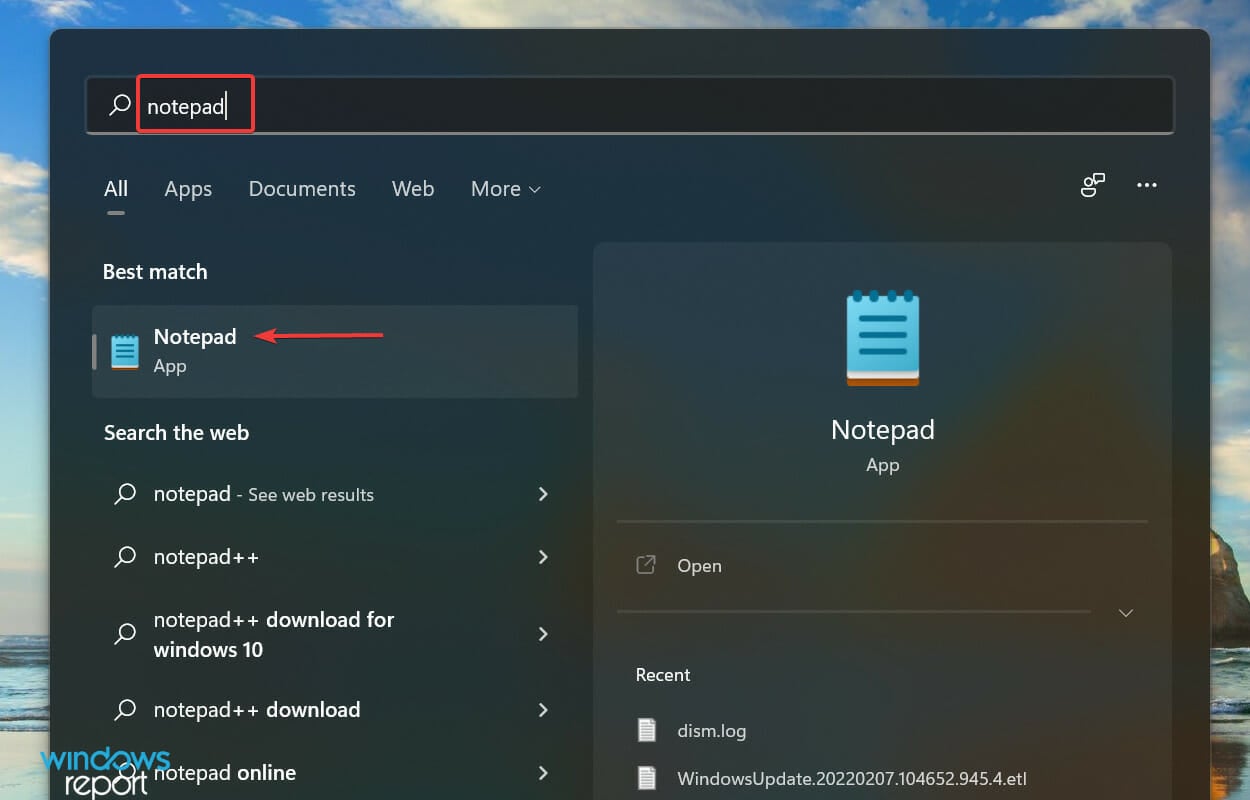
Press Windows + S to launch the Search menu, enter Notepad in the text field at the top, and click on the relevant search result that appears.
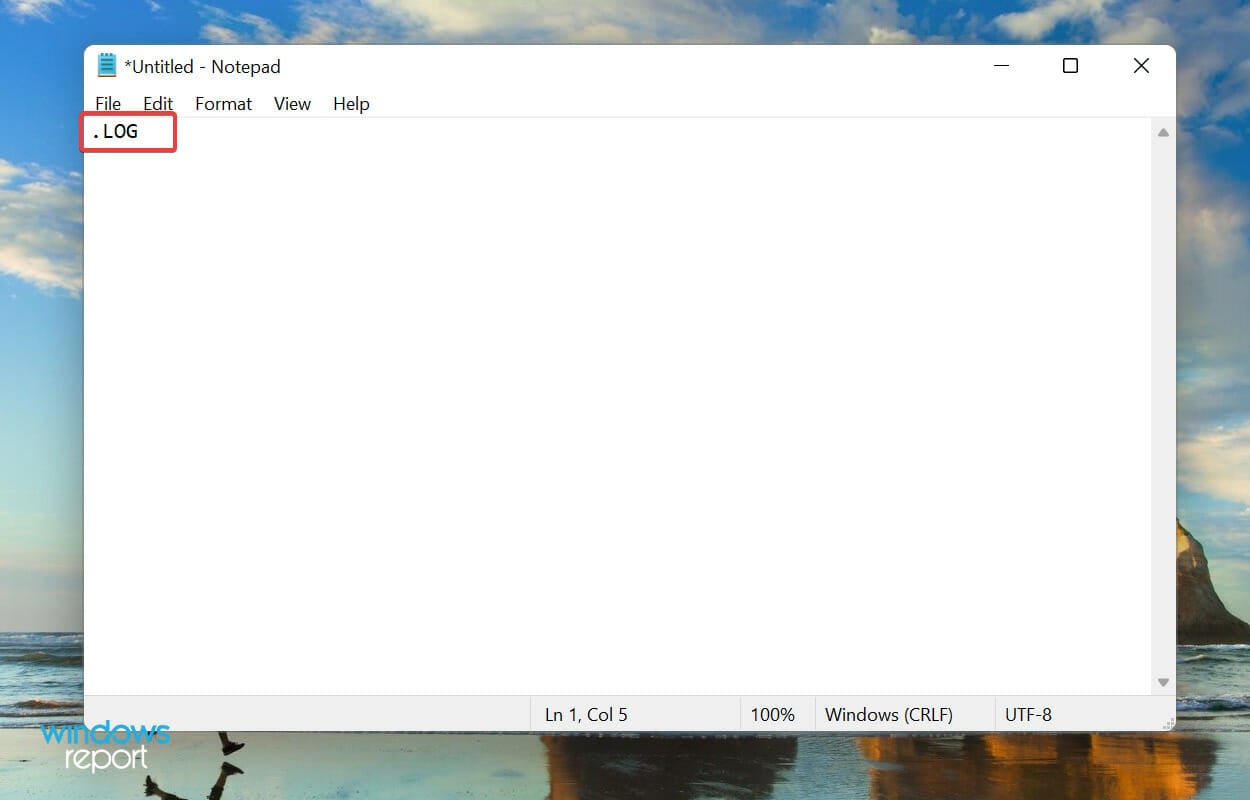
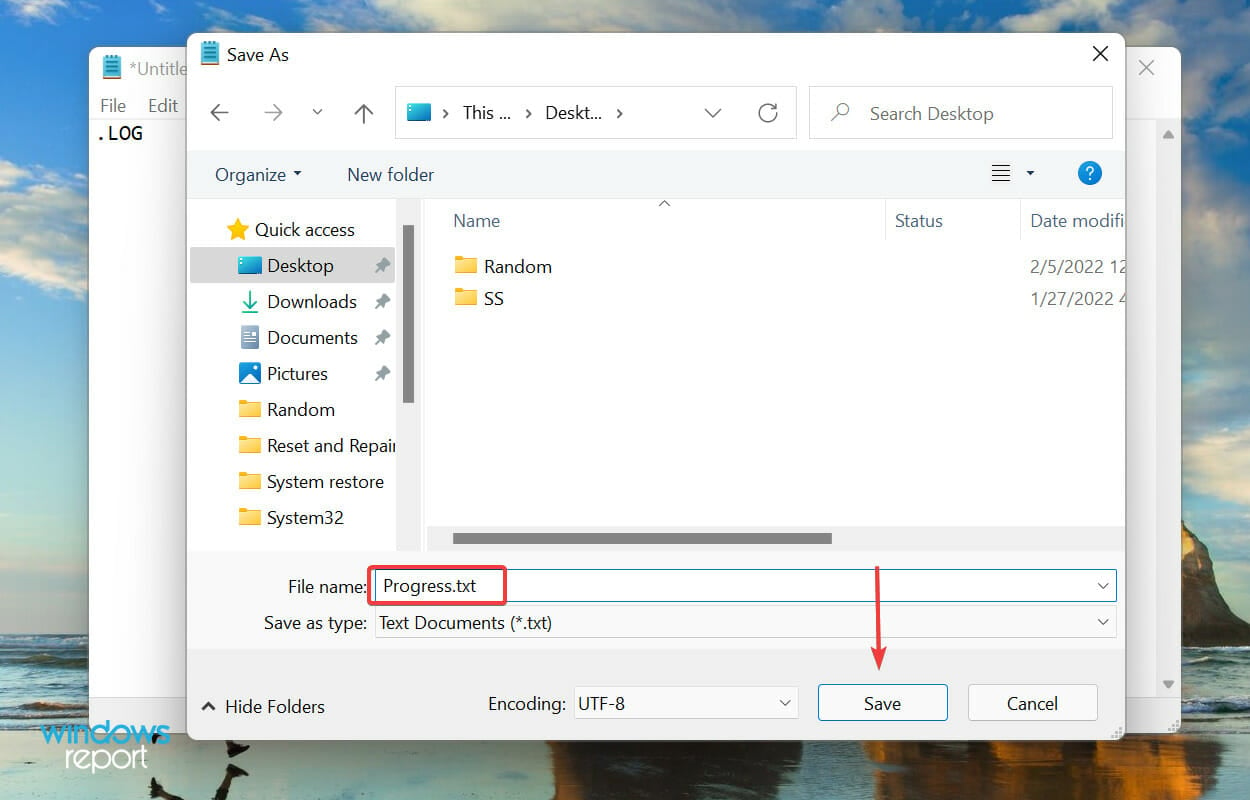
Enter .LOG in the very first line of the Notepad.
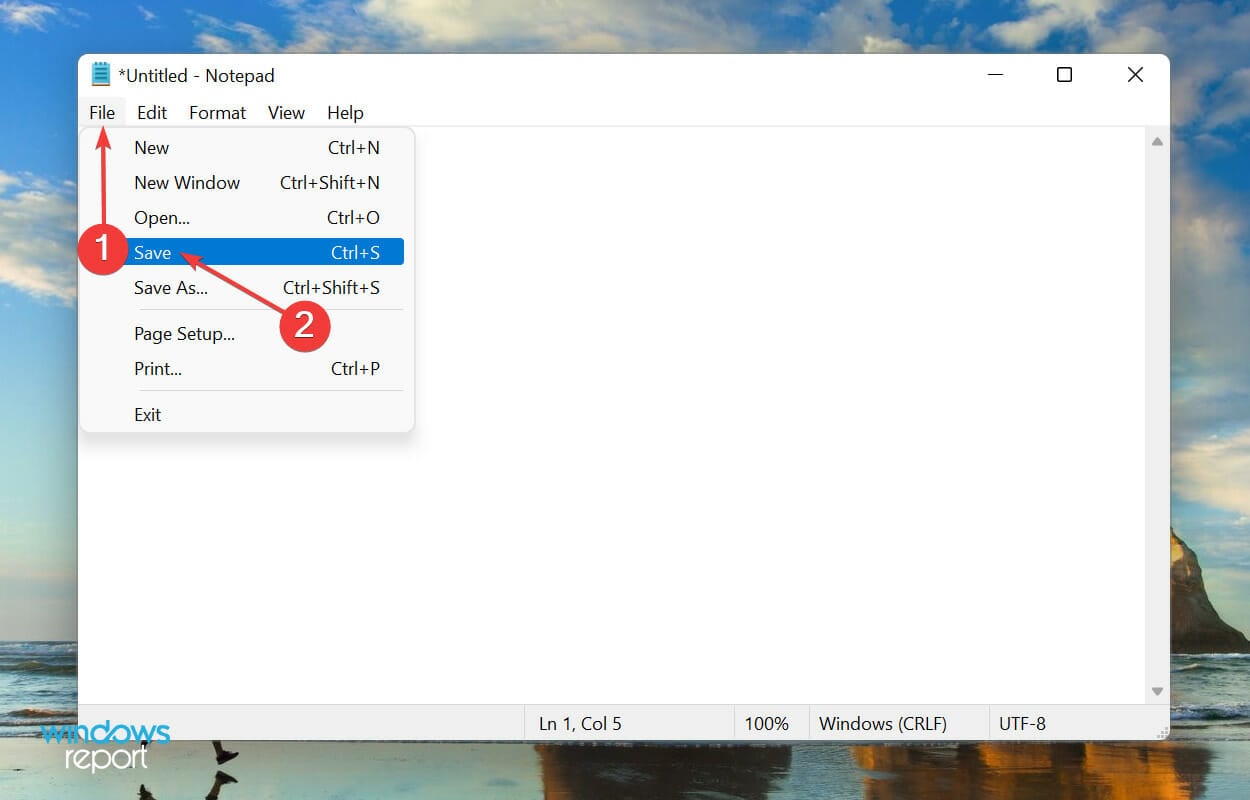
Click on the File menu, and select Save from the list of options.
Next, choose the location and name for the file, and click on Save at the bottom. Now, close the Notepad.
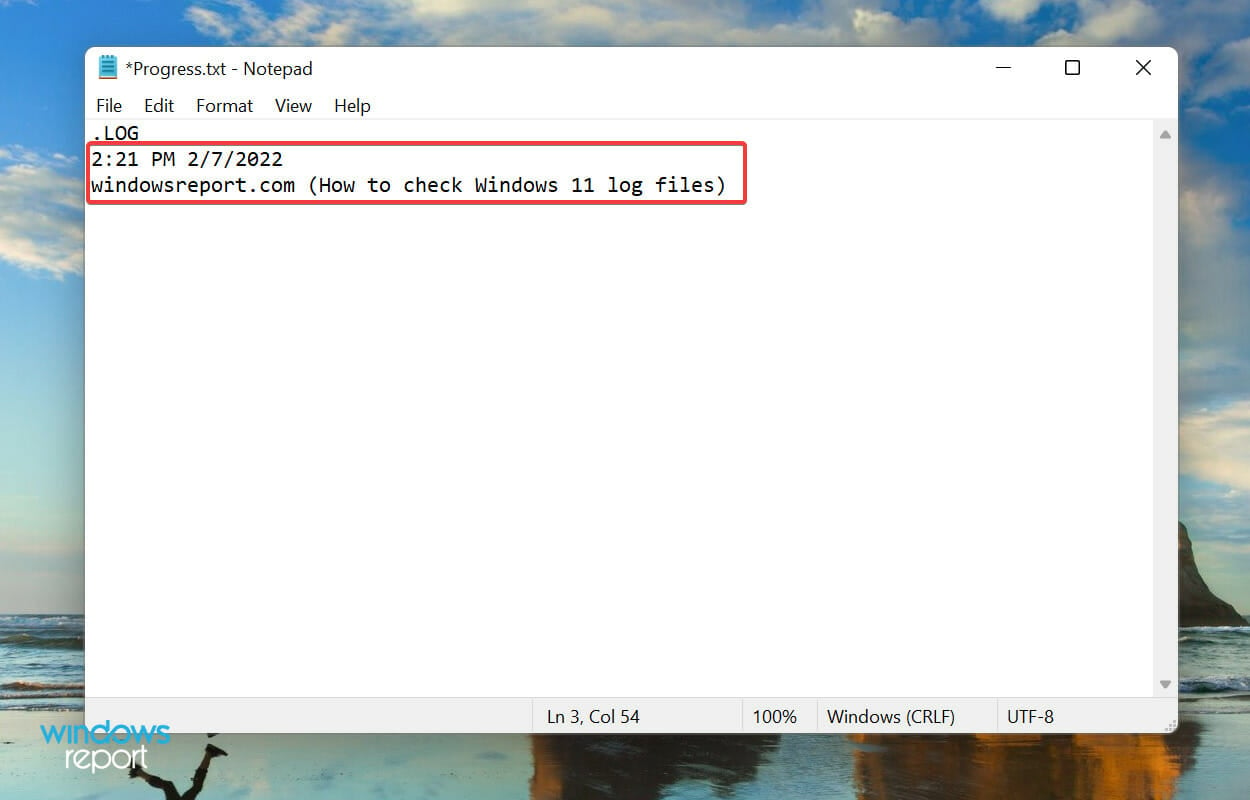
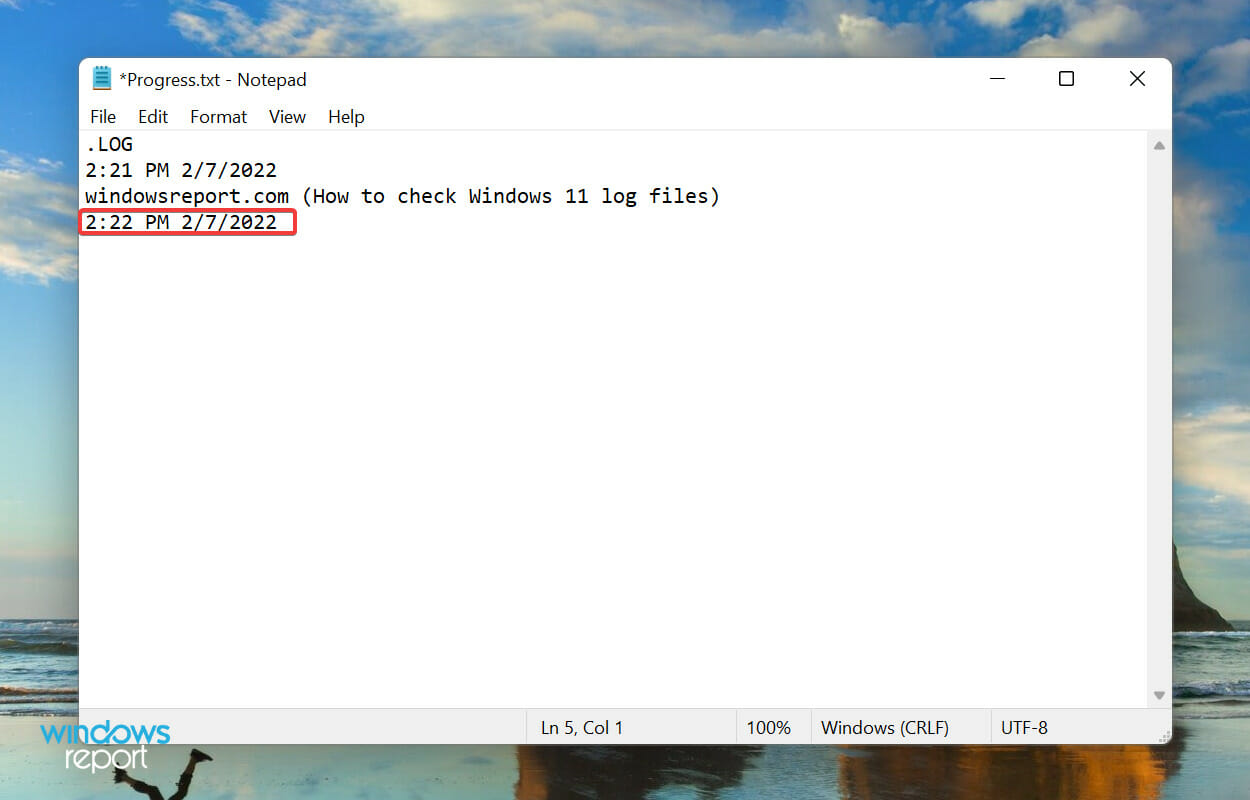
Once the log file is created, the current date and time will be mentioned everytime you open it, and you can enter whatever you want to and hit Ctrl + S to save it.
Now, when you open the same log file the next time, the previously added entry will be listed under that date and time, and the current date and time will again be mentioned below the last entry.
A log file is used to record data. Windows uses it for errors, warnings, and information, while you can use it for other purposes.
Creating a log file is simple, and so is maintaining it. Say you want to record the progress for a book you are reading, just create a log file and enter the number of pages you read each day, or as you may please.
Why do I need to check Windows 11 error logs?
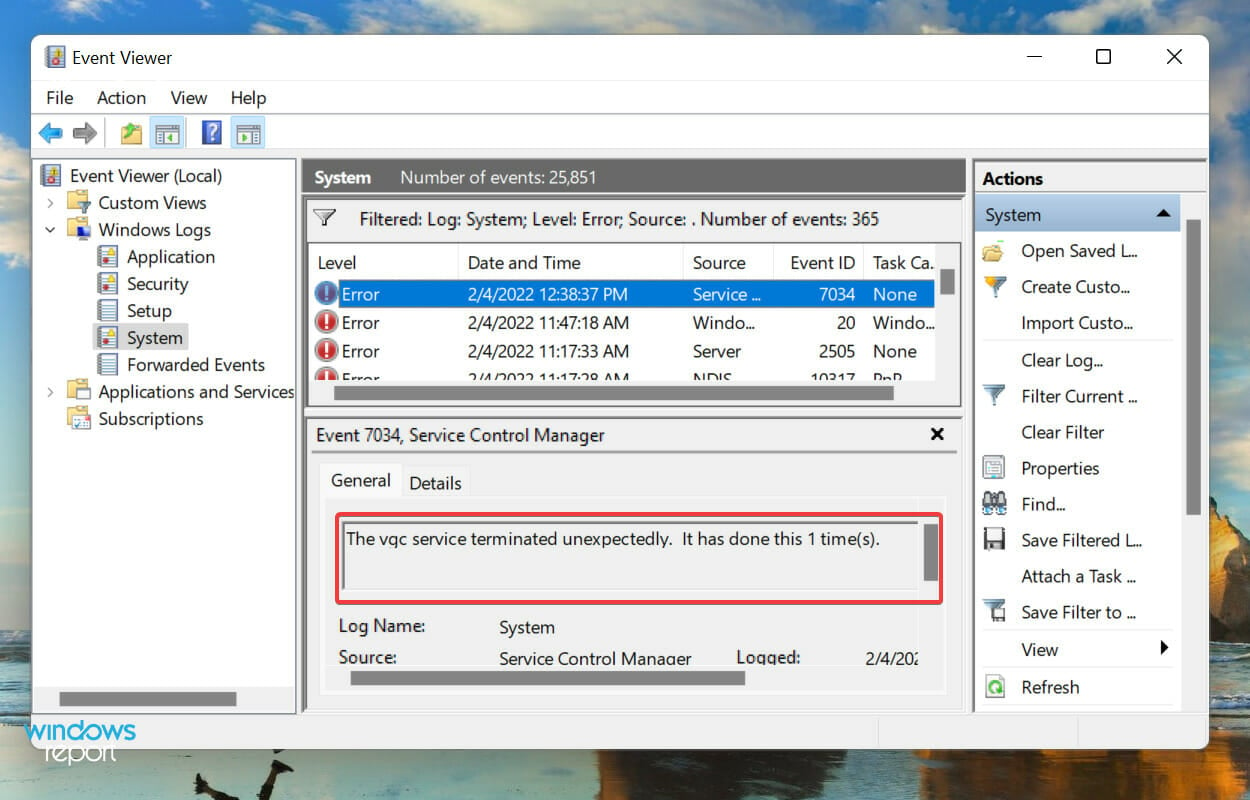
Error log for a service that got terminated unexpectedly
Checking error logs on Windows 11 allows you to find the underlying cause of an issue such as a BSOD (Blue Screen of Death).
That’s all you need to know about Windows 11 system logs. From now on, identifying the underlying cause of errors should no longer be a problem.
Has the New > Folder option disappeared from your desktop and File Explorer context menus so you can’t create a new folder on your Windows PC? We’ll show you how to get it back.
It’s most likely due to corrupted registry keys or system files. Misconfigured settings in the antivirus or permissions sector could also play a role.
What to do if you can’t create a new folder in Windows
First, try creating a new folder with keyboard shortcuts: Ctrl + Shift + N keys. This worked for some users who didn’t have the New Folder option. If this won’t work, try the more advanced steps below.
1. Edit the Registry manually
1. Press the Windows key + R, type regedit, and click OK.
2. Browse to the key below in the Registry Editor window:ComputerHKEY_CLASSES_ROOT\Directory\Background\shellex\ContextMenuHandlers.
3. SelectContextMenuHandlersin the left pane and right-click an empty space on the right.
4. Now,select New, then Key.
5. EnterNewas the title for the key.
6.Select the New key and double-click Default on the right to open the Edit String window.
7. Enter{D969A300-E7FF-11d0-A93B-00A0C90F2719} in the Value data box and click OK to close the window.
8. Now, close theRegistry Editorwindow and right-click the desktop to set up a new folder.
If you can’t access the Registry, we have an expert article that will help you fix that problem right away.
2. Uninstall problematic applications
Press the Windows key + I to open the Settings app and select the Apps option.
Locate and click on the app you want to remove and click the Uninstall button.
Finally, follow the onscreen instructions to complete the process.
If the problem started happening soon after you installed a new app, try uninstalling it. Some apps may interfere with File Explorer.
3. Run an SFC scan
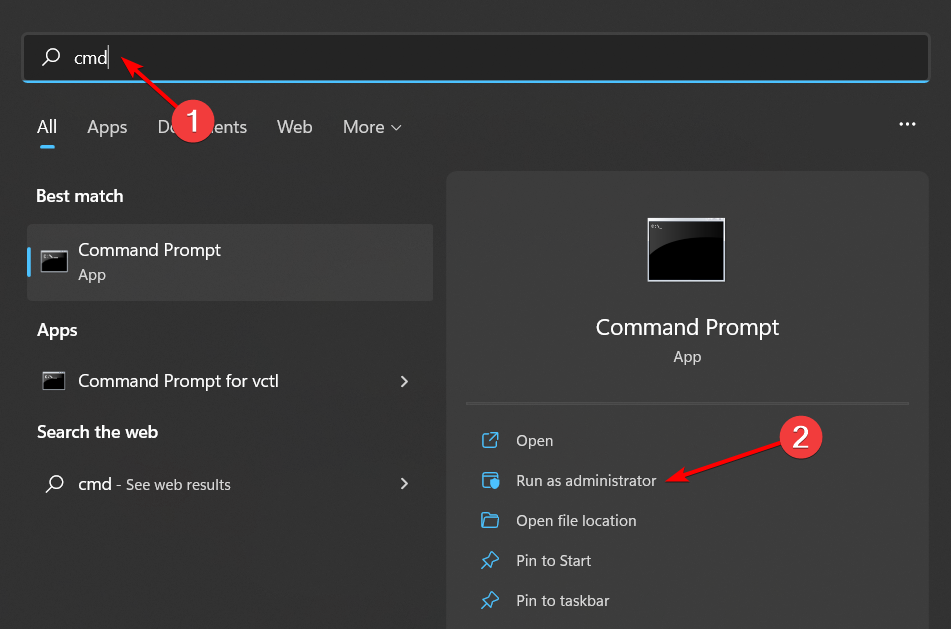
Press the Windows key + S, type cmd, and click on Run as administrator to start Command Prompt as administrator.
Copy and paste the command below and hit Enter: sfc/ scannow
Wait for the scan to complete and try to create a new folder again.
Running the SFC tool will identify and fix file corruption. Alternatively, you can use a dedicated tool to get your system files back to normal.
4. Use Command Prompt to create a directory
Launch Command Prompt as administrator.
When Command Prompt starts, type cd / and hit Enter to navigate to the root directory.
Now, enter the command below and hit Enter in order to create a new directory: mkdir FolderName
By doing that you’ll create a new folder on your C drive.
After doing that, you should be able to create new directories without any issues. Several users reported that they managed to fix the problem simply by using Command Prompt to create a new folder on their PC.
5. Run a System Restore
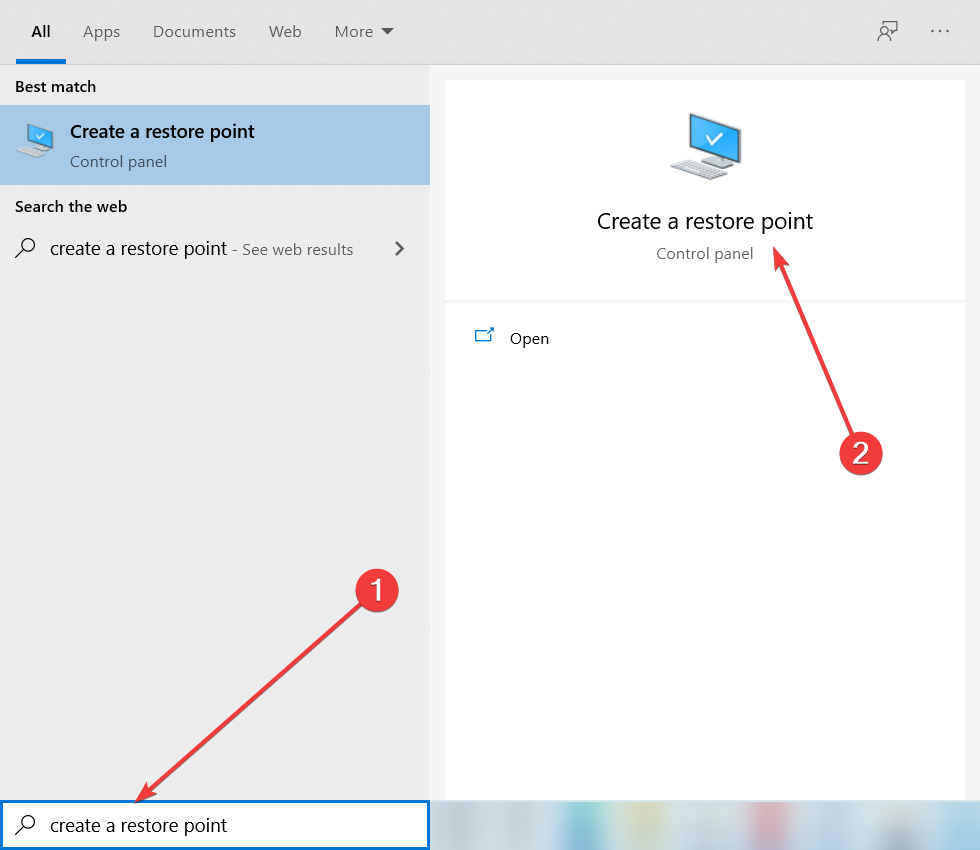
Enter system restore into the Cortana search box and select Create a restore point.
Click System Restore in the System Properties window.
Click the Next button.
Choose a restore point when the New folder option was working fine and click Next.
Finally, click the Finish button to complete the process.
Restoring your PC to a point when the new folder option was working well can get rid of the error.
6. Remove problematic updates
Press the Windows key + I and select Update & Security.
Choose the View installed update history option.
Select Uninstall updates to open the Control Panel.
Now double-click the update you want to remove to uninstall it.
Sometimes an update can cause this problem to occur, and if that’s the case, you can roll it back.
Press the Windows key + X and select the Task Manager option.
Right-click on Windows Explorer and select the End task.
Now, try to create a new folder. If it still does not work, press the Windows key + R to open the Run utility.
Type SYSDM.CPL and hit Enter.
Click the Advanced tab at the top, followed by the Settings button under the Performance section.
Click the Advanced tab at the top and set Adjust the performance of: to Programs in the Processor Scheduling section.
Now, go to the Virtual Memory section in the same window and click the Change… button.
From here, check the box for Automatically manage paging file sizes for all drives.
Finally, click the OK button.
8. Perform a clean boot
Press the Windows key + R, type msconfig, and click OK.
Click the Services tab at the top, then check the box for Hide all Microsoft services, and click the Disable all button.
Click the Startup tab, followed by Open Task Manager.
Right-click each of the services there and select Disable.
Now, go back to the services window, click the Apply button followed by OK and restart your PC.
Third-party apps running in the background are among the major causes of this issue. Performing a cleaning boot starts your system with only the required processes.
Now, you can try creating the new folder again.
9. Disable controlled folder access
Press the Windows key + S and type controlled folder.
Choose the Controlled folder access option.
Toggle the switch before Controlled folder access backwards to disable it and close the Window.
So those are our solutions to effectively fix and restore new folder options if you can’t create new folders on your Windows PC.
Feel free to let us know if you were able to fix this issue with any of our solutions in the comment below.
Hyper V or hypervisor is Microsoft’s product that lets users create and manage virtual machines. You can check out our guide to understand how to enable Hyper V in Windows 11.
In this guide, we will give you a bunch of solutions that will help you resolve a common Hyper V not authorized to connect error. Let us check it out.
What causes Hyper V not authorized to connect error?
The Hyper V services aren’t enabled: Some third-party programs might have disabled the Hyper V service, because of which you are experiencing the problem.
Incorrect system settings: You might not be running the Hyper V without sufficient privileges. In such a case, run Hyper V as an administrator.
The presence of bad sectors can also cause this issue: Due to missing or corrupt system files, it could create multiple issues.
Failed Windows updates: If you tried updating your PC, and it failed because of any reason, then it could cause multiple problems, one of which is the Hyper V not authorized to connect error.
How can I fix the Hyper V that is not authorized to connect error?
Here are a few preliminary checks that we would advise you to apply before proceeding with the advanced troubleshooting solutions mentioned in this guide:
Check if the Hyper-V Virtual Machine service is running.
Make sure that you run the Hyper-V Manager using an account in the Administrators group otherwise, you will be denied access.
Restart your PC and Hyper-V server.
Install the latest available Windows update.
Reinstall Hyper V from Windows feature updates.
If you checked all the boxes above, let’s see how we can fix this problem with the solutions below.
1. Tweak the system settings
Click the Search icon, type security, and click on Window Security.
Click on App & Browser control.
Select Exploit protection settings.
Switch to the Program settings tab.
Locate C:\WINDOWS\System32\vmcompute.exe in the list and expand it.
Click Edit.
Scroll down to Control flow guard (CFG) and uncheck Override system settings.
Click the Windows Search button, type powershell, and open the app from the results.
Execute the below command on PowerShell: net start vmcompute
Restart your PC.
2. Update drivers on your PC
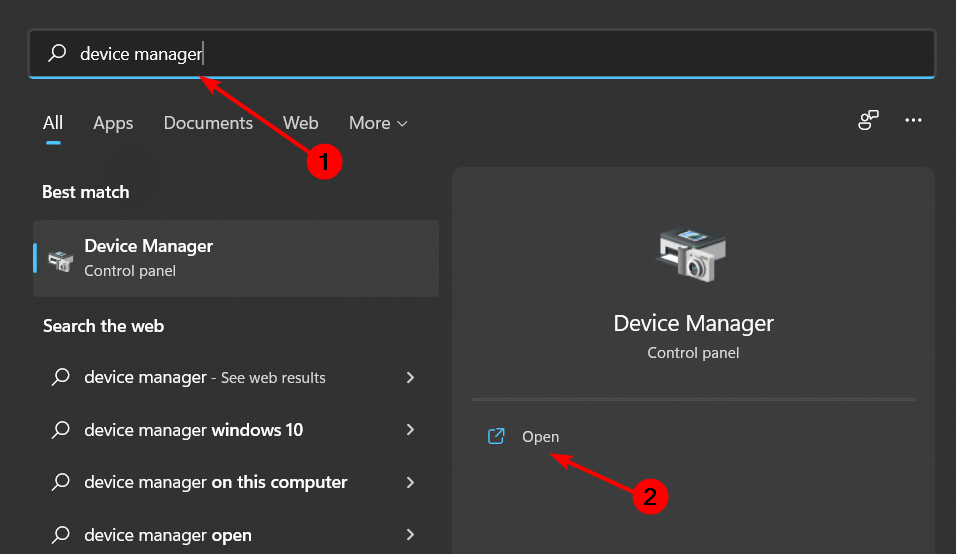
Click the Search icon on the taskbar, type device manager, and click the app from the results.
Expand each section and right-click on it.
Select the Update driver option.
Pick Search automatically for drivers and if the system finds any new ones, it will install them.
Often, we forget to update drivers and because of that not only your PC’s performance will be hampered but it will also trigger issues such as Hyper V not authorized to connect errors.
The above solutions require you to manually check for updates, which is quite time-consuming. A better alternative is to use a trusted third-party tool to update all drivers for you automatically.
We would recommend you check out Outbyte Driver Updater. It scans your PC for all faulty drivers; all you need to do is select all the ones you would like to fix, and everything else will be done automatically.
Outbyte Driver Updater
Enhance your device’s health by keeping all your drivers up-to-date with this great tool.
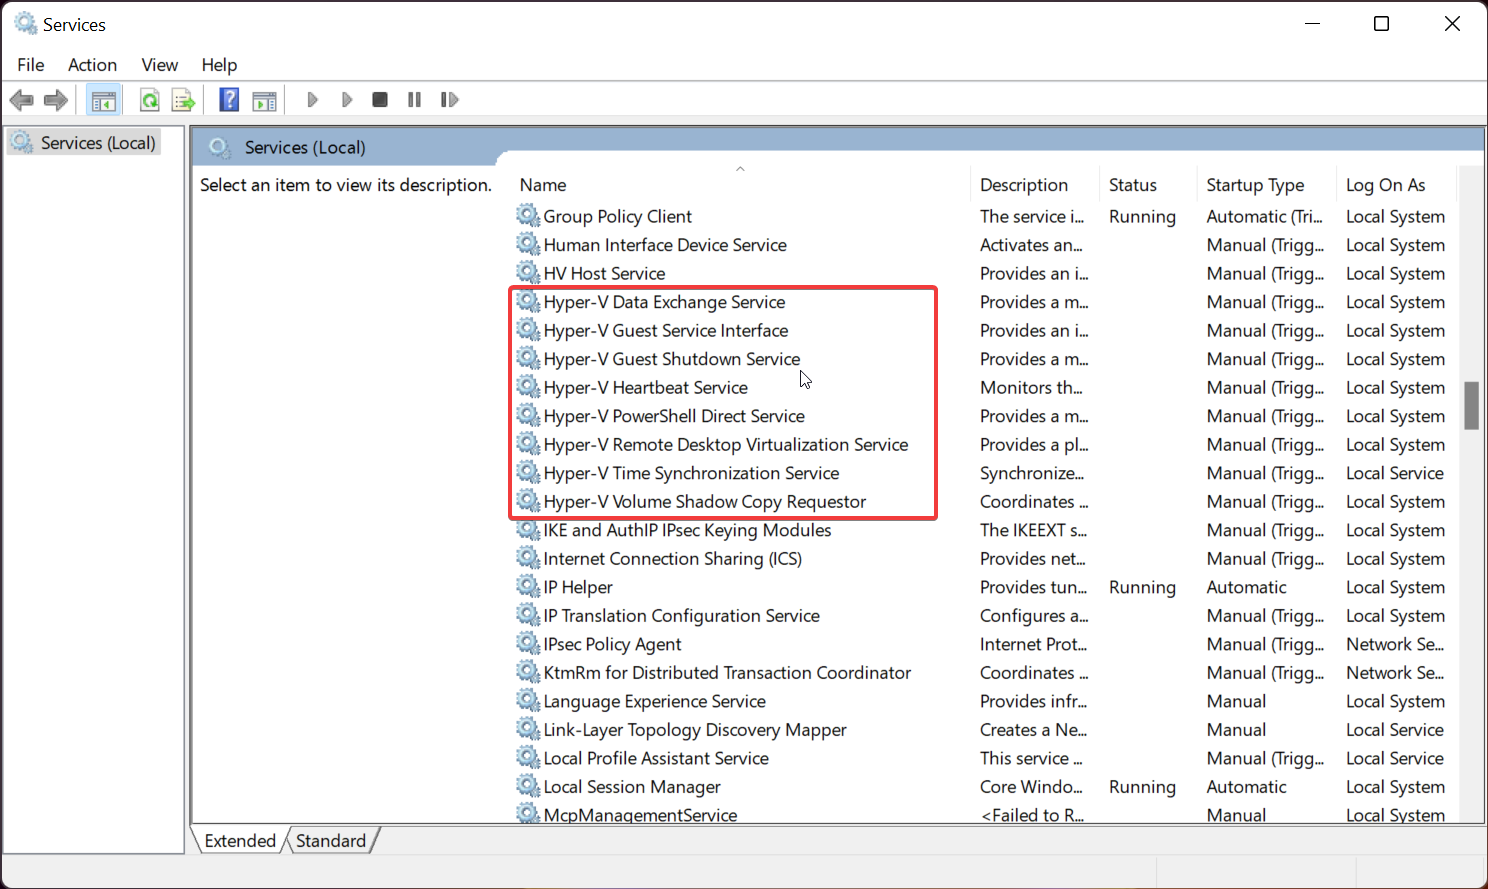
Locate the Hyper-V related services, right-click on each, select Stop, then Start again.
Often a service runs into an error due to continuous usage and settings tweaks. In such a case, it is required that you restart the service, which allows it to reload all of its files from scratch.
Launching the relevant services also helps get rid of the An error occurred while attempting to connect to server. Check that the Virtual Machine Management service is running and you are authorized to connect to the server error.
Click the Search icon, type cmd, and click on Run as administrator.
Type the below command and press Enter: MOFCOMP %SYSTEMROOT%\System32\WindowsVirtualization.V2.mof
Restart your PC and check if this fixes the issue or not.
5. Run Hyper V as an administrator
Right-click on the Start menu and select Computer Management.
From the left side, expand Local Users and Groups and double-click on Groups.
On the right side, select and open Hyper-V Administrators.
Click on Add, and in the Enter the object names to select field, enter your user account name.
Press OK, then click Apply and OK to acknowledge the change.
Restart your PC.
Running as an administrator will help in the case of the Hyper-V You might not have permission to access it error. You can try reinstalling the Hyper-V feature from Windows Features. Check if a new Windows update is available. If yes, then install it.
Also, you can uninstall problematic updates if the Hypervisor error appeared after performing a Windows update. You can check out our guide that will help you easily uninstall updates in Windows 11.
Run SFC Scan and DISM commands to fix or repair missing/corrupt system files. Use System Restore to turn Windows to a previous state in which the Hypervisor worked.
That is it from us in this guide. We hope the above solutions helped you fix the issue, and do not forget to let us know which one resolved the issue.
Windows 11 captured everyone’s attention with an extra sheen of polish that we’ve all been waiting for.
The story is quite the same for most of us: Windows remains the place where we discovered the pure joy of gaming, edited our very first photos, realized how simple it is to connect with our loved ones, and so much more.
Is Windows 11 ISO available for download?
If you want to reinstall Windows 11, you’re going to need an ISO file, and the good news is that you can download it for free from Microsoft’s website.
Microsoft released a list of all system requirements for the latest iteration of their OS on its official Windows 11 page, along with this statement:
There may be additional requirements over time for updates, as well as requirements to turn on specific features within the OS.
For now, the basic requirements for installing Windows 11 on your PC are as follows:
Processor: 1 GHz or faster with 2 or more cores and 64-bit capability
System memory: 4 GB minimum
Storage: 64 GB minimum
System firmware: UEFI, Secure Boot capable
TPM: TPM 2.0 is required
Display: 9-inch minimum in diagonal, High definition (720p), 8 bits per color channel
Graphics: DirectX 12 API, WDDM 2.0
As long as your computer or laptop meets the minimum requirements, you can update to Windows 11 the same way you usually update to new versions of Windows 10.
Also, remember that Windows 11 download size is 9 GB, as per Microsoft, but you need more free space to install updates released in the future.
The good news is that the OS will be offered as a free upgrade for all Windows 10 users. However, OEMs will still have to pay for a Windows 11 license.
Windows 7 users were offered free upgrades to Windows 10 when it was released, and things are no different when it comes to the new OS.
If you’re still using them, you will receive a free upgrade this time as well. However, you will need to do a clean install or reinstall the OS before being eligible.
Besides knowing how much Windows 11 will cost, also note that for Windows 11, the company is planning to return to the normal schedule of one content update per year.
Can I download Windows 11 now? – that’s most likely the question that you also have in mind, given the circumstances, so let’s discover together the precise answer.
Discover if your PC is eligible for a free upgrade
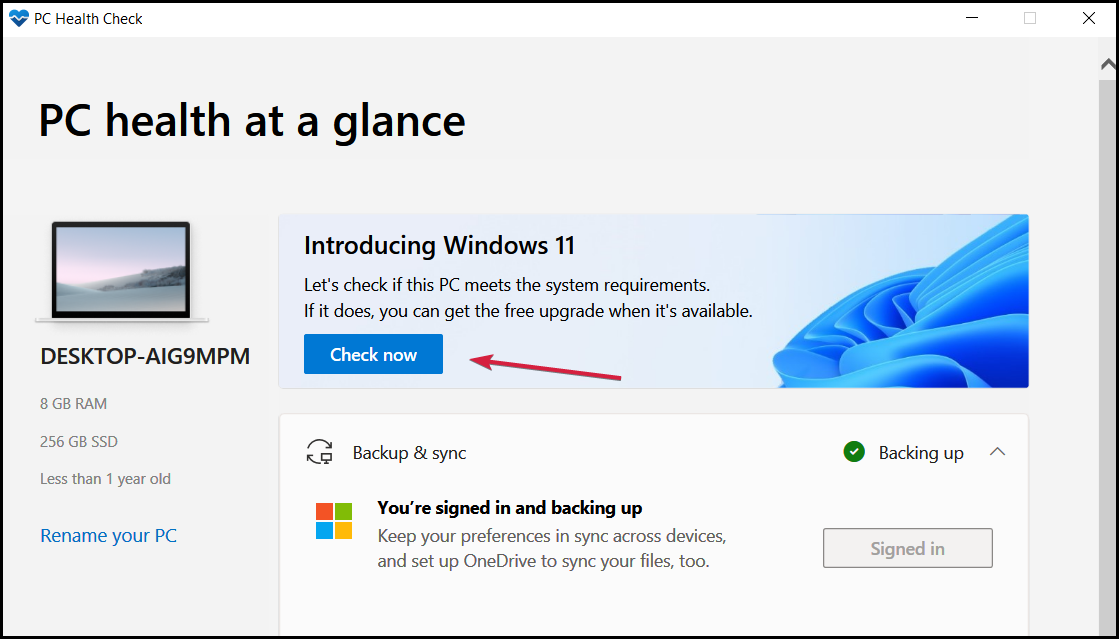
First of all, see if your PC is eligible for the free upgrade to Windows 11. In that regard, you should simply download PC Health Check.
Click the Check Now button and you’ll either be informed that This PC can run Windows 11 and you will be notified when it becomes available, or you’ll continue to receive Windows 10 updates.
PC Health Check app was temporarily removed by Microsoft, as the app was not fully prepared to share the level of detail or accuracy, but the Redmond giant brought it back again and it’s available for download.
There’s also an alternative to Microsoft’s PC Health Check App named WhyNotWin11, which offers an even more detailed system view.
Is Window 11 worth upgrading?
For most, Windows 11 should be worth upgrading. The revamped UI and various other user-friendly changes are bound to enhance your Windows experience.
Windows 11 has a seamless Settings app, a new File Explorer with various options suitably placed, an intuitive Start menu, and an advanced Action Center, amongst other changes. So, if you are up for a neater OS, Windows 11 is worth a try!
We have covered the changes in Windows 11 in a later section, so do check it out.
Will upgrading to Windows 11 delete my files?
No, it won’t, as long as you choose the right settings during the upgrade process. Make sure to select the Keep personal files and apps option in the Windows 11 Setup.
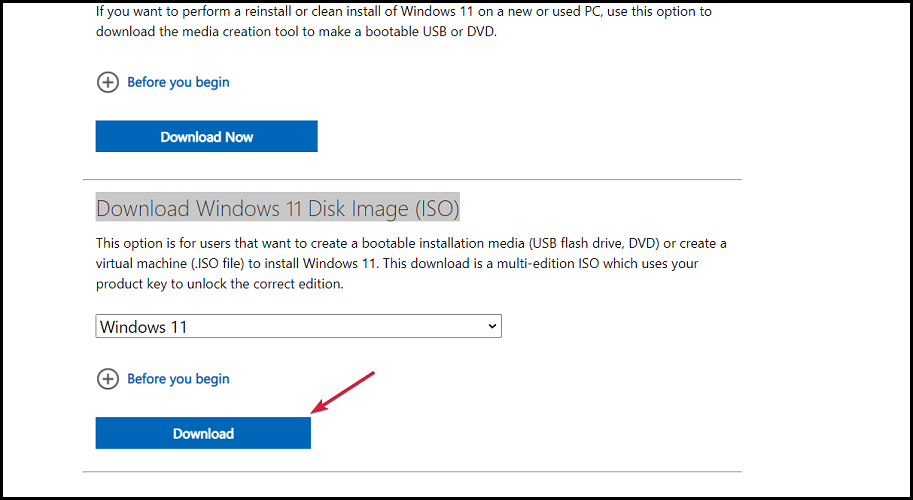
Windows 11 is available to download under an ISO file format. You can download Windows 11 ISO directly from the Microsoft official website, therefore it is a very safe and secure download. Here is what you need to do:
2. Click on Select download under Download Windows 11 Disk Image (ISO), then choose Windows 11.
3. Now hit the Download button.
4. Select the product language you desire, then click the Confirm button.
5. After that, you will receive a download link and you will be able to click on the 64-bit Download button to get the Windows 11 ISO.
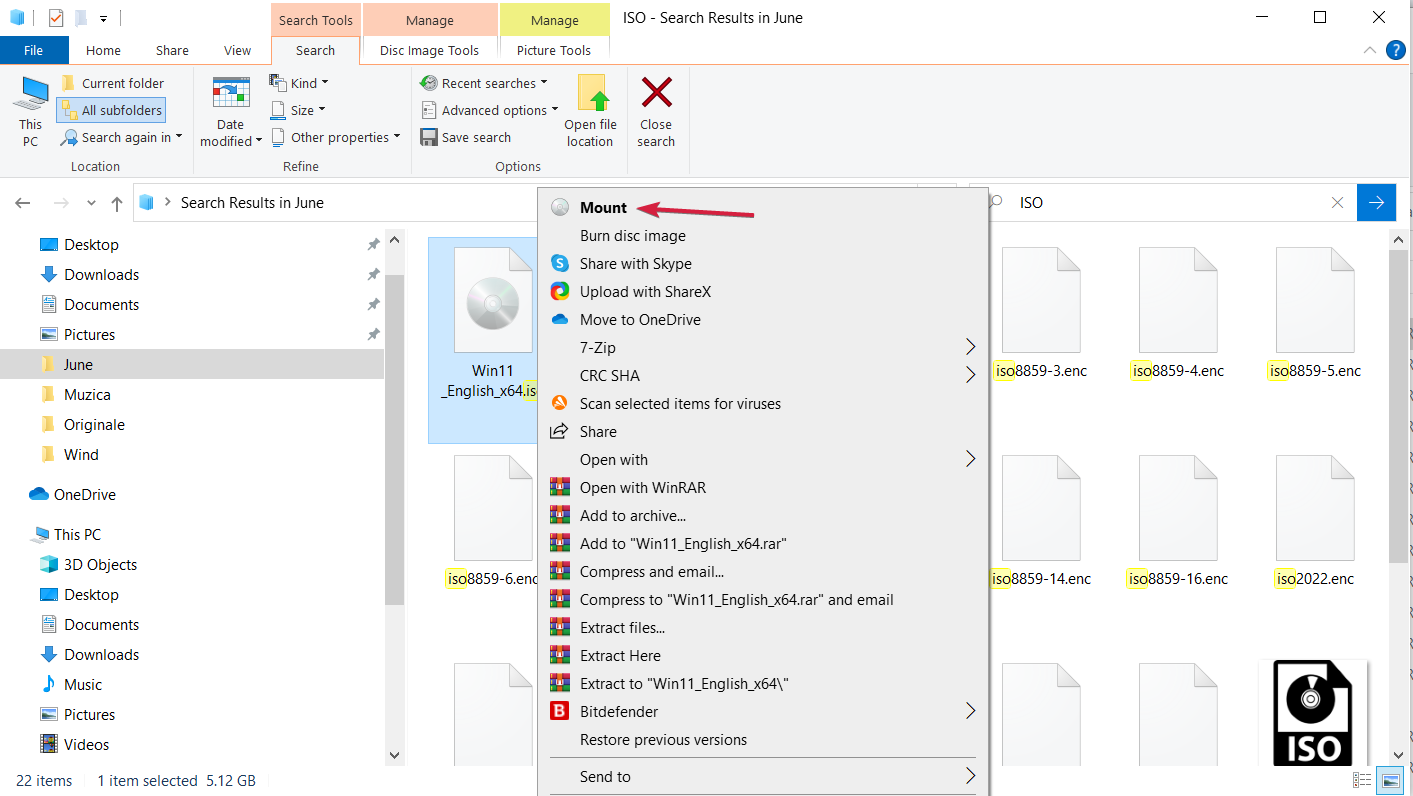
6. Right click the ISO file you downloaded and select the Mount option. An alternative to this is to create a bootable USB or DVD.
7. A new virtual drive will appear in your File Manager window. Just click on it and then double-click the setup file to start the installation process.
2. Upgrade to Windows 11 using Windows Update
Click the Start button and select Settings.
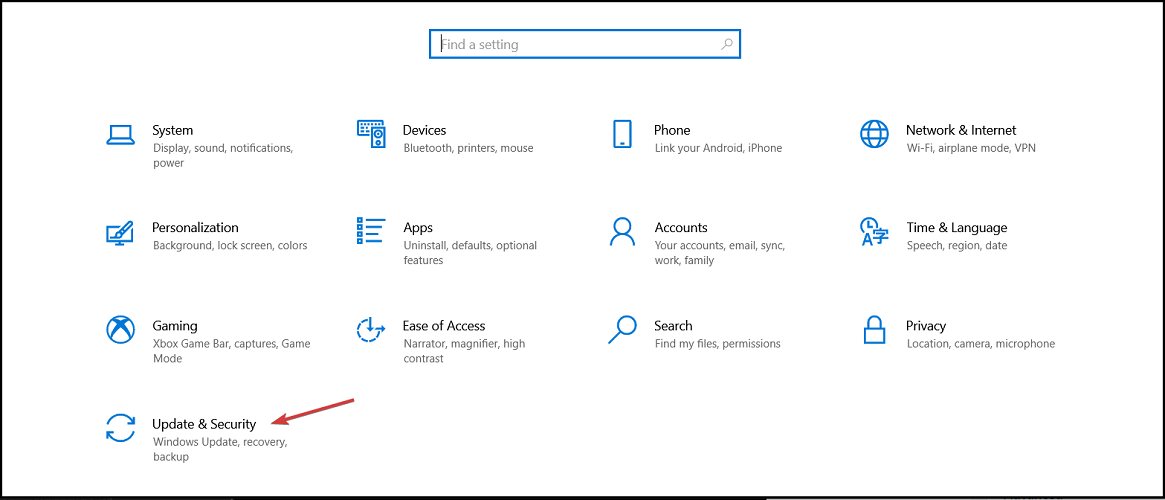
Now select Update & Security.
Just click on the Check for updates button and you should see the Windows 11 Insider Preview Build as a regular Windows update.
It will start to download and then, the installation will begin. You will also be prompted for a restart.
You will get a Windows 11 Installation Assistant executable file. Running it will start the installation process. Click on Accept and install after you read the terms of agreement.
Windows 11 will start downloading and installing so wait patiently until the process is over, then go through with the instructions on the screen to finish.
This is the easiest way to install Windows 11 if your PC is meeting all the requirements because the Installation Assistant will perform all the tasks for you.
For this solution, you will need a USB drive with at least 8 GB of free space.
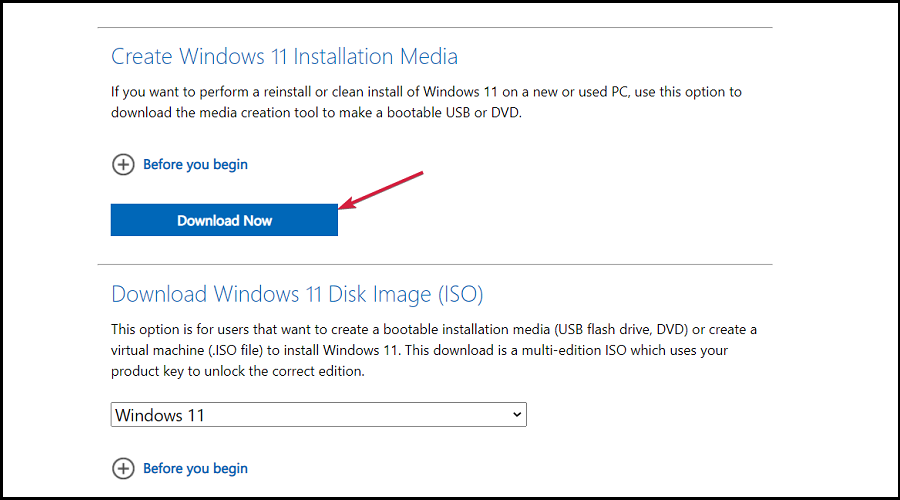
Go to the Windows 11 Downloads page and click on Download now under Create Windows 11 Installation Media, to download the Windows 11 Media Creation Tool.
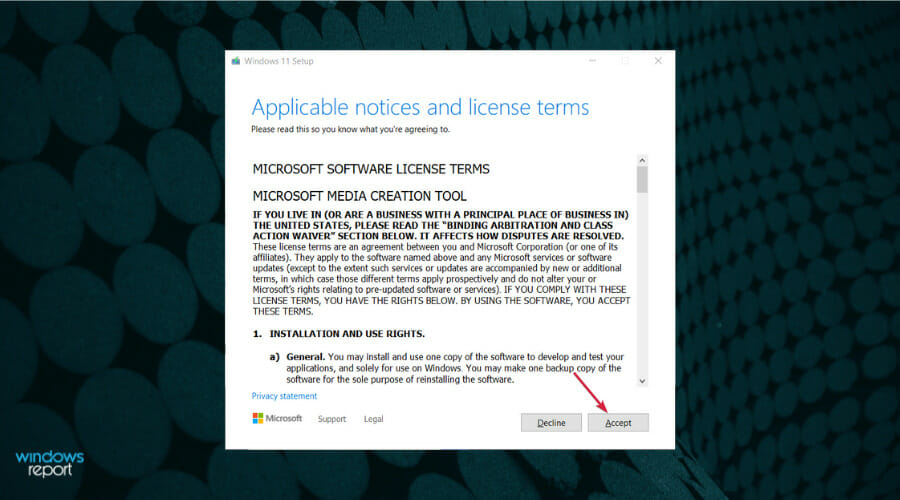
Run the downloaded file to start the Media Creation Tool app. Start by accepting the license terms.
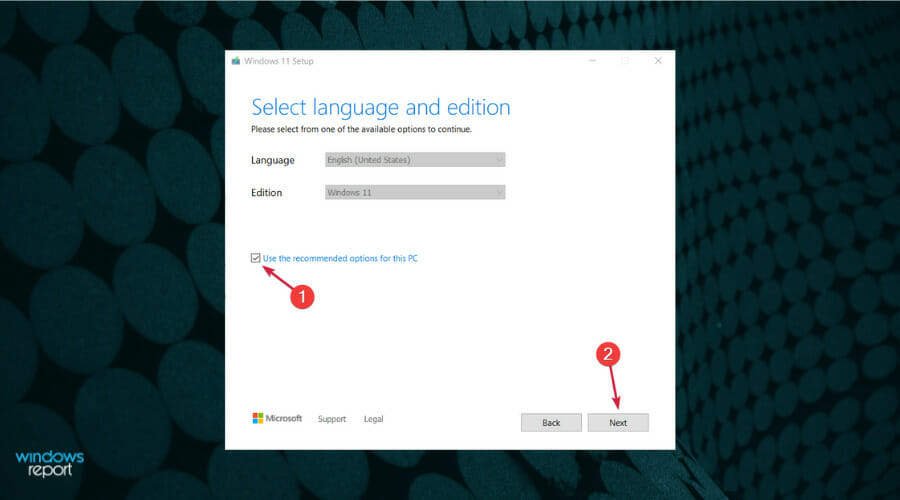
Uncheck the Use recommended box if you want to change the Windows language, then hit the Next button.
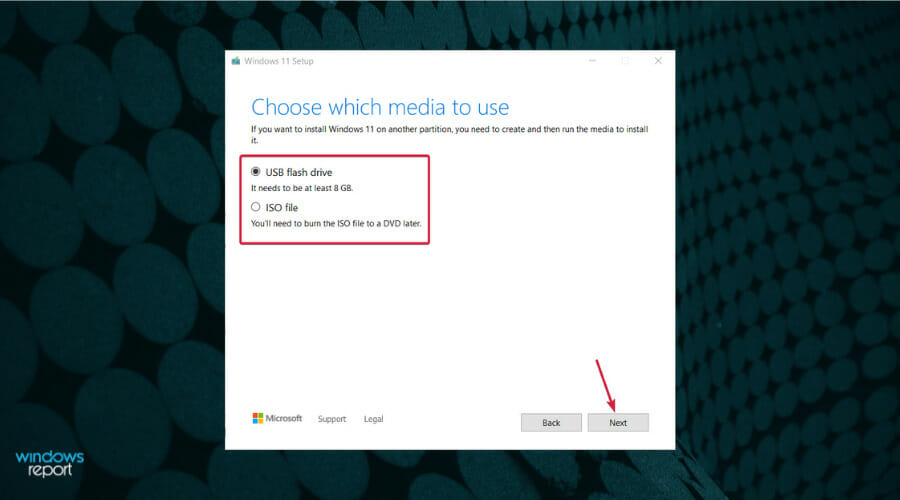
Next, you can choose whether you want to create a bootable USB drive or just to save the Windows 11 ISO and use it later. If you select the first option, make sure you inserted a USB drive before clicking Next. Since you already know how to download the Widows 11 ISO, we will select the first option, to create a bootable USB drive.
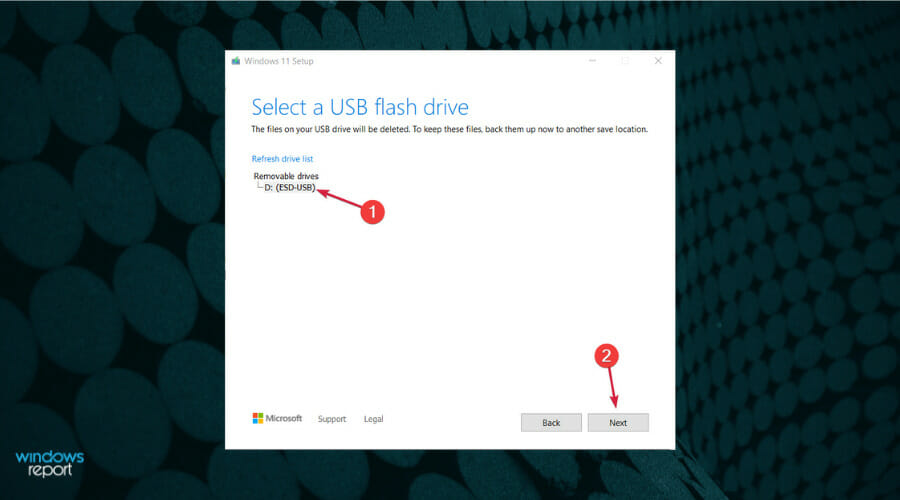
No select the drive you prepared and hit Next.
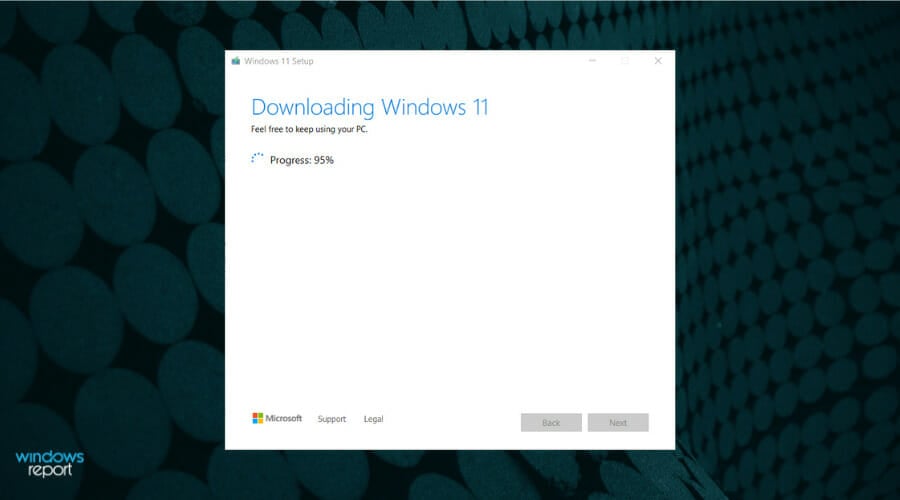
The app will start downloading Windows 11, then verify the download and ultimately creating your Windows 11 bootable media you can use to install the new OS.
If your PC is not prepared with TPM 2.0 and Secure Boot, this solution will not work for you because when the installation starts, those requirements will be checked.
Keep in mind that you might encounter issues during setup due to a lack of Internet connection, but you can easily install Windows 11 without internet.
After the downloading process is complete and you finished creating the bootable drive, you can install Windows 11 using it.
You should also know that Rufus has an option in the Boot section to select an ISO image that bypasses TPM 2.0 and Secure Boot verifications.
So, if you don’t meet these requirements, you will still be able to install Windows 11 without any issues.
6. Join the Windows Insider Program
If you can’t install Windows 11 natively, you can also try to join the Windows Insiders Program and try that way. You will even be able to test the new features ahead of others.
Click on the Start button and open the Settings app.
Select Update & Security.
Then click on Windows Insider Program from the left pane.
You might get an error but you can get through if you go to Settings, Privacy, then Diagnostics & feedback and select Optional diagnostic data.
Now click on the Get started button from the Windows Insider window.
If you already have an account, you just need to click on the Link an account option and specify the user account. If you don’t, you will see a Register button that will take you to a registration procedure.
Of course, if you already signed in with the right Insider account, you won’t be prompted to do anything, and you will switch automatically.
Next, you will need to join the Dev Channel or Beta Channel because only the insiders from those channels can upgrade to the Windows 11 Preview Build so select the Dev Channel or the Beta Channel and click on Confirm.
You will have another confirmation window, and then you will be prompted for a restart.
Joining the Dev Channel or Beta Channel of the Windows Insider Program can be the key to trying Windows 11, so follow the steps above to get it done.
And if you find this process taking an excruciatingly long time, you can opt for an unattended installation.
What are some of Windows 11 new features?
When designing the new OS, Microsoft’s main focus was giving its users an overall better experience, starting with an improved user interface redesign, more collaborations for the App Store, and a unique gaming experience.
The streamlined new design has pastel-like colors and rounded corners, a revamped Start menu, as well as larger touch targets for an improved PC tablet experience, to name a few.
On the right, you can see the new Notifications interface
With support for Android apps through the Amazon Store and a new way to see your interests at a glance thanks to the Widgets feature, upgrading to the new OS is tempting.
But the vision for Windows 11 is best presented by Panos Panay, business executive, and chief product officer for Windows+ devices at Microsoft:
The past 18 months brought an incredible shift in how we used our PCs, we went from fitting the PC into our life to trying to fit our whole life into the PC. Our devices weren’t just where we went for meetings, classes, and to get things done, but where we came to play games with friends, binge watch our favorite shows and, perhaps most meaningfully, connect with one another. In the process we found ourselves recreating the office banter, the hallway chatter, workouts, happy hours, and holiday celebrations – digitally.
We have described how you can upgrade from Windows 10 to Windows 11, but you can also do that by using an ISO, as shown above.
When the right time comes, before jumping to the actual procedure, remember to use the best backup data software and ensure you have a stable Internet connection.
Besides the fact that you’ll be able to download the latest version and then upgrade your PC, note that you’ll also have the option to create a bootable USB drive. Just use a USB drive with at least 8GB of storage in that regard.
While upgrading the operating system, you can choose which programs to keep. Do that for all, save them to a new location, or delete everything from the system and enjoy a fresh start.
As for any Insider Preview builds, do note that we strongly recommend installing them on a second tester device, as bugs will most likely be part of the package.
Windows 11 is the most significant change in years, so it’s only natural to want to enjoy it as soon as possible. As for those worried about getting a message saying This PC can’t run Windows 11, rest assured that it can be easily solved.
Let us know in the comments below if you like the idea of an early beta version as part of the Windows Insider Program or if only the full version is the one you have in mind.
OneDrive is undeniably great; however, at times, users encounter the Application failed to start because no QT platform plugins could be initialized. Reinstalling the application may fix this problem trying to launch certain apps.
Why does the OneDrive QT platform error occur?
OneDrive QT platform error is a frequent concern of the users who stores the data online. There are multiple reasons and factors for this issue; let’s know the most repeated one.
Corrupted system files– One of the reasons for the QT platform error is damaged or corrupted system files. These files are necessary for proper functioning.
Certain apps need reinstallation – There might be some apps that you recently installed and uninstalled that are conflicting with the working of other apps or causing issues with the registry.
Absence of Update.xml file – This file is very important for the functioning of OneDrive. If this file is not in your system, you are bound to experience various errors, including QT platform errors.
After the above checks, let’s move toward the actual solutions to fix this problem.
1. Examine system file corruption
Press the Search icon in the taskbar, type cmd, and click on Run as administrator to start Command Prompt with full privileges.
Copy and paste the following command next to the last command present in the window, and then hit Enter. chkdsk /f /r
Once you have added the command, restart your PC, and your system files corruption will be examined automatically.
Repairing corrupted system files will most probably help you clear the error. Try more solutions if the error is still present on the screen.
As you can see, there is a manual method, but some third-party tools do that automatically.
These tools are an excellent option in this case because they can scan your device thoroughly and fix or replace each broken element of your operating system.
2. Try a clean boot
Click on the Search icon and type msconfig, then click on System Configuration.
Click on the Services tab, check the Hide all Microsoft Services option and click on Disable all.
After that, click on Apply.
A popup appears; click on Restart, and you are done.
Search for runin the Search bar and click on the Run app.
Copy and paste the following command in the dialogue box that will appear on the screen, and then press OK: %localappdata%\Microsoft\OneDrive\onedrive.exe /reset
Special effects aren’t always about adding elements to the screen. Instead, many are looking at how to remove something from a video.
There are plenty of software tools that can be used for this purpose. More so, if you make good use of them, you’ll be able to do it in a completely seamless manner.
Of course, you can’t use just any software tool for this, especially if you value quality above all else. That is why we’ve created this list of the best video editing tools that you can use if you want to remove objects from a scene.
The entries were chosen based on multiple criteria, such as price, how easy they are to use, how popular and widespread they are, and more.
What is the best software to remove objects from videos?
When it comes to professional video post-production, few software tools come close to what Adobe Premiere Pro is capable of.
Thanks to its expanded toolset, pretty much anything you can think of can be achieved, as long as you know how to use it.
In fact, something as simple as removing an object from a video is a piece of cake thanks to Adobe After Effect’s dedicated Cloak tool.
Accessing the Cloak menu is all that you need to do in order to remove any moving objects from your videos, and the end result will look seamless and non-edited.
If you’re not sure whether to invest in this program or not, you should know that you have the possibility of opting for a 7-day trial of the entire Adobe Creative Cloud, and when you are truly satisfied with the product, you can opt for the full license.
How do I remove objects from videos with Adobe After Effects?
Using Adobe After Effects to remove an object from a video is very simple and only takes a few minutes. The app allows you to have full control over what you want to edit out of any frame from the video.
1. Download Adobe After Effects.
2. Install the program on your PC and then launch it.
3. Upload the video you want to remove an object from.
4. Select the video layer you want to edit.
5. Click the Pen tool and use it to draw a mask around the distracting object. Press M to reveal the Mask Path properties.
6. Toggle the stopwatch on to set a keyframe at the playhead’s position. Readjust the mask’s position or shape to keep the object contained.
7. Change the mask’s blend mode from Add to Subtract.
8. Choose Window > Content-Aware Fill to open that tool’s panel. For the FillMethod, select Object if it moves within the shot.
9. Select the range you want to fix and then click Generate Fill Layer.
10. Play the composition to make sure the object is no longer there.
If you notice a shadow cast by the now-invisible object, expand the mask to include it and then click Generate Fill Layer again.
Here are some of Adobe After Effects’ main features:
You can try it for free for 7 days
Their website is full of great guides
Professional-level toolset
Can easily handle tasks the removal of objects from videos
You can enrich it with a wide library of plug-ins
Adobe After Effects
Video editing is an art and Adobe can help you achieve seamless results with removing objects from your footage.
If Adobe After Effects is what you plan on using when adding special effects to an already existent video, then Adobe Premiere Pro is what you use when you want to create the video from the ground up.
This timeline-based video editor is the ultimate tool for creating, editing and composing videos of various sizes and purposes.
In fact, Adobe Premiere Pro is used in many professional-level videos, such as Hollywood movies, TV shows, commercials, and music videos.
As far as cropping objects out of videos is concerned, the program can handle that as well, although the process is not as straightforward as with After Effects’ Cloak feature.
Additionally, you can test the product before deciding whether to buy it or not during the 7-day trial that you can gain access to.
Here are some of Adobe Premiere Pro’s main features:
If you remember Sony Vegas Pro, then you probably know that it changed its name into Magix Vegas Pro a while back. However, while the name did change, it didn’t affect the high standards of the original program.
This video editor stays true to its legacy, allowing powerful video editing features, among which we can also mention cropping out objects from videos.
The end result looks quite spectacular, as you can never tell if the video was doctored or not. However, this is the intended purpose after all.
Here are some of Magix Vegas Pro’s main features:
Constantly updated with new and powerful tools
Great cross-platform support
Seamless video editing
Quite user-friendly compared to other tools
Has a history of being one of the best tools in the industry
Of course, professionals need help with video special effects as well, and that is when you need to pull out the big guns in terms of software tools.
DaVinci Resolve 16 is one such software tool that has become a staple of movie production and editing around the world.
This translates into a massive toolset that allows you to perform pretty much any task imaginable as long as you know how to use it. However, this comes at the cost of not being a very user-friendly program.
More so, you will need a very beefy PC in order to perform the more advanced video editing tasks.
Here are some of DaVinci Resolve 16’s main features:
Professional-level software used in large-scale video productions
Wide range of tools and features
Can perform seamless video editing if your hardware supports it
As mentioned before, sometimes special effects involve removing elements from the screen, and not just adding them. That being said, programs that can efficiently and seamlessly remove objects from the video are hard to find.
However, there are a few options out there of tools to remove an object from a video, so make sure that when choosing which one you buy that you are getting the best deal.
The Event ID 6008 error is triggered if the computer was shut down forcefully using a remote shutdown tool or automatically by a third-party program without the user’s request.
This error can affect any version of Windows from Windows XP to Windows 11 and occurs due to several reasons. To fix the Event Viewer error 6008, you should follow the steps below.
What is Event ID 6008?
This event error could be recorded in the System event log if you restart the computer after an application that makes use of the InitiateSystemShutdownEx function has previously caused the machine to shut down automatically.
Event IDs uniquely identify a given event. Each event source can specify its own unique numbered events, as well as the description strings that will be mapped to those events in the message file that it creates.
What can cause an event 6008?
It is possible that you will experience this issue if the computer has been locked or it is set up with a screensaver that requires a password to be accessed.
And if a program that employs the InitiateSystemShutdownEx function with the force flag is the one that is responsible for the automated beginning of the shutdown procedure.
In this scenario, the Event Log service is not informed about the shutdown occurrence, and as a consequence, the shutdown operation is wrongly regarded as an unexpected event by the Event Log service.
How do you see what caused an unexpected shutdown?
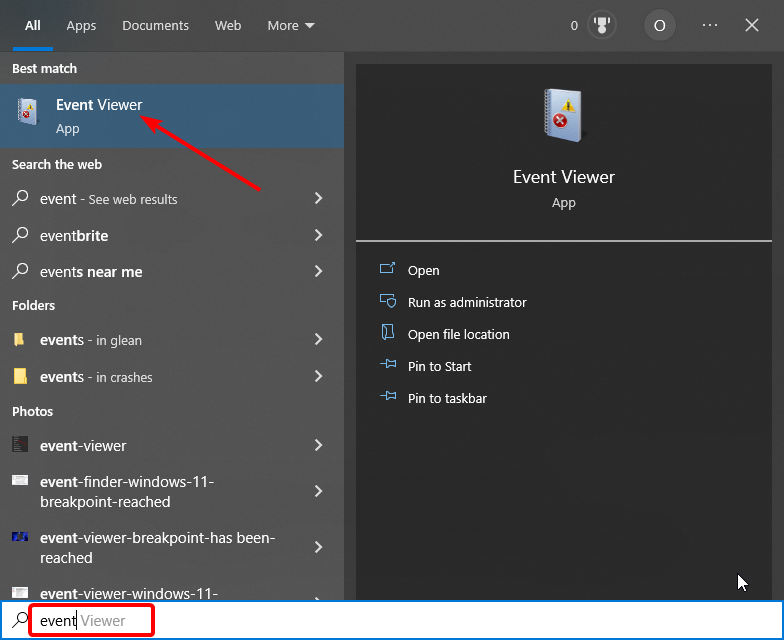
Press the Windows key + S, type event, and select the Event Viewer option.
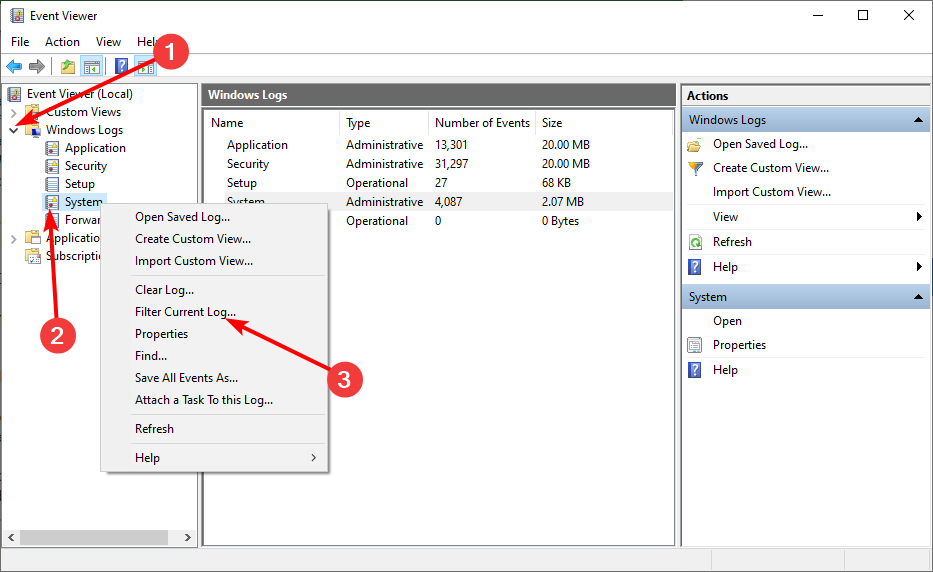
Click Windows Logs in the left pane and right-click on the System option.
Select the Filter Current Log… option.
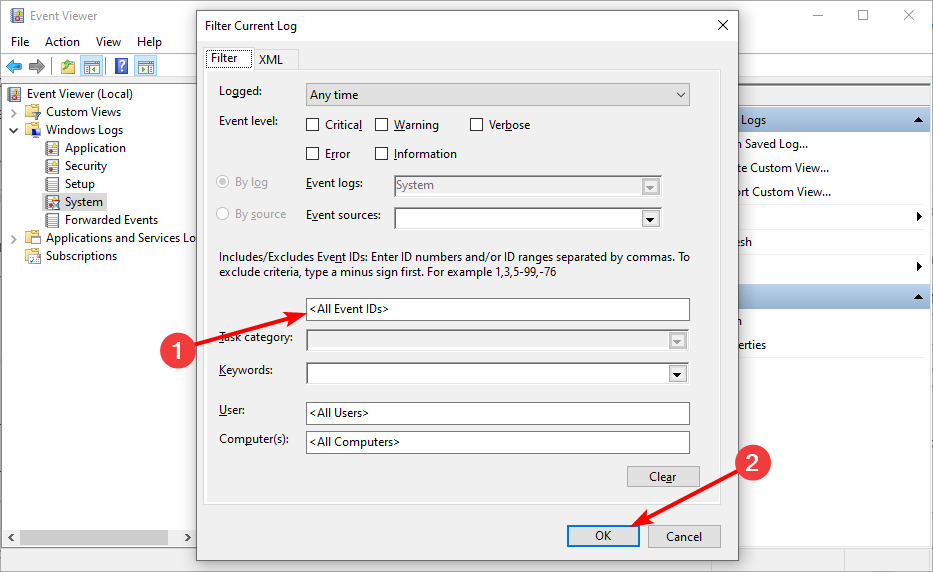
Enter the ID of the issue you want to research in the <All event IDs> box and click OK. For example, type the event id 6008 to see the cause of an unexpected shutdown.
You can now select a log in the next window to confirm the information there.
How do I fix Event ID 6008?
Before moving to any complicated fixes, it is recommended to check your hardware if they are working well. Below are some of the preliminary checks you can carry out:
Check if your CPU is overheating. You can check the CPU temperature using any third-party app.
If on a desktop computer, check if the Sink fan is working.
Try to clean the heat sink fan by removing the dirt using compressed air.
If the issue still persists after these preliminary steps, you can proceed to the fixes below:
1. Use the Roll Back Driver button
If you are facing the event id 6008 while gaming accompanied by a blue screen, it might be caused by your displaydriver. In case you just updated your driver before noticing the issue, the ideal solution is to roll it back to the previous version.
1. Right-click the Start icon then select Device Manager.
When clicking on Start icon, a box will expand and you have to select Device Manager.
2. Click the arrow next to Display Adapter to expand it, then right-click on your Graphic Card Driver and select Properties.
After you clicked Device Manager, a list with devices will be shown. Just click on Display Adapter, right-click on your Graphic Card, then on Properties where you’ll find the Roll Back option.
3. Go to the Driver tab and click the Roll Back Driver button.
Clicking the Driver tab you’ll find the Roll Back Driver button. The roll-back will begin right after pressing the button.
4. Restart your PC.
After the driver is rolled back, reboot the system and check if the Event log 6008 error still appears.
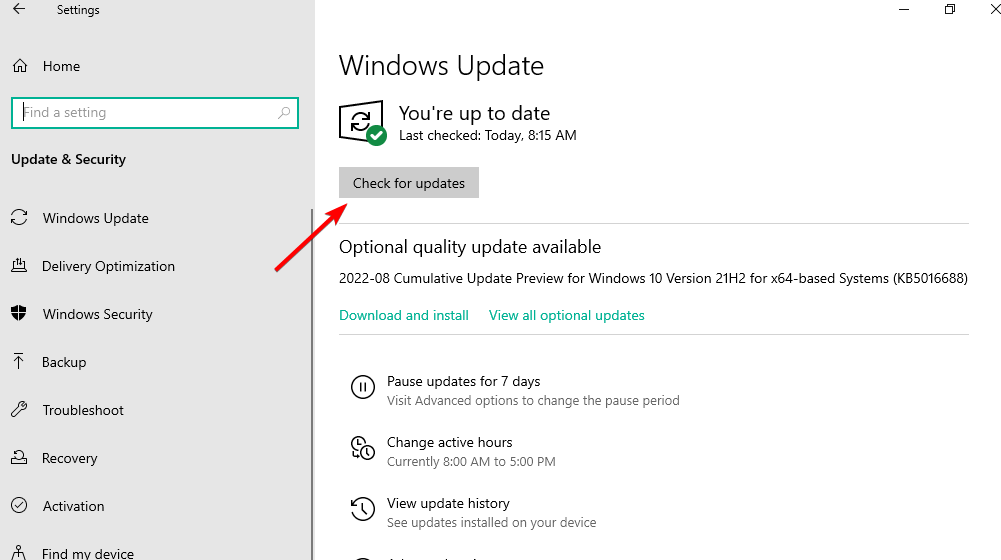
Press Windows + I then go to the Update & Security section.
Next, click the Check for updates button.
If you are getting the Event ID 6008 with qualifier 32768 in the event log, it might be due to an outdated PC. After the update is installed, check if it is triggered again or if your system is freezing.
If the issue is prevalent then it is possible that Microsoft may have released an update to fix the problem. Check for any pending Windows updates, if you haven’t done them already.
3. Uninstall Feature Updates
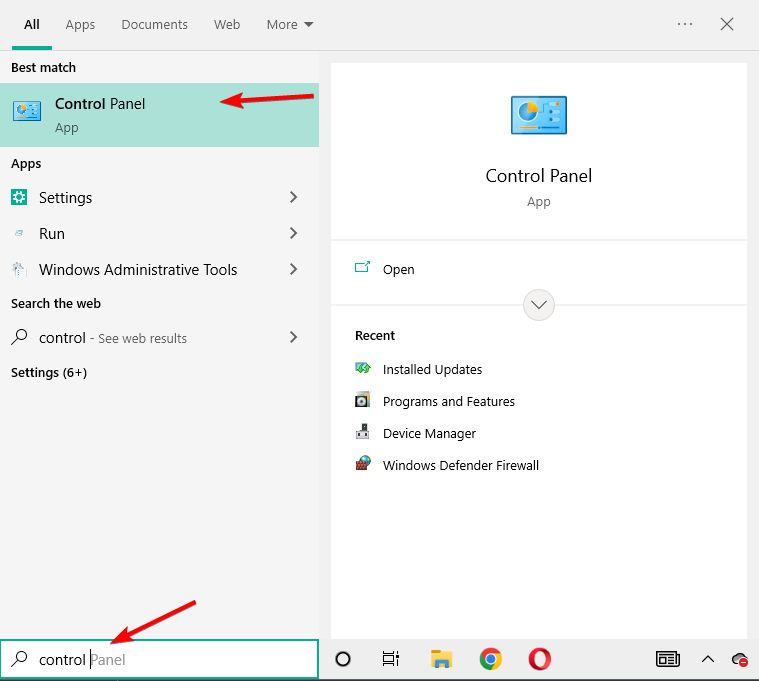
Press Windows, input control, and select Control Panel from the results.
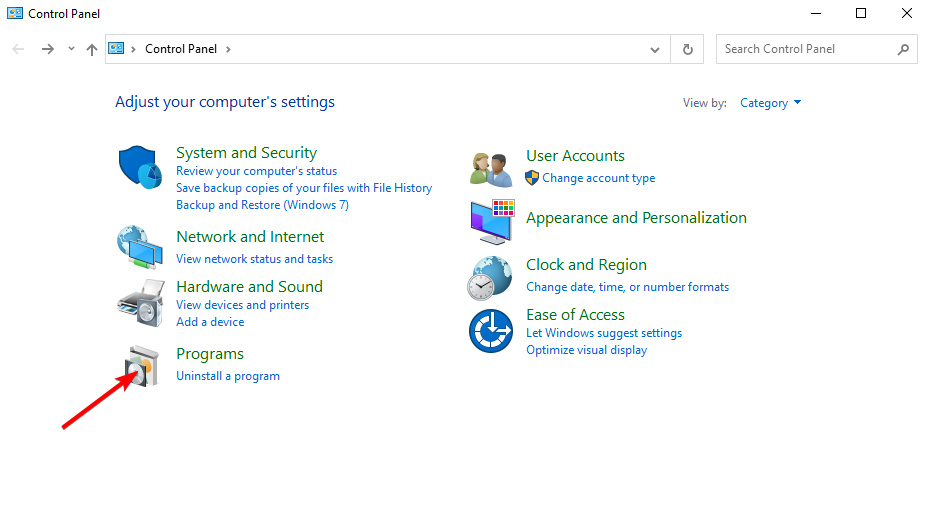
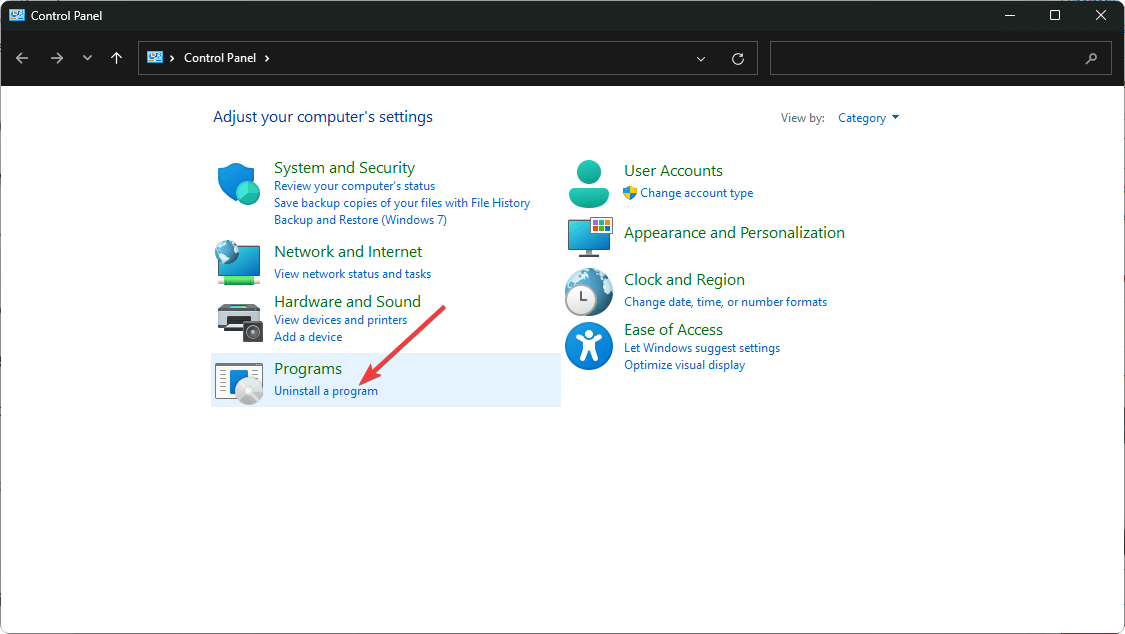
Select Uninstall a program under the Programs option.
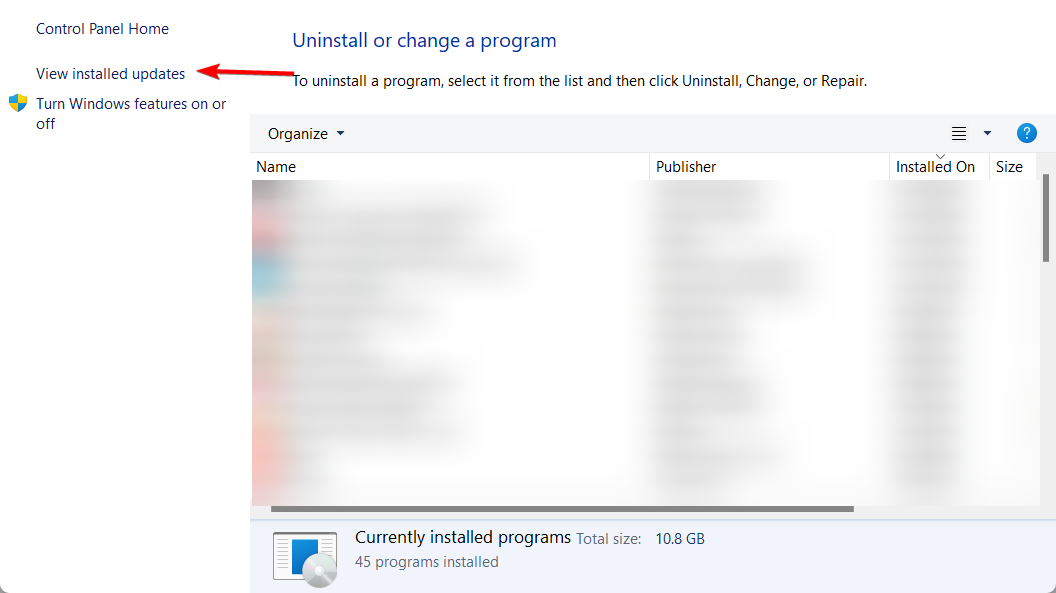
Select the View Installed Updates option.
Now, select the most recently installed update that caused the problem and Clicking Uninstall.
Reboot the system and check for any improvements.
You should try this solution if the error 6008 occurred during a previous Windows Update download, so we advise you to uninstall the KB update from the Control Panel. This would also help when encountering Event ID 6008 in Windows 7.
Additionally, make sure that software updates are checked for on a regular basis and that you are using genuine software versions, which are more stable and include fewer bugs.
As we’ve shown in this article, it is possible to solve the Event ID 6008 and 41 issues by yourself. Though for Windows 10, the solutions here would help fix Event ID 6008 in Windows 11 as well.
Sometimes it can be as easy as downloading the latest Windows updates, while certain situations may require hardware maintenance. We hope that this guide helped you fix the error.
We’d like to hear more from you on this subject, so feel free to drop a comment in the section below.
One standard error issued by the Windows 11 system (which cannot be fixed using classic troubleshooting processes) refers to low virtual memory.
This message refers to low virtual memory, a problem that can lead to lags and malfunctions on your Windows device, not to mention that it is also quite stressful to get the same alert over and over again.
What causes computer to run out of memory?
This happens when certain apps on your computer require an excessive amount of RAM to be allocated to them.
There is also the possibility that an out-of-date BIOS in the system causes the issue. Moreover, if you are using an older computer, the operating system may not be able to access all of the RAM installed.
Memory leaks in Windows can also cause this problem, but this can be prevented by frequently updating applications and your operating system.
This troubleshooting guide will show you how to fix this annoying issue in the following instances:
Your computer is low on memory (but it’s not) – Many users report that when this alert appears, PC memory works correctly. Instead, it seems that the computer somehow misinterprets various memory indicators.
Your device is running low on memory Task Manager – When the system is running low on resources, it’s always a good idea to see which applications are necessary and which ones you can disable, so prioritize them.
Your computer is low on memory in Teams – You can try restarting your computer, and if it does not fix the problem, you will need to uninstall Teams and then reinstall it on your PC.
Your computer is low on memory for Claymore – This cryptocurrency miner uses too much memory, triggering low memory alerts.
Your computer is low on memory which leads to black screen issues – Sometimes, the standard memory error also triggers black screen issues, forcing users to reboot their PCs.
CutePDF Your computer is low on memory alerts – CutePDF is a PDF converter that often displays low memory alerts.
Your computer is low on memory for Excel – Sometimes, saving an Excel file may become challenging due to the low memory error message.
Your computer is low on memory for EZCAD2, Dying Light, Call of Duty, WoW, and more – If you’re a gamer, you have probably encountered this error message quite a few times. Games use large chunks of memory, and for this reason, they often trigger low memory errors.
The following troubleshooting steps will prove helpful in the cases listed above and other similar ones.
How do I fix my computer running low on memory?
1. Close the programs that are using too much memory
Click the Memory tab to sort the processes based on the amount of memory they are using. Then click the top ones that you are ok with closing, then select End task.
Close the Task Manager app and see if the problem still persists.
If you run into low memory issues on your PC and need to repair it quickly, the first solution we suggest is to close the apps that take too much memory. The steps above show you how.
When closing specific programs, you will be prompted to confirm ending them. In those cases, select the Yes button to free up your RAM.
2. Kill processes using Commit size
The commit size is the total amount of RAM that has been committed and is used (either physical or page file). Close the processes applying the steps below. The Your computer is low on memory issue in Windows 10 will be solved.
1. Press Ctrl + Shift + Esc to open Task Manager, then go to the Details tab. Next, Right-click the Name column, then click Select columns.
2. Please scroll down the new window until you find Commit size, then tick the box next to it and click Ok.
3. You will see a new column labeled Commit size. Next, click the Commit size column to sort the processes based on their commit size. Click the top processes and select End task to free up more space.
Press Windows, type advanced system settings, then click the top result, which will be View advanced system settings.
Under the Advanced tab and the Performance section, click Settings.
Next, navigate to the Advanced tab, and click Change under the Virtual memory section.
Uncheck the Automatically manage paging file size for all drives option, then select the Drive that you want to change. Next, select Custom size, then enter the number of MB inside Initial size or Maximum size. Lastly, click Set and Ok to save the changes made.
A paging file refers to a section of the hard disk that Windows users can utilize as if it were RAM instead. Once you’ve followed the above steps, the Your computer is low on memory switch to a different device error will be solved.
How do I increase my RAM on Windows 11?
RAM cleaners and optimizers are software programs designed to make more memory available on your personal computer.
You have the option of using any of them to boost the amount of memory that you have in Windows 11, which is a more cost-effective method than purchasing additional RAM altogether. However, buying new RAM is just as effective.
If you couldn’t fix the Your device is running low on memory issue, as well as the others, after using these guidelines, you should consider expanding your RAM. If you have any questions or need extra help, leave us a message in the comments field below.
After updating your PC to the latest version, you expect everything should work perfectly. However, users are complaining that they are prompted by a Microsoft Visual C++ runtime error.
This message reads: This application has requested the runtime to terminate it in an unusual way. Just like with the Microsoft Visual C++ error 0x80070666 error, you can fix this issue with our solutions.
Still, you won’t need to worry because we have a fix to the Visual C++ runtime library error in Windows 10 and you can continue your normal use of the operating system afterward.
What is the Microsoft Visual C++ runtime library error?
There’s also a chance that the Visual C++ feature is broken or corrupt. In this case, we recommend a third-party tool to automatically download all the outdated drivers on your PC.
What is a C++ runtime error?
A program is said to have a runtime error if its syntax is proper yet it has a bug that can only be found while the program is being executed.
This error could be brought on by the absence of Runtime components of Visual C++ Libraries, or it might be the result of a fault with the software.
What causes Microsoft Visual C++ runtime error?
Visual C++ is a basic component of many applications, and if it gets damaged, you’ll get various error messages on your PC.
Many users reported that they Cannot install Visual C++ 2015, and that can negatively impact all applications that require this component.
These issues affect every version of Windows, and many reported Runtime error in Windows 11 as well. Luckily, there are ways to fix these problems, and this guide will show you how to do that.
The Microsoft Visual C++ runtime error can be problematic, and speaking of errors, users reported the following issues as well:
Microsoft Visual C++ runtime error r6025, r6034, r6016, r6030, r6002 – When this error comes with an error code, it can be due to corrupt files.
Microsoft Visual C++ runtime error in explorer.exe, qbw32.exe, atibtmon.exe, csrss.exe, nvvsvc.exe: This is caused by a problem with a particular application that depends on the Visual C++ feature. You can fix it by reinstalling the application.
AMicrosoft Visual C++ runtime error in Excel, Internet Explorer, Skype, Steam, Java: In this case also, the error occurs due to an application that depends on one of the Redistributables.
Microsoft Visual C++ runtime error on startup: This is usually caused by your startup applications.
Microsoft Visual C++ runtime error in Nvidia: This version of the error is caused by outdated or faulty drivers.
The Microsoft Visual C++ setup failed, not installing: Several users reported that they can’t install Visual C++. According to them, the setup fails to complete on their PC.
Microsoft Visual C++ unspecified error: This can be a big problem, but you should be able to fix it using one of our solutions.
Microsoft Visual C++ keeps crashing: This can also be caused by broken or missing files. You need to reinstall Visual C++ Redistributables to fix it.
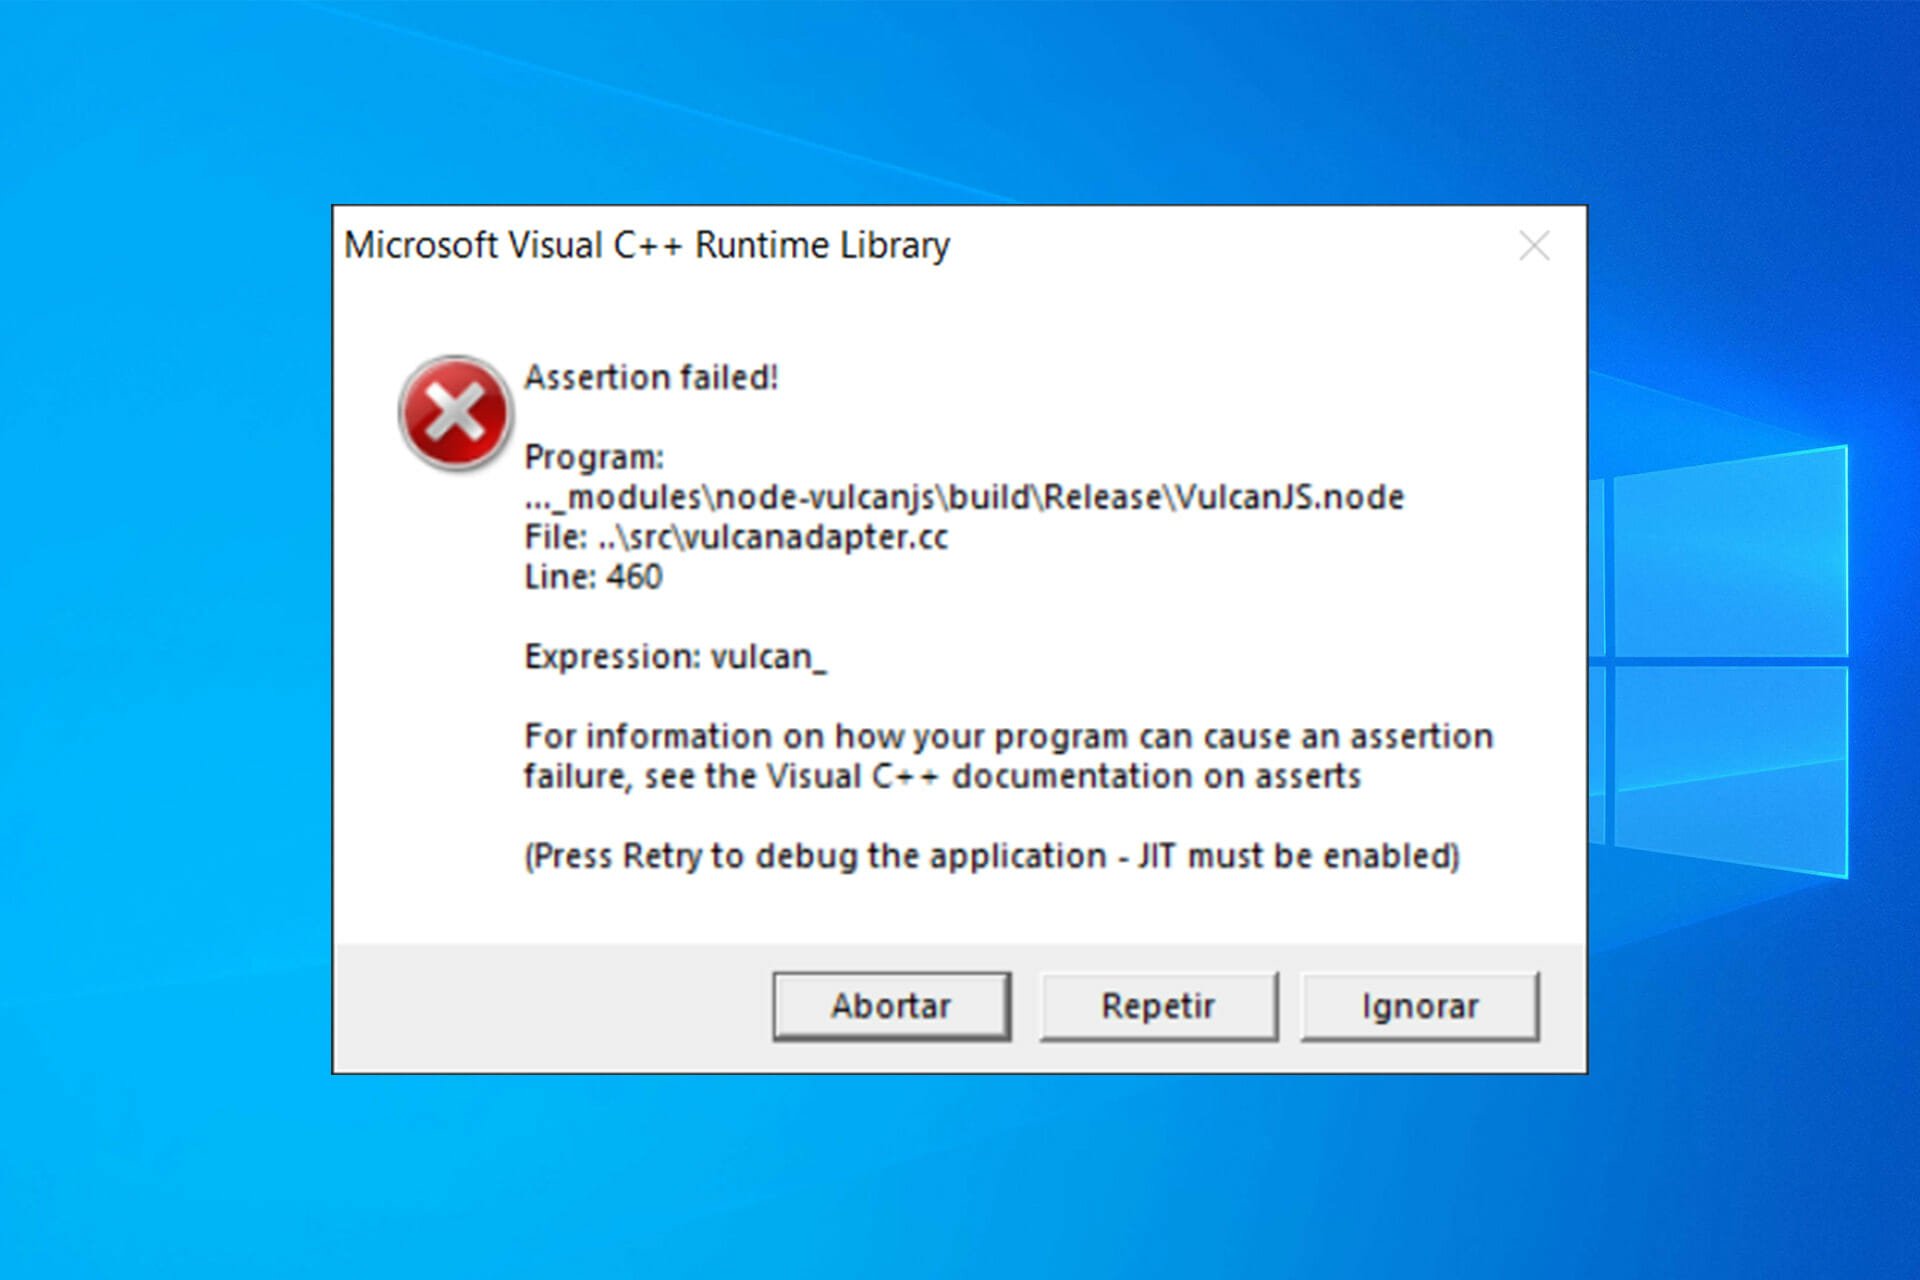
Microsoft Visual C++ runtime error assertion failed: This problem is usually down to the app that gives the error while trying to run it.
A Microsoft Visual C++ runtime error abnormal program termination: If you encounter this issue on startup, it might be down to one of the startup programs.
Microsoft Visual C++ runtime error stray: This is an error that occurs if you are missing one of the Redistributables on your PC.
Mechwarrior 5 Microsoft Visual C++ runtime error: This is another error that occurs if one of the runtime redistributable is missing on your PC.
Microsoft Visual C++ runtime error games: Sometimes, the error occurs in games because of an outdated or broken Microsoft Visual C++ runtime version.
Can we uninstall Microsoft Visual C++?
Yes, you can uninstall some of the Microsoft Visual C++ Redistributables but it is not advisable. This is because there are software and programs on your PC that rely on one or more of them.
So, when you uninstall any one of the Redistributables, the software that relies on it stops working.
How do I fix the Microsoft Visual C++ runtime library error on Windows 10?
1. Perform a clean boot
Press the Windows key + R, type msconfig, and click OK to run it.
Click the Services tab in the top and check the box next to Hide all Microsoft services.
Now, click the Disable all button.
Select the General tab at the top.
From here, tick the Selective startup box and uncheck the box next to Load startup items.
Finally, click Apply and OKto save changes. and restart your system.
Sometimes, third-party and startup applications can interfere with your system and cause Microsoft Visual C++ runtime errors to appear. To fix this problem, you need to perform a clean boot.
If you do not get the error anymore you will have to do this step, but this time disable the applications one by one and see exactly which of them is causing this error to appear.
2. Remove your graphics card driver
Type device manager in the Search bar and select Device Manager from the list of results.
Expand the Display adapters section, and right-click your graphics card.
Select the Uninstall device option from the menu.
Check Delete the driver software for this device and click on Uninstall.
Finally, restart your PC and the driver will be reinstalled automatically.
Your graphics card driver can often cause Microsoft Visual C++ runtime error, and to fix it you need to reinstall your graphics card driver.
If you do not then it means that you need to update your graphics card driver to the latest version that is compatible with your Windows 10 system version.
To see how to update your drivers, we advise you to check out our detailed guide on how to update your graphics card driver.
Another solution is to automatically update your graphic card drivers using a dedicated tool that keeps you away from harming your PC by updating or installing the wrong drivers.
With Fortect Driver Updater, you can update all of your drivers quickly and safely with only a few clicks.
Restart your PC several times during the boot and select Troubleshoot > Reset this PC.
Choose whether to keep your personal files or Remove everything.
Insert Windows 10 installation media, if you are asked to do so.
Select the installed version of Windows and choose Only the drive where Windows is installed > Just remove my files.
Now, click the Reset button.
Finally, follow the instructions on the screen to complete the reset.
If the problem still persists, your only option might be to reinstall Windows. Before you do that, try to access your files and back them up. To reinstall Windows 10, you’ll need a Windows installation media.
To create one, you’ll need to use Media Creation Tool on a working PC. After creating an installation media, follow the above steps.
After you successfully reinstalled the operating system, you will have to make sure that you do not update your PC until Microsoft fixes the issues with Visual C++ runtime error.
4. Reinstall Microsoft Visual C++ Redistributables
To fix the Microsoft Visual C++ runtime error, you can learn the simple but efficient method to reinstall your Visual C++ Redistributables. To do that, follow the steps detailed below.
1. Press the Windows key + S, enter Control panel and select Control Panel from the list.
2. Choose Uninstall a program under the Programs option.
3. Locate Microsoft Visual C++ Redistributable, and double-click it to remove.
4. Finally, click the Yes button when prompted to complete the process.
Once you remove all Redistributables, you have to download them from Microsoft’s website. Keep in mind that you’ll have to install all available Redistributables in order to fix this problem.
Instead of reinstalling the Redistributables, you can also repair your installation by following the steps below:
1. RepeatSteps 1 and 2from above, and click on the Redistributable to repair.
2. Click the Change button at the top.
3. Click on the Repair button in the setup windows and follow the onscreen instructions to complete the process.
Keep in mind that not all Redistributables support repair. If the Change option from step 2 isn’t available, your only option is to remove the selected Redistributable.
This might be a bit tedious solution, but many users reported that reinstalling Visual C++ Redistributables fixed the problem for them, so be sure to try it.
Press the Windows key + I to open the Settings app, and select Accounts.
Click Family & other people in the left pane and select Add someone else to this PC.
Click on I don’t have this person’s sign-in information.
Now click on Add a user without a Microsoft account.
Enter the desired name for a new account and click on Next.
If you’re still getting Microsoft Visual C++ runtime library error, you might be able to fix the problem simply by creating a new user account.
After creating a new account, you need to sign out from your current account and switch to a new one. If the problem doesn’t appear, it means that your old account is corrupted.
To fix the problem, move your personal files to a new account and use it instead of your old account.
6. Turn off the Compatibility mode
Right-click the app causing the problem and choose Properties from the menu.
Go to the Compatibility tab and uncheck Run this program in compatibility mode for.
Now, click on Apply and OK to save changes.
Compatibility mode is a useful feature that allows you to run old applications on your PC. However, this feature can sometimes cause Microsoft Visual C++ runtime error to appear.
To fix the problem, you need to disable Compatibility Mode by following the above steps. After doing that, try to run the application again and the error message shouldn’t appear.
7. Reinstall the problematic application
Press the Windows key + I and select Apps.
Click on the app to remove, select Uninstall, and follow the onscreen instruction to complete the process.
Finally, download and install the app from official sources.
If you’re getting the Microsoft Visual C++ error while trying to run a specific app, you might want to try reinstalling that application. Sometimes your files can get corrupted, and that can cause this error to appear.
You are done, the steps above will fix your Microsoft Visual C++ runtime library error in the shortest time possible.
If you encounter any other troubles along the way, you can write us below in the comments section of the page and we will help you further with this issue.
Also, please leave there any other suggestions or questions you may have.
While a simple driver update often fixes these problems, you sometimes have to start from scratch. In this guide, we’ll show you how to uninstall and reinstall the audio driver on your Windows 11 and fix audio problems for good.
How to reinstall the audio drivers in Windows 11?
1. Via Device Manager
1. Press Windows + S to launch the Search menu.
2. Enter Device Manager in the text field at the top, and click on the relevant search result.
3. Double-click on the Sound, video and game controllers entry to view the devices under it.
4. Right-click on the audio device, and select Uninstall device from the context menu.
5. Tick the checkbox for Attempt to remove the driver for this device, and click on Uninstall.
6. After uninstalling the driver, restart the computer.
7. Windows will now look for the best available driver for the audio device and automatically install it.
The easiest and recommended method to reinstall your Windows 11 audio drivers is via Device Manager. Basically, you need to uninstall the existing drivers and then restart your PC.
As soon as your PC reboots, it will automatically install the latest driver for your device.
2. Via Control Panel
Press Windows + R to launch the Run command.
Enter appwiz.cpl in the text field, and either click on OK or hit Enter to launch the Programs and features window.
Locate and select the audio driver, and click Uninstall at the top.
Click Yes on the confirmation box if any pops up.
Now, restart the computer, and Windows will automatically install the best available driver for the audio device.
Another way to reinstall the audio driver is first to remove it from the Programs and Features window and then restart the PC to let the OS automatically install it.
If you are using external audio interfaces, such as the Focusrite Scarlett Solo, reinstalling the driver directly from the manufacturer often works best. You can follow this step-by-step guide for the Scarlett Solo driver to make sure it installs correctly on Windows.
3. Use specialized software to reinstall audio drivers
You can always rely on a third-party utility if both methods sound too complex or time-consuming. Hence, we recommend using a dedicated tool that automatically scans for any available newer versions and updates the installed drivers.
These are all the ways you can reinstall the audio driver in Windows 11. Both methods are equally simple, and it’s up to the users to choose one or use a dedicated third-party tool.
These methods will work on most drivers, including Realtek Audio driver and AMD Audio driver in Windows 11 devices.
A few users have complained that Steam games are not
\unching on Windows 10; we present all you need to know to resolve this error on your device.
Microsoft made the latest Windows OS a gamer-friendly operating system with game streaming, recording, and a great Xbox One app.
But this Steam issue, among a few others, may reduce or ruin the experience.
Why are Steam games not working in Windows 10?
When Steam games are not working, we first recommend you verify if the servers are working fine using a dedicated website like SteamStatus, though it’s not the official one.
Also, it could be that you are trying to play a game during Steam Maintenance Tuesday, which is not working.
If the servers are doing fine and others can play the game, check the game files. Corruptions with these affect the game’s performance; in some cases, the fun won’t launch.
If you run the game through the standalone launcher, it could lead to issues, though unlikely. But try running the game from the Steam app itself to be sure.
Besides, outdated drivers, misconfigured settings, running an older version of the game, Steam, or the OS, are all possible reasons why Steam games won’t launch on Windows 10.
Does Windows 10 affect Steam games?
The OS is a very gaming-friendly Windows edition. With that said, you do not expect any adverse effect on games, even though manufacturers are always likely to fine-tune their applications for new updates.
What can I do if Steam games are not launching on Windows 10?
1. Update your drivers and DirectX
It won’t do any harm if you head to Device Manager, right-click on the graphics card under Display Adapter, and see if there are any driver updates.
The same goes for DirectX, as you can check if the latest version is installed. However, updating drivers manually can be a long process, especially if you are a newbie.
Powerful driver updating software, such as Fortect Driver Updater allows you to scan for outdated drivers, download fresh ones, and ensure they never go out of date again by notifying you about this as soon as it finds new driver versions.
Go to Library, right-click on a game, and select Properties from the menu.
Select theLocal files tab and click theVerify integrity of game files button.
Wait for the process to finish and re-launch Steam.
3. Update Windows
Press the Windows key + I to open the Settings app and select Update & Security.
Click the Check for updates button.
Now, download and install any available update.
Microsoft pays much attention to gaming and considers gamers a valuable part of the Windows community.
Therefore, the company includes some threats for gamers in every major update for Windows 10.
Are you having trouble updating your Windows 10? If you don’t know what to do about the missing Check for updates button, our tips will help you solve the issue in no time.
4. Reset PC
Open the Settings app and select the Update & Security option.
Select Recovery in the left pane and click the Get Started button under Reset this PC.
Choose whether to keep your files or not and click the Next button.
Now, follow the simple onscreen instruction to complete the process.
Verify that the Steam games not launching has been fixed on your Windows 10 device.
5. Run the game as Administrator
Go to the Steam Library.
Locate the game you want to run.
Right-click the game title, and go to Properties.
Head over to the Local Files tab, and click Browse Local Files.
Find the game executable, right-click it, and go to Properties
Head to the Compatibility tab, and check Run this program as Administrator.
Save the changes and try to run the game.
Verify that the Steam games not launching has been fixed on your Windows 10 device.
If you want to view every single detail of your photos, you need to open them as RAW files. Most digital cameras allow you to save your pictures in this format. But can your computer read them?
Yes, it can! However, you’ll need specialized software. Today, we’ll show you how to open RAW files and introduce you to the best tools on the market that support this type of image.
To open RAW images on Windows, you need to install the free RAW Image Extension from the Microsoft Store.
This extension allows you to view RAW file thumbnails and previews directly in File Explorer and open them with the Photos app. For advanced editing, consider using third-party software:
Best apps to view & edit RAW files on PC
NOTE
Each camera model has its own RAW file format, such as ARI, CRW, PXN, RAF, RWZ, SRF, DNG, RWL, RW2, and KDC.
With InPixio Studio Pro, you can open and work directly with RAW files. This photo manipulation software offers all the features you’re looking for as a photographer or photo editor.
Color correction, background removal, object removal, and filters are just the tip of the iceberg.
Plus, as opposed to other software that drives similar results, the learning curve is minimal and it has a free version.
Lightroom supports editing for various RAW image filename extensions such as CR3, DNG, NEF, CR2, CRW, and more.
Thanks to the Adobe CameraRAW plug-in seamlessly integrating with Lightroom’s architecture you can view and edit RAW images from different cameras such as Nikon, Casio, Epson, Fujifilm, GoPro, Kodak, Konica Minolta, LG, and many others.
Key features:
Manage any number of photos
In-app, interactive tutorials are available on both desktop and mobile
Extensive photo library for inspiration
Panorama fill edges
Cloud storage starting at 1TB or more
Adobe Lightroom
Simplify your photo editing with this lightweight RAW-file-supporting app!
CorelDRAW – professional photo editor with RAW support & advanced features
Editing single or multiple RAW files is as easy as a breeze in CorelDRAW.
Simply use the controls in the CameraRAW Lab to adjust the color and tone of the RAW images, then further retouch them with the advanced editing tools provided by this powerful app.
Let’s quickly look at its key features:
Rotation, Zoom, and pan tools
Preview mode and dedicated window
Color, detail, and properties page
Undo, Redo and Reset to the original buttons
Create snapshots of the corrected version of an image (thumbnails included)
CorelDRAW
Open, view, and edit RAW images with unmatched precision!
The Photo Studio by ACDSee is one powerful app that takes good care of your RAW files be it single images or Zip files containing multiple images.
The app comes in different versions perfectly suited for your digital camera (Adobe, Canon, Epson, FujiFilm, GoPro, Kodak, Konica, Nikon, and more) and there is even a separate product for Mac 6 RAW support).
Let’s quickly look at its key features:
Batch Rename option for renaming multiple images
Batch Resize tool for resizing multiple images to any dimension
GoPro RAW images support
Batch watermark tool
File management (sort, and organize with keywords, tags, and labels, move, and share your images)
Duplicate Finder
Advanced photo editing tools (precision filters, crop, flip, rotate, and resize, add text, special effects, correct flaws, red eye, eliminate noise, and more)
ACDSee Photo Studio
View and manage your RAW files with this reliable tool!
FileViewer Plus is a universal file viewer for Windows that can open and display over 300 different file types. It can also view and edit camera RAWs from over 600 different camera models.
Even the most uncommon or unknown file types are no match for this powerful tool that can do much more than help you open your documents—the FileViewer doubles as an editor and converter for all formats.
Key features:
Native support for over 300 file types including RAW image formats
Complex view, edit, and convert functionalities (convert audio and video formats into multimedia file types)
Advanced image editing (crop, resize, retouch your photos, and more)
Ultra-fast batch conversion
File Inspector to view the file contents
Displays file properties and metadata for every file (author and source information)
Smart file detection to identify any format or file extension
When you’ve installed a RAWcodec, you can open the images in the Windows photo viewer. However, the Photos app doesn’t support RAW by default.
You’ll need to configure the RAW file format to always open with Photo Viewer as follows:
First, open File Explorer and the folder that includes your RAW images
Next, you should right-click a RAW image to open the context menu and select Open with > Choose another app
Then, select Photos App as the default software for the RAW file
Select the Always use this app to open … files option
Press the OK button to close the app selection dialog
How do I view CR2 files on Windows?
There are two options that can help you view CR2 files. First off, some versions of Windows can let you view CR2 files without additional apps, this only if you have installed Microsoft Camera Codec Pack or Canon RAW Codec software.
Summary
Although you can’t edit them with the Photos App, you can add effects to RAW photographs with software such as Adobe Lightroom, Corel’s PaintShop, Photoshop, and more.
If you have any questions about RAW photos and how to deal with them on Windows 10, feel free to drop them in the comments section below.
Most users will agree that there are few issues worse than the dreaded zoom problem. You have a file open in Windows Photo Viewer and you want to zoom in, but nothing happens? This can be quite frustrating for many users.
Although the Photos app came with some changes, it still has its own share of problems. If you encounter such an issue don’t worry because here are several tips to help you fix this problem.
Why can’t I zoom in Windows Photo Viewer?
You’ve probably asked yourself: How do I zoom in Windows Photo Viewer? Well, there are two ways to go about it:
Use the Zoom slider to zoom in on an image.
Keyboard shortcuts to zoom in on an image. Press CTRL + plus sign (+).
However, you’ll find that at times, none of these options work. Some images may contain text and you need to zoom in to see. But, why are you unable to zoom in? Here are a few reasons:
Screen resolution settings – If your screen is set to a higher resolution than necessary, decrease it until it matches the display resolution of your monitor. You may even find that your PC changes resolution on its own and needs to be fixed.
Unsupported image format – If you’re trying to zoom in on an unsupported image file type in Windows Photo Viewer, it may not work. Image formats such as .gif cannot zoom.
Cached images – Your hard drive stores cached images temporarily so they won’t be downloaded each time they’re viewed. If you are trying to zoom in on a cached image, it may not work. You may need to reset the Photos app.
Image is too large – If the image is too large, the Windows Photo Viewer zoom feature may not work. Make sure that your computer has enough RAM and CPU power. A low amount of memory will make it difficult for Windows Photo Viewer to load large images or perform other functions smoothly.
What can I do if the zoom feature is not working in Windows Photo Viewer?
Before anything, it is always advisable to check off the basics. These include:
Check that the picture has been saved in a supported file format. If not, you may need to convert it using an image editing program.
Ensure your computer has enough memory. If it doesn’t, you might need to clean your RAM.
Check and ensure the zoom feature has been enabled.
If other programs are open, close them to see if that helps resolve the issue.
If none of these solutions work for you then there might be something wrong with Windows Photo Viewer. The following solutions may be able to help.
1. Repair and reset Windows Photo Viewer
Hit the Windows key and select Settings.
Click on Apps on the left pane then select Apps & features on the right pane.
Locate Windows Photo Viewer, click on the three vertical ellipses and select Advanced options.
Click the Repair button.
Go back and click the Reset button.
Again, click Reset on the pop-up that appears.
2. Update your device drivers
Hit the Windows key, type Device Manager in the search bar, and click Open.
Locate Display adapters, click to expand, right-click on your display device, and select Update driver.
Select Search automatically for drivers.
If you are not up for it, it is not necessary to go through the tedious process of updating drivers manually when there is an automatic tool that can do that for you.
Outbyte Driver Updater is a comprehensive driver updating tool that scans your computer and finds outdated, missing or corrupt drivers. It will then download the up-to-date versions from the Internet and install them on your PC.
Outbyte Driver Updater
Keep your device at its best performance and let Outbyte Driver Updater find your drivers the latest updates.
Hit the Windows key, type cmd in the search bar, and click Run as administrator.
Type the following command and press Enter: sfc /scannow
If you’re unsuccessful after trying all these recommendations, perhaps you need to try another image viewer application. Such apps support multiple formats and have an array of useful features that you may need.
In case you’d like to zoom in on pictures without losing quality, we have a recommendation for zooming software to ensure you maintain the integrity of your images.
Fill us in on what solution worked for you in the comments section below.
Today we’ll show you how to change the background in the Teams mobile app. All you need is your phone and a few spare minutes.
Let’s get right to it.
How do I change the background in Teams mobile?
1. Change the MS Teams background on the phone before the meeting starts
1. While preparing for a meeting, press theSettingsbutton.
2. Select Background Effects.
3. Choose your desired background from the list. If you want to upload an image and use it as a background, click on the+button.
4. After you finish selecting the perfect background for Teams, press theDonebutton.
5. On the other hand, if you want to turn off the Background Effect, press theDeniedbutton.
6. Start the meeting.
In the Microsoft Teams mobile app, you can easily change your background before a meeting as you would on a computer.
All you need to do is click to join a meeting, and while you’re setting up your audio and video settings, select from a large section of available background to use, or even use a custom one from your PC.
2. Change the background during a meeting or call in Teams
Go to your meeting or call controls and select More options.
Press the Show Background Effects button.
Choose your desired background and press Done.
In case you want to upload an image and use it as a background, click the + button.
If you want more customization, you’ll have to use your PC. The Windows and macOS apps allow you to set animated backgrounds and offer more customization features.
If you work with a computer or need to do school projects, Microsoft’s Office Suite can come in handy. Unfortunately, the Office Suite comes at a hefty price that not everyone can afford.
If that is the case, one good alternative is to use the web-based software office suite offered by Google within its Google Drive service.
This office suite is comprised of 3 different programs, one of which is Google Docs. Google Docs comes with a wide variety of tools reminiscent of Microsoft Word, all while maintaining a simple interface.
One feature that can easily make a document created in Google Docs more professional-looking is a header.
Of course, having different types of headers within the same document is a bit trickier. That is why we’ve decided to create this guide to show you exactly how to add different headers in Google Docs.
How can I make different headers in Google Docs?
1. Open your Google Docs file.
2. Go to Insert.
3. Select Headers & footers. The new Header or footer will be ready for editing.
4. Click onOptions.
5. SelectHeader formatfrom the dropdown menu.
6. Under Layout, check the boxes next to Different odd & even.
7. If you want the first page to be different from the rest of the document, you can also check the box next to Different first page.
8. You can then go ahead and edit how the headers will look on the first page, on odd pages, and on even pages.
When using headers in Google Docs, you can manually configure them to be different from one another. From the Layout options section, you can enable the feature that makes it so that your headers are different on every page.
By following this guide, you can make it so that your Google Docs documents can have up to 3 different header styles. Unfortunately, this is the most customization you can bring to your GoogleDocs headers.
Currently, you cannot make it so that every single page can have its own unique header.
Do you think this is a feature that Google should implement in GoogleDocs? Let us know what you think in the comment section below.
Task Manager is one of the most useful applications on Windows because it allows you to quickly close an application or process that might be using too much of your resources.
Just like many things. Task Manager was changed a bit in Windows 10. But don’t worry, you can bring the Windows 7 Task Manager back to Windows 10.
Should I make Windows 10’s Task Manager look like Windows 7?
Some users are critical when it comes to the new Task Manager despite its new features, such as improved performance graphs and improved resource consumption statistics.
Users criticize the new Task Manager as being slow because it uses more memory and CPU. In addition, the new Task Manager requires UAC elevation which makes it load more slowly.
Also, one more issue with the new Task Manager is that it doesn’t remember the last active tab. This means that you have to navigate to the last used tab every time you start Task Manager.
As you can see, these are some valid concerns while others are just personal preferences. But if you are used to Windows 7 Task Manager today we’re going to show you how to use it on Windows 10.
How do I install the Windows 7 Task Manager on Windows 10?
1. Execute a quick command in Command Prompt
On your Windows 10 computer, open the Start Menu.
Then, go to the Windows System shortcuts folder.
Here you’ll find the Command Prompt shortcut. Right-click it right away.
Up next, open the More sub-menu.
Tap Run as administrator.
You can now type this command and press Enter: reg delete HKLMSOFTWAREMicrosoftWindows NTCurrentVersionImage File Execution Optionstaskmgr.exe
Users claim that the Windows 7 Task Manager was better since it was lightweight and fast. If you feel the same way, you’ll be pleased to hear that you can execute a quick command and get it back too.
As you can see, you just need to find the Command Prompt shortcut and insert the command presented above.
2. Press the Download Task Manager button. A .zip file will be automatically downloaded to your PC.
3. Open the .zip file and then click on the tm_cfg_win8-win10 file to start the installation wizard.
4. Press Yes on the UAC prompt.
5. Select Next.
6. Choose a destination location for the app and then click on Next.
7. Press Next again.
8. Select whether you want the Setup to perform additional tasks such as creating desktop icons, and then click on Next.
9. Press on Install and wait for the installation to complete.
10. Finally, ensure that the Run Classic Task Manager option is checked and then click Finish.
11. The classic Windows 7 Task Manager is now opened on your screen.
Task Manager is a great application if you want to quickly end a task or a process on your PC, but just because it’s the default application for task management, it doesn’t mean that it’s the best.
There are numerous third-party task managers, and they usually have certain features that Windows Task Manager lacks.
For example, certain task managers allow you to see additional information regarding running applications, files, and processes.
We recommend using the Classic Task Manager app, which can be installed on your PC to add the old Task Manager.
If you’re an advanced user or if you’re looking for a task manager that offers additional features, we strongly recommend finding out more or even trying out Task Manager Professional for Windows 10.
There you go, these are two methods you can use to bring back the old Windows 7 Task Manager. If you found our guide helpful, let us know in the comments section below.
If you are using Realtek High Definition Audio Manager Software, chances are that you may at some point face troubles related to missing Realtek Audio Manager advanced settings.
Realtek HD Audio Manager is a useful utility for managing audio settings on your computer. You can use it to regulate audio settings for all your applications and it also offers you advanced options. So, what gives; is it a computer glitch? Let’s find out.
Why is Realtek HD Audio Manager missing advanced settings?
Sometimes it is the Realtek Audio Manager that is missing, other times it is the advanced settings that can’t be found. Here are a few reasons why it’s missing:
Outdated version – If you are using an older version of this software, it is possible that you can’t access advanced settings. You will have to download and install the latest version.
Virus infection – It is possible that Realtek HD Audio Manager has been deleted by accident or maliciously removed by a virus or malware infection. It is for this reason we recommend that you install an antivirus tool.
Corrupt installation – If you’ve recently updated your Realtek driver or have done any other kind of major system change, it’s possible that something went wrong during the update process. You may need to download the Realtek HD Audio driver or reinstall the program to fix this issue.
Unsupported sound cards – If you have an outdated driver version, then it’s possible that your PC may not be able to recognize newer versions of this software anymore. It’s possible for the sound card itself to be incompatible with certain versions of Windows or other programs installed on your computer. If this happens, then it could cause problems with other applications and programs on your PC. You need to update your Realtek audio drivers.
How can I fix Realtek Audio Manager missing advanced settings?
Before you start troubleshooting your missing Realtek Audio Manager, make sure you’ve done a few basic checks. These include:
Ensure that you have connected the sound cables securely to their correct ports.
If all these check out and the advanced settings are still missing from Realtek Audio Manager, proceed to the solutions below.
1. Restore default settings
Hit the sound icon at the bottom right corner and select Open volume mixer.
Click on Speakers and navigate to the Playback tab.
Locate Realtek Audio, right-click and select Properties.
Navigate to the Advanced tab and select Restore Defaults then click OK.
2. Update Realtek drivers
Click on the Windows button type Device Manager in the search bar and click Open.
Navigate to Sound, video, and game controllers to expand, right-click Realtek High Definition Audio and select Update driver.
Select Search automatically for drivers.
You can also choose to download directly from the Realtek website. The only problem that may arise is if you don’t pay attention or don’t know the correct driver, you may end up downloading the wrong one.
In such a case, a third-party tool should suffice. Outbyte Driver Updater is a free driver updater software that can scan your computer and find outdated drivers. It automatically scans your system and downloads the correct ones for you, saving you time and money.
Outbyte Driver Updater
Maintain your system in top shape by keeping all drivers updated.
Hit the Windows + R keys simultaneously to open the Run command.
Type services.msc and hit Enter.
Locate Windows audio, right-click and select Restart.
Should all these fail to restore the advanced settings option, you can choose to uninstall and reinstall the Realtek Audio Manager software.
There’s no such thing as a perfect program, and sometimes your computer can suffer from bugs or compatibility issues. These can only be resolved by uninstalling the software. It’s also an effective way to fix problems with programs that have become unstable or unresponsive.
You may also run into some Realtek sound problems. As such, don’t hesitate to visit our detailed guide on how to solve these issues.
If Xbox party chat is not working on your PC, you should stick around as we resolve this issue in this guide.
The evolution of online gaming is closely followed by the communication services which allow players to chat or use VoIP to communicate with their co-players and friends.
Many excellent services can help you with that, but Windows has a feature that allows you to chat with your friends online.
However, if you are not getting the best of Xbox party, there are ways to fix this issue.
Why can’t I join an Xbox party on PC?
In most cases, the issue can be related to the availability of Xbox Live. If there’s an issue with the service, then Xbox Party won’t work correctly.
In addition, network problems, issues with your playback device, or missing permissions can also cause problems.
Before venturing into any of these solutions, we recommend that you do the following:
Visit the Xbox status website since this may be a general server issue that you will need to wait out
4. If it’s not there, make sure you have Network adapters selected. Then, click on Action in the Main bar and choose Add legacy hardware.
5. Click Next.
6. Choose the Install the hardware that I manually select from the list (Advanced) option and click Next.
7. Choose Network adapters from the list and click Next again.
8. Select Microsoft.
9. ChooseMicrosoft Teredo Tunneling Adapterfrom the list and install it.
10. Restart your PC.
This emerged as the top solution for the problem of Xbox party chat not working on PC. Some knowledgeable users resolved all Xbox Party errors by relying on the Microsoft Teredo Adapter to set the P2P connection.
2. Check the permissions
Press the Windows key + I to open the Settings app.
Choose Privacy.
Select Microphone from the left pane.
Under the Choose which apps can access your microphone, toggle on the Xbox app.
3. Restart the app and the associated service
Close the Xbox app completely.
In the Windows Search bar, type Services and open the app from the results.
Locate the Xbox Live Networking service, right-click on it and choose Restart from the contextual menu. If this option isn’t available, choose Start instead.
Do the same for the IP Helper service.
Close Services and open the Xbox app again.
Other users who use the Xbox Party feature to stream resolved the problem by shutting down the app and restarting associated services.
Even though we’re looking at a built-in app that comes pre-installed on Windows 10, it still tends to stop services. We’re referring to the Xbox Live Networking service and IP Helper.
4. Reset the Xbox app
Open Settings and choose Apps.
Locate the Xbox app under Apps & features and expand it.
Click on the Advanced options link.
Scroll down and click Reset.
You can’t uninstall the Xbox app, but you might restore it to factory settings. This will delete all stored cache and fix some minor bugs which are quite frequent. After the reset, you should try updating the app and see if the Xbox party chat not working problem has been resolved on your PC.
In the Windows Search bar, type sound and open Change system sounds.
Go to the Playback tab and double-click your audio device.
Go to Advanced and click on Restore Defaults.
Repeat this for the microphone in the Recording tab.
Save changes and exit.
Some of the most commonly reported issues with Xbox Party concern sound issues, namely, the microphone sound. However, several users resolved this by resetting the sound devices to factory values.
How does the Xbox Party feature work on Windows?
Xbox Party is available on all Microsoft platforms, including Windows and various Xbox consoles, allowing you to chat and have voice calls with your friends.
This is an essential feature since it allows you to communicate with your friends while gaming, even if you’re on different platforms.
To join or start a party on your mobile devices or PC, you do not need Xbox Live Gold or Xbox Game Pass Ultimate. They are no longer necessary, even on the Xbox console.
We hope that this guide has helped you fix the problem with the Xbox Party on your PC and that you can now play with your friends again.
Users have also noted that some of these fixes will be useful if you’re not getting any party invites on Xbox. This error is similar to Xbox app 0x89231806 error that we covered recently, so don’t miss our new guide.
If you have questions or suggestions, feel free to post them in the comments below.
If you have recently installed the latest Windows 11 operating system on your PC and are looking for ways to disable speech recognition in Windows 11, then you are in the right place.
In this guide, we will explain all the necessary steps that you need to follow to disable speech recognition in Windows 11.
Does Windows 11 have Speech Recognition?
Windows 11, the latest operating system from Microsoft, also comes with similar speech recognition options just like the one you have in Windows 10.
Notably, you can use speech recognition offline or use it with an internet connection. Speech recognition lets you control some apps using your voice and also dictate text to a word document.
Microsoft doesn’t offer you a whole host of features with its speech recognition service. Interested users can check out our guide on some of the best speech recognition apps that you can download on your PC to enjoy advanced features.
Do note that you need to train the feature to improve its accuracy, and many would not find its performance satisfactory. So, you may want to disable it for this very reason.
For whatever reason, before you disable speech recognition on your Windows 11 PC, you should understand that this accessibility feature is meant to enhance your user experience.
It is perfectly safe to turn off speech recognition on your device, it cannot harm it in any way.
Follow this guide to understand how you can disable speech recognition in Windows 11.
What are some of the most common voice commands?
Once you have been given access to the microphone, you can go through the below list of some of the common voice commands and use them to facilitate hands-free usage of your PC.
Open Search: Say Press Windows S
Select an item: Say Click Computer, Click file name (in place of file name say the exact name of the file)
Scroll: Say Scroll up, Scroll down, Scroll left, Scroll right
Show a list of applicable commands: Say What can I Say?
Insert a new line: Say New line
Put the cursor before a specific word: Say Go to word (in place of the word say the specific word)
Don’t insert a space before the next word: Say No space
Capitalize the first letter of a word: Say Caps word (in place of the word say the specific word)
How can I turn off speech recognition on Windows 11?
1. Disable offline speech recognition
1. Right-click on theStartmenu button and selectSettings.
2. Select Accessibilityfrom the left-side pane.
3. Now, from the right side, scroll down and under the Interaction section, click on Speech.
4. Simply turn the toggle off next to the Windows Speech Recognition option.
5. If you ever want to re-enable the feature, simply return to this menu and toggle it back on.
You can easily toggle speech recognition on and off via your Windows 11 PC’s built-in Settings.
All you need to do is navigate to the Accessibility section and configure Windows Speech Recognition settings from there.
2. Use a keyboard shortcut to turn off Windows Speech Recognition
In place of going through the above-mentioned steps, you can also press the Windows+ Ctrl+ S buttons together to turn the Windows Speech Recognition service on or off.
This keyboard shortcut is sure to get the job done in no time and you can go back to using your PC straight away.
3. Disable online speech recognition
Right-click on the Start menu button and select Settings.
You need to select Privacy & security from the left-hand-side pane.
Under the Windows permissions section, click on Speech.
Turn off the the toggle for Online speech recognition option.
4. Turn off speech recognition with the Registry Editor
Besides, you can take a step further and use the registry settings to permanently disable the online speech recognition services.
NOTE
Do note that tweaking the registry editor, although isn’t dangerous, if done wrong, could stop some crucial services on your PC.
Open the Run dialog by pressing the Windows+ R buttons together.
Type regedit and press Enter.
In the address bar of the Registry Editor, paste the below path and press Enter. HKEY_CURRENT_USER\Software\Microsoft\Speech_OneCore\Settings\OnlineSpeechPrivacy
On the right side, double-click on HasAccepted and change the value to 0.
Press OK and close Registry Editor.
Restart your PC and the online speech recognition service will now be permanently disabled.
NOTE
To turn Windows Speech Recognition back on, you need to change the HasAccepted value to 1.
Why should you disable the Windows Speech Recognition feature?
Thankfully, the Windows Speech Recognition feature isn’t enabled by default in Windows 11. To use this service, you need to enable it manually.
But this also means that users won’t be able to use this feature out of the box. Moreover, to use the speech recognition feature, you need to set it up if you are using it for the first time.
Speech-to-text can be beneficial for users who would like to use their voice to type or perform tasks on their PCs. For such users, we have curated a list of some of the best speech-to-text software for Windows OS.
Just like there are fans of some features, there are people that don’t want to use them. The reason behind this is that some of the third-party apps could enable it.
Disabling it makes sense if you do not wish to use the speech recognition feature on your Windows 11 PC. This will ensure no third-party app can enable it. For that, you can follow the above-mentioned steps.
After turning off the feature, you can still take advantage of voice control by setting up Speech Recognition in Windows 11 when you need to re enable it or customize your experience.
PDF documents are used all over the world by all organizations because they are safe, can be signed, and are easily editable.
PDF Pro is a full-featured PDF Editor that positions itself as an affordable solution to Adobe Acrobat, offering simplicity as its main trait. In this article, we will dive into some of PDF Pro’s best features.
PDF Pro is a low-cost alternative to Adobe Acrobat
We’ve seen a lot of other PDF editors, but PDF Pro seems to tick all boxes when it comes to creating, editing and converting your documents.
First, this app allows you to create PDF files from any printable file, including support for Microsoft Office documents, which is not commonly found in many third party tools.
PDF Pro comes with a broad range of tools, such as font modifiers, a form creator, digital signing, as well as a robust and powerful Optical Character Recognition module.
With PDF Pro, you can merge PDF documents, change the order of the pages, edit the text or add and resize the images.
In a few words, you’ve got almost everything that you find Adobe Acrobat with an intuitive and comprehensive user interface.
What are PDF Pro’s best features?
1. Create and convert PDF documents
As we’ve mentioned above, not all PDF editors offer the capability to create a new PDF document.
PDF Pro not only allows you to create a blank PDF File, but you can also create a PDF from existing documents, or merge multiple documents from different file formats into a single PDF.
The software also has a dedicated tab for creating documents. There, you may also flatten the PDF which can reduce the file size. This might be handy if you need to send your document by email, for example.
The CREATE tab gives you the option to convert your document into a Word, Excel, image, HTML, or PDF/A file.
You will notice that all the menus are neatly and intuitively presented. We didn’t feel like there was much of a learning curve.
We find that many other apps on the market tend to have very bloated menus, but not this one, PDF Pro’s menus are easy to navigate, and finding the tool you’re looking for is a breeze.
2. Easy PDF editing
Editing a PDF document is solid with PDF Pro’s WYSIWYG (what you see is what you get). You simply click on the spot where you want to change the text and start typing.
The PDF text editing tool will highlight portions of the document that can be modified. For example, if the text is contained in an image, it won’t be editable without running the OCR module.
Another feature that you won’t find in all PDF editors is the ability to add and edit images contained within the document you’re working on. PDF Pro helps you do that easily.
Just grab the corner of the image to resize it or the top point to rotate it freely. You can also drag and move images to another place on the same page, or cut/paste the image.
We would have liked to see the ability to drop images from your desktop or File Explorer, you have to add them the old-fashioned way, unfortunately.
Within the Edit tab, it’s also possible to add or delete pages, reorder them, change the header or footer, rotate the pages, and more.
PDF Pro offers two Digital Signing options. First, you can sign your documents electronically by applying an image of your signature as a signature annotation. The second method allows you to digitally sign as well as digitally certify through the use of your own digital certificate.
You can either draw your signature or upload a png of your actual signature and remove the background. You even have the option of protecting the signature with a password or discarding it after you close the program for extra protection.
The tool comes with a password protection feature for the whole document. This can be done by applying a password for opening the PDF, or for the rights to modify and print the document.
Password protection allows you to set permissions for your file, such as requiring a password to open the document, printing it, or making other changes such as commenting, inserting, or removing pages.
Other meaningful features of PDF Pro are the OCR scanning from one or multiple files, document annotation, and adding lists, forms, buttons, URLs, and even attachments.
Is PDF Pro worth the money?
PDF Pro comes with a free trial version so you can test all of its suite of features for 15 days. They do ask you to open an account with them, but no credit card is required to sign up.
If you decide to commit, you can go for a paid plan and you have three options to choose from:
Monthly payment – $15 per user
1-year plan – $96, which comes to $8 per user per month
2 years plan – $192, which also comes to $8 / user/ month
They seem to be offering a limited promotion right now where you can save 35% on the 1-year plan and 50% on the 2-year plan. So, for 1 year, you will only pay $60 and for 2 years only $96.
It goes without saying that it’s a lot cheaper than Adobe Acrobat and significantly less expensive than many other competitors, while not compromising features or tools.
If you’re using the standard US English keyboard on your Windows 10 PC, you might have noticed that you cannot use accent characters.
Typing out in your native or second language might be difficult, and you search the Internet to copy-paste the accented characters.
However, there are some easy ways to quickly use an accented character or add a foreign keyboard to your Windows 10.
How can I type accents on Windows 10?
1. Use accents in Windows 10 with the Virtual Keyboard
1. Right-click on your taskbar.
2. Locate the Show touch keyboard button option in the list and click on it to add the virtual keyboard button to your taskbar.
3. Now, press on the button that you just added to the taskbar. Its icon is that of a keyboard, therefore it is very easy to find.
4. The virtual keyboard will open on your screen and you will be able to write using it.
5. Click and hold on a character to get the option of using accent versions of it.
For example, if you want to type e with an accent, you need to click and hold the mouse on the normal e letter, and you will be able to select from the list of options whichever you want.
An easy and handy method to put accents on letter on Windows 10 is to simply use the built-in virtual keyboard.
All you need to do is enable it and add it to your taskbar, and then you can use it whenever you want to type with accents.
2. Use Alt codes to put accents on letters in Windows 10
Turn on the Num Lock key on your keyboard.
When starting to type, press and hold the Alt key, then type any combination of numbers from your number pad (located on the right side of your keyboard).
Follow the image below to check the Windows Alt Codes for Accented Vowels.
After you select the accented character that you want to type, release theAlt key.
Repeat the process for any accented character that you want to use.
3. Add a new keyboard layout to get accents on a Windows 10 keyboard
Another way to type in your native or secondary language characters is to use an additional Windows keyboard.
To add a new keyboard, head over to the bottom-left corner of your Taskbar, under the Search bar, type Edit language and keyboard options, and select the first option
Choose your current default language and click on Options
At the Keyboards section, select Add a keyboard
Choose which keyboard layout to add
Your new keyboard layout has been added
To type using accented characters, select your foreign keyboard, then while pressing on the Shift key, input the accented characters by using the [];'./ keys.
4. Switch between different keyboard layouts on Windows 10
You can switch between your different keyboards on Windows 10 by following the next steps
Head over to the bottom-right of your Taskbar and click on the Keyboards icon
Choose which keyboard layout you need
You can also press the Windows key + Spacebar to switch between your different keyboards
To remove a keyboard layout you no longer need, head over to Edit language and keyboard options
Choose your default language again, then click on Options
Go to the Keyboards section, choose the keyboard that you wish to discard, then click on the Remove button
Your selected keyboard will be uninstalled from your Windows 10 PC
Typing with accented characters in Windows is relatively straightforward, and there are multiple ways to do it.
Windows 10 has made it very practical to add and remove new keyboard layouts for foreign languages while keeping those layouts constantly updated and adding new ones.
We’re pretty sure that many of you have been anxiously waiting for the Adobe Patch Tuesday rollout, and we’re here to make it a bit easier for you to find what you’re looking for.
Indeed, Microsoft isn’t the only company that has such a rollout on a monthly basis, so in this article, we’re going to talk about Adobe and some of the patches for their products.
And, as you know we do every month, we will also include links to the download source, so you don’t have to scour the internet to find them.
Adobe releases updates for 29 CVEs
Before we begin, let’s also take a look at what happened in September 2022, when Adobe released 63 CVEs in four patches for InDesign, InCopy, and Photoshop.
The highlight of last month’s release was definitely the Photoshop update which addressed a combination of 10 CVEs, nine of which are rated as critical.
It should absolutely go without saying that the most severe of these could allow code execution if an attacker convinces a target to open a specially crafted file.
Now that that’s out of the way, let’s get back to the present and explore what the company has prepared for its users as a part of the October batch of patches.
ColdFusion
The fix issued for Adobe for ColdFusion seems to be the most critical, with multiple CVSS 9.8 code execution bugs being addressed.
Know that there is also a fix for a bug in the Admin Component service, which uses a hard-coded password for the administrator user.
That being said, an attacker can leverage this vulnerability to bypass authentication on the system. Hard to imagine hard-coded credentials have existed in the product for so long without being discovered.
Product
Update number
Platform
ColdFusion 2018
Update 14 and earlier versions
All
ColdFusion 2021
Update 4 and earlier versions
All
Commerce & Magento
Moving on, we are going to take a closer look at the Commerce and Magento update, which addresses only one bug, but it’s a CVSS 10.
Thus, if you’re using either of these products, ensure you test and deploy this quickly to fix the stored cross-site scripting (XSS) bug.
Product
Version
Platform
Adobe Commerce
2.4.4-p1 and earlier versions
All
2.4.5 and earlier versions
All
Magento Open Source
2.4.4-p1 and earlier versions
All
2.4.5 and earlier versions
All
Acrobat & Reader
We had an update for this app last month as well, so many users were actually confused to see another one this month.
The October patch for Acrobat and Reader was designed to fix six bugs, with the most severe being stack-based buffer overflows that could lead to code execution.
Using this bug, a threat actor would need to trick someone into opening a specially crafted PDF to get arbitrary code exec.
Product
Track
Affected Versions
Platform
Acrobat DC
Continuous
22.002.20212 and earlier versions
Windows & macOS
Acrobat Reader DC
Continuous
22.002.20212 and earlier versions
Windows & macOS
Acrobat Reader DC
Continuous
22.002.20212 and earlier versions
Windows & macOS
Acrobat 2020
Classic 2020
20.005.30381 and earlier versions
Windows & macOS
Acrobat Reader 2020
Classic 2020
20.005.30381 and earlier versions
Windows & macOS
Adobe Dimension
Adobe also released a fix for Dimension that corrects nine bugs, eight of which are rated critical. Most of these are file parsing bugs and would require user interaction to exploit.
We should also mention that none of the bugs fixed by Adobe this month are listed as publicly known or under active attack at the time of release.
Furthermore, the company actually categorizes these updates as a deployment priority rating of 3, in case you were wondering.
This is what you are looking at in terms of Patch Tuesday releases for Adobe for the month of October 2022, so hurry up and get the software.
What’s your take on this month’s release? Share your thoughts with us in the comments section below.
Windows Photo Viewer is now Microsoft Photos in Windows 11. It is the default image viewer in Windows systems but it has its own share of problems. Some users are having issues as they cannot launch images on fullscreen.
Most will opt for other photo viewer applications but if you are running low on storage space, you have to troubleshoot this issue. Let’s look at some possible solutions for this problem.
Why is my screen not showing full size?
If your screen is not showing the full size, it could be due to a few reasons. Here are some common causes:
Resolution settings – The most common reason is that your display resolution is set to a lower setting than the native resolution of your monitor. When you install Windows, it automatically detects and sets your default display resolution to match your monitor’s native resolution. You may need to set custom resolution for each program.
Your graphics card has a problem – A display driver issue could cause problems with Windows scaling feature especially if it is outdated. This happens when Windows doesn’t know how to scale certain content on its own. If you’re using an old computer, it might be time to replace your graphics card.
Bad cable – If you’re using an HDMI cable, try using a different one, or plugging directly into the display port on your computer instead of using an adapter. The cable could be loose or disconnected or your PC doesn’t recognize your HDMI cable.
Problems with your monitor – Windows is designed to automatically adjust your screen resolution when you change your display settings. If the display is not showing full size, you may have an issue with your monitor. To test this, connect the computer to another monitor that you know works and see if the problem persists. You may have to consider getting a new monitor.
Photos cache – Some apps store photos in their cache, and they may not be able to show them in full size. To fix this, clear the cache for Windows Photo Viewer by resetting and repairing the application or generally clear cache in Windows 11.
Now let’s have a closer look at how to resolve these issues.
What can I do if Windows Photo Viewer is not showing in full screen?
As always, it is important to do preliminary checks before moving on to advanced solutions. These checks include:
Check that all cables are securely connected to their ports. You can also try another HDMI cable and see if the issue persists.
Try the Windows Photo Viewer full-screen shortcut: Windows Key + Shift + Enter.
Disconnect any other external monitors that may be causing conflicts.
Try with another monitor or external display if available.
Restart your PC.
If your screen goes to full screen after trying out these, no need to proceed to the steps below. However, if you are out of luck, here are more troubleshooting steps to try.
1. Adjust display settings
Hit the Windows key and select Settings.
Click on System then select Display.
Hit the drop-down next to Display resolution and select an alternative setting.
Hit the Windows key, type Device Manager in the search bar, and click Open.
Locate Display adapters, click to expand, right-click on your display device, and select Update driver.
Select Search automatically for drivers.
If you don’t want to proceed manually, you can opt for a specialized tool, like Outbyte Driver Updater, to detect outdated or missing drivers and update them automatically.
Outbyte Driver Updater
Improve your device’s performance by keeping your drivers updated with Outbyte Driver Updater.
Click on Apps on the left pane then select Apps & features on the right pane.
Locate Windows Photo Viewer, click on the three vertical ellipses and select Advanced options.
Click the Repair button.
Go back and click the Resetbutton.
Again, click Reset on the pop up that appears.
4. Disable Game Mode
Hit the Windows key and select Settings.
Select the Gaming category and then click on the Game Mode button.
Toggle the Game Mode option to Off.
Game Mode is a feature in Windows 11 that automatically optimizes your PC for an enhanced gaming experience. It can prioritize CPU and GPU resources so that they’re used by games instead of other apps running in the background.
The feature can also affect how other apps run including Windows Photo Viewer so it is best to disable it when not in use.
Hit the Windows key, type Powershell in the search bar and click Run as administrator.
Type in the following command and press Enter: Get-AppXPackage -AllUsers | Foreach {Add-AppxPackage -DisableDevelopmentMode -Register “$($_.InstallLocation)\AppXManifest.xml”}
Restart your PC.
Hopefully, you have been able to resolve this issue and can now view your images on Windows Photo Viewer in full screen again. If you occasionally face low resolution issues on your Windows PC, don’t hesitate to check out our guide for simple workarounds.
Alternatively, you can opt for slideshow maker software that allows you to view images in full screen with no extra effort needed from you.
Should you encounter any other hiccups such as Windows Photo Viewer can’t print, we have covered various steps in our detailed guide to help you resolve this issue.
Let us know of any other solution not mentioned here that may have done the trick for you in the comments section below.
Even though the main focus right now is on Windows 11 and Windows 10, we never miss an occasion to revisit the older versions of the Windows OS.
And, as you surely know by now, the Redmond-based tech colossus also releases security updates for some of the obsolete operating systems, during Patch Tuesday.
That means that not only Windows 10 and 11 users will receive updates during this time. We’re also looking at Windows 7, Windows 8, and various Server versions as well.
We’ve already presented the 85 new updates that became available, along with the official downloadlinks, so all that remains is going a bit more in-depth.
Also, we’ve provided download links to the security updates that Adobe released for its suite of products during the same event.
However, now, let’s take a closer look at what Windows 7 and Windows 8 users were given to work with on the October 2022 Patch Tuesday.
What is going to change with the October Patch Tuesday?
The Redmond-based tech colossus has just released Patch Tuesday updates for Windows 8.1, in the form of KB5018474, and Windows 7, in the form of KB5018454.
It should go without saying, but they each come with a whole host of improvements and known issues with some pretty neat workarounds.
Addresses an issue that leads to User Datagram Protocol (UDP) packet drops from Linux virtual machines (VMs).
Updates daylight saving time (DST) in Chile to start on September 11, 2022 instead of September 4, 2022.
Known issues
After installing this update and restarting your device, you might receive the error, “Failure to configure Windows updates. Reverting Changes. Do not turn off your computer”, and the update might show as Failed in Update History.
After installing this update, file copies which use Group Policy Preferences might fail or might create empty shortcuts or files that have 0 (zero) bytes. Known affected Group Policy Objects are related to files and shortcuts in User Configuration > Preferences > Windows Settings in Group Policy Editor.
Addresses an issue that leads to User Datagram Protocol (UDP) packet drops from Linux virtual machines (VMs).
Updates daylight saving time (DST) in Chile to start on September 11, 2022 instead of September 4, 2022.
Known issues
After installing this update, file copies which use Group Policy Preferences might fail or might create empty shortcuts or files that have 0 (zero) bytes. Known affected Group Policy Objects are related to files and shortcuts in User Configuration > Preferences > Windows Settings in Group Policy Editor.
To get the best security solution for your Windows 10 system, you need to choose wisely.
There are so many antivirus programs available out there that it can turn out to be a real challenge to pick up the perfect software for your particular necessity.
In that matter, you can always review different AV tests. These tests are showing you different parameters and depending on these values you can determine which software offers more protection than others.
Well, when checking out these tests you should also write down the false-positive results.
False-positive results describe how accurate a certain antivirus is. Now, each antivirus program will receive monthly updates from its devs.
These patches are there to keep the antivirus database updated and as accurate as possible.
Based on this internal database, the security program can successfully detect Windows security breaches, infected files, or malware.
If the antivirus is not accurate enough you can get false positives (results that will detect potentially harmful files even when that’s not the case).
Of course, it’s quite impossible to find a security program that ensures 100% accuracy and which runs without any false positives.
But you can get an antivirus that gets close to this value – with such a security solution it will be unlikely to get false positives especially if you are a regular Windows 10 user.
So, during the guidelines below, we will review the best antivirus program that gets close to 100% accuracy.
What are the best antivirus programs without false positives?
TotalAV keeps its settings simple, and when a file is flagged by mistake, restoring it from quarantine or adding an exclusion takes a couple of clicks. Detections are backed by cloud threat data that is updated continuously, so a wrongly flagged file is usually cleared quickly.
Real-time protection and WebShield run in the background, scans can be scheduled for idle hours, and the interface is clear enough that most people never open the advanced options.
Easy quarantine restore and exclusions
Cloud-updated threat data
Real-time protection and WebShield
Scheduled scans
Simple interface
TotalAV
With high efficiency in removing false positives, this solution keeps you always on top.
Panda Dome is a reliable antivirus program that received high-ranking scores in terms of false-positive testing results.
However, the latest results reported increasing false alarms during virtual scans but that shouldn’t discourage you: only certain files were detected as false positives.
The overall score is still one that can be trusted. Moreover, based on these results, the devs will provide specialized updates in order to fix the small issues.
Panda isn’t bringing as many features as Bitdefender or BullGuard but it’s similar in terms of security performance and this should be the most important aspect especially if you are looking for a cheap and fast security program.
Let’s see some of Panda’s key features:
USB protection automatically scans all devices that connect to your PC
Multimedia/Gaming mode to enjoy uninterrupted sessions
Cross-platform protection for all your devices
Data shield and password manager too keep all sensitive data encrypted
Panda Dome
Simple and easy to use, Panda is the right choice when you need a great antivirus.
Avira Free Security has over 500 users so it’s also a great source of helping hands when it comes to false positives.
Of course, if you want to report a false positive or a suspicious file you can submit it by completing a short form in just a few seconds.
Avira also has one of the lowest numbers of false positive alerts so you won’t need to file many of those reports to straighten things out.
Avira is a great choice of protection against scammers, identity theft, and financial loss. Prevent any of these from happening and browse the internet worry-free.
You should also see some of its core features:
Free solution and free VPN included
Built-in PC cleaner tool
System optimizer
Network scanner
Adware, malware, and spyware removal
Avira Free Security
Although it’s free, Avira comes with a ton of features and a very low number of false positives.
Emsisoft Anti-Malware is one of the best AVs with great optimization. It is designed to work even on low-specs and slow computers and is supported by both x32 and x64 platforms.
This tool has a great dual-engine scanner that monitors all your files and blocks suspicious ones. It also searches for unwanted programs and removes them to further improve performance.
With Emsisoft, you can manage it remotely. Block and allow connections through the firewall even when you are not at your workstation.
It also has an intelligent way of detecting and blocking new malware by monitoring the behavior of all running programs.
Let’s quickly look at its key features:
Behavior Blocker (check for not yet discovered threats and will block unknown signatures)
Kaspersky will require fewer resources than Bitdefender and BullGuard but it will also run with more false positives than these antivirus programs.
The latest AV results are showing better false alarm results than Panda but still, a high number compared with the first two antivirus solutions that were reviewed above (almost double that of Bitdefender for example).
Kaspersky is one of the most popular antivirus platforms, so in terms of security performance, you should be covered without any sort of problems.
Kaspersky’s main key features include:
Free VPN included for better privacy and anonymity
Advanced password manager with additional security options
Parental control options to make the use of the computer or other devices safe for kids
Anti-hacking with network monitoring and anti-ransomware
Kaspersky Standard
With plenty of scanning features, be sure to get close to no false positives.
When false-positive results are involved, McAfee represents one of the best solutions to choose for your Windows 10 system.
Based on most of the AV tests, McAfee managed to run without false alarms which, in real-life behavior, can be translated into less than a 1% chance of misleading scans.
McAfee is still integrated within the Windows 10 system so you should be able to install it without hassle.
The main McAfee key features are:
Included VPN for improved privacy
File shredder to clean up junk on your computer
Firewall to block all unwanted connection
Web protection for every browsing session you have
Avast Free Antivirus also has a great mechanism for submitting false positives by just completing a small form on its website.
And with 435 million monthly active users, you can be sure that the news of a false-positive will travel extremely fast right for the Avast engineers who will whitelist it.
Avast also has the advantage of offering a very good free version that covers more than the basic needs of the average user.
Take a look at a couple of its top features:
Frequent updates with the latest threats signatures and more
Great malware removal tool
Small footprint for your PC
Very generous package for a free antivirus
Doesn’t bother you during gameplay or work
So, those are the best antivirus solutions to use on your Windows 10 device if you are looking for a minimum number of false positives.
Other antivirus programs that are ranking high in different AV tests and can represent a reliable alternative are Avira, AVG, Avast, Norton, or TotalAV.
Windows Defender can be also considered a false-positive free antivirus – the third-party apps are more specialized and will receive more updates than Windows Defender.
Best enterprise antivirus software comes with a myriad of benefits not only for your home but also for corporate use.
The benefits of getting antivirus for your business include central management and scalability, besides advanced protection for your systems.
Therefore, you need to find one that matches both your enterprise and security needs so you can enjoy enhanced performance and updated security against known and unknown threats.
A good antivirus for the enterprise should ideally protect your hardware, emails, cloud environment, IP information, and data, therefore you have to be very particular when picking the right one for you.
Here we share the best antivirus for small businesses in 2023 that come loaded with security features meant to deliver maximum protection.
How does an antivirus help your enterprise?
Protects your network: reliable antiviruses can scan your Wi-Fi connection making sure that there are no weak points
Keeps important data private: antiviruses block and prevent data theft regarding your activity, business plan, or clients
Blocks unwanted ads and spam: so you can work more efficiently and with no interruptions
Scans and protects removable media: that is frequently used in office settings such as USB flash drives or external hard drives
In conclusion, there are multiple enterprise AV solutions that deserve your attention, so we compiled a list of the most efficient in the market now.
TotalAV is an award-winning antivirus that offers full protection of all aspects of your home computer or business. From safer browsing sessions and real-time virus removal to system optimization tools for all workstations.
Provides WebShield functionality to protect all online tasks and processes. Malicious websites are automatically blocked, search results are filtered, and downloads and executables are checked before they are accessed.
Also, all web pages will load faster since no ads will be loaded. All ads, popups, and scam notifications will be blocked so you don’t have to worry about people visiting malicious ads.
TotalAV provides a remote firewall so you decide what connections can be made from and to your workstations, which is allowed and which is blocked.
This antivirus alerts you whenever a data breach occurs, so you can take immediate action. All data is actively monitored and kept secure.
Moreover, TotalAV provides the user with a set of tune-up tools to further enhance every system’s performance.
Let’s see some of TotalAV’s main features:
Ransomware, phishing, and scam protection
Multi-device compatibility so all your devices will be protected
PUA protection and zero-day cloud scanning
Password vault for enhanced security and better management
TotalAV is a great antivirus that comes with a complete package of all the necessary tools and security features for your business needs.
TotalAV
Choose the complete system security and optimizing package with TotalAV.
Provided by Panda Security, Panda Small Business Protection offers all the security options you need while being very easy to set up.
This antivirus offers real-time protection for all your devices. It is able to detect and block threats with high accuracy, removing them from your system instantly.
The tool is light and works properly on pretty much any type of device. It is great for real-time protection as you can let it run in the background and continue carrying out your usual tasks.
Panda secures your online presence as well, with an integrated VPN that supports unlimited Internet browsing.
This can be especially useful for businesses as you probably deal with lots of sensitive information that requires this extra layer of protection.
Another important thing to note is that this antivirus scans your Wi-Fi connection and blocks any suspicious network activity. You can rest assured that your business network is carefully scanned so no one can steal your data.
Other key features of Panda Small Business Protection include:
Cloud-based
Secures all confidential files
Supports any Windows device
Daily automatic updates
24/7 customer support
Panda Small Business Antivirus is a paid service. You can create your own plan, with the exact number of devices you want to secure.
Panda Small Business Protection
Panda combines advanced protection technologies with ease of implementation for your business.
Your business needs continuous, powerful protection against any sophisticated threats, and Bitdefender is the right antivirus for an enterprise.
Features include layered next-generation endpoint protection against cyber threats, through which Bitdefender detects advanced persistent threats, protects your organization from ransomware, and defeats exploits, and zero-day attacks.
For your infrastructure, Bitdefender protects all endpoints and features an integrated enterprise security system, with simplified security for SMBs and for service providers.
The GravityZone feature – adaptive, layered endpoint security designed for cloud and virtualization – protects your enterprise from advanced targeted attacks, through its monitoring and revolutionary hypervisor introspection architecture.
Bitdefender also has the GravityZone Endpoint HD with HyperDetect, which is a next-generation layer that uses specialized local machine models and behavior analysis techniques trained to spot and detect hacking tools, malware obfuscation, and exploits.
It effectively blocks attacks that most traditional endpoint and next-gen antivirus defenses don’t.
Let’s glance over the top features of this Bitdefender solution:
New HyperDetect security layer for detecting hacking tools, malware obfuscation, and exploits
Performance is optimized for modern infrastructure
Risk management assessment
Advanced application behavior monitoring
Centralized management of security in both heterogeneous and hybrid environments
This is a lightweight solution, optimized for cloud and virtualization, with centralized smart scanning that translates to 30% performance improvement, if you compare it to traditional antivirus for enterprise vendors.
Bitdefender Gravity Zone
GravityZone offers layered, next-generation endpoint protection for all your business needs.
As the name of the product suggests, ESET PROTECT Advanced has a Windows enterprise solution that will suit the needs of just any business thanks to all the useful modules it brings.
Need to control and secure your network applications remotely? ESET can ensure efficient on-premise or cloud-based management, to make things easier for you.
Need to ensure that your business data, email accounts, and cloud storage are safe and trustworthy? You can easily achieve that thanks to the File Server Security, Mail Security, and Cloud Protection modules.
Rest assured that with ESET PROTECT Advanced, all the workstations, smartphones, and VMs in your network are protected.
This antivirus notifies you of any changes and activities within the devices it protects.
The notification feature lets you pick from a list of pre-defined notifications, but you can also create your own notifications that get triggered by specific events.
Let’s look at some of its best features below:
Multilayered protection with one-click deployment from the cloud console
File server security with secure banking protection
Over 170 built-in reports from 1000 points
Pre-configured live installers deployment for your endpoints
Single-click management
This enterprise antivirus can secure as many devices as you want. It works with Windows, Android, iOS, macOS, and Linux devices. The price of the subscription is dependent on how many devices you will connect it to.
ESET PROTECT Advanced
Complete protection for your company’s endpoints, data, cloud storage, and users.
This is a simple-to-use antivirus for enterprises and is everything your business needs in one package as it leaves nothing to chance with its powerful antivirus, data, and identity protection.
Avast Business Endpoint Protection is tested and approved by the most prestigious anti-malware institute and is an award-winning antivirus security tool, with 100 percent certified protection against zero-day threats.
It is the ultimate security for your business as it protects your IP, customer data, business strategy, and everything else including your server, email, and VPN.
Use the tool’s Patch Management option to manage, maintain, and update Windows and third-party applications, from the unified dashboard.
With the premium products, you also get server protection and privacy features, which are extremely important to secure your business.
Manage and deploy your Avast Business solutions from one platform
Multi-layered protection for your company’s data, including Sharepoint Server Protection and Exchange Server Protection
Protects bank info, passwords, and downloads, especially while on public Wi-Fi
Easy to manage and deploy on your endpoints
Avast Business Endpoint is a paid service. You can use it to secure all your devices, both mobile and desktop. It’s compatible with Windows, macOS, iOS, and Android devices.
Avast Business Endpoint Protection
Keep your applications updated and secure your servers from the all-comprising Avast business hub.
Avira has improved its line of both consumer and business products a lot recently. For small and medium businesses, the developer has a convenient product called Prime.
Prime can cover up to 25 devices and offers the classic, but reliable and powerful security featured the home-user products offer as well.
Other notable features of the tool that your business will benefit from are the unlimited VPN and the password manager, to help with both securing and generating strong passwords.
Also, Avira also supervises all system drivers and important software in terms of updates, making sure that they work within optimal parameters.
To make sure your device is completely secure, Avira Prime also incorporates a software and driver updater.
Other key features of Avira include:
Built-in PC cleaner to improve all workstations’ performance
Anti-tracking to keep all threats at bay
Unlimited VPN so your business is hidden with every connection
Low memory usage and built-in password manager
As you probably know, it is highly recommended to run the latest versions of your software and drivers as they implement security measurements that align with current requirements.
Avira
Use the essential security features that this multi-device antivirus brings to your small and medium business.
Kaspersky’s antivirus for enterprise protects the things that matter to you, while you work. It is designed for businesses running more than 5 computers with servers and other devices.
It works out of the box and has easy management from a cloud-based console, so you don’t necessarily need IT skills to use these powerful security tools.
Features include cloud endpoint security with strong protection and easy management, advanced cybersecurity for business (world-class), ready to scale protection against every type of threat your enterprise faces, whether on-premise or cloud.
You also get multi-layered protection powered by machine learning and human expertise, granular security management, secure communication and collaboration, and enhanced mobile> security and device management.
Other key features include anti-targeted attacks, hybrid cloud security, security operations center to efficiently detect and remediate threats, and Fraud Prevention for proactive detection of cross-channel fraud in real-time.
Let’s see what are the top features of this solution:
Boost productivity and protects employees with cloud-enabled controls
No performance impact on endpoints
Protects against the latest security threats, including fileless threats
Reduces your exposure to cyberattacks with endpoint hardening
Secures diverse environments including PC, Mac, Linux, iOS, and Android
Simplifies security management with a unified console
Whether you are in financial, healthcare, data center, industrial, government or telecoms enterprise, Kaspersky will sort you out.
Webroot Endpoint Security a corporate antivirus promises not to interrupt you as you work because it has been noted that most users find themselves staring at the computer screen while the antivirus does its thing – you won’t have to with this one.
It takes only 20 seconds to check your computer, which is 60 times faster than the average scan time of tested competitor products.
In addition to this super-fast speed, it doesn’t take up much space so you have plenty of room for all your files and documents.
Features include identity theft protection for your usernames, account numbers, and other personal information.
Take a look at a review of its most important features:
Automated, remote management
Fast and easy deployment on your endpoints
Comprehensive reporting for the IT management department
RMM and PSA integrations
Granular visibility
You also get secure browsing with real-time anti-phishing to block fake sites, lightning-fast scans with no interruptions, and webcam protection from spying threats.
F-Secure Antivirus is another reliable utility that lets you do business with confidence.
It is an essential, comprehensive, and advanced tool that secures your company’s endpoints.
This antivirus protects your whole IT infrastructure while managing vulnerabilities proactively. It shields from all conceivable threats with expert guidance.
One of the most impressive features of this antivirus is the Protection Service for Business. It delivers comprehensive but flexible endpoint security for all your devices.
This includes cloud-based protection as well as a rapid detection service that monitors your security status 24/7, alerting you of breaches within minutes with a clear action plan.
F-Secure approaches cybersecurity with a combination of the latest human expertise and continuously improves technology to comprehensively predict, prevent, detect, and respond to threats.
You should also take into consideration this small list with its best features:
Easy-to-deploy scanner for your whole network and all its assets
Multi-layered security platform for both detection and prevention of attacks
Microsoft 365 native email security capabilities with advanced protection against attacks via email and URLs
Advanced managed threat-hunting service
Manage all your security needs from a single console
You can also enhance your salesforce’s native security capabilities by mitigating risks caused by careless or malicious user behavior.
McAfee has been in the computer security game for quite a while now, but it’s only getting better at what it does.
As an enterprise virus protection software, it offers advanced security that protects all your devices against threats, compatibility with every operating system, and ease of use with its robust user-friendly software that is both easy to install and manage.
With McAfee software, you get features such as advanced online banking security with a data encryption service that’s activated whenever you use online banking.
This antivirus also includes enhanced security with its 255-character paraphrases that are unsolvable to thieves but remembered by you.
Not only that, but it also implements an anti-phishing filter reinforcement, 24-hour data theft protection, secure digital vaults to keep your files and data locked and encrypted, and advanced antispam filter protection for your emails.
Other key features of McAfee include:
Anti-ransomware technologies to detect zero-day threats
Fast response rates
AI guided investigations
High fidelity detections
It is simple and easy to use with a console that lets you check the security status of your devices and comes with automatic updates for the latest threat definitions to keep your protection up to date.
Malwarebytes has made a name for itself as one of the most reliable and easy-to-use antivirus software.
It provides up-to-date security implementations to make sure your devices are protected on all fronts. The antivirus has a great business version with real-time protection for multiple connected devices.
This antivirus is built under the multi-layer protection principle, combining more than just one type of shield to secure you against malware, viruses, spyware, phishing attacks, RDP attacks, ransomware, and other threats, old and new.
The tool has a great detection rate, being able to stop attackers before they get a chance to cause harm to your system.
However, in case you get the product only after your system is infected, it is important to mention that Malwarebytes is proven to remove all traces of infection without harming your system.
The tool is very quick to set up. Just connect your devices to the same central Malwarebytes account and keep track of the state of each and every one of them.
Other key features of Malwarebytes Small Business include:
Monthly security reports
Covers up to 20 devices
Compatible with Windows, Mac, Android, and Chromebook
Brute Force Attack Prevention
Malwarebytes small business is available under a subscription plan. There are multiple options, depending on the number of devices you want to secure.
What is enterprise antivirus?
Enterprise antivirus solutions are software that protects all workstations in an enterprise by being remote from the endpoint. It provides security for multiple devices simultaneously and keeps all viruses at bay.
It works just like a regular antivirus, but the process is a bit more complicated as more systems need to be protected at the same time. The security provided is excellent and all attempts to steal your data are prevented.
Most companies are targeted because they have sensitive data that can be used against them or because hackers can access their accounts and other information.
As an enterprise, using an antivirus program can be a weight off your shoulders. By providing the necessary security for all devices used within it, you can be sure that no data leaks will occur.
Using an enterprise antivirus can even take care of possible internal leakage since any USB or device connected to a workstation will be scanned as well.
Also, with an antivirus, you can block inappropriate online content or even limit its usage, so no worker can unintentionally download or access any virus.
We hope that our top helped you find the right tool to protect your business and data from any impending threats.
However, if you didn’t there’s also a great idea to check our selection including the best Windows Server antiviruses for your business.
Have you settled on one of these antiviruses for enterprise, or is there one you’re currently using that you’d like to share? Let us know by dropping your comment in the section below.
Windows 8.1 will reach the end of the extended support in 2023 and customers on Windows 8 had to upgrade to 8.1 in 2016, to remain supported.
What we wanted to underline here is that the two systems are close to their end of life and you should make a move towards Windows 10 as soon as possible.
However, there are still many users that can’t do that for many reasons. If you’re one of them you also need to know that an outdated system is more vulnerable.
That is why we definitely recommend protecting it with a dedicated antivirus that will secure your system and your data at all times.
The search for the best free or paid antivirus software has been going on for years and years, and it’s pretty hard to decide on a winner.
We performed searches and tests and came up with a list of the best Windows 8 and 8.1 antiviruses that you can use right now.
Do I need an antivirus for Windows 8/8.1?
Yes, all Windows versions require an antivirus program. Windows 8 and 8.1 have Windows Defender built-in, but it’s proven insufficient for complete protection.
Windows Defender offers good basic security but falls short against larger threats. When faced with a virus, a good antivirus program will not cause you any problems.
Most antivirus programs have numerous security features that add an extra layer of protection to your computer. Below are some of the best we found.
What are the best antiviruses for Windows 8 and 8.1?
TotalAV – Best browser protection and system maintenance
TotalAV is an antivirus that comes with a wide variety of features for PC optimization, virus removal, and browser security.
One of the main features is WebShield. It automatically blocks access to malicious websites and search results, and scans downloaded and executable files for viruses so you’re never at risk.
It offers antivirus protection with its unique full-scale VPN. The major selling point of TotalAV antivirus is a safe browsing VPN. This is where Wi-Fi protection comes into play.
When the VPN is activated your Internet connection is encrypted locally and transmitted to the VPN server where it is decrypted and moved to the site you want to access.
It also includes TotalAdblocker which blocks all unwanted ads, popups, and annoying notifications. This feature improves page loading by eliminating the need to load ads.
Other great features are:
Impressive VPN system
Good website filtering rates
Password vault for enhanced security
Disk cleanup and system boost options
TotalAV
Total AV has all the features you need to keep your computer and Wi-Fi network safe from malware.
Bitdefender has annually received rewards from independent sources for its security features and it still works on Windows 8 and 8.1 so you should take it into consideration.
The Internet Security version which we recommend below also comes with two extremely important features: Bitdefender VPN and Bitdefender Safepay.
As you probably guessed, the VPN protects your privacy and identity online. It’s limited to traffic of 200 MB per day on a single device but it’s still great when you connect to public Wi-Fi.
Apart from that, this tool works against all e-threats, even from zero-day malware, worms, ransomware, spyware, and rootkits.
It can even secure your peripherals like the webcam and the microphone from any hijacking or intrusions.
Take a look at some of its top features:
Friendly interface for all users
Advanced firewall to block intrusions and filter your network traffic
Behavioral detection to closely monitor active apps
Webcam and microphone protection against eavesdropping
Secure VPN – limited to 200 MB/day/device
Bitdefender Internet Security
Bitdefender offers complete protection for all your devices, even for your Windows 8 PC.
What do you expect from a completely free antivirus? Well, you will get a lot more from this one because Avast is a rich-featured antivirus even on its free version.
For instance, it has a Behavior Shield that closely monitors all your apps and detects any unusual manifestation. This is because some apps can start to produce damage long after installation.
This antivirus is also perfect for times when you work, play, or watch your favorite movie on full screen because it will block any distractions and pop-ups.
This amazing software also brings a network security scanner and offers browser protection which is a lot for a free tool.
However, you should know that this antivirus is free only for personal use. If you want to use it for business purposes, you will need to upgrade it to a paid version.
Let’s take a look at Avast’s top features below:
Network security scanner
Do Not Disturb mode for uninterrupted work or play
Behavior Shield for close app monitoring
Easy to install and operate
Completely free
Avast Free Antivirus
Even though it’s free, Avast Free Antivirus will offer optimal protection for your system.
Luckily, ESET HOME Security Essential has kept its support for older systems and can be used without a hitch on Windows 8 and 8.1.
In fact, this tool is one of the most advanced at the moment, providing unsurpassed protection for any kind of possible threats and you can secure all your devices with one license.
Being trusted by over 110 users worldwide, this software is adapted to the modern needs of users with advanced banking and online payment security wherever you are.
For instance, when you are connecting to an unknown network it will switch to the Strict Protection mode, making your device invisible to other computers connected to the same network.
You will also benefit from Botnet and Anti-phishing protection and it comes with a strong firewall that will also protect your PC from unauthorized access.
Let’s see what its main features are:
Test your router for vulnerabilities
Allows you to block storage media – CDs, DVDs, USB sticks, and disk storage devices
Parental control features
Botnet and Anty-phishing protection
Automatically protects you while performing online payments and accessing web-based crypto-wallets
ESET HOME Security Essential
Protect your Windows 8 system with this full-featured professional antivirus for your PC.
This is another free security tool, this time from Avira. In fact, it’s a lot more than an antivirus because it comes with a lot of additional features.
For example, let’s look at the free, included VPN. It’s limited to 500 MB/week but it can still provide you with enough privacy protection when needed.
Another great addition is the PC Cleaner tool which will help you erase any tracks from any of your browsers and apps so that your data and activity can remain private.
It also comes with a software updated tool that can keep all your installed apps up to date, avoiding any errors and crashes in the process.
Avira also boosts the speed of your system and comes with a powerful firewall that will put any trespassers at bay.
Consider its best features list below:
Free VPN (limited traffic – 500 MB/week)
PC Cleaning feature to get rid of any unwanted activity traces
Speed booster feature
Completely free
Software updater tool
Avira Free Antivirus
Avira is more than an antivirus, it’s a security suite with tune-up powers for free.
Running an antivirus program it’s essential for your system’s security. Windows 10 and Windows 11 come with a built-in antivirus, Windows Defender, that can protect your system against a variety of malware and related threats.
Microsoft’s antivirus program can perform three types of scans: quick, full, and custom.
Getting the antivirus to scan your computer is pretty simple, all you have to do is check one of the three options and wait for the scan to complete.
Unfortunately, recent user reports have revealed that Windows Defender won’t do a quick scan due to an incorrect group or resource state.
Windows Defender is a solid antivirus, but sometimes Windows Defender won’t be able to perform a quick scan. This can be a problem, and speaking of Windows Defender, here are some similar issues that users reported:
Windows defender unable to scan, won’t scan – These are some relatively common problems with Windows Defender, but you can fix them using one of our solutions.
Your PC couldn’t be scanned Windows Defender – This is another problem that can appear with Windows Defender. If you encounter it, be sure to check if you don’t have a third-party antivirus running in the background.
Windows Defender will not complete scan – Sometimes Windows Defender is unable to complete the scan. If this happens, be sure to check the exclusions list and remove any suspicious exclusions.
Windows Defender not scanning Windows 10/11 – If Windows Defender isn’t scanning, the problem might be the missing updates. Simply update Windows 10/11 to the latest version and check if that helps.
How do I fix Windows Defender not doing a quick scan?
1. Check the exclusions list
Press Windows Key + I to open the Settings app.
When Settings app opens, go to Update & Security section.
From the menu on the left select Windows Security.
In the right pane click Open Windows Defender Security Center.
Select Virus & threat protection.
Now select Virus & threat protection settings.
Scroll down to the Exclusions section and click Add or remove exclusions.
If your system drive is on the list, be sure to remove it.
You might also have to remove other exclusions from the list.
If your Windows Defender won’t scan, the problem might be your exclusions list. According to users, sometimes malware can add an entire drive to the exclusions list in order to prevent Windows from finding it.
However, you can fix the problem simply by checking your exclusions list. To do that, follow these steps:
After doing that, the problem should be completely resolved.
2. Try a third-party antivirus
If Windows Defender won’t perform a quick scan, maybe the best option is to switch to a different antivirus software.
There are many great antivirus tools on the market, and if you’re looking for antivirus software that will provide maximum protection without interfering with your system, you should consider using one.
Many antivirus programs offer better protection and lots of other useful tools such as anti-identity and data theft, VPNs, and many others which Windows Defender is lacking.
In addition to scanning your PC for harmful software, these apps will also actively remove dangerous files. Don’t hesitate to strengthen your defenses and install a third-party antivirus as soon as possible.
TotalAV
Try the safest, most popular cybersecurity tool on the market, and always protect your device.
When Settings app opens, click Additional power settings in the Related settings category.
Now locate your current power plan and click Change plan settings next to it.
Set Turn off the display and Put the computer to sleep options to Never, then click Save changes.
According to users, if Windows Defender won’t perform a quick scan, the problem might be your power settings.
After doing that, check if the problem is resolved. This sounds like a strange solution, but several users reported that it works, so you might want to try it out.
4. Install the latest updates
Open the Settings app and go to Update & Security section.
Now click Check for updates button in the right pane.
In some cases, you might be able to fix this problem simply by installing the latest updates. Microsoft is working hard to fix Windows 10/11 bugs and issues, and sometimes a Windows Update might fix your problems.
By default, Windows 10 and Windows 11 automatically downloads and installs the updates, but sometimes you can miss an update. However, you can check for updates at any time manually.
If any updates are available, they will be downloaded in the background and installed as soon as you restart your PC. Once your PC restarts, check if the problem is still there.
5. Perform a System Restore
Press Windows Key + S and enter system restore.
Select Create a restore point from the menu.
The system Properties window will open.
Click System Restore button.
System Restore will now start. Click Next to proceed.
If available, check Show more restore points option.
Select the desired restore point and click Next.
Follow the instructions on the screen to complete the restoration process.
If Windows Defender won’t perform a quick scan, you might be able to solve the problem by performing a System Restore.
If you’re having problems with the System Restore, learn how to fix them with this useful article.
Once the restoration process is finished, check if the problem is still there.
Use a third-party system restoration tool
The Windows system restore tool will bring your OS to a previous version, meaning you will lose any data and software that you installed after the restore point was created, which is not ideal.
Therefore, we strongly encourage you to download a third-party system restoration tool that specializes in finding problematic files and removing them, thus keeping your PC error-free.
6. Perform SFC and DISM scans
Press Windows Key + X to open Win + X menu and choose Command Prompt (Admin).
Alternatively, you can also use PowerShell (Admin).
When Command Prompt opens enter the following command: sfc/scannow
The SFC scan will now start. The scan can take about 15 minutes, so don’t interrupt it.
Windows Defender is a core component of Windows 10 and Windows 11, and if you can’t perform a quick scan, the issue might be file corruption. Your system files can get corrupted, and that will cause this issue to appear.
However, you might be able to fix file corruption issues by performing SFC and DISM scans. To do that, follow these steps:
Once the scan is finished, check if the problem is still there. If the issue is still present, or if you’re unable to run an SFC scan, you might have to use a DISM scan instead. To do that, follow these steps:
Start Command Prompt as administrator.
Now run the following command: DISM/Online/Cleanup-Image/RestoreHealth
DISM scan will now start.
The scan can take about 20 minutes, sometimes more, so don’t interfere with it.
Once the DISM scan is finished, check if the problem is still there. If you want, you can repeat SFC scan once again and all the corrupted files should be repaired.
7. Create a new user account
Open the Settings app and navigate to the Accounts section.
In the left pane, select Family & other people.
Now choose Add someone else to this PC.
Choose I don’t have this person’s sign-in information.
Select Add a user without a Microsoft account.
Enter the username for the new account and click Next.
According to users, sometimes your user account might be damaged, and that can cause issues with Windows Defender to appear.
To fix this problem, it’s advised to create a new user account and check if the problem appears on a new account.
After creating a new user account, switch to it and check if the problem still appears. If not, you’ll need to move your personal files to a new account and start using it instead of your old one.
8. Remove third-party antivirus
Apparently, this error message is a temporary bug that is sometimes accompanied by error code 0x8007139F. Restarting and manually updating Windows Defender should be enough to fix this issue.
If this simple action doesn’t solve the problem, make sure you are not running another antivirus program at the same time. If you do, uninstall it, and keep Windows Defender.
Type remove in the taskbar to open the Add or Removeprograms settings panel.
Locate your antivirus in the list and select it.
Click the Uninstall button and wait for the process to complete.
If you previously had a different antivirus, and you’ve recently installed Windows Defender, it’s also possible that remnants of your previous security program are still present.
Not being able to perform a quick scan in Windows Defender can be a big problem, but we hope that you managed to fix this issue using one of our solutions.
If you’re wondering how you can secure your Wi-Fi network with antivirus software, read on. Today, we will be discussing the best antivirus with Wi-Fi protection.
Antivirus is one of the must-have tools for anyone using a computer since the turn of the century.
The advent of viruses, malware, ransomware, trojans, and phishing websites has made it very dangerous to use a computer without an antivirus.
However, Wi-Fi has helped ease the way we work and use the Internet but it has also made it easier for cybercriminals to get your personal information and login details.
This can happen in diverse ways with most Wi-Fi routers increasingly susceptible to numerous hacking. It is vital to get an antivirus software tool with Wi-Fi protection that can secure your Wi-Fi networks.
Keep in mind that this detailed list should come in handy whenever you’re interested in:
Wi-Fi virus protection – Protecting your network from infected PCs and other devices is mandatory nowadays; you should take your time and check out the above list for an informed choice
Wi-Fi virus scanner – Try out any recommended antivirus for unlimited and accurate virus scans
How can you scan your Wi-Fi for viruses?
Most antiviruses provide features that allow you to scan your home or public router for any vulnerabilities or infections. Without an antivirus, you are exposed to any hacker that can access and take control of that Wi-Fi.
To stay safe before connecting to unknown Wi-Fi, use a VPN to hide your identity, or simply use an SSL connection to ensure that every website you visit is verified.
Most importantly, using an antivirus program is the easiest and safest way to protect your device from data theft attempts. Block unknown connections and allow only verified and safe connections.
What is the best antivirus with Wi-Fi protection?
TotalAV – Best browser protection and system maintenance
TotalAV is a new antivirus software tool that started operation in the year 2016. The antivirus thrives well when compared to older antivirus companies like Avast and Avira.
It offers antivirus protection with its unique full-scale VPN. The major selling point of TotalAV antivirus is a safe browsing VPN. This is where Wi-Fi protection comes into play.
Most antivirus tools protect users’ data when it is local but when your private data is moving around the internet, most of them are limited but not TotalAV.
TotalAV has a virtual private network (VPN) that encrypts your Internet connection protecting your data from snooping and trackers. The VPN service unlike that of Avast is free with no additional costs.
When the VPN is activated your Internet connection is encrypted locally and transmitted to the VPN server where it is decrypted and moved to the site you want to access.
Advertisers and trackers generally use your IP address to follow your Internet activities but when the VPN is activated they only see the IP address of the VPN server used.
Furthermore, TotalAV is an ideal antivirus software although it may not have the name or experience as other well-known antivirus tools.
Other great features are:
Impressive VPN system
Good website filtering rates
Disk cleanup and system boost options
TotalAV
TotalAV has all the features you need to keep your computer and WiFi network safe from malware.
Bitdefender is another top antivirus that can easily secure your Wi-Fi hotspots. Thanks to its Wi-Fi Security Advisor, all network connection vulnerabilities are easily revealed.
Moreover, let us assure you that it’s incredibly straightforward to use and has some extra features that are impossible to refuse.
Well, that’s your chance to stay anonymous on the web and protect your computer against malware or even quickly clean it if it happens to be infected.
You also get unlimited encrypted traffic and SafePay tools to help you stay protected while shopping online.
Some Bitdefender key features you should take into consideration:
Web Shield feature to safeguard all your network activities
Webcam Filter to prevent prying eyes from snooping in
Password Manager to store all your login details in a single place
Multi-layered ransomware protection
Extra security-centered features
Bitdefender Internet Security
Get reliable security for any wireless network and claim the best deal right away!
ESET HOME Security Essential is maybe one of the best tools to use when you want to keep your computer safe from all kinds of viruses, and also to protect your home network.
Moreover, it is a trusted solution by over 1000 million users. Thus, you can rest assured that it will protect you from ransomware and other types of malware with its multilayered protection.
Additionally, the Wi-Fi protection enables you to test your home router for vulnerabilities, such as weak passwords or out-of-date firmware.
Afterward, it provides you with guidance and an easy-to-access list of router-connected devices with improved device detection, to show you who’s connected.
More great features of ESET HOME Security Essential include:
Botnet Protection prevents your computer from being exploited for spam and network attacks
Protects your privacy and assets against attempts by fraudulent websites to acquire sensitive information
Makes your device invisible to other computers connected to the same network
Automatically protects your computer from malicious network traffic
Firewall included
ESET HOME Security Essential
ESET HOME Security Essential will secure your computer and Wi-Fi network with advanced protection for all online threats.
Avira Prima is a great choice when you want to secure not only your Wi-Fi network but also all the devices connected to it.
Moreover, Avira Prime is a cross-platform and multi-device antivirus. With one subscription you can cover up to 25 devices.
It protects your computer and devices from any type of malware, phishing attacks, and real-time protection against other online threats.
Additionally, it comes with a built-in VPN that you can use to surf the web anonymously, and also with 200 privacy settings that you can optimize as you wish.
More important features include:
Cleans junk files, speeds up your boot time, and reduces lags
Password management option
Keeps your software and drivers automatically up to date
Scans your network for vulnerabilities and helps you fix them
Block infected websites, browser trackers, and intrusive ads
Avira
Avira will secure your WiFi and all devices connected, fixing all vulnerabilities.
Panda Dome is a significant upgrade to the Panda Free Antivirus with more features and bonus features which include a firewall and Wi-Fi security monitor.
In addition, it also gives decent detection and blocking of traffic from phishing websites that trick users into giving away their information.
There is also the USB vaccination which modifies USB drives so that malware and virus cannot configure themselves to run automatically from the drive.
This antivirus program includes a simple firewall. However, this firewall feature exercises a bit of control over how programs access the web, but it’s quite limited in function.
It blocks suspicious inbound connections in some programs while allowing outbound connections. Users can also configure the program control rules.
One unique feature of Panda pro is its Wi-Fi protection feature which scans the security of each WI-FI network.
After checking the Wi-Fi network it gives a pop-up sound as a warning if the network has low or medium security. The Wi-Fi Inspector tool also gives reports on how to improve your network security.
In addition, you can also view a list of devices on your network and tag any that should be restricted to connect with your Wi-Fi.
Other key features include:
Good malware detection rates
Firewall feature
Wi-Fi protection feature
Panda Dome
Panda offers reliable WiFi protection without slowing down your system, so make sure you try it out!
Norton Antivirus is one of the popular antivirus software used worldwide. Norton has consistently recorded some of the highest scores in antivirus testing.
The virus protection feature scans all incoming emails and messages for threats. The threats are sent to the quarantine section for monitoring until late it is sure it is not malware.
It also gives protection against removable USB drives such as Flash drives and external hard drives when connected to your system.
It also gives good protection against exploit attacks in which hackers take advantage of vulnerabilities in windows or programs to steal data.
It also gives protection to users’ Wi-Fi connection by blocking exploits attacks on your network which prevents hackers from gaining access to your data.
The password manager stores all your usernames and passwords including online banking credentials and social media login details.
When you log in to these accounts using Norton antivirus you are safe. If any hacker tries to get your password they will get the manager tool password which is not useful to them.
Finally, Norton antivirus is a reputable brand that gives excellent all-around protection and is ideal for those that access the web a lot with its excellent wen protection. The password manager is also a plus.
More great features include:
Excellent marks in malware detection
Good in preventing phishing websites and WI-FI intrusion
Password manager
Norton Antivirus
Use this great antivirus to protect your WiFi network from malware, online scams, and phishing threats.
Although many laptops remain cool to the touch, others can feel like the engine of a race car after a long ride in the desert.
A poorly cooled laptop is uncomfortable to use and poses health risks. Any laptop that gets too hot inside can suffer from component damage and poor performance as the CPU cuts back its clock speed to escape heat pressure.
In this guide, we have prepared a list of the best laptop cooling software to keep your PC running cool to the touch.
What is the best laptop cooling software for Windows 10 & 11?
SpeedFan is the most popular laptop cooling software, and it does more than just keep your laptop cool.
To ensure everything runs smoothly, it helps you stay on top of your system’s vital statistics, including the control of your laptop speed, fan, temperature, and others.
The latest version of SpeedFan comes with an easy-to-use graphical user interface and can do most of your hardware monitoring work.
This tool is a must-use for anyone who wants to monitor the system’s temperature closely. SpeedFan uses digital sensors to scan your system’s temperature.
This laptop cooling software also reads the temperature of your motherboard and hard disk and changes your PC’s fan speed. What’s more, it checks the status of your hard disk using S.M.A.R.T or SCSI attributes and reads the voltages and fan speed.
Also, it automatically searches your computer for informative hardware monitor chips.
When the system BIOS fails to activate some features that may improve performance, SpeedFan tries to enable them as long as it’s the safest thing to do.
This great software supports a wide range of temperature sensors and hardware monitoring chips, and it can help you find the reasons for failing hard disks or unpredictable reboots.
SpeedFan is a potent tool that can help you reduce the fan’s noise while working or watching movies and tell you whether you are likely to experience temperature-related issues.
If you are looking for the ideal cooling software that you can download for free on your HP, Dell, and Asus laptop, you should give SpeedFan a try.
Take a look at some of its key features:
Easy-to-use graphical user interface
Monitors all system’s vital statistics, including speed, fan, temperature, and more
Checks the status of your hard disk using S.M.A.R.T or SCSI attributes
Reads the voltages and fan speed
Automatically searches your computer for informative hardware monitor chips
The more power your computer consumes, the more heat it generates. The KAR Energy Software for laptop cooling employs this principle to enhance your PC’s performance.
At the same time, it keeps your laptop cool by drastically lowering its power consumption by up to 48% in four different ways, including electronically cooling the CPU.
It puts the computer in standby mode even if a program prevents it, reduces the consumption of RAM, and manages the processor’s power.
KAR Energy Software manipulates your CPU speed to conserve energy and reduce overheating. For example, you do not need 3 GHz to write a document.
In such a case, the application will automatically adjust your PC’s clock power to the necessary speed.
This great tool also cools the CPU electronically, which is different from power management, which also cools the processors.
It cools all the unsolicited electronic components. The program also solves non-standby computer issues, which are also called Insomnia. It achieves this by analyzing every laptop activity and forcing standby.
Let’s review some of its best features:
Cools the CPU electronically
Automatically adjusts the clock power of your PC
Solves non-standby computer issues
Analyzes every activity of the laptop and forces standby
Core Temp is a tiny, no-fuss, yet powerful app that will help you monitor the CPU temperature and other vital information.
The software can display the temperature of each core of every processor in your system.
And you will be able to see temperature changes in real-time with varying workloads. Core Temp is also motherboard agnostic.
All major processor manufacturers have implemented a DTS (Digital Thermal Sensor) in their products, and these readings are much more accurate than conventional onboard thermal sensors.
So, you can use Core Temp with all the recent x86 processors by Intel, AMD, and VIA.
The app supports plug-ins, allowing developers to add new features and extend its functionality.
So although the basic app doesn’t cover fan speed monitoring, it can be added with a plug-in if the motherboard comes with the required sensors.
i-Cool is an excellent laptop cooling software solution for HP, Dell, Lenovo, Notebook, and most other PCs. It drastically reduces the heat generated by the CPU while simultaneously reducing the fan noise.
It has an intuitive graphical user interface that features functional buttons that enable you to change the operating behavior of i-Cool.
You will also find a series of indicators that constantly notify you about the CPU usage and fan noise level. You can modify the CPU performance in two modes: automatic and manual.
The manual mode is highly customizable and allows you to choose between 5 different levels of CPU usage: Silent, Low, Medium, High, and Full load.
For example, the Silent mode can be used in those situations when you don’t need to strain the CPU much, like typing, reading a document, etc.
You can change the mode to Medium when you are performing those activities that require moderate CPU performance.
When you switch to automatic mode, i-Cool automatically monitors the CPU loading without the need for user intervention and adjusts the CPU usage and fan noise level accordingly.
i-Cool is a very efficient cooling software that allows you to monitor your CPU usage without hassle.
The only disadvantage with this software is that it only supports GIGABYTE Intel 945 chipset series motherboards.
i-Cool’s most important features include:
Automatically monitors the CPU loading
Notifies you about the CPU usage and fan noise level
Supports GIGABYTE Intel 945 chipset series motherboards
If your laptop is running hot, it might be because you are not providing it with enough ventilation, or because too many unnecessary processes are running in the background.
Another possible cause is a virus on your PC. A virus can have a devastating effect on your computer and lead to all sorts of problems.
How can software keep my laptop cool?
While inefficient heat dissipation is the manufacturer’s fault, users can also play their part in keeping their laptops cool.
Either tweak your computer’s power options to maximum cooling or install third-party cooling software.
The so-called cooling software tools are intelligent apps that can reduce the load on the CPU and other computer components, thus reducing their usage.
How can I make my laptop run cool?
There are a few ways to make your laptop run cool. Below are some of the best tips to apply:
Avoid blocking your PC’s ventilation
Always keep your laptop clean
Close down unnecessary processes
Install a cooling app
Use a cooling fan
Know the activities your PC can handle comfortably at a time
How to adjust my system’s settings for maximum cooling?
Click the Start button, type power, and sleep, and select Power & Sleep settings within the results.
Now, choose Additional power settings.
Select Change plan settings next to the power plan you are using.
Click on the Change advanced power settings button, and enable active power cooling.
Ensure that the highest level of cooling is enabled in the Windows power settings of your laptop.
NOTE
The menu option for enabling active cooling varies from system to system, but in most laptops, it will either read \Active Cooling\ or \Maximum Performance\.
With this solution, we conclude our article on the best laptop cooling software for Windows 10 & 11.
Yes, if you’ve upgraded to the new OS, you should know that all the apps from our list are also Windows 11 compatible.
If your laptop is running too hot and you don’t want to install third-party programs, you should first ensure that the vents are not obstructed by dirt or clogging.
Improving the cooling system on your laptop is paramount for speed and efficiency in performance.
Some laptops are notorious for dissipating heat and can give you a gruesome experience, mainly when used for long hours.
To enhance the performance, we recommend installing one of the laptop cooling software described above and adjusting your system power options to improve the cooling efficiency further.
Facebook is the most popular social media platform in the world, with more than one billion active users. Due to this large number of users, Facebook is also a very attractive target for hackers.
Fortunately, the company built a very reliable security system to protect its users and frequently rolls out updates to block the latest threats.
However, sometimes hackers manage to outsmart Facebook’s security team, sneaking malware into the system. The good news is that such events occur extremely rarely.
One of the worst malware infections that ever targeted Facebook took place in 2016. Locky Ransomware evaded Facebook’s whitelisting by pretending to be a.SVG image file.
The virus was sent from compromised Facebook accounts. As always, Facebook reacted promptly and stopped the ransomware on its track.
This unpleasant event confirms once again why having a reliable antivirus is so important. Indeed, Facebook has a strong security system, but it never hurts to add one extra security layer.
TotalAV is an award-winning antivirus that offers full protection of all aspects of your computer. From safer browsing sessions and real-time virus removal to system optimization tools.
With the WebShield feature, all you do online is completely protected. Malicious websites are blocked, search results are filtered, and downloads and executables are verified, all before you can access any of them.
Also, you won’t see those annoying ads anymore, and no more unwanted pop-ups and notifications. All your Facebook data is safe from any possible stealing attempt.
Moreover, TotalAV provides the user with a set of tune-up tools to further enhance the system’s performance.
Let’s see some of TotalAV’s main features:
Multi-device compatibility so all your devices will be protected
Password vault for enhanced security and better management
Ransomware, phishing, and scam protection
PUA protection and zero-day cloud scanning
TotalAV
Choose the complete system security and optimizing package with TotalAV.
Bitdefender Total Security combines strong malware protection, antispam, and antiphishing tools that will make your PC malware-proof.
The software blocks virtually all malware, email, and phishing attacks, which are pretty popular among hackers targeting Facebook.
We covered the software thoroughly in our awesome Bitdefender review, so feel free to check it out for more information.
All your data, stored information, passwords, and credit card details are completely safe with Bitdefender. Multi-layered ransomware protection guards against attempts to steal them.
Let’s quickly look at its key features:
Powerful anti-malware tools
Integrated file shredder
Password manager that will make it even more difficult for hackers to infect your PC using the social media platform
Scan page URLs for malicious websites (this feature comes in very handy especially when you open a link on Facebook. It can also block outsiders from scanning your system’s ports)
Bitdefender Total Security
Take care of your online privacy and information with Bitdefender Internet Security.
ESET HOME Security Essential is an award-winning cybersecurity tool that offers you rock-solid protection when you’re online.
This software protects you against malware, and ransomware and alerts you if anyone tries to access your webcam.
ESET HOME Security Essential is available for multiple platforms, so you don’t have to worry if you prefer using Facebook on your phone or tablet.
The software’s multilayered protection has stopped ransomware and malware for millions of users worldwide, proving to be the most advanced security software currently on the market.
Let’s quickly look at its key features:
Blocks attacks specifically designed to evade antivirus detection,
Protects web browsers, and other apps, including Java-based software (your Facebook session is now safe on any browser: Mozilla Firefox, Google Chrome, Internet Explorer, and Microsoft Edge are all supported)
Anti-malware and anti-ransomware protection tools
Webcam protection features
ESET HOME Security Essential
Prevent malware from entering your device and accessing your personal data with ESET HOME Security Essential.
Guard.io is an antivirus disguised as a browser extension. Very lightweight and with almost no impact on your system’s resources, it’s ideal protection software for your browser and your system.
Being a browser extension has its perks, such as all processes being done away from the endpoint, so there is close to no resource usage.
Harmful sites are blocked before you access them, all downloads are verified, and no unknown connection can bypass the antivirus.
With advanced anti-phishing protection from emails, your personal Facebook data will be entirely safe. Scan, clean, and keep your computer safe at all times with no system slowdowns.
Also, the main features of Gurad.io are:
Ads are blocked in seconds, and no ads to be loaded means faster page loading
Information leak monitoring to keep track of all data breaches
Remove all suspicious extensions and take control of your browser settings
With advanced machine learning, you are protected in real-time
Guard.io
Guard every browsing session with this fully pledged antivirus with amazing protection.
With Avira, you can safely visit any page, download any file, and stream any video. The tool will block virtually any malware attempting to infect your PC while you’re online.
If you want some extra protection, you can enable the free VPN that is included with the program to keep your IP, identity, and location safe.
Avira blocks all attempts to steal data, whether it’s from Facebook or your other accounts, and with ransomware protection, no one can get close to it.
Also, it blocks ads, trackers, and infected websites. No ads will track your location anymore and since all harmful websites will be blocked, you won’t be exposed to any risks.
Let’s quickly look at its key features:
Reliable protection against malware, including viruses, worms, spyware, and ransomware
Prevent unauthorized access by ensuring your Firewall is optimized
Protect your confidential data from threats – that includes your Facebook password
Kaspersky Standard is a hacker’s worst nightmare. The software offers thorough anti-malware protection and also features a browser protection module that blocks malicious sites.
To further enhance protection it offers a free VPN to improve privacy and let you browse the web without being tracked.
Kaspersky also has anti-hacking that monitors your network and anti-ransomware that prevents hackers from entering your home network and stealing your data.
Protect your identity and money by making payments through an encrypted browser, securing passwords and information with a private vault, and filtering all malicious websites from safe ones.
Let’s quickly look at its key features:
A powerful firewall that blocks network attacks
Virtual Keyboard
Parental controls
Password manager that integrates into Mozilla Firefox, Google Chrome, and Internet Explorer (if you use one of these browsers to connect to your Facebook account, Kaspersky will keep your password safe)
Protection feature for cameras (if you use your PC’s camera to go live on Facebook, Kaspersky will block any camera hacking attempts, protecting your privacy)
Kaspersky Standard
Kaspersky Standard is the ultimate level of protection for personal data and sensitive information.
Norton Security Deluxe is a powerful antivirus that combines antiphishing and antispam capabilities with traditional antispyware and antimalware protection.
With plenty of advanced features, with Norton, you gain a VPN for a private internet connection every time you want to browse the web. It hides your location and makes you untrackable.
Parental control is a must-have feature for your children. Easy-to-use tools to monitor your kids’ activity and smartphone location as well as block inappropriate content.
Norton 360 comes with a family plan to help you simplify the processes of security around the house and help your children learn about the world in a safe way.
Let’s quickly look at its key features:
Protects all your devices, including your PC, tablet, and smartphone (an excellent feature if you use multiple devices to connect to your Facebook account)
The Norton Management feature (to easily move your protection from one device to another)
Scan websites and social networking sites for suspicious links and content in order to identify the latest social networking scams
Avast Free Antivirus utilizes advanced AI and machine learning to provide real-time protection from older and emerging threats alike, such as malware, ransomware, adware, and spyware.
Protect your social media accounts from data theft or from being accessed by unauthorized people with Avast. If you want even more protection, you can upgrade to the Premium version of the software.
Offering complete protection of your personal information and your PC at the same time makes avast a great protection software.
On the premium side, you gain a VPN to safely access any webpage and avoid all trackers that might try to steal your data.
With Avast Premium, you’ll benefit from these key features:
Premium malware scanner and removal
PC cleaner and optimizer
Customer support and remote control
Wi-fi inspector
When you’re online, the risk of malware infection increases. Many hackers target social media in their attempt to spread malware and infect your PC.
Installing a reliable antivirus solution will prevent such unpleasant events, offering you peace of mind when you’re on social media. Which tool do you use? Share your experience with us via the comments section below.