Razer Headphones are Not Working: 7 Ways to Fix Them

We figure a bunch of folks have suffered the problem of the Razer Kraken drivers not working; well, here is our guide to getting you well on your way to fixing this issue.

The Razer Kraken headset is a pair of headphones designed for gaming. Kraken headphones include retractable microphones that players can usually utilize for multiplayer games.

However, some users have reported that the Razer Kraken USB mic is not working for them.

The headphones might have great audio, but it’s hard to keep the faith between the Razer headset not being detected and the Razer mic not working.

Why is my PC not detecting my Razer Kraken headset?

If your PC has not been able to detect your plugged-in Razer Kraken, it is usually because of one of the following reasons:

This is not an exhaustive list, and there could be many other reasons, but regardless of the causes, our suggested solutions should suffice if the Razer headset is not working on a PC or is not detected.

Moreover, the issue can occur on different Windows iterations and applications:

  • Razer headphones are not working in Windows 10/11 – The solutions below are applicable in both OS iterations, so make sure to follow them, one by one.
  • Razer headphones are not working on Discord, Xbox or laptop – You might need to run those applications, that fail to make use of your headphones, in administrator mode.

Why is the Razer Kraken X mic not working?

If this issue occurs, it’s possible that Ryzen Synapse is not detecting the headset. This could be a driver issue, or your headset might not be configured appropriately.

Other brands also have this issue, and many reported that Hyperx Cloud 2 microphone is not working on Windows. If this happens, check if everything is connected correctly and ensure you have selected the correct input device.

We covered USB headset issues in a separate guide; you should check it out if you want more in-depth solutions.

How do I get my Razer headphones to work?

    1. Use the Hardware and Devices Troubleshooter

    Hardware and Devices is a built-in Windows 10 troubleshooter that helps users repair peripheral devices. Thus, that troubleshooter might provide a fix for the Razer Kraken microphone.

  1. 1. Open Run by pressing the Windows key + R. Enter Control Panel in Run, and hit Enter.

    razer kraken drivers not working
  2. 2. Next, click Troubleshooting.

  3. 3. Click View all on the left of the Control Panel window.

  4. 4. Select Hardware and Devices to open the window shown directly below.

  5. 5.  Click Advanced and select Apply repairs automatically.

  6. 6. Follow the wizard till the end then reboot your PC.

If you also have issues with your Razer mouse, don’t hesitate to check our comprehensive guide and make your device work again.

2. Update the drivers with an advanced tool

Updating your drivers is the best solution to keep you away from this kind of issue. But, doing it manually can be time-consuming.

A specialized driver updater can simplify this process and greatly reduce the time needed to do it. Powerful features allow you to quickly scan your computer for a faulty driver and replace it in a matter of minutes.

3. Make the Razer Kraken Headset Microphone your default device

  1. Right-click the speaker icon on the system tray and select Sounds Settings.
    razer kraken drivers not working
  2. Scroll down the right pane and select More sound settings.
    razer kraken drivers not working
  3. Right-click an empty space within the Recording tab and select Show Disabled Devices.
  4. Right-click the Razer Kraken Headset Microphone and select the Enable option.
  5. Then right-click Headset Microphone and select Set as Default Device.
  6. Press the Apply button, and click OK to close the window.

Sometimes Windows 10 automatically choose which device to be your default one for sounds. Choose the Razer headset and check if the problem persists.

4. Adjust the Headset Microphone Line in Volume

  1. Right-click the speaker icon on the system tray and select Sounds Settings.
    razer kraken drivers not working
  2. Scroll down the right pane and select More sound settings.
    razer kraken drivers not working
  3. Then select the Recording tab, right-click your Razer Kraken Headset Microphone and select the Properties option.
    razer kraken drivers not working
  4. Select the Levels to tab on the Headset Microphone window, then drag the Line in the volume bar to the far right (100%) if required.
    razer kraken drivers not working
  5. In addition, click the Advanced tab, and select the lowest sample rate on the Default Format drop-down menu.
    razer kraken drivers not working
  6. Click the Apply and OK buttons.

Maybe the volume level for the Razer microphone is set to a low level right from the driver properties, even if this is an infrequent event. Check the settings to be sure.

5. Run the software in Administrator Mode

  1. Right-click the program’s shortcut or .exe icon and select Properties.
  2. Click the Compatibility tab to open the options in the snapshot below, and select the Run this program as an administrator setting.
  3. Then click Apply then OK to apply the new option.

Run all the games and other software; you utilize the Kraken microphone in admin mode. That will ensure the software can access all connected peripherals.

You should try this solution if Razer Kraken drivers are not working after an update.

6. Roll Back the Realtek Audio driver

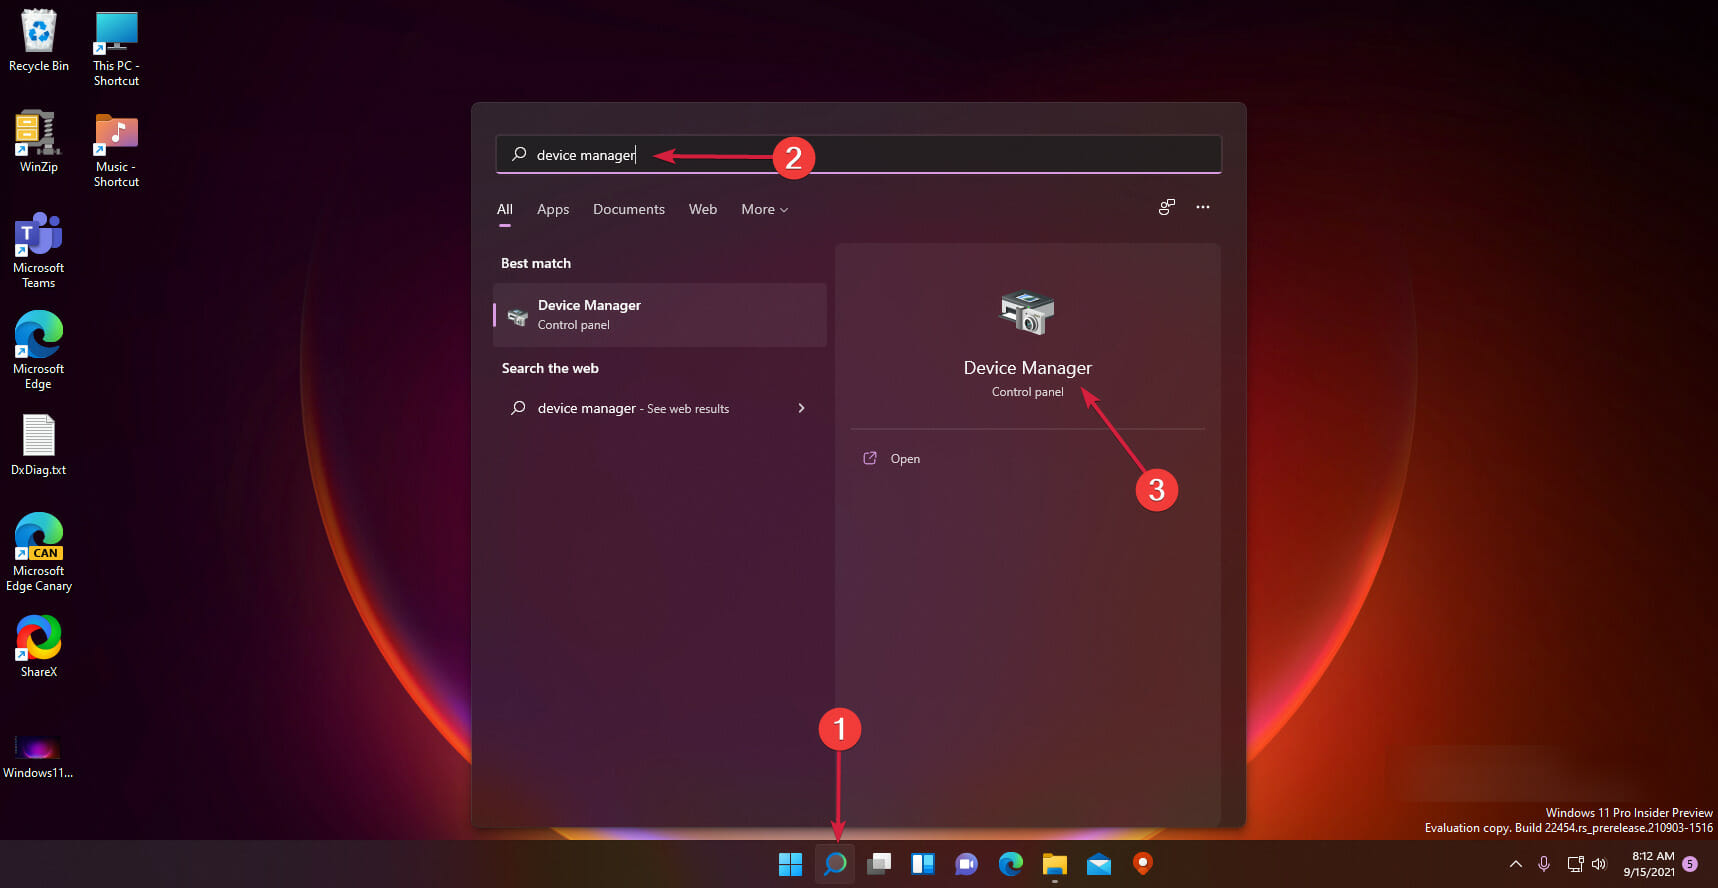
  1. Press hotkeys Win + X and click on Device Manager.
    razer kraken drivers not working
  2. Double-click Audio inputs and outputs to expand that device category.
  3. Right-click the Realtek device and select Properties.
  4. Click the Driver tab, then press the Roll Back Driver button if it isn’t grayed out.
    razer kraken drivers not working

Updating drivers often fixes peripherals. Yet, some Razer Kraken users have stated that rolling back Realtek audio driver updates fixed their headphones’ microphones.

7. Reinstall the Razer Kraken drivers

  1. Press hotkeys Win + X and click on Device Manager.
    razer kraken drivers not working
  2. Double-click Audio inputs and outputs to expand that device category.
  3. Then right-click your Kraken headphones and select Uninstall device.
  4. Press the Uninstall button on the dialog box window that opens.
  5. Then shut down Windows, and restart your desktop or laptop with the Kraken headphones. That will reinstall the Razer Kraken driver.

How do I reset my Razer Kraken headset?

You should use the same steps we discussed in Solution 1. This will automatically reset the Kraken headset. And when it is reconnected, you will have it back to default settings.

Not only the headset can give you various issues, but also the Razer mouse. Thus, we’ve also written a comprehensive guide to help you solve all your mouse issues.

A hardware repair might be required if the above resolutions don’t fix your Razer Kraken microphone.

You can return your Razer headphones to the manufacturer to repair or replace the headset if it’s still within a warranty period. Razer headsets have a one-year warranty support period.

We hope you have resolved the issue of your Razer Kraken drivers not working. Let us know how it worked for you in the comments section below.

Windows 11 Telemetry: How to Permanently Disable it

When you upgrade your PC to Windows 11 or install a fresh copy of it, the telemetry and data collection feature is enabled.

Because this is automatically activated, it collects information about all types of user activity and sends it to Microsoft.

Telemetry is critical technical data collected from Windows devices and provides information about the device and how the operating system and related software are working in the background.

However, while the aims of collecting telemetry data may be noble, many businesses and organizations are concerned about Windows privacy issues and believe that their privacy is being violated, and they may wish to prevent the collection and uploading of this telemetry data.

Individual users want their data to be safe and secure as well, thus, they must disable this option, which can be done through the settings menu.

Besides that, using a VPN is also recommended as it can hide your location, one of the best options we recommend is Private Internet Access.

Unfortunately, Microsoft has not offered a straightforward method of turning it off. However, the built-in Settings app includes a number of choices for disabling telemetry and diagnostic data collecting.

We will go over the various techniques for disabling telemetry in Windows 11 right after we understand a little bit more about what it consists of.

What does telemetry do?

Telemetry is an automated procedure that involves data collection at remote locations and transmission back to the parent, who then uses the information to measure, monitor, and improve services.telemetry  disable windows 11 telemetry

Microsoft collects data from computers, aggregates it, and utilizes it to keep Windows devices secure, improve the quality of its services, and improve the overall performance of the Windows operating system. This is true for Windows 11, 10, and now for Windows 8 and Windows 7 as well.

The information that Microsoft collects complies with the company’s security and privacy policies, as well as applicable national and international laws and regulations.

Among its many applications are the provisioning of, improvement of, and personalization of experiences, security, health, quality, and performance analysis.

But it may share aggregated, anonymized telemetry data with third parties for restricted purposes, or it may share business reports with partners, depending on the circumstances.

You can read more about system diagnostics to understand how Windows collects and processes this information.

How to disable telemetry in Windows 11?

1. Turn off optional diagnostic data

  1. Press the Windows key + I to open the Settings app, then go to Privacy & security, followed by Diagnostics & feedback.privacy-security-diagnostic  disable windows 11 telemetry
  2. Under the Diagnostic data section, make sure the Send optional diagnostic data is switched off.optional-diagnostic-off  disable windows 11 telemetry
  3. Now go back to Privacy & security and choose the Activity history option.activity-history  disable windows 11 telemetry
  4. Uncheck the box for Store my activity history on this device, then go to Speech and click on Stop contributing my voice clips.stop-voice-clips  disable windows 11 telemetry
  5. Now go under the General panel and switch off all the options that collect user data and send it to Microsoft.general-off  disable windows 11 telemetry

Following the procedures outlined above, you will now send less data to Microsoft, so exposing yourself to less risk. Telemetry will not be fully eliminated as a result of this method, but it will be significantly reduced.

2. Use Registry Editor

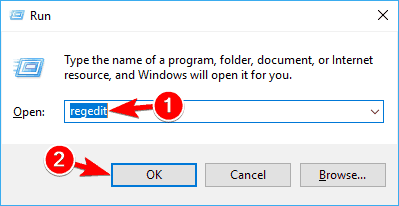
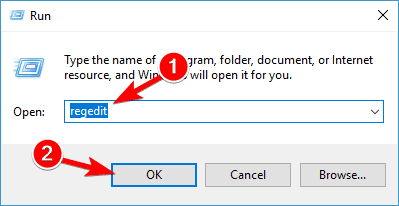
  1. 1. Press the Windows + R key shortcut on your taskbar.

  2. 2. The Run dialog window will open.

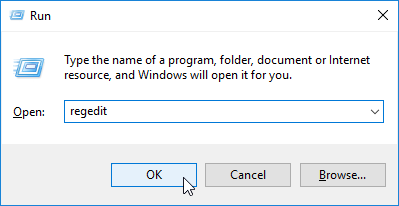
  3. 3. Type regedit in the Run box.

    regedit-windows-11 disable windows 11 telemetry
  4. 4. Hit Enter to run the command.

  5. 5. The Registry Editor menu will open.

  6. 6. Now navigate to the following path by copying and pasting it in the search bar at the top: HKEY_LOCAL_MACHINE\SOFTWARE\Policies\Microsoft\Windows\DataCollection

    regedit-location disable windows 11 telemetry
  7. 7. In the right panel, right-click on any empty space to bring up a list of options.

  8. 8. Choose New from the list and select DWORD value (32-bit) or the 64-bit option for those with a 64 bit system.

  9. 9. Name the new DWORD AllowTelemetry.

    telemetry-value disable windows 11 telemetry
  10. 10. Now, double-click on it and set the Value data to 0.

  11. 11. Restart your computer in order for the modifications to take effect. Your machine will no longer be subjected to telemetry.

  12. A permanent solution to disabling telemetry on your Windows 11 device involves using the Registry Editor. By making a few modifications in it, you can disable the feature altogether, without having to manually configure other settings.

3. Use services.msc

  1. Press Windows + R keys to open the Run command window. On the Run command window, type services.msc and click on the OK button.services-msc-run  disable windows 11 telemetry
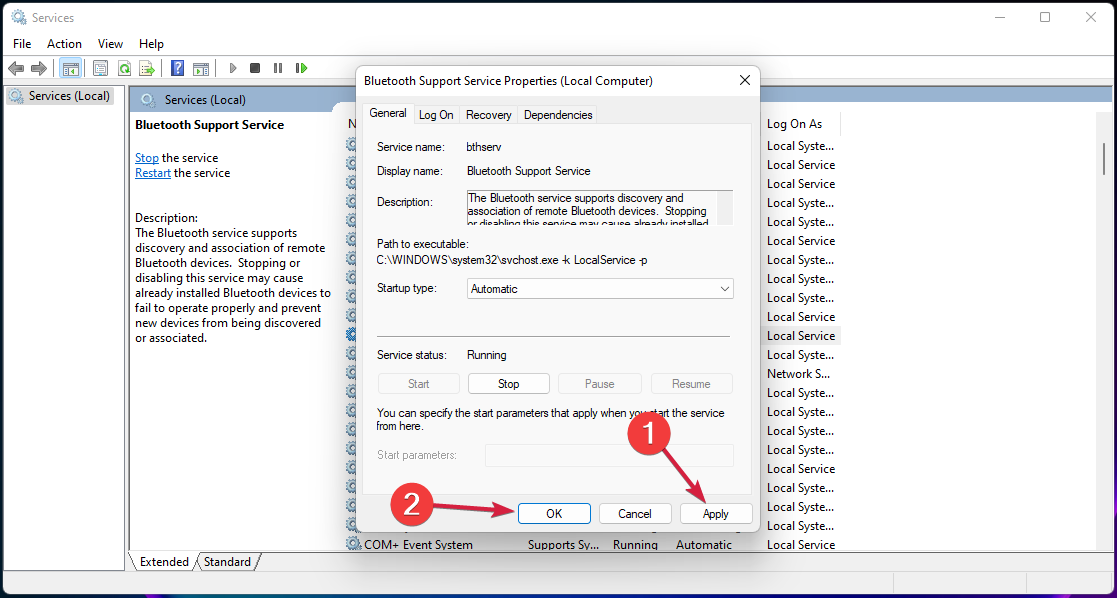
  2. In the Services window, scroll down and double-click on Connected User Experiences and Telemetry. Disable Connected User Experiences and Telemetry by setting Startup Type to Disabled. Now click on Apply to make changes.connected-user-experience  disable windows 11 telemetry
  3.  Now find another service by pressing the Ctrl + F keys and typing in dmwappushsvc, then double click on it.
  4.  Here, disable the dmwappushsvc service by setting the Startup Type to Disable and click on Apply.

It is necessary to restart your computer in order for the changes to take effect. Your machine will no longer be subjected to telemetry beyond this point.

4. Use Task Scheduler

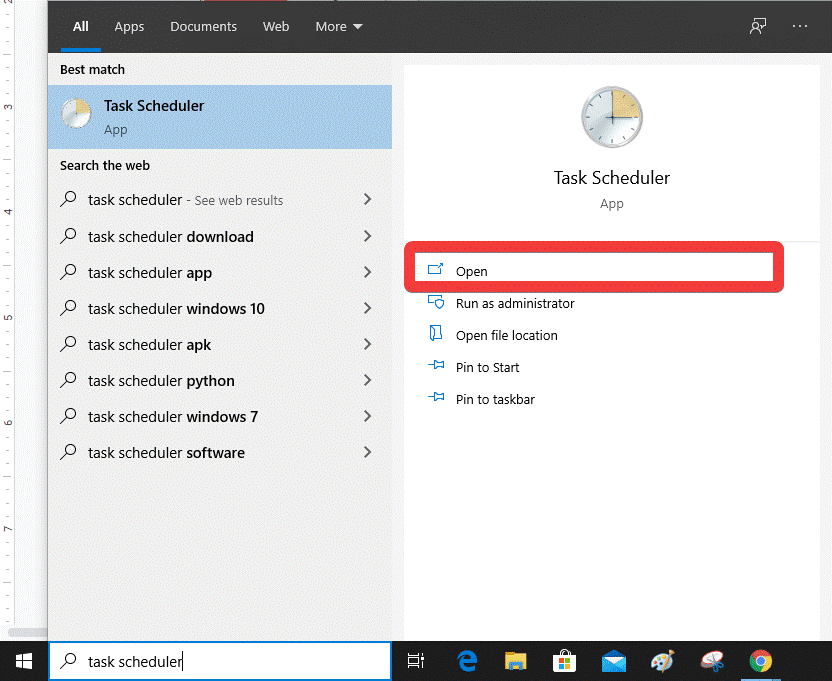
  1.  Open the Start Menu and type Task Scheduler in the search bar. Click on the option that’s most relevant.task-scheduler  disable windows 11 telemetry
  2. In this tab, go to the following destination, right-click on the task named Consolidator and disable it. Repeat the process with all other tasks mentioned in this panel: Task Scheduler Library, followed by Microsoft, then Windows and Customer Experience Improvement Program.disable-consolidator  disable windows 11 telemetry

5. Use Group Policy

  1. Open Group Policy with the run command. Press the Windows key+ R to open the Run box and type gpedit.msc. Next, click on OK or press Enter.gpedit  disable windows 11 telemetry
  2. This opens a new window named Local Group Policy Editor. Here you need to navigate to the following destination: Computer Configuration, followed by Administrative Template, then Windows Components and Data collection and Preview Builds.data-collection  disable windows 11 telemetry
  3. Double click on the Data Collection and Preview Builds, and you will see options on the right pane. Now double click on Allow Telemetry, then click on the Disabled option. To apply the changes applied, click Apply.

In order for the modifications to take effect, you must restart your computer. Beyond this point, your system will no longer be subjected to telemetry monitoring.

Can I change the levels of telemetry?

For those looking for strategies to reduce the number of times your Windows computers communicate with Microsoft, the telemetry and data collection settings in Windows 11 can be configured.gpedit-example  disable windows 11 telemetry

There are four different levels of telemetry:

  • Security – Exclusively the telemetry data necessary to keep Windows devices secure is gathered at this level, and it is available only in the Windows 11 Enterprise, Windows 11 Education, and IoT Core editions of the operating system.
  • Basic – This level collects a bare minimum of information that is necessary for understanding the device and finding problems later in the process.
  • Enhanced – The next one collects information on how you interact with Windows and its apps, which is used to help Microsoft enhance the overall user experience.
  • Full – This layer collects all of the information mentioned above, as well as any additional information that may be required to detect and assist in the resolution of problems.

The fact that Security is the level that sends the least amount of information can be seen in the list above. As a result, Security is the degree of protection I recommend to all of our customers who work in enterprise situations.

At the same time, the model is organized in such a way that new information is received with each level that is completed. In other words, everything collected in Security is likewise collected in Basic, Enhanced, and Full versions of the software.

Furthermore, additional information is provided based on the level selected. All of this information will be transferred to Microsoft, and in return the service will receive configuration information from Microsoft’s data center servers, allowing it to collect hardware/device-specific information.

If you want to change the level of telemetry on your system, open Group Policy Editor and navigate to the following setting:Computer Configuration\Administrative Templates\Windows Components\Data Collection And Preview Builds\Allow Telemetry

Here select Enabled and then from the drop-down, select Basic or any level which your version of the operating system allows.

For the Windows enthusiasts out there, we recommend that you take a look at the five best security and privacy features in Windows 11, to find out more about the beautiful hidden facets of this operating system.

If you’ve been encountering issues with malware or viruses on your computer, check out our article on what to do if Windows Defender is not working properly in Windows 11.

Alternatively, make sure to read our post on the five best antiviruses for Windows 11 to safeguard your PC and avoid any negative consequences.

Let us know in the comments section below which solution worked best for you as well as how many security measures you have taken so far.

Microsoft Works for Windows 10: How to Run it

Have you ever tried using MS Works on Windows 10? It might be harder than you think.

Even though Works has been discontinued by Microsoft, some users still prefer to use this software instead of MS Office because of its simplicity and customization level.

In this article, we will explore a few methods that will allow you to either run MS Works (if you already have an installation CD or the software is installed on your PC) or convert the files from the .WPS file format of Works, to a more compatible format that can be opened in Open Office, Libre Office, or Microsoft Office.

Although Microsoft Works is discontinued, you can still run it on Windows 10 by setting the MSWorks.exe file to run in Compatibility Mode. Alternatively, you can convert .WPS files with dedicated Microsoft Works file converter.

How can I use Microsoft Works on Windows 10?

  1. Run MS Works executable file in compatibility mode
  2. Convert MS Works files (WPS)

1. Run MS Works executable file in compatibility mode

  1. 1. Ensure that you have the MS Works app installed on your PC. If not, go ahead and do it.

  2. 2. Navigate to the folder that contains the executable file for Microsoft Works (C: > Program Files (x86) > Microsoft Works)

  3. 3. Right-click on the MSWorks.exe file, and select Troubleshoot compatibility.

    run microsoft works for windows 10 in compatibility mode
  4. 4. The troubleshooter will automatically detect the best compatibility mode.

  5. 5. After this process is completed, select Try recommended settings.

    recommended settings troubleshooting
  6. 6. Click on Test the program.

    test program microsoft works for windows 10
  7. 7. This will launch the MS Works application.

    ms works window
  8. Although MS Works is an old software, you can still use it on your Windows 10 device. What you need to do is run it in compatibility mode. This will ensure proper functioning of the software.

Note: This method only applies if you already have a Microsoft Works installation CD, or if you already have this software installed on your PC


2. Convert MS Works files (WPS)

MS Office

This converter gives you the power to open, edit and save files in Works Word Processor format.

  1. Download Microsoft Works 6–9 File Converter.converter download Microsoft Works on Windows 10
  2. Install the Microsoft Works Converter to your PC.

Note: Make sure you already have Microsoft Office installed on your PC for this fix to work.

Open Office

openoffice Microsoft Works on Windows 10

You can easily transform your MS Works files to Open Office format, by using the online converter called Zamzar.

  1. Once the website is opened, click Choose and navigate to the location of the file you want to convert, select it, and then click Open.
  2. Next, select the output file format of your choosing.
  3. Enter your email address in the text field.
  4. Click Convert and OK in the confirmation window in order to upload the file to Zamzar.
  5. You will receive an email from Zamzar with a clickable link to the download page of your converted file.
  6. Click on Download, and choose the download location of the newly converted file.

After this process is complete, you will be able to open up the newly created file inside Open Office.

Libre Office

libre office Microsoft Works on Windows 10

If you already have Libre Office installed on your PC, you can follow these steps:

  1. Open up Libre Office, click File, and select Save as.
  2. Navigate to the path you wish to save your file in.
  3. Click on the File type drop-down menu and select the format you need to use the file in RTF, DOC, or ODT.
  4. Click Save to convert the file.
  5. After this process is complete, you can open up the converted files normally.

In this article we explored a quick way to run MS Works on your Windows 10 PC, and also a method to convert WPS files to any Office software you use.

Please feel free to let us know in the comment section below if this article was helpful to you.

How to Connect your Sony Smart TV to Wi-Fi

In order to use all the functionality and features of your Sony Smart TV, the device should be connected to the Internet.

After connecting your TV to the Internet, you’ll have access to more features, you’ll be able to download and install new apps, and even use streaming services.

The Internet connection can be made wirelessly (through a wireless network) or wired (using an Ethernet cable).

Usually, if you like to stream movies and other content on your Sony Smart TV, it’s recommended that you use a wired connection because it’s more stable and offers a bigger bandwidth.

For more Sony guides, check out our dedicated hub.

How do I connect to the Internet on my Sony Smart TV?

1. Set up a wireless connection

how to connect sony smart tv to wi-fi
  1. 1. Check your modem and router to confirm that you have a working Internet connection.

  2. 2. On your Sony Smart TV’s remote control, press the Home button.

  3. 3. Go to Settings.

  4. 4. Now navigate to Network > Network Setup.

  5. 5. Choose Wireless Setup > Scan.  Your device will now scan for available wireless networks.

  6. 6. When you see your Network (SSID), select it and enter the password for your Wi-Fi network.

  7. 7. After that, select Continue.

  8. 8. When prompted to set up the TV’s IP address and proxy server, choose Auto.

  9. 9. Select Continue > Save & Connect.

  10. 10. Confirm the selection by choosing OK. The setup should now be complete.

  11. You can connect to your Sony TV to Wi-Fi using your TV’s built-in Network Settings. Depending on your Sony Smart TV’s model number, some options may differ, but you can select similar ones to follow the same process.

Keep in mind that newer devices have built-in wireless LAN and you can connect directly.

If your TV doesn’t have built-in wireless LAN but is wireless LAN-ready , you can use a wireless LAN adapter like the UWA-BR100 to connect to a wireless network.

2. Set up a wired connection

connect sony smart tv to internet with ethernet cable
  1. First, you’ll need an Ethernet cable.
  2. Search for the LAN port on your Sony Smart TV.
  3. Connect one end of the Ethernet cable to it and the other one to your wireless router.
  4. Press the Home button on the remote control.
  5. Now go to Settings.
  6. Navigate to Network > Network Setup.
  7. Select Wired Setup.
  8. Select Auto.
  9. After that, choose Save & Connect.
  10. Your Sony Smart TV should now be connected to the Internet.

The process is similar for Sony Smart TVs with Android OS as well as for Sony Smart TVs released before 2015. The options may be named differently, but you can choose similar ones to follow the same process.

If there are any connection problems, re-do the Internet connection setup, check with your ISP for issues, or update the Sony Smart TV’s firmware.

Remember that usually, a wired connection is better because it offers more stability and bigger bandwidth, especially if you like watching streamed content or you do heavy network tasks.

If you have any other suggestions or questions, feel free to reach for the comments section below.

Best Ways to Fix This PC Must Support Secure Boot Message

Windows 11 is officially available for download, so it comes as no surprise that you want to install it right away. Microsoft introduced a new set of system requirements, and Secure Boot is one of them. On some machines, it isn’t enabled by default.

This feature is part of the newest Unified Extensible Firmware Interface (UEFI) specification, and it basically defines a new interface between the OS and the firmware or BIOS.

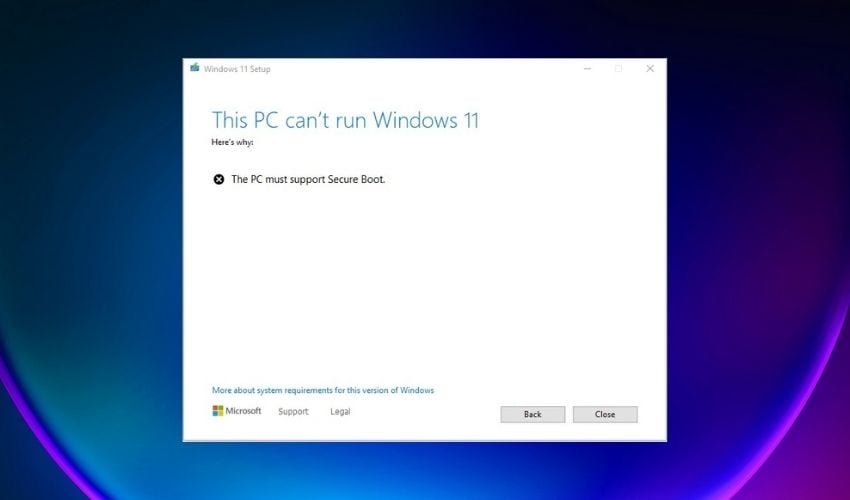
If you don’t have this feature enabled, during the Windows 11 setup you will see the message This PC can’t run Windows 11 followed by This PC must support Secure Boot.

If your PC meets Windows 11’s hardware requirements but Secure Boot is disabled, enabling it in BIOS is not so complicated. Before that, here’s what you need to know about the Secure Boot feature.

What does This PC must support secure boot mean?

The most recent Unified Extensible Firmware Interface (UEFI) specification, version 2.3.1, includes Secure Boot as one of its features. This feature defines a completely new interface between the operating system and any firmware or BIOS that may be present.

A machine is better able to withstand malicious software attacks and infections when the Secure Boot feature has been activated. And all of its settings have been specified.

Windows 11 requires the UEFI Secure Boot feature in order to install it. Even if you have this feature, it might be turned off, hence the error messages:

  • GigaByte This PC must support Secure Boot – Dell computers are no exception from Windows 11’s check for the Secure Boot feature.
  • ASRock This PC must support Secure Boot – Follow the steps below in order to activate your UEFI Secure Boot feature.
  • Lenovo This PC must Support Secure Boot – In case your Lenovo PC does not have the feature, you can try to bypass it by following the steps in our last section.
  • This PC must support Secure Boot bypass – This is the general message that appears on users’ screen when they try to install Windows 11 but they don’t meet the requirements.

Follow along as we will show you how to turn on Secure Boot or how to bypass this check as well as the TPM 2.0 one.

Why should I enable Secure Boot?

When enabled, Secure Boot helps your computer to resist malware attacks that may not be detected by antivirus software. It identifies any unwanted modifications of the boot loaders and the system files by validating their digital signatures.

Practically, if such a trespassing action is detected, it will be blocked from running before it attacks or infects the system.

You can see the Secure Boot like a security gate. When you access it with a valid code, it will pass through the gate and will be executed. If not, Secure Boot blocks the code at the entry point.

Should you be worried if it is disabled? Clearly no. If you use your machine for basic tasks, you will still be safe.

However, you may see it as an important element in your computer’s security. That’s why enabling it is recommended as it helps you ensure better defense against all kinds of threats.

How do I fix This PC must support Secure Boot on Windows 11?

1. Check if Secure Boot is enabled without entering BIOS

  1. Press the Windows + R shortcut to open the Run application then type msinfo32 and click Yes or press Enter.
  2. Under System Summary, you will find an option called Secure Boot State. If it’s On it means that Secure Boot is enabled and if it’s Off, Secure Boot is disabled.
  3. If it’s disabled, follow the instructions from the next step to enable it.

One of the best things about Windows is that it’s very flexible. And easy to use and the same reflects in this scenario. To check if Secure Boot is enabled you don’t need to boot into BIOS and waste your time.

Instead, you can use msinfo32 just like we described in the steps above to check this information quickly.

2. How to enable Secure Boot for Windows 11 (from BIOS)

  1. Click on the Start button and select Settings.settings-w10-menu this pc must support secure boot
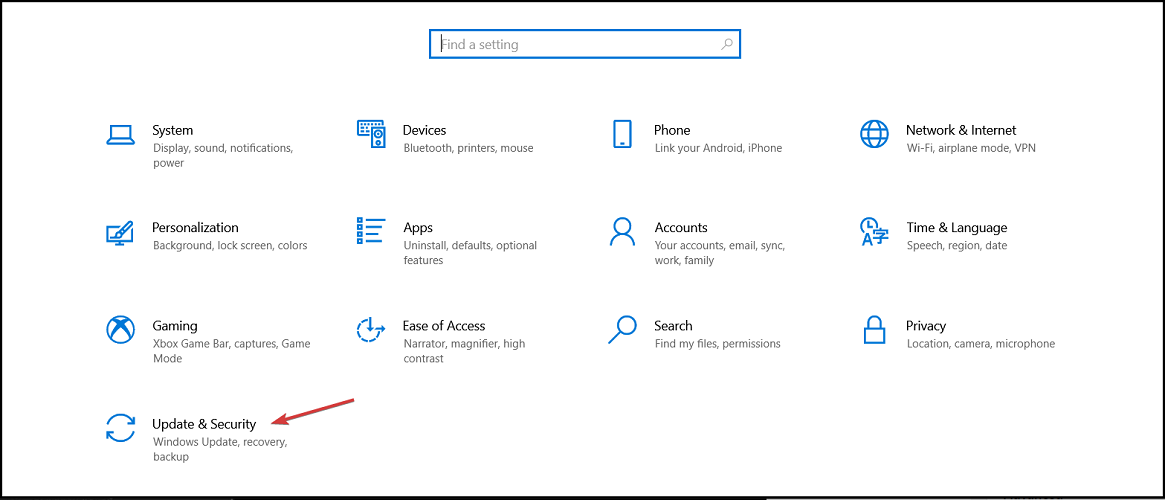
  2. Then click on Update and Security.
  3. In the left tab, find and click on the Recovery option, then select the Restart now button.
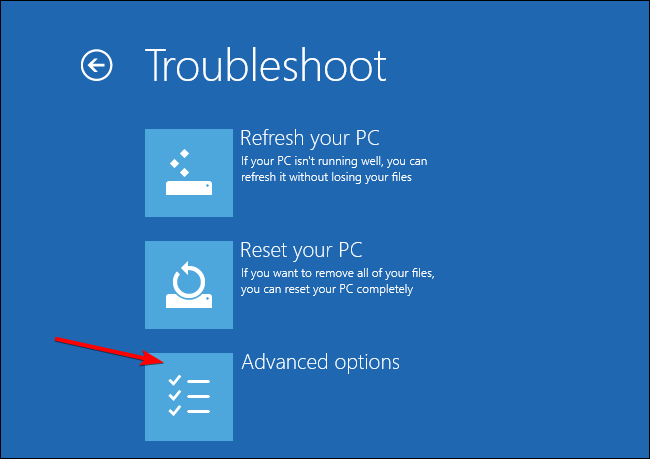
  4. When you get to the boot options, select Troubleshoot.troubleshoot-opt this pc must support secure boot
  5. Now click on Advanced options.advanced this pc must support secure boot
  6. Select the UEFI Firmware settings option.uefi this pc must support secure boot
  7. Your PC will then reboot into BIOS click on the Security, then select the Secure Boot option.
  8. Now enable the Secure Boot by toggling the option to On and accept the changes.
  9. Press F10 on your keyboard to save the changes and exit BIOS.
  10. After the system reboots, restart the Windows 11 installation process.

Remember, for this solution to work, you also need to have a UEFI boot system and not the Legacy BIOS. It’s another Windows 11 requirement that you need to comply with.

If you have to make extra changes, we have an article on how to switch from UEFI to Legacy BIOS but the guide can go both ways.

How do I enable TPM 2.0 and Secure Boot?

TPM is a security component and a prerequisite for Windows 11 that has been the focus of controversy due to the fact that it is required in order to install the most recent version of the operating system.

A lot of different manufacturers use the integrated version that is attached to other chips. The firmware-based versions are also quite common. And they operate within a reliable execution environment on your central processing unit (CPU).

Check out our post on how to enable TPM 2.0 in different versions of BIOS in order to be able to upgrade to Windows 11.

Can you install Windows 11 without Secure Boot?

It is no longer a secret that in order to install Windows 11, you will require TPM 2.0 and Secure Boot, but it is also no longer a secret that you may enable these features using the UEFI BIOS Mode.

On the other hand, we have a solution that will assist you in installing Windows 11 on Legacy BIOS without TPM 2.0 and Secure Boot checks being performed.

Make sure that you have a backup copy of all the crucial data on your drive before beginning the procedure, then take a look at how to install Windows 11 without Secure Boot.

How to bypass the Secure Boot requirement? (Insider account needed)

  1. Log into your Insider account, then head over Microsoft’s dedicated webpage, and download the Windows 11 Preview Build. You have to log into your Insider account and set into the Dev Channel.
  2. Choose Windows 11 under Select edition and click on Confirm.
  3. The download will start and you will get the Windows 11 ISO.
  4. Press the Windows + E combination from your keyboard to start File Explorer.
  5. Locate the Windows 11 ISO you just downloaded, right-click it, and select Mount.
  6. Go to the Windows 11 image, select all files, right-click and then copy all files or use the Ctrl + C shortcut.
  7. Create a new folder by right-clicking an empty space on one of your drives and selecting New, then Folder.
  8. We suggest naming the folder Windows 11.
  9. Now open the folder and paste the contents by right-clicking an empty space and selecting Paste or by using the Ctrl + V shortcut.
  10. Mount a Windows 10 ISO just like you did for the Windows 11 ISO in this solution. If you don’t have a Windows 10 ISO, you can download one by using step 1 from this solution and select a Windows 10 ISO instead of the Windows 11 one.
  11. Access the sources folder within the Windows 10 image.
  12. Locate the appraiserres.dll file, right-click on it, and select Copy.
  13. Now go back to the Windows 11 folder you created earlier, open the sources folder, and paste the appraiserres.dll file.
  14. Select Replace the file in the destination.
  15. Next, double-click the setup.exe file from the Windows 11 folder to start the installation.

This solution will enable you to bypass the Secure Boot check from the installation of Windows 11 so you won’t need to make any changes to your BIOS.

To download the Windows 11 ISO, you will need a Windows Insider account and you need to be listed in the Dev Channel. On the other hand, you can download the Windows 10 ISO without it.

So, the Secure Boot feature is not absolutely necessary but when it comes to your PC, nowadays you shouldn’t spare any efforts to protect your data and privacy.

Of course, you can also get an extra layer of defense with the best antiviruses with unlimited license that will help you forget all about activation headaches. Check out the updated list of antivirus programs for Windows 11 as well.

Did this article help you enable Secure Boot and solve the error This PC Must Support Secure Boot To Run Windows 11? Share your feedback in the comments section below.

8 Ways to Fix Steam Download Restarting or Resetting

Steam download keeps restarting? We’ll show you how to fix it. If you’re watching your download bar jump back or pause endlessly, there’s a good chance something’s interfering behind the scenes.

It could be your internet cutting in and out, antivirus getting too protective, or even Steam itself choking on its cache.

Whatever the reason why Steam downloads keep resetting, we’ll walk you through what’s likely causing it and show you how to get those downloads back on track.

Why does my Steam download keep stopping and restarting?

  • Bad network connection issues: Downloading on Steam requires a stable internet connection. However, experiencing fluctuations in your network can prompt the Steam download to keep restarting. Likewise, connecting your computer to the internet through a cable network can cause a series of issues with the bandwidth. Also, it affects the download speed and can result in the Steam download pausing and restarting issue.
  • Third-party app interference: Sometimes, running many apps simultaneously on your device can cause issues with the Steam Client and affect its downloads. Apps like antivirus and VPNs are common culprits for this error. Furthermore, many apps may share the bandwidth from your network connection. So, it affects the download speed Steam gets, which results in the download keeps resetting issue.
  • Windows Defender interference: Windows Defender can cause issues with Steam downloads, making the Steam Client crash. The Windows advanced antivirus may mistake Steam download for a dangerous connection. Hence, blocking its activities results in Steam restarting updates.

How do I fix the Steam download restart?

First, Visit SteamStat.us to see if servers are down or overloaded. If that’s the case, just wait it out, but if the servers are fine, follow the steps below.

1. Restart your PC

  1. Click Start on your computer screen.
  2. Select Power from the drop-down.
  3. Click on Restart, then OK.

Restarting your device can fix most of the issues you encounter with Steam. It helps the computer fix booting errors and also helps the Steam Client run smoothly.

2. Disable Windows Defender

  1. Click on the Start button on your computer.
  2. Type Windows Security in the search box.
  3. Select the Virus & threat protection option, and click Manage settings.
  4. Toggle off the Real-time protection option to turn off Windows Defender Antivirus.

Disabling the Windows Defender Antivirus on your computer can fix the problem.

3. Check your internet connection

Performing a power cycle on your router can help fix the Steam download keeps restarting issue.

However, switching to a wireless network is best for Steam downloads. It is because the wireless connection is faster and more stable.

4. Limit Steam network bandwidth

  1. Launch the Steam Client on your computer and select Run as administrator.
  2. At the right corner, click on Steam, then select Settings.
  3. Click on Downloads and select the Limit Bandwidth to option.
  4. Select a lower bandwidth and close Steam.

Restart the Steam Client and see if the error persists.

5. Clear Steam download cache

  1. Press the Windows + R keys to launch the Run dialogue box.
  2. Type Steam://flushconfig in the search box and click OK.
  3. Click OK on the confirmation page.

Clearing the download cache has been confirmed to be an effective fix for this problem.

6. Close Background Apps

If Steam’s downloading super slow or keeps restarting, other apps might be hogging your bandwidth. Here’s how to shut them down:

  1. Press Ctrl + Shift + Esc to open the Task Manager.
  2. Click the “Processes” tab.process tab task manager
  3. Look for apps that use a lot of Network or CPU. Think browsers, torrent apps, Discord, VPNs.
  4. Click on the app you want to close.
  5. Hit the “End Task” button at the bottom right.end task task manager
  6. Repeat for any other apps you don’t need right now.

7. Free Up Disk Space

  1. Open File Explorer (Windows + E).
  2. Click on “This PC” to check how much free space is left on your drives.
  3. Right-click the drive where Steam is installed and click “Properties.”Properties C drive
  4. If you’re low on space, click “Disk Cleanup.”disk cleanup
  5. Check the boxes for things you want to delete (like temporary files, recycle bin, etc.).
  6. Click “OK” then “Delete Files.”
  7. You can also uninstall unused apps or move files to another drive or cloud storage.

Additionally, if Steam demo downloads aren’t working or responding, here’s a useful fix for the Steam download demo button not working issue.

💡 Bonus tip: You can change your download folder in Steam:
Go to Steam > Settings > Storage, and add a new folder on a different drive.

8. Run Steam as Administrator

  1. Close Steam completely.
  2. Find your Steam shortcut on the desktop or in the Start menu.
  3. Right-click it and select “Run as administrator.”steam, run this program as an administrator
  4. If Windows asks for permission, click “Yes.”

Why is Steam download so unstable?

A dominant reason Steam downloads can be unstable is the undefined bandwidth limit. However, if there’s no limit to the bandwidth and your internet connection isn’t substantial, it’ll affect your Steam downloads. If you want to learn more about why your Steam download limit might not be working, this guide covers common causes and fixes.

What is a good Steam download speed?

Enjoying a smooth and fast Steam download requires a download speed between 10MBps – 20MBps. Hence, anything less than 10MBps can make Steam download unstable.

Fortunately, some easy fixes can help permanently fix the slow download speed on Steam. Likewise, users can read through our article about how to fix Steam update download stuck or not downloading.

If your Steam download also goes on and off unexpectedly, check out this detailed article on Steam download going on and off.

There can also be forms to this issue, like download restarts from the beginning, and Steam download goes back to 0.

Please comment below if any of the above fixes have worked for you. We’d like a response from you.

How to Uninstall the Windows 10 Anniversary Update

In case you received the Anniversary Update and you’re not satisfied with it, you probably want to go back to a good old 1511 version.

In that case, not everything is lost, because Windows 10 actually offers the option to roll back to the previous build, and you have every right to use it.

Before you decide to remove the Anniversary Update from your computer, we advise you to stick around a little bit longer, because the update is still young, and it offers many great features, so you might actually get to like it eventually.

However, even if you strongly decided to leave the Anniversary Update, you can always bring it back by using ISO files.

Read our article to find out how to get rid of this update.

How can I uninstall the Windows 10 Anniversary Update?

1. Revert to the previous Windows 10 build

    For 10 days since receiving the Anniversary Update, you can revert your OS to the backup that was made prior to it. To delete the update, and go from version 1607 back to 1511, you don’t need to install any additional third-party tools. Windows 10’s Settings app already has everything you need to remove it.

  1. 1. Press the Windows key and type settings in the search box.

  2. 2. Click on the first result to open the Settings app.

  3. 3. In the app, navigate to Updates & security > Recovery.

  4. 4. Choose Get back to earlier builds.

    remove anniversary update windows 10 get back to earlier build
  5. 5. Click on Get Started.

  6. 6. You’ll now be asked to provide feedback to Microsoft on why did you decide to go back to the previous build. You basically can say anything, but the best choice is Earlier builds seemed more reliable.

    how to uninstall windows 10 anniversary update feedback
  7. 7. Once you provide the needed feedback, you might be asked to check for updates.

  8. 8. Click on No, thanks.

  9. 9. Follow further instructions, and choose Go back to earlier build.

  10. 10. Wait for the process to finish.

Once the rollback is finished, you’ll be at Windows 10 version 1511 once again. This was the simplest method to go back to the previous Windows 10 version, but if you, for some reason, aren’t able to perform it, we know one more way to get rid of the Anniversary Update.

2. Use Advanced startup

In case the Anniversary Update actually caused some problems to you, like issues with booting, you probably want to revert to the previous version, just to be able to use your computer.

So, we’ll show you how to remove the Anniversary Update if you cannot boot to Desktop, using the Advanced Startup.

However, to be able to revert back to Windows 10 version 1511, you need to have bootable media with it. So, if you already created a bootable media using Microsoft’s November Update ISO files, you won’t have any problems getting rid of the Anniversary Update.

On the other hand, if you don’t have a bootable media with Windows 10 version 1511, you will be forced to stick with the Anniversary Update, which could be very unpleasant if it causes problems to your computer.

Here’s what you need to do to delete the Anniversary Update using the Advanced startup:

  1. Access Advanced Options at boot, if you don’t know how to do that, take a look at Solution 1 from this article
  2. At the Advanced options screen, choose See more recovery options
  3. Choose Go back to the previous build
  4. Enter the password of the Administrator account you’re using
  5. Click on Go back to the previous build, and the process should begin.

There you go, now you know how to delete the Anniversary Update, even if you’re not able to boot to your computer. As we said, in case you want to go back to the Anniversary Update, you need to create a new bootable image, and install it manually.

Can I remove the Anniversary Update after the 10-day period has passed?

Unfortunately, you cannot uninstall this update and revert to the previous version if the period has passed. This is due to the fact that your previous OS build’s backup gets deleted after the 10 days pass.

Let us know in the comments if you have any questions, and feel free to tell us the reason why you want to downgrade your system to Windows 10 version 1511.

5 Solutions to Try if LockDown Browser Webcam is Not Working

Lockdown Browser is a browser used in a testing environment that prevents digital cheating while taking online exams. However, users have reported that their webcam is not working on Lockdown Browser. Here are our solutions to this issue.

Most online instructors use LockDown Browser to discourage cheating while testing virtually. The browser is compatible with programs like Blackboard, Canvas, Moodle, and more. If you’re having issues installing LockDown Browser to your PC, we have solutions for that.

How do I test my camera on LockDown Browser?

  1. Open LockDown Browser and log in.
  2. Click on the Help Center icon in the toolbar.
  3. Select Webcam Check. Click on webcam check.

Here, LockDown will check if your webcam is detected. Users can change their webcam from an internal or external camera. Make sure not to select anything that is labeled as splitter or filter as this will cause issues.

If your LockDown Browser webcam check is not working, then try the solutions listed below to solve this issue.

Does LockDown Browser record you?

If you are required to have a working webcam for an online, non-proctored exam, then you will be recorded. This feature is referred to as Respondus Monitor which monitors both audio and video actions to ensure there is no possibility of cheating.

How can I fix the LockDown Browser webcam if it’s not working?

1. Close background programs

Close out of any apps running in the background on your PC like Spotify or a VPN. These programs may be interfering with Lockdown Browser and preventing the webcam from working properly.

Close background programs if lockdown browser webcam not working.

Applications that use your camera like Skype or Zoom may be preventing Lockdown Browser from using your webcam if they’re open in the background.

2. Update LockDown Browser

  1. Open LockDown Browser and click on the about icon in the top left corner. On Mac, this icon looks like a globe. About lockdown browser.
  2. Select Check for Newer Version or Check for Update. Check for update to fix lockdown browser webcam.
  3. Follow the instructions to complete the update.

If you have an older version of LockDown Browser or if you haven’t updated it in a while, it may be preventing your webcam from operating properly. Try checking for any updates to fix this issue.

If you’re receiving the error that LockDown Browser Update serve is not supplying update information, we have a helpful guide for that.

3. Disable antivirus

Many users have reported that their antivirus software often causes issues with LockDown Browser. Try disabling any third-party antivirus temporarily.

Remember to turn it back on after your exam. You also may need to disable your firewall if turning off the antivirus doesn’t work.

Disable anti-virus to fix Lockdown Browser webcam if not working.

4. Adjust camera privacy settings

  1. Click on Start and open Settings (or press Windows + I)
  2. Under Privacy & security. Toggle Camera access to On and ensure Let apps access your camera is toggled to On. Allow camera access.
  3. Scroll down and toggle Let desktop apps access your camera to On. Allow desktop apps to use the camera.

In some instances, the privacy settings on some PCs will block LockDown from having access to the webcam. Adjust the privacy settings to allow LockDown to have access to the camera. This issue is most common in Lenovo computers. You may need to restart your PC for this setting to take effect.

5. Update camera driver

  1. Click on Start and search for Device Manager then hit Enter.
  2. Locate Cameras and click the arrow to reveal the cameras on your device. In device manager click on cameras.
  3. Right-click on your camera and select Update driver. Update camera drivers to fix Lockdown browser webcam not working.
  4. Select Search automatically for drivers. Select search automatically.
  5. Follow the instructions to update the driver if needed.

If your camera is not working, then it may be an issue with the driver. If it’s out of date it will need to be updated to avoid any problems.

Outbyte Driver Updater is an incredibly simple but powerful application that will help you keep all your drivers up to date. This tool represents the most effective way that will safely scan your Windows computer and will give you a list of outdated, damaged or missing device drivers.

Outbyte Driver Updater

Keep your drivers under control with this perfect tool.

We hope one of the above steps helped fix the LockDown Browser webcam if it’s not working. Let us know in the comments below which solution worked for you or if you have a suggestion for another solution that is not listed.

Monday’s Windows Insider Podcast features the Xbox Game Bar team

The Windows Insider Podcast hosted by Jason Howard, where both Windows Insiders and leaders from Microsoft come together and decipher tech trends will be having a special show this coming Monday.

Jason will be hosting the show alongside the Xbox Game Bar team, and viewers will get the chance to interact with the team via live chat. The show starts at 5 pm UTC | 10 am PDT and you can watch the episode over at the Windows Insider Program YouTube channel as it premieres, but in the meantime, you can check out a ton of our Xbox Game Bar-themed articles to familiarize yourself with what it is and more.


System Shock reboot shown off at Gamescom 2022, slated for release later this year

Among the many, many games shown off at Gamescom 2022 so far few have generated as much excitement as the upcoming remake of System Shock, especially for old school gamers.

For those who are unfamiliar with the franchise, System Shock was a series of 3D, first-person cyberpunk action-adventure games with a techno-horror twist, to which the Bioshock franchise is essentially a spiritual successor. The Deus Ex series is also heavily influenced by it. System Shock and System Shock 2 were PC games, seeing release on Windows, Mac OS, MS-DOS, and PC-98, OS X, and Linux.

The trailer for System Shock was featured at Gamescom 2022 Future Games Showcase, having been previously displayed at Summer of Gaming 2022 back in June.

The game is being developed by Nightdive Studios, who were responsible for the release of System Shock: Enhanced Edition back in 2015. The upcoming System Shock reboot was born out of a successful Kickstarter campaign in 2016. In 2018, development of the game was halted before being restarted with a new team. The initial 2020 release was pushed back to 2021, and again to 2022.

Hopefully it will all prove to have been worth it in the end when the game finally arrives. At present it is still set for that 2022 release, though with no definite launch date this late in the year, fans probably shouldn’t start holding their collective breath for the game just yet.

Featured image courtesy of uploadvr.com.


How to Disable Shared Experiences on Windows 10 PCs

Windows 10 Shared Experiences is a way of keeping your PCs or laptops synced. It’s a pretty useful feature if you need to move from one machine to another while working on a task.

However, if you don’t need to move between machines, or if you are a network administrator and don’t want nearby machines to have this sharing capability, then you’ll probably want to turn off Windows 10 Shared Experiences.

Methods to turn off Shared Experiences in Windows 10

  1. Use the Settings app
  2. Change Group Policy settings
  3. Use the Registry Editor

1. Use the Settings app

    Disabling Windows 10 Shared Experiences via Settings is the easiest and safest way to do it. You don’t need to make any Registry Changes or tweak Group Policy Settings, you simply use the built-in Settings on your device.

  1. 1. Click on the Start button on your taskbar or press the Windows key on your keyboard.

  2. 2. Choose Settings from the list of options that opened.

  3. 3. Navigate to the System section.

  4. 4. From there, go to Shared experiences.

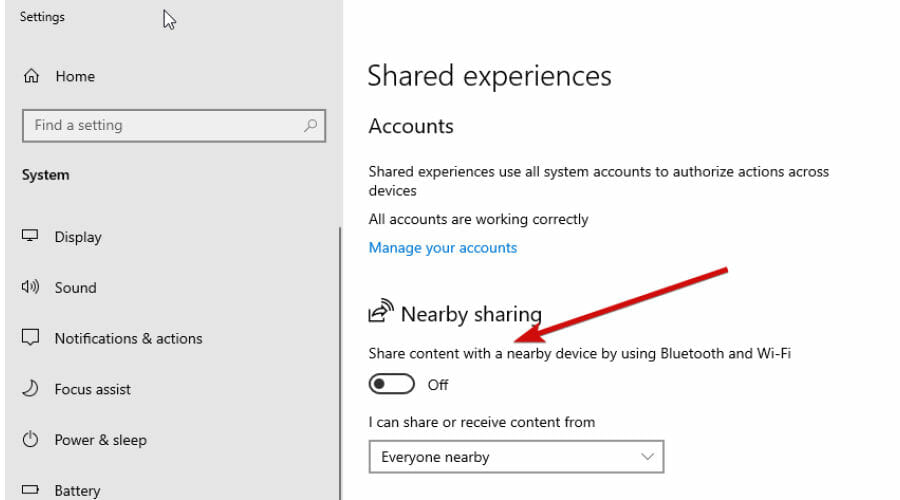
  5. 6. In this tab, you can see the Nearby sharing option. It allows you to send and receive content with other people using the same Bluetooth or Wi-fi device.

    how to disable shared experiences windows 10 toggle
  6. 7. Toggle the setting off to disable this feature.

This is by far the easiest one to do and is probably the one that 99% of users will find the most suitable. Let’s now look at the other two more complicated methods.

2. Change Group Policy settings

First of all, if you are not sure what Group Policy is, then you probably should be using the option above. If you want to know what it is, this is what Microsoft says:

Group Policy enables policy-based administration using Microsoft Active Directory directory services. Group Policy uses directory services and security group membership to provide flexibility and support extensive configuration information. Policy settings are specified by an administrator. This is in contrast to profile settings, that are specified by a user. Policy settings are created using the Microsoft Management Console (MMC) snap-in for Group Policy.

If you would like a more detailed explanation of what Group Policy is, you can find it in Microsoft Support.

To disable Windows 10 Shared Experiences using this method, follow these steps:

  1. Press Windows key + R and type in gpedit.msc
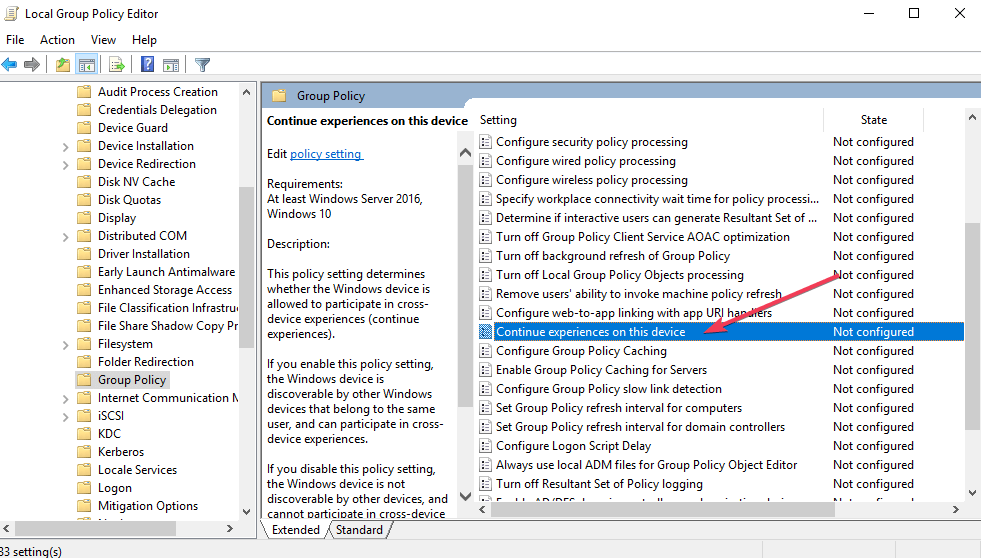
  2. Then find Group Policy by following this path: Computer Configuration > Administrative Templates > System > Group Policygroup policy continue experiences on device
  3. Then double click Continue experiences on this device and choose the Disabled option.

— READ ALSO: Fix: ‘Your folder can’t be shared’ error in Windows 10

3. Use the Registry Editor

Before we continue, it goes without saying that you should use caution when changing the Registry Editor. Personally, I have never had a problem, but you never know your bad luck.

Unless you are sure that the first option above is not for you, I would avoid playing with the registry. If you are going to use this method, back up your entire PC.

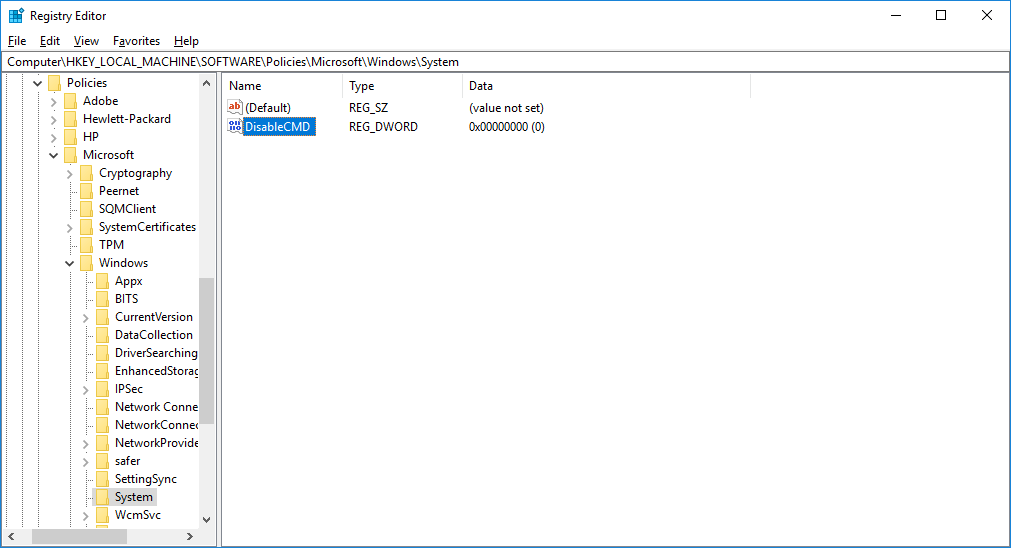
First of all, press the Windows key + r, type in regedit, and click OK. You now need to follow the path below. By the way, you can just copy the path below, paste it into the address bar, and then press enter. That’ll save you a bit of time.

HKEY_LOCAL_MACHINE\SOFTWARE\Policies\MicrosoftWindows. 

Windows 10 Shared Experiences

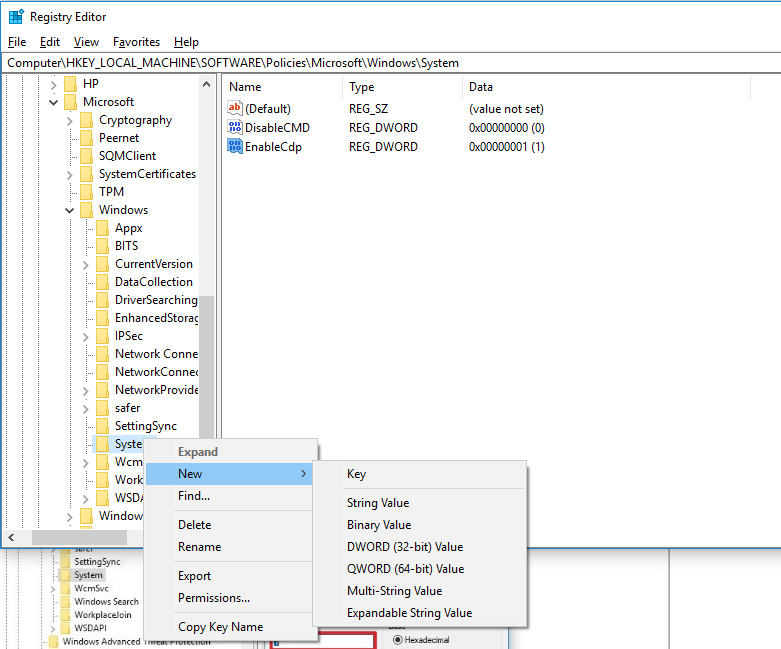
We need to work in a folder called System. You may already have a system folder, in which case, just right-click, select new, and then DWORD (32-bit) value. Check out the image below for more help.

Windows 10 Shared Experiences

Name the new file EnableCdp. Now right-click again and click Modify. Give the file a value of one, click ok and you are done.

If you do not have a folder called System, you can create one by selecting Windows, and then right-clicking and selecting New Folder. Call it System, and then follow the method already described above.

And there you have it. Three easy ways to turn off Windows 10 Shared Experiences. Remember that using the Settings app is by the easiest and safest way to disable Shared Experiences. If you feel a rising panic every time you want to press Windows key + r, you probably should just use the app.

What do you think about Windows 10 Shared Experiences? Do you like it? More importantly, do you actually use it? Let us know by sharing your thoughts in the comments below.

Expand Taskbar to 2 Rows on Windows 11 [How to]

Windows 11 isn’t designed for customization, and many are wondering if can you resize the Windows 11 Taskbar to 2 rows. This is possible, with the right tools.

How do I make Windows 11 Taskbar 2 rows?

1. Use the ExplorerPatcher tool

  1. Open this Github page.
  2. Click on the latest available ExplorerPatcher app version under Releases on the right side.
  3. Scroll down and click on the EXE file.
  4. Download the ExplorerPatcher tool.
  5. Launch the program.
  6. Your taskbar will go black for some time, as it will replace the Windows 11 taskbar with the good-ol’ Windows 10 taskbar.
  7. After the taskbar loads, you can right-click on it and uncheck the Lock the taskbar option.
  8. Now, you can see all the abilities back you used to have with the Windows 10 taskbar.

If this seems a bit complicated, you can also use Start11 to resize Windows 11 Taskbar to multiple rows.

2. Use the Registry Editor

  1. Press the Win + R keys on your keyboard to open the Run dialog.
  2. Type regedit to open the Registry Editor.
  3. Navigate to the below path. HKEY_CURRENT_USER> Software> Microsoft > Windows> CurrentVersion> Explorer> StuckRects3
  4. Double-click on the Settings key file.
  5. A file named edit binary value will show up.
  6. Check out the 00000028 row and FE column in that file.
  7. You need to change the data to 02. This will add another row. In simple terms, if you want two rows in the system tray area, enter 02.
  8. Press Ctrl + Alt + Del button to open the Task Manager.
  9. Locate the Windows Explorer in the Processes tab.
  10. Click on it and select Restart from the bottom.
  11. Your taskbar will get refreshed and now you will see the change.

Keep in mind that Microsoft is quick to fix these hacks, so it’s likely to get fixed.

Now you know how to expand the Taskbar in Windows 11 to 2 rows, so be sure to give these methods a try. To learn more about customization we have a guide on how to enable Enhanced Taskbar on Windows 11.

If you’re looking to hide the taskbar instead of resizing it, check out our guide on how to hide the Windows 11 taskbar for a cleaner workspace.

We also have a guide that will help you move the Taskbar to the top on Windows 11, so don’t miss it.

Let us know in the comments below if you come across any issues while following the above guide.

How to Change Cortana’s Search Engine

Microsoft made Cortana, which is probably the most useful feature of Windows 10. But, it also had one hidden intention with Cortana.

Using Cortana is a great way to promote Microsoft’s own search engine. By default, you can’t change the default search engine in Cortana.

The good news is that with a few simple tricks, that is possible. And we’ll tell you exactly how you can do that.

Changing your default browser in Microsoft Edge is enabled by Microsoft, which is a good move, because if it was otherwise, could drive away a lot of users, Microsoft didn’t include this feature in Cortana.


Quick Tip:

If you’re worried about keeping your browsing history private and want to prevent browsers from profiling you, use a privacy-focused VPN. Developed by Kape Technologies, Private Internet Access is a top choice with browser extensions for Chrome, Firefox, and Opera. The VPN further extended its compatibility with Surf.

Since it uses distributed technology, it encourages developers to build websites without servers, allowing users to privately publish to the open web.

⇒ Get Private Internet Access


How can I change Cortana’s default search engine?

1. Download and install the appropriate extensions

install Chrometa extensions

Some developers came up with the solution. Namely, they developed and released a couple of extensions for Google Chrome which redirect Cortana’s search results from Bing to Google.

So, if you’re using Google Chrome as your default browser, just download and install one of the following extensions.

Every time you search for something with Cortana results from Google will appear in your browser.

Once installed these extensions will redirect the same term you typed in Cortana’s search from Bing to Google.

⇒ Download Bing2Google (Google only)

⇒ Download Chrometa (Google, Yahoo, and DuckDuckGo)

2. Change the default search engine via Settings

    An easy way to change Cortana’s search engine is to modify its default browser. This can be done via your PC’s built-in settings.

  1. 1. Press the Windows key and type settings in the search box that opens.

  2. 2. Click on the first result to open the Settings app.

  3. 3. Navigate to the Apps section.

    going default apps windows 11 settings
  4. 4. Go to the Default Apps section.

  5. 5. Scroll down to the Web browser setting.

  6. 6. Click on it to create a drop-down menu with multiple browsers to choose from.

    default search engine change
  7. 7. Select your preferred browser from the list, then close the Settings window.

3. Use Firefox as your default browser

Firefox default browser

If you’re using Firefox as your default browser, redirecting your search result from Bing to Google is even simpler.

Actually, you don’t have to do anything at all. That’s because the latest version of Mozilla Firefox, 40, comes with this option as a built-in feature.

So, you just have to use Firefox as your default browser, and update to the latest version, if you didn’t yet.

This was completely expected, because Mozilla CEO, Chris Beard recently called out Microsoft for ‘pushing Edge to Windows 10 users over the rival browsers.

So, we can interpret this as Mozilla’s direct glove in the face of Microsoft, Bing, and Edge.

There is no response on this from Microsoft, yet, but if things like this continue to happen, we could witness the beginning of the war between two huge companies, Mozilla and Microsoft.

If you use Edge as your default browser, you cannot redirect your Cortana search results from Bing to Google, even if you set Edge as your default browser.

And you shouldn’t expect this option in the future, because it won’t make any sense for Microsoft to allow you to let Cortana search Google on Edge.

You may also use a privacy-focused search engine such as DuckDuckGo. As stated above, you can force Cortana to use DuckDuckGo as its default search engine as well, so the choice is yours.

You can use DuckDuckGo with Cortana or separately. To further secure your browsing data, try out a privacy-friendly browser too, such as Tor.

If you’d like to read more posts related to this subject, just visit our Cortana section.

There are even more tips waiting to be applied. You’ll find them all in our Tech Tutorials Hub.

Let us know if you managed to change Cortana’s default search engine in the comments area below.

How to Remove Mixed Reality Portal in Windows 10

Here are 2 ways to uninstall the Windows Holographic Platform – the new feature of Windows 10 Creators Update – if it’s no use to you.

Windows Holographic is practically a VR platform that adds mixed reality experiences available on Microsoft HoloLens, offering a holographic shell, an interaction model, Xbox Live services and perception APIs.

Some users might not find this feature very useful in their case, even if they have compatible hardware, so we wanted to show you some ways of getting rid of it.

how to remove mixed reality — used to be holographic I think
HOW? Don’t need it. Don’t want it. IMO it is more MS fluff, and bloatware for my situation.
There is an UNINSTALL switch for it, but it doesn’t work, as with other MS shove it down your throat things !

How do I completely remove Windows Mixed Reality?

1. Remove values from your registry

registry code changes

Removing Registry entries, as this method suggests, can be a dangerous path to walk. Nonetheless, it’s the a great way to remove Mixed Reality from Windows 10.

  1. Restart your PC and remove the following registry values:
  2. Remove FirstRunSucceeded from HKEY_CURRENT_USERSoftwareMicrosoftWindowsCurrentVersionHolographic
  3. Remove PreferDesktopSpeaker and PreferDesktopMic from HKEY_CURRENT_USERSoftwareMicrosoftWindowsCurrentVersionHolographicSpeechAndAudio
  4. Remove DisableSpeechInput from HKEY_CURRENT_USERSoftwareMicrosoftSpeech_OneCoreSettingsHolographic
  5. Remove DeviceId and Mode from HKEY_LOCAL_MACHINESoftwareMicrosoftWindowsCurrentVersionPerceptionSimulationExtensions
  6. To go on, you should remove json from C:Users{username}AppDataLocalPackagesMicrosoft.Windows.HolographicFirstRun_cw5n1h2txyewyLocalState – and this file should be removed for every user who used Windows Mixed Reality.
  7. Remove also the contents of the SpatialStore file, and remember that it’s important not to remove the file itself! You’ll find it in: C:ProgramDataWindowsHolographicDevicesSpatialStore
  8. Remove also the Feature-On-Demand CAB. Mixed Realities relies on this in order to work. The CAB is previously downloaded during the initial experience of a user and it should be eliminated. Open PowerShell in Administrator mode and type: Dism /Online /Get-capabilities
  9. Go on and copy the Capability identity that you see begins with Holographic. Desktop. If you cannot find it, it means the file is not installed.
  10. In the end, you should restart Windows again and this should do the trick.

2. Modify the registry

Microsoft’s Community page offers another easy solution for removing Mixed Reality. You simply have to go to the main page of settings via Registry Editor. We recommend caution, as changing this registry involves some risks. Therefore Microsoft suggests that you back up the registry.

According to Microsoft, you should follow these steps:

  1. Close Settings if the Mixed Reality app is open.
  1. Open the Registry Editor.
  2. Go to the following Registry Key: HKEY_CURRENT_USERSoftwareMicrosoftWindowsCurrentVersionHolographic4.
  3. Modify/create a new 32-bit DWORD value named FirstRunSucceeded.
  4. Set the value date to 1 to add Mixed Reality to Settings.
  5. Set it to 0 if you wish to remove it. (If you’re using Windows 10-64 bit, you still need to create a 32-bit DWORD value).
  6. Restart your PC and go to the Settings app. If you set the DWORD value to 0, Mixed Reality should be gone.

3. Via Powershell

    A quick and handy way of removing the Mixed Reality Portal is by using Powershell. It is a built-in command line tool on your Windows 10 device that allows you to uninstall apps in a few lines.

  1. 1. Press the Windows key on your keyboard to open the Search menu.

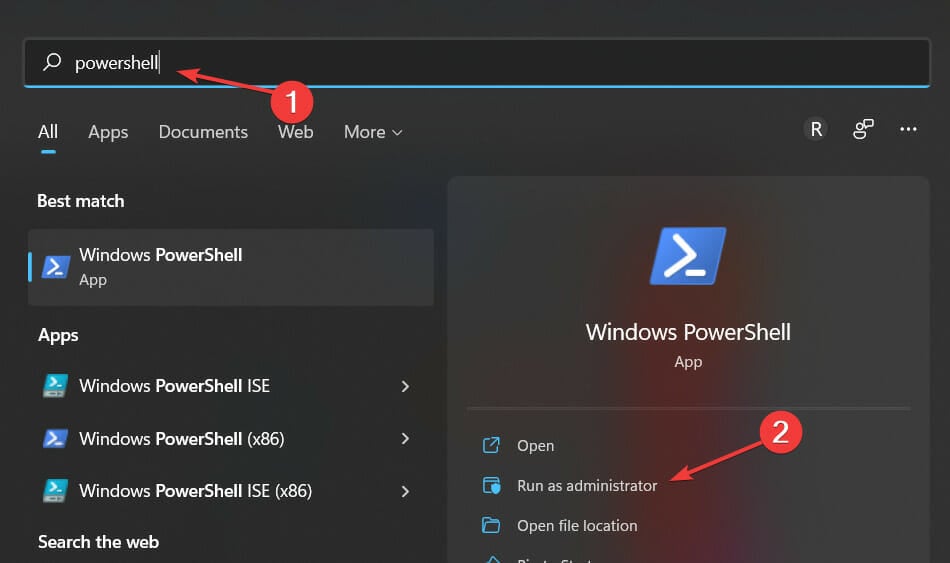
  2. 2. Type powershell in the search box and right click on the first result > select Run as administrator.

    powershell windows 11 wireless display install failed
  3. 3. The Powershell window will now open on your screen.

  4. 4. Input the following command: Get-AppxPackage Microsoft.MixedReality.Portal | Remove-AppxPackage

  5. 5. Press Enter to run the command.

  6. 6. The Mixed Reality Portal is now completely removed from your PC.

We hope that our article helped you uninstall the Mixed Reality Portal. In case you still haven’t been able to resolve the issue, send feedback and report the problem to Microsoft.

How to Repair Windows 10 PC Using DISM Commands [2026]

Operating systems can break down, files can get corrupt, and sometimes fixing and restoring those files to their original state is needed.

There are many repair tools for Windows 10 that will scan and fix your files, and today, we’re going to focus on the DSIM tool.

So, without further ado, let’s get started.

What is DISM on Windows 10?

When you start getting errors such as Blue Screen of Death (BSoD), it signifies that some of your Windows files might be corrupt and need fixing.

The same goes when applications start crashing or certain Windows 10 features stop working.

This is where the DISM (Deployment Image & Servicing Management) comes in. It will scan your system for corrupt files and repair any corrupt sectors.

It is mainly used if the second built-in tool for repairing Windows 10 fails. DISM fixes component store corruption that prevents SFC from running correctly.

Should I run DISM or SFC first?

Another built-in option for repairing Windows is SFC (System File Checker). This command scans your Windows and checks for corrupt files.

If any corrupt files are found, SFC will try to replace them. However, sometimes corrupt files can even affect SFC.

Whenever you cannot perform an SFC scan, it’s time to call the cavalry. And this is where DISM comes into play. If SFC is corrupt and doesn’t work for some reason, you can use DISM to restore it.

How do I run DISM Cleanup on Windows 10?

1. Run directly from Command Prompt

  1. Use Cortana to search for cmd.
  2. Right-click on Command Prompt and choose Run as administrator.
  3. Type the command below:DISM /Online /Cleanup-Image /RestoreHealth
  4. Press Enter to run the command.
    main windows 10 dism
  5. Wait for it to perform the scan. It can take about five to ten minutes, sometimes more.

After DISM has finished its scan, restart your computer. Note that if the progress bar gets stuck on 20 percent, don’t worry. That’s perfectly normal. You need to be patient.

2. Use DISM with ISO file to fix a Windows recovery image

  1. Mount your Windows 10 .iso file by double-clicking it.
  2. Open Command Prompt or PowerShell as administrator.
    clean up windows 10 dism
  3. Check for system health by running these commands:dism /online /cleanup-image /scanhealth dism /online /cleanup-image /checkhealthdism /online /cleanup-image /restorehealth DISM /Online /Cleanup-Image /RestoreHealth /source:WIM:X:SourcesInstall.wim:1 /LimitAccess
  4. Remember to replace X with the letter drive on which your Windows 10 ISO is mounted.

With the command above, you should be able to use DISM with ISO to repair a Windows image on your PC. Remember to restart your computer after the process is complete.

3. Use DISM offline repair Windows 10

  1. Connect Windows 10 installation media to your PC.
  2. Press Windows key + X and choose Windows PowerShell (Admin).
  3. Run the following command: Get-WindowsImage -ImagePath "D:\sources\install.wim"
  4. Find the image index that matches your Windows edition. In our case, it was:ImageIndex = 6
  5. Run one of these commands:

    DISM /online /cleanup-image /restorehealth /source:WIM:D:\sources\install.wim:6 /limitaccess Or: DISM /online /cleanup-image /restorehealth /source:ESD:D:\sources\install.esd:6 /limitaccess

  6. Wait for the process to finish.

This is a useful little trick you can use if DISM has failed on Windows, so we encourage you to try it.

Many users also reported that this method helped them with Many users also reported that this method helped them with DISM source files could not be found error. If you are on the latest OS, check our detailed DISM commands guide for Windows 11 for updated steps.

4. Use alternative software

We did mention that two main built-in tools can deal with corruption.

But you can also employ the help of powerful system repair software. You can perform a full system scan automatically, effortlessly, and without having to deal with any line of commands whatsoever.

The results will be just as good. Thus, you will obtain an error-free, corruption-liberated system that will work like a charm for years to come.

Will DISM delete my files?

As mentioned earlier, DISM scans for corrupt files and fixes them. Its major purpose is to repair corrupt files and sectors and not to delete files.

It logs issues found and repaired and won’t affect your data or apps.

As you can see, SFC and DISM are quite useful tools and aren’t too hard to use. To learn more, we suggest reading our guide about the difference between CHKDSK, SFC and DISM.

In the best-case scenario, they can save you from a clean reinstall of Windows 10. So, if you notice any system errors or Windows functions not working, make sure that you give SFC and DISM a try.

To learn more, don’t miss our What is dismhost.exe guide for more information. We also have a guide on how to fix Elevated permissions are required to run DISM message, so don’t miss it.

If you run into any problems using DISM, feel free to drop us a message in the comments below.

Windows 11 MFA: How to Enable, Set Up & Use

Windows 11 is the latest operating system iteration from the house of Microsoft. While Windows 10 was deemed the last OS that Microsoft would release (as said by their officials), things changed, and now we have Windows 11.

It’s been quite a while since the arrival of Windows 11. With Windows 11, Microsoft has introduced a slew of new features.

The new OS boasts a MacOS-like interface, a centered Taskbar, widgets, integrated Android apps, and an improved gaming experience. It includes essential upgrades such as Secure Boot through device encryption, Virtualization-based Security (VBS), and more.

Privacy and security have also improved. And just like Windows 10, Windows 11 also comes with built-in two-factor authentication (2FA). Notably, you get multi-factor authentication from the word get-go if you have a Microsoft account.

2FA or two-factor authentication adds an additional layer of security to your device, making it extremely difficult for someone to access your private data.

In simple terms, if someone grabs hold of your password, they would still need a second layer of authentication password, which only you can provide.

This guide explains to you the process of how you can enable multi-factor authentication on Windows 11. Let us check that out.

Does Windows 11 have two-factor authentication?

No, not Windows 11, but your Microsoft account comes with multi-factor authentication. When you enable it, it protects your PC from unauthorized access to Microsoft products, including Outlook, OneDrive, Microsoft 365, Xbox Network, etc.

However, to set up the multi-factor authentication on your Microsoft account, you need to install the Microsoft Authenticator app on your phone and connect it to your Microsoft account for your Windows 11 PC to be safe and secured.

For setting up multi-factor authentication on Windows 11, you need to use a third-party app to accomplish the process.

It can be a task for someone unfamiliar with setting up multi-factor authentication on their devices. This is where this guide comes into the picture. We have explained simple steps to set up multi-factor authentication on Windows 11 in no time.

Does Windows 11 have a password manager?

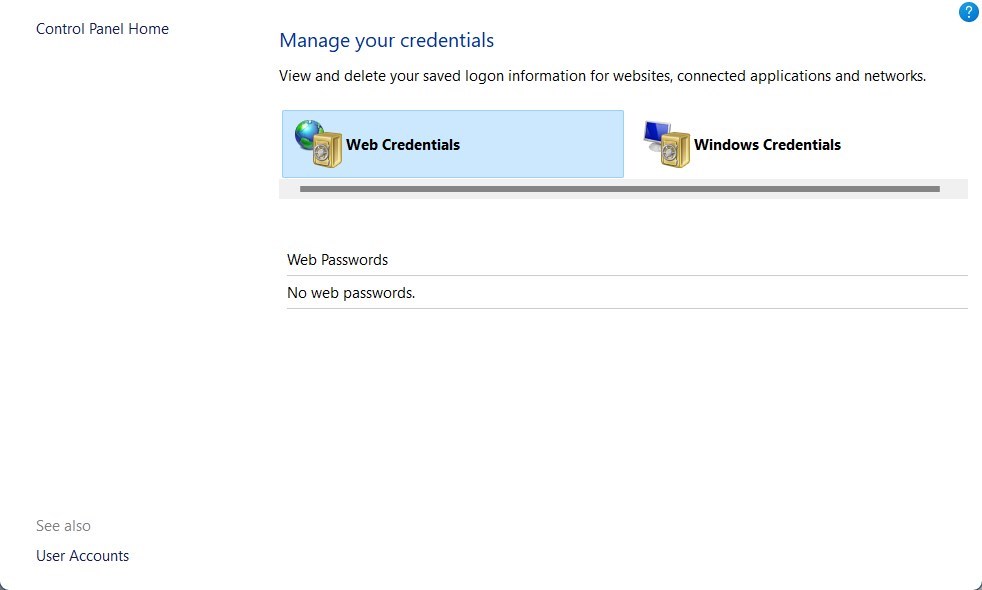
In short, yes. Windows 11 comes with an in-built password manager. It is known as Credential Manager to keep your passwords secure in the OS.

Inside the Credential Manager menu, you can view all of your web credentials and the credentials you saved on your Windows PC.

Credentials Manager was introduced with Windows Vista. It stores your login information, username, passwords, addresses, etc. You can open the Credentials Manager by opening the Control Panel > User accounts > Manage your credentials.

How do I turn on Microsoft Multi-Factor Authentication?

On Android

  1. Open the Google Play Store.
  2. Search for the Microsoft Authenticator app.
  3. Install the app.
  4. Open the app.
  5. Accept the terms by clicking the Accept button.
  6. Sign in with your Microsoft account.
  7. Verify and confirm your Microsoft account by entering the code received in your email.
  8. Select whether to enable autofill and sync data or not.
  9. Press OK.

On your Windows 11 PC

  1. Visit the Microsoft website.
  2. Sign in to your account.
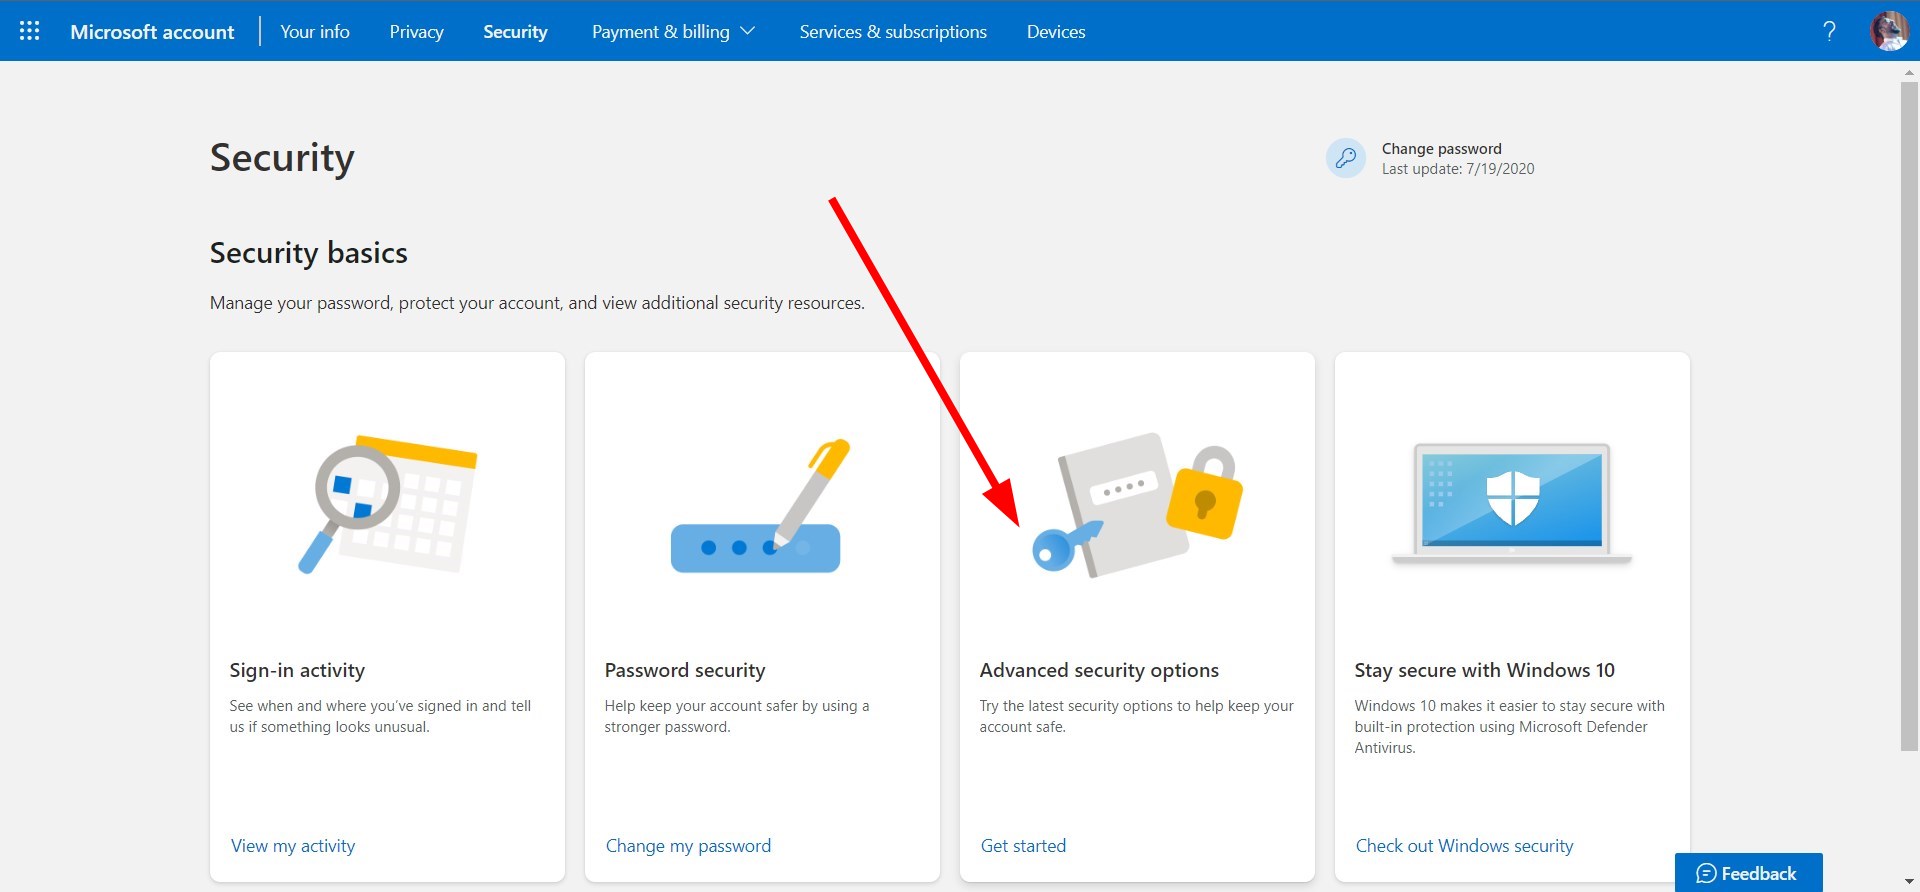
  3. Click on the Security tab.
  4. Select Advanced security options.
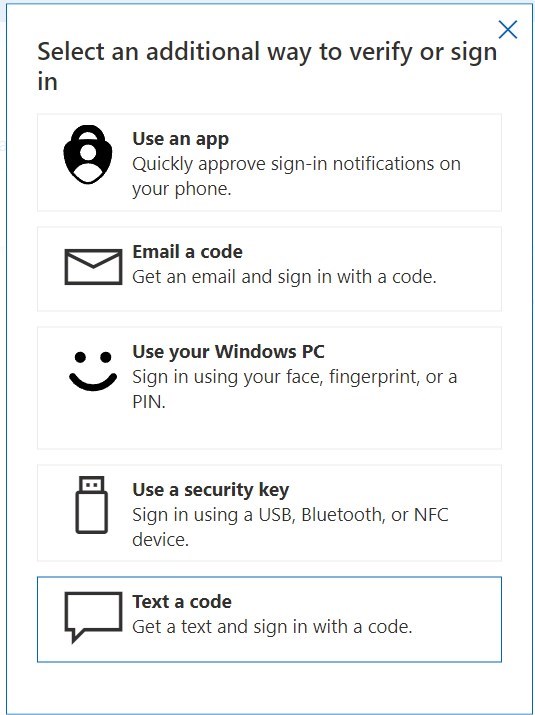
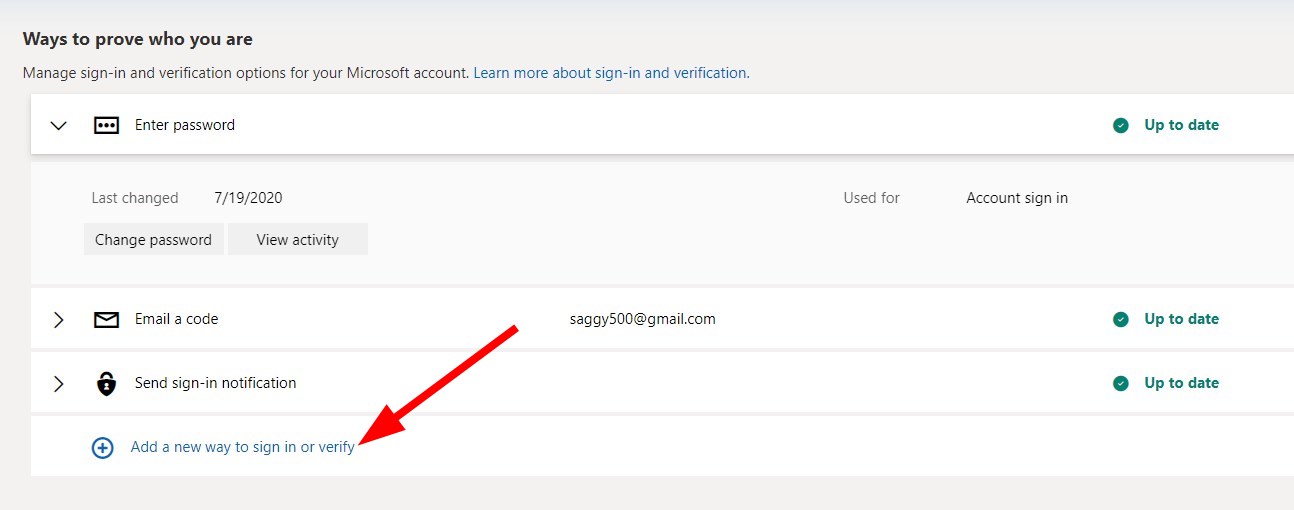
  5. Scroll down and click on Add a new way to sign in to verify.
  6. At present, there are five ways to verify or sign in:
    • Using the Microsoft Authenticator app.
    • Email a code.
    • Use your fingerprint, face, or pin.
    • Sign in using a USB, Bluetooth, or NFC device.
    • Send a text code to your mobile.
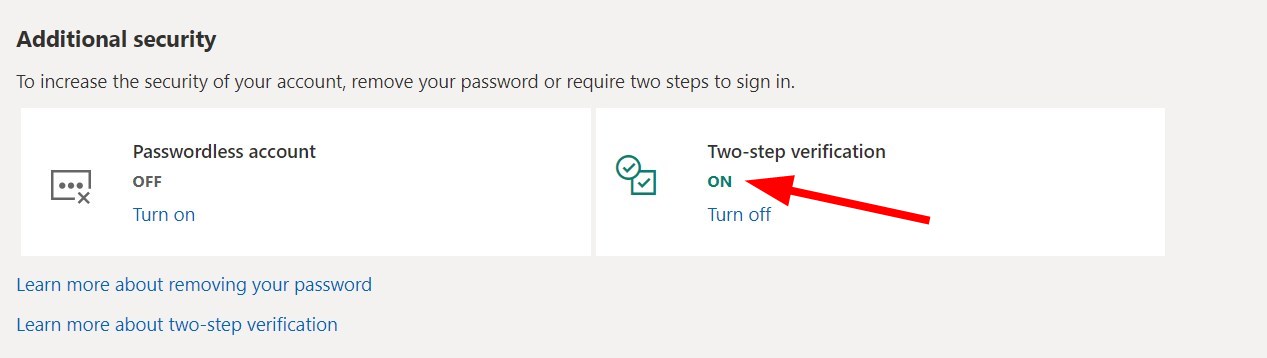
  7. Under the Additional security section, click on the Turn on option for two-step verification.
  8. Follow the on-screen prompts.
  9. Hit the Finish button.

Now, whenever you log in from an unrecognized device, you will receive a notification or warning on your phone. You can confirm or discard the login request to your account using your two-factor authentication app.

How do I use Microsoft Authenticator on Windows 11?

  1. Sign in to your account security dashboard.
  2. Select Add a new way to sign in or verify.
  3. Choose the option Use an app.
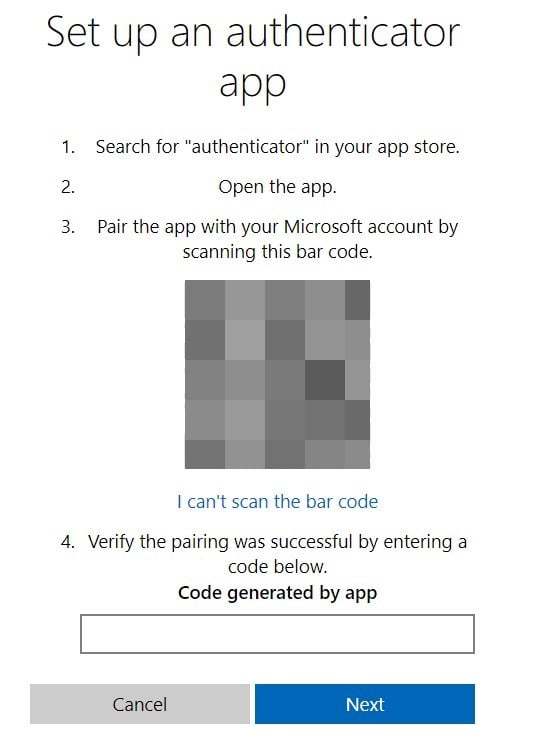
  4. If you have already installed the app, select Next. This will display a QR code on the screen.
  5. In the authenticator app, click on the 3-dot icon.
  6. Select Add account.
  7. Choose the account type and select Scan a QR code.
  8. Scan the code from your smartphone using the Authenticator app.
  9. Select Finish on the PC.
  10. Head to the Microsoft accounts sign-in page.
  11. Instead of typing the password, click on Use the Microsoft Authenticator app instead link.
  12. Microsoft will send a notification on your phone.
  13. Approve it, and you will be logged in.

How to fix multi-factor authentication not working?

Several user reports claim that the multi-factor authentication isn’t working for them. They cannot use the added extra layer of security on their accounts.

After careful research, we have deduced a list of solutions that would help you fix the multi-authentication not working issue.

  • Use the Microsoft Authenticator app
  • Clear the Microsoft Authenticator App cache
  • Restart your mobile phone
  • Make sure that you have input the correct security information
  • Check if your notifications are turned on or not
  • Make sure your device is connected to the internet
  • Turn off the do not disturb mode
  • Unblock phone numbers if you are using the calling method instead
  • Disable third-party security apps

There you have it from us in this guide. We hope you can use the multi-factor authentication offered by Microsoft on your Microsoft account.

While you cannot add multi-factor authentication to your local Windows login, you can use it for your Microsoft account and protect your data. For your PC, consider adjusting the minimum PIN length for your Windows 11 to beef up security.

You may need to use authenticator programs such as Duo to use multi-factor authentication on your Windows logon screen. It comes with a free trial that lets you test the waters before you can actually commit to it.

Moreover, the setup is pretty easy and will ask for approval every time you log on to your PC. This is a much better way to safeguard your PC since it applies multi-factor authentication on a local level.

We have you covered if you are looking for a multi-factor authenticator app. You can check out our guide that lists some of the best multi-factor authenticator apps that also double as password managers.

You might also be interested in learning how to exclude a user from MFA in Azure.

In case you’re not familiar with two-factor authentication, we have a great guide on how to download the Microsoft Authenticator app, so be sure to check it for more information.

We hope that this guide helps you secure your data. Let us know your thoughts about this topic in the comments below.

AVG Secure Browser Won’t Uninstall: Fix It Like an Expert

Having a secure browser is important, and this is why many users choose the AVG Secure Browser. It is one of the most secure browsers with numerous security features that most browsers lack.

Also, it comes from a reputable antivirus company that is well-known for protecting users. However, there are times when you might need to uninstall the browser for some reason.

But many users are having issues removing AVG Secure Browser from their PC, as reported on the official forum.

This can be a problem, so today, we’ll show you how to uninstall this browser properly.

Is AVG Secure Browser a virus?

The AVG Secure Browser, as the name goes, is one of the safest browsers you can use. With the parent company being an antivirus company, it is clear from all destructive codes and features.

Also, it offers full online and offline security. So, you can always trust the AVG Secure Browser.

Is the AVG Browser safe?

The AVG Secure Browser is synonymous with safety. It prioritizes users’ online security and privacy over other features.

Also, it allows you to control the level of security you get. Its adblocker, anti-tracking, anti-phishing, and other security features are fully customizable. Hence, your safety is never in doubt with the AVG Secure Browser.

Who owns AVG Secure Browser?

As the name goes, the browser is owned by the popular security company – AVG. Avast acquired AVG in July 2016.

However, there have not been major changes in its products. It is still focused on privacy and security, just like the new parent company.

The Opera One browser is the software that you should test. It’s a resourceful browser, with all the necessary tools included as native features. This means you won’t have to add extra plugins that otherwise cause a slowdown to even the most frequently used processes.

Built on Chromium, this browser takes advantage of most of Google Chrome’s extension library, including the best VPN completely free for users.

You can set it up afterward according to your needs: separating tabs and workspaces, bringing all bookmarks to the front, and sharing your work across all your devices.

Opera One

Avoid browser errors – switch to a modern browser and benefit from all its awesome, efficient features.

How to uninstall AVG Secure Browser?

1. Uninstall it from the Settings app

  1. Press the Windows key + I to open the Settings app.
  2. Select the Apps option.
    apps option avg secure browser wont uninstall
  3. Locate the AVG Secure Browser, and click on it.
  4. Lastly, click the Uninstall button.

That is how to uninstall the AVG Secure Browser on Windows 7, 10, and 11. However, to be sure the app is completely removed, it’s advisable to remove any leftover files. You can do that from the command line by doing the following:

  1. Press Windows key + X and choose PowerShell (Admin) from the menu.
    windows powershell (admin) avg secure browser can't uninstall
  2. When the PowerShell opens, run the following commands one by one: cd %appdata%
    cd ..local
    rmdir /q /s avgBrowser
    rmdir /q /s %programdata%avgbrowser
  3. After all these commands are executed, the browser should be removed.

Be extra cautious while using the commands to remove the AVG Secure Browser. This is because you’ll permanently remove the respective directories.

2. Use AVG Clear tool

  1. Download the AVG Clear tool.
    remover
  2. Run the program.
  3. Follow the on-screen instructions to remove the AVG software.

Similar to uninstaller software, this tool is designed to remove AVG software if other methods fail to do so. By using this software, you’ll remove all files and registry entries associated with AVG Secure Browser.

3. Use a third-party uninstaller

When you’re having trouble uninstalling a program, you should leave this job to dedicated PC cleaning tools, such as CCleaner.

This way, you ensure that not only a particular program is deleted, but all the associated files.

Otherwise, the uninstall process might leave behind hidden traces that will later interfere with other apps, causing even more trouble.

Download the program and open the tool. You’ll see all the apps in the Uninstall submenu in Tools. Select AV Secure Browser and uninstall it. Wait for the process to finish and scan for leftover files and registry entries.

⇒ Get CCleaner

How to stop AVG Secure Browser from opening on startup

  1. Press the Windows key + X and select Task Manager.
    task avg secure browser wont uninstall
  2. Click the Startup tab in the top menu.
    start up
  3. Locate the AVG Secure Browser on the list and right-click on it.
  4. Now, select the Disable option.

If you can’t or don’t want to uninstall the AVG Secure Browser, knowing how to disable it from startup should reduce its impact considerably.

Knowing how to get rid of the AVG Secure Browser is important, especially if the browser somehow installed itself with other apps. With the fixes above, you should be able to remove it for good and use your favorite browser.

Are you having problems uninstalling Google Chrome on your PC? Then, check our detailed guide to remove it with ease.

If this guide helped you fix this issue, feel free to let us know in the comments section.

How to Download Your Facebook Message History on PC & Mobile

Facebook has been around for a long time, and it’s one of the most popular social media platforms in the world. The service has a lot of features that make it easy to keep in touch with friends, family, and even coworkers. One of those features is Facebook messaging.

Facebook messaging lets you send text and multimedia messages to your contacts. It’s very convenient, but what if you want to save some of those messages? Maybe you want to back up your entire history or restore them after a device reset? 

Well, if you have been trying to access your message history, this article will be of interest to you. Aside from downloading your history, we also share tips on how to delete your Facebook Messenger history, especially when using public computers or Wi-Fi.

Can you download your Facebook message history? 

Yes, you can download your Facebook Messenger history. But there are some important caveats to the process. For instance, you cannot single out a chat from an individual and only download that conversation.

In addition, if the other party unsends their messages, you will only get a copy with the messages currently active on your side.

Quick Tip:

We access social media every day, so having quick access to your chat within a browser can be a plus. If you want to get Facebook messages with ease, you can try using Opera.

It comes with Facebook Messenger right on the sidebar, as well as other implementations such as WhatsApp, Twitter, and Instagram. With an award-winning design and an ad blocker included for those pesky ads, you will not regret it switching to this awesome browser.

Opera

Access messages and social platforms right from the browser.

How can I see my full Facebook message history?

Facebook keeps a record of every message you’ve sent or received. To see the complete message history on Facebook, you need to use the Facebook app.

The easiest way to do this is to use the Messenger app on your smartphone. From there, you can see a list of all messages that have been sent or received in order from most recent to oldest.

If you have a desktop computer, you can also view your message history by:

  1. Click on the message icon in the top right corner.
  2. Scroll down and select See all in Messenger.
  3. This will open your message history.

How do I download the whole Facebook message history on my PC? 

  1. On your PC, log in to Facebook, click on your Profile Picture, and select Settings & privacy from the drop-down menu.
  2. Now click on Settings.
  3. Navigate to Your Facebook information and click on View next to Download your information.
  4. Select your desired time range.
  5. Scroll down, expand Select information to download, and Deselect all.
  6. Now check Messages.
  7. Scroll to the bottom and click Request a download.
  8. You’ll get a message that a copy is being created and the file will be sent to the email associated with your Facebook account in a moment.

How to download a specific Facebook messenger conversation 

At the moment, there is no way to single out a conversation and download it. You can only select a time range but it will be for all messages that fall within that period.

Chrome has a Messages Saver for Facebook extension that works with Messenger but users have since raised concerns that they are experiencing issues. Sometimes the addon works and other times it doesn’t. It’s a matter of trial and error.

If you are extremely desperate, you can download Facebook Messenger conversations by loading the conversation, then copying and pasting it into a text editor, like Notepad. The problem with this method is that if the conversation is lengthy, it could take some time to load.

Where are Messenger chats stored? 

If you’re using Messenger on Android, your chats are stored in a folder on your phone. The Messenger app stores all your messages, photos, videos, and other content on your device.

This means that if you uninstall or delete the Facebook Messenger app, your messages will still be stored on your phone’s internal storage.

The location of this folder varies by the OS your phone is using. You can always delete this folder if you don’t want any traces of your messages lingering on your phone.

Can I recover deleted Facebook messages?

You can recover deleted Facebook messages if the sender has not deleted the message. When Facebook data is deleted, it doesn’t get removed from the Facebook servers immediately.

To recover the deleted messages, follow the steps below:

  1. On your PC, log in to Facebook, click on your Profile Picture, and select Settings & privacy from the drop-down menu.
  2. Now click on Settings.
  3. Navigate to Your Facebook information and click on View next to Download your information.
  4. Select your desired time range.
  5. Scroll down, expand Select information to download and Deselect all.
  6. Now check Messages.
  7. Scroll to the bottom and click Request a download.
  8. You’ll get a message that a copy is being created and the file will be sent to the email associated with your Facebook account in a moment.

And that’s how to access your Facebook chat history. You may also be interested in downloading batch videos on Facebook so be sure to check our detailed guide on how to proceed.

We also have an expert guide on how to share your Facebook post to Instagram if you are looking to drive traffic to your pages.

Let us know whether you have been successful in accessing your chats in the comments section below.

MSTeams.exe Bad Image: How to Fix This Error

Windows 11 got everyone talking about its revamped user interface and features and Microsoft Teams certainly had some interesting updates lately.

However, several readers have reported an error titled msteams.exe – Bad Image that occurs when they try to run Microsoft Teams or click on the chart icon in the taskbar.

The whole error message reads:

C:\ProgramFiles\WindowsApps\MicrosoftTeams_21239.300.960.1678_x64_8wekyb3d8bbwe WebView2Loader.dll is either not designed to run on Windows or it contains an error. Try installing the program again using the original installation media or contact your system administrator or the software vendor for support. Error status 0xc0000020

What causes the Microsoft Teams Bad Image error in Windows 11?

So, what exactly is the Bad Image error? Since Windows 8, Microsoft has configured every operating system to periodically check for available updates, download them and perform an installation of the update.

However, these updates sometimes come with bugs that usually cause applications to not work properly.

The Bad Image error occurs when the program you opened can’t be run due to files and libraries needed for the program to run and are corrupted during an update.

If you are experiencing this issue, then keep on reading because we have listed some solutions you can use to fix this Windows 11 Microsoft Teams error.

Also, we have a great guide on what to do if MS Teams is crashing on startup so check it out if you’re facing this problem.

Where is MSTeams EXE located?

The MS Teams.exe location is usually in a subfolder of the user’s profile folder: C:\Users\USERNAME\AppData\Local\Microsoft\Teams\current\

How do I fix MSTeams exe bad image?

1. Repair or reset Microsoft Teams

  1. Hit the Windows button and select Settings.
  2. Click on Apps from the left pane and choose Installed apps from the right menu.
  3. Look for Microsoft Teams, click on its three-dot button and select Advanced options.
  4. On the new page, scroll down and click on the Repair button. Check if Teams is working fine. If not, also click the Reset button below.

Now give it another try to that MS Teams.exe in Windows 11 and see if the issue has been repaired.

Corrupted or missing Windows 11 DLL files are frequently caused by unsuccessful updates of applications. When MSTeams app updates are installed, for example, DLL files are frequently replaced by newer ones.

This poses problems for the app that may still require the previous version to function. As a result, MSTeams crash, displaying errors and becoming unresponsive.

The easiest way to fix MSTeams.exe Bad Image Teams Error in Windows 11 is to use a third-party system repair tool.

The best part is that you won’t have to go seeking a needle in a haystack; all of this and more can be done with an automated solution.

2. Uninstall and reinstall Microsoft Teams

  1. Click on the Windows Start button and access Settings.
  2. Select Apps from the left menu, then choose Installed apps from the right.
  3. Scroll down until you see Microsoft Teams, click on the three-dot button from its right, and select Uninstall.
  4. Once uninstalled, download and reinstall Microsoft Teams.

3. Create a new user account

  1. Press the Start button and select Settings.
  2. Click on Accounts, then choose Family & other users.
  3. On the next page, click the Add account button under the Other users section.
  4. On the window that appears, click on I don’t have this person’s sign-in information.no-signin-info (ms teams.exe bad image windows 11)
  5. Provide username, password, and answer the security questions to complete the process.create-new-account_ ms teams.exe bad image windows 11
  6. Restart your PC.
  7. After the reboot, sign in using the new account. The problem should be fixed.

4. Rename the Microsoft Teams folder

4.1 View the WindowsApps folder by displaying hidden folders

  1. Press the Windows key + E to start File Explorer.
  2. Click on the View tab, then check the Hidden items box to show all the hidden files and folders.

4.2 Change the Microsoft Teams folder access permissions

  1. Press the Windows key + E to start File Explorer and navigate to the Program Files folder.
  2. Locate the WindowsApps folder, right-click on it, and select Properties.
  3. On the window that appears, select the Security tab.security-tab
  4. Click the Advanced button.advannced-button
  5. On the window that appears, click on Change to change the owner of the folder.change-owner
  6. In the Select User or Group window, click on Object Types.object-types- ms teams.exe bad image windows 11
  7. On the window that appears, check the box for Users.check-users
  8. Click OK to close the window.exit-window
  9. Now, enter your username or Administrators if you are logged in with an administrator account.enter-user name
  10. Click the OK button and exit.

4.3 Rename the Microsoft Teams folder

  1. Get back to the WindowsApps folder and now, because it’s not hidden and you have the proper permissions, you can double click it to see its contents.
  2. Scroll down until you see folders with names that start with MicrosoftTeams and rename them with the suffix .old.

Other readers suggest that you can also delete the Teams folders completely. However, in our solution, you will still have the data that you will be able to use.

Why are there 2 Microsoft Teams Windows 11?

If you have updated from Windows 10 to Windows 11 and you had the Microsoft Teams app installed, you will see that you have two of them.

That is because Windows 11 comes with the Microsoft Teams for Personal Use preinstalled.

However, you will also have Microsoft Teams for Work and School which you probably installed on Windows 10.

That’s why, when you search for Microsoft Teams, you will find both apps. Luckily, as you can se in the image above, they have different icons so you can easily identify them.

How to check for updates in Microsoft Teams?

You should know that Microsoft Teams updates automatically. However, you can also do a manual check and also see the version number if you’re interested.

It’s pretty simple but here’s a small step-by-step guide to help you:

  1. Open Microsoft Teams, click on the three-dots button near the image of your account, and select Settings.
  2. Now, click on About Teams.
  3. At this point, Teams will do an automatic check for updates and it will display the latest version number.

As stated earlier, the Bad Image error is mainly caused by an installed update that had corrupted files. It is a common error that applies to many windows applications, Microsoft Teams is just one of them.

The solutions listed above should help you solve the inconvenience while waiting for Microsoft to release a permanent fix.

Nonetheless, if you are experiencing problems after trying them out, your best bet is to update your Windows software.

Unfortunately, the app has other issues also. For instance, we have solutions if you can’t download files in Teams. Keep this guide handy if you run into that problem.

Feel free to use the comments to let us know if our solutions helped you, or if you have another tip that you would like us to add to the list above.

What Is the Difference Between a Steam Download vs an Install?

Anyone can download Steam and enjoy all the features it has to offer. When you purchase a game through Steam, the app downloads and installs it automatically. This process can take several minutes or hours depending on the size of the game and your Internet connection speed. 

Once it’s finished downloading and installing, you’ll be able to start playing right away. However, if you want to play offline or update an existing game on Steam you’ll need to perform a separate install step before doing so.

There’s a lot of confusion about what Steam downloads are, and how they differ from installs. If you’re confused, you’re not alone. So, let’s clear that up for you.

What is the difference between installed and downloaded in Steam?

Steam is an online gaming platform that allows you to download games onto your computer. The downloads are usually large files, and depending on your internet connection speed, it can take some time for them to finish downloading.

When you purchase games on Steam, they are automatically downloaded to your computer and saved to your library. If you want to play a game that’s not in your library, you’ll need to purchase it and then download it first.

Steam installs are different from downloads because they don’t require an Internet connection. When you purchase a game on Steam, you will be able to download it before installing it.

The download is essentially a small compressed file that you can use to install the game later. An install is when you run the game files from your computer’s hard drive.

How do downloads work on Steam? 

When you download a game or application, your computer will start downloading the files immediately depending on your setting and internet connection. 

You’ll see a progress bar that shows how much of the game remains, and you can track your download speed in real-time. Once your files have finished downloading, they’ll be added to your library automatically. From there, you can launch them whenever you like.

Why does Steam download then install? 

Steam doesn’t install games directly onto your hard drive. Instead, it stores the game files on its own servers, and you access them by logging into Steam and downloading them over the Internet.

This is a good thing for two reasons:

  • You can download your games from anywhere (you don’t need to be at home with an Internet connection).
  • It makes sure that all your games are always up to date — because Steam downloads patches automatically. Some titles include patches or other updates that need to be installed as part of their installation process. 

How do I install a Steam game without downloading it?

You can install Steam games from an optical disc or USB drive instead of downloading them. Insert the disc into your computer’s disc drive or connect the USB drive containing the game files.

Now, you can open Steam and go to your Library then select a game that you want to play and right-click on it to play from an optical drive or USB drive.

Can you play a Steam game while it’s downloading?

Yes, but it is dependent on a few factors. Steam has a feature called Instant Play, which allows you to play games while they are still downloading. You can do this on any desktop or laptop computer.

The Instant Play feature is useful when you’re playing a game with large file size and you don’t want to wait for it to finish downloading. For example, if your internet connection is slow, or if you’re playing on an old computer with a small hard drive that can’t handle large downloads.

Some games don’t need updates and can be launched immediately after installation without waiting for them to finish downloading.

Now that you know the difference between a Steam download and install, you may be interested in the best Steam games for Windows 10 if you haven’t already jumped on the bandwagon.

Let us know of any additional thoughts you may have in the comment section below.

Bluetooth is Not Working in Windows 11: How to Fix It

Like any other operating system, Windows 11 can come up with some random troubles. Bluetooth issues make no difference, and these can be related to various explanations.

You may sometimes encounter some of them on your newest OS and since we want you to be prepared, we suggest taking a look at our guide.

Fortunately, most of them are extremely similar to what we know from Windows 10, so it will be easy to understand what to do.

But first of all, you should find out what are the problems that might cause Bluetooth not to work in Windows 11.

Why is my Bluetooth not working in Windows 11?

There are some reasons why your Bluetooth is not working on Windows 11. However, each of them has a solution, so do not worry! Consult the list below and find out which one suits your situation.

  • Incompatible versions – Even if Bluetooth is supposed to be universal, devices that require different versions of the standard can sometimes come into conflict.
  • Bluetooth is not connected properly or is disabled – This is a problem that may be quickly solved from the Windows Settings menu.
  • Drivers are not updated or compatible – Poor updates or incompatible settings related to your Bluetooth drivers can cause serious problems in using them.
  • Random and temporary bugs – Like any other digital component, Bluetooth may sometimes occur by errors, without a certain explanation.

As you can clearly see, there can be many related causes but don’t worry because the solutions below will clear most of them easily.

Moreover, here is a list of similar errors reported by our users, that will be addressed in the solutions below:

  • Bluetooth not connecting automatically in Windows 11 – In the event that Bluetooth continues to be inoperable in Windows 11, you will need to get its drivers up to date with the most recent version.
  • Bluetooth not showing in Windows 11 – Most of the time, problems with the integration of the Bluetooth software or frameworks are to blame when Bluetooth disappears from your system’s Settings. Hardware problems might also be to blame.
  • Windows 11 Bluetooth stopped working – If your Bluetooth devices are unable to connect with one another, the problem is often caused by one of two factors: either the devices are too far apart or they aren’t in pairing mode.
  • Bluetooth not working after Windows 11 update – Utilizing Windows 11’s Update history function is the most effective method for uninstalling an update.
  • Bluetooth not working after Windows 11 goes to sleep – Start the troubleshooters for both Bluetooth and hardware and devices.
  • Your Bluetooth is not available on this device – This error message in Windows 10 can frequently be brought on by a wide variety of different factors. For instance, this issue might be caused by a Bluetooth driver that has become obsolete.

Don’t fear these errors as we have prepared four efficient ways to tackle and win them over. Follow along to find them out!

If interested, check out the guide to find out how to increase Bluetooth range on Windows PCs

Why is Bluetooth not finding devices?

One of the most typical issues with Bluetooth is when the device you’re trying to connect doesn’t appear in the list that your phone searches for when it runs a search. In most cases, this occurs because the device’s own Bluetooth is either turned off or isn’t set to pairing mode.

You may switch on pairing mode by following the instructions in the user handbook; which will tell you how to make it discoverable.

Some headphones need you to keep the power button pressed for a longer period of time; but other devices include a button that is specifically designated for pairing with Bluetooth devices.

For detailed solutions to the Bluetooth not detecting devices on Windows 10 & 11 issue, check out our dedicated article. Now, let’s see what you can do if Bluetooth is not working in Windows 11.

What can I do if Bluetooth stopped working in Windows 11?

1. Check if Bluetooth is turned on

  1. Click on the Windows key, then open Settings.
  2. Go to Bluetooth & devices, then check if the Bluetooth shows the On button. If it isn’t, just enable it.

2. Run the Windows 11 Bluetooth troubleshooter

  1. Click the Start button, then select Settings.
  2. From the left window pane, select System, then look at the right side and click on Troubleshoot.
  3. Select Other troubleshooters.
  4. Search for Bluetooth, then click on the Run button.

With this option, your OS will automatically run the recommended troubleshooter. Thus, you’ll not have to bother yourself until the process is done. 

Once it is completed, Windows will let you know whether or not it solved a problem; so you’ll know what happened.

3. Make sure Bluetooth Support Service is running

  1. 1. Click the Search icon from the Taskbar and type services in the text box that opens.

    windows search open
  2. 2. Open the Settings app from the results.

  3. 3. Find the Bluetooth Support Service section, then double-click on it.

    bluetooth support service click
  4. 4. In the pop-up window, go to the Startup Type section and open the drop-down menu.

  5. 5. Select Automatic from the menu.

    automatic bluetooth service set
  6. 6. Click on Apply, then on OK.

    apply settings bluetooth
  7. 7. Check if the error persists.

  8. Having Bluetooth Support Service stopped or disabled may cause already installed Bluetooth devices to fail in operating properly. Making sure it is running in normal terms helps you to prevent new devices from not being discovered or associated.

4. Use Device Manager

Update Bluetooth driver for Windows 11

  1. Click the Search icon on the taskbar, then type device manager and select the app from the results.
  2. Expand the Bluetooth section, then right-click on the one you need, and select Update Driver.
  3. Select Search automatically for drivers.
  4. If the system doesn’t find a new driver you can click on Search for updated drivers in Windows Update.
  5. Now click the Check for updates button. If there are any updates, the system will download and install them.

This option might be one of the most efficient ones because it automatically updates drivers, which allows Bluetooth to properly connect.

This is a mandatory process that should be constantly performed on all your drivers to keep your PC running properly.

Of course, there are some other methods you can try to easily update drivers in Windows 11 so do not hesitate to take a look at them. For automatic scans of missing or outdated drivers, we recommend using Outbyte Driver Updater.

This automatic driver updater will scan, find and give you a list of all the drivers your device is in need, what you’ll need to do is just accept the drivers and let the tool work on your behalf.

Outbyte Driver Updater

Use this tool that can help you find new drivers quickly and allow you to download and install drivers easily.

How to reinstall Bluetooth driver windows 11 drivers in Windows 11

  1. Click the Search button from the taskbar, type device manager, and click on the app from the results.
  2. Expand the Bluetooth section, then right-click on the one you need, and select Uninstall device.
  3. Click the Start button, then select the Power icon and choose Restart.
  4. After the reboot, your PC will automatically install a new related driver and clear the Bluetooth cache in Windows 11.

If updating Bluetooth drivers didn’t work as expected, it might be a more serious issue, the components being completely unresponsive.

To fully refresh them, you should also try to reinstall the related drivers and see if the problem is still there.

If none of the listed options worked for your situation, you’ll probably have to access the device manufacturer’s website.

There, you’ll find the exact and updated model, which will surely be compatible with your needs.

Note that you can either search for the requested Bluetooth drivers or raise a ticket to the support team.

For more detailed information regarding Bluetooth drivers, we suggest visiting the Microsoft Drivers Download Center.

How to connect a Bluetooth device to your PC?

  1. Click the Start button, then select Settings from the menu.
  2. Select Bluetooth & devices from the left pane.
  3. Click on the Add a device button and select Bluetooth.
  4. The system will detect all the discoverable Bluetooth devices within range. So make sure that the device you want to connect has Bluetooth turned on and it’s discoverable. Smartphones have this kind of option within their Bluetooth settings.
  5. Now click on the device that you want to pair. They will eventually appear as Paired or Connected, as shown in our screenshot below.

Why can’t I turn on Bluetooth on my computer?

In the event that you are configuring a new device and Bluetooth is not there, check the product specs to see whether or not it is equipped with Bluetooth capabilities. There are several electronic gadgets that do not have Bluetooth.

Make sure the Bluetooth switch is turned on if your laptop has a physical button for it somewhere on the body of the device.

Ensure that your device is powered on, that it is fully charged or that it has recently replaced its batteries, and that it is within range of the computer you wish to connect it to. And lastly, make sure the airplane mode is turned off.

We selected the best solutions to fix the Windows 11 Bluetooth not working issue, so consider this article as significant support.

For those that still use the previous version of the operating system, we have a similar guide on how to fix your Bluetooth in Windows 10.

You need to keep in mind that the Bluetooth connectivity has a range of approximately 30 feet. Also, any obstacles within the devices can alter the quality of the connection.

So, when you try to pair a device with your PC, keep the device close, to avoid any such problems.

You should also avoid any signal interferences with other similar devices you have around. You might as well turn the Bluetooth connectivity off for all the other devices except for the ones you want to pair.

If you’re in a public space, there’s always the risk of your Bluetooth attacks and highjacking so try to avoid using it to transfer files to and from your PC.

To keep your device much safer, do not hesitate to find out what are the best security & privacy features in Windows 11.

If you want to learn more about Bluetooth, we have a great guide on the Microsoft Bluetooth Enumerator driver on Windows 11, so you might want to visit it before you go.

Hopefully, you managed to fix the issue and now you can easily transfer files from laptop to laptop using Bluetooth or connect to a Bluetooth hotspot on Windows 11.

Because your opinion is important, share it with us by leaving a comment in the section below.

Xbox consoles to change how free video games are listed

Xbox engineering lead, Eden Marie, recently revealed on Twitter that the way Xbox consoles would be handing titles currently in an Xbox Free Play Day promotion would be changing.

In addition to showing up within the Xbox Live Gold screen, which is where they’re currently displayed, Free Play Day games will also show up in a user’s library within the Games With Gold category.

“Oh hey, there’s new Free Play Days games on Xbox this weekend!” Marie wrote. “That reminds me that in Alpha and Alpha Skip Ahead rings, these games now appear in your full library Games with Gold section for you to install during the period that they are free.”

As Marie mentions, this change is currently only active for Xbox Insiders within the Alpha and Alpha Skip Ahead ring. This means that this change is currently being tested and should roll out to the general public within a few months once the team is sure that everything works smoothly.

Free Play Days are special promotions that typically run every weekend of the year. During this period, select games are unlocked for free for all Xbox Live Gold subscribers with an active subscription. This coming weekend’s Free Play titles include The Elder Scrolls Online, Destiny 2’s expansions, and Bloodstained: Ritual of the Night.

Destiny 2 expansions, Elder Scrolls Online, and Bloodstained are free on Xbox this weekend

Three video games are free to play on Xbox consoles this weekend for gamers with active Xbox Live Gold subscriptions. And two of them are actually going to be playable well after the weekend’s over too.

Bloodstained: Ritual of the Night, an action and adventure title, will be free to play on Xbox One and Xbox Series X console families until the end of the weekend, Sunday night. The game’s also currently been given a 60% discount for Gold subscribers.

The Elder Scrolls Online, a popular MMO, has been free to play on Xbox consoles since August 16th and will continue to be free until August 29th. It should be noted that Elder Scrolls Online is also playable for free via Xbox Game Pass so subscribers of that service may want to focus on one of the other two free games this weekend instead.

The third free Xbox game this weekend is Destiny 2 which is admittedly already a free-to-play game but, from this week until August 30th, its paid expansions will be unlocked for free for all players.

As with previous Free Play Day promotions, all progress made during the promotional period will save to players’ accounts for continuing at a later date should they buy the content outright. Xbox Achievements will also be unlockable.

After more Destiny 2 fun? The popular video game is currently doing a collaboration with Fortnite.

Microsoft’s GroupMe app updates on iOS, Android, and Windows with improvements

Microsoft’s GroupMe app updated this week for Windows, Android, and iOS with a variety of UI improvements and feature fixes.

Here’s the full release note for Windows:

  • New poll options! You can now create multi-choice polls and public polls.
  • Fixed crash when downloading files.
  • Dark mode fixes when adding people to groups and starting direct messages.

Here’s the Android release notes for this week’s GroupMe app update:

  • Improved: Layout improvements for the Discover tab and group discoverability settings.
  • Improved: The system back button takes you to the chat list first, then out of the app.
  • Improved: System messages are now excluded from search results.
  • Fixed: State issues when loading the Discover tab.
  • Fixed: The chat tab badge and options menu flickering upon login.
  • Fixed: Issue opening the group details drawer.
  • Fixed: Issue viewing a group’s QR code.
  • Fixed: Incorrect colors in dark mode.

And here’s the release notes for the GroupMe app update on Apple’s iOS devices:

  • Improved: UI enhancements to Discover
  • Misc bug fixes

GroupMe is a free messaging app that’s designed to work with anyone across Windows, Android, Apple devices, and the web as long as they have a phone number or email address. It’s a service that definitely hasn’t reached highs of the likes of Telegram (which recently passed 700 million users), even though it’s been around since 2010, but it still has a fairly loyal userbase that use it on a daily basis to communicate with family, friends, and colleagues.

GroupMe
GroupMe
Developer:
Skype
Price:
Free


‎GroupMe
‎GroupMe
Price:
Free+


GroupMe
GroupMe
Developer:
GroupMe
Price:
Free

2 Easy Ways to Resize the Touch Keyboard on Windows 10

The on-screen keyboard is a feature conveniently built into the Windows 10 platform. If the virtual keyboard is too small or too big and you cannot properly use it, read the troubleshooting steps below and learn how to resize it.

The solution listed in this tutorial will work regardless of what Windows-based device you are currently using.

How to resize the touch keyboard in Windows 10?

1. Modify the registry

  1. 1. Press the Win+R hotkey. The Run box will be displayed on your device.

  2. 2. In the Run field type regedit and then press Enter. The Registry Editor will open.

    regedit run
  3. 3. From the Registry Editor window, access the following path:HKEY_LOCAL_MACHINESoftwareMicrosoftWindowsCurrentVersionExplorer

    registry editor on screen keyboard fix
  4. 4. Right-click on the Explorer folder and select New – > Key.

  5. 5. Name this key Scaling.

    registry editor resize on screen keyboard
  6. 6. Now, under Explorer, you should see the recently created Scaling entry.

  7. 7. Right-click on the Scaling folder and choose New – > String Value.

  8. 8. Name this Value MonitorSize.

  9. 9. Next, double-click on MonitorSize and enter the string value 25 (this is the default value for a half-screen-width keyboard). You can also enter a different string value for resizing the virtual keyboard.

  10. 10. Close the Registry Editor.

  11. 11. Restart your Windows 10 system.

  12. The touch keyboard’s size can be easily modified via the Registry Editor. A quick tweak to the Registry helps you resize the keyboard however you want, depending on the value you input.

2. Change the keyboard

If the solution above seems too complicated, you can always try an alternative on-screen keyboard.

You can find high-quality alternatives with advanced features and customization options. Most on-screen keyboards support multiple languages and have auto-complete functions.

Make sure to get an alternative that allows you to set your own shortcuts, and that includes the languages and dictionaries that you frequently use.

This solution should help you adjust the on-screen keyboard size when you think that it’s too big or too small.

Speaking of virtual keyboards, if your on-screen keyboard won’t work at all, check out this troubleshooting guide to fix the problem.

Check out our article on the best virtual key software you can use on your device for more information.

If you have questions or if you cannot successfully complete the steps above, don’t hesitate and share/describe your experience with our team. We will try to find the perfect fit for your problem based on the info that you provide us with.

How to Downgrade to Office 2013 From Office 2016

Newer isn’t always better, especially when it comes to software, and sometimes newer versions of software can cause certain compatibility issues.

In some instances, Office 2016 can be the cause of these issues, and today we’re going to show you how to downgrade to Office 2013 from Office 2016 on Windows 10.

How can I roll back to Office 2013?

office 2016 rollback
  1. Use Office 2013 Subscription
  2. Remove Office 2016 and install Office 2013
  3. Download Office 2013 offline installation package

1. Use Office 2013 Subscription

    Microsoft has recently added a way to roll back to Office 2013 on your My Account page. From it, you can downgrade from Office 2016 to Office 2013 in a few clicks, without having to use any third-party tools.

  1. 1. Open your preferred browser.

  2. 2. Navigate to the Microsoft site.

  3. 3. Sign in to your account using your credentials.

  4. 4. Click on Install.

  5. 5. Select the language and the install options.

  6. 6. Choose Additional install options.

  7. 7. Pick Office 2013 as the preferred version, in the 32 or 64 bit version, depending on your operating system and processor.

  8. 8. You can now use Office 2013 on your device.


2. Remove Office 2016 and install Office 2013

This is a pretty straightforward solution:

  1. Download Fix it tool from Microsoft to remove Office 2016. You can download Fix it tool from here.Rollback to Office 2013 From Office 2016 uninstall office
  2. Install one of the following versions of Office 2013:

After Office 2013 installation you might want to disable automatic updates so it doesn’t update to Office 2016 on its own.

To do so follow these steps:

  1. Open Registry Editor. You can open it by typing regedit in the Search bar or by pressing Windows key+R.Remove Office 2016 and install Office 2013 regedit run window
  2. Navigate to the following path:
    • HKEY_LOCAL_MACHINESOFTWAREPoliciesMicrosoftoffice15.0commonOfficeUpdate
  3. Add this value to the Office Update subkey:
    • “enableautomaticupgrade”=dword:00000000.

If you don’t know how to do this, skip this step and instead download and run this file.


Can’t access Registry Editor on your PC? Here’s a quick and easy fix for that!


3. Download Office 2013 offline installation package

  1. Download Office Deployment Tool for Click-to-Run from here (If the download link doesn’t work, download older version from here).
  2. Run Office Deployment Tool for Click-to-Run and extract it to C:Office15.
  3. Go to C:Office15 and open configuration.xml and delete everything from it.
  4. Enter this into configuration.xml file:
    • <Configuration><Add SourcePath=”C:Office15″ OfficeClientEdition=”64″ ><Product ID=”ProfessionalRetail”><Language ID=”en-us” /></Product></Add></Configuration>
  5. Now you will need to replace certain data. Remember to keep all the values between the quotes:
    • Set SourcePath to the C:Office15
    • Set OfficeClientEdition to 32 for 32bit version or 64 for 64bit version.
    • Set Product ID to one of the values from the table below.
    • Product ID Product Name
      AccessRetail Microsoft Access 2013
      ExcelRetail Microsoft Excel 2013
      GrooveRetail Microsoft OneDrive for Business 2013
      HomeBusinessPipcRetail Microsoft Office Home and Business Premium
      HomeBusinessRetail Microsoft Office Home and Business 2013
      HomeStudentRetail Microsoft Office Home and Student 2013
      InfoPathRetail Microsoft InfoPath 2013
      LyncAcademicRetail Microsoft Lync Academic 2013
      LyncEntryRetail Microsoft Lync Basic 2013
      LyncRetail Microsoft Lync 2013
      MondoRetail Microsoft Office Mondo 2013
      O365BusinessRetail Microsoft Office 365 Business
      O365HomePremRetail Microsoft Office 365
      O365ProPlusRetail Microsoft Office 365 ProPlus
      O365SmallBusPremRetail Microsoft Office 365 Small Business Premium
      OneNoteFreeRetail Microsoft OneNote 2013
      OneNoteRetail Microsoft OneNote 2013
      OutlookRetail Microsoft Outlook 2013
      PersonalPipcRetail Microsoft Office Personal Premium
      PersonalRetail Microsoft Office Personal 2013
      PowerPointRetail Microsoft PowerPoint 2013
      ProfessionalPipcRetail Microsoft Office Professional Premium
      ProfessionalRetail Microsoft Office Professional 2013
      ProjectProRetail Microsoft Project Professional 2013
      ProjectStdRetail Microsoft Project Standard 2013
      ProPlusRetail Microsoft Office Professional Plus 2013
      PublisherRetail Microsoft Publisher 2013
      SPDRetail Microsoft SharePoint Designer 2013
      StandardRetail Microsoft Office Standard 2013
      VisioProRetail Microsoft Visio Professional 2013
      VisioStdRetail Microsoft Visio Standard 2013
      WordRetail Microsoft Word 2013
    • Set Language ID to en-us for English version.office configuration rollback office 2016

As we already mentioned mind the quotes, so please keep all the values between the quotes. If you don’t do that, the installation will fail.

  1. Run Command Prompt. You can run it by entering cmd in Search bar. Type the following to switch to that folder:
    • cd C:Office15
  2. Now enter the following (This will start the download process. Remember, this might take a while depending on your internet speed, so make sure that you don’t cancel it):
    • setup.exe /download configuration.xmloffice rollback command prompt
  3. Now go to C:Office15OfficeData and locate the folder with numbers in its name (Remember those numbers, you’ll need them for next step).
  4. Go back to C:Office15 and open configuration.xml and paste this into it:
    • <Configuration><Add SourcePath=”C:Office15″ Version=”15.0.4481.1005″ OfficeClientEdition=”64″ ><Product ID=”ProfessionalRetail”><Language ID=”en-us” /></Product></Add><Display Level=”Full” AcceptEULA=”TRUE” /></Configuration>
  5. Now you need to change values to the ones you used when downloading Office in Step 4 (Remember to change the Version value to the one from the Step 7).
  6. Open Command Prompt and enter: cd C:Office15.
  7. Now enter this into Command Prompt for the installation to start:
    • setup.exe /configure configuration.xml
  8. If you get any errors, you might need to check configuration.xml if the values are the same like in Step 4 and Step 7 and if they are placed properly between the quotes.

Can’t install Office 2016 due to Error 30015-6 (-1)? Fix that with this guide!


That’s about it. As you can see, the solutions aren’t very complicated, but you need to be aware of the quotes and the lines you enter. One missed letter can be enough to ruin the installation process.

If you have any other questions, please feel free to ask in the comments section below.

Fix: Peacock Is Not Yet Supported in Your Region [OVP 00012]

Peacock is NBC’s popular streaming service. Many argue that it’s even better and cheaper than Netflix.

We like to believe it gained a bit more popularity after it became the only platform to stream The Office after it left Netflix at the beginning of 2021.

Therefore, it makes sense why you’d want to jump on this train as soon as possible. However, as with many other streaming platforms, Peacock is unavailable for everyone.

In fact, if you’re not on US territory, you may face the dreaded Peacock is unavailable in your region error message.

But don’t fret, we’ve got a few tricks up our sleeve that should help you bypass Peacock geoblocks without breaking a sweat.

Why is Peacock not available in my region?

This streaming service from NBC is available only in the US due to regional limitations imposed by the government.

The users can experience this problem with Peacock because of licensing issues that don’t allow other countries to stream such content.

In order to bypass this issue, you can simply connect to a VPN with worldwide servers with the highest connection speed.

How can I watch Peacock outside the US?

1. Use a reliable VPN

  1. Get a premium VPN subscription plan, like Private Internet Access.
  2. Download the VPN installer on your device
  3. Install the VPN client
  4. Launch the VPN and login into your account
  5. Connect to a US server (this step is important)
    use PIA US servers
  6. Access Peacock’s website
  7. Register an account
  8. Enjoy streaming on Peacock

If streaming still fails after connecting to a US server, see our guide on why is Peacock not working for region, buffering, and playback fixes.

Private Internet Access is one of the best VPNs that work with a wide variety of streaming services, including Peacock.

You have more than 22,000 fast servers worldwide that you can use to connect to US servers and access restricted content from Peacock in seconds.

Besides unblocking various geo-restricted content on the Internet, PIA can also protect your privacy and keep your connection secure.

It has a broad range of servers you can choose from and features an Internet kill switch.

Private Internet Access

Is Peacock unavailable in your region? PIA will help you fix that rapidly.
Check price Visit website

2. Use a Smart DNS

Instead of using a VPN, you could use a Smart DNS service to access Peacock if it’s unavailable in your region.

What a Smart DNS service does is it replaces your ISP-assigned DNS with a private one.

As a result, websites you may try to access (such as Peacock) will detect you as being in the same location as your spoofed DNS indicates.

The main advantage of using a Smart DNS is that it’s faster than a VPN since it doesn’t encrypt your traffic or hide your IP address.

That’s precisely why you shouldn’t use such a service if you care about privacy and security.

If, on the other hand, you’re not concerned about your privacy, you should definitely go with a Smart DNS service.

3. Use a proxy server

Proxy servers have been used for a long time to hide your true identity online.

You simply configure your browser or your system with the server you choose, and your traffic will be routed through the proxy.

Therefore, if Peacock is unavailable in your region, a proxy server could help you fix this issue.

However, there are a bunch of drawbacks to using proxies.

Because most of them are free, they tend to become overcrowded. As a result, you’ll experience slowdowns and even random disconnections.

It goes without saying that streaming video content online requires a fast, stable connection.

To avoid the situation above, we suggest you invest in a paid proxy server or use a VPN.

Just a heads-up: proxy servers can’t always bypass geo-restrictions, unlike VPNs.

How to pay for Peacock TV outside the US?

  1. Get a subscription to VPN software with fast US servers like PIA.
  2. Access the USunlocked website and click on Get your card.
  3. Fill in the registration data to get your virtual US card.
  4. Add money to your USU card and wait for it to be processed.
  5. Once you have US funds, go to the Peacock website for your subscription.

Hence, this is the simple method to obtain a subscription if Peacock won’t accept your payment.

All things considered, there are several things you could try if Peacock is unavailable in your region.

One of the most popular methods to bypass this limitation is using a VPN, as it will not only unblock the service but also protect your online privacy. Also, they might help with the Peacock’s Generic Playback error.

If you’re not concerned about your online privacy, however, you could also stick to a Smart DNS service.

Last but not least, proxy servers can sometimes bypass geo-restrictions, but the drawbacks often outweigh the benefits of this type of service.

13 Best Proxy Tools for PC [2026 Reviewed]

Before we start, we need to quickly explain how proxies work. Basically, the proxy works as a middleman between your PC and the Internet.

When using a proxy your actual IP address will be hidden, and you’ll use your proxy’s IP address instead.

Although proxy masks your IP address, it doesn’t encrypt your traffic, which means that malicious users can still intercept it.

What are proxy tools?

Simply said, proxy tools as devices like routers or systems that protect your online privacy with a gateway for the users when navigating on the web.

For instance, you can use proxy servers to access online resources by sending traffic to a proxy that evaluates the web pages before you access them.

Which type of proxy is best?

There are multiple types of proxy servers out there so you can shield your privacy requirements.

If you’re looking for the best proxy types, you should go for residential proxies as they are the most popular option among users because it has real IP addresses for devices.

Which one is better, VPN or proxy?

We have to mention that proxy doesn’t affect your entire network connection, and it will affect only a single application, such as your browser.

Also, by going through a proxy, your original IP can be traced back to your PC. VPNs ensure that your PC is untraceable.

Of course, when you activate a VPN, it will cover all the apps on your PC, not just the browser so you’re covered all the way.

However, this doesn’t mean that proxy tools can’t be useful, and if you’re looking for the best proxy tool, today we’re going to show you a few.

What is the best proxy tool for Windows 10 and 11?

Private Internet Access – Best VPN from all

As the world’s leading VPN, PIA does more for your online privacy than a simple proxy tool could ever do.

With this Kape Technologies-owned VPN, you will be able to enjoy a truly liberated web experience, completely free of censorship and geographically imposed restrictions without compromising on security.

If anything, you will benefit from the highest level of encryption for your traffic data, anonymous browsing, IP cloaking, and other privacy-oriented features including a strict no-logs policy.

This means that your online activity will never be tracked or monitored, not by your ISP, not by governmental agencies, and not by hackers.

Speaking of hackers, you will be completely protected against any kind of cyber threats as PIA also includes a malware blocker and a firewall.

Moreover, your IP address is changed when connecting to one of its 3292 servers strategically spread across 46 countries worldwide.

Let’s quickly look at its key features:

  • Bypass censorship and unblock restricted websites
  • Secure protection even on public Wi-Fi
  • Unlimited bandwidth and ultra-fast Download Speeds
  • Integrated ads, trackers, and malware blocker
  • Compatible with all popular desktop and mobile operating systems
  • Strict no-logs policy for total privacy
  • Easy to set up and easy to use (1 click connection)
  • Secure VPN protocols (Wireguard, PPTP, OpenVPN, and L2TP/IPSec)
  • Protect up to 10 devices simultaneously with just 1 subscription
  • 30-day money-back guarantee

Private Internet Access

Extend the benefits of proxies to your entire network and all your devices with PIA!
Check price Visit website

NordVPN – Quickest connection speed

NordVPN is a reliable VPN service provider trusted by millions of users worldwide.

Unlike a proxy server, this software comes with in-built security features that ensure your traffic data is protected when you browse online.

The VPN program works on the operating system level and encrypts the traffic between your device and the internet network. In this way, your ISP won’t be able to collect data or track what you do online.

With NordVPN’s obfuscated servers you can even hide the fact that you are using a virtual private network.

Since this type of server changes your data packets, connecting to it will enable you to access firewalls blocked by VPNs.

Another great feature of this service is its strict no-logs policy. NordVPN does not track or collect your private data while you navigate online.

Here are other key functions of this software:

  • 5000+ fast servers in 59 countries
  • Supports Windows, macOS, Linux, Android, and iOS
  • Connect one account to six devices at once
  • CyberSec technology
  • Double VPN security feature
  • No ISP or bandwidth throttling
  • Automated kill switch
  • Browser extensions for Firefox and Google Chrome
  • Dedicated, static IP address accessible only by you
  • Mobile apps for Android and iOS
  • Live chat support 24/7

With NordVPN you can download and share files through secure P2P servers with no bandwidth limits.

NordVPN

Connect to the fastest VPN servers and browse stress-free with NordVPN!
Check price Visit website

Surfshark – Great encryption

Surfshark is a resourceful VPN service with a strict no-logs policy. They do not keep track of any of your data.

Plus, by hiding your IP and connecting you to a private server, no third party will be able to identify or track you. 

It uses the private DNS of each server. This means that all your data is fully encrypted. 

Surfshark VPN uses industry-leading AES-256-GCM encryption. No one will be able to access your browsing history, traffic data, or identity without your permission.

Along with that, they use secure protocols like IKEv2/IPsec. They also allow you to use OpenVPN.

In case the connection drops, this VPN is equipped with a killswitch which will automatically turn off any traffic data in case the connection drops.

Surfshark VPN is compatible with all major platforms and you can connect it to an unlimited number of devices. It is subscription-based with a 7-day free trial available for each plan.

Other key features of Surfshark VPN include:

  • Changes your IP
  • NoBordersMode
  • Split tunneling
  • Ad blocker
  • Anti tracker

Surfshark

Keep your data private and increase internet connection speed with this reliable and budget-friendly VPN.
Free trial Visit website

ExpressVPN – Optimized for stable connections

Another useful tool if you want to keep your personal details private is ExpressVPN.

To understand how it works compared with a free proxy tool, keep in mind that every single application will need to be configured separately to use the proxy you desire.

Thus, changing the proxy server location might require a complete reconfiguration.

On the other hand, once you install a VPN tool, selecting a location becomes easy and fast. Express VPN routes and encrypts all kinds of traffic through its servers.

When you choose to connect on a free proxy server, check first if it encrypts its traffic and be aware that loads of other users are getting this free congested highway.

Choosing a premium VPN like this Express VPN International Ltd. owed security software instead is like a secured private tunnel just for you, optimized for speed and stability.

ExpressVPN it’s not free, though its speed and the numerous servers it has in 160 locations spread worldwide make the difference.

Plus, you get to enjoy special discount rates and a convenient 30-day money-back guarantee.

ExpressVPN

Enjoy secure and reliable connections on ultra-fast servers in 94 countries!
Check price Visit website

Cyberghost VPN – Good for multiple devices

The best privacy buddy while surfing the web is a virtual private network software (VPN). You can check out this best VPN list to learn more about the virtual private network.

This is one of the leaders on the market when it comes to security. It masks your IP and keeps all your data safe as you are surfing the Web.

Easy to install and easy-to-use, it allows you to run up to 7 devices at a time. This feature is extremely useful if you are using multiple gadgets for the same purposes and you need a safe internet connection.

One of the most important security features that Cyberghost has to offer is that it separates your browsing from your personal data.

It doesn’t log your files in order to prevent them from being damaged or stolen.

CyberGhost VPN has dedicated servers for various activities and you can customize the recommendations based on your preferences and location.

This flexible function makes it the ideal VPN provider for online transactions, streaming, torrenting, and more.

Cyberghost VPN

Surf online with one of the best anonymous web proxy!
Check price Visit website

IPRoyal – Huge pool of IPs

IPRoyal is one of the best proxy tools out there with over 2 million IPs available so it’s definitely worth a shot.

You can either choose a sticky IP that you can use for 24 hours or a rotating proxy and you will benefit from 99.9% uptime.

All the IPs are real, residential proxies from genuine users and they cannot be distinguished from organic visitors.

Even you can leave your IP to be used if you’re not using your PC for a while and you will be compensated for that.

With IPRoyal’s data centers you will benefit from unlimited bandwidth with no extra charges, and that translates into fast access speeds.

You will avoid any geo-blocking by selecting a proxy from any location in the world and the IP is reserved for you.

And all the browsing is perfectly secure, with HTTPS and SOCKS5 support and a lot more.

IPRoyal

Choose a reliable proxy from any part of the world and enjoy browsing your favorite content.
Check price Get it now

Ultrasurf – Great for Android surfing

Ultrasurf is a small and portable tool that will protect your privacy online. According to its developer,

Ultrasurf has about 3 to 5 million users every month from more than 180 countries. This tool will encrypt your web traffic while hiding your IP address.

At the same time, your IP address will be protected on public networks and you’ll be able to access any website that is blocked on a regional basis.

Ultrasurf is a simple tool, and as soon as it starts it will select the best proxy server and connect you to it.

This is a portable application, so there’s no need to install it. This also means that you can run the tool on any PC and even from a USB flash drive.

We also have to mention that this tool doesn’t require any registration, so you can just download it and use it without limitations.

After you start the application, you’ll automatically connect to the proxy server and your default browser will start.

In our case, Chrome started automatically in Incognito mode, so no traces such as cookies or browsing history are left behind while using Ultrasurf.

From the application, you can choose between different servers and you can even visualize the speed of the server as well.

On the other hand, you won’t be able to see the server’s location, which can be a turn-off for some users.

Ultrasurf is a small, free, and portable proxy tool. The application is rather straightforward, so if you’re looking for a proxy tool, there’s no reason not to try it.

⇒ Get Ultrasurf

Freegate – Great portable tool

Freegate is another proxy tool that will protect your privacy online. Since this tool is also portable, it can run on any PC without installation. As soon as you launch the app, your default browser will start.

For some reason, the default browser wasn’t correct in our case, but you can change the desired browser from the settings menu.

The application comes with a humble user interface that shows you a simple network graph. As for available settings, you can choose between two tunnels.

The tool supports HTTP and SOCKS5 protocols, and you can even use your own proxy server with this tool if you want to.

Freegate is a simple but useful tool, and if you want to use a proxy, you should definitely give it a try.

⇒ Get Freegate

SafeIP – Good for ID protection

SafeIP is another proxy tool that you can use to protect your privacy online. The tool comes with a simple interface so you can easily choose a proxy server with just a few clicks.

All servers are listed in three categories, and you can choose between the US, UK, and other worldwide servers. Simply double-click the desired server and your IP address will change automatically.

The tool offers several available presets such as anonymous web browsing, fast content streaming, and mass or bulk mailing.

Additional options include malware protection, advertisement blocking, cookie tracking protection, referring URL protection, and browser ID protection.

You can also turn on traffic encryption or DNS privacy if you want. To keep your IP address secure, you can automatically change it after a certain number of minutes.

This is a simple application, and it offers most of its features for free. Certain options such as Wi-Fi Protection, Speed and torrents, and Speed Boost modes are unavailable in the free version, but that’s not a big problem.

We also have to mention that not all servers are available in the free version, and the list of available servers will change during the day.

This means that certain servers might not be available at all times, but with an extensive number of servers, this won’t be a problem.

SafeIP is a simple and free proxy tool. With a large number of available servers and a friendly user interface, this app is perfect for all basic users.

⇒ Get SafeIP

Tor – Very easy to use

Tor is probably one of the best-known applications that can protect your privacy online. This tool is simple to use, and in order to do that, you just need to install Tor Browser.

The browser will have some extensions installed that will prevent websites and malicious users from tracking your online.

Although Tor doesn’t allow you to choose a proxy server, it connects to several different nodes, thus hiding your IP address and encrypting your traffic.

Tor is incredibly simple to use, and if you’re concerned about your privacy online, you might want to consider using it. This application is free, and you’ll be able to enjoy it even if you’re a basic PC user.

⇒ Get Tor

KProxy – Good for avoiding location restrictions

KProxy is a useful proxy service that allows you to hide your IP address online. This is a web service, but if you want, you can download Chrome or Firefox plugin.

There’s also a KProxy browser available which is basically a portable version of Firefox with KProxy plugin.

By using this service, you can circumvent any regional restrictions that you might have. This is especially useful if certain services or online content isn’t available in your country.

In addition, this service will also protect you from malicious users and keep your personal information hidden from your Internet service provider.

KProxy is a free service, however, it has certain limitations. By using the free version you can choose between Canadian and German servers.

However, US and UK servers will remain unavailable unless you purchase a Pro version.

We also have to mention that in the free version, servers can get overloaded due to the number of users. You can read a more detailed walkthrough of features, limits, and setup in this KProxy free guide and decide whether the service fits your daily browsing needs.

⇒ Get KProxy

Psiphon – Simple user interface

Another free proxy tool on our list is Psiphon. This tool comes with a simple user interface and it allows you to choose between 7 different servers.

Psiphon allows you to use the Split Tunnel feature, and you can also configure local proxy ports, upstream proxy, or use Transport Mode.

The tool also comes with a useful log that you can use to check your connection status.

In addition, Psiphon is available in several different languages. This is a simple, free, and portable application, so it should work on any PC without problems.

One minor issue is the lack of compatibility with third-party browsers. During our testing, the application worked perfectly with Microsoft Edge and Internet Explorer, but it didn’t work with Chrome or Firefox.

This application is completely free and it doesn’t have any restrictions, so if you’re looking for a free proxy tool, be sure to check Psiphon out.

⇒ Get Psiphon

ChrisPC Free Anonymous Proxy – Unblocks geo-restricted websites

If you’re looking for a free proxy tool, ChrisPC Free Anonymous Proxy might be just what you need.

This tool allows you to choose between many worldwide proxy servers with just a few clicks. We have to mention that this tool offers several different modes.

The first one is Anonymous Proxy Mode which hides your IP address and allows you to browse the Internet anonymously.

Expat Mode will unblock geo-restricted websites and there’s also Unblock Websites Mode that will unblock certain popular websites.

Another available feature is Ads Blocker Filter, but you can use it only for 30 minutes in the free version.

The free version of the tool offers basic options, but if you want to use Expat Mode or change advanced settings, you’ll have to purchase the premium version.

⇒ Get ChrisPC Free Anonymous Proxy

How do I use a proxy tool?

  1. Go to Network and Internet in Windows Settings menu.
  2. Click on Proxy.
  3. In the manual setup window, toggle on Use Proxy Server option.
  4. Slide the option for Automatically detects settings.
  5. Turn on the Use Setup Script option and add the script address.

As you can see, there are many different proxy tools that you can use on Windows 10 and 11.

We have to mention that using a free proxy isn’t the most secure method to protect your privacy online.

So, you might want to refrain from entering sensitive information while using such a tool. Better yet, try a VPN instead to protect your entire network.

In this respect, we suggest checking our list of the best VPNs for Windows 10 & 11.

Have you tried any of the solutions above? If so, share your feedback in the comments section below.

How to Remove a Word from Word Dictionary

When using Windows, you’ll see an option that’s called Add to dictionary in various programs including Microsoft Word, some Note-taking applications, web browsers and more.

Every time you add a word to the spell-checking dictionary, it is saved automatically. Once it is, you’ll be able to ignore it every time the program checks for spelling mistakes.

Add to Dictionary or Ignore

When we write a certain word multiple times and Windows doesn’t recognize it, it will point out that specific word as an error. But if you’re sure the spelling of that word is correct, you can avoid Window’s error prompts and skip its irritating red underline by choosing between “Add to dictionary” or Ignore.

If you choose Ignore, this will happen only once. If you’re sure you’ll use that specific word frequently, it’s better to choose to Add to Dictionary.

In the future, you might also want to remove that word. We’re going to show you the different ways in which you can add, edit or remove words from the default dictionary of Microsoft Office on Windows 10/8/7.

How to remove a word from spell check?

    When you use the Add to dictionary feature, the word you used this option on is automatically saved in a file. You can edit that file manually in order to add or remove words from the spell checking dictionary.

  1. 1. Press the Windows key on your keyboard and type file explorer in the search box that opens.

  2. 2. Click on the first result to open the File Explorer app.

  3. 3. Navigate to File > Change folder and search options.

    file explorer change folder search options
  4. 4. The Folder Options window will now open. Navigate to the View tab.

    view file options
  5. 5. Select Show hidden files, folder, and drives, then click on Apply.

    hidden files windows 10 open
  6. 6. Use the following path to navigate to the Spelling folder: C:\Users\<username>\AppData\Roaming\Microsoft\Spelling

  7. 7. In the Spelling folder you’ll find one or more folders. In case you used more than one language on your system, you’re going to find more than one folder.

  8. 8. Choose a folder based on the language that you’ve used. In each folder, you’ll see 3 files: default.acl, default.dic and default.exc.

  9. 9. Double-click on default.dic and it will open in Notepad.

  10. 10. Here you’ll be able to see all the words that you’ve added to the dictionary. You can now edit the file.

  11. 11. Save and exit after you’re done, and you’re all set!

This might be a bothersome task for some, but it’s the simplest way to edit dictionary entries created on your system. The number of words can pile up rather fast, especially if you’re writing about niche things and not your usual vocabulary is at play. However, once you get used to it, it can come quite handy for adding or, in this case, removing words.

We have an article on the best spell-checking tools you can use that you can check out.

Let us know what you think about this article and tell us if it helped you remove words from the dictionary.

How to Control Your Windows 10 PC with Your Voice

Well, aren’t the input methods nowadays changing or what? A decade ago, most users would find mouse and keyboard the peak performance of input devices, but it seems that the next obvious step forward lies in voice recognition.

It’s all about the smart digital assistants and their usability in various devices, like smartphones, cars, and, of course, Windows PCs.

By following the emerging trends, we decided to provide you with a few ways to control your Windows 10 PC with simple voice commands.

No pointing device is needed here, just a microphone and a few tweaks. So, if you’re determined to roam through the user interface and complete various tasks with nothing but a voice, make sure to check the explanation below.

Here’s how to set the voice control on Windows 10

  1. Use Speech Recognition
  2. Microsoft Smart Assistant a.k.a Cortana
  3. A collection of third-party programs

1. Use Speech Recognition

    Speech recognition isn’t a Windows 10 exclusive, and it dates back to Windows 7. Nonetheless, this handy feature is more than welcomed on the latest Windows version because Cortana tends to misbehave. It’s originally introduced as an ease of access feature, to improve overall usability for users with physical issues.

    If you’re not sure how to configure Speech Recognition and use it later on, make sure to follow the steps we provided below.

  1. 1. In the Windows Search bar, type control and click on the first result to open Control Panel.

    pc voice control windows 10
  2. 2. Select Large icons from the View section.

  3. 3. Scroll down and open Speech recognition.

    pc voice control windows 10
  4. 4. Click on the Start speech recognition to start the process.

    pc voice control windows 10
  5. 5. Press the Next button.

    pc voice control windows 10
  6. 6. Select your Microphone setup and click Next > Next.

    pc voice control windows 10
  7. 7. Read the displayed sentence in order to confirm that your mic is up and running, and then click Next.

    pc voice control windows 10
  8. 8. The next screen offers you an option to improve the recognition accuracy by enabling Document review. We advise you to enable it.

    pc voice control windows 10
  9. 9. On the next screen, you can choose one of the two activation modes:

    • Manual mode – Speech recognition stops when you say ”Stop listening”.
    • Voice activation mode – Speech recognition is on hold and it starts the moment you say Start listening.
  10. 10. Once you’ve decided which mode suits you better, click Next.

    pc voice control windows 10
  11. 11. Now, you can print or just take a glimpse of all available commands in the Speech reference screen. It basically leads to this webpage.

  12. 12. Check the Run speech recognition at startup box and click Next.

    pc voice control windows 10
  13. 13. Now start the tutorial and that should do it. After that, you should be able to use speech recognition without issues.

This feature is quite often overlooked and we decided to correct the injustice and enlist Speech recognition in this list.

Over time, it found its place in mass use due to experimental and ted futuristic approaches. You know, like smart assistants do now.

As a side note, due to interference between Cortana and Speech recognition, we advise you to use one or another. Below we explained how to configure Cortana, so you can try out both and choose the one that suits you better.

2. Microsoft Assistant a.k.a Cortana

In order to meet the expectations and prove itself competitive with the likes of Apple, Google, or Amazon, Microsoft introduced its native smart assistant, Cortana.

In the early stages, Cortana was widely regarded as one of the best artificial assistants out there, but that status dropped after Microsoft Mobile lost the final battle with Android and iOS. Nonetheless, with Windows 10, and we’re referring to the PC version here, Cortana kind of got better and it’s a viable option nowadays.

With Windows 10 as a service, we can expect Cortana to improve over time. And if you’re keen to run your Windows 10 PC with nothing but voice commands, it might come in handy.

  • READ ALSO: Cortana will let you install Windows 10 using only voice commands

Here’s how to enable and configure Cortana for future use on Windows 10:

  1. Click on the Start Menu and open All apps.
  2. Look for Cortana and open it.pc voice control windows 10 cortana
  3. Toggle the ”Use Cortana” option.pc voice control windows 10 cortana settings
  4. Click ”Yes” or ”No, thanks” depending on whether you want to let Cortana track your data in order to improve (get to know you better) or not. It’s your choice.
  5.  Now that we enabled Cortana, press Windows + S and click on the cog-like settings button positioned on the left side.
  6. Toggle on ”Hey Cortana” and configure your microphone. You can let Cortana react when anyone says ”Hey, Cortana” or you force it to react only to your voice.pc voice control windows 10 cortana responds to voice commands
  7. Exit settings and command something to your newly-configured digital assistant.

You can find the list of available commands and tasks Cortana can perform in this article.

3. A collection of third-party programs

Besides the built-in Speak recognition and Cortana, some users might turn to a third-party alternative. Since this is a software category in a state of constant growth, there are various speech recognition solutions in the market compatible with Windows 10. The only question is what are your needs and wants.

Some of them, like Dragon NaturallySpeaking, specialize in fast-paced dictation and voice-to-text in general. Others, like Voice Attack, are there for voice-controlled multitasking and in-game controls (yes, you can reload your weapon in CoD with a voice command). And then there’s VoxCommando that’s mostly used in multimedia programs like Kodi or iTunes, but it can also be used for automated home devices.

So, if Speech recognition or Cortana haven’t met your preferences, you can try them out. Here’s one great article about the top 5 speech recognition third-party programs, so make sure to check it out.

With this, we can wrap it up. Don’t forget to share your experience with speech recognition in general, or talk about individual programs you’ve tried, both built-in and third-party. You can do so in the comments section below.
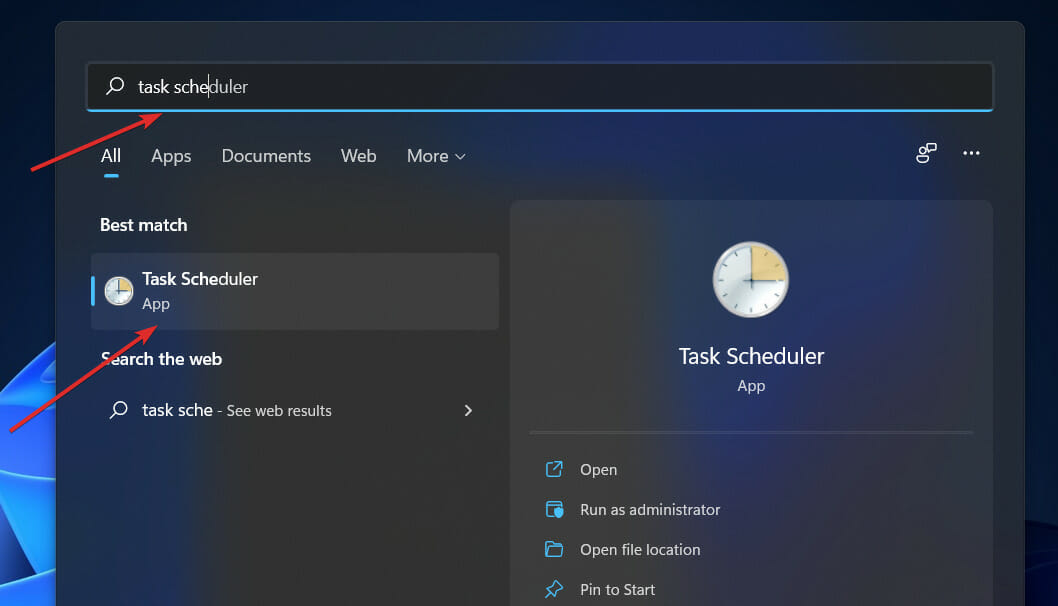
Brochure Design Software: 8 Best Apps to Use in 2026

Handing out brochures is one of the cheapest ways to present and promote your services and business. If you want to impress your audience and potential customers, your brochures need to look professional.

Now, the simplest and safest way to design your brochures is to use dedicated software for brochure design. The good news is that there are many such tools available that you can use both online and offline.

Even in this digital age, paper brochures are still prominently displayed and provide valuable and physical information at the point of sale – an advantage that internet advertising cannot supply. Printed books will not go away, and brochures will not go away either.

Brochure design software assists marketers and designers in creating eye-catching and informative brochures that connect with the target audience and convert prospects into customers.

To make your decision-making process easier, we compiled a list of the best programs for a brochure design that you can use on your Windows computer.

How can I create a brochure?

Creating a brochure for your brand or service is easier than it looks. With so many online tools you will create an amazing brochure in no time. In the following example, we will create a brochure using Adobe Creative Cloud Express.

Before you start, make sure you have all the necessary details that you want to be written in your brochure. This includes products, services, contact info, offers, working hours, locations, etc.

  1. Select the brochure type of project – Adobe offers a wide variety of great layouts and categories, depending on the message you are trying to spread
  2. Choose a template that represents your brand – the color palette should be used to your advantage
  3. Add or edit the text with simple and clear information – feel free to play with the design, photos, and shapes
  4. Lastly, double-check the info then download and you are ready to print – remember to choose an appropriate paper when printing to value your brand

With these 4 steps and a touch of your own creativity, you can make the best brochures to reach out to your clients.

What is the best brochure design software?

Adobe Creative Cloud Express [formerly Adobe Spark] – Most creative designs

Adobe Creative Cloud Express, formerly known as Adobe Spark, is one of the best tools to use if you want to create eye-catching brochures.

You really don’t have to be a designer to create professional-looking brochures since Adobe Creative Cloud Express makes it very easy to create really impressive materials.

Once you’ve completed your design, all you need to do is save it, and you can then share it with your friends or colleagues or print it.

Here’s how to use Adobe Creative Cloud Express:

  1. Select a shape and size: Go to My Projects, select the template that you like best, and set its initial dimensions. You can resize your brochure at any time according to your needs.
  2. Select a theme: Go to Themes and use the drop-down menu to select the theme that suits your brochure best. Each theme features a full suite of editing tools, that allow you to change colors, design elements, and more.
  3. Add your own background image: The default themes bring their own background images, but you can insert your own background image to better personalize your brochure.
  4. Add text: Go to Text and use the text box to type the message that you want to send to the world. When you’re ready, simply publish and share your creation.

This powerful collection of design tools does not require any technical or programming experience to apply. All you need is a computer, an Internet connection, and your own imagination.

A simple drag-and-drop interface allows you to learn the fundamentals in a matter of minutes. And you can see the results of every adjustment you make right away.

Adobe Creative Cloud Express

Ready to impress with the best brochure design? Use Adobe Creative Cloud Express with confidence!
Check price Visit website

Canva Brochure Maker – Best at editing designs

canva brochure maker software

Canva Brochure Maker is a very easy-to-use and intuitive brochure design tool. Use drag-and-drop to create beautiful brochures that will awaken your audience’s interest.

This software provides you with the right tools to present information clearly, beautifully, and persuasively.

This program is perfect for creating marketing materials or completing an assignment for school.

Here is how to use Canva Brochure Maker:

  1. Choose the right dimensions and layout for your design.
  2. Pick a template or add your own photos.
  3. Add the text and all the other information about your brand.
  4. Don’t be afraid to play with the shapes and colors.

It means that professionals, freelancers, and students alike can successfully use it to convey their message in an appealing manner.

Using this software is very easy: simply drag and drop your favorite images, customize the fonts and colors, and add your text.

Brochure Maker features a library of over 1 million professional graphic design elements (images, banners, icons, frames, etc) that you can choose from.

It is worth mentioning that most of these images are free, with some premium ones which cost per use. Of course, you can also upload your own images.

Once you’re satisfied with the result, you can export your creations as PDF documents and print them in high-quality resolution or share them on social media straight from Canva using the Share button.

Canva

Making a brochure couldn’t be more simple than using this free design tool that offers infinite models.
Check price Visit website

Adobe InDesign – Most complex software

Adobe InDesign is another smart brochure design software that allows you to build multi-page brochures. If your project is a print project with numerous pages or a master layout, you may use Indesign’s master page tool to do this. InDesign also provides excellent support for three-column layouts, among other things.

Adobe InDesign is an excellent and adaptable tool for producing a wide range of print media, from flyers to brochures. XMPie and Easy Catalog, two very compatible plug-ins, make complex variable data projects a breeze.

When you require a large number of pages and begin to use text more frequently, you’ll appreciate InDesign’s extensive set of standard features.

When working on such publications, the many sorts of guides, the usage of text flow, the automated techniques for placing and formatting text, and the amazing richness of typographical refinements are all required.

Here is how to use Adobe InDesign:

  1. Select predefined or custom dimensions for your brochure.
  2. Add photos and shapes needed to make your brochure look professional.
  3. Place the text over the other elements and create a nice contrast.
  4. Explore the wide variety of effects and settings Adobe InDesign has to offer.

Unfortunately, it lacks photo editing features such as brightness, contrast, and temperature adjustment. Therefore, you’ll need to use another picture editing tool to do this.

However, because Adobe InDesign integrates with all other Adobe applications, such as the Creative Cloud, you may easily edit your brochures as you want.  

Adobe InDesign

Create print-based publications such as brochures, flyers, posters, and books with this page layout software.
Free trial Visit website

Visme – Most user-friendly

We recently tried Visme, and it piqued our interest in the brochure creation space. We found it to be extremely user-friendly and full of flexible graphics that help accelerate the presentation process.

Visme is employed by over ten million organizations, non-profits, and individuals in over a hundred countries.

It’s quite versatile and simple to use. Using Visme’s pre-designed elements saves a significant amount of time over creating things from scratch.

The versatility of the templates and materials, as well as the built-in animation capability, are two advantages of using Visme.

Here is how to use Visme:

  1. Choose the type of project you want to create.
  2. Select from tens of predefined dimensions based on your need.
  3. Make your choice if you wanna start from zero or a template.
  4. Add or edit text, change colors, add or remove photos, the choice is yours.

Visme is also useful for creating infographics and presentations for online courses, as well as making brochures for businesses.

You can modify the canvas dimensions at any time and choose one of the 30+ attractive templates that are customized to your business. With the pro account, you can insert movies or audio files into sections of the infographics.

Visme

A whole workshop for preparing any type of business presentation, brochures, and flyers.
Free trial Visit website

EdrawMax Brochure Maker – Simple to use UI

EdrawMax Brochure Maker is an interesting tool that you can use to create flyers, brochures, leaflets, and more in just a few minutes.

If you haven’t used brochure design software before, this is the right program to start with. It’s a perfect match for both personal and business brochure designs.

Here is how to use EdrawMax Brochure Maker:

  1. Click on New, then the select project you want to create.
  2. Choose from all the templates it offers.
  3. Select the best information, color palettes and photos for your project.
  4. Double-check all the settings and text.

The Business Report Brochure Template serves as a formal standard for an organization that requires a straightforward design.

The main benefit of this template is the built-in location map. By simply customizing the template, you may add a business name, business data, a brief description of your business, and contact information. This asset is available for free in the online version of EdrawMax.

EdrawMax Brochure Maker

Surprise your clients and peers with this versatile brochure maker you can use online for free at any time.
Free Trial Visit website

Flipsnack – Best for articles and blogs

Flipsnack, which launched in 2011, is a popular solution for creating brochures. It enables users to turn PDFs into digital flipbooks rich in graphic components and multimedia, which can then be published and shared online.

However, Flipsnack, like any other option, has disadvantages, and for some purposes, other flipbook creators are a better choice.

Flipsnack allows you to create your own brochure. It has a multitude of fully customizable brochure layouts to aid you in your creative process.

Here is how to use Flipsnack:

  1. Create a new project.
  2. Pick the right dimensions for your creation.
  3. Add as many photos, shapes, and texts as you need.
  4. Create the best-looking design to represent your brand.

In addition, you can embed your online brochure to display it on your website. This will prevent customers from leaving your website, and engage them more in your content.

We recommend using Flipsnack to convert PDF to flipbook because it has a few noteworthy characteristics, including no advertisements or linked publications, support for rich media (in-flipbook videos, audio, and more), smooth upload, and speedy conversion.

⇒ Get Flipsnack

Marq [formerly Lucidpress] – Best for business features

Lucidpress flyer maker

If you’re looking for online brochure design software, then the Marq Brochure Maker may be the right choice for you.

This tool offers you a bevy of free and premium brochures, leaflets, pamphlets, or handout templates to help you create your brochures in less than 30 minutes.

Of course, you can also start with a white fresh canvas and add your own custom images, fonts and text. Use drag and drop to add text, images, shapes, and videos.

Marq Online Brochure Maker’s modern design allows you to create sleek digital displays, perfect for viewing on a computer. Keyboard shortcuts are also supported.

Here is how to use Marq:

  1. Create a new project
  2. Select a blank or from thousands of templates to work with
  3. Use your creativity for texts, images, and shapes to make your design glow.
  4. Export the design and use it to boost your brand.

You can export your brochures in different formats (JPG, PNG, or PDF) with Google Docs, YouTube, Dropbox, Flickr, Facebook, and other tools.

Real-time collaboration is also supported, allowing you to make changes in a single document at the same time as other users.

⇒ Get Marq [formerly Lucidpress]

SmartDraw – Most variety of uses

SmartDraw is a very useful and interesting brochure design software that will help you create truly amazing brochures and flyers.

Creating brochures to promote your business or events has never been easier. You can design the layout of your brochures and start printing them in minutes.

There are many brochure design templates that you can choose from. Of course, you can then edit them as you like and upload photos, logos, information about your offer or organization, etc.

How to use SmartDraw:

  • Select a new project, then select the type of project you want to create.
  • Either chose a template or a blank to start creating.
  • Mind choosing the best information, color palettes, and photos for your project.
  • Double-check the design you created, and enjoy.

You can share your brochure design with others and ask them for feedback. Thanks to SmartDraw Cloud, you and your team can work together on the same brochure and edit the material in real-time.

You can also export your creations to Microsoft Word, Excel, PDF, or PowerPoint.

Your brochures and pamphlets will look like they were designed by a professional and will be ready-to-print in just a few minutes.

⇒ Get SmartDraw

There you have 8 of the best brochure design software that you can use on your Windows 10 computer.

Go to the official webpage of each tool, test it and select the one that best suits your needs.

How to Set Custom Resolution on Windows 10 [Expert Guide]

Sometimes you want to change the resolution of the display to a custom one. In today’s article, we’ll show you how to set custom resolutions on Windows 10.

To do that, just follow the guide below.

How to set a custom resolution on Windows 10?

    1. Set custom resolution on Windows 10 with Nvidia Control Panel

    It is very easy to create a custom resolution on Windows 10 using Nvidia Control Panel, which is pre-installed on most computers.

    All you need to do is enter Nvidia’s settings on your desktop and tweak the display settings.

  1. 1. Right-click on your desktop and choose NVIDIA Control Panel.

  2. 2. In the left side-panel, under Display, click on Change resolution.

  3. 3. In the right section scroll a bit, and under Choose the resolution click the Customize button.

    custom resolution windows 10 step 1
  4. 4. In the new window that appears, check Enable resolutions not exposed by the display.

    custom resolution windows 10 step 4
  5. 5. Click on Create Custom Resolution.

  6. 6. Now, fill in the boxes with the desired values and then hit the Test button.

  7. 7. If the test is successful and you’re satisfied with the result, Save the resolution.

  8. 8. If you do not like the result, revert to the previous resolution and start the process once more.

2. Set custom resolutions in Windows 10 with the AMD Catalyst Control Center

  1. Right-click on your desktop and choose AMD Catalyst Control Center.
  2. Navigate to Information > Software > copy the 2D driver file path.copy driver information amd catalyst control center Create Custom Resolutions on Windows
  3. Now, press Windows key + R to open Run, and type regedit. Hit Enter.regedit run window Create Custom Resolution amd
  4. In the Registry Editor, navigate to the 2D path from step 2.
  5. Double-click the 0000 folder and inside, find the DALNonStandardModesBCD1 registry key.
  6. Right-click it, select Edit, and then type your desired values in order: The width of the resolution > The height of the resolution > Type four zeros > The refresh rate of your monitor.
  7. If any of the values don’t add up to a 4-digit number, then start the number with 0.custom amd resolution registry editor windows 10 Create Custom Resolutions on Windows 
  8. Click OK and Restart your PC.
  9. After the restart, when you launch the AMD Catalyst Control Center, you should find the custom resolution there.

If you’re Windows 10 or 11 PC keeps changing resolution on its own, you needn’t worry. As always, we prepared a series of quick fixes for you to try out and get things sorted.

3. Use Custom Resolutions/Modes for Intel Graphics driver

  1. Right-click on your desktop and choose Graphics Proprieties.
  2. Select Advanced mode if you’re prompted to select an application mode.
  3. Under the Display Devices tab, check to see if the Custom Resolutions/Modes button is available. If it is, click on it. If it’s not, then go to
     C:>Windows>System32>CustomModeApp.exe
    intel graphics control panel intel custom resolution

    and run the app.

  4. custom resolution intel graphics control panel Create Custom Resolutions on Windows

    In Basic Settings, type your preferred values.

  5. Finally, click on Add and then, when prompted, on Yes.
  6.  If you’re not satisfied with the result, click on the Remove button. If you are, click OK.

4. Use CRU to set a custom resolution in Windows 10

Additionally, you can use Custom Resolution Utility (CRU) to create a resolution.

The app has support for NVIDIA, AMD, and Intel graphics cards so no matter the system configuration, it will work.

As you can see, it’s not that hard to create and set a custom resolution in Windows 10, regardless of the GPU manufacturer and drivers.

What’s your favorite GPU manufacturer and why? Leave the answer along with any other questions you may have in the comments section below.

Top 8 Browsers That Still Support Windows 7 and Ensure Safe Browsing

Want a good browser for Windows 7 that’s safe to use and doesn’t take a toll on your PC’s speed? You’re in luck.

Windows 7 still has a substantial user base even though it has been overtaken by Windows 10/11 and discontinued by Microsoft. If you’re still using it too, check out the browsers below.

What is the best browser to use with Windows 7?

If you’re in a hurry, take a quick look at our top picks and pick the one that works best for your needs:

And if you need more info, check the overviews below:

1. Opera One – Windows 7-friendly with built-in VPN and ad blocker

opera one user interface

Opera One is a fast, AI-powered browser that works on Windows 7. It improves web navigation, making it intuitive and quick.

Its modular tab islands let you group tabs efficiently. You can easily open and collapse them. Opera One also includes Aria, an AI assistant for tasks like web searches, booking flights, and learning recipes.

The browser also features multiple workspaces, VPN protection, and integration for AI language tools.

Modular Tab IslandsGroup tabs efficiently, open and collapse easily.
Aria AI AssistantHelps with web searches and simple daily tasks
Customizable UIAdd or remove apps from the sidebar, address bar, and toolbar.
Multiple WorkspacesOrganize different tasks in separate workspaces.
VPN ProtectionGroup tabs efficiently, open, and collapse easily.
AI Language ToolsIncludes ChatGPT and other useful AI features for better productivity.
Opera One

Opera One

Optimize your web surfing on the Windows 7 OS with this supported and futuristic browser.

2. Mozilla Firefox – Secure and regularly updated for Windows 7

firefox interface

Firefox claims it uses 30% less RAM than Chrome, making it ideal for Windows 7 desktops and laptops with lower specs.

It got a major boost with its Quantum update. This made Firefox faster, revamped its UI, and added new tools. You can rearrange the toolbar, add new themes, and configure fonts.

However, one thing to keep in mind is that Firefox will only support Windows 7 until September 2024. This means it will no longer get updates, including security patches after this date.

Quantum UpdateRearrange toolbar, add new themes, and configure fonts.
Customizable ToolbarFurther, customize the browser with various extensions.
Many ExtensionsFurther customize the browser with various extensions.
Efficient RAM UsageUses 30% less RAM than Chrome, ideal for lower-spec systems.
Privacy-OrientedFocuses on user privacy.
Light on ResourcesEfficient use of system resources.

⇒ Get Mozilla Firefox

3. K-Meleon Browser – Ultra-lightweight, ideal for older Windows 7 PCs

k-meleon browser interface

K-Meleon is one of the lightest browsers, resembling Firefox in some aspects. It lacks extensions but offers its own ad-blockers, pop-up blockers, and themes.

This browser operates smoothly with just 256 MB of memory, compatible even with older systems like Windows XP and Windows 7.

Although its interface appears plain, you can customize it extensively with various skins, buttons, and toolbars.

Extremely LightweightDesigned to be very light on system resources.
Goanna EngineBased on Mozilla Gecko, ensuring compatibility and performance.
Legacy OS SupportWorks on older systems like Windows XP and Windows 7.
Built-in Ad-blockerIncludes its own ad-blocking and pop-up blocking features.

⇒ Get K-Meleon Browser

4. Pale Moon – Supports legacy add-ons and privacy on Windows 7

pale moon browser

Pale Moon is an open-source browser based on the Goanna engine that only requires 256 MB of RAM to work, so it will run on Windows 7 without any problems.

Design-wise, it’s like a stripped-down version of Firefox, making it pretty fast and reliable for any task.

Its newer versions are optimized for the latest processors but lack the sandboxing that would also make it very safe. However, it’s pretty good for privacy protection since it blocks ads, telemetry, and data gathering.

Extremely LightweightDesigned to work even on PCs with very few resources
Based on Firefox ForkOffers compatibility with legacy plugins and features.
Privacy-OrientedFocuses on user privacy by blocking ads and tracking.
Supports Legacy PluginsCompatible with older plugins like Silverlight and Java.

⇒ Get Pale Moon

5. Midori – Minimal resource use and privacy-focused

Midori is a multi-platform browser that has gained a lot of popularity lately thanks to its incredible lightness.

It only requires 37 MB of drive space to operate, and it doesn’t require too much memory either compared to other browsers.

The browser still supports the latest HTML 5 media codecs and CSS 3, so it’s ready for optimal browsing.

Its only downside is that it doesn’t have too many extensions and add-ons to choose from but it will perform greatly on Windows 7.

Optimized for PrivacyEnhances privacy by blocking ads, trackers, and harmful content.
LightweightRequires minimal system resources, ideal for older PCs.
Multi-Platform SupportAvailable on various operating systems for versatility.
Modern Web TechnologiesSupports HTML5 media codecs and CSS3 for optimal browsing.
Simplicity and Ease of UseDesigned for straightforward navigation and user experience.

⇒ Get Midori

6. Maxthon – Lightweight, privacy-first browser for Windows 7 users

Maxthon requires a 1 GHz CPU, 512 MB of RAM, and 64 megabytes of hard drive space and that makes it an ideal candidate for a Windows 7 browser.

Its built-in ad blocker will help you reduce page tab RAM allocation, making browsing faster.

It also comes with cloud synchronization and backup options so you can have the same experience on all your devices.

A neat surprise is that you can include software shortcuts within the browser, and its tabbed interface is pretty modern.

LightweightEfficient use of system resources, suitable for older PCs.
Resource SnifferExtracts URLs of resources for easy management.
Built-in Password ManagerSecurely manages your passwords within the browser.
Split-Screen ViewAllows viewing multiple tabs side-by-side for multitasking.
Tab GroupingOrganizes tabs into groups for better organization.

⇒ Get Maxthon

7. Thorium – Open-source, fast, and privacy-oriented Chromium browser

Not many Chromium browsers support Windows 7 nowadays and the M109 is the last version that will work with older systems.

Thorium is based on this version, and it can bring the features of Chromium to your legacy PC.

According to the developer, it’s the fastest browser in the world, and it offers 8 to 38% performance improvement over the vanilla Chromium, which is impressive.

Although this is a great browser, it might lack some features that other browsers have, but nevertheless, it’s worth trying out.

Based on ChromiumBrings Chromium features to older systems.
Available on Various PlatformsEnsures accessibility across different operating systems.
Supports Legacy OSCompatible with older operating systems like Windows 7.
Incredibly FastOffers significant performance improvements over standard Chromium.

⇒ Get Thorium

8. Falkon – Lightweight with ad blocking, suited for Windows 7

If you’re looking for a minimalistic and lightweight browser for your Windows 7, look no further than Falkon.

This is a KDE web browser that uses QtWebEngine, previously known as QupZilla. The browser’s interface is minimalistic, so you won’t have issues adjusting to it.

In terms of functionality, the browser is rather minimalistic, so don’t expect to see any advanced features, such as extension support, etc.

However, Falkon has bookmarks, history, and tab support. There’s even an integrated ad blocker.

Overall, it’s a rather minimalistic browser with limited features, but it works on Windows 7 without issues.

Minimalistic and LightweightDesigned for simplicity and efficient performance.
Bookmarks, History, Tab SupportBasic browsing essentials for user convenience.
Built on QtWebEngineUtilizes a robust engine for stable performance.
Available on Legacy SystemsCompatible with older operating systems like Windows 7.
Built-in Ad BlockerEnhances browsing by blocking intrusive ads.

⇒ Get Falkon

Summary

Our top Windows 7 browsers will offer safety and speed for those who still use the legacy operating system. If you want to learn more about our top pick, we have a great guide on how to download Opera for Windows 7 that might interest you.

If you’re curious about even more choices, check out this complete list of lightweight browsers for Windows for broader options that also support newer OS versions.

Still using Windows 7? You’re not alone—and you’re not out of options either. We also recommend exploring our full guide on the best browsers for Windows 7 to see more secure and efficient tools designed for older systems.

Or, if you’re planning to upgrade, don’t miss our breakdown of the best browsers for Windows 11 to stay ahead with speed and performance.

Luckily, there’s still a wide variety of options, so you just have to decide which offers the features that best fit your needs and preferences.

From AI features to privacy controls and lightweight design, the options above won’t disappoint.

How to Calibrate Laptop Battery Easily [3 Tested Methods]

A typical laptop battery becomes weakened over time. This is especially common to laptops that are used rigorously on a daily basis.

One key indicator of a weakening laptop battery is the discrepancy between battery life readings and actual battery life.

To correct this discrepancy and extend the lifespan of your battery, the simple solution is battery calibration. And we’ll be showing you how to calibrate laptop batteries in this article.

However, a weakened laptop battery (that has not been calibrated) could cause serious confusion.

For instance, on a typical laptop, the remaining battery life could read 2 hours, which, in actual sense, is only 30 minutes or thereabout.

Hence, while your laptop battery is showing you 2 hours remaining, you get stunned after only 30 minutes – when your battery suddenly drops to 10%, and eventually powers off.

To avoid such confusion and ensure accurate readings of battery life (on a laptop), the ultimate solution is to calibrate your laptop battery.

Follow this article, as the Windows Report team provides you with tips, tricks, and software solutions, which can be employed to calibrate Windows 10 laptop battery.

How do I calibrate the battery on my Windows 10 laptop?

Some high-performance laptops come with a built-in battery calibration tool, which can easily be used to calibrate a laptop battery.

However, a number (in fact majority) of laptop brands are not equipped with this calibration tool.

Nevertheless, there is no cause for worry, as there is a simple trick you can adopt to manually calibrate your laptop battery, and boost its lifespan.

There are three solutions that you can use to calibrate your laptop battery: manually, using BIOS, or using third-party software.

For convenience, we’ll be showing you how to execute this manual calibration, in the next section of this article.

1. Calibrate the laptop battery manually

1.1. Modify your power settings

  1. Navigate to the taskbar on your screen display, and right-click on Battery.
  2. Select Power Options.
  3. Under Power Options, select Change when the computer sleeps.
    calibrate laptop battery win10
  4. Click on the Turn off the display drop-down menu, and select Never.
    calibrate laptop battery win10
  5. Select the Put the computer to sleep drop-down menu, and choose Never.
  6. Press the Change Advanced power setting key.
  7. Click on the + (expand) symbol under Battery.
  8. Select the + (expand) icon under Critical battery action, and choose Hibernate.
  9. Click on the + icon (expand) under Critical battery level.
  10. Under On Battery, select Percentage.
  11. Set the percentage to a low value: 1% to 5%.
  12. Click Apply at the lower right-hand corner of your screen.
  13. Select OK, and Save Changes.

To manually calibrate a laptop battery, the first line of action entails changing the laptop‘s power settings.

At this point, you would be required to change the power settings. This will prevent your laptop from automatically going into sleep/hibernation/power saving mode, after a few minutes of inactivity.

Once you’ve changed the power settings as appropriate, move to the next stage.

1.2. Connect/Disconnect/Reconnect your charger

Connect the charger and power the battery until it is fully charged. Leave the charger plugged in (after the battery is fully charged) for a few minutes or hours (to enable it to cool down).

Remove the charger from your laptop and allow the battery to drain down (discharge). Once the battery is completely drained, your laptop will go into hibernation or completely power off.

Reconnect your charger, and charge the battery up to 100% again.

Note: You can use your computer during the recharging process, but it is better to leave it still.

1.3. Calibrate the battery

Once your laptop becomes fully charged, the manual calibration process is complete. Your laptop should now show normal battery life readings.

After the whole process, you can reset your laptop‘s power settings (back to the original settings), or if you like, you can leave it as it is.

    2. Calibrate the laptop battery using BIOS

    Some Windows laptops come with a pre-installed battery calibration program, which is embedded in their BIOS.rnrnIf your laptop has a built-in Battery Calibration program (in its BIOS), you can use it to calibrate the battery.

  1. 1. Power off your laptop, and power it on again.

  2. 2. The boot menu will appear on the screen.

  3. 3. Enter theu003cspanu003e u003c/spanu003eu003cstrongu003eBIOSu003c/strongu003eu003cspanu003e u003c/spanu003eby pressing theu003cspanu003e u003c/spanu003eu003cemu003eF2u003cspanu003e u003c/spanu003eu003c/emu003ekey at the boot menu.

  4. 4. Using the keyboard cursor keys, select theu003cspanu003e u003c/spanu003eu003cstrongu003ePoweru003c/strongu003eu003cspanu003e u003c/spanu003emenu.

  5. 5. Navigate to theu003cspanu003e u003c/spanu003eu003cstrongu003eStart Battery Calibrationu003c/strongu003eu003cspanu003e u003c/spanu003esection.

  6. 6. Click on theu003cspanu003e u003c/spanu003eu003cemu003eEnteru003c/emu003eu003cspanu003e u003c/spanu003ekey. This action will change your screen background to blue.

    start battery calibration
  7. 7. Follow the on-screen command and plug in your laptop charger.

  8. 8. Once your laptop‘s fully charged (100%), disconnect the charger.

  9. 9. Allow the battery to discharge from 100% to 0% until it automatically powers off.

  10. 10. Reconnect the charger (do not boot your system while it is charging).

  11. 11. Once it’s fully charged, the calibration process is complete.

  12. 12. You can then unplug the charger and reboot your system.

Also, if you encounter a corrupted battery prompt, you should address that quickly.

Seeing a low battery alert while the charger is connected? Get the complete fix in Laptop Low Battery Warning When Plugged In.

3. Calibrate the laptop battery with a third-party tool

There are special software solutions, exclusively designed for calibrating laptop batteries.

In this section of the article, we will be looking at two prominent battery calibration software that is compatible with Windows 10 laptops.

Battery management software can analyze and improve your battery. Many of these tools can give you comprehensive reports regarding the battery temperature, autonomy capacity, and more.

On top of that, you can set them up to help you optimize your settings for longer battery life. They can detect what process in your system is draining your battery the most and find quick and safe fixes for it.

AIDA64 is a popular hardware detection tool for Windows laptops that offers diagnostic functions and support for overclocking.

It can be employed to speed up the discharge process of a laptop battery and facilitate its calibration.

This software is compatible with all 32-bit and 64-bit Windows editions, including Windows 10 and Windows Server 2019.

Aside it is monitoring sensors in real time, it can also gather accurate voltage, temperature, and fan speed readings, while its diagnostic functions help detect and prevent battery issues.

⇒ Get AIDA64

No matter how strong your laptop battery is, it will eventually become weakened, with time.

The battery weakening process is gradual, such that you’ll hardly notice. At this point, battery life readings suddenly become inaccurate, throwing you into a state of confusion.

To prevent/avoid such a situation, you have to calibrate your laptop battery, preferably once every 2/3 months. And we have described, comprehensively, how to calibrate laptop battery in this article.

We hope you found these ways to calibrate your Windows 10 laptop battery useful. For more suggestions or other questions, feel free to visit the comments section below.

Fix the Minecraft VPN Problem Now [Easy Fix to Login & Play]

Many Minecraft players have complained that they can’t connect to the Mojang servers with a VPN. A few years ago, the Mojang Support team has stated that they don’t support the use of a VPN.

VPNs are not supported by Minecraft


Despite fans complaining about this situation, and demanding explanations, the conversation ended there.

All the while more and more players came to realize that when it comes to Minecraft, VPN isn’t a valid alternative to bypass certain geo-restrictions and server-blocking situations.

The certain thing is that users all around the world can’t connect to Minecraft while using a VPN. Users get several types of error messages when facing a VPN problem in Minecraft:

  • You cannot connect on a VPN or Proxy in Minecraft
  • Please Disconnect from your Proxy or VPN before joining Minecraft
  • Your IP has been identified as a VPN or Proxy in Minecraft

Although no official reason has been released by the team behind this game, we have a few guesses.

Does VPN affect Minecraft?

Using a VPN will have an effect on your Minecraft experience. We advise you use a reputable client to get the best experience.

Given that the platform blocks VPN, we advise you use obfuscated servers or double VPN features.

When you use a VPN, your traffic is sent through more tunnels than regular traffic, and if you don’t use a good service, this can lead to slower connections.

On the other hand, a good VPN can actually help increase Internet speed. If you connect to a VPN server that’s close in location to the Minecraft servers, you may be able to reduce ping and lag.

Why can’t I log into Minecraft while using a VPN?

1. Helps schools (and other organizations) block Minecraft effectively

Sometimes schools (and other organizations) enforce restrictions on certain online content, and Minecraft isn’t an exception.

Using a VPN should technically lift these restrictions. The solution? Restrict VPN users from connecting to the game servers.

2. Prevent IP-banned users bypass their penalties

Surely, this could only work if the player didn’t receive an account-wide ban from the server, or if they have multiple accounts.

Still, it’s a good measure to take against abusive/fraudulent users, so this could be another reason.

3. To block players who aren’t supposed to play the game

In some countries such as China, the standard version of Minecraft is not available. However, thanks to technological advancements, users can resort to VPNs to avoid censorship and geo-blocking without too much effort.

Thus, blocking VPN users who might try to bypass these restrictions could’ve been a valid reason.

4. Blocking password brute-forcing attempts

Last, but not least, restricting public VPN users from connecting to the Mojang servers is a great way to eliminate, or at least curb brute-forcing password attempts.

How do I bypass a VPN block in Minecraft?

It appears that Minecraft didn’t ban all VPNs from attempting to connect to their servers. Therefore, it only makes sense to find the right provider, the one that isn’t blacklisted, right?

We’ve tried a bunch of VPNs earlier in our tests and achieved not-so-great results. As you’d expect, we couldn’t connect to the Mojang servers, but we could still play the game offline or in LAN mode.

Just as we were about to give up, we found that PIA (Private Internet Access) works like a charm.

At first, we thought we weren’t connected to the VPN server, so we double-checked. Needless to say, we were, in fact, connected

But then we thought it was just a coincidence, so we tried multiple servers from several countries. Even more, we could even host our own public Minecraft servers with no issues.  Long story short, we never got locked out while using PIA.

Use PIA to connect to Minecraft

If you want an all-around VPN service that you don’t have to turn off while playing Minecraft we recommend PIA.

It’s one of the best VPNs you can download for Windows 10, did great in all of our tests, has fast servers, and provides you with unmatched security.

Private Internet Access

Bypass blocks and connect to Minecraft while keeping your privacy in check.
Check price Visit website

Minecraft servers that allow VPN

It’s been reported that some users of the same VPN have been able to connect to Minecraft whilst others have not.

Turns out that it’s possible that you can remain undetected, but there’s no guarantee. Using a VPN like PIA and activating obfuscation mode and double VPN is the most secure way to access Minecraft.

These features highly encrypt data and hide the fact that you use a VPN in the first place.

Additionally, you don’t even have to switch servers once you’re done playing. You can connect to your favorite server and forget it’s even there. Every service you’ll access through it will work flawlessly.

How to Open RTF Files on Windows 10 [3 Super Quick Ways]

First, let’s clear out what is an RTF file. RTF, otherwise Rich Text Format, is a text file format that saves document formatting such as bold, italic, and images.

Thus, it’s better to save a text document that includes bold formatting as an RTF instead of TXT.

Microsoft introduced RTF in the 1980s, but the company no longer updates the format. As such, RTF might be a slightly antiquated file type.

Nevertheless, there are plenty of Windows word processors and text editors that support the RTF file type.

MS Word, Corel WordPerfect, OpenOffice, LibreOffice, Notepad++, and AbiWord open rich text documents.

You can click File and select Open to edit an RTF file in most compatible software.

How can I open RTF files on Windows 10?

1. Open RTF documents by converting them to PDF files

The easiest and most secure way to open an RTF file on your PC is by using Adobe Reader DC to convert it to PDF. This way your file will be safe and easy to share.

Taking advantage of the numerous functions of Adobe Acrobat Reader DC means that you will need fewer programs installed on your system, making it faster and more stable.

Additionally, you can even convert files to and from PDF and share them easily.

Here’s a quick overview of all the other features Adobe Acrobat Reader DC has to offer:

  • Open a large variety of files
  • Create PDF documents
  • Convert from PDF to Microsoft Word or Excel
  • Add passwords to documents
  • Add digital signatures

Adobe Acrobat Reader DC

This is the best tool if you want to convert your RTF files into a greatly more elegant format like PDF.

    2. Open RTF documents With Google Drive

    Google Drive (GD) is cloud storage with which you can save documents and then edit them via Docs and Slides.

    Google Drive also gives you 15 GB of storage without a subscription fee. You can set up a Google+ account if required, and then you can open an RTF file in Google Drive.

  1. 1. First, access the site at drive.google.com to open Google Drive.

  2. 2. Click on My Drive and select the Upload files option from the menu.

    open rtf file step 2
  3. 3. Select the RTF file to save it in Google Drive and click the OK button.

  4. 4. When Google Drive includes your selected document, right-click the RTF file’s icon.

  5. 5. Click on Open With and select Google Docs from the list.

    open rtf file google docs
  6. 6. Note that opening an RTF in Google Docs generates a second copy of the document in Google Drive with a GDOC file format, which is the edited file.

  7. 7. Edit the file as you desire in Google Docs.

  8. 8. Click File, select Download as and choose Rich Text Format to restore the file back to RTF when you’ve finished editing.

    how to open rtf file download

However, you can also open a rich text file within Chrome or other browsers that support Google’s web apps.

3. Open RTF documents Online with Google Chrome

  1. Open the Google webstore to add the Docs Onlive Viewer extension to Google Chrome.
  2. You can open RTF documents in Chrome by typing the keyword RTF document file samples in Google.
  3. Google will then list three RTF documents at the top of its search page.
  4. Click a View this RTF file button beside one of those links to open the document in Chrome as below.

So you can RTF documents without any additional software. Open the RTF documents in Google Drive to edit them. Or open the linked Rich Text Format documents in browser tabs with Docs Online Viewer.
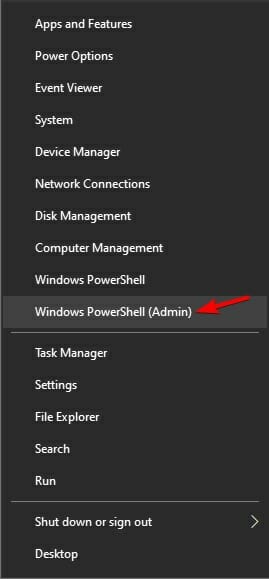
You can also open linked RTF files on website pages or search engines in Chrome with Docs Online Viewer.

This extension supports Rich Text Format so that you can open online RTF documents within Chrome.