Event ID 5379: How to Fix Your Mouse if It Disconnects

Have you noticed an event ID 5379 popup in the event viewer at the same time as your mouse disconnects? If you have, you are probably wondering what the solution is.

In this article, we have investigated the problem, and we introduce probable triggers as well as the most practical solutions.

Why does my mouse disconnect with the event ID 5379 notification?

The following are the possible causes of this disconnecting mouse issue:

  • Faulty or incompatible mouse driver – It’s possible that the mouse driver installed on your computer is either outdated, corrupted, or incompatible with your operating system.
  • USB power management – Sometimes, when the system goes into power-saving mode, it might disable the USB ports, which can cause the mouse to disconnect.
  • Wireless interference – If you use a wireless mouse, the connection may be affected by other devices or wireless signals in the surrounding area.
  • Hardware or mouse defect – Sometimes, a faulty or malfunctioning mouse can cause frequent disconnections. It’s important to consider hardware issues as a potential factor.

How do I fix event ID 5379 caused by a disconnected mouse?

Before going into any detailed solution, try the following workarounds:

  • Check for hardware damage – You may try the mouse on a different computer and replace your mouse if it is damaged.
  • Restart the computer – In some cases, the glitch may be minor, and a simple reboot will force any problematic process causing the error to stop.
  • Stay within range – If you use a wireless mouse, ensure you are within range to avoid disconnection.
  • Check USB connections – Ensure the cables or USB ports are not damaged; you may clean them to remove particles.

If none of the pre-solutions work, proceed to the major fixes we explore below.

1. Update mouse drivers

  1. Right-click the Start menu and select Device Manager.
    event id 5379
  2. Expand the Mice and other pointing devices category, right-click on your mouse, and click Update driver.
  3. Select Search automatically for drivers.
    event id 5379
  4. Verify it fixes the mouse disconnection causing the event ID 5379.

2. Restore the computer

  1. Press Windows + R to open the Run dialog.
  2. Type rstrui, and hit Enter.
    event id 5379
  3. Click the Next button.
    event id 5379
  4. Select a restore point and hit Next.
  5. Click on Finish.
  6. The computer would restart in the process, but at the end, verify that it fixes the mouse disconnection that triggers event id 5379.

3. Adjust the Power Management settings

  1. Right-click the Start menu and select Device Manager.event id 5379
  2. Expand the Universal Serial Bus controllers category.
  3. Right-click on each USB Root Hub and select Properties.
    event id 5379
  4. In the Properties window, go to the Power Management tab, then uncheck the box that says Allow the computer to turn off this device to save power.
  5. Click OK, and now, repeat these steps for all USB Root Hubs listed.
  6. Finally, restart your computer and check if the mouse disconnection issue persists.

There you have it. Note that we have not discussed these fixes in any particular order, so after the initial workarounds, you should try whatever seems the most applicable to your situation.

You may also want to read more on mouse disconnection issues if you need further troubleshooting.

Please let us know what worked for you in the comments section below.

How to Remove Bing From Windows 11 [3 Different Ways]

A few of our readers are caught between deciding whether to remove Bing from Windows 11. While the web search engine owned by Microsoft is essential to many users, you may have a different preference.

In this guide, we will take you through some of the easiest ways to remove it and explore circumstances that warrant its removal.

Should I remove Bing from Windows 11?

This decision is up to you, but here are some reasons you may want to remove the Microsoft search.

  • Preference – If you have a preferred search engine, removing Bing will allow you to personalize your search experience by using your preferred search engine.
  • Privacy concerns – Users may be concerned about how Bing collects data and prefer search engines with stronger privacy policies.
  • Search results accuracy – If you find that Bing’s search results are not meeting your expectations in terms of accuracy and relevance, you may consider switching to a different search engine.
  • Resource management – Removing or disabling Bing can free up system resources by reducing the number of background processes and services associated with the search engine.

How do I remove Bing from my Windows 11?

1. Modifying the Registry to remove Bing

  1. Press Windows + R to open the Run dialog.
  2. Type Regedit and hit Enter.
    remove bing from windows 11
  3. Navigate to the path below:
    Computer\HKEY_CURRENT_USER\SOFTWARE\Policies\Microsoft\Windows
    remove bing from windows 11
  4. Right-click Windows, select New, then Key.
    remove bing from windows 11
  5. Name the new key Explorer.
  6. Right-click on Explorer, and select New and DWORD.
  7. Name the DWORD DisableSearchBoxSuggestions.
    remove bing from windows 11
  8. Finally, to disable search box suggestions, double-click on DisableSearchBoxSuggestions, change the value to 1, and then click OK.
    remove bing from windows 11

2. Using Group Policy Editor to remove Bing

  1. Press Windows + R to open the Run dialog.
  2. Type gpedit.msc and hit Enter.
  3. Navigate to the path below:
    User Configuration\Administrative Templates\Windows Components\File Explorer
  4. Click on File Explorer on the left pane, then on the right, double-click Turn off display of recent search entries in the File Explorer search box.
    remove bing from windows 11
  5. Select Enabled, then click on Apply and OK.
    remove bing from windows 11
  6. Finally, restart the computer, and this will remove Bing from Windows 11.

3. Using Windows 11 Command Prompt

  1. Press Windows + R to open the Run dialog.
  2. Type cmd and hit Ctrl + Shift + Enter to open an elevated Command Prompt.
    remove bing from windows 11
  3. Type in the script below and hit Enter. This command adds a registry entry to disable Bing search.
    reg add "HKCU\Software\Microsoft\Windows\CurrentVersion\Search" /v BingSearchEnabled /t REG_DWORD /d 0 /f
    remove bing from windows 11
  4. Finally, restart the computer so that the changes can take effect.

These are the different ways to remove Bing from Windows 11. All the above methods are effective, so you should try whichever seems the most applicable.

If you need to use the Group Policy Editor to remove Bing but do not have it installed on your computer, our comprehensive guide will show you how to install Group Policy Editor on Windows Home.

Prefer to keep Bing but just remove content filters? Follow our guide on how to turn off SafeSearch on Bing for step-by-step instructions.

And, of course, reach out to us using the comments section below and let us know which of the above methods you prefer.

What is Ie4uinit.exe & How to Fix Its Application Errors

Ie4uinit is a Windows process that belongs to Internet Explorer. It’s used by IE to load the first time you run it, to set up your default home page and other settings.

This file is located in the C:\WINDOWS\system32 directory, where all of the programs on your computer are stored. If it’s causing problems, you’ll find this article of much help.

What is ie4uinit exe in Windows?

The ie4uinit.exe process is a Microsoft Internet Explorer process. It is a system process that runs in the background when you start your computer, allowing you to browse the web.

If you don’t use Internet Explorer often, there’s no need to keep this file on your system. If you use it regularly, it’s best to leave it alone and let it run when needed.

Some common errors associated with the ie4uinit.exe file include:

  • Ie4uinit.exe Error
  • Invalid Win32 Program: ie4uinit.exe
  • Sorry, ie4uinit.exe encountered a problem
  • Ie4uinit.exe not executing
  • Sorry, we can’t find ie4uinit.exe
  • Ie4uinit.exe not found
  • Error starting program: ie4uinit.exe
  • Ie4uinit.exe halted
  • Ie4uinit.exe: App Path is Faulting

These errors are a result of the following:

  • The program is not installed correctly – Since this file is related to the Internet Explorer browser, which has since been discontinued, errors may arise from installation from unverified sources.
  • Malware infection on your computer – A lot of legitimate Windows files are usually clowned by hackers who use similar names. This is all done to inject malware into your system.
  • Missing DLL files – It is possible that the DLL file associated with the ie4uinit.exe file is missing or corrupted.
  • Software conflicts – There may be a third-party application that is preventing the file from executing.
  • Corrupted registry – The associated registry keys may be missing or damaged. A corrupted registry can cause all sorts of issues with your computer, including ie4uinit exe error.

How can I fix ie4uinit.exe errors?

A few basic workarounds to perform before the main steps include:

  • End all ie4uinit.exe processes from Task Manager.
  • Search for the exe file and delete it if it is not in the legitimate Windows folder.
  • Perform a Registry cleanup to get rid of junk files.

1. Run DISM and SFC scans

  1. Hit the Start Menu icon, type cmd in the search bar, and click Run as administrator.cmd-run-admin-w11 unexpected kernel mode trap windows 11
  2. Type the following commands and press Enter after each one:DISM.exe /Online /Cleanup-Image /Restorehealth sfc /scannow

You can also try a dedicated repair program to execute the process mentioned above so that you can remove all corrupt files and other potential system errors.

2. Scan for viruses

  1. Press the Windows key, search Windows Security, and click Open.
  2. Select Virus & threat protection.
  3. Next, press Quick scan under Current threats.
  4. If you don’t find any threats, proceed to perform a full scan by clicking on Scan options just below Quick scan.Scan options
  5. Click on Full scan, then Scan now to perform a deep scan of your PC.Full Scan Scan Now
  6. Wait for the process to finish and restart your system.

3. Reinstall Internet Explorer

  1. Hit the Windows key and click on Settings.settings windows 11
  2. Click on Apps then select Apps & features on the right.
  3. Find Internet Explorer, click on the three ellipses, and select Uninstall.
  4. Confirm Uninstall in the prompt that appears.
  5. Visit Internet Explorer 11’s download page and click on the Download button.
  6. Install the file and open it. The application may fail as it is no longer supported but a workaround is to enable it in Microsoft Edge.
  7. Open Microsoft Edge and click the ellipsis button on the top-right corner.
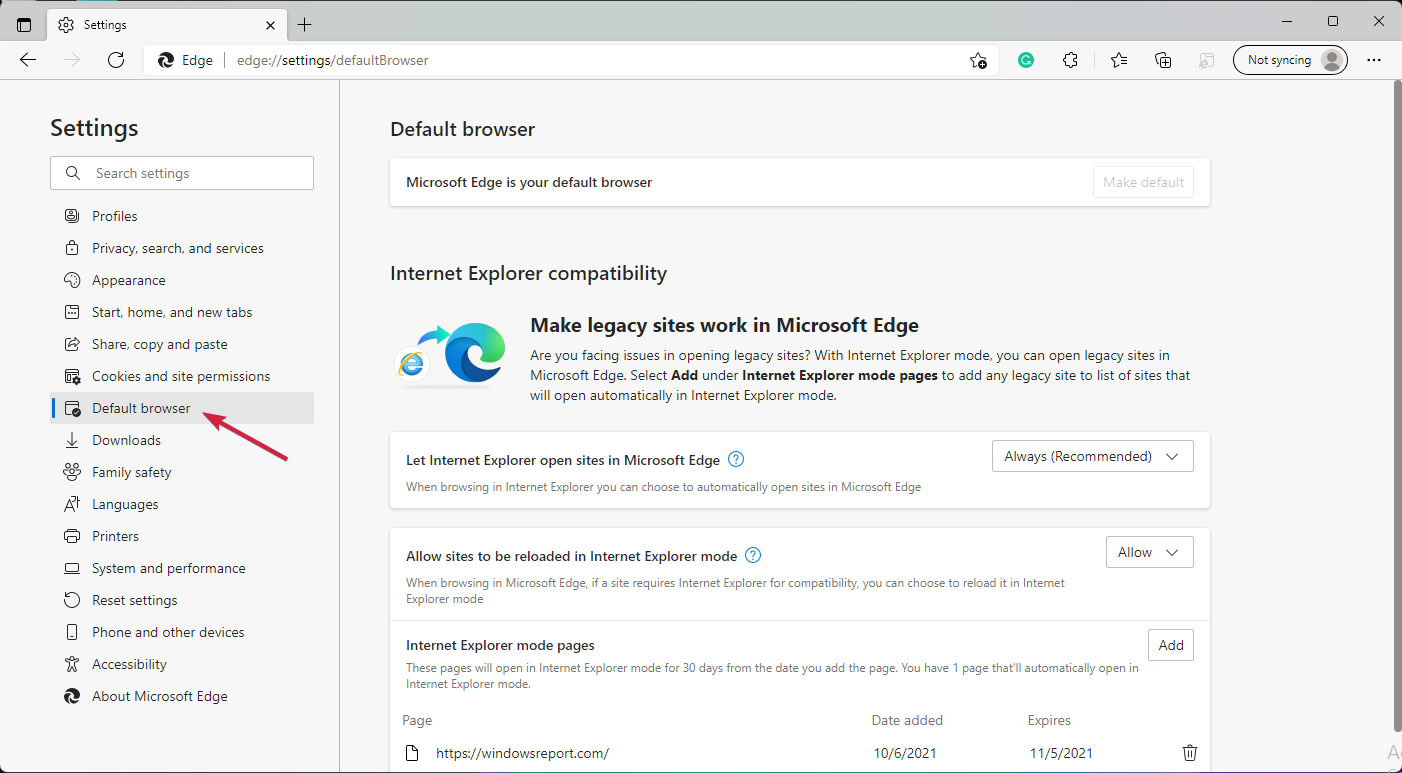
  8. From the drop-down menu, select the Settings option.navigate to settings on edge
  9. Next, click on the Default browser option.edge default browser settings
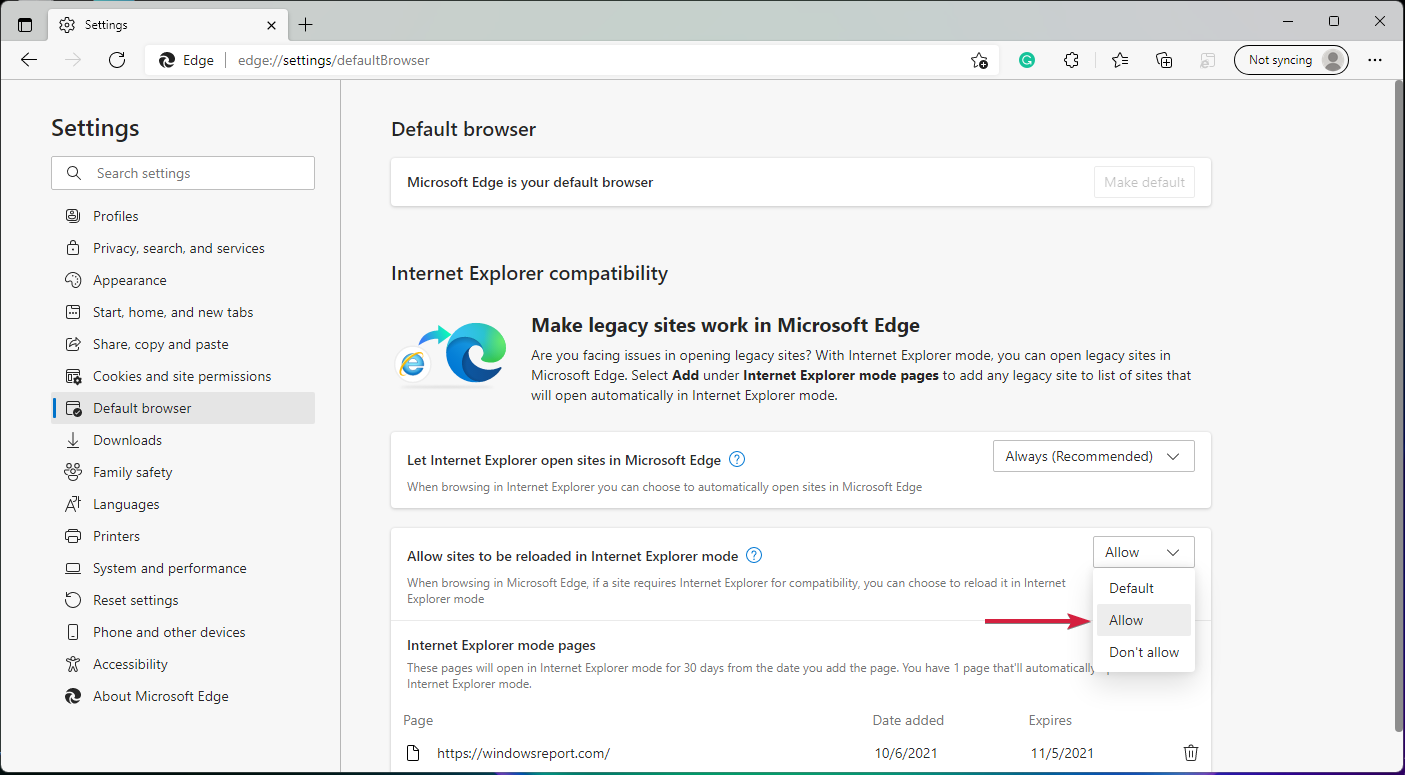
  10. Under Internet Explorer compatibility, click on the drop-down menu next to Allow sites to be reloaded in Internet Explorer mode and select Allow.allow sites to be reloaded in internet explorer checkbox
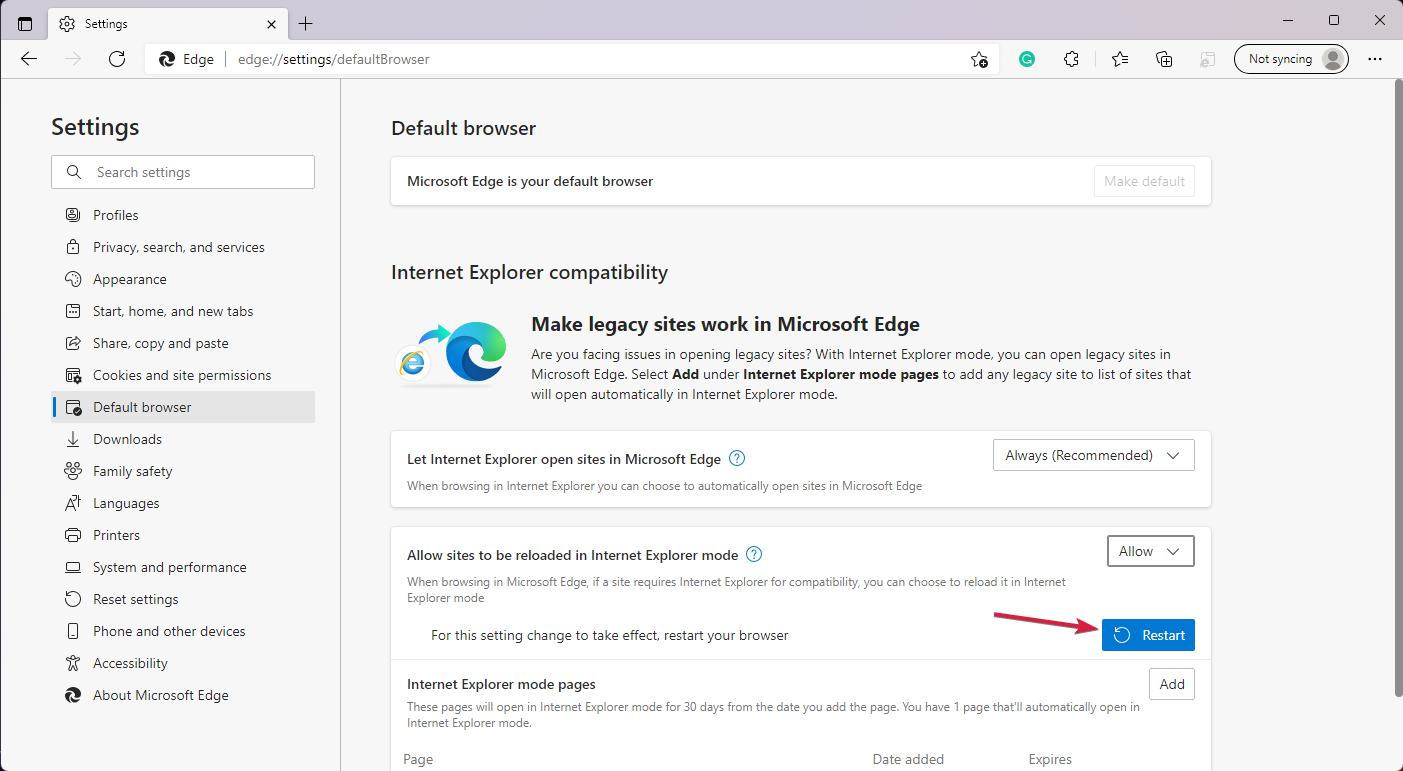
  11. Next, click on the Restart button.restart edge to apply changes

Before you reinstall the browser, it is important to do a clean sweep of any software leftover files. If these were the cause of the ie4uinit.exe error, installing the browser again with the same corrupt files present will only cause a reoccurrence of the issue.

4. Perform a System Restore

  1. Press the Windows + R keys, type rstui, and hit Enter.
  2. The System Restore window will open. Click on Next.
  3. Select the restore point you wish to revert to and click on Next.
  4. Now click on Finish.

If you’re still experiencing the ie4uinit.exe errors, it may be time to perform a clean install on your PC. After all, Microsoft has already ended its support for Internet Explorer, and it’s time to give its replacement a chance.

Microsoft Edge is not your ordinary browser; you can find all about its features in our comprehensive article.

You may also run into the textinputhost.exe file error, so don’t hesitate to check out our expert article on how to disable it.

Let us know what solution fixed this error in the comment section below.

Xbox One Stuck on Green Screen? Here’s What to Do

The Xbox One is a great gaming console with a lot of potential. Unfortunately, it has some bugs that can ruin your experience. One of these bugs is your Xbox One console getting stuck on the green screen.

If your Xbox One turns on and displays a green screen, you might wonder what’s wrong with your console. This guide will help you troubleshoot the problem so you can get back to gaming as quickly as possible.

Why does my Xbox turn on green screen and then go black? 

If your Xbox One is not loading the homepage and instead you get a green screen, here are some common reasons why:

  • Unfinished updates – Sometimes, Xbox One may fail to update even though it has automatic updates that run in the background when available. You may encounter the green screen if they are interrupted by network disconnection.
  • Hard drive failure – If your console turns on a green screen and then goes black, there could be an issue with your hard drive. It’s possible that your data has become corrupt and needs to be recovered or replaced completely.
  • Power supply issues – If you are using an older model of the Xbox One, there might be some problems with its power supply unit (PSU).
  • Network connection issues – Your network connection might be unstable or disconnected. This can interrupt the update process.
  • Overheating – This can happen because of several factors, including faulty fans, dust build-up inside the console, or even a faulty power supply unit.
  • Server problems – If the servers are down or a maintenance window is underway, this will result in limited services being available until the maintenance has been completed.

How do you fix the green screen of death on Xbox One?

A few workarounds to try before attempting the main troubleshooting steps include:

1. Perform Offline updates

  1. You’ll need a USB drive with at least 6GB and above for this step.
  2. Download the OSU1 (Offline System Update) ZIP file.
  3. Extract the files and plug in the USB drive.
  4. Find the $SystemUpdate file in the files extracted and copy it to your USB drive.
  5. Remove the USB drive from the laptop or desktop.
  6. Unplug the Xbox One, then plug it back in again after a few minutes.
  7. Press the Bind and Eject buttons, and hold those buttons to keep them pressed. Then, with the Bind and Eject buttons held, press the Xbox button.
  8. Let go of the Bind and Eject buttons after the second power-up tone. Thereafter, the Xbox One should start up at the Xbox Startup Troubleshooter.
  9. Next, insert the USB drive that includes the update files in an Xbox One USB slot.
  10. Select the Offline system update option with the controller’s D-pad and A button to initiate the update.

Offline updates are a great save, especially if you’re experiencing intermittent connection. This will ensure your updates are not interrupted, minimizing the chances of an update failure.

2. Clear system cache 

  1. Press the Guide button on your controller.
  2. Navigate to Settings and select System Settings.
  3. Click on Storage.
  4. Highlight a storage device then press the Y button on your controller to open Device Options.
  5. Click on Clear System Cache under Device Options screen.
  6. Click Yes when the confirm storage device maintenance prompt pops up.

3. Reset Xbox console

  1. On your controller, press the Xbox button, and on the menu, click the System tab to open Settings.
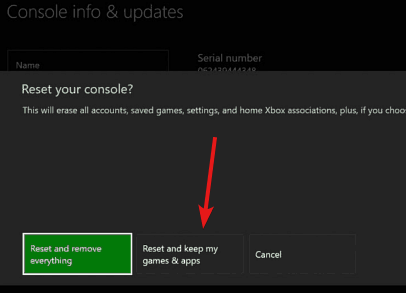
  2. Select System, then click on Console info and hit Reset console.
  3. Choose Reset and keep my games & apps.

Hopefully, one of these solutions has helped you fix the issue with your Xbox One getting stuck on the green screen.

If the problem is with your hard drive, we have an awesome recommendation for hard drives to replace your old one.

Be sure to check out our fixes for when your Xbox One fails to load games properly.

Feel free to leave any suggestions or other potential solutions that may have helped you.

Disable Family Safety Features in Windows 11 [How to]

The Family Safety feature can be useful, but sometimes it can get tiresome, so many are wondering how to disable Microsoft Family Features on Windows 11.

How do I disable Microsoft Family Features on Windows 11?

1. Remove the child’s account from the family

  1. Go to the Microsoft Family page and log in with your parental account.
  2. Click the three dots icon next to the name of the person you want to remove. Choose Remove from family group.
    remove from family microsoft safety
  3. Lastly, click on Remove to remove the child’s account from the group.
    remove from family confirmation

After doing that, the family safety feature will be disabled for that child’s account. This is a quick and easy way to disable Family settings on Windows 11 for a single account.

2. Leave the family group

  1. Navigate to the Microsoft Family page in your browser.
  2. Click the three dots icon next to your name and choose Leave family group.
     leave family group
  3. Click on Remove to confirm.
    remove yourself confirm family group

Once you leave the family group, you will disable Family Safety on Windows 11 for the entire family.

3. Modify the services

  1. Press Windows key + R and enter services.msc. Next, click OK.
     services.msc run window
  2. Locate Parental Controls and double-click it.
    parental control services window
  3. If the service is running, click the Stop button. Next, set the Startup type to Disabled. Lastly, click on Apply and OK to save changes.
    disable parental control service

Now you know how to turn off Microsoft Family Safety, and in most cases, it can be done by disbanding the family group.

Although this is a useful feature, it has its share of issues, and many reported that Microsoft Family Safety isn’t working on their PC. Luckily, we covered that issue in a separate guide.

If you want to know more, we have a great Microsoft Family review that you might want to check out. To learn about different customization options, don’t miss our guide on how to change Microsoft Family settings.

What method do you use to disable Family Safety on your PC? Let us know in the comments section below.

Fix: The Installer Failed to Properly Install This Driver Error

Some of our readers have reported running into an error the Installer failed to install this driver when they tried to install their drivers. The error can be annoying but can be fixed by following basic steps.

Hence, this guide will discuss ways to resolve the problem. Also, you may be interested in our guide about what to do if the no signed device drivers found error appears on your PC.

Why did the installer fail to install this driver properly?

Various factors may be responsible for the error on your computer. Some notable ones are listed below:

  • Corrupt driver file – The installer failed to properly install this driver error can occur when the downloaded driver file is corrupt, making it impossible for the installer to access and install the driver.
  • Driver incompatibility – Reinstalling a driver or downloading a new version on your computer may be unsuccessful because the driver is incompatible with your OS. So, it causes the installation process to result in errors.
  • Security software restrictions – Having security software or programs running firewall services can impede the driver installation on your computer. It occurs when they flag the process as a threat to the system, resulting in this error.
  • Device Installation Restrictions configuration – When the Device Installation Restrictions option is running in the Computer configuration, it can prevent the installation of devices not described by other policy settings, causing the error.

Regardless, we’ll take you through the steps to fix the issue and install your driver.

How can I fix the installer failed to properly install this driver error?

Before attempting any advanced troubleshooting steps, apply the following:

  • Perform a Clean boot – It will start the system with only the most essential files and services required by the operating system, preventing third-party programs from interfering with your driver installation.
  • Turn off background apps – Ending tasks for background processes and apps running on your computer will stop programs from intercepting or blocking the driver installer.
  • Update/backdate Windows OS – Installing the latest operating system updates will fix compatibility problems liable to cause the error. Also, you can roll back the Windows update if you installed an update before the error.

Proceed with the fixes below if the error occurs after following the steps above:

1. Run the chipset with a command line switch

  1. Left-click the Start button, type Command Prompt, and click the Run as administrator option.
  2. Click Yes on the User Account Control (UAC) prompt.
  3. Copy and paste the following in the command bar, then press Enter: SetupChipset.exe -overall
  4. After the command line is complete, restart your computer and check if you can install the concerned driver.

SetupChipset.exe is part of Intel(R) Chipset INF, and running its command helps configure a Software Package to deploy tricky drivers.

2. Disable Device Installation Restrictions

  1. Press the Windows + R key to open the Run dialog box, type gpedit.msc, and press Enter to open Group Policy Editor.
  2. Navigate to the following path: Computer Configuration\Administrative Templates\System\Device Installation
  3. Then click Device Installation Restrictions. Double-click the Prevent installation of devices not described by other policy settings option on the right pane.
  4. Click to select Disabled, and then click OK to save the changes.
  5. Restart the computer and try the driver installation to see if the error persists.

Disabling the Device Installation Restrictions option in the Group Policy Editor allows the system to install devices and drivers not described by other policy settings.

Check our guide about how to fix the Group Policy error on Windows PCs if you encounter any problems.

3. Manually install the driver

  1. Go to the Intel Download Center or your computer manufacturer’s driver site and download the latest version of the driver.
  2. Left-click the Start button, type Device Manager, and press Enter to open it.
  3. Expand the Device entry for the driver, right-click on the driver, and select Update driver from the drop-down.
  4. Click on Browse my computer for drivers from the options on the new window.
  5. SSelect Browser to navigate to the location of the download driver file.
  6. Click the Install this driver software anyway option and follow the on-screen instructions to complete the installation.

The manual installation allows you to override any settings impeding the installer.

Alternatively, you can read our article about manually installing drivers on Windows 11. Also, we have a comprehensive guide on how to disable Driver Signature Enforcement on Windows PCs.

If you have more questions or suggestions on this article, kindly drop them in the comments section.

Accelerometerst.exe Application Error in Windows 10 [Fix]

The Accelerometerst.exe application error on Windows 10 is an error that many users report. It’s especially troublesome for users that have installed the Windows 10 Creators update.

Thankfully, it is not the most difficult issue to fix, provided you follow the solutions in this detailed guide.

Why am I getting the Accelerometerst.exe application error?

Below are some of the potential causes of the Accelerometerst.exe application error on Windows 10:

  • Corrupt system files: If some crucial system files are broken or missing, you can get this error message. You can fix this by restoring these files.
  • Outdated HP 3D Drive Guard: The HP 3D Drive Guard has been throwing up different errors since many users upgraded to Windows 10. The solution is to uninstall the app and install the latest version.
  • Faulty Microsoft Visual Studio: Another potential cause of this error is issues with the Microsoft Visual Studio tool. You need to repair or reinstall the tool to get past the error.

How can I fix the Accelerometerst.exe application error on Windows 10?

1. Run an SFC scan

  1. Press the Windows + S key, type cmd, and select Run as administrator under Command Prompt.
    cmd admin
  2. Type the command below and press Enter to run it: sfc /scannowsfc scan
  3. Finally, wait for the command to finish running and restart your PC.

Sometimes, the Accelerometerst.exe application error on Windows 10 can be caused by missing or corrupt system files. You can fix this by running an SFC scan.

If this process doesn’t give results, you may choose a system repair tool to scan your Windows OS and repair defective system files.

2. Uninstall HP 3D DriveGuard

  1. Press the Windows key, type control, and click Control Panel.
    control panel Accelerometerst.exe application error Windows 10
  2. Choose Uninstall a program under Programs.
  3. Now, right-click the faulty program and select the Uninstall option.
    uninstall
  4. Finally, download and install the latest version of the program on your PC.

If you are an HP user, the Accelerometerst.exe application error on Windows 10 can be due to issues with the HP 3D DriveGuard. To fix this, uninstall the app and install the latest version.

3. Unregister & register VCRUNTIME140.dll

  1. Press the Windows key + R to open the Run utility.
  2. Type the command below and click the OK button: regsvr32 /u c:\Windows\System32\vcruntime140.dllregsvr
  3. Now, launch the Run utility again, type the command below, and hit Enter: Regsvr32 c:\Windows\System32\vcruntime140.dllregsvr Accelerometerst.exe application error Windows 10

Issues with VCRUNTIME140.dll is one of the major causes of the Accelerometerst.exe application error on Windows 10. The solution to this is to unregister and re-register the DLL file.

If you can’t find the DLL file on your PC, then this solution will not work for you.

4. Install Microsoft Visual C++ Redistributable Package Update 3

  1. Visit the official website to download the Microsoft Visual C++ Redistributable Package Update 3 for Visual Studio 2015.
  2. Click the Download button.
    download
  3. If you are using a 64-bit PC, click the checkbox before vc_redist.x64.exe. On a 32-bit PC, you only need to click x86.exe.
    choose Accelerometerst.exe application error Windows 10
  4. Next, follow the onscreen instructions to complete the download process.
  5. Finally, double-click the downloaded file to install the tool and restart your PC.

The Accelerometerst.exe application error on Windows 10 can sometimes be due to problems with the Microsoft Visual Studio 2015 package. Thankfully, there is an update pack released by Microsoft to fix these potential issues.

5. Repair the Microsoft Visual C++ Redistributable file

  1. Press the Windows key + R, type appwiz.cpl, and click the OK button.
    appwiz.cpl
  2. Right-click the Microsoft Visual C++ 2015 Redistributable file and select the Uninstall option.
    uninstalll Accelerometerst.exe application error Windows 10
  3. Finally, click the Repair button and follow the onscreen instructions to complete the process.

If downloading the Update package does not work for you, you can repair the 2015 Visual C++ Redistributable file on your PC. This has proved effective for many users, and you can try it too.

6. Perform a system restore

  1. Press the Windows key + R, type rstrui.exe, and press Enter.
    rstrui
  2. Click Next on the new page.
    next
  3. Now, choose your ideal restore point and click the Next button.
    restore point Accelerometerst.exe application error Windows 10
  4. Finally, click Finish and follow the onscreen instructions to complete the process.
    finish

If you started noticing the Accelerometerst.exe application error on Windows 10 after installing an app or making some changes to your PC, you need to perform a system restore.

This will help you reverse the changes that might be causing the problem.

With this, you now have everything you need to solve the Accelerometerst.exe application error on Windows 10. All you now need to do is to follow the instructions carefully, and things should be back to normal.

Similarly, if you are facing other issues like adbwinapi.dll not found, check our detailed guide to fix it.

Feel free to let us know the solution that helped you solve the problem in the comments below.

A Referral Was Returned From the Server Error [Fix]

It could be very frustrating if you encounter an error message that says A referral was returned from the server while installing applications on Microsoft Windows 11.

We have investigated the Windows error, and in this guide, we will introduce you to probable causes and some of the most practical resolutions.

Why am I getting a referral was returned from the server?

Users have experienced the error for several reasons, including the following:

  • Permission issues – When users lack administrator permissions, they cannot carry out certain functions and may encounter the error.
  • Update errors – Sometimes, the error will start after a bad Windows update or if you use an outdated OS.
  • User account control issue – UAC can sometimes disrupt communication or connectivity between your computer and the referral server.

How do you solve a referral was returned from the server?

Before going through the solutions explored in this guide, we recommend the following workarounds:

  • Use an admin user account – You may log out of your current user and relog in as an administrator.
  • Restart the computer – A restart may work because it fixes minor glitches by forcing the problematic processes to shut down.

If you can not fix the error with the above preliminary solutions, move on to the detailed fixes below.

1. Update User Account Control settings

  1. Press Windows + R to open the Run dialog.
  2. Type control and hit Enter.
    a referral was returned from the server
  3. Click on the User Accounts settings.
  4. Select Change User Account Control settings.
    a referral was returned from the server
  5. Drag the slider down to Never Notify and click OK.
    a referral was returned from the server
  6. Finally, restart the PC and verify if it fixes a referral was returned from the server.

2. Tweak admin values in the registry Editor

  1. Press Windows + R to open the Run dialog.
  2. Type regedit and hit Enter.
  3. Navigate to the path below:
    HKEY_LOCAL_MACHINE\SOFTWARE\Microsoft\Windows\CurrentVersion\Policies\System
  4. Double-click ValidateAdminCodeSignatures on the right pane, set the Value data to 0, then click OK.
  5. Next, double-click EnableUIADesktopToggle, set the Value data to 0, and hit OK.
  6. Finally, reboot the PC and see if it fixes a referral was returned from the server.

3. Update user account preferences in Group Policy

  1. Press Windows + R to open the Run dialog.
  2. Type gpedit.msc and hit Enter.
    a referral was returned from the server
  3. Navigate to the path below:
    Computer Configuration / Windows Settings / Security Settings / Local Policies / Security Options
    a referral was returned from the server
  4. On the right pane, double-click User Account Control: Only elevate signed and validated executables.
    a referral was returned from the server
  5. Select Disabled, then click Apply and OK.
    a referral was returned from the server
  6. Finally, verify if the fix works for a referral was returned from the server.

4. Run apps in Compatibility Mode

  1. Press Windows + R to open the Run dialog.
  2. Type cmd and hit Ctrl + Shift + Enter.
  3. Type in the script below and hit Enter, then restart the computer.
    net user administrator /active:yes
  4. Right-click on the program that causes the error and select Properties.
    a referral was returned from the server
  5. Click on the Compatibility tab and select Change settings for all users.
  6. Tick the Run this program as an administrator checkbox and hit OK.

There you have it; some of the best ways to fix a referral was returned from the server on your Windows devices.

We recommend starting with the resolution as they may save you the time and energy of further troubleshooting. Also, since Group Policy may be integral in fixing the error, you may read our guide on getting Group Policy on Windows 11.

Lastly, other readers will love to hear from you, so please drop a comment below and tell us the fix that worked for you.

Microsoft news recap: China approves Activision Blizzard acquisition, iMessage can be accessed on Windows 11, and more

Microsoft news recap is a weekly feature highlighting the top Microsoft news stories of the past week. Sit back, grab some coffee, and enjoy the read!

Microsoft bumps Bing Chat’s character limit to 4,000

It’s now possible to send longer queries to Bing Chat as Microsoft has doubled the character limit to 4,000, which allows for more detailed queries to be provided.

China’s antitrust committee joins Microsoft’s growing list of Activision approvals

China has become the latest country to approve Microsoft’s acquisition of Activision Blizzard, giving greater credence to the acquisition, despite the issues facing the deal by the UK’s CMA and the FTC in the US.

You can now use iMessage on your Windows 11 PC

It is now possible to use iMessage on Windows 11 through Microsoft’s Phone Link app, as Microsoft has expanded support to iPhone, after originally only supporting Android phones.

Xbox Quick Resume feature might be coming to Windows PCs

Xbox’s Quick Resume feature that allows players to exit a game and return to it instantly, without losing progress, could be on its way to Windows PCs, after hints were dropped that it could be on the way.

That’s it for this week. We will be back next week with more Microsoft news.

3 Ways to Uninstall Cygwin on Windows

Cygwin is a popular software amongst developers due to its ability to allow the compiling of Linux-based applications on Windows. And given its advanced operation, users can’t uninstall Cygwin in Windows like the other apps.

There is no option in Settings to uninstall the program, and users can’t find Cygwin in Control Panel. So, can you remove Cywin from Windows? The answer is yes, but it’s a little more complicated than one would imagine. Let’s find out!

Is Cygwin safe to install?

Yes, Cygwin is safe to install! It’s the go-to software for many developers due to the availability of various open-source tools. It serves as a viable solution for those looking to run Linux apps on Windows.

So, if you haven’t yet made up your mind to uninstall Cygwin in Windows, here are a few benefits of it:

  • Easy to use: Enhanced accessibility and ease of use are two of the primary benefits of Cygwin, making it one of the best terminal emulators to install.
  • Doesn’t burden the disk: Cygwin is lightweight and doesn’t consume a lot of space. It’s an executable file that downloads the required resources to run.
  • Quicker results: When it comes to results, Cygwin is definitely amongst the top options, given its superior performance and ability to deliver quickly and correctly.

How do I completely remove Cygwin?

Tip icon Tip
Since the conventional ways don’t work with Cygwin, we will be using some advanced methods. So follow the steps as it is. And before you start, make sure to create a restore point to revert Windows to a stable state in case things go wrong.

1. Using the Command Prompt

1.1 Disabling the related services

  1. Press Windows + R to open Run, type services.msc in the text field, and click OK.services.msc
  2. Locate and double-click the CYGWIN sshd service.
  3. Select Disable from the Startup type dropdown menu, click on Stop, and then OK to save the changes.services
  4. Similarly, stop the following services as well, if any are found:
    • Cygwin cron
    • Cygwin cygserver
    • Cygwin inetd
    • Cygwin apache
    • Cygwin postgresql

1.2 Uninstalling Cygwin

  1. Press Windows + R to open Run, type cmd, and hit Ctrl + Shift + Enter.cmd to uninstall cygwin windows
  2. Click Yes in the UAC prompt.
  3. Paste the following command and hit Enter to take folder ownership:takeown /r /d y /f cygwincommand to uninstall cygwin windows
  4. Now, run this command for advanced permissions:icacls cygwin /t /grant Everyone:F
  5. Finally, execute the following command to delete the executable and its files:rmdir /s /q cygwin

1.3 Clearing the Registry entries and leftover files

  1. Press Windows + R to open Run, type regedit, and hit Enter to open Registry Editor.registry
  2. Click Yes in the prompt.
  3. Locate the Cygwin key under any of the two, HKEY_LOCAL_MACHINE and HKEY_CURRENT_USER.
  4. If any are found, right-click on them and select Delete.delete key to uninstall cygwin windows
  5. Click Yes in the confirmation prompt.confirm
  6. Also, delete any cache, Start Menu icons, or desktop shortcuts for Cygwin.

That’s it! Though slightly time-consuming, this is the simplest way to uninstall Cygwin with CMD in Windows 7, as well as the other iterations. After uninstalling all Cygwin packages and the remnant files, you will also free up significant disk space.

2. By modifying the permissions

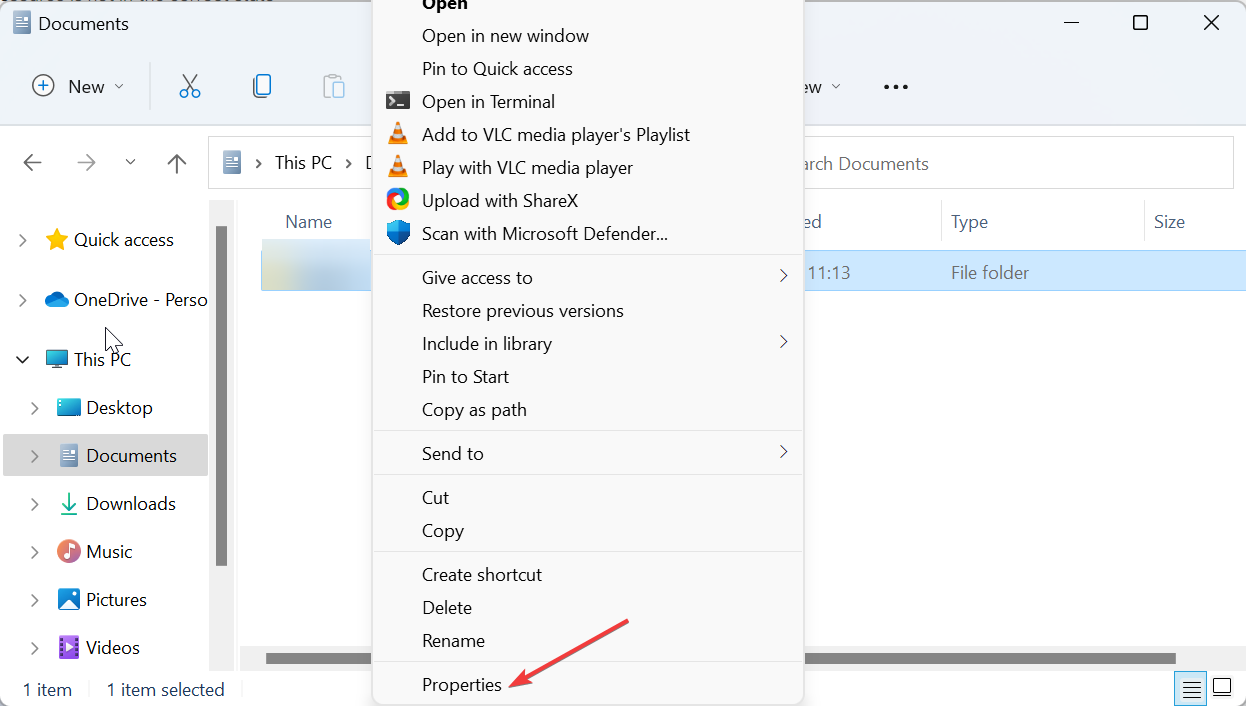
  1. Press Windows + E to open File Explorer, go to the C: drive, right-click on the Cygwin folder, and select Properties.properties
  2. Go to the Security tab, and click on Advanced.advanced
  3. Now, click on Change.change owner to uninstall cygwin windows
  4. Enter the current username in the text field, click on Check Names, and then on OK.username
  5. Tick the checkboxes for Replace owner on subcontainers and objects and Replace all child object permission entries with inheritable permission entries from this object, then click OK.change owner to uninstall cygwin windows
  6. Click on OK to save the changes.
  7. Again, head to the Security tab, and click Edit.edit
  8. Click on Add.add
  9. Enter the username you used earlier, then click on Check Names, and OK.check names
  10. Select the user, then tick the checkbox for Full control, and click OK to save the changes.full control to uninstall cygwin windows
  11. Once done, all that’s left is to select the folder and hit Delete to clear the Cygwin files.

Another way to uninstall Cygwin in Windows is via File Explorer after taking the folder ownership. This is very similar to the Command Prompt method, the difference being that all operations are performed manually. And do not forget to clear the Registry entries and any cache, as detailed earlier.

3. With a third-party uninstaller

If you find the two solutions to be rather complicated, a quick way to uninstall Cygwin in Windows 11 is to use dedicated uninstaller software. These can identify any processes and apps on the computer and quickly remove them.

Besides removing the program, an uninstaller will also identify any Registry entries and look up the app cache, ensuring that it’s all deleted alongside.

Before you leave, do check our comparison of Linux and Windows, to get a better understanding of the two.

For any queries or to share which method worked best for you, drop a comment below.

Consent.exe: What Is It & Should You Delete It?

When an application needs to perform tasks that require administrative privileges, such as installing new software or updating system files, it needs your consent hence why you may see the consent.exe file in your system.

If you’ve been wondering whether you need this file on your PC, we unpack what the consent.exe file does and its importance in this article.

What is the consent UI for administrative applications? 

The consent.exe file is a Windows-based executable used to interact with the user and verify their consent to perform certain actions, such as installing a software program or changing the computer’s settings.

Sometimes, you can download an application but are unsure what it does or how it works. It is best not to allow it to run within your computer until you have researched what it does and whether it is safe to install on your computer.

You’ll most likely find the consent.exe file in the C:\Windows\System32 folder. Anywhere else should be a red flag, as it could be a virus masquerading as the real file.

Should I disable the consent.exe file?

It’s a known fact that you cannot get all the apps you need from Windows Microsoft Store. Sometimes, you’ll need to download non-Microsoft programs from third-party sites. 

They may be necessary, but you risk inviting viruses, trojans, and malware into your system, especially without a comprehensive antivirus.

Here is where the consent.exe program comes in. As part of the UAC, it ensures that any changes you make to your PC are approved. If consent.exe sees suspicious activity, it will stop the process from executing and ask whether you want to allow this action.

While it may be an additional layer of security, a section of users has reported that having this file in their system brings up more problems than it solves.

For instance, some are experiencing PC freezes, random crashes, and high CPU usage. If you notice that consent.exe takes up a lot of CPU or RAM resources, or if it’s constantly running in the background, you might want to disable it.

How can I disable the consent.exe file?

Start with the following preliminary steps before the more complex solutions:

1. Use Settings

  1. Hit the Start Menu icon, type UAC in the search box, then click Open to access the Change User Account Control settings.
  2. The User Account Control Settings window will open. Click and hold the slider, hover your mouse over the Never notify option at the bottom, then click OK.
  3. You will no longer get the prompt whenever you want to install an app.

Keeping this setting at Never notify is, however, not recommended because it allows non-administrators access to specific system functions without requiring them to elevate privileges each time they do so. 

This is very dangerous, especially when using a shared computer, because other users can install malware into your system, and you wouldn’t know it until it is too late.

2. Use the Registry

  1. Press the Win + R shortcut keys to open the Run console, type regedit, and hit Enter to open the Registry Editor window.
  2. Next, navigate to the below path, and double-click on the EnableLUA DWORD.open EnableLUA dword
  3. In the Edit DWORD (32-bit) Value dialogue, change the Value data from 1 to 0. Press OK.
  4. Close the Registry Editor and restart your PC.change value data from 1 to 0

Remember to create a backup of your Registry so that in case anything goes wrong, you won’t lose your data. Also, check out our article on various ways to disable the UAC.

The above steps are for the genuine consent.exe file. If you suspect it may be a virus, follow the next steps to remove it.

3. Run DISM and SFC scans

  1. Hit the Windows key, type cmd in the search bar, and click Run as administrator.cmd-run-admin-w11 unexpected kernel mode trap windows 11
  2. Type the following commands and press Enter after each one:DISM.exe /Online /Cleanup-Image /Restorehealth sfc /scannow

Alternatively, you can go for specialized repair software to make sure you get rid of all your Windows stability errors.

4. Scan for viruses

  1. Press the Windows key, search Windows Security, and click Open.
  2. Select Virus & threat protection.
  3. Next, press Quick scan under Current threats.
  4. If you don’t find any threats, proceed to perform a full scan by clicking on Scan options just below Quick scan.Scan options
  5. Click on Full scan, then Scan now to perform a deep scan of your PC.Full Scan Scan Now
  6. Wait for the process to finish and restart your system.

5. Perform a System Restore

  1. Press the Windows + R keys, type rstui, and hit Enter.
  2. The System Restore window will open. Click on Next.
  3. Select the restore point you wish to revert to and click on Next.
  4. Now click on Finish.

When disabling consent.exe, you may run into this app can’t be activated UAC disabled error, so follow through our helpful guide to bypass this issue.

For any additional thoughts, let us know in the comments below.

Rytr Not Working: 4 Easy Ways to Fix It

If you’re using Rytr.me AI, you’re probably working hard to get the most out of the AI software, but sometimes, things don’t work out as planned. Maybe you can’t get a response after a query input, or the website just won’t load.

It’s nothing alarming, but it is an issue that needs to be addressed immediately. Below, we take you through some common issues with Rytr not working and how to resolve them quickly.

Why is Rytr not working?

AI assistants are just like any other website with downtimes, scheduled maintenance, and usual glitches. When Rytr is not working, it could be because of one or more of the following reasons:

  • Scheduled downtime – Websites sometimes have downtime to upgrade features or fix any bugs reported to improve the efficiency of their products and services.
  • Bug/glitch – It is possible that there is a bug that has infected the website preventing it from working normally.
  • Extensions/plugins – If Rytr stopped working after installing an extension, it is probably the culprit causing this issue.
  • Build-up cache/cookies – While cookies and cache help you load sites faster, they can sometimes be overwhelming when they have not been cleared in a while, causing issues with loading some sites.
  • Excessive traffic – It is also possible that too many people are trying to access Rytr at the same time, causing the server to be overloaded.
  • Outdated/corrupt browser – If you’re still using an older browser, this could be the problem. Most developers roll out updates to their products as soon as browsers are updated for compatibility purposes.
  • Character limit – Since Rytr has a monthly character limit for the free plan, you may have exhausted yours hence why it is not working.

What can I do if Rytr is not working?

Try out the following basic checks first:

  • Check for any browser updates.
  • Verify from Rytr whether their website is running or has any scheduled maintenance.
  • Ensure your internet connection is stable.
  • Verify whether you have exhausted your character limit.
  • Logout of Rytr.me, then log in again.
  • Restart your browser.
  • Switch to another browser.
  • Wait for a few moments and try again.

1. Clear browser cache and cookies 

  1. For this step, we shall be using the Chrome browser.
  2. Launch your Chrome browser and click the three vertical ellipses in the top right corner.
  3. Select Settings.Settings CHrome
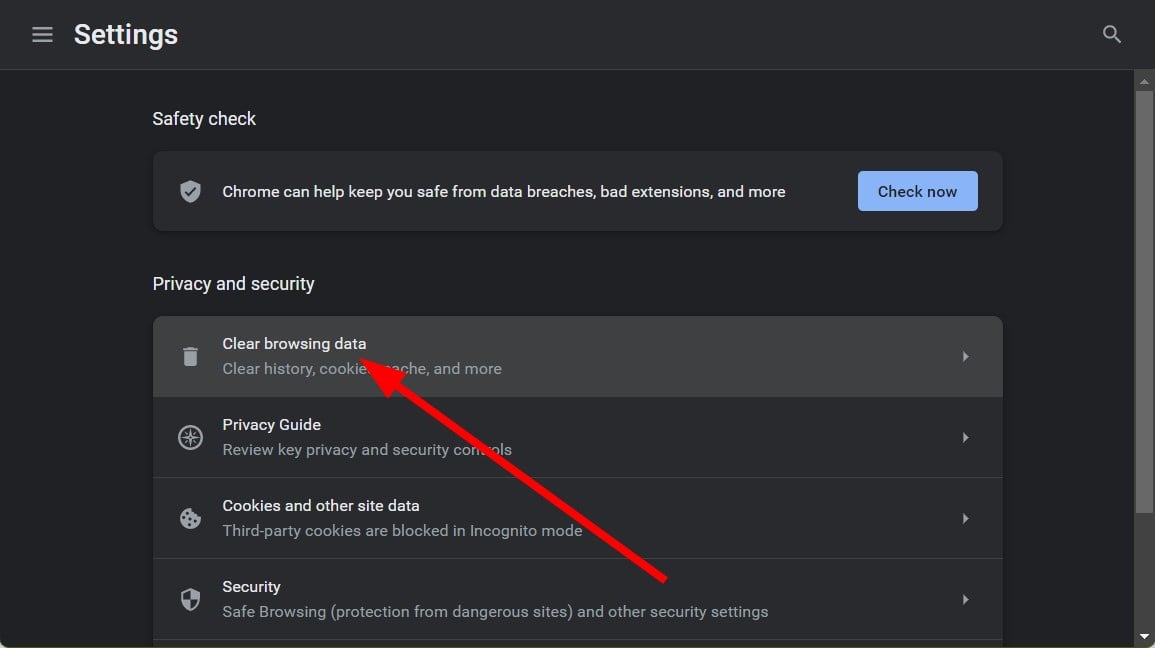
  4. Click on Privacy and security, then select Clear browsing data.
  5. Check Cookies and other site data and Cached images and files, then hit Clear data.Clear data

2. Disable extensions 

  1. Launch your Chrome browser, and in a new tab, enter the following address: chrome://extensions/
  2. Peruse through your extensions and toggle the Disable button for any suspicious-looking ones.disable extension
  3. Repeat this step until you find the culprit.

3. Reset your browser 

  1. Open your Chrome browser and click on the three vertical ellipses at the top right corner.
  2. Select Settings.Settings CHrome
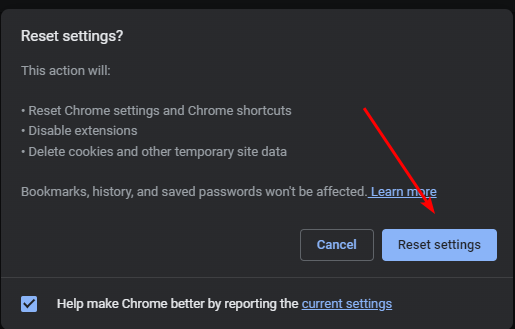
  3. Next, click on Reset and cleanup, then select Restore settings to their original defaults.
  4. Confirm Reset settings in the next dialog box.

4. Report the issue

Your last resort is to report the issue of Rytr not working. Rytr has various avenues where you can connect with them, from Live chat, Email, and social media platforms.

Ensure to include every detail, no matter how insignificant you may think it is, to solve the problem promptly.

Is Rytr free to use?

Yes, Rytr is indeed free. They’ve even indicated on their website that it is free forever. While AI software seems to be taking over, most don’t come cheap. 

You’ll have to part with a generous amount to subscribe to a monthly or annual plan. Others who offer free plans have a character limit. This brings us to the next question. Is there a character limit on Rytr?

Yes, it does have a character limit. If you can’t afford to upgrade to the paid plan offering unlimited characters, you’ll have to make do with the free plan with a 10,000 monthly character limit.

It may not be enough, but it’s better than other ChatGPT alternatives that don’t offer a free trial or plan.

That brings us to the end of this article, but keep the conversation flowing in the comment section below. We want your thoughts on Rytr AI, problems encountered so far, and any other interesting thing.

Error 503: Valid RCPT Command Must Precede Data [Fix]

If you encounter the error message 503 valid rcpt command must precede data, it usually means there’s a problem with the recipient (RCPT) command during SMTP (Simple Mail Transfer Protocol) communication.

Many email senders using SMTP servers like Outlook 365 (Office 365) often encounter this error. So, in this guide, we walk you through the best solutions.

Why do I get the 503 valid RCPT command must precede data in Outlook?

There are a few things that will trigger this error in Outlook, including the following:

  • Incorrect recipient address – If the email address you are trying to send to is incorrect, it may cause the Outlook or Microsoft 365 error.
  • SMTP authentication – If your SMTP server requires authentication and you have provided the correct username and password, it triggers the 503 error.
  • SMTP server configuration – Users who have not correctly configured the email client or application to use the correct SMTP server may get the error.
  • Network connectivity – Sometimes, a slow or bad network connection will cause an Outlook error.

How do I fix the 503 valid rcpt command must precede data error?

Before you proceed with the solutions in this guide, do the following:

  • Verify your internet connection – You may have to use a wired connection or change your ISP to guarantee a good connection.
  • Restart all applications – Sometimes relaunching your apps may fix tiny bugs; you may also consider rebooting the device.
  • Disconnect your VPN – It is recommended that any VPN be disconnected as they may have rigorous firewall or security configurations that can block the necessary ports or protocols.

However, if you are unsuccessful after using the above pre-solutions, proceed to more detailed fixes below.

1. Configure the SMTP Authentication

  1. Log in to Outlook.
  2. Click on the Settings icon and select View all Outlook settings.
    503 valid rcpt command must precede data
  3. Click Mail, then select Sync mail.
    503 valid rcpt command must precede data
  4. Set the SMTP settings to the value below:
    Server name: smtp.office365.com
    Port: 587
    Encryption method: STARTTLS

2. Check Mailbox capacity

  1. Log in to Outlook.
  2. Click on the Settings icon and select View all Outlook settings.503 valid rcpt command must precede data
  3. Click on General, then select Storage.
    503 valid rcpt command must precede data
  4. If you are out of storage, on the right pane, click Get more storage and follow the prompt.
    503 valid rcpt command must precede data
  5. Verify if it fixes the 503 valid RCPT command must precede data error.

3. Check the email address

The email address you used in the From field is visible to the recipient when you send an email. Using a different email address than the one in your outgoing mail settings may lead to authentication problems and error 503.

Also, it’s important to note that using special characters, such as apostrophes, in email addresses can result in email transmission issues and potentially trigger the Outlook 503 error. To ensure accuracy, you should review and eliminate any special characters or symbols in the recipient’s email address.

4. Fix corrupt PST file

If the Outlook PST file is damaged, you might encounter the error 503. So you can use an advanced PST file repair software like Stellar Repair for Outlook.

We have written a comprehensive guide on using this tool to fix your bad PST files.

With the fixes discussed, you should have successfully fixed the 503 valid RCPT command must precede data error.

Other readers would love to know what worked for you, so please leave us a note in the comments section below.

NetworkCap.exe: What Is It & Should You Delete It?

Of the many background processes running on the PC, some perform critical tasks while others, if eliminated, do not affect the core functioning of the OS. A proper understanding of both helps reduce CPU usage in Windows. One such is the NetworkCap.exe process.

And besides resource consumption, there are various other issues accompanying the process. For some users, NetworkCap.exe caused slow Internet speed, dropping from 10 Mbps to a few hundred Kbps. If you are facing problems, here’s everything you need to know!

What is Network Cap exe?

The process relates to HP Network HSA Service and usually comes preinstalled on some HP devices. The executable file for NetworkCap.exe is stored in the System32 folder in either of these locations:C:\Windows\System32\DriverStore\FileRepository\hpcustomcapcomp.inf_amd64_79c5c41204d03777x64 C:\Windows\System32\DriverStore\FileRepository\hpcustomcapcomp.inf_amd64_7898ab4dfb5a2c7bx64

The HP tool is often found running the Task Manager even when not manually initiated by the user. This is what concerns users, and many ask if NetworkCap.exe is a virus. The answer is no, but it could be categorized as bloatware in Windows.

Should I delete NetworkCap.exe?

NetworkCap.exe is a network monitoring tool, but given that it’s not a core Microsoft process, there’s no harm in removing it. And this should not affect the functioning of core Windows processes or even third-party programs.

But before you do, we recommend creating a restore point so as to have the ability to revert the changes in case things go wrong.

How do I fix NetworkCap.exe errors?

1. Manually delete the file

One of the quickest solutions to fixing issues with NetworkCap.exe, be it slow Internet or high memory consumption, is to remove the executable file.

Simply head to the file’s storage location and delete it. Also, make sure to remove the executable file from the Recycle Bin.

2. Scan for malware

  1. Press Windows + S to open Search, type Windows Security in the text field, and click on the relevant search result.windows security
  2. Click on Virus & threat protection.virus & threat protection
  3. Click on Scan options.scan options to fix NetworkCap.exe
  4. Now, choose Full scan and click on Scan now.full scan to fix NetworkCap.exe
  5. Wait for the scan to complete.

While the NetworkCap.exe process is not malware, it could be triggered by one. Or there’s a chance that the PC is infected by a virus disguised as the process. And in this case, running a malware scan is the best choice. You could also use a dedicated antivirus solution for more effective results.

3. Set to low priority

  1. Press Ctrl + Shift + Esc to open the Task Manager, and go to the Details tab.details
  2. Locate the NetworkCap.exe process, right-click on it, hover the cursor over Set Priority, and choose Low from the list of options.low priority to fix NetworkCap.exe
  3. Once done, restart the computer.

Remember, this is not a long-term solution and won’t keep the process from running. It will just prioritize other processes over it and help keep the resource consumption under check.

4. Use a dedicated task-killer software

When nothing else seems to work, you can use a dedicated software to kill the NetworkCap.exe process as soon as it runs.

Configure the software such that it automatically checks for instances of the process every 15-30 seconds and terminates them.

That’s all there is about the NetworkCap.exe HP process and some effective ways to eliminate it in no time. Before you leave, check some quick tips to make Windows run faster than ever.

This process is somewhat similar to Killer Network Service on Windows 11, and we have a special guide dedicated to it, so don’t miss it.

For any queries or to share how you managed to get rid of the process, drop a comment below.

c000021a Blue Screen Error: Best Ways to Fix It

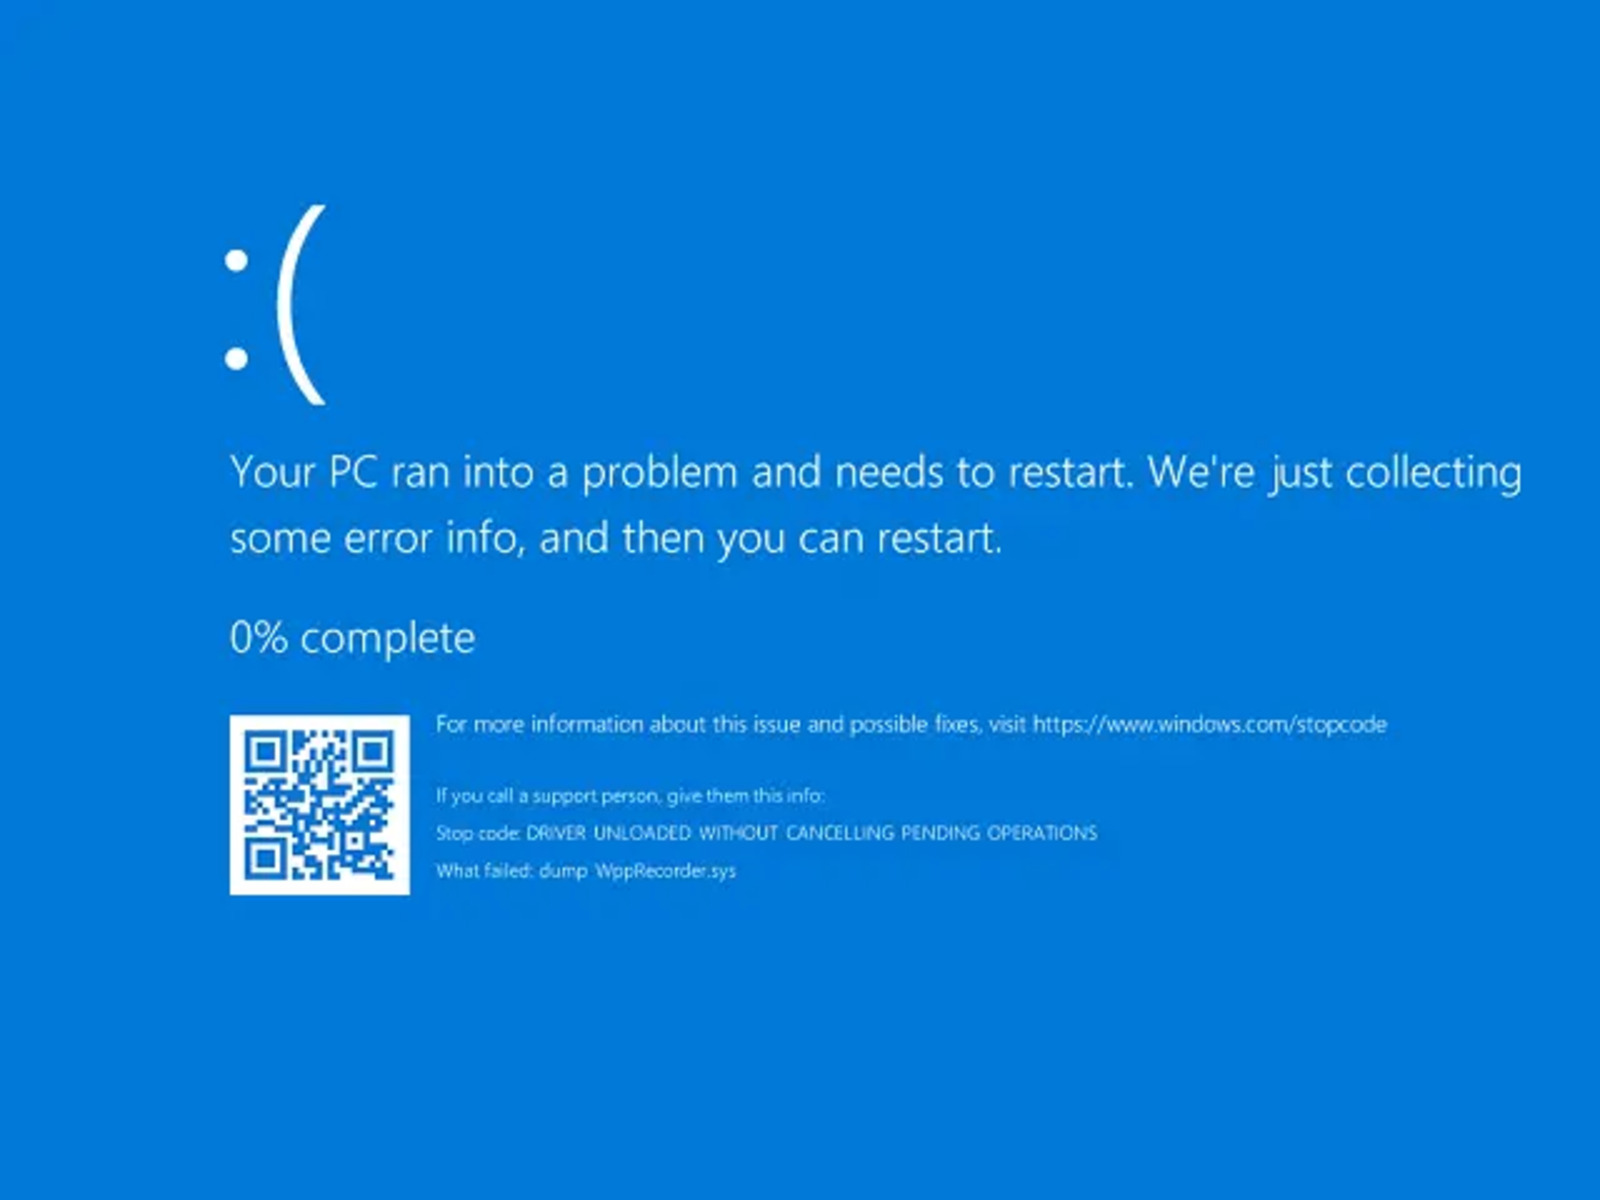
Blue screen errors can be troublesome since they cause your PC to crash. One BSOD error that many users reported recently is c000021a.

If you’re unfamiliar with BSOD errors, we have a great guide on Blue screen causes that we suggest you read before trying any solutions from this guide.

Before we can fix this issue, let’s take a closer look at what causes this error to appear.

What does stop code 0xC000021A mean?

c000021a is a BSOD error, and it’s usually caused by the following:

  • Driver issues – Outdated or incompatible drivers can often cause this problem, so be sure to reinstall or update them.
  • File corruption – Corrupted system files can often cause this error to appear.

How do I fix c000021a fatal system error?

1. Update/uninstall the problematic driver

  1. Press Windows key + X and choose Device Manager.
  2. Locate the device that you suspect that is causing the issue.
  3. Right-click it and choose Uninstall device.
  4. If available, check Remove driver software for this device and click on Uninstall.

In some cases, you need to update your drivers, and you can do this by following these steps:

  1. Visit your device manufacturer’s website.
  2. Locate your model on the list.
  3. Go to the Drivers section. Now locate the latest driver and download it.
  4. Once the driver is downloaded, run the setup file to install it.

After updating or reinstalling your drivers, the c000021a error will be gone.

2. Run SFC/DISM scan outside Windows

Note icon NOTE
To complete this solution, you need to create Windows installation media on a working PC.
  1. Boot from Windows installation media.
  2. Select your setup language and go to Repair your computer.
  3. Navigate to Troubleshoot and select Advanced Options. Lastly, choose Command Prompt.
  4. Enter bcdedit command and look for device setting. Memorize the letter after the partition value.
  5. Run the following command sfc /scannow /offbootdir=D:\ /offwindir=D:\windows
  6. Wait for the scan to finish.
  7. If the problem is still there, you can use the following command as well: dism /image:D:\ /cleanup-image /revertpendingactions
  8. Optional: You can also run the following command: chkdsk c: /r
Note icon NOTE
In steps 5 and 7, you need to use the same letter that you got in step 4, so don’t just copy and paste the commands from above.

If you can access Windows you can fix the c000021a error by doing the following:

  1. Press Windows key + X and choose Windows Terminal (Admin).
  2. Now run DISM /Online /Cleanup-Image /RestoreHealth
  3. Wait for it to finish.
  4. Next run sfc /scannow
  5. After both commands are completed, check if the problem is still there.

These are just a couple of solutions that can help you fix the c000021a BSOD error on your PC. As you can see, in most cases, the problem is related to system corruption or drivers.

For more solutions, we have a great guide on how to fix BSOD on Windows 11, so we encourage you to visit it for more in-depth solutions.

What solution did you use to fix this problem? Let us know in the comments section below.

Fix Unknown Software Exception 0xc06d007e

The infuriating error code 0xc06d007e has been plaguing users, causing a great deal of frustration among tech enthusiasts whenever they try to perform a Software Update. Numerous complaints have been raised regarding this issue.

The current subject matter draws parallels to the Exception code 0xe0434352 error, which we have previously tackled in an extensive manual.

To effectively tackle the matter at hand, it is imperative that we first explore the underlying source.

What is an unknown software exception 0xc06d007e error?

The Unknown Software Exception 0xc06d007e error is a common issue that a variety of factors can cause:

  • Third-party programs clashing – Have you ever encountered issues with certain programs on Windows? It could be due to conflicting background applications that automatically launch upon startup.
  • Antivirus complicity – It’s not uncommon for antivirus software to be overzealous and erroneously prevent authorized third-party programs from running.

How can I fix unknown software exception 0xc06d007e error?

Here’s what to do first:

  • Update your software – If certain software gives you this error, install the latest updates.

1. Uninstall McAfee

  1. On your search bar type in remove programs and click on it.
  2. Next locate the McAfee software you want to delete.
  3. Go to your McAfee account online and log in.
  4. Download your McAfee software.
  5. Follow the instructions during the procedure.
  6. Lastly restart your computer.

Adobe software can also prompt similar issues, you can manually uninstall the program Moving the contents of your Adobe Acrobat cache folders to a different location can be a helpful solution. Simply locate the folder by:

C:\Users\"your current user account name"\AppData\Local\Adobe

C:\Users\"your current user account name"\AppData\Local\LocalLow\Adobe 

C:\Users\"your current user account name"\AppData\Local\Roaming\Adobe 

After restarting your computer, Acrobat will generate new temporary folders and files. By doing this, you can compare the previously cached files with the freshly generated ones to identify any inconsistencies.

It’s important to note that cached content cannot be relocated until all Acrobat-associated processes have been terminated. Keep this in mind when trying to move any cached items.

2. Download Windows 11 ISO

  1. On your favorite browser, go to the Windows 11 Download page.
  2. Click on Select Download under Download Windows 11 Disk Image (ISO), then choose Windows 11.
  3. Now, click the Download button.
  4. Choose the product language you want, then click the Confirm button.

  5. Now you will receive a download link, and you will be able to click on the 64-bit Download button to get the Windows 11 ISO.

  6. Right-click the ISO file you downloaded and select the Mount option. Another option for this is to create a bootable USB or DVD.
  7. A new virtual drive will pop up in your File Manager window. Click on it and double-click the setup file to begin the installation process.

We trust that this guide has effectively resolved your problem. Should you encounter any additional obstacles, we suggest looking into error code 0xe06d7363 for similar solutions.

Your feedback would be greatly appreciated, so please leave a comment below and inform us of the most effective solution you found.

Ekrn.exe: What Is It & How to Remove It

Processes like these are often shrouded in mystery, with many wondering if ekrn.exe is a virus. The suspicion is further raised by the fact that the process triggers high memory usage. For some users, it also used 100% CPU.

EKRN stands for ESET Kernel Service and is a component of the ESET Smart Security program. The primary role of the process is to ensure that the relevant core kernel drivers can run without hindrance, which allows utilities like the antivirus, firewall, and anti-phishing to function effectively.

Remember, ekrn.exe is not a core Windows process but is initiated by a third-party program, ESET Smart Security. So, disabling it or removing the program won’t affect the functioning of the OS. The ekrn.exe file location is either of these two: C:\Program Files (x86)\ESET\ESET NOD32 Antivirus C:\Program Files (x86)\ESET\ESET Smart Security

How do I remove ekrn.exe in Windows?

1. Terminate the process

  1. Press Ctrl + Shift + Esc to open the Task Manager, and navigate to the Details tab.details tab
  2. Locate the ekrn.exe process, right-click on it, and choose End task.end to task to fix ekrn.exe

After terminating the process, you should see an immediate improvement in the PC’s performance. But this is a short-term solution since the process is configured to launch automatically when you boot Windows. For longer relief, try the next solution.

2. Disable the relevant services

  1. Press Windows + R to open Run, type services.msc in the text field, and hit Enter.services.msc
  2. Locate the ESET service, right-click on it, and then select Properties.properties
  3. Select Disabled from the Startup type dropdown menu, and click on the Stop button.disable service to fix ekrn.exe
  4. Once the service stops running, click Apply and OK to save the changes.
  5. Similarly, disable any other ESET services that appear here.

Disabling the ESET services is another way to fix ekrn.exe high disk usage, but remember that it turns off the protection as well. So make sure that Windows Security is working.

3. Uninstall the ESET program

  1. Press Windows + R to open Run, type appwiz.cpl in the text field, and click OK.appwiz.cpl
  2. Select the ESET program from the list of installed ones, and click on Uninstall.uninstall eset to fix ekrn.exe
  3. Follow the on-screen instructions to complete the process.
  4. Make sure to remove any other ESET entries that are listed here similarly.

That’s it! If the previous solutions didn’t deliver the desired results, uninstalling ESET should do the trick. Removing the security software also works when ekrn.exe cannot be deleted the conventional way.

Is it safe to use ESET?

While the ekrn.exe process could create a bit of trouble for users, the ESET antivirus is considered one of the best in the market and is often the primary choice of users. Though not as popular as Norton, Avast, or McAfee, ESET has a decent market share and offers a wide array of security features.

Besides, ESET regularly introduces new features to enhance security to identify and eliminate the most intricate of threats. And so far, there haven’t been any complaints, except for the process.

When you do, clear any remnant files and cache and delete the Registry entries. This will ensure a complete uninstallation. And an easy way for that is to use dedicated uninstaller software.

If you were wondering how to disable ekrn.exe, these are all ways: terminating the process in the Task Manager, disabling the ESET services, or uninstalling the program altogether.

Before you leave, discover some quick tips and tricks to make Windows run faster than ever. And also, check the best security settings for a safer experience.

For any queries or to share what worked in your case, drop a comment below.

What is Msra.exe, And How to Download & Use

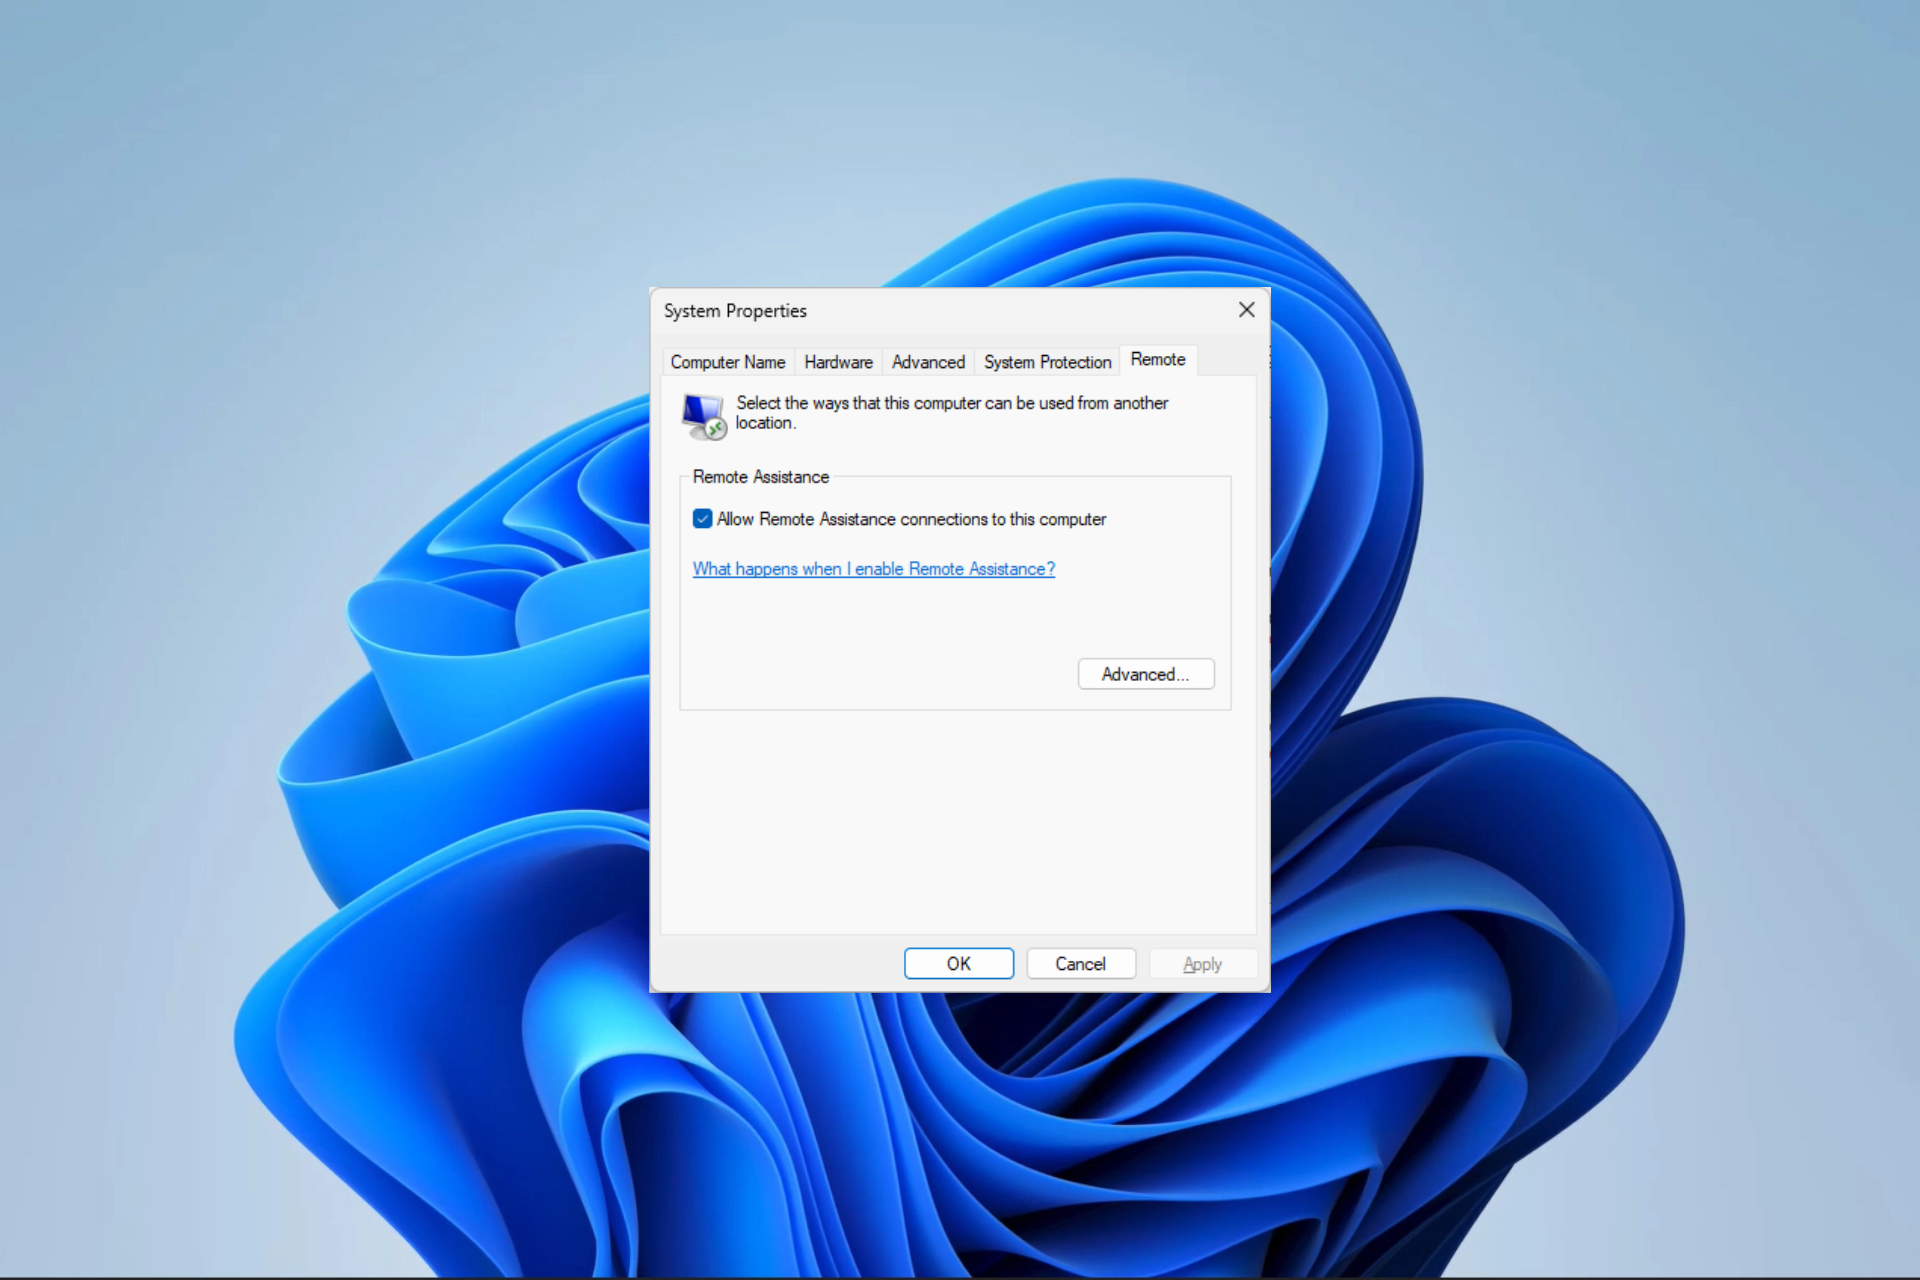
Msra.exe, a Windows Remote Assistance tool, allows you to provide or receive remote assistance for troubleshooting purposes. This guide will explain what Msra.exe is and cover step-by-step instructions on downloading and using it effectively.

What is msra.exe?

Msra.exe is a legit system file responsible for launching the Windows Remote Assistance tool. It allows you to connect to another computer remotely, take control of the machine and provide technical assistance.

The system file is commonly used by IT professionals, support techs, and people seeking tech help from the support team.

This file is usually available in C:\Windows\System32 and is not associated with suspicious or unauthorized activity. However, if the file is found in any other location, a malicious program might be disguising itself with a similar filename to avoid detection.

How can I download msra.exe?

Note icon NOTE
You can’t download this system file separately; downloading it manually from unreliable websites is not advised. However, if the file is missing or corrupted, follow the steps below.

1. Run an SFC scan

  1. Press the Windows key, type cmd, and click Run as administrator.CMD elevated msra.exe
  2. Copy and paste the following command to repair system files and hit Enter: sfc/scannowSFCSCANNOW CMD
  3. Wait for the scan to complete, then restart your computer.

If you want to choose a more thorough repair process and prevent other possible system damage, we recommend you use a specialized repair program.

2. Run Windows Update

  1. Press Windows + I to open the Settings app.
  2. Go to Windows Update and click Check for updates.Windows Update Check for updates Msra.exe
  3. If there is an update available, click Download and Install.
  4. Wait for the process to complete.

The computer will restart during the installation; you must save your work. Sometimes, getting these latest updates installed can resolve the missing files issue.

If you still can’t find the file, you must perform a system restore or clean Windows installation to restore it.

How can I use msra.exe?

Before proceeding with any steps to use the Windows Remote Assistance tool, go through the following preliminary checks:

Once you verify these, move to the steps mentioned below.

1. Invite someone you trust to help you

  1. Press Windows + R to open the Run console.msra.exe Run command
  2. Type msra and click OK to open msra.exe.
  3. On the Windows Remote Assistance window, you will get two options:
    • Invite someone you trust to help you
      Help someone who has invited you
  4. Choose the first option.Invite some one
  5. On the next page, you will get three options:
    • Save this invitation as a file
      Use email to send an invitation
      Use Easy Connect
  6. Select any of the three to send the invite.msra_Send invitation
  7. Follow the on-screen instructions to establish the connection.

2. Help someone who has invited you

  1. Press Windows + R to open the Run console.MSRA.ese
  2. Type msra and click OK to open msra.exe.
  3. On the Windows Remote Assistance window, you will get two options:
    • Invite someone you trust to help you
      Help someone who has invited you
  4. Choose the second option.help someone
  5. On the next page, you will get two options:
    • Use an invitation file
      Use Easy Connect
      msra.exe  Run command
  6. Select any of the two and follow the onscreen instructions to complete.

So, these are the steps to download and use msra.exe to resolve technical issues on your Windows computer.

We also recommend checking our list of the best remote desktop tools for Windows 11 and see if you find a better match for your needs.

If you have any questions or suggestions, feel free to mention them in the comments section below.

How to Reset the Wi-Fi Adapter in Windows 10

If you encounter network connectivity issues, you might want to reset the Wi-Fi adapter on Windows 10. It refreshes network settings and can resolve common issues such as limited connectivity, slow connection speeds, or drops.

Here are the step-by-step instructions to help you get your Wi-Fi connection back on track.

How can I reset the Wi-Fi adapter in Windows 10?

Before engaging in advanced troubleshooting steps, you should consider performing the following checks:

  • Try power cycling the router. Sometimes, that is enough to restore the Wi-Fi connectivity.
  • Make sure you installed all the Windows updates because they might have an update for the Wi-Fi adapter.

If these minor tweaks don’t help you, move to the detailed methods mentioned below.

1. Use the Network troubleshooter

  1. Press Windows + I to open the Settings app.
  2. Go to Update & Security.Update and Security reset wifi adapter windows 10
  3. Click Troubleshoot, then select Additional troubleshooters.Additonal troublshooters
  4. Locate Network Adapter and click Run the troubleshooter.Run the troubleshooter
  5. Follow the onscreen instructions to complete the process.

2. Disable/Enable the Wi-Fi Adapter

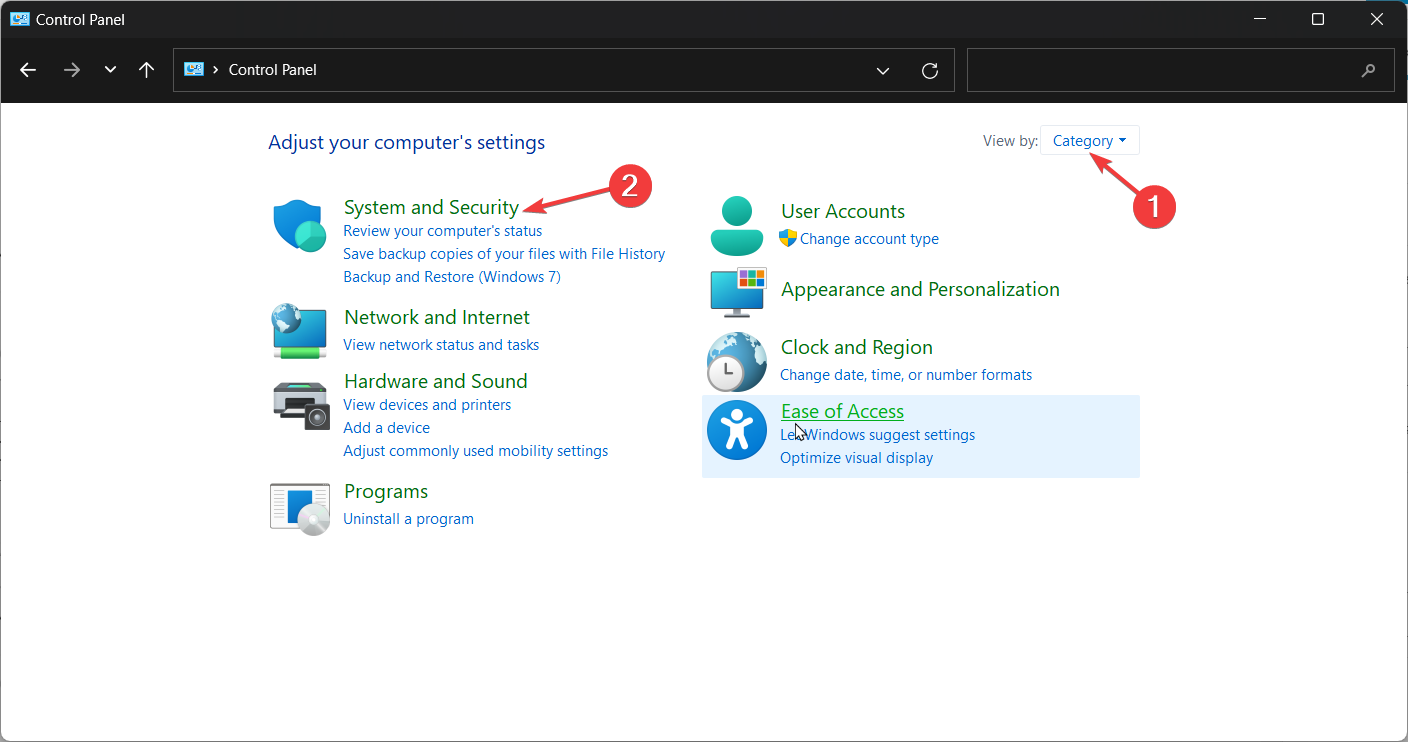
  1. Press the Windows key, type control panel, and click Open.Control Panel reset wifi adapter windows 10
  2. Select View by as Category and click Network and Internet.
  3. Click View network status and tasks.View the status
  4. Select Change adapter settings.Change settings
  5. Locate and right-click the Wi-Fi connection and select Disable from the context menu.Disable device
  6. Restart your computer

3. Restart the Wi-Fi Adapter in Device Manager

  1. Press Windows + R to open the Run dialog box.Device Manager run command  reset wifi adapter windows 10
  2. Type devmgmt.msc and click OK to open Device Manager.
  3. Locate and expand the Network adapters.
  4. Right-click the Wi-Fi adapter and choose Disable device.Disable device
  5. Click Yes to confirm.Network & Internet  YES
  6. Now, right-click it again and select Enable device from the context menu.

4. Resetting TCP/IP Configuration

  1. Press the Windows key, type cmd, and click Run as administrator.Command Prompt reset wifi adapter windows 10
  2. Copy & paste the following commands one by one and press Enter after every command:
    • netsh winsock reset
      netsh int ip reset
      ipconfig /release
      ipconfig /renew
      netsh reset reset wifi adapter windows 10
  3. Once the commands are executed, restart your computer.

5. Use the Settings app

  1. Press Windows + I to open the Settings app.
  2. Go to Network & Internet.Network & Internet reset wifi adapter windows 10
  3. Click Advanced network settings and click Network reset.Network reset
  4. Locate the Network reset and click the Reset now button.Reset now
  5. Reboot your PC to confirm the changes.

6. Reinstall the Wi-Fi adapter

  1. Press Windows + R to open the Run dialog box.Device Manager Run command reset wifi adapter windows 10
  2. Type devmgmt.msc and click OK to open Device Manager.
  3. Locate and expand the Network adapters.
  4. Right-click the Wi-Fi adapter and select Uninstall device.Uninstall device
  5. Click Uninstall and follow the onscreen prompts, if any.Uninstall
  6. Now click Action, then select Scan for hardware changes.Scan for hardware changes

Now your Windows will scan and reinstall the driver. Once done, reboot your computer to save the changes.

In case nothing worked, you may also restore your computer to a point when the Wi-Fi adapter was functioning correctly.

If you are facing other issues with the Wi-Fi adapter, we suggest you read this guide to find the solutions.

So, these are methods that you can follow to reset the Wi-Fi network adapter on Windows 10. If you have any questions or suggestions, feel free to mention them in the comments section below.

0x80242008 Windows Update Error: 4 Ways to Fix It

Windows throws the error code 0x80242008 when there is a problem installing or updating a specific Windows update or driver.

If you are having problems while updating your Windows or encounter the error code 0x80242008 when attempting to download or install updates, keep reading to find a list of possible solutions.

What is error code 0x80242008?

The Windows update error code 0x80242008 usually occurs when Windows update services are not running properly on your system. It usually indicates that the update process encountered an error or was interrupted.

The error code 0x80242008 in Windows Update can occur due to various reasons, including:

  • Network connectivity issues: If there is a problem with your internet connection or network settings, it can prevent the update from being downloaded or installed correctly.
  • Antivirus or security software conflicts: Third-party antivirus or security software can sometimes interfere with the update process and cause errors.
  • Insufficient disk space: If your system does not have enough free space on the hard drive, it can prevent the update from being installed.
  • Software conflicts: Conflicts between the update and other software installed on your system can lead to errors during the installation process.
  • Corrupted system files: If essential system files required for the update are corrupted or damaged, it can cause an error.

How do I fix error code 0x80242008?

Before moving on to more advanced solutions, it is recommended to try the following prerequisite steps to resolve this error:

  • Restart your computer: Most update-related issues can be resolved with a simple reboot.
  • Check your Internet connection: Before attempting to update Windows, ensure you have a reliable and stable Internet connection.
  • Disable the antivirus: Disable the antivirus program temporarily and then try installing the update again.

1. Run Windows Update troubleshooter

  1. Press Windows + I to launch the Windows Settings app.
  2. Go to the System tab, scroll down, and click the Troubleshoot tile.
  3. On the Troubleshoot settings page, click on Other troubleshooters.Other
  4. Then, click the Run button next to Windows Update.win update troubleshoter
  5. Follow the on-screen instructions to complete the troubleshooting process.
  6. Reboot the computer, try downloading updates again, and see if you still see the 0x80242008 error code.

In addition to this solution, you can increase the chances of solving this Windows OS error with a skilled repairing solution. Such software application starts by diagnosing your PC and detecting broken files to repair them automatically.

2. Repair missing or corrupted system Files

  1. Press Windows + R to open the Run dialog, type cmd, hold the Ctrl + Shift key, and click OK to run Command Prompt as administrator.cmd
  2. Click Yes on the User Account Control prompt window.
  3. Type the following command and press Enter:sfc /scannowsfc scan
  4. After running the system file checker (SFC) scan, proceed to run the DISM scan. Type in the following commands and press Enter after each:DISM /Online /Cleanup-Image /CheckHealth DISM /Online /Cleanup-Image /ScanHealth DISM /Online /Cleanup-Image /RestoreHealthDISM
  5. Once you have executed the SFC and DISM scans, restart your computer and see if the 0x80242008 error is gone.

3. Reset the Windows Update components

  1. Open Windows search, type cmd, and select Run as administrator.
  2. Type the following command and hit Enter after each one to stop the update services.
    net stop wuauserv net stop cryptSvc net stop bits net stop trustedinstaller net stop msiserver
  3. Next, rename the update folders by running the below commands:
    ren C:\Windows\SoftwareDistribution SoftwareDistribution.old ren %systemroot%\system32\catroot2 catroot2.old
  4. Finally, run the below commands and hit Enter after each one to restart the stopped update services.
    net start wuauserv net start cryptSvc net start bits net start trustedinstaller net start msiserverrestart update
  5. Exit the command prompt and check if the 0x80242008 Update error is fixed.

4. Perform a Clean Boot

  1. Open the Run command with Windows + R, type msconfig, and hit Enter.msconfig
  2. Go to the Services tab, check the Hide all Microsoft services box, and click Disable all.hide microsoft apps
  3. Then, click Apply to save the changes.click Apply
  4. Switch to the Startup tab and click on Open Task Manager.Open taskmanager
  5. Now, disable all the startup apps. Select the app and click the Disable button.click disable
  6. Once you have completed these steps, proceed to restart your computer. When the computer restarts, it will only run the essential services.
  7. Run Windows Update again to see if the problem was fixed.

If none of these steps resolve the issue, you can manually download and install the update from the Microsoft Update Catalog repository. This involves identifying the specific update causing the 0x80242008 error, downloading it manually from the Microsoft website, and installing it directly.

What solution worked for you? Please let us know in the comment section below.

Wpprecorder.sys BSoD: How to Fix It in 5 Steps

The WppRecorder.sys BSoD (Blue Screen of Death) error usually occurs when there is a problem with the WppRecorder.sys driver. This driver is associated with the Windows Performance Toolkit (WPT) and Windows Performance Recorder (WPR), which are performance profiling tools provided by Microsoft.

The stop code that appears along with the WppRecorder.sys in BSOD errors can indeed vary, for example, SYSTEM_THREAD_EXCEPTION_NOT_HANDLED, DRIVER_UNLOADED_WITHOUT_CANCELLING_PENDING_OPERATIONS.

However, these errors can often be resolved by using the same troubleshooting methods.

What is a WppRecorder.sys file?

WppRecorder.sys is a system file that is part of the Windows Performance Toolkit (WPT), which includes the WPR. WPR allows developers and system administrators to capture and analyze performance-related events and data on Windows systems.

When there is a problem with this driver, it can lead to system instability, crashes, and sometimes the Blue Screen of Death (BSOD) error.

There can be several reasons why the WppRecorder.sys BSOD error occurs:

  • Outdated or Incompatible Driver: If the WppRecorder.sys driver is outdated or incompatible with your system, it can cause conflicts and result in a BSOD error.
  • Driver Conflicts: In some cases, conflicts with other drivers or software on your system can trigger the WppRecorder.sys BSOD error. 
  • System File Corruption: Corruption in system files, including the WppRecorder.sys driver, can lead to BSOD errors. 
  • Hardware Issues: Faulty hardware, such as incompatible or malfunctioning devices, can trigger BSOD errors, including those related to the WppRecorder.sys driver.
  • Software Compatibility Issues: Certain software programs or utilities may not be compatible with the WppRecorder.sys driver. 

How do I fix the WppRecorder.sys BSoD error?

Before proceeding with more advanced solutions, try the following prerequisite steps to address this error:

  • Disable Wi-Fi adaptor: Some users have reported disabling the Wi-Fi adapter helps resolve the issue. If this is the case, uninstall the adapter and reinstall the latest Wi-Fi adapter from the manufacturer’s website.
  • Clear Windows Update cache: Another solution is disabling the Windows Update service temporarily and clearing the Windows Update Cache.
  • Install Intel Management Engine driver: If you have an Intel processor, download and install the latest Intel Management Engine driver from the official Intel website. Ensure that you disconnect the Internet before installing.

1. Update Windows

  1. Click the Start button and select Settings from the Start menu.click settings
  2. Go to the Windows Update tab and click Check for updates.check for updates
  3. Allow Windows to download and install the pending updates. Then, reboot your computer.

2. Run System File Checker and DISM tools

  1. Press Windows + R to open the Run dialog, type cmd, hold the Ctrl + Shift key, and click OK.cmd
  2. Click Yes on the User Account Control prompt window.
  3. Type the following command and press Enter:sfc /scannowsfc scan
  4. After running the SFC scan, proceed to run the DISM scan.
  5. Type in the following commands and press Enter after each:DISM /Online /Cleanup-Image /CheckHealth DISM /Online /Cleanup-Image /ScanHealth DISM /Online /Cleanup-Image /RestoreHealthDISM
  6. Restart your computer and check if the WppRecorder.sys BSOD error persists.

Alternatively, we suggest a specialized repair tool to ease the process and avoid further system issues.

3. Update device drivers

  1. Click the Windows button, type device manager, and select Device Manager.device manager
  2. In the Device Manager console, expand the device drivers related to hardware such as the Chipset, graphics, network adapter, etc., and update them. Right-click the device, and select Update driver.update driver
  3. In the Update Drivers window, select Search automatically for drivers.
  4. Let the Window automatically search for the drivers from the Windows update and install it. Then, click Close.click Close
  5. After updating all the necessary system drivers, reboot your system and check if you still see the WppRecorder.sys BSOD error.

4. Disable NTFS compression

Note icon NOTE
Disabling NTFS compression might be a potential solution for resolving the BSOD (Blue Screen of Death) error caused by the CBS Scavenging process and the compressed driver files. To do this, you may need to access the Windows Recovery Environment.
  1. Press Windows + I to open the Settings app.
  2. Go to the System tab, scroll down, and click on Recovery on the right.recovery
  3. Under Recovery options, click Restart now next to Advanced startup.click restart now
  4. In the Windows Recovery Environment, select Troubleshoot.
  5. Next, choose Advanced options.advanced options
  6. On the next screen, choose Command prompt.command prompt
  7. In the command prompt window, type the following command and press Enter c:\windows\system32\compact.exe /U c:\windows\system32\drivers\*.sys compact.exe
  8. After that, restart the computer and type the below command and press Enter fsutil behavior set DisableCompression 1DisableCompression
  9. Once more restart your computer to apply the changes.

5. Perform a system restore

  1. Open Windows search, type restore, and click Create a restore point.create restore porint
  2. In the System Properties window and click the System Restore button.system restore
  3. Select the Choose a different restore point option, and click Next.choose a different restore point
  4. Then, choose the restore point that you want to use, and click Next.select the restore point
  5. Then, click Finish.click Finish

If the above methods didn’t fix the WppRecorder.sys Blue Screen Error on your computer, you can try resetting your PC or reinstalling Windows.

Additionally, running hardware diagnostics can help identify and address any hardware-related issues that may be causing the error. Ensure to also checkout how we resolved the cldft.sys BSoD error.

If you have any additional questions or suggestions, please leave them in the comments section.

Fix: SecurityHealthSystray.exe Bad Image Error

Recently, some users have complained about the SecurityHealthSystray.exe Bad Image error on their Windows devices. The error occurs when a program is facing difficulty while launching or running. Hence, we’ll discuss some steps for resolving it.

Also, you can read through our article about MSTeams.exe Bad Image and some detailed instructions on how to fix it.

What is SecurityHealthSystray.exe Bad Image?

SecurityHealthSystray.exe Bad Image error occurs when the system can’t go through with a process related to the Windows Defender Security Center.

The error usually comes with an Error status 0xc000012f, indicating \\?\C:\Windows\System32\SecurityHealth\1.0.2207.20002-0\SecurityHealthSSO.dll is either not designed to run on Windows, or it contains an error. 

Further, the error prevents the process from running in the background to scan threats and offers alerts when required.

What causes SecurityHealthSystray.exe Bad Image?

Many factors can cause a Bad Image error to appear on your computer. Some notable ones are:

  • System file corruption – Corrupt system file is a major culprit for the Bad Image error. It means the .exe and .dll files responsible for the program are either outdated or corrupted, causing issues with its process.
  • Installation of faulty Windows updates – If you have recently installed a Windows update, it may trigger the Bad Image error if it is faulty or not properly installed.

These factors may vary in different computers depending on the circumstance of occurrence. Going further into this guide, we will look into steps for fixing the problem.

How can I fix SecurityHealthSystray.exe Bad Image?

Before proceeding with any advanced troubleshooting steps, go ahead with the preliminary checks below:

  • Uninstall recent Windows updates – Since Windows updates may cause this error, removing the recent ones should help fix it.
  • Perform a System restore – Restoring your system to an earlier point when it last worked perfectly might help resolve the error.  Check what to do if the Restore Point is not working on your PC.

If you can’t resolve the error, try the solutions below:

1. Run SFC and DISM scans

  1. Left-click the Start button, type Command Prompt, and click the Run as administrator option.
  2. Click Yes on the User Account Control (UAC) prompt.
  3. Type the following and press Enter: sfc /scannow
  4. Type the following commands and press Enter after each: DISM /Online /Cleanup-Image /CheckHealth  DISM /Online /Cleanup-Image /ScanHealth  DISM /Online /Cleanup-Image /RestoreHealth
  5. Restart your PC and check if the error persists.

Running an SFC scan will detect and repair corrupt system files causing the errors and restore disk health. Check our article on fixing SFC scannow not working on your PC.

Instead of going on with this method, it’s possible to use a system repair solution that goes automatically and fixes broken system files.

2. Run an in-place upgrade

  1. Go to the official site to download Windows 11 Disk Image (ISO) and select Windows 11 Disk Image (ISO).
  2. Open the downloaded file in File Explorer, right-click on the ISO, and select Mount.
  3. Then, click Setup.exe and select Yes on the UAC prompt.
  4. The next window will prompt the Install Windows 11 dialog; click Next.
  5. Accept the license agreement and wait for the setup to start.
  6. Check the box for Keep personal files and apps on the Ready to Install page.
  7. Now, click the Install button. The PC will restart severally before arriving at the lock screen.

This process will guarantee the device upgrade without causing loss of data and files. It is also used to fix corrupted system files, apps, and even incompatible drivers on the system.

3. Reset the Windows Security app

  1. Left-click the Start button, type Windows Terminal in the search box, right-click on it, and select Run as Administrator.
  2. Type the following in the terminal and press Enter: Get-AppxPackage Microsoft.SecHealthUI -AllUsers | Reset-AppxPackage
  3. Exit PowerShell after the command execution and restart your system.
Note icon NOTE
Reinstalling Windows components, such as Defender, comes with security risks for the PC.

Resetting the Windows Security app will restore it to default settings, reversing configuration and issues causing the Bad Image error.

In conclusion, we recommend you check our article about the causes and fixes for the error status 0xc000012f (Bad Image) on Windows 11.

Feel free to use the comments to let us know if our solutions helped you or if you have another tip you would like us to add to the list above.

Fix: iPhone Doesn’t Show Up in Windows File Explorer

Connecting iPhone to Windows PC is effortless now more than ever. However, some users are complaining that iPhone doesn’t show up in File Explorer for some reason.

This restricts your access to the files on your phone. If you also face this issue, the solutions in this guide will help you fix it for good.

Why is my iPhone not showing in File Explorer?

The iPhone doesn’t show up in File Explorer because of varying factors. Below are some of the potential causes:

  • Faulty driver: An outdated or broken Apple mobile device USB driver can be the reason for this issue. You can fix it by updating your driver to the latest version.
  • Outdated PC: If your PC is outdated, it can cause so many reasons like the iPhone doesn’t show up in File Explorer issue on Windows 10 or 11. You can fix this by updating your PC to the latest version.
  • Wrong active driver: Some users have found this issue to be due to selecting the wrong active driver. The solution to this is to change the active driver in Device Manager.

How do I get my iPhone to show up in File Explorer?

Below are the basic troubleshooting steps to apply before proceeding to the detailed fixes in this section:

  • Restart iPhone and PC.
  • Use the official USB cable for iPhone.
  • Download the latest Apple mobile device USB driver from official sources.

Should these fail, you can now explore the fixes below:

1. Update PC

  1. Press the Windows key + I and select Windows Update in the left pane.
  2. Click the Check for updates button.
    check updates iPhone Doesn't Show up in File Explorer
  3. Finally, download and install all available updates.

An outdated PC can be the reason iPhone not showing up in File Explorer on Windows 11, 10, and 7. You need to update and restart your PC to solve the problem.

If your problem happens during device setup rather than when browsing files, you may need a different fix. In that case, see how to fix Quickly Set Up iPhone not working for step-by-step guidance.

2. Switch the active driver in Device Manager

  1. Press the Windows key + X and select the Device Manager option.
    device manager
  2. Double-click the Universal Serial Bus controllers option to expand it.
  3. Now, right-click the Apple Mobile Device USB Driver option and select Update driver.
    update driver
  4. Next, choose Browse my computer for drivers.
    browse my iPhone Doesn't Show up in File Explorer
  5. Select Let me pick from a list of available drivers on my computer.
    let me
  6. Finally, click the MTP USB Device option and click the Next button.

Some users have reported that using the MTP default driver option for the Apple mobile device USB driver fixed this issue for them. So, you should apply the fix too.

3. Take full control of iTunes folder

  1. Press the Windows key + E to open File Explorer and locate the iTunes folder.
  2. Right-click it and select the Properties option.
    properties
  3. Now, uncheck the box for Read Only (Only applies to files in folder) and click the Apply button.
    read only
  4. Click the Security tab at the top.
  5. Next, click the Edit button.
    edit
  6. Finally, tick the checkbox for Full Control under the Allow section and click the Apply button, followed by OK.
    full control iPhone Doesn't Show up in File Explorer

The iTunes folder holds the content of some of your saved content on the iTunes app. According to some users, lack of full control over this app can cause the iPhone not showing up on Windows 11 or 11 issue.

Hence, you need to take full control of the folder.

4. Create the Camera Roll folder

  1. Press the Windows key + E and click This PC in the left pane.
  2. Click the Pictures option.
    this pc iphone doesnt show up in file explorer
  3. Now, click the New dropdown and select the Folder option at the top.
    new folder iphone doesnt show up in file explorer
  4. Type Camera Roll as the name of the folder.
    camera roll iPhone Doesnt Show up in File Explorer
  5. Finally, move one picture to the new Camera Roll folder and disconnect and reconnect your iPhone.

While this might seem like a weird solution, it has surprisingly worked for so many users. So, you should try it too.

5. Uninstall and reinstall the Apple driver

  1. Press the Windows key + R, type devmgmt.msc, and click OK.
    devmgmt iphone doesnt show up in file explorer
  2. Expand the Universal Serial Bus controllers option and right-click Apple Mobile Device USB Driver.
  3. Now, select the Uninstall device option.
    uninstall device iphone doesnt show up in file explorer
  4. Click the Uninstall button to confirm the action.
    uninstall button iphone doesnt show up in file explorer
  5. Finally, disconnect and reconnect your iPhone, and the driver will be reinstalled automatically.

If you still can’t fix the iPhone doesn’t show up in File Explorer issue on your PC, you need to uninstall and reinstall the Apple mobile device USB driver. This should clear up the potential glitches that might be causing the issue.

We have reached the end of this guide on fixing an iPhone if it is not showing in the Windows File Explorer. You should now be able to fix the issue effortlessly, provided you follow the steps in this guide.

If you can’t access iPhone photos on your PC, check our detailed guide to rectify it.

Feel free to let us know if you could fix this issue in the comments below.

7 Ways to Fix Media Disconnected Errors on Windows

Sometimes you need to check all the information about your network adapter to fix some issues. Unfortunately, some users get a media disconnected error when they run the ipconfig /all command on Windows 10 or 11.

While this issue can be annoying, it is a problem that is easy to solve. If you are also dealing with the media disconnected error, the solutions in this guide will help you fix it quickly.

What does media disconnected mean?

The media disconnected error occurs when there is an issue with your network adapter. Below are some of the potential causes of this error:

  • Outdated network driver: Sometimes, this issue can be due to an outdated network adapter driver. The solution to this is to update your drivers and restart your PC.
  • Disabled adapter: At times, the media disconnected error on nic or any device can simply be due to a disconnected network adapter.
  • Issues with network sharing: Some users have found this problem due to the network sharing feature. The solution to this is to disable it and try to connect again.

How do I fix the media disconnected error on Windows?

Before proceeding to the sophisticated fixes in this section, below are some troubleshooting steps to try:

  • Restart your PC.
  • Reset router.

If these do not work, you can now proceed to the solutions below:

1. Reset Winsock & IP Stack

  1. Press the Windows key, type cmd, and choose Run as administrator under Command Prompt.
    cmd admin
  2. Now, type the following commands and press Enter after each: netsh winsock reset catalog netsh int ipv4 reset reset.log netsh int ipv6 reset reset.log
  3. Finally, wait for the command to finish running and restart your PC.

The first thing to do to fix the media disconnected error on Windows 11, 10, and even the old Windows 7 is to reset Winsock and IP Stack. This should clear the potential factors that might be causing the issue.

2. Update network adapter driver

  1. Press the Windows key + X and select Device Manager.
    device manager media disconnected
  2. Click the arrow next to the Network adapters option to expand it and right-click each of the devices there.
  3. Now, select the Update driver option.
    update driver
  4. Finally, click Search automatically for drivers and install any available update.
    search auto media disconnected

Sometimes, the quickest fix to the media disconnected error on your ethernet on Windows 10 is to update your network adapter driver. You can do this using the Windows driver updater following the steps above.

To make things easier and faster, we recommend using a dedicated tool, such as Outbyte Driver Updater, to get the job done.

This superb software automatically scans for outdated, broken, and missing drivers and fixes them with just a few clicks of the mouse.

Outbyte Driver Updater

Get the latest updates for all your outdated or malfunctioning drivers in no time.
Free Trial Download now

3. Run the Network Adapter troubleshooter

  1. Press the Windows key + I and select the Troubleshoot option in the right pane.
    troubleshoot
  2. Select the Other troubleshooters option.
    other troubleshooters
  3. Finally, click the Run button before the Network Adapter option and follow the onscreen instructions.
    run media disconnected

In some cases, the media disconnected error might be due to minor glitches with some network processes. The best way to clear this is to use the built-in troubleshooter.

4. Enable network adapter

  1. Press the Windows key + R, type ncpa.cpl, and click OK.
    ncpa
  2. Now, right-click your network adapter and click Enable.
    enable
  3. If the adapter is enabled, click the Disable option and enable it after some minutes.
    disable
  4. Finally, restart your PC.

The easiest fix can sometimes be the most effective. You might have been facing the media disconnected error because your network is somehow disabled.

Enabling it should help solve the problem in this case.

5. Uninstall network drivers

  1. Press the Windows key + R, type devmgmt.msc, and click OK.
    devmgmt
  2. Expand the Network adapters option and right-click each of the devices there.
  3. Now, select the Uninstall device option.
    uninstall device
  4. Finally, click the Uninstall button and restart your PC when the process is complete.
    uninstall button media disconnected

If updating your network adapter driver does not eliminate the media disconnected error, you might need to uninstall the adapters altogether.

After restarting your PC, the adapter drivers will be replaced by the default ones, which should solve the problem.

6. Disable network sharing

  1. Press the Windows key + R, type ncpa.cpl, and click the OK button.
    ncpa
  2. Right-click your network adapter and select Properties.
    properties
  3. Now, click the Sharing tab at the top.
  4. Uncheck the box next to Allow other network users to connect through this computer’s Internet connection.
  5. Finally, click the OK button.
    sharing media disconnected

Some users have found this frustrating issue to be down to the network sharing features of Windows. Hence, you can disable the feature temporarily and check if you are still getting the error message.

7. Perform a system restore

  1. Press the Windows key + R, type rstrui.exe, and press Enter.
    rstrui
  2. Click the Next button on the window that pops up.
    next
  3. Now, select your desired restore point and click the Next button.
    restore point media disconnected
  4. Finally, click the Finish button and follow the onscreen instructions to complete the process.
    finish

If push comes to shove and every solution you try fails to solve the media disconnected issue, you need to perform a system restore to a point when everything is working well.

This should undo the intentional or accidental changes made to your PC that might be causing the issue.

With this, we can conclude this article on the media disconnected issue on Windows 10 & 11. Hopefully, you can fix the issue before exhausting the solutions on our list.

Similarly, if your ethernet keeps disconnecting randomly, check our guide to fix it for good and restore normalcy on your PC.

Feel free to let us know the solution that helped you fix the issue in the comments below.

Enable & Use Remote Desktop on Windows 11 [5 Tips]

Are you considering using your Windows 11 desktop in a different room within your home? Instead of physically going there, you can conveniently access it remotely from your phone or tablet. You, however, need first to enable Windows 11 Remote Desktop.

There are a few options to accomplish this, and this our guide will take you through some of the most practical solutions.

Does Windows 11 support Remote Desktop?

Yes, Windows 11 supports Remote Desktop. However, it works only with Windows 11 Pro and Enterprise editions. So for users of the Windows 11 Home edition, there may not be much you can do.

Once you are on an edition that supports the service, you can learn how it is enabled and used on Windows 11.

How to enable Remote Desktop on Windows 11?

1. Enable Remote Desktop using the Control Panel

  1. Press Windows + R to open the Run dialog.
  2. Type control and hit Enter.
    enable remote desktop windows 11
  3. Click on Systems and Security.
    enable remote desktop windows 11
  4. Select Allow remote access under the System menu.
    enable remote desktop windows 11
  5. To enable remote access, go to the Remote Desktop section and choose the Allow remote connections to this computer setting.
    enable remote desktop windows 11
  6. Hit Apply and OK.

2. Enable Remote Desktop from Windows 11 Settings

  1. Press Windows + I to open the Settings app.
  2. On the right pane, click on Remote Desktop.
    enable remote desktop windows 11
  3. Toggle on the Remote Desktop switch.
  4. Finally, confirm your choice if prompted.

3. Enable Remote Desktop using the Command Prompt

  1. Press Windows + R to open the Run dialog.
  2. Type cmd and hit Ctrl + Shift + Enter.
  3. Input the script below, then hit Enter.
    reg add "HKEY_LOCAL_MACHINE\SYSTEM\CurrentControlSet\Control\Terminal Server" /v fDenyTSConnections /t REG_DWORD /d 0 /f
  4. Allow Remote Desktop through the firewall by inputting the script below and hitting Enter (This is an optional step).
    netsh advfirewall firewall set rule group="remote desktop" new enable=Yes
    enable remote desktop windows 11

After following the necessary steps, the Remote Desktop feature will be activated, and the firewall settings will be configured accordingly, granting you remote access to the computer.

4. Using System Properties

  1. Press Windows + R to open the Run dialog.
  2. Type sysdm.cpl and hit Enter.
  3. Click the Remote tab.
  4. To enable remote access, go to the Remote Desktop section and choose the Allow remote connections to this computer setting.
    enable remote desktop windows 11
  5. Hit Apply and OK.

5. Enable Remote Desktop from the Windows 11 PowerShell

  1. Press Windows + R to open the Run dialog.
  2. Type powershell and hit Ctrl + Shift + Enter.
  3. Type the script below and hit Enter:
    Set-ItemProperty -Path 'HKLM:\System\CurrentControlSet\Control\Terminal Server' -name "fDenyTSConnections" -value 0
    enable remote desktop windows 11
  4. Allow Remote Desktop through the firewall by inputting the script below and hitting Enter (This is an optional step).
    Enable-NetFirewallRule -DisplayGroup "Remote Desktop"

Once you have completed the necessary steps, you will be able to utilize Remote Desktop on Windows 11 to access your device from afar, even with the firewall activated.

You may go through our comprehensive guide on opening a problematic PowerShell if you can not access the utility.

This is as much as we explore in this guide. If you have followed through, you will realize there are so many options. Simply stick to whichever seems the most accessible.

We, however, would like to know your preferred choice, so please leave us a comment below.

7 Ways to Fix Kernel-Power (70368744177664),(2) Error

You’ve got a kernel-power (70368744177664),(2) attack. This is when the operating system decides it can’t continue with whatever it was supposed to be doing, and the system completely crashes. It keeps doing so, making it impossible to do anything.

In general, it’s good practice to reboot your computer after a kernel panic. It’s not always necessary, but it’s worth trying every time if you’re having random crashes. If this step proves insufficient, stay tuned for more solutions.

What does kernel power 41 63 mean?

A kernel power error 41 63 is a message displayed by your OS when it encounters an unrecoverable problem with your computer’s hardware or software that causes it to crash or freeze. It can also occur when an application unexpectedly quits, freezes, or crashes. 

Some of its triggers include:

  • Faulty memory – Your computer may have faulty RAM installed. This can cause all sorts of problems, including Kernel Power errors and other blue screens of death errors.
  • Software problems – Software conflicts are another common cause for kernel power errors because they can lead to incompatible programs or services running simultaneously on your computer.
  • Hardware changes – If you have recently added new hardware or updated your drivers, you may experience kernel power errors because your system doesn’t recognize the new hardware properly.
  • Infected files or viruses – Viruses can sometimes cause kernel power errors by corrupting key system files, causing them not to run properly when needed by Windows at startup time.
  • Failing PSU – The most common cause of a kernel-power error such as (70368744177664),(2) is a bad or failing PSU (power supply unit). The PSU is responsible for providing the voltage to all components in your computer.

How do I fix the kernel power error?

Try the following preliminary steps before moving on to the slightly advanced solutions:

1. Run the power troubleshooter 

  1. Hit the Windows key and click on Settings.settings windows 11
  2. Click on System on the left pane then Troubleshoot on the right pane.Open system troubleshooter
  3. Select Other troubleshooters.other troubleshooters
  4. Scroll down, locate Power, and click the Run button.

2. Disable Fast startup

  1. Hit the Windows key, type Control Panel in the search bar, and click Open.control-panel-search fallout new vegas runtime error
  2. Click on System and Security.Security and System
  3. Next, select Power Options.
  4. Click on Choose what the power buttons do from the list of options on the left.
  5. Select Change settings that are currently unavailable.
  6. Now, untick the checkbox for Turn on fast startup and then click on Save changes.

3. Run the CHKDSK command

  1. Hit the Windows key, type cmd in the search bar, and click Run as administrator.cmd-run-admin-w11 unexpected kernel mode trap windows 11
  2. Type the following command, replace the C letter with your drive’s letter, and press Enter: chkdsk C: /f

In case CHKDSK gets stuck or takes a long time to complete, proceed to the following step.

4. Run the DISM and SFC commands 

  1. Click on the Start Menu icon, type cmd in the search bar, and click Run as administrator.cmd-run-admin-w11 unexpected kernel mode trap windows 11
  2. Type the following commands and press Enter after each one: DISM.exe /Online /Cleanup-Image /Restorehealth sfc /scannow
  3. Restart your PC.

If you want to get rid of all your Windows system issues, including the error in question, you should try dedicated repair software.

5. Update your graphic driver

  1. Click on the Start Menu icon, type Device Manager in the search bar, and click Open.device manager w11
  2. Navigate to Display adapters and find your graphics card. Right-click on your graphics card and select Update driver.Graphic Driver Update
  3. Select Search automatically for drivers.

Windows may not always install the correct drivers, and while you can easily download them from the manufacturer’s website, there are also third-party driver updater tools that can help you find and update the latest versions of your graphics card drivers automatically.

6. Restore default power plans

  1. Click on the Start Menu icon, type Control Panel in the search bar, and click Open.control-panel-search fallout new vegas runtime error
  2. Navigate to Power Options and click to Open.
  3. Select Change plan settings.Change plan settings
  4. Click on Change advanced power settings.windows-11-not-recognizing-usb
  5. In the Power Options dialog box that appears, select Restore defaults then click Apply and OK to save changes.

7. Update BIOS

  1. The process of updating BIOS will differ depending on your motherboard. For this step, we shall be updating the HP motherboard.
  2. Navigate to the HP driver and software download website.
  3. Choose laptop or desktop, depending on the type of computer you’re using.
  4. Enter your exact serial number or your exact computer model.
  5. Select your OS and OS version, then click Submit.
  6. Click on All drivers and then expand BIOS to see available updates.
  7. Click the download icon.
  8. Install the .exe file, following the on-screen instructions.
  9. Restart your PC.

Kernel power errors such as the (70368744177664),(2) issue are fairly common on computers but can usually be fixed easily. For instance, check out how we resolved the kernel power 41 error.

Leave any further questions, thoughts, or suggestions in the comment section below.

0xc000001d Error Code: How to Fix It on Windows 10 & 11

If you have encountered the error code 0xc000001d while launching an application leading to a BSoD error, this guide can help!

We will explore the possible causes of this issue and provide step-by-step instructions to fix it on Windows 10 and 11, ensuring a smooth and error-free computing experience.

What causes the error code 0xc000001d on Windows 10 & 11?

There could be several reasons for this error to occur; some of the common reasons are mentioned here:

  • Corrupted system files – This error may appear due to corrupted or damaged system files. Try running an SFC scan via Command Prompt to resolve it.
  • Outdated display driver – If the display driver is incompatible or outdated, you may see this error. Try updating it to fix the problem.
  • Bad sectors on your drive – Bad sectors on your disk can reduce the system’s ability to execute specific tasks, leading to such errors. Try running a disk check to understand the issue.
  • Third-party software interference – Some third-party security software conflicts and prevent the app from launching, causing the error. Try disabling the antivirus temporarily.
  • Recent changes – Sometimes certain changes in your machine such as app installation or driver update may disrupt the functioning of DLL files, leading to this error.

Now that you know the causes, let us check out the solutions to get rid of this blue screen error.

How can I fix the error code 0xc000001d on Windows 11?

Before engaging in advanced troubleshooting steps, you should consider performing the following checks:

  • Try reinstalling the app or game affected by the error.
  • Close unnecessary apps and background processes to reduce the load on RAM.
  • Run the app as administrator.
  • Disable the antivirus temporarily.
  • Check the app’s recommended system requirements.
  • If the error shows that any DLL file is missing, you can check our guide on missing DLL files to know the quick solutions.

If these minor fixes don’t work for you, move to the steps mentioned below.

1. Repair the corrupted system files

  1. Press the Windows key, type cmd and click Run as administrator.Run CMD as admin 0xc000001d
  2. Copy & paste the following command to repair system or app files and hit Enter: sfc/scannowSFCSCANNOW CMD
  3. Wait for the process to complete, if it shows an error, type the following command to repair Windows OS image files and press Enter: DISM /Online /Cleanup-IMage / RestoreHealthRestore health
  4. Wait for the process to complete, then reboot your PC.

Additionally, you can opt for a specialized repair tool to ensure a thorough repair process for all your PC’s corrupt or malfunctioning system files.

2. Run a disk check

  1. Press Windows + E to open the File Explorer. Locate and expand This PC.
  2. Right-click the system drive and select Properties.Properties Scan 0xc000001d
  3. Switch to the Tools tab, under Error checking, and click Check.Check the disk
  4. Now click Scan drive.Scan the drive

The tool will scan your drive for errors and repair them. You can click Show Details to learn more about them or click Close to close the window.

3. Update the graphics drivers

  1. Press Windows + R to open the Run console.Device Manager Run command 0xc000001d
  2. Type devmgmt.msc and click OK to open Device Manager.
  3. Locate and expand Display adapters, right-click graphics driver, and select Update driver.Graphics Driver update
  4. Click Search automatically for drivers.Search automatically for drivers
  5. Follow the onscreen prompts to complete the process.

4. Add the app files to the firewall exception list

  1. Press the Windows key, type control panel, and click Open.Control Panel start menu 0xc000001d
  2. Select Category for View by, and click System and Security.System and security
  3. Click Windows Defender Firewall.Windows Defender
  4.  Now click Allow an app or feature through Windows Defender Firewall.Allow an app
  5. Click the Change settings option, then click Allow another app.Change app
  6. Click Browse, select the app file, and click Open.Browse1
  7. Now select Add.ADD
  8. Click OK and close the window.

5. Run the Framework repair tool

Note icon NOTE
This solution applies only if the error message mentions .NET Framework corruption.
  1. Download the Microsoft .NET Framework Repair Tool.Download the tool 0xc000001d
  2. Double-click the downloaded file, accept the license terms, and click Next.Aceept license and click Next
  3. It will scan and suggest the changes, click Next, then it will apply the changes.Click Next to apply the changes
  4. Once changes are made, click Finish to close the window.Click Finish
  5. Reboot your computer to save the changes.

If none of the above solutions fixed the problem, you may also perform a System Restore to roll back your system to a previous healthy state.

Windows will restart and restore your PC to the selected version. If System Restore didn’t successfully complete, we recommend you read this guide to know the solutions.

How can I fix the error code 0xc000001d on Windows 10?

To fix this error on Windows 10, you can follow the methods mentioned above for Windows 11.

As a last resort, you can reset your PC using this informative guide to resolve this problem on your Windows computer.

So, these are methods you can use to fix the error code 0xc000001d on Windows 10 & 11. If nothing has worked for you, you need to perform a clean installation of Windows.

If you have any questions or suggestions, feel free to mention them in the comments section below.
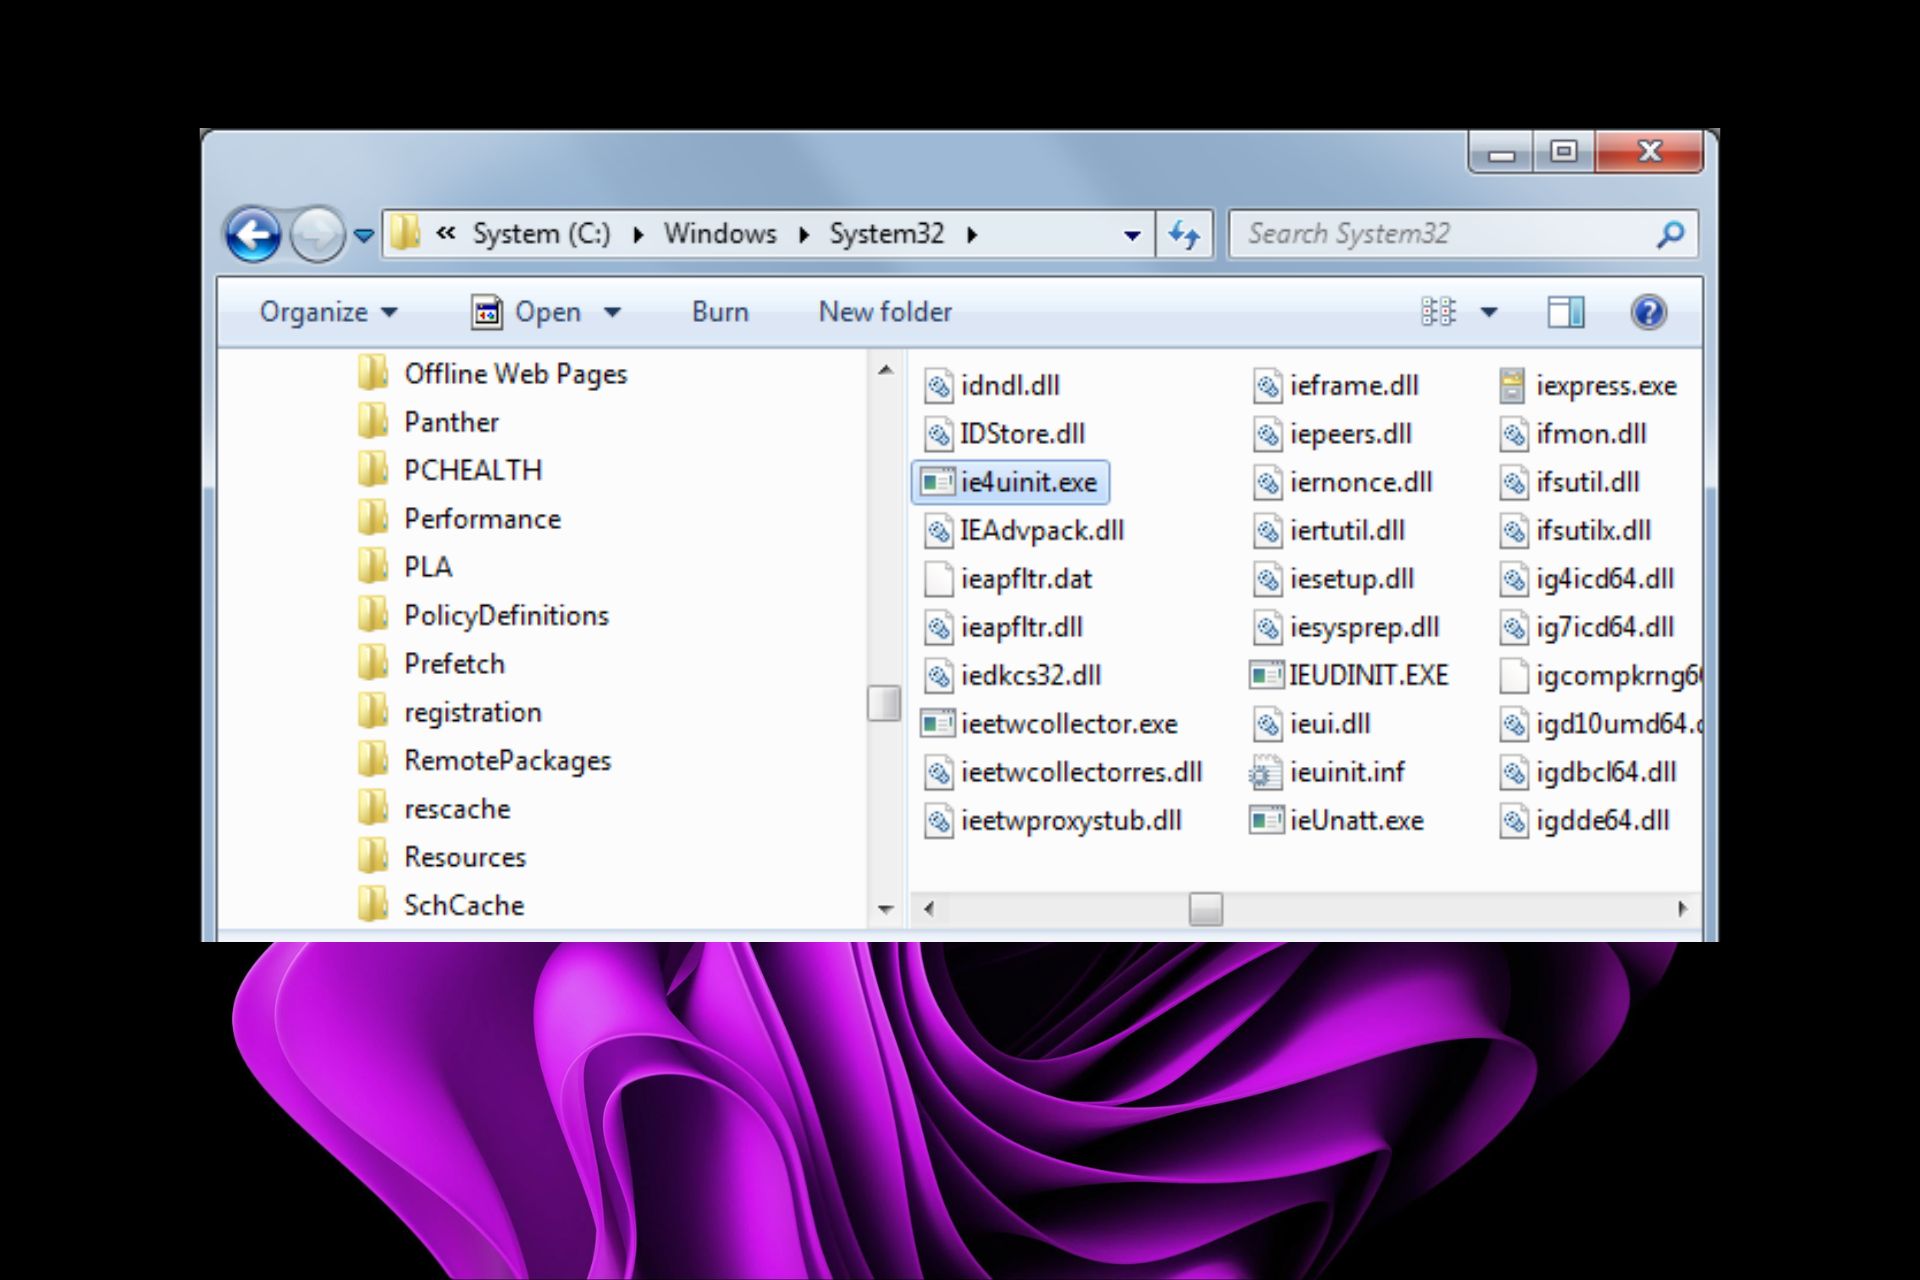
Fix: Windows Couldn’t Automatically Bind the IP Protocol

If you are facing issues with your network and, upon running the Network troubleshooter, you encountered the Windows couldn’t automatically bind the IP protocol stack to the network error, this guide can help!

Why can’t Windows bind the IP protocol stack?

There could be various reasons for this error; some of the common ones are mentioned here:

  • Obsolete network adapter drivers – You might face internet issues if the network adapter drivers are incompatible or outdated. Try updating them to the latest version.
  • Conflicting network configurations or settings – If the network settings are conflicting or corrupted, you may face this problem. Try resetting the network configuration.
  • Not able to fetch IP address using DHCP – Check the network adapter for malfunction if it is damaged; it could cause issues while connecting to the internet.
  • Unsupported VPN software – If the VPN software is incompatible or uninstalled but has leftover files, it might hinder the process. Try uninstalling VPN software completely.
  • WLAN AutoConfig service is disabled -This issue could appear if the service is stopped or not working due to a bad Windows update or some third-party app.

So, these are the causes for this internet connectivity issue; let us check out the solutions.

What do I do if Windows can’t bind the IP protocol stack?

Before engaging in advanced troubleshooting steps, you should consider performing the following checks:

  • Restart your computer and router.
  • Disable or uninstall VPN if applicable.
  • Ensure Windows is up to date.

If these fixes don’t work for you, move to the steps mentioned below.

1. Revert to the default Network Adapter Properties settings

  1. Press Windows + R to open the Run dialog box.Network connections windows couldn't automatically bind the ip protocol stack to the network adapter
  2. Type ncpa.cpl and click OK to open the Network Connections window.
  3. Locate & right-click Wi-Fi and choose Properties.Ethernet 1
  4. Go to the Networking tab and take a screenshot of the current configuration.
  5. Check out this list of items below, and if you see any other items in the list checked in the Network Connections window, remove the checkmark:
    • File and Printer Sharing for Microsoft Networks
      QoS packet scheduler
      Link-Layer Topology Discovery Responder
      Internet Protocol Version 4 (TCP/IPv4)
      Link-Layer Topology Discovery Mapper I/O driver
      Internet Protocol Version 6 (TCP/IPv6)
      Microsoft LLDP Protocol Driver
      Client for Microsoft Networks 
      Uncheck the connections list item
  6. Click OK to save the changes.

2. Modify a registry entry

Note icon NOTE
Making changes into the Registry is risky because it may damage the system. We recommend backing it up before performing this solution.
  1. Press Windows + R to open the Run console.Regedit windows couldn't automatically bind the ip protocol stack to the network adapter
  2. Type regedit and click OK to open the Registry Editor.
  3. Navigate to this path: Computer\HKEY_LOCAL_MACHINE\SOFTWARE\Microsoft\Windows NT\CurrentVersion\NetworkCards
  4. You will see two or three sub-keys related to the network adapters under NetworkCards, click on each sub-key one by one, and on the right-side pane, check the Description entry to locate the Network adapter causing the problem.regedit_Network adapter
  5. Select the affected one, double-click ServiceName, copy the Value data from the next window, and paste it somewhere.
  6. Copy and paste the path mentioned in the Registry Editor’s address bar and replace ServiceName_string_Value with the value you copied in Step 5: Computer\HKEY_LOCAL_MACHINE\SYSTEM\CurrentControlSet\Services\Tcpip\Parameters\Interfaces\ServiceName_string_Value
  7. Right-click ServiceName Value, select New, and click DWORD (32-bit) value.New DWORD
  8. Right-click the freshly created entry, select Rename and name it DhcpConnEnableBcastFlagToggle.Rename the DWORD
  9. Double-click it, set the Value data as 1, and click OK.Change Value data to 1
  10. Close Registry Editor and restart your computer.

3. Reset the IP and clear the DNS cache

  1. Press the Windows key, type cmd, and click Run as administrator.CMD elevated windows couldn't automatically bind the ip protocol stack to the network adapter
  2. Copy & paste the following commands one by one and press Enter after every command:
    • netsh winsock reset
      netsh int ip reset
      NETSH RESET WINSOCK
  3. Type the following commands one by one and press Enter after each command:
    • ipconfig /release
      ipconfig /flushdns
      ipconfig /renew
      cmd_flushdns
  4. Reboot your computer to let the changes take effect.

4. Update the network drivers

  1. Press Windows + R to open the Run console.Device Manager Run command windows couldn't automatically bind the ip protocol stack to the network adapter
  2. Type devmgmt.msc and click OK to open the Device Manager app.
  3. Locate and expand Network adapters, right-click the affected entry, and select Update driver.Update driver
  4. Select Browse my computer for drivers.Browse my computer
  5. Next, click Let me pick from a list of available drivers on my computer.Let me pick
  6. Select the suitable one from the list and click Next.Click NEXT
  7. Follow the onscreen instructions to complete the process.

5. Modify the WLAN AutoConfig service properties

  1. Press Windows + R to open the Run dialog box.SERVICES windows couldn't automatically bind the ip protocol stack to the network adapter
  2. Type Services.msc and click OK to open the Services app.
  3. Locate and double-click WLAN AutoConfig to open its Properties.WLAN AUTOCONFIG
  4. Set the Startup type as Automatic.Automatic click OK
  5. Click OK to save the changes.

If none of the solutions worked, you can always perform a System Restore to revert the OS to a previous healthy state.

Windows will restart and restore your machine to the selected state. If System Restore didn’t successfully complete, we recommend you read this guide to know the solutions.

So, these are methods you can use to fix the Windows couldn’t automatically bind the IP protocol stack to the network error. If you have any questions or suggestions, feel free to mention them in the comments section below.

Jusched.exe: What Is It & How to Properly Remove It

You’ve come here wondering what the jusched.exe is. Or perhaps you want to know if it is a dangerous virus or why it is running on my computer.

In this guide, we answer all the most important questions surrounding the executable process and show you how it may be easily removed from your computer.

What is jusched.exe?

The Jusched.exe executable file is related to the Java Update Schedule. The process is legitimate and part of Oracle’s Java Runtime Environment (JRE), installed on systems with Java. The executable is located in the path below:

C:\Program Files\Java\jre1
jusched.exe

It runs in the background and is primarily designed for checking updates. When an update is found, it prompts you to install the latest version, ensuring you have the most secure and up-to-date version of Java.

Should I disable jusched.exe?

Users who don’t need Java or prefer to manage updates manually may disable jusched.exe. However, disabling jusched.exe does not impact the functioning of other software on your system, but it may mean you may miss some critical Java updates.

How do I remove jusched.exe?

1. End the Process

  1. Press Ctrl + Shift + Esc to open the Task Manager.
  2. Click on the Details tab, search for jusched.exe, click on it, and hit the End task button.
    jusched.exe
  3. Click on the Processes tab, search for any jusched.exe process, click on it, and hit the End task button.

This process will disable jusched.exe but not remove it from your computer. If you prefer to remove the Java Update Scheduler from your system completely, follow the next solution.

2. Uninstall from program and features

  1. Press Windows + R to open the Run dialog.
  2. Type appwiz.cpl and hit Enter.
    jusched.exe
  3. Search for Java 6 Update 15 from the program list, click on it, and click the Uninstall button.
  4. Finally, follow the uninstall wizard to complete the uninstallation.

That is all you may need to know about the Java Update Scheduler. Now that you may have uninstalled it, to maintain security and compatibility with Java-based applications, it is crucial to regularly check for updates manually and ensure that you have installed the most recent version of Java.

Also, you may read our comprehensive guide to learn how to install Java on your Windows 11 devices.

That is all we cover in this guide. Let us know in the comment section if you would love to keep using Java without the updater.

Fix: An Error Occurred While Trying to Copy a File

Many users complained about running into an error message saying An error occurred while trying to copy a file. The source file may be corrupt on Windows 11.

It occurs when trying to install an application on your system. However, this guide will discuss basic steps for fixing the error.

Likewise, you may be interested in our article about ways to resolve the Runtime Error: Could not call proc on Windows PCs.

Why did an error occur while trying to copy a file?

 The following are some probable causes for the error:

  • Corrupt installation – The error may appear when installing an app if its installation files are corrupt. Hence, causing affecting the system when copying needed files from the source path to the destination.
  • Memory issues – Sometimes, memory issues, such as insufficient space, can lead to this error popping up.
  • Antivirus settings – You can also encounter the error due to interference from the firewall feature on the antivirus software that may block the installation of the app.

Though this error may be tricky and sometimes difficult to solve, we’ll take you through some fixes to resolve the problem.

What can I do if an error occurs while trying to copy a file?

Before attempting any advanced troubleshooting steps, apply the following:

  • Connect to a stable internet connection – Power cycling your router or modem will refresh its network and fix slow internet connections.
  • Allow the install file administrator privileges – Running the app as an Administrator assigns it permissions to install and run on the system, resolving permission issues.
  • Stop third-party software – Do this by ending tasks for apps, including antivirus software, as it can experience difficulty determining whether the program you’re installing is legitimate or malware.
  • Ensure you have enough space – Before attempting the installation, ensure your hard drive has enough space to store the required installation files for the app.

If the error persists after trying these preliminary checks, go ahead with the fixes below:

1. Reinstall the affected application

  1. Left-click the Start menu, type control panel, and select Open.
  2. Select Uninstall a program link under Programs.
  3. Locate the affected application and select Uninstall.
  4. Wait for the process to complete and close.
  5. Re-download the setup.exe for the application and reinstall it.

As it was enumerated in the error message that the source file may be corrupted, redownloading a secure copy from the appropriate repository can help.

Hence, the newly downloaded file will override the previous installation files, and you should be able to install the app.

2. Disable Control folder access

  1. Left-click the Start menu and select Windows Settings.
  2. Go to Privacy and Security, then select Windows Security.
  3. Select Virus & threat protection from the options.
  4. On the new window, scroll down and select Manage ransomware protection.
  5. Then, toggle off Controlled folder access.

Some users claim they stopped encountering the issue immediately after they disabled this feature.

Note icon NOTE
Disabling this feature could put your PC at risk. Hence, you should enable it back immediately after the process.

3. Use the Memtest86+

  1. Launch your browser and download Memtest86+.
  2. Connect a USB flash drive to your PC.
  3. Select the USB flash drive and then click on the Create button.
  4. Once the process is finished, restart your PC and boot from the flash drive.
  5. Keep scanning your RAM for at least two hours. In order to pinpoint the faulty module, it’s advised to remove all but one module and scan it for 2 hours. Repeat this step until you find the faulty module.
  6. Once you find the faulty module, remove it or replace it.

We hope that our solutions helped you fix An error occurred while trying to copy a file the source file is corrupted error on your PC.

In addition, you can read through our comprehensive guide on ways to fix the Windows cannot install required files error on Windows 11. Also, we have a detailed article about how to install MSIXBundles on Windows PCs.

If you have further questions or suggestions, kindly drop them in the comments section below.

Vid.sys BSOD: Causes & How to Fix It in 5 Steps

Among the long list of errors users encounter on Windows PC, BSODs are undoubtedly the most dreadful. One of these frustrating errors is vid.sys.

This error can be due to faulty hardware or driver issues. If you are also dealing with this Blue Screen of death error, this guide will show you quick and effective ways to fix it quickly.

What is vid sys?

The vid.sys Blue Screen of Death error usually occurs due to driver issues or faulty hardware. Listed below are some of the potential causes of this error message:

  • Outdated driver: One of the leading causes of vid.sys is an outdated or broken driver. Reinstalling or updating your drivers to the latest version should solve the problem.
  • Corrupt system files: If you have corrupt system files on your PC, it might lead to this BSOD. The solution to this is to repair and restore these files.
  • Outdated PC: An outdated operating system can also lead to this error, and you can fix this by updating your PC.

How can I fix the vid.sys blue screen error?

1. Update the driver

  1. Press the Windows key + X and select the Device Manager option.
    device manager vid.sys
  2. Double-click the Display adapters section and right-click the driver under it.
  3. Now, select the Update driver option.
    update driver
  4. Finally, choose Search automatically for drivers and install any available updates.
    search auto

One of the major causes of the vid.sys BSOD error is an outdated display driver. Hence, you need to update your driver to get past the issue.

Another effective option is to use an automatic driver updater to complete this task. This saves you the stress of searching for and installing the drivers yourself. Also, it eliminates the risk of downloading the wrong driver, which can lead to further problems.

⇒ Get Outbyte Driver Updater

2. Repair system files

  1. Press the Windows key, type cmd, and select Run as administrator under Command Prompt.
    cmd admin
  2. Type the command below and hit Enter to run it: DISM /online /cleanup-image /restorehealthdism restore
  3. Wait for the command to finish running. Now, run the command below: sfc /scannowsfc vid.sys
  4. Finally, wait for the command to finish running and restart your PC.

Sometimes, you might face the vid.sys error. The solution to this is to run the DISM and SFC scans.

Alternatively, you can fix this issue for good by using a dedicated repair tool to save you from the stress of running a series of commands and repairing the files manually.

3. Update your PC

  1. Press the Windows key + I to open the Settings app and click Windows Update in the left pane.
  2. Click the Check for updates button.
    windows update vid.sys
  3. Now, download and install all available updates.

If your OS is outdated, it is prone to different issues, including this vid.sys BSOD error. The quickest way to fix this is to update your operating system, following the steps above.

4. Scan for malware

  1. Press the Windows key + S, type virus, and choose Virus & threat protection.
    virus
  2. Click the Scan options link on the next page.
    scan options
  3. Finally, select your preferred scan option and click the Scan now button.
    scan now vid.sys

The presence of malware on your PC can lead to varieties of issues, including the vid.sys error. What you need to do here is to perform a full scan.

5. Perform a system restore

  1. Press the Windows key + R, type rstrui.exe, and press Enter.
    rstrui
  2. Click Next on the new page.
    next
  3. Now, choose your ideal restore point and click the Next button.
    restore point vid.sys
  4. Finally, click Finish and follow the onscreen instructions to complete the process.
    finish

If the solutions above fail to fix the vid.sys BSOD error, you need to perform a system restore to a point where everything works well. This will undo the changes you might have made that are causing the issue

There you have it: everything you need to fix the vid.sys Blue Screen of Death error. You should now be able to solve the problem with the solutions in this guide.

If you are dealing with a similar issue in navagio.sys BSOD error, check our detailed guide to fix it.

Feel free to let us know the solution that helped you solve this problem in the comments below.

Replika Not Working? How to Fix It in 3 Simple Steps

AI powers the Replika chatbot companion for people needing a nonjudgmental friend with no social anxiety or drama involved. However, some readers have reported that Replika is not working.

So, this guide takes you through some of the likely causes as well as the most practical solutions.

Why is Replika not working?

From interactions with readers, we gather the following are the likely reasons the service may not work.

  • Internet-related issues – Replica may not work if connected to a weak, bad, or slow internet.
  • Outdated app – The problem will be triggered for some users if the app is not running on the most recent updates.
  • Service downtime – On rare occasions, you may have problems with the app or service if there is server maintenance.

Below are a few solutions to explore if the Replika service or application is not working.

What should I do if Replika is not working?

We recommend some pre-fixes before any detailed troubleshooting:

  • Check your internet connection – To optimize Replika’s performance, it’s important to have a stable internet connection. If you experience any weak or intermittent connection, consider connecting to an alternative network or restarting your router.
  • Restart the app – If you encounter any temporary glitches or errors, try closing the Replika app completely and relaunching it. A simple restart can often solve the issue.
  • Update your OS – Depending on your device, you should update the OS to be compatible with the latest Replika versions.

If these initial pre-fixes do not work, you may proceed to some more elaborate solutions outlined below.

1. Clear Cache

1.1 Clear cache on the browser

  1. Press Ctrl + Shift + Delete (this works on Chrome but may be slightly different on other browsers).
  2. Select a Time range, tick the checkboxes, and click Clear data.
    replika not working
  3. Restart the browser and verify if Replika is working.

This solution works if you use the Replika browser service. If you use the app, continue to the steps below.

1.2 Clear app cache and data

  1. Open the Settings app on your device.
    replika not working
  2. Scroll down and tap on Apps.
    replika not working
  3. Look for Replika in the list of installed apps and tap on it.
    replika not working
  4. You should currently be viewing the App Info page for Replika. Tap on the Storage.
  5. On the next screen, click Clear cache, then click Clear data.
    replika not working

2. Reinstall the app

  1. Long-click on the app icon and select Uninstall.
  2. Visit the official website and click a link that corresponds to your OS to start the download.
  3. Once the installation is complete, it should fix any problems of Replika not working.

3. Contact Replika support

If the above steps do not solve the problem, it is advisable to contact the Replika support team for further assistance. They can offer precise troubleshooting instructions or look into any server-related problems that could impact the application.

As a last resort, you may wait it out. If this problem is caused by server downtime, there is absolutely nothing you can do than wait for the server to come back on.

While we have not written these fixes in any particular order, we recommend starting from our preliminary solutions as they may save you further troubleshooting. You may also consider using a Replika alternative.

How to Unlock BitLocker Without Recovery Key or Password [3 Ways]

Today we’ll show you how to unlock Bitlocker without a password or recovery key. So if you forgot your credentials, just follow the steps below.

BitLocker is a full-disk encryption feature available in Windows that helps protect data from attacks such as boot sector viruses and other types of malware. 

The easiest method is to rely on the help of a professional software such as AOMEI FastRecovery. This tool will allow you to unlock Biltlocker in no time at all.

Here’s how to unlock it if you forgot your password:

How do I unlock BitLocker without recovery key

1. Format your hard drive

1.0 Use File Explorer

  1. Press the Win + E keys to open the File Explorer.
  2. Right-click on your drive and select Format from the context menu.
  3. Under the File system drop-down, select FAT32.
  4. You can give a name to your volume label or leave it as is.
  5. Click the Start button.

1.1 Use Command Prompt

  1. Hit the Start Menu icon, type cmd in the search bar, and click Run as administrator.cmd-run-admin-w11 unexpected kernel mode trap windows 11
  2. Type the following command and press Enter: diskpart
  3. Next, type listdisk to display the number of available drives in your system.
  4. Check the number listed against the drive you want to format and Enter the following command. Remember to replace X with the corresponding number of the drive: selectdisk X
  5. Next, type in clean to clear everything from the drive.
  6. Wait for the process to finish, and type in the following command: create partition primary
  7. Next, Enter the following commands to format and assign the drive a letter: select partition x format quick fs=NTFS assign letter C
  8. Restart your PC.

For more info, take a closer look at our dedicated guide on recovering the BitLocker Key with Command Prompt.

2. Disable Secure Boot

  1. Enter your PC’s BIOS mode.
  2. Select Boot Mode, then click on Legacy Boot. 
  3. Save settings and restart your PC.

3. Use a third-party tool

The above methods can seem a bit complicated and take up your time. To avoid this, you can enlist the help of a third-party tool such as Elcomsoft System Recovery.

It has garnered quite a praise from users, so it’s worth trying it out and seeing whether you can bypass the BitLocker page.

Where is the lost 48-digit BitLocker recovery key?

Some of the possible locations where you can find your BitLocker recovery key include:

  • Microsoft account – If you have a Microsoft account, you can recover it by logging in to retrieve it.
  • USB drive – You probably saved a copy of your recovery key in a removable drive, so this is another potential location. 
  • Cloud storage – Many users save important information on cloud storage services, including their BitLocker recovery keys. For instance, you can recover your BitLocker key from OneDrive.

If you’ve forgotten the password to encrypt your hard drive and don’t have a recovery key stored anywhere else, you’re out of luck. There’s no way for you to access any of its contents without losing your data.

You can also check more detailed methods in this guide on what to do when your Windows 11 BitLocker recovery key is lost, which outlines every location where Windows may store the key and explains how to recover access safely.

You can reduce the chance of losing your recovery key again by setting up centralized key backup using Active Directory, and you can learn how to do this in our dedicated guide on storing BitLocker keys in Active Directory.

How do I remove the BitLocker password?

  1. Hit the Windows key, type Control Panel in the search bar, and click Open.control-panel-search fallout new vegas runtime error
  2. Navigate to System and Security.Security and System
  3. Click on BitLocker Drive Encryption.
  4. Locate the drive you want BitLocker Drive Encryption turned off, then select, Turn Off BitLocker.
  5. This will take some time, but finally, you’ll receive a message to decrypt the drive. Click on Decrypt to continue.
  6. Once the process is done, you will have removed the BitLocker password.

Check out our fix guide for additional information about what to do when BitLocker keeps asking for your recovery key.

We also have answers to when BitLocker cannot be enabled, so do not hesitate to check out our article.

Hopefully, you now know how to unlock BitLocker without your password or recovery key.

If you’re down on your luck and none of these have been successful, you might have to do a clean install of Windows and forget about your data.

And don’t forget that BitLocker supports automatic unlocking, which is ideal for devices not continuously connected to the internet.

We’d love your feedback on which solution you found easiest or one that worked for you.

How to Switch to a Local Account on Windows 10

Windows allows you to create and manage multiple user accounts on your computer. If you are looking for ways to change the main account on Windows 10, this guide will walk you through the process.

We will cover the steps and prerequisites to change the primary account, ensuring a smooth transition and uninterrupted access to your PC’s resources and settings.

How to change the primary Microsoft account on Windows 10?

Before proceeding with changing the main account on Windows 10, it is important to consider the following prerequisites:

  1. Ensure your computer is connected to the internet.
  2. Back up your important data.
  3. Make sure you have access to the current primary account.
  4. Verify the UAC is enabled and set to an appropriate level to allow administrative actions during the process.

If you have gone through the checks, use different methods to change the account.

1. Create a new user account

  1. Press Windows + I to open the Settings app.
  2. Go to Accounts.Go to Accounts  how to change main account on windows 10
  3. Click Family & other users.
  4. Now under Other users, click Add someone else to this PC.Add someonne
  5. Follow the onscreen instructions to create a new user account.
  6. Once the account is created, select it and choose Change account type.Change the current account type
  7. Now set it as Administrator and click OK.ADMIN CLICK OK
  8. Log out from the current primary account and log in to the new one.

2. Switching user accounts

  1. Press Windows + L to lock your computer or log out of your current account.
  2. On the login screen, choose the user account you want to use as the primary account and enter the password.
  3. Press Windows + I to open the Settings app.
  4. Go to Accounts.Click Accounts how to change main account on windows 10
  5. Click Your info.
  6. Now click Sign in with a local account instead.Sign in user instead
  7. Select the account and then enter the PIN and click Next.Enter PIN and click Next
  8. Now on Enter your local account info page, enter the User name, and New password, and click Next.Username and password  how to change main account on windows 10
  9. Log out and log in using the new account, and it will be your main account.

3. Changing from a Microsoft account to a local account

  1. Press the Windows key, locate the user profile icon, right-click, and choose Change account settings.Change account settings how to change main account on windows 10
  2. On the Your info section, click Sign in with a local account instead.Sign in user instead
  3. Now click Sign in with a local account instead.
  4. Select the account and then enter the PIN and click Next.Enter PIN and click Next
  5. Now on Enter your local account info page, enter the User name, and New password, and click Next.Username and password how to change main account on windows 10
  6. Log out and log in using the new account, and it will be your primary account.

4. Use the Control Panel

  1. Press the Windows key, type control panel, and click Open.Control panel menu how to change main account on windows 10
  2. Select View by as Category, and click User Accounts.User Accounts select
  3. Select User Accounts again.USER ACCOUNTS
  4. Click Manage another account.mANAGE ANOTHER ACCOUNT
  5. Choose the user account you want to change.Select the account
  6. Click Change the account type.Change account type
  7. Select Administrator and click the Change Account Type button.sAVE CHANGES
  8. Now log out and log in using the new account, and it can be the main account.

5. Use the Command Prompt

  1. Press the Windows key, type command prompt, and click Run as administrator.Command Prompt admin how to change main account on windows 10
  2. Copy & paste the following command to create a new username after replacing <new username> with the username that you want & <password> with the password you wish to use and hit Enter: net user <new username> <password> /add
  3. Once the account is created, type the following command and press Enter: net localgroup administrators <new username> /addNet user account
  4. Now log out and log in using the new account, and it can be the primary account.

So, these are the methods you can use to change your main account on Windows 10.

We also recommend reading our guide on what to do if you can’t log into Windows 10 with the Microsoft account.

If you have questions or suggestions, feel free to mention them in the comments section below,

What is Fondue.exe, and Should You Delete It?

If you’ve come across a file named Fondue.exe on your computer and wondering what it is and whether it’s safe to keep or if it should be deleted, this guide can help!

What is Fondue.exe?

Fondue.exe is a legitimate process, developed by Microsoft and also known as Windows Features on Demand UX.

Originally, it can be found in C:\Windows\System32 However, if it is stored someplace else, it might a malware disguising as the process.

Once you have confirmed the process is not legit, you must get rid of it.

How can I remove Fondue.exe from my PC?

Before removing the Fondue.exe process, it is important to consider the following prerequisites:

Once you finish these checks, move to the steps to remove the process. You must follow the steps mentioned in the same order to complete it.

1. Run a malware scan

  1. Press the Windows key, type windows security, and click Open.Windows Security open Windows key fondue.exe
  2. Go to Virus & threat protection and click Scan options.V& T Scan options
  3. Select Full scan and click Scan now.Full scan -
  4. The tool will search for and list malicious files. Remove them to fix the issue.

Windows Defender is a pretty effective antivirus but we recommend using a more powerful third-party antivirus so that you ensure complete removal of the malware.

2. Delete the process manually

  1. Press Ctrl + Shift + Esc to open the Task Manager.
  2. Locate Fondue.exe and right-click to select End task to terminate the process.End task
  3. Now, press the Windows key + E to start File Explorer and search for fondue.
  4. If you find it anywhere else than the System32 folder, or has any other extension, select the file and hit the Delete button.

3. Run the Disk Cleanup app

  1. Press Windows + R to open the Run dialog box.Cleanmgr Run command fondue.exe
  2. Type cleanmgr and click OK to open the Disk Cleanup.DISK C
  3. On the Disk Cleanup: Drive Selection window, select Local C and click OK.
  4. Now click Clean up system files.Cleanmgr 3
  5. On the Disk Cleanup: Drive Selection window, choose Local C and click OK again.DISK C
  6. Under the Files to delete option, select all the files listed and click OK.Cleanmgr 4
  7. Now select Delete files to remove the temporary files.Delete Files

This step is useful as it is advised to perform further cleanup to ensure there are no threats on your computer.

So, these are steps that you can use to remove Fondue.exe safely, and to prevent such issues in the future, you must always keep your Windows operating system up to date, schedule a malware scan once a week, and avoid downloading any suspicious attachments from the email.

If you have any questions or suggestions, feel free to mention them in the comments section below.

Error 0x80040e4e: OLE DB or ODBC [Exception from HRESULT]

If you are here, you have encountered the error code 0x80040e4e with the following exception OLE DB or ODBC [Exception from HRESULT] when loading or refreshing an existing table in the PowerQuery on the PowerBI desktop.

Though the message itself does vaguely not offer any insight on how to resolve it, you can easily fix the error code 0x80040e4e by implementing the solutions covered in this article. 

Why do I get the 0x80040e4e error code in PowerBI? 

You will encounter the error 0x80040e4e: OLE DB or ODBC [Exception from HRESULT] in PowerBI due to one of the following reasons: 

  • Duplicate table in Power Query – If there is a duplicate table in PowerQuery, the error code in question is likely to show up. 
  • Special characters – Incompetency of PowerBI to handle the special characters in the database and create unusual encoding also causes the loading to fail with the error. 
  • Conflicting data type – If there is a conflict between the data type in the source with the data type of the column, the error code 0x80040e4e is likely to show up.
  • Unnecessary relationships – This error may also occur if PowerBI auto-detects a needless relationship between CoE Settings and Environment.

How do I fix the error code 0x80040e4e in PowerBI?

1. Change the data type of the column

  1. Switch to the Home tab from the top menu bar and click to expand the Edit Queries drop-down followed by Edit Queries from the PowerBI ribbon to access the Power Query Editor window. 0x80040e4e
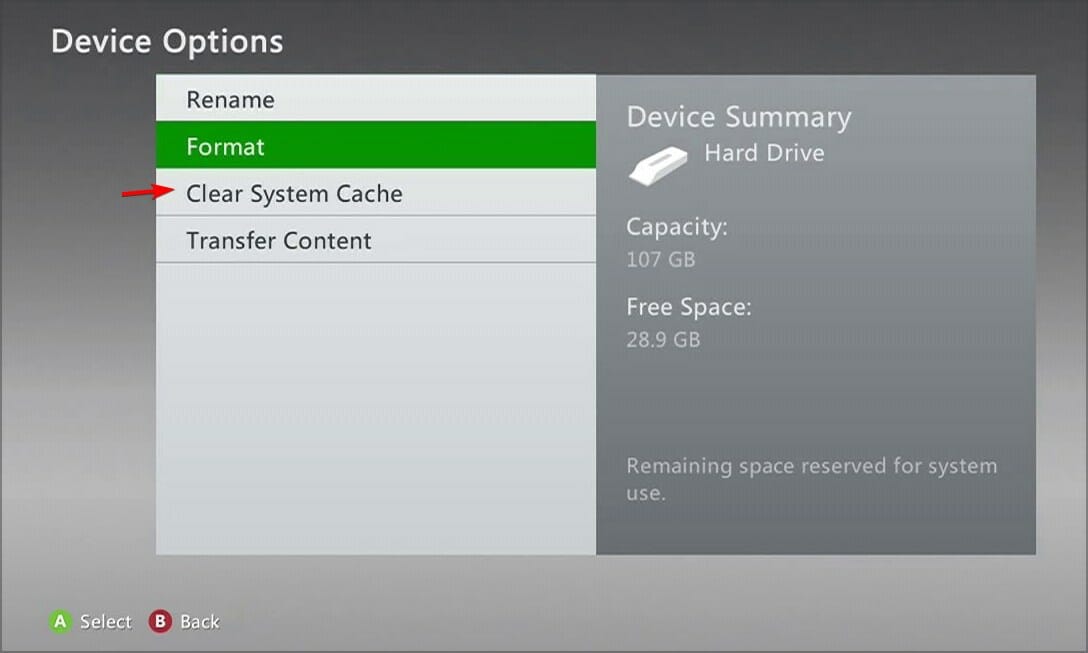
  2. Now, select the column for which you want to change the data type and click the left corner of the column header. 0x80040e4e
  3. Select the suitable data type for the current column from the list of supported data type that appears. 0x80040e4e
  4. A confirmation pop-up window to change the column type will pop up. Click the Replace Current button.

Generally, when a tabled gets loaded from a data source in PowerBI, the data type of the column gets detected automatically. 

However, in some cases, there may be a contradiction when PowerBI applies the incorrect data type, especially for the columns with date data type causing the error 0x80040e4e: OLE DB or ODBC [Exception from HRESULT] in PowerQuery. Hence, changing the data type of the affected column should suffice.

2. Delete unnecessary relationships 

  1. Cancel the table load in PowerBI such that Power BI will now load without any values. 
  2. Switch to the Modeling tab from the top menu bar and choose the Manage Relationships option from the ribbon. 0x80040e4e
  3. Look for the relationship between Environments and CoE Settings in the list of all relationships and press the Delete button located at the bottom. 
  4. Now Save and Close the dialog box and re-load the query.

The query should now load correctly without encountering the error 0x80040e4e in PowerQuery.  

3. Remove duplicate columns from the table 

  1. Open the table in question and click the topmost cell present before the column headers. 
  2. Select the Remove duplicates option from the drop-down menu that appears. 0x80040e4e

Deleting the duplicates in multiple columns across the table will help get past the error code 0x80040e4e in PowerBI. 

4. Clear the data source cache 

  1. Launch the PowerBI desktop and choose File from the top ribbon. 
  2. Choose Options and settings from the left navigation panel, followed by Options from the right sidebar. 
  3. Select Data Load from the left panel of the new window. 
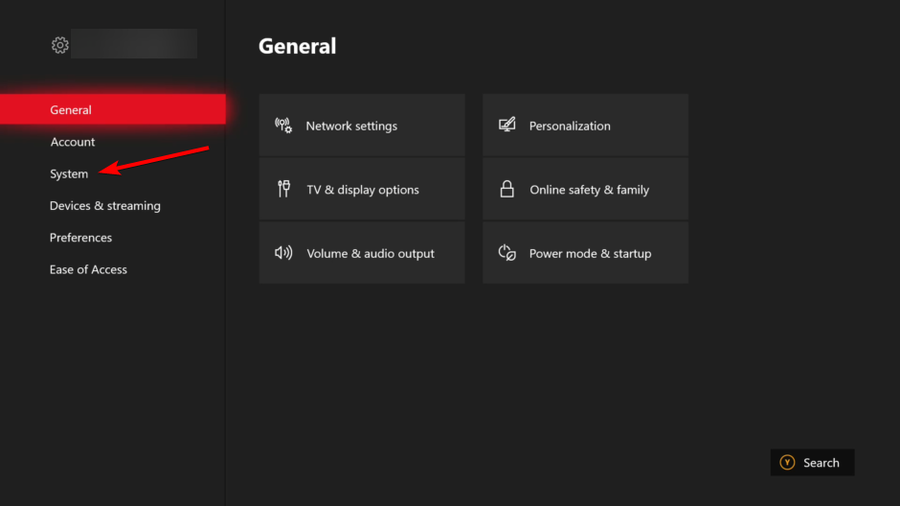
  4. Look for the Clear Cache button under the Data Cache Management Options and Q&A Cache Options section and press the OK button. 0x80040e4e
  5. After you perform the above steps, the Currently used value will be set to 0 bytes. Now re-establish the connection with the required data sources and refresh the data query editor.

5. Clear Global Permissions 

  1. Access the File tab located on the ribbon in PowerBI Desktop. 
  2. Choose Options and settings from the left sidebar, followed by Data Source settings from the right. 0x80040e4e 
  3. In the Data Source settings window, enable Global Permissions on the top, select the BI Connector from the list of data sources, and press the Clear Permissions button at the bottom.  
  4. After you clear the PowerBI cache and data source settings, close all the instances of the Power BI desktop and re-launch it.

Cleaning the global permissions will clear the login credentials forcing you to set up a fresh connection. This will help fix the 0x80040e4e: OLE DB or ODBC [Exception from HRESULT] error when you refresh the table.

That’s pretty much it! You can try the methods listed in this guide to eliminate the error 0x80040e4e : OLE DB or ODBC [Exception from HRESULT] in PowerBI. 

You may also want to fix the PowerBI data source credentials if they are greyed out for you. 

Which of the tricks mentioned in this article worked in your case? We are curious to find out!