In this guide, we’ll show you how to fix the Red Alert 2 game if it’s not working on your Windows PC.
Whether the game is crashing, lagging, freezing, or running slowly, follow these steps to get Red Alert 2 up and running smoothly again.
How can I fix Red Alert 2 not working on Windows?
1. Open the Program Compatibility Troubleshooter
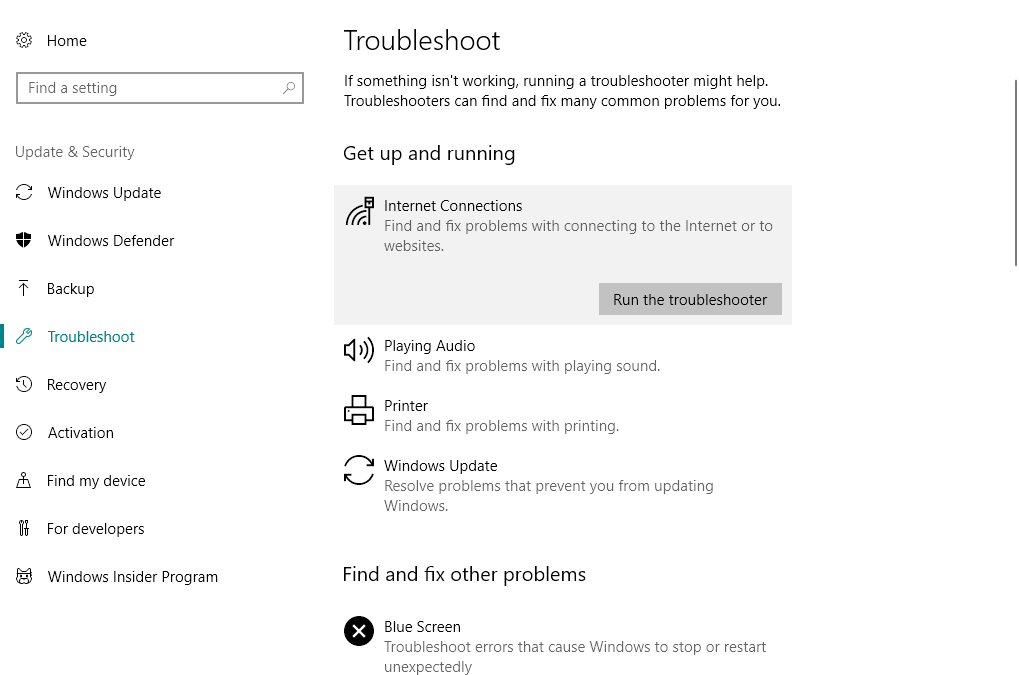
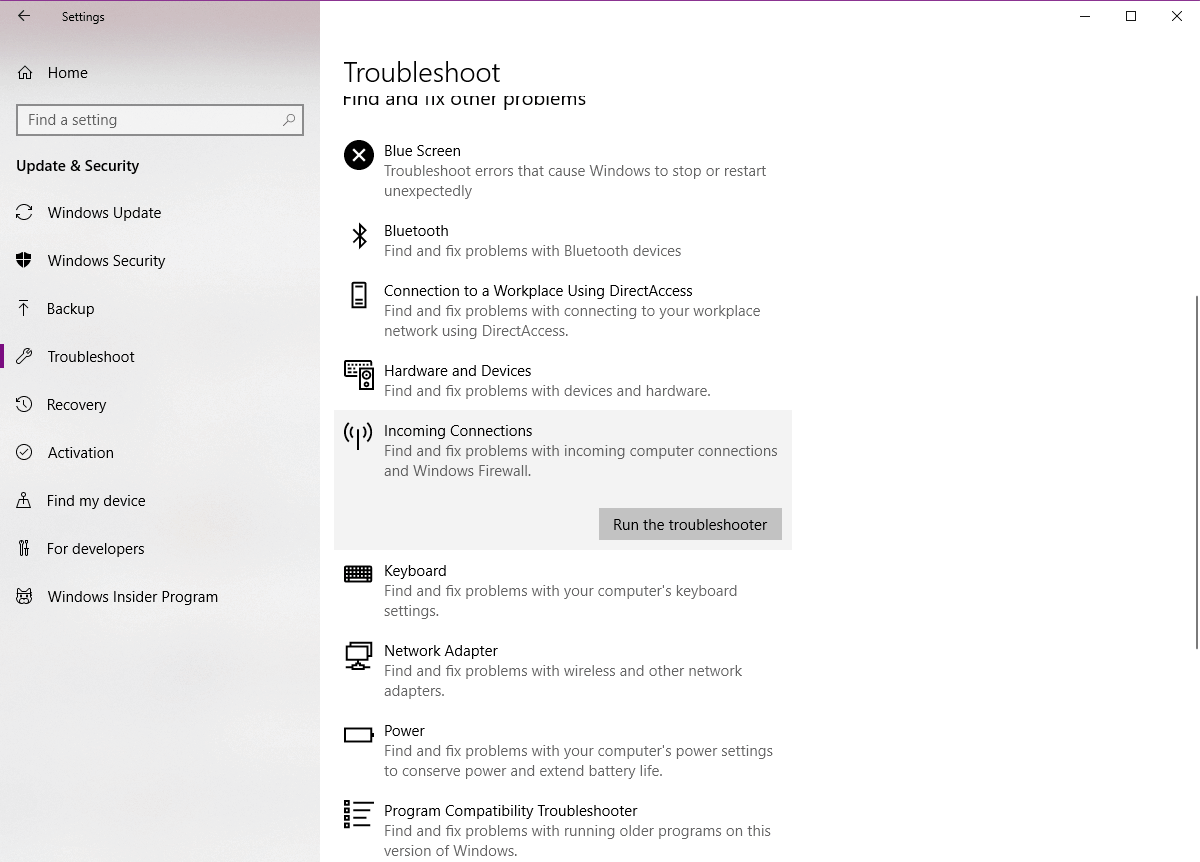
Enter troubleshoot in the Taskbar and open Troubleshooting settings.
Select Other troubleshooters.
Select the Program and Compatibility troubleshooter.
Press the Run the troubleshooter button to open the window in the snapshot below.
Then select Red Alert 2 in the troubleshooter’s software list, and press the Next button.
Wait for the Troubleshooter to investigate the problem.
Check whether the Red Alert 2 not working issue is gone or not.
2. Run Red Alert 2 in Compatibility Mode
First, open the Red Alert 2 folder in File Explorer.
Then right-click the gamemd.exe in File Explorer and select Properties to open the window.
Select the Compatibility tab in the snapshot directly below.
Select the Run this program in compatibility mode for option.
Then select WinXP (Service Pack 3) on the platform drop-down menu.
Select the Run this program as an administrator checkbox on the Compatibility tab.
In addition, adjust the graphical settings by selecting Reduced color mode and 16-bit color from the drop-down menu.
Then click Apply to confirm the new settings, and press the OK button.
Repeat the above guidelines for every exe in your Red Alert 2 folder, such as Ra2.exe, game.exe, YURI.exe and RA2MD.exe.
Red Alert 2 returns a FATAL String Manager failed to initialized properly error for some players who can’t get the game up and running.
Running RA 2 in compatibility mode is a fix more specifically for that error message. You can run RA 2 in compatibility mode as shown above.
3. Configure the Game’s Resolution
Open the Red Alert 2 directory within File Explorer.
Then right-click the RA2.INI file in the Red Alert 2 directory and select Open with.
Select to open RA2.INI with Notepad.
Then edit the ScreenWidth and ScreenHeight values in the RA2.INI file to match your current display resolution.
In addition, edit the VideoBackBuffer attribute to no value. The attribute should be configured as VideoBackBuffer=no.
Click File > Save to save the RA2.INI.
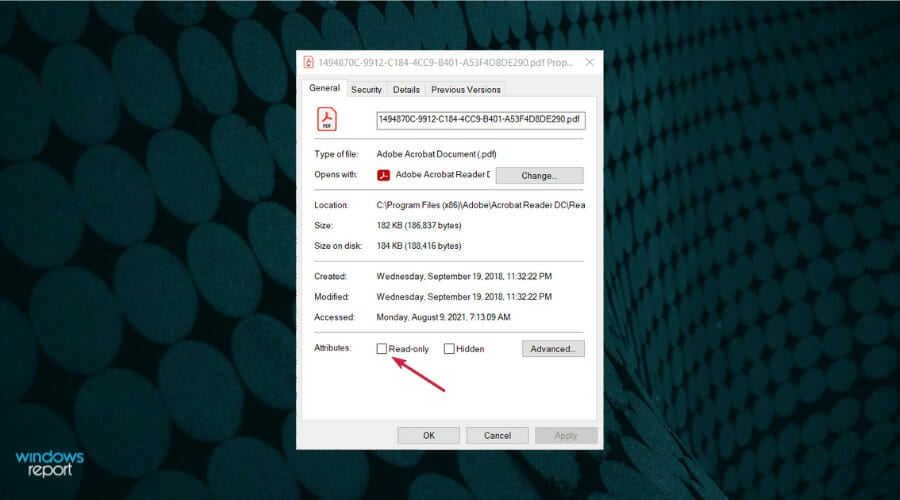
Make the file Read-Only
Red Alert 2 was designed for lower resolution monitors. Some players have fixed the game by adjusting its resolution to match their current VDU resolutions.
4. Adjust Red Alert 2 Game Settings in Origin
Open Origin in Windows and click My Games.
Right-click Red Alert 2 to select Properties on its context menu.
A window will then open that includes a command-line arguments text box. Enter -Win in the text box.
Select the Disable Origin in Game for this game option on the window, and press the OK button.
If you can’t play any RA 2 multiplayer matches in a local network, check out this page on CnCNet. CnCNet provides a fresh multiplayer client for Red Alert 2 that you can download.
Note that Red Alert 2 is not included with the CnCNet multiplayer client download.
That was all. We hope that your issue with Red Alert 2 not working on Windows 10 or Windows 11 and needing a fix was solved by now.
Windows Update can cause as many troubles as it causes good things. One of the issues that Windows update brings is the disappearance of the Internet connection.
If you faced this problem, don’t worry, because here are a few solutions for No Internet Access or Limited Internet Access.
Here are some more examples and error messages:
Windows 10 update lost internet connection – This error message also means that you’ve lost the internet connection after installing certain updates.
Can’t connect to the internet after Windows 10 update – As the error message says, this particular issue occurs in Windows 10.
Windows update no internet connection – It can also happen that you lose the internet connection during the very process of installing Windows Updates.
How do I fix Internet connection problems after installing Windows updates?
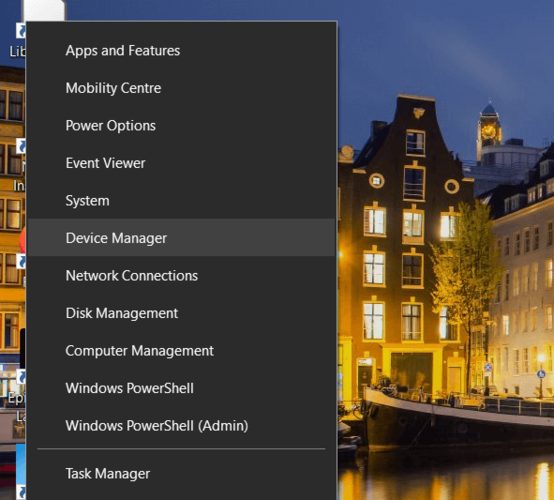
1. Use Device Manager
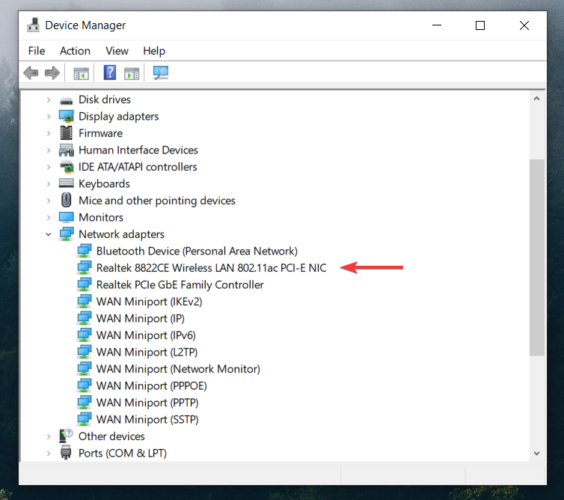
Go to Device Manager and then to Network adapters.
Expand Network adapters.
Check if your network adapter shows the message of No Internet Access or Limited connectivity and select it.
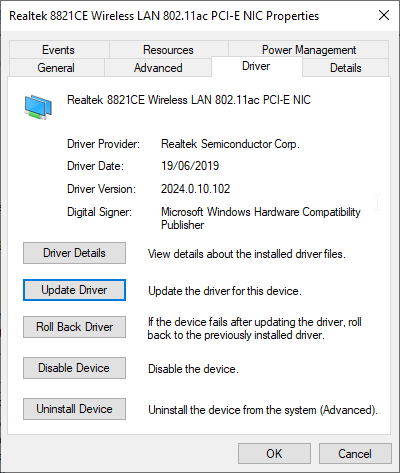
Right-click on your wireless network adapter and go to Update Driver Software.
Now on a new window, you will need to click on Browse my computer for driver software.
After that, select Let me pick from a list of device drivers on my computer.
Choose the Manufacturer’s drivers from the list of two and then click next.
After the completion of the process just restart your PC and check if you have the internet connection now.
If the Device Manager fix didn’t help, try to work a little bit in Command Prompt in order to fix your problem with the internet.
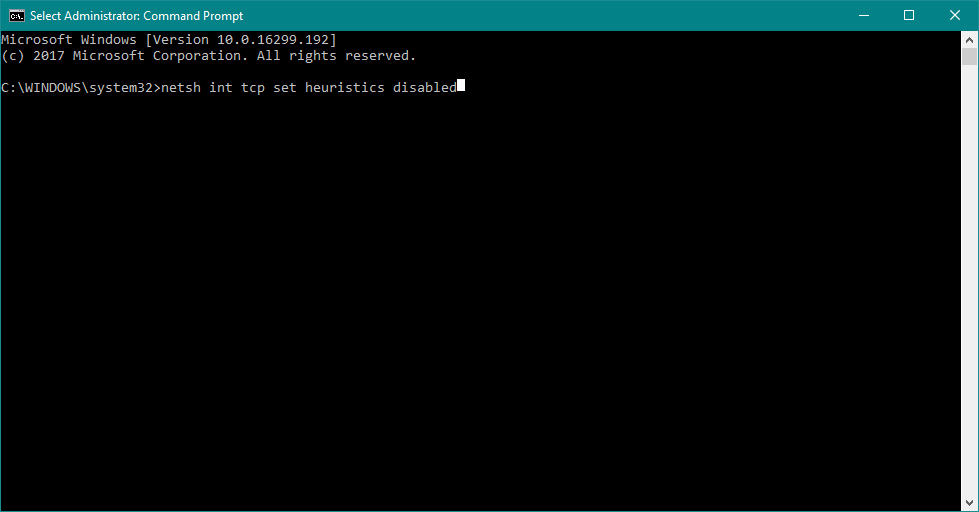
2. Type each of these commands respectively and hit enter after each one of them:
netsh int tcp set heuristics disabled
netsh int tcp set global autotuninglevel=disable
netsh int tcp set global rss=enabled
3. Now to check if the settings are disabled and type: netsh int tcp show global
4. Press Enter.
5. Reboot your PC and see if the problem is solved.
3. Update the Network adapter driver
There’s a chance the update you just installed is simply incompatible with your Network adapter. So, the next thing we’re going to do is update your Network adapter.
But since you can’t connect to the internet, you won’t be able to update your Network adapter the old-fashioned way, through the Device Manager.
So, use another computer, go to your Network adapter or motherboard manufacturer’s website, and download the latest drivers for your network adapter.
After that, manually install drivers on your computer, and you should be good. If you have any questions, just check our article about updating old drivers in Windows 10.
If you don’t have enough time or you simply want to get over this error by updating your drivers, we recommend you use professional driver updater software.
These dedicated tools are a little bit safer because they have large driver databases and can match your hardware with its corresponding driver with no mistake.
4. Clean Boot
Press the Windows key +R In the Run box, type msconfig and press Enter
Under the Services tab, check the Hide all Microsoft services and hit Disable all
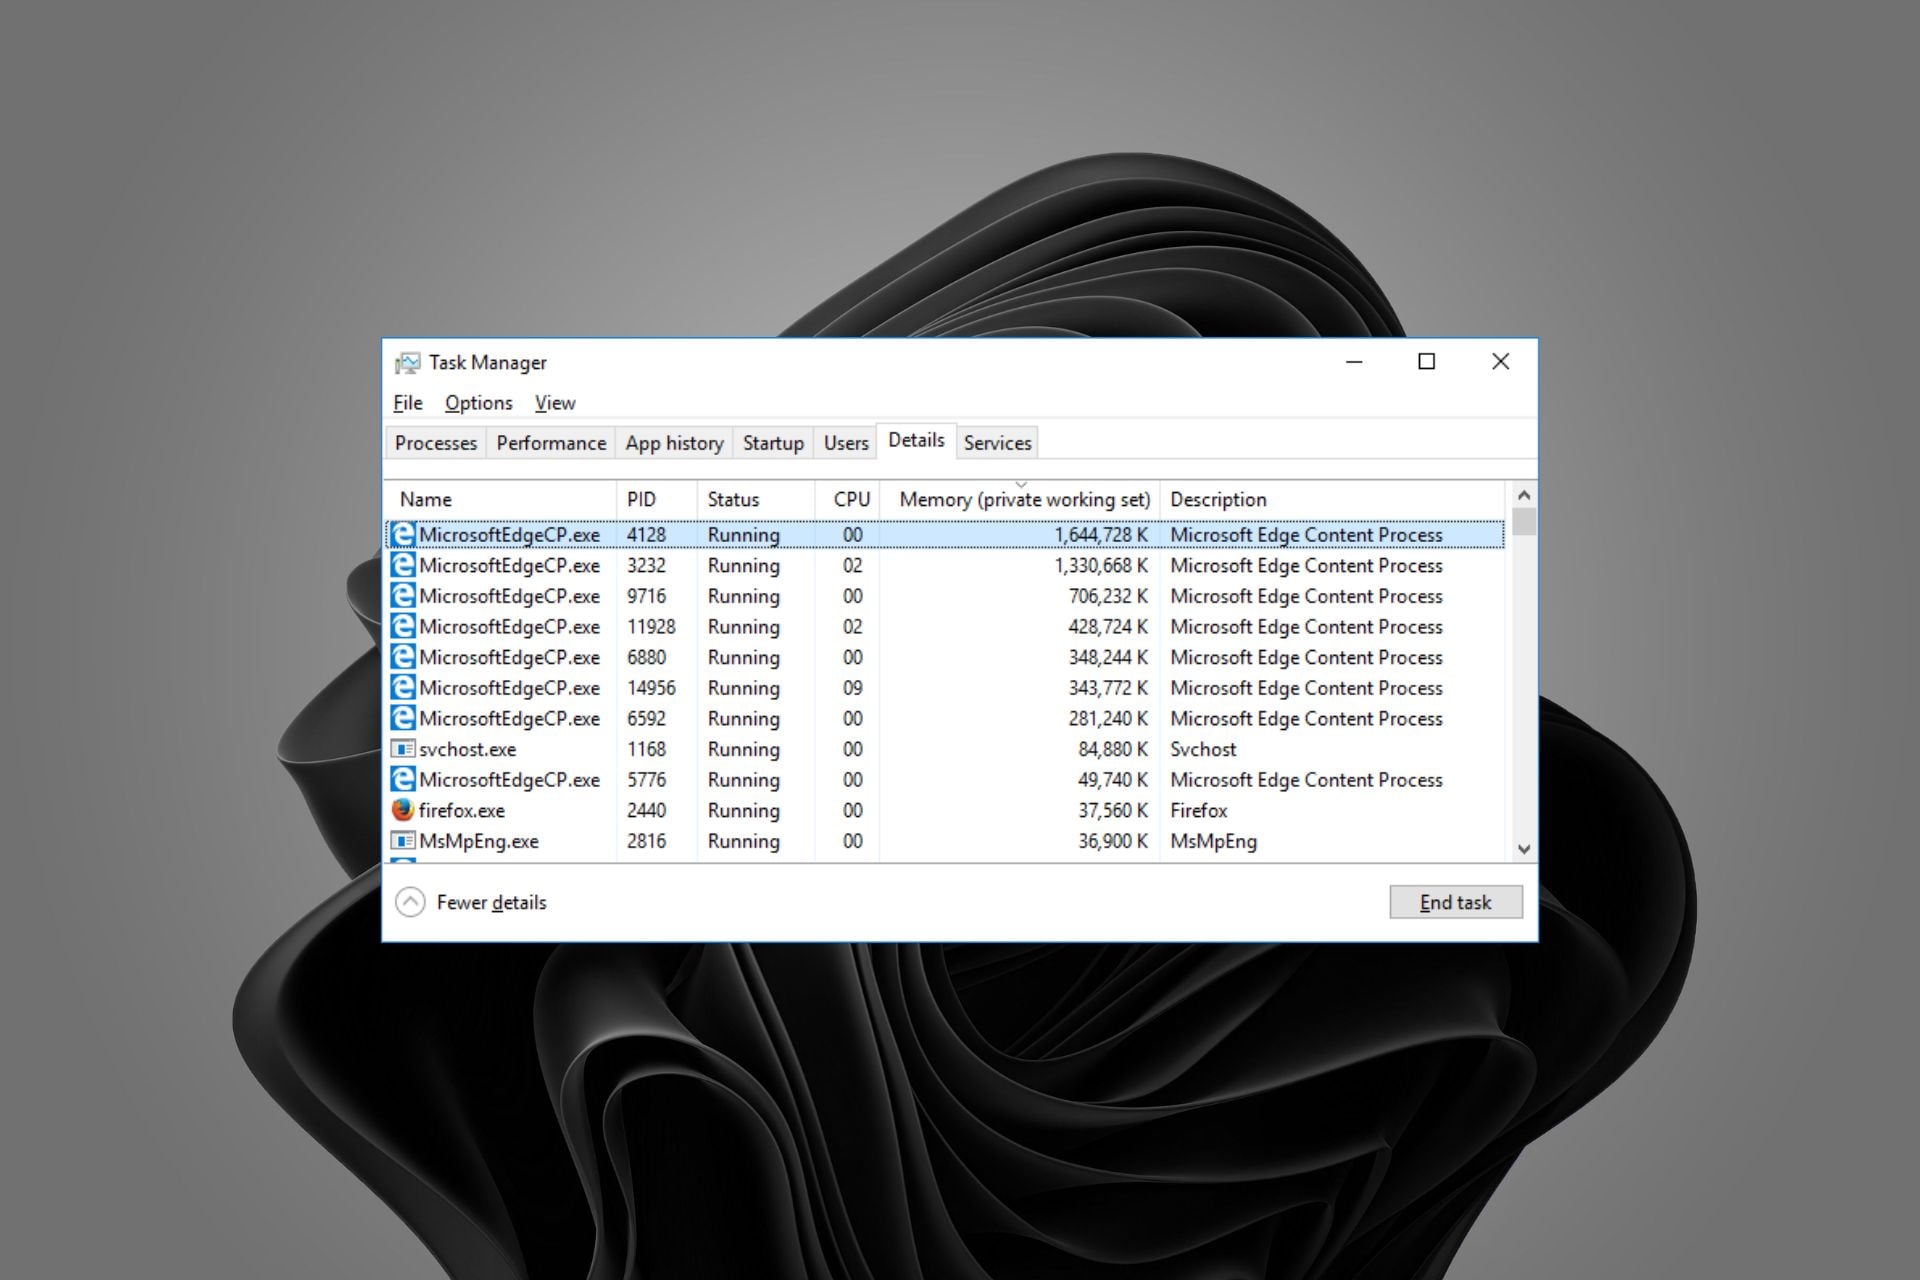
Open Task Manager. Under the Startup tab right-click, disable each Startup item, and then close Task Manager
Click Apply/OK
Restart your PC
If you have the connection now, try to find which software caused you troubles and uninstall it
Try to perform a Clean Boot to see if there’s any third-party program causing your connection to break.
Third-party antivirus programs don’t go along with Windows updates.
Therefore, it’s quite possible that your antivirus is exactly what causes you problems after installing the update. So, consider disabling your antivirus temporarily, and check if you’re able to connect to the internet.
7. Reinstall your network adapter
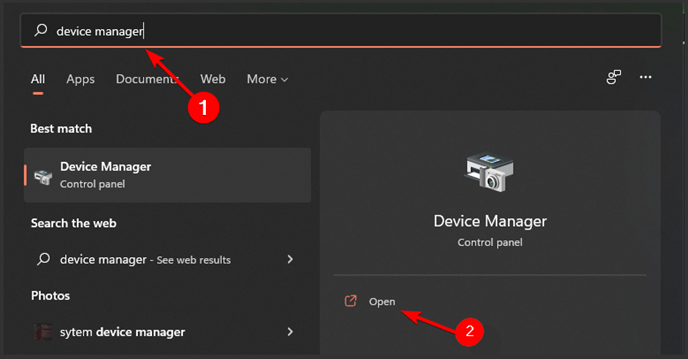
Go to Search, type devmngr, and go to Device Manager
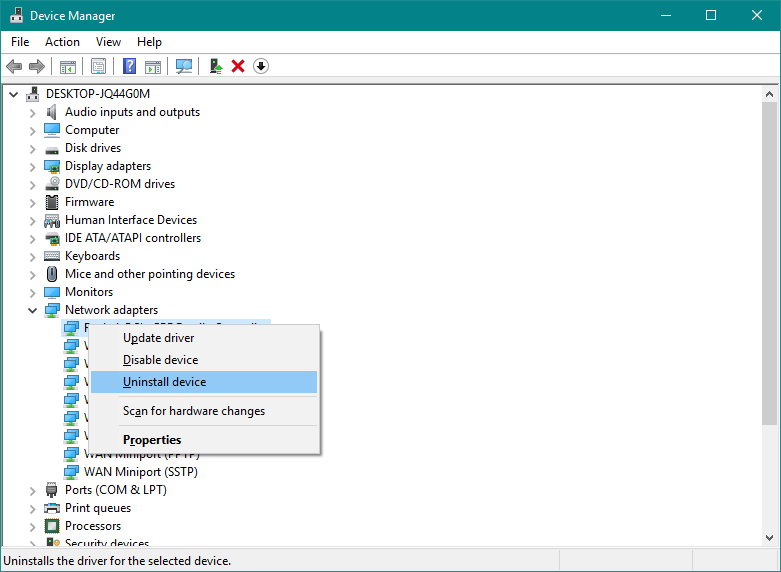
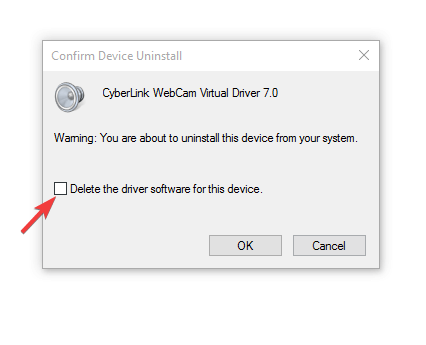
Find your Network Adapter, right-click it, and go to Uninstall Device
Restart your computer
There’s also a chance the freshly installed update interferes with your network adapter. Most of the time, updating your drivers should be enough.
However, you might also need to completely reinstall your network adapter.
Once you install the network adapter again, you’ll automatically get the latest version, therefore updating the drivers won’t be necessary.
Now, Windows should automatically recognize and install the Network Adapter shortly after you uninstall it. However, if that doesn’t happen, here’s what you need to do:
Go to Control Panel
Under Hardware & Sound, go to Add a device
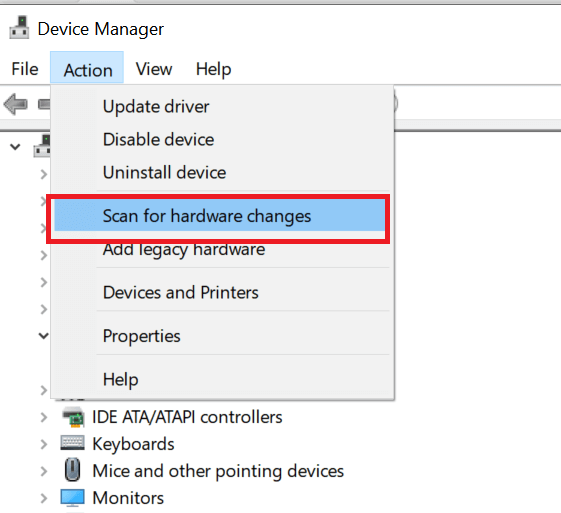
Wait for the wizard to scan for hardware changes
Once it finds your Network Adapter, the installation will be finished
8. Run Windows 10 Network Reset feature
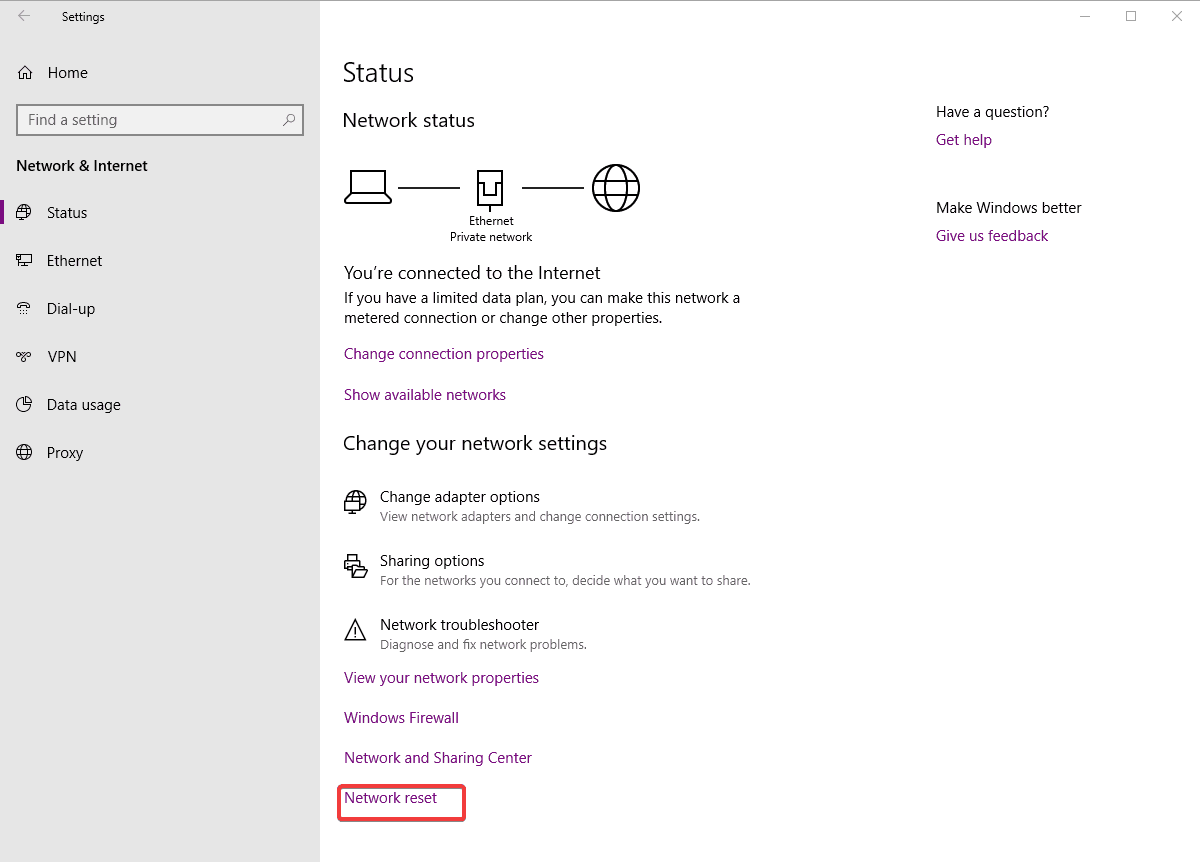
Go to Settings > Network & Internet
Stay in the Status section
Scroll down and click Network Reset
Follow further on-screen instructions
Restart your computer
There’s another (less-known) troubleshooting option for network problems in Windows 10. And that is the Network Reset feature.
As its name says, this feature resets every important Network feature in your system, which can be beneficial for dealing with potential interferences.
That’s about it, we certainly hope at least one of these solutions helped you resolve the problem with the internet connection after installing Windows updates.
If you have any comments, questions, or suggestions, just let us know in the comments below.
If you have any other Internet connection error there’s a big chance you will find a solution in our Fix Internet Connection Errors hub.
If you experienced any other Windows 10 errors we’ve got you covered. Check out our Windows 10 errors hub.
Why won’t my computer connect to the Internet?
There are a lot of issues causing your computer not connecting to the Internet, from simple problems like forgetting to pay your bill or a faulty cable to a malfunctioning network card or system configuration problems.
The default clock in Windows 10 gets the job done, but it’s not exactly flexible. If you’ve ever wanted a larger clock on your desktop, support for multiple time zones, or just a cleaner design, a clock widget can help.
The best clock widgets for Windows 10 offer more visibility, customization, and useful extras like alarms or calendar integration. In this guide, we’ll look at a few solid options that are easy to use, light on resources, and make your desktop feel more functional.
Clocks is simple and unobtrusive app, easy to customize with a few clicks. It lays over other programs and comes with 5 different basic clock shapes, so you can pick your favorite.
The basic version comes for free, and it also has a paid extension.
The Graphics are pretty nice and they feature cool, realistic animations that you can enjoy on your screen, whatever the resolution.
We decided to set it in the first place in our selection because it’s simple, effective, and very customizable.
Other key features include:
Free clock themes with five different basic clock features
Stylish look
Expressive animations
Clocks
Decorate your Desktop with this customizable and versatile Clock app and do tell the time.
This is a clock inspired by the HTC Sense UI initially designed for Windows 7; now you can install it on Windows 10 and even Windows 11.
Apart from the clock, the app also includes dynamic weather information (current conditions and future forecasts). The app is not for free, but it comes with a free trial period.
There are over 20 clock skins to choose from and you can set it with an automatic location (from cell/Wi-Fi or GPS) or manual.
Other key features include:
Clock flip animation
Automatic location
Wind conditions
Sense Desktop
Personalize your Desktop clock and check the weather forecast in real-time with this modern software.
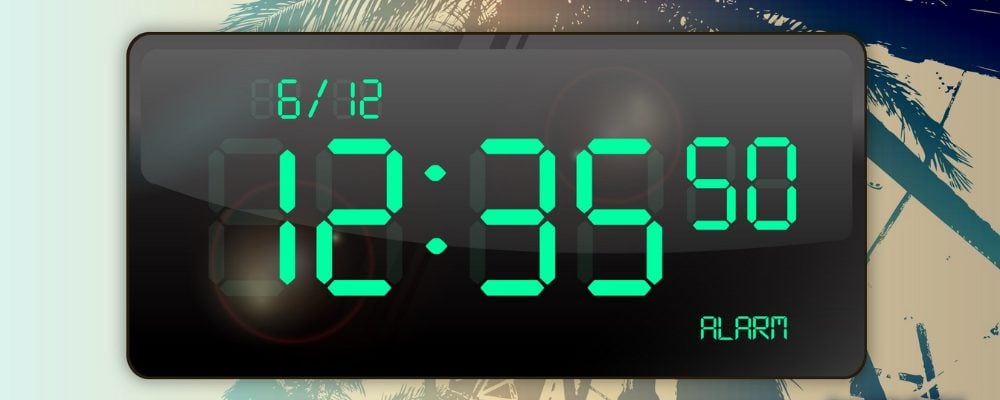
Watch One is a classic digital clock, that also shows the date. You can adjust the color of the number and, of course, the background using one of the 30 included wallpapers.
Unfortunately, you can’t use your own background. As expected, the clock widget can be resized according to your preferences, and you can also set it to be displayed as a portrait.
It’s also worth mentioning that the clock is available in 22 languages so you can feel at home.
With the Watch One digital clock widget, the wallpaper can be changed into the main screen and it also has a switchable portrait or landscape feature.
Other key features include:
Customizable digital color
Support titles
Gorgeous design
Watch One
Customize every setting and create unique visuals for your phone with this intuitive software.
Additional clock widgets for Windows 10 that you might want to try
Desktop Digital Clock: Offers customizable themes and alarms, with options for displaying the second hand. It’s designed for Windows 10 and higher, with subscription or one-time payment plans for full functionality.
Desktop Clock Widget: A lightweight digital clock that integrates seamlessly with Windows, supporting up to 10 devices.
Metroclock: This clock is minimalistic and it allows for background customization and alarm settings, with a free version and premium upgrades.
Clock widgets are small applications or tools that display the time on your desktop, allowing for easy access to time information without opening other apps.
How do I add a clock widget to Windows?
You can add a clock widget via third-party apps like “Rainmeter” or by using built-in features in Windows 11 through the Widgets menu or taskbar customization.
Can I customize the appearance of the clock widget?
Yes, most clock widget tools allow customization of appearance, including clock face styles, colors, sizes, and additional features like alarms or world clocks.
Are clock widgets free to use on Windows?
Yes, many clock widgets are free to use, but some advanced features or themes may require paid versions of the software or add-ons.
We hope that you found the desired clock app among these ones. In case you’re looking for alarm clock apps, we have an entire article dedicated to them.
For more interesting widgets, don’t miss our guide on widgets for Windows 10 for more suggestions.
If you’re using multiple monitors and want to display the clock on each, Windows 11 makes it easy. Follow these steps to enable a taskbar clock on multiple monitors.
We welcome your suggestions and comments in the dedicated section below.
Black screen issues usually occur due to a corrupted or outdated driver. Several users have reported a black screen when installing graphics card drivers.
In some instances, users have reported the computer has crashed with a black screen after installing a graphics card driver. Only after uninstalling the GPU driver in Safe Mode, the user can resolve the issue.
In this article, we have listed a few troubleshooting steps to help you resolve the black screen after installing the graphics card driver problem in Windows 10.
How do I fix the black screen when installing graphics card driver?
1. Uninstall and reinstall the GPU driver
1.1. Reinstall graphics drivers in the Device Manager
Once you have uninstalled the GPU driver, you can reboot the computer to reinstall the drivers and resolve black screen after installing graphics card issue.
1. Open Device Manager by typing it in the taskbar.
2. Locate your GPU driver, right-click on it and select Uninstall or Delete option.
3. Reboot your PC. Windows should automatically detect the GPU and reinstall the driver automatically.
4. Open Device Manager again and check if your GPU driver appears on the list.
Alternatively, you can use dedicated uninstaller software to completely remove your driver files and then manually reinstall them from the manufacturer’s website
Using efficient uninstaller software will offer many advantages. Apart from uninstalling the app, it also deletes leftover registry entries and system files and declutters them.
Next, open your GPU manufacturer’s website and download the latest version of the GPU driver. For Nvidia GPU, download and install Nvidia GeForce Experience to install the required drivers.
If the black screen after installing the graphics card driver Windows 10 issue occurs again, reinstall the drivers in Safe Mode.
1.2. Reinstall the GPU driver in Safe Mode
Press the Windows key + I to open Settings.
Choose Update & Security.
Click on the Recovery tab from the left pane.
Scroll down to the Advanced Startup section and click the Restart Now button.
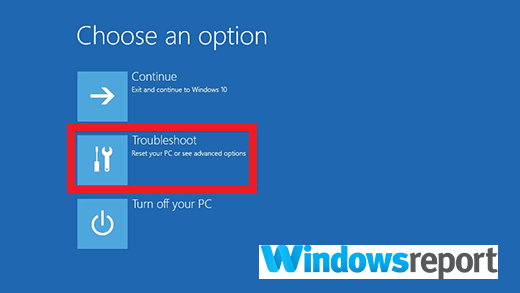
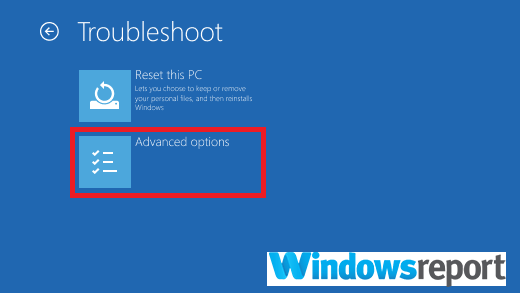
In the Choose and Options window, click the Troubleshoot button.
Next, click on the Advanced options.
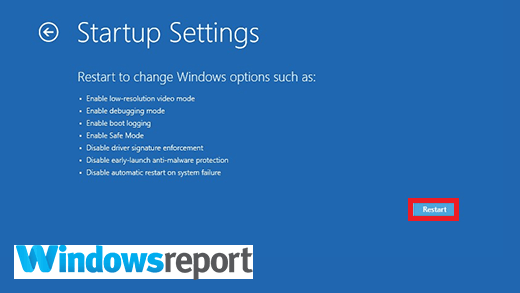
In the Advanced Options windows, click Start-up Settings.
Click the Start button.
Windows will restart and show multiple boot options.
Press the 4/F4 key on your keyboard to choose the Enable Safe Mode option.
Windows will restart in Safe Mode with minimal services and programs running.
Before you install your GPU driver in Safe Mode, make sure to uninstall the GPU driver and other related software. Next, download the latest version of the GPU driver.
Once in Safe Mode, uninstall the GPU driver, if not already uninstalled. Next, run the GPU driver installer and proceed with the installation. Once installed, reboot the computer, and it should start normally.
Third-party software conflict can trigger the black screen after installing AMD graphics drivers issue. In Safe Mode, Windows starts with minimal service and without third-party app interference.
To avoid any kind of GPU errors and save time as well, you can also use an automated assistant that can proceed with this process by scanning your PC for outdated drivers and instantly updating them with a single click.
2. Adjust CPU voltage / Update BIOS / Reinstall older BIOS version
If you have updated your Motherboard BIOS recently, check if the update has changed the default CPU voltage. Underpowered CPUs can cause a black screen while installing graphics card driver issues.
Third-party system resource monitoring software like CPU-Z can help you monitor if you are underpowering your CPU. Download and install CPU-Z and monitor CPU-related information.
If the motherboard undervotes your CPU, try updating your BIOS or reinstalling the older BIOS in case you have already updated the Basic Input Output System.
Updating your BIOS is easy. We have a detailed guide on how to update your BIOS in Windows 10. Refer to the article to install the latest version of BIOS available for your motherboard.
If the error started to occur after installing the BIOS, try to reinstall the earlier version of the BIOS.
3. Check for HDMI cable issues
At times, a defective HDMI cable going through your PC to the monitor can cause Black screen issues. Unplug the HDMI cable and leave the computer idle for a few minutes. Reconnect the HDMI cable and reboot the computer.
Additionally, also check for issues with your PSU. A defective PSU providing insufficient power to the GPU and CPU can cause the hardware to malfunction resulting in the black screen issue.
4. Check for GPU hardware problems
If the problem persists, check your GPU for hardware failure. In most cases, apart from the black screen, you may also notice blue lines that are across the screen.
While there are some workarounds that you can try to fix the hardware failure in graphics cards, it is recommended to consult your GPU manufacturer if the device is under warranty.
As a last resort, try reinstalling Windows 10. A clean install can fix many issues such as corrupted system files and drivers that may have triggered the monitor’s black screen after installing the graphics driver problem.
Make sure to create a backup of your data before proceeding with a clean install. You can create a bootable USB drive or use Media Creation Tool to install Windows 10.
The black screen after installing graphics card driver problems usually occurs due to faulty GPU drivers and insufficient power supply. In some instances, you may have to troubleshoot your GPU for hardware failure as well.
When you run a Windows program, it may sometimes encounter a problem and crash. This can be an error in the program itself or a problem with your computer hardware or software that prevents it from functioning properly.
Wlmerger.exe is a common application file for Windows operating systems. It’s used by Microsoft Windows to run several applications. Apart from going missing, sometimes you may also run into errors such as exe files delete themselves.
Why do I have a corrupt Wlmerger.exe file?
There are many reasons why Wlmerger.exe may not be working properly on your computer:
Bad installation – It is possible that the application was not installed correctly the first time or downloaded from an untrusted site.
Virus infection – It could be due to a virus infection that has corrupted its files so they cannot be read by Windows anymore. Most users think exe files are viruses, but not all of them are.
Accidental deletion – It could have been deleted accidentally by you or someone else in your who has access to your computer
Hard drive error – There might be a problem with your hard drive where this file is located, which means that it cannot be found by Windows anymore.
Wrong location – If the Wlmerger.exe file is not in its dedicated location, it may cause problems with other applications.
Registry errors – Incorrectly editing your registry can lead to a corrupt registry, stop your PC from functioning properly and even cause permanent damage to your PC if not done correctly.
How can I fix a corrupt or missing Wlmerger.exe file?
1. Use a registry cleaner
Registry cleaners are designed to fix problems in your computer’s registry. If there is a corrupt or missing Wlmerger.exe file on your computer, then using one may be able to fix it. It will scan through your system and remove any unnecessary files from within your registry.
These files are often left behind after installing programs, which can cause problems for your computer when they are not removed properly.
It’s also important to note that deleting items from the registry could potentially break other applications on your system that rely on those items being present.
2. Transfer the file to its default location
Navigate to the following location and check whether you can locate the Wlmerger.exe file: C:\ Users\ User\ AppData\ Local\ Temp\ NVIDIA\ GeForceExperienceSelfUpdate\ 9.3.21.0\ Display.Update\ WLMerger.exe
If not, search your PC for the file.
Once you establish its location, cut and paste it on the location in 1.
It is important that the file is in its default location. If it’s not in its proper location, then the program will display an error message when it attempts to open the file.
In most cases, this means that the wlmerger.exe file has been moved or deleted by a virus infection on your computer hence causing the error.
3. Run a virus scan
Press the Windows key, search Windows Security and click Open.
Select Virus & threat protection.
Next, press Quick scan under Current threats.
If you don’t find any threats, proceed to perform a full scan. Click on Scan options just below Quick scan.
Click on Full scan to perform a deep scan of your PC.
Wait for the process to finish and restart your system.
You should also keep in mind that if you have recently installed any new programs onto your computer, it is possible that they could be causing issues with Wlmerger.exe as well as other programs on your machine.
If this is the case, then removing these programs would be a good place to start resolving this issue once and for all.
4. Execute the DISM and SFC scans
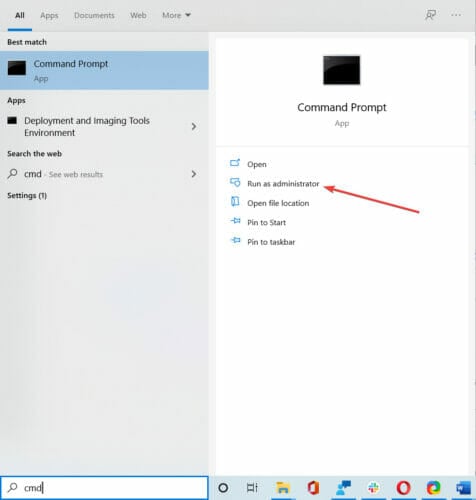
Hit the Windows key, type cmd in the search bar, and select Run as administrator.
Type the following commands and press Enter after each one: DISM.exe /Online /Restorehealthsfc /scannow
When a file becomes corrupt, you can use the Deployment Image Servicing and Management (DISM) command to repair it. You can also use the System File Checker (SFC) scan to attempt to repair corrupt system files.
If you have tried all the methods above without any luck, then there would probably be no other choice than to uninstall the wlmerger.exe file from your computer manually and reinstall it to get rid of this error.
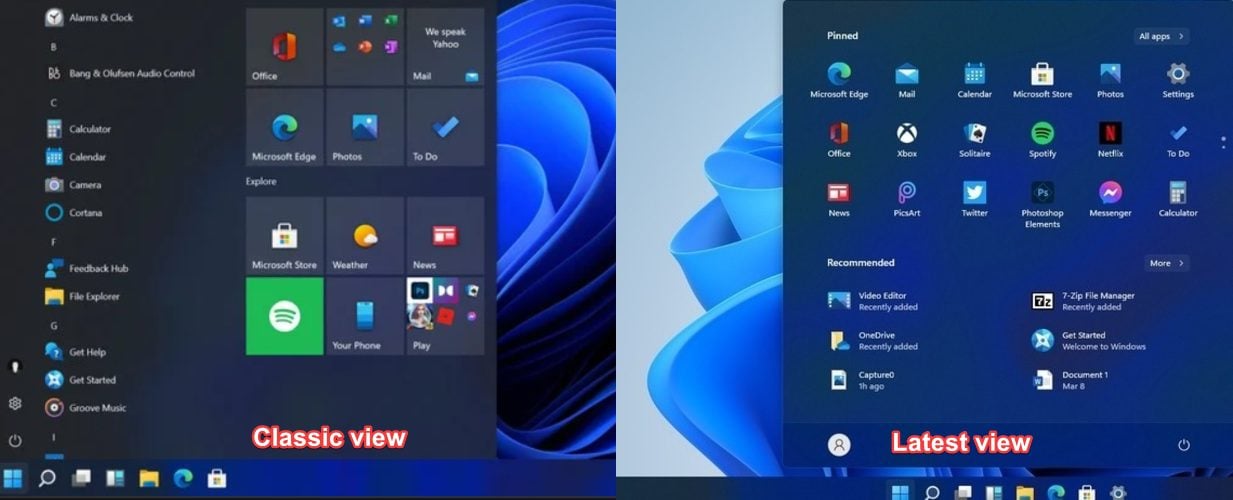
We found that some users want to change Windows 11 to a classic view. You should know that it is extremely simple, so your effort will be minimal. Find below 2 quick ways to do so.
Without further ado, follow the steps below to set Windows 11 taskbar to classic mode:
How to change Start menu in Windows 11 to Classic View
1. Use personalization settings
Open Settings.
Go to Personalization.
From the left window pane, select Taskbar, then drop-down the menu from the right side, and select Left instead of Center.
This option will help you to bring your desktop pinned bar to the Windows 10 look, changing its alignment from the center to the left low side of the window.
2. Once the Run dialog box is opened, type regedit, then press the Enter button.
3. Go to the following location: HKEY_CURRENT_USER\Software\Microsoft\Windows\CurrentVersion\Explorer\Advanced
4. Right-click, then create a new DWORD (32-bit) value from the drop-down menu.
5. Name it Start_ShowClassicMode.
6. Set the value to 1.
7. Restart your computer.
Once you log back into Windows 11, you’ll be greeted with the start menu in the same appearance it’s been on the previous version.
How can I change the taskbar size in Windows 11?
Press the Windows key + R, on your keyboard.
Once the Run dialog box is opened, type regedit, then press the Enter button.
Search for the following location: HKEY_CURRENT_USERSoftwareMicrosoftWindowsCurrentVersionExplorerAdvanced
Right-click on Advanced, select New, then click on DWORD (32-bit) Value.
Rename the key asTaskbarSi, then hit Enter button.
Double-click on the created DWORD.
Change the value from0to2.
This option would help you in case you need to change the Windows 11 taskbar size. This would turn the icon’s size on the large model. As you could notice above, the 1 value is for the default icon size.
Why would I want to change Windows 11 to classic view?
Windows 11 offers a new look with modern and cool animations. It also has a well-known Recommended section that will help you quickly access recent apps and files. If you don’t like it, you can always customize the Start menu layout according to your needs.
And if you got used to the classic view of the taskbar, just follow the guidelines above to revert to it.
We hope the above procedures helped you. If this topic is entirely new to you, don’t hesitate to take a closer look at a full article regarding how to download Windows 11.
If your computer restarted unexpectedly or keeps rebooting without warning, you’re not alone. This issue affects many Windows 10 users, and it can happen during setup, idle periods, or while you’re working. Hardware faults, overheating, corrupted system files, or incompatible drivers may trigger it. Below, we’ve outlined all the verified solutions to help you fix the problem and prevent future interruptions.
How can I fix “The computer restarted unexpectedly” error?
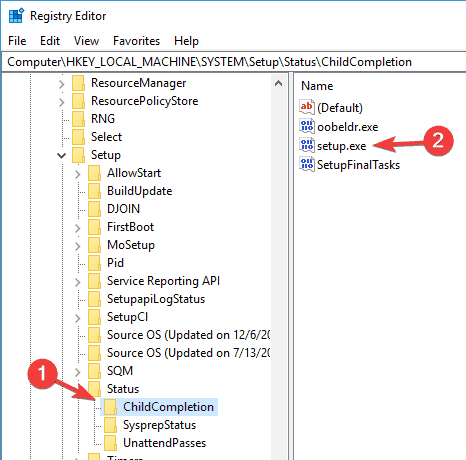
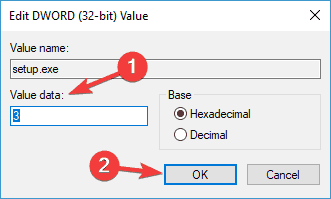
Change the Value Data from 1 to 3 and click OK to save changes.
Close Registry Editor and restart your computer.
2. Check your hard drive cables
Sometimes you might get stuck in The computer restarted unexpectedly loop due to hard drive cable problems.
Users reported that switching the cables that connect the hard drive to the motherboard fixed the issue, so you might want to try that.
Keep in mind that by opening your computer case you will void your warranty, so if your PC is still under warranty, it might be better to take it to the official repair center.
3. Reset your BIOS settings and format the installation partition
Boot from your USB flash drive and if you see The computer restarted unexpectedly error message, press Shift + F10 to open Command Prompt.
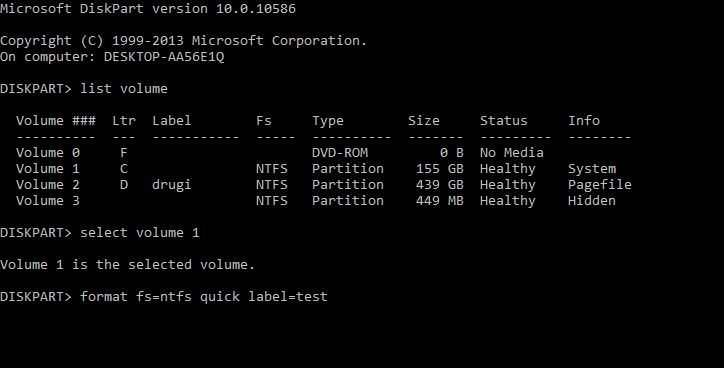
Once Command Prompt opens, enter diskpart and press Enter.
Enter list volume and press Enter. You should see a list of all partitions available. Find the partition on which you wish to install Windows 10 and remember its Volume number.
Enter select volume 1. We used volume 1 in our example, but you need to use the volume that matches your partition.
Enter format fs=ntfs quick label=test and press Enter. You can replace test with any other name you want to use for your partition. We have to warn you that by executing this command you’ll remove all files and folders from the selected partition.
Type exit and press Enter to exit Command Prompt.
After you restart your computer problem with The computer restarted unexpectedly loop should be fixed.
4. Change your boot settings
While your computer boots, press Alt + F10 shortcut.
Command Prompt will now appear. Remove /noexecute=optin and enter system recovery. Now press Enter.
Now you should see a boot screen that has the address of the recovery partition. Press Enter and you should start the recovery process.
5. Disconnect all your USB devices
Most of us use various USB devices on their PC, but sometimes these devices can interfere with Windows and cause The computer restarted unexpectedly error.
If you’re having this problem, be sure to disconnect all your USB devices such as flash drives, printers, and even your USB keyboard and mouse.
Several users reported that disconnecting their USB mouse and keyboard fixed the problem for them, so be sure to try that.
We aren’t sure how your keyboard and mouse can cause this issue to appear, but if you encounter it, be sure to try this solution.
6. Change your BIOS settings
To do that, follow these steps:
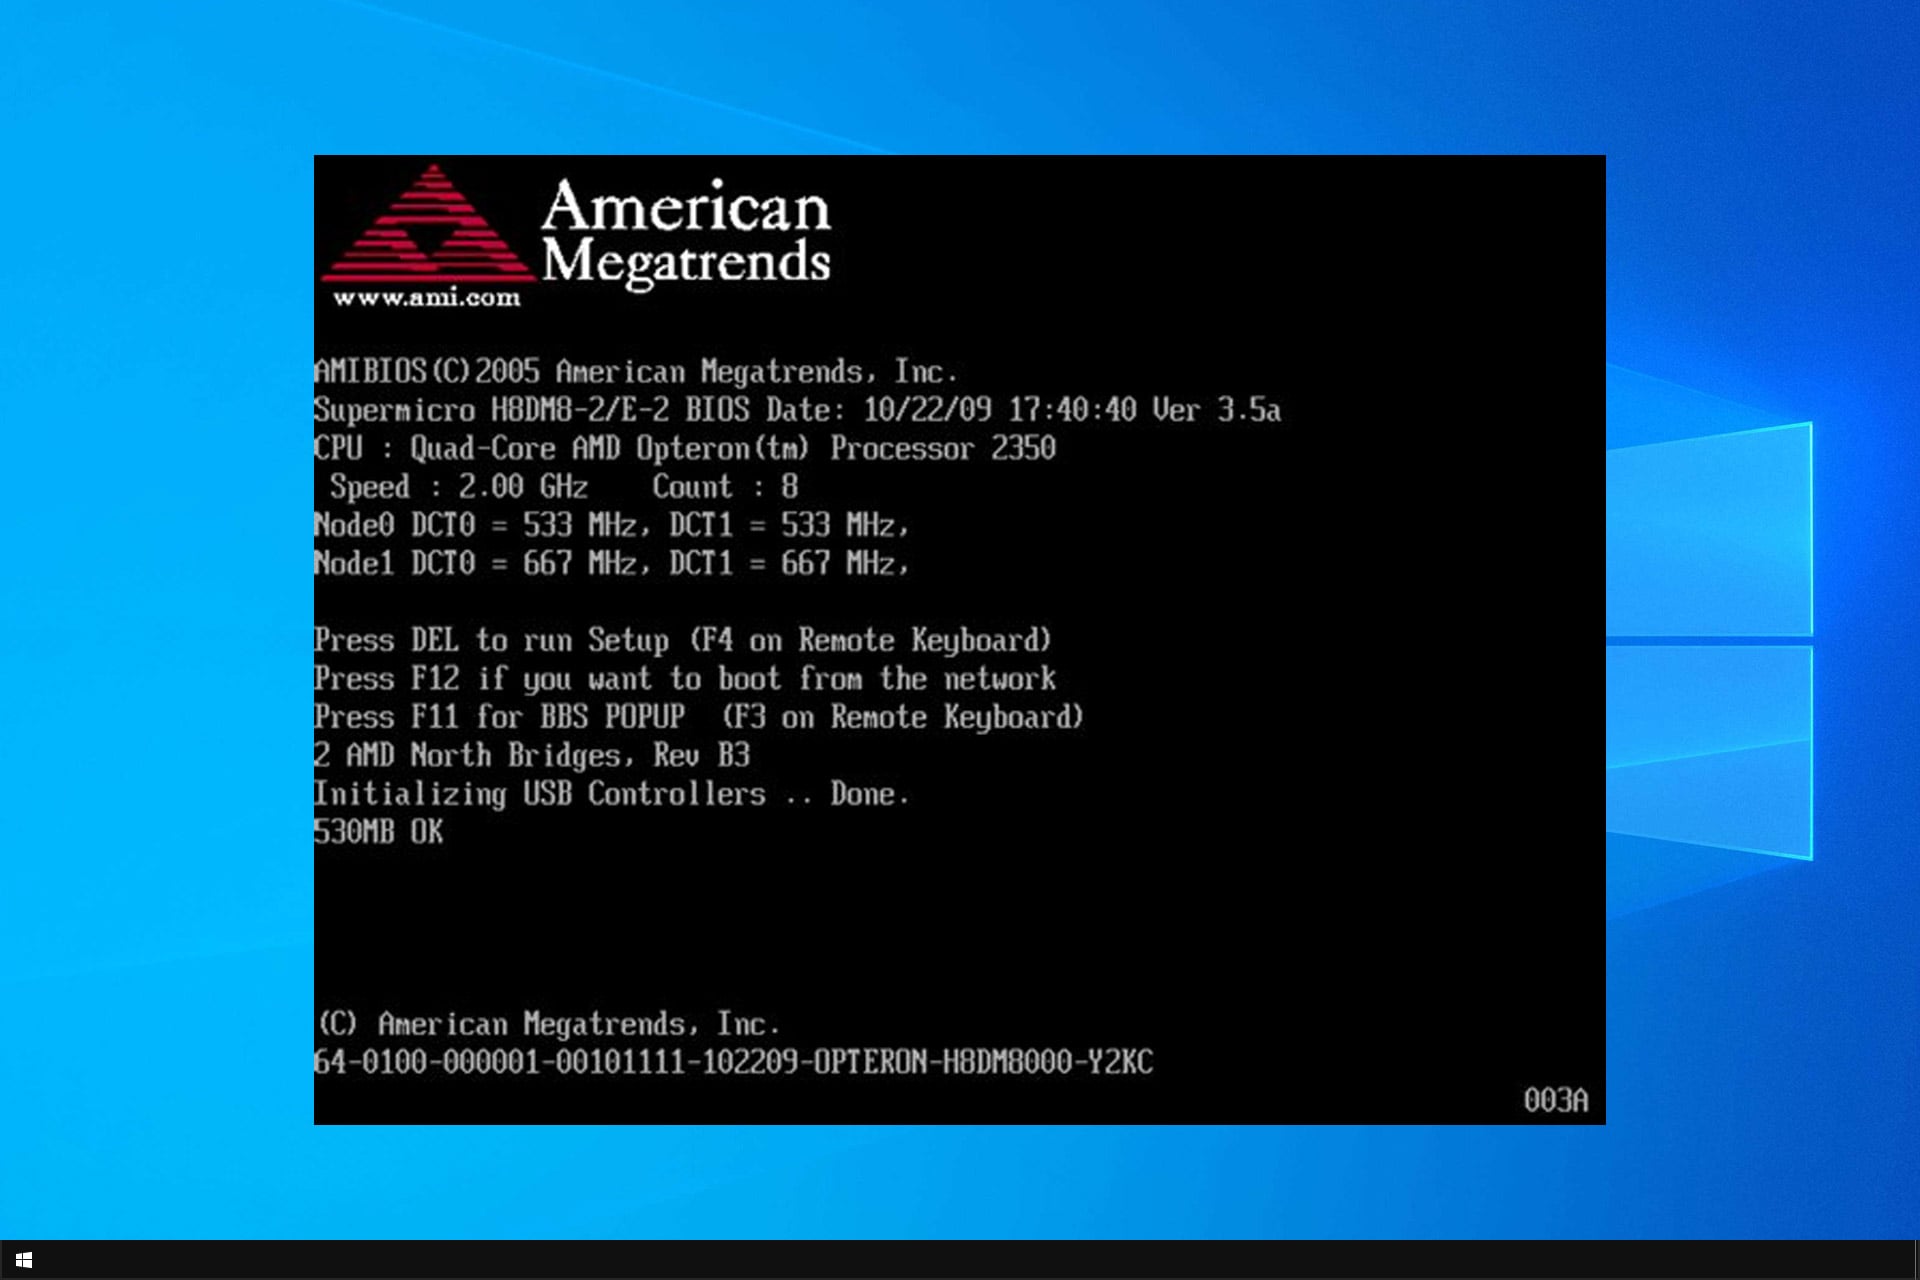
Enter your BIOS while the PC boots.
Once you enter BIOS, navigate to Advanced Tab > Onboard Device Configuration.
Set the SATA Mode to AHCI.
Now go to the Boot tab and set Secure Boot to Enable. Also, change Load Legacy OPROM to Disable.
Set Boot Mode to UEFI and save changes.
While your PC boots, press F12 to open the boot menu. Now select your UEFI boot device. Keep in mind that you might not have all these settings available in BIOS, and if that’s the case, try to enable the available settings.
If the problem still persists, try disabling the aforementioned settings one by one and check if that solves the issue.
Connect a USB flash drive to your PC. For this task you’ll need a drive that is at least 8GB in size. In some cases, 8GB drive won’t be enough, and many users are recommending to use at least a 16GB drive.
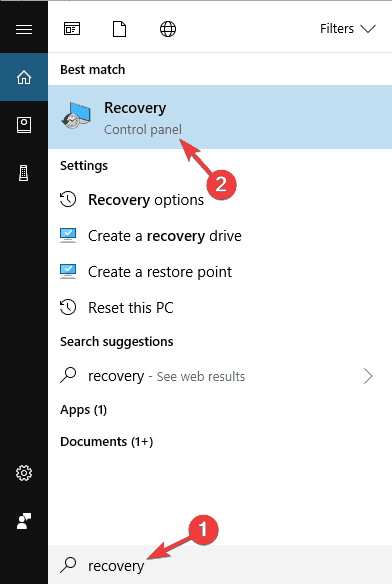
Press Windows Key + S and enter recovery. Select Recovery from the list of results.
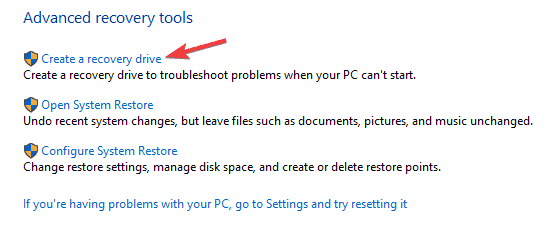
Now select Create a recovery drive.
Choose to create the recovery drive on your USB flash drive and follow the instructions on the screen to complete the process.
Once you create the recovery drive, need to do the following:
Connect the drive to your PC.
Now restart your PC several times during the boot sequence in order to access Advanced Boot section.
Select Troubleshoot > Advanced options > System Image Recovery.
Now follow the instructions on the screen to restore your PC.
Keep in mind that this is an advanced solution, so be extra cautious while performing it. It’s worth mentioning that a recovery drive from another PC might not always work, so it’s always a good practice to create a recovery drive on your PC before you encounter any problems.
Several users reported that they download the recovery drive from their computer manufacturer, so you might want to try that as well. You can also try to fix this problem by using third-party tools to safely recover your drivers.
8. Update your BIOS
In some cases, you might encounter this problem if your BIOS is out of date. Outdated BIOS can sometimes cause The computer restarted unexpectedly error appear, and in order to fix this problem, you might have to update your BIOS.
Updating BIOS is an advanced process, and if you’re not careful you can cause other problems with your PC to occur. In some cases, you can even permanently damage your motherboard, so be extra cautious.
Since you can’t access Windows, you’ll need to download a new version of BIOS on a different PC and move it to your flash drive. Now you’ll need to start Command Prompt and run BIOS update from it.
To see how to update your BIOS, be sure to check your motherboard manual for detailed instructions.
Once you update your BIOS to the latest version, check if the problem is resolved.
What are some variations of the computer restarted unexpectedly loop?
The computer restarted unexpectedly error can be quite problematic, and speaking of this error, users reported the following problems as well:
The computer restarted unexpectedly or encountered an unexpected error setup is starting services – This error can occur due to your boot settings, and if you encounter it, you might have to adjust your settings accordingly.
The computer restarted unexpectedly loop Windows 10 Surface Pro 4 – This error can appear on almost any PC, and many Surface Pro 4 users reported it. However, you should be able to fix it using one of our solutions.
The computer restarted unexpectedly loop Windows 7, Windows 8 – This error can appear on almost any operating system and Windows 7 and Windows 8 aren’t exceptions. Even if you don’t use Windows 10, you should be able to fix this problem by using one of our solutions.
The computer restarted unexpectedly restart the installation, installation cannot proceed – Sometimes this error can prevent you from installing Windows 10. If this happens, be sure to check if your hard drive is properly connected.
The computer restarted unexpectedly regedit – Sometimes this problem can be caused by your registry. However, you can easily fix the problem by changing a few values in your registry.
The computer restarted unexpectedly or encountered an unexpected error message can be rather troublesome and prevent you from installing Windows 10, but hopefully, you’ll be able to fix it by using one of our solutions.
Although it might sound unusual, one of the most important parts of graphic design is fonts. That is why professionals use font managers like Extensis Connect to always have everything under control.
This solution is pretty unique because it comes with both a cloud version and a desktop app and in this article, we will explore its best features and functionality.
What is Extensis Connect and how does it help you?
Extensis Connect unites two solutions: a font management tool through Connect Fonts Powered by Suitcase, and a digital asset management tool through Connect Assets on one flexible desktop and cloud-based platform.
Connect Fonts, powered by Suitcase, is a font manager that helps you organize, view, find, and use fonts efficiently.
However, it can also detect and track fonts within Adobe’s Creative Suite products like Photoshop, Illustrator, After Effects, and more.
That will help graphical designers a lot because they will be able to activate those fonts and use them in other apps easily.
Cloud-based Connect Assets is a central source for every digital asset that makes finding files fast, organizing them simple, and collaboration easy for teams of all sizes.
Actually, this is a digital asset management tool with workflow automation for organizations with large media collections.
We have tried the 15-day Free trial version of Extensis Connect and we will go through some of its best features we discovered.
What are the best features of Extensis Connect?
As we’ve mentioned before, Connect Fonts Powered by Suitcase has a cloud-based version and a desktop version.
The desktop version has more font-organizing features, and it also tracks Adobe fonts. The cloud-based version is a lot better for collaboration and sharing fonts and libraries with your team or peers.
Let’s go through some of Connect Fonts’ best features to help you decide if it’s the right choice for you.
1. Easy font syncing and activation
As we’ve mentioned above, Connect Fonts detects the fonts installed on your system, but also the Google Fonts and the ones from Adobe products.
To use a font from Google, for instance, you can just browse through the library and click on the corresponding dot to activate it.
You can make a temporary activation (the blue dot) and you will be able to use that font until you restart or quit Connect Fonts.
But if you work a lot with that font, you may activate it permanently (the green dot) and it will appear every time in your apps.
Of course, if the list becomes too big, that may slow your system and then, you have the option to deactivate them by setting the dot to gray.
Activating or deactivating a font in the cloud version
As you can see in the image above, the system is the same in the cloud-based version but the UI, in our opinion, is more appealing.
2. Searching fonts with detailed criteria
Going through thousands of fonts to find out exactly what you’re looking for is not the easiest task but with Connect Fonts it’s a breeze.
Right when you start searching for a font, you will get suggestions and smart tags you can use.
Moreover, if you double-click on a fon in the cloud-based version, you get the option to look for pairings, and fonts that are similar.
Smart Search is more complex in the desktop version
As you may see in the image above, in the desktop version, the search options are even more elaborate.
You have a lot of search criteria available, from the font’s family name to foundry or style. And the smart search will remain on your list for later usage.
3. Simple and easy organization
The most simple way of organizing your fonts in the cloud version is to apply the fonts the Favorites star. That will immediately add them to the My Favorites folder on your left.
Then, a simple click on the three dots button and activating them is a piece of cake.
However, you may also create new sets or collections of fonts. But please note that you cannot blend together fonts from other sources.
For instance, you can’t make a set with Google Fonts and Adobe fonts but in the My Favorites folder will appear all starred fonts.
In the desktop version, it’s even easier to create Libraries and Sets. And adding fonts to those is just a matter of dragging and dropping one or more fonts to the folders, just like you would do in File Explorer.
Another way of organizing the fonts is to apply tags so you can easily identify them when you’ll do a search.
And the magical part is that everything you do in the cloud version syncs to the desktop version. However, the Local Libraries won’t appear in the cloud version.
There are four different preview types for the fonts: Title, QuickType, Waterfall, and ABC123. Of course, this is also the order of detail complexity.
You can change the preview type conveniently by using the 4 icons at the bottom of the preview window and you may also change the font size.
This feature, unfortunately, is not present in the cloud-based version. The only font preview available there is the QuickType.
5. Add users and collaborate
Probably the best part of Connect Fonts is that you can share the font libraries and sets with your colleagues.
You can simply send email invitations individually or in bulk, and then they will have access to the content from Team Libraries.
They will also be able to use, add and collect fonts. That is great when you’re working on a common project, and you need to use the same fonts everywhere.
Most importantly, the Team Libraries will sync with the desktop version and as long as you’re connected to the Internet, all the changes you make in the desktop version will appear online as well.
Manage all your digital assets with Connect Assets
As we outlined at the beginning of this piece, Connect Assets is a cloud-based digital asset management hub.
With this tool, you can have all your documents and creative graphics files in one place and share them with your peers.
After you upload them, it will be easy to search within the library with auto-tags and smart keywords.
Of course, then, you may add users and work as a team as they will be able to share their own creations.
You may add libraries, drag and drop content, and set documents as favorites to access them even more quickly.
Extensis Connect pricing
As we’ve mentioned above, both products, Connect Fonts and Connect Assets within the Extensis Connect suite are available as a 15-day Free trial version.
However, if you want to commit to a license, Connect Fonts is available for $9 per user per month. Connect Assets costs $25 per user per month.
Extensis Connect
Manage your fonts and digital assets with friendly cloud-based tools for professionals.
Payments are debited annually and Extensis accept both credit card and PayPal options.
Pros
Simple and comprehensive user interface
Smart tags based on the look and feel of the font make font searching fast, efficient, and intuitive
Access to the largest crowd-sourced font collection
Available as a cloud-based or desktop app
Universal access (any team member, any place, any time
Suitable for individuals, teams, or agencies
Cons
Connect Assets is pretty expensive for individual usage
Final thoughts
Connect Fonts has to be a golden nugget for any graphics professional or agency. And yes, although we tested it as an individual would, this tool is fitted to any size organization.
Although the desktop version of Connect Fonts seems a bit old-fashioned graphics-wise, it is extremely efficient and surprisingly very easy to use.
The cloud-based tool is a lot more appealing but the merge and sync of the two instances make Connect Fonts a great productivity tool for creative people.
Connect Assets, on the other side, has only a cloud-based version but the idea of keeping all the assets of an agency in the same place is extremely attractive.
And the storage quota for a license is 1 TB, which is enough for a whole lot of projects and documents.
We hope that our review offered a lot of information on Extensis Connect software and that you will try them yourself.
You might also be interested in our list of the best Windows 11 fonts to try out on your PC.
If you already tried Connect Fonts or Connect Assets, feel free to write about your experience in the comments section below.
I’m sure many of us were excited about the release of Windows 11, but like me, you might have noticed that Windows 11 is not showing up in Windows Update. This can be due to a variety of reasons, such as compatibility issues and the phased rollout process.
If you’ve been eagerly waiting for the Windows 11 update to appear in your Windows Update section without success, you’re not alone. In this article, I’ll share multiple solutions to help you install Windows 11 on your PC.
Let’s navigate through the reasons behind the absence of the Windows 11 update and explore effective methods to ensure a successful upgrade. Together, we’ll overcome this hurdle and experience all that Windows 11 has to offer!
Why don’t I see the Windows 11 update?
A large number of computers wouldn’t be able to upgrade to Windows 11 owing to the strict system requirements. And Microsoft has its reasoning for that. Also, if you find Windows 11 23H2 not showing up, it could be a problem with compatibility or an issue at your end to blame.
Can my PC run Windows 11?
To check whether a computer can run Windows 11, Microsoft has released the PC Health Check app. Just download and install the app, run it, and you will find out whether or not your system is compatible.
If you get the message This PC meets Windows 11 requirements, your computer is compatible. Head over to the next section to find out ways to make the upgrade even if Windows 11 is not showing up in Windows Update.
For those of you who see This PC doesn’t currently meet the Windows 11 system requirements, you wouldn’t be receiving the upgrade via Windows Update. Head over to the end to find out how you can install Windows 11 on an unsupported PC.
What can I do if the Windows 11 update is not showing up?
1. Resume Windows Update
Press Windows + I to launch the Settings app.
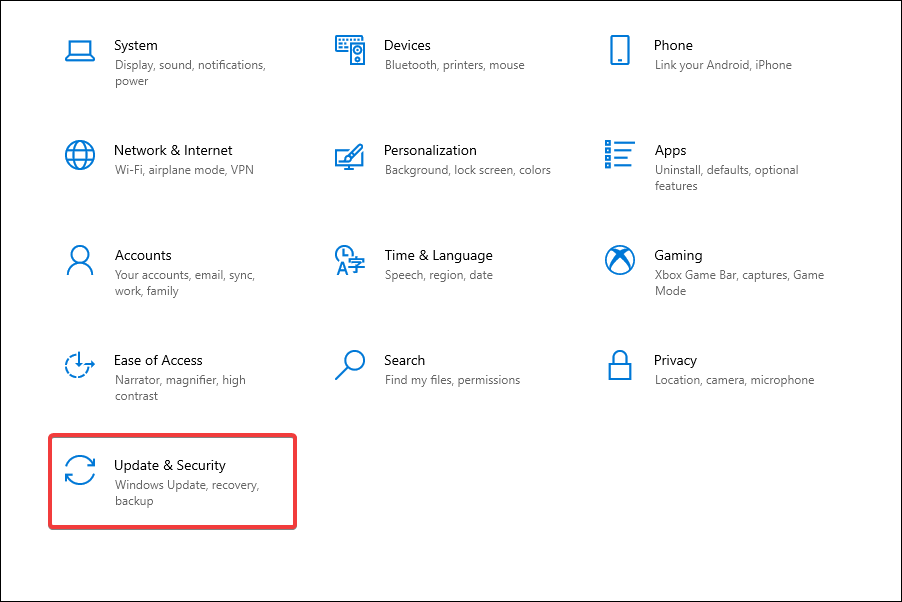
Select Update & Security from the various options listed here.
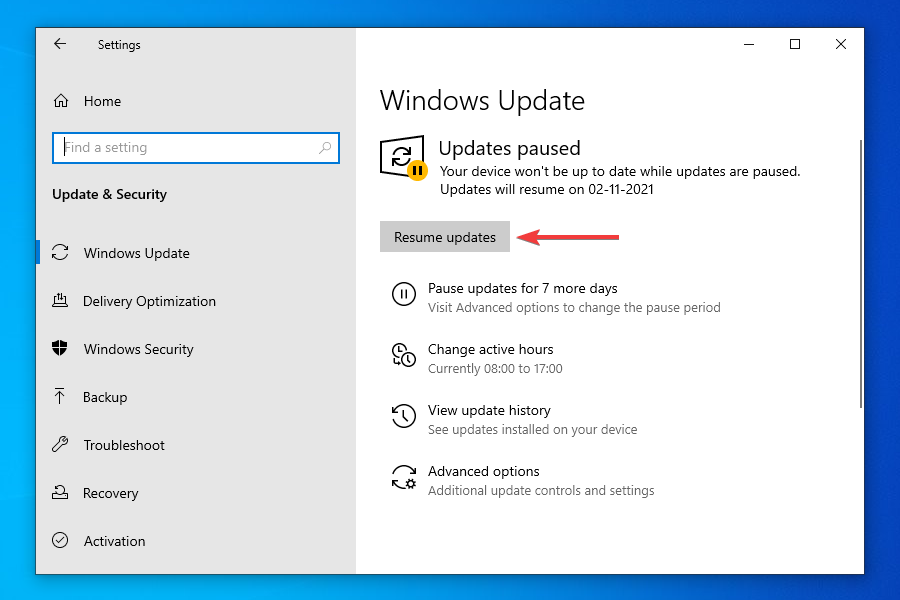
In the Windows Update tab that opens by default, check if there is a Resume Updates button on the right. If there’s one, click on it to start receiving updates.
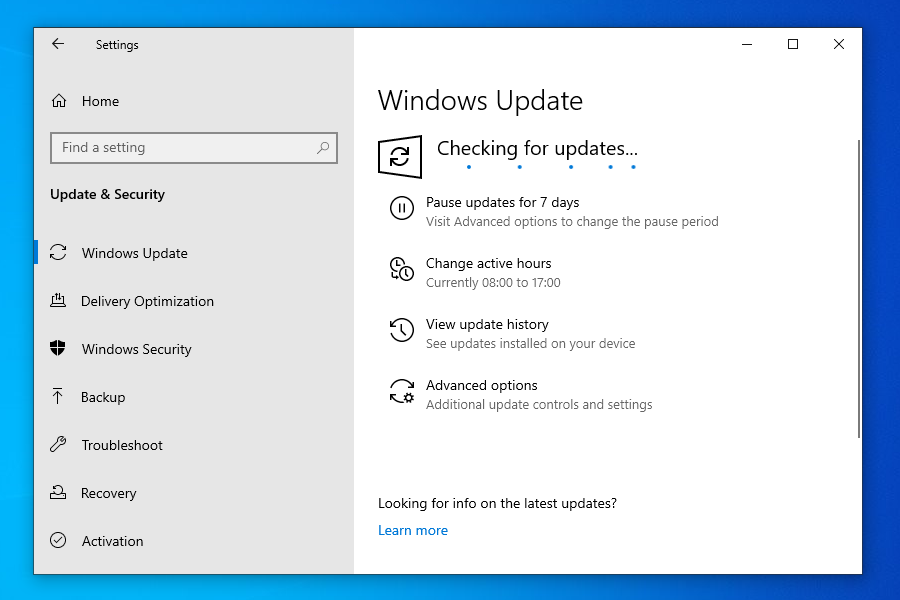
Your system will now automatically start scanning for any available update including those for Windows 11.
If you have paused updates, you wouldn’t be receiving any, including the one for Windows 11. Even if you don’t remember doing it, there’s no harm in cross-checking before we proceed further.
After you enable updates, if an upgrade for Windows 11 is available, it would be shown in Windows Update, and subsequently, downloaded and installed on your computer.
2. Reboot the computer
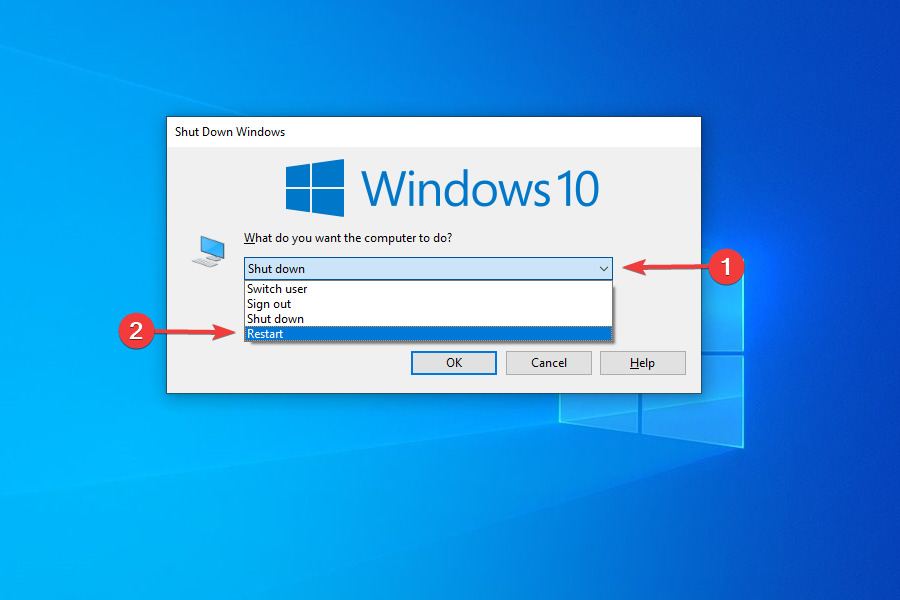
Navigate to the desktop and press Alt + F4 to launch the Shut Down Windows box.
Click on the dropdown menu and select Restart from the list of options.
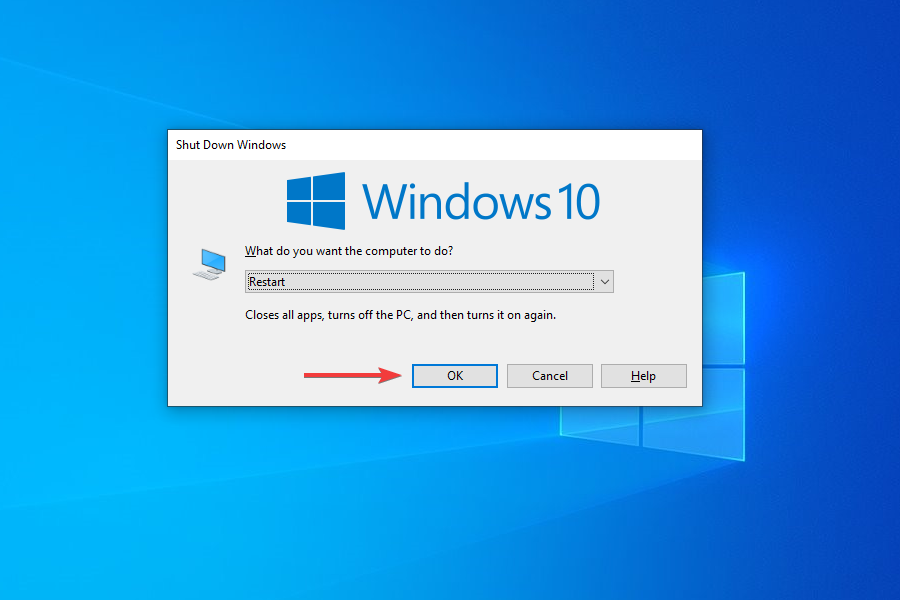
Click on OK to restart the computer.
Before restarting, make sure to save any open files to avoid data loss. Rebooting the computer restarts the OS and fixes any trivial bugs that may be interfering with the Windows 11 update.
3. Run the Windows Update troubleshooter
Press Windows + I to launch the Settings app.
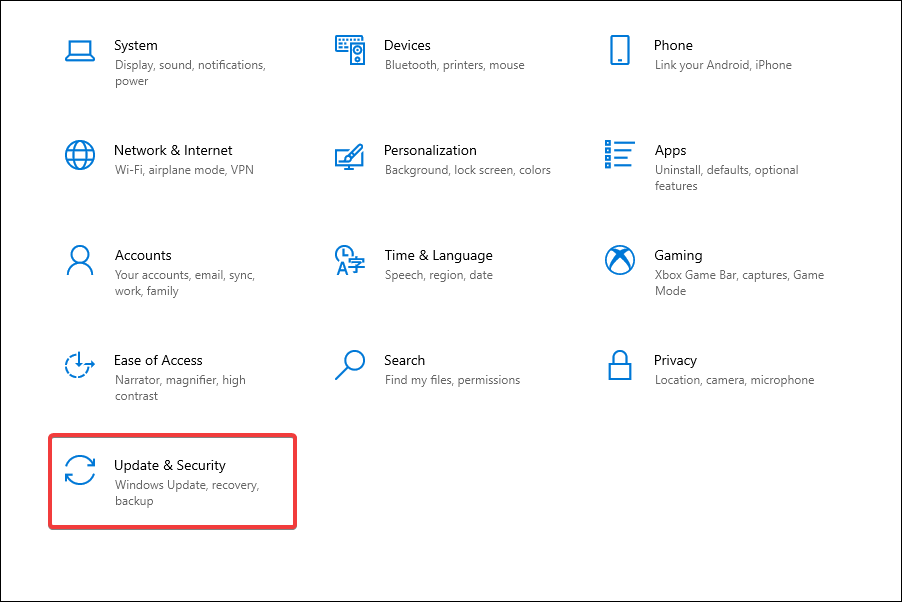
Select Update & Security from the list of options listed in the Settings.
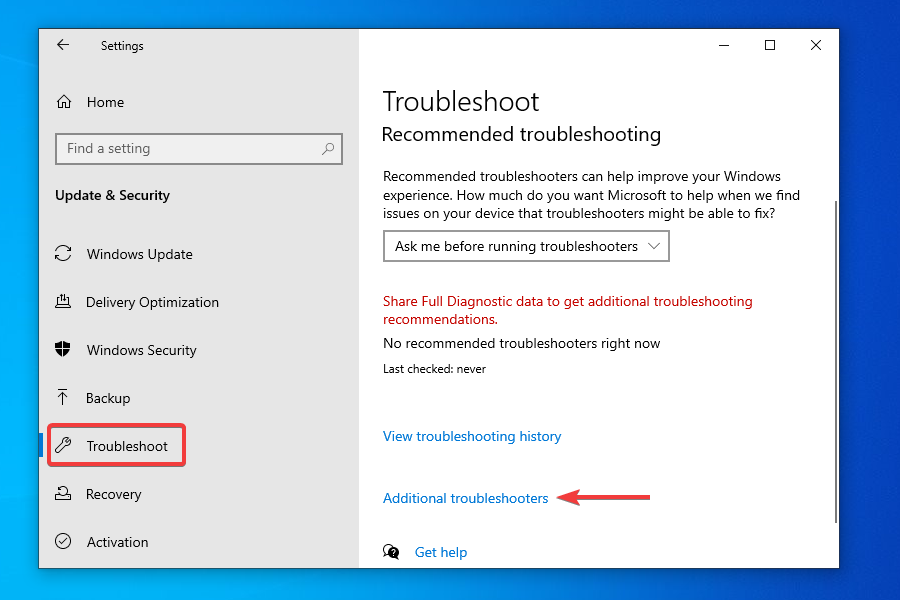
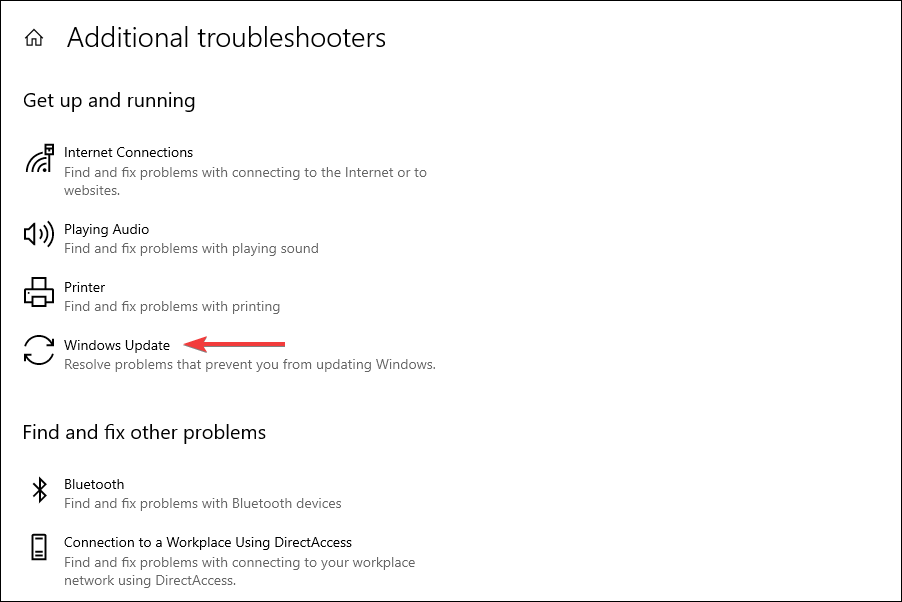
Select Troubleshoot from the tabs listed in the navigation pane and click Additional troubleshooters on the right.
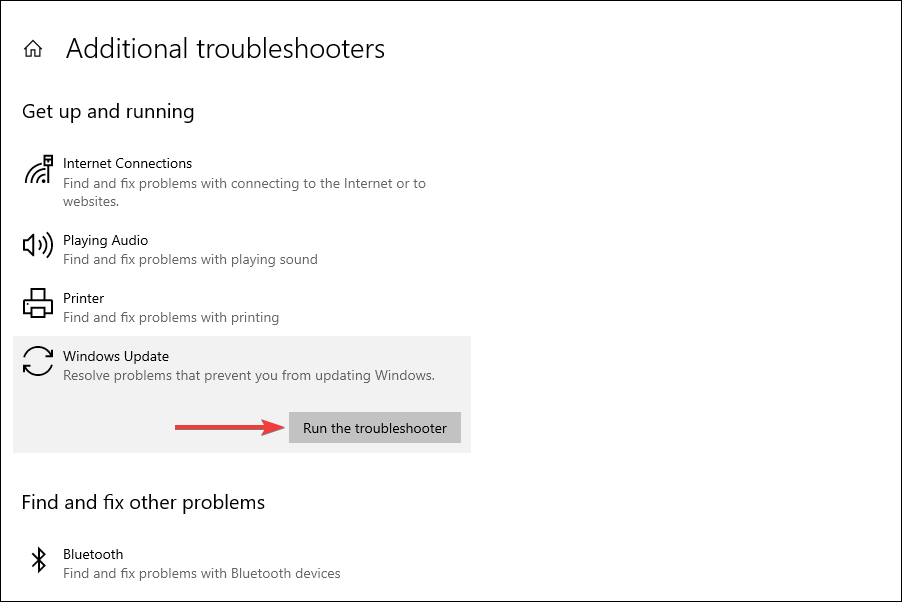
Click on Windows Update.
Click Run troubleshooter to diagnose and fix issues preventing your PC from receiving the update for Windows 11.
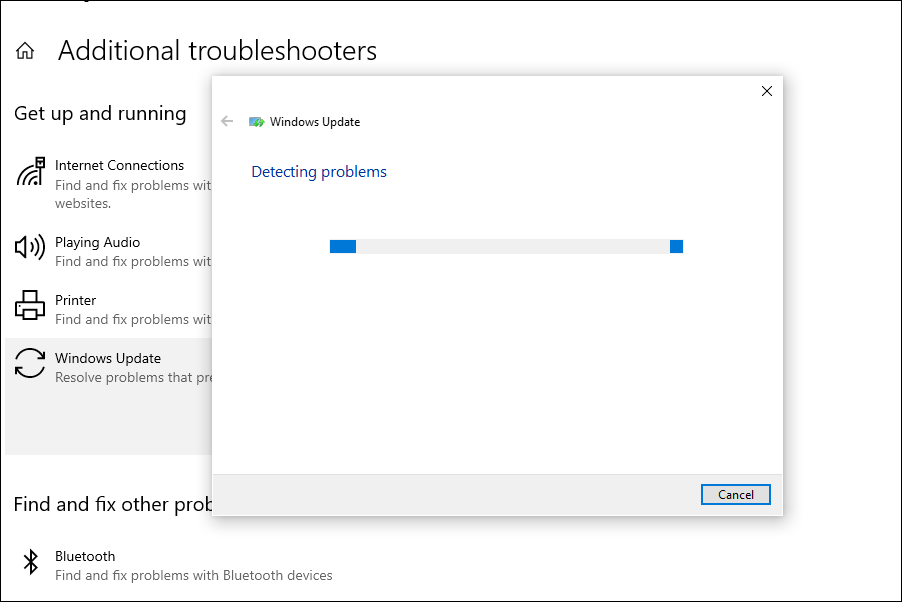
The troubleshooter will now start running. Follow the instructions and choose the appropriate response, if and when prompted, to complete the process.
The built-in troubleshooters offered by Microsoft are excellent in identifying and fixing small bugs, misconfigured settings, and other issues. After the troubleshooter is done running, check if Windows 11 is now showing up in Windows Update.
If they have become corrupt or have run into a bug leading to the Windows 11 not showing up in the Windows update issue, repairing or resetting them should come in handy.
If you are having issues with the Windows update, you can always fix the corrupted files with the help of specialized repair software.
5. Restart the Windows 11 update
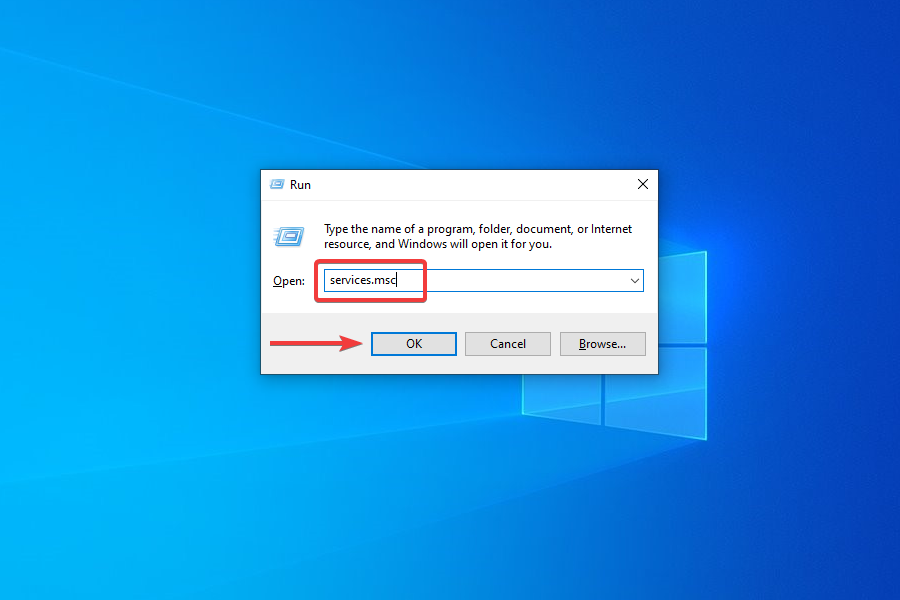
Press Windows + R to launch the Run command.
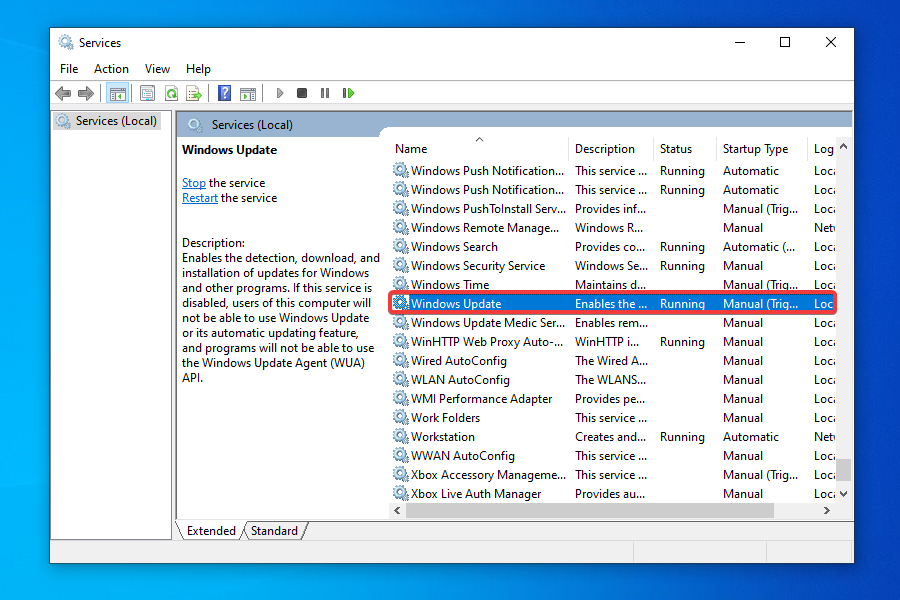
Type services.msc in the text field, and either click on OK or press Enter to launch the Services app.
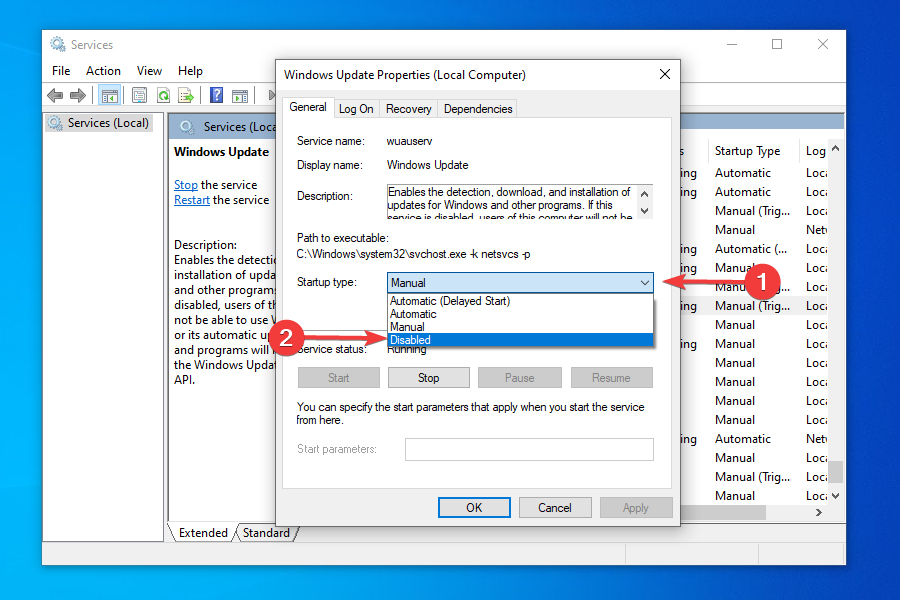
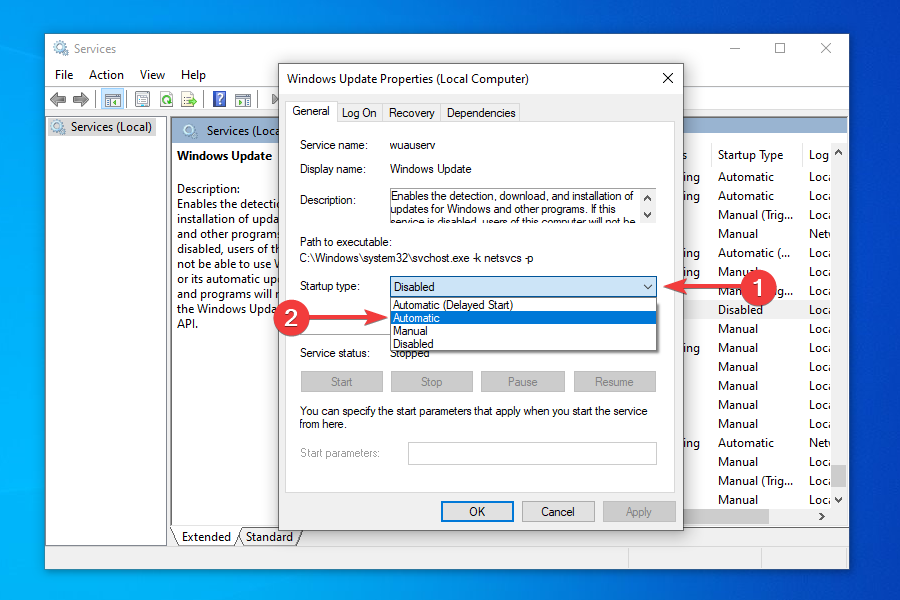
Locate and double-click on the Windows Update service.
Click on the Startup type dropdown menu and select Disabled from the list of options that appear.
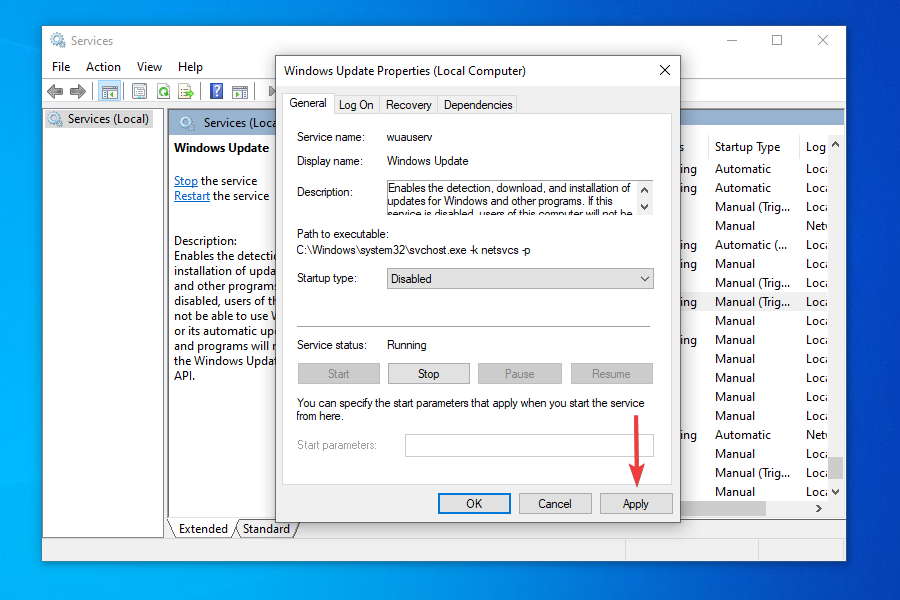
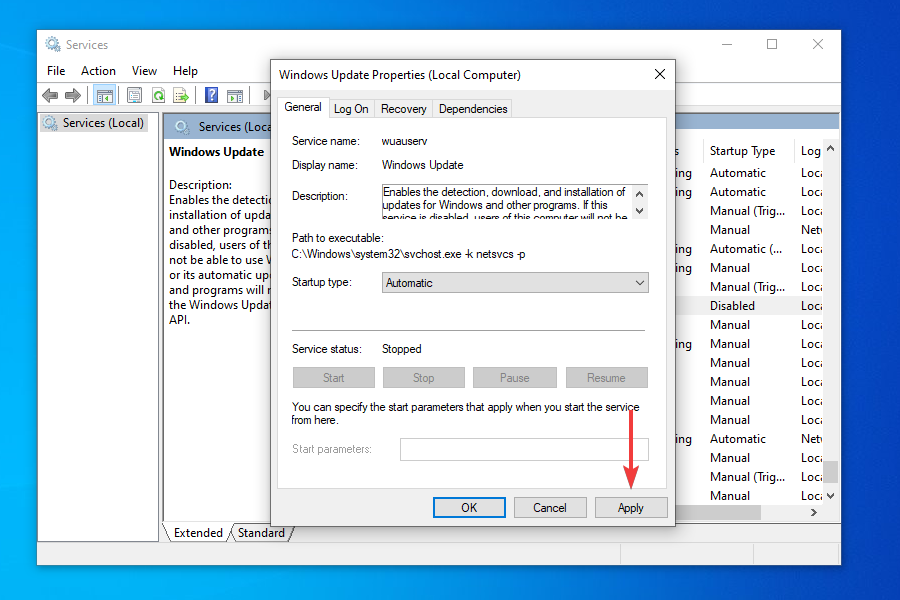
Click on Apply to save the changes.
Next, click OK to close the properties window.
Close the Services app.
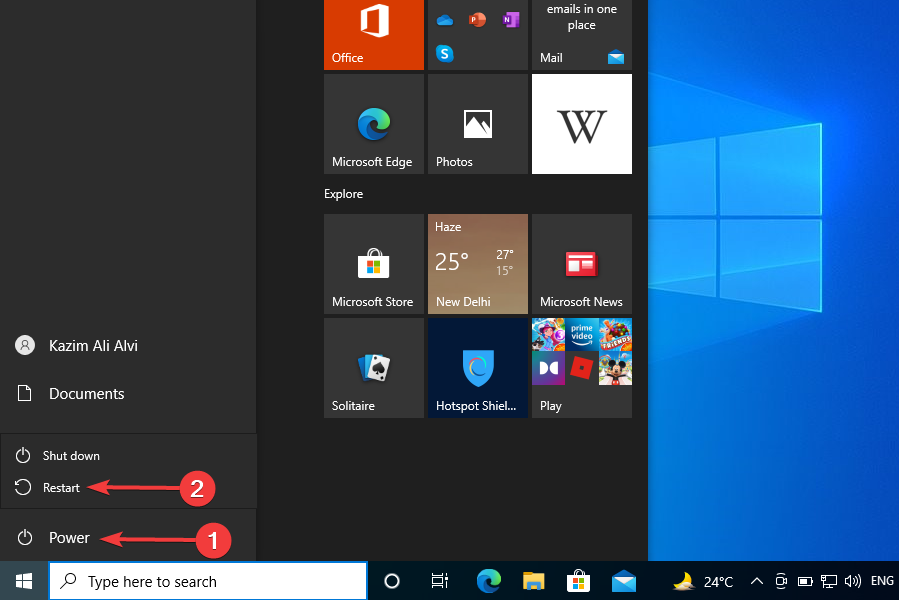
Now, you need to reboot the computer. To do that, press the Windows key, click on the Power button, and select Restart from the menu that appears.
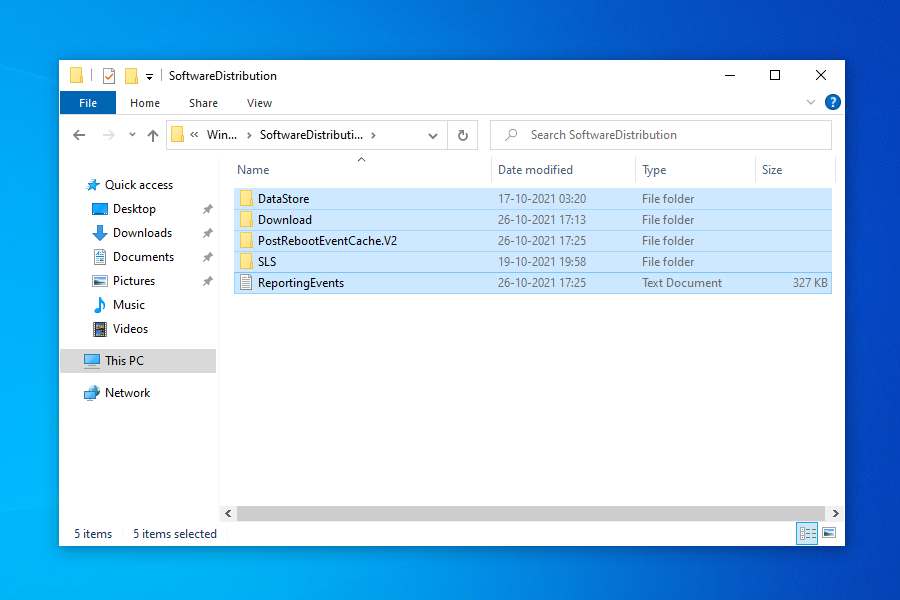
Press Windows + E to launch the File Explorer, and navigate to the following path or paste it in the addressbar at the top and hit Enter.C:\Windows\SoftwareDistribution
Press Ctrl + A to select all the files saved here, and hit the Del key to delete them.
Choose the appropriate response in case a confirmation box pops up.
Now, again launch the Services app as you did earlier, and double-click on the Windows Update service.
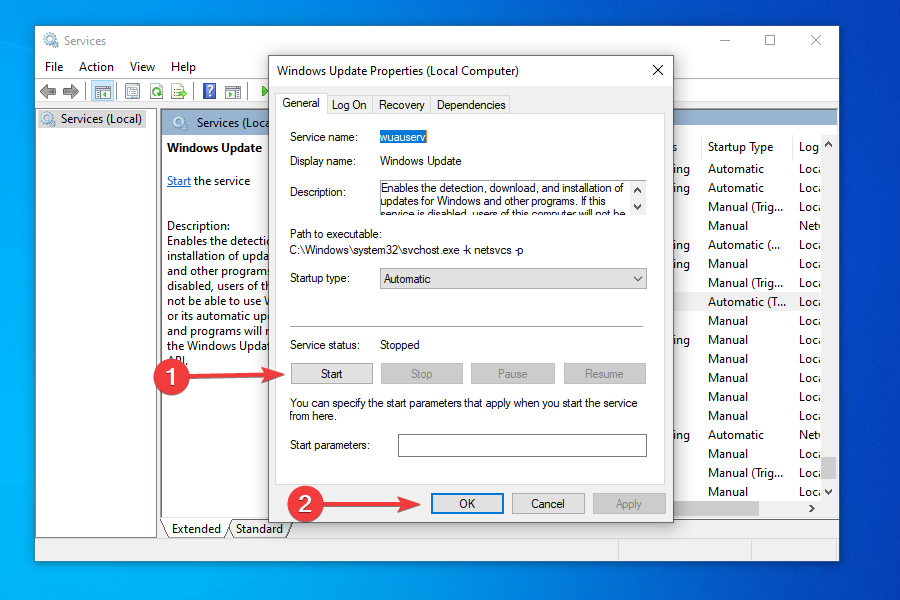
Select Automatic from the Startup type dropdown menu this time.
Click on Apply to save the changes.
Click on Start under Service status to run the service, and then click on OK at the bottom.
Go to the Windows Update section in Settings and check if you can now install Windows 11.
In some cases, the update for Windows 11 may seem stuck at 100% for hours without any progress. In such cases, following the steps mentioned here will get things up and running and allow you to upgrade.
6. Disable or uninstall conflicting apps
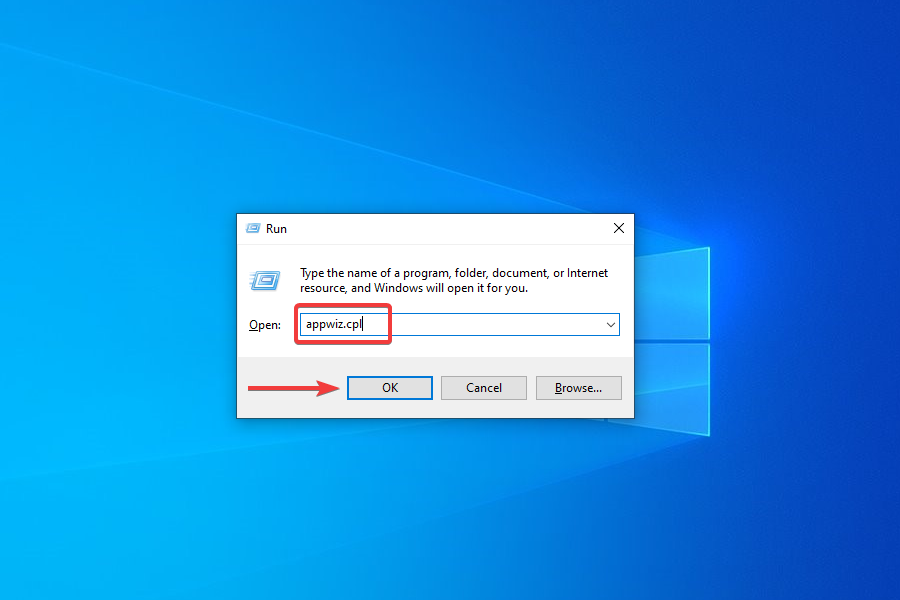
Press Windows + R to launch the Run command.
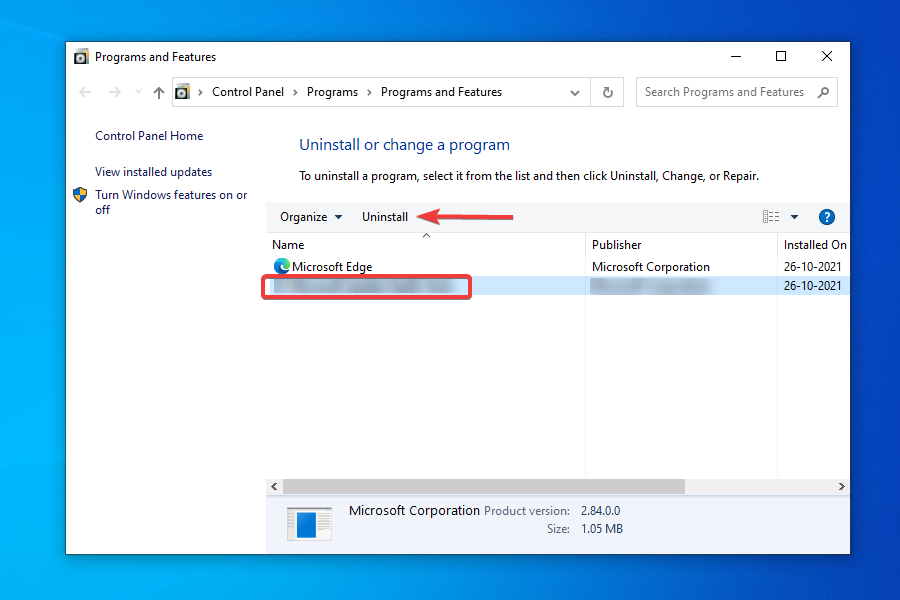
Enter appwiz.cpl in the text field and click on OK or hit Enter to launch the Programs and Features window.
Locate and select the app you want to remove, and click on Uninstall at the top.
Choose the appropriate response in case a confirmation box pops up.
To disable an app, you can go to its built-in Settings and turn on/off the required toggle or choose the appropriate response.
The method to disable each app is different and there should be an option for it somewhere in the app’s built-in Settings. Search the FAQ section on the official website for the program to find out the exact steps.
If disabling the app didn’t work or you couldn’t find the option for it, follow the steps above to uninstall the app.
Certain programs are known to block the Windows Updates, thus leading to the current issue.
You should look out for third-party firewalls and disable or uninstall them. Also, apps like Pi-hole or other similar ones, have been found to be the culprit, and uninstalling them fixed the problem.
Once you are done disabling or uninstalling the problematic apps, check if you are able to find and install Windows 11 from Windows Update.
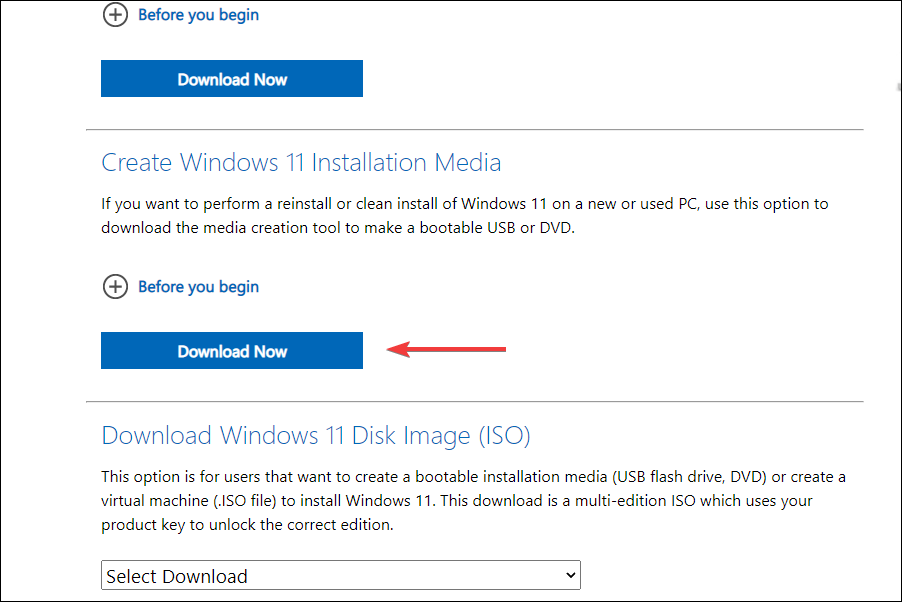
7. Use the Installation Media
NOTE
For this method, you will require a USB flash drive with more than 8 GB of storage to create a bootable USB for installing Windows 11.
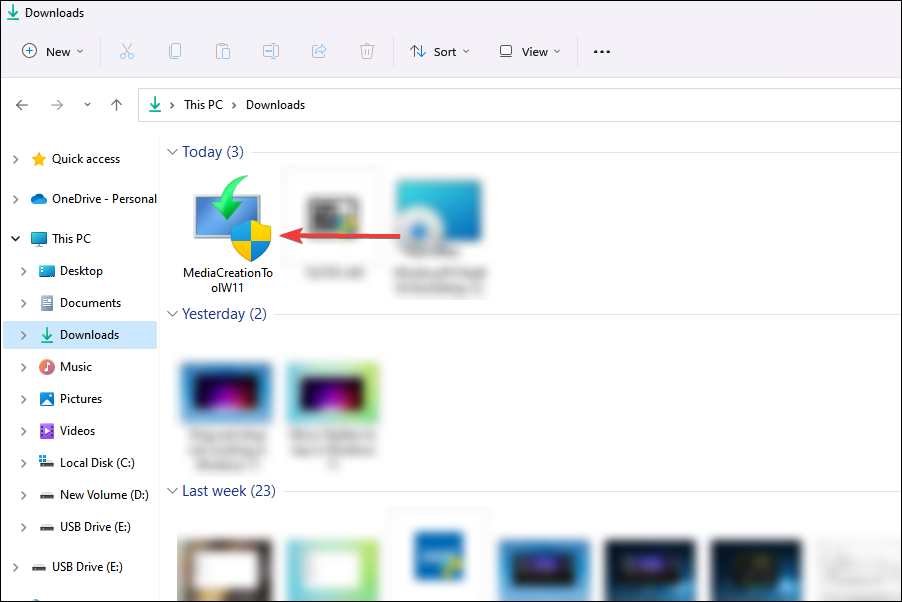
Navigate to the location where the downloaded file is saved and double-click on it.
Click Yes on the UAC prompt that appears.
The setup will take a few moments to get things ready.
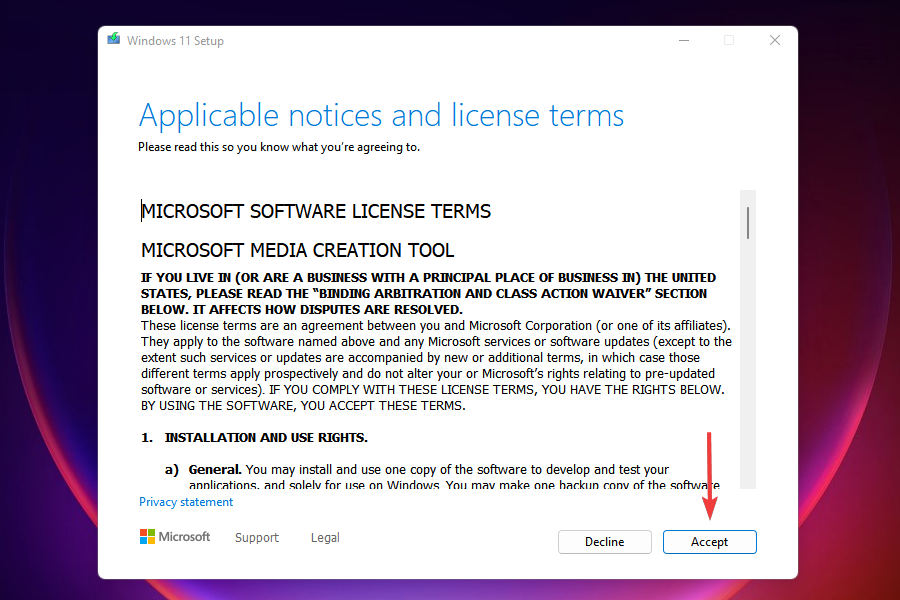
Click on Accept to agree to the license terms.
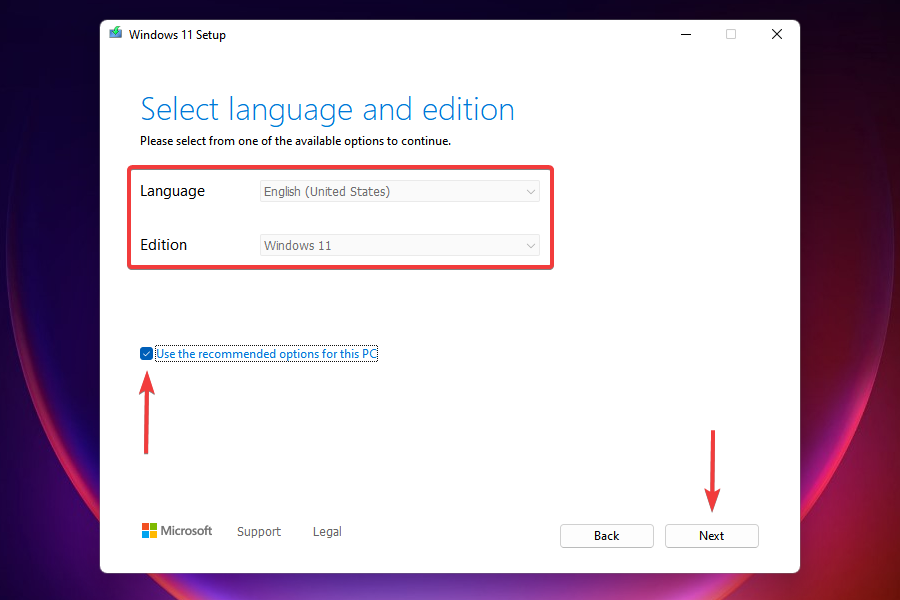
Now, you will find the recommended language and edition already selected. In case you want to make any changes, untick the checkbox for Use the recommended options for this PC and choose the appropriate settings. Finally, click on Next.
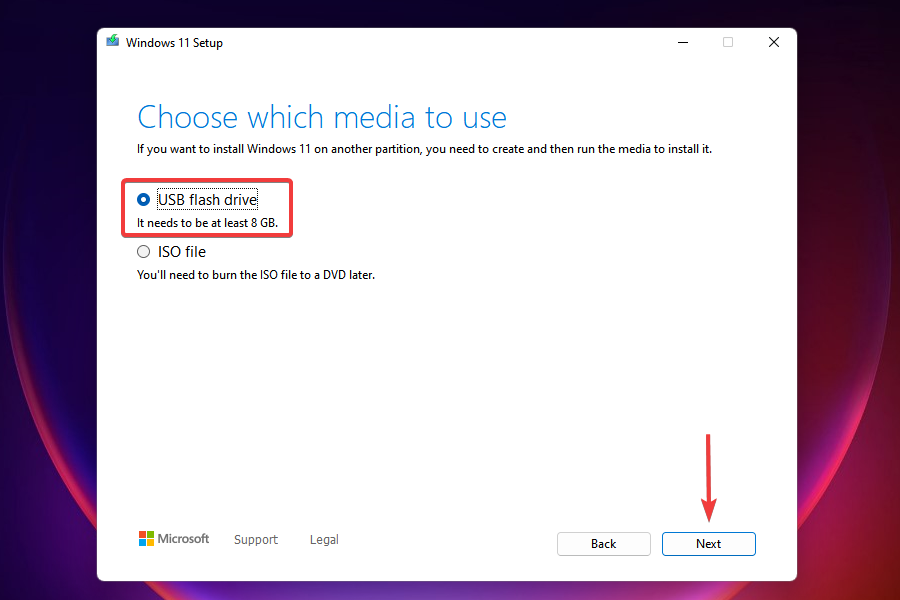
Choose the USB flash drive option and click Next.
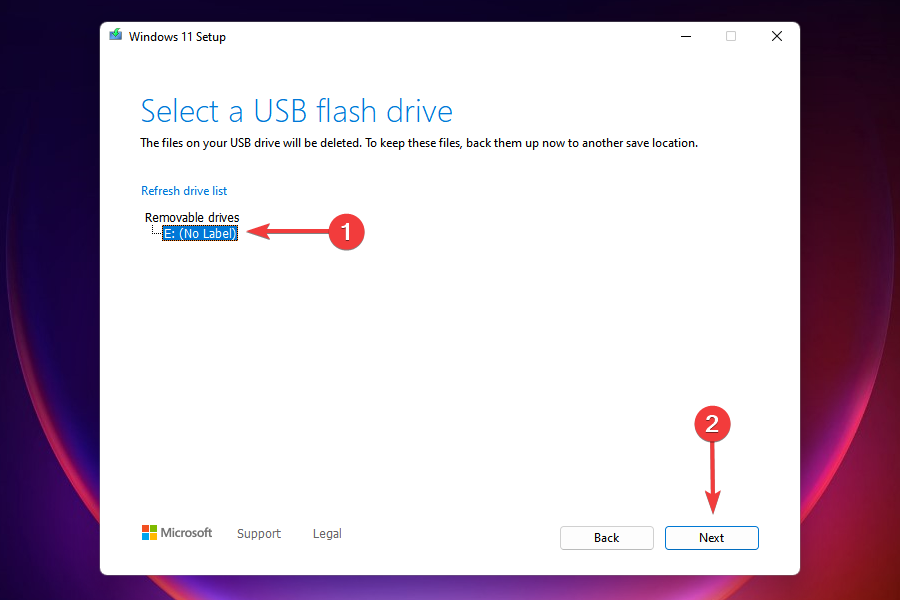
Select the removable drive that you earlier plugged in from the list and click on Next.
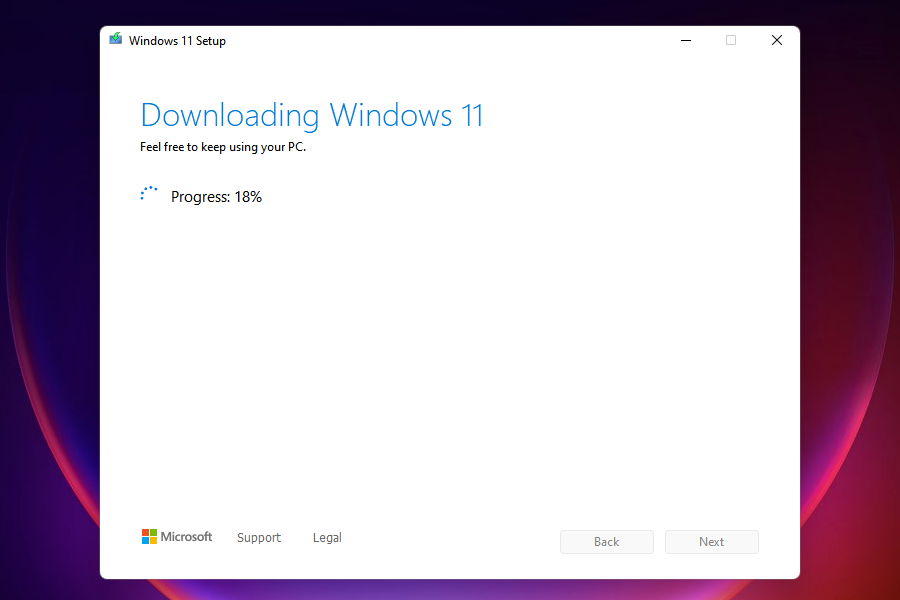
Wait for the setup to create a bootable USB drive. You can monitor the progress in this window.
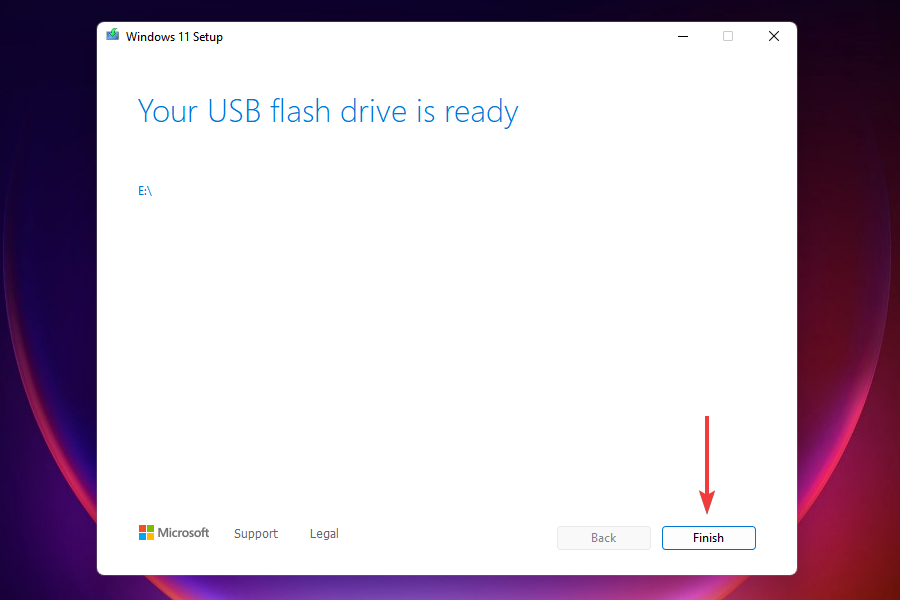
After the bootable flash drive is created, click on Finish to close the setup.
Once done, you can now easily install the OS from the bootable USB drive. Although the guide is for Windows 10, it would assist you when installing Windows 11 as well since the process remains the same.
After the flash drive is booted, follow the on-screen instructions to complete the installation process.
A major advantage of this method is that you will always have a bootable USB at your disposal, which would make things a lot easier in case you have to reinstall Windows 11.
We’ve written extensively about the issue of people being unable to complete the upgrade process to Windows 11 or not seeing the option at all. Here are some resources we’re suggesting for you to check out:
Can I use the Windows 11 Installation Assistant to upgrade?
Yes, the Windows 11 Installation Assistant is another tool at your disposal to upgrade to the latest iteration. However, you cannot use it if the PC doesn’t meet the minimum system requirements, since the Installation Assistant wouldn’t run.
You can download and use the Windows 11 Installation Assistant with the help of our guide. Simply, go to the How to use the Windows 11 Installation Assistant? heading and follow the steps listed there.
What do I do if my PC doesn’t meet the system requirements for Windows 11?
As promised earlier, we will now list out the ways you can install Windows 11 on an unsupported PC. However, Microsoft has stated that such PCs may have compatibility issues and might not receive updates, including those for security. You will thus be exposing the system to a major risk.
By the time you reach the end of this article, you know many ways to install the latest iteration from Microsoft on both supported and unsupported PCS. Also, the Windows 11 not showing up in the Windows Update issue would be fixed.
Let us know which method worked for you and your experience thus far with Windows 11.
Twitch is one of the most used and appreciated streaming services available on the market, but a large number of users reported the Error fetching your channel information message
It usually occurs for users that work with both Twitch and Streamlabs OBS. The error can be very frustrating especially if you dabble in gaming streaming, or if you want to see the latest streams from the channels you follow.
For these reasons, in this article, we will explore some quick fixes for this issue. Please make sure to follow the steps presented here in the order listed below.
What can I do if I failed to fetch settings from Twitch?
1. Restart app with administrator privileges
Restarting the app using administrator privileges might be exactly what Twitch needs to fetch the settings.
Hit the Windows key, type Streamlabs OBS, then right-click on it and open the first result.
2. From the upper-right corner of the window, click on your profile picture.
3. Select Logout.
4. Click on the X button at the top right of your screen to close Streamlabs OBS.
5. Hit the Windows key, type Streamlabs OBS, then right-click on it and select Run as administrator.
6. Log back into Streamlabs OBS using your Twitchaccount, and try to see if the error persists.
2. Run auto-optimizer
Hit the Windows key, type Streamlabs OBS, then right-click on it and select Run as administrator.
Click on the cog wheel Settings button, from the lower-left corner of the window.
Inside the General tab, click on Auto Optimize.
The optimization process will now start.
When the optimization process is complete, click on Next.
3. Check if your stream key is correct
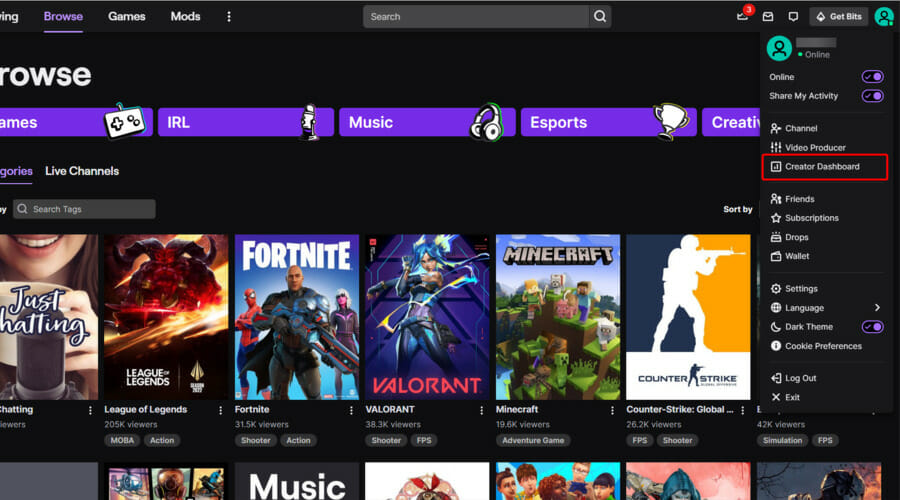
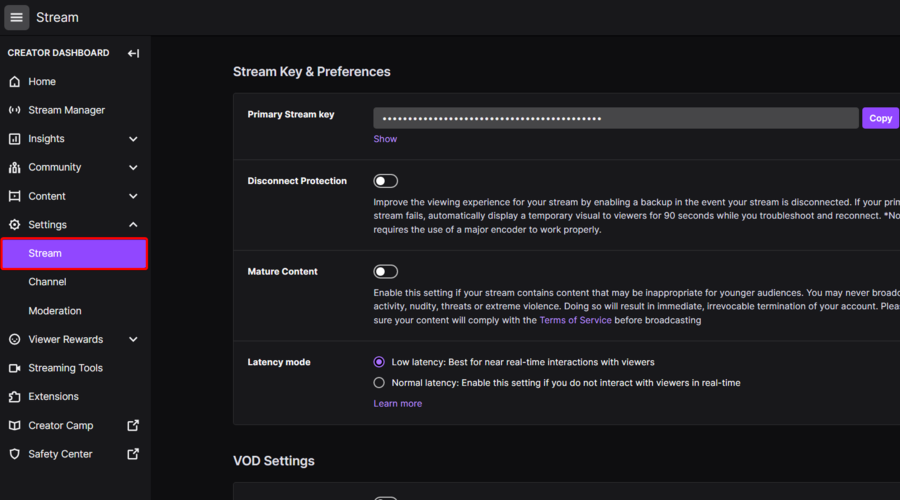
Log into Twitch, then click on your profile picture.
Select Creator Dashboard from the drop-down menu.
In the left panel, expand the Settings section, then selectStream.
Under Primary Stream key, click on Show, then copy the stream key.
Now that you have your Twitch Stream key, hit the Windows key, type Streamlabs OBS, then open it as an administrator.
Click on the Settings cogwheel.
Click on Stream tab, then paste the copied Twitch stream key, and select Done.
Some users also reported that Twitch failed to retrieve the stream key. If it’s happening to be in the same situation, make sure you verify some useful solution to fix it once and for all.
In this article, we explored some of the best methods to deal with the Error fetching your channel information message.
Try them and feel free to let us know if this guide helped you by using the comment section below.
Google Meet is a video chat, but it’s more than just a simple video call. The app also lets you share your screen to show the other participants what’s on your computer, as well as share a document or presentation.
However, these extra features come at a cost. Users have reported that Google Meet sometimes uses more CPU than it should when running in the background. High CPU usage is a common occurrence in Windows devices so let’s troubleshoot this particular one.
Why does my Google take up so much CPU?
There are a few reasons why your CPU usage is off the roof when using Google services. Here are some potential causes:
You don’t have enough RAM – If your programs are competing for the available RAM, some will struggle to keep up. If this is the case, you’ll need to add more RAM or limit RAM usage.
Too many applications open – The more programs you have running on your computer at once, the more work each program has to do in order to keep running smoothly.
Windows update – According to users, they noticed that the high CPU usage started immediately after updating their OSes. It could be a bug or glitch in the new update.
Outdated drivers – If the problem is that your computer isn’t responding quickly enough, it could mean that your drivers are due for an update.
Screen resolution settings – Google Meet will not use as much processing power if your resolution is set to a lower setting.
Your computer might be underpowered – If you’re using an older computer it may not have enough power to run the program smoothly. It may be time to get your hands on a new PC.
Virus/malware – It’s possible that malware could be causing issues with Google Meet and taking up too much of your CPU. Malware often uses up a lot of resources.
Does Google Meet use a lot of RAM?
Google Meet is a very light app, so it shouldn’t use much of your computer’s RAM. However, if you’ve set your video settings to high quality or are using a lot of video effects, installed extensions, and plugins, you could end up using a lot more than expected.
Basically, the amount of RAM that Google Meet uses is dependent on a number of factors that you can easily tweak if you notice it’s consuming a lot significant amount of CPU.
How do I fix high CPU usage in Google Meet?
A few checks that may be able to help include:
Close down any unneeded tabs or Chrome extensions.
If you’re running an older version of the app, you may see high CPU usage. You should always keep your apps up-to-date. This will ensure that they have the latest security patches and are running efficiently.
If there are no updates, you can uninstall and download the Google Meet app again so that any new updates will be registered immediately.
2. Adjust your screen resolution settings
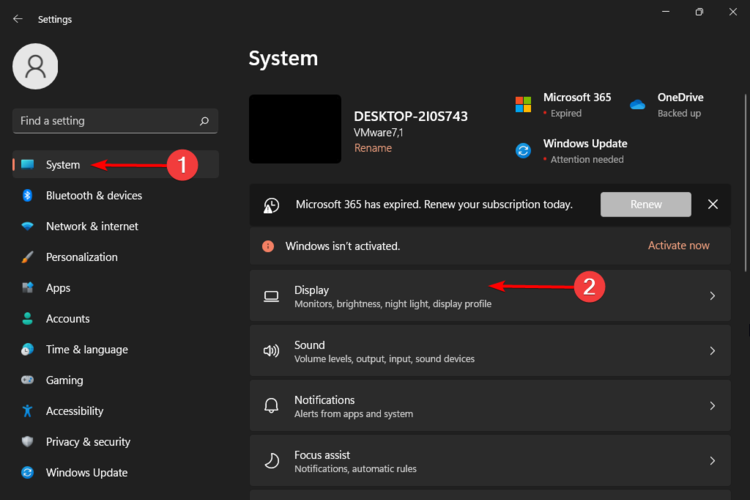
Hit the Start menu icon and select Settings.
Click on System then select Display.
Navigate to the Scale & layout section then under Display resolution, click on the drop-down menu and pick a lower resolution setting than your current one.
3. Update your display drivers
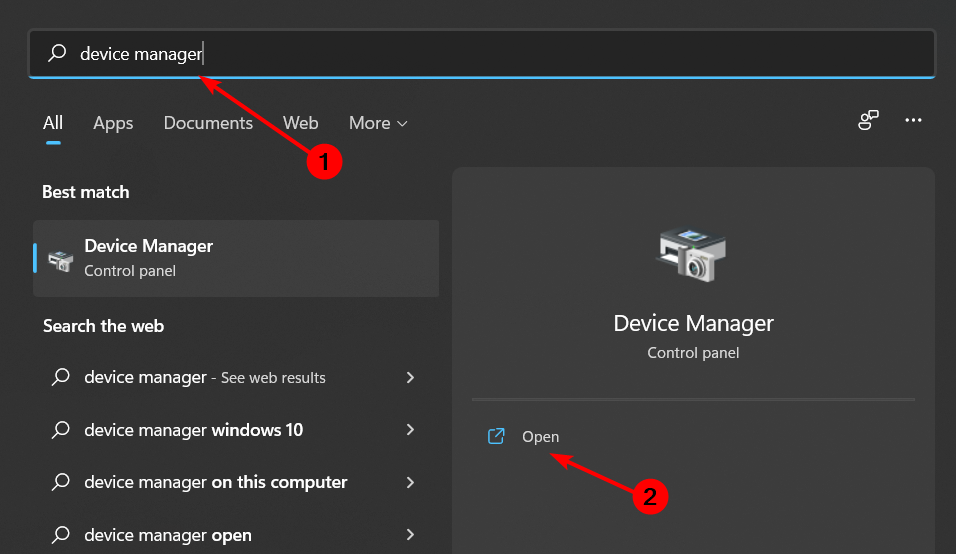
Hit the Windows key, type Device Manager in the search bar, and click Open.
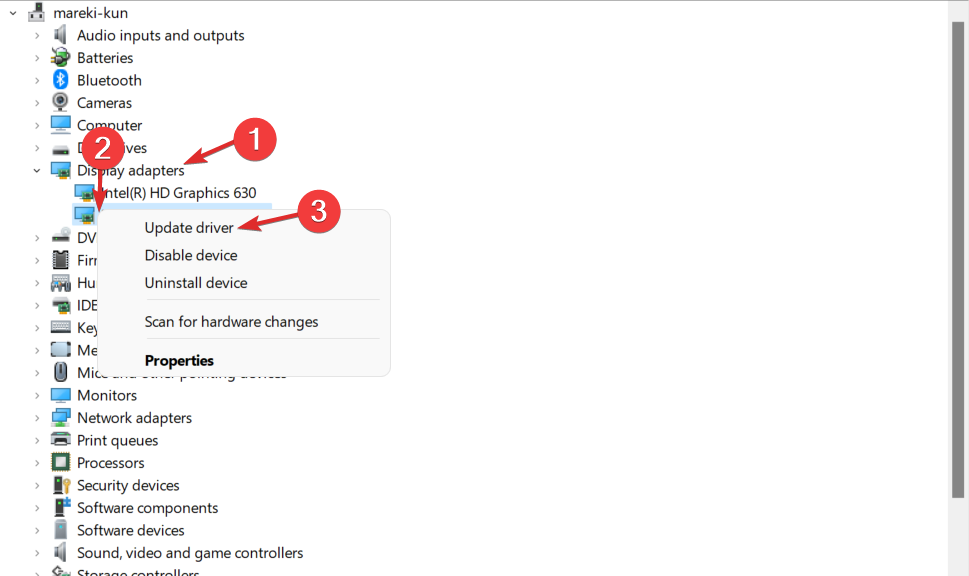
Navigate to Display adapters and find your graphics card.
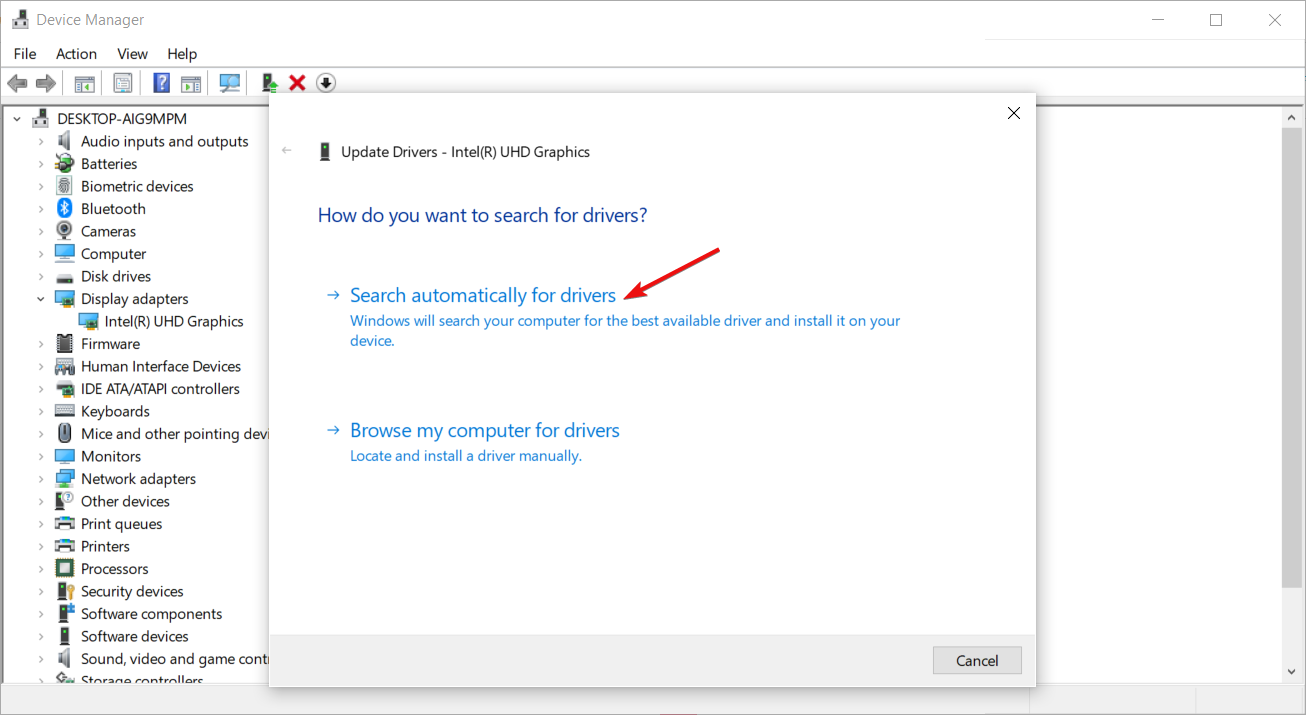
Right-click on your graphics card and select Update driver.
Select Search automatically for drivers.
If you’re not familiar with the process of updating drivers manually, it can be quite frustrating. Even if you’re an experienced PC user, updating drivers can be a time-consuming task that can lead to many problems.
This is where a third-party tool comes in. Outbyte Driver Updater is a tool that allows you to update your drivers automatically. It scans your PC for outdated drivers and offers solutions for updating them.
Outbyte Driver Updater
Try using Outbyte Driver Updater to easily update your outdated drivers with the latest versions.
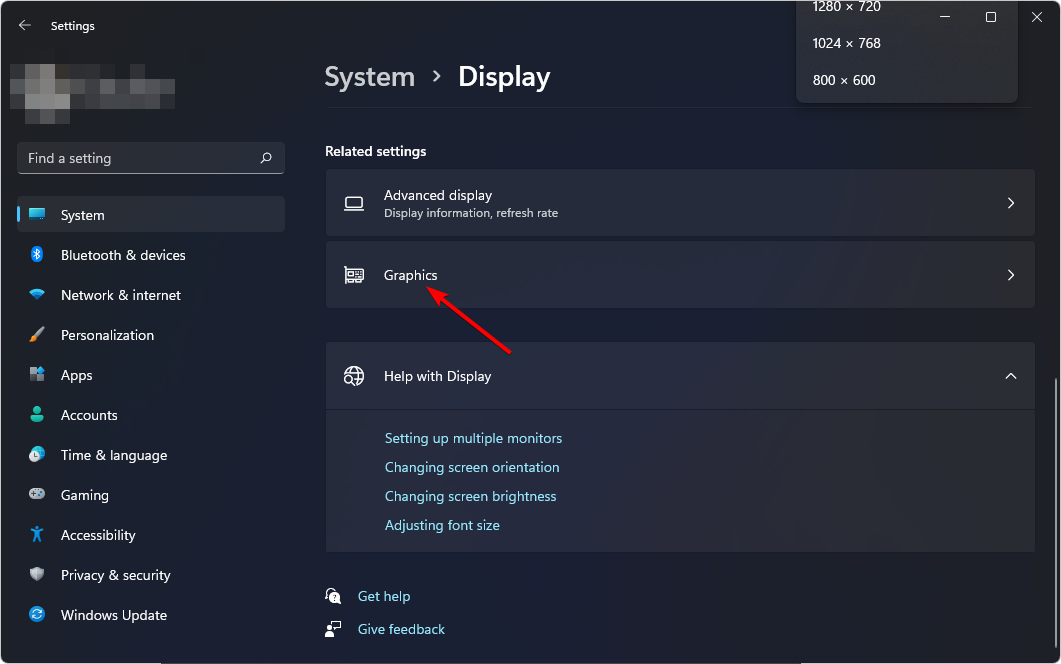
Click on System on the left pane then Display on the right pane.
Scroll down and select Graphics.
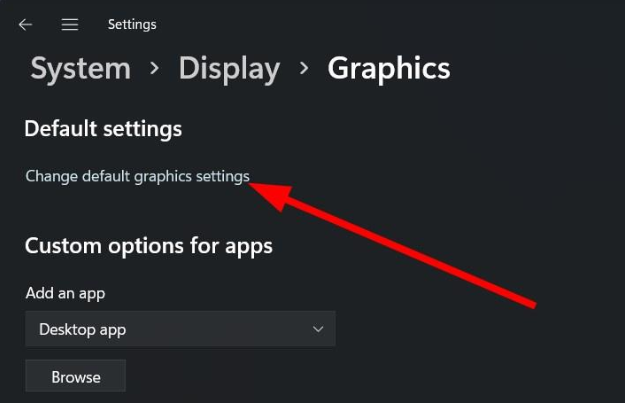
Select the Change default graphics settings option.
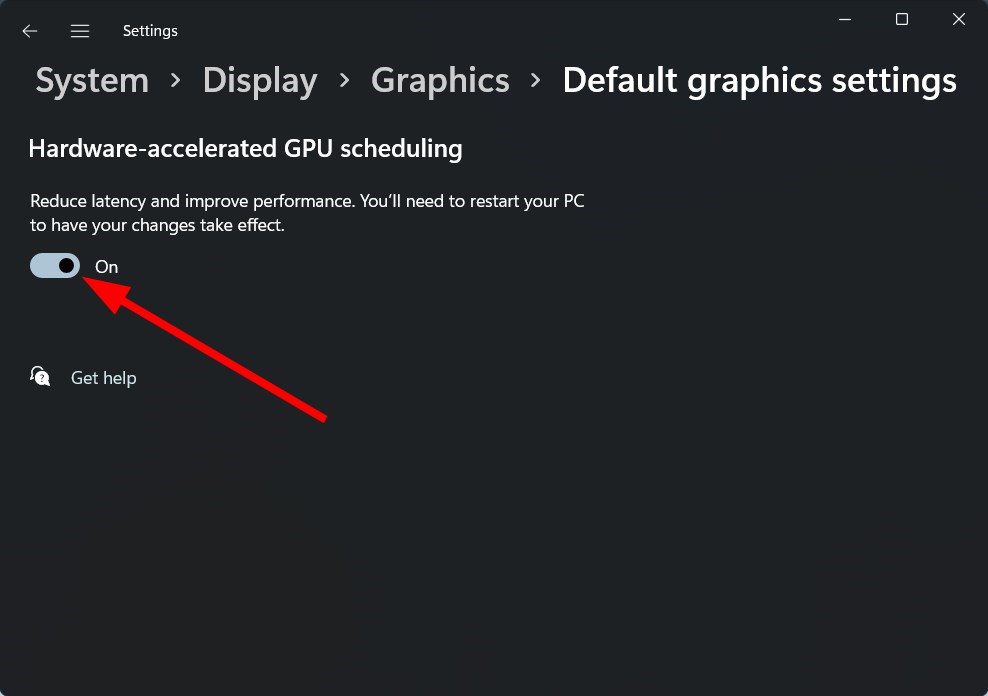
Now, toggle off the Hardware Accelerated GPU Scheduling option.
Disabling hardware acceleration will only benefit an older processor. Multi-core processors need the hardware acceleration turned on so that it will reduce the load on the CPU. If this doesn’t work you can look for other ways to boost your PC’s performance.
Select Windows Update and click on Check for updates.
Download and install if available.
Supposing none of these come to your aid, you can try running a virus scan or switching to a more comprehensive antivirus program. Rolling back Windows updates may also be an option, especially if the spike in CPU usage happened after an update.
If you experience frequent high CPU usage from your apps, you should consider installing CPU usage cleaner software. These work in the background and clean up any processes that are resource-intensive.
Windows 10 has been out for a while, but people from all over the internet are reporting issues like Windows 10 install stuck at 1%, 20%, 90%, setup is starting stuck Windows 10, Windows 10 install stuck at Windows logo, Windows 10 installation is stuck at black screen, and most popular, SOMETHING HAPPENED.
And in this article, we’re going to try to help you find the solution to this problem. Before we get to actual solutions we have to tell you to check if your computer is compatible with Windows 10 first.
This goes especially for those who didn’t have Windows 10 Technical Preview installed at least once, but decided to upgrade when the full version came out. As a part of the compatibility test, you should also check is your BIOS is updated to support Windows 10.
How do I fix Windows 10 if it’s stuck during installation?
According to users, sometimes when the setup is starting it can get stuck on Windows 10 and not enter the installation process. This can be a big problem, but there are other installation problems that can occur.
As for installation issues, here are some problems reported by the users:
Windows 10 install stuck on logo, getting ready, black screen, setup is starting, checking for updates, spinning dots, blue screen, purple screen
There are many issues that can cause your Windows 10 setup to get stuck, but you should be able to fix most of these issues by using one of our solutions.
Windows 10 installation failed
Sometimes your installation can fail due to various reasons.
We already covered what to do if your Windows 10 installation fails in one of our older articles, so be sure to check it out for detailed instructions.
Windows 10 installation error
Sometimes you might encounter installation errors on your PC.
This can be caused by your language settings, but after adjusting them, the issue should be resolved.
Windows 10 install restart loop
Sometimes your PC might get stuck in a restart loop.
To fix this problem, be sure to check your hardware.
Sometimes your RAM might be faulty, and that can cause this and other errors to appear.
Windows 10 setup stuck making sure you’re ready to install
Often the installation can get stuck on making sure you’re ready to install message.
If this happens, be sure to disconnect all non-essential peripherals and check if that helps.
1. Install Windows 10 from an external media
If you received your free upgrade to Windows 10 through Windows Update, there’s a chance that something went wrong while your system was downloading updates, which affects the installation of the system.
Luckily, Microsoft provided ISO files of both 32-bit and 64-bit versions of Windows 10 for all those who didn’t get Windows 10 through the update. So, you can try with creating an external USB drive with Windows 10 installation and install the system.
You can download a tool for creating an USB image with Windows 10 ISO files here. Just follow the instructions, and we hope you’ll be able to install Windows 10 normally.
2. Something Happened while installing Windows 10
Go to Search, type control panel and open Control Panel.
Go to Region.
Go to the region for the United States (or whichever your region is) and click the Administrative tab.
Change the language to English (United States).
If you’re following the news about Windows 10, you probably heard about the infamous Something Happened issue. Internet went absolutely crazy for this creative (if it’s even on purpose) Microsoft’s way to tell you that you’re unable to install Windows 10 on your computer.
But if you faced this issue, it may not be so funny to you. So we managed to find the solution for this strange error message, and we hope it will work.
We don’t know if users outside the US are affected by this strange problem, but the solution is the same for any other region. After changing your Language Settings, you should be able to install Windows 10 normally.
3. Error 80240020 while installing Windows 10
Go to$Windows.~BT folder in C: and make sure you checked Hidden items option in the toolbar.
Delete as many files and folders as possible (you won’t be able to delete all of them due to permission issues).
Go to C:/Windows/Software Distribution/Download and delete everything within that folder.
Right click on Start Menu button and open Command Prompt (Admin).
Type the following command and press Enter: exe/updatenow
Some users who received Windows 10 as a free upgrade through Windows Update received an unexpected error 80240020. The reason for this error is reportedly due to the overloaded Windows servers, which may cause you to receive corrupted download files.
Wait for a couple of minutes and then check if Windows Update started to download Windows 10 again. Once the system is downloaded, you’ll get the message Preparing for Installation.
After that, when you receive a message Your upgrade to Windows 10 is ready, restart your computer and try to install Windows 10 again.
4. Disconnect additional monitors and other peripherals
According to users, your Windows 10 installation can become stuck due to multiple monitors. Several users reported various issues while using two monitors during the setup.
It seems that Windows 10 setup can’t handle two monitors, and in order to fix this problem, you just need to use a single monitor. Disconnect all additional monitors and try running the setup with just a single monitor and check if that works.
In addition to your monitor, sometimes other USB devices can cause this problem to appear. However, you can fix the issue simply by disconnecting all other USB devices.
Couple of users reported that their USB hub was the issue, but after disconnecting it, the installation completed without issues.
5. Remove the installation media
Many users reported that their setup was stuck during the expanding Windows files process. To fix the problem, it’s advised that you temporarily remove your installation media and insert it again.
Users reported that this worked while using a DVD to install Windows 10, but it might also work with USB flash drive, so you might want to try it out.
6. Change your BIOS settings
According to users, sometimes your Windows 10 installation can become stuck due to your BIOS configuration. To fix the problem, you need to access BIOS and make a few adjustments.
To do that, just keep pressing Del or F2 button while your system boots to enter BIOS. If you have problems entering BIOS, be sure to check your motherboard instruction manual and see how to access BIOS properly.
According to users, sometimes the following features can cause this problem to appear:
Legacy Floppy Drive Support
Intel SpeedStep
To fix the problem, simply disable these features and check if the issue is resolved. Few users reported that HyperTransport feature can cause this issue to appear, and to fix it, you need to set KN HT Speed to 1X and KN HT Width to 8.
After disabling these features, check if the problem is resolved.
7. Remove a few RAM modules
According to users, your Windows 10 installation can sometimes get stuck due to the amount of your RAM. Several users reported this problem while trying to install Windows 10 on a PC that has a large amount of RAM.
To fix the issue, users are suggesting to remove few RAM modules from your PC and check if that helps.
According to users, they had this issue while using 12GB of RAM, but after reducing the amount of RAM to 6GB, the issue was completely resolved and Windows 10 installed without issues.
Once Windows installs, you can insert the remaining RAM and the problem should be resolved completely.
Keep in mind that this doesn’t mean that your RAM is broken, but sometimes faulty RAM can cause this problem as well. To check if your RAM is working, you’ll need to use a third-party tool such as MemTest86+ and test your RAM with it.
8. Delete all partitions
If Windows 10 install gets stuck on your PC, the problem might be related to your partitions. To fix the problem, some users are suggesting to remove all partitions on your PC and then recreate them.
This is a drastic solution since it will remove all your files from your hard drive.
If you can’t install Windows 10, be sure to back up all important files before trying out this solution. On the other hand, if your PC is new and you don’t have any important files on it, you might want to try this solution.
9. Leave the setup running for a couple of hours
Sometimes the simplest solution is the best, and several users reported that they fixed the problem simply by leaving the setup running for a couple of hours. Eventually, Windows 10 installed and the issue was resolved.
Keep in mind that you might have to wait a couple of hours, and few users reported that the setup process took more than five hours. If you don’t want to wait for that long, we advise you to try some of our other solutions.
If you have any other Windows 10-related issues you can check for the solution in our Windows 10 Fix section.
Olicenseheartbeat.exe is a file that is related to the Microsoft Office subscription licensing. It is an executable file that is created for MS Office. Multiple users say that they are getting an olicenseheartbeat.exe application error when they try to launch Microsoft Office, specifically MS Office 2013.
The Olicenseheartbeat.exe application is not working is basically a runtime error, which could be caused because of multiple reasons, which we will be discussing along with a bunch of solutions that will help you resolve the problem in your Windows PC. Let us get right into it.
Why am I getting the olicenseheartbeat.exe application error?
There are a bunch of reasons for you to come across the olicenseheartbeat.exe application error in your PC while using Microsoft Office. Here are a few of the most common ones:
The program ended abruptly: If the program is closed midway because of some issue, then this could result in this error.
Microsoft Office files are corrupt: There might be chances that some of the MS Office program-related files are missing or corrupted.
You haven’t updated MS Office: You should make sure that you are running the latest version of MS Office to not only enjoy new features but also keep yourself away from errors.
How can I fix the olicenseheartbeat.exe application error?
Before you go ahead with the advanced solutions, here are a few tips that you can apply and possibly get rid of the olicenseheartbeat.exe application error:
If you ever come across any software-related issue, then the first thing that you should do is simply restart your PC, as the next time your PC boots, it will load all the files properly.
Close Microsoft Office and relaunch it. There could be chances that Office did not load properly.
Make sure that you have activated your copy of Microsoft Office with the correct key.
Scan your PC for viruses or malware and follow the process for its removal. If you are not sure about which antivirus to go for, we have a guide that lists some of the best antivirus software.
Ensure that you are running the latest version of MS Office to rule out problems because of bugs or glitches.
Now let us move on to the advanced troubleshooting methods that will help you fix the problem.
1. Repair Microsoft Office
Press the Win + I buttons to open Settings.
Click on Apps.
Select Installed apps on the right.
Locate Microsoft Office.
Click on the 3-dot menu icon in front of Microsoft Office.
Select Modify.
Select Repair and click Continue.
Follow the onscreen prompts and complete the repair process.
Relaunch Microsoft Office and check if this fixes the problem or not.
In case you are getting a program-related error, then it is best to repair the program, as some changes in the settings might have caused the problem.
2. Reinstall Microsoft Office
Open the Start menu.
Open Control Panel.
Click on Programs and Features.
Select Microsoft Office from the list of programs and select Uninstall from the top.
Follow the on-screen prompts to uninstall the program from your PC.
Restart your PC.
Install Microsoft Office again on your PC.
Check if this problem is resolved or not.
Reinstalling makes sure that if a program-related file went missing during the previous installation, is now loaded correctly.
Type the below command and press Enter. sfc /scannow
Once the scan completes, type the below command and press Enter. DISM /Online /Cleanup-Image /CheckHealth
Let the process finish.
Restart your PC and check if this resolves the problem or not.
SFC Scan and DISM are built-in tools that Windows OS offers, which you can run on an elevated command prompt and fix multiple issues with your PC.
These commands help scan and fix the missing or corrupt system files. There are also dedicated repair toolsthat can help you fix system errors as well as other errors.
By using third-party software you will be able to resolve DLL errors, system crashes, BSOD errors, improve PC stability, and other problems.
4. Perform a system restore
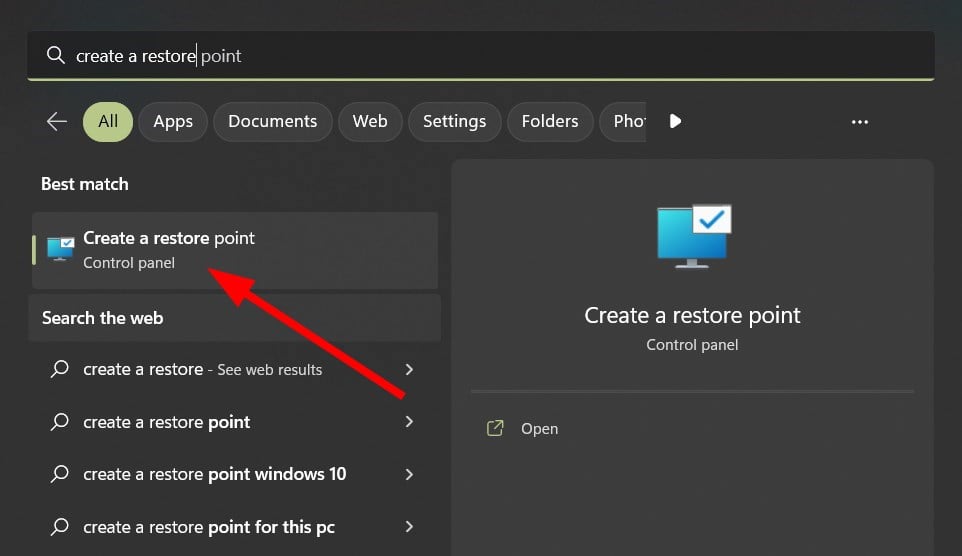
Open the Start menu.
Search for Create a restore point and open it.
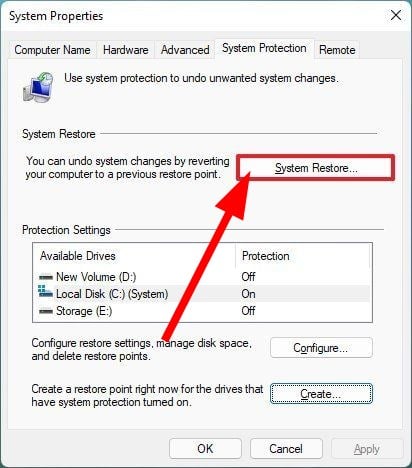
Select C drive and hit the System Restore button. C Drive is basically the drive where you have installed Windows OS.
Click Next.
Select the restore point and hit Next.
Click Finish.
Your PC will begin the procedure of restoring your system back to the state when everything was working normally.
Once done, check if this resolves the issue or not.
Reverting back to a restore point comes in handy in a situation when certain programs do not run smoothly or you are facing some system-related issues.
Select the Keep my files option. This will make sure that all of your apps and settings are removed and your personal files are saved.
Let the reset process complete.
Your PC will boot.
Install Microsoft Office and check if this resolves the issue or not.
This solution was suggested by one of the users and has helped several users fix the olicenseheartbeat.exe application error. If you are having problems resetting your PC, then you can check out our guide, which lists some quick ways to resolve the problem.
If you own any Surface device, you already know that Microsoft releases firmware updates occasionally. The goal behind these releases is to ensure that your Surface device is operating at optimum levels throughout, The company uses updates for drivers and firmware to fix bugs that might have been affecting the device’s performance negatively.
This is why making sure that you’ve installed these updates regardless of whether it is an optional update or not is important. However, it is worth noting that once you update your device to the latest firmware update, you’ll not be able to roll back to the previous one.
How to download firmware updates for your Surface device
Before proceeding to download and install a firmware update to your Surface device, there are a couple of things that need to be in check to ensure that the process is seamless.
First, you need to attach your Surface Type Cover or Surface Dock to ensure that those devices get the latest updates. Next, make sure that you have a stable internet connection that will allow you to download the update quickly. And finally, ensure that your device is at least 40 percent charged before installing updates. Alternatively, you can connect it to an outlet and proceed.
Once you’ve made these preliminary checks, you can now proceed to download and install the latest firmware update on your Surface device:
Click the Start icon in your Windows 11 taskbar.
Next, click on the Settings app to launch it.
Click on Windows Update in the sidebar.
Windows will start downloading available updates.
Click on Update now, and click on the Install button once the download is complete.
Finally, restart your Surface device.
You can also refer to the video below by Microsoft that details the process of how to update and install drivers and firmware for Surface devices.
Note: At first, you might not be able to check for a firmware update that has just been released. This is mainly because Microsoft usually rolls out in phases. When it is ready for you, you’ll be able to access it under Windows Update.
How to manually download firmware updates directly from Microsoft
Using the Windows Update to download firmware updates for your Surface device is the easiest way, you can alternatively download and install the update manually directly from Microsoft:
Search for the device you want to update and select it.
You’ll then be redirected to another webpage where you’ll be able to see the driver updates for the specific device you selected.
Click on the Download button.
Once the .msi file has been fully downloaded, click on Open file and proceed with the setup process by following the on-screen prompts to finalize the installation process.
How to download updates for Microsoft Surface Duo
As you might already be aware, Microsoft’s Surface Duo entry ships with Android out of the box. However, it is possible to run Windows 11 on the device though you run the risk of bricking it.
Navigate to System > System update > Check for update.
Your Surface Duo will start checking for any available updates and proceed to download it when it appears.
Tap on Restart when done to initiate the installation process.
Access new features and enhance your device’s security
A firmware update is quite significant and plays a crucial role in your device, therefore, you should ensure that your device is running on the latest one. This is because it not only grants you access to new features and enhances the device’s user experience, but also fixes bugs and glitches affecting the device. What’s more, it also provides users with an added layer of security because it patches new security vulnerabilities.
Microsoft has announced that it is making it easier for you to listen to your favorite Microsoft Tech Community Blog articles. The company is introducing a new feature to the platform, text to speech which is powered by Azure Speech Services.
The feature is an assistive technology that reads digital text aloud, similar to the one available in the Microsoft Translator app. Therefore, avid Microsoft followers and watchers will be able to listen to their favorite Microsoft Tech community blogs like a podcast, rather than having to go through the entire blog word for word, ultimately reducing the hassle and strain that one has to go through while reading.
Microsoft has partnered with the Azure Speech Services team, part of Azure Cognitive Services to bring this feature to its Tech Community Blogs. All you need to do to access this feature is to click on the little headphone icon which is at the top left of any Microsoft article.
Let us know what you think about this feature in the comment section below.
MS Excel is a powerful tool that comes with a plethora of great features to represent or get meaningful information out of a dataset. Merging cells is another great feature when you want to format the heading or center just to present the dataset in a proper manner.
However, there are reports where users have complained that for them, Excel cells are not merging. In this guide, we will give you five solutions that will help you get rid of the issue. Let us check them out.
Why aren’t the MS Excel cells merging?
After some research, we have found a few reasons that might be restricting you from merging cells in your MS Excel spreadsheet:
Cells are within a table: This is one of the most common reasons because of why you are coming across MS Excel cells that are not merging issues. Excel table does not allow you to merge cells that are inside a table.
Your worksheet is protected: For safety reasons and to avoid people from editing your worksheet, chances are the worksheet that isn’t allowing you to merge cells is protected.
Your worksheet is shared: Do note that along with the protected worksheet, a shared worksheet will also not allow you to merge cells in Excel.
These are the three main reasons why you are facing MS Excel cells not merging issues.
What can I do if Excel cells are not merging?
Here are a few things that you can do before applying the advanced solutions:
Perform a simple restart. Often if the program fails to load all its files properly, then it can throw up multiple errors.
Check if you are running the latest version of MS Excel on your PC. This ensures that this error isn’t because of an old version or compatibility issue.
Make sure that the worksheet that you are working on isn’t corrupt and does not have incompatible values.
Now, let us take a look at the solutions that will help you resolve this problem.
1. Merge cells in a table using the context menu
Select the entire table or click on any cell within the table.
Right-click, select Table, and click on Convert to Range option from the context menu.
Excel will show a confirmation window Do you want to convert the table to a normal range?
Click Yes.
Now select the cells that you wish to merge.
Click on Merge & Center button at the top menu bar in the Home tab.
Select Merge & center again from the drop-down menu.
A pop will show you Merging cells only keeps the upper-left value and discards other values warning. Click Yes.
You will see your selected cells are now merged.
2. Unprotect your workbook
Open your workbook.
Click on the Review tab.
Click on Unprotect Worksheet and Unprotect Workbook.
Select the cells that you wish to merge.
Select Merge & Center button at the top menu bar in the Home tab.
Click on Merge & center again from the drop-down menu.
A pop will show you Merging cells only keeps the upper-left value and discards other values warning. Click Yes.
You will see your selected cells are now merged.
The protected workbook will prevent you from editing, let alone merging cells. In such a case, you can follow the steps above and unprotect your cells.
Then you can follow solution 1 and convert the data to the range and then apply the merge function to merge the selected cells.
Under the Protect section, click on Unshare workbook option.
Now you can go ahead and merge the cells.
4. Disable Add-Ins
Open your workbook.
Click on the File option at the top Menu bar.
Select Options from the left panel.
Click on Add-in.
Make sure that the add-ins are disabled.
Go back to your worksheet and check if you can merge cells or not.
Often add-ins can interfere with the smooth functioning of the MS Excel program. While we install add-ins to enhance the functionality of the program, they can cause issues such as Excel cells not merging problems.
In this case, we would suggest you disable all the add-ins by following the above steps and then trying to merge cells in your workbook.
5. Repair your workbook
Launch MS Excel.
Click on File.
Click on Open.
Select your file and from the Tools drop-down menu, select the Open and Repair option.
Select Repair on the message that pops up.
Often workbooks get corrupted, or data in them get lost, which could be an issue if you aren’t able to merge cells in Excel. Simply follow the above steps, repair your workbook, and check if this resolves the issue or not.
These are some of the best solutions to apply when cells are not merging in MS Excel. Well, you will come across other issues with MS Excel as well.
For users facing Excel won’t scroll down errors, we have a guide that lists some effective solutions to resolve it. We also have a guide on the Excel toolbar missing to fix the issue.
We also have a dedicated guide for those who aren’t able to open Excel on their Windows 11 PCs. Let us know in the comments below which one of the above solutions helped you fix the cells that are not merging in MS Excel.
A lot of users utilize Outlook as email client software so that they can open Gmail emails within that application. However, for some, Outlook keeps asking for the Gmail password.
Consequently, users can’t establish an IMAP (Internet Messaging Access Protocol) connection for Gmail to open that webmail within the Outlook software. So, let’s find out why Outlook keeps asking for the password even though it is correct and the solutions that work.
Why is Outlook asking for my Gmail password?
Here are a few reasons why Outlook 2013 keeps asking for a Gmail password:
2-step verification setup – In most cases, it is the 2-step verification to blame, and, as a result, Outlook cannot connect to Gmail and keeps asking for a password.
Issues with the server – Sometimes, a temporary server outage or a problem can lead to an issue.
Compatibility issues – Google recently changed its authentication mechanism, and previous versions of Outlook were incompatible. So, updating should do the trick.
Some similar issues reported by users are:
Gmail keeps asking for a password – Though the login window gives the impression that it’s asking for the password, it’s sent by Outlook for confirmation.
Outlook 2007 Gmail keeps asking for the password – Don’t worry, as we’ve got your back. Every problem has a solution, after all.
Quick Tip:
A practical method to bypass this Gmail error on your PC is with a browser like OperaOne. It supports password management tools and offers enhanced security for your email.
With built-in VPN protection, this browser is the most suited to help you bypass server connection problems that might generate repeating password issues on your Gmail account.
Opera One
Resolve your email login issues using this optimized browser with a built-in VPN.
Now, click on Account Settings, and select Server settings from the dropdown menu.
Enter imap.googlemail.com in the text field next to Server under Incoming mail.
Next, click on Outgoing mail, type/paste smtp.googlemail.com in the Server text field, and click Next.
Once done, relaunch Outlook and check if it still keeps asking for a Gmail password. Though, in all likelihood, it shouldn’t.
2. Delete the credentials
Press Windows + R to open Run, type control panel, and hit Enter.
Click on User Accounts.
Now, click on Manage Windows Credentials under Credentials Manager.
Locate all MicrosoftOffice entries, select each individually, and click on Remove.
Click Yes in the confirmation prompt.
Similarly, remove all other MicrosoftOffice credentials, launch Outlook, and log in.
Once you have logged in repeatedly, Outlook wouldn’t keep asking for a Gmail password anymore. But, in case it still does, head to the following method.
3. Disable 2-step verification in Gmail
Open your Google Account page in a browser, and then click Security on the left of the page.
Click on the 2-Step Verification setting there.
Now, enter the password to confirm your identity and proceed.
Click on Turn off.
Finally, click on Turn off in the confirmation prompt.
Once done, restart the computer and verify whether Gmail still keeps asking for credentials on your PC. If it does, head to the next solution.
Click the Settings button followed by the See all settings on the menu.
Select the Forwarding and POP/IMAP tab.
Then select the Enable IMAP option. Finally, press the Save changes button, and you’re done.
Click your avatar, and then select Manage your Google Account.
Next, click Security on the left of the Google page that opens. Then click App Passwords.
Click Select app and choose Mail. Next, click the Select Device dropdown menu to select Windows Computer. Then press the Generate button.
After that, users will see a 16-digit password appear within a yellow box. Note that password, or copy it with the Ctrl + C hotkey.
Now, open Outlook, click File and select the Add Account option.
Enter the Gmail email address you’re trying to connect with.
Select the Let me set up my account manually option, and press theConnect button.
Select the IMAP option to choose an account type.
Click Next on the IMAP account settings section. Then enter the new 16-digit app password, and click Connect.
Users can still fix Outlook’s repeating password error for Gmail with 2-Step-Verification by generating an app password to connect to Gmail. If IMAP keeps prompting for a password, setting up an app password should help you, so be sure to try it.
5. Try using a web version or Gmail
If you keep getting this error, try accessing Gmail with your web browser as a workaround, this usually solves the problem.
Also, it could have to do with a temporary server problem, which in most cases, resolves on its own after a while.
You should have the problem fixed by now, and Outlook wouldn’t keep asking for a Gmail password.
Wallpaper Engine is one app that uses CPU and GPU resources on the PC. It can be a problem for systems that lack strength. However, users complain about Wallpaper Engine slowing down their PCs, even when it isn’t active.
The simple answer to the question is Yes. Users also ask if the Wallpaper Engine slows down the PC while gaming. Yes, it does.
As said earlier, it is an app that requires considerable GPU and CPU power to run smoothly on your computer. So, you can experience the Wallpaper Engine causing your PC to lag or crashing your PC.
Furthermore, many factors may be responsible for the Wallpaper Engine slowing down the computer. Some of them are:
System requirement issues – When your PC is not strong enough or doesn’t meet the requirements for the app, it can cause problems.
Graphics card issues –Because Wallpaper Engine uses the graphics resources on your computer, issues with your graphics cards will impact it immediately. So, an outdated or faulty graphics card can affect Wallpaper Engine, causing your PC to crash or lag.
Outdated Wallpaper Engine app – The app is constantly updated to improve its performance and fix bugs affecting its previous version. Hence, not having these updates installed can cause issues with the app.
These are a few of the causes of the lag in Wallpaper Engines. Regardless, you can get the app to work again just by troubleshooting your PC.
What can I do if the wallpaper engine is slowing down my PC?
Before proceeding with any advanced solutions, try the following:
Check the minimum and recommended requirements below to ensure your device is fit to run the Wallpaper Engine. If your device can’t meet these requirements, you upgrade or switch to a stronger device.
Minimum requirements:
OS: Windows 7 (with Aero), 8.1, 10, 11
Processor: 1.66 GHz Intel i5 or equivalent
Memory: 1024 MB RAM
Graphics: HD Graphics 4000 or above
DirectX: Version 10
Storage: 512 MB available space
If Wallpaper Engine still lags, go ahead with the solutions below.
1. Update your graphics driver
Press Windows + R keys to prompt the Run dialog box, type devmgmt.msc, and click OK to open the Device Manager.
Expand the Display Adapters, right-click the driver, then select the Update driver option.
Select Search automatically for drivers.
After the update is complete, restart your device and check if the issue persists.
Updating your graphics driver will fix any bugs affecting its performance. You can read our guide about updating graphics drivers on Windows 11 if you have any issues with the steps above.
2. Update the Wallpaper Engine on Steam
Left-click the Start button, type Steam, and click the Steam app to open it.
Go to the Library.
Find and click on Wallpaper Engine from the app list, and check if an update is available.
Click on Update if there is any update available.
Updating Wallpaper Engine will install the latest features and security fixes for the app and fix the lag issues. Check our guide on what to do if you run into a Steam error in the update process.
The Weather app comes included with Windows. That app provides detailed forecasts for users. However, Some users are complaining that the Weather app is not working for them.
Fortunately, it is not a big problem, and you can fix it quickly if you apply the solutions in this guide.
Why is the Windows Weather app not working?
Below are some of the reasons the Windows Weather app might not be working on your PC:
Faulty store app cache: Sometimes, this issue is caused by a corrupt Store app cache. You can fix this quickly by resetting the Windows Store app cache.
Issues with the Weather app: Sometimes, the Weather app might run into some issues. The quick solution is to run the built-in troubleshooter or reset the app.
How do I fix Microsoft Weather app issues on Windows 10?
1. Run the Windows Store App troubleshooter
Press the Windows key + I to open the Settings app and select the Update & Security option.
Select Troubleshoot in the left pane and click Additional troubleshooters.
Finally, choose Windows Store App, and click the Run the troubleshooter button.
If the Windows Weather app is not working on your PC, the Store app troubleshooter is one of the best tools to help you fix it. It diagnoses the problem and recommends fixes.
You only need to follow its recommendations, and the app should start working again.
2. Reset the Weather app
Press the Windows key + I and select the Apps option.
Select the Weather app and click Advanced options.
Now, click the Reset button and wait for the process to complete.
Sometimes, the Windows Weather app might not be working because of the changes you have made to it. Thankfully, Windows 10 includes a Reset option that helps restore the app’s default settings.
Wait for it to finish running, and the Windows Store app will start automatically.
Weather, and other apps, might not work if the Microsoft Store cache is corrupted. The easiest way to fix the cache is to clear it by following the steps above.
4. Reinstall the Weather app
Press the Windows key and right-click the Weather app.
Select the Uninstall option.
Now, click the Uninstall button to confirm the action.
Launch the Windows Store app, click the menu button (three horizontal dots) in the top right corner, and select My Library.
Finally, click the Install button before the Weather app.
If you have tried everything and the Windows Weather app is still not working, you might need to go broke and reinstall the app. This has fixed the issue for many users and might be helpful for you too.
The Windows Weather app is one of the best apps for weather forecasts. So, when it is not working, it affects many users. Hopefully, you solved the problem with one of the solutions above.
Feel free to let us know the solution that worked for you in the comments below.
Users may encounter error 0x8007112a: There is a mismatch between the tag specified in the request and the tag present in the reparse point when moving or deleting folders.
The error code 0×8007112a is common in Windows 7 & 10 and can occur for many reasons. A prominent factor that causes the error is folder permission issues on your PC. When you’re not using the PC on an administrator’s, you may not have the right to delete the folder.
Furthermore, you can see the Microsoft error deleting folder 0x8007112a due to the factors:
Conflict with other apps – You can run into issues with deleting or moving folders on your PC if other apps are conflicting with File Explorer. Third-party apps, such as antivirus software on your computer, can block your access to the folder you want to delete. Also, if other apps are using the file or folder in question, it can prevent you from deleting it.
Recent Windows update issues – If there is a faulty Windows update, it can corrupt the files and folders on your PC. Likewise, the Update can install bugs on your PC, corrupting your system files and resulting in Windows error 0x8007112a when deleting or moving folders.
These causes may vary on different devices, but you can fix the error using general fixes to troubleshoot your PC.
While the Radeon Software Host Application’s high CPU usage issue is pretty frustrating, you will be surprised that the fixes are simple and easy to apply.
How can I fix the Radeon Software Host Application’s high CPU usage?
1. Create a Radeon folder
Press the Windows key + E to open File Explorer.
Select This PC on the left pane and open the Videos folder.
Now, right-click any space there and select New > Folder.
Finally, name the folder Radeon ReLive and restart the Radeon software.
While this might look like a weird solution for the Radeon Software Host Application’s high CPU usage issue, it is one of the quickest and most effective. Many users have found it helpful, and you shouldn’t hesitate to try it.
Run the app and check what the AMD Radeon Software is constantly monitoring.
Now, delete the app, file, or folder.
Sometimes, the Radeon Software Host Application has high CPU usage because the software monitors some game folders or files. These folders are usually empty, and it tries to salvage something from them.
Launch the AMD Radeon app and click the Gear icon in the top right corner.
Now, click the General tab and go to the Recording section.
Finally, toggle the switch for Record Desktop back.
The Radeon Software has many endearing features that make the host application record high CPU usage. One of them is the recording feature.
Users have primarily found the record desktop feature troublesome. You need to disable the feature to reduce the app’s CPU usage. Also, you can further reduce it by going to the Media section under the General tab and disabling the elements there.
Finally, install the software and restart your PC.
Last but not least, on this list of fixes is to reinstall the software. This solution is relevant if you are using the 19.12.2 2020 version of the AMD software.
If downloading the older version does not work for you, you can search for an update on the AMD website.
We have reached the end of this guide on fixing the Radeon Software Host Application’s high CPU usage. All you need to do to fix the issue is to follow the solutions carefully, and things should be back to normal.
It is important to note that the Windows Audio Endpoint Builder wouldn’t record a high CPU usage typically, hence the need to attend to this issue with urgency.
How can I fix the Windows Audio Endpoint Builder if it registers high CPU usage?
Before exploring the sophisticated fixes in this section, you should try the two troubleshooting steps below:
Remove the audio jack and any other external device for about 10 seconds
Restart your PC
1. Use Command Prompt
Press the Windows key, type cmd, and select Run as administrator under Command Prompt.
Type the following commands and press Enter after each: Dism /Online /Cleanup-Image /CheckHealthDism /Online /Cleanup-Image /ScanHealthDism /Online /Cleanup-Image /RestoreHealthsfc/scannowDism /online /Cleanup-Image /StartComponentCleanupDism /online /Cleanup-Image /StartComponentCleanup /ResetBasenet start w32time w32tm/resyncgpupdate/forcechkdsk /f /r
If you are prompted while running the CHKDSK, press the Y button.
Finally, note that you must wait for each command to finish running before moving to the next.
Sometimes, the Windows Audio Endpoint Builder’s high CPU usage is due to broken system files and corrupt memory partitions. Run the commands below will fix this quickly and restart all the needed components,
2. Uninstall and reinstall audio drivers
Press the Windows key + X and select Device Manager.
Double-click the Sound, video, and game controllers option to expand it and right-click each driver there.
Now, select the Uninstall device option.
Check the box for Delete the driver software for this device and click the Uninstall button.
Finally, go to the manufacturer’s website to download the latest or older version of the driver.
Many users have found problems with their audio drivers to be the cause of the Windows Audio Endpoint Builder high CPU issue. Reinstalling the drivers should solve the problem.
It is important to note that some users have had luck using the latest drivers while some fixed this problem using an older one. So, you can try either.
3. Run the audio troubleshooter
Press the Windows key + I and select the Update & Security option.
Click Troubleshoot in the left pane and select Additional troubleshooters.
Finally, select the Playing Audio option and click Run the troubleshooter.
At times, the Windows Audio Endpoint Builder might be registering high CPU usage because of minor issues. Again, the built-in troubleshooter is the best-placed tool to clear up these glitches and restore normalcy.
Press the Windows key + R, type services.msc, and click OK.
Right-click the Windows Audio Endpoint Builder option and select the Properties option.
Now, set the Startup type to Disabled and click the Stop button.
Finally, click the Apply button, followed by OK to save the changes.
The Windows Audio Endpoint Builder is one of the services that can be disabled without significant issues. However, you will lose your sound for the time being.
But, if the high CPU usage almost renders your PC unusable, it might be a worthy trade-off. Hopefully, you don’t have to get to this stage before fixing the issue.
With this fix, we can conclude this guide on fixing the Windows Audio Endpoint Builder’s high CPU usage issue. Feel free to let us know the solution that helped you solve the problem in the comments below.
After upgrading to Windows 10, some users have reported that they are experiencing a problem with a flashing screen.
The most reliable methods to resolve flickering errors would be to clean boot your PC and check potential harmful drivers or apps on your device.
Fortunately, we are here to solve your problem, just follow some of these further instructions and your monitor won’t flash ever again.
What is a flashing screen in Windows 10?
The flashing screen or blinking issues are display errors generated by various factors such as outdated drivers or system malfunctions.
When you experience flickering issues on Windows OS, you should access the PC in Safe Mode and update your display adapter with the right version.
How can I deal with screen flashes in Windows 10?
1. Enter the Safe Mode and Clean Boot
Restart your PC.
While your PC is booting, press and hold down the Shift key on the keyboard and click the Restart option while still holding down the Shift key.
Click the Troubleshoot icon.
Click the Advanced options icon.
Then, on the next screen, click theStartup optionsicon.
Select Safe Mode with Networking.
Click the Restart button and your PC will reboot.
After reboot, you will see the Startup settings screen.
To enter Safe mode, press the appropriate function key, for example, F4.
Up next, check if the problem still appears in Safe Mode.
That’s a troubleshooting option for Windows, that starts your Windows with a limited amount of features, so you’ll be able to see if some of Windows features are causing the problem.
If the issue doesn’t occur in Safe Mode with networking, then proceed to the Clean Boot steps given below.
If the issue doesn’t appear in the Safe Mode, then perform a Clean Boot in order to determine which software is causing the flashing screen problem.
To perform a Clean Boot, follow these steps:
Go to Search.
Type msconfig in the search box, and then click msconfig.
On the Servicestab of theSystem Configurationdialog box, select theHide all Microsoft services check box, and then go to Disable all.
On the Startuptab of the System Configuration dialog box, tap, or click Open Task Manager.
On the Startuptab in Task Manager, for each startup item, select the item and then click Disable.
Go to Search, type devicemngr, and open Device Manager.
Expand Display Adapters.
Right-click your graphics card, and go to Update driver software.
Follow further on-screen instructions.
If a new update is available, wait for the process to finish and install the update.
Restart your computer.
A logical cause of the screen flickering problem is an outdated graphics card driver. So, we’re going to update the GPU driver and see if there are any positive effects.
Then, to update your graphics drivers correctly, it’s better to do it automatically using the support of specialized software. That way you protect your PC from serious system errors.
In case you’re not sure how to update your GPU driver, follow the above steps, or even better, use dedicated third-party software.
Go to Search, type services.msc, and open Services.
Find Problem Reports and Solution Control Panel, right-click it, and choose Stop.
Do the same thing for Windows Error Reporting Service.
Restart your computer.
Some users also reported that disabling Problem Reports and Solution Control Panel and Windows Error Reporting Service services also solve the problem.
5. Update Windows
It’s not always a good idea to install the latest Windows 10 updates. Because some of them may disrupt your operating system. For instance, a bad update may cause a screen flashing problem.
So, what’s the solution in case of a bad update? Well, install some more updates!
If the screen flickering problem was indeed caused by a Windows update, Microsoft will eventually acknowledge it and release a fixing patch.
To install the latest updates, go to Settings > Update & Security, and check for updates. If a new update is available, your computer will download, and install it automatically.
6. Update Windows 10 apps
Some users have also said that it’s possible for some Windows apps to cause the screen flashing issue. So, we’re going to apply the same practice as for Windows Update. We’re going to update all your apps.
To update your Windows apps, simply go to the Microsoft Store, click the three-dotted menu, and go to Downloads and updates.
If any new updates are available, simply click Get Updates, and the updating process will begin.
Want to automatically update your Windows 10 apps? Check out this quick article and find out how to always stay up to date.
7. Scan the computer for viruses
It is always a good idea to scan your computer for viruses or other malicious software. You can use Windows Defender, of course.
In addition, you can as well consider other suitable antivirus programs to secure your computer from risky digital threats. There are various solutions you can choose from.
If updating Windows apps didn’t get the job done, we’ll get more extreme, and delete the troublesome app(s).
Since this can be a difficult and time-demanding task, check out our detailed guide about deleting Windows apps to make your life easier.
9. Change the monitor refresh rate
Go to the Settings app.
Now, head over to System > Display > Display Adapter Properties.
Go to the Monitor tab.
Change Screen refresh rate according to your monitor’s capabilities.
Another cause of the flashing problem could be a wrong monitor refresh rate. So, search through your monitor’s manual for the best refresh rate it’s compatible with, and change it accordingly.
Use the above steps to change the refresh rate of your monitor.
10. Perform a Windows Recovery
Go to the Start menu.
Click on PC Settings.
Go to Update and Security, and choose Reset this PC.
Under Reset your PC, click on Get Started, click Keep my files and follow further on-screen instructions.
Some of our readers said that pressing Ctrl + Win + Shift + B solved the screen flashing problem temporarily so you might try that as well.
If none of these steps helped you with your flashing screen problem, you might try performing a System Recovery.
Recovery is different from installing a new copy of the system, because it doesn’t affect installed files, so you can perform a Recovery without fear of using your files or settings.
To perform refresh your PC without affecting your files, follow the above steps.
If you are having trouble opening the Setting app, take a look at this handy article to solve the issue.
If you need more info on how to use the Reset this PC feature on Windows 10, take a look at this complete guide that will help you better understand how it works and what it does.
On top of these, do note that there are several issues or error messages related to blinking screen you can encounter on the way:
Windows 10 flashing screen after login – The user screen keeps flashing and it doesn’t load the service.
Screen flickering in Windows 10 – Usually caused by an incompatible display driver and corrupted apps.
Screen flashing Windows 7 – Although more users experienced this problem in Windows 10, it’s also common in Windows 7.
With the screen working properly again, you can get back to using the best screen sharing tools. Don’t hesitate to bookmark our Windows 10 Errors Hub for similar recommendations and tips.
We hope that these steps helped you to solve the problem with a flashing screen. But, if you have any questions or suggestions, please express your thoughts in the comments section below.
While there are many potential causes for the OBS high CPU usage issue, you can quickly fix it by following the steps in the next section.
How can I fix OBS if it’s registering high CPU usage?
1. Update GPU driver
Press the Windows key + X and select the Device Manager.
Click the arrow next to the Display adapters option and right-click the device.
Now, select the Update driver option.
Finally, choose the Search automatically for drivers option and install any available updates.
The OBS’s high CPU usage can be due to outdated or faulty drivers. This is because the app requires proper drivers to function well.
So, if your GPU card driver is outdated, it might cause it to use too much CPU. If the Windows driver updater cannot find the needed drivers, you can go to the manufacturer’s website to download the latest version.
Alternatively, you can use a dedicated driver updater in Outbyte Driver Updater to update your drivers. This tool automatically scans for outdated drivers and updates them before they can cause problems.
Outbyte Driver Updater
Have all your old drivers updated so you won’t experience high CPU usage.
Launch the OBS app and click the Settings option in the bottom right corner of your screen.
Choose the Video option in the left pane.
Now, click the dropdown before the Output (Scaled) Resolution option and choose a lower value than the one you use.
Finally, click the Apply button, followed by OK, and close the OBS app.
Your stream screen resolution determines the quality of the output. However, if it is too high, it can cause OBS to register high CPU usage. Hence, you might need to lower it to fix this issue.
3. Reduce the frame rate
Open the OBS app and click the Settings button in the bottom right corner.
Select the Video option in the left pane.
Now, click the Common FPS value dropdown and choose a lower frame rate than the current one.
Finally, click the Apply button, followed by OK to save the changes.
The frame rate determines the number of frames captured while recording. Unfortunately, this can also lead to the OBS high CPU usage issue if it is too high, as it strains your resources. Thus, it would be best if you reduced it to balance resource usage.
4. Change the X264 preset
Click the Settings button on OBS and choose the Output option in the left pane.
Click the dropdown next to Output Mode and select the Advanced option.
Now, click the dropdown next to CPU Usage Preset (higher = less CPU)and choose the best value for your PC.
The X264 is the video source library used by OBS for video encoding. It gives you options to balance your CPU usage and video quality. Hence, you can determine how much of your CPU OBS uses during the encoding process.
However, it is essential to note that the high the preset value, the lesser the CPU usage. The only downside is that choosing a high value like ultrafast will affect your video quality.
Press the Windows key + I and select the Update & Security option.
Click the Check for updates button.
Finally, install the available updates.
OBS is a resource-intensive software and needs your PC to be firing on cylinders to function well. Hence, if your PC is outdated, it might cause OBS to register high CPU usage.
There you have it: everything you need to fix the OBS high CPU usage issue. We believe you should be able to fix this issue for good and use the excellent stream software without worrying if you follow this guide’s steps carefully.
Windows offers limited options for enhancing or mixing the system and media sounds, but some third-party programs step in nicely to fill this gap.
Equalizer APO, for example, gives you ultimate control over your computer’s sound.
If Equalizer APO doesn’t work the issue is most likely from your Realtek sound drivers.
This is because the program itself would seem to work flawlessly, but your sound drivers play no audio.
Read this guide to the end to learn ways to tackle this issue in Windows.
How do I fix the Equalizer APO and Realtek sound drivers problems?
1. Update drivers using a dedicated program
A dedicated driver updating program is proven to repair the Equalizer APO and Realtek sound driver problems by automatically updating and replacing your outdated or buggy sound drivers.
It scans your system quickly to find driver issues, and then downloads and installs the right versions from its massive library of more than 18 million driver files.
You also don’t have to worry about system malfunctions due to the drivers’ incompatibility. Using automated support, you will get up-to-date versions that will enhance the performance of your device.
Hence, if you need a detailed scan that detects drivers’ issues and updates them in minutes, you most likely need a specialized tool.
2. Install as SFX/EFX
Press the Windows key and search for the Configurator.
Select the Equalizer APO Configurator.
In the Playback devices tab, mark all the devices that you’ll use with the equalizer.
Mark the checkboxes beside Pre-mix and Post-mix.
Chose the Troubleshooting options (only use in case of problems) checkbox.
From the dropdown menu, select Install as SFX/EFX (experimental).
Save your settings and exit the Configurator.
NOTE:If you apply these settings and still get Equalizer APO and Realtek sound drivers problems, return to the steps, unmark the checkboxes beside Pre-mix and Post-mix, and try it again.
3. Disable hardware acceleration for audio devices
Open Control Panel and select Hardware and Sound.
Click on Sounds.
Click on the Playback tab.
Right-click on the audio device and select Properties.
Go to the Advanced tab.
Uncheck the box for All hardware acceleration of audio with this device.
Save your settings and hit the OK button.
4. Enable all enhancements
Open the Control Panel and select Hardware and Sound.
Click on the Sounds option.
Switch to the Playback tab.
Right-click on your sound device and select Properties.
Go to the Enhancements tab.
Unmark the Disable all enhancements checkbox.
Hit the OK button.
5. Use the Windows Registry
Open the Registry Editor with admin rights
Open the Start menu and search for and open the Configurator.
Click on the Playback devices tab and choose the device to use with the equalizer.
Hit the Copy Device command to clipboard button.
Open Notepad or a similar app and press CTRL + V to paste the command. Note: Take note of the part of the command inside the curly brackets. This is the Registry key that you will edit.
To be safe, back up your registry following this guide.
Press the Windows key and search for regedit.
Right-click on Registry Editor and select Run as administrator.
Identify the correct value
In the Windows Registry, navigate to the following folder: HKEY_LOCAL_MACHINE\SOFTWARE\Microsoft\Windows\CurrentVersion\MMDevices\Audio\Render
Click on the arrow beside the last key to expand it.
Find a key name with the string inside the curly brackets from step 4 above.
Modify permissions for it
Right-click on this key and select Permissions.
Hit Advanced.
Click on the Change link.
Enter Everyone in the field provided and click Find name.
Hit the OK button.
In Advanced Security Settings, mark the Replace owner on subcontainers and objects checkbox.
Click on the Add button and click the Select a principal link.
Enter Everyone, complete the name, and hit OK.
Select Full control from the Basic permissions area.
Apply your changes and close the dialog box.
Return to the Registry Editor and right-click the key.
Delete the key and reboot your machine.
Re-install APO with the Configurator.
At this point, you should get the Equalizer APO and Realtek sound drivers problems fixed.
We know how painful it is when your Realtek WiFi adapter isn’t working. From errors like intermittent connections to the adapter not being detected at all, these issues can be incredibly frustrating.
Luckily, they’re fixable, and that’s exactly what we’ll show you how to do below:
How do I fix the Realtek Network Adapter not working
1. Uninstall and download the latest network driver
Press Windows Key + X on your keyboard and go to Device Manager.
Search for Network adapter, and when you find it right click it and choose Uninstall.
In the Uninstall window, choose to Delete the driver software for this device.
Follow the instructions on the screen, and restart the computer when the uninstall process is completed.
After you’ve restarted your computer, go to Device Manager again and click the Scan for hardware changes button.
Doing this will reinstall the default network drivers.
2. Delete your wireless profile
Go to Search, type cmd, and open Command Prompt as Administrator.
When Command Prompt stats type in the following command and press Enter:
Be sure to replace WirelessProfileName with the actual name of your wireless connection
3. Run the Incoming connections Troubleshooter
Go to Settings.
Head over to Updates & Security > Troubleshoot.
Select Internet Connections, and go to Run the Troubleshooter.
Follow further on-screen instructions and let the process finish.
Restart your computer.
4. Reset your router
Realtek WiFi adapter problems can also stem from improper router configuration. Therefore, you can try resetting your router. Just press the reset button.
For more information on resetting your router or exporting your router’s configuration, be sure to check your router’s manual.
Some VPN clients install their own network adapters which can then interfere with those you use for WiFi.
If you can’t run Command Prompt as Administrator, follow our comprehensive guide on this topic, and fix this issue with ease.
That’s about it. We certainly hope at least one of these solutions helped you resolve the problem with your Realtek Network Adapter not working or not being found, and now you can surf the web.
If you have any comments, questions, or suggestions, just let us know in the comments down below.
Locking your PDF files is a great way to protect them, but sometimes you might need to edit a secured PDF without having its password.
This can be a difficult task if you don’t know how to edit a locked PDF. Fortunately for you, we have a couple of solutions that will allow you to access and edit the PDF file, even without the password.
Having that said, you will be able to view all the important documents after you’ve gone through our procedures on how to edit a password-protected PDF file.
How can I edit a secured PDF without the password?
1. Use a dedicated third party
Adobe Acrobat is a versatile and complex tool that allows all sorts of useful editing operations with PDF files.
In case you have a protected document and you have forgotten the PDF password then following the steps presented below will help you edit a secured PDF.
Open your PDF in Acrobat.
Next, go to File and click on the Printer icon in the toolbar.
Choose Adobe PDF from the Print dialog box, as the printer, and click Print.
Type a name for your file and click Save.
The PDF is created, and it opens in Acrobat. You can now edit the PDF.
Adobe Acrobat
Easily open and manage your password-protected PDF file with Adobe Acrobat.
Another quick and easy solution would be to simply use an online tool that will remove the PDF’s password.
Thankfully, there are many free tools out there, and we would recommend that you use one that has good reviews based on the user comments.
Usually, all you will have to do is simply upload the PDF and the service will remove the unknown password from the file and thus change the PDF security settings.
How to edit a secured PDF on Mac?
If you need to edit a secured PDF on your Mac device, you have the option to Edit Permission and type the required password or use a PDF password remover.
How to edit a secured PDF on Android?
You can edit a secured PDF file on Android either by entering the password or removing it using Adobe Acrobat Pro for Android.
These are the easiest and quickest ways to edit secured PDF without a password. We hope that one of the above solutions has helped you open your locked file as well.
If you have additional recommendations or suggestions, we would love to hear them in the comments section below.
While you shouldn’t remove or disable Mcshield.exe, there are ways to stop its high CPU usage, as shown in the following sections.
How can I stop Mcshield.exe high CPU usage?
1. Update PC
Press the Windows key + I to open the Settings app and select the Update & Security option.
Click the Check for updates button.
Finally, install any available updates, including the optional ones.
The first thing to do if the Mcshield.exe process uses a high percentage of your CPU is to update your PC. This is because your present PC version does not have what it takes to handle the security feature at the time.
Launch your McAfee product and click the Setting icon in the top right corner.
Select the Anti-Spam option.
Finally, click the Turn off button.
For some reason, users have found the anti-spam feature of McAfee antivirus to increase the Mcshield.exe CPU usage. Disabling this feature almost half the resource usage process.
This shouldn’t be a problem, as most email clients have built-in anti-spam features already. Also, if you are using the latest version of McAfee products, you will not find this feature there, as it has been removed. So, move to the next fix instead.
Press the Windows key + I and select the Apps option.
Locate and select any other security software you have.
Finally, click the Uninstall button and follow the onscreen instruction to remove it.
If you use other antiviruses or security software with McAfee, you might experience the Mcshield.exe high CPU usage issue. So, you need to remove this software to restore normalcy on your PC.
To be sure that you have removed all components of the app, we recommend using dedicated uninstaller software in CCleaner to uninstall it. This excellent tool removes even the most hidden element of any software and eliminates any leftover files that can cause issues.
Also, CCleaner is a PC cleaner that can remove junk files. This is important to reduce your CPU and memory usage to a minimum.
We have reached the end of this guide on the Mcshield.exe high CPU usage issue. If you still can’t fix the problem after applying the solutions above, we will recommend switching to one of the best antiviruses for Windows PC.
Although Adobe Acrobat is widely used all over the world and has plenty of great features, it is not without errors.
Users have complained about being unable to save their PDF files in Windows 10 after editing them, which is causing a lot of frustration.
When PDF not saving changes, users are getting the following Adobe Acrobat error message and although they follow the indications, the issue is still unresolved:
The document could not be saved. cannot save to this filename” An error was encountered when saving the document.
Why can’t I save the PDF after editing?
The reasons why PDF won’t save after editing can be related to some missing updates or they have something to do with Adobe Acrobat settings.
However, you should first explore the possibility that the file is really read-only or used by someone else.
To verify that, right-check your PDF file and select Properties, then make sure that the Read-only box is not checked, just like in the screenshot below:
Check the Read-only attribute of the file
Also, if you opened the PDF file in a network storage place used by more users, make sure it was not opened by another person.
If these aren’t the issues, let’s go through a few quick and easy ways to solve this problem, so make sure to keep on reading.
What can I do if am I not able to save PDF files after editing?
1. Download the latest Adobe Acrobat software version
Most of the issues concerning Adobe Acrobat have a lot to do with which version of the tool you are using.
As the program is constantly being improved and updated with useful features, before performing any troubleshooting steps we would recommend that you check if you are using the latest available version.
Afterward, restart your device and check if you can now save the PDF file without encountering any issues.
2. Change the storage settings
Open the PDF file with Adobe Acrobat.
Go to the Edit menu and select Preferences.
Choose the General option and uncheck the box for Show online storage when saving files.
Click OK at the bottom to save the settings.
3. Modify the display settings
This simple but workproof solution shows you how to quickly change the display setting on your PDF reader.
1. Open Adobe Acrobat and go to the Edit menu, then select Preferences.
2. From the left panel window select Internet and uncheck the Allow fast web view.
3. Click OK and restart Adobe Reader.
4. Use an online PDF tool
Maybe the best way to fix your “PDF Won’t Save” situation is by using a reliable online PDF program, such as DocHub.
All you have to do is drag and drop your file on the official platform, edit any section of the PDF, and click one button to save it on your PC.
In this way, you will avoid any saving errors and manage all your documents for free due to its user-focused advantages.
Plus, it has strong encryption and security that keeps your data private at no cost. However, you can benefit from the Pro version and get unlimited files or eSignatures.
Press the Windows key + E to start File Manager and go to the following file path: C:/Program Files(x86)/Adobe/Acrobat Reader DC/Reader
Locate and right-click on AcroRd32.exe, then select Properties.
Click on the Compatibility tab and check the box next to where it says Run this program as an administrator.
Try launching Adobe Acrobat Reader DC again.
As you can see, if you can’t save your edited PDF, one of the above solutions should help you fix the problem in no time.
Even more, this document restricts some Acrobat features is a message that shows up when you open a PDF with restricted editing options. If you’re getting this error too, make sure to install the original version of Adobe.
Please let us know in the comments section below which solution has worked for you when you cannot save PDF files after editing. We would love to hear it.
Many users reported that Realtek HD Audio Manager won’t open on their PC. The full message reads: There’s a problem with Realtek audio console. Reinstall the application from its original install location or contact your administrator.
Driver issues are the number one cause of this problem. In this guide, we’ll show you a few different ways to repair and fix your drivers so the Realtek error goes away.
Sounds good? Let’s get started.
How do I fix Realtek Audio Console not opening?
1. Create a shortcut to the Realtek HD Audio Manager
Press Windows key + R, type the command below and press Enter: C:⧵Program Files⧵Realtek⧵Audio⧵HDA⧵
Find and double-click on the Realtek HD Audio Manager .exe file.
After doing that, the Realtek Audio Manager should start. If this method works, create a shortcut to the .exe file and move it to your desktop.
2. Update your audio drivers
2.1. Update drivers from Device Manager
Press the Windows key + X and select Device Manager.
Double-click on the Sound, video and game controllers option to expand it. Right-click the Realtek Audio driver and select Update driver.
Choose the Search automatically for drivers option.
Install any available update and restart your PC.
The Realtek HD Audio Manager not opening issue can b caused by outdated drivers. So, it would help if you considered updating your drivers with the built-in driver updater before using other sophisticated fixes.
2.2. Use driver update software
Updating your audio drivers manually sounds like a rather daunting task whether you’re a newbie. So, we recommend you use an automatic tool to update all the faulty drivers on your PC.
Besides the apparent goal you’re after, note that it protects your private data from leaking.
On top of that, it’s known to optimize PC performance since it includes many features such as system information, resolution adjuster, and audio fixer. That’s precisely what you need too.
Expand the Sound, video and game controllers section.
Double-click the Realtek High Definition Audio device.
Click the Driver tab at the top.
Now, click the Roll Back Driver button.
Is Realtek HD Audio Manager necessary?
The Realtek HD Audio Manager works like a control panel to manage your audio drivers. It can detect new devices and allows you to access them easily.
However, it is not crucial to the smooth running of your drivers and PC. But it does not hurt to install the Realtek HD Audio Manager and enjoy the ease of use that comes with it.
We hope these solutions helped you fix the problems with Realtek HD Audio Manager. For more troubleshooting methods, check out how to fix issues with the Realtek HD Audio drivers.
Feel free to let us know if you were able to fix this issue with one of our solutions in the comments below.
If you’ve tried everything above but still can’t get audio controls back, you may be running into the Realtek Audio Console doesn’t support your machine issue—check that guide for machine-specific workarounds.
In some cases, a deeper problem like Realtek Audio Driver Error 0001 can block the console entirely, so be sure to follow those steps if you see the “no driver supported” message.
And if you ever find that the Realtek HD Audio Manager goes completely missing after an update, our missing manager recovery guide will walk you through restoring it.
Wondering how to control CPU fan speed on your Windows 11 PC? Whether you’re aiming for quieter performance or better cooling, there are several apps and manual methods to help you check, test, and adjust your fan settings easily. Below, we list the best fan speed controller software and manual BIOS-based options.
AIDA64 Extreme – Advanced Sensor Monitoring for Power Users
AIDA64 Extreme is a powerful diagnostics and monitoring tool that lets you check CPU fan speed in real time. While it doesn’t offer control features like setting RPM or creating fan curves, it’s ideal for verifying fan activity, running CPU fan speed tests, and monitoring how your system reacts under load. Best for: Detailed fan speed monitoring and diagnostics, not control. Try it here:Download AIDA64 Extreme
Argus Monitor – Reliable Control with Custom Fan Curves
Argus Monitor offers a sleek, lightweight interface to control CPU fan speed. You can create custom fan curves based on CPU or GPU temperatures, ideal for gamers and workstation users. Best for: Custom fan curves and real-time monitoring. Try it here:Visit Argus Monitor Official Site
This open-source CPU fan speed controller app gives granular control over multiple fans. It automatically detects sensors and supports profiles per workload or temperature range. Best for: Power users who want automated fan control based on sensor input. Try it here:Download Fan Control from GitHub
SpeedFan used to be a go-to for many, but it has limited support for newer motherboards. Still, it’s worth trying for basic CPU fan speed testing and temperature monitoring. Best for: Simple control on older hardware. Try it here:Get SpeedFan from almico.com
Primarily for GPU tuning, MSI Afterburner also offers some basic CPU fan monitoring options on MSI motherboards. It’s especially useful when paired with a high-performance build using the best CPU for Windows 11. Best for: Gamers using MSI components. Try it here:Download MSI Afterburner
Corsair iCUE – Perfect for Corsair Fans and Coolers
If you use Corsair fans or AIO coolers, iCUE provides comprehensive control of CPU fan speed. It includes lighting effects and performance profiles as well. Best for: Users with a Corsair ecosystem. Try it here:Explore Corsair iCUE
For ASUS motherboard owners, AI Suite lets you check CPU fan speed, create profiles, and even enable auto-tuning for optimal performance and quiet operation. If you encounter a CPU fan error at boot, this tool can also help you adjust fan parameters to eliminate the warning. Best for: ASUS desktop users who want native control. Try it here:Get ASUS AI Suite 3
Although it doesn’t let you adjust speeds directly, Open Hardware Monitor is perfect for CPU fan speed tests and live monitoring. It’s a helpful utility if you suspect issues like a CPU fan not spinning, allowing you to verify RPM readings quickly. Best for: Monitoring multiple temperature sensors and fans. Try it here:Visit OpenHardwareMonitor.org
Manual Methods to Control CPU Fan Speed
Use the BIOS/UEFI Interface
Most modern motherboards allow CPU fan speed control directly from the BIOS. This is often the most stable method.
Reboot your PC and press DEL or F2 to enter BIOS.
Navigate to the Hardware Monitor or Fan Control section.
Select your CPU fan and choose a fan curve or manual RPM values.
Save changes and exit BIOS.
Check Windows Power Settings
Although indirect, setting your system to High Performance mode in Windows can ensure your fan runs more actively.
Press Windows + I to open Settings.
Go to System > Power & Battery > Additional Power Settings.
Select High Performance or create a custom plan.
Use Manufacturer-Specific BIOS Features
Some BIOS setups include smart fan tuning features that let you test fan response directly.
Enable Smart Fan Control or Q-Fan in BIOS.
Set custom fan curves based on temperature thresholds.
Check for Dust or Obstruction
Fan noise or poor performance may be caused by dust buildup. Clean your fans to restore proper speed. If you’re using a laptop, you may want to consider both a cooling pad and laptop cooling software to optimize airflow and reduce heat buildup.
Turn off the PC and unplug it.
Use compressed air to blow dust off fan blades and heatsinks.
Make sure cables aren’t obstructing the fan’s rotation.
Conclusion
Controlling your CPU fan speed helps you balance noise levels and temperature. Whether you use a CPU fan speed app or tweak settings manually via BIOS, the right method depends on your hardware. For advanced users, tools like Argus Monitor, Fan Control, and AIDA64 provide useful insight or control. For everyone else, BIOS remains the most stable option.
FAQs
How can I check my CPU fan speed in Windows 11?
You can use tools like AIDA64 Extreme or Open Hardware Monitor to monitor RPM values in real time.
Does Windows 11 have built-in fan control?
No, Windows 11 doesn’t include native fan control. You need BIOS settings or third-party tools to manage it.
Is it safe to manually adjust CPU fan speed?
Yes, as long as you don’t set it too low. Always ensure the fan keeps your CPU within safe temperature ranges.
Can I make my CPU fan quieter?
Yes. Set a less aggressive fan curve in BIOS or fan control software. Be cautious to avoid overheating.
What should CPU fan speed be at idle?
Most CPUs idle with fans running at 600–1200 RPM. It depends on your cooling system and BIOS profile.
If your laptop or PC keyboard making noise when typing, you’re in the right place. We’ll show you how to fix it. Active Filter, Toggle, or Sticky keys are the main culprits.
Filter keys block fast keystrokes, Sticky keys keep modifiers like SHIFT active, and Toggle keys beep when lock keys are pressed. Follow the steps below to fix all of these issues.
How do I stop my keyboard from making noise when typing?
1. Disable non-plug and play driver
Right click Start.
Select Device Manager.
Locate the View tab and click on it.
Choose Show Hidden Devices.
A drop down list with the devices will come up.
Click Non-Plug and Play Drivers.
Right click Beep option and click Properties.
Select Driver tab and hit Disable.
Click Apply then OK.
After performing the above actions, try a different keyboard. If it works with a different keyboard, the issue is probably with the keyboard you’ve been using.
If the keyboard makes noise when you type, there might be a physical issue, and if that’s the case, you might want to replace your keyboard.
Click on Change settings, then onPower Management.
Uncheck the box Allow Computer to Turn off this device to save power.
Windows 10 has a different sound effect for device disconnections. Sometimes the keyboard disconnects itself to save on power and this is why your keyboard is making noise when typing.
Check Options under On-Screen Keyboard application (osk.exe), then remove the checkmark (tick) from the box, and instead Use Click Sound.
If you’re looking for the best virtual keyboard software on the market right now, take a look here and you’ll find it.
4. Update or install drivers
Right click Start.
Select Device Manager.
Select your hardware from the list of results.
Expand the specific category to find your device’s name.
Right click your device.
Select Update Driver.
Select Search automatically for updated driver software.
In case Windows does not find a new driver, look for one on your device’s manufacturer website and follow the instruction details.
To avoid driver-related issues, it’s advised to keep your drivers up to date using professional software. Using a specialized program can save you time; in fact, these tools scan your PC, look for the best drivers for your device, and install them in a couple of moments.
Fill in the form with the user name and password. Your new user account will be created.
Click on Change account type.
Click the drop down arrow and choose Administrator to set the account to administrator level.
Restart your computer.
Login to the new account you just created.
If you’re having trouble opening the Setting app, take a look at this helpful article to solve the issue.
If the keyboard works, then it may mean your other user profile is corrupted. You can try the following in case of a corrupted user profile:
On your new account, use it to downgrade your usual account.
Click Apply or OK.
Raise back your old account to its default admin level.
Rinse and repeat a few times as this will help to remove any corruption.
Leave your account on as Administrator.
Check whether the beeping noise disappears when using the newly created account. If it does, then you can either fix the old user account or migrate to the new account.
This is a common workaround if your keyboard makes noise when you type, so feel free to try it out.
Fix your corrupt user profile right now with a few easy steps from this useful guide!
If your keyboard making noise when typing issue persists, go to the next solution.
6. Turn off Filter Keys
Click Start.
Choose Settings.
Select Ease of Access.
Click Keyboard.
Find Filter Keys.
Slide it let to turn it off.
If you ever wondered why is your keyboard making sounds when you type, the cause might be the Filter Keys feature, so be sure to disable it.
7. Turn off Toggle or Sticky Keys
Click Start.
Choose Settings.
Select Ease of Access.
Click Keyboard.
Find Toggle Keys, slide it let to turn it off. Find Sticky Keys,slide it let to turn it off.
If using other earlier versions of Windows, take the following steps to remove the Toggle or Sticky keys:
Click Start.
Go to the search field and type Ease.
Select Ease of Access.
Select Make the keyboard easier to use.
Uncheck the selection on Turn on Sticky keys.
Click Set up Sticky keys.
Uncheck the selection on Turn on Sticky keys when SHIFT is pressed five times.
Click Save.
Uncheck the selection from Turn on Toggle keys.
Uncheck the selection on Turn on Toggle keys by holding down the NUMLOCK key for 5 seconds.
Click Save.
If your computer or keyboard is making a beeping noise when typing, you’ve probably enabled or activated Toggle keys, and/or Sticky keys, so be sure to disable them.
Go into your BIOS settings on your computer to check the date and time settings.
NOTE
You should only do this if you know what you’re doing!
We sure hope one of these solutions worked for you. If they did, do make sure to apply them whenever your keyboard beeps when typing.
If you’re aware of an alternative solution, share it in the comments section below so that other users can try it. Also, if you have any other questions, don’t hesitate to leave them there, too.
Looking for a reliable keyboard mapping tool for Windows 11 or 10? Whether you want to swap keys, disable a broken button, or assign shortcuts, the right key remapper can make your workflow faster and more comfortable.
Below are the best keyboard mapping software options, including free tools, that work smoothly on both Windows 10 and 11.
Key Remapper has had some rave reviews. As it has a registration fee this isn’t freeware, but you can still add a non-registered version to Windows with more restricted options from this website page.
The great thing about this software is that it enables you to remap mouse buttons and keyboard keys. As such, you can add keyboard functions to mouse buttons.
Key Remapper doesn’t have the visual keyboard GUI design in some of the alternatives. Instead, the software enables you to set up profiles so you can remap keys for alternative programs and purposes.
Then users can remap buttons for profiles by double-clicking the Key Remapper window to open the options shown in the snapshot directly below.
That window also includes options that enable you to configure the remapped keys to work only in specific programs.
Another advantage is that this program doesn’t alter the registry scan codes for keys, so you can remap them without restarting Windows.
Key Remapper
Using this key mapper means you can forget about inconvenient peripherals issues and enjoy a new world.
PowerToys is a set of Windows 10 utilities targeted toward advanced users. Its features help you make more in-depth setups for your device. It comes with appearance customization options, file explorer addons, power options, a keyboard manager, and more.
The PowerToys Keyboard Manager is a comprehensive tool that helps you thoroughly set up your keyboard so that it better fits your specific needs.
It can help with remapping all your keys and changing them up as you like. It is great for making your most-used keys more accessible or setting up your keys to better use different language packs.
Moreover, you can change up the keyboard shortcuts for different actions in your apps. The feature works for each app specifically, so if you want to add, for example, the same shortcut key across multiple apps, you will have to set that specific shortcut for each app separately.
Note that there are some essential, system shortcuts that you won’t be able to remap with PowerToys: Ctrl+Alt+Del, Win+L, and the Function Key Fn.
The PowerToys Keyboard manager is a free product provided by Microsoft. It runs on Windows 10 OS 1803 (build 17134) or later.
SharpKeys is a portable keyboard mapping software tool that makes a simple tweak to the system registry. This way, it enables you to easily swap or remap one key with another. The software application has a straightforward UI that doesn’t include a keyboard layout from which to select keys.
Instead, you can simply select one key to modify from a list and then choose another to switch it with from a second list. This software supports all the standard keys and some multimedia playback buttons on more recent keyboards.
The one notable shortcoming of SharpKeys is that it lacks an option that restores the default keyboard mapping, so users have to manually delete each remapped key separately.
However, aside from this fact, this is still a decent freeware program to remap keys with.
Other worth mentioning aspects are the very simple-to-use interface or the support for multiple Windows versions, from 10 to Vista or XP.
KeyTweak has a visual keyboard layout GUI with which you can select a key to modify on the keyboard and then choose another button to remap it from the drop-down menu. The WindowReport team has covered how to switch keys off with KeyTweak.
It also enables users to remap keys with more unique buttons found on multimedia keyboards and Web browser toolbar options such asBack,Stop,Forward,andRefresh.
Unlike SharpKeys, this program does have a Restore All Defaults button that restores the original keyboard settings.
Another great thing about KeyTweaks is that you can specify and save alternative mapping configurations as remap files, which can then be reloaded and applied.
Besides all, this keyboard virtualization tool has a very simple interface you can use with ease. It’s also possible to run in full teaching mode or half teach mode, disable a certain key, or see a raw map.
That being said, software like this comes really handy when you need to remap your keyboard or change the default layout, so hesitate no more.
AutoHotkey is a more flexible key-mapping software for Windows that’s not entirely the same as some of the others mentioned here.
This is a scripting tool with which you can remap keys, and the software doesn’t remap the buttons via the registry. As such, AutoHotkey enables you to remap keyboard shortcuts and mouse buttons as well as the standard keys.
Then you can also save and export these scripts to other systems as EXE files, which is another advantage.
Moreover, the software offers the possibility of learning basic scripts for beginners to perform tasks like macros, auto-clicking, or autocomplete in forms. Besides, it can help with remapping keys or buttons almost instantly.
On top of that, you can use this tool completely free and enjoy its practical features without other extra fees.
Therefore, anybody can benefit from this open-source key mapping software, plus learning scripting language with all the needed support.
Microsoft Keyboard Layout Creator (MKLC) enables you to create custom keyboard layouts from scratch. For example, you could set up a Dvorak keyboard layout with it.
Alternatively, you can configure new keyboard layouts from existing ones. This program isn’t entirely the same as some of the others as it creates installers that you can add extra keyboards to Windows.
When you’re setting up new keyboard layouts, you can select three alternative configurations for the key layouts around the Enter button. The software has a visual keyboard GUI so that you can click keys to assign values to them.
The one limitation of MKLC is that you can’t configure system buttons such as Return, Ctrl, Alt, and Tab; but assignable keys can have multiple entries such as Ctrl + key.
You can also validate and test keyboard layouts. So MKLC is one of the best remapping tools for setting up entirely new keyboard layouts in Windows.
If your PC gets stuck on the motherboard screen, it means the startup process is freezing right at the start. That logo or splash screen is a quick hardware check before Windows loads. If it hangs there, it usually signals a hardware or firmware issue. Follow the step-by-step instructions below to get it fixed fast.
What can I do when PC is stuck on the boot screen?
Sometimes a quick restart fixes this problem, but if that doesn’t work, keep reading.
1. Boot in Safe Mode
Manually shut down (forcibly) your PC around three times consecutively. The Choose an option screen. Click troubleshoot.
Select Advanced options.
From there, choose Startup Settings
Hit Restart.
After your PC has restarted, you’ll see a host of choices. Select 4/F4 to start it in safe mode.
If it boots, run the system restore to take back your computer settings to a previously working state.
2. Check your Boot order
Start your PC and Get in its BIOS (press the right key at startup e.g. ESC, F9, F2 etc.).
Locate the boot order area and make sure that your hard drive is set to be the first booting device.
Restart your PC.
You will also experience the same problem if you have an external gadget such as an iPod plugged in. So also ensure that you don’t have external storage devices such as a USB hard drive connected.
3. Check the RAM
Open your system unit.
Locate the RAMs and:
Remove the RAMs one by one(where applicable).
You then reinsert the RAMs (again one by one) while trying to boot each time. If the machine starts without one (or more) of the RAMs, know that the issue is with the memories. Needless to say, you’ll need to replace the suspect RAM module(s).
4. Clear the CMOS (BIOS)
NOTE
Please note that this method is general and your machine may need slightly different steps so refer to your computer manual or manufacturer’s website if unsure. Also, at times you’ll require a screwdriver to help press the tab (on the rim) of the battery holder
Turn off every peripheral device attached to the computer.
Disconnect the system power cord from its AC power source.
Remove the computer case cover.
Find the CMOS battery on the motherboard. The battery is typically in either a horizontal/vertical battery holder although it can also be connected to an installed onboard header using a wire.
Remove the CMOS battery. Notice the + and – orientation if the CMOS battery is within a holder. Finally, gently pry your battery free from the connector. For batteries connected with a wire to the onboard header, simply disconnect the wire.
In extreme cases, like the requested system device cannot be found, the only way out is to reinstall the suspect configurations. You may have to reinstall Windows, a brand new hard disk or even a new motherboard.
Windows OS users reported that Wi-Fi disconnects after Sleep Mode on their Windows 11 and Windows 10 PCs, and this can be an annoying issue. However, there’s a way to fix this problem once and for all, and we’re going to show you how to do it.
Some users say that they’re unable to connect to WiFi after waking from sleep mode. But there are some fixes that may help them.
Sleep Mode disconnects network connection? Fix it with these solutions
Windows 10 often loses Internet after Sleep Mode. Affected systems may wake with no connectivity, suffer frequent or sporadic Wi-Fi drops, or disconnect moments later. Mandatory sign-in prompts triggered on wake can also break wireless links. Occasionally, the PC refuses to reconnect despite repeated attempts or declares Wi-Fi completely non-functional, and you could get an invalid IP configuration. Let’s get to the solution and fix your wi-fi when it disconnects after waking up from sleep mode.
1. Change Power Management Settings
One of the most common causes of this issue is the wrong Power Management plan. You should check if your Wireless network adapter is not set to be turned off to save power when computers go to sleep mode.
If it the current Power Management plan turns off your Wireless adapter while in sleep mode, just change it and your problem will be solved. You can check if it is the case and change your current Power Management plan in Device Manager. Do so, follow these instructions:
Press Windows logo key and X key together and choose Device Manager.
Expand Network Adapters, right-click the adapter, click Properties.
Click the Power Management tab, and then clear the Allow the computer to turn off this device to save power check box.
This feature is associated with wake on LAN, and to learn more, we have an in-depth guide on how to enable or disable wake on LAN that you should check out.
2. Uncheck the IPv6 box
If the wrong Power Management plan is not an issue, you might have some problems with IPv6 protocol. In order to disable it, you should perform a couple of operations in your Network and Sharing Center. To untick the IPv6 box, follow these steps:
Click on Change adapter settings (in the left pane).
Right-click on the connection you‘re using. Click Properties.
Now remove the tick from the IPv6 and click OK to save changes.
3. Use Network troubleshooter
If Windows disconnects from Wi-Fi after sleep, you might be able to fix this problem with this simple workaround. According to users, you just have to run the Network troubleshooter by following these steps:
Right click the network icon in the bottom right corner. Choose Troubleshoot problems from the menu.
Network troubleshooter will now start and try to fix your problem.
After the troubleshooter is finished, check if the issue still appears. Many users reported that this solution worked for them, so feel free to try it. We have to mention that this might not be a permanent solution, so you’ll have to repeat it whenever the issue appears.
4. Change your power settings
According to users, sometimes Windows disconnects from Wi-Fi after sleep due to your power settings. Users reported that they fixed the problem simply by following these steps:
When Settings app opens, navigate to System section.
In the left pane navigate to Power & sleep section. Scroll all the way down and check both boxes under Wi-Fi section.
After doing that, your problems with Wi-Fi should be completely resolved.
5. Disable Broadcom Bluetooth
If Windows disconnects from Wi-Fi after sleep, the problem might be your Bluetooth adapter. It seems that Broadcom Bluetooth starts automatically with Windows causing this problem to occur. To fix this problem, you can do the following:
When Task Manager opens, go to Startup tab and locate your Bluetooth service. Right click it and choose Disable from the menu.
If you can’t find the Bluetooth service in Startup tab, you can disable it by doing the following:
Press Windows Key + R and enter msconfig. Press Enter or click OK.
Navigate to the Services tab and click on Hide all Microsoft services. Locate Bluetooth service and disable it. Now click on Apply and OK to save changes.
After making the necessary changes you need to restart your PC in order to apply them. Keep in mind that disabling the Bluetooth service might not be the best solution if you use Bluetooth devices frequently. To use your Bluetooth devices again, you’ll have to enable the disabled services.
6. Disable your antivirus
According to users, if Windows disconnects from Wi-Fi after sleep the problem might be related to your third-party antivirus software or firewall. To fix this problem, it’s advised to disable any third-party antivirus software or firewall and check if that solves the issue.
If disabling your antivirus software or firewall doesn’t solve the issue, you might have to uninstall your antivirus software completely. To do that, it’s advised to use a dedicated removal tool to remove all files associated with your antivirus software.
After removing your antivirus and firewall, check if the issue still appears. If the issue is resolved, you might have to reinstall your antivirus again or switch to a different antivirus solution.
You can find plenty of great Windows 10 compatible antivirus software that will not interfere with your system. Just make sure it has a good threat database, real-time protection, a transparent privacy policy, and good online security.
If Windows disconnects from Wi-Fi after sleep, the problem might be your Ethernet connection. One of the fastest ways to fix this problem is to make sure that your Ethernet connection is disabled. This is rather simple and you can do it by following these steps:
Open Network and Sharing Center and navigate to Change adapter settings.
Locate your Ethernet connection, right click it and choose Disable from the menu.
After disabling your Ethernet connection check if the issue is resolved. In addition, you can also perform this solution simply by disconnecting your Ethernet cable from your PC.
8. Change your connection to Private
Sometimes this issue can occur because your network connection is set to Public. Public network connections use a different set of rules, and sometimes that can cause certain issues to occur. If Windows disconnects from Wi-Fi after sleep, you can fix that by doing the following:
Click your Wi-Fi icon in the bottom right corner and click on Properties.
Now locate Make this PC discoverable section and enable it.
After enabling this option your connection will automatically change to Private fixing any Wi-Fi issues.
9. Disable Require sign-in
According to users, sometimes Wi-Fi problems can be caused by your settings. By default, Windows will ask you for your password once you wake up your PC.
This is a security measure, but many users reported that this feature is causing Windows to disconnect from Wi-Fi. To fix this problem, you just have to disable this feature by following these steps:
Open the Settings app and go to Accounts section.
Select Sign-in options from the menu on the left. In the right pane, in Require sign-in section select Never.
After changing this setting your PC won’t require you to login after waking up from Sleep Mode. Disabling this feature can be a slight security concern, but it should help you with this problem.
10. Perform a System Restore
If you’re still having this problem, perhaps you can fix it by performing System Restore. To do that, follow these steps:
Press Windows Key + S and type system restore. Now choose Create a restore point from the list.
The System Properties window should appear. Click the System Restore
Once the System Restore window opens, click the Next button to proceed.
Check Show more restore points option, if available. Now you need to select the desired restore point and click Next.
Follow instructions on the screen to complete the process.
Once your PC is restored, check if the problem is resolved.
If these solutions didn’t work out for you, or you have some other suggestions, comments, or maybe other useful solutions for this problem, please write them down in the comment section below, we would love to read your feedback.
A lot of Windows laptops and desktops include Realtek sound. The Realtek sound driver is essential to the communication between the PC system and its speakers.
Therefore, reinstalling Realtek HD Audio Codec drivers can often resolve numerous sound issues on Windows PCs.
Why are drivers necessary?
A computer’s efficiency depends on the frequency with which it is updated and maintained. A driver is one of the components that must be updated regularly.
Many people who own a computer are likely to have heard the phrase driver, but they may not be familiar with what it means or how important it is to the machine’s functionality.
Every computer contains several of them, each controlling a different set of installed software and hardware components. Your computer’s hardware and software will not function properly, and in some cases, they may not function at all if you do not have the right drivers installed.
Thus it is necessary to reinstall your drivers independent of what OS you are using. This is related to a frequent question from users asking if they need to reinstall the audio driver on Windows 11 or Windows 10. Yes, it is a must!
You can manually reinstall the Realtek audio driver by downloading the suitable version from the official Realtek website. Open the installer file and follow the on-screen instructions to complete the process.
2. Unninstall the driver and search for duplicates
3. Uninstall the Realtek sound driver via Programs and Features
Press the Windows key + R keyboard shortcut.
Next, type in appwiz.cpl in Run’s box; and click the OK button.
Enter Realtek in the search programs box.
Select the Realtek High Definition Audio Driver listed within Programs and Features.
Click the Uninstall button.
Choose Yes on any confirmation prompts.
Restart Windows after uninstalling the Realtek audio driver.
Then reinstall the Realtek audio driver manually as outlined above.
As you can see, reinstalling drivers is not as easy as it seems if you’re not using specialized software. For a better and faster result, it is recommended that you use Outbyte Driver Updater from the start.
Feel free to share your experience with us in the comments section below.