The power plan is a decisive factor behind a laptop’s performance, and choosing the right one for every situation is the key. The Ultimate Performance power plan is the most preferred one among many who want to get the best out of their devices.
Whether you need to enable the Ultimate Performance or continue with Balanced remains a personal decision based on requirements, but a proper understanding of it is necessary.
What is the Ultimate Performance power plan?
The Ultimate Performance power plan, introduced in 2018, takes High Performance a step forward and delivers even better results.
It’s meant to considerably reduce micro-latencies (delay between the OS identifying that a device needs more power and delivering it), if not altogether eliminate it.
The power plan makes the CPU run at 100% of its power, no matter whether it’s needed. Also, all other critical components are set to deliver the best performance and never stay idle.
Does the Ultimate Performance power plan make a difference?
Yes, it indeed does! And that should be pretty much evident with the performance and battery consumption. The battery will drain out faster when you switch to the Ultimate Performance plan.
Here are some of the results comparing the Ultimate Performance power plan for gaming with other options:
As can be seen and contrary to popular belief, the Ultimate Performance plan doesn’t tremendously improve the gaming experience.
The reason is that the CPU is already running at its full potential while gaming and the only lag you notice would be when the game is first launched. But there are other ways to improve gaming performance.
However, Ultimate Performance generally does an excellent job when required, and we recommend you at least try it.
How can I get the Ultimate performance power plan?
1. Enable the Ultimate Performance Plan on Windows 10
You can easily configure which Power Plan you want to use on your device through the Power Options settings. Enabling the Ultimate Performance Power Plan can be done in just a few clicks from this menu.
Press Windows + I to open Settings and select theSystem category.
2. Select Power & Sleep from the navigation pane and then click on Additional power settings.
3. Click on Show Additional Plans, and then multiple options will appear.
4. Select the Ultimate Performance option, and the power plan will be enabled right away.
What do I do if I can’t find Ultimate Performance?
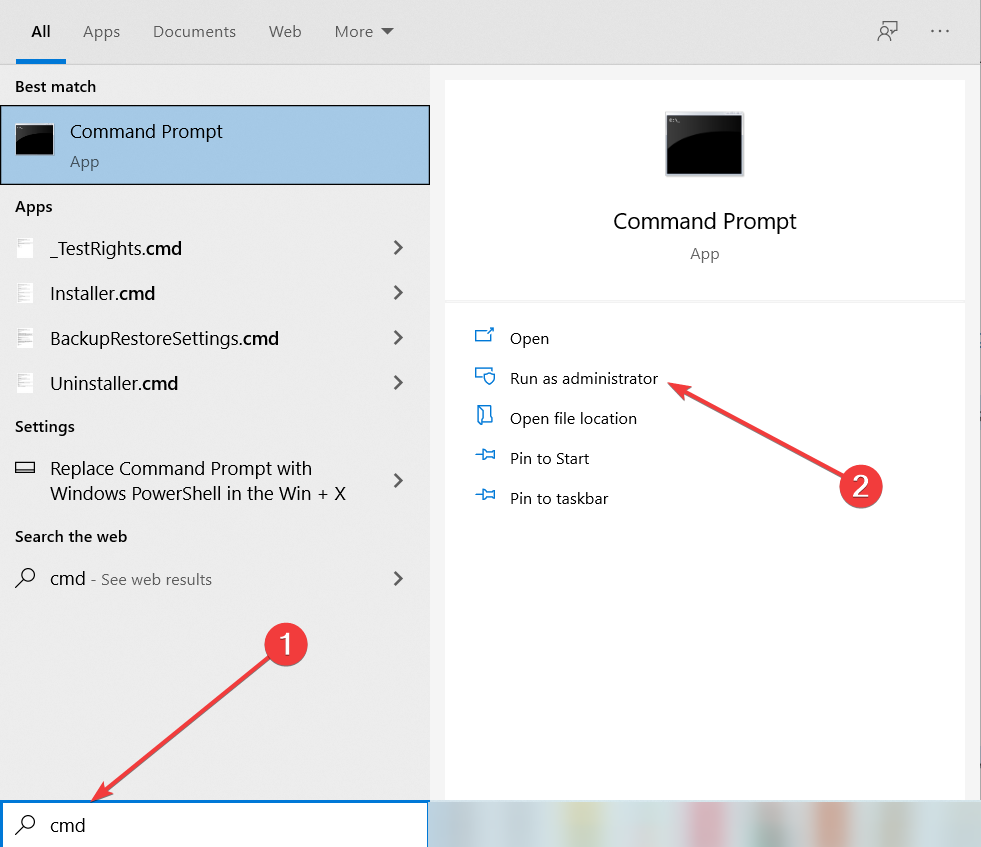
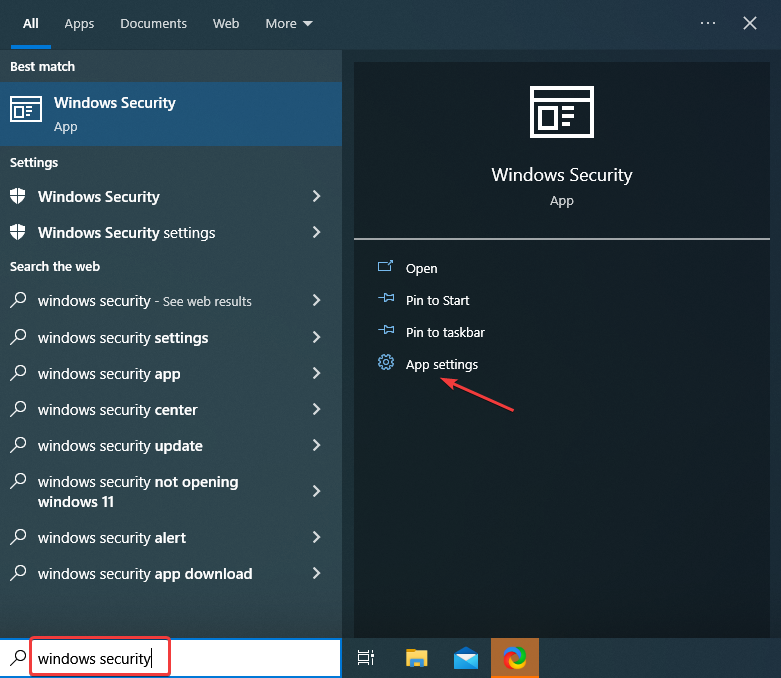
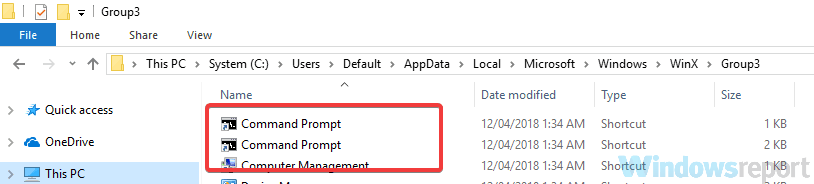
Press Windows + S to open the Search menu, type Command Prompt in the text field, and click on Run as administrator.
Click Yes in the UAC prompt.
Now, paste the following command and hit Enter:powercfg -duplicatescheme e9a42b02-d5df-448d-aa00-03f14749eb61
Once done, reopen the Power Options window, and the Ultimate Performance power plan will show up.
This way, you can enable High-Performance mode in Windows 10 if missing. The Ultimate Performance power plan command quickly adds it to the list of plans on the computer and fixes things when it’s now showing.
Using Ultimate Performance will unlock the total capacity of your hardware components. But remember, there will not be a noticeable difference during the gaming sessions.
If you were specifically aiming to improve gaming performance, check out the best FPS booster software and use one today.
Which one of the available power plans have you selected for your device? Let us know in the comments section below.
Mouse lag can arise in many games, including Call of Duty: Modern Warfare. When mouse lag occurs in Windows, the pointer movement isn’t at the same pace as the mouse. And it can have a notable impact on the gameplay experience.
Be it any game, mouse lag is one of the worst fears of any gamer. But, for mouse lag in Call of Duty: Modern Warfare, you have us fix the keyboard and mouse lag when playing games.
What causes mouse stuttering in Modern Warfare?
Here are some of the reasons behind Modern Warfare input lag on PC:
Issues with the mouse – Usually, it’s a hardware fault with the mouse or misconfigured settings that led to the problem.
Incorrect priority level – In some cases, Modern Warfare had an incorrect priority level set in the Task Manager and switched to Normal fixed things.
Outdated drivers – A problem with any device could result from driver issues, and it’s generally an obsolete version to blame.
How can I fix the mouse lag for Call of Duty: Modern Warfare?
Before we head to the slightly complex fixes for mouse lag in Call of Duty: Modern Warfare, here are a few simple tricks to get things up and running:
Check for Windows updates and install the latest available version. Also, update Call of Duty: Modern Warfare.
If nothing worked, head to the solutions listed next.
1. Update the mouse driver
Press Windows + S to open the Search menu, type Device Manager, and click on the relevant search result.
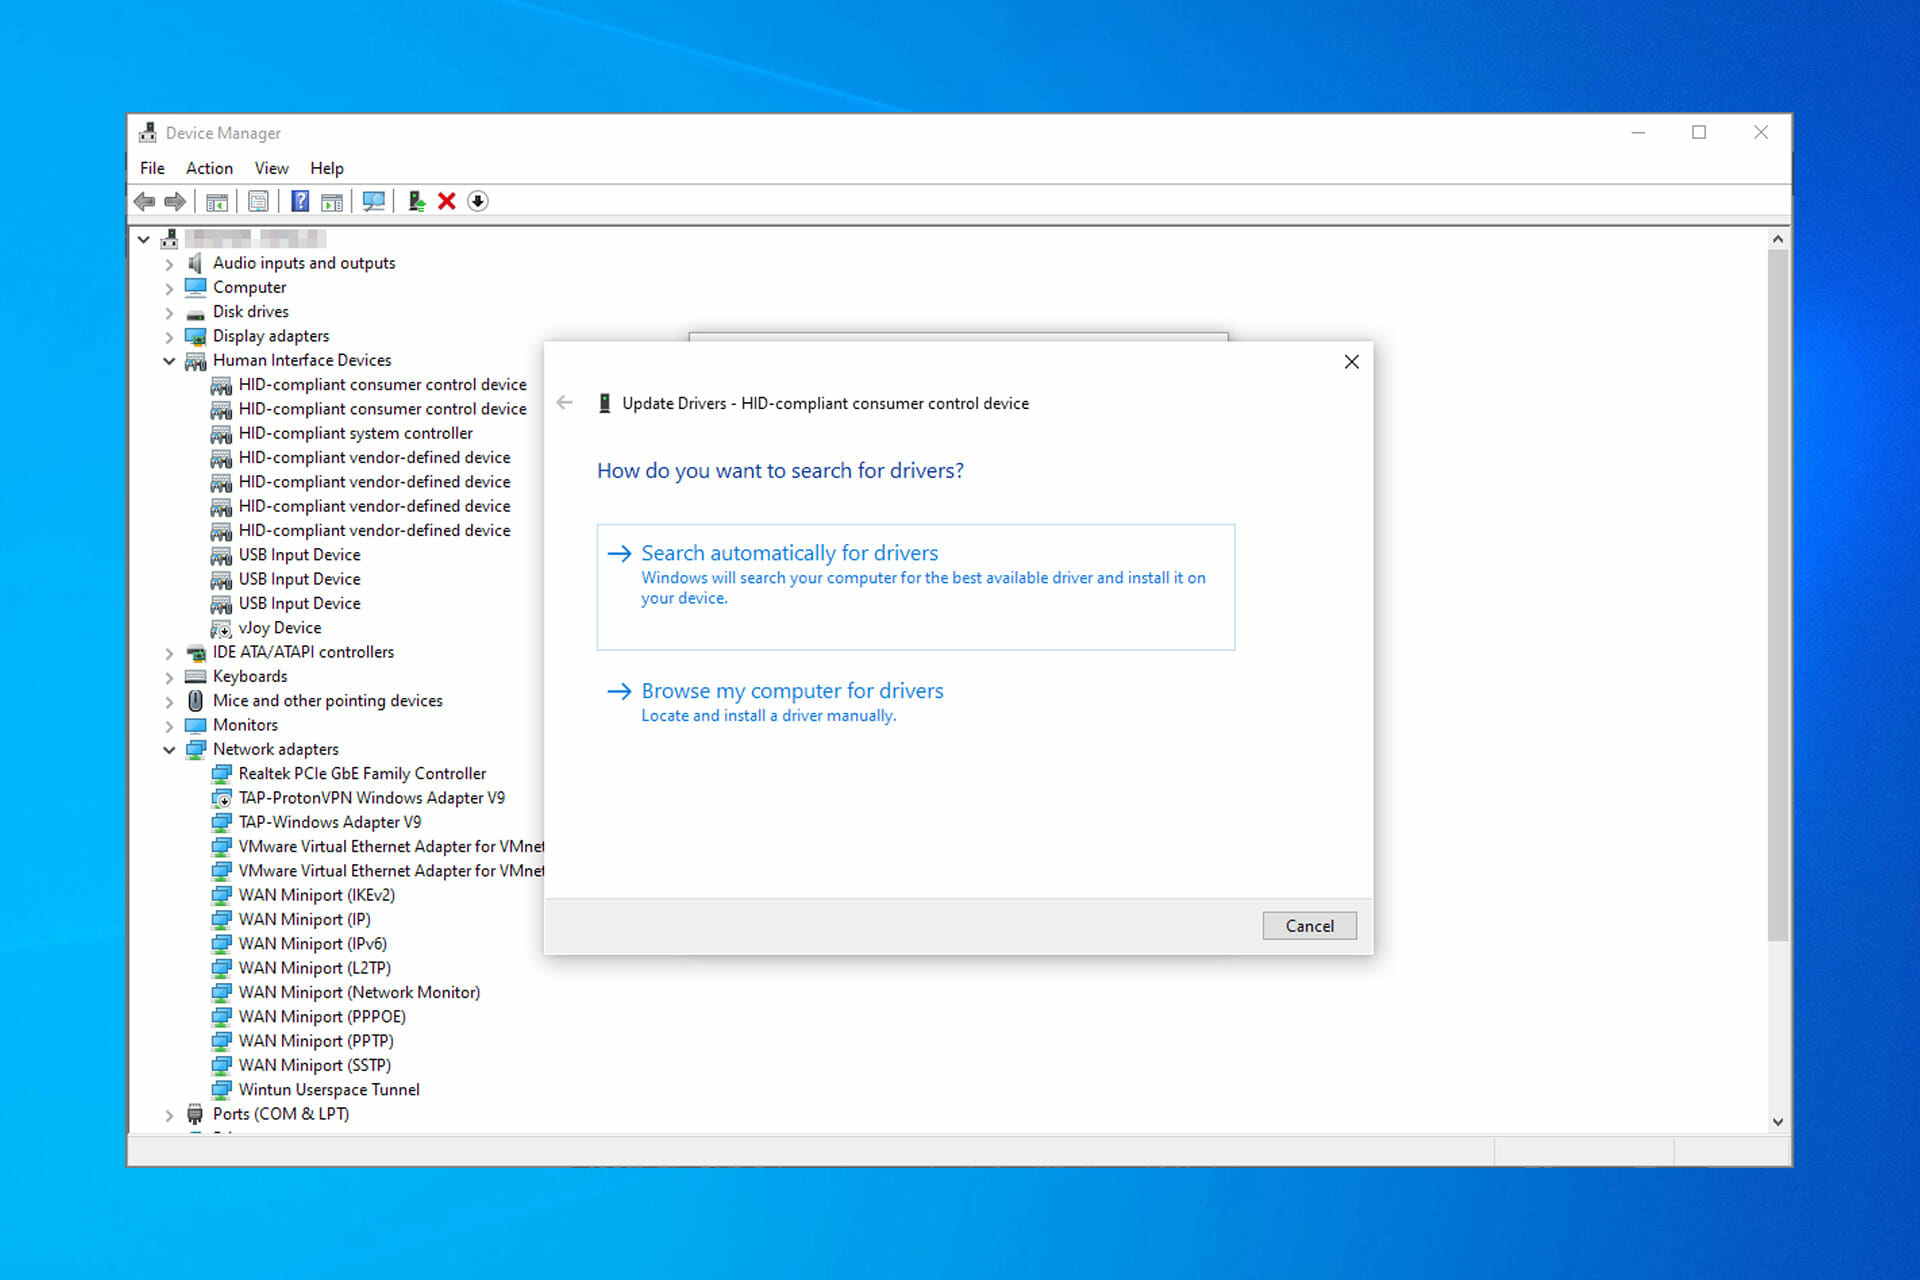
Expand the Mice and other pointing devices entry, right-click on the problematic mouse, and select Update driver.
Now, select Search automatically for drivers and wait for the best one to be installed.
Windows usually automatically installs the best available drivers for the connected devices, but you can do so manually. Updating your device drivers can help prevent other issues while playing Call of Duty, such as DirectX error; read this guide to learn more.
Remember that it wouldn’t be able to fetch one available on the manufacturer’s website, and you would need a dedicated driver updating tool for it.
2. Change the priority setting for COD: Modern Warfare
First, open the Call of Duty: Modern Warfaregame via its launcher.
Now, return to the desktop without closing Call of Duty: Modern Warfare by pressing Windowsor Alt +Enter.
Press Ctrl + Shift + Esc to open the Task Manager and navigate to the Details tab.
Locate the ModernWarfare.exe process, right-click on it, hover the cursor over Set priority, and then choose Normal.
Now, return to the Call of Duty: Modern Warfaregame.
Once done, check if mouse lag is still present in Call of Duty: Modern Warfare. If yes, head to the following method.
3. Adjust the game’s mouse settings
Run Call of Duty: Modern Warfare.
Open theOptions menu in the game, go to Keyboard & Mouse, and make the following changes:
Disable Mouse Smoothing
Change Mouse Acceleration to 0.00
Set Mouse Filtering to 0.00
Readjust Mouse Sensitivity until you get it right
4. Disable VSync in Nvidia Control Panel
Open the NVIDIA Control Panel, and select Manage 3D settings from the left.
Now, locate Vertical sync on the right under Settings, and choose Off from the dropdown menu.
Once done, click on Apply to save the changes.
Many users reported that disabling Vertical sync both in-game and through the NVIDIA Control Panel helped fix mouse lag in Call of Duty: Modern Warfare.
The above resolutions should fix mouse lag in Call of Duty: Modern Warfare for most players. If the problem persists, go to the Activision Support site for COD: Modern Warfare for further support.
Also, the solutions here would help when facing mouse stuttering in Warzone and mouse lag in Warzone. Besides, find out how to optimize the PC for gaming and get the best performance in Windows. Moreover, if you’d like to access bot lobbies with ease, we’ve got you covered!
If you have any queries or know of a solution not listed in this guide, kindly drop it in the comments section below to help fellow gamers fix things.
Did you encounter a Windows Defender service access denied error? Here is all you should know.
Windows Defender is one of the most popular antivirus programs, protecting millions of computers against vicious threads. However, many users report that their Windows Defender cannot be started.
Often, when users try to start Microsoft’s built-in antivirus, an error message appears on the screen informing them that the service couldn’t be started. There are a few ways to fix this.
Why can’t the Windows Defender service be started?
Many Windows 10 users reported that the Windows Defender service wouldn’t start on their PCs. Here are a few reasons why this may happen:
Incompatible antivirus – Some users prefer third-party antivirus. If the choice does not work well with the built-in Windows Defender, you may expect this error.
A corrupted account – Your login account may be corrupt and will trigger this Windows Defender service access denied error.
Corrupted app files – If the app files are bad, you will also not be able to start its services, leading to the error.
Moreover, here are some other similar issues that users reported:
Windows Defender service won’t start in Windows 11, 10, 7 – Even if you don’t use Windows 10, you should know that almost all of our solutions are compatible with older versions of Windows, so feel free to try them.
Windows Defenderservice won’t start error 577 – Sometimes, error 577 can appear while trying to start Windows Defender service. To fix this problem, ensure you don’t have any third-party antivirus installed on your system.
Windows Defenderservice won’t start access denied – This problem can appear due to issues with your permissions. To fix the problem, you need to adjust the security permissions of the ProgramDataMicrosoft directory.
Windows Defenderservice keeps stopping – If Windows Defender service keeps stopping, the issue might be profile corruption. Create a new user profile and check if that solves the problem.
How can I fix the Windows Defender service not found/access denied errors?
1. Disable and remove third-party antivirus solutions
Running two antivirus solutions at the same time causes various technical issues. Use dedicated software removal tools to eradicate any third-party antivirus files.
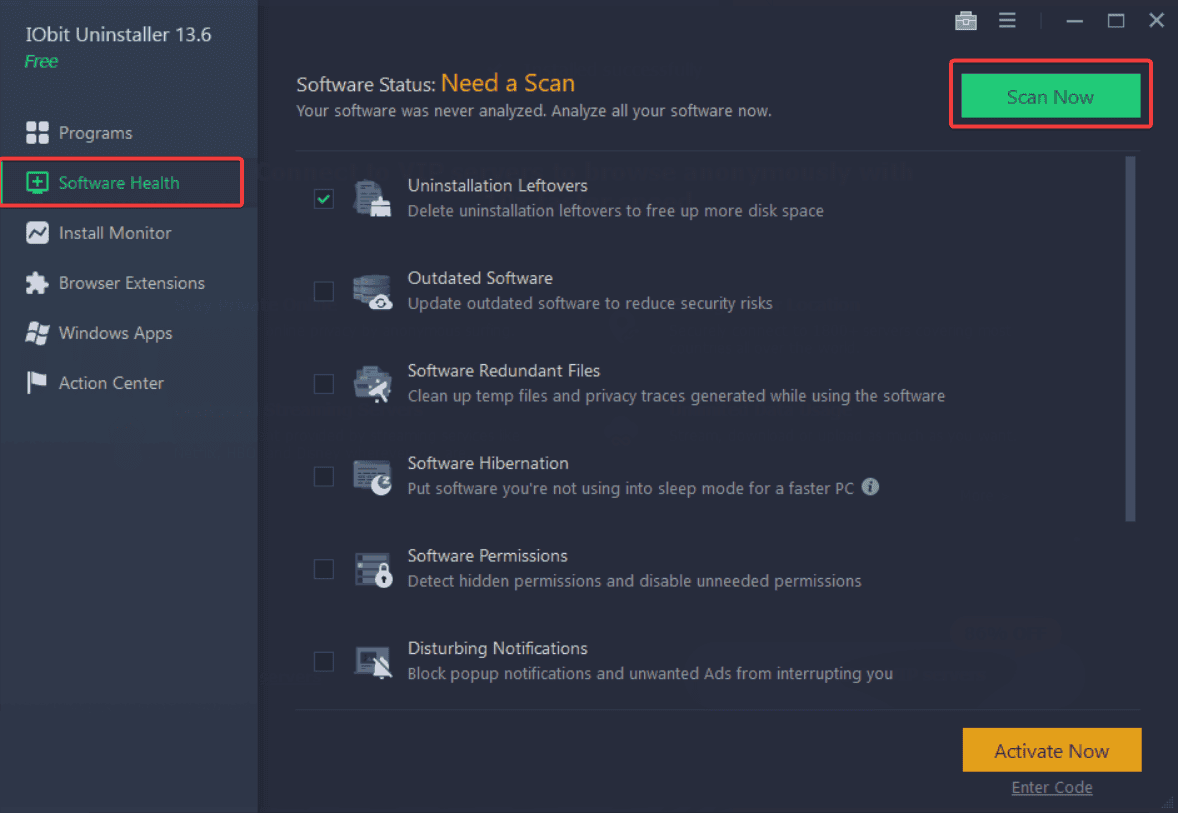
For example, IObit Uninstaller is an excellent choice. This tool can remove all unwanted programs with their associated files, leaving no trace behind, as IObit will scan and display logged programs, folders, registries, etc, to delete them with just a right-click.
IObit Uninstaller
Remove unwanted programs and keep your computer safe and clean with this powerful tool.
Windows will now check for available updates and download them in the background. Once the updates are downloaded, restart your PC to install them.
3. Run an SFC or DISM scan
3.1 SFC Scan
Press Windows Key + X and select Command Prompt (Admin) or Powershell (Admin).
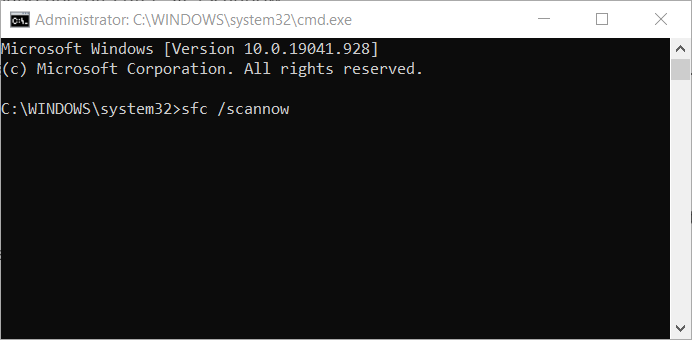
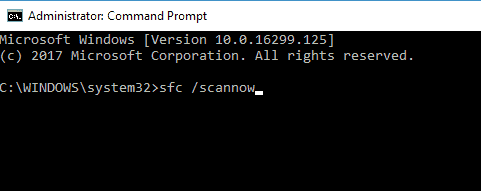
When Command Prompt opens, enter the following command and press Enter: sfc /scannow
The SFC scan will now start. The scan can take up to 15 minutes, so don’t interrupt it.
According to users, sometimes Windows Defender service won’t start because of file corruption. Your system files can get corrupted, and that can cause this error to appear.
Once the scan is finished, check if the problem persists. If the issue is still present, or if you couldn’t run an SFC scan, you might want to try running a DISM scan instead.
3.2 DISM scan
Press Windows Key + X and select Command Prompt (Admin) or Powershell (Admin).
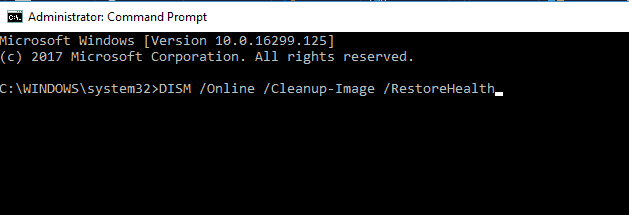
When Command Prompt opens, enter the following command and hit Enter: DISM /Online /Cleanup-Image /RestoreHealth
DISM scan will now start. The scan can take up to 20 minutes, sometimes more, so you need to be patient and not interrupt it.
Once the DISM scan is finished, check if the problem persists. If the problem is still there or you couldn’t run the DISM scan before, repeat the SFC scan and check if that solves the problem.
4. Clean your registry
Sometimes, Windows Defender cannot be started if there are issues with your registry. For example, a corrupted registry entry can cause this issue to appear, and you need to find and remove the problematic access.
This is a complex task to perform manually, so it’s better to use special software. There are many great registry cleaners available that can help you with that problem.
To find the proper choice for this task, you can opt for efficient registry cleaner tools that eliminate residual files and optimize your PC.
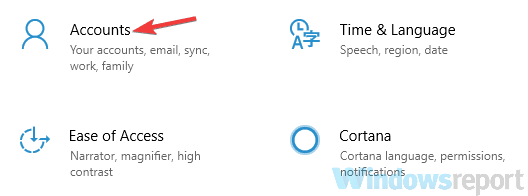
Open the Settings app and go to the Accounts section.
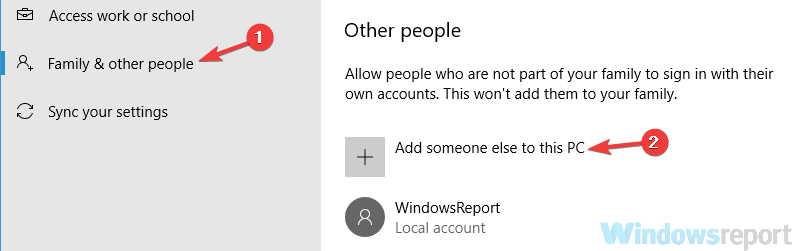
Go to Family & other people on the menu on the left. Then, click Add someone else to this PC in the right pane.
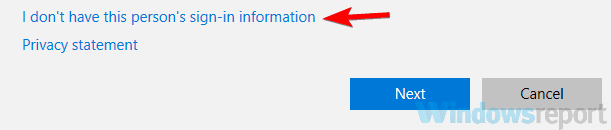
Click I don’t have this person’s sign-in information.
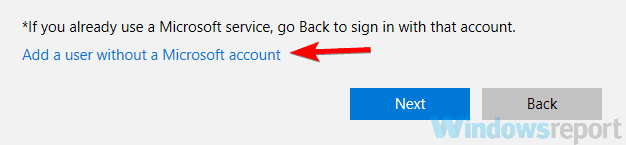
Now select Add a user without a Microsoft account.
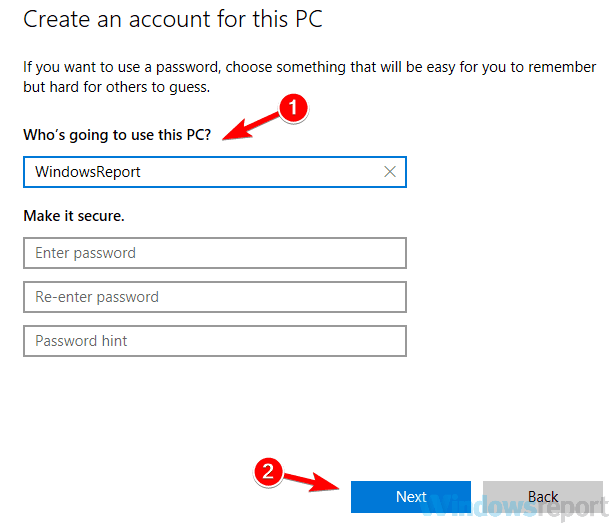
Enter the desired user name and click Next.
After creating a new user account, switch to it and check if the problem is still present. If not, you might have to change to the newly created account and start using it instead of your old one.
Select Download and install updates, driver, and optional features (recommended), then click the Next button.
Follow the instructions on the screen until you reach the Ready to install screen.
Make sure that Keep personal files and apps appears on the recap list. If not, click Change what to keep and select Keep personal files and apps from the list.
Follow the instructions on the screen to complete the installation.
Once the installation is finished, you’ll have a fresh installation of Windows, and the problem should be resolved.
Not being able to start the Windows Defender service can be a problem, but we hope you managed to fix this issue with one of our solutions.
SYSTEM_SERVICE_EXCEPTION is BSoD error happening on Windows 10.
According to Microsoft, the Your device ran into a problem and needs to restart the system service exception error is triggered by a running process transitioning from non-privileged to privileged code.
This doesn’t really answer what causes the error and how to fix it. This is where we come in.
How do I fix the system_service_exception BSOD?
1. Check your peripherals and hardware
Press Windows Key + X keyboard shortcut and choose Device Manager from the list.
Now, in Device Manager, you need to find your webcam, right-click it, and choose Disable from the list.
Sometimes, certain hardware, such as a webcam, even the one that is built-in to your monitor, can cause annoying hardware.sys SYSTEM_SERVICE_EXCEPTION errors.
2. Update your graphics drivers
Go to Search, type devicemngr, and open Device Manager.
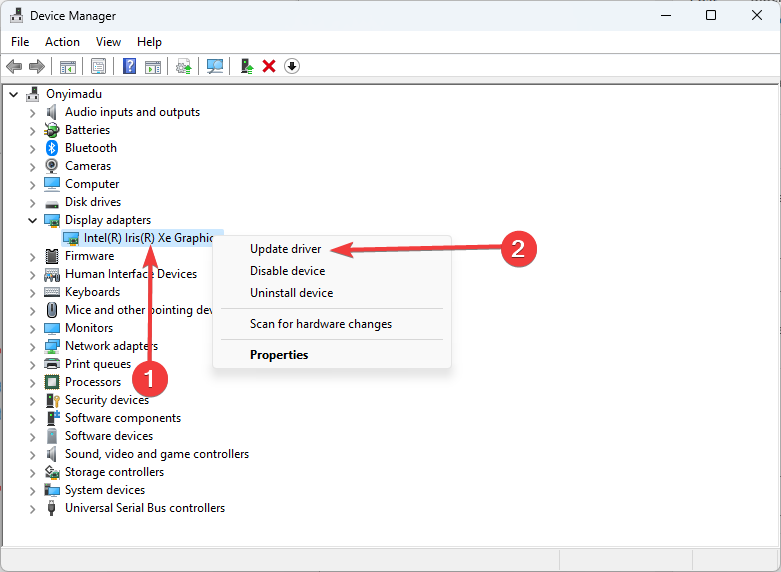
Expand Display Adapters.
Right-click your graphics card, and go to Update driver.
Let your computer automatically find new drivers for your GPU. Wait for the process to finish.
The System Service Exception often appears when playing games. Whether it manifests as a plain blue screen while gaming, or as a game loop in Valorant, Minecraft, Warzone, or other games, the stop code is prone to be triggered by GPU or CPU issues.
But not all of them are compatible with your specs and this can lead to SYSTEM_SERVICE_EXCEPTION errors.
Problematic apps usually include XSplit software, MSI Live update, or Asus GameFirst service, so you might want to disable them or remove them altogether.
4. Use Command Prompt (SFC, chkdsk)
Go to Search, type cmd, and open Command Prompt as administrator.
Enter the following line and press Enter on your keyboard: sfc/scannow
Wait for the process to finish.
Restart your computer.
This is Windows’ built-in tool for resolving various problems, including our BSOD System Service Exception. While running the SFC scan should be easy, you might struggle with executing the Command Prompt as an admin. Don’t worry, we got you covered!
The next thing we’re going to try is to check the hard drive.
Go to the Command Prompt (as shown above).
Enter the following line and press Enter on your keyboard: chkdsk /f C:
Wait for the process to finish.
Restart your computer.
We’re now going to check if everything’s okay with your hard drive configuration. If chkdsk is giving you headaches, you will be able to get it back on track in no time and see it a corrupted system drive is behind the System_Service_Exception error in Windows 10.
Go to Search, type memory diagnostic, and open the Memory Diagnostic Tool.
When the window pops up, choose Restart now and check for problems.
Let your PC restart.
After inspecting your hard disk, it’s time to take a closer look at your RAM memory. The System Service Exception often appears after new RAM is installed, so the steps described above should be perfect for this check-up as well.
Tip
If the Microsoft stop code System Service Exception is still hunting you, updating your BIOS is the last resort. However, you should proceed with utmost caution since a wrong click can render your motherboard unusable. We will guide you step-by-step in flashing your BIOS safely, but we advise you to ask for professional help if you’re not sure what you’re doing.
How to fix the System Service Exception error in Windows 10? Here are 7 quick and easy fixes (with a few bonus alternatives on the side).
If you want to skip the troubleshooting part altogether and go straight for the resolution, you can always rely on professional BSoD repair software to fix things for you.
What causes blue screen system service exception?
Check out the most common System Service Exception BSOD causes:
GUI errors
Corrupted Windows system files
Outdated, damaged, or incompatible drivers
Virus or malware infections
Incompatible or problematic software or Windows updates
Is the System Service Exception related to RAM?
Yes. it can be due to RAM issues. Not only that, you can have specific malfunctions and your access memory can report crashes due to such BSOD errors.
In case you notice that with the RAM on your device, you may consider troubleshooting this to resolve the System Service exception issue.
Startup programs on Windows 7 can sometimes impact your performance negatively, so it might be necessary to remove them, and this guide will show you how to do that.
Is it OK to disable all startup programs?
For the most part, yes, since you’ll gain a performance boost and improve boot time. However, disabling all startup apps might cause certain features not to work. Also, disabling the antivirus can leave your system vulnerable.
How do I disable startup programs in Windows 7?
Before anything, you need to ensure you don’t disable any Microsoft programs. Also, if you don’t have any issues, perhaps disabling startup applications is unnecessary.
1. Deleting the program’s shortcut from the Startup folder
Left-click the Start button and click All programs from the drop-down.
Navigate through and click on the Startup folder to expand it.
Locate the shortcut to the program or application you want to disable under the Startup folder.
Right-click on the Shortcut and click on Delete from the drop-down.
Confirm the process in the new prompt and restart your PC to check if the program is disabled.
The program shortcut in the Startup folder is responsible for launching the program on startup. So, deleting the shortcut will prevent the program from launching on boot.
Today, business management has been made significantly convenient, as there are now various types of business management solutions, each handling specific work functions in a typical business setup.
Some of these tools are highly versatile, such that they can be employed to oversee the entire management workflow of a business.
And this is where back-office management software comes into play. These solutions host a set of tools, which are optimized to execute back-office functions, ranging from production, inventory control, supply chain, HRM and billing among others.
Essentially, the tool assists you in optimizing the usage of your resources (material, financial and human), towards attaining optimum productivity.
There is a good number of ERP tools out there, any of which can be employed to manage back-office functions. However, in this article, we will be showing you a compilation of the top five software that manages the back office.
Sage ERP is an advanced suite of enterprise management tools, designed to facilitate the management of small and medium-scale businesses’ back-office functions.
The tool is a cloud-based solution, with cross-platform support for Windows, macOS, Linux, iOS, and Android among others.
Sage ERP hosts several toolsets (modules), each designed to perform a unique set of functions, which include billing, inventory control, warehouse management, supply chain management, staff monitoring, and appraisal among others.
The software’s modules include:
Enterprise Management
Business Intelligence
Recruitment
Accounting & Finance
Production/Manufacturing
Human Resource & Payroll
Sales & CRM
Sage ERP, though conventionally a software that manages back-office functions, also hosts a “front office” module (sales and CRM). This affords you the opportunity of streamlining your entire workflow (both back office and front office functions). With this, you are able to work more efficiently and productively.
Other notable features of Sage ERP include in-depth financial reports, intuitive UI, templates, data backup, remote access, easy and quick implementation, visual dashboard, extensible platform, cross-platform support, online resources, email support, on-premise deployment, and lots more.
Sage ERP is offered by quote i.e. it offers flexible (custom) pricing to prospective buyers.
Sage ERP
Manage your business faster, simpler, and with more flexibility thanks to Sage ERP’s powerful features.
NetSuite is a top-end software that manages back office functions. It is a versatile ERP tool, designed to assist various classes of business owners in managing their resources (material, financial and human), towards achieving optimum productivity.
The software is widely seen as the best ERP software; hence, it is the ultimate choice of many business owners across the globe.
NetSuite, as a cloud-based platform, hosts a flexible support system, and it’s compatible with virtually all mobile and computer OS platforms, notably Windows, Linux, macOS, iOS, Android and other web-enabled platforms.
The software features the latest in business intelligence, and core business functions (front office & back office) are aptly automated to jack up operational efficiency.
In clearer terms, tasks like billing, revenue management, asset control, inventory management, employee appraisal and more, are executed on a streamlined and automated interface.
Furthermore, the platform hosts open API support, which makes its functions expandable.
NetSuite ERP solution is available by quote (custom-based pricing). Hence, you can contact the sales team to get a suitable quote for your business.
Odoo is one of the most widely used software for managing back office (ERP) functions. And with a global client base of over 3 million users, it conveniently stands out as one of the best software that manages the back office.
Odoo is a versatile business management software, designed to run ERP and CRM functions. It hosts designated support for Windows, and other notable desktop and mobile operating systems.
The software is a 2-in-1 solution, serving, on one hand, as a comprehensive project management tool, and on the other hand, as a dynamic ERP/CRM platform.
Basically, Odoo covers every key area of a typical business setup; notably, inventory control, human resources management, billing/invoicing and other ERP (and CRM) functions.
Notable features/modules of Odoo include invoicing, automated marketing, inventory management, auto-stock update, auto-Calendar, and free trial among others.
Odoo offers a flexible, feature-specific, pricing. And the number of features you select determines how much you are charged. However, it generally goes at a basic price of $6 per user (per month).
ERPNext is a popular enterprise management solution, and it rounds up our list of the best software that manages the back office. It is widely seen as a perfect alternative to NetSuite, and it offers both ERP and CRM functions.
The software hosts cross-platform support for Windows, Linux, and Mac. And there is a web-based edition, which can easily be used on mobile platforms.
ERPNext is an open-source ERP tool, designed for all classes of businesses, irrespective of size. It is optimized to facilitate various financial, inventory and production functions.
In a nutshell, it simplifies the entire back office workflow, and its flexibility makes it applicable in any business setting.
Key modules of ERPNext include HR & Payroll, Production/Manufacturing, Accounting, Projects, Asset Management, Website, CRM, Sales & Purchase, and Helpdesk. All of ERPNext’s features are classified under the aforementioned modules.
ERPNext is probably the best software out there, in terms of affordability. It offers an initial free trial for 14 days, after which you can subscribe to the license edition, which is available at a starting price of $5 per month (per user).
In this post, we have outlined the top 5 ERP software i.e. top 5 software that manages the back office. This software has been selected and rated based on their relative affordability, durability, user base (popularity), user reviews and ease of usage.
So, if you are in doubt about which ERP solution to employ, the above-listed ones are the recommended solutions for you.
You must have just encountered the error message Windows was unable to repair the drive.
Windows 10 OS has a built-in System File Checker and Disk Checker utility. If the OS detects a corruption or malfunction of the drive, it will ask you to run the CHKSDK utility to fix the drive.
The tool has a good record of repairing minor corruption and resolving problems with the hard drive.
However, the built-in diagnostic tools sometimes fail to repair the drive and show Windows could not repair the drive error.
What does Windows was unable to repair the drive message mean?
This error means you have a bad drive that can not be repaired by the built-in Windows tool. A few things may trigger this situation; the following are at the top of the list.
Damaged or bad files – There is the possibility that some of your files are destroyed beyond repair. In this case, the repair tool may be unable to fix the drive.
Quick drive ejection – Sometimes, you may have removed a drive without following the correct Safely remove hardware process. This can damage the drive, and in some cases, you may not be able to repair it.
Virus infection – Generally, this is a cause of many computer problems. It may affect drives and damage them beyond repair. The recommendation is always to use good antivirus software.
A few variations to this problem may include:
Windows was unable to repair the drive flash drive – This is the very same error but is limited to when you use a flash drive on the device. You should use quality USB flash drives to reduce the occurrence of this error.
Disk repair not working Windows 10– Just like this error manifests in the new OS, it also exists in the old one, and similar solutions would apply.
Windows was unable to repair the external drive – In some cases, it is because the external drive is not showing. Other than that, very similar fixes will apply.
While there may be other triggers, these are the top ones, and we will show you the most recommended solutions.
How do I fix Windows was unable to repair the drive errors?
1. Boot into Safe Mode
1.1 If you can log in to Windows
Press Windows Key + R, type msconfig, and hit Enter.
Open Boot tab, select Boot Options,checkthe Safe bootoption and click OK.
Restart the PC.
1.2 If you can see the lock screen
Click on Power button, press hold the Shift key, and click Restart.
From the Choose an option screen, select Troubleshoot, and then Advanced Options.
Next, click on Startup Settings and select Restart.
After your PC restarts, you should see a list of options. Press 4 orF4 on your keyboard to start the PC in Safe Mode.
1.3 If you can’t log in to Windows
Click on Advanced Options, this will open Choose an Option screen.
Click on Troubleshoot, and selectAdvanced Options.
Go to Startup Settings and select Restart.
Windows will restart and show a lot of options. Press 4 orF4 on your keyboard to start the PC in Safe Mode.
Windows will show a Recovery menu if it fails to boot normally three times over. You can manually interrupt the boot process by pressing the Power button when the Window starts to boot.
During the next restart, Windows will show the Preparing Automatic Repair screen and then asks you to select a user account. Windows will try to diagnose the issue and present you with an Automatic Repair screen.
Note that some of these fixes require you to be able to log in to Windows. If you cannot log in or if the boot process fails, you can try to boot Windows into Safe Mode.
Safe Mode is a diagnostic mode in Windows OS that helps you to clean boot the PC with absolutely minimal services running to boot the computer successfully.
This way, if the software or driver conflicts with the booting process, you can log in without the error for diagnostic purposes.
Now that you know how to boot into Safe Mode let’s dive in and look at the solutions to fix Windows that could not repair the drive error.
2. Run Check Disk tool from Command Prompt
Type cmd in Windows search and click on Run as administrator to start Command Prompt with complete privileges.
Now type the following command and hit Enter. Make sure that you enter the right drive letter first and then enter the command: Chkdsk /f /r
The first solution is to run the check disk tool again but manually from the Command Prompt.
In the above command /r locates bad sectors and recovers data where possible, and /f forces the drive to dismount before beginning the scanning process.
Wait for the check disk process to complete. Windows will automatically scan and fix the drive for any error and corruption issues.
3. Run a diagnostic tool
Assuming that the disk error is occurring due to your external hard drive, you can use any diagnostic tools to pinpoint the problem and fix the bad sectors.
Some hard drive makers like WD offer their diagnostic tools. If not, you can always use third-party software like the one recommended below to run and test the drive for errors.
While this software may not fix the error, you can always prevent the hard drive from serious damage due to continued use under bad conditions.
Stellar Data Recovery
This amazing software will help you identify and then further prevent any disk errors.
It also might be that you can’t boot into Windows even with a bootable USB flash drive, which means you probably have a bad hard drive.
Whether it is an internal SDD/HDD or external HDD, the only way to make sure of the hardware failure is to remove the drive from the computer and connect it to another working computer.
If the other computer does not recognize the drive, you mostly have a faulty one and need to repair or replace it.
Connect a spare drive, if you have one, to your non-working computer and try to boot from it. If the PC recognizes the hard drive, it could be a hard drive failure.
In this case, you do not have many options. You can try to return the hard drive, claim the warranty, and recover the data from the hard drive, taking professional help.
6. Clean Install Windows
Assuming you don’t have a hardware failure, you can try to perform a clean install of Windows as a last resort.
This is a solution that many don’t like, but at times, this is the last option to get your computer working again.
If you can log in to Windows, you must create a data backup of your important files and folders.
Windows cannot repair the drive while it’s in use errors can be fixed with CHKDSK or the System File Checker tool most of the time. You can format the disk on an external hard drive or USB drive if feasible.
However, if the problem is with the primary local drive, the error can create serious issues. Follow all the solutions suggested in this article that may help you fix the error on your Windows PC.
Please let us know if any solutions did the trick for you or if you have a new solution that deserves to be on the list in the comments.
We all know how annoying it can be when your computer starts to slow down and applications begin to load slowly or lag. This usually happens after several months of use.
The major cause is usually because of bloatware, the presence of many junk files, and registry errors. Sometimes this can be a result of updates or new upgrades to your Windows operating system.
However, there are many ways to speed up your computer with utility software. Windows Report team has compiled the best software to increase the performance and speed of your computer.
How do you clean up a computer that is running slow?
Not enough disk space, too many open apps, or simply outdated drivers are just a few of the factors that cause a computer to run slowly.
But remember, any operating system inevitably will slow down a little over time if over-solicited. For this reason, we recommend keeping your computer up-to-date and reinstalling your operating system every two years to maintain peak performance.
Today, we are gonna talk about five easy ways to help you refresh and maintain the performance of your PC:
Delete unnecessary apps and files: Delete the temporary files, run a disk cleanup, uninstall old apps that you don’t use anymore, and just free up some disk space.
Empty your Recycle Bin: If you didn’t do that in a while, there might be a lot of files piled up there.
Use an antivirus: Having your PC infected will make it run slower. Do a full system scan with a professional antivirus to make sure your computer is safe.
Use a specialized tool: A tool can do all these steps for you automatically, and even clean and repair some aspects you didn’t think of, so it might be worth a shot.
Update your OS: Outdated OS can run slower since all programs are optimized for their latest updates.
Why is my Windows 10 computer running slow?
Windows can be very slow if you have multiple applications installed and running in the background. If certain applications aren’t necessary, it’s advised to close them.
There are several methods that you can use to improve PC performance, and one of them includes disabling startup applications.
Startup applications can also make Windows slow to boot, but there are ways to fix this problem, and in today’s guide we’re going to show you the best tools for this task.
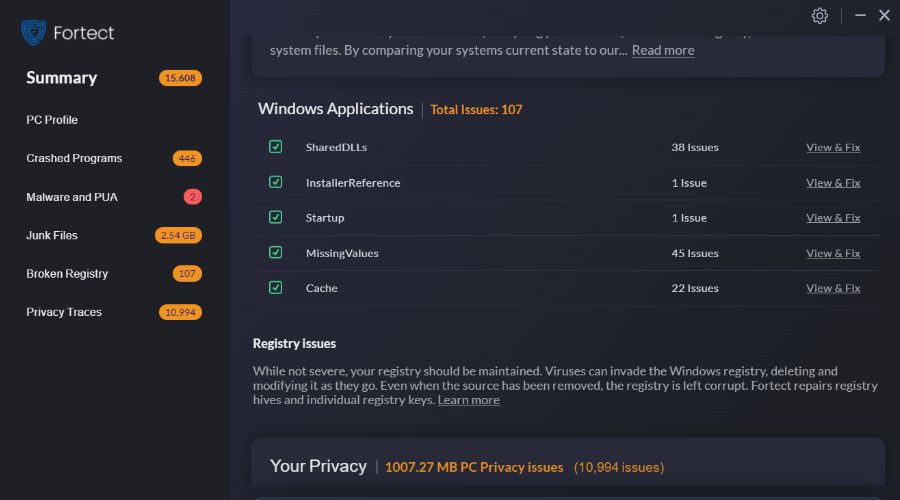
Fortect is a trustworthy repair and optimization software that is great for use when various issues interfere with your computer’s condition.
It is able to run a complete scan of your entire system and provide afterward a diagnostic report with all encountered issues and their root.
Thanks to its advanced OS technology, it also compares your malfunctioning system to a new one and ultimately helps you repair corrupted and missing OS files, such as DLLs and registry keys.
Moreover, you can choose a system cleanup where all the junk files and build-ups are removed from your folders, disk, and hard drive, which helps with boosting your computer’s performance.
Here are other key features of Fortect:
Identify faulty hardware
Prevent blue screen of death
Windows Registry optimization
Fortect
Make sure your computer never slows down with this powerful software.
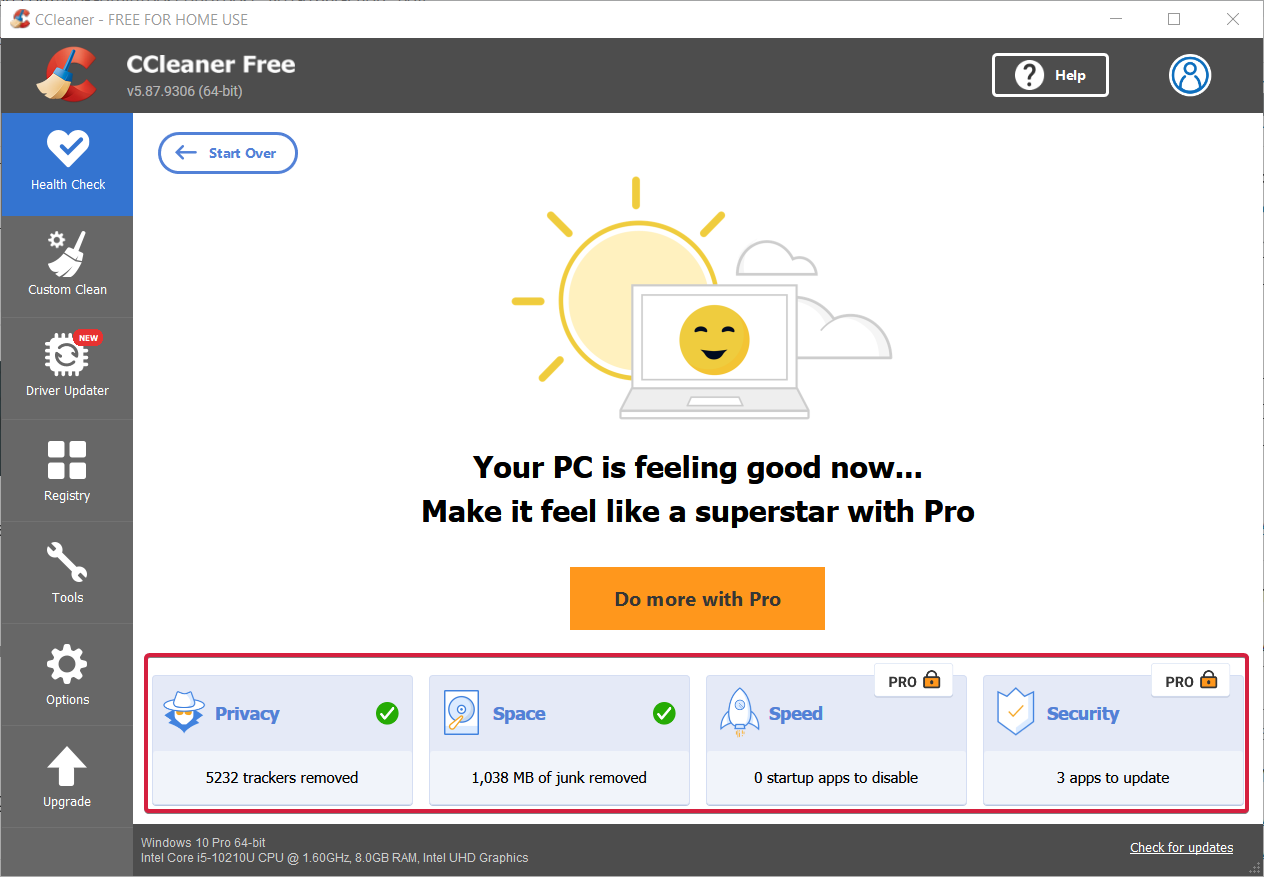
CCleaner is a popular utility application that scans your PC and eliminates junk files, cleans the registry, and updates programs. Unlike other system cleaners out there, CCleaner cleans most of the registry of your Windows PC.
You can schedule cleanups with the scheduling tool and it gives you alerts when you have broken registries.
The software also gives detailed information on your computer after scanning. Also, it contains several tools such as a program uninstaller, startup manager, disk analyzer, duplicate finder, system restore, drive wiper, and many other tools.
CCleaner’s main key features are:
Safer browsing with increased privacy, CCleaner deleting cookies and search history from browsing
Get up to 34% increased speed and 30% more battery life for your laptop
1 click updates all your software
Driver updated included
Piriform CCleaner is a recommended software to fix a slow computer.
Glary Utilities is one of the best tools to make a slow PC run faster. Besides all clutter removal tools, it also can speed up your PC. Moreover, this tool is the safest on the web so it won’t interfere with your firewall or antivirus.
Here are some of its best features that will make your slow PC run faster and smoother:
Repair and cleanup: disk and registry cleanup, shortcut fixer, duplicate file finder
System tools: backup, restore, system files repair
Optimization: startup and memory optimization, disk defragmentation
Privacy: file shredding and encryption, process management, file undeletion
These processes have a customization degree so you could run them according to your needs. After a few cleaning and repairing processes, your PC should run like a charm.
Plus, the tool scans and detects problems 8 times faster than any other tool so you can get your PC cleaned and repaired faster. The tool is available to try for free from the link below.
Glary Utilities Pro
A slow Pc can be fixed by repairing it or boosting it. Glary Utilities Pro can do both, so get it today at a special price!
IObit Advanced System Care Pro is the complete package for protecting and maintaining your slow system. It will check your PC for all issues, problems, and errors that are running and give solutions to solve all of them.
This complex of tools will speed up your slow computer as well as your internet speed. By adapting your browser settings to adapt your browsing style, your surfing experience will be smoother and faster.
It uses an AI-powered scanning feature that intelligently scans the modules that are most likely to slow down your PC.
Using IObit Advanced System Care Pro gives you the benefits of:
Deep PC cleaning of useless registry files, junk files, and old folders
Automatically erasing online traces and blocking untrusted access
Real-time protection against virus infection
1 click to check and updated all software on your system
IObit Advanced System Care Pro was created to boost the speed of your system and keep maintenance over time so it will always be running at peak performance.
IObit Advanced System Care Pro
Fix your slow PC and enjoy speed like the first time you used it.
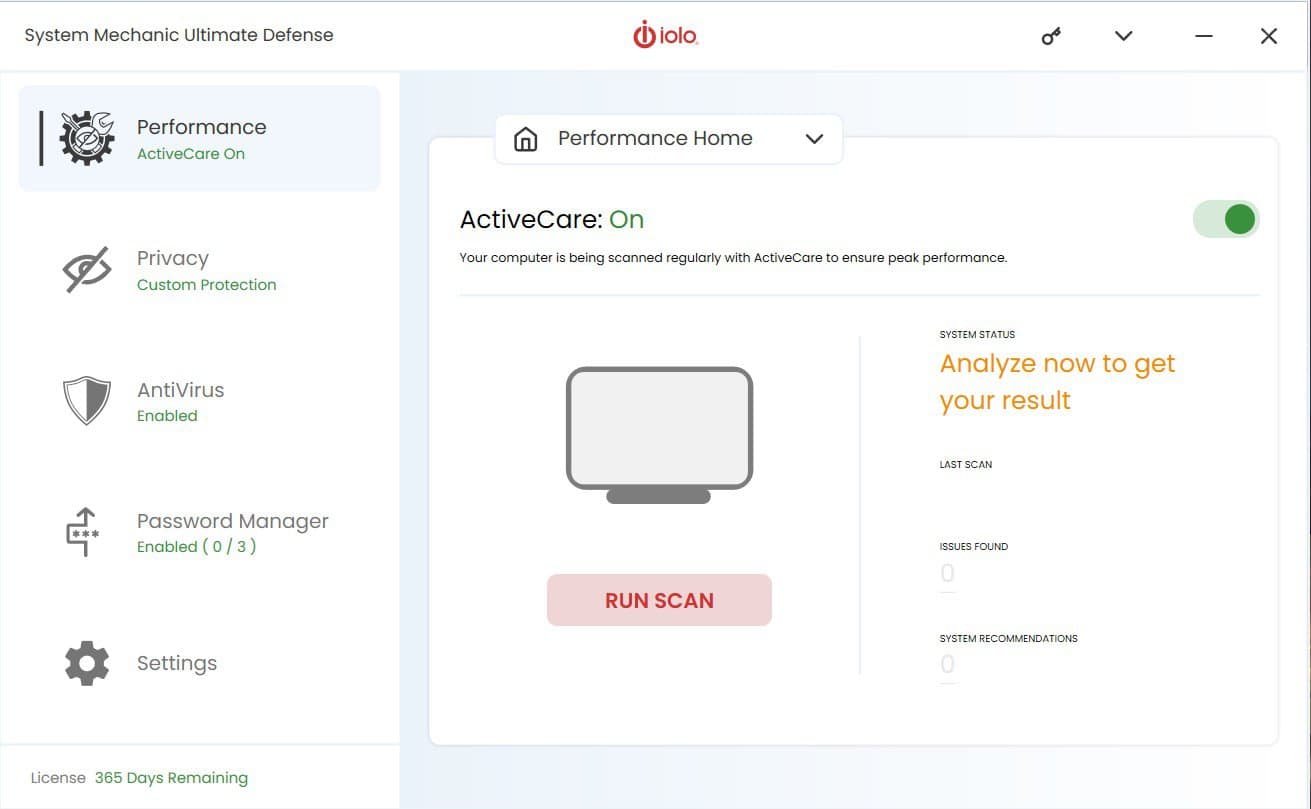
IOLO System Mechanic Ultimate Defense is a system utility cleaner that scans the system for junk files, unwanted apps, bloatware, and caches. This tool removes or updates diagnosed results. It also frees your PC RAM and removes web browser cache and history.
In addition, IOLO System Mechanic gives comprehensive optimization features and gives a significant increase in speed and computer performance. The tool helps to make your system run faster and is a highly recommended application to use for your slow system.
Using System Mechanic Ultimate Defense offers:
Privacy guardian for anti-tracking and privacy protection
Malware killer with included antivirus protection
Military-grade hard drive wiping technologies
Advanced file recovery software
However, System Mechanic has a free edition with limited features and two paid versions that have more features.
Iolo System Mechanic Ultimate Defense
When your car slows down, you take it to a mechanic. When your PC slows down, you give it Iolo System Mechanic Ultimate Defense.
Ashampoo Win Optimizer is a utility software that scans your system and uses its maintenance to fix problems. With this tool, you can easily scan your system for junk files, broken registries, and bloated software with a single click.
Meanwhile, the software runs checks in your system and gives a detailed description of issues diagnosed and what they are about. Hence, you can then make a well-informed decision on either to erase it or keep such files.
The main key features of Ashampoo Win Optimizer are:
Thorough in-depth cleaning of system-critical areas
Super-fast 1-click optimization based on new cleaner modules
Convenient cookie manager for “safe” cookies
Up to 75% faster cleaners
Ashampoo Win Optimizer has tools for maintenance tasks such as defragging hard drives and optimizing your Windows startup process. This makes the application a handy utility software to fix a slow computer.
Ashampoo Win Optimizer
The name says it and Ashampoo Win optimizer does a great job at bringing your PC up to speed!
The second entry on our list is a software tool that looks perfectly suited for Windows 7 since both of them have dated UIs by today’s standards.
However, Tweaking Windows Repair is a complete PC optimization and repair tool, allowing you to fix your slow PC and make it run as if it were brand-new, all with just a single scan.
It is currently available in a free and a Pro version, but if you want to give your PC a complete check and makeover, the Pro version is the recommended one.
Tweaking Windows Repair’s key features are:
Repairs registry errors, internet problems, firewall problems, etc.
Enhanced Windows drive cleaner
Performance enhancements with advanced, powerful Windows services tools
Run speed tweaks after repairs to see exactly the boost in performance
Whichever version you pick, know that the program is just as lightweight, so you won’t end up slowing down your Pc in an effort to speed it up.
Conclusively, the five utility programs we mentioned above will increase your system speed and performance. But it may be better to combine two or three of the programs listed above as some of them have specialized functions.
How to find out what is slowing down my computer?
The simplest way to see what is slowing down your computer is to open the Task Manager and check what uses up the most resources. Most slowdowns are created by apps that use a lot of CPU or RAM.
To free up the memory, you must close those apps. The process is simple, just find the app that uses the most resources, right-click on it then select End Task.
You can do this for any of the apps that run on your PC. Most of them are system apps, so be cautious. To further improve your System performance, you can stop the programs that you are not using at all.
If you desire a full-throttle cleaner, Fortect is recommended, as it incorporates many of the features of the software to fix a slow computer.
Microsoft faces another hurdle as EU antitrust regulators join the fray of anticompetitive legislating bodies reviewing its massive $68B Activision Blizzard acquisition bid.
While it might seem like a bit of a déjà vu for folks in the states to hear that a European regulatory body is investigating Microsoft’s proposed Acquistion of Activision Blizzard, the EU is still a bit different from the UK, which is also conducting a secondary review of the bid.
According to Reuters, the EU’s antitrust regulatory body issued the following statement,
The Commission’s preliminary investigation shows that the transaction may significantly reduce competition on the markets for the distribution of console and PC video games, including multigame subscription services and/or cloud game streaming services, and for PC operating systems.
In particular, the Commission is concerned that, by acquiring Activision Blizzard, Microsoft may foreclose access to Activision Blizzard’s console and PC video games, especially to high-profile and highly successful games (so-called ‘AAA’ games) such as ‘Call of Duty’.
As an opening to this investigation, the EU’s language is seeming rhetorically harsher and more critical of previous anticompetitive regulators, including the UK’s, which Microsoft argues is using explicit Sony talking points when issuing statements of criticism.
Microsoft and the EU have done the anticompetitive dance a few times before which has resulted in fines, software changes and injunctions for Microsoft in the past.
While Microsoft still has to clear the UK’s secondary review its acquisition proposal, the EU’s antitrust regulatory review may be its toughest challenge to date.
Many things can go wrong with Windows updates on your PC, resulting in numerous errors. Error NET HELPMSG 3521 is an error users encounter when they update their Windows OS. It indicates issues with the Windows Update Service. Update Error 0x800f0988 on Windows 10/11 is another error you may experience.
What causes the NET HELPMSG 3521 error?
Error: NET HELPMSG 3521 can occur for several reasons. Since it’s an update-related error, its leading cause stems from the Windows update service. When the Windows update service is unavailable or stopped, activities relating to it are affected.
Furthermore, several other factors can cause issues with Windows updates:
Corrupted Windows update temporary files –Windows updates depend on temporary files, and problems with them can affect your updates. The temp folders may become corrupted or missing, resulting in the error NET HELPMSG 3521 during Windows Update.
Missing or corrupted DLL files – Most Windows errors can result from missing or corrupt DLL files in your PC. The Dynamic Link Libraries (DLL) hold vital components of apps and programs on your PC, so they can cause issues if the files are not intact.
Issues with your internet connection settings – Windows Update Service needs to connect to its servers before it can search for updates and install them on your device. However, issues with your internet connection settings can result in errors.
The cause of the error NET HELPMSG 3521 may vary for different users. Nevertheless, you can fix the error by troubleshooting some settings on your PC, regardless of the cause.
How do I fix the error NET HELPMSG 3521?
Before trying any advanced troubleshooting to fix the error NET HELPMSG 3521 on your PC, go through the following preliminary checks:
First, power cycle your network router and reconnect your PC.
If renaming the folder doesn’t work, we recommend you delete the Software Distribution folder on your PC. Then, restart Windows to reconfigure the folder and download the necessary files.
3. Delete the Windows temporary files
Press the Windows + R keys to open the Run window, type %temp% in the search space, and press ENTER.
Press Ctrl + A to highlight all the files and right-click, then click on Delete from the drop-down.
Error 0x80D03805 usually occurs when you’re trying to download an app from Microsoft Store during a Windows Update. The issue is related to corrupted files or even viruses plaguing your system.
Start your antivirus software. If you don’t have a third-party antivirus, you can use Windows Defender.
Perform a quick or full scan. You might have to do both just to be sure.
If you find any malware, remove it.
To ensure that your PC is completely safe from online threats, you should use reliable antivirus software. In this way, the program will constantly scan your computer for threats, detecting and removing software viruses and malware.
A professional antivirus solution can even detect when a legitimate app has been hijacked by a virus or track your online activity and stop you from visiting malicious websites.
To ensure that your PC is completely safe from online threats, you should use reliable antivirus software.
We hope that these solutions were of help to you and that you managed to fix error 0x80D03805. If you found this article helpful, feel free to let us know in the comments section below.
In the recent past, we have seen Microsoft promote some of its products in Windows 11. For instance, when the company started showing ads for Microsoft 365 to Office 2021 users, offering discounts for Microsoft 365 Family plan subscriptions. We’ve also seen the company bring ads and promos to the Microsoft Store during Build 2022, in a bid to help developers expand their reach while simultaneously making it easier for them to connect with customers.
While the move to incorporate ads in Windows has not been received well by users, that does not seem to be slowing Microsoft on that front. The company has now started promoting its products and services via the Start menu.
Do we really need to stuff OneDrive promos in the user session flyout? Anything for that sweet sweet KPI ???? pic.twitter.com/ZsQGmkntDS
As per the screenshots attached to the Tweet above by Albacore, the ads seem to predominantly feature in the user-switching/sign-out section of the Start menu promoting both Microsoft accounts and OneDrive products and services. The services encourage users to sign up for Microsoft accounts and back up their files using OneDrive.
Bleeping Computer has a hunch that this could be a feature that Microsoft is currently A/B testing because not everyone has seen or been able to access these ads. Share your thoughts with us in the comment section below.
Microsoft Teams is the tech giant’s communications platform that is available on Windows 10, 11, macOS, and more to help companies with video conferencing or serve as a workplace chat.
Why would I need to remove Teams meetings from Outlook?
There are a few reasons you want to remove Teams meetings from the app.
As stated earlier, you want to use a different app. Outlook has a feature that automatically creates a meeting for Microsoft Teams whenever you try to set one up. While Teams is one of the best collaboration software, people like to have a choice.
Some companies are better suited for Zoom and its various tools. It even has games on there for people to enjoy.
Microsoft Teams has had a lot of problems over the years. Including, but not limited to, animations, bugs, and some who don’t like the user interface.
How can I remove Teams meetings from Outlook invites?
There aren’t ulterior methods to removing Teams meetings from an existing Outlook invite, at least for a typical user.
If you have admin-level control over a Microsoft Team account, you can go into the settings and change the settings for meeting invitations. Microsoft has a series of instructions on how to do this on the Learn section of the company website.
Also, if any of the following solutions don’t work, we recommend downloading or updating to the latest Teams version and then trying again.
1. Remove Teams meetings through the Microsoft Office website
3. Remove Teams Meetings through the Outlook desktop app
Start by opening the Outlook app on your Windows computer and click File in the left-hand corner.
In the File, select Options.
Select the Calendar tab on the left-hand side in the new window.
Click the drop-down menu next to Add online meeting to all meetings.
Deselect the box next to Add online meeting to all meetings to prevent Teams Meetings from appearing in Outlook. Click OK when done.
If this solution doesn’t work, you can try the second solution to remove Teams meeting on the desktop app. It can work.
Are there other fixes for Microsoft Teams that I should know about?
One of the fixes we recommend you learn is what to do when encountering an MSTeams.exe Bad Image error that corrupts some of the app’s files. To fix this error, you may have to repair Teams or reinstall it.
Feel free to comment below if you have questions about other Microsoft Office apps. Also, leave comments about guides you’d like to see or information on Windows 11 features.
The best antivirus tools for flash drives offer real-time scanning, USB-specific protection, and lightweight performance.
Whether you need free or premium options, this list highlights the top antivirus software to keep your USB safe.
Which antivirus is best for USB?
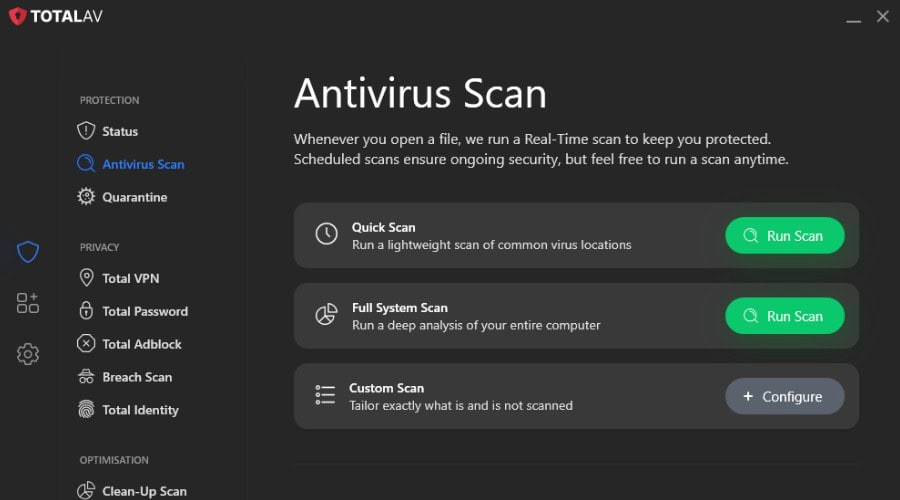
1. TotalAV – Scans a flash drive the moment it is plugged in
TotalAV checks a USB stick as soon as it is connected, which is the whole point when a drive has been in someone else’s computer. Anything suspicious is quarantined before it can run.
The same real-time engine covers files you copy off the drive, and you can run a full scan of any removable device on demand. It cannot block storage devices outright the way TotalAV’s device control does, but for keeping a flash drive from infecting your PC it does the job simply.
Automatic scan of USB sticks and external drives on connection
Real-time protection for files copied from removable media
On-demand full scan of any drive
Quarantine for anything suspicious
TotalAV
Use this machine-learning shield with multiple protection features to scan and block infected USB devices.
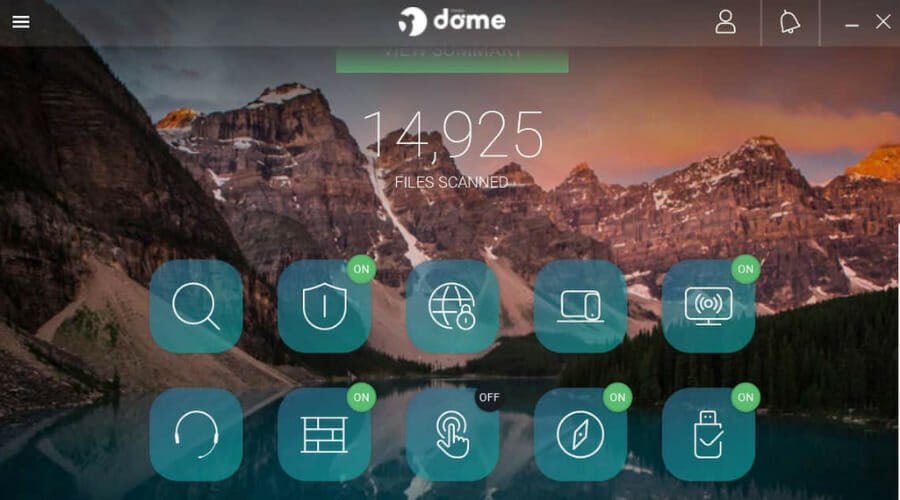
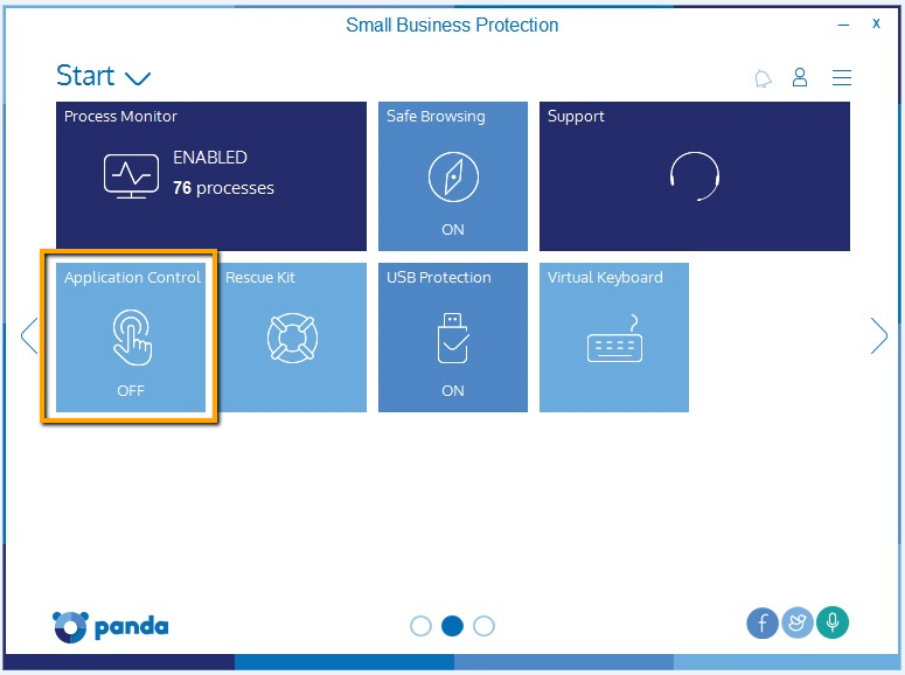
The Panda Antivirus includes the USB Vaccine, which is a great utility that disables the Autorun feature from USB drives, preventing malware from infecting your PC.
When this software is applied on the USB drive, it will permanently block the autorun.inf file and it will prevent it from being read, created, deleted, or modified.
In this manner, Windows won’t be able to automatically execute any malicious file that might be stored on the flash drive. You can then use your USB flash drive in a normal way to copy, move, or delete files.
Panda Security Essential
Secure your USB & other devices with this lightweight antivirus!
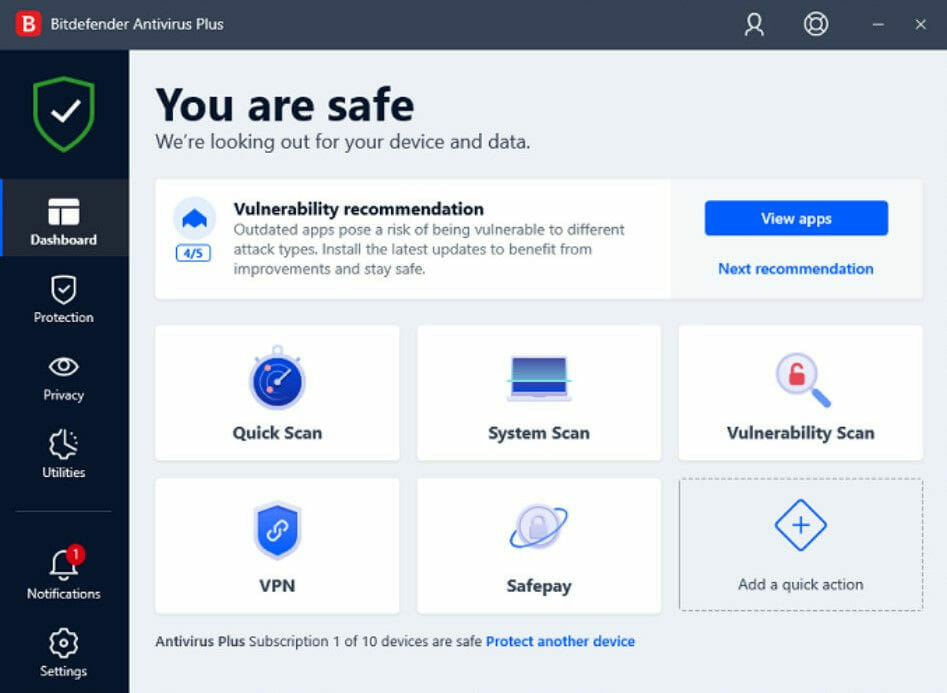
Bitdefender software is the go-to antivirus for best-demonstrated protection against malware and also light usage for your Windows PC.
It includes a USB Immunizer, which disables autorun malware and protects against threats before they can spread. It automatically scans newly inserted USB drives, ensuring they are malware-free.
The Computer Immunization feature prevents malicious autorun files from executing, safeguarding your system against infections.
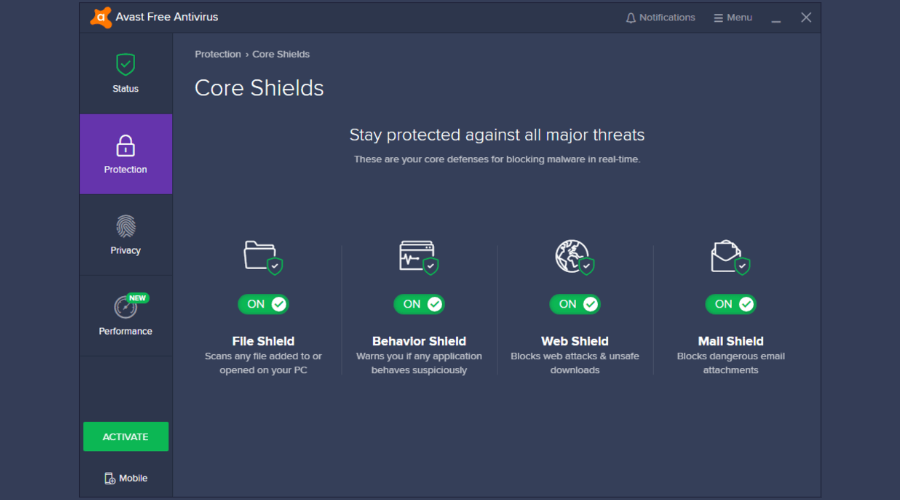
Avast Free Antivirus is another great tool to use in order to protect your computer against viruses and malware, and also to keep your home network safe against intruders.
It features a Do Not Disturb Mode that can block distracting popups whether you’re gaming, watching movies, or presenting in full screen.
You can scan all your computer-connected media storage, including a USB flash driver, HDD, SDD, or any other type of PC storage.
This antivirus has a free version that will check your applications for malware and also keep an eye on their behavior to make sure they don’t suddenly go rogue.
Avast
Download Panda for USB safety & quick PC protection!
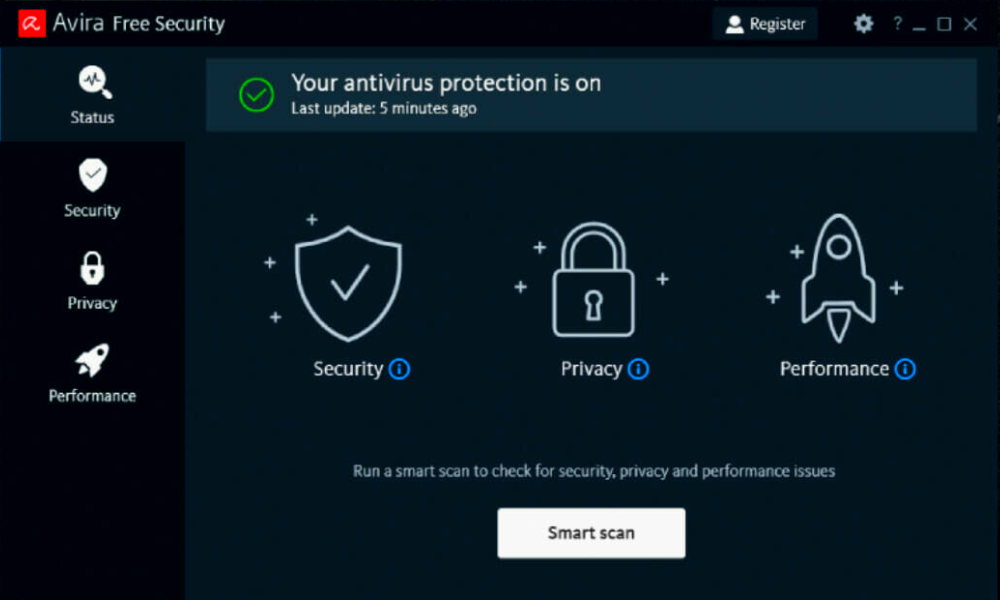
Avira is another great choice if you are looking for a free security solution for your computer. It is a comprehensive, professional-level cybersecurity that is free for home use and is a good antivirus with usb scanner feature.
Antivirus protection will block all online threats, such as malicious websites, ransomware, and any spyware that you can get while surfing the web.
It will also block any infected USB flash drives or other media storage connected to your computer. So, you don’t have to worry when using a USB with documents from another computer.
Avira
Level up your USB security with Avira in just a few clicks!
DriveSecurity is a powerful antivirus solution and usb scan software dedicated to users who often transfer various files, such as pictures, music, and videos via USB drives.
The tool nips malware in the bud, removing it before you transfer any infected files to your drive. In this manner, your USB flash drive is always malware-free.
DriveSecurity detects a wide range of threats, including viruses, rootkits, worms, and spyware.
This program detects any virus before it infects your memory stick and then your whole system. By their very own nature, flash drives are prone to infections.
Oftentimes, users connect them to various computers and this increases the high risk of getting infected.
Once you install it, the USB Disk Security will automatically run whenever a flash drive is inserted into your machine, checking for infections.
USB Disk Security delivers a high level of protection against any malicious programs.
It protects your PC against data theft and accidental disclosure of confidential information, preventing unauthorized persons from stealing your data.
If your USB flash drive is infected with malware, it can cause not only the loss of your data but also spread malware to all the computers it gets plugged into.
Prevention is always better than cure. For this reason, we’re going to the best antivirus software to protect your computer against infected USB flash drives.
They can be used whenever you’re looking for:
USB antivirus – USB flash drives are supposed to be virus-free, so make sure things remain the same even after months of usage.
Bootable antivirus USB – Bootable antivirus programs let you create a special flash drive from a working PC and later use it to scan the hard drive even without starting Windows.
USB antivirus scanner – When you wish to scan your USB flash drives for any malware, these great antivirus solutions with a USB scanner can help you out.
Run antivirus from USB – Booting your PC from a USB drive containing an antivirus often does wonders, so don’t hesitate to pick one of our previously mentioned antivirus solutions.
If you have any suggestions that we should include in our list, please leave us a comment below.
Today, we’ll show you how to fix USB-C to DisplayPort not working.
USB-C to DisplayPort adapters only work if your port supports video output. Look for a lightning or “D” symbol to confirm. If there’s no symbol, the port is likely for charging or data only.
Some users also report “no signal” errors with USB-C to DisplayPort cables, meaning the monitor isn’t receiving the signal. Here’s how you fix it.
How can I fix a USB-C to DisplayPort with no signal error?
1. Use specialized software to detect graphics card issues
The USB C to DisplayPort no signal error can be a graphics card issue, which a dedicated tool can potentially resolve. Fortect Driver Updater is driver updater software that scans for outdated and missing drivers and enables users to quickly update them.
Although you can manually update drivers, this tool will quickly tell you what drivers need updating. Its extensive driver database and lighting quick scans make it a good choice for updating drivers.
First, some users might need to reconnect their monitors with HDMI ports so they have working VDUs. When you’ve installed and launched the application, it will automatically scan drivers. Select to update the graphics card driver.
2. Check if the cable is loose
It might be the case that your USB C to DisplayPort cable is loose. So, make sure your connector cable is correctly plugged into the DisplayPort port and USB C slot.
When a no signal error arises on DisplayPort monitors, there might be an issue with your USB C to DisplayPort cable.
So, carefully check the overall condition of the cable. If the cable isn’t in entirely good condition, you might need a replacement one.
Then unplug the monitor the no signal issue arises on (and completely disconnect its USB C to DisplayPort cable).
Wait for about five minutes.
First, reconnect the monitor to the PC with the USB C to the DisplayPort cable.
Plug the VDU back in.
Plug your PC back in.
Turn your PC on.
4. Adjust the refresh rate settings in Windows
1. Click Settings on the Start menu
2. Then select System and Display in Settings to open the tab directly below
3. Click on Advanced display settings to open the properties windo
4. Then press on the Monitor tab.
5. Select an alternative refresh rate on the Screen refresh rate drop-down men
6. Click theApply button, and select the OK option.
If you can do so, try adjusting refresh rate settings via Windows Settings. This should fix the USB C to display port not working issue in no time, if the other solutions failed to do so.
5. Check if your PC supports DisplayPort Alternate Mode
Not all PCs have USB C ports that support DisplayPort Alternate Mode. DP Alt Mode is a USB C feature that enables users to directly connect DisplayPort VDUs to their PCs.
So, have a look through your PC’s manual or webpage to check if its USB C slot supports DP Alt Mode. If your USB C slot doesn’t support DisplayPort Alternate Mode, you’ll need a USB C to DisplayPort adapter for monitors to resolve the no signal issue.
These steps should help you resolve the USB-C to DisplayPort no signal issue. If the error persists, there may be a hardware problem with the monitor, and you may need to check for repair or warranty options.
Those are some of the more likely fixes for resolving the USB C to DisplayPort no signal error.
If none of the above fixes resolve the error, there might be a hardware issue with the monitor. You might be able to return your VDU to its manufacturer for repairs if it’s still within its warranty period.
Have you ever had that nagging grey X on your files and folders and wondered what to do about it? This is something to be worried about as opposed to the green check mark.
A green check mark indicates that syncing with OneDrive went well, but a grey X means something is wrong with syncing, and you risk losing your files.
What does a grey X on a file mean?
The cloud is an excellent place for storing files, but sometimes you may encounter errors when uploading your files. One common error is the grey X on OneDrive files.
Windows’ default cloud storage is the OneDrive which allows users to back up their files. However, when your file was uploaded and the grey X appeared, there was an error during the upload process, and your file could not be saved.
In the worst-case scenario, it means that the file is corrupted. Then, if you try to open it, you will get an error message.
Why is there a grey X on my files?
The most common reasons for this error are:
Limited storage space – You may have exceeded your storage limit. You may have to clear some storage space or purchase more.
File is too large – Some files are too large for OneDrive. For example, files over 2 GB can’t be uploaded directly to OneDrive. Instead, you may need a file compressor and try uploading again.
Failure in syncing – This could be because the file in question was never added or removed from your computer.
Changes on the file – If the file has been changed on your computer while offline but not on the cloud, this can cause the grey X to appear.
Third-party apps – If you have a grey X on a file, it’s probably caused by a shortcut app that has been blocked from accessing it because of an error in its code.
Interference from other cloud applications– If you have more than one cloud application and have enabled all of them, you may have issues with the grey X.
How can I get rid of a grey X on my files and folders?
First and foremost, before any advanced troubleshooting, check the following:
Refresh the Desktop.
Disable any third-party shortcut applications.
Check the file size and compress it if needed, especially if you are getting the OneDrive is full error.
Ensure you are signed in to OneDrive and sync any pending files/folders.
Right-click on the file and select Open with then choose an alternative option.
If the file opens, click Save as and see if the grey X disappears.
This method only applies to single files and those that can be opened with alternative programs. For instance, if the grey X is on a word document icon, you can open it with Google Docs or a PDF reader.
2. Clear icon cache
Hit the Windows + R keys to open the Run command.
Type %LocalAppData%/ in the dialog box and press Enter.
Locate the IconCache.DB file, right-click and select Delete.
Restart your PC.
3. Unblock the file
Right-click on the file and select Properties.
Select the General tab, and at the bottom, next to Security, check the Unblock box and hit OK.
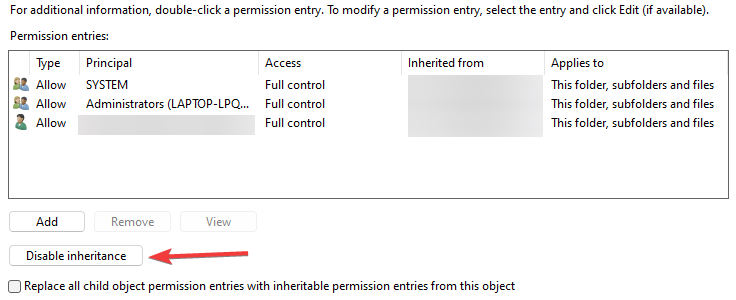
Move to the bottom and click on Disable inheritance.
Inheritance refers to the ability of a folder to pass on its permissions and other settings to subfolders and files within it. If you disable inheritance on a folder, you prevent that folder from passing on its settings.
5. Pause OneDrive syncing
Launch the OneDrive icon by clicking on the system tray.
Click on Help & Settings in the pop-up menu.
Select Pause syncing and choose a suitable time option for you.
When you pause and resume OneDrive syncing, all of the files you have on your computer will be resynced. This way, if a problem is with damaged files, they can be synced afresh.
For users unable to resolve this issue, contacting OneDrive support for further assistance could be another option.
You may also encounter the OneDrive red X on folders, but we have an expert article that addresses how to maneuver around this issue.
If you feel that the OneDrive errors are too much to handle, you can opt for other cloud storage options.
Be sure to let us know any additional solutions you may have tried that worked for you in the comment section below.
Ensure the laptop is powered on and screen brightness is turned up
For desktops, unplug and reseat HDMI or DisplayPort cables
Try using a different monitor or cable
Disconnect docks or USB hubs
If using multiple displays, test with just one
If the issue is limited to part of the screen, such as the bottom half of the laptop screen going black, follow this dedicated troubleshooting guide: Bottom laptop screen is black in Windows 11.
Why is my Windows 11 screen black but the PC is on?
This usually points to a graphics driver crash, misconfigured display settings, or hardware failure. Try resetting the GPU driver with Win + Ctrl + Shift + B.
What causes the black screen of death in Windows 11?
The black screen of death can be caused by corrupted display drivers, loose cables, overheating GPU, or failed Windows updates.
Can I fix an all black screen without reinstalling Windows?
Yes. You can use Safe Mode, reset the display driver, or uninstall recent updates before trying a full reset.
How do I reset Windows 11 if the screen is black?
Use a recovery USB to boot into recovery mode. From there, go to Troubleshoot > Reset this PC.
Will Safe Mode help with a black screen issue?
Safe Mode loads basic drivers and helps bypass faulty display settings or corrupted GPU drivers that trigger the all black screen.
Microsoft has been consistently adding new features to its Edge browser which are all designed to enhance the user’s experience. And it seems that the company will not be slowing down anytme soon.
Microsoft is reportedly working on a new feature, which some might term as the “most requested feature”. While some segments of the Edge browser are already optimized for use with touch, there is a new feature, Touch Mode, that is in the works that will further enhance this capability. The company had incorporated a new option to the browser which enables a dedicated UI for touch devices as spotted by Leopeva64-2 on Reddit.
As per the video above, once you enable the feature the browser’s elements seem to be enhanced in size. What’s more, the Touch Mode also comes with an Auto option which can be accessed from the drop-down menu. With the option enabled, the browser can switch between modes because it can now tell if you are using Windows with touch or not.
If you are on the Microsoft Edge Canary Channel, there is a probability that you can be able to access this new feature. You can access the new Touch Mode feature in Edge by navigating through Settings> Appearance> Touch. As of right now, this looks to be another feature that is in A/B testing. We don’t have it on our end just yet.
In other related news, we also saw Microsoft roll out a new feature in Edge, which lets users resize Edge Sidebar panes.
The Windows cannot find file, make sure you typed the name correctly and then try again error can pop up in 2 instances. Some people can’t open File Explorer because of it, while others can’t open specific apps.
Here’s how to fix it:
How to fix Windows Cannot find file, make sure you typed the name correctly
Here’s a quick video of the steps you can take. You can find more details in the written steps below.
1. Select File Explorer’s This PC option
1. Press the File Explorer icon on the Windows taskbar.
2. Select the View tab in the snapshot directly below.
3. Press theOptions button and select Change folder and search options from its menu.
4. That option will open the window directly below. Select This PC from the Open File Explorer to the drop-down menu.
5. Press the Apply and OK buttons on the Folder Options window.
Fixing the Windows cannot find make sure you typed the name correctly and then try again error for File Explorer is more straightforward.
Some Windows users have resolved the issue by adjusting the Open File Explorer setting to This PC.
2. Reregister Windows 10 apps
2.1 Get the App package using PowerShell
Right-click the taskbar and select Task Manager.
Click File and select Runnew task to open the window directly below.
Enter PowerShell in the Open text box and select the Create this task with administrative privileges checkbox.
Then click OK to open the window below.
Input the following command in PowerShell and press the Enter key. Get-AppXPackage | Foreach {Add-AppxPackage -DisableDevelopmentMode -Register "$($_.InstallLocation)AppXManifest.xml"}
Thereafter, reboot the Windows 10 platform.
Reregistering an app is a little like reinstalling it as that deletes app data, but you don’t need to install it again.
2.2 Reset the apps
Press the Start button, and then click the Settings icon.
Click Apps to open the app list in the snapshot directly below.
Select an app to reset.
Click Advanced options to open the app’s Reset option.
Press the Reset button, and click Reset again, to reregister the selected app.
Browse to the folder location of the program that’s showing the error in File Explorer. If the software has a desktop shortcut, you can right-click that icon and select Open file location.
Select the program’s EXE in File Explorer, and press the F2 key.
Then enter another title for the file, and press the Return key.
A particular error is followed by the message Windows cannot find c:program make sure you typed the name correctly. Renaming EXE files is one resolution for errors that include software paths.
Those are a few resolutions that can fix the Windows cannot find make sure you typed the name correctly and then try again error for File Explorer, apps , and other desktop software. Check out our dedicated post for further details on how you can fix Windows 10 apps that aren’t opening.
If you have any additional questions, feel free to leave them in the comments section below.
If your mouse cursor freezes, jumps, or disappears during your games or while doing something at work, then this tutorial will help. The reason why your mouse keeps freezing could be a post-updated bug.
This may also happen when using a wireless mouse, or when your touchpad is not working properly. Luckily, fixing this issue is pretty simple, and in today’s guide, if a mouse lags on your PC, the solutions from this guide will surely help you.
How do I keep my mouse from freezing or glitching?
1. Disable the disappearing feature in Windows 10
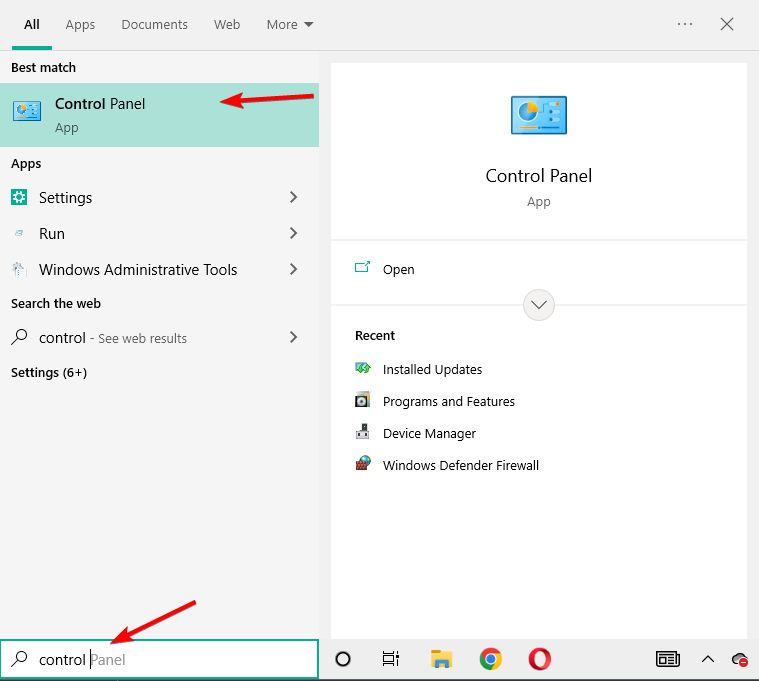
Press Windows and type control inside the search bar. Click Control Panel from the list.
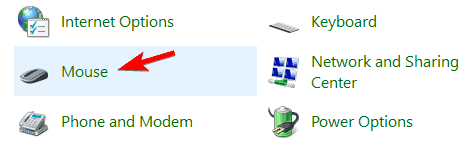
Left-click on the Mouse icon.
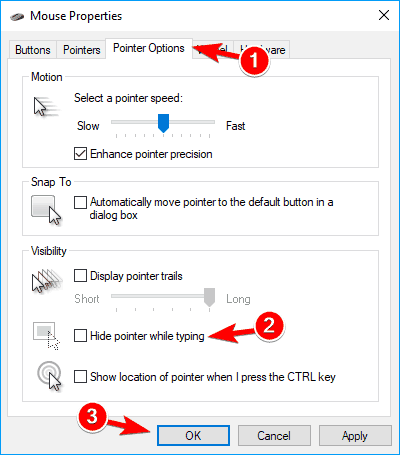
A window with Mouse Properties should open; you will need to left-click on the Pointer options tab on the upper side of the window.
You will have to uncheck the box next to Hide pointer while typing.
Left-click on the OK button on the lower side of the screen.
Close every window you opened and reboot the Windows 8 or Windows 10 device.
Windows has a built-in feature that is supposed to make your cursor disappear while you are typing.
2. Reinstall your mouse driver
Sometimes the mouse freezing or glitching problem can occur due to your mouse driver. Several users reported that their mouse was recognized as a PS/2 instead of USB mouse, and that caused various issues to appear.
Therefore, reinstalling your driver should fix the problem in no time.
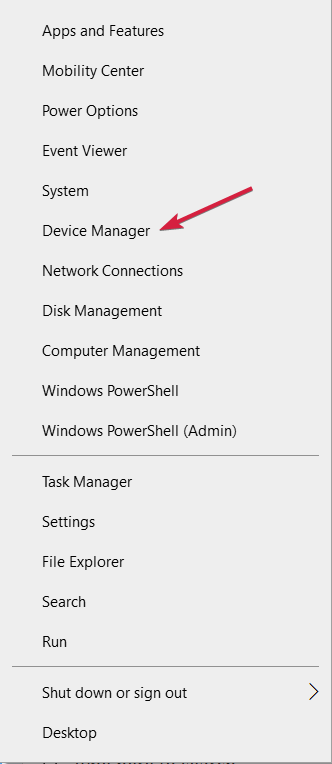
1. Right-click the Start icon then select Device Manager.
2. Expand the Mice and other pointing devices section,
3. Right-click your mouse driver, and select Uninstall device.
4. When the confirmation message appears, click on Uninstall.
5. Restart your computer to automatically reinstall the driver and fix the mouse keep freezing error in Windows 10/11.
3. Fix the unexpected jumps or freezing issues in Windows
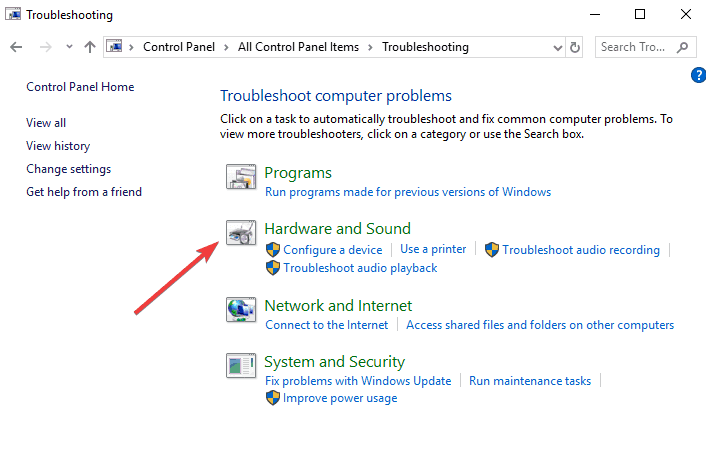
Open Control Panel.
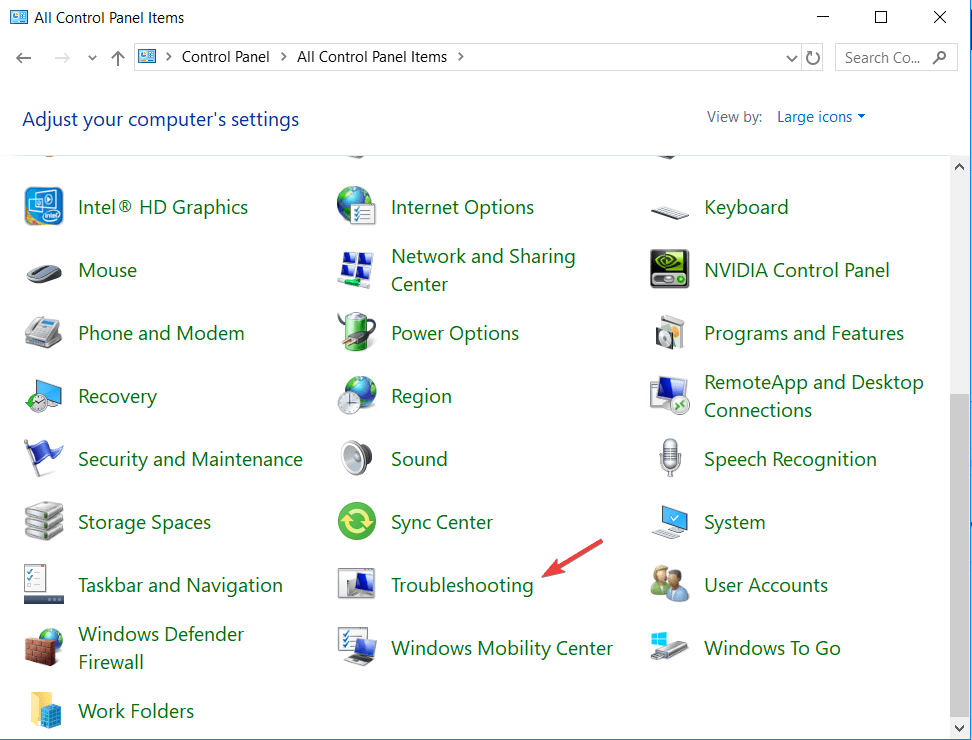
Select the Troubleshooting option.
A Troubleshooting window will show, from the right side of the window left click on the Hardware and Sound option.
Now in the Device category left click on Next button for the Hardware and Devices.
A scan will begin and after it is finished you will need to left-click on Apply this fix.
Close the windows you have open.
Reboot your device and see if the mouse keep freezing laptop error is gone.
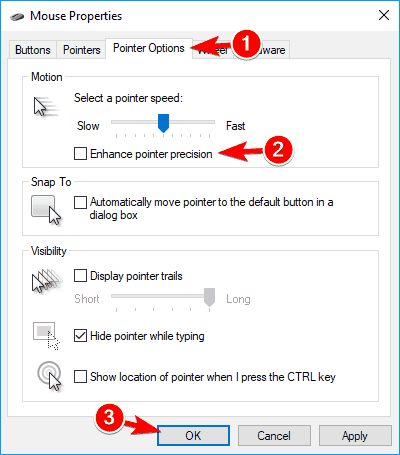
4. Uncheck the Enhance pointer precision feature
Open Control Panel and navigate to Mouse section.
Navigate to the Pointer Options tab and disable Enhance pointer precision feature. Now click on Apply and OK to save changes.
After turning off this feature, problems with your cursor should disappear.
5. Disable HP Control Zone
If your cursor freezes, jumps, or disappears, your problem might be related to HP Control Zone. Several users reported that they fixed the issue simply by disabling HP Control Zone. To do that, follow these simple steps:
Navigate to Mouse section in Control Panel.
Go to HP Control Zone tab and disable HP Control Zone. Click on Apply and OK.
After disabling this feature, your mouse problems should be resolved. Keep in mind that HP Control Zone might not be available on your PC, unless it’s an HP device.
6. Remove AdAware
Sometimes, third-party applications can cause issues with your mouse. Many users reported that their cursor freezes, jumps, or disappears due to AdAware.
This is a solid anti-spyware application, but sometimes it can cause various issues. Users reported that uninstalling AdAware fixed the issue for them, so feel free to try that.
If you want to continue using this app, update it to the latest version and check if that solves the issue.
7. Disable additional mouse drivers from Device Manager
According to users, problems with your cursor can occur due to multiple mouse drivers on your PC.
If your cursor freezes, jumps or disappears, you might have to disable additional mouse drivers on your PC. To do that, follow these steps:
Open Device Manager and navigate to Mice and other pointing devices section.
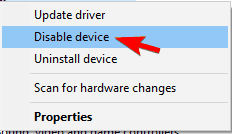
If you see multiple entries in this section, you’ll need to disable all devices that you’re not using.
To do that, simply right-click the device you want to disable and choose Disable device from the menu.
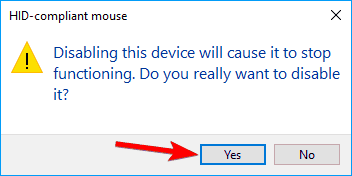
A confirmation window will now appear. Click on Yes to proceed and fix the mouse keep freezing for a second.
After removing additional devices, the problem should be completely resolved.
8. Roll back to the previous driver
Sometimes issues with your cursor can appear due to new drivers. According to users, this issue can appear if you recently updated your mouse or touchpad driver.
If your cursor freezes, jumps or disappears, you need to roll back to the older driver. You can do that by following these steps:
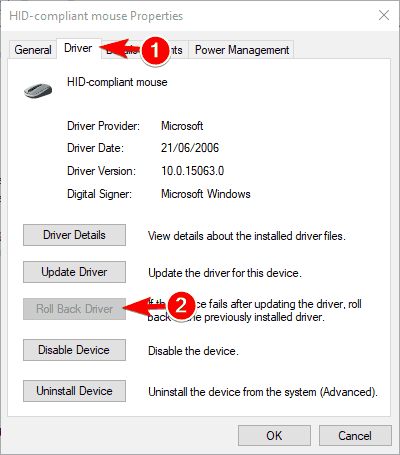
Open Device Manager and locate the problematic device. Double-click the device to open its properties.
When Properties window opens, go to the Driver tab and click on Roll Back Driver button. The mouse keep freezing when playing games issue will be solved.
After rolling back to the older driver, check if the problem is resolved. If Roll Back Driver option isn’t available, you might have to reinstall the driver by following the steps from Solution 4.
It’s worth mentioning that Windows can sometimes automatically update your drivers and cause this issue to reappear.
According to users, sometimes Realtek HD Audio Manager can cause problems with your cursor.
If your cursor freezes, jumps or disappears, you need to prevent Realtek HD Audio Manager from starting automatically with your PC.
To do that, follow these steps:
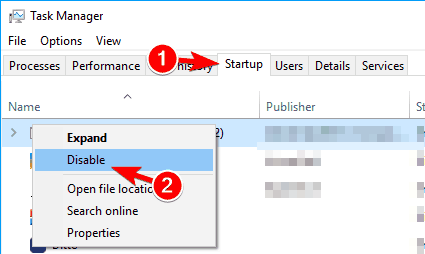
Press Ctrl + Shift + Esc to open the Task Manager.
When Task Manager opens, go to the Startup tab. Locate Realtek HD Audio Manager, right-click it and choose Disable.
After doing that, restart your PC and check if the issue reappears.
10. Make sure that your device is enabled
If this issue appears on your laptop, you need to check if your device is enabled. To do that, follow these steps:
Go to Control Panel > Mouse.
Navigate to the last tab on the right and make sure that the device is enabled.
After doing that, your mouse will reappear, and everything will start working again. Keep in mind that you might have to perform these steps using your keyboard.
This error is not the only one that can bother you. There are many cursor-related problems that one could get on a Windows PC, the most common being, cursor moving to the left while typing.
A freezing mouse can also get your mouse stuck in the corner, but we have a whole article dedicated to this issue.
Let us know in the comment section if these solutions were helpful in fixing various mouse cursor problems.
Just like the previous versions of Windows, Windows 10 comes with some of the default apps such as a text editor, calendar, and Calculator. Speaking of which, some users are having certain issues and report that Windows 10 Calculator won’t work.
We have all used Windows Calculator, it’s a simple application that allows us to perform a quick calculations, so it’s unusual to see that the Calculator application isn’t working for some users.
If you’re having problems with Calculator on Windows 10 here are a few solutions that might help you.
Why does my Calculator not work on Windows 10?
There are many problems with Calculator that can occur on Windows 10, and in this article, we’ll show you how to fix the following issues:
Windows 10 Calculator doesn’t run, start, launch
Many users reported that the Calculator app won’t start at all on their Windows 10 PC.
According to them, the application is completely unresponsive.
The calculatorwon’t open on Windows 10
This is another variation of this problem, and many users reported that their Calculator app is unable to open.
This can be an annoying problem, but you should be able to fix it with one of our solutions.
Windows 10 Calculator opens then closes
Few users reported that Calculator on their PC opens and then instantly closes.
This is a standard problem, and you might be able to solve it by fixing corrupted files.
Windows 10 Calculator not working administrator
In some cases, the Calculator app might not work even if you’re using an administrator account.
To fix this problem, you need to reinstall the application.
Windows 10 Calculator crash, closes
Many users reported that their calculator frequently crashes or closes.
This can be an annoying problem, but you can fix it by using one of our solutions.
How can I fix the calculator not working in Windows 10?
1. Re-register Windows 10 apps using PowerShell
In the Search Bar type PowerShell and right-click PowerShell app from the list of results.
From the menu choose Run as administrator.
When the PowerShell starts, paste the following line and press Enter to run it:
This will re-register all Windows 10 apps on your computer. Wait for the process to finish and then try running Calculator again.
2. Create a new user account
In the Search bar type add user and choose Add, edit, or remove other users from the list of results. You could also do that by going to the Settings > Accounts >Family & other users.
In the Family & other users section click the Add someone else to this PC.
Click on I don’t have this person’s sign-in information.
Now click on Add a user without a Microsoft account.
Now you need to enter username and password for local account.
After you’ve created a new account switch to it.
If everything works, you can delete your old account, but remember to copy your personal files and documents to your new account. This might be a bit drastic solution, but it should help you if the Calculator doesn’t work on Windows 10.
3. Perform an SFC scan
Press Windows Key + X to open Win + X menu. Now choose Command Prompt (Admin) from the list of results. If Command Prompt isn’t available, you can use PowerShell (Admin) instead.
When Command Prompt opens, enter sfc /scannow and press Enter.
SFC scan will now start. The scanning process can take up to 15 minutes, so don’t interrupt it.
Once the scan is completed, check if the issue is resolved. If SFC can’t fix the problem or if you’re unable to run SFC scan, you need to use DISM instead.
To do that, start Command Prompt as administrator.
Now paste DISM /Online /Cleanup-Image /RestoreHealth command and run it.
Wait while Windows performs the DISM scan.
The scan process can take up to 10-20 minutes, so don’t interrupt it.
Once the DISM scan is finished, the issue should be resolved. If you were unable to run an SFC scan before, run it after running a DISM scan and check if that solves your problem.
4. Install the missing updates
Press Windows Key + I to open the Settings app.
When the Settings app opens, navigate to the Update & security section.
Click on the Check for updates button. Windows will now check for available updates. If updates are available, they will be downloaded automatically in the background.
Installing the latest updates can fix bugs and glitches that can cause the Calculator to stop working.
5. Reinstall the Calculator app
Open the Microsoft Store from the Start menu and reinstall the Calculator app. If you need more guidance, be sure to check our article on how to reinstall Windows Store apps.
6. Uninstall the Calculator app
If establishing a new user account in Windows Calculator does not resolve the issue, you can uninstall it.
Because you can’t do it the ordinary way, you’ll need to use an advanced method to reinstall Windows Calculator using an excellent uninstaller application like IObit Uninstaller.
IObit Uninstaller is a helpful uninstallation tool for PCs that runs great on Microsoft Windows apps. It removes any unwanted programs with all associated files for better PC performance.
Simply launch IObit Uninstaller after downloading it and choose All programs from the left panel. You’ll notice a list of all your applications there, where you’ll easily select the Calculator app, and click the trash icon to completely remove it from the Windows operating system.
After downloading the tool, run it and let it scan your PC.
If the troubleshooter finds any issues with your apps, it will automatically fix them.
If Calculator doesn’t work in Windows 10, using the Windows app troubleshooter is one of the simplest and fastest ways to fix it.
8. Turn off your firewall
Press Windows Key+ S and enter firewall. Select Windows Firewall from the list of results.
Click on Turn Windows Firewall on or off in the menu on the left.
Now select Turn off Windows Firewall (not recommended) for both Private and Public network settings. Click on OK to save changes.
After disabling your firewall, check if the issue still appears. If not, you might want to enable your firewall and create a security exception for the Calculator app and check if that solves the problem. In case you use a third-party firewall, as a part of antivirus software, try disabling it instead.
9. Enable User Account Control
Press Windows Key + S and enter user account control. Select Change User Account Control settings.
Move the slider to the default position and click on OK to save changes.
Few users reported that Calculator doesn’t work if User Account Control is disabled, so by enabling it you should be able to fix the problem.
10. Reset the Calculator app
1. Open the Settings app. You can do this by inputting settings in the Windows Search box and pressing Enter.
2. Go to the Apps section. A list of all applications will now appear.
3. Select Calculator and click on Advanced options.
4. Now click onthe Reset button.
5. Select Reset again in the confirmation window. After doing that, the problem should be resolved and you’ll be able to use Calculator without any issues.
When your Windows 10 calculator is not working properly, another quick fix is simply resetting the Calculator app.
This can be done via Settings in just a few clicks and should solve any problems related to the app.
11. End RuntimeBroker.exe process
Sometimes background processes can cause issues with the Calculator app. If Calculator doesn’t work on your Windows 10 PC, the cause might be the RuntimeBroker.exe process.
To fix the issue, you need to end this process by doing the following:
Press Ctrl + Shift + Esc to open Task Manager.
When Task Manager starts, locate Runtime Broker, right-click it, and choose End task from the menu.
After ending the Runtime Broker process, check if the issue is resolved. Keep in mind that this is just a workaround, so you might have to repeat this solution if the issue reappears.
Tip
We covered Calculator updates and issues in the past, so if you’re having any other problems with it, be sure to check our Calculator hub for more information. If you’re having additional Windows 10 issues, we advise that you check out our Windows 10 errors hub for more helpful articles.
That would be all, I hope this article helped you with calculator problems in Windows 10. If you have any comments or questions, just reach out to the comment section below
Live video game streaming is a booming industry. As a result, streaming services like YouTube and Twitch have seen a massive increase in new live game streamers and viewers in recent years.
But, live streaming requires a high-speed stable internet connection and tons of bandwidth which is still an unbuyable luxury for many.
One alternative to live game streaming is to upload recorded gameplay to YouTube and other streaming services. PC gaming is all about sharing, but to do that, you need the right game recording software for Windows 10.
How do you record games on Windows 10?
There are a series of ways to record your games on your PC. You can download one of the best free game recorder software for Windows 10 or use a premium-level tool.
Your Windows PC has a built-in recorder that you can use to record your games easily:
On your PC, launch the game you want to record.
Press Win Key + G.
Click on the Record button (red dot) to start recording.
When you’re finished, just click on the square button to stop the recording.
If you had a memorable in-game moment but didn’t press rec beforehand, you can use the Alt+Win Key + G to record the last 30 seconds of gameplay on your PC.
We have compiled a list of the best game recording software for Windows 10 so that you can spend the best of your time honing your gaming skills.
The Icecream Screen Recorder may not sound as delicious as the real desert, but it offers powerful screen recording features to capture your gameplay on PC.
Apart from being a great game recorder for Windows 10, it can also be used to record webinars, video chat, audio, and pretty much anything on your screen.
Icecream Screen Recorder has an easy-to-use interface that one can get used to without prior knowledge of the tool.
Users can start recording with a click of a button. The area selection lets you capture the entire screen or specific parts according to your needs.
The inbuilt editor allows you to trim the created videos, convert files to different formats, and add annotations and markups along with watermarks.
When recording your screen, you can show or hide your cursor and desktop icons, disable the screensaver, and more. On top of that, you can slow down or fast-forward your recordings.
The software also comes with a scheduling feature. You can add a time and date, and Icecream will automatically start recording.
Let’s quickly look at its key features:
Multi-Platform Support
Record from Webcam and Screen Simultaneously
Integrated Video Editor to trim your clips and speed the action up or down
Intuitive User Interface
Convert your recorded videos to any format
Supports mouse click animation effects
Powerful shareware features to easily share your gameplay with your peers
The software has a free version, as well as a licensed version which is a one-time purchase. You can try the premium version within a free trial.
Icecream screen recorder
Capture your gameplay and tweak it to perfection before sharing it with the entire world!
Bandicam is one of the most popular game recording tools available for Windows.
To begin with, the user interface won’t give you any trouble in navigation whatsoever. You can record videos in 4K Ultra HD resolution and capture up to 144 FPS videos.
The video compression in Bandicam works in real-time while retaining close to 90% of video quality.
The recorded files can be saved in AVI and MP4 formats. You can record separate streams of audio from the game and the mic to create a perfect balance between the two on the editing table.
The HDMI input option allows you to record the gameplay from Xbox and PlayStation devices. You can further customize hotkeys, show a mouse cursor, add a mouse click effect, and add a webcam overlay in the settings.
Bandicam lets you stream dynamic videos with different effects, such as an integrated chroma key effect that works in real-time. You can add all sorts of fun backgrounds to your webcam footage.
On top of that, it comes with minimal effects and animations, voice mixing, and real-time drawing features. These are great for creating unique content and keeping your audience engaged. You can combine them in countless ways to showcase your unique style.
Let’s quickly look at its key features:
Intuitive User Interface
Simultaneous Webcam and Screen recording
Record Internal and External Audio
Record Gameplay in 4K Ultra HD / 144 FPS
Directly Upload to YouTube
Supports Recording on Xbox, PlayStation, smartphones, IPTV, etc
Bandicam has a free trial version as well as a premium version. There are multiple packages available, depending on how many devices you want to use it on.
Bandicam
Capture any movement on your PC screen and render it as a high-quality video with this lightweight screen recorder!
Movavi Screen Recorder is one of the best recording software for PC that has a full set of features that let you create dynamic videos and enhance real-time interactions with your audience.
The software lets you record your screen and webcam at the same time. You can overlay your webcam footage on top of your gaming footage or use one at a time.
Moreover, you can also pick specific settings for audio recording. You can use real-time audio from your microphone or add another audio track to your video recording.
Movavi is a great choice for gameplay as it has a feature that lets you show keystrokes and mouse in real-time as you play. This can make your stream even more engaging as you can show your audience exactly what you’re doing as you do it.
Additionally, if you want your videos to be more instructional, you can do that with the draw feature. You can easily draw on top of your videos in real-time or after recording them.
Movavi Screen Recorder also has some essential video editing features for post-production. You can trim, cut, improve audio quality, and more. Also, You can save your final video in the format of your choice.
If you are a professional streamer, this software may be one of your best bets because it comes with a video recording schedule. You can pick a time and date, and the software will automatically start recording.
The software does not require an Internet connection, so if you want to record your gameplay for offline games and post it later, you can also do that.
Other key features include:
Built-in guides
Free updates
Responsive support team
Movavi has a free version with some limitations, but it allows you to live stream with no problem. The only inconvenience is that it places a watermark on all your videos.
You can get a subscription plan with a 30-day money-back guarantee, so you won’t lose any money if you are unsatisfied.
Movavi Screen Recorder
Record your games and integrate dynamic real-time webcam footage, mouse maps, and keystrokes.
Apowersoft Screen Recorder Pro is similar to Filmora and offers a matching set of functionality. The user interface of this game recorder app for PC is the simplest of the lot, with all the necessary tools shown on the home screen.
Click the start button to start recording after customizing audio and video options like microphone / internal audio, video bitrate, and FPS and saving file format.
The built-in video editor offers many editing options, including trim, merge, visual effects, and the ability to add watermarks.
Apowersoft Screen Recorder Pro supports multiple video formats for export, including AVI, WMV, FLV, MKV, MOV, MPEG, VOB, and WebM.
The edited clips can be uploaded to your server over FTP or directly to video streaming sites like YouTube.
Let’s quickly look at its key features:
Easy-to-use UI
Built-in Video Editor
Upload directly over FTP or to YouTube
Multi-platform support
Record gameplay at 60 FPS
Ampowersoft Recorder has multiple subscription plans. You can try all its features through the free trial.
Apowersoft screen recorder
Easily capture and edit your gaming sessions with this intuitive tool!
FBX Game Recorder is a free game recorder for Windows 10 computers and offers all the basic game recording features you would expect from a pro tool.
This software can record gameplay at 144 FPS and in a maximum of 1440p Quad HD resolution videos.
This software is easy but requires user registration after installation to log in. FBX game recorder only works with video games, so you won’t be able to record other stuff on your screen.
You can select the video encoder (software/hardware), FPS, video resolution, audio options, webcam capture, and hotkeys layout in the settings tab. There is a built-in video editor, which is very basic and limited to video trimming.
FBX game recorder works efficiently on both powerful and old-slower computers based on the game recording settings.
Let’s quickly look at its key features:
Free Game Recorder
Minimal Impact on Performance
Records videos in 1440p QHD / 144 FPS
Built-in video editor
Simple user interface
This software provides various real-time annotations like GIFs, stickers, captions, and other types of effects that can enhance the watching experience of your audience.
NVIDIA ShadowPlay is an in-house game recorder from NVIDIA, and it only works on NVIDIA graphics cards installed on PCs.
It comes bundled with GeForce Experience, can record 60 FPS gameplay, and supports a maximum video resolution of 4K.
There is an instant replay mode that can record the last 30 seconds of gameplay footage on PC at any given time by pressing a hotkey. You can also create 15 seconds GIFs and share 4K resolution screenshots on social media.
ShadowPlay also supports live broadcasting to YouTube, Twitch, and Facebook Live. Unlike other game recorders, NVIDIA’s offering uses GPU to handle video encoding, not the CPU, offering better performance.
One of the greatest features of this game recording software is that it automatically highlights key moments during gameplay, such as match-winning. This is great as you are sure to keep all worth-sharing footage.
If you are using NVIDIA GPU, give it a shot to see how it performs.
Let’s quickly look at its key features:
Free Game Recorder
Video Capture in 4K / 60 FPS
Live Broadcasting Support
Tools to create GIFs and screenshots
The NVDIA community offers extensive tutorials, guides, and ideas about making the best of this software.
OBS is a game streaming and recording tool for Windows and is ideal for anyone looking for a free open-source utility with advanced features. OBS can use both GPU and CPU for encoding videos.
The recording options are straightforward with OBS. Also, the recorded videos are saved in MP4 or FLV format, and it uses your GPU for high-quality streaming on YouTube, Twitch, and Facebook Live.
What’s more default resolution for game recording is set to 1080p at 30 FPS but can be customized by the users.
We must mention that OBS is open source and free to download gaming screen recorder for PC, so you don’t have to spend any money to use it full-featured.
You can record from the webcam during live streaming and add live commentary as it supports audio recording from the game and mic.
Radeon ReLive is to AMD what ShadowPlay is to NVIDIA. A game recorder from the GPU manufacturer that only supports AMD units and allows you to capture gameplay in 1440p QHD resolution at 60 FPS.
AMD ReLive also utilizes the GPU for video encoding, leaving your CPU for other tasks. Live streaming works fine and offers chat integration for YouTube, Facebook, and Twitch.
The audio tracks can be recorded from both game and external mic and saved as individual tracks.
The basic settings can be tweaked from the Global tab, including the recording option, saving folder, audio capture devices, customizing hotkeys, audio volume boost, etc.
Proceed to the Recording tab to change video resolution, recording bitrate, encoding type, instant replay option, etc.
The Radeon ReLive is not the easiest game recorder, but once you get used to it, it can be a good alternative to have on the side if not as the primary recording tool.
Your Windows 10 PC and laptop come bundled with a Game DVR tool that can be accessed from the Xbox app. Game DVR is a basic game recorder that can capture gameplay footage in 1080 resolution at 60 FPS.
Open Xbox, go to Settings> Game DVR tab and enable Record from Game DVR option. To capture gameplay, press the Windows key + G to launch Game Bar.
Open the game and click the record button. The recording will automatically stop and be saved if you exit the game.
Saved gameplays are available in the Menu > Game DVR section of the Xbox app. For editing tools, Game DVR has a built-in video trimming option.
This easy game-recording software uses GPU acceleration for video encoding and works best on a computer with a dedicated GPU.
Let’s quickly look at its key features:
Free built-in game recorder for Windows
Captures 1080/60 FPS videos
Built-in sharing options
How do I record gameplay on Windows 10 for free?
Use free game recording software. If you use Windows 10, the built-in tool comes pre-installed and is completely free, but you can also try out our recommendations.
Most of these tools have free versions or trial periods when you can test them out without having to pay.
What do YouTubers use to record their games?
Most YouTubers use high-quality game recording software to record their games. Some of the recorders popular among them are Camtasia, Bandicam, and OBS.
With some of these tools, you can record the full screen and select the areas you want manually. Lastly, these tools also double as video editors.
What is the best clipping software for gaming?
Gamer recording software is also referred to as clipping software. The best of them is the Icecream Screen Recorder. This is thanks to its perfect combination of the right features.
So, these are some of the best game recording software available for Windows 10. Whether a professional video game player or a hobbyist, having the right tools to record the gameplay is necessary to grow your audience.
Most game recording software tools are either fully or partially free or offer a limited free trial. Make sure you take all of them for a spin before committing to the one that meets your needs.
Feel free to let us know the one you enjoy using in the comments below.
If you want to show a video on your website there are multiple ways to do that. However, if you want to add the custom video using HTML5 you need to use the video tag.
Some users have reported that they get the Browser does not support this video tag error while trying to add a video to their website.
This browser issue can occur due to several reasons including incompatible video format as well as wrong syntax.
Follow the troubleshooting tips given below to fix the Browser does not support the video tagerror in Firefox, Chrome, and other web browsers.
Quick Tip:
If you’re looking for a privacy browser that’s less prone to glitches, we can recommend Opera One. It supports the WebM video format, and HTML5 video and audio formats are compatible with most apps.
It takes fewer resources than most of its counterparts, while still offering free VPN, ad-blocker, and battery-saver features. Not only that but Opera One comes with a built-in AI and has a modular AI-ready design for current and future AI technologies integration.
Opera One
With WebM and HTML5 video support, Opera will keep you away from common video tag errors.
How can I fix your browser does not support the video tag?
1. Change MP4 to H264-MPEG-4 AVC format
If your video is in MP4, it is possible that a browser like Chrome may not support the format anymore.
This issue can only affect the Chrome browser and you might be able to play the same video on other browsers like Firefox and IE.
The solution here is to change the video format using a video converter and convert the MP4 video into H264-MPEG-4 AVC. However, if that does not work, you may want to add a custom piece of js code to force Chrome to show Mp4 videos without the error.
2. Disable Hardware Acceleration
For Firefox
Launch Firefox and click on the Menu.
Select Options.
Under Options, scroll down to the Performance section.
By default, Use recommended performance settings option is enabled.
Uncheck Use recommended performance settings option.
Now uncheck Use hardware acceleration when available.
Close the Firefox browser and relaunch it. Try to use the video tag again and check for any improvements.
You have found this article because your Chrome address bar is missing.
The Chrome Address Bar is designed to make the browser easy to use, and packs in some essential features like typing autocomplete, among others.
However, users are complaining that the Address Bar is missing in Chrome. With this comes the difficulty of performing simple tasks like URL search on the browser.
Be at rest if you face this problem, as this detailed guide contains seven viable solutions. You only need to follow the steps listed, and your Address Bar will be back on Chrome.
The address bar is always at the top of your browser, but when it disappears, it could be for any of the following reasons:
The settings for your browser have changed
The computer is infected with malware
You have placed your browser in fullscreen mode
Your browser files are corrupted
Regardless of the cause, you should successfully rectify this error using the solutions we recommend in this article.
Quick Tip:
If you are having errors in Chrome, we would suggest trying another browser. We highly recommend Opera One, as you can easily import your bookmarks and saved info from Chrome, and it is compatible with Chrome extensions.
What’s more, the Address Bar is ideally placed for easy access. Finally, it is a highly secure browser with its VPN, ad blocking, and native AI features, ensuring you are virtually safe and organized.
Opera One
Switch to Opera One from Chrome with all bookmarks, passwords, and extensions.
Click the menu button (three vertical dots) in the top right corner.
Click the Help option, and select About Google Chrome.
This should automatically update your browser, and you may be required to restart the browser.
2. Activate Bookmarks Bar
Click the menu button, and select the Settings option.
Choose the Appearance option on the left pane, and toggle on the Show bookmarks bar switch.
Now verify that your Address back is displaying.
3. Exit full-screen mode
The full-screen mode, by default, hides the Address Bar, your PC Taskbar, and other browser and PC elements. It only shows the content of the page you are viewing and nothing more.
Press the F11key on your PC to deactivate the full-screen mode. This should return all the missing elements on Chrome, including the Address Bar.
4. Force stop Chrome
Press the Windowskey + X and select the Task Manager option.
Right-click the Google Chrome app on the list of running apps, then select End task.
Now, relaunch Chrome and check if the Address Bar is back.
5. Uninstall and reinstall Chrome
Press the Startbutton, type control panel, and then select the Control Panel app.
From the options, click Programs.
Select Programs and Features.
Lastly, locate the Chrome app and right-click on it, and select Uninstall.
The impact of malware on a PC can run as deep as affecting the performance of your browser.
You can use the full scan option of the Windows Defender to perform a deep scan and remove possible viruses causing the Chrome Address Bar to be missing.
For a more intense search that will dig out viruses that are nearly impossible to erase, you can use the renowned TotalAV antivirus.
It is a super-secure, no-nonsense software that digs deep into your system and removes the most stubborn viruses. It offers both offline and online security and protects your PC from attacks.
Starting from crypto wallet protection to secure online shopping and safe webcam streaming, it offers premium security as if it is nothing.
It might just be all you need to get Chrome working perfectly again.
Where is the Chrome menu bar?
In Chrome, the menu is usually hidden within the Chrome menu icon.
To expand and open up the menu, click on the three vertical dots at the top-right side of your browser.
There’s nothing special about a modern browser when it is not easy to use. And that ease of use is taken away when the Address Bar is missing on Chrome.
As always, we have explained how you can get the address bar back and return that unique edge to your browser. If you are facing other issues aside from this, you can check out our guides on troubleshooting chrome issues for well-detailed solutions.
Lastly, tell us the fix that worked for you in the comments section below. You can also state any effective fix you have tried that is not on this list.
Just like any other operating system, Windows has its share of problems. One particular issue that users reported was the DVD driver issues in Windows 10.
If this happens, your PC won’t recognize DVD drive, or you might experience other issues. This can be a big problem especially if you use optical media frequently, so let’s see how to fix it.
Why can’t I play DVDs on Windows 10?
Here are some of the most common reasons for DVD issues on Windows 10:
Drivers – CD/DVD driver for Windows 10 isn’t necessary in order to use the device. However, sometimes other drives can come into conflict with your drive.
Loose cables – If DVD isn’t detected, it’s possible that it’s not connected properly. Check your cables and make sure that both power and SATA cables are tightly connected.
How can I fix DVD driver issues on Windows 10?
Before we dive deeper into this issue, you can do the following check to rule out any common problems:
Check your cables – Open your PC case and check if all cables are properly connected to your drive. Loose cables are rather common problem, so we advise you to check them.
1. Delete the IDE ATA/ATAPI controllers from Device Manager
Press Windows key + X to open Power User Menu. Select Device Manager from the list.
Once the Device Manager opens, go to View and choose Show hidden devices.
Locate ATA Channel controllers and uninstall them all by right-clicking them and choosing Uninstall from the menu.
Optional: Users also suggest removing Intel (R) Serial ATA Storage Controller, so if you have it make sure that you remove it as well.
After you’re done close Device Manager and restart your PC.
Users reported that this problem can be easily fixed by uninstalling IDE ATA/ATAPI controllers from Device Manager.
If you don’t have ATA Channel available in the Device Manager, be sure to delete SATA controller and restart your computer. When your computer restarts, the DVD drive should appear again.
Some users are also suggesting to remove your DVD drive from Device Manager, so you might want to try that as well.
In addition to deleting devices from Device Manager, some users are also recommending that you update drivers for your DVD drive.
To install DVD driver for Windows 10, visit the drive manufacturer’s website and download the latest drivers for your device.
Update drivers automatically
If you don’t want the hassle of updating drivers manually, we strongly suggest doing it automatically by using Outbyte Driver Updater.
After several tests, our team concluded that this is the best automated solution. Below, you can find a quick guide on how to do it:
Locate your DVD on the list. Right-click and choose Change drive letter.
Click on Change.
Now select a new letter and click on OK .
3. Create new registry keys
Press Windows key + R and enter regedit.
Press Enter or click OK to start Registry Editor.
Once Registry Editor opens, go to the following key in the left panel: HKEY_LOCAL_MACHINE/SYSTEM/CurrentControl/SetServicesatapi
Right-click atapi and select New and then pick Key.
Enter Controller0 as the name of the new key.
Select Controller0 and in the right pane right-click the empty space and select New and then DWORD (32-bit) Value. Enter EnumDevice1 as the name of new DWORD.
Double click EnumDevice1 DWORD to open its properties. Enter 1 in Value data input field and click OK to save changes.
This can also help if your PC throws the CDrom.sys error. Once you make these changes, check if DVD drive is still not showing in Device Manager on Windows 10.
Press Windows key + R and enter regedit. Click OK.
Navigate to the following path: HKEY_LOCAL_MACHINE\SYSTEM\CurrentControlSet\Control\Class\ {4D36E965-E325-11CE-BFC1-08002BE10318}
Locate LowerFilters and UpperFilters. Right-click each of them and choose Delete.
After doing that, check if the DVD drive is still not detected in Windows 10.
Missing DVD drives in Windows 10 can be a big problem, but you can easily fix it by using one of our solutions. This is a common issue, and many reported that DVD player is not working after upgrade, but hopefully these solutions should help with that.
If you have any other suggestions or questions, don’t hesitate to leave them in the comments section below and we’ll be sure to take a look.
Antivirus usage for home personal computers is as important as you would assume, but some users don’t fear viruses or malware at such a rate they would spend money on protection.
Now, we can understand that. You can always use Windows Defender as a go-to antimalware solution. It’s built-in and modestly reliable. However, things change in the business category.
When it comes to business and server protection from malicious software, you’ll probably need a more advanced tool for the job. Just look at the recent ransomware crises and you should have a clear idea of the dangers that roam within the Internet of Things.
Does Windows Server need antivirus?
Back in the day, we would worry about worms or viruses, which, in comparison with malicious software nowadays, appear as a pesky gag. Neo-hackers are not joking, as the era of a hoax is behind us.
They’re up to no good, and that means that they want your money or your data in order to get your money. And with outdated systems or a lack of proper protection, everything is up for grabs.
For that purpose, if you’re any kind of professional who relies on servers and business networks, you’ll need to tie up loose ends.
Antivirus for Windows Servers protects data on Microsoft Windows servers against all types of harmful activities. This idea was designed specifically for high-performance business servers that are exposed to excessive loads. Here are some amazing picks:
Panda Small Business Protection – focused on online footprint
Bitdefender GravityZone – has the most features
ESET PROTECT Complete – best overall security
Vipre Endpoint Protection – covers a large number of threats
Kaspersky Endpoint Security Cloud – has an incredible database
Malwarebytes for Teams – tailored for collaboration
Windows Defender – basic features
Meaning, get an anti-virus that can protect your intellectual and material property. We’re up to help you with a list of best-suited software solutions. Check them out below.
Panda Small Business Protection is a professional antivirus for Windows Servers that protects against Internet-borne threats.
Because fraudsters’ goals are expanding beyond private users and major organizations, a solution to keep your online company safe is critical.
Freelancers and micro e-businesses are targeted on a regular basis since they are easy targets for the bad guys and account for approximately 80% of the business sector in the United States.
As a result, Panda Security has created a solution for tiny and medium-sized businesses: Small Business Protection. An antivirus that is tailored to your company’s requirements: low-cost, speedy, and compatible with any Windows PC.
These are some of the features offered by Panda Small Business Protection:
Technical Support
Personalized auto-configuration
Cloud Antivirus
Lightweight
Automatic updates
Panda Small Business Security
For freelancers and micro-businesses, a security solution that meets basic requirements, to safeguard your small business while focusing on its development.
Bitdefender GravityZone Business Security is one of the most popular antivirus solutions for business practice and server security management.
It’s so feature-rich that you’ll easily get lost in the bundle of different security features which include:
Antimalware
Firewall
Web Advisor and Access control
Detailed Policy Editor
Encryption
Anti-phishing protection
Smartphone protection (Advanced version)
Application control
Everything is governed by a management console (Dashboard) which is designed with professionals in mind.
Nonetheless, once you’ve got the hold on basics, you’ll have an easy time organizing protection and other segments in a seamless manner.
Bitdefender GravityZone uses machine learning to stay on top of the most current developments in malware and new technologies that might put your business at risk.
The most distinctive features of Bitdefender are overwhelming customization, good reporting, and high-end augmented anti-malware functionality.
Drawbacks are the lack of support for handheld devices and the overcomplicated setup.
Bitdefender GravityZone has your back with its fantastic deal, which gives you a 50% discount regardless of the type of plan you choose.
Bitdefender GravityZone
Bitdefender Gravity Zone is what Bitdefender Antivirus Plus is for the common PC: The best antivirus solution!
Though probably best known for the home user solution, ESET offers extremely reliable and complete business software as well.
ESET PROTECTION Complete is, as the name suggests, an all-inclusive tool, that covers all the security needs of your business, whether small, medium, or large.
Using ESET’s complete business antivirus, you’ll secure your network against zero-day threats, malware, phishing, and spam managed from an easy‑to‑use cloud-based console.
Specifically for Windows Server, this solution offers file and mail server protection; additionally, you get cloud app protection, full disk encryption options, and modern endpoint protection
ESET offers discounts for two-year and three-year subscriptions based on the package you need. If you’re already a customer, you may take advantage of the ESET group discount, which gives you a discount on every package you’ve already purchased.
ESET PROTECT Complete
Powerful and scalable security solution for your business network running on Windows Server, plus useful protection components.
Protecting an entire network or a server is nowhere near the same as protecting a single PC, so using a might not be the best course of action.
On the other hand, If you use a dedicated business solution like Vipre Endpoint Protection, then you are indeed talking about total security.
This software is also great for the new work dynamics, offering Vipre Encrypt.team specially designed for protecting your business while working with remote teams around the world.
Vipre offers powerful endpoint security delivering protection against today’s most sophisticated online threats, and this includes threats via email, threats from the latest types of malware, and more.
Besides, your servers will receive protection from threats that haven’t been even established enough on the market, Zero-Day, ransomware, and more.
Vipre Endpoint Protection
Not even the newest cyber-threats will stand a chance against the protection that you will get from Vipre Endpoint Protection!
Not so many security software companies can compete with the legacy and innovative nature of Kaspersky. Over 250 thousands of corporate clients rely upon the protection that Kaspersky offers.
And most of them are satisfied with what they get. Kaspersky Endpoint Security Cloud is mostly oriented toward small businesses, but you can expand its reach.
These are some features you can expect from Kaspersky Endpoint Security Cloud:
Covers Windows-powered systems and servers
Antimalware protection
Firewall
Data loss protection
Browsing protection
Remote administrative management
Mobile devices support both Android and iOS
Application management
Everything is controlled from the web-based console which is well-designed and uncluttered. This decreases resource usage, which is an issue for some other anti-virus solutions.
Additionally, it’s a well-known fact that the Kaspersky virus database is, without precedent, the largest database there is.
Because of that and other advanced technologies this tool utilizes, virus recognition is at the top of the class. Plus, it offers specially designed security for Microsoft Office 365.
Kaspersky Endpoint Security Cloud tool’s best point, in our modest opinion, is advanced support for mobile devices.
Besides the protection, Kaspersky has made huge improvements in sensitive data discovery and monitoring cloud services with its Cloud Discovery feature.
One distinctive drawback is price, but if you’re up to sophisticated and user-friendly security software, you’ll need to spend some money.
If you’re interested, you can inform in detail about the offerings and pricing, by navigating to the official website.
Kaspersky Endpoint Security Cloud
This tool for businesses even offers advanced support for mobile devices, the most vulnerable network devices.
Malwarebytes for Teams is intended to safeguard small enterprises’ data and devices on Windows Servers. It provides real-time threat detection and response, as well as priority phone and email assistance.
You don’t need any cybersecurity or IT experience to manage security for your team with Malwarebytes for Teams; it’s simple to use and has straightforward features.
This software keeps your devices running smoothly, it uses the system’s idle resources to scan for threats ahead of time so you won’t have any downtime. Plus, it offers monthly reports on the threats removed.
Malwarebytes works well on servers, especially if you use their corporate server platform, which is optimized for use with server file systems.
With flexible licensing, you may cover up to 20 devices, with support for additional devices as needed. Each device is given its own unique protection, ensuring that your team is working behind a secure fence.
These are some of the features offered by Malwarebytes for Teams:
Monthly Reports
Device Alerts
Priority Support
Mobile Admin app
Advanced anti-virus, anti-malware, anti-spyware
Brute Force Protection
Tamper Prevention
Slack and MS Teams integration
Malwarebytes for Teams is not yet available for free download and evaluation. If you’re unfamiliar with Malwarebytes features and want to give it a go, you may sign up for a subscription and if you are not satisfied, you have a 60-day money-back guarantee.
Malwarebytes for Teams
Protect your small business and essential data in minutes, with no costly IT infrastructure, and you’ll be up and running right away.
It used to be that Windows was affected by security flaws and malware threats that could only be mitigated by third-party antivirus software.
However, Microsoft has made a deliberate effort to strengthen Windows security over the years, not least with the addition of Windows Defender as a default feature in Windows.
This is no longer the case because Windows Defender now competes with any reliable standard antivirus solution even for Windows Servers.
The AV-Test, an independent antivirus testing lab, gives Microsoft’s solution a good grade, but AV-Comparatives is less enthused, awarding Windows Defender a standard rating for malware protection in its most recent tests.
These are some of the features offered by Windows Defender:
Windows Hello provides secure sign-in.
OneDrive backups are done automatically.
Microsoft Defender Endpoint Security
Blocking of potentially unwanted applications
That’s still proper security, and Windows Defender has the extra benefit of being a hassle-free solution that comes pre-installed with Windows, as well as being free. Windows Defender is all you need if you only want basic protection that works.
This brings us to the end of the list. We recommend that you test these solutions before selecting which one to buy.
To avoid program conflicts and boxing, do not download them at the same time, but test them individually and safely uninstall them whenever you want to make a new installation.
Why use Server malware protection?
The intelligent analyzer detects any malicious character in programs with a high degree of certainty, even if the code of the malware is not contained in the antivirus database.
When a breakdown or forced shutdown occurs, these applications normally restart to provide steady system safety while the diagnostics system determines the cause of the breakdown.
Anti-Virus Protection for Windows Servers records what is accessed, utilized, altered data is examined, and any corrupted files are eradicated.
Furthermore, suspicious files or records are quarantined before being subjected to further investigation. The request scans a certain section of the system based on a plan or an instruction.
If you have a server, you should utilize antivirus for Windows Servers. Because your company’s or even your clients’ sensitive data might be on your server, you should constantly keep your Windows Server safe and up to date with security patches.
Most of these tools will do a good job, but for better insight, it’s recommended to inform yourself before you pay for something. Don’t forget that security is paramount and choose wisely.
Are you looking for TFTP Server to transfer configuration files, system images, and OS firmware updates on a larger scale? Your search ends here.
There are a lot of options available, which makes it challenging to choose the one for you. Therefore, we have analyzed some of the best Windows 10 TFTP servers to download.
What are the advantages of using TFTP servers?
It is a fast transmission method with low traffic overheads.
One of the most robust and straightforward TFTP servers, SolarWinds is an excellent option to download and upload executable images, push OS and firmware updates, and backup network device configuration files.
This TFTP server for Windows 10 has advanced security settings to ensure complete control. In addition, it comes with multi-thread support and can quickly transfer files up to 4 GB.
If we talk about the interface of this TFTP server, it has a simple layout with a clean and minimalist interface.
Let’s look at the critical features of SolarWinds TFTP:
Allows you to download and upload images simultaneously from different network devices
It enables you to authorize a range of IPs or an IP address
Helps you keep your firewalls, switches, and routers up to date, configured, and backed up
Comes with an IP restriction feature to avoid unauthorized access requests
Another lightweight TFTP server for Windows, TFTPD64/32, is an open-source IPV6-compatible app with TFTP, SNTP, DNS, DHCP, and Syslog servers.
The application comes in two variants, 64-bit and 32-bit. It has extensive features, including security tuning, early acknowledgments, progress bars, directory facility, interface filtering, etc.
This TFTP server and client are compatible with TFTP option support such as size, timeout, and block size. With all the extensive features available, this application can deliver maximum performance when transferring files.
Let’s look at some of the key features:
Collects records on configured devices and displays to users
Comes with a DHCP server, which provides unlimited static or automatic IP address assignment
Easily transfers messages and backup Syslog
Allows you to keep track of file transfers with the help of logs
Spiceworks is a visually pleasing network administration app with a TFTP server for Windows 10. This app keeps device settings up to date and ensures that all the network configurations are standard across every network device in an organization.
With its backup and restore feature, one can quickly restore important files if things go awry. In addition, this TFTP server comes with a side-by-side comparison view to check the changes made in configuration files.
One of the best features of this open-source TFTP server is that it excels in saving config files and loading firmware into network devices.
Let’s look at the key features of Spiceworks TFTP server:
Ensures all devices can push out updates and are updated
All available devices are listed, which makes managing them easy
Can push firmware updates to all compatible devices swiftly
Keeps track of network activity in real-time and notifies if any change exists
haneWin TFTP server, based on RFC 1350, is a shareware available to download for Windows 10. With multi-threaded architecture, it is one of the best TFTP servers for Windows, as it is highly reliable and delivers high performance.
This TFTP server installer file comes in both 32-bit and 64-bit versions. With the pipe option, the received data can be directly fed to the other applications, and the output of an app can be transmitted to a file on the server.
It can implement access control to the server depending on the IP address, server directories, and operation requested for data security. In addition, this free TFTP server can run as a service and doesn’t require a user to log on.
Let’s look at the critical features of haneWin TFTP server:
Comes with support for Intel/PXE style multicast operation
Has a control panel applet to monitor and configure with ease
Can run on the command line, making it useful for scripting
A multi-threaded TFTP server, WinAgents TFTP is designed to function 24*7 as a background service.
It has various features such as server port ranges, size, timeout changes, and block number rollover for large files.
WinAgents TFTP server can transmit files using TFTP protocol through firewalls, and routers, where Network Address Translation mode is active.
With high-performance architecture, remote server administration, and a reliable cache system, it is one of the most scalable TFTP servers to download on Windows 10.
The interface of this TFPT server is simple. This tool is free for 30 days and can run on 32-bit and 64-bit systems.
Let’s look at the critical features of WinAgents TFTP:
Allows using UDP 69 port for transmitting files
Can create stock copies of flash images, device settings, and config files
Configures UDP port for connections to send files via firewalls
We hope you find an accessible TFTP server for Windows from the list presented in this guide. If you have any other free TFTP servers that you use, feel free to share them in the comments below.
Steam offers automatic updates for the installed games. However, you may sometimes encounter an error while installing or updating a game, and Steam will display the following message: An error occurs while updating [game title].
Even though there are a few variations to this exact error, the underlying message is the same: you will not be able to run the game. So, let’s find out how to fix things when an error occurs while updating Steam games.
Why is Steam failing to update?
Here are some of the reasons you may encounter the error:
Corrupt game files – If you are facing problems with a particular game, it could be the game files to blame.
Issues with the download cache – Often, Steam’s download cache is corrupt or the configurations are incorrect, leading to the An error that occurred while updating the message.
Antivirus or firewall blocking the update – A third-party antivirus or firewall is often found to affect Steam. A simple solution would be to allow the app.
Unstable Internet connection – If the connection drops every few minutes, you will have trouble updating or installing games on Steam. Here, the error message usually reads, An error occurred while updating (no Internet connection) in Steam.
Some of the games affected by the error are:
An error occurred while updating Destiny 2 (app running) – Destiny 2 is a popular Steam game, and issues updating it can affect the user experience.
An error occurred while updating Red Dead Redemption 2 (app running) – Another standard game reported by many to throw the error while updating.
Sea of Thieves: An error occurred while updating – Several users reported issues with Sea of Thieves, and for some, the download button was missing.
An error occurred while updating Apex Legends – Apex Legends, one of the most played games, often throws errors, and our solutions will help fix things. Also, some reported that Apex Legends wouldn’t launch at all.
How can I fix the error while updating on Steam?
Before we move to the slightly complex solutions, let’s first try a few quick tricks:
Restart the computer.
Run Steam with administrative privileges. To do that, right-click on the Steam launcher/shortcut, and select Run as administrator.
Turn off the modem/router for a minute, turn it back on, and check if you can download/update games.
If you have any third-party antivirus or firewall installed, disable it and verify whether you still receive the An error occurred while updating message in Steam. In case things work out, we recommend switching to a more reliable and user-friendly antivirus and effective firewall.
If you get the An error occurred while updating (shared library locked) message in Steam, ask the other person to either quit Steam or log out for a while.
If none of these did the trick, try the solutions listed next.
1. Terminate related processes
Press Ctrl + Shift + Esc to open the Task Manager and locate the following processes:
The game itself
werfault.exe
wermgr.exe
Any Steam process
Now, select each of these individually, and click on End task.
That’s it! The easiest way to fix issues updating a game in Steam is to terminate the game itself and any related Windows process.
2. Quit Steam
Locate Steam in the System tray, right-click the icon, and select Exit.
Now, relaunch Steam, and verify if you can update the game that earlier threw the error.
3. Clear the Download Cache
Launch the application, click on the Steam menu at the top-left corner, and select Settings.
Navigate to the Downloads tab, and then click on Clear Download Cache.
Click OK in the confirmation prompt.
After Steam relaunches, log in with your credentials.
Now, check whether the An error occurred while updating invalid platform message in Steam disappears. If not, head to the next method.
4. Change the download Region
Launch the application, click on the Steam menu, and select Settings.
Now, head to the Downloads tab, choose another country/place from the Download Region dropdown menu, and click OK to save the changes.
You may have to try a few regions before things get working again.
In some cases, you get the An error occurred while updating message in Steam, when there are issues with the download region. The one currently selected could be down or overloaded, and changing it should do the trick.
Launch Steam, click on the Steam menu, and select Settings.
Head to the Downloads tab, and then click on Steam Library Folders.
Choose the current library where the problematic game is installed, click on the ellipsis and select Repair Folder.
Click Yes in the UAC prompt.
Wait for the repair process to complete.
In case you are getting the An error occurred while updating (disk write error) message in Steam, it could be a problem with the library, and repairing it would work for most. Also, verify the drive storing Steam files doesn’t have Write Protection enabled.
6. Verify the integrity of game files
Launch Steam, navigate to the Library, right-click on the game that’s not launching, and click on Properties.
Now, go to the Local files tab, and click on Verify integrity of game files.
Wait for the process to complete.
If nothing worked till now, you might want to check our guide on Steam disk write error for more solutions.
That’s all there is to the problem! By now, you should have gotten things up and running, and the An error occurred while updating message in Steam shouldn’t appear anymore.
If you have any questions or want to share another solution, please comment in the section below.
A large number of users have reported that their HP All-in-One PC screen turned black all of the sudden. This issue seems to appear randomly.
Here is what one user had to say about this issue on HP Forums:
I have got all-in-one HP Desktop. The model is HP 23-Q0105A 23″ Touch AIO. While I’m working with this desktop, suddenly the screen goes black although s tiny power indicator at the right cornet bottom is on. When I move the mouse or press any key, the screen does not come back. Can anyone please advise what the solution is ?
We already covered the black screen with cursor on Windows 10 in another guide, but today we’re going to focus on HP All-in-one black screen issue on Windows 10.
Why does my HP computer turn on but the screen stays black?
This is a pretty common issue, and it’s usually caused by one of the following components:
Motherboard – Multiple users reported that a faulty motherboard caused this issue on their HP device. If you encounter a black screen and beeping on an HP all-in-one computer, your hardware is a likely cause.
LCD panel – This is another hardware problem. If this issue occurs, your display won’t work, while your PC will boot normally. This can lead to various HP All-in-one screen issues.
Inverter – Although unlikely, in some rare cases issues with your inverter can lead to a black screen on HP devices.
How do you fix a black screen on an all in one computer?
1. Connect an external monitor
Turn off your PC.
Connect the external monitor to it.
Boot the PC.
If nothing happens, press the Windows key + P a few times to change the projection mode
This isn’t the best solution, but it will help you determine if your LCD panel is working or not.
Once you get in touch with HP personnel, they will explain you further steps.
We hope this guide helped you solve your issue. If you experience a black screen after login on an HP all-in-one computer, then the issue is most likely a corrupt user profile or a bad driver.
Please let us know by using the comment section found below.
The Kingston SSD is one of the most used drivers, but some complain it is not detected by their PC. The Drive may not show in Disk Management or it is not detected in BIOS.
If you’re facing something of the sort, we got you covered. In this guide, we’ll explain step by step how to make your PC recognize your Kingston SSD. Let’s get right to it.
How can I fix the Kingston SSD not detected?
Before proceeding to the solutions in this section:
Test the Kingston SSD drive that is not showing up on another computer. The problem might be with the drive if it does not work.
You can also test with another cable on different ports. If it passes these hardware tests, you can explore the solutions below:
1. Change onboard SATA mode
NOTE
Note that some steps and parameters might vary depending on your BIOS. However, the general concept should be the same.
Press the Windows key, click the Power icon, and select the Restart option.
Power on your PC and press the appropriate key (F1, F2, F10, or F12, depending on your PC) to enter BIOS.
Select the System or Hardware Configuration option.
Then, navigate to the AHCI or SATA Mode.
Choose Enable AHCI if you find it there. If not, set the SATA Mode to AHCI.
If your Kingston SSD is not detected on BIOS, it might be because your PC’s SATA mode is still set to the old IDE configuration. You must change the settings to the modern AHCI mode to fix it.
2. Initialize the drive
Press the Windows key + R, type diskmgmt.msc, and press Enter.
Right-click your SSD drive and select Initialize Disk.
Select all the partition style and click OK.
Right-click the newly allocated space and choose New Simple Volume.
Select the proper size and drive letter and that’s it.
3. Set disk drive letter
Press the Windows key + R, type diskmgmt.msc, and hit Enter.
Right-click on the SSD drive and choose Change drive letter and path…
If it does not have a drive letter, click the Add… button. If it has, choose the Change… button instead.
Choose the drive letter you want and click the OK button to save the changes.
Finally, restart your PC.
The drive letter is essential for your PC to access the SSD. So, if your Kingston SSD is not detected, changing or adding a drive letter might help fix the issue.
Press the Windows key + X and select Device Manager.
Click the arrow next to the Disk drives option to expand it and right-click the driver there.
Choose the Update driver option.
Now, select Search automatically for drivers and install any available update.
Go back to the Device Manager window and expand the IDE ATA/ATAPI controllers option.
Right-click the driver there and select Update driver.
Choose Browse my computer for drivers.
Now, select Let me pick from a list of available drivers on my computer.
Finally, select the Standard SATA AHCI Controller option and click the Next button.
To avoid these kinds of errors and performance issues as much as possible, try keeping your device drivers up to date.
To make this easier, you can use a driver updater tool like Fortect Driver Updater. It’s designed to scan and update your drivers automatically, so you won’t run into errors caused by drivers in the future.
5. Run the Memory Diagnostic tool
Press the Windows key + R, type mdshed.exe, and hit Enter.
Select Restart now and check for problems (recommended) option.
Now, wait for the diagnosis to be complete and follow the recommendations.
If your Kingston SSD is not showing up in Disk Management on Windows 10, it might be due to some issues with the drive. The Memory Diagnostic tool should help detect these issues and recommend possible solutions.
6. Download the Kingston SSD Manager
Head to the Kingston SSD Manager page and pick the app version you want. We recommend the up-to-date one unless your drive is very old.
Hit the download button to get the exe file.
Install the app on your PC.
Go to the Health tab to run a quick troubleshooting test on your SSD. The app will tell you how to fix any issues found.
Another option is to download and install the Kingston SSD Manager. This app will show you if there is a problem with your drive.
The reason why your Kingston M.2 SSD might not be detected could be incorrect BIOS settings, a defective drive, outdated drivers, or a missing drive letter.
Following the steps outlined above should help you fix it. Good maintenance practice can also help with slow SSDs and overall better performance.
Feel free to let us know if the solutions in this guide helped you get past the issue in the comments below.
Users have been reporting that VirtualBox LDPlayer is blocking Windows updates, and they wish to uninstall it entirely to get things up and to run.
Users usually see VirtualBox (LDPlayer) Uninstall this app now because it isn’t compatible with Windows 10 when trying to troubleshoot things. And there are a few practical ways to uninstall the app in no time.
What is VirtualBox LDPlayer?
LDPlayer is a software tool that emulates the Android operating system to run mobile games on a computer.
Apart from running Android on your PC, it also includes several powerful gamer-oriented features, for instance, keyboard mapping controls and support for the most recent video games.
Other features include selecting the device’s virtual location, simulating screen rotation, and accessing the Google Play Store, among other things.
How can I uninstall VirtualBox LDPlayer?
1. Use Control Panel
Press Windows + R to open Run, type appwiz.cpl in the text field, and hit Enter.
Now look for the LDPlayer app, select it, and click Uninstall.
Follow the on-screen instructions to complete the process.
Once done, press Windows + E to open File Explorer, paste the following path in the address bar, and hit Enter: C:\Program Files
Now, right-click on the LDPlayer folder, if available, and then select Delete.
This way, you can easily uninstall Virtualbox LDplayer if it’s not compatible with Windows 10.
2. Use the Windows settings app
Press Windows + I to open Settings, and chooseApps.
Locate LDPlayer, click on it, and then select the Uninstall button.
Again, click Uninstall in the prompt.
Follow the on-screen instructions in the uninstall setup to complete the process.
Now, navigate the following path in File Explorer, and delete the LDPlayer folder:C:\Program Files
Once done, restart the computer for the changes to full effect.
An uninstaller tool would be best if you are looking for a quicker alternative to uninstall VirtualBox LDPlayer. These not just uninstall a specific application but also remove any associated files and delete the Registry keys created by it.
This way, the PC’s performance improves considerably after the uninstall, and more storage space is freed. So, check the best uninstaller tools and get one today!
CCleaner is a great maintenance device tool that has a software uninstaller feature and can easily help you uninstall a program or a group of programs just by clicking a button.
CCleaner
Excellent device management tool with a straightforward interface and various useful features.
Resolution not fitting the screen is a common problem reported by Windows users, particularly those with a dual monitor setup. Scaling settings as well as driver issues might be at fault.
If you are also troubled by this issue, here are a couple of troubleshooting tips:
What can I do if the screen doesn’t fit the monitor on Windows 10?
1. Manually change the display size
1.1 Adjust display on Intel Graphics
Type Intel in the search bar and click on the Intel Graphics Command Center option.
Click on the Display icon in the left pane in the Intel Graphics Command Center.
Click the General Settings tab, and adjust the Resolution. We recommend setting it to the Recommended value.
Click on Keep if you can see the image on all the screens or Revert if not.
If the issue persists, click on Custom Resolution, add a button beside the resolution value Display, and click Yes to acknowledge the warning message.
Here you can manually change the height and width of the display. Again, the goal is to adjust the screen size to fit the monitor.
Click on the Adjust desktop size and position tab from the left pane; from the right pane, click the Size tab under Apply the following settings, and tick the Enable desktop resizing box under resize the desktop if the display setting did not provide a proper fit section.
Save the changes and check if Windows 10 fits the screen.
1.3 Adjust display size in AMD control panel
Right-click on the desktop and click on AMD Radeon Settings.
From the ADM Radeon Setting window, click the Display tab.
Use the HDMI Scaling slider to adjust the HDMI scaling.
The preview should be visible on the screen in real time. Set the scaling to your preferred position, and that’s it.
We hope this guide helped you fix your screen doesn’t fit your monitor on Windows. If you need any more help, don’t hesitate to ask in the comments below.
When Windows Defender isn’t working, it’s most likely due to system file problems, or because you have or have had a third-party antivirus installed on your PC. Also, Windows Defender may not open if the Security Center is disabled.
No matter the specific issue, the solutions below should help you sort it out.
Type the following command and hit Enter, then wait for the scan to complete: sfc /scannow
The System File Checker repairs corruption in system files. You can use it to verify whether Windows Defender is corrupted or not.
If you can’t run an SFC scan or if SFC can’t fix the problem, you might want to try using a DISM scan instead. To do that, just follow the next step.
1.2 Run a DISM scan
Start Command Prompt as administrator, as shown in the previous step.
When Command Prompt opens, enter the following command and press Enter to run it: DISM /Online /Cleanup-Image /RestoreHealth
DISM scan will now start. This scan can take up to 20 minutes, so don’t interrupt it.
2. Clean boot your computer
Press Windows Key + R and enter msconfig. Press Enter or clickOK.
The System Configuration window will now appear. Go to the Services tab and check Hide all Microsoft services. Now click the Disable all button.
Navigate to the Startup tab and click Open Task Manager.
Now you’ll see a list of startup applications. Right-click the first entry on the list and choose Disable. Repeat this step for all startup applications.
Once you disable all startup applications, go back to System Configuration window and click Apply and OK. Now choose to restart your PC.
Sometimes third-party applications can interfere with Windows and cause this problem to appear. However, you can find the problematic application by performing a Clean boot.
3. Remove third-party antivirus tools
If you have another antivirus installed on your PC, it can interfere with Windows Defender. To make it work, uninstall said antivirus. Then make sure it’s completely gone by following the steps below:
3.1. Delete leftover files from Program Files
Open File Explorer (press Windows + E or search for it in the Start menu).
Go to This PC and then open the C: drive.
Open both Program Files and Program Files (x86) folders.
Look for folders related to your antivirus software (e.g., Norton, Avast, McAfee) and delete them by right-clicking the folder and selecting Delete.
In File Explorer, click on the View tab and check the box for Hidden items to show hidden folders.
Delete any files and folders related to your antivirus.
3.2. Use an uninstaller software
Download and install a reliable uninstaller software such as IObit Uninstaller.
Go to the Software Health Section.
Locate your Uninstallation Leftovers and Select Scan Now.
Select and delete any remaining files or registry entries found by the scan.
Uninstall the remnants of your previous antivirus, restart your computer and Windows Defender should be automatically enabled.
2. Type services.msc in the Run dialog box and hit Enter or click OK.
3. In Services, search for Security Center.
4. Right-click on it and select Restart.
5. Once you restart the required services, check if the problem with Windows Defender is resolved.
In order for Windows Defender to work properly, you need to have certain services enabled. If those services aren’t running properly, Windows Defender won’t be able to turn on at all.
However, you can always start the necessary services by performing the steps above.
5. Change your group policy
NOTE
If you’ve got a Windows Home version installed on your PC, you will not have access to the Group Policy Editor. However, you can follow our expert guide to install it.
Press Windows Key + R and enter gpedit.msc. Now press Enter or click OK.
When Group Policy Editor opens, in the left pane navigate to the following path: Computer Configuration/ Administrative Template/ Windows Components/ Microsoft Defender Antivirus
In the right pane, double click Turn off Microsoft Defender Antivirus.
Select Not Configured and click on Apply and OK to save the changes.
Sometimes Windows Defender won’t turn on because it’s disabled by your group policy. After making these changes, it should work.
6. Modify your registry
6.1 Use the Registry Editor
Press Windows Key + R and enter regedit. Press Enter or click OK.
When Registry Editor opens, navigate to this key in the left panel: HKEY_LOCAL_MACHINE/SOFTWARE/Policies/Microsoft/Windows Defender
In the right pane, look for DisableAntiSpyware DWORD and double click it.
If the DWORD isn’t available, right-click the right pane and choose New and selectDWORD (32-bit) Value from the menu.
Set Value data to 0 and click OK to save the changes.
6.2 Use Command Prompt
Start Command Prompt as an administrator.
Now enter the following command and press Enter to run it: REG ADD "HKLMSOFTWAREPoliciesMicrosoftWindows Defender" /v DisableAntiSpyware /t REG_DWORD /d 0 /f
If you’re an advanced user and you prefer using the command line, you can do this from Command Prompt or PowerShell by performing the previous steps.
Some users are also suggesting deleting the DisableAntiSpyware DWORD key, so you might want to try that as well.
7. Restart Windows Defender
Type Windows Security in the Search bar, and click on App settings on the right.
Now, scroll down, locate the Reset button, and click on it.
Again, click Reset in the confirmation prompt that appears.
8. Install a better antivirus
Windows Defender is a decent security solution for your PC, but it can’t match the services and features of a third-party antivirus.
If you’re using the Internet for shopping, banking, work, and communication, you must protect your sensitive data with a top antivirus like the one recommended below.
This tool supports all major platforms, including Windows and Android, and provides advanced banking and privacy solutions.
Over 110 million users trust TotalAV’s multilayered protection solution in the world so make sure you try it. You can benefit from a 30-day trial period right now.
TotalAV
Make sure to fully protect your PC with a top antivirus solution like TotalAV.
Can’t run CMD as administrator and getting an error instead? This guide is for you. Besides using an account with no admin rights, your antivirus, or corrupt system files could also cause this.
Follow the steps below to get this error fixed ASAP:
What should I do if CMD is not running as administrator?
Begin with a simple PC restart and check if your antivirus is blocking CMD or related processes. It might show up in Threat History or the Quarantine list.
Press Windows + R to open Run, type cmd, and click OK to run Command Prompt with standard privileges.
Paste the following command and hit Enter:powershell -command "start-process cmd -verb runas"
This way, you can run CMD as administrator from the command line in Windows 10 and 11.
2. Create a Command Prompt shortcut on your desktop
Press Windows + E to open File Explorer and navigate the following path: C:\Users\Default\AppData\Local\Microsoft\Windows\WinX\Group3
Run the Command Prompt shortcuts here and make sure that they work. If they do, copy both to your desktop and run them from there.
Since there are two shortcuts, you have non-administrative and administrative Command Prompt available. You can easily recognize the administrative Command Prompt as its window will be labeled Administrator: Command Prompt once you start it.
Alternatively, you can create a new shortcut on your desktop without copying anything. To do that, follow these steps:
First, Right-click your desktop, select New and then click on Shortcut.
In the text field, enter cmd.exe and click Next.
Enter the desired name of the new shortcut and click Finish.
Now you have to force the new shortcut to run with administrative privileges. Here’s how you can do that:
Right-click the newly created Command Prompt shortcut and choose Properties from the menu.
Go to the Shortcut tab and click the Advanced button.
Check Run as administrator, and now click OK.
Save changes.
You can double-click the new shortcut, and the Command Prompt will start with administrative privileges.
Remember that this is a workaround, but this solution should be helpful until you fix the core problem.
3. Disable all non-Microsoft context menu items
Go to the ShellExView website, scroll to the bottom, and download the third-party application.
After launching the program, you need to find all non-Microsoft entries in your context menu and disable them.
According to users, sometimes your context menu can cause this problem to appear. For example, if you can’t run Command Prompt as an administrator, perhaps other applications are causing this error.
Sometimes applications will add their entries to the context menu, which can lead to many other problems. And, ShellExView should come to your aid in this case.
Almost any application can cause this problem, but a few users reported issues with Express Zip File Compression (NCH Software). So if you’re using it, disable its entries from the context menu.
Keep in mind that this is an advanced solution, so you’ll need to get familiar with ShellExView a bit before you can fully apply this solution.
Press Windows + I to open Settings, and click on Accounts.
Select Family & other people from the left, and click on Add someone else to this PC.
Choose I don’t have this person’s sign-in information.
Select Add a user without a Microsoft account.
Enter the desired username for the new account and click Next.
Sometimes your user account can get corrupted, and that can cause an issue with Command Prompt. Repairing your user profile is difficult, but you can fix the problem simply by creating a new user account.
After creating a new user account, switch to it and check if the problem is still there. If the issue with Command Prompt doesn’t appear on the new account, move your files there and start using it instead of your old one.
5. Install the latest updates
Press Windows + I to open Settings and navigate to the Update & Security section.
Click the Check for updates button in the right pane. Windows will now check for updates and download them in the background.
You will have to restart the computer for the updates to install completely.
According to users, sometimes, you can’t run CMD as an administrator due to specific bugs in Windows. However, Microsoft is usually quick to fix any major bugs that affect the user experience. So, check for updates, and install them if any are available.
6. Run CMD as administrator from Task Manager
1. Press Ctrl + Shift + Esc to open the Task Manager.
2. Go to the File menu and select Run new task.
3. Type cmd.exe in the text field.
4. Check the Create this task withadministrative privileges box, and click OK.
5. Command Prompt will be launched on your PC.
The Task Manager can provide a solid alternative if you can’t run CMD as an administrator directly. Basically, you need to launch Task Manager and configure it to open Command Prompt.
Safe Mode is a particular segment of Windows that runs with default settings, and it’s usually a good place to start the troubleshooting process.
For example, if you can’t run Command Prompt as an administrator, perhaps you should be able to solve the problem by accessing Safe Mode.
Once you enter Safe Mode, try launching CMD as administrator, and if you see a black screen, run the following two commands while replacing the password in the second command with the one you want to set:
net user Administrator /active:yesnet user Administrator password
This fix has been confirmed by users and would help get things running when you can’t run CMD as an administrator.
Also, as an additional piece of advice, you may run CMD as an administrator in folder by right-clicking anywhere in the blank portion and selecting Open in Terminal.
Alternatively, Windows 10 users can navigate to the desired folder and press Alt + F + S + A.
Tell us which solutions worked for you in the comments section below. Also, if you managed to fix things with another method, do let us know.
More and more Windows Defender users are reporting they can’t turn on Microsoft’s built-in antivirus program due to various errors, the most common being the Unexpected error. Sorry, we ran into a problem. Please try again
The error could be due to several reasons, and the long list of solutions can confuse many. But there are a few tried and tested ones that seem to work for most users, and we will be exploring these today.
Before we proceed, here are a few similar errors, the solutions here will fix:
Windows Defender security center not working – If Windows Defender is not working, the problem might be with the services. So be sure to restart them and check if that helps.
Windows Defender unexpected error please try again – This is another common problem that can occur in Windows 10.
Windows Defender keeps stopping – Many users reported that Windows Defender keeps stopping on their PC. If you encounter this problem, check for issues with the Registry.
Quick Tip:
Windows Defender is not the best security tool out there. There are many safer bets for you, that include lots of other features and extra layers of protection.
We suggest switching to specialized antivirus software. You should look for one that uses advanced AI and machine learning to detect even the newest threats out there.
TotalAV
This is the ultimate protection software that will keep your sensitive data, and important files private and safe.
How do I know if a Microsoft security alert is real?
It’s actually quite simple and quick, given you know the ways to identify one. The appearance often helps verify if a security alert is fake. The ones from Microsoft will be well-designed, have no typos, and will have the option to ignore/close the prompt.
Secondly, the place where the security alert appears is another critical factor. Microsoft wouldn’t send alerts while you are on a browser or other third-party apps. Besides, Microsoft wouldn’t ask you to contact an email address or a number.
How can I fix the Windows Defender unexpected error?
Before we head to the slightly complex solutions, here are a few quick ones to get things up and running:
Restart the computer.
Check for updates and install if any are available. There was a bug in Windows that Microsoft addressed and released a patch for it. So, updating should fix the problem in your case, as it did for other users.
Remove any third-party antivirus installed on the computer to fix the Virus and threat protection unexpected error.
If none of these work, head to the solutions listed next.
1. Use antivirus-specific removal tools
Completely uninstall your old antivirus programs using this antivirus removal tool. There should be one on the software’s website. Then restart your computer, and Windows Defender should be able to install the latest updates and get things running.
In addition to antivirus removal tools, you can also use uninstaller tools for this job.
If you’re not familiar, uninstaller apps are specially designed to uninstall any program and remove all its files and registry entries from your PC. Therefore, we suggest you opt for the best uninstaller software on Windows.
2. Run an SFC scan
Type Command Prompt in the Search bar, and click on Run as administrator.
Click Yes in the UAC prompt.
Now, paste the following command and hit Enter: sfc /scannow
Corrupt system files are a common reason behind the Unexpected error in Windows Defender, and a simple SFC (System File Checker) scan should fix things.
3. Reset Windows Security
Press Windows + R to open Run, type powershell, and then press Ctrl + Shift + Enter.
Click Yes in the UAC prompt.
Paste the following command and hit Enter to execute it: Add-AppxPackage -Register -DisableDevelopmentMode "C:\Windows\SystemApps\Microsoft.Windows.SecHealthUI_cw5n1h2txyewy\AppXManifest.xml"
4. Modify the Registry
Press Windows + R to open Run, type regedit, and then click OK.
Click Yes in the UAC prompt.
Now, paste the following path in the address bar and hit Enter: Computer\HKEY_LOCAL_MACHINE\SOFTWARE\Policies\Microsoft\Windows Defender
Locate the DisableAntiSpyware or DisableAntivirus on the right and double-click on it. If you can’t find one, right-click on the blank portion, hover the cursor over New, select DWORD (32-bit) Value, and then name it as DisableAntiSpyware.
Next, enter 0 under Value data and click on OK.
This method has helped several users fix things when the Windows Security Unexpected error showed up. But make sure to be extra cautious and not make any changes other than the ones described here.
5. Perform an in-place upgrade
Go to Microsoft’s official website, and click on the Download tool now button under Create Windows 10 installation media.
Once downloaded, launch the setup, and wait for it to get things ready.
Now, click on Accept to agree to the license terms and conditions.
Choose Upgrade this PC, and click on Next.
Now, wait for the download the complete and follow the on-screen instructions to complete the process.
An in-place upgrade fixes a wide range of issues, including the Windows Defender Unexpected error. Though it will take some time, things should run smoothly after completion.
Also, the solutions here would work in case of the Exploit Protection Unexpected error in Windows.
If you’re looking to upgrade the PC’s defense system, take a closer look at this list of the best antivirus software with lifetime licenses and choose the one that best suits your requirements.
Tell us which fix worked for you in the comments section below.