Microsoft’s Snap Assist feature in Windows 11 could get smarter with AI

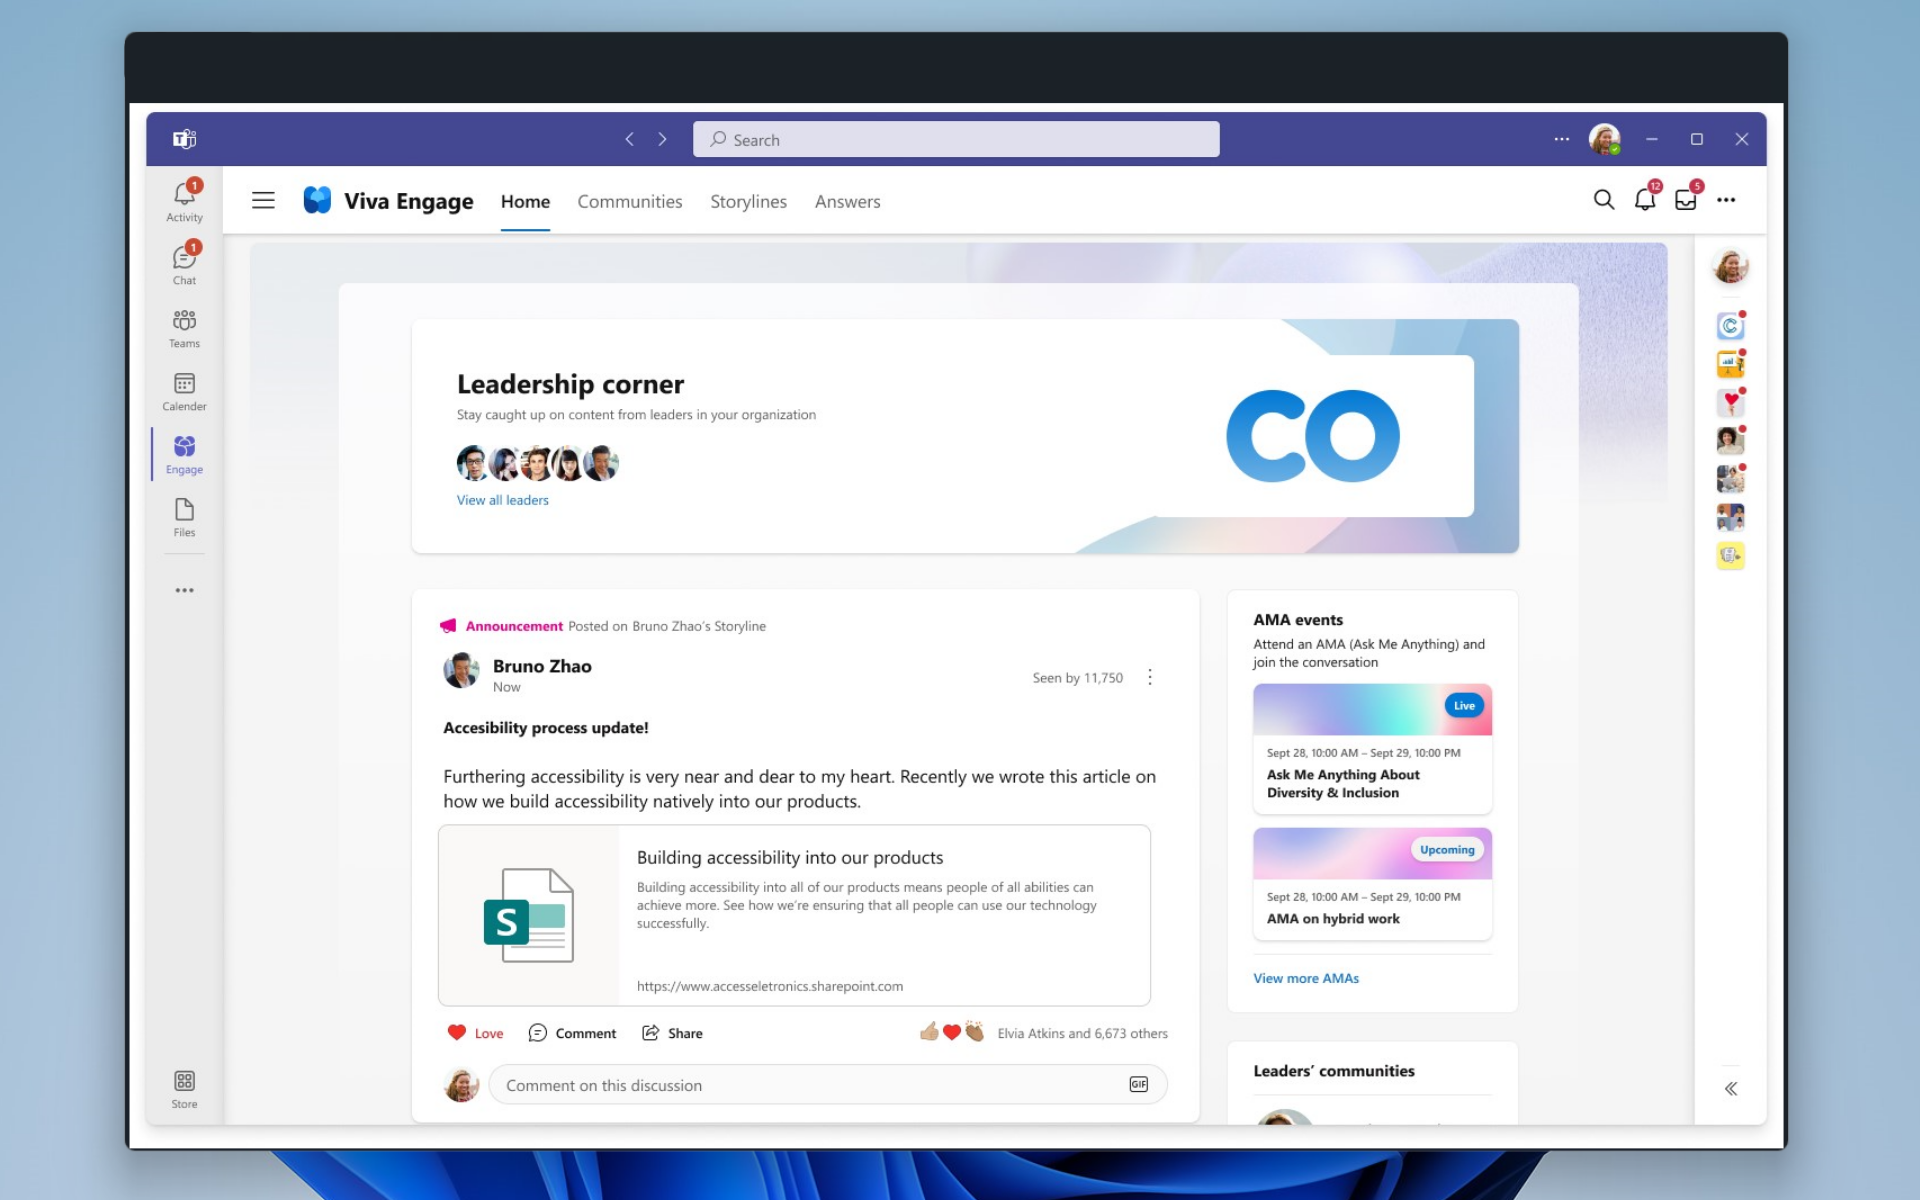
Yesterday, Microsoft released a Windows 11 Insider build for the Dev Channel bumping it to 25300. The build featured Live Captions as well as a new suggestions feature for Snap layouts.

For those unfamiliar with Snap Assist, it’s a neat tool that allows users to drag a window to the Assist tool and have Windows resize it automatically to fill the space. The cool comes in handy, especially for users that handle multiple tasks simultaneously.

Microsoft is reportedly working towards enhancing the snapping experience for users by integrating it with AI, thus making it smarter. This integration will change how users interact with the feature.

Windows Central’s Zac Bowden reports that this integration will introduce “new smart snapping features.” Here’s what you can expect if and when Microsoft makes the release.

First up, Snap Assist will be able to recall snap layouts. This feature will promote efficiency and effectiveness, especially for users who interact with technical applications on a daily basis as they’ll now have one less thing to worry about, ultimately promoting productivity.

Unlike the current setup where the users need to configure their snap layouts each time they close their apps or restart their PCs, with this new approach, users can power their devices and start working immediately since their preferred snap layouts would’ve already been configured. Besides, users will be able to restore their preferred snapping layouts using a single click.

Additionally, Microsoft will be incorporating OCR technology into Snap Assist’s suggestions interface, thus making it easier for users to find a running app that they want to snap side by side. Bowden further highlights that, “you’ll be able to search for a word, phrase, or image you remember seeing in a webpage or app, even if said word, phrase, or image isn’t mentioned in its title.”

What’s more, Microsoft is also said to be testing out a feature that will allow snap layouts to dynamically adjust and have the app in focus take up the bigger part of the screen’s real estate. It s not yet clear when Microsoft intends to start rolling out these features to Snap Assist in Windows 11.

Recently, we’ve seen Microsoft start to incorporate AI technology across its products and services after making a $10 billion dollar investment further enhancing its partnership with OpenAI which is behind the famous ChatGPT bot. Microsoft also recently launched a new Edge browser and Bing search featuring an AI copilot and chat.

We’re likely to see Microsoft making more AI entries across its products? Share your interactions and experiences with us below.

via: Windows Central

3 Quick Ways to Turn Off Face Detection on Windows 10 & 11

Windows computers have a vast and diverse range of security features that protects users from external threats. Facial recognition and biometrics allow users to access the PC with Face ID.

However, many users ask how to turn off face recognition in Windows 11 for many reasons and this guide will show you how to do that.

Why should I disable Facial Recognition on Windows 11?

The Facial Recognition feature on Windows PC is quite resourceful and, at the same time, can be dangerous to use. Here are some factors that may warrant disabling the feature on your PC:

  • Threatens User privacy – Intruders may use and control this feature in your absence.
  • Difficult to use with glasses – The Facial Recognition System in Windows computers can’t detect your face when you have glasses on.
  • Scars to the face can lock you out – It can be tricky to get around the Facial Recognition system after a trauma or face alteration. It can lock you out of your device if you don’t have another login option enabled.
  • Problems with the system – Sometimes, the Facial Recognition feature is simply malfunctioning because of bugs or problems with your camera.

Let’s explore the possible ways to perform this on Windows 11. Also, these steps might be effective in blocking facial recognition software on PCs as they can sometimes monitor the user’s privacy.

How do I turn off facial recognition in Windows 11?

1. Disable Biometric Devices in Device Manager

  1. Left-click the Start button, type Device Manager, then open it.
  2. Scroll through the list of devices and select Biometrics Devices. Right-click on the device and select Disable from the drop-down.disable biometric device

Disabling the Biometric Device on your computer will halt every Biometric scanning option running on your PC, including the Facial Recognition System.

Check our guide on what to do if Biometric devices are not showing in Device Manager on Windows 11.

2. Turn off Face Recognition in Windows Hello login

  1. Press Windows + I key to open the Windows Settings app.
  2. Select Accounts, then click on Sign-in options in the left pane of the screen.Settings account
  3. Go to the Face Recognition tab on the right pane and click the Remove button.face recogntion

Disabling the Face Recognition option in Windows Hello Login stops you from signing into your PC with your Face ID. Moreso, it removes the choice to use Facial Recognition on the Login page.

Read our guide on Windows Hello not working and ways to fix it.

3. Disable Biometrics Using Registry Editor

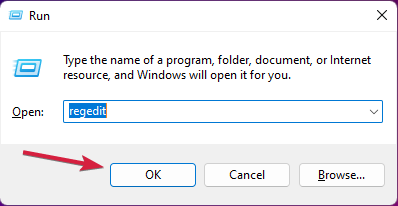
  1. Press Windows + R key to open the Run dialog box, type regedit, and press Enter to launch the Registry Editor.
  2. Navigate to the following directory: HKEY_LOCAL_MACHINE\SOFTWARE\Policies\Microsoft\Biometrics
  3. If Biometrics is not present in the folder, right-click on a space on the left lane, select New from the drop-down, click on Key, then name the New Key as Biometrics.Search biometrics in Regedit
  4. Click on the New key, right-click on the right lane of the page, select New, click on DWORD 32-bit value, and name the new DWORD as Enabled.
  5. Double-click the newly created Enabled DWORD and set its Data Value to 0.change value data to 0

The above Registry Editing process will disable every Biometric sensing on your PC. It prevents Face Detection, Fingerprint, and Iris scans from making changes on your PC.

Further, we have a detailed guide our readers can follow to fix Windows Hello preventing sign-in options on their computers. Also, you can read how to fix the Windows Hello isn’t available on this device error.

If you’re a developer, you might be interested in Microsoft Azure Face API alternatives that you can use in your future projects.

In conclusion, these steps should help you disable facial recognition on Windows 11. Should you have further questions or comments regarding the process to turn off facial recognition, kindly leave them in the section below.

Install Error – 0x80070103: How to Fix This Update Issue

Updating the Windows operating system helps it fix bugs in the previous version that affects its performance. However, many users report the error 0x80070103 in Windows Update.

Read on to find out how to fix this issue and get back to downloading your updates without issues.

Why do I get the Windows Update failed 0x80070103 error message?

The Windows update error 0x80070103 mostly happens when you try to run an already installed driver update with a Windows update. It indicates that an existing driver update on your computer is trying to install alongside Windows updates.

Furthermore, other factors can prompt the error 0x80070103 on your PC. Some are:

  • Driver update compatibility issues – The error 0x80070103 can occur if the driver update trying to install is not compatible with the version of the Windows operating system on your PC.
  • Driver under use – Sometimes, you can experience difficulty updating drivers when they are under use. So, the error 0x80070103 may occur if other programs use the driver you want to install.
  • Corrupt system files – The error 0x80070103 can appear if there’s an issue with the update process due to a corrupt system file. You can check ways to troubleshoot corrupt system files here.

The causes of Windows update error 0x80070103 on your PC may differ from other users. Nonetheless, you can fix the error by troubleshooting your PC.

How do I fix the install error – 0x80070103?

Before proceeding with any troubleshooting steps for the error, try the following preliminary checks:

In case the error appears, proceed with the following solutions:

1. Run the Windows Update Troubleshooter

  1. Press Windows + I key to open the Settings app.
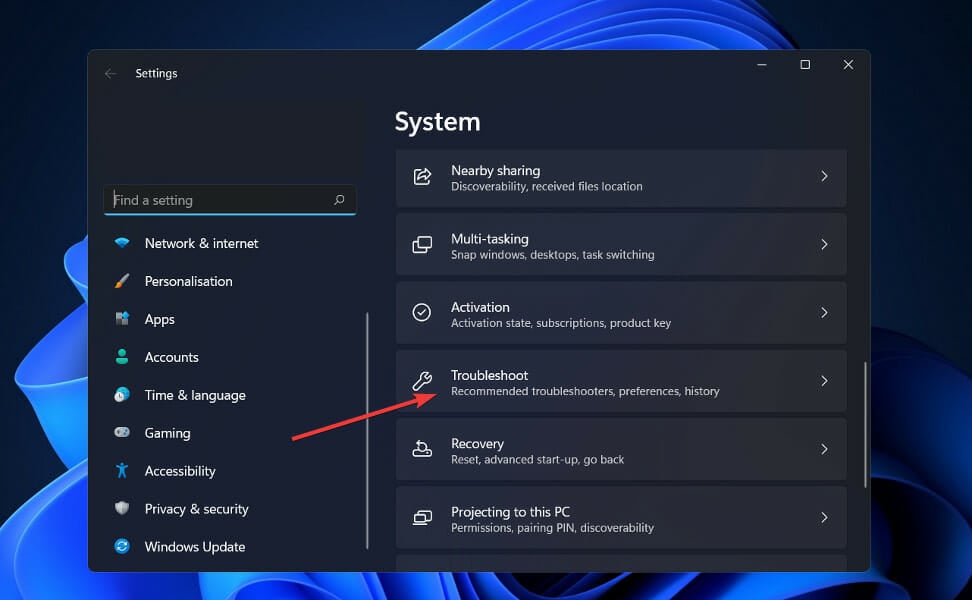
  2. Click System and select Troubleshoot.
  3. Click Other troubleshooters.
  4. Select Windows Update and click Run the troubleshooter to initiate the Windows Update troubleshooter.
  5. Follow the on-screen prompts.

Running the troubleshooter will detect and repair issues causing the Windows update not working on your PC.

Check other ways to run the Windows Update troubleshooter in Windows 10/11 if you have issues with the steps above.

2. Restart the Windows Update process

  1. Press Windows + R key to prompt the Run window type cmd, then press Ctrl + Shift + Enter to launch an elevated Command Prompt.
  2. Input the following commands consecutively, and press Enter after each: net stop wuauserv net stop cryptSvc net stop bits  net stop msiserver
  3. Type the command below to rename the SoftwareDistribution and press Enter after each: C:\Windows\SoftwareDistribution SoftwareDistribution.old ren C:\Windows\System32\catroot2 Catroot2.old
  4. Run the command below: net start wuauserv net start cryptSvc net start bits  net start msiserver
  5. Restart your PC and check if the error persists.

Restarting the Windows Update service can fix issues and corrupt files affecting its processes.

3. Hide updates from reinstalling

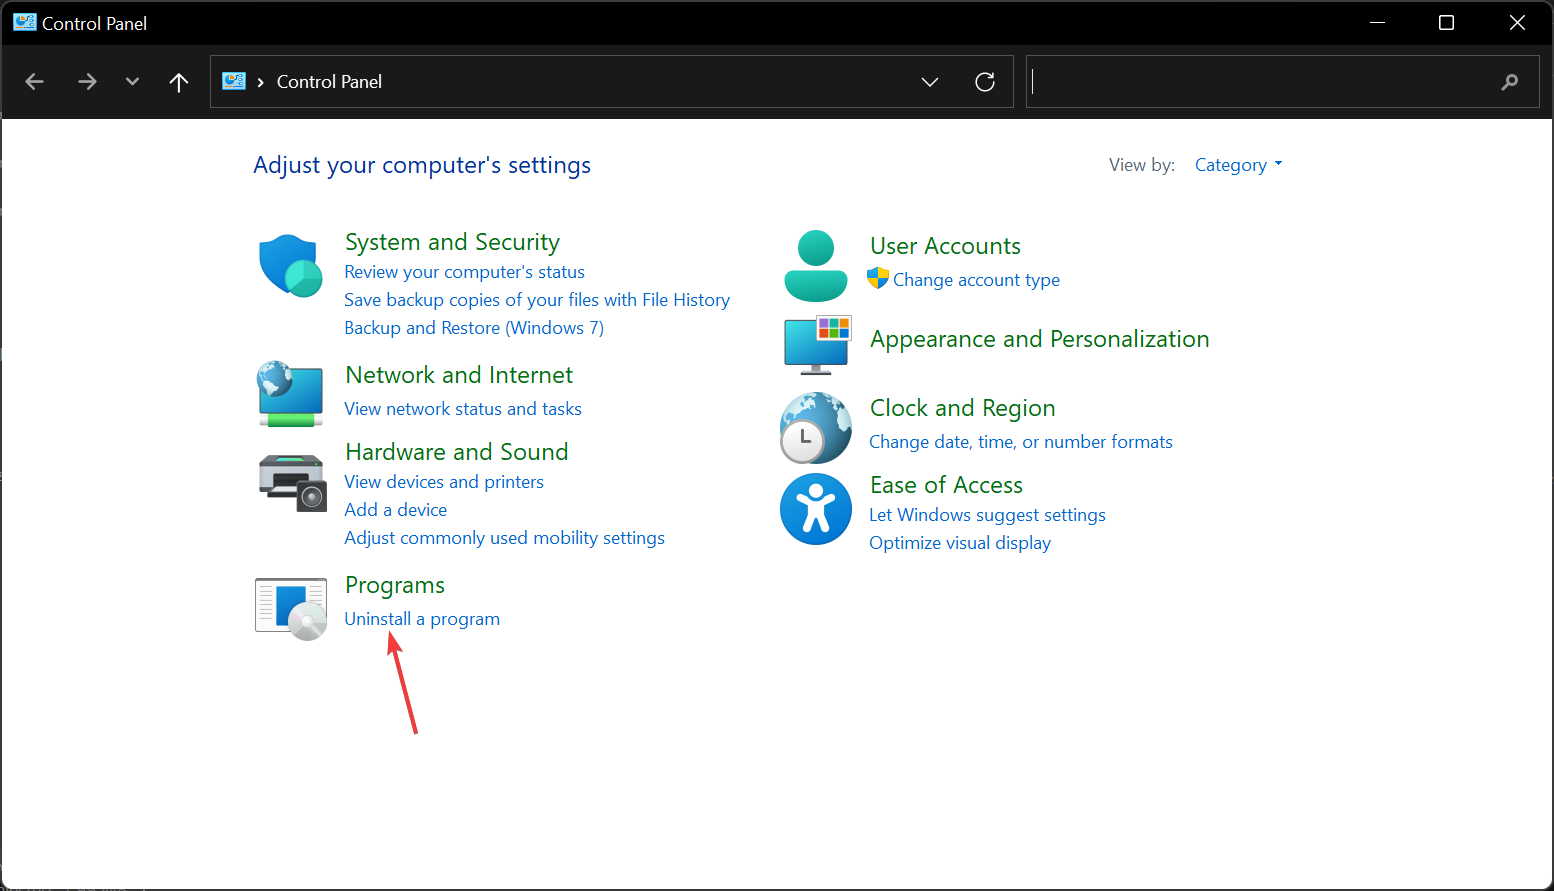
  1. Left-click on Start and type Control Panel to launch the app.
  2. Go to System and click on the Advanced system settings link.
  3. Navigate to the Hardware tab, then click on the Device Installation Settings button.
  4. Select the No option and click on Save settings.
  5. Restart your PC and check if the issue persists.

The above process will prevent Windows from reinstalling driver updates already on your system and should fix the 0x80070103 error code in Windows Update.

4. Delete the Windows temporary files

  1. Press Windows + R keys to open the Run window, type %temp% in the search space, and press Enter.
  2. Press Ctrl + A to highlight all the files and right-click, then click on Delete from the drop-down.
  3. Restart the PC and check if the error persists.

Deleting Windows temp files will clear up corrupt files that may affect your Windows update and fix the error.

5. Update device drivers manually

  1. Go to the driver manufacturer’s website to download the latest update.
  2. Press Windows + R to open the Run window, type devmgmt.msc, and click OK to open the Device Manager.
  3. Navigate to the device you want to update, right-click on the driver, and select Update driver.
  4. Select Browse my computer for driver software to open where the downloaded driver is saved. Then, follow the onscreen prompt to install the driver.
  5. Restart your PC and check if the error appears.

Manual updates will help you update single drivers in isolation without including the rest. Otherwise, you can always use an alternative tool such as Outbyte Driver Updater, which helps you automatically update specific drivers and the whole drivers’ environment.

Some of our readers stumbled upon the Conexant Media installation error 0x80070103. It is an update error connected to the audio driver, mostly from HP laptops. In this case, make sure you get the correct driver from the manufacturer.

We also have a complete guide on how to update Windows when you have a Conexant audio driver.

Alternatively, read more about fixing Windows Update Service registration missing or corrupt on your PC.

Likewise, you can check how to delete the Software Distribution folder on your PC in case renaming it doesn’t work.

Also, Windows update error 0x800f0988 is another error users complain about, which you can read about.

For further questions or suggestions regarding the error 0x80070103 in Windows Update, kindly drop them in the comments below.

Microsoft’s TechSpark program to help small communities turns 5

It’s no secret, technology is advancing at a rapid pace and creating new opportunities daily.  It’s changing how we communicate, how we learn, how we work, and how we access the essential services needed in our communities.  These services often remain out of reach for our rural and underserved metropolitan areas.  Five years ago Microsoft launched TechSpark, a program designed to accelerate economic growth in six communities across the United States and Mexico to change that.

Techspark works with local community organizations and nonprofits to create opportunities.  Today Microsoft is announcing that the TechSpark program is available in all 50 states via the TechSpark Fellows model.  Microsoft will provide funding and hands-on training through a local partnership with each state in a partner-driven model.  The TechSpark program will focus on four key areas in each community.

  • Digital access:  Building the infrastructure needed to provide online access to services and materials
  • Computer Science Education: Building computer Science programs in local schools
  • Digital Skills:  Helping people learn the skills needed for the jobs of the future
  • Digital Transformation: Helping the local communities and nonprofits use technology to face problems and compete in the industry

To make sure everyone benefits from what Microsoft has learned over the last five years they are releasing a playbook and a resource hub to help communities replicate some of the scenarios they encountered.  As the TechSpark Fellows program unfolds Microsoft will continue to share regular public updates so organizations outside of the program can learn from what worked and what didn’t.  Microsoft remains hopeful that the community-driven model will bring success across the country.  An information session is being held on March 1, to learn more you can sign up here.

How to Keep Your Outlook Status Active [Green]

Microsoft Outlook is a platform that brings all your email accounts and calendars into one convenient spot. However, it uses the status feature to indicate whether or not you’re active on the platform.

So, knowing how to keep Outlook status active in the Outlook status settings can help you work better.

Why is my Outlook status showing away?

Many factors may be responsible for your status showing away on Outlook or status on Outlook not showing. It can be due to issues with Outlook app settings or your PC’s display settings.

Some factors liable to cause the Outlook status to show away are:

  • The PC has been idle for a long time – The most common reason for seeing away on your Outlook status is that you haven’t used your PC for a while, and that changes the live status for the app.
  • Internet connection issues – If your network connection isn’t stable or there’s network congestion, it can log you off the service, showing you’re away.
  • Outdated Microsoft Outlook client – Running an outdated Outlook client on your PC can make the app malfunction and impede its functionality. Also, it can leave your Outlook account settings out of date.

The reason for Outlook status showing away can vary on different devices. Nonetheless, this guide will help you understand how to keep Outlook status active.

How do I keep my Outlook status always active?

Try the following preliminary steps:

  • Power cycle and reconnect your router to enable a stable Internet connection.
  • Close and relaunch the Outlook app.
  • Restart Outlook in Safe Mode to concentrate all the PC’s resources on it.

If you can’t get around the problem, follow the solutions below:

1. Ensure your PC doesn’t go to Sleep mode

  1. Press Windows + I key to launch the Settings app.
  2. Select System and then click on Power & battery.Click power and battery to set Outlook active
  3. Go to the Power window, click the Screen and sleep drop-down button, and then set how long the computer should stay awake before going to sleep mode.change sleep mode settings to keep Outlook status active
  4. Launch Microsoft Outlook and check if your status stays Active.

We recommend you set a longer period that covers the time you need to appear active on Outlook. If Windows is going to sleep too quickly, then read what to do here to fix it.

2. Enable online status next to name in Outlook

  1. Launch Outlook on your PC.
  2. Click on File, then select Options.Open Outlook options
  3. Click on People, and then check the box for the Display online status next to the name option.display Status beside name on Outlook

Because the status feature in Outlook requires Microsoft Teams to be installed, configure Teams to stay active.

3. Manually change your Teams Status

  1. Open the Microsoft Teams.
  2. Navigate to the top-right corner of the page, then click on the Profile icon.Teams profile
  3. On the Availability status, click on the marked green Available.Set Teams to AVailable to affect Outlook
  4. Tap on Duration and choose how long you want to appear as Available.

Manually setting your Availability Status on Teams allows you to be active on other users’ Office. It should reflect on Outlook that you’re active as it is on Teams.

Check our guide on what to do if Microsoft Teams status is stuck out of office.

4. Host a Private Meeting

  1. Open the Microsoft Outlook app.
  2. Switch to the Calendar view and click on the Meet Now button.start meeting on Outlook
  3. Input the information to create a meeting and click to Start the call.input details and start the private meeting

Hosting a private meeting on Outlook lets you stay active by keeping an Outlook busy status with the fake meeting.

However, you can learn how to check who’s attending a meeting on Outlook here if you created a proper meeting.

It may be beneficial for you to check our guide on fixing Outlook client disconnected errors should you encounter a problem.

Also, many of our readers complain that they can’t download emails in Microsoft Outlook. Hence, this guide will help troubleshoot that.

In conclusion, this guide has given the necessary tweaks in learning how to keep Outlook status active. Should you have further questions or suggestions, kindly drop them in the comments below.

Windows 11 Cumulative Update Failed: 6 Ways to Install It

If you’re using Windows 11, you’ll want to install the latest updates as soon as possible. However, some users have reported issues installing the cumulative update on their PCs.

To help you troubleshoot these issues, we’ve put together this guide on what to do if the Windows 11 cumulative update fails.

Why is the cumulative update not downloading in Windows 11?

Sometimes the cumulative update (CU) is not available to download through the Windows Update or Microsoft Update. This can be caused by a myriad of issues, as listed below:

  • The cumulative update is not available – The first reason your cumulative update is not downloading is that the cumulative updates are not available in your region yet. A reliable VPN should suffice in such a case.
  • An issue with Microsoft’s servers – If there are any server issues or connectivity problems between Microsoft and your PC, then the Windows 11 cumulative update will not be downloaded at all.
  • Internet connection – Your computer’s Internet connection may be the issue. If you have a slow Internet connection, then it will affect the downloading process. 
  • Bandwidth limits – Some ISPs have bandwidth limits on their subscriptions, which could prevent you from downloading a large file like an OS update in one go. 
  • Antivirus/firewall settings – You may have a third-party firewall installed on your computer that blocks downloads and installation of new programs, including Windows cumulative updates.
  • The Windows Update service is not running – It is possible that the Windows update service has been disabled or stopped running at some point.
  • Insufficient RAM – If your computer does not have enough RAM memory, it will not be able to accommodate any downloads. This includes the Windows cumulative update or any other tasks without crashing.

How do I fix Windows 11 not updating?

As always, it is important to start with some preliminary checks before jumping to the advanced solutions:

  • Make sure that your PC meets the minimum requirements for installing the update.
  • Ensure you have enough storage space to accommodate the new update.
  • Test your connection by connecting directly to your modem or router with an Ethernet cable. 
  • Verify that the Microsoft server status is up and running.
  • Check if there are any pending reboots required after installing the update and try again after those have been completed successfully.

1. Run the Windows update troubleshooter 

  1. Hit the Windows key and click on Settings.settings windows 11
  2. Click on System and select Troubleshoot.Open system troubleshooter
  3. Navigate to Other troubleshooters.other troubleshooters
  4. Click the Run option for the Windows Update troubleshooter.windows-update-run-troubleshooter runtimebroker.exe error

2. Run the DISM and SFC scans 

  1. Hit the Start menu icon, type cmd in the search bar, and click Run as administrator.cmd-run-admin-w11 unexpected kernel mode trap windows 11
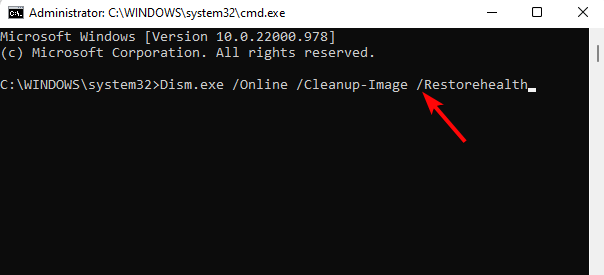
  2. Type the following commands and press Enter after each one: DISM.exe /Online /Cleanup-Image /Restorehealth sfc /scannow
  3. Restart your PC.

3. Disable the antivirus temporarily 

  1. Hit the Windows button, type Windows Security in the search bar and click Open.
  2. Click on Firewall & network protection then select Public network.league of legends black screen after champion select
  3. Locate Microsoft Defender Firewall and toggle the off button.turning off Microsoft Defender Firewall Windows

4. Restart the Windows update service

  1. Hit the Windows + R keys to open the Run command.
  2. Type services.msc and hit Enter.run services.msc command
  3. Locate Windows Update service, double click on it and select Properties.
  4. Navigate to the General tab, under Startup type select Automatic from the drop-down options and click on the Start button.
  5. Next, click Apply and then OK.

5. Rename the software distribution folders

  1. Hit the Windows key, type cmd in the search bar and click Run as administrator.cmd-run-admin-w11 unexpected kernel mode trap windows 11
  2. Type the following commands and press Enter after each one: net stop bits net stop wuauserv net stop cryptsvc ren %systemroot%\softwaredistribution softwaredistribution.bak ren %systemroot%\system32\catroot2 catroot2.bak net start bits net start wuauserv net start cryptsvc 

6. Download the update manually

  1. Navigate to your browser and go to the Microsoft catalogue page.
  2. Search for the problematic cumulative update and hit the Download button.
  3. Click on the downloaded file and follow the on-screen prompts to install the update.

Is a cumulative update for Windows 11 necessary?

Cumulative updates are released on a regular schedule and contain fixes for any issues that may have been found since the previous update was released. 

Microsoft releases these cumulative updates to fix bugs, make Windows 11 more stable and improve performance. They also include any new features that were not previously released in a feature update.

In most cases, Microsoft recommends installing cumulative updates as soon as they become available. Installing them ensures your computer is protected from all known vulnerabilities. In case you are not able to install the latest CU update KB5029263, refer to this guide.

However, if you’re running an older version of Windows 11, it’s worth checking with your IT department before installing the latest CU, as some updates tend to bring up more problems instead of solving them.

If all else fails and the Windows 11 cumulative update failed message is still present, consider performing a clean install of Windows. To prevent future cumulative update install issues, refer to our detailed article for some tips.

That’s all for this article, but keep the conversation going in the comment section below.

Your Browser is Not Supported in Hikvision: How to Fix

Many encountered Your browser is not supported, use the latest version of the browser to access the web interface with Hikvision cameras, and today we’ll show you how to bypass this error.

How can I fix Your browser is not supported in Hikvision?

Before trying anything else, make sure you update your camera’s firmware to the latest version. Version  5.5.53 or newer usually offers better support for browsers.

1. Enable IE Mode in Edge

  1. Launch Edge, then click on the three dots (…) on the upper right. Click on three dots in Edge
  2. Now, select Settings from the menu.Select Edge settings
  3. Click on Default Browser on the left. click on Default Browser in edge
  4. Next, go to Allow sites to be reloaded in Internet Explorer mode and select Allow from the drop-down.  Allow sites to be reloaded in Internet Explorer mode in Edge
  5. Next, click the Add button next to Internet Explorer mode pages.
    internet explorer mode pages add button
  6. Add the IP address of your camera, but before the address make sure you use http protocol like this.
    add a page ie explorer mode

For more information, we have a great guide on how to enable Internet Explorer mode in Edge, so don’t miss it.

2. Use IE plugins

  1. To enable NPAPI support on Chrome or on Chromium-based browsers, visit the Chrome web store and search for the IE tab on the left. search for IE tab on web store
  2. As you hit Enter, you see the IE Tab application at the top of the result page. Click to select. IE tab application
  3. Next, click on the Add to Chrome button. Add extension to Chrome
  4. Now, in the Add IE Tab prompt, click on Add extension. Add IE Tab extension
  5. Once the extension is added, click on the e logo at the top and Chrome will download the installation file.
  6. Click on the .exe file to complete the installation.
  7. Now, click on the e icon again and you will see a second toolbar below. IE tab toolbar on Chrome
  8. You can now enter the URL or IP address of your NVR device in the second toolbar to log in to your device.

As the NVR screen comes up, you will now have access to the live view or the recorded footage from your NVR device.

Which browser is compatible with Hikvision?

This depends on the camera, and some cameras with older firmware require Internet Explorer. Cameras with newer firmware are compatible modern browsers, but if you can’t decide which to use, our best web browsers for Hikvision article will help you decide.

Many users reported that Pale Moon 32-version worked for them, so feel free to try it.

However, if you are looking for alternatives, we have a good list of some of the best video surveillance software for an uninterrupted experience.

If nothing else works, you might want to install Internet Explorer on Windows 11 and check if that helps.

We hope that this guide helped you fix the Your browser is not supported, use the latest version of the browser to access the web interface error with Hikvision.

For more queries on Hikvision or supported browsers, you can leave a message in the comments box below.

Driver Download Failed: Use These 5 Solutions to Fix That

Driver software is crucial for every PC, but sometimes driver download can fail on your Windows PC. Outdated drivers can cause many issues, which makes this issue frustrating.

Knowing the gravity of this issue, we have prepared this guide to help you rectify it and get back to updating your drivers quickly.

Why are my driver downloads failing?

Below are some of the reasons your driver download might fail:

  • Failed integrity checks: Windows usually tests drivers for authenticity during installation. Drivers failing these tests may be prevented from downloading.
  • Third-party applications: Some third-party software sometimes conflicts with the drivers being downloaded, resulting in the issue. So, you might need to remove these apps using uninstaller software to push the download through.
  • Corrupt driver files: The driver’s package could be corrupt/incomplete at the source. The solution to this is to redownload the file from the source.
  • Antivirus software: Drivers are typically in .exe format, so your antivirus might mistake them for malware. You might need to disable the antivirus software to solve the problem.

What can I do if the driver download has failed?

Before exploring the fixes in this section, below are some preliminary checks you should perform:

  • Restart your PC
  • Check your internet connection

If the issue persists, you can now delve into the solutions below:

1. Disable driver signature checks

  1. Press the Windows key, type cmd, and select Run as administrator under Command Prompt.
    cmd admin driver download failed
  2. Type the command below and hit Enter to run it: bcdedit.exe /set nointegritychecks onon
  3. Now, try to download the stubborn driver anew.
  4. After downloading and installing the driver, type the command below and hit Enter to restore driver verification: bcdedit.exe /set nointegritychecks offoff

As mentioned earlier, Windows is default programmed to permit only signed (verified) drivers. Therefore, the download will fail if your driver is not signed.

The solution to this is to disable the integrity check temporarily. Note that you should only do this for drivers downloaded from trusted sources. Lastly, ensure you enable the feature after installing the driver to protect your PC from faulty drivers.

2. Use third-party tools

Downloading the driver manually can be a tedious task, especially if you don’t know where and which drivers to download. You can always try using third-party solutions if Windows cannot download drivers.

An automatic driver updater such as Outbyte Driver Updater can also repair damaged drivers and detect whether your PC has any missing drivers.

It is also a safer option because they always match your hardware with its corresponding driver version. If you update manually, you may install the wrong driver, which can cause significant issues.

⇒ Get Outbyte Driver Updater

3. Disable the SmartScreen filter

  1. Click the Windows icon on the taskbar, type security, and select the Windows Security option.
    windows security driver download failed
  2. Click the App & browser control option.
    app and browser
  3. Now, click the Reputation-based protection settings link.
    reputation based
  4. Finally, toggle the switches for Check apps and files and SmartScreen for Microsoft Edge backward to disable them.
    check apps driver download failed

The Windows SmartScreen filter scans the driver’s download, files, applications, and websites and automatically blocks unrecognized content. If the driver download fails, try disabling this feature.

4. Perform disk cleanup

  1. Press the Windows key, type cleanmgr, and select Disk Cleanup.
    clean mgr
  2. Select the drive partition you want to create space in and click OK.
    select disk  driver download failed
  3. Wait briefly as the tool calculates available space, then check all the file types you want to remove.
  4. Finally, click the OK button and wait for the process to complete.
    cleanup

Some significant drivers will cause issues if you lack sufficient disk space. So, if your driver download is missing, you should free up some space by performing Disk Cleanup.

5. Disable the antivirus

  1. Press the Windows key + S, type virus, and select Virus & threat protection.
    virus
  2. Click the Manage settings option.
    manage settings driver download failed
  3. Finally, toggle the switch under Real-time protection backward to disable it.
    real time

Antivirus software protects your computer against countless security threats. However, it can also be why your driver download failed, as it might flag it as a potentially dangerous file.

Knowing the driver’s legitimacy, you can temporarily disable your antivirus to complete the download. For example, if you are using a third-party antivirus, you can right-click the icon on your taskbar and select the option to turn it off.

Similarly, turning off the firewall may help. Remember to re-enable all your protection systems as soon as possible to reduce your PC’s vulnerability.

If the issue persists, you might want to consider switching to different antivirus software that offers excellent protection. You won’t interfere with your system in any way, so feel free to try it out.

⇒Get TotalAV

With this, we can conclude this guide on pushing your driver download through if it keeps failing. However, you should be able to fix the issue for good now by following the steps therein.

Similarly, if you can’t download only NVIDIA drivers, check our guide dedicated to fixing the issue.

Feel free to let us know the solution that helped you fix this issue in the comments below.

Analytics.google.com Refused to Connect: 4 Easy Fixes

Google Analytics is a web analytics service that tracks and manages website traffic for search engine optimization (SEO) and marketing purposes.

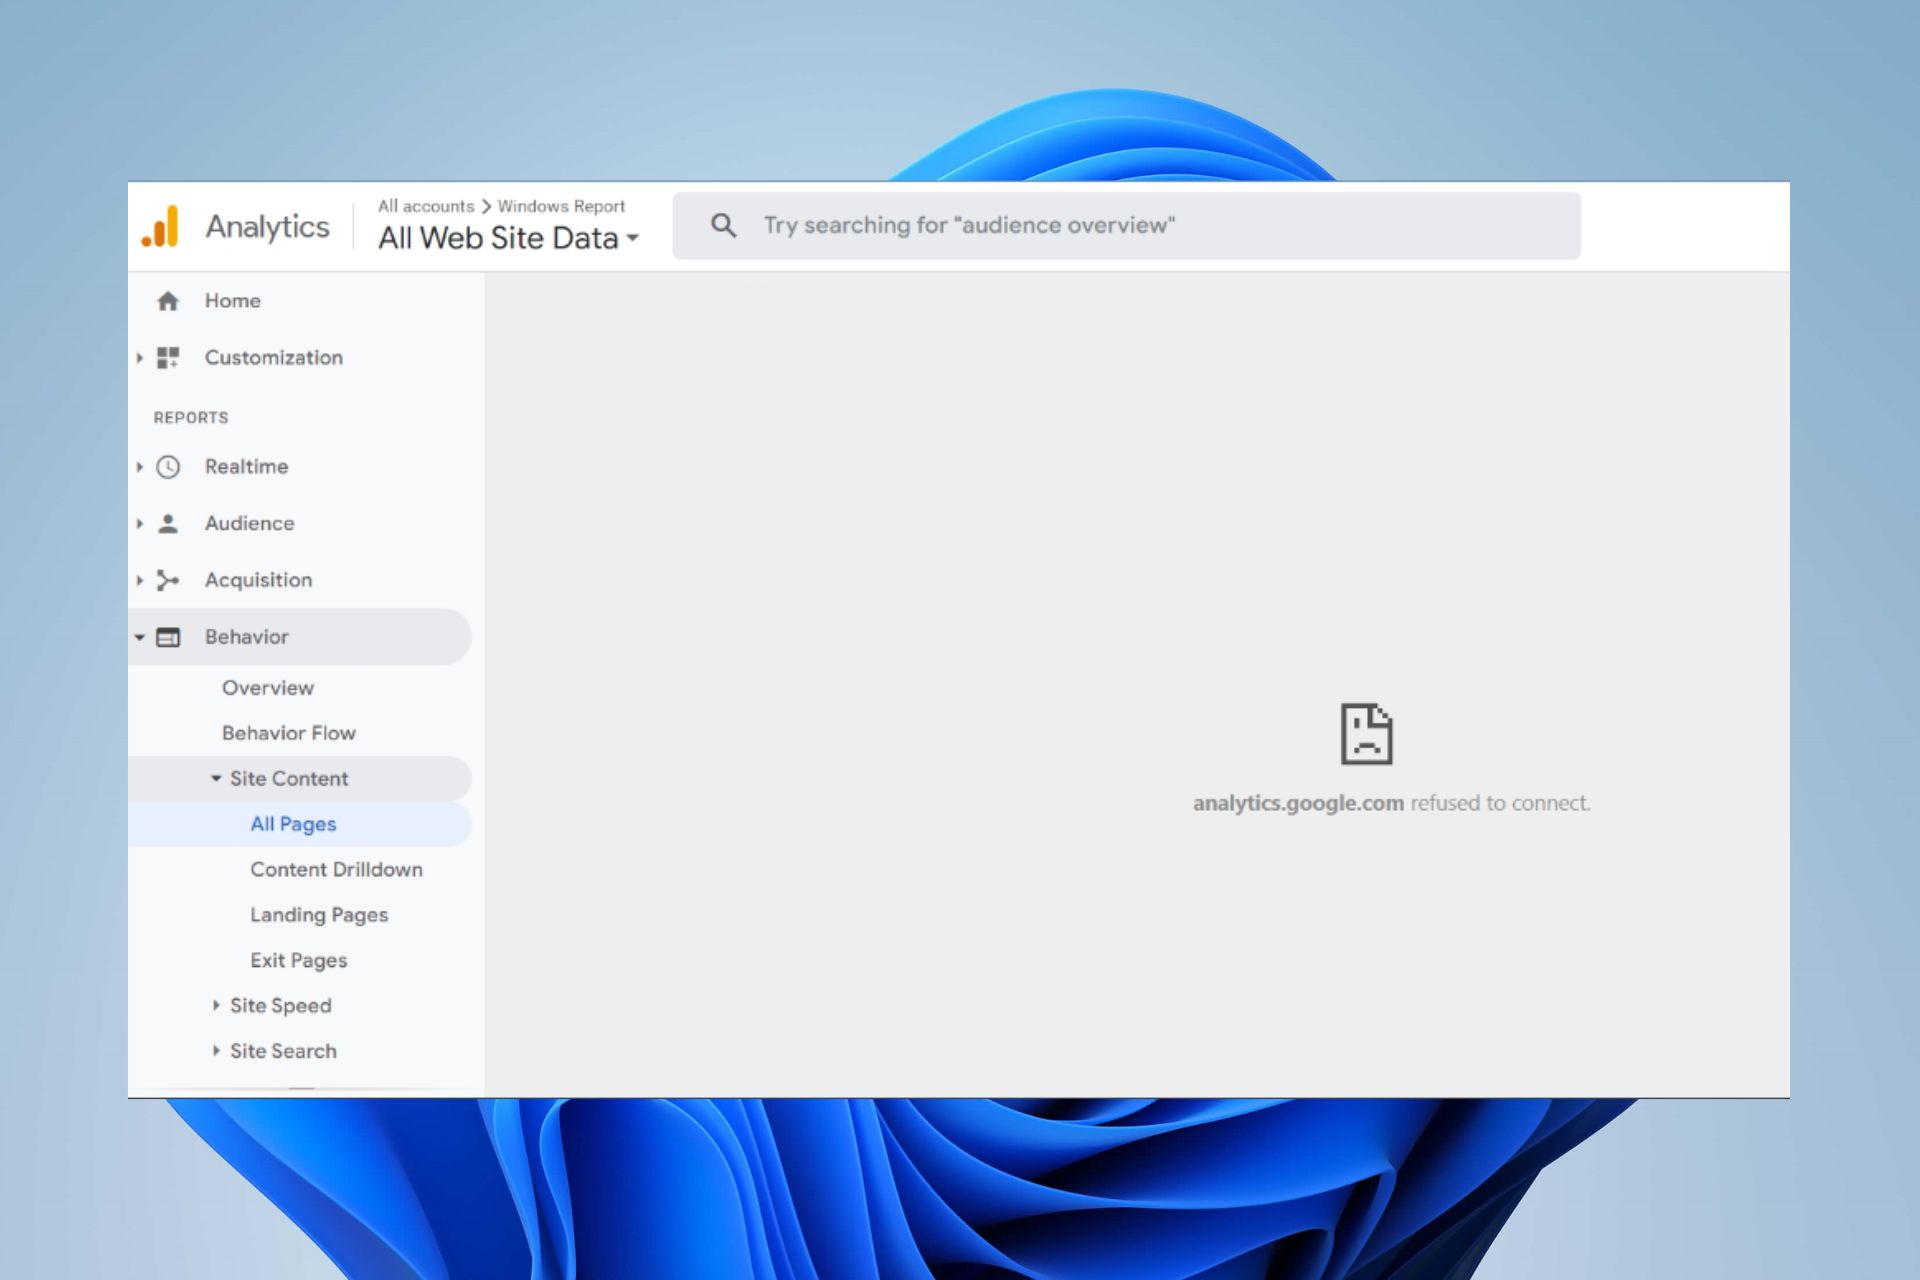
Users report that analytics.google.com refused to connect when accessing it on their browsers.

Why is Google Analytics not connecting?

Users can run into issues connecting Google Analytics for many reasons, preventing it from accessing its other components. Some common factors that can cause the problem are:

  • Issues with your network connection – When your network connection is weak or unstable, it can prevent Google Analytics from communicating with the components needed for its processes.
  • Corrupt cache and cookies – It is possible to encounter problems using Google Analytics due to corrupt cache and cookies of your browser.
  • Interference from addons and extensions – When you have interfering add-ons and extensions installed on your browser, they can impede Analytics activities.
  • Issues with the Google Analytics connector – Analytics.google.com refusing to connect can occur when the connector is not correctly set.

Other factors are liable to cause analytics.google.com not to connect on your PC. Fortunately, there are some fixes you can follow to resolve the problem.

What can I do if Analytics.google.com refused to connect?

Go through the following preliminary checks:

  • Fix network problems on your PC and restart your router.
  • Disable antivirus software running on your computer temporarily.
  • Close and relaunch your browser.

If these steps didn’t fix the issue of analytics.google.com refused to connect, proceed with the following solutions:

1. Use Google Tag Assistant to verify your setup

  1. Launch Chrome and install the Google Tag Assistant Chrome extension.Google Tag Assistant Chrome extension
  2. Click the extension at the top bar, then enable it.
  3. Download the Google Analytics debugger extension, then enable it.Download the Google Analytics debugger extension
  4. Click the Google Analytics icon at the top right-hand of your browser bar to switch to it.
  5. Right-click on the Tag Assistant icon and then select Options.right-click google tags extension
  6. Reset the Level of Details for all Google tags to Detailed Information.detailed information
  7. Click on the Google Tag Assistant extension icon, then click on the Menu button.
  8. Ensure you turn on the Auto Validation and GA Debug settings.
  9. Check if Google Analytics connects.

Google Tag Assistant indicates whether your Google Analytics tracking code is firing correctly on your website. Also, it’ll detect and notify you when there’s an error with your Google Analytics setup.

2. Disable Chrome extensions

  1. Launch the Google Chrome browser and click the three dots to open the Menu. Navigate to More tools and then click on Extensions.Chrome Extension
  2. Disable all extensions by toggling off the switch for each.Toggle off extensions
  3. Relaunch your browser and check if you can fix the connection problem with Google Analytics.

Disabling the extensions on your browser will fix any interference causing the Google Analytics activities. Check how to back up Google Chrome extensions on your PC.

4. Clear your browser’s cache and cookies

  1. Launch the Chrome browser, click the Menu button, select More Tools, and click Clear browsing data.Clear browsing data
  2. Choose the Time range as All time. Check the boxes for Cookies and other site data and Cached images and files, then click Clear data.Clear data
  3. Relaunch your browser and check if it fixes the problem.

Deleting the browser cache and cookies will resolve any corrupt file issues on your browser.

However, we have a detailed guide on the best local SEO software to improve search rankings.

Conclusively, you can read our guide on the best free and paid local SEO software to improve search rankings.

We hope you managed to fix the issue of analytics.google.com refused to connect and that you can use the service without any more problems. In the comments section below, let us know which method worked for you.

Microsoft plans changes based on feedback for Bing Chat

It’s been a whirlwind week since Microsoft’s surprise announcement that it was incorporating a version of OpenAI’s ChatGPT into Bing and Edge. Since then, there’s been lots of interest, some well reported quirks and failings. Microsoft’s new “Copilot for the web” has shown that it’s definitely in its early days, but has also shown a lot of promise.

In a report on the Bing Blog after a week of limited testing in over 169 countries, Microsoft has both been expecting that it has work to do, but also pleasantly surprised an the levels of engagement. The company reports at 71% positive rating based on the thumbs up / thumbs down rankings built into the Chat, and have seen Bing Chat used not only for searching the web, but for “more general discovery of the world, and for social entertainment. This is a great example of where new technology is finding product-market-fit for something we didn’t fully envision.”

Sometimes those long engaging sessions lead to problems, though. Microsoft reports that sometimes “Bing can become repetitive or be prompted/provoked to give responses that are not necessarily helpful or in line with our designed tone.” Because of this, the company plans to make it easier to refresh the context or start from scratch. Microsoft also indirectly addresses some of the reported issues with Bing Chat sort of going off the rails, offering sometimes nonsensical, angst-ridden, or generally out of character answers:

The model at times tries to respond or reflect in the tone in which it is being asked to provide responses that can lead to a style we didn’t intend.This is a non-trivial scenario that requires a lot of prompting so most of you won’t run into it, but we are looking at how to give you more fine-tuned control.

Microsoft also has found that it faces challenges in providing both up to the minute and also direct factual answers:

You are giving good marks on the citations and references that underly the answers in Bing. It makes it easier to fact check and it provides a nice starting point to discover more. On the other hand, we are finding our share of challenges with answers that need very timely data like live sports scores. For queries where you are looking for a more direct and factual answers such as numbers from financial reports, we’re planning to 4x increase the grounding data we send to the model.  Lastly, we’re considering adding a toggle that gives you more control on the precision vs creativity of the answer to tailor to your query.

Microsoft fully acknowledges that this Copilot for the web is in its very early stages, and that there’s a lot of work yet to do:

The only way to improve a product like this, where the user experience is so much different than anything anyone has seen before, is to have people like you using the product and doing exactly what you all are doing. We know we must build this in the open with the community; this can’t be done solely in the lab. Your feedback about what you’re finding valuable and what you aren’t, and what your preferences are for how the product should behave, are so critical at this nascent stage of development.

We’ve been using Bing Chat here, not in full testing mode, but just as casual users like many of you will be. First, it is engaging! It’s fun and somewhat addicting to start a chat with Bing and go down some pretty fun and interesting rabbit holes. These chats aren’t meant to find “10 blue link” answers to begin with, but it’s fascinating to chat with a bot that is personable and fun. Next, the Bing Chat Sidebar for Edge (I’m using Edge Dev, it is apparently rolling out to some with production Edge if you’ve been accepted into the preview) is becoming a very useful tool. I just asked Bing Chat for the spelling of a word, and got a straight simple answer without leaving the editor and wading through links or navigating to a search page. I’ve done this for more complex searches too, and it’s a very useful way to gather information.

Bing Chat needs to get better at what it does, but at the same time it has the potential to be game changing. We’re very intrigued so far. Have you been interacting with Bing’s Copilot for the web? Let us know in the comments below.


Windows 11 Bluetooth is Paired But Not Connected [Fix]

There are some instances when you would like to connect a Bluetooth device, perhaps a mouse, headphones, or speaker, to your Windows 11 device but can’t. This is because while it might appear to be connected, the device is not connected.

Essentially, the main purpose of having Bluetooth is the ability to connect a secondary device to your PC wirelessly. 

Why is my Bluetooth not working on Windows 11?

If you are facing the Windows 11 Bluetooth paired but not connected issue, there are a couple of plausible reasons that can be attributed to this among them:

  • Corrupt drivers – Missing or corrupted Bluetooth drivers could be why you get the Windows 11 Bluetooth paired but not connected error. This can be resolved by installing them.
  • Faulty device – In some instances, the device you are trying to link to your PC might be the problem, thus causing the issue.
  • Problematic Windows update – Windows 11 updates are essential, but they may be problematic at times. You can uninstall the update to patch this issue before a permanent fix is rolled out.
  • Interference from nearby devices – It is possible that another device is already connected to your Windows 11 Bluetooth.

What can I do if a paired Bluetooth device is not connecting with my Windows 11 PC?

Before rushing to more technical solutions, you should start with some of these quick fixes:

  • Make sure Bluetooth is turned on in your device. Sometimes your Bluetooth won’t turn on.
  • Ensure you have turned the Airplane mode off.
  • Make sure your device is fully charged.
  • Disconnect any other peripherals using the Bluetooth connection to prevent interference.
  • Try connecting your secondary device with another Bluetooth device (if available) to ensure it is not faulty.
  • Restart your Windows 11 device.

1. Update Bluetooth drivers

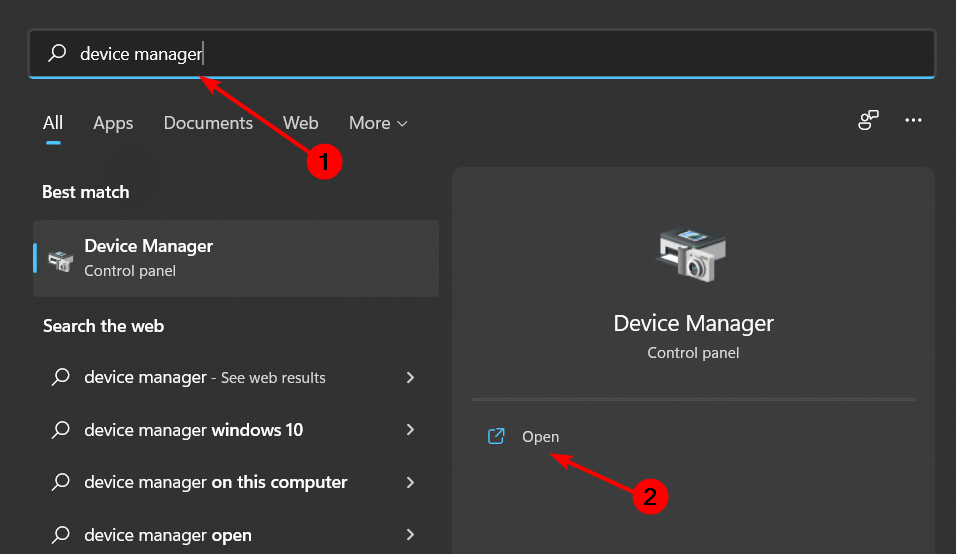
  1. Press the Windows key, type Device Manager in the search bar, and click Open.
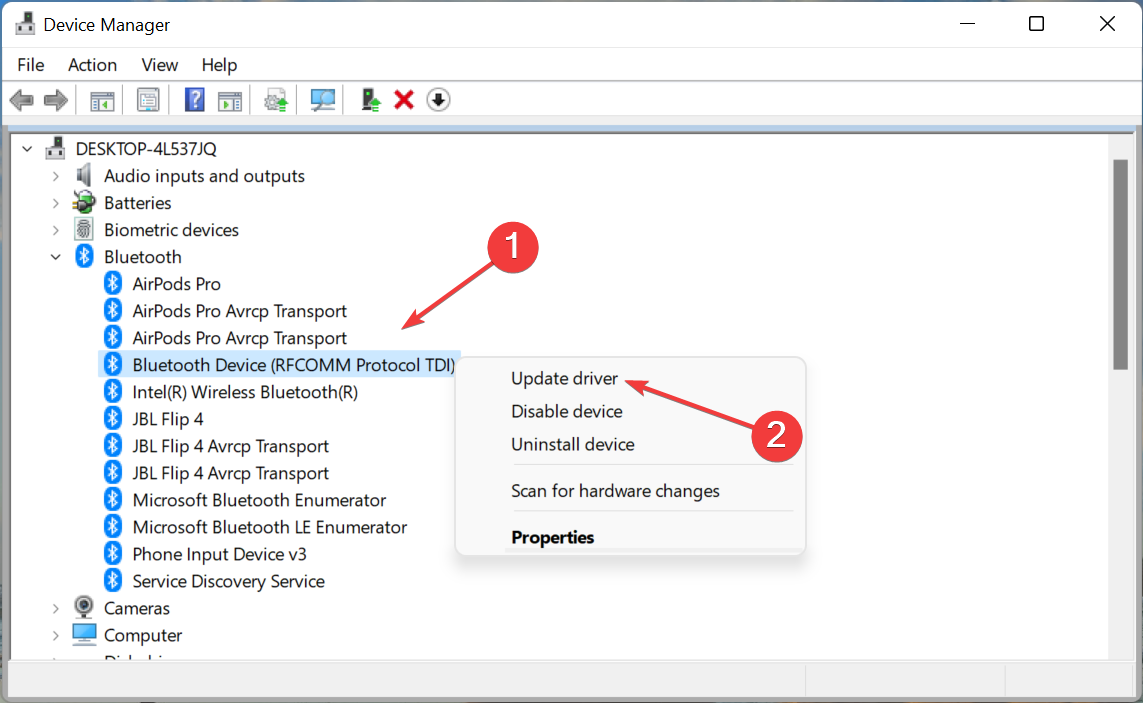
  2. Expand the Bluetooth section, right-click on the one you need, and select Update driver.
  3. Select Search automatically for drivers.
  4. If the system doesn’t find a new driver you can click on Search for updated drivers in Windows Update.
  5. Now, click the Check for updates button. If there are any updates, the system will download and install them.check fpr updates option

Whereas this method of updating drivers manually works well, it may not be the most suitable one, especially for those who don’t like multiple steps. This is where third-party driver updating tools come in.

2. Uninstall and reinstall the Bluetooth driver

  1. Hit the Windows key, type Device Manager in the search bar, and click Open.
  2. Expand the Bluetooth section, right-click on the one you need, and select Uninstall device.
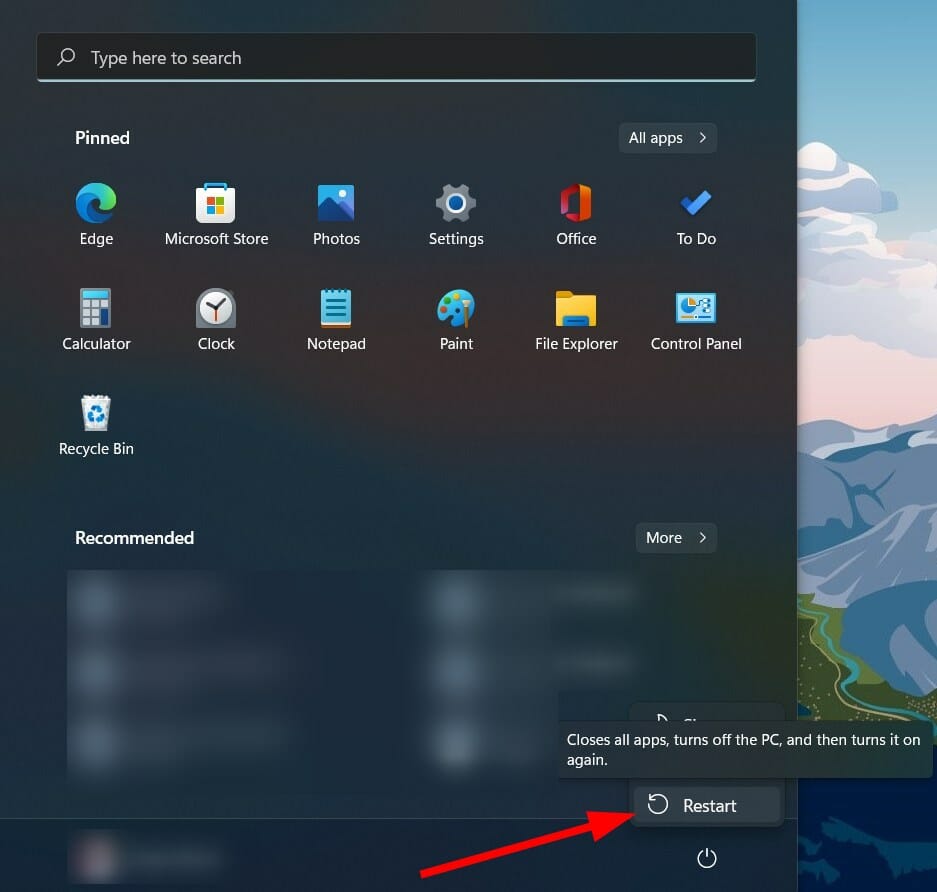
  3. Click the Start button, then select the Power icon and choose Restart.restart-PC windows 11 scanner not detected error
  4. After the reboot, your PC will automatically install a new related driver and clear the Bluetooth cache in Windows 11.

3. Restart the Bluetooth Support Service

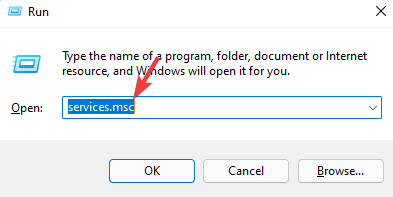
  1. Press the Windows + R keys simultaneously to open the Run window.
  2. Type services.msc in the Run dialog box.Open service manager
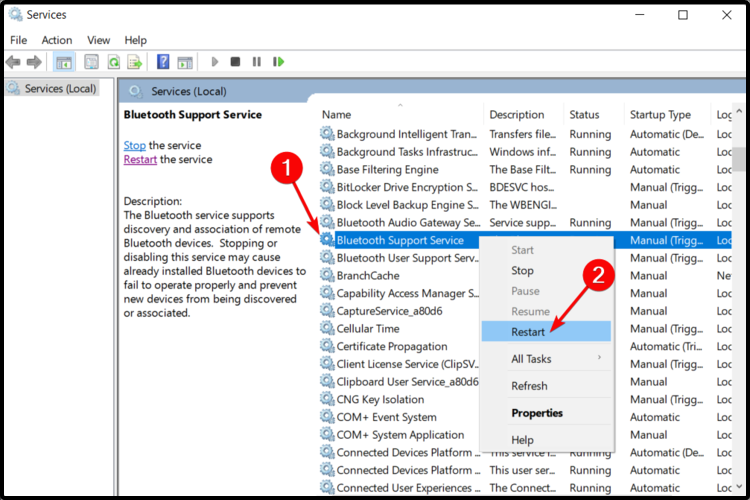
  3. Find the Bluetooth Support Service section, then right-click on it and select Restart.
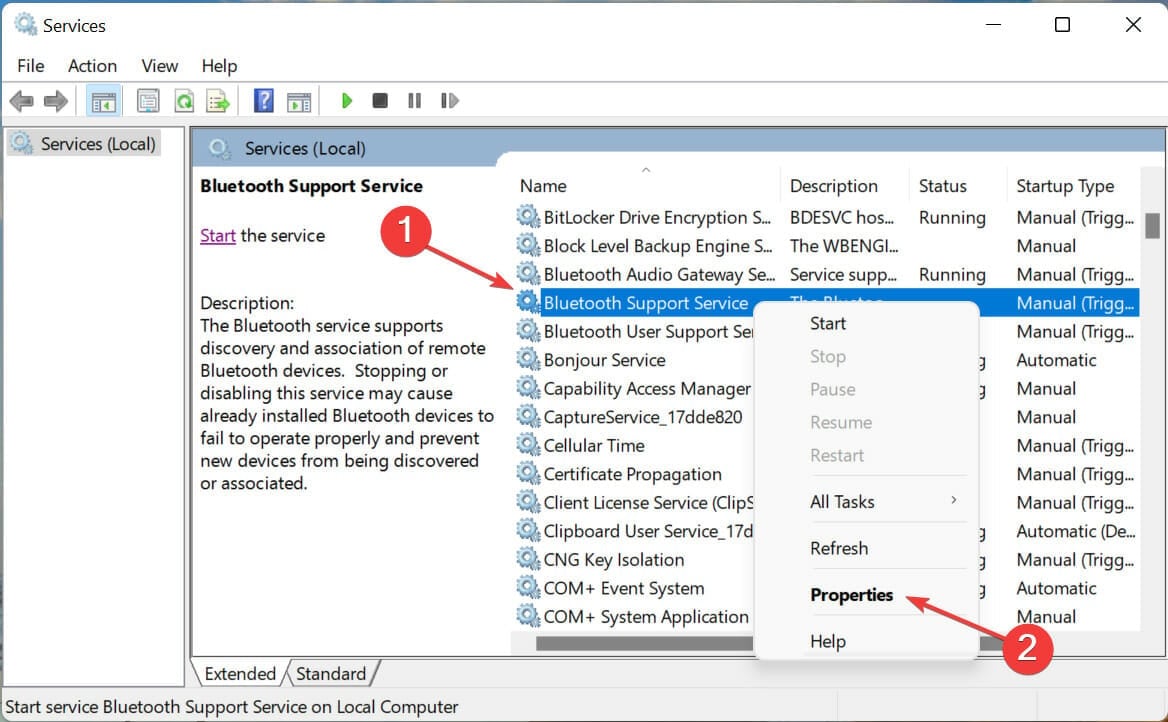
  4. Right-click again and select Properties.
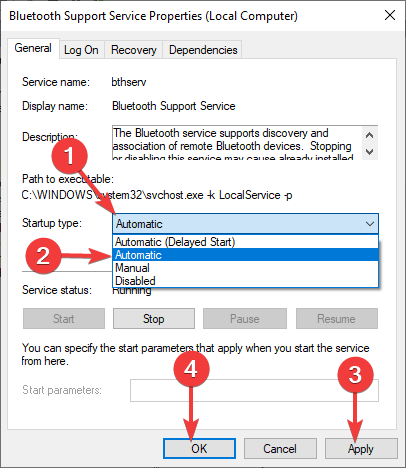
  5. Click on the Startup Type section, select Automatic from the drop-down menu and then click on Apply and hit OK.Automatic Bluetooth Support Service - windows 11 auto connect bluetooth

This solution will help you counter any issues affecting the normal functioning of the Bluetooth Support Service. In most cases, if it is disabled, then installed Bluetooth devices might, in turn, malfunction.

3. Run the Windows Bluetooth troubleshooter

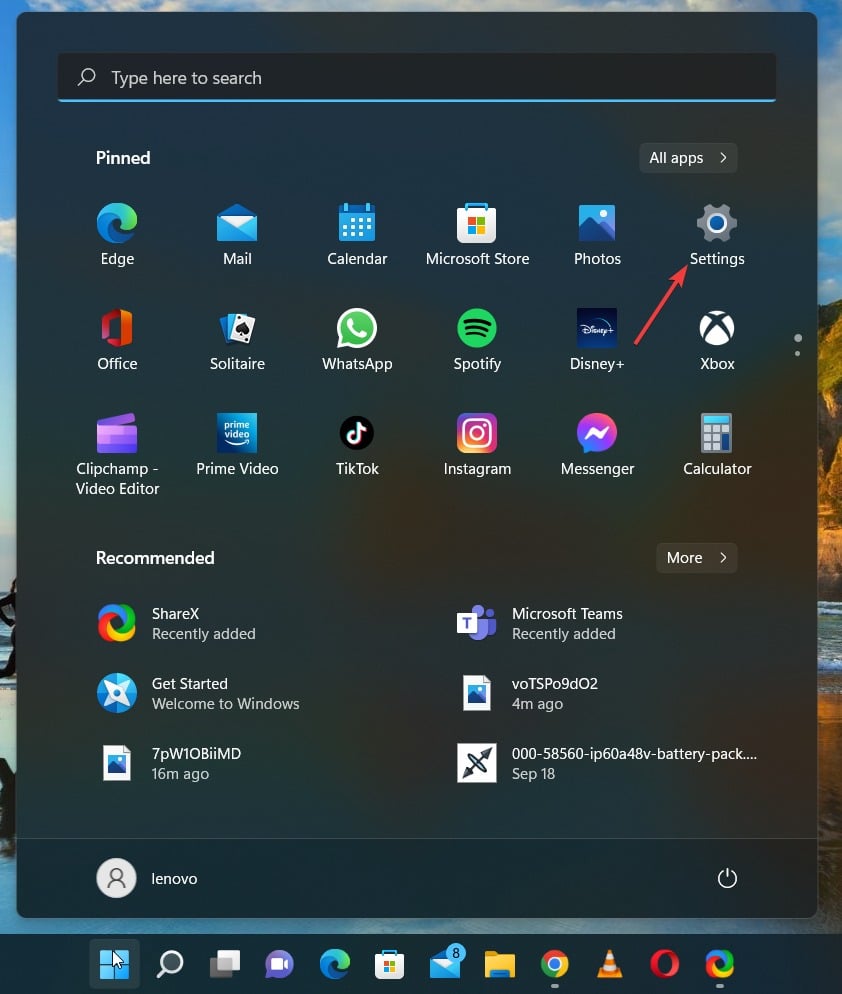
  1. Click the Windows button, then select Settings.settings windows 11
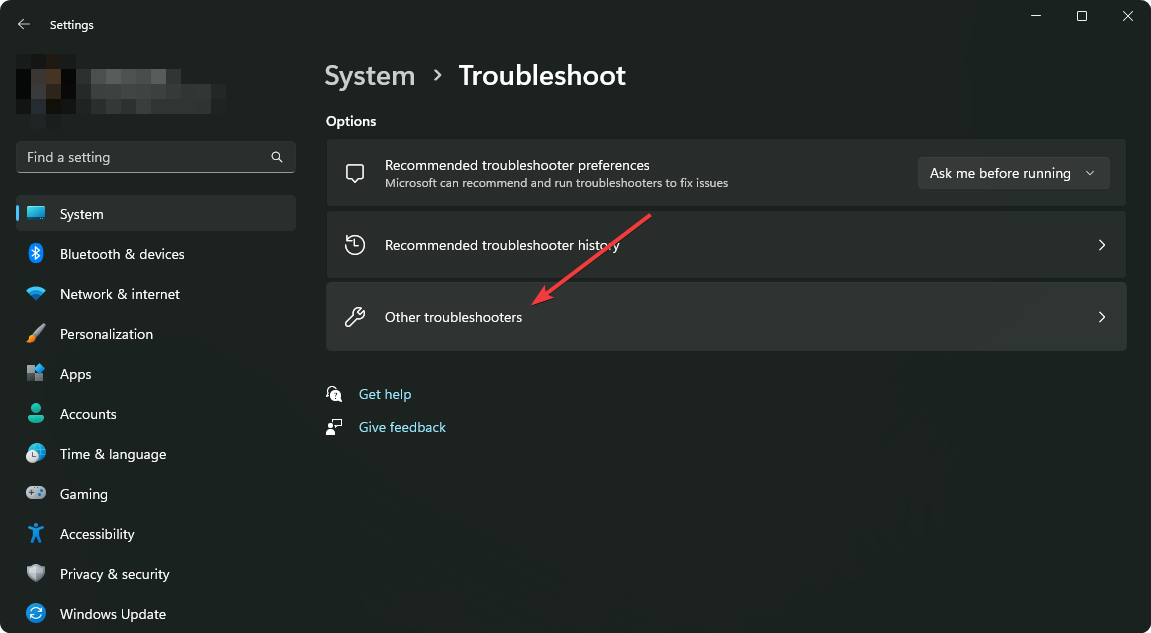
  2. From the left window pane, select System, then look at the right side and click on Troubleshoot.Open system troubleshooter
  3. Select Other troubleshooters.going other troubleshooters win11
  4. Scroll down to Bluetooth, then click on the Run button.

If you are still experiencing this issue even after applying the above fixes, then it might be a proximity issue. Your PC may not be detecting Bluetooth devices. It is important to remember that you need to be as close as possible to your Windows 11 device for your Bluetooth device to pair successfully.

How do I reset Bluetooth on Windows 11?

While there’s no way to explicitly reset the Bluetooth in Windows 11, you could re-enable the Bluetooth adapter from the Network Connections window. For some, restarting the Radio Management Service also did the trick.

If you are facing issues connecting to devices, a simple fix is to remove the device from the list of saved ones and then reconnect to it. Make sure to put the device in pairing mode when connecting to it.

Elsewhere, users have complained about having difficulties removing Bluetooth devices but worry not as our expert guide addresses this issue.

Be sure to also check out our expert guide, which will help you resolve an issue where Bluetooth is not working in Windows 10.

Let us know whether you have been able to solve this issue in the comments section below.

Here are 5 amazing ways you can use Adobe Acrobat in Microsoft Edge

Microsoft deeply integrated Adobe Acrobat in Edge, with the aim of enhancing the PDF experience for users. The company further indicated that:

This will give users a unique PDF experience that includes higher fidelity for more accurate colors and graphics, improved performance, strong security for PDF handling, and greater accessibility—including better text selection and read-aloud narration. These capabilities will continue to be free of cost.

However, if you are looking to access more sophisticated features like the conversion of PDFs to other formats or combining files, you’ll need to purchase an Adobe Acrobat subscription. The Pro version will cost you $19.99/month, whereas the Standard one will cost you $12.99/month. The Pro version currently offers a 7-day free trial.

Once you get your subscription, you’ll be able to Adobe Acrobat’s features and tools within the Edge browser via an extension. You don’t need to have the standalone app installed to leverage these features. This opens up more capabilities, ultimately redefining how Edge users interact with PDF files.

Lori DeFurio, Principal Evangelist at Adobe shared with OnMSFT neat tips and tricks that will help Edge users elevate their PDF experience with Adobe Acrobat. Here’s everything you need to know:

1. Protect Your PDF Using a Password

While it is possible to password protect a file or folder on Windows 11, this new integration further builds upon this premise. It allows users to create password-protected PDFs to protect their sensitive credentials. DeFurio further highlighted that:

According to the Federal Trade Commission, identity theft is the most reported form of fraud in the United States, with more than 1.4 million reports in 2020 alone.

To ensure that your PDFs are secure, you can use the built-in Adobe Acrobat tools to add a password to your documents. This will prevent unauthorized users from opening, editing, or printing your documents unless they have the correct password.

2. Convert Your Screenshots Into a PDF

Did you know that you can convert screenshots in Edge to PDF? Well, with the new Adobe Acrobat and Microsoft Edge integration this is possible. To achieve this, use the ‘print’ function to save your screenshots as a PDF.

This will help you save time since you don’t need to start typing again and then converting the text to PDF, ultimately enhancing productivity. What’s more, this useful hack facilitates the conversion of screenshots into “a universally accepted and viewable format.”

3. Edit Your PDF by Converting It to a Word Document

If you’re looking for a way to convert your PDF files into Word documents, then Adobe Acrobat is the perfect tool for you. The program lets you convert and edit PDFs, as well as create them from scratch.

With Acrobat in Edge, you can convert PDF files into editable Word documents so that you can make changes or additions to the information they contain. This is useful if you want to edit text or make other changes that aren’t possible with PDFs.

4. Convert a PDF Into an Audio Book

If you have a document that contains lots of text, it can be challenging to read. You might have your reading glasses on hand and still need to squint to read the text. Or maybe you don’t have your glasses, but you still want to make sure the words are clear and easy to understand.

Thankfully, there is an easy way for anyone with a computer and Adobe Acrobat Reader to convert their PDF file into an audiobook. This method is especially useful for those who find it difficult or impossible to read text on a computer screen or printed page due to poor eyesight or other factors.

5. Combine Your Files Into a Single PDF

When you’re working with large amounts of data, it’s often necessary to create a single document that includes all the relevant information. For instance, you might have one document that’s a draft of a report for your boss and another that contains potential new hires for the company. In this situation, it would be helpful to merge these documents into one PDF file so you can easily share them with others.

Fortunately, Adobe Acrobat makes this process incredibly simple. The program can merge multiple documents into a single PDF file automatically or manually if you prefer to do it yourself. We also invite you to check our separate post that details how to delete a page from a PDF file.

Do More With Edge’s New Adobe Acrobat PDF Reader

With the tips and trickles highlighted above, you’ll end up saving a lot of time. The more mastery you gain over the program, the less time you’ll have to spend on each document, and therefore your work efficiency increases.


IRS Error Code 2099: How to Fix it in 3 Quick Steps

The Internal Revenue Service, responsible for collecting taxes for the United States, has an official website at IRS.gov.

Many users have reported experiencing difficulties using the website, including IRS website error code 2099.

Since the website contains numerous error codes and flaws, this is not the only problem troubling the users to the point that a list of error codes and their causes is included on the website.

Anyways, we will examine the top five fixes for one specific error: IRS website error code 2099.

Why am I getting error codes while visiting websites?

  • Geo-blocking: If you are getting an error when accessing a website, it could be geo-blocking in play. Either the website does not permit access in your location or it’s been limited by the authorities.
  • Issues with the Internet connection: An unstable or slow Internet connection can lead to errors in accessing websites.
  • The website is down: The problem could also be at the website’s end. It usually happens when the servers are down.
  • The security certificate is invalid: If there’s a problem with the website’s security certificate, your browser will throw an error.

How can I fix the IRS website error code 2099?

Before moving to the slightly more time-consuming solutions, here are a few quick ones to try:

  • Use a service like Downdetector to determine whether the IRS website is down. If that’s the case, try again in a few hours.
  • If the website throws an error or won’t load completely, press Ctrl + Shift + R to perform a hard refresh.
  • Check the Internet speed using SpeedTest, and if it’s too slow, switch to a wired connection.
  • For those using a VPN when opening the IRS website, disable it and try again.
  • Restart or reset the router.

If these don’t work, head to the fixes listed next.

1. Change your browser

If you try a different browser, the issue might be browser-specific and go away. Try installing Opera from the official website if you do not already use it. Try one of the browsers on the list below if the one you’re using now is Chrome:

2. Clear the browsing data

  1. Open Google Chrome on your computer.
  2. Click More in the top right corner and then select Clear browsing data from the More tools menu. clearing the browsing data option in tools
  3. Select a time frame, such as the previous hour or all time.
  4. Choose the categories of data you want to delete.
  5. Tap Clear data.the browsing data settings

This performs the same function as a hard reload while also refreshing your Chrome browser.

3. Disable browser extensions

Note icon NOTE
The steps listed here are for Google Chrome, though the concept remains the same for all. So, you should have much difficulty disabling extensions on other browsers as well.
  1. Open the browser, click on the ellipsis near the top-right, hover the cursor over More tools, and choose Extensions.extensions
  2. Now, turn off the toggle for each extension here.extensions

After disabling all the extensions, you should be able to access the IRS website.

What should I do if I cannot access IRS at all?

Your browser may be unable to open the IRS website due to specific extensions. To access the website, you should disable any recently downloaded extensions or completely reset your browser.

It’s also important to note that your VPN service might bring on this problem; therefore, turn it off and give it another shot.

While we typically assume that a website’s coding is to blame for any bugs or flaws, your internet connection or the browser you’re utilizing to view the website can also cause issues for you and the website.

How do I get in touch with the IRS?

You can contact IRS for tax-related issues or about the refund using one of the numbers provided on the official website.

Call the number that best suits your case within working hours, and you should be patched with an IRS representative. Besides, you could visit a Taxpayer Assistance Center Office. It’s easy to find an Assistance Center near you.

As previously stated, some websites will not accept browsers with a heavy load of installed extensions. That can also cause the IRS website error code 2099 error.

In the comment section below, let us know if you could fix the IRS website error code 2099 issue.

7 Best USB-C Extension Cables for Your Gadgets

Since the USB-C cable was introduced to the market, it came with good tidings and has been a favorite amongst users.

With this connector, you can say goodbye to the frustrations of wrong plugging in due to different orientations. Type-C is a reversible connector that lets you plug in from either direction. So you’ll never get it wrong again.

Should I use an extension cable?

Ideally, you should have a long enough cable for your device to reach wherever you want but sometimes, it’s better to extend the one you already have.

Most modern devices and computers today are fitted with the type-C port. This is how you can plug in and enjoy fast data transmission and file transfers, plus high-powered, super-fast charging for your other gadgets.

These devices usually come packaged with their own Type-C cables. But sometimes you can either misplace it, or it gets broken for whatever reason. Or maybe you just want a longer one for use.

The quality and build of the cable you pick will also determine how long it stays without getting broken, plus whether it is resistant to hazards such as heat, corrosion, and other things that may cause damage.

If you’re looking for the best USB-C extension cable to add to your accessories, here are the top 7 picks we recommend.

What are the best USB-C extension cables today?

Note icon NOTE
The cables listed here have been tested by our experts and were found to be of superior build and quality. Choose one that best fits your budget and requirement, and you won’t regret the purchase.

Faracent USB Type C Extension Cable – Highly versatile

  • Wide compatibility coverage (Macbook, Nintendo Switch, and more)
  • Support for USB/SD/TF cards
  • Fast data transfers
  • Fast charging-enabled
  • Does not work with any Thunderbolt 3 items

If you want to add a few more inches to your current USB cable, this extender with USB 3.1 Type C support may be just what you need.

Highly versatile, the cable does a great job on a wide range of devices, including Lumia 950, Nintendo Switch, Google Chromebook, Macbook, and more.

Moreover, its charging speed is fast, and so are the data transfers performed with this cool accessory.

Stouchi USB C Extension Cable 6FT – Ideal for great speed

  • Supports 4K audio/video rendering
  • Fast transfer speeds
  • Cross-device compatibility
  • 6FT long for more accessibility
  • Does not support any Thunderbolt 3-based products

Stouchi aims to impress with this 6FT long extension cable that takes transfer speed and stability to a new level.

It even supports 4K video and audio signal, and its USB-C port gives it the right amount of flexibility to match all your favorite devices, from your smartphone to your Nintendo Switch console, without ignoring all the other cool gadgets you may have on your repertories such as a Chromebook, a Macbook and many more.

For charging, data syncing, or data transfers, this extension cable can do it all at great speed.

DISDIM USB C Extension Adapter Cable – Plag-and-play-based design

  • Thunderbolt 3 support
  • Fast charging technology
  • Quality and durable material
  • Wide compatibility
  • No known issues

Unlike the previous products on our list, this extension cable provides full Thunderbolt 3 support and covers a wide range of compatible devices, from smartphones to notebooks and consoles.

Its easy-to-use, plag-and-play-based design combined with its durability will make sure you will enjoy this pure copper wire for a long time.

And it does not stop there: the cable is dust-free and tangle-free with a built-in aluminum foil and textile mesh layer that give the most efficient anti-interference effect.

Fast charging and stable data transfers are also part of the deal.

RIITOP USB C Extension Cable – 4K video support

  • Fast charging and data transfers
  • Durable material (nylon plus aluminum-alloy)
  • Cross-device compatibility
  • 4K video support
  • Does not support Apple Multi-Media Adapter

The RIITOP USB-C Extension Cable is a strong candidate if you’re looking for an extension cable that can match a wide palette of devices.

The cable thicks many boxes, including 4K video support, impressive data transfer speeds, and fast charging technology support.

To top it all, its nylon-braided cord and aluminum-alloy connector ensure its durability for you to enjoy it for a long time.

RIITOP USB C Extension Cable Short (2FT) – Scalable power charging

  • Cross-device compatibility
  • Supports Data/Video/Audio transfers
  • Quality durable materials
  • Fast charging technology
  • Does not support the Apple Multi-Media Adapter

This USB-C extension cable is compatible with most major devices, such as tablets, smartphones, and computers, with a USB 3.1 super-speed data transfer of up to 10Gbps.

It has a reversible design type-C connector plug that supports scalable power charging.

Features include a USB 3.1 type-C male-to-female extension cable cord, wire specification of tin-coated copper 16-core cable with an outer PVC mold, and it is 3ft (or 1m) long.

Qicheng&Start USB-C extension cable – Protects laptop’s USB-C interface

best USB-C extension cable

This is the best USB-C extension cable for superfast data syncing of up to 10Gbps, HDMI/VGA, and other signal transmissions, plus it protects your laptop’s USB-C interface.

Features include a USB 3.1 type-C male to USB-C female connection cable, with a length of 2ft, and compatibility with smartphones, laptops, and tablets.

⇒ Check price on Amazon

CableCreation USB-C extension cable – Compact choice

best USB-C extension cable

This cable features a USB 3.1 type-C male to type-C female connector, a gold-plated male plug with a gold-plated shell for guaranteed contact with your device, and delivers data speeds of up to 10Gbps.

It is lightweight, portable, and compact, so you can move with it anywhere, plus, its bi-direction lets you enjoy limitless data transfer as both sides can be either host or target.

The cable is compatible with most major devices, such as tablets, smartphones, and computers. Still, it may not work for extending original type-C cables for charging type-C phones because of voltage issues.

It comes with a brand guarantee of focus on ideal design and quality, plus a lifetime warranty, and you can get it in either black, blue, red, or rose gold colors.

⇒ Check price on Amazon

These are the best USB-C extension cables for daily use and can be connected to most devices. So get one today!

Also, don’t forget to check our curated list of the best USB-C hubs in the market.

Have you found your favorite choice for the best Windows USB-C extension cable? Let us know in the comments section below.

Fix: Two Finger Scroll is Not Working on Windows 11

If your touchpad is broken, it’s one of the most frustrating things to deal with. Everyone relies on their laptop’s touchpad to navigate the user interface and interact with applications. And when the two-finger scroll is not working in Windows 11, it’s not that tricky to fix.

In case the touchpad is not working, it could be a hardware problem or driver issue to blame, but when specific functionalities like two-finger scrolling fail to work, we need to follow a slightly different approach. Let’s find out!

Why is the touchpad scroll not working in Windows 11?

There is a possibility that the scroll and motion features will not operate properly for you. Touchpad problems in laptops are most often the result of changes to the settings.

Microsoft specialists have determined that driver incompatibilities play a significant part in these problems. The other main causes include:

  • Settings might not be enabled – Some laptops have a feature that disables the touchpad when an external mouse is plugged in.
  • Accumulated dust and other debris – This can physically block the pointer’s movement.
  • Faulty hardware – A loose connection or damaged circuits could cause this problem.
  • Touchpad software problems – These are rare, but they do occur. If you have updated your operating system recently, it’s possible that this is the root of the problem. This also leads to a situation where the touchpad clicks but doesn’t move.
  • Scrolling options might not be adjusted – The touchpad might not be properly configured.

If you are using an external mouse and it is also not working, then you should check the complete guide for the mouse not working in Windows 11.

As we know the common causes of the touchpad scroll not working on Windows 11, let’s move toward the solutions now.

What can I do if the touchpad scroll is not working on Windows 11?

Before moving to the detailed solutions, there are some quick checks and troubleshooting steps that you can follow:

  • Reboot the computer and check if the touchpad scroll is working.
  • If you are using a mouse, unplug it and check if the touchpad starts working.
  • Make sure that the touchpad has not had some hardware issues.

After these preliminary checks, let’s move toward the detailed solutions below.

1. Check if the touchpad is enabled

  1. Click the Windows icon at the bottom of the taskbar and select the Settings option from the menu.
  2. Find the Bluetooth & Devices from the sidebar menu and click it.
  3. Now on the right pane, look for the Touchpad.
  4. Make sure that the Touchpad toggle option is On.

If the touchpad scroll is not working in Excel or other applications, make sure the touchpad is enabled. Also, find out how to get your cursor back if it disappears randomly.

2. Update your Touchpad drivers

  1. Right-click on the Window icon at the taskbar and click Device Manager.
  2. Expand the Mice and other pointing devices option. Now you can see your TouchPad device name.
  3. Right-click the HID-compliant mouse and click Update Driver.
  4. Click Search automatically for drivers.

Incompatibilities between drivers are the root cause of Windows 11 touchpad issues in most situations. 

As a result, you need to ensure that each of them has the most recent version, which is a source of reassurance since Windows 11 will handle this process automatically.

If you’re looking for another way to update your Touchpad drivers, then you can count on Outbyte Driver Updater as it’s an automatic tool.

This program scans your device for missing and outdated drivers and detects from its database the latest and most accurate updates.

Outbyte Driver Updater

Top-quality software that works efficiently when it comes to updating your drivers.
Free Trial Download now

3. Change the mouse pointer type

  1. Click on the Search icon on the Taskbar. Search for the Control Panel and click on it.
  2. Click on the Mouse option.
  3. Navigate to the Pointers tab.
  4. From the Scheme section from the Windows Black (system scheme) option from the dropdown. Click on Apply and then OK to confirm the settings.

Some users claim that when the two finger touchpad scroll is not working in Windows 11 on Lenovo, it may be fixed by selecting a different mouse pointer.

In Windows 11, the above-mentioned is the procedure for changing the pointer that appears on the mouse.

After changing the mouse pointer type, some users experience the problem of the mouse cursor jumping around the screen. If so, check our guide to fix the mouse cursor jumping around in Windows 11.

4. Enable the Scroll & zoom option

  1. Click the Windows icon, then click on the Settings option.
  2. Find the Bluetooth & devices in the right sidebar and click on it.
  3. Now on the right pane, look for the Touchpad option and click on it.
  4. Locate Scroll & zoom and click it. After that, enable the option labeled Drag two fingers to Scroll, and other options here.

It is fairly obvious how simple it is for you to activate this option. You can now test whether this has resolved the issue with the two-finger scroll not functioning. 

If you want to see some more Windows 11 gestures, then check out the article on Windows 11 gestures.

It is probably a good idea to restart the computer immediately, just in case anything goes wrong. If it wasn’t successful, you should go on to the next approach.

5. Reset your touchpad settings

  1. Click the Windows icon at the bottom of the taskbar, navigate, and click on the Settings option.
  2. Find the Bluetooth & Devices in the right sidebar and click on it.
  3. Now on the right pane, look for the Touchpad option and click on it.
  4. Now click Reset, and your Touchpad settings will be reset.

Windows computers and gadgets might run into issues from time to time, and figuring out the problem can be quite challenging for users. 

The specialists who work on Microsoft Windows noticed this. Therefore, they included the Reset option for certain hardware devices, which should do the trick when two finger scroll is not working in Windows 11.

The touchpad settings will be restored to their original state after a reset, eliminating any possibility of future issues.

How do I make my touchpad scroll with two fingers?

  1. Press Windows + I to open Settings, go to Bluetooth and devices from the navigation pane, and click on Touchpad.touchpad
  2. Click on Scroll & zoom.scroll & zoom
  3. Now, tick the checkbox for Drag two fingers to scroll.drag two fingers to scroll
  4. You can now easily scroll up and down with two fingers using the touchpad.

The approaches mentioned above will resolve the issue if the touchpad scroll is not working on Dell or other devices, and you can get it running in no time.

Sometimes, it’s a hardware issue as well. If this is the case, you need to buy a new one. So, check the best touchpads for Windows PC.

Do let us know in the comment section below if you have any further questions or want us to give solutions to some other problems too.

How to Use Traceroute (Tracert) on Windows

Traceroute cmd is a tool for tracing the path of a network on a computer. It is most effective when there is a connection problem on the computer to see the exact place where the problem is occurring.

So, in this article, we will cover what the traceroute command does and how to use it.

What is the traceroute command?

The Traceroute command in Windows identifies and tracks network problems such as packet loss, delayed response time, etc. It functions as a tracing system to check the connection from one network to another.

Furthermore, Traceroute is effective when on a computer network that’s not functioning as it’ll be more evident. So, running Traceroute should be done when you’re experiencing problems with your internet connection.

We have a detailed guide on the best visual traceroute freeware for Windows 11.

What is tracert VS traceroute?

Many users believe the traceroute command and tracert cmd are the same. They have the same functions but differ in the way they operate.

However, the Tracert Windows tool determines the route or path a network takes to a destination. It sends ICMP packets to the destination, using varying IP Time-To-Live (TTL) values to specify routes.

The differences between the two are:

  • The Tracert command shows the details of a packet’s route from your computer to your specified destination. Conversely, the Traceroute command records and traces the internet route between a computer and a destination computer.
  • Another notable difference is the Operating System the two commands are applicable. Tracert is available on Windows and is also termed Traceroute on Unix-Linux Operating Systems, including Mac OS X.

Now that we know what Tracert and Traceroute commands are all about, let’s see how they are used.

How do I use Traceroute cmd (Tracert) on Windows?

  1. Press Windows + R key to open the Run dialog box, type cmd, then press Enter to open Command Prompt.Open CMD to use Traceroute
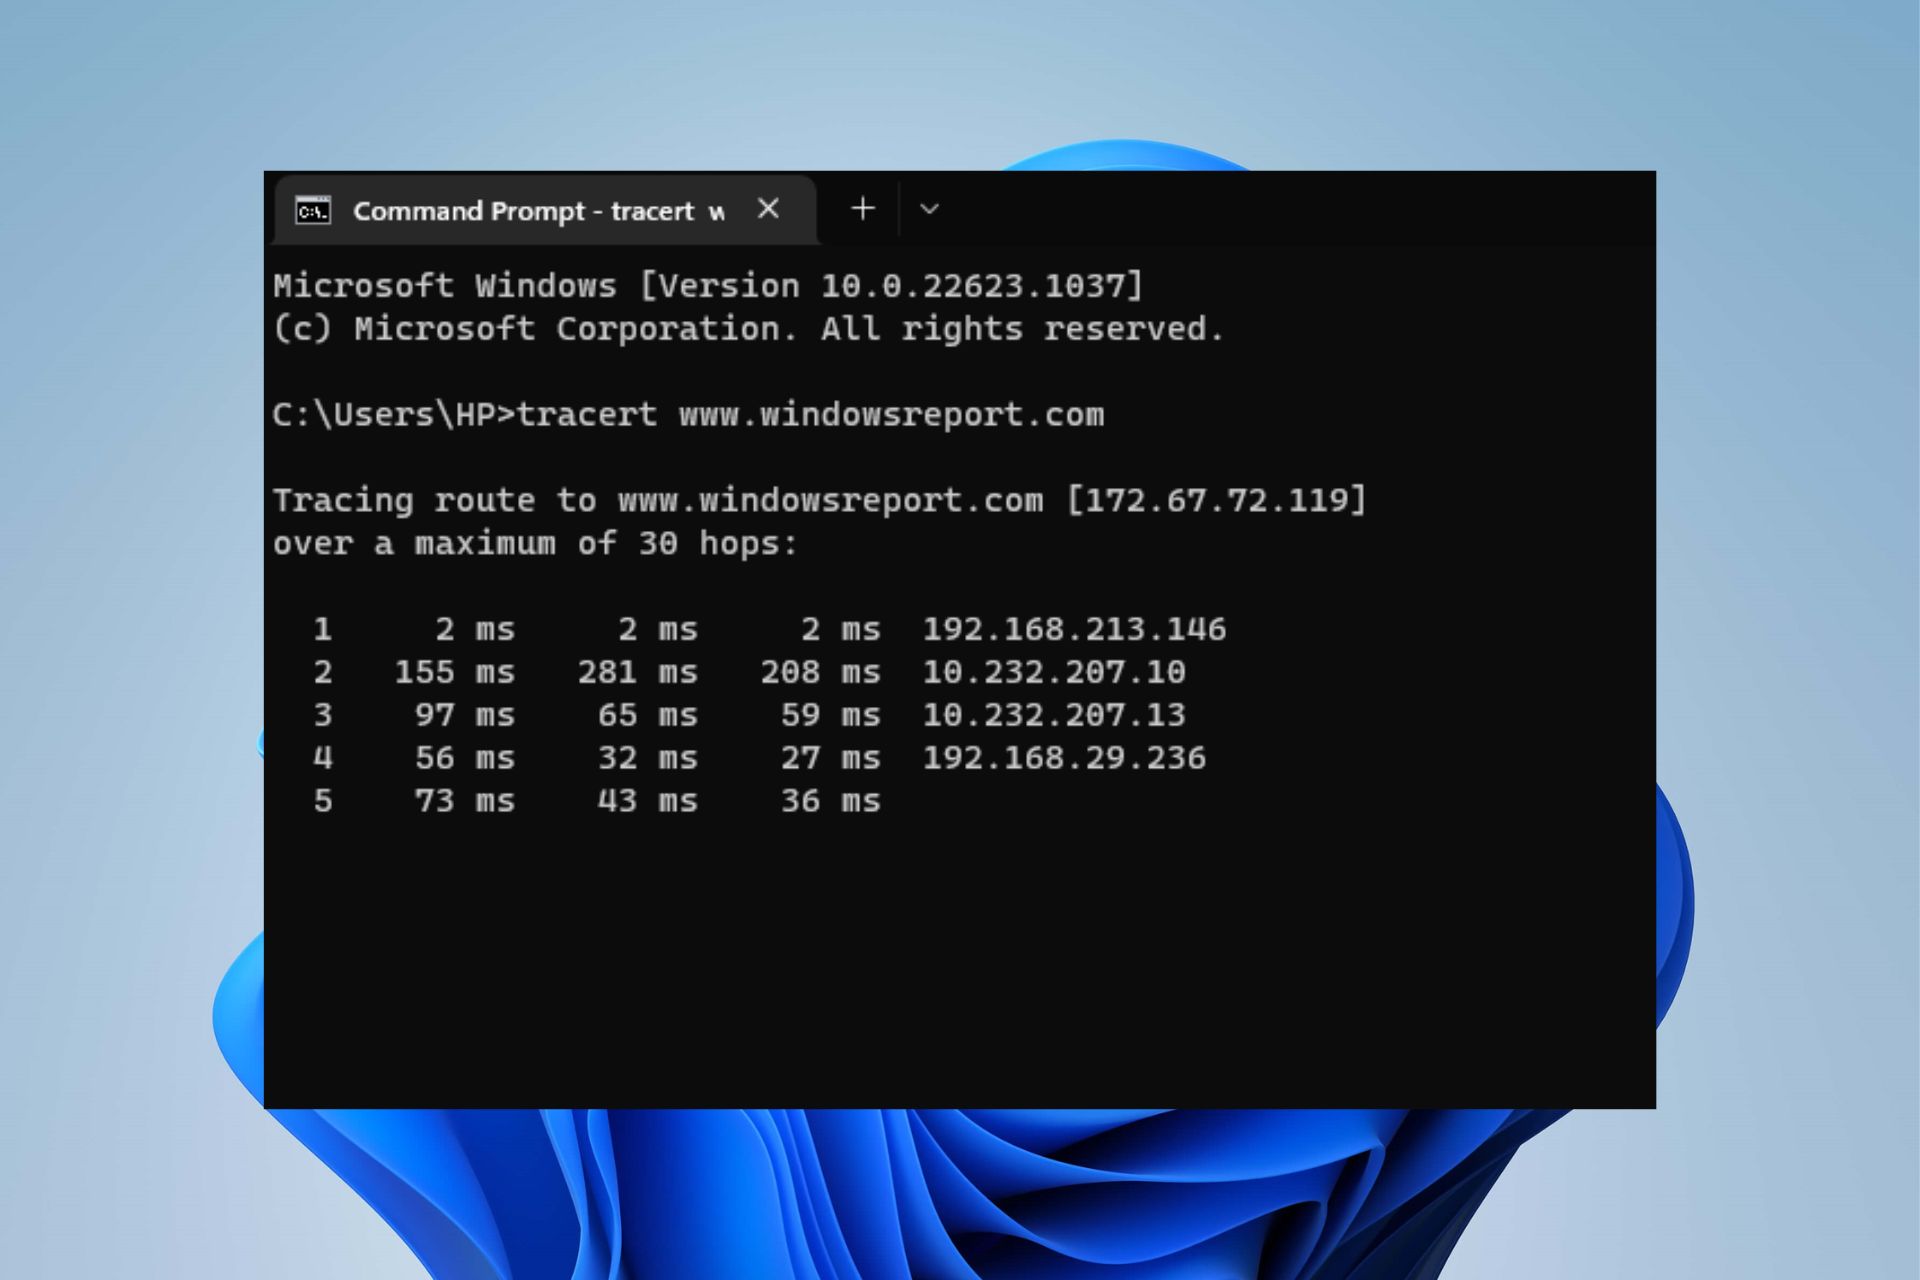
  2. Type tracert, followed by the destination (An IP Address or a Domain Name), and press Enter. E.g tracert www.windowsreport.cominput the command to launch Traceroute
  3. After running the command, it will return a list of the connections on the path and the speed.

On a Unix/Linux system, you will use traceroute instead of tracert, and the syntax is the same.

Further, our readers can check our guide on the network packet loss monitoring tools to use. Also, we have a detailed review of the best bandwidth monitoring tools for Windows 11.

Conclusively, you can drop your suggestions or questions about this guide on the traceroute cmd command in the comments section.

10 Easy Fixes to Apply if Browser Is Slow on Windows 10

Is your browser running slow on Windows 10 even though the internet is fast and stable? If yes, this article will help you get rid of the situation.

Slow browser issue is a generic term. It may include several situations, such as a slow browser but fast internet speed. Also, slow or laggy typing experience, poor download speed, very slow or not responding, and taking a long time to load pages on a web browser in Windows 10 are very common issues.

Why are all my browsers slow?

A web browser on your PC may get slower for various reasons. Since you want an answer to this question: How do I speed up my browser in Windows 10? dig deeper, and you will end up finding these as the most significant reasons behind this problem:

  • Low memory capacity – Modern web browsers, especially Chrome, demands a lot more RAM, which makes it slower on low-end computers.
  • Unstable Windows version – You often may notice slow browser issues after installing an update
  • Too many background tasks – Too much active background processes may take a lot of RAM and CPU power, which gives your browser less room to utilize the computing power.
  • Driver issue – Outdated or incompatible drivers are also responsible.
  • Problematic graphics card – If the GPU is very old or problematic, the modern browser may face problems in rendering web pages correctly.
  • Corrupted and temporary files – These unnecessary or problematic files can slow down all web browsers on your PC.
  • Registry issues – Too many problems in the registry also can slow down your computer a lot.
  • Improper power settings: If it is a laptop, always running on the low-performance mode will affect the browser speed.
  • Old or less powerful CPU – Low-end or very old PCs will not deliver the expected experience.

How do I fix a slow browser on Windows 10?

There are several things to do to solve slow browser problems. However, before that, you must do the following things as strict requirements.

  • Update Windows if it has not been updated for a long.
  • Restart your PC.
  • Powercycle your modem or router.
  • Make sure nothing is being downloaded in the background.
  • Make sure your system drive/local disk C has enough free space.

After doing these things, you can proceed to follow these methods to speed up your web browser experience on your PC:

1. End resource-hungry background tasks

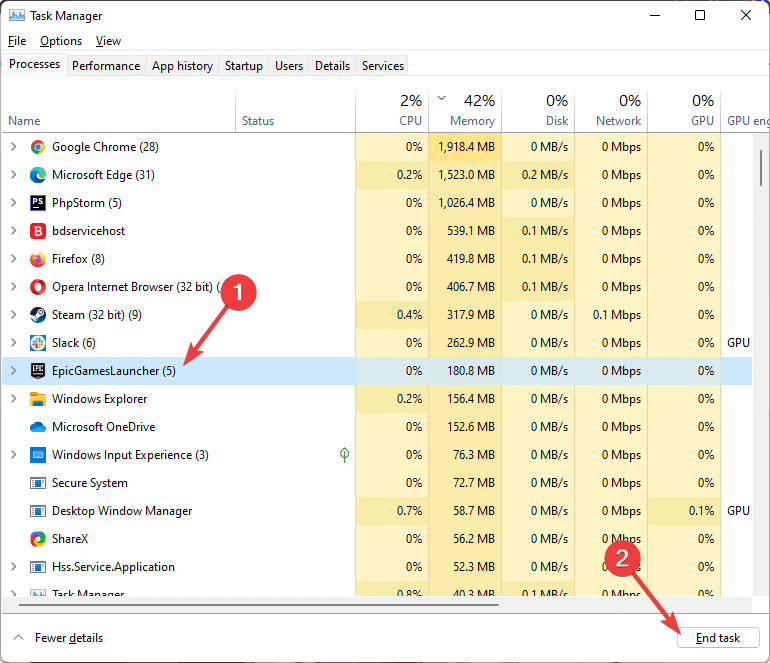
  1. Press Win + X on the keyboard and click on Task Manager.
  2. Go to the Processes tab if it is not opened by default.
  3. Select the most CPU or memory hungry process and click on End Task.ending epicgameslauncher process windows task manager

After ending these processes, you will immediately notice performance improvements.

2. Disable the startup items

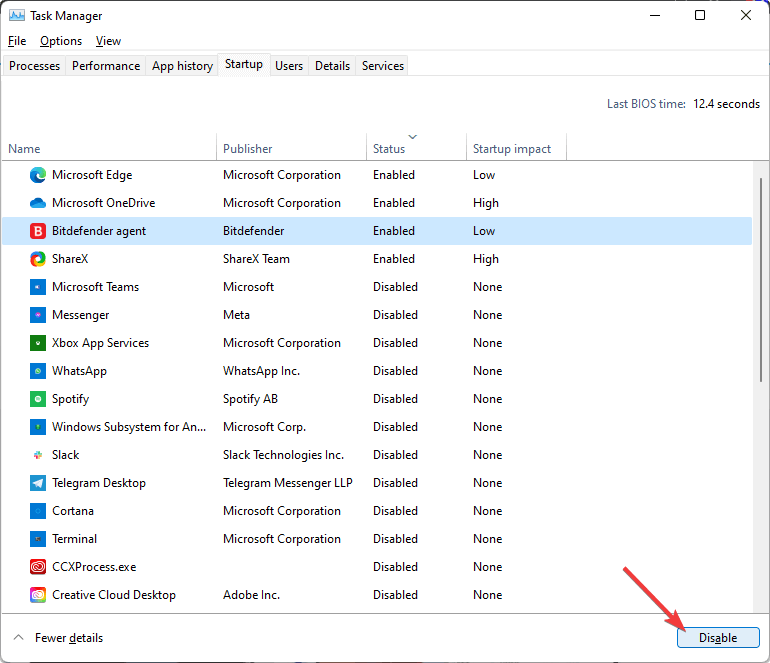
  1. Open the Task Manager again.
  2. Go to the Startup tab.
  3. Select your preferred item and click on Disable.disabling startup items task manager
  4. Do this for all unnecessary startup items.
  5. Restart your PC.

Now, it should improve the slow browser situations on Windows 10.

3. Update the drivers

  1. Open the Start Menu, type device manage, and hit Enter.
  2. Right-click on a driver and choose Update driver.updating network driver windows 11 device manager
  3. Click on Search automatically for drivers and follow the on-screen steps.search automatically for drivers
  4. Do this for all drivers, especially the Display and Network Adapter.

Manually updating drivers may take time. Moreover, Windows Device Manager cannot often find the most appropriate drivers. So, we suggest a tailored driver update solution.

This tool can automatically detect and update outdated drivers with just a single click. In addition, it can do this thing automatically according to your own schedule preference.

Outbyte Driver Updater

The most helpful driver app that can automatically locate the latest updates.
Free Trial Download now

4. Disable the firewall

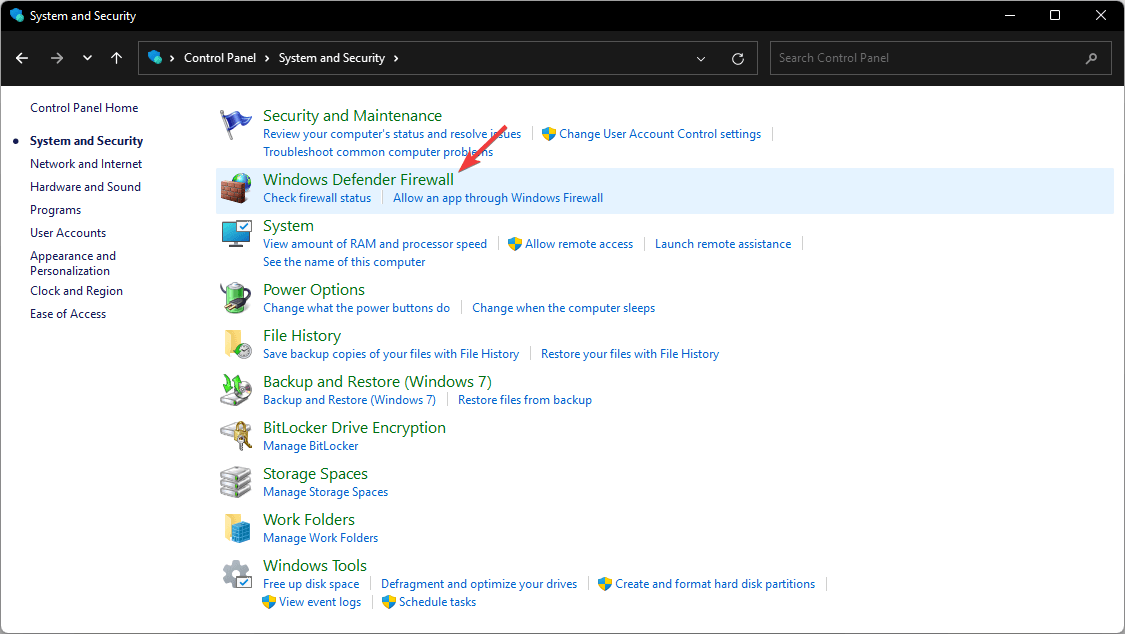
  1. Open the Start Menu, type Control Panel and press Enter.
  2. Go to System and Security.clicking on system & security
  3. Click on Windows Defender Firewall.clicking on windows defender firewall
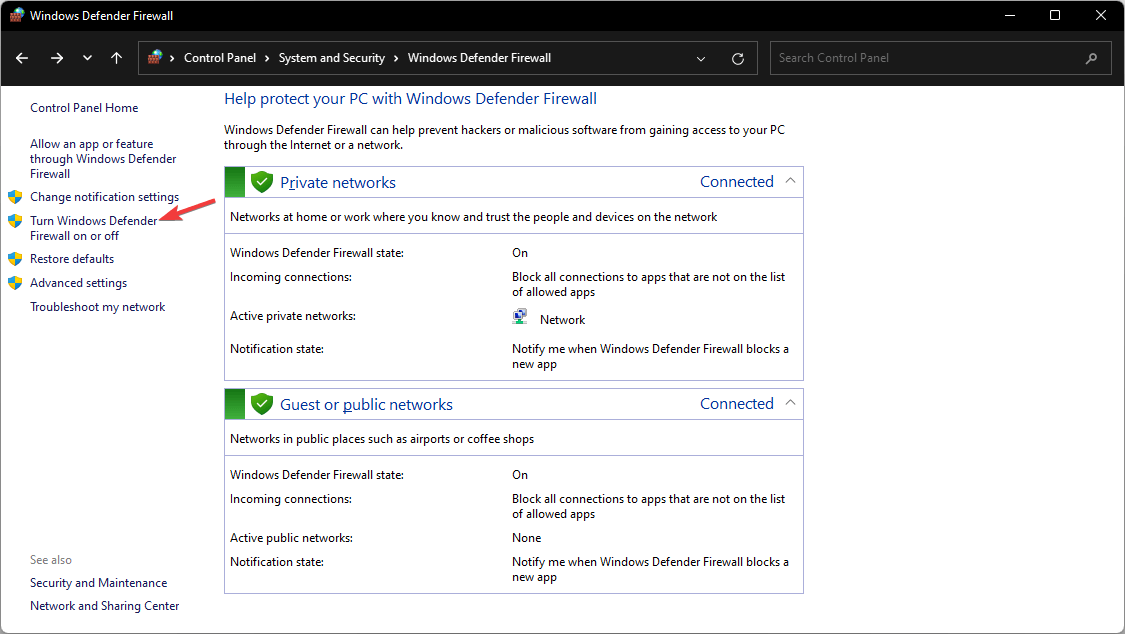
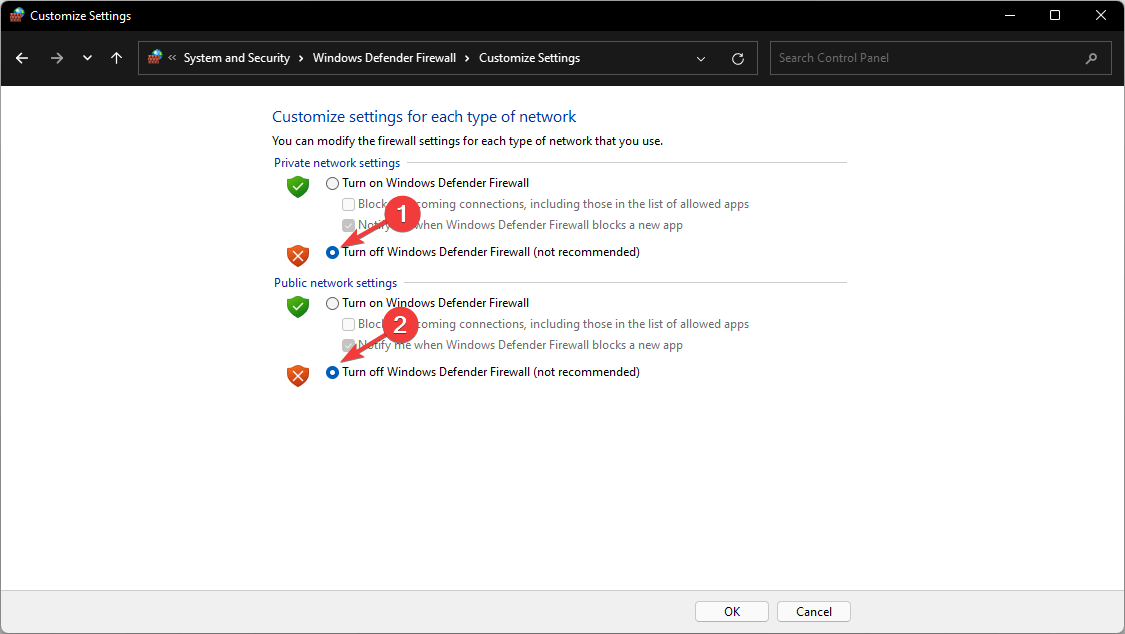
  4. Click on Turn Windows Defender Firewall on or off.click turn off windows firewall
  5. Mark Tun Off Windows Defender Firewall for both private and public networks.turning off windows firewall
  6. Restart your PC.

5. Disable the extensions on your browser

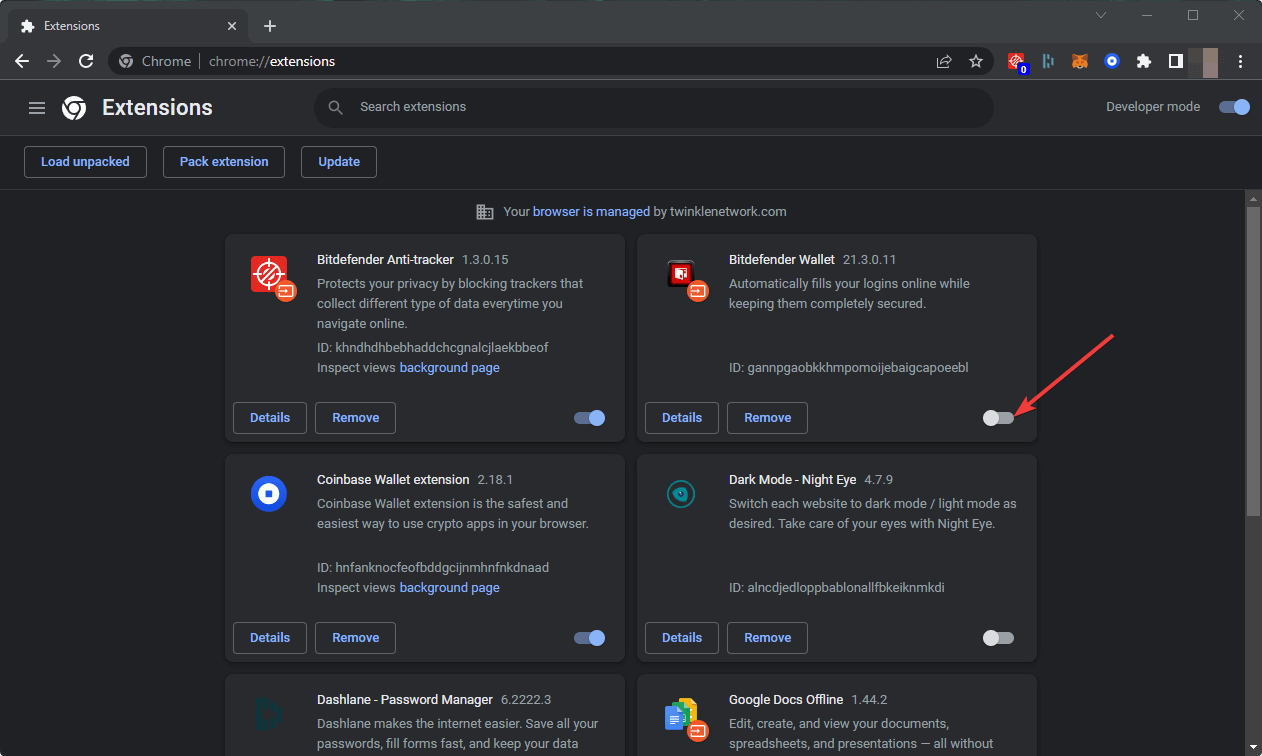
5.1 Disable the extensions on Chrome

  1. Open the Google Chrome browser if it is experiencing slow response issues.
  2. Type the following address on the address bar and press Enter: chrome://extensions/
  3. Toggle the switch off for the extensions you want to disable.disabling chrome extensions
  4. Relaunch the browser.

5.2 Disable addons on Firefox

  1. Open Firefox.
  2. Go to the following location similarly you did on Chrome: about:addons
  3. Click on Extensions and disable the items by tweaking the correct switch.disabling firefox extensions add-ons

Due to problematic extensions, Firefox may become too slow for you. Turning off these add-ons will definitely help.

5.3 Disable the extensions on Edge

  1. Open Microsoft Edge.
  2. Go to the following address using the address bar: edge://extensions/
  3. Toggle off the extensions you want by tweaking the switch.disabling edge extension

Your web browser may often response slow, or you may get a slow or laggy typing experience. Disabling extensions will give you relief from this type of problem.

6. Update the browser

6.1 Update Chrome

  1. Open the Google Chrome.
  2. Go to the following location: chrome://settings/help
  3. It will check for the update and install any available one automatically.updating-chrome Google Chrome not responding
  4. Relaunch Chrome.

6.2 Update Firefox

  1. Click on three vertical lines and go to Help.going to help of Firefox
  2. Go to About Firefox.clicking about firefox
  3. It will update Firefox automatically.

6.3 Update Edge

  1. Using the address bar on Edge, go to the following location: edge://settings/help
  2. It will automatically update your browser.
  3. When finished, click on Restart to relaunch Microsoft Edge.clicking restart edge update

Updating helps when your Edge or other browsers are very slow due to incompatibility issues.

7. Clean unnecessary files

  1. Download CCleaner and install it on your PC.
  2. Open CCleaner.
  3. Go to Custom Clean.
  4. Select the things you want to clean.
  5. Click on Analyze.
  6. At last, click on Run Cleaner.clicking run cleaner ccleaner
  7. Wait for a bit to complete the process.
  8. Restart your PC.

While choosing what to clean, you can uncheck browser history and cookies. Otherwise, you may lose your browsing history permanently, and also you will need to log in to various websites again.

Cleaning the rest of the other things is sufficient to solve slow browser issues. If it still remains slow, consider cleaning the cookies too. Doing this solves slow browser issues like Chrome lagging problems.

8. Repair the Registry

  1. On CCleaner, go to Registry.
  2. Click on the Scan for Issues.clicking scan for issues registry ccleaner
  3. Click on Review selected issues.
  4. You can now take a backup or ignore the pop-up by clicking on No.
  5. Click on Fix All Selected Issues.fixing registry ccleaner
  6. Restart Windows 10.

You also may see these tips to fix corrupted registry issues. It helps speed up web browsers and other programs’ performance on your PC.

9. Uninstall problematic update

  1. Open Control Panel, as shown before.
  2. Click on Uninstall a program under Programs.going uninstall program control panel
  3. Click on View installed updates.clicking view installed updates uninstall or change a program control panel
  4. Next, uninstall the recent update that has caused the browser slow issues.

After uninstalling a Windows update, don’t forget to restart your PC. Then, start using your browser and see if it has restored the performance.

10. Switch to a faster web browser

  1. Download a faster browser like Opera One.
  2. Install it on your PC and start using it.

Opera One is an excellent web browser available on all major platforms. Being Chromium-based, it has no compatibility issues. Yet, it is not as heavy as Chrome.

opera-desktop-browser

This browser has no Google influence and can load a web page significantly faster. Moreover, Opera One supports Chrome extensions to enhance your experience.

Hence, it is the most appropriate alternative if you have a very slow experience loading pages on your current web browser.

Which browser is faster for Windows 10?

Opera, undoubtedly, is the fastest browser for Windows 10 and other iterations of the OS, though Chrome, Edge, and Firefox don’t lag far behind.

Of late, Brave, one of the secure browsers with a built-in adblocker, has made it to the list of high-speed browsers for Windows. So, you might give it a try as well. For more options, check our curated list of the fastest browsers.

Which browser is easiest on the CPU?

For lightweight browsers, your primary choice should be Opera, owing to its plethora of features and relative ease of functioning without hogging the system’s resources.

Other options include Vivaldi, another browser that is easy on the CPU, Midori, an open-source option, or UR Browser, for a safe experience.

In this era, a PC with a dual-core processor is not a good thing on a very old machine. If the CPU is 10/12 generations older, it may not handle a modern web browser well.

In this case, you should consider upgrading to the most recent hardware to match the performance compatibility with modern web browsers.

Also, you can consider reconfiguring your partition to increase the system drive space. Or free up space manually by deleting unnecessary files. Additionally, you can run DISM commands or do a system restore.

It will help to solve slow browser issues like slow download speed problems even though the internet is fast enough.

This article has showcased the most effective methods to solve slow browser problems in Windows 10 computers. If you have any suggestions that may help others, feel free to include them in the comments.

Show My Computer On Desktop on Windows 11: Quick Guide

Having your app icons, files, and folders added to your desktop makes them available on the first screen on your PC. It aids productive use and easy access to the item. Hence, you can show My Computer on the desktop alongside other programs.

Why is my PC not showing desktop icons?

The PC not showing desktop icons can occur for many underlying reasons. Disabling the visibility of desktop icon settings. You can turn on the option to access the feature.

Other factors that can cause my desktop icons to be missing or not showing are:

  • Show desktop items is disabled – To enable the desktop icons on your desktop, right-click on a free space on your desktop, hover over the View option, and check the Show desktop icons feature.
  • Running on the Tablet mode – Enabling the Tablet mode on your PC can cause issues with your desktop icons showing. It affects the display of desktop icons and changes core display settings.
  • Corrupt icon cache – A corrupt desktop icon on Windows will prevent it from working or showing on the computer. It compromises Windows canvas for rendering icons and impedes its processing.
  • Bugs-related issues and corrupt system files – Bugs from outdated Operating systems can cause the desktop icons not to show. Also, having corrupt system files in your computer can infect its display properties.

The above factors can be fixed by troubleshooting your PC and applying the solutions below.

How can I show My computer on the desktop in Windows 11?

1. Personalize the Desktop menu

  1. Right-click on the Desktop and select Personalize from the drop-down.
    personalize desktop settings
  2. Go to the Themes tab in the left pane. Under Related Settings, click on the Desktop icon settings.
    Desktop icons settings
  3. Check the box for Computer on the next page. Uncheck the Allow themes to change desktop icons. It prevents in-built system themes from hiding the Desktop icons.
    Enable my computer in Desktop
  4. Click the Apply button and OK to make this change to your PC.

Setting a personalized icon in the Desktop menu allows you to create icons from your File Explorer.

2. Create a shortcut on the Desktop

  1. Press Windows + D key to prompt the Show Desktop Menu.
  2. Right-click on your Desktop, select New from the drop-down menu, then click on the Shortcut option in the submenu drop-down.
    desktop shortcut
  3. Type %windir%\explorer.exe in the text bar and click on the Next button.
    input My computer
  4. Input This PC as the name and click the Finish button to complete the shortcut creation.
    Type This PC to create My computer on desktop
  5. Right-click on the Shortcut and select Properties from the drop-down.
    My computer's properties
  6. Go to the Shortcut tab and click on the Change Icon… button.
    Change icon for My computer on desktop
  7. Enter the following path in the text bar and click on the OK button: %windir%\System32\imageres.dll
  8. Locate This PC icon in the list, click on it, then the OK button.
  9. Click Apply, and then on OK to create the shortcut in Desktop.

Creating a shortcut for This PC will show it on your desktop and create a quick access icon where you can easily navigate This PC files.

Check our guide for fixing my desktop shortcuts not working on Windows 11 if you have issues using the shortcut.

3. Show My Computer on the desktop via the Group Policy Editor

  1. Press Windows + R to open the Run dialog box, type gpedit.msc, and click OK to launch the Local Group Policy Editor.
  2. Expand the User Configuration folder and then expand the folder Administrative Templates.
  3. Expand the Desktop folder and double-click on the Desktop subfolder.
    gpedit- doubleclick desktop folder
  4. In the right pane, click on Disable all items.
  5. Tick the radio button for Not Configured, click on the Apply button, and then on OK.
    select not configured

The above steps will configure your system to show the icons on your Desktop.

4. Rebuild This PC icon cache

  1. Left-click the Start button, type command prompt, and click Run as administrator.
  2. Click Yes on the User Account Control prompt.
  3. Type the following commands and press Enter after each command:
    • taskkill /F /IM explorer.exe
      cd /d %userprofile%\AppData\Local
      attrib –h IconCache.db
      del IconCache.db
      start explorer.exe
      use CMD to display MyComputer
  4. Restart your PC.

Rebuilding This PC cache will refactor the icon’s cache and properties to help it show on My desktop. It fixes any disruptions that may cause it not to show.

So, this is how to put This PC on desktop in Windows 11. The solutions above will also help you show My Computer icon on the desktop on Windows 10, but make sure that the Show desktop icons option is enabled.

However, you can encounter issues with the desktop icons being too big in Windows 11 and unnecessarily taking up space.

In addition, we have a detailed guide on fixing Desktop Icons flashing on Windows 11. Also, our readers may be interested in our article about how to bring back old desktop icons on Windows 11.

For further questions or suggestions, kindly drop them in the comments section.

How to Force Open Links in Google Chrome and Not Microsoft Edge

While Windows 11 is all great in terms of efficiency and performance, Microsoft has gone one step ahead in forcing users to use its Edge browser for almost everything. They have buried the option to change the default browser under different settings. We have a guide to help you change the browser in Windows 11.

Even if you change the default browser, certain aspects of the OS will force open the link in Microsoft Edge. This guide will guide you on how to open links in Google Chrome and not Microsoft Edge. So let us get right into it.

How can I open links in Google Chrome and not Microsoft Edge?

1. Use MSEdgeRedirect

  1. Download and install MSEdgeRedirect from GitHub.
  2. Open the installer and accept the agreement.
  3. Click on Next.
  4. Choose between Service mode or Active mode to continue.
    • Service mode: Runs without admin rights.
    • Active mode: Requires admin rights to run.
  5. If you decide to go ahead with the Service mode, select the below options:
    • Redirect PDFs to Choose your favorite PDF reader
    • Replace Bing Search Results with: Choose your browser
    • Replace Weather Results with: Choose your browser
  6. If you choose to go ahead with Active mode, select your favorite browser for the below options:
    • Bing Search
    • Bing Images
    • MSN News
    • MSN Weather
    • PDF Viewer
    • Windows Store ‘Apps’: Check the box
  7. Click on Install.
  8. Press the Win + I keys to open Settings.
  9. Click on Apps.
  10. Select Default apps.
  11. Locate your favorite browser and click on it.
  12. Select the option Set default.

Following the above steps, you can redirect any link to your favorite browser without interference from Microsoft Edge.

Do note that you need to select your favorite browser, in our case, Google Chrome, as your default browser to redirect all links to Chrome successfully.

If you are confused about which browser to choose from, you should definitely check out our guide, which lists some of the best browsers you can use on your Windows PC.

2. Use Chrometana Pro extension

  1. Launch Google Chrome.
  2. Head to the Chrome Web Store.
  3. Search for Chrometana Pro extension.
  4. Click on Add to Chrome.
  5. Select Add extension.
  6. Click on the extension icon to configure it.
  7. You can redirect Bing search queries to Google, DuckDuckGo, Yahoo, or Baidu, or even set a custom one.

Microsoft forces users to use Bing to browse the search results when using Windows search. The best part is that you can use the Chrometana Pro extension to redirect the search queries from Bing to Google or any other browser.

These two ways will help you open links in Google Chrome and not Microsoft Edge. Do note that you can choose other browsers as well; it is just that we have chosen Google Chrome as the matter of this discussion.

If you are using a low-end or an old PC and looking for browsers that will eat up less RAM, we suggest you check out our guide that lists some of the tested browsers that are light on resources.

We also have a guide that will give you two ways to set Google Chrome as your default browser on your Windows 11 PC.

Feel free to let us know in the comments below if you face any issues while following the above steps to open links in Google Chrome, not Microsoft Edge.

G-Sync not Working: 5 Solutions That Will Help You

Gamers, let us discuss the problem of G-sync not working. We will also discuss some common causes and the best possible solutions.

PC gaming has become a recreational activity where players compete against each other to achieve the best performance and results.

If you’re a gamer and want to achieve maximum performance and the best image quality, then you are most likely using the Nvidia G-Sync technology.

Although this technology can prevent screen tearing during gameplay sessions, many users reported that G-Sync isn’t working in Windows 10, so let’s see if we can fix that problem.

Note: To get the best out of the tech, you should use G-sync-compatible monitors.

Why is G-Sync not working?

From the experience of users who have had issues with G-Sync not working, we have come up with the most common causes. These include:

  • Problems with settings – In some cases, it could be a minor setting configuration that has hindered it from not working.
  • Outdated drivers – When drivers are obsolete or inadequate, they also could trigger problems with G-sync.
  • Hardware issues – The most common of these are RAM issues. You may need to change your RAM to get it working correctly.

While this is not an exhaustive list, it makes up most of the common culprits. So now, let us discuss solutions.

How can I fix G-Sync if it’s not working?

  1. Change V-Sync settings
  2. Install the latest drivers
  3. Check out the older driver
  4. Reset Windows 10
  5. Install the latest OS updates

1. Change V-Sync settings

  1. Right-click the desktop and select Nvidia Control Panel.
    g sync not working
  2. Go to Manage 3D settings in the left panel.
  3. Navigate to the Global Settings tab, locate the Vertical sync option, set this option to On, and click Apply to save changes.
    g sync not working
  4. You can also turn on Vertical sync for applications experiencing screen tearing from the Program Settings tab.
  5. After making these changes, restart your PC.

You can change the V-Sync settings if G-Sync isn’t working correctly on your Windows 10 PC. However, according to users, you need to turn on V-Sync to fix this problem.

As you can see, you can quickly fix this problem by turning on V-Sync in Nvidia Control Panel.

You need to disable V-Sync in your game and keep it enabled only in the Nvidia Control Panel.

2. Install the latest drivers

Many users reported solving the G-Sync problem after manually downloading and installing the latest Nvidia drivers.

If you don’t want the hassle of updating drivers manually, we suggest doing it automatically using trusted software.

3. Check out the older driver

  1. Press Windows + X and select Device Manager to open it.
  2. In the Device Manager window, scroll down and expand Display adapters.
  3. Right-click on the Nvidia driver, select Properties, click on the Driver tab and click the Roll Back Driver button.
    g sync not working
  4. Follow the instructions to complete the process.

Although this solution works for some users, we have to mention that it’s not perfect, as some users have experienced crashes with your Nvidia driver.

Users reported that they couldn’t watch videos on a second monitor after installing older drivers, so if you need to use two or more monitors, you might want to skip this solution.

4. Reset Windows 10

  1. Press Windows + I to open Settings, then click on the Update & Security option.
  2. Go to the Recovery tab, and click on the Get started button in the Reset this PC section.
    g sync not working
  3. Select Keep my files and follow the on-screen instructions to reset your PC.

A few users reported fixing problems with G-Sync not working on Windows 10 by performing a Windows 10 reset.

Resetting Windows 10 will delete all installed applications and files from your primary partition, so you might want to use this solution as a last resort.

5. Install the latest OS updates

  1. Open the Settings app using Windows + I, then click Update & Security.
  2. Click on Check for updates and install any updates found.

Problems with G-Sync can cause screen tearing and lead to reduced performance. If you’re a gamer with G-Sync problems, we strongly suggest you try out some of our solutions.

These solutions will come in handy for cases of G-Sync not working in fullscreen, with two monitors on HDMI or a FreeSync monitor.

If you have other suggestions or questions, don’t hesitate to leave them in the comments below.

How to Fix a Raw Drive Without Format [5 Easy Ways]

When your external hard drive or other storage becomes RAW, you won’t be able to access the files. If you try to open the files, you will be treated with an error message The file or directory is corrupted and unreadable, or You need to format the disk in drive before you can use it. Do you want to format it?

If you try to use some methods to access the files, you may lose the files altogether. It is where this guide comes into play because here, we will give you a bunch of methods that will help you with your query about how to fix raw drive without format. So let us get right into it.

Why has my external hard drive become RAW?

We researched the internet and found some of the most common reasons that would cause the external hard drive to become RAW.

  • You unsafely ejected your hard drive: There is a safely eject hard drive option available at the bottom taskbar that lets you remove the HDD without causing any issues. Not doing so can easily corrupt all the files or also cause the external hard drive to become RAW.
  • Issues because of a power outage: Because of a power outage or any other sudden failure also, the hard drive can turn into the RAW format.
  • The disk is formatted wrongly: If you do not format the disk or it has been wrongly formatted then also the external hard drive or other storage can become RAW.
  • Virus or malware attack: Of course, a virus or malware attack can not only cause issues while accessing the files inside the hard drive, but it can change the format of the hard drive altogether.
  • The external disk contains bad sectors: The disk area that is storing all of your files might contain bad sectors and the drive isn’t getting recognized by the system.

How can I fix the RAW drive without format?

1. Change the drive letter

  1. Open the Start menu by pressing the Win key.
  2. Type Create and format hard drive partitions and open it.
  3. Right-click on the drive and select Change Drive Letter and Path.
  4. Click on Change.
  5. Select the drive letter from the Assign the Following Drive Letter.
  6. Click on OK.
  7. A pop-up may appear Some programs that rely on drive letters might not run correctly. Do you want to continue? Select Yes.

2. Convert RAW to NTFS using CMD

  1. Press the Win key to open the Start menu.
  2. Open the command prompt as an administrator.
  3. Type the below command and press Enter. Diskpart
  4. Execute the below command. S: /FS :NTFS (S is the drive letter of your hard drive. If it is different, then you should type that)

If you do not wish to format the RAW drive, then you can use the above commands and convert your RAW drive into NTFS.

Do note that you should first restore data from the RAW drive before formatting it using the above commands.

3. Scan your PC for virus

  1. Open the Start menu by pressing the Win key.
  2. Type Windows Security.
  3. Click on Virus & threat protection.
  4. Select Quick scan.
  5. You can hit the Scan options and select Full scan for a deep scan.

We have shown the above steps for the in-built Windows Security antivirus tool. However, this isn’t as effective in most cases as other dedicated antivirus software.

In such a case, you should use a third-party antivirus tool to do the same. Again, we would suggest you check out our guide, which lists some of the best and tested antivirus tools that you can download for your PC and keep protected.

4. Repair bad sectors in the hard drive

4.1 Use CheckDisk utility

  1. Open the Start menu by pressing the Win key.
  2. Type Windows PowerShell and open it as an admin.
  3. Type the below command and press Enter. chkdsk D: /f /r (Make sure to replace the drive letter D with the drive letter of your external hard drive)
  4. Restart your PC.

4.2 Use Repair-Volume

  1. Open the Start menu by pressing the Win key.
  2. Type Windows PowerShell and open it as an admin.
  3. Type the below command and press Enter. Repair-Volume -DriveLetter D -OfflineScanAndFix (Replace the drive letter D with the drive letter of your external hard drive)
  4. After the fix is complete, restart your PC.

5. Run SFC Scan

  1. Press the Win key to open the Start menu.
  2. Open the command prompt as an administrator.
  3. Type the below command and press Enter. sfc /scannow
  4. Restart your PC.

You can use the Windows in-built tool called SFC Scan to fix the corrupt system files as often these could lead to several issues, including the one at hand, and it can help you fix the RAW external hard drive without formatting.

That is it from us in this guide. If your external hard drive is not showing up on the Windows PC, you should check out our guide, which will help you resolve the problem.

Often you will come across an error where your PC will say that the drive letter is not available. This issue is prominent in Windows 11; our guide will help you resolve the problem.

We also have a guide that comprehensively explains HDD failure, the main symptoms, and what you can do to fix it.

Feel free to let us know in the comments below which solutions helped you resolve your query on how to fix the RAW drive without format.

Xbox game pass slaughter game sales, says Microsoft

In 2018, Xbox boss Phil Spencer believed in his Game Pass subscription program. He said that it would not cause a decline in sales and do nothing but boost the number.

His logic? Well, he was sure that it would be an efficient means of advertising the promoted games because they would recommend their peers to purchase them in full after spending just $10. 

Fast forward to 2022, what happened on the field isn’t actually like that.

How bad does the Xbox Game Pass cause sales decline?

In a recent internal investigation launched by the UK’s Competition and Markets Authority (CMA) amidst Microsoft’s attempt to acquire Activision, Xbox Game Pass contributed to the sales decline of video games because more people aren’t looking to own the full game anymore. 

The report also adds that 12 months after the game’s addition to the Game pass, the sales would decline. 

“Microsoft submitted figures on the gamers who spent at least [reduced]% of their total game-time on Halo Infinite in the month following release. According to Microsoft, these figures show that while these gamers’ total game-time increases as a result of their engagement with the new Halo release, both B2P game-time on other games and Game Pass game-time fall.”

The cost of an Xbox Game Pass varies in each region, but generally, it costs as little as $10/month for PC with the first month for $1, $10 for console, and $15 for a gold subscription with EA Play. For comparison, the cost to fully purchase a triple-A title on Xbox can be as high as $60 to $70. 

The news comes amidst Microsoft’s latest attempt to acquire Activision for almost $70 billion, which went sideways last year. CMA experts believe that the deal could stifle competition in cloud gaming and eventually bring more bad than good to the gamers as there will be fewer choices made by the tech giant. 

What do you think about the future of the Xbox Game Pass subscription service? Let us know in the comments!

Fix: Local Security Policy Missing in Windows 10

Using the Local Security Policy console, you can set up security policies for computers or groups of computers available on your network. However, multiple user reports confirm that the Local Security Policy is missing on their Windows 10 PC.

This could be a problem, especially in the Home versions of the Windows OS. In this guide, we will show you how to add the Local Security Policy in Windows 10 and all the different ways you can open it. So let us get right into it.

Why is Local Security Policy missing in Windows 10?

If you are using Windows 10 and when you try to open the Local Security Policy, you get an error Windows 10 can’t find secpol.msc. This is because you are using the Home edition of Windows 10 on your PC.

Since it is an advanced feature and a part of the Group Policy Editor that lets admins administer or manage different security parameters of the host computers, Microsoft did not include this in the Home editions of Windows 10 or 11.

The Local Security Policy module, or often the entire Group Policy Editor, is only available in Windows 10 Enterprise, Pro, and Education editions. If you wish to access Local Security Policy in Windows 10 Home edition, you have manually enabled it.

How can I enable Local Security Policy in Windows 10?

1. Run a few commands

  1. Press the Win key to open the Start menu.
  2. Open Command Prompt as an admin.
  3. Type the below commands one by one and press Enter after each one. FOR %F IN ("%SystemRoot%\servicing\Packages\Microsoft-Windows-GroupPolicy-ClientTools-Package~*.mum") DO ( DISM /Online /NoRestart /Add-Package:"%F" ) FOR %F IN ("%SystemRoot%\servicing\Packages\Microsoft-Windows-GroupPolicy-ClientExtensions-Package~*.mum") DO ( DISM /Online /NoRestart /Add-Package:"%F" )
  4. Restart your PC.

2. Use a script

  1. Download the SecPol script.
  2. Right-click on the downloaded file and extract it.
  3. Make sure that you are connected to the internet.
  4. Open the folder and right-click on the gpedit-enabler.bat file.
  5. Select the Run as administrator option.
  6. A command prompt will open and will install the required files automatically on your PC.
  7. When the Press any key to continue message shows in the command prompt, press any key to exit CMD.
  8. Restart your PC.

3. Upgrade to Windows 10 Pro

  1. Press Win + I keys to open the Settings menu.
  2. Select Update & Security.
  3. Click on Activation on the left pane.
  4. Select the Go to Store option.
  5. Purchase the Pro version of Windows 10.
  6. After the system is upgraded, you will have Group Policy Editor natively.

How can I open Local Security Policy on Windows 10?

1. Use the Run dialogue

  1. Press Win + R keys to open the Run dialogue.
  2. Type secpol.msc and press Enter.
  3. Local Security Policy will open.

2. Use the Control Panel

  1. Press the Win key to open the Start menu.
  2. Open Control Panel.control pane
  3. Switch to Small icons under the View by option.
  4. Click on Windows Tools.
  5. Select Local Security Policy.

3. Use Command Prompt

  1. Press the Win key to open the Start menu.
  2. Open Command Prompt as an admin.
  3. Type the below command and press Enter. secpol

4. Use Task Manager

  1. Press the Win key to open the Start menu.
  2. Type Task Manager and open it.
  3. Click on File.
  4. Select Run new task.
  5. Type secpol.msc in the Create new task window.

5. Use File Explorer

  1. Press Win + E keys to open File Explorer.
  2. Type secpol.msc in the address bar and press Enter.
  3. The Local Security Policy will open.

These are the different ways to open Local Security Policy on your Windows 10 PC. Do note that you will be able to access the Local Security Policy only when you have added it following the methods mentioned above.

We have listed many ways to open the Group Policy Editor on a Windows 11 PC. The guide also mentioned enabling it in case you use the Home edition of Windows 11.

For users looking for ways to resolve the Group Policy Editor error on their Windows 10 PC or laptop, we have a bunch of solutions to help you resolve the issue.

If Local Security Policy is missing on your Windows 11 PC, you should check out our guide and enable it.

Feel free to let us know in the comments below if this guide helped you resolve the Local Security Policy missing on Windows 10.

Windows Settings Freezes or Hangs? 5 Ways to Fix it

Sometimes, when you try to access the display settings, the page hangs or freezes on your Windows computer. The annoying thing that you would notice is that other components work perfectly fine. Does this sound like a familiar experience to you?

If you’re unlucky, your cursor may freeze and disappear, making it extremely difficult to navigate your computer. Today, we shall explore why your display settings freeze and how to fix the issue.

Why do my display settings keep freezing?

If you are trying to access the display settings on your Windows device but keep ending up with a frozen screen, let’s get to the root of the problem. Here are some reasons why it happens:

  • Faulty drivers – This is a very common cause of display settings freezing. It can also cause Windows 11 random crashes. The easiest way to check if it’s your driver causing the problem is by uninstalling it and then reinstalling it. 
  • Corrupted system files – System files are the most important parts of your PC. They include the operating system, program files, and every component that makes up your computer. They’re also the most vulnerable to damage or corruption.
  • Virus/malware – Your computer may have a virus. Malware or viruses can be installed on your computer when you visit untrusted websites, open spam emails, or share files with other users. You need to have an antivirus program to protect your system from viruses and other malicious programs that may try to damage it.
  • Corrupted updates – Sometimes, when installing an update, something goes wrong, causing your Windows display settings to hang or stop working properly. To fix this problem, uninstall the update that caused it.
  • Startup programs – If your display settings are constantly freezing, one of the programs on your computer is likely causing them to do so. You can fix this issue by disabling some startup programs or installing a startup manager. 

How can I fix the display settings not opening?

1. Disable Startup programs

  1. Click on the Windows button, type Task Manager in the search bar, and click Open.
  2. Select the Startup tab and hit Disable all.
  3. You can return and enable them one by one until you find the culprit.

2. Update graphic drivers

  1. Click on the Windows button, type Device Manager in the search bar, and click Open.
  2. Navigate to Display adapters to expand, right-click on your graphics card, and select Update driver.display adapters
  3. Select Search automatically for drivers.

If you want to make this whole process easier, a third-party tool can help you streamline it, as it will scan and detect outdated drivers, and replace them with the latest versions. It also has an automatic update feature that continuously scans for driver updates and notifies you if an installed one goes out of date. This ensures your system is always secure and greatly reduces the risk of errors.

⇒ Get Fortect Driver Updater

3. Run a virus scan 

  1. Press the Windows key, search Windows Security and click Open.
  2. Select Virus & threat protection.
  3. Next, press Quick scan under Current threats.
  4. Wait for the process to finish and restart your system.

4. Execute the DISM and SFC commands

  1. Hit the Windows key, type cmd in the search bar and select Run as administrator.
  2. Enter the following command: DISM.exe /Online /Restorehealth 
  3. Allow for the command to be executed then type in the next one: sfc /scannowrun command to find issues with gpu.

5. Uninstall recent Windows updates

  1. Press the Windows + I keys simultaneously to open Settings.settings windows 11
  2. Navigate to Windows Updates then Go to Update history.
  3. Click on Uninstall updates.uninstall-updates-w11 computer-recognize-logitech-unifying-receiver
  4. Select the most recent update, then click Uninstall.

You can also:

  • Close any background programs that may be taking up memory space. You may also need to run disk cleanup to clear storage space.
  • Restart your PC. 

What is the shortcut to reset the monitor?

You can easily restart the graphics driver using the Ctrl + Shift + B keyboard shortcut, followed by a beep, indicating that the process was completed successfully.

For the display parameters, you will have to reset them manually via the Settings app, but it shouldn’t take much time. If you face major black screen issues and want to reset the monitor and other settings, reinstalling Windows is the best solution.

That’s how you solve the issue when your Windows display settings hang, won’t load, or tend to freeze. If your OS is constantly experiencing performance issues, we have tips on how to make your Windows 11 faster and more responsive.

Alternatively, you can opt for Windows optimizer software which will do the job automatically.

Don’t let the Windows Settings scrolling bug annoy you any longer. Discover solutions to put an end to it.

Leave a comment down below on the solution that worked out for you.

Steam Deck Fatal Error [Causes & Easy Fixes]

Steam Deck is a great portable game console. However, users report the Steam Deck fatal error they encounter when using the handheld device, preventing them from accessing their games.

Also, users complain about running into Steam needing to be online to update error.

What is a fatal error?

A fatal error is an error that appears on a device for numerous reasons, causing your program to terminate without prior warning or saving its state. It stops a program from running due to faulty hardware, bugs, viruses, and other issues.

The error message reads Fatal Error: Steam must be online to update. Please confirm your network connection and try again.

However, encountering the fatal error on Steam Deck returns halts any activity on the program.

What causes fatal errors in Steam Deck?

Some common causes include:

  • Network connection issues – When not connected to a stable and fast network connection, it can prevent the device from connecting to Steam servers and result in a Fatal error.
  • Issues with Steam servers – Without access to the Steam servers, you can run into the Fatal error on Steam Deck because they cannot be reached.
  • Corrupt game files in the Steam library – Some of your installed games in the Steam library on the Deck can be corrupted or compromised, resulting in a Fatal Error.

The factors responsible for the Fatal error in Steam Deck may vary depending on the device. Nonetheless, we’ll take you through some fixes to resolve the error.

How do I fix the Steam Deck fatal error?

Before trying any advanced steps for the error, proceed with the following:

  • Check your network connection and restart your router.
  • Check Steam’s official Twitter page to check if there’s any update regarding the server.
  • Restart the Steam Deck handheld a few times and check if the Fatal error persists.

If you still have this problem after the preliminary checks above, try the solutions below to fix it.

1. Use your Android phone’s mobile tethering

Note icon NOTE
This solution will only work with Android devices that come with USB tethering functionality.
  1. Connect your Android phone with Steam Deck with a USB-C cable (preferably the one that came with your smartphone).
  2. On your phone, go to Settings and access the About phone menu and tap the build number 5 times to activate the developer options.
  3. Go back to Settings, access Developer options, tap on USB or Default USB configuration, and check the USB tethering option.
  4. Next, go back to Settings tap the Connected devices, select USB, tap on This device, then click USB tethering.

This way, your Steam Deck will be able to use your phone’s internet connection and will be able to go through with the update.

2. Use a keyboard

Note icon NOTE
For this, you will need either a USB-C keyboard or a normal keyboard with a USB-C adapter.
  1. Connect the keyboard to the USB-C port of your Steam Deck.
  2. Press Ctrl + Alt + F4 on your keyboard.
  3. In the login screen type deck for the Username and no password and press Enter.
  4. Now, type steamos-session-select plasma and press Enter.
  5. Turn off Steam Deck by pressing the Power button.
  6. Press the power button to turn it back on, and it should boot up in Desktop mode.
  7. Reconnect to the internet and switch back to Steam OS this time will boot normally.

3. Update Steam Deck firmware

  1. Press the Steam button on your Steam Deck to open the Steam Menu and click Settings.steam deck seetings
  2. Click on Settings and navigate to System. Click on Check For Updates on the right. If there’s an update available, click the Apply button to install it.check for updates on Steam deck
  3. Once the update is complete, click on the Restart button to incorporate the updates into the Steam Deck device.

Updating the Steam Deck will install the latest patches for fixing bugs and improving its overall performance. It will resolve the Fatal error. You can read our guide on updating the Steam Deck Software for more details.

4. Verify the integrity of your game files

  1. Power on your Steam Deck and go to the Deck Library.Deck Library
  2. Right-click on the game prompting the fatal error, and select Properties from the drop-down.
  3. Click on Local files and click the Verify integrity of game files button.Verify game integrity on steram deck
  4. Wait for the process to complete and check if it returns any error. Try launching the game and see if it prompts the Fatal Error.

Verifying your game files will resolve issues with poorly installed games. Read what to do if you can’t verify game files integrity on Steam.

5. Factory reset Steam Deck

  1. Press the Steam button on your Steam Deck to open the Steam Menu and click Settings.steam deck seetings
  2. Navigate to the System tab and select Factory Reset. Follow the onscreen prompts to finish the resetting process.steam deck factory reset

Resetting the Steam Deck handheld will clear any corrupt files and apps that may cause the Fatal error to occur.

Also, our readers can check how to run Android apps on Steam Deck in a few steps.

For more questions or suggestions on this guide, kindly use the comments below.

6 Best Software to Create Multiboot USB Flash

Creating a bootable USB drive is easy, but what if you need multiple operating systems on one drive? Multiboot USB software simplifies this by allowing you to install and manage several OS on a single USB. 

Check out our carefully reviewed multiboot USB software list:

What is the top software to create multiboot USB drives?

Ventoy lets you create multiboot USB drives by dragging and dropping ISOs onto your drive. 

It supports both UEFI and Legacy boot modes, and you can store multiple operating systems on the same drive without needing to reformat. 

It’s a practical option for quickly testing or using different operating systems.

Pros:

  • Drag-and-drop setup
  • Supports multiple OS formats (ISO, WIM, IMG)
  • UEFI and Legacy boot support
  • Allows file storage alongside OS installations

Cons:

  • Limited customization options
  • Initial setup may confuse beginners

⇒ Get Ventoy

2. Easy2Boot – Has 3 multiboot systems

Easy2Boot provides flexibility with three boot menu systems: Grub4Dos, GrubFM, and Ventoy.

It’s useful for more advanced users who need precise control over their multiboot setups. 

It supports a wide range of OS formats and boot types, but the setup can be more complex compared to simpler tools.

Pros:

  • Multiple boot menu options
  • Supports many file formats (ISO, WIM, VHD)
  • Works with both UEFI and Legacy boot
  • Can store files alongside OSes

Cons:

  • More complex setup process
  • Not ideal for beginners

⇒ Get Easy2Boot

3. YUMI – Simplest to use

YUMI is a simple tool for creating multiboot USB drives, requiring minimal setup. It’s portable, so no installation is needed. 

You can add one operating system at a time. The process is straightforward, but you can’t add multiple at the same time.

It’s a good choice for basic multiboot tasks but lacks some advanced features.

Pros:

  • Simple and easy to use
  • No installation required (portable)
  • Supports a variety of OSes
  • Works with FAT32 and NTFS

Cons:

  • Can’t add multiple OSes at once
  • Lacks advanced features

⇒ Get YUMI

4. AIO Boot – Supports various bootloaders

AIO Boot supports multiple bootloaders, including Grub2, Clover, and rEFInd, making it versatile for custom setups. 

It works with both UEFI and Legacy boot modes and supports many file formats. 

While it’s a powerful tool, its setup process is more involved and might require technical know-how.

Pros:

  • Supports multiple bootloaders (Grub2, Clover, rEFInd)
  • Works with UEFI and Legacy boot
  • Supports many file formats (ISO, WIM, VHD)
  • Secure Boot support

Cons:

  • Setup is complicated
  • Discontinued with limited updates

⇒ Get AIO Boot

5. Sardu – Supports antivirus boot creation

Sardu lets you create multiboot USB drives with a range of OSes and utility tools, including antivirus software. 

The free version covers basic functionality, but the premium version offers additional features like automatic updates and direct ISO downloads. 

It’s a good option for creating recovery and tool-focused drives.

Pros:

  • Supports Windows and Linux
  • Can include antivirus and utility tools
  • Free version works well for basic tasks

Cons:

  • Limited to FAT32 file system
  • Premium version needed for advanced features

⇒ Download Sardu

6. WinDiskWriter – Quick tool for creating Windows USB drives

WinDiskWriter is designed for quickly creating bootable USB drives for Windows installations.

It supports ISO and WIM files and is fast and easy to use. However, it only works with Windows OSes and does not support Linux or other operating systems.

Pros:

  • Quick for Windows setups
  • Supports ISO and WIM files
  • Easy to use

Cons:

  • No support for Linux or other OSes
  • Limited to Windows OS

⇒ GetWinDiskWriter

Multiboot USB drives are not just for installing operating systems but can also be used to create a rescue USB drive to repair your system in case of system failure.

While you can use any bootable USB creator software, Multiboot Creators provide the flexibility of adding all kinds of tools on a single USB drive.

Some important tools in a multiboot USB drive include an antivirus program, partition manager, Linux, and Windows OS, network diagnosis tools and rescue disk, etc.

To learn more about these tools, visit our guide the best bootable pendrive software.

Have you tried any other multiboot USB creator not mentioned in this list? Do let us know in the comments below.

Improve PC Performance on Windows 10 [Must-Try Tips]

Windows 10 and a multitude of third-party apps include system optimization tools. Those tools enable you to improve your PC performance on Windows 10 and fix system errors that might undermine the OS.

So to give your PC a boost, you should make the most of these tools. While this sounds simple, you still need a detailed guide to walk you through the process of optimizing your system.

Why is my Windows 10 so slow and laggy?

Many factors can make your Windows 10 slow and laggy over time. Listed below are some of the principal reasons:

  • Outdated PC: If your operating system is outdated, your PC is likely to get slower. You can boost your PC performance by updating Windows 10 to the latest version.
  • Too many apps opened: Sometimes, your PC might lag because you have too many unnecessary apps opened. Closing this app should restore normalcy here.
  • Presence of malware: Another possible reason for this issue is the presence of viruses on your PC. Running a malware scan with Microsoft Defender or third-party antivirus software should do the trick.

How can I improve PC performance on Windows 10?

1. Check the RAM usage and close the background processes

  1. Right-click the taskbar and select Task Manager.
    speed up windows 10 task manager
  2. To check RAM usage, select the Performance tab on the Task Manager window as shown below (that includes a Memory graph that shows you the amount of RAM in use).
  3. Click the Processes tab. That shows your software open on the taskbar and background processes.
  4. Select background processes there and press their End task button to close them (do not close the more essential processes listed under Windows processes).

RAM is perhaps the most crucial system resource. This is the amount of temporary storage a PC has for software.

All software needs at least a little RAM, and many open programs and background processes will overstretch system resources. For example, new Windows games are generally the most resource-hungry software.

So, to improve your PC performance for Windows 10 gaming, you need to reduce your PC RAM usage.

Don’t forget that disabling browser extensions, apps, and plug-ins will also save some RAM.

2. Run the System File Checker

  1. Press the Windows key, type cmd, and select Run as administrator under Command Prompt.
    cmd admin improve pc performance windows 10
  2. Type the command below and hit Enter to run it: sfc/scannowsfc scan
  3. Then, finally, wait for the command to finish running.

The System File Checker is a somewhat overlooked maintenance tool that can fix corrupt system files. So, the SFC scan should be your go-to option to speed up Windows 10 with one command.

3. Use a third-party software

One of the best ways to improve performance in Windows 10 is to use a reliable third-party optimization tool.

While some optimizations could be done manually, they require a certain degree of skill and experience to pull off. Otherwise, you might end up damaging your PC instead of repairing it.

Remember that the best Windows 10 optimizer software comes with PC cleaning features, speed boosters, and integrated performance monitors.

On top of that, many of these tools allow you to create backups of your registries before fixing them, ensuring that no damage is done to your PC.

You can also use these utilities to manage your disks. They typically include disk defragmentation tools and disk backup and restore options.

4. Remove the Startup items

  1. Open the Task Manager as before.
  2. Now click the Startup tab to open a list of your startup software as below.
  3. Right-click each startup item and select the Disable option.
    disable

You can save RAM and speed up the Windows 10 startup by removing startup software. Those are programs that open automatically during the Windows startup.

5. Update the drives with third-party software

Antiquated drivers can slow down desktops and laptops, and some hardware devices might not work correctly without the most updated drivers.

True, Windows Update automatically updates essential drivers, but that doesn’t guarantee it will update all of them. As such, you can check and update drivers with the Device Manager in Windows.

However, there are various third-party driver updating programs that identify and update outdated drivers automatically.

    6. Speed up the Windows 10 Boot

  1. 1. In the Windows search box type Control Panel and hit Enter.

  2. 2. Click on System.

    improve pc performance system
  3. 3. Now select Power & sleep and click on Additional power settings.

    improve pc performance power
  4. 4. Click Choose what the power buttons do on the left of the tab.

    improve pc performance buttons
  5. 5. The System Settings tab includes a Turn on fast startup option. If that option is grayed out, select Change settings that are currently unavailable.

    improve pc performance windows settings
  6. 6. Click the Turn on fast startup checkbox to select that option.

  7. 7. Press the Save Changes button to apply the new setting.

    improve pc performance startup
  8. 8. Press the Windows key + R keyboard shortcut and enter msconfig to access System Configuration.

    improve pc performance optimize
  9. 9. Click the Boot tab to open the settings.

  10. 10. Select the No GUI boot option to remove the Windows welcome screen.

    improve pc performance
  11. 11. Press Apply and then click OK to save the settings.

  12. 12. Restart Windows to apply the new MSconfig settings.

If Windows 10 takes a while to boot up fully, you can speed it up to improve PC performance. You can boost the startup with the Turn on fast startup option and the MSConfig tool included in Windows.

7. Adjust the Performance options

  1. Press the Windows key + R hotkey, tap in sysdm.cpl, and press Enter.
    sysdm improve pc performance windows 10
  2. Now, click the Advanced tab on the System Properties window and press the Settings button.
    advanced settings
  3. The Visual Effects tab lists all the effects, which will probably be selected by default.
  4. Selecting the Adjust for best performance option will deselect all the effect settings.
    adjust for best
  5. Finally, press the Apply and OK buttons to confirm the new settings.

Windows 10 also has a Performance Options window from which you can adjust the platform’s visual effects.

The snazzy effects might add a little extra gloss to Windows, but it also need extra system resources.

If your desktop or laptop has more limited RAM, you might switch some effects off to speed it up. Find out more about the sysdm.cpl tool and how to use it in our comprehensive article.

8. Check for low disk space

  1. Click the File Explorer button on the taskbar.
  2. Then select This PC which shows you the devices and drives and how much free HDD you have as below.
  3. You can use a more detailed disk analyzer tool by adding CCleaner to Windows 10. Then open that software, click Tools, and select Disk Analyzer.
  4. You can select to scan for more specific file categories to see what file formats are taking up the most HDD space. Alternatively, you could select the Everything checkbox and press the Analyze button.
  5. Click the Cleaner button at the top left of CCleaner to open its HDD cleaner tool.
  6. You can select to scan for various Windows and third-party software junk files by clicking their corresponding checkboxes. As such, CCleaner is much more flexible than the Disk Clean-up tool.
  7. Press the Scan button to scan for items to delete. Then CCleaner will show you what it will erase and how much storage space will save.
  8. Press the Run Cleaner button to erase the files.
  9. Removing software is the best way to free up HDD space. Click Tools and select Uninstall.
  10. You can select the software there and press the Uninstall button to remove programs.

That is how to clean up your computer to run faster Windows 10. Almost every PC optimization utility comes with a hard disk cleaner, and Windows also has its own Disk Clean-up tool to delete junk files with.

HDD cleaners are essential tools, as overly full hard disks can slow things down. In addition, virtual memory combines RAM and hard disk space, so a full hard disk restricts the amount of virtual memory.

In addition, erasing junk files will give you more space for software and your own documents, photos, MP3s, videos, etc.

The solution above shows you how you can check for low HDD space and erase junk files with CCleaner, which has better options than the Disk Clean-up tool.

9. Run the System Maintenance Troubleshooter

  1. In the Windows search box, type Control Panel and press Enter.
  2. Then, click on System and Security and select Security and maintenance.security and maintenance control panel
  3. Click on Maintenance.
    maintenance
  4. Click on Start maintenance with the windows defender shield icon next to it.
    start maintenance
  5. Wait for the process to finish.

The System Maintenance troubleshooter is another handy tool that can boost PC performance. This deletes unused shortcuts and files and fulfills other maintenance duties.

For example, running the tool can fix the troubleshooting history that’s taking up disk space.

10. Speed up context menus

  1. Press the Windows key + R, type regedit, and click OK.
    regedit
  2. Navigate to this registry key: HKEY_CURRENT_USER\Control Panel\Desktop
  3. Double-click MenuShowDelay.
    menu show
  4. Set the Value data to something like 270.
  5. Finally, click the OK button.
    value data

This is a basic registry tweak. Adjusting the MenuShowDelay string can minimize the delay before a context menu opens. By default, that string has a 400-millisecond delay.

Those are a few best ways to improve your PC performance on Windows 10.

There’s no essential requirement for extra third-party software, but freeware programs such as Outbyte Driver Updater and CCleaner have better options for updating drivers and deleting junk files.

However, Windows 10 already has the more essential maintenance tools and options you’ll need.

If you need a list of the best Windows utilities to tune up your PC, check our detailed guide for the top options.

If you have any more tips or questions about the subject, please share them in the comments section below.

Fix: This Screensaver Requires the Adobe Flash Player

The screensaver is an excellent addition that helps personalize the device, and many have become fond of it using the same screensaver for years.

Since Flash is no longer available, many users reported that their screensaver has also stopped working, creating frustration and discomfort.

This guide will show you how to get rid of this screensaver requires the Adobe Flash Player for Internet Explorer error message on your PC.

How can I fix This screensaver requires the Adobe Flash Player for Internet Explorer?

1. Use the built-in screensaver in Windows 10

  1. Press the Windows key + S, type screensaver, and select Change screen saver from the results list.
  2. Open the Screen saver menu and select one of the available screensavers.
  3. Finally, click on Apply and OK to save changes.

Thankfully, Windows 10 comes with a built-in screensaver option. You can either choose from the existing options or upload different pictures and create one.

You will have 6 available options at your disposal, and you can change the settings as needed to ensure that the final result is satisfactory.

2. Use a specialized app

We know that change is not always easy or received with open arms, but in this case, since Flash is no longer supported in Windows 10, using the old screensaver based on it is no longer an option.

Thankfully, there is specialized software available that offers you an impressive number of screensavers that you can install on your device.

One such tool we have tested, and we recommend you give it a try, is DeskScapes. It’s easy to install and to start using.

3. Check for the newer version of the screensaver

If the Flash screensaver is not working, your best choice of action is to replace it. However, some well-known screensavers are getting updated to work without Flash.

If your favorite screensaver isn’t working, check the development page. You will see if the developers are working on a new version.

Keep in mind that this applies only to newer screensavers. If you’re using a screensaver five or more years old, it’s likely that it won’t get updated.

As shown in this article, although letting go of the old screensaver may not be comfortable, using a new one is a simple process.

By following any of our suggestions, you can fix this this screensaver requires the Adobe Flash Player for Internet Explorer easily on your PC.

If you need a list of the best aesthetic screensavers for Windows 10, check our detailed guide for the top options. We also have a guide that explores if it’s possible to download Adobe Flash Player for Windows 10, so don’t miss it.

Feel free to let us know if you have any suggestions or recommendations in the comments below.

The Remote Connection was not Made: 9 Ways to Resolve it

VPNs (Virtual Private Networks) are tools that make it harder for outside entities to track your browsing behavior while circumventing censorship. While many users use VPNs relatively quickly, some complain that the remote connection was not made.

This issue can be frustrating, but it is not the most difficult to solve, as we will show in this guide.

What caused The remote connection was not made because the name of the remote access server did not resolve?

Several factors can cause the remote connection was not made error message. Below are some of the notable causes:

  • Issues with third-party apps: One of the first things to check is if there is no third-party app messing with your VPN. You can verify this by performing a clean boot and removing any faulty app on your PC.
  • Antivirus interference: At times, the connection to the remote computer cannot be established error message can happen because your antivirus or firewall is blocking the connection. Disabling the two security features temporarily should fix the issue.
  • Wrong hostname: Sometimes, you might encounter this error if you enter the wrong hostname. So, ensure that the hostname you entered is correct.

Speaking of this problem, here are some similar errors that users reported:

  • The remote connection was not made because the attempted VPN tunnels failed Windows 10, Windows 11, and L2TP/IPsec: This is another variation of this problem. If you encounter this issue, try disabling your antivirus or firewall and check if that helps.
  • A connection to the remote access was not made because the modem was not found: According to users, this error can appear due to your DNS, so try changing your DNS settings and check if that solves the problem.
  • The remote connection was not made error 800, 868: There are various error codes that can appear alongside this message. However, you should be able to fix them using one of our solutions.
  • The remote connection was denied, has timed out, was interrupted, and is reconnecting: This issue can be caused by your configuration. To fix the problem, check the configuration and see if that helps.
  • The remote connection was denied because the username and password on the Mikrotik router: Make sure you entered the correct credentials.

How can I fix The remote connection was not made because the name of the remote access server did not resolve?

1. Double-check the Hostname

First, double-check that you’re entering the correct hostname.

The hostname is the device’s name that configures the remote access, as explained above. Check the name and make sure it matches the Hostname in your remote access connection.

Ensure there are no typos in the hostname entered to connect with VPN. Alternatively, you can establish a VPN connection with your server IP address.

2. Use a reliable VPN to create a remote connection

  1. Download and install ExpressVPN.
  2. Launch it from the Start Menu.
  3. Tweak your connection preferences.

VPNs are beneficial, and more often than not, you will eventually have to resort to using one.

Several benefits come with a good VPN.

First and foremost, they ensure your connection is private and protect sensitive data about your identity, location, and browsing activity.

Secondly, they can help boost your connection for gaming or help you access the geo-restricted content on streaming platforms.

Unfortunately, if the VPN you use is not completely up-to-date or set up faulty, you may experience errors like this Remote access connection.

VPN software is quite similar in settings, so you can follow this guide even if you use something else.

If you have a VPN that automatically connects to a server, try manually changing to a different server and see if the problem persists.

ExpressVPN

Avoid remote desktop issues by connecting using ExpressVPN’s premium servers!
Free trial Visit website

3. Flush the DNS and reset Winstock

  1. Press the Windows key, type cmd, and select Run as administrator under Command Prompt.
  2. Run the following commands one by one: ipconfig /flushdnsipconfig /registerdns ipconfig /release ipconfig /renew netsh winsock reset

Flushing the DNS (Domain Name System) and resetting network settings are some of the most effective fixes for this VPN error. After running these commands, check if the problem is resolved.

4. Disable your firewall

  1. Press the Windows key + S, type firewall, and choose Windows Defender Firewall from the list.
  2. Select Turn Windows Defender Firewall on or off in the left pane.
  3. Now, select Turn off Windows Defender Firewall (not recommended) for both Private and Public networks and click OK to save changes.

A firewall is a great security feature, but sometimes your firewall can cause The remote connection was not made error to appear. If you encounter this issue, you might have to temporarily disable your firewall.

If the problem doesn’t appear after doing this, your firewall isn’t correctly configured. Therefore, you need to enable your firewall and check your configuration to fix it.

5. Change your DNS

  1. Right-click the network icon on your Taskbar and select your network from the menu.
  2. Now click on the Change adapter options.
  3. A list of all network connections on your PC will now appear. Next, right-click your network connection and choose Properties.
  4. Select Internet Protocol Version 4 (TCP/IPv4) and click Properties.
  5. Now select Use the following DNS server addresses and enter 8.8.8.8 as Preferred DNS server and 8.8.4.4 as Alternate DNS server.
  6. Now, click OK to save changes.

After doing that, you’ll use Google’s DNS, and the issue should be resolved. If you want, you can also use OpenDNS or any other DNS by using this method.

6. Restart RasMan process

  1. Press the Windows key + S, type cmd, and select Run as administrator under Command Prompt.
    cmd adminthe remote connection was not made
  2. Type the following commands and hit Enter after each: net stop RasMannet start net start RasMannet

Many users reported that The remote connection was not made error message can occur due to RasMan process. To fix the problem, it’s required that you restart this process.

After running these two commands, the RasMan process will restart, and the issue should be resolved entirely.

7. Disable third-party antivirus software

If you keep getting The remote connection was not made an error message the problem might be your antivirus. Third-party antivirus tools can sometimes interfere with Windows and cause this and other errors to occur.

To fix the problem, you need to disable certain antivirus features and check if that helps. For example, you might have to disable your antivirus if the issue is still temporary.

If this fixes the issue, you might have to remove the security software and use another. Many options are available so that you can find the best antivirus software for your particular needs.

8. Disable your proxy

  1. Press the Windows key + I to open the Settings app and select Network & Internet.
  2. Select Proxy from the menu on the left, and in the right pane, disable all options.

Many users use proxy to protect their privacy online, but sometimes your proxy can cause The remote connection was not made an error to appear. To fix the problem, it’s advised to disable your proxy.

9. Perform a clean boot

  1. Press the Windows key + R, type msconfig, and click OK.
  2. Select the Services tab, check the Hide all Microsoft services box, and click the Disable all button.
  3. Navigate to the Startup tab and click Open Task Manager.
  4. Right-click each entry on the newly opened Task Manager window and choose Disable.
  5. Once you disable all startup apps, go back to the System Configuration window and click Apply, followed by OK.
  6. Finally, restart your PC.

Sometimes third-party applications or services can interfere with Windows and cause this and other errors to appear. It would be best to start your PC in Clean boot mode to fix the problem.

Once your PC restarts, check if the problem is still there. If not, you need to enable disabled services and apps one by one until you find the cause.

Once you find the problematic application, you must remove it from your Windows 10 PC.

These are tested solutions to get back on your remote desktop connection. In addition, there are several ways you can connect from one device to another and control a PC through another PC.

You could use Windows 10’s built-in Remote Desktop feature or a third-party remote access tool such as TeamViewer.

Feel free to let us know the solution that helped you fix this issue in the comments below.

Edge Collections not Syncing: 3 Ways to get Them Working

In this guide, we explore the issue of Edge collections not syncing.

Microsoft Edge has quickly become one of the most powerful web browsers available. The various features and performance awards that it earns regularly are impressive, but one, in particular, stands out for users who need to interact with more devices.

Without a doubt, we’re referring to the Microsoft Edge sync feature, a useful tool that makes our lives substantially more accessible.

Without further ado, here’s how to fix Collections syncing in Microsoft Edge on desktops and smartphones.

Why are Edge Collections not syncing?

There could be several reasons why Edge Collections are not syncing, including the following:

  • Sync is not turned on – Make sure that sync is turned on for Edge Collections in your browser settings.
  • Internet connection issues – Check that you have a stable internet connection, as syncing requires an active connection.
  • Outdated browser or OS – Ensure that you are running the latest version of Edge and that your OS is up to date.
  • Sync conflicts – If you have changed Edge Collections on multiple devices, there may be conflicts preventing syncing. 
  • Server issues – There could be server issues preventing sync from occurring. 

Once we have an excellent comprehension of a possible cause, it is time to visit the top recommended solutions.

What can I do if Collections aren’t syncing in Windows 11?

1. Sign in with a local account

  1. Press the Windows key + I to open the Settings app, and navigate to Accounts in the left panel, followed by Your info from the right side.acc-info edge collections not syncing
  2. Now scroll down until you meet the Sign in with a local account instead option and click on it.local-acc edge collections not syncing
  3. Choose your Microsoft account, enter your password, then restart your computer to apply the changes made.

You can also test whether the Collections feature is syncing with your devices after you log into the same local account on all your other devices.

2. Enable Collections syncing from Edge

  1. Enter Edge, click on your icon, then choose Manage profile settings under the drop-down panel.sync-manage edge collections not syncing
  2. Now click on the Sync option, scroll down until you meet the Collections option, and switch on the toggle next to it.sync-on edge collections not syncing

Restart Edge, then test whether Collections syncing is working correctly on all your devices. Again, don’t forget to be logged in with the same account everywhere.

3. Restart the SettingsSyncHost.exe process

  1. Press the CTRL + ALT + DELETE buttons on your keyboard simultaneously, then click on Task Manager to open it.task-manager-home edge collections not syncing
  2. Now search for the SettingsSyncHost.exe process, click on it, and choose End task.end-task edge collections not syncing
  3. Click on File on the top, choose the Run new task option, type in SettingsSyncHost.exe, then hit Enter to restart the process.new-task edge collections not syncing

It is possible that the SettingsSyncHost.exe process itself is not functioning correctly in some instances. Thus ending the task and restarting it will give it a fresh start and remove any errors along the way.

In conclusion, Edge Collections can help organize and manage your browsing activities. However, when they fail to sync correctly, it can be frustrating and lead to losing important data.

By following the three methods outlined in this article, you can synch your Edge Collections again in no time.

CCleaner not Installing: 7 Solutions to Make it Work Again

CCleaner is one of the most popular programs for cleaning and optimizing a computer. Although it has a free version, this program offers the facilities of the most expensive programs of its kind.

It keeps your computer clean and increases its operating speed by deleting temporary files and browser caches and fixing DLLs and the registry. In addition, it has different functions to customize and optimize your computer: Duplicate Finder, Disk Analyzer, Startup, System Restore, and many more.

Many users complain they cannot start the installation due to the following error Windows cannot access the specified device, path, or file. This is because you may not have the appropriate permissions to access the item.

Let us discuss some causes and the most reliable solutions.

Why is CCleaner not installing?

There could be a variety of reasons why CCleaner is not installing, including the following:

  • Corrupted installation file – CCleaner may not be installing because the installation file may be corrupt. For example, a bad download, a virus infection, or an interrupted download process can corrupt the file. 
  • Lack of administrative privileges – You must have administrative privileges on your computer to install CCleaner. This is because the installation process requires permissions only an administrator can grant. 
  • Conflicting software – CCleaner may not install if there is conflicting software on your computer. Antivirus software, firewalls, or other system utilities may interfere with the installation process. 
  • Insufficient disk space – CCleaner may not install if your computer has low disk space. This is because the installation requires a certain amount of free space on your hard drive. 

CCleaner is a great application; however, many users reported that the CCleaner installer doesn’t work on their PC. Not being able to install CCleaner can be a problem, and speaking of problems, users reported the following issues as well:

  • CCleaner This app can’t run on this PC – This is a relatively common problem, and we already covered the similar issue in our This app can’t run on this PC article, so you might want to check it out for more in-depth solutions.
  • CCleaner installer has stopped working, not working, won’t run – Many issues can occur and prevent you from installing CCleaner. If you encounter any problems, ensure you have the necessary permissions.
  • CCleaner this installer requires you to be logged in as an administrator – Sometimes, this error can occur if you don’t have administrative privileges on your PC. However, you can fix this simply by running the setup file as the administrator.

Below we go through some of the most recommended solutions.

What can I do if CCleaner is not installing?

1. Check and disable your antivirus

  1. Click on the hidden access arrow in the Taskbar.
    ccleaner not installing
  2. Click on your antivirus icon, hover over Avast shields Control and select Disable for 10 minutes (This step varies for different antivirus software).

Sometimes your antivirus can prevent you from installing certain applications, and to fix that, you might have to disable certain antivirus features and see if that helps.

If disabling the features doesn’t work, you might temporarily have to disable your entire antivirus. Once you do that, try to install it again and check if that solves the issue.

What we recommend you do in this particular case to fix the issue is to remove your antivirus software and install another option that won’t interfere with other apps on your PC.

Thankfully, you can find plenty of good antivirus software that can protect your device without affecting other apps or using too many CPU resources.

If you are unsure which one will work best for you, we recommend getting an antivirus with a trial version. This will allow testing the software for free, so you won’t be stuck with a subscription you’re not completely satisfied with.

2. Check your permissions

  1. Right-click on the file and select Properties.
    ccleaner not installing
  2. Now click the Security tab, select your name from the Group or user names tab, and click on the Edit button.
    ccleaner not installing
  3. All you have to do here is to check the Full Control, then click on Apply, and you can work with that file.

3. Reinstall CCleaner

  1. Head to the location where you typically store your applications. Typically a local disk such as the path below:
    C:\ Program Files
  2. See if you have any CCleaner folder and open it.
  3. If you have an uninstaller wizard in the folder, open it and follow the prompts to uninstall the current version of CCleaner.
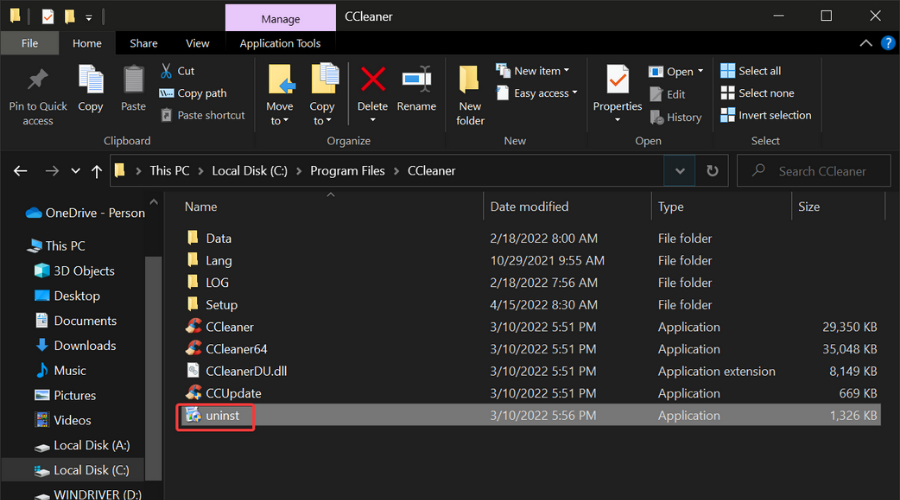
  4. Wait for the process to complete, check if you still have the CCleaner folder in Program Files, and delete it.
  5. Head to the CCleaner website and download the installer.
  6. Follow the prompts and complete the installation.
Note icon NOTE
If CCleaner has previously been uninstalled from your PC, you may not have the uninstaller file in Program Files, but it’s still possible to have other leftover files. In this case, skip Step 3 and delete your files.

According to users that claim to have this issue, the installation process was finished without any problems after removing junk files.

If you are unsure where your leftover files may be or how to ensure they’re completely gone, check the following solution for more in-depth information on this topic.

4. Remove all CCleaner files

Many users reported that they could not install a new version of CCleaner on their PC. This can occur if you have files from the previous version of it that is still on your PC.

To fix this problem, it’s advised to remove any leftover files and registry entries from your PC. This is a tedious task if you plan to do it manually, so it’s always better to use an automated solution.

Many great applications can easily remove leftover files, thus eliminating any trace of the selected program from your PC.

Uninstaller software is configured only to remove the apps you select. They do not affect anything else on your system, so they are completely safe.

Many uninstallers are also equipped with optimization tools that help clean your PC of broken files, registry entries, cluttered browser caches, and more.

If you want an all-in-one solution, we recommend checking all the best options available to see what they offer.

5. Rename the installation file

According to users, sometimes the CCleaner installer won’t work due to the name of their installation file. This is a strange problem, but you need to find your setup file and rename it to fix it.

Simply rename the setup file to CCleaner or Setup and try to install the application again.

After doing that, the problem should be resolved entirely, and CCleaner will start installing. This is a simple workaround, but it works according to some users, so we suggest you try it out.

6. Run the setup as an administrator

  1. Right-click on the installation.
  2. Select the option to Run as administrator.
    ccleaner not installing
  3. Click to confirm your choice, then follow the wizard.

Sometimes this problem can occur if you don’t have the necessary privileges to install the application. You can fix that simply by trying to install CCleaner as administrator.

After doing that, the setup should start with administrative privileges, and you should be able to install CCleaner without any problems.

7. Check if CCleaner is already running

  1. Press Ctrl + Shift + Esc to open Task Manager.
  2. When Task Manager opens, locate CCleaner on the list of running applications, right-click it, and choose End Task from the menu.
  3. Reinstall the application.

If you can’t install CCleaner on your PC, the problem might be caused by a background process. Several users reported that CCleaner keeps running in the background, and that can prevent the installation from running.

To fix this issue, you must ensure that CCleaner is completely closed. To do that, close all CCleaner windows on your PC and check if that solves the problem.

If none of these methods work, we recommend you scan your computer with a good antivirus program or contact the Support department of the developers.

But we are confident you should resolve the issue using one of the recommended solutions.

Lastly, let us know in the comments below what worked for you.

Asus Router Port Forwarding not Working: 4 Ways to Enable it

Asus routers are known for their robust features and performance, but sometimes, users may encounter issues like Asus router port forwarding not working.

This can prevent you from accessing certain services or applications that require specific ports to be open. This article will discuss the common reasons port forwarding may not work on your Asus router and provide several solutions to enable it.

Understanding and resolving port forwarding issues on your Asus router can significantly improve your online experience, whether you are trying to host a game server or access a device remotely.

Why is port forwarding not working?

There could be several reasons port forwarding is not working on your Asus computer. Some common causes include:

  • Incorrect port forwarding rules – Incorrectly configured port forwarding rules can prevent the router from forwarding traffic to the intended destination.
  • Firewall settings – The firewall settings on your computer or router can block incoming traffic, preventing port forwarding from working.
  • ISP restrictions – Some ISPs may block specific ports or restrict incoming traffic, preventing port forwarding from working.
  • Outdated firmware – Outdated firmware can cause compatibility issues with the router, preventing port forwarding from working.
  • Network congestion – A congested network can cause slow or dropped packets, preventing port forwarding from working.

Regardless of the cause, it would be best if you went through some of the effective fixes we suggest in the next section.

How can I fix the Asus router port forwarding if it’s not working?

Before going into any solutions, check with your ISP. Some ISPs may block specific ports or restrict incoming traffic, preventing port forwarding from working. Check with your ISP to see if they are blocking the ports you are trying to forward.

Also, restart the router. A restart will force the device to correctly shutdown, and this could fix little problems.

1. Turn off UPnP

  1. Launch your browser and input the router’s IP address in the address bar to open the router’s web interface, then log in using your administrator username and password.
    asus router port forwarding not working
  2. Under Advanced settings, select WAN.
    asus router port forwarding not working
  3. Change the setting for UPnP to No. This will disable the UPnP feature on your router.
  4. After disabling UPnP, click Save or Apply to save the changes.
  5. Finally, to complete the process, restart your router by unplugging it from the power source, waiting a few seconds, and then plugging it back in.

2. Update the firmware

  1. Launch your browser and input the router’s IP address in the address bar to open the router’s web interface, then log in using your administrator username and password.asus router port forwarding not working
  2. Click on the Firmware Upgrade menu, select Check if there is no ready upgrade, or the Firmware Upgrade button if one is available.
    asus router port forwarding not working
  3. Once the Upgrade has been downloaded, go back to the Firmware Upgrade menu and click on Upload.
  4. Follow the on-screen instructions to install the firmware. This process may take several minutes.
  5. Lastly, restart the router by unplugging it from the power source, waiting a few seconds, and then plugging it back in.

3. Enable port forwarding

  1. Launch your browser and input the router’s IP address in the address bar to open the router’s web interface, then log in using your administrator username and password.asus router port forwarding not working
  2. On the left pane under Advanced Settings, click on WAN.
  3. Click Yes under Enable Port Forwarding. then leave the Source Target field blank, and finally, click the Apply button.

4. Factory reset your ASUS router

As a last resort, users describe removing all their port forwards, saving their configuration settings, and eventually performing a factory reset.

You could do the same. Then, reload your saved configuration file, re-add the port forwards you had in mind, and check if the issue persists.

If you want software that can automatically configure your router, look at this list with our top picks and choose the one that’s right for you.

Should I enable port forwarding on my router?

Whether you should enable port forwarding on your router depends on your specific needs and requirements. Here are some of the pros of allowing port forwarding:

  • Improved accessibility – It can allow access to specific services or applications hosted on a device on your network.
  • Improved online gaming experience – It can enhance your online gaming experience. Allowing game servers to communicate with your device.
  • Better remote access – It enhances remote access to devices by allowing you to access them from anywhere on the internet.
  • Improved security – Port forwarding can also enhance the security of your network by only allowing incoming traffic to specific ports, reducing the risk of unauthorized access.
  • Improved device functionality – Port forwarding can also enhance the functionality of specific devices by allowing them to communicate with other devices on your network.

Hopefully, issues like this will not come up often. However, when they do, remember this remains a great place to find easy solutions.

Microsoft Viva Engage: How to use Insights & Goals

Over a decade ago, Microsoft purchased Yammer for over $1 billion, then included it in all enterprise plans of Microsoft 365 and Teams. Now, the social networking service, which sometimes is barred by error on Chrome, is being retired and integrated into its employee experience platforms, Viva and Viva Engange. 

Starting March 2023, the total rebrand comes to its full circle. The tech giant launched Viva in February 2021 as a platform living inside Microsoft Teams and its answer to the challenge of the growing hybrid workforce.

Confusing? We’d think so too. After all, why does Microsoft have two apps of practically the same service? To answer that, throughout 2023, Microsoft will impose several drastic changes by changing the existing Yammer mobile and web app to Viva Engage. 

“In the coming year, all of Yammer will become Viva Engage, retiring the Yammer brand. In addition, we’ll continue to enhance Viva Engage with new capabilities that spur leadership engagement, authentic expression, events, and knowledge discovery, including new experiences rolling out today.”

All the power of Yammer is coming to Viva, which means there will be no changes to the features and current pricing plans. Viva is currently living inside all Microsoft 365 and Office 365 plans for the enterprise. For $9 per user/month, organizations can access Viva’s additional services such as Connections, Engage, Learning, Insights, Topics, Goals, and Sales.

Viva Insight, which also lives inside Microsoft Teams, pans out personalized insights to help you finish your next task and build better work habits by aggregating data from emails, meetings, calls, and chats in one go. 

With Goals, organizations can align their members to their strategies by mapping out all the key objectives required to achieve the results, in a place where everyone can see. 

How can I use Insight & Goals in Microsoft Viva Engage?

1. Ask your organization’s administrator whether your company collaborates on Microsoft Viva. Check on Viva’s price plans here ➜ Buy now.

2. Depending on the plan, all the features will be inside Microsoft Teams. Only Viva Suite users get access to Insight & Goals. Click on Insight on your left screen. 

3. Or, click on Goals, which also is on your left screen.

Additionally, the new Viva also means a worldwide rollout for the Viva suite and Microsoft Viva Topics customers for features that were only available on Engage back then. Those features include AMA events, a campaign planner, AI-powered learning tool Answer, and advanced analytics. 

Are you excited about this rollout? Let us know in the comments!

Hearthstone not Responding: Repair it With These 7 Fixes

Hearthstone is currently one of the most popular trading card games on PC, but users report having issues with Hearthstone and Windows 10. In some cases, Hearthstone is not responding.

Here we will cover some of the most common issues and try to resolve them. For example, users have reported having game lagging and black screen issues, so let’s see if we can fix them.

Why am I stuck at the loading screen of Hearthstone?

You are stuck at the loading screen in Hearthstone for many reasons. Some common causes include:

  • Network connection issues – A weak or unstable network connection can cause problems loading the game.
  • Outdated drivers – Outdated drivers can cause compatibility issues with the game, causing it to get stuck at the loading screen.
  • Incompatible software – Other software running on your device may conflict with Hearthstone, causing it to get stuck at the loading screen.
  • Corrupted game files – Corrupted game files can cause issues when loading the game, leading to it getting stuck at the loading screen.
  • System compatibility issues – If your device does not meet the system requirements for Hearthstone, it may get stuck at the loading screen.

What are other common Hearthstone problems?

Here are some common Hearthstone issues that users reported:

  • Hearthstone not working on PC – The most likely cause is your drivers. First, update your display drivers to the latest version and check if that solves the problem.
  • Hearthstone connection, lag issues, latency issues PC – Can be caused by your DNS, but you can fix them by switching to Google’s DNS. You can also try restarting your router.
  • Hearthstone not loading – Your antivirus usually causes this, so be sure to add Hearthstone to the list of exceptions.
  • Hearthstone fps, freezing issues – The issue might be the process priority or affinity. You can fix this right from Task Manager.
  • Hearthstone startup issues and launch problems – If this happens, ensure you use a dedicated GPU. You might have to disable the built-in GPU from BIOS to fix this issue.

With that out of the way, below are our top recommended fixes.

How can I fix Hearthstone if it’s not responding?

Before you try any of the solutions listed below, restart your device and reboot your router. Connection issues are a significant trigger, and these two steps may be necessary for removing processes that spoil the connection.

1. Keep your display drivers up to date

Many users have reported stuttering issues on Windows 10, and it has been reported that updating your display drivers to the latest version fixes these issues.

Nvidia users have confirmed that the latest drivers are fixing the stuttering problems, but it won’t hurt to update your drivers if you’re an AMD user.

We recommend Outbyte Driver Updater to download all outdated drivers on your PC automatically. The process is automatic and a lot safer than looking for drivers yourself.

Start by downloading and installing this great tool. After the installation, the software will start automatically and look for driver issues or updates for your system.

The result will come after a few seconds in the form of a list with recommended drivers to update.

The rest is a formality; you have to click on the Update All button to install all the drivers at once or check the individual boxes for each driver to install them separately.

Outbyte Driver Updater

Using Outbyte Driver Updater, you will solve the Hearthstone problem and return to what’s important: playing the game!
Free trial Visit website

2. Check your antivirus and disable it

  1. Click on the hidden access arrow in the Taskbar.
    hearthstone not responding
  2. Click on your antivirus icon, hover over Avast shields Control and select Disable for 10 minutes (This step varies for different antivirus software).

If you’re having Hearthstone issues on your PC, your antivirus may be the cause. Unfortunately, sometimes a third-party antivirus can interfere with your system, and that will cause this and many other errors to occur.

Apart from disabling the antivirus, you may ensure that Hearthstone is added to the list of exceptions in your antivirus and firewall.

However, if disabling the antivirus doesn’t help, your next step would be to uninstall your antivirus. Several users reported that removing their antivirus solved the issue, so try that.

A couple of users reported that McAfee caused this problem. Once the antivirus is removed, check if the problem is still there.

If removing the antivirus solves the problem, you should consider switching to a different antivirus solution.

The best antiviruses compatible with Windows 10 PCs will protect your system in real time without causing any errors.

3. Add Hearthstone to the Windows Defender Exclusions list

  1. Press the Windows Key + I to open the Settings app.
  2. Go to the Update & Security section.
  3. Select Windows Defender from the menu on the left and choose Open Windows Defender Security Center from the right pane.
    Hearthstone freezing issues
  4. Go to the Virus & threat protection.
  5. Navigate to Virus & threat protection settings.
  6. Select Add or remove exclusions.
  7. Click Add an exclusion, select Folder, and choose Hearthstone’s directory.

Check if the issue of Hearthstone not responding is resolved.

4. Delete the Hearthstone folder from AppData

  1. Press Windows Key + R, type %localappdata%, and press Enter.
    Hearthstone not loading
  2. Go to the BlizzardHearthstone directory.
  3. Delete the Hearthstone folder, or move it to your Desktop or any other location.
  4. Start the game now and see if the stuttering issues persist.

5. Disable Switchable graphics from BIOS

  1. When your computer boots, keep pressing Delete, F2, or F12 to enter BIOS.
  2. Locate the Switchable graphics and turn them off.
    hearthstone not responding
  3. Make sure that you save the changes.

Note: This solution only works if you have both integrated and dedicated graphics cards.

6. Use Google DNS

  1. Click the network icon on your Taskbar and select your network.
    Hearthstone fps issues
  2. Select Change adapter options.
  3. Right-click your network connection and choose Properties.
    Hearthstone not working on PC
  4. Select Internet Protocol Version 4 (TCP/IPv4) and click the Properties button.
    Hearthstone not working on PC
  5. Select Use the following DNS server addresses. Be sure to enter 8.8.8.8 as the Preferred and 8.8.4.4 as the Alternate DNS server. Click OK to save the changes.
    Hearthstone connection issues PC

Note: Keep in mind that switching to Google’s DNS can cause some latency issues, but that won’t be a problem for a game such as Hearthstone.

7. Change Hearthstone’s priority and affinity

  1. Start Hearthstone, and press Alt + Tab to minimize the game.
  2. Press Ctrl + Shift + Esc to open the Task Manager, go to the Details tab, and locate Hearthstone on the list.
  3. Right-click Hearthstone and, choose Set priority, set any other value higher than normal (some users even suggest using Realtime value, but that might cause issues on your PC).
    Hearthstone fps issues
  4. Right-click the Hearthstone process again and choose Set affinity.
    Hearthstone startup issues
  5. Ensure only the CPU 0 is checked and disable all the rest. Click OK.
    Hearthstone not working on PC

Note: Keep in mind that this is just a workaround, so you’ll have to repeat it every time you want to start Hearthstone.

Hearthstone is a great, widely-popular game, so that possible issues could spoil users’ experience. The Hearthstone not responding is one such issue.

However, we hope this article helped you solve all your problems with Hearthstone and that you can play the game without any interruptions now.

If you have any comments or questions, leave us a line in the comments section below.

NordVPN Not Working on Windows 11: 4 Easy Ways to Fix It

Many applications have issues with the latest version of Windows, and many reported that NordVPN is not working on Windows 11.

If this happens, NordVPN won’t connect and you won’t be able to protect your privacy. In this article, we will show you how to fix this issue for good. But first, let’s see what are the reasons for this problem and try to understand the issue.

Why is NordVPN not working on my Windows 11 PC?

The problem is that NordVPN can’t connect to the NordLynx adapter and which is a VPN protocol that helps improve the connection to a server. Additional causes include:

  • Compatibility issues – Certain software might not be fully compatible with Windows 11 yet, and that can lead to issues such as this one.
  • Tunnel drivers – Issues with drivers can cause this problem. If that happens, you need to remove and manually install drivers.
  • Registry issues – Sometimes registry keys will interfere with your software, and to fix that you’ll need to manually remove them using Registry Editor.

In addition to that, the users reported other issues with NordVPN software on Windows 11 and these are as follows:

  • Failed to turn on NordLynx Windows 11 (NordLynx adapter can’t be reached Windows 11)
  • NordVPN won’t open Windows 11
  • Can’t add NordVPN to Windows 11
  • NordLynx tunnel Windows 11 unreachable
  • NordVPN not working after the update to Windows 11

However, you can still go through our list including the best VPNs that work on Windows 11, and choose the right one for your needs.

Other reliable VPNs for Windows 11 that you can trust

Rest assured that there are alternatives to this VPN software if you just can’t get it to function on Windows 11.

Hence, if you tried to fix NordVPN multiple times and it doesn’t work, consider the following market-leading VPN apps that are compatible with your Windows 11 PC:

➡️ Private Internet Access – The highest VPN servers you can connect to increase your Internet speed

➡️ Surfshark – Affordable price and access to unlimited devices to fast VPN servers

➡️ ExpressVPN – Extensive server network in 90 different regions

➡️ CyberGhost – Comprehensive anonymity tools with 100% digital privacy

➡️ IP Vanish – Extremely secure VPN connection with WireGuard fast speeds

All being said, you can opt-in for any other professional VPN from here and get full privacy on your Windows 11 device.

How can I fix NordVPN not working on Windows 11?

1. Run the app in Compatibility mode

  1. Press the Windows key + E to start a File Explorer window and navigate to the NordVPN installation folder. You should find it in the Program Files folder.
  2. Right-click on the executable file and select Properties from the menu.

  3. Now, move to the Compatibility tab, check the box for Run this program in compatibility mode and select Windows 7 from the list.

  4. Click on Apply, then OK and see if the app works fine now.

Some of our readers reported that running NordVPN in Compatibility mode fixed the problem for them so you should definitely try it.

However, this solution doesn’t work for all users and if you’re one of them, move to the next.

2. Change the VPN settings

  1. Click on the gear icon found in the top right corner of the NordVPN app.
  2. Select the Auto Connect option from the left side menu.
  3. Disable the Choose a VPN protocol and server automatically setting.
  4. Click the toogle and choose the OpenVPN (TCP) protocol.

As you can see, it is extremely easy to change this option, and it fixes the NordVPN problem on Windows 11, so make sure to perform this procedure as fast as possible.

3. Reinstall the tunnel drivers

  1. Click the Search icon from the taskbar, type device manager, and open the app from the results.
  2. Expand the Network adapters section, right-click NordVPN Tunneling, and select Uninstall device.
  3. Close the window, click the Search icon again, type control panel and select the app from the results.
  4. Now, click on the Uninstall a program option.
  5. Look for NordVPN Network TUN, right click it and select Uninstall.
  6. After uninstalling the program, restart your PC.
  7. Download the latest NordVPN TUN drivers and install them.

If the step was not too detailed, you may check our guide on how to update your drivers on Windows 11 for more information.

This will be also useful for the next step when you will need to uninstall and reinstall NordVPN.

4. Reinstall NordVPN

  1. Click the Search icon, type control panel, and select the app from the results.
  2. Choose the Uninstall a program option.
  3. Find NordVPN in the list of apps, right click on it and select Uninstall.
  4. After finishing the uninstallation, close the window, press the Windows key + R to start Run, type regedit and press Enter or click OK.
  5. Click on the Edit tab and select Find.
  6. Type NordVPN in the Seach tab and click on Find Next, then delete all the keys associated with the VPN.
  7. Restart your PC and install a fresh copy of NordVPN.

Before starting the application, you need to back up your registry like this:

  1. Open Registry Editor.
  2. Search for NordVPN.
  3. Right-click the keys that contain NordVPN and choose Export.
  4. Name the file and choose a save location. Click on Save.
  5. Repeat these steps for all the keys that contain NordVPN.
  6. Start NordVPN again.

In case the problem appears again, simply run exported reg files to fix the problem.

If you don’t feel confident about manually removing the keys from the Registry, it’s a lot safer to use a dedicated repair tool.

It will do the job a lot faster and it will make sure that there are no leftovers after uninstalling NordVPN.

So there finally is a way that we can get NordVPN to function on the new OS. It’s a bit of a tricky process, but nothing out of the ordinary, even by Microsoft standards.

This solution is the quickest way to access the NordLynx protocol, and it spares you the trouble of having to re-image Windows again.

There are, more than likely, other VPN providers that can still offer their services, even on the new developers’ build of Windows 11, but these are the most popular and sought-after.

Remember that, as we mentioned above, NordVPN still works for some users, so you can also go ahead and give that a try. .

Have you tried Windows 11? If so, what VPN works for you on the new OS? Let us know in the comments section below.

Xbox Friend List Disappeared: How to Finally Fix It

Xbox Live Friend lists allow users to add, follow, and keep up with players via messaging and games and view their activity feed.

Sadly, some complain that their Xbox Friends list disappeared from their PC, Xbox One, and Xbox Series X consoles. This is still a common issue in 2024.

Why can’t I see my friends online on Xbox One?

Xbox Friends list not showing can occur in various instances. It can be that the user can’t see anyone on the Friends list, while some can see a few friends, but their complete list of friends is not showing.

Furthermore, the Xbox One and Xbox Series X consoles not showing friends on the Xbox Live Friends list can be due to many factors. Some factors that may be responsible for the error are:

  • Xbox server issues – When Xbox servers are down or not running as they should, it can affect the console’s abilities and it can cause problems accessing its Friends list.
  • Network connection issues – Users can encounter problems accessing their Friends list due to network connection problems on the Xbox console or app.
  • Bug-related and other Xbox issues – The Xbox app on your device may be affected by bugs, causing it to malfunction. Also, startup errors on the Xbox console can cause the Friends list not to appear.

What can I do if my Xbox friend list disappeared?

1. Power cycle your Xbox console

  1. Press the Power button on the Xbox console for ten seconds to remove any residual energy.Press Xbox power button
  2. Unplug the power cable from the console and wait for 1–2 minutes.
  3. Connect the power cable back into the console and press the Power button to turn it on.
  4. After the Xbox is fully booted, try to access your friends list and see if it appears.

Power cycling the Xbox console will fix startup errors causing activity problems.

2. Restart Windows in Safe Mode

  1. Click the Start button and select Settings.
  2. Choose Update & Security.
  3. Click on Recovery from the left pane, then click on Restart now under Advanced startup.
  4. After rebooting, you will get the Advanced Recovery Options page.
  5. Click on Troubleshoot, then select the Advanced options.WinRE troubleshoot
  6. Click on Startup Settings.Click the startup settings
  7. Press 4 to Enable Safe Mode and select Restart.Press 4 to Enable Safe Mode

Restarting Windows in Safe Mode will resolve startup issues that may affect the Xbox app on your PC.

3. Check your Friends list online

  1. Launch a browser on your PC.
  2. Go to Xbox.com and sign in with your Xbox Live login credential.
  3. Click on your Profile icon.Go to your Xbox profile
  4. Select Friends. Check if your Friends list appears and is complete.Select your Xbox friend list

Microsoft allows users to add to remove friends and interact with their friends list via their Xbox Live account online. We recommend you check your friends list online to know if the problem comes from the Xbox app or console.

4. Reset the Xbox console

  1. Power on your Xbox console and press the Xbox button on the controller to prompt the guide overlay.
  2. Select the System menu and click on Settings.Xbox settings
  3. Click on System to expand it and select Console info from the drop-down.Locate your Console info
  4. Click on Reset Console.
  5. Choose between Remove everything or Reset and keep my games & apps.Click on reset console

The Remove everything will delete all data and games, while the Reset console option will restore default factory settings.

You can also:

  • Fix network congestion on your PC. Restarting your router might help as well.
  • Restart your PC, Xbox One, or Xbox Series X console.
  • Check the Xbox server’s status: Users can experience issues with Xbox servers when a maintenance session occurs or the servers are down. You can visit the Xbox server status page to check for any updates.

Check our article on fixing the Xbox controller that is detected but not working if you have an issue with it.

Alternatively, our readers can check our guide about Xbox Live Networking Service missing and how to fix it. Likewise, you can read our guide if you cannot sign in to the Xbox account on your PC.

Nonetheless, you can check what to do if you can’t add a user to a friends list on Xbox or alternatively, add your Xbox friends on your PS5.

We hope you know what to do if your Xbox friend list disappears again. If you have further questions or suggestions, kindly drop them in the comments section.