Bose Headphones Not Connecting to Windows 10: 4 Expert Fixes

To fully enjoy the multimedia on your Windows 10, you need some quality headphones, such as those manufactured by Bose.

Although Bose headphones are fabulous, a few users reported problems with them. While some didn’t get a proper audio output, there was no sound at all in other cases.

So, today we’ll show you how to fix Bose headphones problems on Windows 10. But first, let’s find out why you are facing the issue in the first place.

Why are my Bose headphones not connecting to Windows 10?

In the case of wired headphones, you should check for problems with the cable or the jack at the end. Issues with both will lead to Bose headphone issues in Windows 10.

Also, if the Bose headphone is paired but not connected, it could be a problem with the device itself. In this case, you can update the driver or reset the headphone altogether.

This is a widespread issue; many users reported that Bluetooth headsets are not showing in Windows. This can occur because there’s an issue with the pairing process.

In some instances, Bluetooth audio stuttering can appear if there are issues with the Bluetooth adapter, thus causing the connection to drop.

It’s also possible that you’re having issues with your cables, and if that happens, you’ll encounter the No speaker or headphones are plugged in message. However, all these issues can be easily fixed by following the instructions from this guide.

Can Bose headphones connect to computer?

Yes, you can easily connect Bose headphones to a computer, depending on the means of connectivity offered by the particular model.

For instance, if it’s a wired headphone, simply plug it into the computer, while in the case of wireless ones, you will have to establish a Bluetooth connection between the two.

Why won’t my Bose headphones connect to my laptop?

There are several reasons for this, but the most common ones are Bluetooth glitches. These can happen from time to time, so you should restart your headphones and Bluetooth.

Another reason is that you have other Bose devices connected by Bluetooth so try to turn those off before starting to pair your headphones.

How can I fix problems with Bose headphones on Windows 10?

1. Uninstall your audio driver and install the latest version

    If Bose headphones are not recognized as an audio device on Windows 10, you can try removing their driver and installing them again. You can perform this task following our steps below. 

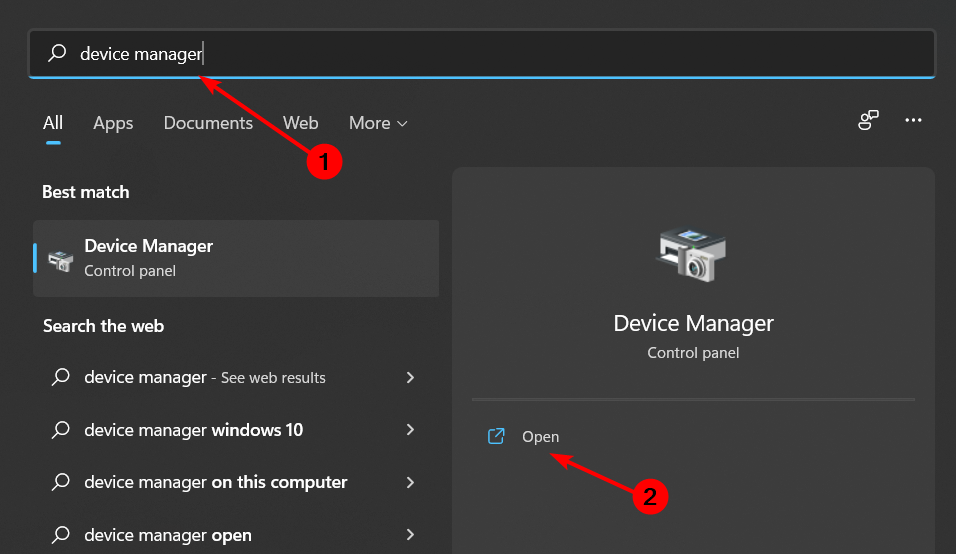
  1. 1. Search, type device manager, and click on the relevant search result.

    bose-headphones-windows-10
  2. 2. Expand the Audio inputs and outputs entry.

    double-click to fix bose headphones windows 10
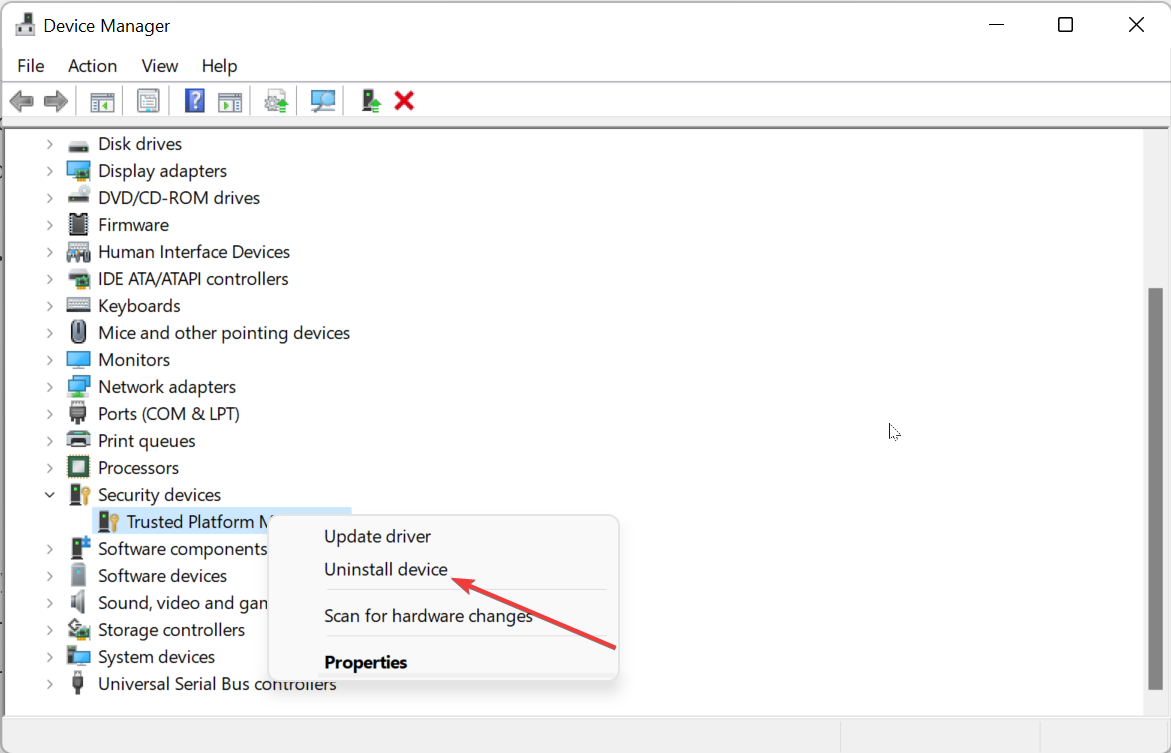
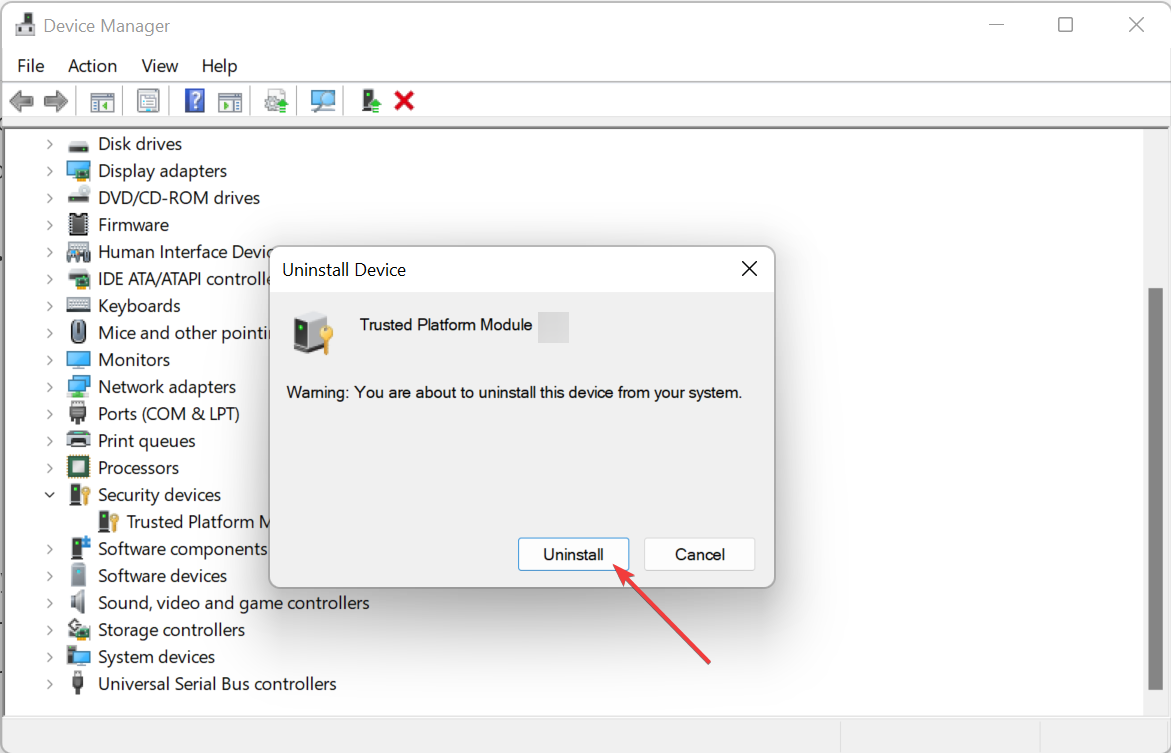
  3. 3. Locate your audio device, right-click on it, and select Uninstall device.

    uninstall device to fix bose headphones windows 10
  4. 4. Click on Uninstall in the confirmation prompt. The Bose headphones paired but not connected issue in Windows 10 will be fixed.

    uninstall to fix bose headphones windows 10

After uninstalling the audio driver, you should go to your motherboard or sound card manufacturer’s website and download the latest driver.

However, installing an automatic driver update software could make things much more accessible. That’s a tool with a highly generous database of drivers; all it takes is one click for the task.

You’ll have your latest audio driver in no time. And besides helping you this time, it will keep your device updated with the newest device drivers which are added daily.

You can also try downloading the Bose Bluetooth driver for Windows 10 and check if that helps.

2. Remove headphones from Device Manager

  1. To fix the Bose headphones connected but no sound issue in Windows 10, press Windows + X, and choose Device Manager from the list.
  2. Expand the Sound, video and game controllers entry.double-click to fix bose headphones windows 10
  3. Locate your headphones, right-click on them, and choose Uninstall device.uninstall device
  4. Click on Uninstall to confirm.

Sometimes there might be issues with Bose Bluetooth headphones on Windows 10, but users reported that this issue could be fixed simply by removing your headphones from Device Manager.

After you’ve deleted Bose headphones from Device Manager, they should appear as headphones in the Bluetooth devices list.

Try pairing your PC with Bose headphones, but if the pairing doesn’t work, you’ll need to delete the headphones’ memory. To do that, follow these steps:

  1. On your Bose headphones, slide the Power button to the Bluetooth symbol and hold it there for 10 seconds.
  2. Now headphones should appear in the Bluetooth devices list, and you’ll be able to connect them to your PC.

Some users suggest that you don’t need to remove the device from Device Manager but must clear the headphones’ memory. So, try that as well. In addition, this method can help if your Bose QuietComfort 35 is paired but not connected to Windows 10.

3. Use a Bluetooth adapter/update your Bluetooth drivers

Bluetooth drivers can cause problems with Bose headphones, such as Bose headphones not recognized as audio device in Windows 10. To avoid this, ensure they are up-to-date before connecting Bose Bluetooth headphones.

If you have the latest drivers but the problem persists, you might want to use a suitable Bluetooth adapter. Users reported that the issue was resolved after buying a Bluetooth adapter and installing the necessary drivers.

While buying a Bluetooth adapter, verify that it comes with a driver CD to avoid any further Bluetooth issues. Again, though, with some of the newer models, Windows will automatically identify and install the best drivers.

4. Use a WiFi antenna

Using WiFi antennas may improve the strength and stability of the WiFi connection, which could solve issues with connecting Bose headphones to a Windows 10 device.

However, many other factors could be causing the connection issues, such as outdated device drivers or interference from other WiFi networks. Therefore, it would be best to troubleshoot the specific connection issues and identify the root cause before attempting to use WiFi antennas as a solution.

What can I do if Bose headphones won’t connect to Windows 11?

Though rarely the case, if Bose headphones won’t connect to Windows 11, you first should run the built-in Bluetooth troubleshooter. It will automatically identify and resolve issues preventing the connection.

Bluetooth troubleshooter

Also, you may update the drivers or roll back to the previous version if the problem starts after installing a new one. Besides, check for conflicting programs that may affect the functioning of Bluetooth, and uninstall the app.

How to connect Bose headphones to my PC?

  1. Press the Windows key + S and type Bluetooth. Select Bluetooth and other devices settings.
  2. Now click on Add Bluetooth or other device.
  3. Select Bluetooth.
  4. Turn on your headphones and activate the pairing mode.
  5. Now select your Bose headphones from the list to connect them.

How to connect Bose headphones to my PC without Bluetooth?

You can connect your Bose headphones to your PC using an audio cable, but to do that, you need to confirm that there’s an audio socket on the headphones.

If there is one, connect an audio cable to it and then click the other end of your PC, and it should start working without any problems.

Problems with Bose headphones on Windows 10 and 11 can be solved quickly, and if you notice any, feel free to try some of our solutions.

They can be applied even when you can’t connect your Bose headphones to the laptop.

Besides, find out what to do if Windows won’t recognize headphones.

If you’re aware of another solution to solve the problem, leave it in the comments section below so that other users can try it.

Also, leave there any other questions you may have, and we’ll certainly take a look.

How to Fix Laptop Not Connecting to Mobile Hotspot [2026]

If your laptop is unable to connect to a mobile hotspot, we’ve outlined tested solutions in the following lines. The problem most likely stems from faulty sharing or DNS settings on your PC.

At the same time, you may want to take a look at the hotspot settings and service availability on your phone.

We’ll show you how to do that and a couple of more tricks for flawless hotspot connections right down below.

How do I fix a hotspot not working on Windows?

First of all, check hotspot connection settings, ensure devices are allowed to connect, and set a channel for the network. Also, try disabling the Microsoft Wi-Fi Direct Virtual Adapter.

1. Change sharing settings

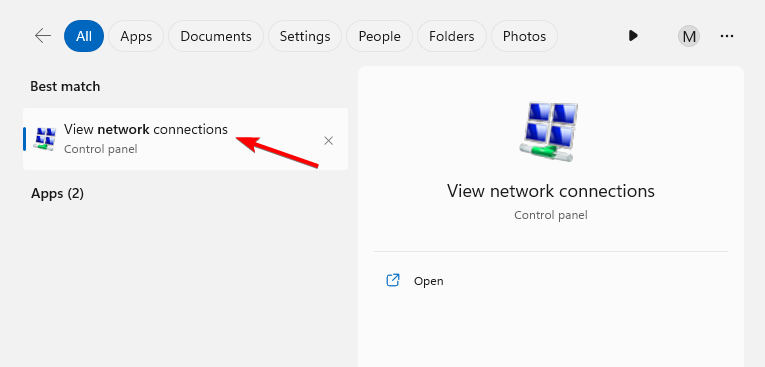
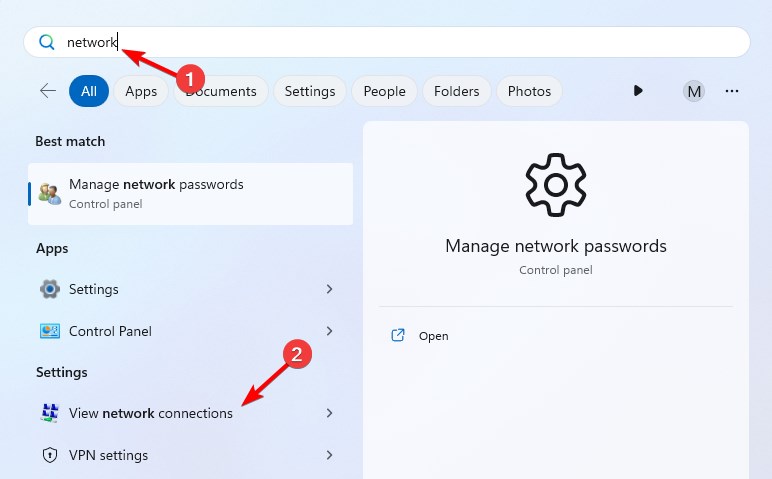
  1. Press the Windows key + S and type network connections. Select View network connections.
    view network connections windows 11 search results
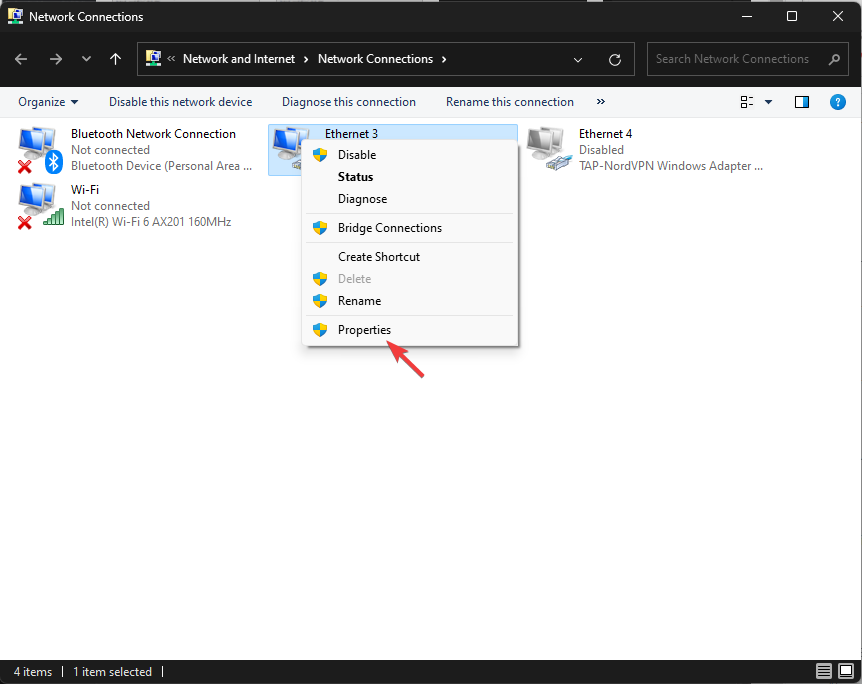
  2. Locate your hotspot connection, right-click it and choose Properties.
    Network Connection properties context menu
  3. Navigate to the Sharing tab and enable all settings in Internet Connection Sharing (ICS).
  4. Save changes.
  5. Repeat the steps again, but this time disable all Internet Connection Sharing settings.

2. Reconnect to the network

Note icon NOTE
Try this solution only if you were able to connect to the mobile hotspot earlier. In case you are encountering the problem on the very first attempt, move to the next solution.
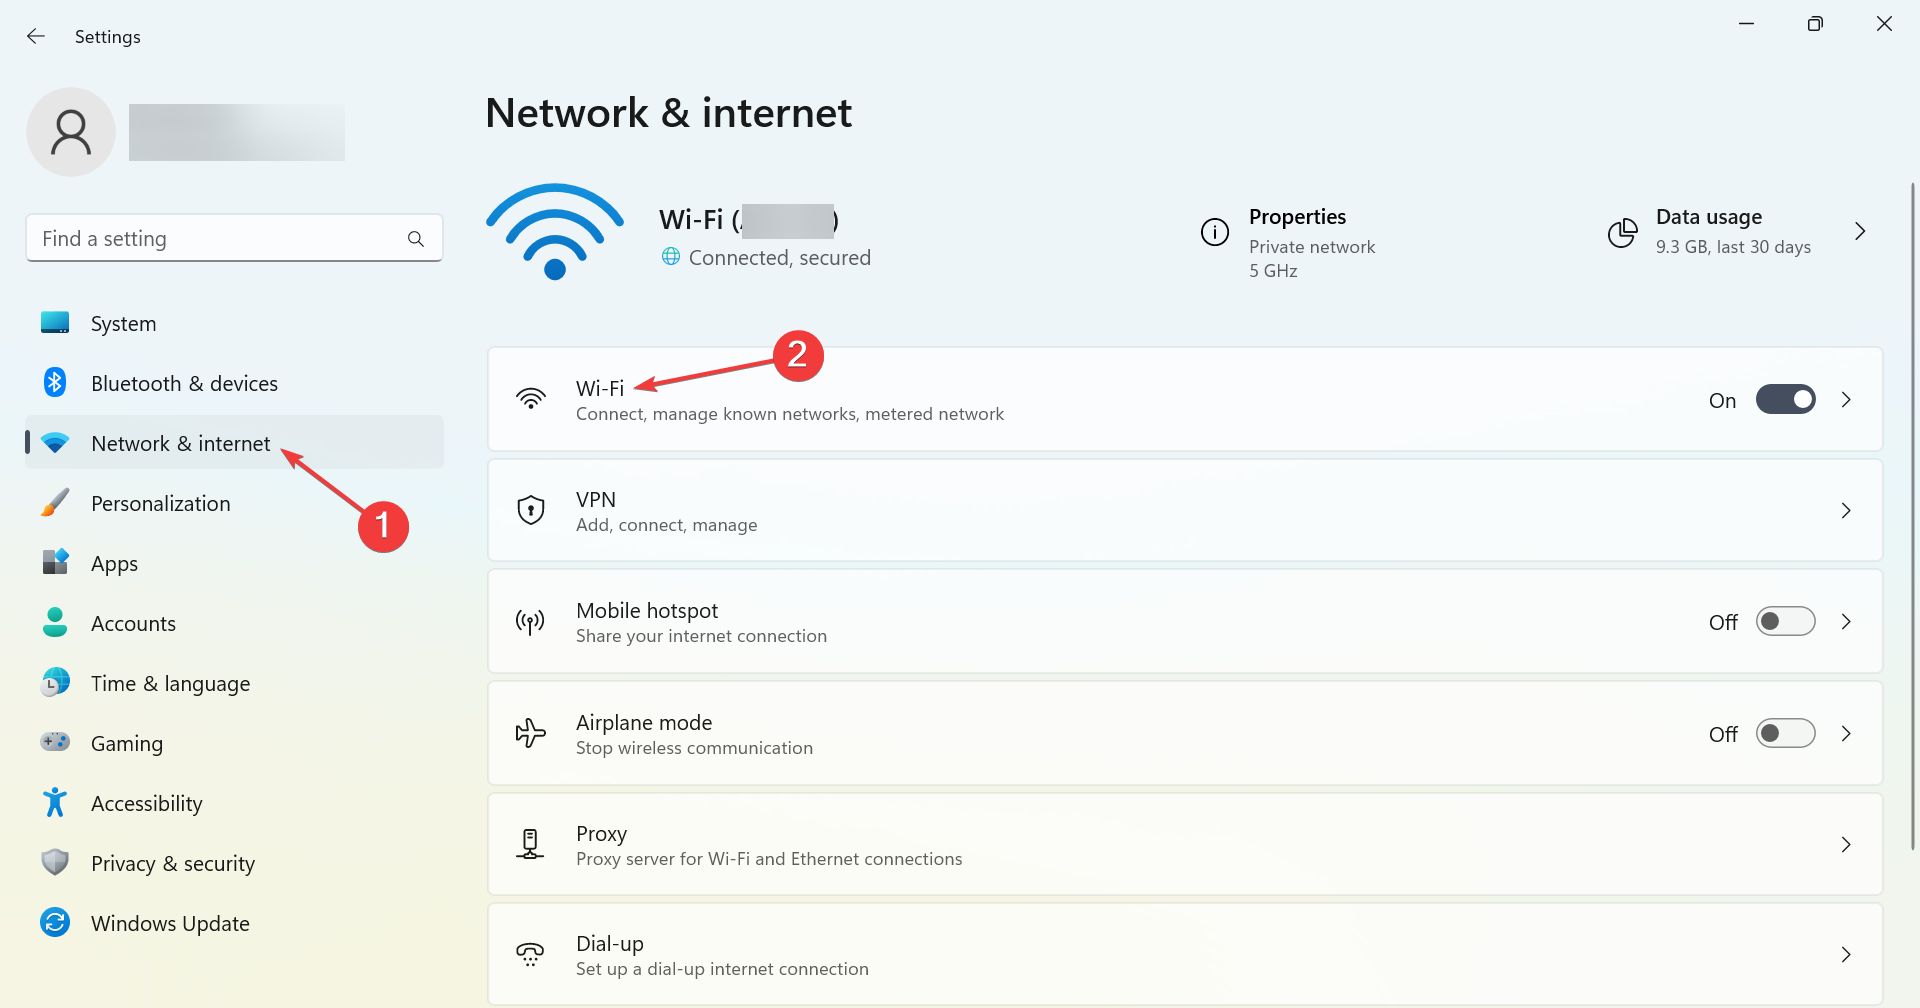
  1. Press Windows + I to open Settings, head to the Network & Internet tab, and click on Wi-Fi.wi-fi settings
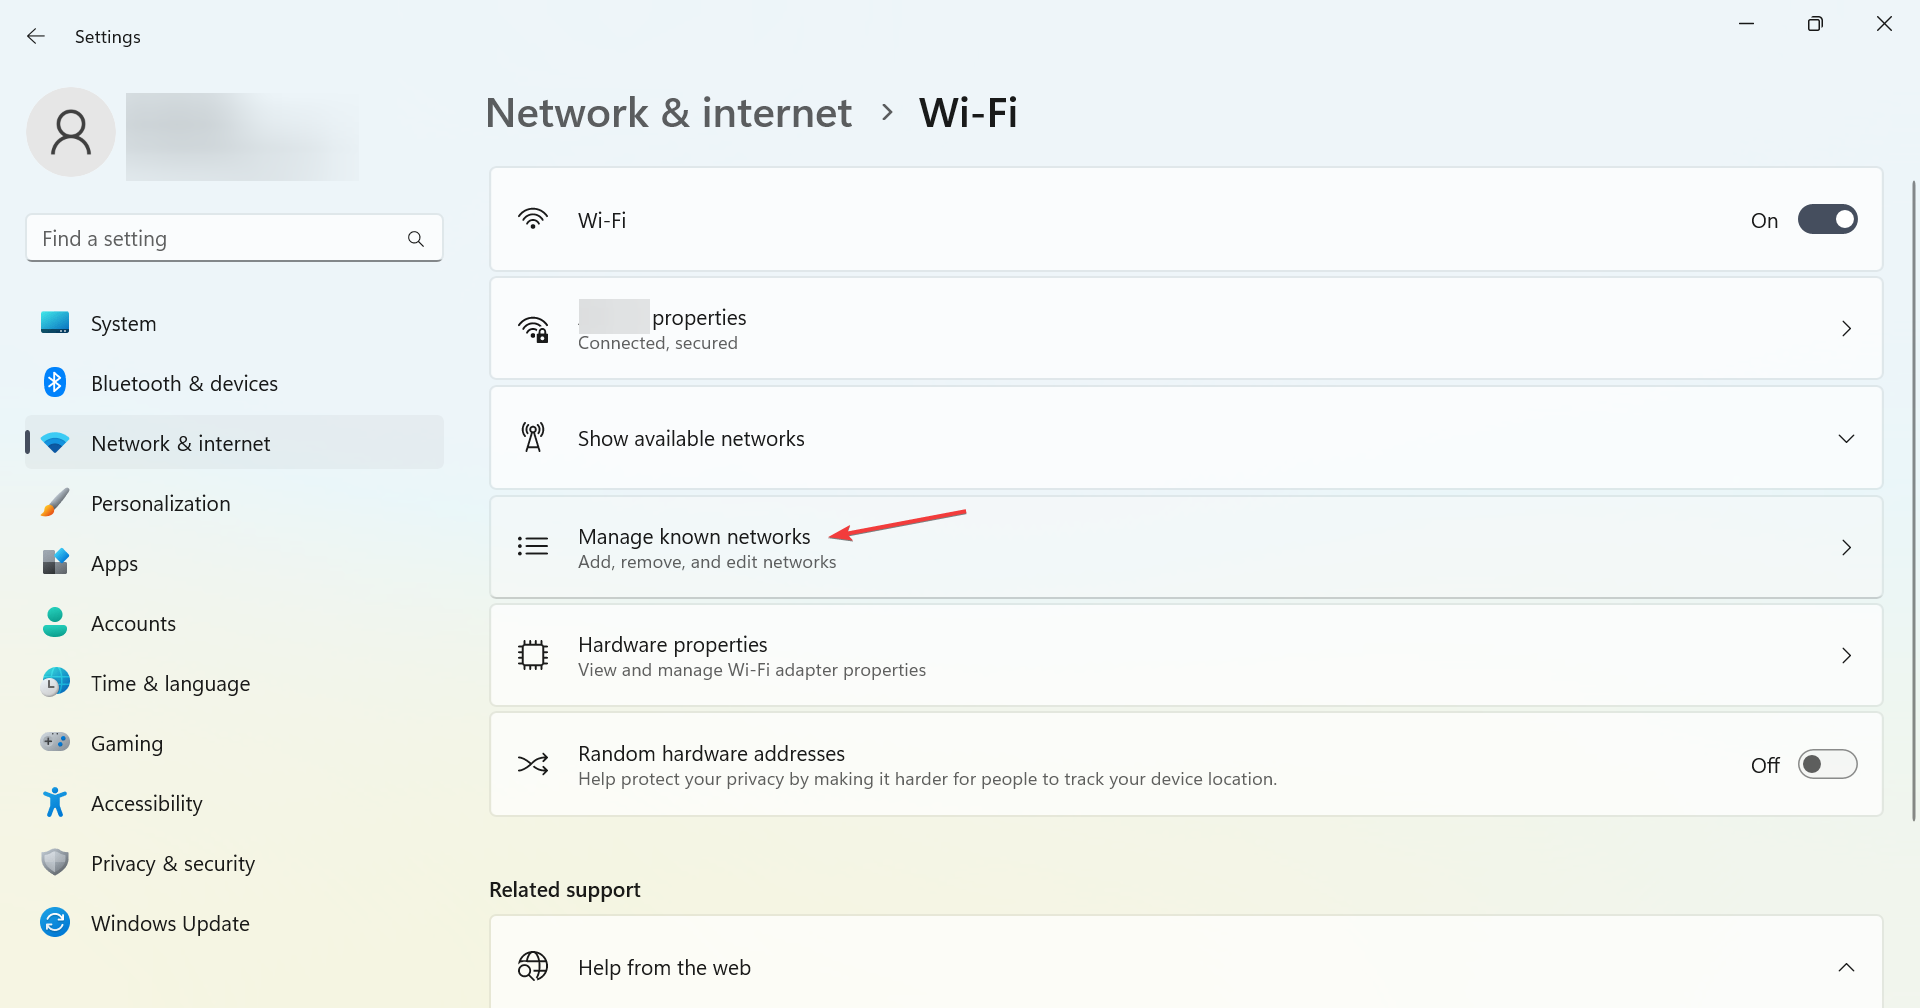
  2. Choose the Manage known networks option.manage known networks settings app
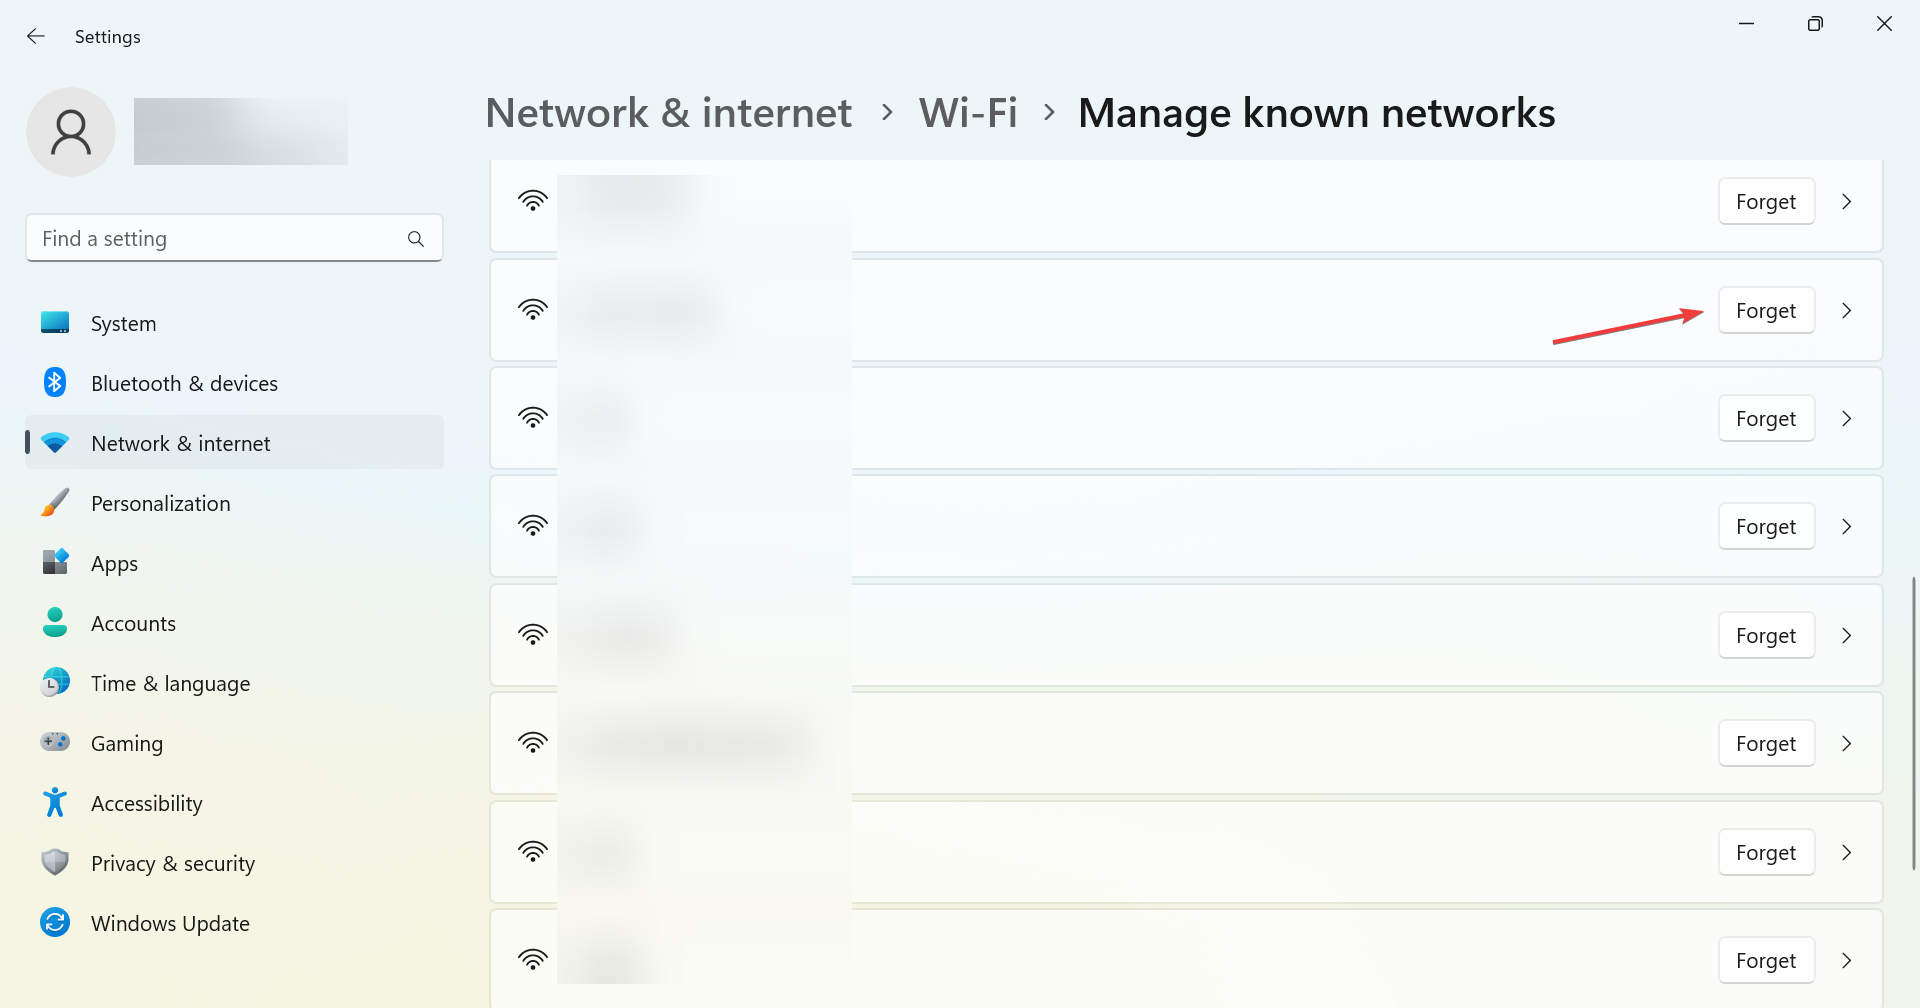
  3. Locate the mobile hotspot, and click the Forget button next to it.forget wi-fi network settings
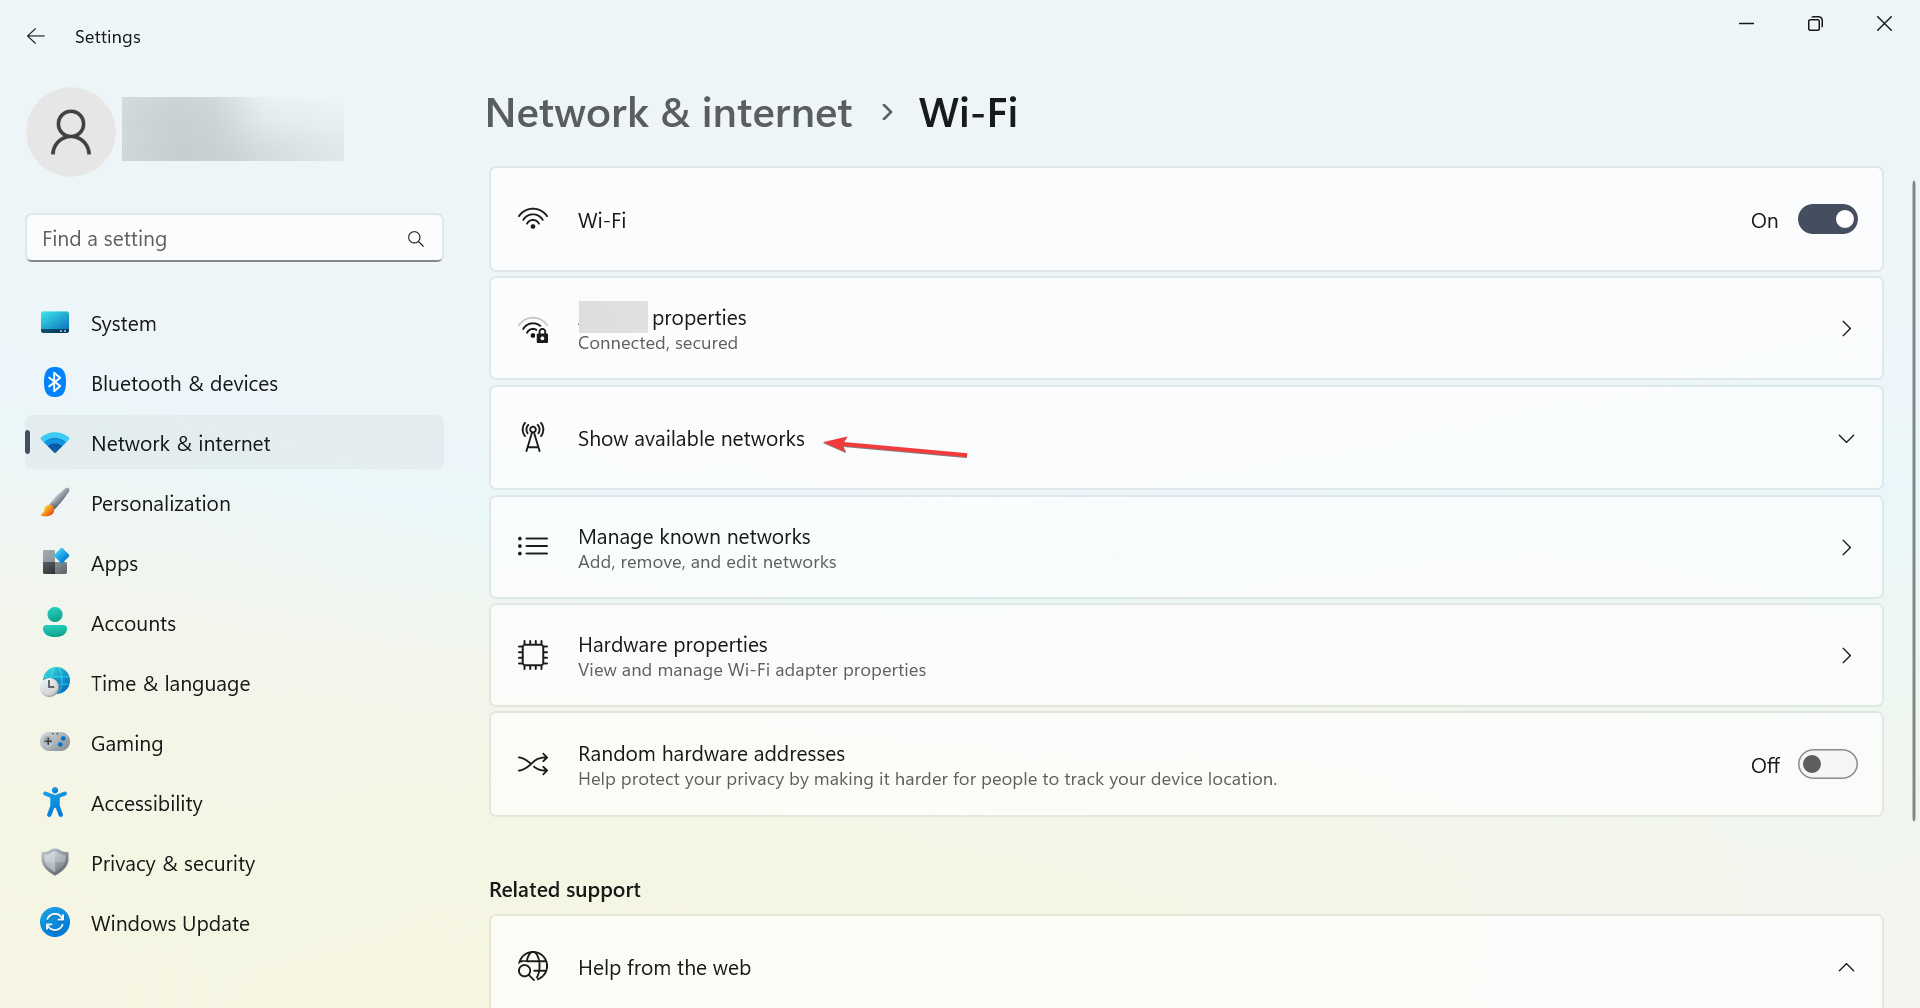
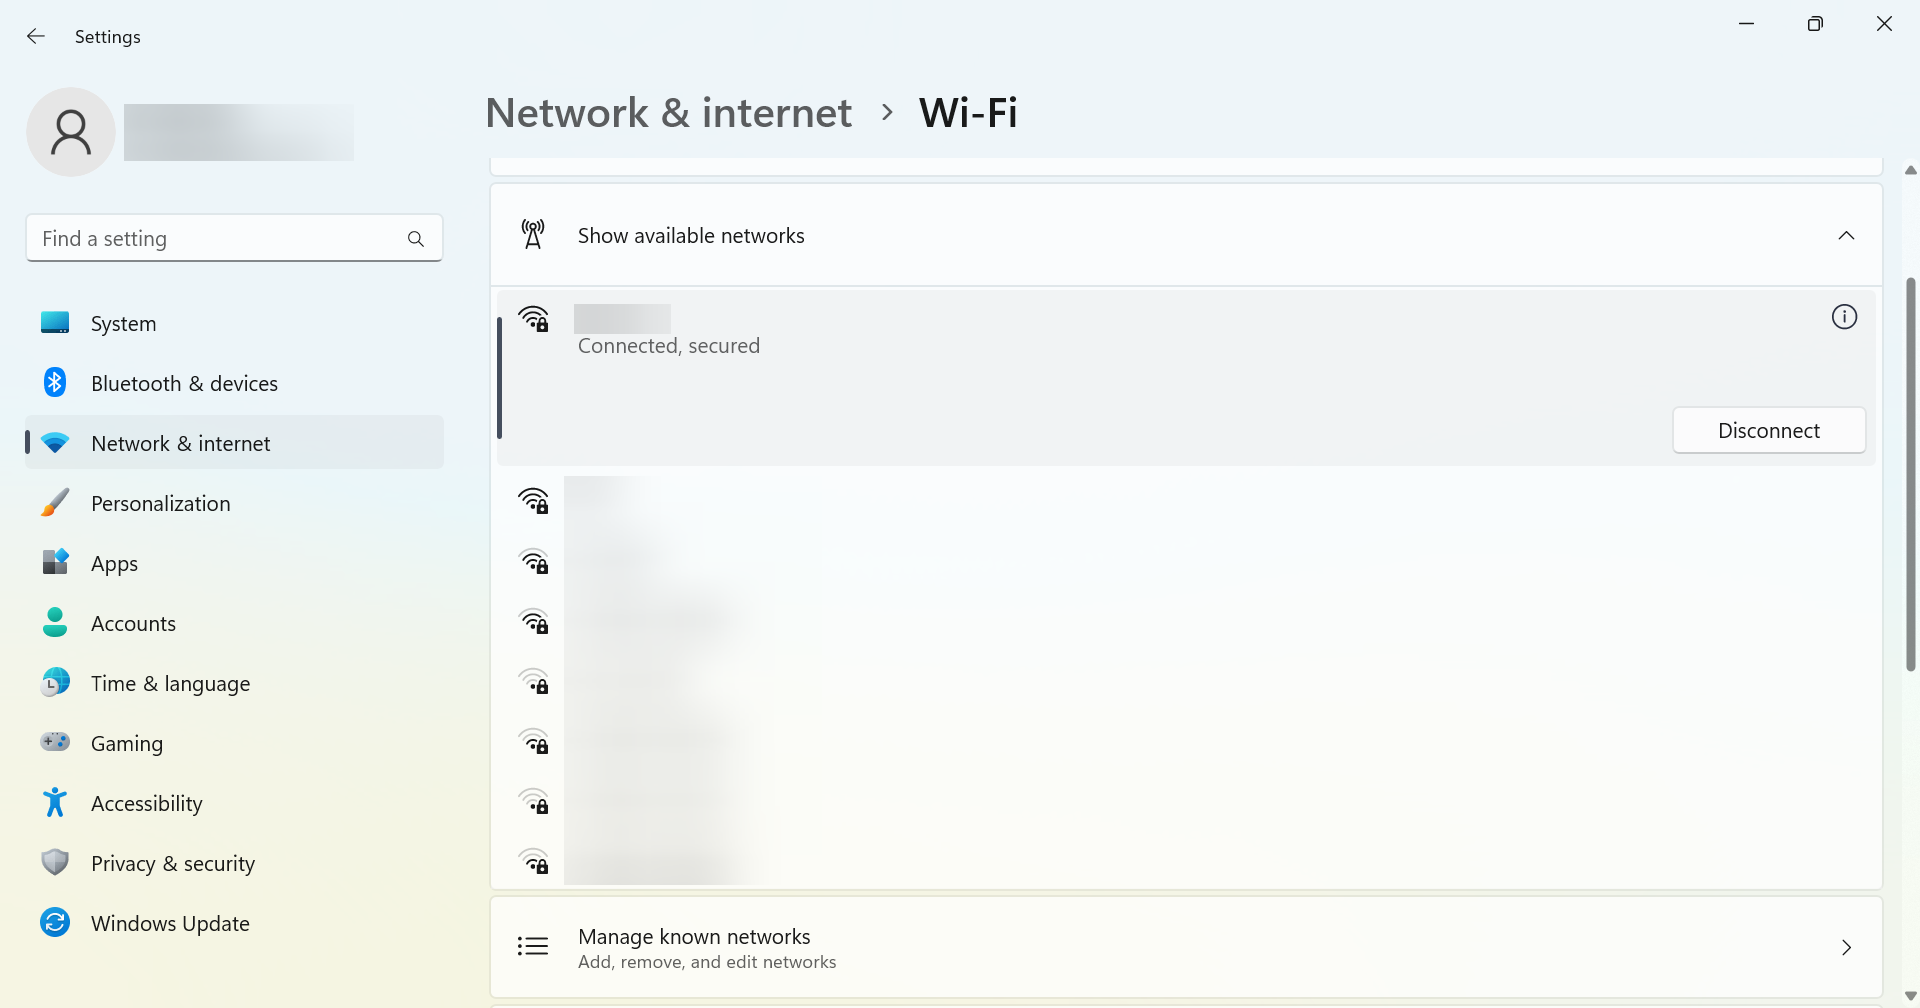
  4. Once done, head back to Wi-Fi settings, and choose Show available networks.show available networks settings app
  5. Now, click on the mobile hotspot here, and enter the password for it to establish a connection.connect to wireless hotspot

3. Check if the critical services are running

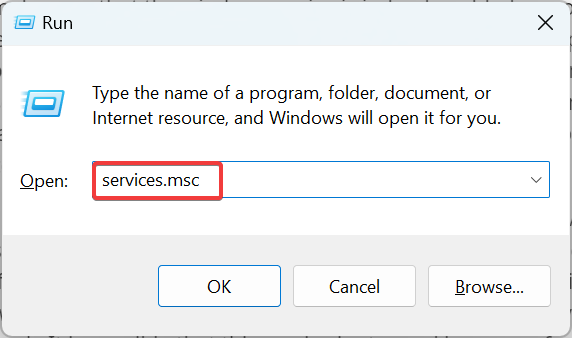
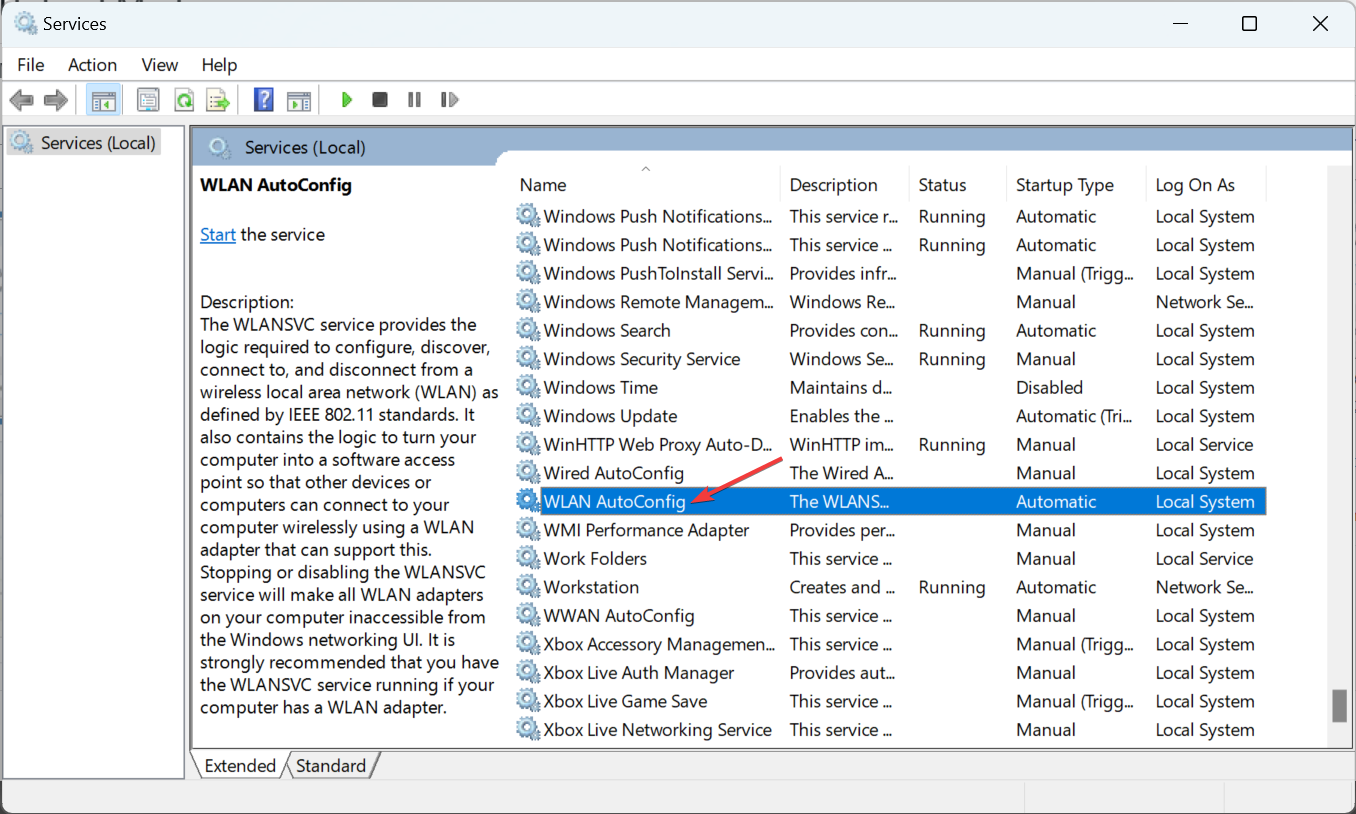
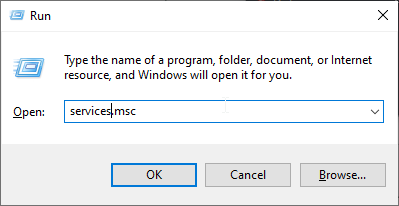
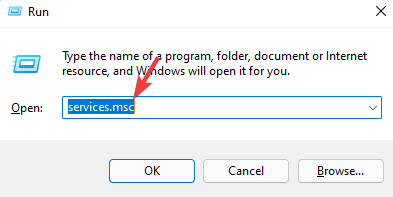
  1. Press Windows + R to open Run, type services.msc in the text field, and hit Enter.services.msc run window
  2. Locate and double-click on the WLAN AutoConfig service to launch its Properties.WLAN AutoConfig service
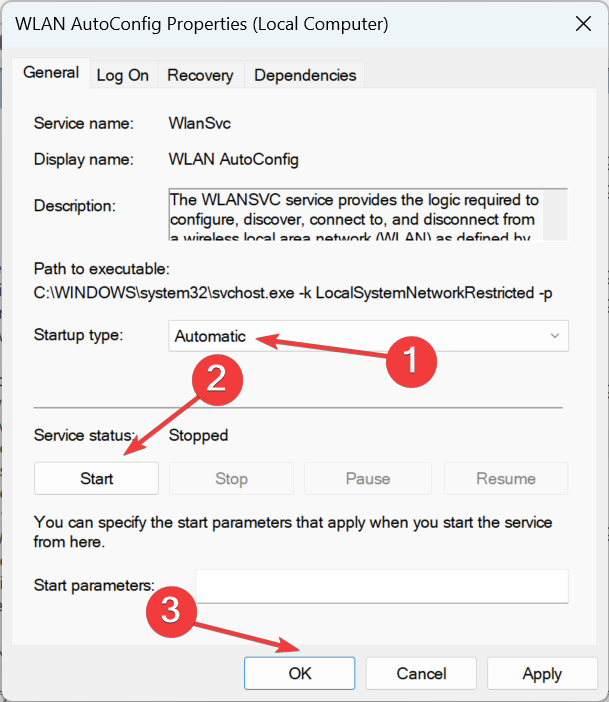
  3. Now, choose Automatic as the Startup type, click on the Start button if the service is not running, and then click OK to save the changes.automatic startup type WLAN AutoConfig service
  4. After you are done, check if the laptop is now connecting to the hotspot.

4. Restore DNS settings to default

  1. Press the Windows key + S and type network connections. Choose View network connections.
    view network connections w11 search results
  2. Locate your hotspot connection and choose Properties.
    Network Connection properties context menu
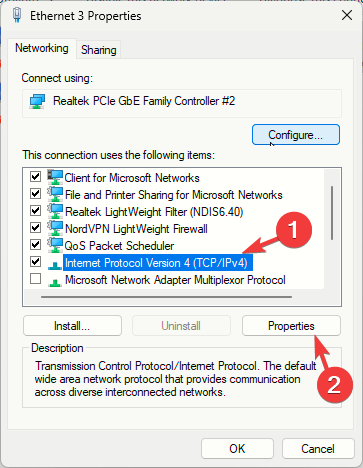
  3. Select Internet Protocol Version 4 (TCP/IPv4) and click Properties.
    internet protocol version 4 properties button
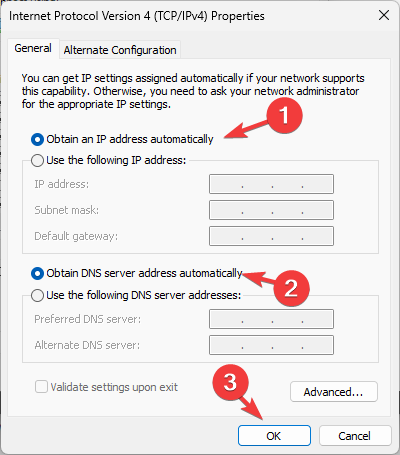
  4. Enable Obtain an IP address automatically and Obtain DNS server address automatically.
    Obtain an IP address automatically & Obtain DNS server selected
  5. Save changes, disable your hotspot connection, and enable it again.

5. Change hotspot security settings

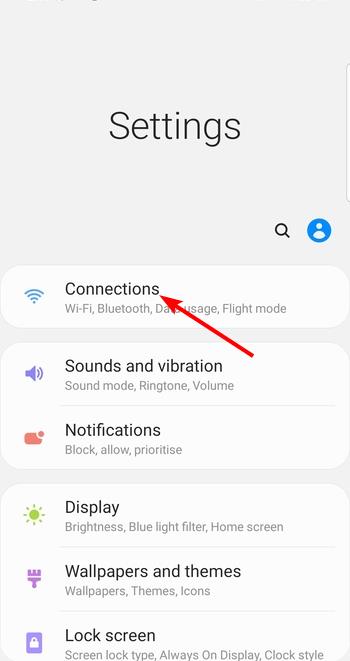
  1. Open the Settings app on your mobile phone and select the Connections option.
    connections phone settings
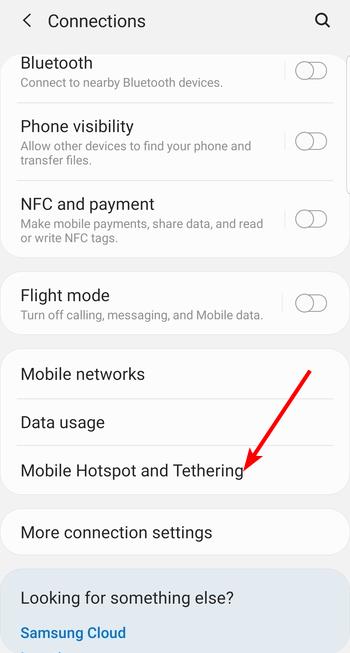
  2. Now, choose Mobile Hotspot and Tethering.
    Mobile Hotspot and Tethering settings
  3. Tap the Mobile Hotspot option.
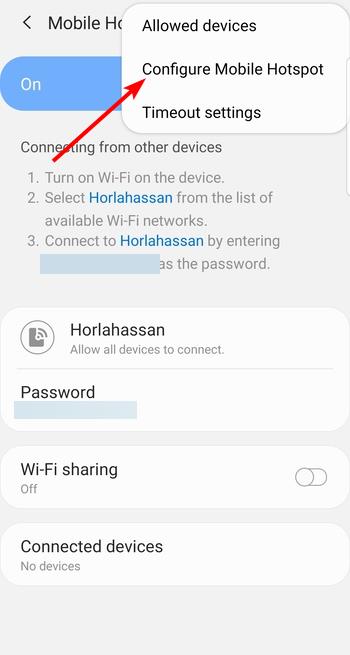
  4. Tap the three vertical dots in the top right corner and select Configure Mobile Hotspot.
    Configure Mobile Hotspot
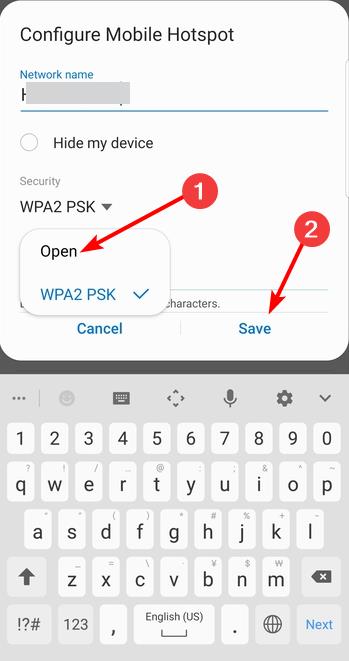
  5. Next, tap the Security dropdown and select WPA2.
  6. Finally, tap the Save option and try connecting again.
    Security settings mobile hotspot

Users reported issues with WPA3, so using a different type of security can help.

6. Change the Wi-Fi frequency

  1. Open the Settings app on your mobile phone and Choose Connections.
  2. Now, select Mobile Hotspot and Tethering.
    Mobile Hotspot and Tethering connections settings
  3. Tap the Mobile Hotspot option.
  4. Next, click the three vertical dots in the top right corner and choose Configure Mobile Hotspot.
    Configure Mobile Hotspot
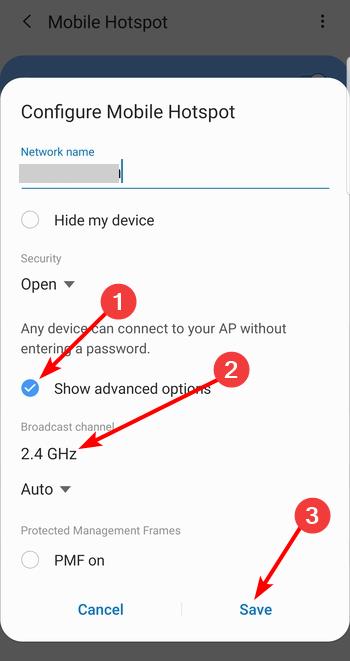
  5. Tick the radio button for Show advanced options.
  6. Finally, select the dropdown under Broadcast channel, select 2.4GHz, and tap the Save button.
    change frequency 2.4GHz mobile hotspot

On newer models, you might have to enable the Maximize Compatibility setting to enable 2.4GHz network.

Finally, if your hotspot is not showing up on your laptop, you might want to consider getting another wireless adapter.

Summary

For more information on this feature, check our guide on how to set up a mobile hotspot on Windows 11. In case you can’t set up a hotspot, check our guide on We can’t set up mobile hotspot or the hotspot keeps turning off.

Many complained that Windows 11 mobile hotspot is not working, as well as Macbook hotspot problems and iPhone WiFi hotspot issues. With a few tweaks like the ones above, you’ll figure those out too, and quickly.

With that said, we can conclude this article. Feel free to tell us in the comments section below if you have anything to add or take.

How to Keep Computer From Sleeping on Windows 10

By default, your Windows 10 PC will lock itself or go to sleep mode after a pre-set time, if you are not using your tablet, laptop, or desktop. This is done in order to preserve power and battery life.

In this way, Microsoft is helping you protect your data and optimizing the power consumption whether you are running your device on its battery or if you are using a physical connection to the electrical network.

Why keep my computer from sleeping?

As you can see, the sleep mode feature is quite useful, though in some situations it might get really annoying and frustrating – for example when your device goes to sleep mode too quickly and really often.

Moreover, automatic locking can be useful because it will prevent other users from accessing your computer if you’re away.

Even though these features are useful, they can sometimes be tedious. Today we’re going to show you the best tools to use to prevent the computer from sleeping or locking.

How can I keep my computer awake on Windows 10?

  1. 1. Open the Start menu and go to Settings.

  2. 2. Choose System.

  3. 3. Select Power and Sleep in the left-hand column and look for the Sleep section on the right.

  4. 4. Set the drop-down menu under When plugged in, PC goes to sleep after to Never.

  5. If you’re a computer administrator you can easily change power settings and stop your computer from sleeping or from locking.

    Of course, there are plenty of third-party apps that can keep your Windows 10 computer awake. However, there’s no need to install them since Windows comes with a dedicated option that allows you to block Sleep Mode.

However, if you’re just a regular user and you don’t have administrator privileges, you might have to look for some third-party solutions.

What are the best apps to keep the computer awake?

Preventing a computer from sleeping or locking is possible even if you don’t have administrator privileges on your PC. For that, you need to use a dedicated program to keep your laptop from sleeping.

Most apps to keep the computer awake that are on our list are portable, so they can work on any PC even if you don’t have administrator privileges. Moreover, you can run them on any PC without installation.

If you’re looking for the best tool to keep your PC awake, we recommend Coffee FF or Don’t Sleep, but you’re more than welcome to try other tools as well.

Caffeine – Simple and efficient

This is another portable app that doesn’t require you to install it in order to use it. Caffeine will stimulate the pressing of the F15 key on your keyboard every minute thus keeping your PC awake and running.

Since the F15 key isn’t available on your keyboard, this application won’t interfere with your work or open applications in any way.

Once you start Caffeine it will be located in the bottom right of your screen.

The application allows you to configure it, and you can set for how long you wish to keep the application enabled or disabled.

This is great if you want your PC to go automatically to sleep after some time but you don’t want to disable the application completely.

Caffeine also supports various command-line options and you can change the time interval of the pressed key, disable the Taskbar icon and so much more.

Caffeine is a simple app that will prevent your PC from going to sleep or automatically locking, and it will be perfect for basic users.

⇒ Get Caffeine

Coffee – Great when transferring files

Another tool that will keep your PC awake is Coffee. This tool checks your network connection and as long as you’re downloading or uploading something your PC will stay awake.

You can customize the download or upload threshold so your PC can go to sleep even if your PC is downloading files in the background. You can also set thresholds for different network adapters on your PC.

This tool is great if you’re downloading files, but unlike other tools on our list, it will not keep your PC awake by simulating a keyboard input. I

If you want to keep your PC awake using this tool, we suggest that you try experimenting with different threshold values. If you want, you can set this tool to start automatically with Windows or check for available sleep blockers.

Coffee is a simple application that will keep your computer from sleeping, and its only flaw is its reliance on a network connection in order to work.

Just like all other tools on our list, this is also a portable application and it doesn’t require an installation in order to run.

⇒ Get Coffee

Coffee FF – No installation required

Coffee FF is basically an improved version of the previous tool. The tools share the same user interface and features.

However, Coffee FF enhances the previous application by adding some missing features.

Using this app, you can prevent your PC from sleeping by setting a specific network threshold. You can also set the delay to remove the sleep block or simulate a key press in order to keep your PC awake.

If you want, you can even block sleep for a predefined number of minutes. Another option that we didn’t expect to see is the ability to prevent display standby which can be rather useful.

Lastly, you can even keep your PC awake as long as certain applications are running.

Coffee FF is a great tool, and it brings features that its predecessor lacks. A portable version of the tool is available, but you can install it on your PC if you want.

⇒ Get Coffee FF

Insomnia – Ideal for keeping a computer awake

This is another portable application that will keep your laptop from sleeping. The application doesn’t require installation, so you can run it on any PC without problems.

To prevent your PC from locking or going to sleep, just start the Insomnia application.

When the application starts, you’ll see its main window. The application doesn’t offer any advanced features, and you can’t configure the application in any way.

As long as Insomnia is running your PC won’t go to sleep or lock itself. Of course, you can lock your PC manually if you want.

Unlike other applications, Insomnia doesn’t simulate keyboard input instead, it uses the SetThreadExecutionState API in order to prevent sleep.

Insomnia is a rather simple application, but despite its simplicity and lack of advanced options, it will be perfect for most basic users to keep their computers awake.

⇒ Get Insomnia 

Caffeinated – Good for setting an awake duration

Caffeinated is a portable application and just like all other portable applications, it doesn’t need to be installed in order to run. Once you start Caffeinated it will show you its welcome screen.

From there you can set this application to start along with Windows or to automatically be active as soon as you turn it on. If you want, you can also set the default duration for the Caffeinated app.

The application will be located in the bottom right corner, and you can quickly disable it or enable it by clicking its icon. In addition, you can set how long will the application keep your PC awake.

Caffeinated is a simple but powerful application. It doesn’t have any advanced features, but it offers a straightforward and simple user interface.

Regarding requirements, Caffeinated requires .NET Framework 3.5 in order to work. This application is simple and portable, and it can start with Windows, so it will be perfect for all users.

⇒ Get Caffeinated

Noise – The most simple option

Another lightweight tool that can prevent your PC from going to sleep is Noise. This tool is portable just like all other tools on our list.

Once you start this tool it will send a random keystroke to its input field every 10 seconds thus keeping your PC awake.

We have to say that this is a somewhat primitive solution, but it should prevent your PC from going to sleep.

Noise doesn’t have any major flaws, but it doesn’t offer any advanced features, and it doesn’t have a modern user interface.

If you want a more modern solution to keep your PC awake, we suggest that you try a different application.

⇒ Get Noise

Don’t Sleep – Good selection of actions

Don’t Sleep is probably one of the most advanced tools on our list. This is a portable application, so there’s no need to install it in order to run it.

The application allows you to choose what type of actions you want to block. You can block Standby / Hybrid Sleep / Hibernation, Shutdown, Log-Off, and Screensaver / Monitor standby.

You can block all options, or you can select them individually from the list.

The application also comes with a timer, and you can schedule a specific time or date for a certain action. For example, you can set the application to turn itself off, stop blocking, or turn off your PC.

There are a total of 7 actions that you can schedule, which is enough for most users.

The application allows you to quickly access many system tools such as Task Manager, Power Options, Screensaver settings, etc. You can even turn off your PC or monitor right from this application.

Don’t Sleep also supports the Mini-HTTP feature that allows you to control the application using your web browser. By doing so, you can configure this application from any device on your network.

Mini-HTTP offers the most basic options, but the feature can be useful to some users.

You can also set this application to start along with Windows or you can change how the application behaves once your computer wakes up from Sleep Mode.

Don’t Sleep is a powerful but relatively simple application that offers advanced features. If you want to prevent your PC from going to sleep, this application is just what you need.

⇒ Get Don’t Sleep

Auto Mouse Mover – Great for mouse automation

Auto Mouse Mover is a simple application designed to move your mouse at specified intervals. By moving your mouse, your PC won’t go to Sleep Mode and it won’t lock itself.

When you start this tool you can choose when you want the tool to run. For example, you can set the tool to run only if you press a specific shortcut.

If you want, you can set the mouse to move as soon as the application starts or after a certain time of inactivity.

If needed, you can configure the inactivity timer and mouse movement as well. This tool also allows you to change the look of its Taskbar icon, so you can change it if you want to.

Lastly, you can set this tool to start automatically with Windows so you won’t have to start it manually every time.

⇒ Get Auto Mouse Mover

If you need to keep your computer from sleeping in Windows 10, tweaking Power settings is the first thing you need to try out. This is an easy solution, and you may find it very useful if you don’t want your PC to go to sleep.

Otherwise, if you don’t have access to changing the Power settings, one of the software options above will surely stop your laptop from going to sleep.

You might also get important information from our guide on what to do if your computer goes to sleep after 2 minutes.

Don’t forget to tell us in the comments section below what your favorite tool is that prevents the PC from sleeping and feel free to share other ways to keep the PC awake.

Mouse Lag in Call of Duty: Black Ops Cold War: 7 Quick Fixes

COD: Black Ops Cold War, released back in 2020, is one of the popular gaming titles. Though refined to a great extent, many users reported mouse lag in Black Ops Cold War.

When the mouse lags while gaming, it affects the whole experience and makes things extremely difficult in the case of multiplayer games. But the underlying cause is usually trivial and can be fixed in no time. Let’s find out how.

Why is my mouse lagging in Black Ops Cold War?

Here are a few reasons you might be encountering the problem:

  • Misconfigured mouse or game settings: In most cases, it was an incorrect setting, either for the mouse or the game itself, that led to the problem.
  • Corrupt or outdated drivers: If the installed drivers are outdated or corrupt, your mouse won’t perform as intended, and you might experience a lag in Black Ops Cold War.
  • Running out of system resources: Oftentimes, you experience mouse lag when enough system resources are not allotted to Black Ops Cold War.

How can I fix mouse lag for Call of Duty: Black Ops Cold War?

Here are a few quick tricks and workarounds we recommend you try first:

  • Restart the computer.
  • When experiencing mouse lag, press the Windows key and then again resume the game.
  • Make sure your PC at least meets the minimum system requirements for Call of Duty: Black Ops Cold War. Remember, it only guarantees that you would be able to run the game, not an optimal performance.
  • For a wired mouse, plug it into a different USB port on the computer.
  • If you haven’t changed the mouse batteries in a while, it’s time you replace them.
  • If you are using a TV for streaming, use a monitor instead since the latter delivers superior performance. In case you can’t, check if there’s a dedicated Gaming Mode on the TV and enable it.

If these two don’t offer any help, the solutions listed below surely would.

1. Update mouse and graphics card drivers

First, try updating the mouse and GPU drivers with driver updater software. Driver updater software will show you if there are more up-to-date drivers for your mouse and graphics card available.

Then you can quickly download and install the latest drivers with the driver updater utility.

2. Adjust Black Ops’ mouse settings

  1. Launch the Call of Duty: Black Ops Cold War game, and open its Settings.
  2. Select the Keyboard and Mouse tab shown directly below.
    keyboard and mouse tab mouse lag black ops cold war
  3. Set the Mouse Filtering and Mouse Acceleration values to 0.
  4. Now, enter 1.78 as the Monitor Distance Coefficient (revert to the default value if this doesn’t work).
  5. Disable the Mouse Smoothing setting if it’s not already.
  6. Experiment with different Sensitivity bar values to see if you can reduce mouse lag with that option.

After making these adjustments, check if the mouse lag is fixed in Black Ops Cold War.

3. Set the game’s priority to high

  1. Press Ctrl + Shift + Esc to open the Task Manager, and head to the Details tab.details
  2. Locate the BlackOpsColdWar.exe process, right-click on it, hover the cursor over Set priority, and choose High from the flyout menu.high priority to fix mouse lag black ops cold war
  3. Once done, run the game and check if mouse lag is still present.

And while you are in the Task Manager, make sure to terminate the non-critical programs and processes while also disabling startup apps to free up system resources.

4. Disable VSync

  1. Launch the Nvidia Control Panel, and choose the Manage 3D settings option from the navigation pane.manage 3d settings
  2. Now, head to the Program Settings tab, choose Black Ops Cold War from the Select a program to customize dropdown menu, and then Off from the Vertical sync menu.disable vsync to fix mouse lag black ops cold war
  3. If you can’t find the game, click on Add, and then disable VSync.

That’s it! Many users reported that disabling Vertical Sync (VSync) helped fix mouse lag in Black Ops Cold War. If this, too, doesn’t work, head to the next solution.

5. Disable the USB power-saving mode

  1. Press Windows + X to open the Power User menu, and choose Device Manager.device manager
  2. Expand the Universal Serial Bus controllers category, and then double-click USB Root Hub to open its properties.USB root hub
  3. Select the Power Management tab, uncheck the checkbox for Allow the computer to turn off this device to save power, and click on OK to save the changes.disable to fix mouse lag black ops cold war

Start the game again and check whether the mouse lag still persists in Black Ops Cold War. If yes, head to the next fix.

6. Disable mouse pointer options

  1. Press Windows + R to open Run, type Control Panel in the text field, and hit Enter.control panel
  2. Click on Hardware and Sound.hardware and sound
  3. Now, click on Mouse under Devices and Printers.mouse
  4. Navigate to the Pointer Options tab, uncheck the Enhance pointer precision and Display pointer trails checkbox, and click on OK to save the changes.disable to fix mouse lag black ops cold war
Note icon NOTE
If you’re utilizing a Logitech mouse, also disable its Smart Move feature. You can disable it in the Mouse Movement tab within the Logitech SetPoint settings software.

7. Change the mouse’s report rate

  1. First, open your mouse settings software, and look for report (or polling) rate sensitivity options.
    Report rate options mouse lag black ops cold war
  2. Select a report rate value of 250 or lower.
  3. Save your selected settings, and close your mouse configuration software.

That’s it! If nothing so far worked, adjusting the report rate should get things up and running when experiencing mouse lag in Call of Duty: Black Ops Cold War.

For those looking to upgrade, check the best gaming mouse for Windows and enjoy gaming like never before. Moreover, if you’d like to access bot lobbies with ease, we’ve got you covered.

Do not forget to tell us which fix worked for you in the comments section below. Also, you can drop any additional solutions that we might have missed.

Drag and Drop Not Working on Windows 10: How to Enable It

Moving files or folders, or even paragraphs and sentences around while working on your computer, is impossible when you can’t drag and drop in Windows 10.

If you’re experiencing issues and the drag and drop not working on Windows 10 issue happens on your computer, here are 12 quick fixes you can use to resolve it.

Why is drag and drop not working on Windows 10?

There are several potential reasons why drag and drop may need to be fixed on Windows 10. Some common causes include:

  • Touchpad or mouse driver issues – If the touchpad or mouse driver is outdated or incompatible with Windows 10, drag and drop may not function properly. Updating or reinstalling the driver may resolve the issue.
  • Corrupted system files – Drag and drop may not work if certain system files are missing or corrupted. Running the System File Checker (SFC) tool can help detect and fix any corrupted system files.
  • Third-party software conflicts – Some third-party programs, such as antivirus or security software, can interfere with drag and drop. Temporarily disabling or uninstalling these programs may resolve the issue.
  • Touchscreen issues – If you use a touchscreen device, drag and drop may only work properly if the touch screen is calibrated or the touch screen driver is updated.
  • Incorrect settings – Drag and drop may be disabled or not configured correctly in the settings. Check the settings of the specific program or the operating system settings to ensure that drag and drop is enabled.
  • Hardware problems – Hardware problems such as a malfunctioning touchpad or mouse can also cause drag and drop not to work. Replacing hardware such as a touchpad or mouse is the solution.

Now, let us examine some reliable solutions.

How can I fix drag and drop not working?

1. Run the DISM tool

  1. Click Start and type command, right-click the Command Prompt, and select Run as administrator.
  2. Type the script below and hit Enter.
    Dism /Online /Cleanup-Image /ScanHealth
  3. Lastly, type the repair script and hit Enter.
    Dism /Online /Cleanup-Image /RestoreHealth

Once the repair is complete, reboot your computer and check if the problem persists, after which you can run an SFC scan as described in the next solution.

2. Run a System File Checker scan

  1. Click Start and type command, right-click the Command Prompt, and select Run as administrator.
  2. Type the script below and hit Enter.
    sfc/scannow
  3. Restart your computer

3. Perform a Clean Boot

  1. Go to the search box, type msconfig, then select the System Configuration app.
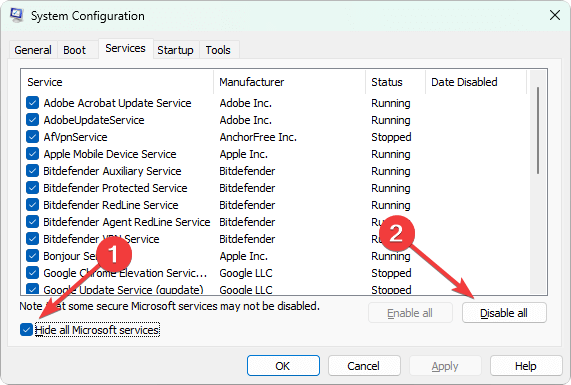
  2. Click the Services tab, tick Hide all Microsoft services, and click the Disable all button.
  3. Go to the Startup tab and click the Open Task Manager option.
  4. Close Task Manager, then click Ok
  5. Reboot your computer.

4. Install Windows Updates

  1. Click Start.
  2. Go to the search field box and type Updates.
  3. Lastly, click Check for Updates, and install all updates listed.

Windows will immediately detect your system’s configuration and download appropriate ones.

5. Reset your PC

  1. Press Windows + I to open the Settings app.
  2. Click Update & Security.
  3. Click Recovery on the left pane, and under Reset this PC, click Get started.
  4. In the Choose an option screen, select the Keep my files option.
  5. Follow the Wizard to complete the reset.

6. Edit the registry

  1. Right-click Start and select Run.
    can’t drag and drop in Windows 10
  2. Type regedit, then hit Enter.
  3. Go to the path below:
    Computer\HKEY_LOCAL_MACHINE\SOFTWARE\Microsoft\Windows\CurrentVersion\Policies\System
  4. Right-click EnableLUA and select Modify.
  5. Change the value from 1 to 0.
    drag and drop not working windows 10
  6. Press OK. then restart your computer.

Check if, after the restart, the drag and drop not working on Windows 10 problem is gone. Try the next solution if you still can’t drag and drop in Windows 10.

7. Run Hardware and Devices troubleshooter

  1. Right-click Start and select Control Panel.
  2. Go to the View by option on the top right corner, click the drop-down arrow, and select Large icons.
    drag and drop not working on Windows 10
  3. Click Troubleshooting.
    https://i.imgur.com/BuFbHAn.png
  4. Select Hardware and Sound.
    drag and drop not working windows 10
  5. Select Configure a Device.
    can’t drag and drop in Windows 10
  6. Click Next to run the troubleshooter

8. Uninstall and reinstall mouse drivers

  1. Right-click Start and select Device Manager.
    drag and drop not working windows 10
  2. Expand Mice and other pointing devices to open the list, right-click the mouse device you want to remove, and click Uninstall driver.
    drag and drop not working windows 10
  3. Click Yes when you get a confirmation message, then restart your computer.

9. Enable drag and drop using ESC key

  1. Open File Explorer or Windows Explorer by pressing Windows + E.
  2. Click any file, and long-press the left-click mouse button.
  3. Press the Esc key.

10. Restart Windows Explorer

  1. Press Crtl + Shift + Esc to open the Task Manager.
  2. Search for Windows Explorer from the list of processes.
  3. Right-click on it and select Restart.

The explorer will be restarted, and in about 2 seconds, your problem should be fixed.

These simple tweaks have managed to fix the drag-and-drop feature for some of your readers, so you should try it also.

Other users reported that the program freezing caused this issue, and when they closed it, things went back to normal, so make sure you don’t have any stuck software.

If the Windows 11 drag and drop not working issue arises too, we have yet another guide to help you out. You can read a complete walkthrough of drag and drop behavior in Windows 11 by checking this guide on how File Explorer handles drag and drop.

Did any of these tips help you fix the drag and drop not working on Windows 10 problem? Let us know in the comments section below.

10 Ways to Fix Edge Browser Lagging in Windows 10/11

Today we’ll explain what to do if Microsoft Edge is lagging. Whether it’s on YouTube, a streaming service, or simply when scrolling or typing, this issue is actually pretty easy to address.

Here’s what you should try:

How do I fix Microsoft Edge if it’s running slow?

1. Clear cache and browsing history

  1. Open Microsoft Edge and click on the dotted menu. Choose Settings.
  2. Under Privacy, search, and services, select Choose what to clear.
  3. Select All time and check the boxes for all the available data.
  4. Click the Clear now button.

2. Set a new location for Temporary Files

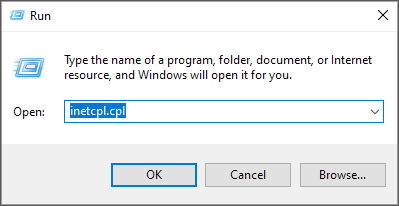
  1. Press Windows key + R, type inetcpl.cpl, and hit Enter.
  2. On the General tab, under Browsing History, go to Settings.
  3. On the Temporary Internet Files tab, click Move folder…
  4. Choose the new location for the Temporary Internet Files folder.
  5. Then set the Disk Space to use 1024MB and click OK.
  6. Open Microsoft Edge, and see if the browsing is now faster.

3. Reset the host’s file

  1. Open File Explorer, and paste the following into the search bar: %systemroot%\system32\drivers\etc
  2. Now, right-click on hosts file, choose Open with..,
  3. Now choose Notepad.
  4. Replace the text from the file with the following text:
    # Copyright (c) 1993-2009 Microsoft Corp.
    #
    # This is a sample HOSTS file used by Microsoft TCP/IP for Windows.
    #
    # This file contains the mappings of IP addresses to host names. Each
    # entry should be kept on an individual line. The IP address should
    # be placed in the first column followed by the corresponding host name.
    # The IP address and the host name should be separated by at least one
    # space.
    #
    # Additionally, comments (such as these) may be inserted on individual
    # lines or following the machine name denoted by a '#' symbol.
    #
    # For example:
    #
    # 102.54.94.97 rhino.acme.com # source server
    # 38.25.63.10 x.acme.com # x client host
    # localhost name resolution is handle within DNS itself.
    # 127.0.0.1 localhost
    # ::1 localhost
  5. Close Notepad, and save the changes.

5. Delete Edge extensions

  1. Click the Menu icon and choose Extensions.
    edge error code status_access_violation
  2. Now click on Manage extensions.
  3. Disable all extensions by clicking the switch icon.

6. Reset Microsoft Edge

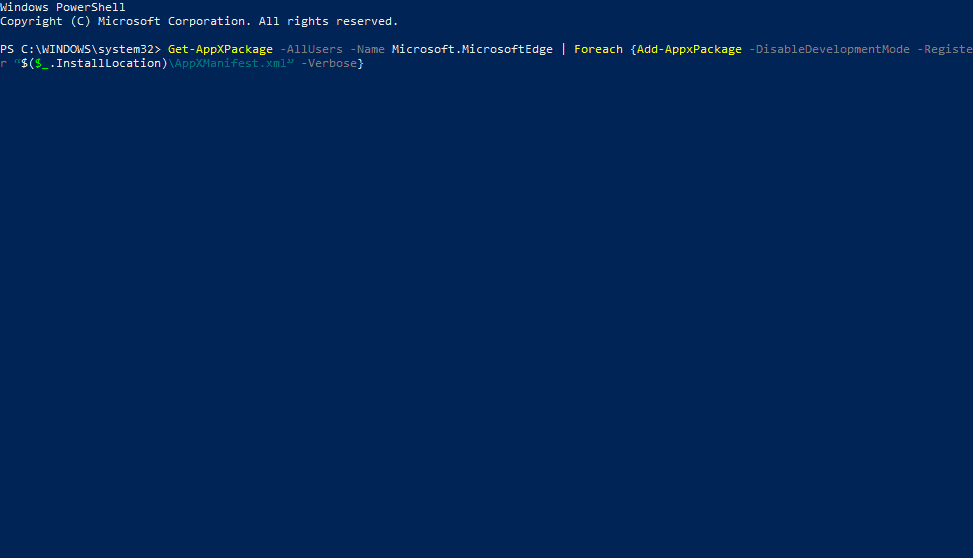
  1. Press Windows key + X and select PowerShell (Admin).
  2. Paste the following command and press Enter:
    Get-AppXPackage -AllUsers -Name Microsoft.MicrosoftEdge | Foreach {Add-AppxPackage -DisableDevelopmentMode -Register “$($_.InstallLocation)\AppXManifest.xml” -Verbose}
  3. Restart your computeredge slow to respond
  4. This command will reinstall Microsoft Edge, and hopefully, your problems will be solved. If not, move on to another solution.

It may be corrupted if Microsoft Edge is slow at scrolling or typing. Also, if Edge is considerably slower than the rather resource-hogging Chrome, resetting the browser to default should help.

7. Run the SFC scan

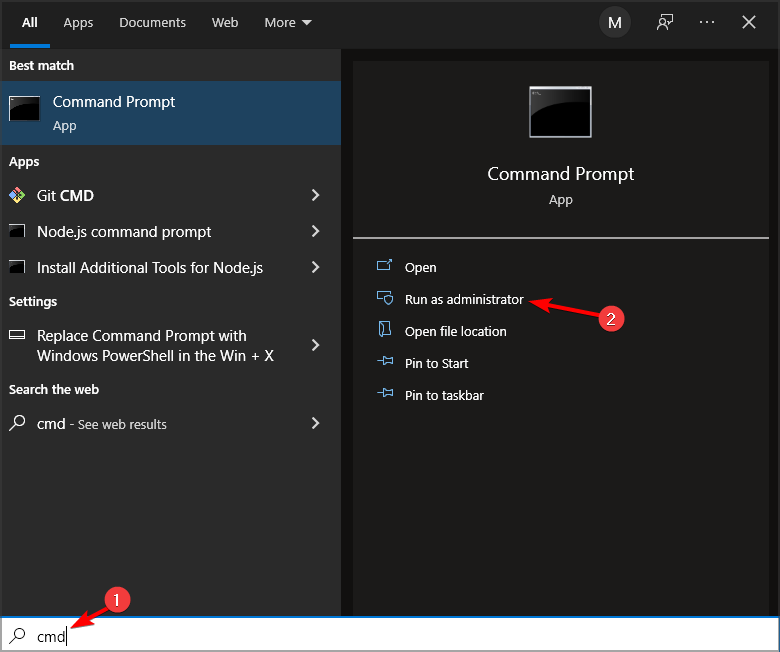
  1. Go to Search, and type cmd in the Search box.
  2. Click on Run as administrator.
  3. At the Command Prompt, type the following command, and then press Enter: sfc /scannowedge not loading pages
  4. Wait for the process to finish.
  5. Restart your computer.

This is a universal solution, and it should work if Microsoft Edge is slow and unresponsive on Windows 11 or 10.

8. Disable hardware acceleration

  1. Press Windows + R to open Run, enter inetcpl.cpl and press Enter.inetcpl
  2. Go to the Advanced tab.internet properties advanced tab
  3. Select the Use software rendering instead of GPU rendering Under Accelerated Graphics and then click OK to save changes.disable hardware acceleration

9. Repair Edge app

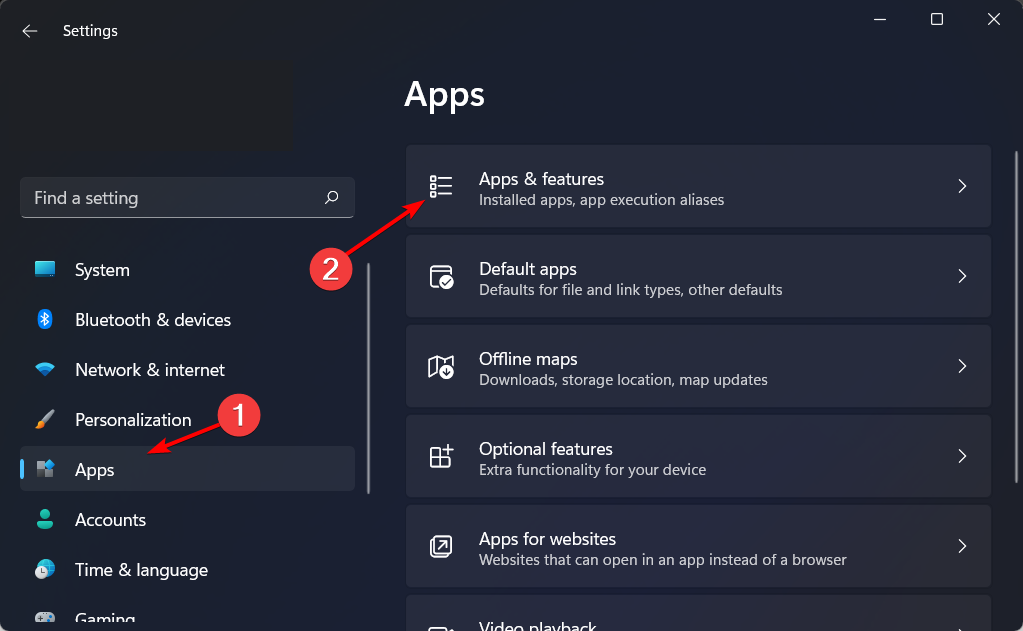
  1. Press Windows + I to open Settings.
  2. Navigate to Apps, and select Apps and features.apps-features where is the chrome menu button
  3. Search for Microsoft Edge from the apps list.
  4. Click the three vertical dots next to it, and select Modify.edge-modify windows 11 edge not working
  5. Click the Repair button and wait for the task to finish. repair-edge windows 11 edge not working

10. Use a faster browser

Ultimately, if you keep having issues with Edge being laggy/slow, consider switching to another browser.

If the Chromium engine is why you chose Edge, we recommend you try Opera One. It is lightweight, and among the fastest browsers in the world.

The looks can be further enhanced thanks to the vast array of visual customization tools, and the toolset can also be enriched with the vast library of extensions.

Besides speed, Opera One also prides itself on its users’ privacy, providing them with a built-in ad-blocker and even a VPN with unlimited data & traffic.

Opera One

Navigate to your favorite web pages instantly with zero lag with this lightning-fast browser!

Wrapping up

We hope this article helped you to solve the problem of Microsoft Edge being slow and unresponsive on your PC.

Also, if you have any other problems with Microsoft Edge, check out our article about fixing Edge problems in Windows 10, and you’ll find the solution.

Did you find a different solution? Please share it with us in the comments section below.

FAQ

Why is Microsoft Edge so slow?

Edge can become slow due to the number of open tabs, so be sure to close all the tabs that aren’t necessary.
Your cache can also cause the browser to be running slow on Windows 10 and 11, so it’s advised that you clean it from time to time. Specific extensions can also cause issues, so disable all unnecessary extensions

How do I reduce Microsoft Edge CPU usage?

To reduce Microsoft Edge’s high CPU usage on your PC, it’s advised to disable specific settings, such as Startup boost, for example.
Browser extensions can also cause slowdowns, especially if you have many of them running simultaneously. Lastly, clearing your cache can help with performance issues in any browser.

Why is YouTube lagging on Edge browser?

YouTube lagging on Edge can be due to slow internet, too many open tabs, interfering extensions, hardware acceleration issues, outdated graphics drivers, conflicting software, or system performance problems. Solutions include checking connections, updating drivers, disabling extensions, and adjusting settings.

How to Change OneDrive Sync Settings on Windows 10

Some time ago, Microsoft was forced to rename its cloud storage service SkyDrive into OneDrive. Besides the branding change, some new options were added, and today we’re going to talk about synchronizing settings.

Since OneDrive is the default cloud storage, Microsoft has decided to embed it deeply inside Windows 10.

How do I change OneDrive sync settings?

1. On Windows 10

  1. 1. Select the OneDrive icon in the taskbar.

  2. 2. Choose More and go to Settings (In some cases, you may be able to open Ondrive folder from the Settings app).

    onedrive settings taskbar
  3. 3. Click on the Account tab and choose folders. The Sync your OneDrive files to this PC dialog box should now be available on the screen.

  4. 4. Uncheck the folders you don’t want to sync to your PC. If you want to sync absolutely all your folders, then check the Make all files available option.

    Also, besides all this, you can choose to back up your files to your OneDrive account, as well.

    onedrive sync settings all files
  5. 5. After you make your selection, hit OK.

  6. You can change OneDrive sync settings in Windows 10 via the app’s built-in options. You can manually choose which folders to sync and which not to.

Speaking of cloud storage, you might also want to check out our guide on the Best Cloud Storage Apps or Top Decentralized Cloud Storage Solutions.

2. On older versions

  1. Open the Search charms bar, go to the right top corner or press the Windows + W keys.
  2. Type PC Settings.
  3. Then choose OneDrive.
  4. From there, choose Sync settings.
windows 8.1 one drive settings

Now, you will have access to a lot of features that you can choose to turn off, or leave them on, as they are, by default. So, from here, you can synchronize to your OneDrive account a bunch of things, and here they are enlisted:

  • PC settings – you can synchronize your desktop or tablet settings across your devices.
  • Start screen – your tiles and layouts
  • Appearance – colors, background, lock screen, and pictures
  • Desktop personalization – themes, taskbar, high contrast
  • Apps – a list of apps you have installed, as well as your settings and purchase within apps
  • Web browser – favorites, open tabs, home pages, history, and page settings
  • Passwords – sign-in information for apps, websites, networks, and HomeGroup
  • Language preferences – keyboard input, display language, personal dictionary
  • Ease of access – narrator, magnifier
  • Other Windows settings – File Explorer, mouse, printers

How to sync files using third-party software?

Since we are talking about synchronization, we simply cannot omit this incredible tool that will keep your files synced across all of your devices with no risk of data loss or leakage.

Keeping all of your assets synchronized has never been easier thanks to Sync, the tool that allows you to store, share, and access your files from any location.

But Sync delivers more than storage, it also protects your data with end-to-end encryption, acts as a real-time backup solution, and delivers strong data recovery features.

Let’s quickly look at its key features:

  • Storage space  of up 4TB in premium plans
  • Realtime backup and sync options
  • End-to-end encryption and data protection
  • File history and recovery features included
  • Two-factor authentification (2FA)
  • Mobile apps, desktop apps, and integration

The best part is that you get up to 5 GB to store all those essential files in the cloud free of charge.

⇒ Get Sync.com

We hope this has been of great help to you, so stay subscribed for more useful tips. As always, feel free to share your personal experience via the comments section below.

Desktop Icons Not Showing in Windows: How to get Them Back

The Windows 11 desktop is where many users stick shortcuts. However, some users can’t access their shortcuts when the desktop doesn’t show icons.

Have the icons on your desktop disappeared in Windows 11? If so, you don’t need to be a magician to get them back. You can fix desktop icons not showing in Windows 11 with the resolutions below.

Why are my icons not showing on my desktop Windows 11?

Before fixing desktop icons not showing, it’s worth considering some of the causes for them disappearing in the first place. These are the causes for desktop icons not showing in Windows 11:

  • A Show desktop icons option is disabled: Windows 11 has a Show desktop icons option that needs to be selected for icons to be visible. Updates can sometimes change that setting without user input.
  • Icon cache corruption: The Windows 11 icon cache might have corrupted data.
  • System file corruption: Icon display issues can feasibly arise from corrupted system files.
  • A Group Policy setting is hiding them: Group Policy editor has a setting that can hide all desktop icons. If you’re sharing your PC with other users, maybe one of them enabled that option.
  • Registry database issues: The icon registry database could be corrupted. A NoDesktop DWORD value can also cause the problem.

Now let’s get your Windows 11 desktop icons back. First, go through the following resolutions in the order specified to restore desktop icons in Windows 11.

How can I get desktop icons back in Windows 11?

1. Select the Show desktop icons context menu option

  1. Right-click any part of your Windows 11 desktop wallpaper to select View.
  2. Click Show desktop icons if that option isn’t selected.
  3. Open the Run command box, which you can view by pressing a Windows + R key combo.
    Show desktop icons option windows 11 desktop icons not showing
  4. To open Desktop Icon Settings, input this command and click OK: desk.cpl ,,5
    desk.cpl command windows 11 desktop icons not showing
  5. Select all the checkboxes for desktop icons.
  6. Click Apply > OK to show the selected desktop icons.
    Desktop Icon Settings window windows 11 desktop icons not showing

2. Change a Hide and disable all items on the desktop policy setting

  1. Select the file search tool on the taskbar by clicking its box or button.
  2. To find Group Policy Editor, enter a gpedit.MSC search phrase for that utility.
    A gpedit.msc search windows 11 desktop icons not showing
  3. Select gpedit.msc to view a Local Group Policy Editor window.
  4. Click User Configuration in Group Policy Editor’s sidebar.
    User Configuration category  windows 11 desktop icons not showing
  5. Select Administrative Template and Desktop to access policy settings for the desktop area.
  6. Double-click the Hide and disable all items on the desktop policy.
    Hide and disable all items on desktop policy windows 11 desktop icons not showing
  7. If that policy is set to Enabled, select Not configured.
    Not Configured radio button windows 11 desktop icons not showing
  8. Click the policy’s Apply option.
  9. Press OK to exit and close Group Policy Editor.
  10. Then press the Windows logo key. Next, click the Power and Restart buttons on the menu that opens.
Note icon NOTE
Windows 11 Home doesn’t have Group Policy Editor. Therefore, this resolution applies to the Windows 11 Pro and Enterprise editions in which you can access that tool.

3. Rebuild the icon cache

  1. Press the taskbar button to access File Explorer.
    File Explorer button windows 11 desktop icons not showing
  2. Click View on Explorer’s command bar.
  3. Select the Show submenu.
    Show option windows 11 desktop icons not showing
  4. Click the Hidden items option.
    Hidden Items option windows 11 desktop icons not showing
  5. Then navigate to this directory path (replace <user folder> with your actual folder): C:\Users\<user folder>\AppData\Local
  6. Right-click the IconCache.db file and select Delete (the bin icon).
    Delete option windows 11 desktop icons not showing
  7. Select to restart the PC from Windows 11’s Start menu.

4. Restart File Explorer

  1. Open Task Manager by clicking Start with the mouse’s right button and select that tool’s Power User menu shortcut.
    Task Manager windows 11 desktop icons not showing
  2. Select Processes within the Task Manager window.
  3. Scroll down to Explorer within the Windows processes section.
  4. Right-click Windows Explorer and select its Restart context menu option.
    Restart option windows 11 desktop icons not showing

5. Scan system files in Windows 11

  1. Bring up Windows 11’s search box.
  2. Search for the Command Prompt by inputting a cmd keyword.
  3. Right-click Command Prompt within the search tool to select a Run as an administrator launch option.
    Run as administrator option windows 11 desktop icons not showing
  4. Execute an SFC scan by inputting this CMD command and pressing Return: sfc /scannow
    sfc scannow command windows 11 desktop icons not showing
  5. Wait for the scan to reach 100 percent and show an outcome message inside Command Prompt.

6. Delete NoDesktop in the registry

  1. Open the Registry Editor app.
    Registry Editor search result windows 11 desktop icons not showing
  2. Bring up this key: HKEY_CURRENT_USER\Software\Microsoft\Windows\CurrentVersion\Policies\Explorer
  3. If you see a NoDesktop DWORD in the Explorer key, right-click it and select Delete > Yes.
    Delete DWORD option windows 11 desktop icons not showing
  4. Restart File Explorer as instructed in the fourth resolution.

7. Reset Windows 11

If desktop icons are still not showing after applying all the aforementioned potential solutions, a more drastic fix might be needed. First, consider resetting Windows 11 to resolve the issue.

Reset this PC option windows 11 desktop icons not showing

Resetting Windows 11 will likely resolve registry or system file issues for missing icons. However, apps that weren’t pre-installed on your PC will not be preserved after a reset.

WR’s guide to factory resetting Windows 11 includes instructions for how to do that with the built-in tool and other methods. Make sure you select the Keep my files option.

It’s essential to have icons on the desktop for quicker software access. The fixes above are most likely to work for restoring missing desktop icons.

Yet, there could still be other ways to fix desktop icons not showing in Windows 11. Users who’ve restored missing Windows 11 desktop icons with other methods are most welcome to share alternative fixes in the comments below.

Fix: Motherboard Audio is Not Working in Windows 11

Sometimes, you may encounter an issue where the motherboard audio may not work on your Windows 11 PC.

A Windows 11 PC producing no sound during an online presentation while listening to music or watching a video can be frustrating and is undoubtedly a matter of worry.

Why is my motherboard audio not working in Windows 11?

There could be different reasons why the motherboard audio of your Windows 11 PC may not be working, such as:

  • The audio cable is not correctly inserted – The motherboard audio may not work if the audio wire is not in the right slot on your motherboard.
  • Speaker wires are not in the correct slot – Sometimes, the laptop speaker plugs are not in the correct audio slot on the back of the motherboard.
  • Outdated audio drivers – If your system is not running the latest versions of the audio drivers, it can cause the audio components in the motherboard to malfunction.
  • Incorrect audio settings in BIOS – Chances are that the audio settings in the BIOS are incorrect.
  • Sound is set to mute – It could be possible that you accidentally set the PC volume to mute; hence, the motherboard audio is not working.

How do I fix it when the motherboard audio is not working?

Before you proceed with the primary methods, make sure to run the preliminary checks below to see if it helps fix the issue:

  • Reboot your PC.
  • Check if you have selected the correct speaker output.
  • Ensure the audio and speaker cables sit in the correct slots on your motherboard.
  • Check if the volume is set to a minimum or is not set to mute.
  • You must confirm if you have installed all the recent Windows updates.

If the above steps do not help you fix the motherboard audio problem, and if it’s still not working, you can continue to try the workarounds below.

1. Update audio drivers

  1. Press the Win + R keys simultaneously to open the Run dialog. Type devmgmt.msc and hit Enter to launch the Device Manager. run dev mgmt.msc command
  2. Next, expand the Sound, video and game controllers section. Here, right-click on the motherboard audio device and select Update driver. update audio device
  3. In the Update Drivers window, click on Search automatically for drivers. Search automatically for drivers
  4. Windows will start looking for the latest versions, and if any are found, it will finish the update automatically.

Once done, close Device Manager and restart your PC. Now, check if the motherboard sound problem is resolved.

If the Windows Update service is not running, we recommend a few practical methods to fix the issue.

Note icon NOTE
Alternatively, you can visit the manufacturer’s website for the motherboard and manually download and install the latest driver version.
Moreover, you can also try a specialized tool like Outbyte Driver Updater to automatically find the latest updates for your outdated or missing drivers.

2. Run the Windows audio troubleshooter

  1. To open the Windows Settings app, press the Win + I keys together.
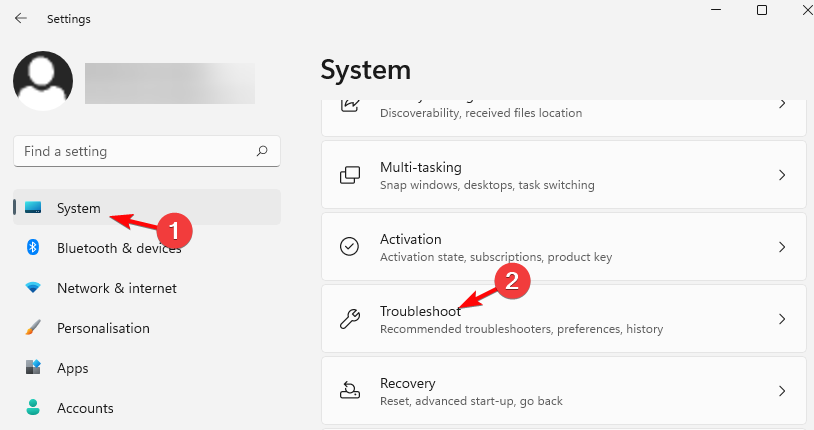
  2. Here, on the left, click on System and then click on Troubleshoot. system troubleshooter
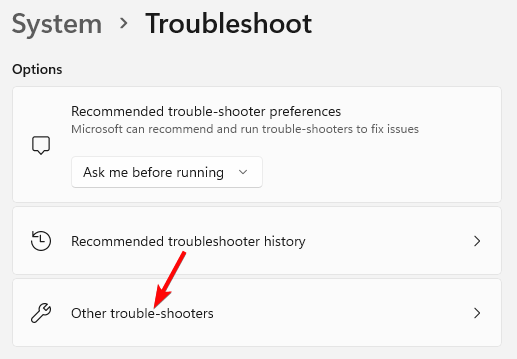
  3. On the next screen, go to the right and click on Other trouble-shooters. Other trouble-shooters
  4. Now, on the right, click on Playing audio. run audio troubleshooter
  5. The troubleshooter will start running, and as it detects any issues, it will automatically apply the repairs.

Now, close the Settings app, restart your PC, and check whether the motherboard audio is working. However, if there is still a problem with the audio device, here’s what you can do.

3. Set the audio device as the default

  1. Press the Win + R shortcut keys to open the Run console.
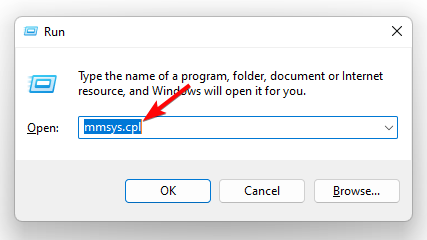
  2. Type in mmsys.cpl and hit Enter to open the Sound dialog. run mmsys.cpl command
  3. In the Sound window, select the Playback tab. Now, right-click on the desired audio device and select Set as Default Device. Set as Default Device

You can now restart your PC and check if the motherboard audio is working fine or not. You can also follow the instructions in our detailed guide to set the default speakers on Windows 11.

4. Disable audio enhancements

  1. Press the Win + R keys to open the Run dialog. For example, type mmsys.cpl and hit Enter to open the Sound dialog. run mmsys.cpl command
  2. In the Sound window, go to the Playback tab, right-click on the audio device, and select Properties. sound properties
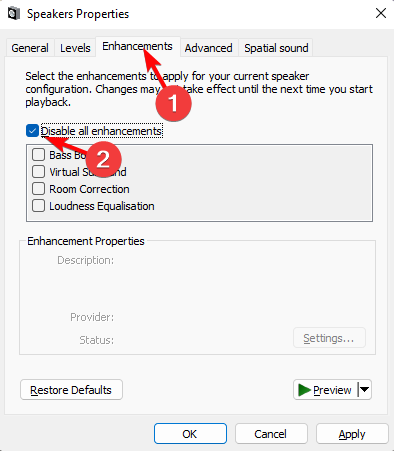
  3. Next, in the Properties dialog, go to the Enhancements tab, and check the box next to Disable all enhancements. Press Apply and OK. disable all enhancements

Once done, close the dialog box, reboot your device and check if the motherboard sound problem is fixed or persists.

5. Restart audio services

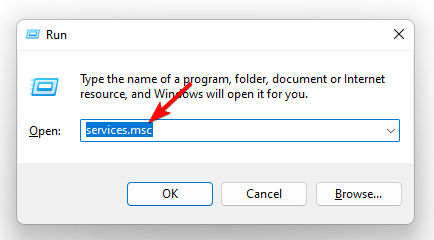
  1. Open the Run console by pressing the Win + R keys together. Then type services.msc and hit Enter to open the Services window. run services.msc command
  2. In the Service manager, go to the right and under the Name column, look for Windows Audio. Then, right-click on it and select and Restart. restart windows audio services
  3. Repeat Step 2 for two more services, such as Windows Audio Endpoint Builder and Remote Procedure Call (RPC).

Now, exit the Services window, and restart your PC. The motherboard audio is not working issue should be fixed now.

If the audio services are not responding in Windows 11, here’s an expert guide on what you can do to fix the issue.

How do I know if my motherboard sound is working?

To check if your motherboard sound is working or if it has a problem, follow the below instructions:

  1. Press the Win + R keys together to launch the Run dialog. Type devmgmt.msc and hit Enter to open the Device Manager window. run dev mgmt.msc command
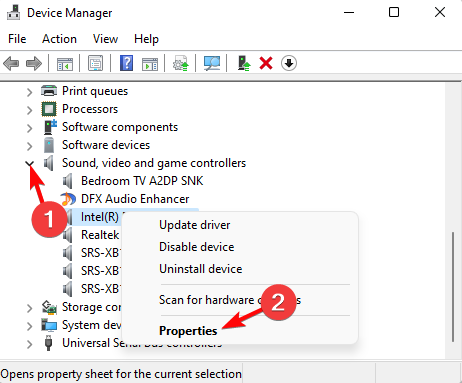
  2. Next, expand the Sound, video, and game controllers section, right-click on the sound card, and select Properties. sound properties
  3. Under the Properties dialog, check the Device status under the General tab. It should say, This device is working correctly.device status - This device is working properly

This indicates that your computer successfully detects the audio card, and the motherboard sound is working fine.

You must also check the sound settings, for example, if your Lenovo laptop (or any other device) is set to mute or if it has been disabled.

Alternatively, you can try different audio formats to check if that helps fix the mother sound problem.

Do leave a message in the comments section below for any other queries related to audio issues on your Windows 11 device.

How to Stop Mouse From Going off Screen: 5 Quick Ways

Whether using a USB mouse device or your laptop’s touchpad, it isn’t very pleasant when it suddenly goes off the screen.

Most computer users do one of two things: either unplug, then plug back the mouse, or change the Synaptics settings for the touchpad. But these quick, basic, yet knee-jerk responses may not always work.

In this case, you’ll want to search for other possible solutions, which we have outlined and described in this article.

What can I do if the mouse pointer goes off screen?

Here are a few things to check before you use any of the solutions below:

  • The make and model of your mouse
  • The operating system you’re using (32 or 64-bit)
  • Whether the issue is in all apps or a specific app
  • If changing mouse settings like speed helps resolve the issue
  • Whether connecting the mouse to a different computer helps
  • Check if you installed the latest drivers for the mouse
  • Look for any yellow exclamation mark on your mouse in the Device Manager
  • Check if other USB devices work properly

1. Check your monitor’s projector mode to fix the mouse going off screen

If your projector mode is set to Extend, this may cause the mouse to go off the screen. Go to the projector settings and set it to Computer only. This limits the mouse to the end where the screen does.

Go to display settings, press multiple displays, and set it to ‘Show only on 1’.

2. Boot in Safe Mode and check for the device

  1. Press the Windows key + I to open the Settings app and select Update & Security.
    update and mouse goes off screen
  2. Select Recovery from the left pane and click the Restart now button under Advanced startup.
    restart now
  3. Now, select Troubleshoot when your PC restarts.
    troubleshoot
  4. Next, click Advanced options.
    advanced option mouse goes off screen
  5. Choose Startup Settings.
  6. From here, click the Restart button.
    restart mouse goes off screen
  7. Once your computer restarts, press 4 or F4 to Enable Safe Mode.
    enable safe mode

If the mouse goes off the screen in Safe mode, then your default settings and basic drivers are not contributing to the issue.

Restart your PC to exit Safe Mode and boot normally. If that does not work, follow the steps below:

  1. Press the Windows key + R, type msconfig, and click OK.
    msconfig
  2. Click the Boot tab at the top.
  3. Now, uncheck the Safe Boot box, click Apply, followed by OK, and restart your computer.
    safe boot mouse goes off screen

Safe mode starts your computer with limited files and drivers, but Windows will still run. If the mouse issue persists, check whether it occurs while your computer is in Safe mode.

3. Run troubleshooter

  1. Press the Windows key, type cmd, and click Run as administrator under Command Prompt.
    cmd admin
  2. Type the command below and hit Enter: msdt.exe -id DeviceDiagnosticmsdt
  3. Finally, wait for the command to finish running.

If your mouse still goes off the screen after applying the fixes above, you might need to run the Hard and Devices troubleshooter to diagnose and fix the issue.

This checks for commonly occurring issues and ensures any new device or hardware is correctly installed on your computer.

4. Uninstall and reinstall mouse drivers

  1. Press the Windows key + X and select the Device Manager option.
    device manager mouse goes off screen
  2. Click the arrows next to the Mice and other pointing devices option to expand it and right-click the device there.
  3. Now, select the Uninstall device option.
    uninstall device
  4. Click the Uninstall button to confirm the action.
    uninstall button
  5. Finally, restart your PC and the driver will be reinstalled automatically.

Sometimes, your mouse might go off the screen because of faulty drivers. The quickest way to fix this is to reinstall the drivers.

5. Check Mouse Properties

  1. Press the Windows key, type control, and select the Control Panel option.
    control panel mouse goes off screen
  2. Choose the Hardware and Sound option.
    hardware and sound
  3. Select Mouse.
    option
  4. Select Click to change Touchpad settings.
  5. Click Sensitivity.
  6. Check the Turn On box next to Touch Guard.
  7. Move the white circle under Touch Guard to your extreme right (towards the + sign).
  8. Click Save and close touchpad utility.
  9. Click Ok.

In some cases, your mouse might be going off the screen because of its settings. You can follow the steps above to adjust its properties accordingly.

With this solution, we can conclude this guide on fixing the mouse goes off the screen issue. You only need to follow the instructions, and things should return to normal.

If your mouse cursor moves erratically, check our detailed guide to fix it quickly. When working with a secondary monitor, you can adjust the cursor movement to precision for easier transition between displays.

Feel free to let us know the solution that helped you solve this problem in the comments below.

Best File Shredder Software for Windows 11 [2026 Tested]

Shredding a file means removing the file from the operating system by overwriting selected data using a specialized data sanitization method.

This process ensures that the deleted file can never be recovered, even with a recovery tool. There are many file shredder tools available for Windows 11, we hope to help you find the right one for your task.

Which are the best file shredder tools on Windows 11?

EaseUS BitWiper – Best for beginners

EaseUS BitWiper - best file shredder windows 11

Removing sensitive data securely from Windows hard disk becomes easy with EaseUS BitWiper. It permanently erases files, partitions, or an entire disk. In addition, this high-speed shredder tool can erase multiple partitions or disks at the same time. 

You can also wipe data off memory sticks, USB flash drives, and SD cards. You can remove confidential data from the hard disk while keeping your system intact.

Many wiping methods destroy all on-disk data, like US Department of Defense Standard 5220.22-M, British HMG IS5, Peter Gutmann, and more.

The shredder tool can erase specific data volume or non-system volume. Also, you can wipe the system partition without a bootable. Finally, it allows you to remove your private information and confidential files, making them irretrievable. 

More about EaseUS BitWiper

  • It allows you to shred files that can’t be deleted forcibly.
  • Delete data permanently even if the recovery software can’t retrieve it.
  • Erase data with high speed from all disks and drives.
  • It comes with flexible data-erasing modes.
EaseUS BitWiper

EaseUS BitWiper

Shred sensitive files effortlessly and try the EaseUS BitWiper application.

BitRaser File Eraser – Great at wiping data from multiple storage devices

BitRaser File Eraser - best file shredder windows 11

BitRaser File can efficiently remove sensitive data permanently from any storage device or place, including hidden areas, files, and folders, drive partitions, application traces, chat & browser history, and log files. It wipes data and makes it irrecoverable, and generates tamper-free audit trails.

You can wipe out confidential files and folders, internet browsing history, saved login passwords, and more from your desktop, laptop, or server. In addition, it enables you to schedule when you can erase files and saves detailed log reports related to it.

This file shredding tool for Windows can automate the wiping process and allows you to customize the erasure process as per international erasing standards. It can also diagnose the mobile or hard drive health status to determine the functioning status.

More about BitRaser File 

  •  Supports international erasure standards, including NIST 800-88 standard, DoD 3, HMG, and Passes.
  • Uses cloud to wipe drives online and select Offline variant to erase data without internet.
  • It saves erasure reports in formats including CSV, PDF, and XML.
  • Identifies and wipes HPA, DCO & remapped sectors.
BitRaser File Eraser

BitRaser File Eraser

Try BitRaser to efficiently remove sensitive information from any of your storage devices.
Check price Visit Website

DriveScrubber – Great batch-file features

DriveScrubber - file shredder Windows 11

DriveScrubber can erase data, including private files, documents, and pictures, so it can never be recovered. It can restore your drives to like new even after a malware infection. It can erase hard drives, memory sticks, flash drives, cameras, etc.

This software is developed as per strict government and military security protocols. It allows you to scrub personal information permanently, which is an excellent way to eliminate your data and recycle your computer. In addition, this shredder has customizable tools to edit the security levels for wiping your data.

The tool also has scalable options, including erasing data in a batch, pause, cancel or resume features. In addition, this file shredder is the fastest in removing data and has optimized wipe methods.

More about DriveScrubber

  • It gives total control with customizable tools, including electron microscopy and magnetic field residue detection shields.
  • Allows you to scrub hidden files, temporary files, previous app files, and even deleted files.
  • Compatible with Windows 11, 10, 8.1, 8, 7, Vista, and XP.
  • It can be used on all home PCs.
DriveScrubber

DriveScrubber

Eliminate your data permanently by using this fast and advanced tool.
Check price Visit Website

Kernel File Shredder – Best shredding methods

Kernel File Shredder - best file shredder windows 11

Kernel File Shredder is one of the most effective shredding tools that enable users to shred important files and make them irrecoverable. This Windows shredder has robust algorithms which ensure that deleted data can’t be restored.

This is a customizable tool that has a lot of options to keep your confidential data secure. However, to make them irretrievable, first, the tool makes the files useless, renames them, and then shreds them completely. 

This tool allows you to create and run the file shredding task at a scheduled time. The file shredder enables you to set a password on your tool to protect your data. In addition, it has 11 shredding algorithms to choose from to ensure your data is completely wiped from the hard drive.

The ease of use and simple interface can make it one of the best software to use to shred files. It also can create log files in which the information related to the shredding task is saved. 

More about Kernel File Shredder

  • Protects confidential data from unauthorized access by shredding it.
  • Enables you to choose from shredding algorithms ranging from Zeros to DoD 5220 + Peter Gutman
  •  File shredding options include Shred File and Folder, Shred System Files, Shred Useless Files, Shred Recycle Bin, and Free Disk Space.
  • It has Automatic Shredding & Scheduler Feature to take care of the routine erasure tasks
Kernel File Shredder

Kernel File Shredder

Make your important files irrecoverable and shred them with this excellent tool.

Eraser – Useful scheduling feature

Eraser - best file shredder windows 11

This file shredding tool lets you wipe sensitive data from your hard drive by overwriting it several times to ensure it isn’t recovered. This tool can be used on Windows XP, Vista, 7, 8, 10, Windows Server 2003, 2008, and 2012-2022.

Eraser is free software, and its source code is released under GNU General Public License. The file shredder tool supports many data destruction standards, including American DoD 5220.22-M, British HMG IS5, and Gutmann.

You can schedule recurring tasks daily, weekly, and monthly. It allows you also to choose and customize the erasure method. All the functions performed by the tool are logged and can be viewed when needed.

More about Eraser

  • Supports both files and volume wiping.
  • Removes residue from deleted files.
  • Has a robust and flexible scheduler to fulfill the shredding needs.
  • Erases MFT and MFT-resident files and Directory Indices.

⇒ Get Eraser

So, these are some of the best file shredder software for Windows 11. You can choose any of them to erase your data permanently.

If you have any questions or concerns, please let us know in the comments section below. We are happy to help! 

Power Bi Data Source Credentials Greyed Out: 4 Simple Fixes

Power BI is a powerful data visualization tool that allows users to connect to various data sources and create dynamic, interactive reports and dashboards. However, users may encounter issues from time to time.

One of the most common ones is data source credentials greyed out on Power BI. It occurs if you don’t have permission to edit them or if there is an issue with the connection to the data source. Here, in this guide, we will discuss steps to enable data source credentials.

Why are the data source credentials disabled in Power BI?

There could be various reasons why data source credentials are greyed out; some of the popular ones are 

  • Wrong data source selected – When the data source is set to use Windows or Organizational authentication, you might face this problem.
  • Incorrect permissions – If a user accessing the data source doesn’t have enough permissions, then you might see the credentials greyed out.
  • Misconfigured settings – If the data source is set to Import mode instead of Live mode, as in Import mode, the data is imported and saved in the Power BI report, and credentials are not needed.
  • Accessing the published dataset – If the data source you are accessing is a published dataset in Power BI and can only be edited by the dataset owner or an administrator. Hence the issue.
  • Outdated version of Power BI – If you have an older version of Power BI, then you might face all kinds of errors, including data source credentials greyed out.

How do I enable data source credentials in Power BI?

To enable data source credentials, you need to follow these steps:

  1. Go to the Home tab.
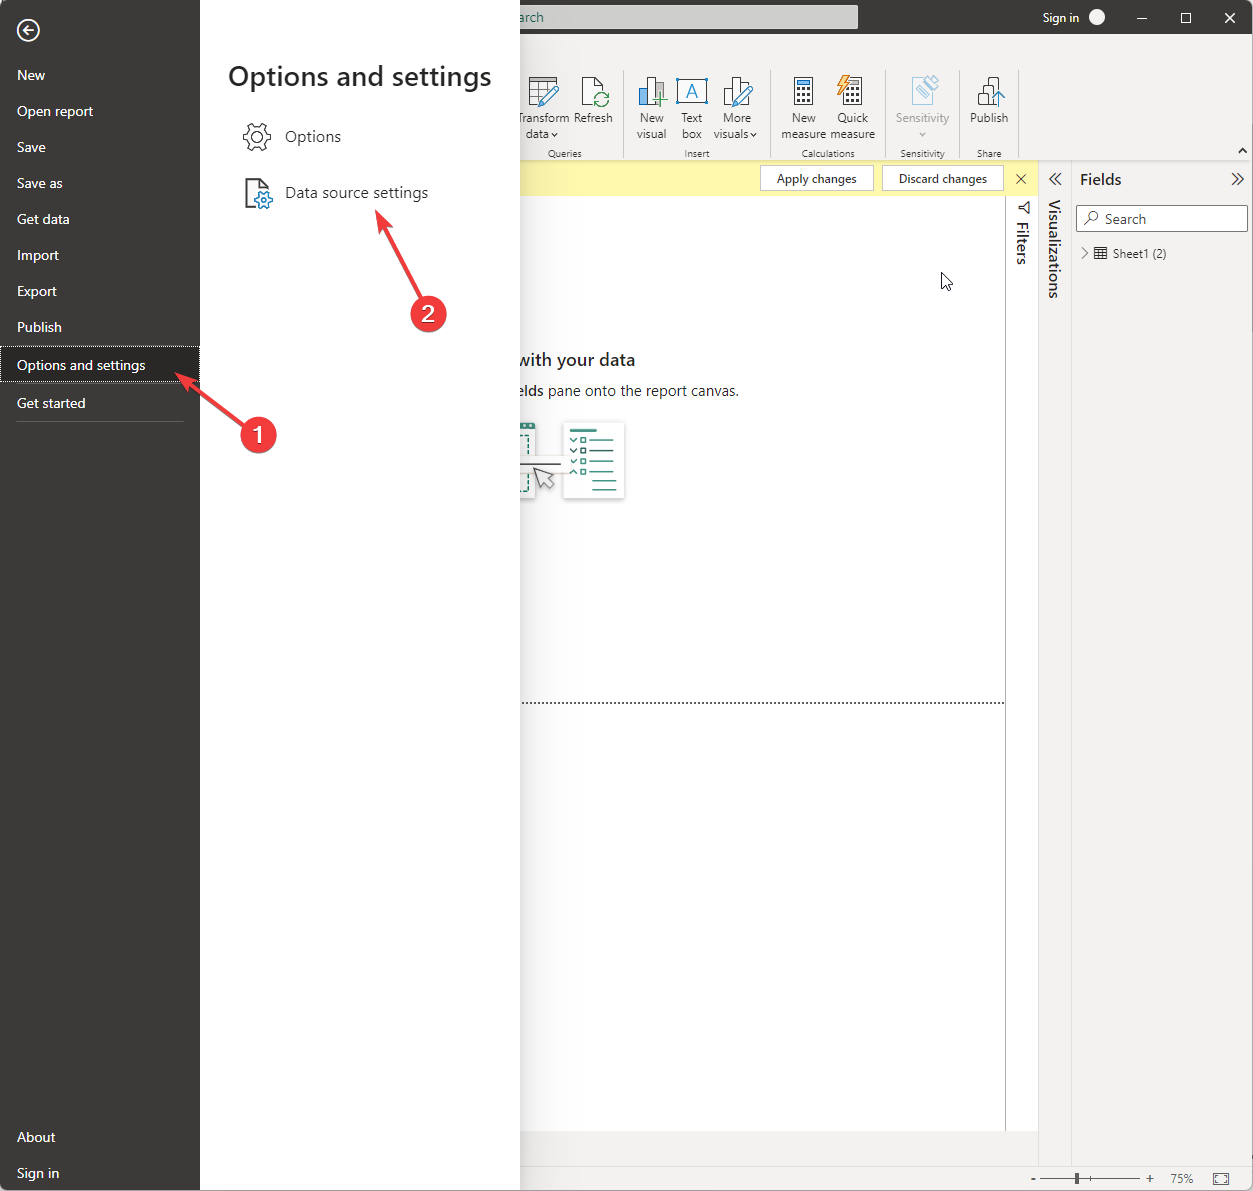
  2. In the Queries pane, click Transform Data, and from the drop-down select Data source settings.click Transform Data
  3. Select the data source for which you want to enable credentials.
  4. Select Edit permissions.
  5. Under Credentials, select Edit.
  6. Choose the appropriate credentials type, and enter the necessary information. Select OK.

How can I fix data source credentials greyed out issues in Power BI?

1. Switch to Database authentication 

  1. Launch Power BI. Now go to the File tab.
  2. Click Options and Settings, then click Data source settings.Data source settings -power bi data source credentials greyed out
  3. In the Data source settings window, select the file and click Edit Permissions.Edit permissions
  4. From here, change the Privacy Level to None.Privacy Level
  5. Click OK and close the Options window. Now check if the issue is resolved.

2. Check your Power BI settings

  1. Launch Power BI, and go to the File menu.
  2. Click Options and Settings, and now click Options.Options and settings
  3. From the Options window, check all the settings in Power BI match the settings in the data source.DatA LOAD
  4. If not, then make the necessary changes and check if the issue is resolved.

3. Ensure Power BI is up to date

  1. Go to the File menu.File menu -power bi data source credentials greyed out
  2. Click Options and Settings, then click Options.Options and settings
  3. Now click Updates.updates -power bi data source credentials greyed out
  4. Place a checkmark next to Display update notifications for Power BI Desktop.
  5. Install updates if available.

4. Use a service account 

If nothing has worked for you from the above steps, you need to create a service account with the necessary permissions to access the data source. Use this account to connect to the data source. 

So, these are the fixes that you need to try to fix Power BI data credentials being grayed out and gain access to the data source. If you have any questions or concerns about Power BI, you can reach out to us in the comments below. We will be happy to help.

Canon Printer Drivers on Windows 11: How to Download & Install

Got yourself an upgraded PC that runs on the latest Windows 11 OS and wondering how to get the drivers for the Canon printer that you have? If yes, then you aren’t alone, as there are multiple users that are looking for ways to download and install the latest Canon printer drivers on their Windows 11 PC.

In this guide, we will show you a bunch of different methods that will help you download Canon printer drivers on your Windows 11 PC and also how you can install them safely. Let us get right into it.

Will Windows 10 Canon printer driver work on my Windows 11 PC?

Several people have this confusion about whether they can run the Windows 10 Canon printer driver on their Windows 11 PC or not.

If you have this confusion, then we would like to tell you that yes, you can absolutely, without any issues run and install the Windows 10 Canon printer driver on your Windows 11 PC.

This is because, Windows 11 is built on the solid foundations of Windows 10, and most Windows 10 drivers run perfectly fine on Windows 11.

How to download Canon printer drivers on Windows 11?

1. Use the official website

  1. Visit the official Canon website.
  2. From the Compatible Operating System drop-down, select Windows 11.
  3. Under the Type drop-down, select Driver.
  4. In the Driver Language drop-down, select English.
  5. The page will reload.
  6. Select your printer model and click on it.
  7. Click on the compatible driver link.
  8. Hit the Download button to download the EXE file of the Canon printer.

If you specifically own a Canon G3110 model, you can follow this Canon G3110 driver download guide to quickly get the right driver for Windows 11 without searching manually.

2. Use Windows updates

  1. Press the Win + I keys to open the Settings menu.
  2. Click on the Windows Update on the left pane.
  3. Click on Advanced options.
  4. Select Optional updates under Additional options.
  5. Click on Driver updates.
  6. Tick the box next to the Canon printer driver and hit the Download and Install button.

3. Using a specialized tool

  1. Download and install Fortect Driver Updater.
  2. Launch the program.
  3. Wait for the program to finish the scan.
  4. Select the drivers that you wish to download.
  5. Wait for Fortect Driver Updater to download the selected Canon driver it detected.
  6. Follow the on-screen steps to install the program.
  7. Restart your PC.

Using a specialized and recommended tool like this one will help you ease the task of updating or fixing corrupt driver files.

With Fortect Driver Updater, not only you can update the drivers on your PC, but it also helps to fix corrupt drivers, schedule driver scans to keep your PC performance optimal, create driver backups, act as an efficient download manager, and much more.

Fortect Driver Updater

You need to keep your drivers updated at all times, so this tool will optimize and refresh your PC.
Free Trial Visit Website

How can I install the Canon printer drivers on Windows 11?

  1. Launch the EXE file.
  2. The file will start unzipping itself.
  3. Open the unzipped folder.
  4. Open the UFRII folder.
  5. Double-click the x64 folder.
  6. Double-click the Setup file.
  7. Click Yes on the terms and agreements page.
  8. Select among the three options mentioned;
    • Standard: It will search the internet and install the latest driver.
    • Custom: Specify the port or IP address manually to install the drivers of the printer.
    • USB Connection: Install the driver of the connected printer.
  9. Click Next.
  10. Depending on the option you selected in Step 8, follow the onscreen prompts to install the printer on your PC.

Most printers are plug-and-play. So, you don’t need to install any printer driver for it. However, it is best to install the printer as it can also fix the problem of the printer not responding, etc.

We have a complete guide to help you fix the printer not responding in Windows for Canon, HP, and EPSON printers.

If you are getting an issue where Windows cannot connect to the printer, then you can check out our guide and fix the problem.

For users whose printer is printing double-sided by default, then you can refer to our guide and resolve the issue in no time.

We also have a complete guide that will give you an explanation of why the printer isn’t printing the actual size and how you can fix it.

For users looking to download the printer driver for Canon LBP2900B Driver for Windows 11, they can check out our dedicated guide.

If you are looking for the best photo printing software, then you can check out our curated list of apps.

Let us know in the comments below, which method you used to download the Canon printer drivers for Windows 11.

Error Code 0xc00000e on Windows 10: How to Fix & Causes

System errors like the Blue Screen of Death 0xc00000e alert are never welcomed. They can occur for various reasons. In the case of the mentioned error code, the main cause is always a faulty boot sector.

This error occurs after cloning your system image while some users replicate it on a new SSD. Irrespective of the cause of the issue, we have prepared the solutions to help you fix it in this guide.

How do I solve error code 0xc00000e on Windows 10?

1. Check the hardware

The Windows error code 0xc00000e mostly occurs due to corruption in BCD (Boot manager). However, hardware changes are not unusual to invoke such a critical system error.

So, before we move to advanced software troubleshooting, remove and unplug all peripheral devices you have connected to lately.

Furthermore, restart your PC a few times and look for changes. You can temporarily remove RAM and non-system hard disks and get them back in. This might require some tools, and also, be advised removing the power cord is suggested.

After you’ve removed everything and tried booting, try finding the reason for the boot issue by the system of elimination.

2. Run a system check

  1. Create and insert Windows 10 bootable media on your PC
  2. Enter the Boot menu or BIOS settings to change the boot order to boot from the installation media drive.
  3. Now, press any key to boot your PC, enter your language and other information, and click Next.
    language 0xc00000e
  4. Choose Repair your computer from the bottom left corner.
    repair computer
  5. Next, click the Troubleshoot option.
    troubleshoot
  6. Select Advanced options.
    advanced 0xc00000e
  7. Now, choose the Command Prompt option.
    command prompt
  8. Type the command below and hit Enter: sfc/scannowsfc scan 0xc00000e
  9. Wait for the command to finish running. If the SFC scan fails, type the command below and press Enter: DISM /Online /Cleanup-Image /RestoreHealthdism restore
  10. Finally, wait for the command to finish running.

We highly recommend repairing your system files to fix the BSoD errors like 0xc00000e. You can do this by using the built-in tool, as detailed above.

Alternatively, you can restore your PC to a previous healthy state by using dedicated advanced software.

By relying on this excellent tool, you can repair damaged files that are sometimes responsible for the BSoD errors and remove any other bugs from your PC.

3. Rebuild the BCR registry hive

  1. Repeat Steps 1 to 7 in Solution 2.
  2. Type the following commands and hit Enter after each: bootrec /FixMbrfixmbr bootrec /FixBootfixboot 0xc00000e bootrec /ScanOsscanos bootrec /RebuildBcdrebuildbcd
  3. Finally, close CMD, remove the installation drive and try starting the system in a normal manner.

BCD (Boot Configuration Data) or MBR (Master Boot Record), for that matter, are configuration files that most users never heard of. They are responsible for the boot sequence, and together with BIOS (UEFI) and winload.exe, they enable your system to start.

If these important files are corrupt, you can encounter the error code 0xc00000e. Hence, you need to repair the files following the steps above.

4. Change the CMOS battery

  1. Shut down your PC completely.
  2. Unplug the power cord and remove the battery if it’s a laptop.
  3. Hold the power button for 60 seconds to completely discharge your PC.
  4. Open the PC case with a screwdriver and touch a metal surface to discharge your static electricity.
  5. Remove the CMOS coin cell battery. You should locate its socket easily.
  6. Insert a new battery into the socket.
  7. Start your PC and configure BIOS.
  8. Confirm changes and look for improvements.

Some users reported that the BSoD came with a message that said Your pc/device needs to be repaired 0xc00000e and to fix this particular issue changing the CMOS battery helped.

5. Use the Automatic Repair tool

  1. Repeat Steps 1 to 6 in Solution 2.
  2. Select the Automatic Repair option.
    automatic repair 0xc00000e
  3. Enter your account details and follow the onscreen instructions to complete the process.

Sometimes, the 0xc00000e error can be down to issues that are difficult to trace. One of the best tools to fix this type of issue is the Automatic Repair tool.

6. Reset BIOS

  1. Restart your PC and keep pressing Esc, F2, F10, or Del (depending on your PC manufacturer) when it boots up.
  2. Navigate the BIOS menu with the arrow keys on your keyboard and locate the Load Default option (or something similar, depending on your PC).
  3. Now, select the Load Default option and press Enter button to confirm the action.
    load default
  4. Finally, save the changes made, press F10 to exit BIOS, and wait for your PC to restart.

If you have recently changed your BIOS settings, it might be the reason for the 0xc00000e issue. So, resetting it to default should clear up any problem.

7. Reinstall Windows 10

If all the fixes above fail to solve the 0xc00000e error, you might need to reinstall Windows 10 completely. This is because the issue might have messed with some crucial components of the operating system.

For everything you need to reinstall Windows 10, from the conditions to the steps, check our detailed guide.

When it comes to Blue Screen of Death problems, you should stay informed on all the important aspects, so check out the main causes of the BSoD errors.

That should conclude it. Finally, one friendly tip that should keep you off this and similar critical errors: if you format the system partition, don’t delete the boot section, too.

We recommend you try using some excellent tools dedicated to repairing the Blue Screen of Death errors on your Windows 10 PC.

If you have additional solutions regarding system error 0xc00000e in Windows 10, feel free to tell us in the comments below.

Is Your Xbox 360 Disc Unreadable? The Best Simple Fixes

Xbox 360 disc unreadable error will prevent you from playing your favorite games, so it’s important to fix it as soon as you can.

Many reported that Xbox One is not reading disc, so this issue can appear in other systems as well. However, there are ways to fix that on Xbox 360, and today we’re going to show you to do it.

What causes Xbox 360 to not read disc?

There are several causes for this problem, with the most common ones being the following:

  • Disc scratches – If your disc is damaged, it might not be read by the console properly. If this happens, you might get The game couldn’t start Xbox 360 error.
  • Not using the right profile – In case you try to start the game from a profile that didn’t purchase the game, you’ll encounter this error.
  • Licensing issues – Problems with the game license can also cause this issue, simply transfer the license to your console or reinstall the game to fix it.

How to fix a Xbox 360 disc that is unreadable?

Before we start fixing the issue, there are a couple of checks you can perform to fix the issue:

  • Check your profile – Ensure that you’re using the same profile that you used to purchase the game. If you’re not using the same profile, switch to the original one and try again.
  • Clean your disc – Clean your disc carefully with a soft and damp cloth. Wipe the disc gently from the center to the edges. Wait for the disc to try completely and try again.

1. Transfer the game license to your console

Note icon NOTE
This solution only applies if you’re trying to play the game you purchased on a different console.
  1. On your Xbox, sign in to the Microsoft account.
  2. Navigate to Settings and then choose Account.
  3. Head over to the Your Billing Options and select License Transfer.
  4. Follow the instructions on the screen to complete the content transfer.
  5. After transferring the licenses, you’ll need to download the content again in order to update the licenses on your console.
  6. After the process is done, try to run the game again.

If Xbox 360 disc is unreadable but has no scratches it’s most likely a license issue, and that can be solved with this method.

2. Reinstall the game

  1. Go to Settings and choose System.
  2. Head over to the Storage and choose your storage device.
  3. Now select Games and apps and the game you’re having trouble running.
  4. Select Delete from the menu.
  5. Download a game demo from the Microsoft Store that is the same size as the game you couldn’t run.
  6. Now press the Guide button on your controller and go to Settings and choose Account.
  7. Head over to the Download History, select your Games on Demand game and choose Download again.
  8. After the game is downloaded, check if the issue is resolved.
Note icon NOTE
Some users are suggesting using a different storage device when downloading the game again, so you might want to try that as well.

If you choose to do so, there’s no need to download a demo game, just delete the game and download it again.

There you go, several quick and simple solutions that might help you fix This disc is unreadable error on your Xbox.

To prevent these types of problems in the future, consider using Xbox 360 backup software to back up your games to a secure location.

If you found these solutions helpful, feel free to let us know in the comments section.

Slow YouTube on Windows 11: Causes & Quick Fixes

Well, if you love watching YouTube videos just like everyone else, but are frustrated because YouTube is running slow on your Windows 11 PC, then you aren’t alone. There are several user reports regarding YouTube. Well, for some users the issue is existing on a good-spec PC as well.

This really hampers the entertainment part of using a PC. Fortunately, in this guide, we will give you a bunch of solutions that will help you fix YouTube running slow on a Windows 11 PC. Let us get right into it.

Why is Youtube running slow on Windows 11?

There can be multiple reasons why YouTube is running slow on your Windows 11 PC. After reading various user reports and going through the internet, we have created a list of reasons why the error is triggered:

  • You are using a VPN: Often VPN connections are slow, especially if you are using a free VPN. This could cause communication of your internet with the YouTube servers a bit slow, because of which it is running slow.
  • Browser cache file: This could be altogether the fault of your browser cache. If the browser cache isn’t cleared very often, it gets accumulated and causes several browser-related issues.
  • Graphics driver isn’t updated: You need to make sure all drivers on your PC, in our case, the graphics driver is up to date to ensure the best performance of your PC.
  • Faulty Internet connection: Everything depends on your internet. If it is pretty slow, then of course you will have issues streaming videos in high quality, and you will come across buffering issues.
  • Background apps are causing problems: If multiple apps are opened or running in the background, then this could cause issues.
  • Faulty extensions: Often third-party extensions that you have installed for your browser might be conflicting with YouTube.

How can I make YouTube faster in Windows 11?

Here’s what you should do first:

  • If you have installed a VPN, then you can use it to access region-blocked content and websites. However, if left ON, then you will have some issues with regular websites. You should disable the VPN that you are using and then visit the YouTube website and see if this resolves the issue or not.
  • On the contrary, you can turn on VPN and connect to a server in a different region and check if this resolves YouTube running slow in Windows 11.

1. Update the graphics driver

  1. Open the Start menu by pressing the Win button.
  2. Open Device Manager.
  3. Expand the Display adapter section.
  4. Right-click on your GPU and select Update driver.
  5. Click on Search automatically for drivers.
  6. Follow the on-screen prompts to install the latest graphics driver on your PC.
  7. Restart your PC.

This is one way to update the graphics driver on your PC. However, if you have to update all drivers on your PC, you have to go through the same steps and update drivers one by one.

To simultaneously update all drivers on your PC, we recommend using a third-party tool called Outbyte Driver Updater.

Using the tool, not only you can update drivers on your PC, but it can help you schedule driver scans to keep them up to date all the time, create driver backups, use its efficient download manager, and much more.

Outbyte Driver Updater

Keep your drivers updated at all times to make your PC faster as well.
Free trial Visit website

2. Clear browser cache

2.1 Google Chrome

  1. Launch Google Chrome.
  2. Click on the 3-dot menu icon.
  3. Select Settings.
  4. Click on Privacy and Security on the left pane.
  5. Click on Clear browsing data.
  6. Select Cookies and other site data and Cached images and files option.
  7. Hit the Clear data button.

2.2 Mozilla Firefox

  1. Click on the 3-line icon.
  2. Click on Settings.
  3. Select the Privacy & Security tab from the left.
  4. Locate Cookies and Site data section.
  5. Hit the Clear data button.
  6. Select both Cookies and Site Data and Cached Web Content boxes.
  7. Hit the Clear button.

Cache files store all your personalized settings for the websites that you have visited. If this gets corrupt, then it can cause multiple issues.

In such a case, we would suggest you clear the browser cache and then restart the browser and check if this resolves the issue. We would also suggest you switch to a different browser and see if this fixes the issue or not.

We have a curated list of some of the best browsers that you can check out and enjoy better features over the ones you are already using.

3. Disable Hardware-accelerated GPU scheduling

3.1 On your system

  1. Press the Win + I keys to open Windows Settings.
  2. Click on Display.
  3. Select Graphics.
  4. Click on the Change default graphics settings link.
  5. Toggle OFF the Hardware-accelerated GPU scheduling.

3.2 On your browser

  1. Launch Google Chrome.
  2. Click on the 3-dot menu icon.
  3. Select Settings.
  4. Click on System from the left pane.
  5. Toggle OFF Use hardware acceleration when available.

When the hardware acceleration is enabled, it forces the GPU to enhance the computer’s performance, which could often lead to stuttering and YouTube running slow issues.

Disable the hardware acceleration on your PC and on the browser that you are using, in our case, it was Google Chrome, and see if this resolves the issue or not.

4. Disable browser extensions

  1. Launch Google Chrome.
  2. Click on the 3-dot menu icon.
  3. Select Settings.
  4. Click on Extension on the left pane.
  5. Toggle OFF all the extensions one by one.

That is it from us in this guide. We have a list of the best YouTube apps that are available for Windows 11 both free and paid.

If you are a YouTube content creator, then you should definitely check out our guide on the best tools to create custom YouTube thumbnails. You can also check out our recommended list of the best YouTube intro maker that are free and are available without any watermark.

We also have a guide that will help you fix the low volume on YouTube issue on your Windows PC. Our guide on the best live streaming software for YouTube also gives you a complete list of the best tools to stream without any issues.

Feel free to let us know in the comments below, which one of the above solutions helped you resolve the YouTube running slow on Windows 11 problem.

MSI Dragon Center Firewall Error: 5 Simple Solutions to Apply

Are you getting the firewall error with MSI Dragon Center? If yes, this article will help you to solve this problem.

For MSI gaming computers, the Dragon Center is an essential application. However, this helpful tool may not sometimes work due to some errors. You may get problems like MSI mystic light not working or gaming mode not activating, etc. But, the Firewall blocking issue is the most annoying one.

Why is my firewall or antivirus blocking MSI Dragon Center?

It is happening because your security program is treating Dragon Center as a potential threat. It is a false positive result. This problem occurs due to the following reasons:

  • Outdated version of the app: Is your Dragon Center app outdated? It may be the reason you are getting errors.
  • Outdated SDK: The outdated SDK is another reason your AV or firewall programs may block MSI Dragon Center.
  • Corrupted application files: For unknown reasons, the app data or installation files may get corrupted. It may trigger various problems, including the firewall error with MSI DC.
  • A false alert: Sometimes, your antivirus or firewall program may give a false alert due to a bug with it. If necessary, learn how to check if Windows Firewall is blocking a program.

There may be other reasons. But, these are the most common ones.

How can I fix the MSI Dragon Center firewall error?

Before trying our solutions, we strongly suggest you check the following things:

  • Make sure Windows is up to date.
  • Run the Dragon Center as an administrator and see if it helps.
  • Ensure that the Dragon Center app was downloaded from the official source.
  • Your antivirus or firewall software is genuine.
  • Also, verify that other security programs are not blocking the Dragon Center. You can do it by uninstalling your current AV program and installing a different one. We suggest you check out these best antivirus programs with trial versions for Windows.

After ensuring the above things, follow these methods:

1. Whitelist the Dragon Center services on the firewall

1.1 From Windows Defender Firewall

  1. Open the Start Menu, type windows security, and press Enter.
  2. Go to Firewall & network protection.
  3. Click on Allow an app through the firewall.clicking allow app through firewall windows security
  4. Click on Change settings.
  5. Now, tick Private and Public for all MSI services.allowing msi dragon center through windows firewall
  6. Save the settings and restart your PC.

1.2 From third-party Antivirus or Firewall

  1. Open your antivirus or firewall.
  2. Go to the Protection tab or any similar option.
  3. Find and go to Firewall settings.
  4. Go to the Rules tab if applicable.
  5. Now, allow all MSI services.allowing msi services using bitdefender firewall total security

We have used Bitdefender Total Security. If you use a different one, you will have to figure out the steps. But, it should be mostly similar.

Whitelisting the MSI DC in the firewall should solve the Dragon Center firewall error. If not, follow the other methods.

2. Uninstall MSI SDK and try again

  1. Press Win + I on the keyboard to open Windows Settings.
  2. Go to Apps and click on Installed apps.going installed apps windows 11 settings
  3. Find the MSI SDK by using the search option.
  4. Click on the three vertical dots next to it and then click on Uninstall.uninstalling MSI SDK

After uninstalling the SDK, when you relaunch the MSI DC, it will automatically install the latest SDK. It should solve your problem.

3. Enable related services

  1. Press Win + R on the keyboard to open Run.
  2. Type the following command and click on OK: services.mscservices windows 11 optional features empty
  3. Double-click on an MSI service.msi center service windows services
  4. Set its startup type to Automatic.setting msi center service to automatic windows
  5. If the service is stopped, click on Start to activate it.
  6. Do the same thing for all MSI services.
  7. If necessary, restart your PC.

Now, your security program may treat it as a legit application. However, you still may get firewall errors with MSI Dragon Center. In this case, follow the next methods.

4. Repair or reset the Dragon Center app

  1. Go to the installed app settings like before.
  2. Search and find the Dragon Center app.
  3. Click on the three vertical dots next to it and go to the Advanced options.going advanced options msi dragon center
  4. Scroll down and click on Repair.clicking repair msi dragon center app

After repairing, try to relaunch the app and see if you still get the problem. If it doesn’t work, click on Reset from the same settings to reset the app.

5. Re-install MSI Dragon Center

  1. Open the Installed app settings again like before.
  2. Uninstall the MSI SDK like before.
  3. Search for the Dragon Center app.
  4. Click on the three dots and choose Uninstall.uninstalling msi dragon center app windows 11 settings
  5. Restart your PC.
  6. Now, download the Dragon Center and install it again.

We suggest you use an uninstallation tool like Revo Uninstaller to uninstall these applications. It is because Windows may not be able to remove them completely, and that may not solve our problem.

This method should fix the MSI Dragon Center firewall error. If necessary, learn how to solve Dragon Center not installing.

This article has explained how you can fix the MSI Dragon Center firewall error. If you have any questions or suggestions, feel free to let us know in the comment box.

How to Fix Modern Warfare 2 Stuck on Loading Screen

Is MW2 stuck on the loading screen? If yes, this article is your redemption as it contains the most effective solutions and vital information.

Call of Duty Modern Warfare 2 is one of the most popular multiplayer games among gamers. However, due to some problems with this COD Modern Warfare, a group of gamers is not being able to play it conveniently. The stuck loading screen issue is one of them.

Why Call of Duty: Modern Warfare 2 is stuck on the loading screen?

Initially, it is impossible to identify the exact reason behind this problem. When users encounter this situation, they also may experience FPS drops, crashes, or glitches in the gameplay if somehow the loading screen issue goes away temporarily. Usually, it happens due to the following reasons:

  • Internet connectivity problem: Sometimes, the COD MW2 game loading screen may become stuck forever due to a very problematic internet connection.
  • Antivirus or Firewall: Your antivirus or other security programs may interfere, and you may face this problem.
  • Corrupted game files: If the game installation files get corrupted somehow, the Modern Warfare 2 is not working, or the loading screen is stuck issue may appear, and you won’t be able to play it until you apply the proper fixes.
  • Graphics driver issue: Is your video driver not up to date? It may be the reason you are getting this problem.
  • Background services: Sometimes, too many background processes or a single problematic service may create this problem.

What can I do if Modern Warfare 2 is stuck on the loading screen?

We have prepared the most effective solutions to tackle this error. However, before that, you must do these things as primary steps:

  • Update Windows to the latest version or at least to one of the most recent versions.
  • Disable the antivirus temporarily and see if it helps.
  • Make sure the internet connection is stable.
  • If the root of the problem can be your network condition, we recommend you try a different network. For example, you can try your mobile hotspot instead of your broadband connection.
  • Check the current server status of COD MW2 from this Activision Online Services page.
  • Power cycle the router and see if it helps.

After doing the above things, if you still need the solution, follow these methods to fix MW2’s stuck loading screen problem.

1. Run as administrator

  1. Locate the CW2 game file launcher shortcut file.
  2. Right-click on it and go to its Properties.
  3. Go to the Compatibility tab.
  4. Tick Run this program as an administrator.enabling run as administrator m2
  5. Click on OK.

2. Update graphics card driver

  1. Open the Start Menu, type device manager, and hit Enter.
  2. Expand the display adapter.
  3. Right-click on your graphics card and choose Update.choose update driver for NVIDIA graphics card device manager
  4. Follow the on-screen steps to complete the process.

Updating the GPU driver should fix COD MW2 stuck on the loading screen error. If you don’t find the above method convenient to update the graphics driver, we suggest you use Outbyte Driver Updater, as it can update any drivers on your PC automatically.

If necessary, learn how to update drivers on Windows.

3. Verify and repair game files

  1. Open the game launcher like Steam or any other launcher depending on the platform from where you have purchased the game.
  2. Right-click on the Call of Duty: Modern Warfare 2 and go to its Properties.
  3. Go to the Local files tab.going local files tab cod mw2 steam properties
  4. Click on Verify integrity of game files.clicking verify integrity of game files cod mw2 steam properties
  5. Relaunch the game.

The above steps are applicable to the Steam platform. However, If you are using Battle.net, you will find the Scan and Repair option, which is similar to the Verify integrity of game files. For any other platforms, you will need to figure it out.

If the above method doesn’t help or you cannot follow the steps, you can consider re-installing Modern Warfare 2 with the latest version. It should fix MW2’s stuck on the loading screen problem.

4. Perform a clean boot

  1. Open the Start Menu, type MSconfig, and press Enter.
  2. Go to the Services tab.
  3. Tick Hide all Microsoft Services and click on Disable all.disabling non microsoft background items system config windows
  4. Click on OK.
  5. Restart your PC.

The clean boot will ensure no third-party background services are causing the problem. You can keep the clean boot status.

However, we suggest you enable the third-party service one by one and find the problematic one. After that, you can keep that service disabled or uninstall the related program if necessary.

5. Use a gaming VPN

If the problem persists even after trying a different network, a gaming VPN like ExpressVPN or Private Internet Access can be a good solution. You can consider using any of them as these may reduce latency and solve multiplayer game connectivity issues in specific cases.

If you are interested, learn how to solve if Modern Warfare 2 uninstalled itself.

It is also possible that you are still getting the problem even after trying out every possible way to solve it. In this case, it may be your operating system or platform. In this case, you can consider resetting Windows or the platform you are using and see if it helps.

This article has described all the possible ways to fix MW2’s stuck loading screen problem. If you have any better ideas that can help others, let us know in the comment box.

How to Stop eir from Blocking IPTV? [Quick and Easy]

Like many other ISPs, eir blocks various streaming sites and IPTV services that are running on an illegal basis.

During peak hours and popular events, the Internet provider restricts IPTV access entirely.

However, with a good VPN, you can bypass this obstruction and enjoy all the content you want.

Why is eir blocking IPTV?

IPTV is only legal when the service provider has all the necessary licenses for its content. Since that isn’t always the case, ISPs can block it.

Some of the biggest media companies, such as eir, heavily restrict IPTV programming during important events like the Premier League games. 

Keep in mind that non-sporting events are also often blocked.

Therefore, if you can’t access your preferred IPTV, it’s because of eir’s policy.

How to bypass eir’s block?

Luckily, there’s a way to access any IPTV content you want. 

As long as you have a reputable VPN, you’ll be able to hide your traffic from eir and bypass all of its restrictions. 

We recommend ExpressVPN as it has a solid track record in circumventing geo-blocks and over 3000 servers available.

Furthermore, you can use any VPN location you want, even in the UK.

Here’s how to stop eir from blocking IPTV services:

  1. Visit ExpressVPN’s website to purchase a subscription.
ExpressVPN pricing plans
  1. Download the VPN software and install it on your device.
  1. Log into your account.
  1. Connect to a nearby server for a speedy connection.
ExpressVPN connected
  1. Try accessing the IPTV content you want.

With your real IP masked and your traffic is hidden from eir, you should now be able to stream any IPTV programming.

ExpressVPN

You’ll be able to bypass all restrictions with this premium VPN service.
Check Price Visit Website

Wrap up

With good VPN software, circumventing eir restrictions and stopping eir from blocking IPTV services is easy.

If you don’t already have a VPN subscription, getting one is a great idea.

However, always make sure you use a reliable service, as free and lower-tier providers often fail to perform efficiently.

Windows 11 Wallpaper Keeps Changing: 5 Ways to Stop It

Many users have been complaining that after upgrading to Windows 11 or after a recent update, the desktop wallpaper keeps changing.

While you can change the Windows 11 background back to your choice, the wallpaper may revert automatically after you restart your PC.

Why does my Windows 11 wallpaper keep changing?

There could be multiple underlying reasons why the Windows 11 wallpaper keeps changing, such as:

  • You have selected the Slideshow option – It could be possible that the problem arises because you have selected the Slideshow option in Personalisation settings.
  • Faulty Slideshow.ini & TranscodedWallpaper files – Sometimes, the issue may occur due to corrupted Slideshow.ini & TranscodedWallpaper files in the Themes folder.
  • Sync settings are turned on – The Windows Theme sync settings, if enabled, may sometimes interfere with the Windows background.
  • A recent Windows update changed the wallpaper – Chances are, that a recently installed Windows update triggers the issue and the background keeps changing.
  • Corrupted Windows files – If the system files are corrupted, it can also cause the Windows 11 wallpaper to malfunction.

How do I stop my Windows 11 wallpaper from changing automatically?

Do not hesitate to try some of the preliminary checks:

If the above steps fail to work, you can try the below workarounds if the Windows 11 wallpaper still keeps changing.

1. Tweak the power options

  1. Press the Win + R shortcut keys to launch the Run dialog. Type powercfg.cpl, and hit Enter to open the Power Options window. run powercfg.cpl command
  2. On the right, go to the current power plan and click on Change plan settings. Change plan settings
  3. Next, on the Edit Plan Settings page, click on Change advanced power settings. Change advanced power settings
  4. This will open the Power Options dialog. Here, expand the Desktop background settings section and then click on the Slide show option. Desktop background settings
  5. Now, set both the On battery and Plugged-in options to Paused. Press Apply and OK. pause slide show

Once done, exit the Power Options window, restart your PC, and check if the Windows 11 background issue is resolved.

2. Delete files in the Themes folder

  1. Press the Win + E keys simultaneously to open File Explorer. Click on View at the top right, and click on Show. show view files
  2. Next, select Hidden items in the sub-menu. show hidden items
  3. Now, navigate to the below path in the File Explorer window: %USERPROFILE%\AppData\Roaming\Microsoft\Windows\Themes Here, double-click on the slideshow.ini file. slideshow.ini file
  4. As the file opens in a Notepad, delete all content and save the file. delete slideshow.ini file content
  5. Next, delete the TranscodedWallpaper file. delete TranscodedWallpaper
  6. Now, double-click on CachedFiles to open the folder, and change the image inside.

3. Disable the slideshow in the desktop background 

  1. Press the Win + I keys together to open the Windows Settings app.
  2. Here, click on Personalisation on the left, and click on Background on the right. background settings
  3. On the next screen, go to Personalise your background, and select either Picture or Solid color. select picture or solid colour

Once you have set the background, there should not be any conflict with the Windows 11 desktop background.

4. Rebuild your icon cache

  1. Open File Explorer by pressing the Win + E keys together. Here, select View and then enable the option Hidden items.view hidden items
  2. Click on This PC shortcut on the left and on the right, click on C drive. navigate to c drive
  3. Next, go to Users. users file
  4. Now, navigate to the below path: AppData\Local\Microsoft\Windows\Explorer.
  5. Here look for files that say iconcache and end with .db extension. For example, iconcache_32.db, iconcache_64.db, etc., and delete them all. delete all cacheicon files

Now, restart your PC and check if Windows 11 still keeps changing the desktop wallpapers.

5. Turn off sync on Windows 11

  1. To launch the Settings app, press the Win + I keys together.
  2. Click on Accounts on the left and on the right, click on Windows backup. navigate to windows backup
  3. On the next screen, go to Remember my preferences, and turn it off. turn off Remember my preferences

At the same time, you can use the system file checker tool to repair any corrupted system files that may be causing the issue.

Alternatively, you can perform a clean boot to look for the exact service that’s causing the problem where Windows 11 keeps changing wallpaper on its own.

You may also try and use a local account to check if that helps fix the glitch with the Windows 11 background.

If none of the above methods work, it’s recommended to perform a system restore to revert your Windows OS to a previously working state.

For any other issues related to the Windows 11 background, do let us know in the comments box below.

Fix: Diagnostics Policy Service not Running on Windows 10/11

The Diagnostics Policy Service is not running error signals your internet connection is down. When you try to connect, a Connect to a Network window opens, stating computer has limited network connectivity.

If you’re dealing with this error, keep reading to fix it in no time.

How to fix Diagnostics Policy Service not running

1. Check if the Diagnostics Policy Service is Running

  1. Press the Windows key + R, type services.msc, and click the OK button.
    services diagnostics policy service is not running
  2. Double-click Diagnostic Policy Service to open its properties.
    option
  3. Now, set its Startup type to Automatic and click the Start button.
    automatic
  4. Click the Apply button followed by OK to save the changes.
    apply diagnostics policy service is not running
  5. Finally, right-click your network’s system tray icon and select Troubleshoot problems to launch Windows Network Diagnostics.

The Windows Network Diagnostic troubleshooter does say that the Diagnostic Policy Service isn’t running. As such, you might need to switch that service on if it’s off.

2. Give the Network Services Admin Privileges

  1. Press the Windows key, type cmd, and select Run as administrator under Command Prompt.
    cmd admin
  2. Type the command below and hit Enter to run it: net localgroup Administrators /add networkservicenetwork
  3. Now, type the command below and press Enter: net localgroup Administrators /add localservicelocal diagnostics policy service is not running
  4. Finally, restart your PC.

Some users have fixed the Diagnostics Policy Service is not running error by granting admin privileges to the local and network services. You should be able to do this by following the steps above.

3. Reinstall Network Adapter Card Driver

  1. Press the Windows key + R, type devmgmt.msc, and click OK.
    devmgmt
  2. Double-click Network adapters to expand it and right-click your device.
  3. Now, select the Uninstall device option.
    uninstall device
  4. Click the Uninstall button to confirm the action.
    uninstall button
  5. Next, click the Scan for hardware changes icon at the top to reinstall the driver.
    scan for
  6. Finally, restart your PC.

The Diagnostics Policy service is not running error might also be due to a corrupted network adapter driver. Thus, reinstalling the network adapter driver might resolve the issue. Keeping it up to date is also essential.

4. Roll Windows Back to a Restore Point

  1. Press the Windows key + R, type rstrui, and click the OK button.
    rstrui diagnostics policy service is not running
  2. Click the Next button to open a list of system restore points.
    next
  3. Now, select a restore point and click the Next button.
    restore point
  4. Press the Scan for affected programs button to check what software gets deleted for a restore point.
  5. Finally, click the Finish button to confirm the action.
    finish diagnostics policy service is not running

Some users have stated that the System Restore utility fixed the Diagnostics Policy Serviceerror for them.

5. Run a System File Checker Scan

  1. Launch Command Prompt as admin.
    cmd admin
  2. First, run the Deployment Image Servicing tool by typing the command below and hitting Enter: DISM.exe /Online /Cleanup-image /Restorehealthdism restore
  3. Now, wait for the command to finish running.
  4. Next, type the command below and hit Enter: sfc /scannowsfc diagnostics policy service is not running
  5. Finally, wait for the scan to complete and restart your PC.

That’s it. With the above-mentioned solutions you’ll be able to fix the Diagnostics Policy Service Not Running error.

Similarly, if you are dealing with a lost internet connection error on Windows 10, the solutions outlined above would help.

Feel free to let us know the solution that helped you fix this issue in the comments below.

Fix: Display Settings is Not Showing The Correct Resolution

Windows 10 users report a wide array of issues on a daily basis, and it turns out the display settings panel won’t show the correct resolution for some.

Others have stated the resolution changes by itself in Windows 10, while others mentioned the fact that recent updates broke their systems.

Why are my display settings not showing the correct resolution?

We can also show you how to set a custom resolution in Windows 10, but right now let’s focus on the matter at hand, which is that the display settings actually show incorrect resolution information.

As you know, there isn’t just one reason for why this is happening, as with most Windows-related issues. Not seeing the correct resolution can be a result of:

  • Software incompatibility – Your application software or operating system may not be compatible with the monitor’s technology.
  • Incorrect monitor settings – Settings may need to be modified on the monitor itself (different from manufacturer to manufacturer).
  • Mismatch in the graphics settings – Graphics settings may need to be reconfigured if your system includes items such as video/graphics cards.
  • Old or corrupted drivers – You may need new or updated drivers to get the full benefits of your new monitor’s capabilities.

However, before we get into this troubleshooting process, there are a few steps you have to complete, to determine if you have to do it in the first place.

That being said, make sure that if the monitor came with an interface cable, you’ve used it for your installation.

How can I fix the display settings not showing the correct resolution?

Before getting into more complicated procedures, let’s crosscheck some basic steps off the list:

  • Check connections to ensure they’re secure and that the cable is connected to the appropriate port on your PC.
  • If you have a similar monitor, connect that one, to eliminate a possible hardware problem.
  • If the resolution problem is with a specific app or game, check if the display options for that program are compatible with your monitor.

If the situation didn’t change, let’s try to fix the problem with the solutions provided below.

1. Update Windows

  1. Press Win + I to access Settings.
  2. Click on the Updates & Security tab.updates
  3. Select Windows Updates, then click on the Check for updates button.windows update
  4. If Windows found any updates, click on the Install now button.

2. Rollback display adapter driver

  1. Right-click the Start button and select Device Manager from the list.
  2. Expand Display adapters, right-click on the one you are using, and select Properties.
  3. Click on the Roll Back Driver button.rol back driver
  4. If the option is grayed out, that means you don’t have any previous driver to go back to.

3. Disable scaling

Note icon NOTE
The value might differ depending on your monitor or GPU, so always try using the recommended value.
  1. Press Win + I to access Settings.
  2. Select the Display tab, then choose the Recommended scaling value.display

4. Update your graphics driver

  1. Right-click the Start button and choose Device Manager to open the app.
  2. Expand Display adapters, right-click the one you are using, then select Update driver.update display driver
  3. Select Search automatically for drivers.search automatically for display drivers

Now you know a lot more about why your display settings are not showing the correct resolution. After completing this troubleshooting process, everything should be back to normal.

Take your time and go through the steps at your own pace. These solutions have been proven to work and reported as successful by many users facing the same problem.

Some of our readers also reported that Display Settings has no app associated in Windows 10, but this guide should help you if you’re facing the problem.

Has this guide helped you fix the issue as well? Let us know in the dedicated comments section located below.

How to Share a Facebook Post on Instagram: 2 Quick Methods

Most of us use several social networks, and posting the same content on multiple networks can be tedious, especially if you’re doing it manually. And many users wonder how to share a Facebook post to Instagram.

The process, though simple, can be a bit tricky to execute since the option to share posts between the two most popular social media platforms is located, kind of, deep inside the Facebook settings. So, let’s find out how you can do that!

Should I share a Facebook post on Instagram?

That depends on the idea behind the post and the audience you want to present it to. For instance, we may have different social circles on Facebook and Instagram, and sharing the same post on the two platforms might not work out well.

But for users who only have friends and family or the same set of people added on both Facebook and Instagram, the idea to share posts from the latter to the former actually makes sense and is, in fact, quite simple.

Quick tip:

We recommend Opera One because it’s very versatile and full of great features and has kept its shine with constant improvements, integrations, and updates.

This browser offers the opportunity to access Instagram and Facebook news feed, view Instastrories and Facebook stories. Many will also appreciate the built-in ad blocker, video pop-up feature, speed ​​dial home tab, and especially the privacy and security-enhancing VPN feature.

Opera One

Use this reimagined and fluid browser for a more satisfying Web experience.
Free Download Visit website

How can I share a Facebook post on Instagram?

1. Configure the account settings on Facebook

  1. Open your Facebook account, click on the profile icon near the top-right and choose Settings & privacy.settings & privacy
  2. Now, click on Settings.settings to share facebook post to instagram
  3. In the navigation pane on the left, scroll down to the bottom and click on Accounts Centre.Accounts centre to share facebook post to instagram
  4. If you haven’t added an Instagram account yet, click on Add accounts, and then follow the on-screen instructions to complete the process.add accounts
  5. Next, click on Sharing across profiles from the left.sharing across profile
  6. Choose your Facebook account from the list.facebook
  7. Now, make sure the Instagram account is selected under Share to, and then enable the toggle for Your Facebook story and Your Facebook posts, as the case may be.share facebook post to instagram

That’s it! From now on, every time you post on Facebook, it will be automatically shared on Instagram. As we said, the process is simple and quick! You just need to figure out where the exact option is placed.

2. Use a third-party tool

  1. Sign up for IFTTT through the official website.ifttt
  2. Now, head to the Facebook Page to Instagram service, and click the Connect button.
    facebook page to Instagram share facebook post to instagram
  3. If asked, sign in to your Facebook and Instagram accounts.
  4. After doing that, your Facebook posts should be automatically shared on Instagram.

IFTTT offers a wide array of features, so you might want to experiment with different Facebook and Instagram recipes in order to achieve the desired results.

Alternatively, you can use services such as Hootsuite or Buffer that allow you to post on multiple social networks simultaneously, but these services usually have a monthly fee.

By now, you must have figured out how to share a Facebook post to Instagram and some effective tools to automate things for a seamless experience. So, level up your social media game!

Did you know that you can assess the actual engagement on an Instagram account? It’s called exactly like that, Instagram Engagement Rate Calculator, and you just need to enter a username for the numbers to start flowing.

If you’re a frequent social media user, check our list of best web browsers for Facebook and pick the best browser for your social media needs.

For any other queries or to share recommendations for social media toolkits, drop a comment below.

How to Backup TPM Keys in a Couple of Easy Steps

Many users are wondering how to perform a TPM backup on their PC to ensure that their data doesn’t remain encrypted and inaccessible to them.

Microsoft has made some changes in this regard, so backing up your keys might not be as simple as it previously was.

Where is my TPM key?

The TPM has a master wrapping key stored on the TPM chip itself. The wrapping key protects all other keys on the TPM chip.

Is the BitLocker key stored in TPM?

Yes, the BitLocker key used for encryption is stored in the TPM chip so that your drive can be fully protected from tampering.

How do I back up my TPM key in Windows 11?

Adjust the Group Policy settings

  1. Press the Windows + R keys to open the Run command.
  2. Type gpedit.msc in the dialog box and press Enter to open the Group Policy Editor.GPEDIT
  3. In the left pane, navigate to Computer Configuration\Policies\Administrative Templates\Windows Components\Bitlocker Drive Encryption
  4. In the right pane, double-click the Store Bitlocker Recovery information in Active Directory Domain Services.
     
  5. Set it to Enabled and click on Apply and OK.

TPM backup is no longer available in Windows in order to ensure the safety of the device. However, this feature was used for backing up BitLocker keys primarily, and this is still possible with steps from above.

Does clearing TPM erase data?

Yes, clearing TPM will erase data protected by TPM. This includes the following:

  • Created keys related to the TPM, including the BitLocker recovery key.
  • Your sign-in PIN.

Therefore, backing up your Bitlocker recovery key is essential if you plan to clear the TPM.

To learn how to reset TPM, we have a great guide on how to clear the TPM keys.

And that’s how to back up your TPM keys in Windows 11. The same procedure also applies to Windows 10. Don’t forget to check out our article on what to do if your TPM device is not detected.

In case you’re in the market for a new TPM 2.0 chip, we have curated a list with detailed specs and price points to help you get started.

Let us know of any issues you may encounter while backing up the TPM keys in the comment section below.

3 Ways to Enable Remote Desktop on Windows Server 2019

Remote Desktop Connection is a protocol that helps you to connect to another computer that is available at a remote location. But, some users are experiencing problems while enabling Remote Desktop on Windows Server.

So, if you were planning to enable the functionality and remotely access the computer, there are quite a few ways to do that. Read the following sections to learn more about it and choose a method that seems the most convenient.

Does Windows Server 2019 have Remote Desktop?

Yes, Windows Server 2019 does support the functionality and allows users to enable the Remote Desktop feature seamlessly. Though remember, Windows Server 2019 has Remote Desktop turned off by default for security reasons.

So, users need to first manually enable it before being able to connect, access, and control the computer through another device.

How do I enable Remote Desktop in Windows Server 2019?

1. Use PowerShell

  1. Press the Windows key, search for Windows PowerShell, right-click on the relevant search result, and select Run as Administrator.
  2. Paste the following command in PowerShell and hit Enter:Set-ItemProperty -Path 'HKLM:\System\CurrentControlSet\Control\Terminal Server' -name "fDenyTSConnections" -value 0
  3. By default, remote desktop connections are blocked by the Windows Firewall. Execute the following command to configure the firewall to allow remote desktop connections:Enable-NetFirewallRule -DisplayGroup "Remote Desktop"

This is, by far, the quickest method to enable Remote Desktop in Windows Server 2019. If due to some reason, you are experiencing problems, use the Server Manager GUI to enable Remote Desktop connections as illustrated next.

2. Use Server Manager GUI

  1. First, log in to the server as a local administrator.
  2. Now, search for Server Manager in the Start menu, and launch it.
  3. Next, select Local Server from the navigation pane on the left, and then click on the Disabled option next to Remote Desktop.Click Disable local server windows server how to enable remote desktop
  4. Tick the Allow remote connections to this computer option.System properties allow remote connections to this computer windows server how to enable remote desktop
  5. You will now see the Remote Desktop firewall exception warning. Click the Select Users button to add allowed users.
  6. Now add the Username and hit the Check names button. Finally, click OK to save the changes.

That’s it! If the changes don’t reflect right away, perform a quick refresh, and you will find that Remote Desktop is enabled on Windows Server.

3. Use Command Prompt

  1. Press Windows + R to open Run, type cmd in the text field, and hit Enter.cmd
  2. Now, paste the following command and hit Enter:SystemPropertiesRemotecommand to enable remote desktop windows server
  3. Under the Remote tab, tick the checkbox for Allow remote connections to this computer, and click on OK to save the changes.

If none of the solutions were helpful, you could use Mikogo for secure remote desktop services. The tool offers a wide range of other features, each simplifying one task or the other.

In case you are experiencing problems with it, find out what to do when Remote Desktop is not working.

If you have any queries or want to share feedback for this guide, drop a comment below.

How to take text-grabbing to the next level with Text Grab 3.2’s new features and improvements

Text Grab is a quick and easy app available on GitHub that uses Optical Character Recognition (OCR) built into Windows to grab any on-screen text. It doesn’t need to run in the background and doesn’t require an internet connection. It was designed to be easy to use and efficient, allowing users to be more productive on Windows 10 and Windows 11.

Text Grab can be used to grab text from pictures, PDFs, applications, videos, websites, and any combination of the above. It has four different modes: Full-Screen Mode, Grab Frame mode, Edit Text Window, and Quick Simple Lookup.

There’s a new update out, bringing the version number to 3.2, announced by app creator Joe Finney on Twitter.

The app stores the copied text in the Windows Clipboard History and can be accessed by using Windows key + V.

Text Grab 3.2 features and improvements

You can find all the details on Text Grab 3.2 on GitHub, but here’s a quick look at what’s new and improved in the four different modes.

  1. Full-Screen mode can now recognize and extract text from tables.
  2. Grab Frame mode allows users to add, remove, resize, and adjust the lines as they see fit. There are now more advanced search capabilities added, including a menu to add additional quick actions and options.
  3. Edit Text Window now has a fully customizable bottom bar to add quick actions that you use as part of your daily workflow.
  4. Quick Simple Look Up adds “Hold CTRL+ALT to launch Right-side value if it is a valid URI.”

    text grab
    Text Grab: Quick SImple Look Up

You can go to Github to download the latest release, but consider supporting the developer by buying the app from the Microsoft Store. Text Grab is available now at a discount for a limited time. Find information about Joe Finney on his website: https://joefinapps.com/

Text Grab
Text Grab
Developer:
JoeFinApps
Price:
$9.99

Adobe Save for Web Error in Photoshop: Why & How to Fix

A lot of users say that things went smoothly with editing their content until they opened a GIF in Adobe Photoshop to correct some details and got an annoying Save for web error.

Long story short, they couldn’t complete the Save for web action. This Photoshop problem can be frustrating, as it makes the feature unusable.

To help recover this important feature, we have prepared the solutions you need to fix the save for web error in this guide.

How can I fix the Save for web error in Adobe Photoshop

1. Restart Photoshop

One of the quick ways to fix the save for web error on Adobe Photoshop is to restart the app. This is because the issue might just be down to a temporary glitch.

We recommend saving your image as a .PSD before closing the app. This is because you might lose the original file, and the .PSD file will be a backup.

2. Install the latest updates

Another quick fix Adobe save for web error is downloading the latest photo editor version. This is because the latest versions provide more than better features and usability.

More importantly, they also bring bug fixes, so that’s your chance to forget about your current issue.

3. Change image/canvas size

  1. Launch Photoshop and click the Image tab at the top.
  2. Select the Image size option and change it accordingly.
  3. Finally, select the Canvas size option and adjust it.
    image adobe save for web error

Another cause for the Adobe save for web error is the wrong image size. For example, if your image size is set to something like 20,000 inches, you need to reduce it to a lower value.

Also, you should note that your image and canvas size should not be different. If they have different sizes, you must ensure they correspond to get past this error.

4. Save the image as JPEG

  1. Click the File tab at the top and select Save as.
  2. Now, click the Save as type dropdown and choose the JPEG option.
  3. Finally, click the Save button.
    save

Another effective fix for Adobe save for web error is to save the image as a JPEG. This is because JPEG files can be used on the web without using the feature.

5. Reset Photoshop Preferences

  1. Launch Photoshop and click the Edit tab at the top.
  2. Select the Preferences option.
  3. Now, click General.
    preferences
  4. Finally, click the Reset Preferences on Quit button and restart Photoshop.
    reset

If the solutions above fail to fix the Adobe save for web error, you might need to reset the preferences. This will undo the changes you have made to the app and hopefully eliminate the error.

Those are a few of the confirmed fixes for the Save for web error in Adobe Photoshop. So, be sure to apply each of them carefully.

If you want to know how to unblur images in Photoshop, check out our detailed guide to do it quickly.

If you have any other questions or suggestions, feel free to leave them in the comments below.

5 Best Free GPU Comparison Tools [GPU Benchmark]

Whether you have a new GPU you need to rate, or you want to compare yours with better ones, you will need a GPU comparison tool to help you. GPU benchmarking software will analyze the performance of your graphics processor and match it with others by performing specific tests.

What are GPU comparison tools?

The benchmark software is used for testing the main components of your machine. Then, it compares the data with the ones stored in its database about other similar products.

In this article, we will talk about the comparison tools for Graphics Processing Units (GPUs). We will outline their main features, helping you to decide the best tool for your needs.

What are the best GPU comparison tools?

3DMark – Best GPU benchmarking tool

3DMark is the oldest and most reliable benchmarking tool out there, and luckily, it also has a free version available.

The tool displays detailed information on how clock speed and frame rates change during the tests.

Of course, it also detects your hardware and shows you a temperature chart for the CPU and GPU.

However, in the free version, you only get the Time Spy, Night Raid, and Fire Strike benchmarks.

So, if you want a lot more tests and customization options, you should at least go for the paid, 3DMark Advanced Edition version.

It is also available for Android and iOS platforms if you want to test your smartphone capabilities.

Here are some of its best features:

  • Advanced information about CPU and GPU performance
  • Three benchmarks available in the free version
  • Seamless hardware detection
  • Temperature charts for GPU and CPU
  • Get accurate graphics scores

⇒ Get 3DMark

GFXBench – Extensive GPU comparison

Another free and extremely efficient GPU comparison tool to consider is GFXBench.

It measures GPU performance with next-gen graphics features on all platforms. It supports all the APIs including OpenGL, OpenGL ES, Vulkan, Metal, DirectX/Direct3D, and DirectX 12.

GFXBench detects the right level supported by your device and runs only the relevant tests.

Then, it compares the scores of your graphics card against the newest tests and products on the market.

Here’s a rundown of its key features:

  • Supports all the APIs including OpenGL, OpenGL ES, Vulkan, Metal, DirectX/Direct3D, and DirectX 12
  • Extensive library of graphics card scorings
  • Automatically detects the level of your supported APIs
  • Displays the list of your system’s specifications
  • Available for Windows, macOS, Android, and iOS

⇒ Get GFXBench

PassMark – Great 2D and 3D benchmarking

PassMark can be exactly what you’re looking for if you need a simple but effective benchmarking tool.

It has 28 standard benchmarks and covers all the main components, including CPU, GPU, memory, and disks.

For the GPU, PassMark has dedicated 2D and 3D settings, and for the second option, you will have the choice of running DirectX 9, 10, 11 & 12 tests together with a GPU computing benchmark.

You will also have the option to create your own custom tests that can add a bit of flavor to your benchmarks.

There is a 30-day free trial version and the paid one. Of course, the first has limited capabilities, but it’s still fast and reliable.

Take a look at its key features:

  • 2D and 3D benchmarking tests
  • Customized GPU benchmarking for DirectX 9, 10, 11 & 12
  • Tests for all major system components
  • Available for Windows, macOS, Linux, and mobile
  • Easy to use and configure

⇒ Get Passmark

MSI Afterburner – Great overclocking features

With MSI Afterburner, you get GPU benchmarking and extensive overclocking features for your graphics card.

The tool is free and is not only for MSI products but for any type of graphics card and GPU.

Afterburner also monitors the GPU temperature and allows you to set the fan speeds if your graphics card has that capability.

This software also comes with a live monitoring screen that displays the main performance characteristics of any app or game.

And if you need even more detail, you need to pair it with the MSI Kombuster stress test tool to check the results of your overclocking.

Let’s review a few of its best features:

  • Extensive overclocking capabilities
  • Supports all major Windows versions
  • Monitoring in-game GPU performance
  • Works on all major manufacturers’ graphics cards
  • Customizable UI

⇒ Get MSI Afterburner

Heaven Ungine – Great GPU stress test

If you want to hammer your graphics card to the limit, Heaven Ungine is a GPU-intensive benchmark tool that will satisfy that need.

The software assesses the stability of your GPU under extremely stressful conditions and also checks the cooling system’s potential.

Heaven uses the proprietary UNIGINE Engine to get the most out of your graphics card by going through a complex 3D visual experience.

It’s a great GPU comparison tool and it comes with a free version that comes with custom settings and GPU monitoring.

Here are some of its most important features:

  • Extreme hardware stability testing
  • Accurate results due to 100% GPU-bound benchmarking
  • Support for DirectX 9, DirectX 11, and OpenGL 4.0
  • GPU temperature and clock monitoring
  • Dynamic sky with volumetric clouds and tweakable day-night cycle

⇒ Get Heaven Ungine

We hope that our selection of the best GPU comparison tools helped you decide the best option for your needs.

In this regard, you may also consider our list of the best overclocking stress test software for your PC.

If you have any other suggestions for software that provided good results, feel free to let us know in the comments section below.

How to add a copyright symbol on a Windows computer

The copyright symbol, alternatively called a copyright sign, indicates that you own the legal rights to make and distribute any item. Like most things today, the concept of copyrights has also been carried over to the digital world.

 And it makes perfect sense.

With so much content and creators out there, copyright is precisely what protects your work from getting stolen from individuals and other companies. Luckily, if you’re a Windows user, you’d be glad to find that a feature to add copyright symbols is also available on your PC. In what follows, we’ll go over two methods to insert copyright on your Windows.

How to add a copyright on Windows PC

Adding a copyright symbol to your Windows doesn’t have to be complicated. And Microsoft has made sure that this is precisely the case.

Apart from a host of emojis and stickers that you can add with a few shortcuts, through Alt code adding a copyright symbol on your Windows is even easier. Here’s how:

Take your cursor anywhere you’d like to insert the copyright sign and press the Alt key. And, while you hold the alt key, press the “0160” keys using the alphanumeric keys from your keyboard.

Release the Alt key, and that’s it—the copyright symbol will be inserted into your document.

Insert a copyright symbol on Windows without a keypad

While the above method with alphanumeric keys will work in most cases, you may sometimes have to rely on going without a keypad. In situations like that, follow the steps below:

  • Press the Fn + NumLk to turn on the Num Lock key.
  • Locate the numeric keys on your keyboard.
    If you don’t see any specific num lock keys, try the following keys on your Windows:
    M=0, J=1, K=2, L=3, U=4, I=5, O=6, 7=7, 8=8, 9=9.
  • Now, press and hold the Alt key and type 0169 on the numeric keys.

Finally, release all the keys, and if you did everything as laid out above, you’d see the copyright symbol in your document.

Adding a copyright symbol on a Windows computer

Copyright makes your soft documents “yours”—at least on the internet. It clearly signals that what you have to offer shouldn’t be used for free, or at the very least, without a citation. 

We hope one of the methods from above did the trick for you, and you can insert copyright symbols on your Windows documents freely.

BitLocker Could Not Be Enabled: 5 Ways to Fix This Error

BitLocker is a Microsoft encryption utility which encrypts a hard disk drive’s data. Recently, users have complained that they are getting an error message that reads BitLocker could not be enabled the data drive specified is not set to automatically unlock.

It is enabled by default on computers that are running newer versions of Windows, but you can install Windows without BitLocker. If you’ve come across this error, let’s look at why it occurs and how to fix it.

Why is my BitLocker not working?

If you’re having trouble enabling BitLocker on your Windows device, below are some possible reasons:

  • Hardware issues – If you try to enable BitLocker using a computer that does not recognize it, it’s possible that the computer does not have the requisite storage capacity or drivers present on its system. 
  • Bad BIOS settings – If your BIOS settings are not correct, it could prevent BitLocker from working properly. 
  • Unsupported TPM – If your computer is running an earlier version of Windows and you want to use BitLocker, you need to upgrade to TPM 2.0 motherboards.
  • Incompatible partition style – Between the two partitions, MBR and GPT, MBR has less support for features and may not work well with newer versions of Windows.
  • Outdated BIOS – If your BIOS has not been updated in a long time, it may not support newer versions of BitLocker. You need to update your BIOS.
  • Disabled TPM and secure boot – If the TPM is disabled or if the secure boot feature is disabled, BitLocker will be unable to protect your operating system volume.

How can I fix the BitLocker could not be enabled error?

Before you try any of the below troubleshooting options, check off the following:

1. Enable the BitLocker services

  1. Hit the Windows + R keys to open the Run command.
  2. Type services.msc in the dialog box and hit Enter.Open service manager
  3. Locate BitLocker Drive Encryption Service, right-click on it and select Properties.
  4. Set the Startup type to Automatic, click Start then Apply and OK to save changes.

2. Reinstall TPM drivers 

  1. Hit the Windows key, type Device Manager in the search bar, and click Open.
  2. Navigate to the Security devices option, expand and right-click your TPM device.
  3. Now, click the Uninstall device option.uninstall device the pc must support tpm 2.0
  4. Finally, click the Uninstall button to confirm the action and restart your PC.uninstall

This method will only work if your PC already meets the system requirements for running Windows 11. TPM 2.0 is one of the prerequisites so if the drivers are outdated, reinstalling them might solve the issue of unsupported TPM.

3. Update BIOS

  1. Navigate to your PC’s manufacturer’s site. In this case HP driver and software download website.
  2. Select a laptop or desktop, depending on the type of computer you’re using.
  3. Enter your exact serial number or your exact computer model.
  4. Select your OS and OS version, then click Submit.
  5. Click on All drivers and then expand BIOS to see available updates.
  6. Hit the download icon.
  7. Install the .exe file, following the on-screen instructions.
  8. Restart your PC.restart-PC windows 11 scanner not detected error
  9. During the startup, you can select Apply Update Now.

4. Disable TPM temporarily

  1. First, check the status of your TPM by pressing the Windows + R keys to open the Run dialog.
  2. Type tpm.msc in the dialog box and press Enter.run tpm.msc command
  3. Now you should see the status of the TPM.
  4. Next, enter your PC’s BIOS settings.
  5. Navigate to TPM and disable it.
  6. Go back and try to enable BitLocker now.

Remember that you can also enable BitLocker without TPM especially if you’re operating an older system that doesn’t meet modern PC system requirements. This can also help avoid issues preventing you from encrypting a folder.

5. Convert your partition style

  1. Hit the Windows key, type diskpart in the search bar then click Run as administrator.
  2. Type in the following commands to establish the MBR and GPT disks and press Enter after each one: diskpart list disk
  3. Next, note down the disk you wish to convert to GPT and type the following commands replacing # with the corresponding disk number to be converted: select disk # clean convert gpt

When you do the conversion, any data on that drive will disappear, so ensure that you back up all your files before performing this step.

Also, if you’re successful and can now enable BitLocker, BitLocker may fail to encrypt your hard drive. If you are in such a situation, feel free to check out our expert article on how to get encryption working again.

Aside from the BitLocker not being enabled, you may also come across the BitLocker prompt screen error, but worry not, as our detailed article has steps to fix this issue.

That’s all we had for this article, but be sure to leave us a comment below with any additional thoughts you may have on this issue.

SharePoint Search Is Not Working: 4 Ways to Fix It

SharePoint is a popular collaboration and content management platform used by organizations of all sizes. One of the key features of SharePoint is its search functionality, which allows users to quickly and easily find the information they need.

However, when SharePoint search is not working, it can significantly inconvenience users and impede productivity. This article will examine why SharePoint search may not work and how to fix it.

Why is my SharePoint search not working?

There are several reasons why SharePoint search may not work. Some of the most common causes include:

  • Incorrect search configuration – SharePoint search relies on a set of configurations to function properly. If these configurations are not set up correctly, the search may not work as expected.
  • Indexing issues – SharePoint search uses indexing to create a catalog of all the content in the system. If the indexing process is not working correctly, the search may not return the expected results.
  • Network and firewall issues – SharePoint search relies on network connectivity to function correctly. The search may not work as expected if network or firewall settings are issues.
  • Corrupted search database – SharePoint search relies on a database to store the indexed content. If the database becomes corrupted, the search may not work as expected.
  • Insufficient permissions – SharePoint search requires specific permissions for users to function correctly. The search may not work as expected if users do not have the necessary permissions.
  • Lack of adequate hardware resources – SharePoint search requires specific hardware resources to function correctly. If the hardware is not sufficient, search may not work as expected.

Other common issues users may face using the service include:

Without much ado, let us show you how to fix this problem. Note that these fixes will work if the SharePoint search is not working for one user, SharePoint 2013 or 2016 search is not working, or if the SharePoint list search is not working.

How do I fix SharePoint search?

1. Start the SharePoint Server Search

  1. Go to Central Administration.
  2. Navigate System Settings, then Manage services on the server.
  3. Check that the SharePoint Server Search service is running; if not, start it.

2. Use solutions from the KB article

  1. Open the Central Administration.
  2. Now click on System Settings and select Manage farm solutions.
  3. Check if any recent update has been done on SharePoint; if yes, try to look for the related issues in the KB article and resolve them by following the steps mentioned.

3. Rebuild the Search Index

  1. Press the Windows key, type Power, and select the Run as administrator option for PowerShell.
    sharepoint search not working
  2. Type the command below and hit Enter to Add the SharePoint cmdlets to the current PowerShell session.
    Add-PSSnapin Microsoft.SharePoint.PowerShell
  3. Use the following command to stop the search service (Where Search Service Instance Name is the GUID of the service):
    Stop-SPEnterpriseSearchServiceInstance -Identity Search Service Instance Name
  4. Use the following command to rebuild the index (Where Search Service Application Name is the GUID of the service):
    $searchapp = Get-SPEnterpriseSearchServiceApplication Search Service Application Name
    $searchapp.RebuildIndex()
  5. Finally, use the following command to start the search service:
    Start-SPEnterpriseSearchServiceInstance -Identity Search Service Instance Name

Note that the rebuild Indexing process might take a long time, depending on the amount of data you have and how complex your environment is.

Also, it’s essential to ensure that the SharePoint servers have enough resources to handle the process; otherwise, it might fail.

4. Check for permission levels

Permission levels in SharePoint determine users’ actions on a site or site collection. These actions include viewing and editing content, creating and managing lists, and managing site settings.

When it comes to search, a user’s permission will affect the results they see on a SharePoint site. Users with higher permission levels will be able to see more search results than users with lower permission levels.

So it would be best if you were sure you have the right access to the search you need.

In conclusion, SharePoint search not working can be a frustrating issue to deal with, but with the right troubleshooting steps, it can be resolved

So let us know if this was helpful in the comments section below.

Microsoft Edge will let users split two tabs in a single window soon

If splitting two tabs into one window is something you’ve been long anticipating to enhance your workflow and navigation while browsing the web, then you might be able to access this feature soon. As it happens, Microsoft is currently testing this feature with Edge insiders in the Canary Channel as spotted by Leopeva64-2 on Reddit.

Edge Insiders in the Canary Channel can access this feature by enabling the Microsoft Edge Split Screen flag. By enabling this flag, a new button will be introduced in the address bar. Then, you can click on the Edge Split Screen button to use two tabs simultaneously in one Edge window. Here’s an illustration of how the feature works:

Microsoft Edge tabs in a new side-by-side view.

While it is still possible to achieve the same by having multiple tabs open in a single window simultaneously and be able to navigate between them, it is quite tedious and you might at times lose track of your workflow.

Alternatively, the browser also comes with a provision that allows users to drag a tab and make use of the in-built Windows split view to split two tabs in a single Edge window.

Even then, the process is quite long and tedious, and when compared to the new Edge Split Screen, the latter is by far more appealing since all you need to do is make a single click.

What’s more, users that have access to this feature in Edge can duplicate them, pin them side by side, or even share them in groups. The same feature can also be found in Vivaldi, though instead of splitting one window into two tabs, users can split up to 4 tabs simultaneously in one window.

In other Edge related news, the browser has extended its support for the Windows Server 2012 to October 2023. Share your thoughts regarding this feature in the comment section.

How to Check DisplayPort Version on Windows 11

DisplayPort is a digital display interface that often connects a computer to a monitor or TV. With the release of Windows 11, it is essential to know which version of DisplayPort your computer is using to ensure compatibility with your display device.

In this guide, we’ll discuss how to check the DisplayPort version on Windows 11.

What are the benefits of DisplayPort?

Many users rave about DisplayPort, which is for good reason. It offers the following:

  • High-resolution support – DisplayPort supports resolutions up to 8K, allowing for ultra-high-definition displays.
  • High refresh rate support – DisplayPort can support up to 240Hz, providing smoother visuals for fast-moving content.
  • Multi-stream capability – DisplayPort allows for connecting multiple displays to a single port, allowing more efficient use of ports on a computer.
  • Audio support – DisplayPort supports audio transmission, allowing for a single cable solution for both video and audio.
  • Low power consumption – DisplayPort uses less power than other display interfaces, making it more energy-efficient.

Some users have experienced some problems with the DisplayPort, like the DisplayPort HDMI not working and the DisplayPort VGA not working. However, in all, this is a very sound technology.

Now let us explore how you may check your DisplayPort version.

How can I check my Windows 11 DisplayPort version?

Use the manufacturer’s website

  1. Press Windows + I to open the Settings app.
  2. Select System on the left pane, then on the right, scroll and click the About section.
    how to check displayport version
  3. Take note of your Processor specifications. In our case, it is 11th Gen Intel(R) Core(TM) i7-1165G7 @ 2.80GHz 2.80 GHz.
  4. Head over to the manufacturer site; this may be Intel or AMD (In our case, Intel).
  5. Click Processor.
    how to check displayport version
  6. Select your processor type.
  7. Select an Intel Core Processors option, then check for your Product Name.
  8. Search for Max Resolution (DP); the value signifies the resolution supported through DisplayPort output.
    how to check displayport version

In conclusion, checking the DisplayPort version on Windows 11 is a simple process that can be done by following the steps outlined in this article.

Knowing which version of DisplayPort your computer is using can help ensure that your display device is compatible and that you get the best visual experience.

By keeping your DisplayPort version up to date, you can ensure that your computer can optimize the latest advancements in display technology.

You can now convert a PowerPoint presentation into an animated GIF

Last week, the Office Insider Program got a new name, Microsoft 365 Insider program, as well as a new look. Microsoft executed this move in a bid to align with its transition from Office 365 to Microsoft 365.

The company highlighted that this change will not affect how the program has been running since its inception back in 2015. “Same early access you know and love with a newly expanded purview,” says Microsoft.

Building upon the same premise, the recently revamped program announced the availability of a feature that lets PowerPoint for iPad users export their PowerPoint slides or even an entire presentation into an animated GIF. This feature was already available for both PowerPoint for Mac and Windows users.

Animation of exporting slides as an animated GIF

To access this feature on your iPad, you need to open the presentation you want to turn into a GIF and tap on the ellipses. Select the Create GIF option, where you will be prompted to choose the slides you’d want to turn into a GIF from your presentation. You also get to set how long each slide gets to be displayed as well as the quality of the animated GIF.

If you are part of the Microsoft 365 Insider Program and have an iPad running on Office Insider Version 2.70 (Build 23012202) or later, you should be able to access this neat feature. In related news, PowerPoint for iOS will let users create slides in portrait mode to make the process of creating presentations easier.

Microsoft Edge extends support for Windows Server 2012 to October

Towards the end of last year, we saw Microsoft’s Edge Dev build drop support for Windows 7, Windows 8, and Windows 8.1. Microsoft later cut support for both OSs at the beginning of this month, meaning they’ll no longer receive any security updates.

If you continue using an unsupported version, you are more susceptible to phishing attacks by hackers such as the recent development where attackers use attachments in OneNote’s notebooks to lure unsuspecting users to their traps.

As we had earlier reported, Windows Server 2012 is set to reach its end of support in October, though Microsoft didn’t detail how long it’ll continue receiving Edge updates, The company has now come out to confirm that it will continue to receive updates till October 2023.

According to Microsoft:

Microsoft Edge version 109 will be the last supported version on Windows Server 2012 and Windows Server 2012 R2 (version 110 and later will be unavailable). Version 109 will receive critical security fixes and fixes for known exploit bugs until October 10, 2023. WebView2 Runtime version 109 will be supported in the same way.

That said, if you try to install Microsoft Edge to these unsupported versions, you’ll get error messages. However, it is possible to continue using Microsoft Edge 109 as it was the last version that supports these operating systems. Microsoft will continue providing security updates for the version till October.

It should be noted that though Microsoft Edge 109 will continue getting security updates from Microsoft, Windows Server 2012 users shouldn’t expect any new features or improvements. The company further added that IE11 will also be supported on both Windows Server 2012 and 2012 R2 till October.

Microsoft recommends that admins should consider transitioning to Windows Server 2022 or purchasing Extended Security Updates (ESUs) if they want to keep their on-premises Windows Server 2012 servers running and continue getting security updates.

via: Ghacks