Many users rerported issues with their Internet connection, and they have encountered Can’t reach the DHCP server the network connection quality might be low error message. This can be a problem, but there are ways to fix it.
Why is the DHCP server not reachable?
There are several reasons, including outdated network adapter drivers, wireless adapter settings or glitches with DHCP.
How can I fix the Can’t reach DHCP server error?
Before trying anything else, try restarting your router or modem. Also, try disconnecting the network cable from the router/modem. Inspect network cables for hardware damage.
1. Update or reinstall your network drivers
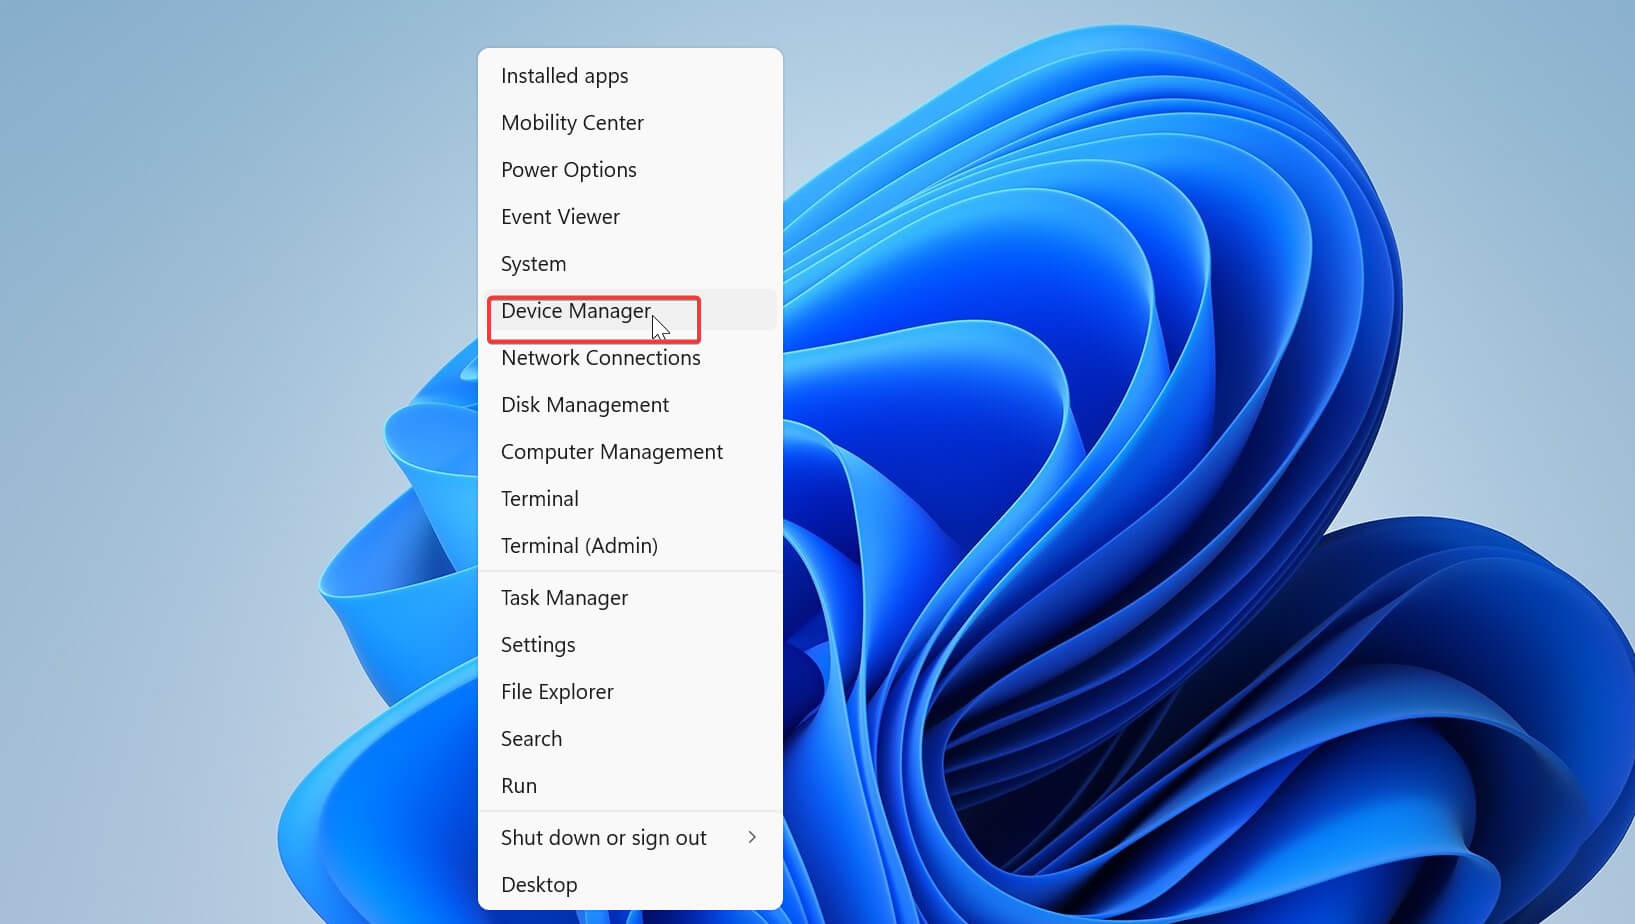
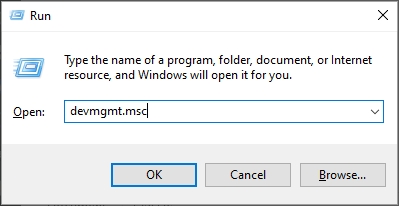
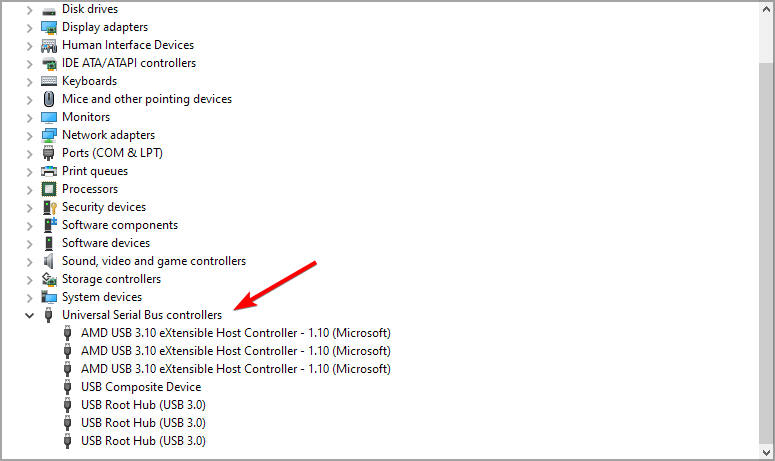
Press the Windows key + X, and select Device Manager.
Select a category to see names of devices, then right-click on the one you’d like to update.
Select Update driver.
Click on Search automatically for updated driver software.
Once it’s done updating you’re all set.
To reinstall your network drivers, follow these steps:
Open Device Manager again.
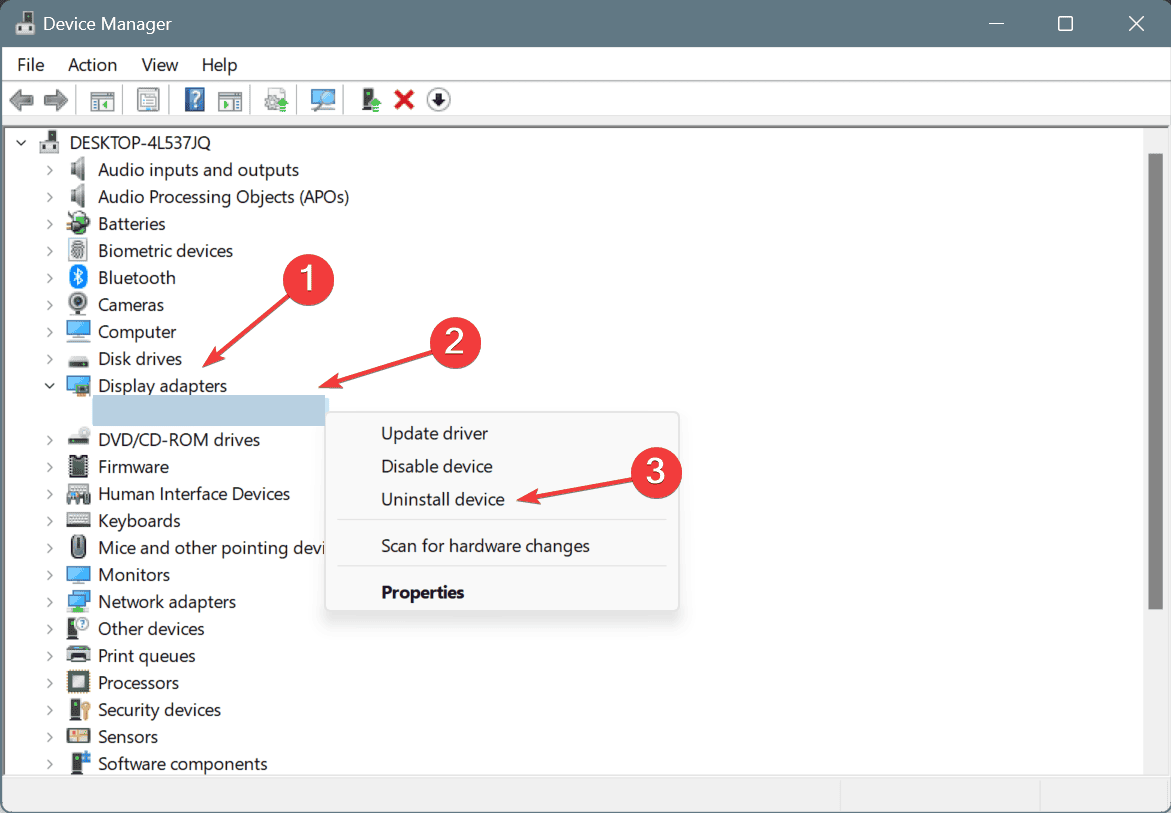
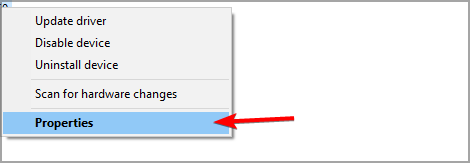
Locate your network device, right-click it and choose Uninstall device.
Check the Remove driver software for this device option.
Select Uninstall.
Click the Scan for hardware changes icon.
Windows will now try to install the default driver.
2. Change wireless adapter settings
Open Device Manager.
Locate your wireless adapter and double-click it.
Navigate to the Advanced tab.
Locate 802.11a/b/g Wireless Mode and set it to any 2.4GHz value.
This is a simple solution if you can’t reach DHCP server on WiFi, but keep in mind that 2.4GHz connection is slower.
3. Register your DNS via cmd
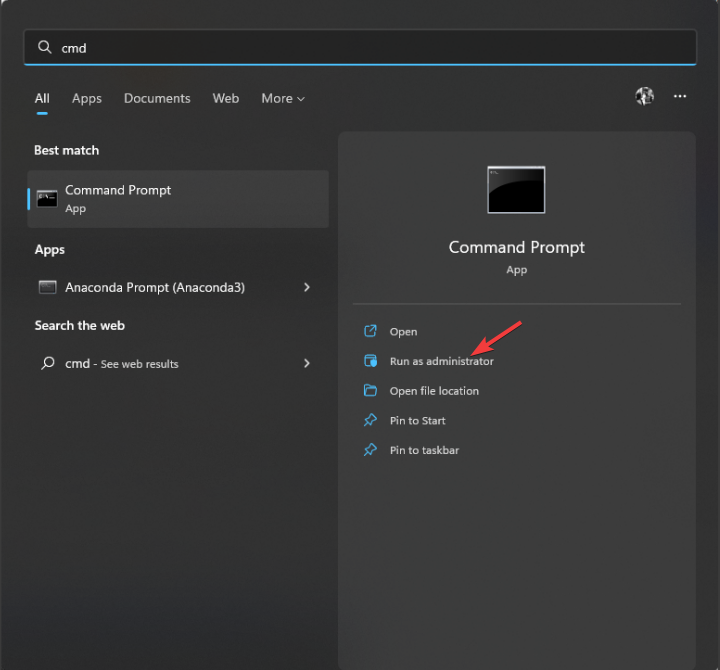
Type cmd in your Start Menu. Open Command Prompt.
Enter ipconfig /registerdns
Type exit in Command Prompt.
Restart your PC.
4. Enable or disable DHCP
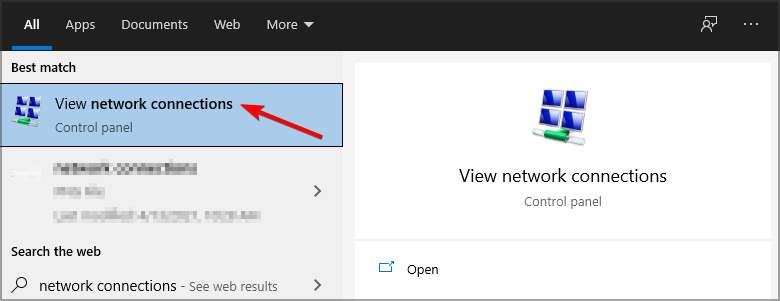
Search for View network connections and select the first option.
Double-click the active network connection. Next, select Properties.
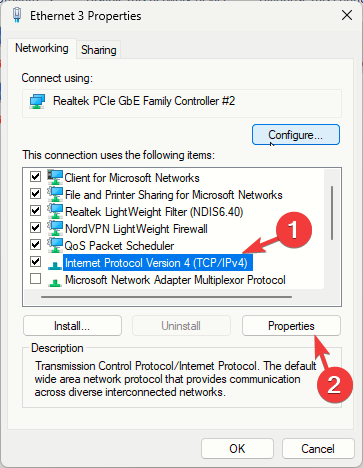
Click on Internet Protocol Version 4. Select Properties.
Click on Use the following IP address.
Enter the values for your IP Address, Subnet Mask, etc. And check if that works.
If DHCP is disabled, click on both Obtain an IP Address automatically and Obtain DNS Server Address Automatically and save changes.
This method can be useful if you can’t reach DHCP server via Ethernet on Windows 11.
OneDrive is an online cloud storage service from Microsoft. It allows users to store files and access them from anywhere on any device. The primary purpose of using this service is to sync files between multiple devices so that you can access your documents from anywhere you want.
However, sometimes users face issues with this service and its performance. Sometimes the error code 0x800701AA may appear on your computer screen when downloading files from your OneDrive account.
Why am I getting the error 0x800701AA in One Drive?
Below are some possible causes of why you aren’t able to download files from One Drive:
Unstable internet connection – If your device doesn’t have an active internet connection at all times then you won’t be able to download any files from OneDrive until it does.
Insufficient storage – If you’re trying to download a large file and don’t have enough storage space on your device, you may get this error code.
Corrupt file – If there’s a problem with the file you’re trying to download, it may present some issues.
The file is too large – If you’re trying to retrieve an extremely large file, OneDrive may not be able to handle the process.
Server error – If Microsoft servers are undergoing maintenance, their services may also experience downtime, and you’ll get The Cloud operation was not completed error message.
The folder is inaccessible – It is also possible that the folder containing the file is not accessible at the moment.
How can I fix the error 0x800701AA in One Drive?
As you attempt to find a fix, try the basic checks first:
Close any background apps.
Check whether you have enough hard drive space to accommodate the download.
Ensure you are signed in to OneDrive and sync any pending files/folders.
Open OneDrive, locate the file you want to download and copy its location.
Press Windows + E to open File Explorer.
Navigate to Network on the left pane and click on Map network drive.
Select Connect to a Web site that you can use to store your documents and pictures in the dialog box that appears and click Next.
In the Specify the location of your website dialog, paste the location copied in 1 and click Next.
Select a name for the new location.
Hit the Windows key, type Powershell in the search bar, and click Run as administrator.
Type and Enter the following command: {$_.FullName Get-Content -Path $_.FullName -first 1 | Out-Null}
4. Uninstall and reinstall OneDrive
Hit the Windows key and click on Settings.
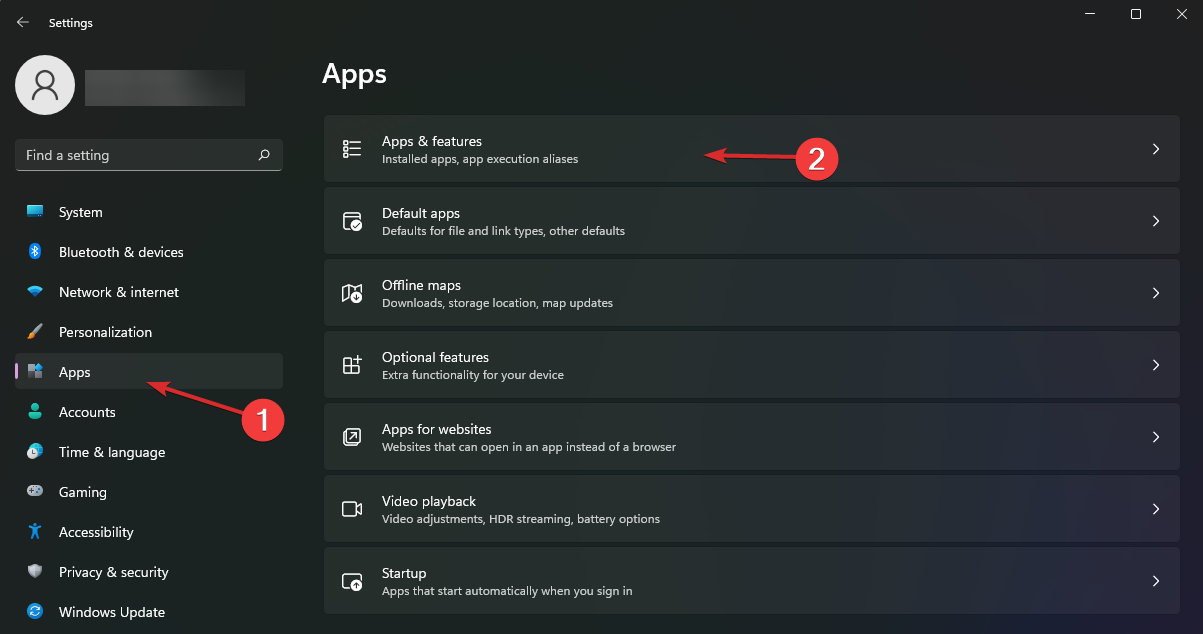
Click on Apps on the left pane then Apps & features on the right pane.
Locate the OneDrive app, click on the three vertical ellipses and select Uninstall.
Now launch the Microsoft Store by clicking its icon in the taskbar.
Search for OneDrive.
Click on the Get button to install OneDrive.
And that’s how to fix the 0x800701AA. A section of those who use Apple services on Windows also complained of the iCloud error 0x800701AA. If so, you can use the same steps to resolve it.
Elsewhere, users also complained that at times, they encountered an error where they couldn’t access OneDrive. If you experience something similar, don’t hesitate to check out our helpful guide on the same.
Another annoying habit is that you may find that OneDrive is constantly syncing so be sure to refer to our article on how to solve this issue.
Share with us in the comment section below any other solution not mentioned here that was able to help you resolve this error.
1. Press the Start button and input the keyword troubleshootwithin the search text box.
2. Next, click on Troubleshoot settings to open that tab within Settings.
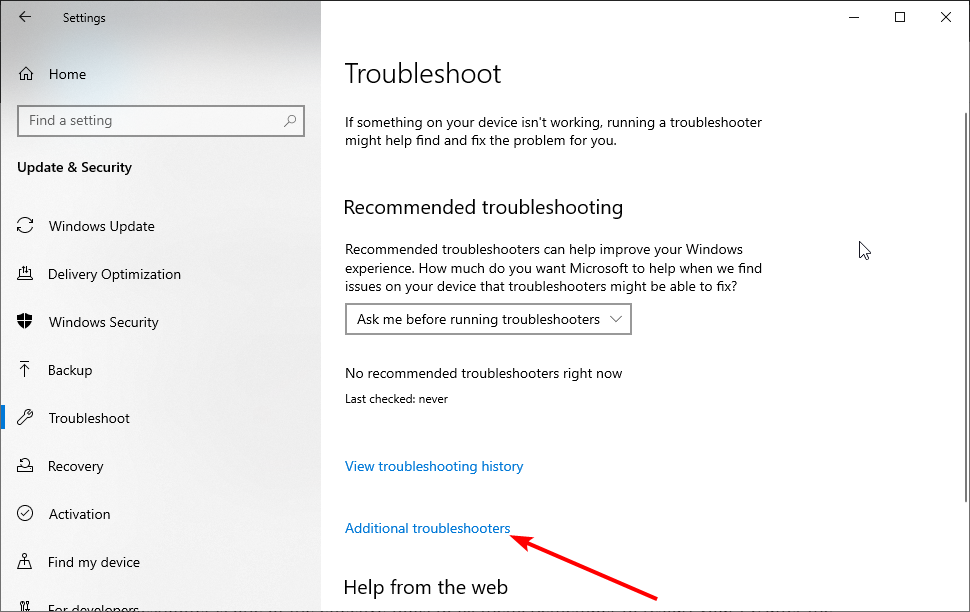
3. Next, click on Additional troubleshooters to open the troubleshooter list in Settings.
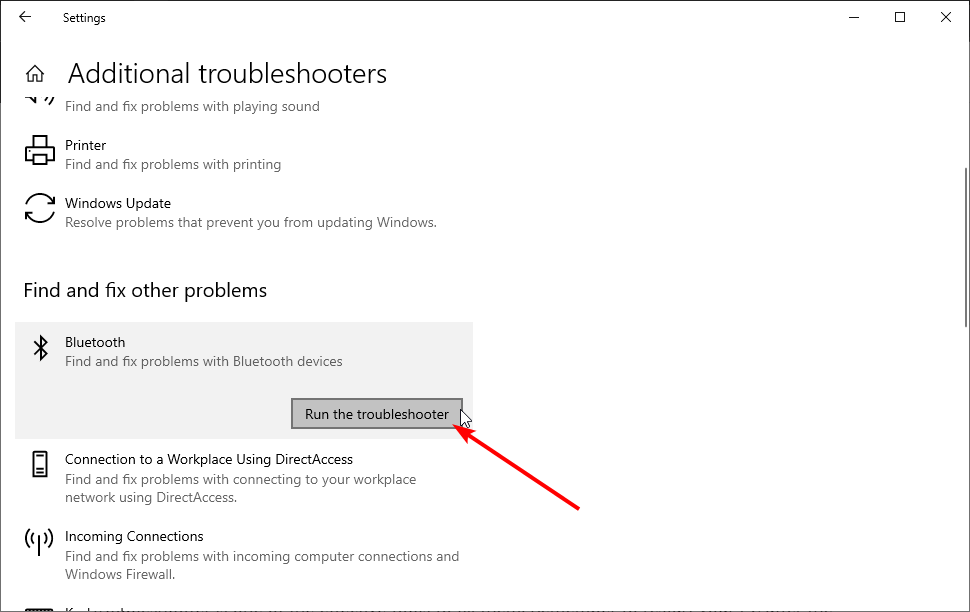
4. Select Network Adapter in Settings, and press the Run the troubleshooter button.
5. Select theEthernetoption in the Network Adapter troubleshooter, and clickNextto go through any suggested resolutions.
If your Ethernet keeps disconnecting, you have a built-in troubleshooter on your PC that you can use to fix the problem.
Windows has a Network Adapter troubleshooter that will scan your device for issues and recommend solutions to your specific problem within seconds.
2. Update your Ethernet adapter driver
You might need to fix an outdated or faulty Ethernet driver to resolve the Ethernet cable that keeps disconnecting Windows 10 or Windows 11 issue. You can quickly and easily update drivers with driver updater software.
A driver updater utility will scan your PC and list devices you need to update drivers for. Fortect Driver Updater is excellent for this, plus, this tool will also help you keep your drivers up to date by regularly scanning and informing you of their status.
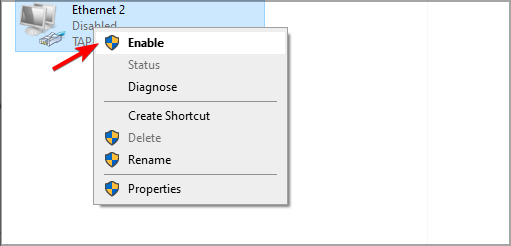
Open the search tool by pressing Windows, then type the keyword network into the search tool’s text box. Finally, click View network connections to open it.
Right-click your listed Ethernet connection there to open its context menu.
Then select the Enable option if Ethernet is disabled.
5. Try a different Ethernet cable
If the Ethernet keeps disconnecting on Windows 10, check the condition of your Ethernet cable. If it’s not in OK shape, consider replacing your Ethernet cable with a new one.
In addition, try connecting your Ethernet cable to different ports on your router and check if that helps.
6. Disable the Windows firewall
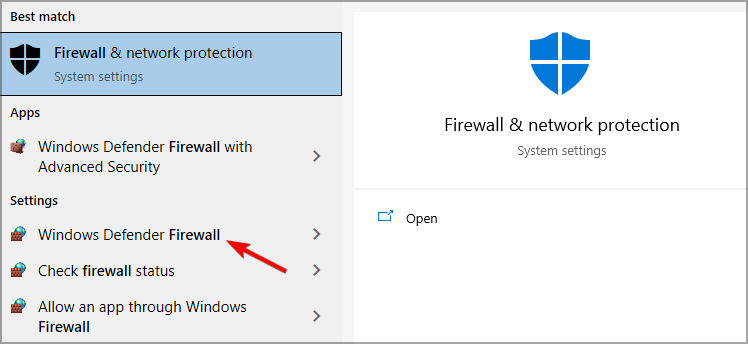
Press the Windows keyboard key and S simultaneously to open the search utility.
Input firewall in the search box to find Windows Defender Firewall. Then, click the Windows Defender Firewall applet in the search results.
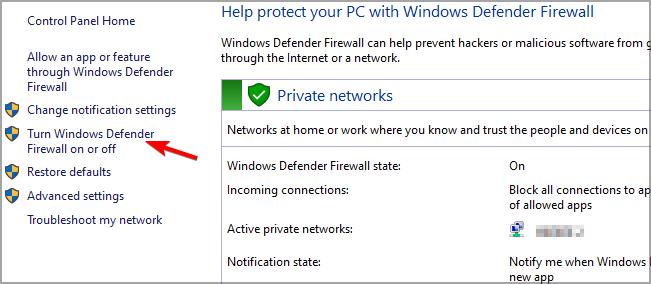
Then click Turn Windows Defender Firewall on or off on the left of the open applet.
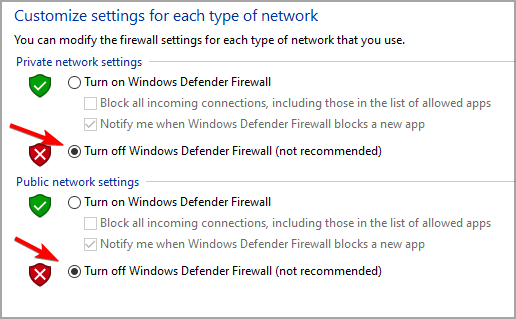
Select both the Turn off Windows Defender Firewall options within Customize Settings.
You can usually disable a third-party antivirus utility by right-clicking its system tray icon and selecting a disable (turn off) shield setting of some description.
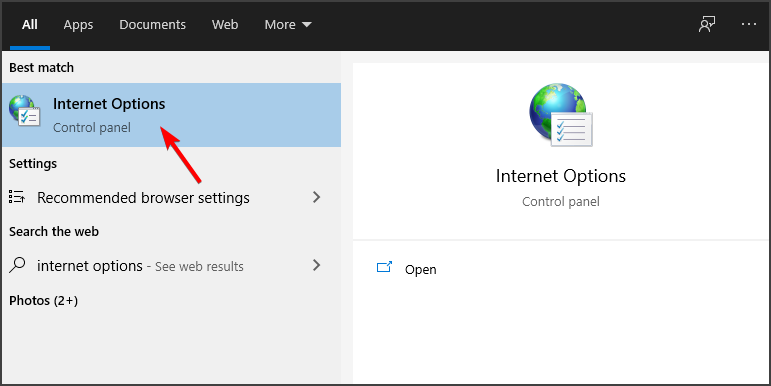
Open Windows 10’s a search box, and type the keyword Internet Options in the search tool’s text box. Next, click Internet Options to open the Internet Properties window.
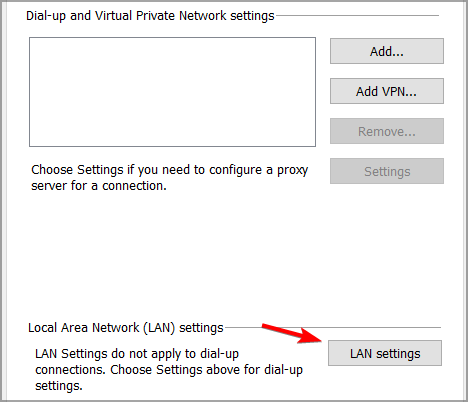
Select the Connections tab. Now click the LAN settings button.
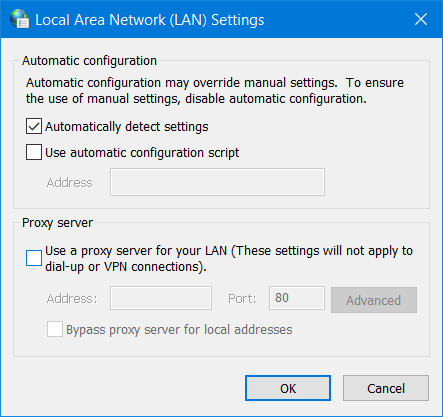
Then click the LAN settings button to open a Local Area Network (LAN) Settings window.
Deselect the Use a proxy server checkbox if that option is selected.
Click OK to exit the Local Area Network window.
8. Reset your network
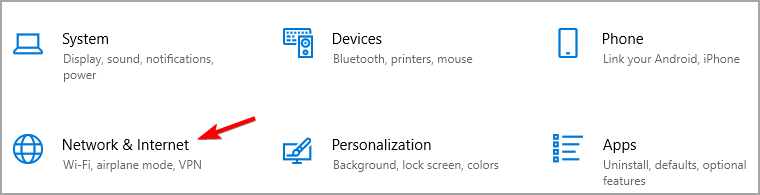
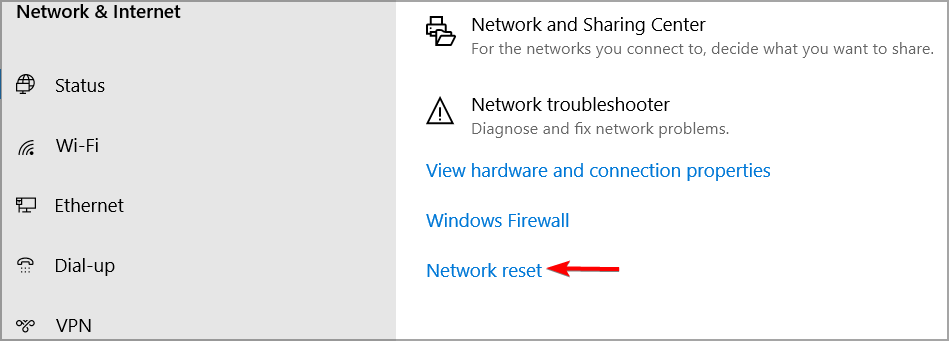
Open Settings with the Windows key + I hotkey, then click Network & Internet to open a Status tab in Settings.
Then click the Network reset option.
Press the Reset now button to confirm and restart your PC.
9. Disable VPN software
It’s also recommended that users disable any VPN software installed on their desktops or laptops. Our guide on how to turn off VPN provides further details on how you can disable a VPN connection permanently or temporarily.
If you have a VPN browser extension enabled, make sure you also disable it. You can do that by opening the extensions tab in your browser and toggling the VPN extension off there. Alternatively, you can altogether remove the extension.
What can I do if my Ethernet keeps disconnecting on Windows 11?
Resolving this issue is not very different from the resolutions presented in this guide. The steps are mostly the same, with very slight changes when it comes to the things you need to click on.
Can I use Ethernet and Wi-Fi at the same time?
Yes, a personal computer can use both Wi-Fi and Ethernet simultaneously, provided that the computer’s network settings are adjusted to give equal weight to each connection.
And that they are programmed not to disconnect from either connection when the other reference is made. For more information, check out our post on how to combine Internet connections on Windows 10.
So, various potential resolutions can help you fix if Ethernet keeps disconnecting on Windows 10.
Now that we know what variations this error has been presented in, we can discuss another important topic -where does this issue occur?
For more information on this topic and potential solutions, please look at our article on Ethernet not working in Windows 10/11 to learn what to do about it.
Also, find out what to do when you get the unidentified network error message from our dedicated article.
If none of the resolutions stabilize your Ethernet connection, consider contacting your ISP support line for further assistance.
If you’re looking to buy a new USB C to Ethernet adapter and you’re wondering which are the best deals available right now, then you’ve come to the right place.
We will tell you which products are in vogue right now and what they offer you. They are all available to buy on Amazon.
Without further ado, let’s find out together our top picks for the best USB C to Ethernet adapters at the moment!
What are the best USB C to Ethernet adapter deals?
The Type-C to LAN Gigabit Ethernet (RJ45) Network Adapter is the best adapter for streaming large videos, playing games online, or downloading your favorite stuff at maximum speeds without interruption.
Enjoy fast data transfers, and better security compared to most wireless connections.
It is a plug and play, so you don’t need any drivers or to install any – simply insert the cable and start using the adapter.
The LENTION LAN Adapter offers up to 1000 Mbps gigabit ethernet connection. It is a great competitor on the list of the best USB C to Ethernet adapter.
Now you can enjoy faster HD video streaming, gaming, browsing, and storage over a secure connection compared to Wi-Fi alternatives, and it automatically connects and detects the speed and works accordingly.
It is also good to look at what with its sleek aluminum metal finish, plus there’s no need for driver installation as it is a plug and play adapter.
CableCreation’s USB-C Gigabit Ethernet adapter is designed with a Gigabit Ethernet port so you can access superfast network speeds.
It is easy to use, supports plug and play meaning no installation software is required, plus it has an LED status light so you know whether it’s working properly or not.
Enjoy fast data transfers, better security, and the manufacturer’s promise of a top quality cables, and a lifetime warranty on the adapter.
This is the best USB-C Gigabit Ethernet adapter when you need multiple ports as it comes with USB 3.0 ports plus HDMI/VGA video ports that support 4K UHD over HDMI, with a single USB-C connection.
The USB type C cable is a reversible, user-friendly connector, so you can use it from whichever end you want.
However, with this adapter, you may need an updated BIOS or firmware drivers from the manufacturer.
Gigabit Ethernet translates to high speeds with a maximum data rate of about 1Gbps (or gigabit per second, an equivalent of 1000Mbps).
In today’s digital world, Gigabit Ethernet has been made possible thanks to different technologies that support effective and fast data transfer via cable.
If you want to know whether your computer or device supports Gigabit Ethernet, it may not show at face value by looking at it physically.
Still, the cables usually have the information based on the standards they support. This can let you verify whether it can operate at gigabit speeds or not.
For most modern computers, connecting to such high speed networks requires using the best USB-Cto Ethernet adapter.
These devices also come with USB type C connector or port. This is reversible, user friendly, and lets you connect to your device from whichever direction.
What is a Gigabit Ethernet adapter?
A Gigabit Ethernet adapter is a small but compact gadget that connects from the USB port on your computer with an RJ-45 port that supports the 10/100/1000Base-T networks.
If your internet connection speed exceeds the 100Base-T, you may not be able to enjoy the high performance connection immediately. Still, it will be useful for future purposes.
USB-CGigabit Ethernet adapters harness the Ethernet where there is inconsistent, non-existent or over extended wireless connectivity.
So, you can connect seamlessly, and enjoy fast, uninterrupted, and reliable speeds.
Have you found the best USB-C Gigabit Ethernet adapter for yourself among these six?
Let us know your choice, or if you know a good USB C to Ethernet adapter that deserves to be on this list, share with us in the comments section below.
Are you one of the users getting error code 0x80072efd in Windows 10 while trying to update your device to the latest build?
It seems that many Windows 10 users cannot connect to the Windows update servers, Cortana, and also Internet Explorer.
When they try to update the operating system, they get the error above.
Before you try to install the latest Windows 10 version on your device, you need to install the latest Windows updates and Optional Updates.
Also, you can run the Windows Update Troubleshooter which will find and fix any issues regarding the Windows 10 operating system.
What does 0x80072EFD mean?
In most cases, this error means that you have an Internet connection issue when trying to update Windows because of the firewall protection that blocks the server connection.
As well, you can meet another issue such as The error code is 0x80072efd, in case you need it. This error message occurs on the Microsoft Store app due to Internet network connections.
How do I fix error code 0x80072EFD in Windows 10?
1. Update Windows 10
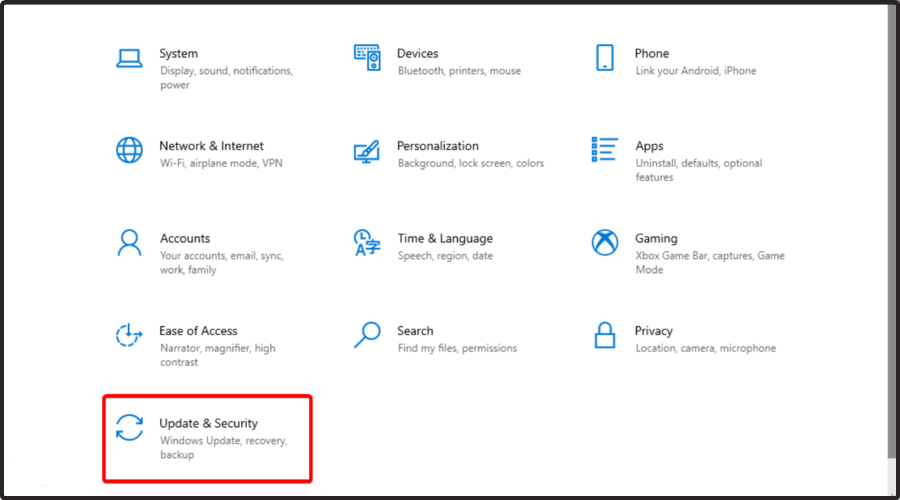
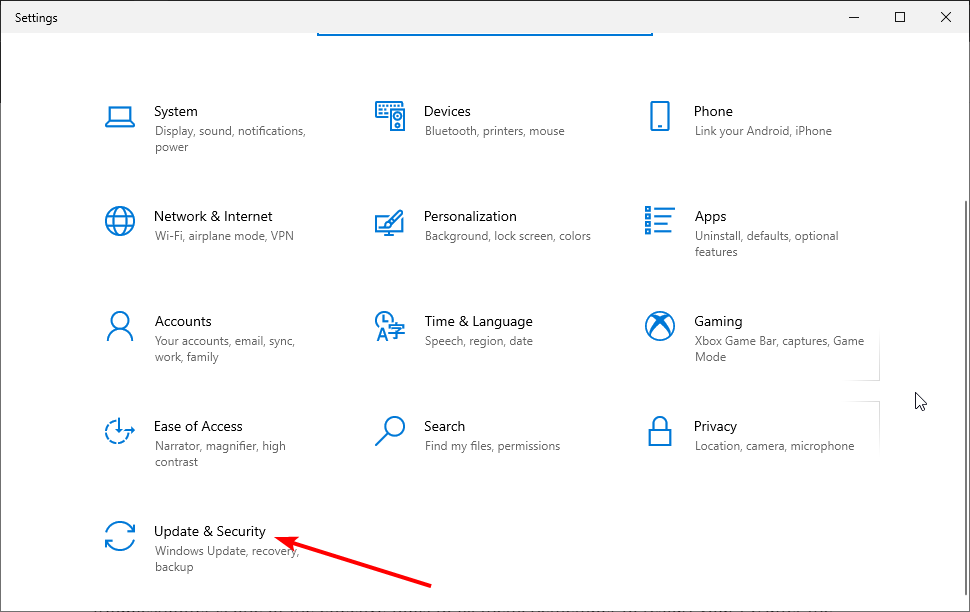
Go to Start > Navigate to Settings > Click on Update & Security
Click on the Windows update button
Now click on the Check for Updates option
Wait for the scanning process to finish
After the scan is completed and the updates have been installed, return to Windows Update
This time, go to the Advanced option and check Give me updates for other Microsoft products when I update Windows
When you finished the installation process, reboot Windows 10 computer
After the device starts, check again if you still get the error code 0x80072efd.
2. Run the Windows Update troubleshooter
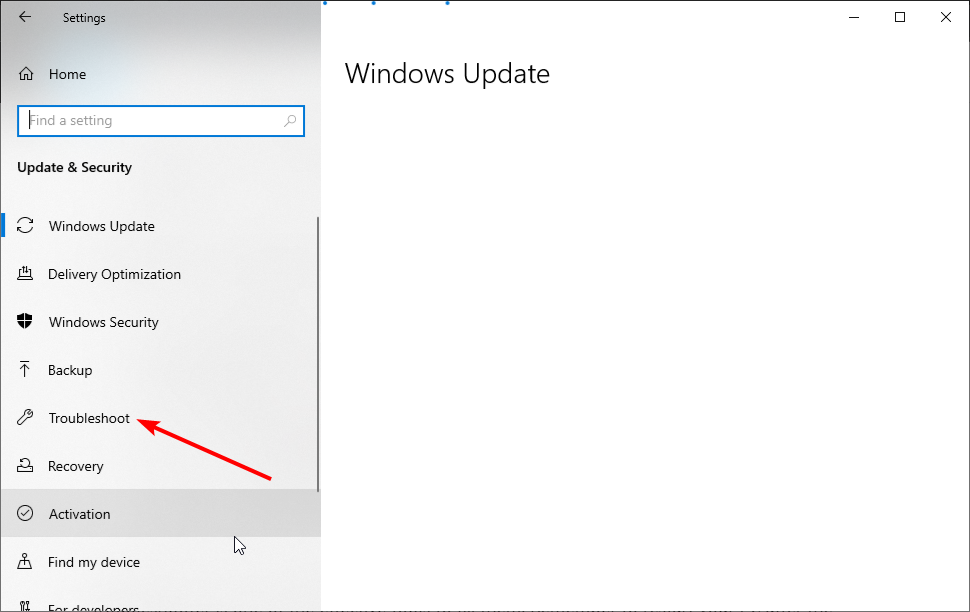
Go to Settings > Update & Security > navigate to Troubleshoot
Select the Windows Update troubleshooter > run it
Follow the instructions on the screen and finish the troubleshooting process
Restart your Windows 10 computer
Check again if you still get error 0x80072efd.
3. Clean boot Windows 10
Go to Start > in the search dialog box enter msconfig without the quotes
Press the Enter button on the keyboard
Click or tap on the msconfig icon > the System Configuration Window should be visible
Click on the Services tab
Check the box next to Hide all Microsoft Services.
Click on the Disable all button.
Now click on the Startup tab located on the upper side of the window.
Select Open task Manager
In the Task Manager window go to the Startup tab.
Left-click or tap on each item on the list > select Disable
Close the Task Manager window > click OK
Reboot your Windows 10 machine.
Check if you can install the updates without getting error 0x80072efd.
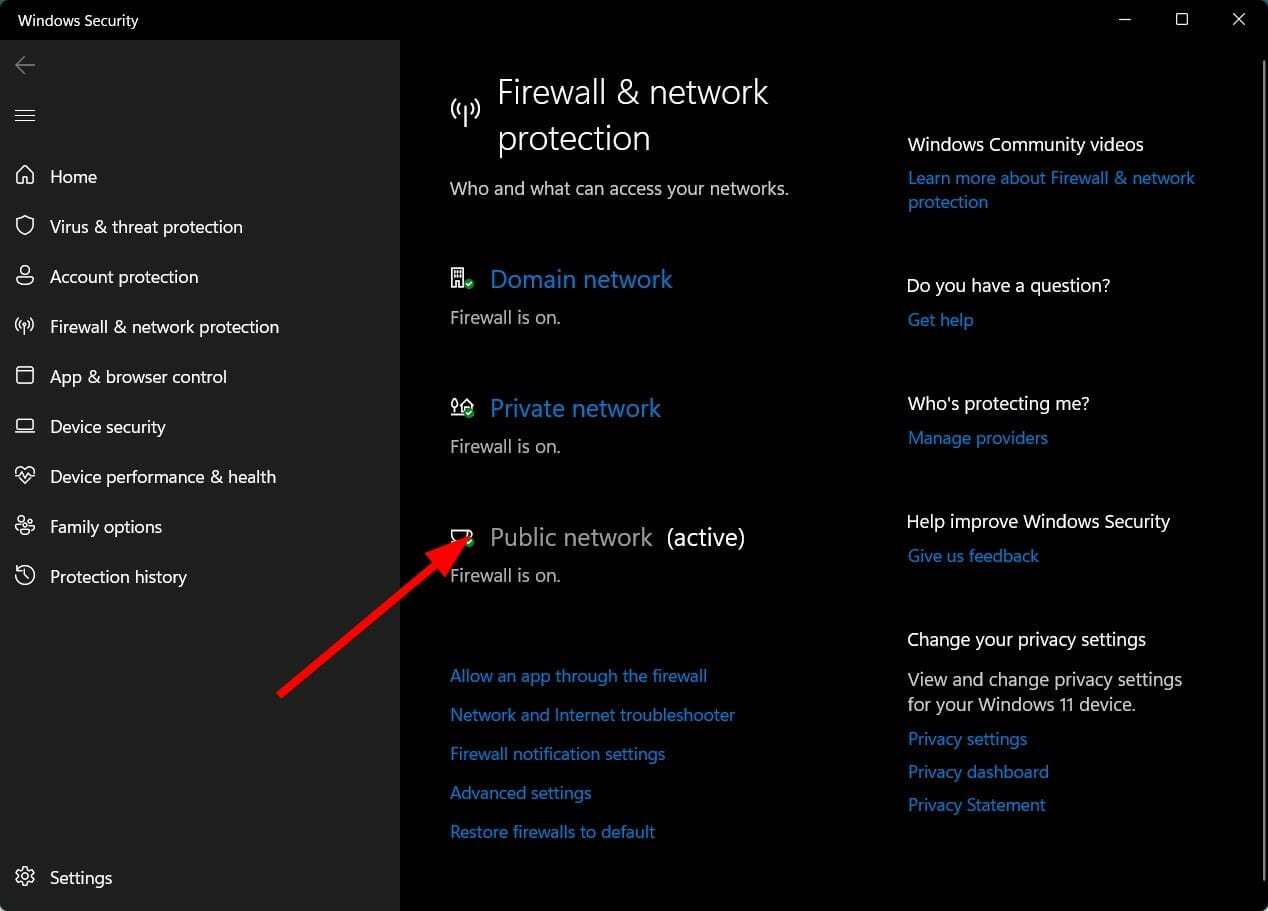
4. Disable your antivirus/ firewall
If you keep getting this error, this can indicate that your firewall, antivirus or anti-spyware software is preventing Windows Update Services (SVCHOST) from accessing the Internet.
In this case, temporarily disable your security tools (yes, all of them) and try to install the latest updates.
If this method works, don’t forget to enable antivirus protection as soon as you finished updating your computer.
Make sure that your Windows Time service configuration is correct. If this service isn’t properly configured, you may experience various issues, including update errors.
Go to Start > type Services > ChooseServicesfrom the results.
On the Services window, locateWindows Time service and double click it.
Check theStartup typesection and set it toAutomatic.
Now, restart the service by clickingStopand then click Startagain. If the service isn’t running, click theStart button to start it.
ClickApplyandOK.
6. Disable Proxy
Go to Start > type inetcpl.cpl
Go to Connection > select LAN Settings.
Check the box ‘Automatically detect settings’
Under Proxy server, uncheck the box ‘Use a proxy server for your LAN’.
7. Reset Windows Update components
Before you reset Windows Update, don’t forget to back up your Registry. In case anything goes wrong, you will be able to restore a working Windows version.
Go to Start > launch Command Prompt as administrator
Type the following commands and hit Enter after each one:
net stop bits
net stop wuauserv
net stop appidsvc
net stop cryptsvc
8. Rename the Software Distribution folder
Renaming the Software Distribution folder may help you fix error 0x80072efd.
To do this, launch Command Prompt as administrator once again and run the following commands one at a time hitting Enter after each one:
9. Delete the content inside the Software Distribution folder
If renaming the Software Distribution folder didn’t help, try deleting all the files and folders from the respective folder.
To do this, go to C:WindowsSoftwareDistribution and open the folder. Simply delete the content available inside that folder.
If your system’s Datastore and Download folder are no longer synced, this may cause Windows Update to fail to work correctly.
As a result, you will encounter various issues, errors included, when checking for updates or installing them.
The files and folders that you deleted will get automatically downloaded again when you reboot your computer.
However, keep in mind that you will lose your Windows Update History and Windows will take longer to detect updates the next time you run Windows Update.
Error code 0x80072efd Windows 11
If you encounter this update error on your Windows 11 OS, the reliable workaround to fix it is with Windows Update troubleshooter. Follow the next steps to apply it:
Type Troubleshoot settings in the search bar.
Go for Other troubleshooters.
Find Windows Update troubleshooter and click Run.
Wait for the process to find your issue.
Accept the suggested repair, if you have it.
And there you have it, these methods will help you get rid of error code 0x80072efd in Windows 10 so that you can update the OS.
If you get an Excel error message saying that your formula omits adjacent cells when you try to enter it, your Excel spreadsheet has probably been modified.
This could mean that the cell has no data, no longer exists, the range has been changed, or there are blank cells in between each cell that you want to include in your formula.
Find tested fixes below:
What can I do if the Excel error formula omits adjacent cells?
1. Uncheck formulas that omit cells
Launch your Excel sheet and then click on File.
Navigate to Options and then select Formulas.
Look for Error checking rules and uncheck Formulas which omit cells in a region.
Click OK.
2. Switch from absolute to relative reference
Open the Excel sheet and select the cell that contains the formula.
Navigate to the formula bar at the top and press F4 until you get the relative reference option.
Absolute and relative references in Excel formulas are two ways to refer to cells in your spreadsheet. They both have their purpose, and sometimes you may find yourself using them interchangeably.
Absolute cell references are the default in Excel. However, there are times when using an absolute reference is not the best option. This type of notation is not always intuitive because it does not take into account the position of the cell that contains the formula.
When you update the formula to include the cells that you want to reference, Excel can properly evaluate it and display its result properly.
The caveat to this method is that if you have a very large spreadsheet with many formulas, then it can be difficult to track down which cell is causing the problem.
If nothing seems to work, you can opt to ignore the error or seek help from the help task pane in Excel. The built-in tool diagnoses some problems and may be able to recommend a solution.
Excel errors are in no shortage as you can expect to encounter a few hiccups when you’re working with sheets and formulas. We have crafted a dedicated article to help you in case you want to recover a corrupted Excel file so that you don’t have to lose all your work.
In other instances, you may be unable to type in Excel, but we know what you can do to keep things moving as you shall see in our expert guide. To learn more about Excel, don’t miss our guide on how to add a new line in cell in Excel.
Let us know of any other tricks you used if you were in a similar predicament in the comment section below.
Users have reported encountering the error message Recovery drive is full on Windows 10. This should not be confused with the low disk space message.
The first error code deals with the specific Recovery drive, and the second message relates to the general space availability on your PC’s hard drive.
The Recovery drive is a separate partition stored on your PC that contains all the files needed for you to be able to fully restore your PC if your system becomes unstable for some reason.
This article will explore the best methods to deal with this issue. Please follow these steps closely to avoid causing any other problems to your system.
Why is my Recovery D drive so full?
Users have reported a few elements that contribute to this problem, some of them include:
Writing data – When users continually write data to this drive, it will eventually be filled up, which is the leading cause of the issue. Only data connected with system recovery should be saved to this drive.
Malware – If the Recovery drive is full, but no files are written on it, you may suspect malware on the computer. We always recommend using the best antivirus systems.
Whichever the case is, you should try the solutions that we suggest below. This problem cuts across different brands as users have experienced Recovery drive full on HP, Dell, ASUS, etc.
What can I do if my Recovery drive is full?
1. Manually move files from the Recovery drive
Press the Win + I keys on your keyboard and select System.
Scroll down and select System info.
Select System protection from the menu on the left side.
Choose the specific Recovery drive inside the System protection window, then Configure.
Select Disable system protection and click Ok.
Press Windows + E, click the View tab and select the Hidden files checkbox.
Double-click your Recovery drive to open it, select the files you want to move, and copy them to another drive with free space.
Delete all the other options by using the key combination Shift + Delete.
This should have fixed your low disk space issue for your Recovery drive.
Note: Make sure not to delete files associated with system recovery. These include: $RECYCLE.BIN, boot, hp, EFI, Factory Update, preload, Recovery, RM_Reserve, system.sav, bootmgr, RMCStatus.bin, BT_HP.FLG, CSP.DAT, DeployRp, HP_WSD.dat, HPSF_Rep, language, or RPCONFIG.
Press the Win + R keys on your keyboard, type cleanmgr, and hit Enter.
Select the Recovery partition and click Ok (for this example, we’ll use the C: partition).
Wait for Windows to calculate the amount of space you will be able to free up.
Select the files you want to delete by clicking the respective boxes, then press OK and wait for the process to be completed.
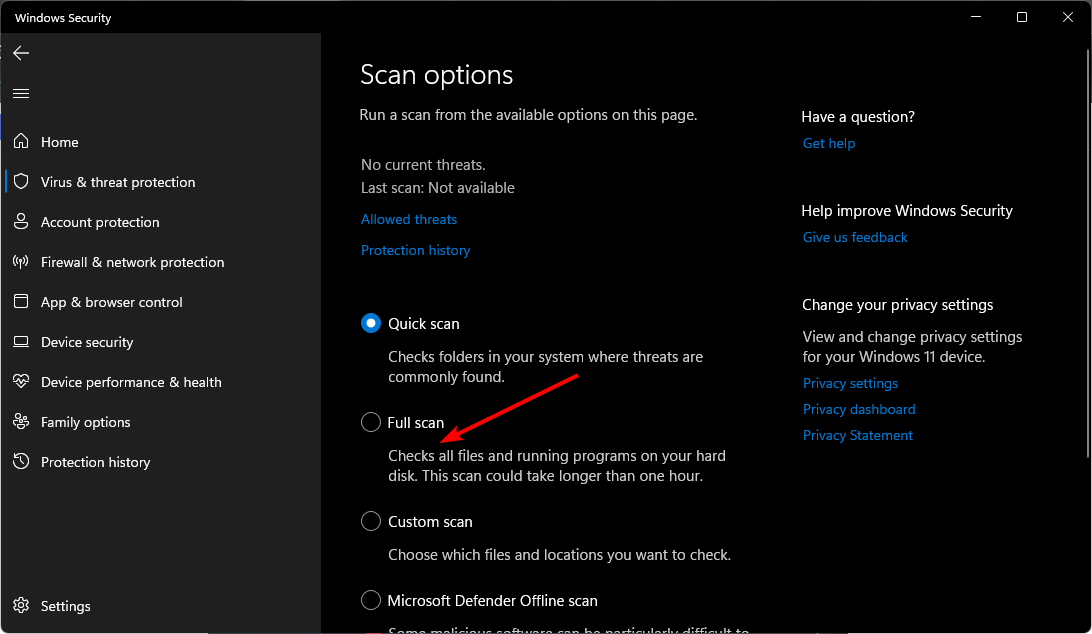
3. Run a full scan
Type Windows Security in the Search bar, and click on the relevant search result.
Now, click on Virus & threat protection here.
Click on Scan options.
Now, select Full scan and click on the Scan now button at the bottom.
The first two solutions cover all possibilities, but there is also a third scenario that you might encounter and we dare say it’s even more frustrating. It happens when the Recovery drive is said to be full, but you cannot find any files to delete or remove.
Checking for malware becomes a viable alternative.
In this article, we explored some quick methods to ensure you’ll never get the Recovery drive is full error ever again.
Follow the steps presented in this article closely to avoid deleting any useful backup files from your Recovery drive.
We would love to know if this guide helped you solve your issue. Please feel free to let us know by using the comment section found below.
The Group Policy is integral to Windows 10 as it is in charge of many advanced settings and is used to fix several issues. However, some users are complaining of an error on the feature, which can be pretty concerning.
Though there are different causes for this, it is not as complicated as it seems. This guide will show you how to fix the Group Policy error and help you regain control of the critical feature.
What causes Group Policy errors in Windows 10?
Below are some of the causes of the Group Policy error:
Corrupt system files: Corrupt system files are one of the leading causes of the processing of group policy failure. Windows attempted to retrieve the new group policy settings error message. You need to fix the corrupt system files using a dedicated tool or the built-in file fixers.
Faulty registry files: According to some users, issues with the registry.pol and secedit.sdb files can cause this error too. The solution to this is to delete or move these two files.
Issues with the OS: In some cases, it might be hard to trace the cause of this problem. You can only assume that your OS is faulty. To get past this, you need to perform a system restore.
How can I fix the Group Policy error in Windows 10?
1. Delete or move the registry.pol file
Open File Explorer and paste the path below in the address bar: C:\Windows\System32\GroupPolicy\Machine\
Now, locate Registry.pol file and move or delete it. A safer option would be to move it to your desktop because you might want to restore this file if any new issues occur.
After moving or deleting this file, you’ll need to run one command in Command Prompt to recreate this file and restore the original group policy values. To do that, follow these steps:
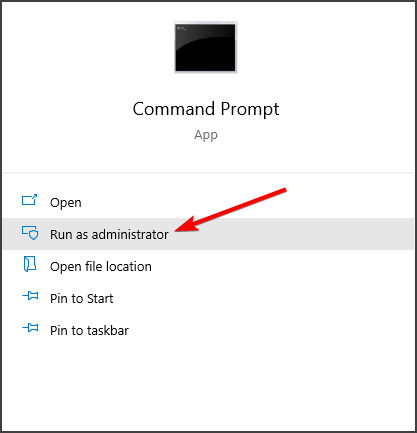
Press Windows key + S, type cmd, and select the Run as administrator option under Command Prompt.
Type the command below and hit Enter to run it: gpupdate /force
Finally, restart your PC.
Once your PC restarts, the registry. The pol file will be recreated, which should fix the Group Policy error in Windows 10. Many users reported that this solution fixed their problem with corrupted local group policy, so try it out.
2. Move or delete secedit.sdb file
Launch File Explorer and navigate to the path below: C:\WINDOWS\security\Database
Locate secedit.sdb file, and move it to your Desktop.
Now, restart your PC.
Another fix for the Group Policy error on Windows 10 local group policy is to move or delete the secedit.sdb file. Deleting this file will reset your group policy settings to the default.
3. Use Command Prompt
Launch Command Prompt as administrator.
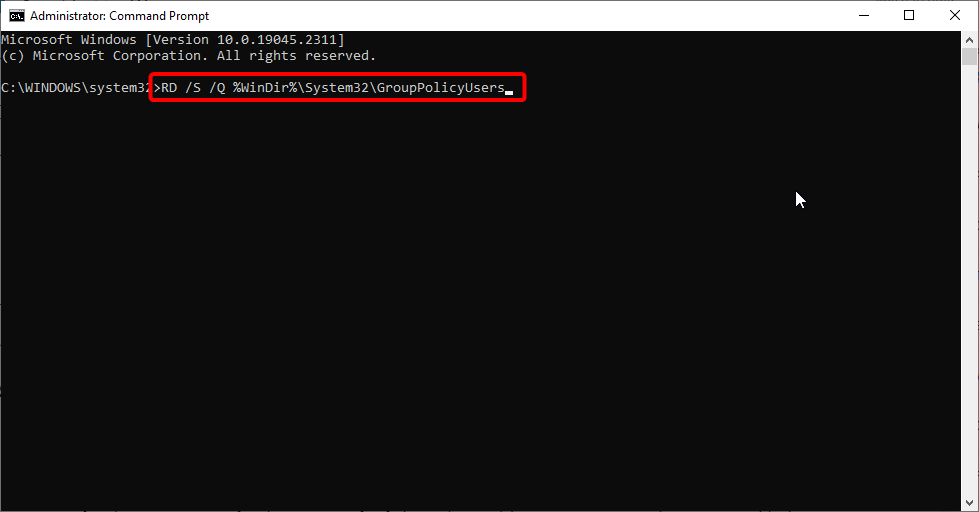
Type the commands below and press Enter after each: RD /S /Q %WinDir%\System32\GroupPolicyUsersRD /S /Q %WinDir%\System32\GroupPolicygpupdate /force
If you’re facing the Group Policy error on Windows 10, you might be able to fix the problem simply by using Command Prompt. The commands above will help you reset the Group Policy.
4. Perform DISM and SFC scans
Start Command Prompt as an administrator.
Type the command below and hit Enter to run it: sfc /scannow
Wait for the SFC scan to finish running. Then, if it fails or the problem persists, type the command below and hit Enter: DISM /Online /Cleanup-Image /RestoreHealth
DISM scan will now start. The scan takes about 20 minutes, so don’t interfere with it.
As mentioned earlier, corrupt system files can cause this issue. However, running the commands below will help you fix the files causing the Group Policy error in Windows 10.
Alternatively, you can use a third-party system file fixer to repair the broken system file. These tools are pretty fast and require no command to get going.
With just a few clicks, they will fix your files and restore normalcy on your PC.
5. Restart the Group Policy client
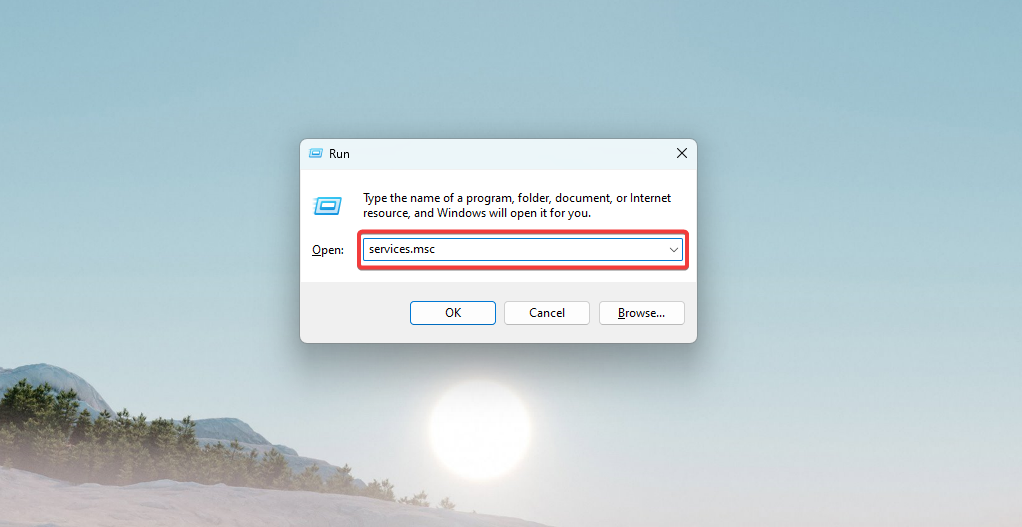
Press the Windows key + R, type services.msc, and click OK.
Double-click the Group Policy Client to open its properties.
Now, set its Startup type to Automatic and click on the Start button.
Click the Apply button and OK to save changes.
Finally, launch Command Prompt as admin, type the command below, and hit Enter: netsh winsock reset
Sometimes, all you need to fix the Group Policy error on Windows 10 is to restart the necessary services. The steps should help you take care of this quickly.
Press the Windows key + S, type system restore, and select Create a restore point.
Click the System Restore button.
Now, click Next to proceed.
Check Show more restore points option, if available. Select the desired restore point and click Next.
Follow the instructions on the screen to finish the process.
If the Group Policy error on Windows 10 persists, you might be able to fix the issue simply by performing a System Restore. This feature will help your return your PC to an earlier date when everything is working well.
The Group Policy error on Windows 10 can cause many issues, but we hope you solve them using one of our solutions. However, if you still cannot get the feature to work well, you might need to take a risk and perform a clean install or an in-place upgrade.
We are well aware that the main focus right now is on Windows 11 and Windows 10, but we never allow ourselves to miss an occasion to revisit the older versions of the Windows OS.
That being said, be sure to check out the latest versions of Windows 10, which is 22H2, and also Windows 11, which has also reached version 22H2.
And, as you surely know by now, the Redmond-based tech colossus also releases security updates for some of the obsolete operating systems, during Patch Tuesday.
That means that not only Windows 10 and 11 users will receive updates during this time. We’re also looking at Windows 7, Windows 8, and various Server versions as well.
We’ve already presented the 52 new updates that became available, along with the official download links, so all that remains is going a bit more in-depth.
Without any further ado, let’s take a closer look at what Windows 7 and Windows 8 users were given to work with on the December 2022 Patch Tuesday.
What should I know about the December 2022 Patch Tuesday?
The Redmond-based tech colossus has just released Patch Tuesday updates for Windows 8.1, in the form of KB5021294, and Windows 7, in the form of KB5021291.
Keep in mind that they each come with a whole host of improvements and known issues with some pretty neat workarounds.
By order of the Fijian government, Fiji will not observe daylight saving time (DST) in 2022. Therefore, clocks do not change by an hour at 02:00 on November 13, 2022.
A memory leak in the Local Security Authority Subsystem Service (LSASS.exe) occurs on Windows domain controllers. This issue is known to occur after installing Windows updates dated November 8, 2022, or later.
Known issues
After installing this update and restarting your device, you might receive the error, “Failure to configure Windows updates. Reverting Changes. Do not turn off your computer”, and the update might show as Failed in Update History.
After this update or a later Windows update is installed, domain join operations might be unsuccessful and error “0xaac (2732): NERR_AccountReuseBlockedByPolicy” occurs. Additionally, text stating “An account with the same name exists in Active Directory. Re-using the account was blocked by security policy” might be displayed.
After installing this update, apps which use ODBC connections through Microsoft ODBC SQL Server Driver (sqlsrv32.dll) to access databases might not connect. Additionally, you might receive an error in the app, or you might receive an error from the SQL Server.
By order of the Fijian government, Fiji will not observe daylight saving time (DST) in 2022. Therefore, clocks do not change by an hour at 02:00 on November 13, 2022.
A memory leak in the Local Security Authority Subsystem Service (LSASS.exe) occurs on Windows domain controllers. This issue is known to occur after installing Windows updates dated November 8, 2022, or later.
Known issues
After this update or a later Windows update is installed, domain join operations might be unsuccessful and error “0xaac (2732): NERR_AccountReuseBlockedByPolicy” occurs. Additionally, text stating “An account with the same name exists in Active Directory. Re-using the account was blocked by security policy” might be displayed.
After installing this update, apps which use ODBC connections through Microsoft ODBC SQL Server Driver (sqlsrv32.dll) to access databases might not connect. Additionally, you might receive an error in the app, or you might receive an error from the SQL Server.
Yes, you have forgotten your iPhone passcode and it’s pretty frustrating, but the FoneGeek iPhone Passcode Unlocker tool will unlock it quickly.
In fact, it can remove various iPhone/iPad/iPod Touch locks to help you regain control over your device.
What is iPhone Passcode Unlocker and how can it help?
iPhone Passcode Unlocker, developed by FoneGeek, is a dedicated Windows software that can unlock your iPhone or any other iOS device.
It can remove 4-digit or 6-digit passcodes, Face ID, Touch ID in just 3 easy steps. It also helps you remove the Apple ID from iPhone/iPad without a password.
The tool fixes disabled iPhone/iPad/iPod touch devices without the need for iTunes or iCloud.
Don’t worry about anything because it works well with iOS 16/iPadOS 16, iPhone 14/13/12, and a lot more.
This procedure will erase all the data from your iOS device and the iOS version will be upgraded to the latest one. Also, make sure that your device has enough power.
Start iPhone Passcode Unlocker and click on Unlock Screen Passcode.
Make sure that your iOS device is connected to your computer and click the Start button.
You will receive instructions on how to set your device in DFU mode. On iPhone 8 or later, the sequence is to press the Volume up, then Volume down, and lastly the Power button until the screen goes black.
Then, press the Power and Volume down buttons for 5 seconds, release the Volume down button and keep the Power button pressed for another 10 seconds.
Once your device is in Recovery or DFU mode, the tool will identify the device model and all available system versions. Choose your preferred version and click Download to get the firmware package.
Now, all you need to do is to click the Start Unlock button.
Lastly, you will receive a message that your device has been unlocked and it will restart. You will start fresh with your mobile device.
As you probably noticed, we outlined the recovery process for iPhone 8 and later devices but iPhone Passcode Unlocker also works for iPhone 7 and other iOS devices.
Also, this method also works if you want to solve problems like fixing disabled iPhone/iPad/iPod touch devices or removing Face ID and Touch ID.
iPhone Passcode Unlocker is incredibly easy to use by anyone because all the instructions are readily supplied.
How much do I pay for iPhone Passcode Unlocker?
The tool is one of the cheapest software for this purpose on the market. You only need to pay $23.95 to unlock up to 5 devices for one month.
You may also opt for a yearly plan of $33.95 to unlock up to 5 devices from one PC and a lifetime license is only $45.95.
However, if you hurry up, you can benefit from a 10% OFF Code: RFPAIR10 and get it even cheaper.
So, whether you need to fix a one-time problem or ensure that you never have problems with your iOS devices, the FoneGeek tool has got you covered.
UNetbootin is a popular Windows utility to create bootable USB flash drives for Ubuntu and other Linux distributions. At times UNnetbootin is not working on Windows 10, and this is usually followed by the Failed to start error.
The full error reads Windows failed to start A recent hardware or software change might be the cause. This error is usually triggered if the Live USB was not created properly, and in this guide, we’ll show you how to fix this issue.
How do I fix UNetbootin error?
1. Change BIOS Setup
The reliable workaround for the UNetbootin Windows failed to start error is to modify your BIOS setup as shown below.
1. Press the Windows key + I to open Settings.
2. Go to Update & Security.
3. Open the Recovery tab from the left pane.
4. Scroll down to Advanced startup and click the Restart Now button.
5. After the Restart, select the Troubleshoot option.
7. Under Advanced options, choose UEFI firmware settings.
8. Confirm the restart. This will allow you to enter BIOS on your Windows 10 PC.
9. After entering the BIOS, open the Boot tab.
10. Set UEFI/BIOS Boot Mode to Legacy.
11. Save the changes and exit BIOS.
Restart your PC and try to boot with the live USB. Check if the UNetbootin not working in Windows 10 error is resolved.
2. Disable Secure Boot
Power off your PC. Restart and then start pressing F2 to access the BIOS.
In the BIOS, open the Security tab.
Highlight and choose Default Secure boot on and set it as Disabled.
Save the changes and exit BIOS.
Reboot the computer with live USB connected and check if the failed to start UNetbootin error is resolved.
If the error persists, disable Fast startup in Windows 10. Fast Startup is a feature designed to reduce boot time. However, it prevents the computer from completely shutting down, which can lead to compatibility issues.
3. Disable Fast Startup
Press the Windows key and type cmd.
Now select Run as administrator.
In the Command Prompt window, type the following command and hit Enter: Powercfg -h off
This will turn off Fast Startup. Reboot the computer and check for any improvements.
4. Create a new Live USB
One of the common reasons for Windows failing to start – A recent hardware or software change might be the cause is a corrupted Live USB drive created using UNetbootin.
To make sure the Live USB was created properly, create a new bootable drive using the existing ISO file. This would eliminate any chances of error that may have triggered due to missing or corrupt files in the drive.
If the UNetbootin is still not working after creating a new live USB, check your ISO image for errors. Incomplete download or corrupted files may cause the installation to file.
Download the latest version of the ISO image available from the official source. Then create a new bootable drive and check for any improvements.
Alternatively, try using boot repair software. If you are experiencing an error on an existing installation, boot repair tools can fix computer booting issues and repair corrupted files.
Make sure you have the latest ISO installed, and the USB is connected to your PC.
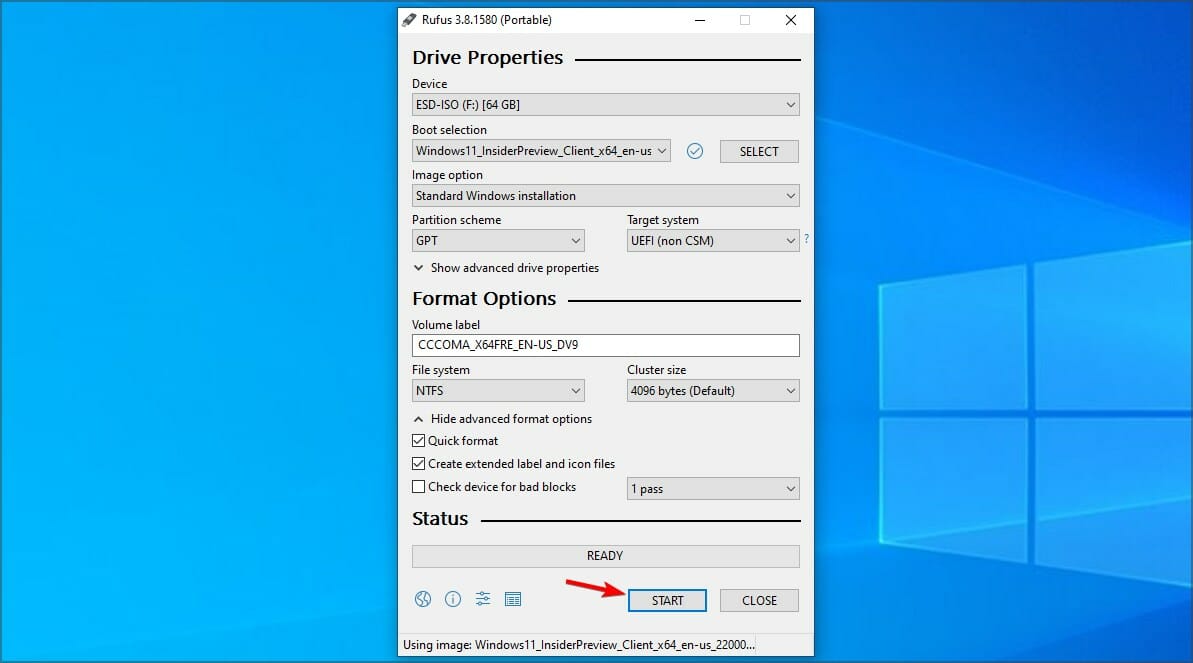
Launch the Rufus application.
Select your flash drive under the device.
Next, choose your ISO, partition scheme, and target system as BIOS or UEFI.
Choose the Format option and leave the other options as default.
Click Start to create a bootable drive.
Rufus is a popular utility to create bootable USB flash drives. If UNetbootin is not working, Rufus is an excellent alternative with a uncomplicated interface.
Next, select Advanced Option and choose Command Prompt.
In the Command Prompt, type the following command one by one and hit enter: diskpart sel disk 0 list vol
Make sure the EFI System Partition is using the FAT32 file system.
Run the following command to assign a drive letter to the partition that is not in use. sel vol <number of volume> assign letter <drive letter>: Exit
To repair the boot record, run the following command: Cd /d <drive letter>: \EFI\Microsoft\Boot\ Bootrec /fixBoot
Wait for the command to find and fix issues with the bootloader. Restart the PC once the repair is complete.
The UNetbootin not working in Windows 10 Failed to start error is triggered due to faulty bootable drive or corrupted ISO image. Try changing the BIOS setup to fix the error. If not, use an alternative flash drive creator utility like Rufus.
Did you find a solution to this problem on your own? Don’t be shy and share it with us in the comments section.
If you own an HP printer you may notice that the printer is printing documents in Red even though the color of the source file is Yellow. This is a common issue and can happen with other printers as well. This issue is usually caused if you have a cartridge running low on ink or if the cartridge heads are not clean.
In this article, we take a look at a couple of fixes to resolve “my printer prints yellow instead of red” issue.
Why is my printer printing in yellow only?
1. Clean the Printheads
Performing multiple cleaning of the printheads can resolve any printer related issues.
Load plain white papers in the input tray.
On the printer control panel, press the Right Arrow key to display more option.
From the list of options, select Setup.
Select Tools to view the Tools Menu.
Select “Clean Printhead“.
Wait for the printer to complete the printhead cleaning process. Press OK once the process is complete.
The printer will now print a test page for you to review the results.
If you are not satisfied, perform another printhead cleaning repeating the earlier steps. Do this 3-4 times if needed.
2. Align the Printhead
Load plain paper in the input tray.
Press the Right Arrow key to display the second navigation screen.
Select “Tools” from the options and then press Align Printhead.
Wait for the printer to align the printhead and then print an alignment page.
Make sure you print another Print Quality Diagnostic Page to see if the issue is resolved.
3. Check Low ink Level
The printer uses a variety of colors for mixing and printing the document in the required color. If any of the ink cartridges is low on ink, then you may need to replace it.
For example, if the red color is not printing then you need to also check for cyan apart from Red cartridge ink level.
Press the Setup button on the printer control panel.
Press the down arrow key and select Tools and press OK.
Select “Display Ink Gauge” and press OK. This will display the ink level of the cartridges on the printer’s control panel.
Replace the cartridge if needed.
4. Recalibrate the Color
Load a couple of clean and white paper in the input tray.
Open the HP Solution Center app.
Click on Settings and select Print Settings.
Now click on Printer Toolbox.
From the Device Services tab, click on Calibrate Color option.
Follow the on-screen instructions. The process may take a few minutes to complete. Wait for the printer to print the test report, verify the report and repeat the process again if needed.
Sticky Notes is one of the best note-taking apps; its function is very similar to physical ones. With these, you can quickly add a note and stick it to your desktop for easy access. But, several users report that Sticky Notes is not working in Windows 11.
It first became a standalone app in Windows 7 and has been one of our favorites since then. Apart from that, you can sync Sticky Notes across devices, even the ones that run on iOS or Android, given they have OneNote and Outlook for Windows.
If you are facing problems with it, go through the following sections to find out what’s causing the issue and the best ways to get Sticky Notes working in Windows 11.
Why is Sticky Notes not working in Windows 11?
This is one of the few errors where the underlying issues are limited, unlike other cases where the list goes on. We have listed some of the common causes that prevent Sticky Notes from working in Windows 11:
OS or program bugs – A bug in the current version of your operating system or the Sticky Notes app may trigger this issue. at times, it may be certain new features that affect efficient functioning.
Corrupt app files – When application or system files become corrupted, you may expect them to throw a few errors. Sticky Notes is not an exception.
Problems with installation – For some users, the problem is a bad installation.
But, one of the rather tricky aspects here is identifying what’s causing the problem. And that wouldn’t be easy!
We recommend you execute the fixes below in the listed sequence for quick and effective troubleshooting.
What can I do Sticky Notes are not working on Windows 11?
1. Update Windows 11
Press Windows + I to launch the Settings app, and select Windows Update from the tabs listed in the navigation pane on the left.
Now, click on Check for updates to scan for any available newer versions of the OS.
If any are listed after the scan, click on Download & install.
Your primary approach when dealing with issues regarding the apps bundled with Windows is to look for updates. If it’s a known bug, Microsoft will likely release a patch for it in the subsequent updates.
2. Update Sticky Notes
Press Windows + S to launch the Search menu, enter Microsoft Store in the text field at the top, and click on the relevant search result.
Click on the Library icon near the bottom-left corner.
Next, click on the Get updates button.
Wait for the scan to complete and if an update for Sticky Notes is listed, download it.
3. Run the troubleshooter
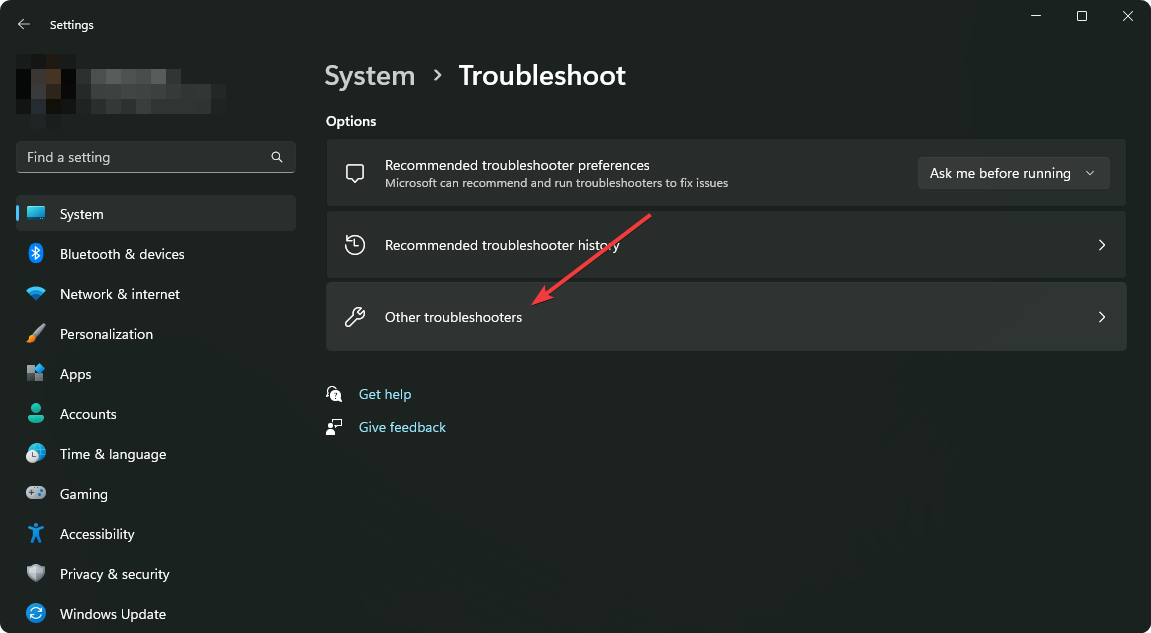
Press Windows + I to launch the Settings app, and click on Troubleshoot on the right in the System tab.
Click on Other troubleshooters to view all the available ones.
Locate the Windows Store Apps troubleshooter and click on the Run button next to it.
Follow the on-screen instructions, and choose the necessary response, if prompted, to complete the troubleshooting process.
It’s always recommended that you look for a built-in troubleshooter when facing a problem in Windows. Microsoft offers several of these to help diagnose and eliminate issues with the system and errors connecting with peripherals.
And, luckily you have one, Windows Store Apps troubleshooter, which should fix issues that lead to Sticky Notes not working in Windows 11.
4. Disable insights in Sticky Notes
Press Windows + S to launch the Search menu, enter Sticky Notes in the text field at the top, and click on the relevant search result that appears.
Now, click on the Settings icon near the top.
Finally, turn off the toggle for Enable insights under the General section.
5. Reset the Microsoft Store cache
Right-click on the Start menu and select Terminal (Admin).
Click on the downward-facing arrow at the top, and select Command Prompt from the list of options. Alternatively, you can press Ctrl + Shift + 2 to launch Command Prompt in a new tab.
Next, type the following command and hit Enter to reset the Microsoft Store cache and fix any issues with it: wsreset
Wait for the reset process to complete. Once it’s done, Microsoft Store will automatically launch.
If the Sticky Notes is not working in Windows 11 due to problems with the Microsoft Store cache, resetting it could help. Apart from resetting the cache, the process eliminates trivial bugs that may affect the functioning of the Windows Store and associated apps.
6. Repair/reset Sticky Notes
Press Windows + I to launch Settings, and select the Apps tab from the ones listed in the navigation pane on the left.
Next, click on Installed apps.
Locate the Sticky Notes app, click on the ellipsis next to it, and select Advanced options from the menu.
Now, click the Repair button and wait for the process to complete.
If repairing didn’t help, click on the Reset button.
Again click on Reset to confirm and start the process.
Repairing or resetting an app are two of the best ways to eliminate issues that prevent Sticky Notes from working in Windows 11. But, the two processes are entirely different.
When you repair an app, all its files are checked, and any corrupt or missing ones are replaced. Apart from that, the Registry entries are also verified, but all this doesn’t affect the stored data or configured settings.
On the other hand, when you reset an app, it’s taken back to its initial state when it was installed the first time. All your data and configured settings will be lost during the process; hence we recommend you go with reset only if repairing doesn’t work.
If none of the fixes above have helped eliminate issues that lead to Sticky Notes not working, it’s most likely an issue with the current user account.
When it comes to a user account, you can create a local account or one linked with Microsoft. While in the case of the former, you will be missing out on certain features, it works for those using their system as a standalone device.
Creating a user account is simple and shouldn’t take more than a few minutes, whether a local or one linked with Microsoft.
After you finish it, sign in through the new profile, and Sticky Notes will now work in Windows 11.
These were all the ways you could fix issues that led to Sticky Notes not working. Once the error is eliminated, you can add these to your desktop and quickly access the required information frequently.
The Microsoft Store is a one-stop hub for Windows users to download and install a bunch of apps on their PCs. However, things are not always rosy as users are bombarded with Microsoft Store errors from time to time.
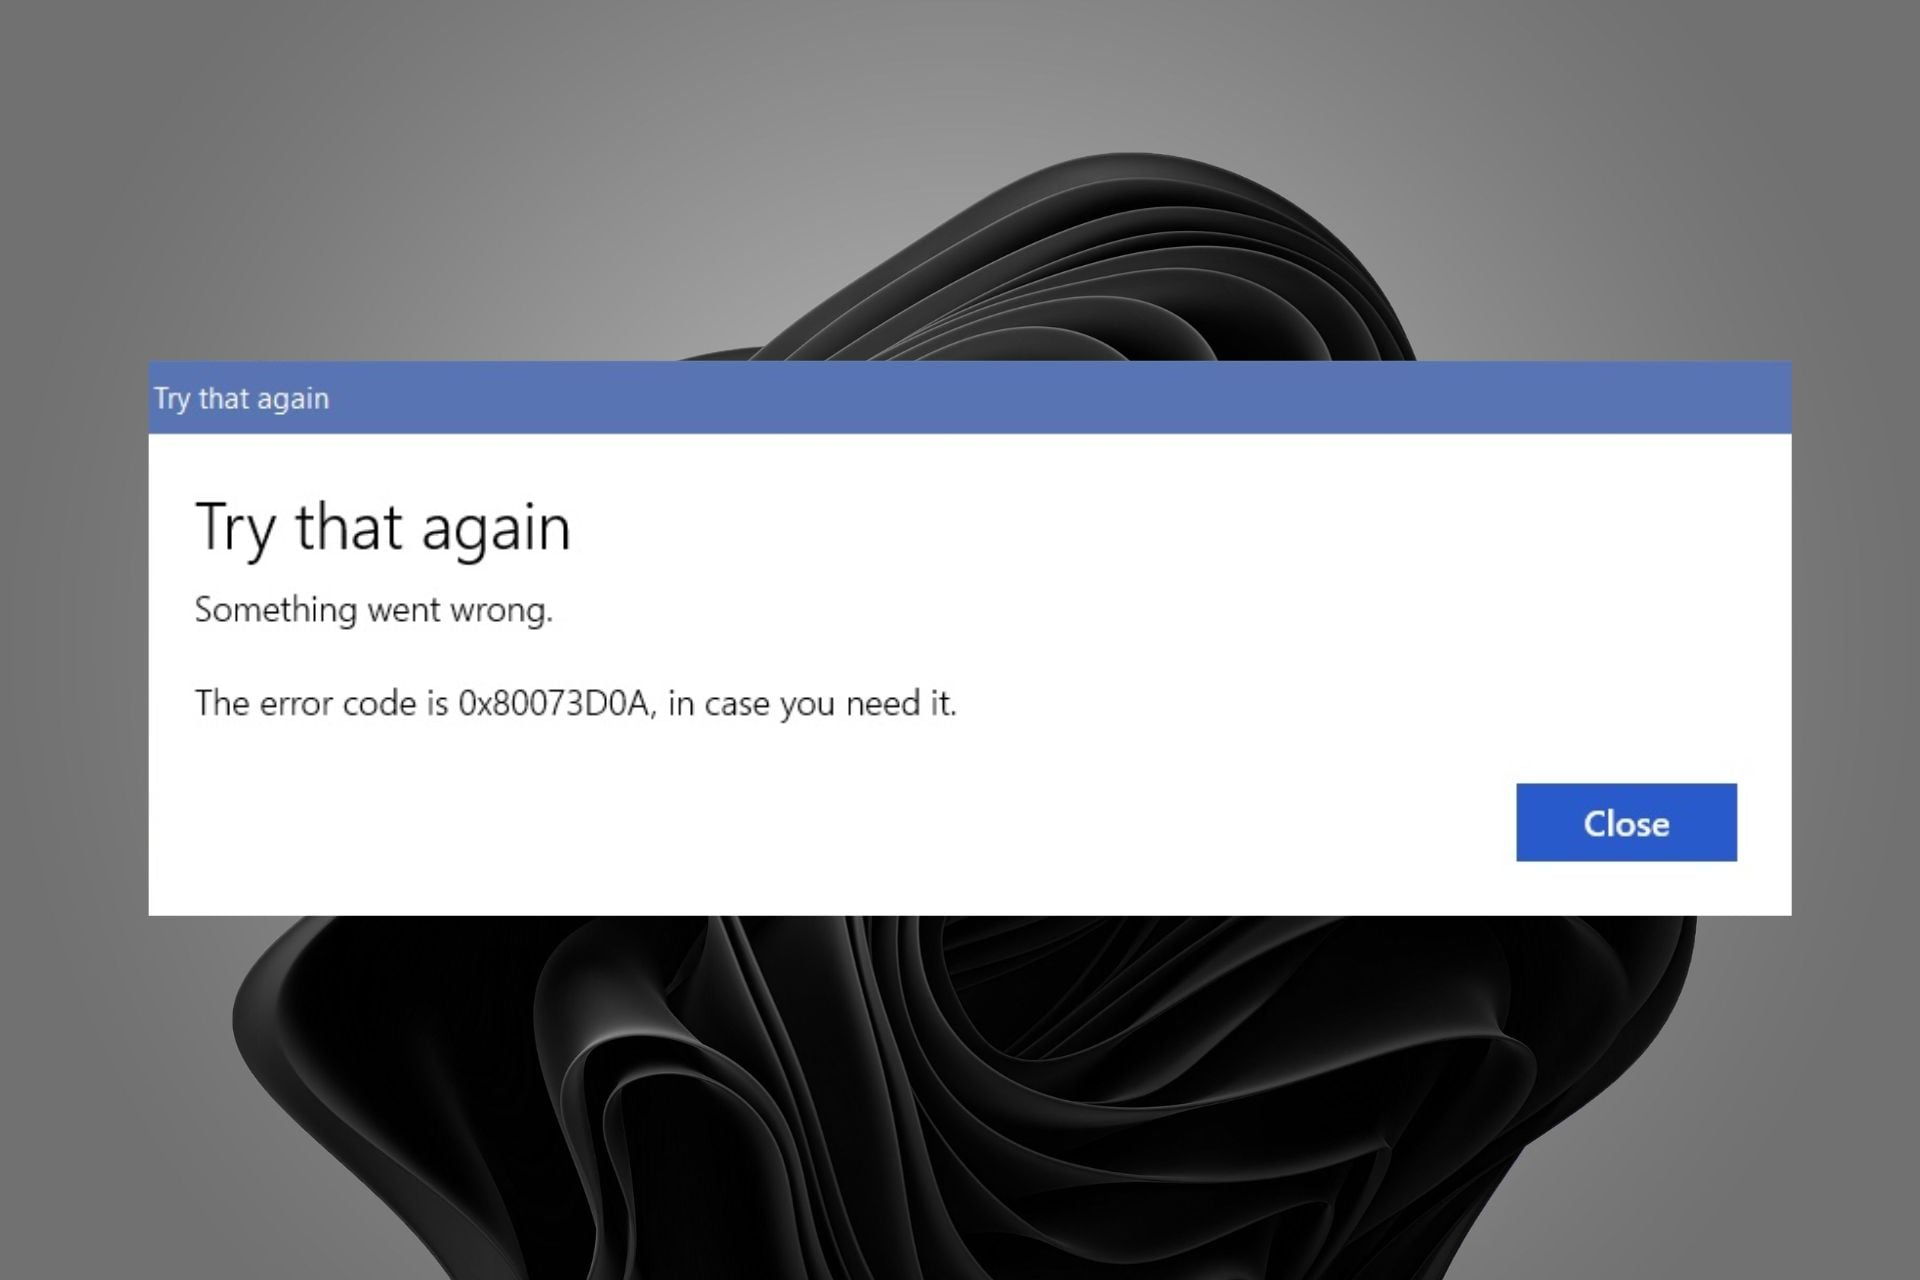
It now appears there’s another problem as users reported encountering The error code is 0x80073d0A, in case you need it message whenever they try to download or update apps from the store. If you have encountered such an error, read on to find out how to easily bypass it.
What is error code 0x80073d0a?
The error code 0x80073d0A occurs when you try to download or update an app from the Microsoft Store on your Windows PC. So what could be the trigger? Below are some potential causes:
Bug/glitch – Sometimes, the Microsoft Store is not working because of an error with Microsoft servers, and there’s nothing you can do but wait.
Cached data – Over time, apps accumulate cache which can become corrupted and present such problems.
You don’t have enough disk space – If there’s not enough space on your PC, you’ll get this error message when trying to download an app or update it.
Incompatible version – If your version of the Microsoft Store is not the official version of Windows, you may experience problems.
Firewall blocking – Sometimes, your firewall program may block some operations if it deems it a risk to your system.
Virus infection – If malware has found its way to your PC, it may alter how some programs work on your PC.
How do I fix error 0x80073d0a?
Before embarking on any troubleshooting, try the following:
Click on System on the left pane then Troubleshoot on the right pane.
Select Other troubleshooters.
Scroll down, locate Windows Store Apps and click the Run button.
4. Repair/reset Microsoft Store
Hit the Windows key and click on Settings.
Click on Apps on the left pane then Apps & features on the right pane.
Locate the Microsoft Store app, click on the three vertical ellipses and select Advanced options.
Click on Repair.
Go back and click on Reset.
5. Reset the Microsoft Store cache
Hit the Windows search icon.
Type WSReset.exe in the search bar and hit Run as administrator.
The process will take a little while so ensure you have saved all your work and that you remember your passwords as you’ll be signed out of your accounts.
Here we are, in December, and instead of receiving Christmas carols or gifts in our stockings, Microsoft is giving us another batch of security updates for the Windows operating system.
It’s the second Tuesday of the month, which means that Windows users are looking towards Microsoft in hopes that some of the flaws they’ve been struggling with will finally get fixed.
We’ve already provided the direct download links for the cumulative updates released today for Windows 7, 8.1, 10, and 11, but now it’s time to talk about Critical Vulnerabilities and Exposures again.
For December, Microsoft released 52 new patches, which is a lot more than some people were expecting right before we switch to 2023.
These software updates address CVEs in:
Microsoft Windows and Windows Components
Azure
Office and Office Components
SysInternals
Microsoft Edge (Chromium-based)
SharePoint Server
.NET framework
We got 52 new fixes in December 2022’s Patch Tuesday rollout
It’s safe to say that this wasn’t either the busiest or the lightest month for Redmond-based security experts, so we should be sort of glad.
You might like to know that, out of the 52 new CVEs released, 43 are rated Important, and three are rated Moderate in severity.
And, if you are looking for an overall for the year 2022, know that it actually was Microsoft’s second busiest ever with Microsoft fixing over 900 CVEs in total.
Out of all these vulnerabilities addressed this month, one of the new CVEs is listed as publicly known, and one is listed as being in the wild at the time of release
You might want to remember that these types of bugs are often wrapped into some form of social engineering attack, such as convincing someone to open a file or click a link.
Let’s take a closer look at the full list of CVEs released by Microsoft for December 2022:
Windows Graphics Component Elevation of Privilege Vulnerability
Moderate
7.8
No
No
EoP
The PowerShell Remote Code Execution Vulnerability is nothing to take lightly. This Critical-rated bug could actually allow an authenticated user to escape the PowerShell Remoting Session Configuration and run unapproved commands on an affected system.
Malicious third parties often try to live off the land after an initial breach, which means that they use tools already on a system to maintain access and move throughout a network.
Know that PowerShell is one such tool, so any bug that will therefore bypass active restrictions is likely to be abused by unwanted guests.
As for the remaining Critical-rated fixes, there are two patches for the older Secure Socket Tunneling Protocol (SSTP).
According to Microsoft, both could allow a remote, unauthenticated threat actor to get code execution on an affected system by sending a specially crafted connection request to a server with the RAS Server role enabled.
There are 16 other remote code execution bugs getting fixes this December, packed along with 18 other patches addressing Elevation of Privilege (EoP) bugs.
Let’s also mention the one new advisory (ADV220005) this month, which provides additional guidance on third-party drivers that appear to be certified by the Microsoft Windows Hardware Developer Program.
The tech company stated that the drivers that appear to have been certified by this program have been seen in the wild in post-exploitation activity.
Have you found any other issues after installing this month’s security updates? Share your experience with us in the comments section below.
System Volume Information is a mysterious Windows folder that users aren’t permitted to open. The System Volume Information folder stores System Restore, Volume Shadow Copy, and content-indexing files.
So, that folder can hog quite a bit of hard drive storage space for some users. However, users can still clean up that folder to free up HDD space.
How can I delete System Volume Information folder?
1. Reveal the System Volume Information folder in File Explorer
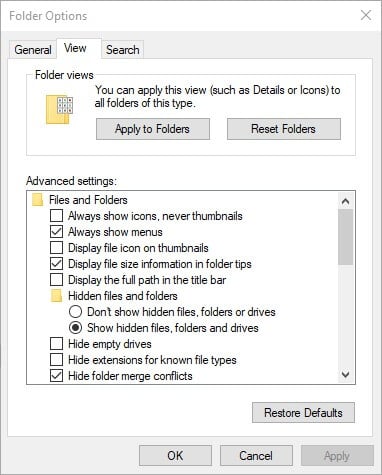
File Explorer doesn’t display the System Volume Information folder unless users configure a few folder settings. First, click the View tab in File Explorer.
Then press the Options button and select Change folder and search options.
Select the View tab shown directly below.
Select the Show hidden files, folders and drives option.
Then uncheck the Hide protected operating system files (Recommended) check box.
Press the Apply button, and click OK to close the window.
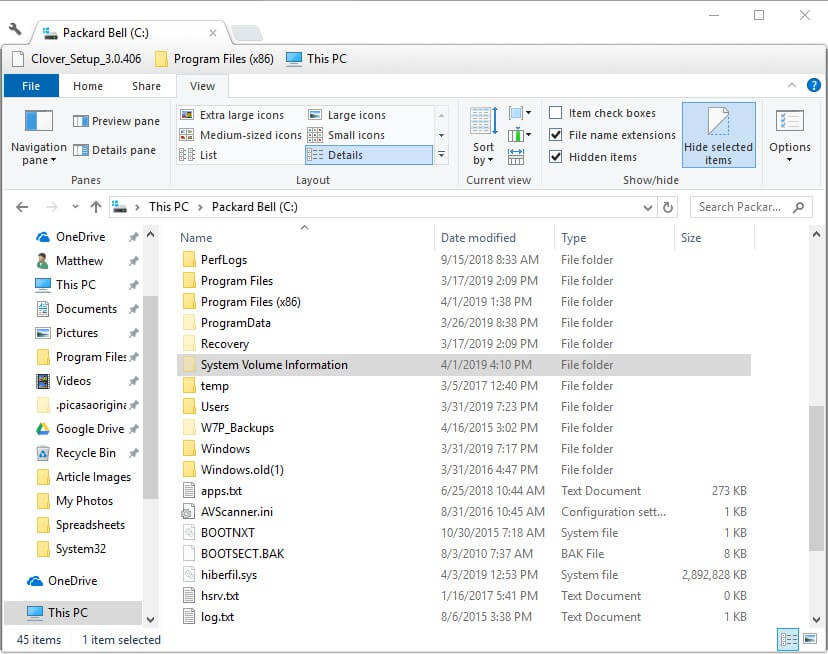
Next, open the C: root directory in File Explorer. Now a System Volume Information window will be visible as shown in the snapshot below.
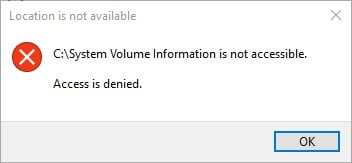
An Access is denied error message will pop up when users try to open the System Volume Information folder. However, users can still right-click the folder and select Properties to open a window that provides further details pertaining to folder size.
2. Reduce HDD Space Allocated to System Restore
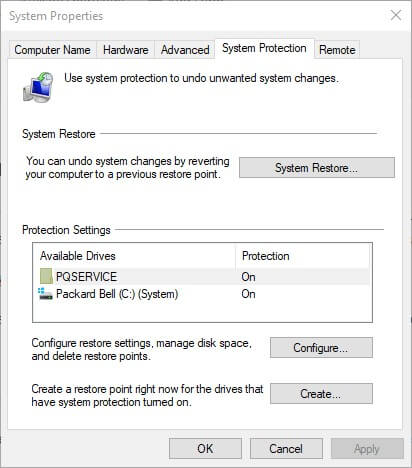
Users can cut a System Volume Information folder down to size by reducing the amount of hard drive space allocated to System Restore. To do that in Windows 10, press the Windows key + Q hotkey.
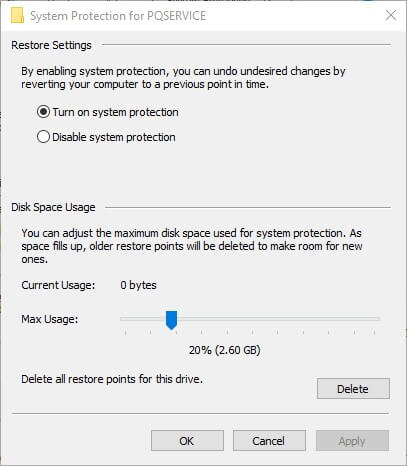
Drag the Max usage bar left to reduce the hard drive storage allocated to System Restore.
Alternatively, users can select the Disable system protection option to turn off System Restore.
Select the Apply option.
Click OK to close the window.
3. Clear System Volume Information Folder With Disk Cleanup
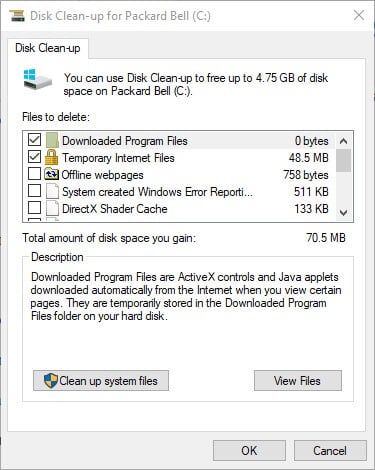
Users can also clean up the Volume Information Folder with the Disk Clean-up utility in Windows. To do that, enter Disk Cleanup in Cortana’s search box.
Click Disk Clean-up to open the window shown below.
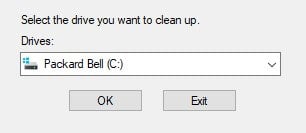
Select the C: drive on the drop-down menu, and click the OK button.
Press the Clean-up system files button.
Then select the C: drive again on the Drive Selection window.
Click the OK button.
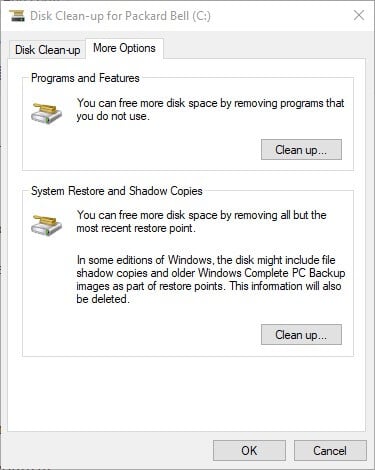
Next, select the More Options tab shown below.
Press the Clean up button under the System Restore and Shadow Copies subheading.
Press the Delete button to further confirm.
So, that’s how users can cut a bloated System Volume Information folder down to size. Doing so can potentially free up gigabytes of storage space hogged by System Restore.
The OneDrive app on Windows 11 is getting a fresh look and feel to better match the design and visual effects of Windows 11. It’s just a new look though, no new features are being introduced.
The new OneDrive app is available for download on Microsoft’s website, if you are running Windows 11, it’s not clear whether those still running Windows 10 will get the update. The most noticeable change is the OneDrive settings which now follow the look and feel of the Windows 11 settings app including light and dark modes.
You’ll see all four areas you can click on in the left column including a glance at the storage limits on your account in the lower left. The OneDrive app lines up nicely with other apps such as Paint, the Clock app, and the Snipping tool to fit the Windows 11 design.
Microsoft launched the Airband Initiative in 2017 with the intent of bringing broadband internet to millions of rural residents who don’t currently have access. And today, Microsoft announced its new partnership with Viasat, a global communications company that is in place to further this cause and provide “internet access to 10 million people around the globe, including 5 million across Africa.”
The new partnership will help the Airband Initiative get a step closer to its main objective, “delivering internet access to a quarter of a billion people across the world, including 100 million people on the continent of Africa, by the end of 2025.”
Viasat will be the first satellite organization to work with Microsoft in the Airband Initiative. They’ll work closely together to ensure that the residents in the Democratic Republic of the Congo, Nigeria, Guatemala, Mexico, and the United States can access an affordable and stable internet connection, which is also part of the United Nations’ Sustainable Development Goals (SDGs). There are plans underway to expand the initiative to Egypt, Senegal, and Angola.
At the moment, an estimated 2.7 billion people have never accessed the internet, which constitutes one-third of the world’s population per the findings from the International Telecommunication Union at the UN. Accessibility plays a major role as to why some people are still yet to access internet, but with satellite, this will no longer pause as an impediment.
According to Microsoft:
Working together, the companies will combine expertise and assets to help enable telehealth, distance learning and education, precision agriculture, clean power, and other services to reach new areas through the transformational provision of power and connectivity. The companies will collaborate to provide and pilot technologies including, but not limited to, satellites (both geostationary orbit and low earth orbit) and fixed wireless.
Microsoft’s vice president of Technology and Corporate Responsibility, Teresa Hutson stated, “We believe access to the internet is a fundamental right and that digital skills create and enable economic prosperity for people, businesses, and governments. Through our Airband Initiative, we will extend high-speed internet access to 100 million people on the continent of Africa and to a quarter of a billion people living in unserved and underserved areas across the world by 2025.”
Viasat’s Global Fixed Broadband President, Evan Dixon further added that:
We’re proud to partner with Microsoft as it represents another important step in bringing affordable internet service across Africa, Latin America and the U.S., as both companies continue to break down barriers to bridge the digital divide and make significant progress toward digital equity and inclusion. Providing internet access to the world is a challenging and bold goal, and doing so in a sustainable and responsible manner will unlock enduring opportunities for those who need it most.
Microsoft’s Airband Initiative works closely with multiple partners providing both internet and energy access at a local and regional level. Telecom, nonprofits as well as governmental and nongovernmental organizations also play a crucial role and assist the initiative to achieve its main goal. This is why the program is currently able to provide high-speed internet access to over 51 million people on a global scale.
Sometimes you might need to change the priority of a certain process in Task Manager. However, users reported that they can’t set the priority in Task Manager on Windows 10.
This can be a problem, and in this article, we’re going to show you a quick fix once and for all if you are unable to change priority.
Why can’t I change priority in Task Manager?
Usually, you might want to change priority in Task Manager so Windows will allocate a big part of its capacity to your preferred process for better performance.
This error may appear for all processes on your system or with a specific process on all systems, but you don’t have to worry as we have a few solutions prepared.
What do I do if I can’t set priority in Task Manager on Windows 10?
1. Go to Safe Mode
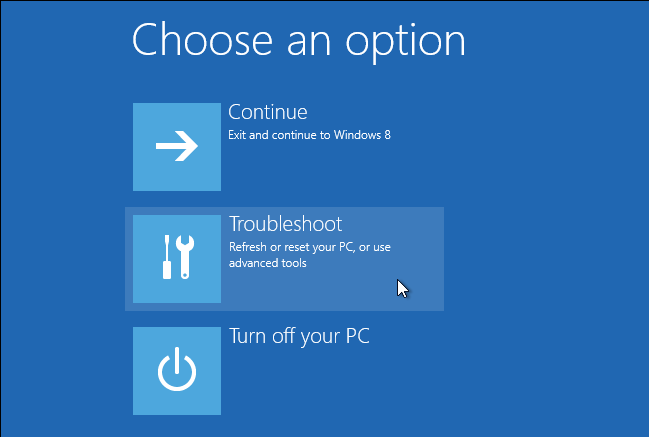
Open the Start Menu, click the Power button, press and hold the Shift key, and select Restart.
Now go to Troubleshoot > Advanced options > Startup Settings and click on Restart.
Once the PC restarts, press F4 or F5 to enter Safe Mode.
After entering the Safe Mode, check if the problem is still there.
If there’s no problem in Safe Mode, it’s rather likely that your settings or installed applications are causing this issue, so you might want to try disabling certain applications and check if that helps.
2. Show processes from all users
Make sure that you’re using an administrator account.
Open Task Manager.
Now click on Show processes from all users.
After doing that, try to change the priority and check if the problem is resolved.
3. Make sure that Administrators have full control
Start Task Manager.
Locate the process whose priority you want to change.
Right-click the process and choose Properties.
Go to the Security tab and click on Edit.
Select Administrators and check the Full control option in the Allow Now click Apply and OK to save changes.
You can also give Full control to the Users group, but that comes with some minor security risks.
4. Disable User Account Control
Press Windows Key + S and enter user control. Select Change User Account Control settings.
Now move the slider all the way down to Never notify. Click OK to save changes.
After doing that, User Account Control will be disabled, and you should be able to change the priority of your processes.
If Task Manager can’t change priority, it’s rather likely that your settings are causing the problem, but you should be able to fix the problem after using our solutions.
It’s December, the month of giving, and the time has come again for us to open our virtual arms and extend a warm welcome to the latest batch of security updates from Microsoft.
Please keep in mind that these updates actually bring an entire array of changes for both Windows 10 and Windows 11, regardless of whether it is a newer or an older version.
This December 2022 Patch Tuesday batch of updates is expected to fix some of the issues that were still pending, and in the article below we will be looking to see exactly what we get.
We have included a detailed changelog for each cumulative update, and we will also be providing you with direct download links from Microsoft’s Windows Update Catalog, so you know that they are secure.
That being said, remember that, alternatively, you can always use other methods to get the latest updates, including:
The Windows Update menu on your OS
The WSUS (Windows Server Update Service)
Group Policies set up by your admins if you’re part of a larger network.
Now that we got this out of the way, let’s have a closer look at the December 2022 Patch Tuesday updates rollout from Microsoft.
What should I look for in the December Patch Tuesday updates?
Windows 11
There really isn’t further need for introductions, since most of you are already running Windows 11 on your devices.
You might also like to know that the 22H2 version of Windows 11, the operating system’s first major update, is now ready for downloading and installing.
Addresses security issues for your Windows operating system.
This update contains miscellaneous security improvements to internal OS functionality. No additional issues were documented for this release.
Known issues
After you install this or later updates, you might be unable to reconnect to Direct Access after temporarily losing network connectivity or transitioning between Wi-Fi networks or access points.
After installing this update, apps that use ODBC connections through Microsoft ODBC SQL Server Driver (sqlsrv32.dll) to access databases might not connect. Additionally, you might receive an error in the app, or you might receive an error from the SQL Server.
Windows 10 version 22H2 is the latest major version of Windows 10, and as such has the most experimental features on it.
Fortunately, most bugs that were first present when it was first made available have been weeded out, and this version of Windows 10 is far more stable.
This update contains miscellaneous security improvements to internal OS functionality. No additional issues were documented for this release.
Known issues
Devices with Windows installations created from custom offline media or custom ISO image might have Microsoft Edge Legacy removed by this update, but not automatically replaced by the new Microsoft Edge. This issue is only encountered when custom offline media or ISO images are created by slipstreaming this update into the image without having first installed the standalone servicing stack update (SSU) released March 29, 2021 or later.
After installing this update, apps that use ODBC connections through Microsoft ODBC SQL Server Driver (sqlsrv32.dll) to access databases might not connect. Additionally, you might receive an error in the app, or you might receive an error from the SQL Server.
This version of the Windows operating system is outdated and will no longer receive any updates from the Redmond tech company.
Therefore, users that are still running this old version on their devices are strongly advised to choose a more recent one to update to.
If you still want to use Windows 10 and are not willing to upgrade to 11, you don’t have to do so right away. After all, Microsoft announced that the support for Windows 10 will go on until 2025.
This update addresses an issue that might affect applications that run on the Windows Lock Down Policy (WLDP). They might stop working.
This update addresses an issue that affects remote networks. This issue stops you from reconnecting to them using DirectAccess.
This update addresses a known issue that might affect the Local Security Authority Subsystem Service (LSASS.exe). It might leak memory on Windows domain controllers. This issue might occur when you install Windows updates dated November 8, 2022, or later.
Known issues
After installing KB5001342 or later, the Cluster Service might fail to start because a Cluster Network Driver is not found.
After you install this or later updates, you might be unable to reconnect to Direct Access after temporarily losing network connectivity or transitioning between Wi-Fi networks or access points.
After installing this update, apps that use ODBC connections through Microsoft ODBC SQL Server Driver (sqlsrv32.dll) to access databases might not connect. Additionally, you might receive an error in the app, or you might receive an error from the SQL Server.
After installing this update on Hyper-V hosts managed by SDN configured System Center Virtual Machine Manager (VMM), you might receive an error on workflows involving creating a new Network Adapter (also called a Network Interface Card or NIC) joined to a VM network or a new Virtual Machine (VM) with a Network Adapter joined to a VM network. Existing VMs with existing Network Adapters should not have issues connecting after installing this update, only new Network Adapters created after installation of this update are affected.
Windows 10, version 1607 has reached the end of service for all of its available editions. Update to the latest version of Windows 10 in order to keep your system protected.
This update addresses a known issue that might affect the Local Security Authority Subsystem Service (LSASS.exe). It might leak memory on Windows domain controllers. This issue might occur when you install Windows updates dated November 8, 2022, or later.
Known issues
After installing this update, apps that use ODBC connections through Microsoft ODBC SQL Server Driver (sqlsrv32.dll) to access databases might not connect. Additionally, you might receive an error in the app, or you might receive an error from the SQL Server.
Well, folks, this is pretty much what we are dealing with in terms of security updates for the month of December 2022, as a part of the Patch Tuesday rollout.
Have you noticed any issues after downloading and installing these security updates for your version of the Windows operating system? Let us know in the comments section below.
In case you have tried all the above solutions, and none of them helped you fix the issue then it is recommended to use dedicated repair software.
We hope at least one of these solutions helped you fix the problem with the missing Media Pack. To learn more about other features, visit our best optional features to enable guide.
As always, don’t hesitate to leave us a comment in the dedicated section below, we would love to read them.
Several Dell users have taken to different forums to inquire about the Usbupdate.exe error. This is listed as Usbupdate.exe in the event viewer and is shown to be located in: C:\WINDOWS\TEMP\invF53C_tmp\Executables\UsbUpdate.exe
It is developed by Dell Inc. and isn’t a virus or malware. While some users were able to fix the problem, there isn’t a complete guide on what Usbupdate.exe is and how you can fix the problem when it stops working.
What is Usbupdate.exe and why am I getting the Usbupdate.exe error?
Usbupdate.exe is a part of the Dell tool called the Dell Support Assistant. The error associated with Usbupdate.exe pops up as soon as the PC boots up.
Reportedly, there is some issue with the Dell Support Assistant that runs at the startup and causes the problem. Dell themselves have confirmed this Usbupdate.exe is related to the Dell Support Assistant and they have released a solution for it.
However, do note that a virus or malware could also be conflicting with the program and could be responsible for throwing up errors associated with Usbupdate.exe. Let us take a look at the solutions that you can apply to fix the problem.
How can I fix the errors associated with Usbupdate.exe?
Well, there are just a few things that you can do and possibly try to fix the problem at your end:
Restart your PC and check if this gets rid of the Usbupdate.exe error message or not.
Check if you have the latest version of Windows installed on your PC. If Windows Update isn’t working, then you can refer to our guide that lists some solutions to fix it.
Let us now check out the advanced solutions to resolve the error associated with this executable file.
1. Disable Dell Support Assistant
Press the Win + R keys to open the Run dialogue.
Type msconfig and press Enter.
Switch to the Services tab.
Locate Dell Support Assistant.
Uncheck the box before Dell Support Assistant.
Click Apply and OK.
Restart your PC and check if this resolves the issue or not.
This will stop Dell Support Assistant from running when your PC boots up, which is when most users are experiencing errors associated with the Usbupdate.exe.
2. Uninstall Dell Support Assistant
Open the Start menu.
Open Control Panel.
Click on Programs & Features.
Locate Dell Support Assistant.
Click on Dell Support Assistant and select Uninstall from the top.
Now go to the below locations and delete these folders:
C:/ Program Data/ PCDR
C:/ Program Data/Supportassist
C:/ Program Data/Dell/Dell data volt
C:/ Program Files/ Dell/Supportassist
C:/ Program Files/ Dell/ Dell data Volt
Restart your PC and check if this fixes the issue or not.
Uninstalling Dell Support Assistant is another great option to eliminate the issue associated with it. Although you get features such as software upgrades, driver updates, etc. using this tool, the errors because of it are more annoying. So, uninstalling it is a better option.
If you do not wish to delete Dell Support Assistant and want to take advantage of its features, then the best solution, as advised by Dell is to update the Dell Support Assistant.
The best part about this solution is that no input is required from the user’s end. As soon as the Dell Support Assistant opens up, it will update itself.
Basically, there were several users facing this issue. So, Dell responded that they will release an update to fix the problem. But they clearly mentioned:
There will be no notification of any sort. The OTA (over the air) update is going to happen for all Dell remediation services (SupportAssist, Alienware Update, Dell Update).
So, install the latest update and check if this resolves the Usbupdate.exe issue on your Dell laptop or PC or not.
4. Perform a system restore
Open the Start menu.
Search for Create a restore point and open it.
Select the drive where you have installed Windows OS and hit the System Restore button.
Click the Next button.
Select the restore point and click Next.
When the restore finishes, click Finish.
If nothing works, then we would suggest you perform a system restore and go to a point when everything was working smoothly.
Getting the A2 motherboard error code? It usually shows up because the system cannot identify the bootable device, such as your HDD, SSD, or USB.
Luckily, like any other system malfunction, we can easily fix the A2 boot issue and here are the troubleshooting methods that should be applied in this situation.
How to fix the A2 motherboard error code
1. Disconnect the drivers one by one
The first thing you should do is disconnect and then properly reconnect your drivers.
In this way, you can get past the motherboard A2 issue and access BIOS. First, disconnect all peripherals f and afterward disconnect all your drivers.
Finally, plug in only one driver (the SSD for example) and power on your computer. This should take you to BIOS where you can pick how to boot.
2. Reset or update CMOS / BIOS
Another way in which the A2 motherboard code problem can be fixed is by updating BIOS. Of course, initiating a rest might also address this problem.
→ To reset your BIOS setting. you’ll have to long press F2 (or DEL/ ESC depending on the model). Once open, select the Reset to Default option. If resetting won’t work, you may have to update your BIOS.
→ From the main menu check if there’s an update feature and select it. If there’s no such option, you’ll have to go to your computer’s manufacturer’s website and download and install it manually.
3. Update your drivers
If the A2 motherboard error code is experienced only rarely, you should also check the drivers installed on your Windows PC. For example, a USB 3.0 driver might cause boot issues.
The easiest way is to go to Device Manager. Check peripheral drivers and make sure they’re properly installed and up to date.
4. Particular case: SATA devices
The A2 boot error can sometimes be related to SATA devices. If that is the case, then try testing it out:
Load BIOS default settings.
Change the SATA ports.
Install your SATA devices one by one to verify which device this issue is related to.
Verify your SATA cables.
If you have access to another system, please check if the device is running properly.
Hopefully, after following the troubleshooting solutions from above your Windows 10 system is now running without problems. However, if you still experience the same A2 boot error, let us know in the comment section below.
Make sure you describe your problem in detail along with your hardware configuration. Based on these details, we can bring further solutions that may work in your particular case.
BTServer.exe error is an error that is mostly encountered by Windows 10 users. However, Windows 11 users have also come across this error a bunch of times.
The BTServer.exe error appears when booting the system or application and is a problem associated with Bluetooth software on your PC. Here is the complete error message:
BTServer.exe – BAD IMAGE C: \ Program Files (x86) \ Realtek \ Realtek Bluetooth \ obexpf.dll is not designed to run on windows or contains an error. Try to install the program again using the original installation media, or contact your system administrator or software vendor for support. Error status 0xc0000020
What is BTServer.exe and why am I getting this error on my Windows PC?
BTServer.exe is a file associated with Realtek Bluetooth by Realtek. It is a configuration utility for Bluetooth devices, that allows the user to manage the connection and security settings of the attached Realtek Bluetooth adapter.
Well, there can be several reasons you are facing the BTServer.exe error on your Windows PC. After some research, we have deduced a list of some of the most common reasons that could trigger this error:
Bluetooth driver has accidentally deleted: Chances are that a third-party program or you have accidentally removed the Bluetooth driver from your PC.
The Bluetooth driver is corrupt: Chances are that the Bluetooth driver is outdated or has gone corrupt because of which you are getting the BTServer.exe error.
Bluetooth service might not be running: Often third-party programs overtake system settings and disable essential services.
How can I fix the BTServer.exe error on my Windows PC?
Here are a few things we would advise you to do before you apply the advanced solutions to resolve the BTServer.exe error:
Common software glitches or bugs can be easily resolved by simply restarting your PC. Here’s what to do if the computer won’t restart.
Check if you have installed the latest Windows updates or not. This ensures that the bugs present in the previous version are fixed.
Now let us take a look at the advanced solutions and try to resolve the problem at hand.
1. Reinstall the Realtek Bluetooth driver
Press the Win + X keys on your keyboard to open the Context menu.
Select Device Manager from the list.
Expand the Bluetooth menu.
Right-click on the Realtek Bluetooth driver and select Uninstall device option.
Follow the on-screen prompts to completely uninstall the device from your PC.
Restart your PC.
As soon as the PC boots up, your system will automatically install the Bluetooth driver.
This solution was suggested by one user. In case your PC does not automatically reinstall the Bluetooth driver, then you should make use of a dedicated tool known as Outbyte Driver Updater.
Outbyte Driver Updater scans your PC for missing or corrupt drivers and prompts you to install them. This way you are getting the compatible driver for your PC. Also, other features of this tool include the ability to schedule scans, and even create driver backups in case things go south.
Outbyte Driver Updater
Get the right driver versions for your computer in no time and try using Outbyte Driver Updater.
Type the below command and press Enter. sfc /scannow
Once the process completes, type the below command and press Enter. DISM /Online /Cleanup-Image /RestoreHealth
Windows comes with built-in SFC Scan and DISM tools that will help you to scan corrupt system files or replace the missing ones.
They can be operated by a simple command, and you can follow the steps above to safely execute the commands.
4. Scan your PC for virus
Open the Start menu.
Type Windows Defender and open it.
Click on the Virus & threat protection option from the left pane.
Hit the Quick Scan button. This will start scanning your PC for viruses or malware and if detected will prompt you to take action to remove them.
If you press the Advanced scan option, you will be presented with three more options. From here, you can go ahead with Full Scan which will initiate a deep scan of your PC.
While the above makes use of the built-in Windows Defender antivirus tool, it is often found not to be that effective in detecting modern viruses or malware.
In such a case, we would recommend you make use of a third-party antivirus tool. If you are confused about which one to choose, then you can check out our guide which lists some of the best antivirus software for Windows 10 and 11.
That is it from us in this guide. If nothing works, we recommend you reset your Windows 10 PC. If you are unsure how to do that then you can refer to our guide.
Surface Pro 4 is an amazing laptop, but despite the series’ quality, users reported some unusual problems. Near the top of the list is the complaint that the Surface Pro mouse keeps jumping around on the screen.
This problem can make your device incredibly hard to use. Fortunately, it is not the most difficult issue to fix, requiring a tweak here and there, as we will show in this guide.
Why is my mouse cursor jumping around?
There are a few reasons that might cause your Surface Pro mouse to be jumping around. Below are some of the notable ones:
Outdated PC: One of the major reasons the Surface Pro cursor keeps moving is an outdated operating system. You need to update your PC to the latest version to curb the issue.
Wrong touchscreen calibration: If you have recently changed your touchscreen calibration, it might be why your Surface Pro 4 mouse cursor is flickering. The solution here is to reset the touchscreen calibration to default.
Faulty driver: Sometimes, issues with your touchscreen drivers might be the cause of this problem. You might need to re-enable or update your driver to the latest version to arrest the situation.
How can I fix the mouse jumping around on Surface Pro 4?
Before exploring the detailed fixes in this section, below are some general troubleshooting steps you should try:
Press the Windows key + I to open the Settings app and select the Update & Security option.
Click the Check for updates button.
Finally, install any available updates.
The first thing to do if your Surface Pro mouse keeps jumping around is to update your PC. By default, Windows 10 automatically downloads the latest updates, but sometimes you might miss an update or two due to certain bugs.
So you can always check for updates manually.
2. Disable your touchscreen driver
Press the Windows key + X to open the Power User Menu and select Device Manager from the list.
Double-click the Human Interface Devices option to expand it, and right-click the HID-compliant touch screen option.
Now, select the Disable option.
Finally, wait a few seconds, right-click the device and select the Enable option.
Sometimes, your Surface Pro mouse keeps jumping around because of minor issues with your drivers. Disabling and enabling the touchscreen drivers should fix this.
Alternatively, you can use a special tool in Outbyte Driver Updater to check if there are updates available for the drivers. This is because outdated drivers can cause all manners of issues, too, and you can’t put this beyond it too.
Press the Windows key, type calibrate, and press Enter to select Calibrate the screen for pen or touch input.
Now, press the Tab key on your keyboard till you select the Reset option and press Enter. If the Reset button is greyed, the calibration is still at the default. So you can move to the next solution.
Finally, press the Tab key again until Yes is selected and press Enter.
One of the quick ways to fix the Surface Pro mouse jumping around issue is to reset your screen calibration. This has worked for many users, so you should try it too.
Press the Windows key + I and select the Devices option.
Click the Touchpad option in the left pane.
Now, click the dropdown under Touchpad sensitivity and change it from Medium to Low.
Some users found that the sensitivity of their touchpad was causing the Surface Pro mouse to jump around. Reducing it to the bearest minimum should restore normalcy quickly.
That’s all there is to fixing the Surface Pro mouse if it keeps jumping around. All you need to do now is to follow the steps carefully, and you should be able to solve the problem for good.
To make video calls, you need a quality webcam, and speaking of which, many users reported that Microsoft LifeCam HD-3000 is not working on their PC. This can be a problem, and in today’s guide, we’ll show you how to fix this issue.
Why is Microsoft LifeCam HD-3000 not working?
There are several reasons why your webcam isn’t working, with the following ones being the most common:
App permissions – If your webcam isn’t working, you need to adjust its settings and enable the webcam.
Driver issues – Sometimes, reinstalling and updating drivers can help with webcam problems.
What can I do if the Microsoft LifeCam HD-3000 is not working?
Before we start fixing this issue, there’s one thing you can try:
Change USB ports – Issues such as these can occur due to your USB port. If the webcam isn’t showing in Device Manager, try connecting it to a different port.
1. Change the settings
Press the Windows key + I to open Settings.
Next, select Privacy.
In the left pane, click on Camera. Here, turn on the Allow apps to access your camera option.
2. Uninstall the USB Root Hub
Press the Windows key + X and select Device Manager from the list.
Locate the Universal Serial Bus Controller section and expand it.
Next, locate the USB Root Hub and right-click on it. After that, choose Uninstall device. Do this for all Root Hubs.
Restart your device and allow Windows to automatically reinstall it.
Locate your motherboard and go to the Support section.
Now expand the Driver section and look for a USB or chipset driver.
Download the drivers and install them.
If this process seems a bit complicated, you can speed it up using specialized driver updater software, such as Outbyte Driver Updater. With it, you can easily update all your drivers with a single click.
We hope that one of the presented solutions in this article helped you solve the Microsoft LifeCam HD-3000 not working with Skype.
In case you’re having additional problems, visit our Skype camera not working guide for more information.
Which one of the solutions presented in this article worked best for you? Don’t hesitate to leave us a comment in the dedicated section below.
There’s a chance that you might encounter specific problems when installing a new hard drive on your computer.
Perhaps the most common issue with a new HDD in Windows 10 is that the system doesn’t show them for some reason. But before we solve this problem, let us discuss some possible triggers.
Why is my new HDD not being detected?
From what we gathered from multiple users, any of the following elements may make Windows 10 not to discover your HDD:
Driver problem – Drivers are essential in connecting software and hardware. If they are corrupted or outdated, you may expect some issues.
Network connection problem – Some users with network connection issues may also have this error.
Incorrect BIOS settings – The BIOS may play a key role and, if not correctly configured, may stop the OS from noticing a new HDD.
Wire connections – Another cause could be a connection problem due to a malfunctioning USB port or a frayed or damaged USB cable.
Note that these causes can result in other common problems, such as:
Internal hard drive not showing up in Windows 10, in Disk Management – If your hard drive isn’t showing in Windows at all, it’s possible that it’s not connected correctly. To fix that, enter BIOS and make sure that the drive appears.
Can’t see the hard drive in Windows 10 – If you can’t see your hard drive in Windows 10, it’s possible that your hard drive isn’t properly initialized and formatted. However, you can fix that with ease using Disk Management.
External hard drive not showing up – This issue can also appear with external hard drives, and we already covered how to fix problems with an external hard drive on your PC in one of our previous articles.
Hard drive won’t appear in BIOS, on PC, or in File Explorer – In some cases, the hard drive won’t appear in BIOS. Your configuration usually causes this in BIOS or by connection issues with your hard drive.
Internal hard drive not showing up on Windows 11 – If you are using Windows 11 and you get this error, you can still apply the solutions below but tweak them a bit.
Let’s jump into the solutions to the hard drive errors mentioned above without further ado. Follow along!
How do I detect hard drive on Windows 10?
First, before you go into any of these solutions, you must:
Ensure your hard drive is correctly connected to your motherboard and power supply.
Also, it would be best if you tried connecting the hard drive to a different port or using a different cable.
1. Update your drivers
Press the Windows Key + S, type device manager, and click the Device Manager option.
In the Device Manager, select the device you wish to update, right-click on it, then select Update driver.
Repeat for all the devices you want to update.
You may have a driver issue if your hard drive won’t show up in Windows. To fix the problem, ensure your drivers are up to date.
This goes for your motherboard and chipset drivers, so visit the manufacturer’s websites and download the latest ones for your motherboard.
2. Initialize the disk
Press Windows Key + X and choose Disk Management from the list.
You’ll see all connected hard drives listed when the Disk Management window opens. Look at the list, and find a drive listed as Disk 1, or Disk 10 (other names are possible, as well).
You’ll recognize this drive because it is not initialized and is listed as Unknown, and unallocated.
Right-click on that partition, and select Initialize Disk from the right-click context menu.
Once you initiate the process, it will ask you to choose between a Master Boot Record (MBR) or a GUID Partition Table (GPT). We advise you to choose a GPT. Click OK.
Once you do this, you’ll get back to the main window, where your new drive will be listed as Basic and Online, but it will still have unallocated space.
To fix that, right-click on the stripped box, and select New simple volume…
Click Next, and assign a drive letter.
Now you need to format your new drive. For the best results, choose the NTFS file system, and Perform a quick format, then hit Next.
Finish the process.
There you go; This is a simple way to detect a new hard drive on Windows 10. If you’re not too fond of Disk Management, you can use any third-party disk management software.
In most cases, you need to initialize your new hard drive, after which the HDD will show up on your PC normally.
3. Use diskpart command to clean your drive
Press Windows Key + X and choose Command Prompt (Admin) or Powershell (Admin) from the menu.
When Command Prompt opens, enter the following command and press Enter: diskpart
After diskpart starts, input the script below and hit Enter: list disk
You should now see a list of all hard drives on your PC.
You must select the correct hard drive. If you select the wrong hard disk, you’ll wipe all your files and lose them, so be extra cautious.
Check the size of each drive to find the hard drive that is giving you trouble. Select the problematic drive by entering select disk X.
In our example, we used select disk 0, but you’ll likely need to use a different number on your PC.
After you select the hard drive, double-check everything and make sure that the problematic drive is selected.
Now enter the script below and hit Enter: clean
If your internal hard drive doesn’t show up, it might not be properly configured. Sometimes, you need to use a single command to completely wipe your hard drive and initialize it again.
Before we start, we have to mention that this solution will delete all files and partitions from the selected drive, so it’s best to use it with a new hard drive that doesn’t have any files.
If your hard drive has some files, it would be best to back them up to removable storage or a different drive.
After a few moments, your hard drive will be wiped, and all your files will be removed. Now go back to the Disk Management tool and initialize your hard drive.
Then, create a new partition, and assign a letter to it, as we showed you in one of our previous solutions.
Alternatively, you can initialize and format your hard drive right from disk part. Just start Command Prompt as an admin and run the following commands:
diskpart
select disk 1 (make sure to and select the disk that you just cleaned)
attributes disk clear readonly
online disk
select disk 1 (make sure to and select the disk that you just cleaned)
convert gpt
create partition primary
format quick fs=ntfs label="data" unit=64k
assign letter=“E"
4. Check if your hard drive appears in BIOS
Keep pressing F2 or Del while your system boots to enter BIOS. Sometimes it might be a different keyboard key, so if you’re unsure, check your motherboard’s manual.
Once you enter BIOS, look for your hard drive.
Many users reported that their internal hard drive won’t appear in Windows, and various issues can cause this. However, you can always check if your hard drive shows in BIOS.
If your hard drive appears in BIOS, it’s connected and working correctly, so Windows cause the issue.
On the other hand, if the hard drive doesn’t show in BIOS, it’s likely not properly connected.
If you’re finding it hard to access your BIOS, take a closer look at our dedicated guide that will teach you how to do it quickly.
That’s about it. If you did not know how to detect a new hard drive in Windows 10, this should have helped. In most cases, you need to initialize it, and we sincerely hope this action will be the only one required.
If you have any comments, questions, or suggestions, let us know in the comments section below.
There are so many Windows 10 updates that it’s hard to track them. Today we are talking about some significantly impacting the Outlook Mail functionality.
So, if you run Outlook Mail and it crashes due to a memory error and does not synchronize e-mail when the app runs in the background, you need to be aware that it isn’t only happening to you.
Microsoft has fixed this problem through its Windows Update feature. As no hotfixes were available, you just needed to ensure that you’re running the latest version of your Windows 10 OS for this fix.
Why does my Outlook app keep crashing?
Users have reported this problem, and we gather it may occur for varying reasons. Some include:
Problems with add-ins – Sometimes, add-ins may cause your Outlook service to behave unexpectedly. Disabling add-ins may help you to fix this problem quickly.
Conflicting programs – These could be any of the third-party tools you have installed, but the antivirus is a common culprit in most cases.
It is so common to experience Outlook issues. However, the above solutions have been confirmed to work in the flowing scenarios too:
Outlook crashes when maximized – Users describe how maximizing their Outlook application to full screen leads to the same result: it crashes and closes down. If that’s your issue, disabling add-ins may help you out.
Outlook crashes after Windows 10 update – If you’re running Windows 10, you want the latest updates. You’re no stranger to the fact that they don’t always bring the stability you’re after, but the above fixes will help you get things on track.
Outlook 2013 crashes on startup – If the application crashes on startup and you cannot enjoy it, think of a more reliable email client alternative.
If you installed the latest OS version but are still experiencing Outlook crashes, here are some additional solutions.
How can I fix Outlook crashing issues on Windows 10?
Before you go into these solutions, you may consider the following:
Switch to another email service to avoid Outlook crashing issues. We are sure you’ll find some exciting alternatives even though it’s not always easy to make such changes.
1. Disable add-ins
Click the File tab in Outlook.
Select Options to open an Outlook Options window.
Click Add-Ins on the left of the window, selectCom Add-on on the Manage drop-down menu, and press the Go button.
Deselect all the add-ins listed on the COM Add-ins window, then press the OK button.
Finally, restart Outlook.
2. Repair Office
Press Windows + R, enter control panel, and hit Enter.
Click on Uninstall a program.
Right-click on Office installation and select Change.
Click on Download on the official website to get the Office 365 Support andRecovery Assistant.
Run the program after it is finished installing.
Select the appropriate issues to run the troubleshooting tool, and follow the on-screen solutions.
4. Run Scanpst
Close the Outlook app.
Open File Explorer by pressing the Windows key + E hotkey.
Navigate to any of the paths below depending on your Outlook version: C:\Program Files (x86)\Microsoft Office\root\Office16 C:\Program Files (x86)\Microsoft Office\Office15 C:\Program Files (x86)\Microsoft Office\Office14 C:\Program Files (x86)\Microsoft Office\Office12
Double-click on SCANPST.EXE to start the repair tool.
Click the Browse button to select the PST file. The PST files are usually in the DocumentsOutlook files folder for an Outlook profile.
Press the Start button to initiate the scan, and select the Repair option to fix a corrupted PST.
Thankfully, if you have an Office 365 account, you can use their specialized tool to diagnose, troubleshoot and solve all Office-related problems and errors.
NOTE
If nothing worked, creating a new Outlook profile may help eliminate all those annoying Outlook crashes.
If you have any corrupted emails in outlook, you should also check out Repair Toolbox for Outlook. It’s an excellent tool that will restore them and their contents in no time.
That concludes our article. Which of these methods worked for you? Do let us know in the comments below. We also strongly advise you to leave us feedback regarding the subject.
For so many reasons, mostly good, you can decide to call it quits on your friendship with someone.
Every social network has its version of the blockfeature, and Facebook Messenger isn’t an exception.
If you wish to block a user while on Messenger, the program asks if you want to do so on Messenger or on the larger Facebook as well.
After blocking a user whom you wish to cut off, a worry is that they may still be able to see when they are active.
There’s not much information on this topic, but it’s vital to know for the sake of your privacy and security. This post tells you precisely what happens when to expect when you block someone on Messenger.
Can I see if someone is online if they blocked me on Messenger?
Blocking a user on Facebook removes everything about the person from your interface.
This means that neither of you will see each other’s updates nor be able to chat with each other.
However, it gets tricky because Facebook allows you to block users in two different ways – blocking on Facebook or blocking on Messenger.
In this section, I’ll briefly explain what happens when someone blocks your Facebook as well as Messenger.
When you’re blocked on Facebook
As mentioned earlier, I pointed out that if someone blocks you on Facebook (not Messenger), your profile ceases to exist to the user.
They no longer find your profile even if they search. The Facebook block extends to Messenger.
The person who blocked you won’t see you on their contact list because you’re blocked on Facebook.
You won’t even see each other’s profiles. Regarding seeing when you’re online, you won’t even find them on your contact list, talk more about seeing when they’re active.
When you’re blocked on Messenger
If the person only blocks you on Facebook Messenger, you can see when they’re online.
While you’re blocked on Messenger alone, you can still view the person’s Facebook profile and interact with their content.
However, you can’t send them messages or reach old messages send before they blocked you.
In the area where you would normally type your message, you’ll see a notice saying you can’t reply to this conversation.
When someone blocks you on Messenger only, you will still see them on your list but can’t send them messages or view their last seen or online status.
However, you must note that this doesn’t only happen when a user blocks you. You will also not be able to interact with them if they deactivate their Facebook account.
Many Xbox One users have complained about facing error 0x8027025A when signing in on the Xbox app. Fortunately, there are solutions available to fix the problem.
This guide will discuss some of the available fixes and probable causes for the issue. Let’s get started!
What causes the Xbox error code 0x8027025a?
There could be various reasons for this Xbox sign-in error. Some of the popular ones are listed below:
Xbox service – If there is a problem with the Xbox Live service, you might get this error. It is advised to wait for some time before signing in.
Sign-in issue – If there is a sign-in issue with your profile due to connectivity, the error might appear. Check your internet connection.
The app didn’t load in the expected time – If an app takes too long to start, you get this Xbox One error. Try restarting the app.
What can I do to fix Xbox error code 0x8027025a?
Before moving to the troubleshooting steps, try these quick fixes to resolve the problem:
First, unplug and replug the network cable if you are using a wired connection.
Check all the connections to ensure there is no loose end.
Check all the services listed on the page. Expand them if you see any alerts.
Scroll down to notifications.
Sign in to get notified once the service is up and running.
2. Restart the affected app
Press the Xbox button on the controller to open the guide.
Select Home.
Go to the app and click the Menu button.
Choose Quit.
Wait for 10-15 seconds and restart the app.
3. Reinstall the affected app on the external HDD
If nothing else worked for you, then it is suggested to uninstall the app in question from the internal HDD of the console and install it on an external hard drive instead. This is clear some space on the console and could resolve the error.
Press and hold the Xbox button on the console for 10 seconds or more until the console shuts down.
Remove the power cord from the console. Wait for three minutes, then plug it in.
Press the Xbox button on the controller to restart your console and controller.
5. Contact Xbox Support
If even after installing the game on external hardware doesn’t work for you, it is suggested to contact Xbox support and explain your issue. Also, tell them all the fixes you have tried so far for them to understand the situation.
So, these are the methods you need to follow to eliminate error 0x8027025a on Xbox One. Try them and let us know what worked for you in the comments below.
When launching a game or an app, if you get AUEPEC.exe -system error saying, The program can’t start because VCRUNTIME140.dll is missing from your computer. Try reinstalling it to fix this problem. Then, you are not alone.
Here we will discuss what AUEPUC.exe is and how to fix this system error with expert-recommended fixes. Let’s begin!
What is AUEPUC.exe?
AUEPUC.exe, developed by AMD, is also known as TODO. It is an entirely safe executable file used by a background process of AMD.
What causes the AUEPUC.exe system error?
There could be various reasons for the error message. However, we have listed some of the most popular ones:
Program installed incorrectly – This error could occur if the program in question is not installed correctly. Try to uninstall and reinstall the program.
Missing Microsoft Visual C++ Redistributable– If your computer doesn’t have Microsoft Visual C++ Redistributable file, this error message could come up. You can install the latest version of the tool to fix the issue.
How can I fix the AUEPUC.exe system error?
Before diving into detailed troubleshooting, here are some things you should do:
Locate the program, and right-click on it to select Uninstall.
Go to the executable file location of the program and double-click to run and install.
Follow the on-screen instructions to complete.
2. Re-register the VCRUNTIME140.DLL file
Press the Windows key, type CMD, and click Run as administrator.
Type the following commands one by one to re-register the DLL file, and press Enter after every command: regsvr32 /u VCRUNTIME140.dllregsvr32 VCRUNTIME140.dll
Under Visual Studio 2015, 2017, 2019, and 2022, in a table, you will get the link for the Microsoft Visual C++ Redistributable. Click on the link as per your PC’s architecture.
Once downloaded, double-click to Run the file.
Follow the on-screen prompt to complete the installation.
5. Run the SFC & DISM command
Press the Windows key, type CMD, and click Run as administrator.
Type the following command one by one and hit Enter after every command: sfc/scannowDISM /Online /Cleanup-Image /RestoreHealth
6. Restart the Windows Update service
Press Windows + R to open the Run window.
Type services.msc and hit Enter to open Services.
Locate Windows Update and double-click it.
Change the Startup type to Automatic.
Click the Start button under Service status.
Click Apply and OK.
So, these are methods to fix the AUEPUC.exe system error. Try them and let us know which worked for you in the comments section below.
Even with advanced algorithms and substantial virus databases, antivirus programs might sometime fall short. Updane.exe is one such potentially dangerous executable file, which often goes undetected.
Here we will explain what Updane.exe is, how it affects your PC, and how to remove it safely from your PC. Also, we have mentioned the harmful effects that it could have if not removed.
What is Updane.exe?
Updane.exe is a Windows executable file but is not essential for Windows OS. It is programmed to spy on all your moves on your PC and invade your privacy.
It keeps an eye on your keyboard and mouse inputs and records personal and financial data. Once its work is done, it exposes all the data to cybercriminals who planted it in the first place.
How does Updane.exe work?
Updane.exe can be a part of a program you installed or can enter your computer via a spam email. It can delete important files, crash programs, and make your computer run slowly.
Updane.exe can infect more files and record more data from your computer if not dealt with immediately.
How can I remove Updane.exe for good?
Before moving to the troubleshooting steps, ensure you perform these preliminary checks:
Once you are done with these, please follow all these steps to remove Updane altogether.
1. Remove program related from the computer
1.1 Identify the file location
Press Ctrl + Shift + Esc to open Task Manager.
On the Details tab, look for the File, right-click on it and select Open file location.
You will get the name of the app and the folder in which it is stored.
1.2 Uninstall the program
Press Windows + R to open the Run window.
Type appwiz.cpl and press Enter.
Select and right-click the program. Then, from the context menu, click Uninstall.
1.3 Verify Hosts files content
Press Windows + R to open the Run window.
Copy and paste the following path and press Enter: C:\WINDOWS\System32\drivers\etc
Locate the hosts file, and open it using Notepad.
Compare your hosts File to the image below and if there is any other information displayed apart from this, remove it. Press Ctrl + S to save the File and close it.
1.4 Remove leftovers from Registry Editor
Tip
Making changes to the Registry Editor affects your computer. Any wrong move can leave your computer inoperable. Therefore before making any changes, it is advised to create a backup. Go to File, and click Export. Save the .reg File in any of the drives apart from C (the drive with Windows installed).
Open the Run window, type regedit, and hit Enter.
Follow this path and right-click the program that you uninstalled, and select Delete: HKEY_LOCAL_MACHINE\SOFTWARE
Finally, select Yes on the following prompt to complete the process.
2. Run Disk Cleanup
Press Windows + R to open the Run window.
Type cleanmgr and press Enter.
On Disk Cleanup: Drive Selection window, click OK.
Click Clean up system files on the Disk Cleanup window.
Click OK on the next window.
Under Files to delete, select all the items and click OK.
Press the Windows key, type CMD and click Run as administrator.
Type the following commands one by one and press Enter: sfc/scannowresmon
Copy and paste the following command and press Enter: DISM.exe /Online /Cleanup-image /Restorehealth
Restart your PC once the scan is complete.
4. Change the internet settings
Press Windows + R to open the Run window.
Type ncpa.cpl and press Enter.
Right-click on the active connection and select Properties.
From This connection uses the following items option, locate and double-click Internet Protocol Version 4(TCP/IPv4) to open Properties.
Ensure that Obtain an IP address automatically and Obtain DNS server address are selected automatically. If not, select them.
Click OK and OK again.
So, these are the steps to remove Updane.exe from your PC altogether. Alternatively, you can use reliable antivirus software to eliminate this threat from your computer.
Stuck somewhere while removing Updane? Feel free to let us know in the comments section below.
If you need to set up Windows 10 Home Single Language, you can do so easily with the right tools and files.
This edition is designed for users who require a specific display language and don’t need the extra customization options of Pro or Enterprise. Below, you’ll find a step-by-step guide to download, install, and activate Windows 10 Home Single Language.
How can I download Windows 10 Home Single Language Edition?
When you get to this page, make the following selection:
Select type:Windows (final).
Select version: Windows 10, Version 1703.
Select edition, and go for Windows 10 Single Language.
Select language: Your favorite Language, for example, English.
Select file:Windows 10 1703 SingleLang_English_64.iso (or 32bit.iso for 32-bit machines).
Finally, click Download.
Then wait as the file downloads. It may take a while, depending on your Internet connection. Once the ISO file is downloaded, you need to burn it by following these steps:
2. Click on Download tool now in the Create Windows 10 installation media section.
3. Connect a USB flash drive to your PC.
4. Once the file is downloaded, run it.
5. Accept the terms of service.
6. Select Create installation media.
7. Check if your settings are correct and click Next.
8. Select USB flash drive and click Next.
9. Select your drive and wait for the process to finish.
How can I install Windows 10 Home Single Language?
Connect your USB flash drive to the PC.
While it boots, press F2, F10, or F12 to open the boot menu.
Select your flash drive.
Now press any key to boot.
The Windows logo pops up on the screen.
Select Time, Keyboard method, and your Language (as you had chosen when downloading), then click Next.
Click Install now.
Run through the remaining steps (Remember to select Custom Install -Windows only advanced) at the type of installation step.
Select the correct partition.
Follow the instructions on the screen to complete the process.
Is it possible to update Windows 10 Home Single Language to Windows 11?
You should be able to upgrade to Windows 11 using the Single Language edition. The process is simple and can be completed from the Windows Update section.
How to add more languages into Windows 10 Home Single Language?
You cannot add additional display languages in Windows 10 Home Single Language, as it supports only one language. To install more languages, you must upgrade to Windows 10 Pro through the Microsoft Store. However, language packs for typing and input can still be added.
Summary
As you can see, it’s pretty simple to clean install Windows 10 Home Single Language edition if you can download the original ISO file.
Nevertheless, Windows 10 is on its way out so you should seriously thinking about Windows 11 instead.
Activating Windows is critical to an optimal experience, but the error code 0XC004B100 often stands in the way.
How do I fix the error code 0XC004B100?
1. Make sure you are entering the correct key
As per Microsoft, the error code 0XC004B100 results from an incorrect MAK (Multiple Activation Key), so you must verify that first. Often, we enter a faulty activation key in a hurry, so take your time and check it once before submitting.
Also, if this is the first time you got the error, try again in a few hours since it could be a server-related problem. In case that doesn’t work, head to the next solution.
Once downloaded, run the tool and wait for it to verify if the requirements are met.
Now, click Install in the confirmation prompt and let the application get ready.
Click on I agree to accept the license terms and conditions.
Let the tool run, and follow the on-screen instructions to fix the error.
Whenever you encounter the error code 0XC004B100, the most viable solution is running an official tool from Microsoft, the Support and Recovery Assitant tool, or the Activation troubleshooter.
This should get things running for most users, and even if the tool cannot eliminate the error, it will list the possible solutions.
3. Check for any hardware changes
A few users reported the error code 0XC004B100 after changing the hardware, usually the motherboard and CPU. Here, re-activating Windows becomes imperative and is often tricky.
In this case, you may be able to activate Windows using the previous key or have to get a new one, depending on how Windows was installed initially. In addition, windows licenses bought from a store or the Microsoft website are transferable, while those from the OEM are not.
If yours is, transfer the Windows license and get the device up and running. In case this, too, doesn’t work, head to the last solution.
Press Windows + R to open Run, type slui 4 in the text field, and hit Enter.
Choose your country from the dropdown menu, and click Next to proceed.
Call on the provided number, follow the instructions to activate Windows to secure the confirmation ID, and then click on Enter confirmation ID.
Finally, enter the confirmation ID here, and click on Activate Windows.
This is another way to fix error code 0XC004B100 when the servers seem to be giving you a hard time. Also, find out what to do when the Windows activate key is not working. Drop a comment below for queries or to share solutions that are not listed here.
Microsoft allows hardware vendors to push driver updates through Windows updates, including AMD. However, some users may prefer installing the driver update manually. So, is there a way to stop Windows from updating AMD drivers?
For those who do a lot of testing with new PC hardware, automatic driver updates can change the testing results on different hardware.
Even for those who are not tech-savvy, automatic GPU driver updates can still be annoying. Is Windows keep installing old AMD drivers? Don’t stress, you can resolve it with the right tools.
If you are one of those who prefer to install GPU drivers for your AMD graphics card manually, this is the article you need.
We’ll show you how to stop AMD drivers from updating automatically or disable AMD driver updates in Windows 10.
How can I stop AMD drivers from updating automatically?
1. Change device installation settings
Press Windows Key + S and type advanced. Select View advanced system settings.
Open the Hardware tab and click on the Device Installations Settings button.
Choose No (your device might not work as expected) option.
Click the Save Changes button. Click Yes when prompted by the UAC.
Next, click Apply and OK to save the changes on other open System Properties windows.
This is a simple solution, but it might help you stop windows 10 AMD driver update.
2. Uninstall and reinstall the older driver
Press Windows Key + X and select Device Manager.
Locate the AMD driver, right-click it and choose Uninstall driver.
If available, check Delete the driver software for this device option and click on Uninstall.
Once the driver is uninstalled, you need to restart your PC.
Visit AMD’s website and download an older version of the driver software.
You can also remove AMD software and driver by using specialized uninstaller software, that removes icons, folders, and registries. By using this software, you’ll remove any application along with all of the files associated with it and the clutter that may have been left behind after the normal uninstall.
We recommend browsing the article about the removal tools since every PC is unique and varies in specs. Therefore, you need to choose one that is most compatible with your operating system to avoid any conflicts.
Doing this may be a time-consuming and tricky process since Windows will reinstall the designated and unwanted driver. We recommend using a different solution, such as a driver updater and installer, to avoid a never-ending loop.
The driver updater program is handy for updating and installing required specific Windows drivers. Otherwise, doing it manually takes time and requires a thorough understanding of the drivers you’re looking for.
Not to mention that it might cause problems on the PC, which we don’t want.
In just a few seconds, Outbyte Driver Updater will scan your system for any faults or missing drivers and generate a report. It would figure out outdated or missing drivers and then seeks your permission to update them.
Outbyte Driver Updater
Control what AMD drivers are updated and which are not with this automated driver manager.
3. Use Microsoft Show or Hide Updates Troubleshooter
Download Microsoft Show or Hide Updates Troubleshooter and run it.
Click on Hide updates.
Now select the update that you want to block using this tool.
Follow the instructions on the screen to complete the process.
For this process to work, you need to know the exact name of the update that is causing this problem, so keep a close eye on any recently installed updates.
That’s because Windows Update may have automatically replaced your AMD graphics driver and you have to identify it.
Keep in mind that Wushowhide.diagcab isn’t working for many users since Microsoft removed this tool from their servers, but you can still get it from third-party sources and use it to block the updates.
To stop the Windows 10 AMD driver update, you can try changing the device installation settings or try using an older version of the driver.
Many users reported that they stopped the drivers from updating by following the solutions from that guide and by modifying their Group Policy settings, so be sure to try that.
Did these solutions work for you? Let us know in the comments section below.
Looking for the best photo viewer for Windows 7? Although Windows 7 reached end of support, many users still rely on it and want a smooth way to open and organize images. Whether you want the classic Microsoft Photo Viewer experience or a modern free app, there are several excellent options.
You would usually have to install multiple applications to manage all your photos, documents, and archives. It’s convenient to choose one that can handle at least most of the formats you are going to work with.
File Viewer Plus 3 is a universal file viewer for Windows that can open and display over 300 different file types. Meaning that you can use it as a JPEG viewer or JPG viewer platform.
The new version brings extra features and focuses on support for viewing and converting over 50 new file formats, including over 25 additional image, audio, and video formats.
The new batch conversion feature works at great speed and you can save settings to use it again for different jobs.
Raw files are well supported with this program and you can open photos from 600 different camera models. You can also view EXIF data for digital photos and camera raw files.
Other key features include:
Simple and smart layout
Affordable price
User-friendly interface
File Viewer Plus
Easily view images and multiple file types with just one tool.
Adobe Lightroom is a complete solution for any photo editing needs, including image viewing down to pixel levels as well as advanced image manipulation.
This app lets you work on countless file formats and is one of the best when it comes to photo organization.
The automatic photo arrangement based on the timeline along with the option to group images based on tags and filters makes it easy to manage any amount of photos depending on your desired criteria.
Photos from your collection panel can be assembled into a photo book or slideshow format. You can also assign stars, flags, color labels, and keywords to your photos, you can use those depending on your needs, be it for quality assessment or thematic grouping.
Therefore, if you need undisputable services in photo management, this software will take good care of your shots using cutting-edge functions to smoothen your viewing processes.
Other key features include:
Tone adjustments
Easy editing
Instant objects removal
Adobe Lightroom
Enjoy Adobe’s next-gen photo editing and viewing capabilities on your Windows 7 OS.
The next entry in the list is CyberLink presenting PowerDirector video and photo editing solutions.
Firstly, you should know that it’s possible to use this full-featured app on Windows 7 devices or other recent versions.
Regarding functionalities, you have professional tools for motion editing, AI object replacing, millions of royalty-free stock, or animated stickers.
At the same time, it allows photo organizing in a structured and convenient manner. You can make albums, add photos in categories, or a library browser.
It’s also possible to create photo slideshows instantly. Simply do it by selecting photos in bulk and organizing them with transitions or customizable elements.
In terms of photo editing, you have different edits such as brightness or contrast, that can improve the aspect of your shots.
Other key features include:
Sharing and collaboration tools
Zoom pan for seeing details
Digital photos organizer
Storyboard editing
CyberLink PowerDirector
Manage every photo you have using this modern video & photo editing software.
This one comes in different types for different users such as the home user or professional as it is like a full photo studio suite for use in viewing, editing, and creating unique images.
It supports more than 60 image formats including GIFs, plus you not only get to view crisp quality images on a super platform, but you also can edit, organize, manage and even share your digital photos with your loved ones or friends, or workmates from your desktop.
Sometimes photo viewers can be slowed down but this one, even with all its features, is fast in terms of opening and scrolling through directories of your images.
Moreover, you can benefit from lightning-fast media mode to manage your photos database or scan through the folders quickly to choose between.
Thus this unrivaled software is capable of managing your shots using machine learning or other automated features, plus stunning viewing options that streamline your workflow.
Install it on your computer and give it a try.
Other key features include:
Superior file management
AI-driven facial recognition
Complex photo editing
ACDSee Photo Studio
View, edit & organize your photos, all in one place with ACDSee!
Irfanview is one of the most popularly used and best Windows 7 photo viewer software you can get. It is small, super-fast, and compact, plus if you’re a beginner, it is so simple to use.
Professionals can also take advantage of this powerful tool, which, unlike other photo viewers, is built to create new, unique, and interesting features for your graphics.
It is actually the first Windows 7 photo viewer globally that delivers multiple GIF, ICO, and multipage TIF support.
It is this variety of features that comes with Irfanview that makes people love it and also use it as their photo editor, besides viewing photos, because it also supports filters from Adobe Photoshop.
Plus it comes completely free of charge if not used for commercial purposes, otherwise, you’d have to register for $12 for commercial use.
Other key features include:
Batch conversions for advanced image processing
Photoshop filter support
Paint options
Capture screenshots, change cut/crop, and add watermarks
This is also one of the best Windows 7 photo viewer software used in the world. Besides offering viewer capabilities, you can also convert images as it supports over 500 image formats.
This tool offers different viewing features such as Thumbnail, Fullscreen, Filmstrip, and Slideshow so you can always view based on your preferences, or when making a presentation.
You can also edit images using various editing features such as resizing, rotating, cropping, adjusting brightness and contrast, modifying colors, or even applying filters among other effects.
You can also export over 70 image formats, but also create slideshows, web pages, contact sheets, image strips, and so much more.
It has unrivaled compatibility in terms of format support, which includes animated still formats, GIFs, and ICO support.
this Windows 7 photo viewer comes in two types for your viewing pleasure:
FastStone Image Viewer
FastStone MaxView
FastStone Image Viewer
This tool is fast and user-friendly, plus comes with a variety of features including image editing, viewing, and management.
You get great features such as slideshow and other transitional effects, plus it supports major graphic formats such as JPEG, BMP, PNG, TIFF, ICO, GIF, TGA, and most RAW formats.
With this tool, you can also compare up to 4 images side by side at a go, so you can modify your photos for better viewing.
It also comes with the usual features such as color effects, paint options, editing tools, an image magnifier, zoom support, different screen view styles, print and scan options, create montages, batch processing and so much more.
It is also free to download and use, plus you don’t get the silly ad popups, adware, or spyware that come with using free apps. Speaking of adware and spyware, here are the best tools to erase them completely!
FastStone MaxView
Similar to the classic version, MaxView is faster, more compact, and supports major graphic formats.
You get an intuitive, user-friendly layout so you can view your photos in different ways, plus you can even password protect your files in a jiffy in case you have those private photos you don’t want all and sundry to access.
It has regular photo editing and paint options, but you can view compressed or archived files securely and directly. It also supports touch interfaces if you like to touch or swipe.
This Windows 7 photo viewer is fast and supports different formats and viewing of images in compressed and archived files without the need to extract them.
One cool thing about this photo viewer is that if your images have GPS information, their location can easily be seen on Google Maps, and you can store the photos you want.
It doesn’t come with any adware and/or spyware, plus you can view your photos in different displays such as Fill or Parallel view modes.
You also get a photo folder feature where you can store any of your favorite photos.
Some of the formats supported by this photo viewer include BMP, JPG, GIF, PNG, PSD, TGA, TIFF, and RAW formats from digital cameras.
GIMP is great free software that will allow you to view and edit photos. It has a simple user interface where you can quickly find the necessary tools for the editing process.
You will find their special effects filters, color controls, exposure controls, selection tools, and many more.
Gimp is more a tool for beginners and for amateurs that would like to create some basic images by using some of the most used tools.
We strongly recommend it, especially because of its price – free. Plus, the tool works with every Windows version from 7 and higher.
If you’re looking for a Windows 7 photo viewer, you should consider Nomacs. This is a free and open-source image viewer, and it’s available on all major desktop platforms, including Mac, Windows, and Linux.
Nomacs supports over 25 different image formats, including RAW format and it has the ability to view EXIF information.
It can also change the transparency of windows and is capable of seeing histogram or file pieces of information.
With the Nomacs app, you can hide the toolbar and menu bar for extra immersion and synchronize images and zoom, pan, or switch images in sync.
Other key features include:
Fast thumbnail preview
Frameless view
Slideshow support
Basic image editing options: cropping, resizing, color adjustment, rotation
Have you found your favorite pick among these Windows 7 photo viewer tools? Let us know in the comments section below.
If you’re using Windows 7 and want a smooth, reliable photo viewing experience, these options cover everything from simple image viewing to advanced editing.
However, we encourage you to upgrade to Windows 10. Make sure you check out our tutorials on how to make the transition as smooth as possible.
Choosing the right photo viewer can really enhance how you manage your pictures. While you’re updating your system tools, you might also want to check out the best browsers for Windows 7 to keep your web experience fast and secure.