5 Ways to Fix HBO Max when It’s Not Allowing Downloads

HBO Max is available on select devices and platforms and can be purchased as a standalone or bundled with a traditional HBO subscription. However, HBO Max not allowing downloads is a problem faced by several of its users.

If you are having problems with the HBO Max app not allowing downloads, there are a few things you can try, as discussed in this article. Try and use them to resolve your issue. 

Why does HBO Max disallow downloads? There are a few reasons why HBO Max does not allow users to download shows or movies:

  • One reason is that it would take up a lot of storage space on users’ devices.
  • Another reason is that it would be easy for users to share downloaded content with others, which would violate copyright laws. 
  • Finally, HBO Max wants users to watch shows and movies on their platform so that they can continue to generate revenue from advertising.

What can I do if HBO Max is not allowing downloads?

1. Check your internet connection

  1. Visit fast.com to check the speed of your internet.fast speed test
  2. If slow, change your connection or contact your ISP.

2. Update the HBO Max app

  1. Open Microsoft Store on your device.windows store - hbo max not allowing downloads
  2. Click the Library icon at the bottom left side of the screen.
  3. Scroll down to HBO Max and select Update.Update
  4. Once the update is downloaded, click the Open button to launch HBO Max.

3. Restart your device

  1. Click the Windows Start button and select the Power button.
  2. Select Restart, wait for your computer to start, and then open the HBO Max app.restart device - hbo max not allowing downloads

4. Clear the HBO Max or your browser cache

  1. On Google Chrome, click the three dots menu on the top right.
  2. Select More tools and then Clear browsing data.Chrome settings - hbo max not allowing downloads
  3. Select All time on the time range option at the top.
  4. Tick the checkbox on Cookies and other site data and Cached images and files, and then select the Clear data button at the bottom.Clear cache

5. Uninstall and reinstall the app

  1. Press the Windows + I key combination to launch Settings and then select Apps.Apps on settings - hbo max not allowing downloads
  2. Search for HBO Max or scroll down to the app and then click on it.Search HBO
  3. Click on the Uninstall button and follow the on-screen instructions to uninstall the app.Uninstall HBO - hbo max not allowing downloads
  4. Visit the Microsoft Store and then reinstall the app.

How do I download shows or movies on HBO Max?

To compete with streaming giants Netflix, Amazon Prime Video, and Disney Plus, Warner Bros. established the standalone streaming service HBO Max. A wider selection of programming is available on HBO Max, including HBO originals, Max originals, and more. 

Additionally, because you might wish to watch HBO Max while traveling or in an area with spotty internet, this service lets you download HBO Max movies and series to your device and view them offline.

The HBO Max app, available for download on smartphones and tablets, is the quickest and most straightforward way to download content from HBO Max for offline viewing. You can download shows or movies on HBO Max by going to the My Stuff section and selecting the download icon next to the title.

If none of the solutions work, you may need to contact customer support. Have you seen any HBO Max login notifications that you don’t recognize? Investigate this issue as soon as possible.

In the comments section below, let us know which way worked for you. Feel free to comment about any other solutions as well.

How to Install Star Wars Forces of Corruption Mods on Steam

Mods are a great way to enhance the experience of playing your favorite games. They allow you to do things that normally aren’t possible in the game, like adding new characters and items, changing the way it looks and sounds, or even adding new gameplay features. 

If you’re a gamer, it’s likely that you’ve heard of Steam and Star Wars. Being a fan-favorite game, we explore how to install Star Wars Empire at War Forces of Corruption mods on Steam. 

Why should I install mods on my Steam games?

Mods are a great way to add more fun and replayability to your favorite games. But why should you install mods on Steam? What do they do, and how can they help? Here are some of the best reasons:

  • Save time – Installing mods on Steam will not only save you a lot of time, but they can also help you get more things done than before.
  • New experience – When you install mods on Steam games, it means that you will be able to have a different kind of experience from what you would have had without them. 
  • Fun factor – Mods allow you to make your game more immersive or challenging to keep things interesting.
  • Enhance graphics – Mods can also improve the graphics or performance of some games. This is especially useful if you’re playing older titles that are no longer supported.
  • Bug fixes – Some mods may even fix bugs in the base game itself, making it more stable or giving you a better quality of life when playing it.
  • Free of charge – Most mods are developed by fans and are totally free. This is a win for gamers as you get a top-notch experience without a dip in your pockets.

How do I Install Star Wars Forces of Corruption Mods on Steam?

1. Use the Steam library

  1. Launch Steam and navigate to the Steam Workshop for the Star Wars: Empire at War Gold Pack. 
  2. A list of mods will appear, so browse through available ones. (Note that some mods are tied to specific games and won’t work on every Star Wars version). 
  3. Once you have identified the mod you’d like, click on Subscribe to download.
  4. Go back and load Star Wars and click on the main menu, select Options, then hit the Mods button.
  5. A list of mods you have subscribed to will appear. Select the one you’d like to use and the game will download the mod to your system.
  6. Restart Steam and the mod will now be enabled.

2. Use Command Prompt

  1. Navigate to your browser and Download SteamCMD.
  2. Find the AppID for the program. This can be found on Steam’s official page. 
  3. Also, find the ModID. This can be in the mod description box or at the top of the address bar where the link is while browsing the Mod.
  4. Run SteamCMD and launch the command line version of Steam. 
  5. Type the following commands and remember to replace AppID and ModID with the values you found in 2 and 3 above then press Enter: login anonymous workshop_download_item <AppID > <ModID>

The Command Prompt method may be long and tedious for the not-so-tech-savvy users so we recommend you install it from the Steam library.

Aside from the Star Wars mods, there are also a bunch of other games that you may be interested in downloading mods to. If you would like to install Sims 4 mods, we have an excellent article guide for PC and Mac users.

We also have a list of the best mods for the top games if you’re unsure what mods you’d like to try to take your game to the next level.

Let us know which method you found easier to install the Star Wars mods in the comments section below.

How to Fix Windows Update Error Code 8024402

Windows updates are essential for fixing bugs affecting your PC and adding new features to your PC. However, error code 8024402C is an error users encounter when updating Windows.

Also, users report that Windows 10 couldn’t install on their PCs for some reason.

What does an error code 8024402C mean in Windows Update?

Windows Update error code 8024402C appears when Windows Update can’t connect to Microsoft’s update servers, making it impossible to complete updates. It is rampant on Windows 7 and 10.

Likewise, it can indicate issues with Windows Update services running correctly on your device.

What causes the Windows Update error 8024402C?

Windows Update errors can be due to many factors impeding the update process. They occur due to network connection issues that are causing the Windows Update services not to connect to Windows Server.

The process requires a stable and fast network connection. Other factors that can cause the error to occur are:

  • Third-party app interference – The Windows update on your PC may be affected by installing third-party apps like antivirus software. They can block the connection between your computer and the Windows update service, resulting in error 8024402C.
  • Issues with Windows Update components – The Windows update process on your computer needs some services to run smoothly. So, you can run into the error code 8024402C if the Windows update components are not intact.

Hence, we’ll take you through some fixes for the issue.

How do I fix the error code 8024402c?

We recommend you go through the following preliminary checks:

  • Turn off apps running in the background on your PC.
  • Disable third-party antivirus software on your computer.
  • Resolve network congestion issues.
  • Power cycle your network router or modem.
  • Restart Windows in Safe Mode, retry the update, and check if the error appears.

If you still can’t get through with the Windows update, proceed with the solutions below.

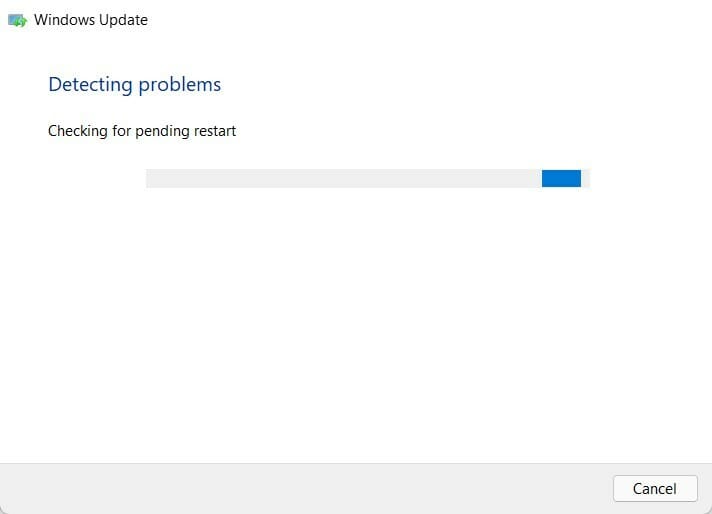
1. Run Windows Update Troubleshooter

  1. Press Windows + I key to open the Settings app.
  2. Click Update and Security.
  3. Select Troubleshoot and select Additional troubleshooters.
  4. Then click on Windows Update and click Run the troubleshooter.
  5. Follow the on-screen prompts and restart your PC afterward.

The troubleshooter will repair issues causing the Windows Update not working on your PC.

If you can’t use the steps above, check other ways to run the Windows Update troubleshooter in Windows 10/11.

2. Reset the Windows Update process

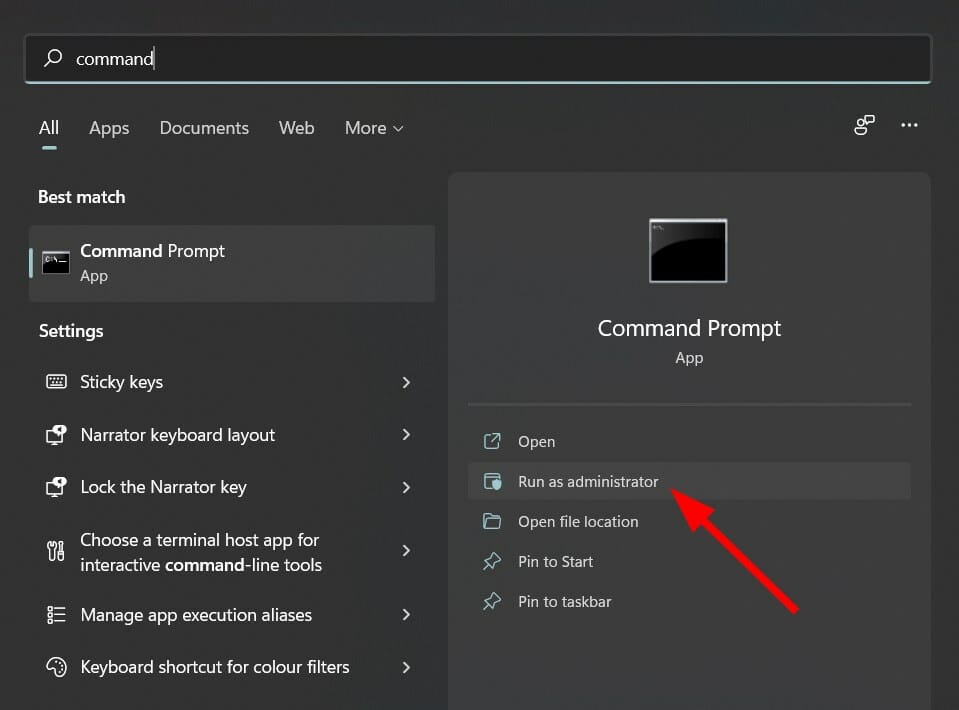
  1. Left-click the Start button, type cmd, and choose Run as Administrator.
  2. Type the following commands and press Enter after each one to stop Window update services:net stop wuauserv net stop cryptSvc net stop bits net stop msiserver
  3. Type the following command one after the other: ren C:\Windows\SoftwareDistribution SoftwareDistribution.old   ren C:\Windows\System32\catroot2 Catroot2.old
  4. Input the following commands and press Enter after each one to start Windows update services:net start wuauserv net start cryptSvc net start bits net start msiserver
  5. Exit the Command Prompt and restart your PC.

Resetting the Windows Update process will fix the problems with Windows update services and clear the update caches on your PC.

3. Disable Windows Firewall

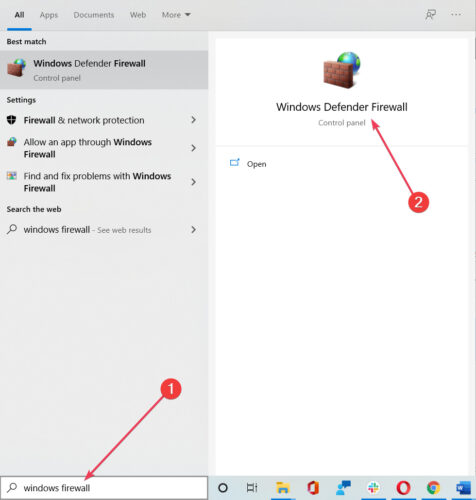
  1. Click the Start button, type the control panel, then press Enter.
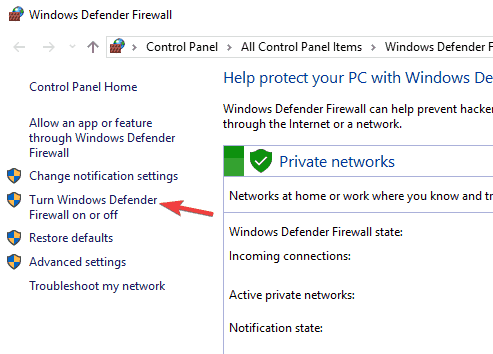
  2. Then click on the Windows Defender Firewall option and click the Turn Windows Defender Firewall on or off option from the left side.
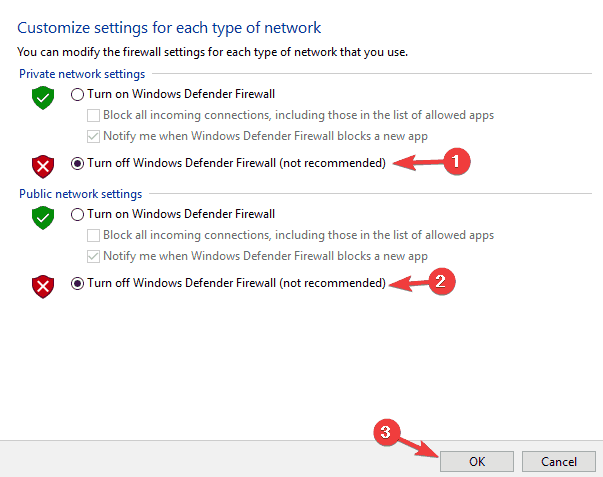
  3. Go to the Private network settings and Public network settings, then click the radio buttons for the Turn off Windows Defender Firewall (not recommended) option.
  4. Close the Control Panel and restart your computer.

Disabling the Windows Defender Firewall will fix any interference it’s causing in the Windows update process.

4. Change your DNS server address

  1. Press Windows + R key to open the Run dialog box, type ncpa.cpl, then click OK to open the Network Connection page.
  2. Right-click your Network adapter and select Properties from the drop-down.
  3. Select Internet Protocol Version 4 (TCP/IPv4) and click Properties.
  4. Tick the box for the Use the following DNS server addresses option, type 8.8.8.8 in the Preferred DNS server, and 8.8.4.4 for the Alternate DNS server, then click OK to save settings.
  5. Restart your PC, then try updating Windows to check if the error persists.

Changing your DNS server address can help fix network issues and help the Windows Update services connect to Windows Update servers.

Read more about checking and changing the DNS server on Windows 10 if you’re having trouble with the steps.

Alternatively, our readers can check our article to fix slow Windows updates on their PCs. Likewise, we have a guide on Windows Update error 0x8007045b and some fixes for it.

Do not hesitate to leave your comments if you have any suggestions or questions.

Microsoft news recap: FTC sues Microsoft over Activision Blizzard acquisition, Xbox Series X|S could be UK’s 2022 best seller, and more

Microsoft news recap is a weekly feature highlighting the top Microsoft news stories of the past week. Sit back, grab some coffee, and enjoy the read!

The FTC officially sues Microsoft to halt its Activision Blizzard take over

A legal challenge by the US Federal Trade Commission has been filed against Microsoft over its Activision Blizzard acquisition, with the FTC explaining its decision to sue Microsoft over the deal:

Today we seek to stop Microsoft from gaining control over a leading independent game studio and using it to harm competition in multiple dynamic and fast-growing gaming markets.

FTC building with sign out front

Xbox Series X|S could be 2022’s best-selling console in the U.K.

According to information from GamesIndustry.biz, Xbox Series X|S could be a best-seller in the UK for 2022, as there’s reportedly just 20,000 unit sales between the top spot, amongst PlayStation 5, Xbox Series X|S, and Nintendo Switch.

Xbox Series X|S could be 2022's best-selling console in the U.K. - OnMSFT.com - December 8, 2022

Microsoft’s stats detail how the Sleeping tabs feature is helping Edge users save resources

Sleeping Tabs is a Microsoft Edge feature that freezes open tabs that aren’t in use, helping to save resources and energy. The latest data shows that over 1.38 billion tabs have been put to sleep.

Microsoft's stats detail how the Sleeping tabs feature is helping Edge users save resources - OnMSFT.com - December 7, 2022

Microsoft promises to support Call of Duty games on Nintendo consoles and Steam

As Microsoft continues to fight to get its Activision Blizzard deal over the line, the company has reached an agreement with Nintendo and Steam to bring Call of Duty to the respective platforms for 10 years.

Call of Duty Modern Warfare 2 video game on Xbox Series X

That’s it for this week. We will be back next week with more Microsoft news.

How to Fix Snapchat Code C14a [3 Methods]

Getting hit with Snapchat Code C14a? This error usually pops up when Snapchat can’t connect to its servers during login.

It’s often caused by poor internet, corrupted app data, device restrictions, or using outdated software. Sometimes, it’s triggered after switching devices, reinstalling the app, or logging in too many times in a short span. Whatever the cause, here’s how to fix it quickly.

How can I fix Snapchat support code C14a?

1. Install the latest version of the app

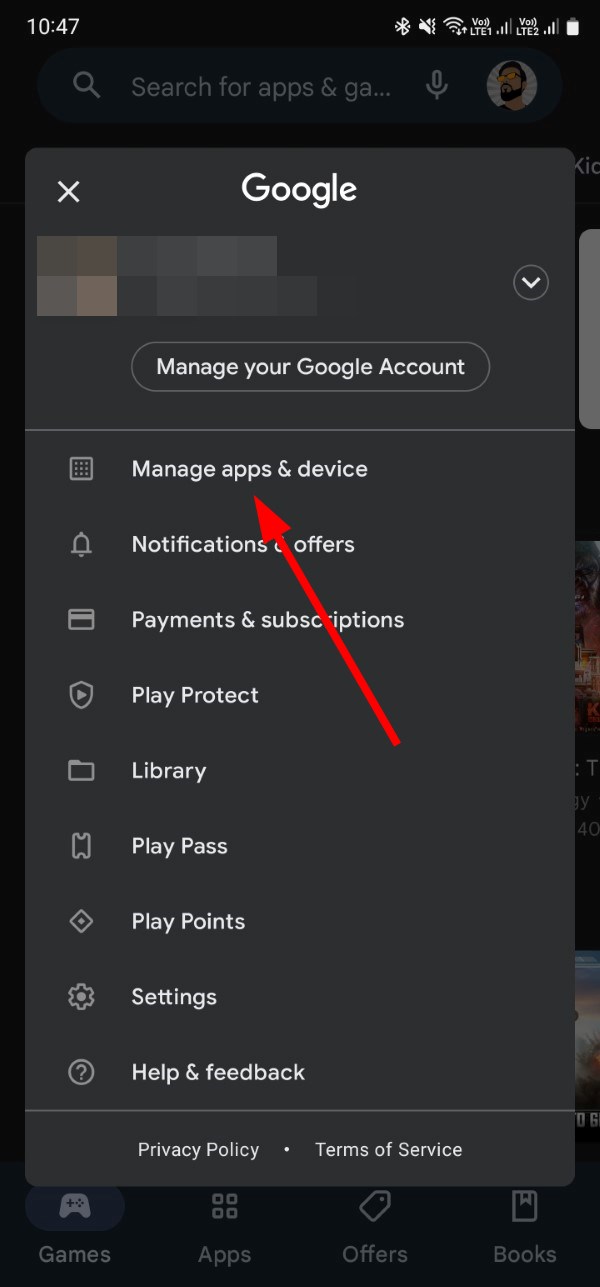
  1. Open the Google Play Store (or App Store on your iPhone).
  2. Click on your profile picture.
  3. Select Manage apps & device.
  4. Under the Updates available section, click on See details.
  5. Check if there is a new update available for the Snapchat app. If yes, then hit the Update button.
  6. After the app is updated, launch it and see if it fixes the Snapchat error code C14a.

As mentioned, this issue has been resolved for several users after installing the latest version of the Snapchat app. If you haven’t done that yet, you can follow the above steps and update the app to resolve the issue.

After doing that, check if Snapchat support code C14a login error is still there.

2. Clear the Snapchat app cache

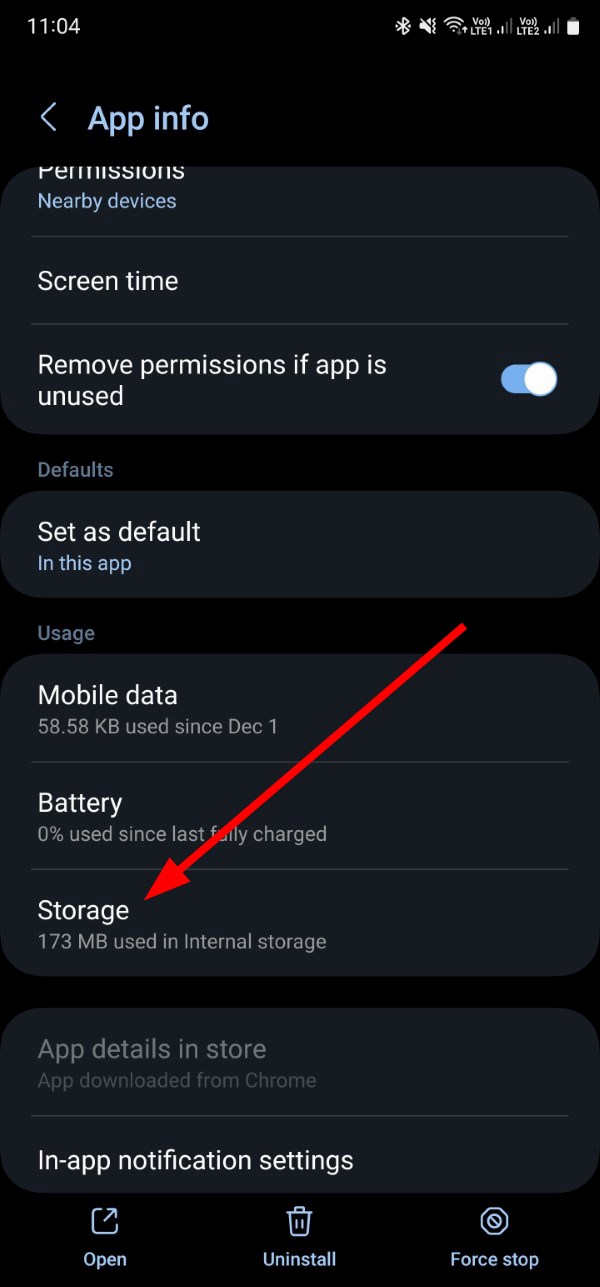
  1. Long-press on the Snapchat app icon.
  2. Tap on the I button at the top to see App details.
  3. Under the Usage section, tap on Storage.
  4. Hit the Clear cache button.
  5. Relaunch the app and check if this resolves the issue or not.

Chances are that the app cache stored on your phone is of an older version of the app which is causing conflict with the app. Clear the app cache and check if this resolves the issue.

If your issue also includes a camera black screen or failed captures, follow this guide on fixing the back camera not working on Snapchat.

3. Reinstall Snapchat

  1. Long-press on the Snapchat app.
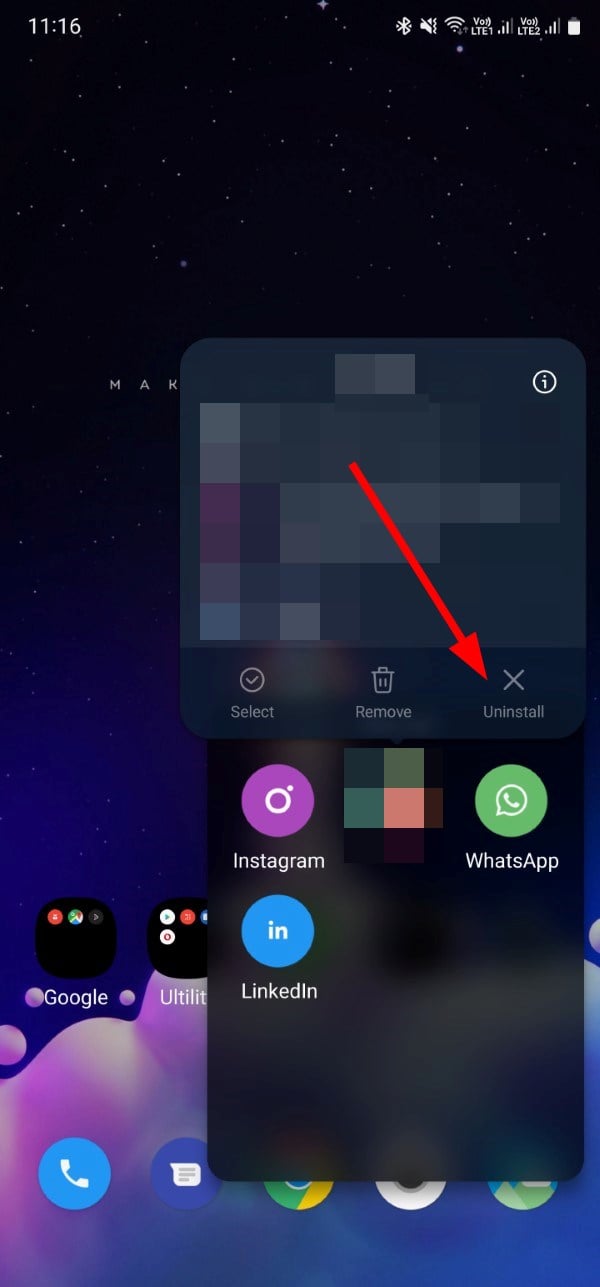
  2. Select Uninstall.
  3. Open Google Play Store.
  4. Search for Snapchat.
  5. Install the app.
  6. Launch the app, log in with your credentials, and check whether this resolves the issue.

Snapchat error code C14a is an app glitch caused by difficulties in contacting the servers. Limited Internet connection and a corrupt cache.

Did you know that you can download Snapchat without Play Store? We have a dedicated guide that will show you how to do that.

Let us know in the comments below which one of the above solutions resolved the Snapchat error code C14a for you.

8 Best Software For Turning Photos Into 3D Models

How software can turn a face photo into a 3D model?

If you are a graphic designer or a regular user who would like to know the best software available on the internet for turning photos into 3D models, then you have come to the right place.

Previously, it required a lot of time and a lot of images of the face from different angles to create a face into a 3D model. Thanks to artificial intelligence and powerful software, you can easily turn your face photo into a 3D model.

In this guide, we will present 7 of the best free and paid software for turning pictures into 3D models. Some software is pretty easy to use, while others require a bit of graphic designing knowledge to convert photos into 3D models. Let us take a look at the software one by one.

What is the best software for turning photos into 3D models?

Adobe Substance 3D Sampler – Digitize and enrich assets

We all know that Adobe is the go-to company when it comes to digital art and anything visual actually. Of course, they are also great at transforming your picture into a 3D asset.

Adobe Substance 3D Sampler it’s the product that can do that for you. This Adobe software is packed with powerful tools that are not as hard to master as one would think.

The scan system of this product is powered by AI allowing you from the very start to set up the way your 3D will look like. You can remove shadows, generate albedo, roughness, and mapping. Post-scanning you can focus on the 3D transformation.

Adobe Substance 3D Sampler also comes with parametric effects, allowing you to combine weathering and natural effects any way you want.

It is worth mentioning that this Adobe product is not part of the Creative Cloud All Apps.

Some key features:

  • AI-powered Scan Processing
  • Create HDR environment lights
  • Built-in Photogrammetry
  • Send any image directly to Adobe Photoshop
  • Combine weathering and natural effects

Adobe Substance 3D Sampler

Transform your photos into 3D assets with this professional tool from Adobe.
Free Trial Visit Website

Clip Studio Paint – Great for drawing 3D comics

If you are looking for great value software to help turn your face into a 3D model, then you should consider using Clip Studio Paint.

Clip Studio Paint consists of over 10,000 free assets, and many more are available if you are ready to pay. It comes with access to 3D models, which you can use to create illustrations and comics.

You can use it to create full 3D color comics and convert tone and outline into separate layers by using the LT conversion of layers. The best part is that you can import 3D data made with other software and configure them as materials in this tool.

Here are some of the key highlights of Clip Studio Paint:

  • You can import 3D data from other software
  • Use built-in AI to pose your figure
  • Lets you fine-tune various attributes of your 3D drawing figure
  • Regsiter 3D primitives as materials

Clip Studio Paint

Create 3D models by using this great app which has a multitude of editing options, including tones, layers, and colors.
Free Trial Visit Website

Autodesk Tinkercad – Good overall 3D modeling software

Tinkercad is the next one on our list of the best free software for turning photos into 3D models. It is available for free and can be accessed via the web. All you need to do is create an account on the website, and you can create your 3D masterpiece.

You can use Tinkercad to turn your 2D images into 3D images. The 3D model will have clearly separated colors and will show off gradually.

Tinkercad also lets you enhance the details of your 3D model, place objects, combine objects, and use various features.

Check out some of the best features of Tinkercad:

  • It has a user-friendly interface
  • Available for free
  • It is compatible with 3D printing
  • You can use it on your browser

⇒ Get Tinkercad

ItsLitho – Create high-quality 3D printed lithophanes

ItsLitho is a free online tool that will help you turn your 2D image into a 3D lithophane. The user interface is also easily understandable, and there isn’t much learning curve.

The tool also has multiple in-built tools, such as a gray-scale converter and pixel editor to edit the brightness and contrast of the images.

You can also use this tool to design your shape, add a frame or border, enhance the quality, and other aspects of the image.

Apart from converting your image to a lithophane, you can also turn a 2D image into a 3D model as well.

Here are a few key features of the ItsLitho tool:

  • Create a 3D printable image from a 2D image in a few clicks
  • Easy to use
  • Free of cost
  • Does not require installation and can be used on a browser

⇒ Get ItsLitho

Vectary – Decently price 2D to 3D converter

Vectary is another popular name that makes it to our list of the best software for turning photos into 3D models. While you can use it on your browser for free, it will have limitations, which you can easily get rid of by purchasing the paid plan.

The conversion process is pretty simple and comes with an extensive library of tools to create 3D visuals on your 2D image.

You can drag-and-drop elements, use ready-made assets from the massive 3D library, and tweak the size or rotate your 3D model as per your liking.

Here are the best features of Vectary:

  • It is web-based
  • The user interface is pretty simple to use
  • Lets you control various elements of the 3D model
  • Comes with a huge 3D asset library
  • Allows viewing in Augmented Reality

⇒ Get Vectary

Blender – Free and open-source tool

Blender is an open-source and free tool that lets you easily and quickly create 2D to 3D images. It is an advanced tool that is used by professionals and is best for commercial projects.

You can use this tool on any device, and apart from converting your images from 2D to 3D, you can also create a 3D image from scratch.

Blender can be used to for rendering, modeling, sculpting, animation, motion tracking, 3D printing, and much more.

Some of the best features of Blender are:

  • It is a free and open-source tool
  • Can be used on any device as it is web-based
  • Comes with multiple features
  • Apt from 3D printing and various other aspects of filmmaking

⇒ Get Blender

3DF ZEPHYR – An advanced tool for creating 3D models

3DF ZEPHYR lets you create 3D models from images you have captured from any device. Be it a camera, phone, laser scanner device, drone, etc., you can use the images from these devices to convert them into 3D models.

While the tool offers a free version to try out the features, you need to purchase the product to access advanced features such as full exporting capabilities, control points, full NVIDIA GPU support, etc.

Check out some of the special features of 3DF ZEPHYR:

  • Can take images from different devices to process them together in a single project
  • Fast processing speeds
  • Control minute data points to enhance the image
  • Offers plenty of editing tools
  • Good for advanced users

⇒ Get 3DF ZEPHYR

Photomodeler – Powerful photogrammetry software

Last but not least, we have the Photomodeler tool that will help you extract measurements out of 2D and 3D images.

You can try out the Photomodeler software to measure your photos for free but get the paid version for advanced measurement, diagramming 3D modeling, or 3D scanning tasks.

The customer support is also pretty great, as several users have reported getting their queries resolved in no time. The product is highly accurate, captures moving objects, and can be used with photos from many devices.

Check out the best features of Photomodeler:

  • Highly accurate measurement
  • Good for professionals
  • Multiple editing tools to enhance your photos

⇒ Get Photomodeler

That is in our list of the best free and paid software for turning photos into 3D models. Do note that this list contains both free and paid options allowing you to decide on the software as per your need.

If you are someone that is looking for the best CGI software, then we would suggest you check out our guide on the 5+ best CGI software for professional 3D modeling list.

We also have a guide on the 5 best 3D printing software for PC that lists some of the best tools that you can have for 3D printing.

Let us know in the comments below which one of the above tools you opted for turning 2D images into 3D.

Fix: CPU Usage Stays High until I Open the Task Manager

Having your CPU work full blast for an extended period of time can actually harm your computer. The high temperatures can cause irreparable damage which is why CPUs are outfitted with cooling fans.

Fixing is as easy as going into the Task Manager and closing some apps, but something peculiar has been reported. Whenever Task Manager is open, CPU usage suddenly drops only to then increase when closed.

What causes this strange CPU fluctuation?

CPU usage dropping can be a sign of something benign or you have a very serious problem with your Windows computer. If it’s the latter, you’ll need to get it fixed as soon as possible.

The following list is by no means extensive but does mention the most likely culprits of this phenomenon.

  • The Task Manager is simply readjusting itself: If you ever see the CPU indicator on Task Manager drop after opening, that’s normal. It’s just the software outputting a more stable reading.
  • Your computer has been infected with a virus: Malware can infect your computer and wreak havoc. It’s very important that you protect yourself with the best antivirus software.
  • Your computer is using cryptocurrency mining software: Some bad actors have been caught accessing other people’s computers and taking advantage of their hardware to earn cryptocurrency.
  • A bad actor has hijacked your machine: Similar to cryptocurrency takeovers, people on the internet will hijack the computers of others. Fortunately, there exist special antivirus tools to protect you.

What can I do to stabilize my CPU?

From our own research, the more effective ones are the complex solutions, but you can always the easier ones first and see if they work:

  • Run your antivirus software to get rid of malware infesting your computer. This will solve the problem a majority of the time.
  • Download and install any new updates you have pending. If updating doesn’t work, we recommend performing a clean boot first, then updating.

1. Run an SFC scan and more

  1. In the Windows search bar, bring up the Command Prompt and select Run as administrator.
  2. If a User Account Control window appears, select Yes.
  3. In Command Prompt, type in the following and hit Enter on your keyboard: dism /online /cleanup-image /restorehealth
  4. Give your computer ample time to complete the process.
  5. Once done, type in this command, hit Enter, and wait until it’s done: sfc /scannow
  6. Now type in this to access a new set of tools: powershell
  7. Copy and paste the following command and hit Enter: Get-AppXPackage -AllUsers |Where-Object {$_.InstallLocation -like "*SystemApps*"} | Foreach {Add-AppxPackage -DisableDevelopmentMode -Register "$($_.InstallLocation)\AppXManifest.xml"}
  8. Give your computer time to finish.
  9. Once done, restart the computer and see if the CPU usage problem has been fixed.

2. Use Process Explorer to find hidden software

  1. Go to Microsoft’s Learn page and download the Process Explorer app.
  2. Extract the file you just downloaded and open it.
  3. Take the time to look through Process Explorer and identify what other processes are utilizing the CPU. If you have a computer with a lot of software running, this may some time.
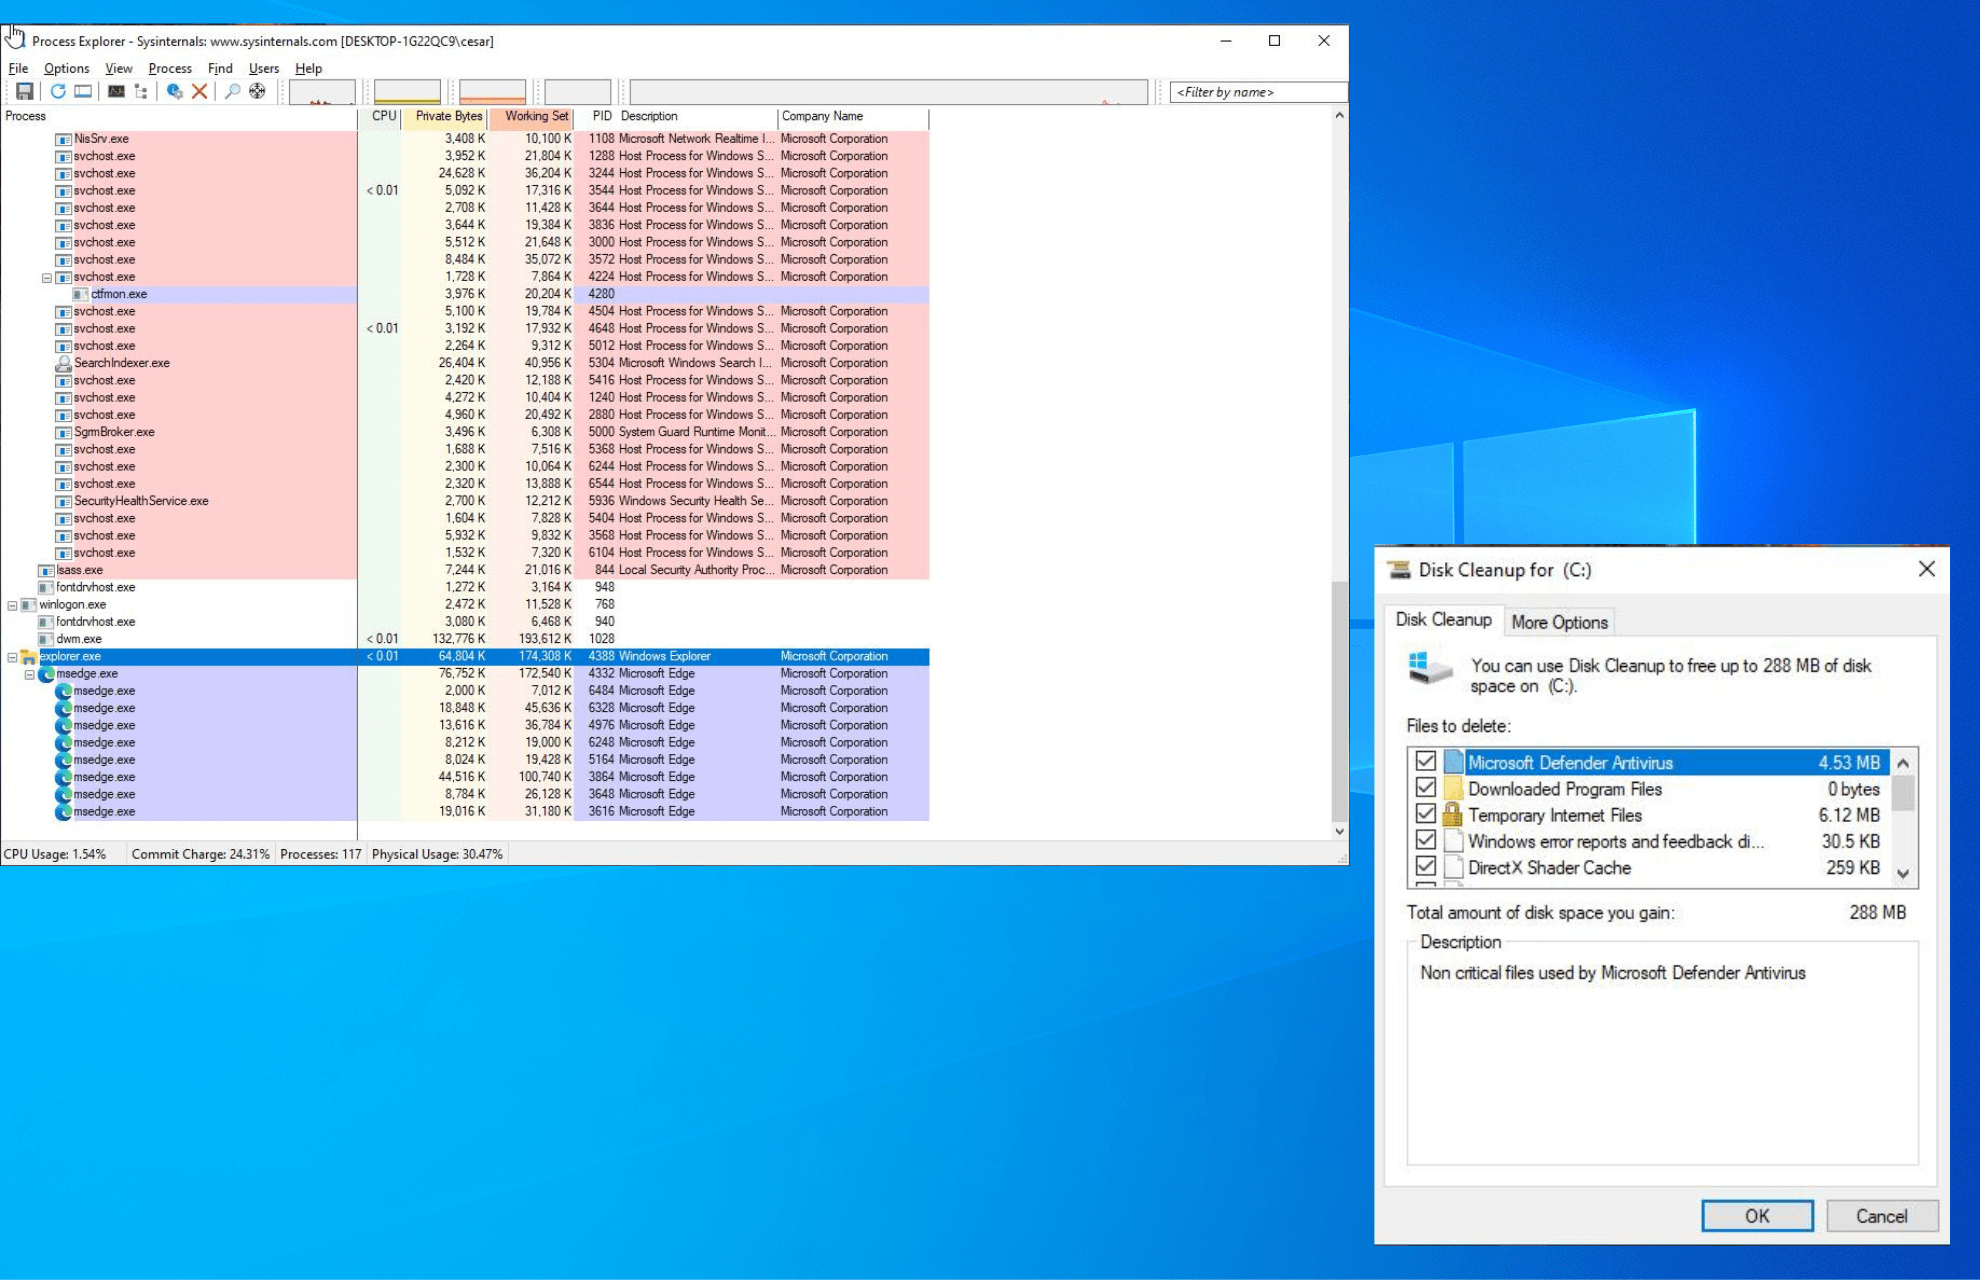
  4. Right-click it and select Kill Process If you locate an app running that you don’t remember installing. The image below is just an example.
  5. Open File Explorer and go to the following address: C:\Users\USERNAME\AppData\Roaming
  6. Replace USERNAME with the name of your computer.
  7. Locate any folders or applications with archiver or unarchiver in the name and delete them.

Process Explorer is a first-party app from Microsoft that gives you a first-hand look into every single file and directory running at any given moment. It’ll show software normally undetectable by Task Manager.

If you download files from an unverified source, you may have installed hidden malware. Offending processes to look out for are archiver or unarchiver as some have reported online.

3. Clean up system files

  1. Open Windows Search and type in Clean.
  2. Select Disk Cleanup.
  3. Click the Clean up system files button.
  4. Check off all the boxes in the Disk Cleanup window and select OK to finish.

Needless to say, the CPU is a crucial part of any computer and because of that, it’s very important that you keep a close on it at all times. To help you do this, we recommend installing a monitoring app. This type of software gives an up-to-date reading on your CPU’s load, clock speed, and even RAM usage.

You should also look into AIO (All-in-One) coolers if you build your own computers or are thinking of doing it. They can be pricey but offer some of the best cooling possible for processors.

Feel free to comment below if you have questions about other CPU problems.

Libusb0.dll: What Is It & How to Fix It if It’s Missing

When you encounter an error message saying the Libusb0.dll file is missing on your computer, it means the programs in need of the file can access it. It’s due to issues affecting the Libusb0.dll file.

Aside from the Libusb0.dll file error, there are other DLL file missing errors you can run into on Windows 11.

What is Libusb0.dll?

Libusb0.dll is a vital file in the Windows system files library. It ensures that the programs on your PC operate as they should. Without the file, some programs depend on it won’t work, resulting in errors.

Why is Libusb0.dll missing in Windows 11?

Many factors can prompt the Libusb0.dll missing file error on Windows 11. The most prominent cause of the error is that the Libusb0.dll file is corrupt or deleted from the system. So, programs and services that require it won’t have access to it.

Furthermore, you can come across the Libusb0.dll missing file error due to other factors such as:

  • Issues with the program – Sometimes, the error may be from the program you’re using. If it is not updated or its installation file is corrupt, it can impede it from accessing the Libusb0.dll file. Hence, it prompts the missing file error.
  • Malware infection – Malware blocks the functionality of the programs running on your computer. It can prevent system files, including the Libusb0.dll file, from being visible when invoked by programs.

There are other likely reasons for the error, but you can fix them by trying some troubleshooting steps.

What can I do if Libusb0.dll is missing on Windows 11?

Go through the following preliminary checks:

Proceed with the solutions below if you can’t fix the Libusb0.dll missing error:

1. Download and replace your Libusb0.dll file

Note icon NOTE
We don’t encourage downloading from unofficial sites. However, our experts have tested these steps to confirm their safety.
  1. Launch your browser and download the appropriate version of the Libusb0.dll file for your Windows.
  2. Double-click the downloaded zip file to open it, click Extract all, and select Desktop for a location to extract the DLL file.
  3. Restart your PC and check if the error persists.

Downloading a new copy of the Libusb0.dll file will replace the missing copy, which should fix the error.

2. Register the LibusbO0.dll file

  1. Left-click the Start button, type Command Prompt, and click Run as administrator.
  2. Click Yes on the User Account Control prompt.
  3. Type this command and press Enter:regsvr32 LIBUSB0.dll
  4. Restart your PC.

The Libusb0.dll missing error should not persist on your computer after registering it. It helps the system rewrite the file, making it visible to the services needing it.

3. Run a System File Checker scan

  1. Left-click the Start button, type Command Prompt, and select Run as administrator.
  2. Click Yes on the User Account Control window.
  3. Type the following and press Enter: sfc /scannow
  4. Restart your PC and check if the error persists.

The System File Checker scan will find and repair corrupt system files causing the Libusb0.dll file not to be visible. Check our article about what to do if nothing happens when you select run as administrator on Windows 11.

And if you want to complete this process automatically, you can easily opt for a specialized repair tool as it can do the job for you by running an in-depth scan to find corrupted or compromised files and locate healthy replacements for them.

4. Run System Restore

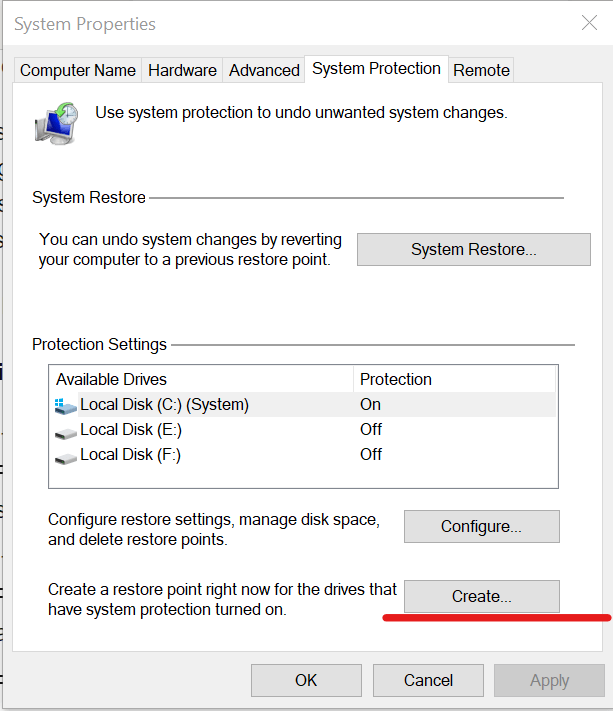
  1. Left-click the Start button and type Restore, then click on Create a Restore Point.
  2. Go to the System Protection tab and select System Restore.
  3. Choose a different system restore and click Next to select a specific Restore Point.
  4. Select the last time your PC worked perfectly, and click Next.
  5. Click the Finish button.

The System Restore will backdate your PC to an earlier point in time. It will remove any apps, drivers, and updates installed on your PC after selecting the restore point. Read how to fix Restore Point if it’s not working on your PC.

Alternatively, you can go through our guide on the best DLL repair tools you can download to solve the error on your PC. Finally, our readers may be interested in the Autorun.dll error on Windows 11 and its fixes.

For further questions or suggestions, kindly drop the in the comments section below.

How to Stop Webex From Using Your Mic Outside of Meetings

If you are using Cisco Webex, you’ve probably run into the Microphone is not working issue at least once. Now, users are also reporting that the program is still using the mic long after the meeting is done.

When using Cisco Webex meetings, there’s a chance that your microphone will be turned on even when you’re not using it. This is because it uses the microphone to detect nearby devices and automatically add them to meetings.

Why is Cisco Webex always using my microphone?

If you’re wondering why Webex is constantly using your mic even when you’re not in a meeting, below are some possible reasons:

  • Browser settings – If you’re having this issue, it’s likely that you have a setting in your browser that’s causing Webex to use your microphone.
  • Automatic detection setting – If the microphone is always on outside of meetings, it is likely that you have enabled the detect nearby devices option on Webex.
  • Virus infection – A malware attack on your system can cause strange behavior with some programs’ functions. You should always protect your system with a reliable antivirus program.
  • Default input device – If you’re using Cisco Webex as the default input device, it will use your microphone even after the meeting is over.
  • Webex is running in the background – Sometimes, even after the meeting, you’ll find that Webex is still running in the background and hence still using your mic.

How do I stop Cisco Webex from using the mic outside of meetings?

1. Disable all Webex processes from Task Manager

  1. Hit the Windows key, type Task Manager in the search bar, and click Open.
  2. Navigate to the Startup tab. 
  3. Locate any Webex processes and click on Disable.

Also, if you want to stop Cisco Webex from running in the background, you can follow the same process, only this time, you’ll navigate to the processes tab and End all Webex instances. 

2. Run a virus scan 

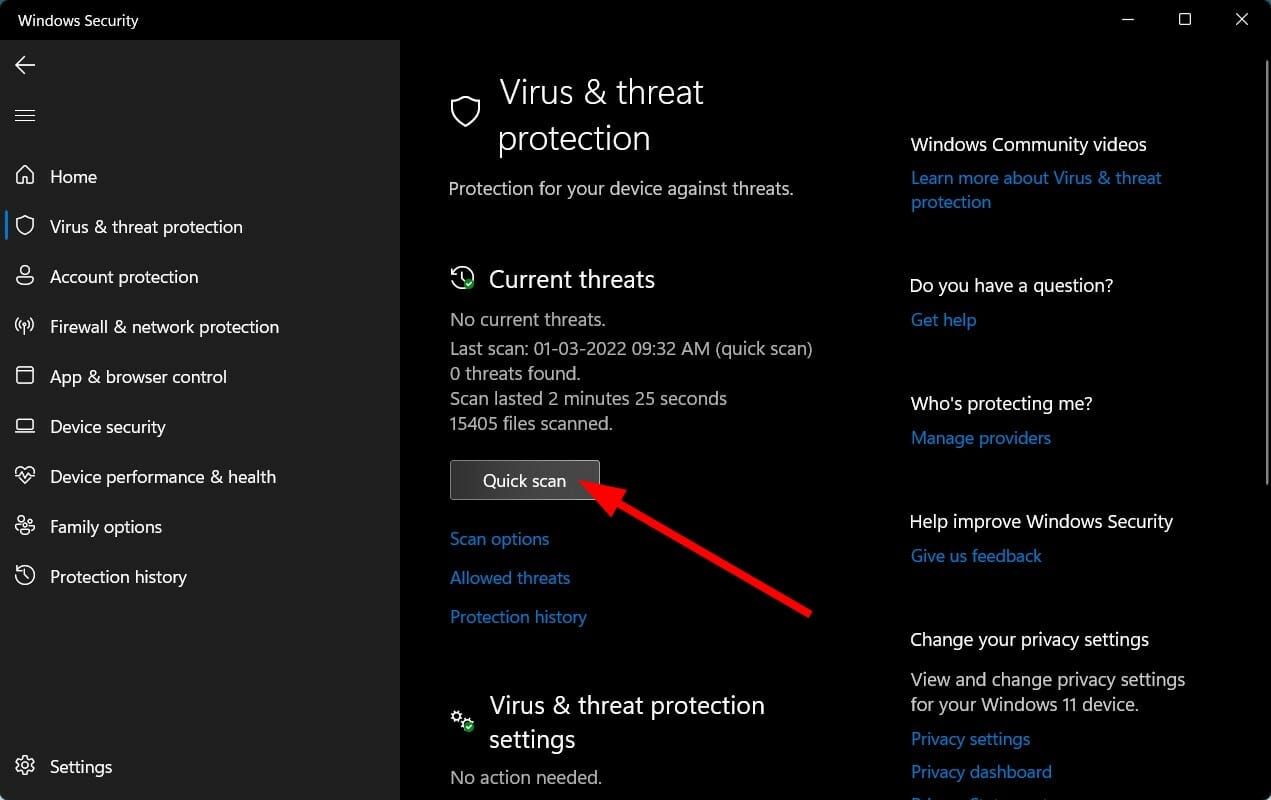
  1. Press the Windows key, search Windows Security and click Open.
  2. Select Virus & threat protection.
  3. Next, press Quick scan under Current threats.quick scan
  4. If you don’t find any threats, proceed to perform a full scan by clicking on Scan options just below Quick scan.
  5. Click on Full scan to perform a deep scan of your PC.Full scan
  6. Wait for the process to finish and restart your system.

Running a virus scan on your computer is crucial as you are able to see viruses and other digital threats that may affect its health.

Apart from your Windows Security, there are also advanced antivirus programs like TotalAV that can offer multilayered security features to remove all kinds of cyber threats and prevent them from entering your PC.

3. Turn off automatically discover nearby devices 

  1. Launch your Webex desktop app and select Preferences.
  2. Click on Video system and uncheck Automatically discover nearby devices.

You may be wondering why Cisco proximity is using your microphone. This is because of the automatic nearby device option that you have enabled on Webex. 

The application automatically discovers nearby devices, including microphones and video cameras, so that users can join a meeting and start talking to each other. If your microphone is turned on, it’ll be automatically detected and used by the meeting.

4. Run the sound troubleshooter

  1. Click on the Windows button and select Settings.settings windows 11
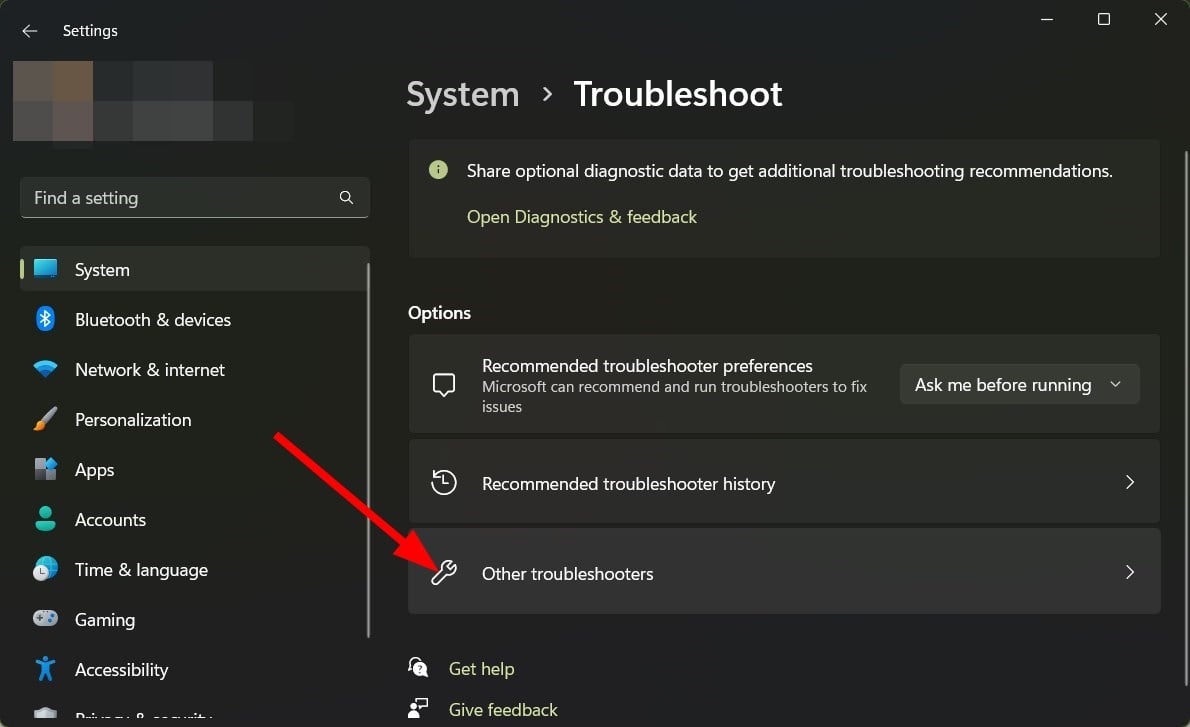
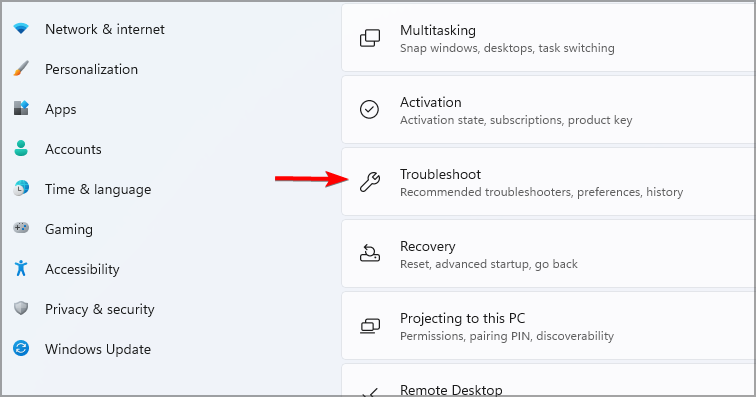
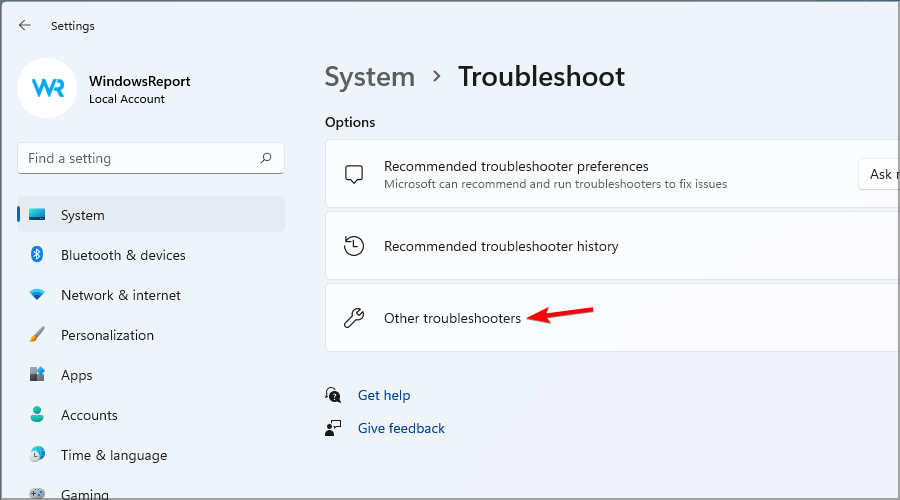
  2. Select System then click on Troubleshoot.Open system troubleshooter
  3. Click on Other troubleshooters.
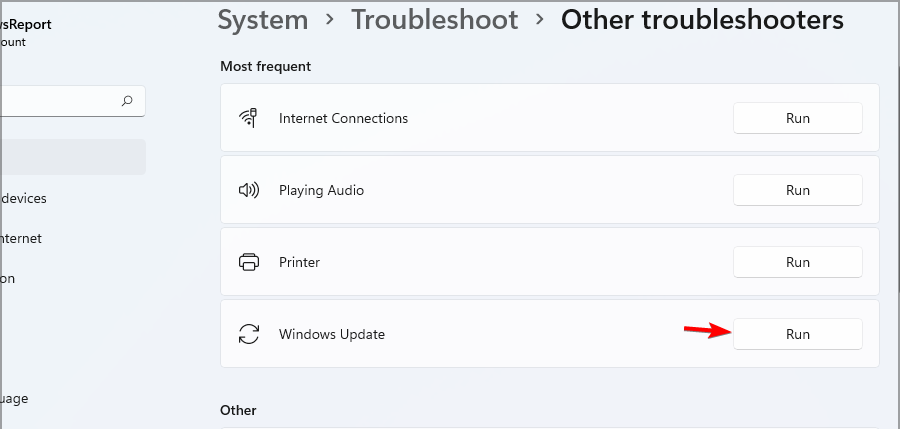
  4. Hit the Run button next to Playing audio.playing-audio game audio stops working

5. Uninstall and reinstall Cisco Webex

  1. Hit the Windows key and click on Settings.settings windows 11
  2. Select Apps on the left pane then click on Apps & features on the right pane.
  3. Locate Webex, click on the three vertical ellipses and select Uninstall.
  4. Go to the Webex site and download Cisco for Windows.

Uninstalling the application will help clear any glitches or bugs that were present and causing the anomaly. To ensure you get rid of all problematic files, also remove any software leftovers before installing the application again.

Hopefully, one of these steps has helped you solve the issue of Cisco using your microphone outside meetings. If you’re out of luck, you should try changing your input device and see if the error persists.

Cisco Webex is not the only software you can install for your meetings. If you’re looking for variety, we have a rich list of the best video conferencing software to choose from.

Let us know what solution worked for you in the comment section below.

How to Fix a Windows Update That is Stuck at 35%

Is the Windows update on your Windows 7 PC stuck at 35%? Multiple users confirm that they are waiting for hours, but nothing happens as the Windows 7 update is stuck at 35%. Some were able to access their PCs, while some could not.

Fortunately, in this guide, we will give you a bunch of solutions that will help you resolve the Windows 7 update stuck at 35%. The best part about this guide is that you can apply the solutions for other versions of Windows as well. Let us get right into it.

Why is the Windows 7 update stuck at 35%?

Before we apply the solutions, it is very important to understand what exactly is causing the problem, which in our case is Windows 7 update stuck at 35%.

  • Outdated drivers: Outdated drivers might conflict with the system update. It is very important to keep all drivers up to date to avoid errors.
  • Incompatible peripherals connected to PC: Chances are some peripherals or device connected to your PC is causing the issue.
  • Third-party program conflict: On many occasions, the third-party applications that we install on your PC interfere with the system processes and cause multiple issues.
  • Corrupt temporary files: Temporary files are created for your system to remember some in-app settings. In case they get corrupt, you will face multiple issues.

How can I fix Windows 7 update stuck at 35% problem?

Here are a few things that we would advise you to do before applying the advanced troubleshooting methods.

  • Try restarting your PC. Chances are your system wasn’t able to load a crucial Windows update-related file.
  • Check the internet connection. If the internet connection is faulty, the system won’t be able to contact the server.
  • Delete the temporary files. If you are having issues deleting temporary files on your PC, you can follow this guide.
  • Disconnect the peripherals attached to your PC and check if this resolves the update error or not.
  • Uninstall unwanted programs from your PC.

Now let us advance toward the troubleshooting method that has helped users to fix this problem.

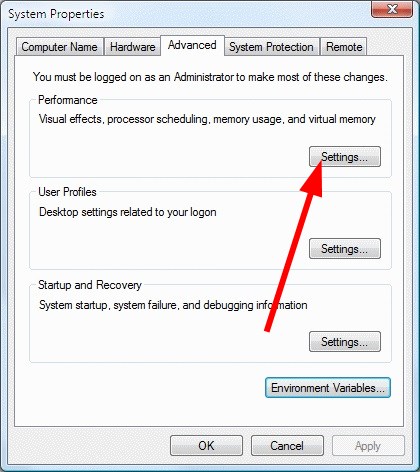
1. Turn on Data Execution Prevention

  1. Press the Win + R keys to open the Run dialogue.
  2. Type sysdm.cpl and hit Enter.
  3. Click on the Advanced tab.
  4. Under the Performance section, select Settings.
  5. Select Data Execution Prevention.
  6. Choose Turn on DEP for Essential Windows Programs and Services only option.
  7. Click Apply.
  8. Restart your PC and check if this resolves the issue or not.

According to several users, turning on the Data Execution Prevention feature resolves the Windows 7 update stuck at 35% error because this feature prevents other processes from interrupting the Windows update process.

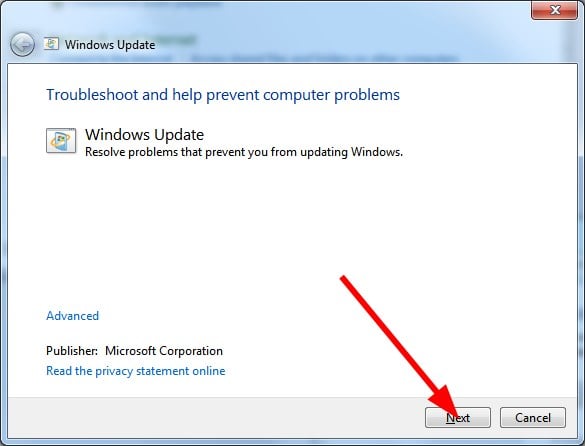
2. Run the Windows update troubleshooter

  1. Open the Start menu.
  2. Type troubleshoot and open it.
  3. Under System and Security, click on Fix problems with Windows Update.
  4. Click Next.
  5. The troubleshooter will detect the errors and prompt you to apply solutions to fix them.

3. Restart Windows Update Service

  1. Press the Win + R keys to open the Run dialogue.
  2. Type services.msc and hit Enter.
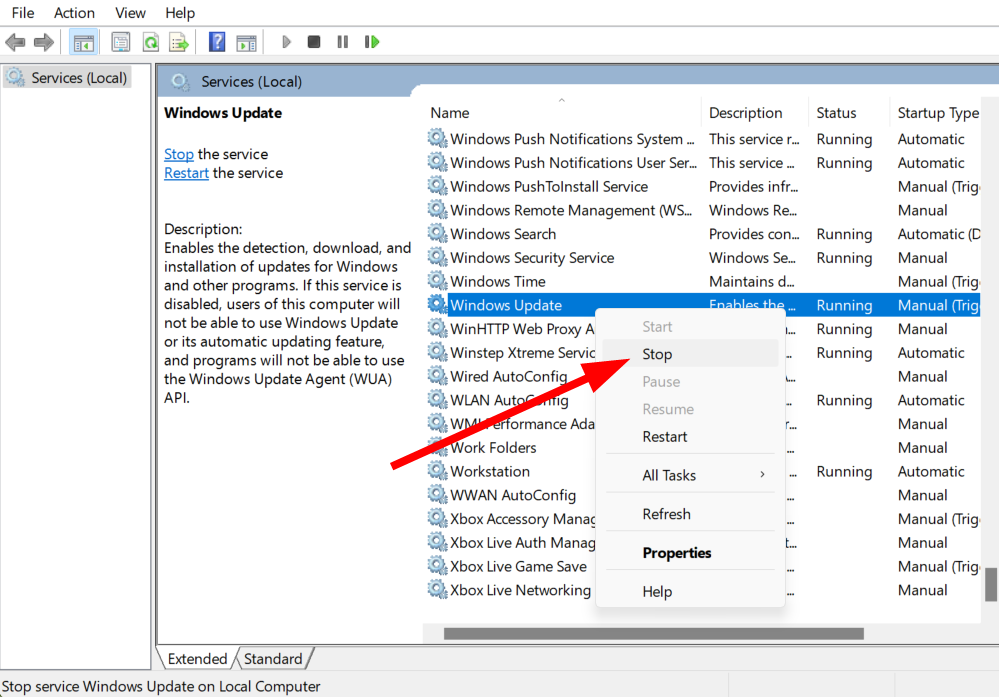
  3. Right-click on the Windows Update service and select Stop from the context menu.
  4. Wait for sometime and then right-click on the Windows Update service and select Start.
  5. Close Services.
  6. Restart your PC and check if this resolves the issue or not

Chances are that the Windows update service is facing some internal issues, or it failed to load some important file that has stuck the Windows 7 update at 35%. You can restart the Windows update service and check if this fixes the problem or not.

4. Run the DISM command

  1. Reboot your PC with your Windows 7 CD or DVD.
  2. Press any key when you get Press any key to boot from CD or DVD message to enter Windows Recovery Environment.
  3. Select Windows 7 language and other settings.
  4. Select Next.
  5. Click on Repair your computer.
  6. Click on Command Prompt.
  7. Type the below commands and press Enter. dism /image:C:\ /cleanup-image /revertpendingactions
  8. Let the DISM complete the process.
  9. Restart your PC and check if this fixes the issue or not.

5. Perform System Restore

  1. Reboot your PC with your Windows 7 CD or DVD.
  2. Press any key when you get Press any key to boot from CD or DVD message to enter Windows Recovery Environment.
  3. Select Windows 7 language and other settings.
  4. Select Next.
  5. Click on Repair your computer.
  6. Select System Restore.
  7. Click on the system restore point and select Next.
  8. Your PC will now be restored to back when everything was working normally.

This solution is helpful when you have waited for long, and nothing happens. The only option now left is to forget about the update and restore your PC back to the state when everything was working normally or when you were able to access your PC.

That is it from us in this guide. However, Windows 7 update stuck at 35% isn’t the only error troubling its users. Users have reported facing issues updating their Windows 7 PC, which can be resolved by following the guide.

We also have a guide that provides multiple solutions to the most common Windows 7 update errors. In the comments below, let us know which of the above solutions resolved the Windows update stuck at 35%.

Posted in Fix

Fix: Windows is Stuck on Cleaning Up – 0 Percent Complete

Despite Windows 11 being around for about a year now, Microsoft frequently supports and updates Windows 10 and will probably do so for a while. Updates often bring fixes and new features to an OS.

To facilitate this, Windows 10 updates have a Cleanup feature that gets rid of the old files to make way for the new ones. But some users have reported the Cleanup feature not starting beyond launching.

What causes Windows Update to get stuck on cleaning up?

The main driving force behind Window Update’s Cleanup feature is the Disk Cleanup tool itself. Any time the cleanup is stuck at zero percent, there’s something wrong with the app.

  • Your Windows computer has too many files: It’s entirely possible that because you have so many files that need to be parsed, it will take Disk Cleanup a long time to finish.
  • Your computer is experiencing slow performance: As a consequence of too many files, Windows may experience a performance drop because it’s all too much to process.
  • Corrupt files may be getting in the way: We recommend repairing and restoring corrupted files to get past this obstacle and ensure things run smoothly.

What can I do if Windows 11 is stuck on Cleaning up – 0 percent complete?

Before trying out any of the solutions, we recommend the following:

  • Wait it out. Perhaps you have so many files on your hardware that it takes your computer extra time to finish.
  • Create a restore point in case things go south and you have a way to bring your computer back to its previous state.
  • Turn off or uninstall your antivirus. It’s been reported that sometimes antivirus software will get in the way of important Windows functions.
  • Run the Windows Update Troubleshooter to identify the problem and resolve it. The software has been known to have its issues, so we recommend running a debug tool to fix it.
  • Install any new Windows updates currently available, specifically in Safe Mode. Microsoft frequently rolls out fixes in its updates.

1. Run a series of commands

  1. Bring up the Command Prompt in the Windows search bar and select Run as administrator.
  2. Click Yes if a User Access Control window pops up.
  3. Type the following in Command Prompt and press Enter on your keyboard to stop Windows Update: net stop wuauserv
  4. Next, type in the following commands and hit Enter after each one: net stop bits net stop cryptsvc net stop trustedinstaller
  5. After that’s done, type in the following command and press Enter after each one: ren %systemroot%\softwaredistribution softwaredistribution.bak ren%systemroot%\system32\catroot2 catroot2.bak
  6. Now it’s time to restart earlier services. Start by typing in the following and hit Enter after each one: net start wuauserv net start bits net start cryptvc
  7. Type in the following commands and press Enter like before: net start trustedinstaller net start appidvc

Stopping and restarting the services in the solution clear out the Windows Update cache so the system can redownload the files instead of using the ones already on the drive. Those files may be damaged.

2. Perform a clean boot

  1. Now it’s time to perform a clean boot. Open System Configuration on your computer.
  2. Go to the Services tab, click Hide all Microsoft services then Disable all. Select Apply to finish in this tab.
  3. Go to the Startup tab and click Open Task Manager.
  4. Select each item you see in Task Manager and disable everything.
  5. Close Task Manager, click Apply, then OK.
  6. Select Restart in the new window that appears. After the clean reboot, update your drivers and see if the problem has been fixed.

3. Run an SFC scan

  1. Bring up the Command Prompt again with the same administrator permissions as before.
  2. Type in the following and hit Enter on your keyboard: SFC /scannow
  3. Wait for the process to finish.
  4. Next enter the DISM command: DISM /Online /Cleanup-Image /CheckHealth
  5. Type in and press Enter: DISM /Online /Cleanup-Image /ScanHealth
  6. Now, type the following and press Enter: DISM /Online /Cleanup-Image /RestoreHealth
  7. Restart your computer to complete the process.

This solution is recommended to be performed after the clean boot, but you can do this at any time and see similar results.

How can I fix the 0 percent clean-up issue in Windows 11?

In case of facing this issue on this OS, do not hesitate to run the troubleshooter and SFC scan on Windows 11, as described below.

  1. First, open the Settings menu and click System on the left-hand side.
  2. Scroll down to Troubleshoot and click it. Select Other troubleshooters on the following page.
  3. Click Run next to Windows Update activate the troubleshooter. Give it time to finish.
  4. Select Next if a window appears telling you to restart your computer.
  5. A window will appear telling you what the problems were and if it fixed them.
  6. Now, bring up Command Prompt on Windows Search and select Run as administrator.
  7. Type the following command and hit Enter on your keyboard: SFC /scannow
  8. Wait for your computer to finish the process.

Note that this straightforward solution is the best for Windows 11, but you can also try it out on Windows 10.

Also, whenever Windows Update’s cleanup feature gets rid of old files, it puts them in a folder called Windows.old.

Older versions of Windows tend to be more stable, so this folder is handy to have in case you want to revert. But you can get rid of it, if you choose, to free up space on your hardware.

We also recommend checking out our best memory cleaner list. These apps clear out all the extra fluff software manufacturers may add. In return, you’ll experience much faster performance.

Feel free to comment below if you have questions about other Windows 10 problems. And please tell us if there’s a specific guide for any error or app you’d like to see.

How to Fix fltmgr.sys BSoD on Windows 10 & 11

The fltmgr.sys (Filesystem Filter Manager) ensures all files stored in the user’s hard drive are in their locations. Likewise, it ensures the data is readable and accurate. However, users report issues with the fltmgr.sys BSoD (Blue Screen of Death).

Moreso, many factors can cause a Blue Screen of Death on your PC.

What causes the fltmgr.sys error?

The fitmgr.sys failed bluescreen error can appear on your computer due to various factors. A common problem that may be responsible for the error is outdated or corrupt drivers. When the relevant driver for the fltmgr.sys process is outdated, it can result in BSoD.

Other factors that can cause the fltmgr.sys BSoD errors are:

  • Corrupt system files – You can run into the Blue Screen of Death if you have corrupt system files on your PC. These files will affect the fltmgr.sys activities and can result in the fltmgr.sys system service exception error.
  • Hardware issues – Users can encounter problems with the fltmgr.sys if there is a hardware issue. Also, external devices plugged into the PC can impede the functionality of the Filesystem Filter Manager, resulting in fltmgr.sys kmode _exception_not handled error.
  • Outdated Windows OS – Many things can go wrong with your PC if your operating system is not updated. It means your PC can’t access needed patches and updates for fixing bugs and can cause errors.
  • Problematic drivers – Faulty or corrupt drivers may also cause the fltmgr.sys page_fault_in_nonpaged_area error. Updating the faulty driver will solve this issue.

Fltmgr_file_system blue screen error is causing your PC to crash and restart. Fortunately, there are some effective fixes for the fltmgr.sys BSoD error.

How do I fix the fltmgr.sys BSoD error?

Go through the following preliminary checks:

  • Turn off background apps running on your computer.
  • Temporarily disable antivirus software services on your PC.
  • Restart the computer and check if the error persists.

If the error occurs again, proceed with the solutions below to fix the problem.

1. Restart Windows in Safe Mode

  1. Click the Start button, select the Power icon, hold the Shift key, and hit Restart.
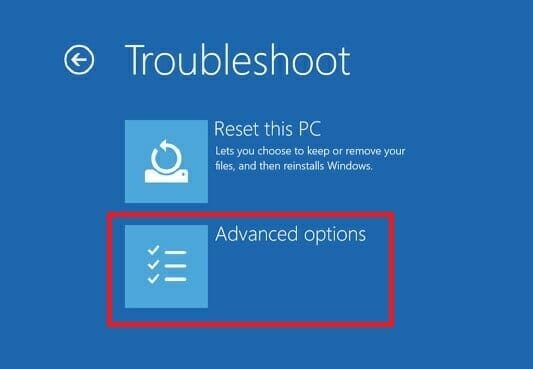
  2. Click on Troubleshoot, then select the Advanced options.
  3. Click on Startup Settings and select Restart.
  4. Press 4 to Enable Safe Mode.  

Restarting Windows in Safe Mode can fix startup issues that can cause fitmgr.sys memory leak and other issues.

2. Run an SFC scan

  1. Left-click the Start button, type Command Prompt, and click Run as administrator.
  2. Click Yes on the User Account Control prompt.
  3. Type the following command and press Enter: sfc /scannow
  4. Restart your PC and check if the error persists.

Running an SFC scan will find corrupt system files causing the fitmgr.sys failed bluescreen and repair them. Read about fixing the run as administrator option if it’s not working on your PC.

Also, you can use a third-party tool to run a system file check which will automatically repair any problems that are found.

3. Update the graphics driver

  1. Press Windows + R key to prompt the Run dialog box, type devmgmt.msc, and open the Device Manager.
  2. Expand the Display adapters, right-click the driver you want to update, and click the Update driver.
  3. Then select Search automatically for drivers.
  4. Restart your PC and check if the issue persists.

Check our guide on how to update drivers on Windows 11 for other methods to use.

4. Update Windows OS

  1. Left-click the Start button and select the Settings app.
  2. Click on the Windows Update option and click on Check for updates.

If there are any updates available for your PC, Windows will search for and install them.

Windows updates will fix bugs affecting your PC that can cause fitmgr.sys BSoD error and add new features.

If you encounter issues during the update, check how to fix Windows not connecting to update services on your PC.

We need to mention that this guide will work seamlessly on Windows 10 as well as for Windows 11.

We hope you can fix the problem and get the Blue Screen of Death off your screen. However, you can read our article about fixing Fltmgr_file_system Error on Windows for more details on the problem.

Windows Activation Error Code 0x8007007b: 4 Quick Fixes

Users encounter numerous activation errors when attempting Windows Activation. These errors prevent users from verifying their Windows OS. Moreso, Windows activation error code 0x8007007b is a problem users complain about.

Also, Windows 7 & 10 Activation Error 0xc004f063 is an error that users frequently report.  

What causes the Windows activation error 0x8007007b?

Many reasons can be responsible for the Windows activation error 0x8007007b on Windows 7, 10 & 11 PCs. It indicates that the filename, directory name, or volume label syntax is incorrect and can also refer to other issues that may prompt Windows activation to fail.

However, a prominent cause of the error is the activation wizard not connecting to the Key Management Service (KMS).

When the connection between the two components can’t be established, the activation process will fail and result in an error.

Furthermore, you can encounter the error due to other factors, such as:

  • Corrupt system files – Having corrupt system files on your computer can prevent the activation wizard from connecting to the KMS server. Also, it can affect other Windows activation protocols on your PC, resulting in errors.
  • Illegal Windows activation – Many PCs were activated with pirated Windows versions that are not supported or licensed. It can cause the errors to prompt when you upgrade to Windows 10 from Windows 7 or 8.1. So, installing a new Windows OS on a used PC with an illegal pre-install Windows version will fail.

Users should note that the causes of the error may vary in different computers because the error comes in many instances. Nonetheless, you can generally fix the error by troubleshooting your PC.

How do I fix the Windows activation error 0x8007007b?

Before trying any fixes for the error, take care of the following:

  • Resolve network congestion on your computer.
  • Temporarily disable antivirus software on your PC.
  • Restart Windows in Safe Mode and check if the error persists.

Proceed with the solutions below if you can’t fix the error.

1. Run the Windows Activation Troubleshooter on Windows 10

  1. Press Window + I to open the Windows Settings app.
  2. Click the Update & Security option.
  3. Click on the Activation button, then tap on the Troubleshoot link.
  4. After troubleshooting completes, click on the I changed hardware on this device recently link.
  5. Input your credentials and sign in to your Microsoft account.
  6. Select your device and click Activate.

2. Manually assign a KMS server on Windows 7

  1. Left-click the Start button, type cmd.exe to prompt the Command Prompt, then Run as an administrator.
  2. Provide the necessary information for the prompt.
  3. Run a command from the following according to your network setup: cscript slmgr.vbs -skms yourkmshost.domain.com  cscript\windows\system32\slmgr.vbs –skms <KMS_FQDN> :<port> cscript\windows\system32\slmgr.vbs –skms <Ipv6Address> :<port>  cscript\windows\system32\slmgr.vbs –skms <Ipv6Address> :<port>
  4. Close the Command Prompt and restart your computer.

3. Replace and generate a new product key on Windows 11

  1. Left-click the Start button, type command prompt, and click Run as administrator.
  2. Type the following and press Enter to change the product key: slmgr -ipk <your current product key>
  3. After changing the product key, press Enter to submit and activate the product key change.
  4. Wait till you see a Windows Host Script prompt informing you that the product key has been successfully activated, then close the Command Prompt.
  5. Restart your PC.

After some hours, try the Activation process again with the new generic code. Read our guide if the Windows server change product key does not work on your PC.

4. Run an SFC/ DISM scan and clean up your PC

  1. Left-click the Start button, type Command Prompt, and click Run as administrator.
  2. Click Yes on the User Account Control prompt.
  3. Copy and paste the commands below and press Enter after each: sfc /scannow
  4. Then input the following and click Enter also: dism.exe /online /cleanup-image /restorehealth
  5. Restart your PC and check if the error persists.

An SFC scan will find and repair corrupt system files and clean up faulty system data that can cause the activation error 0x8007007b. Check our guide about finding Windows product keys on your PC.

Alternatively, you can make use of a specialized PC cleaning tool that simply scans your device and repairs defective system files that may generate this Windows activation error.

Conclusively, we have a detailed article on the most common Windows Activation errors & how to fix them. Also, you can read about resolving Windows 11 activation error 0xC004F034 on your PC.

If you have further questions or suggestions, kindly drop them in the comments section below.

How to Fix Shstat.exe Application & System Errors

Several of our readers have reported that they encounter the shstat.exe system error message. While some request to know how to fix this error, others are interested in knowing what it is.

What is shstat.exe?

This shstat.exe file is an application of the McAfee VirusScan Enterprise product. The VirusShield Statistics process, which manages program communication between various McAfee AntiVirus components, is run by the executable file shstat.exe.

It is well known that Shstat.exe, which is not a Windows system file, usually leads to computer issues. Shstat.exe can be found in a C:Program Files subdirectory.

The Windows operating system excludes the shstat file from its components. Shstat.exe can alter other Windows tasks, and cause system file errors, in addition to tracking other programs.

Because of this, most users believe that this file might pose a threat. It has a high likelihood of becoming harmful.

What causes the shstat.exe application and system errors?

You may consider the following causes:

  • Damaged or corrupted entries – If Windows notifies you of a shstat.exe system error, the problem may be due to corrupted or damaged entries. You should run a scan on the Windows Registry to determine the error.
  • Unnecessary startup programs – In some cases, programs and files can have a strong impact on the performance of a Windows operating system. This can also include shstat.exe. You should turn off the automatic startup of shstat.exe and other programs, causing the PC to lag.
  • Shstat.exe file in a wrong path – It is possible that during installation, the shstat.exe file was installed on the wrong path, this can be an indication of a virus.

Now that you know some of the potential reasons behind the shstat.exe system error message, let’s proceed to how you can fix this issue.

How do I fix the shstat.exe application & system errors?

Before attempting the fixes we have identified, try these few tweaks:

  • End task for the McAfee app in the Task Manager. If the Task Manager is not working, check this guide for fixes.
  • Restart your PC to check if the issue persists.

If it does, then try the following solutions.

1. Run the SFC/ DISM Scan

  1. Press the Windows + X keys to bring up the Command Prompt menu (Admin).
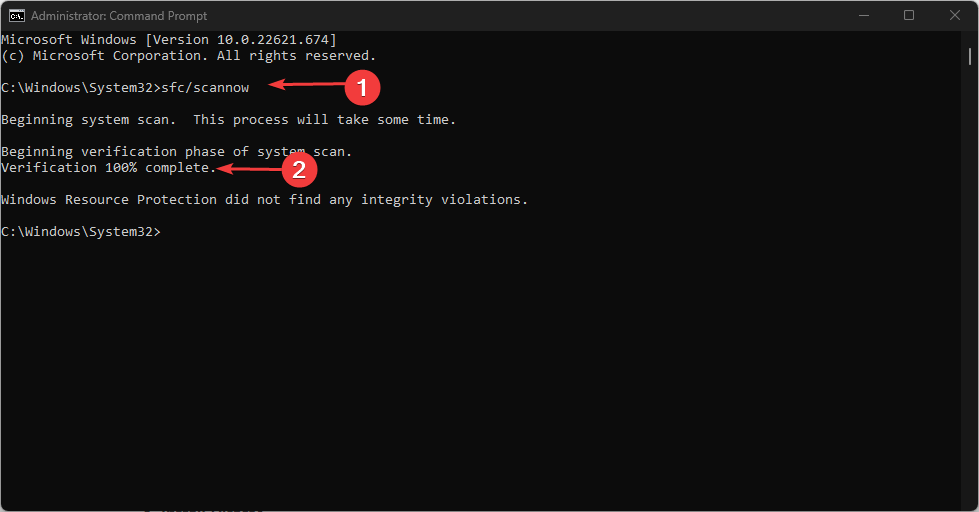
  2. Type the following command line and press Enter: sfc/scannow
  3. Do not interrupt the scanning process, as it may take up to 15 to 20 minutes.
  4. Also, you can run this DISM command and click Enter: DISM /Online /Cleanup-Image /RestoreHealth
  5. Close the Command Prompt and restart your PC.

The SFC and DISM scans are the most straightforward fixes for application and system errors through the command-line tool that thoroughly checks your system for potentially damaged files.

2. Uninstall/Remove the app

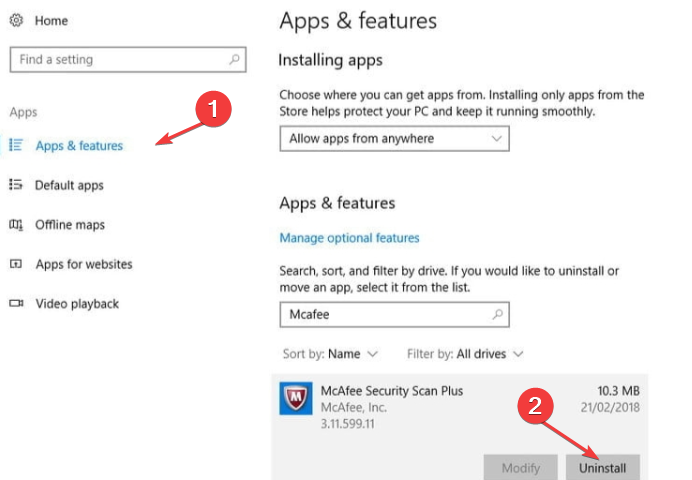
  1. Left-click the Start button and click on Settings.
  2. Click on Apps.
  3. Locate the McAfee product or app in the list, then click on Uninstall.
  4. Select Yes in the UAC prompt requiring the administrator’s permission.
  5. Follow the screen prompts on McAfee’s uninstaller and close Settings.

By removing McAfee, you should uninstall the shstat.exe also. In case the shstat.exe file has an uninstall program, you can run the Uninstaller located in such a directory also.

Alternatively, you can remove shstat.exe from your PC’s Control Panel in the Add/Remove Programs section.

Additionally, if your application or system is lagging, make sure to remove some of the unnecessary programs in your Task Manager.

And if you’re unable to open your Task Manager, try to follow the right solution provided in our dedicated guide.

If you have any questions or suggestions, do not hesitate to use the comments section below.

How to Enable Minidumps on Windows & Where to Find Them

Blue Screen of Death or BSOD errors are some of the most frustrating errors to come across on a Windows PC as they prevent you from your PC normally.

While there are multiple BSOD fixing software that can help you fix the error, knowing what is causing the issue could help you troubleshoot it the next time something happens.

You can fix the BSOD error by using the crash dump file or minidump files. We have a similar guide that gives you information regarding the BSOD dump file location in Windows 7. In this guide, we will give you details on how to enable minidumps on Windows. Let us get right into it.

What could trigger BSOD errors?

Here are some of the most common causes that could trigger the BSOD or Blue Screen of Death error on your Windows PC:

  • Outdated operating system: Whenever there is a new update available, you need to install it right away as it brings fixes for several underlying issues. If your OS isn’t up to date, you will face multiple issues.
  • Hardware malfunction: You need to make sure that when you install a new RAM or a new SSD into your PC, there isn’t any loose connection. Because of this, there could be a loss of power, and it can malfunction. Hardware, when pushed beyond its capabilities, can also cause a BSOD error.
  • Corrupt system files: Because of corrupt system files can also trigger BSOD errors. It can happen if a third-party program has tweaked system settings or replaced the DLL files.
  • Virus attacks: The presence of viruses or malware can give rise to multiple issues, among which is the BSOD error. You can check out some of the best antivirus tools for Windows 11.
  • Outdated device drivers: Outdated drivers on your PC can create a hurdle for your hardware to communicate with your PC, ultimately causing the BSOD error. Here are the different ways to update drivers on your Windows PC.
  • Power issues: PCs, when connected to a power source with a fluctuating voltage, can also cause certain hardware to misbehave, leading to BSOD errors.

How can I enable the minidump file in Windows?

  1. Press the Win key to open the Start menu.
  2. Open Control Panel.
  3. Click on View by and select Large icons.
  4. Open System.
  5. Click on Advanced system settings.
  6. Hit the Settings button for Startup and Recovery.
  7. Under the System Failure section Small memory dump.
  8. The highlighted box below shows you the location of the dumpfile.

Where can I view the minidump file in Windows?

  1. Open File Explorer.
  2. Navigate to the below path and press Enter: C:\Windows\Minidump
  3. If your system has created a minidump file in case you have encountered the BSOD error, then you will see the dump file available there.

How can I view the minidump file in Windows?

  1. Download the WinDbg Preview app.
  2. Launch the tool.
  3. Click on the File button.
  4. Select the Start debugging option.
  5. Click on the Open dump file option.
  6. Select the dump file: %SystemRoot%\Minidump
  7. Click the Open button.
  8. Let the program load the dump file.
  9. Type the below command and press Enter: !analyze -v

Once the analysis is complete, you can view the information regarding the dump file analysis. The WinDbg is a brilliant tool that explains the analysis in a language anyone can understand.

You can check the FAILURE_BUCKET_ID and MODULE_NAME lines to know more about the dump file that you are reviewing.

We have a guide that explains some quick fixes for Windows 11 users to resolve the BSOD errors. Also, for fixing the critical process died BSOD error in Windows 11, you can refer to our guide.

If Chrome is causing the BSOD error, then you can check out our guide to resolve the BSOD error in Windows 11. Also, we have a guide that will help you fix the BSOD error 0x00000109.

Can’t Create New Event in Outlook: Here’s How to Fix It

Can’t you create a new event in the Outlook app? This article will explain why it happens and how to resolve this problem.

Usually, you should not be facing any issues while creating a new meeting, appointment, or any kind of event in the Outlook calendar. But, for some users, exceptions are happening. For some users, the problem occurs when they invite attendees to the event.

If you are interested, learn the ways to fix Outlook keeps crashing issue.

Why can’t I add a new event to my Outlook calendar?

If you cannot add a new event on the Outlook calendar, it may be because of the following reasons:

  • Problematic app: If the version of the app you have been using has some bugs, it may prevent you from creating new events.
  • OWA is disabled: In some cases, if Outlook Web Access (OWA) is disabled in your organization, it may be the reason behind the problem. This issue was reported by a user in Microsoft Community Forum, and he stated, Outlook will open a tab in my browser that does nothing but have the Outlook logo.
  • Corrupted cache: Sometimes, the temporary cache files may become corrupted and create various issues, including event creation bugs.

Want to know the creation date of an event or appointment, check out this guide.

What to do if I can’t create a new event on Outlook?

If you want to solve this problem, you must ensure the following things before taking the main steps:

  • The organization has granted you proper rights.
  • The Outlook app is genuine.
  • The internet connection is OK.
  • If you are using the Outlook Office app, you can use the built-in calendar app that comes with Windows 10 and 11 or vice versa. It may help you to create a new Outlook event.
  • For macOS, you can switch between the App Store version and the stand-alone version of the app to see if it helps.

After that, follow the methods one by one to repair the Outlook event creation error.

1. Use Outlook web

  1. Go to the Outlook Calendar site.
  2. Sign in if necessary.
  3. Click on New Event and add the event.clicking new event outlook calendar online

Please keep in mind that the Outlook calendar online URL is different for personal users and Microsoft 365 users. Your organization may have a custom link for this as well.
Not all browsers work great with Microsoft 365. So, we suggest you learn about these best Outlook 365 browsers.

2. Enable Outlook on the Web Access (OWA)

  1. Go to the Management tab.
  2. Navigate to Exchange Online and click on Mailbox Management.
  3. Under the Exchange Configurations section, click on Mailbox Features Settings.
  4. Now, Click on Enable for OWA, as shown in the screenshot.enabling owa office 365
  5. Click on Save.

Are the options different in your case? If yes, you will need to figure it out. If you are not being able to create any new outlook event, you can ask the administrator to enable OWA if possible. The administrator can enable this feature by following the above steps.

It is currently a known problem for organizations with OWA disabled. So, you also can choose to wait until Microsoft fixes it.

If your organization has enabled the OWA and you are still getting the problem, you should clear the outlook cache and see if it helps.

3. Sign out and sign in

  1. Open the Outlook or Calendar app.
  2. Go to Settings and click on Manage Accounts.going manage accounts windows 11 calendar app
  3. Click on the account you want to sign out.
  4. Click on Delete account from this device.deleting account outlook calendar windows 11 app
  5. Relaunch the app.
  6. From the Manage account, click on Add account.
  7. Provide account credentials and add again.

Are you using the built-in Outlook mail app? Learn how to log out from the Mail app on Windows.

If you are using the Outlook Microsoft Office or 365 desktop app, the options can be slightly different. We recommend you follow the clearing Outlook calendar cache part at the end of the article.

4. Re-install the app

  1. Press Win + I on the keyboard to open Windows Settings.
  2. Go to Apps and click on Installed apps.going installed apps windows 11 settings
  3. Click on the three horizontal dots next to Outlook and click on Uninstall.
  4. Download the app from the official source again.
  5. Install it on your PC.

How do I clear my Outlook calendar cache?

  1. Close the Outlook app.
  2. Press Win + R on the keyboard to open Run.opening outlook cache folder using run
  3. Type the following command and hit Enter: %LOCALAPPDATA%\Microsoft\Outlook\
  4. Rename the .ost file to something like oldname.ost.backup or anything you prefer.renaming ost outlook file cache

It will clear the Outlook calendar and account cache on Windows. On Mac, you will need to remove the account and add it again to do it. Alternatively, re-install the app.

This article has explained how you can fix can’t create a new Outlook event problem. If you have a different solution for this issue, feel free to write it down in the comments box.

How to Fix USB Device Not Recognized in Windows 11

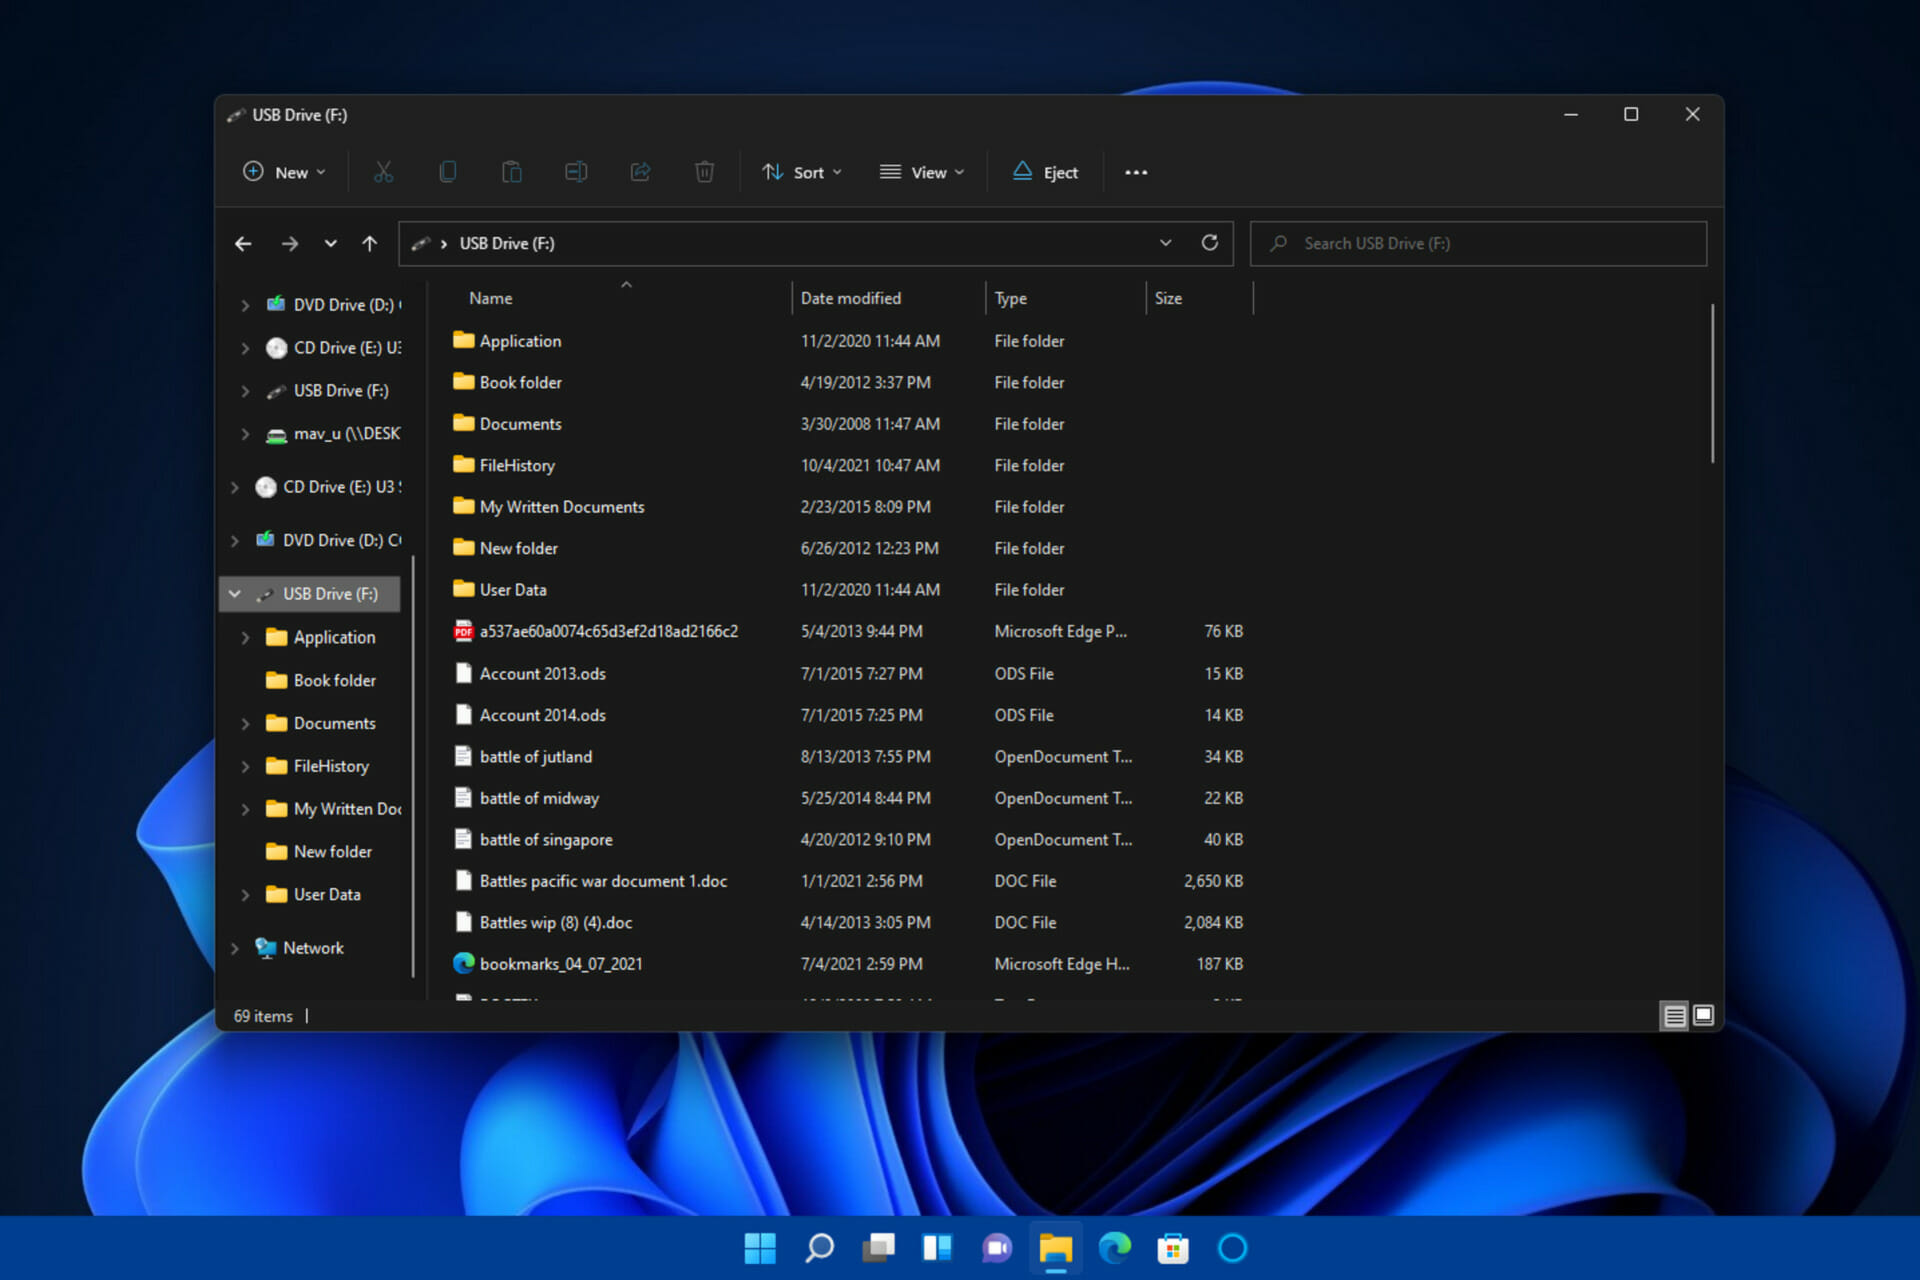
If you’re getting a not recognized error when trying to access your USB device in Windows 11 or it’s simply not showing up in File Explorer, keep reading. We’ll show you how to fix it.

The reason why your USB is not showing up in Windows 11 is most likely related to device drivers or power settings. Follow along as we show you how to address these issues.

How do I fix USB device not recognized by Windows 11?

1. Disable the selective suspend option

  1. Enter the keyword edit power plan in the search box. Click Edit power plan to bring up the Edit Power Plan Control Panel applet.
  2. Next, click Change advanced power settings in that applet.
    Change advanced power settings
  3. Double-click USB settings on the Power Options window.
  4. Then double-click USB selective suspend to open the setting that you can see below: Select the Disabled option on the Setting drop-down menu.usb selective suspend settings
  5. Press the Apply and OK button on the Power Options window.

2. Change the power management settings for USB root hubs

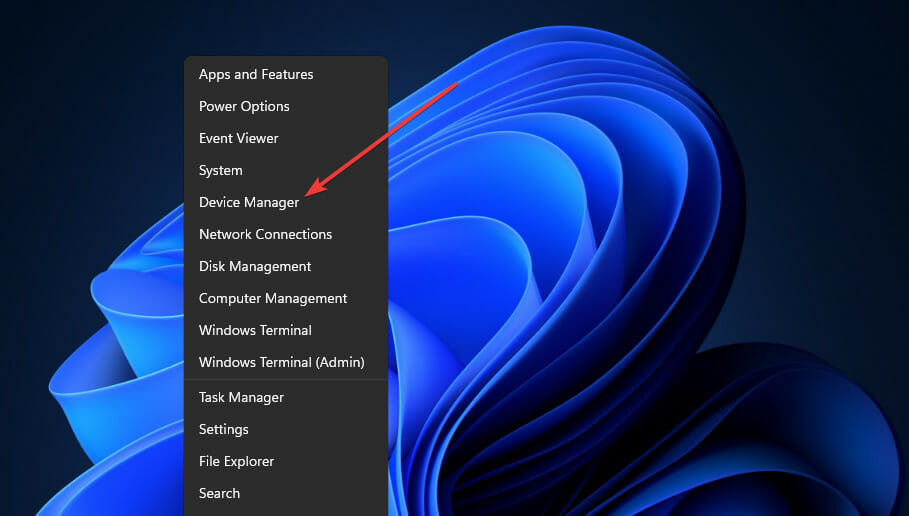
  1. Right-click Windows 11’s Start button to open a handy shortcuts menu.
  2. Select the Device Manager shortcut on that menu.
    Device Manager shortcut win + x menu
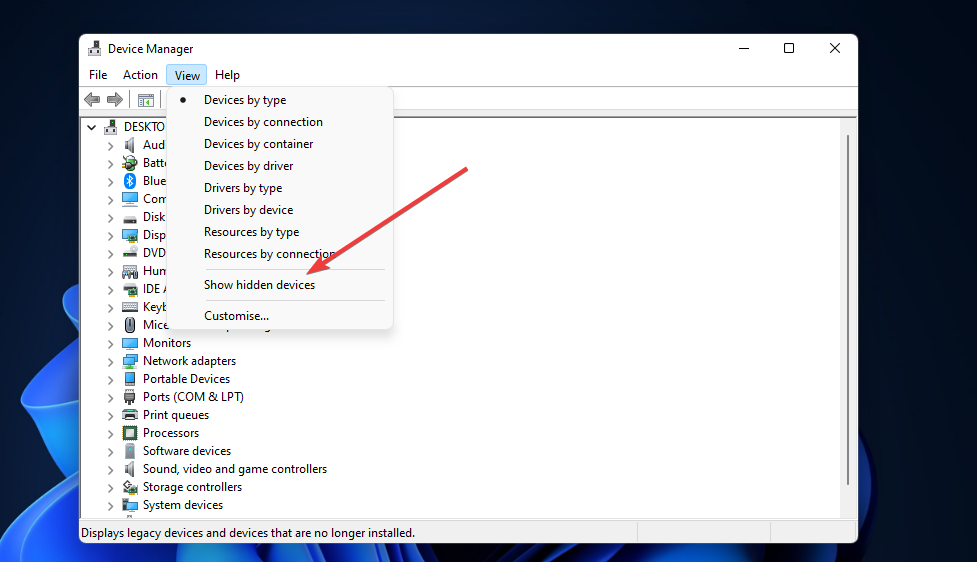
  3. Click the View menu.
  4. Select the Show hidden devices option on the menu.
    Show hidden devices option device manager
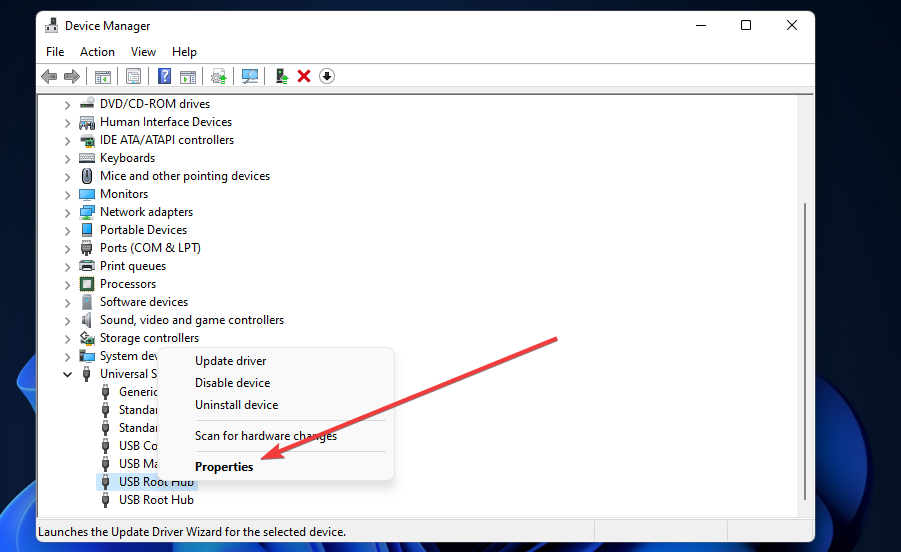
  5. Double-click the Universal Serial Bus controllers category.
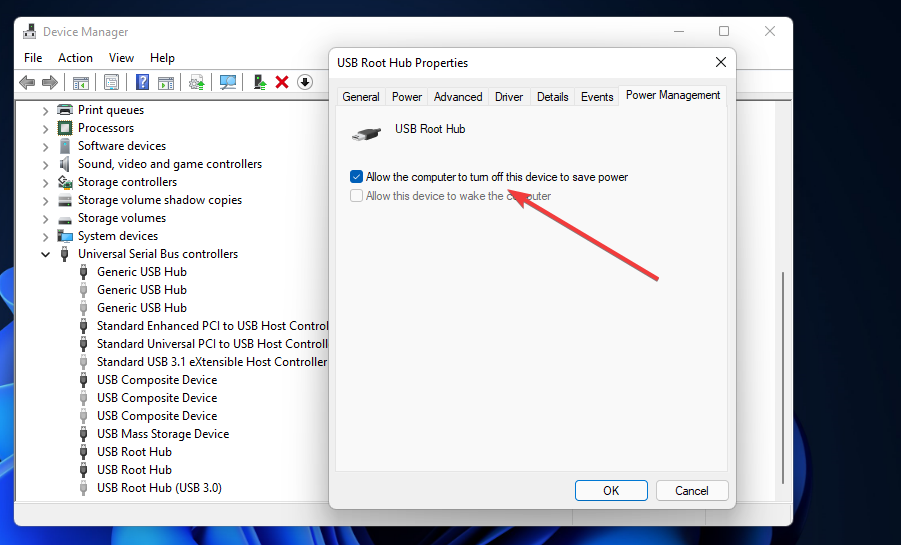
  6. Right-click a USB Root Hub listed there and select Properties.
    Properties option usb root
  7. Then select the Power Management tab.
  8. Uncheck the Allow this computer to turn off this device to save power checkbox to deselect that option.
    The Allow the computer to turn off this device checkbox
  9. Click OK to close the USB Root Hub window.
  10. Repeat steps six to nine for all USB Root Hubs listed in Device Manager.

3. Assign a drive letter to the USB device

  1. Plug the USB storage drive into your PC.
  2. Right-click Start and select Disk Management.
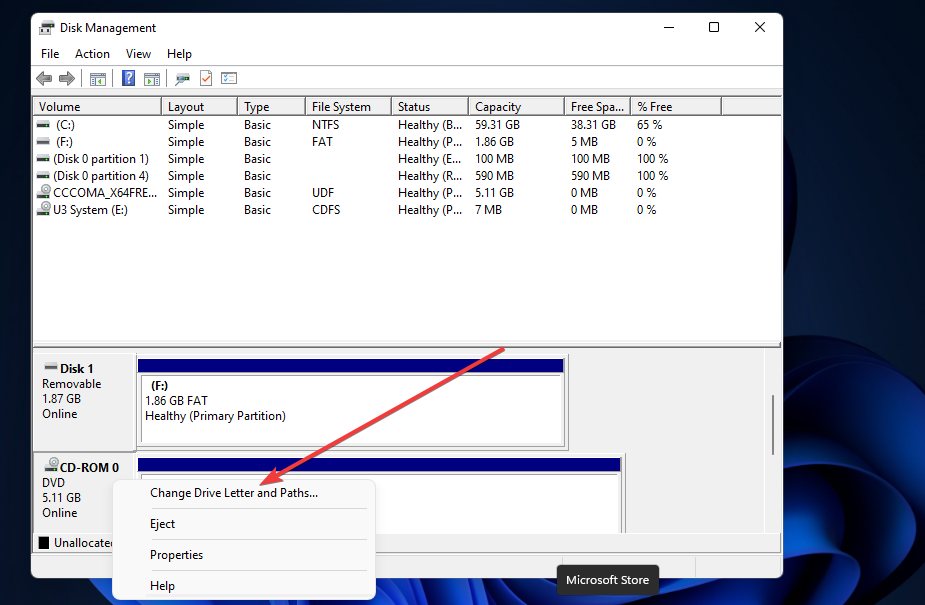
  3. Next, right-click the USB drive in Disk Management and select Change Drive Letter and Paths.
    Change Drive Letter and Paths
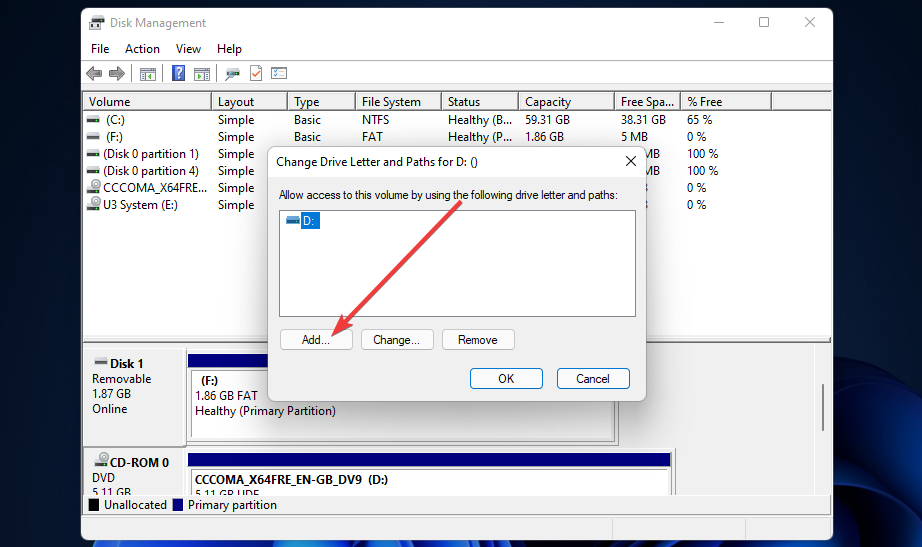
  4. Click the Add button on the Change Drive Letter and Path window that opens.
    Change Drive Letter and Paths window add button
  5. Press the OK button on the Add Drive Letter or Path window.

4. Update drivers for USB root and generic hubs

  1. Open Device Manager as covered in the first couple of steps of the third resolution.
  2. Next, click View and Show hidden devices.
  3. Double-click Universal Serial Bus controllers to expand that category.
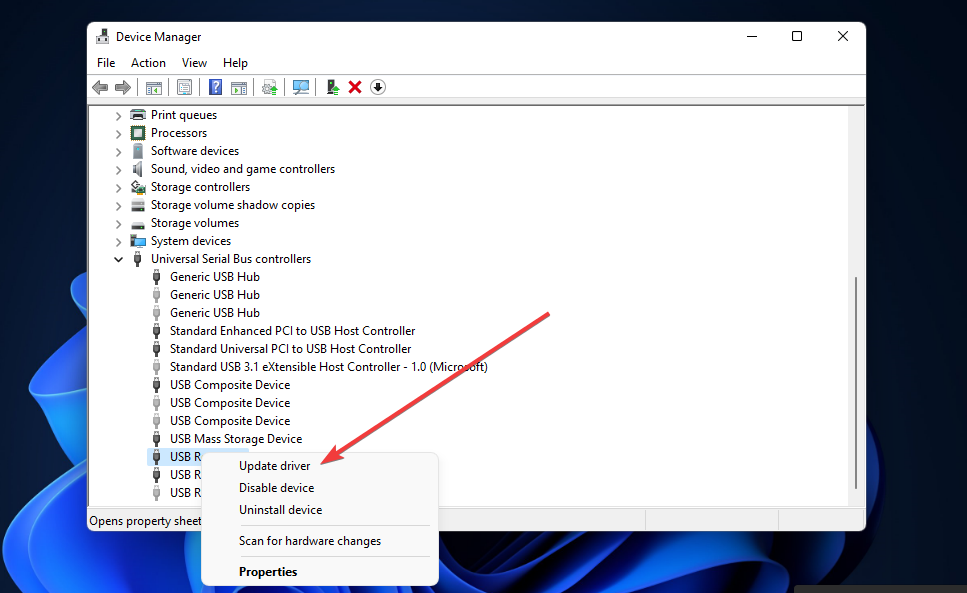
  4. Right-click a USB Root Hub to select its Update driver option.
    Update driver usb root hub
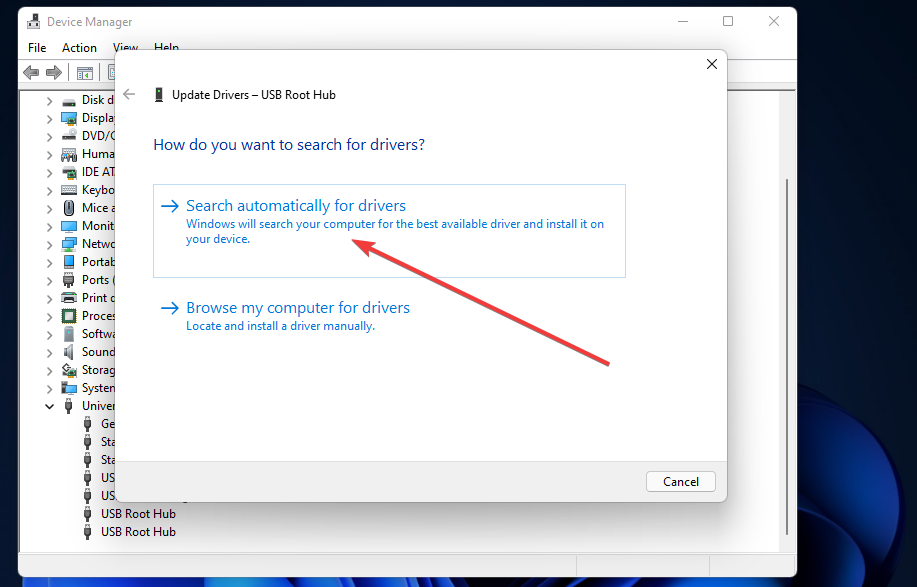
  5. Select Search automatically for drivers in the Update Drivers window that opens.
    Search automatically for drivers usb root device
  6. Repeat steps four and five for all USB Root Hub and Generic USB Hub controller devices listed.
  7. Optional: Reinstall the USB root driver and upgrade the chipset drivers.

In some cases, the problem may be linked to missing or outdated device-specific drivers. For example, hardware that relies on serial-to-USB connections often requires the FT232R USB UART driver to function correctly on Windows.

Likewise, if your board uses a CH340 chip, you’ll need to install the proper CH340 driver for Windows 10/11 to ensure detection.

Alternatively, you can update USB controller drivers with third-party driver updater software. Scanning your PC with a driver updater utility will list all its devices that have outdated drivers.

Then you can select to download and install the latest drivers with the software, so don’t hesitate to check out the tool below in that regard.

⇒ Get Fortect Driver Updater

5. Reinstall drivers for the USB drive that isn’t recognized

  1. Insert your USB drive into your desktop or laptop.
  2. Bring up the Device Manager window as covered in resolution three.
  3. Double-click Disk drives in Device Manager.
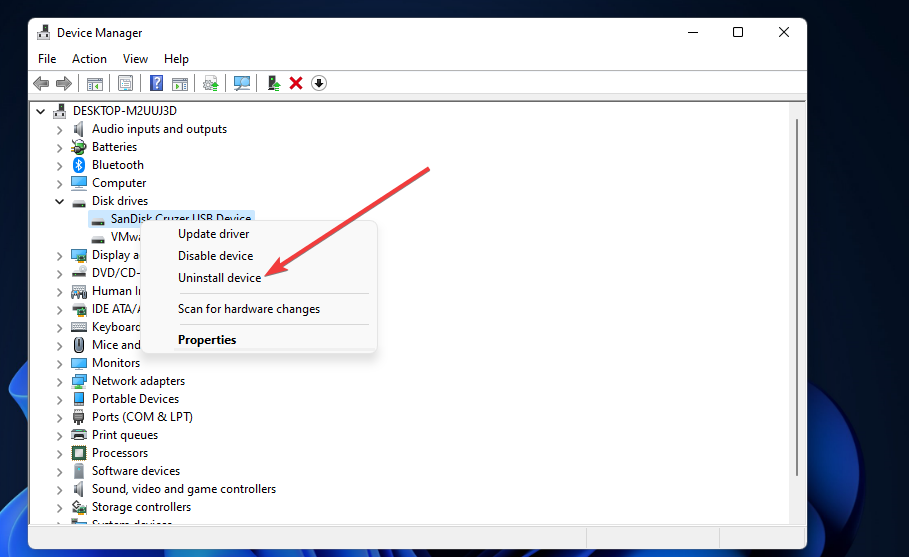
  4. Next, right-click the USB drive for which you need to fix the not recognized error to select Uninstall device.
    The Uninstall device manager
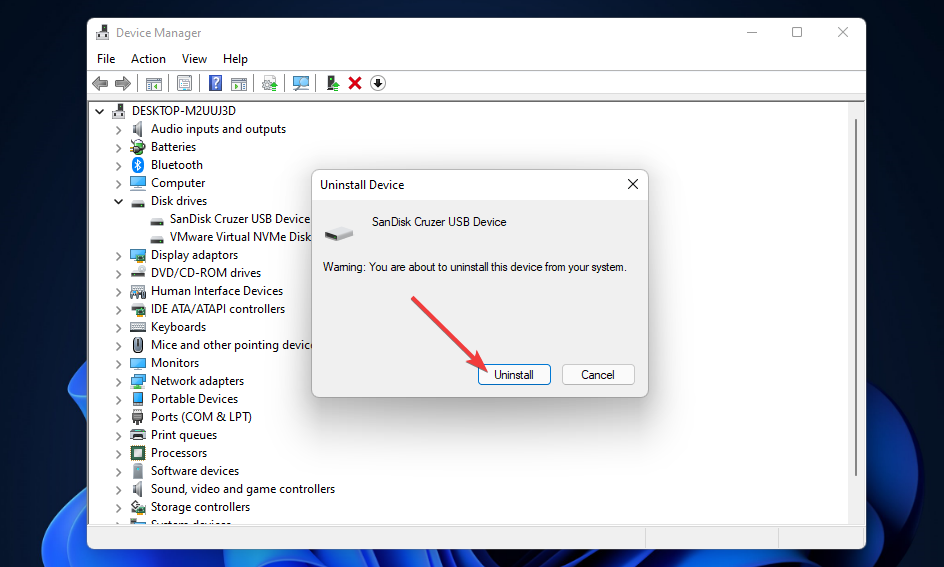
  5. Click the Uninstall button on the confirmation window that opens.
    Uninstall button device manager
  6. Thereafter, unplug your USB device from the PC.
  7. Wait about one or two minutes, and then connect the USB drive with your PC again.

This error is often associated with USB device not recognized code 43 in Windows 11, but we have an entire guide dedicated to it, so don’t miss it.

Many also reported the last USB device malfunctioned error in Windows 11, however that issue can be easily fixed.

If you’re experiencing issues with USB ports on Windows 10, you can find detailed troubleshooting tips in this guide to fix USB not working on Windows 10.

For problems with a USB to HDMI adapter, check out these solutions to resolve USB to HDMI adapter issues. If your USB-C to DisplayPort cable isn’t functioning as expected, this troubleshooting guide can help.

Finally, if a USB port on your TV has stopped working, this article offers fixes for USB ports not working on TVs.

As you can see, it’s pretty simple to fix this error, but if you’re using an older version of Windows, we have a guide on how fix USB device not recognized error in Windows 10, so don’t miss it for more solutions.

3 Ways to Fix the Xbox Error Code 0x800c0009

The Xbox One has a very powerful feature that lets you organize your games and apps into groups, so you can easily find them. This can be especially useful if you have a lot of games and don’t want to scroll through all of them every time you want to play something.

Recently, users have reported that they are bombarded with the error code 0x800c0009 whenever they try to add some of their favorite games to groups or when they try to create a new group. Elsewhere, others can’t join the Xbox party but we have already addressed the issue in our detailed guide.

Why am I getting the Xbox error code 0x800c0009?

If you get the Xbox error code 0x800c0009, it may be because of one of the following reasons:

  • Corrupted profile – If you have recently switched from one Xbox console to another, it is possible that the previous owner’s profile was corrupted, or the profile is not allowed.
  • Outdated Xbox console – You may experience issues with your Xbox if your console is outdated or hasn’t been updated in a while. 
  • Beta program bugs – The Xbox beta program is a great way to get early access to new features and test them out, but it also has its fair share of bugs.
  • The game is already in a group – If you’re attempting to add a game that’s already in one of your groups, then it won’t let you do so again. 
  • Unsupported game – You can only add games that you purchased directly from the Microsoft Store or have redeemed a code for to your library. 

How can I fix the Xbox error code 0x800c0009?

As always, a few preliminary checks can help address the issue instead of starting with advanced solutions. These include:

  • Check your internet speeds and ensure that they are optimal.
  • Make sure you’re signed in with your Microsoft account.
  • Ensure the game you’re adding is compatible with your Xbox version.
  • Finally, restart your console and check if the error persists.

1. Update your Xbox console

  1. Press the Xbox button on your console and click on your account icon to open Settings.
  2. Click on Devices and connections.
  3. Select Accessories.
  4. Click on your Xbox controller and select Update now and restart once it is finished.

2. Exit the Insider/beta group

  1. On your Xbox, navigate to the landing page, then click on Previews.
  2. Select Xbox Insider Hub.
  3. Click on Manage.
  4. Select the beta program you’d like to exit and select Leave Preview.

Xbox Insider is a program that allows you to register your console and then participate in the testing of new features before they are released to the general public. However, it’s not without its problems. You can opt-out of the program and check whether the error code 0x800c0009 still appears.

3. Reset your Xbox console

  1. On your controller, press the Xbox button, and on the menu, click the System tab to open Settings.
  2. Select System, then click on Console info.
  3. Click on Reset console.
  4. Choose Reset and keep my games & apps.

And that’s how you solve the Xbox error 0x800c0009. Hopefully, you get to save your games in groups again.

You may also be interested in how to record party chats, and we have just the perfect article to help you get started.

Do let us know if you have been able to resolve this issue in the comment section below.

uiautomationcore.dll Missing: How to Download & Fix it

Encountering The program can’t start because uiautomationcore.dll is missing from your computer error indicates that the file is not available or accessible. Hence, the programs that need it can’t start due to its inaccessibility on Windows 10.

Also, you may run into Windows.devices.smartcards.dll missing error due to missing files on your PC.

Why is uiautomationcore.dll missing?

The uiautomationcore.dll missing on Windows 11 can be due to many factors. Corrupt system files can cause the uiautomationcore.dll file on your computer to be unavailable or missing. Also, corrupt files impede the activities of other components on your computer.

Furthermore, you can run into the uiautomationcore.dll missing error due to other factors such as:

  • Missing or deleted uiautomationcore.dll file – The error can occur if the DLL file is missing or deleted from the Windows Registry. It affects its functionality because it is no longer intact. So, the services dependent on it won’t work, resulting in the error.
  • Outdated Windows OS – Windows devices are known to run into several issues when the Operating System is outdated. It indicates the lack of necessary Windows Updates for fixing bugs. So, the missing file error may occur if Windows is not up to date.
  • Malicious software – Users can encounter the uiautomationcore.dll missing error due to the malicious apps on the computer. This faulty software can disrupt other programs running on the PC and cause your system files to miss or become inaccessible.

There are various instances where you can encounter the uiautomationcore.dll missing error. Nevertheless, you can fix them by troubleshooting your PC.

How do I fix uiautomationcore.dll if it’s missing on my Windows 10?

Before proceeding with any solution for the error on Windows 10, go through the following preliminary checks:

Try the solutions below if you can’t fix the error:

1. Run a System File Checker (SFC scan)

  1. Left-click the Start button, type Command Prompt, and select Run as administrator.
  2. Click Yes on the User Account Control window.
  3. Type the following and press Enter: sfc /scannow
  4. Restart your PC and check if the error persists.

Running an SFC scan will find and repair corrupt system files causing the missing system file error. Also, it can restore the uiautomationcore.dll file if it is corrupt. Read about fixing the run as administrator option if it’s not working on your PC.

Besides manually running an SFC scan, you can also opt for a specialized tool that can execute this procedure automatically.

2. Run System Restore

  1. Left-click the Start button and type Restore, then click on Create a Restore Point.
  2. Go to the System Protection tab, and select System Restore.
  3. Choose a different system restore and click Next to select a specific Restore Point.
  4. Select the last time your PC worked perfectly, and click Next.
  5. Click the Finish button.

The System Restore will backdate your PC to the last time it functioned properly, removing the corrupt items causing the error. Check how to fix Restore Point if it’s not working and if you have any issues running it on your PC.

3. Update Windows OS

  1. Press Windows + I key to open the Settings app.
  2. Click on Windows Update and select Check for updates.

If there are any updates available, Windows will search for and install them. Update Windows OS will fix bugs affecting your PC and update your drivers. check how to fix Windows not connecting to update services on your PC.

4. Download and re-register the uiautomationcore.dll file

Note icon NOTE
We’d never ask you to download from any untrusted site. However, our expert has tested this procedure to ensure its safety.
  1. Launch your browser and download the correct version of uiautomationCore.dll for your PC.
  2. Open the downloaded zip file, click the Extract icon at the top bar and select Desktop for a location to extract the DLL file.
  3. Left-click the Start button, type Command Prompt, and click Run as administrator.
  4. Click Yes on the User Account Control prompt.
  5. Type this command and press Enter: regsvr32 uiautomationcore.dll
  6. Restart your PC.

Replacing the file should fix the error. The uiautomationcore.dll missing error should cease to pop up on your PC after this.

Alternatively, you can read our detailed guide about fixing DLL files missing from your PC.

Also, our readers may be interested in our article on fixing a corrupt bootres.dll file in Windows 10/11.

If you have further questions or suggestions, ensure to drop them in the comments section.

Combase.dll: How to Fix It if It’s Missing or Crashing

Many users report getting the combase.dll not found error while installing or starting an app on Windows 10/11. It can be because the Microsoft COM file is not available to help run Windows programs correctly.

Another missing file error is the Autorun.dll error on Windows 10/11, which prevents users from installing or updating programs.

What is Combase.dll?

Combase.dll is a Windows Dynamic Link Library file responsible for running Windows programs properly on the PC. It contains functions, instructions, and procedures used by Windows programs.

Furthermore, it is essential for running .exe programs on Windows 11. It is because it offers quick access to instructions and data necessary for applications to work.

Why is Combase.dll missing?

The combase.dll file missing on your PC can be due to many factors, including the corrupt combase.dll file.

Many users report that they start experiencing the error after updating Windows OS. The update might have installed a bug that has corrupted system files on Windows 11, causing it to be unusable or crash.

Also, you can encounter the combase.dll missing error because of other reasons, such as:

  • The combase.dll file is deleted – Users can mistakenly delete the combase.dll file from their computers while tweaking their registry. So, the programs that need the file won’t have access to it, resulting in the combase.dll missing error.
  • Malware attack – Malware on your computer can affect its performance and cause some components to not work properly. It can infect the combase.dll file, causing it to crash or miss.

Fortunately, there are a couple of fixes that you can use for the error.

How do I fix Combase.dll if it’s crashing or missing in Windows 11?

Go through the following preliminary checks before trying any advanced steps:

Go ahead with the following solutions if it persists:

1. Run a System File Checker scan

  1. Left-click the Start button, type Command Prompt, and select Run as administrator.
  2. Select Yes on the User Account Control interface.
  3. Type this command and press Enter: sfc /scannow
  4. Restart your PC and check if the combase.dll problem persists.

Running a System File Checker scan will detect corrupt system files on your PC, repair them and restore the combase.dll file on Windows 11.

If you don’t want to manually run a System File Checker scan, then we recommend you try using an automated repair tool.

Check our article about what to do if nothing happens when you select run as administrator on Windows 10/11.

2. Update your Windows OS

  1. Press Windows + I key to open the Windows Settings app.
  2. Click on Windows Update and click on Check for updates.

If there are any updates available, Windows will search for and install them. Updating Windows OS will fix bugs affecting your PC and update your drivers.

Read about fixing Windows not connecting to update service if the error occurs on your PC.

3. Re-register the DLL

  1. Left-click the Start button, type Command Prompt, and click Run as administrator.
  2. Click Yes on the User Account Control prompt.
  3. Type this command and press Enter: regsvr32 combase.dll
  4. Restart your PC and check if the error persists.

Re-registering the combase.dll file will rewrite and prompt it to appear when initialized.

4. Run DISM (Disk Image Servicing and Management) scan

  1. Left-click the Start button, type Command Prompt, and select Run as administrator.
  2. Select Yes on the User Account Control interface.
  3. Type the following and press Enter to execute the command: DISM.exe /Online /Cleanup-image /Restorehealth
  4. Restart your PC and check if the combase.dll problem persists.

The DISM scan will scan for corrupt files and components, then repair any problems it detects on your PC.

In conclusion, our readers may be interested in fixing the corrupt bootres.dll file in Windows 10/11 as it can cause the system not to boot.

Kindly leave your comments if you have any suggestions or questions below.

How to Test the Mic on Your Chromebook [Easy Steps]

If you are looking for a way to test your microphone on your Chromebook, you are at the right place. This guide will discuss how to do the same in three different ways. Let’s begin.

How can I test the mic on Chromebook?

Before moving forward to the actual steps, make sure you make these preliminary checks:

  • Google Chrome is up to date.
  • If you use an external mic, plug it in correctly before starting. 
  • If using an internal mic, check if the mic is turned on.

1. Use the inbuilt camera app

  1. Go to the Circle menu on the left of the Chromebook desktop, and click the Camera icon. 
  2. The Camera app will open. Click the Video button to record the video and test the microphone.
    Video button
  3. Next, the microphone will also appear on the screen; please ensure it is enabled.
    Microphone enabled
  4. Click on the Start Recording button to record, and start speaking something.
  5. Once done, click the Stop Recording button and play the video to check.

2. Use the Google voice search

  1. Go to Google.
  2. Click on the Search by voice icon.
    Search by voice
  3. You will get a pop-up menu asking permission to access the microphone. Click Allow.
    Allow 2
  4. Now click on the Search by voice icon and speak. If you see the words appearing when you talk, this suggests your microphone is working.
    Google voice search -how to test mic on chromebook

3. Use a website

  1. Go to Online MIC Test.
  2. Under The mic test option, click on the Play button.
    MIC test
  3. Your browser will prompt you to Allow/Block access to a microphone. Click Allow.
    Allow access - MIC test chromebook
  4. Now talk into the mic; if you see lines moving, your microphone is working.
    Microphone record

So, these are steps to test your mic on a Chromebook. If you might encounter any issues with the Chromebook camera, you can also check how to fix them here. If you have an issue with your microphone or want to check if it is working correctly, review them and let us know which worked for you in the comments section below.

How to Use a VPN with Brave Browser on PC [Properly]

Brave is a privacy-focused desktop and mobile browser. It rolls a firewall and a VPN into one, making it fairly secure.

But does this mean you wouldn’t need a third-party VPN when surfing the web with Brave?

Let’s find out.

Does Brave have a VPN for PC?

Brave is based on Google’s open-source Chromium code, so any ethical hacker can dissect it and look for security vulnerabilities.

Like Google Chrome, Brave doesn’t cost a dime to download. As long as no firewall or antivirus is interrupting its installation process, it’s painless to set up.

But what separates it from Chrome is that it rejects trackers by default. Plus, it can shield you from malicious files that can infect your device.

Moreover, this powerful browser uses less memory and helps prolong the battery life of your electronics.

Since it doesn’t collect and sell data to keep the lights on like tech giants do, it generates revenue by offering its native premium VPN service, among others.

The problem is that it’s currently available to iOS and Android users only. As of writing, the Brave VPN PC versions are still in the works.

That said, Brave can still hide your IP address.

By opening this browser’s private window, you can use Tor as a web proxy to help obscure your location and search with peace of mind using DuckDuckGo.

Still, Brave can’t encrypt the data tunnels of PCs yet.

Luckily, you can easily add a robust third-party VPN to Brave on Windows because it supports most, if not all, Chrome extensions found in the Chrome Web Store.

How to enable a VPN in Brave Browser on a PC

For this setup instruction, let’s use Surfshark VPN as an example:

  1. Go to Surfshark VPN’s website and create an account.
surfshark vpn subscriptions
  1. Launch Brave.
  2. Click the hamburger icon for Settings.
brave browser home screen settings
  1. Choose Extensions.
  2. Select Web Store.
brave browser web store
  1. Type in Surfshark VPN in the search bar.
brave borwser surfshark vpn extension
  1. Add Surfshark VPN to Brave.
brave surfshark vpn add extension
  1. Click the puzzle piece icon for Extensions.
brave browser home screen extensions
  1. Enter your Surfshark VPN credentials to log in.
brave surfshark vpn log in
  1. Choose the shield icon for VPN.
brave.com vpn quick connect
  1. Select the server location you wish to connect to.
surfshark vpn server locations
  1. Start browsing when your connection is successful.
brave surfshark vpn connected to australia server

Which are the best VPN services for the Brave PC browser?

Here are the best options when pairing Brave with a third-party VPN:

Surfshark VPN – The most affordable

surfshark vpn interface

Surfshark is a Windows, Chrome, and router VPN with a global network of 3,200+ RAM-only servers in 100+ countries.

With no simultaneous connection cap, you can install it on as many PCs as you want.

Surfshark VPN’s impressive feature set includes a kill switch, system- and app-level split tunneling, MultiHop, and an IP rotator.

What’s more, this service prevents DNS leaks, offers static IPs, and can route Brave traffic through encrypted tunnels using OpenVPN, IKEv2, and WireGuard.

To top it all, you’ll get a 30-day money-back guarantee after placing your order.

Surfshark

Boost your online security and use Surfshark with Brave Browser on all your devices.

Private Internet Access (PIA) – Great for security

Interface of Private Internet Access VPn connected to Pennsylvania IP

With PIA, you can obscure your Brave traffic via its open-source Windows app or Chrome extension, or install it directly on your router.

This provider’s server fleet covers 80+ territories, with most of its 10Gbps RAM-only hardware housed in the US.

But, despite the dangers of operating on Uncle Sam’s turf, PIA’s no-logs policy has been able to hold up multiple times in the past.

This VPN vendor sells dedicated IPs as extras. But its regular subscriptions include WireGuard and OpenVPN protocol options and SOCKS5 proxies.

PIA plans permit up to 10 simultaneous device connections and come with a 30-day refund guarantee.

Private Internet Access

Keep your Brave browsing traffic hidden with PIA’s advanced obfuscation features.

ExpressVPN – Amazing speed

expressvpn locations

ExpressVPN offers IPs from 94 countries and territories. And you can pair it with Brave through its Chrome extension, Windows app, or your router.

This VPN provider runs its servers on RAM instead of hard drives, emptying data storage after every reboot.

Rounding out its arsenal are OpenVPN and Lightway protocols, the Network Lock kill switch, split tunneling, and IPv6 leak protection.

ExpressVPN gives you up to five simultaneous connections.

All plans come with a 30-day money-back guarantee to make your purchase risk-free.

ExpressVPN

Enjoy world-class online privacy protection and full support for Brave Browser with ExpressVPN.

NordVPN – Wide server network

nordvpn server map

Like every good Brave VPN for Windows, NordVPN has a native Windows app, Chrome extension, and supports routers.

Its network of 5000+ 10Gbps servers encompasses 50+ countries and territories. And it has specialty hardware capable of obfuscation, double VPN, and Onion over VPN

Likewise, it runs private DNS, gives access to dedicated IP addresses, promises IPv6 leak protection, and has a kill switch. On top of that, it has dark web monitoring capabilities.

When it comes to tunneling protocols, NordVPN uses OpenVPN and IKEv2/IPSec. It doesn’t support WireGuard, as its proprietary option NordLynx is arguably a better version of it.

With NordVPN, you can securely browse the internet through Brave using the service on up to six devices at the same time.

And you get a full refund if you decide to cancel your subscription within the first 30 days.

NordVPN

Enjoy all the security features you’ll ever need with NordVPN’s robust and reliable service.

CyberGhost – Perfect for European users

cyberghost interface

CyberGhost controls 9,100+ VPN servers that can provide shared IPs associated with 110+ global locations. And it offers full Brave VPN PC support.

What’s more, this VPN vendor refuses to use third-party data centers. It self-manages its so-called NoSpy servers in its own facilities to keep malicious parties at bay.

Like every Brave VPN for desktop worth its salt, CyberGhost employs military-grade encryption, leverages OpenVPN, IKEv2, and WireGuard protocols, uses RAM storage, and has a kill switch.

More importantly, this VPN provider takes pride in its streaming-optimized hardware, which does a great job of unblocking popular streaming platforms in various countries. 

And you can pair it with Brave on up to seven devices.

This vendor is so confident that you won’t regret your purchase, it boldly offers a full refund within 45 days.

Additionally, you can download and use its Chrome extension at no cost, albeit with limited server location options.

CyberGhost

Access a staggering number of servers from around the globe and boost your browsing privacy with CyberGhost.

Conclusion

It’s a bummer that the Brave VPN PC subscription remains unavailable. But it may be a blessing in disguise.

If you use Brave with an established third-party VPN, you’ll be able to push the boundaries of this celebrated privacy-focused browser.

Excel Out of Memory: 5 Quick Tips to Fix It For Good

If you work in an organization, you most probably have the latest version of the Microsoft Office suite or Office 365 installed on your PC. Even if you don’t, it’s very unlikely that you have never heard of Microsoft Excel before.

However, this doesn’t make Excel immune to occasional bugs. Such would be the case with an error message users have been reporting, which looks something like this: Out of Memory. Not enough System Resources to Display Completely.

Why does Excel say out of memory?

There is not a single cause for this Excel message to appear, so you should consider a number of reasons. For example, the error may occur because you’re running other consuming apps in the background

Other factors that generate Excel out-of-memory issues are added macros or add-ins included in your sheets.

How do you clear memory in Excel?

The most used and easy solution to clear the memory in Excel is to erase its cache data. In order to do so, you should use the Microsoft Office Upload Center.

You can simply go to Settings and then look for the Delete files from the Office Document Cache when they are closed option. Tick the option and press Delete cached files.

How do I fix Excel not enough memory?

✅ Pre-checks: Check the contents of the spreadsheet

These are the main things that cause the out-of-memory error messages:

  • Inserting a row or column
  • Performing calculations
  • Copy and pasting
  • Sorting
  • Opening or closing the workbook
  • Running VBA

If you are doing any of the actions mentioned above and you receive the error, check what exactly is wrong. If that is the case, try doing the following:

  1. Recheck the formulas
  2. Recheck the calculations
  3. Avoid using excess shapes
  4. Avoid using complex PivotTables
  5. Try not to use macros and complex charts with many data points

1. Check your Excel Add-ins

    If you believe an Excel add-in is responsible for Excel out of memory error, try disabling it and then check if the error appears again. Check the steps below for the support.

  1. 1. Click on the File option.

    excel file menu
  2. 2. Go to Options.

    not-enough-disk-space-excel
  3. 3. Select Add-ins.

    excel-insufficient-memory
  4. 4. Click the Go button.

  5. 5. Select the add-ins you want to disable or remove.

  6. 6. Uncheck the box in front of the respective add-in.

  7. 7. Click OK and Save.

2. Verify Excel or install the latest updates

  1. Right-click the Start button
  2. Select Apps and Features on the pop-up menu.
  3. Select Microsoft Excel, and select Modify

Depending on whether your copy of Office is Click-to-run or MSI-based install, the next steps will vary a little.

2.1. Click-to-run

A window called How would you like to repair your Office Programs will appear

office 365 not enough system resources to display completely repair
  1. Select Online Repair
  2. Choose Repair to make sure everything gets fixed
    • The Quick Repair option is faster but it only detects and then replaces corrupted files

2.2. MSI-based

  1. In Change your installation, select Repair
  2. Click Continue
  3. Follow the given instruction to complete the process

3. Disable your Antivirus

Antivirus software will usually run in the background scanning your Excel file as you make it. This will usually make Excel run out of memory and thus trigger the error message.

Disable your antivirus program and see if Excel still encounters this error. Remember that each antivirus program is disabled in a different way, so check the documentation on the developer’s website for more info.

4. Use the 64-bit version of Excel

The 32-bit version of Microsoft Excel has a is 2 GB limitation. So, if the processes require more than 2 GB, Microsoft excel will run out of memory and the error message will appear.

Moving to the Microsoft Excel 64-bit version provides more space and will thus solve any memory-related issues you may have with the application.

5. Completely reinstall Microsoft Excel

Sometimes we have no choice but to start from scratch. Such would be the case if all the above-mentioned solutions fail to solve your problem.

  1. Remove your old Microsoft Office completely
  2. Go to the Microsoft Office product page
  3. Buy the Office package of your choice
  4. Log in using your Microsoft account credentials
  5. Select Install Now to save the installation file on your PC
  6. Double-click on the downloaded file and follow the on-screen instructions

Did our guide help you in getting rid of the memory-related error in Excel? Let us know in the comments section below.

How to Enable And Use Compatibility View Settings in Edge?

After discontinuing Internet Explorer, Microsoft ensured that users porting to Microsoft Edge didn’t have to find other solutions to view old websites. That’s why the tech giant introduced the Compatibility mode on Edge.

This guide will discuss how to enable the compatibility view in the Edge browser on Windows 10 and make the transition from IE smoother.

How can I enable compatibility view settings in Edge?

  1. Launch Edge browser.
  2. Press Alt + F to open the Edge menu. Click Settings from the given options.Microsoft Edge compatibitity view Windows 10
  3. Select the Default browser option from the Settings page’s left pane.
  4. Under Internet Explorer compatibility, click on the drop-down beside Allow sites to be reloaded in Internet Explorer mode (IE mode) and choose Allow.Compatibility view Edge
  5. Click Restart to reopen the browser and let the changes take effect.Restart Edge

How can I use compatibility view settings in Edge?

  1. Open a website as usual. 
  2. Right-click on the tab, and select Reload tab in Internet Explorer mode from the context menu.Compatibility view
  3. The page will load with the Internet Explorer icon. Once it is loaded, click on the icon. Compatibility
  4.  You will get a pop-up menu. You can toggle on the switch for Open this page in Internet Explorer mode next time option and Open this page in Compatibility view, then click Done. If you don’t want that, skip it and click Done.
  5. To exit this mode, right-click on the tab and click the Exit tab from the Internet Explorer mode option. Exit the compatibility view
  6. You can view the pages added to always open in Compatibility mode under Internet Explorer mode pages in Edge Settings.View added sites.

Note: If you enable Open this page in Internet Explorer mode next time option, please remember it will only be enabled for 30 days. After that, you need to turn on the feature for the website again.

So, now you can open and view websites in compatibility view on Edge browser on Windows 10 and 11.

What do you think about this feature? Feel free to let us know in the comments section below.

FIX: Igfxem Module High CPU and Memory Usage: 5 Ways

The Igfxem.exe is related to Intel’s Common User Interface Module, and it determines how the required configurations will be accessed by other programs.

But sometimes it comes into conflict with other software, and in an attempt to occupy more CPU time with the effort to execute what has been demanded of it, it eventually causes the CPU overload.

Additionally, some malware is cheekily named the same and could be the actual reason behind the persistent Igfxem high CPU utilization.

This can be a serious problem, and in today’s article, we’ll show you how to safely fix this issue.

How do I fix the Igfxem.exe high CPU and memory usage?

1. Scan your system for malware

First, eliminate the probability that your copy of Igfxem.exe is indeed a virus by performing a comprehensive virus and malware scan on your PC.

In order to perform the scan, we recommend a reliable antivirus program that protects your computer against malware and other hidden or hard to detect threats.

A combination of a classic virus scanner, a behavior-based adware detection, and also cloud functionality ensures accuracy and prevents the Igfxem high CPU usage.

Antimalware software searches a computer device for malware in order to detect, trace, and remove it. When you want to detect malfunctions, it’s always a good idea to rely on this additional defense.

These great programs employ over-the-edge Artificial Intelligence technology to predict, identify, and quickly stop even the most recent attacks, Trojans, malware, spyware, and other Internet perils.

2. Update the Intel graphics cards driver

  1. Download the applicable driver from Intel’s Download Center.
  2. Unzip the file to your preferred location or folder.
  3. Press Windows Key + R.
  4. Type devmgmt.msc, and click OK.
  5. Click to expand the Display adapters section.
  6. Right-click on the Intel graphics option and choose Update Driver Software.
  7. Choose Browse my computer for driver software.
  8. Select Browse and navigate to the directory where you unzipped the driver files.
  9. Click OK then Next.
  10. Restart your PC.

You can fix the igfxem.exe high CPU usage problem by updating your version of the Intel graphics card driver.

The process is closely connected with your PC’s graphical processing unit so upgrading to the latest GPU drivers could help.

If you find the previous method too difficult, you can always use third-party solutions to automatically update all outdated drivers with just a couple of clicks.

We strongly recommend the Outbyte Driver Updater tool to update your drivers in order to avoid damage to your PC by manually downloading the wrong driver versions.

In order to keep your PC including hardware components safe and efficient, the latest drivers should always be installed, like the Intel graphics cards driver.

This great tool was developed so that you do not have to worry about manually downloading and installing your drivers yourself. Already installed drivers can also be stored in an archive and used, for example, when the system is restored.

However, a tool like Outbyte Driver Updater not only downloads and installs drivers, but also manages them by troubleshooting, backing up, and restoring them, so you can rely on it all the time.

⇒ Get Outbyte Driver Updater

3. Restart the Igfxem.exe process

  1. Press Ctrl + Shift + Esc to open Task Manager.
  2. Head over to the Processes area and look for igfxem.exe.
  3. Right-click on it, and choose End task.

If disinfecting your system didn’t help, and you’re still having problems with igfxem.exe high CPU usage consider suspending the igfxem.exe process.

4. Block the Igfxem.exe process from running at startup

  1. Press the Windows + R, and type msconfig.
  2. Press Enter to open the System Configuration.
  3. Locate the Services tab, and find the igfxem module.
  4. Uncheck the checkbox, press Apply and OK.

You can fix the Igfxem.exe high CPU usage problem simply by preventing the application from running at startup.

Note: Repeat the above steps in the future when you want to use the service. Just be sure to enable the service and save changes.

5. Halt all unnecessary processes

  1. Go back to the Task Manager’s Processes tab and study how much CPU resource each app is holding.
  2. Terminate every program with a high CPU usage.
  3. To be on the safe side, only do this after shutting down your other programs.

When you terminate the programs with a high CPU usage, you should be careful not to interfere with some fundamental operating system running processes such as explorer.exe and winlogon.exe.


These are some of the solutions that can help you fix the Igfxem.exe high CPU usage problem, so we hope it helps you when you find it difficult to start the troubleshooting.

If you have any further suggestions on this topic, feel free to drop us a line in the comments section below.

[wl_navigator]

Fix Intel Technology Access Service.exe high CPU usage

Windows is an extremely complicated piece of software. At times, some process may start hogging all the available resources of your system leading to instability issues. Just like the IntelTechnologyAccessService.exe causes high CPU usage for some users.

What is Intel Technology Access Service?

The Intel Technology Access service is a part of Intel Online Connect Access. Intel uses the process to provide a safe and secure way of making fingerprint touch payments.

Basically, the process is related to your Laptop’s fingerprint access and includes a built-in two factory authentication system for security. It sometimes goes rogue and thus its respective service, IntelTechnologyAccessService.exe, consumes large portions of CPU and HDD processing.

However, the service can often create problems with the system resources and leave the user with little to no resources to perform other actions. You can easily disable the service, following the steps given below.

How do I fix Intel Technology Access Service high CPU?

Method 1: Disable Intel Technology Access Service

If you don’t want to remove all the functionalities that come with this Intel process, you can simply disable the process from auto-restarting from the services window. Here is how to do it.

  1. Press Windows Key + R, to open Run.
  2. Type services.msc and click OK to open the Services window.
  3. In services, locate “IntelTechnologyAccessService.exe” process.
  4. Right-click on IntelTechnologyAccessService.exe and select Properties.
  5. For the Startup type, click on the drop-down menu and select Disable. If you want to be able to start the process manually, select Manual. But, I would recommend you to select Disable for now.
  6. Now, under the Status, click on the Stop button to kill the service.
  7. Click Apply and then OK to save the changes.
  8. Close the Services window and reboot your system.

After the restart, open the Task manager and check if the IntelTechnologyAccessService.exe service has started again. If the issue persists, you can uninstall the program to fix the issue.

Method 2: Uninstall Intel Management Engine Components

The IntelTechnologyAccessService.exe process is a part of a tool called Intel Management Engine Components. If you want to remove the software, you can uninstall the software from the Control Panel or Settings.

Create a Restore Point

Before trying to remove or uninstall any of the system related or hardware related programs, it is recommended to create a Restore Point. If anything goes wrong, you can easily roll back the changes through the Restore Points. Here is how to create Restore Points in Windows 10.

  1. In the Cortana/search bar, type Restore Point and select “Create a Restore Point” option.
  2. In the System Properties window, click on the Create button (refer the image).
    Restore Point - System Properties - Create
  3. It will ask you to enter a description and time for the restore point to identify it in the future quickly.
    Restore Point - System Properties - Create - Enter name
  4. Click on the Create button and System Protection will start creating a Restore point for your C: drive.
  5. Once the System Restore Point is created, you will see a “The restore point was created successfully” message.

You can proceed with deleting/uninstalling Intel Management Component once the Restore Point is created.

  1. Open Control Panel and go to Programs > Programs and features.

  2. Select Intel Management Engine Components and select Uninstall.

Alternatively, you can also remove it from the Settings interface.

  1. Click on Start and select Settings.
  2. Click on Apps > Apps and Features.
    Intel Management Component Uninstall
  3. Look for Intel Management Engine Components. Click on the software and select Uninstall.
  4. Close the Settings interface and restart the system.
  5. After the restart, open the task manager and check if the problem is resolved.

That should deal with the IntelTechnologyAccessService.exe process for good. If you have further issues with it, make sure to tell us in the comments section below. We might look into alternative ways to solve it.

FIX: Client Server Runtime Process High CPU Usage

If you’re a longtime Windows user, you’ve probably bumped into one or more system processes that tilt CPU to sky limits.

Some are less common, some are almost automatically implemented with the system (Windows Update process in Windows 7).

One of the rare ones that can occasionally take hold of your CPU in Windows 10 is Client Server Runtime Process better known as csrss.exe.

This process is an essential piece of the Windows platform and it usually takes minimal resources. Well, not in this scenario.

Users reported that, upon inspection in Task Manager, they bump into a strange process that takes 80 – 100 % of CPU usage.

It’s fair to say that this is a grave issue, so you’ll need to address it as soon as possible. The solutions we provided below should be helpful, so make sure to check them out.

How can I resolve high CPU activity of csrss.exe in Windows 10?

  1. Scan for viruses
  2. Delete current user profile
  3. Reset this PC

1. Scan for viruses

Let’s start by addressing the sporadic cause of this inconvenience. It’s fairly rare for system processes to start misbehaving in this manner.

There are indeed various possible reasons why one of the essential Windows services starts hogging on your resources, especially CPU, but most of the time it’s due to an external factor. Or, to be exact, a malware infection of some kind.

With that said, we advise you to use either Windows Defender or any give third-party antivirus tool and scan your system for virus intruders.

Since the scanning procedure differs, taking into consideration all available software, we made sure to explain how to scan your system with Windows Defender.

It’s always there, even if you don’t want it to be, so make sure to check the steps below:

  1. Open Windows Defender from the Notification area.
  2. Click on Virus & threat protection.csrss.exe high cpu
  3. Click on the Advanced Scan.csrss.exe high cpu
  4. Select Windows Defender Offline scan.
  5. Click Scan now.csrss.exe high cpu

We also strongly recommend using professional antivirus software in order to be sure that any virus threat will be scanned, found, and deleted from your PC.

2. Delete current user profile

A lot of users resolved the problem by simply deleting their user account and creating a new one. Due to corruption of dedicated files that are responsible for configuring the user profile.

Since Client Server Runtime Process is partially related to a user profile, CPU spikes are nothing uncommon.

Now, the reasons for this unwelcome occurrence are to be found in a malware infection, which tends to corrupt system files or even clones them.

So, even though your PC isn’t infected at the moment, the damage might be already done.

That should be a good enough reason to delete your user profile and try a new one.

Yes, you’ll need to backup your data and reconfigure some minor things, but the problem should be resolved. Here’s how to do it in a few simple steps:

  1. In the Windows Search bar, type Control and open Control Panel.
  2. Open User Accounts.csrss.exe high cpu
  3. Choose User Accounts.csrss.exe high cpu
  4. Click on Manage another account.csrss.exe high cpu
  5. Click on Add a new user in PC settings.
  6. Choose to Add someone else to this PC.
  7. Enter credentials for an alternative user profile and get back to Change an Account.
  8. Open the newly created account and click Change the account type.csrss.exe high cpu
  9. Grant it administrative role.csrss.exe high cpu
  10. Now, get back and select your current profile. We advise you to backup files from Documents and Desktop.
  11. Click on Delete account and then Delete files.csrss.exe high cpu
  12. Log out and log in to the new user account.
  13. In the Windows Search bar, type Advanced settings, and choose View advanced system settings.csrss.exe high cpu
  14. Select the Advanced tab.
  15. Under the User Profiles section, click Settings.csrss.exe high cpu
  16. Delete your default account and save changes.
  17. Restart your PC, login with the new user profile, and navigate to Task Manager to check on csrss.exe CPU usage.

3. Reset this PC

As the final getaway, we only can advise you to turn to recovery options. Or the Reset this PC option, to be more precise. This option is similar to a factory reset we usually have on smartphones.

It completely restores Windows 10 to its initial values, while preserving your data in the process.

However, for the sake of this exact issue and its complexity, we advise you to clear everything.

Of course, you should back up everything from the system partition to an alternative partition, cloud storage, or external storage.

Here’s how to do it and hopefully resolve the issue at hand:

  1. Press Windows key + I to summon the Settings app.
  2. Open the Update & Security section.windows 10 app store error 0x803f7003
  3. Choose Recovery.
  4. Under Reset this PC, click Get started.
  5. Choose to delete all files and the restoring procedure will commence.

That should complete it. Don’t forget to share your experience with csrss.exe high CPU usage in the comments below.

0x800f081f on Windows 11: 6 Ways to Fix this Install Error

Installing the latest Windows 11 updates is essential for multiple reasons. But our readers have been complaining about the Windows 11 install error 0x800f081f. This error code is mainly related to the Microsoft .NET Framework 3.5 incompatibilities.

Notably, similar issues were reported by users with the Windows 10 OS as well. Here’s what to do to fix it.

What does Windows 11 error code 0x800f081f mean?

Error 0x800f081f is a system error code related to updates in Windows 11. The interesting fact about this error code is that it’s among the most common ones that pop up for the same reason. Here are some of the causes of this error:

  • Improper connection – This happens because Windows cannot download the critical files from the available update.
  • .Net Framework issue – Microsoft .Net Framework incompatibilities also cause this problem so updating .Net Framework can be a viable solution.
  • Improper commands – It may also come up because of the DISM (Deployment Image Servicing and Management) tool, or some Windows PowerShell commands.

The other three error codes are 0x800F0906, 0x800F0907, and 0x800F0922. All these error codes, including error code 0x800F081f, will show you an error message: 

There were some problems installing updates, but we’ll try again later. If you keep seeing this and want to search the web or contact support for information, this may help.

Now that we know what we’re dealing with, let’s fix the problem with the solutions below.

How do I fix error code 0x800f081f in Windows 11?

1. Run the Windows Update troubleshooter

    Multiple users reported that Windows Update troubleshooter can help you restore the 0x800f081f error on Windows 11 OS.

  1. 1. Open the Start Menu.

  2. 2. Type in Troubleshoot other problems and open the app.

    troubleshoot other settings
  3. 3. Click Run next to Windows Update.

    windows-11-update-error-0x800f081f
  4. 4. The troubleshooter will begin the diagnosis and will check for errors.

    windows-11-update-error-0x800f081f
  5. 5. Apply the recommended fixes.

  6. 6. Restart your PC.

One of the most common solutions to fix most of the common Windows 11 issues is to run the in-built Windows troubleshooter.

To fix this Windows 11 update error 0x800f081f, we advise you to try the Windows update troubleshooter. It will not only detect the issue but possibly fix it during the process.

2. Tweak your group policy

  1. Press Windows + R keys to open the Run dialogue.
  2. Type gpedit.msc and hit Enter.
  3. Expand Computer Configuration.
  4. Then expand Administrative Templates.
  5. Click on System.system
  6. On the right pane, click on the entry labeled Specify settings for optional component installation and component repair.group policy editor
  7. Double-click on this entry to open it.
  8. Check Enabled and hit OK.enable

3. Repair Windows system files

  1. Open the Start menu.
  2. Search for Command Prompt and run it as an administrator.cmd admin
  3. Type the below command and hit Enter.
    sfc /scanowsfc-scannow
  4. Your PC will start scanning and, in the process, will try to fix the issue.
  5. Reboot your PC.
  6. Again open command prompt.
  7. Type in the below command and hit Enter
    chkdsk C: /f /r /x
  8. After the process completes, enter the below command and press Enter.
    DISM.exe /Online /Cleanup-image /Restorehealth
  9. You will see the message – The operation completed successfully. Close the window and reboot your PC.

Besides this manual process, you can always choose a professional tool that will perform all these steps automatically. It is a safer and much easier option for your computer’s health and performance.

4. Download Windows 11 update manually

  1. Open the official Microsoft Catalogue website.
  2. In the search bar, enter the KB (Knowledge Base) number of the Windows update you wish to download and hit the Search button.windows 11 update error 1
  3. A list of available update packages associated with the entered KB number will show up.list of updates
  4. Click on the update’s title to get more information, such as Installation Resources, Package details, and Languages supported about the update.update details
  5. Identify the correct update and hit the Download button.download the update
  6. Right-click on the download link and press Save link as.save link as
  7. Choose the download directory and press Save.download directory
  8. Open the folder where you have downloaded the Windows 11 update package.
  9. Double-click on it to run.open the update
  10. After a few seconds, press the Yes button on the Windows Update Standalone Installer pop-up to begin the update installation.
    0x800f081f windows 11
  11. Reboot your PC and check if this fixes the Windows 11 update error 0x800f081f.

5. Clear Windows Update Cache and components

  1. Open the Start menu.
  2. Search for Command Prompt and run it as an administrator.cmd admin
  3. Type the below commands and hit Enter after you have typed each command, one by one.
    Net Stop bits
    Net Stop wuauserv
    Net Stop appidsvc
    Net Stop cryptsvc
    Ren %systemroot%SoftwareDistribution SoftwareDistribution.bak
    Ren %systemroot%system32catroot2 catroot2.bak
    Net Start bits
    Net Start wuauserv
    Net Start appidsvc
    Net Start cryptsvc

4. Exit cmd and restart your PC.

6. Remove WUServer and WIStatusServer from registry

  1. Open Run dialog using Windows + R keys on your keyboard.
  2. Type the below command and press Enter.regeditregedit run command
  3. Click on Yes if a prompt asks you for permission.
  4. You need to navigate to the below address
    HKEY_LOCAL_MACHINE\SOFTWARE\Policies\Microsoft\Windows\WindowsUpdate
  5. On the right pane, locate WUServer and WIStatusServer.
  6. Delete both entries.delete registry entries
  7. If these entries are not available, then hop onto another solution.

Why do my Windows updates keep failing?

There are several potential causes for problems like Windows Update failing repeatedly. Based on user feedback, we have generated a list of the most frequent reasons.

  • Out-of-date drivers – Drivers must operate components like graphic cards and network cards that aren’t natively compatible with Windows. Windows Update problems might result from outdated drivers connected to this problem.
  • System file errors or absences – System files are essential to the smooth operation of your device. Your system files may have recently been destroyed or damaged, which is why Windows Update failed.
  • A problem with the Windows Update service – Your update service may be having problems. If so, alternate methods for downloading the most recent Windows update are provided above.

Remember that not all potential reasons are included in the list mentioned above. However, the error can occur specifically for you because of a problem with your machine.

What else can I do to avoid Windows 11 update error 0x800f081f?

When you come across an error, and that too while installing a Windows 11 update, then it can be frustrating and annoying.

The solutions mentioned above can be of great help when facing Windows 11 update error 0x800f081f, but that’s not all.

If, for some reason, none of the above steps helped you fix it, then we have some important points that you can follow and check if this fixes the issue or not.

➡ Make sure the .NET Framework is turned on

It is essential since this issue is related to the Microsoft .Net Framework. Open Windows Feature by searching for it on the Start menu and checking the box next to .NET Framework 3.5 (includes .NET 2.0 and 3.0).

Hit OK and reboot your PC. Ensuring the .NET Framework is enabled will let you get automatic updates with no issues.

➡ Turn off Developer Mode

All you need to do is open the Start menu and search for Developer mode. Open it and make sure to turn off Developer mode.

There are instances when developer mode may interfere with Windows update installation and, thus, the error. Make sure it is disabled and check if this fixes the issue or not.

➡ Reset your copy of Windows 11

If absolutely nothing works, then as a last resort, all you can do is reset or reinstall the Windows 11 OS on your PC. Possibly, some critical files were not installed during the previous installation.

If you encounter the 0x800f081f error on Windows 10, we have another article on the topic that you can check out.

Let us know in the comments below which one of the above solutions helped you fix the Windows 11 update error 0x800f081f. Moreover, you can also share with us any other solution.

0x800f081f: How to Fix This Windows Update Error

Windows 10 updates are mandatory, as you already know. At least, that’s what Microsoft wants you to believe.

However, an issue that bears the install error – 0X800f081f code may occur when you’re trying to update this feature. So, if this bothers you as well, we’ve prepared a few solutions to help you out.

The full error message states: There were some problems installing updates, but we’ll try again later. If you keep seeing this and want to search the web or contact support for information, this may help: (0x800f081f).

What causes the Windows Update error 0x800f081f?

Various variations of the install error – 0x800f081f, with varying causes, exist. Below are some of the popular ones:

  • 0x800f081f .NET 3.5 Windows 10: If you can’t install updates due to this error, the problem might be .NET Framework. To fix the problem, enable .NET Framework or use an offline .NET installer.
  • 0x800f081f Windows Update core, agent: This error can affect other Windows Update components, and to fix the problem, it’s advised to reset all Windows Update components using the Command Prompt.
  • 0x800f081f Surface Pro 3: This issue can affect Surface Pro and other laptop devices. If this happens, you should know that all of our solutions can be applied to laptops, so don’t hesitate to try them out.

If you encounter the 0x800f081f error on Windows 11, check out our dedicated guide for more info.

How can I fix the install error – 0x800f081f?

1. Use offline .NET Framework installer

  1. Search for the latest offline .NET Framework installer on the web.
    microsoft page
  2. Download the installer and start the process.
  3. The installation can take some time before the files are ready to install.
  4. Follow the instruction and, after the procedure is finished, restart the PC.

Make sure you are using an official Microsoft version from the verified site, as this is where you can get a trusted version to solve the Windows Update error 0x800f081f.

2. Use SFC and DISM scans

  1. Press Windows key + X and choose Command Prompt (Admin) or Powershell (Admin).
    0x800f081f Windows Update agent
  2. Now, type sfc /scannow, and hit Enter.
    Windows Update error 0x800f081f Windows 8.1
  3. SFC scan will now start. Remember that this can take up to 15 minutes, so don’t interrupt it. Once the scan is finished, check if the problem is resolved.
Tip icon Tip
Check out this detailed guide and learn to use System File Checker like a trustworthy technician!

If the SFC scan didn’t fix the problem, or if you couldn’t run an SFC scan at all, you might want to try using the DISM scan instead. To do that, follow these steps:

  1. First, open Command Prompt as admin.
  2. Type the command below and press Enter: DISM.exe /Online /Cleanup-image /Restorehealth
    0x800f081f .NET 3.5 Windows 10

If the update service is not available, you can insert USB/DVD media with system installation files and type (copy-paste) the following command:

DISM.exe /Online /Cleanup-Image /RestoreHealth /Source:C:RepairSourceWindows /LimitAccess

Don’t forget to change C: RepairSource with the location of your repair source. Once the process is finished, restart your PC and try updating again.

Once the DISM scan is finished, check if the Windows 10 0x800f081f update error is still there.

2.1. Error 0x800f081f when running DISM

While DISM is a valuable tool, it can fall victim to this error code itself while trying to repair the online Windows image on a regular PC or in various editions of Windows Server (2012, 2016, and 2019).

If this happens, you will likely stumble across this error message: Error: 0x800f081f. The source files could not be found. Use the Source option to specify the location of the files required to restore the feature.

So, what happens if DISM doesn’t work? Don’t worry. There are ways to deal with DISM when it fails.

Here’s what you need to do to fix the DISM error 0x800f081f:

  1. First, open the Command Prompt with admin rights.
  2. In the CMD window, type the following commands and press enter after each one: dism.exe /online /Cleanup-Image /StartComponentCleanup
    dism windows 10 0x800f081f
    sfc /scannow
  3. Retry to run the initial command: Dism /Online /Cleanup-Image /RestoreHealth

3. Install the update manually

  1. First, you must visit Microsoft’s Update History website to find the update number.
  2. Once you find the updated code, you must visit the Microsoft Update Catalog page. It should start with KB and some numbers.
  3. Enter the update code in the search field, and the results list should appear.
  4. Once you download the update, run the setup file to install it, and that’s it.

Remember that this process won’t fix the Windows 10 Update 0x800f081f error. Instead, it will allow you to circumvent it and download the update.

Note that the Microsoft Update Catalogue list will show updates for different architectures. So, be sure to select one that matches your system architecture.

4. Restart Windows Update components

  1. Start Command Prompt as administrator.
  2. Type the following commands, and press Enter after each: Net Stop bits Net Stop wuauserv Net Stop appidsvc Net Stop cryptsvc Ren %systemroot%SoftwareDistribution SoftwareDistribution.bak Ren %systemroot%system32catroot2 catroot2.bak Net Start bits Net Start wuauserv Net Start appidsvc Net Start cryptsvc

After running the commands, check if the problem issue is resolved.

If you don’t want to run these commands manually, we wrote a short guide on creating a Windows Update reset script, so be sure to check it out and find out how to automate this process.

As you might know, Windows 10 Update relies on certain services to work correctly, and if there’s an issue with one of the services, you might experience error 0X800f081f.

But the steps above will restart Windows Update components and fix any glitches if that’s the case.

5. Make sure that .NET Framework is enabled

  1. Press Windows key + S and enter windows features.
  2. Select Turn Windows features on or off.
    0x800f081f Windows Update core
  3. Tick the .NET Framework 3.5 box.
  4. Click the OK button.
    0x800f081f Surface Pro 3

After enabling the .NET Framework, try to perform the update again and check if it works. If the install error – 0x800f081f persists, try out the next solution.

6. Use Windows Update troubleshooter

  1. Press the Windows key + I to open the Settings app.
  2. Select the Update & Security option.
    update and windows 10 0x800f081f
  3. Now, choose Troubleshoot from the left pane.
    troubleshoot
  4. Click the Additional troubleshooters option.
    additional troubleshooter
  5. Now, click Windows Update.
    option windows 10 0x800f081f
  6. Finally, click the Run the troubleshooter button.
    run troubleshooter
  7. The troubleshooting will now start. Follow the instructions on the screen to complete it.

Once the troubleshooter is finished, check if the Windows 10 Update 0x800f081f error is resolved.

7. Perform a clean install

  1. First, backup your files and the license key.
  2. Then, download the Media Creation Tool and use a USB or DVD to install the system.
  3. Once you have the bootable source, plug it into the affected device.
  4. Open the Start Menu, and click the Power button.
  5. Now, press and hold the Shift key and choose Restart from the menu. Sometimes, you might need to go to your BIOS and change your boot priority settings.
  6. A list of options will appear. Select Troubleshoot > Advanced options.advanced options
  7. In the next screen, choose Startup repair and follow to instructions.
  8. The process might reboot the device once again.

We advise you to perform a clean reinstall if you’ve tried previous solutions and haven’t succeeded. Also, ensure you back up your files and the license key.

Once the process is done, you’ll have a fresh installation of Windows 10. It repairs any corrupted files and fixes most errors caused by misconfiguration.

Can I download Windows 10 updates offline?

You can install updates offline without an internet connection. However, you need to download the complete update when you are online.

You can now install the update when you don’t have an active internet connection.

Besides regular system stability updates, Windows Update usually brings steady improvements for other features. For example, one feature that receives updates relatively frequently is the dotNet Framework.

That should wrap it up. We believe you have everything needed to fix the install error – 0x800f081f.

If you are facing other issues like the Windows 10 Update error 0x8007042B or the 0X8007013 install error, check our detailed guides to fix them effectively.

If you have any suggestions or remarks, feel free to tell us in the comments below.

Google Chat Dark Mode: How to Enable Or Disable It?

Since dark mode’s inception in devices, it has always been appreciated because it makes the app interface easier on the eyes and takes off the extra stress. In addition, Google Chat, one of the most widely used chat platforms, now offers the same functionality.

This guide will discuss how to enable and disable Dark Mode on Google Chat. Let’s get started!  

What can I do to enable or disable Dark Mode on Google Chat?

Tip icon Tip
There are two variants available for Google Chat, a standalone app and a web version. The steps to enable/disable Dark Mode are the same for both.

1. Enable Dark Mode

  1. If you have the Google Chat app, press the Windows key, type Google Chat, and click Open. Else, open the app’s web version.
  2. Locate and click Settings from the top right corner. 
  3. The Chat settings window will appear; scroll to find Theme settings.Dark Mode enabled Google Chat
  4. Click the radio button beside Dark Mode to enable it.
  5. Click Done.

2. Disable Dark Mode

  1. Launch the app or web version of the app.
  2. Navigate to the Settings icon and click on it. 
  3. On the Chat settings window, go to Theme settings.Google Chat Dark mode disabled
  4. Click on the radio button beside Light Mode to disable Dark Mode.
  5. Click Done.

So, these are steps to enable and disable Dark Mode on Google Chat. Turn on this option today so that chatting with your friends and family doesn’t stress your eyes. 

Which theme do you prefer and why? Feel free to tell us in the comments section below.

0x80070643 in Windows 11: How to Fix This Fatal Error

Microsoft might have recently released Windows 11, but some things never change regarding updating errors. Users have already posted about the update error 0x80070643 in Windows 11 on the forums.

The error has been passed down from the previous Microsoft OS. This article examines the error and its causes and gives you the most reliable resolutions available for Windows 11 users.

Note that this error arises for some users when installing new patch updates via Settings. It is a Windows update error. And simply signifies that there have been issues with your update process.

What causes 0x80070643 error in Windows 11?

Before trying to get rid of the update error 0x80070643, it’s worth considering the more likely causes of the issue:

  • Third-party antivirus software conflicts – Antivirus software might conflict with the Windows Update service. Hence it would be best if you stuck to only compatible antivirus software.
  • Missing, outdated, or corrupted .NET Framework installation – Updates fail to install because .NET Framework is corrupted or missing, or you might need to install a newer version.
  • Corrupted system files – You might have to repair corrupted system files causing the issue.
  • Damaged Windows Update components – Some Windows Update components might be corrupted or incorrectly configured.
  • Corrupted Windows Defender definitions – Error 0x80070643 can also arise because of corrupted Windows Defender definitions.

To solve the error 0x80070643 in Windows 11, you must apply resolutions that feasibly remedy those causes. Give these potential fixes a try right away.

How do I fix the install error – 0x80070643 in Windows 11?

1. Run the Windows Update troubleshooter

  1. First, open up the Start menu by clicking the Windows icon on the taskbar.
  2. Select the Settings app that’s pinned to the Start menu.
    The Start menu 0x80070643 windows 11
  3. Then click Troubleshoot within the System tab.
    System tab 0x80070643 windows 11
  4. Select Other trouble-shooters to bring up a list of troubleshooters in Settings.
    Other trouble-shooters option 0x80070643 windows 11
  5. Click the Windows Update troubleshooter’s Run button.
    The Run button 0x80070643 windows 11
  6. After that, apply any potential fixes suggested by the troubleshooter.

2. Run a system file scan

    The SFC scan is a fast and effective way to identify system errors that may cause issues during Windows 11 installation. You can run this scan by following the steps below.

  1. 1. First, bring up the search utility by clicking the magnifying glass button for that tool.

  2. 2. Next, type the keyword cmd in the search box to find Command Prompt.

    NVIDIA_Share
  3. 3. Click the Command Prompt’s Run as administrator option on the right side of the search tool.

    NVIDIA_Share_run as an administrator
  4. 4. Input this system file scan command and press Enter:sfc /scannow

  5. 5. Thereafter, wait for the system file scan to reach the 100 percent mark and display its outcome in the Command Prompt.

If you need to fix this Windows issue automatically, we advise using an automated repair tool to comprehensively detect corrupted system files.

3. Install the latest .Net Framework 4.8

  1. Open the .NET Framework 4.8 webpage in your web browser.
  2. Click the Download .NET Framework 4.8 Runtime button on that page.
    The Download .NET Framework 4.8 Runtime option 0x80070643 windows 11
  3. Choose a folder to download .NET Framework 4.8 to, and click the Save button.
  4. Next, press the Windows key + E hotkey to bring up File Explorer.
  5. Open the folder you downloaded .NET Framework 4.8 installer file to.
  6. Double-click .NET Framework’s ndp48-web.exe setup file to launch the installer.
  7. Then, go through the setup wizard to install the runtime package.

4. Repair .NET Framework

Note icon NOTE
This potential fix is recommended if the latest .NET Framework version is already installed on your desktop or laptop.
  1. Open the Microsoft .NET Framework Repair Tool page.
  2. Then press the Download button there.
  3. Select a folder to download that repair utility to, and click the Save button.
  4. Next, click File Explorer’s button on the taskbar.
    The File Explorer button 0x80070643 windows 11
  5. Open the folder that includes Microsoft .NET Framework Repair Tool.
  6. Double-click NetFxRepairTool.exe to open that utility’s window.
  7. Select the I have read and accept the license terms checkbox.
    The .NET Framework Repair Tool 0x80070643 windows 11
  8. Then, press the Next button to initiate the repairs.

5. Temporarily turn off third-party antivirus software

  1. Click on the hidden access arrow in the Taskbar.
    0x80070643 windows 11
  2. Click on your antivirus icon, hover over Avast shields Control and select Disable for 10 minutes (This step varies for different antivirus software).
    0x80070643 windows 11

Disable any third-party antivirus utility installed on your PC before you try installing the latest Windows updates in Settings.

6. Change the SoftwareDistribution subfolder name

  1. First, bring up the search utility by clicking the magnifying glass button for that tool.
    The magnifying glass button 0x80070643 windows 11
  2. Next, type the keyword cmd in the search box to find Command Prompt.
  3. Click the Command Prompt’s Run as administrator option on the right side of the search tool.
  4. To disable a couple of services, type in these commands and press Enter:
    net stop wuauserv
    net stop bits
  5. Type this command in the Prompt’s window and press Enter to execute: rename c:\windows\SoftwareDistribution SoftwareDistribution.bak
    rename command 0x80070643 windows 11
  6. To restart the disabled services, input these commands:
    net start wuauserv
    net start bits

7. Reset the Catroot2 folder

  1. First, bring up the search utility by clicking the magnifying glass button for that tool.
    The magnifying glass button 0x80070643 windows 11
  2. Next, type the keyword cmd in the search box to find Command Prompt.
  3. Click the Command Prompt’s Run as administrator option on the right side of the search tool.
  4. Input these three separate commands (press Enter after each):
    net stop cryptsvc
    md %systemroot%\system32\catroot2.old

    xcopy %systemroot%\system32\catroot2 %systemroot%\system32\catroot2.old /s
  5. Next, open File Explorer (press the Windows key + E in that regard).
  6. Open the catroot2 folder at this path: C:\Windows\System32\catroot2 
    catroot2 folder 0x80070643 windows 11
  7. Press the Ctrl + A hotkey to select all content within the catroot2 folder.
  8. Click File Explorer’s Delete button to erase the selected items.
    Delete button 0x80070643 windows 11
  9. Thereafter, open Command Prompt again.
  10. To restart the disabled service, input this command and hit Enter: net start cryptsvc

8. Update Windows Defender’s signatures 

Note icon NOTE
This potential resolution is especially recommended when error 0x8007064 occurs for Windows Defender updates.
  1. First, bring up the search utility by clicking the magnifying glass button for that tool.
    The magnifying glass button 0x80070643 windows 11
  2. Next, type the keyword cmd in the search box to find Command Prompt.
  3. Click the Command Prompt’s Run as administrator option on the right side of the search tool.
  4. Type this command into the Prompt’s window and press Enter: “%PROGRAMFILES%\Windows Defender\MPCMDRUN.exe” -RemoveDefinitions -All
    remove definitions command 0x80070643 windows 11
  5. To update Windows Defender’s signatures, enter these two separate commands pressing Enter after each:
    “%PROGRAMFILES%\Windows Defender\MPCMDRUN.exe” -SignatureUpdate
    “%ProgramFiles%\Windows Defender\MPCMDRUN.exe” -SignatureUpdate -MMPC

    signature update command 0x80070643 windows 11
  6. Then close Command Prompt, and restart Windows 11 by clicking Power, then Restart on the Start menu.

We can’t promise that the above fixes are 100 percent guaranteed. If they’re not enough, resetting Windows 11 might also be worth a shot.

Some third-party repair utilities can also fix many Windows update issues, such as error 0x80070643. These best Windows update repair tools are worthy of your attention as well. As for other errors, we also covered error code 801c03ed, so you might want to check it out.

In the comments below, let us know your opinion on the Windows 11 install error – 0x80070643.

9 Ways to Fix 0x800f0922 Windows Update Error

Through frequent Windows updates, customers get improved security and fixes for common system bugs. Sadly, sometimes errors such as 0x800f0922 can prevent you from getting those updates.

Why is that so? Well, the reasons are similar. But, instead of upgrading to the new OS, the error occurs with the new build.

  • Low space on the System Reserved partition – As we mentioned above, you probably don’t have enough space to load the new update; you will need at least 500 MB for Windows 10
  • Can’t connect to the update server – Connection problems may be the root of this problem; the servers are not available at the moment or your local connection is not strong enough

Now, there is no shortage of problems when trying to install updates. But some issues are more stubborn than others.

Usually, running a Windows Update repair tool should suffice. So let’s see what 0x800F0922 is all about.

What does error code 0x800f0922 mean?

Error code 0x800F0922 means that the system couldn’t download the newest OS update.

That is in fact a consequence of the fact that there isn’t enough System Reserved partition space for installing the new update or you just can’t connect to the Windows Update server.

Sometimes you might get Windows Update Error 0x800f0982 but this one is just as easy to fix.

Here are some similar issues that users reported:

  • Error 0x800f0922 Windows Server 2012 r2 – Even if this is an issue with Windows Server, you might be able to fix this problem with one of our solutions.
  • Windows 8.1 update error 0x800f0922 – This can appear on Windows 8.1 as well but our solutions are universal, and they will work with older versions of Windows.
  • Windows failed to install the following update with error 0x800f0922 – This is just a variation of the original error. If you encounter this issue, try disabling your antivirus and check if that helps.
  • 0x800f0922 Framework 3.5 – This issue is caused by the .NET Framework. If the .NET Framework 3.5 is missing from Windows, enable this feature and try to update again.
  • 0x800f0922 Secure Boot – This error can appear due to the Secure Boot feature. However, you can fix the problem simply by disabling this feature in BIOS.

We prepared a few workarounds that should resolve this issue in no time. You can check them out below. Update errors 0xc1900104 and 0x800F0922 sometimes go together, but this solution should work for both of them.

How can I fix the Windows update error 0x800f0922?

1. Turn off your firewall

  1. Search for windows firewall and select Windows Defender Firewall from the results.
  2. Open Turn Windows Firewall on or off.
    Windows failed to install update error 0x800f0922
  3. Turn off the firewall for both private and public networks.
    Error 0x800f0922 Windows Server 2012 r2
  4. Save your selection.
  5. Try updating now.

Note: Remember to enable the firewall before proceeding to install the updates. Additionally, your security may be endangered, and we don’t want that for sure.

In addition to Windows Firewall, your antivirus software can also cause this issue to appear. To fix the problem, it’s advised to disable certain antivirus features and check if that helps.

If the issue still persists, you need to completely disable your antivirus.

In the worst-case scenario, you might have to uninstall your current antivirus. If removing the antivirus solves the problem, it’s advised to switch to a different antivirus solution.

2. Repair your installation with SFC and DISM scans

2.1 Run an SFC scan

  1. Search for cmd and click on Run as administrator to open Command Prompt.
  2. Enter sfc /scannow and press Enter.
    0x800f0922 Secure Boot
  3. The scan can take about 15 minutes, so don’t interfere with it.

Note: If you can’t run an SFC scan or if it doesn’t solve the problem, you should use a DISM scan instead.

2.2 Run a DISM scan

  1. Start Command Prompt as administrator and run the following command: DISM /Online /Cleanup-Image /RestoreHealth0x800f0922 Framework 3.5
  2. DISM scan can take up to 20 minutes, so don’t interrupt it.

Note: Once the DISM scan is finished, check if the problem is still there. If you were unable to run an SFC scan before, or if the DISM doesn’t solve the problem, be sure to repeat the SFC scan again.

An effective solution would be to opt for a reliable third-party tool that removes damage done to your Windows OS and restores its stability by bringing the registry keys to their default settings.

In just a few moments, the software scans your PC and proceeds to fix Windows errors and other issues, like system junk that slows down your device and damaged DLLs.

3. Check your internet connection and switch off the VPN

  1. Try to connect via a browser. If there is no connection, move on.
  2. Restart your router and PC.
  3. Try using a wired connection instead of Wi-Fi.
  4. Disable VPN if you are using any.
  5. Run the Troubleshooter.
  6. Disable bandwidth-hogging programs like a torrent client and download managers.

If your VPN was the problem, you might want to consider switching to a different solution.

Sometimes, VPN tools can interfere with your network connection and cause this issue to appear, therefore it’s important to use a good VPN tool.

There are many great VPN tools available, but be sure to try out a dedicated tool that will provide you a secure IP and will make your PC untraceable while you’re online.

4. Check the .NET Framework

  1. 1. Open Windows Search and type Windows Features in the text box.

  2. 2. Click on Turn Windows Features on or off.

  3. 3. Check any boxes related to .Net Framework.

    check the net framework related options
  4. 4. Click on OK.

  5. 5. Restart your PC.

  6. Another quick fix for the 0x800f0922 error is to ensure that all .Net Framework related features are turned on, and to manually enable those which currently aren’t.

    Note: Use this with caution since there are some essential features. Just enable the .NET Framework and move on. On the other hand, if the update error is relentlessly reappearing, move on to the next steps.

5. Use a third-party partitioning tool to change partition size

If somehow, due to the excess of data, your system partition lacks space, you may use a third-party tool to extend it. Keep in mind that at all times you’ll need at least 500 MB of free space in order to install updates.

If you have less than that, you can try to delete some files, use a built-in system tool to clean up junk or extend the partition with a third-party partitioning tool.

If you’re looking for good partitioning software, we strongly recommend considering Paragon Partition Manager Advanced. This tool is incredibly simple to use, and it will allow you to modify your partitions any way you like.

Partitioning your drives is not a very simple task for everyone but this professional-grade partitioning tool will help you divide your hard disk extremely easily, making you look like a Pro.

This solution creates partitions quickly, and it will make sure that the storage space is used optimally.

And if you’re worried about risks, Paragon comes with built-in backup functions that help you save the current configuration before working on a hard drive.

That means that in case you run into any possible problems, you won’t suffer any damage and the built-in recovery wizard will restore your system immediately.

6. Delete certain registry values

  1. Search for regedit and press Enter or click OK to start the Registry Editor.
    Error 0x800f0922 Windows Server 2012 r2
  2. In the left pane, navigate to: HKEY_LOCAL_MACHINESOFTWAREMicrosoftWindowsCurrentVersionWINEVTPublishers
  3. Right-click the Publishers key and choose Export from the menu.
    Windows 8.1 update error 0x800f0922
  4. Select the location where you want to export this key and enter the desired file name.
  5. Click Save (in case anything goes wrong after modifying your registry, you can simply run the file created in this step to restore it).
    Windows failed to install update error 0x800f0922
  6. Locate the following keys and delete them:
  • HKEY_LOCAL_MACHINESOFTWAREMicrosoftWindowsCurrentVersionWINEVTPublishers{e7ef96be-969f-414f-97d7-3ddb7b558ccc}
  • HKEY_LOCAL_MACHINESOFTWAREMicrosoftWindowsCurrentVersionWINEVTPublishers {8c416c79-d49b-4f01-a467-e56d3aa8234c}To delete a key, simply right-click it, choose Delete from the menu, and click Yes to confirm.0x800f0922 Framework 3.5

Note: If you can’t access the Registry Editor, we can help you solve the issue quickly and easily with an expert guide.

7. Remove all your temporary files

  1. Press the Windows Key + R, enter %temp%, and press Enter or click OK.
    Error 0x800f0922 Windows Server 2012 r2
  2. Delete all its content.
  3. Press the Windows Key + R, enter TEMP, and press Enter or click OK.
    Windows 8.1 update error 0x800f0922
  4. Delete the contents of the TEMP folder.

8. Disable the Secure Boot

The Secure Boot is a useful feature that can protect your PC from certain malware, but this feature can also cause problems with certain updates.

Many users reported that they encountered error 0x800f0922 due to the Secure Boot feature.

In order to fix the problem, it’s advised to temporarily disable it. To do that you just need to enter BIOS and disable Secure Boot from there.

To see how to perform this procedure, we strongly advise you to check your motherboard manual for detailed instructions.

You can get the necessary information about your motherboard if you use a third-party motherboard information tool.

Once you disable the Secure Boot, try to install the update again. Once the update is installed, you can go back to BIOS and enable the Secure Boot again.

9. Perform a Repair Upgrade

  1. Download the Media Creation Tool and run it on the affected device.
  2. During the initiation process, choose Upgrade this PC now.
  3. Then, select Keep personal files and apps.
  4. Wait for the process to finish and reboot.

As you can imagine, this is actually a reinstallation of the Windows 10 OS without affecting your files and apps.

Since it’s a fresh copy, it should be void of glitches and bugs and you should be able to freely use your device.

How can I fix Windows 11 update error 0x800f0922?

  1. Press the Windows key + I to open the Settings app.
  2. Navigate to Troubleshooters in the right pane.
  3. Now click on Other troubleshooters.
  4. Locate Windows Update and click Run next to it to run the troubleshooter.

If running the troubleshooter does not pay off, we have more easy tricks for you to try in order to fix the Windows 11 update error 0x800f0922.

And that’s it. We hope you’ll manage to resolve your update error 0x800f0922 with these workarounds. If you are having any questions or suggestions on your mind, the comment section is always open.

Best Excel Repair Tool: 5 Recovery Software That Work 100%

Are you having issues when trying to access the data from an Excel file? Are you tired of having to re-do the tasks you already completed because your Excel files got corrupted? Did you lose important information in those documents?

Excel documents can be damaged or corrupted by a variety of factors, from hardware failure while saving the document, to a corrupted partition on your hard drive that shuts down your PC before the saving is completed normally, etc.

Luckily, there are a few methods that can help you recover and save your documents.

The best and most secure method of repairing a corrupt Excel file is by using specialized software.

So, let’s explore some of the best software options on the market that allow you to recover your corrupted Excel files.

How do I fully repair an Excel File?

If you’re worried about lost data from your corrupted Excel files, you should relax because it can be repaired.

You can recover all your worksheet data and repair damaged Excel files using different methods. Namely, you can perform it manually on your PC by following these steps:

  1. Open Microsoft Excel and click on the Menu.
  2. Go to the Open feature.
  3. Click on Browse to locate your corrupted Excel file.
  4. Select your file in the Open dialog box.
  5. Click on the arrow next to the Open button.
  6. Press on the dropdown button and select Open and Repair.

Alternatively, you can delete the stored temporary files that may cause a conflict with your Excel files. You can simply resolve this by erasing all the Office files from your system.

If your worksheet becomes corrupted before you had the chance to save your file, you can revert the workbook to the last saved version to save your Excel data.

Aside from repairing your spreadsheets manually, there are proficient tools like the ones below that are ready to recover your data more efficiently.

What is the best Excel recovery software?

Stellar Repair for Excel – Complete solution for all Excel issues

repair corrupted Excel files with stellar

This software from Stellar called Repair for Excel is a great software option that allows you to repair corrupted Excel documents (.XLS/.XLSX). Or, if that’s not possible, to easily extract the data from the respective files.

An important aspect is that Stellar Repair for Excel doesn’t modify the data in any way, maintaining the same original format – tables, charts, cell comments, images, formulas, etc.

This allows you to not worry about this aspect when recovering your lost files. Having to deal with changes in your data after a repair would be a lot of hard work, and an inefficient way to correct the issue/issues.

Stellar Repair for Excel can identify the error that’s causing the corruption, fix it, and restore it to its original format and content. You can use this software to repair a large number of files at the same time, allowing you to save valuable time.

The real-time preview for your repaired files allows you to check if the data is kept unmodified in the process of repairing and see a preview of the final results before saving.

In addition, very useful built-in search options to quickly access your Excel documents from the main menu. Plus, it supports MS Excel versions: 2016, 2013, 2010, 2007, 2003, and 2000

The user interface of this software is very intuitive and gives you easy access to start repairing damaged Excel files using a step-by-step wizard that takes you through the entire process, for optimal results.

Stellar Repair for Excel

Restore your corrupted Excel files to their original form in just a few steps.
Check price Visit website

Kernel for Excel Repair – Recovers any files as before

Kernel for Excel is another greatly useful software option that gives you the power to solve any corruption errors that might stop you from accessing the data in your Excel files.

It has support for both .xls and .xlsx formats and doesn’t require the files to be of a particular size.

You can also use Kernel for Excel to restore formulas, filters, OLE objects, URLs, numbers, etc.

The tool can repair your Excel files with ease, no matter if the corruption was produced because of a header error, an Excel file crash, etc. You can use this software to recover all original text, images, numbers, font, color, hyperlinks, etc.

The wide range of formats that can be restored with Kerner for Excel, makes it one of the best software options on the market to deal with this kind of issue.

You can always preview the repaired files before applying any final changes.

In addition, you can restore multiple Excel files at once and there are no size limitations. Thus, repair the large files without any functional problems on your PC.

At the same time, the software has a user-friendly interface that can be used by every user who is not already tech-savvy.

Kernel for Excel Repair

Use this complete tool to recover single or multiple corrupted, damaged, or inaccessible Excel files with all the included data.
Check price Visit website

Wondershare Repairit – Repairs inaccessible or blocked files

Repairit software is among the most reliable and professional file repair tools on the market today, so reclaim your Excel files or other documents.

If you choose this repairing tool you will acquire the chance to access corrupted or blocked Excel files on your PC in a few moments.

There is possible to recover all your spreadsheet files in very simple steps regardless of the error type.

You can repair your files from various Excel versions and handle every type of corruption with your files. For example, if you have unreadable content or inaccessible format, you can get it fixed with Repairit.

Moreover, it promises the recovery of impossible to open files, garbled files, or Excel files with changed layouts and formatted content.

There is Wondershare Recoverit as well that can help you repair broken Excel files and recover deleted documents, and even videos or photos.

It’s worth knowing that Repairit runs a simplistic process and you can repair all the Excel files in 3 steps. You should only add any files that need to be fixed, press the Repair button, preview, and save.

Wondershare Repairit

Recover all your Excel work and other file types, and forget about files loss with this tool.
Check price Visit website

Excel Repair Toolbox – Restores files with functions

Excel Repair Toolbox - Repair corrupted Excel files

Excel Repair Toolbox is another great software option that can repair corrupted Excel files and recover data without modifying it in any way.

This software can fix corrupted .xls, .xlt, .xlsx, .xlsm, .xltm, .xltx and also .xlam Microsoft Excel files.

This software scans for any errors in your Excel file and then offers the possibility to fix a wide range of elements – table styles, cell numbers or formats, worksheets, row heights, formulas, cell colors, etc.

Unfortunately, Excel Repair Toolbox has some limitations regarding the data types and objects that it can recover from a corrupt Excel file.

For instance, it cannot repair sorting settings, diagrams, conditional formatting, merged cells, or comments.

In other words, this Excel repairing toolbox can fix almost anything in your corrupted files. More so, it’s possible to recover spreadsheets data for many editions, starting from Excel 95, 98 to 2019 format.

⇒ Get Excel Repair Toolbox

Recovery for Excel – Solves old version Excel files

Recovery for Excel allows you to recover the data in corrupted Excel documents, being able to extract data from .xls, .xla, and .xlsx formats.

All the versions of Excel starting from version 5.0 and finishing with the 2016 edition are supported.

All the recovered data is saved into a new Excel document without making any changes to the original setup, allowing you to easily access the information.

This software has a good-looking and user-friendly user interface that allows you to recover multiple files at the same time, and even recover folders.

The repair is applied to a wide range of errors that can affect text, numbers, formulas, conditional formatting, merged cells, embedded images, filter settings, sheet names, and many others.

In order to use Recovery for Excel, it is recommended that you first backup your corrupted documents on an external hard drive or USB stick, select the files you want to recover, and then easily choose a name for the export file that contains all the exported data.

Recovery for Excel will automatically add a Recovered tag to the name of your exported Excel document.

⇒ Get Recovery for Excel

So, in this article, we explored some of the best software options on the market that allow you to either repair or recover data from a corrupted Excel document.

The software options we presented in this list cover a wide range of capabilities besides recovering the original data.

With the software options and DIY solutions we presented in this list, you will surely be ready to tackle any Excel file corruption issues in the future.

We would love to know what software you chose to solve your issues and how it worked for you. Feel free to let us know in the comments section below.

FIX: Hyper-V high CPU and Memory Usage [Quick Solutions]

A large number of users have stormed different online forums reporting that their Hyper-V has high CPU usage on their host systems.

This issue can be caused by not having enough power allocated to the VM machine, or if your system capabilities are not up to par with the requirements.

Beyond this, it can also be caused by not having the latest updates installed, or the required settings applied.

In this article, we will explore some of the best fixes for this issue. Please follow the steps presented here carefully.

It is also recommended that you try to see if the issue is fixed after each of the methods. This will allow you to find the most effective and least invasive solution available.


Here’s how to deal with your Hyper-V high CPU usage and fix it

1. Close all running antivirus software

antivirus software - Hyper-v high cpu usage


Because your antivirus software might be able to cause a conflict between your Hyper-V and your system, it is recommended that you fully close the antivirus software.

The steps required to do this will vary depending on the software you’re using, but the most common way is to open the antivirus and stop the protection services from the settings menu.


2. Install the latest firmware and update drivers for your Hyper-V host

laptop with user clock - Hyper-V high cpu usage
  1. Open the Hyper-V Manager.
  2. Select the virtual machine you want to apply the update to.
  3. Click Connect.
  4. Click on the Action menu -> select Insert Integration Services Setup Disk.
  5. On the guest VM -> select the DVD drive that contains the installation files.
  6. Right-click the DVD drive -> Install Hyper-V Integration Services.
  7. This will start the upgrade process of the Hyper-V Integration Services.
  8. Restart your server.

You can’t Install Hyper-V in Windows 10? Here’s the fix


3. Change the System Profile Settings

user laptop - hyper-v high cpu usage


Using BIOS:

  1. Restart your server and press F2 to enter System Setup mode.
  2. Enter the System BIOS.
  3. Select the System Profile Settings option.
  4. Click the drop-down menu with the title Setup Profile -> select Performance.
  5. Apply these settings and reboot your server.

Using OMSA:

  1. Launch the Server Administrator -> expand the System section.
  2. Inside the System section -> select Main System Chassis -> select BIOS.
  3. Click on the Setup button at the top of the page -> scroll down until you find the System Profile Settings option.
  4. Select it.
  5. In the System Profile section -> choose the Performance option -> Press Apply.
  6. Reboot your system in order for the settings to be fully applied.

4. Use Resource Monitor to identify performance issues

laptop on desk with notepad - Hyper-v high cpu usage
  1. Press Win+R keys -> type Resmon.exe -> press Enter to open the Resource Monitor window.
  2. Observe which of these processes are impacting your System the most.
  3. Press Win+R keys again -> type Perfmon.exe -> hit Enter.
  4. On the right pane -> right-click System Diagnostics -> click Start.
  5. This will start the process of gathering data.
  6. Identify what causes the performance issue and apply the appropriate solution.

Conclusion

We would love to know if this guide helped you solve your Hyper-V high CPU usage issue.

Let us know by commenting below.

READ ALSO:

Dev Error 5476 in Warzone: 3 Ways to Permanently Fix it

One of the errors you will likely face on Call of Duty: Warzone is Dev error 5476. It is one of the more recent errors that have been reported.

Most users have complained about this error pop-up after the recent updates. Also, it is a multi-platform error across all the gaming consoles.

This dev error prevents users from logging into the game to play multiplayer and has frustrated many.

However, some users have found a way around this error. Hence, we will elaborate on the possible ways to troubleshoot this error quickly.

What does the Dev error 5476 mean in Warzone?

This error has existed for quite a while, but the new update seems to have spiraled it out of control. Unfortunately, the cause of the new issue is yet to be discovered. However, from user experience, we can highlight the cause of the Dev error 5476 on Warzone.

  • Settings – Most users have encountered this error because of incorrectly placed calling cards and emblem settings.
  • Code update – In many cases, it results from a mismatch in a single line of code during the update. Due to this, the game is nearly impossible to access.
  • Cross-play incompatibility – If there is a glitch or a bug in the multiplayer or matchmaking, this error can pop up.
  • Corrupt game file – If the game is not correctly installed or encountered difficulties while installing, the game file may be corrupt. Hence, it will prevent the game from functioning normally.
  • Corrupt Graphics driver – Once the Graphics driver is corrupt, the game will be impossible to parse. Hence, it can lead to this error.

Now, let us explore some of the most practical solutions.

How do I fix Dev error 5476?

1. Update the Warzone

  1. Launch the battle.net app and choose Warzone.
  2. Select Options and choose Check for updates.
  3. This should automatically begin if there’s a pending update.

After a successful game update, the Dev error 5476 on Warzone should be fixed if this is the cause. Besides, installing the latest version also helps with Dev Error 841 in MW3.

2. Change calling card and emblem

  1. Launch the battle.net app and choose Warzone.
  2. Select Options and click on BARRACKS.
  3. Choose a Calling card and select a different card apart from the randomized cards.
  4. Go back, open the emblem and repeat the same process.
  5. Then relaunch your Warzone.

A common glitch for the Dev error 5476 on Warzone is the calling cards and emblems. By removing them from random, the error should be fixed.

3. Disable crossplay

  1. Launch the battle.net app and choose Warzone.
  2. Select Options and click on Account, then under Online, select the arrows beside Crossplay to disable it.
  3. Close it and relaunch Warzone.

Since this is one of the major causes of Dev error 5476 on Warzone, disabling it should fix the issue.

These are some of the best ways to fix the issue. However, if none of these worked for you, try to reboot your connection or wait till the developers address the issue.

Another common issue in CoD is the error torch; learn how to fix the error code torch in Warzone. Also, you can check out our article on ways to improve the error code Blzbntbgs00004666 on Warzone.

You can leave your comments below. We’d like to hear from you.

Lock Screen Bug on Windows 11: 7 Fixes to Use When Stuck

Many people are excited to finally get their hands on Windows 11 because of its unique features and updates. However, it also has its share of bugs that completely disrupt the user experience. 

One of the main issues the users face is being stuck on the login screen. It can be frustrating as it deters you from working, as you cannot access your device. 

In some instances, the sign-in form does not appear. However, this guide will show you the easy ways to get past the lock screen, irrespective of the form it takes.

What causes the Windows 11 lock screen bug?

Different factors can lead to the Windows 11 lock screen bug preventing you from logging in to your PC. Below are some of them:

  • Faulty system files: If your Windows 11 welcome screen takes a long time, the problem might be due to broken system files. The quick solution is fixing the corrupt system files with a dedicated file repairer.
  • Issues with a user account: In some cases, the problem might be with your user account. You need to create a new user account to get past the issue.
  • Problems with the Fast Startup feature: Sometimes, the Fast Startup feature might be causing this problem, as it prevents your PC from shutting down completely. Disabling the feature should do the trick here.

How can I fix the lock screen bug on Windows 11?

Before exploring the fixes in this section, try the following troubleshooting steps:

  • Use the power button
  • Restart your PC
  • Press the Ctrl + Alt + Shift key

1. Enable Safe Mode

  1. Switch off your device, then turn it back on. Once your device restarts, hold the Power button till the device turns off again. Repeat this process till you enter winRE.
  2. Once the Windows Recovery Environment interface pops up, the Choose an option page will display.
  3. Select the Troubleshoot option.
  4. Then, choose Advanced options.
    advanced options windows 11 lock screen bug
  5. Select Startup Settings.
    startup settings
  6. From here, click the Restart button.
    restart button
  7. When your PC restarts, press 5 or F5 to Enable Safe Mode with Networking.
    enable safe network

After enabling the Safe Mode, check if the Windows 11 lock screen bug is still troubling your PC.

2. Make all the necessary updates

  1. Insert a Media Creation Tool and boot your PC from it.
  2. Press Shift + 10 to get to the Command Prompt window.
  3. Type the command below and hit Enter to enable Safe Mode: bcdedit /set {default} safeboot networkopen
  4. Close the Command Prompt and the Windows Repair window. Then, remove the installation media allowing your device to boot in Safe Mode with Networking.
  5. Now, press the Windows key + I and select Windows Update in the left pane.
  6. Finally, click the Check for updates button.
    check

3. Disable your lock screen 

  1. Repeat Steps 1 to 4 in the Solution 2.
    request
  2. Press the Windows key + I key to open the Settings menu and select the Personalization menu on the left.select
  3. Then click on Lock Screen on the right.select
  4. Select the Screen timeout that is located under the Related settings option. choose
  5. Change the screen behavior to Never. This will prevent the login screen from appearing when your device is idle. set

Disabling your lock screen is an effective way that you can use to fix the Windows 11 lock screen not showing due to a bug. You can use the Settings menu to disable your lock screen.  

Removing the lock screen feature from your device will protect you from the setbacks of the bug. The lock screen will not appear even if your device is in sleep or idle mode. If you’re using a shared PC, consider disabling lock screen widgets instead of the lock screen for security purposes.

4. Prevent your screen from turning off

  1. Press the Windows key + I key to open Settings. open
  2. Then, click on Accounts. click
  3. Select the Sign in options option.select
  4. Click on Additional Settings on the right-hand side.select
  5. Next, change the behavior of the If you’ve been away, when should Windows require you to sign in again? Then select Never.prevent

5. Repair system files

    The lock screen bug could be caused by corrupted or missing system files. Therefore, performing an SFC scan is likely to solve the issue. You can easily perform it through Command Prompt.

  1. 1. Boot your device in Safe Mode

  2. 2. Then, press Windows key + S keys, type cmd, and click Run as administrator under Command Prompt.

    cmd admin
  3. 3. Type the command below and hit Enter: sfc/scannow

    sfc scan -windows-11-lock-screen-bug
  4. 4. The System File Checker will then be able to identify any errors on your device. This process can take a while.

Instead of fixing the system file manually, you can always rely on specialized repair tools. This kind of software allows you to quickly scan and fix or repair any broken system files.

6. Uncheck the Turn on fast startup option

  1. Press Windows + S key, type control, and choose Control Panel.
    control
  2. Go to System and Security and then click on Power Options.system settings
  3. In the left pane, click on Choose what the power buttons do.choose
  4. Next, click the Change settings that are currently unavailable link.change
  5. Under the Shutdown settings section, uncheck the Turn on fast startup option to turn it off.uncheck
  6. Click Save changes to apply the changes.save

If the Windows 11 lock screen is black because of a bug, you should disable the Fast Startup feature.

7. Create a new user account

  1. Boot your device in Safe Mode. 
  2. Press the Windows key + I key to open the Settings page. Then, click on Accounts.
  3. On the left side, click on Family & other users.
    family
  4. Scroll down the page till you see Other users. Then, click the Add account button.add account
  5. Now, select I don’t have this person’s sign-in information.
    i dont have
  6. Then, click on Add a user without a Microsoft account.
    add a user
  7. Enter all the information required, then click on the Next button once you are done.
    next
  8. Restart your device and log in to your device using the new account to check whether the problem has been resolved. 

We hope that the above solutions were able to get you out of the lock screen not working in the Windows 11 issue.

If you want to know how to customize your lock screen on Windows 11, check our detailed guide to do it quickly.

We also have a guide on Lockapp.exe on Windows 11, so don’t miss it if you want to learn more about the lock screen.

Share your thoughts in the comments below, including the method that helped you resolve the lock screen issue.