Crunchyroll error code SHAK-6007-GENERIC will prevent you from watching your favorite anime in the browser. This is a Crunchyroll playback error and it appears due to browser issue such as cache and old version. Certain extensions, such as ad blockers will prevent the website from running.
Before anything else, try Crunchyroll’s mobile app or open it on another browser. You may also try switching to another hotspot or connection method. Sometimes the issue will occur only on specific segments, so try to skip them if you can to avoid the issue.
How do I fix Error Code SHAK-6007-Generic on Crunchyroll?
1. Update your browser
Open Chrome and click on the Menu icon in the top right corner.
Expand the Help section and choose About Google Chrome.
The browser will now check for updates and download them automatically.
Once the browser is updated, check if the issue is resolved.
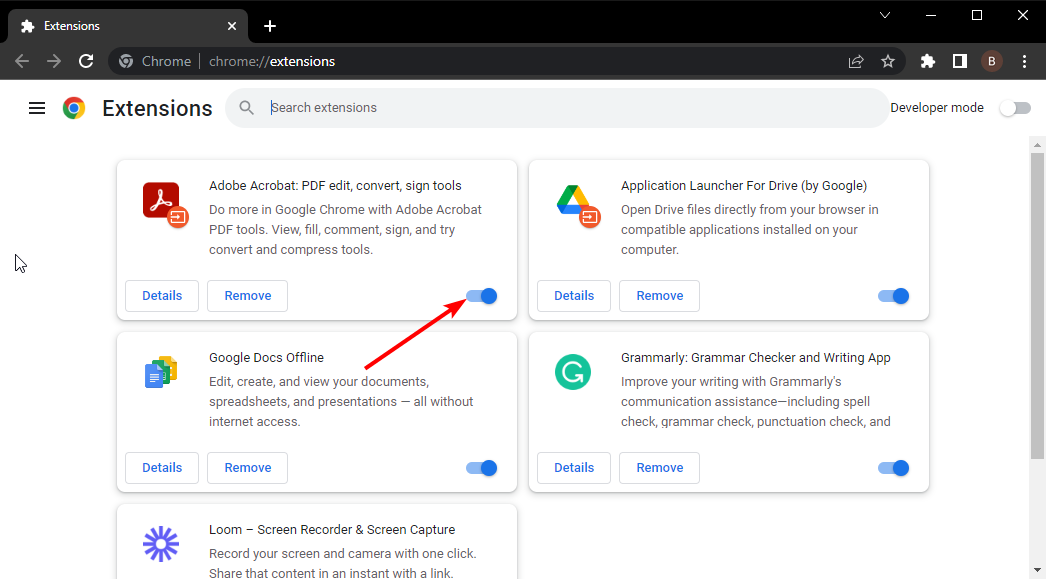
2. Disable extensions
In Chrome, click the Menu icon.
Choose Extensions and then Manage Extensions.
Disable any adblock, or script block extensions that you may have installed.
Check if the problem is resolved.
3. Clear the browser cache
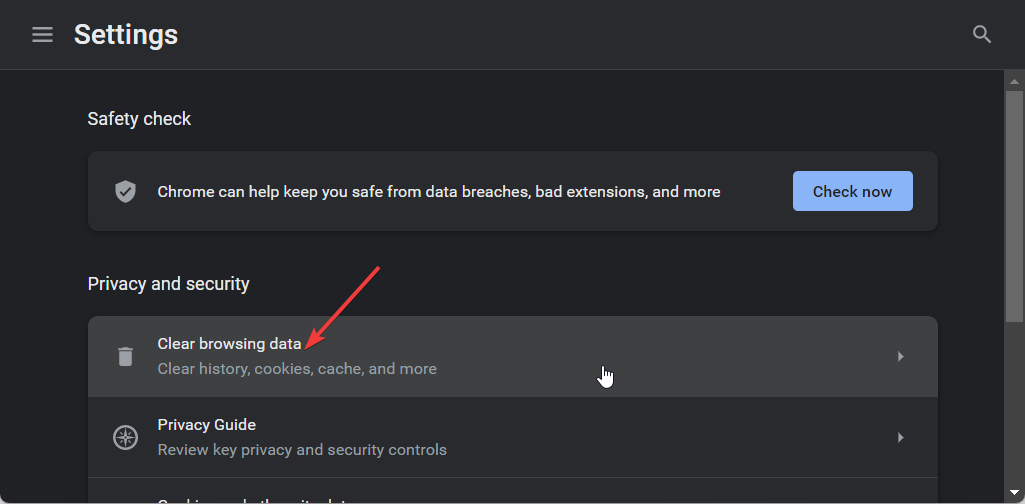
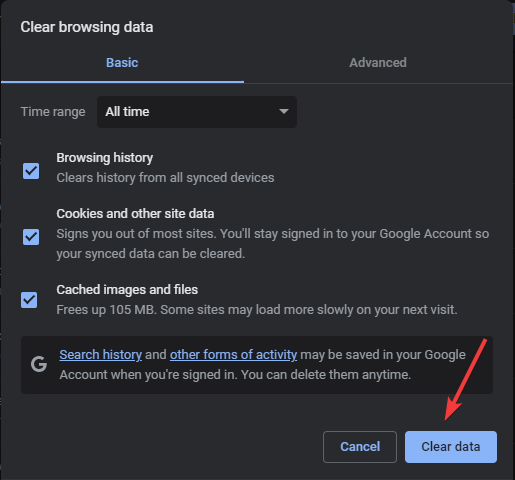
Click the Menu icon and choose More tools. Select Clear browsing data.
Select the type of data that you want to clear and click on Clear data.
Wait for the process to finish, restart the browser, and check if the issue is resolved.
Crunchyroll error code SHAK-6007-GENERIC can occur usually due to your extensions, but that’s not the only issue, and we have covered Crunchyroll bad gateway errors in the past.
Destiny is a popular first-personal shooting game, and while it runs perfectly for most, a few users reported the error code Marionberry in Destiny 1. It prevents them from signing in or accessing the characters, amongst other things.
The error code is encountered in Destiny 2 as well, and both the underlying causes and fixes remain pretty much the same. So, this guide will also work in that case.
What is error code Marionberry?
Marionberry is a network-related error that arises when your device is unable to reach the Destiny servers. It can be due to misconfigured network settings, issues with the DNS server or a temporary server outage.
Besides, problems with the router configuration can also trigger problems. For instance, a few found that UPnP (Universal Plug and Play) conflicted with the connection.
How do I fix Destiny 1 error code Marionberry?
Before we start with the slightly complex solutions, try these quick ones:
Check the Destiny Server and Update Status to identify any server downtime. If that’s the case, wait for a while, and things should automatically be up and running.
When faced with the error, repeatedly press A on the controller and verify whether the console is able to establish a connection.
Check for any pending game or console updates and install them.
Disconnect other devices from the network, or you could try connecting to another network, preferably a mobile hotspot. For some, switching to a wired connection did the trick.
Disable any parental controls configured on PlayStation, Xbox, or the router.
If none work, head to the fixes listed next.
1. Power cycle the console
When faced with Destiny 1 error code Marionberry on PS5 or Xbox, power cycling the console usually does the trick.
For Xbox, hold the Xbox button on the console for 10 seconds, and when it turns off, again press the button to turn on the device.
For PlayStation, power off the console, unplug all the cords from the back, wait for 5 minutes, then plug them back in, and turn on the device.
2. Disable UPnP
UPnP, or Universal Plug and Play, allows easy access to network devices but can also pose a security threat or trigger the Destiny 1 error code Marionberry when signing in. So try disabling UPnP and check for improvements.
To disable UPnP > log in to your router’s configuration page > head to Advanced network settings (or a similar section) > and turn off UPnP. These steps may differ on your router. So check the FAQ section on the manufacturer’s website for the exact procedure.
3. Change the DNS server
3.1 On Xbox
Press the Xbox button on the controller, go to the System tab, and select Settings.
Go to the Network tab from the navigation pane, and select Network settings.
Select Advanced settings.
Now, choose DNS settings.
Go with the Manual configuration.
Next, enter the following DNS server in the two fields:
Primary IPv4 DNS: 208.67.222.222
Secondary IPv4 DNS: 208.67.220.220
3.2 On PlayStation
Open the PS settings, and go to Network.
Now, choose Set up Internet Connection.
Select Use Wi-Fi when asked for network type.
Go with the Custom setup.
Set the required configuration for IP Address Settings and DHCP Host Name.
Restart the console to terminate any active games.
Now, press the Xbox button, go to Destiny 1, press the three-line controller button, and select Manage game and add-ons.
Scroll down to the right and select Saved data.
Next, choose the game save file.
Select Delete From Console, choose the appropriate response in case a confirmation prompt appears and wait for the process to complete.
Now, relaunch the game and check whether the Destiny 1 error code Marionberry is fixed.
4.2 On PlayStation
Open Settings on your PS console, and go to Storage.
Choose System Storage. It may take a few seconds to calculate the current storage before you can select it.
Now, select Saved Data.
Choose Destiny 1 from the list of games.
Select all the saved data files, and then choose Delete.
Confirm the change and wait for the process to complete.
Finally, relaunch Destiny 1 and check for improvements.
5. Reinstall the game
When nothing else works, the last option is to reinstall Destiny 1 to get rid of the error code Marionberry, be it on Xbox One, PS5, or any other console.
Make sure to restart the console after uninstalling the game and clear any cloud storage for it.
Once you reach this part of the guide, the Destiny 1 error code Marionberry shouldn’t appear anymore. And remember, network-related fixes will also help with packet loss in Destiny.
Besides, if faced with other similar problems, check our curated guide listing all the Destiny 2 error codes and their solutions. These work with Destiny 1 as well!
For any queries or to share what worked for you, drop a comment below.
Facebook Memories is a popular feature you can use to post older events but for some reason, for many, Facebook Memories is not working and you cannot post while the Memory is loading.
Why can’t I post a memory on Facebook?
Sharing wasn’t turned on for the original content
The memory isn’t shareable because there were posts by others on your timeline
Problems with the internet connection
The Facebook app is not up to date or it is corrupted
What do I do if the Facebook memory is not loading?
Before getting into more complicated tweaks, try the following simple procedures:
Try to log in from a browser and try to share the Facebook memory from there.
Make sure that you have a consistent internet connection on the device you’re using Facebook on.
1. Check if Facebook Memories is turned ON
Start the Facebook app, click the Menu button, and select Memories from the left pane.
Click on Notifications from the left and check All memories from the right.
Also, check if you block any people or dates. If some of them are included in the memory you want to share, it won’t post.
The process is similar for the browser version or the mobile versions for Android and iOS.
If you’re wondering why can’t I see my memories on Facebook, the answer is that you probably turned them Off or you have blocked some people related to those events.
2. Clear the cache of the Facebook app
2.1 On PC
Open the Facebook app on your PC.
Click on the Settings icon from the top right corner of the window, and select the Privacy tab.
Now, click on the Clear Cache button.
2.2 On Android
Open the Settings app on your smartphone.
Now, go to Apps > Facebook.
Tap on Storage & cache and finally, tap on Clear Cache.
On previous Android or Facebook versions, you might have the Clear cache button straight into the Facebook menu.
After clearing the cache, open the app again to see if the problem was solved.
2.3 On iOS
Open the Facebook app on your iOS device.
Tap on the Menu button (three horizontal lines) and select Settings & privacy.
Now, tap on Settings and select Profile settings.
Find Browser below and tap on it.
Finally, tap on Clear under the Browsing data section.
Start the app and see if now you can post a Facebook Memory.
2.4 Clear the browser cache
In Chrome, click on the Menu button (three vertical dots), hover with your mouse over More tools, and select Clear browsing data from the menu.
Now, check the boxes and click on the Clear data button below.
We have shown here how to delete the cache and cookies from Chrome but the procedure is similar on all the major browsers. This solution will also work for the Facebook Memories Something went wrong error.
If Facebook Memory is still not working after clearing the app and browser cache, you should try to reinstall the app on your device.
On a Windows 10 PC, go to Settings > Apps, find Facebook, and select Uninstall. On Windows 11, go to Settings > Apps > Installed apps and uninstall Facebook from the list of apps.
If you are using the Facebook app on mobile devices, just long tap the app and select Uninstall or drag it to the Uninstall option.
After this, Facebook Memory should work fine and you will be able to load the memories and post them without any issues.
Why can’t I see my Facebook Memories?
If you can’t see your Facebook memories, that means that either the notifications for Facebook Memories are turned off, or you have hidden people or dates from the Memories function.
On Facebook, go to Menu > Memories to change those settings, as shown in Solution 1 from this guide.
To summarise our guide, if you cannot post while the Memories is loading, turn on the notifications, clear the cache from any device you’re using Facebook on, or reinstall the app.
If you have both speakers and headphones, it’s important to know how to change the output device on Windows 11 to ensure that you’re using the right one for the occasion.
Many issues can occur if you don’t select the right output device, such as no audio on your PC, so in today’s guide, we’re going to show you how to quickly and easily select the right audio device.
Is there a shortcut to change sound output on Windows 11?
It’s not directly possible to change the sound output with a keyboard shortcut, however, you can use one of the following shortcuts to open a menu that allows you to choose the output device:
Ctrl + Windows + V – This will open a Taskbar menu and let you change the output device.
Ctrl + G – Using this shortcut you’ll open a Game Bar, and from there you can change your sound settings.
How do I select an output device in Windows 11?
1. Using the Taskbar volume icon
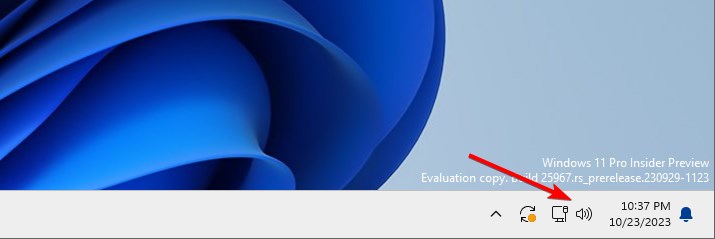
Click the volume icon on the Taskbar.
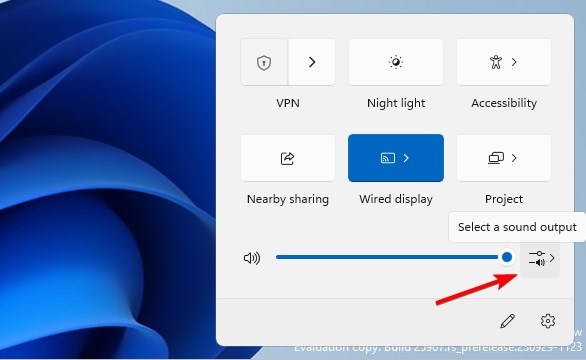
Next, click on Select a sound output icon.
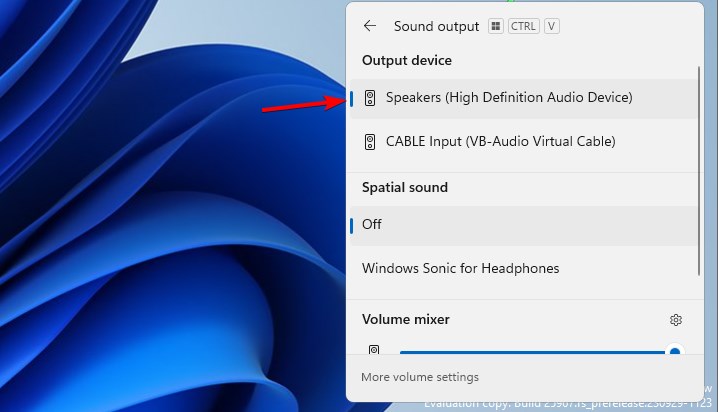
Lastly, select the desired device from the Output device list.
In case you can’t perform these steps, we have a great guide on what to do if volume icon is missing that can help you.
To better understand all your playback and recording options, you can also read our detailed guide on how to change sound settings in Windows 11 before proceeding with the steps below.
2. Use the Volume Mixer
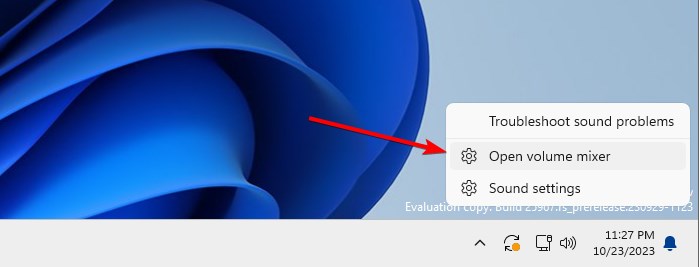
In the Taskbar, right-click the volume icon and choose Open volume mixer.
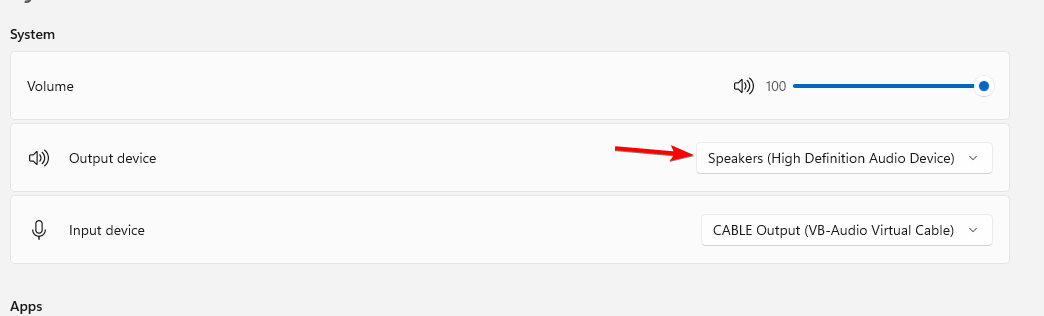
Locate the Output device section and select your desired output device.
The changes will be automatically saved.
Do keep in mind that many users reported that Volume Mixer keeps resetting, but we have a guide that addresses this issue.
3. Change Sound settings
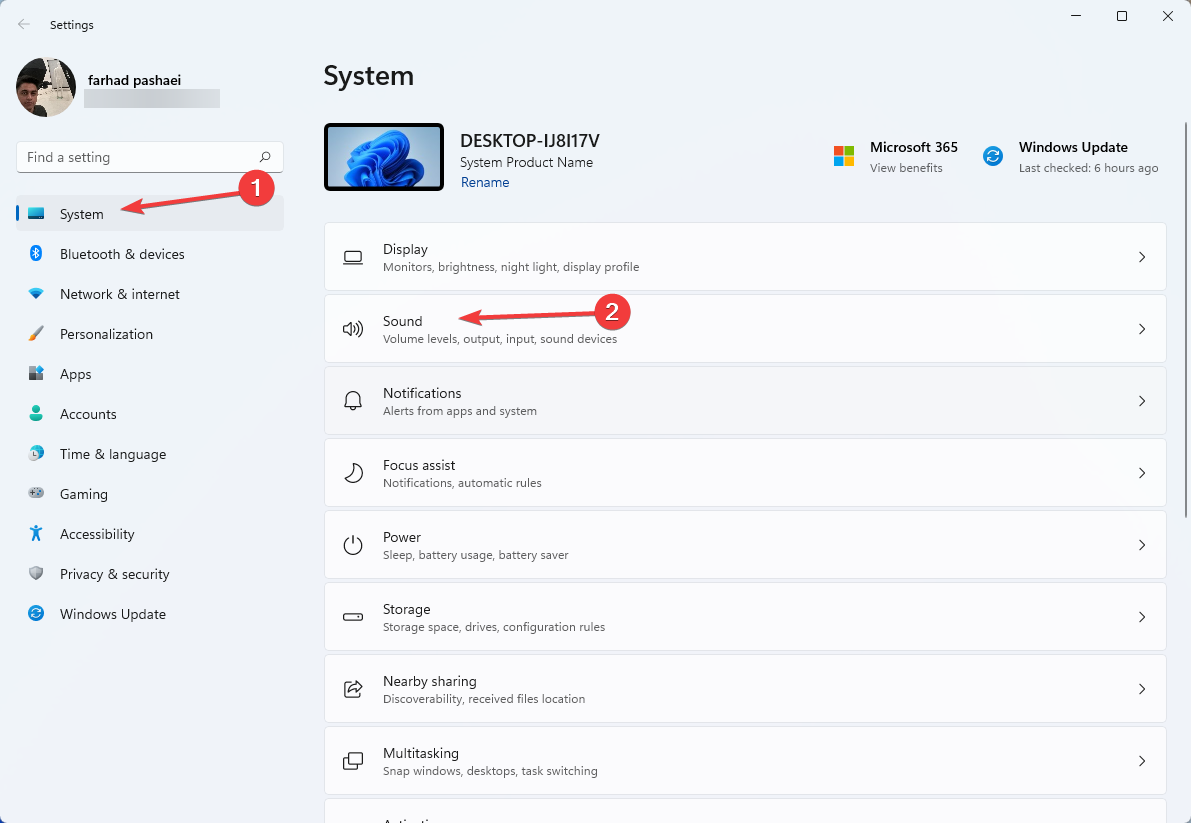
Press the Windows key + I to open the Settings app.
Navigate to System and select Sound.
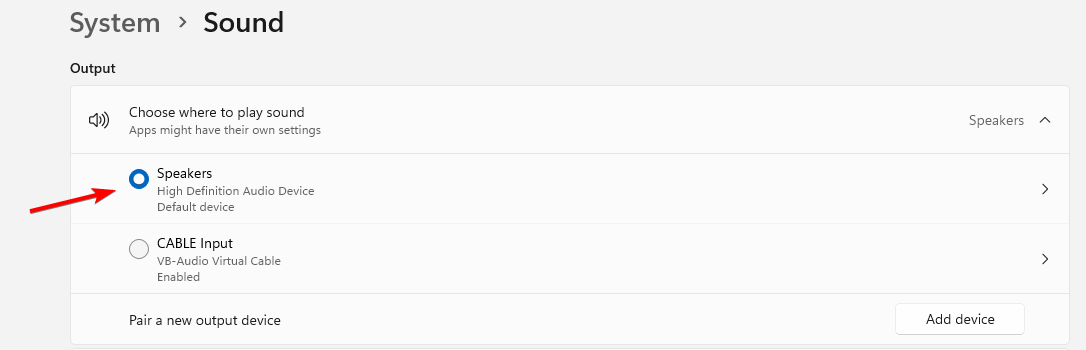
In the Choose where to play the sound section select the desired output device.
Before changing output devices through the Sound menu, you can open Sound Settings in Windows 11 directly to access all available playback options faster.
4. From the Control Panel
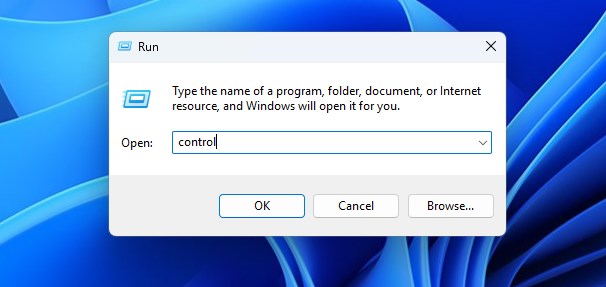
Press the Windows key + R and type control. Press Enter.
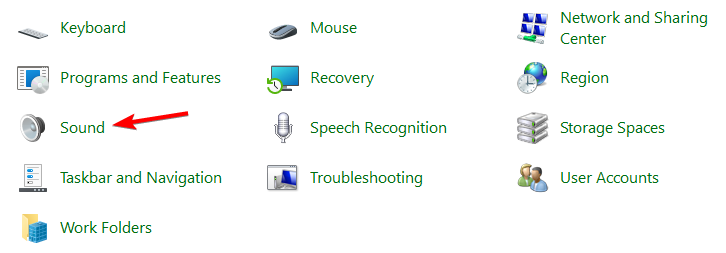
When the Control Panel opens, click on Sound.
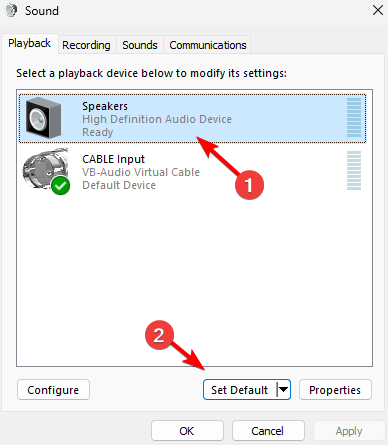
Select the desired output device and click on Set Default.
Lastly, click Apply and OK to save changes.
5. Use the Game Bar
Press the Windows key + G to open the Game Bar.
In Windows Default Output select the desired output device.
The changes will be automatically saved.
How do you choose output devices based on application?
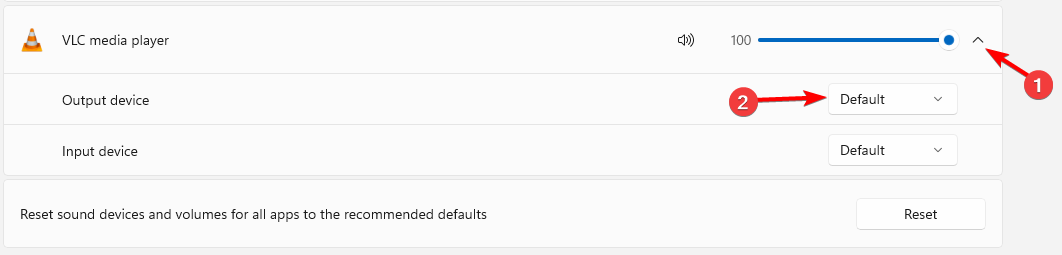
Open Volume Mixer on Windows 11.
Next, locate the application that you want to change the output device for.
Click the down arrow next to the volume slider and select the output device.
Microsoft recently released a patent for a technology describing a virtual web browser capable of running on any device. According to the patent, now available to the public, this is not the first time Microsoft has dabbled with the concept. In fact, the patent is based on inventions from 2021, 2017, and 2012.
However, since cloud technologies are far more advanced, this might finally be a good time to develop and release a virtual web browser. But what is it one, anyway? Well, a virtual browser is a cloud-based browser that allows users to access the internet on devices that wouldn’t properly run it in the first place. Think about being able to run a virtual browser on a smartwatch.
In many ways, a virtual browser is similar in concept to cloud gaming. If we take, for example, the now-defunct Stadia, the platform made users capable of running demanding video games on browsers such as Chrome. A virtual browser works similarly, more or less.
Microsoft’s virtual web browser: How would it work?
The system uses a virtual browser located on a proxy server. This virtual browser does all the heavy lifting – retrieves, renders, and encodes web pages for all devices.
The devices themselves only need to be able to decode and display the web pages. They don’t need to have their own web browsers or be able to handle user inputs.
The system also includes a touch controller that can be a remote control for devices with limited or no user input capabilities.
The method would also allow for seamless web browsing across multiple devices, even when those devices aren’t designed to support web browsing.
Could this be a future iteration of Microsoft Edge? Or will Microsoft come with an entirely new browsing experience?
It seems that multi-device experiences are becoming more popular these days, and it’s only a matter of time until they become the standard. Samsung has its own Galaxy Connected Experience, and according to a document leaked to us by close sources, Qualcomm will also debut a similar service called Snapdragon Seamless.
These multi-device experiences allow a task to be started on one device and then continued on another, different from the first. The experience allows for greater mobility and doesn’t stop productivity, no matter where a user is.
So why shouldn’t browsing the internet also become a multi-device experience? The technology described in the patent definitely points it out.
The page cannot be displayed. (80710a06) message appears when accessing web pages to download gaming components or add-ons.
It occurs mainly on PS3 and the most common reasons it happens are slow internet, misconfigured DNS settings, incorrect URLs, and low PS3 memory. PSN otages can also cause it.
Check the steps below to fix it quickly:
How to fix The page cannot be displayed (80710a06) PS3 error
To start with, restart your router and PS3 and try again, make sure your PS3 is connected to the Internet, and up-to-date, and check the PlayStation Network Service Status page to outrule PSN outages.
If none work, head to the fixes listed next.
1. Use a different web address
When getting ps3xploit The page cannot be displayed (80710a06), use http instead of https in the address. HTTPS is more secure than HTTP, given that the former uses SSL encryption. But for websites that don’t support HTTPS, you will need to use http.
Besides, a few websites with downloadable content host multiple web pages. So you can access the other ones. But make sure to verify their authenticity first.
2. Change the DNS server address
On your PS3, open Settings, and go to Network.
Select Set up Internet connection.
Choose Use Wi-Fi for the setup.
Now, select Custom to manually set up the connection.
Set the IP AddressSettings to Automatic and DHCP Host Name to Do Not Specify.
For DNS Settings, choose Manual.
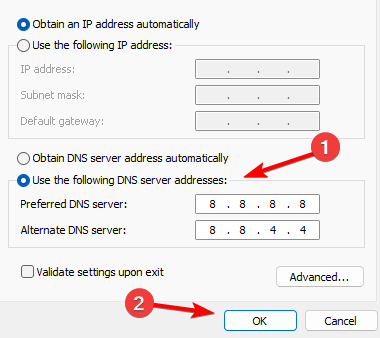
Next, enter the Google’s DNS address given below:
Primary DNS: 8.8.8.8
Secondary DNS: 8.8.4.4.
Finally, configure the remaining settings as you see fit, but it’s best to go with the default configuration.
3. Disable proxy on PS3
Often, a proxy server is the problem when you get The page cannot be displayed. (80710a06) PS3 error. To fix things, simply disable the Proxy.
For that, all you have to do is select Do Not Use under Proxy Server while setting up the network connection.
Remember, there’s no option to reset just the network settings. Rather, you will have to restore the entire system to its defaults. Make sure to note down any important credentials.
On your PS3, go to the Settings Menu.
Choose Restore Default Settings and confirm.
Wait for the process to complete, and connect again to your Internet Network.
When nothing else works, it’s best that you contact PlayStation support. They must have come across several such instances and will be able to provide you with the underlying cause and the relevant fix.
And that should get rid of The page cannot be displayed. (80710a06) browser error on PS3. Besides, if you have a PC lying around, consider using a PS3 controller in Windows.
Microsoft has recently filed a patent that describes a technology capable of automatically attaching files to documents, based on relevancy to the topic and the user’s intent.
The patent, developed in 2022 and published recently, seems to envision a technology best suited for mailing apps, such as Outlook, or even file management apps, such as Microsoft Teams, on OneDrive.
All three of these apps received some major updates recently: for example, Outlook will get Copilot, which will allow users to automatically compose emails; Microsoft Teams is also getting AI and a new design that allows for better file management within it.
And speaking of file management, OneDrive will also get a revamped design and an improved search, which also makes using the platform more intuitive and automatic, almost.
So, it would come as no wonder that Microsoft would develop such a technology. According to the patent, the technology would help users attach to right files to a document based on their input. The method would guess what a user wants to do, then it would ask the user to confirm, and only then it would suggest a list of files to attach. In many ways, this is similar to how Copilot already behaves on certain tasks.
Automatic file attachment: How does it work?
The system uses an intent model to guess if a user wants to attach a file.
It then asks the user to confirm this guess with a prompt (called an inline nudge).
An inline menu is created and shown to the user, which has a list of files that the user might want to attach. These files are ranked based on how relevant they are.
The system uses the user’s intent to narrow down the search for files.
The intent model uses two other methods (an embedding model and an N-gram model) and some limited seed queries to figure out the intent.
The system then ranks the files based on how relevant they are to the intent.
The user can then choose one or more files from the list to attach to their document.
As we mentioned earlier, Outlook can make the best use of this new technology, by suggesting automatic file attachments to users in their emails.
However, it can go beyond Outlook: OneDrive, Microsoft Teams or any other mailing app outside Microsoft can potentially use it. As a whole, the technology can be a game-changer, as it could greatly reduce time and workload when sending emails.
While we don’t know if Microsoft will release this technology, the patent is a good sign of where things are heading when it comes to file management.
While Corel VideoStudio remains a popular editing software, quite a few users reported that it won’t open. The problem has been present across iterations, be it Windows 7, Windows 10, or Windows 11. And it becomes all the more prominent after users upgrade the OS.
The problem appears in different scenarios, but based on our experience and forum reports, it’s usually the app to blame. Check out some of the most common reasons why Corel VideoStudio is not opening:
Issues with program files or app data
Missing or corrupt DLLs
Problems with the Visual C++ Redistributable packages
Recent Windows updates conflict with the program
The app installation didn’t go through properly
What can I do if Corel VideoStudio won’t open?
Before we start with the slightly complex solutions, try these quick ones:
Check for any pending Corel VideoStudio updates and install them. Also, update the OS.
Identify all VideoStudio processes, select them individually, and click on End task.
Press Windows + E to open File Explorer, navigate the following path or paste it in the address bar and hit Enter: C:\Program Files\Corel
Double-click on the folder with the same name as the installed program version.
Locate the uvDV.dll file, right-click on it, and select Rename.
Now, name it uvDV-old.dll.
Finally, relaunch the program and verify whether Corel VideoStudio is still not opening.
2. Replace the corrupt or missing DLLs
There are also cases when a missing or corrupt DLL is the reason Corel VideoStudio won’t open in Windows 11. Here, you will have to get a fresh copy of the DLL and paste it into the program’s folder or the System32 folder. For Coral VideoStudio 2023, it’s: C:\Program Files\Corel\Corel VideoStudio 2023
Based on our research, the following DLLs could be the problem:
In the program’s folder:
MUIHelper.dll
iEncoder.dll
In the System32 folder:
jscript9.dll
MSVCP110.dll (System32)
Also, you could check the error logs and identify the problematic DLL in your case. Open the log that relates to the Corel VideoStudio crash and verify what’s listed next to Faulting module name.
3. Repair the Visual C++ Redistributables
NOTE
This solution only applies in case you have Visual C++ Redistributables installed. If not, head to the next one.
Press Windows + R to open Run, type appwiz.cpl in the text field, and hit Enter.
Locate all the Microsoft Visual C++ Redistributable entries, select each individually, and click Change/repair.
Click the Repair button.
Click Yes in the UAC prompt and wait for the process to complete.
Now, launch the program and check for improvements.
4. Download Visual C++ Redistributables
Go to Microsoft’s official website and download the latest Visual C++ Redistributable packages. We recommend you download them all.
Now, run the setup and follow the on-screen instructions to complete the installation.
Once done, verify if Corel VideoStudio still won’t open.
Press Windows + I to open Settings, go to Windows Update from the navigation pane, and click on Update history.
Scroll down and click on Uninstall updates.
Now, click Uninstall next to the updates that were installed around the same time Corel VideoStudio stopped working.
Again, click Uninstall in the confirmation prompt.
When Corel VideoStudio won’t open, it, most certainly, could be the installed OS version to blame. So uninstall Windows updates and check for improvements. Remember, this also works when Corel VideoStudio doesn’t open in Windows 10.
7. Repair/reinstall Corel VideoStudio
Press Windows + R to open Run, type appwiz.cpl in the text field, and click OK.
Select Corel VideoStudio from the list of apps, and click Uninstall.
On the first attempt, choose Repair, and click Next to proceed.
Once the repair is complete, check whether the program now opens.
If not, select Uninstall the next time and follow the on-screen instructions to remove the app.
Also, make sure to delete any app files and Registry entries.
When Corel VideoStudio doesn’t open, many found that uninstalling the app along with all the files and then downloading a fresh copy did the trick! If that sounds like too much trouble, you can always use an effective program uninstaller tool.
One of these solutions should have helped when Corel VideoStudio wouldn’t open and automatically crashes after the splash screen. If not, you can always switch to a more reliable video editing software.
An internal server error on the Janitor AI website means something has gone wrong with the server that prevents it from fulfilling a request.
It’s usually a temporary problem; you can try again in a minute or two. However, if the issue persists, we’ve lined up a few troubleshooting options you can try.
How can I fix the Janitor AI internal server error?
Try the following before any technical solutions: switch to an Ethernet cable, as wireless connections tend to be unstable, try a mobile hotspot, check for any browser updates, restart your browser, or switch to another one.
1. Clear the browser cache
Launch your browser, and for this step, we shall be using Google Chrome.
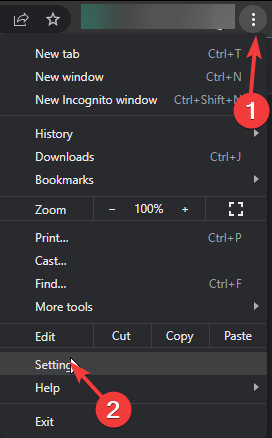
Click the three horizontal dots and select Settings.
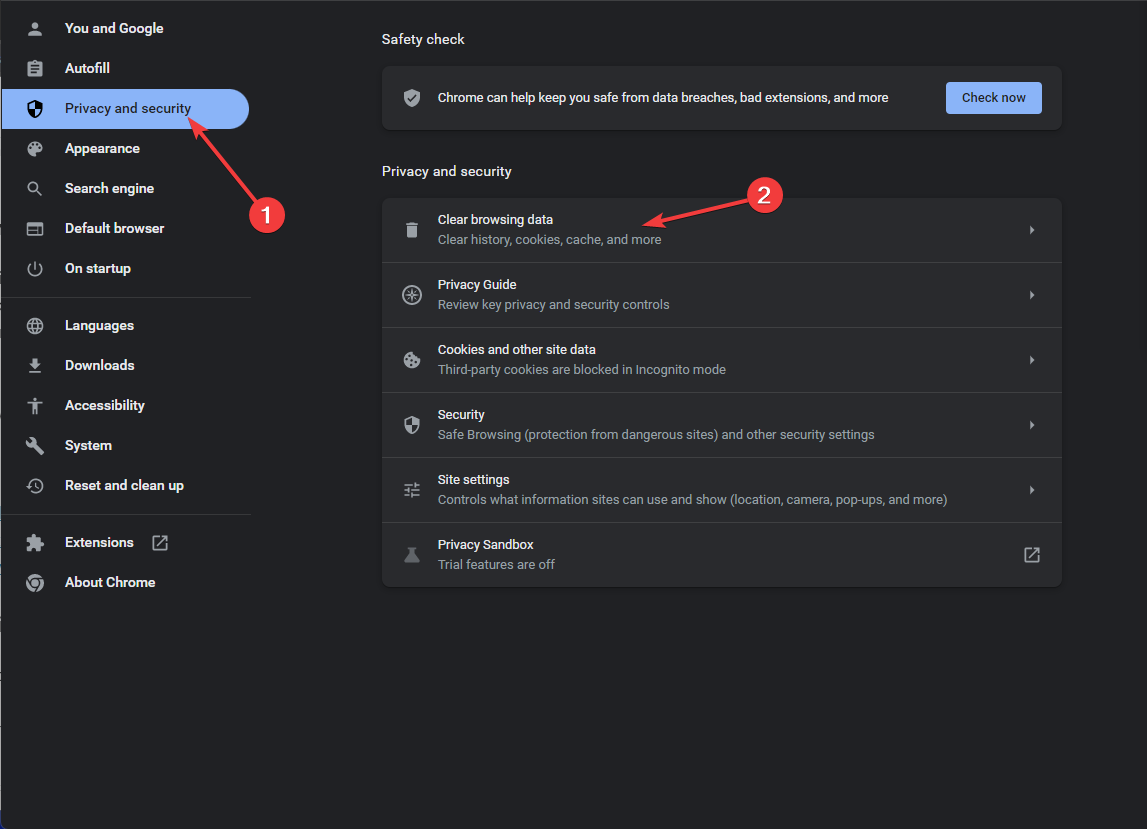
Go to Privacy and security and click Clear browsing data.
Select Browsing history, Cookies and other site data, & Cached images and files, then click Clear data.
2. Disable the browser extensions
Launch your Chrome browser, and in a new tab, enter the following address:chrome://extensions/
Peruse through your extensions and toggle the Disable button for any suspicious-looking ones.
Next, select Network & internet and click on VPN in the right-side menu.
Select the VPN connection you want to disable, click on the drop-down and select Remove.
You can also enable it if it was disabled and see if setting your server location in a different area bears any results.
5. Disable your Proxy
Press the Start Menu icon and select Settings.
Click on Network & Internet on the left pane, then scroll down and click Proxy on the right pane.
Select Edit next to Use a proxy server option in the Manual proxy setup section, toggle off Use a proxy server and click on Save.
Janitor AI may fail to recognize your proxy because it has been misconfigured. Ensure it is set up properly or disable it, then try again.
6. Use a different API
Janitor AI uses both Open AI and Kobold AI. Since most users have been complaining of OpenAI throwing the internal server error, it’s probably because of an overloaded server. If Janitor AI cannot fetch, it cannot handle all requests on time.
You can switch to a different one and see if there are any changes.
7. Contact support
If, at this point, you’re yet to get a solution to the error, it has more to do with Janitor AI than things on your side. You should get in touch with Janitor AI customer support and report the issue.
Ensure to explain in detail with possible screenshots, the browser you’re using, and the approximate time you’re getting the error. Unfortunately, when Janitor AI is not working most of the time, you just have to wait for the developers to release a bug fix.
While you wait, you can also browse community forums where other users or experts who have encountered the same internal server error have shared their troubleshooting solutions.
Why do I keep getting internal server errors on Janitor AI?
Internal server errors are often caused by problems with a web server. This may be due to an overload of traffic or a technical glitch that the site administrator needs to fix. They can also be caused by network errors or problems with the browser.
And they’re not unique to Janitor Ai. You may also encounter an internal error on Claude AI. But if you’re in dire need to generate content, you can use ChatGPT alternatives that serve the same purposes as Janitor AI.
Hopefully, you’ve been able to fix this issue. Have you encountered this error before? We’d love an account of your experience and how you solved it. Share with us in the comment section down below.
Many users reported that they are unable to access certain websites due to This page has been blocked by your administrator message.
This can be a big problem and prevent you from accessing websites necessary for your daily activities, so in today’s guide, we will show you the best methods you can use to fix this issue.
Why am I being blocked from certain websites?
Your administrator might have blocked a specific website on your PC.
Many antivirus applications block potentially harmful websites automatically.
A web browser can sometimes block certain pages from running in your browser.
How do I unblock a website that is blocked by the administrator?
Before we address this issue, be sure to perform the following checks:
Contact your system or network administrator. Security policies might be set that prevent you from using certain web pages.
Try using a different browser since browser settings or add-ons may be responsible for the problem.
Administrators block websites for the following reasons:
Many malicious, phishing, or harmful websites will be blocked for security reasons.
Productivity is also a concern for many administrators, therefore, many websites will get blocked to minimize distractions.
Many companies or government institutions can block web pages due to required compliance.
Certain websites negatively impact network performance, so administrators can block high-bandwidth websites.
Distribution of copyrighted content can lead to legal issues, which is why many administrators block websites associated with this kind of content.
We hope that this guide helped you bypass This website has been blocked by your administrator message on Windows 11. In most cases, it might be best to contact an administrator to address the issue thoroughly.
Everyone enjoys fast Internet speeds, hence why the 5G frequency is a favorite. Under the right circumstances, you should have a seamless connection with stability, but some users complain of the connection dropping often.
Network connection issues can happen to any frequency including the 2.4GHz, which is normal, but if it happens often, you may need to look into your configuration or see whether it’s time for a router upgrade.
Why does 5G Wi-Fi keeps disconnecting?
There’s interference between your device and the router.
There may be compatibility issues that often occur when you have upgraded your OS or device but have yet to update your router.
The device doesn’t support 5G Wi-Fi.
Your ISP (Internet Service Provider) may not be providing adequate bandwidth for you to use your 5G connection at full speed.
Locate the Network Adapter troubleshooter and click on the Run button next to it.
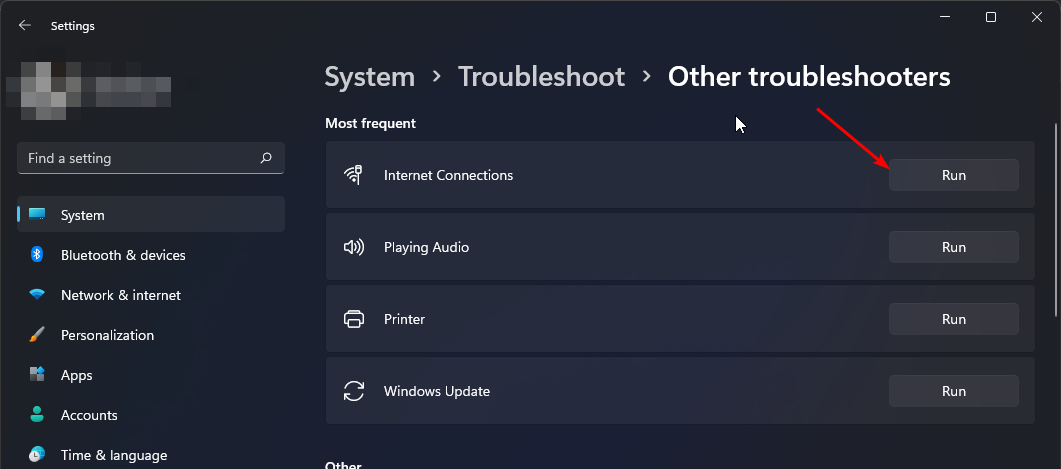
1.2 Run the Internet Connections troubleshooter
Hit the Windows key and click on Settings.
Go to System, and click Troubleshoot.
Now click Other troubleshooters.
Locate Internet connections, and click Run.
Follow the onscreen prompts to complete the process.
If the built-in tools aren’t of much help, you can opt for Wi-Fi analyzers that can help pinpoint the network issues and help your router locate the best connection possible.
2. Change your router’s channel
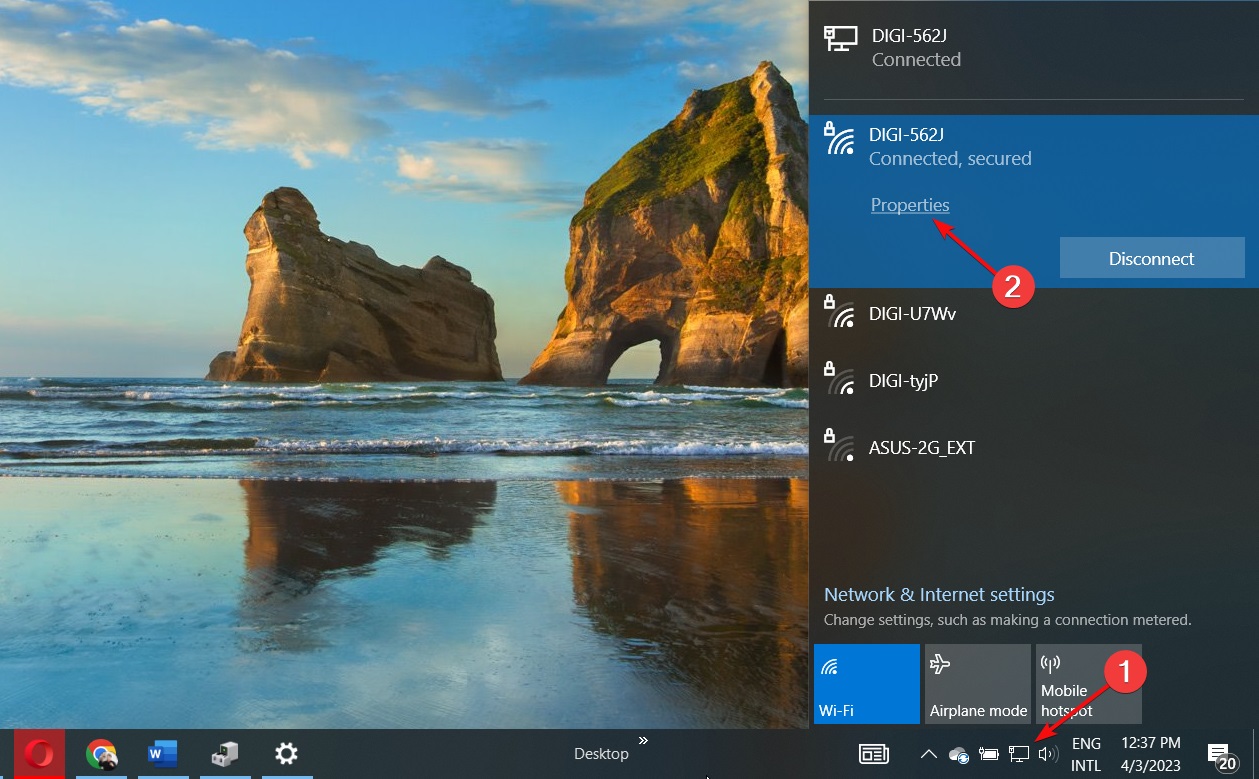
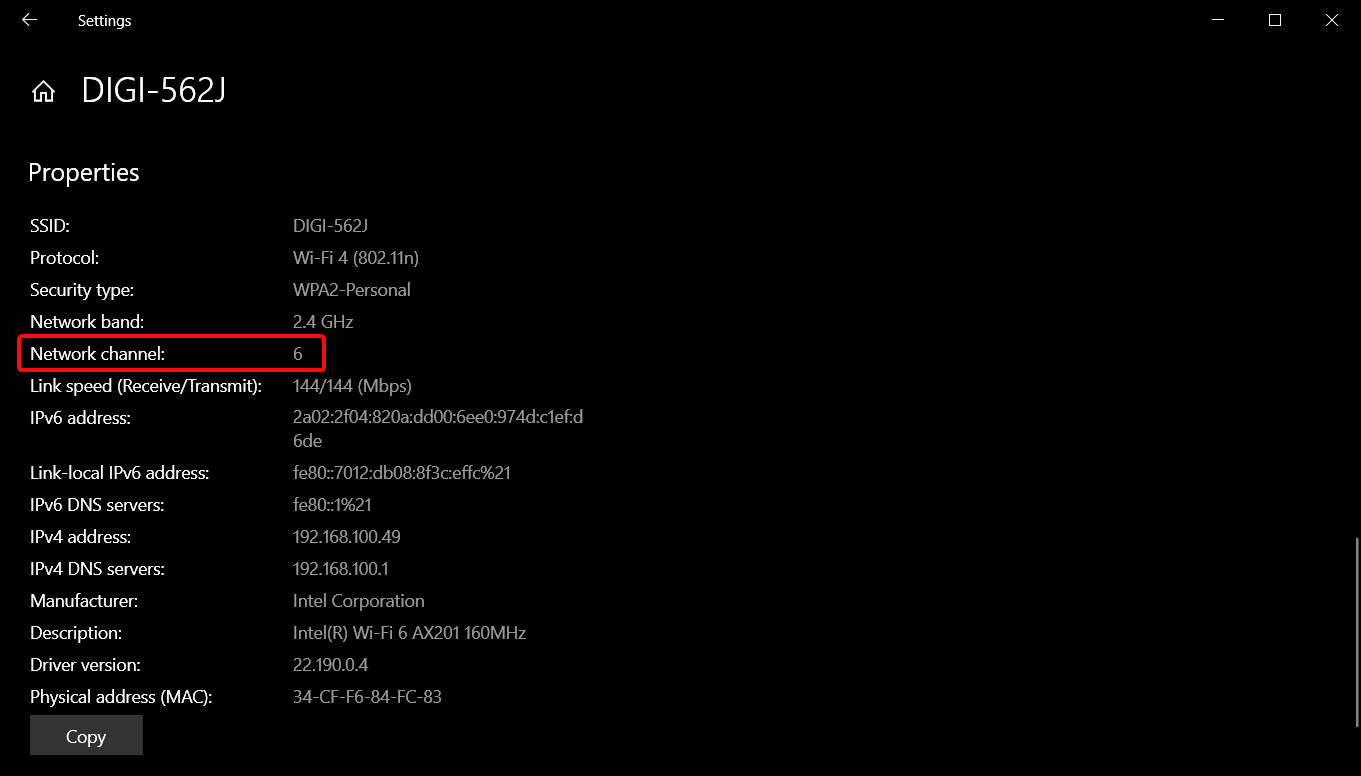
Click on the Network icon on your taskbar, select your Wi-Fi connection, and click on Properties.
Now, scroll down and you should see the Network channel for your Wi-Fi connection.
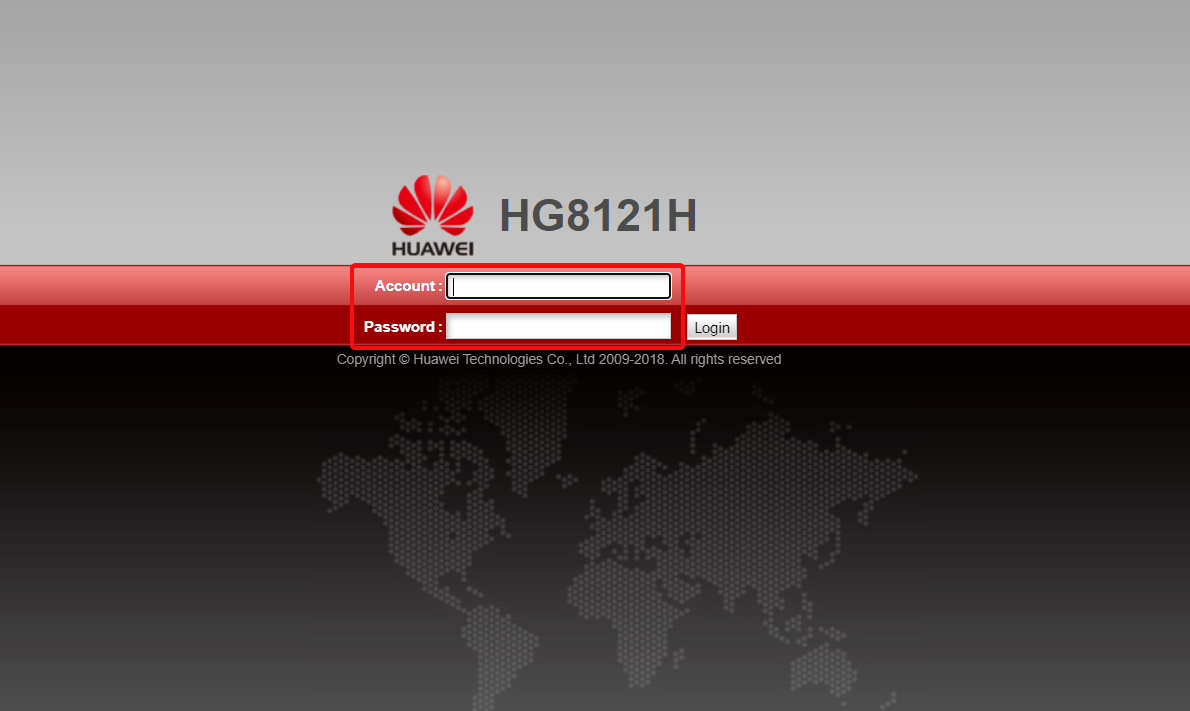
Navigate to your browser and log into your router with the correct credentials. You can find that info on the router itself or on the manual of the router.
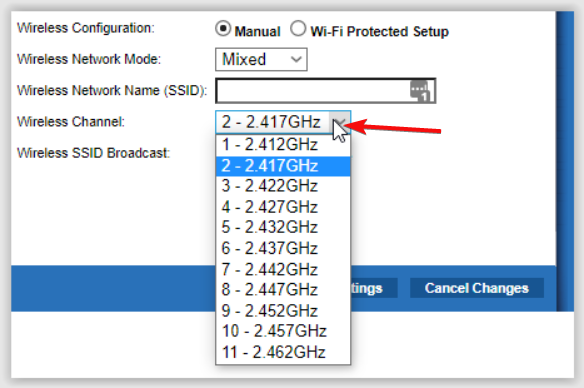
Go to the Wireless settings of your router and change the router channel to a different one from the default.
And because manually configuring your Wi-Fi channels involves a lot of guesswork and switching back and forth, using a Wi-Fi scanner can help you connect automatically to the best channel and avoid disruptions.
3. Update your Network driver
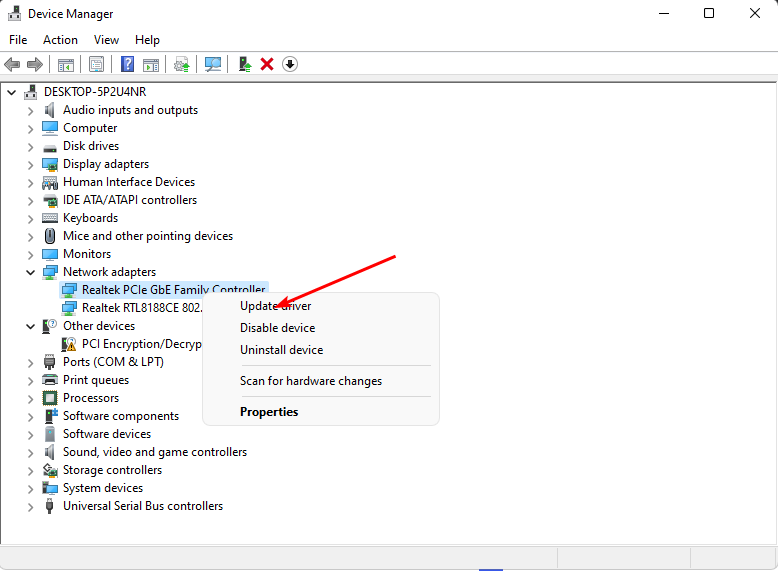
Hit the Windows key, type Device Manager in the search bar, and click Open.
Navigate to your Network adapter, right-click on it, and select Update driver.
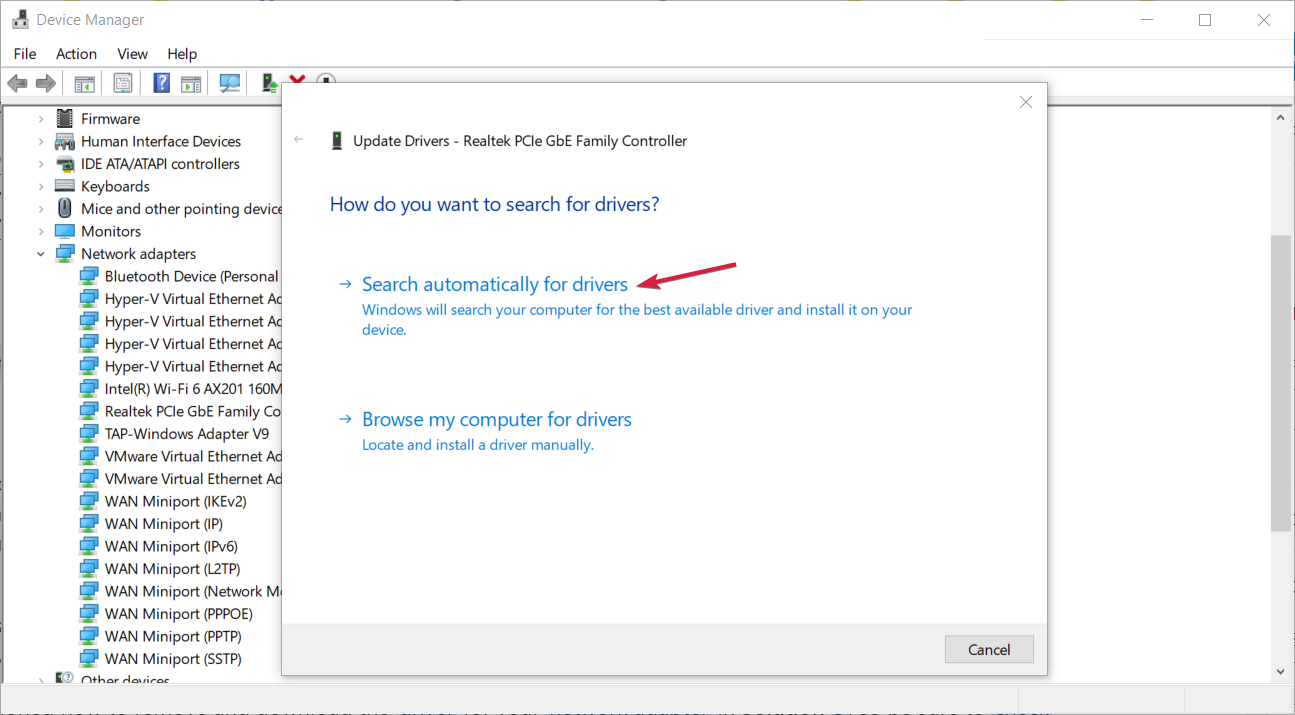
Select Search automatically for updated drivers.
If you want, this process can be automated by using specially designed software, such as Outbyte Driver Updater. Not only that but you can always rest assured all your drivers are up to date.
This tool will scan your computer, find out-of-date, broken, or missing drivers, then it will download you proper and genuine replacements for them, all with just a few clicks.
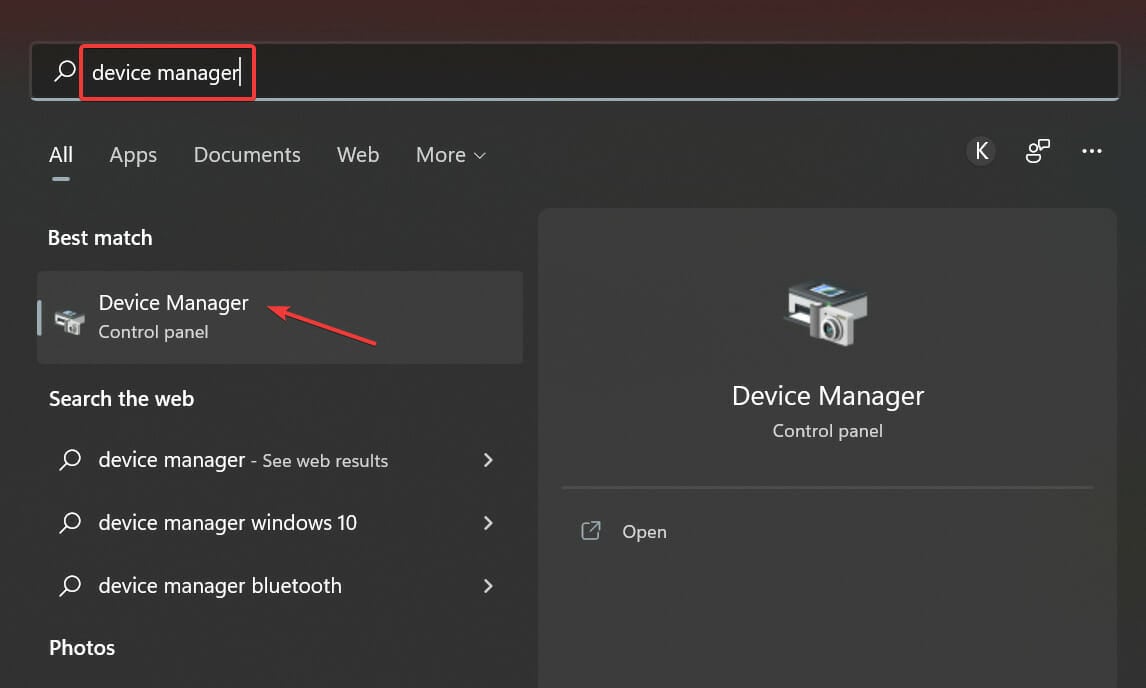
Press Windows + S to launch the Search menu, enter Device Manager in the text field, and then click on the relevant search result.
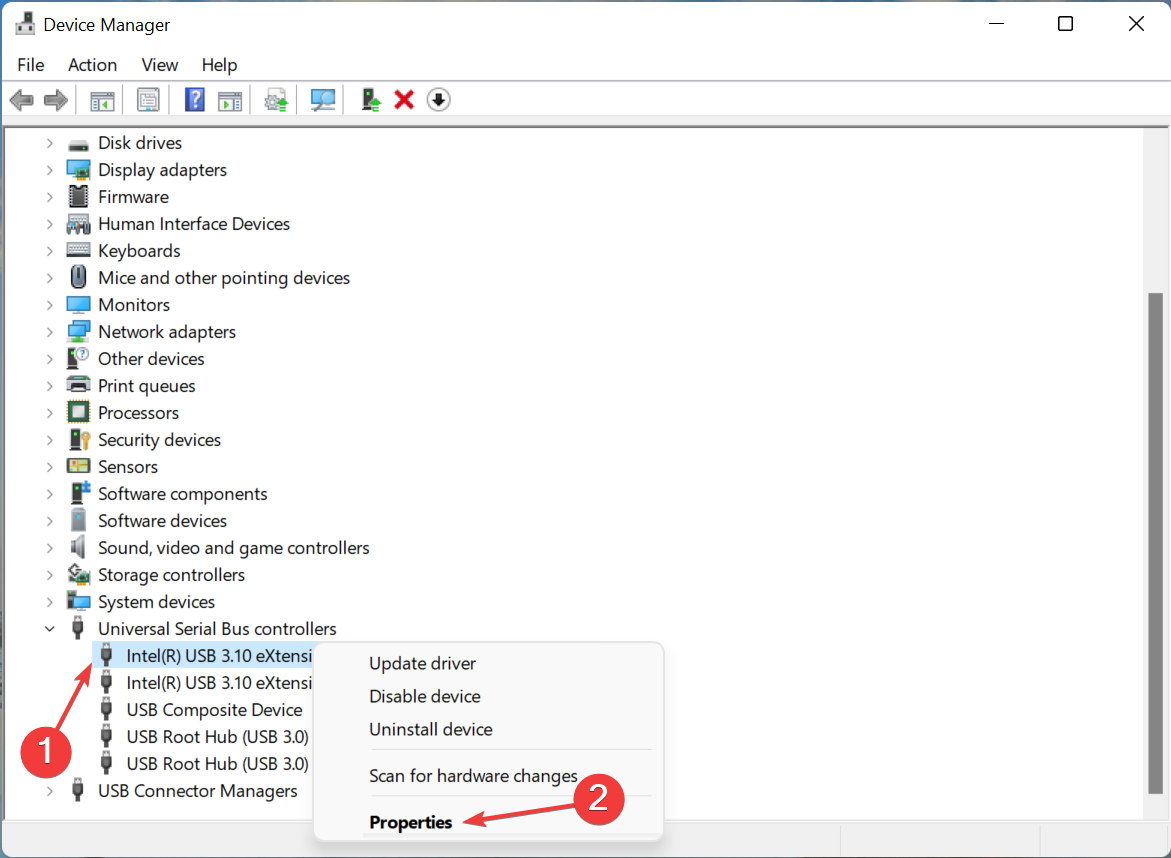
Next, right-click on the problematic device and select Properties from the context menu.
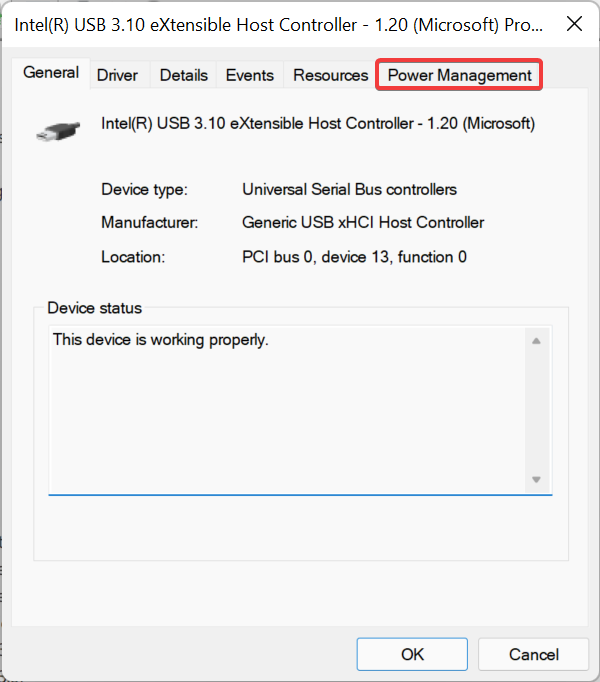
Navigate to the Power Management tab.
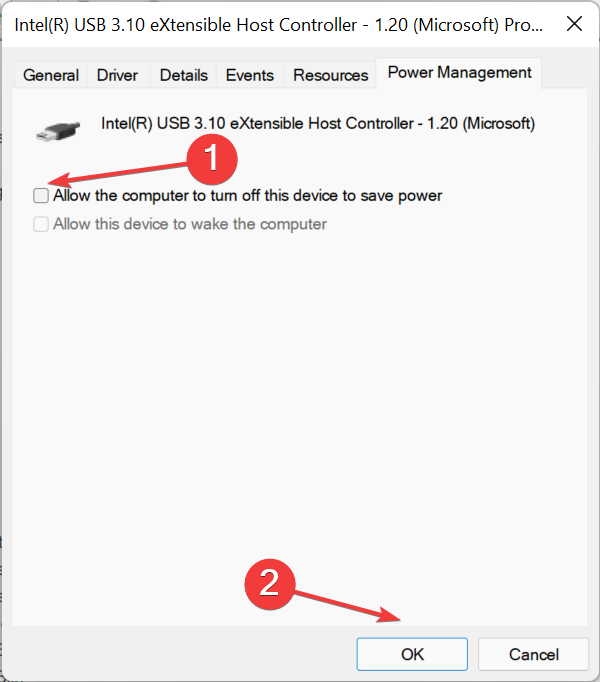
Untick the checkbox for Allow the computer to turn off this deviceto save power and click on OK at the bottom to save the changes.
Once done, restart the computer for the changes to come into effect.
8. Uninstall recent Windows update
Press the Win + I keys to open the Settings menu.
Click on Windows Update on the left pane.
Select Update history on the right.
Under Related settings, select Uninstall updates.
Choose the recently installed update and hit the Uninstall button.
Follow the on-screen prompts.
Restart your PC and see if it helps.
9. Perform a Network reset
Hit the Windows key and click on Settings.
Navigate to Network & internet.
Select Advanced network settings.
Click on Network reset.
Next, hit the Reset now button.
Fortunately, it’s not all that complicated to speed things up. With these tips and tricks, you can easily improve your 5G network, ensuring you can enjoy fast internet speeds without interruption.
Often, when faced with sound issues, the first line of action is to reinstall the drivers, and while doing so, many encountered the Install Realtek HD Audio Driver Failure error message. It also lists an error code, be it 0001, 0002, 0x00005b3, and 0x00000070, amongst others.
These codes won’t help you much other than providing an extremely basic overview of what went wrong. In most cases, users had to execute a series of fixes before one worked. But with a nuanced approach, you can eliminate the install error in no time!
Possible causes behind the install error:
A conflicting driver is present on the PC.
The PC doesn’t have enough disk space.
The driver you are trying to install is not compatible with the system architecture or OS.
Third-party software conflicts with the process.
Malfunctioning hardware, especially the sound card.
How do I fix Install Realtek HD Audio Driver Failure Error code?
Before we start with the slightly complex solutions, here are a few quick ones to try:
Restart the computer and then try installing the driver. Also, make sure you have downloaded the correct driver version.
Check for available Windows updates and install them.
If you get Error Code: 0x00000070 while installing the Realtek HD Audio driver, free up disk space. You can run Disk Cleanup or, to automatically clear unwanted files, configure Storage Sense.
If none work, head to the fixes listed next.
1. Uninstall the Realtek HD Audio device
Press Windows + R to open Run, type devmgmt.msc in the text field, and hit Enter.
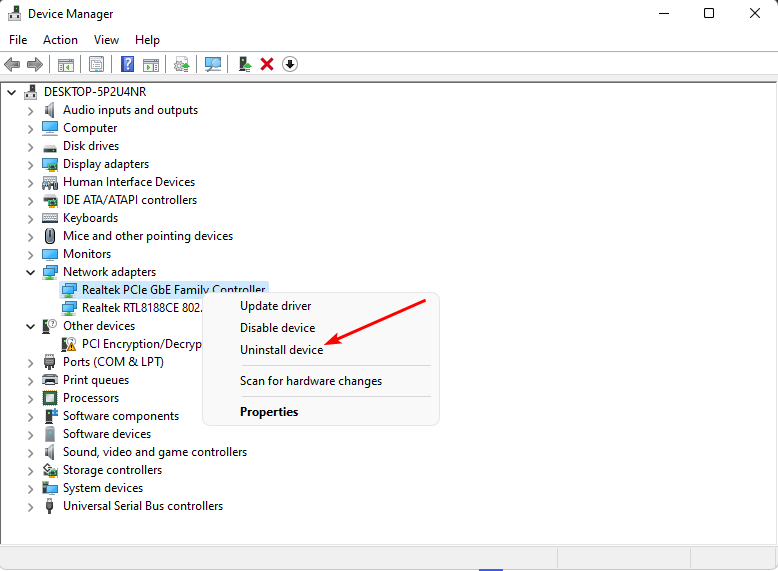
Expand the Sound, video and game controllers entry, right-click on Realtek HD Audio, and select Uninstall device.
Tick the checkbox for Attempt to remove the driver for this device, and click Uninstall.
Now, run the Realtek HD Audio driver installer setup that earlier gave the error.
Often, the quickest fix when you get the Install Realtek HD Audio Driver Failure error is to remove the already available driver. You may use a reliable driver uninstaller to remove the software component effectively.
2. Let Windows update the driver
Press Windows + X to open the Power User menu, and select Device Manager from the list of options.
Now, double-click the Sound, video and game controllers entry, right-click on Realtek HD Audio, and select Update driver.
Click on Search automatically for drivers and wait for Windows to install the best version available locally.
Restart the computer and check whether the audio problems are fixed!
Of course, this process can be automated by simply using a specialized tool, such as Outbyte Driver Updater.
This software will scan your system, identify, broken or out-of-date drivers, and will look up new ones. Within a few minutes, you can have all your drivers up to date and you can resume using your computer.
Press Windows + S to open the Search menu, type Device Manager in the text field, and click on the relevant result.
Expand the Sound, video and game controllers entry, right-click on Realtek HD Audio device, and select Update driver.
Click on Browse my computer for drivers.
Now, click on Let me pick from a list of available drivers on my computer.
With the Show compatible hardware option checked, select another version of the driver from the list, and then click Next.
Wait for the driver install confirmation and verify whether the sound issues are fixed.
4. Get the driver from the manufacturer’s website
If you got the Realtek HD Audio driver package from an unreliable source, download it from the official website. The driver works on both Windows 10 and Windows 11.
In case you still get the Install Realtek HD Audio Driver Failure (Error Code 0x00005b3 or another), download the setup from the PC manufacturer’s official website and then manually install the driver.
These websites usually have an embedded auto-detect tool which identifies your PC’s model, which will eliminate any compatibility issues.
5. Enable Stereo Mix
Press Windows + S to open Search, type Change system sounds in the search bar, and click the relevant result.
Go to the Recording tab, right-click on Stereo Mix, and select Enable.
Once done, click on Apply and OK to save the changes.
Now, run the driver installer and check whether the Install Realtek HD Audio Driver Failure Error code 0002 disappears.
Press Windows + S to open Search, type Create a restore point, and click the relevant search result.
Click the System Restore button.
Now, select Choose another restore point, and click Next.
Pick a different restore point from the list, preferably the oldest, and click Next.
Verify the restore details, and click Finish to start the process.
If nothing else works against the Install Realtek HD Audio Driver Failure error, perform a system restore! For this, you need a restore point created before the underlying cause first made its way. This will also help when Realtek HD Audio is not working in Windows 11.
In the HD+ vs Full HD battle, FHD will win every time because it defines a resolution of 1920×1080 pixels while HD+ is only 1600×900 pixels.
What do HD, HD+, and FHD mean? HD means high definition and it is used to define the resolution of 1280×720 pixels or up to 1366×768 pixels. HD+ is a slightly higher resolution of 1600×900 pixels and FHD or Full HD is the 1920×1080 pixels resolution.
Which one is better, HD+ or Full HD?
If you just compare the resolution, higher is always better. Full HD (FHD) has a higher pixel count at the same aspect ratio of 16:9 than HD+, so Full HD is clearly better.
There is also the Full HD+ resolution of 1080 x 2400 pixels which you will usually see on smartphones and it’s clearly better than Full HD.
How are HD+ and Full HD related to screens?
While we established that Full HD has more pixels than HD+, there is also the question of the screens you apply it to.
If you display images of HD+ and Full HD resolutions to a 5-7 inch smartphone screen, you won’t see much difference but if you do the same on a 32-inch or higher diagonal TV, you will notice a difference in quality.
That is simply because, with Full HD resolution, you will have a bigger pixel density on the same screen area.
On a 32 inch screen with HD+ resolution (1600×900 pixels) you will have a total of 1.4 million pixels and a pixel density of 57.4 ppi (pixels per inch).
The same screen with Full HD resolution (1920×1080 pixels), will display 2 million pixels on the same area, so a higher pixel density of 68.8 ppi.
As a fun fact, to get roughly the same pixel density on a 65-inch TV, you will need a 4K resolution (3840×2160 pixels).
What is the best resolution to display on my screen?
The image you can display on your screen is limited by the resolution of your device. You can still force playing higher image resolutions on a lower-resolution screen but that means that the image will be reduced to the actual resolution of the display.
There are a lot of video editing tools out there but only a few of them can process 8K content.
At the same time, there are a lot of 4K TVs that upscale the lower-resolution images so that you don’t see the difference on the screen.
Right now, the highest resolution you can get on a screen is 8K (7680 x 4320 pixels). However, there are a few commercially available screens out there that can reproduce that resolution.
At the same time, even if you get an 8K TV there is a lack of 8K content that can be viewed on such displays.
The next best is, of course, 4K with variants of 3840×2160 pixels or 4096×2160 pixels to cover different aspect ratios. Here’s what to do if your device doesn’t display 4K on Windows 10.
Other resolutions or screen-related questions
How far should I stand from my TV? – The most comfortable distance from your TV is roughly double the diagonal of the screen. So, if you have a 50-inch screen, you should be at around 100 inches (8 feet) from it. Of course, that also depends on your viewing preferences and visual acuity.
How big should my TV be? – The size of your TV should depend on the size of the room and the practical viewing distance you can sit away from it. It’s impractical to install a 65-inch TV in a small room as it may be pointless to get a 32-inch screen in a 100 sq ft living room.
What are the benefits of a larger resolution screen? – The higher the resolution, the higher the pixel density and quality of the image. The larger the screen, the higher the resolution must be to get a better pixel density and quality.
So, if there was any confusion, HD+ is not the same as Full HD or FHD, and Full HD is better than HD+ because it has a higher resolution.
The latest Firefox 119.0 for Windows, Mac, and Linux is set to release a plethora of new features that many users have long awaited. Version 119 includes new features like the ability to insert images into PDF documents, Firefox View that provides more content and improved privacy in Firefox with Encrypted Client Hello (ECH), and other improvements and bug fixes.
Check out the release notes below to learn more about the Firefox 119 changelog. We’ve analyzed it and summarized the most significant changes.
Mozilla Firefox 119.0 release notes
Firefox 119
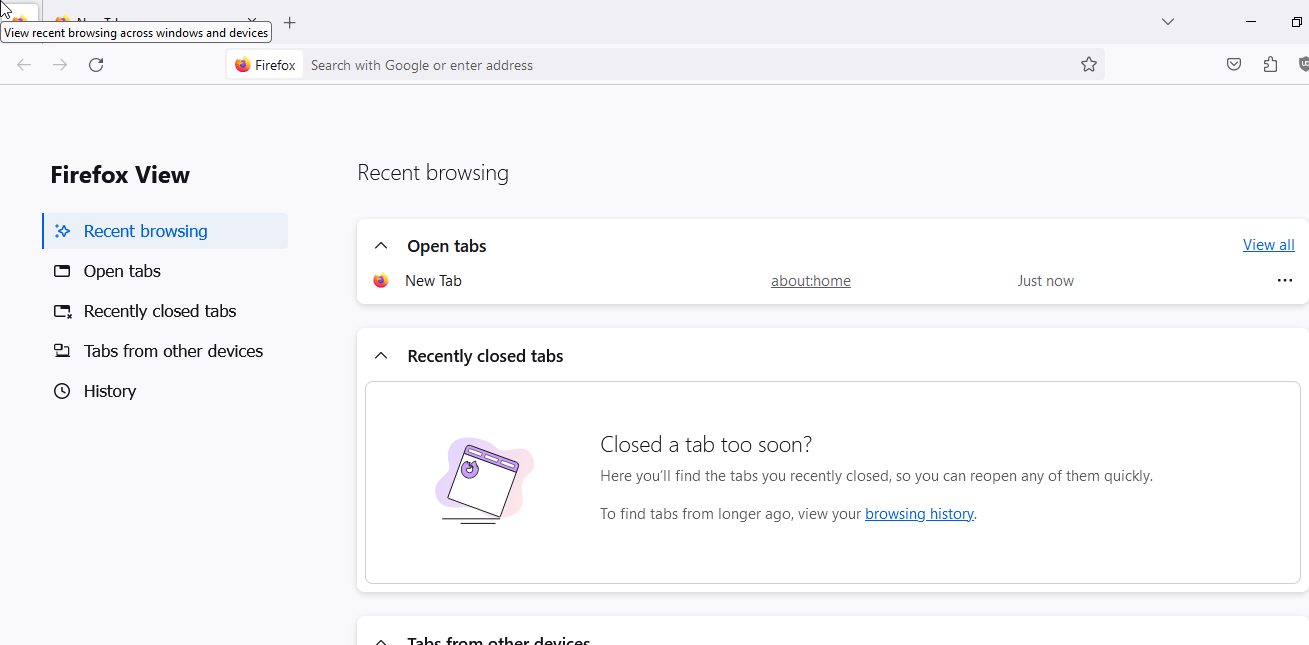
1. Firefox View gets some much-awaited improvements. You can now see all open tabs from all windows, and if you sync them, you’ll see all tabs from other devices. Browsing history is now listed, and you can sort by date or by site; recently closed tabs are also listed on Firefox View. Select the file folder icon or Firefox icon at the top left of your tab strip to access Firefox View.
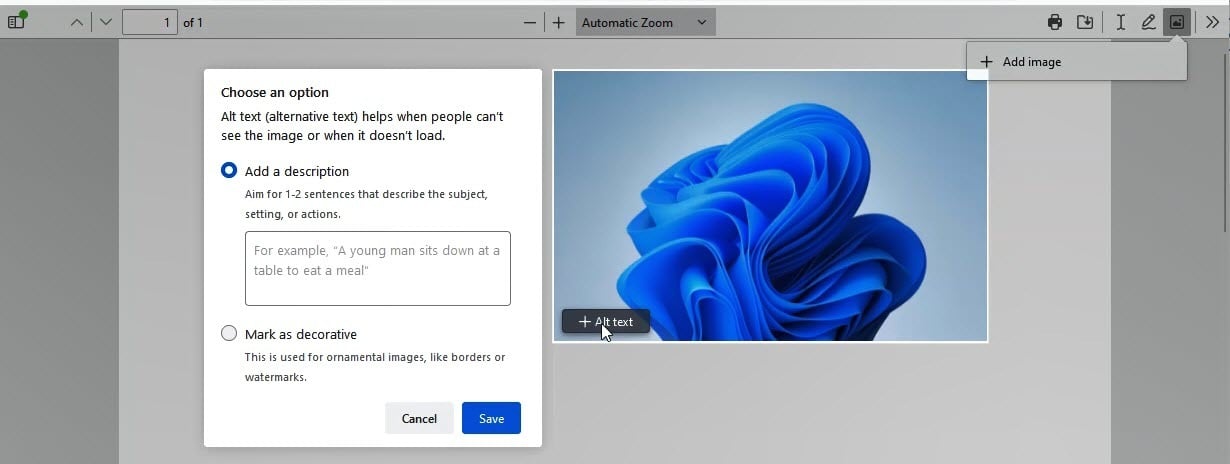
2. Firefox 119 allows users to edit PDFs by adding images and alt text. Click the Picture icon on the toolbar, click Add image, select the image, click +Alt text, and add a description for your picture. You can also mark it as decorative without adding a description.
3. You can now open recently closed tabs across sessions even if Firefox has automatic session restore not enabled. Use the shortcut Ctrl+Shift+T.
4. If you’re migrating your data from Chrome, Firefox now allows you to import some of your extensions.
5. As part of Total Cookie Protection, Firefox now supports the partitioning of Blob URLs. This mitigates a potential tracking vector that third-party agents could use to track an individual.
6. The visibility of website fonts has been restricted to system fonts and language pack fonts in Enhanced Tracking Protection strict mode to mitigate font fingerprinting.
7. The Storage Access API web standard was updated to improve security while mitigating website breakages and further enabling the phase-out of third-party cookies in Firefox.
8. Encrypted Client Hello (ECH) is now available to Firefox users, delivering a more private browsing experience. ECH extends the encryption used in TLS connections to cover more of the handshake and better protect sensitive fields. Read more about the launch of ECH on Mozilla Distilled.
9. Media sniffing is no longer applied to files served as type application/octet-stream. This allows files to be downloaded instead of attempting playback.
10. On Windows, the mouse pointer will disappear while typing if the relevant Windows mouse properties from the system setting are enabled.
11. Firefox is now available in the Santali (sat) language.
The update also fixes an issue causing unexpected jumps in the Scroll position on Facebook. You can find full details, including Enterprise, Developer, and Web Platform information, on the Firefox 119 release post page.
What’s your take on Firefox 119 and the improved Firefox View? Share your thoughts in the comments section below.
When installing programs on your Windows 11 PC and you run into an error occured while attempting to create the directory message, your system files may be corrupt.
There is a chance that installing what you want will work perfectly, but it doesn’t always apply to all cases. If you’re unfortunate enough to end up with this issue, there is a way to get rid of this error.
What is Error 1317: An error occurred while attempting to create the directory on Windows 11?
This is an error that can happen if you are trying to install a program because your system may not have enough disk space to create the directory. Other common causes include:
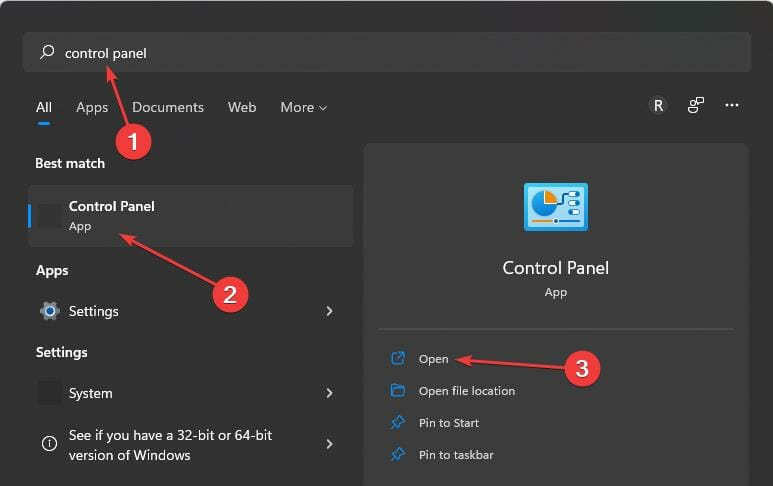
Hit the Start menu icon, type Windows Security in the search bar, and click Open.
Click on Firewall & network protection, then select Public network.
Locate Microsoft Defender Firewall and toggle the off button.
2. Run the DISM and SFC scans
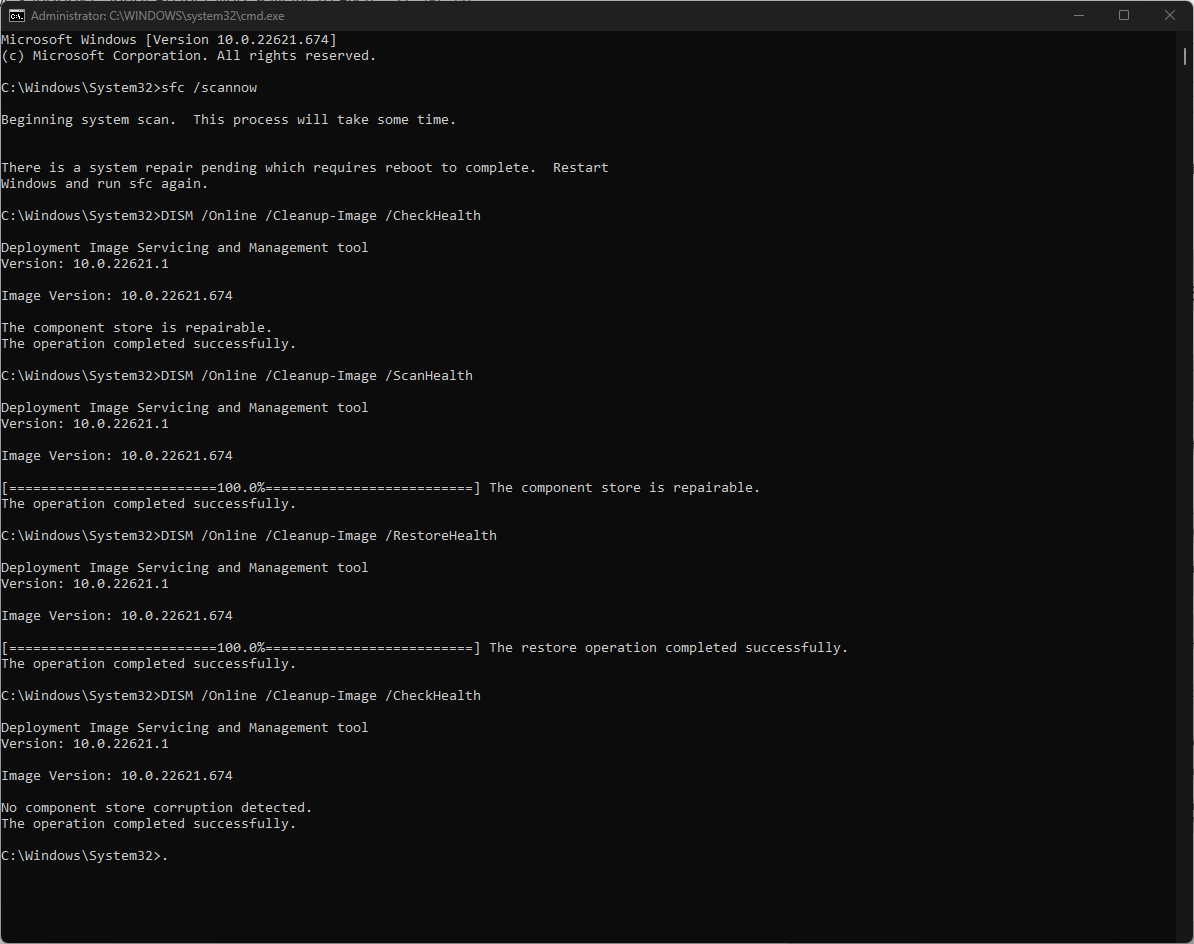
Hit the Start Menu icon, type cmd in the search bar, and click Run as administrator.
Type the following commands and press Enter after each one:DISM.exe /Online /Cleanup-Image /Restorehealthsfc /scannow
You can always rely on specialized repair tools to do this for you. This software will scan and then replace any broken system files with just a few clicks.
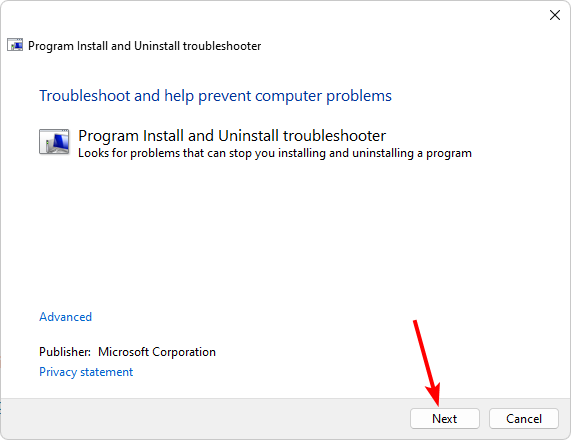
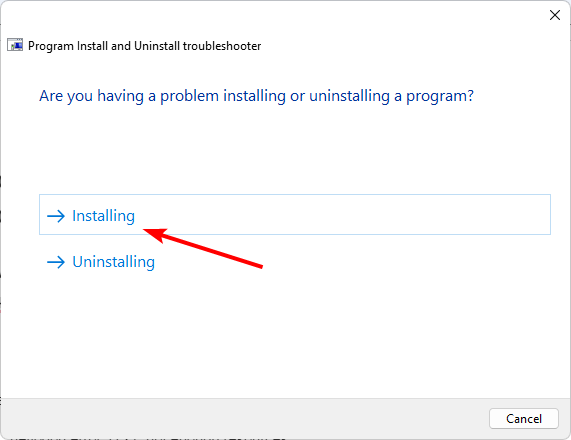
3. Run the Program Install and Uninstall troubleshooter
Hit the Windows key, type Windows Security in the search bar, and click Open.
Navigate to Virus & threat protection.
Scroll down and select Manage ransomware protection.
Locate the Controlled folder access option and toggle it off.
Controlled folder access is a feature that protects your files from malware. It does this by monitoring the folders where apps can write files and create new ones. You can disable it temporarily and install the problematic app, then switch it back on for the safety of your system.
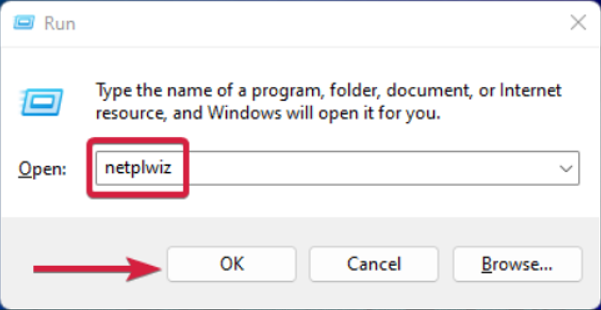
Press Windows + R to launch the Run console, enter netplwiz in the text field, and click OK.
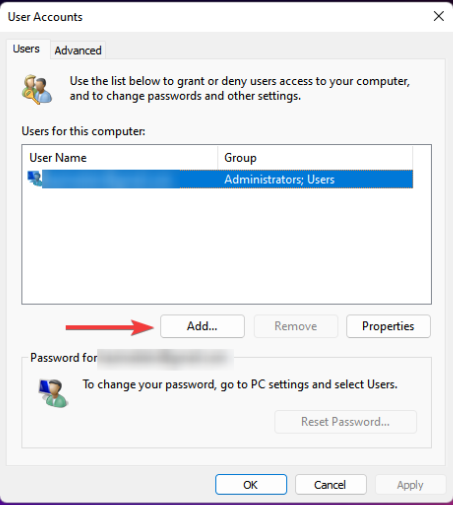
Click Add in the User Accounts window.
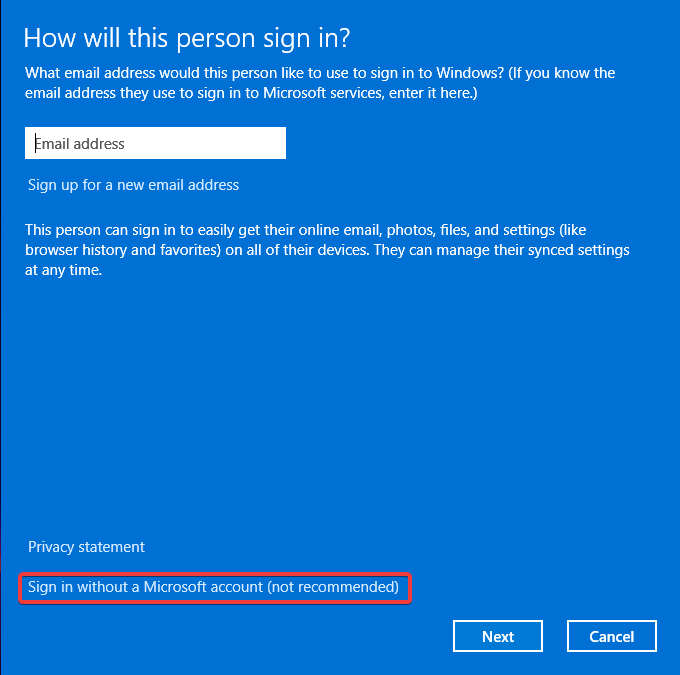
Select Sign in without a Microsoft account (not recommended).
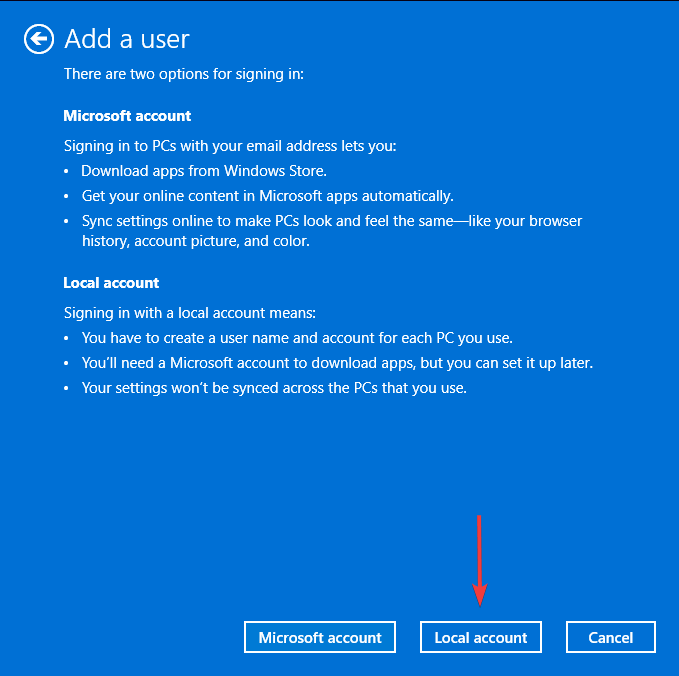
Click on Local account button.
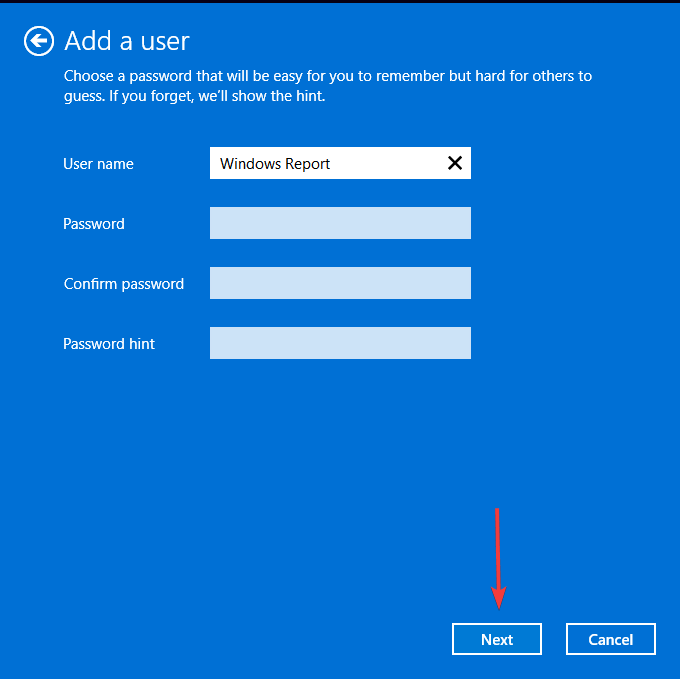
Enter a username and password (optional) for the new user account, and a hint, in case you set a password. Once done, click on Next.
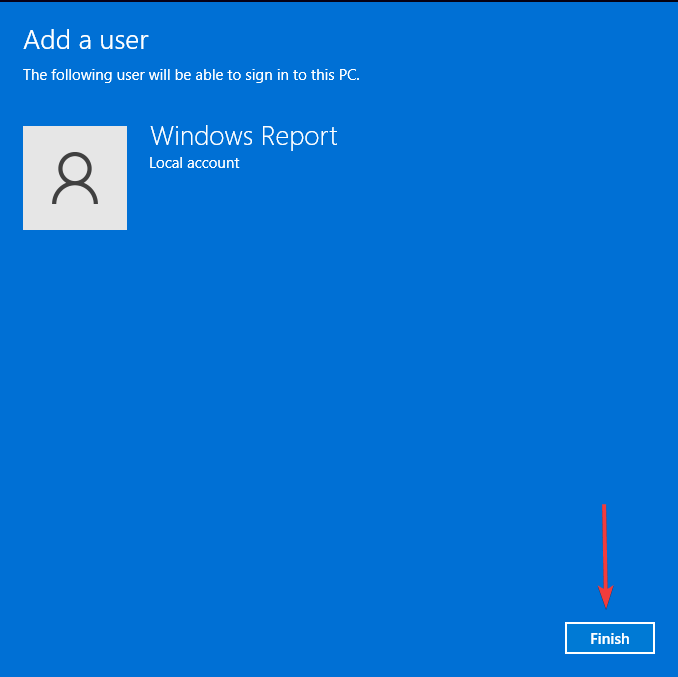
Click on Finish to create the Local account.
If the error 1317: An error occurred while attempting to create the directory goes away in this new user profile, your previous one may have been corrupted. You can take the necessary steps to repair the user profile or copy it to the new user account.
7. Perform clean boot
Hit the Windows key, type msconfig, and open System Configuration.
Switch to the Services tab and select Hide all Microsoft services.
Click on the Disable all button, then hit the Apply button to save the changes.
Go back and click on the Startup tab, select Open Task Manager then click OK.
In the Startup tab of the Task Manager, Disable all the Enabled startup items.
Close Task Manager and restart your PC.
In summary, access denied errors like this are mostly due to a lack of proper maintenance of your PC. Over time, the registry becomes bloated with unnecessary entries, which affect its performance.
Cleaning out your registry regularly can help optimize your PC and minimize the occurrence of such issues.
If you have a 100-page presentation and need to jump to a PowerPoint Slide in edit mode, we know a shortcut to help you.
What is the shortcut key for going to a specific slide in PowerPoint? The shortcut key to go to a specific slide in PowerPoint is to type the number of your slide in Slide Show mode and press Enter.
How do I jump to a specific slide in PowerPoint Edit Mode?
Unfortunately, there is no shortcut in PowerPoint Edit Mode to go to a specific slideshow but we have a few methods to do that very quickly.
1. Move through slides in Slide Show Mode and edit
Open your PowerPoint presentation.
Press the F5Slide Show shortcut to start the presentation.
Type the number of the slide you want to edit and press Enter.
Press Esc on your keyboard to edit the current slideshow.
So, basically, you move through the slides in Slideshow mode and when you exit, you will find yourself at the current slide that you want to edit in normal view or edit view. Of course, you may also use the up or down arrow keys to go to the previous slide or the next slide.
2. Using the Slide Sorter option.
Open your presentation and click on the Slide Sorter icon from the bottom.
You will see a preview list with the slides but by default, the images are pretty big. Press and hold the Ctrl key and zoom out using the scroll wheel on your mouse. You may also use the Zoom slider from the bottom-right corner.
Now you will be able to scroll through the slides in Edit Mode a lot faster and when you see the right one, double-click it to edit the slide.
Another trick you may use is to go to View and open a new window with the same presentation. Arrange the windows to fit both on your screen, use the one on your left to search through the slides in the Slide Show view, and use the one on your right to identify the slide in the Slide Sorter view.
3. Create and run a macro
Open your presentation, go to the View tab, and click on Macros.
Enter a name for the macro, then click on Create.
Paste the following code in the Visual Basic window:
Sub go_to_slide()
Dim S As Integer
Dim total_slides As Integer
total_slides = ActivePresentation.Slides.Count
S = InputBox("Enter slide number", "Go To Slide")
If (S <= 0) Then
MsgBox ("Enter slide number greater than zero")
ElseIf (S > total_slides) Then
MsgBox ("Enter slide number less than the total slides")
ElseIf (S <= total_slides) Then
ActivePresentation.Slides(S).Select
End If
End Sub
Make sure you save your presentation as a .pptm file (Macro Enabled PowerPoint Presentation).
Now, go back to your presentation, select Macros from the View tab, select the newly created macro, and click on Run.
Now, you just need to enter the slide number and click OK to go to the desired slide on your presentation even when you are in Edit mode.
Now, whenever you want to use this macro, press the Alt + F8 shortcut and run it.
What are the most common handy shortcuts in PowerPoint?
The Windows Report software team has gathered a set of very useful PowerPoint keyboard shortcuts that will help you increase your productivity.
Action
Shortcut
Start a presentation from the first slide
F5
Open the presentation from the current slide
Shift + F5
Start the presentation in Presenter View
Alt + F5 – Not working in PowerPoint 2010 and 2007
Perform the next animation or go to the next slide
N Enter Page down Right arrow or Down arrow keys Spacebar
Start the previous animation or go back to the previous slide
P Page up Left arrow or Up arrow keys Backspace
Hide the pointer and navigation buttons
Ctrl + H
Display a blank black or white slide or go back to the presentation from a blank black or white slide
B or . (period) for black and W or , (comma) for white
End the presentation
Esc - (hyphen) for PowerPoint 2010 and 2007
What shortcuts can I use during the PowerPoint presentation?
While you are in Slide Show (full-screen) mode, with or without Presenter View, you can press the F1 key to see the shortcut menu and see the list of shortcuts for different categories.
In the Slide Show Help window, you will see all the shortcuts you can use during the presentation, including the ones for media and touch.
How to create a slide zoom – This guide will help you create slide, section, or summary zooms in PowerPoint.
This concludes our guide on how to jump to a PowerPoint slide in Edit Mode and we hope that we provide sufficient information on the subject.
To summarize our article, the easiest way to jump to a desired slide is to start the presentation, type the number of the slide and press Enter, then hit the Esc key to edit it. You may also use the Slide Sorter or create a macro for this action.
If you know about any tested methods of jumping to a slide in Edit Mode, leave us a note in the Comments section below.
There are different types of RAID each with its benefits and flaws, and in order to better understand them, in today’s guide we’ll take a closer look at RAID 0 vs RAID 1.
These two technologies use different principles, and we’ll analyze the speed and reliability of each system and help you find the right choice for you.
Advantages & disadvantages of RAID 0 & RAID 1
RAID 0
What is RAID 0?
RAID 0 is a storage virtualization technology that uses disk striping functionality to split the files into blocks and distribute them across all drives in the array.
Fault tolerance in RAID 0
By distributing files as blocks across multiple drives, it has zero fault tolerance. This means that if any drive in the RAID array fails, all blocks on that drive will become unrecoverable and they can’t be used to read or write files.
Benefits of using RAID 0
It offers great performance for both read and write operations.
With RAID 0 all capacity is utilized and there is no overhead.
Easy to implement.
When to use RAID 0 vs. other levels?
RAID level 0 can be used in systems that require very high read and write speeds. It can be used for the following purposes:
Video editing – in order to quickly load large files.
Gaming – it can improve loading time for some games.
Storing of temporary files – If you need to quickly access the cache, RAID 0 might be a great option for you.
RAID 1
What Is RAID 1?
Similarly to RAID 0, RAID 1 is a storage virtualization technology that uses a mirroring feature. Thanks to this feature, all data from a single drive is copied automatically to the second one.
Fault Tolerance in RAID 1
RAID 1 offers fault tolerance because it copies all data from a single disk to another one, so even if a drive failure occurs, you can continue using the second drive.
The only way for data loss to happen is for both drives to fail, which is pretty unlikely to occur. To make your data even safer, you can add an additional drive to RAID 1, so you can have two backups.
Benefits of Using RAID 1
It offers read and write speed as a single drive, so you won’t notice any performance issues.
Offers an exact duplicate of your files, so even if the primary drive fails, all your data will be preserved.
It’s simple to use.
When to use RAID 1 vs. other levels?
You should use RAID level 1 in systems that require data availability. Some of the main usage cases include:
Business servers – If you have a file or email server for a small business, RAID 1 is a perfect choice to prevent file loss.
Operating system drives – In case you’re running a workstation or a server, backing up your data with RAID 1 will minimize the downtime time and chance of data loss.
Backup – RAID 1 is a perfect backup choice for both personal and business users since it copies all your files to the second drive.
Differences Between RAID 0 & RAID 1
Storage capacity differences
RAID 0 combines the capacity of both drives since it distributes data across both disks.
RAID 1 offers only the full capacity of a single, or smaller, hard drive, meaning you’ll have less disk space to work with.
This means that RAID 1 allows you to use only half of the maximum storage capacity on your PC since the other half is dedicated to backup.
Disk failure differences
RAID 0 offers no protection against disk failure. If one drive fails, the entire array fails, and the data on both drives is permanently lost.
RAID 1 offers full redundancy since it mirrors data from one drive to another. Even if one drive fails, the other will keep all your data intact.
Which one should I use?
The RAID configuration depends primarily on your needs and whether you need performance or reliability:
RAID 0 is cheaper, and it offers full capacity while providing you with a performance boost.
RAID 1 is more expensive since there’s only 50% of the usable storage capacity.
Despite providing a performance boost, RAID 0 doesn’t offer any disk failure protection, meaning that if one drive fails, the data on the other drive is unrecoverable.
The advantage of RAID 1 is disk mirroring, so you can rest assured that all your data is safe, even if one drive fails.
Our choice would be RAID 1 since we prefer having a reliable backup, but if your configuration requires high read and write speeds, RAID 0 might be a better option.
This is everything you need to know about RAID 0 and RAID 1, and each of them has its benefits and drawbacks. As previously stated, we prefer RAID 1, and if you want to use it, we have a guide on how to configure RAID 1 on Windows 11.
You can also use external hard drives in RAID, but if this setup process seems too complicated, there is various RAID software available that will make setting up RAID a breeze.
Have you ever used either of these RAID options? Share your experience with us in the comments section below.
To simplify things or highlight their purpose, we can add comments to folders in Windows 11. Though, you wouldn’t find an option for it either in the context menu or the Properties window.
Also, it’s possible to add comments to files in Windows natively, with the exception of a few file types/formats that do not support metadata or have a comment field, but not folders.
Can you add tags to folders in Windows 11?
Yes, you can add tags to folders. For anyone wondering how to add tags to folders in Windows 11, it requires modifying the desktop.ini file or creating a batch (.bat) file followed by making changes to the Registry Editor. The process is slightly complex but achievable!
Also, since the functionality isn’t available via any of the available folder options, you may have to relaunch File Explorer or reboot the PC for the changes to reflect.
How do I add comments to a folder in Windows 11?
1. Using the desktop.ini file
Tip
This is a multi-step process. So, to simplify things, we have broken it down into sub-sections.
1.1 Add the Columns tab to File Explorer
Open the folder where you want to add the comment, right-click on the top of any of the columns, and select More.
Tick the checkbox for Comments and click OK.
1.2 Change the folder icon
Right-click on the folder you want to add the comment to and select Properties.
Go to the Customize tab, and click on the Change Icon button under Folder icons.
Select any other icon from the list of options or upload a custom icon, and click OK.
Again, click Apply and OK to save the changes.
1.3 Enable system-protected hidden files
In the same folder, click the ellipsis near the top, and select Options.
Go to the View tab, untick the checkbox for Hide protected operating system files, and click OK.
The desktop.ini file will now appear in the folder.
1.4 Modify the desktop.ini file
Right-click on the desktop.ini file, choose Open with, and select Notepad if the app doesn’t appear in the primary context menu.
Now, paste the following directly under [.ShellClassInfo], while replacing This is your comment with the actual comment you want to add:InfoTip=This is your comment
Press Ctrl + S to save the changes to the desktop.ini file.
1.5 Relaunch File Explorer
Press Ctrl + Shift + Esc to open the Task Manager.
Select Windows Explorer from the list of apps, and click on Restart task.
Finally, the added comment will appear under the dedicated column.
While it’s usually easy to customize File Explorer in Windows 11, some functionalities, like adding comments, continue to remain time-consuming. But it’s not entirely impossible. The desktop.ini file will allow you to make the changes!
Also, once done, make sure to hide the protected operating system files and revert the folder icon to default (if required).
Adding a comment to a JPG file
Besides, to add comments to files, simply head to the Details tab, and enter your comment in the dedicated section. Remember, the comments field will be missing for PDF or PNG files and several other file extensions that don’t support it.
When adding comments to multiple folders at once, it’s often wise to use a third-party tool. And StyleFolder does the job pretty well! We are not affiliated with it in any way and recommend that you run a malware scan using an effective antivirus solution before running the tool.
NOTE
There are several websites hosting StyleFolder. Make sure to verify the authenticity of the website before downloading the tool. We used Softpedia.
To add comments using StyleFolder, right-click on the relevant folder > select Show more options > choose Customize with StyleFolder > add the comment in the text field > click Apply and then OK > relaunch File Explorer.
StyleFolder
Remember, StyleFolder, too, modifies the desktop.ini file but provides an easy interface to do so. Besides, the tool allows changing the text colour and folder icon.
For anyone wondering how to put sticky notes in a folder, you can download Notezilla from the Microsoft Store. It’s not a free software, though, and is priced at $1.69!
Additional settings for folder comments
You can also edit or remove the comment through the desktop.ini file.
You now know how to add a description or comments to folders in Windows 11. The built-in option works fine for folders, but for specific file types, say, to add comments to PDF files in Windows Explorer, third-party tools are a viable option.
And if you find that the folder reverts to read-only or the permissions are misconfigured, taking full control will help!
For any queries or to share how you add comments to folders in Windows 11, use the comment section below.
We’ve exclusively reported that Qualcomm will soon launch its very own closed ecosystem feature called Snapdragon Seamless, and from the look of it, we may be in for a game-changing feature that could be a lifesaver.
In fact, this new tech has the potential to be even better than Phone Link on Windows devices and what Microsoft and Samsung are doing together with Galaxy phones.
Why? Well, a lot of Android devices are using Snapdragon. In fact, Qualcomm says that Snapdragon Seamless will roll out on those devices (even AR glasses!) running Snapdragon 8 Gen 3, X Elite, S7 pro sound platform Gen 1, and AR2 Gen 1, from multiple Android-based manufacturers like Microsoft, Google, Oppo, Honor, Dell, and Lenovo.
With so many crossovers between devices happening all at once, it’d be a waste if Qualcomm doesn’t bring continuity features into Snapdragon Seamless. This feature will allow you to continue tasks that you are working on on one device on another device — just like how Apple devices have the same feature.
For example, if you are working on a document on one device, like a Windows laptop, you could then pick up your Android phone and continue working on the same file without having to start over.
Interestingly, the tech maker also said in a leaked official document that they’re set to launch Qualcomm S7 and S7 Pro Gen1 Sound Platforms. Designed for earbuds, headphones, and speakers, these platforms are said to be powered by on-device AI with support for up to 192kHz lossless music quality.
So, maybe, with a lot of smart speakers and high-tech Bluetooth car kits coming soon, it’ll be interesting how Seamless and this audiophile-friendly feature are working together.
The upcoming Snapdragon X Elite, which we’ve exclusively reported, is also one to watch out for. Releasing mid-2024, these new chipset has generative AI models with over 13 billion parameters on-device with better battery life and faster performance.
Then, we have the hotly-anticipated AI assistant tool, Copilot in Windows. Taking into account that Qualcomm has been deep into AI works with these recent products on features, there’s a high chance that these two will come together.
How? Well, say you have a file that needs to be shared from your phone to the laptop cause you need to create a summary of it. You can share it with Seamless, and then ask Copilot in Word to summarize it for you.
Aren’t we all excited about this? Do share your thoughts in the comments!
Qualcomm is releasing a new AI super-charged platform called the Snapdragon X Elite that aims to revolutionize the PC landscape with faster CPU performance (up to 2 times vs. competitors) at just one-third of the power consumption. The company’s latest top-of-the-range CPU, Qualcomm Orion, makes this possible.
Qualcomm Snapdragon X Elite platform: Full details
According to a source familiar with the company’s plans, the big unveiling will occur at the Snapdragon Summit 2023. We’ve already shared details about Snapdragon Seamless, the set of features that will enable cross-platform device experiences, that will also be unveiled at the same event.
As expected, the two platforms are closely intertwined and will make communication between Snapdragon-based devices much more effortless. But what’s the Snapdragon X Elite bringing to the table? First, to no one’s surprise, AI. Lots of it.
Snapdragon X Elite boasts generative AI models with over 13 billion parameters on-device to enhance productivity, creativity, and entertainment. The company also promises improved battery life along with the new Snapdragon Oryon CPU.
Based on a 4nm architecture, the CPU has 12 high-performance cores clocked at 3.8GHz, with a dual-core boost of 4.3GHz. The memory is LPDDR5x with 42MB of total cache and 136 GB/s memory bandwidth. This combo promises 50% better multi-thread performance than ARM-based competitors. Other specs include support for internal display up to 4K@120Hz, HDR10, triple UHD or dual 5K external display support, and an integrated Qualcomm Adreno GPU.
PCs with Qualcomm Snapdragon X Elite are expected to land somewhere in mid-2024. Check out the full specs below.
CPU
Qualcomm® Oryon™ CPU 64-bit Architecture 12 cores, up to 3.8 GHz Single and Dual-Core Boost, up to 4.3 GHz
GPU
Qualcomm® Adreno™ GPU Up to 4.6 TFLOPs API Support: DX12
Memory
Memory Type: LPDDR5x Transfer rate: 8533 MT/s Capacity: Up to 64 GB Bandwidth: 136 GB/s Bit Width: 16-bit Number of Channels: 8
Storage
SD: SD v3.0 SSD/NVMe Interface: NVMe SSD over PCIe Gen 4 UFS: UFS 4.0
Display
Display Processing Unit (DPU) Name: Qualcomm® Adreno™ DPU Max. On-Device Display Resolution: eDP v1.4b, up to UHD120 HDR10 Max. External Display Resolution: DP v1.4 – 3 displays, up to UHD60 HDR10, 2 displays 5K60
Image Signal Processor Name: Qualcomm Spectra™ ISP Dual 18-bit ISPs Always-sensing ISP Dual Camera: 2x 36 MP Single Camera: Up to 64 MP Video Capture: 4K HDR
Wi-Fi/Bluetooth
Wi-Fi/Bluetooth System: Qualcomm® FastConnect™ 7800 System Generations: Wi-Fi 7, Wi-Fi 6E, Wi-Fi 6 Standards: 802.11be, 802.11ax, 802.11ac, 802.11n, 802.11g, 802.11b, 802.11a Spectral Bands: 6 GHz, 5 GHz, 2.4 GHz Spatial Streams: Up to 4 Peak QAM: 4K QAM Features: Passpoint, 8×8 Sounding, TDLS, Wi-Fi QoS Management, Wi-Fi Optimized Connectivity, Wi-Fi Location, OFDMA (UL/DL), Miracast, Target Wake Time, Voice-Enterprise, MU-MIMO (UL/ DL), Multi-Link Operation (MLO), High-band Simultaneous (HBS) Bluetooth Specification Version: Bluetooth 5.4 Bluetooth Connection Technology: Bluetooth LE M.2. Interface: WiFi M.2. card over PCIe Gen 3
USB
USB Specification Version: USB 4.0 Interface Type: 3x USB-C 3x USB4, 2x USB3.2 Gen2, 1x eUSB2
Snapdragon X Elite Full Specifications
On-device AI: How the future looks like
The Snapdragon X Elite is built from the ground up for on-device generative AI. With the new CPU and NPU, Windows 11 computing will take a massive leap in performance and efficiency. Expect to see devices from Microsoft, Google, Xiaomi, Honor, and Lenovo integrating Qualcomm’s latest platforms for seamless integration between their line-ups next year.
On-device photo expansion looks promising, as it’s much faster and more precise. That’s paired with what the company describes as the fastest Stable Difusion on the market, but we’ll have to wait and try it out ourselves. Maybe the most interesting one is the AI Assistant with Skyscanner plugin, as it will enable route planning with on-the-go modifications straight from your AI assistant. And guess what? Your AI assistant will be able to send that route planning to Skyscanner and give you options to choose from.
The new CPUs promise improved generative AI tasks, bringing the on-device chat assistants and image generation to a new level. Snapdragon Seamless will ensure task continuity across all devices, from phones and laptops to smart glasses and cars.
Based on all that, it seems like Qualcomm is slowly rebuilding its ecosystem from the ground up. What’s your take on Qualcomm’s new AI path? Share your thoughts in the comments section below.
If you want to open the SQL .BAK file in Excel, you must know it is not a standard process as these files are database backup files by SQL Server.
In this guide, we will walk you through two easiest methods to open it in Excel, thereby making it easy to access and work with as and when required.
Is technical knowledge needed to open BAK files in Excel?
Yes, you need some understanding of SQL servers and related things to open BAK files, as these files are database files created by database management systems.
How do I open an SQL BAK file in Excel?
Before proceeding with manual methods to open this file type from the SQL server, go through the following preliminary checks:
Must have access to the SQL server.
Ensure you have the SQL Server Management Studio app to manage the SQL server.
Locate & copy the folder of .bak files to an accessible location or external USB drive. The backup files are usually present at Program Files\Microsoft SQL Server\MSSQL 1.0\ MSSQL\BACKUP
1. Convert the SQL BAK file to Excel format
Press Windows + E to open the Windows File Explorer.
Click three dots and select Options.
Next, go to the View tab on the Folder Options window and ensure the Hide extension for known file types option is not selected.
Click Apply, then OK.
Next, right-click the MS SQL BAK file, click the Rename icon, and change the file extension to .xls, CSV or .xlsx.
Now that the file format is compatible with Excel, double-click the CSV file to open it in the app.
2. Use the SQL Server Management Studio (SSMS)
First, we will restore the BAK file in SSMS; for that, follow these steps:
Press the Windows key, type sql server management studio, and click Open to launch the MS SQL Server database engine.
Locate and right-click the database you want to open, then go to Tasks, click Restore, and select Database.
Next, navigate to the Source for restore section on the Restore Database page, click three dots, or click Browse next to the From device option.
Choose the file from the USB drive or the original location and click OK.
Place a checkmark next to Full Database Backup & Transaction Log Backup to choose the backup sets, then click OK.
The process will start and may take a few minutes, so wait for it to complete.
Now that the file is saved; follow the below-mentioned steps to export it to Excel:
Next, click Task to view this file on Excel, then Export data.
On the SQL Server Import & Export Wizard, click Next.
Choose a destination as Microsoft Excel, then choose the Excel file path, then click Next.
Next, click the radio button next to Copy data from one or more tables or views, and click Next.
Select Source Tables and Views and click Next. If you want to preview the table, select the table and click Preview.
Next, click Run immediately on the Save and Run Package window, then select Next.
Click Finish.
Click the drop-down next to Report and select Save Report to File. Choose the destination file to open in Excel, and double-click it to open when you want.
Speaking of data, data loss is a common problem; it can occur due to simple overwrite, file corruption, or virus infections. If you want to learn how to recover it in an SQL server, read this guide.
How do I view a BAK file without SQL Server?
To open a BAK file without SQL Server, you can locate the file manually & change its extension or restore and export it to Excel using SSMS using the abovementioned steps.
If you often use the TBL file to analyze, transform, and present your data, you can open the TBL file with this guide.
When working with backup files, you will likely encounter BCK files, and our guide on how to open BCK files will help you learn everything you need to know about them. You can also learn how to convert and open Numbers files.
Remember to always save the file to a different location before making any changes or proceeding with the steps to avoid data corruption and future hassle.
If you have any other questions or suggestions about the subject, please mention them in the comments section below. We would love to interact with you!
If you want to check if Windows 11 is UEFI or Legacy BIOS on your computer, this guide can help! We will explore simple ways to find the system boot mode information, as it is essential for tasks like boot management & system maintenance.
What’s the difference between UEFI and Legacy?
Categories
Legacy BIOS
UEFI (Unified Extensible Firmware Interface)
Boot interface
Text-based format, which is less user-friendly.
Provides GUI during the boot process and usually has mouse support.
Secure Boot
Doesn’t come with it.
Speeds up the boot time and supports security features like Secure boot.
Disk Partitioning
Has the MBR (Master Boot Record) partitioning scheme with limitations & supports 3 primary partition and 1 extended partition.
Uses with the GPT (GUID Partition Table).
Compatibility
Is compatible with older hardware and 32-bit operating systems.
Compatible with the latest hardware, including 64-bit operating systems and drives larger than 2.2 terabytes.
How do I know if I have UEFI or Legacy on Windows 11?
Before proceeding with the steps to check the system boot mode, go through the following preliminary checks:
Ensure you have logged in using an account with administrator privileges.
Should have access to the computer either physically or remotely.
1. Using the System Information page
Press Windows + R to open the Run dialog box.
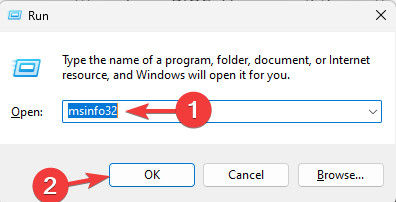
Type msinfo32 and click OK to launch the System Information page.
From the left pane, select System Summary.
Now locate BIOS Mode from the right pane, and check the Value to see if it is Legacy or UEFI.
2. Check the setupact.log
Press Windows + E to open the File Explorer window.
Navigate to this path: C:\Windows\Panther\UnattendGC
Locate and double-click setupact.log to open it in Notepad.
Press Ctrl + F to get the Find dialog box. Type Detected Boot Environment and click Enter.
Once you reach the line, your system has Legacy BIOS if it says: Callback_BootEnvironmentDetect: Detected boot environment: BIOS. However, if you see Callback_BootEnvironmentDetect: Detected boot environment: UEFI, then it uses UEFI.
3. Using the BCDEDIT command
Press the Windows key, type cmd, and click Run as administrator.
Copy & paste the following command to get the list of entries in the Boot Configuration data and hit Enter: bcdedit /enum
Next, locate the Windows Boot Loader entry and check its path. If you see \WINDOWS\system32\winload.efi, the system has UEFI boot mode. However, it says \Windows\system32\winload.exe, and the computer has Legacy BIOS.
Type diskmgmt.msc and click OK to open the Disk Management app.
Go to the lower section of the app and hover over the primary HDD or SSD; if you see EFI System Partition, the boot mode is UEFI.
If your system BIOS mode is UEFI and you want to learn how to create a Windows 10 bootable USB to upgrade the system, explore this guide!
Want a quick primer on the firmware behind UEFI? See our guide on what EFI is in Windows.
5. Using the Command Prompt at boot
Boot your computer using a USB drive, then press Shift + F10 to the Command Prompt with administrative rights.
Type the following command and press Enter: wpeutil UpdateBootInfo
Next, copy & paste the following command and hit Enter: reg query HKLM\System\CurrentControlSet\Control /v PEFirmwareType
If the PEFirmwareType has set the Value data to 1, it is Legacy BIOS; if it is 2, it is UEFI.
6. Using the Windows PowerShell
Press the Windows key, type powershell, and click Run as administrator.
Type the following command and hit Enter: $env:firmware_type
It will display the system boot mode in an instant.
7. Using the Advanced options
Press Windows + I to open Settings.
Go to System, then Recovery.
Locate and click Restart now, next to Advanced Startup.
Windows will reboot; on the Choose an option screen, select Troubleshoot.
Now, select Advanced options.
Click UEFI Firmware Settings.
Next, click Restart; your computer will restart with the BIOS menu.
Go to the Boot menu and locate Advanced Boot options. Check if it is UEFI or Legacy.
Can I switch from Legacy to UEFI?
You can switch the system mode, provided your system hardware supports it. Also, it is a necessary step if you are upgrading your computer to Windows 11. To switch it, follow these steps:
Reboot your computer and press the F2 or F10 key, depending upon your device manufacturer, to enter the BIOS menu.
Next, go to the Boot tab and locate Advanced Boot options.
You will see UEFI and Legacy BIOS mode; use the arrow keys to switch between them, then press F10 to save and exit the BIOS menu.
Checking the BIOS mode is essential if you are going to make significant hardware changes, like adding a new hard drive or can be useful while troubleshooting boot problems.
Also, if you are planning to upgrade your computer to the latest Windows version or get firmware updates, you must know about it.
Renaming an external hard drive on Windows 11 is a simple task and can help you organize your storage devices and make them recognizable.
In this guide, we will explore several methods with step-by-step instructions to perform this task safely, helping in the file management process.
Can you rename a hard drive without losing data?
Yes, you can rename a hard drive without losing data on it, as it is a non-destructive operation that changes the display name of the drive, leaving its content as it is.
How do I rename my external hard drive on Windows 11?
Before proceeding with any steps to rename your USB drive on Windows 11, go through the following preliminary checks:
Ensure you have logged in via a user profile with administrative rights.
Make sure you have the external hard drive safely connected.
Remember, you can assign a unique name of up to 11 characters for FAT drives or 32 characters for NTFS drives with spaces.
1. Using the keyboard shortcut
Press Windows + E to open File Explorer.
Click This PC, select the drive you want to rename, then press F2.
Type in the name to change the volume label and hit Enter.
If you get a prompt, click Continue to complete the process.
2. Using the Context menu
Press Windows + E to open File Explorer.
Click This PC, right-click the drive you want to change the name for, and select Rename from the context menu.
Input the new name and press Enter.
Click Continue if prompted to approve the action.
3. Using the Properties window
Press Windows + E to open File Explorer.
Click This PC, right-click the USB drive you want to change the name for, and select Properties from the context menu.
On the Properties window, select the existing name and press Delete. Type the new name and click OK to confirm.
Click Advanced storage settings to expand and select Disks & volumes.
Locate the external drive and select Properties.
Click the Change label button.
Type in the new volume label on the Change Volume label window and click Apply.
5. Using Command Prompt
Press the Windows key, type cmd, and click Run as administrator.
Type the following command after replacing the <DriveLetter> with the external hard drive name or letter & New name with the name you want to choose and hit Enter: label <DriveLetter>: New name
Close the Command Prompt window when done.
6. Using the Windows PowerShell
Press the Windows key, type powershell, and click Run as administrator.
Copy & paste the following command after replacing the <Current drive name> with the existing name of the USB flash drive and the <New drive name> with the new name, then press Enter: Set-Volume -FileSystemLabel "<Current drive name>" -NewFileSystemLabel "<New drive name>
7. Using the Disk Management
Press Windows + R to open the Run dialog box.
Type diskmgmt.msc and click OK to open Disk Management.
Renaming the external hard drive is a great way to distinguish them, primarily if you use multiple devices. However, choosing the method to do it is entirely at your discretion.
Which method do you like to use to change the drive label on Windows 11? Tell us in the comments section below.
A good hard drive disk does not come cheap, so it’s no surprise users would opt to create a RAID. The only issue is that there are different RAID levels. If you don’t understand the requirements, benefits, and drawbacks of using each, you may end up disappointed.
This doesn’t have to be you. We’ve compiled this article to debunk the different RAID levels so that you can configure the right one as per your hardware.
What is RAID?
This is a data redundancy technology that is frequently used to improve the performance of a hard drive. It does so by creating a backup solution by mirroring your disks to cushion against hard drive failure.
Since it creates multiple virtual hard disks, it also stretches your drive’s storage capacity with no performance degradation.
What are the different RAID levels?
Before we get to the RAID levels, you need to understand you can configure RAID in two ways: hardware or software.
Hardware RAID: In this type of storage configuration, dedicated hardware is used to perform the data storage and retrieval functions. The only downside is that the controller may be integrated into the motherboard or installed as an add-on card, so you’ll need a compatible motherboard, RAID controller driver and chipset. On the bright side, if it’s all systems go, a hardware RAID is very fast because it allows for the simultaneous reading and writing of data to multiple drives.
Software RAID: Software RAID is when the hard drives are installed into your computer, and your operating system manages them through software. It uses virtualization technology to combine multiple physical disks into one virtual disk. RAID software uses less CPU power than hardware RAID because it doesn’t need a separate processing unit. However, it is slower than a hardware-based RAID because it uses system memory instead of dedicated memory for disk processing.
1. RAID 0 (Striped Array)
Overview of RAID 0
In this array, each drive receives the same amount of data. This is done by striping the data across each drive, hence the name Striped array. The result is that all of the drives can read and write at the same time, increasing performance.
If you’re looking to use this level of RAID, ensure it is for non-critical operations because of the data loss volatility issue.
Benefits of Using RAID 0
Speed – It offers terrific speed to your computer because it uses multiple disks at once.
Scalability – Since it allows you to use more than one disk at a time, you can create arrays with any number of drives.
Storage capacity – Since two or more drives are used, you gain additional storage capacity.
Cost savings – Two or more disks can be combined into a single logical drive without requiring special hardware or software.
Drawbacks of Using RAID 0
No redundancy – When the hard disk fails, all the data stored on it will be lost forever. So if you have 2 disks in RAID 0 and one fails, all your data will be gone forever.
Data integrity issues – These problems occur when data is written or read from the disks in an inconsistent order which leads to inconsistencies within the system itself.
Performance levels depend on the read/write speeds of the drives – If you have slow drives, the performance will be low because each write must go through both disks before being completed.
2. RAID 1 (Mirrored Array)
Overview of RAID 1
This storage technology provides fault tolerance by using two or more disks to hold identical data.
When one disk fails, the other disk can continue to work seamlessly in its place. As long as at least one disk in the array continues to function properly, all data remains available.
You can easily configure RAID 1 from your Settings app hence it’s no surprise that it is the most popular RAID type used.
Benefits of Using RAID 1
Reliability – Because each drive has its own controller and reads from and writes to its own physical disk, if one drive fails, it can be replaced without affecting the integrity of your data.
Data protection – If a single drive fails, you don’t lose any data because it’s mirrored in another drive. You can keep working with the other one until you get your replacement drive installed.
Cost-effective – Its simplicity in implementation when compared to other types of RAID arrays that require more than one disk drive for implementation, makes it a go-to for most users.
Drawbacks of Using RAID 1
Storage degradation – You lose half of your available storage capacity because each drive stores identical data.
Reduced performance – Because both drives in a mirrored array have to be accessed at all times, it results in slower performance than if you had used two separate disks.
Scalability – If you need more space for your data, it’s not easy to add more capacity because it’s limited to two drives. You can only replace the failing drive but can’t add another hard disk into your array.
Disk replacement may fail – Although you can replace a drive if one fails, it’s not as easy as you think. If you’re operating a large server, you may need to power down the entire system, causing interruptions.
3. RAID 4 (Striping and parity)
Overview of RAID 4
RAID 4 is a bit like RAID 1 but with striping. The difference is that RAID 4 strips data across all drives in the array. This gives you more throughput than RAID 1.
If any one drive in the array fails, the other drives can be used to rebuild the data on a replacement drive. It is generally used in servers where high performance is required.
Benefits of Using RAID 4
Performance enhancements – Improves performance by spreading the write load across multiple disks.
Data redundancy – In case of a drive failure, it uses the parity bits to calculate which data blocks need to be replaced after a failure occurs.
Efficient storage – This type of RAID does not waste any space on its disks. Every byte is used for storage purposes.
Scalability – Allows an increase in capacity by adding additional drives as needed.
Drawbacks of Using RAID 4
Slow read/write speeds – It’s less efficient at writing because the parity blocks must be written to a separate physical disk.
Requires large data blocks – Although it can strip data in small amounts, it beats the sense because its cost may outweigh its benefits.
Availability – RAID 4 technology is not readily available in all storage configurations today.
RAID 5 is similar to RAID 4 but with a few differences. The array is comprised of multiple disks that are divided into blocks called stripes. The number of disks in an array and the amount of space allocated on each disk determines the array’s capacity.
It also provides for faster access times and more consistent performance. This is because all drives can be accessed at once instead of waiting for one drive to complete its operation before another can access it.
This is a common choice for servers that need high levels of data protection and increased performance.
Benefits of Using RAID 5
Performance enhancement – Since RAID 5 distributes parity information across all drives, performance can be increased by distributing data evenly across all drives in the array.
Redundancy – The risk of failure is low because there are multiple copies of your data on different drives, so even if one drive fails, there will be enough data left over on another drive to rebuild it automatically.
Flexible – There’s greater flexibility in how you use your hard disk space because you can add more drives later or remove them if they’re no longer needed.
Seamless drive replacement – When one drive fails, you can easily swap with a new one without the need to power down an entire server.
Drawbacks of Using RAID 5
Performance degradation – As you add more drives to your array, the performance degrades since each drive has its own unique workload and performance profile. Over time, this will cause the array to become less efficient and slower when compared to a single drive.
Complex rebuild process – The rebuild process requires more steps compared to other RAID levels. It can take several days or even weeks before your computer returns to normal after losing a disk in your array.
High maintenance – RAID 5 requires rebuilding after a drive failure and also requires regular maintenance to prevent data corruption.
5. RAID 6 (Double parity striping)
Overview of RAID 6
This type of RAID provides both data redundancy and performance benefits. It uses two parity disks to protect against the loss of data and can survive up to two simultaneous drive failures.
The extra parity information increases performance by allowing blocks to be read and written simultaneously instead of having to wait for parity calculations to finish first.
Benefits of Using RAID 6
Improved performance – RAID 6 improves performance by striping data across multiple disks rather than writing it just once on one disk.
Supports more drives – This makes it possible to use larger amounts of storage without having to worry about performance issues such as bottlenecks in the system.
Data protection – RAID 6 offers a high level of protection against disk failure. If one drive fails, another can be used to reconstruct the array and restore your data.
Drawbacks of Using RAID 6
More complex to configure and manage – RAID 6 arrays use more complex algorithms than RAID 5 arrays, which makes them more complex to configure and manage.
Slow write speeds – Because of the parity data that needs to be calculated and written in parallel with your data, RAID 6 has slower write speeds than other RAID configurations.
Requires more CPU power – Because of the RAID calculations in parity and rebuilds in case of disk failure, RAID 6 requires more CPU power to process such tasks.
Longer recovery time – After a drive failure, the recovery time is significantly longer compared to other RAID levels because of the rebuild time for the parity information to be reconstructed and written back to disk.
6. RAID 10 (Mirroring and striping)
Overview of RAID 10
RAID 10 is a RAID level that combines the performance and redundancy of RAID 0 with the mirroring of RAID 1. This means that data is written to multiple drives, but it’s also written as individual blocks stripes across all drives.
This way, if one drive fails, the other disks can continue functioning and allow you to rebuild the data from the remaining disks in the array.
It is an excellent choice for performance-sensitive applications where you need fast reads and writes without sacrificing protection against drive failure.
Benefits of Using RAID 10
Flexibility – RAID 10 gives you high performance without sacrificing fault tolerance — or vice versa. It can also be configured as hardware-based or software-based RAID.
Better scalability – You can add more disks at a later date to expand your storage capacity without having to recreate the array.
Performance – Striping alone can deliver excellent performance with multiple drives. However, when combined with mirroring, you get the best of both worlds.
Reliability – Because each drive maintains its own copy of the data, RAID 10 provides backup protection against one drive failing.
Drawbacks of Using RAID 10
Additional costs – A RAID 10 array requires at least four hard drives with the same capacity and speed. Hard drives do not come cheap, so this can dent your pockets. To bring the cost down, you can RAID external hard drives.
Increased power consumption – A RAID 10 array requires more power than other arrays because each drive has to do more work when writing data to the array.
A summary of the RAID levels in tabular form:
Level
Type
No. of disks
Redundancy
Performance
Flexibility
Configuration
Cost
RAID 0
Striping
2
No
Decent read and good write
Low
Very easy
Low
RAID 1
Mirroring
2
Yes
Good read and decent write
Moderate
Easy
Low
RAID 5
Striping with parity
3
Yes
Decent read and decent write (can be slow)
High
Moderate
Moderate
RAID 6
Double parity striping
4
Yes
High read and slow write
High
Moderate
Low
RAID 10
Mirroring and striping
4
Yes
High read medium write
Extremely high
Complex
High
What RAID level should I use?
Each RAID level offers different benefits and drawbacks, so it’s important to understand the tradeoffs before you make a decision. Your answer should be guided by a few factors: cost, capacity, redundancy, and performance.
If performance is your primary concern, choose RAID 10, RAID 6 if data redundancy is more important, and RAID 5 if capacity is more important than either performance or data redundancy.
When selecting the safest RAID level, look for one with disk mirroring properties. Depending on your needs, you can go for either RAID 1 or RAID 10.
Ultimately, whichever RAID level you choose will depend on your specific needs. With the right selection, you can have more storage space without worrying about losing any of your data.
Hopefully, this article has helped you understand how the different RAID levels work, and you’ll feel up to the task putting these skills into practice.
We’d love to hear about your experience with any of the RAID levels mentioned above, so engage us in the comments section below.
Many of our readers are asking how many times you can use a Windows 11 key and the short answer is as many as you want as long as it’s active on one PC.
Is a Windows 11 key lifetime? Yes, but the OS will eventually become obsolete, and you will need to install Windows 12. It’s the same story that happens now with Windows 10, and the keys are not backward compatible with a lower version of Windows.
How many times can I reinstall Windows 11 using the same license?
If you have a 25-character product key, you can reinstall Windows 11 using the same license indefinitely or as many times as you need. However, you cannot install it on more than one PC.
OEM(Original Equipment Manufacturer) – This type of digital licensing is used by the manufacturer and the OS comes preinstalled on your device. It cannot be transferred to another computer.
Retail license or digital license – You can buy it from retail stores, and you can activate it on a single device. You can transfer it to another computer as long as it’s not active on the old one. If you activate it on a new PC, it will automatically deactivate from the other.
Volume license – These can be acquired by organizations for a set of multiple endpoints. They can be installed on multiple computers from the organization.
Whatever the type of license, you can even activate Windows 11 on VM, it doesn’t have to be a physical PC.
How can I check which Windows 11 license I have?
Click the Start button, type powershell, and open it as an administrator.
Type the following command and press Enter: slmgr /dlv
You will get the information under the Product Key Channel. In our case, it’s an OEM license.
Why are Windows 11 keys cheap?
The Windows 11 keys are still cheap because you can still upgrade from Windows 10 for free.
Microsoft didn’t say how long this will last but at some point, it will switch to a paid license politics. However, Microsoft is not selling Windows 10 licenses anymore.
Another question is how cheap you got them. There are a lot of websites that sell Windows 11 keys but most of them are not licensed to do that. Some of the keys may work, others not, and you get to the point where you can’t activate your Windows 11.
We always recommend getting a Windows license from a legitimate source, either directly from Microsoft or from authorized third-party sellers.
Can I use a Windows 10 key to activate Windows 11?
Yes, you can do that, as long as it’s the same edition. For example, you can activate Windows 11 Pro with a Windows 10 Pro key.
However, you only need to do that if you fresh install Windows 11. If you’re upgrading from Windows 10 to Windows 11, you don’t need the product key, if it is a valid product key.
To summarize our guide, you can use a Windows 11 key indefinitely and as many times as you want, but only on one PC.
We hope that our guide offered you enough information on how many times can you use a Windows 11 key.
When using the Hard Disk Serial Number Changer, we often encounter the message, Unable to write to this disk in drive which prevents the operation from completing.
Remember, the program doesn’t actually change the disk drive serial number but that of the volume. While changing this may help bypass bans enforced by anti-cheat systems, some critical programs or Windows components may stop functioning.
Causes of the error
Missing permissions
An incompatible file system
Running an unsupported iteration of the Windows operating system
Security software triggering conflicts
How do I fix the hard disk serial number changer unable to write error?
Before we start with the slightly complex solutions, try these quick ones first:
Restart the computer and check if the error message disappears on subsequent attempts.
In case you receive the error multiple times, verify whether the volume serial number has already changed.
If none work, head to the fixes listed next.
1. Format the drive to the NTFS file system
Tip
In our case, changing the file system worked. So, start with this and then move on to the other solutions!
Press Windows + X to open the Power User menu, and select Disk Management from the list of options.
Right-click the primary partition for the affected disk or drive letter on the right, and select Format.
Select NTFS as the File system, tick the checkbox for Perform a quick format, and click OK.
Once done, relaunch Hard Disk Serial Number Changer, and the Unable to write to this disk in drive error will not appear anymore. Instead, you will get a success message.
2. Run Hard Disk Serial Number Changer as administrator
Press Windows + E to open File Explorer, head to the location where Hard Disk Serial Number Changer is downloaded, right-click on the launcher (.exe) file, and select Run as administrator.
Click Yes in the UAC prompt.
Now, select the required hard disk or floppy drives from the dropdown menu, and click Change.
3. Enable compatibility mode
Locate the program’s launcher, right-click on it, and select Properties.
Go to the Compatibility tab, tick the checkbox for Run this program in compatibility mode for, select Windows 7 from the dropdown menu, and click OK to save the changes.
Now, run the program and check whether the error box disappears.
4. Disable the antivirus
Press Windows + S to open Search, type Windows Security in the search bar, and click the relevant result.
Now, click on Virus & threat protection.
Click on Manage settings under Virus & threat protection settings.
Disable the toggle for Real-time protection.
Click Yes in the prompt that appears.
Often, the security software or antivirus can prevent you from using the Hard Disk Serial Number Changer, and the Unable to write to this disk in drive error message shows up. So, disable Windows Security or any other installed third-party antivirus solution.
Oftentimes, the problem appears when the Hard Disk Serial Number Changer is not downloaded properly. So, delete the current file and redownload it from a reliable source.
Besides, you may try another source for the tool. There are several download options available. Just make sure to scan the file with an effective antivirus solution before running.
6. Use another PC
As per our research, Hard Disk Serial Number Changer may not work on Windows 10 and Windows 8 due to incompatibility with these iterations.
So, you may consider switching to another PC when changing the Volume IDs assigned to a USB flash drive.
7. Try another software
NOTE
Windows Report is not associated with any of the third-party tools listed below. We actually recommend against changing the serial number to avoid conflicts. If you still want to, make sure the alternative is safe.
If nothing else works, you can always use Hard Disk Serial Number Changer alternatives to assign a new serial number.
VolumeID remains a popular option to change the disk serial number. The only issue is that it’s a command-line program, making the process a tad bit difficult.
VolumeID from Sysinternals
You may also come across other software programs that claim to do the job. Research the safety aspect and try them out.
If you had earlier been bothered by the Hard Disk Serial Number Changer’s Unable to write to this disk in drive error, it shouldn’t be the case anymore. But other disk issues are not going anywhere. A few claimed their second hard drive is not detected.
If you have an old PS4, you can utilize its hard drive on your PC. In order to do so, you need to remove it and format the PS4 hard drive for PC.
This is rather simple, and in this guide, we’ll show you how to do that on Windows 11, so let’s get started.
Is the PS4 hard drive exFAT or NTFS?
PS4 uses the exFAT file system for its storage. NTFS is not supported, and the NTFS drives won’t work on PS4.
How do I reformat a PS4 hard drive for Windows 11?
1. Use Disk Management
Connect the PS4 drive to your PC. You can connect it as an external storage device with a drive enclosure or as an internal drive by adding it to your PC.
Press the Windows key + X and choose Disk Management.
You should now see a new disk with multiple volumes. Right-click each volume on that disk and choose Delete Volume.
Click on Yes to confirm.
Repeat the previous steps for all volumes on that drive.
Now that you have only one volume on the entire drive, right-click on the unallocated space and choose New Simple Volume.
Set the size of the volume.
Next, assign the desired drive letter.
Set the desired file system, we used NTFS. It’s also advised to set the volume label.
Lastly, click on Finish.
2. Use diskpart
Make sure that the PS4 drive is connected to your PC.
Press the Windows key + X and select Terminal (Admin).
Run the following command: diskpart
Next, type list disk
Determine what is the number of PS4 disk. It’s crucial to select the correct disk since this process will remove all files from the selected drive.
Select the PS4 disk. We used 0 in our example, but your drive will most likely have a different number assigned to it: select disk 0
Run the following command to remove all files from the selected disk: clean
Run the following commands to format the drive and assign a drive letter to it: create partition primary format fs=ntfs assign
After doing that, you can close the Terminal.
Your drive for PS4 is fully compatible with your PC, and to use it as an external drive, you just need a docking station and a USB connection. After connecting it, you can use it to backup PS4 save data, or to fix the problem in extended storage on PS4,
If you don’t have enough disk space or just want to remove Ubuntu from dual boot on Windows 11, our Windows Report software team is here to help.
Before applying the solutions below, back up any critical data from the Ubuntu OS. Whether you installed Ubuntu with a third-party tool or on a stand-alone partition, we have the solution to remove it.
How do I delete Ubuntu from dual boot on Windows 11?
1. Remove Ubuntu from the boot sequence in BIOS
Click the Start button and select Settings.
In System, go to Recovery from the right pane.
Now, click on Restart now from Advanced startup section.
The PC will restart showing you the startup settings. Click on Troubleshoot, and then on Advanced options.
Next, select UEFI Firmware Settings and click on Restart.
The PC will go into BIOS. Go to the Boot section, change the Boot priority order and make Windows Boot Manager first. Some BIOS software also allow you delete the boot options. If you have the possibility, do that.
Apply the changes and exit BIOS.
After reboot, if you deleted the boot option, you won’t see the dual boot option on the screen and the PC will automatically load Windows 11.
If you need to remove the Ubuntu from the dual-boot options, this solution is all you need. If you also want to remove Ubuntu, continue with the solutions below.
2. Remove Ubuntu from dual-boot if it was installed with a third-party tool
Click on Start and go to Settings.
Select Apps from the left pane and click on Installed apps from the right pane.
Now, look for ubuntu in the search tab, click on its three-point button from the right, and select Uninstall.
If you installed Ubuntu using Wubi or another tool, you can uninstall it as any other software, and that will disable it from the boot loader as well.
Click on the Search tab, type disk management, and select Create and format disk partitions from the results.
Right-click on the Linux partition and select Delete volume.
Now, you can select the unallocated space and partition it as an NTFS volume. The Linux partitions may not show on the Disk Management tool so if you don’t see it, apply the solution below.
3.2 Using Command Prompt
Click the Search bar, type cmd, and click on Run as administrator from the results.
Type diskpart and press Enter.
Now, type the following command to show the available disks: list disk
Next run the following command to select the disk with the Ubuntu partition (change the number according to your setup): select disk 1
Now list all the partitions using the following command: list partition
Select the correct partition using the following command (change the number according to your configuration): select partition 1
To see more information on the selected partition type detail partition and press Enter.
Now select the right volume typing select volume 3 (change the number with your correct volume).
Type the following command to delete the volume: delete volume
Type exit to quit Diskpart and close Command Prompt.
Of course, if you find this procedure difficult, you may use better disk management software that will allow you to delete the Linux partition a lot easier.
3. Remove the Ubuntu firmware from UEFI
Click the Windows button, type cmd, and launch Command Prompt as an administrator.
Type the following command and press Enter: bcdedit /enum firmware
Now, look at the list, identify the Ubuntu firmware, and copy its identifier (first from the list).
Finally, type the following command to delete the Ubuntu firmware application (change <identifier> with the actual alphanumeric data): bcdedit /delete <identifier>
To check whether you have successfully removed Ubuntu from your system, reboot your PC, enter BIOS, and look again at the boot sequence to see if it shows up. Of course, after these solutions, the boot loader will not show Ubuntu as an alternative.
Now, you will have only Windows 11 as the default boot entry, not two operating systems.
So, this is how to remove Ubuntu from dual boot without Windows CD or other bootable media. However, make sure you have a bootable disk or USB flash disk close by just in case.
Unallocated space in Windows 11 is simply a waste of storage, with the OS not recognizing it, and it’s imperative that you merge the space with another partition. But doing so is not always easy!
Windows has a major drawback. It can’t merge partitions unless they are adjacent. In most situations, this is actually the case and the Extend Volume option is greyed out. This is where third-party tools come into the picture. Let’s get straight to it and find out all the ways to merge unallocated space.
How do I merge unallocated space in Windows 11?
1. Using Disk Management
1.1 When the partitions are adjacent
Press Windows + S to open Search, type Create and format hard disk partitions in the text field, and click the relevant result.
Identify the unallocated partition, right-click on the one to its left, and select Extend Volume from the context menu.
Click Next in the Extend Volume Wizard.
Now, enter the disk space you want to merge with the adjacent partition in the available field, and click Next. The maximum storage space available is listed just above it.
Verify the details, and click Finish.
1.2 When the partitions are not adjacent
Tip
We are taking an example here. The situation might not be exactly the same for you, but the concept will work across all similar problems.
Press Windows + X to open the Power User menu, and select Disk Management from the list of options.
Say, you want to merge the unallocated space on the right with the E: drive but can’t do so because of the D: drive in between the two.
Transfer all the data on the D: drive to another partition or an external storage.
Now, right-click on the D: drive partition, and select Delete Volume.
Click Yes in the confirmation prompt.
Next, right-click on the E: drive, and select Extend Volume.
Then, click Next to continue, enter the amount of unallocated space that existed earlier in the text field, and follow the on-screen instructions to merge.
Once done, right-click on the remaining unallocated space (previously the D: drive), and select New Simple Volume.
Go with the default settings unless you want things customized, and recreate the partition you deleted earlier.
An easy way to merge unallocated space in Windows 11, whether you have the space adjacent to the required partition or not, is through Disk Management. And if you find Extend Volume greyed out, deleting the partition(s) in between will do the trick!
2. With Diskpart
Press Windows + R to open Run, type cmd, and hit Ctrl + Shift + Enter.
Click Yes in the UAC prompt.
Paste the following command and hit Enter: diskpart
Run this command to view the available disks (each is assigned a number): list disk
Then, execute this command to select a disk while replacing X with the number assigned to it: select disk X
Now, run this command to view the available disk partitions: list volume
Next, execute the command while replacing Y with the assigned volume number to select the formatted partition adjacent to the unallocated space: select volume Y
Finally, execute this command to merge the unallocated space: extend
Using Diskpart to extend the C: drive in this case or merge unallocated space in Windows 11 is slightly more complex, given that it won’t list the target partition. So, you will need to first identify the adjacent partition and then extend it.
Run the setup and follow the on-screen instructions to complete the installation process.
When the AOMEI Partition Assistant launches, right-click on the volume adjacent to the unallocated partition, and then select Resize/Move Partition.
Now, hold and drag the partition to the right such that the unallocated space finally remains to the left of it and click OK.
Click Apply near the top left for the changes to come into effect.
You may have to repeat the steps a couple of times if the two volumes to be merged have several partitions in between.
Once the unallocated space is adjacent to the required partition, right-click on the latter, and select Resize/Move Partition.
Drag the slider to resize the partition and merge the unallocated space, then click OK to save the changes.
Finally, click Apply and then restart the computer.
To merge two partitions not adjacent to each other, you can use a third-party software and not worry about losing data or having to move it to another volume. And there’s none better than AOMEI Partition Assistant. It has a simple user interface and allows making quick changes.
Defragment the hard drive before merging unallocated space.
Use a third-party software to merge non-adjacent partitions if you don’t want to undergo the hassle of moving data.
Make sure the operating system and the file system are compatible with the target partition size.
For regular users, it’s best to go with the built-in Disk Management utility instead of Diskpart since the latter can make more advanced changes without throwing a warning.
You don’t necessarily need to combine the entire unallocated space into a single volume. Spread it between partitions, if required.
That’s how you merge unallocated space to C: drive in Windows 11 or an adjacent partition. Problems usually arise when the unallocated space is not adjacent, but you now know how to work around it!
And while you are at it, there’s also the option to merge two SSDs without losing data. This will provide greater storage on a single partition and enhance efficiency.
For any queries or to share how you merged the unallocated space, drop a comment below.
Due to its simplicity and availability, IPTV is the choice for many users worldwide, and in today’s guide, we’re going to focus on the best IPTV services in the UK.
So join us while we take a look at these services and examine what features and channels they offer to their subscribers.
Are IPTV providers legal in the UK?
Yes, IPTV is legal in the UK, as long as the content provider has all the required licenses to stream that specific content.
NOTE
This guide is purely for educational purposes. We can’t verify the legitimacy of these services and whether they have the necessary licenses to stream certain content, so be sure to do your own research before choosing to purchase their services.
VocoTV allows you to view satellite channels, and it works in any country worldwide. It allows you to view your favorite channels, movies, series, sports, and other content.
The service is incredibly simple to set up, and it provides content thanks to the dedicated Android app. This allows you to use it on any Android set-top box, TV, phone, or tablet.
VocoTV has several plans available, and all plans offer the same features. The only difference is the number of available connections, so if you plan to use this service on two or more devices, be sure to pick the appropriate plan.
With this service, you can access more than 20,000 global channels, and this includes premium sports and PPV events.
Speaking of channels, the service offers almost all UK channels, so you can easily find the content you want to watch. It’s important to mention that the service guarantees 100% availability and almost no buffering.
Flixtele is available on all devices, such as Android TV, Android STBs, mobile devices, tablets, and PCs. All pricing plans offer the same features and the only difference is the price and the length of the subscription.
What separates LuxeVision TV service from others is its speeds, and thanks to the dedicated European server, there should be no latency and the channels should open in less than a second.
Regarding the available content, there are over 30,000 channels available as well as over 40,000 films and series as a part of their on demand content. Of course, you can view sporting events as well, including the Premier League.
The service is compatible with all devices, so you should be able to use it on any Android box, smartphone, or on your PC. It’s important to mention that the service is incredibly simple to set up, so why not give it a try?
Other great features:
Huge selection with over 30,000 HD channels
Over 40,000 movies and series
Compatibility with a wide array of popular devices
IPTV Great comes with more than 35,000 television channels around the world, and there are about 120,000 movies and series available in several languages.
If you’re a fan of sports, you’ll be pleased to hear that the service supports premium sports channels as well as PPV events. Regarding the channel quality, the service offers HD, SD, and FHD resolutions.
With 99% uptime and Anti-Freeze technology, you can enjoy your favorite content without any interruptions.
Other great features:
Several pricing plans are available
Support for premium channels and high-quality content
Unlike previous entries on our list, this one comes with fewer channels, and it offers more than 16,000. As for video on demand, that number is set at over 50,000.
PPV content is also supported, and you’ll get access to both UK and UK content. An Electronic Program Guide is also available, and it is updated every 3 days.
The service delivers 99.99% uptime, and there’s even the ability to request a certain channel to be added. Overall, it’s a decent service that is worth checking out.
Other great features:
Vast library of channels
More than 50,000 VODs
99.99% uptime
Fast servers provide you with bufferless streaming
Channel list varies depending on the provider, but our research concluded that most standard and premium channels are available on all services.
However, due to differences between the services, always research the desired service and ensure that it has the channels that you need.
International channels available
All services support international channels, and you’ll easily find the desired content. Keep in mind that not all countries and channels are available, so be sure to check the channel list before choosing your provider.
Most services offer a 24-hour trial, however, some will require payment for a free trial.
Regarding the subscription plans, all services come with one-month, three-month, six-month, and annual plans. However, this is just for a single device, and if you want to use it on two or more devices, you’ll need to purchase licenses that support additional connections.
Stable servers and a wide range of content demands
All services guarantee 99% uptime, so you’ll be able to use them reliably without almost any downtime.
As for the content, each service offers thousands of channels and VODs, so you’ll surely find something for your needs.
Payment options and security measures
Most services accept debit or credit cards, while several use crypto or PayPal as payment methods. A refund option is also available, but to be on the safe side, suggest using a free trial beforehand.
Luckily, we have a guide that will help you fix when IPTV is not working, so don’t miss it. If you want to enjoy this content on your PC, we have a list of the best IPTV software that you should check out.
What is your IPTV service of choice? Let us know in the comments below.
There are plenty of ways to use the phone mic on a PC, but it’s a bit harder to use your PC as a microphone for your phone. We have tested various solutions in the Windows Report lab so read below to find out how to use the PC mic on your phone.
Can you use your PC mic as an Android or iPhone mic? Yes, you can use the PC mic as an Android or iPhone mic.
How do I use my Windows 11 PC as a mic for smartphone?
What you need before setting up:
Bluetooth 4.0 on both PC and smartphone.
Steady internet connection on both devices and both devices need to be connected to the same Wi-Fi hotspot.
Windows 10 version 19041.0 or higher on your PC. Windows 11 if you want to connect an iPhone.
Install the Link to Windows app on your Android device as well.
Follow the on-screen procedure on both devices to pair your phone to the PC through a Bluetooth connection.
Now, in the Phone Link app from the PC, go to Calls and look through the contacts to make a call. The phone will use now the microphone and speakers of your PC.
With Phone Link and Link to Windows apps, you won’t need to rely on the internal mic of your laptop. You can connect an external microphone to your PC.
Also, with Phone Link, you can see the text messages from your phone and send text messages as well. You may also see the photos from your phone and download them on your PC.
The procedure is almost identical, but you need to install Link to Windows from the App Store on your iOS device. Of course, you will go through the same Bluetooth pairing with the Windows 11 PC.
Initially, Phone Link was developed exclusively for Samsung Android phones. However, Microsoft extended the support for many other brands, but they didn’t publish a complete list of supported Android phones.
As you have seen from our tests, we managed to link a Motorola G72 which is not a top-of-the-line model so our recommendation is to try it. Please note that it won’t work with all Android smartphones.
2. Broadcast any sounds from your PC to the smartphone
Now, download and install the app on your Android device. You can use this link or look for the AudioRelay app on Google Play on your smartphone.
Make sure that both smartphone and PC are connected to the same Wi-Fi hotspot.
Open AudioRelay on your PC, go to the Server tab, and click on the Audio device option.
From the next window, choose what audio source you want to broadcast. We have chosen an external USB mic connected to the PC, but you may also use the Headphones and that will broadcast all the sounds that go to the headphone jack (basically, every sound that plays on your PC).
Now, open the app on your smartphone and you will see the server from your PC so click it. If you can’t see it, enter the IP from the desktop app shown in the server details on the Android app and hit Connect.
The connection is made, and you will hear the sound from your computer mic on the speakers of your phone.
If you notice that you have a high latency, you can change the Audio output in the mobile app.
Depending on the usage, you might also consider changing some settings in the mobile app like compression or the audio sampling. However, changing the latter is possible only in the paid version.
As you might have noticed, you can also use AudioRelay to broadcast the sound from your microphone or apps on your PC. You just need to set the phone as the Server and the PC as a Player and connect them on the same server IP.
Unfortunately, AudioRelay is not available for iOS, but it can work on Windows, Linux macOS, and Android.
If you want to do it the other way around and use the smartphone as a mic for a Windows PC, you can also use a USB cable to connect it to PC and download an app on your phone.
To be honest, in the tests from our WR lab, the audio quality when using the built-in laptop mic was pretty poor. However, when we connected an external mic to the PC, we got high-quality audio.
It will also work with a wireless microphone connected by Bluetooth but the audio quality will suffer once again.
To conclude our guide, it is possible to use your PC as a microphone for your phone by employing the help of apps such as Phone Link and AudioRelay. There are probably other third-party apps out there allowing you to do that but the ones we tested in the WR lab work 100%.
Microsoft Excel is getting a new automatic data conversion feature in Windows and Mac devices, according to the latest blog in the Microsoft 365 Insider program. This comes just days after the Redmond-based tech giant announced that its Copilot AI will also debut on the platform starting in November.
Automatic data conversion was already released to Excel, but now Microsoft is making the broadly available for all Windows and Mac Excel users out there.
Plus, the company improved the general layout of the feature, making it easier to find while also supporting more formats.
But this is not all. Microsoft made it possible for users to change Excel’s default options and even disable specific types of automatic data conversions.
Here’s how to enable & use automatic data conversion in Excel
Open your Microsoft Excel, and then select File.
From there, go to the Options menu, and select Data.
Here, if you scroll down, you’ll see a new section, Automatic Data Conversion.
To enable automatic data conversion, make sure to check the Enable all default data conversions below, when entering, pasting, or loading text into Excel on.
Enable it by clicking OK.
To use the feature, first, you should check all the additional options in the Automatic Data Conversion panel, and enable those that you see fit for your needs.
Remove leading zeros from numerical text and convert them to a number.
Truncate numerical data to 15 digits of precision and convert it to a number that may be displayed in scientific notation, if needed.
Convert numerical data surrounding the letter “E” to a number displayed in scientific notation.
Convert a continuous string of letters and numbers to a date.
After you’ve chosen your preferred options, there are many ways to use the new Automatic Data Conversion in Excel. For example, Microsoft recommends the following situation:
Type directly into a cell.
Copy and paste from external sources (e.g., a web page).
Open a .csv or .txt file.
Find and replace operations.
Select Data > Text to Columns, and then use the Convert Text to Columns Wizard.
The feature is available to all users running Windows (Version 2309 or later) and Mac (Version 16.77 or later).
Most web browsers have a built-in translate feature to translate text on web pages, but Microsoft is bringing video translation to Edge. This is why many are wondering how to enable video translation in Edge.
This is a unique feature that will allow you to enjoy videos in foreign languages in your native one, and in this guide, we’re going to take a closer look at this feature.
How do I turn on video translation mode in Edge?
Change the launch parameters
NOTE
Make sure you are using the latest Edge Canary to enable the video translation feature
Close Microsoft Edge.
Now right-click on its shortcut and select Proprieties.
Add the following switch to the target field after giving a space and click Apply: --enable-features=msVideoTranslateOverlayButton The target field should look similarly to this after the change: "C:\Program Files (x86)\Microsoft\Edge\Application\msedge.exe" --enable-features=msVideoTranslateOverlayButtone
Launch Edge with the shortcut appended and visit YouTube.
Play a video not in your preferred language set in the Edge browser.
Hover over the video to notice the Translate button and Picture in Picture.
A few users reported messages saying that the specified value in the Target box isn’t valid. If this happens, make sure you add –enable-features= line after the quotes without modifying the current value.
If you enabled the feature but still face issues with subtitles, it could be related to translation glitches. In that case, you may want to try the solutions in our guide on YouTube autotranslate not working.
Where is the translate option in Microsoft Edge?
Open a page that is not in your preferred language.
Click the Translate icon in the address bar.
Next, select the desired language and click the Translate button.
Currently, nothing happens when you click the Translate button. The update has just added the translate icon, so wait for follow-up updates to activate the feature.
Microsoft is testing two variations for the Video Translate button: text + icon and icon. We have included both screenshots in this article.
In case you’re not a fan of Bing and its translation feature, we have a guide on how to use Google Translate offline, so don’t hesitate to give it a try.
What is your take on Edge’s Video Translation feature? If you find it useful, let us know how you plan on using it in the comments section below.
Many users have complained about being stuck with Your Virus and threat protection is managed by your organization and unable to use the Windows Security app. If you are one of them, this guide can help!
We will explore the common causes of the issue and delve into the expert-recommended methods with step-by-step instructions to fix it.
Why do I see Your Virus & Threat Protection is Managed by Your Organization?
Windows Defender is corrupted.
Malware infection.
Windows update is pending.
How do I fix a Virus and threat protection is managed by your organization on Windows 11?
Before proceeding with any steps to fix this error, go through the following preliminary checks:
Ensure you have installed the latest Windows updates.
Restart your computer and run it in a clean boot state to understand the cause of the issue.
Make sure you log in using a personal Microsoft account or a local user account with admin privileges.
Press the Windows key, type cmd, and click Run as administrator.
In the Command Prompt window, copy & paste the command and hit Enter:REG DELETE “HKLM\SOFTWARE\Policies\Microsoft\Windows Defender” /v DisableAntiSpyware
Once the command is executed, reboot your PC to complete the action.
2. Modify the Group Editor Policy
Press Windows + R to open the Run dialog box.
Type gpedit.msc and click OK to open the Group Policy Editor.
Navigate to this path: Computer Configuration\Administrative Templates\ Windows Components\Microsoft Defender Antivirus
Click the arrow next to Microsoft Defender Antivirus to expand it.
Now locate the Turn off Microsoft Defender Antivirus option from the right pane and double-click it to open its Properties.
Select Not Configured or Disabled, and click Apply, then OK.
Go to this path: Computer Configuration\Administrative Templates\Windows Components\Windows Security\Virus and threat protection
Locate and double-click Hide the Virus & threat protection area.
Select Not Configured, then click Apply, then OK. Once done, restart your computer to let the changes take effect.
3. Disable the Intrusion Prevention System in Windows Defender
Press the Windows key, type powershell, and click Run as administrator.
Copy & paste the following command in the PowerShell window, and press Enter:Set-MpPreference -DisableIntrusionPreventionSystem $true
Reboot your PC to save the changes.
4. Using the Registry Editor
Press Windows + R to open the Run dialog box.
Type regedit and click OK to open the Registry Editor.
Go to this path: Computer\HKEY_LOCAL_MACHINE\SOFTWARE\Policies\Microsoft\Windows Defender
Click the Windows Defender folder, double-click DisableAntiSpyware, and set the Value data to 0 to disable it.
Now click OK.
Next, navigate to this path: Computer\HKEY_LOCAL_MACHINE\SOFTWARE\Policies\Microsoft\Windows Advanced Threat Protection
Locate and right-click Windows Advanced Threat Protection, then select Delete.
Click OK
Go to this path: Computer\HKEY_LOCAL_MACHINE\SYSTEM\CurrentControlSet\Control\DeviceGuard\Scenarios\HypervisorEnforcedCodeIntegrity
Locate and double-click Enabled DWORD, and set Value data to 0, then click OK to confirm the change and restart your PC.
In case you still face the issue, you need to tweak a few more registry entries:
Open the Registry Editor again with the steps mentioned.
5. Verify if the Windows Defender service & its dependencies are running
Press Windows + R to open the Run dialog box.
Type services.msc and click OK to open the Services app.
Locate Windows Defender Firewall service and double-click it.
Select Automatic from the drop-down menu for Startup type and ensure Service status is Running. If it is not running, click the Start button to initiate it.
Click Apply, then OK.
Now locate the Security Center service, right-click it, and select Restart.
Next, locate Windows Security Service, double-click it, and choose Manual from the drop-down menu for Startup type.
6. Re-register the DLL files
Press the Windows key, type cmd, and click Run as administrator.
Copy & paste the following commands one by one and press Enter after every command:
Restart your computer to let the changes take effect.
7. Reset/reinstall the Windows Security app
Press Windows + I to open Settings.
Go to Apps, then Installed apps.
Locate Windows Security, click the three dots icon, and select Advanced options.
Click the Reset button. This action will delete the app’s data. If the issue persists, proceed with the steps to reinstall the app.
Press the Windows key, type powershell, and click Run as administrator.
Copy & paste the following command to reinstall the app and hit Enter: Get-AppXPackage -AllUsers | Foreach {Add-AppxPackage -DisableDevelopmentMode -Register "$($_.InstallLocation)\AppXManifest.xml"}
Reboot your computer.
8. Run an SFC scan
Press the Windows key, type cmd in the search box, and click Run as administrator.
Type the following command to identify and replace the problematic system files with a clean copy from the local cache or the original installation media and hit Enter: sfc /scannow
Restart your PC.
If nothing worked for you so far, chances are your system files are damaged beyond repair, and the best way to eliminate the problem is to reinstall the Windows operating system.
To conclude, remember to always keep your computer up to date, turn on real-time protection & scan your system using an antivirus tool periodically to avoid virus attacks.
Formatting your laptop is like cleaning out your closet. It’s an organized way to get rid of unnecessary files and free up space on your computer. But what happens when you get unexpected results like a slower device?
This can happen to anyone, even if your laptop is brand new. It’s no cause for alarm as we’ll walk you through how to speed it up after a format so that it works like new again.
Does formatting a laptop affect performance?
When you format a laptop or desktop computer, you are deleting everything on it, including registry files. These files are critical for your operating system to run properly.
Since this information needs to be created again from scratch, it will take longer for your programs to open and for websites to load. That’s why you might notice the boot time is longer because the operating system will be reset to its default settings.
How do I fix my laptop if it’s slow after formatting?
Begin with the following basic steps before attempting the somewhat technical solutions:
Hit the Windows key, type cmd in the search bar, and click Run as administrator.
Type the following command and hit Enter. You can replace the drive letter C with yours: chkdsk C: /f
3. Restart the SysMain service
Press Windows + S to launch the Search menu, enter Services in the text field at the top, and click on the relevant search result.
Locate the SysMain entry here, right-click on it, and select Properties from the context menu. Alternatively, you can double-click on the service.
Now, click on the Startup type dropdown menu, select Automatic from the list of options and click Start.
Hit the Apply and OK buttons to save changes.
The SysMain service is a system file that is used by Windows to help run various processes, such as starting programs and loading data into memory. While it is meant to boost the performance of your PC, if your PC is running low on memory, it can lead to a slow laptop and cause other performance issues.
If this is the case, you can disable it and see if there are any notable changes.
4. Perform clean boot
Hit the Windows key, type msconfig, and open System Configuration.
Switch to the Services tab and select Hide all Microsoft services.
Click on the Disable all button, then hit the Apply button to save the changes.
Go back and click on the Startup tab, select Open Task Manager then click OK.
In the Startup tab of the Task Manager, Disable all the Enabled startup items.
Close Task Manager and restart your PC.
5. Increase Virtual memory
Press Windows + S to open Search, type View advanced system settings, and click on the relevant search result.
In the Advanced tab, click on Settings.
Now, navigate to the Advanced tab, and then click on Change under Virtual memory.
Untick the checkbox for Automatically manage paging file size for all drives, select No paging file, and click Set.
Now, choose Custom size and enter the paging file size based on the available RAM using the following formula:
Initial size: 1.5 x (Physical RAM in MB)
Maximum size: 3 x (Physical RAM in MB)
For instance, if the physical RAM is 4 GB, the initial and maximum sizes become 6144 MB (1.5 x 4 x 1042) and 12288 MB (3 x 3 x 1024), respectively.
Once done, click Set and OK to save the changes.
6. Create a new user profile
Press Windows + R to launch the Run console, enter netplwiz in the text field, and click OK.
Click Add in the User Accounts window.
Select Sign in without a Microsoft account (not recommended).
Click on Local account button.
Enter a username and password (optional) for the new user account, and a hint, in case you set a password. Once done, click on Next.
If your main reason for formatting your laptop was to get rid of malware, there’s a good chance you’ve resolved the issue. However, some viruses are stubborn, and even a format is not enough to remove them.
You can run a virus scan, but to completely remove them, you will need a tool stronger than the built-in Windows Defender. We recommend installing antivirus software with the capability of outing hidden malware.
8. Update your laptop’s BIOS
The BIOS controls the core functions of a computer’s hardware components. It’s important to keep your BIOS up-to-date because it can allow new hardware and software to operate more efficiently on your PC.
If you’re experiencing a problem with your laptop running too slowly after formatting, it may be time for an update.
9. Cleanup your Registry
Cleaning up the registry is one of the most effective ways to speed up your laptop. This can be done using a registry cleaner or by manually removing obsolete files from the Windows Registry. Use a registry cleaner if you don’t know how to do this yourself.
In addition to helping you find and remove obsolete files from the registry, these software programs also offer many other features, including defragmentation, startup management, and privacy protection.
10. Replace your hard drive
Formatting tends to leave unused space on the hard drive. This unused space can lead to fragmentation, which makes the computer run more slowly and experience more crashes and system errors.
Update your OS – It is always good to update your operating system. This will ensure to fix any compatibility issues with hardware and software.
Update all drivers – You should also update all drivers for each component of your laptop. This will ensure they match your operating system. Otherwise, they won’t work properly or may cause some problems while booting up or running applications on your PC.
Restore backups – If you’ve been making backups of your files and settings, restore them now. This will not only get your data back but also any settings and customizations that you had made to the system.
Set up a System Restore point – If something goes wrong after formatting your laptop, then you can create a System Restore point to revert back to a previous state of the system.
It is evident that formatting of laptop periodically will keep it running smoothly. However, during the inopportune times that it doesn’t, the above fixes should help you bring it up to speed.
It’s also important to get to the root of the problem. Sometimes, your laptop may run slow after a system restore because you created it incorrectly, and other times, it’s just your hardware component setting.
Remember, your PC’s speed is directly proportional to the resources available, such as RAM, CPU cores, and processor type, among others.
Did you manage to boost your laptop’s speed with any of our recommended fixes? We’d love to hear about it, so drop us a comment down below.
Resource consumption on the PC is an important aspect, especially when it exceeds the normal level, and the device’s performance is affected, as is the case with svchost.exe (imgsvc).
There’s not much information available on the web, but our research points to a built-in Windows component. Let’s get straight to it!
What is Imgsvc (Windows Image Acquisition) service?
The Windows Image Acquisition service allows imaging applications to interact with imaging hardware. It sets a standard for interaction between the different devices/drivers and programs, thus eliminating the need to develop the application individually for each combination.
So, the same application can control a wide range of devices, with the Windows Image Acquisition service acting as an intermediary, facilitating this interaction. It streamlines things for everyone: application developers, device manufacturers, and end users.
Why is Imgsvc running in task manager?
When Windows Image Acquisition is running in the Task Manager, it indicates that a process is actively employing the image acquisition functionality. This could be a built-in service or a third-party program.
It is usually the case when there’s a printer, scanner, webcam, or camera connected to the PC.
Remember, under ideal conditions, the Service Host will load imgsvc only when needed and automatically terminate the process when the image acquisition functionality is no longer utilized by any program.
Is it safe to disable Imgsvc?
If there are no relevant devices connected or programs running, you may consider disabling the service.
But it will affect the video calling experience and will leave applications like Microsoft Office Document Imaging and Adobe Acrobat with reduced functionality, specifically any dealing with image acquisition.
How do I fix Imgsvc high CPU usage on Windows 11?
Before we start with the slightly complex solutions, try these quick ones:
Restart the computer and check whether the CPU usage remains at normal levels. This also helps when services.exe consumes a high CPU.
Disconnect any non-critical peripherals, especially the ones that utilize the Windows Image Acquisition service.
If none work, head to the fixes listed next.
1. Change the Windows Image Acquisition service properties
Press Windows + R to open Run, type services.msc in the text field, and hit Enter.
Scroll down, locate Windows Image Acquisition, right-click on it, and select Properties.
Now, select Automatic from the Startup type dropdown menu, and click Apply to save the changes.
Now, head to the Dependencies tab, identify the components (services) Windows Image Acquisition depends on, and make sure they are running.
Restart the computer and check for improvements.
2. Repair the corrupt system files
Press Windows + S to open Search, type Command Prompt in the search bar, right-click on the relevant result, and select Run as administrator.
Click Yes in the UAC prompt.
Now, paste the following three commands individually and hit Enter after each: DISM /Online /Cleanup-Image /CheckHealthDISM /Online /Cleanup-Image /ScanHealthDISM /Online /Cleanup-Image /RestoreHealth
Once done, execute this command for the SFC scan: sfc /scannow
Finally, restart the computer for the changes to apply.
If you’d like this process can be greatly simplified by using specialized repair tools. This software will scan your system and repair any broken and corrupted files, with just a few clicks and within minutes.
3. Uninstall the corrupt camera/scanner driver
Press Windows + X to open the Power User menu, and select Device Manager from the list of options.
Now, locate the defunct camera and scanner devices, right-click on them individually, and select Uninstall device. These may be located under Printers or Camera.
Tick the checkbox for Attempt to remove the driver for the device, and click Uninstall.
If you get a temporary reprieve from high CPU usage, but the problem keeps reappearing after a restart, consider disabling automatic driver downloads.
Alternatively, you can update the drivers for the printer, scanner, and camera. When doing so, make sure to check the manufacturer’s website for the latest version.
4. Uninstall programs that trigger imgsvc
Press Windows + R to open Run, type appwiz.cpl in the text field, and click OK.
Locate any programs related to your defunct printer, scanner, or camera, select them individually and click Uninstall.
Now, follow the on-screen instructions to complete the process.
If you are forced to remove a program linked to an active device, we recommend first updating it or reinstalling it from the official website.
Go to Microsoft’s official website, select the OS edition and product language, then download the Windows 11 ISO.
Double-click the downloaded ISO file, and click Open in the confirmation prompt.
Run the setup.exe file.
Click Yes in the UAC prompt that appears.
Click Next in the Windows 11 Setup.
Read through Microsoft’s license terms, and click Accept to proceed.
Finally, make sure the setup reads, Keep personal files and apps, and click on Install.
Wait for the process to complete.
Since imgsvc is linked to Windows Image Acquisition, a built-in component, an in-place upgrade will eliminate any issues and fix the background process. This may take a few hours, but you won’t lose any programs or files.
Problems with built-in processes like imgsvc, especially high resource consumption, are tricky to troubleshoot. They are often responsible for critical tasks, as is the case with Cdpsvc (Connected Devices Platform Service), which handles external devices.
You can learn why related host components sometimes create excessive load by checking this guide on Service Host Network Service network usage, which explains how certain background tasks can trigger heavy resource spikes on Windows.
An ideal approach is to identify what triggers the issue and then take the necessary action! To better understand how this component works within Service Host, check our detailed svchost.exe explanation before continuing.
For any queries or to share what worked for you, drop a comment below.