The way we read books has changed thanks to Kindle, which offers a practical and portable platform to access a vast collection of electronic books. However, some readers have complained that Kindle book is not opening occasionally.
This guide will detail some practical ways of resolving it. You may also want to try other cross-platform ebook readers.
Why are my Kindle books not opening?
Any of the following may cause the problem:
Your Kindle device is not connected to the internet.
Windows 11, the latest iteration from Microsoft, has made Android users’ dreams come true with the introduction of the Windows Subsystem for Android that allows you to sideload Android apps.
Still, some users prefer to sideload apps using alternatives like Bluestacks for Windows 11. Bluestacks is a very popular Android emulator, and if it’s your choice of poison, we show you how to download it.
Can you download BlueStacks on Windows 11?
Yes, you can download BlueStacks on Windows 11. Whenever you get a question on whether you can download an app on Windows 11, you should already know it has something to do with the system requirements.
The OS came with stringent hardware and software requirements, so if you don’t meet these prerequisites, you should probably look toward Android emulators for low-end PCs.
Luckily, BlueStacks is somewhat lenient on the requirements and almost everyone can easily achieve them. All you need is:
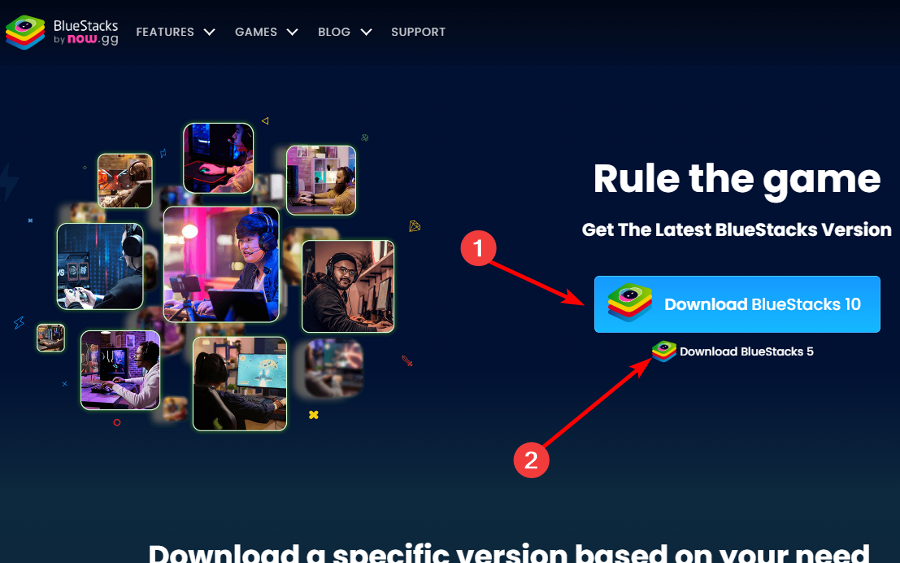
You’ll find two options: BlueStacks 10 and BlueStacks 5. If your PC meets the requirements mentioned above, proceed to hit the download button for BlueStacks 5, which is the offline installer. However, if you have a lower-end PC and don’t want to download the file, you can go for BlueStacks 10, the cloud version.
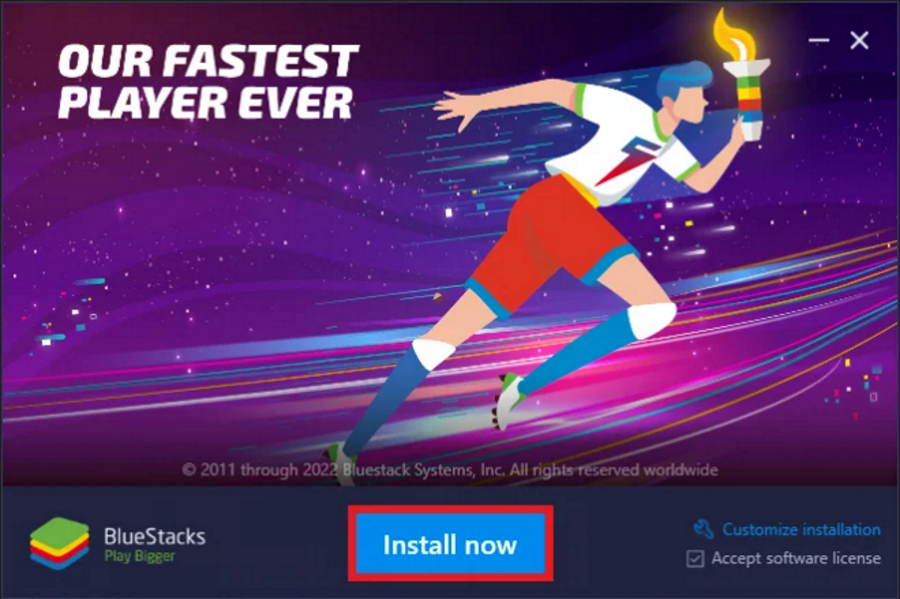
Once you’ve downloaded the installation file, click on it once it and hit Installnow.
Wait for the emulator to finish the installation. If you feel it is taking too long, your firewall or antivirus may be blocking the installation, so disable it temporarily until this process is complete.
You’ll be taken to the homepage, where you can download Android apps.
Users who choose to go for BlueStacks 10 must ensure they have a stable and strong Internet connection. They must also have enough free disk space to accommodate the game data.
The main advantage of the cloud-based version is syncing. This allows you to access your BlueStacks from another device and continue playing games wherever you are.
Which Bluestack is best for Windows 11?
The correct answer is always the latest version. BlueStacks comes in both 32-bit and 64-bit versions, so make sure you download the right one for your computer.
Since Windows 11 does not have a 32-bit system, it’s easier for you to get the 64-bit version and avoid confusion. However, there’s more to it.
Although BlueStacks 5 is the latest version, you’ll find four options on the download page which have all been optimized for Windows 11.
When you discard the 32-bit version, you remain with three. So which BlueStacks should you pick?
Nougat 64-bit – You can only download and play games that support the 64-bit Android system.
Pie 64-bit – You can only download and play games playable on Android 8 and 9.
Android 11 – You can only download and play games playable on Android 11.
Most users prefer the Pie version because it has been optimized for enhanced gameplay. It is also Hyper-V enabled.
One of the benefits of BlueStacks being Hyper-V supported is that it allows you to use your BlueStacks emulator on a virtual machine.
This means that you can run your Android applications on a virtual machine, which will help save up on memory and processing power and increase security compared to using an emulator directly on your computer.
It’s as simple as that. With BlueStacks, you’re just minutes away from having all the favorite apps you use on your Android device available to you on your Windows computer.
With a host of features, including virtualization, emulators, and compatibility with numerous Android apps, it’s worth having on your PC.
Have you downloaded BlueStacks on your Windows 11? What do you like most about it? Let us know in the comment section below.
If your system has crashed and come up with a blue screen indicating a problem related to the AswNetSec.sys driver file, this guide can help!
We will explore several methods to help you troubleshoot and fix the AswNetSec.sys BSoD error, allowing you to get your system back up and running smoothly.
What causes the aswNetSec.sys BSoD error?
Outdated or incompatible Avast app – If you’re running an outdated version of Avast or using an incompatible version with your operating system, it can result in conflicts and trigger the BSoD error.
Corrupted or faulty driver – The AswNetSec.sys driver may become corrupted or outdated due to incomplete installations, malware infections, or system file corruption.
Security software interference – Running multiple antivirus or security software simultaneously can cause conflicts and result in system instability, including BSoD errors.
System file corruption – If the system files are damaged or corrupted, you may face a lot of issues. Try to run SFC scan to repair system files.
Now that you know the causes of the issue, let us check out the solutions to fix it.
Press the Windows key, type cmd, and click Run as administrator.
Click Yes on the UAC prompt to proceed.
Copy & paste the following command to verify the integrity of system files and repair them and hit Enter: sfc/scannow
The SFC scan command will compare the system files against a known good copy stored in the Windows component store (WinSxS folder) and replace any corrupted or modified files with the correct versions.
Once done, type the following command to repair and restore the Windows image files and press Enter: Dism /Online /Cleanup-Image /RestoreHealth
Now the command will scan the system for any corruption and attempt to restore the damaged files from a known good source, such as Windows Update.
Once done, restart your PC.
2. Update Avast
Press the Windows key, type avast, and click Open.
Once Avast is launched, click Menu.
Select Settings.
Go to Update, and click Check for Updates. If available, install it to keep the tool up to date.
Double-click the installation file and follow the onscreen instructions to complete the process.
4. Check your disk
Press the Windows key, type cmd, and click Run as administrator.
Click Yes on the UAC prompt to proceed.
Copy & paste the following command to detect and repair file system errors on a disk and hit Enter: chkdsk /f
If any errors are found during the scan, the command attempts to repair them. Once completed, restart your computer.
So, these are the methods that you can use to fix the aswNetSec.sys BSoD error and ensure the stability and security of your computer.
To learn more, let us tell you that the aswNetSec.sys file is associated with Avast antivirus software, which is a popular security program used to protect computers from malware and other threats.
When this blue screen error occurs, it indicates that there is a problem with the Avast antivirus software or its associated driver.
It can disrupt normal computer operations, leading to data loss and the inability to use the system until the issue is resolved.
The Event id 4104 is typically represented by the symbolic name TLS_E_RPC_LISTEN and addresses the communication issues because the remote procedure call (RPC) port is not listening.
In this troubleshooting guide, we have listed the different methods to fix the communication issues with the terminal services licensing server, which ultimately resolves the event id 4104.
What does event id 4104 mean?
The event id 4104 signifies the issue when the remote procedure call (RPC) port is not listening. The event id directly points to the communication error between the RPC client and the terminal services license server connected via a network.
The Terminal Services license server uses the Microsoft Windows Terminal Services Licensing to install, issue, and track the availability of Terminal Services client access licenses (TS CALs).
The event id 4104 is logged in the event viewer for several underlying reasons. Some of them are:
Disabled Terminal Services Licensing service – The event id 4104 can is logged when the terminal services licensing service and other essential ones are restricted from running in the background.
Restrictions by Firewall – It will not be possible to reach out to the remote procedure call if the Windows firewall or other security feature restricts the traffic from the terminal server.
Name resolution problems – If the RPC server resolves the wrong IP address, the client will contact the wrong server or one that does not exist at all.
Network issues – An issue with the network connectivity is also a reason why the client is unable to communicate with the Windows terminal server.
Now that you know the causes of the event id, below are the solutions that can fix the event id 4104.
What can I do to fix the event id 4104?
1. Start the Terminal Services Licensing service
NOTE
You can only implement these steps if you are a member of the Local Administrators group or have the required permissions.
Press the Windows key on the taskbar, go to Administrative tools from the flyout menu, and then select Services.
Click Continue on the User Account Control dialog box to allow the applications to make changes to the computer.
Scroll down the Services pane and look for the Terminal Services Licensing service.
Right-click the service and choose Properties from the context menu.
Switch to the General tab of the Properties window and choose Automatic in the Startup type drop-down menu.
Next, press the Start button under the Service status to start the service if not already.
Finally, press the OK button to exit the Terminal Services Licensing Properties dialog box.
Starting the Terminal Services Licensing service helps verify that the Terminal Services license server is currently available.
Change the Firewall settings
Use the Windows key to launch the Start menu, type control panel in the search bar and choose the relevant search result.
Set View by drop-down to Large icons and click the Windows Defender Firewall option.
Click the Allow an app or feature through Windows Defender Firewall located on the left sidebar.
Press the Change Settings button.
Scroll down and look for Remote Assistance under the Allowed apps and features list and ensure that both the checkboxes next to it are enabled.
There have been instances when the Firewall blocks the traffic to the RPC port and results in the RPC server having unavailable problems or not listening issues.
Hence, reconfiguring the Windows Firewall such that it unblocks the network connections for RPC.
That’s pretty much it! We hope you now have a thorough idea of the event id 4104 and what steps you should take when the event is logged in.
Blue screen errors are common errors every Windows user has faced at least once. One such error is the nvpcf.sys BSoD error. Also, this error is more associated with the Dell Precision 7560 / 7760 laptops.
If you’re experiencing the nvpcf.sys blue screen of death error, this article will provide ways to help you fix it.
What is nvpcf.sys and what causes the BSoD error?
Nvpcf.sys is an Nvidia driver-related file contributing to the driver’s functionality. The file is usually located in the following directory: C:\\Windows\System32\drivers
The nvpcf.sys BSoD error can be caused by:
Corrupt Nvidia drivers – This is the primary cause of the nvpcf.sys error. Corrupt graphics drivers can prevent Windows from functioning correctly, leading to crashes and BSoD errors.
Viruses & Malware – Viruses are among the most common causes of BSoD errors. If you’re experiencing it, your PC is likely infected with a virus.
Corrupt system files – If your PC has corrupted system files accumulated due to viruses or forced PC shutdowns, you’ll run into errors like the nvpcf.sys during booting.
How can I fix nvpcf.sys blue screen error?
Before anything else, try the following preliminary checks:
Perform a system restore to the last point before the error starts.
Update your Windows OS to fix bugs that may cause this error.
If the error persists, try the tweaks below.
1. Boot into Safe Mode
Press the Windows key + I to open the Settings app.
Select System and select the Recovery tab in the next window.
Scroll to locate the Advanced Startup option and click Restart now.
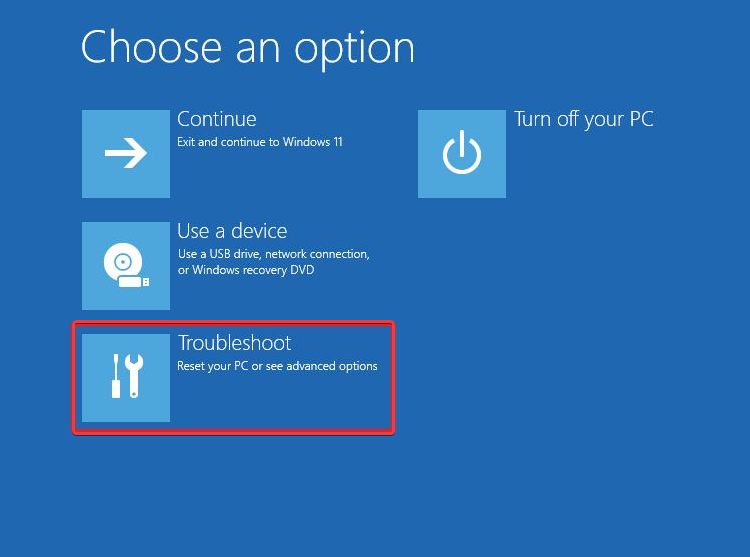
Once your PC restarts into the WinRE environment, select Troubleshoot.
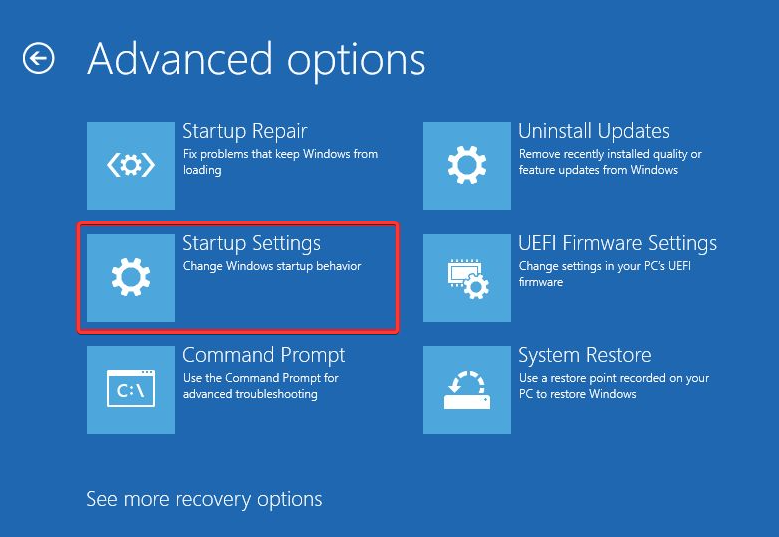
Click Advanced Options in the Troubleshoot menu, and then click Startup Settings.
Then, select F4 to Enable Safe Mode and click Restart.
When your PC restarts, press the Windows key, type Device Manager, and hit Enter.
In the Device Manager window, locate the Software Devices option, click on it, and select Nvidia Platform Controllers and Framework.
Click on all the Devices under the Nvidia section, and select Uninstall.
Then, manually download and install the latest Nvidia drivers.
Sometimes, Nvidia drivers can get corrupted, leading to BSoD errors during booting. Reinstalling the drivers is one of the best ways to fix the nvpcf.sys BSoD error.
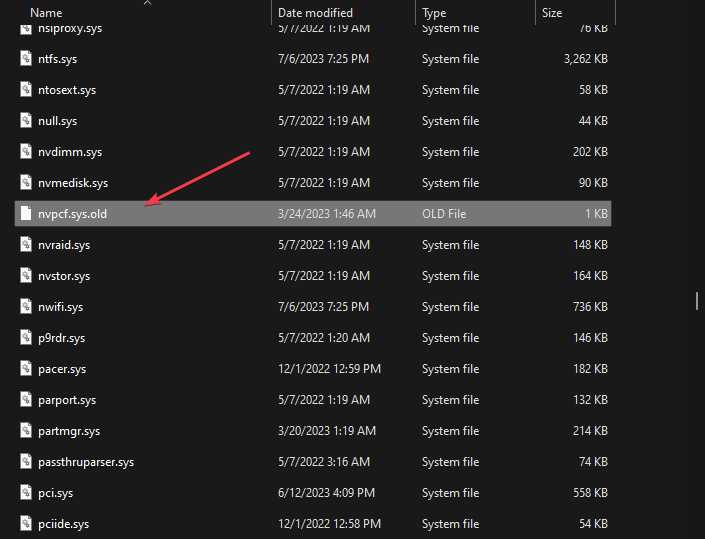
Launch the File Explorer and input the following path into the address bar: C:\Windows\System32\drivers
Locate the nvpcf.sys, right-click it, and select Rename option.
Change the file from nvpcf.sys to nvpscf.sys.old.
Then close your File Explorer and check if you still encounter the issue.
Some users have claimed this process worked for them. However, any update to the Nvidia drivers will undo this and may prompt the error again.
3. Roll back the Nvidia driver
Right-click the Start menu and click on the Device Manager.
Expand the Display adapter, right-click the Nvidia driver, and click Properties.
Then, select Driver tab and click on Roll back button.
Then follow the prompts to complete and check if the error persists.
More often than not, Nvidia graphics update often cause the error, Hence, returning to the previous point before the issue occurred will troubleshoot it.
Resolving BSoD errors on Windows isn’t a complex task but can be chaotic if you do not know what to do. Luckily, in this article, we’ve listed X best ways for you to resolve the nvpcf.sys blue screen error. You can also learn how to deal with a similar issue, DRIVER_INVALID_STACK_ACCESS.
Suppose you’ve fixed the nvpcf.sys BSoD error using alternative methods, we’d like to hear your solutions in the comments.
If you are an IT admin, then you know the importance of RSAT. With RSAT or Remote Server Administration Tools, an IT admin can remotely manage the roles and features of Windows Server from a client machine.
In case the RSAT installation fails on your PC, then it hinders the task of an IT admin. In this guide, we will show you different methods to fix RSAT not installing on Windows 10 problem. Let us check out the solutions.
What is RSAT?
As already explained, using RSAT, IT admins can manage the roles and features of Windows Server remotely. Do note that RSAT cannot be installed on Home or Standard editions of Windows.
You need to be running Professional or Enterprise editions of the Windows client operating system. In the RSAT for Windows 10, all tools are enabled by default.
The RSAT or Remote Server Administration Tools includeServer Manager, MMC (Microsoft Management Console), and Windows PowerShell cmdlet modules that can be used to manage roles and features that are running on Remote servers.
How can I fix RSAT not installing Windows 10 problem?
Before applying the advanced solutions, let us go through the simple solutions and hopefully resolve the problem at our end.
You should try restarting your PC as it might be a temporary glitch, which is why RSAT is not installing on Windows 10.
Make sure that you have the latest version of Windows update installed on your computer as it will help fix the underlying bugs present in the previous version of the update.
If the above solutions did not fix the problem, let us go through the advanced solutions to fix the problem.
1. Install RSAT using PowerShell
Press the Win key to open the Start menu.
Type Windows PowerShell and open it as an administrator.
Type the below command and press Enter to know which RSAT component is installed on your PC. Get-WindowsCapability -Name RSAT* -Online | Select-Object -Property DisplayName, State
To install specific tools, you need to type the below command. For example, if you want to add AD management tools, you should type the below command and press Enter. Add-WindowsCapability –online –Name Rsat.ActiveDirectory.DS-LDS.Tools~~~~0.0.1.0
To install other components of RSAT on your Windows 10 PC, below is the list of commands that you can execute. - Add-WindowsCapability –online –Name Rsat.Dns.Tools~~~~0.0.1.0 - Add-WindowsCapability -Online -Name Rsat.FileServices.Tools~~~~0.0.1.0 - Add-WindowsCapability -Online -Name Rsat.GroupPolicy.Management.Tools~~~~0.0.1.0 - Add-WindowsCapability -Online -Name Rsat.IPAM.Client.Tools~~~~0.0.1.0 - Add-WindowsCapability -Online -Name Rsat.LLDP.Tools~~~~0.0.1.0 - Add-WindowsCapability -Online -Name Rsat.NetworkController.Tools~~~~0.0.1.0 - Add-WindowsCapability -Online -Name Rsat.NetworkLoadBalancing.Tools~~~~0.0.1.0 - Add-WindowsCapability -Online -Name Rsat.BitLocker.Recovery.Tools~~~~0.0.1.0 - Add-WindowsCapability -Online -Name Rsat.CertificateServices.Tools~~~~0.0.1.0 - Add-WindowsCapability -Online -Name Rsat.DHCP.Tools~~~~0.0.1.0 - Add-WindowsCapability -Online -Name Rsat.FailoverCluster.Management.Tools~~~~0.0.1.0 - Add-WindowsCapability -Online -Name Rsat.RemoteAccess.Management.Tools~~~~0.0.1.0 - Add-WindowsCapability -Online -Name Rsat.RemoteDesktop.Services.Tools~~~~0.0.1.0 - Add-WindowsCapability -Online -Name Rsat.ServerManager.Tools~~~~0.0.1.0 - Add-WindowsCapability -Online -Name Rsat.Shielded.VM.Tools~~~~0.0.1.0 - Add-WindowsCapability -Online -Name Rsat.StorageMigrationService.Management.Tools~~~~0.0.1.0 - Add-WindowsCapability -Online -Name Rsat.StorageReplica.Tools~~~~0.0.1.0 - Add-WindowsCapability -Online -Name Rsat.SystemInsights.Management.Tools~~~~0.0.1.0 - Add-WindowsCapability -Online -Name Rsat.VolumeActivation.Tools~~~~0.0.1.0 - Add-WindowsCapability -Online -Name Rsat.WSUS.Tools~~~~0.0.1.0
To only install the missing components of RSAT, run the below command. Get-WindowsCapability -Name RSAT* -Online | where State -EQ NotPresent | Add-WindowsCapability –Online
Navigate to the below path and press Enter. HKEY_LOCAL_MACHINE\SOFTWARE\Policies\Microsoft\Windows\WindowsUpdate\AU
Double-click on the UseWUServer key on the right side.
Change the value to 0 and click OK.
Exit Registry Editor and restart your PC.
Several of our readers were able to fix the problem of RSAT not installing on Windows 10 by simply disabling the UseWUServer key. After the installation is complete, you should revert the value of the UseWUServer key to 1.
If the UseWUServer registry key is set to the value of 1 it will by default configure Automatic Updates to use a server that is running Software Update Services and prevents it from using Windows Update.
3. Install the US English pack on your system
Press Win + I keys to open the Settings menu.
Click on Time & Language on the left pane.
Click on Language.
Add English (United States).
Under English (United States) you will see the Language pack available.
Click on Options and download the language pack.
Restart your computer.
Some users have reported that installing the English (United States) language pack on their Windows 10 PC has helped them resolve the RSAT not installing on Windows 10 problem.
If the above solutions did not help, then we would suggest you reset Windows 10. Follow the steps mentioned in our guide to safely reset your Windows 10 PC and then try installing RSAT on your PC.
Micorosft Exdge is the native browser bundled with a Windows 11 installation. It is sleek and has many new features that help it compete in a saturated market. However, some readers recently encountered the Microsoft Edge error with code 3, 15, 1067.
Let us help you resolve it in this guide. Also, if you do not already have it, you may consider downloading Microsoft Edge on your computer.
What is error code 3, 15, 1067 in Microsoft?
This error often shows you have an underlying issue with an essential Edge service or driver. Any of the following mainly triggers it:
How do I fix the Microsoft Edge error code 3, 15, 1067?
Before exploring all our solutions, try these workarounds:
Use a different browser, as this may save you the stress of troubleshooting.
Try accessing Edge on a different device.
Browse Microsoft Edge as a guest.
However, you may proceed to the permanent solutions we discuss below.
1. Edit your Registry profile name
Press Windows + R, type regedit, and hit Enter.
Navigate to the path below: Computer\HKEY_LOCAL_MACHINE\SOFTWARE\Microsoft\Windows NT\CurrentVersion\ProfileList
Under the ProfileList key, check for any name with a .bak extension. If there is none, proceed to the next solution; however, if you find one, go to step 4.
There should be another profile with the same name but no .bak extension; and .old to this one and remove .bak from the other profile’s name.
Close the registry, reboot the computer, and verify if it fixes the Microsoft Edge error code 3 15.
2. Delete work or school profile from Edge
Click the 3 dots at the top right corner of the browser and select Settings.
Select the three dots to the right of your profile name and click the Remove option.
Click on the Add profile option and re-enter your profile details.
Lastly, restart Edge and verify if it fixes the Microsoft Edge error code 3 15.
Click the Get in Store app button and ensure it is correctly installed.
3.3 Reinstall Edge
Press the Start menu.
Type PowerShell and click Run as administrator.
Paste in the script below and hit Enter, then wait for the process to complete. winget install XPFFTQ037JWMHS
Restart your PC and verify it fixes the Microsoft Edge error code 3 15.
This error is particularly problematic because it may remain even if you reinstall the Windows OS. However, you should be able to fix it using the solutions recommended in this article.
Please let us know which of the fixes were most effective for you using the comment section.
If you’re receiving the Cannot retrieve tweets at this time error message while using Twitter, this is mainly because of internet connection problems or you’ve exceeded the number of daily tweets for your account. Before applying the solutions below, try restarting the app or refreshing the browser. You may also enable or disable the VPN (if you’re using one) and check the current X server status.
What can I do if Twitter cannot retrieve tweets?
1. Subscribe to Twitter Blue
Launch your Twitter app and log in with your credentials.
Click on your profile picture and select Verified.
Select your preferred subscription and click Subscribe.
Follow the on-screen command to make a payment to subscribe to Twitter Blue.
Subscribing to Twitter Blue monthly or annually gives the account exclusive access to more tweets.
2. Wait for the Twitter rate limit
Twitter sets a new limit to the number of tweets accessible to each account based on account type.
If you have exceeded the daily limit for tweets allocated to your account, you will wait 24 or 48 hours to load new tweets.
If you’re facing the frustrating issue of your Lenovo docking station not detecting your monitor, it can disrupt your workflow and hinder productivity.
In this guide, we will explore various troubleshooting steps to help you fix the issue and get your monitor recognized by the docking station.
Why is my Lenovo docking station not recognizing my monitor?
Several factors can contribute to the issue; here are some common causes to consider:
Connection issues – Loose or faulty cables, adapters, or connectors can prevent the docking station from properly detecting the monitor. Ensure that all cables are securely connected.
Incompatible hardware – Some monitors may not be compatible with certain docking stations or require specific adapters. Verify that your monitor is compatible with it.
Outdated drivers – Outdated or incompatible graphics drivers can cause communication issues between the docking station and the monitor. Update the graphics drivers.
Display settings – Incorrect display settings on your laptop or computer can prevent the monitor from being detected. Verify that the monitor is enabled in the display settings and configured.
Faulty ports or damaged cables – The faulty ports, damaged cables, or malfunctioning components could also cause this problem. Ensure there are no signs of damage.
So, now that you know the reasons for the problem, move to the troubleshooting steps.
How do I get my monitor to work with my docking station?
Before engaging in advanced methods, you should consider performing the following checks:
Ensure that all cables connecting the docking station, monitor, and laptop are securely plugged in and there is no visible damage to any of them.
Confirm that your monitor is compatible with the docking station. You may also try connecting your monitor directly to exclude any problems with the monitor and/or cable.
Power off your laptop, docking station, and monitor.
Disconnect & reconnect the power adapters from both the docking station and the monitor.
Connect your docking station to a different monitor to determine with which device the issue lies.
Once done, check out the detailed solutions mentioned below.
1. Update the driver
Press Windows + R to open the Run dialog box.
Type devmgmt.msc and click OK to open Device Manager.
Locate, and click Monitors to expand it.
Right-click the monitor from the list and select Update driver.
Click Search automatically for drivers.
Follow the on-screen instructions to complete the process.
Now go to Display adapters, and click it to expand it.
Right-click the graphics driver and select Update driver.
Click Search automatically for drivers.
Follow the on-screen instructions to complete the process.
In some cases, you won’t be able to update the graphics driver manually if your OS doesn’t detect it. So, you can either search for it on the web or use a life-saving driver updating solution.
We advise you to consider the professional driver manager as it will automatically locate any outdated drivers and update them properly in a few moments.
2. Restart the graphics driver
Press the Windows + Ctrl + Shift + B on your keyboard.
The screen will go black for seconds, and it triggers a signal to the operating system to reset the graphics driver.
It addresses issues related to a frozen or unresponsive display. By restarting the graphics driver, it attempts to recover the display and bring it back to a responsive state without requiring a system reboot.
Locate Detect other display and click the Detect button.
From the drop-down menu, select either Duplicate or Extend.
Once your monitor lights up, locate Identify displays, and click the Identify button. Numbers will pop up on your monitors; note down the number and line the devices in the same order.
4. Update the Lenovo docking station’s firmware
Check the docking station or user manual to identify the specific model. Open a web browser of your choice and go to the official Lenovo support website.
On the Lenovo support website, enter the model name or number of your docking station in the search bar. Select the appropriate product from the search results to access the support page.
Look for a section on the support page titled Drivers & Software.
Within the Drivers & Software section, look for any firmware updates specifically mentioned for your docking station model.
If a firmware update is available, click on the associated download link to get it. Now double-click the downloaded file, and follow the provided instructions carefully to update the firmware.
By following these troubleshooting steps, you should be able to identify and resolve the issue of your Lenovo docking station not detecting your monitor.
You may encounter millions of apps and games when you scroll through Microsoft Store’s vast collection. However, as with any other software, Microsoft Store is not immune to errors as well. One such error you may come across is the 0x80080206 code.
Today, you’ll learn what causes the 0x80080206 error and some easy solutions that will help you resolve it. Let’s get right to it.
What is error code 0x80080206?
Typically, the 0x80080206 error is triggered when:
Corrupt cache: The corrupt cache files often lead to an error.
Critical services not running: There’s a problem with data or services associated with the Microsoft Store app.
Here are some troubleshooting methods you can try:
How do I fix the 0x80080206 error?
Before you go into advanced troubleshooting, try these workarounds:
Check Windows Updates: Keeping your system up to date is crucial to the correct functioning of the Microsoft Store. Faulty update service can result in multiple errors, including the 0x80080206 one.
Check regional and language settings: Occasionally, incorrect settings can interfere with the app and trigger the 0x80080206 error. Ensure your settings are correct by visiting the Time & Language feature in your OS settings.
1. Clear the Microsoft Store cache
Hold Windows + R key. Type the following command and press Enter: wsreset.exe
Microsoft Store should launch automatically after the process is complete.
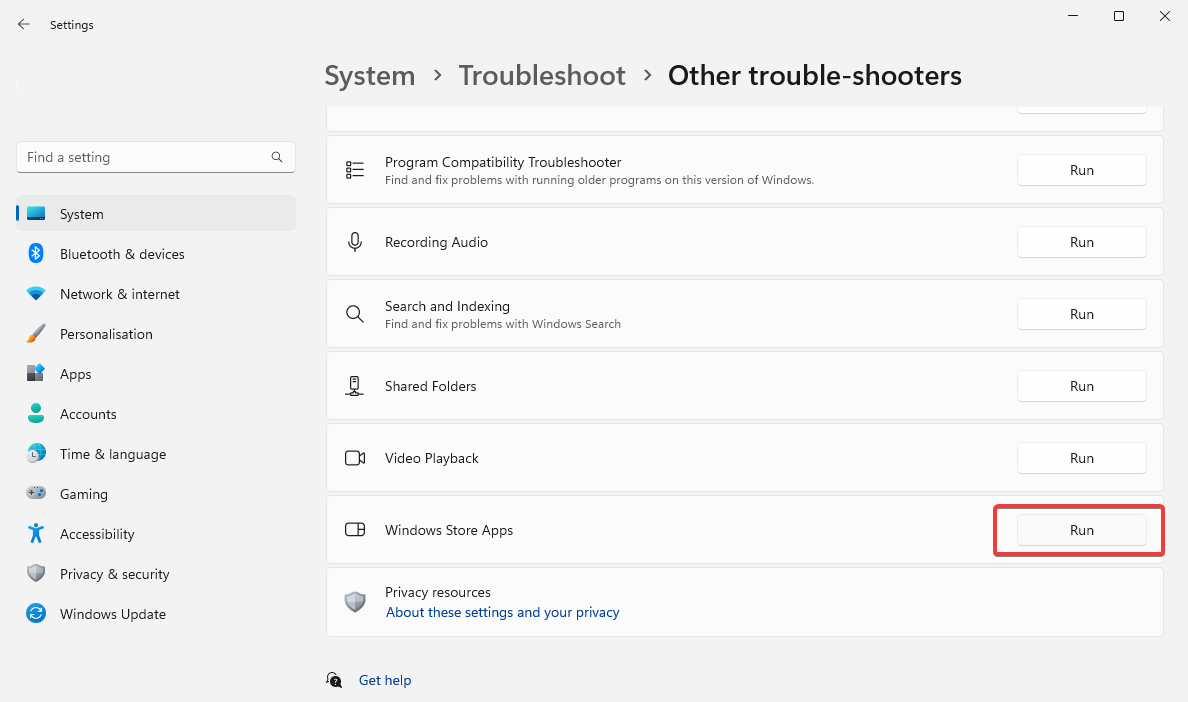
2. Run the Windows Store Apps troubleshooter
Press Windows + I key to open Settings. Locate Troubleshoot and click on it.
Go to Other Trouble-shooters.
Scroll down to Windows Store Apps and click on Run on the right.
Follow the on-screen instructions to complete the troubleshooting process.
Windows provides built-in troubleshooters that can automatically detect and fix various issues. Running the troubleshooting tool can help you easily identify and resolve your Microsoft Store issue.
If you’re getting the Chatgpt We’re experiencing exceptionally high demand. Please try again later error, you’re in the right place. This usually happens during peak-use time or when you’ve entered way too many queries in a short amount of time.
ChatGPT status & outage history for the past 90 days, as seen on OpenAI’s official status page
Otherwise, try the following fixes to get back on it fast:
What do I do when ChatGPT experiences exceptionally high demand?
1. Try the service during off-peak periods
The off-peak periods may vary by region, but you may try using the service at night or early in the morning. If these were the times you experienced the error, choose a different time of day.
2. Clear your browser cache
Launch your browser and press Ctrl + Shift + Del (we use Chrome, and the hotkey may differ in other browsers).
Pick a Time Range, tick all the checkboxes, and click the Clear data button.
Confirm your choice and verify it fixes the ChatGPT exceptionally high demand issue.
3. Use a VPN or incognito mode
With a VPN, you can log in from an entirely different location virtually. If ChatGPT is not facing exceptionally high demand from that region, you may be able to use the service without an error.
Having that said, you may consider high-speed VPN software that offers you stable server locations in 94 countries, unrestricted content from anywhere, and anti-tracking policies to cover your personal data.
ExpressVPN
Don’t compromise content freedom and pass ChatGPT services at any time using this best-ranked VPN.
Try opening ChatGPT in a different browser. Compatible and hitch-free options that work great on our end include Opera and Firefox.
You can also try logging into your account on a different computer and mobile device. Many times during outages, mobile phones seem to be less affected.
This will direct you to the free version of ChatGPT. You can use it without logging in into your account. It’s built for testing, and no chat will be saved after you end the session, but it can be a good option if the app won’t open in any other way.
Why is ChatGPT at high capacity?
The service may be at capacity for several reasons, including the following:
There is an overwhelming demand for ChatGPT.
GPT-3.5 is computationally intensive because of the complex algorithms for processing queries.
You may refer to our other guide that explains navigating ChatGPT high-capacity problems.
How many times can I use ChatGPT in an hour?
You may use ChatGPT as often as you like in a given hour. There is a pace limit in place to stop you from sending too many requests quickly. This safeguards against service misuse and guarantees everyone an equal opportunity to utilize it.
The type of requests you make and the server load affect how many requests you can make in an hour. However, you should typically anticipate being able to send a few dozen requests in a single hour without exceeding the rate cap.
The world of software development is constantly evolving, and Microsoft’s .NET framework is at the forefront of this evolution. Developers access enhanced features, improved performance, and expanded capabilities with each new release.
In this article, we will explore the battle between .NET 6 and .NET 7, two major framework versions. We will delve into their support, performance, and key differences, helping you decide which version is best suited for your development needs.
.NET 6 Vs. .NET 7: Support & Performance
.NET 6 is the latest long-term support (LTS) version released by Microsoft which introduced various new features and improvements that empower developers to build high-performing and scalable applications.
The successor to .NET 6 is .NET 7, which offers standard-term support (STS) is out. It focuses on being unified, simple, but at the same time, modern and fast.
Let’s discuss both frameworks in detail to understand more about them.
1. Support
Support is a critical factor when selecting a version of the .NET framework. It ensures that developers receive updates, bug fixes, and security patches to maintain the stability and security of their applications.
.NET 6 is Microsoft’s latest long-term support (LTS) version. As an LTS version, it guarantees long-term support for an extended period.
This makes it ideal for production applications requiring stability and long-term maintenance. Microsoft provides regular updates and bug fixes for .NET 6, ensuring developers can rely on a well-supported framework for their projects.
However, .NET 7 is the latest framework and offers standard-term support, which is 18 months from the time of release.
Developers should be aware that new features introduced in .NET 7 may still be in the experimental phase and undergo changes before reaching stability.
2. Performance
Performance is a crucial aspect of any framework, as it directly impacts the responsiveness and efficiency of applications.
.NET 6 introduces significant performance improvements compared to its predecessors. It optimizes startup times, reduces memory footprint, and improves just-in-time (JIT) compilation.
These enhancements result in faster application initialization, reduced memory consumption, and improved performance.
Developers can expect smoother user experiences and better application responsiveness with .NET 6.
With .NET 7, performance is the main focus, and many enhancements are made to achieve better performance.
Profile-guided optimization (PGO) now works with On Stack Replacement & is easier to enable, and it can also instrument and optimize additional things.
Native AOT (Ahead-of-time) produces a standalone executable in the target platform’s specific file format with no external dependencies.
This means reduced startup time, self-contained deployment, less memory and disk usage, and access to restricted platforms.
What are the differences between .NET 6 and .NET 7?
1. Native application development
One of the notable differences between .NET 6 and .NET 7 is the introduction of the general availability of the .NET MAUI (Multi-platform App UI) framework in .NET 7.
MAUI enables developers to build native applications on multiple mobile, desktop, and web platforms. This framework streamlines cross-platform development and maximizes code sharing.
2. Language and tooling enhancements
Both versions have introduced enhancements to the C# language and productivity tools. However, specific features and improvements are more apparent with .NET 7.
With C# 11, it has introduced new features, including nullable reference types, async streams, and value types. It focuses on making the developer’s tasks easy by making them write less code.
New features such as generic math, object initialization enhancements, and raw string literals are introduced to simplify coding.
3. Containerization and DevOps
.NET 7 aims to provide better integration with container technologies like Docker and Kubernetes, simplifying the containerization of .NET applications.
It also focuses on streamlining the DevOps experience, facilitating the deployment and management of .NET applications in containerized environments.
4. Web application development
While both versions support web application development through ASP.NET Core, .NET 6 introduces features like minimal APIs, HTTP/3 support, and improved performance.
These enhancements improve the development experience for building modern web applications.
However, with .NET 7, Minimal API got a range of improvements, such as endpoint filters and better support for binding query or header parameters.
5. Cloud support
Both versions offer improved integration with cloud platforms such as Azure, AWS, and Google Cloud. However, the specific enhancements vary, and newer cloud-related features are introduced in .NET 7.
.NET 7 helps build serverless and cloud-native apps and includes cloud-oriented APIs and libraries to streamline the development of cloud-based apps and services.
How to choose the right version for your project?
When deciding between .NET 6 and .NET 7 for your project, you should consider the following factors:
1. Stability and support
If stability and long-term support are critical for your project, .NET 6, an LTS version, is the safer choice. It guarantees long-term support and regular updates for an extended period.
However, if you want to leverage the latest cutting-edge features and are willing to adopt a newer version, .NET 7 can offer exciting possibilities.
2. Project timeline
While choosing the version, you must consider your project timeline and release schedule. If you plan to release your application soon, using a stable and well-established version like .NET 6 ensures a smoother development process and minimizes the risk of compatibility issues.
3. New features and innovations
You can make a wise decision by evaluating and understanding the difference between the two versions.
If the upcoming features in .NET 7, such as the MAUI framework or performance improvements, align with your project requirements and can provide a competitive edge, it might be worth considering adopting .NET 7.
In this detailed comparison, we explored the support, performance, and critical differences between .NET 6 and .NET 7. .NET 6, being the latest LTS version, offers long-term support, significant performance improvements, and enhanced web development features.
On the other hand, .NET 7 introduces exciting features like the MAUI framework for native application development and focuses on containerization and DevOps workflows.
When choosing between the two versions, you should consider the project’s requirements, the need for long-term support, performance considerations, and specific feature requirements.
Ultimately, your decision should align with your project goals and the needs of your development team.
Have you made your decision? Which one would you choose? Please feel free to leave your thoughts, tips, and experience with the subject in the comments section below.
If you find the Bing Discover feature distracting or prefer a different browsing experience, this guide can help!
In this article, we will walk you through the steps to disable or remove the Bing Discover button from Microsoft Edge.
What is the use of the Bing Discover button?
The Bing Discover button is located in the upper-right corner of Microsoft Edge, which opens a flyout overlay that allows you to interact with Bing Chat AI in the same tab.
It has three tabs, Chat, Compose, and Insights. The Chat tab lets you interact with the chatbot on Bing.com.
The Compose tab can help you create different types of content formats. In the Write about box, you can mention the details and choose the tone, format, & length.
The Insights tab understands the web page context you are viewing and mentions its related information.
It is a valuable feature; however, not everybody wants a chatbot on their browser. If you are one of them and wish to turn it off, then move to the next section.
How can I remove the Bing Discover button?
1. Use the browser settings
Press the Windows key, type edge, and click Open.
Locate three dots and click Settings.
Now click three horizontal lines, and click Sidebar.
Click Bing Chat.
Locate Show Discover and click the toggle button to switch it off.
Omegle is a virtual chat platform that has again got its buzz ignited, thanks to its nature of allowing users to chat with random strangers across the globe, which fits right into this modern era of the internet.
However, there are multiple concerns raised by parents and people about whether Omegle is monitored or not. In this guide, we will discuss this concern and give you all the details you should know about Omegle.
What is Omegle?
Omegle was launched in 2009 and it serves as a virtual chat platform, where strangers across the globe can interact with each other using their device’s webcam.
Once you arrive on the Omegle platform, it pairs you up with strangers and you can chat online with connected people via text, video, or both.
Users can also add their interests and connect with people of the same interest. If the interest matching fails, you will be connected with anyone. The best part is that it doesn’t require any signup and your chats are anonymous as long as you do not share your details.
There is no official app of Omegle available, and you can access it via the web only. When you search Omegle, you will find multiple websites appearing to be Omegle, but they aren’t official websites.
Who can use Omegle?
Anyone. Although the official age set by Omegle is 13 years with parental permission, and without parental permission, it is 18 years, anyone can access it.
Omegle is mainly popular in regions such as the US, UK, India, and Mexico. It is extremely popular among children and adults alike.
What type of chat options are available on Omegle?
The video chat option on the Omegle platform which says that it is monitored by Omegle, actually offers you three options, which are explained below:
Adult – Anyone can access this section with just a click. This section contains explicit videos and indecent acts by users.
Moderated chat – Omegle themselves say that the moderated chat section isn’t perfect, and you may come across people who misbehave.
Unmoderated chat – Once you click and go past the warning box, you will come across people trying to influence you into bad things, performing indecent acts, etc.
Is Omegle monitored?
Anything that you do online isn’t safe. Moreover, if it involves the usage of a webcam and microphone then it becomes a bit more serious.
Speaking of Omegle, there doesn’t seem to be powerful moderation, or any security measures taken up by the team of the Omegle video chat website. So, in simple words to answer your question is Omegle monitored? Absolutely not!
Besides, the platform doesn’t require anyone to register or sign up, making everyone anonymous. And Omegle is a big platform for child abuse, as adult videos are available for free.
Children could be asked online to share their name, age, location, and other details for some fun and this is where Omegle isn’t safe, especially for children.
There are multiple main reasons why Omegle isn’t safe, more specifically when it is being used by kids:
Exposure to explicit content
Ill-minded people can influence kids in doing wrong things
Exposure of your personal information
Chances of your private messages and videos getting hacked
Your conversation can be recorded and used against you
The fact that even after Omegle states that the website is monitored, people come across wrongful activities.
So, it won’t be wrong to say that Omegle does not monitor its videos or chats and lets everything pass through. There could be some monitoring, but it isn’t that strict.
Whatever the case may be, if there are risks involved in something that you are doing, it shouldn’t be done, or at least it should be avoided.
How to be safe on Omegle?
There are some ways that will help you keep yourself safe on Omegle, some of them are listed below:
Use the filter option on Omegle and do not enter explicit words that could match you with people with similar interests.
Do not share your personal information on Omegle like name, number, location, age, etc.
Use a VPN to replace the real IP address with a VPN IP address. For a list of the best VPNs, you can read our guide.
Block Omegle altogether using Parental Control apps. We have a guide that lists some of the best Parental Control apps you can try out.
That is it from us in this guide. For some users, Omegle is showing an error when connecting to a server. You can resolve it by applying the solutions in our guide.
Feel free to let us know your thoughts in the comments box below what you feel about Omegle and if you use it or not.
Whether you’re a seasoned developer or just starting your journey in the world of software development, understanding the new features and improvements in .NET 6 is crucial to stay ahead in the rapidly evolving landscape.
In this article, we will explore the exciting enhancements introduced in the framework and provide step-by-step instructions on downloading and installing it.
What are the new features of .NET 6?
1. Performance improvements
.NET 6 brings significant performance enhancements, including faster startup times and reduced memory consumption.
With just-in-time (JIT) compilation, the framework optimizes code execution for improved overall performance.
2. Single File Applications
The framework introduces the capability to create single-file applications, allowing you to package your application and its dependencies into a single executable file for easier distribution and deployment.
3. Hot Reload
This feature lets you make code changes during runtime without restarting the application.
With hot reload, you can see instant updates and modifications, enhancing productivity during development.
4. Improved web and cloud development
The framework offers several web and cloud development advancements, including enhanced support for building cloud-native applications, improved APIs, and better integration with popular frameworks like Blazor and ASP.NET Core.
5. Cross-platform development
With .NET 6, you can build and deploy applications on various platforms, including Windows, Linux, and macOS.
The framework provides better cross-platform compatibility, making creating applications that can run seamlessly on different operating systems easier.
.NET 6 introduces improvements in AI and machine learning capabilities by integrating ML.NET. It offers simplified APIs, model training enhancements, and improved performance for developing intelligent applications.
7. Native Application Development
.NET 6 enables you to build native applications using the new MAUI (Multi-platform App UI) framework. MAUI allows you to create cross-platform applications that target mobile, desktop, and web platforms, providing a unified development experience.
Once the executable file is downloaded, double-click it to initiate the installation.
On the Microsoft .NET SDK 6.0 Installer wizard, click Install.
Click Yes on the UAC prompt.
Follow the onscreen prompts and wait for the installation to complete.
Once done, click Close.
From performance optimizations to improved productivity tools, .NET 6 offers a range of advancements that empower developers to create robust and efficient applications.
By familiarizing yourself with the new features, you can harness the power of .NET 6 to streamline your development process, improve application performance, and deliver high-quality software solutions.
If you are looking for a way to install .NET Framework on Windows, we advise you to read this guide to find the step-by-step instructions.
Please feel free to give us any information, tips, and your experience with the subject in the comments section below.
Microsoft Outlook showing the wrong time is an error we’ve recently received from several of our readers. They claim that the timestamps of their emails, calendar events, or other time-related information within Outlook are inaccurate.
If you are experiencing similar issues and don’t know how to correct your Outlook time to the accurate one, we have gathered some easy steps to fix it here.
Why is Outlook showing wrong time?
There can be several reasons Outlook is showing the wrong time. Below are some of them:
Incorrect time zone settings – Outlook relies on the system’s time zone settings to display the correct time. Double-check the time zone settings on your computer and adjust them if necessary.
Daylight Saving Time (DST) settings – If you are in a region that observes Daylight Saving Time, it can affect the displayed time in Outlook.
Having confirmed the above checks, if the problem persists, you can work through any of the methods provided below.
1. Change your time zone in the Outlook app
Open the Outlook app on your PC.
Select the File tab and select Option.
Navigate to the Calendar tab, and under Time zone, type a name for the time zone of your current location in the Label box.
Select the new time zone you prefer from the list and click the OK button to save the changes.
Changing the time zone using the Outlook app automatically considers any applicable daylight savings time adjustments. If the error persists, try the next fix.
2. Change the time zone via Settings
Press the Windows + I keys to open the Settings app.
Click on Time & Language and select Date & time.
Under the Date & time settings, click on the drop-down menu next to Time zone to view the available time zones.
Next, select the time zone that corresponds to your location.
Sign in to Outlook Web app, and click on the Settings gear icon at the top-right corner of the screen.
Next, click General from the left sidebar and select Language and Time from the second column.
Under the Current Time Zone section, enter your new city, then select the corresponding time zone.
Click on the Save button to apply the changes.
Remember that changing the time zone in the Outlook web app will only affect the display of timestamps and other time-related information within the webmail interface.
And that’s how to fix Outlook showing the wrong time error. Hopefully, one method in this guide will help you fix the issue with your Outlook time and date.
Millions of people use the well-known email program Outlook. It provides various features and functionalities to aid customers in efficiently managing their email accounts. However, issues like Outlook view not showing email content dampen the user experience.
Launch the Outlook app and click on the File menu.
Expand Account Settings and select Manage Profiles.
Click on the Show profiles button.
Select the Add button.
Name the profile and click OK.
Input your Name, Email, Password, and click the Next button.
Click Apply and OK.
Finally, launch Outlook and use the newly created profile, then verify if Outlook view not showing your email content is resolved.
4. Repair your Outlook app
Press the Windows button, type control, and open the Control Panel app.
Click Uninstall an app.
Select Microsoft Office and click the Change button.
Select the Quick Repair option, then click the Repair button.
Restart Outlook and verify that the view not showing your email content is fixed.
The solutions we have discussed in this guide would work for most users. You should, however, start with the ones that seem most appropriate to you. Also, try using Outlook online to see if it works better.
On a laptop, a lot of its use will be connected to engaging the internet. So we understand how depressing it is for some of our readers who complain that their Lenovo laptop is not connecting to the WiFi.
Press Windows + R to open Run, type devmgmt.msc in the text field, and hit Enter.
Expand Network adapters, right-click your WiFi adapter, and select Uninstall device.
Select Search automatically for drivers.
Follow the prompts and, at the end, verify if the issue of your Lenovo laptop not connecting to WiFi is fixed.
4. Forget the Wi-Fi network and then reconnect to it
Click on the WiFi icon on the Taskbar.
Click on the forward pointing arrow in front of your network.
Right-click the exclamation icon and select Forget.
Finally, try logging into the WiFi.
There it is for this article. Most of these fixes will also work for other laptop brands. You should start with any solution that feels the most appropriate.
Also, while connecting to the internet, you should maintain your privacy and security. You may need to use any of the best VPNs for Lenovo.
Finally, let us know in the comments below which solutions have been effective for you.
If you’re a Lenovo user and your screen brightness won’t adjust, you’re not alone. The problem stems because of outdated display drivers, function key issues, power-saving modes, or interfering software.
No matter the cause, with the steps below you should be able to fix it:
What to do if my Lenovo laptop brightness can’t adjust?
Start by updating your OS, and uninstalling recent third-party screen dimming or display management software. Restart your PC and check if the issue is fixed. If it’s not, keep reading.
1. Update the graphics driver
Press the Windows + R keys to prompt the Run window, type devmgmt.msc, and click OK.
Expand Display Adapters, select the driver from the drop-down menu, and click the Update driver option.
Then, select the Search automatically for drivers option.
Restart your PC and check if the m issue persists.
Updating the graphics driver will fix bugs and install the latest features to improve performance. Also, you can check other steps for updating graphics drivers on Windows 11 if you have any issues.
2. Install an old version of your graphics driver
Press the Windows + R keys to prompt the Run window, type devmgmt.msc, and click OK.
Expand the Display Adapter entry, right-click on the driver, then select Update driver from the drop-down menu.
Select Browse my computer for drivers.
Click Let me pick from a list of available drivers on my computer.
Then, check the box for the Show compatible hardware option, select an older driver version from the list, and click Next.
Restart your PC and check if you’re able to adjust the brightness.
Running an older graphics driver fixed the issue for some users. It resolves incompatibility issues and faulty update issues causing the Lenovo laptop’s inability to adjust brightness.
A VPN (virtual private network) is a great way to remain anonymous online. It will encrypt any personal data you transmit so that it can’t be intercepted, and you can always log on securely, knowing you aren’t being spied upon.
However, it’s also possible for your VPN to become blocked. You may find that you still can’t access all the content you want, even after using a decent VPN. If this sounds familiar, we will show you how to use a VPN if it’s blocked.
Why is my VPN locked?
Have you ever tried using VPN on a site but were quickly locked out or received a warning to turn it off? Well, some sites don’t want you to use a VPN, and here is why:
Country/Work/School restrictions – Some countries block VPNs because they want to control the information their citizens can access. So if you’ve been wondering whether your government can block a VPN, yes, it can. This also applies to employers and schools who restrict certain connections.
Expired VPN – If you have a paid VPN service, then it’s likely that your subscription will have an expiry date. Once this date passes, your account will be locked until you renew your subscription.
Your IP address has been blocked – Some websites and apps only allow selected IP addresses to access them because they don’t want too many people using their services simultaneously.
Copyright infringement – This is mostly seen on streaming sites like Netflix, Showmax, and Hulu. These platforms usually have licenses to show in select countries. You may find your VPN is blocked if you’re not in the whitelisted country to avoid copyright infringement.
Fraud prevention – Is particularly common on money transaction sites to prevent money laundering cases. You must prove your real address, and using VPNs is strictly prohibited.
How do I bypass a blocked VPN port?
A few tweaks that may lift the block include:
Change to a different server on your VPN list.
Switch to mobile data if you were using a Wi-Fi connection.
This technique allows you to redirect incoming traffic from the Internet to a specific computer, server, or device on your network.
If you’re experiencing a problem with your VPN connection, it’s possible that your ISP is blocking the port used by your VPN provider.
To bypass this restriction, you’ll need to configure port forwarding for the appropriate ports on your router. You can do this manually or use port forwarding software.
2. Use a different port
If your ISP is blocking the port your VPN uses, the easiest thing to do is change the port number to one they haven’t blocked yet. Port blocking is usually only implemented on certain ports, so if you use one of these, you should be able to get through.
It’s unlikely that your ISP will block all of them at once. Changing to a different port is extremely easy because you don’t need to contact your ISP provider. You can also use port software to check for the best available ports.
Proxy servers are one of the most common methods to unblock blocked ports on the internet. A proxy server is a third-party server that connects you to your desired website or content from another server.
This means that when you connect to a website using a proxy, you will not be connected directly to that site as we normally do but instead connect through the proxy server first.
The advantage of using a proxy server is that it hides your IP address and makes it impossible for anyone monitoring your network to know what websites you are visiting and what data you are transferring over the internet.
4. Get a dedicated IP
Most of the time, when you connect to a VPN server, the service assigns you a shared IP address. When too many people use the same IP address, the traffic can be flagged as suspicious and get you blocked.
Getting a dedicated IP may be the easiest way to bypass a VPN block. You can use a VPN service that provides dedicated IPs for each user. Unfortunately, this will almost always come at an extra cost.
Which VPN can bypass VPN block?
To select a VPN that can bypass a block, you first need to understand the different types of blocks:
IP blocking
This is the process of denying access to a specific IP address or range of addresses. It is also the easiest form of blocking because VPN addresses are, unfortunately, publicly available.
Sites that have done their due diligence have already blacklisted such addresses. The only way to bypass an IP block is to purchase a unique address. Free VPNs do not offer such, so you may have to upgrade to a premium VPN service.
Port blocking
This is another common form of VPN blocking where your firewall or antivirus is the culprit. Port blocking can deny access to specific services on your network.
Private companies and government agencies often use DPI to block access to certain websites. It is a form of intrusion detection system that can identify and manage Internet traffic in real-time, including VPN traffic.
In general, deep packet inspection can be used to gain more specific knowledge about the traffic being analyzed. This lets you take action based on more than just IP addresses and port numbers.
To answer our main question, which is the best undetectable VPN? It will need to be obfuscated such that the encrypted traffic will look like regular traffic. Here are our top recommendations:
In conclusion, with every VPN you use, it can be a hit or miss. They can get blacklisted, banned, and even blocked. Once you understand what type of blocking has been enforced, you can figure out how to bypass it.
That being said, we have an awesome list of VPNs that can’t be detected if you want to avoid such situations.
Has your VPN been blocked before? What did you do to get out of that situation? Let us know in the comment section.
Many users complained about ISP (Internet Service Provider) blocking their VPN (Virtual Private Network) connection. It means they are actively preventing users from connecting to a VPN server.
Hence, this article will discuss what to do if ISP blocks your VPN. Also, we have a detailed guide on using a VPN to access blocked sites on your device.
Before proceeding with any advanced fixes, we recommend you go through the following preliminary checks:
Try connecting to a different server location within your VPN client.
If your ISP consistently blocks your current VPN, try a different VPN service and check if it helps.
Enable any optional options like stealth mode or obfuscation in your VPN client.
What do I do if ISP blocks VPN?
Launch the VPN client application on your PC and navigate to the Settings or Preferences section.
Find options for the VPN connection or Network settings in the settings menu.
Locate the option to modify the default port used by the VPN. It might be labeled Port, Protocol, or Connection Type.
Choose port 443 from the available list of ports or input it manually.
If there is an option to specify a custom port, enter 443 in the appropriate field.
Save the modified settings, and the VPN client will attempt to establish the VPN connection using port 443.
Connect to the VPN and see if your internet traffic goes through the VPN and if you can access blocked content or services.
NOTE
Not all VPN providers allow you to switch ports or offer specific instructions for port selection. Also, the steps may differ depending on the VPN you are using.
ISPs may block VPNs to mitigate potential security risks or ensure policy compliance.
ISPs may block or throttle VPN traffic to manage their network resources.
Sometimes, ISPs comply with geolocation regulations by blocking VPN connections.
ISPs use network infrastructure or hardware incompatible with some VPN protocols.
The ISP may have firewalls that actively block VPN traffic, thus preventing it entirely.
Users should note that these causes aren’t general and can vary on different computers depending on the circumstances. Nonetheless, we’ll take you through the detailed steps for unblocking your VPN.
Encountering error code 6000.87 while trying to launch or play Rockstar Games can be a frustrating experience for players.
In this guide, we will explore effective troubleshooting steps to help you fix Error Code 6000.87 and get back to enjoying games like Grand Theft Auto V (GTA V) or Red Dead Redemption 2 (RDR2) smoothly.
What causes the error code 6000.87?
This error is specific to Rockstar Games’ launcher, and there are several reasons for the same; some of the common ones are:
Server issues – Rockstar’s servers may sometimes experience temporary problems or maintenance, leading to the error. If that’s the case, you can only wait until the problem is resolved.
Firewall interference – Your firewall or antivirus software may be blocking the launcher. Temporarily disable your firewall or antivirus software and try relaunching the game.
Corrupted game files – Corrupted game files can cause various issues, including this one. To address this, verify the integrity of the game files using the Rockstar Games launcher.
Outdated launcher or game version – If the launcher or the game is outdated, you might face this error. Check for the launcher’s update or download the latest version from the official website.
So, these are the causes of the error; let us check out the methods to fix it.
How do I fix the Rockstar launcher error code 6000.87?
Before we go to the advanced fixes, here are a few preliminary checks you should do:
Many use external monitors with their laptops because they offer more space and better quality. However, many users reported that an external monitor not using GPU.
This can be a problem and affect your performance, so it’s important to fix it, and this guide will show you the best ways to do it, so let’s get started.
Why is my monitor not using GPU?
The monitor isn’t compatible with HDMI standards or HDMI cables.
Dedicated graphics isn’t set as the default graphics processor.
Do external monitors use GPU?
On laptops, integrated graphics render the user interface and other graphics components. This means that integrated graphics will be used on external monitors as well.
Only if you start a demanding application, such as a video game, will your laptop be forced to switch to a dedicated GPU.
After doing that, it doesn’t matter if the game is displayed on an internal or external display, it will run on your dedicated GPU.
What can I do if an external monitor is not using GPU?
Before we start, there’s one thing you need to check:
Make sure that your cables and ports are compatible with your monitor.
1. Reinstall the graphics driver
Press Windows key + X and choose Device Manager.
Locate your graphics card. Right-click it and choose Uninstall device.
If available, check the Remove driver software for this device and click Uninstall.
After the driver is uninstalled, you need to update the graphics driver and check if that solves the problem.
While uninstalling your drivers, some users recommend using Display Driver Uninstaller, so you might want to try that as well.
2. Set a preferred GPU
Open Nvidia Control Panel.
Select Manage 3D Settings.
Now go to Program Settings.
Select the application that you want to use for your GPU.
Set Preferred graphics processor to High-performance Nvidia processor.
Start the application and move it to the external display.
As you can see, this is a minor issue, and it’s normal behavior since the external monitor not using GPU by default.
Having trouble logging into your Ticketmaster account because the one time code is not sending? Whether you’re trying to sign in, reset your password, or verify your ID, it’s incredibly frustrating when the verification code doesn’t arrive.
Many users experience delays or never receive the reset code or ID verification for authentication. In this guide, we’ll break down the possible reasons behind this issue and provide simple troubleshooting steps to help you regain access to your account quickly.
What can I do if Ticketmaster is not sending code?
Tip
Before you start, make sure the phone number you entered is correct and check for the code in filtered messages/spam. Some Ticketmaster users also say the messages are delayed, so consider waiting a few minutes.
1. Check your Ticketmaster account
Press the Windows key, type in your browser’s name, and hit Enter.
Then, navigate to the Ticketmaster sign-inpage, and enter your credentials to log in.
In your account dashboard, navigate to the My Tickets or Order History section to see if your ticket confirmation code is already available.
2. Contact Ticketmaster support
If all else fails and you still can’t get your code, consider contacting Ticketmaster. Visit their support page and pick the Ticket Delivery Category.
You’ll have to fill out a form where you need to describe your issue and then submit your request.
Sometimes, Ticketmaster may not require separate confirmation codes to purchase tickets. If so, the confirmation code may already be visible in your account.
A slow internet connection can cause other errors like Ticketmaster error code U533, which prevents you form completing the purchase, so make sure to keep it in check.
In addition, some of our readers have also encountered the pardon the interruption error on Ticketmaster. So, feel free to check the easy fixes provided in the above guide.
Likewise, error 5005 on Ticketmaster and error 504 also share similar causes with the problem addressed in this guide. So, you can check it for more options to fix this issue.
Signing up and using the Microsoft 365 apps, including OneDrive on Windows PC, is a matter of seconds. However, several users have been encountering an error message: Your OneDrive has not been set up. For help, contact your IT department. followed by the error code 0x8004e4f1.
The error code 0x8004e4f1 indicates an explicit sign-in scenario that can be easily resolved by the solutions listed in this guide.
Why do I get the 0x8004e4f1 OneDrive error code?
The 0x8004e4f1 error code occurs when the User Principal Name (UPN) commonly known as the email domain address of Microsoft 365, is replaced with a new domain.
For the uninitiated, UPN or email domain is a default attribute required for generating the email address, which like an email address, can be used to sign in to Windows devices.
To uncomplicate the process, users usually prefer to have the same UPN and email address but can be changed if necessary. For instance, The old UPN [email protected] can be changed to [email protected]. However, it is important to ensure that both of these domains should belong to the same Microsoft 365 tenant.
When the changes are made to the UPN, the primary email address (SMTP) automatically updates itself to match the UPN, but the process is time taking.
To tackle this, users can explicitly set up all Microsoft 365 apps from scratch. Unfortunately, the procedure accomplishes the desired results for all the Microsoft apps, excluding OneDrive. As a result, you are interrupted by the error code 0x8004e4f1 during the setup process.
How do I fix the 0x8004e4f1 OneDrive error code?
Before you try the advanced troubleshooting steps, here are some preliminary steps you should perform the fix the issue:
Wait for an hour or two to ensure that the domain change has been propagated to access the network.
Check the OneDriver server status and see if it is up and running.
Uninstall the MS Office 365 app and download and install it from the official website.
If these workarounds do not help, jump to the solutions listed below.
1. Clear OneDrive credential cache
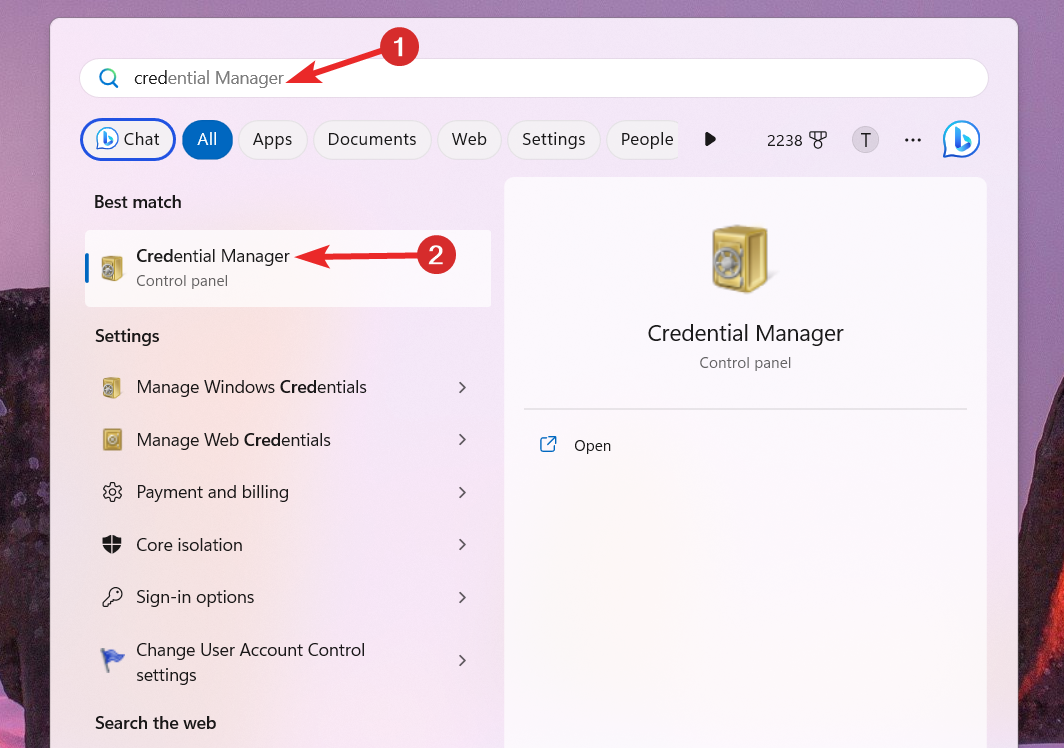
Press the Windows key, type credential manager in the search bar, and choose the relevant search result.
Switch to the Windows credentials tab on the Manage your credentials window.
Look for the OneDrive cached credentials under the Generic Credentials section and click to view the related settings.
Click Remove to delete the OneDrive credential cache.
Press the Yes button on the confirmation pop-up that appears.
The credential cache of OneDrive maintained by the Credential Manager is the primary reason for the 0x8004e4f1 error. Removing this Windows Credentials cache prove to be an easy fix.
2. Relink the user UPN
Press the Windows key, type powershell in the search bar on top, and select the Run as administrator option from the search result.
Click Yes on the User Action Control dialog box to launch Windows PowerShell with elevated permissions.
Type or paste the following command in the PowerShell window and press the Enter key to execute the command. Press Y if prompted to change the execution policy. Set-ExecutionPolicy RemoteSigned
Now type or paste the following commands one by one and press the Enter key after each of them. Add the old email address and new email address in their respective placeholders. Install-Module -Name ExchangeOnlineManagement -ForceImport-Module ExchangeOnlineManagementConnect-ExchangeOnlineSet-MsolUserPrincipalName -UserPrincipalName old email address -NewUserPrincipalName new email address
As reported by several Microsoft users, using Windows PowerShell to re-link the old user UPN to a newly generated one resolves the Ox8004e4f1 error code such that the OneDrive setup is successful.
However, it might take several hours for the changes to show up for your Microsoft 365 account. Hence you should skip 24 hours and attempt to sign into the OneDrive app.
Enter a new email address in the text box or click the Use a phone number instead option and press the Next button.
Provide a new password in the Create a password field and press Next.
Follow the step-by-step process to create a new user account for the OneDrive app.
You may also struggle with OneDrive if your user account has become corrupt. Creating a new user account to step up OneDrive will help fix the 0x8004e4f1 error code.
4. Reset OneDrive
Use the Windows + R shortcut key to launch the Run dialog box.
Copy and paste the following path in the text box and press Enter to reset the OneDrive app. %localappdata%\Microsoft\OneDrive\onedrive.exe /reset
As soon as you will execute the command, the OneDrive icon in the notification tray will blink and re-appear.
Resetting OneDrive to the default values may take some time. Once complete, relaunch and set up the OneDrive app; the 0x8004e4f1 will no longer interrupt the process.
Hopefully, you could successfully troubleshoot the error code 0x8004e4f1 such that the setup process is complete.
In case, the error persists, you should uninstall OneDrive from your Windows PC and reinstall it by following the step-by-step process mentioned in this guide.
If you have any comments, feedback, or solutions for us, do let us know in the comments section.
Sometimes older games can run into problems when trying to play them on Windows 11. Gothic 2 and Mirror’s Edge, for example, are two games that sometimes run into compatibility issues on Windows 11.
So when that happens, it’s always the question: can older games run on newer Windows versions? Well, they can. And Windows 11 has a lot of compatibility settings to turn on for this kind of issue.
But one solution that will almost fix any compatibility issues you have, is to make sure you can get the game from an official platform. Let’s take Cold Waters, for instance. This game is not particularly old, but Windows 11 was not around when the game was released, so a lot of you will ask: does it run on Windows 11?
The answer is yes.
Here’s how you can get Cold Waters to properly run on Windows 11
Make sure you buy Cold Waters from official gaming platforms such as Steam, or GOG. Usually, they have older games in their catalog that have no compatibility issues. On GOG, for example, the platform explicitly tells you if the game is running or not on Windows 11.
Once you’re there, get it by clicking the Add to Cart button.
Download and install it.
You should also have no problems playing Cold Wars from GOG. The game runs through the GOG platform for additional achievements in the game. Also, the GOG platform makes it explicit that the game runs on Windows 11.
This is how you properly run Cold Water on Windows 11. You should make sure to always get your games from official sources, this way you won’t run into any problems with the games.
Are you playing Cold Waters? Do you like it? Let us know in the comments section below what you like about this game.
Microsoft Rewards is a loyalty program that allows users to earn points by performing tasks and activities. However, some of our readers complain about encountering there is an issue with your account or order error message on Microsoft Reward when redeeming points.
Hence, this guide will discuss how to fix the problem. Alternatively, you may be interested in our article about what to do if you run into Oops! looks like you’re on the go error on Microsoft Rewards.
Why is my Microsoft Rewards not working?
Microsoft Rewards may flag your account for verification if any suspicious activity is detected.
Issues with the payment method can cause this problem to appear.
Inaccurate information on your Microsoft Account can cause this problem.
Technical issues or temporary service disruptions on the Microsoft Rewards platform can result in error messages.
It can also occur if the particular reward service’s region or location settings are restricted.
Violating the terms and conditions of the Microsoft Rewards program will lead to this issue.
AGI and ASI stand for Artificial General Intelligence and Artificial Super Intelligence. When we talk about AGI or Artificial General Intelligence, then it means that a robot with AGI will be able to think like a human mind. AGI is similar to the human mind.
On the other hand, ASI, or Artificial Super Intelligence surpasses the human mind, and it would even be capable of showing emotions. Or even forming relationships. And to the scientists from the Superalignment project, Bing AI and other OpenAI tools will reach ASI this decade.
Truth is, Microsoft, for example, has poured a lot of budget into investing in AI research, and the results are fascinating. There is Orca 13B, which the Redmond-based tech giant will release open-source.
You’ll have LongMem, which will train your AI model to have an unlimited context length. Kosmos-2 is gaining visual knowledge, and it’s a Microsoft-funded project.
And now there is the Superalignment project, which is not Microsoft-funded, but will help BingAI as well since the AI tool is based on GPT.
OpenAI AGI timeline – in 4 years AI will reach AGI
According to Superalignment’s statements, superintelligence will be the most impactful technology humanity will ever discover. We will be able to solve a lot of the world’s problems when we’ll discover it.
We need scientific and technical breakthroughs to steer and control AI systems much smarter than us. To solve this problem within four years, we’re starting a new team, co-led by Ilya Sutskever and Jan Leike, and dedicating 20% of the compute we’ve secured to date to this effort.
The team’s honesty is prevalent. They don’t have a solution for controlling a potentially superintelligent AI or preventing it from going rogue. According to them, the current alignment techniques will not scale to superintelligence. There is a need for new scientific and technical breakthroughs.
So they came up with a plan. The goal is to build a roughly human-level automated alignment researcher. Then they will use vast amounts of computing to scale the efforts and align superintelligence to their needs.
The team wants to reach this goal in four years. Go to their website here, if you want to read more about the project. And if you’re interested in the subject, or you have expertise in it, then you can sign up to join the team.
What do you think? Will AI reach superintelligence in 4 years? Let us know what you think in the comments section below.
Optional Features is a Windows OS component for adding or removing specific functionality such as RSAT. However, people reported issues with RSAT missing in Optional Features encountering an unexpected installation hurdle. Therefore, we will discuss fixing RSAT not available in Optional Features.
What is RSAT?
RSAT stands for Remote Server Administration Tools. It is a collection of tools developed by Microsoft, and it does the following:
Provides tools for managing and administering Active Directory services.
RSAT includes the Group Policy Management Console (GPMC), allowing administrators to create, edit, and manage group policies across the network.
It offers tools for managing and configuring Domain Name System (DNS) servers.
It manages and configures Dynamic Host Configuration Protocol (DHCP) servers. Administrators can allocate and control IP addresses for client computers.
RSAT provides PowerShell cmdlets and modules for automating administrative tasks and performing various management operations on remote servers.
Why is RSAT not available in Optional features?
RSAT may not be available in the Optional Features list if your Windows edition does not support it.
Specific Windows features need to be enabled before RSAT will appear in the Optional Features list.
If your OS doesn’t have the necessary components for RSAT, you won’t be able to install it.
RSAT availability can sometimes be affected by the Windows update status.
What do I do if RSAT is not available in optional features?
Observe the following preliminary checks before proceeding with advanced troubleshooting.
Update your Windows operating system to install all the missing requirements needed for RSAT to work.
Check your Windows edition to ensure your OS is compatible with the administrative tool.
Check for RSAT availability in your region, as it is limited in some locations.
1. Install from PowerShell
Right-click the Windows icon and select Terminal(admin).
Type in the following command and press Enter: Get-WindowsCapability -Name RSAT* -Online | Select-Object -Property Name, State
Navigate through, and copy the RSAT name and feature you want.
Then, paste the copied name down in the blinking console and press Enter.
Close the Terminal Window when the successful message appears.
Press the Windows button, type Control Panel, and press Enter.
Then, right-click the Programs category, select Programs and Features and click Turn Windows features on or off.
Expand the Remote Server Administration Tools in the Windows feature dialogue box and click on the Feature Administration Tools.
Then, clear all the boxes you want to turn off and check all the boxes you want to turn on.
Accessible from the Tools menu of Server Manager must be opened from the Administrative Tools folder and click on OK.
Look for features related to RSAT, such as Hyper-V or Windows Hypervisor Platform. If any relevant features are disabled, enable them by selecting the checkbox.
Then, wait for the downloading process to complete and double-click on it.
Follow the on-screen command to complete the installation process.
Downloading the file will add the RSAT to the operational features. Check our detailed guide on how to download & enable RSAT on Windows 10. For more solutions, we have a detailed guide on installing RSAT on Windows 11 that you shouldn’t miss.
In conclusion, you can read how to fix RSAT crashes on Windows 10/11. Also, check out our guide on resolving couldn’t Install RSAT in Windows 11.
You’re not alone if you’re experiencing the Zoom error code 10002 on your computer. The error can be annoying as it renders the Zoom client unresponsive till the error is resolved. However, this article will take you through some steps for fixing it.
Also, we have a detailed guide discussing the Zoom error code 100000502 that occurs when joining a meeting and how you can resolve it.
What is the error code 10002 on Zoom?
The error code 1002 on Zoom is accompanied by an error message indicating Unable to install updates, causing it to crash or close abruptly. The error is most common with macOS users but also occurs on Windows PCs.
However, the Zoom Unable to Install Updates Error Code 10002 means the Zoom installer is experiencing difficulties accessing the source file.
What causes Zoom error code 10002?
If the source link of the Zoom installer package is broken or corrupted, you’ll get this error.
Unstable Internet connection will prevent the update from downloading or installing.
Sometimes, security software or firewalls can interfere with Zoom.
You may not have the necessary permissions to install software updates on your computer.
Lack of storage space can lead to this and other Zoom errors.
Other software or applications on your computer may conflict with the Zoom update process.
These are just a few possible causes, and the actual cause of the error may vary on different devices. Regardless, we’ll discuss ways to fix the error in the next section and get your Zoom client working again.
How do I fix Zoom error code 10002?
Go through the following preliminary checks before attempting any advanced troubleshooting steps:
Restart your device to resolve temporary software glitches interfering with Zoom installation.
Right-click on the Zoom installation file and select Run as administrator to ensure you have the necessary permissions.
Use a Disk Cleanup tool to clear temporary files and free up disk space.
If the above steps can’t resolve the error, proceed with the solutions below:
1. Uninstall and reinstall Zoom
Click the Start button, type control panel, then press Enter.
Click on Programs, go to the Programs and Features tab, and find the app from the list.
Select the Zoom app, click the Uninstall button, and follow the on-screen instructions to complete the uninstallation process.
Once completed, download and reinstall Zoom to see if the error persists.
Reinstalling Zoom will resolve broken installer files and replace them with a new copy in the source folder. Also, it allows you to install the latest version automatically.
2. Allow Zoom through Windows Firewall
Left-click the Start button, type firewall, and open Windows Defender Firewall.
Go to Allow an app or feature through Windows Defender Firewall.
Click on Change Settings.
Scroll down, select Zoom from the list of apps, and check the boxes for both Private and Public.
Click OK to save the changes and restart your PC.
Allowing Zoom as an exception in Windows Firewall prevents the firewall from checking or delaying its processes.
Also, temporarily disable third-party antivirus software as they may be blocking the Zoom update. You can check how to fix Windows Firewall blocking other app features on your PC.
Conclusively, you can check our guide on fixing error code 5003 on Zoom and get it working. Likewise, read about Zoom error code 1001 if you encounter it while using the app.
Should you have further questions or suggestions regarding this guide, kindly drop them in the comments section below.
Paper jams are one of the most common problems faced by printers. Even well-known printers like Epson experience paper jams. Sometimes, it can be resolved simply by following the printer’s troubleshooting procedure.
However, there may be times when you need to take more drastic measures to remove a paper jam from your printer. We show you how to get out of this fix if you’ve experienced this before.
Why does paper keep jamming in the Epson printer?
There are a few reasons why paper keeps jamming in Epson printers:
Paper not loaded correctly – If the paper is not loaded correctly, or there is not enough paper loaded into the tray, your Epson printer may experience a paper jam.
Poor paper quality – The quality of the paper you use has a lot to do with how well it works in your printer. Using poor-quality paper in your printer can cause frustration as it tends not to feed properly.
Dust accumulation – Dust accumulation inside the machine may lead to paper jams as it clogs up the feeder mechanism inside the printer.
Rollers are not properly lubricated – The rollers can lose their proper function due to overuse or poor maintenance, which may cause paper jams. If you also subject your Epson printer to heavy printing without regular lubrication, it can easily get damaged.
How do I fix my Epson printer jam?
Before embarking on the somewhat complex solutions, try the following preliminary steps:
Make sure all cables are connected securely and that no loose ends are hanging from the back of your computer or printer.
Ensure you only use the recommended type of paper for your printer.
Check the condition of your toner cartridge and ensure it is not dried out or empty.
Verify that there are no foreign objects inside, such as staples or paper clips, stuck inside your printer carriage.
Turn off your computer, unplug it from any power source, and wait about 10 seconds before plugging it back in.
1. Remove the jammed paper
On your PC, cancel the print job.
Press the OK button and follow the on-screen instructions.
Lift the scanner and check for any visible paper jam. Be careful not to touch the white cable inside the printer.
If there’s no paper, press the two buttons on the rear to remove the rear cover. This will depend on your printer’s model. Some have one button.
Check for any paper in the rear cover and slowly remove it. Be careful not to touch the rollers.
Press and hold the reset button on the back of the printer. The reset button could also be at the front depending on your printer model.
Still holding the reset button, turn on the printer.
Wait for the warning print out, then release the reset button.
A few seconds later, another sheet will print out with the default IP address, and your Epson printer will have been successfully reset.
What do I do when my Epson printer says paper jam but there is none?
If the printer is saying there is a jam, but you don’t have any paper in it, then there is most likely a problem with the rollers inside. You can try cleaning them out with a damp cloth and see if that works.
Start by unplugging your printer from its power source and turning off your computer. Then remove all of the ink cartridges from the printer, wipe them clean with a dry cloth, and then replace them into their slots in their proper positions.
Now plug your printer back into its power source and turn on your computer. Wait for about 15 minutes for everything to initialize before proceeding further with this process. If it still says there’s a paper jam, you may need to take it in to be serviced by an expert.
Since there are a lot of printers in the market, make sure you also check out how to solve the same issue when your Brother printer gets a paper jam.
Bing AI is definitely one of the most popular AI tools out there, just second to ChatGPT in popularity. The tool is very useful in schools, projects, or getting work done more efficiently. Recently, a lot of users have been experimenting with Bing AI, pushing the model to the limits of creativity.
The year is not over yet, and Bing has the potential to become the most visited and used AI platform on the market.
What does the AI market share look like?
According to the chart, ChatGPT is still the most popular AI tool in the world right now. For example, ChatGPT crossed 1.5 billion monthly visits in March 2023 and it kept rising until May 2023.
Ever since Chat GPT’s usage has been decreasing. But many suspect this is because school time is over, and the summer vacations are happening.
It is summer…I’m an undergrad and use it for summer research but during the semester, almost every class/seminar had us using chatgpt for something. Could be less students checking it out since school is out.
It is possible ChatGPT will rise again coming September when schools will open again. But so can Bing. Actually, the two were very close in visitors number in March 2023. But before that, Bing AI was the dominant AI tool.
Given how much emphasis Microsoft is putting on AI, Bing AI will probably dominate the market share by the end of this year.
What do you think about this? Let us know in the comments section below.
Efficiently controlling your computer can significantly optimize your workflow, saving time and energy. Thus, leveraging keyboard shortcuts can be a game-changer when turning off your monitor. Therefore, we will examine four quick ways to turn off the monitor using the keyboard.
Right-click on the blank space on your Desktop screen, select New from the context menu and click on Shortcut from the sub-context menu.
Copy and paste the following command into the address bar and click Next: powershell.exe -Command “(Add-Type ‘[DllImport(\”user32.dll\”)]public static extern int SendMessage(int hWnd,int hMsg,int wParam,int lParam);’ -Name a -Pas)::SendMessage(-1,0×0112,0xF170,2)”
Type the name you want for the shortcut as Push Monitor Off, and select Finish to create a new icon on your Desktop.
Right-click the shortcut on your Desktop and select Properties from the context menu.
Click the Shortcut tab and select the Shortcut Key field.
Type the keyboard shortcut of your choice (e.g. Shift +Ctrl + M) to execute the PowerShell Shortcut and click on OK.
The computer’s monitor will turn off anytime you press the shortcut key you assign to execute the PowerShell command.
Open the extracted folder, which contains various files. The files needed will be Doff application, Doff screensaver, and Doff tray.
Right-click on the doff application, select Send to, and click on Desktop.
Right-click the Doff application shortcut on the Desktop and select Properties.
Click the Shortcut tab and select the Shortcut Key address bar.
Type the keyboard shortcut key you want and click on OK to assign a hotkey to doff application.
Repeat steps 3-6 for Doff screensaver and Doff tray.
You should note that the Doff application immediately turns off the screen, Doff screensaver activates a black screensaver, and Doff tray adds a feature to the system tray when double-clicked to turn off the monitor.
If you’ve encountered the 0x8004de25 error code with the There was a problem connecting to OneDrive message while trying to sign in to your account, you’re not alone.
OneDrive errors are pretty common, and we already wrote about an issue where OneDrive is constantly syncing. Today, we’ll show you the steps to fix the annoying 0x8004de25 issue. Let’s get right into it!
What is error code 0x8004de25?
This is a pretty common OneDrive error, and it’s usually caused by the following:
Network connection issues can cause issues while accessing OneDrive and cause this error.
Incorrect credentials will often cause a 0x8004de25 error because authentication fails.
A faulty or outdated OneDrive app can lead to various login problems.
How do I fix the OneDrive 0x8004de25 error?
Before we move on to our tested solutions, try these simple workarounds first:
Install pending Windows or OneDrive updates to ensure no bugs are causing the issue.
Verify your login credentials and ensure your login data is correct.
1. Unlink your PC
Open your OneDrive app by clicking on its icon in the system tray.
Click on Help & Settings (the gear-shaped icon) and then choose Settings from the drop-down menu.
Once the Settings window opens, make sure you’re on the Account tab. Press on Unlink this PC.
Confirm by clicking the Unlink account button.
A linking issue could commonly result in a sign-in error such as 0x8004de25. After unlinking your account, try reconnecting again to see if this resolves the issue. If the error persists, move on to the next step.
2. Reset the OneDrive app
Press Windows + R key to open the Run dialog. Type the following command in the search box and press Enter: %localappdata%\Microsoft\OneDrive\onedrive.exe /reset
If a Windows can’t find… error message pops up, type the following command instead and press OK: C:\Program Files (x86)\Microsoft OneDrive\onedrive.exe /reset
Restart your PC.
Resetting OneDrive signs you out of the app and clear its settings and corrupt cache data. According to our research, this solution is the one that resolves various OneDrive sync issues, including the 0x8004de25 error code.
It may be useful to learn how to reset an app in Windows 11 if you had issues with the above steps. Alternatively, if that didn’t work, it might be time to take more radical measures.
Press Windows + R key, type the following in the dialog box, and click OK: appwiz.cpl
Locate Microsoft OneDrive in the list of installed programs, right-click on it, and select Uninstall. Follow the on-screen prompts to complete the uninstallation process.
Alternatively, you can download it from Microsoft Store. Press the Windows key, type Microsoft Store, and hit Enter.
Search for OneDrive, click on the app, and choose the Get button.
Launch OneDrive and sign in using your credentials to see if the error is fixed.
A corrupt OneDrive app can lead to various operational errors. Reinstalling it might be a last resort, but this is surely set to fix error 0x8004de25.
The process deletes all previous app data and restores it to its default state, ensuring you have the latest version and that any faulty files or settings are removed.
In the unlikely case that none of the methods managed to help you, it might be helpful to learn what to do when you still can’t access your OneDrive files. Or you could check out the most reliable backup software and make the switch.
We hope our guide helped you solve the 0x8004de25 error and your OneDrive app is working fine now. Please comment below and let us know which method proved most effective. Feel free to use the comment section if you need further assistance.
You boot up your PC and encounter a random uiwatchdog.exe error? This can be alarming since we have many unknown exe files running on our computers.
Speaking of which, we recently covered poqexec.exe file, so if you want to learn more, we suggest reading that guide as well.
Whatever the case, today, you’ll learn all you need to know about the uiwatchdog.exe file – what it is, what it does, and how to fix its system errors. Let’s get right into it!
What is uiwatchdog.exe?
Uiwatchdog.exe process is an integral part of the Trend Micro Security suite.
It can detect if the agent is running and start it if it’s not
It’s required in order for the Trend Micro software to work properly
Should I remove uiwatchdog.exe?
No, you shouldn’t remove this file due to the following reasons:
It’s part of legitimate security software.
Removing it can cause issues with the software and leave your PC vulnerable.
Remove the file only in the following circumstances:
You’re having issues with it.
You suspect that the file is not legitimate.
If you’re planning to remove Trend Micro software.
You don’t recall installing Trend Micro on your PC.
The process is usually stored in the following path: C:\Program Files (x86)\Trend Micro\
Remember that if you find a file with the same name in a different directory or haven’t installed the security software on your PC, it’s probably malware. Perform an independent scan with an efficient antivirus program to protect your system.
The uiwatchdog.exe is known to display system errors stating that certain DLL files are missing, so it’s important to fix any issues you may have with this file.
How do I fix uiwatchdog.exe’s system errors?
Before trying our proven solutions, you should:
Make sure your Windows is up to date by installing the latest Windows updates.
Check for software conflicts and remove software that might clash with the file.
Press Windows + R to open the Run dialog. Type the following command and click Enter: supporttool.exe
If prompted by a UAC (User Access Control) message, confirm by clicking Yes. (If the file’s missing or the program isn’t showing any results, follow this alternative guide from Trend Micro’s official support page.)
You should be in the Trend Micro Diagnostic Toolkit. Go to the Uninstall tab and click on Uninstall Software.
Confirm your intention by clicking Yes in the popup window.
Copy your security number, check the I copied my serial number prompt, and click on Uninstall.
Restart your PC.
Download the software from Trend Micro’s website. Open the installation file and follow the on-screen instructions to complete the process.
You can try uninstalling the app by accessing Windows settings. However, since it’s an antivirus, this will surely leave some residuals. Instead, we suggest you follow the steps above.
According to our research, in most cases, this solution fixed uiwatchdog.exe’s system errors. However, if that didn’t work, move on to the other suggestions:
2. Run DISM and SFC commands
Press the Windows key, search for Command Prompt, and choose Run as administrator.
Copy & paste the following commands and hit Enter after each one: dism /online /cleanup-Image /restorehealthsfc /scannow
Reboot your PC.
System files can become corrupted or damaged over time, leading to errors. To fix this, you can run the System File Checker tool, which scans your system for any damaged files and replaces them with a cached copy.
Alternatively, we entirely recommend you consider specialized support from a dedicated PC repair solution that can actually fix damaged system files. Within a few clicks, your Windows will be diagnosed and ready to repair all the detected issues.
3. Perform a System Restore
Press Windows + R key. Type the following in the search window and click OK: rstrui
Choose Next.
Select the restore point you wish to revert to. Click on Next.
If you started experiencing issues with uiwatchdog.exe after making system changes, you can use the System Restore feature. This allows you to revert your settings to when everything was working fine.
Well, that was it on uiwatchdog.exe, and its system errors! If the above methods are unsuccessful, you might have to reset or reinstall Windows. To learn more, check our reset vs clean install guide.
Multiple Xbox users have reported that they are facing the 0x80a40021 suspension code. For some, the reason is genuine, while some are not able to exactly point out why this happened with their account.
In this guide, we will explain what this 0x80a40021 Xbox suspension code is and offer possible solutions to fix the problem.
Why did my Xbox account get suspended?
You will get the 0x80a40021 suspension code from Xbox Enforcement, a division of Microsoft. Such enforcement suspension codes are given to users who violate the Xbox Live Code of Conduct or the Xbox Terms of Service.
Moreover, when the Xbox account of a user is suspended, they will be restricted from using certain Xbox Live features or services for a particular period of time specified by the Enforcement.
There are multiple reasons why you could get the Xbox suspension code such as the 0x80a40021, which are listed below:
Violation of communication – When you are found to be a part of harassment, hate speech, threats, or inappropriate communication with other players on the Xbox community.
Cheating or modding – Cheating, modding, or usage of trainers are the most common reasons why your account could get suspended.
Piracy – The usage of pirated copies of games, downloadable content (DLC), or other copyrighted materials on the Xbox platform is a cause for account suspension.
Fraudulent activities – Engaging in fraudulent activities, such as stealing or sharing accounts, and personal information, or using unfair practices for personal gains, can lead to account suspension.
Inappropriate content – Your account can also get suspended if you are sharing or creating content that is inappropriate and does not go in line with the Xbox community guidelines.
Payment issues – If you are engaged in fraudulent transactions including usage of stolen credit cards, can also result in suspension.
Many of our readers have reported that they got the 0x80a40021 suspension code without any reason while playing a game. They confirmed that they weren’t involved in any fraudulent or any of the above activities that could ban them. So, there’s that.
Let us now take a look at the process that will help you at least appeal to get your Xbox account unbanned.
Under Enforcement history or Active suspensions, you may find active enforcement for your account or one that you’ve selected.
You need to choose an enforcement action to get more info about the cause and effect of the suspension.
If your enforcement action qualifies for case review, you can then hit the Submit an appeal button to receive more info from Xbox Safety.
Once the form is filled, click on Submit.
The only way you can appeal against the ban on your Xbox account or if you have received the 0x80a40021 suspension code, is to contact the Xbox enforcement team and submit a case review.
To do that simply follow the above steps and wait for the enforcement or support team to get back to you and discuss your issue with them. In case you are not found guilty under any circumstances, Xbox would revert the suspension on your account.
Here, you can check the case review status, and it may display one of the below:
Under Review: Xbox enforcement team is still investigating your case.
Need Info: The Xbox team needs more info from you. For that, you can check for any latest comments from the support agent. Also, do not forget to give additional info that is requested. Then submit it to continue the case review process.
Decision: The Xbox team has finalized a decision on your case review. The team will list answers to your questions and any other decision info in the agent’s comments. The status is given, immediately after the case review is complete.
Summary: The case review is close ed and a summary of the outcome is provided to the submitter. This status remains in your enforcement history for you to review at any time.
That is it from us in this guide. You should also read our guide that explains how you can resolve the 0x803f800e error when launching a game.
Feel free to comment below, if you also come across the 0x80a40021 suspension code. Also, mention what steps you took to get your account out of suspension.