Windows PCs store temporary data created by Windows or programs running on your computer in temporary files. Temporarily files (tmp or temp files) hold data while a permanent file is writing. They are stored in the Temp folder.
However, issues with the above process may result in the Make sure your temp folder is valid or Your temp folder must allow execution errors.
Why do I get the Make sure your temp folder is valid error?
Getting the error message Error writing temporary file: Make sure your temp folder is valid on your computer indicates that the Temporary folder can’t store the related data when it adjusts the registry. Some notable causes of the error are:
Corrupt temp files – Temporary files can corrupt the temp folder, causing issues with its activities.
Malware and viruses – Malware and virus infection can cause a temp folder error when running an installer file or uninstalling an app. Also, it may corrupt system files on your computer.
Wrong configuration in the Temp folder – Wrong configuration in the temp folder can cause problems storing related data as it writes the registry.
NSIS error – The error writing temporary file make sure temp folder is valid may come from an improper installer and it also appears as error writing temporary file NSIS.
Now that we know what causes this error, we’ll discuss ways to fix it and get your temp folder working again.
How can I fix the Make sure your temp folder is valid error?
Before trying any advanced troubleshooting steps, go through the following preliminary checks:
If these preliminary steps don’t fix the error, proceed with the following solutions.
1. Delete the temporary folder files
Press Windows + R keys to open the Run window, type %temp% in the search space, and press Enter.
Press Ctrl + A and right-click, then click on Delete from the drop-down.
Navigate to the following path: This PC\Local Disk (C):\Windows\Temp
Press Ctrl + A and delete all the temp files.
Restart the PC and check if the Temp folder error persists.
Deleting temp files on your PC will clear the corrupt files liable to cause the NSIS error writing temporary files. You can check our article about how to delete Temporary files on Windows 11 for more steps.
2. Perform a clean boot
Press Windows + R key to open the Run dialog box, type msconfig, and click OK.
Select the Services tab and check the box for the Hide all Microsoft services option, then click the Disable all button.
Go to the Startup tab and click Open Task Manager.
Select the startup programs and tap the Disable button.
Restart your PC and check if the temp folder error persists.
A clean boot prevents startup from running programs liable to cause the error from running when you start the system.
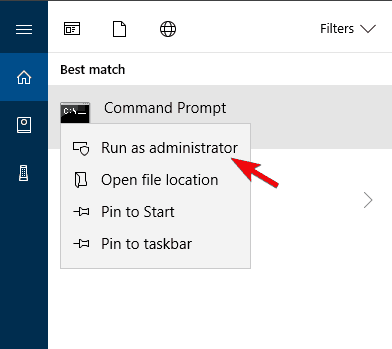
Left-click the Start button, type command prompt, and click the Run as administrator option.
Click Yes on the User Account Control prompt.
Type the following commands and press Enter: chkdsk C: /r
Restart your PC.
Running the chkdsk command examines disk space and disk use. Also, it provides a status report specific to each file system and shows the errors found in the system file.
4. Compress the installer file prompting the error
Press the Windows + E key to open File Explorer.
Navigate to the Downloads folder and find the installer file prompting the error.
Right-click on the installer file and click on Send from the drop-down. Click on the Compressed (Ziped) folder option to zip the installer file inside a folder.
Open the zipped folder and double-click the installer file to start the installation process.
The above steps should run the installer without any errors. Compressing the installer file prevents interference from other files.
Alternatively, you can read our guide about Temporary files and their functionality on Windows PCs.
In conclusion, if you have further questions or suggestions on what to do if you encounter the error: make sure your Temp folder is valid; kindly drop them in the comments section.
Sleep mode allows you to take a quick break from your PC, allowing the PC to rest while keeping your apps, pending the time you are away. Sadly, some users report that the Windows 11 Sleep mode closes all programs, making it impossible to retrieve any recent apps running before going to Standby or Sleep.
Does Sleep mode stop applications?
Placing your system in Sleep mode indicates that it is not engaging in any computation process but withholds the data currently running on it. Sleep mode doesn’t stop apps from running on the system. It only prevents any further processes until it is revived from the sleeping state.
Also, our readers reported that Microsoft Store apps close in sleep mode on Windows 11. Let’s see why.
Why do my apps close when my computer sleeps?
The PC closing apps when placed on Sleep mode can occur for many reasons; some are:
Issues with your PC’s Power plan – If there’s a misconfiguration with the power settings on your PC, it may result in data loss and your apps closing.
Issues with recent updates – Sometimes, newly installed updates and patches can change system settings, causing miscommunication between the PC and its components.
Corrupt system files – System files can become corrupt or missing, causing issues with how the system works. So, corrupt system files on Windows 11 can cause inconsistencies or malfunction in the sleep process.
These causes may vary on different devices. Fortunately, there are some fixes you can try to get it working. Also, if you’re asking if it’s better to shut down your PC at night, hit the highlighted link for the detailed answer.
How do I stop Windows 11 Sleep mode if it closes all programs?
Try the following preliminary checks:
Ensure your PC has enough power.
Disconnect unused external devices.
If these preliminary steps don’t fix the issue, proceed with the following solutions.
1. Uninstall recent Windows updates
Press Windows + I key to open the Settings app.
Go to Windows Update and select Update history.
Click the Uninstall updates button and select the most recent update.
Click on Uninstall.
Uninstalling the recent Windows update will resolve issues with the last build causing the Sleep mode to malfunction. Read our guide on how to uninstall updates on Windows 11 for more information.
2. Run the Power troubleshooter
Press Windows + I keys to open Windows Settings app.
Go to the System tab, then click on Troubleshoot in the right pane.
Click Other troubleshooters.
Find and select the Power option, then click the Run button to initiate the troubleshooter.
The Power troubleshooter will automatically find and fix problems with your PC’s power settings that cause your programs to close when the system is in Sleep mode.
If you want to opt for other methods than the manual one mentioned above, you can try specialized software.
4. Enable the Hybrid Sleep mode
Left-click the Start button, type control panel, and select it from the result.
Navigate to Hardware and Sound and select Power Options.
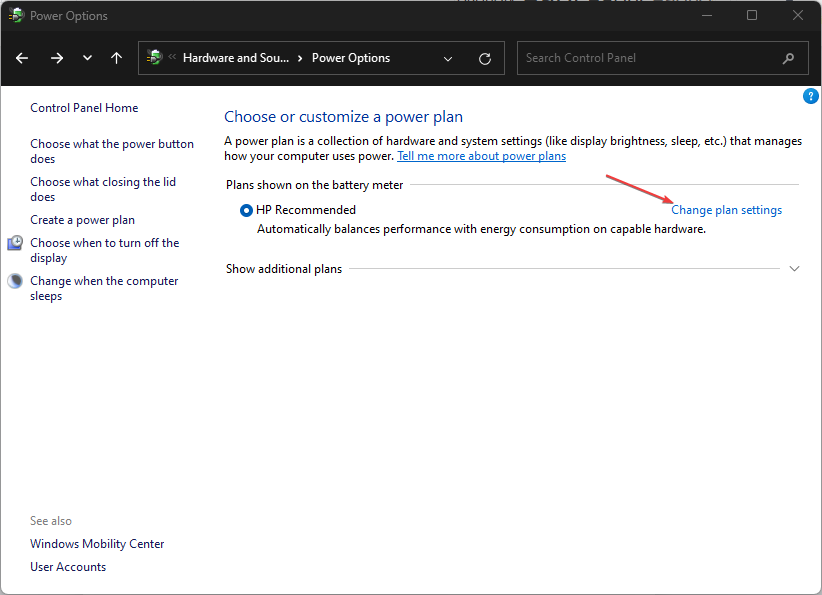
Click on Change plan settings, then select Change advanced power settings.
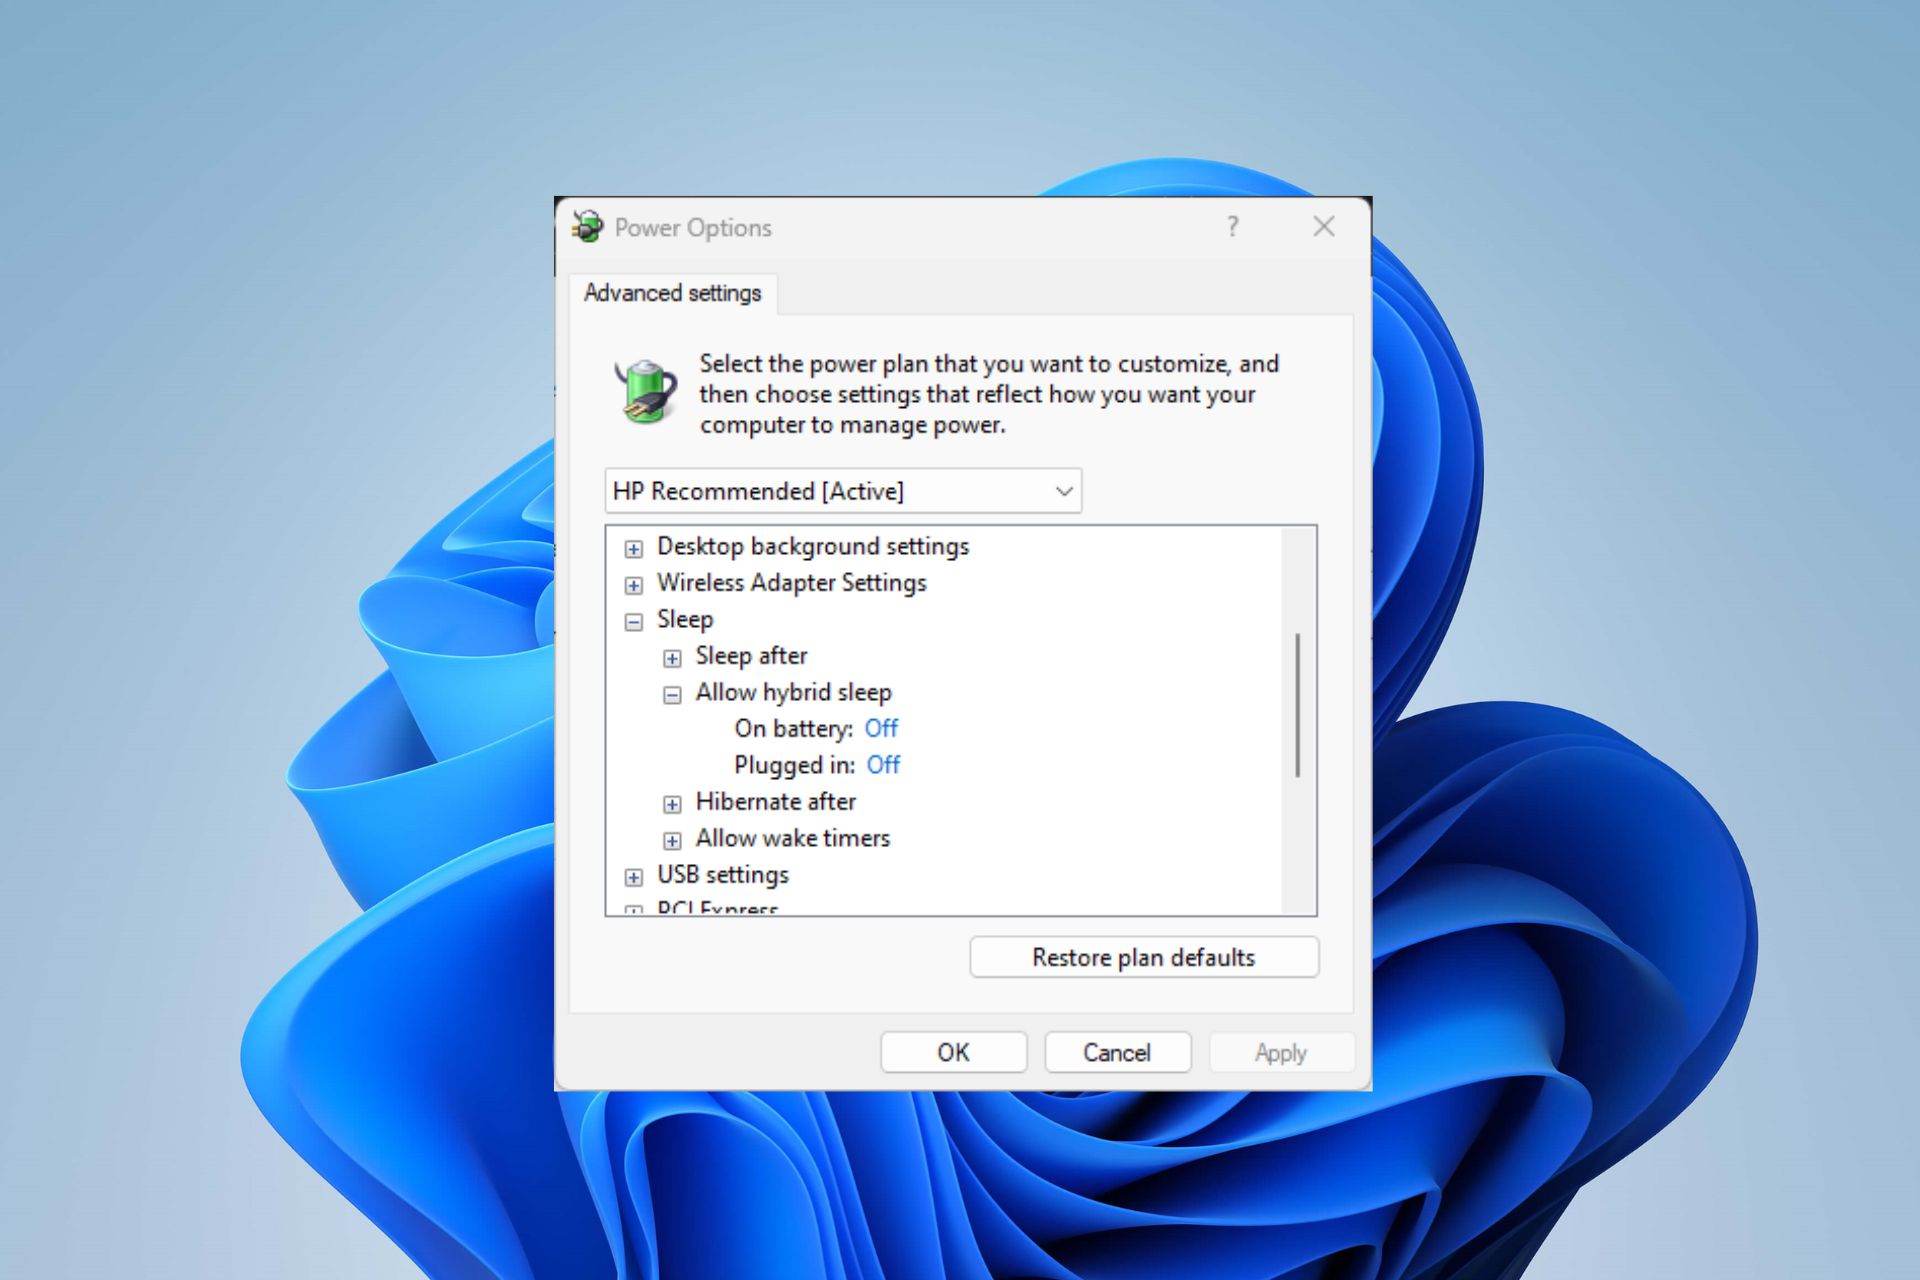
Tap on the + sign against Sleep to expand its menu, click on Allow hybrid sleep, and then set it to On for both On battery and Plugged in options.
Go to Hibernate after and set it to Never for both On battery and Plugged in options.
Click the Apply button, then OK.
Enabling the Hybrid Sleep mode on your PC allows it to put any open documents and programs in memory whenever it’s sleeping. It aids in quickly recovering your data and app activities after sleep.
In conclusion, this guide should help you troubleshoot Windows 11 Sleep mode if it closes all your programs. If you have more questions or suggestions, kindly drop them below.
Xbox Free Play Days returns with another round of games for subscribers of Xbox Live Gold and Xbox Game Pass Ultimate to play for free this weekend. The games will be available from Thursday, February 23 through Sunday, February 26. Check out the lineup below.
Bloodstained is an exploration-focused, side-scroller action RPG packing all of the best features you’ve come to know and love from the Metroidvania genre into a single, content-packed game.
Play as Miriam, an orphan scarred by an alchemist’s curse which slowly crystallizes her body. In order to save herself, and indeed, all of humanity, she must battle her way through a demon-infested castle summoned by Gebel, her old friend whose body and mind has become more crystal than flesh.
The Definitive Destiny Campaign Delve into Savathûn’s Throne World to uncover the mystery of how she and her Lucent Hive stole the Light. Learn the secrets to crafting new weapons, the new Glaive, and survive the truth within her web of lies.
DRAGON BALL: THE BREAKERS is an online asymmetrical action game in which a team of 7 ordinary citizens tries to survive the Raider (a classic DRAGON BALL rival such as Cell, Frieza, and Buu), who will hunt them down and evolve during the game into an unstoppable force. Escaping won’t be so easy!
Wrap up
It’s another solid lineup for Xbox Free Play Days this week. The best part is that some pretty sweet discounts usually come with the games featured during Xbox Play Days events. This week is no different: Bloodstained: Ritual of the Night is currently 65% off while Dragon Ball: The Breakers gets a 25% discount. If you would like to learn more, head on over to the Xbox Free Play Days FAQ page.
The Scansnap s1500 is a document scanner for small businesses and home offices. It also offers outstanding color accuracy and consistency, making it suitable for scanning photos and business documents.
For this scanner to function optimally, its drivers need to be up-to-date. If you’ve just gotten your scanner and are wondering how to download and install the correct ScanSnap s1500 driver, we show you how in this article.
How do I install the ScanSnap driver?
Before you install the driver, check the following:
ScanSnap drivers are installed automatically when you connect your device to your computer using the USB cable that came with the scanner. However, this is not always the case with most drivers.
If you have recently purchased a ScanSnap scanner, you will need to install the driver on your computer before you can use it. Instead of scouring the internet for drivers from different sites, you’ll find a third-party tool does it better.
2. Use the official site
While you may find a variety of ScanSnap scanner drivers available on the manufacturer’s website, some have been discontinued. Usually, you can download them without paying anything.
However, you must ensure you have downloaded the right one for your operating system. ScanSnap S1500 is a discontinued scanner, so you may not find the ScanSnap s1500 driver on the site. This also applies to the Fujitsu ScanSnap s1500 driver for Windows 10 and s1500 driver for Windows 7.
However, you can still find them on other sites. If you download them, ensure your antivirus program is up for the task and can detect any risks before they make it to your system.
Unsupported drivers can cause serious problems and even make your computer unusable. They might cause your computer to crash, freeze or even become infected with malicious software.
3. Use Device Manager
Hit the Windows key, type Device Manager in the search bar and click Open.
Navigate to the s1500 driver, right-click on it and select Update driver.
Click on Search automatically for updated drivers.
Wait for the scan to complete, and Windows will match you with the best driver available.
You may have trouble finding drivers for your device if you don’t know where to look for them. There are several places where you can find drivers for Fujitsu products:
Fujitsu website – The Fujitsu website offers downloads of drivers and firmware updates for many of its products. This site is easy to use because it contains links to all of their most popular products along with details on how to download the latest version of their product software.
Third-party sites – Another way to find out which driver site has what you need is to visit a driver’s website. Some companies, such as Driver guide compile drivers from different manufacturers.
It is important to note that the ScanSnap S1500 has since been discontinued, so although the ScanSnap s1500 driver for Windows 11 can be downloaded, it is not a guarantee that it will be at peak performance.
Many protocols and services are responsible for the communication between your computer and other destinations or devices on the internet. The TCP/IP (Transmission Control Protocol/Internet Protocol) is one of the essential elements.
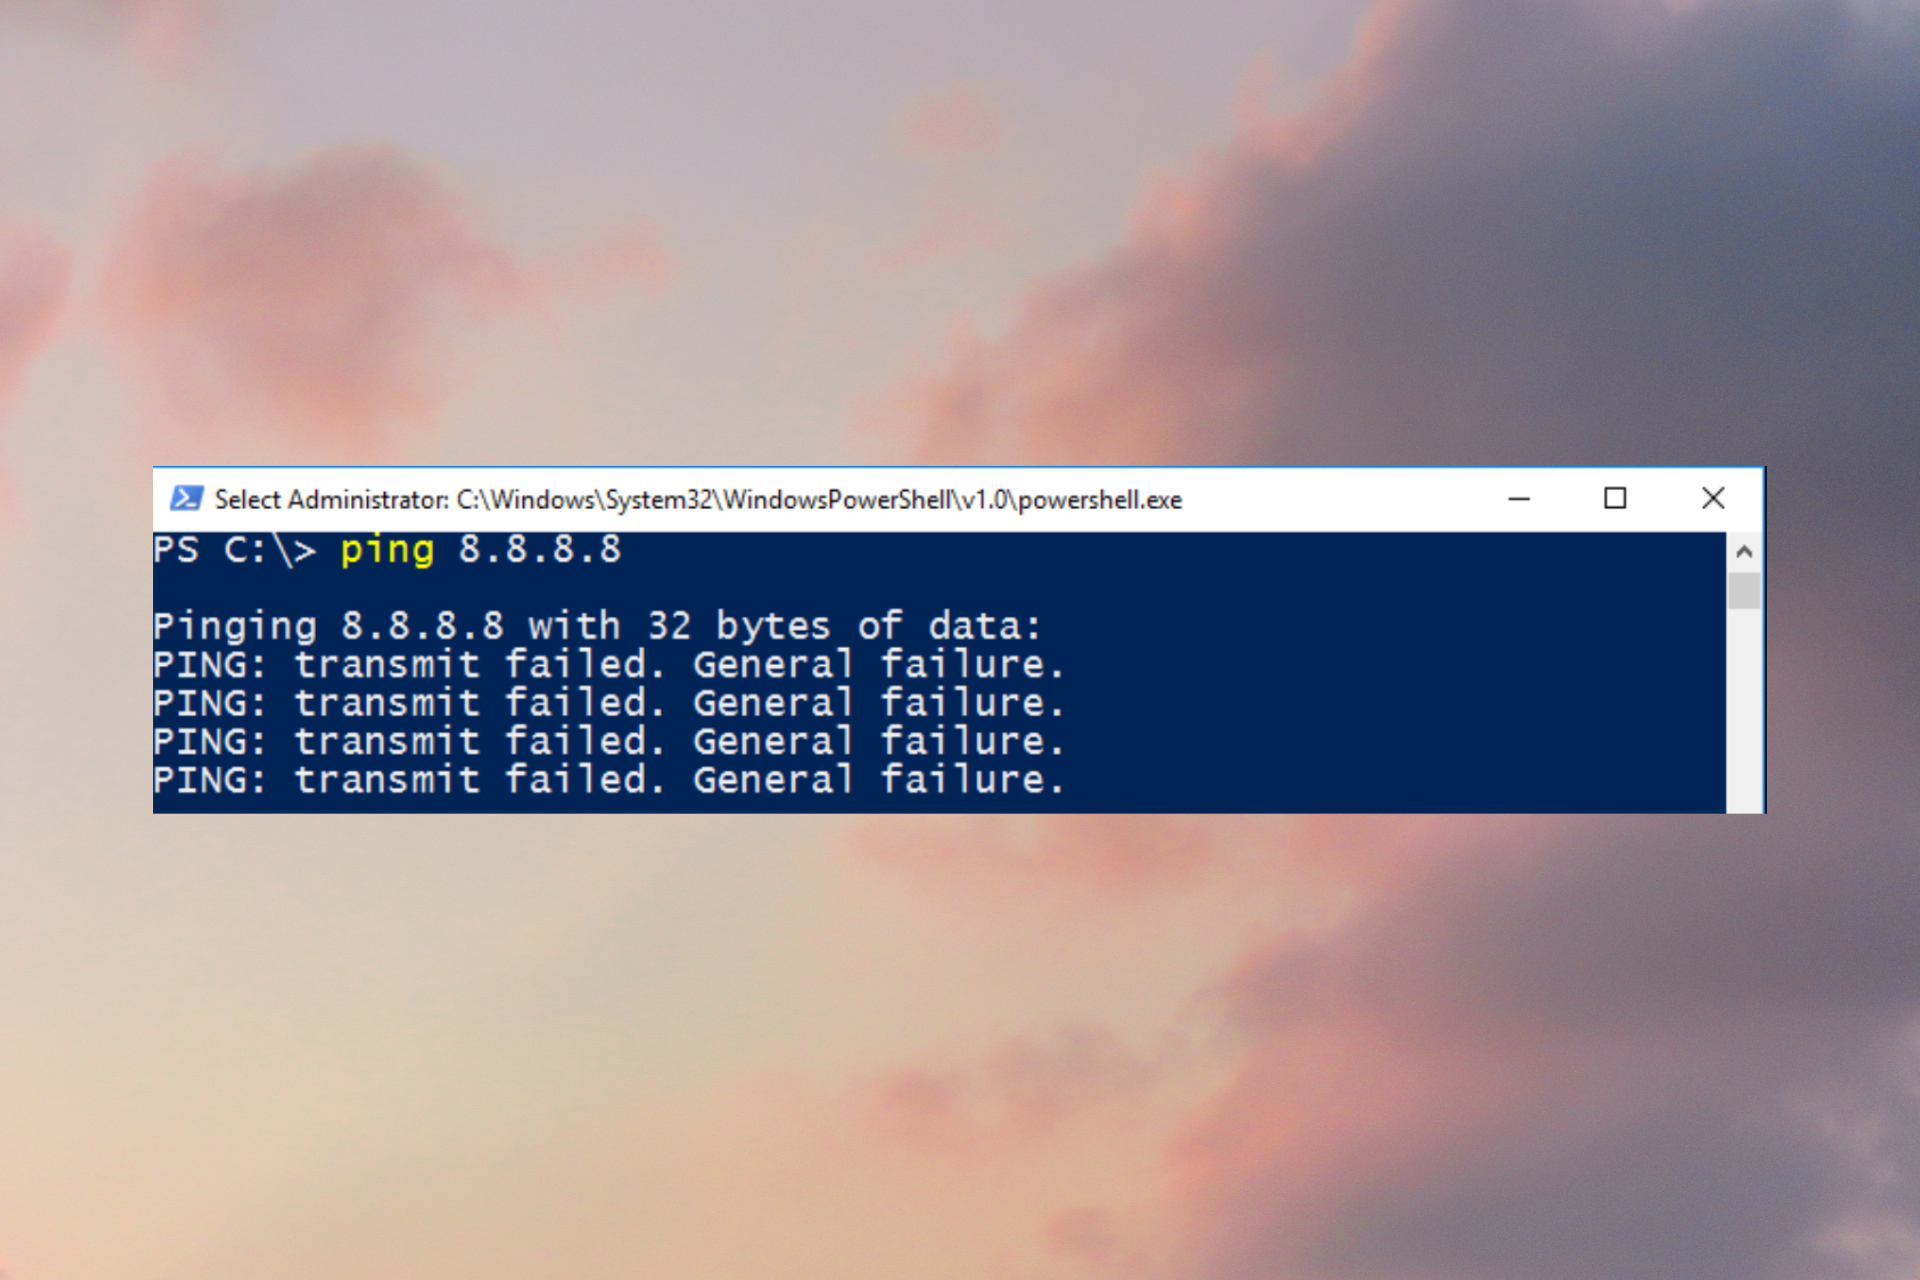
However, it can get corrupted or encounter other network issues, causing you to reset TCP/IP Stack on Windows 11.
What does Reset TCP/IP Stack mean?
TCP/IP (Transmission Control Protocol/Internet Protocol) is a suite of communication protocols that controls how digital information is broken into packets. It is responsible for interconnecting network devices on the internet.
Also, it ensures packets are properly routed between your computer and its destinations. Furthermore, the Stack lodges these TCP/IP protocols.
The TCP/IP Stack processes data through layers and defines the interconnection between the Internet & other networks functions.
Sometimes, you may run into problems with the network connection on your PC if your packet size is larger than required. A quick change in your MTU size or resetting TCP/IP Stack will refactor the network configuration on your PC.
Also, it resets your computer’s Internet Protocol to default and fixes network issues on Windows 11.
Once your TCP/IP Stack is restored, you can further enhance network stability and speed by using the TCP Optimizer tool. It automatically refines your Internet settings for better connection quality and lower latency on Windows 11.
How can I reset TCP/IP Stack on Windows 11?
1. Use Windows PowerShell
Left-click the Start button, type powershell, and click Run as administrator.
Click Yes on the User Account Control prompt.
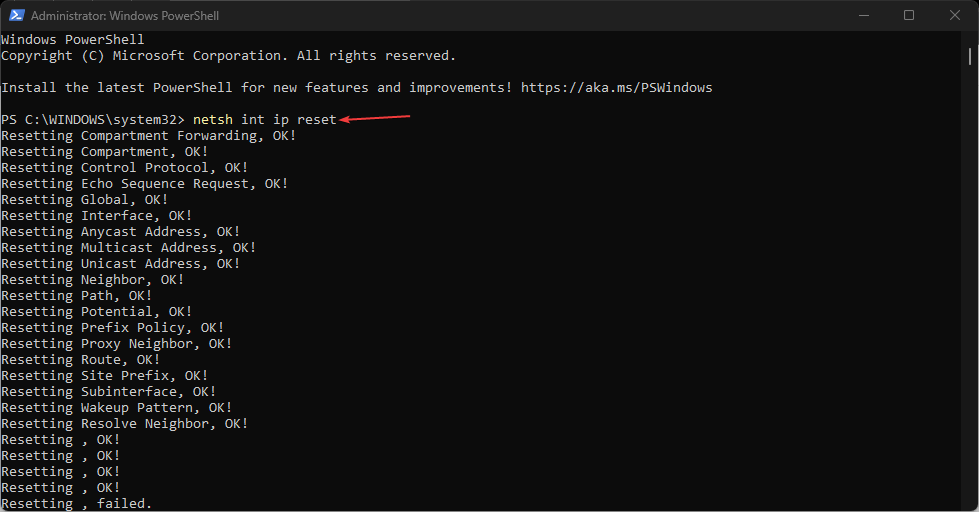
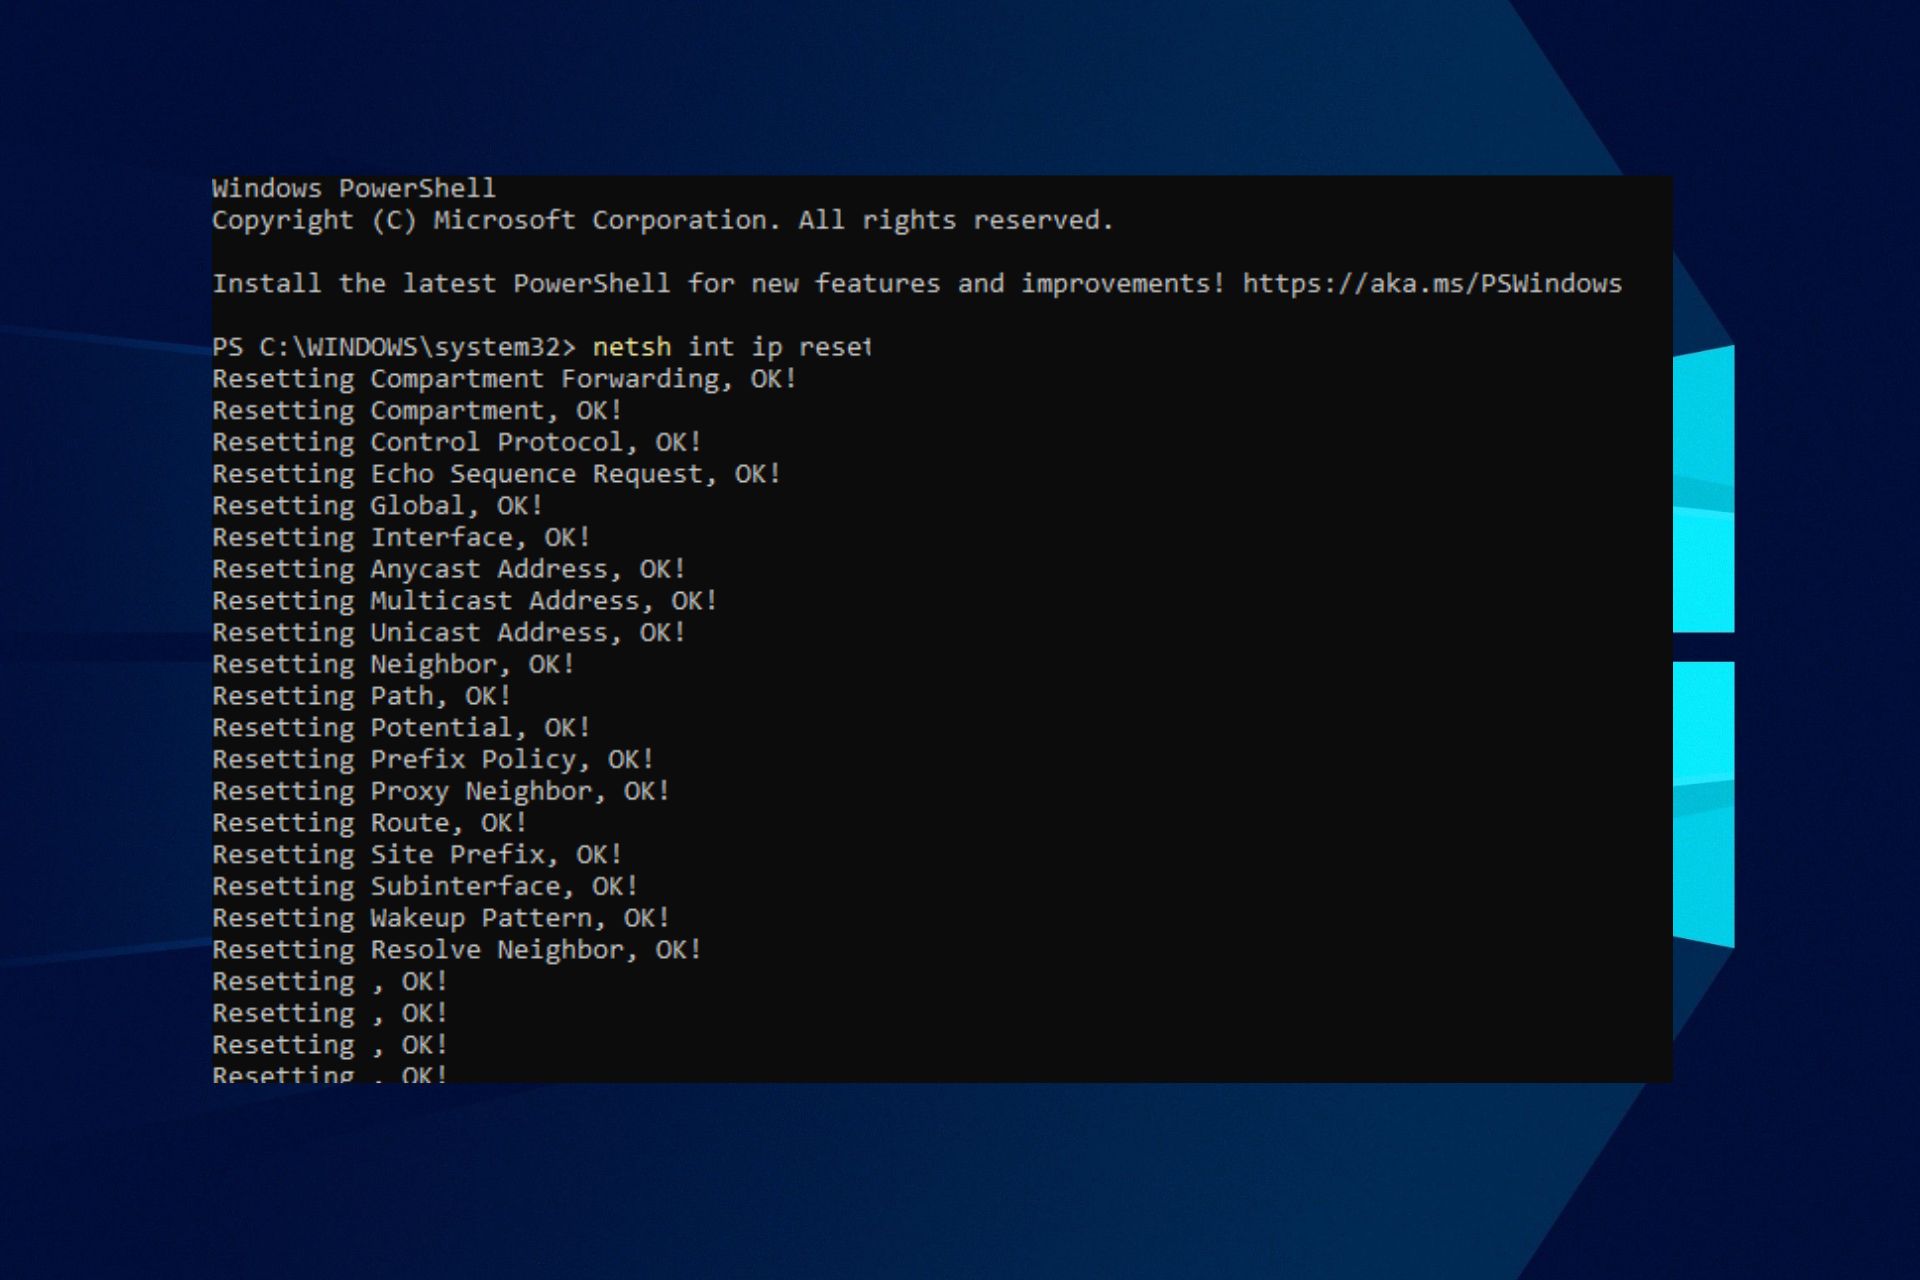
Then, copy and paste the following lines and press Enter: netsh int ip reset
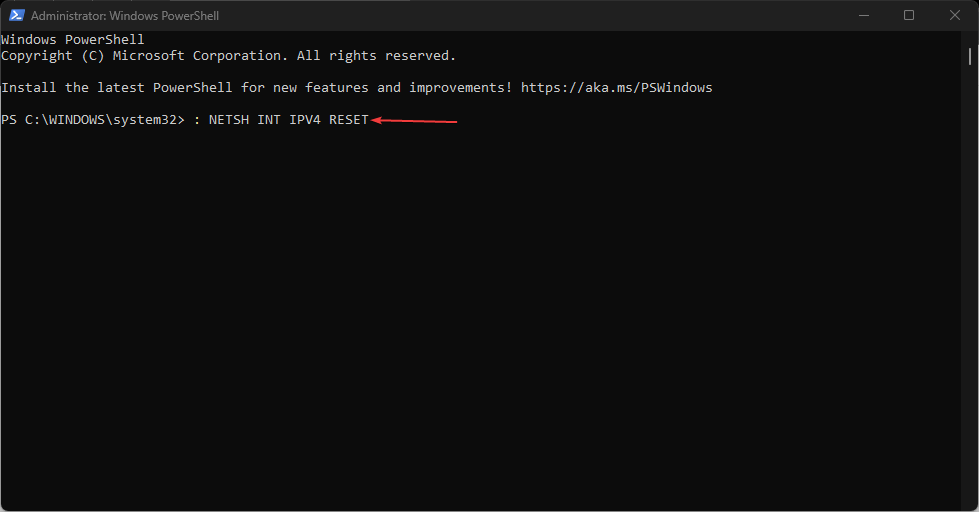
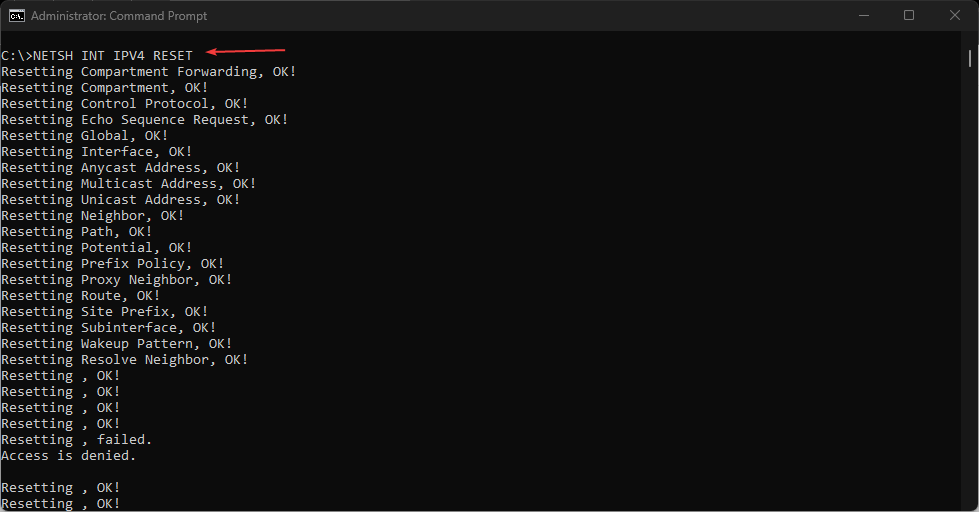
If you’re using IPv4, type the following command and press the Enter key: NETSH INT IPV4 RESET
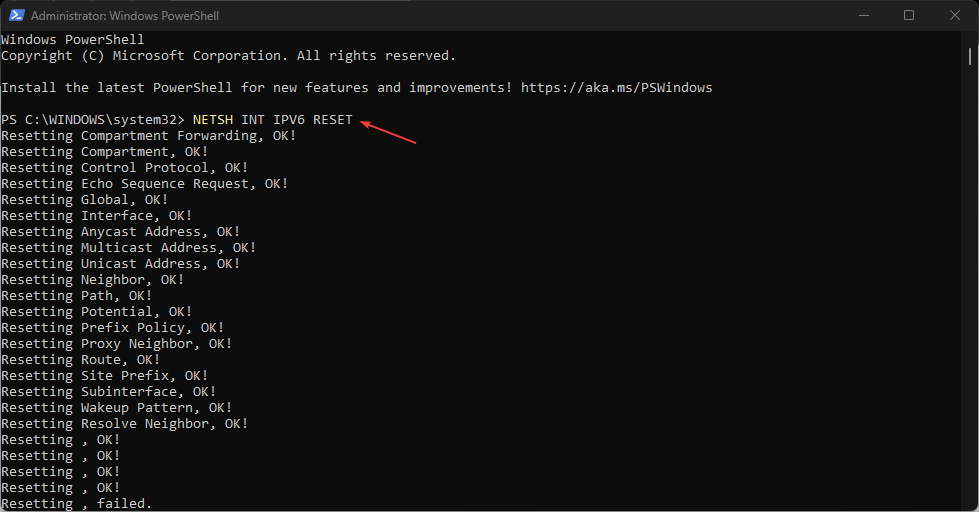
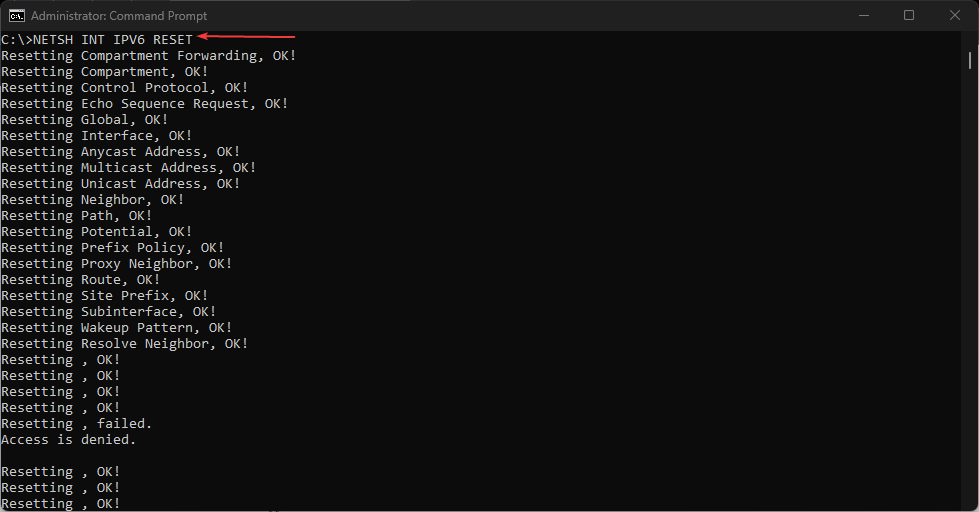
For IPv6 users, type this command and press the Enter key: NETSH INT IPV6 RESET
If the command executes successfully, you should see a repeated result on your screen saying Resetting, OK!
Then, restart your computer to sync the reset process with your network settings.
The above steps will reset the TCP/IP Stacks on your PC.
In conclusion, this guide should help you easily reset TCP/IP Stack on Windows 11. If you have further questions or suggestions concerning this guide, kindly leave them in the comments section.
Several services are running on your computer, ensuring every component works as expected. These services are allocated system resources to help them function. However, users report DsmSvc high CPU usage is causing issues with the system performance.
What is DsmSvc?
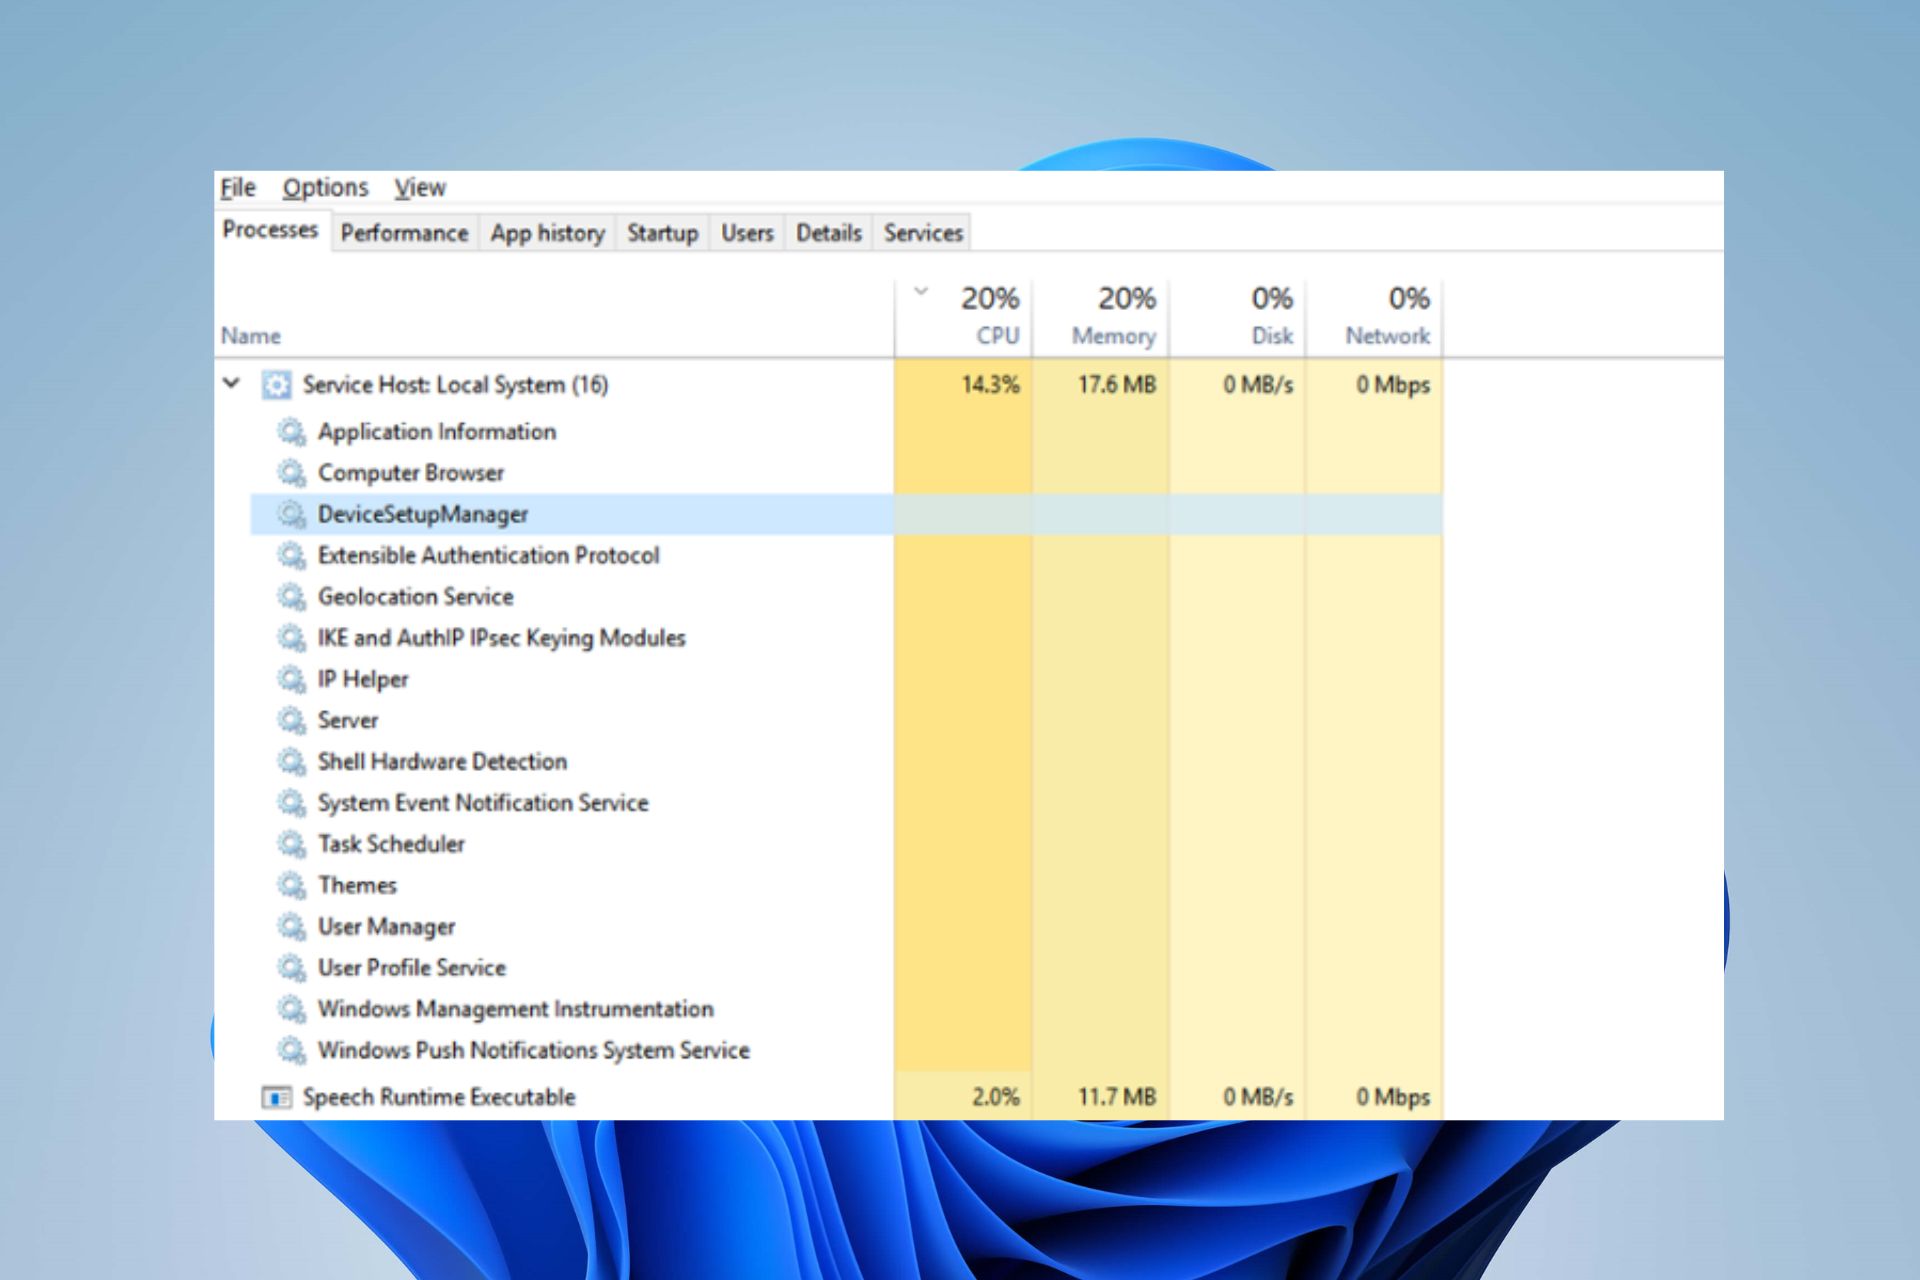
DsmSvc is also known as the Device Setup Manager service. It is a Windows PC service responsible for managing device installation and setup. It ensures devices are installed and configured correctly on the Windows PC.
Why does DsmSvc cause high CPU usage?
DsmSvc high CPU usage causes the system to be slow or laggy and can affect the programs running on the PC. The high CPU usage can occur for reasons such as:
Corrupt system files – When you have corrupt system files on your PC they can cause the services on your PC to malfunction and use more system resources than expected.
Malware and virus infection – If your system gets infected, Device Setup Manager service may use more system resources than allocated.
Issues with DsmSvc – It is possible that the Device Setup Manager service isn’t working correctly on your PC, causing high CPU usage.
If you can fix the issue, go ahead with the steps below.
1. Run the SFC and DISM to repair damaged system files
Left-click the Start button, type Command Prompt, and select Run as administrator.
Tap Yes on the User Account Control (UAC) prompt.
Type the following and press Enter: sfc /scannow
Type the following commands and press Enter: DISM /Online /Cleanup-Image /RestoreHealth
Restart your PC and check if the DsmSvc high CPU usage persists.
Running SFC and DISM scans will detect and repair corrupt system files causing DsmSvc high CPU usage on your PC. Check our guide on what to do if Command Prompt keeps crashing on your PC.
2. Run Windows Defender scan
Left-click the Start button, type Windows Security, then click Enter.
Click on Virus & Threat Protection from the menu and tap on Scan Options.
Then Full scan to begin an extensive scan. Click the Scan now button and wait while the scan completes.
Windows Defender scan will find and remove any malware and viruses on your PC that may cause the issue.
Sometimes, not even a full scan with Windows Defender can clean your PC, so we recommend running a full scan with a better third-party antivirus.
Click Run to initiate the Windows Update troubleshooter.
Follow the on-screen prompts and restart your PC afterward.
The troubleshooter will repair update issues causing the DsmSvc service high CPU usage on your PC. If you can’t get through the steps above, check other ways to run the Windows Update troubleshooter in Windows 10/11.
4. Disable the DsmSvc service
Left-click the Start button, type services in the text bar, and launch the Services utility.
Double-click on Device Setup Manager in the list of services.
Go to Startup type, set it to Disabled, and then click Apply to save the changes.
Disabling the DsmSvc service on your PC prevents it from using high system resources. Still, we recommend you only do this temporarily because the service is very important in properly functioning your PC.
In conclusion, fixing DsmSvc high CPU usage is tricky, but with our guide, you should troubleshoot it just fine. If you have further questions or suggestions, kindly leave them below.
Many of our readers encounter issues with their computer’s network connection and find it hard to resolve. A misconfiguration or faulty TCP/IP protocols most likely cause network issues. Hence, it is only reasonable to learn how to reset TCP/IP Stack on Windows 10 as it helps restore it to default settings.
Why do I need to reset the TCP/IP Stack on Windows 10?
All TCP/IP protocols on your PC are stored in a repository known as Stack, allowing the network to run on all protocols. The TCP/IP Stack processes data through layers and organizes the connections between the device and other internet network components.
However, resetting TCP/IP Stack will help with the following:
Improve the interconnection between network devices – Resetting TCP/IP Stack on your PC aids the interconnection between your system and network devices.
Reset TCP/IP Stack to fix network issues – Resetting TCP/IP Stack helps restore the network configuration on your computer and fix connection issues.
Remove faulty IP (Internet Protocol) – When you reset TCP/IP Stack on your computer, it restores Internet Protocol to default, removing faulty protocols and resolving network issues on Windows 10.
Since we have outlined the reasons, let us explore how to reset TCP/IP Stack below.
How can I reset TCP/IP Stack on Windows 10?
1. Through Windows PowerShell
Left-click the Start button, type powershell, and click Run as administrator.
Click Yes on the User Account Control (UAC) prompt.
Copy and paste the following lines of commands and press Enter to initiate them: netsh int ip reset
For users running IPv4, copy and paste the following command and press the Enter key: NETSH INT IPV4 RESET
If you are running IPv6, type this command and press the Enter key: NETSH INT IPV6 RESET
If the command executes successfully, you will see a repeated result on your screen saying Resetting, OK!
Restart your computer to complete the reset process with your network settings.
Running the above commands resets the TCP/IP Stacks on Windows 10 and fixes network problems. You can further enhance connection speed and stability by using the TCP Optimizer tool. It automatically adjusts advanced Internet parameters for smoother performance and reduced latency.
2. Via Command Prompt
Left-click the Start button, type command prompt, and click the Run as administrator option.
Click Yes on the User Account Control prompt.
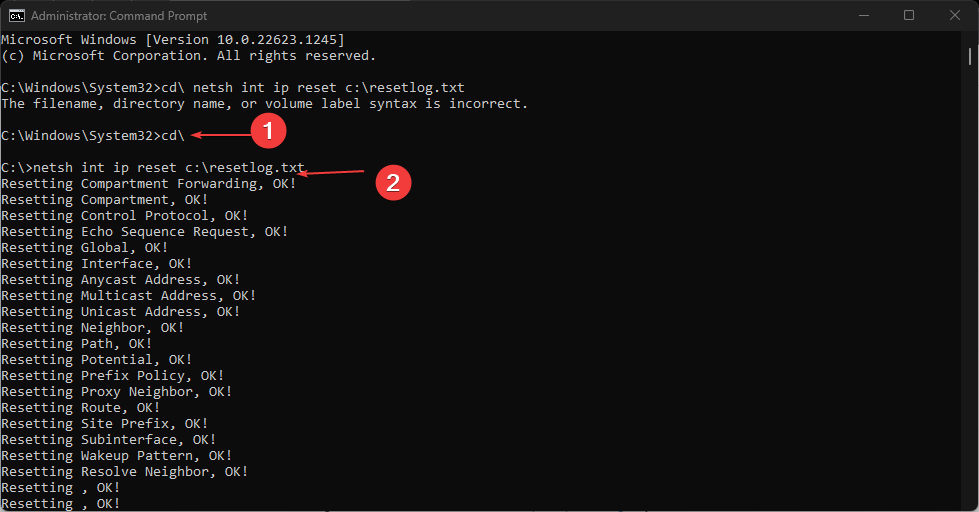
Then, type the following commands and press Enter: cd\netsh int ip reset c:\resetlog.txt
If you’re using IPv4, type the following command and press the Enter key: NETSH INT IPV4 RESET
IPv6 users, type this command and press the Enter key: NETSH INT IPV6 RESET
Some users have reported that they encounter Discord robot voice when playing games, which is becoming frustrating as it dampens the perfect game experience.
If you are experiencing Discord voice/audio issues, worry less, as we will guide you through simplified, proven fixes for this error.
What causes the Discord robot voice?
In case you’re experiencing Discord voice sounds like a robot, there can be several reasons behind this error. The following are some of the potential reasons reported by some of our readers:
Improper Discord audio Settings – If your Discord audio settings are not correctly configured, you may encounter this issue. Make sure that the default and output devices are correctly set.
Server/Connection issues – You will experience the Discord robot voice issue if your connection to the server is lower than 5 Mbps. Try the fixes in this guide to solve Network congestion problem.
Broken or faulty peripherals – Discord robot voice can be triggered if your headset or microphone has sustained damage. Consider replacing your headset or microphone to see if the error is fixed.
Corrupt drivers – One of the significant reasons behind several audio errors is due to corrupt or missing drivers. Check this guide for ways to troubleshoot outdated driver errors on Windows.
Now that you know some factors responsible for the Discord robot voice, you can fix the problem. This will lead us to provide some solutions to apply in the next section.
How do I fix the Discord Robot Voice?
Consider observing the following preliminary checks before engaging in advanced troubleshooting steps:
If you’re using an external mic, try to connect through other ports.
Make sure your network usage isn’t limited. Restart your router.
Ensure that your audio drivers are up-to-date.
Turn off any interfering third-party voice software.
Restart Discord or your browser.
After confirming the above checks, if the problem persists, you can explore the advanced solutions provided below.
1. Check hardware utilization and end other processes in Task Manager
Right-click on the Start button, then select Task Manager.
Select the Performance tab if any component is hitting close to 100%, then end background apps.
Next, click the Processes tab and search for Discord. Select End task by clicking the application.
You can then relaunch Discord by navigating to its location on your computer’s hard drive.
Restarting your Discord app from your Task Manager should enable you to eliminate some random bugs and fix the error. However, if your Task Manager fails to work, check out our guide to troubleshoot it.
2. Change your Discord server region
Make sure you are the admin of the server. If you’re not, tell the admin to follow these steps on your behalf.
Click on the down arrow beside your server’s name to drop down and select Server settings.
In the server region’s box, select Change.
Next, choose the region you want to connect to. Make sure to select the nearest one to your audience.
Changing the server region may be a great Discord robot voice fix, so make sure to try it out.
Some of our readers have recently requested to know how to recover permanently deleted Google docs. There are possible instances when users later need some documents they had earlier deleted -and, at times, permanently deleted, for that matter.
Worry less; this article has provided some possible steps to recover your Google documents.
Where do permanently deleted documents go on Google Docs?
If you’ve recently deleted a file or folder and are wondering where to recover it, you can check the trash bin in your Google Drive.
Whenever you delete a Google document or file, the deleted file stays in the trash bin for 30 days before it is permanently deleted. Just like when you hide comments in Google Docs, they remain in the Resolved section.
Although Google Drive does not allow users to restore Google Docs that have been permanently deleted after 30 days, such Google Docs can also be recovered from a backup or offline copy, which was possibly once created or edited in the local folder before it was uploaded to Google Drive.
Now that you know where your permanently deleted documents will likely go on Google Docs, the next section will provide simplified steps to recover your files.
How do I recover permanently deleted Google Docs?
Before engaging in advanced troubleshooting steps, you should perform the following preliminary checks:
Perform a scan on the drive for the missing document.
Check to ensure that your data is regularly backed up.
After confirming the above checks and recovering permanently deleted Google docs, you can explore the advanced solutions below.
1. Visit your Google Drive trash folder
Login into your Google account and go to Google Drive by clicking on the Drive icon.
Open your Google Drive app and tap the Menu icon in the top-left corner.
Next, navigate to the Trash option and click on it.
Locate the file that you’ve lost, right-click on it, and select Restore.
This should be your first step when trying to recover your files. Your Google document may be in the trash folder, but if it’s not you can try the next fix.
2. Recover documents as an admin
Sign into your Google Admin console.
Click the Menu icon, go to Directory, and access the Users option.
Select the user that lost their documents, click the drop-down menu, and select Restore data.
However, remember that you need to be the administrator of a Google service to do that. If you work in an organization, ask the administrator to do that for you.
Also, keep in mind that you may only recover the data if they have been deleted within 30 days.
3. Recover your locally saved files
Left-click the Start menu, type restore files and hit Enter.
Then find the Google docs in the folder where you stored the files.
Click on Restore button to recover permanently deleted Google Docs on Windows.
Another way to restore your Google docs is by checking your computer for files automatically synced while configuring it.
One of the backup services offered by the G-suite that can enable you to recover your lost files is Google Takeout. Aside from this, you can also use third-party backup apps.
And that’s it! Ensure you work your way through the provided fixes one after the other to know which works for you.
Ddraw.dll is a Dynamic-Link Library file that DirectX needs for 2D graphics. It is a shared system file that is essential for multimedia software. If that file gets deleted or corrupted, you will encounter a missing ddraw.dll error code and software issues.
Some common DLL issues will return an error message stating, This application can’t start because ddraw.dll is missing from your computer.
This guide will explore possible causes for these errors and the most effective fixes.
What causes the ddraw.dll error code?
The ddraw.dll error code typically occurs when there is a problem with your computer’s Microsoft DirectX software component. DirectX is a set of APIs (application programming interfaces) allowing developers to create multimedia applications for Windows-based operating systems, such as games, video players, and graphic design software.
The ddraw.dll error code can be caused by a variety of issues, including:
Malware or virus infection – Malicious software can infect and damage system files, including ddraw.dll, causing errors.
Hardware issues – Issues with your computer’s hardware, such as a faulty RAm or failing hard drive, can cause the ddraw.dll error code.
Registry problems – The registry database stores configuration settings for your computer and applications. If there are issues with the registry, it can cause errors with system files like ddraw.dll.
Software conflicts – Conflicts between software programs installed on your computer can cause errors with system files like ddraw.dll.
What does Ddraw dll do?
Ddraw.dll is a dynamic link library file part of the DirectX software component for Windows-based operating systems.
Ddraw.dll specifically provides the DirectDraw API, which handles 2D graphics rendering, including image manipulation, display, and scaling. In addition, DirectDraw provides a high-performance interface between an application and the display device, allowing applications to access hardware acceleration features for improved performance.
In addition to DirectDraw, DirectX also includes other APIs for handling 3D graphics rendering (Direct3D), audio playback (DirectSound), input device management (DirectInput), and other multimedia functions.
Ddraw.dll is just one component of the larger DirectX software package and is crucial for many multimedia applications to function correctly on Windows-based computers.
How can I fix the ddraw.dll error code?
1. Run a third-party DLL fixer
A great solution for solving the ddraw.dll error code is to use a specialized repair tool that can help you address various computer issues promptly.
For example, you can use it for DLL errors, BSoD problems, or when your computer often freezes.
2. Run a System File Checker scan
PressWindows + Sto open the Windows Search bar.
Typecmd, right-click on Command Prompt, and Run as administrator.
Next, enter the command below and press the Enter key: DISM.exe /Online /Cleanup-image /Restorehealth
Also, type in the script below and hit Enter. sfc /scannow
The SFC scan could take up to half an hour. Restart Windows if the WRP does repair some files.
Note: If malware has indeed corrupted the ddraw file, the System File Checker might also repair it. The tool will scan system files and replace any corrupted ones with a cached copy.
3. Scan for malware
Type Windows Security in the Search bar, and click on the relevant search result.
Now, click on Virus & threat protection here.
Click on Scan options.
Select Full scan and click the Scan now button at the bottom.
DLL files are a frequent target for malware. As such, malware might be responsible for the missing ddraw.dll error. To purge malware from Windows, add an antivirus utility to the OS.
Hence, we advise you to download one of the top picks for security software and get excellent security against all threats, including malware, ransomware, and phishing attacks. In addition, you will have a constantly updated threat database, ensuring a high detection rate.
As a result of protecting your PC with such tools, you’re completely secured against complex malware or damaged system files compromised by viruses. Plus, you benefit from high data encryption so all your DLL files are safe.
4. Re-register the ddraw file
PressWindows + Sto open the Windows Search bar.
Typecmd, right-click on Command Prompt, and Run as administrator.
Enter the script below and hit Enter. regsvr32 /u ddraw.dll
Then input the following script and once again hit Enter. regsvr32 ddraw.dll
Regsvr32 is another Windows tool that can come in handy for fixing DLL errors. For example, it might be the case that the ddraw file has broken registry references, which regsvr32 can fix.
Open CCleaner’s installer to add the utility software to Windows.
Click the CCleaner icon to open the software’s window.
Click Registry.
Select Missing Shared DLLs and all the other checkboxes for the most thorough scan, then click the Scan for Issues option to scan for registry issues.
Then press the Fix selected issues button to repair the registry entries listed.
A dialog box opens that asks to back up the registry. Click Yes to create a backup, choose a folder for the file, and press the Save button.
Then press the Fix All Selected Issues button to give further confirmation to repair the registry.
The registry can often be the source of DLL file errors. For example, it might be the case that there are invalid registry entries for ddraw.dll. You can scan and repair registry entries with the most efficient third-party utility software.
6. Reinstall the software
Open Run by pressing the Win + R hotkey.
Enter appwiz.cpl in Run and press Enter to open the Control Panel.
Select the program that’s returning the DLL error.
Press the Uninstall button to remove the program.
Click Yes on the Programs and Features dialog box to confirm you’re sure about removing the software.
After that, reinstall the program with its setup wizard.
Reinstalling the software could fix the issue if one specific program returns the missing ddraw.dll error. The missing DLL error message also suggests that you reinstall the program.
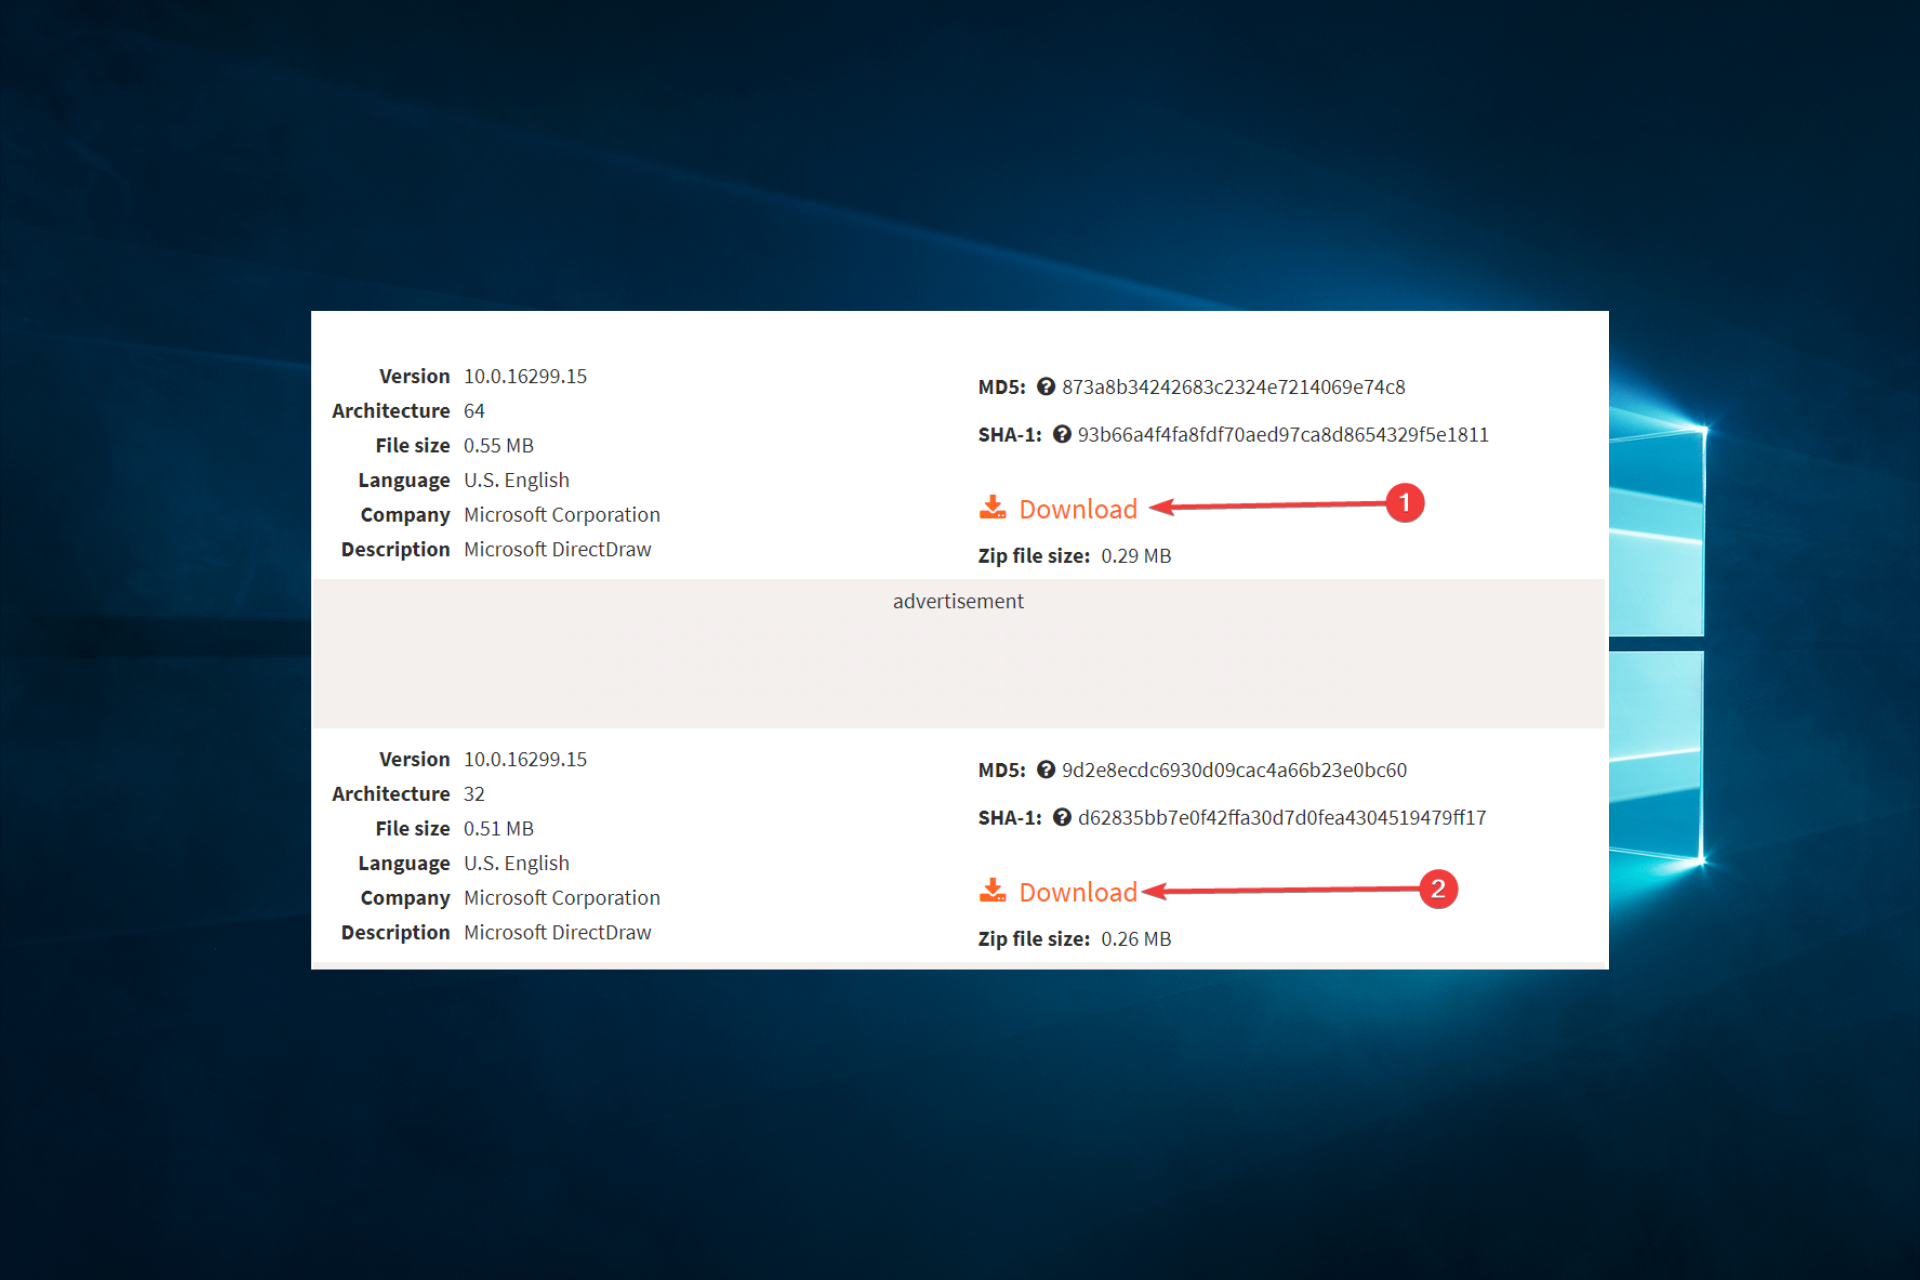
Choose between the 64-bit and 32-bit architectures.
Unzip the file and move the ddraw.dll to the folder: C:WindowsSystem32
You might also need to register the ddraw file by entering regsvr32 ddraw.dll in the Command Prompt.
8. Rollback Windows
Press Windows + R, type rstrui, and hit Enter.
Click the Next button.
Select a restore point that predates the missing ddraw error and click Next.
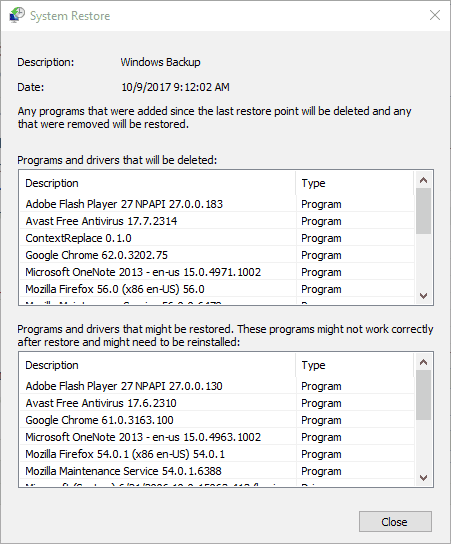
Press the Scan for affected programs button to check what software will be lost after restoring Windows. That option will open the window below, showing you the software added after the restored point.
Press the Next button, and click the Finish and Yes options to confirm your selected system restore point.
System Restore provides one of the best fixes for DLL errors. This will undo changes made to system files and roll the registry settings back to a selected restore point date.
Those are some of the best remedies for the missing ddraw.dll issue. Aside from those resolutions, DLL fixer software such as DLL Suite, DLL Tool, and DLL-files Fixer might also resolve the issue.
We are curious to know what was most effective for you. So please leave us a message in the comments section below.
If you’ve been playing Lost Ark since it came out in 2019, you have a general idea of what users had to go through. And given that you went through all those errors and bugs and still find it within you to keep playing, it is an excellent title.
But even though developers constantly put in the work to keep the game playable and error-free, sometimes glitches find their way into our game and completely ruin everything.
Luckily, even though Smilegate has yet to release a fix for this error, Lost Ark players found some workarounds that will keep this issue at bay until an official solution is provided.
What causes Lost Ark w0x2-0pelpwn1n2nt error?
Several different factors can cause the w0x2-0pelpwn1n2nt error in Lost Ark. Here are a few possible reasons why you might be experiencing this error:
Server issues – Lost Ark is an online game, and if the game servers are experiencing problems or are down for maintenance, you may encounter the w0x2-0pelpwn1n2nt error.
Third-party software conflicts – Sometimes, other programs running on your computer can interfere with Lost Ark and cause the w0x2-0pelpwn1n2nt error. For example, antivirus software, firewalls, or other security software can sometimes cause conflicts.
Outdated drivers – If your computer’s drivers (especially your graphics card drivers) need to be updated, you may encounter issues with Lost Ark and see the w0x2-0pelpwn1n2nt error.
Corrupted game files – If corrupted game files are in your Lost Ark installation, this can also cause the w0x2-0pelpwn1n2nt error.
If you’re experiencing the error in Lost Ark, you can try a few things to resolve the issue. We have the most effective solutions listed below.
How can I fix the W0x2-0PELPWN1N2NT error?
Before trying any fixes, ensure you have a working internet connection. This is because a weak internet is often a trigger for this problem.
You should also check the server status because the error may result from a down server.
1. Run a Steam Integrity Check
Launch the Steam app.
Click on Library.
Right-click on the Lost Ark game and select Properties.
Select the Local Files tab, then Verify integrity of game files.
2. Use a VPN
Using a VPN can help with the Lost Ark W0x2-0PELPWN1N2NT Error by providing a new IP address and allowing you to bypass any network restrictions or limitations that may be causing the error.
Our recommendation is to try ExpressVPN which has a large number of servers around the world and has proven to be a safe and reliable VPN.
Here’s how you can easily get the ExpressVPN service:
Press Windows + R, type msconfig, and hit the Enter key. This will open the System Configuration window.
Click the Services tab, tick the Hide all Microsoft services option, and click on the Disable all button.
Next, click on the Startup tab, and select Open Task Manager.
Click on each startup item in the Task Manager window and select Disable.
Close the Task Manager window and go back to the System Configuration window.
Click on OK and then click on Restart.
Through these steps, Lost Ark users have indicated that the W0x2-0PELPWN1N2NTerror was fixed, and they could resume playing.
It will probably be a little while until Smilegate figures out how to solve this issue and provide availability for a patch permanently.
Until then, though, these workarounds should do, and we hope one is perfect for your situation.
Keep in mind that Lost Ark players are also dealing with Authentication Error 10010, and most also want to switch servers, so you should have a quick look into that.
Which steps above did the trick for you when dealing with this error? Let us know in the comments section below.
An updated Steam VR is the ultimate tool for experiencing VR content on your PC. However, updating the tool is easier said than done, as evident by numerous queries on how to go about it.
This guide will show quick and easy ways to update the tool without encountering common SteamVR errors.
Launch Steam VR and click the three horizontal lines.
Click the Devices option.
Finally, select the Update Firmware.
Suppose you want to update the Steam VR devices firmware software. The steps above are the most straightforward route to do so. With this, your device will always run smoothly.
We have reached the end of this guide on updating Steam VR. You are now equipped with the correct information to get the best virtual reality experience possible on your PC.
Many people report that their external drives don’t work on Windows 10 when using a Sabrent USB 3.0 to SATA/IDE adapter.
While this issue can be due to various factors, it is not the most difficult to fix, as shown in this guide.
Why is my USB SATA drive not detected?
Listed below are some of the prevalent causes of the Sabrent SATA to USB not working issue:
Connection issues: Sometimes, the USB to SATA adapter is not recognized on Windows 10 issue can be caused by a bad physical connection. You need to check the ports and cable and try to connect the adapter to another PC to fix the issue.
Insufficient power: In some cases, the SATA to USB adapter might not be showing up because the cable you are using for the connection is not supplying enough power. It would be best if you used the power cable that came with Sabarent SATA to restore normalcy.
What can I do if Sabrent SATA to USB is not working?
Below are some preliminary troubleshooting steps to try before exploring sophisticated solutions:
Connect to another port.
Connect the adapter to an older PC like Windows 7
1. Check the drive connection
One of the most common causes of the Sabrent USB 3.0 SATA HDD docking station not working is a bad physical connection.
To rule out this cause, it’s recommended to check if the USB port or the USB cable function as it should.
Check the USB cable and also search for a light indicator that will let you know the hard drive is working,
Additionally, you can check and see if the USB port on your computer is not by any chance damaged by unplugging the drive and using it on a different device or port on the same PC.
Press the Windows key + X and select the Device Manager option.
Click the View tab at the top and select Show hidden devices.
Now, double-click the Universal Series Bus controllers option to expand it.
Right-click the USB Attached SCSI (UAS) Mass Storage Device option and choose Update driver.
Next, select Browse my computer for drivers.
Choose Let me pick from a list of available drivers on my computer.
Finally, choose USB Mass Storage Device and click Next.
The Sabrent SATA to USB not working issue can sometimes be caused by an outdated or incompatible driver. To fix this, you should use the default drivers that came with your PC.
To make things easier, however, we recommend using a third-party driver updater such as Fortect Driver Updater.
Using this driver manager tool, you can access the online database containing thousands of authorized drivers ready to be installed for your devices.
It would be best if you thus benefited from this automated support to update, install, or fix any drivers with their latest versions in no time.
If the above steps did not help you solve the problem, we recommend you use the power supply module that came with the Sabrent unit.
The HDD you’ve prepared may have more power than can be supplied by a USB3 port. However, a USB3 port can only supply up to 0.9 amps.
It is usually indicated that an HDD needs 1 amp to start up and over 2 amps for reading and writing, which could be why you should use the power supply unit Sabrent came with.
That is all you should do to fix the Sabrent SATA to USB adapter not working issue. If you need a list of the best USB 3.0 external hard drive enclosures you can use, check our carefully-curated picks.
In the comments below, let us know the solution that helped you fix this issue.
Sometimes you might encounter There was an error opening this document access denied message. This issue can be pretty annoying since you won’t be able to view the desired document, but there’s a way to fix it.
This guide has gathered the best solutions to help you get your favorite PDF reader working as it should.
Why am I getting There was an error opening this document message?
There are a series of factors that can cause There was an error opening this document error message. Below are some of the notable ones:
Outdated app: Sometimes, you get There was an error opening this document; an updated version of Acrobat is needed prompt. This implies that your PDF reader is outdated and needs updating.
Security settings: The Adobe Reader has a Protected Mode enabled by default. This can prevent you from opening some old files.
Interference from antivirus software: Sometimes, your third-party antivirus software might flag the file you are trying to open. The solution is to disable the software temporarily if you trust the file.
Speaking of this issue, below are some of its variations, as reported by users:
Adobe Reader access denied when opening PDF: This issue can occur if Protected Mode is enabled in Adobe Reader. Simply disable this feature, and the problem should be gone.
There was an error opening this document there was a problem reading this document(57): This problem can occur due to your antivirus software, but you can fix the problem by disabling your antivirus temporarily.
Acrobat Reader DC there was an error opening this document. access denied: This issue can sometimes appear in Acrobat Reader DC. To fix the problem, update your reader to the latest version and check if that helps.
How do I fix There was an error opening this document?
Listed below are some troubleshooting steps to try before proceeding to the solutions in this section:
Rename long filenames to something shorter
Move the PDF file to a different directory
Save the PDF from your email and open it on your PC
If this does not solve the issue, you can delve into the fixes below:
1. Disable Protected Mode in Adobe Reader
Launch Adobe Reader and click the Edit tab at the top.
Select Preferences.
Now, choose Security (Enhanced).
Finally, uncheck the Enable protected mode at startup (Preview) checkbox.
According to users, There was an error opening this document access denied can appear in Adobe Reader when trying to view certain PDF documents. The Protected Mode mode in Adobe Reader usually causes this issue.
This can be useful since some PDF documents might be malicious. Therefore it’s good to have this feature enabled. But in this case, you need to disable it temporarily to get past this error.
2. Update Adobe Reader
Launch Adobe Reader and click the Help tab.
Select Check for updates.
Finally, click the Download and Install button if an update is available.
Sometimes, There was an error opening this document this file cannot be found caused by an outdated app. You can check for and install updates within the Adobe Acrobat app.
3. Reinstall Adobe Reader
Press the Windows key + R, type appwiz.cpl, and click OK.
Right the Adobe Acrobat Reader option and select Uninstall.
Now, follow the onscreen instructions to complete the process.
Sometimes There was an error opening this document access denied can appear if your Adobe Reader installation is corrupted. In this case, you should uninstall and reinstall the app.
If you want to uninstall an application for good and remove all its files and registry entries, we suggest using dedicated software such as CCleaner.
Using this software, you can uninstall and then delete registry entries associated with Adobe Reader, so it will be as if the application was never installed.
Launch Adobe Acrobat and click Edit > Preferences.
Select Security (Enhanced).
Now, choose Privileged Location.
Select Add Folder Path.
Finally, please navigate to the folder with the file you are trying to open, select it, and click OK.
If you are getting Adobe Reader – there was an error opening this document. Although the path does not exist error message, you can add the folder path as a privileged location. With this, you should be able to access the files in that folder.
6. Try out a different PDF reader
If you keep getting There was an error opening this document access denied in Adobe Reader; you should consider switching to a different PDF reader.
There are many great PDF readers besides Adobe Reader, and if you’re looking for a new tool for reading PDF files, we strongly suggest you try out Icecream PDF Editor.
It is lightweight and fast, but most importantly, it is very good at doing the job it was designed to do, which is pretty much all that matters.
This PDF reader is straightforward, providing a similar user experience to Adobe, making the transition smooth. Plus, it includes intuitive editing tools to manage everything PDF-related from one place.
With this, we can end this detailed guide on fixing There was an error opening this document error message. You should now be able to get rid of the message for good if you follow the steps in this guide carefully.
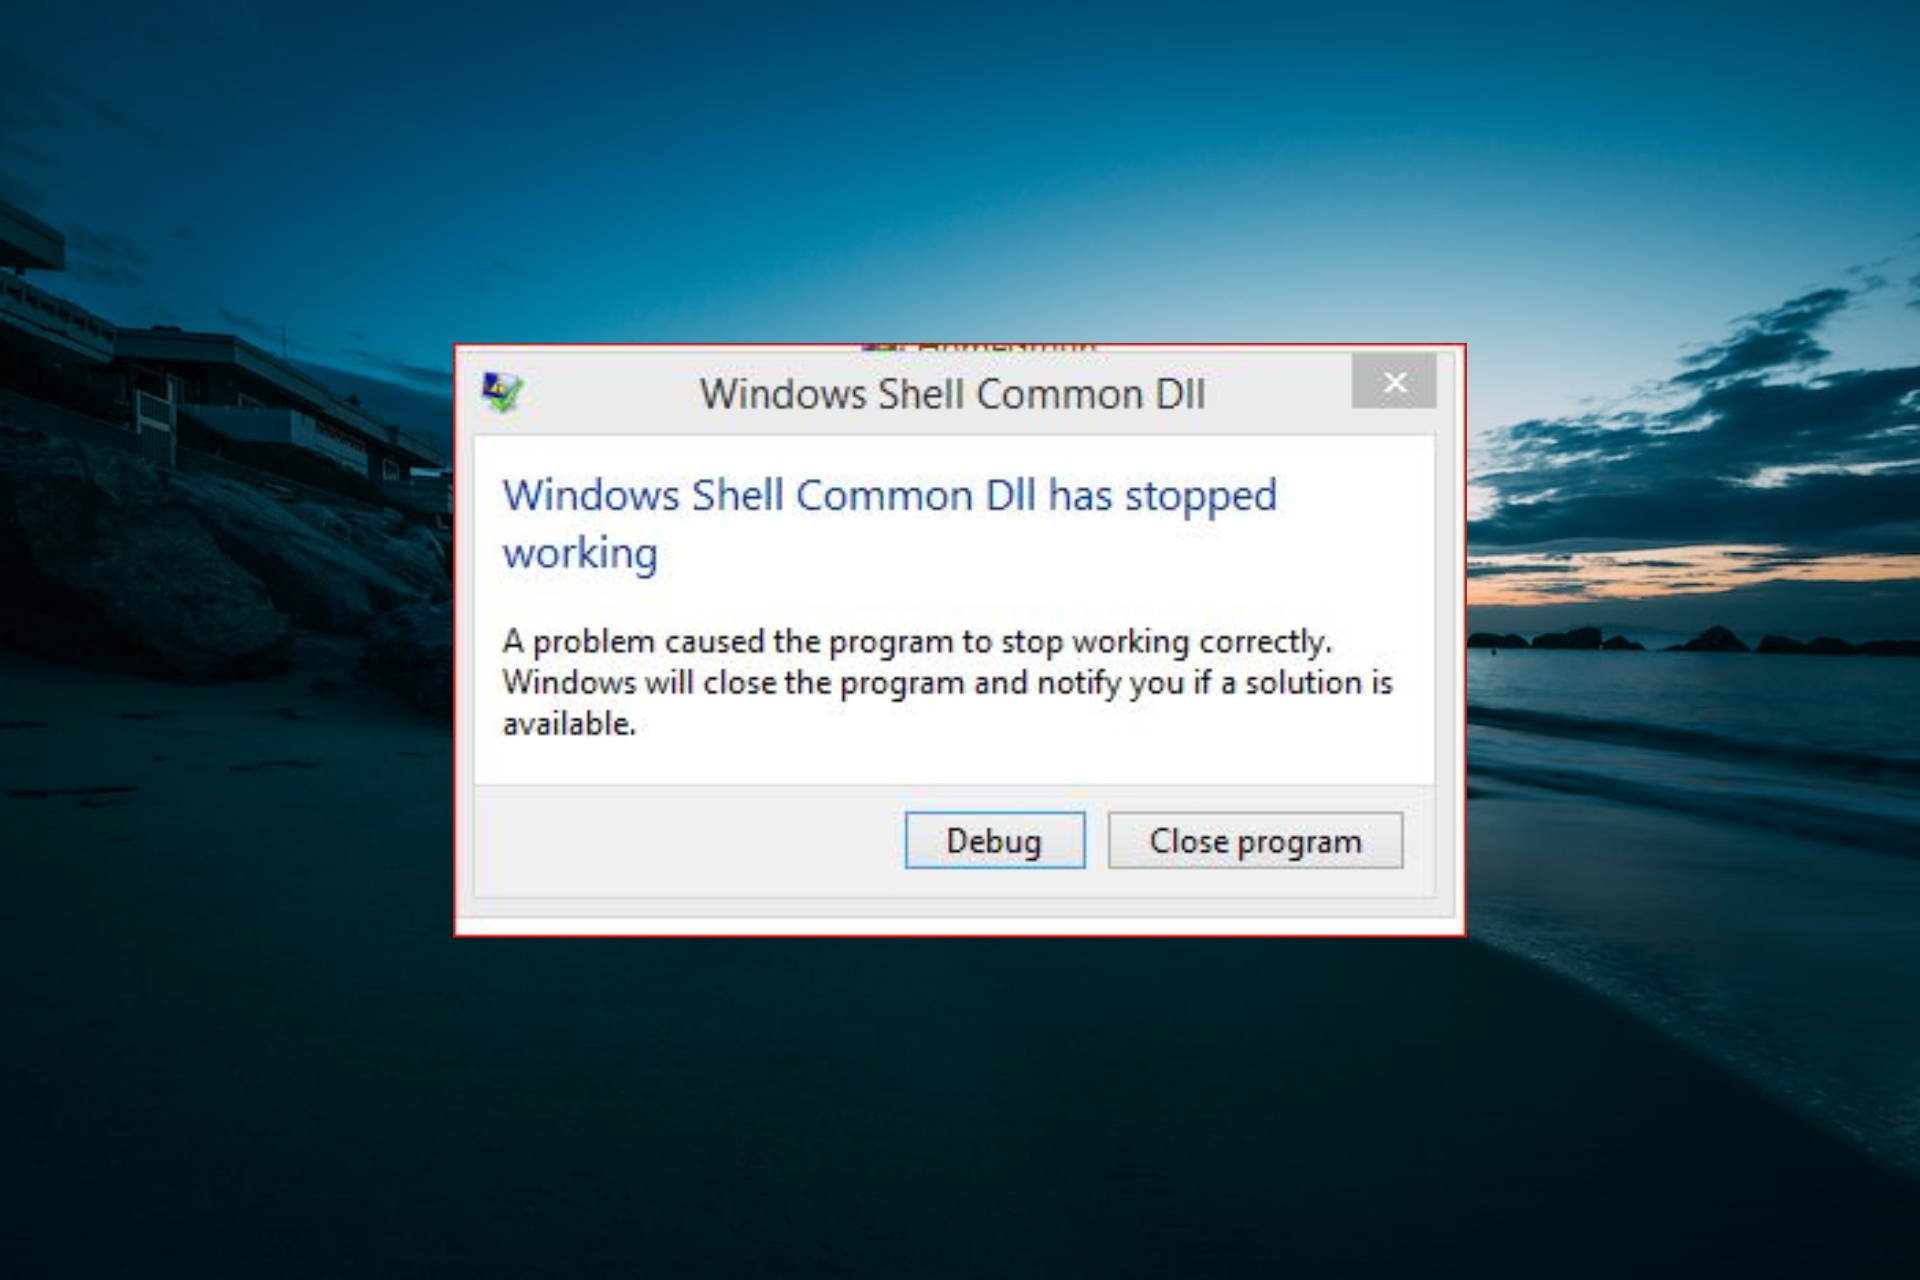
All sorts of errors can appear on your PC, but one of the most annoying ones is Windows Shell Common Dll has stopped working.
This error can prevent you from using standard Windows features and be problematic. So, in this article, keep reading to find additional solutions for this error.
Why does Windows Shell Common DLL has stopped working message appear?
Below are some of the factors that can cause the Windows Shell Common DLL error on your PC:
Faulty drivers: If the Windows Shell Common DLL stopped working while using your recording devices or microphone, it might be because of faulty audio drivers. You need to reinstall or update your driver to solve the problem.
Interference from third-party apps: Sometimes, this issue can be down to an app running a counter program to the software you are trying to open. This is especially true if you are getting the Windows Shell Common DLL has stopped working error on Outlook 2016 or 2013.
Faulty system files: Sometimes, this issue might be because some of your files are broken or missing. Repairing and restoring these files should restore normalcy.
Outdated PC: An outdated PC can cause several issues, including this DLL problem. Hence, you need to update your operating system.
How can I fix Windows Shell Common DLL has stopped working error?
Listed below are some of the preliminary troubleshooting steps to try before exploring the more sophisticated solutions:
If these steps do not fix the issue, proceed to the solutions below:
1. Reinstall your audio drivers
Press the Windows key + X and choose Device Manager.
Double-click the Sound, video and game controllers option to expand it and right-click the High Definition Audio Device.
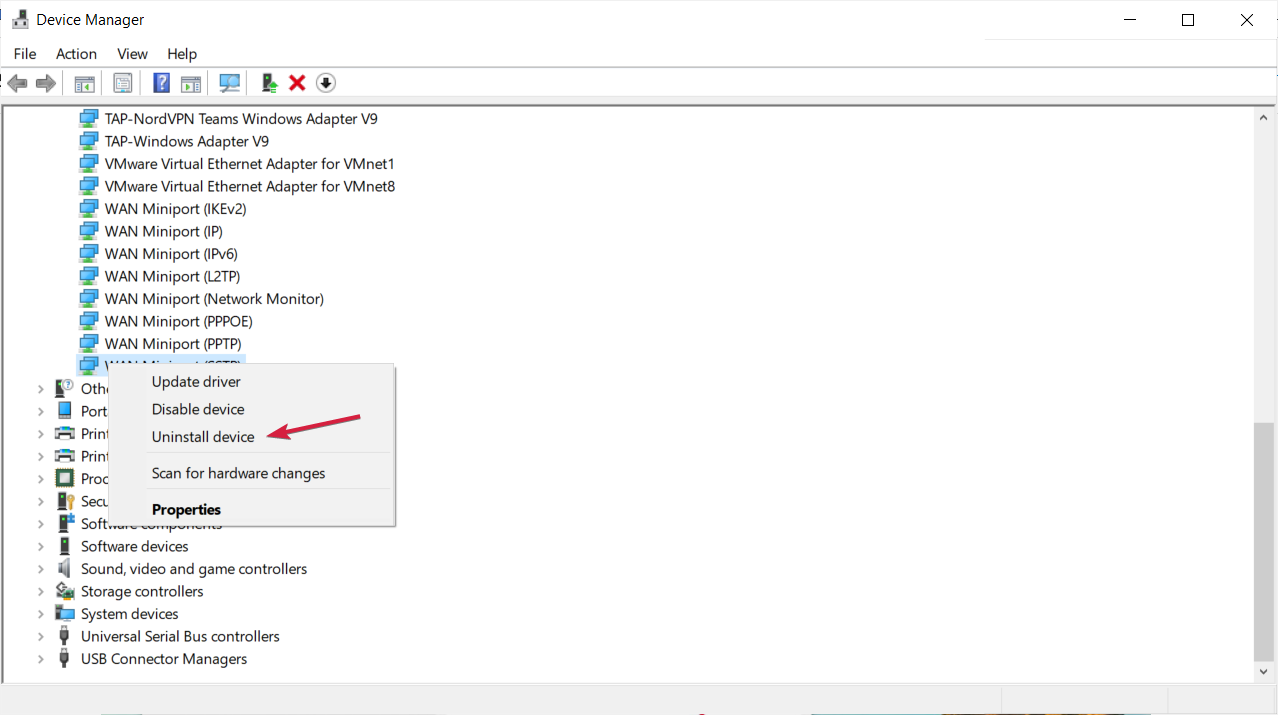
Now, choose Uninstall device.
Check the box for Remove driver software for this device if available and click the Uninstall button.
Finally, restart your PC, and Windows will automatically reinstall the driver.
According to users, they managed to fix the Windows Shell Common Dll has stopped working error simply by reinstalling their audio drivers. However, your drivers can be buggy, and that can cause this error to appear.
To keep your drivers up to date at all times, we advise using specialized driver updater software such as Outbyte Driver Updater.
2. Uninstall Synaptics driver
Launch Device Manager.
Expand the Mice and other pointing devices option and right-click the Synaptics Touchpad.
Now, select Uninstall device.
Finally, click the Uninstall button to confirm the action.
According to users, Windows Shell Common Dll has stopped working error can appear due to Intellipoint software and Synaptics driver.
These two aren’t compatible, and to fix the problem, you need to remove one or both from your PC.
3. Repair system files
Press the Windows key + S, type cmd, and choose Run as administrator under Command Prompt.
Type the command below and hit Enter to run it: sfc /scannow
Finally, wait for the command to finish running and restart your PC.
Sometimes this error can appear if your system files are corrupted. File corruption can occur for various reasons, but you should be able to fix it by performing an SFC scan.
Once the scan is completed, check if the problem still appears. If the issue isn’t resolved or you can’t run an SFC scan, you might have to use a DISM scan instead.
However, if you want to effortlessly fix Windows Shell Common DLL issues, the simplest and fastest way would be to use a third-party DLL fixer.
4. Change the security permissions of the UserChoice key
Press the Windows key + R, type regedit, and click OK.
When Registry Editor opens, navigate to the path below in the left pane: ComputerHKEY_CURRENT_USERSoftwareMicrosoftWindowsCurrentVersionExplorerFileExts.txtUserChoice
Now right-click the UserChoice key and choose Permissions from the menu.
If Group or user names section is empty, your security permissions are missing, so you’ll need to add them again. This solution won’t apply to you if security permissions aren’t missing. So you can skip it.
To add missing permissions, click the Add button.
In Enter the object names to select field, enter Administrators, and click on Check Names.
If everything is in order, click on OK.
The Administrators group will be added to the Group or user names list.
Next, select Administrators from the list and check Full Control in the Allow column.
Finally, click Apply and OK to save changes.
Optional: Following the steps above, you might have to add SYSTEM, RESTRICTED, and your user name to the list.
Users reported Windows Shell Common Dll has stopped working error while trying to open .txt files on their PC.
After changing the security settings for the UserChoice key, the problem should be resolved entirely. However, remember that this solution applies only if this error appears while trying to open .txt files.
5. Copy necessary files to the System32 directory
Launch File Explorer and navigate to the following directory: C:WindowsSystem32
Locate joy.cpl and copy it to your Desktop.
Right-click joy.cpl and choose Properties from the menu.
Navigate to the Security tab and click on Advanced.
Locate the Owner section and click on Change.
Now, enter your username in the Enter the object name to select and click on Check Names.
If everything is in order, click on OK to save changes.
After doing that, click Apply and OK to save changes.
After taking ownership of joy.cpl, you can now delete it.
Once you delete the file, go to the following directory: C:WindowsSysWOW64
Locate joy.cpl and copy it to C:WindowsSystem32
Once you copy the file, the problem should be resolved, and you can access gamepad settings from Windows without any issues.
According to users, Windows Shell Common Dll is not responding error appears while trying to configure gamepad settings.
To fix the problem, copy a single file to your System32 directory, as we showed you above.
6. Disable the Hardware graphics accelerator in Office
Open Outlook or any other Office application.
Choose File > Options.
Now, select Advanced.
Finally, locate and disable the Hardware graphics accelerator option.
Windows Shell Common Dll is not responding error can affect almost any application, and Outlook is no exception. However, you can fix this problem simply by disabling the Hardware graphics accelerator.
After you disable this feature, the error message should stop appearing, and you’ll be able to use Outlook without any problems.
7. Configure Windows to accept certificates
Press the Windows key + S, type powershell, and select Run as administrator under Windows PowerShell.
Type the command below and hit Enter to run it: Set-ExecutionPolicy -ExecutionPolicy Unrestricted -Scope CurrentUser
The Windows Shell Common Dll is not responding error can appear because Windows isn’t configured to accept certificates. However, you can quickly fix this problem by using PowerShell.
8. Use System Maintenance
Press the Windows key + R and type the command below: %systemroot%system32msdt.exe -id MaintenanceDiagnostic
Now, click OK to run it.
The System Maintenance tool will now appear. Click on Next to continue and follow the instructions on the screen.
Few users claim they fixed the problem simply by running System Maintenance Troubleshooter. However, this is a built-in tool, and it can sometimes fix various issues with Windows.
9. Re-register your DLLs
Open Command Prompt as administrator.
Type the command below and hit Enter to run it: regsvr32 /i shell32.dll
Then, finally, wait for the command to finish running.
If you’re getting Windows Shell Common Dll has stopped working error message, the cause can sometimes be your DLL files, specifically shell32.dll.
This can be because the DLL files became unregistered for some unknown reason. To fix this problem, you have to re-register shell32.dll.
Press the Windows key + R, type msconfig, and click OK.
Select the Services tab, check the box for Hide all Microsoft services, and click Disable all.
Navigate to the Startup tab and click on Open Task Manager.
Right-click each of the apps there and choose Disable from the menu.
Afterward, return to the System Configuration window and click Apply and OK.
Finally, restart your PC.
If Windows Shell Common Dll has stopped working error message frequently appears on your PC, a third-party application may be causing it.
So, you need to perform a clean boot to start your PC with the required services and processes. If this solves the problem, you must enable the apps and services in batches to know the faulty ones.
11. Install the latest Windows updates
Press the Windows key + I to open the Settings app and select Update & security section.
Now, click the Check for updates button.
Finally, download and install any available updates.
After you download the updates, they’ll be installed automatically once you restart your PC. According to users, you might be able to fix this problem simply by installing the latest Windows updates.
We have come to the end of this detailed guide on fixing the Windows Shell Common DLL has stopped working issue. You should now be able to solve the problem if you follow the steps therein carefully.
First of all, Avast’s high CPU usage should be normal because the program can consume considerable resources while it’s scanning your system.
However, sometimes, it can be problematic because you get an error saying Avast service 32 bit high CPU even when Avast is idle.
Don’t uninstall Avast just yet before troubleshooting it with these solutions to fix Avast if the antivirus is using too much CPU resources.
Why is Avast using so much CPU?
Some of the main reasons for Avast using so much CPU are background virus scans as well as cleanup. All antivirus software does this, but the degree of usage varies.
How can I lower the Avast high CPU usage?
1. Uninstall the Avast Cleanup tool
Launch Avast on your computer.
In the Avast interface, click Menu and open Settings.
Next, navigate to Components on the left sidebar.
To remove Avast Cleanup, click on the downward-facing arrow beside the Components tab and hit uninstall component.
After that, confirm the operation by clicking on the OK button at the bottom of the page.
Finally, restart your computer.
When you successfully uninstall the Avast Cleanup tool, you should no longer get the Avast.exe high CPU problem. Otherwise, continue to the next solution.
2. Update Avast
Open Avast on your computer.
Next, click on Settings and select Menu from the dropdown list.
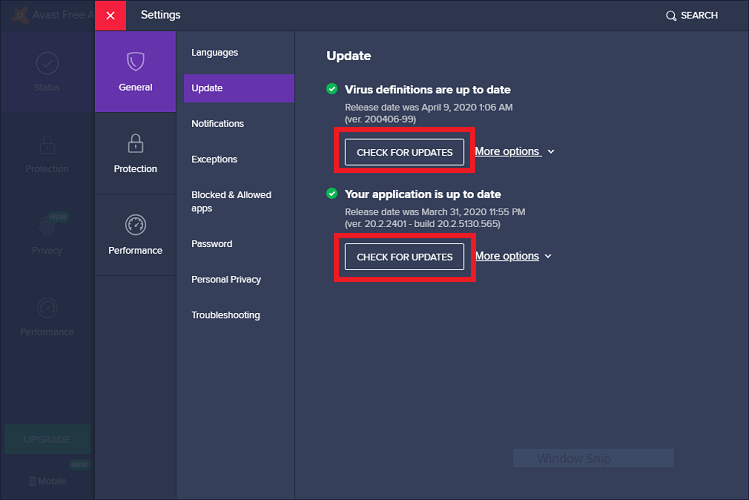
In the menu, navigate to the General tab and choose Update to the right of the page.
Now, what you want to do here is update the database, as well as Avast itself. On this page are two Check for Updates buttons for updating both.
If the virus definitions or application is not up to date, begin the update, and on completion, the update should clear the avastsvc.exe high CPU usage error.
Updating Avast and its virus definitions can definitely solve this problem so make sure you try it. It certainly can’t do any harm, that’s for sure.
3. Fix Avast service high CPU by editing avast5.ini
Next, navigate to the following location C:ProgramDataAvastSoftwareAvast
Next, from the Avast folder, open the file called avast5.ini and add the following line to the end of the file: [GrimeFighter] : ScanFrequency=999
Finally, save the avast5.ini file and then reboot your machine.
4. Repair the Avast program
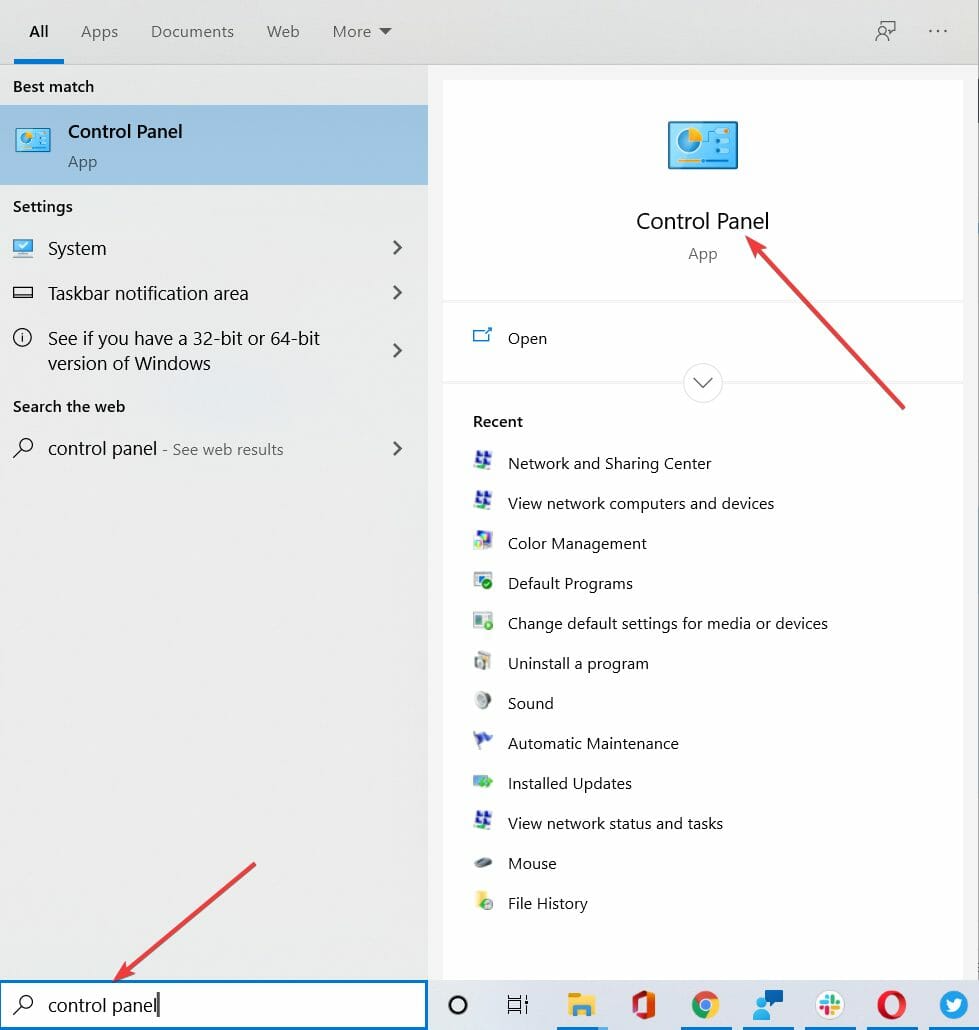
Type control panel in Windows search and open Control Panel from the results.
Switch to the Category view of Control Panel by selecting it from the top right-hand corner, and then select Uninstall a Program in the Programs category.
Scroll down this list and locate Avast. Right-click on the Avast program and hit Change.
Next, you will see the Avast uninstallation wizard screen showing three options – Update, Repair, and Modify. Select Repair and hit Next.
Follow through with the wizard, and at the end, Avast will restart with the Avast high CPU usage fixed.
Repairing the Avast app can fix this high CPU usage problem and will improve the overall functionality of the app so try this without hesitation.
5. Stop Avast Screensaver scanning
On your computer, get any file at all and right-click on it. Next, from the options, click Scan selected items for viruses to scan this file with Avast.
On selecting to scan the file, Avast will display the result of the process after a while. Here also, you will see the results of other running scan operations.
Next, look for the Avast Screensaver scan and then hit Stop to end the process.
When the Avast service high CPU occurs, it hampers the performance of your PC and can cause overheating or similar issues. Some files like avastvboxsvc.exe can also consume system resources and slow down your PC.
For more options to pick from, you should also check out these best antiviruses with lifetime license so that you don’t need to constantly renew the agreement.
Hopefully, the solutions on this page have helped you fix the Avast antivirus engine server high CPU issue. Did it work? Let us know in the comments below.
We all experience computer errors from time to time, and some Windows 10 users have reported the Kernel Power 41 error on their devices. You might also get the 0x8000400000000002 error code with it, and face random restart issues.
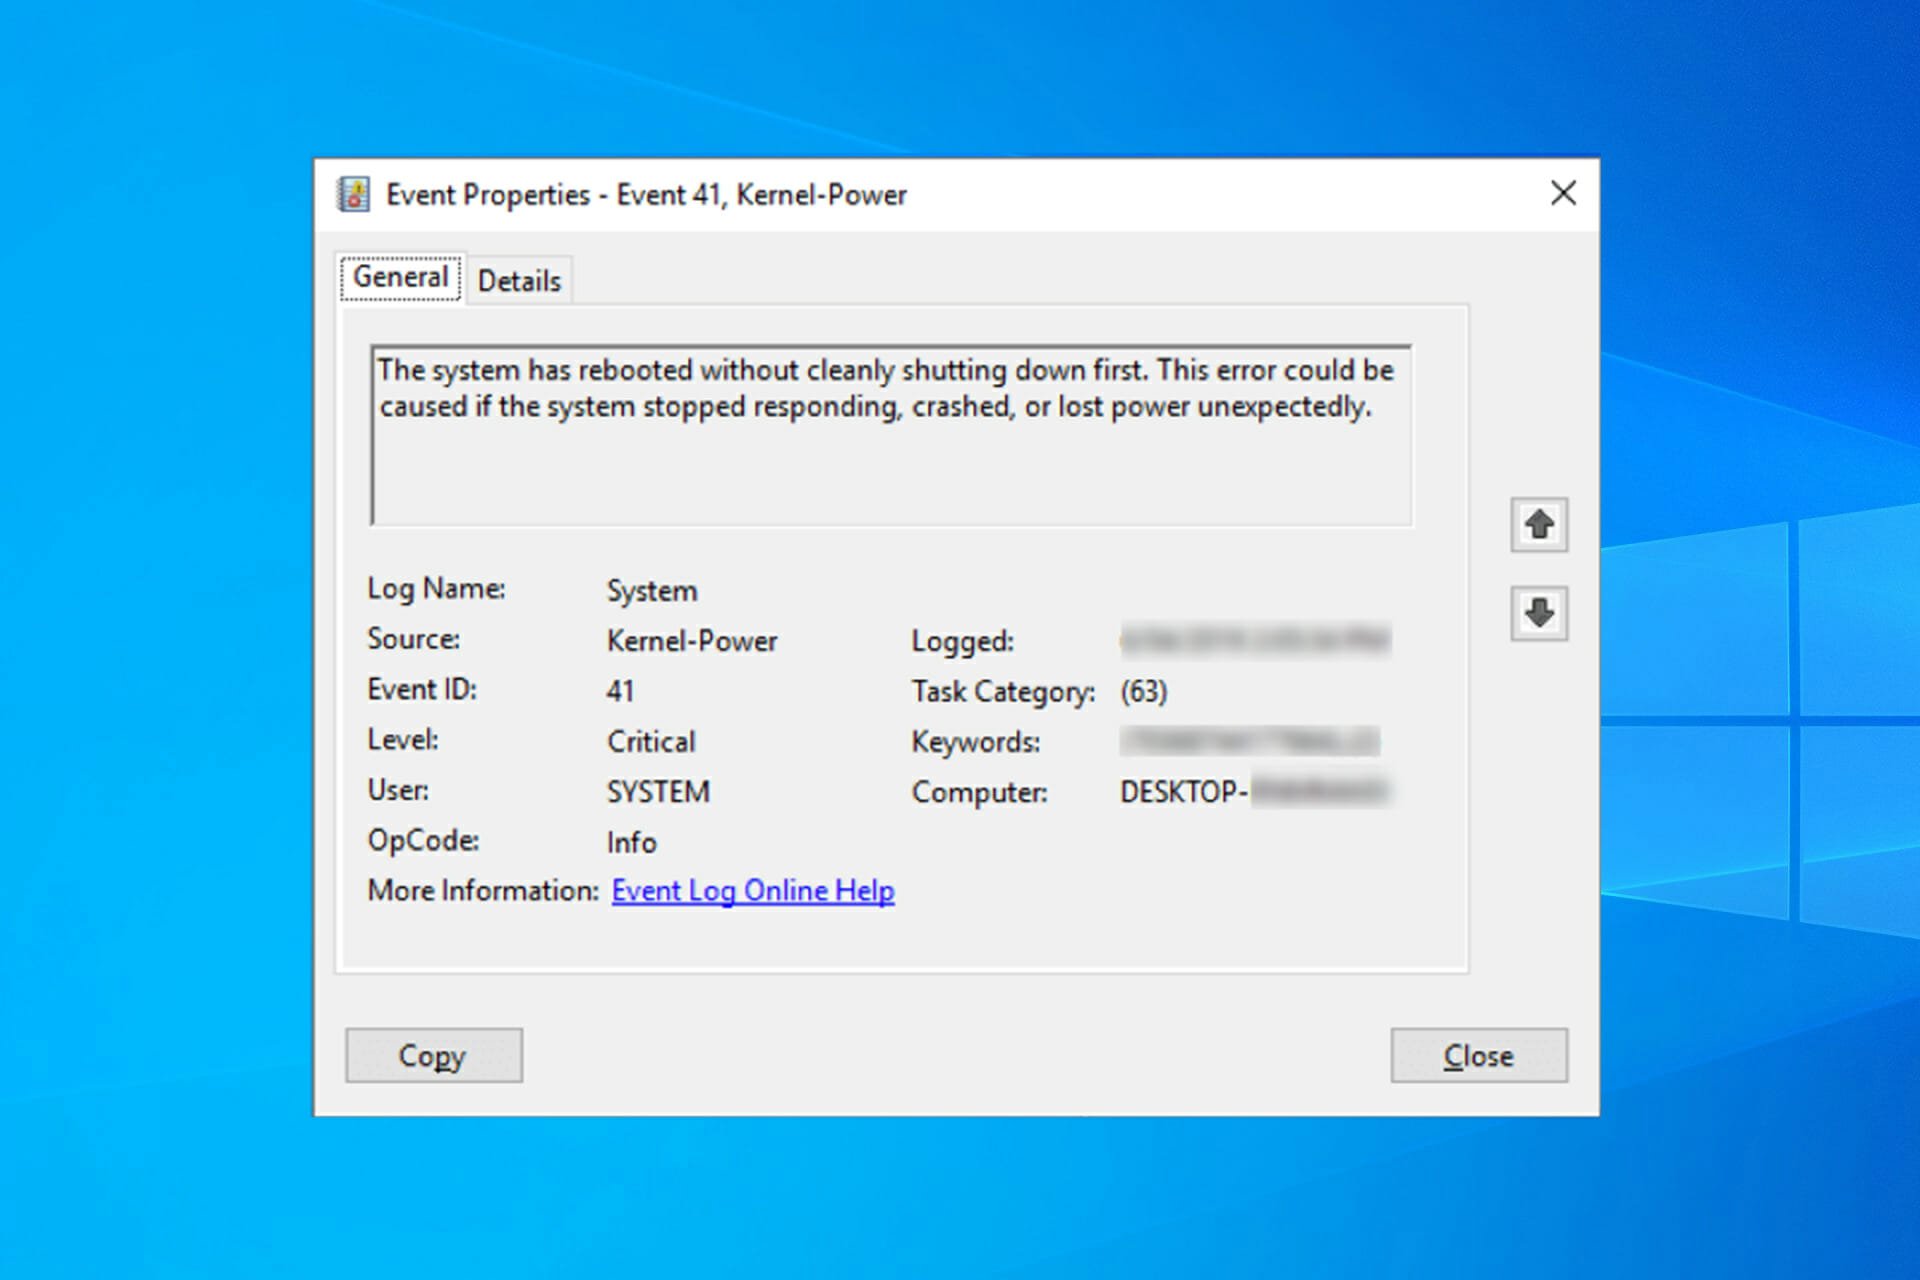
The error comes with the following message: The system has rebooted without cleanly shutting down first. This error could be caused if the system stopped responding, crashed, or lost power unexpectedly. Let’s find out how to fix things!
Why does the Kernel Power 41 black screen appear?
The reasons behind this problem are vast, but we will highlight some main ones. We are firstly referring to improper shutdown – if this error appears right after a crash, clearly, the system failed to initialize some important components.
Here are some more variations and causes of the Kernel Power 41 problem:
Kernel Power 41 after sleep mode – If there are any errors with your power settings or a delayed Windows update that’s not properly installed, the error can happen after sleep or hibernation.
Kernel Power error when playing games – Some games are pretty resource-demanding. That’s why you can bump into kernel-power 41 (63) on Windows 10 while gaming.
Kernel Power 41 in Windows 7 – Although we’re talking about Windows 10 here, Kernel Power 41 is error is also common in Windows 7. Either way, you can use most solutions from this article.
Kernel Power event 41 task 63 in Windows 10 – Another variation of the Kernel Power 41 error.
Kernel Power 41 when using a Windows 10 laptop – This error is equally common on Windows PC and laptops.
BSOD 0x8000400000000002 – Kernel Power 41 error usually causes a BSOD followed by the 0x8000400000000002 error code.
Now that we know the reasons behind this issue and its possible iterations, let’s start fixing it.
How can I fix the Kernel Power 41 error on Windows 10?
Before getting into the actual tweaks, let’s go through some simple checks that might fix the problem quickly:
Check for any drivers that display a yellow exclamation mark in Device Manager. Just like with the Kernel Security Check Failure error, it’s recommended to make sure that your drivers are OK, and the exclamation mark to their right signals a possible problem.
Make sure that your Windows OS is updated.
Restart your PC. The system may recover without any intervention whatsoever.
Check your hardware for any damage and see if the fans inside the PC are working properly. This error may be triggered by hardware failure or overheating. If so, stop your machine and make the necessary repairs ASAP.
If you crosscheck the critical steps above, let’s fix this problem by using the solutions below.
1. Update your drivers
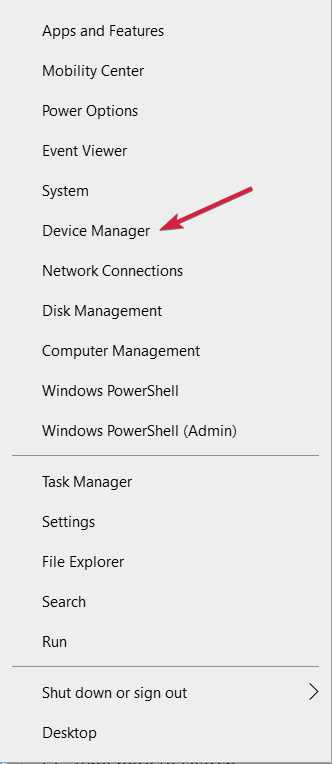
Right-click the Start button and select Device Manager.
Expand the sections one by one, and look if any of the drivers have an exclamation mark to their right.
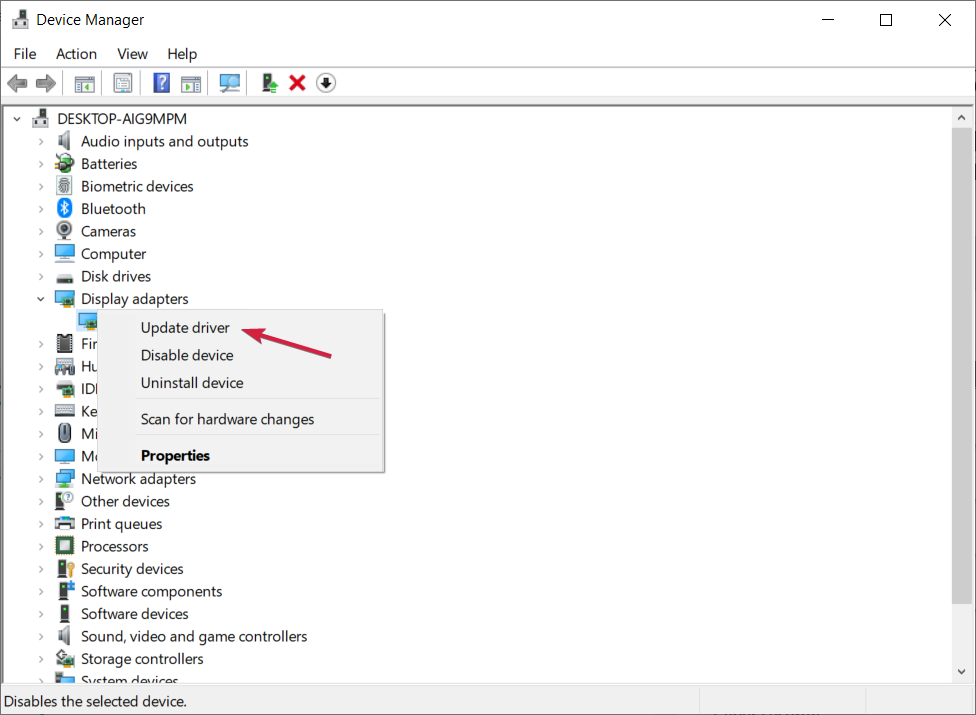
Right-click the driver and select Update driver.
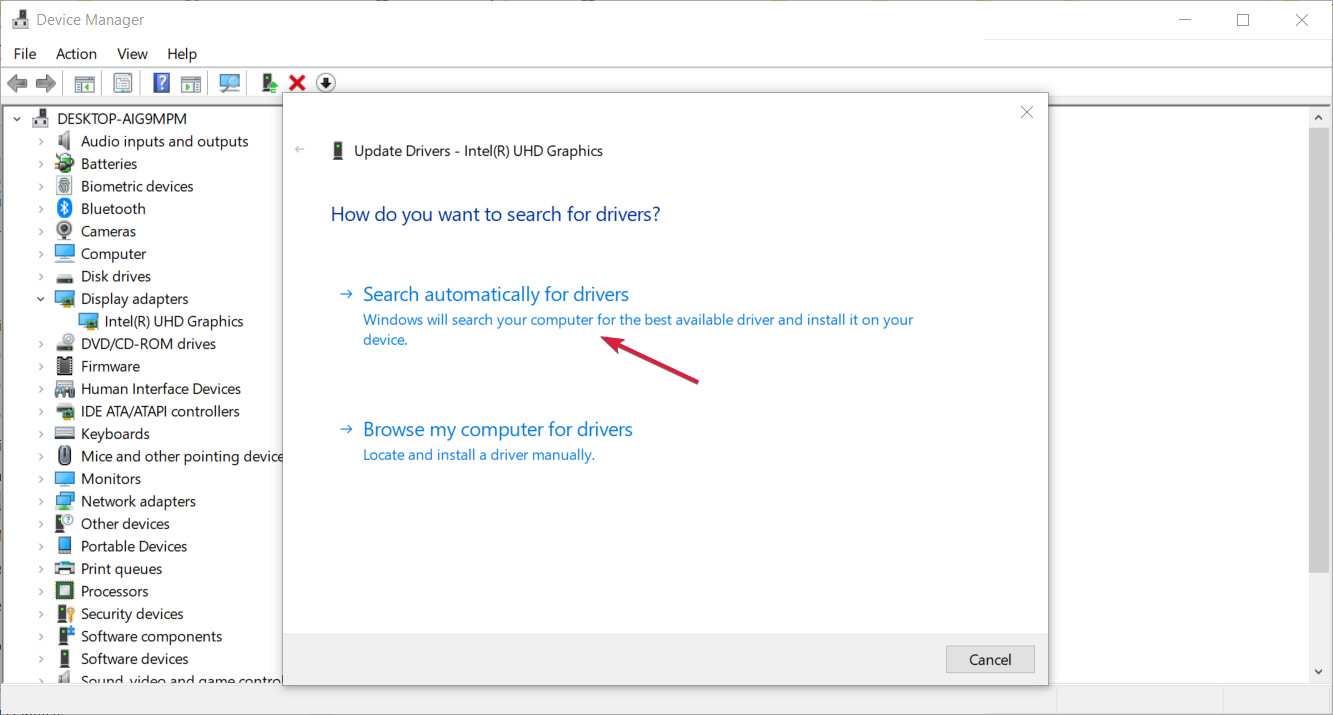
In the next window choose theSearch automatically for drivers option.
The system will look for any updates and install it.
If the problem still persists, instead of updating the driver in step 3, select Uninstall device.
Reboot your PC and the system will detect the device and install a generic driver for it.
If that doesn’t work either, go to the manufacturer’s website and download the driver for your OS.
Perform this solution especially for the audio and graphics drivers as they are the most prone to producing this error.
The kernel-power 41 (63) Windows 10 error is sometimes caused by outdated drivers, and if you want to fix it, make sure that you have the latest drivers installed.
You must keep your graphics drivers updated as it is known to prevent all the issues like LiveKernelEvent 144.
If you do not have the necessary computer skills to update/fix the drivers manually, we strongly suggest doing it automatically by using a third-party tool.
With a tool such as Fortect Driver Updater, you can scan for and update all your drivers. plus, this software will notify you when drivers go out of date, so you will never have to worry about this issue again.
Right-click the Start button and choose Device Manager from the menu.
When Device Manager opens, locate your audio drivers in the Sound, video and game controllers section.
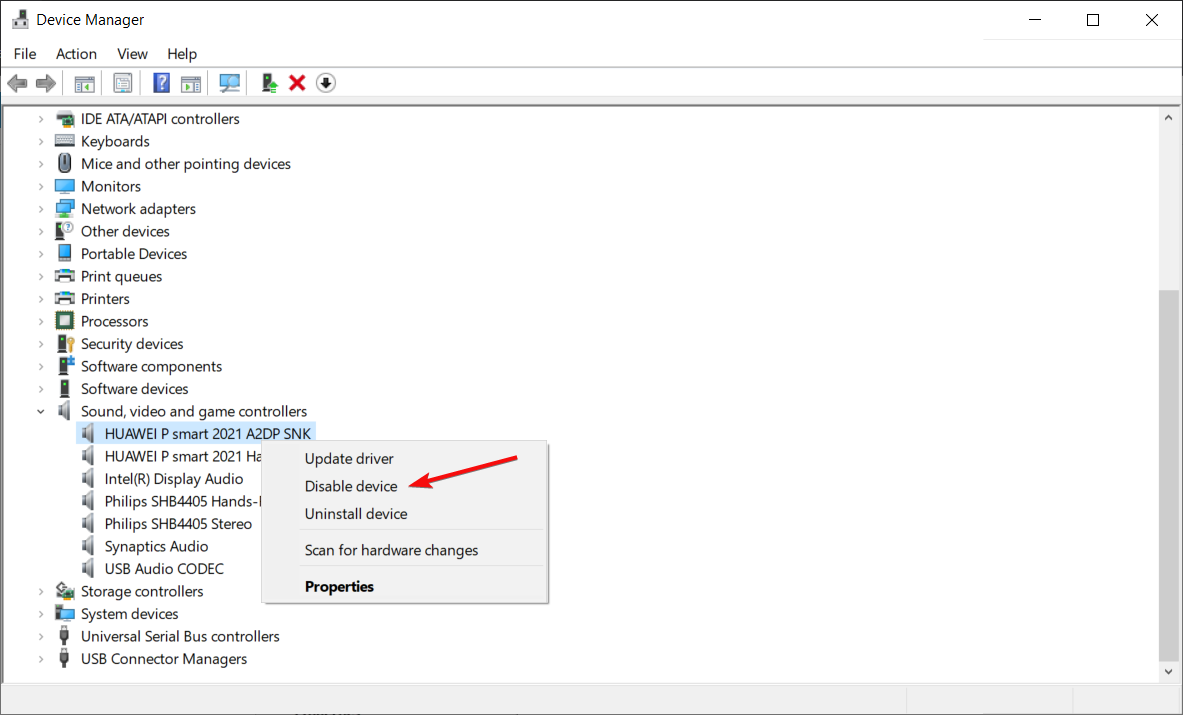
If you see duplicate entries, right-click one of those duplicates and choose Disable device from the menu.
We already mentioned that Kernel Power 41 errors can be caused by your audio driver, so make sure that you check Device Manager for any duplicate driver entries.
Even if you don’t have duplicate audio drivers, you can try disabling one of the audio drivers that you have on the list.
Users have reported that the issue was resolved after disabling ATI High Definition Audio Device from Device Manager.
Even if you don’t have ATI High Definition Audio Device installed, you can try disabling any audio device that isn’t High Definition Audio Device.
3. Disable or uninstall your antivirus
Certain antivirus software, such as AVG, can cause Kernel Power 41 errors on your Windows 10 device. If you have AVG antivirus installed, try to temporarily disable or uninstall it and see if the issue is resolved. Sometimes, the event 41 kernel power fix is as simple as deleting/reinstalling your security software.
If the problem persists, you might want to consider switching to a different antivirus software that offers efficient protection.
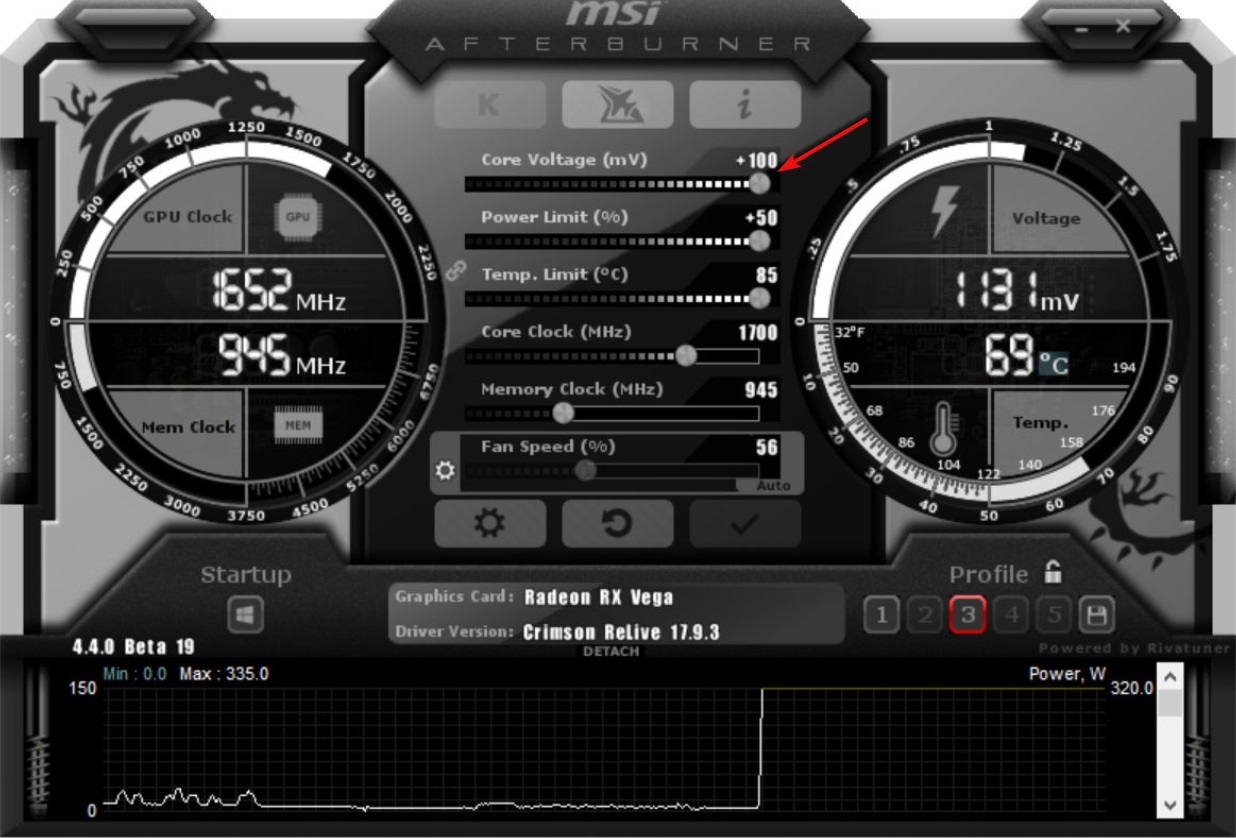
For example, in MSI Afterburner, you need to access the Settings menu and adjust the voltage of the
Please note that although this solution worked for some of our readers, it’s a delicate procedure, so if you don’t do it properly, there is a chance you can damage your components.
5. Change your power settings
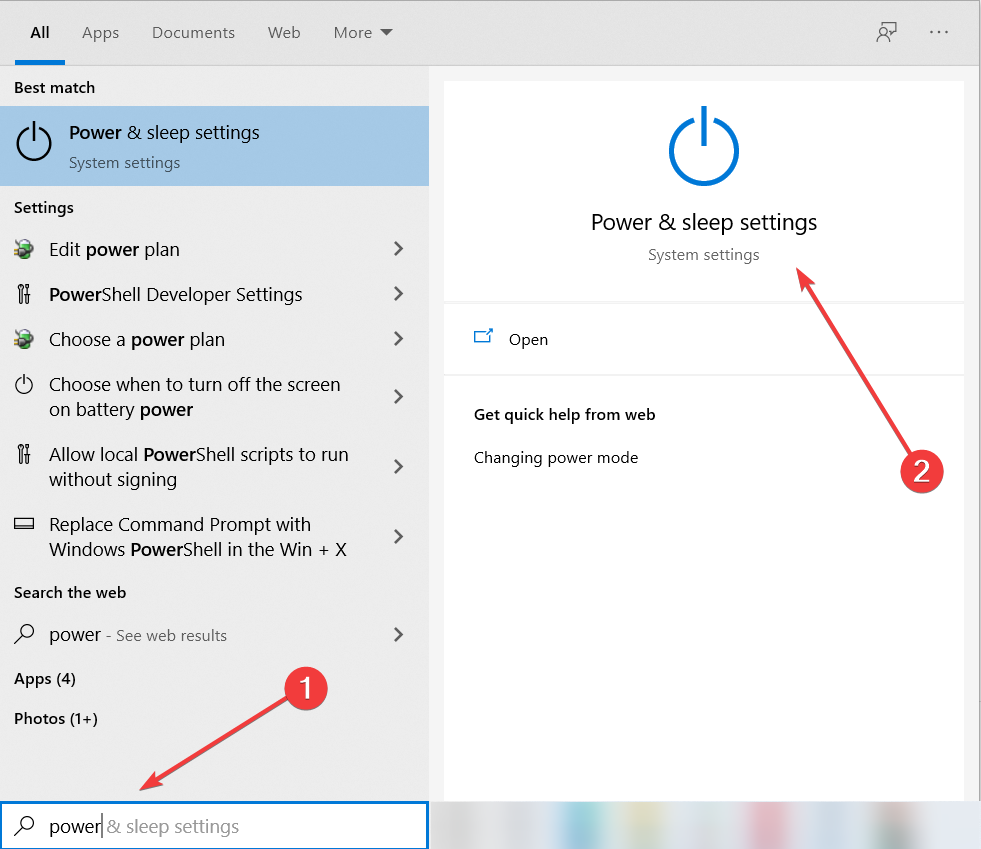
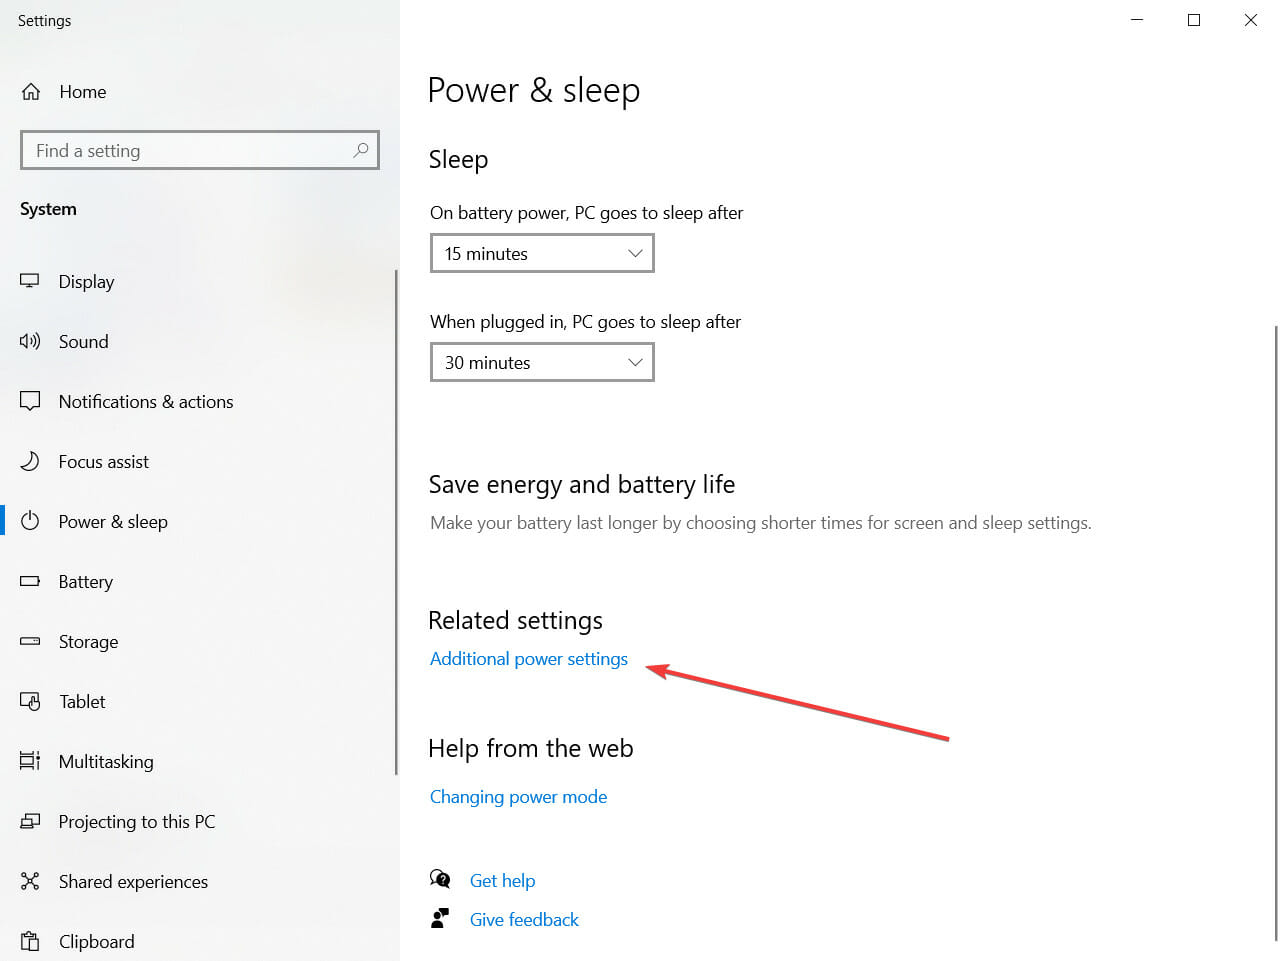
Press Windows key + S, type power, and choose Power & Sleep settings from the menu.
When Power Options window opens, click on Additional power settings.
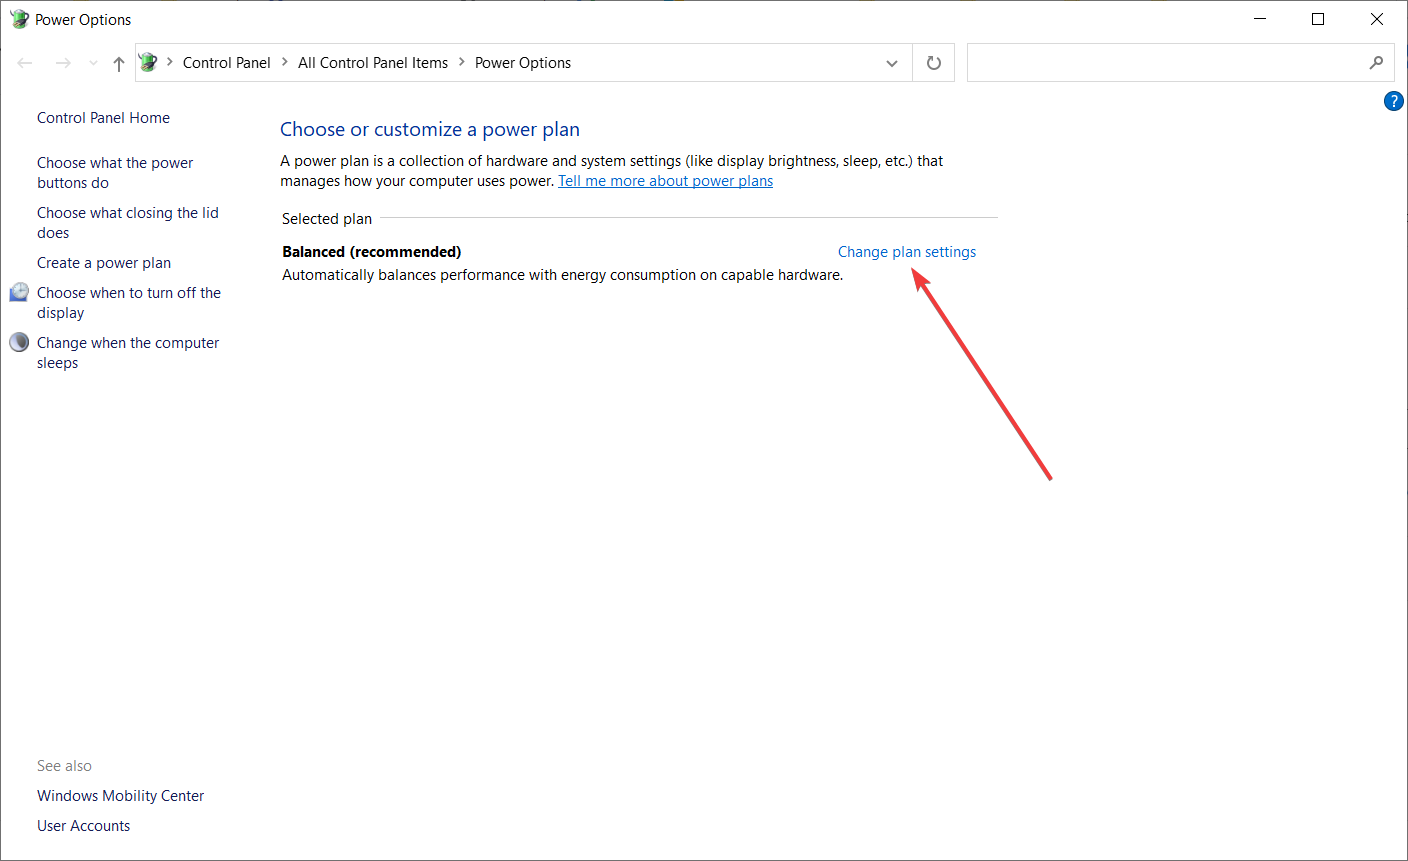
Find your current plan and click on Change plan settings.
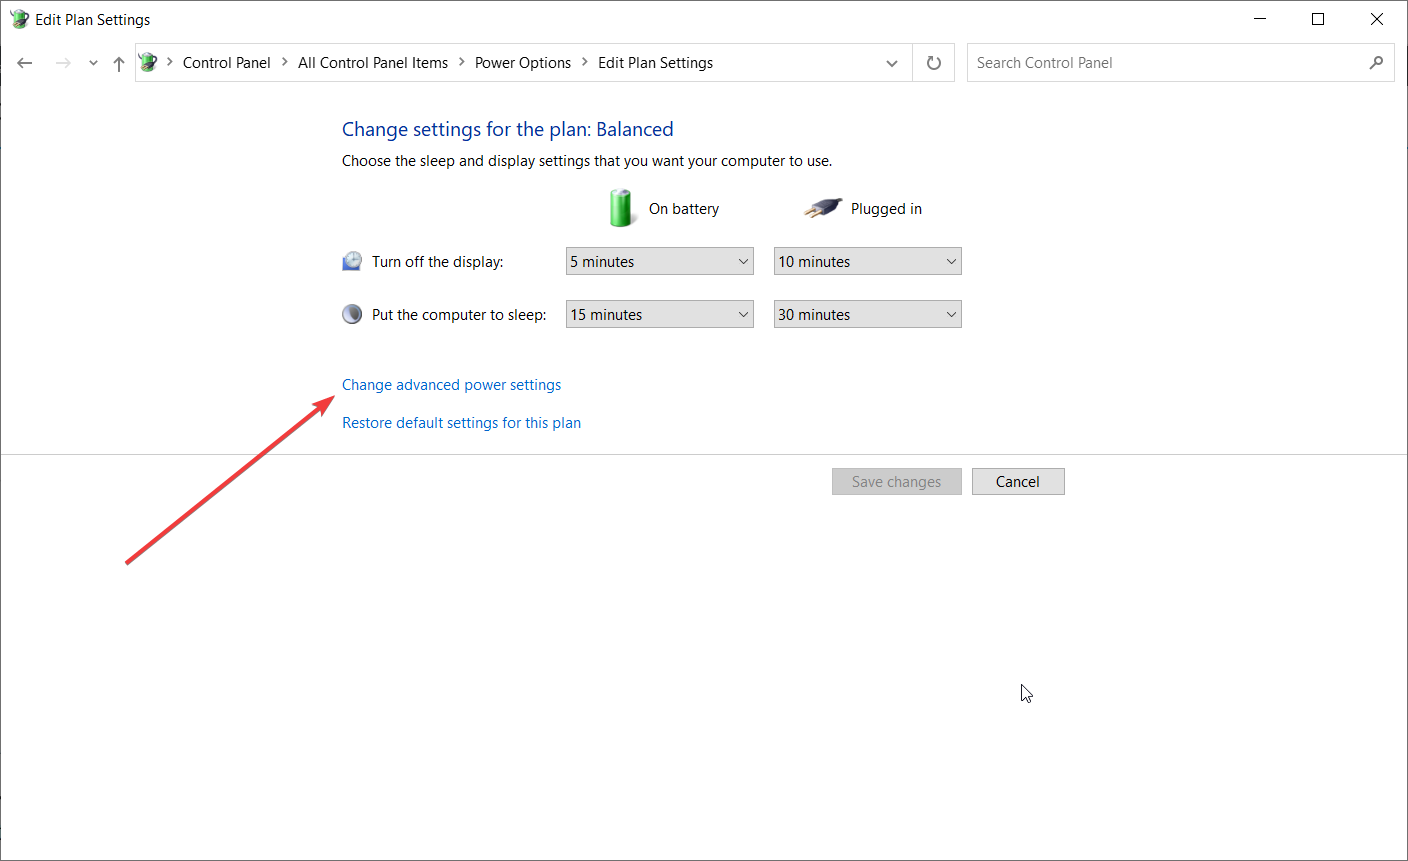
Now click on Change advanced power settings.
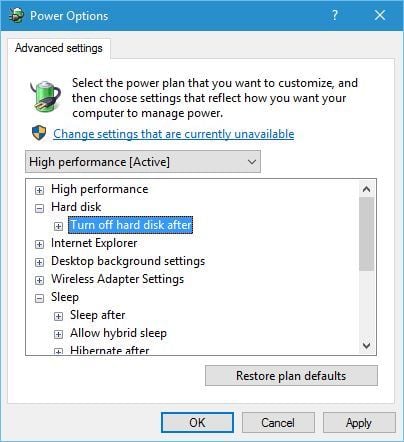
Locate Hard disk section and expand it. Click on Turn off hard disk after and set it to Never (You can do that by entering 0 as a value).
Find the Sleep section and set the sleep timer to 0 in order to turn it off.
Click Apply and OK to save the changes.
Kernel Power 41 blue screen errors can be caused by your power settings, so it might be best that you change some of those settings.
If you can’t find your Power Plans, get them back by following the easy steps in this comprehensive article.
6. Turn off Fast Startup
Press Windows key + S, type power, and select Power & Sleep settings from the menu.
When Power Options window opens, click on Additional power settings.
When Power Options window opens, click on Choose what the power buttons do.
Click on Change settings that are currently unavailable.
Scroll down to the Shutdown settings section.
Locate Turn on fast startup (recommended) and uncheck it.
Click Save changes.
You should know that this issue can be caused by the Fast Startup option. In order to fix this problem, it’s advised that you turn off the Fast Startup feature, and you can do that by following the steps above.
After you’ve turned off Fast Startup, your computer might start a bit slower, but the Kernel Power 41 error should be resolved.
2. Select Update & security and click on View update history.
3. Choose to Uninstall updates.
4. Look for the last update or any other recent update that might have caused the error.
5. Uninstall the latest update (and any other recent ones) and restart your PC.
We all know how Windows 10 mandatory updates can bring us a world of pain. Maybe the intentions were good, but the end results are preposterous for some users.
Some of them reported that the Kernel Power Error 41 started with the latest Windows Updates, which rendered the system completely unusable.
Now, since you can’t avoid updates completely, you can at least relieve yourself from the recent updates by uninstalling them from the system.
If you’re having trouble opening the Setting app, check out this complete guide to solve the issue.
9. Disable Auto-restart in the Advanced System settings
In the Windows Search bar, type advanced settings and open View advanced system settings.
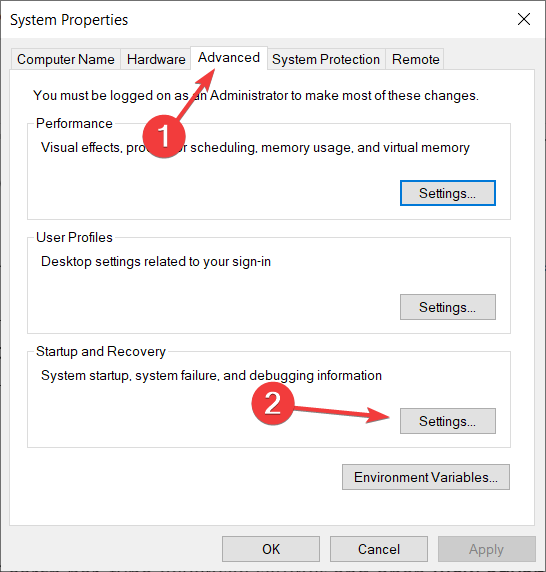
Select theAdvanced tab, then select Settings under the Startup and Recovery section.
Uncheck the Automatically restart box and confirm the changes.
This workaround comes into play only and only if you’re 100% sure that your hardware is spot on.
The majority of affected users resolved the issue by replacing some of the key hardware components, with a special focus on the power supply and CPU.
You may increase the voltage towards your CPU in the BIOS. This way, the CPU will always have enough power and will not shut down.
Therefore, if you’re completely certain that everything is bread and butter concerning the hardware, but the sudden shutdowns with the same error reoccur frequently, you can try and disable the error-inflicted auto-restart.
In case it’s an electrical fault, and you are persistently getting the Kernel Power 41 error, the likelihood of damage to sensitive components is even higher. So, in all, the error is pretty bad, and you should get it fixed as soon as possible.
Because event 41 kernel power is pretty standard and many users complained, even Microsoft made a detailed document explaining the error. You can check out their advanced troubleshooting guide for more info on what it is and what causes it.
If you have any more questions about the event 41 Kernel Power, feel free to post them in the comments section below. Our latest guide tackles the Invalid_Kernel_Stack_Address error, so you might want to check it out.
The popular spreadsheet application is famous for its computing formula, but with this feature, you can sort, filter, calculate, and write formulas with pictures.
“We’ve received a lot of feedback about the wish to be able to insert images in cells, and we’re happy to deliver! Your images can now be part of the worksheet, instead of floating on top. You can move and resize cells, sort and filter, and work with images within an Excel table. This improvement unlocks and facilitates many new scenarios, such as tracking inventories, creating employee dashboards, or building games and brackets.”
There are a few possibilities that come with this formula, which also works in the Safe mode. You can fit the picture in the cell and maintain its aspect ratio or ignore it, maintain the original size which could exceed the cell boundary, or customize the height and the width.
Read along to find out how to do so in Excel.
How to insert images into cells in Microsoft Excel.
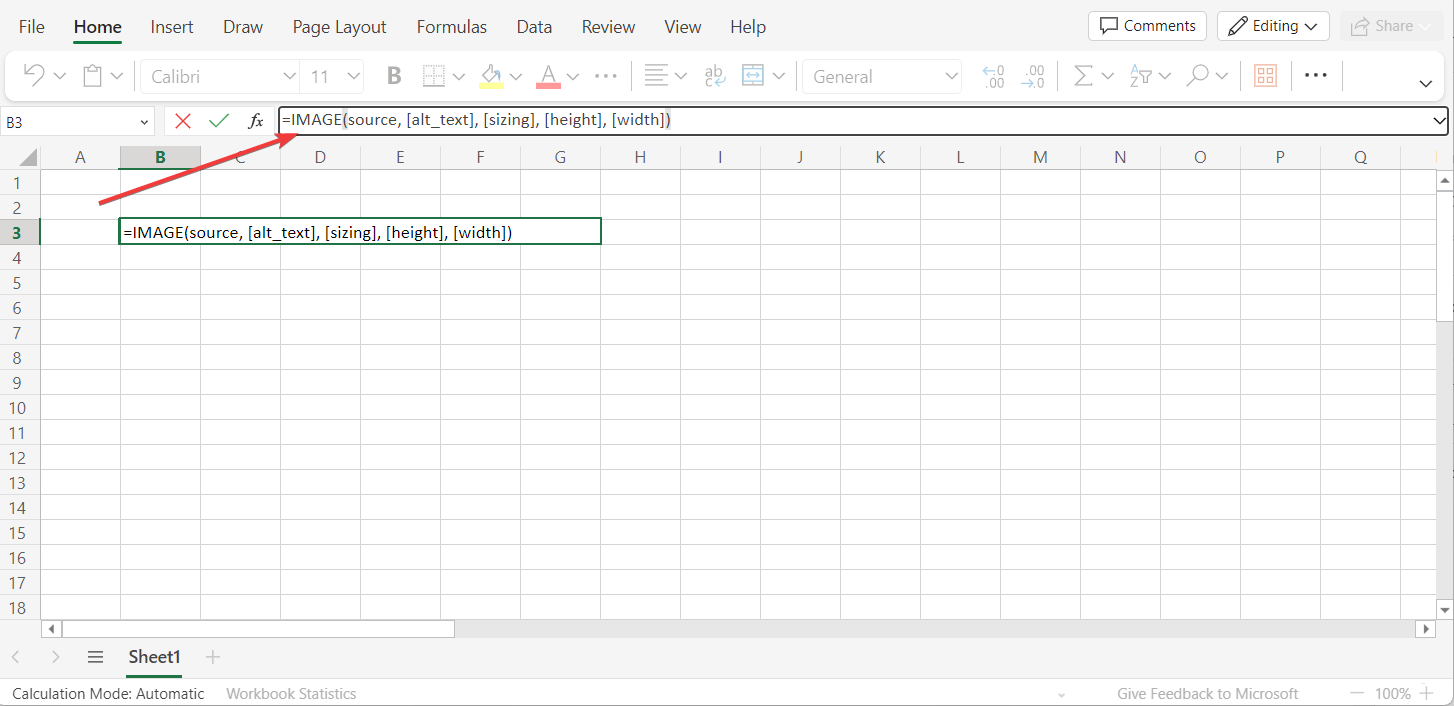
1 With your Microsoft Excel opens, type =IMAGE(source, [alt_text], [sizing], [height], [width]) into the desired cell.
Please be mindful that the function requires a web source location (BMP, JPG/JPEG, GIF, TIFF, PNG, ICO, and WEBP files with an HTTP protocol are supported).
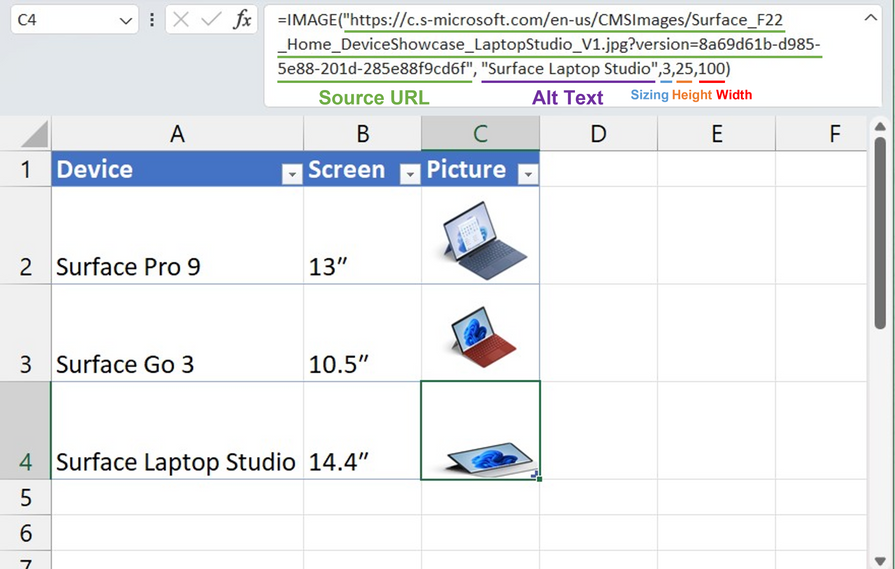
2. Replace source with the web location, [alt_text] with the alt text, and so on.
However, it’s worth noticing that the URL limit is set to just 255 characters, you can do a workaround of it by putting the image link in another cell and then referencing that cell as a source.
Have you ever used this feature? Let us know in the comments!
Just a few days after the latest support for .NET 6 and .NET 7, Microsoft announced the release of .NET 8, and its first preview is ready to be downloaded for Windows, Linux, and macOS and promised to release new previews and candidate builds every month.
The announcement came three months after .NET 7 was launched in general availability, but this is the first preview release of the tech giant’s next LTS (long-term support) version of the framework.
Releases of .NET include products, libraries, runtime, and tooling, and represent a collaboration across multiple teams inside and outside Microsoft. The broader themes covered in this blog post do not encompass all of the key scenarios and investments for .NET 8. They represent large areas but are just a part of all the important work going into .NET 8.
Jeremy Likness, Principal Product Manager for .NET.
Microsoft .NET 8 brings several tools, but the tech giant highlights the Ahead-of-Time (AOT) compilation in Native AOT and .NET Container images, which improves startup time, battery life, and memory footprint.
Publishing app with Native AOT creates a fully self-contained version of your app that doesn’t need a separate runtime because everything is included in a single file. As of preview 1, this single file is smaller. In fact, Linux builds are now up to 50% smaller.
Read along to find out how you can download and install Microsoft .NET 8.
2. Depending on your need, you can choose Build apps – SDK or Run apps – Runtime.
3. Choose whichever platform you’ll be running it on. In this case, we’re choosing Windows x86 for app developers, which is compatible for Visual Studio 2022 (v17.6 Preview 1) users.
4. Double-click on the file once the download is finished.
5. Click Install.
What are your thoughts on Microsoft .NET 8? Let us know in the comments!
Microsoft just released Windows 11 Build 22621.1343 (KB5022913) to Insiders in the Release Preview Channel for version 22H2 users, bringing a plethora of updates to live. Once this feature comes stable, it could help you improve the energy efficiency of your device and reduce your carbon footprint.
As spotted by Windows enthusiast PhantomOcean3 (@PhantomOfEarth), additionally, the latest build also introduces a lot of nice additions to Windows 11, such as an addition of process filtering on task manager, a new start menu search box design, and a slight tweak in the taskbar, especially for tablet users.
New taskbar search experience and updated start menu search box design are officially coming to Windows 11, version 22H2 with the KB5022913 update, which should be available by the end of this month for stable pic.twitter.com/lXs32PUOLb
With that being said, however, these new features are still out for review by select users and aren’t out in the stable yet, so you may expect a few performance hiccups here and there. Features are usually rolled out for general users a month after their availability in the Release Preview Channel.
How to enable & use the energy recommendations on Windows 11?
1. Make sure to join the Insider program and have Windows 11 Build 22621.1343 installed in your system. If not, head over to Microsoft’s Preview Windows page to get started.
2. Go to Settings → System.
3. Scroll down a bit to Power & Battery → Energy Recommendations. Click Apply all to enable all the recommendations.
What other features and fixes are coming in KB5022913?
New features
New! This update provided access Windows Studio Effects directly from quick settings on the taskbar for devices that had a supported neural processing unit (NPU). This made it quick and easy to turn on and configure camera effects. Those effects included Background blur, Eye contact, Automatic framing, and Audio effects (Voice focus). You can still access these effects in the Settings pages.
New! This update made it easier to get help if you were having PC issues. It added a link to the Quick Assist app at the bottom of Settings > System > Troubleshooters. You could also find Quick Assist in the Start menu’s All apps list.
New! This update improved the search box experience on the taskbar. As you typed in the search box, search results appeared in the search box. You could also change the search experience you wanted for your taskbar by going to Settings > Personalization > Taskbar. For commercial customers, this update added a new policy for IT administrators to manage how the search box on the taskbar appears in your organization. For more information, see Customizing search on the Windows 11 taskbar.
New! This update provided energy recommendations. If you used them, they could help to improve the energy efficiency of your PC and reduce your carbon footprint. Go to Settings > System > Power & Battery > Energy Recommendations.
New! This update enhanced the system tray (formerly called the notification area). All icons had a rounded focus and hover treatment in the lower right, including the “Show hidden icons” flyout menu. You could move icons to rearrange them in the “Show hidden icons” flyout menu or move icons to the taskbar.
New! This update introduced a touch-optimized taskbar for 2-in-1 devices that you could use as a tablet. There were two states of this taskbar: collapsed and expanded. To switch between the two states, swipe up and down on the bottom of your screen. When collapsed in tablet mode, the taskbar receded to give you more screen space and kept you from accidentally opening the taskbar. When expanded in tablet mode, the taskbar was optimized to be easier to use with touch. Your taskbar automatically changed to this optimized version when you disconnected or folded back the keyboard.
This feature only worked on devices that could be used as tablets and was on by default. To change that, go to Settings > Personalization > Taskbar > Taskbar behaviors. The setting is called “Optimize taskbar for touch interactions when this device is used as a tablet.” If your company manages Windows updates for your device, this feature will be off by default. Administrators can turn it on using the new commercial control for continuous innovation.
New! This update provided enhanced support for braille devices. They continued working while you switched between Microsoft Narrator and third-party screen readers. Narrator automatically changed braille drivers. For more information, see Chapter 8: Using Narrator with braille.
New! This update also added support for new braille displays and new braille input and output languages in Narrator. Some of the new braille displays included the APH Chameleon, the APH Mantis Q40, the NLS eReader, and many more. For more information, see Chapter 8: Using Narrator with braille.
New! This update made voice access more flexible and supported interaction with more user interface (UI) controls. For example, voice interacted with controls that contained:
Names that had numbers, such as “Click 5”
Names without whitespaces between them, such as “click PivotTable” or “click PivotChart”
Names that had special characters, such as Bluetooth & devices (“click Bluetooth and devices”) or Dial – up (“click dial hyphen up”)
New! This update added voice access support for spin controls, thumb controls, and split buttons. You interact with these controls by using the “click” command or number overlays. This update also fixed issues that affected snapping commands that snapped a window left or right. Commands that moved the cursor in a text box ran instantly.
New! This update also provided voice scrolling enhancements. You could use voice to scroll to the extreme left and right on a page. You could also use continuous scrolling to the left or right like what is already present for vertical scrolling. For more information about the new voice access commands, see Voice access command list.
New! For devices that were joined to Azure Active Directory (AAD), this update provided AI-powered recommended content on your Start menu. On the Start menu, you found content to help you to prepare for meetings, quickly access files you were collaborating on, and more.
New! We added the new Tamil Anjal keyboard for the Tamil language. To add it, make sure Tamil (Singapore), Tamil (Malaysia), Tamil (Sri Lanka), or Tamil (India) appears in Settings > Time & Language > Language & Region. Select the ellipses (…) next to the language. Select Language Options. Add Tamil Anjal (QWERTY) to the list of keyboards.
Fixes
We fixed an issue that affected the Color filters setting. When you selected Inverted, the system set it to Grayscale instead.
We improved the reliability of Windows after you installed an update.
We supported the United Mexican States’ daylight-saving time change order for 2023.
We fixed a date information issue. It affected the format of dates sent between Windows and some versions of the Heimdal Kerberos library.
We fixed an issue that affected IE mode. The text on the status bar was not always visible.
We fixed compatibility issues that affected some printers. Those printers used Windows Graphical Device Interface (GDI) printer drivers. Those drivers did not completely adhere to GDI specifications.
We fixed an issue that affected the software keyboard. It did not appear in the Out-of-Box Experience (OOBE) after a Push-button reset (factory reset). This type of reset required an external keyboard to be attached to provide credentials.
We fixed an issue that displayed a blue screen during video playback. This occurred after you set high dynamic range (HDR) on your display.
We fixed an issue that might have affected the touch keyboard and the PIN entry keyboard. You might not have been able to use them to enter text when you signed in to your device.
We fixed an issue that affected AppV. It stopped file names from having the correct letter case (uppercase or lowercase).
We fixed an issue that affected Microsoft Edge. The issue removed conflicting policies for Microsoft Edge. This occurred when you set the MDMWinsOverGPFlag in a Microsoft Intune tenant and Intune detected a policy conflict.
We fixed an issue that affected provisioning packages. They failed to apply in certain circumstances when elevation was required.
We fixed an issue that affected Azure Active Directory (Azure AD). Using a provisioning package for bulk provisioning failed.
We fixed an issue that affected Universal Print’s Configuration Service Provider (CSP). A command prompt window appeared when you installed a printer.
We fixed a reliability issue that occurred when you used Task View.
We fixed an issue that affected which folders appeared in the Browse for Folder picker.
We fixed an issue that affected File Explorer. When you used Shift +Tab or Shift+F6, the input focus did not move.
We fixed an issue that affected the user interface (UI). The volume up and volume down commands from a Bluetooth keyboard did not display.
We fixed an issue that affected Xbox subscribers. If you purchased an Xbox subscription using the “Redeem code” option, the Xbox subscription card did not appear on the Settings Accounts page. This occurred when recurring billing was off.
We fixed an issue that might have affected lsass.exe. It might have stopped responding. This occurred when it sent a Lightweight Directory Access Protocol (LDAP) query to a domain controller that had a very large LDAP filter.
We fixed an issue that affected the Local Security Authority Subsystem Service (LSASS). LSASS might have stopped responding. This occurred after you ran Sysprep on a domain-joined machine.
We fixed an issue that affected copying from a network to a local drive. Copying was slower than expected for some users.
We fixed an issue that affected parity virtual disks. Using Server Manager to create them failed.
Are you excited about these features? Let us know in the comments!
Time management and keeping to tasks have been a challenge for most individuals. Thus, a calendar app helps you manage and schedule tasks, appointments, and events.
So, this article will look at how to add and use Google Calendar on Windows 11.
Is there a Google Calendar app for Windows 11?
Calendar does not have a standalone app for Windows on Microsoft Store. Although, there is no indication of why Google has yet to launch its Google Calendar desktop app.
However, Google Calendar is available on the web and can be accessed through a web browser on Windows 11 or add the web app shortcut.
Click the Menu button (the three dots), hover with your mouse pointer over More tools, and select Create shortcut.
Check the Open as window box and hit the Create button.
Now, go to your desktop and the Google Calendar shortcut appeared. Right-click on it, select Show more options and select Pin to taskbar from the menu.
Now, you will see the Google Calendar shortcut on your taskbar for quick access.
You need to know that if you don’t check the Open as window box in step 4, every time you click on the shortcut, this will launch the app in Chrome.
This way, the calendar will appear in a separate window. Also, the app will connect to the internet to access Google Calendar.
In our example, we used Google Chrome because it’s the most simple method but you may use other browsers, log into your Google account and create a shortcut to your Google Calendar.
2. Synchronize Google Calendar with Windows Calendar
Left-click the Start button, type in calendar, and click it to open it.
Select the Settings icon in the bottom-left corner of the sidebar menu and click on Manage Account from the pop-up menu.
Click on the Add account button, then select Google from the drop-down.
On the Sign-in menu, fill in your Google account credentials and follow the on-screen instructions.
After signing in, click on Allow to grant Google Calendar the needed permissions.
Input your name into the Send your messages using this name bar and click the Sign-in button.
With the unavailability of the Google Calendar on Windows, syncing your Google Calendar with the Microsoft Calendar will be the best solution as it saves time, is user-friendly, and saves space by having one calendar app.
1. Create an Event on your Google Calendar on Windows 11
Left-click the Start button, type in calendar, and click it to open it.
Select the date for the event and type in the name of the event in the name bar.
Check or uncheck the box for All day to specify the nature of the event, then input the time the event will take place.
Add the event’s location, then click on the More details button.
Select the reminder notification time and input time.
Select the Event description bar to input the optional event description.
Click on the drop-down arrow button beside the color dot, and from the list, click on Google Calendar. Click on Save.
Selecting Google Calendar and saving the details set on the calendar events allows it to take effect on the Google Calendar. Also, you can find out how to restore Google Calendar missing on Windows.
2. Manage Google Account Sync Settings
Left-click the Start button, type in Calendar, and click it to open it.
Select the Settings icon in the bottom-left corner of the sidebar menu and click on Manage Account from the pop-up menu.
Click on your Google account to prompt its settings interface.
Select Change mailbox sync settings.
Under the Sync option, you can turn on or off all sync options to your personal preference.
Google sync allows users to make changes to their calendar or contacts on one device that will be reflected on all other devices where the account is logged on. It makes it easier to keep track of events and calendar activities across multiple devices.
In conclusion, following the steps outlined above, you should find it easy to use the Google Calendar on Windows 11. If you have more questions or suggestions, kindly drop them in the comments section.
You may encounter the error message Game Security Violation Detected when attempting to launch Apex Legend.
The error generally shows out of the blue without prior indication and prevents you from launching the game. And every Apex Legend fan must know how to fix it.
This article looks at some troubleshooting steps to help you resolve the Game Security Violation Detected (#00000001) error in Apex Legends.
Why does the Game security violation detected message appear in Apex?
This Game Security Violation Detected error occurs when Apex Legend’s anti-cheat system detects an issue with your game files. That said, most of the time, it is a false positive. A few triggers for this error are:
Third-party programs or software – The installed antivirus or firewall is often found to lead to the error. Also, the message can appear when the game’s anti-cheat system detects the presence of other third-party programs or software running alongside the game.
Unauthorized modifications – The anti-cheat system is designed to detect any unauthorized changes to the game’s code or memory. If it detects any suspicious activity, it will trigger the message.
Hardware monitoring software – Some types of hardware monitoring software, such as those that monitor CPU or GPU temperatures, may trigger the anti-cheat system and cause the message to appear.
Outdated game files – In some cases, the Game Security Violation Detected message might appear if the game’s files are outdated or corrupted.
What are some of the most common errors in Apex?
Apex Legends is no stranger to errors; users often encounter these while playing the game. But most errors are easily fixable and shouldn’t take much time.
Here are some of the common Apex Legends errors:
Game Security Violation Detected Apex Legends [LightingService.exe] – usually triggered by your antivirus and is often a false positive alarm.
Apex Legends Game Security Violation Detected (0000006) – This is very similar to the above error and is often triggered by the same things.
Game Security Violation Detected Apex [LEDKeeper] – Here is another variant of the violation error we discuss in this guide.
0x887a0006 DXGI_ERROR_DEVICE_HUNG – This error typically occurs when the graphics processing unit (GPU) stops responding for some time, and the game cannot recover.
Apex Legends Error Code 23 – This connection error can occur when the game cannot connect to the servers.
Apex Legends Error Code: 100 – This error can prevent players from accessing the game and may occur for various reasons, including internet connectivity issues, server maintenance, firewall or antivirus software blocking the connection, or corrupted game files.
Also, you might come across many other Apex errors, and the solution listed here should work for most of these.
How do I fix Game Security Violation Detected in Apex?
1. Disable Antivirus and Firewall
1.1 Turn off the antivirus
Press Windows + S to open the Search menu, enter Windows Security in the text field, and click on the relevant search result.
Click on Virus & threat protection.
Next, click on Manage settings under Virus & threat protection settings.
Toggle the switch to turn off Real-time protection.
Click Yes in the UAC prompt that pops up.
If you have a third-party antivirus installed, open it and temporarily disable the antivirus. Once done, rerun Apex Legend and check if the Game Security Violation Detected error in Apex on Steam is resolved.
1.2 Disable Microsoft Defender Firewall
Click on Firewall & network protection in Windows Security.
Next, click on Private network or the other options here, depending on which one reads Active.
Toggle the switch to turn off the Microsoft Defender Firewall.
Click Yes in the UAC.
After disabling the firewall, run Apex Legends and check for any improvements. Then, makeable the firewall and real-time protection to keep your computer safe.
If disabling the firewall works, add the Apex Legends file to the white list. This way, you don’t have to disable the firewall whenever you want to play the game.
1.3 Allow through firewall
Press Windows + S to open the Search menu, enterAllow an app through Windows Firewall, and click on the relevant search result.
Click on Change settings.
Scroll down, tick the Private and Public boxes for every Apex Legends entry, and click OK to save the changes.
That’s it. Now try to rerun the game while keeping the Firewall enabled and check if the Game Security Violation Detected error in Apex Legends is fixed.
2. Repair the game
Launch Origin, and select My Game Library from the options on the left.
Right-click on Apex Legends, and then select Repair.
Origin will scan the game files and apply the required fixes to resolve any issues.
After the repair, close Origin, relaunch the game as administrator, and check if the Game Security Violation Detected error in Apex Legends is resolved.
Try to launch the game from the Origin client instead of directly launching it using the desktop shortcut. This method has worked for several users in fixing crashes.
If you have a third-party game booster software or game management utility installed, it may create issues with Apex Legend. For example, gaming laptops often come pre-installed with Game Center Software that can conflict with the game’s anti-cheat system.
Close all the third-party apps running in the background, then launch the game to see if it usually works. Also, you can uninstall the app if it doesn’t perform a critical function on the PC.
If the issue persists, open Task Manager and check if any process related to the game management tool or RGB lighting controller is still running in the background. If true, terminate the process and verify if the Game Security Violation Detected error in Apex Legends is fixed.
4. Reinstall Origin
Press Windows + R to launch the Run command, enter appwiz.cpl in the text field, and click OK.
Select Origin from the list of installed apps, and click on Uninstall.
Follow the on-screen instructions to complete the process.
Reboot the computer.
Download Origin, and run the setup to install it all over again.
When you open Origin, the Game Security Violation Detected (#0000000D)error in Apex Legends will be resolved.
Battle.net is a popular gaming client and the launcher for Blizzard’s multiplayer games. It has a fair share of users and commands significant appeal amongst the community. However, many users have recently reported that the Battle.net client is crashing on their PCs.
There isn’t a specific underlying cause for Battle Net crashing the computer, so identifying the problem and eliminating it may take time. No matter the case, we will help find you a solution when the game keeps crashing in Windows.
Why is Battle.net crashing on my PC?
Lack of permissions: One of the reasons the client crashes in Windows is the lack of administrative privileges.
Corrupt or outdated graphics driver: Even corrupt or outdated drivers can trigger issues, both with Battle.net and other apps on the PC.
Third-party conflicts: Several third-party applications, usually antivirus or security software, could be responsible when Battlenet crashes on the PC.
Misconfigured settings: Many users reported that it was the misconfigured app settings that led to Battle.net causing a blue screen.
What can I do if Battlenet is crashing on my PC?
Before we head to the solutions, restart the computer, launch Battle.net again, and verify if the problem is resolved, check for Windows updates, and if you have any third-party antivirus running on the computer, disable it, and verify whether Battlenet stops crashing on the PC.
1. Update the graphics driver
Press Windows + X to open the Power User menu, and select Device Manager.
Expand Display adapters, right-click on the graphics adapter, and choose Update driver.
Select Search automatically for drivers and wait for Windows to install the best available version.
In most cases, users could fix things when Battle.net kept crashing on the PC by updating the graphics driver. In case Windows is unable to find an update, you can directly head to the manufacturer’s website to manually install the driver. Here are quick links for the three:
Right-click on the Battle.net launcher and choose Properties.
Navigate to the Compatibility tab, tick the checkbox for Run this program as an administrator, and click OK to save the changes.
Once done, relaunch Battlenet and verify whether it still keeps crashing on the PC. If yes, move to the next solution.
3. Disable Nvidia RTX Voice
Press Ctrl + Shift + Esc to open the Task Manager, and head to the Startup tab.
Locate NVIDIA RTX Voice, select it, and click on Disable.
Now, restart the computer.
A few users reported that NVIDIA RTX Voice was responsible for Battlenet crashing on the PC, and disabling it from automatically launching at startup fixed things in no time.
4. Modify settings
Launch the Battle.net app, click on the main icon near the top left, and select Settings.
Now, under the App tab, scroll down to the bottom and untick the checkbox for Use browser hardware acceleration.
Click Restart Now in the confirmation prompt.
Again, open the Battle.net Settings, navigate to the Game Settings tab, select the one that’s crashing, and tick the checkbox for Additional command line arguments.
Paste the following in the field and hit Enter:-dx9
Even though most of the playable games that Blizzard offers are primarily made for DX10, some of them may perform better with DX9. So, after making the changes, check whether Battle.net stops crashing on the PC.
5. Reinstall Battle.net from scratch
Press Windows + R to open Run, type appwiz.cpl and hit Enter.
Locate Battle.net, select it, and click on Uninstall.
Click Yes in the UAC prompt.
Choose Yes, Uninstall in the confirmation box, and wait for the process to complete.
Once done, press Windows + R to open Run, paste the following paths individually, then hit Enter, and delete any Battle.net or Blizzard files/folders found there:%LOCALAPPDATA%%APPDATA%%TEMP%%PROGRAMDATA%
If the previous solutions didn’t work, reinstalling Battle.net can help fix things if it keeps crashing on Windows PC. Just make sure to remove all the related files before reinstalling the app. Or you may use a reliable uninstaller software to do the same.
6. Create a new user account
Press Windows + I to open Settings, and click on Accounts.
Go to Family & other users from the navigation pane, and click on Add someone else to this PC.
Click on I don’t have this person’s sign-in information.
Now, select Add a user without a Microsoft account.
Enter the username and password (not mandatory for Local Account), and click on Next to proceed.
Now, select the account you just created, and click on Change account type.
Choose Administrator from the dropdown menu, and click OK.
Finally, log into the new account, download Battle.net from the website, and it should run smoothly.
That’s it! If nothing else helps fix things when Battlenet is crashing on Windows PC, the last option is to create a new user account. It works almost every time, but since this process is time-consuming, we recommend you use it as a last resort.
Once the agreement comes into place, gamers can stream Xbox PC titles from GeForce NOW to PCs, macOS, Chromebooks, smartphones, and other devices. The news itself arrives amidst Microsoft’s latest attempt to acquire Activision Blizzard, which has turned into a tug-of-war saga with EU antitrust regulators.
The Head of Xbox Phil Spencer is optimistic that the partnership is beneficial for both parties and gives developers more ways to make money out of their games.
Xbox remains committed to giving people more choice and finding ways to expand how people play. This partnership will help grow NVIDIA’s catalog of titles to include games like Call of Duty, while giving developers more ways to offer streaming games. We are excited to offer gamers more ways to play the games they love.
Phil Spencer, the Head of Xbox
What could the Xbox – Nvidia integration mean for gamers?
Nvidia launched its GeForce NOW cloud gaming service in 2020 and has supported over 1.500 titles for its 25 million members in over 100 countries. With this addition, Xbox games in third-party stores like Steam or Epic will be able to be streamed through GeForce NOW.
Combining the incredibly rich catalog of Xbox first party games with GeForce NOW’s high-performance streaming capabilities will propel cloud gaming into a mainstream offering that appeals to gamers at all levels of interest and experience. Through this partnership, more of the world’s most popular titles will now be available from the cloud with just a click, playable by millions more gamers
Jeff Fisher, senior vice president for GeForce at NVIDIA.
In the latest update of the Microsoft-Activision saga, the Redmond-based company’s execs arrived at a hearing to persuade EU antitrust regulators to greenlight the deal.
Have you ever faced PING: transmit failed. General failure? Unfortunately, it’s common for Windows users who try to run ping commands.
The main reasons for the ping general failure error are a corrupt DNS cache and network configuration mishaps. Follow the steps below to fix this error in no time.
How do I fix the PING: transmit failed. General failure error?
Before trying advanced fixe, make sure you restart your PC, and router and check if your internet connection is working properly. If the error persists, continue with the guidelines below.
1. Run the Network Adapter troubleshooter
Open the Search menu and type Settings.
Select the Update and Security option.
Navigate to select Troubleshoot from the left pane and click on Additional troubleshoot.
Choose Internet Connection and click on Run the troubleshooter option.
Follow the troubleshooting process to see the diagnosis.
Restart your PC.
2. Flush the Corrupt DNS Cache
Go to the Windows Search tab and type cmd, then click on the Run as administrator option.
Type this command in the Command Prompt and hit Enter: ipconfig /flushdns
Restart your PC after the process.
3. Disable IPv6 transition technologies
Go to Start Menu, enter cmdin the Search box, right-click on it and select Run as administrator.
Into the Command Prompt, enter the commands below and hit Enter after each one.
netsh int ipv6 isatap set state disabled
netsh int ipv6 6to4 set state disabled
netsh interface teredo set state disable
After running these commands, close Command Prompt and restart your computer, and check to see if the problem is fixed and if you can run adequate ping commands.
Go to Start Menu, enter cmdin the Search box, right-click on it and select Run as administrator.
Into the Command Prompt, enter the commands below and hit Enter after each one.
netsh i i r r
netsh winsock reset
After doing that, close Command Prompt and restart your computer.
We hope these solutions helped you fix your PC’s Ping transmit general failure error. If any of these solutions worked for you, let us know in the comments below.
If your Epson printer is not printing on Windows, the cause is usually related to the connection, drivers, ink levels, or internal errors. This guide explains the most common reasons and gives you detailed, step-by-step fixes that apply to all Epson models.
USB, Wi‑Fi, or Ethernet connection problems that interrupt communication
Low ink, clogged print heads, or cartridges not installed correctly
Paper jams, incorrect paper size, or mismatched print settings
Outdated, missing, or corrupted printer drivers
Firmware bugs or internal hardware issues such as faulty sensors or worn components
Step-by-Step Fixes for Epson Printer Not Printing
1. Power Cycle the Printer and PC
Turn off your printer and computer.
Unplug the printer for 30 seconds.
Plug it back in and restart both devices.
Restarting both your printer and PC clears temporary glitches stored in their memory. Over time, small communication errors can accumulate between devices, blocking print jobs. Power cycling forces a clean restart so the printer reinitializes its connection to the computer.
2. Reinstall the Printer Driver
Press Windows + R, type devmgmt.msc, and press Enter.
Expand Print queues, right-click your Epson printer, and select Uninstall device.
Restart your PC and turn the printer on. The computer should automatically reinstall the printer driver upon detecting the device.
Printer drivers are like translators between your PC and printer. If they are outdated, corrupted, or not designed for your exact model, your print commands may not be recognized. A fresh install ensures full compatibility.
For a faster option, you can use a trusted automatic driver updater such as Fortect. It automatically scans and installs the latest versions of compatible drivers for your hardware.
3. Check Physical Connections
Replace or reseat your USB cable.
Confirm Wi‑Fi connection on the printer display.
Check the Ethernet cable and router status.
Loose cables, bad ports, or unstable wireless signals can silently break the connection. Even a partially connected USB cable can cause intermittent failures. For wireless printers, router updates or interference can cause disconnects. For more help, see our guide on fixing Epson printer Wi‑Fi connection issues.
4. Set Your Epson Printer as Default
Go to Settings → Bluetooth & devices → Printers & scanners.
Select your Epson printer and choose Set as default.
If Windows changes your default printer after updates or when a new printer is connected, jobs may be sent to the wrong device, such as a PDF printer. Setting your Epson as the default ensures every job goes to the correct printer.
5. Clear the Print Queue
Open Control Panel → Devices and Printers.
Right-click your Epson printer and select See what’s printing.
Cancel all pending jobs.
If a single print job fails, it can block all the others behind it. This is common if the document is too large, corrupted, or uses unsupported fonts or graphics. Clearing the queue resets the print workflow so new jobs can process.
6. Run the Windows Printer Troubleshooter
Open Settings → System → Troubleshoot → Other troubleshooters.
Click Run next to Printer.
The troubleshooter scans for paused print queues, wrong configurations, driver mismatches, and offline status. It applies recommended fixes automatically, which saves time and avoids guesswork.
7. Restart the Printer Spooler Service
Press Windows + R, type services.msc, and press Enter.
Right-click Print Spooler and select Stop.
Delete files in C:\Windows\System32\spool\PRINTERS.
Right-click Print Spooler and select Start.
The spooler is the Windows service that stores and organizes print jobs before sending them to your printer. If its files are corrupted or overloaded, new jobs cannot start. Restarting and clearing it resets the process completely.
8. Check Ink or Toner and Paper Settings
Verify ink levels and cartridge installation.
Run Nozzle Check and Head Cleaning.
Match paper size and type in both Windows settings and the tray.
Low ink or toner can stop printing entirely, and even if ink remains, clogged nozzles can produce blank pages. Incorrect paper size or type settings in Windows can also cause the printer to reject the job. If the printer refuses to print black or white, see how to fix printers that will not print black and white.
9. Enable Print Directly to the Printer
Go to Control Panel → Devices and Printers.
Right-click your Epson printer and select Printer properties.
Open the Advanced tab and check Print directly to the printer.
This bypasses the spooler entirely and sends each job straight to the printer. It is helpful when the spooler service keeps crashing or causing long delays.
10. Update Printer Firmware
Download your model’s firmware from Epson’s support page.
Run the updater and follow the prompts.
Firmware updates address bugs, improve compatibility with Windows updates, and may fix known printing issues specific to your model. If your issue started after a Windows update, a firmware update often restores normal operation.
11. Test a Standalone Print
Disconnect the printer from your PC.
Use the printer’s control panel to print a test page.
If the printer cannot print a standalone test page, the problem is inside the printer such as faulty sensors, print head damage, or a board failure. If you also use Epson Easy Photo Print, see how to fix Epson Easy Photo Print not working.
FAQs
Why is my Epson printer printing blank pages?
Clogged nozzles or empty cartridges are the main culprits. Run a nozzle check from the printer’s utility menu. If you see gaps, run head cleaning until the pattern prints correctly. Using genuine Epson ink reduces clogging issues.
How do I fix the Epson printer showing as offline?
Confirm the printer is powered on and connected. In Devices and Printers, right-click the Epson printer, choose See what’s printing, uncheck Use Printer Offline, then set it as default so jobs route correctly.
What if my Epson only fails in certain programs?
This is likely a software-specific printing issue. Test printing from another application. If it works, update the affected program or export your file to PDF before printing.
Conclusion
Most Epson printer issues on Windows are caused by easy-to-fix problems like bad connections, stalled print jobs, or outdated drivers. Working through these solutions in order solves most cases without needing professional repair. If none of the steps work, the problem is likely hardware-related and requires Epson service. Keeping your printer’s drivers, firmware, and maintenance up to date will prevent many of these problems from happening again.
Most users update drivers on their PC manually. However, others don’t enjoy the heavy lifting and prefer downloading software for the job. Bit Driver Updater is one such tool that can help you keep your computer’s drivers up to date.
Working in the background, it scans your system for outdated and broken drivers and offers to download new ones from its online database. This is useful if you want to keep your computer in good shape.
Is Bit Driver Updater legit?
Bit Driver Updater is a user-friendly, comprehensive, and safe tool that effectively manages and updates drivers on both Windows and macOS, ensuring optimal system performance and compatibility.
To determine if a driver updater is good, you have to check out a few different criteria:
Ease of use
The software is available for both Windows and macOS users. It comes with an easy-to-use interface that allows you to manage all the installed drivers on your computer. You can uninstall them if they are no longer used or update them if they are outdated.
Functionality
Overall, Bit Driver Updater actively scans, updates, manages, and checks the status of drivers to optimize system performance and reliability.
Scans and Updates Drivers: Bit Driver Updater scans for outdated and broken drivers on the system and updates them from its online database.
Driver Management: Users can uninstall unused drivers and update outdated ones through the tool’s interface.
Driver Status Checks: It identifies functional drivers and detects corrupted ones, helping to maintain system stability and security.
Safety
Bit Driver Updater is generally safe to use, it’s not a virus and it doesn’t put you at risk of an infection of that kind.
However, its background operation, if left unchecked, can potentially slow down your computer and defeat its own purpose.
It’s crucial to configure its settings according to your PC’s specifications and usage to ensure optimal performance and avoid any unintended impact on system speed.
Driver Source & Certification
Bit Driver Updater claims to only pull WHQL-certified drivers from trusted sources like Microsoft or OEMs (Intel, NVIDIA, etc.). That’s great on paper—and a good sign if true. But real-world user experiences are mixed. Some users report system issues after updates, like broken touchpads or display problems. So while the tool says it sources from official vendors, it’s wise to double-check what it wants to install.
Backup & Restore Safety Nets
This is where BDU shines. It automatically backs up your current drivers before installing new ones. You can restore individual drivers or do a full rollback if something breaks. It also offers to create a system restore point, which is a nice touch for peace of mind.
Verdict: Solid backup and restore options. You’re covered if something goes sideways.
Scan Accuracy & Customization
The scan engine is fast and detailed. You’ll see version numbers, release dates, and publisher names for each outdated driver. Plus, you can schedule scans or exclude specific devices from updates. That’s handy. But—again—accuracy isn’t perfect. Some updates are mismatched or unnecessary, so don’t hit “Update All” blindly.
User Control & Transparency
You get a decent amount of control. Updates don’t install automatically unless you let them. You can review each one manually and skip anything that looks suspicious. The downside? There’s no detailed changelog, so you won’t know exactly what’s changing. Also, the one-click bulk update is locked behind the Pro version.
Performance & Annoying Extras
Bit Driver Updater is lightweight overall, but the free version installs something called “BG Search Monitor”—basically a browser search engine swap that helps fund the app. That’s a red flag. Some antivirus tools flag BDU as a PUP (potentially unwanted program) because of that bundled stuff. You may also see pop-ups or ads asking you to upgrade.
Here are the main things you should know about how to set it up:
How can I download and install Bit Driver Updater?
Go to your Download folder and click the file to open the installation wizard.
Click on Next and wait for the setup wizard to complete the installation.
The program will create a shortcut on your Desktop and you can click to open and start.
This option is for the Bit Driver Updater free version. If you would like access to more advanced features, such as anti-malware, you will need to purchase the Pro version that comes with a Bit Driver Updater license key.
Also, for those looking for Bit driver updater free key, we recommend not downloading any tools that claim to activate the updater for free since it could be malware.
Yes, like any other software, you can delete the Bit driver updater in no time using either Settings or the Control Panel. Uninstalling apps in Windows is quick and simple.
Though it’s not recommended that you do so because the drivers won’t be up-to-date anymore, which will affect the performance of devices and, in the worst case, lead to BSOD errors.
Does Windows 10 need a driver updater?
If you have Windows 10 for basic use, say, run a few simple applications, browse the web, and take notes, a driver updater tool is not required. Microsoft releases the latest drivers regularly through Windows Update, and you can easily get them.
But for resource-intensive applications, such as games or rendering software, you need the latest graphics or network drivers for the best performance. And these, in some cases, never get released through Windows Update and are, instead, directly uploaded to the website.
This is where a driver updater comes into the picture. It scans your computer for devices, then checks all possible sources for driver updates, and if any are found, automatically installs them. The best part, all this takes place in the background.
Which is the best driver updater?
The answer to this question depends on what you’re looking for. Some people want an all-in-one solution, others a free driver updater, while the rest are looking for a portable app that can update drivers offline. It is all based on your driver’s needs.
The best driver updater program can automatically scan your PC, find outdated drivers, and update them. This can be done manually, but it takes time, and you must go through several steps.
There are many free and paid programs available in the market that will help you to update drivers in Windows. As far as Bit Driver Updater is concerned, it’s a win for us because of one feature: backup.
Before it searches for any drivers, it backs up the available drivers so that if you wish to restore them at any time, you can. New driver versions can sometimes have issues, so it’s always a good idea to have a backup plan. It is much better than having to roll back driver updates.
While you are still here, you may also be interested in driver detector software, so check out our article.
Let us know your thoughts on Bit Driver Updater in the comments below.
An unallocated partition is a type of partition in Windows that has not been assigned to any drive letter or volume label. Unallocated partitions are usually created when you install a new operating system on your computer.
They are also created when you format an existing hard drive. You may wonder why unallocated space is a problem. This is because you cannot store any data on it, therefore, rendering it useless. In this guide, we show you how to recover the unallocated partition and make put it into use.
How does one end up with an unallocated partition?
You can end up with an unallocated partition using the wrong partitioning scheme. Also, if you don’t dedicate all space in a hard drive to partitions, any remaining space not taken up by the OS will be unallocated. Other reasons include:
Hard drive failure – Sometimes, hard drives can malfunction, and this can interfere with the partitions already in place.
Virus/malware – Some viruses target your hard drive and may delete previously stored files. As such, the partition that was in existence may now appear as unallocated space.
Unexpected shutdowns/power failure – If you were in a write process and your PC randomly shuts down, or an unexpected power failure occurs, your data may get corrupted and leave you with a damaged partition.
Incorrect partition scheme – Usually, MBR and GPT are the two main partition schemes used. If you use one meant for the other, you may have such errors.
What can I do to recover an unallocated partition?
Before jumping into the slightly technical solutions, we recommend you first try these preliminary steps:
Ensure all your drivers are up-to-date. This will rule out the possibility of your hardware components being the cause of the problem.
Check your hard drive’s health and make sure that the drive has not been damaged or physically removed from your computer.
Run the CHKDSK command to ensure there are no hard drive errors.
Hit the Windows key, type cmd in the search bar and click Run as administrator.
Type the following commands and press Enter after each one. Remember to replace X with the corresponding number of the unallocated volume: diskpartlist volumeselect volume Xdelete volumedelete volume override
You can use partition software to recover unallocated partitions. There are many partition recovery tools available for free on the internet. But AOMEI Partition Assistant is our top recommendation.
It gives users powerful features to recover deleted or damaged partitions and files. This works especially for those with no knowledge of how partitions work. AOMEI Partition Assistant is a powerful, easy-to-use, and reliable partition recovery software.
What makes it a winner for this task is that not only is it comprehensive in partition management but can also help you recover data from the unallocated drive.
Is it possible to recover data from unallocated space?
Yes, it is possible to recover data from unallocated space. If you had created a backup of the partition before it became corrupted, you can easily restore it from the Windows backup feature. That’s how to recover an unallocated partition with data for free.
However, if you didn’t, you will need the help of specialized software that can search through every bit of data on the disk looking for certain types of information. There is a lot of data recovery software available, both free and paid.
Although it’s not always a guarantee that you will recover your data, it is good practice to regularly back up your files. This way, you won’t need third-party apps to recover files if such issues arise.
In case you’re having problems creating new partitions, we have an answer in our detailed article, so be sure to check that out.
You may also be interested in hiding partitions, especially when using shared computers. If so, make a quick detour to our article, and let us show you how to go about it.
That’s all we had for this article regarding recovering unallocated partitions. For any additional comments, leave us a comment down below.
Internet Explorer is one of the oldest browsers with lots of good features. Browsing with it on your PC allows you to surf the internet smoothly.
However, users report A problem with a webpage that caused IE 11 to close and reopen the tab without the user prompting it.
Why does Internet Explorer close and reopen tabs?
The issue with Internet Explorer closing and reopening tabs can occur due to many underlying problems with the browser. Some notable causes are:
Network issues – If the network is unstable, it causes the browser not to load or takes a long time to load tabs. Also, network congestion on your PC can result in the browser closing and reopening tabs frequently.
Faulty browser Add-ons – Add-ons can become corrupt, causing problems with the browser’s performance and tabs closing unexpectedly.
Corrupt system files – Corrupt system files may impede the browser’s access to the necessary resources on your PC, causing it to close and repo tabs or crash at will.
Outdated Internet Explorer – Internet Explorer is obsolete, and it’s not receiving any new updates, causing it to become unstable and prone to all sorts of bugs.
Some of our readers also complained about Internet Explorer keeps closing. Nonetheless, we’ll discuss how to get Internet Explorer working again.
What can I do if I encounter a problem with a webpage caused IE 11 to close and reopen the tab?
Before trying any advanced troubleshooting steps, go through the following:
To conclude, you should easily fix the problem that caused IE 11 to close and reopen. You can tell us which solution worked best in the comments section.
Have you seen WAN blocking on your router? Do you need an idea of WAN blocking and how to enable or disable it? Well, you have come across a helpful guide cause this guide will tell you all you need to know about WAN blocking.
What does WAN blocking mean?
WAN blocking prevents specific traffic or network connections from entering or out of a device or network. Through the WAN interface, this can be performed using a router or firewall that can block or filter traffic based on specific criteria such as IP address, port number, or protocol.
Furthermore, the primary purpose of WAN blocking is to improve security by preventing unauthorized access or the spread of malicious traffic. Also, it controls internet usage on the web, for example, blocking social media for protection.
Should I disable the WAN port ping for gaming?
Disabling WAN port ping, also known as ICMP (Internet Control Message Protocol) blocking, can provide additional security for your network, but it may not be necessary specifically for gaming.
Disabling WAN port ping can make it more difficult for others to troubleshoot network connectivity issues, such as deciding if a problem is with your system or the network.
Also, some online games or services depend on the ICMP to check the network connection status. Therefore, disabling the ICMP may cause connectivity issues with these games or services.
It’s your decision whether to disable or enable the WAN port ping, but if you have any doubts, consider consulting an IT professional.
WAN block vs LAN block
Blocking within LAN refers to restricting access to services within the local area network. So, it’s the same as the WAN block but for local networks.
ISPs usually employ LAN blocking to restrict access to certain services for the users.
Connect to your router’s web-based management interface by typing its IP address into a web browser.
Enter your login credentials.
Navigate to the Firewall or Securitysettings.
Look for an option related to WAN blocking or WAN access control.
If it is disabled, you can enable it or vice versa.
Save the changes you’ve made and reboot your router.
You should note that the above steps are a general guide, and the process may vary depending on your router. Hence, we recommend you check your router manual or contact the manufacturer for assistance.
If you haven’t heard of Insignia, it is an unofficial, community-created replacement for Xbox Live 1.0. This was the original incarnation of Microsoft’s online gaming service for the original Xbox.
Insignia launched back in November last year, with support for 25 games, on the 20th anniversary of the launch of Xbox Live 1.0. New titles have been added to the service since then, and 11 more are soon to be added to the list. Some have already been added, and more will launch next week bringing the number of supported games to well over 60. Below is the list of newly added and coming soon.
Call of Duty 2: Big Red One (February 3rd, 2023)
Capcom vs. SNK 2 EO (February 3rd, 2023)
Dancing Stage Unleashed (February 3rd, 2023)
Trivial Pursuit: Unhinged (February 3rd, 2023)
Tony Hawk’s American Wasteland (February 3rd, 2023)
Rainbow Six 3 (March 3rd, 2023)
Room Zoom: Race For Impact (March 3rd, 2023)
Splinter Cell Pandora Tomorrow (March 3rd, 2023)
Marvel Ultimate Alliance (March 3rd, 2023)
Thousand Land (March 3rd, 2023)
Prince of Persia Warrior Within (March 3rd, 2023)
Insignia is a free service. It is invite-only however, not to mention it is still in beta form at present. Its feature list includes online multiplayer with matchmaking functionality and online leaderboards. At the time of this writing just over 4,600 people have signed up for Insignia so far.
Microsoft Edge is the default browser and PDF reader for Windows OS. However, many of our readers complained about saved passwords missing in Edge. In addition, it makes it difficult to access the password manager.
Why are my saved passwords missing in Microsoft Edge?
Different factors can contribute to saved passwords being missing in Microsoft Edge. The primary reason could be bugs and glitches in the app development. Other factors are:
Malware or viral attacks – Malware or virus attacks can intrude and corrupt the data stored in the password manager, preventing access to saved passwords. Also, it can result in the Edge browser freezing.
Corrupt browser profile – A corrupt browser profile can cause issues with saved passwords that become inaccessible or cause errors when the browser attempts to use them.
Add-ons and extensions – Installing browser extensions such as privacy or security tools can result in saved passwords getting deleted or missing.
Privacy settings error – If you have enabled passwords under the privacy settings, it deletes saved passwords when the Edge browser is closed.
These reasons may differ on various PCs. Finally, we will show you how to retrieve your saved password and prevent further occurrences.
What can I do if saved passwords are missing in Microsoft Edge?
Before trying any advanced password recovery options, apply the following:
In conclusion, you should be able to gain your lost passwords on Microsoft Edge by following the outlined steps. Now that you’ve recovered your passwords, why not check our guide on how to manage saved Edge passwords on Windows 11?
Should you have further questions or suggestions, kindly drop them in the comments section.
The error code 200 is the most common error code that is seen on the login screen of ESO. If you’re logging in for the first time, you may be unable to reach one of the game’s mega servers. This issue can occur when the gamer tries to log in but is locked out.
The game client may be trying to connect to one of the mega servers, but your connection is not fast enough to keep up with the game’s speed. There may also be other issues that we look at in detail and explore possible solutions below.
Why won’t ESO let me log in?
There are many reasons why you might be seeing this error message, but the most common are:
Change of servers – If you are trying to play on a different region or server than the one that you purchased the game from, you may be locked out.
Your internet connection is down or limited – There may be a temporary slowdown in your internet connection. Sometimes this happens when the game has trouble loading new data or if you’ve been playing for a long time.
System requirements – It’s also possible that you are using an old or faulty computer that does not meet ESO’s system requirements.
Server overload – At times, it has nothing to do with you. The ESO unexpected internal error is usually because of downtime, which should be resolved in no time.
Your ESO account has been banned – If you’ve breached any of the Terms and conditions for using ESO, you may get this error too.
How do I fix Error 200 in ESO?
Ensure you perform the following preliminary steps first as they could solve your issue without you having to go through the slightly technical solutions:
Check the server status to see if the game is working.
Wait a few minutes, then try again. If the number of players on a specific server has reached its limit, players from other servers will not be able to connect to that server until it has been freed up.
Ensure you have selected the correct server from the list of available servers when logging in for the first time after installing ESO Client.
Hit the Windows key, type cmd in the search bar and click Run as administrator.
Type ipconfig/all and hit Enter.
Take note of the IPV4 address, copy and paste it on a new tab in your browser. This will take you to your router’s login page.
Enter your login credentials. (The router for this step is TP-Link).
Click on NAT Forwarding then select Virtual servers.
A list of virtual servers will appear. Click on the Add icon.
Now proceed to open the following ports:
TCP / UDP Ports 24100 through 24131
TCP / UDP Ports 24300 through 24331
TCP / UDP Ports 24500 through 24507
TCP Port 80
TCP Port 433
While some programs may use specific ports, opening up ports on your routers is an easy way for hackers to get into a network and steal sensitive data from within.
This is because anyone with access to those ports could gain access to your internal network by simply connecting directly to them. In addition, opening up additional port ranges on your router may result in some devices becoming nonfunctional or unstable.
If all else fails and the ESO error 200 has not been resolved, try using a VPN and see whether this fixes the issue.
Although ESO is not geo-restricted, using a VPN can help improve the overall performance of the game in terms of speed and connectivity. To that effect, we have an awesome recommendation of VPNs perfect for ESO.
Feel free to contact Customer Service for assistance, especially if you have tried all recommended fixes.
Let us know if you have been able to log in after trying out these steps in the comment section below.
Over the years, Search engine technology has evolved greatly, improving the search-ability available for users. Google has been the leader in the field for more than 15 years without a competent rival.
However, the advancement of AI-powered chatbots like ChatGPT and Google Bard redefine the way we look at online search.
Hence, we’ll discuss ChatGPT VS Google Bard to give a detailed comparison of the two.
What is ChatGPT?
ChatGPT is an AI-powered chatbot built on OpenAI’s GPT-3 with long-form question-answering models that help it to understand human conversations and provide meaningful responses.
Furthermore, ChatGPT can predict the next word in a series of words because of its ability to follow instructions and generate responses that are satisfactory to humans.
It uses the Reinforcement Learning with Human Feedback (RLHF) training model to improve its conception and development of human feedback. Also, it can generate code snippets, write essays, etc.
Since ChatGPT is often flooded to capacity, you can check our detailed guide on the best ChatGPT alternatives if you need an AI service.
Also, our guide about ChatGPT not working will help you fix it if it gives you any headaches.
What is Google Bard?
Google Bard is a similar AI chatbot powered by the Language Model for Dialogue Applications (or LaMDA for short).
The conversational AI service, as Google calls it, combines the information it draws from Google’s search engine with an intelligent language model to provide comprehensive, natural responses.
ChatGPT vs Google Bard – Which one is better at its job?
ChatGPT claims to offer a more precise and short answer, meaning it’s more effective than Google Bart.
However, Google Bart is only augmenting its search with AI responses and also provides the search responses as it used to, below the AI response.
Hence, we’ll take you through the comparison of the two tools to know which is better at its job.
Advantages and downsides of ChatGPT
Advantages:
ChatGPT has large language models that allow it to understand human interaction and generate more natural and coherent responses. Also, it is fluent in responses and can handle short and long text forms.
ChatGPT is efficient for text development and summaries, analysis, language understanding, and others. It makes it easier to approach text because of its human-like interaction properties.
Developers can integrate ChatGPT into their apps. Also, it is excellent for code debugging as it searches for code snippets, generates the actual code, corrects the code, and explains the error.
ChatGPT can serve as a virtual assistant due to its artificial intelligence and empathy for human emotions deduced from texts.
Downsides:
ChatGPT is free for just the trial and customer-feedback period. Users will soon be required to pay a subscription to access the platform.
Many AI intelligence enthusiasts say ChatGPT has accuracy issues and may not provide facts. It is limited in data because it uses a data model limited to 2021.
ChatGPT is limited in knowledge and cannot provide real-time facts.
Unlike ChatGPT offering precise answers but is limited by its knowledge, Google Bart combines over a hundred billion web pages indexed in its database with the AI chatbot response.
LaMDA is a new engine developed on top of previous models tested by Google while ChatGPT uses an older GPT-3 language model.
Although we don’t have precise information yet, like Google Search, Bart will be free, and embedded into Google Search.
Although it’s not yet a fact, we can imagine that Google will embed Bart into Google Chrome and other Chromium software and it will also be available for developers.
From the early information, Google Bart will also embed AI responses that will include visual and audio information.
Downside:
Google Bart is available to only a few developers right now.
ChatGPT VS Google Bart
Both AI chatbots and search services essentially offer the same thing: quick natural language answers to naturally asked questions.
ChatGPT got a head start because Microsoft built it into its Teams app, and it’s coming to the Edge browser in a limited form for developers.
The Opera browser also stated that intends to embed ChatGPT in the future while Google Bart is still in a closed testing medium.
However, we can definitely see Google Bart built into the Chrome browser and other Chromium products soon.
Bart, explaining the James Webb discoveries to a 9-year old
ChatGPT comes with a plagiarism checker feature, and Google Bard doesn’t. However, LaMDA may be adapted to offer that usability as well.
Both ChatGPT and Google Bart had examples of providing incorrect responses and that makes us question not only their functionality but also the ethics behind them.
The bottom line is that while ChatGPT had a first starting position, Google Bart has the huge advantage of being embedded into an existing product that already has the leading edge in search.
Google Bart
ChatGPT
Powered by LaMDA
Powered by GPT-3 (older language model)
Embedded in Google Search
Only text responses through queries
Free
Free and paid plans
No plagiarism tool
GPT-2 Output Detector plagiarism tool
Available only to selected beta testers
Available now
Overall – Google Bart is superior to ChatGPT because it combines natural language responses with the search service.
How does ChatGPT compare to other Google services?
Considering that Google Bart is not yet available to the general public, it makes sense to compare ChatGPT to other existing Google services like Assistant and Translate.
ChatGPT VS Google Assistant
Scrutinizing ChatGPT based on its assistant feature, it is more advanced than other technology in the market. It doubles as a virtual assistant that can draft a contract, write an essay, suggest gift items, and much more.
Google Assistant is a virtual assistant software that can engage in two-way conversations. It can answer questions, schedule events, adjust hardware settings, etc. However, it can’t operate as the ChatGPT virtual assistant does.
Overall – ChatGPT has the best virtual assistant because it offers more functionality than its competitor.
ChatGPT VS Google Translate
ChatGPT offers a translation service that translates code snippets, languages, and other data into your desired language. It is swift and straightforward with its translation. Also, it proffers correction to translated words if improperly formed.
Meanwhile, Google Translate supports more than 100 languages and can translate written or audio content from one language to another. It functions offline with 59 languages.
Moreover, Google’s tool can translate whole websites by providing a page link.
Overall, Both tools are vibrant for translations, but ChatGPT can translate code snippets that Google can’t.
In conclusion, this guide has taken a deep dive to explore the differences between ChatGPT and Google Bart. You should be able to make an informed decision on what to use after going through this guide.
Should you have further questions, kindly leave a message in the comments section.
ChatGPT is an AI-powered chatbot built on OpenAI’s GPT-3. Its large question-answering models help it understand and respond to human conversations. It is free for users since it is in the trial stage.
However, OpenAI plans to release the premium version of ChatGPT Professional or Plus. Keep reading to learn all about this new tool.
What is ChatGPT Professional or Plus?
Since the release of OpenAI’s ChatGPT, it has been free to use because it was in its trials and user-feedback stage. Moving forward, Microsoft’s OpenAI has launched a paid version of the chatbot and says it is due to the need to ensure the tool’s long-term viability.
However, ChatGPT Professional is a monetized version. It requires users to pay a monthly fee to access the exclusive features of the Professional. The ChatGPT Professional introduces priority access to new features, increases functionality with no limits, and quicker reaction times.
In fact, the newer ChatGPT version available for paying customers is Turbo, and it’s optimized for speed.
Furthermore, the ChatGPT Pro version doesn’t remove the rights of users who are now willing to pay for the tool. The free plan allows you to use it as it has since its first release.
What are the differences between ChatGPT and ChatGPT Plus?
Of course, both services are built on the same engine, but the Professional or Plus version has a lot of advantages over its free iteration:
Larger dataset – OpenAI says that the paid version has a larger training set. That translates into better, more precise answers to queries.
Better support and resources – ChatGPT Plus users will have access to tutorials, documentation, and will be able to benefit from customer support for guidance to maximize the tool’s potential.
Ready-made API – Right now, you can’t access the OpenAI API but with a ChatGPT Plus account, you will be able to access the ChatGPT API, and incorporate it into your own software and infrastructure.
Turbo responses – The paying customers will access a much faster, Turbo version of the tool, with lightning-fast responses.
High volume of requests – Right now, in the free version, a lot of users exceed their quota of requests. With ChatGPT Plus, you will have a much larger quota fitted for organization usage.
New users who are exploring subscription options may also want to see this quick guide on how to use ChatGPT before deciding on a plan.
Readers who plan to work with the API can also check this guide on how to get an OpenAI API key to set up access for their projects.
How much ChatGPT Plus costs?
On the company’s official Discord server, OpenAI posted a waitlist link. It asks a series of questions about payment preferences, including at what price (per month) would you consider ChatGPT so expensive that you would not consider buying it? It is to hear from the user’s perspective how much to bill.
The Professional version of OpenAI’s ChatGPT Plus is available on a $20 monthly plan with many features. However, there may be other plans to make a variety for users to choose from in the future.
Can I subscribe to ChatGPT Plus right now?
Unfortunately, not! Even for a paid subscription to ChatGPT Plus there is a waiting list.
Although there was an official release of this service, OpenAI officials didn’t provide a launch date for public availability.
The free version of ChatGPT has worked okay since its release. Interestingly, the ChatGPT Professional has premium features and tools that are only available to paid users. Some of the premium features that you will enjoy are:
It’ll be available at all times, even during high demand or internal server errors. It guarantees no blackout periods.
Another reason you need the ChatGPT Pro version is because it guarantees faster response speed, breaking every impediment that may draw back its performance.
Premium users have priority access to new features on the platform. It offers more quota and resources than the free plan.
According to OpenAI, many other features will be added to the Professional ChatGPT version to make it more valuable.
We hope you found out all you wanted about the ChatGPT Professional release. Please write down any thoughts you have about this in the comments section below.
OneDrive is a cloud-based file hosting service by Microsoft that offers cloud storage for users to save files and other data. Sadly, many users report twin files in the cloud space. Hence, we’ll remove duplicate OneDrive files from your cloud storage and free up some space.
Why does OneDrive duplicate files?
Having two of the same file in your OneDrive cloud storage is a problem users report. It can occur for some reasons listed below:
Syncing the same file on two devices – Some data synchronized on one device may be available on another, prompting OneDrive to sync the file twice. Also, it can be due to other OneDrive sync problems affecting the files.
Uploading the same file twice – You may mistakenly upload the file twice. Usually, OneDrive picks up duplicate files and sends a prompt notifying you of an existing file.
Some of our readers also reported OneDrive creating duplicate files with copies in the file name.
Nevertheless, this article will discuss finding and removing duplicate files that may consume your OneDrive cloud storage.
How can I find & remove OneDrive duplicate files?
1. Manually find duplicate files in OneDrive
Open OneDrive and click the Open folder icon on the taskbar to open the OneDrive folder in File Explorer.
Right-click on a blank space, move your cursor to the Sort by on the drop-down menu to show its options, and then click on Name or Size.
The duplicate files in OneDrive will display next to each other because they carry the same or almost identical names.
Right-click the duplicate files and select Delete from the drop-down to remove them from OneDrive.
Alternatively, hold down the Shift or Ctrl key while selecting, right-click the files, and then select Delete from the drop-down to remove them from OneDrive.
The above steps will help you find duplicate files and remove them conveniently.
2. Use third-party apps to find and remove duplicate files
How can I prevent OneDrive from syncing duplicate files?
Deleting duplicate files on OneDrive doesn’t help the problem, as it will reoccur during the next syncing session. Hence, follow the steps below to prevent syncing duplicate files.
1. Change the OneDrive Sync Conflicts option
Click the OneDrive icon in the notification corner on your desktop, click the Settings icon (the gear), and then select Settings from the drop-down.
Click on the Office tab, go to Sync conflicts, tick the radio button for Let me choose to merge changes or keep both copies, and then click OKto save the changes.
Allowing the Let me choose to merge changes or keep both copies in Sync conflict lets you decide whether to keep or discard a duplicate file during the syncing process.
Left-click the Start button, type credential manager, and open it from the search results.
Navigate to the Windows Credentials tab, under the Generic Credentials section, find and select any data about OneDrive Cached Credentials, click on it and choose Remove.
Restart OneDrive on your PC to refresh the necessary files for running it.
Refreshing OneDrive credentials will prevent it from duplicating files.
In conclusion, you should have learned how to remove duplicate OneDrive files from its guide. If you need further assistance, kindly leave your questions in the comments section.