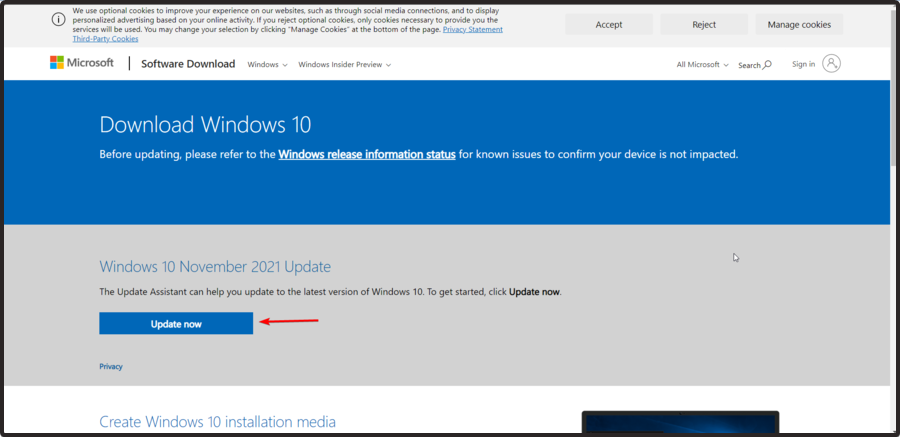
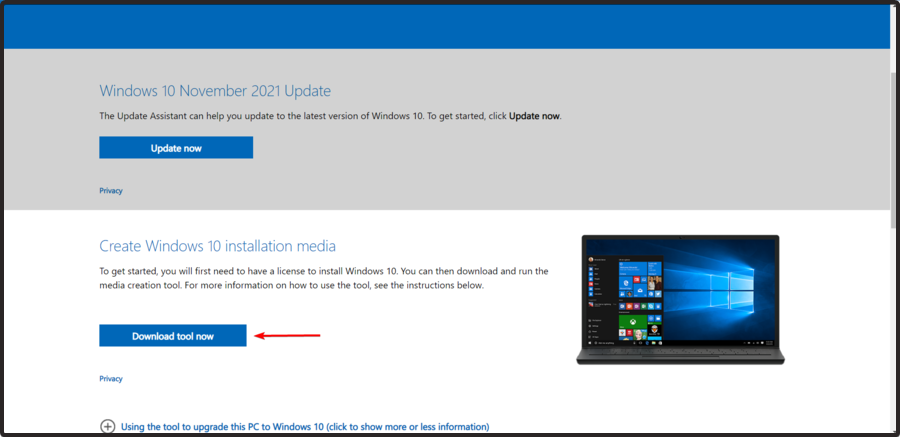
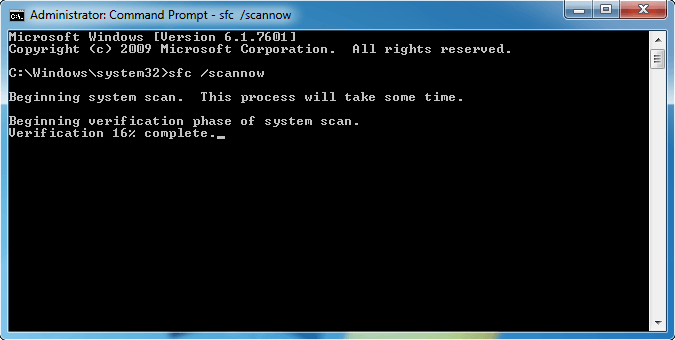
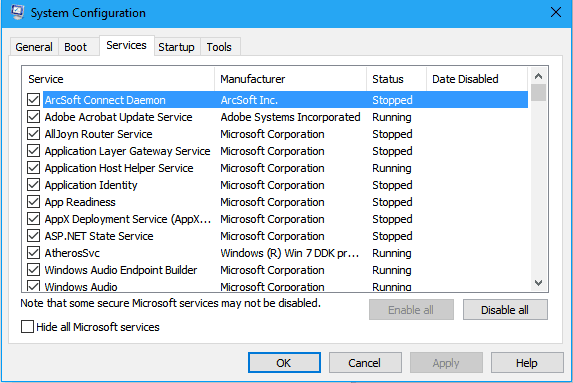
The error 0xc1900208 can appear while you’re trying to upgrade to the latest version of Windows 10. This happens when there is software on the computer that is incompatible with the latest Windows 10 build.
As a result, you won’t be able to upgrade at all. In today’s article, we’re going to show you how to fix error 0xc1900208 once and for all.
Some antivirus applications are known to cause error 0xc1900208. However, you can fix this problem simply by finding and removing problematic applications.
Open the File Explorer by pressing the Windows key + E and paste this C: WindowsPanther in the bar and press Enter.
Right in the folder, search for the Compat*.xml file and open it.
You will find the name of the app that is incompatible with your system.
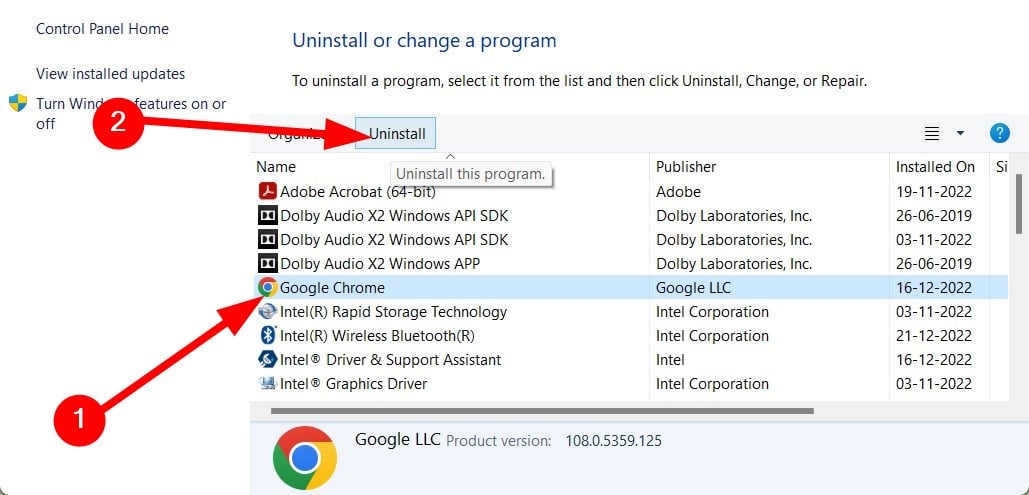
Uninstall that application from your PC and try to upgrade again.
Bear in mind that some applications might leave leftover files that can cause future issues, therefore it’s important to remove those files as well.
3. Run a third-party solution
If you’re going for third-party software, you might as well go for the best in the niche.
Firstly, using an uninstaller tool might be extremely beneficial to remove stubborn apps from your system. You can, of course, perform this task just using Control Panel to uninstall unwanted programs.
Yet that can leave temporary files and broken registry files behind that might cause errors. That’s why uninstaller software plays an essential role here, detecting the installed programs and permanently removing them from your computer.
Our top recommendation in this regard is CCleaner. It scans your PC for junk files and removes them in just a few clicks and it also integrates its own uninstaller.
Just locate your app in the list, select it and click the uninstall button. CCleaner will uninstall the app and completely remove any files related to it.
We hope these solutions were able to help you fix the error 0xc1900208 on your PC.
Let us know how it went for you and feel free to share any other possible solutions via the comments section below.
If you are interested in reading more about the topic, check out more handy solutions in our Windows Update Hub.
Also, for those of you that are interested in getting the best out of your operating system, don’t be shy to explore our Windows 10 Guides for more in-depth information.
Windows 10 users could sometimes face an error when updating their Windows 10 version to the subsequent build.
Windows 10 update error 0x80246017 appears, and the update installation gets stuck. The entire error message reads: WU_E_DM_UNAUTHORIZED_LOCAL_USER & The download failed because the local user was denied authorization to download the content.
While many users have complained about it in Windows 10, error 0x80246017 also exists on Windows 11.
Luckily, there’s a solution to this problem, and you’ll find it in this article.
How can I fix the Windows Update error 0x80246017?
1. Delete Previous Windows Installation files
The most common solution for the Windows 10 update error 0x08246017 error is deleting previous Windows installation files. To delete these files, just do the following:
Now go to Search, type disk cleanup, and one Disk Cleanup tool.
Remove Temporary files and Previous Windows Installations.
Reboot your computer
If this workaround didn’t get the job done, you can try with a little registry tweak, just follow the instructions shown below.
2. Reset registry keys values
Installing the new build should set the registry keys values back to normal, but if it somehow fails to, you won’t be able to install the update. Thus, the Windows 10 update error 0x80246017 or some similar error might appear. To fix this issue, just follow these instructions:
Go to Search, type regedit and open Registry Editor
Find BranchName and check if it shows FBL_AWESOME1501 (If it doesn’t, change it)
Locate TresholdRiskLevel and change it to low
Find TresholdInternal and delete it
Find TresholdOptedIn and delete it
Close Registry Editor
3. Run the Update Troubleshooter
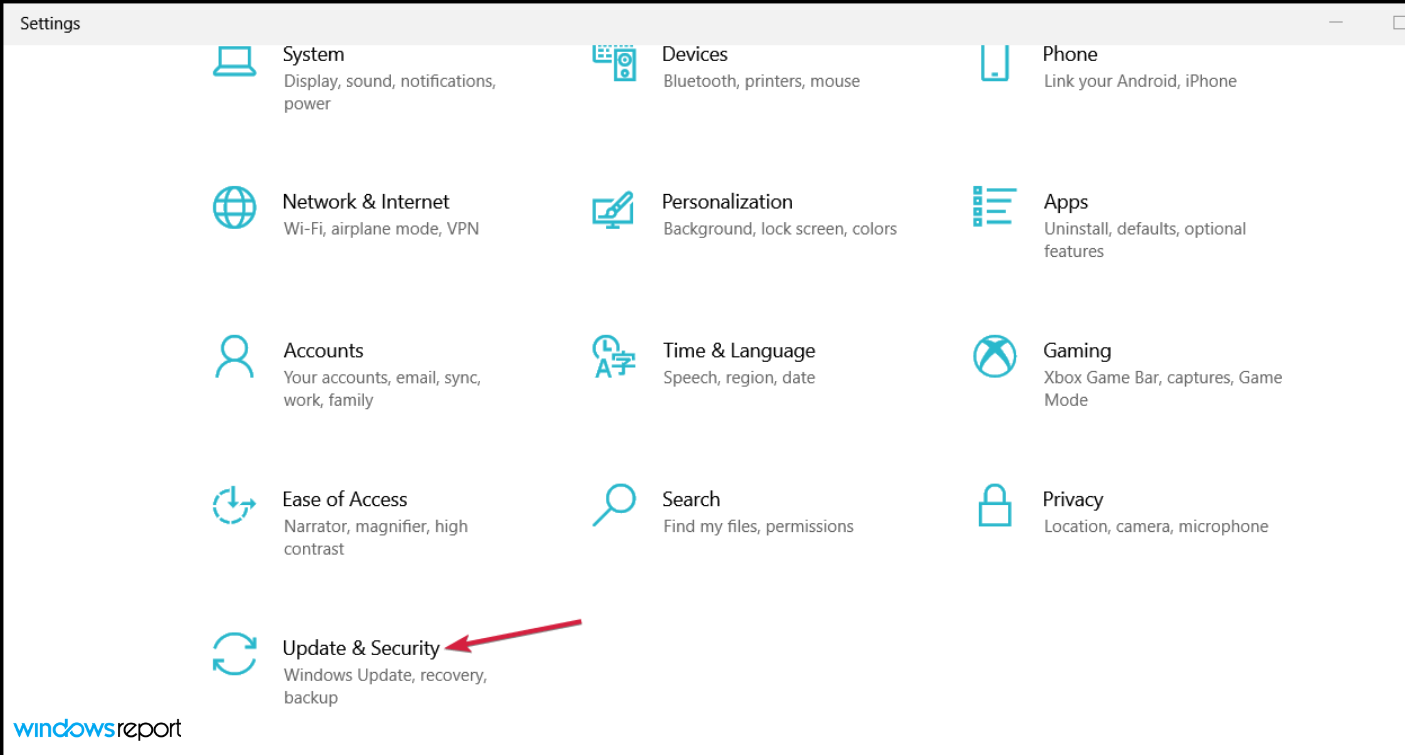
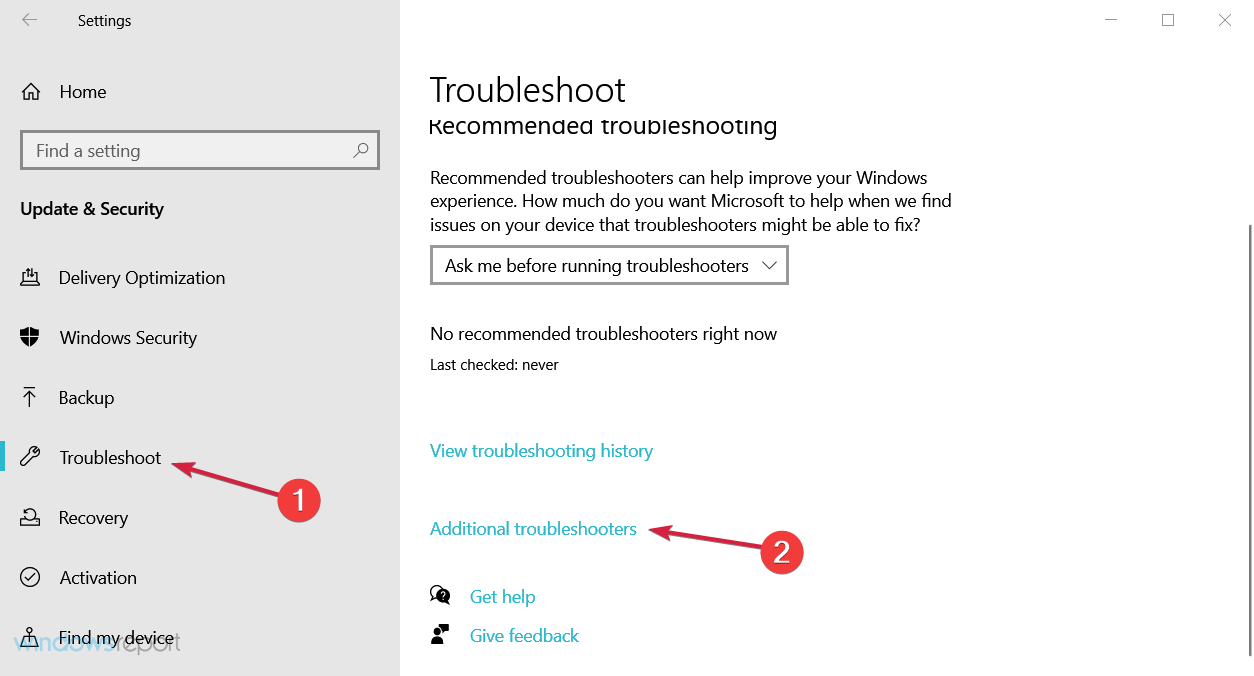
Windows 10 also features a built-in troubleshooting tool that can help you to fix general update issues and bugs. So, if the two methods listed above didn’t work, you can go to Settings > Update & Security > Troubleshoot and run the troubleshooter.
4. Disable your antivirus
As many Windows 10 users have found out by now, sometimes your antivirus software may trigger various update errors. The quickest way to fix this issue is to simply disable your antivirus tool and re-enable it after you’ve installed the latest updates.
That would be all, after performing one of these fixes, you should be able to install the latest build update for your Windows 10 Technical Preview build.
5. Check the status of some important Windows Services
Press Windows + R, type services.msc, and hit Enter.
Scroll down to the Windows Update service, double-click it, ensure it is running, and set the Startup type to Manual.
Next, locate the Background Intelligent Transfer Service, double-click it, ensure it is running and set the Startup type to Manual.
If you have any questions, suggestions, or maybe you know other solutions to fix the Windows Update error 0x80246017, make sure you reach for the comments section and share your ideas.
Having your Windows update halted by errors can be very frustrating, I’m sure we can all agree on that. Not being able to access new features or fix those bugs in the current version you’re running can really put a damper on things.
I know how exasperating it can be when your system throws that dreaded error message, “There were problems installing some updates.” But don’t worry, as I’m here to share a few solutions that will help you tackle this issue head-on.
This guide is packed with practical tips to resolve the Windows update error 0x80244018, so let’s dive right in and get your system back on track.
Why am I getting Windows update error 0x80244018?
After some research, we were able to list out some of the most common reasons users are getting the Windows update error 0x80244018.
The server is down: Sometimes, when official servers are down, you won’t be able to download the latest Windows updates on your PC.
Your internet connection is faulty: Your internet connection might be jumpy, which is why you are getting the Windows update error 0x80244018.
Background Intelligent Transfer Service isn’t running: Some third-party app or your settings might have disabled the Background Intelligent Transfer service.
How can I fix Windows update error 0x80244018?
Before you go ahead and check in with the advanced troubleshooting solutions, we would advise you to apply the below-mentioned fixes and hopefully resolve the problem quickly.
Shut down your PC and wait for about 5 mins before turning it on. A restart will help you reload all the system files from scratch.
Check if your internet connection is working perfectly fine or not.
If you have installed a VPN, we recommend uninstalling the program from your PC.
Now, let us apply the solutions the advanced solutions.
1. Use the Windows update troubleshooter
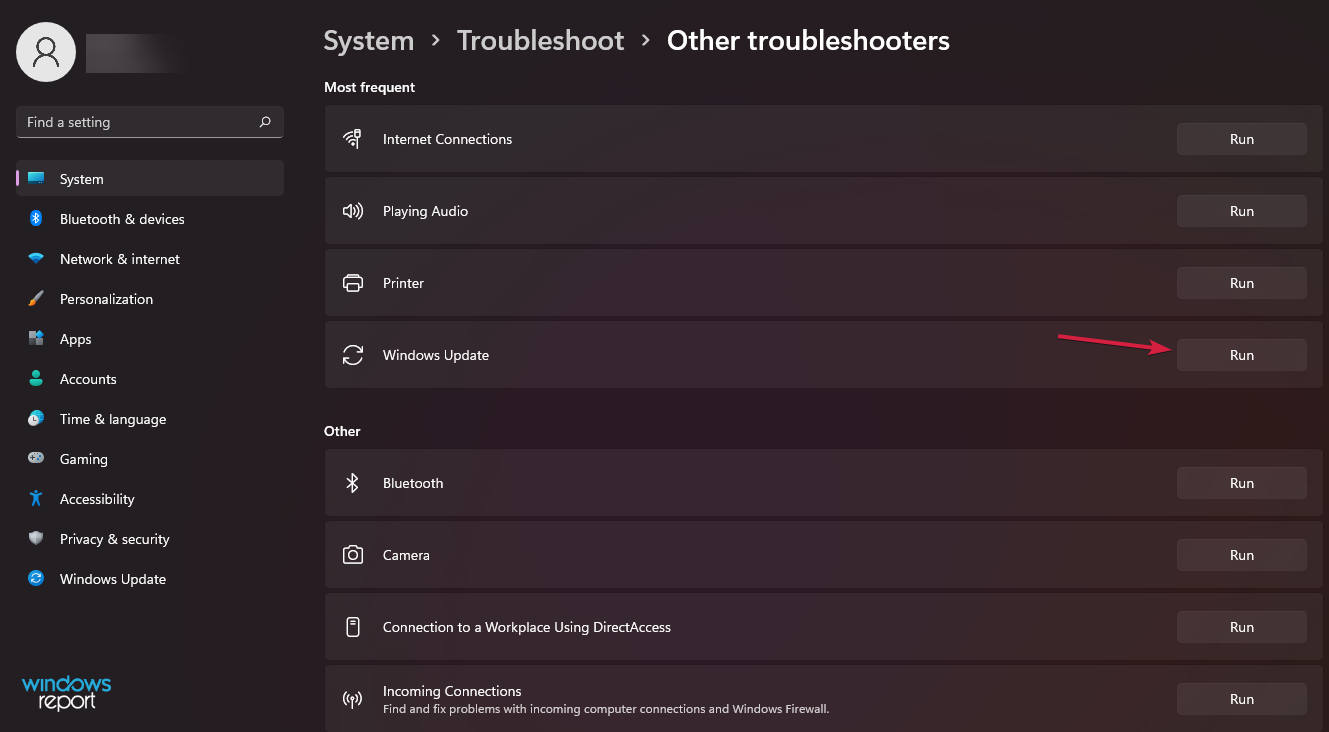
Press the Win + I buttons to open Windows Settings.
Click on Troubleshoot on the right side.
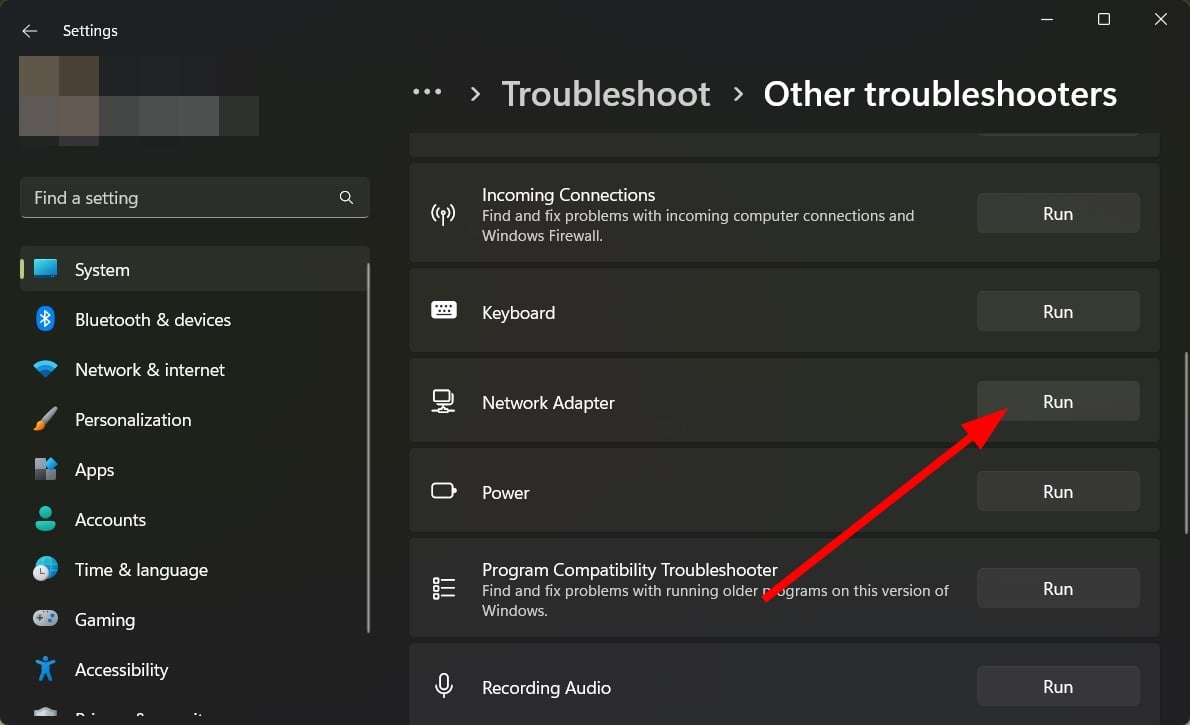
Select Other troubleshooters.
Click the Run button next to the Windows update option.
Your system will start detecting the issues and will prompt you to apply the fixes if there are one.
Windows OS comes with a built-in troubleshooting tool, which along with another hardware troubleshooter, also features a Windows update troubleshooter.
You can use this feature by following the above steps and fixing the problem quickly.
2. Restart the update service and rename the SoftwareDistribution folder
Open the Start menu.
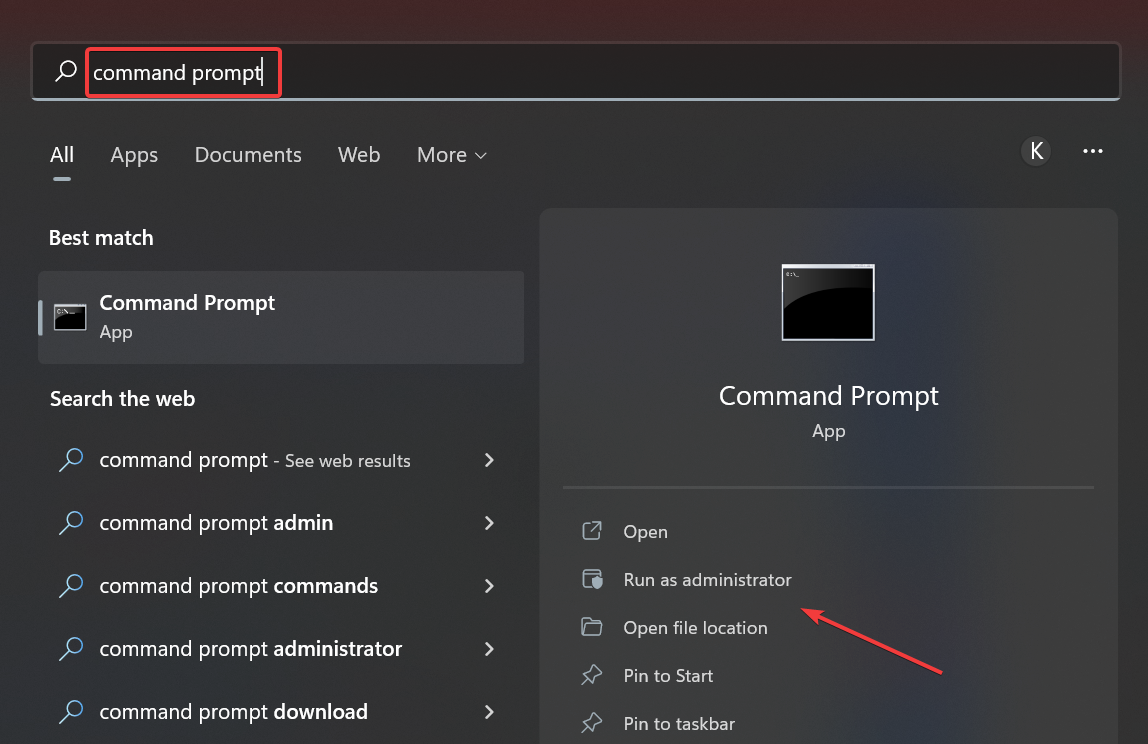
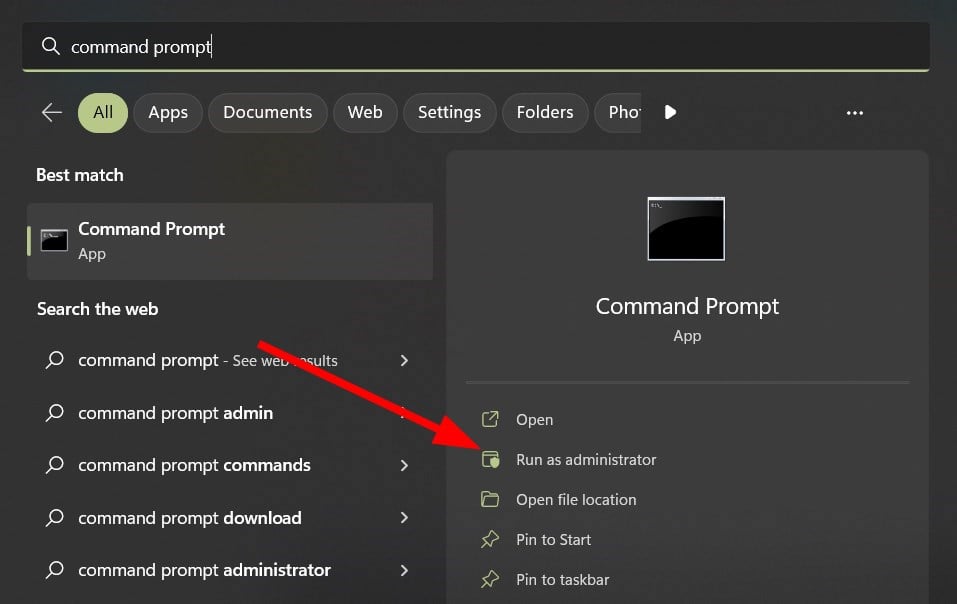
Type the command prompt and run it as an administrator.
Type the below commands and press Enter after each one. net stop wuauservnet stop cryptSvcnet stop bitsnet stop msiserverren C:\Windows\SoftwareDistribution SoftwareDistribution.oldren C:\Windows\System32\catroot2 catroot2.oldnet start wuauservnet start cryptSvcnet start bitsnet start msiserver
Navigate to the below path. Computer\HKEY_LOCAL_MACHINE\SOFTWARE\Microsoft\WindowsSelfHost\Applicability
Delete the ThresholdOptedIn registry entry if it is available.
Windows stores all data and information regarding our installed applications in your system. If they crash, it will cause update issues, which is why you will face Windows update error 0x80244018. Follow the above steps, delete the ThresholdOptedIn entry, and check whether this resolves the problem.
4. Check whether the BITS service is running
Press the Win + R buttons to open the Run dialogue.
Type services.msc and press Enter.
Locate the Background Intelligent Transfer Service and double-click on it.
Under the Service status, press the Start button.
Select Automatic for the Startup type drop-down menu.
Services such as the Background Intelligent Transfer service should run in the background to ensure that the Windows update processes are performed smoothly. When any of these services are stopped, it could trigger update errors.
5. Turn off the Proxy Settings
Press the Win + I keys to open the Settings menu.
Select Network & Internet from the left side pane.
Click on Proxy on the right side.
Under Manual proxy setup, click the Set up button.
Toggle on the Use a proxy server option.
Restart your PC.
6. Run SFC Scan and DISM commands
Open the Start menu.
Type the command prompt and run it as an administrator.
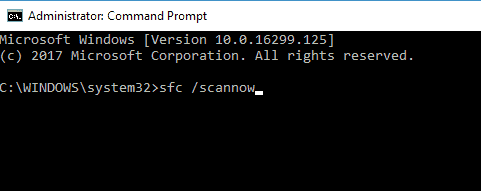
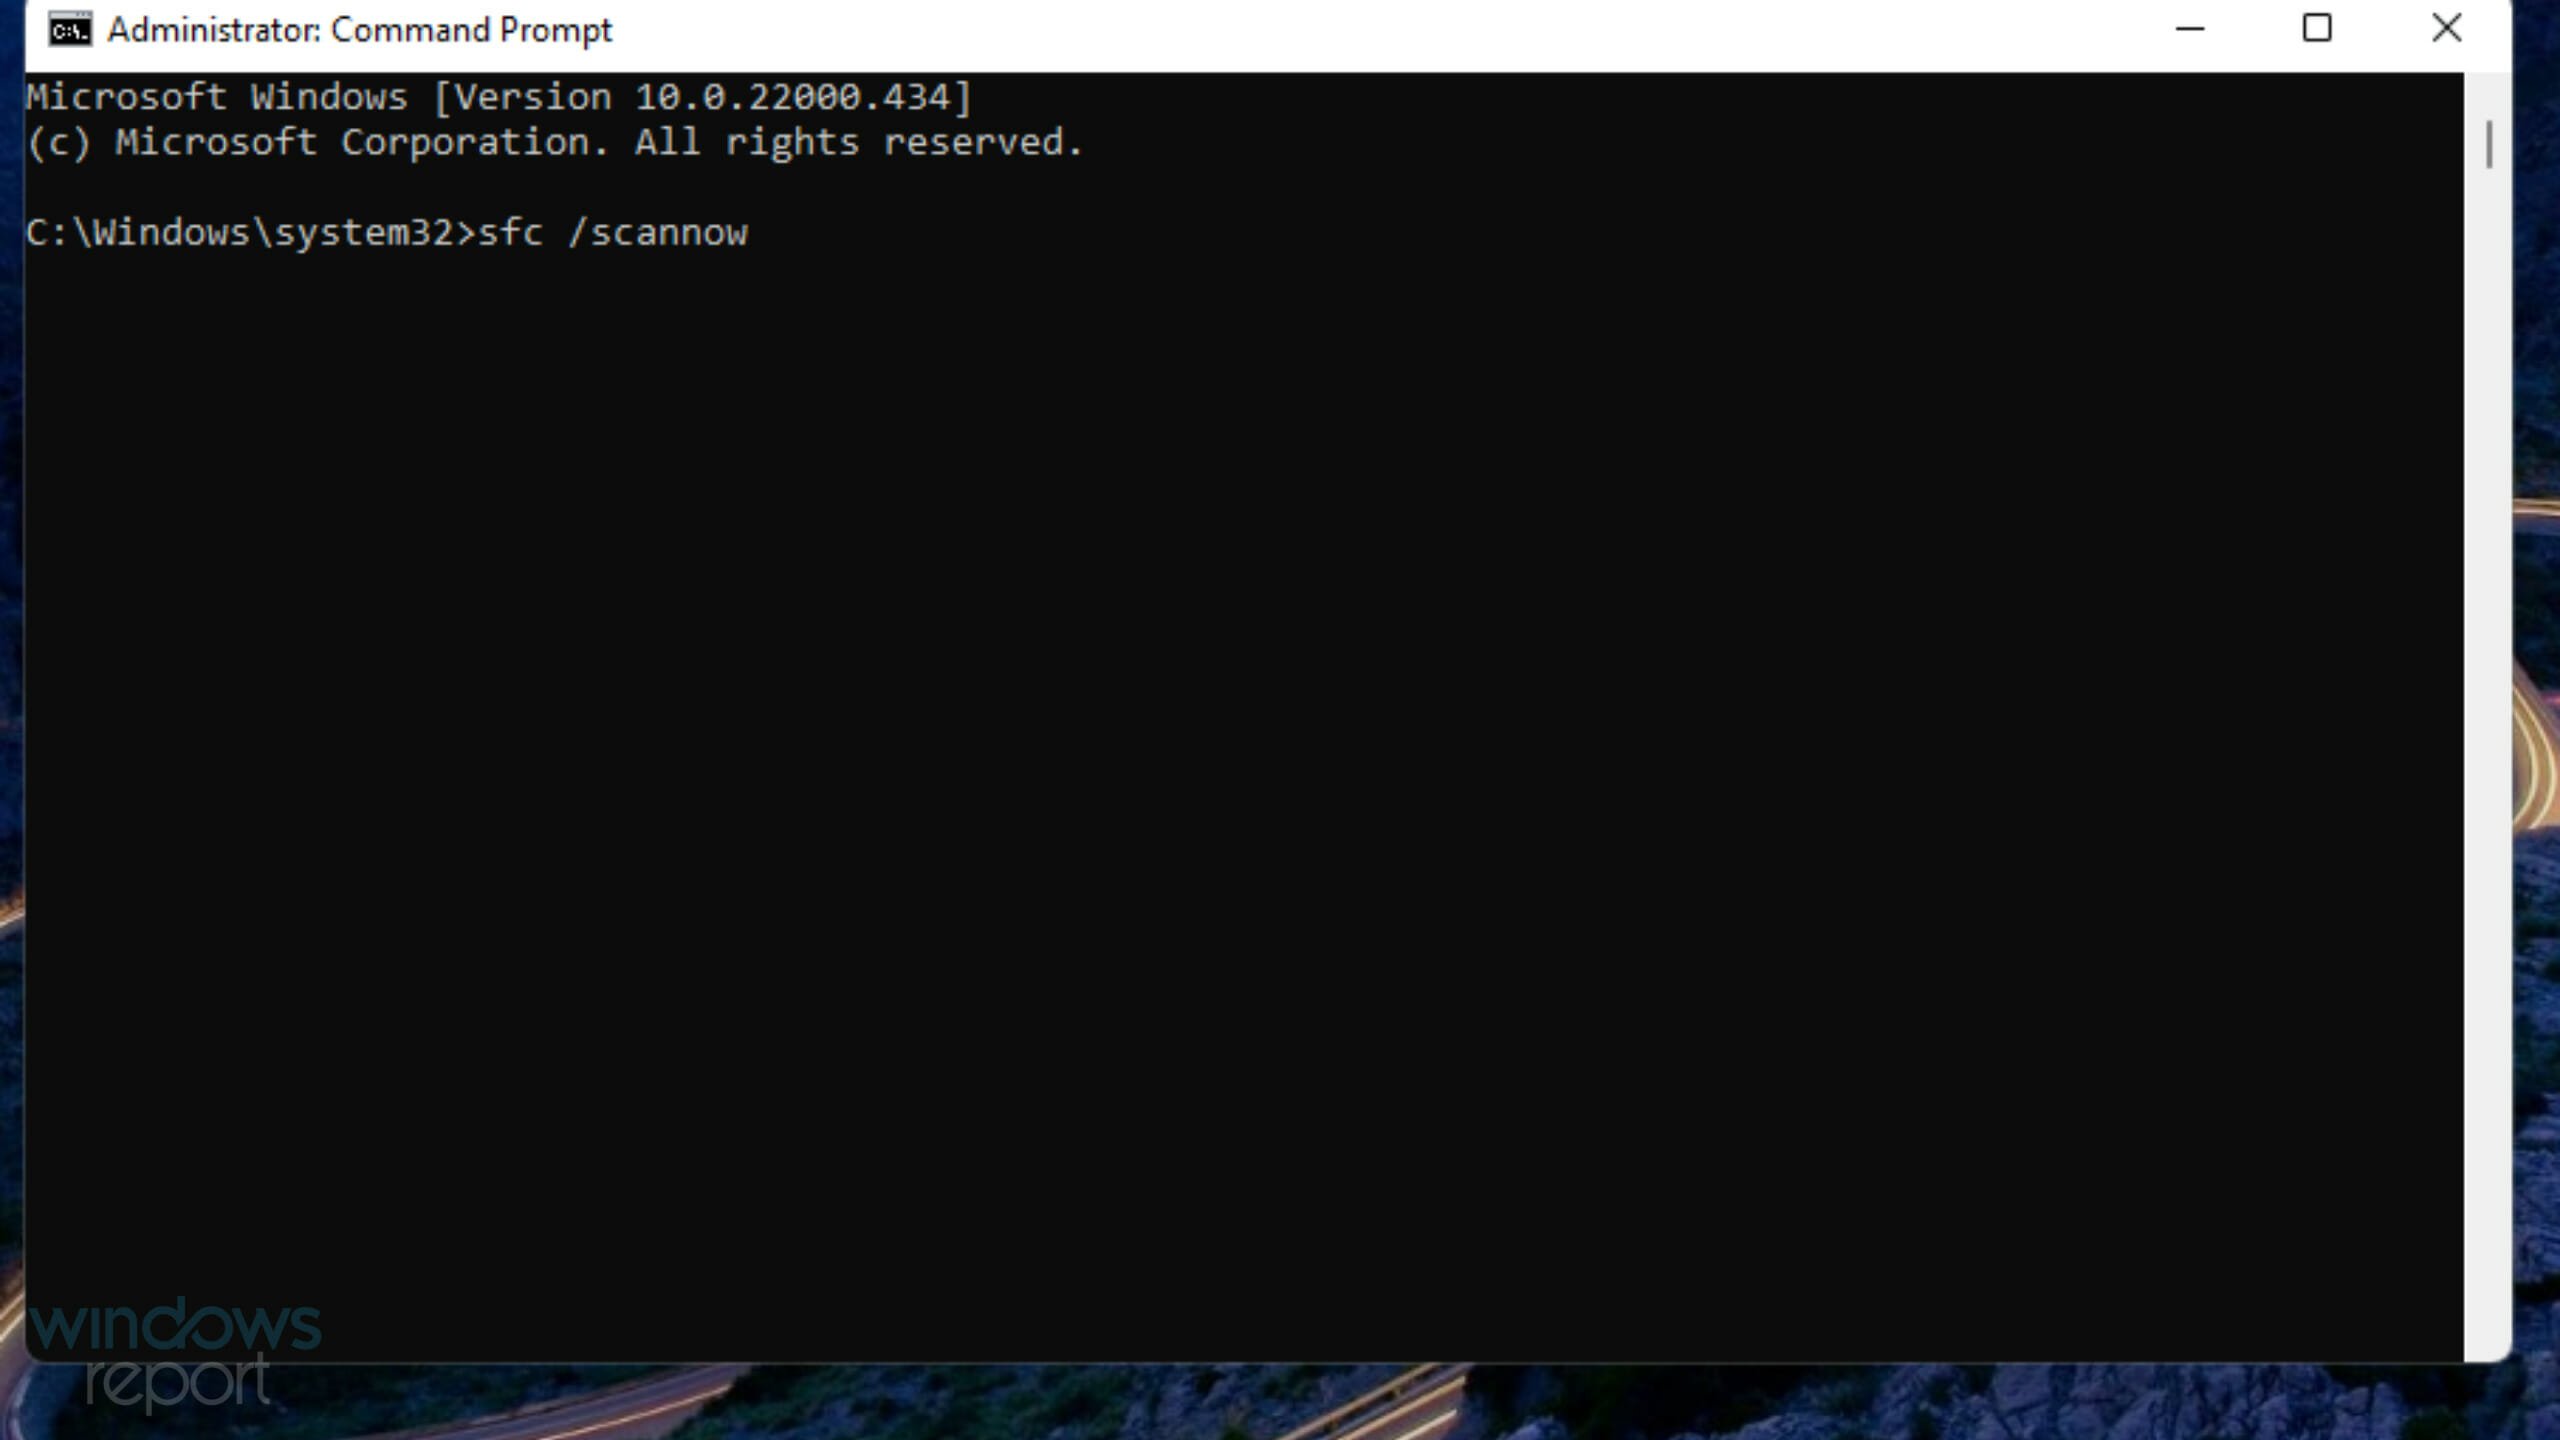
Type the below command and press Enter. sfc /scannow
That is it from us in this guide. However, if you are getting Windows update error 0X800f081f, then you can check out our guide that lists a bunch of solutions to resolve the problem.
The Windows Update error 0x8024401f has been discussed in numerous Microsoft forum threads. That issue arises when users check for Windows updates via Settings. Error 0x8024401f can also arise when users try to update apps via Microsoft Store.
As a result, Windows and app updates aren’t installed. The resolutions below are primarily for fixing error 0x8024401f in Windows 10, they might also resolve the issue in 8.1 and 11 using this guide.
What causes the Windows Update Error 0x8024401f?
Several potential causes for a Windows update error with the code 0x8024401f. Here are some common ones:
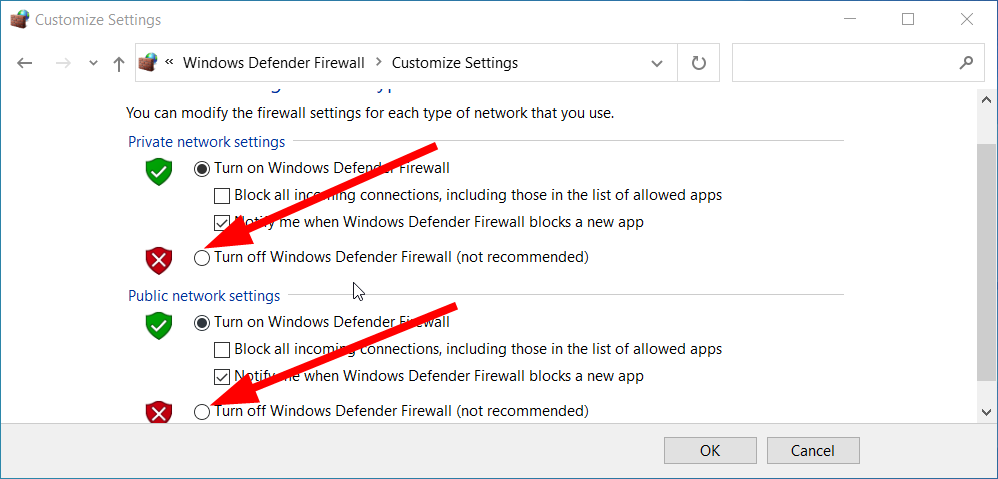
Firewall or antivirus software – If your firewall or antivirus software is blocking the update, it can cause this error. You may need to temporarily disable these programs to see if they are causing the issue.
Insufficient hard drive space – If your hard drive is full or almost full, it can cause the update to fail. Make sure you have enough free space on your hard drive before installing the update again.
Corrupted update files – Sometimes, the update files can become corrupted during the download process. You may need to delete the temporary update files and try downloading the update again.
Corrupted system files – If your system files are corrupt, it can cause the update to fail. You may be able to fix this by running the System File Checker tool.
Pending updates – If other updates are waiting to be installed, it can cause this error. Make sure to install any pending updates before installing the update causing the issue.
These are some of the most common causes of this error. I hope this helps!
How do I fix the Windows Update error 0x8024401f?
1. Run the Windows Update troubleshooter
Windows Update troubleshooter doesn’t always fix update errors, but it’s still worth a shot nonetheless.
Press the Windows key + S keyboard shortcut to open the Type here to search box.
Input troubleshoot in the search box, and click Troubleshoot settings.
Next, click Windows Update and select its Run the troubleshooter option.
Click the Apply this fix option if the troubleshooter presents a resolution to you.
2. Turn off third-party antivirus software
Some users have said they fixed error 0x8024401f by disabling their third-party antivirus software, such as Comodo, McAfee, and Sophos. To do so, right-click the system tray icon for your antivirus software to open a context menu.
You can usually select a disable or turn off option on an antivirus utility’s context menu. In addition, select an option to disable the utility’s firewall if its context menu includes one.
If you discover that the antivirus is causing the problem, then you should consider getting a better antivirus.
net start wuauservnet start cryptSvcnet start bitsnet start msiserver
Close the Command Prompt, and restart Windows.
5. Reset the Microsoft Store cache
If you need to fix error 0x8024401f for MS Store app updates, open the Command Prompt as administrator. Then enter this command: wsreset.exe. Press the Return key after entering that command.
6. Reset your Windows OS
Type the keyword reset in Windows 10’s search box.
Click Reset this PC to open the Recovery tab in Settings.
Click Get started to open Reset this PC.
Click the Keep my files option.
Click Next to continue, and press the Reset button.
A few users have also confirmed that resetting Windows 10 can fix error 0x8024401f.
Those are some of the most likely fixes for error 0x8024401f. We would like to know which solutions worked best for you, so leave us your feedback in the form of a message in the comments section below.
The scenario of confronting with Windows updates that are not working properly are numerous. Certain users experience the lack of any new install updates, repeated installation of the same updates, endless reboot cycles, and all sorts of error codes. For example, they describe getting the 0x80244007 error code.
This happens when they try to install certain updates by using the Windows Update function. In most cases, affected users are also receiving the following error message: There were some problems installing updates, but we’ll try again later.
The good news is that in this post we will talk about some of the reasons behind the Windows Update error 0x80244007 and offer practical troubleshooting solutions to solve it.
How can I fix the Windows Update error 0x80244007?
1. Try running the Update troubleshooter
First of all, select Start > Settings > Update & Security.
Then, open up the Troubleshooting tab of the Settings app.
Once you’re inside the Troubleshooting tab, select Windows Update under Get up and running.
Then, select Run the troubleshooter from the newly appeared context menu.
After successfully starting the utility, wait patiently until the initial scan is complete.
Depending on the issue that you’re encountering, you might be prompted to do some additional steps.
Lastly, just click on Restart.
Any time you get an error code like 0x80244007 while downloading and installing Windows updates, the Update Troubleshooter can begin scanning and help to fix the problem. Make sure you have Internet access and apply the above steps.
2. Clean out junk files with Disk Cleanup
Enter into Start > File Explorer > This PC.
Up next, right-click your main hard drive and select Properties.
You’ll then see a list of items that can be removed, including temporary files and more.
For even more options, click Clean up system files.
Feel free to tick the categories you want to remove.
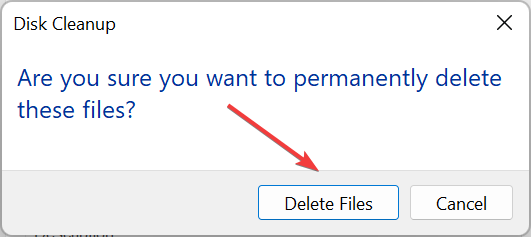
Then, just click OK > Delete Files.
One of the main causes of the Windows update error 0x80244007 is that Windows couldn’t renew the cookies for Windows Update. If you’re still seeing that dreadful message, you can also clear temporary or junk files to resolve it via Disk Cleanup.
Don’t worry if you run into any Disk Cleanup issues. Just check this guide and quickly solve the problem.
3. Run the System File Checker (SFC) utility
Open up a Run dialog box by pressing the Windows key + R keyboard shortcut.
Up next, type cmd inside the newly opened text box and press Ctrl + Shift + Enter to open up a Command Prompt with admin access.
Right-click it and select Run as administrator.
If you are prompted for the admin password, enter the password and click OK.
A new completely black window should then open. You can type commands directly into this window.
This process could take a long time, so feel free to minimize the window and return later.
When the SFC process is finished, restart your computer and see if the issue is resolved.
Instead of spending time trying to find out the core of the 0x80244007 error message, use the System File Checker tool. This is designed to quickly fix the most common issues that may be preventing your computer from updating correctly.
4. Reset the Software Distribution folder
Open Start.
Search for Command Prompt, right-click the result, then select Run as administrator.
Then, you need to type the following commands to stop the Windows Update Service and the Background Intelligent Transfer Service, then press Enter: net stop wuauserv net stop bits
Next, in the File Explorer go to the Software Distribution folder.
Don’t hesitate to delete the folders inside by pressing the Delete button.
Once you’ve completed the above steps, Windows 10 will reconfigure the folder and re-download all the necessary components.
If you keep seeing the same Windows update error, let us finally walk you through the steps to delete the content inside the Software Distribution folder.
When it comes to fixing the Windows update error 0x80244007, there are several things that you can do, from utilizing the built-in Update troubleshooter to resetting the Software Distribution folder.
If all the previous troubleshooting steps failed, you could also try resetting all Windows Update components or performing a repair install.
Do you know any other way to bypass this Windows update issue? Feel free to share it with us in the comments section below.
Since the beginning, new Windows updates have been bringing a lot of issues to users. Moreover, with the introduction of Windows 10 and the mandatory updates, the problems vastly increased.
Nonetheless, the importance of updates is unchanged: your security and overall performance are substantially improved with updates.
But, what to do if the updates won’t install and you are prompted with a certain error code, in this case, 0x80070663?
Well, this code seems to show up because of, either Microsoft Office package corruption or a general update failure. So, if you have any of the 2 mentioned issues, we prepared some workarounds for you.
How can I fix the 0x80070663 error?
1. Use SFC to check the integrity of the system file
SFC tool is a valuable built-in tool with the main purpose to scan and resolve system files corruption. Due to a virus infection or misuse, certain files can get corrupted or even deleted.
That can heavily affect update features and cause errors like the one we are sorting out today.
You can use the SFC tool easily by following these instructions:
In the command line, type (or copy-paste) sfc/scannow
Press enter to start the scanning.
After the process is finished, you’ll be informed of possible errors.
If you are looking for the safest and faster solution;a specialized repair tool will scan, detect and replace any missing or corrupted file on your device with a new one one
2. Disable antivirus
You’ve probably already read numerous times that third-party antivirus programs can block Windows updates.
To make sure that’s not the case, temporarily disable your antivirus, and try to install updates.
If you can install your updates after disabling your antivirus, we recommend you try another security tool that won’t interfere with your system.
As we already stated, this specific error can occur due to Office update files corruption. As you are probably aware of, updates for Microsoft Office come through standard update procedure.
And they can, as same as other cumulative updates, get corrupted. Because of that, we advise you to uninstall and reinstall Office. At least temporarily, before some of the future patches fix this issue permanently.
Here’s how to do that:
Open Control Panel.
Choose Add or Remove programs.
Find Microsoft Office and choose Uninstall.
You may as well repair the installation. but that’s not your safest bet.
Once the uninstalling task is finished, use CCleaner to clean remaining registry files.
Restart the PC.
Install Office again and check for updates.
Once it’s done, you should be able to download and install the latest Microsoft Office updates.
4. Hide the corrupted update with Show and Hide troubleshooter
Even though updates are forced in Windows 10, you can at least prevent certain, individual updates from downloading.
There so, you’ll temporarily resolve the issue and continue with the seamless updating process. Follow these steps to utilize this tool:
Once you run the tool, it will search for available updates.
Choose to hide the update file that provokes the error.
Install updates.
Have in mind that some security updates are essential. So, it’s not recommended to restrict them from updating. Luckily, we have another solution that will address that sensitive update issue.
5. Manually download cumulative updates from MicrosoftCatalogue
When online updates don’t work because of various reasons, you can download and install those files manually. Microsoft Catalogue is the collection of all of the files used in updates.
Starting with small cumulative updates and leading to the major updates and patches. In case you’ve tried previous workarounds and the problem with certain files is persistent, follow these steps:
Download the file. Keep mind on your system architecture (x86 or x64).
Install the update file.
Restart your PC.
Check for additional updates to make sure the update is up and running.
6. Run DISM
If the aforementioned SFC scan didn’t get the job done, we’re going to try a perhaps more advanced troubleshooting tool. You guessed it, we’re talking about DISM.
DISM stands for Deployment Image Servicing and Management, and as its name says, it deploys the system image all over again. Hopefully, the potential issue will vanish along the way.
Here’s how to run DISM in Windows 10:
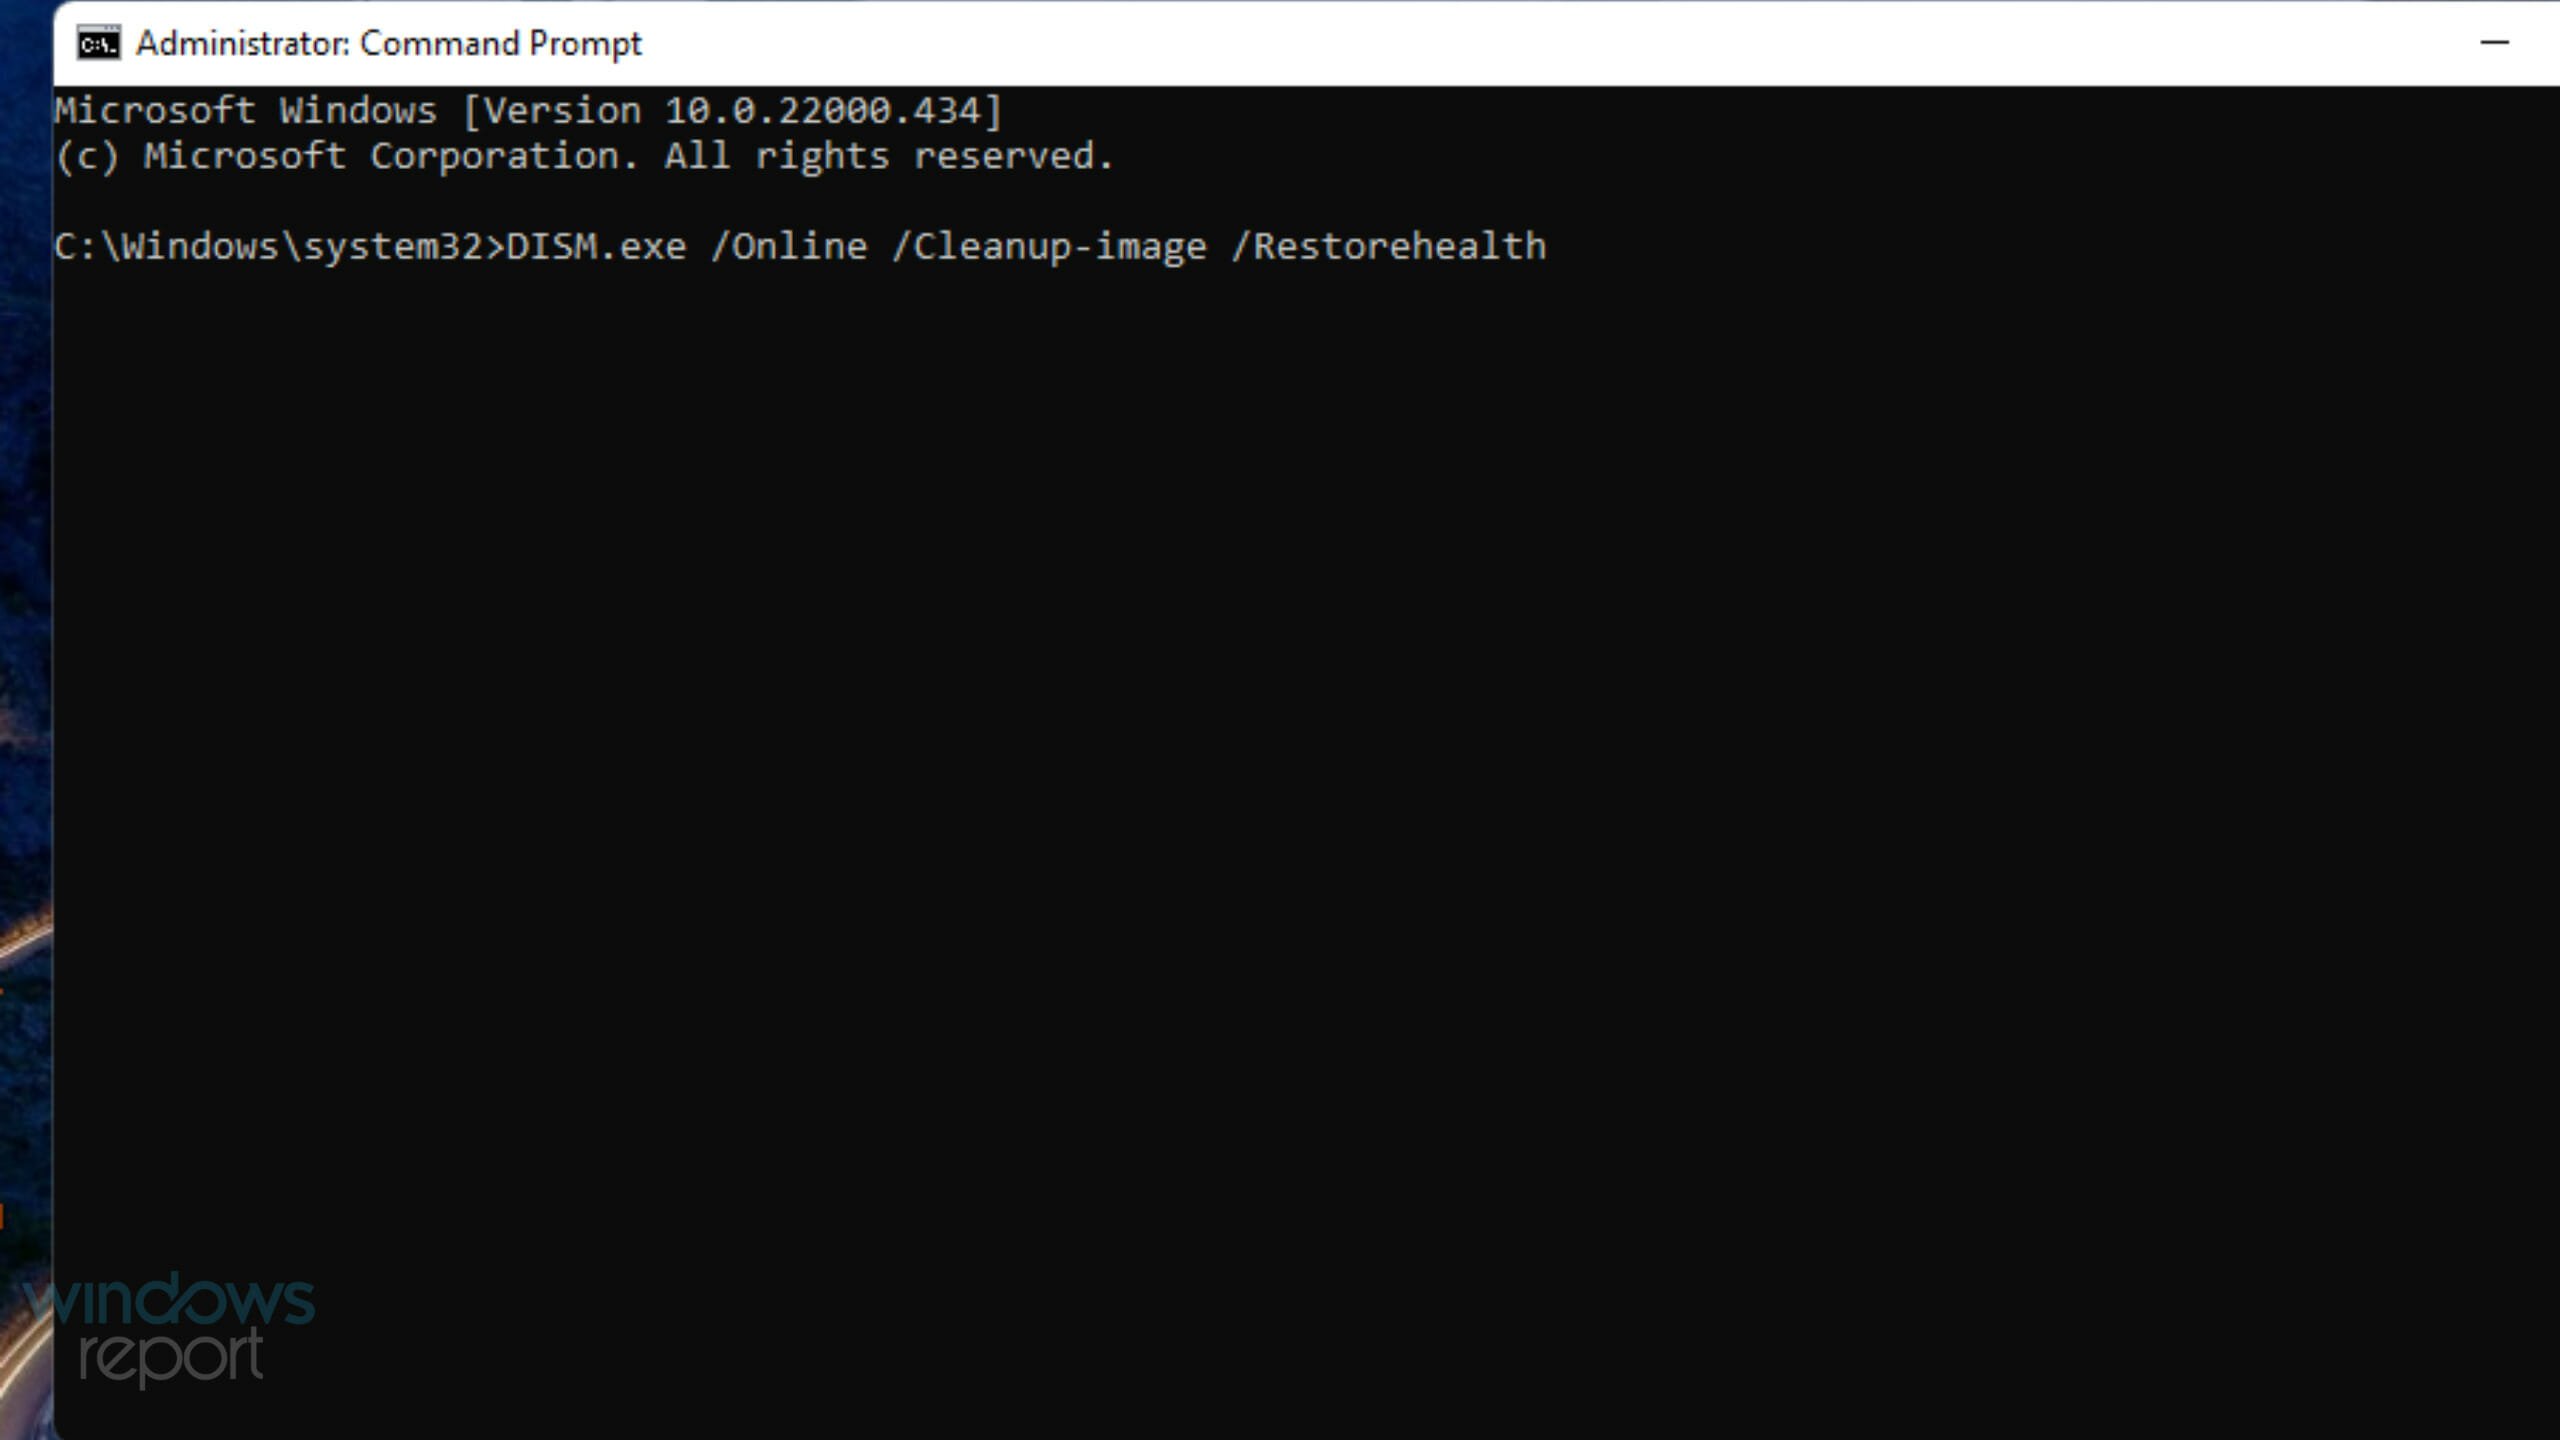
Open the Command Prompt as shown above.
Enter the following command and press Enter:
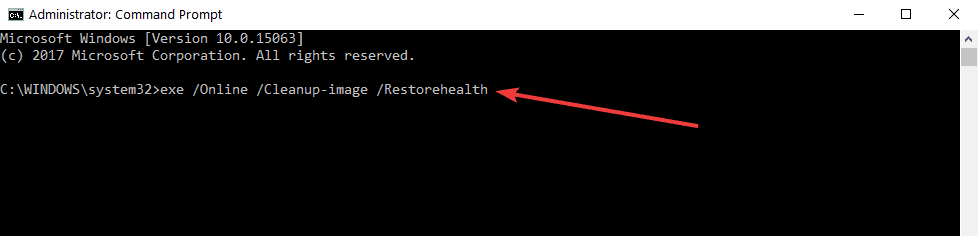
DISM.exe /Online /Cleanup-image /Restorehealth
Wait for the process to finish.
Restart your computer.
In case the DISM can’t obtain files online, try using your installation USB or DVD. Insert media and type following command:
The third troubleshooter we’re going to try and mention in this article is Windows 10‘s built-in troubleshooting tool. You can use this tool for resolving all kinds of issues, including update problems.
Here’s how to run Windows 10‘s built-in troubleshooter:
Go to Settings.
Head over to Updates & Security > Troubleshoot.
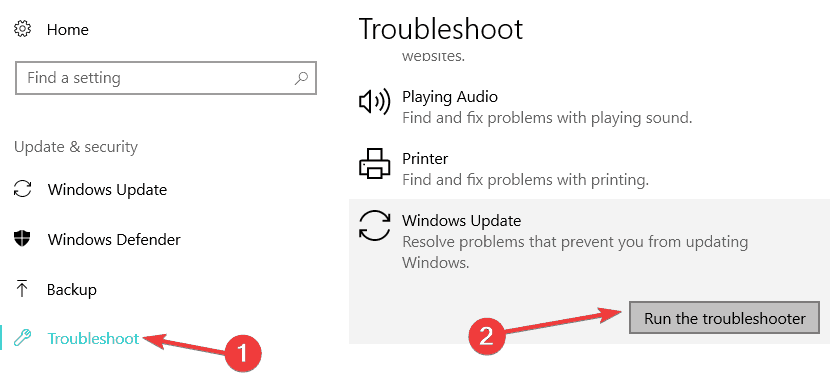
Select Windows Update, and go to Run the Troubleshooter.
Follow further on-screen instructions and let the process finish.
Restart your computer.
8. Uninstall previous updates
It’s also possible that the previous update you installed actually messed up your system. For example, it may disrupt the update mechanism, preventing you from installing future updates, thus leading to the error code 0x80070663.
If you doubt the legitimacy of the previous Windows update you installed on your computer, go and uninstall it.
Here’s how to do that:
Go to Settings.
Head over to Updates & Security > Windows Update.
Go to Update history > Uninstall updates.
Now, find the latest update installed on your computer (you can sort updates by date), right-click it, and go to Uninstall.
Restart your computer.
9. Restart Windows Update components
Another thing we’re going to try is resetting crucial Windows Update components inside your system. Here’s what you need to do:
Start Command Prompt as administrator.
When Command Prompt starts, run the following commands:
Speaking of crucial Windows Update components, the BITS service is one of the most important ones. If this service isn’t running, well, you won’t be able to install any updates.
So, make sure the BITS service is on:
Go to Search, type services.msc, and open Services.
Find Background Intelligent Transfer Service. Right-click and open Restart.
Wait for the process to restart.
Now, on the General tab, find Startup type and choose Automatic.
If the BITS is not running, right-click and choose Start.
Confirm selection and close window.
11. Make sure Windows Update service is running
The same goes for the Windows Update service:
Go to Search, type services.msc, and open Services.
Find the Windows Update service. Right-click and open Properties.
On the General tab, find Startup type and choose Automatic.
If the service is not running, right-click and choose Start.
Confirm selection and close window.
With this, we complete the list of fixes for the 0x80070663 error. In case you have any alternative workarounds, questions, or suggestions, please tell us in the comments section.
Windows 7 is somewhat the preferred OS choice of many computer users across the globe.
It is durable enough to run low-end operations while also optimized to execute high-end functions with near-perfection.
Its flexibility makes it ideal for all classes of computers, and many people see it as the best Windows version, with little regard for the newer versions (Windows 11 included).
However, Microsoft has phased out Windows 7 as of January 14, 2020. So, why are we still talking about it? There are still many loyal fans who would like to stay on Windows 7 forever.
Due to significant pushback from users worldwide, Microsoft made yet another concession; hence the Windows 7 end of life extended to 2023.
Fast forward to January 2023, the extension comes to an end. So what now: can you still use Windows 7, does Windows 7 still work? We shall try to answer all your questions, as follows.
Can I still use Windows 7?
Windows 7′ EOL is upon us, meaning there is no more official support (from Microsoft) for Windows 7 PCs.
With this, security patches and system updates are stopped, leaving Windows 7PCsvulnerable and outdated.
What happens if you still use Windows 7?
Users are left with no choice but to upgrade their OS to a newer version. Failure to upgrade would expose their Windows PCs to malware attacks, bugs, system lags, and other security issues.
But is there really no choice to be made? We don’t think so.
If you still want to keep running Win7 on your PC for as long as possible, without official support, you can, and we will show you how to do it. But first, we have a few things to clear out.
? Does Windows 7 still work? Yes, and you will be able to stay on Windows 7 forever or until it is no longer available, which leads us straight to the next big question.
? Can I still install Windows 7? As long as you have a product key, you can install it on a compliant PC.
? Is Windows 7 still good? There is no right answer here. Technically, it is outdated, and there are better options to pick from. However, those who decided to remain loyal to this now-historical version of Windows still appreciate its stability and ease of use. To test out the iteration, use an online Windows 7 simulator.
? Can you still use Windows 7 safely? This is also debatable, you can go the extra mile and add a robust antivirus that works with Windows 7 as well as a lightweight VPN for privacy. However, the best way to keep out of trouble is to stay offline as much as possible.
In this guide, we are going to be showing you what you can do to stay on and use Windows 7 forever, without installing Windows 10.
How can I continue using Windows 7?
1. Disable Windows 10 Upgrade
Navigate to the Computer Configuration option on your PC, and click on it.
2. On the displayed window, select Policies.
3. Under Policies, click on the Administrative Templates option.
4. Select Windows Updates.
5. On the displayed window, double-tap on the Turn off the upgrade to the latest version of Windows through Windows Update option.
6. Finish the configuration by tapping on Enable.
This is the first and most conventional process if you want to hang on to Win7 on your PC. Most Windows 7PCs by default auto-update to the latest version.
Hence, if this function is not disabled, your Windows 7 computer would automatically be updated to Windows 10.
To disable the Windows 10 upgrade option, there is a Group Policy setting that is designed to facilitate such configurations. And this would ensure your PC blocks any form of version upgrade on your PC.
However, the most convenient way of disabling upgrades is via the system configuration method. To disable and block Windows 10 upgrade using this method, follow the step-by-step guide provided above.
With this action, your Windows PC would maintain its original version for as long as possible.
However, when Microsoft pulls support, your device might become vulnerable to malware attacks, unauthorized access, and system malfunctions.
2. Continue using your Windows 7 after Windows 7 EOL (End of Life)
When Microsoft pulls out support for Windows 7, you can continue using the version, albeit at your own risk. To ensure you are not affected by the vulnerability that follows, do the following:
Download and install a durable antivirus on your PC. Since you are officially unprotected by Microsoft, ensure you go for reliable (tested and trusted) AV software.
Download and install GWX Control Panel, to further reinforce your system against unsolicited upgrades/updates.
Back up your PC regularly; you can back it up once or thrice a month. This is to facilitate recovery if and when required.
Stay informed about any new update/upgrade, and always custom-install any update you need.
By adhering strictly to the above-stated points, you can continue using Windows 7 for as long as you want. However, you have to be extra careful while surfing the internet, as your unprotected system is now vulnerable to hacks.
For a full walkthrough, you can follow this detailed Windows 7 installation guide that explains each step from start to finish.
Virtual machines allow you to imitate an OS on another operating system. Hence, you can easily use this trick to bypass the impending Windows 7 EOL come January 2020.
There are numerous virtual machine programs out there; however, only a handful of them are durable. So, ensure you download and install a reliable one on your computer.
To continue enjoying Windows 7 after the EOL, follow the steps below:
Install a virtual machine program on your computer
Download and install GWX to prevent unsolicited upgrades
Install Windows 7 on the virtual machine software.
Run the imitated OS (Win7) on your PC via the VM software. The VM software interfaces between the installed Win7 and your PC
No one can say exactly what Microsoft is cooking up; if they are planning to end Windows 7 for good, they’d eventually phase it out with time.
For now, however, you can hang on to your Windows 7 especially if you’re clinging onto apps like OneDrive for Windows 7 or simply upgrade to the latest Windows 10 version.
Windows 7, according to official estimates from Microsoft, constitutes about 30% of all Windows PCs across the globe. This means that for every five Windows PCs, at least one is running Windows 7.
With this, it is one of the most reliable Windows versions out there, and users are especially impressed with its ease of usage and durability. That’s why we believe Windows 7 is the next Windows XP.
By this time, Windows 7 users would be expected to upgrade to a newer version or risk having their system’s security and patch support withdrawn.
Keep in mind that if you choose to use Windows 7 you’ll need a reliable browser to with it, and we have a great guide on how to install Thorium browsers on Windows 7, so don’t miss it.
So, if you still want to keep running your PC on Win7 after the impending apocalypse, the guides herein would assist you. In this article, we have succinctly described how to stay on Windows 7 forever.
Windows 10 offers great tools for creating various documents of all kinds. And of course, you’ll have to print those documents from time to time. But what if you face some kind of problem with your printer? Don’t worry, there might be a solution for that.
Why is my printer installation failing?
There could be several causes why your printer installation is failing, such as outdated or incompatible printer drivers, conflicts with software, a problem with the printer itself, or a lack of permissions.
How to fix unable to install a printer on Windows 10?
1. Check your print process files
There’s a possibility that your PC is missing some print process files. In that case, you don’t have to re-install the whole system for this, all you have to do is to copy needed files from the PC without this problem and you’re good to go. Here’s exactly what you need to do:
First, go to Search, type services and open Services.msc
In Services, find Print Spooler service and stop it
Now, from working PC, copy all files from the following location to the same location on the PC that has issues with the printer:
C:WindowsSystem32spoolprtprocsx64
Now you have to create a registry entry for your newly copied print process file. Just follow these instructions to do that:
On the ‘working’ computer, go to Search, type regedit and open Registry Editor
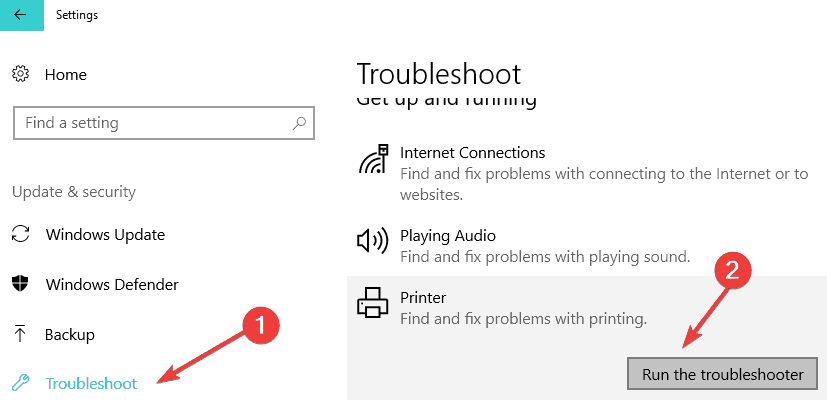
Windows 10 also features a built-in troubleshooter that allows you to quickly fix general print-related issues. To run it, simply go to Settings > Update & Security > Troubleshooter > run the Printer troubleshooter.
Additionally, you can also run the Hardware and Devices troubleshooter.
3. Use Clean Boot
Sometimes, some of the apps and programs installed on your device may prevent Windows 10 from detecting and installing your printer. In order to fix this issue, you can clean boot your computer so that it uses only the minimum set of drivers and apps it needs.
Go to Start > type msconfig > hit Enter
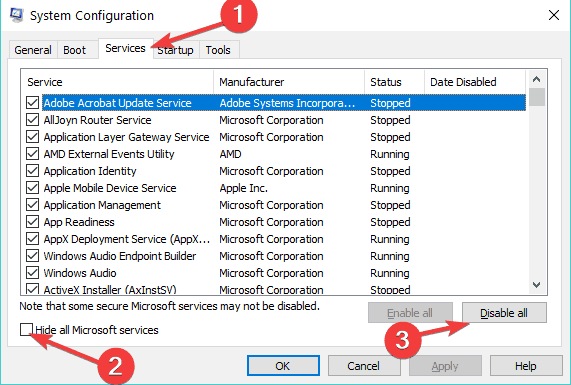
Navigate to System Configuration > click on the Services tab > check the Hide all Microsoft services check box > click Disable all.
Go to the Startup tab > Open Task Manager.
Select each startup item > click Disable
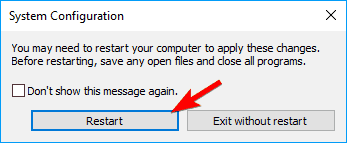
Reboot your computer.
4. Uninstall your printer driver
If your printer driver is installed incorrectly or your old printer’s driver is still available on your machine, this could also prevent you from installing a new printer. In this case, you need to completely uninstall all printer drivers using Device Manager.
5. Buy a new printer
Since you’re experiencing this issue in Windows 10, there’s a possibility that your printer is not compatible with the system, especially if you’re using an older one. So if you want to print your documents in Windows 10, you’ll have to buy a new printer if your current one is not compatible.
So, now that you’ve made sure that your printer is indeed compatible with Windows 10, but you’re still unable to install it, you can try the following solution.
This isn’t the only problem, and many reported that PC can’t connect to printer, but we tackled that issue in another guide, so don’t miss it.
If you’re using a Canon device, we have a great guide on how to download the Canon LBP2900B driver that might come in handy, so don’t miss it.
That would be all, you should be able to install your printer now. We hope that one of these fixes solved the problem. If you have any questions or suggestions related to this guide, let us know in the comments below.
The Windows update error code 80070026 usually appears in Windows 10 when you try to install the latest updates.
A possible reason as to why you get this error code is the fact that your C:Users folder was changed to another directory, like F:Users resulting in potential system errors with the Windows Update feature.
Luckily, there are a few very easy methods to fix error code 80070026 and resume your everyday work. So just follow the steps listed below in the order they are described and you’ll have your operating system up and running in no time.
How can I fix the Windows Update error 0x80070026?
Write the following command and press the Enter: dir C:
Do this for all your partitions to determine which one is on the SSD or external hard drive, and which one is on the internal hard drive. (We are going to take partition G as the external hard drive and partition H as the internal hard drive.)
In the command prompt window, write the following and press Enter: robocopy /copyall /mir /xj G:$$PendingFiles H:$$PendingFiles
Afterward, run the following and press again Enter: rmdir /S /Q G:$$PendingFiles
Now open the File Explorer and see what letter the Internal HDD has. (We are going to use C.)
Write in the command prompt window the following and hit Enter: mklink /J G:$$PendingFiles C:$$PendingFiles
Exit Command Prompt and reboot your device.
When the device starts you will need to open your Windows Update feature and check again if you still get the error code 80070026.
Note: If some of the steps listed for the second solution are not available on your Windows 10 device, skip this solution completely and go to the next one.
3. Check your antivirus
Quite frequently, your antivirus prevents you from updating your computer. To check if your antivirus tool is the culprit, temporarily disable it and then hit the Check for updates button.
Many times, disabling your antivirus won’t be enough so you will need to uninstall it completely. If this proved helpful, that means you should consider switching to another solution.
There are numerous valuable antivirus programs available, and many of them are designed with unique and interesting features for each user’s needs.
4. Run DISM
In the search dialog box, write Command Prompt and open as admin.
Write the following and hit Enter: DISM.exe /Online /Cleanup-image /Scanhealth
Then, run the following and press Enter: DISM.exe /Online /Cleanup-image /Restorehealth
Exit and reboot your operating system once more.
See if your Windows Update feature is working correctly.
5. Refresh your PC
Open the Recovery menu as shown in the second solution.
In the Reset this PC section click on Get Started.
Follow the instructions on the screen to finalize the System Refresh and try again your Windows Update feature to see how it goes.
If the issue persists and you want to take a short break from any complex troubleshooting solutions, then you can run Windows’ built-in update troubleshooter.
This useful tool can help you fix general update issues so that you can finish installing the latest OS updates on your PC.
If you’re running Windows 10, go to Settings > Update & Security > Troubleshooter and run the update troubleshooter as shown in the screenshot below.
If you’re running Windows 7 or Windows 8.1, you can launch the Update troubleshooter from Control Panel.
Type troubleshoot in Contol Panel windows, open the tool and select View All to list all the troubleshooting tools. Locate and run the Update troubleshooter.
7. Reset Windows Updates components
Launch Command Prompt as admin again.
Stop the Windows Update Services by typing the following commands and hit Enter after each one:net stop wuauserv net stop cryptSvc net stop bits net stop msiserver
Rename the SoftwareDistribution and Catroot2 folder by typing the commands:Ren C:WindowssoftwareDistribution SoftwareDistribution.old Ren C:WindowsSystem32catroot2 Catroot2.old
Restart the Windows Update Services by typing the following commands:net start wuauserv net start cryptSvc net start bits net start msiserver
Exit Command Prompt, restart your computer and check if you can install the latest updates.
8. Install updates manually
If the Windows Update service is still not working, try to install the problematic updates manually.
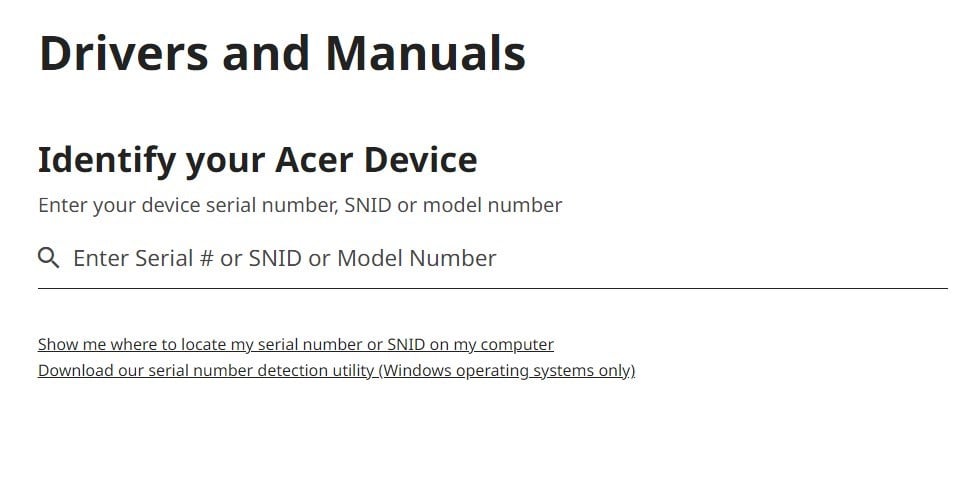
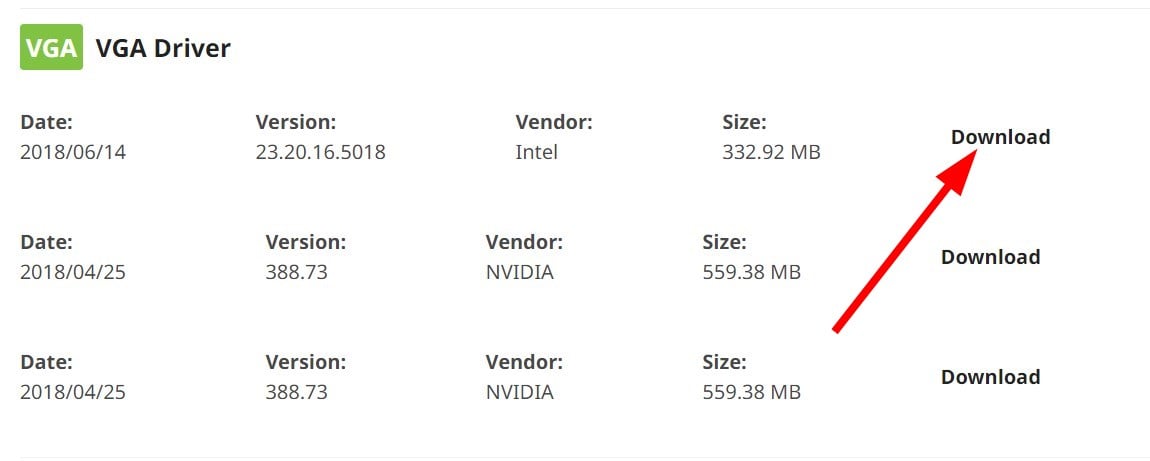
For example, if you’re trying to install the latest hardware driver updates, go to the manufacturer’s website and get the updates from there.
If you’re trying to install the latest Windows patches, go to Microsoft’s Update Catalog, enter the KB number of the respective update(s) and hit the download button.
If you’ve carefully followed the methods above, you now have a working Windows Update feature on your device.
If you need further assistance, you can write to us in the comments section of the page situated below and we will get back to you as soon as possible.
Besides the WoW add-ons error message is one of the more annoying error messages out there, it can also significantly impact the quality of your game.
Fortunately, most of World of Warcraft’s add-ons errors have the exact cause, and by reading through, you’ll learn how to fix them.
Why are my WoW add-ons not working?
From the experience of numerous users, we gather that this error may be triggered by some factors, including:
Broken or outdated add-ons – If you get an add-on error message, one or more of your add-ons are either obsolete or severely broken. Blizzard updates World of Warcraft regularly to resolve issues like high latency or disconnects.
Third-party add-ons – Conflicts between third-party add-ons are often one of the significant causes, especially since they may not auto-update like others that go through frequent add-on resets. Some developers will provide an update for their add-on, which you will have to update manually.
Disabled add-ons – In some cases, you may have disabled the specific add-on in the game, which may cause it not to function.
Usually, with a WoW add-on error message, you get an intricate piece of text that can prompt you to the add-on causing the problem.
If this isn’t the case, or if you can’t figure out the error’s path strictly, then some manual tweaking will be required.
How do I fix World of Warcraft add-ons error messages?
Before going into any of these fixes, we suggest you download all your add-ons and create a zip file containing them. This way, you may reinstall them if you lose them during any process.
1. Repair corrupted files
Visit the official website and click Download for Windows to download the Battle.Net launcher.
Run the app and launch it.
Navigate to World of Warcraft.
Navigate Options, then click on Scan and Repair.
Select the Begin scan option.
This should help you solve any WoW add-ons error message.
2. Disable one add-on at a time and launch the game
Download your add-ons again and create a zip
Go to your World of Warcraft installation folder C:\Program Files (x86)\World of Warcraft\_classic_
Go to Interface and access the Add-ons folder.
Delete one add-on, relaunch the game, and repeat the process till the game works properly.
Although it hurts, remember that you saved your add-ons as a zip file. Deleting one add-on at a time will help you track down which one is causing the error.
Tip
If the first add-on is problematic, don’t rush to unzip it immediately. Some add-ons communicate with each other, so it’s best to wait until the end of the process.
There are multiple options available so that you can make your pick. What’s great about an Add-on Manager is that the above process is fully automated.
The manager will automatically detect outdated add-ons and suggest an update.
Every World of Warcraft player has, at some time, encountered this WoW add-ons error message. The solutions we have discussed should help you resolve any associated problems.
Feel free to tell us in the comments what add-on gave you a headache and how you dealt with it.
In Windows 10 you can choose how often and when you want to update your device which for many users is a great feature.
Lately, some of them reported that when trying to update their Windows 10 th following error message appeared:
There were problems downloading some updates, but we’ll try again later. If you keep seeing this, try searching the web or contacting support for help. This error code might help: (0x8024a105)
The error 0x8024ce0e Failed To Install is not uncommon and it appears usually as a result of improper installation, a virus, file corruption, or missing files.
Luckily this error is easy and simple to fix and we will show you in this article the exact steps you need to make, so make sure to keep on reading.
How can I fix the 0x8024ce0e failed to install error?
1. Use a specialized tool
The most reliable way of solving this kind of error implies using specialized software that will scan, update, and fix any system issues.
With these tools, you will not have to make any manual settings, other than run the program itself and allow for the process to finish.
2. Reboot your device
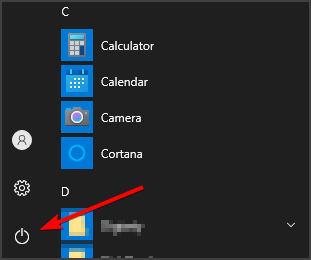
Click the Start Icon.
Now click the Power icon.
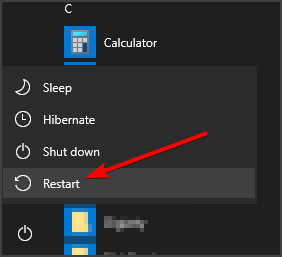
Choose Restart from the menu.
Although it seems as simple thing to do, it is known that rebooting your device will solve the error code 0x8024a105. In some instances, this solutions can also fix Update error 0x8024001e, so be sure to try it.
3. Ensure you have enough space
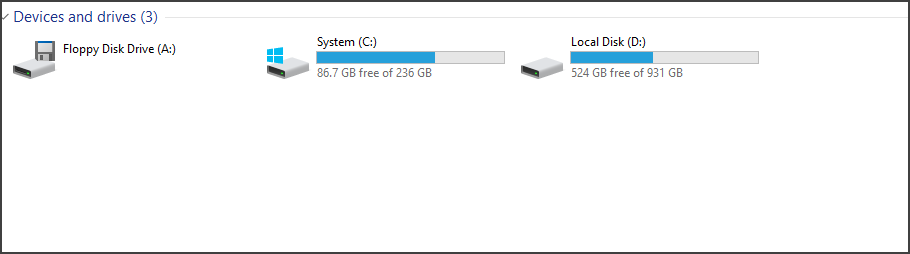
Open File Explorer.
Go to This PC.
In the Devices and drivers section check the remaining storage space on your drivers.
In order to upgrade a 32-bit OS your device needs at least 16 GB of free space, or 20 GB for a 64-bit OS. Therefore, depending on your device specification is essential to ensure you have enough space.
You can free up space on your device by deleting the unnecessary files and folders and even deleting apps that you are no longer using.
4. Disconnect external hardware
Make sure to remove any external devices and drivers, or any other hardware plugged into your device that is not needed for basic functionality.
Once you performed this step, try to run the update again and see if you are still receiving the Windows Update error 0x8024ce0e.
That is all. We hope that one of the solutions presented above have helped you to successfully solve the Windows update error 0x8024ce0e failed to install.
If you have additional recommendations or suggestions, we would love to hear them so don’t hesitate to leave us a message in the comments section below.
In this article, we’re going to talk about error code 0x80070020, which reportedly prevents users from installing a new version of Windows 10.
Since installing the freshest Windows release is highly advisable, we can’t let this error hang in there forever.
So, we’ve prepared a couple of solutions, that may be appropriate for dealing with error code 0x80070020 .
Why am I getting Windows failed to install the following update with error 0x80070020 message?
This message is quite similar to the update error 0x80070026, and if you encounter it, it’s advised to run the update troubleshooter.
Damaged Windows components can cause all sorts of issues, and update error 0x803c0109 is one of them. If you encounter it, we recommend checking if the update service is running properly.
Many have reported There were some problems installing updates message while trying to update, and we covered this issue in-depth in a separate guide, so you might want to check it out.
Error code 0x80070020 can prevent you from installing the latest updates. Speaking of update issues, users also reported the following problems:
Error 0x80070020 Windows 7 – This error can appear on older versions as well. Even though these solutions are intended for Windows 10, almost all of them can be applied to older versions of Windows, so feel free to try them out.
Download error – 0x80070020 Windows 10 – Sometimes this error can appear while downloading the latest Windows 10 builds. If that happens, restart Windows Update components and check if that helps.
How can I solve the error code 0x80070020?
1. Run the Windows Update troubleshooter
If none of the solutions listed above managed to solve the problem, you should try running Microsoft’s official Update Troubleshooter. This tool solves various update-related issues, and it might solve your problem, as well.
Here’s what you need to do to run Windows Update troubleshooter:
Launch the tool > follow the on-screen instructions.
Try to install the update again.
2. Restart the Background Intelligent Transfer Service (BITS)
Background Intelligent Transfer Service (BITS) is a Windows process responsible for delivering updates to your computer. So, if this process gets corrupt, you’ll have problems receiving updates.
In order to make it work again, we should restart BITS, and try to run Windows Update once again. Here’s exactly what you need to do:
Press Windows Key +R and enter services.msc. Press Enter or click OK.
Find Background Intelligent Transfer Service. Right-click and open Properties.
On the General tab, find Startup type and choose Automatic.
If the BITS is not running, right-click and choose Start.
Confirm selection and close window.
If nothing’s wrong with BITS, move on to another solution.
3. Reset Windows Update services
Windows Update relies on various services in order to work properly, and if there are any issues with Windows Update, you might be able to fix them by resetting Windows Update services.
This is relatively straightforward, and in order to do this, you need to run a few commands in Command Prompt. To do that, follow these steps:
Start Command Prompt as administrator.
When Command Prompt starts, run the following commands:
After running these commands, check if the problem with Windows Update is resolved. If you don’t want to enter all these commands manually, you can perform this solution by using the Windows Update reset script.
4. Perform SFC
Although many users consider the SFC scan an overrated solution, it might be helpful in some cases. In case you’re not familiar with this tool, it scans your computer for issues and corrupted features, and tries to solve them (more or less) effectively.
Here’s how to run the sfc/scannow command in Windows 10:
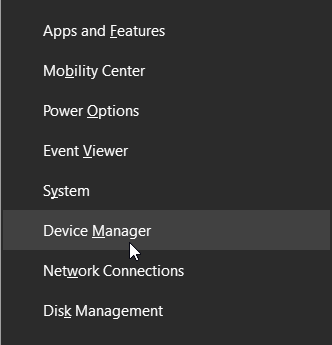
Press Windows Key + X to open Win + X menu. Select Command Prompt (Admin) or Powershell (Admin) from the list.
In the command line type sfc/scannow
The process should last a few minutes.
After it’s done, close the Command Prompt.
If the SFC scan can’t fix the problem, or if you can’t run SFC scan at all, you might want to consider using DISM scan instead. To perform a DISM scan, you just need to do the following:
Start Command Prompt as administrator.
Enter DISM /Online /Cleanup-Image /RestoreHealth and press Enter to run the command.
DISM scan will now start. The scan can take about 20 minutes or more, so don’t interrupt it.
Once the scan is finished, check if the problem is resolved. If the issue is still present, or if you were unable to run SFC scan before, be sure to repeat the SFC scan. After doing that, check if the issue is resolved.
Alternatively, you can rely on an automated repair tool to scan, find, and replace any corrupted and missing files on your PC.
5. Disable your antivirus
Third-party antivirus programs and Windows are not the best friends ever. Having a third-party antivirus installed on your computer can actually cause more harm than you’d hope for.
That conflict can cause malfunctions of various Windows features, including Windows Update.
If you’re using a third-party antivirus, you might want to try changing its settings and check if that helps. In some cases, you might want to completely disable your antivirus in order to solve this problem.
Even if you disable your antivirus, Windows 10 has its own antivirus in form of Windows Defender, so your PC won’t be in any danger.
In some cases, you might even have to completely remove your antivirus to solve this issue. If removing the antivirus solves the problem, you should consider switching to a different antivirus solution.
There are many great antivirus toolsoptions fully compatible with Windows 10, that won’t interfere with it in any way.
6. Use Command Prompt to find the problematic services
According to users, sometimes certain services can interfere with your system and cause error 0x80070020 to appear. However, you can find these services by using Command Prompt. To do that, just do the following:
Start Command Prompt as an administrator.
Now run netstat -aon | find “:80” and netstat -aon | find “:443” commands. You’ll see a list of information. Look at the numbers at the right side. These numbers represent the ID of the processes that are using your network connection.
To find a problematic process, you need to open Task Manager. You can do that by pressing Ctrl + Shift + Esc.
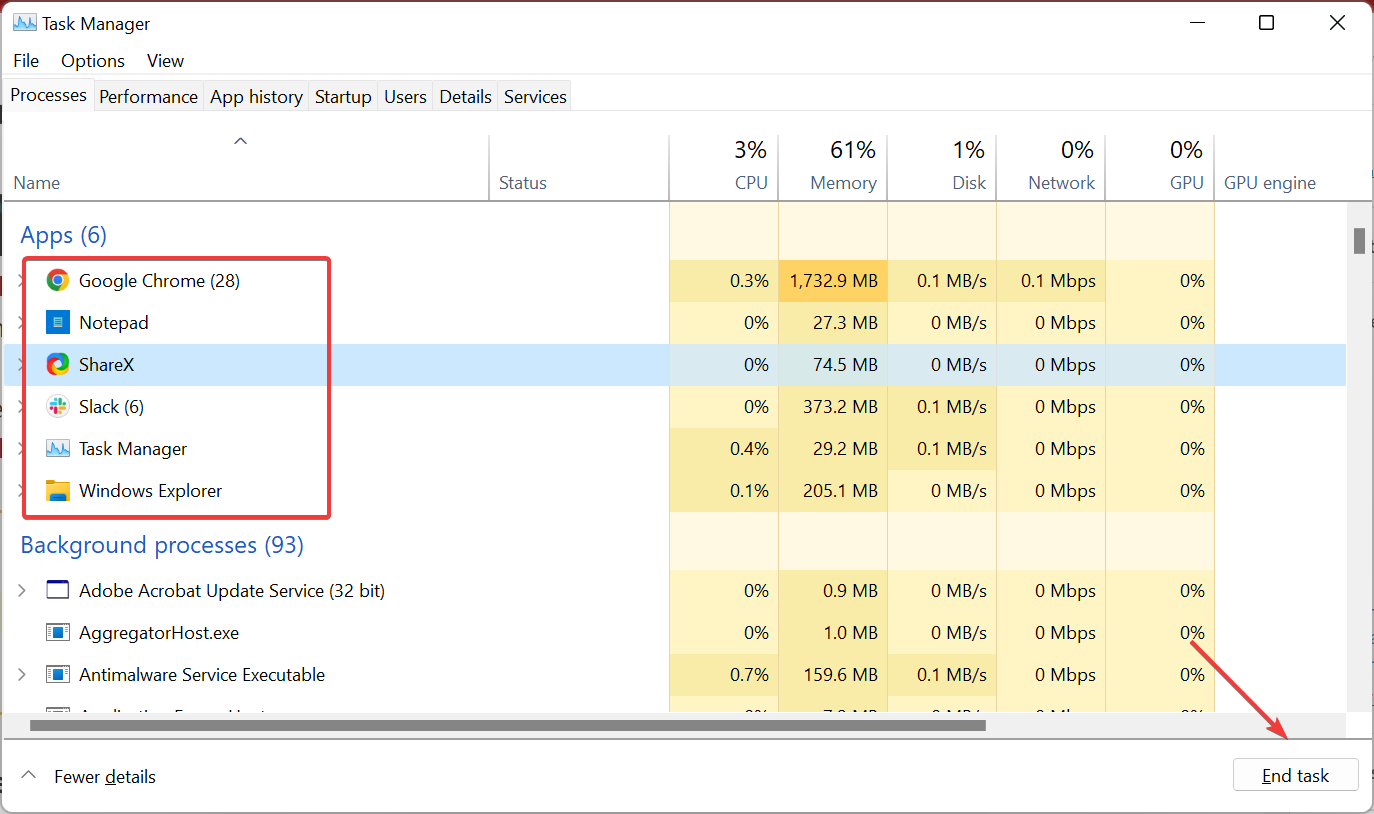
When Task Manager opens, go to the Details tab and look at the PID column. There you should be able to find the same numbers you got in Step 2. Find the problematic process, select it and click End task.
Now go to Services window and check the PID column for any numbers from Step 2. If you find a match, right-click the service with that PID, and choose Stop from the menu. Keep in mind that certain services are required by Windows, so be cautious while disabling services.
This is an advanced solution, so be extra cautious and follow the instructions carefully.
Can’t open Task Manager? Don’t worry, we’ve got the right solution for you.
If you can’t update your Windows due to a 0x80070020 error, you might want to try performing an in-place upgrade. This process will install the latest version of Windows, but it will keep all your files and applications intact.
To perform an in-place upgrade, you need to do the following:
Wait while Media Creation Tool prepares the necessary files.
Select Download and install updates and click Next. Wait while updates are downloaded.
Follow the instructions on the screen until you reach Ready to install screen. Click on Change what to keep.
Select Keep personal files and apps. Now click Next.
The installation will now start. Follow the instructions on the screen to complete it.
Once the installation is finished, you’ll have the latest version of Windows installed and the issue should be resolved.
That’s about it, we hope this article helped you deal with the Windows Update error 0x80070020, and that you’re now able to install the new update normally.
In case you have any comments, questions, or suggestions, please reach us in the comments section below.
Sleep is an essential part of the life of any IT equipment as it gives the machine, like your computer, time to rest and save power when idle. It was actually added to computers for the sake of preserving battery life while solving energy waste issues.
The system assumes you’re away and cuts off power to unneeded subsystems while keeping sufficient power on so you can pick up from where you left on when you resume.
So what happens when the Windows screen is not turning off?
Well, for one, the battery is drained faster and your computer consumes more energy. You could probably try to manually put it to sleep, but it’s best if it does it automatically.
What can I do if Windows 10 monitor won’t sleep?
1. Unplug any devices connected to your computer
Sometimes devices that are connected like USB flash drives, joystick, mouse or keyboard, consoles, and others can cause the computer not to go to sleep mode.
This happens due to compatibility issues between the devices and Windows 10. To avoid it, disable the device. If it’s a game controller device, do the following:
Right-click Start and then select Device Manager
Click Human Interface Devices
Click HID Compliant Game controller and disable it
Note: when you disable the game controller, you may lose virtual joystick-related features in the synapse.
Some users have noted that the Skype app blocks their monitors from going to sleep mode or turning off if open in the taskbar, even if it wasn’t in use. So quit Skype and check if it helps.
Other users have noted that the issue is caused by adware, and when uninstalled, the monitor started behaving normally.
2. Disable USB Selective Suspend setting
Click Start
Select Settings
Select System
Click Power and Sleep
Go to Additional Power settings
Click Change Plan settings
Click Change advanced power settings
Click USB settings
Click USB Selective Suspend Setting and set to Disabled
3. Update latest drivers
Click Start and then select Settings
Click Update and Security
Select Windows Update
Select Check for updates
Install the latest drivers along with chipset drivers, firmware, and BIOS updates if available.
Some drivers are very hard to be found and you can put your system to risk while installing the wrong versions. However, you can avoid that by choosing to do it automatically with Outbyte Driver Updater.
This is the best-automatized solution to spot driver issues – mostly missing or outdated software.
If you want to install the latest version of your drivers without putting your system at any risk, then get it automatically withthis awesome app.
Updating Windows 10 can often turn into a nightmare. In some cases, users can’t install updates on their devices due to various bugs.
From the Windows Update option not working to many update error codes, situations are varied and require particular attention. The good news is that anyone can attempt to troubleshoot update issues using the Windows Update troubleshooter, even without much technical knowledge.
However, you still need to know how to run the Windows Update Troubleshooter, and that is what we will show you in this guide.
What is the Windows Update troubleshooter?
The Windows Update troubleshooter on Windows 11, 10, and older versions help to fix issues preventing you from installing updates and update-related error codes. It saves you from performing so many troubleshooting steps by diagnosing and fixing the causes of these issues.
Below are some of the features of this tool:
Cleans any update-related temporary file that could be causing problems
Repairs and resets any defaulting update-related components
Clears the SoftwareDistribution folder
Checks for any available updates
Checks the status of services related to updates
How can I run the Windows Update Troubleshooter?
1. Run the troubleshooter on Windows 10
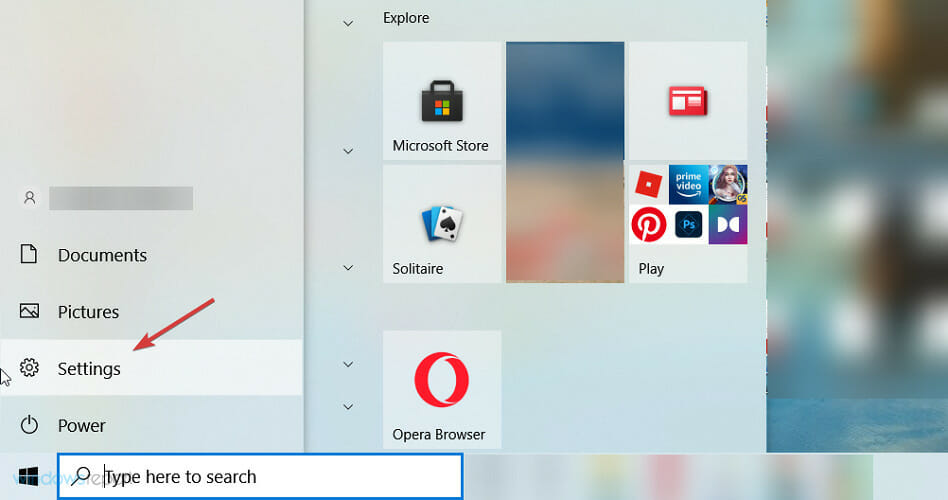
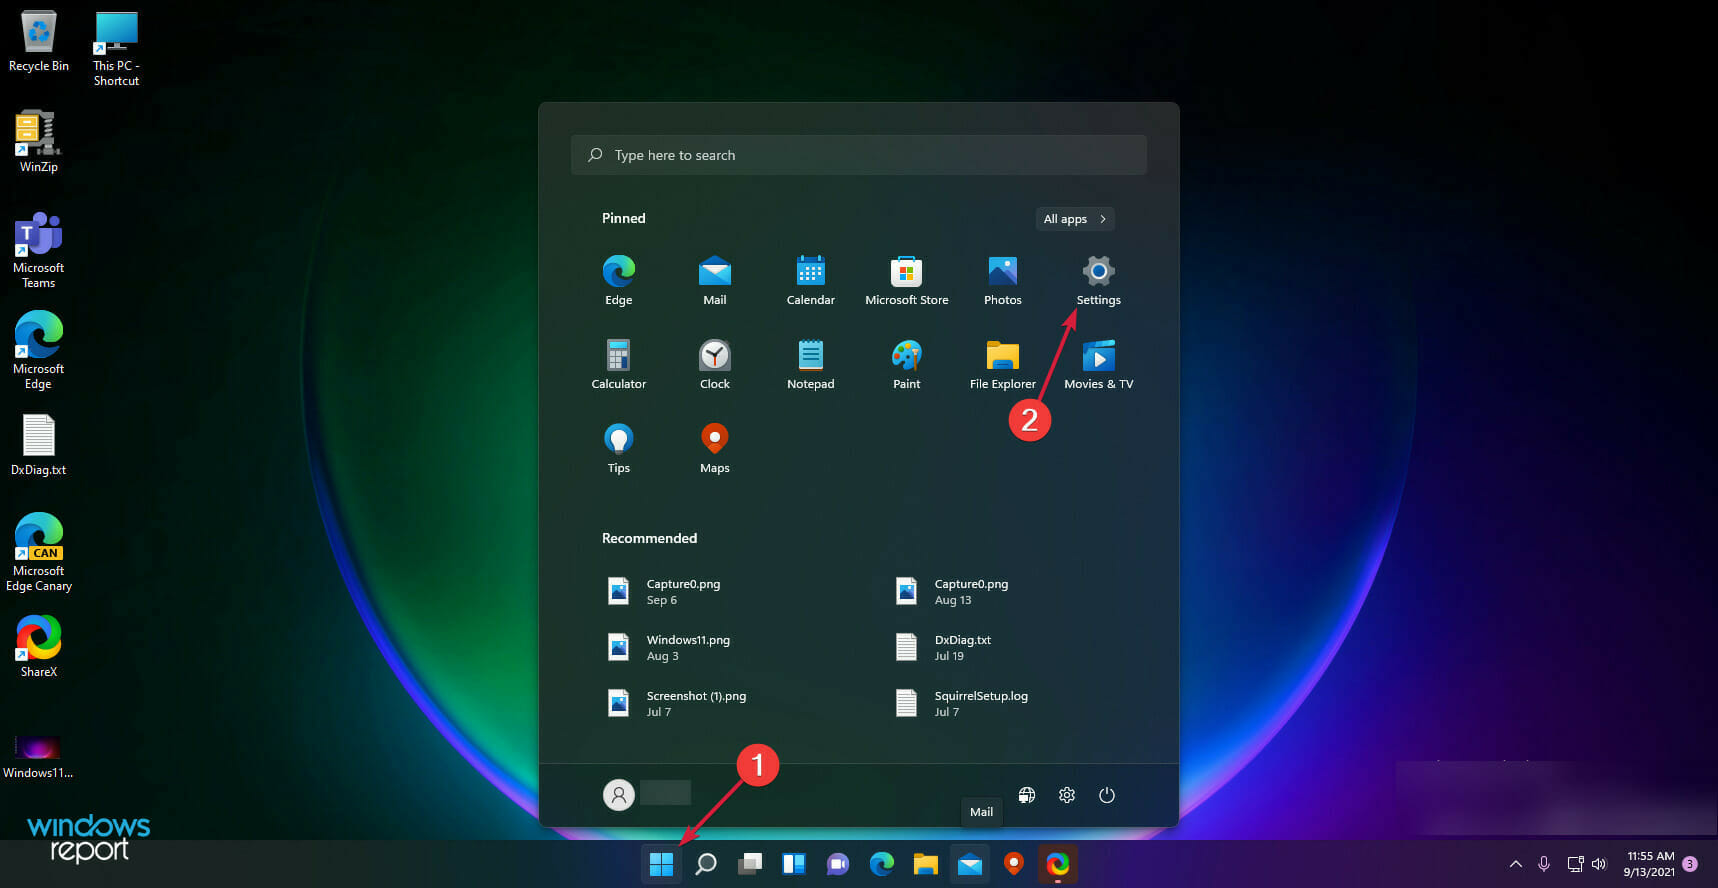
Press the Windows Start button and click on Settings.
Choose Update & Security from the options.
Now, select Troubleshoot from the left pane and click on Additional troubleshooters from the right.
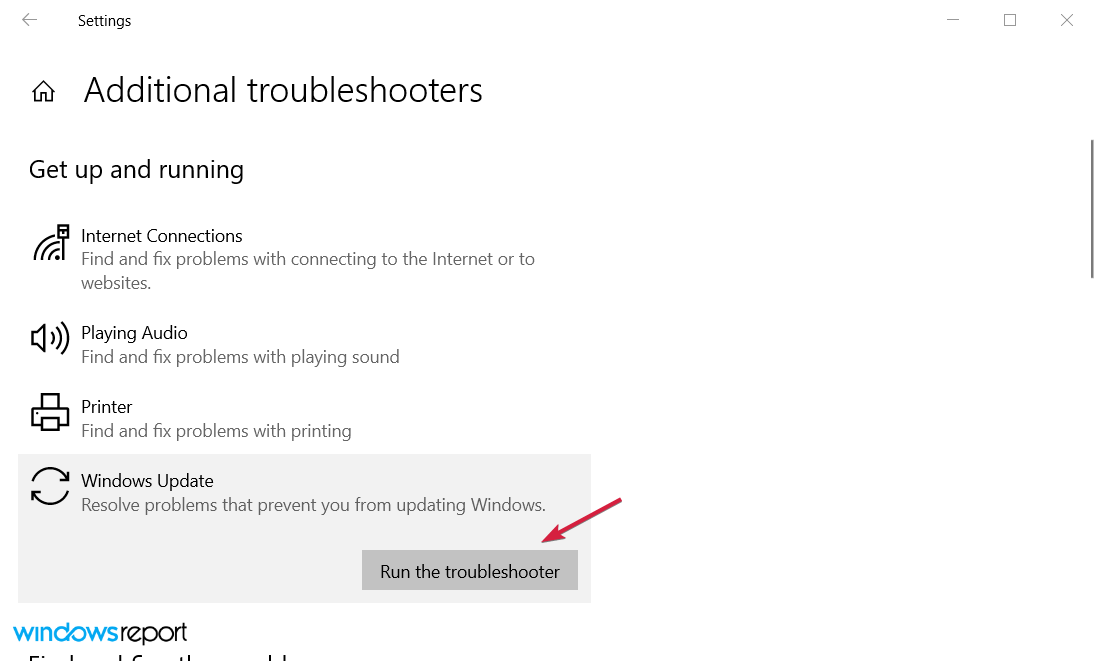
Click on Windows Update to expand it, then hit the Run the troubleshooter button.
Windows 10 has a built-in tool, a convenient, free method to check out what went wrong during the update process.
The Windows Update troubleshooter carries so much importance and can save you a lot of stress. It is not a complicated tool to use, as we have shown in this guide.
If you can’t fix the Windows Update issue you’re experiencing with this tool, choose from our list of dedicated Windows update repair tools to solve the problem.
You can also rely on the Reset Windows Update Tool, which restores update components and fixes issues the built in troubleshooter cannot handle.
Should you encounter any additional problems or you have any other suggestions, don’t hesitate to write us in the comments section below.
A lot of people are using the Universal Outlook app, instead of a web-based version, but some reported Outlook not sending emails issues, among others.
In this article, we’re going to show you some tested solutions to fix your problem with Outlook emails failing, whether after an update or under any other circumstances.
Here are some of the most common issues reported by users:
Also, Outlook not sending emails to certain addresses
Outlook not sending emails with attachments
Why is Outlook not sending my emails?
The first thing you need to understand is that pinpointing the root cause is often tricky. What’s more, it may not be a singular culprit to blame at all, but a conjunction of factors.
SMTP server authentication is not configured – In this case, you’re likely to stumble across Outlook error 0x80040115 when trying to send an email.
The Send option is not checked
Outlook account password is not synced – Make sure your password is properly updated if you recently changed it
Connection issues – Make sure Outlook is online if you’re unable to send emails
Incorrect inputs – Double-check the recipient’s address and try to resend the message
1. Go to Search, type control panel, and open Control Panel.
2. Go to User Accounts and open Mail.
3. In the Mail window, go to Add…
4. In the Profile Name box, type the name of your new profile and click OK.
5. After that, select Manually Configure Server Settings.
6. On the Choose Service page, click Internet E-mail, and click Next.
7. Fill in the boxes in the Internet E-mail Settings dialog box. Make sure that the Account Type setting is set to POP3.
8. Click Next and then, click Finish.
9. Now go back to the Mail window, in When Starting Microsoft Outlook, use this profile box and select the profile you just created.
Click OK. Finally, open Outlook to see if there are any changes.
There’s a possibility that your email profile is corrupted, so you can try creating a new one. Follow the steps described above to create a new email profile for Outlook.
If you still have problems, even if you switched to another profile, you can check if TCP/IP is set as your default protocol. Here’s what you need to do:
Go to Search, type ncpa.cpl, and press Enter.
Right-click on your Internet connection and go to Properties.
Under the Networking tab, make sure that Internet Protocol Version 6 (TCP/IPv6) is checked.
Despite being a very popular email service, Outlook has a very long history when it comes to known issues for both their downloadable client, as well as their web client.
Thus, if none of the solutions written below manage to fix the issue for you, maybe it is time to consider switching to the email client.
One perfect candidate for the job is Mailbird, since it has all of the tools of Outlook, and so much more.
With Mailbird, you can manage all your emails and contacts from multiple accounts easily in one unified Inbox, and visually customize the app to look in whatever way pleases you most.
That’s all, we hope that at least one of these solutions solved your problem with emails in Outlook. If you have any comments, please write them down in the comments section below.
Several users have reported getting the Windows Update error 0xc190012e whenever they try updating their Windows 10 operating system.
It seems that the most common situation in which this error appears is when users try to upgrade from Windows 10 Insider Preview.
This issue can be very annoying, especially if you’re trying to upgrade your Windows 10 OS for security reasons. This error can also stop you from accessing any new or updated features.
For these reasons, in this article, we will explore some of the best troubleshooting methods to try and solve this issue once and for all. Please follow the steps presented in this guide closely.
What is the Windows Update error 0xc190012e and why does it appear?
To explain today’s error in a more detailed way, keep in mind that it is directly related to a Windows Update glitch or some kind of system file corruption.
Plus, you have to consider that experts’ tests also claimed the Dell Encryption, Dell Data Security, and BitLocker interference as one of the most common causes of this issue.
According to some Windows 10 users, this occurs while attempting to install a few particular Windows feature updates. In most cases, it seems like versions 1903 and 1909 are the ones that are giving headaches.
Now, let’s see how you can easily fix the Windows Update error 0xc190012e in just a few simple steps.
How to fix the error 0xc190012e?
1. Clear temporary files
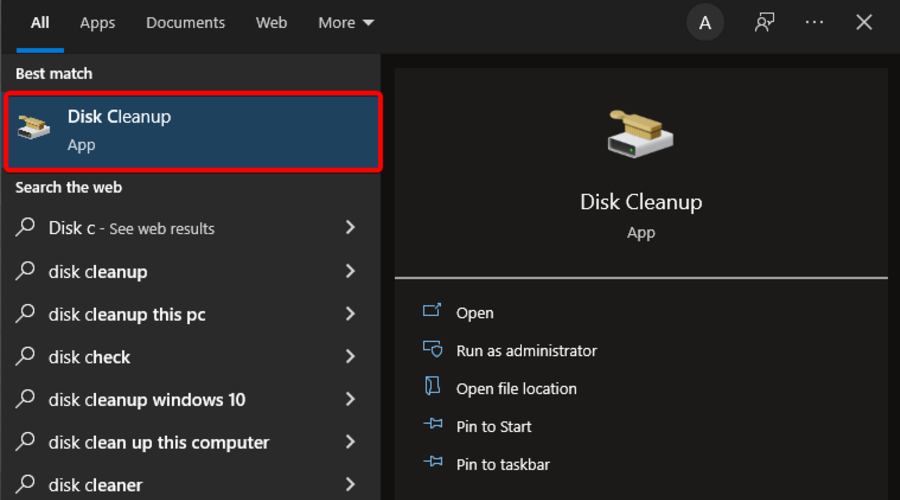
Click on Cortana search box, type in Disk Cleanup,and open it.
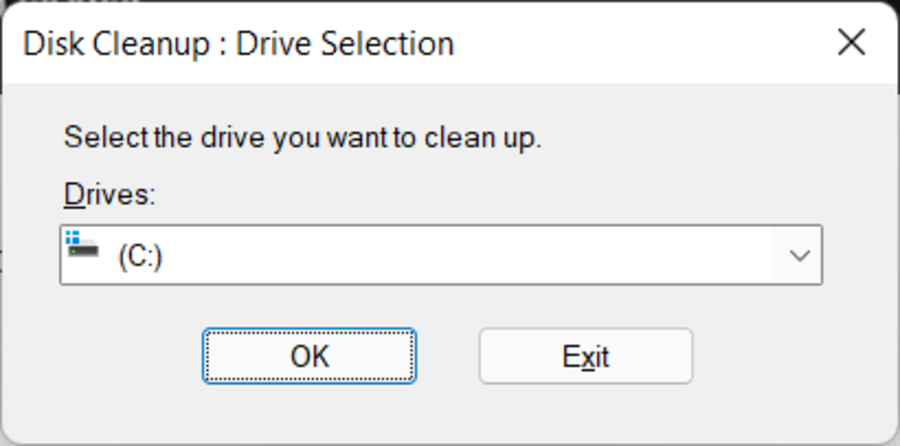
Select Drive C, then click Ok.
Windows will now calculate all the files that can be removed.
Select all the files that you want to remove from the list, and select Ok.
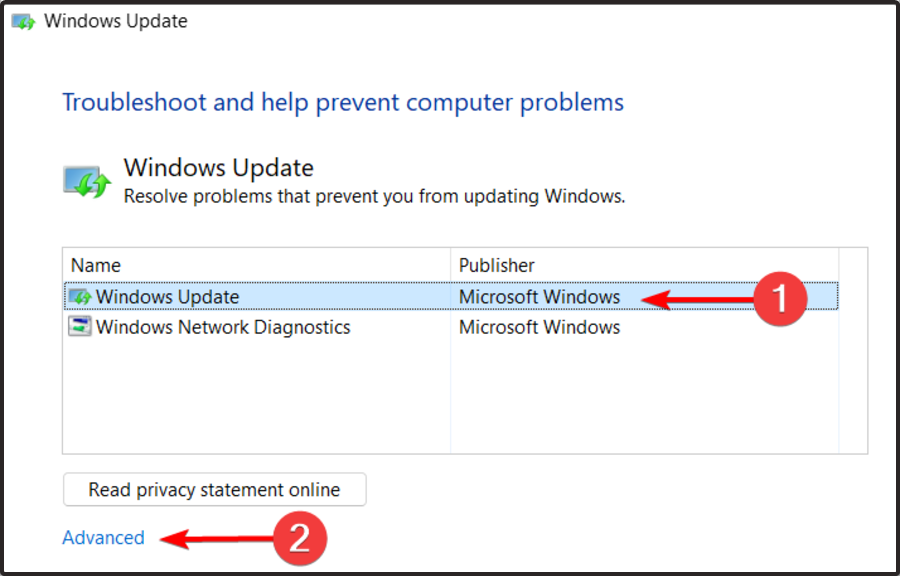
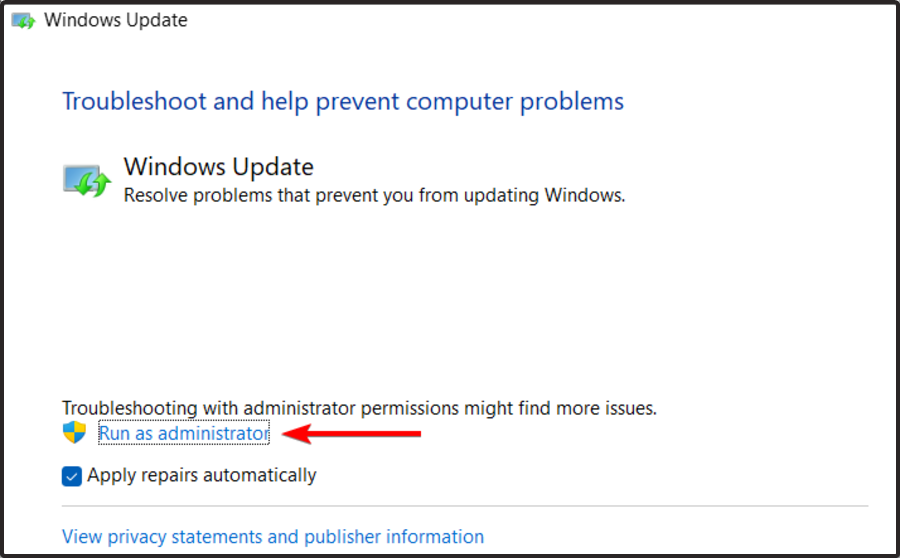
Open the file and select the Windows Update option, then click on the Advancedbutton.
Choose to Run as administrator.
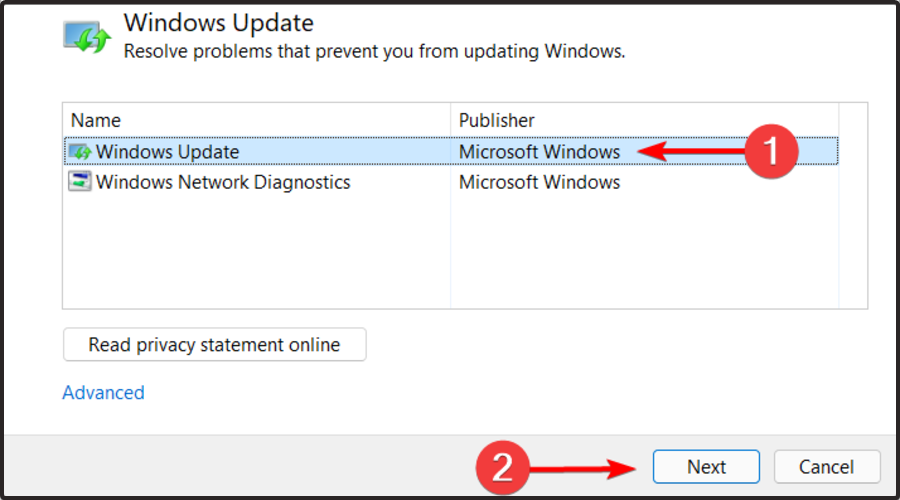
Select Windows Update again, and click Next.
Wait for the process to complete, and close the troubleshooter.
Open Windows Update Troubleshooter again.
Click again on Advanced, then choose to Run as administrator.
Select the second option in the list Windows Network Diagnostics.
Click on Next.
After the process is completed, restart your computer and try to see if you can update your Windows 10 normally.
In case you didn’t manage to get rid of the Windows Update error 0xc190012e, your situation might be related to some corrupted files that need to be cleared.
Make sure you read all the listed solutions below because you’re surely going to discover one that will fit your needs.
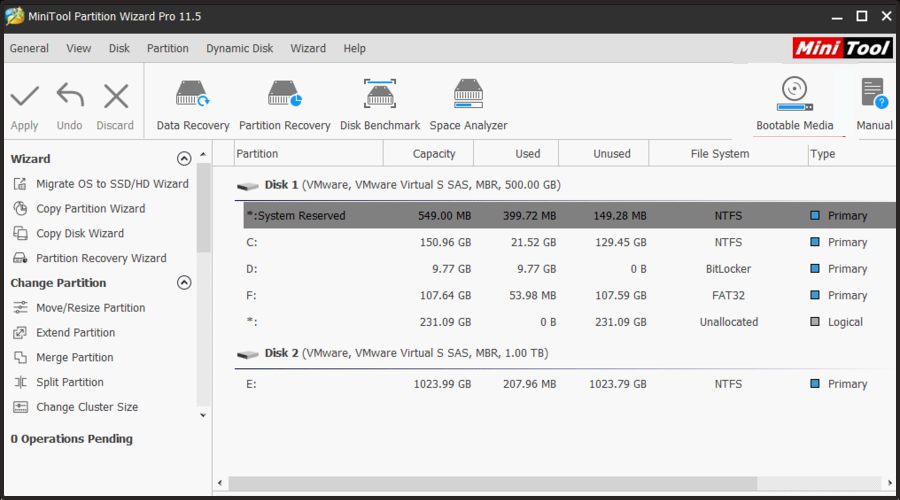
Many users claimed that MiniTool Partition Wizard pro successfully supported them when encountering Windows Update errors, such as the one presented in today’s guide.
What is this tool exactly? It is one of the best disk cloning programs available for Windows users, is especially dedicated to those who need to back up or upgrade components, without spending hours reinstalling Oss or apps.
As many beginners choose MiniTool Partition Wizard Pro, we can strongly agree that it is extremely user-friendly and easy to use.
It seems like this tool will help you a lot when you got to migrate from a Hard disk to an SSD a Hardware Cloner, to quickly change partitions types and define them.
MiniTool Partition Wizard Pro is not only a disk cloning app, but it can also be considered as an all-in-one partition manager that works impeccably in recovering data and diagnosing disks.
With this software, you’ll be able to create, delete, move, resize, format, and extend partitions, convert disks between MBR and GPT, and many other amazing actions.
Partition Wizard can also run diagnostics on disks, measuring things like the read/write speed, verifying the integrity of the file system, fixing file system errors, and detecting bad sectors.
Because this tool can be simultaneously connected to up to 5 PCs, it would be a great idea to share the experience with your loved ones.
Plus, MiniTool Partition Wizard Pro is compatible with multiple Windows operating clients. In this matter, we have to consider Windows 2000, XP, Vista, 7, 8, 8.1, and 10.
Thus, do not hesitate to use it also on aged devices, as it would work smoothly and without any faced troubles.
As an overall conclusion, we have to admit the MiniTool Partition Wizard Pro is an excellent choice if you want to take care of your data storage setup, changes, and maintenance.
The Ultimate license of MiniTool Partition Wizard Pro offers the following features:
Merge Partition
Convert Dynamic disk to Basic disk
Change cluster size
Partition Copy, Disk Copy
Data recovery and partition recovery
Support up to 5 PCs
MiniTool Partition Wizard Pro
If you face the Windows Update error 0xc190012e, you should use one of the best partition managers!
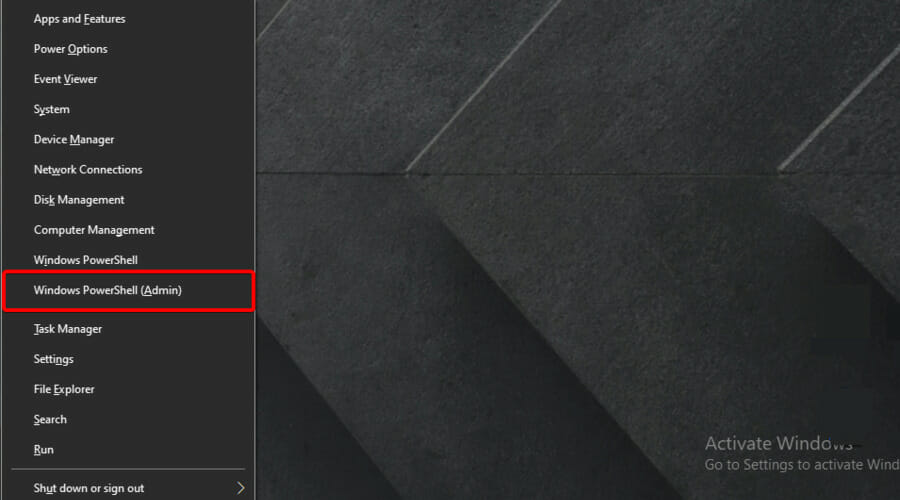
Presssimultaneously on the following keys: Windows + X.
Select Windows PowerShell (Admin).
Inside the PowerShell window, input the following command, then press on Enter: SFC /scannow
Wait for the Windows to check for missing or corrupt files, then restart your computer.
This command will help you not only with the Windows Update error 0xc190012e but also in case you face many other issues, like the 0x1000007e bugcheck blue screen error.
As it can be extremely useful in multiple situations, we strongly recommend saving it somewhere you can easily access it. If Sfc /scannow stops on Windows 10/11, make sure you also check a dedicated fixing guide.
5. Run CHKDSK command
Use the following keyboard shortcut: Windows + X.
Navigate to Windows PowerShell (Admin).
Type in this command then hit Enter:chkdsk C: /f /r /x
In case the volume you want to check is C, then the command will not run (the system is using it now).
Then, you will receive the message that asks you Would you like to schedule this volume to be checked the next time the system restarts?
Type in Y and press Enterso that the system performs the check next time your computer restarts.
Windows Update error 8007005 – This one occurs during Windows updates with an error message that states the following – Error 8007005: Windows encountered an unknown error.
TheWindows Update error 0x800f0845 – Some users claimed that this error shows up when they’re trying to install the update component KB4056892, and during the installation of other update components.
Error 0xc0000409 in Windows 10/11 – According to our experiments, the error code 0xc0000409 can be the result of a known issue with the new Windows 10 Insider Preview Build 19624.
Windows Update error 0x800704c7 – In this case, you might face missing/corrupted files or background processes conflicting with the update due to which you are not able to get the latest update.
Windows 10/11 update error 0x8007000e – This one Error is an update error that affects some users when they try to search for new updates via Settings.
In this article, we explored some of the best troubleshooting methods for dealing with the error 0xc190012e. Feel free to let us know if this guide helped you by using the comment section below.
Some users utilize Outlook’s calendar to schedule event reminders. Outlook has a reminder sound that alerts users to scheduled events on their calendars. You can customize Outlook’s default reminder sound by changing it to one downloaded from the web.
How can I download and configure Outlook’s reminder sounds?
1. Download Outlook reminder sounds
First, you’ll need to download a new Outlook reminder sound. You can get Outlook reminder sounds from numerous alert sound effect website depositories. Check out the Free Sound Clips website, which includes an Alert Sounds page.
You can download numerous reminder alert sounds for Outlook in the WAV file format.
To download a sound file at Free Sound Clips, click the link for it in the Sound Effects column. Then, you can select to download either a WAV or MP3 file. Download the WAV file.
Sounds4email is another website that includes a repository of sound effects. Those sound effects are designed primarily for email notifications, but you can still utilize some for reminder sounds.
Click a sound on the Sounds4email site to open a preview clip window for it, from which you can select to download its ZIP file.
After downloading the reminder sound, you’ll need to extract the ZIP file for the audio clip. Click the sound effect’s ZIP file in File Explorer to do that. Click the Extract all button. Then press the Extract button.
2. Change the reminder sound in Outlook
Then you’ll need to change Outlook’s reminder sound to the downloaded one. Select the File tab in Outlook.
Click Options on the left of Outlook’s window.
Click the Advanced tab on the Outlook Options window.
Select the Player reminder sound option if it’s now already selected.
Click the Browse button.
Select the WAV reminder sound you downloaded.
Click the Open button.
Press the OK button on the Outlook Options window.
When a reminder alert pops up, it will include the sound effect you selected. That sound effect can be any short audio clip downloaded from the web (in WAV format).
Now that you know how to customize sounds, why not check our guide on how to set reminders in Outlook to learn more about them?
However, you can also download sound effects with other file formats and convert them to WAV format. If you want to do that, first check out this handy list with the best audio converters you can download now.
When trying to copy or move files from your Windows system to an external storage device like a Micro SD card or a USB drive, you may encounter Error 0x800703ee. This error can also occur when trying to install, clean install Windows, or update the system. The full error reads:
Installation Failure: Windows failed to install the following update with error 0x800703EE
In this article, we have listed a few troubleshooting steps to help you resolve the error 0x800703ee on external storage when trying to clean Install Windows or install the update.
What is error code 0x800703ee?
If the error 0x800703ee the volume for a file has been externally altered so that the opened file is no longer valid is occurring when clean installing or updating Windows, it usually points to corrupt update files due to which the update process is not initiating.
This error can occur due to several reasons, including third-party antivirus conflict, programs using the file, issues with other third-party software installed on your system, and corrupted storage drives.
How do I fix error 0x800703ee?
1. Change the USB Port
At times a malfunctioning USB port can be the cause for the error 0x800703ee. The issue may also occur on a functioning USB port but due to some other issues.
A quick workaround would be to change the USB Port. Unplug the bootable USB flash drive and connect to a different USB port on your system. This is usually helpful if you are using a USB 3.0 port. Try connecting the flash drive to a USB 2.0 port and then proceed with the installation or upgrade process.
If you are working with the Windows Media Creation tool and are troubled by this error, then move on to the next steps.
2. Update your PC in Safe Mode
Press the Windows Key + I to open Settings.
Choose Update & Security.
Select the Recovery tab from the left pane.
Scroll down and click the Restart Now button under the Advanced Startup section and follow on-screen instructions to open the Recovery menu.
Under the Choose an Option section, select Troubleshoot.
Next, select the Advanced Settings option.
On the Advanced Options screen, choose the Start-up Setting option.
Click the Restart option under Start-up Settings.
After the PC restarts, you will have multiple numbered options.
Select option 4 to Enable Safe Mode. Press the 4 key on your keyboard to select the option.
After the PC restarts in Safe Mode, go ahead and try installing the update to see if the issue is resolved.
Restarting your PC in Safe Mode allows you to install updates without any third-party software conflict. A major cause of the error 0x800703ee has been due to conflict with third-party software.
Finding the exact software that is causing the issue is a difficult task. As a result, you can completely negate this issue by restarting your system in Safe Mode. When in Safe Mode, Windows only starts with necessary system services and apps running in the background.
3. Install the Windows update manually
Press the Windows key + I to open Settings.
Choose Update & Security.
Click on the Windows Update tab.
Scroll down and click on Windows Update History.
Scroll through the Update History and note down all the updates that have failed to install.
Search for the update that has failed to install on the right hand. Download all the update packages to your system.
Run the downloaded files one by one to install the updates.
Microsoft allows you to download and install some feature updates from its update catalog manually. This is particularly helpful if one or a few specific updates are causing the error.
Connect the USB flash drive to your computer and reboot the system.
The system will reboot into the Windows Setup screen. If the Windows restart normally instead of booting into the Setup screen, you need to change the boot priority in BIOS.
Restart your PC and start pressing the ESC / F2 / F10 key on your keyboard to change the boot priority. From the BIOS menu, open the Boot tab and set the bootable USB flash drive as the priority boot drive. Save the changes and exit.
From the Windows Setup screen, click on the Install now button and proceed with on-screen instructions.
If the installation fails with the error again, check if the Windows 10 ISO is corrupted. Download a new ISO file and try to clean install Windows 10.
The error 0x800703ee the volume for a file has been externally altered when installing or updating Windows can be triggered due to several reasons.
Follow the steps in this article one by one to fix the error and install the Windows update successfully.
Windows Update error 0x8007371b is an old issue that originally occurred on Windows 7 and Vista. However, users have also posted on forums about error 0x8007371b for Windows 10. The error 0x8007371b message states, 0x8007371B = ERROR_SXS_TRANSACTION_CLOSURE_INCOMPLETE.
That issue arises when users try to update Windows 10. As a consequence, updates don’t get installed. These are some potential fixes for Windows Update error 0x8007371b.
How can I fix error 0x8007371b?
1. Use a dedicated system repair tool
This type of error is often caused by a broken or corrupted system file. The best and fastest way to fix this is with the help of professional repair software. These tools allow you to perform comprehensive scans and replace any file with fresh genuine ones from their large databases.
2. Use Windows Update
Run the Windows Update troubleshooter
Open the search box by clicking the Type here to search taskbar button.
Enter the keyword troubleshoot in the search utility.
Click Troubleshoot to open that Settings tab.
Click Additional troubleshooters to open the window shown directly below.
Select the Windows Update troubleshooter listed there.
Click Run the troubleshooter to open the Windows Update troubleshooter.
Then go through and apply the troubleshooter’s suggested fixes.
3. Run the DISM scan
To run Deployment Image & Servicing Management scans, press the Windows key + S search box keyboard shortcut.
Type cmd in Windows 10’s search box.
Right-click Command Prompt and select Run as administrator to open an elevated CP window.
First, type in this command and press Enter: Dism /online /cleanup-image /ScanHealth
After than scan, input this Deployment Image command: Dism /online /cleanup-image /CheckHealth
Finally, type in this command and hit Enter: Dism online /cleanup-image /RestoreHealth
4. Run the SFC scan
Open an elevated Command Prompt window as outlined for steps one to three of the previous resolution.
Some users have started threads on the Microsoft forum about the Windows Update error 0xc1900130. That’s another of those Windows Update errors which can arise when users check for updates via Settings.
Windows doesn’t install pending updates when that error arises. These are some of the resolutions for error 0xc1900130.
How do I fix Windows Update error 0xc1900130?
1. Run the Windows Update troubleshooter
The Windows Update troubleshooter is likely to easily solve this error code and allow you to resume your updates in no time.
To open that troubleshooter, click the Type here to search button on Windows 10’s taskbar.
To search for Troubleshoot settings, enter the keyword troubleshooter in the text box.
Click Troubleshoot settings to open that tab in Settings.
Then click Windows Update, and press its Run the troubleshooter button.
Select the Apply fix option if the troubleshooter provides a potential resolution.
2. Use dedicated software for Windows errors
The most convenient solution is to use a professional repair tool that performs an in-depth scan and identifies damaged system files that lead to Windows errors like this one.
3. Start all required update services
Make sure all the required services for Windows Update are enabled.
To do that, input cmd in Windows 10’s search box.
To open the Prompt with elevated rights, right-click Command Prompt and select Run as administrator.
Input each of these separate commands into the Command Prompt:
SC config wuauserv start= auto
SC config bits start= auto
SC config cryptsvc start= auto
SC config trustedinstaller start= auto
4. Reset Windows Update
Resetting Windows Update has fixed the 0xc1900130 error for some users.
Open an elevated Command Prompt as outlined for the second fix directly above.
Next, enter the following separate commands (press Return after entering each one): net stop wuauserv net stop cryptSvc net stop bits net stop msiserver
Next, you’re going to rename the SoftwareDistribution folder to clear it.
To do that, enter ren C:WindowsSoftwareDistribution SoftwareDistribution.old; and press the Return keyboard key.
Then input this command:
ren C:WindowsSystem32catroot2 Catroot2.old.
That will rename the Catroot2 folder to reset it.
To restart the services, input these commands into Command Prompt: net start wuauserv net start cryptSvc net start bits net start msiserver
After that, restart your desktop or laptop.
5. Rename the iastora.sys file
Error 0xc1900130 can be due to a conflicting iastora driver.
To fix that, open File Explorer (press the Windows key + E hotkey).
Then open this folder in File Explorer: C: > Windows > System32 > drivers.
Right-click the iastora.sys file and select Rename.
Change the file title to iastora.sys.old, and press the Enter keyboard key.
Click Yes on any UAC prompt that might open.
Then restart Windows before checking for updates again.
6. Restore Windows 10 to an earlier date
With System Restore, you might be able to roll Windows 10 back to a time when error 0xc1900130 didn’t arise on your desktop or laptop.
To do that, right-click the Start button to select Run.
Enter restrui and click OK to launch System Restore.
Click the Next option to proceed.
To select from a full restore points list, click Show more restore points.
Then you’ll need to select a restore point that predates error 0xc1900130 on your PC.
Select the oldest restore point if you’re not entirely sure what one to choose.
Software and updates installed after a selected restore point get deleted.
Click Scan for affected programs to see what software a selected restore point removes.
Click Next and Finish to restart and roll back Windows 10.
The fixes above can get Windows 10 updates rolling again. Remember that you can also manually download and install cumulative updates from Microsoft Update Catalog.
Enter the updates’ KB numbers in the search box on that website to download them from there.
If you follow the troubleshooting steps mentioned above, you should be able to fix the Windows Update error in no time.
That being said, let us know if you found this article helpful by leaving us a message in the comment section below.
Error 0xca00a000 is a Windows Updateerror that arises for some users. The full error message states: 2018-07 Cumulative Update for Windows 10 Version 1803 for x64-based Systems (update code) – Error 0xca00a000.
Consequently, the update hasn’t installed in Win 10. Some of the resolutions below might fix error 0xca00a000.
How can I fix error 0xca00a000?
1. Open the Windows Update Troubleshooter
First, try fixing the issue with the Windows Update troubleshooter. A few users have stated that the Windows Update troubleshooter repaired the error code. Users can open that troubleshooter as follows.
Press the Windows key + Q keyboard shortcut to open Cortana.
Input ‘troubleshoot’ in the search box.
Select Troubleshoot to open the Settings app as below.
Select Windows Update and press the Run the troubleshooter button.
Thereafter, the troubleshooter might provide a fix for error 0xca00a000. If so, select the Apply this Fix option.
Restart Windows after closing the troubleshooter.
2. Run a System File Scan
Windows Update errors can be due to corrupted system files. So, it might be worth running a System File Checker scan to repair files. To do that, follow the guidelines below.
Enter ‘Run’ in Cortana’s search box, and select to open Run.
Input ‘cmd’ in Run and press Ctrl + Shift + Enter.
Enter ‘DISM.exe /Online /Cleanup-image /Restorehealth’in the Prompt’s window, and press the Return key.
Next, enter ‘sfc /scannow’ in the Prompt and press Return. Then the SFC scan might take about half an hour.
Thereafter, the Command Prompt might tell you that Windows Resource Protection repaired files. Restart the desktop or laptop if WRP did fix files.
3. Select an Automatic Startup for Windows Modules Installer
Some users have fixed error 0xca00a000 by selecting Automatic as the startup type for the Windows Modules Installer. So, it might be the case that the Windows Modules Installer is disabled. This is how users can change the startup setting for WMI.
Open the Run accessory.
Enter ‘services.msc’ in Run and click OK to open the window in the shot directly below.
Double-click Windows Modules Installer to open the window below.
Then select Automatic on the Startup type drop-down menu.
Click the Apply and OK buttons.
Alternatively, users can change Windows Modules Installer’s startup setting via the Command Prompt. Press the Windows key + X hotkey, and select Command Prompt (Administrator).
Then enter ‘SC config trustedinstaller start=auto’ in the Prompt and press Return.
4. Clean Boot Windows
Conflicting third-party antivirus software can also be another factor behind error 0xca00a000. Users can clean boot Windows to ensure there aren’t any conflicting antivirus software or other programs, which might resolve error 0xca00a000. Follow the guidelines below to perform a clean boot.
Click the Selective startup radio button on the General tab if that’s not already selected.
Select the Load system services and Use original boot configuration settings.
To remove programs from the startup, deselect the Load startup items check box.
Open the Services tab shown below.
Select the Hide all Microsoft services option there to remove them from the list.
Select the Disable all option to turn off the remaining third-party services listed.
Select the Apply option.
Click OK to exit System Configuration.
Select the Restart option on the dialog box that opens to reboot the Windows.
Thereafter, the required update might install. Users can restore the orignal boot configuration by selecting the Load startup items setting and Enable all option on the Services tab.
5. Clear the Software Distribution Folder
Error 0xca00a000 can also be due to corrupted Windows Update components within the Software Distribution folder. Therefore, clearing the Software Distribution folder will reset those components and potentially fix error 0xca00a000. This is how users can clear out the Software Distribution folder.
Before clearing the Software Distribution folder, users should disable update services first. To do so, press the Windows key + X hotkey and select Command Prompt (Admin).
Input these commands in the Prompt:
net stop bits
net stop wuauserv
net stop appidsvc
net stop cryptsvc
Next, press the Windows key + E keyboard shortcut to open File Explorer.
Enter ‘C:WindowsSoftwareDistribution’ in File Explorer’s address bar, and press the Return key.
Press Ctrl + A to select all the content within the folder.
Click the Delete button.
Thereafter, open the Command Prompt again. Then enter these commands in the Prompt:
net start bits
net start wuauserv
net start appidsvc
net start cryptsvc
Select Restart on the Start menu.
6. Manually Update Windows 10
Users can also install Windows updates manually. Instead of relying on Windows Update, users can get the required update from the Microsoft’s Update catalog. That method might not entirely be a fix for error 0xca00a000, but users can still install the required update nonetheless. Follow the guidelines below to manually update Win 10.
Enter the update code that appears within the error message in the website’s search box.
Press the Search button to open the search results as below.
Then select to download the update for your Windows 10 version. For example, you’ll need to download an 1803 update for Windows 10 version 1803.
If you’re not sure what update to download, enter ‘system’ in Cortana’s search box.
Then click About your PC to open the window in the snapshot below, which includes the required Windows 10 version and system type details.
Open the downloaded update file executable to install it.
Those are some of the best resolutions for fixing error 0xca00a000 so that Win 10 updates as expected. The Windows Update troubleshooter on the Windows Support site might also provide some resolutions for fixing error 0xca00a000.
Downloading Windows updates is important if you want to keep your Windows 10 PC safe, but some users have reported error code 0x80070490 while trying to download Windows updates on Windows 10.
So today we’re going to find out how to fix error 0x80070490. According to the reports, Windows Update stops running, and when that happens users get this error code.
This can be a big problem because you won’t be able to download Windows updates, and you’ll be missing out on new features and security patches.
What causes the error code 0x80070490?
Error code 80070490 can appear on all versions of Windows, and it’s usually caused by damaged system files, so you’ll have to repair them in order to fix this issue.
Most errors, including 0x800f0831 update error can be fixed simply by running the built-in troubleshooter, so be sure to give it a try.
In order to fix this issue on Windows 10 you’ll have to create a new local account and move your files to it:
Create a new local account with administrator privileges.
Move your documents and personal files to new account.
Delete your old account and switch to new one.
After you’ve switched to new local account add your Microsoft account to it.
After doing that, error 0x80070490 should be fixed. However, if the issue doesn’t get resolved, try some of the solutions listed below.
Moreover, the program does an in-depth registry cleanup and removes malware, while also optimizing your PC.
2. Use a system repair tool
Installing trustworthy repair software whose aim is to fix Windows errors and keep your computer secure is a great solution.
This type of tool performs an advanced scan and through its repair function, it fixes your Windows errors within minutes, as well as your registry keys, DLLs, and corrupted system files.
3. Run the Update Troubleshooter
If you’re running Windows 10, you can use the new troubleshooting tool, simply called Windows Troubleshooter. This tool can be used for dealing with various system problems, including update issues.
Here’s how to run this troubleshooter in Windows 10:
Go to Settings
Head over to Update & Security > Troubleshoot
Find Windows Update, and click Run the troubleshooter
Since we’re at the troubleshooting tools in Windows 10, let’s try another one. This time, we’ll be using the SFC scan. In case you’re not familiar with this tool, it serves as another built-in troubleshooter designed for resolving various system problems.
However, the SFC scan doesn’t have a users interface, so you’ll have to run it using the CommandPrompt. In case you don’t know how to do that, just follow these instructions:
Go to Search, type cmd, and open Command Prompt as Administrator.
Enter the following line and press Enter: sfc/scannow
Wait for the process to finish.
Restart your computer.
If you’re having trouble accessing Command Prompt as an admin, then you better take a closer look at this guide.
5. Run DISM
And the last troubleshooting tool we’re going to try when resolving the 0x80070490 is the DISM. Deployment Image & Servicing Management (DISM) is yet another troubleshooting tool in Windows 10, but it’s the most powerful one.
So, if previous troubleshooters failed to resolve the problem, we’re going to try this one. In case you don’t know how to run DISM, just follow the instructions below:
Go to Search, type cmd, and open Command Prompt as Administrator.
Enter the following command on the command line:
DISM.exe /Online /Cleanup-image /Restorehealth
In case the DISM can’t obtain files online, try using your installation USB or DVD. Insert media and type following command:
Make sure to replace ”C:RepairSourceWindows” path of your DVD or USB.
6. Check for malware
Some users also associate the error 0x80070490 with viruses or some other kind of malware. So, if none of the solutions from above managed to resolve the problem, scan your computer for viruses.
For this reason, we recommend you run a full PC scan and remove all threats found if any. You can use the inbuilt Windows Defender, but for more accurate results, we suggest you use a third-party antivirus.
Using a dedicated antivirus with high detection rates may save you some time and hassle as it generally implements more detection and blocking features than the built-in Windows utility.
On the contrary to the previous solution, there’s a chance your antivirus is exactly what gives you this error. Antivirus programs and Windows updates are known for not getting along with each other.
So, you may be getting this error because of your third-party antivirus. To check that, simply disable your antivirus, and check for updates. If there’s no error, make sure your antivirus is up to date.
If you’re using any antivirus solution and you want to completely remove it from your PC, we recommend you use dedicated uninstaller software.
8. Delete user ID store cache from registry
To do that, follow these steps:
Open Registry Editor. You can open Registry Editor by pressing Windows Key + R and typing regedit. After you’ve typed regedit press Enter or click OK to start Registry Editor.
When Registry Editor starts, you need to navigate to the following key in the left panel:
Now you need to find keys that look like this: S-1-5-21-1505978256-3813739684-4272618129-1016. We have to mention that this is just an example, and most likely your keys will have the similar format, but the name of the keys won’t be exactly the same.
Select all these keys and delete them.
After you’ve deleted these keys, close Registry Editor and restart your computer.
If you can’t edit your Windows 10’s registry, there is a handy guide that will help you find the quickest solutions to the issue.
9. Check if specific system services are running
Press Windows Key + R and type services.msc.
When Services window starts, find the following services: BITS, Cryptographic, MSI Installer and the Windows Update Services. Make sure that those services are running.
If one or more of these services aren’t running, make sure that you start them by selecting the service and clicking Start the service.
The last thing we’re going to try is deleting the SoftwareDistribution folder. This folder stores all updated data, so if something inside this folder gets corrupted, you may encounter some update problems.
But before we delete this folder, we should disable the Windows Update service. And here’s how to do that:
Go to Search, typeservices.msc, and go to Services.
In Services list, search for Windows Update.
Right-click and go to Properties, then choose Disable.
Restart your computer.
Now that the Windows Update service is disabled, let’s go and delete (rename) the SoftwareDistribution folder:
Navigate to C:Windows and find the SoftwareDistribution folder.
Rename folder to SoftwareDistribution.OLD (you can delete it, but it’s safer if we just leave it there).
Restart your computer.
Not sure what to do with the Software Distribution folder? You can either rename it or even delete the folder.
Once you do that, go and re-enable the Windows Update service:
Once again navigate to Services and find Windows Update and, in Properties, change from Disabled to Manual.
Restart your computer once again.
Check for updates.
As you can see, fixing the error code 0x80070490 on Windows 10 & Windows 11 isn’t that hard and we hope that our solutions were helpful to you.
This guide will discuss WiFi vs. Bluetooth gaming headsets and tell you all you need to know.
If you are looking for a wireless headset to add to your arsenal, you have most likely come across Bluetooth and wireless headsets. However, if you are wondering if they are the same, they are not.
All Bluetooth headsets are wireless, but not every wireless headset is Bluetooth supported. Wireless headphones have some definitive advantages over BT-enabled devices and are expensive.
So, should you get a wireless or Bluetooth gaming headset? This article discusses what makes a wireless headset a better alternative for wireless gaming than Bluetooth headsets.
Do gamers prefer wireless headsets?
The answer is yes! For most gamers, a wireless headset will be the go-to. They come with many advantages, including the following:
Portability and mobility – These are clear advantages. You may change your posture and sit farther back because they are not wired.
Increased comfort – Because there are fewer restrictions, you can quickly adapt playing to your setup. You may lie down, sit up or assume whatever positions work the best for you.
Audio control access – Because audio is a massive part of gaming, you may constantly need to change sound levels, especially if you find some soundtracks distracting. Having quick access makes a world of difference.
Sound quality – While you have done away with the litter of wires, most of these devices are developed to deliver the best possible sound quality.
Some users have complained they face a few issues using wireless headsets, but it is usually a breeze once you scale this.
Let’s dive into WiFi vs. Bluetooth gaming headsets and see how they stack against each other.
Is wireless or Bluetooth better for gaming?
While both types of headsets are cordless, the technology in use differs. Bluetooth headsets use radio waves to send signals; wireless headphones, on the other hand, use radio waves or IR to send and receive the audio signal.
Bluetooth headsets are compatible with almost all handheld media device that supports Bluetooth technology, like your laptop, desktop PC, smartphone, and more. In addition, this excellent technology offers more options in all price ranges and works with a built-in chip or an external Bluetooth adapter.
While a Bluetooth headset is suitable for media consumption, it is not ideal for anything that hates latency, such as multiplayer games where missing a footstep can cost you a game. We touch more on the disadvantages of Bluetooth headsets for gaming.
WiFi headphones, on the other hand, are sophisticated pieces of hardware. It usually requires a 2.4GHz base that connects to the audio source via USB or a 3.5 mm RCA cable to transmit and receive signals. The transmitters include the headset, so you don’t have to look for them separately.
Compared to the Bluetooth headset’s 30 feet range, the WiFi headset offers a better range of up to 300 feet. The wireless headphone is also ideal for gaming due to the better latency technology it employs.
Why is a wireless 2.4GHz headset better for gaming than a Bluetooth headset?
1. Latency
One reason Bluetooth headsets are not great for gaming is the latency issues.
On a WiFi connection, the average audio latency is between 5-10 ms, whereas Bluetooth headphones can range from 35-100ms.
Wireless headsets can reduce this up to 16ms, making them an ideal choice for wireless gaming headsets.
Wired headsets offer the best audio quality. However, when it comes to wireless devices, Bluetooth and WiFi headsets have built-in codecs to compensate for the loss of audio fidelity.
The wireless technology can offer bandwidth up to 40,000 HZ even while using the mic, resulting in a better audio output.
Compatibility
While Bluetooth headset is compatible with the most common media devices, such as smartphones and laptops, it is still not compatible with gaming hardware such as PlayStation, Xbox, or even Nintendo Switch.
However, you can connect a WiFi headset to compatible devices via the RC cable or the USB-C port to stream audio.
To summarize, Bluetooth headsets are not ideal for gaming. Whether you do mobile, console, or PC gaming doesn’t matter.
Latency is the most significant disadvantage, and only WiFi headsets seem to reduce the lag.
Still, if you are inclined to a Bluetooth headset due to its wider compatibility without requiring an external source, look for a headset with an optional wired mode to help you with gaming sessions.
Alternatively, consider purchasing headsets that support Bluetooth and 2.4GH wireless technology to have the best of both technologies.
And that is as far as we will go in this WiFi vs. Bluetooth gaming headset guide. We hope you understand the differences and that this informs your choice if you are looking to acquire a new device.
Many Outlook users have encountered an error message when trying to display a linked image.
Outlook normally displays images from incoming emails, but oftentimes users get the infamous red X button and the message the linked image cannot be displayed.
The error mainly occurs in Outlook 2013 and Outlook 2016 users. The linked image cannot be displayed message in Outlook can be quite annoying and prevent you from viewing your emails properly.
Let’s see how to easily correct that.
How do I fix an Outlook image that can’t be displayed?
1. Check your antivirus software
In some instances, it’s possible that your antivirus is causing this issue.
If the linked image cannot be displayed in Outlook, it might be possible that email protection feature is causing the problem.
To fix the problem, open email protection settings and try disabling certain features. If that doesn’t help, you might have to disable your antivirus altogether.
In some cases, the only way to fix this issue is to remove your antivirus, so you might want to try that as well.
Even if you remove your third-party antivirus, you’ll still be protected by Windows Defender on Windows 10, so there’s no need to worry about your safety.
Many users had this issue with McAfee, but other antivirus applications can also cause this problem to appear.
For Norton users, we’ve got a dedicated guide on how to completely remove it from your PC. There’s a similar guide for McAffe users, as well.
If you’re using any antivirus and you want to completely remove it from your PC, after removing the antivirus, check if the problem is still there. If the problem doesn’t appear, you should consider switching to a different antivirus.
2. Modify the registry
1. Press Windows Key+R to open a Run dialog box, and type regedit and press Enter.
3. Right-click the BlockHTTPimages key > select Delete, and confirm the deletion.
5. Go to the File menu, and click Exit.
According to users, sometimes the linked image cannot be displayed in Outlook due to certain issues in your registry.
Your registry holds all sorts of values, and if one of those values is corrupted, you might encounter this and many other problems.
As always, before modifying the registry, back it up in case anything goes wrong.
However, you can fix that problem by completing the above procedure. After making these changes to the registry, check if the problem is still there.
If you can’t edit your Windows 10’s registry, read thishandy guide and find the quickest solutions to the issue.
Can’t access the Registry Editor? Things aren’t as scary as they seem. Check out this simple guide and solve the issue quickly.
3. Relocate your Temporary Internet Files folder (IE)
Press Windows Key + S and enter internet options.
Choose Internet Options from the list of results.
In the Browsing history section click the Settings button.
Now click the Move folder button and choose a new location for temporary Internet files.
After doing that, save changes and restart your PC. Once your PC restarts, check if the problem is still there.
Sometimes the linked image cannot be displayed in Outlook due to your Temporary Internet Files folder.
The contents of this folder can get corrupted, and the best way to fix the issue is to choose a different location for a new Temporary Internet Files folder.
By doing so, you’ll recreate the Temporary Internet Files directory. To choose a new location for Temporary Internet Files, follow the above steps.
4. Disable the setting for encrypted pages
Open Internet Options window.
We showed you how to do that in one of our previous solutions.
Navigate to the Advanced tab.
In the Security section, disable Do not save encrypted pages to disk option.
Now click Apply and OK to save changes.
According to users, sometimes the linked image cannot be displayed in Outlook due to certain settings.
Sometimes certain settings can lead to various issues, but you can solve the problem simply by disabling them. After disabling this option, check if the problem is still there.
5. Repair the Office Outlook app
Press Windows Key + S and enter control panel.
Select Control Panel from the list of results.
Head over to the Programs and Features section.
A list of installed applications should now appear.
Select Online Repair and click Repair once again to confirm.
Now follow the instructions on the screen to repair the Office installation.
If the linked image cannot be displayed in Outlook, it’s possible that your Office installation is corrupted. To fix this problem, it’s advised to repair the installation.
After the Office installation is repaired, check if the problem is still there.
You can’t open Control Panel? Take a look at this step-by-step guide to find a solution.
6. Add a sender to the Safe Senders List
In Outlook, go to the Home tab, click Junk, and choose Junk E-mail Options.
Head over to the Safe Senders tab and check Automatically add people I e-mail to the Safe Senders List check box.
In order to fix the problem with linked images, it’s important that you add a specific sender to a Safe Senders List.
In addition, you can also add the entire domain to the Safe Senders List. To do that, just follow the above procedure.
In addition, there should be an option to add individual emails and domains to the Safe Senders List, so you can add only specific contacts and domains.
After making these changes, check if the problem is still there.
7. Create a new user account
Open the Settings app by using Windows Key + I shortcut.
When the Settings app opens, navigate to the Accounts section.
Select Family & other people from the left pane.
Now click Add someone else to this PC button in the right pane.
Now select I don’t have this person’s sign-in information.
Choose to Add a user without a Microsoft account.
Enter the desired username for the new account and click Next.
According to users, if the linked image cannot be displayed in Outlook, the issue might be your user account.
Sometimes the user account can get corrupted, and this can lead to this and many other problems.
However, you can fix the issue simply by creating a new user account. After creating a new user account, switch to it and check if the problem is still there.
If the issue doesn’t appear on the new account, you’ll need to move your personal files to it and start using it instead of your old account.
If you’re having trouble opening the Setting app, take a look atthis detailed article to solve the issue.
8. Reinstall Outlook
If the linked image cannot be displayed in Outlook, you might want to try reinstalling it. Sometimes the Outlook installation can be corrupted, and one way to fix it is to reinstall Outlook.
There are several ways to do that, but the most effective one is to use uninstaller software.
In case you don’t know, uninstaller software is a special application that will completely remove all files and registry entries associated with an application.
The best uninstaller software will be able to force the uninstallation of nonresponsive or malicious apps without causing any damage to your system.
Once Outlook is removed, install it again and the problem should be resolved.
Which solution worked for you? Leave your answer along with any other questions or suggestions in the comments section below and we’ll be sure to take a look.
Speaking of these solutions, apply them when encountering similar issues:
The linked image cannot be displayed Office 365 – According to users, this issue can be caused by your antivirus software and in order to fix it, you might have to disable your antivirus.
The linked image cannot be displayed. The file may have been moved renamed or deleted– This issue can appear if there’s a problem with a Temporary Internet Files directory. Simply move this directory to a different location and the problem should be resolved.
Outlook 2016, 2013, 2010 error the linked image cannot be displayed – This issue can affect almost any version of Outlook. However, most of our solutions are compatible with all versions of Outlook, so you should be able to apply them.
Outlook email signature the linked image cannot be displayed – If this issue occurs on your PC, you might be able to solve it simply by making a couple of changes in your registry.
Go to the Outlook.com sign-in page and click on Sign in. You can log in with your email address or phone number. If needed, use this guide to fix Outlook not opening issues.
Some Gmail users utilize Outlook email clients. That enables those users to open their Gmail messages within the Outlook applications. However, some users have said on the Microsoft forum that they can’t open their Gmail emails within Outlook. Outlook doesn’t download all Gmail emails for some users and the messages don’t appear in their inboxes.
How Can Users Fix Outlook Not Receiving Gmail Emails?
1. Check Gmail’s POP/IMAP Settings
First, users need to check that they have enabled either IMAP or POP to receive Gmail emails within Outlook. To do that, open Gmail within a browser.
Click the Settings button to open a menu.
Select Settings on the menu to open the General tab shown directly below.
Then click the Forwarding and POP/IMAP tab to open POP/IMAP settings.
Users can select Enable POP or Enable IMAP to receive Gmail messages within Outlook. As IMAP is the more current standard, select the Enable IMAP option if it’s not selected.
Users have also said that selecting the Disable POP setting with IMAP enabled fixed Outlook not receiving Gmail emails for them.
2. Delete Email Rules
Email rules might route Gmail emails away from the inbox for some users. To delete rules in Outlook, click the File tab.
Then select the Manage Rules & Alerts option.
Select a rule to delete on the E-Mail Rules tab within the Rules & Alerts dialog box.
Click Delete and OK to erase the selected rule.
3. Free Up Inbox Space
Outlook mailboxes have maximum size limits that range from 2 GB up to 50 GB in the most recent Outlook 2019. Users can’t receive any emails when they’ve reached their mailbox storage limits. So, some users might need to delete Outlook emails to receive further Gmail messages.
4. Enable Recent Mode
Users who utilize Outlook on multiple PCs or devices might need to enable Recent mode to ensure the email client software receives Gmail messages on all devices. To do so, click Info on Outlook’s File tab.
Click Account Settings to open an Account Settings window.
Select the Gmail account on the Account Settings window.
Then edit the Account name field by adding ‘recent:’ at the start of the email address there. For example, the email address might then be something like this: recent:[email protected].
Press the Done button.
5. Turn Off Third-Party Antivirus Software
Third-party antivirus firewalls can also block users from receiving messages within email clients. To fix that, users will need to at least temporarily turn off the antivirus utilities by right-clicking their system tray icons and selecting disable or turn off options. If users then receive Gmail messages in Outlook after turning the antivirus utilities off, they’ll need to adjust the firewall settings for the software as outlined in the post below.
6. Turn Off the Windows Defender Firewall
In addition, try turning WDF off to ensure that it isn’t blocking Outlook in any way. To do so, open Win 10’s search utility with the Windows key + S hotkey.
Input the keyword ‘Windows Defender Firewall’ in the search box.
Click Turn Windows Defender Firewall on or off to open the options in the image directly below.
Select the Turn off Windows Defender Firewall settings to switch off the firewall.
If that resolves the issue, users will need to configure the firewall to allow Outlook when they turn WDF back on. To do that, click Allow an app or feature through Windows Defender Firewall on the WDF Control Panel applet.
Select both the check boxes for Outlook, and click the OK button.
Some of the above resolutions might fix Outlook so that it receives all Gmail messages for its users. Remember, however, that there are quite a few notable freeware email client alternatives to Outlook. For example, users can set up Mozilla Thunderbird to be an email client for Gmail.
If you use an Office 365 or Microsoft Exchange account with Outlook, you can take advantage of the Scheduling Assistant to improve your time management. But what if Microsoft Outlook Scheduling Assistant is not working properly?
You got used to creating and updating meetings at the best time for all attendees and easily tracking who has replied and what they replied to. Furthermore, Outlook adds the meeting to your Outlook calendar and sends that great reminder before the meeting starts.
Sometimes, things don’t turn out as planned and various Outlook Scheduling Assistant issues arise. If you’re one of the Outlook users with such a problem, continue reading as this tutorial may be able to help you one way or another.
What to do if Microsoft Outlook Scheduling Assistant is not showing availability?
1. Scheduling Assistant is not showing availability
Open Outlook in Safe mode.
Close out of Outlook and hold the CTRL key down when you click on the Outlook icon.
Check and see if Scheduling Assistant is working.
If the issue doesn’t persist, it might be due to add-ins.
When having the confirmation, open Outlook.
Go to File < Options < Add-ins.
Under Manage, select COM Add-ins.
Click on GO (beside Manage).
Uncheck all the add-ins and click OK.
Try to open Outlook. What is the result?
To begin with, when attempting to use Scheduling Assistant, it either takes a long time for the information to come through on a user’s schedule or it just says all the info is unavailable no matter whose schedule users try to view.
You might need to disable the add-ins to solve the problem.
2. Outlook Scheduling Assistant is not showing rooms
Scheduling a meeting in Outlook seems to work properly at first, yet the room list will not show available rooms for meetings that last over 13 hours. Simply adding rooms individually will immediately correct the issue.
Other users say that creating a meeting and then adding an individual conference room in Scheduling Assistant leads to the room being displayed briefly. To solve this, reset the working hours in the room mailbox to a valid value.
3. Outlook Scheduling Assistant is not showing all hours
Worried about this issue too? Add this to your troubleshooting tips as this is a quick, yet efficient one: within the Scheduling Assistant window, look for the Options button.
There you’ll see a checkbox called Show only my working hours. Uncheck it right away and the Assistant will open up at all hours. You have to do this each time you use Scheduling Assistant, but it’s an inconvenience users got used to.
4. Scheduling Assistant is not showing all meetings and attendees
In Outlook, right-click Calendar folder.
Then, choose Properties.
In the Permissions tab, make sure that the Default user’s permission is Free/Busy time.
Click Other Free/Busy.
Then, set Update free/busy information on the server every 45 minutes.
Click OK to confirm action.
After creating a new meeting request, check the Free/Busy information, when Scheduling Assistant is refusing to show all meetings.
If the meeting is not present on the OWA calendar, you should contact your system administrator for further Exchange Server data analysis.
When facing any attendee relates issues, remember that Office 365 accounts usually update the attendees for all invitees within the org. This happens despite forwarding the invite to a new person to avoid the send an update message.
Moreover, when finding a particular attendee on the global address list isn’t possible, you just need to refresh the locally cached Address Book. In Outlook, click on File, select Account Settings, and then choose Download Address Book.
The error We’re checking everyone’s calendars pops up while scheduling a meeting in Outlook client. If that’s your case too, how do you choose the attendee’s address?
In case of choosing it from autocomplete cache, click the “X” to delete the entry. Then, re-type the email address to see the result.
If you choose addresses from GAL, you may try to update the Offline address book. To do this, follow this path Send/Receive > Send/Receive Groups > Download Address Book. Unselect Download changes since last Send/Receive. Finally, click OK.
Should the issue persist, you could also try recreating your Outlook profile to see if it helps or uninstall and reinstall Microsoft Office Pro Plus as this often resolves the problem.
In this post, we’ve guided you in troubleshooting some common Microsoft Outlook Scheduling Assistant errors.
If anything is unclear or if you have any other concerns, remember we can help. Use the comments area to let us know how we may assist you.
Color prints look stunning though that is only when all three primary colors fire in the right proportions.
Unfortunately, it is here that printers are often found lacking, and one common error noted is when the prints seem to have an abundance of green shade. Why is my printer printing green – That’s the big question.
That points to an error with the color selection, though the good thing here is that the issue can be remedied with a bit of effort.
However, the point to keep in mind is that it is generally those printers that have four separate cartridges for the four primary colors that can be adjusted to have less green.
Why does my printer print green?
In time, cartridges get out of calibration, which is one of the first and most obvious reasons why a printer is printing green when it shouldn’t. A manual adjustment should do the trick, but that is not always the case.
As always, corruption can impact your routine and printing makes no exception. Especially if you installed your printer a long time ago, there’s a chance that some files on your system may have become corrupted.
The same goes for printer drivers. As with all drivers, they require regular updating and maintenance in order to avoid malfunctions.
Let’s quickly go through some of the most common issues reported by users worldwide:
Printer only printing green – This is the most common case and it implies a printer printing everything green.
Epson, Canon, HP printer printing green – The issue does not affect a particular brand, but rather most of them.
Printer printing green instead of colour – instead of black, red, yellow, brown – Some users all complained that their printers print yellow instead of red, so pretty much all combinations are possible.
HP printer printing green tint – Speaking about brands, some particular models seem to be more impacted than others such as HP OfficeJet 3830, and Envy. Users also reported issues with HP printers not printing black.
Continue reading to see how you can fix the green printing problem in a few simple steps.
How do I stop my printer from printing green?
1. Adjust the color cartridge
Open the document – or anything else – that you need to print.
Click on Print and then select the printer that you want to use.
In the Print dialog box that opens, look for anything like Properties or Settings.
Look for something like Maintenance, or anything that resembles it.
Next, look for something like Ink Cartridge Settings. The point here is to get to the specific cartridge settings so that you can adjust the specific ink outflow.
Now, there isn’t anything specifically marked as green. Instead, it’s cyan and yellow that mix together to create a green color.
See if you are able to reduce the proportions of either of these – cyan and yellow.
If not, you will have to disable either of these to prevent the creation of the green effect.
Click on OK or any button that allows you to complete the printing task.
See if the prints conform to your liking with less green.
Sometimes cartridges get out of calibration. This is also one of the main reasons why printers suddenly start printing blurry. If so, try to reach the printer properties and adjust the colors manually.
2. Reinstall the printer
Go to Start, select Settings, and choose Devices.
Under Printers & scanners, click on the printer you are having issues with and select Remove device.
Reinstall the printer by following the standard procedure.
If you installed your printer a long time ago and used it many times, there’s a chance that some files on your system may have become corrupted in the meantime.
That’s why by reinstalling your printer you make sure you get rid of all sorts of errors that can also cause your documents to print green.
1. Type Device Manager in the Cortana Search box and select from the search result.
2. Right-click on the Printer and select Update driver.
3. In the next window, select Search automatically for the updated driver software, or opt for Browse my computer for driver software if you have the latest driver on your PC.
4. Follow the on-screen instructions.
This should ensure your prints are of the normal hue, sans the overwhelming shade of green. Once you have tried these solutions, the green printing problem should be solved.
You also have the alternative option of using dedicated driver updater software. Such tools can automatically update and fix your drivers.
A driver updater software can also be safer because they eliminate the risks that come with installing faulty drivers that don’t match your hardware.
The set of folders cannot be open is one of those errors, and it will prevent you from starting Outlook.
This suggests you might deal with corrupt files, and it can also happen after a Windows update. Whatever the case may be, it’s fixable. Here’s what our team found to be working:
How do I fix Outlook: The set of folders cannot be opened?
1. Start Outlook in safe mode
Press Windows key + R and enter Outlook /safe. Press Enter or click OK.
If Outlook starts in safe mode, you need to disable your add-ins. To do that, click on File > Options > Add-ins.
Now click on the Go button next to Manage: Com-in Add.
Disable all available add-ins and click OK to save the changes.
After disabling add-ins, try to start Outlook again and check if the problem still appears. Some readers reported that the LABBYY FineReader add-in was the cause for this problem, so if you have it, be sure to disable it and check if that solves the issue.
Most Windows users don’t know how easy it is to add Safe Mode to the boot menu. Find out how you can do it in justa couple of steps.
2. Run Outlook as administrator and turn off the Compatibility mode
Locate Outlook’s shortcut, right-click it, and choose Properties from the menu.
Go to the Compatibility tab and uncheck Run this program in compatibility mode foroption. Now check Run this program as an administrator option and click on Applyand OK to save the changes.
Is some of our tests, we simply cleared this error by starting Outlook as an administrator. Disabling the Compatibility mode also worked.
After making these changes, try to start Outlook again and check if the error message appears again.
When the Run dialog opens, enter Outlook.exe /resetnavpane command. Press Enter or click OK to run it.
It seems that the problem was caused by the navigation pane in Outlook, and that caused this problem to occur. Once you run this command your navigation pane will reset to default and hopefully, the problem will be fixed.
4. Use scanpst.exe to fix your .ost file
Open your Office Installation directory. By default, it should be C:\Program Files(x86)\Microsoft Office\Office16
Now locate scanpst.exe and run it.
When Microsoft Outlook Inbox Repair Tool starts, click on Browse.
Now you need to select your .ost or .pst file. You can find the .ost file in this directory: C:\Users\your_username\MyDocuments\OutlookFiles
As for .pst file, it is located in C:\Users\your_username\AppData\Local\MicrosoftOutlook. You can use any of these files for the repair process.
Once you select the desired file click the Start button to scan it.
When the scan is completed, you’ll be asked whether you want to repair the file. Click the Repair button. Keep in mind that you might need to run the repair process a couple of times if you want to completely fix all errors.
Some of our readers reported that The set of folders cannot be opened error can appear if your .ost file is corrupted. To fix the problem, you need to use Microsoft Outlook Inbox Repair Tool also known as scanpst.exe, as shown above.
After you repair your .ost file, the error message should disappear and you’ll be able to use Outlook without any problems.
5. Check iCloud
iCloud could cause the The set of folders cannot be opened error in Outlook because of add-in conflicts, integration issues, or corrupt data files. Try to:
Sign out and back into iCloud
Be sure to completely close Outlook.
Now start iCloud. You can do that by opening the Start Menu and typing iCloud. Choose the iCloud Desktop app from the list of results.
When iCloud opens, click on the Sign out button.
You’ll be asked whether you want to keep your contacts, calendar, and tasks. Choose Delete from computer option.
After deleting your contacts wait for a few minutes for changes to take effect.
Now sign in to iCloud again.
Once you sign in, choose the option to sync Mail, Contacts, Calendars, and Tasks.
If the issue persists:
Reinstall iCloud
Open Outlook and go to File > Account Settings > Account Settings > Data Files.
Locate the iCloud data file and click on Remove. You can easily recognize iCloud data file by its .aplzod extension. When the confirmation message appears, confirm that you want to delete the data file.
After doing that, close Outlook.
Now open iCloud Control Panel and uncheck Mail, Contacts, Calendars, and Tasks with Outlook options.
Download and install the latest version of iCloud. During the installation be sure to select the Repair option.
After you install iCloud again, restart your PC.
Once your PC restarts, start iCloud Control Panel and select Mail, Contacts, Calendars, and Tasks with Outlook, and start the sync process.
After doing that, start Outlook again and check if the error message still appears.
6. Create a new Outlook profile
Press the Windows key + S, type control panel and choose Control Panel from the list of results.
Navigate to the Mail section. If you can’t find it, go to User Accounts > Mail.
Now click the Show Profiles button.
Select your profile and click on Remove.
In Mail Profiles window click the Add button and enter the name of your new Outlook profile. Click OK to save changes.
Now choose Auto Account Setup or Manual Setup and follow the instructions on the screen to complete the process.
7. Repair Office installation
Open Control Panel and navigate to Programs and Features.
When Programs and Features window opens, select Microsoft Office from the list of applications and click the Change button at the top.
Now select Quick Repair option.
Follow the instructions on the screen to complete the repair.
After you repair your Office installation, the problem should be resolved and everything should work normally.
8. Make sure that your .pst file is on the C drive
This error can occur if the .pst file from Outlook is located on a drive other than C. Moving it to the C drive fixed the problem for us, so be sure to try that as well.
9. Make sure that the path to the .pst file is correct
Many readers reported this problem because the path to their .pst file isn’t correct. Some users prefer to save this file in a different location, and that can cause the problem to appear.
To fix the issue, you need to navigate to Mail settings in Control Panel and set the correct path to your .pst files. After doing that, the problem should be resolved and you’ll be able to use Outlook without any problems.
10. Remove .xml files from the Outlook directory
Press Windows Key + R and enter appdata. Press Enter or click OK.
When AppData directory opens, navigate to LocalMicrosoftOutlook16*.
Now locate and remove all .xml files.
This error may occur due to corrupted XML files in Outlook’s directory. To fix the issue, you need to delete those files manually. Removing these files won’t cause any problems since Outlook will recreate them, so there’s no need to worry.
In our solution, we showed you how to fix the problem in Outlook 2016, but the approach should be the same for older versions of Outlook.
11. Clean Microsoft Office credentials
Press Windows key + S and enter credential. Select Credential Manager from the list of results.
Now, click on Windows Credentials.
Locate Outlook or Microsoft Office in the list of credentials and click it.
Now choose Remove to remove credentials from your PC.
Confirmation message will now appear. Click on Yes to remove the credentials.
Credentials Manager holds all your local passwords, and to fix the problem, you need to remove credentials for Microsoft Office as shown above.
After you remove the credentials, the problem should be resolved and you’ll be able to use Outlook without any problems.
According to Microsoft, this tool can fix various Outlook problems, and several users claim that it fixed this issue for them. The tool is completely free and simple to use, so be sure to try it.
13. Remove the user from delegates and add them back again
This error message can sometimes appear while using a shared mailbox. To fix the issue, users are suggesting removing users from delegates or permission-level access and adding them back again.
After doing that you just have to restart Outlook and the problem should be resolved completely.
14. Delete your account from the Mail app
Open the Mail app.
Now navigate to the Accounts section in the left pane.
Manage Account pane will now appear. Select your email account from it.
When the Account settings window appears, click on Delete account.
The confirmation message will now appear. Click on Delete to remove your account.
This error can appear if you have added your email account to the Mail app prior to adding it to Outlook.
After you remove your email account from the Mail app, you should be able to start Outlook without any problems. We don’t know why this problem occurs, but if you’re using the Mail app, remove your email account from it and check if that solves the issue.
15. Export your profile from the registry
Press Windows Key + R and enter regedit. Press Enter or click OK.
Right-click the Profiles key and choose Export from the menu.
Choose a safe location for your file, set profile.reg as the name, and click on Save.
Now locate profile.reg file, right-click it and choose Edit from the menu.
When Notepad opens, replace 15.0 with 16.0 everywhere in the file. To do this automatically, just press Ctrl + H and enter 15.0 in Find what and 16.0 in Replace with field. Now click the Replace All button.
After doing that, save changes.
Now locate profile.reg and run it.
The confirmation message will now appear. Click Yes to proceed.
Several readers reported The set of Outlook folders cannot be opened error message after upgrading from Office 2013 to Office 2016. According to them, they were unable to set their profile in Outlook due to this error.
After doing that, your profile will be added to Outlook and you should be able to use it without any problems. Keep in mind that this is an advanced solution, so if you’re not comfortable editing your registry, you might want to skip this solution entirely.
Open Control Panel and go to Network and Sharing Center.
In the left pane, click on Change adapter settings.
Network Connections window will now appear. Locate your connection, right-click it, and choose Properties from the menu.
When the Properties window opens, select Internet Protocol Version 4 (TCP/IPv4) and click on Properties.
Select Use the following DNS server addresses option and set Preferred DNS server to 8.8.8.8 and Alternate DNS server to 8.8.4.4. Click OK to save changes.
The set of folders cannot be opened error can sometimes appear due to your DNS configuration.
17. Reinstall Outlook and remove its values from the registry
Open Registry Editor. For more instructions on how to do that, check Solution 13.
When Registry Editor opens, In the left pane navigate to
HKEY_CURRENT_USERSoftwareMicrosoftOffice
Right-click the Office key and choose Delete from the menu.
When the confirmation dialog appears, click on Yes.
After doing that, restart your PC.
When your PC restarts, Outlook should be completely removed. Now you just have to reinstall Microsoft Office and the problem should be fixed.
If you want to completely and safely uninstall an app on Windows 10, we recommend you try a dedicated uninstaller tool.
18. Delete the Outlook key from your registry
Open Registry Editor.
In the left pane, navigate to this key HKEY_CURRENT_USER\Software\Microsoft\Office15.0\Outlook\Profiles\Outlook
Keep in mind that this key can sometimes be called Default Outlook Profile instead.
Right-click the Outlook key and choose Deletefrom the menu. When the confirmation message appears, click on Yes.
Now right-click the Profiles key and choose New > Keyfrom the menu. Enter Outlook as the name of the new key.
This error can appear if your Outlook Registry key is damaged. To fix the problem, you need to open Registry Editor and delete the problematic key, as shown above.
After doing that, you just need to start Outlook again and the problem should be resolved completely.
Why the set of folders cannot be opened in shared calendar?
File corruption is a common problem in Outlook, and many reported that The folder cannot be expanded. This happens if your profile or installation is damaged.
The set of folders cannot be opened error can prevent you from using Outlook, but you should be able to fix this problem by using one of our solutions.
If any of the emails are damaged in Outlook, you can just fix them quickly using Repair Toolbox for Outlook. It’s a great tool that repairs all your emails together with all their contents.
For any other suggestions or questions, don’t hesitate to leave them in the comments section below and we’ll be sure to check them out.
A network adapter driver is a program that allows communication between your network connections and your PC. Thus, installing and updating it must be necessary to avoid digital conflicts.
You can perform these actions using several alternatives on all Windows versions. Here, in this guide, we will show you some of the best options to quickly install your network adapter driver on Windows 7.
How to install the network adapter driver on Windows 7?
1. Use Device Manager
Press the Windows key and open the Start menu.
Type Device Manager and open it.
Expand the Network adapters section.
Right-click the adapter and select Update driver software.
Click on Browse my computer for driver software.
Click onLet me pick from a list of device drivers on my computer.
Highlight Show All Devices and click on Next.
Click on Have Disk.
Click on Browse, point to the inf file in the driver folder, and click on Open.
Select Next, and follow the instructions until the installation is complete.
After installing the driver, you may also need to set up your wireless connection. See our step-by-step guide on how to connect Windows 7 to WiFi to complete the process.
We also recommend you use the support of third-party software. Thus, we can talk about driver updater software, which seems to be a precious option.
Once you let it run on your computer, it will automatically install the drivers. Also, it is easy to forget about it, and you’ll probably never use it again until the next PC update appears.
Moreover, with its help, you can set third-party software to run on your system startup and perform periodic PC scans.
Installing and using specialized software can save you time and be a long-term ally. Thus, you’ll not have to bother yourself again with the manual installation process.
4. Use the support website
Visit the Acer support website. Similarly, you can visit the support website for your laptop’s brand.
Enter your device’s serial number, SNID,or model number,and press Enter.
Locate the network adapter.
Select your network adapter driver and hit the Download button.
We have shown the above steps for an Acer laptop. Similarly, you can visit the Dell website, HP website, etc., and download the standard network adapter driver for your Windows 7 laptop or PC.
It will open a web page and automatically scan your PC for updated or missing drivers.
If it detects a missing network adapter driver, it will prompt you to install it.
Install the latest network adapter driver.
Reboot your PC.
These were our recommended suggestions; you can try to install your network adapter driver on Windows 7. Again, we made sure we selected the best you could find.
If you’re also wondering if you can make Windows 10 drivers work on Windows 7, then feel free to check a complete guide. In addition, our guide on the best browsers you can install on your Windows 7 PC lists some tested and tried browsers you can check out.
In addition, let us know which of the listed options suits you the best. So, don’t hesitate to leave your opinion in the comment section below.
The storeagentscanforupdatesfailure0 error, tracked as Event ID 1001, shows that Windows ran into an issue when trying to scan for updates. Let’s see what causes this error and how to fix it.
As Windows users explain, this error often causes the system to freeze, needing a restart to recover. Common causes include low memory, antivirus conflicts, or corrupted system files that interrupt the update scan process.
Let’s see how you can fix it:
How do I fix the Windows error reporting 1001?
1. Run an SFC scan
Press Windows + S to open the Search menu, type CommandPrompt in the text field, and click on Run as administrator for the search result.
Click Yes in the UAC prompt.
Input this command and press Enter: DISM.exe /Online /Cleanup-image /Restorehealth
To scan system files, paste this command and press Enter:sfc /scannow
Wait until the Command Prompt displays a scan outcome.
This command should identify and fix file corruption issues. If the problem persists, you can instead use a third party tool that has the same aim, or continue reading as we have more fixes for you.
2. Scan for malware
First, double-click the Windows Security icon in your system tray.
Select Virus & threat protection to open the scan tab.
Click Scan options to view more settings.
Select the Full scan option, and then click on Scan now.
Windows Security should be able to fix the Event ID 1001 Windows Error Reporting CbsPackageServicingFailure0 if it was caused by malware. However, if it can’t locate any problems, try using an effective third-party antivirus.
3. Close superfluous background apps
Press the Ctrl + Alt + Delete hotkey, and select the Task Manager option.
Select all the programs listed under the Apps section individually, and click the End task button.
Similarly, terminate all superfluous background apps and services listed under Background processes.
Next, navigate to the Startup tab, select the programs configured to launch when you turn on the computer individually and click Disable.
After making these changes, you shouldn’t see The computer has rebooted from a bugcheck Event ID 1001 in the Event Viewer anymore. But, in case you do, head to the following method.
4. Free up hard drive space
Press Windows + S to open the Search menu, enter Disk Cleanup in the text field, and click on the relevant search result.
Choose the drive you want to clean from the dropdown menu, and click OK.
Select all the checkboxes under Files to delete, and click on OK.
Click Delete Files in the prompt to confirm.
There are also many other ways to free up disk space in Windows. Once you are done with these, verify that the Event ID 1001 bugcheck doesn’t reappear in Windows 10.
5. Turn off Cloud-delivered protection
Press Windows + S, type Windows Security in the text field, and click on the relevant search result.
Click Virus & threat protection tab within the utility’s window.
Then click the Manage settings option.
Turn off the Cloud-delivered protection option.
Disable the Automatic sample submission setting.
6. Extend virtual memory allocation
Press Windows + S, search for Adjust the appearance and performance of Windows, and click on the relevant result.
Click the Advanced tab in the Performance Options window.
Press the Change button on that tab.
Uncheck the Automatically manage paging file size for all drives checkbox in the Virtual Memory window.
Click the Custom size radio button to select it.
Enter values in the Initial Size and Maximum Size boxes to increase virtual memory allocation on your PC. Then, look at the details provided under Total paging file size for all drives to check current values.
Press the OK button to save the changes.
Virtual Memory is a part of the storage drive used as RAM to store inactive programs. Increasing the virtual memory should do the trick if you encounter Error Reporting Event ID 1001 due to memory issues.
7. Reinstall software that throws Error 1001
Press Windows + R to open the Run command, type appwiz.cpl in the text field, and click OK.
Now, select the app leading to the error, and click the Uninstall button.
Follow the on-screen instructions to complete the uninstall process.
Once done, restart the computer for the changes to come into effect.
After that, reinstall the software you just uninstalled. Again, you should download the latest version from the publisher’s website.
How can I check if error 1001 occurred on my PC in Event Viewer?
If you suspect error 1001 has occurred on your PC, but haven’t checked, look through the events log. Event Viewer is a Windows utility that includes records to help users identify and troubleshoot issues.
You can check for an error 1001 log with that utility as follows:
Press Windows + S to open the Search menu, enter Event Viewer in the text field, and click on the relevant search result.
Double-click Windows logs in the left pane.
Then select Application.
Look for and double-click recent error logs to view them. All those logs include the event IDs; the one you’re looking for is 1001.
Alternatively, click Find on the right of Event Viewer.
Input 1001 in the Find what box.
Then click Find next to find error 1001 with the search tool.
If you find an error 1001 log, have a look through the details for it on the General tab. Look for a faulting application path specified there, which can help you identify the software the issue occurs for.
There isn’t any specific guaranteed resolution for error 1001. However, applying all the potential solutions above could feasibly resolve that issue on your PC.
If those fixes aren’t enough, consider contacting Microsoft’s Windows support service via the Contact Microsoft Page for further fixes. Enter an error description, click Get help, and select Contact Support from there. You can then discuss the error in live chat with a support agent.
You can also chat about the Event ID 1001 error in the comments below. Have you discovered any other way to fix this issue? If so, let us know about it below.
If you’re looking for a new Outlook guide to help you change or remove your primary account, you’ve come to the right place. Any user enjoys the freedom to add two or more accounts to the Outlook e-mail application.
It makes perfect sense to get all your emails in a single application, right? However, the first account added remains the primary account. So, you’ve got a problem on your hands when migrating from one Exchange service to another.
Outlook informs you that The primary Account cannot be removed unless it is the only account in profile. You must remove all other Exchange account before removing primary account. Ideally, a new data file should override the old primary account preference, but this doesn’t happen.
If you are wondering how to change or remove the primary account from Outlook, just follow the procedure below to understand how it works.
How can I change or remove the primary account from Outlook?
1. Change the primary account by adding a PST file
In Account Settings, remove all secondary accounts.
Then, delete the primary account. This one can be easily identified via the checkmark in the left-hand section of the screen.
With all the accounts now removed, click the Data Files tab.
Tap on Add and browse to your PST location.
After you load it, click on Set as Default.
Add the new account that you want to serve as primary by clicking the New button.
Up next, close this window.
Restart Outlook and go to Account Settings > Account settings.
Here, click on the Data files tab.
Make sure the OST file is set as the default. If it isn’t, then select it and click the Set as default button.
Restart Outlook again. Your new account should be now shown as primary.
First of all, you can simply change your primary account and keep it along with any profile-specific settings. Do so by adding a PST file to the profile and setting it as the default data file.
If you want to convert a Microsoft Outlook PST file to OST, check out this detailed guide and learn how you can do it with ease.
2. Remove the primary account by making a new one
Close Outlook and any associated dialogs.
Press Windows key + R and type control mlcfg32.cpl.
Press Enter.
Click on Show Profiles.
Click the Add button to create a new profile.
Also insert a profile name.
Use auto Email Account setup to insert your email credentials and configure the new account.
Go back to the initial Mail window.
You can now make it the default choice by clicking on Always use this profile and selecting your new profile from the list.
Don’t forget to click Apply to save your preferences.
Finally, just select your old profile and click Remove.
If the first procedure is time-consuming and not totally safe (it includes chances of data loss and might affect other Exchange accounts), this one is faster and more stable.
However, you won’t get to retain any profile settings. Your email account from the new profile will become the new primary account this time.
These are the methods by which you can change or remove the primary account from Outlook. If you have any comments or questions, feel free to write them down in the comments area.
Many users have posted on forums about their browsers not connecting to the internet. When a browser doesn’t connect to the internet, it doesn’t load any web pages even though its PC’s connection is seemingly acceptable. That’s a common connectivity issue that perplexes many users.
Also, being unable to surf the internet could be pretty annoying as we accomplish most of our tasks using web browsers. This guide will give you some troubleshooting solutions to apply and quickly fix the browser not connecting to the internet issue. Let us check them out.
Why doesn’t my browser connect to the internet?
Various potential factors can be behind a browser not connecting to the internet. Those factors can be network or browser issues. These are some of the more likely reasons for a browser not loading webpages:
Antivirus software and firewall blocks: A firewall or your antivirus tool might be blocking your browser from connecting to the internet.
DNS (Domain Name Server): There could be a discrepancy between IP address assignments on your PC and the DNS server. Or your DNS server might be somewhat overloaded.
Browser: The issue might arise because you’re utilizing an old browser version or how some of your browser’s settings have been configured.
Malware: Some malware might be preventing pages from loading in your browsers.
Network issues: Network issues arise from incorrect Winsock catalog settings and TCP/IP configurations.
How can I fix a browser not connecting to the internet problem?
1. Try utilizing a different browser
You might find alternative browsers that can connect to the internet and load pages without issues. For example, if you’re not already utilizing Opera, try browsing with that browser instead of Chrome, Firefox, Edge, and co. That’s a reliable Chromium browser with unique features and an excellent UI design.
When browsing with Opera, you might not miss Chrome that much. It includes a built-in VPN, messenger, music player, battery saver, and screenshot features you don’t get in Google Chrome. Opera users also have access to Chrome Web Store extensions much the same.
Other Opera features
Opera’s start page incorporates customizable speed dials and a sidebar
Users can utilize Opera with mouse gesture movements
Press the Win + I buttons to open Windows Settings.
Select Troubleshoot.
Click Other troubleshooters.
Scroll down and click Network Adapter.
Press the Run button next to Network Adapter.
Follow the onscreen steps to initiate the troubleshooting.
3. Turn off firewalls and third-party antivirus software
Press the Win button to open the Start menu.
Type Windows Defender Firewall and open it.
Next, click Turn Windows Defender Firewall on or off.
Check the boxes for Turn off Windows Defender Firewall (not recommended) for both Private and Public network settings.
Click OK to apply the options.
Disable that software if you have a third-party antivirus utility installed, which might incorporate a firewall. To do so, look for and right-click the system tray icon for the antivirus software. Then select the option for disabling the antivirus utility’s on its context menu.
NOTE
Note: If turning off Windows Defender Firewall or disabling antivirus software resolves the issue, the disabled security utility was likely blocking the browser connecting. However, it’s not recommended you leave your PC’s antivirus shield and firewall permanently disabled.
4. Flush the DNS cache
Open the Start menu by pressing the Win key.
Search for the Command Prompt and run it as an administrator.
Type the below command and press Enter after each one: ipconfig /flushdnsipconfig /releaseipconfig /renew
Search for the Command Prompt and run it as an administrator.
Type the below command and hit Enter: netsh winsock reset catalog
Input this reset TCP/IP command and press Enter: netsh int ipv4 reset reset.log
Restart your desktop or laptop.
6. Reset the browser
Click the 3-dot menu icon.
Select Settings on the menu.
Click on Reset and clean up.
Click the Restore settings to their original defaults option.
Press the Reset settings button to restore Chrome to its default settings.
The above procedure is shown for the Google Chrome browser. You can follow the steps for your browser appropriately.
7. Switch to a Google DNS
Open the Start menu by pressing the Win key.
Type Control Panel and open it.
Select Network and Sharing Center.
Click Change adapter settings to open Network Connections.
Right-click your internet connection and select Properties.
Double-click Internet Protocol Version 4.
Select the Use the following DNS server addresses.
Enter 8.8.8.8 in the Preferred DNS server.
Then input 8.8.4.4 within the Alternate DNS server.
Click the OK button.
8. Reinstall your browser
Open the Start menu by pressing the Win key.
Open the Control Panel.
Click Programs and Features.
Select your browser, and click the Uninstall option.
Restart your desktop or laptop after uninstalling the browser.
Download the latest version of your browser.
Install the browser and check if this resolves the issue or not.
You can also utilize a third-party uninstaller to uninstall your browser. In addition, some third-party uninstallers will erase leftover residual files along with the software.
Note: This resolution is recommended if you can still open websites in alternative browsers. If you can’t open websites in any browsers, try updating the browser you need to fix with its built-in update option.
Get in touch with the affected browser’s support service. So long as you can still view websites in other browsers, you can find support contact details on browser help pages. You can also post on the browser’s support forum.
Your ISP (Internet Service Provider) might also be able to assist with this issue. There could be an issue with your ISP that’s stopping your browser from connecting to the internet. So, consider contacting your ISP’s support service for further guidance.
Those resolutions many users have confirmed can fix browsers not connecting to the internet. Although there isn’t a guaranteed resolution for this issue, those potential fixes are worth a shot.
In the comments below, let us know which solutions helped you resolve the browser not connecting to the internet or Wi-Fi connection. Still, the browser is not working, doesn’t connect to Wi-Fi, or will not connect to internet issues.
Windows 10 Pro and Enterprise editions support the Windows Domain feature. This option allows users to add their computer to the corporate environment, but what if Windows 10 Join Domain is missing?
Before we dig in, it might be useful to know exactly which Windows versions can join a domain. From the beginning, you should know that not all editions are eligible for this feature, but only Pro, Enterprise, and Education.
So, here’s the big question: can we join Windows 10 Home Edition to domain? Not by default.
However, there is a Windows 10 Home join domain workaround that will allow you to do so even if at first it seems that you’re unable to join a domain on Windows 10.
Using the Domain, you can access the resources for which you have permission within the network perimeter. Unfortunately, some users have reported that Domain Join is greyed out even after meeting all the requirements.
Why can’t I join a domain in Windows 10?
Here’s what one of them had to say.
I upgraded from windows 10 home to pro. I wish to add this computer to my work domain but even though I have pro the add to domain choice is missing.
Others simply see this message without further instructions: you cannot join a computer running this edition of Windows 10 to a domain.
Aside from the above, there are more issues that users reported in connection to Windows 10 Join Domain missing, as follows:
2. Right-click on Command Prompt and select Run as Administrator.
3. In the Command Prompt, enter the following command and hit enter. netdom /domain:Techmaniac /user:tashre1 /password:addyourown member <computer name> /joindomain
4. In the above command replace Domain with your domain name and the user with your username. Add the password and make sure to change the computer name with your PC name.
5. This should add your computer to the Domain.
4. Adding Other Users to Domain
Open the Command Prompt as Admin.
In the Command Prompt window, type the following command and hit enter. netdom /domain:techmaniac /user:tashref1 /password:addyourown member <computer name> /add
To run the above command you need to be the Administrator of the domain. And it is necessary that you run this command to add the new user to the domain before the user can join that domain.
Now on the user front, enter the following command and hit enter.
netdom /domain:Techmaniac /user:tashre1 /password:addyourown member <computer name> /joindomain
Here also make necessary changes to the above command to join the domain.
if you were wondering which command is used to join a computer to domain, you’re in luck. In the above command, Netdom is a command line tool that is built-into Windows Server 2008 and above.
It can be used to not only join a domain but create an account and trust relationships. So if you deal with the Domains frequently, this can be a really handy utility to learn.
Joining a domain is a fairly simple process for anyone who has worked with the servers. To join a domain you need a User Account on the Domain, the name of the Domain, a computer running Windows 10 Pro or Enterprise version OS and a Domain Controller running Windows Server 2003.
Hold the left-click button on the mouse and drag the cursor over cells to select the range of cells that will include the dates.
Right-click on the selected cell range and select Format Cells from the drop-down options.
Select Date on the Number tab, then click the OK button to change the format for the selected range of cells.
To change the cell format for a whole spreadsheet, click the box in the top-left corner of the sheet.
Right-click on any cell and select Format Cells from the drop-down options.
Select Date on the Number tab, then click the OK button to change the format for all cells.
Changing the cell format allows you to type dates in the cells without them appearing as numbers. It changes the Excel converting rules. If the spreadsheet arrow is not working in Excel, check l our guide for some fixes.
2. Insert a sign
Open Microsoft Excel and go to your sheet.
Click on any empty cell, press Ctrl + ; (semicolon), and then press Enter.
The above combination will quickly enter the current date in your worksheet without converting it to a number.
Have you (or your meeting organizer) forgotten to include somebody in a meeting? If so, you can forward a meeting invite in Outlook to somebody even when you’re not the original meeting organizer.
The meeting organizer can also add a new person to the attendees’ list and send a meeting update in Outlook. This is how you can forward meeting invites in Outlook.
How do I forward a meeting invite in Outlook?
1. Forward a meeting invite and inform the organizer
If you haven’t organized a meeting or declined a meeting request, you can still forward an invitation for it; and the original organizer will also receive a notification that you forwarded an invite. First, open the Calendar in Outlook.
Double-click the meeting you need to forward an invite for.
If it’s a recurring meeting, you’ll need to select either Just this one (for a single meeting invite) or The entire series (for a whole meeting series invite).
Click the Forward button with the envelope icon, and then select Forward on its menu.
Next, input the email address of the new attendee to forward the invite to in the To box.
Press the Send button.
2. Forward a meeting invite without informing the organizer
You can also forward meeting invites without notifying the original organizer. To do that, open the Calendar view in Outlook.
Select the meeting you need to forward.
Drag and drop the selected meeting onto the mail icon at the bottom of Outlook’s Navigation Pane. That copies the selected meeting into a new email.
In the email window, add a recipient to the To field.
Then you can enter a few extra details in the message, and click the Send button.
3. Forwarding meeting invites as an organizer
You don’t need to select the Forward option if you’re the original meeting organizer. Instead, double-click the meeting on the calendar.
Then add attendee email address to the To field.
Press the Send Updates button.
Thereafter, select the Send updates only to the added or deleted attendees option.
Alternatively, you can select the Send updates to all attendees option to update all those invited.
Click the OK button.
So, there are three ways that you can forward a meeting invite to a new attendee. Select whichever method you prefer.
The User does not exist or account does not existerror is usually encountered when a user is trying to gain access to his/her Microsoft account.
It also occurs when an attempt is made to log into a service using the Microsoft ID associated with a Windows device.
The services that require the use of this ID include OneDrive, Outlook.com, Xbox Live, and Skype.
A Microsoft subscriber may be prompted to try a different email address or register a new one and try again.
Many are left puzzled and wondering about the meaning of the user does not exist error: why does it say my email doesn’t exist or why is my Microsoft account not recognised? So, let’s see what can possibly trigger the issue.
Why does Microsoft say my account doesn’t exist?
Ascertaining the status of an account is the first thing that should be done, especially if the account has not been used in a long time (more than 1 year).
All kinds of mismatches or incorrect inputs can also lead to Microsoft saying that the user does not exist, even if it actually does, or at least it did at some point in time.
If the user ID you entered does not exist anymore, you might also be trying to use it for the wrong type of account, so we advise extra caution. Aliases are also to be avoided if you want to get to the bottom of things.
Here are some of the most common issues reported by users:
The email or username you entered does not exist. please check that you have typed your email or username correctly.
Microsoft account does not exist error – The User ID you entered does not exist
Outlook email doesn’t exist – Outlook says my account doesn’t exist
Microsoft account not recognized – Microsoft account doesn’t exist but it does
This article outlines a few steps that the reader should follow to fix this error.
How do I fix a Microsoft Account that doesn’t exist?
1. Ensure that your Username and ID actually exist
To check if the account is still active, visit the Live, Outlook, and Hotmail web pages depending on the type of Microsoft account that you used, and try logging in with the associated username and password.
If on the login attempt the message says an account with this email already exists then it is possible that the email may have been changed to an Alias (this will be explained later).
Another time the error message may reflect as The Microsoft account does not exist. Then, this account may have been permanently deleted because of inactivity (failure to access the account using a browser within 365 days).
A new account can be created with the same mailbox name (note that previous data such as old emails and files on OneDrive would have been lost). It is better to use new details here.
After the Microsoft account ID registration is completed, you can try to log in again, and the Microsoft account does not exist error should be gone.
2. Double-check to ascertain the correctness of every input
Make sure that account details are correctly spelled and that the appropriate characters are used before hitting sign-in.
Try out a couple of familiar usernames and passwords variation that might been have used recently.
3. Attempt logging in with the primary Microsoft ID
This is a common error among Microsoft users encountering the error under consideration. They try to login into Microsoft using an email that is an additional address added to an account rather than the primary user id of the account itself.
If this situation arises, use the primary User ID instead of the additional address. An additional address is meant for useraccount recovery and security purposes.
4. Avoid attempting to log in with an Alias
Usually, the erroruser ID does not exist denotes that the user is trying to log in using an Alias.
If by any chance, the email address in question has been swapped with a new one, the original email address then becomes an Alias. Hence, logging in with the affected account (Alias) will trigger the user IDerror. To resolve this, log in using the details of the new account.
Ensure that the case for both username and password are correct
Avoid pressing the incorrect key accidentally, so be careful
Try logging in from another secure computer as your keyboard might have issues
From an existing and active e-mail address, send an email to the user ID in question to see if it will bounce back (mailer-daemon) or get delivered.
If it gets delivered without any error, then the account still exists, and the steps provided above should be followed to fix the user does not existerror.
6. Do not use an account name from another type of account
Using an account name from a different kind of account such as an Xbox, Work, or School account may trigger the user IDerror.
Trying to sign into a variety of Microsoft services using an Xbox Gamertag is impossible. A Gamertag is meant to serve as an identity only on Xbox.
Also, attempting to sign in to Xbox or the Microsoft account website with a user ID supplied associated with a user‘s school or work may not work. So, visit the Microsoft Web page and sign up for a new account.
7. Recover your account by requesting a password reset
Visit the Reset your password webpage.
2. Choose from the options provided on why you need a password reset, then click Next.
3. Slot in the Microsoft user ID that needs to be recovered.
4. Enter the on-screen character and click Next.
5. In case the account has security information, you will receive a one-time code on the associated alternate (additional) e-mail address or phone number from Microsoft.
6. After entering the unique code, you will be able to create a new password and sign in.
A Microsoft account reset will most times be required but before that, check to ensure that Caps Lock is off because passwords are generally case-sensitive.
If there is no doubt as to using the right details and sign in remains impossible, then a reset is what should come next.
Note: Before requesting a password reset, the user ID must have been confirmed to exist by the steps mentioned earlier. Also, a user needs to request a reset of the primary account, not the additional e-mail address.
8. Fill out a Microsoft Account issues form online
If the tweaks earlier mentioned do not solve the sign-in problem, the issue might have to be reported to Microsoft.
To log a complaint, visit the account recovery page, and on the next screen, check the issue you need help with.
On the next page, fill out the necessary details. To access this form, the user must be signed in with a Microsoft account.
Use an alternate account to sign in (if one exists) or sign up for another one.
After registering successfully, you will be able to fill out the form for the account that needs to be fixed.
We hope that the suggestions listed above helped you to fix this error message.
If you’ve come across other solutions to fix this problem, you can help the Windows Community by listing the troubleshooting steps in the comment section below.