Communicate with Your Team for Free with Pumble Chat App

When your workforce is scattered all over the world, it’s important to have a reliable communication platform.

Pumble was first introduced in 2020 as a Slack alternative and we discovered that it covers most communication needs.

In this article, we will take a closer look at this text, voice, and video calls web app for you to decide if it’s the right choice or not.

What is Pumble and what does it do?

As we mentioned above, Pumble is a free communication platform that offers text, voice, and video call features.

Its structure looks a lot like the one in Slack, and it can work online in most browsers but it also has downloadable apps for all the platforms.

That includes Windows, macOS, Linux, Android, and iOS, so basically, you can use it on almost any device.

What are the best features of Pumble?

1. Instant communication

The core feature of Pumble is the instant text communication. In other words, you can chat privately, one-on-one, in private group chats only for invited users, and in public conversations with whoever wants to join.

Everything is pretty straightforward. You can notify someone by adding the @ symbol in front of the name.

Another interesting feature is that you may pin an important message during the conversation to have it for later.

You have the option to create as many channels as you want and split up the communication between departments or key activities you need to discuss.

And, just like on Slack, you can keep the conversations in threads so you don’t spam the channel.

2. Great interactivity

The best part of Pumble is that you can forget about the mail and send files directly within the channel or thread.

It’s as easy as drag-and-dropping the file straight in and all the other members can comment or add reactions as they do on social media platforms.

Images, videos, links, PDFs, and more can all be added seamlessly for others to download or see right in the app.

Also, anyone can change their status by clicking on their emoticon from the top-right corner to let others know if they’re available or not.

This will save a lot of time checking if someone is on leave or sick and pushing for an answer.

3. Voice and video calls

If you want to spread your message better, there’s nothing better than one-to-one audio or video call.

For that, you only need to select the user you want to talk to and click on the audio or video button.

Unfortunately, you don’t have the option of group calls but if you upgrade to the Pro plan, you also get the screen sharing option.

The voice and video quality are very good although that also depends on your Internet connection, of course.

What are the advantages of Pumble Pro plan?

As we’ve mentioned above, Pumble is a fremium app. That means that the core features are free but if you want extra features, you need to upgrade your account.

The price for the Pro plan is $1.99 per user per month and for that, you will get the following bonus features:

  • Guest access – You can invite anyone from outside and limit their right to content viewing
  • Screen sharing – During a video call, you can switch the view to your system desktop
  • 10GB storage per user – In the free version, you only have a fixed 10GB of space in total
  • Workspace permissions – Full admin rights for invitations, member removal, posting permissions, user groups management, and more
  • User groups – You can create user groups and add members to notify everyone at once by mentioning the group
  • Customizable sidebar – With this feature, you can fully customize the channels and users on the sidebar
  • Priority customer support – Guaranteed first-time response within four hours

⇒ Get Pumble

Right now, Pumble is less expensive than most competitors so we recommend trying it to see if it meets your expectations.

It’s definitely easy to use, it’s available on all platforms and it offers all the tools for efficient communication.

Another interesting tip is that you can integrate Pumble into Clockify as a communication platform.

We hope that our article provided relevant information for your decision. You may also find useful our list of the best automated chat software for your business.

If you’ve already tried Plaky, share your experience in the comments section below.

Boost your Productivity with the Plaky Project Management Web App

Project management can make or break your whole operations. That’s why we looked closely at the Plaky project management web app.

It’s a modern and easy-to-use tool that will help you boost your team’s productivity. It helps you manage projects and tasks, collaborate with teammates, and get status live reports with just one click.

But the best of all, it’s free! For an unlimited number of users, and an unlimited number of projects.

In this article, we’re going to talk about its best features and how you can use it to keep a close eye on all your projects easily.

How can Plaky help me manage my projects?

Let’s see a few points on how this modern cloud-based app will help you handle even the most complex projects.

For starters, Plaky helps you write all the to-dos organized in one place and assign your team members for all tasks you need to complete.

You can color code any stage or project individually, to keep everything clean and clear. You may also do that by adding notes and indications.

Most importantly, the tool doesn’t force a unique way of doing things. You will discover a full collection of pre-designed templates for a number of project types like events, product launches, strategy plans, and a lot more.

However, you can still create everything from scratch if you have another structure idea that fits your project better.

And while the project is in development, you can collaborate with your teammates by sharing files and inserting comments.

Also, on any changes, including if you receive a new task, you will be notified immediately. And as a project manager, you will be able to view the work development from any angle you need by using filters to sort any activity.

Now that we have a broad understanding of Plaky, let’s highlight its best features more closely.

What are Plaky’s best features?

1. Smart task management

The core and most important part of Plaky is the easy-to-use task management feature. After you create a board for your project, it’s easy to add the stages and tasks for it.

You can assign a team, set a deadline, the cost of the project and you will actually see the status of each task.

Everything is color-coded so, as a project manager, you will know exactly where to look and provide the necessary input if an activity is stuck.

Of course, you can always order the tasks by any of your columns to find the information you’re looking for quickly.

And when you click on any of the tasks, you will have access to detailed information on all its activities and collaborate with your team.

Also, here you can add the related files related to the projects and see any meaningful comments related to the task.

A big hint is that you can integrate Plaky with the free Clockify time-tracking tool and actually track the timing of tasks.

2. Great selection of boards and templates

If you’re dealing with a lot of head scratching to select the correct structure for your project management board, Plaky softed it all out for you.

That’s because it comes with a library of searchable board templates to choose from. You may either select a category from the left pane including general project management, HR, Sales, or even personal, or you may just browse for the one that strikes your eye.

Of course, you may also start from scratch and create your own board to look like the ones you may have used before.

And all the templates will come with prefilled tasks that are meaningful for that type of project. However, you can delete the ones you don’t need and add new ones as you please.

3. Team collaboration

On Plaky, you are always in continuous communication with your team. If you see a red dot on the notifications bell from the left, that means someone made a comment in any of the projects you are on.

Here, you will also see if you were mentioned or if a task or activity was assigned to you.

But you can also comment on any project to report the status or respond to any comments. And within the project, you can actually upload the file you are working on and request input or opinions from your team members.

Plaky doesn’t have an actual online chat option but actually, this can keep your communication a lot cleaner.

4. Administration from a single dashboard

As a project manager, you can decide and set permissions for any member or any board. You may even add different workspaces for different departments if you need them.

The boards can be public or private and that will allow you to control who sees what on any given project.

And the members may have different permissions on each workspace, board, or project individually.

It sounds complicated but with Plaky, the menus are so simple and intuitive that everything will seem easy.

5. Quick activity tracking

If you want to see who is busy as a bee, it’s enough to click on the Activity tab from the top-right of your board.

There, you will see all the actions performed by each member on the project, and clicking on it will provide the exact information.

It’s an efficient way to see who’s doing what. But, as a big hint, you can integrate Plaky with the free Clockify time-tracking tool and actually track the timing of tasks.

This way, any member can punch the clock on any task, and you will have clear activity feedback.

How do I get Plaky and add members?

That’s the simplest part because you don’t need to download anything, just visit the Plaky website and create a free account or log in with your Gmail account, or Apple ID and that’s it.

Then, you just add your members by clicking on the dedicated icon from the bottom left. You have the option of sending an invitation link or adding their email and hitting the Invite button.

After you get all your team in one place, you may start assigning them tasks and including them into projects.

The process is so easy and straightforward that it doesn’t need too much tutoring. However, Plaky offers a lot of tutorials and how-to guides on their website, so they don’t leave anything to chance.

⇒ Get Plaky

ProsCons
Great collection of board templatesIt doesn’t have online chat
Integration with Clockify time tracking app
Modern and intuitive interface
Built-in collaborative features
Free to use for unlimited members and projects

Final notes

Project management is not an easy job and keeping things organized can be a painstaking operation.

Well, as we’ve found out, Plaky takes care perfectly of this part and it comes with all the tools necessary for you to plan your projects in detail.

And if you combine it with Clockify, which offers free time-tracking and clock-punching for free, your projects will come to completion perfectly.

The app is completely free and all the menus are very intuitive and which will help you map out all your stages and activities in no time.

Probably the best part is that everything works on a browser, and everything is saved in the cloud so you can always continue from where you left off whether you’re at the office, at home, or on the field on mostly any device.

Of course, Plaky is not magical, you still need a project manager to coordinate the team and lead it, but we’re sure that you’ve got this part covered.

We hope that you found our information useful and that you will give Plaky a try. You may also check our article on the best productivity apps and boost the efficiency of your teams.

If you’ve already worked with Plaky, your input will be very appreciated by all the readers in the comments section below.

Citrix Workspace Not Launching in Windows 11? Try This!

If your Citrix Workspace is not launching, it might be due to outdated software or, in some cases, permissions issues that require administrator access.

Network connectivity problems, corrupted user profiles, or even corrupted files from a previous installation could be the cause.

Let’s see how you can force-launch Citrix when it doesn’t work:

What can I do if the Citrix workspace is not launching?

1. Refresh applications

Click the drop-down next to your name in the upper-right corner of the menu. Then, click Refresh Apps and see if the issue persists.

2. Ensure full permissions for the user account

If you’re looking to launch Citrix Receiver in Windows 10 with no effort again, note that Full Permissions are required for the user account.

You will find this under HKEY_USERSUSER_SIDSOFTWARECitrix on the client machine.

We recommend ensuring you have full permissions for the user account used to log in to Citrix Receiver for the Registry Key.

If the domain user account does not have permissions, delete the Citrix Registry key after taking a backup. Then, exit Citrix Receiver and launch it back.

The Registry key will be created once more, with all relevant required permissions, and thus fix the Citrix workspace not opening ICA file error.

3. Download the latest version available

  1. In a browser, go to Citrix’s website to find the Citrix Windows 11 download file then click Download.download citrix receiver not launching applications
  2. The latest available version of the Citrix Workspace app should be there specified. Follow the on-screen steps to install it.

4. Reset Citrix Receiver

  1. Firstly, right-click the Receiver icon in the system tray.
  2. Click Advanced Preferences next and select the Reset Receiver option.reset-receiver citrix receiver not launching applications
  3. A prompt will appear asking if you are sure you want to reset the receiver back to default settings. Confirm by clicking on Yes, reset Receiver.
  4. If Citrix Receiver requires you to add your account again. Enter your Domain username and password. You may be prompted to log in twice. This is also how you can fix Citrix apps not launching on Mac.

5. Use another remote working solution

If Citrix Receiver is only giving you more headaches, maybe you should try another remote desktop solution. This way, you may increase your productivity.

To be more exact, we recommend Parallel RAS. It can deliver applications and desktops to any employee from a network.

The best part is that it is not complicated to implement within any environment. You will be able to secure all the online communication channels.

From data leakage and theft by using the Secure Sockets Layer (SSL), data encryption using FIPS, and 2-way identification. It also integrates SafeNet, DualShield, Azure MFA, RADIUS, and Google Authenticator.

Parallels RAS

Parallels RAS

Start using this all-in-one remote work solution for accessing your applications.
Free Trial Visit website

While each user has different expectations, this guide will provide a good overview of what you can do when you cannot launch Citrix Receiver in Windows 10/11.

For more potential solutions, check out how to fix the Citrix Receiver fatal error on Windows 10/11.

Do you have any ideas or tips to make Citrix Receiver work properly? Please drop a comment below and let us know your thoughts.

3 Best Ways to Fix Warframe Connection to Host Lost

Getting error messages like Warframe Connection to Host Lost can be frustrating. Among factors that impact the gaming experience in Warframe are game speed, character agility, and data load speed. 

The shooter game is published by Digital Extremes and has a load full of tactical missions and intriguing stages. 

Unfortunately, connection issues can cut shut players’ expectations and make them draw back from the game. The issue is however fixable.

We look at the best ways to get back on track when you experience a Warframe connection to host lost error, so make sure to check our solutions below.

Why do I keep losing connection to the host in Warframe?

Connection loss to the Warframe host server shouldn’t put you in panic mode. From poor internet connection to improperly configured device settings, there are a few factors that can cause this issue. 

➡️ Internet problems – either your ISP restricts you or too many devices use your network at the same time which leads to poor or slow connection.

➡️ Outdated game version – the game may not be able to hold all new development, especially when you try to connect to online servers.

➡️ Problem on their end – the Warframe servers are down or undergoing maintenance, you’ll just have to wait it out.

Now that we know what’s causing the issues, we will move on and explore what exactly you can do to fix it and prevent it from happening again.

✅ Preliminary checks

→ Restart your device

It’s a but remains an old hack to fix common connection issues. Let the device reconfigure and re-establish the Internet connection, then try to launch the game again.

→ Check internet connection

If you can connect to the Internet but the connection is poor, check the speed (use an online speed test), and contact the ISP if necessary.

Also, if you use Wi-Fi, try to move your device closer to your router. Proximity can be a relevant factor that affects your connection speed and quality.

How to Fix Warframe Connection to the Host Has Been Lost?

1. Free up bandwidth

It helps to close unnecessary applications so there is enough bandwidth to have Warframe operate seamlessly without losing connection to the host. 

You can do this on any device you play Warframe on, here’s an example for PC users:

  1. Open Task Manager.
  2. Check all the apps and processes that are currently running.
  3. Select the ones that you don’t use right now and click on the End Task button.warframe connection to host lost

Are you running multiple applications simultaneously with Warframe opened? Then you may experience a bandwidth issue. 

The game and pretty much any online MMORPG take a considerable amount of PC operation capacity, and may not perform impressively if other applications are competing for system network data. 

Solutions to fixing this issue take different approaches since possible causes are of different orientations as well. From basic preliminary checks to decisive guides, you will find answers you can explore below. 

2. Use a VPN 

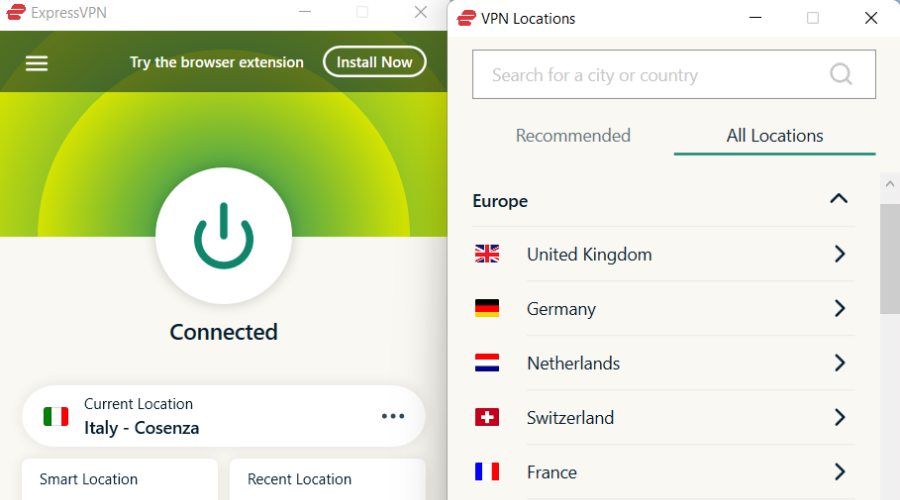
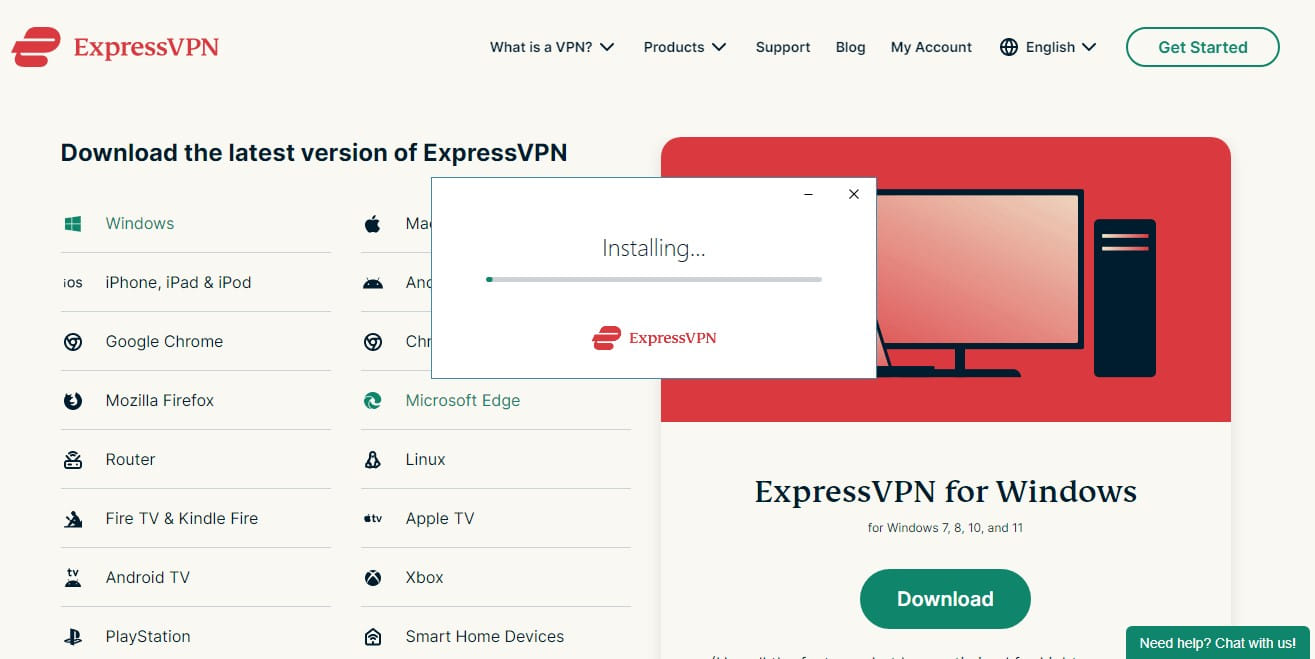
  1. Subscribe to a VPN client. For gaming, we recommend ExpressVPN.
  2. Download the VPN app and log in with credentials.warframe connection to host lost
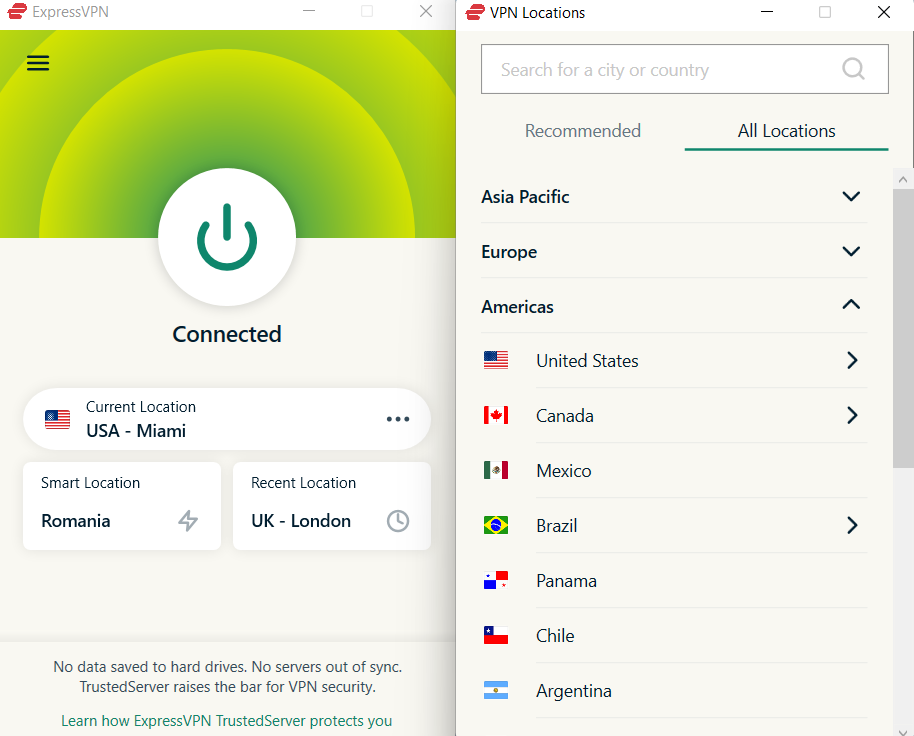
  3. Connect to a server by clicking on the power button.warframe connection to host lost
  4. Open the game and enjoy!

VPNs give you access to thousands of fast servers that can be a lot more optimal for your gaming than what your ISP offers and can help you get rid of bandwidth throttling.

You can use it to connect to international servers around the world and connect to a place that’s closer geographically to the Warframe servers you play on.

ExpressVPN

Connect to ExpressVPN to fix connection issues in Warframe and get the best gaming experience!
Free trial VIsit website

3. Update the game version

  1. On your PC, open a web browser.
  2. Head to the Warframe official website.
  3. Go to the Updates section. You’ll find information about the latest developments. Check if your version matches and download the latest one if it doesn’t.warframe connection to host lost

You should check what game version you have. Developers update game software to improve security, visual enhancement, new quest, and garrison.

So, not flowing with the tide may be the reason for seeing a Warframe connection to host lost error. 

An outdated game version leaves you behind and may mean that game features and interactions with the game server may not work as they should.  

Does Warframe Ban VPN?

No, you will not need to worry about a Warframe VPN ban because the game doesn’t forbid it. Sophisticated VPNs now make it hard for hackers to trace you or steal your data.

Warframe allows VPN usage. The only issue that can arise is if your VPN disconnects and changes your IP mid-game. That is against the terms of use and can lead to you getting banned.

If you use a stable VPN for Warframe you don’t have to worry about that.

Preparing to serve justice and then getting a Warframe connection to host a lost error message is a frustrating scenario that has always been complained about in gam

Manage Your Projects with the Clockify Time Tracking Software

Time tracking is very important, especially when your team is working from all over the world or they are freelancers.

That’s why you need a powerful time tracking tool like Clockify, not only to manage your projects but also to be able to make payments based on everyone’s timesheet.

There are two sides to this solution. The user dashboard is much simple and all they need to do it to punch the clock.

They may get assignments to project, present their schedule and write descriptions for their tasks.

The manager’s app is a lot more complex, with a lot of useful features for managing the teams, getting reports, and assessing the whole situation.

In this article, we will outline some of Clockify’s best features and show you some effective ways how to boost business productivity.

How can Clockify help your business?

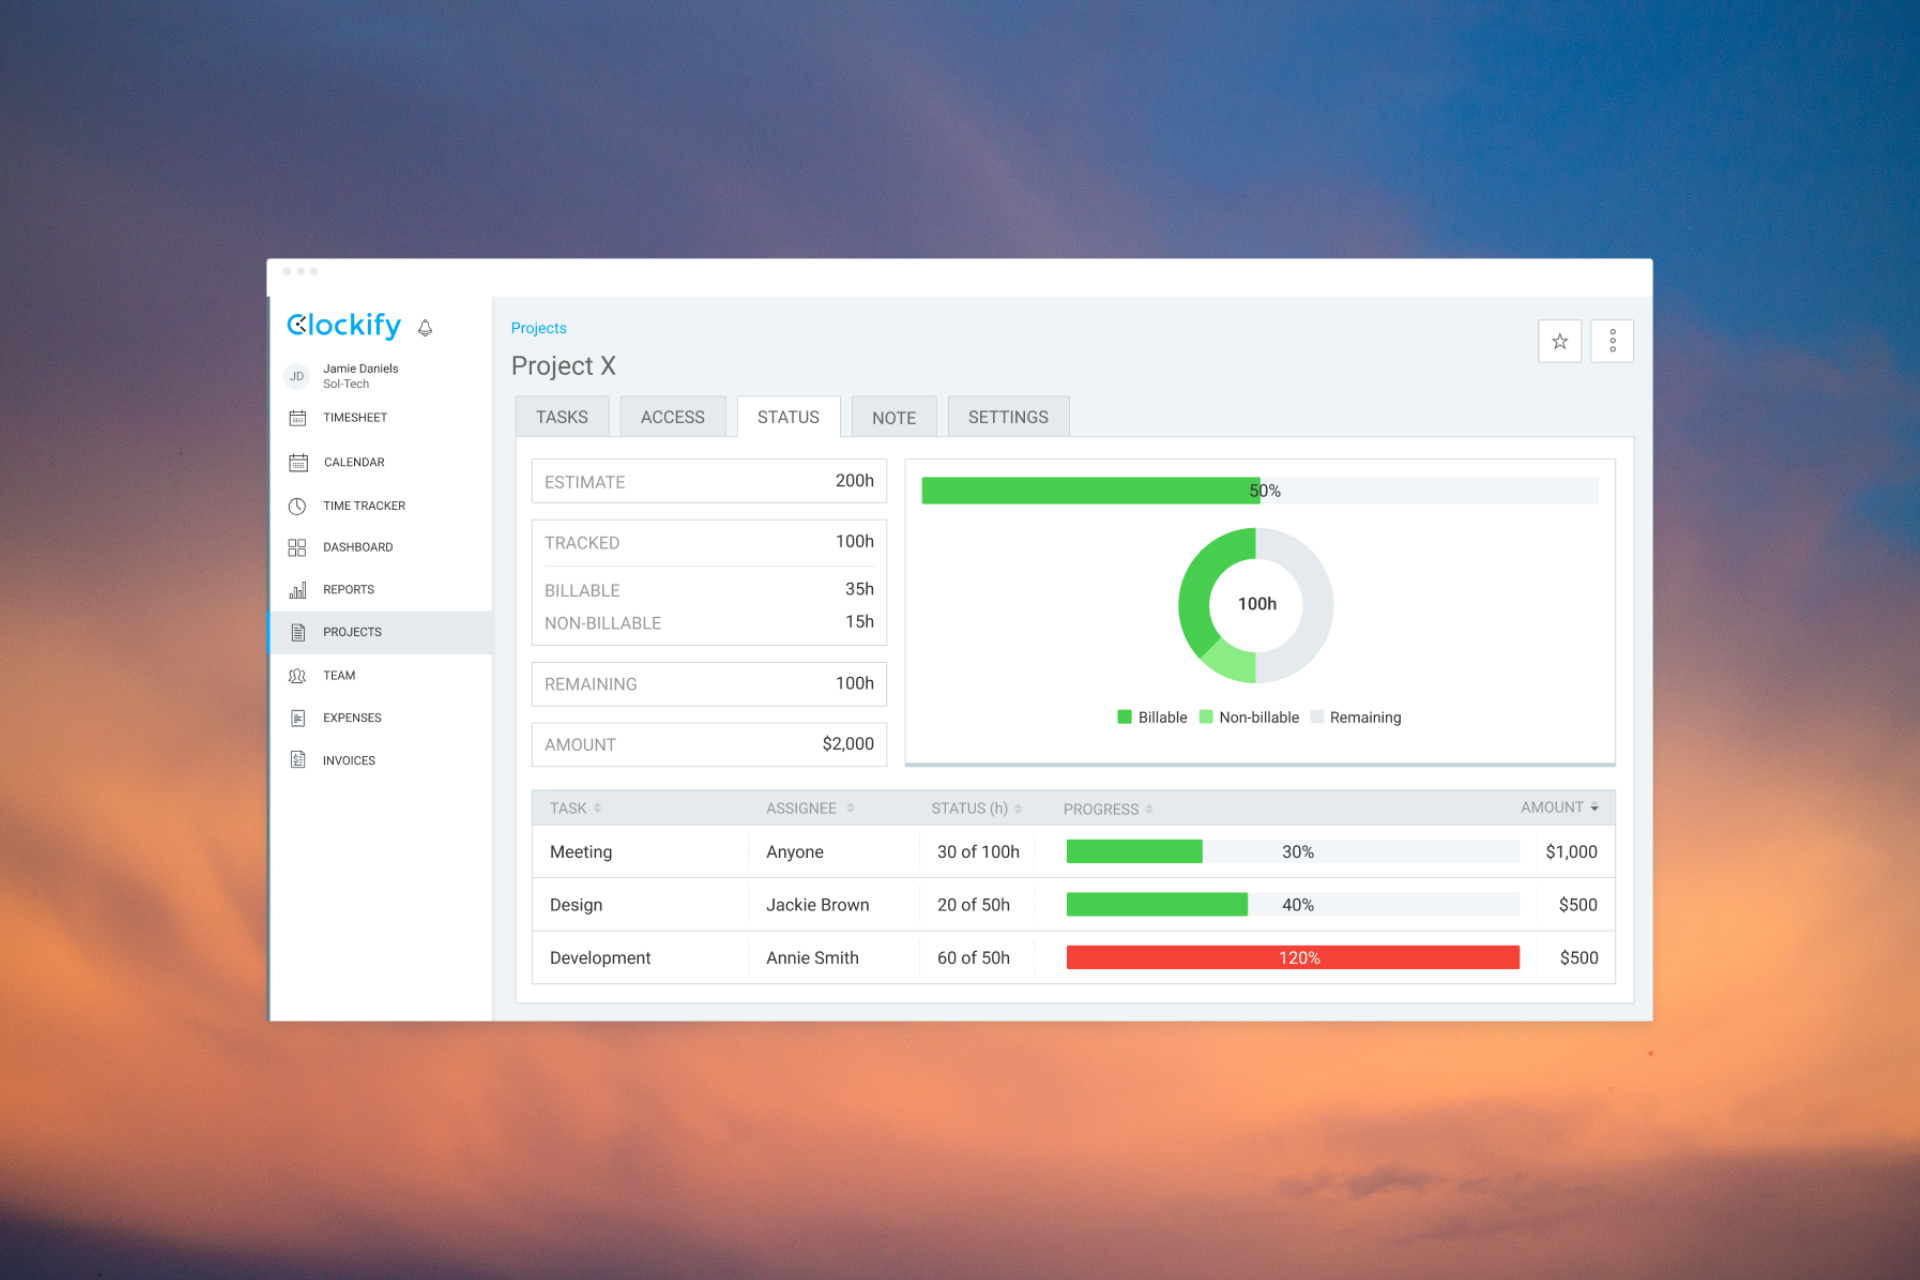
Clockify is a free time tracker and timesheet app that helps you track the actual work hours across your projects.

Not only that, but with this tool, you can get detailed reports on your workforce activity.

And based on those reports, you may issue invoices and track your expenses so you will always be able to keep a close eye on all your projects.

Also, scheduling tasks with your team and keeping up with your client’s requirements will be right on your dashboard.

In a few words, Clockify helps you manage all the projects, scheduling, time tracking, and even GPS tracking of your workforce effectively.

Let’s see what are Clockify’s best features below and find out more about how it works.

What are Clockify’s best features?

1. Free time-tracker

Time-tracking is the core feature of Clockify and it’s free, no matter how many team members you have.

The main tool of the time tracker is the timer button. You simply need to select a project, enter a small description and push the Start button.

This is how you can keep track of your hourly progress and your activity, and the tasks will be chronologically ordered automatically.

On the project manager’s side, he will be able to see in real-time which member is working on which project and what is actively doing.

The location of your workforce based on GPS

One of the most exciting features of Clockify is that you may even track your field workers based on their GPS location.

And the time tracking works on any device whether it’s a desktop PC or Mac or a mobile device, whether you’re working on a browser or on a certain app.

2. Detailed reporting

Reporting is an essential part of the whole project management operation and Clockify does that with great results.

And there are so many filters to choose from. You can practically get any data about the overall progress up to individual members of your team.

For instance, in the Summary window, you will see the number of hours worked based on time tracking and the revenues based on client invoicing.

However, you may also go deeper and discover what is the situation on a certain project and see the involvement of each team member.

And of course, all the reports can be downloaded and made into presentations for a detailed project assessment.

3. Great team management features

Even if the time-tracking function is the core of this app, Clockify is a great software to actually manage your whole team.

If you click on the Team tab from the left of Clockify, you will access the list of your users and the groups you can assign for the projects.

You can add new members, set their hourly rates, assign them to projects, and a lot more.

A great component of team management is scheduling the work for the projects and Clockify does that admirably.

You have the breakdown on all the projects individually, color-coded, you can assign individual users to projects, and set up the working hours based on a clear timeline.

This way, as a manager, you get all the information you need quickly without hassle.

4. Invoices and expenses management

We don’t need to tell you how important it is to keep track of your budget expenses. Expenses is a Pro version feature where you get the whole balance automatically.

Of course, you can add them manually, but the wages for the team members are included automatically based on all the factors you’ve set up.

Again, you may see the expenses report on a daily basis or broken down on projects, however, is more convenient.

And when it comes to collecting the fruits of your labors, you don’t need to head over to accounting.

In Clockify, you can issue invoices directly in a ready-made form together with your logo, and the list of services or products.

You don’t even need to think too much because you can import the time and expenses directly from the app.

Then, you may download the invoice in a secure PDF file and send it to your client in seconds.

Other meaningful advantages of using Clockify

Clockify is very simple to use but at the same time, it is extremely complex in terms of what you can do with it.

Let’s look at some of the other perks of Clockify:

➡ Works on any device

Clockify is a cloud-based app so you, as a manager or any other member of your team can access the app on any browser wherever they are.

It comes with a mobile app but you may also set up kiosks for the users to clock in even if they don’t have it on their machine.

➡ Manage leaves & holidays

Any team member can request leaves, and days off, and based on approval, everything will be clocked automatically.

You even have the option of adding official holidays and everything will show up live in the Calendar feature.

➡ Powerful integrations

Clockify alone is a great time-tracking and management tool, but when you combine it with Quickbooks, Trello, Plaky, and over 80 other integrations, you’ve got yourself a really powerful business management suite.

You may even integrate other productivity tools like Microsoft Teams, Gmail, Outlooks, or Google Docs and Sheets.

How can I get Clockify and how much does it cost?

You can simply go to the Clockify website and hit the big Start Tracking Time button. You will be able to download the Windows, Mac, or Linux tracking app or the extensions for Chrome, Firefox, and Edge.

The mobile app is also available for Android or iOS users but the management app is also available for access on any browser with a dedicated Gmail account.

As for payment, as we mentioned before, the time tracking feature is completely free.

However, if you want to benefit from the advanced features that we outlined above, you will have to go for one of the 4 available plans: BASIC, STANDARD, PRO, and ENTERPRISE.

The full seat means a manager or administrator account and the limited seats are for regular users and your workforce.

You can still buy a license and test it for 30 days. If it doesn’t fit your needs, there is a money-back guarantee policy.

⇒ Get Clockify

Pros
Simple and comprehensive interface
Free time-tracking
Can be used on any platform, device or browser
Expenses tracking and invoicing
Extensive library of guides
Cons
If you have a big organization, it may take some time to set it up

Final notes

Time tracking and team management are crucial, especially if you have employees scattered all over the world or on the field.

However, Clockify seems to have answers for every single aspect of the operation, from the simple clocking and invoicing of your clients.

The interface is extremely neat and well-structured so you can easily find the needed information straight away.

We hope that the information provided in our review is useful and you will give Clockify a try.

But while we’re on this subject, you may also want to see our list of the best Windows 11 productivity apps. Most of them also work on Windows 10 if you didn’t upgrade to the latest OS yet.

If you’ve already tried Clockify, tell us all about your experience in the comments section below.

Google Chrome Causing Blue Screen/BSOD: Can It Be & How to Fix

Many users reported that Chrome causes BSoD while browsing the internet or watching YouTube videos.

Now, Chrome hardly causes this matter on its own. The browser is probably only a trigger. Regardless, we have many steps for you to try and, hopefully, address the BSoDs for good.

How do I fix the blue screen on Google Chrome?

1. Disable Hardware Acceleration

    If you’re getting YouTube BSoD in Chrome, it’s possible that this setting is causing it, so be sure to disable it.

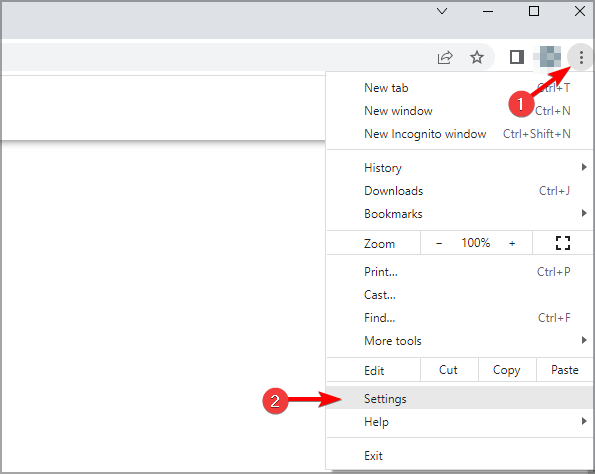
    1. Open Chrome.
  1. 2. Click on the 3-dot menu and open Settings.

    settings-chrome
  2. 3. In the left pane, navigate to System.

    system-chrome-browser
  3. 4. Toggle off the Use hardware acceleration when available setting.

    chrome-causing-bsod-windows-10
  4. 5. Restart your browser.

2. Try a BSoD troubleshooter

A dedicated blue screen fixer will look into all possible bugs that might have led to this issue, so it might be your best shot to get rid of it and prevent such events in the future.

3. Run SFC and DISM

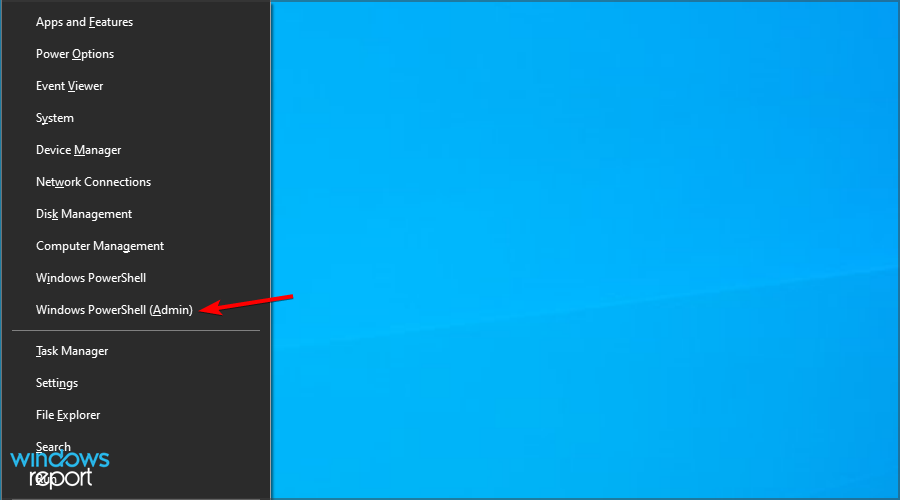
  1. Press Windows key + X and select Windows PowerShell (Admin).
    windows powershell
  2. In the command line, run the following command: sfc/scannow
    sannow command windows
  3. After its done, type the following command and press Enter after each: DISM /online /Cleanup-Image / ScanHealth
    scan health dsim command
    DISM /Online /Cleanup-Image /RestoreHealth
  4. When the procedure ends, restart your PC.

This issue probably goes beyond Chrome. We’re possibly looking at the Windows system corruption of some kind. And the best way to resolve it is with SFC and DISM combined.

Those two are the built-in system utilities run through the elevated command prompt. Once you run them, they’ll scan for system errors and fix them by replacing corrupted or incomplete files.

If you’re getting a blue screen when opening the browser, your system files may be damaged, so be sure to repair them using these methods.

After repairing the files, the Chrome BSoD should be gone.

4. Disable Fast Boot and start the PC in a clean boot regime

  1. In the Windows Search bar, type Power and open Power & sleep settings.
  2. Click on the Additional power settings.additionall power settings
  3. Click on the Choose what the power buttons do from the left pane.
  4. Choose Change settings that are currently unavailable.change settings that are currently unavaialble
  5. Disable Fast Startup and confirm changes.disable fast startup
  6. Now, in the Windows Search bar, type msconfig and open System Configuration.
  7. Under the Services tab, check the Hide all Microsoft services box.
  8. Click Disable all to disable all active third-party services.
    hide all
  9. Select the Startup tab at the top and click Open Task Manager.
    open task
  10. Right-click all the startup programs and select Disable.
    disable startup programs
  11. Finally, go back to the System Configuration window, click Apply, followed by OK.
    apply
  12. Restart your PC.

A clean boot should eliminate the possible negative impact of third-party applications on your system stability and help you if you’re getting a BSOD when browsing the internet.

5. Boot into Safe mode

  1. When the Windows logo appears during the startup, press and holds the Power button until the PC shuts down.
  2. Power on the PC and repeat the procedure three times. The fourth time you start the PC, the Advanced recovery menu should appear.
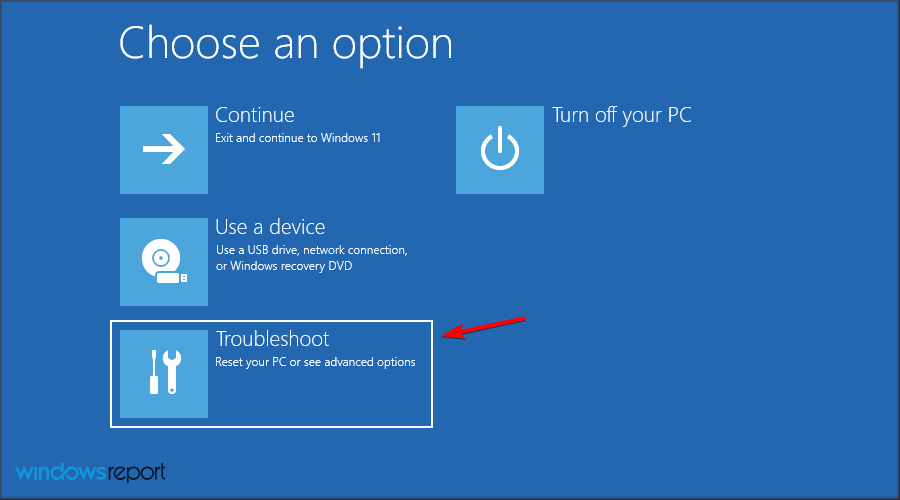
  3. Choose Troubleshoot.
    troublehoot
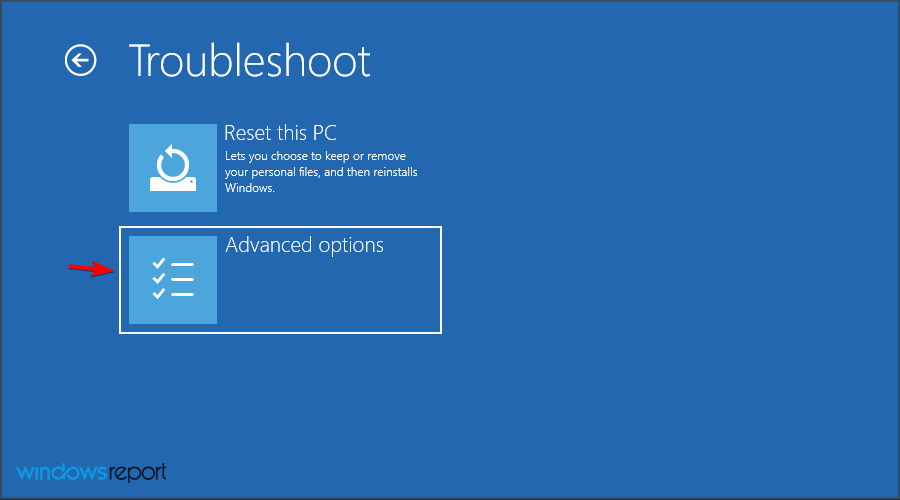
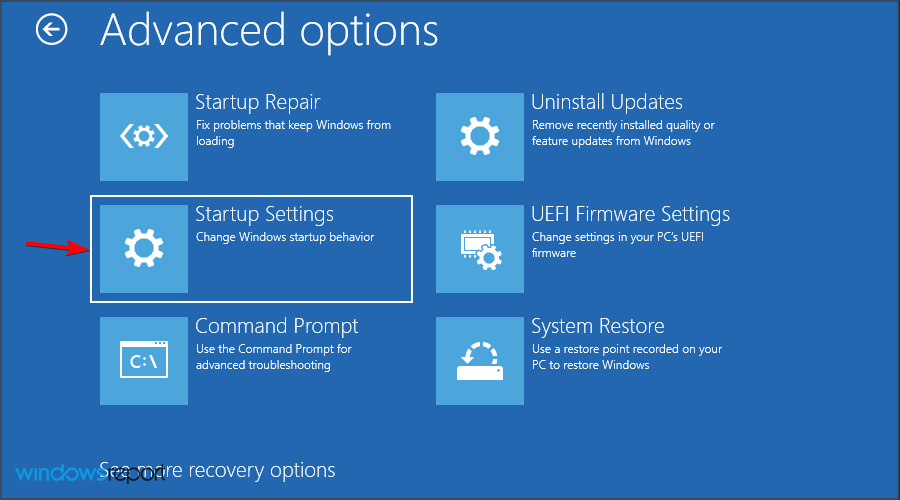
  4. Select Advanced Options and then Startup settings.
    select advanced options
  5. Click Restart.
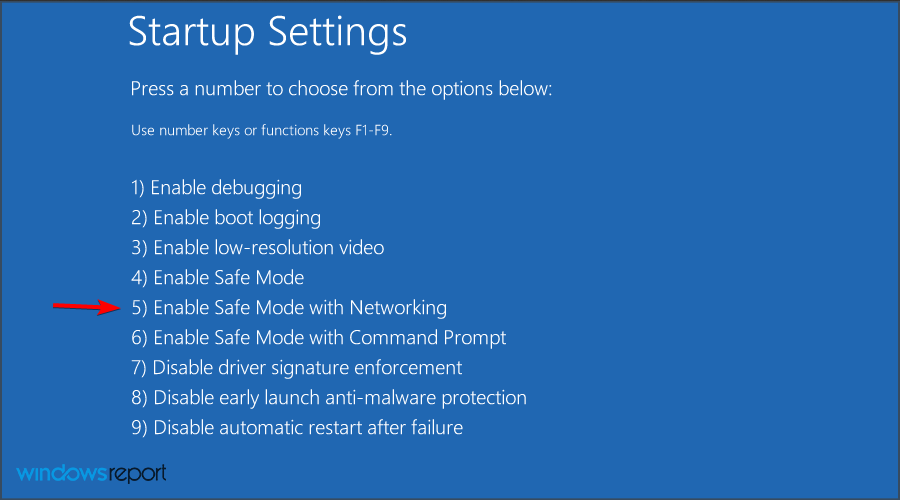
  6. Choose Safe mode with Networking from the list.
    safe mode with networking
  7. Run Chrome and look for improvements.

If the Chrome BSoD disappears, we strongly suggest following instructions from the next step on this list. If it’s still present, move to the next step.

6. Update Windows and BIOS

Now we’re reaching the most probable reason for the BSOD. And those are drivers. The simplest way to address this is to allow Windows Update to install all missing drivers.

In addition, we’ll need you to check on the BIOS/UEFI version you’re running and apply updates if necessary. You can find everything you need to know about it in our BIOS flashing guide.

We suggest using a dedicated driver updater in Outbyte Driver Updater. This will make the process fast, and the update will be done automatically.

7. Run Driver Verifier and reinstall failing drivers

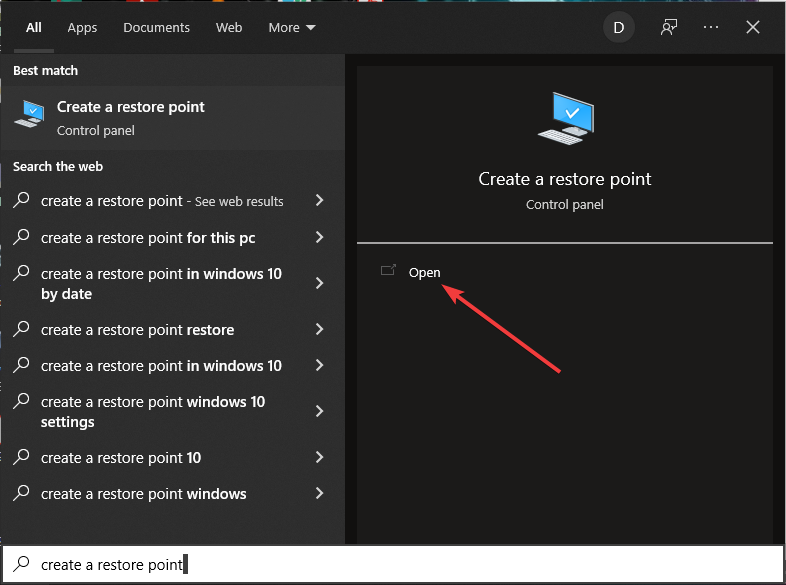
  1. Make sure to create a Restore Point.
  2. Right-click on the Start and open Windows PowerShell(Admin) from the Power User menu.
    windows powershell
  3. In the command line, type verifier and press Enter.
    verifier command powershell
  4. The windows will pop up.
  5. Choose to Create custom settings (for code developers) and click Next.create custom settings
  6. Select I/O verification, Force pending I/O requests, and IRP logging from the list and click Next.
    verification force pending IRP loging
  7. On the next screen, click Select driver names from a list.
  8. Check all non-Microsoft drivers and click Finish.
  9. Reboot your PC and let the Driver Verifier work in the background for no more than 48 hours. 24 hours should do. You might experience slight performance drops as the tool will be a burden on drivers for testing purposes.
  10. After 24 hours or so, open Driver Verifier again and choose to Delete existing settings, and click Finish. Restart your PC.

Driver Verifier, the built-in tool which detects illegal actions made by corrupt drivers. That way, you’ll find out what exact driver is causing BSOD, and you can install a proper iteration timely.

8. Reinstall Windows

Finally, if none of the previous steps worked for you, we suggest reinstalling Windows 10 cleanly. Of course, this time, we recommend relying on OEM-provided drivers instead of their generic versions provided by Windows Update.

If you’re unsure how to install Windows 10, we’ve got a complete guide on how to reinstall Windows 10.

Can Chrome cause a blue screen error?

Some Google Chrome settings like Hardware acceleration and other issues with the browser can lead to a blue screen on your PC.

There are multiple causes for BSoD, including damaged files, system corruption, driver issues, etc. In the worst-case scenario, the BSoD can be caused by failing hardware, mainly your RAM.

Sometimes specific applications can cause these issues, and today we’re going to look into the Memory management BSoD error in Google Chrome.

Can a website cause a blue screen?

Technically, no, a website can’t cause a BSoD error to appear. These errors are caused by driver issues, missing system files, or hardware problems.

A random website or URL may try to use your hardware, which will cause the BSoD issue, but that can happen with any other tasks or applications on your PC.

In this article, we’re focused on Chrome BSoD and the reasons behind it.

With that said, we can wrap it up. These are just a few solutions you can try if you’re getting Chrome BSoD on your PC.

This isn’t the only problem that users encounter, and if you have Chrome freezing on your PC, you should check our dedicated guide to see how to fix it.

What solution did you use to fix this problem? Let us know in the comments section below.

d3dcompiler_43.dll: How to Fix it if it’s Not Found

Let us share all you must know about the missing d3dcompiler_43.dll error.

The d3dcompiler_43.dll is a Dynamic Link Libraries file utilized by DirectX. This is an important file for games and graphics applications.

Missing DLL errors occur when the OS can’t find a required DLL file for a program or if the DLL is corrupted somehow.

If a d3dcompiler_43.dll file is missing, you might get an error message stating that d3dcompiler_43.dll is missing from your computer.

However, there are various potential fixes for the d3dcompiler_43.dll missing error; we present some resolutions that can resolve the issue.

What is a d3dcompiler?

DirectX uses the (DLL) Dynamic Link Libraries file d3dcompiler43.dll. It is a necessary file that is required for gaming and graphics programs.

This dll and other DirectX problems might impact any Microsoft OS released after Windows 98. Windows 11, 10, 8, etc., are included in this.

The following are a few frequent occurrences where people have seen this error:

  • D3dcompiler_43.dll missing GRID 2 –
  • D3dcompiler_43.dll missing max Payne 3 – In this case, you should first ensure the computer works well and has robust internet access.
  • A d3dcompiler_43.dll missing Far Cry Primal – You may try reinstalling the game program to repair this problem.
  • D3dcompiler_43.dll missing Far Cry 4 – Downloading the d3dcompiler 43.dll file will also solve the missing DLL problem.
  • D3dcompiler_47.dll missing Photoshop – You should copy the DLL file into the photoshop folder to redress this problem.
  • A d3dcompiler_43.dll download 64-bit – Once a gain, in this case, you will have to download the compiler file.
  • D3dcompiler_43.dll download GTA 5 – You may first try updating your DirectX, as this has been a helpful fix for many users.
  • D3dcompiler_43.dll not found plutonium – Once again, ensure DirectX is updated, and try downloading the missing DLL file.
  • A d3dcompiler_43.dll not found windows 10 ;

Why is d3dcompiler_43 dll missing?

The missing d3dcompiler_43.dll error will most likely occur when you run games or graphic software on various Windows platforms.

Sometimes this could be because of internet connection issues; other times, it could be triggered by an outdated DirectX.

Software packages that return a missing d3dcompiler_43.dll error message aren’t going to run for you.

How do I fix d3dcompiler_43.dll errors on Windows 11

1. Run a System File Checker scan

  1. Press the Window key + X hotkey, and select Windows Terminal (Admin); in some OS versions, this may be Command Prompt (Admin).
    d3dcompiler_43.dll missing
  2. Before you initiate an SFC scan, input the following line in the Terminal and press Enter.
    DISM.exe /Online /Cleanup-image /Restorehealth
  3. Then input the script below and hit Enter.
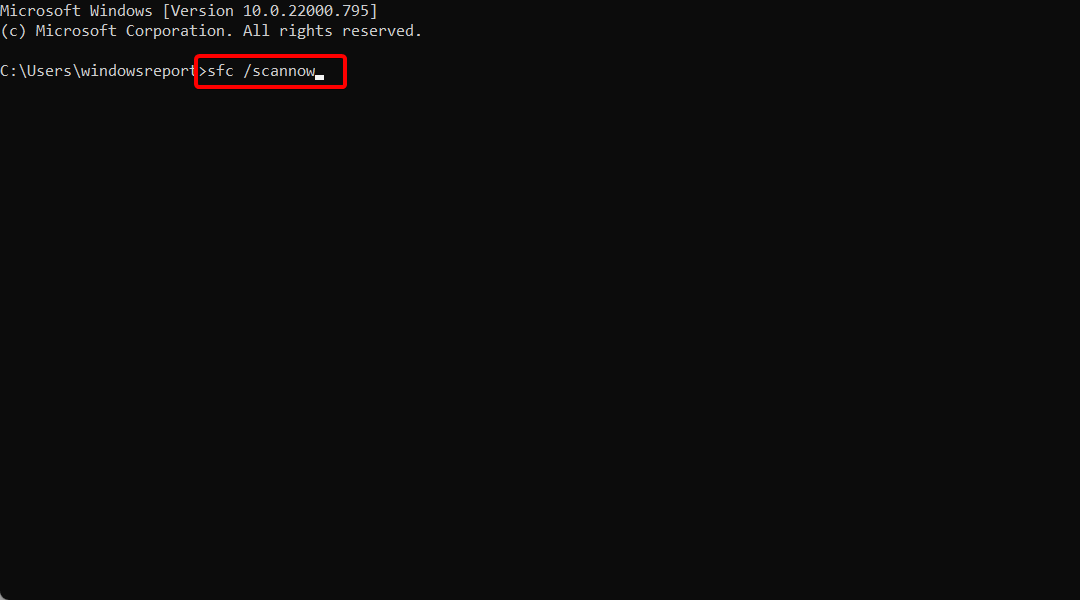
    sfc /scannow
    cmd sfc scan d3dcompiler_43 dll missing

The System File Checker, or SFC, is Windows’ built-in tool for repairing corrupted or missing system files. An SFC scan can fix various DLL errors.

When the SFC has completed the scanning, the Command Prompt will tell you if Windows Resource Protection repaired files. If the WRP does fix something, restart your desktop or laptop.

2. Fix missing DLLs with specialized software

DLLs are sensitive data libraries that the user shouldn’t handle unless they truly know what they are doing, and even then, they are recommended to create backups.

That is why the safest alternative so far is to use third-party tools that can fix and repair your registries for you, and the best one on the market at the moment is a professional tool that automates the entire process.

DLL repair tool software can be used to correct Dynamic Link Library issues. In addition, with their registry cleaners and scanning tools, general-purpose system maintenance software could repair DLL issues.

Some of these programs have additional utilities that allow you to erase cache and browser history and build a backup before you begin the repair process.

3. Update Microsoft DirectX

  1. First, press the Download button on this website page.
    d3dcompiler_43.dll missing
  2. That will open a page with some optional software downloads.
  3. You can uncheck those checkboxes if you don’t need the extra software.
    download page d3dcompiler_43 dll missing
  4. Open the DirectX installer’s window.
  5. Click the I accept the agreement radio button and press the Next button.
    d3dcompiler_43.dll missing
  6. Uncheck the Install the Bing Bar check box if you don’t need that browser toolbar, and press the Next button to update DirectX components.

As the d3dcompiler_43.dll is a part of Microsoft DirectX, updating DirectX is a potential fix for the d3dcompiler_43.dll missing error.

The DirectX End-User Runtime Web Installer can update outdated DirectX versions and restore missing DX files if required.

Once you update DirectX, check if the problem is still there.

4. Reinstall a Program

  1. Press the Windows key + R keyboard shortcut to open Run.
  2. Enter appwiz.cpl in Run, and press the OK button.
  3. Select the software to uninstall.
  4. Some software might have a Repair option; if so, click Repair first to fix the program installation.
  5. If there isn’t a Repair option, press the Uninstall button.
    d3dcompiler_43.dll missing
  6. Press the Yes button on the dialog box to provide further confirmation.
    uninstall confirm d3dcompiler_43 dll
  7. Restart Windows to ensure the software is completely removed.
  8. Install the software again with its setup wizard.
  9. Make sure that you install the most updated software version.

If one specific program or game returns, the d3dcompiler_43.dll is missing an error message; reinstalling that software might resolve the issue.

This will replace the program’s files, including the DLLs and registry entries. Unfortunately, you’ll also lose saved game files when reinstalling games, so consider backing up games before uninstalling the software.

Removing applications by using the previous method might not be effective since you can leave specific files and registry entries behind.

These files can cause future problems, and you need to remove the selected application to fix them.

Therefore, we recommend you use uninstaller software to delete any program from your computer thoroughly. A healthy PC needs no superfluous program files, such as clutter and software residue.

As an outcome, you know that the program has been entirely removed, reducing the risks of future issues.

5. Roll back Windows to a Restore point

  1. Enter restrui in Run’s text box and click OK.
  2. Click Next to open the list of system restore points.
    d3dcompiler_43.dll missing
  3. Select a restore point that will roll the OS back to a date when there was no missing d3dcompiler_43.dll error on your Windows platform, then click Next.
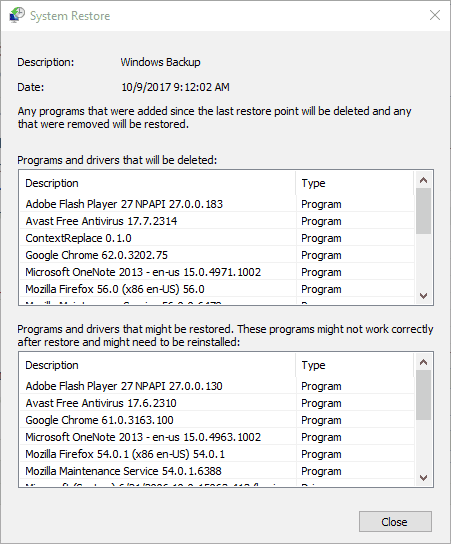
  4. You can also press the Scan for affected programs button to see your installed software after a selected restore point. Software, updates, and drivers added after the selected restore point will get deleted.
    system restore result d3dcompiler_43 dll missing
  5. Click Next and Finish to confirm the selected restore point and roll back Windows.

With the System Restore tool, you can roll back Windows to an earlier date.

System Restore can also restore or repair a deleted or corrupted d3dcompiler_43.dll file so long as you roll Windows back to a date when none of your software returned any missing d3dcompiler_43.dll errors.

However, System Restore probably won’t fix the issue if you select a recent restore point.

6. Recover the missing D3dcompiler_43.dll file

If the d3dcompiler_43 DLL has been deleted, you could feasibly recover that file by checking if it’s in the Recycle Bin.

  1. Open the Recycle Bin.
  2. Enter D3DCompiler_43.dll in its search box, then hit Enter. d3dcompiler_43.dll missing
  3. Then right-click the d3dcompiler_43.dll and select the Restore option.

If you can’t recover a deleted d3dcompiler_43.dll in the Recycle Bin, you might have more luck with third-party file recovery software.

Many file recovery utilities could feasibly recover a deleted DLL for you, such as Recuva, EaseUS Data Recovery, Pandora File Recovery, and MiniTool Partition Recovery.

This software guide tells you about Windows’s best file recovery tools.

7. Download a new D3dcompiler_43.dll file from DLL-files.com

  1. Open this page on DLL-files.com.
  2. Click Download beside the 64 or 32-bit d3dcompiler_43.dll file version.
  3. The file saves as a ZIP that you can extract by opening the ZIP in File Explorer and pressing the Extract all option. Then, select a path for the extracted file, and press the Extract button.
    d3dcompiler_43.dll missing
  4. Then you’ll need to move the d3dcompiler_43.dll to the folder path C: > Windows > System32.
  5. Restart the PC.
  6. Press the Window key + X hotkey, and select Windows Terminal (Admin); in some OS versions, this may be Command Prompt (Admin).
    d3dcompiler_43.dll missing
  7. Enter the code below and click Enter.
    regsvr32 d3dcompiler_43.dll

There are many websites from which you can download a new d3dcompiler_43 DLL file to replace a missing one.

Not all of those sites might be reputable sources, but DLL-files.com is one of the better websites to obtain a replacement DLL from when required.

These are several resolutions that might fix the missing d3dcompiler_43.dll error in most Windows platforms.

It would help if you used whichever seems most relevant to your situation since we have not written the solutions in any particular order.

In addition, malware and registry scans and updating your video card driver might also resolve this issue. Finally, check out this article to fix other missing DLL errors after the Windows 10 Creators Update.

Fix VCOMP140.DLL Not Found or Missing Errors [5 Easy Tips]

If you use the Media Go app, or its successor Music Center for PC, on a Windows 10/11 computer, you may have already encountered the missing VCOMP140.dll error. This can appear when you try to add or delete content from the multimedia folders.

The complete error message reads: The code execution cannot proceed because VCOMP140.dll was not found. Reinstalling the program may fix the problem.

The good news is that you can quickly fix this issue by installing Microsoft’s Visual C++ Redistributable for Visual Studio.

Missing VCOMP140.dll can prevent you from running your favorite applications, Speaking of which, a user reported the following problem:

My computer has a Windows 10 64-bit operating system. When I went to use Media Go to change some music files on my model NWZE385 Walkman, it initially let me delete some albums […] As soon as Media Go tried to reopen, an error message saying The program can’t start because vcomp140.dll is missing from your computer. Try reinstalling the program to fix the problem. […] I’ve no idea how to recover the file since I do not want to utilize one of those third-party file recovery services since I can probably buy a new Walkman for what those services cost.

So let’s find out all about the VCOMP140.dll file and the solutions if it is missing in Windows 11 & 10.

What is VCOMP140?

Microsoft is the creator of the DLL file known as COMP140.DLL. The Microsoft® C/C++ OpenMP Runtime is another name for this component.

The VCOMP140.dll file is an integral component of the Windows operating system. It is an important file that guarantees the correct operation of all Windows apps.

Fortunately, you can download VCOMP140.dll on your computer and fix the missing issue. Keep on reading to find out how!

There are many third-party tools available, and the majority of them live up to their claims of being able to repair or replace DLLs that have been damaged or lost.

Don’t forget that you may apply them in all these unfortunate scenarios:

  • The code execution cannot proceed because vcomp140.dll was not found – When getting this error, performing an SFC scan and reinstalling the program are both useful recommendations.
  • The program can’t start because vcomp140.dll is missing from your computer – As users claim, that’s another frequent error that bugs them. If that’s your case, downloading the Visual C++ Redistributable does wonders.
  • Vcomp140.dll download – People often ask themselves the same question: Where would I find the vcomp140.dll file? Keep in mind that this file is part of the Microsoft Visual C++ Redistributable Packages for Visual Studio. That’s why most errors involving VCOMP140.DLL can usually disappear when installing Visual C++ Redistributable.
  • Missing vcomp140.dll in Office, Outlook – According to users, this missing file can affect Microsoft Office applications, especially Outlook. If you’re having this problem, we advise you to try some of our solutions.
  • Missing VCOMP140 in PDF – This problem can also affect PDF files. According to users, they were unable to open their PDF files at all due to this problem.
  • Vcomp140.dll not found in AutoCAD – If the file is not found, you can easily download it from a safe website or install Redistributable, as we did in the first solution.

For more detailed, step-by-step solutions, check out our post on how to fix DLL files missing from your Windows 10/11 PC.

But now, let’s see what to do if VCOMP140.dll is missing and get back to using your PC error-free. Follow along! Also, these would work irrespective of whether VCOMP140.dll is missing on the 64-bit or 32-bit version of Windows.

How do I fix VCOMP140 dll missing?

1. Install Visual C++ Redistributable

  1. Press Windows + R, type appwiz.cpl in the text field, and click OK.appwiz.cpl
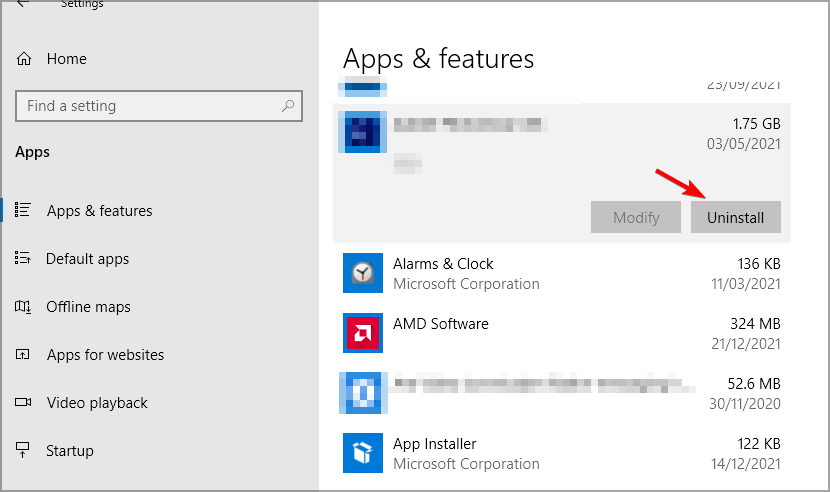
  2. Select Media Go or Music Center for PC, and click Uninstall.uninstall-w10 vcomp140.dll missing
  3. Go to the Microsoft website and download the Visual C++ Redistributable for Visual Studio.download-v vcomp140.dll missing
  4. Select both vc_redist.x64.exe and vc_redist.x86.exe files to download.
  5. Once the files are downloaded, restart your PC.
  6. Next, go to the Music Center’s website, and click on the download option.download-music vcomp140.dll missing
  7. If you receive a warning that the certificate is invalid or corrupt, right-click and select Run anyway, though that shouldn’t be the case for most.

Once the installation is complete, you will be able to run the application and not encounter the VCOMP140.dll is missing error anymore.

Note that Media Go is no longer supported; instead, you can use Music Center for PC, as it is essentially its successor.

While the solution focuses on Music Center, the idea remains the same for all apps. Just uninstall it, get the required redistributable packages, and then reinstall the program that threw the VCOMP140.dll is missing error in Windows.

This quick workaround should fix the problem and eliminate the annoying Missing vcomp140.dll error, so be sure to try it out.

2. Copy files from your PC or another computer

You can quickly fix the problem with missing VCOMP140.dll simply by copying the file from another PC. But, of course, if you don’t have another PC nearby, you can always search your PC for VCOMP140.dll.

Sometimes this file can be available in Windows.old directory. So you have to copy it to the application’s directory that is giving you this error, and you’re good to go.

After copying the missing file, the issue should be resolved. However, keep in mind that this isn’t the most reliable solution since you might not be able to find the problematic file on another PC.

Some users are also suggesting downloading the missing .dll files from the Internet. Many websites allow you to download .dll files, but some of them might not be trustworthy, so keep in mind that you’re using them at your own risk.

Generally, it’s always safer to transfer the missing files from another PC.

3. Look for the VCRedist directory

If you’re getting the VCOMP140.dll is missing error message while trying to run a particular game, the problem might be related to Visual C++ Redistributable.

Download the necessary Redistributable package from Microsoft’s website to fix this problem. Since many versions are available, finding the most suitable version is often the tricky part.

On the bright side, many games come with necessary redistributables, and you can install them manually.

To find the required files, open your game’s installation directory and navigate to the VCRedist directory. You should see two files available here. Install both and check if the issue is resolved.

4. Perform the SFC and DISM scans

4.1 SFC scan

  1. Press Windows, type cmd, and choose the Run as administrator option from the right panel.cmd-run-admin 0x80070002 windows update
  2. Click Yes in the UAC prompt.yes
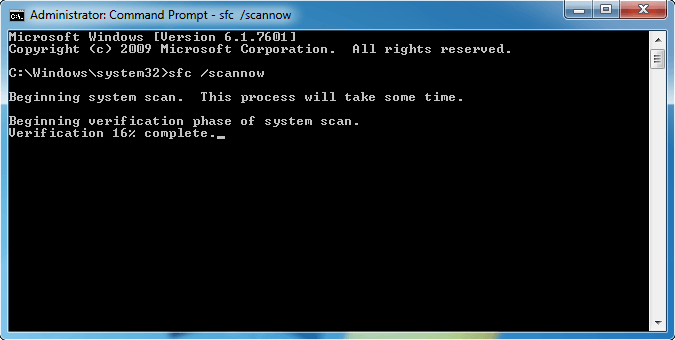
  3. When Command Prompt launches, paste the following command and press Enter to run it: sfc /scannowscannow 0x80070002 windows update
  4. The scanning process will now start. Keep in mind that the SFC scan can take up to 15 minutes.

If you see the VCOMP140.dll is missing error in Windows 10 or 11, it could be due to file corruption. To fix the problem, performing an SFC scan is advised.

Once the SFC scan is finished, check if the problem is resolved. You might have to perform a DISM scan if the issue persists.

4.2 DISM scan

  1. To perform a DISM scan, first, press Windows + S, enter cmd in the text field, and click on Run as administrator. cmd-run-admin 0x80070002 windows update
  2. Click Yes in the UAC prompt that pops up.
  3. Once the window opens, type/paste the following command and press Enter to run it: DISM /Online /Cleanup-Image /RestoreHealthdism
  4. DISM scans can take more than 20 minutes to complete. After the scan is finished, check if the problem is resolved.

If you could not run an SFC scan before, try running it after completing the DISM scan. Then, after you complete both scans, check if the error appears.

Find out the best ways to use DISM commands to seamlessly repair issues with the PC!

5. Install DirectX

When users attempt to launch a specific video game, they frequently see an error message stating that certain files are missing. If vcomp140.dll is missing from your computer, installing DirectX might be the solution to your problem.

Installing the necessary version of DirectX is all that is needed to rectify the situation, after which the problem should no longer exist. You may get the required files by going to Microsoft’s website and downloading them from there.

How can I fix the missing VCOMP140.DLL in Windows 11?

Users have reported that their antivirus software can occasionally cause problems with Visual C++ Redistributables and prevent them from installing the necessary files, in turn leading to VCOMP140.DLL missing in Windows 11.

You must turn off your antivirus software to determine whether or not this resolves the issue. If deactivating the antivirus software does not resolve the case, you will need to uninstall the app.

Downloading a specialist uninstaller software and utilizing it to delete all files linked with your antivirus software is the most effective approach to do this task.

After removing the antivirus software, you should next attempt to install the Visual C++ Redistributables.

There have been several reports of difficulties with AVG, but this issue can also occur with other antivirus programs. Therefore you must delete or disable it immediately. Afterward, choose a better antivirus that won’t interfere with Windows DLL files.

Where are DLL files located Windows 11?

The problem may almost always be fixed by thoroughly reinstalling the VCOMP140.DLL file on your personal computer under the Windows System folder. The path for it is:

C:\Windows\System32

Alternately, specific applications, most notably PC games, call for the DLL file to be stored within the folder designated for the game or application’s installation.

A missing VCOMP140.DLL file can prevent you from running your favorite applications. This isn’t a grave error, and you can fix it in most cases simply by transferring the missing files from another computer.

Also, find out what to do if you come across the Microsoft Visual C++ runtime library error in Windows 10/11.

Did these solutions help you solve the problem? Please leave us your answer in the comment section below.

2 Quick Ways to Disable Search Highlights on Windows 11

Microsoft producers released the new Search highlights feature for Windows 11. If you’re unsure what this is all about, remember that search highlights extend the operating system’s search functionality.

Note icon NOTE
Search highlights require you to run Windows 11 build 22572 and higher, Windows 10 build 19044.1618 (KB 5011543), and more. As of writing the article, the feature is still rolling out to insiders.

In this matter, you can highlight anything special about users’ moments, like impressive moments of the day or organization content.

So, all of these excite us because it lets users learn about significant events around them, on the Internet, in the world, and in your organization.

The feature includes notable moments such as holidays, anniversaries, and other educational moments. This happens both globally and in your region.

However, it can also become a distraction and clutters the useful Search interface. In this matter, some users seem to be interested in discovering how to disable Windows 11 Search Highlights.

How can I disable Windows 11 Search Highlights?

1. From Windows Settings

  1. 1. Press the Windows + I keyboard shortcut to open Windows Settings.

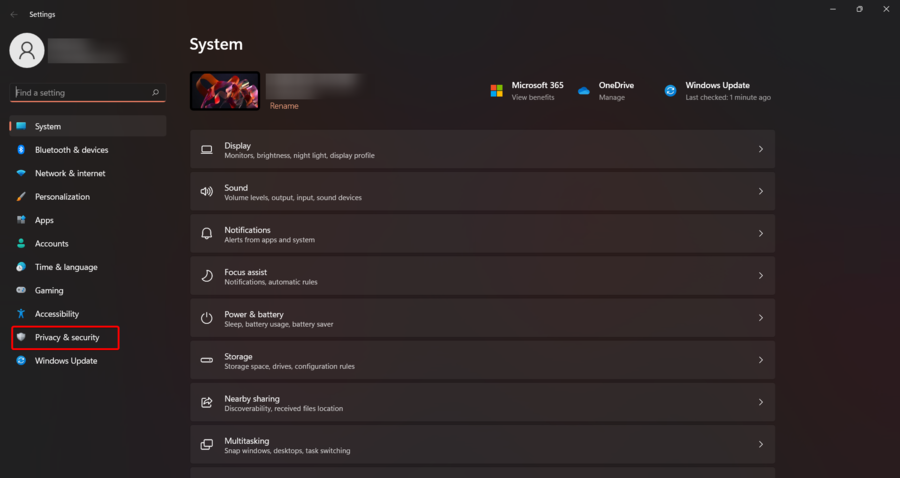
  2. 2. From the left window pane, click on Privacy & security.

    go to privacy and security
  3. 3. Scroll down until you reach the Search permissions section. Click on it.

  4. 4. Under More Settings, you can see a toggle next to Show search highlights. Toggle it off.

  5. 5. That’s it. Search Highlights are now turned off on your Windows 11 PC.

    If you ever need to turn them back on, simple return to the same window and toggle the feature on with a simple click.

  6. In Windows 11, Search Highlights is a feature that can be easily enabled or disabled via Windows Settings. All you need to do is navigate to the Show search highlights option and toggle it on or off, according to your preference.

2. Via Taskbar

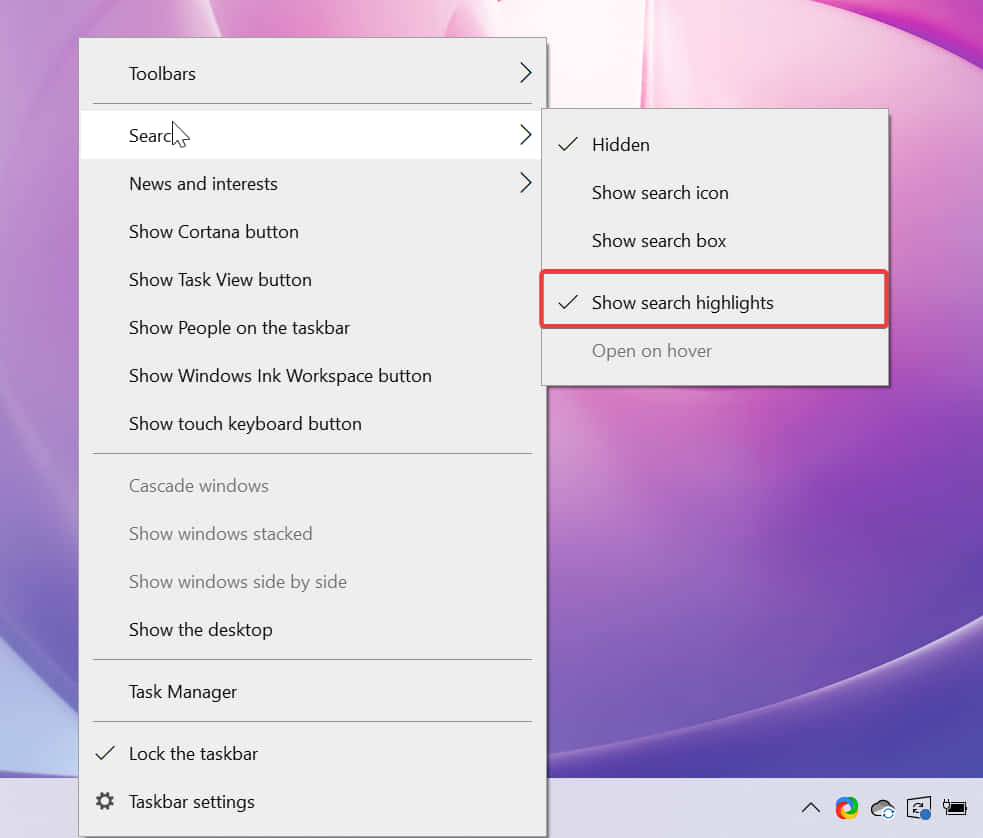
  1. Right-click on an empty space on your taskbar. A context menu will appear.
  2. Hover over the Search option. A drop-down menu will open.
  3. Click on the Show search highlights option to toggle it off.click to disable windows 11 search highlights on taskbar

An even faster method to disable Search Highlights on your Windows 11 PC involves using your taskbar’s settings. From it, you can toggle the feature on and off in just three moves.

How do I turn off Search Highlights on Windows 10?

On Windows 10, you can use the same methods we previously described. You can choose whichever you prefer.

The fastest and easiest way to do it on Windows 10 is, once more, via the Taskbar by right-clicking on an empty space on it, opening the Search options, and then toggling Search Highlights off.

So, this is the guide that you’ll definitely need to save somewhere, just in case you ever need to disable Windows 11 Search Highlights quickly.

In case you don’t want the Search interface to be bloated with unwanted trending searches and information, these are the easiest steps to turn it off. In the same way, for a seamless search experience, try disabling trending searches on Google.

Microsoft is ready to bring some new impressive features to the latest OS. In this matter, we strongly recommend checking how to activate Windows 11 File Explorer tabs.

Are you facing any other related questions? Feel free to use the comment section below.

5 Ways to Fix a Black Screen with Blinking Cursor

A black screen with a blinking cursor indicates that your PC has crashed or frozen and you can’t access your desktop. This problem is not limited to Windows but occurs in macOS and Linux too. You may also experience a black screen with no cursor, so be sure to check out our detailed guide on the same.

What does a black screen with a blinking cursor mean?

This is where a black screen with a blinking cursor appears on your screen as a result of your computer freezing. This issue can be caused by many different things, such as:

  • Bad drivers – The most common cause of a black screen and a blinking cursor is the display driver. The display driver is software that controls how text, images, and video are displayed on your monitor. When it malfunctions, the result is a frozen screen, so keep your drivers updated.
  • Overheating hardware – Overheating occurs when components in your computer are forced to work too hard for too long without stopping to cool down. Heat buildup can cause components to fail or reduce their performance significantly over time.
  • Hard drive failure – If your hard drive is failing, it may not boot at all, or it may give you a black screen that quickly blinks out. If this happens, you should have the hard drive replaced as soon as possible.
  • Outdated antivirus – If you have not updated your antivirus program in a while, you may end up with this issue. That’s why using an antivirus tool with offline update features is recommended.
  • Incompatible biometric devices – Biometric devices are the most common way to log in to modern-day computers. These devices include fingerprint readers, facial recognition cameras, and iris scanners. Sometimes, they may have compatibility issues.
  • Dead power supply – Sometimes, your computer can’t boot because it doesn’t have enough power to run its various components. If your computer’s motherboard has been damaged or corrupted, it will not boot up properly.
  • RAM failure – RAM failure can also cause this issue. If you have recently installed new RAM in your computer, it may be possible that the new RAM has failed to work properly with existing components inside your PC or laptop. 

How can I fix the black screen with a blinking cursor on Windows 11?

Before trying anything else, ensure that you perform the below checks:

  • Restart your computer and check whether the black screen with a white blinking line on startup disappears.
  • Make sure that all other cables inside or outside of your PC are also connected properly.
  • Unplug any external devices you are not using, and verify if the black screen with the blinking cursor in the top left corner goes away.
  • Clean out the dust from your computer that may be causing insufficient airflow.
  • Ensure that your Windows 11 is activated and up to date with the latest updates. If you have been trying to update your OS but the download is stuck, our guide will help you.

If none of these prerequisite measures didn’t fix your problem, check the solutions below.

1. Change the boot order

  1. Open the BIOS Settings by pressing the corresponding key shown on the screen. Usually, there can be any of the F10, F2, F12, F1, or DEL keys and it is different for each manufacturer/BIOS.
  2. Now, switch to the Boot tab. Then, under Boot Option Priorities, go to each boot option and press Enter.
  3. Change the boot order to the HDD or SSD you have the system installed on.

If you only get a black screen with a cursor, the system doesn’t boot up. And that may be caused by the fact that the device is trying to boot the system from another source and doesn’t find any bootable system.

If you followed our instructions from the beginning of this guide and removed all media and external devices, this shouldn’t happen. However, sometimes, Windows ignores the boot order, and this happens.

2. Try to start up in Safe Mode

  1. Restart your device by using the Power button three times until it goes into Recovery Mode.
  2. Now, select Troubleshoot and then, Advanced Options.
  3. Select Startup Settings, press 4 for Safe Mode, and hit Restart afterward.
  4. If the device boots in Safe Mode, update your drivers and scan your hard drive for errors.

If you can boot in Safe Mode and not in normal mode, usually, it’s some corrupted drivers preventing that.

However, this issue may also be caused by corrupted system files or problems on your storage drive. Repairing or replacing the corrupt system files should also work when you have a black screen with a blinking cursor in Windows 7.

3. Boot your PC from a bootable media

  1. If your PC still isn’t booting, you will need to create a bootable Windows 11 USB drive on another PC.
  2. Follow Solution 1 to enter BIOS and change the boot order to your USB drive.
  3. Connect the USB drive to your PC and try booting from it.
  4. When the installation window appears, click on Repair your PC.
  5. Next, select Troubleshoot, Advanced Options, and launch Command Prompt on the system.
  6. Type the following commands and press Enter after each one:
    • bootrec /scanos
      bootrec / fixmbr
      bootrec / fixboot
      bootrec / rebuildbcd

The commands will scan the system and fix the MBR and BCD, which might be responsible for this issue.

For all we know, the Master Boot Record might even be missing entirely, but this guide will help you fix the problem.

4. Update BIOS

BIOS is an essential system component that allows your computer hardware components to communicate with each other and perform their tasks properly without any interruption or failure. 

You can update BIOS using your motherboard manufacturer’s website or by using a bootable CD/DVD containing the latest version of the BIOS update file. When updating BIOS, you need to exercise caution as one wrong move could render your hardware unusable.

If you are unsure how to go about it, ask for assistance from an expert to minimize the risk of damaging your PC.

5. Change your hard drive

There is the possibility that if nothing else in this guide worked, your hard drive has failed. To know for sure, the only way is to take out the hard drive from your PC and connect it to a different machine.

However, if that voids any warranty policy, you should address the service support for your device.

You may also experience a blinking cursor when booting from a USB. This could mean that your USB flash drive is not formatted properly, your USB port is damaged, or a case of outdated firmware.

You can also try another USB or another computer, if possible, and test both devices on that computer. It could be an incompatibility issue between those two particular devices rather than an issue with your computer.

Should you run into a black screen when playing games, we have covered various ways to fix the issue. You may also come across a black screen on Remote Desktop, so be sure to check out our comprehensive article on how to go about it.

Let us know if you have managed to fix this issue in the comments section below.

8 Ways to Fix Desktop Shortcuts That Aren’t Working

After updating their system, several users have reported problems with shortcuts on Windows 10.

Both app shortcuts in Modern UI and in Desktop mode became unresponsive and failed to launch the necessary programs.

Why are my shortcuts not working on Windows 11?

If your Windows 10 & 11 shortcuts are not working, this can cause many issues, considering that you won’t be able to access the specific software easily, thus wasting valuable time.

Usually, the main issue why the shortcuts are not working is because the program launched by that shortcut changed location.

Even though Windows 10 offers troubleshooters to deal with these issues, for some systems, these tools were not able to find solutions, resulting in many unhappy customers.

Not being able to use your shortcuts can be a big problem, and in this article, we’re going to cover the following issues:

  • Desktop shortcuts not working on Windows 10
  • Desktop icons not working, won’t open, unresponsive
  • Shortcuts not responding on the desktop

These errors can be easily fixed, and in this guide, we’ll show you how to do it.

What can I do if desktop shortcuts are not working on Windows 11?

1. Remove your antivirus

It can happen that these problems with your shortcuts occur due to the antivirus software you are using. To fix the issue, we are suggesting using another antivirus solution as this may help fix things if the Windows 11 desktop is not loading.

You can benefit from powerful security services and low resource consumption with another antivirus. Plus, you have great protection while browsing, and malware threats are detected instantly.

Hence, after removing your antivirus you should certainly install one that will not interfere with your Windows, thus choose from the best antivirus software on Windows 10 today.

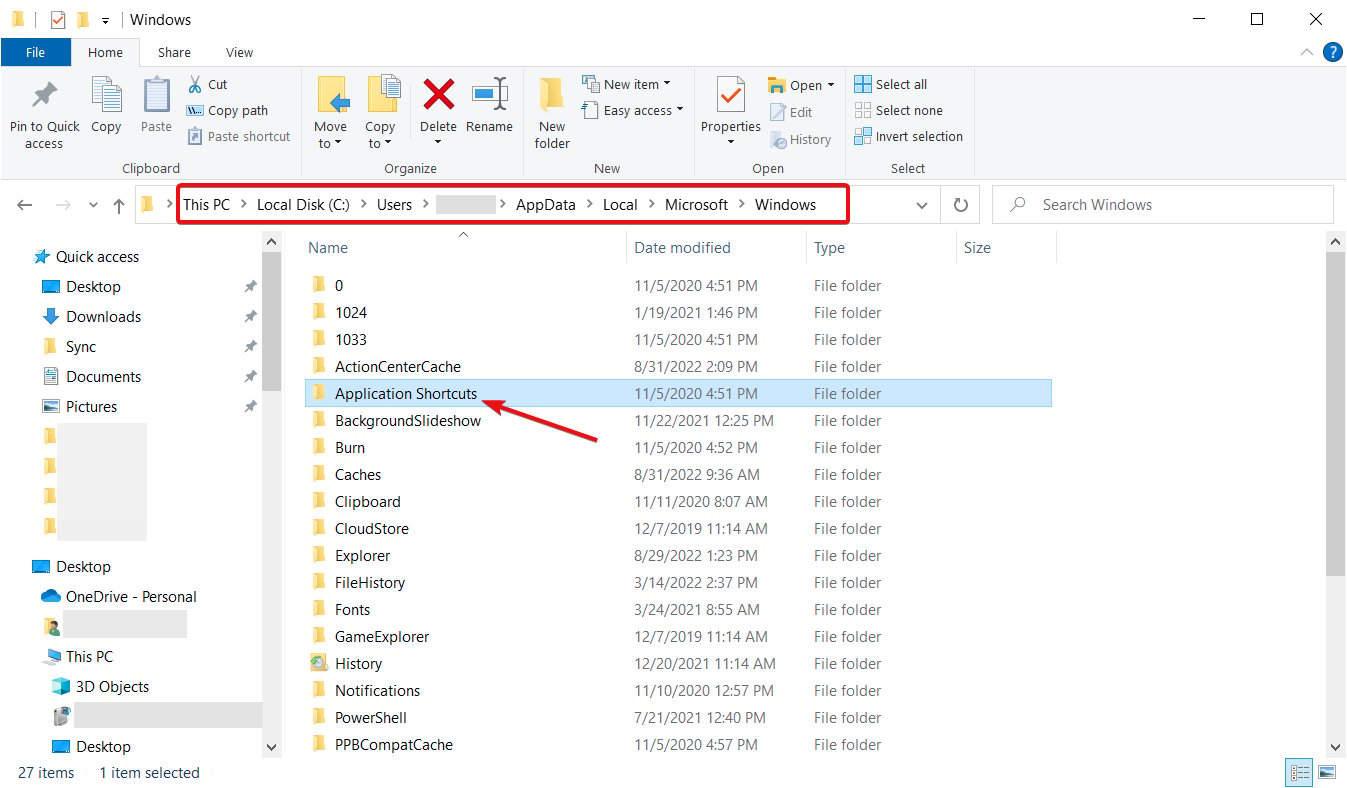
2. Check Application Shortcuts directory

  1. Press the Windows key + E to launch File Explorer.
  2. Navigate to the following path and locate the apps which are causing you issues: C:\Users\Your Account Name\AppData\Local\Microsoft\Windows\Application Shortcuts
  3. In this folder, you will find all the apps you’ve installed on your system, each in a separate folder.
  4. Locate the apps which no longer work and open their corresponding folder.
  5. In it, you will see a shortcut named App.
  6. Delete the shortcut and do so for all the apps that are not working.
  7. After you’ve finished, reboot your system and all should be fine.

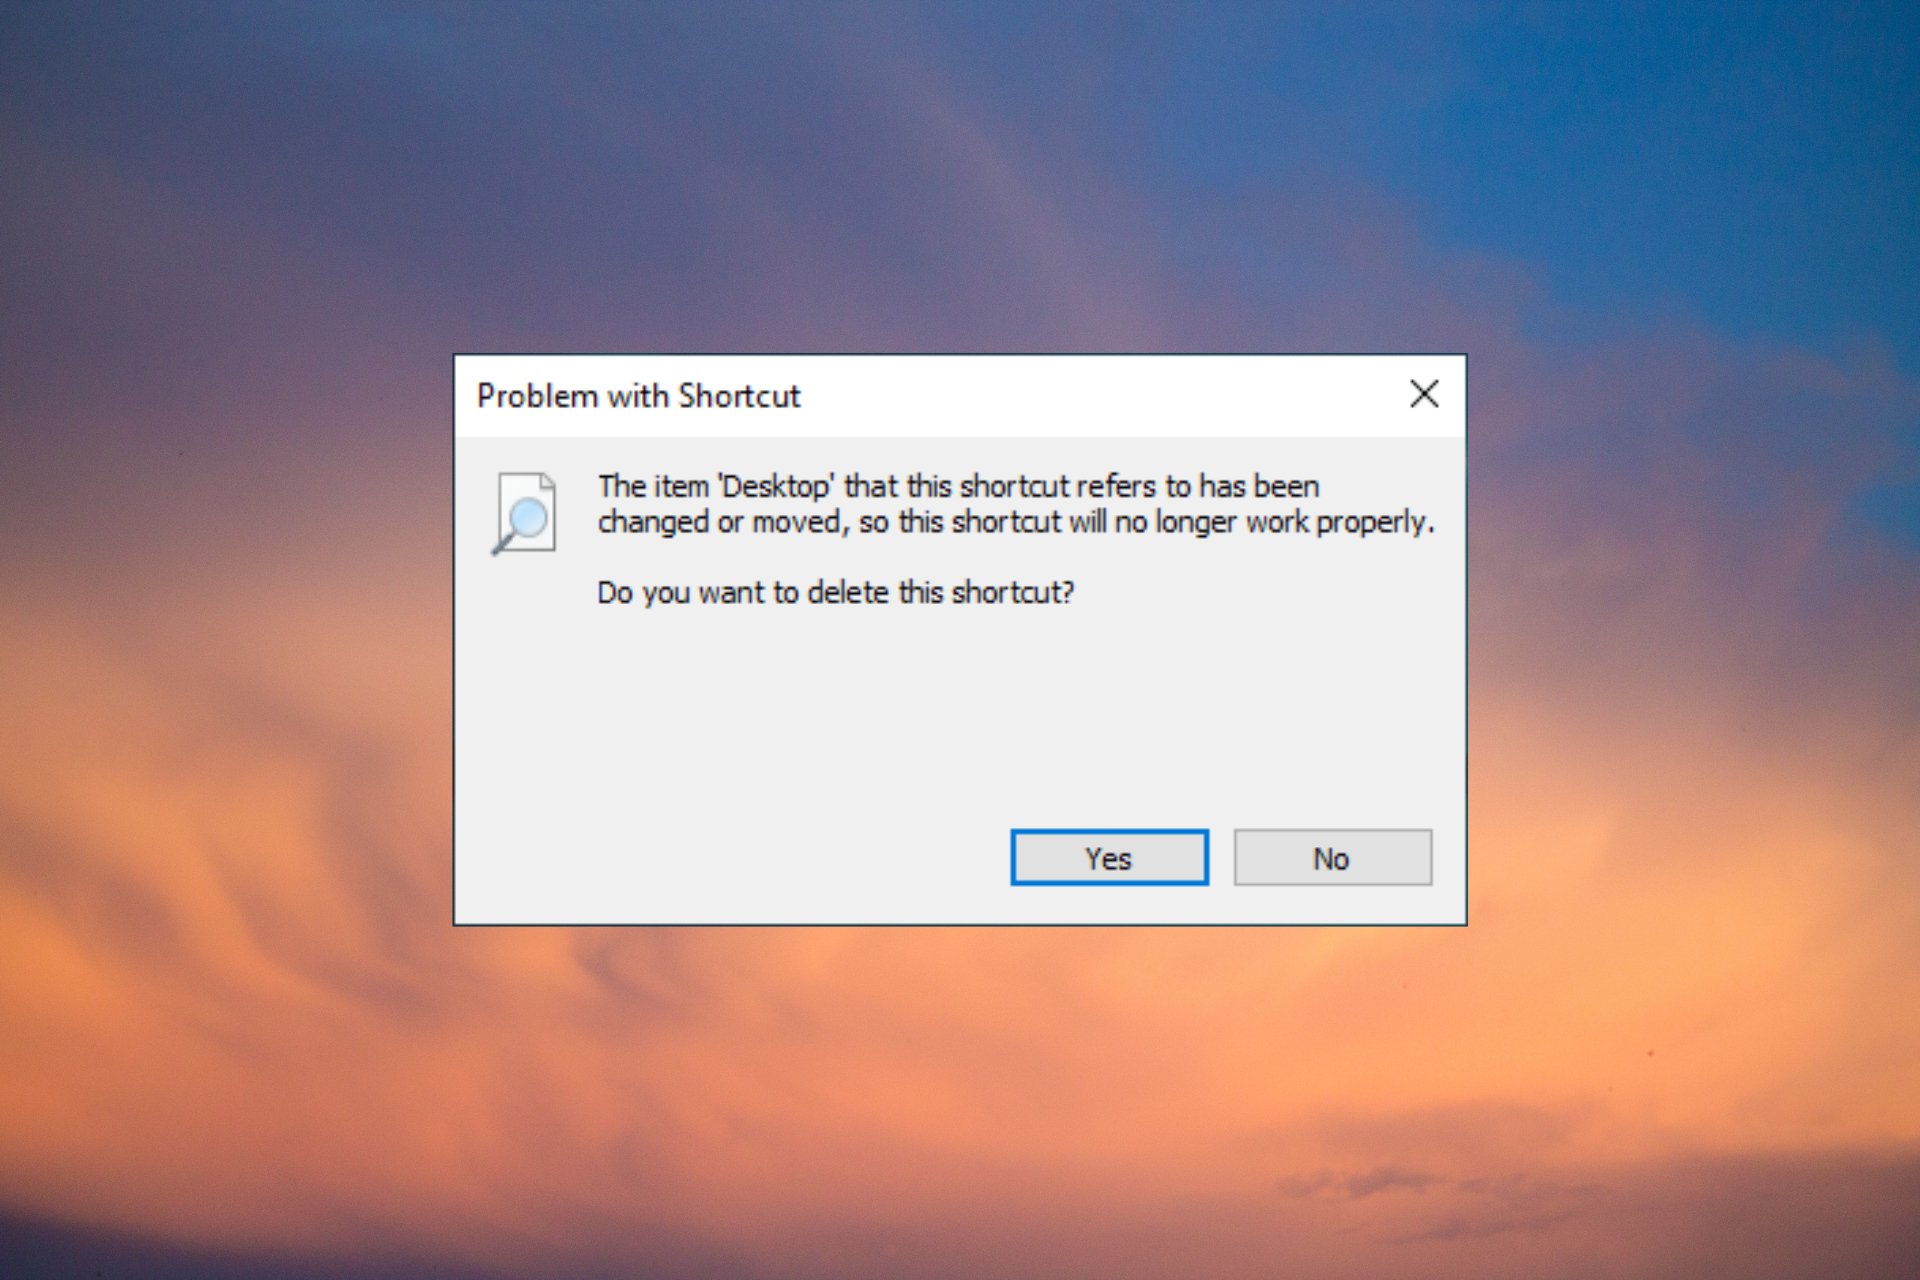
If Windows 11 desktop files are not showing, it’s usually due to a broken path to the program executable they should launch.

If you’ve uninstalled a certain program, then all you’re left with is deleting the shortcut.

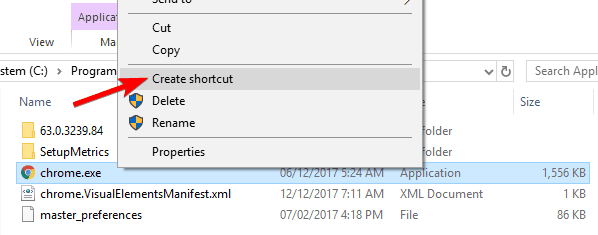
3. Recreate the shortcut

  1. Press the Windows key + E to start File Explorer.
  2. Locate the software with the problematic shortcut
  3. Right-click on the executable file and select Create shortcut.
  4. If you are in a system folder, Explorer will place the shortcut directly on your desktop, and you can move anywhere you wish afterward.

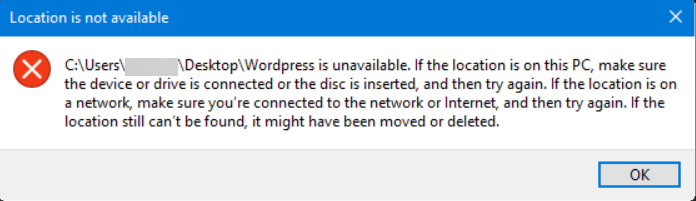
If you’ve moved or updated the program and the corresponding desktop icons are not showing in Windows 10 anymore, you have the option to either create a new one or try and fix the path of your old shortcut.

4. Check if the path to the application is correct

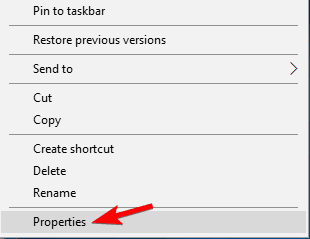
  1. Locate the problematic shortcut, right-click it, and choose Properties.
    Desktop shortcuts not working Windows 10
  2. In the windows which opens, you will see the Target field, under the Shortcut tab where the path to the program exe should be.
  3. If the path is not correct, locate the executable for the program and copy the path to this field, being careful to add it in quotation marks (example: program path).
  4. Click on Apply and OK to save the changes.
    Desktop icons won't open

If things are not working, you would have to modify the Windows 11 desktop icons settings. Once done, the problem should be resolved. If not, head to the next method.

5. Leave the Homegroup

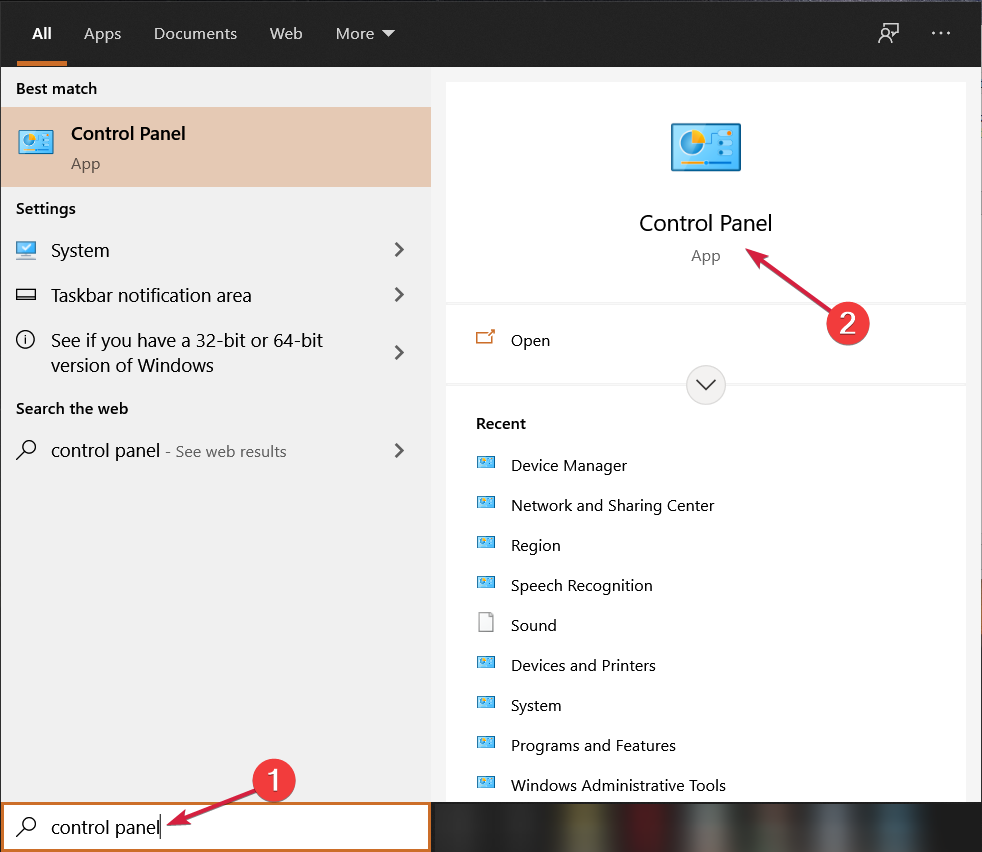
  1. Press Windows key + S and enter control panel.
  2. Select Control Panel from the list.
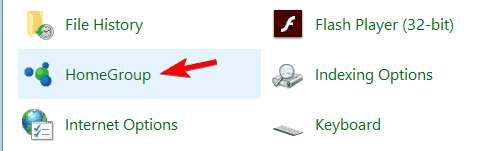
  3. Next, navigate to HomeGroup.
    Desktop icons won't open
  4. Now click on Leave the homegroup.
    Shortcuts not responding on desktop
  5. Click on Leave the homegroup.
    Desktop icons unresponsive
  6. When the confirmation message appears, click on Finish.

6. Use PowerShell

  1. Right-click the Start button and select PowerShell (Admin) from the list.
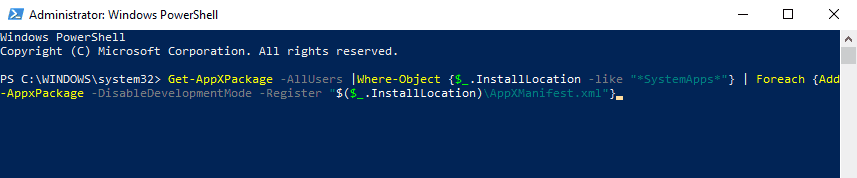
  2. When PowerShell opens, enter the following command and press Enter to run it:

Get-AppXPackage -AllUsers |Where-Object {$_.InstallLocation -like "*SystemApps*"} | Foreach {Add-AppxPackage -DisableDevelopmentMode -Register "$($_.InstallLocation)AppXManifest.xml"}

Shortcuts not responding on desktop

7. Perform a Clean Boot

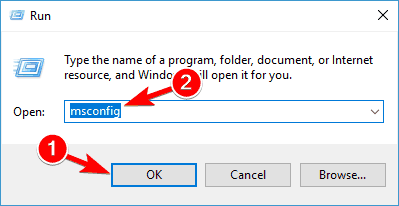
  1. Press Windows key + R and enter msconfig.
  2. Now press Enter or click OK.
    Desktop icons won't open
  3. Navigate to the Services tab and check the Hide all Microsoft services box.
  4. Next click on Disable all button.
    Shortcuts not responding on desktop
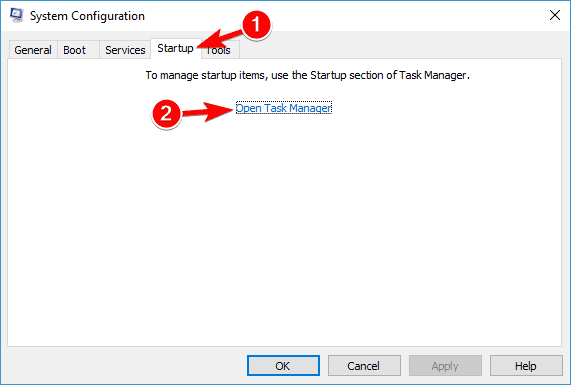
  5. Navigate to the Startup tab and click on the Open Task Manager.
    Desktop shortcuts not working Windows 10
  6. Right-click the first entry on the list and choose Disable from the menu.
  7. Repeat these steps for all entries on the list.
    Desktop icons not working
  8. Once you disable all startup applications, go back to System Configuration window and click on Apply and OK.
    Desktop shortcuts not working Windows 10
  9. If asked to restart your PC, choose the option to restart it now.

8. Fix file associations

8.1 Change file associations using the Registry Editor

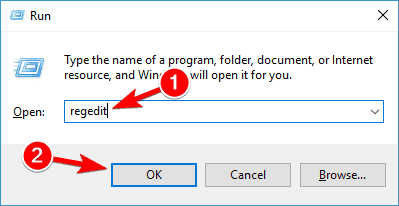
  1. Press Windows key + R and enter regedit.
  2. Press Enter or click OK.
    Shortcuts not responding on desktop
  3. Since we’re going to modify the registry, it might be a good idea to back it up beforehand. To do that, just click on File and select Export.
    Desktop shortcuts not working Windows 10
  4. Set Export range as All and enter the desired file name.
  5. Choose a save location and click the Save button.
    Desktop icons unresponsive
  6. In case anything goes wrong after modifying the registry, simply run this file to revert the changes.
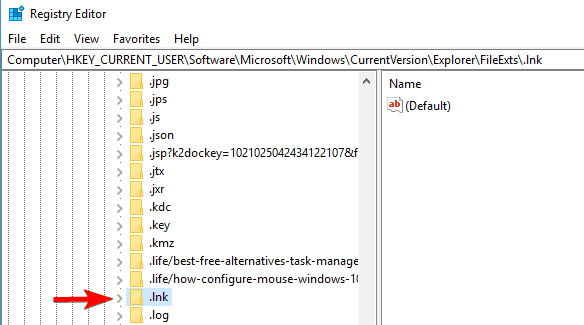
  7. In the left pane, navigate to the following path: HKEY_CURRENT_USER\Software\Microsoft\Windows\CurrentVersion\Explorer\FileExts\.lnk
    Shortcuts not responding on desktop
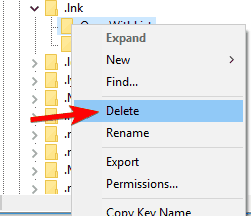
  8. Expand the .lnk key and locate UserChoice key.
  9. Right-click it and choose Delete from the menu.
    Desktop shortcuts not working Windows 10
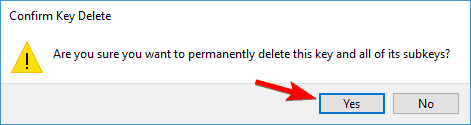
  10. When the confirmation dialog appears, click on Yes.
    Desktop icons not working
  11. After removing this key, restart your PC and check if the issue reappears.

8.2 Run a .reg file

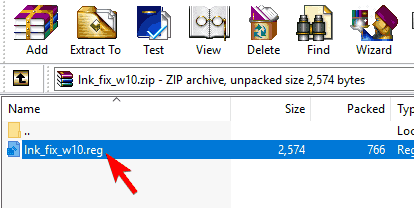
  1. Download this zip archive.
  2. Open the archive and run lnk_fix_w10.reg file.
    Shortcuts not responding on desktop
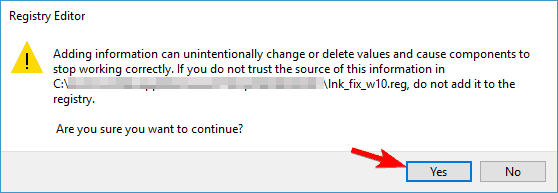
  3. When the confirmation message appears, click on Yes.
    Desktop shortcuts not working Windows 10
  4. After doing that, file association for .lnk files should be fixed and your shortcuts should start working again.

How can I fix Desktop shortcuts not working on Windows 11?

Although the new OS has more features and a new design, its core is still very close to the one from Windows 10.

That’s why all the solutions we highlighted above for Windows 10 will work seamlessly on Windows 11 as well.

However, the menus and windows look a bit different, and in Solution 6, you will have to use Windows Terminal instead of PowerShell.

Not being able to use your desktop shortcuts can be an annoying problem. Shortcuts not deleting is an even bigger problem, but we hope you managed to solve it by using the solutions from this article.

Now that you’ve fixed this issue, you might be interested in our article, including the 50 best Windows 11 shortcuts.

Please let us know in the comments section below if you have further suggestions or recommendations.

Welcome to another servicing pipeline update for the Windows 11 Insider Dev Channel

Microsoft announced another servicing pipeline update for Windows 11 Insider build 25217 for the Dev Channel. The new build “does not include anything new and is designed to test our servicing pipeline for builds in the Dev Channel.”

As a reminder, build 25217, which was released last week on October 6th, did contain some new stuff, including a “sneak peek” at the new video calling service for Chat from Microsoft Teams in Windows 11, the first look at support for 3rd party widgets, allowing devs to test their widgets out locally, and the usual assortment of changes, fixes, and known issues.

So help the Windows Insider program out and download and install this servicing pipeline update 25217.1010 (KB5019765).

Windows Security not Opening in Windows 10: Fix & Causes

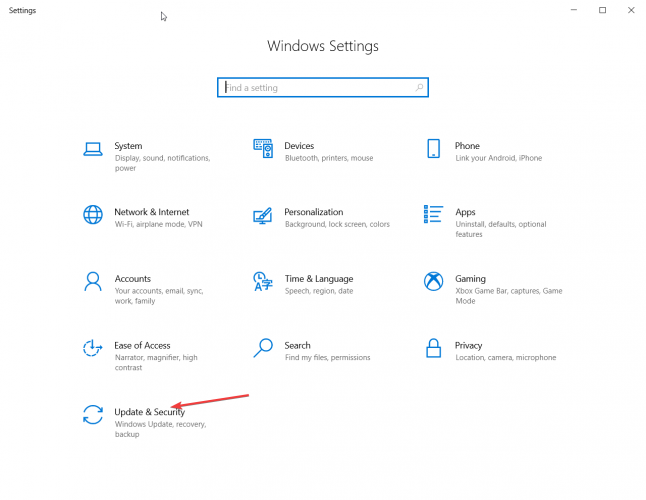
Update & Security is a special field integrated by default into the Windows 10 core system. This built-in menu offers access to processes and operations related to updating and restoration features.

Here you can check for your update history or schedule your restart for a specific time and the process is automated so you don’t have to do anything manually.

Shortly, by accessing the Update & Security window you can scan for new updates, apply certain updates, remove recently installed patches, initiate a system recovery operation, and perform similar other processes.

However, sometimes you might notice that Windows Security won’t open. This is quite a common Windows 10 error caused by corrupted system files or by other Windows 10 malfunctions. And speaking of malfunctions, users reported more similar issues.

Why is Update and Security not opening?

The Update and Security tab not opening or working issue has been triggered for several users because of different reasons. Note that sometimes, the issue is that the Windows update closes immediately.

We did our research and have come up with a list of common reasons why the Update and Security tab isn’t working for you:

  • An important system file related to it is corrupt
  • Your PC is infected with a virus or malware
  • There is a bug present in the current version of the Windows OS
  • Your copy of Windows is missing an important file
  • Corrupt Windows Security component
  • Corrupt cache data

Frequent issues associated with the Windows Security tab:

  • Windows 10 update and security closes immediately / Windows Update closes automatically
  • (Ironically) Windows Security not working after the update
  • Windows Security shows a blank screen
  • Also, Windows Update won’t load in Update & Security settings
  • Windows Security not showing anything
  • Windows Update closes immediately
  • Windows Update won’t open in Windows 10
  • Windows Update page not loading in Windows 11
  • Windows Update screen not loading in Windows 10
  • Windows Update not opening

The latest Windows 11 is also not exempt from such issues. Users reported the following cases: Windows Security not responding, not showing anything/blank, or Windows security not opening, and Windows update page not loading windows 11.

Fortunately, there are a few solutions that you can use to fix the Update & Security tab.

How to fix windows security not opening windows 10?

  1. Run the System File Checker tool
  2. Use a dedicated software
  3. Scan and fix errors using DISM commands
  4. Change the Windows account
  5. Perform a system restore

1. Run the System File Checker tool

  1. Type cmd in the Seach box and click on Run as administrator under the Command Prompt app.
  2. Type this command and press Enter: sfc /scannowSfc scannow
  3. Wait until the scan is completed (it might take a while depending on how many files are stored on your computer).
  4. If problems are found the troubleshooter should fix them automatically.
  5. Don’t forget to restart your PC in the end.

2. Use a dedicated software

Corrupted system files, missing program files, and even malware are all factors that contribute to Windows security not opening. For this reason, we suggest using dedicated repair software that can fix all of these issues in one go.

These tools will not only fix your files and system issues but also continue to monitor your PC for online privacy and viruses, thus improving the overall system performance.

3. Scan and fix errors using DISM commands

  1. Open the Start menu.
  2. Search for Command Prompt and run it as an administrator.
  3. Enter the following commands (press Enterafter each entry):
    • Dism /Online /Cleanup-Image /CheckHealth
    • Dism /Online /Cleanup-Image /ScanHealth
    • Dism /Online /Cleanup-Image /RestoreHealth
  4. Close the command prompt window.
  5. Restart your PC.

If you want to learn everything there is to know about using DISM commands, check our handy guide.

4. Change the Windows account

  1. Press the Win + I buttons to open the Settings menu.
  2. Then, click on Accounts.
  3. Click on Email & accounts.
  4. Select Add an account.
  5. You will have to pick Sign in without a Microsoft account and Local account.
  6. Fill out the forms and save your changes.
  7. Switch to the newly created account and verify if you can access the Update & Security tab.

The problem might be associated with one particular account. So, it’s recommended to create a new account as afterward, you might be able to access the Windows 10 Update & Security tab again.

5. Perform a system restore

  1. Open the Start menu.
  2. Search for Create a restore point and open it.Search-for-system-restore-point
  3. Hit the System restore button in the new window that appears.
  4. Select the appropriate option and follow the on-screen prompts.
  5. Your PC will reboot and begin the process.
  6. Once the restore is complete, check if this fixes the issue or not.

If our steps above look too complicated, we also have a complete guide on how to create and use a System Restore Point in Windows 10.

If you are having difficulties opening Settings and Updates, we have your back, check this guide to learn more.

Hopefully, you managed to solve the Windows 10 Update & Security tab not working issue.

Usually, one of the troubleshooting solutions from above is fixing this Windows 10 problem without having to initiate a clean install of the system itself.

However, depending on each situation and how you use your Windows 10 device, the solutions might differ.

How can I fix Windows Security not opening on Windows 11?

Check out some quick solutions that you can apply to fix the Windows Security not opening on Windows 11 issue.

1. Reset Windows Store certification

  1. Press Win + R to open the Run command.
  2. Type powershell and hit Enter.
  3. Execute the below command: Get-AppxPackage Microsoft.SecHealthUI -AllUsers | Reset-AppxPackage
  4. Restart your PC.

2. Uninstall third-party antivirus software

  1. Open Control Panel.
  2. Select Programs and Features.
  3. Select the antivirus software and hit the Uninstall button at the top.

3. Reset the Windows Security app

  1. Press Win + I to open Windows Settings.
  2. Select Apps.
  3. Then Apps & features.
  4. Search for Windows Security.
  5. Hit the 3-dot icon.
  6. Select Advanced options.
  7. Scroll down and hit the Reset button.
  8. Restart your PC and check if this fixes the issue or not.

How do I reinstall Windows security?

  1. Press Win + R to open the Run command.
  2. Type powershell and hit Enter.
  3. Execute the below command: Set-ExecutionPolicy Unrestricted
    Get-AppXPackage -AllUsers | Foreach {Add-AppxPackage -DisableDevelopmentMode -Register "$($_.InstallLocation)\AppXManifest.xml"}
  4. Restart your PC.

That’s why, if the issue persists, use the comment section below to describe your situation in detail. Based on the details that you offer, we can try to find more solutions for you.

Black Screen After Automatic Repair: 4 Quick Ways to Fix it

If you have an issue with your Windows 11 PC, you can use the automatic repair feature to fix it. However, this feature may not always work as expected and could leave your computer in an unusable state. In unfortunate cases, you may end up in an automatic repair loop or a black screen.

What causes the black screen after automatic repair on Windows 11? 

The black screen of death usually occurs when your computer freezes up or crashes and you get nothing on your screen. The following are some of the possible causes for this issue:

  • Corrupt Windows update – In some cases, Windows 11 updates can be corrupted and you’ll find yourself stuck with a black screen. Can the black screen of death be fixed? In this case, you should try reinstalling Windows 11 from scratch as this often does the trick.
  • Driver conflicts – Uninstalling and reinstalling the drivers properly is the way to get rid of the problem.
  • Graphics card issues – If there is any issue with your graphics card drivers or software then it can cause this error message as well.
  • Software issues – If any software on your computer is corrupted then it may also cause this error message to appear on your computer screen and prevent it from booting properly into Windows 11 OS.
  • Corrupt registry entry – Corrupt registry entries can cause all kinds of problems, including your machine locking up or slowing down unexpectedly.
  • Malware infection – If there is malware infection on your computer, it can also cause this issue. You need to use reliable antivirus software to scan your computer and remove all infected files from it as soon as possible.

How do I fix a black screen after automatic repair on Windows 11?

Before you attempt any advanced troubleshooting, there are a few checks you should perform:

  • Make sure that your computer is properly connected to the power supply source and turned on.
  • Check whether all cables are plugged in properly and if they are not damaged or broken.
  • Disconnect any secondary monitors.

If all the above check out but you are still experiencing the problem, proceed to the next solutions.

1. Repair boot records

  1. Restart your PC three times by using the Power button to start Windows Recovery.
  2. Hit Troubleshoot.
  3. Next, choose Advanced options and select Command Prompt.interrupt exception not handled
  4. Type the following command prompts and press Enter after each one:
    • bootrec /scanos
      bootrec / fixmbr
      bootrec / fixboot
      bootrec / rebuildbcd

2. Repair the registry 

  1. Just like in Solution 1, use the Power button of your device to restart your system until Windows Recovery starts.
  2. Select Troubleshoot after the machine reboots, then Advanced options.
  3. Choose Command Prompt.
  4. In Command Prompt, enter your Windows drive letter (usually it’s C:), then hit Enter.
  5. Type the script below, then hit Enter to go to the System32 folder.
    cd c:\windows\system32
  6. Type the following command, then hit Enter to create a backup folder called configBak:
    mkdir configBak
  7. Copy and paste the script below, then hit Enter to back up the config folder.
    copy config configBak
  8. Type the script below, then hit Enter to enter the RegBack folder.
    cd configRegBack
  9. Type the script below, then hit Enter to copy the data RegBack to config.
    copy *...*
  10. Confirm every operation by pressing Y and Enter.

Repairing the registry can help to fix the black screen issue, especially for those who have installed any new software. The new programs may have come bundled up with malware and that’s how you ended up with a corrupt registry.

You can run the system file checker command to troubleshoot or opt for an automatic third-party tool. In such a case, we suggest you run a registry cleaner to scan and repair all registry errors automatically before attempting manual methods to resolve this problem.

A great option is a third-party tool that can run a comprehensive scan of your operating system and offer you a detailed report of the broken elements. They may fix the Windows Registry and replace any damaged components of the operating system thanks to its large database that has the latest Windows features.

3. Rollback to the previous build

  1. Start Windows Recovery by restarting your system three times by using the Power button.
  2. Hit Troubleshoot.
  3. Select Advanced options and click on Go back to the previous Build.
  4. Follow the on-screen instructions to roll back the OS.

4. Update BIOS

If your BIOS is corrupted or outdated, you may encounter a black screen after performing an automatic repair on Windows 11.

To fix this, you’ll need to update the BIOS on your computer. This process is different for every computer manufacturer. 

You can restart your computer in Safe Mode to ensure any problematic programs are disabled. When you reboot in Safe Mode, Windows runs with only basic drivers and services. There are many ways to update BIOS so be sure to check our comprehensive article on the same.

When getting a black screen after automatic repair, can try some simple solutions yourself, like the ones mentioned above, or take your device to an Authorized Service Provider for diagnostic testing and repair.

If you choose to do it yourself, we also have a dedicated article on how to fix the black screen of death to guide you. 

Aside from the black screen of death, you may also encounter a black screen after login which we have exhaustively covered in our guide.

Let us know any other solutions not mentioned here that worked for you in the comments section below.

How to Fix “Administrator Permission Required to Delete Folder” on Windows

If you’re seeing the message “You’ll need administrator permission to delete this folder” on Windows 10 or 11, it usually means the file or folder is protected by system-level permissions.

This guide walks you through 5 reliable fixes, from taking ownership to using Safe Mode, to help you delete even the most stubborn folders safely.

How do I get administrator permission to delete a file or folder?

1. Take ownership of the folder

  1. Navigate to the folder you want to delete, right-click it and select Properties.
  2. Select the Security tab and click the Advanced button.
  3. Click on Change located at the front of the Owner file and click on the Advanced button.
  4. Enter your username in the Enter the object name to select field. Click on Check names and then OK.
  5. Check Replace owner on subcointainers and objects and click on Apply and OK.
  6. Click on Advanced button again.
  7. Navigate to Auditing tab and click on Add.
  8. Click on Select a Principal in order to add your account.
  9. Enter your username in the Enter the object to select field and click OK.
  10. Check Full control and save changes.

If this solution seems complicated, you can always use specialized software, such as Stellar Bitraser to delete any file from your PC with ease if you can’t delete folder even though you are an administrator.

2. Disable User Account Control

  1. Search uac in the Search box and select Change User Account Control settings.
  2. Move the slider to the bottom, i.e., to Never notify.
  3. Restart your computer.

Knowing how to manage UAC settings on your computer allows you to access, modify, and delete folders.

3. Activate the built-in Administrator account

  1. Press Windows key + X and select Windows PowerShell (Admin).
  2. Run the following command: net user administrator /active: yes
  3. Log out of your account and switch to the administrator account.
  4. Check if the problem is resolved.

When you see the You’ll need to provide administrator permission to delete this folder prompt, logging in via the administrator account should do the trick. Also, find out all the ways to make yourself an administrator in Windows.

4. Use SFC

  1. Press Windows + X and choose Windows PowerShell (Admin).
  2. Run the following command:sfc /scannow
  3. Wait for the process to finish and restart your PC.

Also, you can delete as administrator from CMD using the SFC scan.

5. Use Safe Mode

  1. Press Windows + S and type recovery. Select Recovery options.
  2. Click the Restart now button in the Advanced options section.
  3. Click on Troubleshoot.
  4. Head to the Advanced options.
  5. Select Startup Settings and click on Restart.
  6. Press F5 or 5 to select Enable Safe Mode with Networking.
  7. While in Safe Mode, locate the file that you want to delete and try to perform the operation
  8. Restart your computer to exit Safe Mode.

For more information, find out how to access Safe Mode on Windows 11. Do keep in mind that the methods from that guide can also be applied to older versions.

How do I delete a folder that won’t delete?

To delete even the most stubborn folders, elevate your user privileges using the solutions above. Ensure you do not delete critical system files.

Why do I need permission from myself to delete a folder?

The system also has some features to protect itself from accidental file deletion. Here’s how to deactivate the Controlled folder access feature:

  1. Press Windows, type virus & threat protection, and open the top result.virus-threat-protection steam.exe bad image
  2. Scroll down to the Ransomware protection then click Manage ransomware protection.manage-ransomware You Need Administrator Permission to Delete on Windows 10
  3. Here, toggle off the Controlled folder access option to stop being asked for permission from yourself.off-fodler-control You Need Administrator Permission to Delete on Windows 10

Can’t delete a folder even though you are an administrator?

If you can’t do that, it might be a problem with the Group Policy and the restrictions that come from your organization.

The key is to change the local policy for your account and grant yourself the right to edit and delete folders.

Local Group Policy Editor allows you to modify the group policies in Windows

Find out how to edit a Group Policy in Windows 10 to help get acquainted with the process and make advanced changes to your computer.

Common folder deletion problems you can fix with these methods

Moreover, the following are common error variations that you may encounter, but nonetheless, fix with the solutions provided below:

  • You’ll need to provide administrator permission to delete this folder in Windows 11
  • You’ll need to provide administrator permission to copy to this folder in Windows 11
  • You will need to provide administrator permission to delete this folder in Windows 10
  • File access denied, need administrator permission to delete file in Windows 11, 10, 7, 8
  • Need administrator permission to delete folder but I am administrator
  • You require permission from administrator to delete this folder /file

If you’re still unable to delete a folder after trying all the fixes above, check out our full guide on what to do when a folder won’t delete in Windows—it covers additional troubleshooting steps and third-party tools that might help.

That’s it! You will no longer see the You’ll need to provide administrator permission to delete this folder in OneDrive or other locations. If you want to learn how to give only read/write permissions, we have a special guide that can help you with that.

If you have other alternative solutions, do not hesitate to use the comments section below. Also, leave there any other questions you may have.

7 Ways To Fix Nvidia VSync If It’S Not Working [2026 Guide]

Vertical Sync (VSync) syncs a game’s FPS to the rate of your monitor to avoid lags and stuttering. However, users have reported that Nvidia’s VSync is not working correctly on their PC.

Nvidia’s VSync feature provides the graphics technology needed to give gamers lag-free graphics for demanding games. If you’re having issues with your Nvidia graphics card not detected on Windows 11, we have a guide for that.

Why is Nvidia VSync not working?

VSync can be a crucial feature when playing high-demanding games or AAA games and can lead to screen-tearing if it’s not working. Nvidia VSync may not be working for a number of reasons, including:

  • Outdated Nvidia graphics card drivers – To make sure such an issue never happens again, refer to our guide on how to update drivers on Windows 11.
  • Corrupted or damaged graphics card drivers – There are multiple ways to update your drivers and solve such issues, including auto-updating via the Settings menu or using a dedicated tool, such as the one mentioned below.
  • Too many processes running in the background – Rest assured that terminating unwanted processes is easy if you use Task Manager’s features efficiently, as described in our guide.
  • VSync is not properly enabled, including the fact that VSync is not enabled globally.

How do I enable VSync on a game?

  1. Click on Start and search Nvidia Control Panel then hit Enter.
  2. Under 3D Settings, click on Manage 3D Settings. manage 3d settings in nvidia control panel.
  3. Navigate to Program Settings and select the game to customize.
  4. Scroll down to Vertical sync, click on the dropdown menu, and select On. turn vsync on for program settings.

This is how to enable VSync from the Nvidia Control Panel. Users can also turn on VSync inside the games menu.

How do I fix Nvidia VSync if it’s not working?

1. Force VSync

  1. Click on Start and search for Nvidia Control Panel, then hit Enter.
  2. Under 3D Settings, click on Manage 3D Settings. manage 3d settings in nvidia control panel.
  3. Under Global Settings, scroll until you find Vertical Sync. turn on vsync.
  4. Click on the dropdown menu and change to On.

Forcing VSync on under Global Settings will apply VSync to all games, not just a particular one. Try adjusting VSync to work across all games through the Nvidia Control Panel to see if that solved the problem.

2. Close background tasks

  1. Click on Start and search Task Manager then hit Enter.
  2. Under the Processes tab, go through and select a program that you don’t need running and click End Task. end task if nvidia vsync not working.
  3. Repeat the above step for all unnecessary apps.
  4. Restart your PC. restart pc.

Sometimes, if apps and programs are running in the background, Nvidia VSync may not work as intended while gaming. Try closing out unnecessary apps to fix this issue.

3. Update drivers

  1. Click on Start and search Control Panel then hit Enter.
  2. Click on Hardware and Sound then open Device Manager. open device manager.
  3. Select Device adapters to reveal graphics card drivers.
  4. Right-click on the Nvidia graphics card driver and select Update driver.
  5. Click Search automatically for drivers.

If your Nvidia graphics card driver is out of date, then VSync will not work properly. Try updating your drivers and see if that solves the issue.

If the missing driver wasn’t automatically detected by Windows, we recommend using a simpler solution, Outbyte Driver Updater, a tool that specializes in updating drivers.

Outbyte Driver Updater scans your computer for all outdated drivers and installs them safely. We have a database of over 18 million ready-to-use driver files.

Outbyte Driver Updater

Keep your system in shape by maintaining all drivers updated.
Free Trial Visit Website

4. Uninstall and re-install drivers

  1. Click on Start and search Control Panel, then hit Enter.
  2. Click on Hardware and Sound then open Device Manager. open device manager.
  3. Select Device adapters to reveal graphics card drivers.
  4. Right-click on the Nvidia graphics card driver and select Uninstall device. uninstall nvidia driver.
  5. Click Uninstall again.
  6. Go to the Nvidia driver download home page and enter your Nvidia details, then click Search. search for nvidia driver.
  7. Click Download. download nvidia driver.

Nvidia VSync might not be working if the Nvidia graphics card is damaged or corrupted. Performing a clean installation may help fix the problem. You can reinstall the correct driver from Nvidia’s driver download homepage.

5. Change from fullscreen

  1. Open Steam and go to your game library.
  2. Right-click on your game and select Properties.
  3. Go to Local Files then select Browse to go to the file location of the game. view local game file.
  4. Right-click on the game application and select Properties. open properties.
  5. Click on the Compatibility tab and check the box next to Disable fullscreen optimizations. Disable fullscreen to fix nvidia vsync not working.
  6. Click Apply then OK.

Users report that disabling fullscreen optimization helped fix Nivida VSync when it wasn’t working. Try disabling fullscreen to see if that solves the problem.

6. Set to fast sync

  1. Click on Start and search Nvidia Control Panel then hit Enter.
  2. Under 3D Settings, select Manage 3D Settings. manage 3d settings in nvidia control panel.
  3. Under Global Settings, scroll until you find Vertical sync.
  4. Click on the dropdown menu and select Fast. change vsync to fast.

Setting Vertical Sync to fast will allow for higher FPS and not idle your GPU. If your GPU is providing a higher FPS than the monitor, then fast sync may kick your VSync into gear. Fast Sync also ensures that no screen tearing or lagging occurs.

7. Adjust Max Fram Rate

  1. Click on Start and search Nvidia Control Panel then hit Enter.
  2. Under 3D Settings, click on Manage 3D Settings. manage 3d settings in nvidia control panel.
  3. Under Global Settings, scroll until you find Max Frame Rate.
  4. Click on the dropdown menu and change to On and then enter 120 FPS then click OK. change max frame rate if nvidia vsync not working.

In case you experience game stuttering in Windows, rest assured that we have solutions for that as well.

Hopefully, one of the above methods helped you fix Nvidia VSync if it’s not working. Let us know in the comments which one did the trick.

11 Best VPNs With a Really Fast Connection [Free & Paid]

While a VPN’s primary purpose is protecting your privacy and security online, nobody wants to compromise on speed.

Speed is one of the hardest factors to quantify, especially with a VPN, but there are various ways to run speed tests, though the fact remains that the fastest VPN where you’re located isn’t necessarily the same in a different location.

Again, the fastest VPN for streaming video content may not necessarily be the fastest when gaming. Speeds also change according to the time of day or night. But, overall, there are some VPNs that are still faster than others.

When choosing the fastest VPN, always consider proximity to your location, latency (time taken to send/receive requests from a server), server loads (if high, it means more traffic hence slower connections), and the VPN protocol (go for a speedier one, but OpenVPN is your best bet).

Below we’ve listed our top picks for the fastest VPN for Windows 10.

Does VPN give you a faster connection?

VPNs can improve connection speed if you use a client with good servers for your configuration.

What we mean by this is that just using a VPN doesn’t necessarily mean that speed improves.

You need a good service that has a large server of the network (to avoid overpopulated servers which are, you guessed it, slower). VPNs can help you increase Internet speed in certain scenarios:

➡️ Remove ISP restrictions: many Internet Service Providers may restrict traffic on certain websites or after you’ve used a certain amount of data. With a VPN, your ISP won’t be able to track your activity, and good VPN clients offer unlimited bandwidth which means you’ll never run out of speedy connections.

➡️ Connect to a better server for your location: even though a VPN connection is not as direct and needs more routing than a normal, local connection, you can get better speed if you use the auto-connect option. Most modern VPNs include it and it automatically detects the fastest server for you, which is generally from a nearby country or city.

➡️ Improve speed on certain platforms: Connecting to a server that is closer in location to servers of the platform, service, or game you want to access can improve overall connection speed.

What is a good VPN connection speed?

A good speed that will let you carry out demanding tasks like watching video-on-demand or gaming should be somewhere above 100 Mbps for download and at least 10 Mbps for upload.

The VPNs recommended below have proven to provide speeds well over these rates, with some of them going all the way up to over 200 Mbps, which is great considering you route your traffic via multiple tunnels.

Which VPN has the fastest connection?

Private Internet Access – Largest server network

Private Internet Access is among the best and fastest VPNs for Windows 10 available out there.

When it comes to streaming, speed is a crucial aspect to be considered if you are to choose the perfect VPN tool. And speed is exactly what Kape Technologies-owned PIA delivers.

Armed with unlimited bandwidth, ultra-fast download speeds, and powered by a most impressive network of servers with global coverage, PIA will streamline your connection, help you bypass geo-restrictions, and unblock streaming services flawlessly.

Speaking about restrictions, this leading VPN provider is on a mission to eliminate censorship so that you can enjoy a truly liberated web experience.

With multiple gateways spread across 80 countries worldwide with over 35 000 servers, PIA guarantees to take latency, buffering, and lags, but also ISP throttling out of your online pursuits. Fast and reliable servers are inherent to this VPN.

PIA uses best-in-class encryption technology and offers support for P2P, torrenting, and streaming. It’s compatible with multiple protocols, including WireGuard, PPTP, OpenVPN, and L2TP/IPSec protocols plus SOCKS5 Proxy

Let’s quickly look at its key features:

  • Huge network of servers all across the world
  • Best-in-class encryption technology for secure connections
  • Eliminates any geo-location restrictions
  • Easy to use
  • Strict, no-logs policy

Private Internet Access

Want speed? Enjoy lightning-fast download speeds and unblock streaming with PIA VPN!
Check price Visit website

ExpressVPN – Proprietary protocol for speed

Another great VPN that you might want to try is ExpressVPN. This VPN allows you to easily access any geo-restricted content thanks to the 148 server locations located in 94 countries around the world.

Unlike many other VPNs, ExpressVPN has a built-in Speed Test feature so you can easily test the server speed and ensure maximum performance.

Another great feature is VPN split tunneling, and thanks to this feature you can route some of your traffic through VPN while using the remaining traffic without a VPN.

By using this feature, you can force only certain applications to use a VPN which can be useful if you want to have full control over your VPN.

As for encryption, ExpressVPN uses AES 256-bit encryption and it supports OpenVPN protocol. In terms of privacy, you should know that ExpressVPN doesn’t collect any logs, so your IP address, browsing history, DNS queries, and traffic data will be completely safe.

It’s worth mentioning that ExpressVPN uses a private, zero-knowledge, encrypted DNS, so your browsing history will remain protected at all times.

ExpressVPN offers great features in terms of privacy and security, and thanks to the built-in Speed Test feature, you should be able to find the fastest server for your needs with ease.

Here are its best features:

  • Split tunneling
  • Encrypted DNS
  • Server coverage in 94 countries
  • No traffic logs
  • Built-in speed test feature

ExpressVPN

Enjoy secure and reliable connections on ultra-fast servers in 94 countries with ExpressVPN!
Free trial Visit website

AstrillVPN – Powerful & fast servers

For a fast VPN connection, you can’t ignore the offer from AstrillVPN. That’s because it comes with servers that feature modern processors which support AES encryption offloading.

That’s a very important aspect because VPN connections require lots of computational power for encryption.

Another advantage is that each AstrillVPN server is connected to a 1 Gbit or 10 Gbit connection with dedicated bandwidth.

On their website, you will even be able to see the speed test results so you have a clear idea of the performance of the servers.

You can rest assured that while using the VPN, all your connections will be protected with 256-bit military-grade encryption for complete anonymity.

Also, you will be able to connect up to 5 devices simultaneously with the same account without any problems.

Of course, AstrillVPN also features a kill switch to protect your identity and works on all platforms including Windows, macOS, Linux, iOS, Android, and routers.

Here are some of AstrillVPN’s best features:

  • VPN servers in 107 cities across 55 countries
  • SSL encryption
  • Connect up to 5 devices simultaneously
  • Unlimited server switches
  • Bitcoin supported

AstrillVPN

Protect your privacy with fast and powerful servers that span 107 cities across 55 countries!
Check price Visit website

NordVPN – Best server obfuscation

This VPN protects your information from being intercepted and also keeps you from being served with phony websites.

With over 5500 servers across the world, with numerous features including ad-blocking, and robust, consistent service.

In terms of speed, NordVPN scores highly on domestic servers, but not as well on international connections, which is good because you’ll be using domestic servers to access the content that’s been restricted.

As one of the fastest VPNs for Windows 10, NordVPN scores well on reducing latency and increasing download and upload speeds.

With NordVPN, you get access to 5500+ ultra-fast servers and can benefit from unlimited bandwidth so you don’t have to worry about running out of fast traffic.

Let’s review some of its best features:

  • Great server network coverage
  • Low latency and fast download speeds
  • Protects against phishing or fake websites
  • Eliminates geo-location content bans

NordVPN

NordVPN is one of the fastest VPNs on the market. But don’t take our word for it, see for yourself!
Check price Visit website

FastVPN – Fastest VPN configuration

Another great VPN for a speedy connection is FastVPN. This easy-to-setup client comes with unlimited bandwidth and a generous server base.

The VPN lets you connect to various locations from all around the world. You get access to over 1000 servers from 50+ locations.

We must also mention that this VPN uses strong encryption and doesn’t keep any user data logs.

This VPN encrypts your traffic and protects your data regardless of the type of network you use. It can speed up and secure your connection even on public Wi-Fi.

FastVPN can also unblock restricted platforms and is compatible with all major operating systems and can also be installed on certain routers.

For one subscription, you can connect all your devices because this VPN supports an unlimited number of simultaneous connections.

Take a look at some its core features:

  • Servers in over 50 locations.
  • All traffic is encrypted
  • Unblocks restricted platforms
  • Compatible with all major OSes and platforms
  • Unlimited number of simultaneous connections

FastVPN

Connect to a speedy server from various worldwide locations for lag-free Internet!
Check price Visit website

CyberGhost – Easy-to-use apps for all devices

CyberGhost’s servers all have optical fiber internet connections with very high data speeds, which makes it the fastest VPN for Windows 10.

Its performance in terms of speeds is impressive. When you combine speed with powerful security-oriented features, you get a well-rounded VPN that is perfect for your streaming needs.

Moreover, this user-friendly VPN allows you to extend its protection on up to 7 devices simultaneously with just 1 subscription and they do not even have to run on the same kind of operating system.

Highly versatile, CyberGhost integrates seamlessly with Windows, Mac, iOS, Android, Linux, routers and other devices to secure your entire network.

With its automatic killswitch and DNS protection, CyberGhost ensures you’ll never leak any information to malicious third parties.

Plus, thanks to the split tunneling feature, you can prioritize traffic which means you can select which app uses VPN. This can help you speed up the Internet for particular platforms like Netflix or for gaming.

CyberGhost VPN

Enjoy unmatched speeds and unhindered access to streaming services worldwide with Cyberghost!
Free trial Visit website

PureVPN – High scores on independent speed tests

PureVPN has advanced features that ensure preventive and complete security by creating encrypted tunnels, restricting malware and viruses, blocking annoying ads, and filtering unwanted content.

One of the biggest concerns people have with VPNs is that their computers will slow down. However, the impact is usually unnoticeable in many situations, but no one wants the idea of browsing at very slow speeds.

This is why PureVPN ranks among the fastest VPN for Windows 10, with its robust network of VPN servers located in diverse spots, plus the highest scores in independent speed tests.

Usually, with extra security measures, the speed performance is likely to reduce, but with PureVPN, download speeds are improved.

PureVPN

In need of a VPN that’s not only safe but also lightning-fast? Try PureVPN.
Check price Visit website

TunnelBear VPN – Fun interface and fast servers

While many security software firms sell their products with scaremongering designs, this VPN uses a cute bear with an equally cutesy user interface, to woo its users and customers. However, this doesn’t mean it isn’t a strong VPN.

TunnelBear is one of the fastest VPNs for Windows 10, but also very powerful with its excellent security tools, and servers in 20 countries, except Africa, the Middle East, Russia, and Turkey whose internet access policies are restrictive.

The more locations offered, the better performance since you’ll have a server close by, plus more options for spoofing your location.

This also influences speed, and TunnelBear performs at par with other VPNs, sometimes even surpassing its rivals, especially over international connections.

Other great features include ad blockers, and site whitelists, and it has client software for Windows and other operating systems, plus browser plugins for Chrome and Opera.

TunnelBear VPN

TunnelBear is a reliable VPN that has several ultra-fast servers. Try it out now!
Check price Visit website

IPVanish VPN – Fast download and upload speeds

This VPN owns and operates all its 1400+ servers in 75 countries globally, instead of renting them out from third-party providers, for better security and privacy, plus a less congested connection.

It also has an auto-select feature that lets you connect to the fastest server available in a given location, so you can monitor the upload and download speeds in real-time.

All this is protected by the VPN’s 256-bit AES encryption, and a no-logs policy to ensure no data is recorded.

IPVanish also passes the test in terms of speed, keeping in mind that networks change depending on time, the number of people connected, among other variables.

However, this VPN has a huge impact on the domestic front as it decreases latency, but when it comes to downloading speeds, the impact reduces to those of similar VPNs.

IPVanish

Tired of your VPN’s slow servers? IPVanish can help your connection go faster while keeping you private.
Check price Visit website

VyprVPN – Global server coverage

VyprVPN is built to deliver fast speeds with the highest level of security on more than 70 global server locations.

Speed and performance both change very fast, but VyprVPN doesn’t disappoint domestically.

While it doesn’t have much effect, whether positive or negative on download speeds, when it comes to uploads, VyprVPN picks up internationally, redeeming itself.

VyprVPN’s features over 200 thousand IP addresses, easy and unlimited server switching, no third parties, and unrestricted internet experience via Chameleon technology that defeats VPN blocking and throttling worldwide.

So you can expect to enjoy benefits such as increased privacy and security, access to limited content by escaping restrictive censorship, improved streaming, and protection from data retention laws.

For additional security, VyprVPN provides a NAT firewall as an extra security layer for your connection and additional protection on your router or mobile device.

VyprVPN

Feeling that your VPN is slowing down your connection? Why don’t you try VyprVPN for a change?
Check price Visit website

VPN Unlimited – Affordable fast VPN

Wherever you are browsing or streaming content from, security is a top issue, but speed follows at a close second.

This is especially true in public places where WiFi connections are available, but however convenient, they are not necessarily secure.

A VPN like KeepSolid Unlimited, however, keeps your browsing encrypted and private, at an affordable price and with flexible subscriptions.

In terms of speed, this VPN delivers solid scores making it such an attractive deal. KeepSolid Unlimited increases latency in the domestic front, with minimal reduction in download speeds, and similarly with upload speeds which are quite slow.

However, when connected to a server, or servers far off, it increases latency significantly, while reducing download and upload speeds.

KeepSolid VPN Unlimited

Is your VPN running slow all of a sudden? KeepSolid VPN Unlimited won’t let you down like that.
Check price Visit website

What is the fastest truly free VPN for PC?

You probably know at this point that there are several factors that have an impact on VPN speed.

One of the most important ones is location. The closer the server is to your actual location, the better the connection will be.

In terms of free VPNs, many users around the web are very satisfied with ProtonVPN. It has a free version that offers unlimited bandwidth.

As opposed to many other free VPNs, this one doesn’t keep any user data logs. Plus, it’s capable to go undetected on restrictive platforms like Netflix.

That being said, it only is available in three locations: the United States, Japan, and the Netherlands. 

Did your favorite VPN make the list? If not, let us know which one you use with Windows 10, or which of these fastest VPNs for Windows 10 you’re ready to use, by leaving a comment below.

Viber Not Connecting on Windows PC: Fixed [7 Solutions]

For some users, Viber is not opening on Windows 11. It goes like this: You attempt launching it and get an This app can’t open error.

That’s not an entirely unusual error for UWP apps, but you have to fix it. Here’s how:

How can I fix Viber if not opening in Windows 10?

1. Open the Windows Store App Troubleshooter

  1. Press Windows key + S.
  2. Input troubleshoot in the search box, and click Troubleshoot settings.
  3. Navigate to Additional troubleshooters.
  4. Select the Windows Store Apps troubleshooter listed and click the Run the troubleshooter button.

If Viber is running but not opening on your PC, you can run the troubleshooter to detect and fix the issues blocking it.

Alternatively, you can try software specialized in finding and solving issues like this. If you want to avoid incompatibilities and errors, you may use a simple and smart tool that scans your PC and repairs any damaged or corrupted registries and system files.

2. Run Viber as an Administrator

  1. Open the Start menu.
  2. Locate the Viber app.
  3. Right-click it and choose Run as administrator.

Sometimes, Viber keeps crashing on your PC because you don’t have administrative privileges. Running it as admin should fix the issue.

3. Reset Viber

  1. Press Windows key + X and select Apps & Features.
  2. Select Viber on the list and click on Advanced options.
  3. Click the Reset button.
  4. Click Reset again to confirm further.

4. Reinstall Viber

  1. Press Windows key + X and select Apps and Features.
  2. Now select Viber and click on Uninstall.
  3. Follow the instructions on the screen to complete the process.
  4. Once the application is removed, install it again.

5. Reset the MS Store Cache

  1. Press Windows key + R.
  2. Enter wsreset.
    wsreset command Viber not opening windows 10
  3. Press Enter.
  4. A Command Prompt window will briefly open to reset the MS Store cache.
  5. After that, restart Windows.

6. Modify the hosts file

  1. Press Windows key + S and type notepad. Right-click Notepad and select Run as administrator to launch it.
  2. Click File and then Open.
  3. Then navigate to the following directory: C:\Windows\System32\Drivers\etc\
  4. Change Text Documents to All files and select hosts.
  5. Then add 127.0.0.1 ads.viber.com to the last line of the hosts file.
  6. Save changes.

7. Temporarily turn off Windows Defender Firewall

Note icon NOTE
Disabling your firewall can put your device at risk. This is just a temporary test to see if Windows Security is blocking Viber. If that’s the case, you can whitelist it.
  1. Press Windows key + S and type firewall. Choose Windows Defender Firewall.
  2. Select Turn Windows Defender Firewall on or off.
  3. Now select Turn off Windows Defender Firewall for both types of connections and click OK.

In addition, turn off any third-party antivirus utilities that might include firewalls. Right-click an antivirus utility’s system tray icon to select a disable or turn-off option on its context menu.

Some of the most common reasons why Viber is not opening on Windows are glitches within the software, cache problems, or interfering security apps. With the steps above, you’ll fix it.

Were you able to fix Viber not working on Windows? Let us know which solution worked for you and don’t hesitate to ask if you have any questions.

Acer Monitor Driver: How to Download & Install

Acer has a variety of monitors that are reliable for gaming and other activities you may need them for. However, users get worked up about how to get Acer monitor drivers downloaded on their monitor.

This will help enhance performance and upscale its performance like display, network, etc., so refer to our guide right away.

Do all Acer monitors need drivers?

Drivers are software that helps your computer/monitor communicate with hardware components running on it.

However, there are two main types of monitors, the Plug & Play monitor and those that are not.

Plug & Play monitors don’t require you to download and install any driver for them, while others require driver installation. So, your Acer monitor will need a driver if it is not built into the system to run on startup.

Likewise, it is essential to keep your monitor drivers up to date to ensure it works efficiently as expected. It’ll help the monitor fix bugs affecting it.

How do I download and manually install drivers for my Acer monitor?

1. Use Acer’s official website

  1. Go to Acer’s official website to check for the monitor driver.
  2. Navigate through the page and click on the Support tab.
  3. Select the Drivers and Manuals option from the drop-down menu list.
  4. Input your device information (model number, product serial number, etc.).
  5. Then press Enter to search for the driver that matches the device information.
  6. Choose the correct Windows Operating System.
  7. Download the appropriate Acer monitor drivers.
  8. Run the downloaded file and follow the on-screen prompts to complete the driver installation process.

Downloading the latest Acer monitor driver will ensure smooth system performance and improve functionality.

However, you can refer to our article on how to download the generic plug-and-play monitor driver without running into issues.

2. Use Device Manager

  1. Press the Windows + R keys to prompt the Run dialog page.
  2. Type the following command in the text space: devmgmt.msc, then click on OK to open the Device Manager.
  3. On the Device Manager, locate and click Monitors to display the properties under it.
  4. Right-click on the Acer monitor option and select Update driver from the drop-down options.
  5. Click on the Search automatically for updated driver software option to allow the system to find updates for your driver.
  6. If there are any updates available, download and install them.

3. Use Windows OS updates

  1. Press the Windows + R keys to prompt the Run dialog page.
  2. Type ms-settings:windowsupdate in the search space, then click on OK to prompt the Windows Update settings.
  3. On the Windows Update screen, click on the Check for update option.
  4. Wait while Windows searches for updates, then download the update if any are available.

Updating your operating system is another way of downloading the Acer monitor drivers.

For users having difficulty downloading the Windows Update, we recommend you check our solution for Windows Update not working on Windows 11.

Also, with the drivers already updated, you can check our guide on what to do if the external monitor is not working. Likewise, if you encounter issues with your external monitor turning off randomly, read through our fixes to get the problems fixed.

If you have further questions or suggestions, kindly leave them in the comments below.

Xbox Game Pass made $2.9 billion last year, according to Brazil Activision filings

Microsoft has given us some idea of how much Game Pass makes.  According to a report seen by Tweaktown Microsoft makes about $2.9 billion a year on gaming subscription services (Game Pass).  This report was composed by Brazil’s Administrative Council for Economic Defense (CADE) which has already approved the Activision acquisition.  The actual profit from Game Pass is not revealed, and PC Game Pass is not included in the report.

This means that Game Pass made up 18 percent of Microsoft’s total annual Xbox revenue ($16.28 billion) and nearly 30 percent of all its games and services revenue ($12.581 billion).  Just for comparison, Nintendo Switch Online posted revenue of $932 million dollars while Electronic Arts took in $356 million.   No information was given about Sony’s subscription service, likely due to being new to the market and enough data isn’t yet available.  The report was given by CADE as part of its full approval of the Microsoft and Activision merger.

Worth noting, CADE believes that even if the Call of Duty franchise was to become an Xbox exclusive in the future as a result of the merger Sony still has the means to remain competitive.

Via VGC

Windows 11 Blocking Downloads: Tested Ways to Fix It

Can’t download anything on Windows? You’re not alone. Many people complain about not being able to download files from the Internet.

The main reasons why your computer isn’t letting you download files are corrupt browser data, insufficient space, faulty system files, or malware. You can find below tested ways to fix the issue, irrespective of the exact cause:

How do I enable downloads on Windows 11?

1. Check if external programs are downloading something

It’s possible that you or someone else using your network is downloading something that’s taking all available bandwidth.

For example, if you’re downloading a significant game on Steam, you probably won’t have enough bandwidth for other downloads.

To check if Windows 11 is downloading something in the background, you can open Task Manager or a resource monitor software.

2. Clear browser data

  1. Launch Chrome and click the menu button.
  2. Choose the Settings option.
    settings cant download files windows 10
  3. Select Privacy and security on the left pane.
    privacy
  4. Choose Clear browsing data.
    clear browsing
  5. Click the dropdown next to Time range and select All time.
    all cant download files windows 10
  6. Check the boxes for Browsing history, Cookies and browser data, and Cached images and files.
  7. Finally, click the Clear data button.
    clear data cant download files windows 10

3. Reinstall your browser

  1. Press the Windows + I keys to open the Settings app.
  2. Select the Apps option.
    apps
  3. Click on Google Chrome.
  4. Click on the Uninstall button.
    uninstall
  5. Go to the official website to download Chrome.
  6. Click the Download Chrome button.
    download cant download files windows 10
  7. Click on the downloaded file and follow the simple onscreen instruction to complete the installation.

4. Make sure you have enough space

  1. Open Settings by pressing Win + i.
  2. Click on System.system settings in windows 11
  3. Select Storage.

You’ll see a breakdown of your storage usage, showing how much space is used and what categories (like Apps, Systems, Documents, etc.) are taking up space.

You can click on each category to see more details and manage your storage.

If you don’t have enough space on your hard disk, consider deleting some apps you don’t use or clearing temporary and old files.

5. Change download location

  1. Open Chrome and click the menu button.
  2. Select Settings.
    settings cant download files windows 10
  3. Click Downloads in the left pane.
    downloads
  4. Click the Change button.
    change button
  5. Choose your desired location and click the Select folder button.
    select folder

You can’t download files on Windows 10 because of issues with the download location. Changing the download location, in this case, should solve the problem.

The procedure slightly varies depending on your browser, but it’s pretty simple on all of them.

6. Check for viruses

6.1. Use the built-in tool

  1. Press the Windows key + I and select Update & Security.
    update and security
  2. Click Windows Security in the left pane.
    windows cant download files windows 10
  3. Click Virus & threat protection.
    virus and threat
  4. Now, select Scan options.
    scan options settings cant download files windows 10
  5. Choose your desired scan option and click the Scan now button.
    scan now

We don’t have to tell you that viruses and malware can do nasty things to your computer. But, it can be the reason you can’t download files on Windows 10. Choose the Full Scan or Microsoft Defender Offline scan option for an in-depth can.

6.2. Use a dedicated antivirus software

As good as the built-in virus scanner is, it is still not as good as dedicated antivirus software. And there is no better antivirus than the award-winning ESET NOD32 software.

It is a fast and light software that offers total online and offline protection. It uses cutting-edge technology and advanced machine learning to protect your digital life on your PC.

Lastly, with crypto, online shopping, malware, ransomware, and phishing protection, you are sure you have everything you need to protect your PC.

⇒ Get ESET NOD32

7. Disable the antivirus

Now, let’s do the total opposite. There’s a chance Windows Defender won’t let you download a file if it is perceived malicious. So, the obvious solution, in this case, is to disable your antivirus solution temporarily.

But be careful. You should do this only if you’re sure the file you’re trying to download is secure. If you’re not sure, it’s better to keep your antivirus on.

Your antivirus can block your Internet connection, so check out this helpful guide to find out more.

8. Disable the Firewall

  1. Go to Search and type firewall.
  2. Open Windows Firewall.
  3. Click on the Turn Windows Firewall off or on.windows firewall can't download files windows
  4. Go to Turn off Windows Firewall.

If you still can’t download files on Windows 10, it might be the Windows firewall blocking downloads for some reason. So, you might consider switching it off. But once again, for a short period.

9. Run SFC and DISM scans

9.1. Run an SFC scan

  1. Press the Windows button and type cmd.
  2. Right-click on Command Prompt and select Run as administrator.
  3. In the command line, type the following command and press Enter: sfc/scannowsfc scannow can't download files windows
  4. Wait for the procedure to finish, and restart your PC.

Sometimes, your Windows 10 computer won’t download files from the internet because of broken system files. The simplest solution, in this case, is to run the SFC scan.

If you’re having trouble accessing Command Prompt as an admin, you better look at the guide.

9.2. Run a DISM scan

  1. Open Command Prompt an administrator as shown in the previous step.
  2. In the command line, type the following command and press Enter: DISM.exe /Online /Cleanup-image /Restorehealth
    dism can't download files windows
  3. The process should scan and resolve possible file corruption and fix related issues.

If the SFC scan fails to rectify the can’t download files issue on Windows 10, you can always turn to DISM. This will help to fix the broken and corrupt system files causing the problem.

There is also the possibility that DISM can fail on Windows 10 but don’t worry because we have an expert guide on how to fix it.

10. Reset the Internet Security settings

  1. Search, type Internet options, and open it from the results.
  2. Go to the Security tab, click on Internet, and Custom level…
  3. Scroll to Downloads, and make sure that the Front download option is enabled.internet security settings can't download files windows
  4. Save the changes and restart your computer.

Downloads should be enabled by default, but there’s a chance something disturbed this setting. We can’t surely tell you the cause, but it won’t hurt to check if the settings are on point.

11. Check the registry

  1. Open Search and type regedit.
  2. Open the Registry Editor.
  3. Go to the following path:
    HKEY_CURRENT_USERSOFTWAREMicrosoftWindowsCurrentVersionPoliciespolicies
  4. Look for the Attachments subkey (If you can’t find it, create one).
  5. To create the Attachments subkey, right-click Policies, select New, then Key, and name it Attachments.
  6. Right-click Attachments, select New, then DWORD (32-bit), click on Set Value name as ScanWithAntiVirus and give it the value of 1.

After downloading a specific file, browsers will automatically put it through the antivirus scan with your antivirus program (if you have any).

So, as we were saying before, your antivirus may not allow the file to be downloaded, and you’ll run into a problem. The solution, in this case, is to disable the feature that forces your downloads to go through the antivirus scan.

Note icon NOTE
Doing this is not recommended for safety reasons, so if you determine antivirus scans are not the cause of your problem, turn this feature back on by using the steps above.

If you can’t edit your registry, follow the steps in this dedicated guide and learn how you can do it like a pro.

12. Reset your computer

  1. Open the Settings app.
  2. Click the Update & Security option.
    update and security
  3. Choose Recovery on the left pane.
    recovery
  4. Click the Get Started button under the Reset this PC option.
    get started cant download files windows 10
  5. Choose Keep my files.
    keep files
  6. Finally, click the Next button followed by Restart.
  7. After the procedure is finished, you’ll end up with a fresh copy of Windows.

Resetting your system should be your last resort, but if none of the above helps, it might be the only viable solution.

If the Settings app doesn’t launch on your Windows 10 PC, look at the article to solve the issue.

If resetting the PC doesn’t work, don’t worry because we have a great step-by-step guide that can also fix that problem.

13. Don’t use the download manager

There are thousands of download managers for Windows out there. However, some may interfere with your browser and cause issues with downloading.

Consider removing or disabling your if Windows can’t download files.

Back in the days when browsers weren’t as advanced so you’d need this type of tool. But nowadays, most browser have their built-in download managers that may start acting up if you also have a separate software on your PC.

How do I change my download settings?

Changing download settings on your browser can be done from the browser settings. This guide shows how to change the download location on Chrome.

This is an effective way to solve download issues on your browser. The method is similar to most modern browsers, with just a few differences.

That’s about it. We hope at least one of these solutions helped you resolve the can’t download files problem on Windows 10 and 11.

If you are facing other issues like download failed system busy error on Chrome, check our detailed guide to fix it quickly.

Another issue that can appear is that downloaded files aren’t showing on the Desktop, and we have a guide that addresses it.

The comments section is just below if you have any questions, comments, or suggestions.

Game Keeps Minimizing: 10 Ways to Stop it for Good

Windows 10 and 11 have made it easier and easier to enjoy gaming on your PC. However, they can also run into errors, such as the Full-screen game keeps minimizing one.

Now, let’s take into consideration the mere number of different PC configurations, including hardware and software. This can be a bug, an error, an isolated case, or a stubborn annoyance.

And, there’s a good chance that you’ve run into it if you’re an avid gamer. As reported by many users, their games (which cover many AAA titles) keep on minimizing while on the full screen.

Due to the specs variety of affected users, this is quite an indefinite issue. Symptoms are the same, but the solution might vary.

Why does my game keep on minimizing?

The issue is typically brought on by an incompatible or outdated program, as is the case with most Windows faults. Because drivers are such vital components of the communication bridges that exist between software and hardware, they must be maintained up to date.

It’s possible that your computer is infected with some covert malicious software, which continually runs other programs over your game window and, as a result, negatively impacts the gaming performance by reducing the window.

Streaming applications such as OBS have the potential to be impacted by Windows’ game mode, which may result in the game window being minimized.

Speaking of this issue, users reported a plethora of other similar errors regarding their game minimizing. Some of the most common ones are the following:

  • Full-screen programs keep minimizing – As you will see below, you first need to check your graphics drivers for new updates.
  • The computer keeps exiting full-screen – If your drivers are outdated, a miscommunication between your games’ settings and the drivers will occur.
  • Full-screen game minimizes dual monitor – Even if you have a dual monitor, games will misbehave if your drivers are not entirely up-to-date or if your background applications are interfering.
  • The game keeps minimizing to desktop in Windows 10/11 – Windows 10’s Game Mode may be doing the opposite of what it is intended, ruining your gaming experience.
  • Modern Warfare keeps minimizing – Scanning for viruses on your PC is another good idea since they might be causing bugs.
  • Sims 4, Steam game keeps minimizing – The interference of another overlay is the most likely source of this problem. This may be Discord, Steam, or even the Origin in-game overlay.
  • Game keeps minimizing when clicking the second monitor – In this case, you will have to disconnect and reconnect your monitor.
  • Game keeps minimizing on startup – After you scan your computer for viruses, make sure to update your drivers and OS.

Let’s see what you can do to fix the full-screen game minimizing the issue without further ado. Follow along!

How do I stop my games from minimizing?

    1. Check GPU drivers for the latest updates

    Some users reported they had much better performance with older drivers, so inform them about the best-suited driver’s version for the game.

  1. 1. Right-click the Start icon, then select Device Manager.

  2. 2. Expand the Display adapters section, right-click your drivers, and select Update driver.

    update drivers w10
  3. 3. Select the Search automatically for drivers option.

    automatically-search bluetooth not working windows 10

Alternatively, you can download the driver updates directly from the manufacturer’s website:

  1. Make sure to navigate to one of the below-listed OEM sites:
  2. Search for your GPU model and download the latest stable drivers.
  3. Install drivers and give the troubled game another try.

Try the next solution if the older drivers don’t resolve your problem.

Update drivers automatically

Downloading drivers manually is a process that carries the risk of getting the wrong driver installed, which may lead to severe malfunctions in your  PC. Thus, it is always a good idea to employ the help of professional driver updating software.

2. Kill background applications

2.1 Disable startup applications

  1. Right-click on Taskbar and open Task Manager.
  2. Go to the Startup tab, then right-click and Disable all redundant applications.disable-redundant full screen game keeps minimizing
  3. Restart your computer.

The next spot on our list is reserved for the usual suspects. Background applications and processes are known instigators of performance drops in PC gaming.

They can cause a minimizing, depending on the game and the application running in the background.

So, you’ll need to disable nonvital applications and services. That way, they won’t minimize your game suddenly to show you an unimportant message or notification.

2.2 Stop currently active applications and services

  1. Right-click Taskbar and choose Task Manager.
  2. Open the Details tab. Now, you can quickly identify resource-hogging applications by simply sorting processes.details full screen game keeps minimizing
  3. Right-click on the ones with high CPU and RAM activity and choose End process.sharex-end full screen game keeps minimizing
  4. Additionally, experiment with other processes that tend to push notifications in the background. The full-screen game keeps minimizing issues will be fixed.

The application types that are known for stealing system focus from a game are:

  • VoIP programs like Skype.
  • Cloud programs like OneDrive.
  • Torrents and downloaders.
  • Third-party antivirus solutions.
  • Remote-access programs like TeamViewer.
  • Updates like Java or Adobe.

3. Disable Game Mode

  1. Press Windows + I to open the Settings app, then choose Gaming.gaming-w10 full screen game keeps minimizing
  2. Open Game Mode from the left pane and toggle Use Game Mode off. The full-screen game keeps minimizing issues will be fixed.gmae-mode-off full screen game keeps minimizing

With the Creators Update, Windows 10 users who are avid gamers received a viable improvement in the gaming department.

Namely, Microsoft introduced a Gaming Mode to improve overall performance by configuring system resource allocation.

However, it seems the long-awaited Gaming Mode is more of a drawback, to be perfectly honest since it caused substantial FPS drops for some users.

4. Disable Action Center notifications

  1. Click on the Action Panel in the desktop’s bottom right corner.
  2. Click on Quite Hours to enable the feature.quiet-h0urs full screen game keeps minimizing

Besides background processes belonging to third-party apps, built-in UI features can also minimize games.

Action Center notifications, app notifications, and Windows Error Reporting service are known minimizing-to-desktop instigators for some games, like Skyrim.

For that purpose, we advise you to disable them temporarily and look for changes.

First, let’s talk about Quite Hours. While enabled, this feature will suppress all notifications and sounds and let you enjoy your game without any prompts.

Of course, there’s no selective notification push since Quite Hours blocks all notifications on your system. Every single message, except error reporting, of course.

Regarding error reporting, you’ll need to take down one individual service to prevent unwanted prompts in the middle of the in-game clash.

Follow these instructions to disable the Windows Error Reporting service:

  1. Press the Windows key, then type services and open the first result.serices-w10 0x80070002 windows update
  2. Scroll down until you reach Windows Error Reporting Service. Right-click and open Properties.prop-windows full screen game keeps minimizing
  3. Choose Disabled in the Startup type drop-down menu.
  4. Confirm changes and restart your PC.

5. Run as admin and in a different compatibility mode

  1. Navigate to the game’s installation folder (by default, it’s in C: Program Files) and locate the main EXE file.
  2. Right-click on it and choose Properties.prop-app amd driver install problems
  3. Open the Compatibility tab.
  4. Choose Run this program in compatibility mode and choose Windows 8 from the drop-down menu.compat full screen game keeps minimizing
  5. Now, check the box next to Run this program as an administrator.
  6. Confirm changes and restart the game.

Sometimes, the permissions are the ones to blame for the sudden minimizing of the game. On the other hand, some games will work seamlessly if and only if you run them as an administrator.

Furthermore, older titles might have a hard time working without interruptions in Windows 10, so you can also try and run the game in a different compatibility mode.

6. Give the game’s process a higher CPU priority

  1. Start the game, then press Alt + Tab or Ctrl + Alt + Delete to minimize it.
  2. Right-click on the taskbar and open Task Manager.
  3. Choose the Details tab. Right-click on the game process and choose Set Priority to High.high-prio full screen game keeps minimizing
  4. Get back in the game and look for changes.

In addition to administrative permission, you can grant additional privileges to a game process. That can (given the fact the CPU priorities are important) relieve you of the issue at hand.

The long-awaited Game Mode was supposed to do just that, to prioritize the game over other background processes. But, sadly, things didn’t work out as intended, so you’re forced to do it manually.

7. Disable dual-GPU

  1. Open Catalyst or Control Center from the notification area.
  2. Choose 3D Settings and open Program Settings.program-set full screen game keeps minimizing
  3. From the drop-down list, select the troublesome game.
  4. Set the dedicated GPU as a preferred graphics processor and apply changes.gpu full screen game keeps minimizing

Dual-GPU cards are quite a popular option in the gaming laptop computers niche. One, the Theowerhouse card activates only when needed, while its integrated counterpart works when the PC is idle.

The primary purpose of this system is to preserve energy. You don’t need a gaming GPU rendering while using Paint or posting social updates, don’t you?

However, the responsible software won’t always react as intended and perform a timely switch between dedicated and integrated graphics cards while gaming.

Consequently, this can cause FPS drops and erratic behavior, including sudden minimization of full-screen games.

We advise you to change individual settings for the troublesome game and appoint a dedicated GPU to resolve this. Depending on your card’s manufacturer, you can do so in ATI Catalyst or Nvidia Control Panel.

8. Scan for viruses

  1. Open Windows Defender from the notification area, choose Virus & threat protection and select Scan options.scan-opt full screen game keeps minimizing
  2. Now, you can select the Full scan.full-scan-w10 full screen game keeps minimizing
  3. After the threats are dealt with, give the game another try and look for improvements.

As the case has shown so many times, the malware presence on your computer can cause almost anything.

And, indeed, nothing good. If you’ve tried previous steps and the problem is persistent, maybe a virus of some kind initiates crashes or makes the fullscreen games minimize.

So, make sure to scan for possible malicious presence on your PC. Then, you can use either trusty third-party solutions or turn to Windows Defender.

It’s your choice, but we recommend you check our article for detailed insight into the best antivirus solutions for gaming PCs.

9. Update Windows

  1. Press Windows + I to summon the Settings app then choose Update & security.update-security nmi hardware failure windows 10
  2. Click on the Check for updates button.check-updates searchui windows 10

The unpredictable nature of Windows 10 Updates never ceases to amaze us. Meaning that occasionally, updates Microsoft forced upon your PC are more of a drawback than an improvement.

So, an update might bring a bundle of points instead of resolving previous issues. Including issues that affect gamers, or, to be precise, the minimization problem we’re addressing today.

Now, there’s a bright side to it, as well. Updates are frequent, so it’s legit to believe future updates will address this issue. Therefore, even though it’s a long shot, install updates and look for changes.

10. Show the taskbar on all displays for a multi-display setup

  1. Right-click on the Taskbar and open Taskbar settings.
  2. Scroll to the bottom and toggle on the Show taskbar on all displays option.show-taskbar full screen game keeps minimizing
  3. Close settings and restart the game.

Finally, the final solution is specifically predetermined for users suffering from repetitive game minimization on multiple screens. Namely, it seems the game minimizes on one of the screens while working fine on others.

Luckily, this seems to be one of those grave problems accompanied by a simple solution.

What can I do if fullscreen games keep minimizing on Windows 11?

  1. Press Windows + I, then navigate to Gaming, followed by Game Mode.game-mode full screen game keeps minimizing
  2. Here, toggle off the Game Mode option.game-mode full screen game keeps minimizing

How do I force full screen on Windows 11?

Pressing the F11 key is the quickest way to have a window fill the entire screen. However, if this doesn’t work, you must go through the above solutions, as they all apply to Windows 11.

If you cannot, another way to escape the full-screen mode is to use the F11 key on your keyboard.

With that, we can conclude this lengthy read. Hopefully, you managed to fix the problem regarding the full-screen minimizing.

For more potential solutions, we recommend you look at our post on how to go full-screen in Windows 11.

We also need to mention that one of our readers fixed the problem by changing his 4K display settings to 60Hz refresh rate instead of 30Hz, so make sure you also try that.

Tell us in the comments section below if you have any questions, suggestions, or remarks regarding the minimizing syndrome we addressed today.

4 Ways to Fix Your MSI Camera if It’s Not Working

While MSI maintains a reputation as one of the best high-end gaming laptops on the market, some streaming gamers complained about camera issues.

However, most of them claim that their MSI camera not working problems often occur when the system can’t detect it. Some of our readers also received the error code 0xA00F4292<PhotoCaptureStartTimeout>.

Why is the MSI laptop camera not working?

Firstly, issues with the camera privacy settings on your laptop can cause a black screen on the MSI camera. Meanwhile, other notable causes are:

  • Outdated MSI camera driver issues: Not keeping your device’s camera driver up-to-date can cause the MSI camera not working 0xa00f4244 error. Do not hesitate to refer to our guide on how to update drivers on Windows 11.
  • Outdated Windows: An outdated Windows can affect various parts of your computer. In the event that Windows is unable to finish installing updates, our guide can help you.
  • Camera access is not allowed: It will be impossible for apps to use MSI cameras if they aren’t allowed in your system settings.

How can I fix the MSI laptop camera if it fails to work?

Here’s what you should keep in mind:

  • Switching to an external webcam can save you the stress of constantly fixing issues when the MSI laptop camera is not working in Windows 11. There are lots of webcams you can buy for your laptop. We recommend you read our article about the best 4K webcams for your Windows 11 PCs.

1. Allow access to your camera

  1. Click the Start button and click on Settings to open the app.
  2. Select the Privacy option and navigate to the Camera tab.
  3. Click to turn on the Camera access for the device.
  4. Toggle on the Let apps access your camera option on the Camera tab.

Allowing apps to access your MSI laptop camera will revoke any settings preventing it from working.

We recommend you check out our guide on the best ways to access webcam settings in Windows 10/11 for more details.

2. Update your MSI camera driver

  1. Click on the Start button, type Device Manager in the search box, and press Enter.
  2. Navigate to Cameras and click to expand the menu.
  3. Right-click on the laptop camera or integrated webcam driver option from the drop-down, and tap on the Update driver option.
  4. Choose the Search automatically to update the drivers option.
  5. Restart your computer once the driver update is complete.

MSI camera driver update provides the components dependent on it with the essential patches to fix issues like webcam flickering on Windows 11.

You can also try to use an automated program that can scan and update your drivers for you more safely and quickly.

3. Tweak your camera privacy settings

  1. Click on the Start button, input camera privacy settings in the search box, and press Enter.
  2. Toggle on the Let desktop apps access your MSI laptop camera option.
  3. Select the apps you want to allow access to your system camera, then toggle on the switch against them.

Close the camera privacy settings windows and check if you can fix the MSI camera not working issues. Alternatively, this guide on changing privacy settings on Windows may further help you.

4. Update your operating system

  1. Click the Start button.
  2. Select Settings and click on Windows update.
  3. On the Windows update page, select Check for updates (if there are any updates available, Windows will automatically search and install them).

An outdated operating system can affect many parts of the system and can result in problems like the camera function key not working or triggering the 0xa00f4244 nocamerasareattached message.

You can read more about what to do if the camera is not showing in Device Manager by clicking the link above.

Nonetheless, you should not panic if you encounter problems with your laptop. We have a detailed guide on fixing your laptop camera if it isn’t working and how to get it working correctly.

Also, check our article about what to do if you experience black screen issues with the webcam on your device.

If you have more questions or suggestions on a helpful fix that has worked for you but not included, kindly leave them in the comments section.

Winword.exe Application Error in Windows: 9 Easy Fixes

If you’re seeing the winword.exe error and can’t open Word, it’s likely due to corrupt files, registry issues, an outdated OS, or a virus. Below, we’ll show you easy steps to fix this.

How do I fix Winword.exe application error on Windows 10?

1. Repair MS Office

  1. Open Control Panel.
  2. Go to the Programs and Features section.
    Winword.exe application error the application was unable to start correctly
  3. Then you can right-click a specific Microsoft application listed there.
  4. Select Change. (Alternatively, you could select the Microsoft Office suite instead)
    Winword.exe application error Windows 10
  5. Click on Online Repair.
  6. However, you can also select Quick Repair to fix corrupted files.

2. Run an SFC and DISM Scan

  1. Press Win + X.
  2. Select Command Prompt (Admin) or PowerShell (Admin) from the list.
    Winword.exe application error office 2013
  3. When Command Prompt opens, run the below command. sfc /scannow
    Winword.exe crash wwlib.dll
  4. SFC scan will now scan your system.
  5. This can take about 10-15 minutes, so don’t interfere with or cancel it.

Continue with DSIM:

  1. Start Command Prompt as administrator.
  2. Run the following command: DISM /Online /Cleanup-Image /RestoreHealth
    Winword.exe application error the application was unable to start correctly
  3. DISM scan will now start.
  4. Remember that this process can take about 20 minutes or more, so don’t interfere with it.

Alternatively, you can use a tool that specializes in file repair. These tools scan your PC for corrupted or damaged files and repair or restore them to their original version.

If you’re dealing with other system process issues, you can also follow our step-by-step fixes for the filecoauth.exe application error.

3. Check for Windows updates

  1. Open the Settings app by using Windows + I shortcut.
  2. When the Settings app opens, go to the Update & Security section.
    Winword.exe crash wwlib.dll
  3. Now click the Check for updates button.
    Winword.exe application error Windows 7

Sometimes missing system updates can cause a winword.exe application error to appear. To fix this issue, it’s advised to keep your system updated at all times. Also, an OS update will fix the msosync.exe Bad Image error.

4. Run an antivirus scan

There are times when the winword.exe application error occurs if there’s a malware infection on your system. Fir up Windows Defender, and run a full system scan.

Also, if you want to get specialized antivirus services and upgraded protection tools, you can certainly switch to more effective antivirus. We suggest you use a full-featured tool based on multi-layered protection such as TotalAV.

5. Reinstall the software

  1. Open Control Panel.
  2. Select Programs and Features.program and features
  3. Select Microsoft Office.
  4. Hit the Uninstall button.uninstall button
  5. Head to the official Microsof Office website.
  6. Download the program.
  7. Install it on your PC and check if this fixes the issue or not.

If winword.exe application error keeps appearing on your PC, the problem might be a corrupted installation. An alternative to the above-shown solution is using an uninstaller software.

Such tools remove the app and all files and registry entries related to it.

6. Undo System Changes with System Restore

  1. Press Windows + S and type System restore.
  2. Choose to Create a restore point.
    Winword.exe application error the application was unable to start correctly
  3. Click the System Restore button.
    Winword exe runtime error
  4. When System Restore window opens, click Next.
    Winword.exe application error office 2010
  5. Check Show more restore points option if it’s available.
  6. Choose the desired restore point.
  7. Click Next.
    Winword.exe application error Windows 10
  8. Follow the instructions on the screen to complete the process.

7. Restart Winword process

  1. Right-click on the Start menu.
  2. Select Task Manager.
  3. Locate the process and select it.
  4. Click on End task.
  5. Relaunch the Microsoft Word app and check if this fixes the issue or not.

8. Update Windows

  1. Press Win + I buttons to open the Settings menu.
  2. Select Windows Update from the left side.
  3. Hit the Check for updates button.windows 11 check for updates
  4. If there is a new update available, you system will prompt you to download it.

9. Modify AppInit_DLLs

  1. Press Win + R to open the Run dialogue.
  2. Type regedit and hit Enter.Run regedit windows
  3. Head to the following path. Computer\HKEY_LOCAL_MACHINE\SOFTWARE\WOW6432Node\Microsoft\Windows NT\CurrentVersion\Windows
  4. Expand the Windows folder from the left-side.
  5. Look for AppInit_DLLs on the right.
  6. Double-click on AppInit_DLLs.
  7. Delete any values in the Value data box.
  8. Press OK.
  9. Restart your PC and check if this fixes the issue or not.

Where is Winword Exe located?

Note icon NOTE
The location of Winword.exe may differ from one version to another, but there’s a way you can easily find it in Windows, no matter the version of Microsoft Word you are running.
  1. Press Windows + R to open Run, enter regedit in the text field, and click OK.regedit
  2. Click Yes in the UAC prompt.
  3. Now, paste the following path in the address bar and hit Enter:HKEY_LOCAL_MACHINE\SOFTWARE\Microsoft\Windows\CurrentVersion\App Paths\Winword.exepaste path
  4. Click on the Path string here.path
  5. The address listed under Value data will be where you will find the Winword.exe file.copy path
  6. Press Windows + E to open File Explorer, navigate the path found in the previous step, and you will see the Winword.exe file.winword.exe

Apart from the above solutions, you can also try these three solutions to fix the Winword.exe application error on your Windows 11 PC. The solutions are almost similar for Windows 10 and 11 PCs.

You might also be interested on how to fix Offspon.exe related errors if you have encountered them.

Let us know in the comments below, which one of the above solutions helped you fix the problem on your PC.

How to Fix Video not Playing on PC in 8 Simple Steps

Video is perhaps the most consumed content today, whether you’re streaming online or watching offline from your computer or device.

Over the years, Windows PCs have enabled many users not just to create but also to embed and edit videos from their computers, using different Office programs and apps.

Windows 10 has seen steady uptake from consumers, but this, too, has come with many troubleshooting concerns.

One of these concerns is related to videos not playing on Windows 10. Let’s see some issues aggregated around the same topic that you will hopefully fix with our solutions:

  • Video not playing after Windows 10 update
  • Online videos not playing on the laptop
  • Video not playing after download (offline)/recovery
  • Video plays sound but no picture in Windows 10
  • Can’t play video on Windows 7, 8, XP
  • Windows can’t play MP (Whether we’re talking about Windows 10 or 11, it is impossible to play MP4 files).

Among the quick fixes for this is restarting your computer, but should this not help, try the troubleshooting tips below.

Why won’t videos play on my computer?

Apart from work, we also use our laptops and PCs for media consumption. But if the video is not playing on your Windows 10 PC, it could be because of the below-mentioned reasons.

  • Your player doesn’t support the type of file you are trying to open.
  • The video file itself is corrupted.
  • Your display driver is not updated.
  • The required codec isn’t installed on your PC.
  • Essential plug-ins are missing.
  • Necessary settings aren’t tweaked.
  • The video player isn’t updated.

Now that you know the issues that could trigger video not playing matter on your Windows 10 PC let us go through the solutions you can apply and resolve the problem.

How do I fix video not playing on my computer?

1. Uninstall and reinstall the display driver

    One of the main point to look at if your video does not play on you Windows laptop is the fact that the drivers might be outdated or even some of them are missing. Here’s how to carefully uninstall & reinstall them, both manually via Device Manager and automatically with the help of a driver updater tool.

    1. Right-click Start and select Device Manager.
  1. 2. Select Display drivers to expand the list.

  2. 3. Right-click on the device and click Uninstall.

    display adapters
  3. 4. Ensure the option to delete the driver package from the system is checked/selected so that the driver package installed is deleted.

  4. 5. Go to the Action menu.

  5. 6. Select Scan for Hardware changes to reinstall the driver.

    device manager scan for hardware changes
  6. 7. Close and restart the computer.

To avoid doing this manually, we bring to your attention a quick and useful software that will handle this situation automatically.

For this type of issue, our recommendation goes towards Fortect Driver Updater, a quick, friendly, and very efficient tool. Not only does this tool let you know when your drivers are outdated, but also it lets you choose from a bunch of missing ones to have your PC up-to-date and running again.

⇒ Get Fortect Driver Updater

2. Convert the video into a readable format

Apart from the drivers possibility, a common solution to the inability to play videos is the fact that the format is not compatible with any of the players that you have on that PC. To fix this you can try to change the video format into another one that can be read through one of the programs.

Out in the market are a big number or good video editing programs intended not only for professionals but also for persons that just emerge into this space. Some of them are designed for the special effects particularity others are friendly to users and you get plenty of features that will let your creativity go wild.

They support a large number of formats and give you the freedom that you need in terms of customization.

3. Check if the proper codec is installed/run. Optimize compatibility

If videos are not playing in the browser on Windows 10, it could be that you don’t have the appropriate codec installed.

For example, someone could send you a PowerPoint presentation with media based on a codec that your PC doesn’t have.

WinX HD Video Converter Deluxe can fix the video not playing on Windows 10 by converting video formats/codecs to MP4, MKV, WMV, AVI, MOV, H.264, etc.

This process happens fast and efficiently, and the results ensure professional-level quality.

Simplifying the process of converting the files that can’t run on Windows 10 by using this incredible software allows you more time to ensure that all the other project elements are up to standard.

On top of these, that’s your chance to get access to any video, regardless of codec HEVC/H.264 or frame rate. 

4. Install missing plug-ins

You may be missing Adobe Flash or Silverlight plug-ins that could enable video playback, especially for browsers.

Get the right or missing plug-ins, then check if the video is playing again.

5. Open video in the browser

  1. Right-click on the video that is not playing.
  2. Select the Open with option from the list that appears.
  3. Choose Google Chrome.
  4. The video will start playing as soon as your select Google Chrome.

Some sites have online videos that cannot play from other applications. Try opening through your browser and check if this fixes the video not playing on Windows 10 issue.

6. Check for all available Windows updates

  1. Click Start and select Settings.Videos not playing on Windows 10
  2. Click Update and Security.Videos not playing on Windows 10
  3. Click Windows Updates.Videos not playing on Windows 10
  4. Click Check for Updates.Videos not playing on Windows 10
  5. Install the updates that are pending.

Keeping up your system to date is essential, and if videos don’t play on your computer, then be sure to download the latest Windows updates.

7. Use software rendering instead of GPU rendering

  1. Click Start and select Control Panel.
  2. Select the Network and Internet option.Videos not playing on Windows 10
  3. Select Internet Options.Videos not playing on Windows 10
  4. An additional window titled Internet Properties will open.
  5. Select the tab labeled Advanced.
  6. You will see a section titled Accelerated Graphics.
  7. Check the box labeled Use software rendering instead of GPU rendering.Videos not playing on Windows 10
  8. Scroll down the list until you see an additional section labeled Security.
  9. Check the box for Enable 64-bit processes for Enhanced Protected Mode*.
  10. Now select Apply and OK.
  11. Restart your browser.

This solution is quite simple, but it might help if videos don’t play on your laptop.

8. Change the video player

If none of the above solutions helped you fix the video is not playing issue on your Windows 10 PC, then it is time for you to switch to a different video player.

Often because of a bug on the player, you will encounter such problems until they are fixed with an update. If no update is available, you can opt for a different video player.

There are multiple video players available in the market, and we have a dedicated guide that lists some of the best video players you can download on your PC.

What can I do if the video is not playing in Windows 11?

The above solutions also apply to the video not playing issue in Windows 11. However, a few other tips can help you resolve the problem on your Windows 11 PC.

1. Run troubleshooter

  1. Press the Win + I keys to open the Settings.
  2. Select Troubleshoot in the System tab.troubleshoot-opt-w11 0xa00f4244 nocamerasareattached
  3. Click on Other troubleshooters.other troubleshooters windows 11
  4. Scroll down and click on Run next to the Video Playback option.

2. Disable video processing

  1. Press the Win + I keys to open the Settings.
  2. Select Apps from the left side.
  3. Click on Video playback on the right side.
  4. Disable Process video automatically to enhance it option.

Why won’t MP4 play on my computer?

Here are some common reasons why MP4 file format won’t run on your computer.

  • The MP4 video file you are trying to play is corrupt.
  • The player you are using to run the MP4 file is not supported.
  • There is a bug in the version of the video player you are running.
  • A glitch in your Windows OS version is causing the issue.
  • Some critical system files are missing.

Did any of these solutions fix the Videos not playing on Windows 10? Let us know by leaving a comment in the section below.

For more potential solutions, check out 11 Ways to Fix There Was a Problem Playing This Video Error.

Also, leave there any other suggestions or questions you may have.

League of Legends Ping Spikes: How to Stop Them Permanently

League of Legends ping spikes can ruin your experience and put you in a disadvantage, so it’s important to fix them, and this guide will show you how to do it.

Why does my ping keep spiking in League of Legends?

Issues with your firewall or DNS are the most common cause for this issue. Having proxy or VPN enabled can also cause this.

How can I fix the League of Legends ping spikes?

1. Remove the Xbox app

  1. Type Resource Monitor in the Search menu and then select the relevant result.
    League of Legends lag
  2. Go to the Network section of Resource Monitor.network
  3. Search for the GameBarPresenceWriter process, right-click on it, and then select Suspend Process.suspend process

Disable the Xbox app:

  1. Type PowerShell in the Search menu, right-click on Windows Powershell, and then select Run as administrator.
    League of Legends lag
  2. Click Yes in the UAC prompt that appears.
  3. Paste the following command and then hit Enter:Get-AppxPackage Microsoft.XboxApp | Remove-AppxPackagecommand

2. Turn off the auto-connect option for Wi-Fi

  1. Press Windows + I to open the Settings app, and then click on Network & Internet.network & internet
  2. Select Wi-Fi from the navigation pane, and then click on the connected network on the right.network
  3. Disable the Connect automatically when in range setting.connect automatically when in range

3. Make sure League of Legends isn’t blocked by your firewall

  1. Press Windows + S to open the Search menu, enter Windows Defender Firewall, and then click on the relevant search result.windows defender firewall
  2. Click on Allow an app or feature through Windows Defender Firewall on the left.allow an app
  3. Click Change settings and then check League of Legends on the list.change setting
  4. Now, click on the Allow another app button.allow another app
  5. Click Browse in the Add an app window.browse
  6. Now, locate League of Legends and other files listed below, select them individually, and then click on Open.league of legends
  7. Click Add.add
  8. Verify that both Private and Public checkboxes are ticked for the process, and then click on OK to save the changes.ok

For League of Legends to work properly on your PC, the following files need to be allowed to go through your firewall:

C:\Riot Games\League of Legends\lol.launcher.exe
C:\Riot Games\League of Legends\lol.launcher.admin.exe
C:\Riot Games\League of Legends\RADS\systemrads_user_kernel.exe
C:\Riot Games\League of Legends\LeagueClient.exe
C:\Riot Games\League of Legends\RADS\solutions\lol_game_client_sln\releases\(latest release version - ex: 0.0.0.xx)\deploy\League of Legends.exe
C:\Riot Games\League of Legends\RADS\projects\lol_air_client\releases\(latest release version - ex: 0.0.0.xx)\deploy\LolClient.exe
C:\Riot Games\League of Legends\RADS\projects\lol_launcher\releases\(latest release version - ex: 0.0.0.xx)\deploy\LoLLauncher.exe

After allowing all these files through the firewall, you shouldn’t have any more issues with the game.

4. Change your DNS

  1. Press Windows + R to open Run, enter ncpa.cpl in the text field, and then click OK.ncpa.cpl
  2. Right-click your network and choose Properties from the menu.properties
  3. Select Internet Protocol Version 4 (TCP/IPv4) and click Properties.IPv4
  4. Select Use the following DNS server addresses, enter the values below in the fields, and click OK to save the changes.
    • Preferred DNS server: 8.8.8.8
    • Alternate DNS server: 8.8.4.4dns address
  5. Again, click OK in the Network Properties window.

Keep in mind that changing the DNS can lead to changes with your ping, so always test League of Legends ping after changing these settings for any improvements.

5. Forward the required ports

The process is different for each router, so there are no universal guidelines. Log in to your router and locate Port Forwarding on the configuration page. Now forward the following ports:

  • 5000 – 5500 UDP (League of Legends Game Client)
  • 8393 – 8400 TCP (Patcher and Maestro)
  • 2099 TCP (PVP.Net)
  • 5223 TCP (PVP.Net)
  • 5222 TCP (PVP.Net)
  • 80 TCP (HTTP Connections)
  • 443 TCP (HTTPS Connections)
  • 8088 UDP and TCP (Spectator Mode)

This is an excellent solution if League of Legends lag spikes occurs with low ping, so we encourage you to try it.

6. Disable proxy and VPN

  1. Press Windows + I to open the Settings app, and click on Network & Internet.network & internet to fix league of legends ping spikes
  2. Navigate to the Proxy tab from the left and disable all settings on the right.proxy to fix league of legends ping spikes

That’s it. The League of Legends ping spike should be fixed if the previous methods didn’t work till now.

How to Test Ping in League of Legends

  • In-Game (Live Match)
    • Press Ctrl + F to display ping (top-right corner).
    • Enable it permanently in Settings > Interface > Show FPS and Ping.
  • Practice Tool
    • Go to Training > Practice Tool for safe testing.
    • Use Ctrl + F to monitor ping during ability use or movement.
  • Command Prompt (Outside Game)
    • Open cmd, type: ping 104.160.131.3 -t (NA server example).
    • Use Ctrl + C to stop the test.
  • Tips
    • Ideal ping: under 60ms.
    • Use Ethernet and close background apps to reduce lag.

How can I fix League of Legends ping spikes on Windows 11?

In addition to the methods listed earlier, you may check for third-party app conflicts and remove all such apps. Though if you are removing an antivirus, ensure the built-in Windows security is enabled to keep your system safe.

Also, updating the network drivers may help if the problem lies with the connection. Finally, if you share a relationship with others, try switching to a high-speed Internet plan since low Internet speed is also a likely cause.

Besides, for the best experience under these circumstances, you may join a server that’s located geographically close.

Why is my ping so high but my internet is good?

This could mean a problem with your device or the connection. So the primary thing to do is terminate all non-critical apps and background processes that might be using the Internet.

The distance between the device and the router affects the Internet speed, so move the two closer and check if that improves the situation.

Resetting the router also did the trick for many, but before you do that, restart it once, and verify if the ping comes down to normal levels. If none of these solutions work, we recommend contacting the ISP since it could be a localized issue.

Will a better router improve ping?

It might, if you are currently using an outdated model, but in general, routers don’t play much of a role with the ping. Ping is mostly related to the distance between you and the hosting server.

A stable Internet connection with minimum interference and reducing the distance between the device and router should primarily help you improve ping.

But if you have a decent spare router lying around, give it a try and check if the ping improves. Though you must know, switching to Ethernet is highly effective at reducing ping.

That’s all there’s to ping spikes in League of Legends and, in general, with other games. And the solutions listed here should fix things for you.

Also, find out what to do when you notice an FPS drop in League of Legends.

Use the comment section below to tell us if these methods worked for you!

[Fixed] Can’t Click Anything on Windows 10/11: Cursor/Mouse Problem

Can’t click anything on the Windows desktop after booting up the computer? You’re not alone. The problem stems from Windows Explorer crashing or from hardware issues (but don’t panic, it’s usually not a big deal).

Here’s how to fix it:

What to do if you can’t click anything in Windows?

1. Restart the explorer.exe process

  1. Press Ctrl + Shift + Esc to open the Task Manager. Alternatively, press Ctrl + Alt + Delete, navigate to the Task Manager using the Tab key, then press Enter.
    can't click anything Windows 10
  2. Press the Tab key until one of the processes is selected.
  3. Use the Down Arrow key on your keyboard to select Windows Explorer.
    can't click anything Windows 10
  4. Since the right-click is not working, we will use Shift + F10 (shortcut for right-click) to bring up the context menu.
  5. Use the Down Arrow key and select End task, then click Enter.
  6. Once the explorer.exe process is killed, you may see a black screen for a short time.
  7. Press the Windows key + R, type explorer.exe, and hit Enter.
    can't click anything Windows 10
  8. This will relaunch your Windows Explorer. Next, try using the mouse to click anything to see if the issue is resolved.

If your Windows Explorer has crashed or frozen, it may lead to the can’t click anything issue in Windows 10 and 11. However, ending and restarting the explorer.exe process can resolve this problem.

2. Check your keyboard for issues

Faulty keyboard keys can prevent the mouse from performing the right-click and left-click actions.

Check if your keyboard has

  • any broken keys or long-hold keys that are pressed without your knowledge
  • PAY special attention to the spacebar because it’s most likely to crack
Note icon NOTE
The spacebar is one of the standard keys to break or get stuck on your keyboard.

You may also unplug the keyboard and restart your computer to see if the mouse and clicking functions work.

Check the keyboard for faulty keys if the mouse works without a keyboard connected to your computer.

3. Check for pending Windows updates

  1. Press the Windows key on your keyboard and type update; use the Arrow key to scroll to Check for updates, then hit Enter.
  2. In the Windows Update section, use the Tab key to navigate.
  3. Select Download updates or the Download & Install option and hit Enter.
  4. Windows will download and install any pending Windows 10 updates.

Mouse-clicking issues in Windows 10 are pretty common. Ensure you are running the latest stable Windows 10 build to fix any problems caused by a glitch in the OS.

4. Check your mouse and third-party software

4.1 Try another mouse or your mouse on another computer

Disconnect your mouse from the current machine and connect it to another computer to see if it works properly.

if it works:

Check the port in which is connected or try connecting it to another port.

You may also try to unplug the mouse and connect another mouse to your computer. Right-click on any app or desktop and check if the secondary mouse is working.

If the mouse works, you may need to replace the device with a new one.

4.2 Check for a third-party software

  1. If you had recently installed third-party software to customize a mouse or keyboard, it might create issues with the pointing device.
  2. Close any apps such as Razer Synapse or other customization software from the Task Manager.
  3. Disconnect and reconnect the mouse to see if that resolves the issue.

5. Use a restore point

?This is a more advanced solution. If you never made a restore point in your life, watch this video (it’s easier to grasp). AND BACKUP YOUR DATA!

(Find step-by-step instructions right below the video)

  1. Press the Windows key, type restore, select Create a restore point, and hit Enter to open System Properties.
  2. Press the Tab key to select the System Restore button and hit Enter.
  3. Hit Enter to select the Next option.
    can't click anything Windows 10
  4. Use the Tab key to select a restore point, navigate to Next with the Tab key, and hit Enter.
  5. Windows will restore your system to its state before the date selected. However, the process may take some time to complete, so wait till the PC reboots and shows a success message.

Repeat the steps with an older Restore Point if System Restore is unsuccessful.

Alternatively, you can use specialized software to try and repair this Windows error. Windows repair tools will scan all system files’ integrity for corruption or damage and repair them.

Why is my laptop cursor not clicking?

If your laptop cursor is not clicking, it might be because it has been turned by some keyboard combination mistakenly.

Also, the problem might be due to broken or outdated mouse drivers.

This concludes our troubleshooting, and we hope that after performing the steps, you have been able to fix the problem on your PC.

You might also find it helpful to read our article on how to fix File Explorer if it is slow on Windows 10 & 11 because it may help you understand the problem better.

Let us know in the comments section below if you have other suggestions or questions about this issue.

10 Quick Ways to Fix HyperX Problems on Windows 10

HyperX is a famous gaming hardware series that includes memories, SSDs, headsets, and peripherals. But many recently reported encountering problems with HyperX in Windows 10.

Issues with HyperX devices can arise for several reasons, and it’s generally tricky to identify the underlying cause.

So, in the following sections, we will walk you through what’s causing HyperX problems in Windows 10 and the solutions for each.

Why is my HyperX not working?

When the HyperX device is not working on the computer, it’s essential to identify the type of device you are facing issues with.

For instance, if it’s a headphone, misconfigured sound settings, outdated or corrupt drivers, or improper connections are to blame.

Several users also reported that the HyperX mic is not working, in which case, you would have to check the connections, be it a wired or wireless microphone.

Besides, certain services and processes are supposed to run on the computer to function the connected devices effectively. And in their absence, you are bound to encounter issues.

What to do if HyperX Cloud 2 mic is not working?

Many users reported that HyperX Cloud 2 mic is not working on Windows 11 and 10, but this issue can be quickly resolved. First, set the microphone as the primary device and verify if that resolves the problem.

You may update the audio driver or the ones specific to the HyperX Cloud 2 mic if it doesn’t. Besides, if you have third-party apps running that could modify the sound settings, disable or uninstall them to fix the HyperX problems in Windows 10.

If the microphone keeps resetting to 0 volume, you may run the audio troubleshooter or disable apps from taking control of the HyperX Cloud 2 mic.

Does HyperX need drivers?

Yes, HyperX needs drivers, as is the case with any device. But things are a lot more effortless and streamlined with HyperX.

Users don’t need to add the drivers manually; instead, they are automatically fetched and installed as soon as the HyperX device is connected. This is why you wouldn’t be able to find HyperX driver updates online.

Also, it’s best that you download HyperX NGENUITY software to customize compatible devices. In addition to that, it will also ensure that the devices work fine.

How do I fix HyperX issues on Windows 10?

1. Reinstall the headset driver

  1. Press Windows + X to open the Power User menu, and choose Device Manager from the list.
  2. Locate your HyperX audio device, right-click on it, and choose Uninstall device.uninstall device
  3. A warning dialog will appear. Click on Uninstall to remove the device.
  4. Once done, unplug your headset and then restart your PC.
  5. After your PC restarts, reconnect the headset, and the driver for it should be installed automatically.

You might have to repeat this process several times before your headset starts working.

Drivers allow your PC to work with the hardware. Therefore, any driver-related issue will cause problems. That is why reinstalling the drivers will most likely solve the problem immediately.

Update drivers automatically

Outbyte Driver Updater automatically update drivers

If the previous method doesn’t fix the issue, we recommend you use a dedicated tool. Downloading and installing drivers manually is a process that carries the risk of getting the wrong driver installed, which may lead to severe malfunctions in your system.

So the safest and easiest way to update drivers on a Windows computer is by using a third-party tool. We strongly recommend Outbyte Driver Updater.

It scans your system, automatically identifies each device on your computer, and matches it with the latest driver versions from an extensive online database.

Drivers can then be updated in batches or one at a time without you having to make any complex decisions in the process.

Outbyte Driver Updater

Update all your audio outdated drivers with just a few clicks..
Free Trial Download now

2. Make sure that your microphone is unmuted

Some users mentioned that they were unable to adjust the microphone volume. The solution to this problem is relatively simple: you have to check the USB dongle that comes with the gaming headset.

There’s a small Mute switch on it, so make sure to press it to unmute the microphone. After doing that, the problem should disappear. It’s worth mentioning that the USB dongle also has its microphone control keys, so adjust the volume of your microphone from here.

Lastly, double-check if the headset is correctly connected to the USB dongle. To fix this problem, firmly connect your headset to the USB dongle and check if that solves the HyperX headset not working issue on Windows 10.

Also, find out what to do if other headsets are not working in Windows 10.

3. Connect your headset to a different USB port

HyperX Cloud II is a USB headset, meaning many USB-related problems can affect it. For example, although the USB 3.0 standard is gaining popularity, several users reported that this headset isn’t working correctly with this USB version.

Connect your headset to a different USB port

So instead of using USB 3.0, try to connect your headset to a USB 2.0 port and check if that solves the issue. In addition, some users suggest you use the ports on the back of your computer instead of the front ones, which are more likely to be faulty.

4. Check your audio device settings

  1. Press Windows + S, enter Change system sounds in the text field, and choose the relevant search result from the menu.change system sounds to fix hyperx problems windows 10
  2. Go to the Recording tab, right-click the empty space, and check the Show Disabled Devices and Disconnected Devices options.
  3. Now locate your microphone, right-click on it, and choose Enable from the menu.
  4. Click on OK to save changes.

Some users also suggested deactivating and reactivating the microphone to fix this problem. You can easily do it by choosing Disable and Enable from the Sound window.

5. Use the sound troubleshooter

  1. Press Windows + I to open the Settings app, and click on the Update & Security section.update & security
  2. Choose Troubleshoot from the navigation pane on the left.Troubleshoot
  3. Click on Additional troubleshooters here.additional troubleshooters
  4. Now select Recording Audio and click on the Run the troubleshooter button.recording audio to fix hyperx problems windows 10
  5. Follow the on-screen instructions and choose the relevant response when prompted to complete the troubleshooting process.

Running the built-in troubleshooter is probably one of the simplest methods to fix HyperX problems in Windows 10. But remember that it would only work if Microsoft has acknowledged the issue and a solution is available.

6. Update the firmware

If you’re having microphone problems with your HyperX Cloud II headphones, you might be able to fix them by upgrading the firmware since it’s critical for the effective functioning of the device.

Note that firmware update is an advanced procedure, and it can cause irreversible damage to your headphones if not done right, so exercise caution.

If you intend to update it, download the firmware update for HyperX Cloud II from the official support website. The updates for other devices, too, can be found on the support website.

7. Try using an audio splitter

Users reported that the microphone wasn’t recognized on their HyperX Cloud Stinger headphones. They mentioned one might be able to circumvent this problem by using an audio splitter.

Try using an audio splitter

This small device comes with two 3.5mm ports, one for audio and one for the microphone. This isn’t the best solution, but it’s a decent workaround, so you might want to try it if you’re having problems with the HyperX Cloud Stinger headset in Windows 10.

8. Update the drivers

  1. Press Windows + R to launch the Run command, enter devmgmt.msc in the text field, and click OK to open the Device Manager.devmgmt.msc
  2. Locate your audio driver, right-click it and choose Update driver.update driver to fix hyperx problems windows 10
  3. Select Search automatically for drivers.search automatically
  4. Windows will now check for driver updates and install new drivers.
  5. After the new driver is installed, restart your PC.

We have to mention that Device Manager is the simplest way to update your audio drivers but not necessarily the most efficient one. Usually, Device Manager doesn’t download the latest drivers, which can be a problem. And

To ensure you have the latest drivers, download these from the motherboard or sound card manufacturer’s official website.

Better yet, use the dedicated tool recommended in the first solution, Outbyte Driver Updater, and you’ll surely get the correct components in no time.

9. Use the remote control to adjust the microphone

Some HyperX headsets have a remote control that allows you to control your microphone or adjust your audio.

hyperx headset remote control

Using the remote control, you can adjust your headset’s microphone sensitivity, so be sure to do that.

Few users reported that this method solved the problem for them. If the previous ones didn’t help, try this one.

10. Check your headset wires

If you’re having any problems with the HyperX headset in Windows 10, you might be able to fix them by checking the cable. In some cases, your cable is damaged, and you might be able to fix it by taping the affected area.

To verify if the cable is the culprit, you might want to try the headset on a different PC and check if the same appears. If it does, you now know what’s causing the problem and its solution.

How can I fix HyperX problems on Windows 11?

The solutions remain the same with Windows 11 as they were for Windows 10. However, a couple of additional measures you may undertake are as follows:

  • Look for applications that might control the Bluetooth functionality or the sound settings and uninstall them.
  • If the problem started after updating the OS, revert to the previous version.
  • Performing a system restore might do the trick.
  • Disable apps from accessing the microphone.
  • As a last resort, you may reset Windows 11 to factory settings.

Is there software for HyperX?

There are a series of software that allows you to customize some of HyperX’s features. A good example is the HyperX NGENUITY software that is available for download in Microsoft Store

HyperX series offers a great range of gaming hardware, but as you may have noticed, some of its products have had problems in Windows 10. Though the solutions are simple, you should have them working in no time.

Also, find out how to optimize the PC for gaming and run even the most resource-hungry games seamlessly.

If you have any other suggestions or questions, don’t hesitate to leave them in the comments section below, and we’ll be sure to take a look.

Fix: Unable to Activate Windows Defender Windows 10 Firewall

Users complained that Windows could not start the Windows Defender Firewall service on the local computer.

Since Windows Firewall is a handy feature, especially if you don’t have any third-party antivirus software installed, this could be a severe problem.

So, we came up with a few solutions to help you solve the problem with Windows 10 and Windows 11 Firewall.

Here are some more error codes and messages you may encounter on the way:

  • Windows could not start the Windows Firewall on a local computer. This is one of the most common error messages you may encounter if you cannot run the Windows Defender Firewall.
  • Firewall error code 13 – Error Code 13 is one of the most common errors you’ll see if you can’t turn on the Windows Defender Firewall.
  • Windows 10/11 Firewall error 1068 – Another standard error code that prevents users from starting Windows Defender Firewall.
  • Windows 10/11 Firewall error 6801 – Although the error code 6801 is less common, you can also encounter this code.

Why is my Windows Firewall not turning on?

Windows Firewall that scans your PC and protects it from network-based threats. It scans or checks the files you download over the internet, so you aren’t downloading a virus or malware-infested file.

After some research, we have prepared a list of why you cannot turn on the Windows Firewall on your Windows 10/11 PC.

  • Your account does not have the necessary permissions to start Windows Firewall.
  • A third-party antivirus tool is blocking Windows Firewall.
  • A virus or malware is not allowing Windows Firewall to open.
  • An important Windows Firewall file is missing or corrupt.
  • There is a registry error.
  • The Firewall configuration doesn’t match your system.

Is Windows Defender the same as Windows Defender Firewall?

Windows Defender is popularly known as Microsoft Defender Antivirus. However, often WindowsHowever, under Firewall is also known as Windows Defender. So, there is a bit of confusion here. Let us sort that out.

One of the simplest ways to understand the difference between Microsoft Defender and Windows Defender Firewall is that Microsoft Defender Antivirus is a malware scanner. In contrast, the Windows Defender Firewall is the network firewall.

Windows Defender Firewall permits or denies access programs on a computer from accessing the network or internet. At the same time, the Microsoft Defender Antivirus scans your PC for malware.

Now, if you are looking for the difference between Windows Defender and Windows Defender Firewall, there is no difference between the two. Windows Defender is the short form of Windows Defender Firewall.

Quick Tip:

If your Windows 10 Firewall doesn’t work, use third-party antivirus software, and your computer will automatically switch to the antivirus firewall.

However, we strongly recommend you the solution below as the world’s best antivirus on the market right now. It has a lot of valuable features and protection tools.

TotalAV

Forget about the built-in firewall and employ a full-fledged antivirus with advanced protection for your system.
Free Trial Visit Website

Why is my LAN speed only 100mbps?

There are several reasons behind it, but the primary factor you will have to verify is whether the connected hardware supports higher speeds. Because if any of the components responsible for the connection have a lower capability, the speed would be stuck at 100 Mbps or lower.

Usually, it’s the Cat5 cable to be blamed, and if it’s used for the LAN connection, you can only achieve a maximum of 100 Mbps. In that case, the best option would be to upgrade to Cat5e, Cat6, or later Ethernet cables.

How do I fix slow LAN speed on Windows 10?

1. Restart the Firewall service

  1. Press Win + R to open the Run dialogue.
  2. Type services.msc, and open Services.
  3. Look for Windows Defender Firewall.
  4. Right-click on it and choose Restart.Windows Firewall error code
  5. Wait until the process is finished.
  6. Now, right-click on Windows Firewall, and go to Properties.
  7. Make sure that the Startup type is set to Automatic.

If the Windows Firewall is not turning on, the first thing we’re going to try is to restart the Firewall service.

Probably, something disrupted the service, but restarting Windows Firewall will likely bring it back to normal.

To restart the Windows Firewall service, perform the previous steps. If restarting the Firewall service didn’t get the job done, we have a couple more solutions.

2. Perform a Registry tweak

  1. Open the Start menu.
  2. Type regedit, and open the Registry Editor.
  3. Up next, go to the following path: HKEY_LOCAL_MACHINE/SYSTEM/CurrentControlSet/Services/BFE
  4. Right-click on BFE, and choose Permissions.
  5. Click on Add.
  6. Type Everyone and click OK.
  7. Now, click on Everyone, and check Full Control under Permissions for Everyone. Then click Apply and OK.
  8. Restart your computer.

Microsoft is aware that users occasionally experience problems with Windows Firewall, so it provided a solution to this problem.

We wouldn’t have any info if this solution helped someone to solve the problem with Windows Firewall in Windows 10.

But it’s an official solution, provided by Microsoft, and not some basic steps from famous Engineers from Microsoft Community forums.

If you can’t access the Registry Editor, check out this step-by-step guide on how to solve this problem quickly.

3. Run the dedicated downloadable troubleshooter

  1. Download the dedicated Firewall Troubleshooter from the Microsoft page.
  2. Run the tool and click on Advanced.
  3. Check the Apply repairs automatically box and click Next.
  4. Wait for the procedure to finish and look for changes.

Even though this problem emerged recently for Windows 10 users, it also plagued users for years on former Windows iterations.

For that purpose, the Microsoft folks offered a unified downloadable troubleshooter to avoid in-depth troubleshooting for ordinary users.

This tool worked well on Vista and Windows 7, so we can also expect positive results in Windows 10.

4. Reset the Firewall settings

  1. Open the Start menu.
  2. Type Firewall in the Windows Search bar.
  3. Open Windows Defender Firewall from the list of results.
  4. Click on Restore defaults in the left pane.Windows 10 Firewall error 1068
  5. Click on the Restore defaults button and reboot your PC.

Constant updates that are the typical workflow for Windows 10 have a lot of side effects. One of those allegedly forced changes of specific system settings concerning essential built-in programs.

Windows Firewall certainly falls in that category. To resolve possible issues with an alternative configuration imposed by Windows Update, you should reset Firewall settings.

Follow these instructions above to reset Windows Firewall settings and address the issue.

If you get an error while managing the Windows Firewall settings, check out this expert guide to fix it like a pro.

5. Use Command Prompt to reset Windows Firewall

  1. Open the Start menu.
  2. Type cmd and click on Run as administrator.
  3. In the command line, type the following command and press Enter: netsh firewall set opmode mode=ENABLE exceptions=enable
  4. Close Command Prompt and restart your PC.

Alternatively, you can use the elevated Command Prompt to reset Windows Firewall to default values. It seems like a drag but is relatively simple and requires minimal effort.

This is similar to a previous solution, but it will cost you nothing to give it a try if the standard way isn’t showing favorable results.

6. Uninstall recent security-related updates

  1. Press Win + I to open the Settings app.
  2. Select Update & security.updates and security
  3. Click on View installed update history.
  4. Choose to Uninstall updates.Windows could not start the Windows Firewall on local computer
  5. Uninstall all recent updates and restart your PC.

Most of the Windows 10 updates are security-oriented patches. Many of those cover Windows Defender and Windows Firewall.

And we’re well aware that many of those patches bring more issues than benefits. That could, consequently, mean that one of the recent updates negatively affected Firewall, rendering it unusable.

Luckily, even though you’ll have a hard time disabling Windows Updates for good, you can at least uninstall most of them and resolve issues that way.

Follow the steps above to uninstall the recent updates and fix possible issues they inflicted on Windows Firewall.

What can I do if Windows 11 Firewall is not working?

Here are some quick fixes from the ones mentioned above to fix the Windows Firewall not working on Windows 11.

  • Use the Windows Firewall troubleshooter.
  • Scan and remove malware or virus from your PC.
  • Run the SFC Scan and DISM tool to fix corrupt system files.
  • Enable Windows Firewall from the registry.
  • Reset Windows Firewall settings.
  • Perform a clean install of Windows 11 OS.

How do I force a Windows Firewall?

  1. Open the Start menu.
  2. Type cmd and run it as an administrator.
  3. Execute the below command. NetSh Advfirewall set allprofiles state on
  4. To check the Firewall status, execute the below command. Netsh Advfirewall show allprofiles

That would be all; we hope this article helped you to solve the problem with Firewall in Windows 10 (or convinced you to switch to third-party software).

If you’re unsure about the choice above, you can also look at our unlimited license validity antiviruses list and choose the proper tool.

Should you have any comments or questions, reach for the comment section below, and we’ll check them immediately.

Laptop Battery Not Charging on Windows PC: How to Fix

Is your laptop battery not charging? Outdated or corrupt drivers could be the issue, leading to inaccurate battery percentages and reduced battery life.

Before you think about replacing your battery, check out the steps below to update your drivers. We’ll also share tips to help optimize your battery performance.

Sounds good? Let’s get started.

How can I fix laptop battery if it’s not charging

Start by removing and reinserting the battery. This simple trick fixes the issue for many users. Also, try connecting your charger directly to the power outlet, don’t use a power strip.

1. Run the Power Troubleshooter

  1. Press the Windows key and enter troubleshoot. Select Troubleshoot from the menu.
    Laptop battery not charging Asus
  2. Choose Power from the right pane and click the Run the troubleshooter button.
    Laptop battery plugged in not charging
  3. Now follow the instructions on the screen.

Sometimes you can fix this problem simply by running the power troubleshooter. Once the process is finished, check if the issue is resolved.

2. Update the battery driver

  1. Right-click the Start icon, then select Device Manager.device-manager-w10 amd driver install problems
  2. Now click Batteries in the Device Manager window. Next, right-click Microsoft ACPI-Compliant Control Method Battery and select Uninstall device from the context menu.uninstall-microsoft laptop battery not charging
  3. Reboot your PC.
  4. Reopen Device Manager, select Batteries, and right-click Microsoft ACPI-Compliant Control Method Battery again. Next, select the Update Driver Software option from the context menu.update-microsoft laptop battery not charging
  5. A window will open from which you should select Search automatically for updated driver software. Windows will then find suitable battery drivers for you.

Alternatively, you can use a dedicated driver updater tool to do it automatically and to prevent the risk of downloading and installing the wrong driver versions.

Still getting a low battery alert while plugged in? Check the full guide on Laptop Low Battery Warning When Plugged In for more detailed solutions.

3. Check for overheating

If you want to keep a close eye on your temperature, we advise you to try a dedicated tool that allows you to monitor your temperature and keep a close eye on your hardware.

We also have a helpful guide on how to fix laptop overheating problems on Windows 10, so be sure to check it out for more information.

4. Update your BIOS

The problem might be your BIOS if a laptop battery isn’t charging. As you know, BIOS is in charge of your motherboard and hardware, and it might be one of the reasons for battery problems.

Note icon NOTE
Important: Ensure your laptop runs smoothly without the battery before starting the update. If it shuts down while connected to the charger, avoid updating the BIOS, as this could cause permanent damage.
  1. To update your BIOS, go to your device’s manufacturer’s website.
  2. Locate the latest BIOS version for your exact model and download it.
  3. Remove the battery and plug the laptop into the charger.
  4. Backup your current BIOS in the settings menu.
  5. Run the update following the manufacturer’s instructions.
  6. Wait for the update to complete without turning off or disconnecting the laptop.
  7. Once the update finishes, the laptop will restart automatically.

Remember that BIOS update is an advanced procedure, so be extra cautious. First, check your laptop manual to see how to properly and safely update your BIOS.

You may also use the instructions on the manufacturer’s website.

5. Clean the adapter and laptop connectors

Sometimes dust can lead to this issue, and to fix the problem, it’s advised to clean both laptop and adapter connectors.

Turn off your laptop and disconnect the adapter from the power outlet. Now take a lint-free cloth and gently clean the connectors. Once your connectors are clean, the charging issue should be resolved entirely.

Why is the laptop battery not charging above 80?

If the battery on your computer, or even mobile, is only charging to 80%, this is likely because Battery Life Extender is turned on.

Battery Life Extender sets the maximum battery charge level to 80% to extend your battery life. So, turn it off if you want to charge the battery up to 100%.

Also, speaking of laptops and batteries, here is a list of great laptops with the best battery life. With such products on your side, nothing seems to be impossible.

Which of the above solutions worked for you? Do not hesitate to let us know in the comments area below.

5 Ways to Fix the Internal Server Error on Crunchyroll

Crunchyroll is a popular video-streaming service for watching Japanese anime. Hundreds of millions of users watch Crunchyroll content on Windows, iOS, Android, and Xbox devices.

However, some users can’t watch Crunchyroll content because of an internal server error. They see an internal server error pop up when they try to watch anime videos on Crunchyroll.

Does a similar error occur when you try to watch Crunchyroll content on Windows 11/10? If it does, try applying the potential internal server error resolutions below.

Why am I getting the Crunchyroll internal server error?

Crunchyroll’s internal server error can sometimes occur because of server overload. Users have complained about Crunchyroll’s servers being regularly down during weekends.

However, server outages aren’t always to blame for Crunchyroll’s internal server error. Streaming issues can arise when the Crunchyroll app’s cache is overly full.

Or it could be the case that your Windows Crunchyroll app is corrupted. In this case, you would probably need to reinstall the app to fix the internal server error.

Some DNS servers can’t handle the heavy load of Crunchyroll streaming as well as others. So, changing your DNS server to a better alternative could also be a fix for the internal server error.

How do I fix an internal server error on Crunchyroll?

1. Check Crunchyroll’s server status

To check if the Crunchyroll server is down, open the Downdetector website. Select your global location in the drop-down menu there, input Crunchyroll in the search box, and click OK.

Crunchyroll's DownDetector page crunchyroll internal server error

The page that opens will tell you if a general outage has been reported for Crunchyroll. If it has, wait a few days for Crunchyroll to get it sorted.

2. Power cycle your router

  1. Unplug the router’s power cable. Users with separate modems will also need to unplug their modems.
  2. Next, wait for a couple of minutes before reconnecting.
  3. Plug your router’s cable back in. If you’ve also unplugged a separate modem, plug that in first before the router.
    A router plug crunchyroll internal server error
  4. Give it about five minutes before you try watching anything on Crunchyroll again.

3. Change your DNS server settings

  1. Press Windows + S, and type network connections in the search box.
  2. Click View network connections to bring up the Control Panel applet.
    View network connections crunchyroll internal server error
  3. Right-click your internet connection and select Properties.
    Properties option crunchyroll internal server error
  4. Click Internet Protocol Version 4 to select it.
    Internet Protocol Version 4 setting crunchyroll internal server error
  5. Press the Properties button to bring up the IP address and DNS server options.
  6. Select Use the following DNS server addresses on the General tab.
    Use the following DNS server option crunchyroll internal server error
  7. To switch to Google, enter 8.8.8.8 in the Preferred DNS server box.
  8. Input 8.8.4.4 inside the Alternative DNS service box.
  9. Click the Internet Protocol Version 4 window’s OK button.
  10. Select OK again on the other properties window.

4. Clear the Crunchyroll app’s data

  1. Press Windows key + X for opening the Power User menu.
  2. Select Apps and Features to open that part of Settings.
    Apps & Features option crunchyroll internal server error
  3. Click the three-dot menu button for the Crunchyroll app.
  4. Select Advanced Options to access Crunchyroll’s Reset button.
    Reset button crunchyroll internal server error
  5. Click Reset twice to clear Crunchyroll’s data.

Resetting the app cache can also fix issues like Crunchyroll Error P-DASH-114; read this to learn more about it!

5. Reinstall Crunchyroll

  1. Open Apps & features, as covered in the first two steps of method four.
  2. Click Crunchyroll’s Menu button.
  3. Select the Uninstall option for Crunchyroll.
    The Uninstall option crunchyroll internal server error
  4. Click Uninstall again when prompted to confirm.
    The Uninstall option crunchyroll internal server error
  5. Open Microsoft Store (click its Start menu shortcut to view that app).
  6. Type Crunchyroll in MS Store’s search tool.
  7. Select Crunchyroll in the results.
  8. Click Get to reinstall the video-streaming app.
    The Get button crunchyroll internal server error

How do I stop Crunchyroll video errors in browsers?

Crunchyroll video errors can arise in browsers due to software incompatibilities and conflicting extensions. Make sure you’re utilizing a supported and up-to-date Chrome, Edge, Safari, Opera, or Firefox browser.

In addition, disable all browser extensions before selecting to play Crunchyroll videos. You can turn off add-ons from extension tabs in browsers.

Logging out and back into Crunchyroll accounts is a simple potential solution for video errors that might sometimes help. To log out, click the Profile button and select Sign out. Then sign back into Crunchyroll.

The internal server error resolutions above are more specifically for the Crunchyroll Windows app. However, you may also be able to fix that issue for Crunchyroll mobile apps with similar resolutions.

You can also contact Crunchyroll’s help service for further suggestions about fixing the internal server error. Open Crunchyroll’s Submit a request page, fill out the form, and click Submit.

This isn’t the only problem that users had in their browser, and many encountered Crunchyroll error code Shak-6007-Generic on their PC as well, but we have a guide that tackles that issue.

However, give all the potential solutions for Crunchyroll’s internal server error in this guide a try first. They’re relatively straightforward fixes to apply that might work for some users.

4 Quick Ways to Fix Maplestory Connection To Server Has Ended

MapleStory is a popular MMORPG for Windows developed by Nexon. Initially launched in Asian countries, it has become available worldwide and gained a lot of popularity over the years.

Like any game, it has its share of errors and problems. We explore here the connection to the server error that pops up when you try to launch the game.

Maplestory connection to the server has ended one of the problems that many gamers face while playing this game. The majority of them have quit the game due to this reason.

However, there are several trusted and tested ways to fix this problem and if you are interested in them, continue reading on. 

Why Maplestory’s Connection To Server Has Ended?

There are multiple possible underlying issues that prompt this error. Some regarding your setup, others your Internet connection:

Network problems: slow connections can certainly prevent the game from performing well, or from launching at all, as the case in point

Outdated operating system or drivers: if your OS is outdated, most of its apps won’t run properly, same goes for your drivers, especially those that affect your game directly: the graphics card drivers

Geo-restrictions: MapleStory is available worldwide, but it also has a regional server; if you try to access the Asian servers from the US, you will likely get an error message if you don’t mask your IP with a VPN or proxy

✅ Preliminary Check:  

Reboot your Wi-Fi. You can try turning off your wifi and then turn it back on to reboot it. It will give your router a chance to stop unnecessary tasks or bugs that accumulate over time.

Now let’s take a closer look at these issues and what can we do to get rid of and avoid having to deal with them in the future:

How do I fix the Maplestory connection to the server that has ended on Windows PC?

  1. Run MapleStory as an administrator
  2. Use a reliable VPN for gaming
  3. Check your graphics driver
  4. Update Windows

Make sure you carefully follow our instructions and recommendation. Check all of them before starting because not all may fit your particular situation.

1. Run MapleStory as an administrator

  1. Go to the MapleStory installation folder.
    • If you launch it using Steam, it should be something like  C:\SteamLibrary\steamapps\common\MapleStory
    • If you launch it with Nexon, it should be C:\Program Files (x86)C:\Nexon\Library\maplestory
  2. Find the game’s .exe file – maplestory.exe.
  3. Right-click on it and select Properties.
  4. Go to the Compatibility tab and select Change settings for all users.
  5. Check the box next to Run this program as administrator.
  6. Click ok to save your settings.
  7. Now, right-click on your launcher (Steam or Nexon) and select Run as administrator. 
  8. Try to connect to MapleStory again.

Running as an admin allows an app to use all its features and processes.

It’s not enabled by default on your PC, as a security measure to prevent untrustworthy software from damaging your PC and also unauthorized users from using certain apps.

This oftentimes has an impact on games, including MapleStory. Many bugs and problems arise because of this because the game isn’t allowed to run all its features.

So if you cannot connect to the server or are prompted with an unexpected error message, try to run the game this way. Many users around the web report getting rid of the problem this way.

2. Use a reliable VPN for gaming

  1. Decide on a good VPN for MapleStory. We use ExpressVPN.
  2. Head to ExpressVPN’s official website and get a subscription.
  3. Download the dedicated app and install it on your PC.
  4. Launch ExpressVPN and connect to a server. Simply click on the power button in the main UI. To manually pick a location, click the three dots to get the list of all servers available

Using a VPN like ExpressVPN can help you establish a better connection on faster servers. It’s great for gaming and can increase Internet speed if you configure it properly.

In addition to this, you will be given a virtual private address, which will hide your accurate IP address.

Because of this, it will be more difficult for your internet service provider (ISP), government agents, and hackers to keep tabs on you.

ExpressVPN

Connect to ExpressVPN to overcome geo-blocks and connection problems in MapleStory and log in without issues!
Free trial Visit Website

3. Check your graphics card driver

You may be employing a graphics driver that’s either defective or outdated, which would explain the frequent crashes.

In addition to increased performance, the most recent driver can fix bugs and address most of the compatibility issues.

  1. On your PC, open Device Manager.
  2. Locate the Display adapters section. maplestory connection to server has ended
  3. Expand it and select your current graphics card driver.maplestory connection to server has ended
  4. Right-click on it and select Update driver.
  5. Select Search automatically for drivers.maplestory connection to server has ended

Your OS will automatically search and install any new drivers if they are available.

You can manually update your graphics driver by going to the manufacturer’s website (NVIDIA, AMD, or Intel). Be careful to pick the correct version, otherwise, you may end up with even more errors.

Use an automated driver updater such as Outbyte Driver Updater if you want to have your drivers updated all the time without very little effort on your part.

4. Update Windows

You also need to check to see if you’re running the most recent version of the system. You can often improve the compatibility of older software by updating it to the latest version of Windows. 

Manually checking for updates can be done in the following manner: 

  1. Press the Win key on your keyboard (the Windows logo key). To access the Settings menu, locate the gear symbol in the bottom left corner of your screen and click it. maplestory connection to server has ended
  2. Scroll down until you reach the bottom, then pick Update & Security.maplestory connection to server has ended
  3. Click Windows Update.
  4. Then click the Check for Updates button. The next step is to wait for the process to finish. After you’ve done that, restart your computer.maplestory connection to server has ended

After installing all of the available updates, you should restart your personal computer and launch MapleStory.

The MapleStory connection to the server has ended is a frustrating issue, but if you find what’s causing it and carefully take care of that problem, you’ll get rid of it in no time.

Let us know which of these solutions you ended up using and if it improved your gaming experience in any way.

5 Easy Ways to Fix Discord if It Crashes When Streaming

Nothing can compare to how aggravating it is if Discord crashes when streaming and restarts when you are playing a game.

Several possible causes for the Discord app on your computer to crash. Perhaps a software bug, out-of-date drivers, or your PC can’t handle the load are to blame.

We offer the best methods to easily fix Discord crashes to bring an effective solution to your issue and address why your Discord keeps crashing.

What are the causes of Discord crashing?

A few factors cause this problem. But the most common ones are:

  • The main cause of this issue is out-of-date drivers on your computer
  • If Discord crashes, it can mean that there aren’t enough system resources available for it to use
  • There is a probability that the frequent crashes of your Discord app are caused by the fact that Hardware Acceleration is enabled

How do I fix Discord if it crashes when streaming?

1. Disable Hardware Acceleration

  1. Open Discord and go to User Settings.
  2. Select appearance in the left pane, then scroll to Hardware Acceleration in the right panel.discord setting and advanced section
  1. Turn it off by clicking on Okay.confirming to disable the hardware acceleration option
  1. Try streaming on Discord once more.

A Discord feature called hardware acceleration provides the GPU complete control over all graphic and text-related processes, improving your user experience. This functionality may, however, cause more issues than it resolves in some systems.

2. Turn on Legacy Mode

  1. Launch Discord and click on Settings.
  2. Choose Voice & Video from the sidebar.
  3. The Audio Subsystem dropdown menu is set to Standard if you scroll down.
  4. Change it to Legacy mode.
  5. When the Change Audio Subsystem box displays, click Okay.confirming the changes on audio

You can also activate Discord’s legacy mode to resolve crashes that occur while streaming. The legacy mode becomes useful when your PC hardware becomes incompatible with Discord’s most recent audio subsystem.

3. Update drivers

  1. Visit Windows settings from the start menu and then click Windows Update.
  2. Select Optional Updates after clicking on Advanced Options.optional updates section in Windwos updates
  1. Choose all of the updates that are currently available for download by clicking on Driver Updates.
  2. Click Download and Install to finish. downloading and installing driver updates

Another common cause of Discord streaming crashes is out-of-date graphics drivers. The next thing you should have to try is to update any out-of-date drivers by checking for updates.

On Windows, there are two methods for updating drivers. The first option is manually updating it by visiting Windows settings, and the second is allowing a driver upgrading program to handle the task.

The approach mentioned above involves manually updating drivers. If you want the easy way around, you can update your PC’s drivers with any third-party driver updater app available on the market.

4. Delete Discord app data

  1. To open Run, press the Windows + R keys simultaneously.
  2. Then press Enter after typing %AppData%Discord.appdata command in run box
  3. Go to the Cache folder now.
  4. Then, after selecting all the files with CTRL + A, click the delete button to remove them.electing all the cache files of discord and then deleting them
  5. After that, open the Local Storage folder by returning to the Discord folder.
  6. Use CTRL + A to remove all of the files from this area.
  7. After deleting it, open Discord and try streaming to check if it crashes.

There is also a good likelihood that corrupt files or cache are to blame for Discord’s crashes while streaming. The best solution is to remove the Discord app’s data.

5. Turn Off Compatibility Mode

  1. Open the System tray, then right-click the Discord client and choose Quit Discord to shut it down.
  2. Type Discord into the search box in Windows, then right-click and select Open file location.opening Discord file location
  1. Right-click on the Discord icon, and choose Properties.
  2. Select the Compatibility tab.
  3. Uncheck the box that is labeled Run this program in compatibility mode for here.compatibility setting for discord
  1. Next, select OK after clicking Apply.

Sometimes the Compatibility mode can adjust application settings which will then cause streaming issues.

Does Windows 11 affect Discord?

Discord is a well-liked tool for connecting with like-minded individuals and gamers. However, many people have complained that Windows 11 does not support Discord.

While streaming, this compatibility problem could also cause Discord to crash. There is now no fix available, but we anticipate one in the future.

Unexpected crashes when utilizing Discord always leave us feeling awful. Our entire gameplay is impacted, in addition to losing the full broadcast quality we had produced over the previous few hours.

With the top streaming app on the market, you can once more take advantage of uninterrupted streaming.

In the comments section below, let us know if you were able to fix Discord crashes when streaming.

Fix: HBO Max is Not Recognizing My YouTube TV Subscription

It was good news when YouTube TV announced partnering with HBO Max. By implication, users can now bundle HBO Max with YouTube TV and combine both services.

Subscribers can access all HBO channels on YouTube TV. At the same time, they can use their subscription through YouTube TV to sign in directly on HBO Max. 

Months later, as users are battling HBO Max buffering problem, on one hand, they have HBO Max not recognizing YouTube TV subscriptions to deal with on the other.

When trying to log in to HBO Max with their YouTube TV subscription credentials, subscribers are prompted that their subscription has expired, whereas it hasn’t.

Why is HBO Max not recognizing my YouTube TV subscriptions?

The problem most times has nothing to do with the users. It’s totally due to some bugs. There are two underlying glitches why HBO Max is not recognizing your YouTube TV subscriptions.

First is a bug that affects how YouTube TV and HBO communicate in the backend. The second is when HBO Max forgets your subscription. 

HBO Max pulls your credentials when you log in with a YouTube TV subscription. Only to forget whether you are subscribed or not after a short time. 

While HBO and YouTube are yet to give a lasting solution to the problem, there are a few ways to fix the problem whenever it happens.

How can I fix HBO Max not recognizing my YouTube TV subscriptions?

1. Sign out of HBO Max and sign in again

1.1 Sign out of HBO Max on Android and iOS devices

  1. Open the HBO Max app on your device.
  2. Tap on the profile icon at the bottom.
    hbo max profile
  3. Select Settings, the gear icon at the top of your screen.
    Settings hbo max app
  1. Next, click Sign Out at the bottom of the page.
    hbo max app sign out

1.2 Sign out of HBO Max on a search browser

  1. Visit HBO Max website on your browser of choice.
  2. Navigate to your Profile and open the side menu.
    visit hbo max website
  1. Click Sign Out at the bottom of the menu.
    hbo max website sign out
  1. After signing out of your HBO Max, wait a few minutes before signing in.

Signing out may not solve it if other devices are still logged into your account. In this case, you have to sign out all devices.

2. Sign out of all devices

2.1 Sign out all devices on Android and iOS 

  1. Launch the HBO Max app on your phone
  1. Tap your Profile Icon at the bottom right of your screen.
    hbo max profile
  1. Go to Settings, gear icon in the upper right corner of your screen.
    hbo max settings app
  1. Click on Manage Devices.
  1. Tap SIGN ALL DEVICES OUT.
    sign out all devices

2.2 Sign out all devices using a browser

  1. Go to HBOMax.com on your web browser.
  1. Click on your Profile Icon at the top right of your screen.
    hbo max homepaeg
  1. Next, choose Manage Devices from the menu.
    manage device hbo max website
  1. Click SIGN ALL DEVICES OUT.
    hbo max website sign all devices out

3. Update the HBO Max app

3.1 For Android users

  1. Visit Google Play Store on your phone.
  1. Select your Profile, then go to Manage apps and device.
    manage playstore app
  1. Switch to the Manage tab to see your app list.
    playstore manage app
  1. Select Updates available and scroll down the page to locate HBO Max from apps.
    hbo max update
  1. Tap the Update button.

3.2 For iOS devices

  1. Visit the App Store on your iPhone or iPad.
Visit apstore iphone
  1. Go to Profile and locate the HBO Max from the app list.
  2. Tap the UPDATE button to start updating.
    iphone update hbo max
  1. Launch HBO Max after the update to see if the issue is solved.

4. Clear Cache on web browser

  1. Open your browser and click on the three-dot menu in the upper right
  2. Select More tools, then Clear browsing data.
    clear cookies and cache
  1. Check the corresponding boxes to the data you want clear.
  2. Click Clear data.
    clear website data hbo max

You can also try to use a device maintenance tool to do the job for you. CCleaner is an excellent option because it clears successfully not only your cached images and files but cookies and browsing history too with just a few clicks.

⇒ Get CCleaner

Why can’t I fix HBO Max not recognizing YouTube TV subscriptions?

Using one of these methods may not solve the problem. At times, you will have to combine two or three.

For instance, signing out may not work if there are other devices logged into your account. In this case, you have to sign out all devices.

Also, if you are accessing HBO Max from a web browser, the problem may persist even after you’ve signed out of all devices.

It means your browser has saved information about your log-ins. Clearing browsing data like cookies and cache, as explained above, should help.

You should know that this problem does not affect users accessing HBO Max from YouTube TV. You can log in to your YouTube TV and add all the HBO channels of your choice without any headache. 

Another way to escape the issue altogether is to subscribe to HBO Max directly.

If you also want to access geo-locked HBO Max content, here’s a list of VPNs to unblock HBO Max from anywhere in the world.

We hope HBO Max and YouTube find a lasting solution to this problem soon. But before then, you can always revisit this guide.

GTA SA Crash Fix: 8 Ways to Get it to Work

The revamped version of GTA San Andreas has been crashing on Windows 11 for many players, but there are ways to fix it.

Both the original and remastered versions are compatible with Windows 11, but the remastered version has higher system requirements. It needs 8GB of RAM, an Intel Core i5-6600K CPU, and 45GB of storage.

As long as you meet those requirements, follow the steps below to get the game running smoothly again.

How do I fix GTA San Andreas crashes on Windows 10 & 11?

1. Run GTA in compatibility mode

  1. Find GTA .exe file (if you bought the remastered game from Steam, locate Steam Library and right-click on GTA and select Properties, then select Local Files, followed by Browse).Steam game properties
  1. Right-click on the game and select Properties.
  2. Select the Compatibility section and choose Run this program in compatibility mode for: and then select WindowsME/98.Compatibility mode section

Compatibility mode is a mode in which an application either emulates an earlier version of the software or mimics another operating system to avoid compatibility issues.

2. Change the resolution in-game

  1. Run the GTA San Andreas.
  2. Go into Settings and change the screen resolution to 1024 x 768.Gta San Andreas Settings

This solution can be used as a workaround to fix the GTA San Andreas Crash Windows 10 problem.

3. Mod .dat file

  1. Open the GTA San Andreas folder (follow the instructions above if you downloaded the game from Steam to locate the game folder).Steam game properties
  1. Click on the GTA SA data folder, then select GTA.dat.
  2. Type in IMG MODELS\PLAYER.IMG and save.

This fix is a suggested solution from a user who has successfully fixed the problem.

4. Update your graphics drivers

  1. Open Device Manager.
  2. Go to the Display adapters section and expand it.
  3. Select your graphics card, right-click on it and select Update driver.choose update driver for NVIDIA graphics card device manager
  4. Select Search automatically for drivers, hit next and wait for the process to complete.

Alternatively, if you Windows can’t find new drivers or working with Device Manager seems like a hassle, you can use a driver updater software such as Fortect‘s,

Using a specialized tool to update your device drivers can solve most serious errors and performance issues, and ultimately prevent them so you can get the best gaming experience.

5. Use frame limiter

  1. Download Rivatuner Statistics Server.
  2. Install the application and open it.
  3. Once in the main menu, you will see a Framerate limit. RiveraTuner frame limiter
  1. Set it on 30.

Since classic games don’t have frame limiters built in and would behave abnormally if the PC could run them at more than 30 FPS, frame limiting them can solve many problems.

6. Activate Administrator privileges

  1. Type in Command Prompt in the Start menu’s search box, right-click the first result and choose Run as Administrator. Searching command prompt in the start menu
  1. Type the following command into the Command Prompt and then hit Enter:
    net user administrator/active:yesnet user administratoractiveyes command in command prompt
  1. Right-click on the game and select Run as administrator.

The game can access files that it normally cannot by running it with administrator privileges.

7. Enable Background Intelligence Transfer

  1. Press Windows + R keys, then type services.msc and press Enter.deploying services screen
  1. Find Background Intelligence Transfer and ensure you set it to Start and Automatic.making sure Background Intelligent transfer is running

Background Intelligence Transfer controls the game’s background processes, such as file access and data reading.

8. Update Windows

  1. From the Start menu, select Settings.settings app in start menu
  1. Choose Update & Security to get to the Windows Update tab.
  2. Select Download & Install when a Windows feature update becomes available. Windows Update section and checking if there are any updates
  1. If you cannot upgrade your Windows version, use the Check for updates option.

Among gamers, there has been a lot of debate about graphic enhancements and game performance since the remastered release.

These controversies have compelled users to rush back to the original game, as most believe the previous version is far superior to the current one.

This frenzy is why there have been numerous instances of users reporting GTA San Andreas crash Windows 10 and 11 issues. Speaking of issues, many reported that the mouse is not working in GTA San Andreas, but we addressed that in a separate guide.

In the comments section below, let us know if you were able to fix the GTA San Andreas crashes.

5 Ways To Fix Error 503 Backend Is Unhealthy

Various error 503 web errors can occur for users browsing the web. Error 503 Backend is unhealthy is one such issue some users have reported.

Our readers encountered the Backend is unhealthy error when trying to download images. However, that error occurs more often when users try to open website pages.

Thus, users can’t open pages on some websites or download certain images from specific sources when the error occurs. The fixes in this guide might help some users resolve this issue.

How come this Error 503 Backend is unhealthy error occurs?

The Backend is unhealthy message backend is unhealthy error

The Backend is unhealthy error can be a server-side issue. For instance, a website’s server could be down for maintenance or heavily overloaded. In such cases, you can’t do much to resolve the error.

However, error 503 can sometimes occur because of browser or connectivity issues. So, you may be able to resolve that issue with some of the potential fixes below.

How can I fix the Backend is unhealthy error?

1. Check for server outages

  1. Visit Downdetector page.
  2. Now enter the website URL.
  3. Check the results and see if there’s an outage.
    whatsapp web not working

Alternatively, you can check if specific pages are down for your or everybody at Is It Down Right Now. Input the page URL for which error 503 occurs in the box there, and click the Check button.

If those sites highlight there’s a general server-side issue for affected pages, there’s probably not much you can do other than wait it out. Try opening the website on another day.

2. Refresh pages the error occurs on

  1. Make sure you’re on the page that is giving you error 503.
  2. Now click the Refresh button.
  3. Wait for the page to load and check if that helps.

Refreshing a page is something you should always try when a webpage doesn’t open in a browser. This is a simple workaround, but it might help in some cases.

3. Restart your router

  1. Remove the power cord from your router. If you have a separate modem, you’ll need to unplug that as well.
  2. Wait one or two minutes.
  3. Then reconnect (plug in) your router again. Plug the modem in first if you don’t have a 2-in-1 router.
  4. Then wait a few minutes for the router to fully light up.

4. Clear your browser’s cache

Google Chrome

  1. Press the Ctrl + Shift + Del key combination.
  2. Select the Cached images checkbox.
    Cached images and files option backend is unhealthy error
  3. Click the All time option on the Time range drop-down menu.
    All time option backend is unhealthy error
  4. Press Chrome’s Clear data button.

Edge

  1. Input the following Edge’s address bar, and press the Enter button: edge://settings/privacy
  2. Press the Choose what to clear button.
    Choose what to clear option backend is unhealthy error
  3. Select the checkbox for Cached images and files.
    The Cached images and files option backend is unhealthy error
  4. Click Clear now to delete Edge’s cached data.

Firefox

  1. Input the following URL bar, and press Return on your keyboard: about:preferences#privacy
  2. Select the Clear Data option.
    Cookies and Site Data
  3. Then select the Cached Web Content box.
  4. Click the Clear option.
    The Clear option

5. Open affected pages in an alternative browser

A good way to test if the Backend is unhealthy error is a browser-specific issue is to try opening affected pages in different software. The same error might not occur in a different web browser.

If you’re not already utilizing it, Edge is a browser included with Windows you can try out without installing more software. Mac users can try opening pages within the default Apple Safari browser.

Moreover, you can try to open the page with Opera One because it is a much safer browser option. It can block any ads and pop-ups that can affect your online activity, thus improving significantly your browsing speed and loading web pages faster.

⇒ Get Opera One

What’s the Error 503 Backend fetch failed error?

Error 503 Backend fetch failed is a similar issue to the Backend is unhealthy error. That error also occurs for some users when they try to open webpages on some sites. The potential resolutions above are also applicable to that error.

So, give those potential fixes a try whenever you see the Error 503 Backend is unhealthy message in your browser. Aside from those possible solutions, resetting your browser might also be worth a try.

Did any of those Error 503 Backend is unhealthy resolutions work for you? Or have you found another way to resolve that issue? If so, let us know about it in the comments section below.