Game Crashes When Streaming on Discord: 3 Ways to Fix It

Many users complain in different forums that streaming a game in Discord seems to be impossible, as the game crashes right after the start button is clicked.

There is no need to worry, though, as solving this game crashing when trying to stream it on Discord is pretty simple, and in this article, we will explore the exact steps you need to take.

Why does my game crash when I stream on Discord?

Below are some of the prevalent factors that can cause your game crashes when streaming on Discord:

  • Wrong setting: The first factor that users have noticed to be the cause of this issue is your in-app settings. Some found the problem to be due to the hardware acceleration feature. You need to disable these features to enjoy a faultless streaming experience.
  • Interference from other apps: Sometimes, apps like MSI Afterburner can mess with your streaming on Discord. The solution to this is to close these apps.
  • Corrupt app data: A corrupt Discord cache can sometimes cause this problem. Clearing the junk files manually or using dedicated software should do the trick.

How can I fix my game crashes when streaming on Discord?

Before proceeding to the fixes in this guide, try the following troubleshooting steps:

  • Relaunch Discord.
  • Close Rivatuner Statistics and MSI Afterburner apps if they are open.

1. Disable Use our latest technology

  1. Launch the Discord app and click the Gear icon in the bottom left corner.
    setting game crashes when streaming on discord
  2. Select the Voice and Video option in the left pane.
  3. Now, toggle the switch for Use our latest technology to capture your screen backward to disable it.
    disable
  4. Finally, disable the Use an experimental method to capture audio from applications option.

According to some users, some in-app features can cause the game crashes when streaming on Discord. The easy way around this is to disable the features.

2. Disable the Hardware acceleration

  1. Open Discord and go to User Settings.
    setting game crashes when streaming on discord
  2. In the APP SETTINGS section, locate Advanced and click on it.
  3. Next, toggle the switch for Hardware Acceleration backward to turn it off.
    advanced
  4. Restart your device and try streaming the game again.

While the hardware acceleration feature helps improve your overall experience, it can cause your game to crash while streaming on Discord. Disabling the feature fixed this issue for many users.

3. Delete app data

  1. Press the Windows key + R to open the Run box.
  2. Type in %AppData%\and press OK.
    appdata game crashes when streaming on discord
  3. Next, go to the Discord folder and double-click on the Cache folder to open it.
    cache
  4. Press Ctrl + A to select all the files and right-click to Delete them.
    select all
  5. Return to the Discord folder and click on the Local Storage folder.
  6. Select and delete all the files from this folder.
  7. Finally, restart your device and try to open the game.

Sometimes, the game crashes when streaming on Discord issue can also be triggered by faulty app data. Following the steps above should help you fix this quickly.

There you go. These are the best solutions to help you solve the game crashing issue while streaming on Discord.

If Discord is registering high CPU usage on your PC, check our detailed guide to fix it quickly.

Feel free to let us know the solution that helped you fix the issue in the comments below.

Error Occurred Starting Vegas Pro, There Is No License [Fix]

If you are into video editing, whether you are a professional or just a casual editor, you might have heard about Vegas Pro. Recently, some users have reported coming across a Vegas Pro error code 59 that prevents them from starting the program.

The complete error message reads An error starting Vegas Pro. There is no License to use this software. For users facing this issue, this guide will help you resolve the problem and also let you start the program so that you can start video editing. Let us get right into it.

Why am I getting An error starting Vegas Pro. There is no License to use this software?

We did some research and found out that there are a few common reasons that could trigger the Vegas Pro error code 59 which reads An error starting Vegas Pro. There is no License to use this software:

  • Poor internet connection: You should ensure you are connected to the internet when starting Vegas Pro software.
  • Corrupt installation file: Some tweaks or incomplete installation can miss a few of the important files required by the tool to run smoothly.
  • Lack of privileges: If sufficient privileges aren’t provided to the Vegas Pro app, then it could result in multiple errors like the one at hand.
  • Corrupt system files: Missing or corrupt system files can not only cause problems with the software installed in it but the entire functioning of the system.

How can I fix Vegas Pro error code 59?

Here are a few preliminary solutions that we would like you to apply:

  • Restart your PC as there might be a few files that couldn’t load during the previous session.
  • Check that your internet connection is working perfectly fine as it is required for you to launch the program.
  • Restart your internet router and check if this fixes the issue or not.
  • To be on the safe side, perform an antivirus scan and see if a virus was causing the problem or not.

Now let us check out the advanced solutions and possibly fix the Vegas Pro error code 59 An error starting Vegas Pro. There is no License to use this software problem.

1. Launch the program as administrator

  1. Right-click on the desktop icon of the Vegas Pro app.
  2. Select Properties.
  3. Switch to the Compatibility tab.
  4. Check the box for Run this program as an administrator option under the Settings section. This will make sure that Vegas Pro opens in admin mode whenever you launch it.
  5. Click Apply and OK.
  6. Close the Properties window.
  7. Launch Vegas Pro and check if this resolves the issue or not.

By granting sufficient privileges you are ensuring that the Vegas Pro software gets access to all the files and system-related processes to run smoothly.

2. Run SFC Scan and DISM

  1. Open the Start menu.
  2. Run Command Prompt as an administrator.
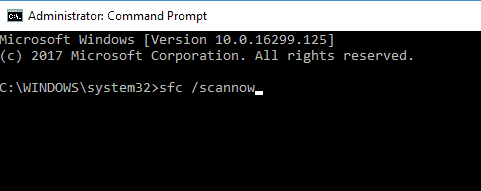
  3. Type the below command and press Enter. sfc /scannow
  4. Once the process completes, type the below command and press Enter. DISM /Online /Cleanup-Image /RestoreHealth
  5. Wait for the process to complete.
  6. Exit Command Prompt.
  7. Restart your PC.
  8. Launch Vegas Pro and check if this fixes the issue or not.

If system files are missing or corrupted, then your system will not be able to run all programs smoothly. You can easily fix it using the Windows in-built SFC Scan and DISM commands and fixing problems.

Another way of fixing system-related issues is to make use of specialized third-party tools. These tools will help you to fix DLL-related issues, system crashes, BSOD errors, remove spyware, etc.

3. Reinstall Vegas Pro

  1. Open the Start menu.
  2. Open the Control Panel.
  3. Click on Programs and Features.
  4. Select Vegas Pro from the list of apps and click on Uninstall at the top.
  5. Wait for the uninstallation to complete.
  6. Restart your PC.
  7. Visit the official Vegas Pro website and download the program.
  8. Install the program and check if this fixes the issue or not.

Some installation files might have gone missing during the previous installation because of interruptions from third-party programs.

To fix this, simply remove the program from your PC and then install it back again and this time make sure there are no interruptions.

4. Remove registry entries

  1. Press the Win + R keys to open the Run dialogue.
  2. Type regedit and press Enter.
  3. Navigate to the below path and press Enter. HKEY_LOCAL_MACHINE > SOFTWARE > Wow6432Node > Sony
  4. Delete Vegas Pro entries.
  5. Close Registry Editor.
  6. Open File Explorer.
  7. Navigate to the below path. C:\Program Files(x86)\Steam\SteamApps/common
  8. Install the Vegas Pro back.

You can perform reinstallation by following solution 3. However, if that doesn’t work, we suggest you perform a clean install.

And by clean install, we mean deleting the registry entries of the previous installation and completely removing it from your PC. Then install the program and check if this fixes the issue.

You can also check out our guide that lists some of the best video editors you can try on your Windows 10 PC. We also have a guide for Windows 11 users looking for best video editors that are free.

Let us know in the comments below, which one of the above solutions helped you resolve the Vegas Pro error code 59 An error starting Vegas Pro. There is no License to use this software problem.

How to Fix Minecraft Sound not Working on Windows 10 & 11

Minecraft is, without a doubt, one of the most played games. However, it is not without its fair share of problems, with some users reporting that Minecraft sound is not working on their PC.

Below is how one user put it in one forum post:

, So whenever I open up Minecraft, (this is since I got Windows 10- I have never had this problem before) the sound for Minecraft isn’t working.

Fortunately, it is an issue that can be fixed easily. And we will show you the steps to follow in this guide.

Why is Minecraft sound not working?

Below are some of the potential factors that can cause the Minecraft sound not working issue:

  • Outdated or faulty drivers: One of the first things to check if Minecraft sound is not working on headphones is your sound drivers. If they are outdated or malfunctioning, you have found the cause of the issue. The solution to this is to reinstall or update your drivers.
  • Sound enhancement settings: If you have enabled some sound enhancement features, they might cause this issue. You need to disable everything to get restore normal service.
  • Issues with the game: If Minecrafty sound is not working with Discord, it might be because your game files are corrupt. Reinstalling the game should do the trick here.

Check out these potential fixes for Minecraft’s sound not working

1. Press Minecraft’s F3 hotkeys

Minecraft has a couple of F3 debug hotkeys that refresh the game and can also fix its audio. First, open Minecraft; and press the F3 + S keyboard keys simultaneously. Then try pressing the F3 + T hotkey, which reloads game textures and sounds.

Maybe you can give a shot to a dedicated gaming browser with built-in controls to ease this process.

2. Reinstall the sound driver

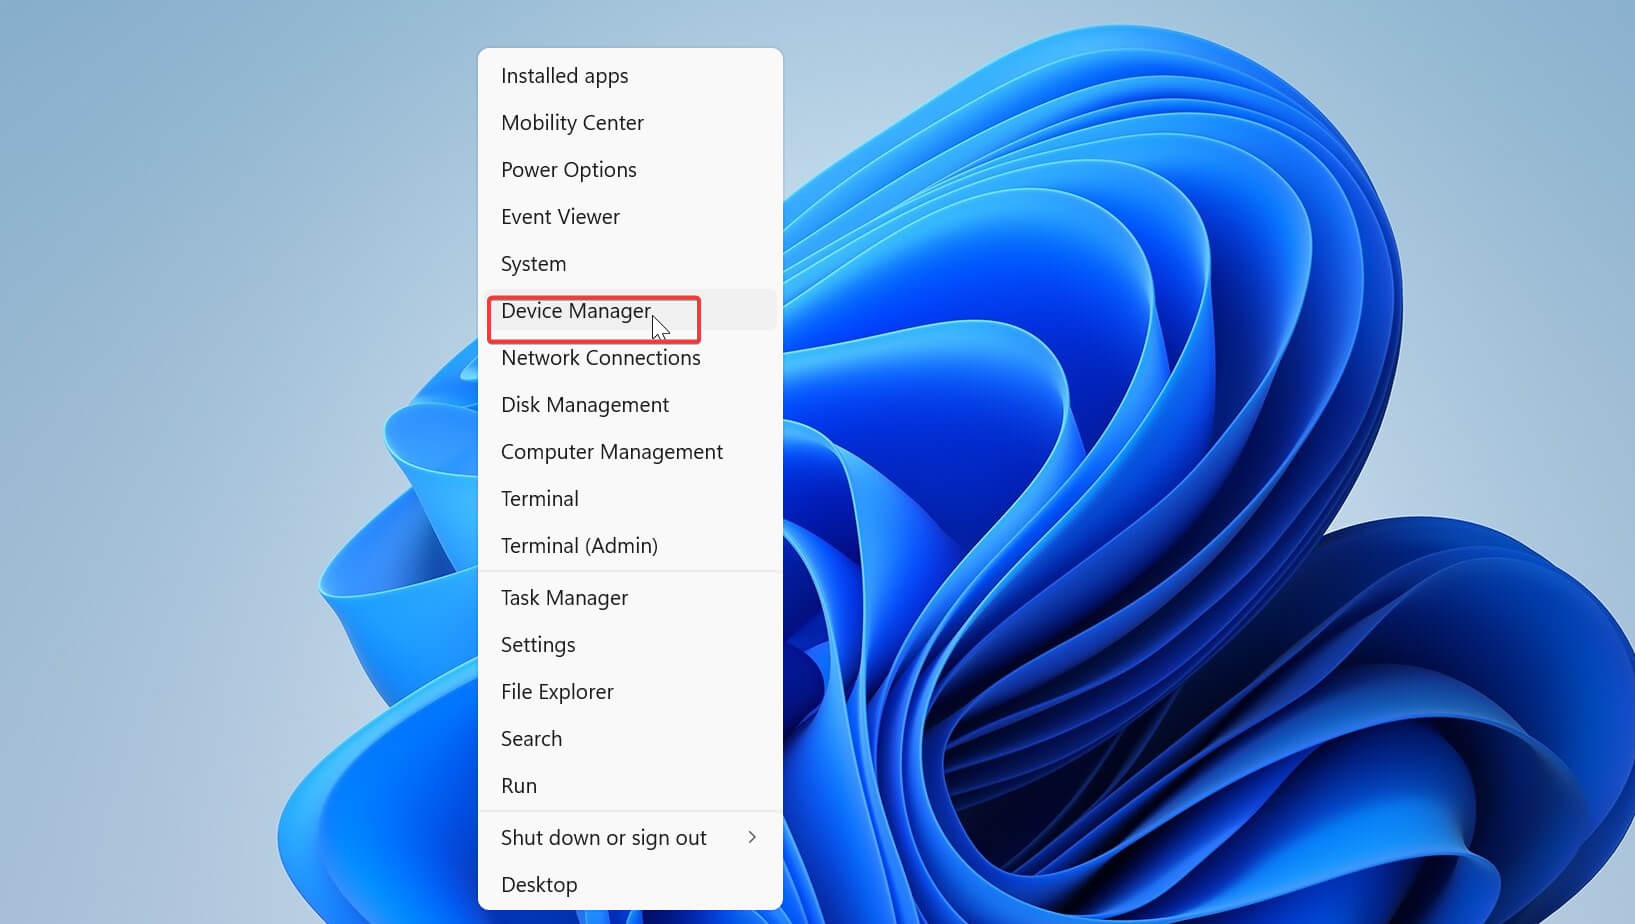
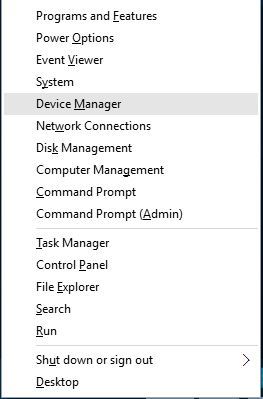
  1. Right-click the Start button and select Device Manager.
    device manager
  2. Double-click the Audio inputs and outputs option to expand it, and right-click your speaker device.
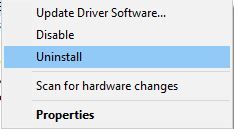
  3. Now, select the Uninstall device option.
    uninstall device
  4. Click Uninstall on the dialog box that opens.
    uninstall button
  5. Finally, click the Scan for hardware changes icon at the top and restart your PC.
    scan minecraft sound not working

If your sound drivers are faulty, your Minecraft sound might not work. You need to uninstall and reinstall the drivers to get past this issue.

Regardless, you can solve annoying sound issues by updating your sound driver automatically, without long steps or risky methods. The software below will do it for you.

3. Check if Minecraft has been muted

  1. Right-click the speaker icon on your Taskbar.
  2. Select Open Volume mixer.
    open volume minecraft sound not working
  3. Now, click the Speaker icon under Minecraft to unmute it if it is muted.
    unmute minecraft sound not working

You can now check if the Minecraft sound is working.

4. Check Minecraft’s audio settings

  1. Click Options on Minecraft’s title screen.
  2. Click the Settings button.
  3. Now, click the Music & Sounds option (some users will need to click Audio).
  4. Increase all the game’s audio settings to 100 percent if they’re less than that.Music & Sound Options sound not working
  5. Click the Done button.

5. Disable sound enhancements

  1. Right-click the Speaker icon on your Taskbar and select Sounds.
    sounds
  2. Click the Playback tab at the top of the Sound window.
  3. Now, right-click your default sound device and select Properties.
    playback
  4. Next, select the Enhancements tab.
    enhancements minecraft sound not working
  5. Select the Disable all enhancements option. Note, however, that not all Speaker Properties windows include that option.
  6. Now, click the Advanced tab at the top.
    advanced
  7. Check the box for Allow applications to take exclusive control of this device.
  8. Finally, click the Apply button, followed by OK to save the changes.
    allowcheck the box for Allow applications to take exclusive control of this device.

Some Minecraft players have said they’ve fixed the game’s sound by disabling the sound enhancement feature. So, you should try it too.

6. Reinstall Minecraft

  1. Press the Windows key + R keyboard, type appwiz.cpl, and click OK.
    appwiz
  2. Right-click the Minecraft app and select Uninstall.
    uninstall
  3. Now, follow the onscreen instructions to complete the process.
  4. Finally, visit the Minecraft website to download and install the latest version of the game.

Those are some of the best resolutions for fixing Minecraft’s sound. If Minecraft’s sound still doesn’t work, there might be a more general audio issue. Check that the sound is ok for alternative games.

If Realtek sound is not working on Windows 10, you can check our detailed guide to restore it quickly.

Feel free to let us know the solution that helped you fix this issue in the comments below.

[wl_navigator]

Darktide Backend Error: 3 Ways to Fix This Issue

Darktide backend error will prevent you from signing in and playing the game. Luckily, there are a couple of solutions that you can use to fix this.

What does a backend error mean in Darktide?

This issue is most likely caused by server issues, but it can sometimes appear due to connection issues.

How do I fix Darktide backend error signing in?

Before we start, check the server status. You can also restart your router or try switching to a wired connection. You can also try restarting Steam as a workaround.

1. Verify the game files’ integrity

  1. Start the Steam app.
  2. Go to Library.
  3. Right-click on Warhammer 40K Darktide and select Properties.
  4. Select Local Files and click on the Verify the Integrity of game files option.
  5. If there are any issues with the game files, the app will fix the problem.

2. Use a VPN

Some of our readers fixed this problem by using a VPN. Since this is a backend server problem and there are different servers for different regions, this might work just fine.

For this purpose, we recommend NordVPN which is the best right now for gaming. It’s extremely fast, has worldwide coverage, and unlocks any restricted content.

After you install the VPN, change the country or region and see if the Backend error, Error signing in error in Warhammer 40K Darktide is still there.

NordVPN

A great VPN source that helps you unlock any restricted content and provide lightning-fast speeds.
Free Trial Visit Website

3. Disable your firewall

  1. Click the Start button, type firewall, and open Windows Defender Firewall from the results.
  2. Click on Turn Windows Defender Firewall on or off.
  3. Now, turn off Windows Firewall for all networks and press the OK button at the end.
  4. Try to start Steam and the game and see if it makes a difference.

If you have a third-party antivirus with a firewall installed, try disabling the firewall from its settings menu.

Should the solution not work, turn the firewall back on because it protects your system against a lot of threats.

We remind you that this is a backend server problem so sometimes, the solution is to wait until the servers are fixed.

We hope that our guide helped you fix the Backend error, Error signing in in Warhammer 40K Darktide and now you’re enjoying the game.

This isn’t the only problem you can encounter, and we wrote about Darktide error 4001 and Darktide error 4008 in separate guides.

We also have a guide that focuses on the most common Darktide errors, so don’t miss it.

For any other questions or suggestions, leave us a comment in the dedicated section below.

Fix: The Connection was Terminated by The Remote Computer

Many users report running into error 628: The connection was terminated by the Remote computer before it could be completed on their PC. It occurs when connecting to the Internet and there’s an issue with the connection.

Likewise, some complained about the unable to ping other computer issues on Windows 10.

What does Error 628 mean?

When trying to establish or set up a VPN connection, you may run into Error 628. It accompanies the message: The Remote computer terminated the connection before it could be completed.

The VPN Error 628 is a Point-to-Point Tunneling Protocol (PPTP) error that can appear when port 1723 is inaccessible on your PC. It means the remote computer fails to establish a connection successfully.

However, the error can occur for some reasons, some are:

  • Issues with the router or modem – Issues with the router can affect the connection your system is trying to establish. Also, outdated router firmware can cause problems with its network connection.
  • Windows Firewall interference – The connection error can occur if the Windows Firewall is blocking a port and interrupts the VPN connection. It impedes the connection if it perceives it as a threat or malicious activity.
  • Unstable Network connection – Network congestion and slow internet connections on your PC can cause the error 628 to occur if it can’t set up a connection. Also, issues with the network components, like network adapters, can result in an error.

Nevertheless, you can fix Error 628 by using some troubleshooting steps on your PC.

How to fix the Connection was terminated by the remote computer before it could be completed error?

Before proceeding with any advanced troubleshooting steps, follow these preliminary checks:

  • Restart your router or modem.
  • Temporarily disable antivirus software on your computer.
  • Restart Windows in Safe Mode and check if you encounter issues establishing the connection.

If the error persists, follow the steps below:

1. Uninstall and reinstall all the Miniports

  1. Press Windows + R key to open the Run window, type devmgmt.msc, and click OK to open the Device Manager.
  2. Expand the Network adapters tab, right-click on WAN Miniport (SSTP) and select Uninstall device from the drop-down.
  3. Select Uninstall in the following prompt.
  4. Then, repeat step 2 to uninstall all the WAN Miniport devices.
  5. Tap on the Action tab in the top bar, then select Scan for hardware changes from the drop-down.Scan for hardware changes

Scanning for hardware changes will reinstall all the WAN Miniports uninstalled. You can further check how to reinstall devices in Device Manager.

2. Check for Router Firmware updates

Routers can get outdated and suffer from bugs that can cause their network to be unstable. Hence, updating its firmware to provide the needed patches to fix these bugs is crucial.

Hence, go through the router manual and check for router firmware update procedures. Also, you can contact the manufacturer for guidance on how to update your router.

3. Use Microsoft CHAP version 2 protocols in the Network settings

  1. Right-click on the Wi-Fi icon in the bottom right-hand corner, then select Open Network and Sharing Center from the drop-down.
  2. Click on Change adapter options.CHnage adapter option
  3. Right-click on the VPN connection and select Properties from the drop-down.
  4. Navigate to the Security tab, tick the radio button for the Allow these protocols option, check the box for Microsoft CHAP version 2, and then click OK to save the changes.CHAP version 2
  5. Restart your PC and check if the error persists.

Allowing the Protocol will fix the connection error disrupting the Remove connection on Windows 10.

4. Disable Proxy

  1. Press Windows + R key to open the Run window, and type inetcpl.cpl, then press Enter to open the Internet Properties window,
  2. Go to the Connections tab and click on LAN Settings at the bottom of the page.
  3. Uncheck the box for Use a Proxy server for your LAN, then press OK to save the changes.Disable proxy
  4. Restart your computer to sync the changes.

Disabling the Proxy can resolve connection problems causing error 628.

5. Disable Windows Firewall

  1. Click the Start button and type control panel, then open it.
  2. Click on the Windows Defender Firewall option.
  3. Select the Turn Windows Defender Firewall on or off option from the left pane.Turn Firewall off
  4. Go to the Private and Public network settings, then click the radio buttons for the Turn off Windows Defender Firewall (not recommended) option.Turn off private and public firewall
  5. Restart your PC.

Disabling the Firewall will resolve any Windows Defender Firewall interference on the connection you want to establish.

In conclusion, our readers can check our guide on how to fix VPN Error 691 in Windows for more information on fixing error 628. Also, you can read about fixing connection failed error 800 on Windows.

If you have any questions or suggestions, kindly drop them in the comments below.

Error700003: Your organization has deleted this device [Fix]

As you can tell by the title, Error 700003 occurs whenever your workplace or school has removed your device from its network. It can also happen if the organization removes your Office 365 account.

It’s not a super common error, but it can really hamper your user experience when it does happen. But before going into the fixes, it’s essential to understand why this happens first.

Why does Error 700003 occur?

The network may be going through some downtime, or someone may have accidentally kicked you off. Outside of things you can’t control, there are several other reasons.

  • The internet connection is bad: You may be experiencing an internet service interruption. We recommend contacting your ISP or resetting your Wi-Fi adapter.
  • You’re running an old version of Microsoft Office: Downgrading may have its benefits, but running an older version can cause compatibility issues, so you should state up to date.
  • The firewall prevents the apps from connecting: An overzealous firewall has been the source of many user headaches. Reconfigure the firewall to stop it from blocking apps.
  • Your computer is being hampered by a glitch: Not everything works perfectly right off the bat. Try installing the latest Windows Update. It may instantly fix the current problem.

How can I fix Error 700003 on my Windows 11 computer?

The first thing that you should do is contact the network administrator. Ask them if they can reinstate you. If that doesn’t work, below is a series of quick solutions followed by more complex ones.

  • Restart your computer. The error could be a spur-of-the-moment thing that’ll go away after a quick reboot. This should be the first thing that you should do.
  • Use Microsoft Office online. Microsoft has a version of its Office suite of apps on its website. You can use this in the meantime while everything gets sorted out.
  • Close the other apps you have open in the background. Having so many windows open cause performance problems.

1. Disconnect your account

  1. Open the Settings app and click the Accounts tab on the left-hand side.
  2. Scroll down, then select Access work or school.
  3. Expand your connected account and click Disconnect. Wait for your computer to finish disconnecting.
  4. Afterward, reconnect your account once more with your same credentials to see if it’s been fixed.

2. Remove credentials

  1. In the Windows Search bar, bring up the Credential Manager. It’ll be the first one that appears.
  2. Select Windows Credentials in the new window that appears.
  3. Scroll down until you find the offending network. Expand it and select Remove to get rid of those credentials.
  4. Like the previous solution, log into the same network again to see if the connection works.

3. Force recovery or deregister with the Command Prompt

  1. Use the Command Prompt in the Windows Search bar and select Run as administrator.
  2. Type in the following command and hit the Enter key after dsregcmd /forcerecovery
  3. Click Sign In in the new window to access your organization’s resources. After this, you may need the help of the network admin.
  4. If that doesn’t work, type the following command in, and press Enter on your keyboard dsregcmd.exe /leave
  5. Finally, enter the following command and see if your computer has genuinely left the network dsregcmd /status

After this, register your account to the network again. Error 700003 should be gone.

What other errors can occur on Office 365, and how can I address them?

Office 365 doesn’t get errors very often, but there is one we want to mention: Error Code 0x426-0x0. It prevents you from using the apps because of corrupt files.

You can either repair the suite with a utility app or enable Click-to-Run. As something about a specific Office app, we recommend learning about Microcosft blocking Excel macros.

Macros can be a great way to speed up data entry; however, the software may think it’s untrustworthy. In addition, unblocking macros can be a little tricky as it’ll require you to go through specific menus.

Feel free to comment below if you have any questions on other Microsoft Office 365. Also, leave comments about guides you want or information on other Windows 11 apps.

Fallout New Vegas Crashing & Not Launching on Windows 11

Many users reported that Fallout New Vegas is crashing on Windows 11 and that they are unable to play the game. However, this can be fixed and this guide will show you how to do it.

Why is Fallout New Vegas crashing?

Sometimes GPU drivers or exploit protection features can cause issues. Not using proper optimization mods can also cause crashes.

How do I fix Fallout New Vegas crashing on Windows 11?

Before we start, try using the GOG version since this one is the most stable. Keeping your GRPU drivers up to date can also prevent issues with the game.

1. Install older GPU drivers

  1. Press the Windows key + X and choose Device Manager.
    device manager windows 11 win+x menu
  2. Locate your graphics card driver, right-click it and choose Uninstall device.
    uninstall NVIDIA GPU
  3. Click Uninstall to confirm.
  4. Once uninstalled, download and install an older version of the driver.

According to the community, the latest AMD drivers are causing this issue, so be sure to reinstall them. To see how to do that, don’t miss our guide on how to update the graphics card driver on Windows 11.

2. Disable security features

  1. Open Windows Security.
  2. In the left pane, navigate to App & browser control.
     app and browser control windows security
  3. Next, select Exploit protection settings.
    exploit protection settings
  4. Under the system settings tab, under Force randomization for images (Mandatory ASLR) select Off by default.
    force randomization for images off by default

Disabling this feature might make your PC less secure, but it will help if Fallout New Vegas is crashing on the loading screen or not launching at all.

3. Use DXVK mod

  1. Visit the DXVK download page and download the mod.
    dxvk mod
  2. Open the directory that has FalloutNV.exe, for many  users that’s: C:\XboxGames\Fallout- New Vegas Ultimate Edition (PC)\Content\Fallout New Vegas English
  3. Paste the .dll and .conf files from the archive you downloaded in Step 1.
  4. Run the game in windowed mode. 

4. Install additional mods

  1. Using some of these mods can improve the stability of the game:

Many are also recommending using Viva New Vegas since it fixes various issues with the game, so be sure to try it.

Does Fallout New Vegas work on Windows 11?

The game works on Windows 11, however, it’s not optimized for it, so you’ll likely experience issues unless you use mods to fix the various Fallout New Vegas problems on Windows 11.

These fixes should help you restore normalcy to the game on Windows 11 in no time. Keep in mind that outdated mods such as NVSR and Project Nevada should be removed since they are outdated.

Those are some resolutions players have fixed Fallout: New Vegas crashing and freezing with. In the same vein, if you are experiencing FPS drop, lag, and stuttering on Fallout New Vegas, check our guide to fix it quickly.

Many also experienced Runtime error in Fallout New Vegas, but we have a guide that tackles that issue as well. Before you go, don’t miss our guide on the Fallout New Vegas out of memory error.

Now that you know how to run Fallout New Vegas on Windows 11, let us know which solution worked for you.

Can’t Play Any EA Games Online? Fix it With These Solutions

Some of the biggest online multiplayer titles are from EA games. However, various connection issues can arise that prevent players from accessing online features for their EA games. Fortunately, this guide has listed a lot of tested solutions to help you resolve the can’t play any EA games online issue.

Before applying the solutions below, restart your PC and your router, to make sure that your local connection is fine.

What can I do if I can’t play any EA games online?

1. Check for server issues

  1. Open the EA help page in your browser.
  2. Click on Games.
  3. Type the name of the game you can’t play.
  4. Select the game from the list to go to the main page.
  5. Look for the Server Status icon at the top.

The above steps will allow you to check the server status for specific games. Alternatively, you can check for any EA server outage by opening the DownDetector page for EA. That page will tell you whether there’s a general EA server outage. If there is an available EA server issue, you’ll need to wait for EA to get it sorted.

2. Check your EA account’s status

  1. Open the EA Help website.
  2. Login with your account credentials.
  3. Click on Accounts.
  4. Select My Ban History from the drop-down menu.
  5. Under the Infraction History section, you will see the history of your account bans and suspensions.

EA will also inform you if your account has been suspended or banned, as noted in the My Ban History section of that website. If EA has suspended or terminated your account, you’ll need to contact Electronics Arts for further details.

3. Run Origin as an administrator

  1. Right-click on the Origin launcher app and select Properties.
  2. Click the Compatibility tab.
  3. Select the Run this program as administrator checkbox.
  4. Click Apply and OK.

4. Flush the DNS cache

  1. Open the Start menu.
  2. Open Command Prompt as an administrator.
  3. Type the below commands and press Enter after each one.
    ipconfig/flushdns
    ipconfig /registerdns
    ipconfig /release
    ipconfig /renew
    netsh winsock reset
  4. Restart your PC.

5. Switch to Google DNS

  1. Open the Start menu.
  2. Type Control Panel and open it.
  3. Click View by and select Category.
  4. Select Network and Internet.
  5. Select Network Connections.
  6. Right-click your internet connection and select Properties.
  7. Select Internet Protocol Version 4 on the Networking tab.
  8. Click Properties.
  9. Click the Use the following DNS server addresses radio button.
  10. Input the value 8.8.8.8 within the Preferred DNS server box.
  11. Then enter 8.8.4.4 in the Alternative DNS server box.
  12. Press OK.

6. Disable Windows Defender Firewall

  1. Open the Start menu.
  2. Type Windows Defender Firewall and open it.
  3. Next, click Turn Windows Defender Firewall on or off.
  4. Select the Turn off Windows Defender Firewall radio buttons.
  5. Click OK.

If this solution allows you to play EA games on your PC, then you can keep the Windows Defender Firewall off till the time you play the game.

Once you are done playing, you should turn the Windows Defender Firewall back on because this will ensure that you are safe when accessing the internet and dealing with third-party software.

Alternatively, you can do the same with the third-party antivirus software and check if this resolves the problem.

7. Clean boot Windows

  1. Press the Win + R keys to open the Run dialogue.
  2. Type msconfig and press Enter.
  3. Click on Selective Startup on the General tab.
  4. Deselect the checkbox for Load startup items.
  5. Select both the Load system services and Use original boot configuration options.
  6. Click the Hide all Microsoft services checkbox on the Services tab to select that setting.
  7. Press the Disable all button to deselect all remaining services.
  8. Click Apply and OK options.
  9. Restart your PC.
Tip icon Tip
Note: You can restore the original boot configuration by selecting the Load startup items and Enable all options in the System Configuration window. If the clean boot fixes the issue, you’ll need to figure out what program or service conflicts with Origin and your EA games.

8. Make sure UPnP is enabled for your router

  1. Open the Start menu.
  2. Open Command Prompt as an administrator.
  3. Type ipconfig and press Enter.
  4. Note down the default gateway number, which will be something like 192.168.0.1.
    ipconfig command can't play any ea games online
  5. Close the Command Prompt.
  6. Open your web browser.
  7. Input your gateway number in the browser’s URL bar, and hit Enter.
  8. Sign in to your router’s settings page. You can find the required username and password for your router’s settings on the Router Passwords website.
  9. Find an Enable UPnP option in your router’s settings. Usually, that option is on the Advanced Network or Misc tab, but it varies between routers.
    An Enable UPnP checkbox can't play any ea games online
  10. Select the Enable UPnP setting if it’s not selected.
  11. Select Apply or Save Settings option.
Tip icon Tip
Note: Network Discovery also needs to be turned on for UPnP to be enabled for Windows. You can turn on Network Discovery via the Network and Sharing Center Control Panel applet.

9. Disable the Use a proxy server option

  1. Press the Win + R keys to open the Run dialogue.
  2. Type inetcpl.cpl and press Enter.
  3. Select the Connections tab.
  4. Click LAN settings.
  5. Uncheck the Use a proxy server for your LAN option if it’s selected.
  6. Select the Automatically detect settings checkbox.
  7. Press the OK button on the Local Area Network (LAN) Settings window.
  8. Next, click OK on the Internet Properties window.

Why can’t I play EA games online?

After careful research of user reports on various forums, here are a few of the most common reasons you can’t play any EA games online;

  • An issue with your account: When you can’t play any of your EA games online, there might be an issue with your account. For instance, your account might have been suspended or deactivated for some reason. Under such circumstances, online features will become generally unavailable for EA games and you may keep getting the oops, an error occurred message.
  • Server issues: A more general networking issue could stop the game from connecting with servers.
  • DNS problem: An unreliable DNS (Domain Name System) can also cause connectivity woes for gaming. In this case, changing DNS can sometimes help resolve such gaming issues.
  • Your antivirus is blocking the game: Security features for Windows and antivirus software can also generate issues for playing EA games online. In addition, such features can impede server connectivity for online EA games. So, disabling firewalls and antivirus software can also fix general online gaming issues for EA titles.

If none of the above solutions resolve your problem, then as a last resort, we suggest you contact EA support. You can contact EA support’s service via the EA Help site. Log in and select the game you are having trouble with.

The potential resolutions above can feasibly fix various issues that prevent players from playing EA games online via Origin client. So, those resolutions are worth a try if you can’t play any EA games online.

We also have a guide that lists some practical solutions for users facing You must be signed in to your EA account to access online features of this game error.

Let us know in the comments below which solutions helped you resolve the can’t play any EA games online error.

Fix: Codec Error 0xc00d5212 – Format Not Supported [5 Ways]

Error 0xc00d5212 is an error message that pops up for some Windows Media Player users when they try to play AVI videos.

That error message states: This item is was encoded in a format that’s not supported. 0Xc00d5212.

Consequently, WMP doesn’t play the video. Below are a few resolutions that should fix the error 0xc00d5212 for some users.

How can I fix This item was encoded in a format that’s not supported. 0xc00d5212?

1. Convert the AVI video to an alternative format

  1. Open the Convert video to MP4 page at Online-Convert.com.convert video to MP4 with online video converter
  2. Click the Choose Files button to select an AVI video that doesn’t play.
  3. Select a resolution on the Choose a Preset drop-down menu that matches your VDU’s resolution.change video presets online video converter
  4. Then click Start conversion.
  5. Select the Download option.

Error 0xc00d5212 will pop up when the correct codec required to support the AVI file isn’t installed. Thus, converting the AVI video to an alternative format Windows Media Player will likely play is one way to fix the issue.

MP4 is among the most universal video file format that most media players play.


2. Install K-Lite Codec

As error 0xc00d5212 can be a codec issue, installing the all-in-one K-Lite Codec pack might fix the error. Users can do that by clicking Download on the Contents of K-Lite Codec Pack page.

Then open the K-Lite setup wizard to install the pack. That should ensure there aren’t any codecs missing.

3. Update the display adapter driver

Error 0xc00d5212 can also be due to an incompatible graphics card driver. Therefore, updating the display adapter’s driver might resolve the issue.

The easiest way to do so is to use a third-party driver updater and fixer that will scan and then show users what devices, if any, require a driver update.

We recommend Outbyte Driver Updater because it has a high rate of accuracy when it comes to matching your hardware with its corresponding driver. It is also very lightweight, so it can work on pretty much any PC.

⇒ Get Outbyte Driver Updater


4. Fix Corrupted Video File

  1. Users can fix corrupted AVI files with Remo Repair AV.
    • To try out the demo version, click Free Download (for Windows) on the software’s page.
  2. Open Remo Repair’s setup wizard to install the software.
  3. Launch Remo Repair, and click its Browse button to select the AVI video to fix.
  4. Then press the Repair button.
  5. Thereafter, users can select Preview to check the repaired video.
    • In the registered Remo Repair, users can also click Save to save the video.

If the error 0xc00d5212 error message occurs for one specific AVI file, that might be a corrupted file. Try playing alternative AVI videos in Windows Media Player to check if they play.


5. Play the Video With VLC

vlc player

VLC is a better media player than WMP that incorporates more built-in codecs. Thus, it’s an altogether more reliable video player than Windows Media Player.

Some WMP users have also confirmed that their AVI videos that didn’t play in Windows Media Player played fine in VLC.

Users can add VLC to Windows 10 by clicking Download VLC on this webpage.

VLC media player users can also fix corrupted AVI files. So, before splashing out on Remo Repair, try fixing an AVI with VLC. To do that, click Tools > Preferences in VLC. Select Input & Codecs on the left of the Preferences window.

Select Always Fix on the Damaged or incomplete AVI file drop-down menu, and select the Save option. Thereafter, VLC might fix corrupted AVI clips when users play the videos.


Those resolutions will usually fix error 0xc00d5212 for most WMP users so they can play AVI videos. Switching to an alternative media player is probably the most straightforward, and best, resolution.

As Microsoft hasn’t released a new WMP version since 2009, Windows Media Player is becoming increasingly antiquated media player software.

  • How do I fix error codec?

To solve this problem you need to set the player to Download codecs automatically. Then, when you try again to play the file, you will be prompted to install the codec. You can also install a codec pack.

  • How do I fix an unsupported video format?
One of the solutions is to install the proper codec for the video file. You can also read our article about software that will play almost all video files.

[wl_navigator]

Fix: Connection Blocked After Timeout Error in TeamViewer

Is the TeamViewer connection blocked after timeout? This article will tell you why it happens and how to fix this.

TeamViewer is probably the most popular remote access and control software out there. You may depend on it for various reasons. However, sometimes, you may encounter some unpleasant problems with TeamViewer.

The connection blocked after timeout error is one of the most common ones. Of course, like any other errors, you can troubleshoot and fix them. However, before that, you should know why it happens.

Why is my connection blocked after a timeout error on TeamViewer?

There may be some specific reasons behind this problem. It includes the followings:

  • Subscription limitations: Your subscription doesn’t allow you to use this service the way you currently use it.
  • False positive detections: Sometimes, from TeamViewer ends, due to technical limitations, the server may block you falsely.
  • IP blocked: Your IP address may get blocked for various reasons, and you may face the connection stopped after a timeout error.
  • Partner ID blocked: For misusage or other things, your partner ID may get blocked.

How to fix the TeamViewer connection blocked after timeout?

Before going through the main solutions, we suggest you do the following things as primary steps:

  • Update the TeamViewer app to the latest version and see if it helps.
  • Ensure that your internet access is not blocked or hampered due to internal issues.
  • Try using your mobile network and see whether it fixes the problem.
  • Finally, disable your antivirus program and firewall to prevent interference.

After that, go through the following methods to solve the TeamViewer connection blocked error:

1. Re-Install Team Viewer

  1. Press Win + I on the keyboard to open Windows 11 Settings.
  2. Navigate to Apps and click on Installed apps.going installed apps windows 11 settings
  3. Click on the three horizontal dots next to the TeamViewer and click on Uninstall.uninstalling teamviewer windows 11
  4. After uninstalling, download the latest software from the TeamViewer website and install it again.
  5. Verify if it has solved your problem or not.

However, rather than using the built-in option, we suggest you use IObit Uninstaller or Revo Uninstaller to remove TeamViewer from your PC. These tools can remove any applications from a PC entirely and don’t leave any registry entries and other leftovers.

2. Change TeamViewer ID

  1. Uninstall TeamViewer as shown in the previous method.
  2. Open the Start Menu, type regedit, and press Enter to open Registry Editor.
  3. Navigate to the following location: Computer\HKEY_LOCAL_MACHINE\SOFTWARE\
  4. Delete the TeamViewer key.teamviewer registry entry
  5. Go to the following location: Computer\HKEY_CURRENT_USER\Software\
  6. Delete the TeamViewer key from there as well.
  7. Download this Mac address changer and install it on your PC.
  8. Open that tool.
  9. Click on Random MAC Address and then on Change Now.Technitium MAC address changer
  10. Install TeamViewer again.

Now, you will get a new ID. It should solve your problem.

3. Go for a commercial license

In most cases, the problem occurs when a free user overuses TeamViewer. If it keeps happening, they may ban your client ID. So, to solve the connection blocked issue, go for a commercial license if your usage doesn’t qualify for the free support.

Though TeamViewer claims the free usage is unlimited, it is not. Depending on your usage pattern, you may be required to upgrade your subscriptions.

If necessary, learn how to solve commercial use detected errors on TeamViewer.

4. Use VPN

  1. Download a VPN app, for example, Private Internet Access (PIA).download private internet access
  2. Install it on your PC.
  3. Connect to a VPN server.
  4. Now, use TeamViewer and see if it helps.

If TeamViewer has an issue with your ISP or country’s network, it may randomly show timeout errors and connection-blocked messages. Using a VPN may solve this problem. It also helps when your IP address gets banned on TeamViewer.

5. Contact support

  1. Go to the TeamViewer support page.
  2. Sign in if necessary.
  3. Use your preferred medium to contact the support team. For example, you can use the Chat Now option.chat now teamviewer support
  4. Explain your problem; hopefully, you will get a solution.

Sometimes, the problem also may appear due to malicious activity on your device. So, we also suggest you use one of the best Antivirus programs to protect your computer from such things.

This article has explained how to solve the TeamViewer connection being blocked after a timeout error. Let us know in the comment box if you have a suggestion or opinion.

Fix: World of Warcraft Not Using GPU / Low GPU Usage [5 Ways]

Are you having trouble getting your game to run on your GPU? World of Warcraft is one of those games that heavily depend on your GPU to render its graphics. However, you may find that at times, WoW is not using your GPU or the GPU usage is too low.

This is not the only issue gamers may face. Sometimes, WoW won’t start in Windows but we’ve already tackled this problem in our fix guide. For today, let’s focus on how to get the most out of your GPU when it comes to WoW.

Why is WoW not using the graphics card?

So you just upgraded your hardware to a high-end gaming PC but still, WoW won’t use your GPU. Why is that? Below are some potential reasons:

  • Incompatible graphics card – You may have upgraded to a powerful graphics card but if it is not compatible with WoW, there’s no way it will work.
  • Outdated game – If your WoW current game version is not the latest, you may have trouble getting it to work as it may not meet the GPU requirements to run it.
  • Missing/outdated drivers – If you have missing drivers or updated the wrong ones for your graphics card, the game may have trouble recognizing the correct GPU to run on.
  • Out-of-date OS – Most modern games rely on the latest software so if you’re still running earlier versions of Windows, it may not meet WoW’s current requirements. It may be time to upgrade to Windows 11.

How can I fix WoW low GPU usage?

A few preliminary checks before proceeding to the slightly advanced technical solutions include:

1. Change your graphic settings to high performance

  1. Press Windows + I to open Settings.
  2. Click on System on the left pane then select Display.
  3. Under Related settings, click on Graphics.graphics
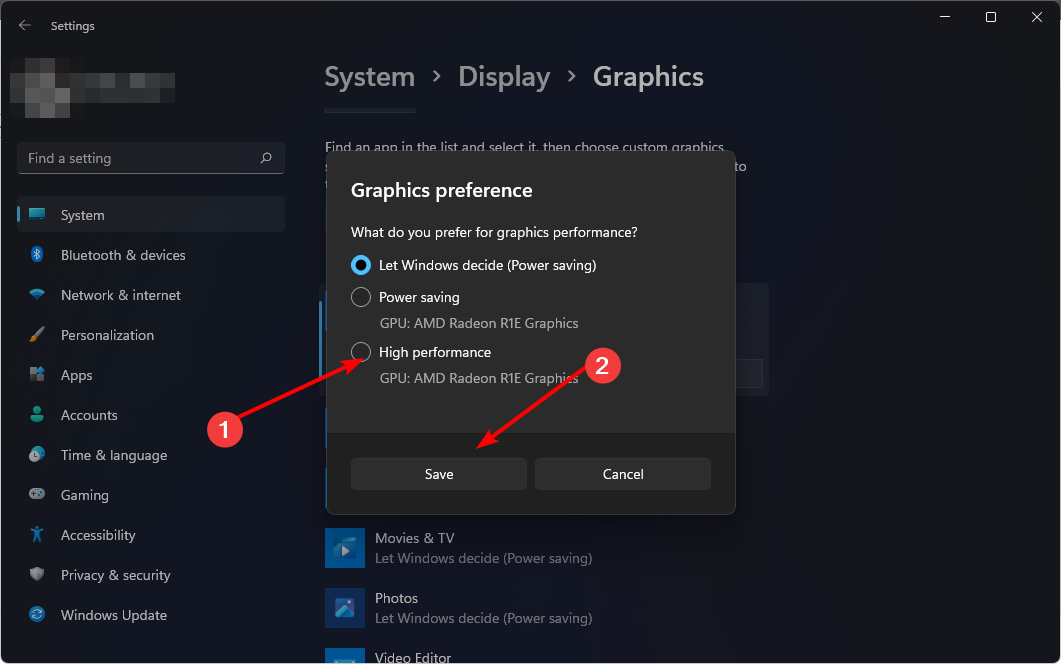
  4. Select World of Warcraft from the list, and click on Options.
  5. Now, choose High Performance and click Save.

2. Disable the default GPU

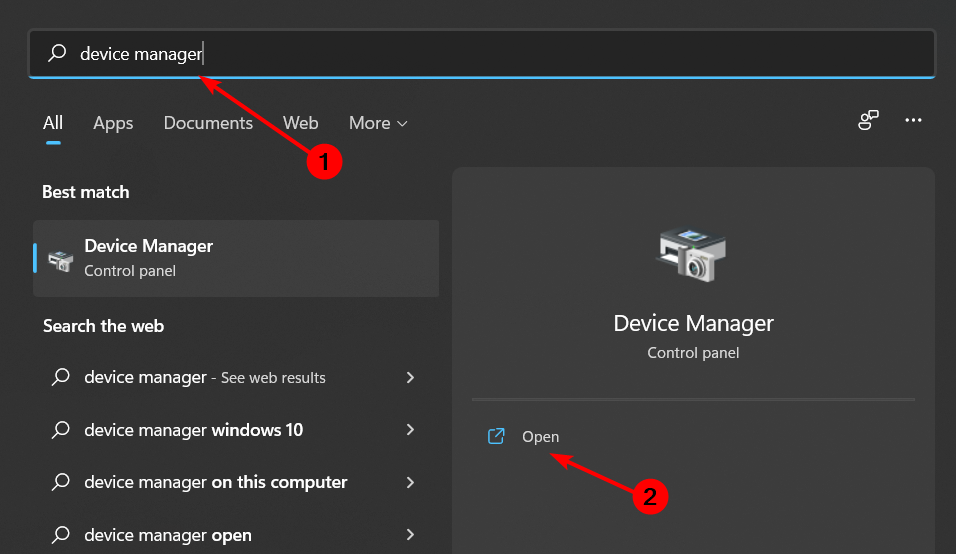
  1. Click on the Start Menu icon, type Device Manager in the search bar, and click Open.
  2. Navigate to Display adapters to expand, right-click on your graphics card, and select Disable device.disable device to fix elden ring not using gpu

Your integrated GPU is good to perform basic functions but when it comes to running graphic-intensive games, a dedicated GPU should be your go-to. It is also imperative that when choosing the dedicated GPU, pick one that is recommended for WoW to avoid compatibility issues.

3. Update your graphics driver 

  1. Click on the Windows key, type Device Manager in the search bar, and click Open.
  2. Navigate to Display adapters to expand, right-click on your graphics card, and select Update driver.update graphics driver
  3. Select Search automatically for drivers.

While this method works most of the time, a lot of PC users might detest going through multiple steps and to make it worse, choose the wrong driver. To avoid such mishaps, we recommend using a third-party tool.

Outbyte Driver Updater is an excellent automatic driver updater utility that scans your system for missing, outdated, and corrupt drivers. It then searches, downloads, and installs the best-matched drivers for your PC without you having to go through multiple steps.

4. Update your OS

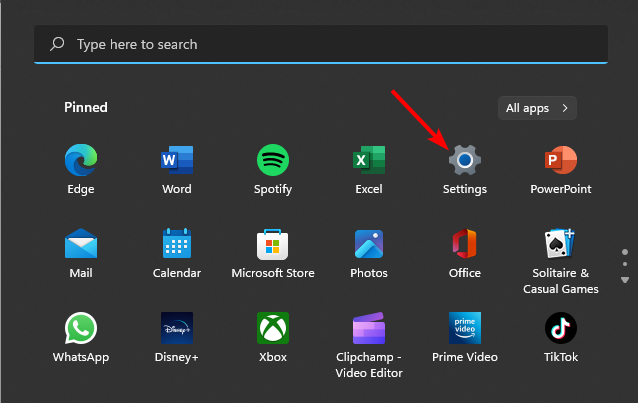
  1. Hit the Windows key and click on Settings.
  2. Select Windows Update and click on Check for updates.check for updates windows 11 settings
  3. Download and install if available.

5. Install overclocking software

Overclocking is a process in which you can increase the performance of your PC’s hardware by tweaking its settings. There is a lot of overclocking software available so don’t hesitate to check out our recommendations.

Note that this can cause instability in some cases, but if you’re careful, you can use it to boost your game performance and get better frames per second (fps) in games like World of Warcraft (WoW). To ensure it is within the recommended settings, also install overclocking monitoring software.

Other measures you can take to make sure your GPU is not left idle are to move your game files to an SSD card and enable hardware acceleration. Moving your Steam games to an SSD card will accelerate the load times since SSDs are known to be faster than hard drives.

If you’re new to SSDs and are in the market for one, we have an awesome recommendation of the best SSDs with great storage options and impeccable performance.

Also, enabling hardware acceleration ensures that your dedicated graphics card is being utilized to its full potential.

If all else fails, it may be your PC that’s too old and making your GPU not detectable. Should this be the case, perhaps it’s time to upgrade your hardware. To that effect, we have a list of budget PCs to play World of Warcraft without hurting your pockets too much.

That’s all we had for today so make sure to leave us a comment down below especially if you used another method not mentioned here.

Fix: Printer Not Responding in Windows [Canon, HP, Epson]

Are you getting a Printer not responding error when trying to print a document with Windows 10? If so, there are a variety of potential fixes.

It doesn’t matter if you’re no pro. We’re here to help you out, so read on to find out all about them.

What can I do if the printer is not responding?

1. Check your antivirus and firewall

In some cases, the Printer not responding message can appear due to your antivirus or firewall. This usually occurs if you’re using a Wi-Fi or network printer.

To check if your antivirus is the problem, we advise you to disable it temporarily and check if that helps. If not, your next step would be to uninstall your third-party antivirus software.

Once you do that, check if the problem is still there. If removing the antivirus solves the issue, you should definitely consider switching to a different antivirus solution.

There are many great antivirus solutions on the market, and you can analyze them and choose from the most effective antivirus software now.

2. Check all the printer connections

The most obvious thing to check first is the printer’s connections with desktop or laptop to see if they’re all correctly plugged in.

If the printer connects via a USB port, try connecting it with an alternative USB port. For Wi-Fi printers, you’ll need to check that the printer is connected to the correct Wi-Fi network.

For example, it could be that the printer isn’t detecting the correct network name.

3. Update the Printer’s Device Driver

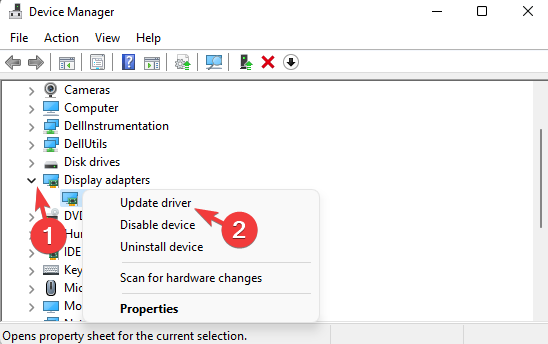
  1. Open Device Manager. You can do that quickly by pressing Windows Key + X and choosing Device Manager from the list.

    Printer not responding to PC
  2. Locate the printer on the list of devices, right-click it, and choose Update driver.

    Printer not responding Samsung
  3. Now choose Search automatically for updated driver software.

    Wireless printer not responding

Outdated printer drivers can cause the Printer not responding message to appear. However, you can fix that problem simply by installing the latest drivers for your printer.

The simplest way to do that is to use the Device Manager. Windows will try to download a suitable driver for your printer.

If that doesn’t work, you can always download the latest driver directly from the manufacturer’s website.

If you don’t want to manually download the drivers, you can use dedicated software to automatically download the missing drivers.

⇒ Get Outbyte Driver Updater

4. Run the Printer Troubleshooter in Windows 10

  1. Press Windows Key + I to open the Settings app.
  2. When the Settings app opens, go to the Update & Security section.
    Printer not responding Canon
  3. Choose Troubleshoot from the menu on the left. Select Printer in the right pane, and click the Run the troubleshooter button.
    Printer not responding to PC
  4. Follow the instructions on the screen to complete the troubleshooter.

If you’re getting a Printer not responding message on your PC, you might be able to fix the problem simply by running a troubleshooter on your PC.

Windows 10 has various troubleshooters that can fix common problems, and if you’re having issues with your printer, you just need to run the troubleshooter by performing the above procedure.

After the troubleshooter finishes fixing the problem, the issue should be completely resolved.

5. Make sure the selected Printer is the default one

  1. First, enter default printer into the Cortana search box and select Change default printer to open the window directly below.

    Printer not responding Canon
  2. That window includes a Let Windows manage my default printer option, which you can now switch off if required.
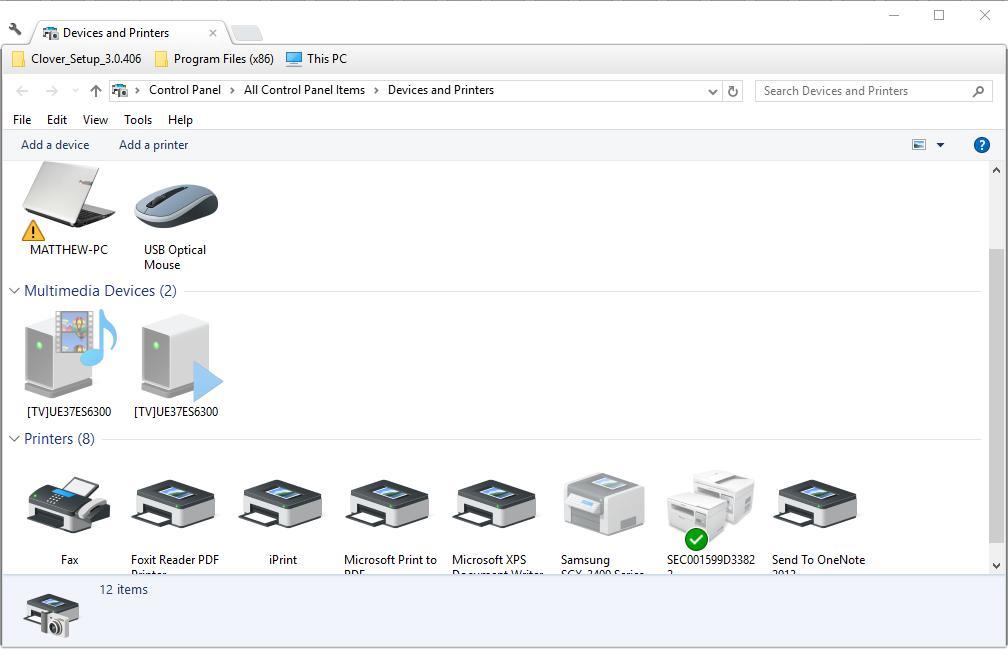
  3. Now the Devices and Printers tab in Control Panel will include a green tick to highlight your default printer as shown directly below. You can right-click an alternative printer there and select Set as default printer.
Wireless printer not responding

You should also check if the printer that isn’t responding is the default one. Note that Windows 10 has a Let Windows manage my default printer option that automatically configures the last printer you printed with as your default one.

You can switch that option off and select your default printer as follows.

6. Check the printer’s Windows 10 compatibility

If you’ve recently upgraded to Windows 10, check if the printer you own is compatible with the platform.

Almost all new printers will certainly be compatible with Windows 10, but older printers might not be.

You can check if a printer is compatible with Windows 10 on the manufacturer’s website.

For example, this page on the Canon site provides printer compatibility details. If you click SELPHY Series on that page, you’ll find that most models in that series are not compatible with Windows 10.

The page also highlights that Canon isn’t issuing Windows 10 device drivers for the Photo Inkjet Series. So look for a similar page on your printer manufacturer’s website.

7. Restart the Print Spooler service

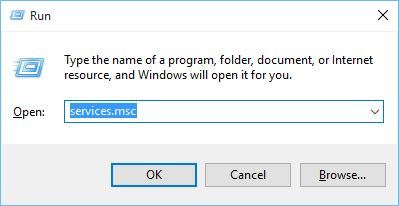
  1. Press Windows Key + R and enter services.msc. Now press Enter or click OK.

    Printer not responding to computer
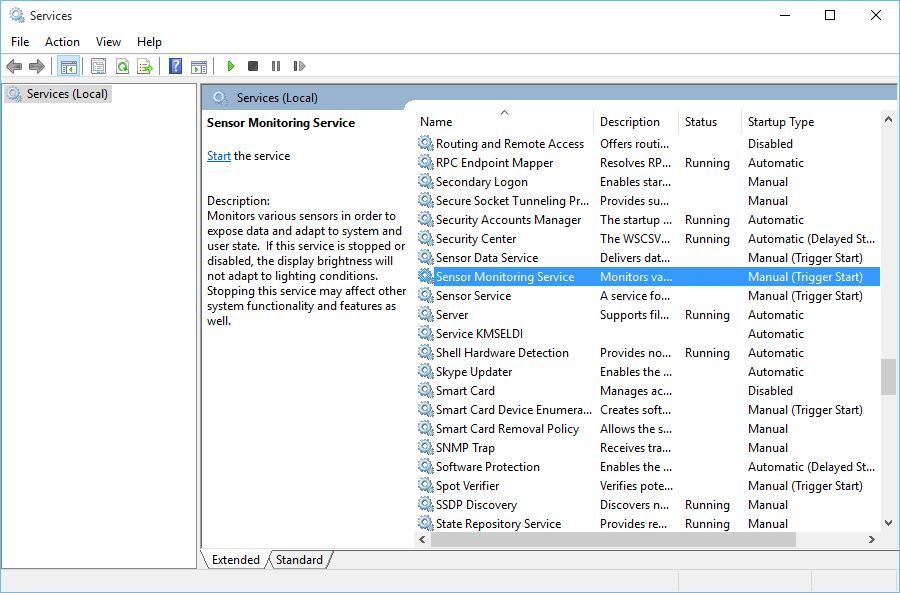
  2. When the Services window opens, locate and double-click the Print Spooler service.

    Printer not responding Epson
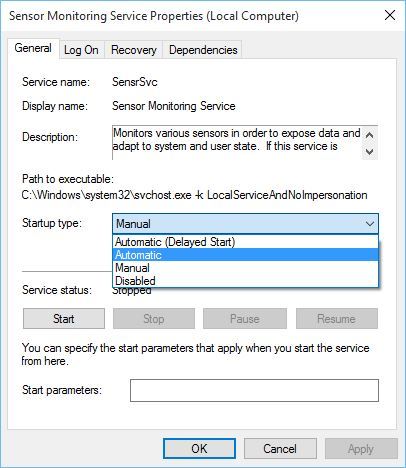
  3. When the Properties window opens, set the Startup type to Automatic and click the Start button to start the service. If the service is running, click the Stop button, wait for a couple of moments and then click the Start button.

    Wireless printer not responding
  4. After doing that, save changes.

In order to print, Windows relies on Print Spooler service, but sometimes certain issues with this service can occur.

These issues can lead to a Printer not responding message and other similar problems. However, you can fix this issue by doing as described above.

Once you restart this service, the problem should be completely resolved and everything will start working again.

Several users are recommending completely stopping this service and then deleting the files associated with it. Stopping the service is simple, and you can do it right from the Services window.

Once you disable the service, go to the C:WindowsSystem32spoolPRINTERS directory and delete all files from them. After doing that, start the service once again and check if the issue is still there.

8. Make sure that your printer is properly configured

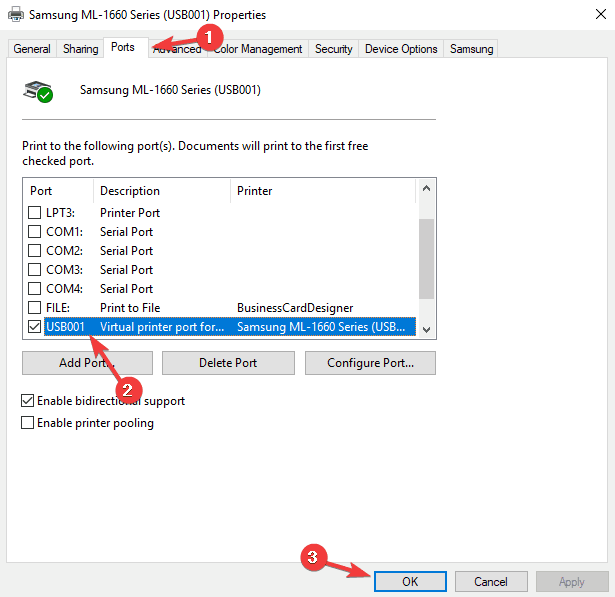
  1. Open Control Panel and go to the Devices and Printers section.
  2. Locate your printer on the list, right-click it, and choose Printer properties.

    Printer not responding HP
  3. Go to the Ports tab. Now make sure that the proper port is selected. After doing that, click Apply and OK to save changes.

    Wireless printer not responding

According to users, the Printer not responding message can appear if your printer isn’t configured properly.

After making these small adjustments, check if the problem with your printer is resolved.

9. Install the latest updates

  1. Open the Settings app.
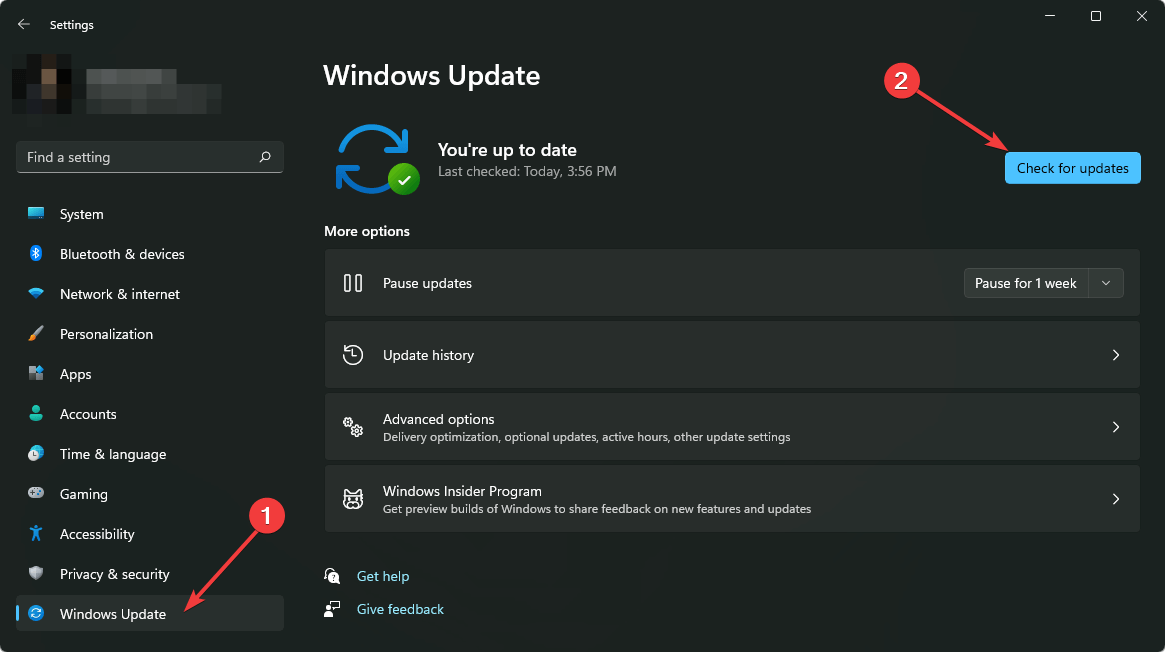
  2. Navigate to the Update & Security section.
  3. Click Check for updates button.

    Wireless printer not responding

If you’re getting Printer not responding message on your PC, the issue might be a missing update.

Sometimes there might be certain glitches on your system, and in order to remove them, you need to install the latest updates.

Microsoft is frequently releasing new updates, and Windows usually downloads these updates automatically.

However, sometimes you might miss an update or two, but you can always install them manually. Windows will now check for available updates and download them in the background.

Once the updates are downloaded, restart your PC to install them.  After updating your PC, the issue should be completely resolved.

Now you should be able to get the printer responding and printing again. However, if not you can always check out other Windows Report articles that provide further printer fixes.

We also recommend taking charge and managing your device and printer settings for optimized performance.

As you’ve seen above, the Printer not responding message can cause certain issues on your PC and prevent you from printing documents.

However, the solutions previously detailed may be used to fix any of these problems reported by users:

  • Printer not responding Canon, HP, Epson, Samsung – This problem can appear with any printer brand, and if you encounter it, be sure to try some of our solutions.
  • Canon printer not responding to PC, computer – This issue may occur if your drivers are out of date. Simply update your printer drivers and check if that solves the issue on your PC.
  • Wireless printer not responding – This problem sometimes appears if you’re using a wireless printer on your PC. Temporarily disable your antivirus/firewall and check if that helps.

5 Quick Fixes for Purple Screen of Death on Windows 10 & 11

When Windows encounters severe issues, it can sometimes display a Purple Screen of Death. While this error is far less common than the famous Blue Screen of Death, but it does occur.

Before we dive into the matter, here’s how one user describes the Windows 10 purple screen issue:

Windows 10 upgrade went all the way to win 10 from win 7 pro. When shut down then power on get blinking purple screen and cannot do anything. Can only hold the power button down to turn off. Cannot get to login only shut down with power button.

If your computer crashes with a Purple Screen of Death, follow the troubleshooting steps listed in this article to fix the problem.


How do I fix Purple Screen of Death issues on PC?

1. Update your graphics card drivers

1.1. Update drivers manually

  1. Go to Start > type Device Manager > expand the Display adapters category.
  2. Right-click your graphics card > select Update Driver.
  3. Select Search automatically for updated driver software.
  4. If Windows doesn’t find a new driver, go to your device manufacturer’s website and follow their instructions.

This is one of the simplest methods, but there are alternative ways to update your Windows drivers. You can install drivers manually directly from the manufacturer’s website, and you can also use automated software utilities.


1.2. Update drivers automatically

We also must inform you that downloading drivers manually is a process that carries the risk of getting the wrong driver installed, which may lead to serious malfunctions.

The safer and easier way to update drivers on a Windows computer is by using an automatic tool such as Outbyte Driver Updater.

This tool will safely operate on your system in order to find all outdated drivers and propose the right versions you need to install for each hardware piece on your computer.

Additionally, it will also scan your system for any broken or missing drivers, so you don’t have to worry about not knowing what to install at all.

Finally, all of these features are available in an easy-to-use UI, allowing anyone to use it, even those with no experience at all.

⇒ Get Outbyte Driver Updater

2. Force shut down your PC

Press and hold your computer’s power button to shut down the device. Oftentimes, this simple action solves the problem, saving you the trouble of following complicated troubleshooting steps.

3. Disconnect all peripherals

Unplug unnecessary external hardware, such as printers, webcams, additional monitors, mice, headphones to see if this fixes the problem.

4. Remove overclock settings and tools

When you overclock your PC, you change its hardware clock rate, multiplier, or voltage, which generates more heat. As a result, your CPU or GPU may become unstable. Purple Screen of Death errors can also indicate your GPU is overloaded.

You can also use a dedicated device or software to cool your computer. For example, you can use a cooling pad as well as specialized cooling software to dissipate heat faster.

5. Clean the heat sink

Purple screens are usually caused by GPU malfunctions due to excessive heat. It is a good idea to clean your device’s heat sink in order to remove any obstructions.

We hope the solutions listed above help you fix the less common Purple Screen of Death issue. If you’ve come across other solutions to fix this problem, you can list the troubleshooting steps in the comment section below.


[wl_navigator]

How to Download and Install Windows Live Mail in 2026

Live Mail was ceased on Windows 7, but you can still download and install it on Windows 10 and 11. You’ll have to download from a third party, but we found one that’s safe to use.

Follow the steps below for installing Windows Live Mail on your PC:

How to Install Windows Live Mail on Windows 10?

Note icon NOTE
Windows Live Mail is discontinued and no longer supported by Microsoft, meaning it will not receive updates or security patches. Downloading it from third-party sources carries additional risks, such as malware and viruses. Ensure you trust the source and have up-to-date antivirus software installed.

Use third-paty sources to download Windows Live Mail 2012

  1. Download Windows Essentials from this third-party source.
    microsoft windows live essentials 2012 download
  2. Run the installer.
  3. When you run the installer, choose Windows Live Mail from the list of programs you want to install (of course, you can install other programs from the package, as well).
  4. Wait until the installation is finished.

For a complete login walkthrough, see our Windows Live Mail login guide.

Once installed, you’ll need to sign in with your Hotmail account or your other email account. For detailed instructions, see our Windows Live Mail sign in Hotmail guide.

How do I switch from Windows Live Mail to Outlook?

If downloading a particular update (KB3093594) and setting up Windows Live Mail takes too much time, you can always switch to Outlook.

You can easily export all your Windows Live Mail data to your new Outlook account including your contacts, messages, and attachments.

For a complete walkthrough, see this step-by-step guide on moving Windows Live Mail to Outlook.

Outlook is the new Windows Live

Microsoft is moving away from both Windows Live Mail and the built-in Mail app, focusing on the new Outlook for Windows 10 and 11.

Outlook offers seamless integration with Microsoft services, enhanced security, and a user-friendly interface, providing a unified email experience across devices.

For those seeking alternatives, Mailbird is a strong option with customizable features.

It is a great email client app that supports multiple email accounts. You can open your HTML emails and search easily for a specific email from one of your accounts.

Summary

Before Microsoft introduced Outlook and Mail as a universal app, users were mainly using Windows Live Mail as their primary email client.

But even if it isn’t pre-installed in Windows 10, you can still download Windows Live Mail 2012 with these steps.

What’s your favorite email client for Windows 10? Are you using Windows 10’s Mail app, or you’d like to go old school, and receive your emails on Windows Live Mail?

Tell us in the comments and also make sure to check out our list of the best email clients for your Windows PC.

FAQs

Does Microsoft still support Windows Live Mail?

No, Microsoft no longer supports Windows Live Mail. Users are encouraged to switch to Outlook or the Mail app for continued updates and support.

Can Windows Live Mail still be downloaded?

Yes, Windows Live Mail can still be downloaded from third-party sources, but it’s not officially supported by Microsoft.

How do I import Windows Live Mail into Windows?

To import Windows Live Mail data into Outlook, first, export your emails and contacts from Windows Live Mail by selecting the export option in the File menu. Save the files in a compatible format like CSV or PST. Then, open Outlook and use the import feature to bring your emails and contacts into your Outlook account.

How to Turn off Automatic Window Resizing in Windows 10

Windows 10 has a Snap Assist feature for resizing windows. This feature automatically resizes windows when you move them to the sides or edges of the screen.

However, not all users appreciate windows automatically resizing when they move them. You can disable automatic window resizing with any of the methods below.

What’s the point of Snap Assist?

Microsoft introduced the Aero Snap feature in Windows 7 to assist users in arranging windows better with a mouse and keyboard. That feature was refined and renamed Snap Assist in Windows 10.

Snap Assist automatically halves, quarters, or expands a window full-size when you drag it to a desktop corner or side. In addition, you’ll see a faint outline showing how it will resize a window when you release the mouse button.

However, Snap Assist isn’t ideal for users with dual monitors. It’s easy to accidentally trigger that feature’s automatic window resizing when moving a window across monitors.

Users can accidentally trigger Snap Assist on single monitors by moving a restored window close to a desktop corner or side. So, some users might prefer to have that feature disabled.

How can I turn off automatic window resizing (Snap Assist) in Windows 10?

1. Disable automatic window resizing in Settings

  1. Click Start and the Settings button on the left of the menu.
    Settings app button turn off automatic window resizing windows 10
  2. Select the System category inside Settings.
    System category turn off automatic window resizing windows 10
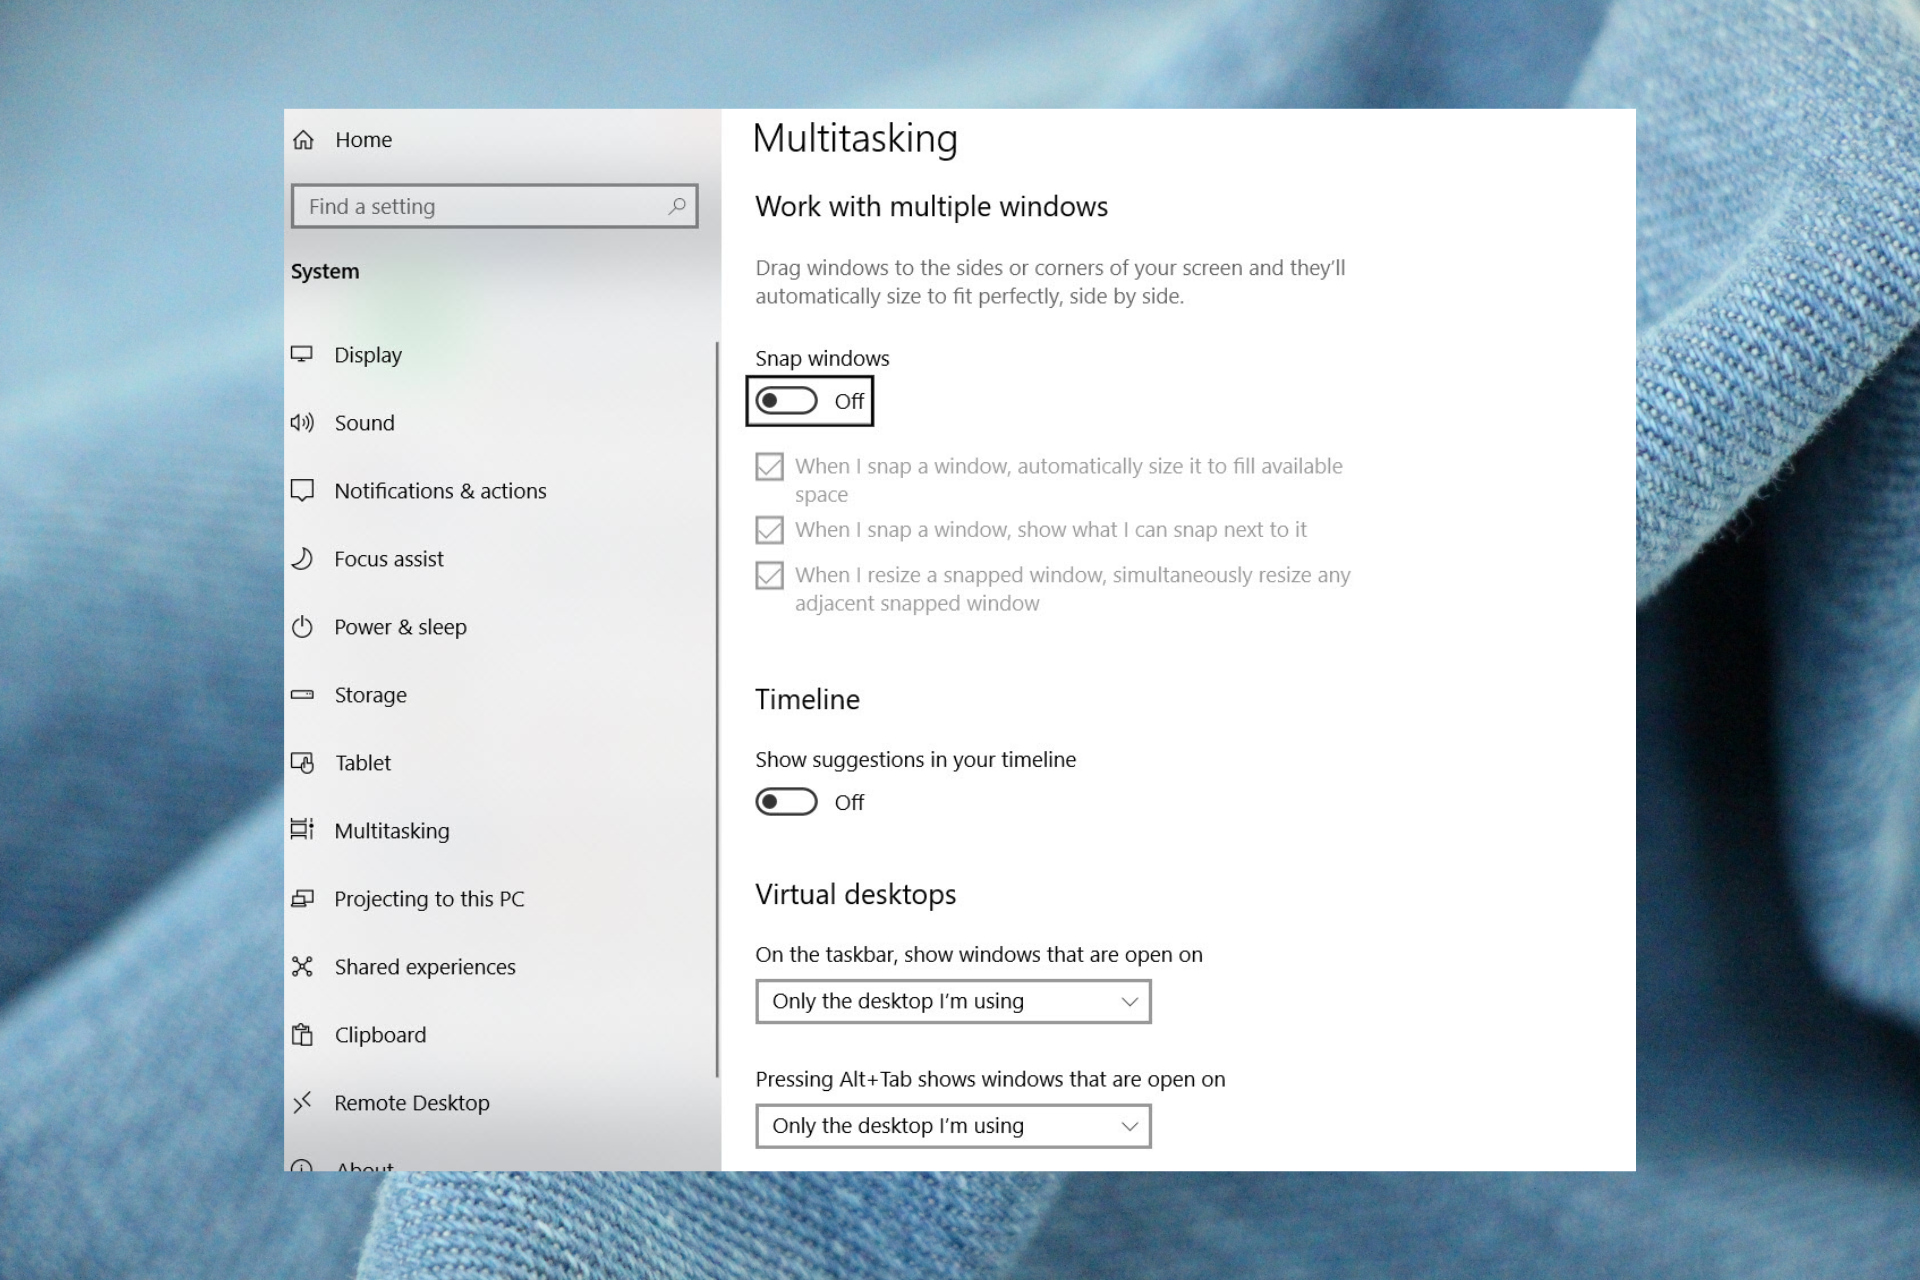
  3. Click Multitasking to access a Snap windows option.
    Snap windows option turn off automatic window resizing windows 10
  4. Turn off the Snap windows option.

2. Turn off automatic window resizing in the Control Panel

  1. Press Windows 10’s Type here to search the taskbar button.
  2. Then enter the keyword Control Panel to find a matching app.
  3. Select Control Panel from the search tool.
    Control Panel search result turn off automatic window resizing windows 10
  4. Click Ease of Access to view more navigation options.
    Ease of Access center turn off automatic window resizing windows 10
  5. Select Ease of Access Center to view that applet.
    Ease of Access option turn off automatic window resizing windows 10
  6. Next, click the Make the mouse easier to use option.
    Make the mouse easier to use option turn off automatic window resizing windows 10
  7. Select the Prevent windows from being automatically arranged checkbox.
    The Prevent windows from being automatically arranged checkbox turn off automatic window resizing windows 10
  8. Click the applet’s Apply button.
  9. Select OK to exit the mouse settings.

The exact checkbox exists in other parts of the Ease of Access Center applet. Click the Make the keyboard easier to use and Make it easier to focus on tasks navigation options to reach them.

You’ll see the same Prevent windows from being automatically arranged checkbox in both those applet sections. Select both those checkboxes to disable the automatic resizing of windows further.

3. Disable automatic window resizing by editing the registry

  1. Bring up Windows 10’s Type here to search the text box.
  2. Enter the search phrase Registry Editor inside the box.
  3. Select the matching Registry Editor search result.
    Registry Editor search result turn off automatic window resizing windows 10
  4. Next, input this path inside the registry address (location) bar and press Enter: Computer\HKEY_CURRENT_USER\Control Panel\Desktop
  5. Select the Desktop key, and scroll down to its WindowArrangementActive string.
    The WindowArrangementActive string turn off automatic window resizing windows 10
  6. Double-click the WindowArrangementActive string.
  7. Delete 1 in the data box, and replace it with a 0 value.
    Edit String window turn off automatic window resizing windows 10
  8. Select OK to save the new WindowArrangementActive string value.
  9. Then close the window for the Registry Editor.

All of the above methods will disable automatic window resizing in Windows 10. Then you can move your windows all around the edges of the desktop without Snap Assist kicking in.

5 Quick Fixes for Halo Infinite Not Using GPU [Low GPU Usage]

Halo Infinite isn’t the first-person shooter game to use a lot of GPU power. In fact, there are plenty of other games that can eat up your GPU. While it’s true that the game has been optimized for RTX 20 series GPUs and CPUs, it also uses more resources than most other games. 

This means that if you’re playing on an older system or if you have a lower-end graphics card, you might experience some issues with Halo Infinite. But what do you do if the game isn’t using your GPU? Let’s find out, shall we?

Why is my game not using GPU?

If your graphics card is not working when you play a game, it is most likely due to one of the following reasons:

  • Your graphics card is outdated – If you haven’t updated your graphic drivers, you need to do so as soon as possible to keep things running smoothly.
  • The graphics card is not powerful enough –  If this is the case, either upgrade your graphics card or lower your settings until you can get a playable framerate.
  • Running an old game – If you’re playing an old game on a new OS, it is possible that it has not been optimized for the new features and lacks support.
  • The game doesn’t support hardware acceleration – This means that it won’t use your graphics card or there will be low GPU usage. In such cases, you may find Halo Infinite using the CPU instead of the GPU.
  • Incompatible graphics card – Most games only work with integrated GPUs, while others need a dedicated GPU. You may need to reset your GPU.

How can I fix Halo Infinite low GPU usage?

First things first, the basic checks:

1. Set your graphic performance to high

  1. Press Windows + I to open Settings.
  2. Click on System on the left pane, then select Display.
  3. Under Related settings, click on Graphics.graphics
  4. Select Halo Infinite from the list, and click on Options.
  5. Now, choose High Performance and click Save.

2. Disable your integrated GPU

  1. Click on the Start Menu icon, type Device Manager in the search bar, and click Open.
  2. Navigate to Display adapters to expand, right-click on your graphics card, and select Disable device.disable device to fix elden ring not using gpu

If you find that Halo Infinite is not using the dedicated GPU, it’s because your PC can’t detect the second GPU.

3. Update your graphics driver 

  1. Click on the Windows key, type Device Manager in the search bar, and click Open.
  2. Navigate to Display adapters to expand, right-click on your graphics card, and select Update driver.update graphics driver
  3. Select Search automatically for drivers.

For non-tech-savvy users, you’ll be happy to know that there’s a simpler route to achieve the same results. A third-party tool that automatically does the job for you.

4. Update DirectX

  1. Hit the Windows key and click on Settings.
  2. Select Windows Update and click on Check for updates.check for updates windows 11 settings
  3. Download and install if available.

If you’re using an old version of DirectX, it could be causing problems with your game. Since there’s no standalone package for DirectX, you’ll have to get it by updating your OS. This is a two-in-one deal, as you get to update both and solve the issue of an outdated OS and DirectX version.

5. Enable hardware acceleration

  1. Hit the Windows key and select Settings.
  2. Click on System on the left pane, then Display on the right pane.
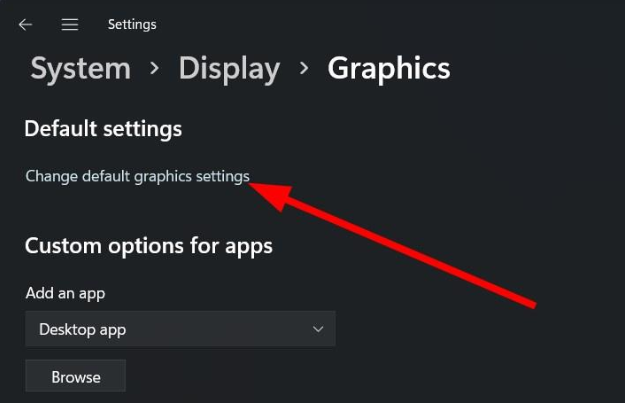
  3. Scroll down and select Graphics.graphics
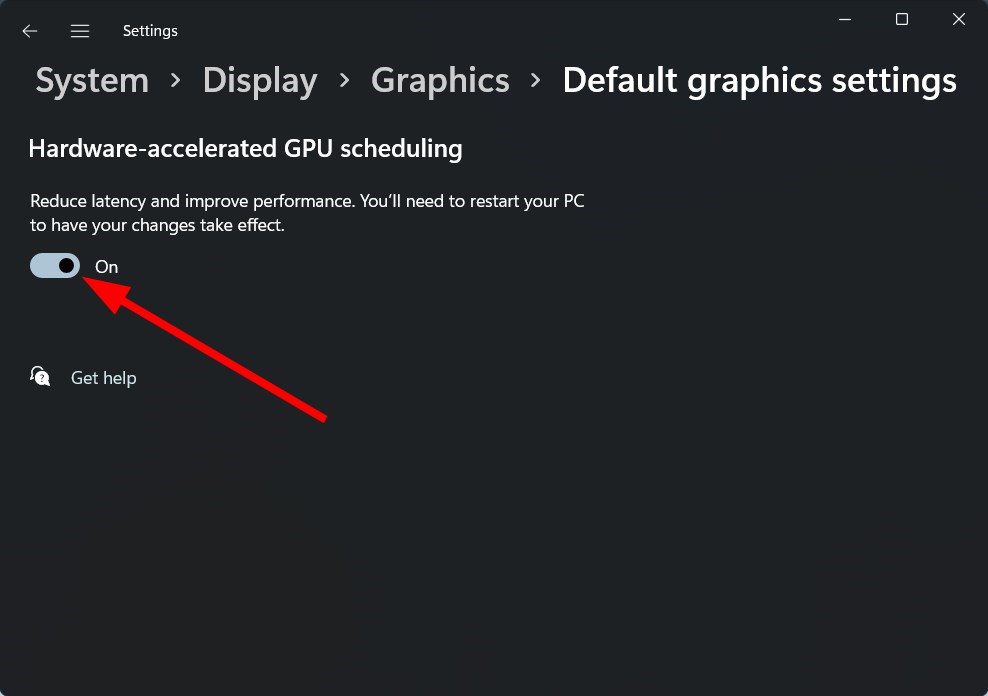
  4. Select the Change default graphics settings option.
  5. Now, toggle on the Hardware-accelerated GPU scheduling option.disable Hardware-accelerated GPU scheduling

Hardware Acceleration is a feature that allows games to take advantage of your system’s dedicated graphics card, especially in cases where Halo Infinite is not using your GPU. This can make games look better, but it also makes them run smoother.

You can find out more about hardware-accelerated GPU scheduling and when to enable or disable it in our detailed guide.

How do I change my graphics card in Halo Infinite?

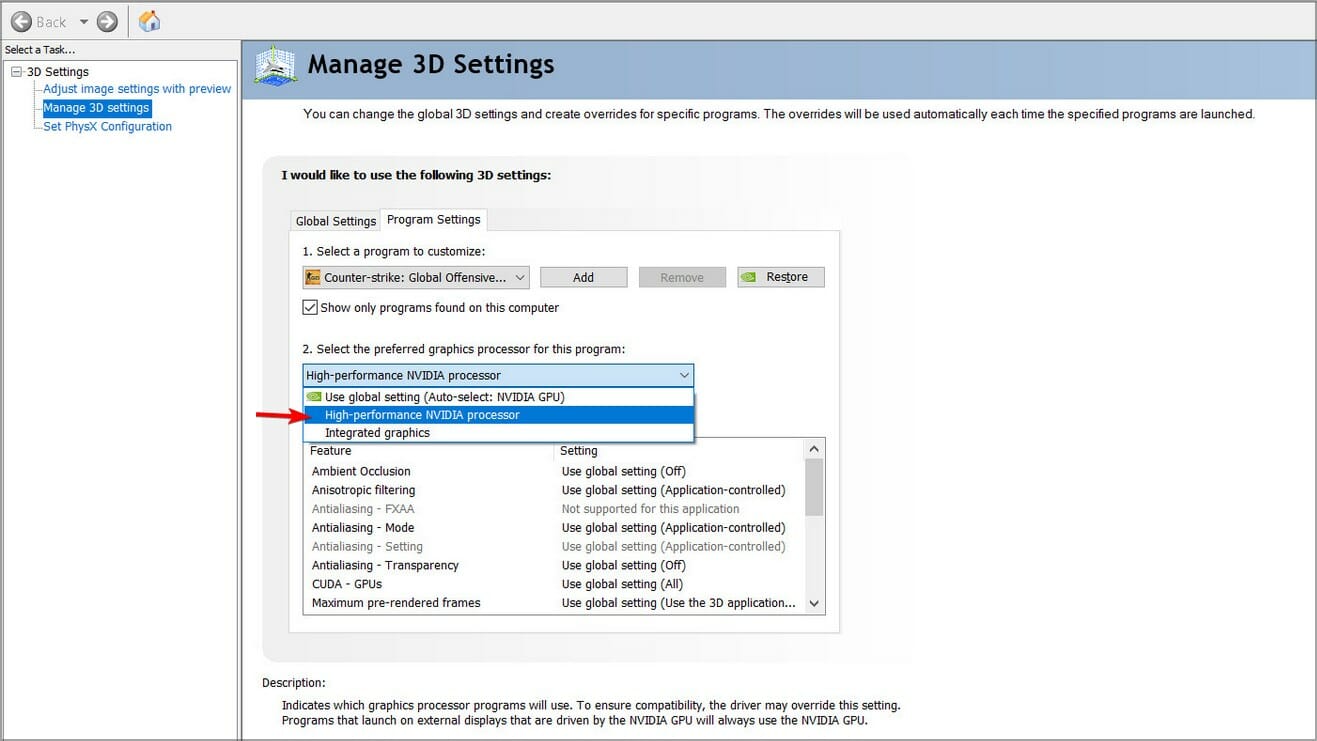
  1. Launch your dedicated graphics card control panel (In this case, Nvidia Control Panel)
  2. Select Manage 3D settings from the navigation pane on the left.
  3. Next, choose a High-performance NVIDIA processor from the Preferred graphics processor dropdown menu.

You might be wondering why you need to use a dedicated GPU when your computer has an integrated graphics processor. That’s because IGP is designed to handle basic tasks like displaying windows, moving windows around, and playing videos. 

However, it doesn’t have the horsepower to do more intensive stuff like video editing or playing games at high resolutions. This is where a secondary GPU comes in handy — it can handle these tasks much more efficiently than an IGP.

The problem is that many games today require a lot of processing power, so they’ll only run on systems with dedicated graphics cards. This means if you want to play them, then you need to upgrade to a powerful GPU.

In case Halo Infinite is also using too much CPU, we can help. You just have to check out our article for a guided fix.

And that’s how we wrap up this article. Do let us know which solution came in handy in the comment section below.

How to Get Your Toolbar Back When It Disappeared [Windows 10]

The Windows 10 toolbar (more widely known as the taskbar) is undoubtedly the cornerstone of the platform. But numerous users complained that the toolbar disappeared or is missing all of a sudden.

We’ll show you a few different ways to restore the taskbar in Windows and explain along the way what underlying causes they address.

Ready? Let’s go!

How do I get my toolbar back to normal?

1. Restart Windows

  1. First, try restarting Windows when the taskbar goes missing.
  2. To do that without the Start menu, press the Windows key + X and select the Shut down or sign out option.
  3. Finally, choose Restart or Shut down from there.
The Shut down option how to recover toolbar in windows 10

2. Restart the Windows Explorer.exe Process

  1. Some users might need to restart the Windows Explorer.exe process to recover the taskbar in Win 10. Press the Ctrl + Alt + Delete hotkeys.
  2. Then select Task Manager to open the window shown directly below.Task Manager how to recover toolbar in windows 10
  3. Scroll down the Processes tab to Windows Explorer.exe.Windows Explorer.exe process how to recover toolbar in windows 10
  4. Right-click Windows Explorer.exe and select Restart.

3. Turn Off the Automatically Hide the Taskbar Option

  1. The Win 10 toolbar disappears when the Automatically Hide the Taskbar option is selected. To turn that setting off, press the Windows key + I hotkey.
  2. Select Personalization to open the customization options shown below.The Personalization tabs how to recover toolbar in windows 10
  3. Click Taskbar on the left of the window.Taskbar options how to recover toolbar in windows 10
  4. Then turn off the Automatically hide the taskbar in the desktop mode setting.

4. Turn Off Tablet Mode

  1. The taskbar can often go missing in Windows 10’s Tablet mode. To turn the Tablet mode off, open Settings with the Windows key + I keyboard shortcut.
  2. Click System in Settings.System tabs how to recover toolbar in windows 10
  3. Click Tablet mode on the left of the window.Tablet mode options how to recover toolbar in windows 10
  4. Then turn off the Optimize the system for tablet and touch usage by enabling the Tablet mode option.
  5. Alternatively, users can turn off the Automatically hide the taskbar in Tablet mode setting.

5. Check the Display Settings

Users who utilize secondary VDUs might need to check their display settings to restore the Windows 10 toolbar.

To do so, press the Windows key + P hotkey to open the options shown directly below. Then make sure the PC screen-only option is selected.

Project display options how to recover toolbar in windows 10

Those are a few of the resolutions that will restore the Windows 10 taskbar.

Aside from those fixes, users can also try running a System File Checker scan or rolling back Windows 10 to a restore point with System Restore.

Fix: WMI Provider Host High CPU Usage on Windows 10

Although Windows 10 is a great operating system, many users reported problems with WMI Provider Host and high CPU usage. This is a system service that shouldn’t use too much resources normally.

However, for some reasons, like faulty hardware, broken system files, and outdated apps, you might experience wmiprvse.exe high CPU usage on your PC.

Knowing how frustrating this can be, we have prepared this guide to help you fix the issue effortlessly.

How do I fix WMI Provider Host high CPU usage on Windows 10?

1. Run System Maintenance Troubleshooter

  1. Press Windows Key + R to open the Run dialog.
  2. Enter msdt.exe -id MaintenanceDiagnostic and press Enter or click OK.
  3. System Maintenance window will now appear. Click on Next and follow the instructions on the screen.

After running System Maintenance tool, check if the problem is resolved.

According to users, you might be able to fix the problem simply by running System Maintenance Troubleshooter. This is a built-in Windows application and sometimes it can fix various errors.


2. Run System Performance Troubleshooter

  1. Press Windows Key + X to open Win + X menu and choose Command Prompt (Admin) from the list.
  2. When Command Prompt opens, enter msdt.exe /id PerformanceDiagnostic and press Enter to run it.
  3. Follow the instructions on the screen to complete the troubleshooter.

After completing the troubleshooter check if the issue still persists.

If you have problems with WMI Provider Host and CPU usage, you might want to run System Performance Troubleshooter. By running System Performance Troubleshooter you’ll optimize your PC and improve its performance.


3. Use Event Viewer

  1. 1. Press Windows key + X and select Event Viewer from the list.

    event wmi provider host high cpu
  2. 2. When Event Viewer starts, go to the View menu and check Show Analytic and Debug Logs.

    show analytic
  3. 3. In the left pane navigate to Applications and Service Logs > Microsoft > Windows > WMI Activity > Operational.

    operational
  4. 4. Select any of the available errors and check for extra information.

  5. 5. Look for ProcessId and memorize its value. Keep in mind that you’ll have multiple errors so it’s advised to check all errors and write down all ProcessId values.

    process
  6. 6. Now, press Ctrl + Shift + Esc to start Task Manager.

  7. 7. Once Task Manager starts go to Services tab and check PID for all running services. If you manage to find a service that matches the value from Step 4, you need to remove the application associated with that service.

  8. 8. Some users are also suggesting to disable the service simply by right clicking it and choosing Stop from the menu.

    stop wmi provider host high cpu

Event Viewer is a great troubleshooting tool that can help you fix various problems. According to users, you can use Event Viewer to find the application that is causing high CPU usage for WMI Provider Host.


4. Close Speccy

Speccy is a useful little application that allows you to see your system information along with computer temperature. According to users, the problem with WMI Provider Host appears after you start Speccy.

To avoid this problem you need to close Speccy and check if the issue still persists. If you need to use this application, you might want to consider updating Speccy to the latest version.


5. Update Trusteer Rapport

According to users, Trusteer Rapport can often cause this problem to appear. However, you can easily fix this issue simply by updating Trusteer Rapport to the latest version.

Several users reported they solved the problem by removing IBM Trusteer Rapport, so you might want to try that as well if the update doesn’t fix the problem.


6. Disable HP Software Framework Service

  1. Press Windows key + R and enter services.msc.
  2. Press Enter or click OK.
  3. List of all available services will now appear.
  4. Locate HP Software Framework Service and double click it to open its properties.
  5. Once the Properties window opens, set the Startup type to Disabled and click the Stop button to stop the service.
  6. After you’re done, click Apply and OK to save changes.

After disabling this service, the issue should be fixed. Keep in mind that disabling this service will cause HP Wireless Assistant to stop working. It’s worth mentioning that HP Wireless Assistant service can also cause this problem to occur, so try disabling it as well.

This solution applies to HP devices, so if you don’t have an HP device or HP software, you might want to skip this solution.

Speaking of problematic services, users reported that disabling Bitdefender Device Management Service or Citrix Desktop Service fixes the problem, so if you have any of those services running in the background you might want to disable them.


7. Remove Conduit Search

  1. Press Ctrl + Shift + Esc to open Task Manager.
  2. In the Processes tab, locate Conduit Search, right-click it and choose End task.
  3. After the application is stopped, press Windows Key + I to open the Settings app.
  4. Navigate to the System section.
  5. In the left pane select Apps & features.
  6. List of installed applications will appear.
  7. Select Conduit Search and click the Uninstall button.

One of the most common causes of this problem is malware called Conduit Search. This application usually installs with some other application without your knowledge, and it causes this issue to appear.

To fix the problem, first you need to stop Conduit Search and uninstall it. After you remove Conduit Search from your PC, restart it and check if everything is in order.

Another application that can cause this problem is Youcam, so if you have it on your PC you need to disable it from Task Manager and uninstall it.


8. Check your PC for malware

As we mentioned in our previous solution, problems with WMI Provider Host and high CPU usage can be caused by malware. If you’re having this problem, we strongly advise that you scan your PC and check for malware.

In addition, you might want to try using a tool such as Malwarebytes to perform a thorough scan of your system. After removing the malware, check if the problem is resolved.


9. Restart Windows Management Instrumentation service

  1. Locate Windows Management Instrumentation service, right-click it and choose Restart.

If you’re having problems with CPU usage, you might be able to fix them by restarting Windows Management Instrumentation service.

Some users are also advising to check the depending services. To do that, simply double click Windows Management Instrumentation service to open its properties.

Now go to Dependencies tab and expand both sections. From there you’ll be able to see which services are dependent on Windows Management Instrumentation.

Using this method you can easily find any suspicious services that are related to WMI service and disable them. Several users reported they fixed the problem by using this method, so be sure to try it out.

Speaking of dependent services, users reported that restarting IP Helper (iphlpsvc) and Security Center (wscsvc) fixed the problem for them, so be sure to try that.

Some users are also suggesting to temporarily stop Windows Management Instrumentation service and wait for 30 seconds before turning it back on again. According to users, this fixes the issue, but it’s just a temporary solution because the problem occurs again after the restart.

Lastly, several users reported that you can fix the problem simply by disabling Windows Management Instrumentation service completely. We already showed you how to disable a service in Solution 6, so be sure to check it out.

We have to mention that disabling Windows Management Instrumentation service can lead to certain issues, so keep that in mind. Another solution that you can try is to set Startup type for the service to Automatic (Delayed Start). Few users reported that this solved the problem for them, so you might want to try it.


10. Restart associated services

  1. Start Command Prompt as administrator.
  2. Once Command Prompt opens, run the following commands one by one:
    • net stop iphlpsvc
    • net stop wscsvc
    • net stop Winmgmt
    • net start Winmgmt
    • net start wscsvc
    • net start iphlpsvc

If the problem with WMI Provider Host and high CPU usage persists, you might be able to fix it by restarting the associated services.

After running all commands, close Command Prompt and check if the problem still persists. If the problem still occurs, restart your PC and check if that solves the issue.


11. Uninstall Scorpion Saver or Relevant Knowledge

Another problematic application that can cause problems with WMI Provider Host is Scorpion Search. This application is a malware that installs alongside other applications.

To fix the problem, you need to find and uninstall Scorpion Search software from your PC. If you have issues removing this software, you might want to try using some malware removal tool.

Another malware that can cause this issue on your PC is Relevant Knowledge. If you notice any problems with high CPU usage, we strongly suggest that you check if you have this application installed. If so, remove it and check if that solves the problem.


12. Disable GoPro Studio automatic startup

If you have a GoPro camera, you probably have a GoPro Studio application on your PC. We should mention that this software can cause problems with WMI Provider Host and CPU usage.

By default, this application starts with Windows automatically, but you can prevent that by changing its settings. After you disable automatic startup for GoPro Studio the issue should be resolved.

If you need to use GoPro Studio and you don’t want to keep it disabled, you might want to try updating it to the latest version and check if that fixes this problem. If software update doesn’t fix the problem, you might have to remove GoPro software from your PC in order to fix it.


13. Disable Beats Updater software

Sometimes this problem is caused by non-malicious applications such as Beats Updater. This application is created by Apple, and it will run in the background after you start your PC.

Even though this application is harmless, it can cause high CPU usage, so we advise you to disable it. After disabling the application CPU usage should be back to normal. If you frequently use Beats Updater software, you should try downloading the latest version and check if that solves the problem.


14. Disable MultiPoint Connector component

According to some users, MultiPoint Connector can cause problems with WMI Provider Host and high CPU usage on your PC. To disable this component, you need to follow these simple steps:

  1. Press Windows key + S and enter features.
  2. Select Turn Windows features on or off.
  3. Windows Features window will now appear. Locate MultiPoint Connector option on the list and disable it.
  4. After doing that, click the OK button to save changes.

After you disable MultiPoint Connector, check if the issue is resolved.


15. Perform sfc and DISM scan

  1. Open Command Prompt as administrator.
  2. Type sfc /scannow and press Enter to run the command.
  3. Sfc scan will now start. Don’t interrupt the process and wait for it to finish.
  4. After the scan is completed, check if the problem is resolved.

If the issue still persists, you might have to run DISM scan. To do that, follow these steps:

  1. Start Command Prompt as administrator.
  2. Enter DISM /Online /Cleanup-Image /RestoreHealth and run the command.
  3. Wait for the command to finish and don’t interrupt it.

If one of core Windows components is corrupted, that can lead to many issues including high CPU usage. According to users, they managed to fix this problem simply by running sfc and DISM scan. Both scans are designed to repair damaged Windows components.

After completing the DISM scan, check if the issue still persists.


16. Perform a Clean Boot

WMI Provider Host high CPU usage problem occurs due to running applications, and if you want to find the application that is causing this problem, you might want to perform a Clean Boot. To do that on Windows 10, you need to do the following:

  1. Press Windows key + R and enter msconfig. Click OK or press Enter.
  2. When System Configuration window opens, go to Services tab and check Hide all Microsoft services.
  3. Now click on Disable all button.
  4. Go to Startup tab and click on Open Task Manager.
  5. List of all startup applications will appear. Disable the first application on the list by right clicking it and choosing Disable from the menu.
  6. Repeat this step for all available applications.
  7. After you disable all applications, close Task Manager and go back to System Configuration window.
  8. Click Apply and OK to save changes.
  9. Restart your computer.

After your PC restarts, you need to check if the issue still appears. If the problem is resolved, the cause is one of the disabled applications or services.

To find the problematic service, repeat this process and enable services and applications one by one until you find the problematic application. After that, you need to remove this application or update it and check if that solves the problem.

 Is it safe to disable WMI Provider Host?

Yes, you can disable the process temporarily if the need arises. However, it is not advisable as it can cause most Windows-based software to malfunction.

Also, it must be noted that you can not disable this process permanently. This is because it is a core system service.

Is WMI Provider Host a virus?

The WMI Provider Host is a safe system service that plays an important role in the smooth running of Windows-based software.

So, it is not a virus. However, sometimes, malicious programs can disguise themselves as system services.

Hence, you can run a virus scan if you notice any unusual activity.

WMI Provider Host high CPU usage can be a big problem, but in most cases, this issue is caused by a problematic application. You need to find the problematic app and uninstall using an uninstaller software or disable it to fix it.

By following these steps, you should be able to remove any type of CPU issues caused by the WMI Provider Host.

While there are plenty of methods that you could try, we would like to know which one worked best for you. As such, let us know by leaving us a message in the comments section below.

[wl_navigator]

Fix: Rotation Lock Greyed Out in Windows 10 & 11

If you own 2 in 1 Windows 10 device, the rotation is one of the basic features that you’re going to use.

Unfortunately, users have reported that Rotation Lock option is grayed out and that rotation isn’t working on their devices, so let’s fix that.

  • Windows 10 rotation lock missing
  • Windows 10 auto rotate not working
  • Lenovo Yoga rotation lock greyed out
  • Lenovo Yoga Screen rotation not working
  • Lenovo Yoga auto rotate not working

How do I fix a greyed-out Rotation Lock button in Windows 10?

1. Turn on portrait mode on your device

  1. Open Settings App and go to System > Display.
  2. Find Orientation and choose Portrait from the menu.
    portrait-orientation
  3. Your device should automatically switch to portrait mode.

If Rotation Lock is grayed out or missing on your device, sometimes you just need to rotate it to portrait mode. After rotating your device, rotation lock should be clickable again.

2. Reset your device

  1. Turn off your device.
  2. When the device turns off, hold Volume Up and Power button.
  3. Choose reset and save option and exit.

Users have reported that Rotation Lock function isn’t even showing in the notification area on their Microsoft Surface, and if you have the same problem on your Surface device, you can try to reset your device.

After you’ve done that, Rotation Lock should now appear in the Notification area, and it should work properly.

It seems that this issue is caused by connecting your Surface to an external display, so in order to avoid future problems, maybe you should avoid connecting your device to external displays until Microsoft releases a patch that fixes this issue.

3. Uninstall / Update your display drivers

Sometimes, problems with Rotation Lock can be caused by your display drivers, so you might need to update them or uninstall them.

To uninstall your drivers, do the following:

  1. Press Windows Key + X and choose Device Manager from the list.
    device-manager
  2. When Device Manager opens, navigate to Display adapters section and locate your driver.
  3. Right-click the driver and choose Uninstall.
    uninstall-driver
  4. After you have uninstalled the driver, restart your device.

If the problem still persists, you might have to update your display adapters. To do that, follow these steps:

  1. Open Device Manager and locate your display adapter driver.
  2. Right-click it and choose Update Driver Software.
    update-driver-software
  3. Choose one of the options and follow the instructions.

In addition, you can always go to your device manufacturer’s website and download the latest drivers for your device.

Update drivers automatically

If this solution doesn’t work or you do not have the necessary computer skills to update the right driver version (wrong drivers can damage your system), we strongly suggest doing it automatically by using a professional driver updater tool.

Once installed, the program will start scanning your PC for outdated drivers automatically.

A driver updater will check your installed driver versions against its cloud database of the latest versions and recommend proper updates. All you need to do is wait for the scan to complete.

4. Use your device in tent mode

  1. Put your device in tent mode. If your display is upside down, don’t worry.
  2. Click the Action Center icon in your Taskbar and Rotation Lock should be available.
  3. Now you can turn off the rotation lock and your display should rotate to a proper position.

Users have reported that Rotation Lock is grayed out on their Dell Inspiron 11, and the only way to fix this is to use the tent mode. To enable Rotation Lock, perform the steps above.

5. Disconnect your keyboard

If Rotation Lock is grayed out on your Surface Pro 3 or Dell XPS 2-in-1 device, you might want to try disconnecting your keyboard.

Users have reported that after the keyboard is disconnected Rotation Lock button starts working normally.

Of course, if you own a different 2-in-1 device, you can still try this solution.

6. Switch to Tablet Mode

Some users claim that problems with grayed out or missing Rotation Lock button can be fixed simply by switching to Tablet Mode.

If your device doesn’t switch automatically to Tablet Mode, you can do the following to access Tablet Mode manually:

  1. Click the Action Center button in the Taskbar.
    action-center-button
  2. When Action Center opens, click the Tablet Mode.
    tablet-mode

You can also enter Tablet Mode using the Settings app:

  1. Open Settings > System > Tablet Mode.
  2. Make sure that Make Windows more touch-friendly when using your device as a tablet is turned On.
    tablet-mode-settings
  3. If you want, you can also change how your device will work when you automatically switch Tablet Mode on or off.

7. Change LastOrientation registry value

  1. Press Windows Key + R and type regedit.
  2. Press Enter or click OK.
    regedit
  3. When Registry Editor opens, you need to navigate to the following key in the left pane:
    • HKEY_LOCAL_MACHINESOFTWAREMicrosoftWindowsCurrentVersionAutoRotation
  4. In the right pane, find LastOrientation and double-click it.
    autorotate-registry
  5. In Value data box enter 0 and click OK to save changes.
    lastorientation-value
  6. If you see SensorPresent DWORD available, double-click it and make sure that its value is set to 1.

If you have problems with Rotation Lock and if the rotation isn’t working on your device, you might have to change some registry values.

8. Make sure that your screen is allowed to auto-rotate

If your screen isn’t allowed to auto-rotate, this can be one of the causes for Rotation Lock problems. To fix this issue, you need to check if your screen is allowed to auto-rotate. To do that, follow these steps:

  1. Right-click your desktop and choose Display settings.
    display-settings
  2. When Display settings open, click on Advanced display settings.
    advanced-display-settings
  3. Now click on the Advanced sizing of text and other items.
    advanced-sizing-of-text
  4. On the left side choose Change display settings.
    change-display-settings
  5. Check Allow the screen to auto-rotate.
  6. Click Apply and OK to save the changes.
  7. After you’ve done that, restart your computer in order to apply the changes.

9. Check Sensor Monitoring Service

  1. Press Windows Key + R and type services.msc.
  2. Press Enter or click OK.
    run-services
  3. When Services window opens, locate Sensor Monitoring Service and double-click it.
    sensor-monitoring-service
  4. Change the Startup type to Automatic and click Start to start the service.
    sensor-monitoring-service-automatic
  5. Click Apply and OK to save the changes.

Problems with Rotation Lock and rotation can be caused by certain services, so let’s check if those services are working properly.

10. Disable YMC service

  1. Open Services window and locate YMC service.
  2. Double click the service to open its properties and set the Startup type to Disabled.
    disabled-service
  3. Click Apply and OK to save the changes.

If you own Lenovo Yoga device and you have problems with rotation and Rotation Lock button, you can fix these problems by disabling the YMC service.


11. Remove Intel Virtual Buttons Driver

  1. Open Device Manager. You can open Device Manager by pressing Windows Key + X and choosing Device Manager from the list.
    device-manager
  2. Once Device Manager opens, locate Intel Virtual Buttons driver.
  3. Right-click it and choose Uninstall.

It has been reported that Intel Virtual Buttons driver causes problems with rotation and it also makes the Rotation Lock button grayed out.

After the driver has been removed, rotation and Rotation Lock button should be working normally.

12. Disable sensors from Device Manager and enable them again

  1. Start Device Manager.
  2. Find Sensor sections and disable all sensors by right-clicking them and choosing Disable from the menu.
    device-manager-disable
  3. After you’ve disabled all the sensors, you need to enable them again. To do that, just right-click the disabled device and choose Enable from the menu.

Problems with rotation can be caused by your sensors, and you might have to temporarily disable them from Device Manager.

If the issue still persists, it’s advised that you restart your computer after you’ve disabled the sensors. After Windows 10 starts, you need to go back to Device Manager to enable the sensors again.

13. Download latest firmware, drivers, and Windows updates

Often these issues can be resolved by downloading the latest drivers from the manufacturer’s website, so if you have problems with missing or grayed out Rotation Lock button, try downloading and installing all latest drivers for your device.

Yoga 3 users have reported that problems with rotation and Rotation Lock have been fixed after ITE sensor firmware update, so make sure that you download and install the latest firmware for your device.

Other users have reported that these problems have been resolved by downloading latest Windows updates, so if you’re having this problem, it won’t be a bad idea to update your Windows 10.

14. Update your BIOS

If Rotation Lock is grayed out or missing, you might be able to fix that by updating your BIOS. To update BIOS, you need to go your device manufacturer’s website and download the latest BIOS.

Before you perform a BIOS update, make sure that you read the instruction manual carefully in order to avoid any potential damage.

15. Restart Windows 10

In some cases, the most obvious solution is the best solution, and few users have reported that they have managed to fix missing Lock Rotation button by simply restarting their device.

We have to mention that turning off and turning on your device won’t work since Windows 10 uses hybrid shutdown (that is similar to Hibernate feature from previous versions of Windows).

Instead, you’ll have to choose Restart option from the Power menu in order to perform a proper restart.

16. Reset this PC

  1. Press Windows key + I to open Settings.
  2. Choose Update & security.
  3. Select Recovery from the left pane.
  4. Under the ”Reset this PC” section, click Get Started.
  5. Choose whether to preserve your data or to delete it and wait for the procedure to end.

Finally, if none of the available solutions provided a terminal solution for your problem and you’re still experiencing inconsistency with the Rotation Lock, we advise you to reset your PC to factory settings.

This is a nifty recovery option introduced in Windows 10. You can preserve your data in the process, which is great in comparison to a clean reinstallation.

There are many reasons why the Rotation Lock button might be grayed out or missing on your Windows 10 device, but we hope that you’ve managed to fix this issue by following our solutions.

If you have any comments, questions or suggestions, just let us know in the comments below.

Illustrator Is Not Using Your GPU? You Can Fix It in 4 Steps

Adobe Illustrator is a renowned vector graphics editor and design program that run smoothly on the GPU. However, different users have reported issues with Illustrator not using their GPU.

Alternatively, you can check our article on Adobe Illustrator not responding and how to fix it.

Why is Illustrator not using GPU?

The most common cause of Illustrator not using GPU is when Illustrator encounters an object or artwork in the document, causing the GPU to stop working. Other causes are:

  • The system requirement issues – Running Adobe Illustrator on a PC that doesn’t meet the minimum system requirements causes the app not to run effectively. It can result in many challenges Illustrator can encounter, such as Illustrator not using the device’s GPU.
  • Outdated Illustrator app – Application developers release an app upgrade in other to fix bugs and errors found in the previous versions. Therefore, having an outdated version of the Illustrator app can cause issues with not using the GPU.
  • Outdated GPU driver – Adobe Illustrator runs effectively on a PC with the aid of the Graphics Processing Unit (GPU). It helps accelerate graphics rendering. However, if the GPU driver is outdated, it will affect the Illustrator’s performance even if the GPU is compatible with the system.

What can I do if Illustrator is not using the GPU?

Before trying any advanced troubleshooting on your PC, here are some quick steps that you can apply:

If the issue can’t solve using the preliminary checks, proceed with the solutions below.

1. Force Illustrator to use GPU

  1. Left-click the Start button, type Settings, and click on it to open it.
  2. Click on System from the menu and select Display.display settings
  3. Scroll down and click on Graphics settings.
  4. Click on the Browse button, navigate and select Adobe Illustrator executable file.
  5. Click on the Options button, select the High-performance option from the drop-down, and click on Save.

Performing the stated steps will allow the Illustrator to run directly on the GPU whenever the app runs on the PC. Also, you can check our guide on fixing PC not detecting GPU.

2. Start with a clean preference file

  1. Press Windows + E to open Windows Explorer and type %appdata%\Adobe in the search bar to go to the Adobe folder.
  2. Rename the folder Adobe Illustrator 22 to settings to Adobe Illustrator 22 settings_old.rename the illustrator folder
  3. Restart Illustrator and check if GPU Performance features are working as expected.

Starting a clean preference will reset the app folder and fix all errors.

3. Enable GPU performance

  1. Open the Illustrator app. Click on Edit and select Preferences.
  2. Then, select the Performance option from the left pane and check the box for GPU performance.GPU performance on Illustrator

Enabling the GPU performance will resolve Illustrator not using the GPU while working on a document.

4. Update the graphics driver

  1. Press Windows + R keys to prompt the Run window, type devmgmt.msc, and click OK.
  2. Then, click on Display adapters, select the driver, and click the Update driver.
  3. Select the Search automatically for drivers option.search automatically for drivers
  4. Restart your PC and check if the Illustrator GPU issue persists.

Updating the graphics driver will fix bugs affecting the device and install the latest features to improve its performance.

Read about other steps for updating graphics drivers on Windows 11 if you have any issues with the above steps.

On the other hand, if you want to update your graphics driver more efficiently, you can use a dedicated tool like Outbyte Driver Updater as it helps you scan your PC for outdated drivers and find right away the latest updates as replacements.

Alternatively, our readers can check how to reset GPU with a shortcut key on Windows quickly. Also, we have a detailed guide on how to check a graphic card on your computer.

If you have any questions or suggestions concerning this guide, kindly drop them in the comments section.

Fix: MSI Afterburner Fan Speed Locked / Can’t Change It

If you are trying to change your fan speed but the MSI Afterburner Fan Speed is locked or won’t work, this article is for you.

While MSI Afterburner lets you push the limits of your hardware for more computing power, impediments like faulty settings or out-of-date drivers can cause it not to work. Follow the steps below to quickly fix it.

How do I fix the greyed out fan speed on MSI?

1. Unlock the fan speed

  1. Open MSI Afterburner.
  2. Click on the Settings Icon.
  3. Go to the Fan tab.
  4. Check the box called Enable user defined software automatic fan control.
  5. Set the Predefined fan speed curve to Custom.
  6. Click Apply then Ok.
  7. Make sure the Auto option is disabled.

MSI Afterburner has an auto-fan speed mode. This adjusts the speed based on the factory settings of your GPU. To make sure it works, you have to give it the right permissions.

Note: If you are using an NVIDIA 20x series GPU, your Fan setting will be missing in most cases. You should use the beta version of the software which you can download from their official site.

2. Do a clean GPU driver install

Use DDU

  1. Download DDU.
  2. Go to the Windows Start button, Shift+right-click on the Power button, and select Restart.
  3. After it restarts, click on Troubleshoot on the screen that will pop up.
  4. Click on Advanced Options.

  5. Then click on Startup Settings.
  6. Select Restart.
  7. When asked to, press 4 on your keyboard.
  8. Run DDU.
  9. On the right-side sliders, select GPU and your manufacturer, then select Clean and Restart.
  10. Download and install your new GPU drivers from the manufacturer’s website.

Uninstall GPU drivers manually

  1. Open Windows Search Bar and search Device Manager.
  2. Click on Display Adapters to expand it.
  3. Right-click on your GPU name and select Uninstall device.
  4. Visit your GPU manufacturer’s site, then download and install the latest driver available.
  5. Restart your PC. The drivers will automatically reinstall.

3. Adjust the power options

Note: Laptop users come with power plan options that limit their consumption to reduce the risk of hardware damage. Therefore, you need to make sure that your fans are enabled

  1. Open the Windows Button and open Control Panel.
  2. Go to Power Options.
  3. Click on Change Plan Settings.

  4. Then click on Change advanced power settings.

  5. Expand Processor power management, then expand System Cooling Policy.
  6. Set it to Active for both on-battery and plugged-in.

Note: Some high-end gaming laptops have a special button on their keyboard that controls their fan speed.

4. Reinstall MSI Afterburner

  1. Open the Windows Button and go to Control Panel.
  2. Set View By to Category.

  3. Click on Uninstall a program.
  4. Find MSI Afterburner, right-click on it, and select Uninstall.
  5. Download the setup from their official site and reinstall the software.

Sometimes updates or changes to your system or corrupted files can cause your software to break. Reinstalling MSI Afterburner can fix many issues, so give it a try.

There are multiple reasons why your MSI Afterburner doesn’t allow you to change the speed of your fans. This article provides all the information you need to resolve your issue.

To quickly adjust your GPU settings and underclock your PC, you can always use power limit feature in Afterburner.

If you have anything important to add regarding the subject of our article, feel free to do it in the comment section below.

Black Screen after BIOS Update on Windows 10 & 11 [Fixed]

Many users using Windows 10 experience a black screen on a laptop after updating the BIOS. Sometimes, upon restarting their devices, Windows boots into BIOS, then displays the black screen.

So this behavior happens in most cases after a restart or after updating their computers.

There are a few possible explanations:

  1. An external device (mouse, printer) could be the culprit.
  2. This Windows 10 version might be corrupted.
  3. The motherboard might be broken.

Black screen issues can be problematic since you won’t be able to see your screen at all. Similar reported issues are the following:

  • Black screen windows 10 with/ without cursor – Black screen usually appears if you have two monitors. Simply detach one of your monitors and the problem should disappear.
  • Windows black screen with cursor after login – This issue can be caused by your Project mode. To fix it, simply use Windows Key + P shortcut to switch to a different project mode.
  • Black screen after Windows 10 update – This problem can sometimes appear after a problematic update. To fix the issue, you’ll need to remove this update or install a fresh copy of your OS.
  • Black screen Windows 10 after sleep – Several users reported black screen issues after waking up their PC from sleep. To fix that, try disabling the Fast Startup feature.

So let’s take a closer look at how to fix these issues. Note that most solutions imply entering Safe Mode – if possible.

How do I fix a black screen after BIOS update?

1. Deploy a BSOD fixer utility

If by any chance you are able to boot in Safe Mode, the quickest solution is to use a specialized BSOD fixer to detect and correct the issue.

2. Check the external devices

If you can’t get past the black screen, some troubleshooting is necessary. So first, disconnect all external devices from your PC:

  1. Unplug the device from any port/ docking station.
  2. Disconnect all connected peripherals (USB storage devices, external displays, and printers).
  3. Unplug the AC adapter from the computer.
  4. Remove the battery from the battery compartment.
  5. At this point, press and hold the Power button for about 15 seconds to drain any residual electrical charge from the capacitors.
  6. Put the battery back in and reconnect the AC adapter and reboot.
  7. If the process is successful, you might be taken to a startup menu. Choose Start Windows Normally.

Hopefully, you get an easy way out with just this much. If otherwise, try the next solutions.

3. Try a Startup repair with a Windows Installation Media

  1. Create a clean copy of Windows 10 on a USB using Windows Media Creation Tool.
  2. Boot from the newly created flash drive.
  3. Open Advanced Startup options.
  4. Choose Repair your computer (in the Install now section).
  5. Select Startup repair, and allow the process to finish.

4. Try to repair boot records

  1. Start you device and during the startup process press F9/ F11/ F12 repeatedly (depending on your device model).
  2. Choose Troubleshoot, then Advanced options.
  3. Then, select Command Prompt.
  4. The first command to try is check disk, and press Enter: chkdsk/ r
  5. Then also try sfc /scannow
  6. If the issue persists, run the following commands in turn, pressing Enter after each one:
    • bootrec /scanos
    • bootrec /fixmbr
    • bootrec /fixboot
    • bootrec /rebuildbcd
  7. Try to restart your device normally after that.

5. Remove the latest Windows update

If the crash occurs after a recent Windows update, the solution is to remove it from the system.

This can only be done in Safe Mode, so check out how to enter it in our first solution.

Then, you should be able to enter the Update & Security section of the device’s Settings, and remove the latest update.

Also, performing a System Restore and reverting to a previous point in time when the system was perfectly OK might be useful.

This will remove any app or process that’s been recently added to your OS, that might be conflicting.

6. Update your BIOS

Sometimes black screen issues can appear after an update due to your BIOS. Several users reported that they fixed the problem simply by updating their BIOS to the latest version.

To see how to update BIOS, you might want to check our guide on how to flash BIOS. In addition, be sure to check your motherboard manual for detailed instructions.

Keep in mind that BIOS update is an advanced and somewhat risky procedure, and you can cause permanent damage to your PC if you’re not careful.

7. Turn off Fast Startup feature

  1. Enter Safe Mode.
  2. Press Windows Key + S and enter power settings.
  3. Select Power & sleep settings from the menu.
    Black screen windows 10 with cursor
  4. Click on Additional power settings in the Related settings section.
    Windows black screen with cursor after login
  5. Power Options window will now appear. Click on Choose what the power button does option from the menu on the left.
    Windows 10 black screen without cursor
  6. Click on Change settings that are currently unavailable.
    Black screen after Windows 10 update
  7. Uncheck Turn on fast startup (recommended) option and click Save changes.
    Black screen Windows 10 after sleep

Windows 10 comes with this useful feature called Fast Startup that combines shutdown and hibernation. Using this feature you can start your PC faster.

But it can also result into a black screen when the device is suddenly prompted to wake up.

Keep in mind that your PC might boot a bit slower after disabling Fast Startup feature.

8. Use Windows Key + P shortcut

  1. Start your PC and wait until the mouse cursor appears.
  2. Now press the Spacebar and enter your password. (You’ll have to perform this step blindly, so it might take you a few tries. If you don’t have a password assigned to your account, you can just go to the next step.)
  3. Now press Windows Key + P shortcut and down arrow once.
  4. Now press the Enter key. Keep repeating this step until the problem is resolved.

In this case, the problem might be the Project mode. According to users, this issue occurs if your PC has both dedicated and integrated graphics.

As a result, Windows 10 assumes that you have two monitors attached and it sends the video signal to the second monitor, even if you have only one monitor.

This is a strange Windows 10 glitch that can cause your screen to go black. However, you might be able to fix the issue by using this little workaround.

9. Check your motherboard

Unfortunately, even after trying all these options, some users couldn’t restart their computers normally.

This might indicate issues with the motherboard. A dedicated service shop or a specialist can confirm it or advise further.

Black screen can be a big problem, but you should be able to fix it with one of our solutions. Be sure to try all of our solutions and let us know if these fixes worked for you.

How to Use a HEIC Viewer to Open a HEIC File

HEIC is a popular format that’s not natively supported on Windows, and one way to view it is with a HEIC viewer, this guide will show you how to use them.

Why can’t Windows 10 open HEIC photos?

As mentioned earlier, the Windows environment does not provide native support for the HEIC format, so it’s not possible to open it.

How do I view a HEIC file?

Before we start, you can preview HEIC files on Dropbox from Windows, so you can use that as a workaround.

1. Use Adobe Lightroom

  1. Download Adobe Lightroom free (You need to register an Adobe account).
  2. Install it on your PC.
  3. Press Start and go to Settings.
  4. Select Apps and go to the Default Apps menu
  5. Under Photo viewer, select Adobe Lightroom as the default program.
  6. Try opening a HEIC file now.

2. Add HEIC image extensions to Windows

  1. Navigate to the HEIF Image Extensions page.
  2. Click on Download.
  3. Follow the instructions on the screen to install the necessary codecs.

For videos, you’ll need to use the HEVC Video Extensions codec instead.

3. Check out CopyTrans HEIC for Windows

  1. Visit the CopyTrans HEIC webpage.
  2. Download and install this tool.
  3. Use it to convert HEIC files.

4. Open HEIC images with Apowersoft Photo Viewer

  1. Navigate to Apowersoft Photo Viewer page.
  2. Download the software.
  3. Use it to open HEIC files.

So that’s how you can add HEIC support to Windows or open the files with alternative third-party software.

We also have guides on how to convert HEIC to JPG, and a list of the best browsers that support HEIC, so don’t miss them.

We hope that you found the best HEIC viewer Windows 10 and newer versions. If you happen to know more methods, let us know in the comments section below.

Can’t Install Windows 10 on SSD? Here are 5 Quick Fixes

If you connected a new SSD on your computer, but you can’t use it to install Windows 10, continue reading this guide to learn how you can fix this problem.

Usually, the error message that appears on the screen is this:

Windows cannot be installed onto this disk. This computer’s hardware may not support booting to this disk. Ensure the disk’s controller is enabled in the computers BIOS menu.

There’s a reason why people prefer to install their Windows 10 operating system on SSD – it makes the computer run much faster.

However, if you can’t install Windows 10 on SSD storage, there are solutions that can help get you be able to do it so you can enjoy faster processing speeds and run time on your machine.

Why can’t I install Windows on my SSD?

The main cause of this issue occurring is a hardware disk that does not support booting, you will need to enable it from BIOS in most cases.

What can I do if I can’t install Windows 10 on SSD?

1. Preliminary fixes

  • One solution you can start with when you can’t install Windows 10 on SSD is to perform a clean install to a partition of the right size on an HDD, and clone that to the SSD. The only thing you’ll need to check is the number of free blocks before the partition.
  • Make sure that the SSD is attached correctly, with all cables plugged in properly.
  • Make sure you have the latest BIOS version on the laptop.
  • It shouldn’t matter which slot SSD is in, but if your machine says it should be in a particular spot, like primary bay then that’s where it should be.
  • Windows works best with UEFI. Unfortunately, there are machines where it got corrupted. It might be a repair job if update won’t fix things.
  • Make sure that SATA Operation mode is on AHCI.

2. Convert disk to GPT

When you can’t install Windows 10 on SSD, convert the disk to GPT disk or turn off UEFI boot mode and enable legacy boot mode instead. To do this:

  • Boot into BIOS, and set SATA to AHCI Mode.
  • Enable Secure Boot if it is available.
  • If your SSD still is not showing at Windows Setup, type CMD in the search bar, and click Command Prompt
  • Type diskpart
  • Type list disk to display all the disks
  • Type select disk [disk number] for exampe select disk 0
  • Make sure the selected disk has no valuable data.
  • Type clean all and press Enter to wipe out the SSD.
  • Type exit to close this windows and go back to Windows Setup screen.

Accessing BIOS seems too big of a task? Let us make things easier for you with the help of this amazing guide!

3. Download Windows 10 Media creation tool

Check the media, as this step is crucial because some Windows media can get corrupt and fail to use the SSD. To do this:

  • On a working computer, go to the Microsoft software download website
  • Download media creation tool and run it
  • Select Create installation media for another PCCreate installation media for another PC
  • Choose a language, edition and architecture (32 or 64-bit)
  • Follow the steps to create installation media then click Finish
  • Connect the installation media you created to the computer that isn’t working and turn it on
  • On the initial set up screen, enter language and other preferences and click Next
  • If you don’t see set up screen, your computer may not be set up to boot from drive so check how to change your computer’s boot order (from manufacturer’s website) and try again
  • Select Repair your computer
  • On Choose an option screen, click Troubleshoot
  • Select Advanced options
  • Select System Restore
  • Select Reset this PC to reinstall Windows 10

If you want to create a bootable USB drive with Windows 10 on it, follow the simple steps in this article and do it with ease.

4. Update BIOS

You can update your computer’s BIOS to version A16 by downloading the BIOS Update Executable file for Windows. Once you find the file from your computer manufacturer’s site, do the following:

  • Click Download File to download the file.
  • When the File Download window appears, click Save to save the file to your hard drive.
  • Run the BIOS update utility from Windows environment
  • Browse to where you downloaded the file and double-click the new file.
  • Windows System will auto restart and update BIOS while system startup screen.
  • After BIOS update is finished, the system will automatically reboot to effect changes.

Note: Do not turn off your computer or disconnect from your power source while updating the BIOS or you may harm your computer.

Do not carry out other tasks on the computer until the BIOS update has been completed. Back up your data files to external media before updating the BIOS.

If you don’t know how to backup your data on Windows 10, this step-by-step guide will help you do it in no time.

Also, if you want some backup software that will automatically do it for you, check out this list with our best picks.

If your SSD isn’t recognized by the BIOS when you attach it, check for these things:

  • Check the SSD cable connection or switch another SATA cable. You can also connect it to an external USB adapter.
  • Check if SATA port is enabled as sometimes the port is turned OFF in System Setup (BIOS). You may need to manually turn it on before you can see the drive in BIOS.
  • Connect the drive to another working computer to see if the SSD is damaged.

5. Set up GPT

If Windows 10 sees your SSD drive but you can’t install Windows 10 on SSD, you’ll get the error ‘Windows cannot be installed to this disk.

The selected disk is of the GPT partition style.’ This can be fixed by changing BIOS settings or converting the disk to MBR partition style. To do this:

  • Go to BIOS settings and enable UEFI mode. If you only see Legacy boot mode, convert the SSD to MBR disk
  • Press Shift+F10 to bring out a command prompt.
  • Type Diskpart
  • Type List disk
  • Type Select disk [disk number]

  • Type Clean Convert MBR
  • Wait for the process to complete.
  • Go back to Windows installation screen, and install Windows 10 on your SSD.

Were you able to install Windows 10 on SSD after using any of these fixes? Let us know your experience by leaving a comment in the section below.

Also, leave there any other questions you may have and we’ll be sure to check them out.

Virtual Credit Card Apps: 7 Best to Use [Instant, No Deposit]

The use of virtual credit cards (VCCs) has been on the rise in the past few years with a number of card providers having introduced them for easier use of physical cards online.

With them, users can assign a maximum value and the cards expire in a few months, reducing fraud and eliminating points of entry for hackers.

You can set up a VCC with virtual credit card software, apps largely available for mobile and tablet platforms that save virtual cards for online transactions.

As Windows is a relatively small mobile platform compared to Android and iOS, there aren’t so many virtual card apps for it. However, these are a few virtual credit card apps you can add to Windows mobiles for the best experience.

The best virtual credit card apps with no deposit required

Revolut

Topping out our list is probably the most resounding name in the virtual card market today.

Revolut radically changes the way you perceive credit card payments since it is incredible just how many things you can do without strings attached.

Simply install the android app, register for a credit card, and just wait for a couple of business days until the actual physical card is delivered to you.

Enjoy real-time currency conversion, crypto trading, one-tap money transfers between you and your phone contacts, and more.

Here are some of the perks of using Revolut:

  • Premium accounts can get a customized metallic card
  • You can monitor your expenses over a timeline
  • Create budgets so not to overspend
  • You get a free physical card
  • Easy money transfers
Revolut

Revolut

Register now and get access to the next generation of virtual cards, now from the comfort of your phone.

Payonner

The next entry on our list is yet another virtual credit card that can easily replace your standard credit card.

Similar to the entries on this list, Payoneer will also provide you with an actual physical card if you feel more comfortable with it.

However, pretty much anything that you can do with the card can be accomplished from the company’s website, or from the phone app. In fact, you can even make payments without the card as long as your phone features NFC.

Transfer money to and from bank accounts, send easy money to other users, manage monthly expenses through it, and more.

Here are some of the perks of using Payoneer:

  • You can feed the account through your standard bank account
  • Pretty much anything can be done from the app
  • Fast money transfers between accounts
  • No hidden fees
Payoneer

Payoneer

Manage all of your banking needs without ever having to step foot into an actual bank with this great service.

Oxigen Wallet

Oxigen Wallet is a freely available Windows app that enables you to set up prepaid VISA virtual credit cards using the app itself and an RBL account.

Then, you make online transactions with anybody who accepts a VISA. The app enables users to create MB Way VISA gift cards and send them via email or SMS, as well.

You can also recharge mobiles and pay utility bills with Oxigen Wallet.

⇒ Get Oxygen Wallet

MB Way

MB Way is an app compatible with Windows, Android, and iOS. There’s also a desktop app for Windows 10.

By setting up a VCC with MB Way, you can make transactions with anybody who accepts MasterCard, American Express, and Visa. MB Way is one of the few virtual credit cards that enables you to make transfers with your mobile number.

You can also create VCCs with 14 different banks through the MB NET site.

⇒ Get MV Way

VCpay

VCpay is a VCC app that you can add to Windows, Android, and iOS smartphones. First, note that the VCpay virtual card isn’t one you can use internationally even if the app’s website states an international card will be introduced.

As such, this is currently a virtual credit card limited to retail in South Africa with the requirement of needing a South African ID. With the app, you can set up virtual MasterCards for yourself or as gift cards.

The app also provides clear card statements and supports EFT from banks.

A managing director of VCpay’s parent company stated VCpay empowers both banked and unbanked users to pay securely and interoperably for goods online, in-store, in other mobile applications, or on mobile services like Uber.

⇒ Get VCpay

Zeta

The Zeta app for Windows 10 and 8.1 mobiles is a virtual MasterCard RBL boasts is a new-age super card. That might be because the virtual card offers unique and dynamic PINs that change with every transaction made. Furthermore, you can use this VCC as an offline card at e-POS machines. The app also provides a number of other bonuses including tax-free meal vouchers and a Zeta Rewards Card.

⇒ Get Zeta

FreeCharge

FreeCharge is a unified digital wallet app you can add to Windows 10 desktops, tablets, and phones. The app enables you to set up a FreeCharge Go MasterCard for use on Indian websites and mobile apps, such as BigBasket, Snapdeal, Amazon, and Flipkart. It also gives you discounts and cashback on a variety of transactions. Note that the Windows app is not entirely the same as its Android and iOS counterparts since the former sports a redesigned UI and Cortana integration so you can recharge it with the virtual assistant. The FreeCharge CEO stated:

We at FreeCharge are continuously innovating to provide differentiated services. With the revamped Windows app, we have aimed at creating a seamless user interface that is simple and intuitive. One can now easily recharge/pay bills in less than 10 seconds.

Those are a few Windows apps that you can set up virtual credit cards with. VCCs are a convenient alternative to standard cards, and their apps also provide other bonuses and services. So, even if you don’t require a VCC, the apps might still be worth using.

⇒ Get FreeCharge

As a reminder, the above-mentioned apps also work if you are looking for the following:

  • Virtual credit card – All entries on this list have a virtual variant that allows you to better manage your funds, either via phone app or web client
  • Free online virtual credit card – You can use these services however you like, just as long as you are connected to the Internet
  • Prepaid virtual credit card – Some of the entries on this list will provide you with physical prepaid cards that you can use
  • Instant approval virtual credit card – Many of the entries allow for instant money transfer between users of your own bank accounts
  • Free virtual credit card – All services listed here are completely free of charge and have no hidden costs associated with them
  • No deposit create virtual credit card – Many of the entries here require no initial deposit in order to start using them

That pretty much wraps up our list of the best virtual card apps that you can use. If you happen to know other entries that are just as good, let us know by leaving us a message in the comments section below.

Fix: Repairing Disk Errors, This Might Take an Hour [9 Ways]

Are you getting the Repairing disk errors. This might take more than 1 hour startup error message? You are not alone; we have the solutions for this startup problem.

Many users reported getting the error alert Repairing disk errors. This might take over an hour to complete, when they boot into Windows 10, and the startup screen error still won’t go away.

If you experience this problem, the basic workaround would be to wait more than one hour for the boot process to complete. However, waiting won’t clear this problem.

Hence, the Windows Report team has compiled a list of solutions to fix this problem, so be sure to take a closer look.

How long should I wait for repairing disk errors?

The usual wait time for this procedure is around 10-15 minutes. Sometimes, you can get an error that says that it sometimes takes over an hour or even a day.

How do I fix Repairing disk errors. This might take over an hour to complete ?

1. Run CHKDSK

  1. Press the Windows Key + X, and select Command Prompt (Admin).reparing drive this might take more than 1 hour
  2. When Command Prompt opens, enter chkdsk /f /r and press Enter.
  3. If you see a message saying that you need to restart your PC before you can scan the C partition, be sure to follow the instructions, and restart your PC.

One of the fixes that worked for those who encountered this startup problem, was to run chkdsk. If you are still experiencing the error, you might want to proceed to the next solution.

Also, if you are experiencing corrupt directories on your Windows PC, check out our dedicated guide to fix it in no time.

2. Repair PC registry

  1. In Safe Mode, go to Start and type cmd.
  2. Right-click Command Prompt, and select Run as Administrator.CSGO blue circle
  3. Now, type the following command, and press Enter: sfc /scannowwe need your help to finish adding a feature
  4. Wait for the scanning process to complete and then restart your computer. All corrupted files will be replaced on reboot.

Sometimes, the Windows Registry might be bloated or corrupted; hence, you need to repair the registry.

Meanwhile, Microsoft’s System File Checker verifies the integrity of all system files and repairs files with problems when possible.

The simplest way to repair your Windows registry is to use a dedicated repair tool that scans your PC for any errors and irregularities and fixes faulty registries and files from the moment they appear.

3. Set the boot disk at the top of the computer’s boot order in BIOS

  1. Power up your computer.
  2. Press the F1 key or any specified key to enter the BIOS (other keys such as F1, F12, or Delete may be used depending on your HP system).
  3. Locate your computer’s boot order under BIOS Boot.
  4. Select the HDD/SSD i.e. the boot disk and move it upward using the arrow key.
  5. Save the changes by following the screen prompts, and exit the BIOS.

Another reason for this startup problem is that the HDD/ boot disk is not at the top of the boot order. The system retrieves boot information and OS details by following a boot order.

The boot order consists of the sequence of sources that the computer searches to retrieve valid information.

However, if the HDD/boot disk is not at the top of the boot order, the computer tries to boot from another source, which results in an error message.

If you intend to set the boot disk i.e. HDD at the top of the boot order in BIOS (Basic Input/Output System), follow the above steps.

This is a simple solution, but it can help you if you’re getting a Disk read error occurred message on your PC.

4. Run Automatic Repair/Startup Repair

  1. Insert the Windows bootable installation DVD, and restart your PC afterward.
  2. Press any key to boot from CD or DVD when prompted to continue.
  3. Select your language preferences, and click Next.
  4. Click Repair your computer in the bottom-left.
  5. In the Choose an option screen, click on Troubleshoot. reparing drive this might take more than 1 hour
  6. Select the Advanced option, and choose Automatic Repair or Startup Repair.reparing drive this might take more than 1 hour
  7. Then, wait for the Windows Automatic/Startup Repair to be complete.
  8. Restart your PC, and boot to Windows.
  9. Attach the second hard drive afterward.
Note icon NOTE
Ensure you already have a Windows bootable installation drive or USB before proceeding with this fix.

You can also fix the Repairing drive This might take more than 1 hour to complete the issue by performing automatic repair/startup repair on your system using a Windows bootable installation DVD.

5. Use System Restore

  1. Press down the power button until the Automatic Repair message appears.
  2. Go to Troubleshoot, select Advanced options, and choose System Restore.
  3. Now, select your username and enter your password.
  4. Click on Next, select the desired restore point, and follow the on-screen instructions to restore your PC.reparing drive this might take more than 1 hour
  5. After your PC is restored, check if the problem still appears.

System Restore reinstates your system to its previous state and fixes any recent issues, most especially related to the startup issue. Follow the above steps to run system restore on your Windows 10 PC.

6. Install Microsoft Hotfix

  1. Go to the Microsoft Support link.
  2. Now, click on the Hotfix download option.
  3. After downloading, install the Hotfix by following the prompts.
  4. Restart your PC afterward.

Some Windows users have reported great success in resolving the problem by installing Microsoft Hotfix, so it’s worth giving it a try.

However, if this method does not fix the problem, you may proceed to the next method.

7. Roll back to Windows 8.1/7

  1. Press the Windows Key + I to open the Settings app.
  2. Go to the Update & security menu.
  3. Select the Recovery tab, and click on the button Get started.reparing drive this might take more than 1 hour
  4. Follow the prompts to finish the downgrade processes.

Sometimes, the startup problem might be related to a recent upgrade from Windows 7/8/8.1 to Windows 10.

Hence, you may consider downgrading your Windows OS back to its previous OS, besides this fix won’t take more than 1 hour to complete.

However, you may have to enter Safe Mode in order to downgrade.

8. Rebuild BCD

  1. Insert the Windows 10 bootable media (USB stick or DVD), and restart your PC.
  2. Set USB/DVD as the primary boot device. Either by entering the Boot menu (F10, F11, or F12) or from the BIOS settings.
  3. The loading process of the installation file should start.
  4. Select the language, time/format, and keyboard input of choice and click the Next button.
  5. Choose Repair your computer from the bottom left corner.
  6. Open the Troubleshoot option, and select the Advanced Options.reparing drive this might take more than 1 hour
  7. Open Command Prompt. Select your account, and enter the password if asked.
  8. Copy-paste the following commands, and press Enter after each: bootrec /FixMbr bootrec /FixBoot bootrec /ScanOs bootrec /RebuildBcd

Although the BCD (Boot Configuration Data) is rarely affected, it still can get corrupted.

Sometimes, incomplete OS installation or frequent installation of different operating systems results in incomplete BCD, and your PC won’t be able to boot; hence, the BCD corruption.

This solution should finalize the repair procedure, and you should be able to boot your PC to Windows.

Also, if the operating system version is incompatible with Startup Repair, take a closer look at our detailed guide and fix it with ease.

9. Reset this PC

  1. Hard power off your PC 3 times until the Advanced Recovery environment appears.
  2. Choose the Advanced options, and select Troubleshoot.
  3. Click on the Reset this PC option.
  4. Choose whether you want to keep or delete your files and apps.
  5. Click Reset to proceed.

Finally, you can fix this problem by resetting your PC. This option is an advanced recovery option that restores your PC to its factory state.

The Repairing drive. This might take more than 1 hour to complete startup error can potentially be fixed by any of the solutions we mentioned above.

If you encounter the message Windows found errors on this drive that need to be repaired, be sure to take a look at our comprehensive guide and fix them in no time.

Also, feel free to share your experience with us and let us know how you were able to tackle the problem using our listed solutions. Comment below if you have any questions.

Fix: USB Headset Not Working on Windows 10 [Mic, Drivers]

Many people use USB headsets, but it seems that some users are having issues with their USB headsets. If your USB headset is giving you trouble today we’ll show you how to fix those issues on Windows 10.

Users are reporting distorted sound on their USB headsets and replacing the USB headset with the exact same model doesn’t fix the issue. So if the problem isn’t the USB headset what can you do to fix this problem?

USB headsets are great, but sometimes you might encounter certain issues with them. Speaking of USB headset issues, here are some problems that users reported:

  • USB headset mic not working – Sometimes the microphone on your USB headset isn’t working properly. This can be a big problem, but you might be able to fix it by changing your microphone settings.
  • USB headset not working Windows 10, 8, 7, on Skype – This problem can appear on any version of Windows, and if you encounter it, you should be able to fix it using the solutions from this article.
  • USB headset not detected, not showing up in playback devices, not working with YouTube – Sometimes your headset might not be detected at all. To fix this issue, be sure to reinstall your USB headset and check if that works.
  • USB headset audio, sound not working – If your USB headset isn’t working, the issue might be a third-party application. To fix the problem, you need to find and remove this application from your PC.
  • USB headset noise problem, static, crackling, buzzing – These are some common problems that can appear with USB headsets. To fix the problem, temporarily disable your headset and enable it again.
  • USB headset is not working – If your USB headset isn’t working, you might have to reinstall your USB drivers. Once your drivers are installed, check if the problem is still there.

How to fix USB headset not detected or working on Windows 10?

1. Unplug the headset while Windows 10 boots

Users report that there might be some conflicts with your USB headset and other USB devices, and in order to fix this issue, it’s required that you unplug your USB headset while your system boots. When your Windows 10 starts you can plug in your USB headset and it should work without any problems.

2. Update your BIOS and reset CMOS

Some users report that updating BIOS and resetting CMOS fixes the distorted sound issue. Updating your BIOS is an advanced process and it’s different for each motherboard. If you don’t know how to do it properly maybe hire a professional to do it for you if you want to avoid any potential damage to your system.

3. Don’t use your headset as default playback device

This solution applies to headsets that come with built-in sound card and connect to both USB and audio port on your computer. The issue with these headsets is that you’re hearing sound only from one speaker when gaming, and in order to fix it you need to do the following.

  1. Right-click the Sound icon in the Taskbar and choose Open Sound settings from the menu.
    USB headset mic not working
  2. Select Sound control panel.
    USB headset not working on Skype
  3. The sound window will now appear. Right-click your headphones and choose Properties from the menu.
    USB headset mic not working
  4. Set Device usage to Don’t use this device (disable) and click Apply and OK to save changes.
    USB headset not working Windows 10

By doing this you will make the sound card process your audio instead of the card that is built in your USB headset.

4. Uninstall your USB drivers

According to users, sometimes USB headset issues can occur due to your USB drivers. Several users reported issues with USB 3 drivers, but after reinstalling them, the problem was permanently resolved. To do that, you just need to follow these steps:

  1. Press Windows Key + X to open Win + X menu. Now choose Device Manager from the list.
    USB headset is not working
  2. When Device Manager opens, locate your USB 3 driver, right-click it and choose Uninstall device.
    USB headset not detected
  3. Confirmation dialog will now appear. Choose Uninstall from the menu.
    USB headset audio
  4. After the driver is uninstalled, click Scan for hardware changes icon.
    USB headset noise problem

Windows will now search for the default driver and install it. Once the default USB driver is installed, be sure to check if the problem is resolved. Keep in mind that this solution works for both USB 2 and USB 3 drivers, so you can use it regardless of the USB type you’re using.

The default drivers should work without issues, but sometimes it’s better to use a dedicated driver. You can download the appropriate drivers from your motherboard’s manufacturer’s website. Simply visit the website, enter the model of your motherboard and download the latest drivers for it.

If searching for drivers manually seems a bit complicated to you, there are automated tools that can download the necessary drivers with just a single click.

5. Remove the problematic applications

Sometimes third-party applications can install their own drivers, and that can lead to USB headset issues. To fix the problem, it’s advised to remove the problematic application from your PC.

Some users reported that Etron software caused this problem to appear, and in order to fix the issue, you need to remove the software. You can remove the application using the Settings app, but this method isn’t always effective since it can leave certain leftover files that can still interfere with your USB headset.

To fix the problem, it’s advised to use an uninstaller software. This is a special application that can remove any application from your PC along with all of its files and registry entries.

By using an uninstaller application, you’ll remove all files and registry entries associated with the problematic application and prevent any future issues from occurring.

Once you remove the problematic application, the issue should be permanently resolved.

6. Temporarily disable your USB headset

Sometimes there might be a glitch in your system, and that glitch can cause various USB headset issues to appear. One of the fastest ways to fix this problem is to temporarily disable your USB headset. To do that, you just need to do the following:

  1. Open Device Manager.
  2. Locate your USB headset, right-click it and choose Disable device from the menu.
    USB headset not working Windows 8
  3. Now right-click your USB headset and choose Enable device.

After doing that, your USB headset will start working again. Keep in mind that this is just a workaround, so you’ll have to repeat it if the issue reappears.

7. Disconnect the headset and turn off Razer Synapse software

Sometimes USB headset issues can be caused by a software such as Razer Synapse. According to users, they managed to fix the problem simply by unplugging the headset and closing the Razer Synapse. After doing that, you just need to connect the headset again and restart Razer Synapse software.

Keep in mind that this is just a workaround, so you’ll need to repeat it whenever the issue occurs.

8. Check your privacy settings

According to users, USB headset issues can occur due to your privacy settings. Users reported that apps weren’t allowed to use the microphone on their USB headset due to certain settings. However, you can fix that issue by doing the following:

  1. Open the Settings app. You can do that quickly by pressing Windows Key + I.
  2. Navigate to the Privacy section.
    USB headset sound not working
  3. In the left pane choose Microphone. In the right pane, make sure that Allow apps to access your microphone is enabled. In addition, be sure to check the list below and allow individual applications to access your microphone.
    USB headset static

After enabling your microphone the issue with your USB headset should be completely resolved.

9.Uninstall any old USB headset drivers

Several users reported USB headset issues after purchasing a new headset. According to them, the problem was caused by drivers from an older USB headset. To fix the problem, it’s advised to remove the older driver since it might interfere with your new headset. To do that, just follow these steps:

  1. Open Device Manager.
  2. Now go to View > Show hidden devices.
    USB headset not showing up in playback devices
  3. Locate your old USB headset driver, right-click it and choose Uninstall device.
  4. If available, check Remove driver software for this device and click Uninstall.

After removing the older driver, the issue should be completely resolved, and you should be able to use your USB headset without any problems.

In case none of these solutions worked for you, go and check out our article about sound problems in Windows 10, maybe it will be helpful.

However, we hope this article helped you to solve the problem with your USB headset in Windows 10. If you have any comments or questions, just reach for the comments, below.

PDF Thumbnails are Not Showing on Windows 10 & 11 [FIX]

Many users have documents in PDF format on their PC, and sometimes it’s easier to recognize different PDF files by their thumbnail.

Others reported that PDF thumbnails aren’t showing on Windows 11. This can be a bothersome issue, especially if the PDF preview is not working either. However, there are several solutions for this matter.

So, Windows 11 PDF thumbnails are essential since they allow us to find the needed files quickly without opening them.

However, many users reported problems with PDF thumbnails, so today we’re going to cover the following topics:

  • How to show PDF thumbnails in Windows 10 – In order to show PDF thumbnails on Windows 10, you need to have a default PDF viewer installed. Most users prefer Adobe Reader, but there are many great third-party alternatives.
  • Enable PDF thumbnail previews in Windows Explorer – In order to enable thumbnail previews in Windows Explorer, you need to set a default application for PDF files. After doing that, the issue should be resolved.
  • PDF thumbnails not showing Windows 10, Windows 8.1, Windows 7 64-bit – This problem can occur on any version of Windows, and even if you’re not using Windows 10, you should be able to fix the issue using one of our solutions.
  • PDF thumbnails disappeared, don’t show, gone, no longer showing – If PDF thumbnails are missing, the issue is most likely Adobe Reader. To fix the issue, be sure to check its settings and update it to the latest version.

Why are the thumbnails not showing on Windows?

The main reason why this issue occurs is that images become corrupt, you will need to either install the latest Windows updates or follow 3rd party software to recover the files.

How to show PDF thumbnails on Windows?

1. Use Adobe Acrobat Reader

  1. Press Windows Key + S and enter default programs. Choose Default app settings from the list.
    Enable PDF thumbnail previews in Windows Explorer
  2. Select Choose default apps by file type.
    PDF thumbnails disappeared
  3. Find .pdf format on the list and double-click it to set the default application. Set Adobe Reader as a default application.
    PDF thumbnails not showing Windows 10

By following the steps above, you’ll set Adobe Reader as the default application for PDF files.

Many users reported that the Preview pane is not working for PDF files in Windows 10, but that can be fixed by changing a few settings.

  1. In Adobe Reader open Edit menu and go to Preferences.
  2. Select Updater.
  3. Enable Do not download and install updates automatically option.

After doing that your PDF thumbnails should return automatically and solve the PDF preview not working on Windows 10 situation.

If you can’t fix it using this workaround, there are other considerable methods to solve thumbnail preview is not showing up problems.

Make sure that you have the latest version of Adobe Reader installed

Some users claim that a recent Adobe Reader update fixed this issue, so be sure that you have the latest version of Adobe Reader installed. To ensure that you have the latest updates installed do the following:

  1. Open Adobe Reader.
  2. Go to Help > Check for updates.

If you have the latest version of Adobe Reader installed be sure to enable thumbnail previews by going to Preferences > General and selecting the Enable PDF thumbnail previews in FileExplorer option.

⇒ Get Adobe Reader

2. Install the latest updates

  1. Open the Settings app. You can do that quickly by using Windows Key + I shortcut.
  2. When Settings app opens, go to Update & Security section.
    Enable PDF thumbnail previews in Windows Explorer
  3. Now click Check for updates button.
    How to show PDF thumbnails in Windows 10

If PDF thumbnails are not showing on your Windows 10 PC, the problem might be the missing updates. Certain glitches with Windows can occur once in a while, and in order to keep your Windows working properly, it’s important to keep your Windows up to date.

By default, Windows 10 installs the missing updates automatically, but sometimes you might miss an important update due to certain bugs or errors.

To prevent these types of problems from appearing, be sure to keep Windows 10 up to date at all times.

If your PDF thumbnails are missing, the problem might be Adobe Reader X. Many users reported that this application was the cause for this issue, and after removing it, the problem with thumbnails was resolved.

To completely remove this application from your PC, it’s advised to use uninstaller software.

If you’re not familiar, these types of applications are specially designed for removing applications and they will remove all files and registry entries associated with a specific application.

By doing so, you’ll completely remove the desired application from your PC and ensure that the problem doesn’t appear anymore.

If you’re looking for good uninstaller software, you should check out our list of best uninstaller tools for Windows.

3. Install the fix for Adobe Acrobat

According to users, Adobe Acrobat isn’t showing thumbnails for PDF files on Windows 10, and in order to fix this issue, many users are suggesting installing a fix for it.

Supposedly this third-party fix fixes the problem on 64-bit versions of Windows 10 with Adobe Acrobat X, so be sure that you have a try.

Note: This fix comes from a third-party source, and we’re not responsible for any damage that it might cause.

4. Use PDF Preview

By default, Windows 10 can’t show thumbnails for PDF files, but you can easily fix that by using third-party solutions such as PDF Preview. This is a freeware tool available for both personal and commercial use.

This tool will generate thumbnails for all PDF files regardless of their version, therefore this application can be perfect if you work with PDF files on a frequent basis.

5. Use third-party tools

If PDF thumbnails aren’t showing on your PC, the problem might be Adobe Reader. While Adobe Reader is a great application, there are many other great PDF viewer apps.

All these applications have similar features to Adobe Reader, so they are a perfect alternative if you need a new PDF viewer.

Speaking of PDF viewers, many users reported that they fixed the problem with thumbnails simply by using Soda PDF.

According to users, after installing this application, the issue with PDF thumbnails was resolved, so be sure to try this application.

6. Use a preview pane

  1. Locate the PDF file that you want to preview in File Explorer.
  2. Now go to the View tab and enable Details pane.
    How to show PDF thumbnails in Windows 10

This is just a workaround, but it might be useful until you find a permanent solution. If the PDF preview is not working in File Explorer, you could use the preview pane to see your PDF files.

You should be able to see the preview of your documents in the preview pane simply by selecting them. If needed, you can also show or hide the Preview pane by using Alt + P keyboard shortcut.

Keep in mind that this is just a workaround and not the best long-term solution, but until you manage to solve the problem, you might want to keep using this workaround.

If you want to easily restore thumbnails in Windows 10, take a look at this dedicated guide and learn how you can do it in just a few steps.

7. Preview files using Adobe Reader

  1. Open Adobe Reader.
  2. Now choose File > Open.
  3. Navigate to the directory that has your PDF files. Your thumbnails should now be generated. Don’t open or select any PDF files.
  4. Close Adobe Reader.
  5. Now open File Explorer and go to the directory that has your PDF files.

If Preview pane is not working for PDF files in Windows 10, be sure to try this quick and simple workaround.

8. Use Disk Cleanup

In case the PDF thumbnails are not showing on Windows 10, the problem might be your temporary files. Sometimes temporary files can get corrupted and that can cause this and many other problems to appear.

Your thumbnail cache is a temporary file, and if your thumbnails aren’t showing, it’s rather likely that your temporary files are corrupted.

However, you might be able to fix this issue simply by using Disk Cleanup to remove temporary files. Once your thumbnail cache is removed, your PC will regenerate your thumbnails again.

To learn more about Disk Cleanup and see how to remove your temporary files, feel free to check our guide on how to use Disk Cleanup for detailed information.

Although Disk Cleanup can fix this problem for you, some users prefer third-party solutions.

If you likewise need stronger tools to clean your system thoroughly from temporary files, then consider more efficient deep clean hard drive software.

Not being able to see thumbnails for PDF files in Windows 10 can be inconvenient, but you can easily fix that problem by using one of our solutions.

If you have any other suggestions or questions, don’t hesitate to leave them in the comments section below and we’ll be sure to check them out.

Fix: Bluetooth Keyboard Problems [Not Connecting / Typing]

Transition to Windows 10 isn’t always as easy as you might think, and when you’re switching to a new operating system there are always going to be some issues with hardware.

Today, we’re going to explain to you how to deal with Bluetooth keyboard problems with Windows 10.

If your Bluetooth keyboard isn’t working with Windows 10, you’re having a driver issue, which can be quite annoying since you can’t do anything without your keyboard.

However, since this is a driver issue, it can be resolved with a few simple tricks.

Bluetooth keyboards are useful, but some users reported issues with them on Windows 10. Speaking of keyboard issues, users reported the following problems with their Bluetooth keyboard:

  • Windows 10 not generating passcode for Bluetooth keyboard – Many users reported that they can’t pair their Bluetooth keyboard with Windows since Windows 10 isn’t generating the necessary passcode. However, you can enter the passcode manually and the problem should be resolved.
  • Bluetooth keyboard Windows 10 not working – If your Bluetooth keyboard isn’t working with Windows 10, the issue might be your drivers. Reinstall or update your drivers, and the issue should be resolved.
  • Bluetooth keyboard disconnects Windows 10 – Many users reported that their Bluetooth keyboard disconnects frequently on Windows 10. However, you can fix that problem simply by connecting your USB receiver to a different port.
  • Bluetooth keyboard won’t connect, pair (Windows 10) – Several users reported that their Bluetooth keyboard won’t connect or pair with Windows 10. To fix that, be sure to try one of our solutions.
  • Bluetooth keyboard connected but not typing (Windows 10) – This can be an annoying problem, but you should be able to fix it simply by disconnecting and pairing your keyboard with your PC again.

How can I fix Bluetooth keyboard problems on Windows 10?

1. Uninstall and reinstall the Bluetooth driver

  1. Press Windows Key + X to open Win + X menu.
  2. Select Device Manager from the list.
    Bluetooth keyboard Windows 10 not working
  3. When Device Manager opens, find your keyboard, right-click it, and press Uninstall.
    Bluetooth keyboard disconnects Windows 10
  4. Windows will ask you to confirm that you wish to uninstall the driver.
  5. Click on Uninstall.
    Windows 10 not generating passcode for Bluetooth keyboard
  6. After confirming and uninstalling your keyboard driver, restart your computer.
  7. Now you need to visit your keyboard manufacturer’s website and check if there’s a new driver available for Windows 10.

Driver problems are one of the most common problems users are facing after the Windows 10 upgrade. So, just in case, you should go and check if your Bluetooth drivers are up to date.

We have to mention that sometimes after uninstalling the driver, Windows is able to reinstall the driver so you might not need to download a new driver from the manufacturer’s website.

We also have to mention that sometimes updating the driver from Device Manager helps and in order to do so you just need to follow the first two steps from this solution, but instead of clicking on Uninstall, you just need to click Update Driver instead, and when the process is completed just restart your computer.

1.2 Update drivers automatically

2. Run hardware and Device troubleshooter

Windows troubleshooter is Microsoft’s built-in tool which can solve a lot of system-related problems, and the problem with the Bluetooth keyboard may be one of them. To run the device troubleshooter, do the following:

  1. Press Windows Key + S, enter troubleshoot and choose Troubleshoot from the menu.
    Bluetooth keyboard disconnects Windows 10
  2. Select Hardware and devices from the list and click Run the troubleshooter button.
    Bluetooth keyboard won't connect, pair Windows 10
  3. Follow the instructions to complete the troubleshooting.

3. Enter the pairing number manually

  1. Start the pairing process. You’ll be asked to insert an 8-digit number.
  2. Enter any 8-digit number in the input field using your wired keyboard. If you don’t have a wired keyboard, you can also use a virtual keyboard. Click Next.
  3. Make sure that your Bluetooth keyboard is in the pairing mode and enter the same 8-digit number on your Bluetooth keyboard and press Enter.

Many users reported issues while connecting their Bluetooth keyboard with Windows 10. According to them, they experienced issues with pairing.

Wait for a few moments and your Bluetooth keyboard should be paired with your Windows 10 PC.

4. Change keyboard settings

  1. Press Windows Key + S and enter control panel.
  2. Select Control Panel from the list of results.
    Bluetooth keyboard connected but not typing Windows 10
  3. When Control Panel opens, enter Devices and Printers.
    Windows 10 not generating passcode for Bluetooth keyboard
  4. Locate your keyboard on the list, right click it and choose Properties.
  5. When the Properties window opens, go to Services tab. Select Drivers for keyboard, mice, etc (HID). Save changes.

If you have Bluetooth keyboard problems on Windows 10, the issue might be related to your keyboard settings. After doing that, the issues with your Bluetooth keyboard should be completely resolved.

5. Select OK, try entering passcode on it option

  1. Start Bluetooth keyboard pairing process.
  2. Hold the connection key on your keyboard until the Bluetooth icon starts flashing.
  3. Now click on OK, try entering passcode on it option.
  4. A code should be generated on your screen. Enter the code on your Bluetooth keyboard and it will be automatically paired with your PC.

If you’re having problems pairing your Bluetooth keyboard with your Windows 10 PC, you might be able to solve the problem by entering the desired passcode on your Bluetooth keyboard.

As you can see, this is just a minor glitch, but you can fix it by using this option.

6. Pair your keyboard with your phone first

  1. Pair your Bluetooth keyboard with your Android device.
  2. After doing that, press the Connect button on the keyboard and turn off Bluetooth on your phone.
  3. Now, try to pair your keyboard again with your PC.

According to users, they fixed this problem using a simple workaround. To fix this problem, first, you need to pair your Bluetooth keyboard with an Android phone.

This is an unusual workaround, but several users reported it works for them, so you might want to try it out. It seems that there’s a glitch that will prevent you from connecting the keyboard to your PC, but can easily fix it by using this workaround.

It’s worth mentioning that this is a long-term workaround, and it should work until you replace your keyboard batteries.

7. Try using a different USB port

If you’re having Bluetooth keyboard and Windows 10 issues, the problem might be related to your USB port. Sometimes certain devices won’t work with USB 3.0 or USB 2.0 ports, and that can cause this problem to appear.

To fix this, simply reconnect your Bluetooth receiver to a different port and check if that solves the problem. If you have USB 3.0 ports on your PC, connect your device to a USB 2.0 port and try to pair it again.

USB 3.0 port offers great transfer speed, however, your keyboard doesn’t require that kind of speed, so be sure to try using a USB 2.0 port instead.

8. Check other USB devices

If you’re having any problems with your Bluetooth keyboard, the issue might be caused by other USB devices. To fix this issue, be sure to disconnect any unnecessary USB devices from your PC and check if that solves the problem.

In addition, make sure that you remove any USB hubs that you have. If your Bluetooth receiver is connected to the USB hub, be sure to connect it directly to the PC and check if that solves the problem.

9. Change power saving options

  1. Open Device Manager.
  2. When Device Manager opens, locate your Bluetooth keyboard and double click it.
  3. When Properties window opens, navigate to Power Management and uncheck Allow the computer to turn off this device to save power. Now click on OK to save changes.
    Bluetooth keyboard Windows 10 not working

Windows allows you to turn off certain devices in order to save power, but that can cause issues with Bluetooth keyboard. To fix that problem, you need to change the power-saving options for your keyboard.

After doing that, check if the problem with the Bluetooth keyboard is resolved.

Some of our readers also complained about the Microsoft Designer Keyboard not pairing. If you also have problems with that, hit the link to fix the problem quickly.

For more questions or suggestions, reach out to the comments section below.

Windows Emulator for Mac: 5 Best to Use in 2026

Windows emulators enable you to run Windows platforms and programs on Mac. This means that you can run a Windows OS within an Apple Macintosh.

Thus, you can get the best of both the Microsoft and Apple worlds with a virtual machine. As such, you can greatly expand the amount of software you can open on Mac.

There are two types of Windows emulators. The first is virtualization software that emulates operating systems with virtual machines.

The second enables you to run Windows apps on Mac without the VM. So which one should you use? Join us while we take a look at the best Windows emulators for Mac.

How does a Windows emulator work?

A Windows emulator is a virtual machine software that runs in an isolated environment inside your operating system.

With it, you’ll run an operating system, such as Windows, inside of macOS. Since you’re running another OS, it means that you can run all its programs as well.

Are Windows emulators safe to use?

Yes, all virtual machine software is made by reputable companies, which means they are perfectly safe to use.

Virtual machine isolation chart

The application will run the guest OS in a virtual environment, completely separated from your operating system, so even if you get malware on the guest OS, it can’t affect your host PC.

What is the best Windows emulator for Mac?

Parallels Desktop

If you’re looking to run Windows apps on your Mac, look no further than Parallels Desktop. The software can handle almost any application without issues, including Office and Internet Explorer.

Thanks to the seamless integration, you can easily test your code on multiple platforms, which is perfect for app developers.

In addition, you can easily share files between your Mac and the virtual machine. Drag and drop is fully supported, allowing you to copy data and files intuitively.

Parallels Desktop is incredibly simple to set up, and it will automatically download Windows, so you won’t have to obtain the ISO file on your own.

The entire process is straightforward, which makes it perfect for first-time users. Speaking of speed, it’s worth mentioning that the software is fast, and it won’t slow down even when running more demanding apps.

In addition to programs, you can use Parallels to run games, but your performance might vary depending on your hardware and the game in question.

Thanks to the Coherence Mode, you can completely hide the guest OS, and use its apps separately. Or if you prefer, you can run Windows in full screen and switch to macOS when needed.

If you’re a Boot Camp user, we have some good news. You can reuse your existing installation, so no need to set everything up again.

Overall, Parallels Desktop is an amazing Windows emulator for Mac, and if you want to run Windows on your macOS, this is one of the best tools for that task.

Other great features:

  • Touch Bar integration
  • One-click tuning
  • Ability to launch Windows software from the Dock
  • Travel Mode to extend the battery life
  • Ability to view your resource usage

Parallels Desktop

A unique way to integrate Windows software with the host Mac platform that brings you countless benefits on top!
Check price Visit website

VMware Fusion

Another great virtualization software for macOS is VMWare Fusion. Using it, you can run almost any Windows application inside of a virtual environment.

However, that’s not all. The software has 3D hardware-accelerated graphics support, as well as DirectX 11 with Shader Model 5.0 and OpenGL 4.1, so it can run 3D games as well.

Regarding virtual machines, you can assign to them up to 32 CPU cores, 128GB of RAM, and up to 10TB of virtual storage. To top it off, you can dedicate up to 8GB of vRAM per virtual machine.

Since you’re running Windows software inside of the virtual environment, it’s important to know that it’s completely isolated thanks to the sandboxing support.

Even if you get malware on your guest OS, your macOS will remain unaffected since the two are completely separated.

If you’re a developer, you’ll be pleased to hear that VMWare Fusion supports OCI container images and local Kubernetes clusters allowing you to build and debug modern applications.

Another feature that deserves a mention is the ability to convert your PC into a virtual machine. Just connect it to your Mac and the software will convert it thanks to the Migration Assistant feature.

Lastly, the software supports easy file sharing between the guest and the host OS, and you can even have shared or mirrored folders.

Overall, VMWare Fusion offers amazing features, and it’s a  great software if you want to run Windows in a virtual environment on your Mac.

Other great features:

  • Support for mass deployment
  • Full support for 4K, 5K, and Retina displays
  • Virtual Trusted Platform Module support
  • Snapshots
  • Support for Windows, Linux, and Mac guest operating systems

VMware Fusion

No other emulators can match Fusion’s seamless Mac integration, extensive virtual machine support, and graphics engine.
Check price Visit website

CrossOver

If you want to run Windows software without actually having to install Windows in the virtual environment, perhaps CrossOver is what you need.

Unlike the previous entries, this isn’t an emulator, so it runs faster while using fewer resources. Instead, the software translates Windows into Mac commands.

This allows you to run any app on your Mac with ease, almost like the native software. CrossOver integrates with your desktop environment, and you just need to click its icon, and that’s it.

It’s important to mention that there’s no need to restart your Mac to run Windows, everything is available right away, without having to reboot or interrupt your work.

According to the developers, the software can handle games as well, but your performance may vary depending on the type of game you’re trying to run and your hardware.

Virtual machine software tends to occupy your resources, which results in slowdowns even on high-end devices. However, that’s not a problem, and all Windows applications will run at native speed.

It’s important to mention that this tool is incredibly simple to use, and you just need to drag and drop applications to it to use them, it’s simple as that.

CrossOver is a unique type of software since it doesn’t require Windows to be installed to run its apps, so you’ll save precious time and space by using it.

This has advantages such as less resource usage and better performance, however, you should keep in mind that this software might not be able to handle every single application.

Other great features:

  • Incredibly simple to use
  • Available for Mac, Linux, and Chrome OS
  • Designed to boost your productivity
  • Offers great speed and performance

⇒ Get CrossOver

VirtualBox

If you’re looking for a free Windows emulator for Mac, then VirtualBox might be what you’re looking for. This is a well-known virtualization application, and it runs on almost all desktop platforms.

The software is classified as hosted hypervisor or type 2 hypervisor. This means that it doesn’t run directly on the hardware, instead, it requires an operating system to be installed to run.

Cross-compatibility is supported, and you can run a virtual machine created on a completely different operating system without issues.

This is achieved thanks to the Open Virtualization Format, also known as OVF. It’s worth mentioning that that other applications can create VMs in this format as well.

As a result, you can run a virtual machine created with another software and another platform in VirtualBox, as long as it’s saved in a compatible file format.

The software doesn’t require hardware virtualization, so there’s no need to have features such as Intel VT-x or AMD-V on your PC.

This allows users to run virtual machines even on older devices, but this can lead to some performance issues and slowdowns, so keep that in mind.

It’s important to mention that you can assign up to 32 virtual CPUs to each virtual machine, and there’s virtualization available for all types of hard disk controllers.

However, it doesn’t stop there, and the software virtualizes network and sound cards, serial and parallel ports, and I/O APIC controllers.

Overall, VirtualBox is an amazing multi-platform virtualization software, and if you’re looking for a free and open-source solution, this might be the one you’re looking for.

Other great features:

  • Seamless mouse integration
  • Shared folders
  • Shared clipboards
  • Branching snapshots
  • Remote access

⇒ Get VirtualBox

WineBottler

If you want to run Windows apps on your macOS, without having to install another operating system, then WineBottler is what you need.

The software is simple to set up, and once you start it, you need to pick a software that you want to install from the list of available apps.

After selecting the desired program, it will be installed and you’ll get an app icon on the desktop allowing you to run it like any other app.

Do keep in mind that WineBottler doesn’t come with applications preinstalled, instead, it runs the scripts to download, install, and configure them.

In case your desired software isn’t available on the list, you’ll be pleased to hear that you can convert any .exe or .msi file into a Mac app.

You don’t even have to convert the software if you don’t want to, instead, you can just run it directly in the generic environment.

Do keep in mind that this is 32-bit software, and it only works with 32-bit applications at the moment. Also, be prepared for some compatibility issues since not every app is optimized for this process.

In case you don’t want to install Windows inside your macOS, this might be a perfect alternative for you. It’s based on an open-source tool called Wine, and if you’re a Linux user, you’re most likely familiar with it.

Overall, WineBottler is a great tool, that allows you to run Windows software as native Mac apps, but be prepared for some compatibility issues along the way.

Other great features:

  • Easy to use
  • No need to install Windows
  • Ability to convert .exe files to Mac apps
  • Based on Wine

⇒ Get WineBottler

How does Boot Camp work?

Boot Camp is a feature of macOS that allows you to dual boot Windows and macOS. With this feature, you’ll make a dedicated partition for Windows, and switch to it when needed.

This feature is incredibly simple to use, and if you want to run Windows on your Mac, this is the fastest and arguably the best way to go.

Is Boot Camp better than a PC emulator?

Boot Camp will better utilize your resources since it doesn’t run in a virtual environment. As a result, you’ll get better performance especially when gaming.

However, you’ll need to restart your Mac every time you want to switch to Windows, so this isn’t perfect for users that do a lot of multitasking.

Lastly, Boot Camp runs directly on your hardware instead of the virtual environment, so it’s less safe to use. However, as long as you’re vigilant online and you have Windows antivirus software installed, you won’t have to worry.

Running Windows apps on Mac is possible with these tools, but not all of them offer the same features to its users.

For best compatibility, we suggest using virtual machine software, since it allows you to install Windows on Mac and run all the apps you want.

What is your Windows emulator for Mac of choice? Share your thoughts in our comments section below.

Unable to Reset Your PC: Required Drive Partition Missing

Users can usually reset their PCs to factory settings with the Reset this PC tool in Windows 11/10. However, some users have reported an error that stops Windows resetting. That error’s message says:

Unable to reset your PC. A required drive partition is missing.

Sometimes users can’t boot into Windows because of this issue. In this case, troubleshooting needs to be applied via the Windows Recovery Environment.

What causes the Unable to reset your PC error?

The Unable to reset your PC error can arise because something is corrupted or file system errors. These are some of the more specific causes attributed to Unable to reset your PC issue:

  • A corrupted master boot record: Windows doesn’t reset the PC because of a corrupted master boot record.
  • Corrupted system files: The Unable to reset your PC error arises because of damaged system files.
  • Bad drive sectors: Your hard drive could have some bad disk sectors.
  • An incorrectly set active partition: The system partition isn’t set correctly.

To fix this error, you must apply solutions to address those causes. These are some potential Windows 11/10 resolutions for the Unable to reset your PC issue.

How can I fix the Unable to reset your PC error?

1. Run the SFC Command Prompt tool

  1. Enter Windows Recovery Environment with a method in our guide for accessing WinRE.
  2. Then select the Troubleshoot > Advanced Options buttons on the blue menu.
    The Troubleshoot option unable to reset your pc a required drive partition is missing
  3. Select Command Prompt on the Advanced options menu.
    Command Prompt option unable to reset your pc a required drive partition is missing
  4. To initiate a Deployment Image scan, execute this command: DISM.exe /Online /Cleanup-image /Restorehealth
    Restorehealth command unable to reset your pc a required drive partition is missing
  5. Then run the SFC (System File Checker) tool by entering this text and pressing Return: sfc /scannow
    sfc scannow command unable to reset your pc a required drive partition is missing
  6. Wait for the SFC tool to finish the scanning and show an outcome.

Although running the SFC scan manually is helpful, you might want to try an automatic repair tool, since it can scan your PC for corrupt or missing files and replace them in a second with healthy ones from its database.

2. Run a Chkdsk (disk) scan

  1. Access the Command Prompt via WinRE as outlined in steps one to three of resolution one.
  2. Input and execute this scan command: CHKDSK c: /f /r
    chkdsk command unable to reset your pc a required drive partition is missing
  3. Restart the PC after the Chkdsk scan.

3. Run the Bootrec tool

  1. Open Command Prompt from WinRE as covered for the first potential fix.
  2. First, run this bootrec command: bootrec /scanos
    bootrec scanos command unable to reset your pc a required drive partition is missing
  3. Then input this command for repairing the master boot record and hit Return: bootrec /fixmbr
    bootrect /fixmbr command unable to reset your pc a required drive partition is missing
  4. Type in this bootrec command text and press Enter: bootrec /fixboot
    bootrec fixboot command unable to reset your pc a required drive partition is missing
  5. Finally, execute this fourth and final command for rebuilding boot configuration data: bootrec /rebuildbcd

4. Use the Startup Repair option

  1. Bring up the Windows Recovery Environment menu.
  2. Press the Troubleshoot button.
  3. Click (select) Advanced Options to go to that menu.
    Advanced options unable to reset your pc a required drive partition is missing
  4. Then select Startup Repair to initiate that tool.
    Start-up Repair option unable to reset your pc a required drive partition is missing
  5. Restart Windows when the Startup Repair tool has done its stuff.

5. Restore Windows to a previous date

  1. Go to the Advanced Options menu in WinRE as outlined for previous resolutions.
  2. Select System Restore on that menu.
    System Restore option unable to reset your pc a required drive partition is missing
  3. Click Next inside the System Restore tool.
  4. Choose the oldest restoration point from those available.
    System Restore tool unable to reset your pc a required drive partition is missing
  5. Select Next again to reach the confirmation step.
  6. Then click Finish roll back Windows 11/10.
    Finish button unable to reset your pc a required drive partition is missing

6. Set your system partition

  1. Bring up Command Prompt in WinRE as instructed for the first potential resolution.
  2. Then enter and execute this command to utilize the Diskpart tool: diskpart
  3. For example, to view drives, input the following and hit Enter: list disk
    list disk command unable to reset your pc a required drive partition is missing
  4. Next, execute this command to select a disk that includes the system partition: select disk 0
  5. Type in and run the following command: list partition
    list paritition command unable to reset your pc a required drive partition is missing
  6. Then select the system partition by inputting this command: select partition 0
  7. To set the system partition as active, execute this command: active
    active command unable to reset your pc a required drive partition is missing
  8. Finally, input this command to exit Diskpart: exit
  9. Select the Turn off your PC option in WinRE.

The select commands above include the value 0 only for the sake of an example. You should replace the 0 value in those commands with the actual number for your PC’s system partition and the disk, including that partition.

Note icon NOTE
Warning: Your PC won’t boot if you don’t set the system partition right.

The Unable to reset your PC error is a severe issue when users can’t get into Windows after it occurs. There aren’t any guaranteed fixes for this error, but the ones above are most likely to work.

If they don’t resolve the Unable to reset your PC error, consider reinstalling Windows via USB with the Media Creation Tool. Or send your PC to a reputable IT repair service for further support.

Comic Book / CBR Reader Apps for PC: 9 Best to Use in 2026

Comics are now widely available in digital format, which sequential image viewer software first established.

As such, there are numerous software packages with which you can open and flick through comics in Windows, Mac OS X, Linux and other platforms.

Those programs support archived comic book file formats such as CBZ, CBR and CB7. These are some of the best digital comic book readers for Windows 10.

What is the best CBR reader for Windows 10 & 11?

Icecream Ebook Reader – Best for casual readers

Icecream Ebook Reader is the right choice for you if you’re an occasional comic reader. The app also packs some very useful features that allow you better manage your library of comic books.

Other reading features include single and double-page support, full-screen reading, zoom, page navigation, continuing from where you left off, and more.

The supported formats should be enough to allow you to read common comic book file formats (CBR and CBZ, FB2, EPUB, PDF, MOBI, and more).

You can also add notes or highlight text if you like a particular page and you would like to read it again. Bookmarks are also supported.

You can also use the copy, translate and search options to select the text, copy it and translate it or search Google.

This tool supports night mode as well, which is perfect is you often read in low light.

Icecream Ebook Reader

If you’re reading a comic book that’s not in a language you speak, use Icecream Ebook Reader to find out the action.
Check price Visit website

Soda PDF – Great for cloud integration

If you’re a comic book enthusiast, you need a safe comic book reader that will allow you to view the latest comics on any device.

Experience an interesting new way of reading comic books with Soda PDF’s innovative 3D page-flipping technology that allows you to read digital comic books on your PC just like a real book.

The Comic Book Reader feature is included in the Soda PDF Standard’s version. This feature has a user-friendly interface that will allow you to easily open and view your CBZ file with beautifully rendered graphics.

Some of its features include:

  • Absolute 3D view mode
  • Cloud integration: OneDrive, Google Drive, Dropbox, Box
  • Bookmarking
  • Full-screen mode
  • CBZ, CBR, EPUB, and PDF support

Soda PDF Reader

Soda PDF has a built-in 3D reader that gives you the experience of reading a real book.
Check price Visit website

Adobe Digital Editions – Great for smartphones & tabets

Adobe Digital Editions was one of the early adopters of ePub format which is one of the most popular eBook formats today along with PDF and Kindle.

The best part is that it is completely free, and you can use it on your PC, Mac, Tablet, or smartphone with the ability to sync the books across devices.

It supports the most popular comic book type files such as ePub and PDF. Also, you can easily bookmark any favorite parts from the manga you are reading.

Create filtered grouping and custom bookshelves based on author, publisher, or any personal criteria.

⇒ Get Adobe Digital Editions

Cover – Great free version

Cover is a native Windows 10 app you can download for free on Microsoft Store and it comes with a lot of useful features.

For instance, it allows you to sync your own comics files so you can load your stash of DRM-free files.

However, there’s a catch. You can only load 50 books in the free version and you will have to pay for the full version if you need more space.

On the bright side, if you go for the full version, you also get the chance to upload your content from cloud services like Google Drive, OneDrive, and Dropbox.

All in all, it’s a nice e-book reader that will load all the major comix formats in an elegant manner.

You can customize the reading mode with single/dual page, fit width/height/page, change the background color, cropping, night mode, and more.

⇒ Get Cover

MComix

comic

MComix is a fork of the Comix image viewer. This comic book reader has got better and better with more regular updates. This is open-source software compatible with both Windows and Linux.

Note that it’s also a portable program you can run from USB sticks.

The developers have designed MComix to open both western and manga comics in a various archive formats such as CBZ, CBR, CBT, PDF, ZIP, and RAR. It also supports JPEG, PNG, and GIF image file formats.

One great thing about this program is its intuitive UI layout that displays comic page thumbnails running down the left of the window with a large pane on the right that includes the current page.

Users can reconfigure the UI by removing toolbars, adjusting thumbnail scales, selecting background colors and choosing UI parts to include in full-screen mode.

This software also gives users multiple comic views such as double-page, fit image to window or manual zoom modes.

Image tools to enhance pictures with, bookmark support and customizable slideshows are a few more of the great things this program includes.

⇒ Get MComix

Comic Seer – Very good support

Comic Seer is multiplatform software freely available for Windows and Linux that has an effective UI design and reasonably extensive options. There’s also a Windows app version you can add to tablets.

With this software, you can open CBZ, CBR, RAR, and ZIP graphical novel file formats.

The program has a straightforward UI that incorporates a tabbed navigation panel with which you can open seven comics in one window.

The main viewer includes handy rotate, zoom, double or single page display, and Browse mode options. Comic Seer also includes a library management panel for you to set up and organize comic book databases with.

The program also automatically saves and reloads comics if you don’t close their files much the same as Chrome restores the previous browsing session tabs.

This can come in handy as it saves you from opening the comics again each time you restart the software.

Furthermore, this software even restores the last-read pages of comics that you close before exiting the software. However, it’s not free.

⇒ Get Comic Seer

YacReader – Great features

YacReader is a comic book reader freely available for Windows, Mac OS X, and Linux that has had some glowing reviews. You can add this program to desktops and laptops.

There’s also a YacReader Portable version for you to add to USB sticks and other external storage.

YacReader can open comics and magazines with RAR, CBR, CBZ, TAR, PDF and CB7 archive formats and image files.

The software also includes plenty of customizable hotkeys for quicker navigation, image adjustment options, a translator dictionary and bookmarks for comics.

The program has a stripped-down UI with minimal toolbars that preserves as much window space for the comic display as possible.

This tool also incorporates novel comic flow transitions into its library manager. These are transition effects displayed when you scroll through cover thumbnails as in the snapshot below.

You can select five alternative effects from the Page Flow tab such as Classic, Stripe, and Roulette Look; and each page flow has advanced customization settings.

⇒ Get YacReader

MangaMeeya – Ideal for manga fans

Manga are Japanese comics, and MangaMeeya (otherwise MMCE) is software more specifically designed for manga. As this is a portable tool no installation is required.

Even though the developers designed MMCE for displaying manga, you can still open all types of comics as it supports several image formats and CBR, CBZ, ZIP and RAR archives.

This program has quite a few options for users to explore such as three comic display modes, a slideshow mode, filters, and aspect ratio configuration.

It includes a page-flipping animation effect, which is a good touch. As a lightweight application with minimal system requirements, MMCE is a stable and fast program.

The one notable thing this tool lacks is library management options, but aside from that it’s a solid comic book reader.

⇒ Get MangaMeeya

Comic Collection Browser – Best for all your comics

The Comic Collection Browser is a 2-in-1 software because you can read and also browse and catalog all your loved comics collections.

Setting it up is a child’s play. You just need to point out the folders on your computer where you keep your stash and the app will do the rest.

You can have them in cbz, cbr, pdf, and even zip, and the tool will still be able to access them quickly.

A remarkable thing is that you can even have them stored as separate photos, it will still see them as a comic book. That way, you can make your own collage.

With Comic Collection Browser you will even be able to view the latest, mp4 moving comics and all are fluent and seamless for your enjoyment.

You can now also check out a free version of the software. However, you will be limited to 1 collection with 5 series and a total of 25 comics. It’s a great way to test the product!

⇒ Get Comic Collection Browser

So now you can open your favorite digital comics with the above software. Those programs support most archive formats and include extensive display and image adjustment options.

Note that you can also open comics with some ePub readers, but they probably lack some options found in YacReader, MangaMeeya, Comic Seer, MComix and ComicRack.

You may also check out our list of the best online comics websites to enjoy right now.

If you have any suggestions with other software we can include, mention them in the comments section below.

Projector Not Showing Computer Screen on Windows [Solved]

Business users often utilize projectors to project slideshows on PC VDUs (Visual Display Units) to larger projector screens.

However, users can also run into a few snags when they try to set up a projector to display a slideshow on a laptop or desktop. Sometimes a projector might not display anything at all.

How do I display my computer screen on a projector?

1. Check for Loose Cables

Users who connect their projectors with HDMI and VGA cables should check that those cables aren’t in any way loose.

Check that the cables are securely connected with their required ports on both PC and projector. If not, unplug and the cable and then plug it back in again to ensure a secure connection.

2. Switch the Display Mode

  1. Press the Windows key + P hotkey, which opens the sidebar shown directly below.
  2. The Duplicate display mode option there is the one most widely utilized for projector presentations.
  3. So, that’s probably the best display mode option to select if it’s not already selected.

Some users might need to adjust their display mode settings to fix the projector’s display.

3. Update graphics card and port adapter drivers

  1. Press the Windows Key + S and type in Device Manager.
  2. Open the Device Manager and search for the display adapters.
  3. Right-click on the ones you wish to update and select Update driver.

A projector display error might also pertain to a graphics card or HDMI/VGA port adapter drivers.

Update drivers automatically

To check if those drivers need updating, use third-party driver updater software that automatically scans in seconds.

Updating drivers manually can be a time-consuming task. To be sure that all the work is safely made use a professional tool whose primary function is scanning for old drivers and updating them.

So, the most suitable software that can manage your drivers and update each one individually is undoubtedly Outbyte Driver Updater.

4. Turn on the PC’s Video Output

Some users might need to turn on their desktop’s or laptop’s video output to enable projection. To do that, users usually need to press an Fn hotkey combination.

For example, Acer laptop users can press an Fn + F5 hotkey to turn on the video output.

However, the video output hotkey varies between different PC brands. Users can check their PC manuals for further video output hotkey details.

5. Check if the Projector’s Standby Mode is On

The projector might be on standby mode. Users can wake up a projector in standby by pressing its standby mode button.

If you’re not sure where the standby mode button is, look through the projector’s manual for further details. This button differs from device to device.

Note icon NOTE
The projector hardware might also need repairing or has a lamp that needs replacing. Users can return projectors within their warranty periods to manufacturers for repairs.

Those are a few resolutions that might fix a projector that doesn’t project a laptop or desktop’s display.

Try them out and tell us which one worked for you, and feel free to add any information regarding the subject in the comment section below.

Windows 10 Services You Can Safely Disable & How to Guide

Did you know that you can safely disable Windows services to boost your computer’s performance?

However, the problem comes in determining which services are safe to disable and which ones are not. To save you from a bit of trial and error, we’ve devised the following guide.

In it, we have listed all the Windows services you can disable to boost your computer’s performance for gaming or enhance security.

In addition to this, we have also included a short section that shows you how to disable said services in Windows 10.

So you may find it beneficial to read this guide until the end. Without further ado…

What Windows 10 services can I disable?

Application Layer Gateway ServicePhone Service
Alljoyn Router ServiceProgram Compatibility Assistant Service
AVCTP ServicePrint Spooler
BitlockerParental Control
Bluetooth Support ServiceRemote Registry
Connected User Experience and TelemetryRetail Demo Service
Certificate PropagationSecondary Logon
Diagnostic Policy ServiceSmartcard
Diagnostic Service HostTCP/IP NetBIOS Helper
Diagnostic System HostTouch Keyboard and Handwriting Panel Service
Distributed Link Tracking ClientWindows Error Reporting Service
Download Maps ManagerWindows Insider Service
Enterprise App Management ServiceWindows Image Acquisition
FaxWindows Biometric Service
File History ServiceWindows Camera Frame Server
GameDVR and BroadcastWindows Connect Now
Geolocation ServiceWindows Insider Service
IP HelperWindows Media Player Network Sharing Service
Internet Connection SharingWindows Mobile Hotspot Service
NetlogonWindows Search
Offline FilesWindows Update
Parental ControlXbox Accessory Live Auth Manager
Payments and NFC/SE ManagerXbox Live Auth Manager
Xbox Live Networking ServicesXbox Live Game Save

How can I disable Windows Services?

  1. Open a Windows Run Dialog (Win + R).
  2. Type in services.msc.
    run-services-from-windows-run-dialog-services
  3. Right-click on the service and select Properties.
    service-right-click-context-menu-properties
  4. Click on the Stop button (if the service is running).
  5. Change the Startup type to Disabled.
  6. Click on OK.
    service-properties-general-tab-disable-windows-10-services

Disable Windows 10 services to improve performance: Pros & Cons

Pros

  • Frees up memory and boosts Windows Performance.
  • Can assist you in troubleshooting a problem.

Cons

  • Will stop certain Windows quality-of-life features from working.

You can safely disable all 48 Windows 10 services listed in this guide. However, it’s important to note that you may still need some of these services, depending on how you use your computer.

For instance, if you are a gamer, it would be inadvisable to stop the Xbox-related services. Thus, you should apply the tips in this guide with a bit of discernment.

Some of the functions of these services can be replaced with third-party applications. For example, you can replace the Windows Search service with a third-party file finding program.

Disabling these Windows 10 services isn’t permanent. Make a note of each service you disable. You may be required to re-enable them in the future.

Either way, we hope you’ve found this guide to be helpful. If you have your own list of inessential services, please share it down below. As always, thank you for reading.

How we Fixed Disney Plus Keeps Buffering Issue [Simple Guide]

Disney Plus has finally launched to the masses and seems successful. However, new technical problems are constantly reported by subscribers. One prominent issue is frequent Disney Plus buffering.

This isn’t the only problem, many reported that Disney Plus is not streaming in full screen. Luckily, buffering issues can be fixed, and this guide will show you how.

Why does Disney Plus keep buffering?

  • Network issues – A slow Internet connection can cause streaming problems. To fix it, be sure to check your Internet speed.
  • Application issues – It’s possible that the application is encountering issues like the error code 83. If that’s the case, go ahead and update it. If that doesn’t work, you might have to uninstall the Windows app to fix it.

What can I do if Disney Plus keeps buffering/freezing?

Before we start fixing this issue, there are a couple of preliminary checks you can perform:

  • Restart the app – In some instances, this problem can be caused by a temporary glitch, so go ahead and close the application, start it again, and check if that helps.
  • Restart your devices – If the problem isn’t related to your app, it might be caused by your devices. Turn off your device and unplug it. Leave it like that for a minute or two then turn it back on. You can also do this for your network devices.
  • Test Internet speed – Streaming services require a reliable Internet speed for the best performance. 5.0 Mbps for High Definition and 25.0 Mbps for 4K UHD streaming.
  • Change the video quality – In case you’re having network issues, changing the video quality from Automatic to Standard can sometimes help.

1. Uninstall and reinstall Disney Plus

  1. Press the Windows key + X and choose Apps and Features.
  2. Select Disney+ from the list and click on Uninstall.
  3. Follow the steps on the screen to complete the process.

After you’re done, just install the Disney+ client again.

⇒ Get Disney+

2. Check for Disney Plus/app updates

  1. Open the Windows Store app. Press Windows key + S on your keyboard. Next, type store and select Windows Store from the list.
  2. Navigate to Library.
  3. Next, locate Disney+ on the top and click Update to install the latest version.

If you’re a current Disney Plus user, issues like buffering shouldn’t scare you off. Things will most likely improve in the coming months.

For more solutions covering crashes, buffering, and login errors, check our full guide on Disney Plus App Not Working.

If the buffering issues persist, especially with specific titles, consider that Disney Plus is drawing in many subscribers these days.

Some programs are seeing heavy demand, so there are times when the only recommendation that stands is to wait a bit and try again later. Either way, the movie you’re eager to watch will still be there tomorrow.

Also, a good idea may be to clear the cache and data. If you need help deleting the browsing history, follow our detailed guide. After clearing the cache, log back into Disney Plus.

If Disney Plus is not working on Fire Stick, we have a special guide that addresses this issue. We also have a guide on what to do if Disney Plus plays only audio and no video, so don’t miss it.

Do you know another way to fix the problem? Do tell us in the comments section below!

Laptop Battery Health Check Software: 11 Best for 2026

Your laptop battery can easily lose capacity over time, so it’s important that you frequently check its health.

Checking the battery health is relatively simple, and you can do that right from Windows 10 with these tools. Be sure to check them out below.

What are the best battery utility monitors for Windows?

Avast Battery Saver

We’ve all wanted to watch our favourite movie, but our laptop battery was about to die when the movie started playing.

Avast comes to the rescue with Avast Battery Saver that gives your Windows laptop up to 32% more battery life by stopping energy drainers.

It reduces CPU performance when you don’t need it, it adjusts the brightness of your monitor automatically, and turns off the screen when you’re not using it.

In addition to these great features, you should know that you can try it for free for 15 days, and you can also benefit from the 30-day money-back guarantee after you purchase it.

Avast Battery Saver

Avast Battery Saver

Wisely save your Windows laptop battery with this solution from Avast and enjoy your favorite content.
Free trialVisit website

Battery Report

  1. Press the Windows Key + X, and choose Command Prompt (Admin). Note: for the users with newer versions, Command Prompt (Admin) now is Windows PowerShell (Admin).
  2. When Command Prompt opens, enter powercfg /batteryreport command and run it.

Microsoft added a useful feature in Windows 8 that allows you to see your laptop battery health. This feature is also available in Windows 10, and you can use it in a matter of seconds.

To generate a Battery Report on Windows 10, you need to follow the above steps.

After running this command Windows 10 will create a report in your user account’s directory, such as C:UsersYour_username.

The report is stored in an HTML file that allows you to easily see the basic information about your system. The available information includes computer name, BIOS version, version of the operating system, etc.

The report will also show you the name, serial number and chemistry type of the battery.

Of course, additional information such as design capacity, full charge capacity and cycle count is also available. This information is rather important since batteries lose their capacity over time.

If your battery is new, it will have the same design capacity and full charge capacity. However, full charge capacity will become lower as you use the battery.

This is perfectly normal and it happens with every working laptop battery. Cycle count is also important since it tells you how many times was your battery completely drained and recharged.

Each laptop battery supports a certain number of cycles, so it can be useful to know how many cycle counts you had.

Battery Report can also show you your recent usage statistics. This section allows you to see battery usage in the last three days.

You can see the exact time when your laptop was active or suspended as well as battery charge percentage and mWh.

This section also has a graph that shows you the battery usage over the last three days.

There’s also a usage history section that shows you the detailed information about battery usage over time.

Unlike Recent usage, this section isn’t limited to the last three days, and it can show you older information with ease.

From this section you can see how much time your device spent using a battery or wall outlet.

There’s also Battery capacity history section so you can easily view how your full charge capacity changes over time. Probably the most useful information is offered in Battery life estimates section.

This section can estimate how long could your battery last if full charge capacity was unchanged. Thanks to this feature, you can compare your current battery life and estimated battery life with ease.

Battery Report offers extremely useful information regarding your laptop battery, and every laptop owner should know how to use this feature.

Although this feature is rather useful, it requires you to generate a new report from Command Prompt every time.

Battery Eater

If you’re looking for free software that can check your battery health, you might want to consider Battery Eater. This is small and portable application, so it should work on any PC without issues.

The application will show you your battery information, but you can also benchmark your battery in four different modes. If needed, the application can also generate a battery charging graph.

The software also allows you to view basic system information, which can be useful to some users.

Battery Eater is a simple application that can check your battery health with ease.

The application doesn’t offer any advanced options, but since it’s portable and simple to use, it will be perfect for basic users.

⇒ Get Battery Eater

BatteryCare

Another useful software that can help you check your laptop battery health is Battery Care. The application will reside in the bottom right corner, and simply by hovering its icon you can view some basic battery information.

In addition, you can also view temperature information regarding your CPU or hard drive. The application also allows you to quickly switch between power modes with just few clicks.

BatteryCare can also show you your battery status, remaining battery time and current battery capacity. If needed, you can also see detailed information such as battery model, designed capacity, total capacity and current capacity.

This information is extremely useful if you want to check how your capacity is changing over time.

The application also offers information such as charge and discharge rate, tension and wear level. You can also view total number of discharge cycles if needed.

The application uses advanced algorithm that can easily detect a complete discharge cycle. BatteryCare will also give you a notification after reaching a certain number of discharge cycles.

It’s worth mentioning that BatteryCare supports automatic power plan switching. As a result, your power plan will change automatically depending on the power source.

If needed, you can also disable demanding services right from this application in order to preserve your battery.

According to the developer, BatteryCare uses only 0.1% of your resources, so it won’t interfere with your system in any way. This is a solid battery health application, and it’s available for free.

It’s also worth mentioning that there’s a portable version as well, so you can run this tool without installation.

⇒ Get BatteryCare

Battery Optimizer

Battery Optimizer is another free application that can help you monitor your battery performance. Thanks to the advanced diagnostics, the application can optimize and extend your battery life.

Battery Optimizer also supports warnings, and you can get a notification whenever your battery usage reaches a certain threshold.

The application is light on your resources and it allows you to switch easily between different power profiles. In addition, you can also monitor your battery usage and charge statistics right from this application.

There’s also a powerful diagnostic tool, so you can easily check the health of your battery. The application has a simple-to-use interface, and since it’s completely free, there’s no reason not to try it.

⇒ Get Battery Optimizer

BatteryInfoView

Another free application that lets you check your battery health is BatteryInfoView. This is a lightweight and portable tool that will show you the necessary information regarding your battery.

The application will show you information such as battery name, manufacturer name, serial number and manufacture date.

BatteryInfoView can also show you current power state as well as current capacity percentage. In addition, you can view the capacity in mWh as well.

There’s also full charged capacity and designed capacity, so you can easily compare how much your capacity changed over time.

The application also lets you see battery wear level, voltage, charge or discharge rate and battery chemistry. Information such as battery temperature and number of charge and discharge cycles is also available.

BatteryInfoView can also show you the estimated battery charging or usage time.

There’s also a battery log feature that you can use to keep track of battery capacity and power state. The log is updated every 30 seconds, but you can easily customize the update rate.

BatteryInfoView is a free and portable application, so it’s perfect for all users that want to keep track of their laptop battery health. The application is simple to use, so even the most basic users will be able to use it.

⇒ Get BatteryInfoView

BatteryMon

If you want to monitor your laptop battery and check its health, you might want to consider BatteryMon. The application allows you to see charge and discharge rate on a graph, which makes it easier to keep track of your battery status.

There’s also detailed statistic available that you can use to diagnose problems. Speaking of problems, you can easily compare and measure your battery performance with the expected discharge rate.

Regarding discharge, you can easily see critical discharge points for your battery.

BatteryMon supports multiple battery packs, and you can easily see the status of each available battery. The application can also create a log thus allowing you to view a detailed report about your battery.

If you want to keep track of your battery at all times, there’s a mini window mode that can show you battery charge as well as estimated running time.

As for available information, this tool can show you battery status as well as device name, serial number, unique ID and manufacturer.

Additional information such as manufacture date and battery temperature is also available.

BatteryMon can also show you the chemistry of your battery, design capacity and full charge capacity. You can also view alert levels, number of charge cycles, voltage, and charge rate.

BatteryMon is a solid laptop battery health software, and it’s free for personal use. We have to mention that this application also works with UPS units, so it can be used on desktop computers as well.

⇒ Get BatteryMon

BATExpert

BATExpert is a lightweight laptop battery health software. The application offers simple interface so you can easily see the necessary battery information. All information is sorted in sections so it’s simple to access.

BATExpert allows you to easily see your battery manufacturer, but you can also see manufacture date and serial number. Available information also includes battery chemistry as well as its wear status.

Speaking of battery health, you can also see battery temperature and charge cycles.

Just like with any other similar software, the application allows you to see your battery status. This includes charge rate, estimated battery time, capacity, etc.

BATExpert lacks some advanced features, but it makes up for it with its simple design. This application is simple and completely free, so it will be perfect for first-time users.

We also have to mention that a portable version is available, so you can run this tool without installation.

⇒ Get BATExpert

BatteryBar

Another useful application that can help you monitor your laptop battery health is BatteryBar. This is a lightweight application, so it won’t use too much of your computer resources.

The application will monitor your battery and estimate remaining battery power based on your previous performance.

The tool also allows you to switch quickly to a different power scheme in order to preserve your battery life. BatteryBar also supports graphs, so you can easily monitor your battery charge or discharge.

The tool supports customization, and you can even set up warnings that will inform you when your battery charge reaches certain threshold.

The application can show you the current battery capacity in percent or in mWh. In addition, it will show you the charge rate as well as percent of battery wear.

BatteryBar offers the basic features regarding battery health, so it might not be the most advanced tool on our list. We have to mention that this application isn’t free, and some advanced features are only available in Pro version.

However, if you want to use only the basic features, you might want to try BatteryBar.

⇒ Get BatteryBar

Battery Status Monitor

This application allows you to keep track of your battery health, but it also allows you to monitor other hardware.

Battery Status Monitor has a floating widget that you can position anywhere on the screen in order to keep a close eye on your battery.

If needed, you can also switch to different power modes or turn off your laptop right from this application.

The application can show you the status of your battery as well as the current charge percent. In addition, you can also see the charge in mWh.

Information such as name, capacity and additional details about your battery is also available. Battery Status Monitor allows you to see the type of battery that you’re using, number of cycles as well as wear percent.

The application comes with a useful graph, so you can easily keep track of your battery charge. In addition, you can also see CPU speed and load.

Battery Status Monitor also allows you to monitor CPU and hard drive temperature, which can be quite useful.

Battery Status Monitor is a solid application, and it offers the necessary information regarding your laptop battery and other components.

The application is completely free, so we advise you to try it out.

⇒ Get Battery Status Monitor

Smarter Battery

calibrate laptop battery win10

Another application that can help you monitor your laptop battery health is Smarter Battery. The application has attractive and simple user interface, so it’s perfect for first-time users.

Smarter Battery can detect up to four batteries, which is more than enough for most users.

Thanks to the simple user interface, you can easily see current charge percent and remaining battery time. Of course, you can also see battery mode and number of cycles.

The application can show you information such as designed capacity and full charge capacity. In addition, you can also see current capacity in mWh.

If needed, you can check charge rate and alert values for your battery.

The application also has a battery graph that you can use to monitor your battery status. We have to mention that Smart Battery adds a small icon in the bottom right corner so you can monitor your battery with ease.

In addition, the application allows you to change a power plan, brightness or to turn off your PC right from the Taskbar.

Smarter Battery offers great visual interface as well as a lot of information that can help you monitor the health of your laptop battery.

Unfortunately this application isn’t free, but you can download and use the demo version free of charge.

⇒ Get Smarter Battery

Laptop battery health is rather important, so it’s crucial that you monitor it. We covered the best tools for laptop battery health, so be sure to try some of the tools from our list.

Fortunately, there are always solutions to avoid unpleasant or even dreadful events. There are many cases in which laptops closed unexpectedly because of battery issues.

If you want to check other components, don’t miss our guide on how to run hardware diagnostics on Windows for more information.

This is why it is extremely important to maintain the health of this crucial element of your device.