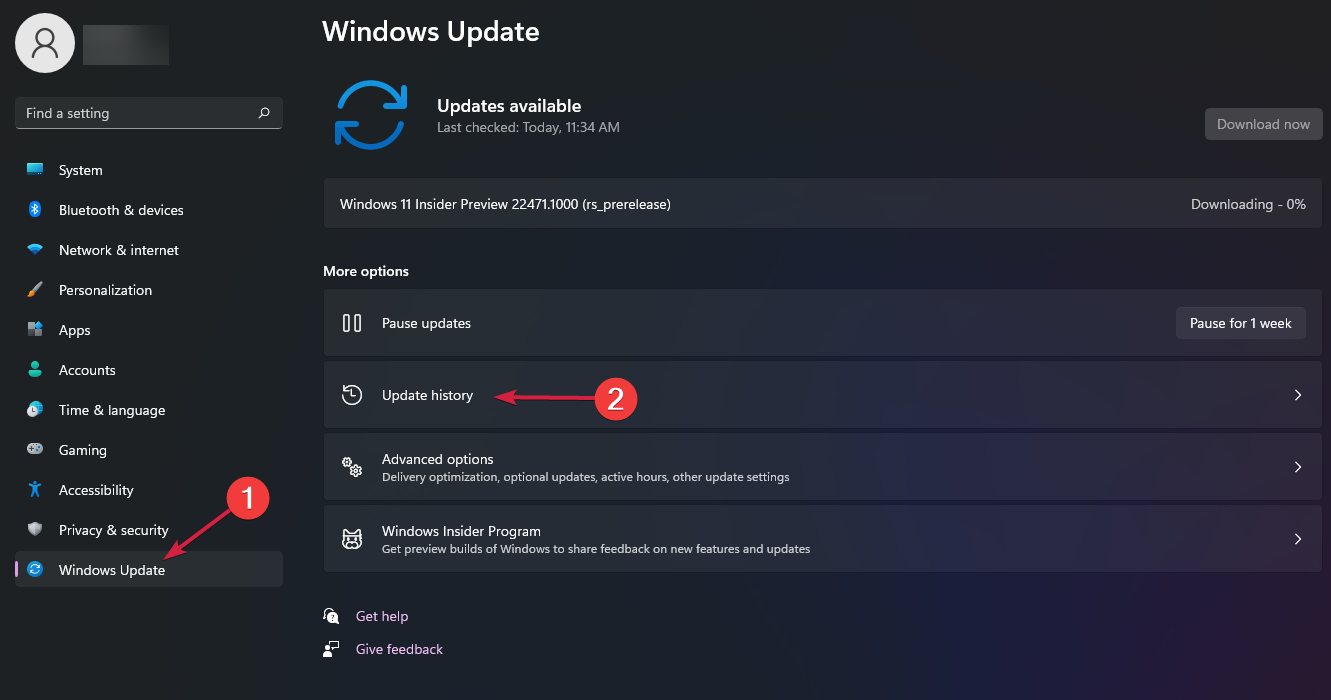
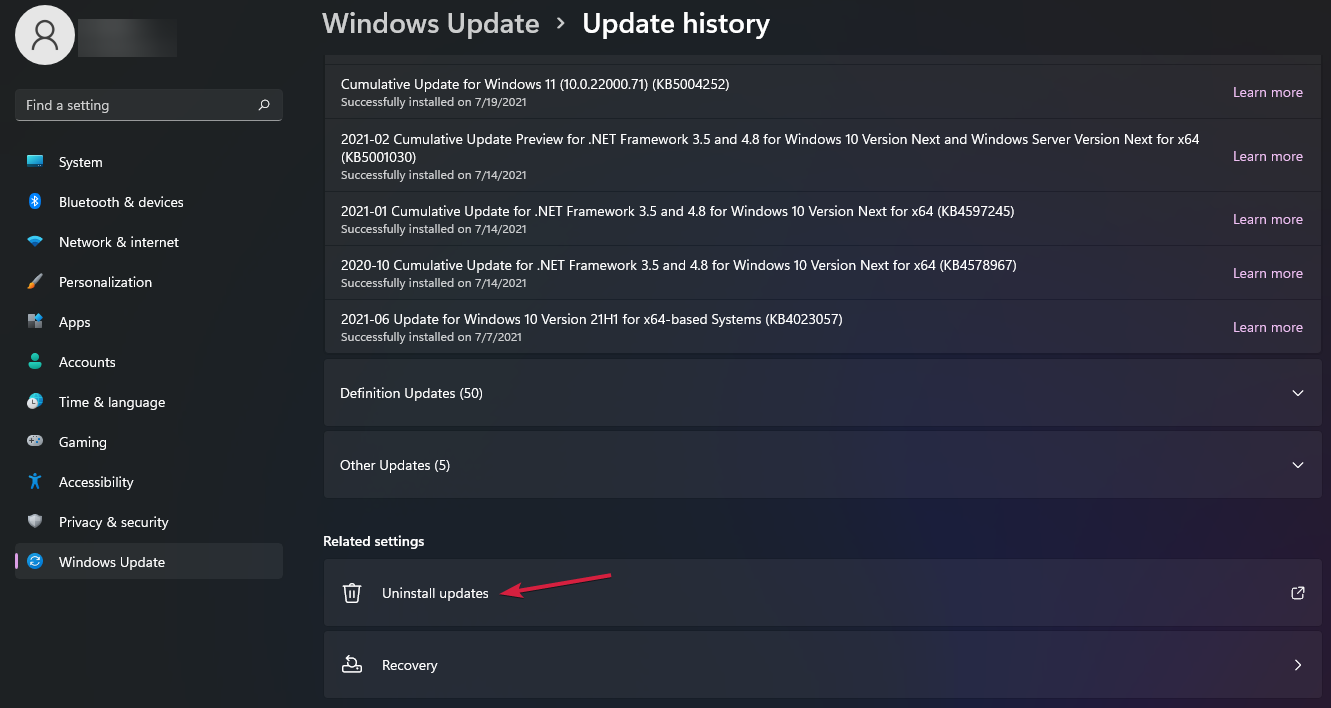
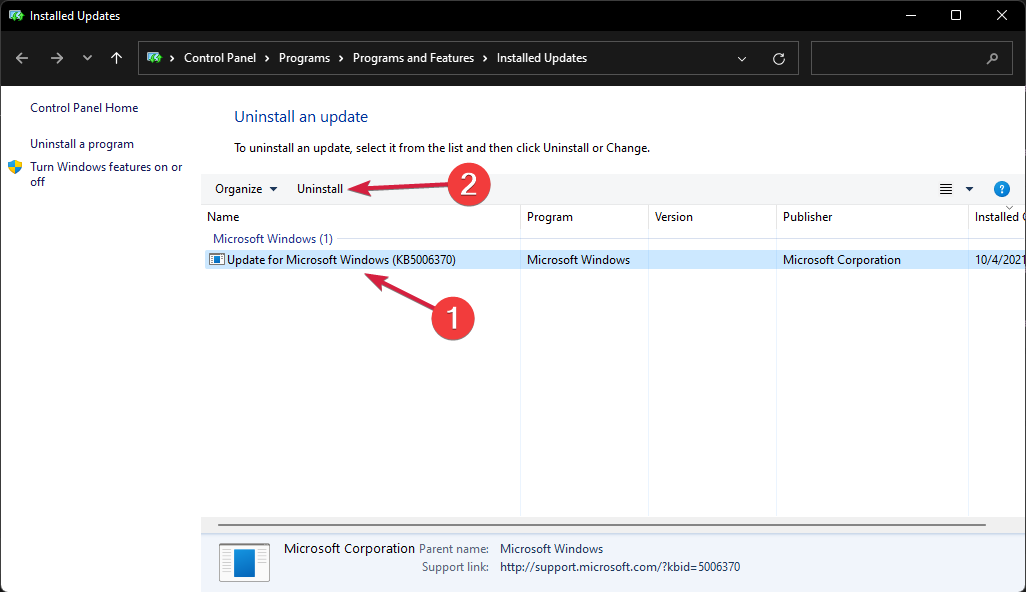
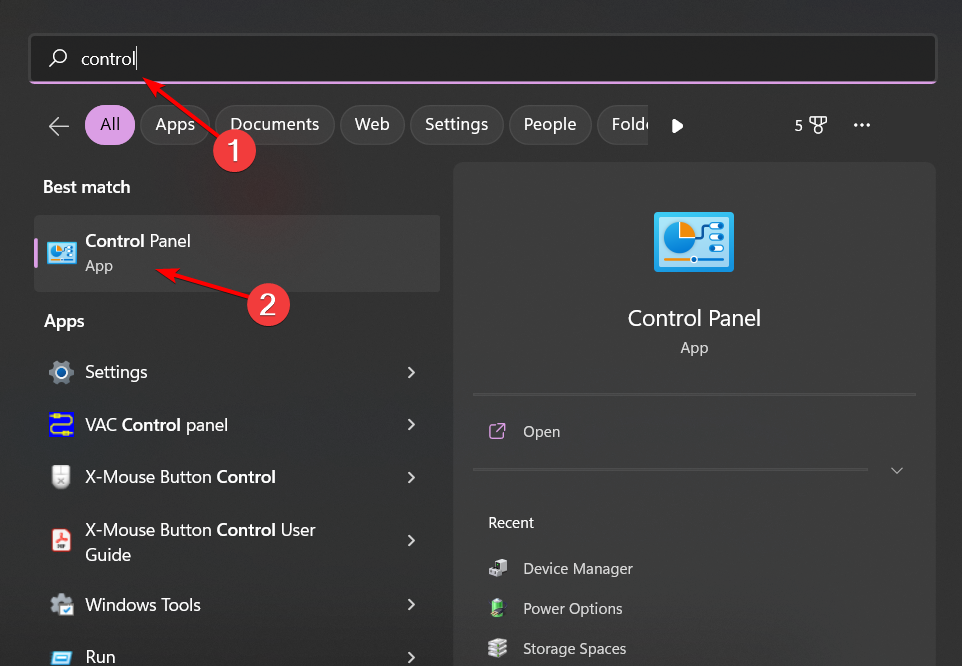
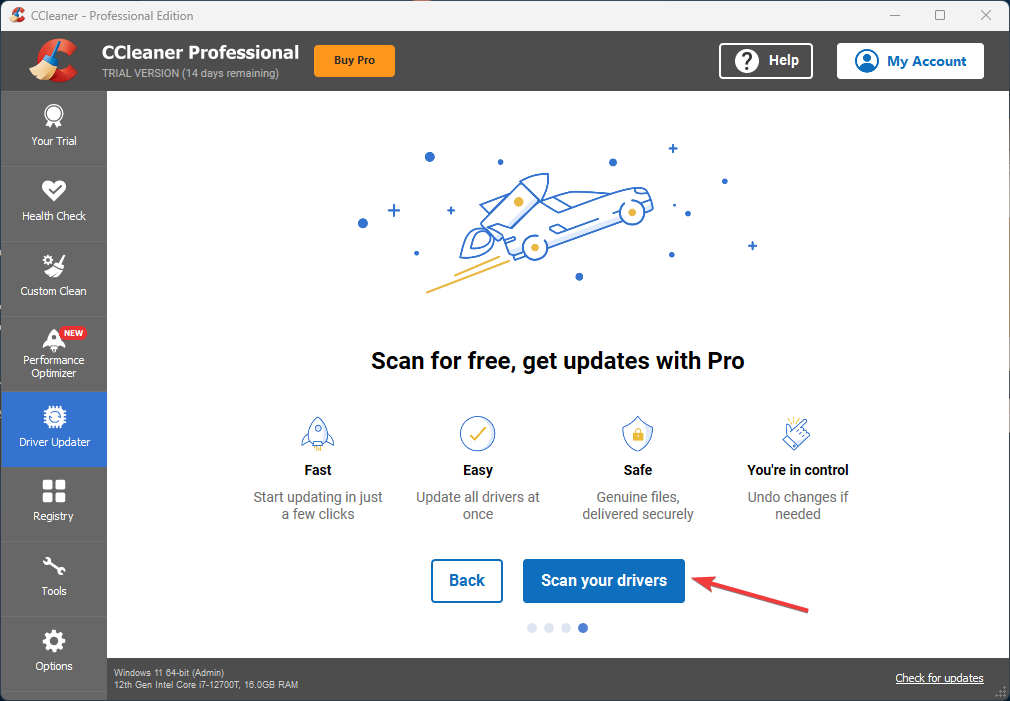
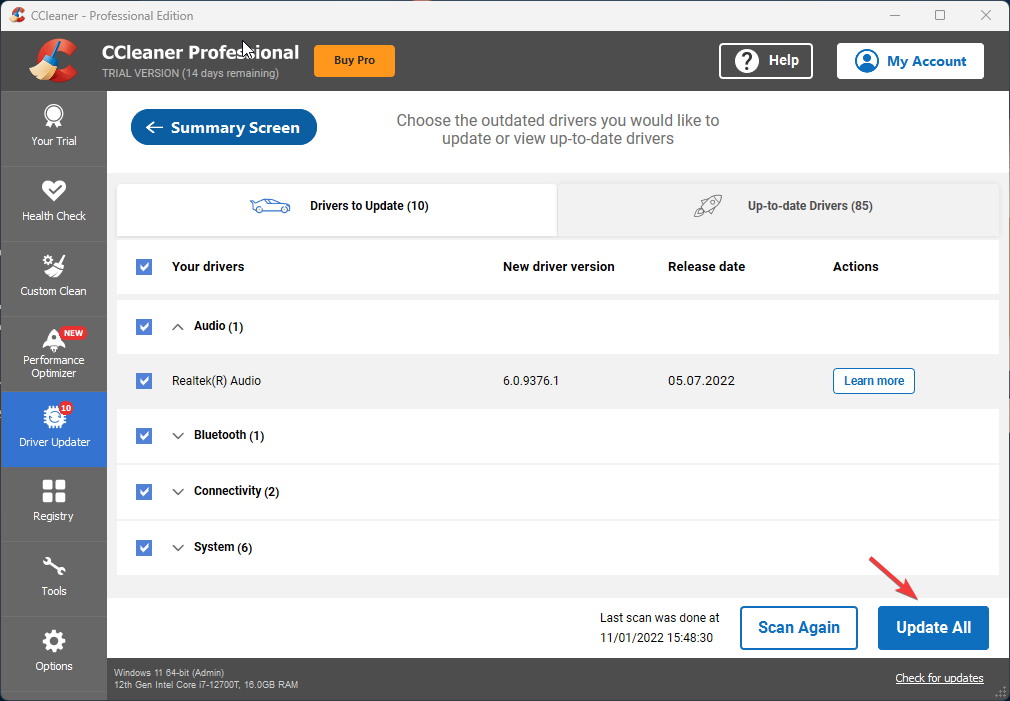
The Intel Driver Utility download has gone through major changes. The original Intel Driver Update Utility is now outdated and no longer supported. In this guide, we’ll show you how to use both the modern Intel Driver & Support Assistant (DSA) and the legacy utility for older systems. Whether you’re updating new hardware or maintaining an older PC, you’ll find step-by-step help right here.
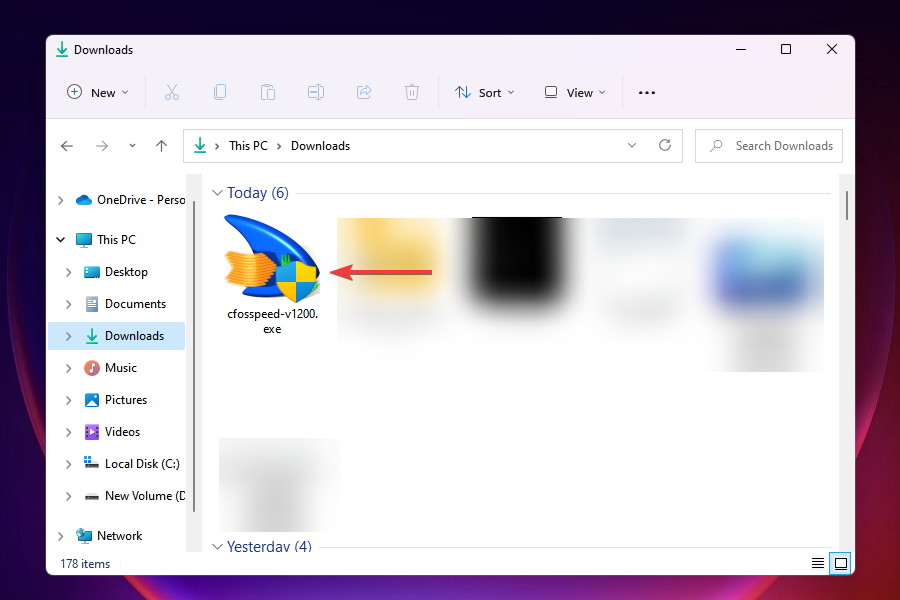
Press the Windows + E keys to open File Explorer. By default, the .exe file should be in the Downloads folder, then launch it.
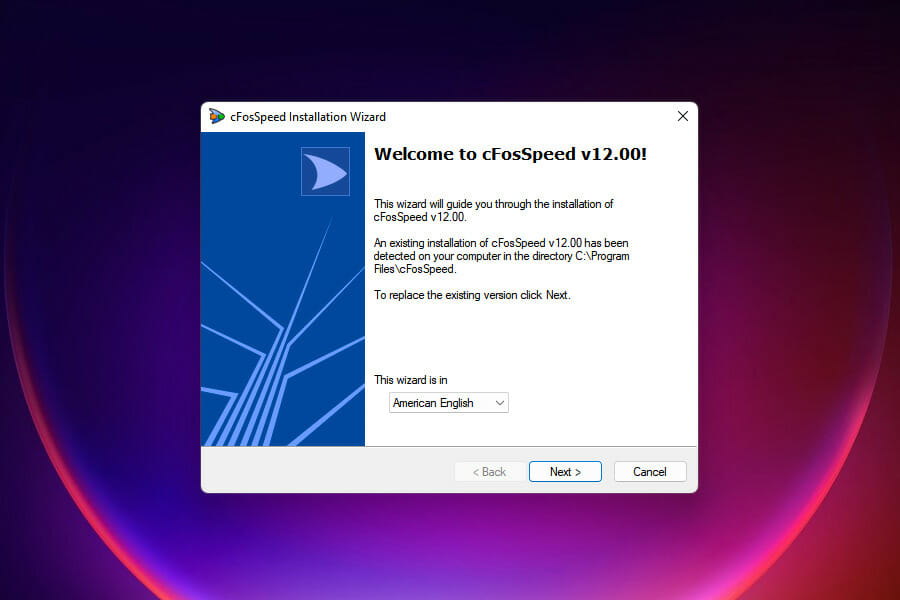
Check the I agree to the license terms and conditions, then click the Install button and confirm the UAC prompt.
Wait for the installation to complete and click Restart to effect the changes.
Left-click the Start button, search for intel driver & support assistant and launch it.
Click Download all and check the box for I understand and wish to proceed.
Then click Install all and wait for the process to complete.
Also, the utility will inform you once there are new updates via your device’s notification.
This is the best way to get Intel’s driver updater and use it. So, we recommend that you follow the steps strictly for optimal results.
Option 2: Download and Install Intel Driver Utility (the Legacy Version)
NOTE
The legacy Intel Driver Update Utility is no longer supported by Intel and hasn’t been updated since 2017. It should only be used on older systems (pre-2017) where the new Driver & Support Assistant no longer works. Use it with caution, and only download it from reputable sources. Installing outdated or incorrect drivers can lead to system instability or hardware conflicts.
What can I do if the Intel Driver and Support Assistant installation fail?
Many factors can cause the Intel Driver and Support Assistant installation to fail on your PC. Factors such as an outdated Windows operating system, low disk space, startup errors, etc., can cause issues with the installation.
If you experience more issues, go on with the solutions below:
Many people reported that some keys are not working in Windows 11, particularly on laptops. If you are among them, don’t worry. The issue is pretty trivial and easy to fix.
Outdated or corrupt drivers, faulty device settings as well as dusty hardware could lead to this. Just follow the steps below to see how you can make all of your keys work again.
What to do if some keys on the keyboard are not working in Windows 11?
Before you delve into the fixes, check these three elements:
Restart the computer, as a reboot could help correct some minor device issues.
Blow dry air through the keyboard if dust or particles are stuck underneath.
If you are sure it is a hardware issue, you may replace the keyboard and save the stress of these solutions.
1. Run the Keyboard troubleshooter
If Windows 11 arrow keys are not working, or even the other keys, you should run the built-in troubleshooter. Microsoft offers several of these to help automatically identify and fix issues preventing the system and connected devices from working effectively.
1. Press Windows + I to launch the Settings app.
2. Navigate to the System tab.
3. Scroll down to the Troubleshoot section.
4. Click on Other troubleshooters.
5. Now, locate the Keyboard troubleshooter, and click on the Run button next to it.
6. Follow the on-screen instructions and choose the appropriate response when prompted to complete the process.
7. Check if the keyboard is working properly now.
2. Reinstall the keyboard driver
Press Windows + S to launch the Search menu, enter Device Manager in the text field at the top, and click on the relevant search result.
Double-click on the Keyboards entry to expand and view the devices under it.
Right-click on the malfunctioning keyboard, and select Uninstall device from the context menu.
Click Uninstall in the confirmation prompt that pops up.
Now, restart the computer, and Windows will automatically install a fresh driver for the keyboard.
If the currently installed driver for the keyboard is corrupt, you may find that some keys are not working. In this case, you should reinstall the driver. To identify a corrupt driver, look for a warning sign near the corner of the device icon.
Alternatively, you can use a third-party tool such as Fortect Driver Updater. This will automatically install the latest driver updates and keep them all in check.
4. Run a scan for malware
Press Windows + S to launch the Search menu, enter Windows Security in the text field, and click on the relevant search result.
Click on Virus & threat protection.
Next, click on Scan options to view all the available ones.
Select Full scan and then click on the Scan now button at the bottom.
5. Modify keyboard settings
Press Windows + I to launch the Settings app, and select Accessibility from the tabs listed in the navigation pane on the left.
Scroll down and click on Keyboard under Interaction.
Now, turn off the toggle for Sticky keys and Filter keys.
Once the changes are made, restart the computer for these to fully effect.
The Sticky keys feature keeps modifier keys, namely Ctrl, Shift, amongst others, to remain active even after you release them. On the other hand, when the Filter keys feature is enabled, the keyboard will ignore when keys are repeatedly hit to help users with hand tremors type.
But, these two may make it appear as if Windows 11 shortcut keys are not working. Thus disabling them could fix the problem.
In case you have a problem with the Ctrl key, we have a great guide on what to do if Ctrl key is not working, so we encourage you to check it out.
6. Check if a certain set of keys is disabled
6.1 Function keys not working in Windows 11
The function or F-keys perform a dual role, allowing you to use them both in their designated role and the one configured on your system. It could be either multimedia or increasing and decreasing the brightness and volume.
If the F-keys are unlocked, they will generally perform the other role, as highlighted on the F-key itself, and it will seem like Windows 11 function keys are not working.
On the contrary, if the F-keys perform the role to change the volume, it would appear as if Windows 11 volume keys are not working, with the function key locked.
Many keyboards have a separate set of number keys to the right, often referred to as Numpad or the number pad. This imitation of a regular calculator allows users to input numbers quickly. But many find the number pad to be not working in Windows 11.
This is generally because the number pad is locked. And to unlock it, you will have to hit the Num Lock key on your keyboard. Also, a small light on the keyboard could indicate when the number pad is locked and when it’s working.
Besides, when the number pad is locked, the keys here will function as the arrow keys, which indicates that the set is locked.
These are all the fixes you can try if your Windows 11 keyboard is not working, and one of these should help eliminate the issue. Remember never to discard a malfunctioning keyboard right away.
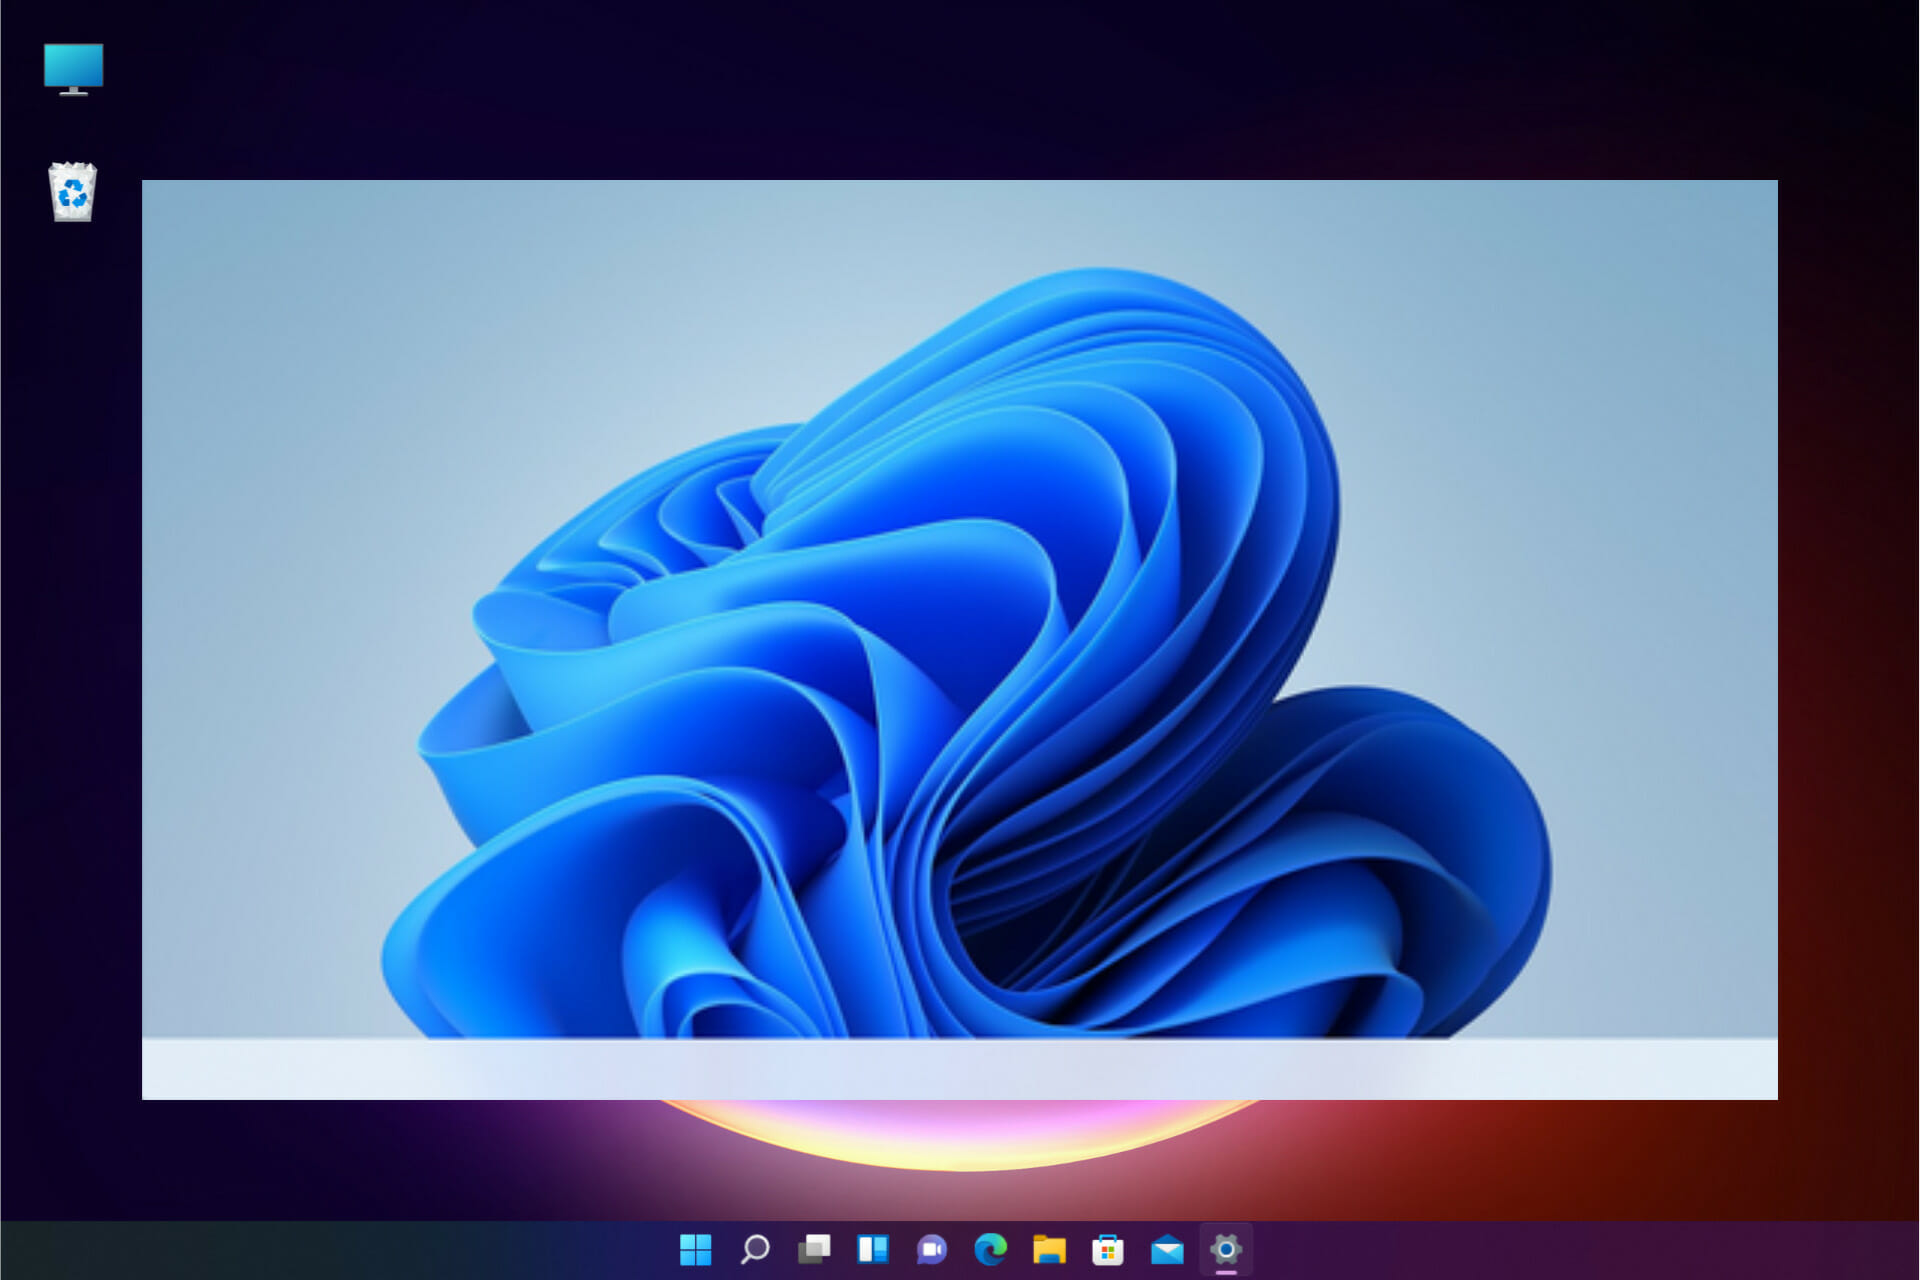
Windows 11 is here, but that doesn’t mean the bugs disappeared overnight. After an update or even a simple restart, many users looked at their taskbar only to find it empty and unusable.
Microsoft has issued a workaround for this problem, but it’s still a matter of fixing this before doing more harm. We added some solutions that worked for our readers, so read below and try them out right now.
Why is my taskbar empty in Windows 11?
Judging by the workaround supplied by Microsoft, which you will find in our first solution below, this problem was caused by a minor component. However, there are other causes as well:
IrisService – It’s a file that is part of the Windows Spotlight service that is used to bring you some tips, suggestions, and promotions on the Lockscreen window. You may disable it altogether as well as other non-essential services.
Windows Explorer process – It is a process that manages and offers the graphical user interface (GUI) that you use to interact with the majority of Windows’ features. So you can expect this to be the culprit to the Windows 11 taskbar being an empty issue.
Windows Updates – Although updates bring new exciting features and bug fixes, they can cause other bugs. This can be the case with the empty taskbar situation, and all you have to do is uninstall the latest update.
This being said, let’s jump into the list of solutions below.
How do I fix the blank taskbar in Windows 11?
1. Make a change in the Registry
If you encounter issues such as Windows 11 taskbar empty error, an effective method you can try is to change your Registry using the following steps.
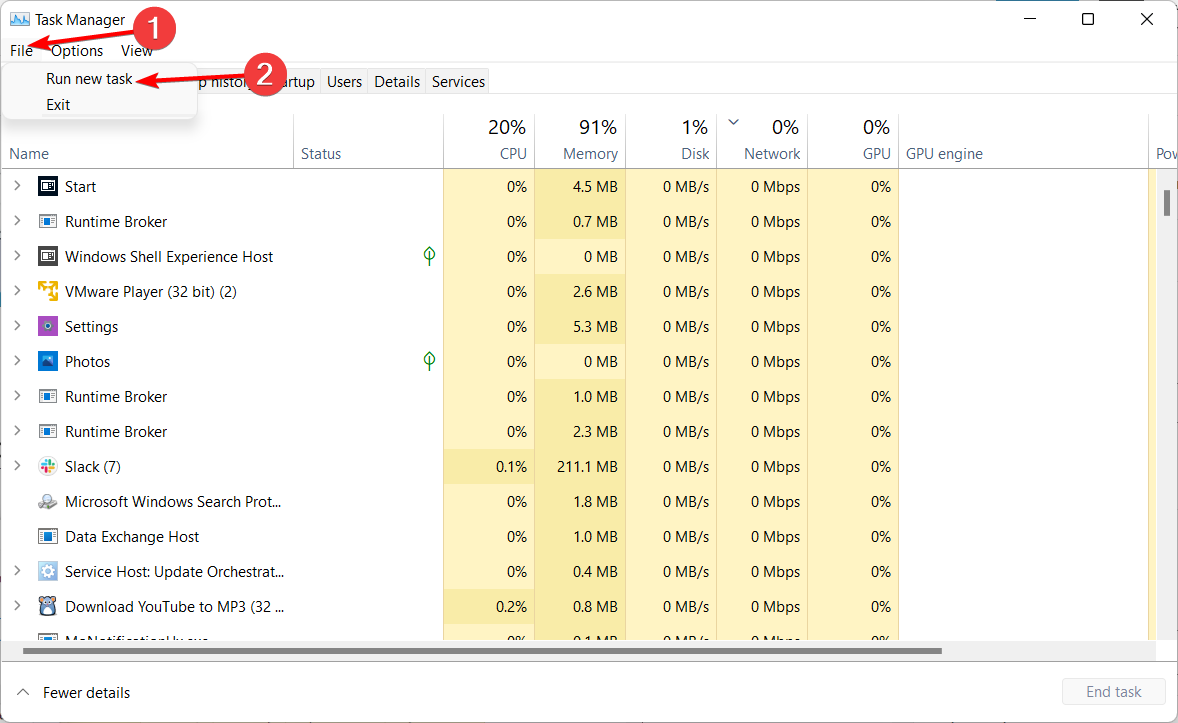
1. Press the Ctrl + Alt + Del keys to open Task Manager, then select File followed by Run new task.
2. Type cmd and press Enter or click OK.
3. Paste the following command and press Enter to run it: reg delete HKCU\SOFTWARE\Microsoft\Windows\CurrentVersion\IrisService /f && shutdown -r -t 0
4. The PC should reboot after this command, and after restarting, the Windows 11 taskbar greyed-out issue will be solved.
2. Restart Windows Explorer
Press Ctrl + Alt + Del to access Task Manager.
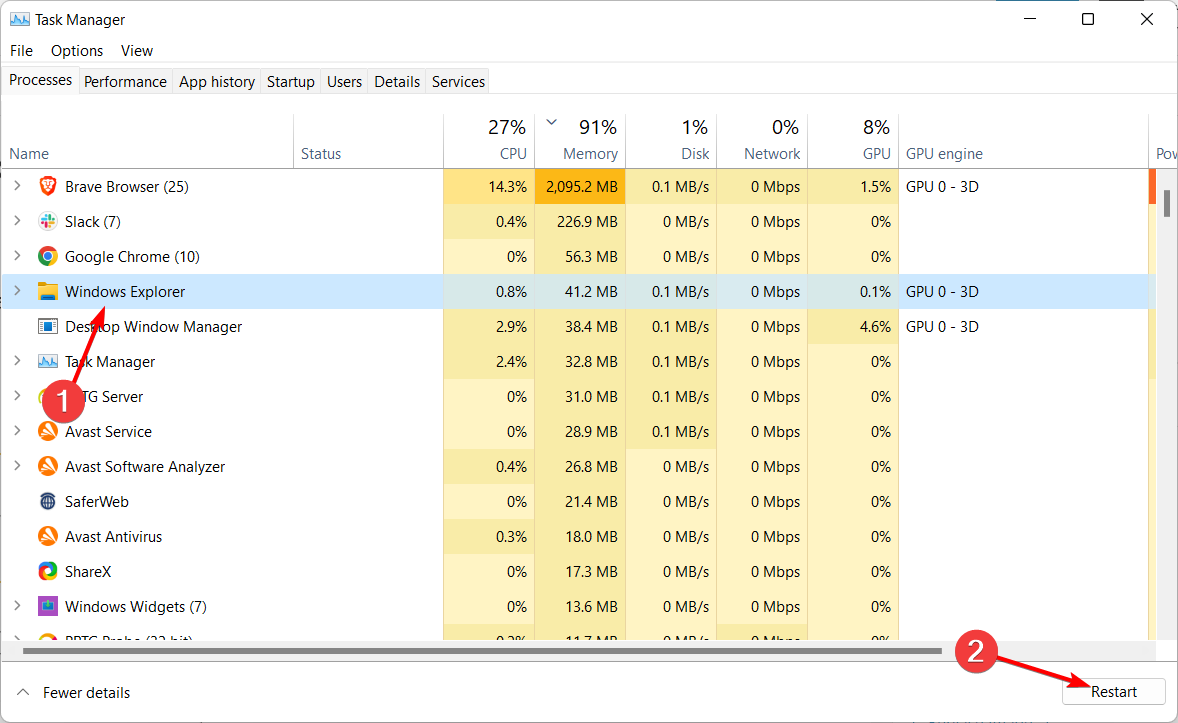
Click Windows Explorer, and choose Restart.
Once it’s done, check whether the Windows 11 taskbar not working issue persists.
3. Run SFC and DISM
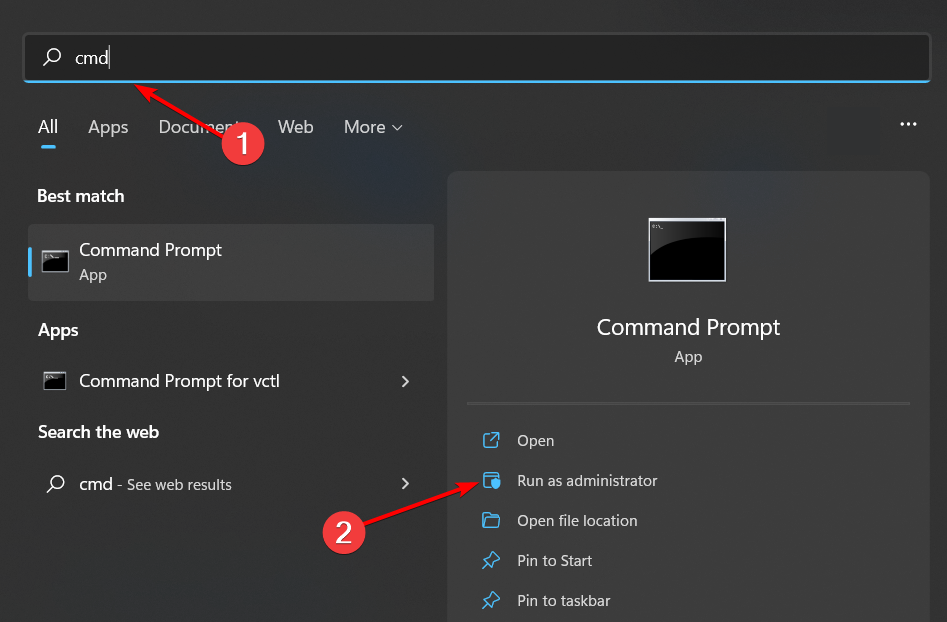
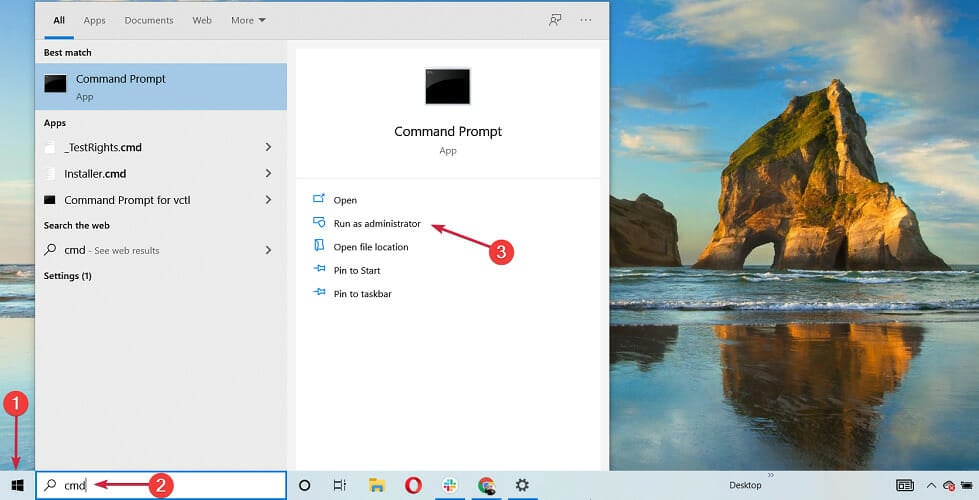
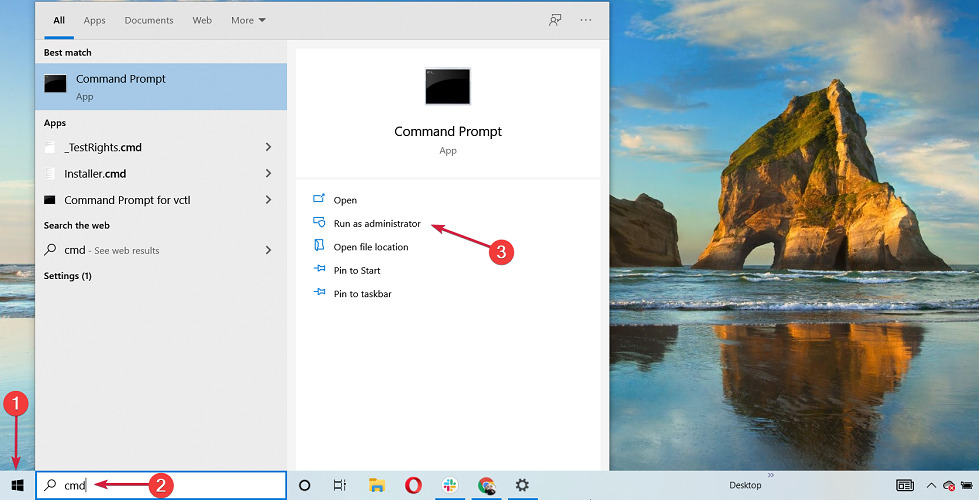
Press Windows, enter cmd in the search bar, then click Run as administrator.
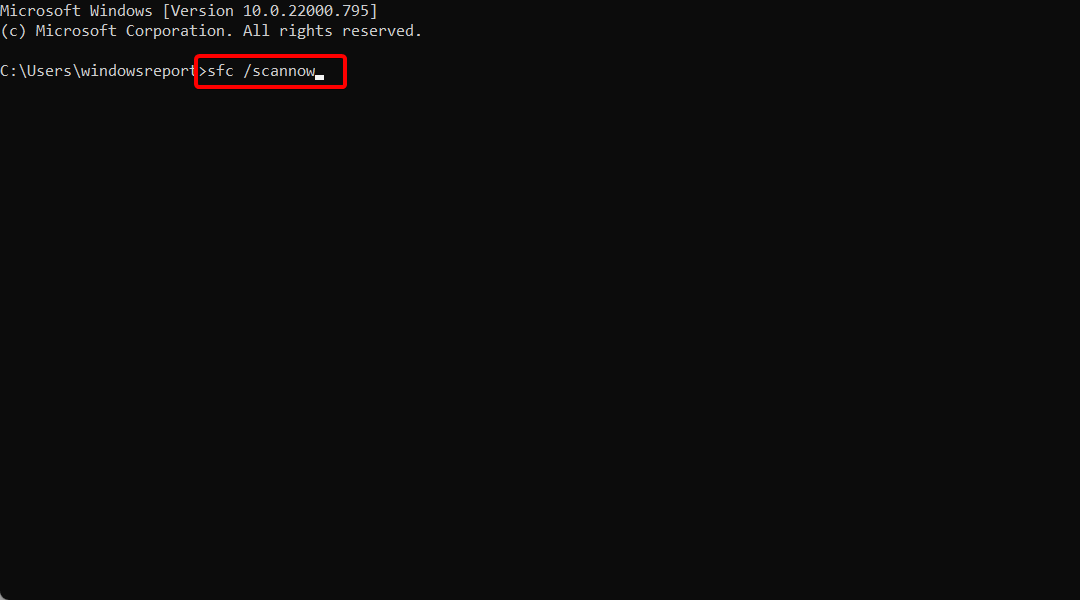
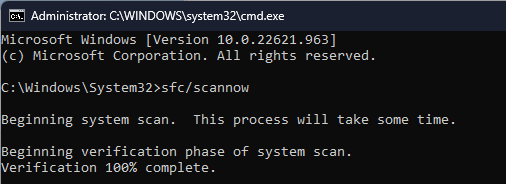
Type the following command, then press Enter and wait for the scan to finish: sfc /scannow
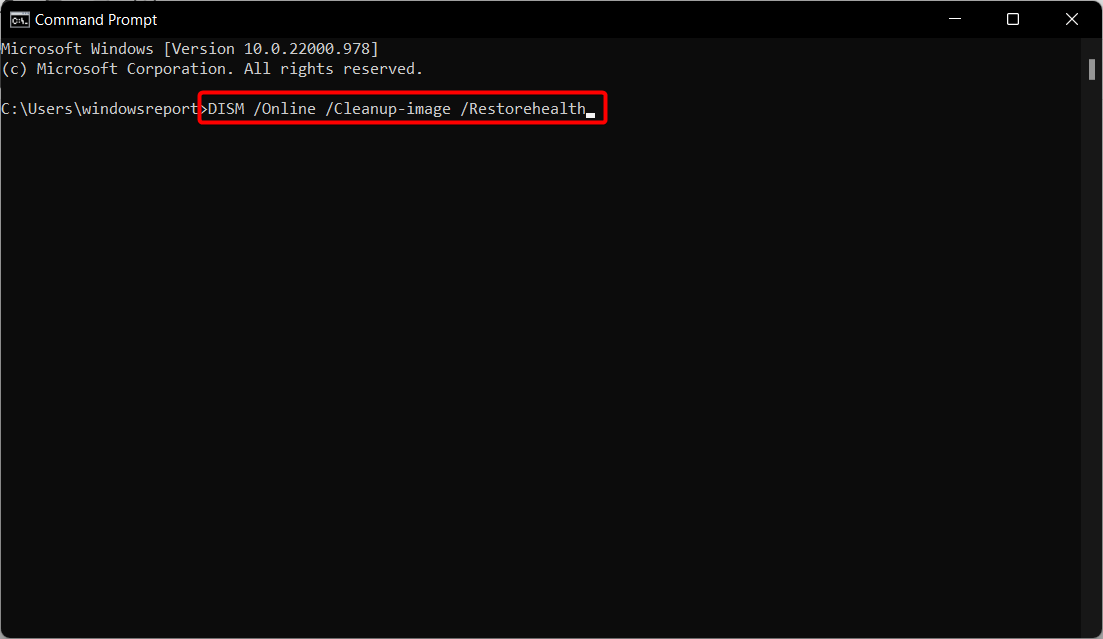
Once the SFC scan is over, type the following command and press Enter. Reboot your computer once the DISM scan has ended: DISM /Online /Cleanup-image /Restorehealth
After the scan is finished, check if the problem is still there.
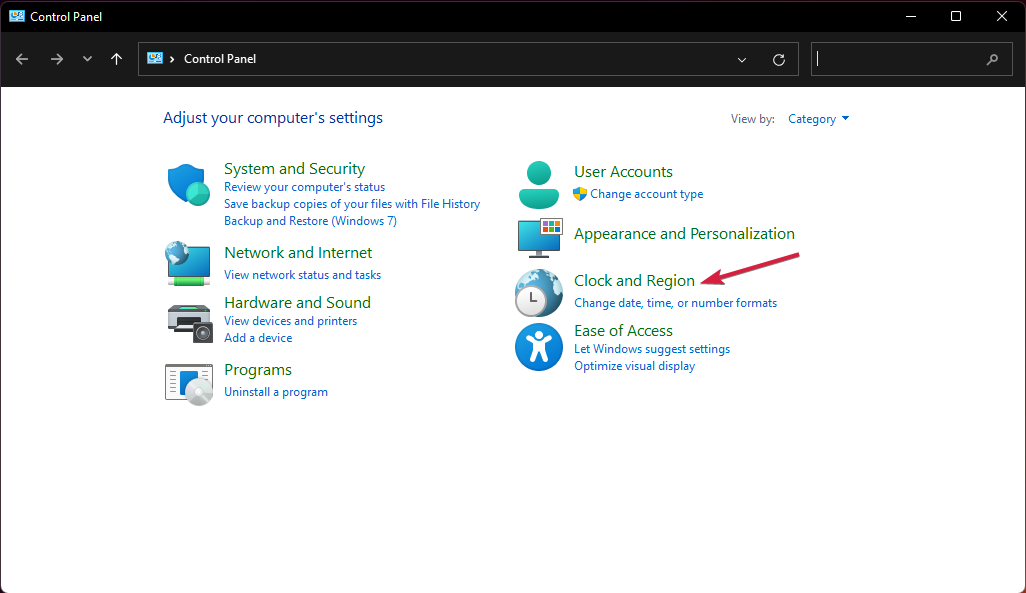
Press the Windows key, then type control and click the top result.
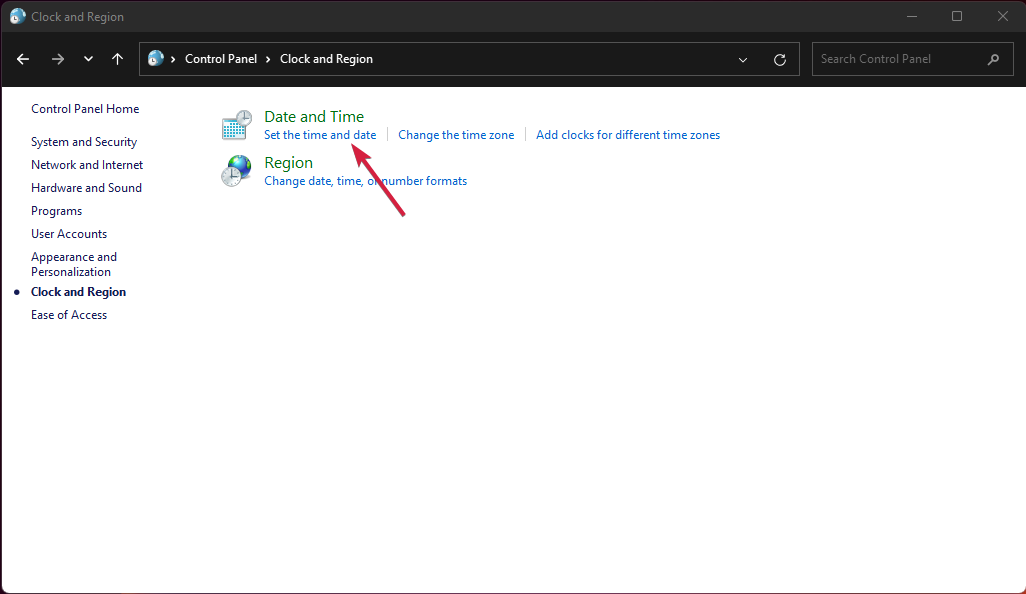
Choose Clock and Region.
Click the Set the time and date button.
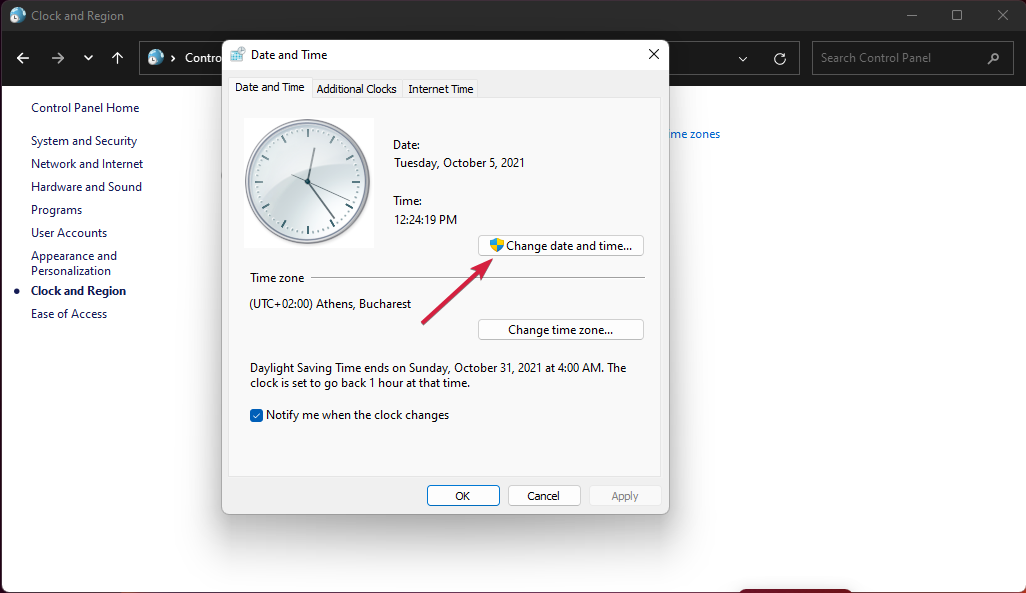
Click the Change date and time settings button.
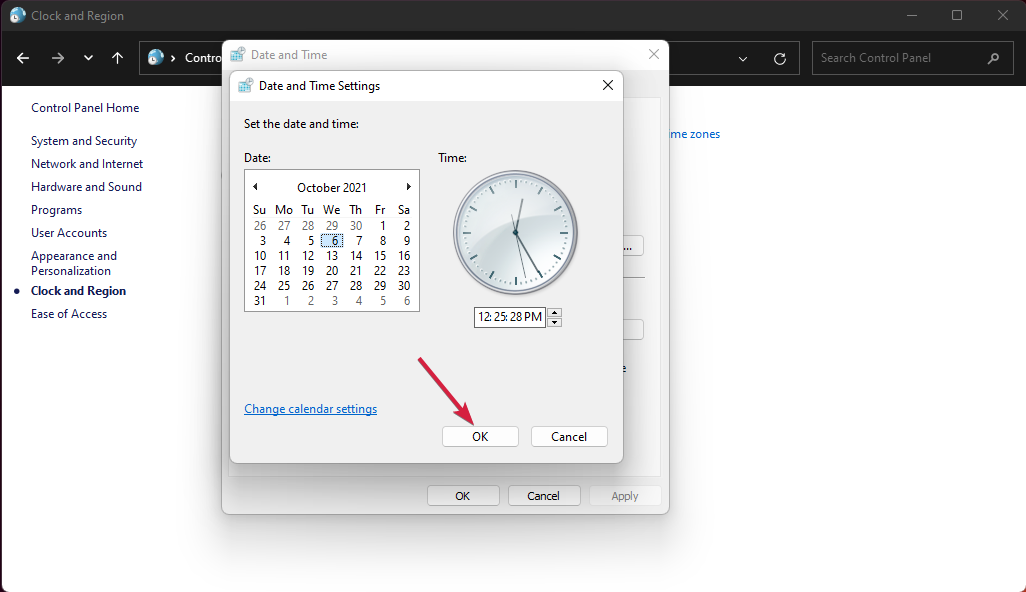
Select a date in the future, then click OK.
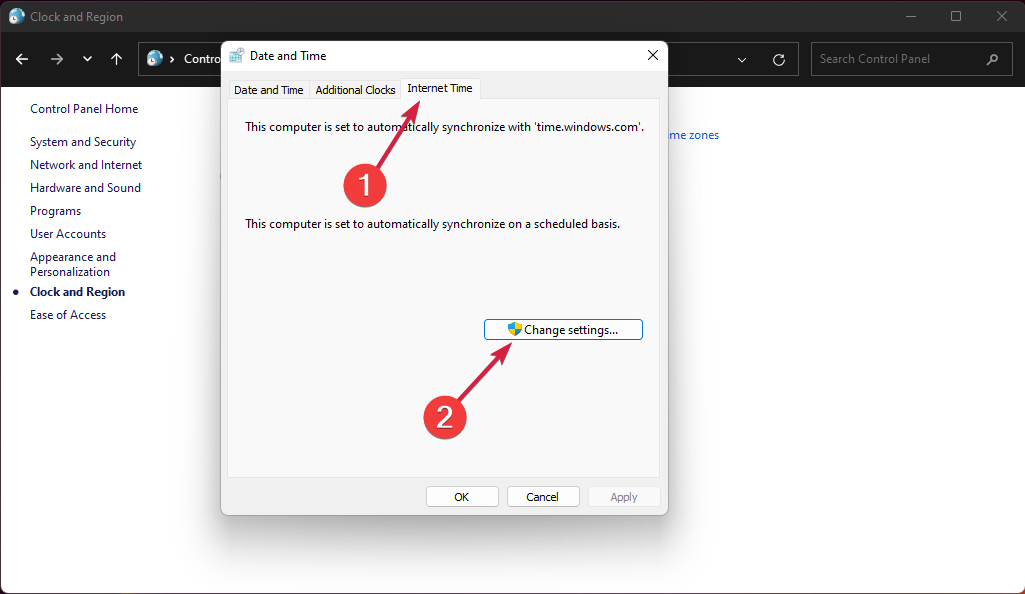
Switch to the Internet Time tab and click on the Change settings button.
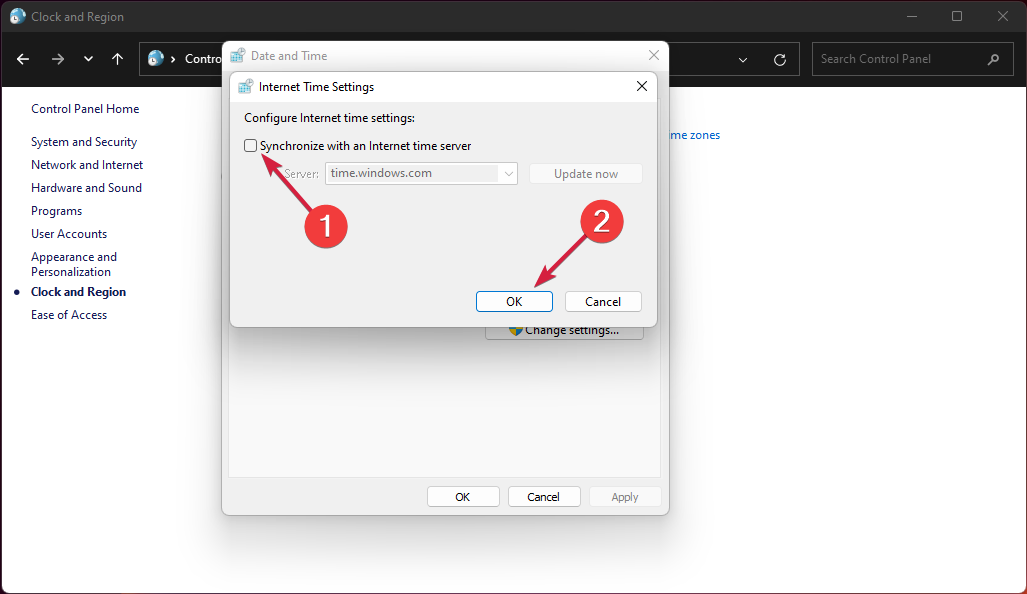
Turn off the Synchronize with an Internet time server option, then click OK.
6. Use PowerShell
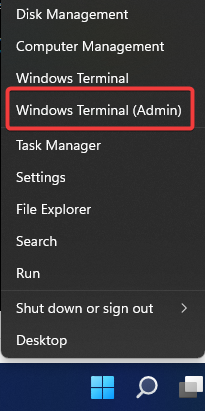
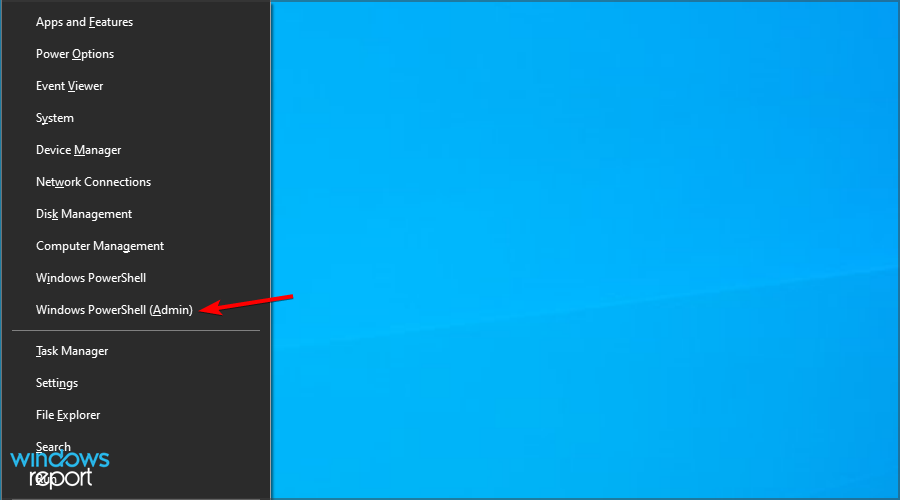
Press Windows key + X and select Windows Terminal (Admin).
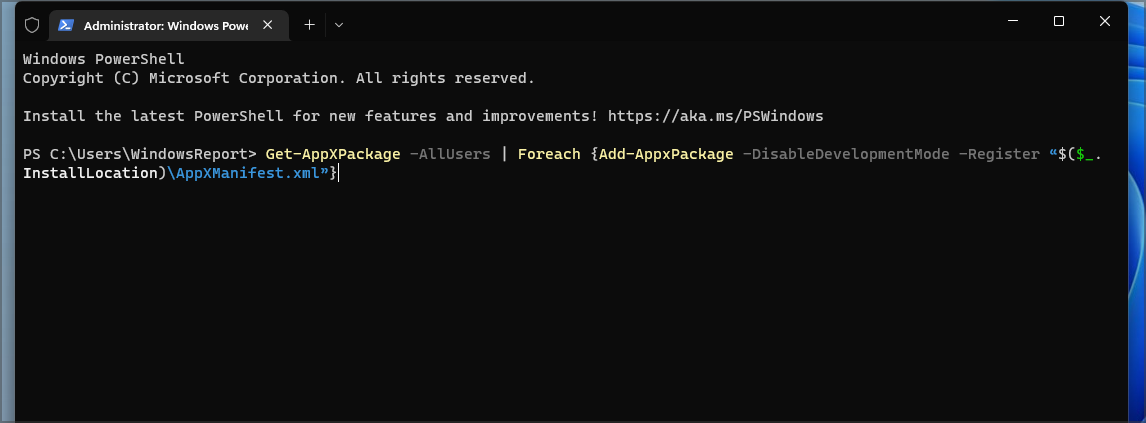
Now run the following command: Get-AppXPackage -AllUsers | Foreach {Add-AppxPackage -DisableDevelopmentMode -Register “$($_.InstallLocation)\AppXManifest.xml”}
Once the command is executed, restart your PC.
We hope our guide helped you fix the empty Taskbar issue in Windows 11, and now you’re using your OS in normal conditions. For more information, follow our guide on how to fix Windows 11 Taskbar blank icons.
If you have other suggestions or need more information, don’t hesitate to access the dedicated comments section below to leave us a line about that.
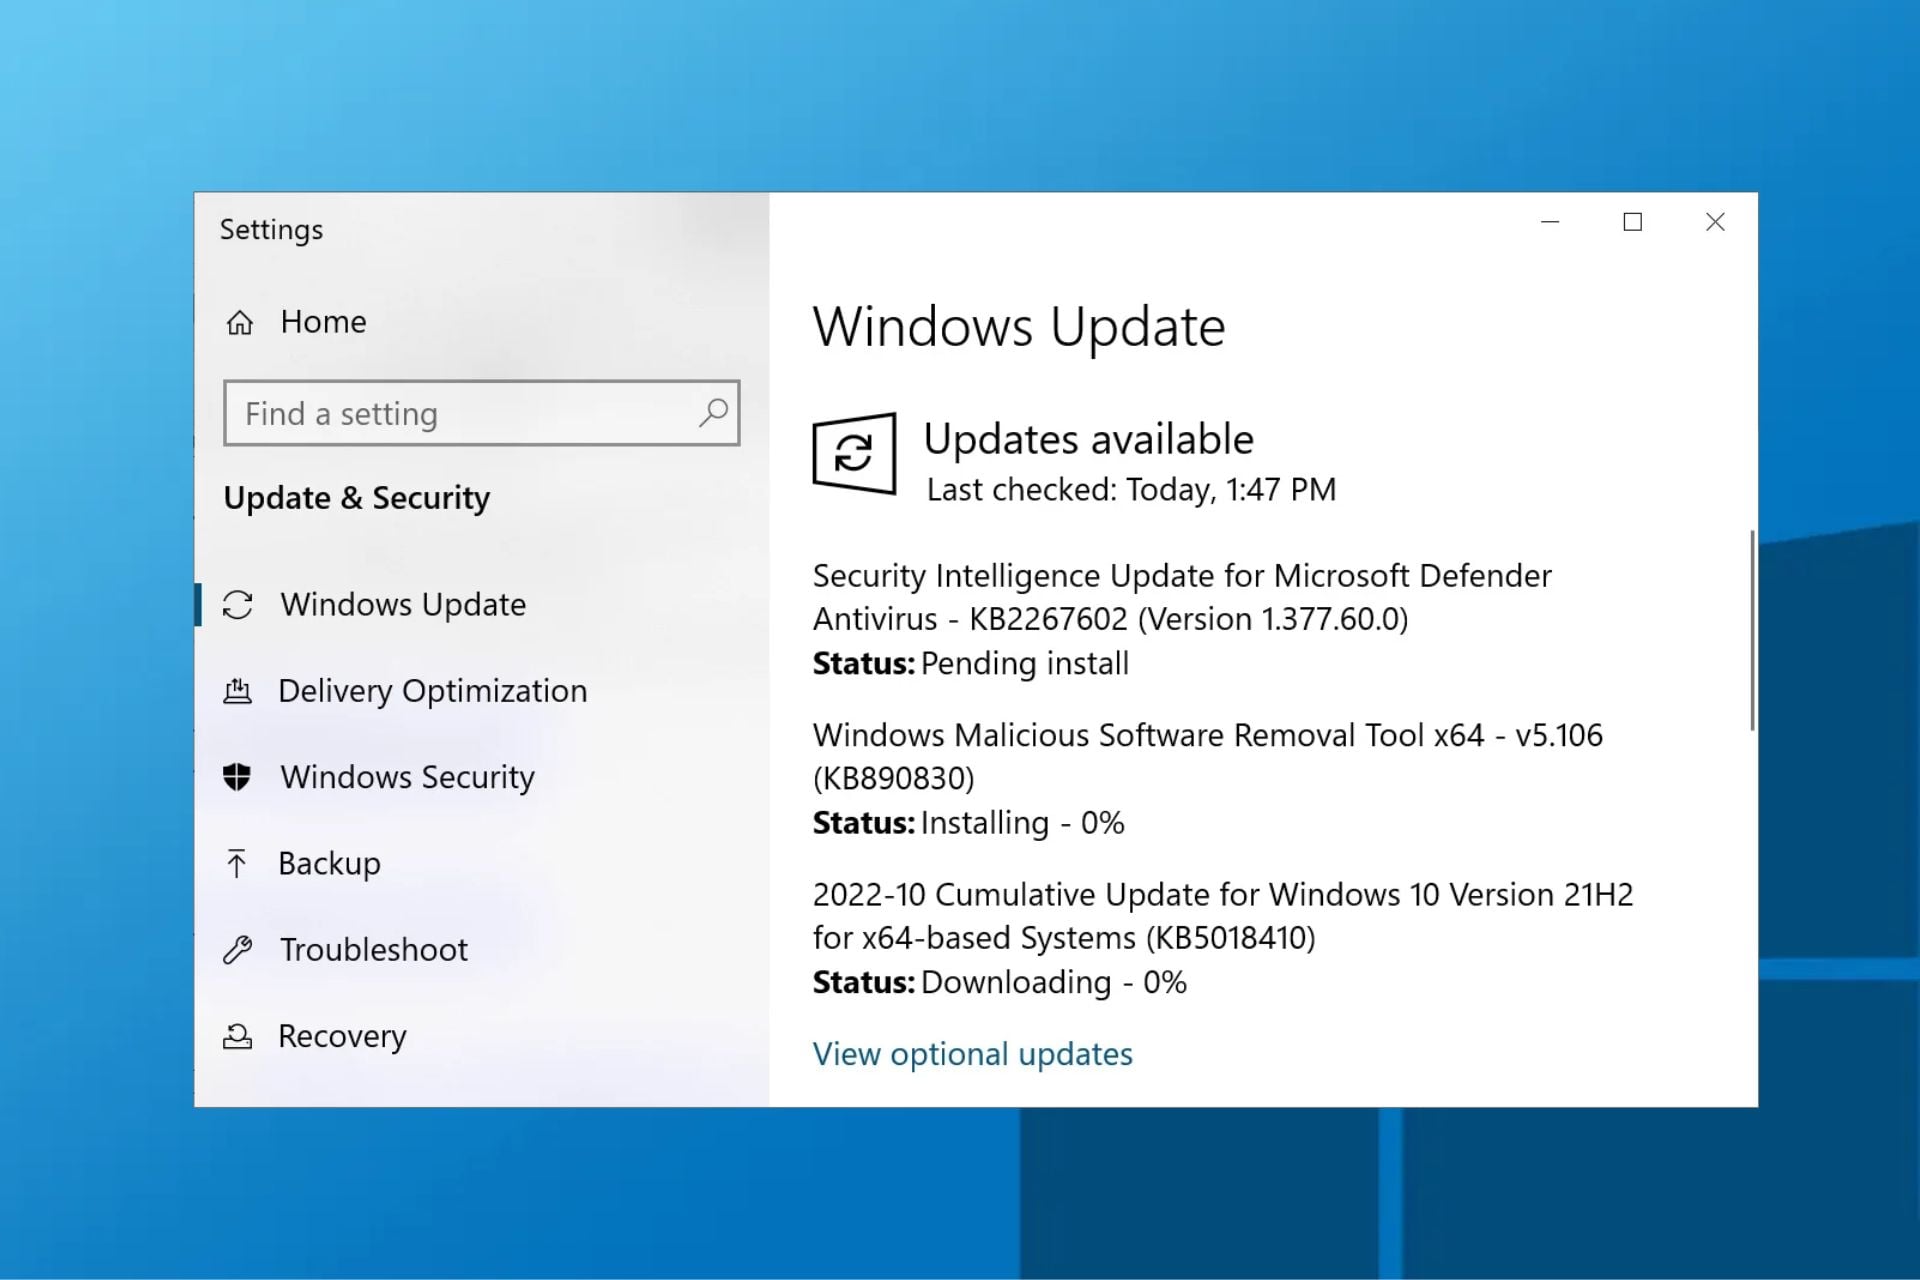
Several of our readers claim they have been trying to install the 2022-10 Cumulative Update for Windows 10 Version 21H2 for x64-based systems KB5018410 without success.
Since KB5018410 not installing is giving a lot of our readers headaches, we have prepared some fixes for this error.
Why are Windows 10 cumulative updates not installing?
There can be several reasons why cumulative update for Windows 10 version 21H2 is not installing. Below are some factors that can hinder the updates:
Poor internet connection – This is one of the primary reasons for these errors. You should ensure that you are correctly connected to the internet.
The updates won’t install after a restart – The update may get stuck after trying to perform a restart. Hence, the cumulative update for Windows 10 version 21h2 is stuck.
2. Roll back and uninstall a bad update with System Restore
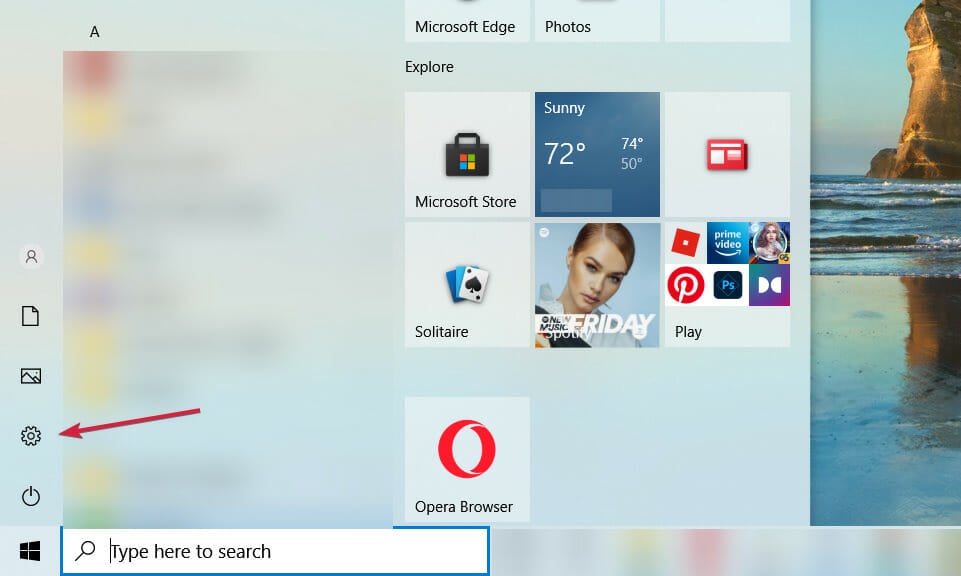
Open the Start menu, and click on Settings above the Power button.
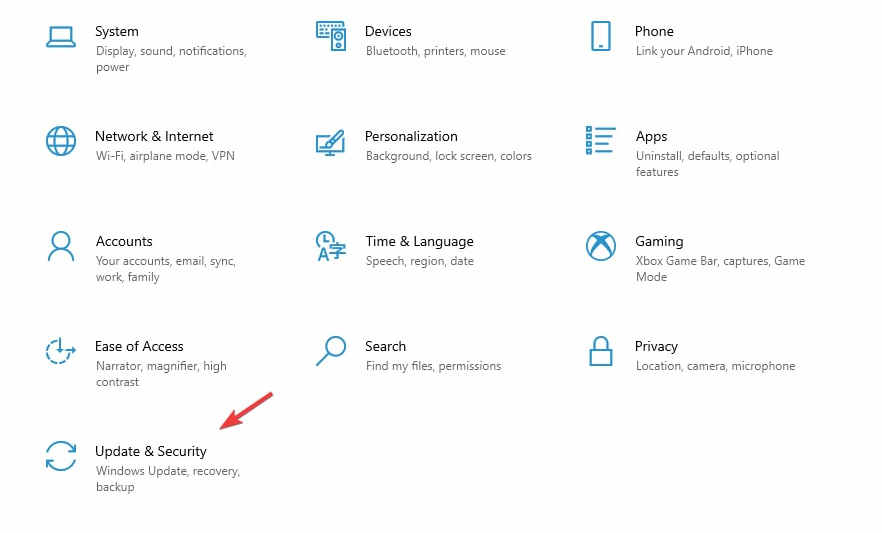
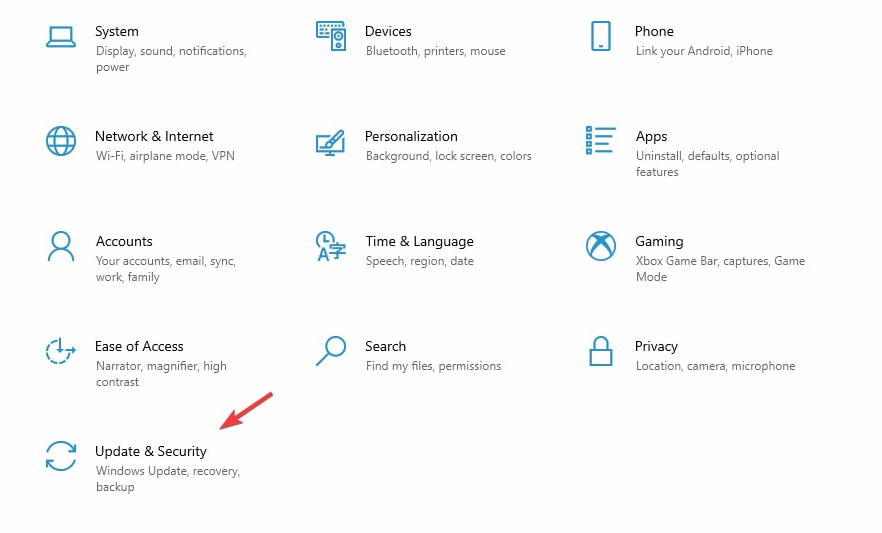
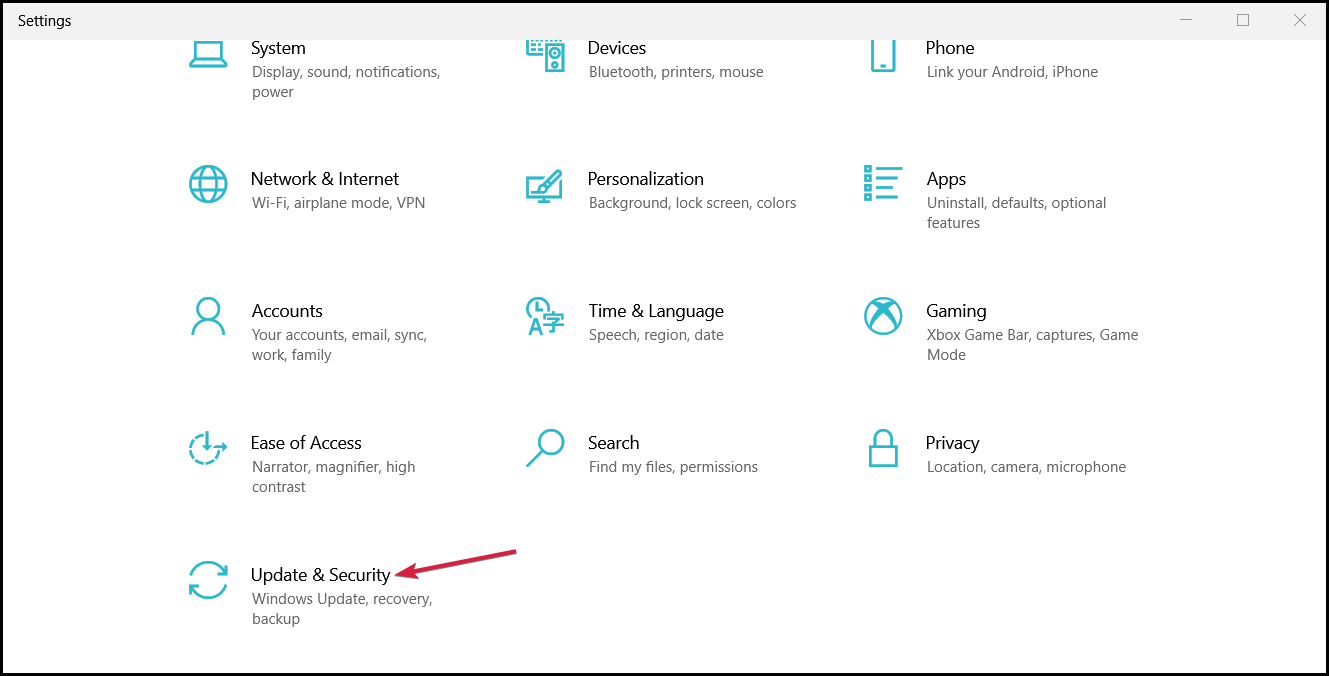
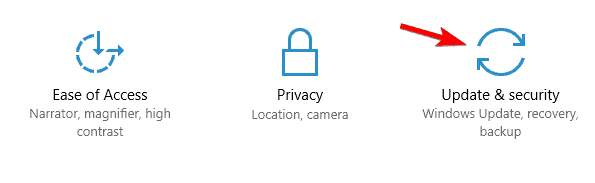
Next, click on Update & Security.
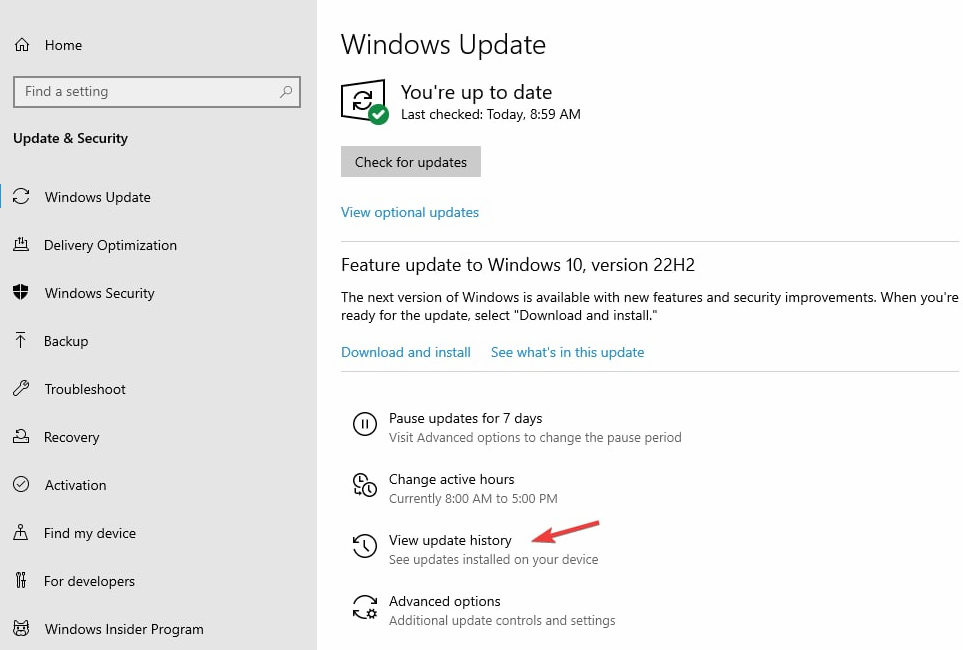
In the new window, select View update history to check the last successful update installed on your Windows.
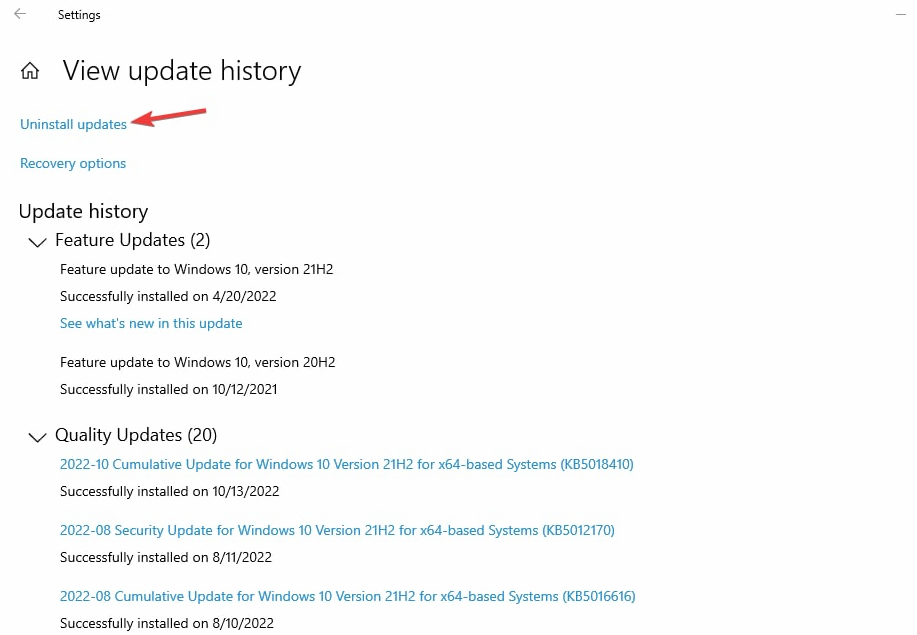
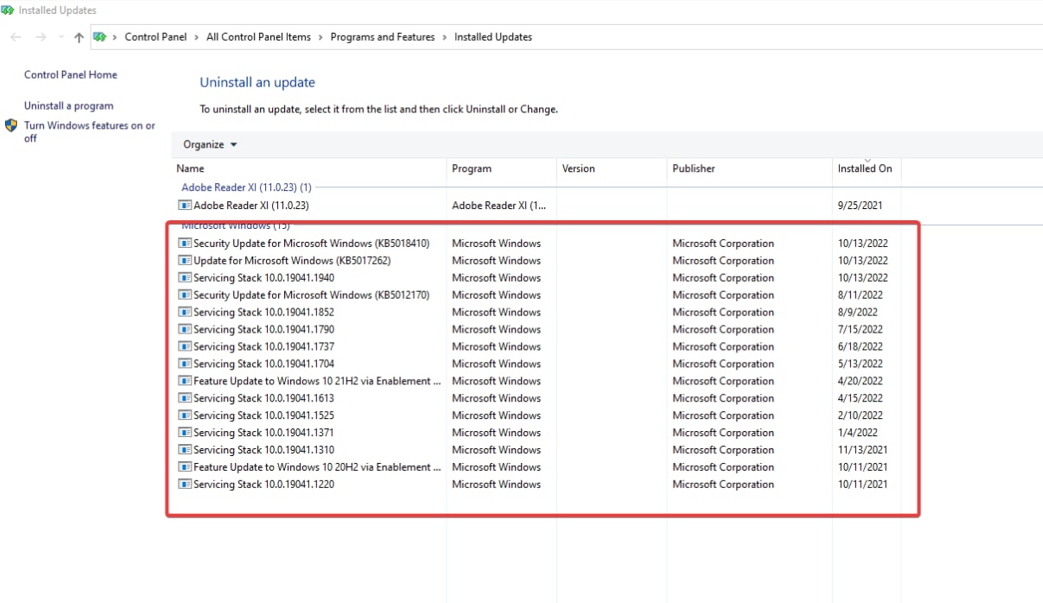
Next, click on Uninstall updates at the top.
You can decide to uninstall any of these but do so with caution so as not to uninstall critical updates, which may lead to a computer full of bugs.
Once you are done, restart your PC.
After completing the system restore, your PC should work correctly.
The above fix means you have created a restore point to which you now want to revert. If you can’t find the restore point, you may need to create another manually.
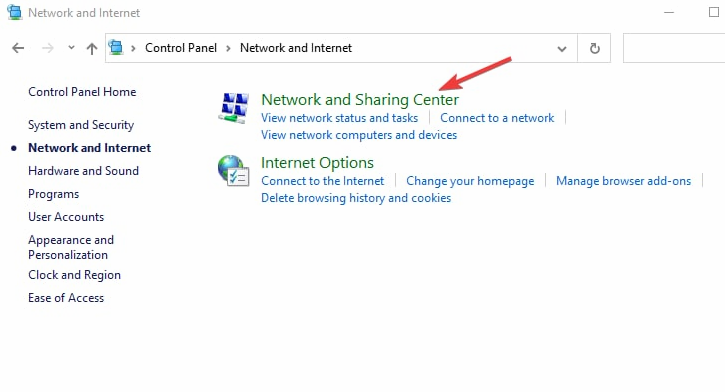
Press the Windows key, search for control panel, and launch it.
Expand the Network and Internet option and click on Network and Sharing Center.
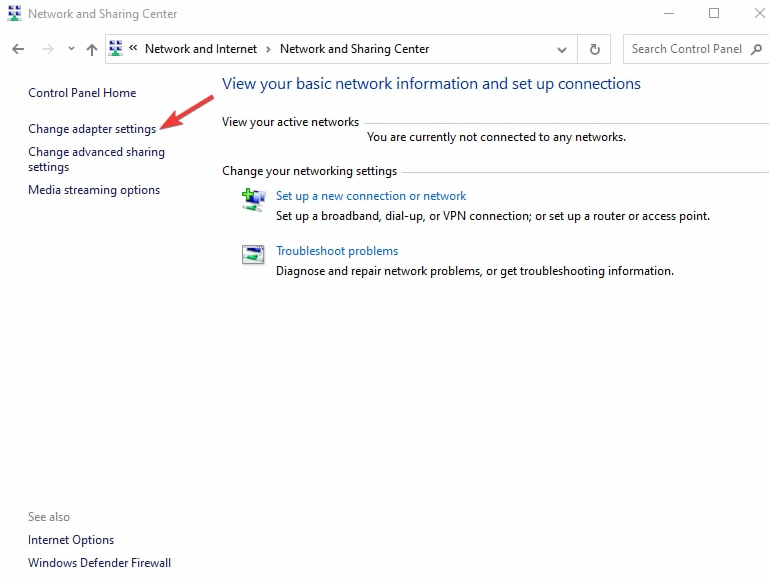
Click on Change adapter settings in the left pane.
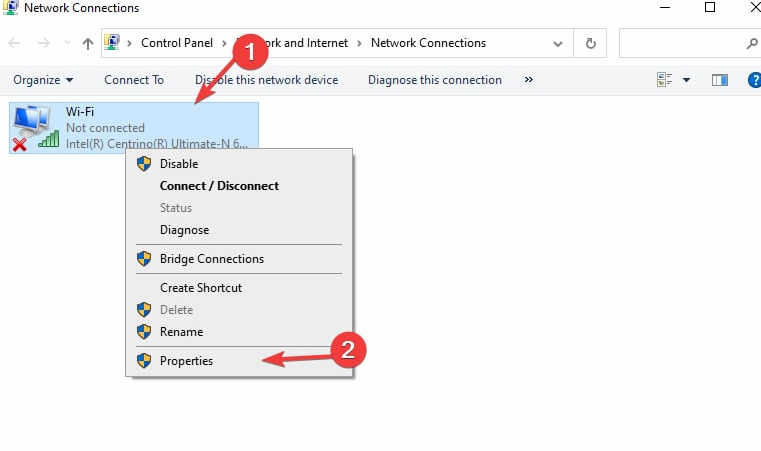
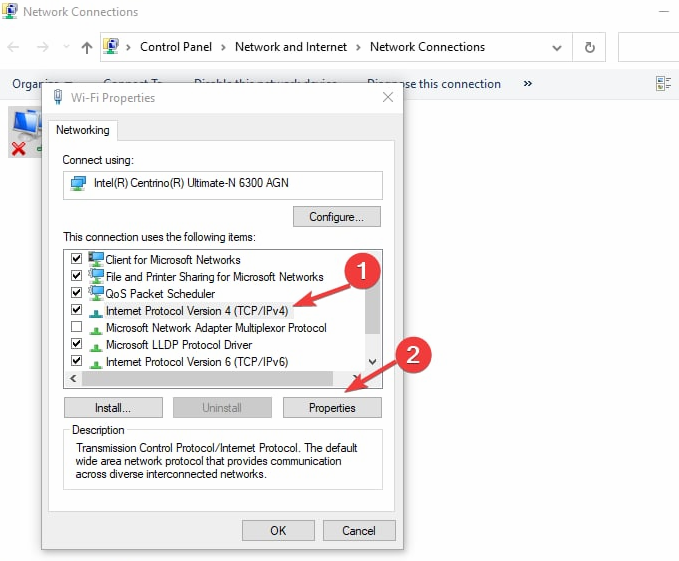
Right-click your network connection and choose Properties from the drop-down menu.
Select Internet Protocol Version 4 (TCP/IPv4) and click on Properties.
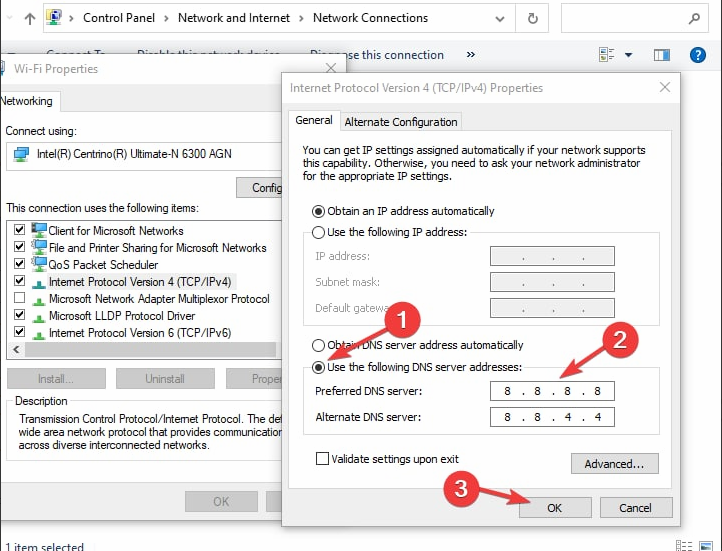
Select Use the following DNS server addresses, type 8.8.8.8 as a Preferred DNS server, and type 8.8.4.4 as an Alternate DNS server.
Click OK to save changes.
At times, it may be that your default DNS is causing the KB5018410 not installing problem. Hence, changing your DNS should fix the cumulative update for Windows 10 version 21h2 if it fails to install.
4. Factory reset your PC
Press the Windows key + I to open the Settings app.
Navigate to the Update & Security section.
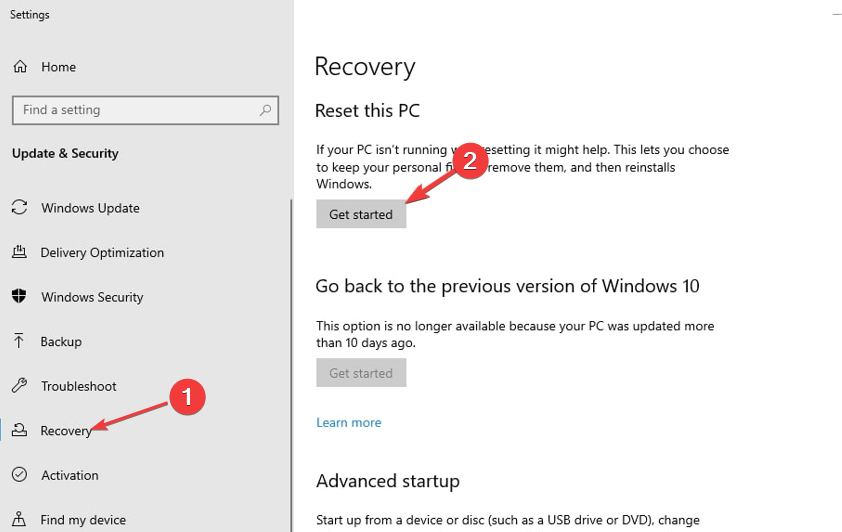
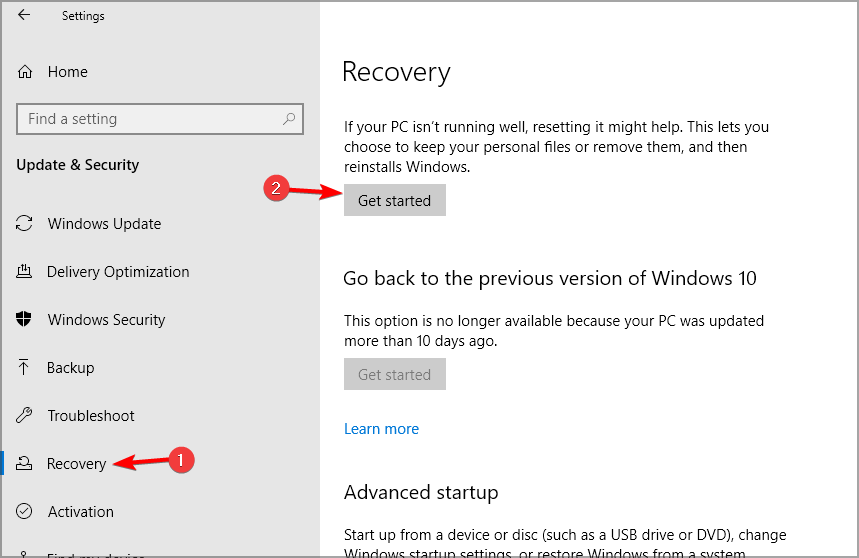
Go to Recovery and click Get Started.
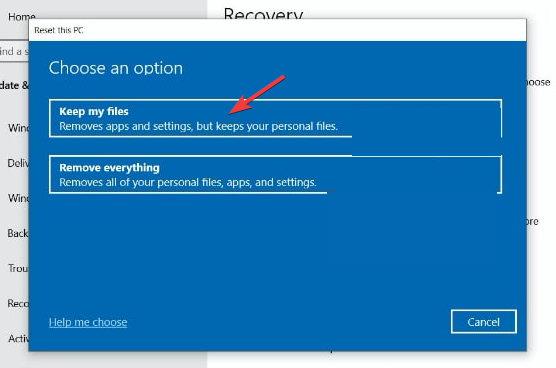
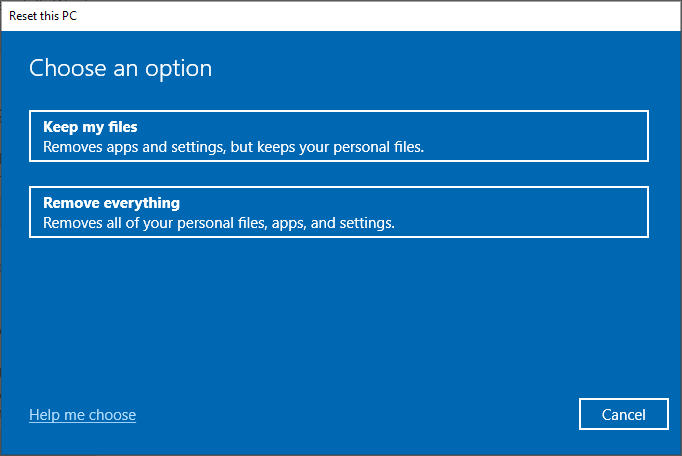
Choose the Keep my files option.
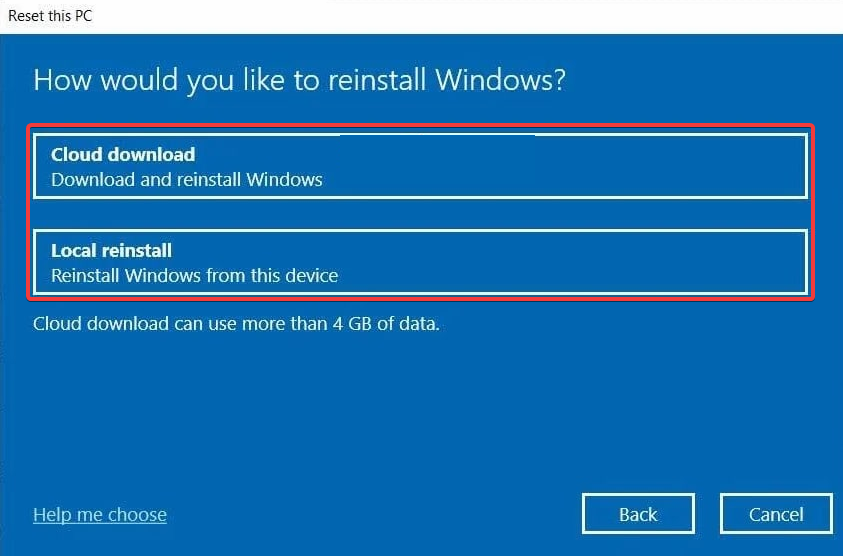
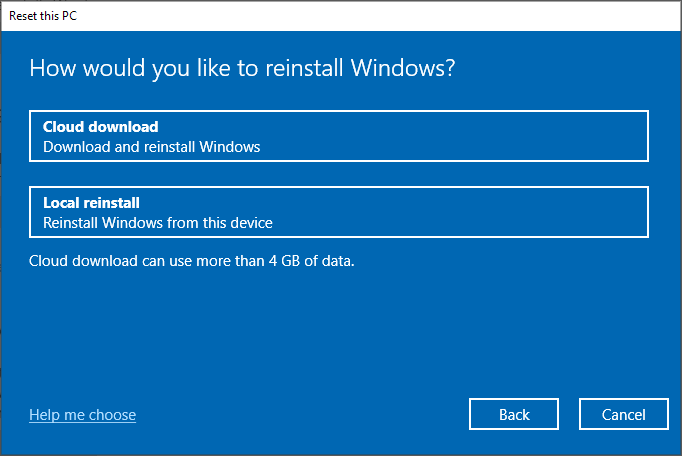
Select Cloud download or Local reinstall (Local reinstall is faster, so we recommend it)
Follow the instructions on the screen to complete the process.
But before you do this, make sure you back up your data on an external drive to avoid losing what’s important to you.
Moreover, ensure you write down your product ID in a safe place before performing the re-installation.
Blue Screen of Death errors are one of the most serious types of errors that you can get on Windows 10, and since these errors are commonly caused by faulty hardware they can be hard to fix.
Many users reported getting the Driver Verifier Detected Violation error, and today we’re going to show you how to fix it.
What is Driver Verifier Detected Violation error?
The Driver Verifier Detected Violation error is often brought on by defective drivers or hardware. Some of its common causes are the following:
Outdated drivers – Although outdated drivers may not directly contribute to BSOD errors, the interactions that these drivers have with your operating system do. When you update your Windows operating system, your older drivers may become incompatible.
RAM issues – There are other components of the computer than the hard drive that are capable of triggering blue screen of death issues. These faults can also be caused by slots that are not properly fitted in a number of other components, most notably the RAM.
Driver Verifier running for no reason – This program substitutes the default operating system subroutines with ones that were built expressly to catch vulnerabilities in device driver software. Misfitted detections can lead to Msdn bugcheck driver_verifier_detected_violation.
Without further ado, let’s jump into the list of solutions!
How can I fix the Driver Verifier Detected Violation error?
Before moving on to more advanced troubleshooting solutions, make sure to do the following:
Check your RAM for any physical damage as this is one common cause of this error.
Run a virus scan on your computer to make sure it is not infected with malware.
1. Enter Safe Mode and deactivate Driver Verifier
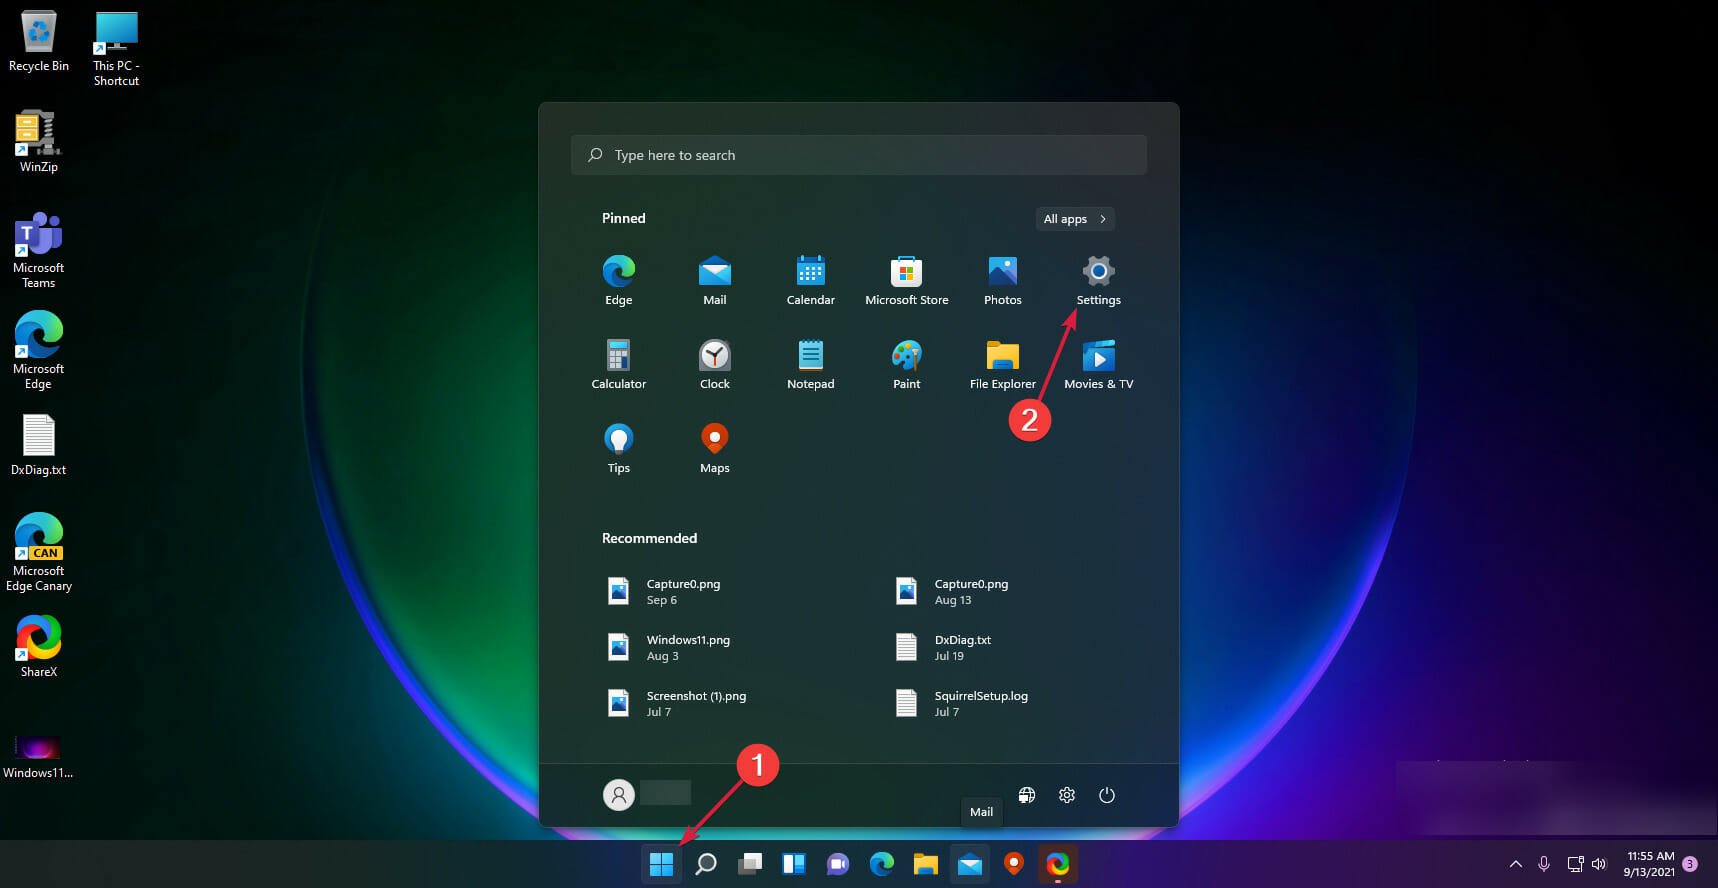
To fix the Driver Verifier Detected Violation loop, click the WindowsStart icon and select Settings.
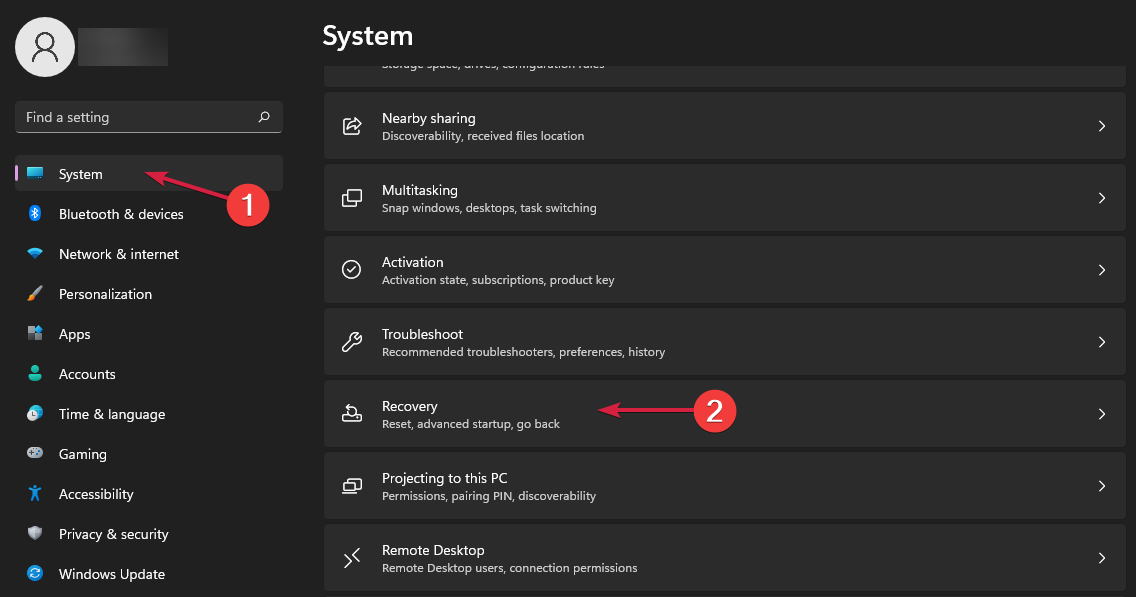
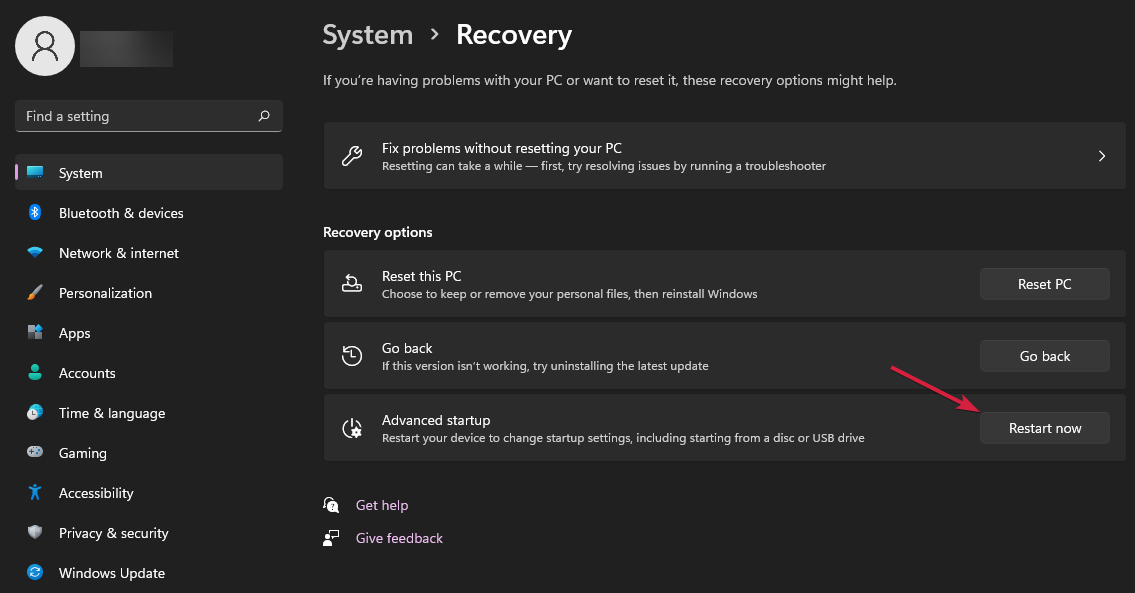
Next, go to System, then select Recovery.
Next to the Advanced startup option, click on the Restartnow button.
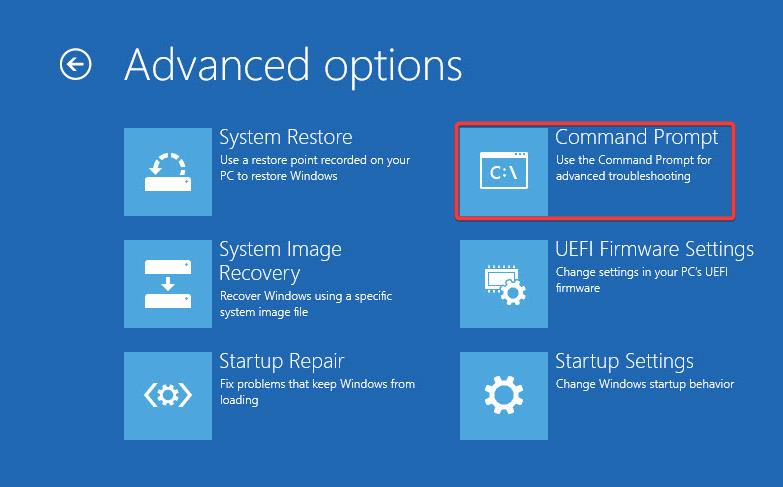
Your computer will restart then show the Advanced options screen. Here, select Troubleshoot.
Next, select Advanced options.
Click Startup Settings.
Lastly, click the Restart button.
Once your PC reboots, press the F4 key to get into Safe Mode.
Next, press Windows + R, enter verifier, and click OK.
Next, select the Delete existing settings option and click Finish. Reboot your computer to apply the changes made. The Driver Verifier Detected Violation on Startup issue will also be fixed afterward.
2. Update drivers
Press Windows + I to open Settings then go to Windows Update and select Advanced options.
Next, select Optional Updates.
Here, expand the Driver updates section, select all the updates listed and click Download and Install. The DRIVER_VERIFIER_DETECTED_VIOLATION when shutting down issue will be solved.
These tools are equipped with powerful features that allow them to quickly scan your computer, identify the correct version of the driver you need, and then prompt you to download it.
3. Run System Restore
If you get Driver Verifier DMA VIOLATION, press Windows + R then type rstrui and press Enter.
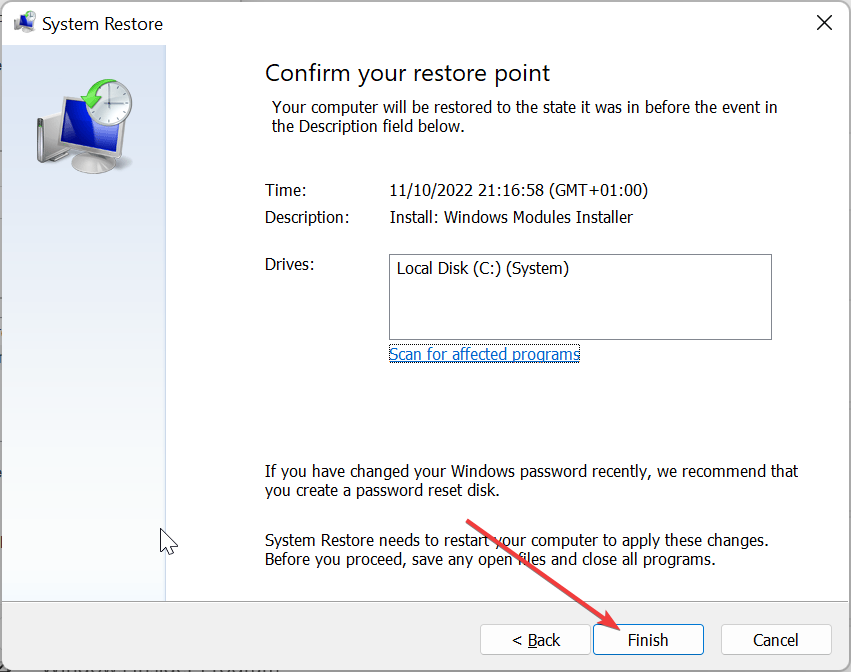
Click Next to proceed. Then select the restore point to which you wish to revert to and click Next.
Follow the on-screen steps to revert your system to the selected restore point. If you don’t have any restore points, check out how to create one.
Driver Verifier Detected Violation error can cause problems, but hopefully, you managed to fix this error by using one of our solutions.
If you have additional comments or suggestions, please let us know in the comments section below.
The Settings app is one of the most important Windows 10 features because you control the whole system with it.
Basically, if you want to change most of the features in your OS, you are usually going through this app. And if it stops working, you can have serious issues.
What causes Settings not to open?
There can be a lot of reasons for which the Settings app won’t open in Windows 10 and just as many for which it won’t launch in Windows 11. Depending on their complexity, we outlined a few of the possible issues.
➡ An OS update – Sometimes, this problem manifests after a Windows update although before it worked just fine. The solution here is to roll back the update that caused the issue.
➡ Corrupted app – When it happens out of nowhere, without obvious reasons, the problem is usually caused by the corruption of the app by power outages, malware, or similar factors but the solutions below will help you fix it.
➡ Glitches and junk files – Too many junk files on your PC can cause serious damage in time but can also be responsible for this problem. Cleaning the unnecessary files from your PC is a must in this situation.
➡ System bugs – Sometimes, the system can be influenced by third-party corrupt apps and a simple uninstall or a reboot can get things back to normal. Booting in Safe Mode is also a solution because it prevents third-party apps from loading.
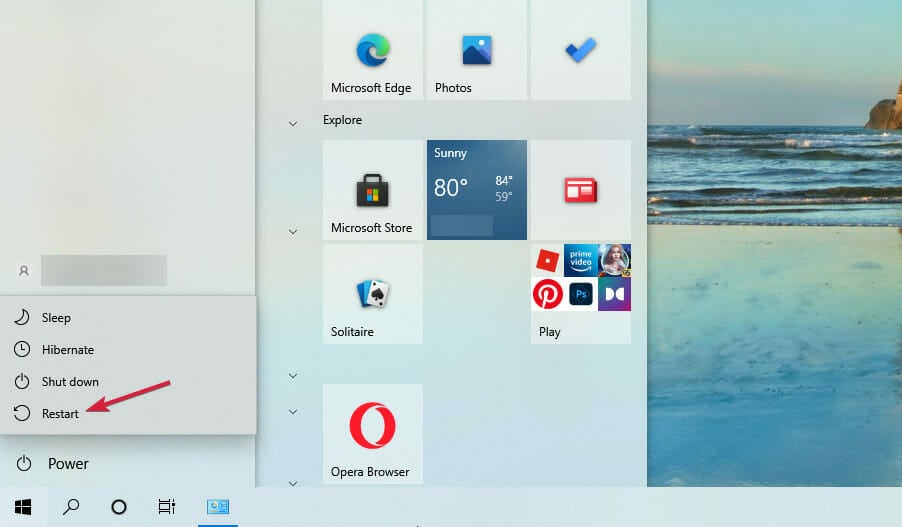
To boot in Safe Mode you just need to hold the Shift key while clicking the Start button, then the Power option, and selecting Restart.
In this case, you should be able to use Windows Startup Repair to recover your Settings apps.
How do I fix Windows Settings won’t open?
1. Run the SFC/scannow command
1. Click the Start button to open the Windows Search box.
2. Type cmd in it and select Run as administrator to start Command Prompt with full privileges.
3. Enter the following line and press Enter: sfc/scannow
4. Wait until the process is done.
5. Close Command Prompt and restart your computer. To do that, click the Start button, select the Power button, and chooseRestart.
The SFC command will completely scan your computer for issues, and it will provide a suitable solution (if available)
So, it will for sure cover the Windows Settings app not opening problem, and besides that, it may solve some problems that you even didn’t know about.
If you have problems with the SFC process, we’ve got a guide that will help you learn what to do if the scannow command stops before finishing the process.
2. Use Powershell to reinstall preinstalled apps
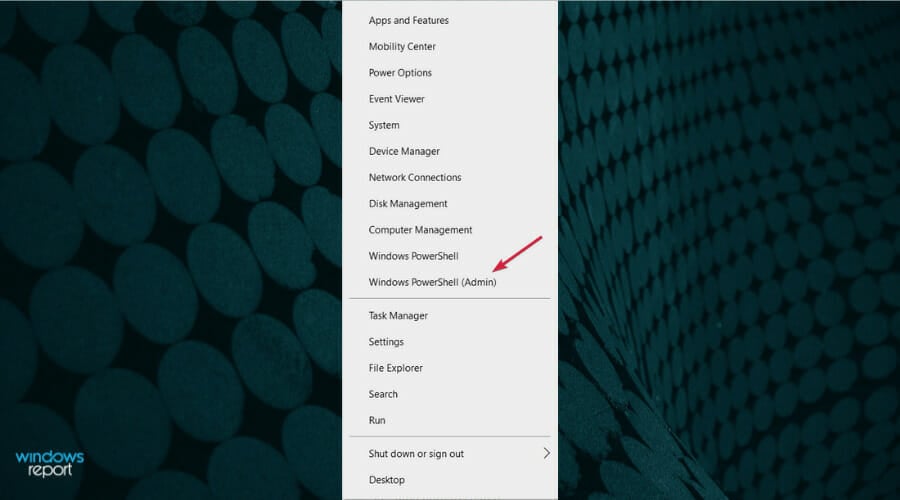
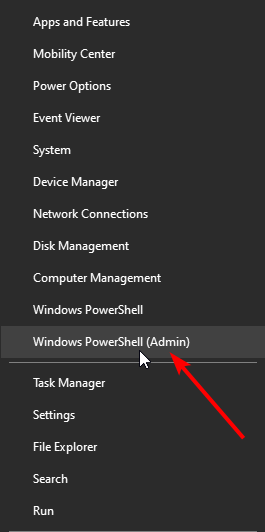
Right-click the Start button and select Windows PowerShell (Admin) from the list.
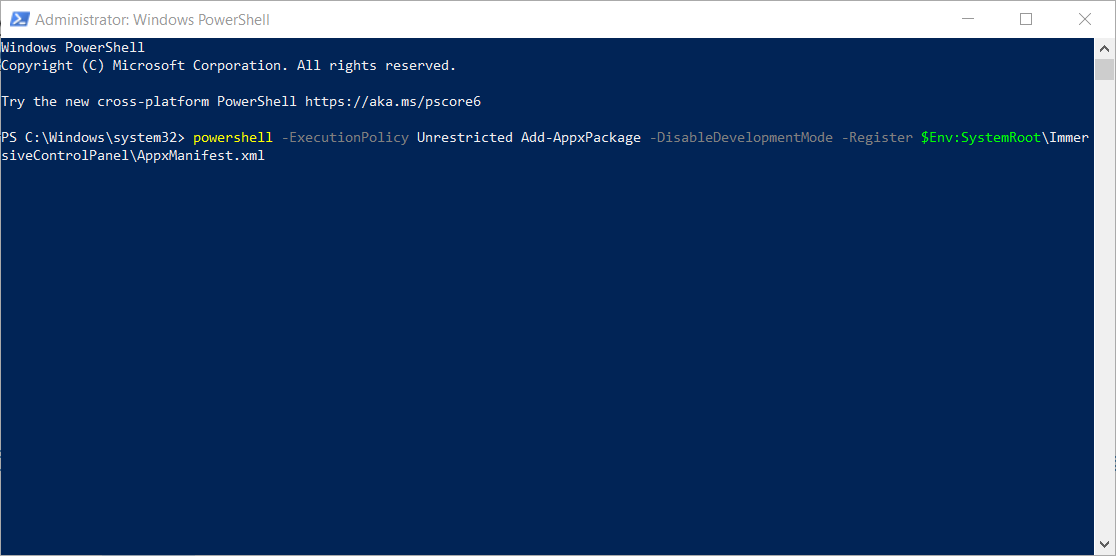
Type or paste this code and press Enter to run it: powershell -ExecutionPolicy Unrestricted Add-AppxPackage -DisableDevelopmentMode -Register $Env:SystemRoot\ImmersiveControlPanel\AppxManifest.xml
This process might take a while, so make sure that you wait until it’s finished.
3. Run DISM
Click the Start button, type cmd and choose Run as administrator to start Command Prompt with full rights.
Type in the following command and press Enter: DISM.exe /Online /Cleanup-image /Restorehealth
Wait for the process to finish, then click the Start button, select the Power button and choose Restart to reboot your PC.
Deployment Image Servicing and Management (DISM) is another built-in troubleshooting tool from Windows.
As its name says, DISM deploys the system image all over again, refreshing all the system features on the way, including the Settings app. Do not hesitate to learn what to do if DISM fails before finishing the process.
4. Update Windows
Click the Start button and type update, then select Check for updates from the results.
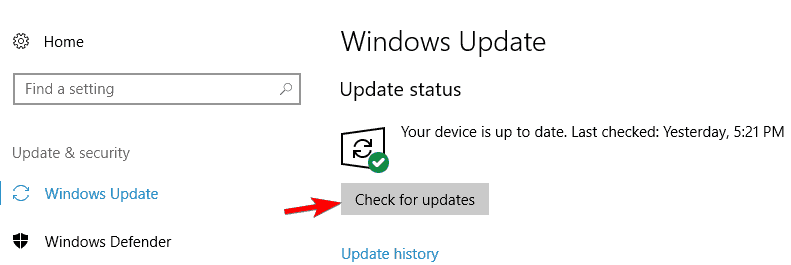
Now, click the Check for updates button. If there are any new updates, the system will download and install them.
Microsoft usually releases patches and fixes for various system problems through Windows Update.
The solution above still directs you to the Settings app so if you still can’t access it, the only solution you have in this case is to install the updates manually.
Go to the Windows Update Catalog page, find the latest update for your version of Windows 10, and follow further instructions to download the update directly.
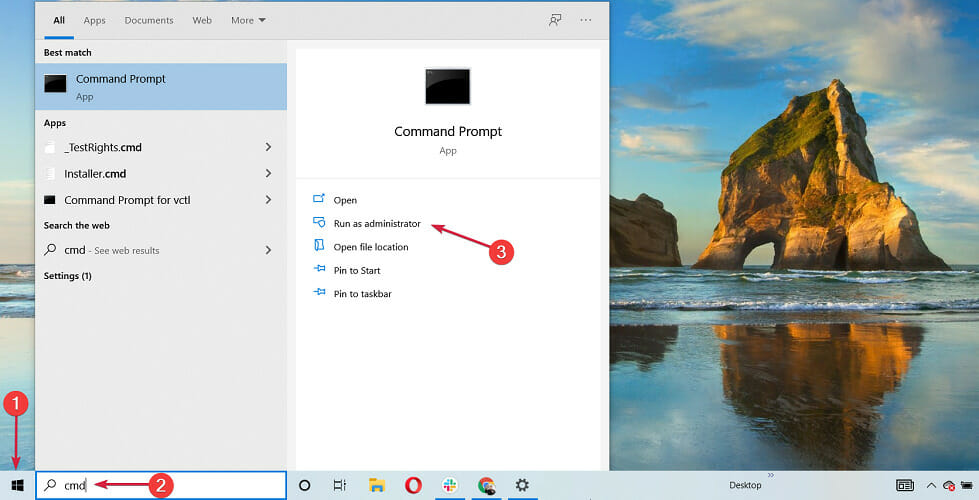
Click the Start button, type cmd and select Run as administrator to start Command Prompt with full privileges.
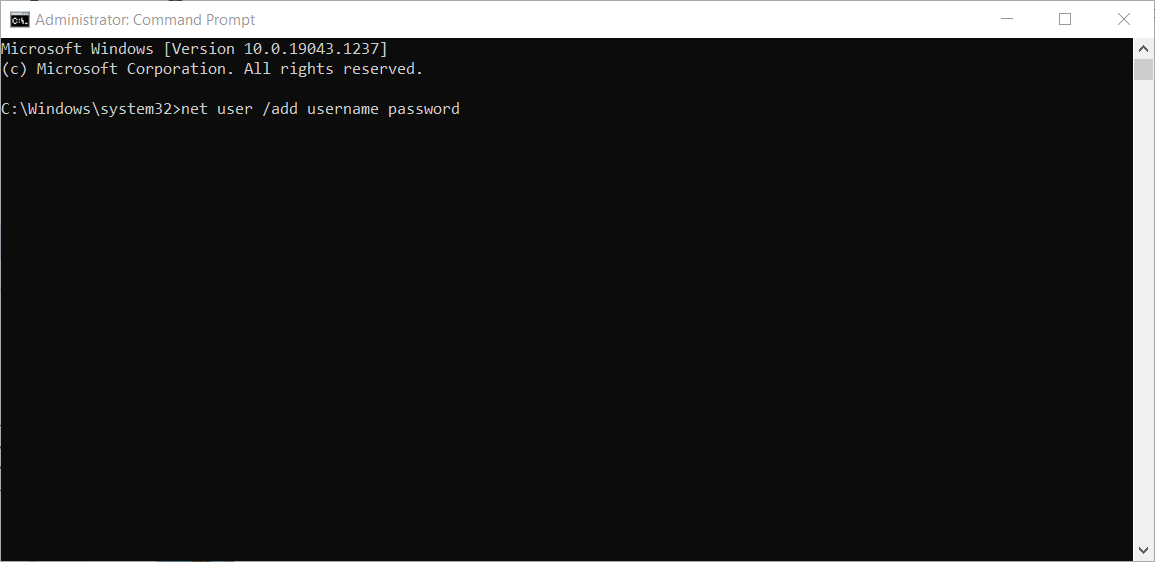
Type or paste the following command and press Enter to run it (make sure you replace username and password with the user name and password of your choice): net user /add username and password
Now give it administrator privileges by entering the following command and press Enter (make sure you replace username with the name of the user you created earlier): net localgroup administrators username /add
Now login with the new user you just created and try to open the Settings app again.
If your user account is broken or corrupted, you may not be able to access all the Windows 10 features. The same thing may happen if you’re using a user account that doesn’t have administrative rights.
So, make sure that your account has all the necessary permissions to access the Settings page. If not, you can create a new account and check if this solved the problem.
What can I do if Windows 10 Settings won’t open in Safe Mode?
Press and hold the power button to force your computer to shut down (You may need to perform this action more than once).
Once your computer boots into the blue screen, select Troubleshoot among the options.
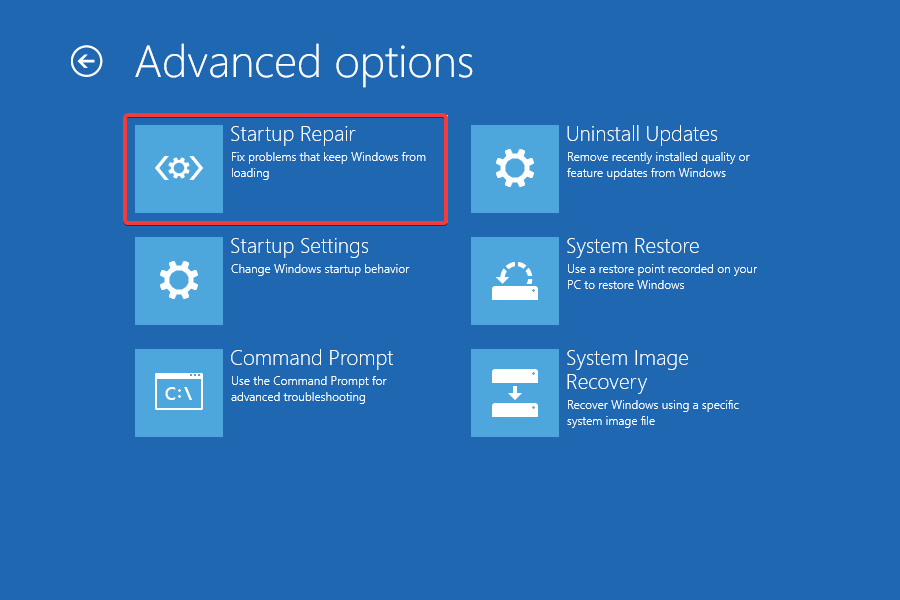
Next, go to Advanced options and choose Startup Repair.
Introduce the credentials associated with your user account and proceed with the Startup Repair.
If the Windows Settings won’t open (not even in Safe Mode), you should be able to recover them with this method.
Are there any other possible issues with the Settings app?
Here are some more examples of similar issues you can resolve with the same solutions:
Windows 10 Settings app won’t open – The most common issue with the Settings app in Windows 10 is when you just click the icon, but nothing happens.
Windows 10 Settings app missing – In some cases, you won’t be able to even locate the Settings app icon, as it completely disappeared from the Start Menu.
Windows 10 Settings app crashes – Another common issue is when you’re actually able to open the Settings app, but it crashes immediately upon launch.
Windows 10 Settings grayed out – And the least common (but still possible) scenario is when the Settings app icon is just grayed out in the Start Menu.
How can I quickly open the Settings app?
Sometimes, just a way of opening the Settings app might be the problem, so trying out different methods may lead to success. That’s why we encourage you to check a few more suggestions:
Use the Start button
This is the most simple way of doing it. Just click the Start button and select Settings.
2. Use the Search function
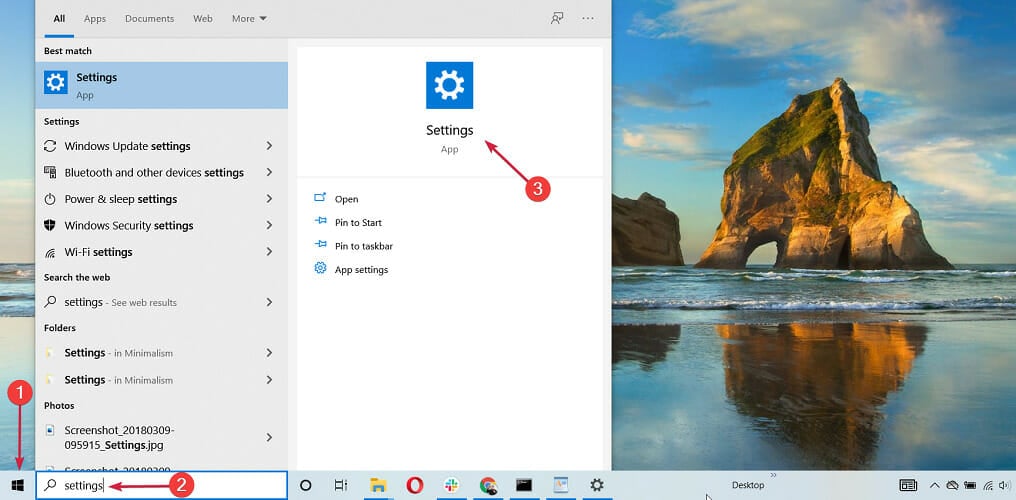
A close runner-up solution is to click the Start button, then type settings and open the app from the results.
3. Right-click the Start button
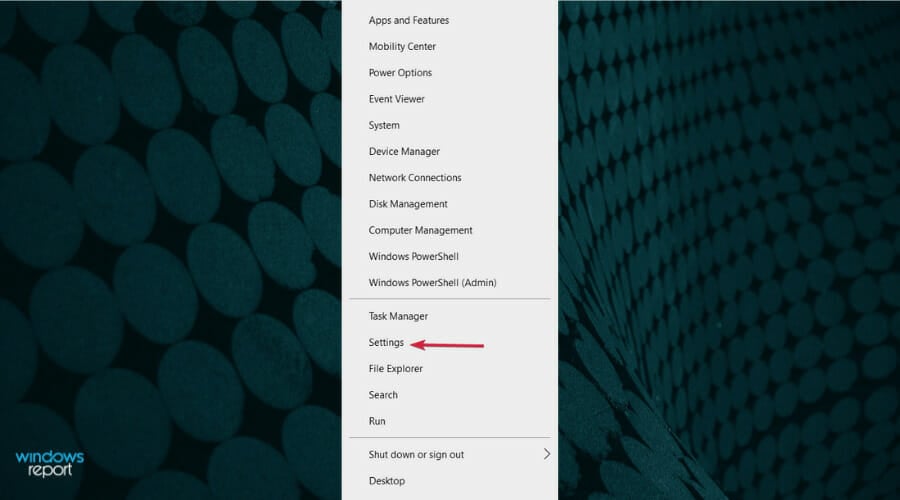
It’s also easy to right-click the Start button and select Settings from the list of options.
4. Use the Settings shortcut
You can also open the Settings app by using the Windows key + I shortcut from your keyboard. It’s extremely fast and effective.
Try to remember it because if you find yourself in a situation where the mouse is not responding or the screen is frozen, this might be the only method left.
5. Use the Run app
Press the Windows key + R to start the Run app.
Type ms-settings: (include the : character at the end. It’s not a mistake) and press Enter or click OK.
6. Use Command Prompt
Click the Start button, type cmd and select Run as administrator.
Type start ms-settings: and press Enter to run it.
Of course, there are many ways to open the Settings app. For instance, you can also ask Cortana to open it, but the important thing is to actually work.
What does Windows cannot find ms-settings mean?
Several of our readers encountered the message when trying to start Settings from the Command Prompt console: Windows cannot find ms-settings. Make sure you typed the name correctly, and then try again.
Luckily, this is just a simple typing error. The correct command is startms-settings:. Without the semicolon symbol (:) at the end, you get this error.
We hope that our solutions helped you solve the Settings app problem in Windows 10 and now everything is back to normal. Now, the Settings app can be just one side to the story. If no Windows 10 programs seem to work, you might want to take your troubleshooting even further.
If this issue occurred after a Windows update, make sure you installed any patch after it because Microsoft may have already released one.
Even if you still can’t access the Settings, you will get a notification in the system tray and you might be able to get it from there.
Now that you fixed the Settings app in Windows 10, you might be interested in the best Windows 10 optimizer software that can solve system issues and make your PC run faster.
For more questions and suggestions, reach out to the comments section below and we’ll be sure to take a look.
A red X next to OneDrive usually means sync issues, a paused account, or missing files. To fix it, check your internet, ensure you’re signed in, and restart OneDrive. Also, verify you have enough storage and permissions and that OneDrive is in sync.
Here’s how:
How do I fix red X on files and folders?
1. Sync OneDrive with your Microsoft account
1. Click the OneDrive button in the bottom-right corner of the taskbar, then select the Settings option.
2. Select the Unlink this PC option.
3. Click on the Unlink account button.
4. Write your email account for your OneDrive account in the wizard, then click the Sign-in button.
5. Type your account password. Select the Sign-in button and then click Next.
6. Continue with the on-screen directions or close the window. The Red X on SharePoint folder issue will be solved.
If you’re experiencing seeing red X on files on your PC, the first thing you need to do to try and fix the problem is sync OneDrive with your Microsoft Account. You can do this via OneDrive’s built-in Settings.
A few users reported that they couldn’t unlink their accounts using our instructions. Instead, they had to go to Settings and select My account from there.
Other components are affected by this issue, and a few of our readers reported the red x on the volume icon, but this is most likely a hardware or a driver issue.
A few readers reported a variation of this problem in the form of blank desktop icons on Windows, but this issue can be easily resolved by following the instructions from this guide.
2. Check your OneDrive storage
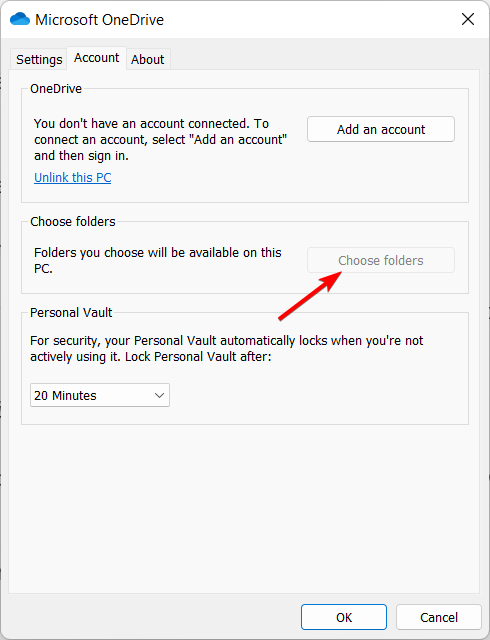
Go to the OneDrive menu, and select Settings.
Click on Choose folders.
Uncheck the folders that you don’t want to upload on OneDrive. The OneDrive red X issue will be solved.
If everything is ok with syncing your Microsoft account to OneDrive, it is possible that the culprit is the lack of space in the cloud.
This usually happens if users upload automatically all files and folders in OneDrive.
You must either update the app for OneDrive, Dropbox, or any other cloud service and if it does not solve the problem, you must delete the software and then reinstall the most recent version of it.
This is the last resort if the two solutions above do not work for you. You can opt to use one of the 7 best uninstaller software in order to completely remove the cloud service from your PC.
Why is OneDrive not syncing?
It’s possible that your OneDrive won’t sync correctly across all of your devices due to troubles with the Internet, incorrect passwords, or a simple flaw in the system.
In rather rare cases, it can be an issue across all OneDrive accounts; in this case, you only have to wait until the app developers address the issue.
Did you find our solutions helpful? Let us know in the comments section below.
Yup, it’s another servicing pipeline build for the Windows 11 Insider Dev Channel. This one, build 25236.1010, or KB5021116, comes at the heels of Wednesday’s 25236 Dev Channel update. As usual, there’s nothing new in this servicing pipeline build, and is “esigned to test our servicing pipeline for builds in the Dev Channel.”
A small servicing update for #WindowsInsiders in the Dev Channel. Build 25236.1010 is available. This update does not include new content and is designed to test our servicing pipeline. https://t.co/uZBAcnRefs ^BLB
As a reminder, build 25236 added tips on how to use the Search Box, included a bunch of fixes, and introduced some new stuff for the Microsoft Store app. Feel free to go ahead and help Microsoft test how new builds are deployed by downloading and installing this latest attempt to service the pipeline!
If your PC won’t boot and stays stuck in a restarting loop, you’ll have to address corrupt system files, problematic updates, and possibly disable interfering startup apps.
To access such settings and tweaks, you’ll most likely have to access Windows in Safe Mode. Below, we’ll walk you through all the steps necessary to start your system correctly. Just follow along.
How to stop the PC from being stuck on restarting?
Power cycle your computer: Hold the power button for 5–10 seconds, unplug it, and disconnect all peripherals. Wait 1 minute, then restart.
If the issue continues, read on.
Quick Video Summary of the Steps Needed to Fix Laptop Stuck On Restart
1. Boot the computer in safe mode
Long-press the power button of your computer until you’re completely sure it shuts down.
Wait a few seconds, then turn it back on.
When booting starts, pressF8 repeatedly until you get the Advanced Boot options.
Select Startup Settings.
Type F4 to enable Safe Mode, then clickRestart.
If stuck on restart, try entering Safe Mode. This will only load essential system files and drivers. The PC might boot because no third-party apps that might interfere will be used.
2. Run an SFC scan
Search for Command Prompt in the Start menu.
Right-click on it and select Run as Administrator.
Type sfc/scannow and Press Enter.
The System File Checker (SFC) will identify and fix corrupt system files which can cause Windows being stuck on restart.
3. Revert recent updates
Search for Control Panel in the Start bar.
SelectRecovery.
Select Open System Restore.
HitNext in the incoming window.
You’ll get a list of all Restore Points saved. Select one from a date before the day you updated your OS and click Next to confirm.
Confirm your choice and wait for the process to complete.
This will restore your PC to the state it was before you updated it. So if it started being stuck on restart after an update, this trick should fix it.
If this is the case, but you still want to update your OS, check the following solution.
4. Restart the stuck update
Press Windows + R to open Run, type cmd, and press Ctrl + Shift + Enter to open Command Prompt with administrative privileges.
Click Yes in the UAC prompt.
Type the following command and press Enter: net stop wuauserv
Now, input the following commands and press Enter after each: cd %systemroot%ren SoftwareDistribution SD.oldnet start wuauserv
If the computer is stuck restarting during/after update, reinitiating the process should do the trick.
5. Disable startup apps
If the laptop is restarting for a long time, press Ctrl + Shift + Esc to launch the Task Manager, and select the Startup apps tab from the left.
Locate the programs that read Enabled under the Status column, select them, and click on Disable.
While disabling startup apps, keep two things in mind. First, disable all third-party apps that appear in the list.
Second, if any critical program or process is listed and enabled, keep it that way. This should fix the Windows 10 is stuck on restarting issue.
6. Check the RAM
Run the built-in Windows Memory Diagnostics tool. It helps identify issues with the RAM and automatically fixes things.
For a more detailed investigation of RAM issues, you could run Memtest86+, an open-source tool that runs many tests on the memory sticks, even individually, and lists each problem.
If the RAM is faulty, replacing it should get things running if the computer keeps restarting randomly.
7. Update your drivers
If the computer is taking forever to restart, pressWindows + Xand choose Device Manager.
Select a category to see the names of devices under it.
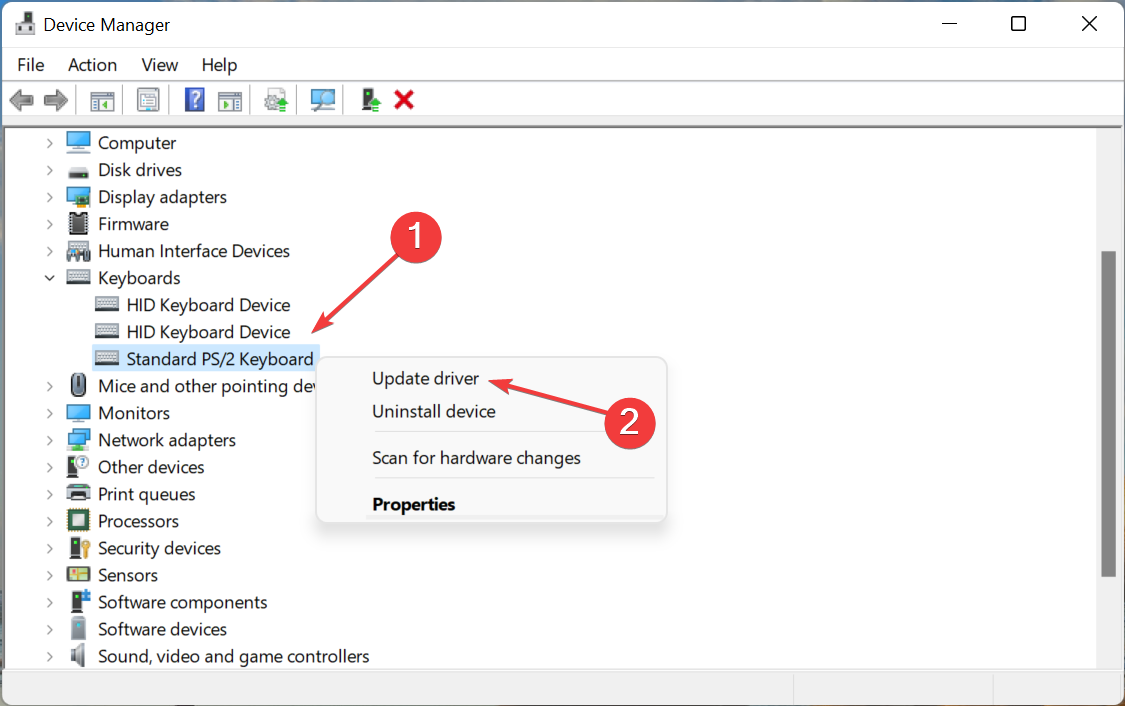
Now, right-click on the one you believe is causing the problem and select Update driver.
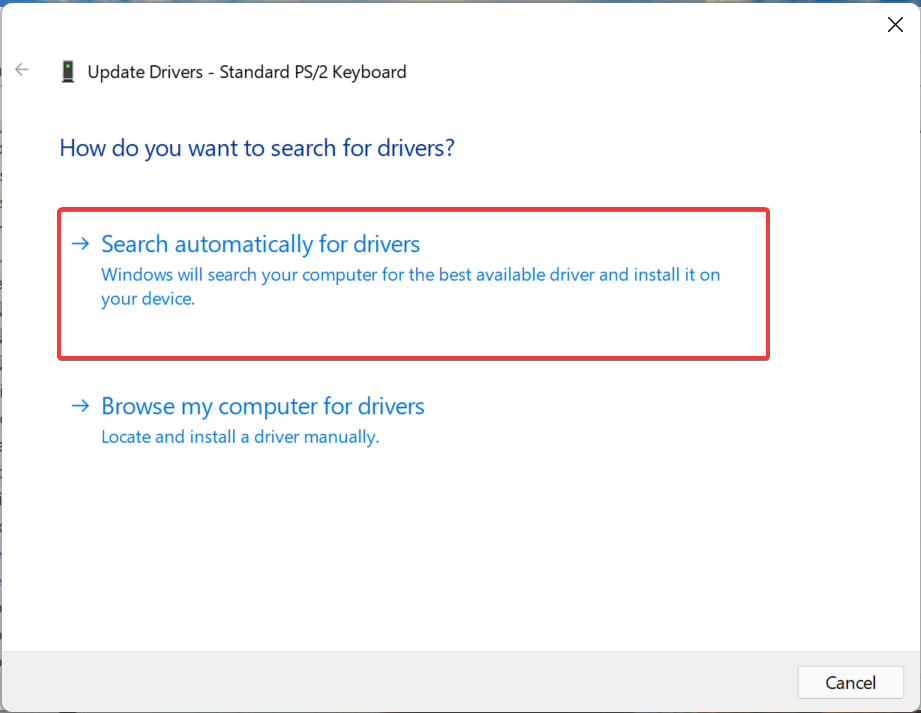
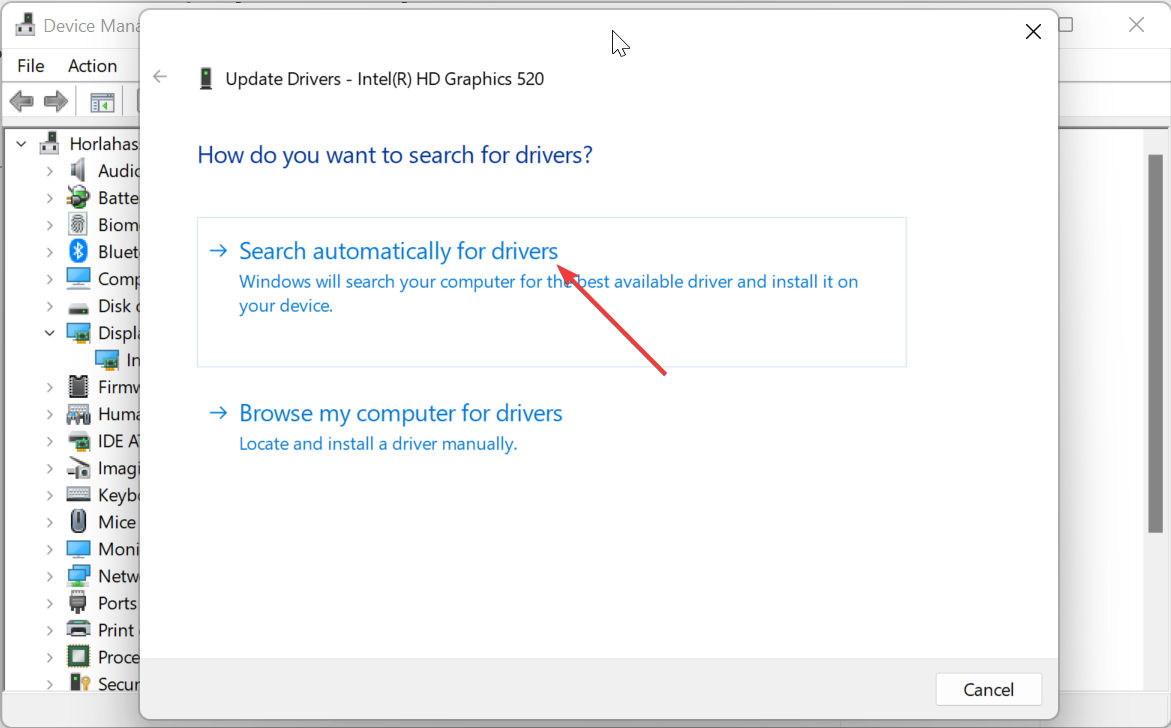
Select Search automatically for drivers and wait for Windows to automatically locate the best driver on the computer and install it.
Repeat the process for all devices.
A driver conflict might cause Windows getting stuck on restart. Updating device drivers might get rid of the issue.
1. Press Windows + R to open the Run dialog box, enterControl Panel in it, and then click on OK.
2. Click on the View by dropdown menu and select Large icons from the list.
3. Choose Troubleshooting.
4. Select View all from the left.
5. Click on System Maintenance.
6. Follow the other on-screen prompts to complete the process.
7. Once done, verify if the computer keeps restarting randomly. If yes, try the next solution.
If your computer is stuck restarting, you should try using the Windows Troubleshooter. All Windows PCs have a built-in Troubleshooter that can detect and fix problems on your PC and it’s likely to solve your problem.
9. Update the BIOS
If nothing so far has worked, and the Dell/HP/etc.. laptop is stuck on restarting, you should update the BIOS.
This is an intricate and critical process, so we recommend you practice extra caution and follow the steps as it is. For more help updating the BIOS, read the instructions on the OEM’s website.
The methods listed above should fix things when the computer keeps restarting randomly. Also, you may try reinstalling Windows if you are sure it’s a software-related issue.
After fixing the restart loop or reinstalling the new OS, we recommend to boost your Windows PC’s performance just to make sure you avoid similar problems in the future.
Many reported that the Xbox app won’t let them sign in. Could be a Xbox services issues, local files problem or even faulty credentials. Find below working solution to address this login problem.
What can I do if Xbox app won’t let me sign in?
? Removing recent updates, such as KB5034441, and installing them again can help. Ensure that all Xbox services are starting with Windows to eliminate potential issues. Also, check your account settings on Xbox.com and, if necessary, request a password reset.
If you’re still can’t sign into your Xbox account, check the more advanced fixes below:
1. Reinstall Gaming Services
Press the Windows key + X and choose Windows PowerShell (Admin).
Run this command in order to remove Xbox Gaming Services: get-appxpackage Microsoft.GamingServices | remove-AppxPackage -allusers
After that, run start ms-windows-store://pdp/?productid=9MWPM2CQNLHN
When Microsoft Store starts, choose the option to install Gaming Services.
If you don’t feel comfortable reinstalling Gaming Services, you can restart them by running these commands:
sc stop GamingServices sc start GamingServices
2. Make sure that Xbox services aren’t disabled
1. In the Search bar type services, then select the Services app from the list of results.
2. Scroll to the bottom of the list and locate the following services: Xbox Live Auth Manager, Xbox Live Game Save, Xbox Live Networking Service.
3. Double-click the Xbox Live Auth Manager service to open its properties.
4. Find the Startup type section and make sure it’s set to Automatic. If the service isn’t started, click Start to start the services. Save changes.
5. After you’ve done, do the same for Xbox Live Game Save and Xbox Live Networking Service.
Lastly, check if Xbox services are starting with Windows by doing the following:
Press Ctrl + Shift + Esc to open Task Manager.
Go to the Startup tab.
Locate Xbox App Services. If it’s set to Disabled, right-click it and choose Enable.
3. Clear the local Xbox identity data
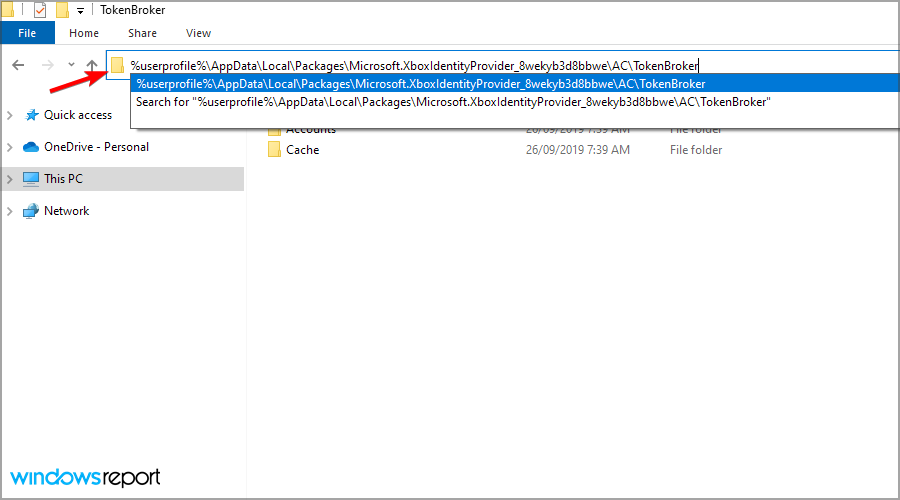
Open File Explorer using the Windows key + E shortcut. In the address bar paste the following line: %userprofile%\AppData\Local\Packages\Microsoft.XboxIdentityProvider_8wekyb3d8bbwe\AC\TokenBroker
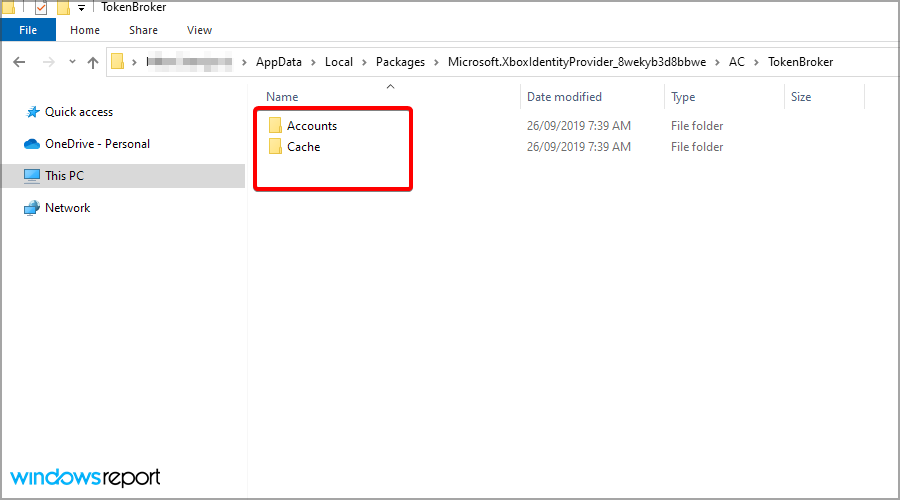
If there are Accounts and Cache folders available make sure that you delete them.
After removing the cache, try to start the Xbox app again.
Avast Driver Updater is a device management tool that helps to detect missing, old, corrupt, or outdated drivers in your PC.
Also, it fixes them to work smoothly with connected devices such as printers, scanners, and other devices. We also have a recommended list of the best Windows 11 driver updaters.
Is the Avast Driver Updater free to use?
The Avast Driver Updater is a paid product that requires a subscription to use. However, new users are allowed a free trial of all the software features for a limited time.
Once the free trial expires, you’ll need to pay for a subscription to use the software features.
How do I download and install the Avast Driver Updater?
Before installing the driver updater, ensure you do not have other security software running on your computer. Doing so may hinder the updater from working.
However, if you do, uninstall it and reboot your computer to allow the updater to run smoothly.
The computer has rebooted from a bugcheck is one of the Blue Screens of Death errors in Windows 11. As the name indicates, this error occurs after having performed a reboot.
The primary causes of the error include outdated or corrupt system drivers, memory issues or insufficient primary storage. To detect and fix these problems, you need to run Mdsched.exe to check the memory.
Any of the above may make your system freeze, enter a booting loop, restart frequently, or even crash completely. Running a BSoD fixer tool is always a good idea but you might want to see some more helpful steps.
How do you fix the computer has rebooted from a Bugcheck?
1. Uninstall and reinstall drivers
Press the Windows key + R, type devmgmt.msc, and click OK to open Device Manager.
Double-click any option from which you want to remove drivers to expand it.
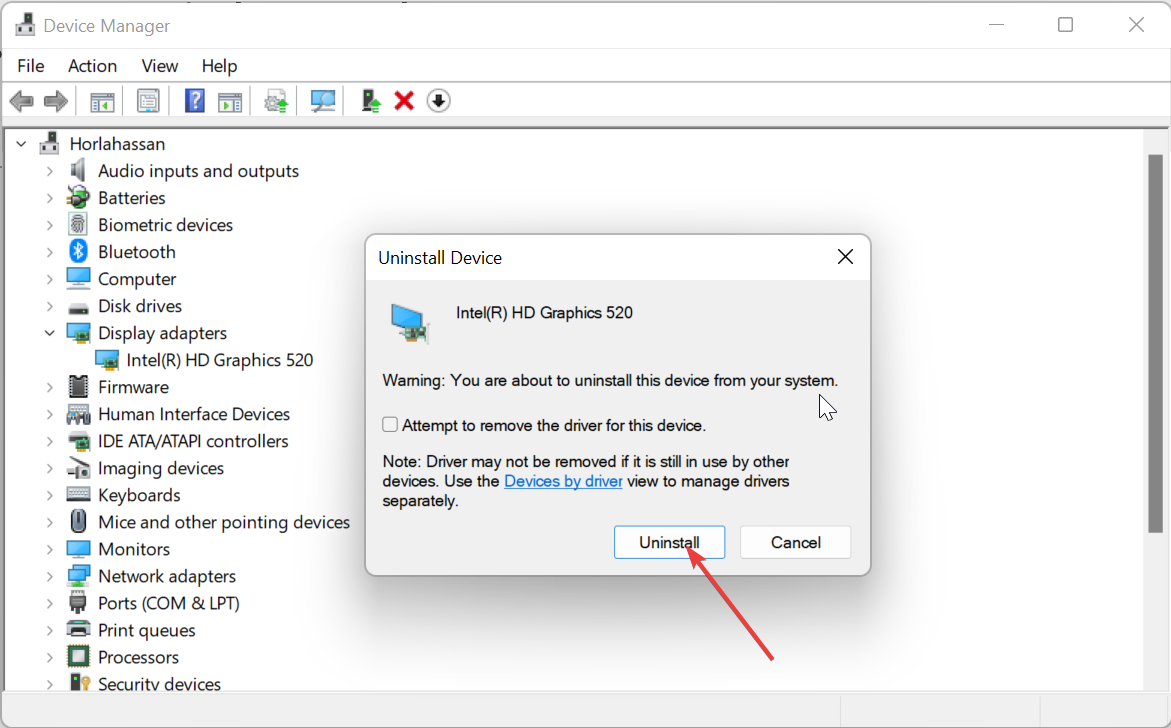
Now, right-click on the faulty driver and select Uninstall device.
Now, click the Uninstall button to confirm the action.
Finally, restart your PC and the driver will be reinstalled automatically.
If you have recently installed a peripheral device on your computer, it is a good idea to remove it first. Next, you need to uninstall the device from the Device Manager to fix the computer has rebooted from a bugcheck 0x00000d1 issue.
Take note of your graphics and audio drivers especially as they have been reported to cause the problem.
If you can’t manage to remove them without any problems, you can also pick a dedicated tool from our list including the best driver removal software.
2. Update your drivers
1. Launch Device Manager.
2. Double-click any option (Disk Drivers, Keyboards, Mice, etcetera) you want to update drivers for.
3. Right-click each of the drivers there and select Update driver.
4. Select Search automatically fordrivers.
5. Install the available updates after the scan is complete.
If you have not updated your drivers for long, they might be the cause of the computer has rebooted from a bugcheck with the error code 0x00000116, and when you get the error on Server 2012.
The first way to update your drivers is via Device Manager and it takes very few minutes.
Aside from using the built-in driver updater, you can download and install the drivers from the manufacturer’s website. However, there is always the risk of installing the wrong drivers.
To prevent this, we advise you to use a dedicated tool, such as Fortect Driver Updater. This software will update your drivers automatically with the latest options from a large, always-updated database.
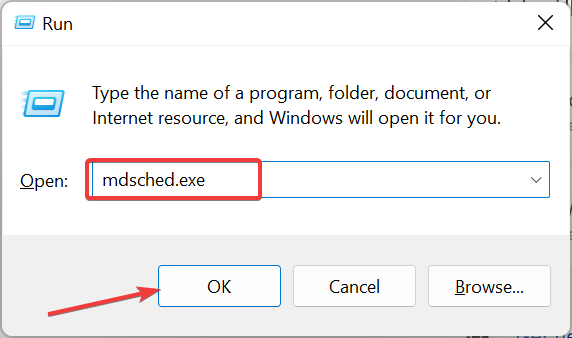
Press the Windows key + R to start the Run utility and type mdsched.exe.
Press Enter or click the OK button.
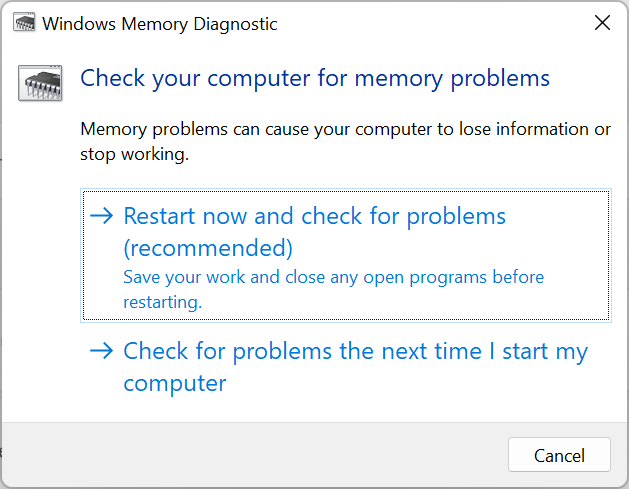
Click on one of the options from Restart now and check for problems or Check for problems the next time I start my computer.
If this does not work, you can use MemTest to check your memory for errors.
The computer has rebooted from a bugcheck 0x50, event id 1001 error can also be caused by a memory fault, so you should check your memory by performing this troubleshooting as instructed above.
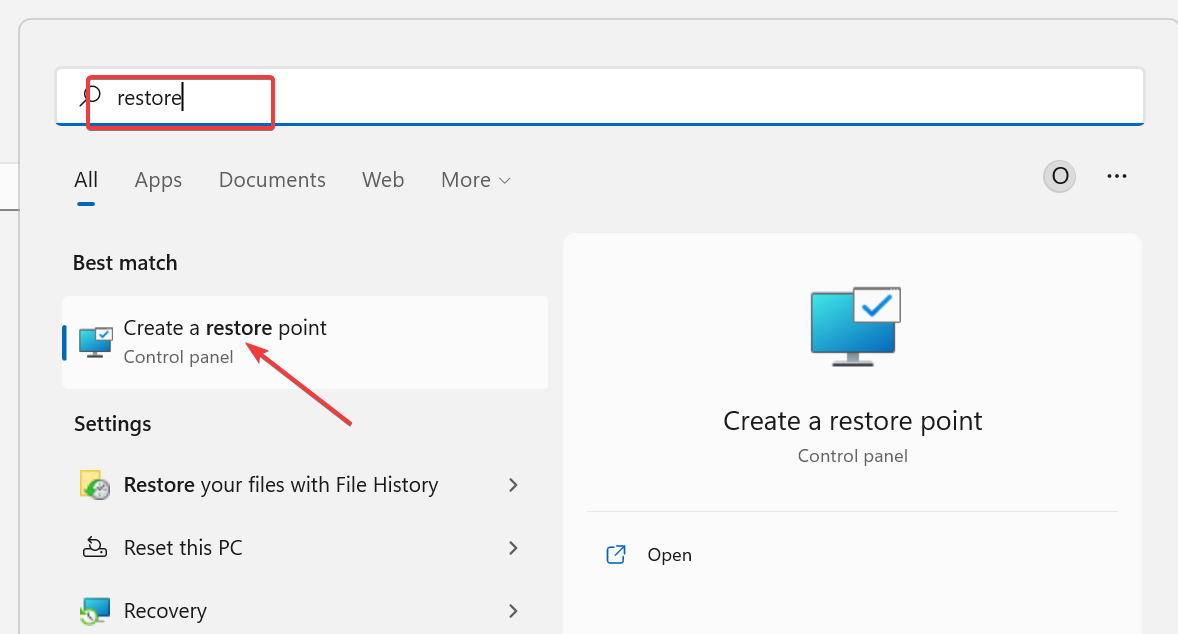
Press the Windows key, type restore, and click on Create aRestore Point option.
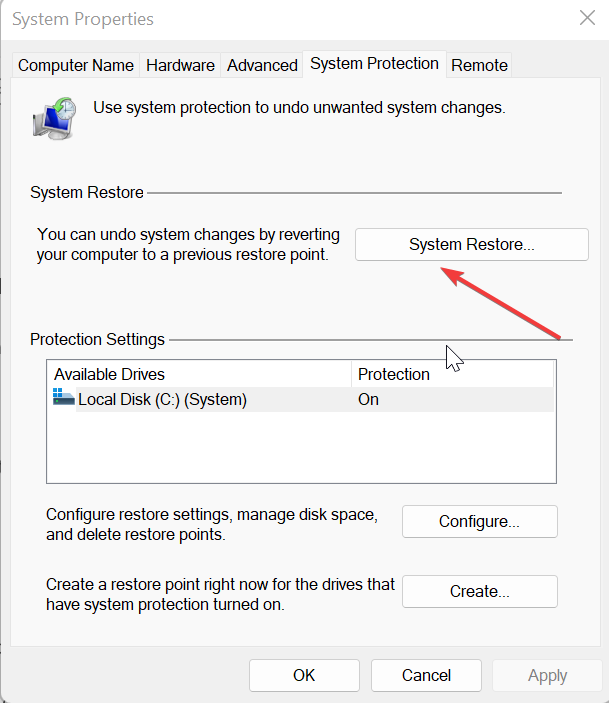
Click on the System restore button.
Click the Next button when prompted.
Select a point that was created before your computer started to crash and click Next.
Read the warning message and click on Finish.
Wait for the restore point to restore your PC to an earlier state where it was working without any issues.
Using a previous restore point can bypass this problem completely but you might not find a useful one. After you manage to clear the problem, don’t forget to create a new restore point to have at hand for the next time your device runs into a problem and needs to restart.
Here are the most common scenarios when you encounter a bugcheck BSoD:
Various Windows versions: the computer has rebooted from a bugcheck Windows 11
the computer has rebooted from a bugcheck Windows 10
Servers: the computer has rebooted from a bugcheck Server 2012
the computer has rebooted from a bugcheck Server 2016
Specific events: the computer has rebooted from a bugcheck Event ID 1001
the computer has rebooted from a bugcheck 0x00000d1
the computer has rebooted from a bugcheck memory DMP
Thumbnails are helpful, but unfortunately, many reported that thumbnail previews are not showing in Windows 10. Many others complained that folder thumbnails are not showing in Windows 11 either. Here, we will show you how to fix this issue permanently on your PC.
Why are my thumbnails not showing the pictures?
Here is why Windows 10 thumbnails are not showing:
Wrong File Explorer Options settings or bugs within the app
Broken or corrupt system files, or issues with the folder settings
Press Windows key + X and choose PowerShell (Admin).
Type the following command and press Enter: sfc /scannow
Wait for the scan to complete. Note that this process can take up to 15 minutes, so don’t interrupt it.
4. Use Disk Cleanup to remove your thumbnails
Press Windows key + S and enter disk cleanup. Select Disk Cleanup from the menu.
Once Disk Cleanup starts, you’ll be asked to select the drive you wish to scan. Select your System drive. By default, it should be C, and click on OK.
Wait while Disk Cleanup scans your drive.
Check the box for Thumbnails from the list and click on OK. A few users are also suggesting selecting Temporary files, so you might want to do that.
If you’re an advanced user, you can remove the thumbnail cache by using Command Prompt as shown below:
Now open Command Prompt as administrator.
Type the command below and press Enter: taskkill /f /im explorer.exe
Now, type the following commands and press Enter after each: cd /d %userprofile%\AppData\Local\Microsoft\Windows\Explorer attrib -h thumbcache_.db del thumbcache_.db
After running these commands, restart your PC and check if the problem still appears.
This solution can also be useful to take care of PDF thumbnails that are not showing on Windows PCs. Such issues may affect any type of file and prevent the user from organizing their desktop and local files.
Press Windows key + R enter gpedit.msc, and click on OK.
In the left pane, navigate to User Configuration and then Administrative Templates. Lastly, select Start Menu and Taskbar.
In the right pane, locate and double-click Turn off taskbar thumbnails.
Select Disable. Now, click on Apply and OK to save changes.
There’s also another method you can use to fix the missing thumbnails. To do that, follow these simple steps:
Start Group Policy Editor.
In the left pane, navigate to User Configuration. Expand Administrative templates and select Windows components. Next, click on File Explorer.
In the right pane, double click the Turn off the display of thumbnails and only display icons.
Now, select Not Configured or Disabled. Finally, click on Apply and OK to save changes.
Once you change these settings, check if thumbnail previews not showing in Windows 10 issue is still there.
8. Scan your system for spyware
Press the Windows key + I to open the Settings app. Select the Update & Security option.
Click Windows Security in the left pane.
Choose Virus & threat protection.
Now, select Scan options.
Finally, click the Scan now button.
To perform a detailed scan, we will recommend using dedicated antivirus software, such as TotalAV. This tool uses cutting-edge technology and advanced machine learning to detect and remove the most stubborn malware on your PC.
9. Set a different default application for affected files
Right-click the problematic file and choose Open with. Next, select Choose another app from the menu.
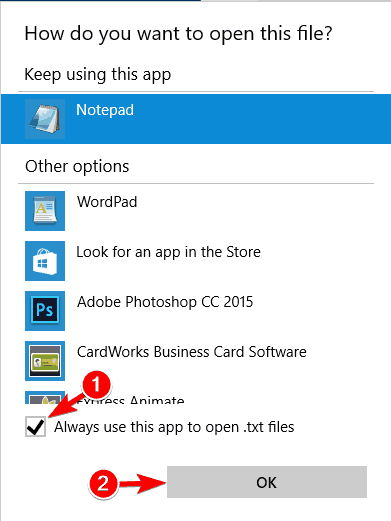
Select the desired application and check Always use this app to open files option.
Now, click on OK to save changes.
After making these changes, check if the problem is resolved.
10. Modify your registry
Press Windows key + R, type regedit, and click OK.
In the left pane, navigate to the left pane: HKEY_CURRENT_USER\Software\Microsoft\Windows\CurrentVersion\Policies\Explorer
In the right pane, look for DisableThumbnails DWORD. If the DWORD isn’t available, right-click the space in the right pane and choose New and then select DWORD (32-bit) Value.
Enter DisableThumbnails as the name of the new DWORD.
Double-click the newly created DisableThumbnails DWORD to open its properties.
Now, set the Value data to 0 and click OK to save changes.
After making these changes, the problem with thumbnail previews not showing in Windows 10 should be gone.
11. Prevent Windows from deleting your thumbnail cache
NOTE
This solution can be potentially dangerous, so keep in mind that you’re changing these settings at your own risk.
Press Windows key + R type appdata, and click OK.
Navigate to the Local\Microsoft\Windows
Locate the Explorer directory, right-click it, and choose Properties from the menu.
Navigate to the Security tab and click on Advanced.
After Advanced Security Settings opens, click on Add button.
Now click on Select a principal.
In the Enter the object name to select field enter SYSTEM.
Click the Check Names button. If everything is in order, click on OK.
Set Type to Deny and click on Show basic permissions. Uncheck all options except Delete subfolders and files and Delete. Click OK to save changes.
Thumbnails are pretty helpful, and many users prefer using them over icons. If, for some reason, thumbnail previews aren’t showing, this guide should help you restore thumbnails in Windows 10.
A Hex editor is a must-have tool for any programmer. It is used to view and edit the raw data of computer files. Hex editors are also useful for modifying specific parts of binary files, such as device drivers or graphics resources.
In this guide, we’ll walk you through some of the best hex editors for PC that you need to know about. We’ll cover what they are and their key features and capabilities so that you can make an informed choice.
Why do I need a hex editor?
Modern computers are complex machines, and it’s not uncommon for them to have problems. If you’re having trouble with your computer, or if you just want to see what makes it tick, you might want to look at the files that make up your operating system.
These files are stored on your hard drive in binary format, and they’re not easy for humans to understand. This is where a hex editor comes in. A hex editor lets users open and edit binary files. It works by translating those binary files into text that can be read by humans.
This is important because you can use a hex editor to fix errors in your operating system or other programs. You can also use it — as long as you know what you’re doing — to change some details about how your computer operates.
Other benefits of using a hex editor include:
Viewing and editing binary files – You can view and edit binary files, such as executable files, Microsoft Office documents, PDF documents, MP3 files, and so on.
Searching specific data in a file – If you are looking for a specific string of text in a file, then it will be easier to find it using a hex editor than any other tool.
Deleting unwanted data from a file – If you want to remove unwanted data from an executable program, you can do so with a hex editor.
Modifying executable programs – You can modify an executable program by changing its code or its data with the help of a hex editor.
HxD is a popular free hex editor that is used by many IT professionals and developers. It has been around for years, so it’s definitely proven its worth.
The program has all the features you’d expect from a hex editor: searching for specific values in a file, changing data, copying data to another location, etc.
WinHex is another popular option with advanced searching capabilities and support for multiple languages. It is a powerful hexadecimal editor with many advanced features that were designed to handle any kind of binary file, in any size and in any quantity.
Easy to use, fast and flexible, WinHex is the ideal tool for Windows users who need to work with raw disk sectors, device drivers, or other binary data files.
Hex Workshop is an advanced hex editor that can edit files of any size. The program is easy to learn, but it has many powerful features that allow you to work with even large files quickly and efficiently.
The interface is very clean and easy to understand. It includes all the basic functions you would expect from a hex editor — editing and modifying data, copying and pasting, comparing files, and more. You can also create new files and folders, as well as delete them if needed.
The main feature that sets UHex apart from other hex editors is its ability to work with multiple files at once. This makes it easy to open multiple files at once, and even compare them with each other.
It makes it a great tool for developers who are working on projects that involve multiple files, as it makes it easier for them to see how changes affect different parts of a file at once.
Hackman is one of the best free hex editors for Windows. It is a very simple application that allows you to edit files in hexadecimal format.
The program has some basic features such as searching, replacing, and inserting text into a file. In addition to editing files in hexadecimal format, it also supports editing files in ASCII and Unicode formats.
UltraEdit is a powerful and flexible text, hexadecimal, HTML, and code editor. It’s not just an editor, it’s a tool to help you do your work better. UltraEdit is designed to provide the power and flexibility that experienced programmers need in a simple interface that’s easy to use.
It also includes a built-in FTP client that allows you to edit files on remote web servers without needing to use your browser or any other third-party application.
Hex Editor Neo is one of the best free hex editors for Windows, Mac and Linux. It’s a lightweight but full-featured tool that provides a great user experience.
If you are looking for an advanced hex editor that offers many options for editing binary files, this could be the right choice for you.
HexEd.it is a browser-based offline and online hex editor that allows you to edit files, copy data from one file to another and convert between binary, octal, decimal, and hexadecimal formats.
It has features like file upload, edit, and download, text search and replace, multiple undo, etc. The program allows you to edit files of any size directly in the browser without downloading anything.
Hexplorer is a free and open-source hex editor that can be used to view, edit, and convert binary files. It is written in Java and can be run on Windows.
Hexplorer provides many useful features including a binary file viewer, hexadecimal viewer, filter, and compare tools.
Cygnus Hex Editor is a freeware hex editor for Windows. It has basic features like editing, copying and pasting, printing, and saving files in different formats.
This software supports the editing of files up to 2 GB in size and allows inserting and deleting data from files. It also allows searching for and replacing specific data within the file. The software has an intuitive user interface, which makes it easy to use even by inexperienced users.
You have plenty of options if you’re looking for the best hex editor. We’ve shared information about our top picks here, and provided you with an overview for each. Hopefully, these reviews have given you a good sense of which option is likely to work best for your needs, and why.
Features are important and there’s no point in having a super fast hex editor if it doesn’t have some useful options. The top-ranked editors in our list had a pleasing combination of speed, bug-free coding, and a good range of options to edit files.
Next week’s lineup of new Xbox releases is looking pretty sweet, with a couple of big-name entries on the roster. And at least a dozen other games are headed to Xbox between November 7-11. Let’s have a look at what’s coming to Xbox.
Football Manager 2023 (PC) – November 8 (available day one with Game Pass)
So which of these games have got you excited for next week? No doubt Sonic Frontiers will be the highlight for many; for others it will be Return to Monkey Island. Or perhaps there is a sleeper hit waiting in the lineup. Anyway, let us know your thoughts on next week’s Xbox games down in the comments.
Here’s how to enable the Microsoft Teams Meeting Add-in in Outlook so you can schedule Teams meetings directly from your calendar. If the button is missing or greyed out, don’t worry, you can re-enable it manually in just a few steps.
How can I re-enable the Teams meeting add-in in Outlook?
Now, navigate to the Add-ins tab, select Disabled items under the Manage dropdown menu, and then click on Go.
If you see Teams listed here, select it and then click on Enable.
Save the changes and restart Outlook.
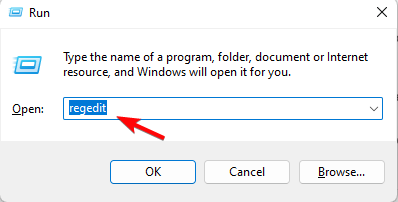
Press Windows + R to open Run, type regedit, and then hit Enter.
Paste the following path and hit Enter:Computer\HKEY_CURRENT_USER\Software\Microsoft\Office\16.0\Outlook\Resiliency\DoNotDisableAddinList
Now, right-click on the empty portion, hover the cursor over new, select DWORD (32-bit Value), and name it TeamsAddin.FastConnect.
Once done, double-click on it, change the Value data to 1, and then click on OK.
Register Teams as the chat app for Office
Open Microsoft Teams.
Click on your profile pictures and select Manage Account.
Go to the General tab and check the box next to Register Teams as the chat app for Office (requires restarting Office Applications).
Restart Teams and Office.
After re-enabling the Teams add-on, you should also make sure to set it as the default chat app for Office. Doing this prevents contradictory settings from interfering with the add-in’s functionality.
That’s it! The Teams add-in would be enabled and remain that way, courtesy of the Registry changes you made here. But make sure to keep checking for updates and install it as soon as one is available.
For those who still don’t see the option, Microsoft has released a workaround to get things running. Here, you will have to make sure that the Teams plugin is added to Outlook and enabled.
Microsoft has finally released a fix for one of the many issues reported by users, and we hope others too are addressed soon. Until then, share your experience with Microsoft Teams in Outlook and whether you received an update.
A lot of Windows users often complain of high CPU usage on their devices especially if they are gamers or do a lot of work that takes a toll on their CPU and GPU. It gets worse if you have an old processor that can’t handle the workload.
That’s why Microsoft introduced the hardware accelerated GPU scheduling feature. It enables you to schedule your CPU and GPU resources by prioritizing tasks to be executed first for optimal performance.
Hardware accelerated GPU scheduling is a feature that was first introduced in Windows 10 and is also available in Windows 11. The question of whether to turn hardware accelerated GPU scheduling on or off depends on your system.
The GPU scheduler allows multiple jobs to share the GPU at once so that it can be used to its full potential. This can help performance, especially on slower systems where not all GPUs are being utilized by a single job.
This means that you need GPU scheduling if you want to get the most out of your graphics card. But what happens if you turn off GPU scheduling? Should you leave it on?
Here are some benefits of GPU scheduling:
Increased performance – A larger number of tasks can be completed at once when there are more GPUs available for processing. This increases productivity and reduces wait times for results.
Faster processing – If you have multiple GPUs on your computer system, they can each handle different parts of your workload independently and complete them faster than a single large processor would.
Reduced power consumption – A system that uses GPU scheduling can use less power because it doesn’t have to run all of its components at once.
Improved responsiveness – Because of its improved performance, users will see better responsiveness from their systems when they use them.
Reduce load on CPU servers – GPUs are often idle or underutilized when they could be put to good use. By assigning work to GPUs proactively, you can ensure that they don’t sit idle.
In general, turning on GPU scheduling is a good thing because it uses its power more efficiently. If your graphics card isn’t being used to its full potential, you won’t see any performance benefit from turning it off.
What is hardware accelerated GPU scheduling gaming?
GPU scheduling is one of the most important features of your graphics card’s driver. It’s part of the graphics pipeline, and it’s responsible for deciding what parts of the rendering pipeline to assign to each GPU core.
Hardware accelerated GPU scheduling gaming is a new approach to managing the GPU. The idea is to optimize gaming performance by using hardware scheduling, or in other words, scheduling your workload on the GPU.
Gaming on your PC or laptop is all about graphics, and the better your graphics card, the better your game will look. If you have a powerful desktop, you can get away with a mid-range graphics card.
However, if your laptop doesn’t have a dedicated GPU, it’s not going to be able to support high-end games. In fact, GPU scheduling on an old GPU can cause high latency between frames, or even stuttering during gameplay.
This happens because the scheduler may be busy with other processes, so it cannot immediately respond to requests for graphics rendering. If this happens often enough, it can cause the game to lag or freeze up completely.
Therefore, If you have an older computer with limited system resources, then we would recommend turning off the GPU scheduling and trying other ways to speed up your PC to boost performance.
However, if you have a newer computer with plenty of RAM and CPU power, then you should turn it on. This will help keep your games running smoothly without causing any issues with other applications or processes running on your system.
How can I turn on/off GPU Scheduling?
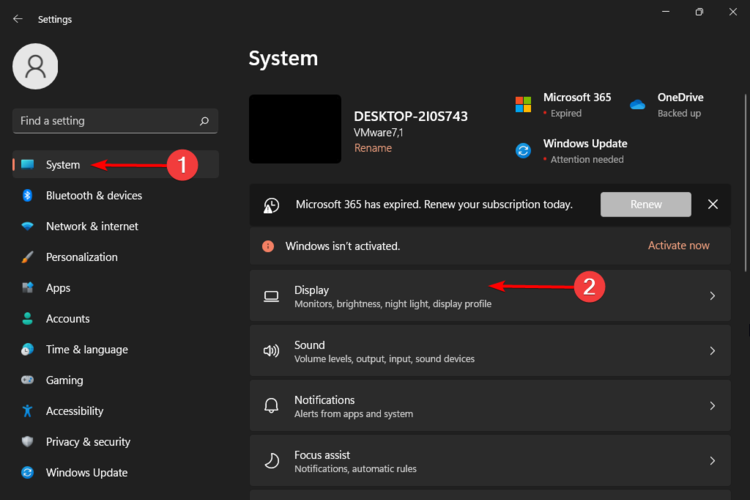
1. Use the Settings app
Hit the Windows key and select Settings.
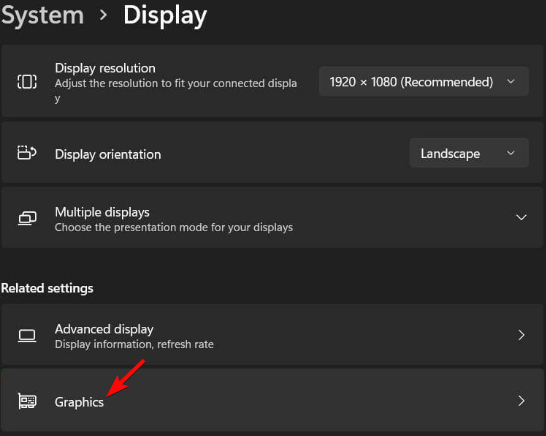
Click on System on the left pane then Display on the right pane.
Scroll down and select Graphics.
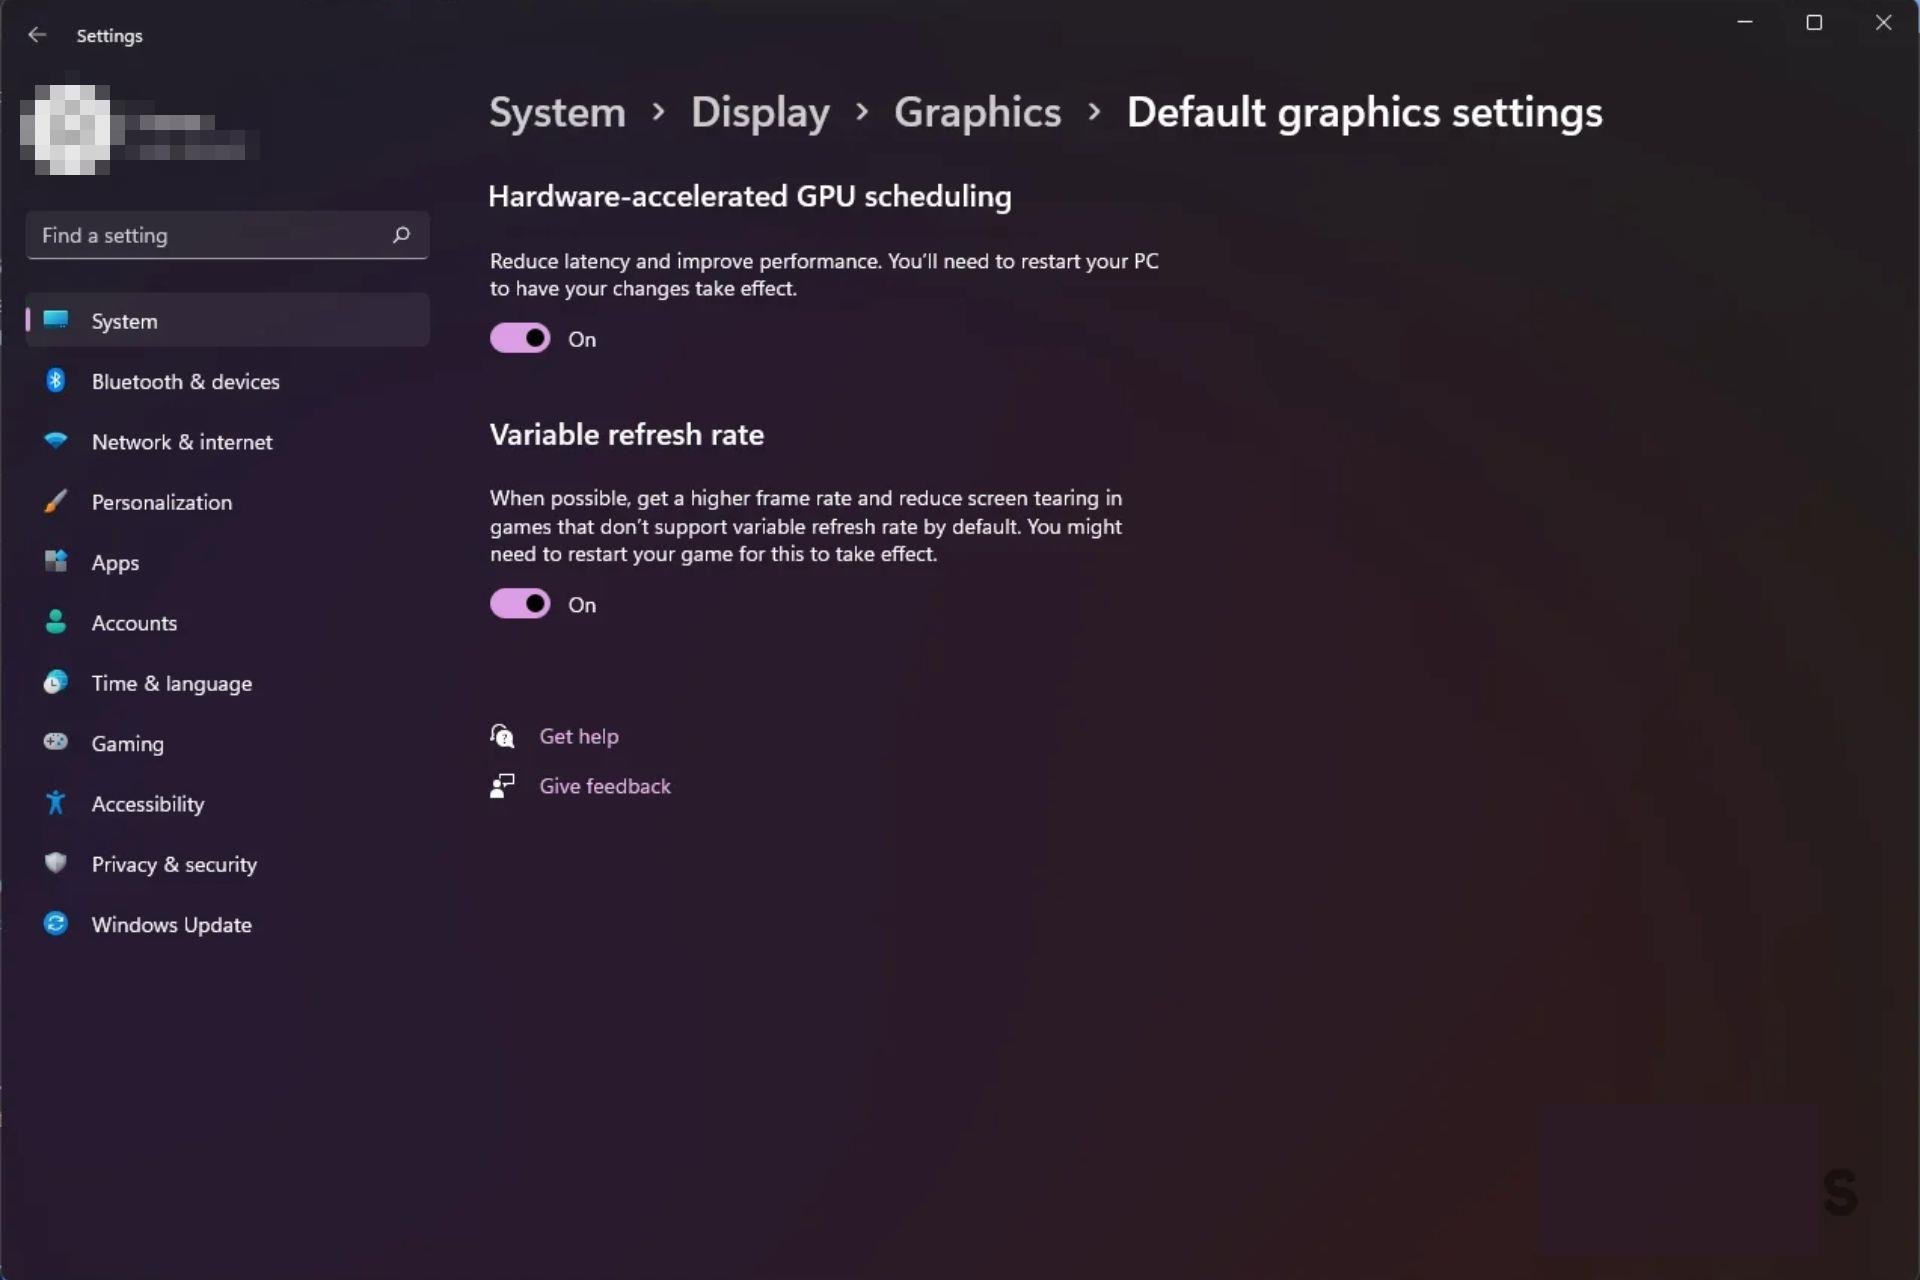
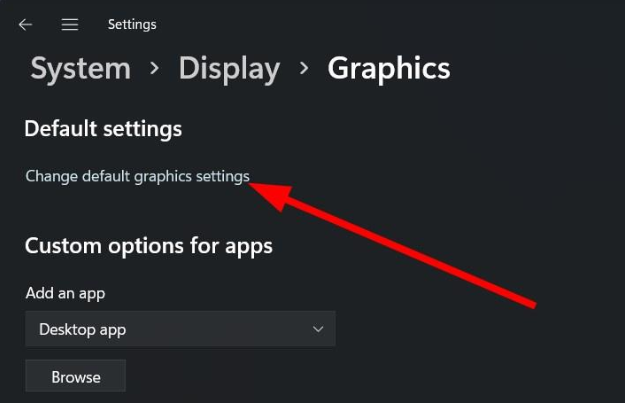
Select the Change default graphics settings option.
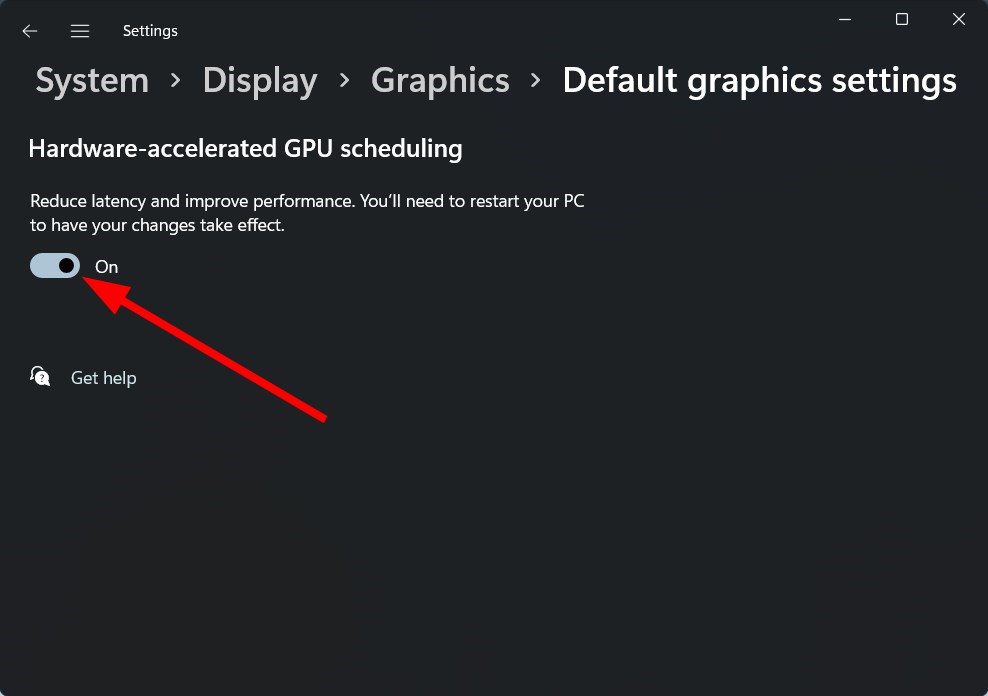
Now, toggle on or off the Hardware-accelerated GPU scheduling option.
2. Use Windows Registry
Hit the Windows + R keys to open the Run window.
Type regedit in the dialog box and hit Enter.
Navigate to the following location: Computer\HKEY_LOCAL_MACHINE\SYSTEM\CurrentControlSet\Control\GraphicsDrivers
Double click on the HwSchMode, type in 2 in the Value data to enable then press OK.
Does hardware accelerated GPU scheduling reduce FPS?
GPUs are designed to be used for graphics and video processing. However, they can also be used to speed up other types of processing as well.
With hardware accelerated GPU scheduling, a process running on the CPU will offload some of its work to the GPU instead of doing it all itself on its own processor.
This means that some of the load is moved from one processor to another, allowing both processors to do less work and therefore complete their tasks more quickly. The advantage here is that it frees up system resources (such as RAM) so that other processes can run better.
You, therefore, have nothing to worry about when it comes to your FPS drops and stuttering. The only time hardware accelerated GPU scheduling could cause stuttering and possibly affect your performance is if you have an older computer and the game is running too slow, to begin with.
Even so, the difference will be barely noticeable. Still, you can always incorporate FPS booster software if you are worried about it affecting your gameplay.
If you are looking to explore the Hardware accelerated GPU scheduling feature, you may have to upgrade your graphics card.
Having an extended monitor setup is a dream and good-to-have setup for gamers and users who are into multi-tasking. However, there are several users who have reported that their 3rd monitor is detected but not displaying in Windows 10.
If you are also among such users and are looking for effective ways to fix it, then you are at the right place. In this guide, we will give you a list of solutions that will help resolve 3rd monitor detected but not displaying in Windows 10 issue. Let us jump right into it.
Why is my 3rd monitor detected but not displaying in Windows 10?
After some research, we deduced a list of common reasons why the 3rd monitor is detected but not displayed in Windows 10 issue exists:
There is some issue with your GPU: Your graphics card settings might have been accidentally tweaked by a third-party program or by yourself.
Might be a hardware issue: Chances are that the monitor that you have connected itself has some internal issues.
The port or cable might be damaged: The HDMI port or cable you are using to connect your three monitors might be damaged.
How can I fix 3rd monitor detected but not displaying in Windows 10?
Before applying any advanced solutions, let us first go through the simple yet effective fixes that might help resolve the problem:
Try a quick restart as this could be because of a temporary glitch or bug.
Check all the connections and ensure that they are secured.
Try using the 3rd monitor solely and ensure that there is no hardware issue with it.
You can also try swapping the position of the monitors.
If the above solutions don’t help then, let us check out the advanced troubleshooting solutions.
1. Enable Extend these displays option
Press the Win + I keys to open the Settings menu.
Click on Display.
If you have connected all your monitors, select the Extend these displays option.
Click on Keep changes.
The settings applied to the selected monitor will appear in blue.
A bunch of users has reportedly fixed this 3rd monitor detected but not displaying issue in Windows 10, by enabling this option.
This is because, when you connect a monitor to Windows 10, it will display inside the Display screen, but won’t work since it is disconnected. You need to enable the option in order to use it.
2. Turn on Set up multiple displays option (For Nvidia GPU)
Plug in all of your displays.
Right-click on your desktop homescreen and select Nvidia Control Panel.
From the left, expand Display.
Click on Set up multiple displays.
Check the boxes for all three monitors connected to your PC.
Save the changes.
Restart your PC and check if this resolves the issue or not.
You need to manually select your monitors inside the Nvidia Control Panel because this issue was fixed for several users by following the above steps.
Right-click on the Start menu button and select Device Manager.
Expand the Display adapters option.
Right-click on the integrated GPU and select Disable device from the context menu.
Reconnect the third monitor and check if this resolves the issue or not.
Integrated GPU aren’t capable of handling graphics-intensive tasks such as support for multiple monitors. There are chances that your integrated GPU is by default selected because of which you aren’t able to use the dedicated GPU, hence no show of the third monitor.
Try disabling the integrated GPU and see if this resolves the 3rd monitor detected but not displaying issue in Windows 10.
4. Update the graphics driver
Right-click on the Start menu button and select Device Manager.
Expand the Display adapters option.
Right-click on the dedicated GPU and select Update driver from the context menu.
Click on Search automatically for files option.
Let the system update the drivers for you and check if this fixes the issue or not.
Chances are that because your graphics driver isn’t updated, you are facing multiple issues with the display.
You can check for driver updates by following the above method. But it will take a lot of time as you have to follow multiple steps.
There is one easy way to check and update all the drivers on your PC in just a few clicks. This can be done by using a third-party tool called Outbyte Driver Updater.
With just a few clicks you can update your drivers, fix broken drivers, find missing device drivers, perform driver backups, and more.
Outbyte Driver Updater
Prevent display issues and easily locate the latest updates for your graphics driver.
Press the Win + I buttons to open the Settings menu.
Click on Display.
Select Advanced display.
Under Choose a refresh rate, select 60Hz.
Even if your monitor supports a higher refresh rate, we would suggest you dial it down to 60Hz, because this has helped several users.
6. Install Windows updates
Open the Settings app by pressing Win + I buttons.
Click Windows update on the left.
Hit the Check for updates button.
Finally, click the Install now button to install all updates available.
7. Use specialized software for multimonitor setup
If you are still having trouble after tweaking the system settings, then we would advise you to check out our recommended software, DisplayFusion.
It is a great tool for Windows that will help you with your multi-monitor setup. It’s easy to use and helps you go through complex features very easy to transform the multiple monitor setup process into a breeze.
DisplayFusion can also be controlled with hotkeys and you can further customize it by using Power User Menu, TitleBar Buttons, etc.
This software also boasts an impressive library of wallpapers and screen savers to choose from which are best suited for a multi-monitor setup.
You don’t need to commit to it from the start. You can still test it under a free trial period.
Windows will now check for available updates. If updates are available, Windows will download them automatically in the background and install them once you restart your PC.
Windows 10 is a solid operating system, but sometimes you might find a certain bug. Microsoft is working hard to fix all Windows 10 bugs, and the simplest way to keep your PC bug free is to install Windows updates.
By default, Windows 10 automatically downloads the updates in the background, but sometimes you might skip an important update.
In case you are having issues with your second monitor, we have a guide that lists some solutions that will help you resolve second monitor not detected in Windows 10 issues.
Also, if you are having issues changing the display resolution on your monitor, then you can check out our guide and fix the issue.
Let us know in the comments below, which one of the above solutions fixed the 3rd monitor detected but not displaying problem in Windows 10.
A few years ago, in order to play Roblox on your PC, you had to download the Roblox browser. This was sluggish and limited in its capabilities.
You didn’t get access to functional tabs, it only allowed you to browse the Roblox website, and the URL bar couldn’t be edited in any way.
Fortunately, those times are long gone. In 2011, Roblox was already compatible with Google Chrome and Mozilla Firefox, but you still needed to install the Roblox browser on your PC in order to get access.
All issues ended a year later when the new release was not tied to the Roblox browser anymore.
In this article, we will try to explore what is the best browser to play Roblox on your Windows 10 PC. The results will vary, depending on the processing power of the computer you’re using.
How to choose a good browser for Roblox?
Making a choice of the browser when you have lots of options can be overwhelming even for the most passionate of us, so let’s discuss the exact principles that need to be considered when making this choice:
Speed – The speed at which you’ll be able to build your dream world in Roblox will depend on the capabilities of your device mostly, but having the right browser for the tasks you want to cover can have a huge impact on the overall experience.
Stability – As being able to run Roblox at full speed is not enough, using a browser that was created for online gaming will ensure that your world-building experience will not be cut off by any errors or pop-ups from your browser.
Privacy – Even though Roblox players are not particularly concerned about their online privacy when playing the game, having a browser that ensures that your data and information are kept safe will considerably impact the health of your system in the long run, and thus your gaming experience.
Online security – Feeling secure in the online environment is becoming a harder task by the day, so choosing a browser with all the qualities mentioned above, while also keeping your identity safe online should be one of the most important elements to consider.
The principles mentioned above were all used in order to curate the list for the best browsers to play Roblox, so make sure to check it out.
How can I play Roblox without installing it?
If you don’t want to install Roblox, you can play the game directly in your browser. No setup required, no headaches, just a couple of clicks. It’s simple and efficient and you can enjoy your game without wasting any time. Check out the best browsers for Roblox that we’ve found.
Opera GX – Best Roblox browser with amazing built-in features
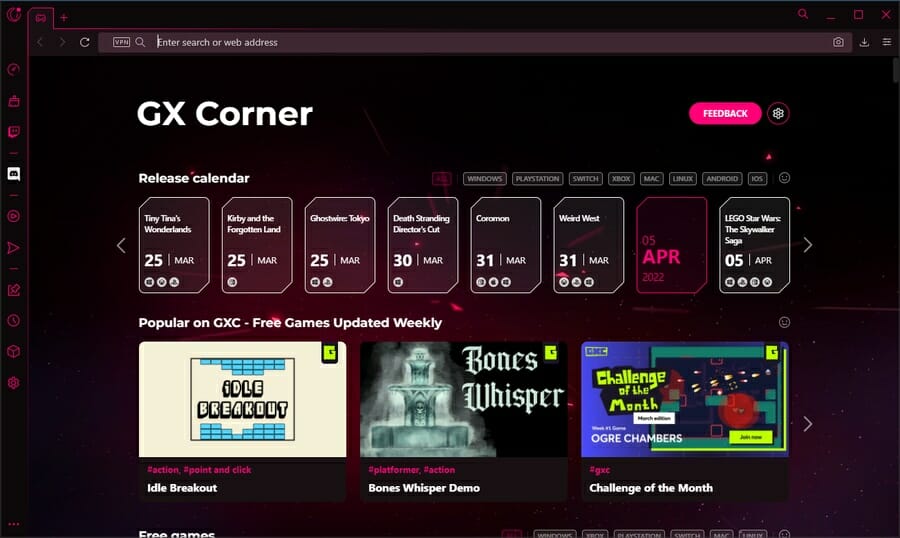
Opera GX is a version of the Opera browser which was specifically designed for gamers. That’s why it ranks in the top position in our recommendations for the best Roblox browser.
Opera GX can be downloaded independently of your main browser. You can save it as the default search engine as well, and use the excellent RAM and CPU limiter features to control how much of your PC capacity you want the browser to take.
We tested all the features incorporated in the Opera GX browser to see how they will affect the gameplay, and we are absolutely stunned at how easy it is to optimize your online gaming experience with this browser.
This browser is extremely useful for everyday usage, offering a wide range of customized themes, sounds, and designs to immerse yourself completely in the gaming state of mind.
As Roblox offers you a wide range of types of servers and games, the only limit is your imagination. No matter if you’re looking to simply build a beautiful house, want to interact with people, or simply want to shoot some avatars, playing Roblox in Opera GX is a truly special experience.
Additionally, with the Discord integration, you make sure that you’re staying connected to your gaming peers. The Twitch integration is also worth mentioning since you might want to use it for further analysis of your designs.
Other notable features that will surely contribute to a positive impact while playing Roblox are the inbuilt ad-blocker, messenger tabs for various social media platforms, and separate workspaces.
Opera GX uses its powerful build-in VPN service to ensure that you can access even geo-restricted servers, or simply use a server near you to keep your privacy while not having the speed affected.
Opera GX
Try Opera GX today and benefit from all the exclusive gaming features by taking your Roblox experience to the next level.
Google Chrome – Large amount of Roblox add-ons and extensions
Google Chrome is one of the most versatile browsers you can use to play Roblox on Windows 10.
If your computer can handle the high impact on the CPU, then choosing Chrome will surely help you experience the full effect of your game.
Note: Users with low-end PCs might experience slow loading speeds and possible crashes when using Chrome to play Roblox. In this case, you might want to check out the other recommended browsers.
This extension found in the Chrome Web Store enhances the Roblox website and can modify the look, while also adding a wide range of additional features.
You can see more details about this extension, and download it to your browser, by accessing the Chrome Web Store BTRoblox download page.
This extension can also add an incredibly wide range of new features to your Roblox experience. You get access to different fixes, a website status shortcut, auto-refresh features, and also message notifications.
UR Browser – Low impact on system resources and fully customizable
The UR Browser is another option to try out when you want to play Roblox. This software option gives you the processing power and speed of Google Chrome and Firefox’s low system impact.
This software is perfectly optimized to adapt to any system configuration and offers an extensive range of customization options.
Besides all these features, UR Browser also offers you unparalleled security and privacy online while giving you quick access to any of its features.
The speed, privacy, processing power, versatility, and customization power found in this software make UR Browser one of the best software to play Roblox online.
This browser is an extremely resourceful tool for a private online experience and it has lots of integrated features to improve your game performance.
With this completely private browser, you’re covered against tracking websites and ads that store your personal data. This way, you get x2 faster navigation online and enjoy your content.
Your security is also increased with the help of an integrated VPN and firewall that encrypts your connection and secures any digital behaviors.
The built-in VPN can secure your network not only on your browser but on other devices like mobiles or on the full system.
In addition, you have a very helpful feature called Brave Talk and it offers a confidential video call platform to hang out with your friends while you’re playing Roblox.
There is no need for other applications or extensions to take the call and it’s fully protected from third-party invasive trackers.
Vivaldi Browser – Amazing interface with customizable elements
Vivaldi is a privacy-friendly option that can provide you with lots of practical features and support to play your Roblox browser games.
This browser puts privacy first and comes with an ad-blocker tool, plus tracking protection from different websites.
You can use effective browsing tools designed to streamline your experience. Thus, you have tab master tools like split-screen tabs, grouping, or favorite tabs in the sidebar.
With the extensions support, it’s possible to enhance your browser with Chrome extensions or other efficient ones.
Moreover, you can enjoy mouse gestures or keyboard shortcuts for your gaming activities and easily access your fun content online.
Mozilla Firefox – A wide range of Roblox add-ons and options
Mozilla Firefox is another great option if you want to play Roblox on your Windows 10 operating system and own a medium-range PC.
The extensions in the Firefox online store are also extensive, covering many topics – wallpapers, fixes, etc.
The wide range of features found in Chrome cannot be compared with the ones found in Firefox, but what this browser lacks in extension variation, it makes up for in the speed department.
If you have a low-end or medium-end PC, Mozilla Firefox is your best bet.
Microsoft Edge has many advanced features and functionalities that can be useful for regular users or gamers.
This browser is the right choice for productivity and an organized homepage so that you can get done all your duties and save time for relaxation.
You also have anti-tracking security tools that block persistent ads using your personal information for useless promotions.
Moreover, this browser will protect you from digital threats like malware or phishing attacks. According to the test by CyberRatings.org, malware protection is even higher than Chrome protection.
There are also privacy instruments such as passwords manager, data breach protection, easier online shopping, and multi-level tracking privacy.
Even though it’s not a gaming dedicated browser, you can surely benefit from features that support your online gaming experience.
It was officially announced in 2012 that Roblox games could be played directly on the browser. In addition, you can run multiple games on different browsers like Opera, Firefox, or Google Chrome.
Using a mobile cloud to start Roblox games on your current browser would be best. You can thus use Now.gg to install the game in the browser immediately.
You only have to login into the browser and choose your gameplay with other millions of users worldwide.
However, it is also possible to install Roblox on the PC and launch it anytime you feel like it.
So, in this article, we explored the best browser options to use when playing Roblox on your Windows 10 PC.
All of the options listed above are good. However, it all depends on the capacity of your PC.
Also, it would be best to decide whether you want a dedicated browser with exclusive features, such as Opera GX, or a more general one, like the others.
Please share your opinion about this topic using the comments section below.
Corrupted system32 is a serious problem and it will prevent your PC from booting, but you might be able to fix it with steps from this guide.
What is Windows System32 error?
This error message appears if there’s a problem with your System32 directory. There are several causes for this issue:
File corruption – If your System32 directory is corrupted, you Windows installation won’t work at all and you won’t be able to access Windows at all. This can lead to Windows System32 config system error 0xc00000e9 and many others.
Registry corruption – System folder hold necessary Windows information, and if it gets corrupted, you won’t be able to boot at all.
How do I fix Windows system32 config system is missing or corrupt?
Before we start fixing this issue, we advise you to perform several preliminary tasks:
Back up files from the C drive – To fix this error you might have to reinstall your operating system, so be sure to back up all your important files. You might have to connect your hard drive on a different PC in order to do that.
Use Linux Live USB– Create a Linux Live USB on another PC and use it to back up your files. Few users reported that booting from Linux USB fixed the problem, so you might want to try that.
Create Windows 10 installation media – Find a working computer and create a bootable Windows 10 installation media. You’ll need it to complete steps from this guide.
1. Scan for HDD errors
Connect your USB flash drive to the PC.
Press the F4 key to select a boot device. The key might be different on your PC and it’s usually displayed during the boot.
Select your USB flash drive.
Windows installation will now start. Select Repair your computer.
Now select Troubleshoot. Next, go to Advanced options.
Lastly, pick Command Prompt.
Type the following command and press Enter: chkdsk /r C:
Wait for the scan to finish.
After the scan is finished, check if the problem is resolved.
Plug-inUSBor insertDVDwith the Windows 10 installation.
Restart your PC and enter the boot menu. Choose to boot from the installation media.
Wait until the installation files load and chooseInstall now.
Select preferred settings and choose theCustom install.
Select your C partition and click Next. Keep in mind that partitions aren’t labeled, so make sure you correctly determine the right partition.
If there’s not enough space on the partition, you’ll have to format it before you can proceed.
Follow the instructions on the screen to complete the process.
Once the process is done, you’ll have a fresh installation of Windows and the issue should be resolved. If you want to fix windows/system32/config/system without CD, then this is the way to go.
Fixing Windows system32 config system on Windows 10 is a complicated process, and it usually requires you to create installation media in order to repair or restore your system.
This isn’t the only error, but we tackled errors such as Windows cannot find windir system32 in a separate guide. Did you fixed this problem with a different solution? Share it with us in the comments below.
If you reach the Partner or Affiliate status, you will also be able to upload pre-recorded videos on Twitch.
How can streaming pre-recorded videos help me?
This can be very useful to make a point and comment on an existing video or simply to make your livestreaming session more entertaining.
It’s also a great way to create your videos in advance and schedule them to be published at a certain time and date.
As you will see, uploading and streaming a video is very simple on Twitch but you may also use a very cool third-party tool like OneStream Live to livestream on multiple platforms at the same time.
That being said, let’s go through the ways on how you can livestream your prerecorded videos on Twitch.
How do I livestream pre-recorded videos on Twitch?
Head over to the Twitch website and log into your account.
Now, click on the account icon from the upper-right corner and select Video Producer from the list.
Now, if you have a Partner or Affiliate status, you should see and click on the Upload button, select the video from your machine or just drag-and-drop your clip on this window.
Finally, click on your video and Publish it right away or schedule the publishing for later.
Now, log into your account, create a new one or just log in with your Gmail account as we did.
Next, connect with the social accounts you want to stream on, in our case, Twitch.
You will be prompted to authorize the usage of your Twitch account on OneStream Live.
Now, click on your Twitch account from the left pane and select the UPLOAD or RECORD button. You may also notice that you can also upload content from your Cloud storage accounts.
On the next pop-up window, you can drag-and-drop your video, or upload it from your device. You also have the option to record the video right now using your webcam or a screencast.
After your video is uploaded, you may edit it, change the title and description, and add tags, but more importantly, you are able to schedule the streaming and make a lot of adjustments related to scheduling.
Finally, select one or more accounts you want to stream to and hit the Schedule button below.
That’s it, the pre-recorded video will start streaming on your Twitch account.
With OneStream Live you have more scheduling options than with Twitch and you can multistream up to 40+ social platforms at once.
This tool is free to use and it also includes streaming analytics to help you keep track of your popularity.
Windows Device Manager usually lists webcams under the Imaging devices or Camera category. However, some users have stated that they can’t find their webcams in Device Manager.
Thus, their webcams, or even all image devices, are missing. Consequently, those users can’t utilize their webcams in Windows.
If you’re dealing with a case of the camera not showing in Device Manager, let us take you through all you need to know.
Why is my camera not showing up in Device Manager?
A few things could be responsible when your cameras are not detected on the Device Manager app. On the top of the list are the following:
Missing drivers – This is a cause of many PC problems connected to hardware components and is a top cause of your laptop camera not working.
Antivirus software – Some antivirus are notorious for blocking certain components and drivers and may be a reason for webcam problems on Windows
System glitch – It’s also possible that a system glitch is causing this issue, but luckily that can be fixed by following the solutions from this guide. Sometimes this may lead to black screen issues with your webcam.
A few variations to this problem include the camera not showing in Device Manager for Surface Pro, HP, Dell, Lenovo, and ASUS camera driver missing.
Moreover, here are some error variations that you may encounter, but fix with the solutions below:
Camera missing from Device Manager (Windows 10)
Camera not showing in Device Manager (Windows 11, Windows 10, Windows 7)
Laptop camera not detected – laptop integrated camera not showing in Device Manager
Camera not showing in device manager (Lenovo, HP, Dell, Acer, MSI, Logitech, Surface Pro)
Webcam not showing up in Device Manager
Now let us discuss some solutions.
What can I do if the camera is not showing in Device Manager?
1. Run the Hardware and Devices Troubleshooter
Press Cortana’s Windows key + Q hotkey.
Input the keyword troubleshoot in the search box, and select TroubleshootSettings.
Press the Run this troubleshooter button for the Hardware and Devices troubleshooter.
Then go through the resolutions presented by the troubleshooter, and select the Apply this fix option for the solutions provided.
The Hardware and Device troubleshooter can fix issues with Windows devices. For example, that troubleshooter might provide a resolution for restoring a missing webcam.
2. Update the webcam driver
How do I reinstall my camera driver in Device Manager? It might also be the case that the webcam’s driver is missing, antiquated, or corrupted.
Thus, the quickest way to fix a webcam driver issue is to add an excellent driver maintenance piece of software.
All you have to do is to download and install it on your PC. Once installed, open it and start a scan.
Then, go for the update process. You can click scan once more, as some new driver versions are not directly installed; they might need multiple layers until the correct version is installed.
We recommend being patient with your drivers and their versions, as they are an essential component of your PC. A bad driver could cause many problems, including BSODs.
3. Manually add the webcam to the Device Manager
How do I add a camera to Device Manager? First, open Run with the Windows key + R keyboard shortcut.
Input devmgmt.msc within Run’s open text box and clickOK.
Then click View, then Show hidden devices.
Click Action and select Add legacy hardware.
Click Next.
Select the Install hardware that I manually select from a list option, and click the Next button.
Select Imaging devices or Camera and click Next.
Afterward, select the webcam missing from Device Manager; and press the Next button.
Click the Start menu and select the Settings option.
Click Update & Security, then select Recovery.
Under Reset this PC, click Get Started.
Select the Keep my files option.
Then click Next, and select the Reset option.
Some users have also confirmed that reinstalling Windows 10 restores a missing webcam. Reinstalling Windows 10 is relatively straightforward thanks to the Reset this PC utility. Also, this helps when the webcam is detected as a NDIS compatible device.
At least one of the resolutions above will probably restore missing webcams in Device Manager for most users. Then users can utilize the webcams once again.
Let us discuss how to remove a program from Windows 10 altogether.
It’s a common practice for all computer users to install software programs regularly to keep up with new technologies or to meet their needs.
Whenever you install software, it creates files on the hard drive and adds registry entries to work efficiently.
What are software leftovers, and how can I get rid of them?
Please use the recently installed program and don’t forget about it. The problem is when you uninstall it because the program might not completely remove itself from your PC.
That’s where software leftovers come into play. To remove a program in Windows, we usually uninstall it from the Control Panel. But, unfortunately, this doesn’t permanently eliminate it.
As a result, your system continues to accumulate unused files that take up space and makes all the actions you perform over time on your PC more difficult.
Entries for the old programs can also remain in the Windows 10 registry, which cuts back on the performance of your machine.
How can I altogether remove programs on Windows 10?
1. Manually remove the software leftovers
1.1 Uninstall the program using the control panel
Click on Start and select the Control panel app.
Select Uninstall a program.
Select the program you wish to uninstall from the app list and click Uninstall.
1.2 Delete leftover folders
Use hotkeys Windows + R to open the Run dialog, then type in the path below and hit Enter. %programfiles%
Select a folder corresponding to the uninstalled app and delete it.
Use hotkeys Windows + R to open the Run dialog, then type in the path below and hit Enter. %appdata%
Select a folder corresponding to the uninstalled app and delete it.
1.3 Remove software keys from the Windows Registry
Use hotkeys Windows + R to open the Run dialog, then type in the script below and hit Enter. regedit
Navigate to the path below: Computer\HKEY_CURRENT_USER\Software
Look for a key with the name of the program you just removed. If you find a key, delete it.
Perform steps 2 and 3 for the following paths as well: Computer\HKEY_CURRENT_USER\Software Computer\HKEY_USERS.DEFAULT\Software
NOTE
It’s essential to do a backup before deleting anything from the Windows registry so that if something goes wrong, you can restore the system to its earlier state.
To do a backup, right-click on the key you want to delete and select Export. It will save a REG file with the backup of that key. Once this is done, you may quickly restore the backup if needed.
1.4 Empty Temp folder
Use hotkeys Windows + R to open the Run dialog, then type in the script below and hit Enter. %temp%
Empty the content of the folder.
Use hotkeys Windows + R to open the Run dialog, then type in the script below and hit Enter. temp
GlarySoft also has a handy Registry repair tool to scan computers, clean registry junk, and fix registry errors.
It performs comprehensive and deep analysis for Windows Registry. It also repairs invalid entries or references that cause computer freezing, system crashes, instability, blue screen, and PC slowdowns.
Another software recommendation takes care of stubborn programs very well and can uninstall programs others can’t.
Since the tool is portable, you can download it on a USB to help fix buggy PC’s on the go.
The tool performs deep scanning and removes all the junk files and other software leftovers. It also features an efficient user interface and instant startup. In addition, it offers both clean uninstall and forced uninstall.
This article provides you with three effective methods to remove a program from Windows 10 altogether.
Of course, you can always use the Control panel if you want to uninstall a program. But afterward, some file fragments may be left in a few system folders. Therefore, you will need other methods to ensure nothing is left behind.
Have you used any of the methods described above? Feel free to share your experience with us in the comments section below.
Spotify is a popular music streaming service that is available for multiple platforms including Windows. The Spotify app for Windows is free to install and use (with ads), however, some users Spotify won’t open, particularly in Windows 10.
The window does not appear nor the app process can be located in Task Manager. In fact, many users claim that Spotify doesn’t work on PC all of a sudden.
While some stumble across nasty errors such as the stop code 18 in Spotify, others are not able to launch it all. Instead of Spotify, they see a black screen.
While we cannot really say if Spotify is better in browser or app, we know for sure that people’s needs are different and so are their preferences. Spotify not opening in Windows 10 can be frustrating but have listed a couple of troubleshooting tips to help you out.
Let’s see what triggers it in the first place and why won’t spotify open.
Why can’t I open Spotify?
Your Spotify app in Window can run into trouble due to your antivirus or firewall blocking the connection, incompatibility with the Windows version as well a glitch in the app.
If you’re using a browser, specific features such as Hardware acceleration can end up doing more harm than go, so you mush what to keep that in check.
Running outdated versions of both devices and browsers can also be responsible for Spotify not opening in Windows 10.
How can I fix Spotify if it’s not opening in Windows 10?
1. Run in compatibility mode
Right-click on your Spotify desktop shortcut.
Select Properties.
If you don’t have a Spotify shortcut, navigate to the following location: C:Users\username\AppData\Roaming\Spotify or C:Program\Files\Spotify
Right-click on Spotify.exe file and select Properties.
In the properties window, open the Compatibility tab.
Click on Change settings for all users button at the bottom.
Under Compatibility mode, check Run this program in compatibility mode.
Select your current version of Windows. For example, Windows 7.
Under Settings, check the Run this program as an administrator box.
Click Apply and OK to save the changes.
If you are still rocking Windows 7 on your computer, Spotify may face compatibility issues. Running the app in compatibility mode for Windows 7 seems to have fixed the issue for many users.
You also have made it run as administrator, which should fix any issue that may occur due to permission issues.
2. Troubleshoot Microsoft Store
Note: Follow these steps if you have installed Spotify from Microsoft Store and experiencing issues.
Press the Windows key.
Type PowerShell.
Right-click on PowerShell and select Run as administrator.
In the PowerShell window, type the following command and hit enter one by one. Set-ExecutionPolicy UnrestrictedGet-AppXPackage -AllUsers | Foreach {Add-AppxPackage -DisableDevelopmentMode -Register "$($_.InstallLocation)AppXManifest.xml"}
Once successfully executed, close PowerShell.
Restart your computer.
Relaunch Spotify and check if the issue is resolved.
3. Check your security programs
Press Windows Key + I.
Go to Update and Security.
Click on Windows Security.
Open Firewall and network protection.
Open your currently active network.
Toggle the switch to turn off Windows Defender Firewall.
If you have a third-party antivirus program installed, turn it off temporarily as well. Right-click on the antivirus icon in the system tray and then select Disable Temporarily.
Once disabled, relaunch Spotify to see if the problem is resolved. If it works without any issues, add Spotify to the Firewall whitelist.
You may also want to change your antivirus if the issue persists. Don’t forget to enable the Defender Firewall once the issue is resolved.
In the System Configurationwindow, open the Services tab.
Check the Hide all Microsoft services box.
Next, click the Disable all button.
Click Apply and OK to save the changes.
Restart the system.
Uninstall Spotify
Press Windows Key + R.
Type appwiz.cpl and click OK.
SelectSpotify.
Click on Uninstall and then click Yes to confirm.
Once uninstalled, navigate to the following location: C:Users\Username\AppDat\Local\Spotify\Storage
Delete everything inside the Storage folder.
Navigate to the following location: C:Users\Username\AppData\Local\Spotify\Users<random numbers-user>
Next, navigate to the following location: C:Users\username\AppData\Roaming\C:Users\Username\AppData\Roaming\ and C:Users\Username\AppData\LocalSpotify or C:Program\Files\Spotify
Find and delete the Spotify folder in the directory.
Reinstall Spotify
Download the full offline Spotify installer.
Run the installer and proceed with the installation
Once installed, launch Spotify and check if the issue is resolved.
The Spotify won’t open in Windows 10 issue usually occurs due to compatibility or permission issues. However, if the issue persists, try to clean install Spotify in clean boot mode.
If you want to explore this subject more, check out our thorough Web Apps Hub. To see more Spotify-related information and guides, have a look at our specialized Spotify section.
Do let us know which method helped you resolve the issue in the comments.
IObit Driver Updater is the feature of Driver Booster that can help you update drivers for your computer. Nothing can ever deny the importance of driver updates when it comes to the overall health of the PC.
This driver updater app is one of the best Windows driver updaters. It is best for updating drivers for internal and external components of a PC.
What is IObit Driver Updater, and what does it do?
IObit Driver Updater is a feature of the Driver Booster tool that helps keep your drivers up to date. It scans your computer for outdated or missing drivers and then downloads and installs the latest versions. Some prominent features of the IObit Driver Updater app are:
8500,000+ drivers database
You can fix 35+ hardware issues with a single click
Auto update, backup & restore drivers
Now we know the prominent features of IObit Driver Booster, let’s see how to download and install it in your system.
How do I download and install IObit Driver Booster on my PC?
Go to the official website of IObit, Click on Driver Updater and then select Driver Booster Free from the dropdown menu.
Next up, click on the Free Download button to download it on your PC. The installer file might take a few minutes to download.
After downloading, open the downloaded file and click on the Install button to kickstart the installation process.
Now agree to the Privacy Policy by marking the circle present beside it and then click on Install.
Once the installation is completed, you can run a quick hardware scan by clicking on Scan Now.
If you want to remove the burden of searching for drivers and installing them away from your shoulders, downloading the IObit Driver Booster is your best bet.
IObit Driver Booster
Prevent frequent system crashes and let IObit Driver Booster download the best drivers for your PC.
What features does the IObit Driver Booster offer?
The IObit Driver Booster is packed with many features, but there are some features that are limited to the free version and available only in the premium version. Below is the table comparing different plans of the Driver Booster.
Free Plan
$19.95
1 PC Plan
$22.95
3 PC Plan
Discount
-
50% OFF
70% OFF
PC Quantity
-
1 PC
3 PC
Driver Database
6500,000+
8500,000+
8500,000+
Driver Download Speed
Basic
100% Faster
100% Faster
Auto Update, Backup & Restore Drivers
No
Yes
Yes
Get Necessary Game Components
No
Yes
Yes
Fix 35+ Hardware Issues with 1-Click
No
Yes
Yes
Update and Install Driver Offline
No
Yes
Yes
Priority to Update Game Ready Drivers
No
Yes
Yes
Priority to Update Game Ready Drivers
No
Yes
Yes
Furthermore, the IObit Driver booster is essentially safe to use. This driver booster poses literally no harm to your PC except for increasing its productivity by ten folds.
We hope you received an abundance of guidance regarding the complete downloading and installation process of the IObit Driver Booster through this guide.
With Windows 11 released for the public, most users have been thrilled to upgrade to the latest iteration. But some faced quite a unique problem – the Windows 11 cFosSpeed driver error.
When users tried to upgrade to Windows 11 via the setup, they received an error that read Your PC has a service that isn’t ready for this version of Windows 11. However, a new version is available.
Does cFosSpeed work with Windows 11?
If you wonder What is cFosSpeed driver? know that it is software often bundled with driver packages, and a traffic shaper used to increase the network speed while reducing the ping.
Most computers have this driver pre-installed, generally those with MSI motherboards. As MSI users reported most commonly that the cFosSpeed driver in Windows 11 is malfunctioning.
While the software is intended to increase network speed, it may sometimes be counterproductive. For example, several users have reported that it decreased their network speed and caused certain websites to slow down.
How do I fix my cFosSpeed driver?
1. Uninstall the driver
The next solution presents an intuitive way to uninstall the cFosSpeed driver from your Windows PC to fix it once and for all.
1. Press Windows + E or click the File Explorer icon in the Taskbar to launch it.
2. Now, navigate to Program Files (x86) in the C: drive, and look for a folder named after the OEM. For example, for MSI motherboards, the folder would be named MSI.
3. Now, check inside the folders listed here for another one named LanManager.
4. If you are facing trouble finding it, a simple way would be to use the Search menu. Press Windows + S, enter LanManager in the text field, click on More, and select Folders from the drop-down menu.
5. Next, locate and double-click on the unins001.exe file, and follow the on-screen instructions to remove the cFosSpeed driver and software.
After the software is uninstalled, the cFosSpeed driver error should be fixed, and you can easily upgrade to Windows 11.
Several users reported that this software reinstalls when you subsequently boot the Windows. In this case, you can uninstall the LanManager itself.
The process differs for various manufacturers; hence you should either check the official website FAQ section or try to locate files that go by the same name to uninstall it.
However, if you want to ensure that you uninstalled the driver successfully and that there are no leftovers, a tool like CCleaner will come in handy.
CCleaner
Make sure the programs are successfully uninstalled and no build-ups are left behind with the CCleaner app.
Type ncpa.cpl in the text field and click on OK or hit Enter to launch the Network Connections window.
Right-click on the network adapter and select Properties from the context menu.
Now, locate cFosSpeed under This connection uses the following items and click on Uninstall.
Click Yes on the confirmation box that appears.
After uninstalling the cFosSpeed driver from the network properties, check if you can install Windows 11. Suppose you can’t locate cFosSpeed here; head to the last solution.
Please navigate to the folder where the downloaded file is stored and double-click on it to launch the installer.
Click Yes on the UAC prompt that appears.
Follow the on-screen instructions to complete the installation process.
Choose the appropriate response in case you receive a prompt.
Once the installation is done, check if you can upgrade to Windows 11.
If, for some reason, you couldn’t uninstall the cFosSpeed software or couldn’t find it, updating it would be an ideal solution even to fix the Asus cFosSpeed driver error in Windows 11.
After you update the Windows 11 cFosSpeed driver, you should be able to solve the cFosSpeed driver error and upgrade.
The above methods will fix the cFosSpeed driver error and allow you to install Windows 11. However, before you upgrade, read our comparison of Windows 11 and 10 to understand the differences between the two versions better.
If you don’t find Windows 11 worth the hype, do not hesitate to learn how to roll back to Windows 10.
Lastly, let us know which solution worked for you in the comments section below and your experience with the latest iteration of Windows.
If you are unsuccessfully trying to download a certain book, because Adobe Digital Editions generates the Error getting License alert, it’s time to take action.
The error has been encountered in all sorts of scenarios. Some users discovered it while trying to authorize a copy of Digital Editions to their account, while others complain that they can no longer download any books from their local library.
One way or another, this sounds like a serious problem that needs to be addressed as soon as possible. We’ve prepared a few solutions that might help.
But before that, here are some variations of the error that can be fixed by following the methods below:
Adobe Digital Editions Error Getting License e_adept_no_token
Adobe Digital Editions Error Getting License e_lic_already_fulfilled_by_another_user
Adobe Digital Editions Error Getting License e_lic_license_sign_error
Adobe Digital Editions Error Getting License e adept request expired
Adobe Digital Editions Error Getting License adept document type unknown
Adobe Digital Editions Error Getting License e_stream_error
Error getting License. License Server Communication Problem: E_ACT_NOT_READY
How can I fix Adobe Digital Editions Error getting License?
1. Update to the most recent Adobe Digital Editions version
You’ve fallen in love with its simplicity, minimalist design, and ease of downloading and transferring books between devices and you weren’t wrong.
There’s no better choice than Adobe Digital Editions when looking for the richest reading experience. Since no software tool is truly error-free, it’s only natural to encounter a few hiccups here and there.
Grabbing the latest Adobe Digital Editions version will remove the error of getting a License for good, so you know what you have to do.
Adobe Digital Editions
Make the best of your online books collection with tool which is a favorite of major publishers.
2. Type regeditand press Enter or click OK to open the Registry Editor.
3. Locate this registry key in the left pane, then right-click it and select Export: Computer\HKEY_CURRENT_USER\Software\Adobe\Adept
4. In the Export Registry File dialog box, click on Selected Branch.
5. Enter a name and location for the backup registry key. Then, click Save.
6. Right-click the Adept key and choose Delete.
7. Click OK in the Confirm Key Delete dialog box.
8. Close the Registry Editor.
9. Finally, don’t forget to open Adobe Digital Editions and reauthorize. The Adobe Digital Editions unable to download error while getting license will be fixed.
You can find the above-detailed steps for quickly reauthorizing Adobe Digital Editions. The procedure itself isn’t complicated, yet we do have to tell you that erasing the authorization is often refused by the application itself.
When you’re encountering the error getting License in Adobe Digital Editions, this fix should solve the problem in no time.
That’s why reinstalling the software sounds like a better option to take into consideration if you want to get rid of the message that says Error getting License Adobe Digital Editions.
This method also works if you encounter the e_act_not_ready error on Android devices. You need to do this:
Go to Settings.
Navigate to Apps.
Choose Adobe Digital Editions from the list.
Clear your cache and delete all your existing data.
Close the app.
Alternatively, you can also try to delete the folder named .adobe-digital-Editions, if the previous steps weren’t enough to fix the issue.
IceCream Ebook Readeris one of those hassle-free ePub readers for booksters that do what they claim: they allow you to peacefully read eBooks in several formats – EPUB, MOBI, FB2, to name a few.
Managing your digital eBook library works like a charm in IceCream Ebook Reader too.
In addition, it also allows you to add notes or highlight text and transfer your eBook collection from one Windows PC to another. Many functions are similar to those featured on Adobe Digital Editions.
We recommend Ebook Reader as an alternative when you encounter certain issues, especially if you get the Adobe Digital Editions error, Unable to download. Error getting License.
We hope that the solutions presented in this article gave you all the knowledge on what you can do when Adobe Digital Editions generates the Error getting License alert. For more information and potential solutions, check out how to fix Error Check Activation in Adobe Digital Editions.
If you have any questions or know some solutions we didn’t list here, don’t hesitate to let us know in the comments below.
If you are trying to shift from using your favorite email client on the desktop to the web, our post helps you to pick the best browser for Outlook 365.
However, the browser should fully support your Outlook email and that depends on the operating system you are using.
Opera is a fantastic browser that has some excellent security features that allow you to enjoy a private Outlook 365 mailing experience.
Using Outlook 365 with Opera has its benefits thanks to the ad-blocker, built-in VPN, and battery saver for laptops. It may not be the quickest browser, but it is certainly the most extensible, providing solid browsing and emailing experience.
One of the benefits is that you may add Outlook mail to the speed dial on the Opera main page and access it quickly.
These are the key features of Opera:
Built-in free proxy VPN
Ad-blocker
Tab organizer
Sidebar messengers
Full support for video calls
You may also use Opera plugins to modify your Outlook mail and turn it to Dark Mode, or install the Notifier for Outlook to receive instant messages and alerts.
Opera
Enjoy a private, ad-free mailing experience to get the most of your working and shopping routine while using Outlook 365.
How do I change my default browser in Outlook 365?
Follow the below instructions to change the default browser in Outlook 365:
Press the Win + I shortcut key combination to launch Windows Settings.
Click on Apps on the left side of the Settings app.
Now, navigate to the right side and click on Default apps.
On the next screen, scroll down and click on the browser that you want to set as default.
Now, click on Set default to change your default browser in Outlook 365.
Now, whenever you open Outlook on the web, it will open in the default browser you changed to.
Whether you talk of its speed, new features like Poll time to meet, or its built-in People Search feature, using Outlook 365 on a browser has its own advantages.
You have found this guide because PUBG won’t launch on your PC. Here is all you should know.
PlayerUnknown’s Battlegrounds (PUBG) is an enthralling multiplayer battle royale for Windows and Xbox. However, some players have stated on forums that Battlegrounds doesn’t start for them after a recent update.
This error isn’t accompanied by a pop-up message window that provides further clues, but we will show you how to resolve it.
Why is my PUBG not opening?
There are a few reasons why PUBG will not launch on a Windows device. Here are the leading causes:
Outdated DirectX runtime components – Some of these DirectX components are essential for proper gameplay and must be constantly updated.
Missing or Corrupted PUBG files – Players can use a built-in utility in Steam to check the game files’ integrity.
Compatibility issues – These may be other programs or antivirus software incompatible with PUBG.
Let us now consider the most reliable solutions; these will work if PUBG is not working after an update or if PUBG is crashing on launch or doesn’t start.
What can I do if PUBG won’t launch after an update?
Click on your antivirus icon, hover over Avast shields Control and select Disable for 10 minutes (This step varies for different antivirus software).
Try launching PUBG.
TotalAV does include a whitelisting option as part of their gaming and performance support. This is helpful because it allows you to submit your game to reduce the possibility of false positives.
This option is meant to be used as a preventive step for trusted and undiscovered applications to reduce the chance of future false positives.
The whitelisting utility is not a conduit for deleting current detections, resolving disputes, or resolving any unrelated issues, but to be clear, PUBG is not harmful to your computer.
2. Verify the Steam Cache for PUBG
Open Steam and click on the Library tab.
Right-click PlayerUnknown’s Battlegrounds and select Properties.
Click on the Local Files tab and theVerify Integrity of Game Files… button.
Check if the issue of PUBG not launching is resolved.
Right-click on the Start menu and select Device Manager.
Expand DisplayAdapters in the list of Drivers to unfold the options.
Right-click on your graphics card driver, and select Update Driver.
Click on Search automatically for drivers and wait for the system to search.
When graphics drivers become corrupted or obsolete, they can cause various problems; thus, ensuring that your drivers are up to date is an essential step.
It is also worth noting that complete removal and clean reinstallation of your drivers can sometimes help eliminate the drivers as the source of an issue.
You may also do a clean fix with an automatic solution, such as a driver updater and troubleshooter.
For an automatic update, we recommend Outbyte Driver Updater, which will scan your PC for outdated or missing drivers and repair anything that isn’t performing correctly.
You may rely on Outbyte Driver Updater to make such changes to ensure a proper update with the most recent graphics card drivers.
Outbyte Driver Updater
Outbyte Driver Updater is your one-stop destination for driver updates and troubleshooting, with a large database and driver backup.
Press the Windows key + R keyboard shortcut, enter Control Panel in Run, then click Enter.
Click Network and Sharing Center.
Click Change adapter settings.
Right-click your network connection and select Properties.
Double-click Internet Protocol Version 4 (TCP/IPv4.
Select the Use the following DNS servers radio button, and enter the values below for Preferred DNS server and Alternative DNS server, respectively. 8.8.8.8 8.8.4.4
Click the OK button to close the window, then check if the issue of PUBG not launching is resolved.
After recent updates, some PUBG players could not connect to the game’s server so we can try with Google’s DNS.
As such, Battlegrounds not starting can also be due to an outdated DNS directory, if not the issue with the server.
5. Roll Back Windows 10
Press the Windows key + R keyboard shortcut, enter rstrui in Run, then click Enter.
If you can select a Choose a different restore point option, select that option and click Next.
Select Show more restore points to expand your choice of restore points fully.
Select to restore Windows to a date that predates recent PUBG updates, and click Next.
As PUBG doesn’t start for some Steam users after a recent update, rolling Windows 10 back to a system restore point might also fix the issue. System Restore undoes software updates after a selected restore point.
You can select to restore Windows 10 to a restore point that predates a few PUBG updates. So you can restore Windows to a time when Battlegrounds ran just fine.
Those resolutions might kick-start PUBG so you can relaunch the game if it doesn’t launch. For further PUBG fixes, check out this post with numerous Battlegrounds bugs.
Please let us know which of these solutions has been effective for you in the comments section below.
Now, Google announced on the Android Developers blog that the beta version was extended to many other countries, including the United States, Canada, Mexico, Brazil, Indonesia, Philippines, Malaysia, and Singapore.
What is Google Play Games beta and how can I use it?
Google Play Games beta is the app that allows you to play Android games on your Windows 10 & 11 PC.
All you need to do is to head over to the Google Play Games website and download the app on your PC by hitting the Download beta button.
After you download the installer, double-click on the executable file and follow the on-screen instructions to install Google Play Games beta.
Then, sign in with your Google account and enjoy your favorite games on your PC.
What do I need to use Google Play Games beta?
There are a few things you should keep in consideration before installing this app:
First, you can’t install the app unless you are in one of the following countries: United States, Canada, Mexico, Brazil, Indonesia, Philippines, Malaysia, and Singapore. Although using a VPN will cover this problem.
You need to turn on Hypervisor or HAXM because Google Play Games beta will prompt you in you don’t have it activated. HAXM is only for Intel processors.
Obviously, you need a Google account but we are sure you covered that part already.
If you’re about to scroll the news feed on Facebook and it just doesn’t work properly, then this issue can have various reasons.
Considering that Facebook is one of the most used social media platforms globally, the issue with News Feed not loading can really affect your day-to-day activities.
There are various explanations for this problem to occur and you can resolve it effortlessly using specialized software or just changing some of the app settings.
In case you require immediate support in resolving this frustrating issue on your Facebook profile, you can follow the answers below to fix it properly.
From Facebook glitches to the current time zone, if you are experiencing news feed loading problems on Facebook, you can often fix them yourself. What you can do is explained below in 6 simple ways.
How can I fix the Facebook feed not loading issue?
1. Check the News Feed preferences
To fix the Facebook posts not loading issue, go to the main page of Facebook.
On the left side of the screen, locate the News Feed title.
Click on the three dots.
From the drop-down list, you can choose which type of news feed you want.
Click on Top Stories or Most Recent, as desired.
2. Restart the application
A restart is the easiest option if the Facebook News Feed not loading on PC/computer issue persists. First, you can try simply restarting Facebook.
If this does not work, you should restart the browser you are using. In an emergency, a complete PC restart can also help.
3. Delete cookies and cache
1. Launch Google Chrome.
2. Press on the three dots in the right corner of the window, then select the Settings option from the list.
3. Under Securityand Privacy, place a checkmark in front of Clear cookies and site data.
4. Choose the time range you want the data should be deleted, then click on Clear data.
5. Now, from the same Security and Privacy menu, you need to click on Clear browser data.
6. You can choose the time range you want the data should be deleted. Confirm with Clear data. The Facebook feed not updating issue be will solved.
Sometimes it can happen that data is stored incorrectly in the cache. There are also cookies that can cause your Facebook news feed to not load.
To solve this problem, you must clear your browser’s cache or cookies. You can do this via its built-in Settings.
Another common reason for problems is that safe browsing is not available to all Facebook members. For example, the Facebook app does not have this feature.
So if Facebook surfs in safe mode by default, it can cause problems when switching back and forth between HTTP and HTTPS.
To fix this problem, type https://www.facebook.com/ in the search bar of your browser in order to fix the Facebook News Feed not working today.
5. Check the time settings
If the date and time settings on your computer are not correct, Facebook will not be loading posts effectively, even though you have a good Internet connection.
So check your system settings and set the current time zone if necessary.
6. Enable JavaScript
Open Google Chrome, and go to the three-point menu.
Select Settings.
Under Privacy and security, choose Site Settings.
Click on JavaScript.
Activate the slider so that Allowed (recommended) appears. The Facebook News Feed isn’t available right now issue will be fixed.
If JavaScript is deactivated in your browser, this can lead to problems when displaying web pages.
You should therefore check the setting and activate it if necessary.
This isn’t the only issue, and some users encountered Error performing query Facebook error, but we tackled that one in another guide.
Many gamers use NVIDIA Geforce Experience to improve their gaming experience. However, users reported Nvidia web helper.exe bad image error while using it.
So, if you don’t want to receive the same error message each time you start or restart your Windows 10 machine, follow the guidelines below.
What causes Nvidia web helper bad image error?
There are two major causes for this problem:
Outdated NVIDIA software – If your Nvidia Experience software is out of date, you might experience NVIDIA web helper.exe corrupt file and many other issues.
Corrupted NVIDIA software – Sometimes your software installation is corrupt, which leads to this problem.
How do I fix Nvidia Web Helper.exe bad image error?
Once the setup file is downloaded, run it and follow the instructions on the screen.
By keeping drivers up to date, you’ll prevent NVIDIA web helper.exe xinput9_1_0.dll/libprotobuf.dll is missing error, along with many others.
You can also automatically update your drivers by using a professional tool that can help you scan your computer for out-of-date elements with extreme accuracy.
Get ready to download fresh patches from a database that contains over 18 million files. Update one app at a time if you want and schedule your regular updates.
The tool will start operating automatically after installation, so you won’t have to look for a shortcut or the source folder. In just a few seconds, Outbyte Driver Updater will scan your system for any faults or missing drivers and generate a report.
The driver updater program is handy for automatically updating Windows drivers. If you do it manually, it takes time and requires a thorough understanding of the drivers you’re looking for.
Outbyte Driver Updater
Keep your GPU and all other drivers updated for maximum performance and no errors.
If you’re getting NVIDIA web helper.exe system error msvcr120.dll or msvcp140.dll reinstalling the software might help.
That’s it, there are the troubleshooting solutions that can be applied for fixing the NVIDIAweb helper bad image problem and the annoying There is no disk in the drive. Please insert a disk into drive D: error message.
Do tell us which method worked for you or if you managed to fix this issue by using another solution – we will update this tutorial accordingly and give you credits for your contribution.
The syncing option of Firefox and other browsers has been a game-changer. Sadly like with every tech, there abound a few complications with Firefox sync not working.
Quick Tip! If Firefox keeps causing problems, try a different browser. With Opera One, you can transfer your current Mozilla Firefox preferences, bookmarks, and history in just a few clicks.
To sync all your browsing data across multiple devices, you just have to create a free Opera One account. Log in with your credentials on each device and you’re good to go.
Your Devices and applications section displays a list of linked devices to the Firefox Sync account.
It’s conceivable that your sync is functioning across the devices specified, but it’s not showing up on this list, and sometimes the sync is not just working.
Common culprits for this error could be:
An outdated Firefox version – This feature was released on more recent versions, so they may be buggy or not work in older editions.
Antivirus – Your antivirus may also be a reason for failed syncs. Not all antivirus is compatible with every Firefox feature.
Breaches in your Firefox account – Data can be leaked and exposed during a breach. For this reason, if you have an unverified log-in, sync will be automatically deactivated to protect your privacy. You will need to pass a verification test to get the sync working again.
There could be a few other reasons, but our fixes should help fix the Firefox sync not working regardless of the cause.
How do I force Firefox to Sync?
1. Force close and restart your browser
Righ-click, the Start menu, then click on Task Manager from the option list.
Select the Processes tab (the first tab at the top).
On the window’s left pane, please right-click on the Firefox process (you may have to scroll down to find it), then choose the End task option.
Restart the browser and try syncing again.
End task is a feature on the Application processes tab of Windows Task Manager that lets you terminate processes that are not responding. For example, the End Task option may be used to end a frozen or non-responsive program without restarting your PC.
2. Restart the computer
Click the close button – the button with an X at the top right of Firefox.
Click the Start menu of your computer, then click on the Power button and select the Restart option.
Wait for the PC to turn back on before relaunching Firefox to check whether you are now able to sync Firefox.
If you restart your computer, it will run more smoothly. A restart clears your PC’s memory, stopping any programs consuming RAM. Furthermore, a program may eat memory long after you’ve closed it, and restarting ensures that this does not happen.
This reboot can restore your computer to a perfect running condition and clear whatever issue stopped it from syncing.
3. Disable recently installed extensions
Click on your Firefox menu icon at the top right corner of the browser, and select the options for Add-ons and themes.
Select Extensions, search the extension list and turn off the switch to disable your most recently added extensions on the left pane.
Relaunch the Firefox browser and try syncing again.
When prompted, click Yes for the installation to proceed.
Click Next on the window for the installation wizard.
From the Setup type, select Standard, then click Next.
Lastly, click on Install and then Finish when the installation is done.
7. Double-check for breaches
Data breaches trigger an automatic de-syncing process by Firefox. You should make sure that you reverify your account if you have experienced a breach.
After the verification, you should be able to sync browsers again across your devices. If you need a helping hand, feel free to follow these steps.
? How do I enable tab Sync in Firefox?
Click on the 3 horizontal lines at the top right corner.
Click the Sign-in option in front of Sync and save data.
Input your email, click Continue, and input your password when prompted.
Once again, click on the horizontal lines at the top right corner.
Click on your Settings.
On the left pane, click on the Sync option.
Click on the Change setting under the syncing option on the right pane.
Make sure you select Open tabs from the list of options, then click the Save Changes button.
If your case is one of Firefox not syncing passwords, you should also tick the Login and passwords option.
? How do I enable bookmark Sync in Firefox?
Click on the horizontal lines at the top right corner.
Click on your Settings.
On the left pane, click on the Sync option.
Click on the Change setting under the syncing option on the right pane.
Make sure you select Bookmarks from the list of options, then click the Save Changes button.
This is an important setting to check for issues related to Firefox not syncing bookmarks.
How do I bypass Firefox sync unexpected errors?
If you are faced with this problem, you will probably get it fixed by restarting your PC. This has worked for most users who have encountered this issue.
Computer restarts are an easy fix for many minor browsers and computer errors.
And there you have it. We have tried to cover every single aspect of the issues of Firefox sync not working.
While it can occur for different reasons, we encourage you to do all you can to significantly protect your data and privacy since syncing exposes your data across many gadgets.
You may want to factory reset your HP desktop for many reasons. However, users need to know how to factory reset Windows 10 on an HP desktop.
It’ll help you do it right without harming or crashing your PC. Also, you’ll be able to know what to do if you can’t factory reset Windows 10.
How often should I reset my PC?
Factory resetting your PC is a good practice when done reasonably. It has many benefits but can be detrimental also. However, factory resetting your PC shouldn’t be consistent.
Furthermore, how often you can reset your PC depends solely on how much you use it. If you intend to clear data load or wipe the junk accumulated over time on your PC, you need to give it enough space.
We recommend you factory reset your PC once in 2 years, at most once a year, depending on how much you need. So, you don’t need a factory reset from time to time if your computer is working perfectly.
Some benefits of factory resetting your PC are:
It helps in removing all corrupt system files on the PC.
It can troubleshoot more significant issues causing the PC not to respond or work smoothly. Thereby returning the PC to its initial clean state.
Consequently, resetting the PC frequently can lead to the loss of valuable data, the system crashing, loss of a noticeable amount of RAM and ROM, and it can affect battery life also.
How do I factory reset my HP desktop?
Some things should be put in place before factory resetting your PC, so we recommend you follow the preliminary checks below:
Plug your HP desktop to ensure you don’t run into a power outage during the reset.
Disconnect any external devices plugged into the desktop.
Disconnect any Remote Desktop connections from your computer.
Plug your bootable drive into the HP desktop to boot from a drive.
After that, you can proceed with the factory reset process for your HP desktop.
1. Via the Windows Settings
Left-click the Start button and click Settings from the menu.
Input reset this PC in the search box, then press Enter.
Under the Reset this PC tab, click Get started.
Select either the Keep my files option or Remove everything.
Follow the on-screen prompts and answer questions about how to reset your HP desktop.
When you get to the How would you like to reinstall Windows tab, click the Cloud download option.
Click the Reset button to start the process in the Ready to reset this PC screen.
Once the process begins, it will be impossible to cancel the process, so be sure you’ve selected the right choices.
Alternatively, you can factory reset HP desktops with the options below if you don’t want to follow the above steps.
2. Via the Windows Recovery
Press the Power button and repeatedly press the F11, F8, F10, or F4 keys to prompt the System Recovery window.
On the Choose an option screen, click the Troubleshoot option.
Click Reset this PC, then select either Keep my files or Remove everything depending on which you prefer.
Go to myrecoverykey to find your recovery ID, input it and click Continue.
Click Reset on the new prompt to begin the reset.
Wait for your HP desktop to factory reset, but the process may take a while. Check our guide for what to do if you can’t find the Recovery Environment on Windows 10/11.
Follow the instructions on the screen to create the Recovery drive.
Unplug the drive from the second PC and insert it into the HP desktop. Then, press the Power button to start the HP desktop, then wait for it to detect the USB drive.
Select Use a device from the options.
Follow the installation wizard for instructions on how to complete the installation process.
Some of our readers have also encountered the error saying there was a problem resetting their PC. Hence, check what to do if you can’t factory reset Windows 10 or 11.
If you have further questions or suggestions, kindly use the comments section below. We are also open to other queries concerning the steps outlined above.
Using the best browser for ITV Hub provides one of the most reliable solutions for streaming your favorite programs. ITV Hub gives users access to view all ITV programs online, including Live Shows, movies, etc.
ITV Hub (formerly ITV Player) is an online video-on-demand service accessible through the main ITV website. The service offers a variety of programs from homegrown programming to acquisitions across ITV, ITV2, ITV3, ITV4, ITVBe, and CITV.
Users can view ITV channels on demand a few minutes after airing for as long as 30 days afterward. You get access to ITV archives, online exclusives, ITV live events, and Live Restart to meet up with an ongoing program from the start.
And that’s where a fast and streaming-optimized browser helps a lot. These are the browser that best fit ITV Hub:
Opera One – Excellent choice for streaming
UR Browser – Best for online security
Google Chrome – Best for Secure browsing
Microsoft Chromium Edge – Ideal for Windows users
Mozilla Firefox – Best known for Speed
Can you watch ITV Hub on browsers?
Yes, you can watch ITV without the app, on any supported browser. The easiest way to do this is by hooking your laptop or mobile device up to a decent WiFi network to stream your chosen content, for free.
Of course, if you have a mobile contract with plenty of data available, you can also use your mobile network to watch TV via an app. Just make sure you monitor how much data you’re using if you don’t have all you can eat.
Like the BBC iPlayer, ITV’s channels can be watched online or via its ITV Hub smartphone and tablet app. On your laptop just tap the link above, while mobile users on Apple or Android devices can head to the App Store or Google Play store. Just search and download.
Watch ITV without the app or embrace the app if you must – it’s all up to you! You’ll need to sign up for an account before you get streaming, but this is free and easy enough.
How do I update my browser settings to play ITV?
You may receive an error regarding the ITV update browser settings message when trying to stream ITV Hub. This prevents you from watching protected content. Please follow these troubleshooting steps to fix this issue:
UR Browser is a browser that comes with some amazing privacy features to ensure your online security such as the built-in VPN.
And that means you can now view your favorite TV programs on the ITV Hub anywhere without restrictions. Simply pick a UK-based server and start viewing your chosen program.
UR Browser is light. It makes use of fewer system resources and allows for 4 x faster download and viewing speed.
Key features:
Customizable interface
Download manager to organize your downloaded content better and faster
Integrated VPN tool for enhanced privacy
Ad-blocker feature to block third-party cookies and invisible trackers
UR Browser
Have advanced privacy and tracking protection, plus VPN support to watch ITV from anywhere you are.
Edge Chromium offers a better, lighter, and fast browsing experience. But does ITV Hub work on Microsoft Edge? It sure does. In fact, that’s one reason why Edge is the best browser for ITV programs.
Users can enjoy a Chromium-based platform, with more privacy, secure browsing, and clear visuals on 1080p HD quality.
You, however, need to install relevant extensions to improve the overall experience.
Firefox has been around for a long time and was one the most popular browsers before Chrome and others took over.
Its compatibility with all devices from Windows and macOS to Linux, iOS, and Android is not surprising. Although, it is better suited for Windows.
Firefox has always been fast but has taken things to another level since its Quantum update. This update has elevated it to an incredible speed level that can compete with the best browsers. This gives you an amazing ITV experience.
If you want guaranteed HD for ITV your best bet is to subscribe to ITV via Amazon Prime. On the ITV Hub app, you will at best get higher resolution SD with an ITV Hub+ subscription.
? ITV Hub not working on smart TV/ITV Hub not working on firestick
Go to Settings and click on Applications.
Then select Manage Applications and locate the ITV Hub.
Select Clear Cache and clear the cache.
Select Clear Data and clear the data.
If your Firestick is showing you a blank screen, make sure it’s plugged in properly to a working HDMI port. You can follow the above steps if ITV Hub is not working on your Smart TV also.
The five suggested browsers offer unique opportunities to enjoy the best browsing and streaming experience with ITV Hub.
Keeping the drivers up to date is essential as it ensures your PC has no security or compatibility issues. You can install drivers on your computer manually or use a third-party application. However, it is suggested to use a driver updater tool to update drivers seamlessly.
This guide will discuss how to update drivers using CCleaner Driver Updater. But before that, let us know more about this driver updater.
Can CCleaner Driver Updater update drivers on the computer efficiently?
Updating drivers manually can be tricky, especially when you don’t know your way around your computer. Also, updating the device drivers without any help might cause configuration issues.
Using a third-party tool like CCleaner Driver Updater that searches across all major device manufacturers to ensure you get the correct driver for your computer is the safest option.
That’s it; this is how you can update your device drivers on Windows 11 using CCleaner Driver Updater. In addition, you can run a scan every once in a while using the driver updater tool for smooth performance of your PC.
Facing any issues while updating drivers? Feel free to let us know in the comments section below.


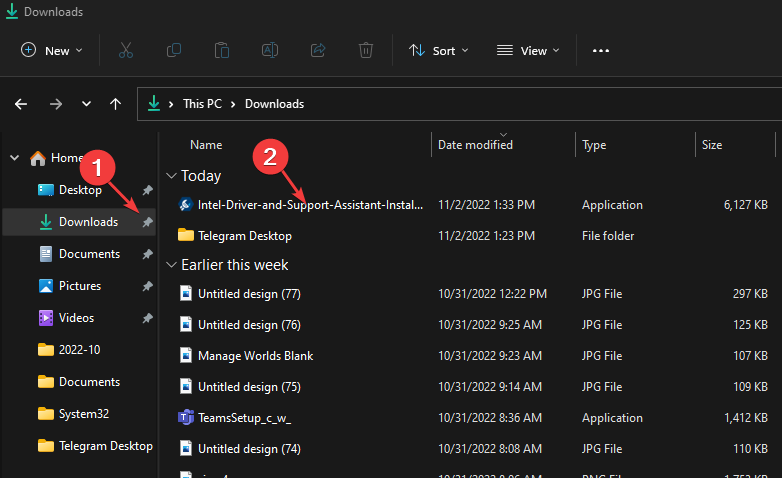
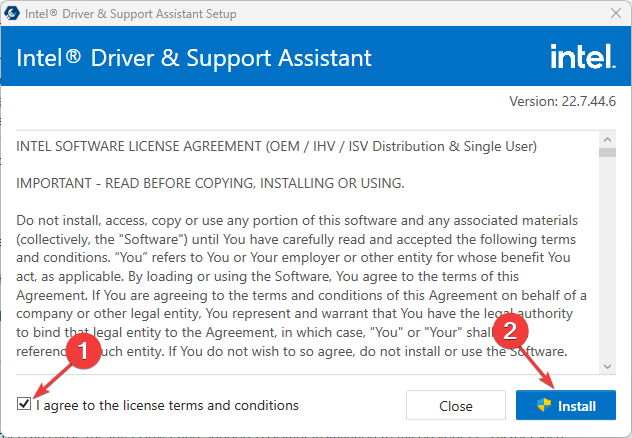
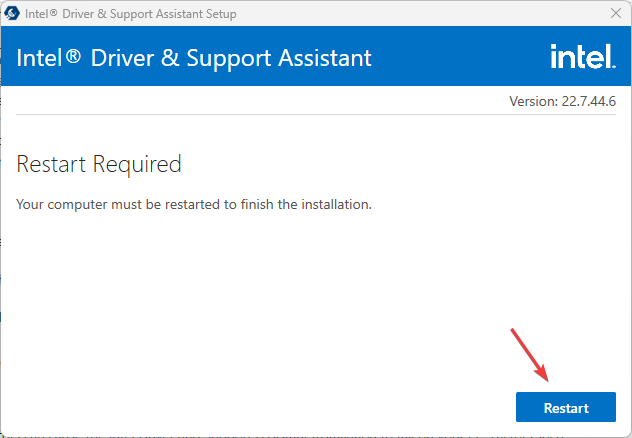
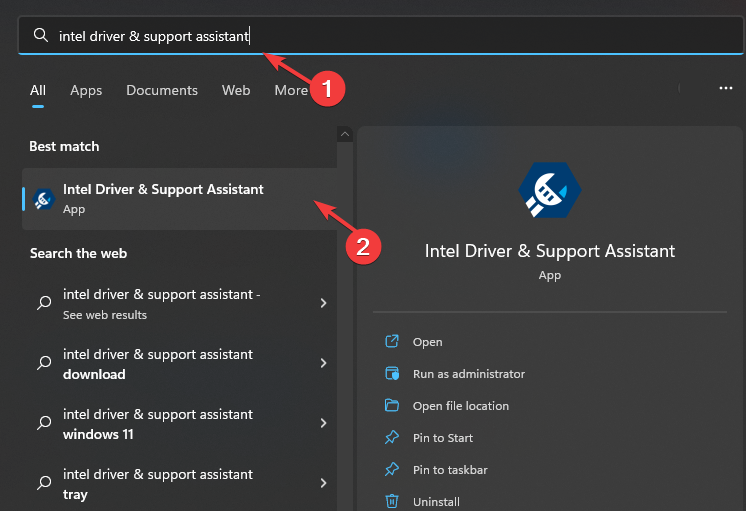
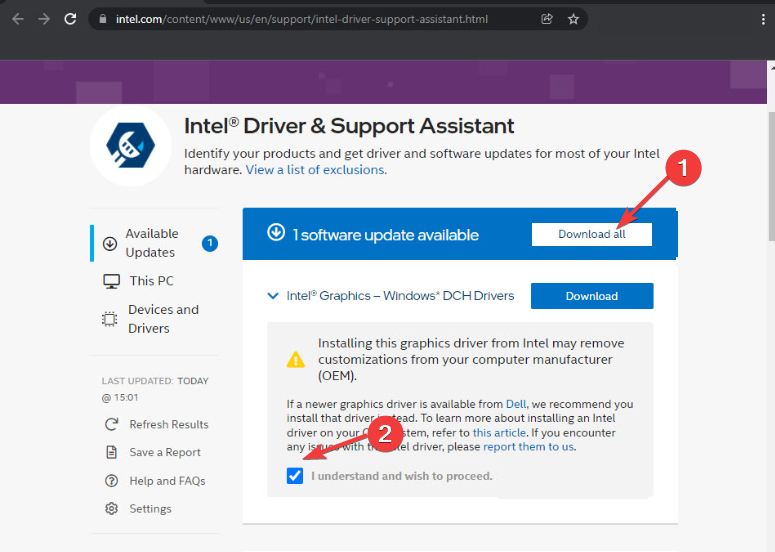
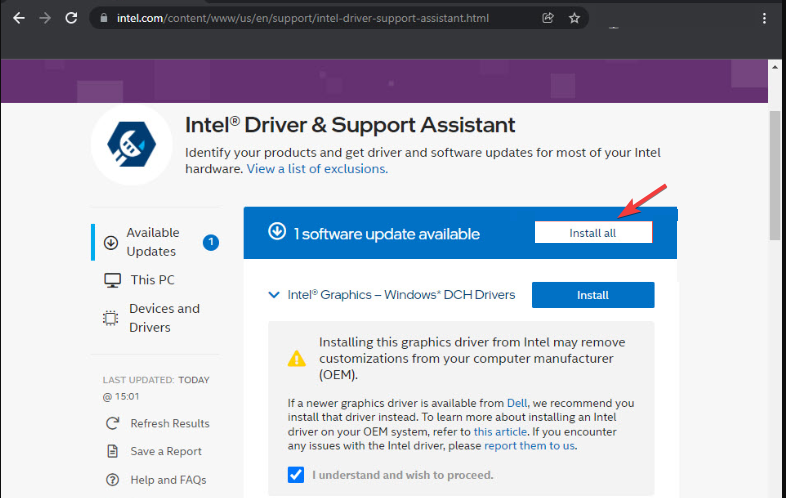
 NOTE