How to Open JAR Files in Windows 11: 3 Easy Methods

Some of our readers have recently requested to know the workarounds on how to open JAR files in Windows 11.

While this may be easy for some users, we have provided this simplified step-by-step guide. Ensure to work your way through any of the steps provided below.

What is a JAR file?

A JAR file is an archiving package format that stores directories and source files. JAR files are similar and can be run as executable files, however, they require the Java framework to run.

Although you can extract JAR with archiving software, you can’t run a pure Java JAR app as you would with other programs in Windows.

Simply, a JAR file contains a compressed version of .class files, audio files, image files, or directories.

How can I open JAR files in Windows 11?

If you don’t readily have Java on your PC, you’ll need to download it, as it is the only way a JAR file can run on Windows PC.

The following are some of the simple step-by-step instructions on how to open JAR files in Windows 11.

1. Use CMD to open a JAR file

  1. Left-click on Start on your Taskbar, type cmd in the Search box, and choose Run as administrator from the options to run Command Prompt with full privileges.
  2. Then type the following command line in the text field: java -jar c:\pathtojarfile.jar
  3. Make sure to replace pathtofile in the example above with the actual path of the file you need to run. Next, press Enter.
  4. The executable JAR file will then be opened if it contains a manifest file that specifies the application’s entry point (the developers should have already included that in the archive).

The command-line program is essential for installing and debugging apps, but if it doesn’t work, find out how to fix Command Prompt in Windows.

2. Double-click to open a JAR file on Windows 11

  1. Press the Windows + E keys to start File Explorer.
  2. Navigate to the folder where the JAR file(s) you need to run.
  3. Next, right-click on the JAR file you wish to open and select Open with from the context menu.
  4. Then, select Choose another app.
  5. From the list of options, select Open with and choose Java(TM) Platform SE binary.
  6. Next, click the Always use this app to open .jar files checkbox, then press the OK button to close the menu.

Now you can open the selected JAR, and all other JAR files in Java by merely double-clicking on them.  

3. Create a .bat file

  1. Press the Windows + E keys to launch File Explorer.
  2. Tap on the three-dots menu icon from the options at the top. From the drop-down options, select Options.
  3. Select the View tab from the Folder Options window’s menu when it appears.
  4. Scroll down to Hide extensions for known file types under Advanced settings, and then uncheck the box next to it.
  5. Click OK to save the changes. The file names will now include the file extensions as well.
  6. Navigate to the folder containing your JAR file now, launch Notepad there, and enter the following text: java -jar yourfilename.jar 
  7. Make sure to substitute the name of the.jar file for your file name.
  8. Save the file with the .bat extension.

After following the above steps, every time you double-click the BAT file, it will take you to the JAR file and run it accordingly.

And that’s how to open or run JAR files in Windows 11. Alternatively, users can install a third-party JAR executor to Windows 11 by visiting the JARX website to download the Jarx-1.2-installer.exe file.

You can also check our detailed guide on other software for opening JAR files.

Additionally, if your JAR files are not opening well, you can follow our detailed guide on how to fix the issue.

If you have any further questions or suggestions, do not hesitate to use the comments section below.

Chat GPT Oops an Error Occurred: 3 Simple Fixes

You probably came across the error message Oops, an error occurred, if this issue persists, please contact us through our help center at help.openai.com. This error usually occurs because GPT doesn’t understand the prompt you inserted, or there is a connection problem from the server or your network. It’s also possible that you’ve reached the API limit or the model exceeded the memory limit and cannot provide an answer.

Before applying the solutions below, make sure that you have a steady internet connection and check the Open AI website to see if there are any downtime or scheduled maintenance. If you are trying to generate large text, try breaking the input into smaller chunks and try again.

How do I fix an Error Occurred message on ChatGPT?

1. Check your API limit 

If you are using the API, you may have reached the API limit. Some plans have a limited number of requests that can be made per month.

an error occurred. if this issue persists please contact us through our help center at help.openai.com.

You can check the usage of your API by visiting your OpenAI Dashboard and checking if you have reached the limit.

2. Check the input format 

Ensure that the input you provide to the model is in the correct format. If the input is not formatted correctly, the model may not understand it and will return an error message. Some essential elements to keep in mind when providing input to the model include:

  • The input should be a string of text.
  • Your input should be encoded in UTF-8.
  • The input should not contain any special characters or non-printable characters.

3. Contact OpenAI Support

  1. Navigate to the contact page on your browser.
  2. Click the message icon at the bottom right corner and select the Send us a message button.
    an error occurred. if this issue persists please contact us through our help center at help.openai.com.
  3. Type your message and send it.

It’s essential to give them as much information as possible about the error message, such as the input you provided and the steps you took to troubleshoot the issue.

In conclusion, the error message an error occurred, if this issue persists please contact us through our help center at help.openai.com can be caused by several factors, such as incorrect input format or a temporary technical issue.

For another common issue, check our dedicated guide on the Chat GPT error in message stream, which explains how to fix responses being cut off unexpectedly.

However, following the above steps, you can troubleshoot and fix the issue. Finally, please let us know what worked for you in the comments below.

Excel Not Scrolling Smoothly: Fix It in 5 Simple Steps

If you are using Excel and the scrolling is not working as it should be, there could be several reasons. It could be that your computer is too old or too slow. But in most cases, Excel will not scroll smoothly because of an error in the program. 

We’ve already covered steps on what to do if Excel is not scrolling at all, so if you see that your spreadsheet is not scrolling smoothly, stay put as this article takes you through how to fix this problem with Excel.

Why is my Excel sheet not scrolling smoothly?

If you’re wondering why scrolling in Excel is excruciatingly slow or buggy, below are some possible reasons:

  • Outdated versions – It is possible that your Excel program is outdated and not optimized for your current Windows version hence the inconsistencies.
  • Program interference – If an application on your computer blocks other programs from running, this will also affect the smoothness of scrolling in Excel sheets. 
  • Too many rows/columns – If you have a large document with many rows and columns, they can slow down your computer’s performance and hence interfere with scrolling.
  • Not enough memory – If your computer or laptop doesn’t have enough memory, then it won’t be able to process all of the formulas in your spreadsheet quickly enough, and therefore it won’t be able to scroll smoothly through them all. 
  • Too many formulas in your workbook – If too many formulas are being calculated at once, this may slow down the whole process. This is because they are being processed one by one, which takes time to complete.
  • Your Excel sheet has a lot of data – If your Excel sheet has a lot of data, such as images, tables, and graphs, it can take a longer time to scroll through it. 
  • Old OS – You may have a new version of Excel, but if you’re still using an old version of Windows, the program may have difficulty matching up to old software.

How do I stop Excel from jumping cells when scrolling?

A few workarounds that may resolve the issue before you proceed to the complex solutions include:

  • Try cleaning your mouse and mouse pad to ensure no debris could interfere with scrolling.
  • Close any background apps that may be hogging the RAM.
  • Close and re-open Excel.
  • Free up hard drive space to ensure you have enough memory.
  • Ensure your Windows is up-to-date.

1. Adjust the Mouse speed 

  1. Hit the Search icon, type Mouse Settings, and click Open.
  2. Click on Additional mouse settings.
  3. Navigate to the Pointer Options tab in the Mouse Properties window that pops up.
  4. Under Motion, hover the mouse to a speed of your preference.
  5. Also click the checkbox next to Enhance pointer precision to stabilize the cursor.

2. Disable Excel Add-ins

  1. Launch Excel, and click on the File menu.file
  2. Click on More, and then select Options from the flyout menu.options to fix Microsoft Excel is waiting for another application to complete an OLE action
  3. Go to the Add-ins tab, and with Excel Add-ins selected in the Manage dropdown menu, click on Go.Excel add-ins
  4. Now, uncheck all the add-ins listed here, and click on OK to save the changes.disable add-ins to fix Microsoft Excel is waiting for another application to complete an OLE action
  5. Again, go to the Add-ins tab, choose COM Add-ins from the dropdown menu, and click Go.COM add-ins
  6. Go back and disable any remaining Add-ins.disable COM add-ins to fix Microsoft Excel is waiting for another application to complete an OLE action

3. Disable hardware acceleration 

  1. Launch Excel, click on Files in the top menu bar, then select Options from the menu on the left.
  2. Select the Advanced option.
  3. Go to Display, check the box for Disable hardware graphics acceleration, and click on OK to save the changes.
  4. Close and restart Excel, then try scrolling and see if you can.

4. Update graphic drivers 

  1. Click on the Windows button, type Device Manager in the search bar and click Open.device manager w11
  2. Navigate to Display adapters to expand, right-click on your graphics card and select Update driver.Graphic Driver Update
  3. Select Search automatically for drivers.

An automatic tool may come in handy to complete this step faster and reduce the chances of ending up with the wrong driver. 

Outbyte Driver Updater is a free tool that lets you scan and update your PC’s drivers with a single click. It’s fast, easy to use, and requires no complicated steps or configuration.

5. Repair Microsoft Excel

  1. Click on the Start menu icon and select Settings.settings windows 11
  2. Type Control Panel in the search bar and click Open.control-panel-search fallout new vegas runtime error
  3. Go to Programs and select Uninstall a Program.going uninstall program control panel
  4. Now, click Microsoft Office and select Change.change
  5. Finally, click Online Repair, then select Repair.online repair to fix Microsoft Excel is waiting for another application to complete an OLE action
  6. Alternatively, you can click on Windows Settings, select Apps, then click on Apps & features.
  7. Locate Microsoft Excel/Office, click on the three ellipses and select Advanced options.
  8. Next, click on Repair.
  9. Once the repair process is complete, restart your computer and check whether the issue still occurs.

And that’s how to fix the issue of Excel not scrolling smoothly on your Windows PC. You may also encounter an issue where you’re unable to type in Excel but worry not, as our detailed guide adequately covers fixes for it.

We also have answers to when Excel fails to print, so be sure to check out our article.

We’d love to hear from you on what solution fixed this issue, so leave us a comment below.

Xbox One Black Screen: What Causes & How to Fix

Since its release in 2013, Xbox One has become one of the most popular gaming consoles in the world, but it is not without its faults. One such is the Xbox One black screen of death, a glitch that usually happens after an Xbox Insider update.

The BSoD error affects how the dashboard loads from the web, causing some sections to appear black therefore making the console inoperable. So, let’s find out all about it and the solutions that work.

Why is my Xbox screen completely black?

The Black Screen of Death error is usually the result of a glitch in the console dashboard. This could happen if the system doesn’t load the dashboard correctly after starting from rest mode.

Like any device during startup, the Xbox console operates a full system check on every hardware component to validate the software.

If the system fails to run the startup process, the PC will display a black screen instead of the well-known Xbox animation.

Faulty updates are also a potential culprit. Bugs can interfere with the way your console works, and this can result in a BSoD error.

Quite a few users have taken to Twitter about this issue, stating that the newest update caused their screen to go black:

How do I fix various black screen issues on the Xbox One?

Various quick methods may help you fix the Xbox One BSoD issue, so before moving on to the actual solutions, you should try them:

  • Press RT + Y to get control over your console. Just start up your Xbox One, and once the pins begin to move, simultaneously press RT and Y.
  • Try to press PSA – RT +LT + Y to refresh your dashboard and the Game Store. This will restart the console.
  • Open the guide, choose Home, and then navigate to another tab away from the main dashboard to prevent the bug from occurring.
  • You can also set your console to offline mode by disconnecting from Xbox Live.
  • Disconnect any external hard drive and plug it back in.
  • Try switching off the Xbox, hold down the eject and bind buttons and switch the Xbox on while holding them down. You’ll hear the chirps as the power comes on, and the Xbox will give you the option to factory reset.
  • Unplug the satellite or cable box from Xbox One, and hold the power button on the console for 10 seconds until it turns off. When you turn it on, Xbox should allow you to access the menu.

If nothing worked, move to the solutions listed next:

1. Black screen after returning to Home

  1. Hold down the Xbox button on the front of the console for roughly 10 seconds to turn off the console.Xbox console button
  2. Press the Xbox button on the console or the Xbox button on your Xbox One wireless controller to turn the console back on.

2. Black screen when watching a Blu-ray Disc

  1. Press the Xbox button on your wireless controller to open the guide.Xbox controller button
  2. Navigate to Profile & system, then to Settings.Xbox settings
  3. Select Display & sound.Xbox Display & sound
  4. Choose the Video output option.Xbox Video output
  5. Then select Enable 24Hz to turn off this setting.

3. Use an AVR in your setup

  1. Switch on your devices in the following order:
    1. Turn on your television first.
    2. Once your television is displaying a picture, turn on the AVR.
    3. Turn on your Xbox One console.
  2. Turn the input source of AVR away from Xbox One and then back to HDMI or HDMI2, and then back to HDMI1 again using the Input button on your television’s remote control.
  3. Reboot the AVR.
  4. Set your TV connected to HDMI:
    • Press the Xbox button to open the guide.Xbox controller button
    • Go to Settings and select the Display & sound option.Xbox Display & sound
    • Select Video output.Xbox Video output
    • Go to TV connection.
    • Select the HDMI option.

4. Request a repair

  1. Go to the official support page for Xbox and sign into your Microsoft account.log into microsoft account
  2. Select the Problem with a device.
  3. Under For which device? choose your Xbox One console or register it.microsoft account - devices xbox one
  4. Check the warranty status for your device. If your console is out of warranty, you’ll be charged a fee.
  5. Click on Display Issue and select Next.
  6. On the next page, provide details of the issue in the Describe your problem field.
  7. Based on the problem described, you need to create a service order to replace your device, and click Next.
  8. Follow the steps to complete your service order.

5. Perform a hard reset

Note icon NOTE
This procedure will erase all accounts, saved games, settings, and home Xbox associations. You’ll have to re-install your games, but saved data will return when the specific game is installed.
    1. Press the Xbox button on your console to open the menu.
    Xbox console button
  1. 2. Navigate to Profile & system, then to Settings.

    Xbox settings
  2. 3. Go to System and select Console Info.

  3. 4. Select the option Reset Console.

    Reset console option
  4. If the Xbox is connected to your computer, the problem might not lie there. A general BSoD troubleshooting tool will quickly help you in this case.


How can I fix black screen after turning on the Xbox console?

  • Ensure your TV is set to the correct input signal (HDMI).
  • Ensure that the HDMI cable connection to your console is secure.
  • Check that the HDMI cable connection to your TV is secure.
  • Make sure that the HDMI cable is connected to the out-to-TV port on the console.
  • Perform a cold boot on your Xbox One console by holding the Power button on the front for 10 seconds and then turning it on again.
  • You can also reset your display settings:
    1. If there’s a disc in the Xbox One console, remove it.
    2. Press and hold the Xbox button on the console for five seconds to turn it off.Xbox console button
    3. Press and hold the Xbox button and the Eject button until you hear a beep to turn on the console. You will hear one beep right away and a second beep 10 seconds later. Note that this will boot your console in low-resolution mode, 640 × 480. You can reset this setting through Settings > Display & sounds > Video options > TV Resolution.
    4. Change your TV connected to HDMI if you are required to complete these steps on every boot-up.
  • Connect the HDMI cable to a different HDMI port on your TV.
  • Use a different HDMI cable to connect your console to your TV.
  • Connect your console to a different TV.

What are the most common Xbox One errors?

Besides the Black Screen of Death error in Xbox One, users have reported numerous other issues with their console.

One that made the rounds over the Internet quite a few times is the Took too long to start message that can stop users from starting their games and apps.

If you’ve also encountered it, start by checking the status of Xbox Live services or restart your console to fix it.

Another issue with the Xbox One console is the grinding sound the disc drive makes when inserting a game, movie, or any disk in the console’s optical drive.

Fortunately, users facing this problem can return the hardware by contacting Microsoft and asking for a replacement.

One of the most common issues with Xbox One is updates. If Xbox doesn’t install updates, there might be a problem with the Internet connection, but it’s safe to clear the system cache.

Source: Reddit

Another frequent error being reported by Xbox users is that the system won’t turn on or off. Resetting your power supply might be the key to getting rid of this issue, but it is not the only thing that can fix it.

While there are many issues with the Xbox One, you know you can count on us to provide you with the latest solutions.

And while we are talking about the console, check out the best games on Xbox and play them today!

After applying the above tips, the BSoDs on Xbox One should no longer bug you. Do you know of other fixes to take into consideration? Let us know in the comments section below.

PUBG packet loss: How to fix it [2026 Guide]

PUBG is one of the most popular games on the market and contributed to increasing the popularity of battle royale games by a great deal. First of all, it’s worth mentioning that PUBG is an online game.

Therefore, you need an Internet connection to enjoy it, and there’s no other way around it. Up to 100 players (including yourself) can participate in the battle royale. This game mode is actually a last man standing deathmatch.

If you’re the last player alive, you win the match. It’s as simple as that.

However, the fact that you can’t enjoy PUBG offline with bots, for instance, can be problematic, especially if your connection isn’t exactly great. Many players complain about issues such as high ping, packet loss, or even jitters every now and then.

These can seriously affect gameplay and cause problems such as rubberbanding, extreme lag spikes, and even sudden disconnections due to high ping. One of the most common issues to this day is packet loss.

What is packet loss in PUBG?

Packet loss is the inability of data fragments (packets) to reach their destination point. In PUBG, packet loss can mean that packets you send towards the PUBG servers never make it to their destination, or that server packets never make it to you.

These events usually end up in full-blown de-syncing issues, which can get you kicked out of the game, so as to preserve the connection quality for other players.

It’s kinda frustrating when you think you got a clean headshot, only to discover that your arch-nemesis is rubberbanding all across the map. It’s even worse for him, but you get the picture.

It gets even more annoying when you get to understand that sometimes packet loss occurs randomly. Furthermore, it often solves by itself as quickly as it happened, and there’s no immediate fix for it.

However, by understanding what packet loss is and what causes it, we can make sure that we create the perfect environment so that the incidence of this unwanted phenomenon stays at a minimum.

What causes packet loss with PUBG?

The truth is that generally speaking packet loss doesn’t discriminate. So if it happens with PUBG, it probably happens with other services, as well. But not if the packet loss is on the server’s side, that’s a whole nother story.

Thus, you must understand one thing: a lot of things can cause packet loss. With that in mind, let’s take a look at the most common causes of packet loss:

  • Overloaded networks: a high volume of traffic, especially if there are several routes between multiple devices
  • Device instability: weak CPUs for network devices can even affect other similar neighboring devices
  • Hardware and/or software malfunctions: if your equipment, be it hardware or software, is glitching, it can take a toll on the entire network and cause packet loss
  • Poorly configured routers or PCs: if your PC isn’t properly configured to withstand a high-speed connection, you might end up losing packets, and the same goes for your router
  • Bad ISP: if your ISP delivers a poor service on a poorly routed network, this might also be a common cause of losing packets
  • Using Wi-Fi over Ethernet: if you choose Wi-Fi over a wired connection, interference might cause connection drops and packet leaks
  • Server issues: the server you’re connecting to (PUBG server, in this case) may be leaking packets, but in this case, all players should experience the same thing you are

There you have it. Although most of these reasons don’t apply exclusively to PUBG, this list can help you understand better where to look in case you’re experiencing packet loss.

How to view packet loss in PUBG?

  1. Launch PUBG
  2. Open the main menu
  3. Go to SettingsSettings menu PUBG
  4. Switch to the Gameplay tab
  5. Scroll down to Network Debug Statistics
  6. Toggle it on by using the combo menuGameplay settings in PUBG
  7. Click the Apply buttonPUBG HUD packet loss

You should now be able to see your ping, down/up speed values, and packet loss percentage. However, you should be aware that some players reported seeing high values in those sections (i.e. pkt loss) even though their gameplay seemed unaffected.

How to fix PUBG packet loss?

1. Use a VPN

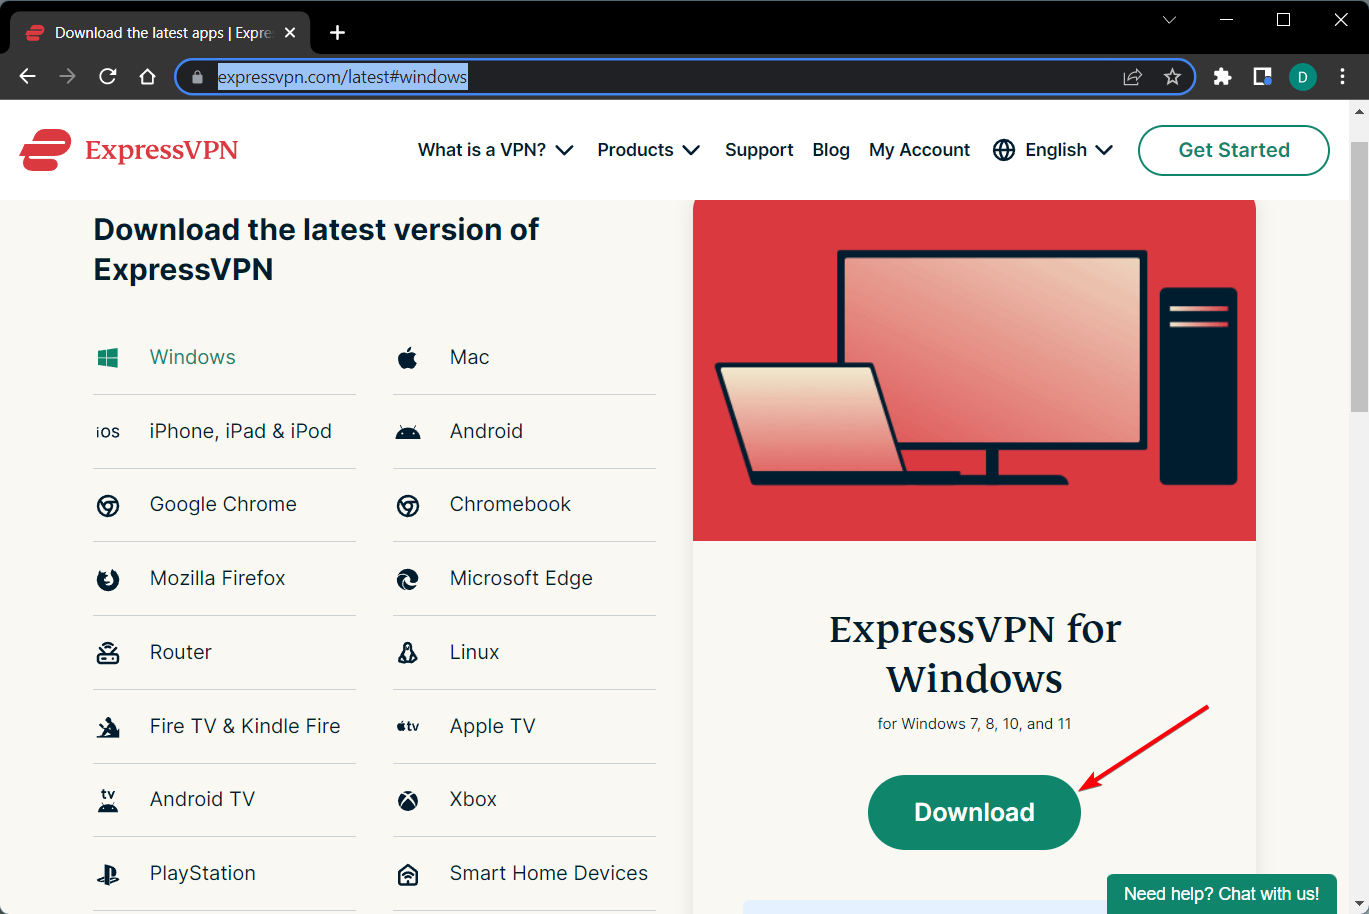
  1. Download ExpressVPN and install it on your PC.
  2. Open the app and login with your credentials.
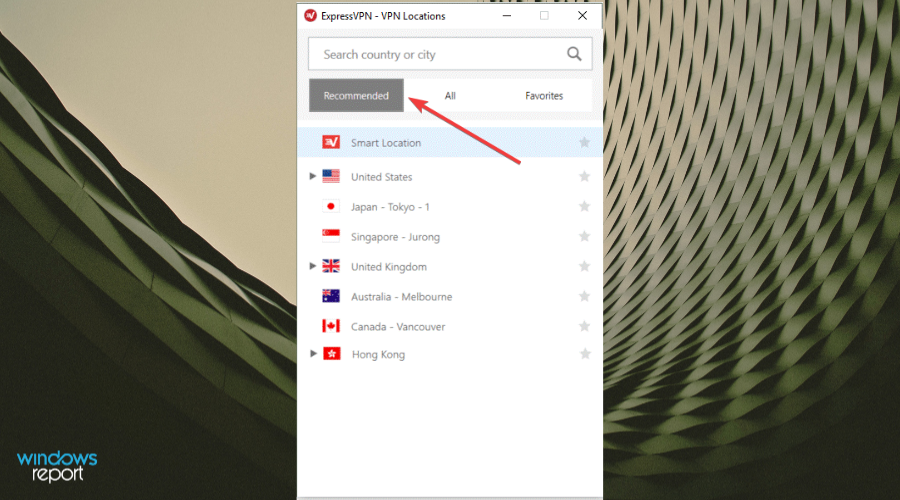
  3. Launch it and select a server from the recommended server list.
  4. Launch PUBG.
  5. Check if the problem still persists.

It’s worth mentioning that this method will only fix your packet loss issue if it’s caused by your ISP. If the problem is with you or the game server, a VPN won’t help you and will probably only make matters worse.

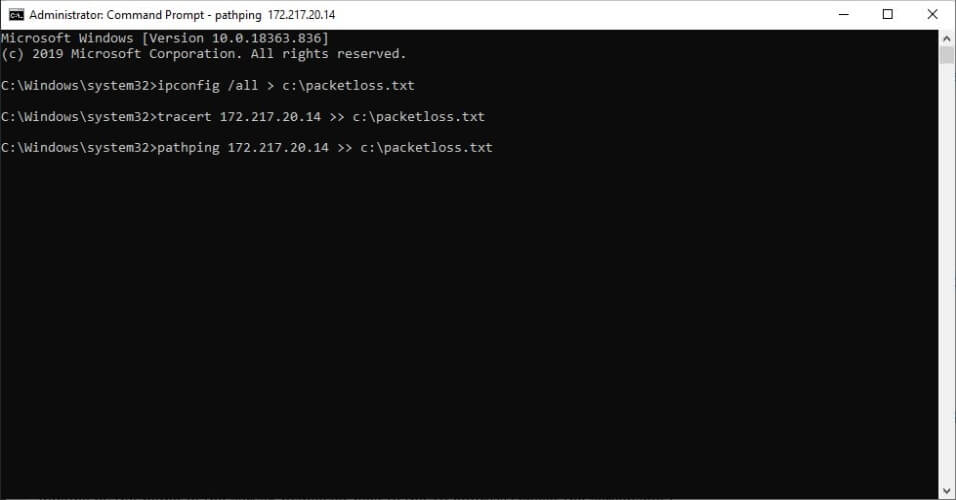
If you want to make sure before trying it, you can run a ping test on google.com and check the packet loss there. Our comprehensive guide will tell you all about packet loss and how to perform a packet loss test.

ExpressVPN

Bypass ISP throttling and enjoy the battle arena game without FPS drops or lags.
Check price Visit Website

If you want to make sure before trying it, you can run a ping test on google.com and check the packet loss there. Our comprehensive guide will tell you all about packet loss and how to perform a packet loss test.

2. Troubleshoot your connection

  1. Perform a packet loss test (use our guide to help you)Packet loss analysis Windows with tracert and pathping
  2. Isolate the hop that’s experiencing packet loss
  3. Try solving the issue accordingly (e.g. check your cables, call your ISP, configure your router, etc)

Remember that there’s no magic fix for packet loss. However, you can achieve great results if you perform complete troubleshooting instead of trying quick fixes that you find on the Internet, which might even break your computer or connection.

Packet loss in PUBG can be fixed, or better yet avoided

As we’ve mentioned above, steer away from quick fixes’ false promises. If you want to fix packet loss, try making sure that your connection is in its best condition.

If you’re not sure about performing certain tests, it’s better to call your ISP than trying to install miracle tools on your PC.

Using a VPN can, and probably will fix your packet loss issue but only if it’s on your ISP side. If the problem’s with you or the PUBG server you want to connect to, using a VPN won’t do anything to improve your situation.

Microsoft Forms not Sending Email Notifications: 3 Fixes

Sometimes, you may not be able to get email notifications in Microsoft Forms.

Your comments to Group Forms, such as those you develop in Microsoft Teams, may not be received via email.

If your Microsoft Forms are not sending group email notifications, read on to find out how to fix this issue. 

Why am I not getting email notifications from Microsoft Forms?

Microsoft forms not sending email notifications can be caused by the email notification settings not being enabled or notification settings not being set. 

Can Microsoft Forms notification of each response?

Yes, Microsoft Forms can get notifications of each response. You can enable this feature from the group settings by clicking the email notification of each response option.

What can I do if Microsoft Forms is not sending notifications?

1. Set up email notifications 

  1. Log in to your Microsoft Forms account.
  2. Once you’ve signed into Forms, scroll down to My Groups.
  3. Go to the bottom of the page and click on My Groups.
  4. Choose the group for whom you’d like to receive them.
  5. Select the group for which you’d want to receive email alerts.
  6. On the right side of the screen, you will see the number of group members in the group. When you tap on the number, the group email page in Outlook opens on the web. 
  7. Groups can be edited by clicking the Edit button above the group’s name in Outlook. 
  8. Click on Let people outside the organization email the groups, and Members will receive all group conversations and events in their inboxes. 
  9. Open Microsoft Forms, and click on the ellipsis button on your computer screen’s right side.
  10. Click on Settings.
  11. Click on the Get email notifications of each response option. 
  12. Save your changes.

2. Global administrator method of setting up email notifications

  1. Go to Groups, then Active groups in the Microsoft 365 admin center.
  2. When selecting a group, go to the Settings tab and make changes.
  3. Click on the Allow external senders to email this group and Send copies of group conversations and events to group members boxes. 

3. Turn on the notification of each response

  1. Go to Settings.
  2. Click on Options for responses.
  3. Click on Email notification of each response and save your changes.

If you’re experiencing additional Microsoft Forms issues, you can read our article to learn how to fix them. Finally, you can check out another guide if you have problems with file uploads.

Thank you for reading, and don’t forget to comment below!

OneDrive High CPU: Here’s how to Fix it

OneDrive changed considerably in the last years, and mostly for good. However, an issue here and there can certainly ruin all of OneDrive’s positive features.

For example, the OneDriveSetup.exe (OneDrive installer) works in the background and allegedly feasts on your CPU.

While this cannn be frustrating just like the can’t access OneDrive issue, we have prepared 5 solutions to help you restrain this horrid misuse of your resources. So, without further ado, check the list below and follow the steps closely.

How do I reduce OneDrive’s high CPU usage?

1. Delete Telemetry logs

    1. Right-click the Start icon and select the Task Manager option
    task manager onedrive high cpu usage
  1. 2. Go to the Processes tab, locate OneDriveSetup.exe or just OneDrive, right-click it, and select End task.

    end
  2. 3. Follow this path: C:Users/<Your Username>/AppData/Local/Microsoft/OneDrive/setup/logs

    log onedrive high cpu usage
  3. 4. In the logs folder, locate and delete the parentTelemetryCache.otc.session and userTelemetryCache.otc.session files.

    parent
  4. 5. Restart your computer.

  5. 6. Navigate to path below and run the OneDrive.exe installer: C:UsersUsernameAppDataLocalMicrosoftOneDrive.

This strange occurrence is, believe it or not, related to telemetry. While installing OneDrive, the setup tries to check the telemetry logs hidden in the AppData folder. That isn’t the problem per se, and it shouldn’t affect CPU usage.

The real problem starts if your username isn’t written exclusively in English/ASCII values. Basically, the presence of a single alternative letter or sign in your username (Cyrillic or language-specific) and the OneDrive installer won’t be able to access the telemetry files.

Nonetheless, that sole fact won’t prevent the installer from trying over and over and over again. And that will take a toll on the CPU.

For such a minor thing to cause such over-consumption of CPU is absurd, but then again, this is Windows we’re referring to. In order to resolve this problem, you’ll need to get rid of those telemetry files (they aren’t of any use anyway).

2. Restart OneDrive

  1. Press the Windows key + X and select the Task Manager option.
    task manager onedrive high cpu usage
  2. Right-click the OneDrive option and select End task.
    end task onedrive high cpu usage
  3. Finally, press the Windows key, type onedrive, and select the OneDrive option to relaunch the app.
    one

Sometimes, the OneDrive high CPU usage issue might be a minor issue caused by some glitches. In this case, the best thing to do is restart the app.

3. Unlink and relink the account

  1. Right-click the cloud icon on your taskbar and click the gear icon in the top right corner.
  2. Select the Settings option.
    settings gear
  3. Now, click the Account tab at the top and select the Unlink this PC option.
    unlink this onedrive high cpu usage
  4. Click the Unlink account button to confirm the action.
    unlink account
  5. Finally, press the Windows key, type one, click OneDrive, and follow the onscreen instructions to relink your account.
    one

If restarting OneDrive does not curb the high CPU usage, you might need to unlink and relink your account. This should restart the sync processes and other things that can lead to the problem.

4. Reinstall OneDrive

  1. Press the Windows key + S, type control, and select Control Panel.
    control panel onedrive high cpu usage
  2. Choose Uninstall a program under the Programs option.
    uninstall a
  3. Now, right-click the OneDrive option and select Uninstall.
    uninstall
  4. Restart your PC, press the Windows key + E to launch File Explorer and go to the location below: C:Users/Username/AppData/Local/Microsoft/OneDrive/Update/OneDriveSetup.exeonedrive high cpu
  5. Right-click OneDriveSetup.exe and choose to run as administrator.
  6. After the installation is finished, insert your credentials and log in.

If the OneDrive process is still causing high CPU usage, you might need to uninstall and reinstall the app.

Before the Creators Update, Windows 10 users could not delete or reinstall OneDrive. Luckily, Microsoft decided to provide us with a choice and provide OneDrive as any other third-party app.

That move eased the troubleshooting substantially and made the system more customizable and user-friendly.

5. Use an alternative cloud service

If OneDrive is a resource-gulping app that triggers high CPU usage, consider switching to a more CPU-friendly solution that can perform the same tasks.

An alternative to OneDrive is the high-rated Sync.com, a cloud service that allows you to exploit up to 5GB of free storage space.

Seamlessly blending with all major operating systems, Sync allows you to sync, store, back up, and safely access and preview your files across all your devices.

Speaking about security, you will be pleased to know that your confidential data is protected through end-to-end encryption, as Sync has the utmost concern for your privacy.

With a generous storage capacity ranging from 2 to 4 TB, you may Sync data across all platforms and devices. You can save your personal data privately and securely with end-to-end encryption and real-time backup and sync.

There are also additional sharing and collaboration capabilities, file history and recovery features, and extensive controls for sharing, downloading, password security, and granular permissions.

Once you convince yourself of its excellent capacities, you can increase your storage quota by up to 4 TB according to the subscription plan of your preference.

Does OneDrive use a lot of CPU?

Ordinarily, OneDrive should not register a high CPU usage. Even syncing files, it uses a reasonable percent of your CPU.

However, if it encounters problems, this might change, and the app might consume your PC resources.

That should do it. You only need to follow the listed steps carefully, and things should be back to normal.

If OneDrive is constantly syncing on your PC, check our detailed guide to fix it quickly.

Don’t forget to share your questions or alternative solutions regarding the OneDrive CPU hogging in the comments below. We’ll be glad to hear from you.

How to Find the Steam Library Folder

Steam is a popular game distribution and management platform. Now, if something goes wrong with a game or the app, you may need to access the Steam folder. However, it seems like users can’t sometimes find a certain Steam folder and it can be pretty annoying.

By default, Windows 10/11 installs all the apps in the Windows installation folder. So, if your Windows installation is in the C drive, the OS will install the apps in the same drive as well.

However, if you can’t find the Steam folder, there are several solutions you can try. In this article, we explore a few ways to help you find the Steam folder in Windows 10 and 11.

Where should my Steam folder be?

In case you don’t know where your Steam folders should be, well, to discover it, you’ll only have to right-click on the Steam desktop shortcut, then choose to Open file location.

The app should be located on the folder it opens (usually PC > (C:) > Program Files (x86)).

Keep in mind that this is more reliable than the library-based method because the library folder might be located somewhere other than steam’s folder.

Now, let’s see what you can do if you can’t find Steam folders.

What can I do if I can’t find my Steam folders?

1. Use the Steam client

  1. Hit the Windows key, type Steam, then open the app.
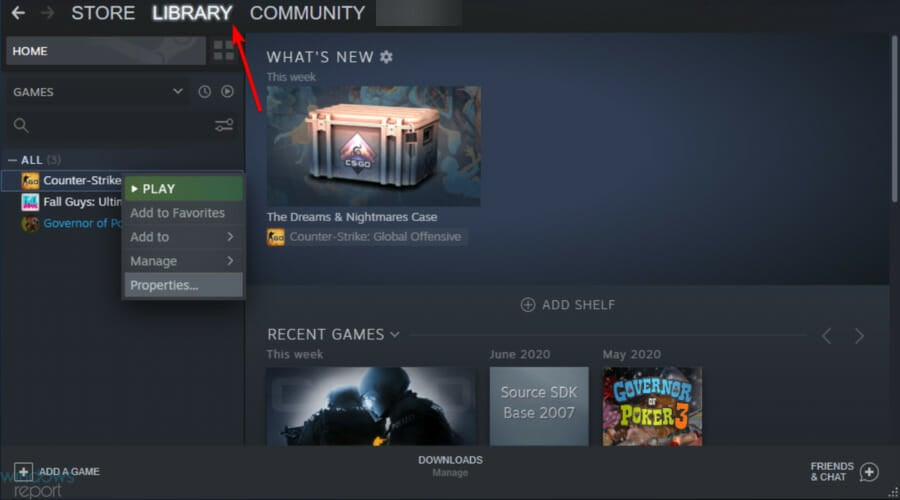
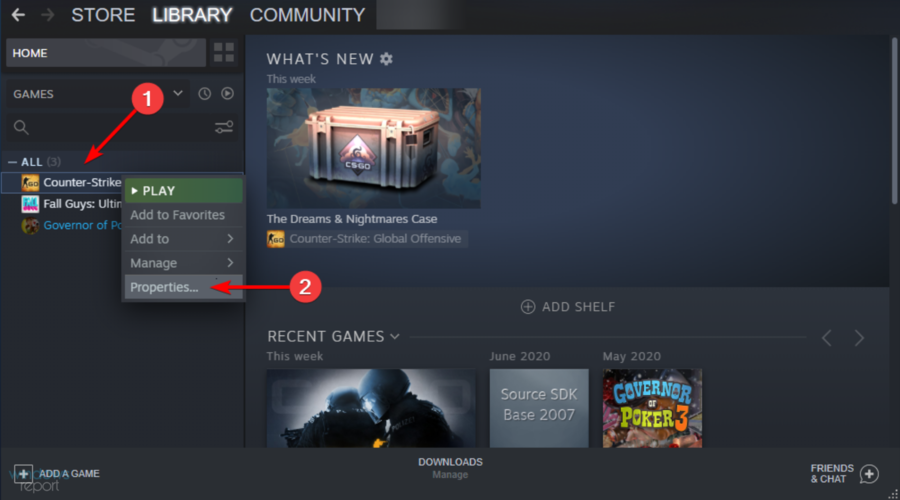
  2. In the main menu, select LIBRARY.
  3. Right-click on any of the installed games, then navigate to its Properties.
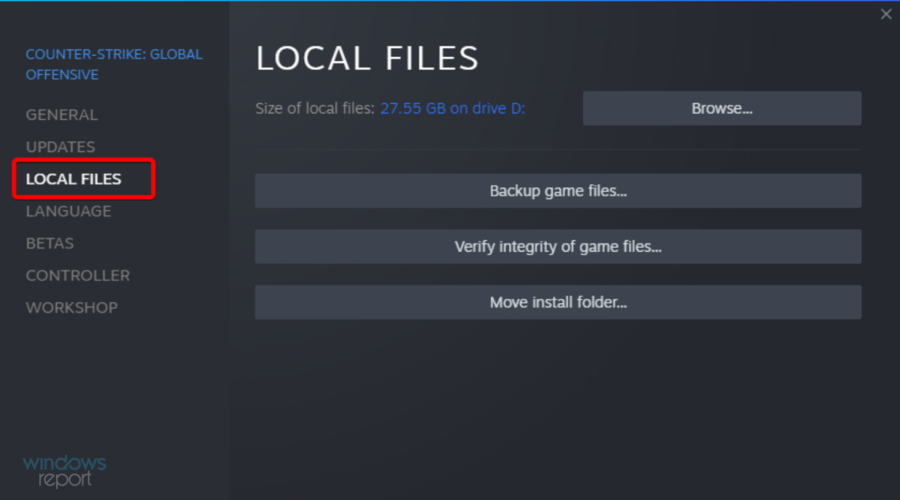
  4. In the Properties window, open the Local Files tab.
  5. Click the Browse Local Files button.
  6. File Explorer will open the selected game’s installation folder.
  7. In the File Explorer click the Up-arrow icon until you see the Steam folder.
Note icon NOTE
This method applies if you have a game installed in your Steam client. If you don’t, follow the steps described below instead.

2. Locate Steam folder from Settings

  1. In your Windows search bar, type Steam, then open the app.
  2. Make sure you are not in Family View.
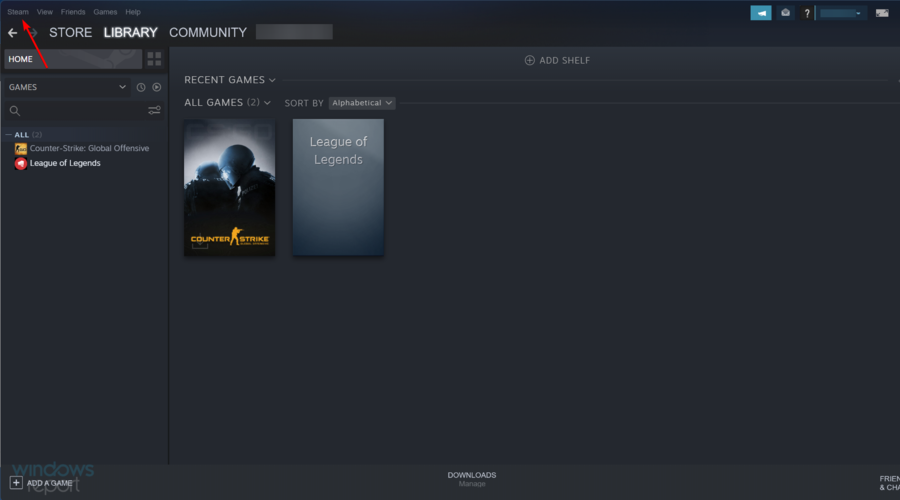
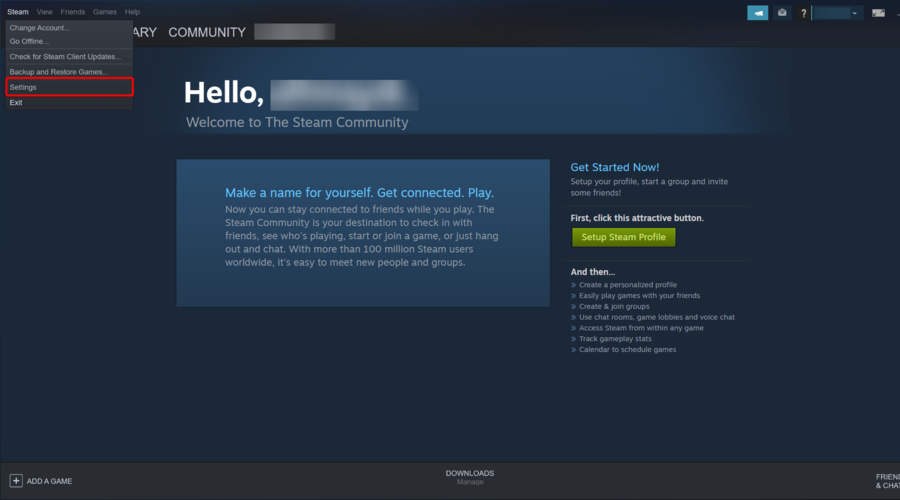
  3. Now, from the top-left corner of the window, click on Steam.
  4. Navigate to Settings.
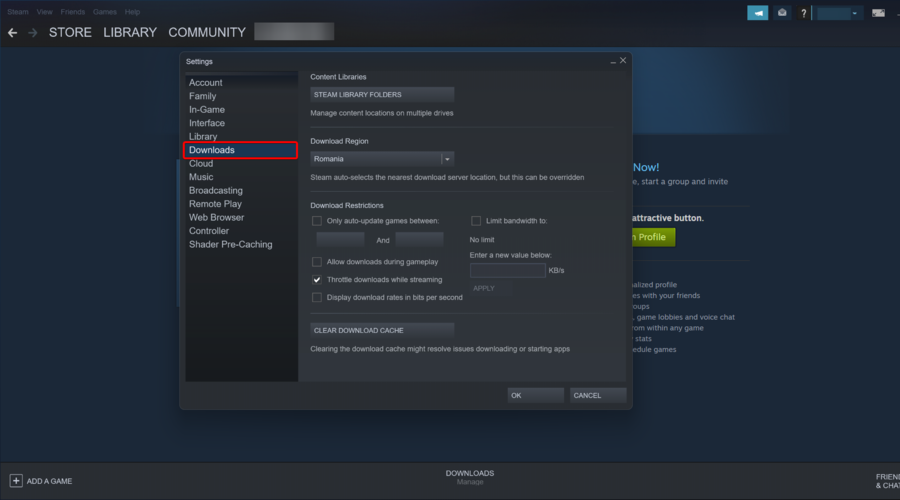
  5. From the Settings window, open the Downloads tab.
  6. Under Content Libraries, click the Steam Library Folders.
  7. Note down the path under Folders. It should look something like this: C:\Program Files(x86)\Steam
  8. Open File Explorer and navigate to the same to find your Steam folder.

Alternatively, you can also find the same by accessing the Steam Music tab. To do that, follow the steps below:

  1. Hit the Windows key, type Steam, then open the app.
  2. Look at the top-left corner of the window, and choose Steam.
  3. Now, got to Settings.
  4. From the left window pane, select the Music tab.
  5. The file path under Music Library that includes the Steam folder opens the same folder in File Explorer.

3. Install a game

  1. Hit the Windows key, type Steam, and open the desktop client.
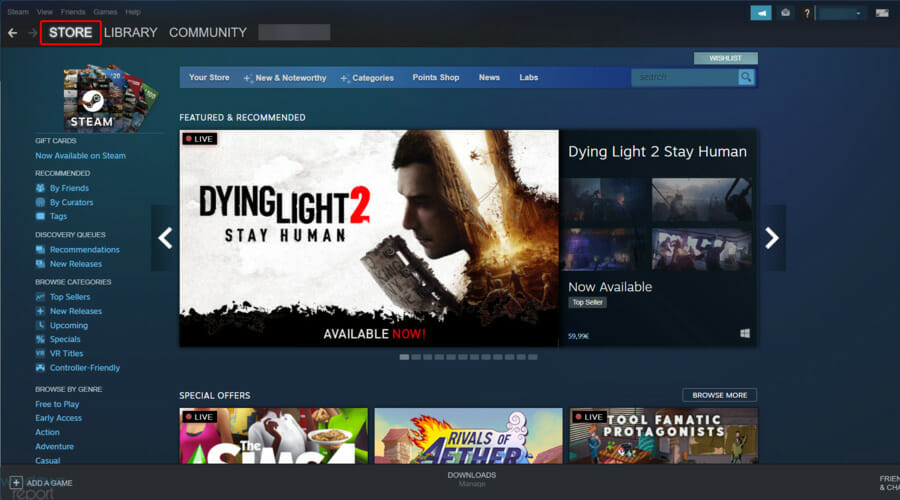
  2. From the main menu, go to Store.
  3. Select any game that is free to install.
  4. Click on Play Game.
  5. Under Choose location for install, note down the default installation path for Steam, then click on Next and proceed with the installation.
  6. Navigate to the same installation path using File Explorer to find the Steam folder.

If you are still looking for a way to find the Steam folder, try installing a game.

When installing a game on Steam, you can find where the Steam is located as the game will prompt you to select an installation path.

What other Steam folders related issues should I be aware of?

We can admit that not being able to find Steam folders can be a pretty annoying problem, but you should know that it is not the only folder-related error you can encounter while using this app.

Some users also reported that the library folder is not writable on Steam. In this case, keep in mind that this can occur after manually changing the library location for Steam games.

Fortunately, if you ever face this error, you can always check some useful solutions to easily get rid of it.

If you’re an online games fan, you probably know how important it is to be able to take a screenshot of certain actions while running Steam. That’s why we’ve created a guide that presents how to effortlessly use Steam Screenshot Manager.

Finding your Steam folder can be an annoying task if you have changed the default installation folder during installation. In this article, we have listed all the ways that you can find the Steam folder in the Windows operating system.

Lastly for seamless access to all Steam files, create a new Windows library, and add all the game folders to it.

For any additional questions regarding today’s subject, feel free to use the comment section below.

5 Best Terraria Seed Map Viewers to Find Hidden Secrets

If you want to get a sneak peek at the maps in Terraria, you’re in the right place.

Whether you’re looking to uncover hidden treasures or prevent corruption from ruining your masterpiece, third-party Terraria map viewers can help you explore and even edit your world with ease.

Let’s check them out.

What are the best Terraria map viewers?

TEdit

terraria map viewer TEdit
  1. Download TEdit and unzip.
  2. Launch TEditXna.exe.
  3. Go to File > Open.
  4. Browse for your Terraria world.

TEedit is an extensive Terraria map viewer which allows you to view the entire world by removing the fog-of-war and seeing all the blocks and biomes at once. In addition, you can zoom in to specific areas and see traps, resources, chests, cloud islands, and Crimson / Corruption distribution.

Additionally, as the name implies, you can edit your world with TEdit and change specific properties, like which bosses you’ve defeated, the number of clouds, or the world type.

While TEdit is not known to cause issues, we still recommend you back-up your world before you make any modifications.

➡ Get TEdit

MoreTerra

terraria world viewer
  1. Download MoreTerra and unzip.
  2. Launch MoreTerra.exe.
  3. Browse for your world file.
  4. Select the output folder.
  5. Click on Draw World.

MoreTerra is a simple Terraria map viewer which will load the world file and output a picture with the fog-of-war removed and all points of interest marked on the map.

While the output picture is detailed, you cannot zoom in to see all the details from each biome. This tool is designed to give you an overview of the map and analyze the contents.

You can filter chests from the World Information tab and see their location and contents. Additionally, you can set custom markers for people, containers, or specific minerals. This will allow you to hunt down elusive materials needed for crafting.

➡ GetMoreTerra

Terrafirma

terraria viewer terrafirma
  1. Download Terrafirma and unzip.
  2. Launch terrafirma.exe.
  3. Go to File > Open World.

One of the simplest yet most effective Terraria map viewers using seed is Terrafirma. This tool allows you to load a specific world with only a few clicks and view it in its entirety. In addition, you can zoom in to see all the details of the world, including objects, traps, and resources.

Furthermore, you can filter items and highlight them on the map by pressing the shortcut key F2. From here, you can check chests, NPCs, or specific blocks.

➡ Get Terrafirma

TerraMap

terramap for windows terraria world viewer
  1. Download TerraMap and unzip.
  2. Launch TerraMap.exe.
  3. Go to File > Open World.
  4. Go to File > Open Player.
  5. Select either your player or All Spoilers.

TerraMap allows you to open your Terraria world in two modes: either with the fog-of-war and only seeing the progress you’ve made so far or by selecting All Spoilers, where you can see the entire world.

This Terraria map viewer allows you to browse the world parameters to see which bosses you’ve defeated and all other settings. You can select different entities to show on the map from the Highlight option, including chests, NPCs, minerals, and others.

Remember that selecting multiple items on a large map is computationally intensive, and your CPU must work hard to complete this task. An alternative would be to use the Terraria map viewer tmodloader.

➡ Get TerraMap

TerraMap Online

terraria online world viewer
  1. Go to TerraMap Online.
  2. Select Choose File on the top of the screen.
  3. Use the filters to highlight different items.

TerraMap online is a version of the Terraria world map viewer for PC. The advantage is that this is a cross-platform Terraia world viewer that retains its PC counterpart’ features.

You will need to navigate to the world file, which is located in C: > Users > [Your Username] > Documents > My Games > Terraria > Worlds.

Terraria is a game chunk-full of surprises, which allows players to explore vast worlds in search of hidden treasures. But even more than that, it is a means for players to express their creativity and, like Minecraft, create works of art with simple blocks.

➡ Get TerraMap Online

Is there an item in Terraria that reveals the whole map?

Yes! If you get the Ancient Master’s Map of the Lost King’s Great Ancestors, it will reveal the entire map, consisting of a 150 radius around the player in Multiplayer mode.

This Terraria seed viewer allows your gameplay to expand considerably.

This will allow you to quickly choose any other location on the map and even for finding treasures. You can learn more about how this item works and how you can get it.

How do I view the whole map in Terraria?

To view the entire map in Terraria, you will need to use the Full-Screen Mode for the map/ This will allow you to move the map without moving the character and also allow you to observe the entire map.

To activate this option, you must use the Toggle Map Style button and switch between portrait, overlay, hidden, and full screen. To close the full-screen map, simply press the M or inventory keys.

If you know of other Terraria world map viewers, let us know in the comments section below.

Unable to Open Connection to Com1: 13 Ways to Fix

If you’re getting a “Unable to open serial port” error message on Windows, we’re here to help. This usually happens when a program tries to access a serial (COM) port that isn’t available, is in use, or is misconfigured.

It’s a common issue for hardware that communicates through serial ports like Arduino boards, modems, and USB-to-serial adapters. The good news is that, even though it sounds technical, it’s actually easy to fix.

Follow the steps below to troubleshoot the error in just a few minutes.

How do I fix unable to open serial port?

1. Make sure that you have the necessary drivers

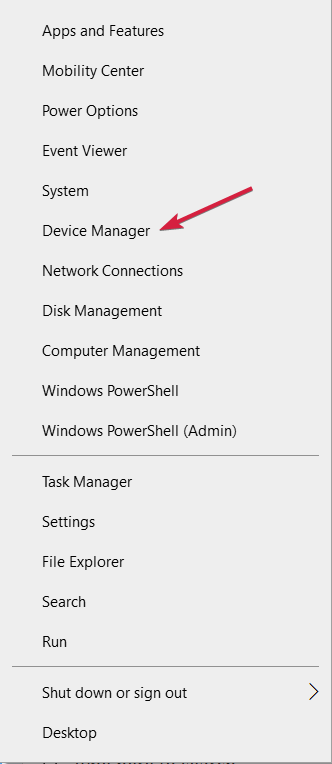
  1. Right-click the Start menu and select Device Manager.
    unable to open serial port
  2. Expand the Universal Serial Bus controller category.
  3. Right-click on your driver and choose Update driver.
  4. Lastly, click on Search automatically for drivers.

2. Verify that the port isn’t open/disconnect the cable

Sometimes the Unable to open serial port message can appear if the port is already open. To fix this problem, users are suggesting disconnecting the cable from the other device and trying to connect again.

try to disconnect the cable

This is a simple workaround, but several users reported it worked for them, so feel free to try it out.

3. Stop the Windows Fax and Scan service

  1. Press Windows Key + R keyboard shortcut to open the Run dialog.
  2. Enter services.msc and press Enter or click OK.
    services run window can't open serial port
  3. When the Services window opens, locate Windows Fax and Scan service and double-click it to open its properties (If this service isn’t available, try changing the settings of the Fax service).
  4. Set the Startup type to Manual and click the Stop button to stop the service. Now click Apply and OK to save changes.
    manual startup type serial port not working

4. Disable the serial port in Device Manager

  1. Press Windows Key + X and choose Device Manager from the list.
    serial port device manager
  2. When Device Manager opens, locate the serial port, right-click it, and choose Disable device from the menu.
  3. When the confirmation dialog appears, click Yes.
  4. Wait for a couple of moments, and then enable the serial port.

5. Try using a different cable

Sometimes, an unable to open serial port error can appear if your USB cable isn’t working. Be sure to check if your cable is connected correctly. In addition, check for any visible damage.

If your cable seems in order, try replacing it and check if the problem appears with a different cable.

6. Reinstall the serial port driver

  1. Open Device Manager.
  2. Locate your serial port, right-click it, and choose Uninstall device.
    uninstall device serial port can't open
  3. Now click Uninstall to confirm.
    confirm device uninstall serial port not working
  4. Once the device is uninstalled, restart your PC.

As we already mentioned, sometimes issues with your serial port can be caused by your drivers.

If you keep getting Unable to open serial port message, you might be able to fix the problem simply by reinstalling the serial port driver.

After your computer restarts, Windows should install the default driver, and the problem will be completely resolved.

7. Make sure that the system is up to date

  1. Open the Settings app and go to the Update & Security section.
  2. Now click the Check for updates button in the right pane.
    update windows open serial port
  3. If any updates are available, they will be downloaded automatically in the background and installed as soon as you restart your PC.

Sometimes, an unable to open serial port message can appear if your system isn’t out of date.

An outdated system can lead to various compatibility issues, and the best way to avoid these issues is to update your system.

This process is relatively straightforward in Windows 10, and for the most part, Windows installs the updates on its own. Once your system is updated, check if the problem is still there.

8. Change the COM Port Number

The COM1 port may conflict with another device.

  • Press Windows + X, select Device Manager.
  • Expand Ports (COM & LPT).
  • Right-click your device > Properties > Port Settings tab > click Advanced.
  • Change the COM Port Number to a different unused port (e.g., COM3 or COM4).
  • Click OK and restart the system.

9. Check for Conflicting Applications

Another application might be locking the COM1 port (e.g., hypervisors, serial tools, Arduino IDE, etc.).

  • Open Task Manager, look for background apps that may use serial ports.
  • Close any app you’re not using.
  • If unsure, boot into Safe Mode with Networking and try again.

10. Reset BIOS/UEFI Serial Port Settings

Some motherboards allow toggling or reassigning COM1 from BIOS.

  • Restart your computer and enter BIOS/UEFI (Del, F2, or as per your device).
  • Look for Serial Port Configuration or Super IO Configuration.
  • Set the COM1 port to Enabled or Auto, and save changes.

11. Use Windows Troubleshooter

If the issue is with hardware or device detection, the built-in troubleshooter might help.

  • Go to Settings > System > Troubleshoot > Other troubleshooters.
  • Run the Hardware and Devices troubleshooter.
  • Follow the on-screen instructions.

12. Use a USB-to-Serial Adapter

If the physical COM1 port is failing, consider bypassing it.

  • Purchase a USB-to-RS232 serial adapter.
  • Plug it in and install any required drivers.
  • Assign it a COM port number and test the connection.

13. Check for Security Software Interference

Firewall or endpoint protection tools might block serial communication.

  • Temporarily disable antivirus/firewall software and test the connection.
  • If it works, whitelist the serial port software or tool.

How to enable COM port in Windows 10?

  1. Click the Windows key, enter regedit and select the Registry Editor app.
  2. Navigate to the part below:
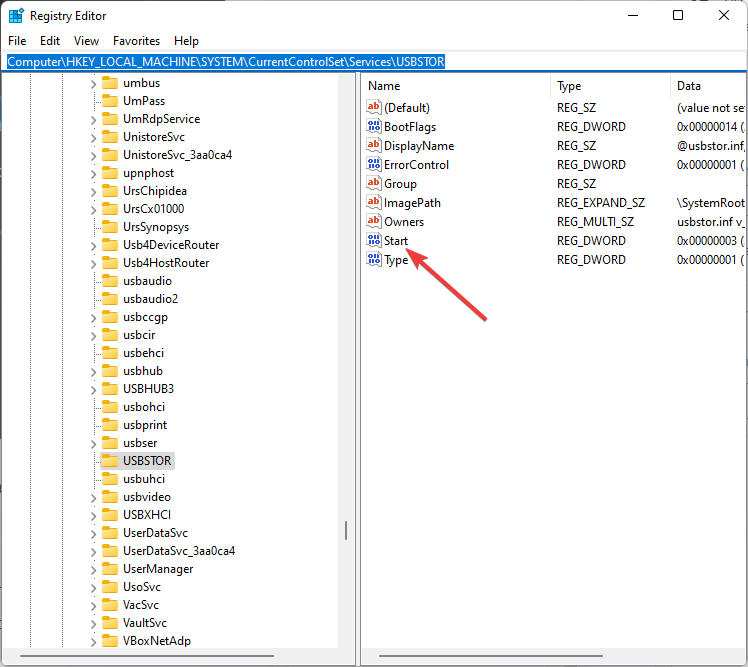
    Computer\HKEY_LOCAL_MACHINE\SYSTEM\CurrentControlSet\Services\USBSTOR
  3. On the right pane, double-click on Start.
    unable to open serial port
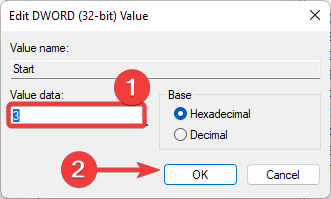
  4. Change the Value data to 4 and click OK.
    unable to open serial port

Getting the Unable to open serial port message can be frustrating, especially if you rely on COM ports for specific hardware. Fortunately, the steps above should help resolve the issue in most cases.

And if your COM port is missing entirely, you can manually add one via Device Manager to get things working again.

Remember that we have not made these solutions in any particular order, so you should try what seems most appropriate for your situation.

Let us know which one worked for you in the comments area below.

FAQ: COM1 and Serial Port Errors on Windows

1. What is a COM port?

A COM port (short for communication port) allows your computer to talk to external devices using serial communication. Even if you’re using a USB connection, many devices (like Arduino boards or serial adapters) still create a virtual COM port in Windows (e.g., COM3, COM4).

2. Why does it say COM1 when I’m not using it?

Many programs default to COM1, assuming it exists. On modern PCs, COM1 is often missing or already in use. If your device is connected to COM4 but your software tries to use COM1, it won’t work.
Fix: Check Device Manager for the correct COM port and set your program to use that instead.

3. How do I find which COM port my device uses?

Open Device Manager (right-click Start > Device Manager).
Expand Ports (COM & LPT).
Find your device in the list (e.g., “USB-SERIAL CH340 (COM3)”).
Use that COM number in your software settings.

4. What if a program doesn’t release the port?

If a program crashes or hangs, it may leave the COM port locked. This blocks other programs from using it.
Fixes:
Restart your PC to release the port.
Use Task Manager to close any stuck apps.
Use Process Explorer to check which process is holding the port.

5. How do I enable COM1?

If COM1 is disabled or missing:
In Device Manager:
Go to Device Manager, expand Ports, right-click COM1 (if shown), and select Enable.
In BIOS/UEFI:
Enter BIOS at startup (often by pressing F2 or Del).
Look under Advanced or Peripherals for serial port settings.
Enable COM1, then save and exit.
Note: Some PCs don’t have a physical COM1 port anymore. Use a USB-to-Serial adapter if needed.

Run Time Error 1004: 3 Ways to Fix it

Excel runtime error 1004 typically comes up when you are working with a corrupt document. You also get this error if you open a VBA Excel file when your Excel is having a conflict with other programs.

The Excel runtime error 1004 could show up due to a variety of other underlying issues. The most common error messages include the following:

  • VB: run-time error 1004: Application-defined or object-defined error
  • Excel VBA Runtime error 1004 Select method of Range class failed
  • runtime error 1004 method range of object _global failed visual basic
  • Excel macro Run-time error 1004
  • Runtime error 1004 method open of object workbooks failed
  • Run time error 1004: Method Ranger of Object Worksheet Failed
  • Save As VBA run time Error 1004: Application-defined or object-defined error

If you get any of these errors, then you can fix the error using the solutions here.

Quick Tip:

Before doing anything else, you can simply fix all the broken files like Excel documents with a PC repairing software like Kernel Repair for Excel.

Excel data is accurately restored, including table, chart, formula, chart sheet, picture, cell comment, sort, filter, fields, forms, and reports.

Kernel Repair Excel

Advanced methods are used to restore and save the original data structure and features.

What is Run Time error 1004 in Excel?

The runtime error is specific to apps that integrate Microsoft Visual Basic for Application (also known as VBA) script to run repetitive tasks.

All Microsoft Office applications use this Windows-specific programming, but the most prevalent issues arise in Excel, especially Excel 2007.

Many users report having issues when creating macros. A macro is a feature in Excel that records keystrokes and clicks in order to help you automate repetitive tasks.

Oftentimes, this task gets in conflict with the VBA which leads to the 1004 error. Another common cause is a corrupt Excel application or a corrupt XLS file.

Other possible causes that have been linked to this error include having a number of legend entries that exceed the space available, and a file conflict between Excel and other apps.

How do I fix runtime error 1004 in Excel?

The good news is that this error has been around for a while and there are several proven methods that will help you fix it.

1. Uninstall Microsoft Works to fix Runtime error 1004

  1. Press the CTRL + ALT + DEL combination and click on Task Manager.
  2. End all the programs that are currently open.
  3. Next, press the Windows key + R to open the Run utility.
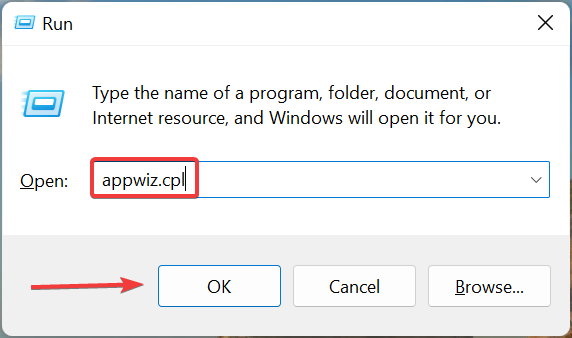
  4. Here, enter appwiz.cpl and click the OK button.excel-runtime-error-1004-uninstall-microsoft-works
  5. From the list of programs installed on your computer, find Microsoft Works. Right-click on it and hit Uninstall.

2. Delete GWXL97.XLA to fix Run Time error 1004

  1. Start by opening File Explorer on your computer. You can do this by pressing the Windows key + E.
  2. Next, click on the address bar, type in the following path, and hit Enter: C:Users\user name\AppData\Local\Microsoft\Excel
    excel-runtime-error-1004-find-the-excel-folder
  3. Here, open the XLStart folder.
  4. Finally, find the GWXL97.XLA file and delete it.

    3. How to fix Runtime error 1004 by creating a new template

    A great and easy method to fix runtime error 1004 is to use a new Excel template.

    You need to transfer the template from the Excel file that had issues to the new one, and the runtime error will be gone.

    While we’re at it, you might want to learn more about the Excel application and its best uses.

    If so, take a closer look at our Excel page to get your hands on countless informative recommendations and error fixes.

  1. 1. Launch Microsoft Excel on your computer.

  2. 2. Next, create a new Microsoft Excel workbook by pressing the CTRL + N combination or selecting Blank workbook from the first screen.

    excel new workbook
  3. 3. After making the workbook delete all the sheets on the workbook except one.

  4. 4. Format the remaining sheet.

  5. 5. Then go to File > Save As.

  6. 6. Save the file with the Excel Template (.xltx or .xlt) file format.

  7. 7. When the document is saved successfully, you can insert the template with the help of this code:Add Type:=pathfilename

    • Replace filename with the actual name of the document.

Knowing that there are many causes of the runtime error 1004 in Excel, only one solution may work.

With the help of this guide, you can now fix the Microsoft Excel runtime error 1004 and recover your file data.

In case you need further assistance, we have a dedicated Hub for Troubleshooting Runtime Errors that is full of articles like the one below.

How to Force Detach your Surface Book

Microsoft presented the Surface Book as the most powerful laptop, and the device is indeed powerful, but it’s more than just a regular laptop.

Namely, you can detach the screen from the keyboard, and use Surface Book as a fully legitimate tablet.

Since detaching a screen is a simple action, it should be performed without any issues, but this doesn’t appear to be the case.

A couple of users complained that they’re unable to detach Surface Book from the keyboard, as the detach button doesn’t react well.

When I first got my surface book I could detach it without any issues, however, I am no longer able to. Now when trying to detach it the detach button’s light blinks green but nothing happens.

When I hover over the software detach option it says Surface Detach: Detached and when looking at the battery status it says Battery 1 not available. Everything appears to indicate it does not think it is currently attached to the keyboard, when in fact it is.

Microsoft noticed this issue, but the company said that all necessary updates for Surface Book have already been released, so the issue must be of a technical nature.

But even if the company didn’t help, users managed to find the solution by themselves, so if you’re also facing the problem with detaching your Surface Book from the keyboard, check out the solutions below.

Surface Book is a great device, but several users reported that they are unable to detach the keyboard. Speaking of issues, these are some common problems with the keyboard that users reported:

  • Surface Book detach button red – This is a common problem with Surface Book and keyboard dock. If you encounter this problem, be sure to try some of our solutions.
  • Surface Book manual release – If you are having problems with your keyboard, you might be able to detach it manually. This is a risky procedure, so use it only as a last resort.
  • Surface Book please resolve before detaching – Sometimes you’ll get a message saying to resolve issues before detaching. This is most likely caused because an application is using the dedicated GPU. Simply close that application and you should be able to detach your keyboard.
  • Surface Book force detach – If you’re unable to detach the keyboard from Surface Book, you might be able to forcefully detach it. To do that, you just have to manually press the buttons inside of the Surface Book.
  • Surface Book Detach button doesn’t work – Many users reported that the Detach button doesn’t work. However, you should be able to fix that by using one of our solutions.
  • Detach Surface Book while off – If you want to detach your keyboard while the device is off, the only way to do that is to use the manual method. Keep in mind that this method can potentially damage your device, so use it as a last resort.

How can I fix Surface Book detaching from keyboard error?

1. Perform a two button reset

  1. Turn your Surface Book off.
  2. After your Surface turns off, press and hold the volume-up button and the power button at the same time for at least 15 seconds, then release both (The screen might flash the Surface logo, but don’t release the buttons for at least 15 seconds).
  3. After you release the buttons, wait for 10 seconds, and then press the power button again to turn on your device.

One user reported that the detaching issue was solved by performing a two-button shutdown, and since it’s the simplest solution we have in this article, we’re going to try it first.

Once you performed a two-button shutdown, try to detach your Surface Book from the keyboard, and it should work without any problems. In case you’re still unable to detach it, try some of the following solutions.


Your Surface Book is not turning back on? Check this guide to solve the problem quickly.


2. Enter BIOS

  1. Shutdown your Surface Book.
  2. Press the power button to turn it back on.
  3. Hold the volume up button until you enter the BIOS.
  4. Do not make any changes in the BIOS.
  5. Exit the BIOS, and you will be prompted that the changes will be saved.
  6. The computer will restart.

This solution was provided by the user who reported the issue on Microsoft Community forums at first place.

It does sound a little strange for us, and we didn’t test if it works, but he claims that it solved the problem for him, so if performing a two-button reset didn’t work, you can give his solution a try.

After doing this, as our friend from Community forums says, various permission errors will occur, but you should ignore them, and just restart your computer again.

After that, everything should get back to normal, and you should be able to detach your Surface Book from the keyboard without any problems.

If your Surface Book keyboard becomes unresponsive, you can fix it by following this handy guide.


3. Manually detach the keyboard

Before we start, we have to mention that this solution is potentially dangerous and by performing it, you might permanently damage your device.

We’re not responsible for any damage that can occur to your device as a result of this solution.

According to users, if you’re unable to detach Surface Book from keyboard, you might be able to do that manually. To do that, you just need a paperclip or any other long and thin object.

To do that, you just need to put your paperclip through the sixth ventilation hole and find the hidden button that holds the keyboard. If you can’t find the button, you might need a flashlight in order to find it.

Keep in mind that you need to do that for both sides in order to release the keyboard. It’s also worth mentioning that keyboard could also snap back to its original location and become locked again, so you need to be careful.

As we already mentioned, using this solution you can cause physical damage to your device, so use it only if other solutions don’t work.

Another great thing about this solution is that you can use it even if your device is turned off, so you can detach the keyboard even if your battery is empty.

Many users reported that this solution worked for them, but if you want to try it, be extra cautious in order to avoid causing damage to your PC.


4. Make sure that your applications are using integrated graphics processor

According to users, sometimes you’re unable to detach Surface Book from keyboard because your applications are still using dedicated graphics processor.

To fix the issue, you need to open Nvidia Control Panel and set all your applications to prioritize integrated graphics.

After making this change, your applications won’t use dedicated graphics and you should be able to detach your keyboard without any problems.

Keep in mind that there’s a downside to this solution, and you might experience lower performance after setting all your applications to use integrated graphics.

If you’re using demanding applications, such as video games, for example, you can set them to use a dedicated graphics processor in order to achieve better performance.

After doing that, you should be able to detach your keyboard without any issues.


Nvidia Control Panel won’t open on your Surface Book? Don’t worry, we’ve got the right solution for you.


5. End the application that is using your dedicated graphics

  1. Press Ctrl + Shift + Esc to open Task Manager.
  2. Now locate the application that is using your GPU, right click it and choose End task from the menu.
    Surface Book detach button red

If you’re unable to detach Surface Book from keyboard, it’s rather likely that a certain application is still using your dedicated graphics processor.

In our previous solution we showed you how to make all applications use a dedicated processor, however, if you don’t want to do that, you can always manually end the application that is using your GPU.

To do that, you need to use Task Manager. To end an application, just follow the steps above.

After ending the application, you should be able to detach the keyboard without any problems.

Keep in mind that this isn’t a permanent solution, so you’ll have to manually end the applications that are using your GPU whenever you want to detach your keyboard.

Can’t open Task Manager? Take a look at this step-by-step guide and fix the issue in no time.


Windows won’t end a task in Task Manager? Count on us to solve the problem.


6. Charge your Surface Book

According to Microsoft, you might be unable to detach Surface Book from keyboard simply because your battery isn’t charged.

In order to detach the keyboard, your device must be charged more than 10 percent. After charging your device, you should be able to detach the keyboard without any problems.


7. Wait for 10 seconds before pressing the detach key

If you can’t detach your keyboard, you might want to wait for a couple of moments and then try again. According to users, simply press Detach key for a one second and try to detach the keyboard.

If that doesn’t work, you might have to wait for 10 seconds or more and try again.


That’s about it, once again these are not official solutions, as we picked them up from users of Microsoft Community.

So, if you’re also experiencing the similar problem, we can’t guarantee that they’ll work for you, but you can give it a try.

If you have any other questions or suggestions, feel free to leave them in the comments section below and we’ll be sure to check them out.

Fix: CyberGhost not Working / Could not Download Needed Files

CyberGhost is a popular VPN client, but some users reported that CyberGhost is not working on their PC.

This can be a problem and leave your online privacy unprotected from third parties and your ISP. However, there’s a way to deal with this problem.

Using a VPN is important, and speaking of VPNs, many users reported that CyberGhost is not working on their PC. As for VPN issues, here are common CyberGhost problems that users encountered:

  • CyberGhost not connecting Windows 10, opening, starting up – These are some common problems that can occur with CyberGhost. If you encounter this issue, be sure that your antivirus or firewall aren’t blocking CyberGhost.
  • CyberGhost 6 has stopped working – This problem can occur if your installation is corrupted. To fix the problem, reinstall CyberGhost and check if that helps.
  • It is currently not possible to connect to the CyberGhost VPN network – If you’re unable to connect to the VPN network, it’s possible that your firewall is causing the issue. To fix that, be sure that the required ports are open.
  • CyberGhost service not reachable – This issue can appear on any version of Windows, and if you encounter it, be sure to try some of our solutions.

Why is CyberGhost blocking Internet connection?

It’s not uncommon to lose Internet connection after connecting to VPN, and this usually occurs due to your settings.

This also affects wireless networks, and many reported that Wi-Fi disconnects when using a VPN. It’s possible that the server can’t be reached, thus causing the problems with your network.

Another cause for this problem can be your network hardware, and it’s not uncommon for VPN to be blocked by router or any other network device.

How do I fix Cyberghost not working?

  1. Update your network drivers
  2. Switch to Google’s DNS
  3. Use the Command Prompt
  4. Reinstall Cyberghost
  5. Make sure that your network connection is working
  6. Check your system time
  7. Check your antivirus
  8. Make sure that the required ports are open
  9. Install the latest updates
  10. Run CyberGhost as an administrator or in Compatibility

1. Update your network driver

Updating your network driver has never been easier. All you need to do is download a capable third-party app that will automatically update your drivers.

You won’t need to manually search for the latest versions anymore. The program automatically scans your computer’s drivers and updates them for you. The days of installing wrong driver versions are gone.

2. Switch to Google’s DNS

  1. Click the network icon on your Taskbar and select your network from the menu.
    network icon cyberghost not working
  2. In the right pane, click the Change adapter options.
    cyberghost doesn't work adapter options
    • You should now see the list of available network connections.
  3. Right-click your network connection and select Properties from the menu.
    ipv4 properties cyberghost not working
  4. Highlight Internet Protocol Version 4 (TCP/IPv4) on the list and click the Properties button.
    cyberghost not working connection properties
  5. A new window will appear. Select Use the following DNS server addresses option. Now enter 8.8.8.8 as the Preferred and 8.8.4.4 as the Alternate DNS server. Lastly, click the OK button to save changes.
    DNS change cyberghost not starting

Using a VPN is important if you want to protect your privacy online, but some users reported that they get the Cyberghost could not download needed files error on their computers.

This can be a problem, but you might be able to fix this issue simply by switching to Google’s DNS.

After doing that you’ll switch to Google’s DNS and the problem should be resolved. Many users reported that this method worked for them, so feel free to try it out.

3. Use the Command Prompt

  1. Press Windows Key + X.
  2. Now choose Command Prompt (Admin) or PowerShell (Admin) from the menu.
  3. In Command Prompt, type the following commands:
    • ipconfig /release
    • ipconfig /renew
    • netsh winsock reset
    • netsh int ip reset
    • ipconfig /flushdns
    • ipconfig registerdns
    • netsh int tcp set heuristics disabled
    • netsh int tcp set global autotuninglevel=disabled
    • netsh int tcp set global rss=enabled
    • netsh int tcp show global

According to users, sometimes CyberGhost is not working due to problems with your network connection. This is a relatively common problem, and in order to fix it, you need to run several commands in the Command Prompt.

After running these commands, check if the problem with CyberGhost is still there.

4. Reinstall CyberGhost

If CyberGhost is not working, the problem might be the installation itself. Sometimes the installation can get corrupted, and in order to fix the problem, you need to reinstall CyberGhost.

This is quite simple to do, but the best way to do it is to use uninstaller software.

In case you don’t know, uninstaller software is a special application that will remove all files and registry entries related to the selected application.

As a result, you’ll remove all potential leftover files and prevent them from causing issues in the future. If you’re looking for good uninstaller software, we suggest you try the app uninstaller shown below.

The uninstaller will also remove all leftover files thus performing a deep uninstall. Once you remove CyberGhost with uninstaller software, download and install the latest version and check if it is solved.

5. Make sure that your network connection is working

If CyberGhost VPN isn’t working on your PC, perhaps the problem is related to your network connection. To fix the problem, be sure to check if other applications, such as your browser, for example, are working properly.

If the network connection works, then this is not the starting point of the problem, and you should proceed to the next solution below.

6. Check the system time

  1. Right-click the clock icon in the bottom-right corner.
  2. Choose Adjust date/time from the menu.
    adjust date/time cyberghost doesn't work
  3. A new window should now appear. Locate Set time automatically option and turn it off.
  4. After a couple of moments, turn this feature back on again.
    set time automatically cyberghost not working

Sometimes your system time can cause problems with Cyberghost, especially if your clock isn’t correct. To fix this problem, be sure to check your clock.

After doing that, the date and time should be readjusted automatically. If you want to change date and time manually, click the Change button and adjust it.

After your date and time are correct, check if the problem is still there.

7. Check your antivirus

According to users, sometimes your antivirus can cause this problem to appear. If CyberGhost is not working on your PC, try adding CyberGhost to the list of exceptions in your antivirus.

If that doesn’t help, try disabling certain features or disable your antivirus altogether. In the worst-case scenario, you might have to uninstall your antivirus.

Several users reported issues with Malwarebytes and CyberGhost, so if you’re using Malwarebytes, be sure to uninstall it and check if that solves the problem.

Bear in mind that other antivirus tools can cause this problem, so you might have to remove them as well.

If removing your antivirus solves the problem, we suggest that you switch to a different antivirus solution.

There are several Windows 10 compatible antiviruses that won’t interfere with you VPN.

Many of the good security software on the market offer free trial versions, so if you are not sure which one to get, you can try out a few before you make a decision.

Key features to look for are frequent updates, a large threat database, multi-layered protection, a strong firewall, and a solid privacy policy.

8. Make sure that the required ports are open

In order to use CyberGhost on your PC, you need to ensure that certain ports are open. To do this, be sure to check your firewall settings and enable the following ports:

  • 443
  • 8078
  • 8080
  • 9081
  • 9082

Note: In addition to the firewall on your PC, perhaps you should check your router’s configuration page and make sure that the aforementioned posts are open there as well.

9. Install the latest updates

  1. Open the Settings app.
  2. When the Settings app opens, navigate to the Update & Security section.
    check for updates cyberghost not working
  3. Now click Check for updates button in the right pane.

If you keep having issues with CyberGhost, perhaps the problem is caused by system glitches. Problems on your operating system can occur and interfere with various applications.

However, you should be able to fix most of these system glitches simply by updating your system. Windows 10 already installs the missing updates automatically, but you can always check for updates manually.

If any updates are available, they will be downloaded automatically and installed as soon as you restart your PC. Once the latest updates are installed, check If the problem is still there.

10. Run CyberGhost as an administrator or in Compatibility mode

  1. Right-click the CyberGhost shortcut.
  2. From the context menu choose Run as administrator.

If CyberGhost is not working on your PC, the issue might be the lack of administrative privileges. To fix this issue, users are suggesting running CyberGhost as an administrator.

If this works, CyberGhost should now start without any problems. Bear in mind that you need to repeat this step every time you want to start CyberGhost.

However, you can automate this process and set CyberGhost to always start with administrative privileges.

To do that, follow these steps:

  1. Right-click the CyberGhost shortcut and choose Properties from the menu.
  2. Navigate to the Compatibility tab and check Run this program as an administrator option.
  3. Now click Apply and OK to save changes.
    run as administrator cyberghost not working

After doing that, this shortcut will always start CyberGhost with administrative privileges, so you won’t have to do that manually.

If administrative privileges didn’t fix your problem, perhaps you can try running the application in Compatibility mode. To do that, follow these steps:

  1. Right-click CyberGhost shortcut and choose Properties from the menu.
  2. Head over to the Compatibility tab and check Run this program in compatibility mode for and select the desired version of Windows.
  3. Now click Apply and OK.
    compatibility mode cyberghost

After doing that, try to start the application and check if the problem is still there. Bear in mind that you might have to experiment with different Compatibility modes until you manage to find the one that works for you.

11. Try using a different VPN service

If you’re having issues with CyberGhost, you might want to consider using an alternative such as PIA. The software is open-source, so everybody can inspect it and verify its security.

There’s no logging, so your browsing history and online activity is completely unavailable to third-parties. Lastly, the service has servers all around the world, thus providing you with fast, reliable and secure connection at all times.

PIA

With its open-source code and no log policy, PIA is one of the best VPNs for all types of users.
Check price Visit website

CyberGhost is a great VPN software, but if CyberGhost isn’t working on your PC, feel free to try some of our solutions and check if that solves your problem.

Posted in VPN

Galaxy Buds Won’t Connect to PC: 6 Ways to Recognize Them

You probably can’t connect Galaxy Buds to your PC. But here are the essential details.

Windows 10 offers you a variety of useful features, including using Samsung Galaxy Buds, which are ideal for a wireless experience. They are supposed to connect to Bluetooth mode automatically.

However, some users reported that they sometimes couldn’t connect Galaxy Buds to a PC. Here are some possible causes and remedies for this error.

Why won’t my Samsung Buds connect to my computer?

While connection should be seamless, we have realized that a few common factors inhibit this process. From what we gathered from users, the top elements include the following:

  • Bluetooth settings – This is one of the biggest issues. If your Bluetooth is not enabled, you will not be able to connect. You may also need a Bluetooth adaptor if the built-in Bluetooth is faulty.
  • Your device is hidden – There are chances you have not allowed the Buds to be discoverable. And this will hinder any connection efforts.
  • Glitches on your Computer – There may be tiny issues that you would need the computer to troubleshoot before you can complete the connection automatically.

Here are some tested solutions, no matter what the trigger is. Note that these fixes will work if you can’t pair Galaxy Buds to a PC or laptop and would also work for Pro versions.

What to do if I can’t connect Galaxy Buds to my PC?

1. Enable Bluetooth

  1. Press Windows + I to open the Settings app, then select Devices.
  2. On the left side, select Bluetooth & other devices.
  3. Check if the toggle button is blue on the activated mode.

Since your Windows 10 PC supports Bluetooth, you’ll need to turn it on. Then, apply the above procedure to achieve your goal quickly.

2. Make your Galaxy Buds discoverable

  1. Place your earbuds in the charging case and close the lid.
  2. Wait 5-6 seconds and open the case.
  3. Galaxy Buds should automatically enter Bluetooth pairing mode.
Note icon NOTE
If your device is already paired with another one, insert your Galaxy Buds into your ears and hold both touchpads for a few seconds until they enter pairing mode.

3. Discover your Galaxy Buds on the PC

  1. Press Windows + I to open the Settings app, then select Devices.
  2. On the left side, select Bluetooth & other devices.
  3. Click on the + button next to Add Bluetooth or other device.
  4. Select Bluetooth.
  5. Turn on your Galaxy Buds.
  6. The PC should now discover your device automatically.

4. Use the Hardware and Device Troubleshooter

  1. Press Windows + I to open the Settings app, and click on the Update & Security section.
  2. On the left side, select Troubleshoot, then go to Additional troubleshooters.
  3. Click on the Bluetooth section under Find and fix other problems.
  4. Select Run the troubleshooter.

5. Update Windows

  1. Press Windows + I to open the Settings app, and click on the Update & Security section.
  2. On the left side, select Windows Update. Then click on Check on updates button.

6. Reinstall the Bluetooth driver

  1. Unpair your Galaxy Buds.
  2. Press Windows + X keys and select Device Manager.
  3. Expand the Bluetooth section, right-click on your Bluetooth device that appeared below, and select Uninstall device.
    can't connect galaxy buds to pc
  4. In the opened window, click on the Uninstall button and wait until it is completed.
  5. Repeat these steps to uninstall all Bluetooth devices, including Galaxy Buds.
  6. Reboot your computer.

This was our list of best solutions when you couldn’t connect Galaxy Buds to your PC. We hope you found this article to be essential support for your issue.

When none of these lead to a result, you should consider pairing your buds on another computer to ensure the connectivity works.

Also, if you encounter any troubles regarding audio devices on your PC, you can always check a complete fix guide when you can’t find Bluetooth headphones on Windows 10.

If you have any suggestions for the presented issue, please don’t hesitate to comment in the section below.

PC Xbox Game Pass: Availability extends to 40 new countries

In the wake of Microsoft’s ambitious project to acquire Activision Blizzard, the Redmond tech giant may also have one step ahead of its competitors as it announced the expansion of Xbox’s PC Game Pass to over 40 new countries worldwide.

The expansion means that starting February 28, potential markets in these regions can sign up for Xbox Insider Program to benefit from access to hundreds of triple-A PC games on Windows, even those that are exclusive on Xbox, and play them through Xbox Game Cloud service. From the Insider Hub app, you can unlock a preview version of this service before its general availability.

In the coming months, PC Game Pass will launch in these countries for all players to experience. This means that Game Pass community members from 86 countries around the world can play hundreds of games together with their friends and family. We look forward to welcoming more players from around the world to the Game Pass community.

It also means that at least 86 countries will now have access to Microsoft’s largest gaming database. The latest expansion happened in March 2022 in several Southeast Asian countries including Indonesia, Thailand, and Singapore.

What are the available countries on PC Game Pass?

Here’s the list of where Microsoft expanded its PC Game Pass service:

  • Albania   
  • Algeria 
  • Bahrain 
  • Bolivia 
  • Bosnia and Herzegovina  
  • Bulgaria   
  • Costa Rica  
  • Croatia   
  • Cyprus  
  • Ecuador 
  • Egypt   
  • El Salvador  
  • Estonia   
  • Georgia  
  • Guatemala 
  • Honduras  
  • Iceland   
  • Kuwait 
  • Latvia   
  • Libya 
  • Liechtenstein  
  • Lithuania   
  • Luxembourg   
  • Malta  
  • Moldova   
  • Montenegro   
  • Morocco 
  • Nicaragua 
  • North Macedonia 
  • Oman 
  • Panama 
  • Paraguay 
  • Peru 
  • Qatar 
  • Romania   
  • Serbia   
  • Slovenia   
  • Tunisia 
  • Ukraine   

Previously, the tech giant also rolled out two important 10-year expansive deals with Nintendo and Nvidia.

Those deals will allow Xbox titles, including Activision’s most-wanted Call of Duty, to be played on the console and the GeForce NOW cloud gaming service. In the long run, Microsoft hopes to strengthen its position to acquire the Santa Monica game publishing company.

What are your thoughts about this expansion? Let us know in the comments!

OneDrive Error Code 0x8004de40: 6 Quick Solutions

While trying to sign in to your OneDrive desktop client, you may encounter the OneDrive error code 0x8004de40. The full error message reads: There was a problem connecting to OneDrive and offers a try again option.

This can be a real concern for many users because it affects the normal use of the OneDrive service.

So, in this guide, we look at some tried and tested solutions and common triggers of this error.

Why am I getting OneDrive error code 0x8004de40?

If you get the OneDrive error code 0x8004de40, it could be caused by any one of the following:

  • Incorrect Internet configuration – This is the primary cause of the error for most users. You probably are on a weak internet connection and can not correctly access the cloud.
  • Corrupted OneDrive installation – If the installation is corrupted, there are a few bugs that it will cause. The error code 0x8004de40 could be one of them.
  • Third-party antivirus software – There may be conflicts in software that trigger this issue. This is often a secondary antivirus software installed on the PC for many users.
  • Outdated software – You should be mindful that working on Microsoft services that have not been updated will trigger errors. It would be best if you were up to date on all your software to avoid this.

With these causes in mind, let us explore some solutions that other users have found effective.

How do I fix the OneDrive error code 0x8004de40?

1. Change the Internet Properties

  1. Press the Windows Key + R keyboard shortcut to open Run.
  2. Type inetcpl.cpl and click OK to open the Internet Properties window.
  3. On the Internet Properties window, open the Advanced tab, and under Settings, scroll down, find the following options, and check their boxes: Use TLS 1.0, Use TLS 1.1, Use TLS 1.2.
  4. Click Apply and OK to save the changes.

TLS 1.0 and above is a security protocol that helps establish encryption channels over the computer network. Your OneDrive client may not function properly when these protocols are disabled.

2. Configure the Internet proxy settings

  1. Press the Windows Key + R keyboard shortcut to open Run.
  2. Type inetcpl.cpl and click OK to open the Internet Properties window.
  3. Open the Connections tab on the Internet Properties window and click on LAN Settings.
  4. Under LAN Settings, uncheck the Use a proxy server for your LAN option and tick the Automatically detect settings option.
    OneDrive error code 0x8004de40
  5. Click Apply and OK to save the changes.

Proxy servers allow you to bypass certain restrictions your ISP apply, while some organizations use them to establish a secure connection to their network.

However, sometimes incorrect proxy settings can create issues with the OneDrive account, resulting in a connection error.

Are you unable to connect to a proxy server in Windows 10? Feel free to make all proxy server issues a thing of the past immediately.

3. Reset the OneDrive client

  1. Press Windows + I to open the Settings app, then click on Apps.
    OneDrive error code 0x8004de40
  2. Select Apps and Features and click on OneDrive.
  3. Click on Advanced Options, and in the OneDrive advanced options window, scroll down and click on Terminate.
  4. Scroll down again, click on Reset, then click on Reset to confirm the action.
  5. Close the Windows Settings window and relaunch OneDrive and check for any improvements.

An alternative way to reset OneDrive: 

  1. Press Windows Key + R to open Run, type the following command in the Run box, and click OK:
    %localappdata%MicrosoftOneDriveonedrive.exe
  2. Wait for the command to execute and relaunch the OneDrive desktop client.
  3. Check if you can establish a connection now.

Resetting the OneDrive client can help resolve issues due to bad cache and configuration. Also, for those wondering how do I fix a corrupted OneDrive, this should do the trick.

4. Whitelist OneDrive in Firewall

  1. Press Windows + R to open Run, type firewall.cpl in the text field, and hit Enter.firewall.cpl
  2. Click on Allow an app or feature through Windows Defender Firewall.allow an app
  3. Click Change settings.change settings
  4. Now, click on Allow another app.allow another app
  5. Click Browse.browse
  6. Navigate the following path, while replacing Username with the account name on the PC:C:\Users\Username\AppData\Roaming\Microsoft\Windows\Start Menu\Programs
  7. Select OneDrive, and click OK.onedrive
  8. Click on Add.add
  9. Make sure both the Private and Public checkboxes are ticked for OneDrive, and click OK to save the changes.whitelist

Whitelisting Microsoft OneDrive in the firewall for both Private and Public networks should fix the OneDrive error code 0x8004de40 in Windows 11.

5. Reset Winsock properties

  1. Type command in the search box, right-click the Command Prompt option, and select Run as Administrator.
    OneDrive error code 0x8004de40
  2. In the Command Prompt, type the following command and hit Enter:
    Netsh winsock reset catalog 
  3. Once the command is successfully executed, close the command prompt and restart your PC.

If you’re having trouble accessing Command Prompt as an admin, rest assured that our simple tips will help you in no time.

Winsock reset usually helps with resolving network problems on your Windows PC. Running the above-given command should help you resolve OneDrive network-related issues. Also, it would work if you are getting OneDrive error code 0x8004de40 in Windows 7.

6. Delete Registry keys

  1. Press Windows + R, type regedit, and hit Enter.
  2. Navigate to the path below:
    Computer\HKEY_LOCAL_MACHINE\SOFTWARE\Policies\Microsoft\Cryptography\Configuration\SSL\00010002\Functions
  3. Delete the functions key if it exists.

Even after following all the steps in this article, the OneDrive error code 0x8004de40  persists; launch the Microsoft Store, and check if an update is available for the OneDrive client.

Also, download and install any pending Windows updates by going to Start > Settings > Update and Security > Windows Updates.

Even more, check out this guide dedicated to OneDrive errors during Windows 10 shutdown. This issue can cause stress, so don’t hesitate to solve it for good.

Leave any other questions or suggestions in the comments section below, and we’ll check them out.

Can’t Add a Phone Number to Microsoft Account: 3 Ways to Fix

If you can’t add phone number to Microsoft Account, it will be more vulnerable since you won’t have an additional verification method.

Luckily, this is a minor issue, and it can be fixed easily by following the instructions from this guide.

Why can’t I add my phone number to my Microsoft account?

  • Typing mistakes and incorrectly entered numbers can cause this problem.
  • A weak signal will prevent you from receiving SMS messages.
  • Phone settings will sometimes block messages from unknown numbers.
  • In some cases, you just need to wait a bit more for the process to finish.

Now that we know what we’re up against let’s see how to fix the problem quickly.

What to do if I can’t add a phone number to Microsoft Account?

1. Use a different number

  1. Go to Microsoft account page.
  2. Click on Add a phone number.
     
  3. Now enter a different phone number that you’re using.
  4. Save changes.

2. Request another verification code for a few hours or even a day

  1. Try to add the number again.
  2. You’ll get a request code.
  3. If you don’t get a code, repeat the process again after a few hours.

3. Contact Microsoft support

  1. If any of the previous two aren’t working, go to Microsoft Support’s page. Click on Show expanded list of products.
  2. Scroll down and click Get help and support.
  3. Type I am unable to receive SMS code while adding a phone number to my account and click Get Help.
  4. Click Contact support.
  5. Select Other Products from the first drop down, and then Select your support category.
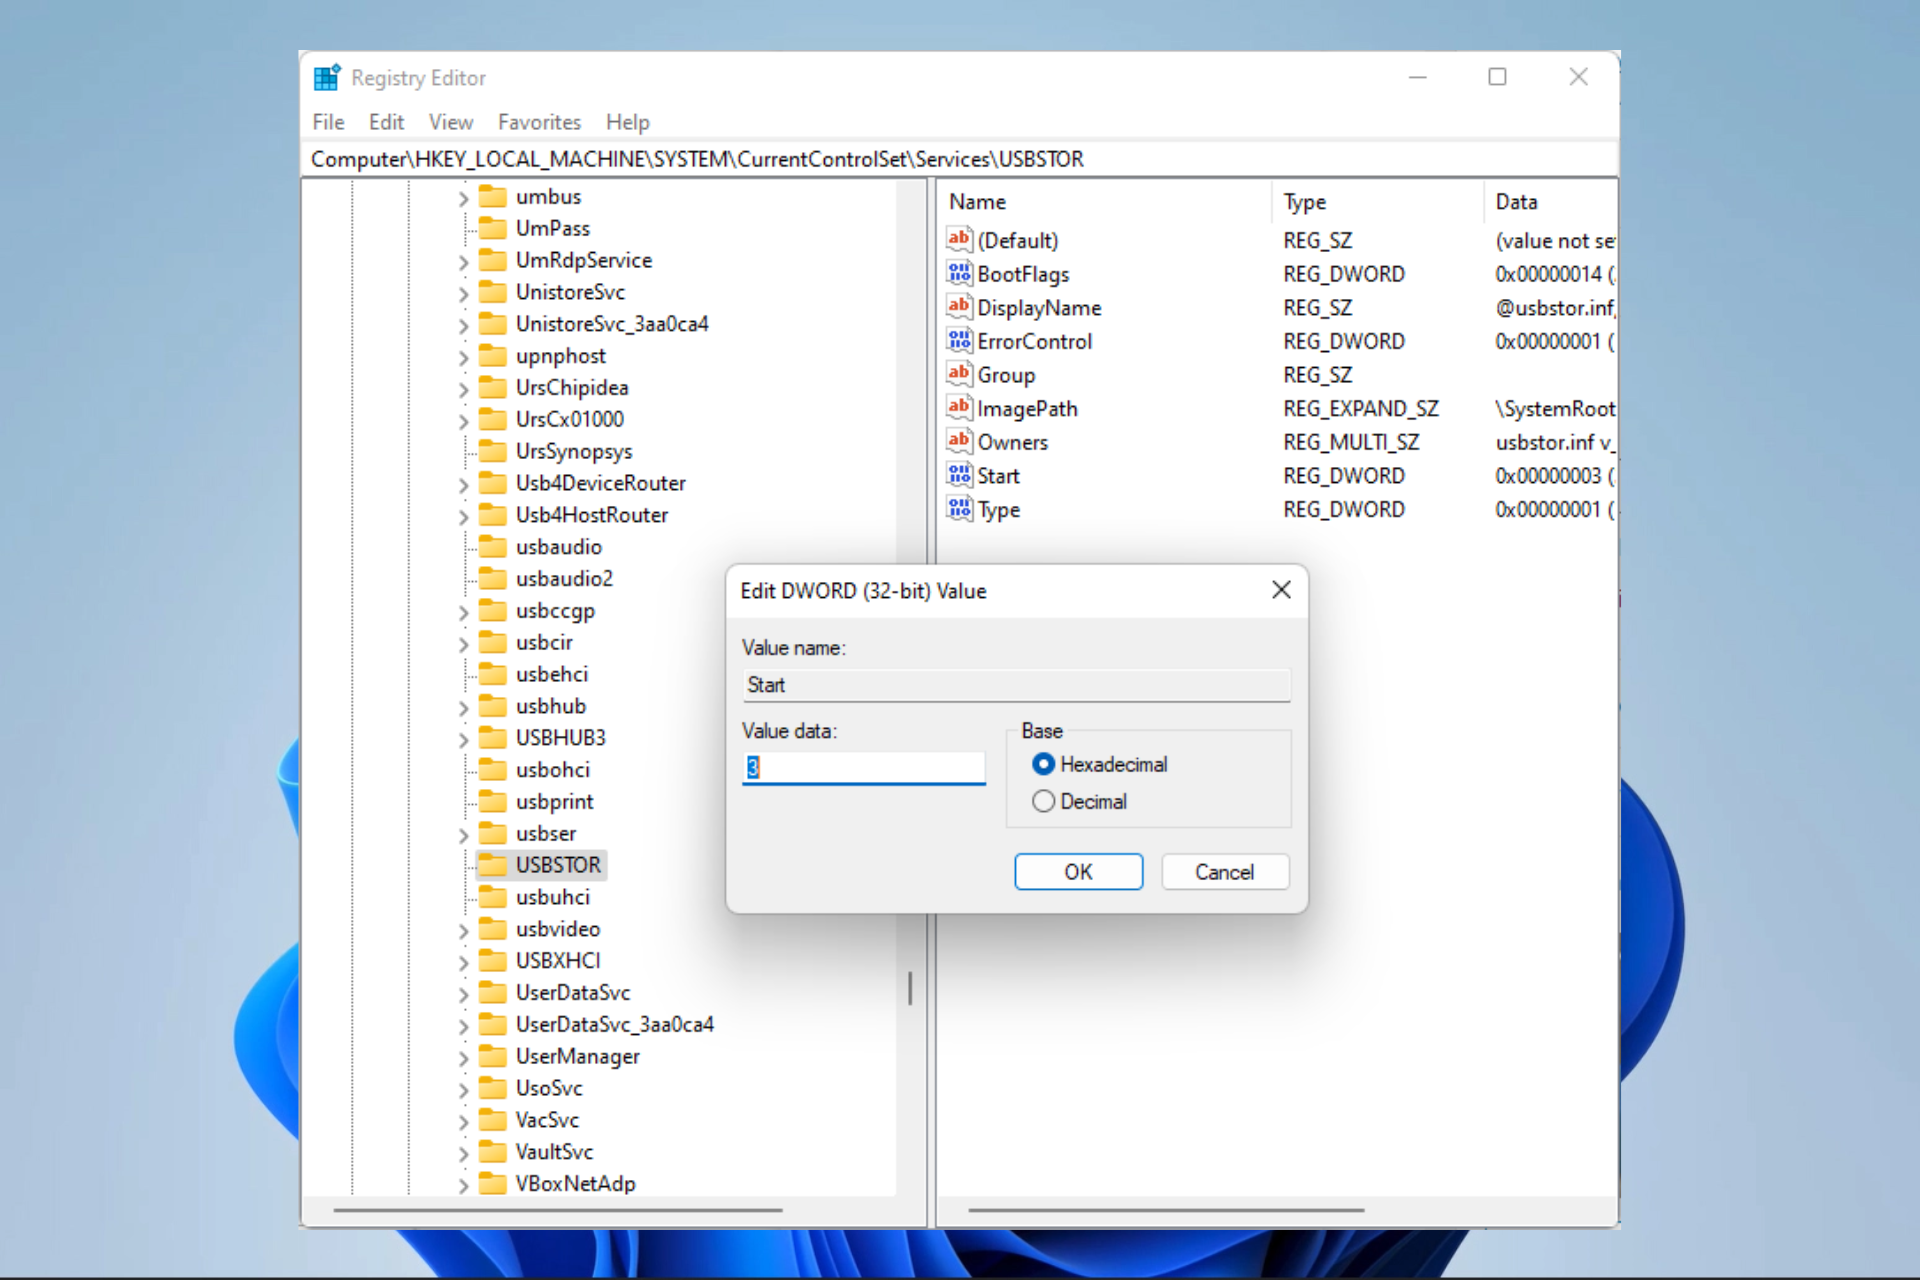
  6. A window to Chat with a support agent in your web browser will pop up. Click on it.

Adding your phone number to your Microsoft account shouldn’t be complicated if you’ve played your cards right. Otherwise, you might run into another This alias cannot be added to your account error.

After all, it doesn’t require much technical know-how, and with these simple fixes, you should be able to continue experiencing your Windows 11 to the fullest.

7 Ways to Fix Windows.storage.dll Crash on Your Windows PC

If you encounter a windows.storage.dll crash error, you probably won’t be able to run your desired programs or apps due to crashes.

Also, it isn’t uncommon for DLL files to go missing on Windows 11. Hence, this guide will explore the causes and possible fixes for the Windows.storage.dll crash on your PC.

What is Windows.storage.dll, and why does it crash?

Windows.storage.dll is an essential component for some Windows applications, and the reason for the error message is that the file is corrupt or missing, which affects the application.

It is often caused by an overwrite from another program that renders the DLL file unusable. Also, this overwrite is related to third-party apps like antiviruses or Windows Defender. However, other possible causes are:

  • Installation issues: If your installation is incomplete or a program deletes DLL files during its uninstallation, then this error will come up. Also, if you are wondering why rundll32.exe windows.storage.applicationdata.dll crashed, this is a reason.
  • Outdated Windows: If the Windows OS is outdated, bugs could take over the PC, and issues like missing files can occur. If you encounter any issues, you can use the Windows Update troubleshooter.
  • Registry issues: You can also encounter a PC crash when running a program if the Windows.storage.dll is not properly registered within the folder. Hence, the program can’t locate it.

Although there are other causes, these are the prominent ones from most user complaints.

How do I fix the Windows.storage.dll error on my PC?

It would help if you considered performing the following preliminary checks before engaging in any troubleshooting fixes:

  • Ensure to check the antivirus whitelist section to check for the missing files.
  • Try to boot your computer in Safe Mode.
  • Check your recycle bin to restore the DLL file if you accidentally deleted it. However, if you accidentally empty your recycle bin, our guide will help fix the problem.

If, after these checks, the error persists, kindly hop on the fixes below.

1. Run a system file scan

  1. Right-click the Start button, input Command Prompt, and Run as administrator.
  2. Enter the following command and press Enter: sfc/scannow
  3. Wait for the scan process to complete and restart your computer to check if your DLL file is still missing.

Using the system’s built-in file repair tool, this process is meant to identify the reason for the windows.storage.dll crash. Hence, this should be fixed if corrupt system files cause the error. An SFC scan also works when the winmmbase DLL is missing.

However, if you are having trouble accessing the Command Prompt as an admin, it is recommended that you take a closer look at this guide.

2. Run DISM to repair DLL files

  1. Right-click the Start button, input Command Prompt, and Run as administrator.
  2. Copy and paste the following command and press Enter: DISM /Online /Cleanup-Image /RestoreHealth
  3. Wait patiently until the process is complete.
  4. Then, restart your computer.

DISM (Deployment Image & Servicing Management) tool is another solution similar to the SFC Scanner if it fails to fix the problem.

3. Install the Windows.storage.dll file

Note icon NOTE
We don’t recommend downloading the Windows.storage.dll file from untrusted sources. The solution below was tested and approved by our experts.
  1. Go to the DLL download page and download the Windows.storage.dll file according to your computer’s processor (64-bit/32-bit).
  2. Open the downloaded file and extract it into a folder.
  3. Copy and paste the Windows.storage.dll file into the following directory: C:\Windows\System32\
  4. Click the Start button, search cmd, and Run as administrator.
  5. Input the following command and press Enter: regsvr32 windows.storage.dll
  6. Restart the PC for the changes to take effect.

By installing the Windows storage.dll file into the system, it should restore, fix and overwrite the previously corrupt files leading to the error.

4. Use a file recovery software

There are numerous third-party DLL fixers and file recovery software that you can use to restore the missing files.

They efficiently scan your whole PC and automatically handle any issues they detect. They automatically download, install, and register the fresh DLLs into your system.

5. Use System Restore

  1. Press the Windows + R keys to launch Run, type rstrui, and click OK.
  2. Select Choose a different restore point, then click Next.
  3. Check the box from Select more restore points for the list with dates.
  4. Select a date to restore Windows 11.
  5. Click on Next and then Finish.

After you have followed these steps, your computer will restart automatically. This should restore the missing files; if it doesn’t, try the next fix.

If the restoration fails, check our guide on what to do if the restore point is not working in Windows 11 to fix the problem.

6. Update your Windows

  1. Press Windows + I to open the Settings app.
  2. Click on Windows Update and select Check for updates button (if there are new updates, Windows will automatically identify and install them).

This update should fix the issues related to missing files that may lead to crashes. Check this guide for solutions if Windows Update fails to work.

7. Disable the Windows Firewall

  1. Click the Start button, input Windows Defender Firewall and launch it.
  2. Click Turn Windows Defender Firewall on or off in the left pane.
  3. Select the Turn off Windows Defender Firewall radio buttons in the Private and Public sections.
  4. Click the OK button.

The Windows Defender removes malicious files on the PC; sometimes, DLL files may appear as such. However, if Windows Defender is missing on your Windows 11, take a look at this guide to restore it.

How do I know if a DLL is corrupted?

Several applications share a DLL file. So when it’s corrupt, you will likely find out real soon. Besides, the SFC (System File Checker) scan also helps identify corrupt DLL files on the PC. However, you will have to replace these afterward manually.

SFC Scan

However, the best possible solution to find and fix corrupt DLL files is to use a reliable DLL repair tool. These are highly effective at the job and can quickly replace corrupt DLLs.

All the instructions in this article are a great solution to fixing your Windows.storage.dll crash problem.

Also, if you encounter any missing DLL files from your PC, check our guidelines for an in-depth guide.

If any fixes have solved your problem, kindly let us know using the comments section below. Also, you can leave your questions or suggestions.

Uninstall WinZip Driver Updater Safely in Just 2 Steps

If you have installed WinZip Driver Updater on your computer, then you need to remove it from your computer as soon as possible. WinZip Driver Updater is a software application that will display ads, pop-ups, and other types of unwanted content on your computer screen.

This program has been designed to be installed in the background without your permission. The only way you can notice that this program is running on your computer is by looking at the applications list in the Start menu and seeing that a new program has been added.

Should I update WinZip drivers?

If you are asking yourself whether Winzip Driver Updater is safe, it is not. This is a fake driver updater application that is supposedly made by WinZip. The virus is designed to trick you into thinking that your computer’s drivers are out of date and not working properly.

Usually, this type of malware has the ability to download and install other types of viruses onto your computer. This is what makes it dangerous, and why you need to remove the WinZip Driver Updater virus as soon as possible.

You may not even realize it has found its way into your PC. You may have installed this program yourself by accident or it may have been added to your computer when you installed another program.

Once installed, the Trojan may change your browser settings and redirect you to malicious websites. The WinZip Driver Updater is not safe. It is designed to trick users into paying for fake drivers. 

Consequently, you can update your drivers from Device Manager or use driver updater tools.

Why can’t I uninstall WinZip Driver Updater?

The uninstallation process doesn’t always run smoothly so you may hit a bump and the malicious app fails to uninstall. If you are unable to uninstall WinZip Driver Updater, you may have a problem with your computer, disk drive, or the software itself.

Here are some of the other reasons why you can’t uninstall WinZip Driver Updater:

  • App leftovers – There are still some files left in your system. You can try to remove the software leftovers manually one by one or use an uninstaller app to help you.
  • Files in other locations – Some programs store files in other locations on your hard disk than where they were installed.

We also have a detailed article on how to get rid of apps that won’t uninstall in Windows if the software is becoming problematic.

How do I remove the WinZip Driver Updater virus?

1. Uninstall WinZip Driver Updater

  1. Hit the Windows key and select Settings.settings windows 11
  2. Click on Apps on the left pane then select Apps & features on the right-pane.
  3. Locate WinZip Driver Updater, click on the three ellipses then select Uninstall.
  4. Confirm uninstallation in the pop-up dialog box.

2. Scan your PC for viruses

  1. Press the Windows key, search Windows Security and click Open.
  2. Select Virus & threat protection.
  3. Next, press Quick scan under Current threats.
  4. Wait for the process to finish and restart your system.

To get rid of WinZip Driver Updater, you must remove its components. The next step is to stop all processes related to it. You’ll want to run a virus scan to eliminate any residues.

The WinZip Driver Updater virus is likely to have infected other files on your computer even after you’ve removed the main infection from your PC. There may still be some residual malware lurking on your hard drive.

A virus scan will look for these remaining pieces of malware and remove them if found. The Windows scan may not be sufficient, so we recommend a third-party antivirus program.

To ensure that your PC isn’t affected, you might want to do a full driver check with Outbyte Driver Updater, a tool specialized in driver updates.

Outbyte Driver Updater will scan your entire PC for all drivers that are outdated or missing and will safely install each one of them within a few moments.

Outbyte Driver Updater

Maintain your system’s performance by keeping all your drivers up to date.
Free Trial Download Now

Hopefully, you have been able to uninstall this virus that presents itself as useful software.

You might also be interested in checking our selection of the best PUP remover tools that can help you get rid of these unwanted programs.

Let us know what method you use to keep such software from making its way into your PC in the comments section below.

Xbox App Not Detecting Gaming Services: How to Fix It

You might already be conversant with the Xbox app, a neat tool to check for recommendations, search the catalog, and download video games.

Unfortunately, the tool malfunctions at times. Users have previously complained that the Xbox app is stuck at the preparing screen, while others say it is not detecting gaming services. Let’s get to the bottom of this problem, shall we?

Why won’t my Xbox connect to the Xbox app?

If you are having trouble connecting your Xbox to your Xbox app, several factors could be causing this issue. Here are the main reasons:

  • Bad internet connection – If you cannot establish a stable internet connection, then you might not be able to connect your Xbox to the Xbox app.
  • Incorrect time and date – When your Windows PC uses the wrong time and date, you might face this issue since the Xbox app won’t be able to access the servers.
  • Outdated application – Microsoft pushes updates to the Xbox via Windows Updates. Therefore, not installing the latest Windows version means you risk missing an Xbox app update, too.
  • Corrupt application – Just like any Windows app, the Xbox app can also get corrupted by viruses which might deter it from working properly.
  • Gaming services-related issues – Xbox Gaming Services might be experiencing downtime or could be under a scheduled maintenance run.
  • VPN interruptions – It is apparent that Xbox services like Game Pass are limited to certain regions; therefore, if you are running a VPN on your device, it might disrupt your accessibility.

What can I do if the Xbox app is not detecting gaming services?

Before proceeding to execute more advanced techniques to resolve this issue, we would recommend that you conduct these:

  • Sign out of the Xbox app, then log back in.
  • Check your date and time settings and ensure that they are correct.
  • Make sure the Xbox app is up to date from the Microsoft Store.
  • Verify that Xbox Live services are not experiencing any issues or that there is no scheduled downtime. 
  • Ensure that you have the latest Windows version running on your device.
  • Reset your router to ensure that you have a strong internet connection.
  • Restart your Xbox app as well as your Windows PC.

1. Run the Windows Store Apps troubleshooter

  1. Press the Windows key and click on Settings.
  2. Click on System in the left pane and select Troubleshoot.
  3. Select Other Troubleshooters.
  4. Scroll down and click the Run button next to Windows Stores Apps.
  5. Follow the screen prompts to run the troubleshooter.

2. Modify the registry

  1. Press Windows + R to launch the Run command, type regedit in the text field, and either hit Enter or click on OK to launch the Registry Editor.
  2. Paste the following path into the address bar at the top and hit Enter to open it. Alternatively, you can use the navigation pane on the left to find this key: HKEY_LOCAL_MACHINE\SYSTEM\CurrentControlSet\Services\GamingServicesNavigate path
  3. Right-click on the Gaming Services key and then select Delete from the context menu.Delete key to fix xbox app not launching games windows 11
  4. Click Yes in the confirmation prompt that pops up.Confirm deletion
  5. Now, go to the following path, and similarly delete this key as well: HKEY_LOCAL_MACHINE\SYSTEM\CurrentControlSet\Services\GamingServicesNetDelete the key
  6. After deleting both, restart the computer, and the problem should be resolved.

It should be noted that making other changes to the registry in your Windows PC will affect its functionality, but not to worry, we have a detailed post highlighting how you can fix broken registry items in Windows 11

3. Reset the Xbox app

  1. Press the Windows key and click on Settings.
  2. Select Apps from the left side and click on Apps & features from the right.
  3. Type Xbox in the search box, hit Enter, click on the three-dot icon, and select Advanced options.
  4. Scroll down and under the Reset section and click on Reset.
  5. Windows 11 will reset the app.

4. Reinstall the Gaming Services app

  1. Click on the Start menu in the taskbar and type Windows PowerShell in the box and select Run as administrator.
  2. Select Yes when the User Account Control (UAC) prompt appears.
  3. Key in the following command in the console and press Enter to uninstall the Gaming Services app: get-appxpackage Microsoft.GamingServices | remove-AppxPackage -allusers
  4. Now, run the following command to open the Gaming Services app page in Microsoft Store: start ms-windows-store://pdp/?productid=9MWPM2CQNLHN
  5. Finally, click on the Get button to download the Gaming Services app once more.

Reinstalling Gaming Services can also prevent issues like Xbox games from showing up on my computer; to know more, read this guide.

Why doesn’t Xbox cloud gaming work?

There are several reasons why Xbox cloud gaming is not working. Your browser might have accumulated faulty browser data or bugs. Additionally, you might be using an internet connection that is not stable.

At this point, you should have already resolved the Xbox not detecting Gaming Services issue and be able to make the most out of Xbox Game Pass for PC.

We also invite you to check out our expert guide in case you are having trouble signing in to the Xbox app. If you are facing more issues, you should visit our Xbox app problems guide for more potential solutions.

Before you go, don’t miss our latest guide on how to get Xbox Cloud Gaming unblocked.

Share with us which solutions helped you fix the Xbox app not detecting Gaming services issue in the comment section below.

Fix: Hard Disk Full but no Files on Windows 11

Storage problems are commonplace on Windows 11. Some users are complaining about not enough memory space on Windows 11, others are fuming about the hard disk being full without files.

If the latter is your case, you can’t store any more data on your hard disk, performing system upgrades is no longer possible, and Windows is now running slow on your PC.

Why is my hard disk full, but there are no files on Windows 11?

Some of the reasons of hard disk is full but no files on Windows 11 include:

  • Disk errors: Some Windows 11 disk errors can cause the hard disk to malfunction and display the wrong disk space.
  • Virus or malware attack: Your hard disk could get mysteriously full of files generated by undetected malware and viruses.
  • Windows installation files: When you update Windows to a newer version, your system stores a copy of the former versions in Windows.old folder. This folder grows huge over time.
  • System restore points:  Auto-saved system files and Windows Registry restore points consume space on your system drive.
  • Hidden and temporary files: Temporary, cache files, and other systems files can grow big to eat space on your hard disk.
  • Corrupt system files: Corrupt system files can also cause your hard disk to be full for no reason.

Whatever the cause of the problem, this guide contains effective solutions you can immediately employ to get rid of hard disk full but no files on Windows 11.

How can I fix hard disk full but no files on Windows 11?

Before trying your hands on the advanced fixes below, first, apply these:

  • Run a virus check: If your hard disk is full, but there are no files, your first action is to run a virus check. Having and running an up-to-date Windows Defender on your PC should be helpful, at the very least.
  • Show and delete hidden files: Some hidden files and folders can gulp away memory space on your PC without you noticing. You can unhide these hidden folders and files and delete them. 
  • Empty Recycle Bin: Deleting files and folders may not be enough because they end up in the recycle bin, which uses similar disk space. Emptying your Recycle Bin might help.

If your hard disk is still full after applying all these preliminary solutions, you can opt for the following advanced fixes.

1. Delete System restore points

  1. Type Create a restore point into the Search box and select the best match result.
    System Restore point
  2. Switch to the System Protection tab, select Local Disk (C:)(System) and click Configure.
    System protection tab
  3. Choose Turn on system protection and click OK.
    Turn on system protection
  4. Go back to the System Protection tab, select Local Disk (C:)(System) and click Configure again.
    System protection tab
  5. Next, go to Delete all restore points for this drive and click Delete.
    Delete restore points
  6. Select Continue from the dialogue to confirm delete.
    Continue to delete restore points
  7. Wait for the process to complete and restart your computer.

After deleting system restore to fix the problem, it’s advisable to create a new one once your computer is back on. This guide on how to create a restore point on Windows 11 will help you.

2. Check and repair disk error

  1. Right-click Windows icon on your taskbar and select File Explorer from the resulting menu.
    Open Windows Menu
  2. Select This PC on the left pane, right-click on Local Disk (C:) and choose Properties.
    Open drive
  3. Switch to the Tools tab and select Check under the Error checking section.
    Hard drive properties
  4. Select Scan drive and wait for Windows to complete the scan.
    Scan hard disk for error
  5. If there are any disk errors, Windows will notify you. Follow the on-screen prompt to repair the Error.

Not all disk errors can be fixed with this method. If you are interested in knowing more, we have a detailed article to guide you on how to fix Windows 11 disk error. Also, this method will help when the D drive is full but no files are in Windows 7.

3. Perform disk cleanup

  1. Type Disk Cleanup in the Search Box and select the best match result.
    Start hard disk clean up
  2. Select Clean up system files.Clean up system files
  3. Next, select other files you want to clean up under Files to delete and click OK.
    Disk cleanup files
  4. Click Delete Files on the dialogue box to confirm delete.
    Confirm delete files
  5. Wait for the cleanup to complete and restart your PC.

Of course, this isn’t the only way to perform disk cleanup. You can use other ways as explained in our guide on running disk cleanup on Windows 11.

Tip icon Tip
CCleaner is an excellent maintenance program that can help you with disk cleanup by removing unnecessary and build-up junk files that can deteriorate your PC performance. It also offers features like driver updater, PC health checks, and automatic app updates.

4. Run the chkdsk command

  1. Right-click Windows icon on your taskbar and select Run.
    Run Chkdsk command
  2. Type in or paste the following command and click OK: %WINDIR%\System32
    Type in command
  3. Type cmd on your keyboard, right-click on it and select Run as administrator.
    run cmd as admin
  4. Input the following command and hit Enter on your keyboard: CHKDSK /F
    enter chkdsk command
  5. Wait for the scanning to complete and restart your computer.

At times, Windows can get stuck when trying to run the chkdsk command. Here’s what to do when chkdsk got stuck on Windows 11.

Why is my hard drive still full after deleting files?

Here are a few possible reasons behind it:

  • Files are in the Recycle Bin: When you delete a file, it isn’t automatically removed but first goes to the Recycle Bin. Files here do take up space on the drive and have to be cleared yet again from the bin.
  • Changes don’t reflect yet: If you have deleted the files, but the drive still appears full, it could be the slow computer performance to blame, as a result of which Windows cannot process the change yet. Restarting the PC should do the trick here.
  • An app is holding onto the files: There are a few apps that offer a feature to retrieve files deleted from the Recycle Bin. And to achieve that, the app ensures that the files are not completely deleted.
  • Malware infection: In many cases, a malware infection was found to be why the hard drive was full even after deleting files.

If you’ve been searching for a solution to resolve a hard disk full without files on your PC, now you have some solid fixes.

You may also encounter other memory problems like high RAM usage on Windows 11. Check out our detailed guide to solve it.

Are you able to solve the problem with this guide? Share your experience with us in the comments section.

Fix: Keyboard is Not Working in Windows 10 Recovery Mode

So, you have seen this error message already. Your keyboard stops working in Windows 10, or you restarted your computer, and while in recovery mode, you can no longer use the keyboard.

One of the most popular issues many users face is Windows not detecting the keyboard. However, it now appears that after entering recovery mode, their keyboard, mouse, or both stop working. 

Why is your keyboard not working in recovery mode?

Is Windows 10 not detecting the keyboard on the setup screen? What could be the reason? Here are a few possible causes:

  • Damaged USB ports – It is possible that there is an issue with your USB ports or other hardware devices on your computer. You can try connecting another device like a USB stick or external hard drive to see if it works properly before making any changes on your computer.
  • Keyboard is damaged or defective – Your keyboard may be defective. Remove the battery and clean the contacts with a cotton swab. Then, replace it back and try again. If it doesn’t work, it could be damaged. In this case, you should consider replacing your keyboard because it is most likely damaged or defective.
  • The keyboard driver is not installed properly – If the PC cannot detect the keyboard it could mean the device has been disabled, or the system does not have proper drivers for it. It is also possible that you ended up with a corrupt keyboard driver during the recovery mode.
  • BIOS corruption – BIOS corruption can occur when you install new hardware or software on your computer. In some cases, it can happen during a power outage or other unexpected event where your PC loses power unexpectedly. If you’re experiencing problems with your keyboard not working after installing new hardware, it is possible that the problem was caused by a BIOS corruption issue.

Now that you know what causes your keyboard to go dead suddenly, here are a few troubleshooting steps that could help you resolve this issue.

How can I fix the keyboard if it is not working in recovery mode?

Before anything, you need to check a few things. These don’t require any technical know-how. They include:

  • Ensure the keyboard is connected securely to its ports. If using a wireless keyboard, ensure it is in range, and the batteries are charged.
  • Try different USB ports. It may be a case of a damaged port.
  • Disconnect other peripherals, then connect only the keyboard. You may have a third-party keyboard installed on your PC, interfering with the default keyboard driver. Check out how to disable the laptop keyboard when using an external one.
  • Try another keyboard (if available).

After performing these checks and still can’t get your keyboard to work, proceed to the below solutions.

1. Update Keyboard drivers

  1. Right-click the Start button and select Device Manager from the list.
  2. Expand Keyboards, right-click on your keyboard and select Update driver.update-driver-keyboard lenovo-ideapad-keyboard-not-working
  3. Select Search automatically for drivers.

You can also opt to go the automatic way and use a third-party tool. Outbyte Driver Updater is a great tool for updating drivers and repairing your system problems. 

The program downloads and installs the latest version of the driver automatically, so you don’t have to worry about manually installing any new software or hardware, which can be difficult for some people.

You may have to activate the On-screen keyboard if navigating using your mouse becomes cumbersome. You can press Windows + Ctrl + O keys simultaneously to bring it up.

Outbyte Driver Updater

A simple way to install driver updates safely straight from the manufacturer.
Free Trial Download Now

2. Restore defaults in BIOS 

  1. Press the F10 key continuously until the Boot Menu shows up.
  2. Navigate to the Exit tab and select Load Setup Defaults.
  3. Select Yes to confirm.
  4. Hit F10 to save changes.
  5. Restart your PC.

Most users may be concerned about data loss when resetting BIOS. Resetting the BIOS is the process of clearing out all settings from your system’s memory. All configuration settings will be cleared out, and default values will be restored.

However, it is always good practice to back up all your files regularly to avoid inconveniences.

3. Enable Legacy Support

  1. Restart your PC and when the login screen appears, click on the Power icon while holding down the Shift key then hit Restart.
  2. Select Troubleshoot.troubleshoot
  3. Click on Advanced options.
  4. Navigate to UEFI Firmware Settings.uefi firmware settings
  5. Click on Restart.
  6. Navigate to the Boot tab, scroll to Boot mode and set it to Legacy.Selecting Legacy in the drop down
  7. Save and exit.

Sometimes, you may have issues entering recovery mode so be sure to check out our article on how to navigate around this problem.

In case you get stuck, we have a guide on how to exit Windows Recovery Mode, so be sure to check it out as well.

Why is my keyboard not working in Windows 10 but working in BIOS?

When your keyboard works in BIOS but in Windows 10, it highlights that the problem lies with the OS or its settings and not the peripheral. Here, you can be sure that hardware malfunction is not the underlying cause.

In this case, it’s usually missing OS Updates, outdated or corrupt drivers, or even a bug in the current Windows version. Many users fixed things by uninstalling recent Windows updates. Besides, you may take a look at our comprehensive guide about keyboard works in BIOS but not in Windows

Can a laptop boot without a keyboard?

Yes, a laptop can boot without a keyboard, but you must modify the BIOS settings, depending on the error received at startup. This will be unique to each manufacturer since the BIOS is structured differently.

So, if you plan to boot the laptop with a keyboard, head to the BIOS and make the required changes.

We also explore how to fix your Bluetooth keyboard lag and ensure you continue to work efficiently and effectively.

Don’t hesitate to share any additional solutions not mentioned here but worked for you in this same issue. Drop us a comment down below.

How to enable/disable apps using ViVeTool on Windows 11

Just like what Microsoft did with the WinAppSDK-powered look of File Explorer on Windows 11 Insider Build 25300, the tech giant is reportedly bringing out the feature to uninstall apps with interdependencies. 

As spotted by Windows enthusiast @PhantomOnEarth, the feature, which was available in Build 25169 (July 2022) but disabled in 25211 (September 2022), can be re-enabled in the latest Dev builds (25300) with a few registry tweaks on ViVeTool. 

Apps with interdependencies are those programs that won’t be able to run without another program. For example, games installed through Steam wouldn’t be able to run without the Steam app itself, and so on. 

Usually, those apps use a database to store information somewhere else, which resulted in how they perform, compute, interact, etc. 

However, with this feature, it seems like you’ll be able to do so, although we’re still curious how that will work. 

Read along to find out how to enable/disable apps using ViVeTool on Windows 11.

How to enable/disable apps using ViVeTool on Windows 11?

1. Make sure to have the latest Windows 11 Insider Build installed in your system. If not, head over to Microsoft’s download page for insider builds to do so. 

2. Head over to GitHub to download the latest version of ViVeTool.

3. Once downloaded, click Extract all, select the location where you want to extract it by clicking Browse, then hit Extract. 

In this case, we extract it at C:\Users\WindowsReport\Documents\Tools\ViVeTool-v0.3.2.

4. Hit ? on your keyboard, then type “cmd” and right-click on Command Prompt -> Run as administrator.

5. Type in cd + the directory where we extracted ViVeTool. In this case, it’s at C:\Users\WindowsReport\Documents\Tools\ViVeTool-v0.3.2, then hit Enter.

6. Type the following command then hit Enter.

vivetool /enable /id:38579715

7. Reboot the computer.

In the meantime, it’s still worth noting that being an insider-only feature that isn’t out for primetime yet, you may be running into some performance problems here and there, so, patience is a virtue.

What are your thoughts about this functionality? Let us know in the comments!

Front USB Port Is Not Working: Here’s How to Enable It

There have been reports from some of our readers that their USB ports suddenly stopped working on the PC. This has been a significant issue since the USB ports allow you to charge, transfer data and connect to other peripheral devices.

Hence, we will discuss fixing issues with the front USB not working on Windows 11. Alternatively, you can read about how to fix USB ports not working in Windows 10.

Why is the front USB port not working?

The front USB ports not working Windows can occur for the reasons listed below.

  • Physical damage – The system USB port is open, exposing it to humidity, dust, and debris on the terminal. They can affect its proper connection, causing issues with how the front USB ports work.
  • Outdated drivers – Windows driver is a program that allows the computer hardware to communicate and function effectively with the operating systems. Thus, an outdated or incompatible USB driver will affect the operating system’s function with the USB hardware component.
  • Power supply issues – The USB port has a specific volt of electricity supply from the motherboard that allows it to either charge or power the connected device. A power surge on the USB or an insufficient power supply output from the motherboard can cause the USB port to malfunction.
  • Loose connections – The wires that connect the front USB ports to the motherboard or internal USB headers can come loose over time due to frequent use. Also, the USB cable may not be firm on the port.

These factors vary depending on the situation and your devices. Regardless, we’ll guide you through how to get your USB ports working again.

What can I do if the front USB port is not working?

Apply the following quick steps before proceeding with advanced troubleshooting:

  • Connect the USB device to another PC to see if it works.
  • Remove all dust and debris to fix the front USB port not working on PS5.
  • Restart your PC in Safe Mode.

You can proceed with the advanced solutions discussed below if the issue persists.

1. Update the Windows driver

  1. Press the Windows + I key to open the Windows Settings.
  2. Navigate to the Windows Update tab and select the Advanced options.
  3. Click on the select Optional Update.
  4. Click the drop-down button on the Driver Update and checkmark the list of updates available.
  5. Select the Update and Install button and wait for the drivers to install.

Updating outdated drivers will fix outdated USB drivers causing the USB ports not to work when accessories like a mouse and keyboard are connected.

If the above steps fail, take a look at how to update driver packs on Windows 11 in this guide.

2. Check the USB port with the Device Manager

  1. Lift-click the Windows icon, type Device Manager, and press Enter to open it.
  2. Expand the Universal Serial Bus controllers, right-click the device with USB Host Controller from the list, and select Uninstall.
  3. Close the Device Manager and restart your PC. Restarting your PC will automatically reinstall the necessary device.

It helps to troubleshoot hardware issues interfering with how ports work on your device. Hence, this should fix the front USB port if it’s not working on your PC.

3. Scan for Hardware changes

  1. Right-click the Windows icon and click on Device Manager.
  2. Click on your Universal Serial Bus controller’s name to highlight it, right-click on the Action tab, and select Scan hardware for changes.
  3. Close the Device Manager and check if your USB ports are working.

The above process will scan and resolve issues will undetected USB ports and devices. Alternatively, you can check our guide to running hardware diagnostics on Windows 10, which can also help fix USB ports not working.

4. Check the power settings

  1. Left-click the Windows icon, type Control Panel, and press Enter to open it.
  2. Select Hardware and Sound and click on Power Options.
  3. Click the change plan settings link and select the Change advanced power settings.
  4. Expand USB settings and click the USB selective suspend setting.
  5. Disable the On battery and Plugged in option.
  6. Select OK and select Apply.
  7. Close the Control Panel and restart your device.

The above method will help fix battery performance settings that could affect the USB 3.0 front port not working or detecting peripheral devices. You can further read about the best power efficiency tweaks in Windows 11.

In addition, you can read how to fix a USB device if it’s not recognized in Windows. Also, check our guide on ways to fix USB drives detected but not accessible on your device.

Should you have further questions or suggestions on this guide, kindly leave them in the comments section.

Invalid IO Boost State Error: Fix It Using These 6 Methods

BSOD errors are undoubtedly the most dreaded among users. It crashes the OS altogether and leads to loss of unsaved data, in addition to highlighting a major fault with the PC. One such is the Invalid IO Boost State error.

While most BSOD errors have been fairly covered, and you will find a number of solutions on the web, there seems to be a dearth of reliable information when it comes to the INVALID_IO_BOOST_STATE error. So, let’s find out all about it.

What does Invalid IO Boost State mean?

In technical terms, the error indicates that a thread exited with a non-zero I/O boost state, which under an ideal scenario should have been zero. Here are a few reasons you might be getting the error:

  • Malfunctioning hardware: A malfunctioning piece of hardware can affect the PC’s performance and trigger a range of errors.
  • Incompatible, corrupt, or outdated drivers: If you haven’t got the right ones, or the installed drivers are outdated or corrupt, it might lead to this error.
  • Corrupt system files: When there are corrupt system files on the PC, you may get this error.
  • PC infected with malware: Malware or virus on the computer is another reason for this error, and a full system scan will make that clear.

How can I fix the Invalid IO Boost State error?

Before we head to the slightly complex solutions, here are a few quick tips that might help:

  • Restart the computer and check if the error appears again. In some cases, it could be just a one-time thing.
  • Make sure all the connections are in order.
  • Disconnect all non-critical peripherals from the PC while leaving just the keyboard, mouse, and monitor. Now connect them one at a time and see whether the Invalid IO Boost State error reappears. When it does, the peripheral connected last is the problematic one.
  • Remove any external hard drives connected to the computer.
  • Check for any pending Windows updates, and if there are any, install them.
  • Disable any antivirus installed on the PC, except the built-in Windows Security.

If none of these work, head to the fixes listed next.

Note icon NOTE
The solutions here require booting the OS. So, if you cannot turn on the PC normally, boot in Safe Mode with Networking and then execute the fixes.

1. Disable automatic restart

  1. Press Windows + S to open Search, type View advanced system settings, and click on the relevant search result.view advanced system settings
  2. Click on the Settings button under Startup and Recovery.settings
  3. Untick the checkbox for Automatically restart under System failure, and click OK to save the changes.disable automatic restart to fix invalid io boost state

2. Scan for malware and virus

  1. Press Windows + S, type Windows Security in the text field, and click on the relevant result.windows security
  2. Click on Virus & threat protection.virus & threat protection
  3. Select Scan options.scan options
  4. Choose Full scan and then click on Scan now at the bottom.full scan to fix invalid io boost state

A full system scan using the built-in Windows Security should help if it’s malware or a virus causing the Invalid IO Boost State BSOD error.

3. Update the drivers

  1. Press Windows + R to open Run, type devmgmt.msc, and hit Enter.device manager
  2. Expand the Display adapters entry here, right-click on the graphics adapter, and select Update driver.update drivers to fix invalid io boost state
  3. Choose Search automatically for drivers and wait for the update process to complete.search automatically for drivers
  4. Similarly, update all the other drivers for the devices listed here.

Though Windows usually takes care of updates, you should update the drivers every once in a while, especially when getting the Invalid IO Boost State error. If the OS can’t find updates, you can always manually install the latest drivers.

Still, you can also choose the easier way to manage any of your PC drivers with dedicated support from a practical tool like DriveFix.

Shortly, the program will entirely scan the system and find outdated or missing drivers, thus updating them automatically and 100% secure.

⇒ Get Outbyte Driver Updater

4. Uninstall the problematic applications

  1. Press Windows + X to open the Power User menu, and select Installed apps.installed apps
  2. Locate the app installed around the same time the error first appeared, click on the ellipsis next to it, and choose Uninstall.uninstalled app to fix invalid io boost state
  3. Again, click Uninstall in the confirmation prompt.uninstall
  4. Similarly, remove the other probable problematic apps here.

5. Test the RAM

  1. Press Windows + R to open Run, type mdsched in the text field, and click OK.mdsched
  2. Select Restart now and check for problems (recommended).restart now and check for problems to fix invalid io boost state
  3. Wait for the test to complete. It may take a while.

The built-in Windows Memory Diagnostic tool helps fix issues with the RAM, a probable cause for the Invalid IO Boost State error.

If it doesn’t work, you can use Memtest86+, an open-source and effective memory testing tool. It runs various tests on the RAM, even individually on each module, identifies the problems, and tries to fix them.

6. Perform a system restore

  1. Press Windows + R to open Run, type rstrui.exe, and hit Enter.rstrui.exe
  2. Select Choose a different restore point, and click Next.choose a different restore point
  3. Now, select a restore point created before you first encountered the error from the list, and click on Next.restore point
  4. Verify the restore details and click on Finish.restore to fix invalid io boost state
  5. Wait for the restore to complete.

System Restore is an effective troubleshooting method to eliminate trivial issues and even the Invalid IO Boost State BSOD error when recent system changes are responsible for it. Also, you don’t lose any files in the process, though it affects the installed apps and configured settings.

If the problem persists, it’s likely a more complex underlying cause difficult to identify manually, and using an effective BSOD repair tool is the best way to proceed.

Tell us which fix worked for you in the comments section below.

Blizzard Battle.net Unexpected App Error: 5 Ways to Fix It

Blizzard is a popular gaming platform offering gamers a range of exciting titles, with Battle.net as the client. But its gaming client still isn’t as polished, with many getting the Battle.net Unexpected error at launch.

The error message reads, The application encountered an unexpected error. Since many users have reported encountering it, we researched and identified the solutions to fix the Battle.net Unexpected error.

Why does Battle.net unexpected error appear?

Here are a few reasons you might be getting the error:

  • Running an outdated version of the app: If the Blizzard.net app has not been updated in a while, you might come across a range of errors with it.
  • Corrupt cache or game data: A corrupt app cache or issues with the game data can trigger the Battlenet Unexpected error on startup.
  • Outdated drivers: When running outdated drivers in Windows, you are bound to face issues with devices and apps.

How do I fix the Blizzard Battle.net unexpected error?

Before we start making changes to the PC, here are a few quick solutions you should try:

  • Restart the computer.
  • Run the app as administrator and verify whether the Battlenet network error is resolved.
  • Update the Battle.net app. Simply connecting to the Internet while launching the gaming client should do it.
  • Check if there are any updates available for Windows and install them.
  • Ensure your PC meets the minimum system requirements for the Blizzard Battle.net game you are trying to play.
  • Disable the installed antivirus, primarily AVG, and check whether the Battle.net unexpected error is resolved. If yes, we recommend you switch to the best antivirus to avoid running into such third-party conflicts.

If none work, move to the ones listed next.

1. Disable GPU

  1. Locate the Battle.net launcher, right-click on it, and choose Properties.properties
  2. Paste the following at the end in the Target field followed by space:--disable-gpudisable gpu to fix battle.net unexpected error
  3. Click Apply and then OK to save the changes.save changes

2. Clear the app cache

  1. Press Windows + E to open File Explorer, paste the following path in the address bar, and hit Enter:C:\ProgramData\Blizzard Entertainment\Battle.net\Cachepath
  2. Press Ctrl + A to select all the folders here, and hit the Delete key.delete cache to fix battle.net unexpected error
  3. Choose the appropriate response if a confirmation prompt appears.

Once done, check whether the Battle.net unexpected error goes away. If not, head to the next solution.

3. Disable OneDrive

  1. Press Windows + R to open Run, type regedit in the text field, and hit Enter.registry
  2. Click Yes in the UAC prompt.
  3. Paste the following path in the address bar and hit Enter:Computer\HKEY_CURRENT_USER\Software\Microsoft\OneDrivepath
  4. Right-click on the empty portion, hover the cursor over New, choose DWORD (32-bit) Value, and name it DisableFileSyncNGSC.dword to fix battle.net unexpected error
  5. Double-click on the newly created DWORD.DisableFileSyncNGSC
  6. Enter 1 under Value Data, and click OK to save the changes.modify to fix battle.net unexpected error
  7. Once done, restart the computer.

If OneDrive is enabled on the PC, certain critical files needed to run Battle.net may be synced and become unreachable/unreadable, thus resulting in the Unexpected error. So, disable OneDrive on Windows to fix things. In case this doesn’t work, make sure to revert the changes.

4. Update the drivers

  1. Press Windows + X to open the Power User menu, and select Device Manager.device manager
  2. Expand Display adapters, right-click on the graphics adapter, and choose Update driver.update drivers to fix battle.net unexpected error
  3. Select Search automatically for drivers from the options that appear and wait for the process to complete.search automatically for drivers

Updating the graphics driver should help fix the Battle.net Unexpected error in Windows. Also, some users identified the audio drivers to be responsible, in which case updating the audio drivers should do the trick.

To perform this task, you can opt-in for dedicated software that is capable to manage all drivers and update them in less than 5 minutes.

Hence, you don’t need to second guess and utilize a complete tool like Outbyte Driver Updater and fix various game errors without problems.

⇒ Get Outbyte Driver Updater

5. Reinstall Battle.net on the system drive

  1. Press Windows + R to open Run, type appwiz.cpl in the text field, and click OK.appwiz.cpl
  2. Select the Battle.net app here, and click Uninstall.uninstall to fix battle.net unexpected error
  3. Click Yes, Uninstall in the confirmation prompt.yes. uninstall
  4. Now, head to the official website and download the Battle.net client.battle.net
  5. Run the setup and click Yes in the prompt.
  6. Make sure the installation path listed here is for the system drive, most likely, the C: drive. If it’s not, click on Change, choose the one listed here, and then click on Continue to proceed with the installation.change path to fix battle.net unexpected error

Many users reported installing the Battle.net client on a non-system drive can trigger the Unexpected error. Also, if you run out of storage on the C: drive, you can always move the games to another drive.

That’s all there is to the error, and we hope one of the solutions here should have worked for you. Also, find some quick tips and tricks to optimize Windows for gaming.

For any queries or to share a solution that worked for you, comment below.

How to Delete Windows.old Folder on Windows 10

Starting from Vista, Windows creates a folder called Windows.old when you upgrade the installed iteration. Though it’s practically harmless, many users want to remove Windows.old folder to clear up storage space on the PC.

But what is the Windows.old folder, why you have it, will delete it affects the functioning of Windows, and what are the ways to delete Windows.old folder. These are some of the questions users often ask. Let’s find out the answer to each.

How to delete Windows.old folder from Windows 10?

1. Use Disk Cleanup

  1. Press Windows + R to open Run, type cleanmgr in the text field, and then hit Enter.disk clearnup
  2. Choose C: from the Drives dropdown menu, and click OK to proceed.c drive
  3. Now, select Previous Windows Installation(s) from the options here, and click on OK.previous windows installation to remove windows.old folder
  4. Choose Delete files in the confirmation prompt that pops up.delete files

That’s it! This should remove and delete the Windows.old folder on your PC and clear up storage right away.

2. Via Settings

  1. Press Windows + I to open Settings, and choose System.system
  2. Now, go to Storage, and then click on Temporary files under your system drive.temporary files
  3. Tick the checkbox for Previous version of Windows and then click on Remove files.remove windows.old folder

All you have to do now is wait for the OS to remove the Windows.old folder. It shouldn’t take much time.

3. Use Command Prompt

    1. Press Windows + S to open Search, type Command Prompt in the text field, and click on Run as administrator.
    command prompt
  1. 2. Click Yes in the UAC prompt that appears.

  2. 3. Now, paste the following commands individually and press Enter after each one: takeown /F C:Windows.old /A /R icacls C:Windows.old /Grant Administrators:F /inheritance:e /T attrib -r -a -s -h C:Windows.old /S /D RD /S /Q %SystemDrive%windows.old

  3. 4. After the commands are executed, close Command Prompt and check if the Windows.old folder is deleted.


  4. An easy and quick method to delete the Windows.old folder on your device is to do this through Command Prompt. All you need to do is run a few deletion commands, then the tool will remove the folder for good.

4. Use CCleaner

Note icon NOTE
While CCleaner earlier offered the option to delete Windows.old folder from its free version, the feature is now limited to Advanced users.
  1. If you haven’t already, download CCleaner and run the setup to install the program.
  2. Once done, open CCleaner, go to Options from the left, choose Include, and then click on Add.add
  3. Click on Browse.browse
  4. Now, locate and select the Windows.old folder, and click on OK.windows.old folder
  5. Again, click OK to proceed.ok
  6. Click Yes in the confirmation box.yes to remove windows.old folder
  7. Next, click the Analyze button and wait for it to check and report the details.
  8. Finally, click on the Run Cleaner button to delete the folder.

CCleaner is one of the best tools to clear storage on the hard drive, and it can be used to delete a range of files. Besides, the app is capable of running deep scans and identifying files stored deep down.

5. Manually delete the Windows.old folder

  1. Navigate to the C: drive, right-click on the Windows.old folder, and choose Properties.
  2. Head to the Security tab, and then click on Advanced. advanced
  3. Now, click on Change.change to remove windows.old folder
  4. Enter your username in the field, click on Check names, and then on OK to proceed.check names
  5. Once done, click OK to save the changes.ok
  6. Again, open the Properties, head to the Security tab, and, this time, click on Edit.edit
  7. Click on the Add button.add to remove windows.old folder
  8. Enter the username you entered earlier, click on Check names, and then OK.check names
  9. Now, select the user you just added, make sure all the permissions are granted, and click on OK to apply the new settings.provide permissions to remove windows.old folder
  10. Click OK on all subsequent windows.
  11. Finally, you can simply select the Windows.old folder and hit the Del key to delete it.

That’s it! If the other methods to remove Windows.old folder didn’t work, you could always delete it manually. It would require reconfiguring the permissions and taking control of the folder.

Keep in mind that when you install a new version of Windows, such as Windows 10, for example, your system automatically moves your older installation to Windows.old folder. This way, you can quickly roll back to the previous iteration if the new one doesn’t work well.

In addition, this folder works as a backup, so even if the installation process fails for some reason, your PC can use Windows.old folder to restore the previous version of Windows.

The size of the Windows.old folder ranges anywhere between 6 to 30 GB depending on the previous installation.

Can I safely remove Windows.old?

Yes, you can safely and, in all likelihood, easily remove the Windows.old folder from your PC. Windows, anyway, will delete it after 10 days. That’s the maximum period you can revert to the previous iteration without having to do a complete reinstall.

Remember, once you remove the Windows.old folder, you will have to reinstall the OS using the Media Creation Tool or a bootable USB if you plan to downgrade the OS. So, make sure to verify this beforehand.

If the sole objective of deleting the folder was to clear storage, do not forget to check the other ways to free up disk space. We also have a guide on removing extra Windows folder, so don’t miss it.

Tell us which method you choose to delete the Windows.old folder in the comments section below.

Fix: DX11 Feature Level 10.0 is Required to Run Engine

Some of our readers have reported running into several DirectX errors when playing high-end games on their PC. One such predominant error message is the Dx11 feature level 10.0 is required to run the engine.

The error message signals that your system lacks the Direct3D hardware feature level required by the game engine. Hence, we will walk you through the methods to fix the issue.

Why do I get DX11 feature level 10.0 is required to run the engine?

This error message, DX11 feature level 10.0 is required to run the engine, occurs when playing high-end games like Valorant, MIR4, VirtualBox, etc. Some of the major causes are:

  • Incompatible GPU driver – This error often occurs when the graphics card on your PC isn’t compatible with the game or does not support DirectX 11 feature level 10.0. Also, issues with the DirectX Graphics Dxgmms1.sys file can cause it.
  • Corrupted or missing graphics drivers – The error message may pop up if your game is missing a file or any files associated with the game are corrupt. You can verify the integrity of the game file to fix it.
  • Issues with the game’s GPU components – The error may be because the game is not using a dedicated GPU or there’s a fault with the GPU system. So, the causes might extend to the game itself.

Nevertheless, we’ll take you through some fixes to resolve the error and get your game working again.

What can I do to fix DX11 feature level 10.0 is required to run the engine?

Before trying any advanced troubleshooting steps, go through the following:

Proceed with the solutions below if you can’t resolve the error:

1. Update your graphics drivers

  1. Press Windows + R keys to prompt the Run window, type devmgmt.msc, and click OK to open the Device Manager.
  2. Expand the Display adapter entry, right-click on the device driver, then select Update driver from the drop-down menu.
  3. Click on Search Automatically for the updated driver software option.
  4. Restart your PC and check if the error persists.

Updating the graphics drivers installs patches for fixing bugs causing the DX11 feature level 10.0 is required to run engine Valorant error.

Suppose the steps above fail; read our detailed article on updating graphics drivers on Windows 11 to get other ways.

Even more, you have an alternative that can surely help you manage all drivers at once and update or repair broken device drivers. Thus, don’t hesitate and get rid of this DirectX error for good.

Updating the graphics driver can also help you fix the UE4-Game has crashed Fatal error issue; read this guide to learn more about it.

2. Force the app to use the dedicated graphics

  1. Left-click the Start button and select Settings.
  2. Click on system and choose Display.
  3. In the next window, select Graphics from the options.
  4. Click the app prompting the error, select High-performance, check the box for Don’t use optimization for Windowed games, and click Save.

Your PC might switch to low-performance when Power saving mode is on. Hence, this might prevent apps from using the dedicated graphics needed to run high-end games.

This is the perfect solution if you’re looking for a DX11 feature level 10.0 is required to run the engine MIR4 fix.

3. Check the DirectX version and install the runtime environment

3.1 Checking the DirectX version on your PC

  1. Press Windows + R key to open the Run dialog box, type dxdiag, then press Enter to open the DirectX Diagnostic Tool.
  2. Navigate to the System tab.
  3. Go to DirectX Version under the System Information panel to check which DirectX version is listed.
  4. After detecting the DirectX version running on your PC, check the manufacturer’s website for the latest version to know if yours is still up to date.

If the version on your computer is outdated, DX11 feature level 10.0 is required to run the engine error will likely occur if you open VirtualBox. Hence, you need to install the updated version.

3.2 Install the DirectX runtime environment

  1. Go to the official Microsoft website to Download DirectX Runtime Web Installer.
  2. Choose the desired language, then click the Download button.
  3. Double-click to open the dxwebsetup executable file you downloaded, choose I agree with the terms and click the Next button.
  4. Follow the on-screen instructions to complete the process.
  5. Restart your PC and check if the DX11 feature level 10.0 error is resolved in the game.

Installing the latest version of DirectX will fix compatibility issues causing the game error. Also, you may check our guide on reinstalling DirectX on your PC if you have problems with the steps above.

This fix is particularly effective if the DX11 feature level 10.0 is required to run the engine error that occurs with Steam games.

Read about fixing Windows not connecting to update service if the error occurs on your PC. Also, you can check our article about the LowLevelFatalError message that appears when a game crashes unexpectedly on Windows 11.

In addition, we have a detailed article about ways to fix the dxgmms.sys Blue Screen error.

Should you have further questions or suggestions, kindly drop them in the comments section.

DLL Not Designed to Run on Windows: How to Fix

DLL-related issues are one of the most common problems Windows users face and are tricky to fix. One such is the Not designed to run on Windows error when running an application.

Though the app or program may have worked fine until recently, it throws this error for users and recommends reinstalling it. But before you reinstall, let’s find out all about the Bad Image error that reads, Is either not designed to run on Windows or it contains an error.

Why am I getting not designed to run on Windows message?

Here are a few reasons you might be getting the error:

  • Buggy Windows Update: In most cases, users get the error after an update, which indicates a bug in the latest version.
  • Missing or damaged DLL files: If the DLL files are missing or damaged, applications that rely on them will start throwing the error. This usually happens when a particular program makes unwanted changes to the DLL file or deletes it altogether.
  • Corrupt system files: Some users also found out that the corrupt system files triggered the error in their case.

How can I fix Not designed to run on Windows error?

Before we head to the slightly intricate solutions, here are a few quick tricks that might work:

  • Restart the computer and check if you can now run the application(s).
  • Locate the path for the problematic DLL in the error message. Now, move the same DLL file from another computer (with the same Windows iteration, version, and architecture) to the listed path and then delete the problematic one.
  • Use an effective DLL repair tool to identify and fix issues with the DLL files on the PC.

If these don’t help, move to the fixes listed next.

1. Disable unnecessary startup program

  1. Press Ctrl + Shift + Esc to open the Task Manager, and head to the Startup tab.startup
  2. Select the non-critical programs listed here one by one, and click on Disable.disable to fix not designed to run on windows
  3. Do this for all the unnecessary apps.

2. Uninstall recent Windows Update

  1. Press Windows + I to open Settings, and click on Update & Security.update & security
  2. In the Windows Update tab, click on View update history on the right.view update history
  3. Now, click on Uninstall updates.uninstall updates to fix not designed to run on windows
  4. Select the last installed update, and click on Uninstall.uninstall to fix not designed to run on windows
  5. Click Yes in the confirmation prompt.confirm

When faced with the Not designed to run on Windows or it contains an error message, the first thing you should do is uninstall the recent update since this helped most users fix the problem. And if it doesn’t work, move to the next solution.

3. Run the DISM and SFC scan

  1. Press Windows + R to open Run, type cmd, and hit Ctrl + Shift + Enter.cmd
  2. Click Yes in the UAC prompt.
  3. Paste the following commands individually and hit Enter after each:DISM /Online /Cleanup-Image /CheckHealth DISM /Online /Cleanup-Image /ScanHealth DISM /Online /Cleanup-Image /RestoreHealth
  4. Next, execute the following command to run the SFC scan:sfc /scannowsfc scan to fix not designed to run on windows

DLLs are very sensible files so it is always recommended to use the utmost care when handling them. A dedicated repair tool can help simplify the process and assure the safety of your system.

With these tools, the scanning and repairing of DLLs is done automatically and in a matter of minutes.

4. Repair/reinstall Microsoft Visual C++

  1. Press Windows + R to open Run, type appwiz.cpl in the text field, and hit Enter.appwiz.cpl
  2. Locate all the Microsoft Visual C++ entries, select them individually, and click Change.change
  3. Click Repair in the window that appears.repair to fix not designed to run on windows
  4. If repairing doesn’t work, uninstall the Microsoft Visual C++ entries listed here.uninstall to fix not designed to run on windows
  5. Once done, head to Microsoft’s official website and download the one(s) you uninstalled earlier.download
  6. Run the setup and let the installation complete.install to fix not designed to run on windows
  7. Finally, restart the computer for the changes to come into effect.

A quick fix when you get the msvcp140.dll not designed to run on Windows error is to repair or reinstall the Microsoft Visual C++ Redistributables.

5. Reinstall the affected app

  1. Press Windows + I to open Settings, and click on Apps.apps
  2. In the Apps & Features tab, select the app that’s throwing the error, and click Uninstall.uninstall app to fix not designed to run on windows
  3. Again, click Uninstall in the confirmation prompt.uninstall
  4. Once done, head to the app’s official website, download the setup, and run it to complete the installation.

For Chrome not designed to run on Windows error, a viable solution would be to uninstall the program and then get it via the dedicated website or installer setup.

6. Do a system restore

  1. Press Windows + S to open Search, type Create a restore point, and click on the relevant search result.create a restore point
  2. Click on System Restore.system restore
  3. Select the Choose a different restore point option, and click Next.choose a different restore point
  4. Now, select a restore point from the list created before you first encountered the error, and click Next.system restore to fix not designed to run on windows
  5. Click Finish to start the restore process.finish

System Restore is a great way to fix issues with the PC, including the msvcp110.dll not designed to run on Windows error. That’s why it’s recommended that you regularly create a restore point.

7. Perform an in-place upgrade

  1. Go to Microsoft’s website, and click on Download Now to get the Media Creation Tool for Windows 10.download now
  2. Run the setup, and wait for it to get things ready.get things ready
  3. Click on Accept.accept
  4. Select Upgrade this PC now, and click Next.upgrade this PC now to fix not designed to run on windows
  5. Wait for the download to complete and follow the on-screen instructions to perform an in-place upgrade.download

When nothing else works, an in-place upgrade will help get rid of the Not designed to run on Windows error in no time. Remember, you wouldn’t lose any installed apps or stored files on the PC.

Also, find out what to do if the MSVCR120.dll is not found and get the missing DLLs back easily.

For additional insights into specific DLL problems, particularly if you’re encountering Library DevIl.dll issues, check our detailed guide and learn how to resolve Cannot Load Library DevIl.dll error.

If you have any questions or suggestions, please let us know in the comments section below.

0x800f081e Language Pack Error: Use These 5 Simple Fixes

Adding a language pack in Windows helps enhance the experience. While the newer iterations have a built-in way for it with all the languages, Windows 7 and Windows 10 users have to download them manually and sometimes get the 0x800f081e language pack error.

It’s usually encountered while installing the language pack using the DISM command and prevents the process from progressing further. So, let’s find out all about add-windowspackage failed Error code = 0x800f081e.

What is error 0x800f081e when installing language pack?

The error code 0x800f081e when installing a language pack could arise due to the following reasons:

  • Using an incompatible version: In most cases, users get the error after downloading a language pack that’s not compatible with the version of the OS.
  • Security software: At times, your antivirus program blocks relevant files making the installation/update causing the problem to appear.
  • Compatibility mishaps: You may also run into the Windows 10 language pack error 0x800f081e if you have got the wrong version of the chosen language pack.
  • Corrupt system files: When the system files are corrupt, you will likely encounter issues while installing a language pack.

How can I fix 0x800f081e language pack error?

Before we head to the slightly complex solutions, let’s try these quick ones:

  • Restart the computer.
  • Disable your antivirus and check whether the 0x800f081e language pack error disappears. If that’s the case, we recommend you switch to a more reliable third-party antivirus to avoid running into issues.
  • Make sure you are downloading the correct language pack, one that’s compatible with the OS, along with all the relevant files.

If these don’t work, move to the fixes listed next.

1. Manually install the language pack

  1. Press Windows + I to open Settings, and choose Time & Language.time & language
  2. Navigate to the Language tab from the left, and click on Add a language.add a language
  3. Now, search for the language pack you want to install, select it from the search results, and click Next.search language
  4. Next, tick all the checkboxes here, and click Install.install to fix 0x800f081e language pack
  5. Wait for the download to complete.
  6. You can now change the display language by choosing the language pack you installed earlier from the dropdown menu under Windows display language.change to fix 0x800f081e language pack

One of the easiest ways to fix the 0x800f081e language pack error is to download the language pack manually and set it as the display language. Remember, you won’t get the same results with every pack, and certain elements might still be displayed in the default language.

2. Run the DISM and SFC scan

  1. Press Windows + R to open Run, type cmd, and press Ctrl + Shift + Enter.cmd
  2. Click Yes in the UAC prompt.
  3. Paste the following three commands one after the other, and hit Enter after each:DISM /Online /Cleanup-Image /CheckHealth DISM /Online /Cleanup-Image /ScanHealth DISM /Online /Cleanup-Image /RestoreHealth
  4. Once done, run the following command: sfc /scannowsfc scan to fix 0x800f081e language pack

If it was the corrupt system files behind the issue, running the DISM (Deployment Image Servicing and Management) and the SFC scans usually do the trick.

3. Update Windows

  1. Press Windows + I to open Settings, and click on Update & Security.update & security
  2. Now, click on Check for updates on the right.check for updates to fix 0x800f081e language pack
  3. If an update is listed, click on Download and install to get it.download and install

4. Delete temporary files

  1. Press Windows + E to open File Explorer, paste the following path in the address bar, and hit Enter:C:\Windows\SoftwareDistribution\Downloadsoftware distribution folder
  2. Now, press Ctrl + A to select all the files, and hit the Delete key.delete files to fix 0x800f081e language pack
  3. Click Yes in the confirmation prompt.yes

If the 0x800f081e language pack error doesn’t seem to go away, clearing the SoftwareDistribution folder, which stores the temporary Windows Update files, might do the trick.

5. Perform an in-place upgrade

  1. Head to Microsoft’s official website, and download the Media Creation Tool for Windows 10.download
  2. Run the setup and click Yes in the UAC prompt.
  3. Now, wait for the setup to initialize and get things ready.get
  4. Click on Accept to agree to the license terms.accept
  5. Choose Upgrade this PC now and click Next.upgrade this PC to fix 0x800f081e language pack
  6. Wait for the setup to download Windows and then follow the on-screen instructions to complete the in-place upgrade.reinstall to fix 0x800f081e language pack

That’s it! If the previous solutions didn’t work, an in-place upgrade will help fix the 0x800f081e language pack error for good. Also, find what to do if language packs don’t work in Windows.

Tell us which fix worked for you in the comments section below.

Fix VMware Enhanced Authentication Plugin not Working: Chrome, Firefox

VMware Enhanced Authentication Plugin not working issues are unfortunately not uncommon. You can stumble across them on pretty much any modern browser from Chrome to Firefox, Edge, and so on.

The theory is simple. This is a vSphere 6.5 release that provides Windows Authentication and smart card functions. However, users report errors.

They claim to have installed the plugin, but it won’t show up in Chrome or Firefox and there is still the option to download it.

While Chrome users tend to associate the issue with specific browser versions such as V105+, Firefox’s minus is that it doesn’t allow self-signed certificates to import. The same goes for Edge.

The common problem is that the entries are there but the plugin keeps breaking and it simply not working. Now, Chromium-fueled browsers are no strangers to plugin issues.

One example that comes to mind is Chrome and Edge’s inability to load PDF or Flash plugins.

The good news is that vSphere is supported on all major browsers that use HTML5 since the death of Adobe Flash, including Microsoft Edge, Google Chrome, Opera, and Safari.

?️ Quick Tip:

If you keep having errors in Chrome and Firefox, why not consider a different browser altogether? A good alternative is Opera because it’s focused on performance and has very low error rates.

It’s fast and responsive and should be able to work with the VMWare Enhanced Authentication plugin with no issues.

 Opera

Opera

Use this lightning-fast browser for a secure error-free web experience!

How do I install Enhanced Authentication Plugin?

Users need to have a vCenter account and the vSphere Client to download, install and enable the Enhanced Authentication Plugin. After that, it’s a simple and straightforward process.

  1. First, open your browser of choice.
  2. Launch the vSphere Client by typing the address of your vCenter Server in the URL bar of your browser.
  3. Click the Download Enhanced Authentication Plugin button.
  4. Follow the prompts on the screen to complete the installation.
VMware Enhanced Authentication Plug-in.

So, if you’re wondering what is VMware CIP message proxy service, this is for you.

The VMware Enhanced Authentication plugin integrates Windows authentication and facilitates the use of smart cards for Windows devices just like the previous CIP (Client Integration Plug-in from vSphere 6.0) did before it.

And speaking of that, users should not encounter any issues with both of the plugins installed.

How do I fix VMware enhanced authentication plugin?

  1. Disable pop-up blocker
  2. Create a certificate exception
  3. Trust root certificates for vCenter server

1. Disable pop-up blocker

Users report that disabling any ad or pop-up blockers fixed the VMware Enhanced Authentication plugin not working issue, especially when doing this before installing the plug-in.

If you have any third-party ad blockers installed, be sure to disable them.

1.1. Firefox

  1. Open Firefox and click on the three lines in the top right corner.
  2. Click on Settings, then select Privacy & Security. Go to Firefox Settings and Privacy and Security.
  3. Scroll down to Permissions and uncheck the box next to Block pop-up windows. Under Permissions, allow pop-up windows.
  4. Restart Firefox.

1.2. Chrome

  1. Open Chrome and click on the ellipsis icon in the upper-right corner to open its menu.
  2. Next, click on Settings and select Privacy and security from the left pane.
  3. Open Site Settings and go to Pop-ups and redirects.
  4. Check the box next to Sites can send pop-ups and use redirects in order to disable the blocker.
  5. Alternatively, you can add an exception for the VMware Enhanced Authentication plugin and continue to block most pop-ups.

2. Create a certificate exception

2.1. Firefox

  1. Open Firefox and click on the three lines in the top right corner.
  2. Click on Settings, then select Privacy & Security. Firefox Privacy & Security.
  3. Scroll down to Security and click on View Certificates. Under security click view certificates.
  4. Under Servers, select Add Exception. Click add exception to fix enhanced authentication plugin not working firefox.
  5. Enter the URL https://vmware-plugin:8094 and click Get Certificate. Enter URL and click get certificate to if enhanced authentication plugin not working firefox.
  6. Click Confirm Security Exception.

Because Firefox blocks the import of self-signed certificates, it may cause issues to arise with the Enhanced Authentication Plug-in and prevent it from working. Creating an exception should fix the issue.

2.2. Chrome

  1. Go to https:vmware-plugin:8094 and click Advanced, then Proceed.
  2. Now, return to your VCenter server and log in using enhanced authentication.
  • ⚠️ As already mentioned, Chrome versions from v105 onwards will not load this plugin automatically because they introduced their own root certificate store.
  • ⚠️ Thus, you’re likely to get a VMware Enhanced Authentication plugin invalid credentials error instead of the Proceed button.
  • ⚠️ You can either roll back to a previous browser version, which is a practice we do not endorse or recommend, or disable this policy via GPO (for enterprise) or directly in your registry. This way, VMware Plugin will be able to add its certificate to the Windows root store.

3. Trust root certificates for vCenter server

3.1. Firefox

  1. Open Firefox and type about:config in the address bar then hit Enter. Type about:config in firefox and hit enter.
  2. In the search bar type security.enterprise_roots.enabled to set the preference to true. Adjust preference if enhanced authentication plugin not working firefox.
  3. Restart Firefox.

By setting the preference to true, enterprise root support will be enabled for Windows. Firefox will inspect the registry location for vCenter Server Root Certificates and any trusted will be imported.

3.2. Chrome

  1. In Start, type regedit. Select and open the Registry Editor from the list of results.
  2. Navigate to: Computer\HKEY_LOCAL_MACHINE\SOFTWARE\Policies\Google\Chrome
  3. In the central part, right-click with your mouse and select New, then DWORD (32-bit) Value.
  4. Name the new key ChromeRootStoreEnabled and set its value to 0.
  5. Double-check the value in the Chrome policy (chrome://policy/).

The ChromeRootStoreEnabled policy controls whether Chrome uses its own root store or the platform’s root store to verify certificates and it’s by default set to use Chrome’s own root store.

This is one of the main reasons for which plugin incompatibility issues arise and you can tackle the problem easily by setting this value to False (0).

Hopefully, one of the above solutions helped fix the issue of the VMware Enhanced Authentication Plugin not working in Chrome or Firefox issues. If not, you can always go for an alternative browser such as Opera.

Now, that might seem like a rather radical solution but it can also be bluntly effective even in situations involving stuck browser or site connection verification loops.

Do not hesitate to let us know in the comments which solution worked for you or if you have another fix to suggest.

5 Best Windows Server DDOS Protection Tools for 24/7 Uptime

For many Internet users, DDoS was a completely new word until recently. Then, millions of Windows users couldn’t access platforms such as Twitter, Reddit, and Amazon due to attacks, and that’s when the idea of a Windows Server DDOS protection software became mainstream.

Distributed Denial of Service (DDoS) attacks overwhelm websites by pushing traffic from many sources, usually computers and other network-based devices infected by malware. So, let’s find out more about the subject and the best DDOS protection software.

Does Windows have DDoS protection?

If you are running a domain, Windows can’t do much about protecting it, and third-party software is usually the best bet. But with the built-in Windows Security (Windows Defender), it can identify and remove malware responsible for DDoS attacks.

Microsoft offers Azure DDoS Protection, which provides advanced features to eliminate even the most intricate DDoS attacks. The best part, it doesn’t require any application or changes to the resources.

Let’s now find out the best options for Windows Server DDoS protection.

What is the best Windows Server DDOS protection software?

Sucuri – Constant threat monitoring

Sucuri is a web security company that provides cloud-based security services. It is not the software you must install but a subscription service that will keep your website safe from malware, hackers, and DDoS attacks.

Regarding DDoS, Sucuri’s platform detects and blocks DDoS layers 3, 4, and 7 attacks. All these attacks are aggregated and analyzed by the Sucuri platform’s AI to anticipate malicious behavior.

Other features include:

  • The cleaning process doesn’t affect the website in any way.
  • A website firewall protects you from malware and hacking, brute force and DDoS attacks, and zero-day exploits.
  • Constant threat monitoring with a variety of alert options.
  • Highly optimized CDN that offers greater loading speeds for webpages.
  • Unlimited malware removal.
  • Increased page loading speed.

Sucuri

Highly secure your Windows server with this security resource that stops any malware or DDoS attacks.
Check price Visit website

SiteLock – Built-in VPN

SiteLock is another great cloud-based website security service that will eliminate all the possible threats that might affect your website, and it offers DDoS protection.

Let’s get straight to the point: SiteLock offers infrastructure, web application protection, and DNS security.

It also detects and blocks application levels of DDoS attacks and gives you detailed reports so you can be up to date with the state of your website after each attack.

Other features include:

  • Automatic separation for human and bot traffic.
  • Detects DDoS attempts and starts different protection services accordingly.
  • Full PCI compliance lets you keep your client’s card details safe from third parties.
  • The built-in VPN ensures your anonymity online.
  • Great hosting security that protects your end-users.

⇒ Get SiteLock

Imperva FlexProtect – API security

imperva windows server ddos protection

FlexProtect is a very reliable tool, offering complete protection from all types of network and application-level DDoS attacks. The tool automatically filters traffic for transparent mitigation and relies on a 2Tbps network backbone for instant overprovisioning.

FlexProtect secures websites against the most fierce and dangerous DDoS attacks without disrupting your business.

Thanks to its cloud-based service, your online business will be up and running even under attack, and your visitors won’t notice anything unusual.

Other features include:

  • A real-time dashboard that gives you a useful overview of your security.
  • Uses advanced technologies to reduce the number of false positives to a minimum.
  • Web application Firewall Gateway.
  • API security – protects your website and APIs by using a single-stack approach.
  • Attack analytics – automatically analyzes the threats and adapts to them proactively.

⇒ Get Imperva FlexProtect

BeeThink anti-DDoS Guardian – Real-time network activities monitoring

top windows server ddos protection

BeeThink’s anti-DDoS tool protects your Windows servers against most DDoS/DoS attacks, such as SYN attacks, IP flood, TCP flood, UDP flood, ICMP flood, slow HTTP DDoS attacks, Layer 7 attacks, Application attacks, Windows Remote Desktop brute force password guessing attacks, and more.

This DDoS protection software is light, robust, and can easily be deployed on Windows website server machines.

Other features include:

  • Support multiple IP list formats, such as Apache’s .htaccess.
  • Automatically update the IP list.
  • Support IP blacklist and white list.
  • Support exceptional rules.
  • Look up remote IP addresses and ownership information.
  • Run Anti-DDoS Guardian as a Windows service.

⇒ Get BeeThink anti-DDoS Guardian 

Cloudbric – Deep learning system

cloudbric

Cloudbric is a reliable Windows Server DDoS protection tool that can be used by anyone with a website and domain, irrespective of the website platforms hosting your online business.

You can activate Cloudbric on your website in less than three minutes – a simple DNS change is all you need.

This tool sets up a shield in front of your website to filter malicious attacks. Penta Security System guarantees that Cloudbric can protect your website against all cyber-attacks.

Major companies activating in various fields, such as Samsung, ING, eBay, and others, rely on Cloudbric to protect their websites.

Other features include:

  • Easy-to-use interface
  • The dashboard allows you to have an overview of your entire security settings plan
  • Deep learning system – COCEP engine that integrates a machine learning platform called VISION
  • You can download monthly customized reports

⇒ Get Cloudbric

These were the best options for Windows Server DDOS protection, and a few here also offer remote DDOS protection. So, get one of these today to protect your website.

Also, for those looking for all-around protection, check the best website security software.

Tell us your favorite pick from the options listed here, or share your recommendations in the comments section below.

Fix: Documents Disappear From Print Queue Without Printing

When you print documents from your computer, they are given to the printer and are printed. If the printer is busy with another job or offline, it cannot print your document immediately. However, if everything is working fine but documents disappear without printing, this should cause alarm.

Normally, your printer is just not working and needs a few tweaks, but it can also be another underlying problem unrelated to the printer. In this article, we explore in detail the causes and possible solutions.

Why are my documents in queue and not printing?

If you have tried printing documents but they suddenly disappear from the print queue without printing, below are some possible causes:

  • The printer is not connected to the network – Most, if not all, printers require an internet connection to print. You may have trouble printing anything successfully if your connection is slow or unstable.
  • Paper jam issues – Your printer may need a paper jam check to determine whether it is blocking paper from printing correctly in the feeder tray. 
  • The printer is not installed properly – If you have recently taken out your printer’s cartridge, you may have failed to install it back in correctly.
  • Firewall settings – Sometimes, your firewall blocks your printer from printing because of settings that may flag your printer as an unknown device.
  • Too many jobs in print queue – There’s a possibility that the number of pages, size, and type of paper in the print queue is too large for the printer to handle.
  • Not enough memory – Your computer may not have enough memory available for printing documents of the size in queue.
  • Unsupported file format – It is possible that your printer does not support the type of file format or resolution you’re trying to print.
  • Problematic update – If your documents started disappearing from the print queue after a Windows update, it may have bugs that interfere with printing, which is why documents are not going to the print queue. 

What should I do if no documents are getting printed from the printer?

A few basic steps that may help you resolve this issue before you move to the more advanced solutions include:

  • First, check that your printer is turned on and connected to your computer. Sometimes, Windows has trouble connecting to the printer. 
  • Try another USB port on your computer, as some ports may not be working. 
  • Check whether the printer is connected to a computer with an active internet connection.
  • Make sure that paper trays are loaded correctly and that the correct type of paper is in front of each one.
  • Check the printer for paper jams.
  • Free up some hard drive space on your PC.
  • Turn off the printer, wait 30 seconds, and then turn it back on again.

1. Run the Printer troubleshooter

  1. Hit the Windows key and click on Settings.settings windows 11
  2. Select System on the left pane, then click Troubleshoot on the right.Open system troubleshooter
  3. Click on Other troubleshooters.other troubleshooters
  4. Find the Print troubleshooter and click the Run button next to it.System Troubleshooter - Printer - Run

2. Restart the Print Spooler service

  1. Hit the Windows + R keys to open the Run command.
  2. Type services.msc in the dialog box and hit Enter.run services.msc command
  3. Locate the Print Spooler service, right-click on it and select Stop.
  4. Right-click on it again, then select Restart.

This is also an effective way of deleting a document from your printer queue that won’t delete.

3. Update the Printer drivers

  1. Hit the Windows key, type Device Manager in the search bar and click Open.device manager w11
  2. Navigate to Print queues and locate your printer.
  3. Right-click on it and select Update driver.Update driver Printer -windows 11 can't find printer
  4. Select Search automatically for drivers.Search automatically for drivers
  5. Windows will find the most suitable driver and recommend you install it.

If you feel this route has too many steps, we have an alternative method that does not involve multiple steps. There is an automatic tool that will do the detecting, scanning, and installation of the driver for you.

Outbyte Driver Updater is a driver updater tool that automatically searches for the right driver from its huge database and, matches it with yours, then installs it for you.

Outbyte Driver Updater

Take care of your PC drivers and update them in 3 minutes with this reliable software.
Free trial Download

4. Reinstall the printer drivers

  1. Hit the Windows key, type Device Manager in the search bar and click Open.device manager w11
  2. Navigate to Print queues and locate your printer.
  3. Right-click on it and select Uninstall device.uninstall device
  4. Confirm uninstallation in the next prompt, then restart your device.
  5. Your printer drivers will automatically be reinstalled when you reboot.

5. Uninstall recent Windows updates

  1. Hit the Windows key and select Settings.settings windows 11
  2. Click on Windows Update and select Update history on the right pane.update-history restart to repair drive errors
  3. Scroll down, and under Related settings, click on Uninstall updates.uninstall-updates-w11 computer-recognize-logitech-unifying-receiver
  4. This will take you to the most recent installed updates.
  5. Select the topmost update and click on Uninstall.uninstall-update-latest computer-recognize-logitech-unifying-receiver
  6. Restart your PC and check if the problem persists.

Can I retrieve a print queue?

Yes you can retrieve a print queue. If you want to check what documents are stuck, you can easily access your print queue by:

  1. Hit the Windows Search icon, type Printers & scanners, then click Open.
  2. Locate your printer and click on it.
  3. Select the Open print queue option to retrieve the print queue.

If documents disappear from the print queue without printing in Windows 10, the same steps apply. You may find printer software helpful in such cases, especially to manage the number of users accessing the printer.

And if you get the Your file waiting to be printed was deleted error, we have the perfect guide to help you resolve it.

We also have a comprehensive list of printer recommendations you can upgrade to if yours has reached its end of life.

Let us know of any additional thoughts you may have on this issue in the comment section below.

How to Uninstall RAV Endpoint Protection: 4 Ways

In this article, we will take a look at what RAV Endpoint Protection is, how it ended up on your system, and how to uninstall it.

To start with, you should know that this is a legitimate antivirus, though it may intrusively end up on your PC because it’s bundled into other software. So you don’t have to worry about malware.

Even so, having two antiviruses on a PC leads to errors and malfunctions, so here’s how to get rid of the RAV antivirus:

How do I remove the RAV antivirus?

1. Use Settings

  1. Press Windows + I to launch Settings and select Apps from the tabs listed in the navigation pane on the left.Apps to remove rav antivirus automatically installed
  2. Click on Apps & features on the right.Apps & features
  3. Locate the RAV antivirus entry here, click on the ellipsis next to it, and select Uninstall from the flyout menu.Uninstall to remove rav antivirus automatically installed
  4. Again, click Uninstall in the confirmation prompt that pops up.Confirm

A simple and effective method to remove RAV antivirus if it’s automatically installed is to go with Settings. In some rare cases, clicking Uninstall might not work on the first attempt, and you will have to hit it a few times.

2. Use the Control Panel

  1. Press Windows + R to launch the Run command dialog box, enter appwiz.cpl in the text field, and either click on OK or hit Enter to launch the Programs and Features window.appwiz.cpl
  2. Next, select the RAV antivirus entry here, and click on Uninstall.Uninstall to remove rav antivirus automatically installed
  3. Click Yes in the confirmation prompt that appears.Yes
  4. Now, follow the on-screen instructions to complete uninstall process.

Using Control Panel is another quick way to remove the RAV antivirus when it’s automatically installed on the system. Just make sure to properly follow the on-screen instructions in the app uninstaller.

3. Use a third-party uninstaller software

Even though the built-in uninstaller tools in Windows are reliable, they may leave behind residue files or registry entries. This can cause interference with your system even when the app is no longer on your PC.

To make sure everything related to RAV Endpoint Protection is off of your PC, use a third-party uninstaller software. It will completely remove the app and ensure no trace of it is left behind.

A reputable tool that lets you quickly select the app you want to remove and does all the heavy lifting of deleting installer files, temp files, and registry entries is IOBit Uninstaller.

⇒ Get IOBit Uninstaller

4. Perform a System Restore

  1. Press Windows + S to launch the Search menu, enter Create a restore point in the text field at the top, and click on the relevant search result.Create a restore point
  2. Now, click on the System Restore button.System restore to fix rav antivirus automatically installed
  3. You can either proceed with the recommended restore point or choose a different one manually. Select the relevant option here and click on Next to proceed.Next
  4. If you selected the Choose a different restore point option earlier, select one from the list and click Next.Next to remove rav antivirus automatically installed
  5. Finally, verify the details and click on Finish at the bottom to start the restore process.Finish

When nothing else works, there’s always the option to perform a system restore. When you do that, the state of the computer is reverted to a previous point, referred to as the Restore point.

Any changes made to the computer during the period will be reverted. If your antivirus is blocking system restore or you can’t finalize the task, try running it as an Administrator.

These are all the ways you can remove the RAV antivirus after it is automatically installed on your system.

Now’s a good time to remind you never to leave your computer unprotected. Windows 11 definitely needs an antivirus.

While we understand why you want to uninstall RAV, make sure you always run a reliable antivirus on your PC.

If you have any other questions, do not hesitate to comment in the section below.

3 Ways to Fix Unknown USB Device Port Reset Failed Error

One of the errors users complain about is the Windows USB port reset failure that appears in the device manager while the computer is trying to read the device.

In addition, receiving an error message such as this indicates that your USB device is not detected by the PC or won’t work properly.

Fortunately, there are some methods you can use to fix the Windows USB port reset failed in Windows 10 error and other related errors like Unknown USB device port reset failed USB C. We’ll go through them all in the following sections.

What does Unknown USB device port reset failed mean?

The Unknown USB device port reset failed is an error message on the USB device descriptor. Whenever the descriptor responds with a failed error message, It indicates that it cannot recognize a USB device or the USB device won’t function properly.

In short, the error message in the USB descriptor means something is wrong with the USB device. As a result, the computer can’t initiate it.

Why does port reset fail?

  • Broken or old USB drivers: When the USB driver is outdated or broken, it’ll prompt many errors and prevent the computer from reading.
  • Selective disable: Windows initiates the selectively disable mode to save power. However, if the program prevents USB activities, it can cause issues with the computer accessing it.
  • Broken USB device: Many things can happen to the USB device if it falls or gets tampered with. Hence, it can prevent it from functioning.

What can I do if the Unknown USB Device Port Reset Failed in Windows 11?

Here’s what you should do first:

  • One way to determine where the problem lies is to plug the device into another USB port. If it works perfectly, then the issue is with the port; if not, the device may be broken. We recommend you try using the USB device on another computer to be sure if it’s broken.

1. Uninstall the USB drivers

  1. Click Start and open the Device Manager.
  2. Click the drop-down button for Universal Serial Bus Controllers.
  3. Right-click on Unknown USB Device (Port Reset Failed) and click on Uninstall to remove the device.
  4. Restart your PC. (Windows will reinstall the device automatically on startup)

It will help fix the Unknown USB device port reset failed Dell dock error.

2. Update the Generic USB Hub Drivers

  1. Click Start and open the Device Manager.
  2. Click the drop-down button for Universal Serial Bus Controllers.
  3. Right-click on the Generic USB Hub device and select Update Driver.
  4. Select Browse my computer for driver software and select Let me pick from a list of device drivers on my computer.
  5. Tick the box for Show compatible hardware and tap on Generic USB Hub.
  6. Then, Click on the Next button.
  7. Repeat steps 3-5 to update driver software for every Generic USB Hub.

It is a perfect fix for the USB hub that failed to reset the code 43 error. Users can read through our article on how to update drivers in Windows.

3. Disable Fast Startup

  1. Click Start and type in power plan.
  2. Select the Choose a power plan option.
  3. Click on Change Plan Settings and select Change Advanced Power Settings.
  4. Expand the USB Settings, select the USB selective suspend settings, and tap on the Plugged in option.
  5. Select Disabled from the drop-down menu.
  6. Click on Apply, then OK.

After disabling Fast Startup, verify whether the USB device not recognized Port reset failed error is fixed. If not, head to the last solution.

After trying the above fixes and still being unable to solve the problem, we recommend you switch to a new USB device.

What is error code 43 in USB?

The error code 43 in USB is a somewhat straightforward error indicating that Windows detected an error in the USB device.

As a result, Windows has shut down the device’s operation, preventing it from running on the computer.

Furthermore, it indicates that a driver component in the USB device informs Windows about a fault in the device. Consequently, it can prompt the Unknown USB device port reset failed code 43 Windows 10 in Windows.

How to recover data from external USB flash drives with code 43?

An easy way to recover data from a USB drive that shows code 43 would be to use a reliable recovery tool. These come in useful and help recover corrupt or deleted data from flash drives, in addition to when it shows specific error codes.

Also, updating the USB port drivers and those for the flash drive may help if you take a manual approach.

Nonetheless, you can check our article about how to create a bootable USB drive for Windows 11. Besides, we recommend you learn how to boot from USB in Windows 10.

Leave your comments and suggestions in the section below. We’d love to hear from you.

This Copy of Windows Is Not Genuine: 3 Quick Fixes to Apply

This copy of Windows is not genuine is one of the most common errors in the Windows operating system.

As a result of encountering this error, the desktop wallpaper set by you will convert into a black screen, the battery life will decrease as this message keeps popping on the laptop, and more.

Some Windows 10 features will no longer work unless you remove this message. This alert can get quite annoying, especially while working with the important stuff, as it pops up at regular intervals.

However, you can still do other things on your PC, like complete your work and use the computer like before.

Why does it say that my copy of Windows is not genuine?

Here are a few reasons behind the message:

  • OS is not activated: If you got a trial period of Windows and, after it expired, never activated the OS with a product key, you will get the message.
  • License used on multiple devices: You may also see the error when the same key is used on multiple devices, more than what’s permitted under the license.
  • Malware attack: A malware or virus can lead to corrupt Windows System Files and files storing the activation data, which would trigger the error.
  • Windows is indeed not genuine: In most cases, the copy of Windows installed on the PC is not genuine.

How can I fix Windows is not genuine errors?

Here’s what you should first do:

  • If you have paid for a license, and if you now find that it was a fake one, you could take up the matter with Microsoft, report counterfeit software and see what happens.
  • Also, you have to contact your vendor as Microsoft support, in most cases, will only help you resolve the issue when you buy Windows OS from Microsoft Store.

1. Use the RSOP command

  1. Press Windows and R buttons from the keyboard to open the Run window.
  2. Type rsop.msc there and press Enter button.rsop.msc
  3. Navigate to Windows Settings, click on Security Settings, and then go to System Services.security settings
  4. Look for the Plug and Play services, then right-click on it and then start looking for the Startup and then click on the Automatic.service startup mode
  5. Press Windows and R buttons as you did at the first step and paste gpupdate/force into the Run boxgpupdate
  6. Restart your computer.

You can try to solve the error generated on your Windows screen through the RSOP method, as shown above, where RSOP stands for Resultant Set of Policy Window.

2. Use the SLMGR-REARM command

  1. Click the Start button, type cmd, and select Run as administrator from the results.
  2. Type SLMGR–REARM or SLMGR /REARM and press Enter.run slmgr rearm
  3. You will see a confirmation window. Click on OK and restart your computer.

By using SLMGR (Windows Server License Manager Script), a Windows 7 Not genuine removal tool, and a simple command, you can fix this problem in Windows 32-bit and 64-bit and in all iterations of the Windows operating system.

Note icon NOTE
SLMGR is a Windows software licensing management tool. The REARM command will reset the licensing status of the machine.

3. Turn off updates

  1. Click the Start button and select Settings.
  2. Go to Update & Security.
  3. Now, scroll down on the right pane and click on Advanced options.
  4. Look for the Pause updates section, click on the Select date menu and pick a date until you want to pause the updates.
  5. Now, if you go back to the Windows Update menu, you will see that the updates were paused.

To ensure that This copy of Windows is not genuine message does not come back, pause the automatic Windows updates.

Note icon NOTE
Your computer is now never getting this error again. However, you cannot upgrade your Windows to the latest version to fix bugs or get new features.

How do I permanently fix Windows 7 is not genuine?

While one way to permanently fix This copy of Windows is not genuine message is to pause Windows Updates, most users won’t be comfortable with it.

So, we recommend you get the valid activation key received at the time of purchasing the computer or the operating system’s CD, enter it, and resolve the error for good.

On some old PC models, the activation key is pasted on a sticker, while for the new ones, it can be located in the Microsoft account.

All in all, we hope the methods described above help you to fix the error message that states your copy of Windows is not genuine.

Also, to avoid such trouble, one must not support pirated version of Windows and should own a genuine Windows Copy officially from Microsoft.

There are a lot of online stores out there that sell copies of Windows, but many of those are not genuine and do not provide any security.

So, pick a trusted vendor certified to sell Microsoft software products before hitting the Buy button.

Before you leave, don’t forget to check our error 0x803fa067 on the Windows 11 guide for more solutions. We also have a guide on what to do if you get a Your Windows license will expire soon message, so don’t miss it.

If you have any other suggestions or questions, please use the comments section below.