How to Make a WhatsApp Video Call on PC in Windows 10 & 11

A number of Windows users have been asking a series of questions such as: can I do a WhatsApp video call on Windows 10/11, is WhatsApp available for Windows 10/11, how to install WhatsApp on my PC, and so forth.

WhatsApp is a popular instant messaging client for smartphones. Due to the massive popularity of WhatsApp, the application made its way from smartphones to Windows 10/11 PCs.

Whatever your concern is regarding using and exploring WhatsApp Messenger on your PC, worry less, we have gathered users’ queries and hopefully, yours would be attended to in this article.

Can WhatsApp video call on Windows 10 or Windows 11?

The official WhatsApp App is finally available for Windows desktops, meaning Windows 10 and Windows 11 users can now use WhatsApp on Windows desktops without having to open a web browser.

While WhatsApp for Windows 10/11 desktop is excellent news for billions of PC users out there, the fact is that WhatsApp for Windows desktop is nothing but an improved version of WhatsApp Web.

Although the WhatsApp for Windows desktop program is fast and responsive, unlike the WhatsApp for Web, you still need to have an active internet connection for your PC to send and receive messages/photos/videos/audio on your Windows desktop.

How do I get the WhatsApp App on Windows 10?

It is important to note that WhatsApp was initially available for 64-bit or x64 type of Windows only. Thankfully, the team behind WhatsApp released installers for 32-bit and 64-bit a few months ago.

Hence, to get the WhatsApp App on Windows 10, you can now install WhatsApp desktop on both 32-bit and 64-bit Windows operating systems. Follow the steps below to install the WhatsApp application:

  1. Visit the page on the WhatsApp website and click the Download for the Windows button to download the setup file.
  2. Double-click on the installer file to install it.
  3. Once installed, launch WhatsApp on your PC to see the following screen with a QR code.
  4. Launch the WhatsApp app on your phone, and make sure that your smartphone is connected to the internet.
  5. Tap Settings (iPhone) or Menu (Windows Phone & Android), tap Linked devices, and then tap the Link a Device button to open the QR code scanner.
  6. Using your smartphone, scan the QR code, which is being shown on your Windows 10/11 computer, and then click the OK, Got it, or similar button to confirm the scan.

The WhatsApp app on your phone will send the scanned information to WhatsApp servers, and your WhatsApp program on Windows 10 desktop should now show your recent messages. That’s it!

Can you video call on WhatsApp on PC?

A simple and straight answer to this is: Yes, WhatsApp allows you to make end-to-end encrypted video and voice calls on a PC using any web browser of your choice be it Opera One, Google Chrome, or some other viable web browsers we recommend.

How can I make a WhatsApp video call on a PC?

1. Make a video call on PC on WhatsApp Web

  1. 1. Launch your favorite browser on PC.

  2. 2. Navigate to the web page for WhatsApp Web.

  3. 3. Log in to your account by scanning the QR code on the screen with your phone.

    scan qr code to launch whatsapp web
  4. 4. Select the contact whom you wish to call.

  5. 5. Click on the Camera icon, and that’s it!

    open the chat
  6. If you wish to make a WhatsApp video call from your Windows 10 or Windows 11 PC. you can accomplish this directly from your web browser.

    You don’t have to download anything, you simply need to log in to WhatsApp Web on your browser and call your preferred contact as you would on the phone, by tapping the Camera icon.

To make a video call using the WhatsApp Web on Windows 10/11, we recommend using Opera One as it comes with a built-in WhatsApp app feature in it. It’s simple to use and has the most customization options.

Also, it gives access to several other messenger platforms to capitalize on while using it. Hence, it saves effort and time.

2. Make a video call on PC on the WhatsApp app

  1. Launch your WhatsApp application from your desktop.
  2. (Since you have linked your WhatsApp account to your PC) Your WhatsApp account will immediately open on the screen.
  3. Now open a chat and click the voice call icon or the video call icon at the top right corner to place a call through to the contact.

If you have followed the steps to activate WhatsApp on your computer, then follow these steps to easily make your calls.

Therefore, you can easily use the WhatsApp app to make a WhatsApp video call on laptop or PC.

How do I record a WhatsApp video call on Windows 10 or Windows 11?

  1. Press the Windows key and G to open the game bar box.
  2. All you need to do now to start recording your screen is to hit the capture button and it will start.
  3. Hit the button again when you want to stop the recording. You can also use a keyboard shortcut Windows key + Alt + R to start and stop the recording.

The Game bar is Microsoft’s toolbar for gamers to record screenshots and video clips directly from their games. Although this feature is for games, you can also use it in regular works like WhatsApp call recording.

There’s also a Settings button used to set the limit on the length of your recording, so you don’t have to worry about filling up your hard disk space.

Whatsapp desktop video call not working: common causes & how to fix it

Been trying to make a call on your WhatsApp desktop app but it’s not coming through? check out these common causes and fixes.

  • Internet connection issues: Ensure your computer and phone are connected to the internet, and you have a strong internet connection.
  • Update WhatsApp to the latest version available because outdated Whatsapp can cause this issue also.
  • Ensure that your device supports desktop calls. Desktop calling is available on Windows 10 64-bit version 1903 and newer and macOS 10.13 and newer.
  • Make sure you have an active connected microphone, camera, and speakers.
  • Troubleshoot your microphone and speakers through your computer’s sound settings.
  • Use a headset for the best audio. Using a separate external microphone and speaker devices might cause echo.
  • Ensure you’ve granted permission for WhatsApp to access your microphone and camera.

The above resolutions might fix WhatsApp video call not working for many users. However, if more fixes are required, check out our guide on WhatsApp video calls on PC Windows 10/11 not working on the web.

Also, you can read about how to maximize the use of the Opera One browser for your Whatsapp web video call 2022.

Further, to fix WhatsApp issues on Windows 10/11, you can read our detailed troubleshooting guide here.

We hope you managed to make WhatsApp video calls on a laptop or PC using our guide. Let us know what you think in the comments section.

How to Add Date/Time Stamp to Photos Already Taken

Some photographers like to keep track of when they took their photos by adding date stamps.

A date stamp is a small text included in an image that tells you the date the photographer captured the original photo. Some cameras include built-in date stamp options that add stamps at the time of picture capture.

However, not all cameras include date stamp features. Many users who take snapshots with mobile phone cameras will probably need to add stamps to their photos with third-party software and apps.

Read on to find out how to add date/time stamps to your photos on a Windows 10 computer.

How can I add date/time stamps to photos on the computer?

Adobe Lightroom – RAW file editor

Interface of Adobe Lightroom

Adobe Lightroom is a photo editing software targeted toward users that want to make quick adjustments to their pictures.

You can use this tool to manually add photo stamps to pictures that are already taken on your computer.

The process is easy to follow and quite fast, but you have to keep in mind that the software allows you to work with one picture at a time.

It does not allow you to work on multiple pictures thus add datestamps in batch. If that is what you are looking for, check the other suggestions below.

To add a timestamp in Adobe Lightroom, just open the software and select the picture you want to edit. Go to the File menu> Export.

There you will see an Include Watermark option, check the box on its right. Then you can edit your watermark to transform it into a timestamp.

You can personalize the look of your photo stamp by adjusting the font, size, and color. You can also add the location of the photo.

Other key features of Adobe Lightroom include:

  • Save and store presets
  • RAW file editor
  • AI-powered clarity enhancement
  • Compatible with mobile devices

Adobe Lightroom integrates well with other Adobe products. You can get it on its own or integrate it within the creative cloud.

Adobe Lightroom

Create your own customized datestamps with this top-quality photo editor.
Free trial Visit Website

Apowersoft Watermark Remover – Batch-processing support

Watermark Remover is software that enables users to add and remove image watermarks. With it, you can quickly add date stamp watermarks to your images with custom fonts, colors, transparency, and other effects.

Watermark Remover is compatible with the vast majority of standard image formats. It also incorporates an intuitive drag-and-drop UI that makes it quick and easy for users to add date stamp watermarks.

Other useful features

  • Includes watermark selection tools for removing photo objects
  • Includes a wide range of built-in fonts for date stamps
  • Supports batch processing
  • It also enables users to add or remove watermarks from videos

Apowersoft Watermark Remover

This amazing software enables you to add and remove watermarks with just a few mouse clicks.
Check price Visit Website

BatchPhoto – Versatile and intuitive

    BatchPhoto is image manipulation software for Windows and Mac platforms. It includes a utility for adding date stamps that pulls the original date/time EXIF data from photos.

    So, its users don’t need to manually find EXIF date info for their pictures.

  1. 1. Download and install BatchPhoto from the official website.

  2. 2. Launch the software on your Windows device.

  3. 3. Click the Add Photos button on BatchPhoto’s window.

  4. 4. Select a photo to add a date stamp to, and click the OK option.

  5. 5. Click the Add Filter button to open a Select Filter window.

  6. 6. Then select Annotate on the left of the filter window.

  7. 7. Select Date to open a Date window.

  8. 8. Click on Original Date & Time on the Show drop-down menu to add a date watermark.

  9. 9. Click the Format drop-down menu to select alternative date formats.

Use the Ofoct Date Stamp web utility to date/time stamp photos on PC

  1. First, open File Explorer with the Windows key + E hotkey.
  2. Open a folder that includes the photo you’re going to add a date stamp.
  3. Right-click the photograph you need a date stamp for and select Properties.
  4. Select the Details tab shown directly below.
    Details tab date stamp photos
  5. Note down the date taken info within the Origin section of the Details tab.
  6. Click OK to exit the properties window.
  7. Open the Ofoct date stamp app page in a browser.
    Ofoct app date stamp photos
  8. Select the Upload From Computer option.
  9. Select the photo that you noted down the date taken info for, and click the Open button.
  10. Click the orange Open option and Modify the stamp to include the date taken.

So, that’s how you can add date/time stamps to photos on your computer. You can add date stamps to photos with any image software that includes watermark features.

However, it’s quicker to utilize software to time stamp your photos, which also pulls dates for stamps from your digital photo’s EXIF data records. Also, if you are a privacy-oriented user, find out how to edit or remove the EXIF data in Windows.

We hope you managed to add a date or timestamp to photos that were already taken using our recommended tools. Write down in the comments section below if you encountered any problems.

BSOD Driver Power State Failure: Diagnosed & Fixed

Driver Power State Failure is a BSOD error and occurs mostly as a result of an incompatible driver installed.

In 99% of the cases, Driver Power State Failure is caused by placing your operating system into a sleep mode state. The error is caused by the power settings or because some drivers are having incompatibility issues in the system.

How can I fix Driver Power State Failure?

Below is our visual guide to help you solve the issue quickly:

1. Enter Safe Mode and remove recently installed drivers

  1. 1. Click the Start icon from your Taskbar then right-click the Power button.

  2. 2. Hold the Shift key and click Restart.

  3. 3. Next, select Troubleshoot.

    click on troubleshoot
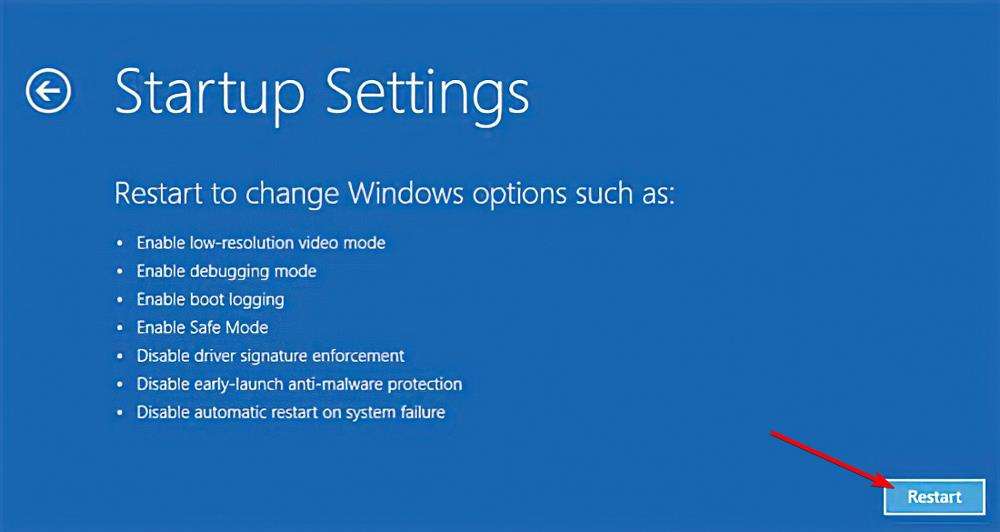
  4. 4. Select Advanced options, followed by Startup Settings.

    startup-sett Driver Power State Failure
  5. 5. Click the Restart button.

    restart-startup-screen Driver Power State Failure
  6. 6. When your PC boots, press the 4 key or F4 on your keyboard in order to enter Safe Mode.

  7. 7. Next, right-click the Start icon and select Device Manager.

    device-manager-w10 amd driver install problems
  8. 8. Here, expand the section that contains the driver that is causing you issues, generally, it will have a yellow exclamation mark next to it, and select Uninstall device.

    uninstall-device-graphics-card windows 11 keeps restarting
  9. 9. Check whether the error is gone. If the Driver Power State Failure stop code persists, you’ll have to remove another recently installed driver. Repeat this step until your PC starts working again.

  10. The Driver Power State Failure is likely to be solved by removing recently installed drivers in Safe Mode. First you boot your PC into Safe Mode, and then perform the uninstallation via Device Manager.

This is a simple solution, and it might help you fix the Windows Driver Power State Failure error, so why not try it out?

Note icon NOTE
After you find the driver that is causing you this blue screen you should check on the manufacturer’s website for an updated version of it that is compatible with your Windows operating system in order to prevent the error Driver Power State Failure from appearing again.

2. Update your drivers

To fix the stop code Driver Power State Failure on your PC, it’s advised that you update your drivers. Doing so manually can be a hassle, but there are specialized driver updating tools that can help you out.

These powerful tools allow you to perform a scan of your system, identify outdated or corrupted drivers, and update them all within just a few minutes.

3. Perform an SFC scan

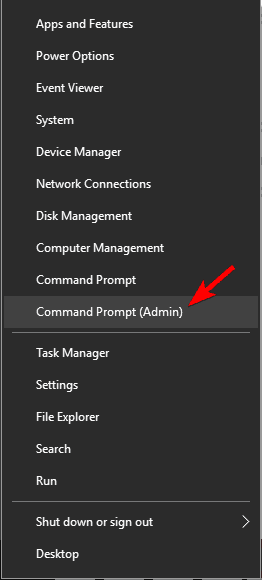
  1. Press Windows Key + X and choose Command Prompt (Admin) from the list. If Command Prompt isn’t available, select PowerShell (Admin) instead.
    Driver Power State Failure Nvidia
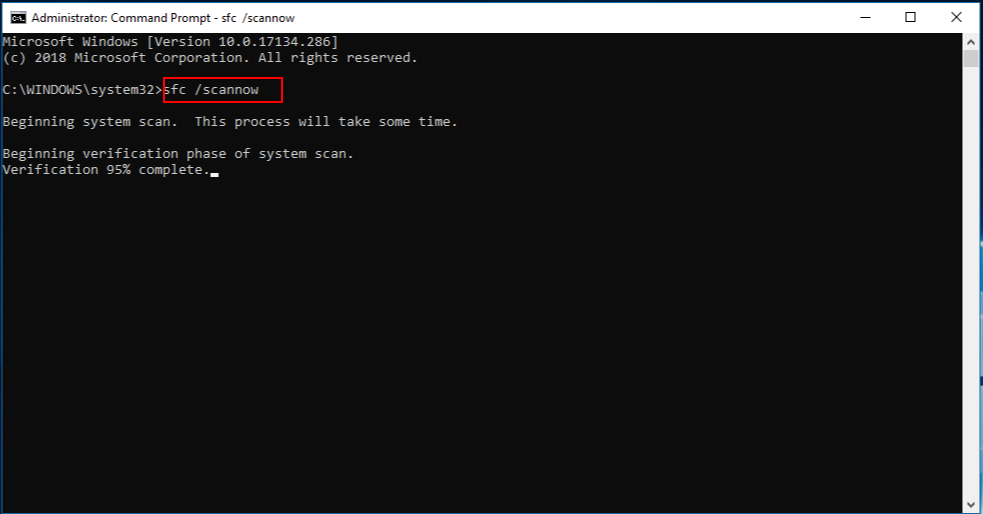
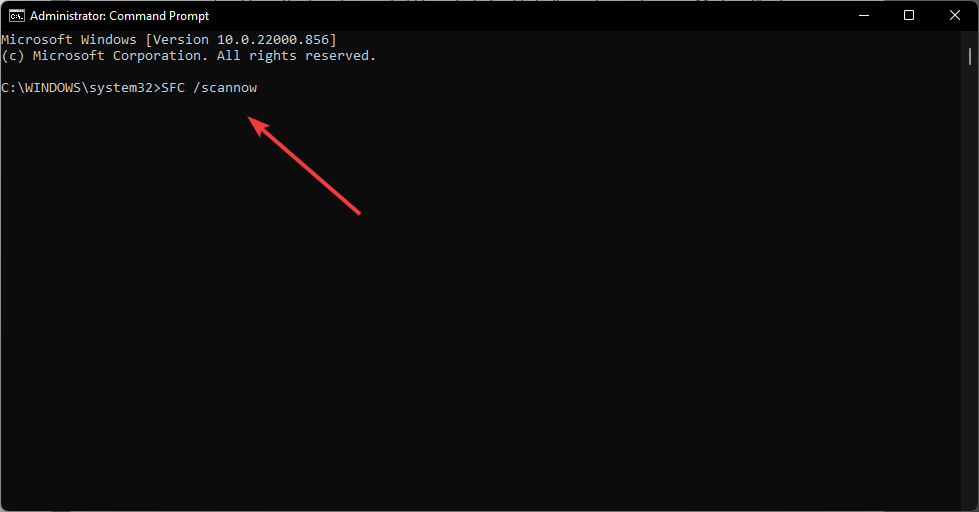
  2. When Command Prompt opens, enter the following command and press Enter to run it: sfc /scannow
  3. The scanning process will now start. Keep in mind that the SFC scan can take about 10 minutes, so don’t interrupt it.

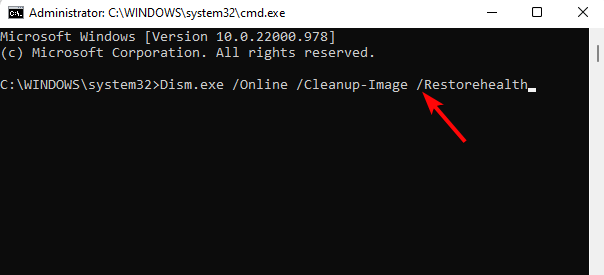
If you can’t run the SFC scan, or if the scan can’t fix the problem, users are recommending to use DISM scan instead. To do that, follow these steps:

  1. Open Command Prompt as administrator.
  2. Run the following commands:
    DISM.exe /Online /Cleanup-image /scanhealth
    DISM.exe /Online /Cleanup-image /Restorehealth
  3. After running both commands, check if the problem is resolved.

If you were unable to run the SFC scan before, be sure to run it after the DISM scan is completed. Once you run both scans, the problem should be completely resolved and the error message will stop appearing.

If you’re getting the Driver Power State Failure message, you might be able to solve it by following the instructions mentioned above.

4. Change your Power settings

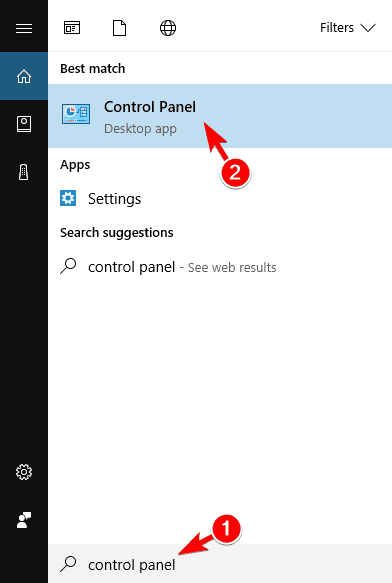
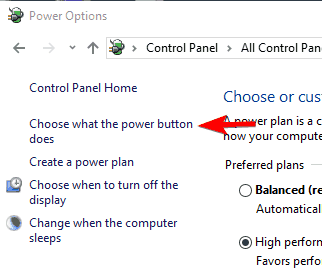
  1. Press Windows Key + S and enter control panel. Select Control Panel from the list.
    Driver Power State Failure USB
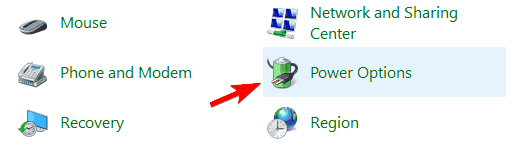
  2. When Control Panel opens, locate and click on Power Options.
    Driver Power State Failure on startup
  3. Click on Choose what the power button does.
    Driver Power State Failure Photoshop
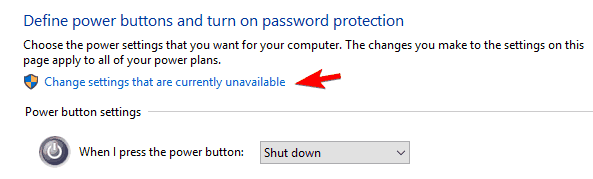
  4. Now click on Change settings that are currently unavailable.
    Driver Power State Failure SSD
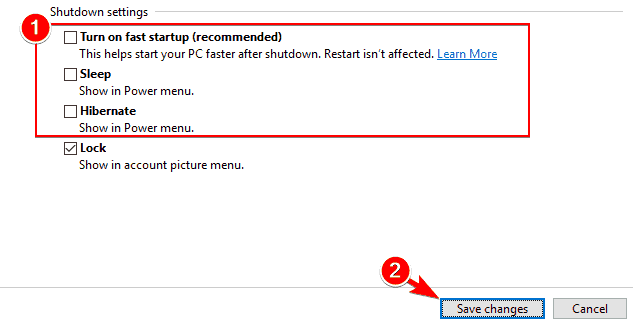
  5. Disable Turn off fast startup (recommended), Sleep and Hibernate options. Click on Save changes button.
    Driver Power State Failure Kaspersky

Sometimes Driver Power State Failure can appear on Dell devices due to your power settings.

According to users, you might be able to fix this problem simply by disabling certain power settings as we showed you above.

5. Change your Power Plan Settings

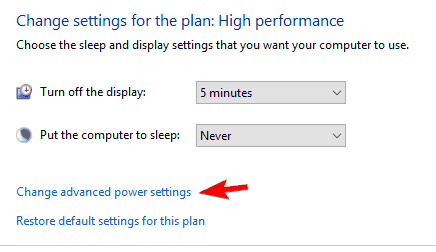
  1. Navigate to Power options. Locate your currently selected plan and click on Change plan settings.
    Driver Power State Failure ntoskrnl.exe
  2. Click on Change advanced power settings.
    Driver Power State Failure Windows 10 HP
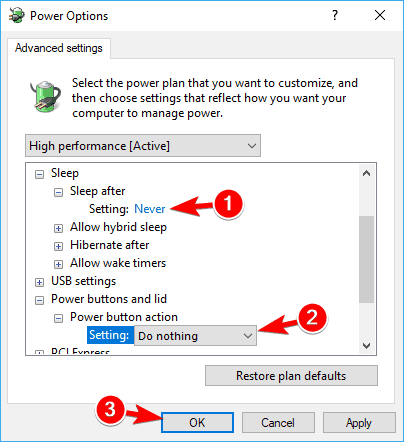
  3. Now you’ll see a list of settings. Open the Sleep section and make sure that Sleep and Hibernation are set to Never. In Power buttons and lid section make sure that everything is set to Do nothing. Now click on Apply and OK to save changes.
    Driver Power State Failure Nvidia
  4. Optional: Set Graphics settings or PCI Express and Link State Power Management to Maximum Performance. Do the same for Wireless Adapter Settings.

If you’re using a laptop, users are recommending removing its battery and connecting it to the power outlet.

After making these changes, Sleep and Hibernate features will be completely disabled and the problem should be resolved.

If you use these features frequently, you should try a different solution.

6. Disable or remove your antivirus software

Antivirus software is rather important but sometimes your antivirus can interfere with Windows and cause Driver Power State Failure error to appear.

To fix this problem, we advise you to temporarily disable your antivirus software and check if that solves the issue. If not, you might have to uninstall your antivirus software completely.

Many users reported problems with Avast antivirus, but other antivirus software can also cause this problem to appear.

In order to remove your antivirus software and all files associated with it, it’s recommended to use a dedicated removal tool.

7. Revert your graphics card drivers to the older version

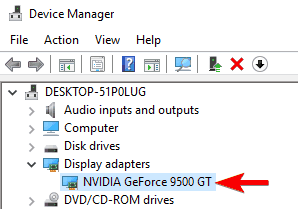
  1. Open Device Manager.
  2. Navigate to the Display adapters section and double-click your graphics card.
    Driver Power State Failure USB
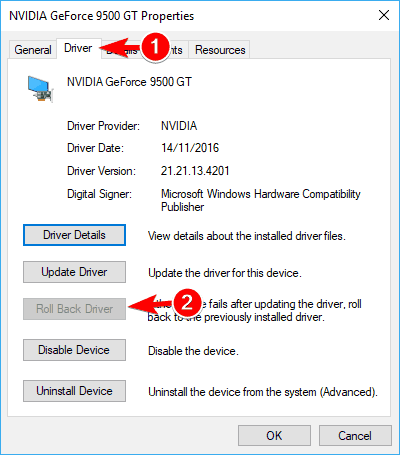
  3. When the Properties window opens, go to the Driver tab and click on the Roll Back Driver button.
    Driver Power State Failure on boot
  4. Wait for the process to finish.

If the Roll Back option isn’t available, you’ll need to uninstall your graphics card driver from Device Manager. Alternatively, you can use CCleaner to completely remove all files associated with your graphics card.

After you remove the driver, visit your graphics card manufacturer’s website and download the older version of the driver. After installing the driver, check if the problem is resolved.

8. Change Power settings in Nvidia Control Panel

  1. Open Nvidia Control Panel.
  2. In the left pane, select Manage 3D settings.
  3. In the right pane, select your dedicated graphics card as the Preferred graphics processor. Locate Power management mode in the list of settings and select Prefer maximum performance.
  4. Save changes and check if that solves your problem.

This mode will use more battery power, so keep that in mind if you’re using a laptop. If you’re using AMD graphics, you can find similar settings in Catalyst Control Center.

9. Change your device’s power options

  1. Open Device Manager.
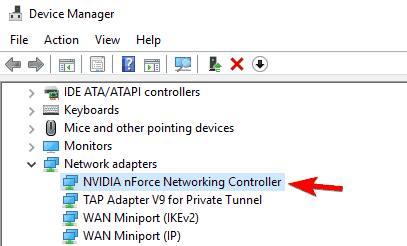
  2. Locate your network adapter and double-click it to open its properties.
    river Power State Failure Autocad
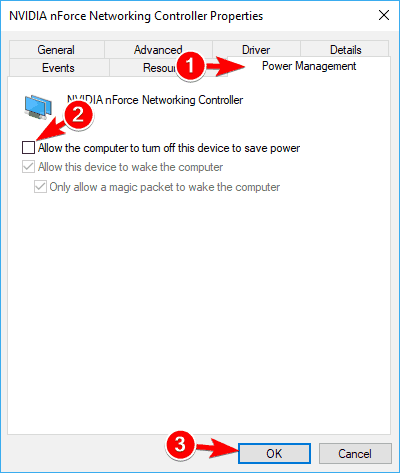
  3. Navigate to Power Management tab and uncheck Allow the computer to turn off this device to save power. Click on OK to save changes.
    Driver Power State Failure hard drive

After doing that, the problem should be completely resolved. Keep in mind that your PC has multiple devices that support this feature, so you need to disable it for all problematic devices.

Sometimes the Windows Driver Power State Failure error can occur due to your power settings. Many devices can be turned off in order to save power, but sometimes this option can cause this problem to appear.

Other issues caused by Driver Power State Failure that the users reported as well:

  • Driver Power State Failure in Windows 10 Toshiba, HP, Dell, Acer, Alienware, Samsung, Sony, Lenovo – This problem affects almost all devices since any device depends on drivers, which need to be constantly updated.
  • Driver Power State Failure Nvidia – Make sure to update or roll back your Nvidia driver in order to solve this situation.
  • Driver Power State Failure USB – Sometimes this error can occur while using a specific USB device. To fix the problem, you might have to disconnect all USB devices in order to find the one that is causing this issue.
  • Driver Power State Failure on startup, boot – Changing your power options that keep changing is the best course of action when this error occurs.
  • Driver Power State Failure in Photoshop, Autocad – Applications such as these, require that your GPU driver is up to date in order to communicate with it effectively.
  • Driver Power State Failure SSD, hard drive – Sometimes this error can be caused by a new hard drive or SSD. If that happens, you might have to update your hard drive drivers and check if everything is in order.
  • Driver Power State Failure Kaspersky, McAfee – Third-party antiviruses are known to cause this problem along with others as well. According to users, this issue usually occurs if you’re using Kaspersky or McAfee.
  • Driver Power State Failure blue screen – 0x0000009f error screen on startup is usually triggered by a driver-related issue. The problem has been solved by Microsoft in the update file KB 2983336.
  • Driver Power State Failure ntoskrnl.exe – This error message can sometimes show you the name of the file that is causing the error. Users reported that ntoskrnl.exe is the most common cause of this problem, and you will need to end it.

For those of you who updated to the latest version, we have a guide on how to fix driver power state failure in Windows 11.

Speaking of the Blue Screen of Death, avoid this horror by installing software dedicated to fixing BSODs.

Before you go, don’t miss our latest guide on Error Drivers Leaking Locked Pages message. We also wrote about Manually_Initiated_Power_Button_Hold, so you might want to check it out.

Please write us below if you have any other additional questions on this article and we will make sure that you fix your issue in the shortest time possible.

Error Code 0x800704cf: Diagnose & Fix in 5 Simple Steps

Using a workgroup or being part of a network center has advantages that make our work easier. But sometimes your work can be interrupted due to a system error. And the most common issue related to Windows Network PCs is the 0x800704cf error.

It’s easy to recognize because it usually comes along with the following message: Network error – Windows cannot access.

What does error code 0x800704cf mean?

As stated earlier, the error is primarily encountered when connecting your PC to a network or while opening the Microsoft Store. And in both these cases, the error code indicates a network issue.

In the case of Microsoft Store, the app is unable to reach its servers, and the error message reads, You’ll need the Internet for this 0x800704cf, and the problem has to be fixed manually.

Though when seeing the error while connecting to a network, the error box gives you a Diagnose option to automatically detect and eliminate the problem.

Below are some of the variations of the issue you can fix with the solutions in this guide:

  • 0x800704cf Microsoft account error – The error message appears when signing into a Microsoft Account.
  • 0x800704cf Microsoft Store error – Seen when launching the Microsoft Store app. The solutions below should fix things.
  • 0x800704cf Windows Update error – Some users also reported the error when trying to install an update.
  • 0x800704cf Windows activation error – Though not very common, many users had trouble activating Windows when the error code showed up.
  • Error 0x800704cf Xbox – Create a new profile for Xbox, then log into it to see if the error persists.
  • Error 0x800704cf Windows 7/10/11 – As you’ve probably guessed, the network error 0x800704cf is not exclusive to Windows 10 but also occurs on the new OS, and Windows 7. The solutions below are applicable to all of them.
  • You’ll need the Internet for this 0x800704cf – Change your DNS settings in order to fix the Internet connection.

How can I fix error code 0x800704cf?

Before we head to the full-fledged software fixes, here are a few things you can try:

  • Restart the computer.
  • If you are using a wired connection, disconnect the cable, power off the modem/router, wait for a minute, then turn it back on and reconnect the cable.

If these two don’t work, you should try the solutions listed next.

1. Reinstall the network adapters

1.1 Reinstall the drivers manually

    A first workaround you can try is to check your drivers and reinstall the network device driver to get rid of 0x800704cf Internet connection error.

  1. 1. Right-click the Start button and select Device Manager from the list of options.

    error-0x800704cf-pc-fix
  2. 2. From the main panel, click on View and select Show hidden devices.

    error-0x800704cf-pc-fix
  3. 3. Expand Network adapters, right-click on each entry here and select Uninstall device.

    error-0x800704cf-pc-fix
  4. 4. If you cannot uninstall a certain adapter, don’t worry, go to the next one.

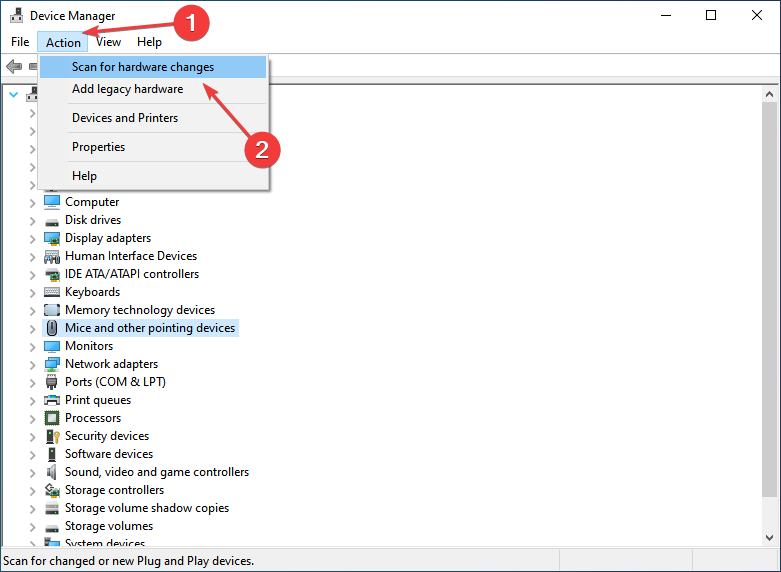
  5. 5. When done, click on the Scan for hardware changes icon or you could simply restart the computer.

    error-0x800704cf-pc-fix

If you are still dealing with the 0x800704cf error code, uninstall the network adapters to remove the corresponding drivers and get a fresh copy for each.

1.2 Reinstall the drivers automatically

Of course, you can reinstall them manually but as you can see, there are a lot of them and the process might take some time.

The quicker and safer solution is to use a third-party tool that will perform the job automatically for all the drivers on your PC.

We recommend Outbyte Driver Updater because it is safe, lightweight, and very easy to use. It saves you the time and hassle of manually updating your drivers and it can also repair damaged drivers.

Outbyte Driver Updater

Automatically update all drivers and keep your system in sharp performance.
Free Trial Download Now

2. Run the Network adapter troubleshooter

  1. Press Windows + I to open Settings, and select Update & Security.update & security
  2. Select Troubleshoot from the left, and then click on Additional troubleshooters.troubleshoot to fix 0x800704cf
  3. Now, select Network adapters here, and then click on the Run the troubleshooter button.network adapters to fix 0x800704cf

3. Change the DNS settings

  1. Press Windows + R to open Run, type ncpa.cpl in the text field, and hit Enter.ncpa.cpl
  2. Right-click on the current network and select Properties.properties
  3. Select Internet Protocol Version (TCP/IPv4) and click Properties.IPv4 properties
  4. Now, select the Use the following DNS server addresses option, enter the following details in the fields underneath, and click OK:
    • Preferred DNS server: 8.8.8.8
    • Alternate DNS server: 8.8.4.4change DNS server to fix 0x800704cf
  5. Now, restart the computer once for the changes to fully come into effect.

Once done, the 0x800704cf error should be fixed, be it while opening Microsoft Store or accessing the Microsoft account.

4. Reset proxy

  1. Type Command Prompt in the Search bar, and click on Run as administrator.command prompt
  2. Click Yes in the UAC prompt.
  3. Now, paste the following command and hit Enter: netsh winhttp reset proxyreset proxy to fix 0x800704cf
  4. Once done, restart the computer.

Most users managed to fix the 0x800704cf error by resetting the configured proxy settings. So, make sure to try it!

5. Create a new user profile

  1. Press Windows + R to open Run, type netplwiz in the text field, and click on OK.netplwiz
  2. Now, click on Add.add account to fix 0x800704cf
  3. Enter the Microsoft Account address in the text field and follow the on-screen instructions to complete the process.provide details

That’s it! If none of the previous methods have worked, creating a new administrator user account linked to Microsoft would help fix things. Also, you may try creating a local account as well, though we recommend a Microsoft account.

If creating a new user profile fixes the issue, create a backup of the files stored on the problematic profile and transfer it to the new one.

We hope that one of the troubleshooting methods listed above fixed the Windows error 0x800704cf.

If you want to supervise your network closely, start using the best network traffic inspection services and tools today!

If you have any other queries or know of a method not listed here, drop a comment below.

8 Best Screen Sharing Software With Audio To Use

Screen-sharing software tools capable of sending images with audio are highly sought after nowadays because we are still forced to conduct our work online.

These programs are also often used for remote desktop assistance. No matter if you’re asking for help or providing it, a screen-sharing tool is a must.

How can a screen-sharing app help me?

Screen-sharing apps are great for troubleshooting problems on remote machines, collaborating on a project, or just creating a step-by-step guide.

However, if you include the voice feature withing screen-sharing, that can be extremely helpful to make your point quicker and more comprehensively.

There are plenty of screen-sharing solutions out there, so we extended our reach to find the best ones for you so check them out below.

What are the best screen-sharing tools with audio?

Zoho Assist – Great for remote troubleshooting

This is not just a simple screen-sharing tool. Zoho Assist is an enterprise-grade remote support software.

Of course, you can perform screen sharing with voice but with this solution, you can actually provide attended and unattended remote support on computers anywhere in the world.

And with the remote access features, you can even manage remote endpoints without even needing voice assistance.

You don’t need to worry about safety because all the connections are protected with TLS 1.2 and AES 256-bit encryption.

And probably the top advantage is that the dashboard is cloud-based, accessible from any location on virtually any device.

Moreover, there is also no need for any installation of any software on the endpoint side.

Of course, if the situation requires it, you may also send updates, patches,, or any other type of files right during a live session.

To top it all up, Zoho Assist allows you to view any number of monitors connected to the remote computer simultaneously.

Let’s review some of its top features:

  • Enterprise-grade security: TLS 1.2 and AES 256-bit encryption
  • Faster implementation and deployment
  • Quick adoption and simple to use
  • No prior downloads are needed for on-demand remote sessions
  • No installation is needed for technicians to start remote sessions

Zoho Assist

his tool not only allows screen sharing with voice but troubleshooting remotely on any computer!
Check Price Visit Website

Zoho Meeting – Perfect for collaboration

If you’re looking for interactive screen sharing, Zoho Meeting is just the tool you need.

It is a communication tool similar to Zoom but it’s a lot more complex than that and it offers a lot of other collaboration tools.

With Zoho Meeting not only that you can share your screen during a meeting but you may also add all sorts of other documents with someone.

And if someone was left out or can’t attend, you can record, and share your web meeting with any other who can replay them to stay in touch.

The interactive features extend to launching audience polls, answering questions through Q&A, letting attendees get your attention through Raise Hand, and encouraging them to speak and present.

This platform even helps you organize webinars and then get reports on attendees, engagement, polls, and Q&As in XLS and CSV formats.

And if you’re worried about safety, Zoho Meeting encrypts audio, video, and screen sharing to keep your information secure at all times.

Last but not least, this software offers integrations with a lot of other Zoho tools but also with Outlook, Teams, Gmail, and more.

Let’s review some of its best features below:

  • Screen sharing, voice, and video communication
  • Record and share meetings
  • Share documents on a safe, encrypted connection
  • Get extensive meeting reports in XLS and CVS formats
  • Easy to use and implement

Zoho Meeting

Communicate with your team seamlessly while sharing your screen and important documents.
Check Price Visit Website

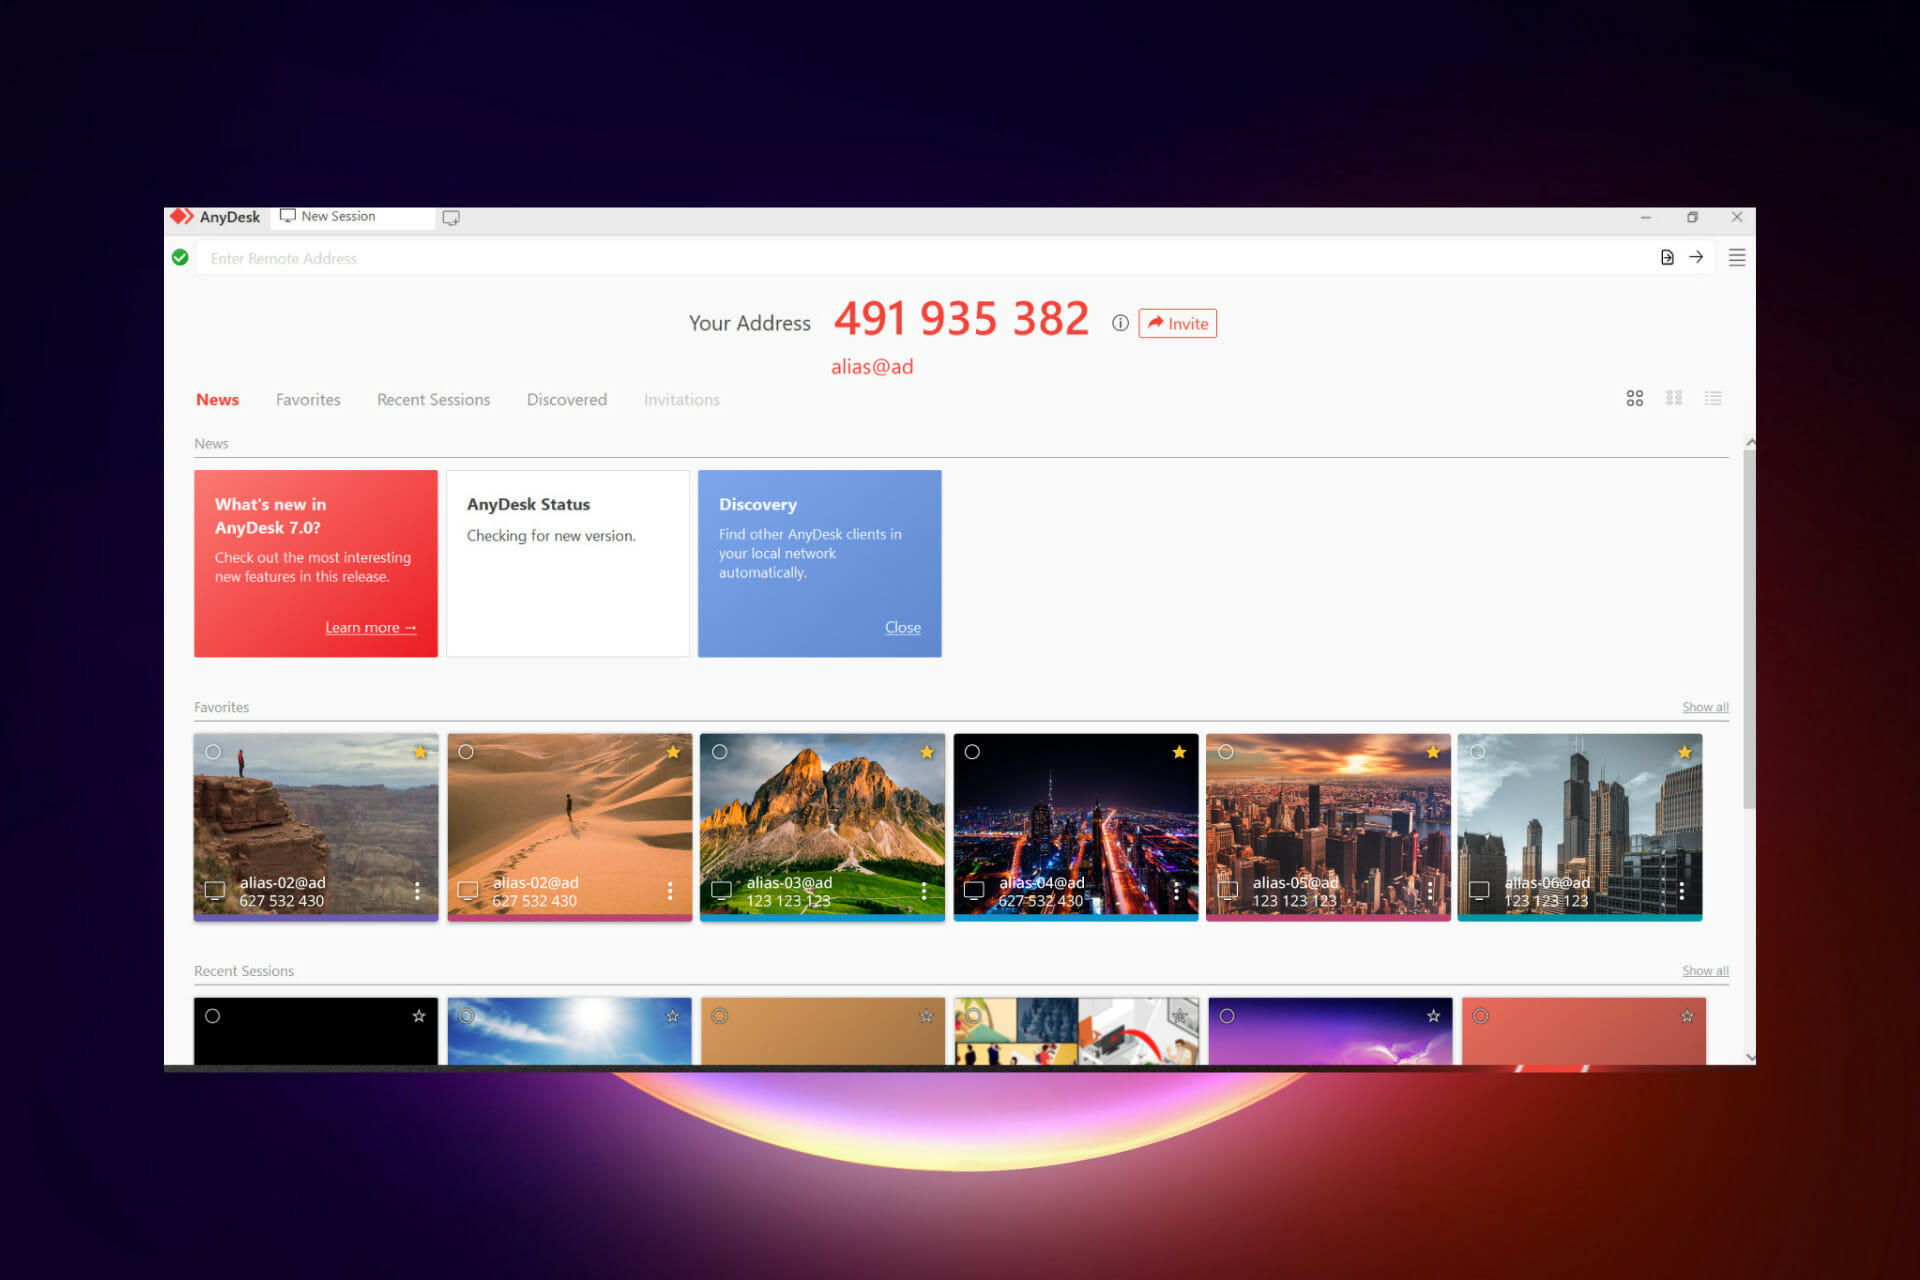
AnyDesk – Good for remote desktop control

AnyDesk is the perfect tool either if you want to use it to help someone or simply communicate remotely because it comes with a Transmission option.

AnyDesk is a remote desktop application with thousands of worldwide users. It’s suitable for remote work as well as online learning.

You can simply send audio in real-time if you check the Transmit sound option in the software’s settings. You can even set up the audio device used for the audio transmission on the client’s PC.

Otherwise, AnyDesk offers military-grade encryption for the connection so you can rest assured that you will be protected from any unauthorized access.

Along with the remote desktop feature, AnyDesk also has a video conference option where users can communicate in real-time.

As for compatibility, this solution works on all major platforms and operating systems and has a latency of only 16 ms so your remote-control actions will be almost instant.

The tool also lets you share your mobile screen directly from your Android device.

AnyDesk is a paid service. It has three different plans that vary in features, the number of devices you can connect, and customer support options.

Let’s see some of AnyDesk’s best features:

  • Very low latency
  • Military-grade encryption
  • High framerate image
  • Compatible with all major operating systems and platforms
  • Instant support and live administration through remote control

AnyDesk

If you want to benefit from remote desktop control and sound transmission simultaneously, AnyDesk is the best out there!
Get AnyDesk Visit website

Mikogo – Great whiteboard feature

Mikogo is not only a screen-sharing tool but it offers high-quality VoIP and teleconferencing features that transform it into a full-fledged collaboration tool.

Of course, like any other remote desktop app, with this software, you can share your screen but you can also send text and files.

And if you get interrupted or you need to do something else, you have the pause or lock the session with a click on the dedicated buttons.

The best part is that you don’t need to be a tech wiz to operate it because it’s really simple to use and comes with a friendly interface.

Mikogo lets you select the exact applications/windows you want to share while hiding everything else you have open on your PC.

This helps you stay focused on communicating and presenting what you want to present without requiring you to close other tasks.

Mikogo also implements a multi-user whiteboard that lets you use annotation tools in real-time, as you share your ideas.

Mikogo is a subscription-based service with three different plans available. It offers packages for individual users, professionals with large teams, and smaller teams.

Let’s take a look at some of its key features:

  • High-quality VoIP and teleconferencing audio-video connection
  • Session Scheduler for setting the meetings in advance
  • Application selection and multi-monitor features
  • Efficient transfer system of files up to 200 MB
  • Free version available

Mikogo

Forget about voice assistance, with Mikogo you can start live conferences to convey your message to all peers.
Free trial Visit website

TeamViewer – Great for remote controlling

If you’re looking for free screen-sharing software with audio for your personal use, you can go for TeamViewer. It’s really popular because you can also share video and audio with other users.

A great advantage of this tool is that it is available to use in over 30 languages so you’re not stuck with the regular few choices found in most software.

TeamViewer is very well-adjusted for Windows 10 and Windows 11 use, but you can also work with it on most platforms and operating systems, including Linux or Mac.

Not only does this software enable screen sharing, but it also lets you remotely manage the devices you connect to.

This means that you get to use the connected computer with a pre-established set of rights. 

It is a useful customer support application as it lets agents connect to the user’s desktop in real-time and offer quick audio guidance.

Along with the screen-sharing option, Teamviewer also has a video conferencing feature.

This tool is pretty complex so you can even hold real conferences by also using whiteboard functions or chat and you can even send important files across to the attendants.

Other key features of Team Viewer include:

  • Remote printing for Windows and macOS
  • Secure file sharing option
  • Black screen for private remote access

⇒ Get TeamViewer

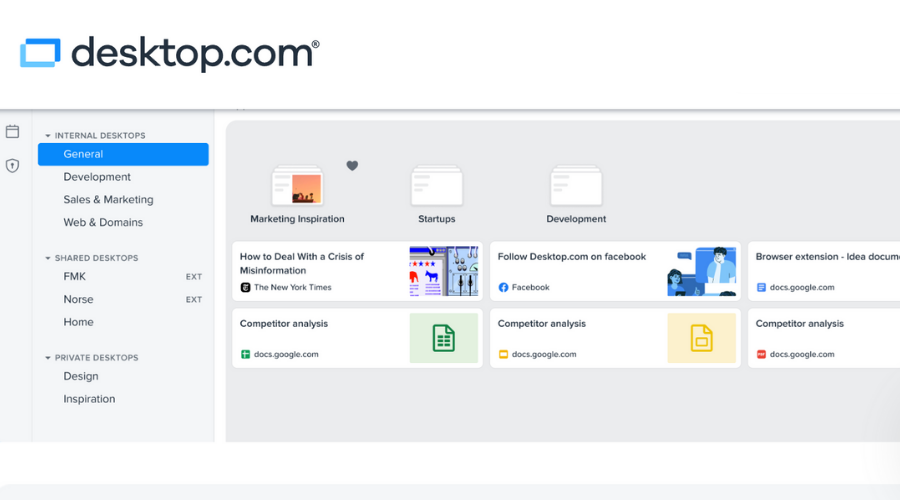
Desktop.com – Simple screen-sharing

Next on our list is a full-fledged workspace and collaboration tool that is very promising and versatile when it comes to screen sharing options.

With Desktop.com you will be able to share your screen with other participants of a video conference in just a few clicks.

This way you will be able to present your screen and also make use of the audio and video communication features present within the conference option.

As the name of the app suggests, Desktop.com lets you create and share your desktop, meaning your digital workspace along with all apps and integrations within it.

Not only does it offer you the possibility to create and manage several desktops, but you can also share your desktop with your team members for easier collaboration.

It is another option that you can use to share your screen. It’s best suited for real-time collaboration, and not necessarily for making a presentation or explaining something, as it is the case for conference calls.

To share your desktop, you just have to navigate to the Desktops menu and select one of the private desktops you have access to. Click the share button and select the team members you want to give access to.

If you want to use audio whilst sharing your desktop, just click on the chat button and start a discussion. You can access it from the same unified UI so you have the possibility to share your desktop and chat at the same time.

Desktop.com also offers you the possibility to share a desktop on a mobile device for Android users. It works under the same principle the PC desktop sharing is using.

This collaboration software that includes screen sharing with audio features is available for free under a limited plan that’s best for individual use. It also has paid options that have more storage space and a larger set of features.

Other key features of Desktop.com include:

  • Share third-party audio and video files in conference calls
  • Task management and assigning tools
  • Connect third-party message apps to a unified chat
  • Strong encryption protocols to keep all data private

⇒ Get Desktop.com

Zoom – Most popular

Zoom in another great web conferencing app that also comes with screen sharing with sound and it’s free if you keep the session under 40 minutes and participants under 100.

With this increasingly popular tool, not only that you can share your screen, but you can also make annotations on it, using it as a whiteboard while you’re voice or text chatting.

And the best part about Zoom is that it can be used on all platforms and operating systems and it can be easily used as a business communication tool.

That’s because it can record everything, including the questions from the participants by chat and videos from the presenters.

Zoom is an efficient way to host and participate in meetings. You can benefit from the scheduling features to set a time for the meeting and notify each participant ahead of time.

With Zoom, you can also customize your background picture which is not only a fun option, but can also help you preserve your privacy if you are working from home and are not necessarily comfortable with sharing your surroundings.

The tool also has a powerful search feature that allows you to quickly find contacts, messages, upcoming meetings, or chat channels. Just enter your keywords and you’ll get your results in a few seconds.

Zoom is an overall good option if you want to be able to share your screen and benefit from audio at the same time. It offers high-quality video and audio support.

Other key features of Zoom include:

  • Audio-only conferencing
  • Cross-platform message feature
  • Powerful end-to-end encryption
  • Waiting rooms
  • Customizable permission settings for each session

⇒ Get Zoom

Skype – Native Windows compatibility

Everybody knows about Skype and it’s extremely popular for audio and video communication purposes. However, you can also use it for screen sharing and that makes it a great choice on our list.

After entering a video call, you simply have to click the + button in the call window and select the Share Screen option to achieve your goal.

Apart from that, if you didn’t use its screen-sharing option, you should check it out and see if it works for you because the tool is free.

Skype recently implemented the call recording and live subtitle feature. This gives better accessibility in case of a bad connection that may cause audio problems for some participants.

Not only that, but you can save your conference and re-watch it if you need to be reminded of some key elements that were discussed.

Another benefit you get from using Skype is that you can connect from multiple platforms. This makes it easy to have conferences on the go, as it supports mobile phones, tablets,  virtual assistants such as Alexa, and even Xbox. You can also connect directly from your browser.

You can use the conference options and screen-sharing options within Skype for free. Skype to Skype calls are not charged, but if you want to integrate the use of phone numbers, you will have to pay.

Other key features of Skype include:

  • Secure file-sharing option
  • Integrate your mobile number and reach people that are not online
  • Industry-leading end-to-end encryption

⇒ Get Skype

These are some of the best audio share software tools available right now on the market. Give them a try and select the one that meets your needs.

If you’re looking for a solution to share screen and audio, we’ve got an excellent list including the best screen-sharing software for Windows 10 that you can get right now.

Tell us what tool you’d like to use from all these and why in our comments section below. You can also give us other ideas if you like.

5 Best SAP & BI Reporting Tools [Top Brands Reviewed]

If you are thinking of implementing a BI (Business Intelligence) reporting & SAP tool, these apps will help you understand trends and derive insights from your data.

However, the larger question is how does one know which business intelligence and SAP reporting tool to use to achieve their goals?

Why do I need SAP & BI reporting tools?

From the latest studies, 64% of businesses that self-service platforms get a substantial competitive advantage. However, 87% of businesses don’t use BI reporting tools.

To use Business Intelligence tools, one need not be an advanced analytics specialist. Since they can be used by anyone, all you have to do is find the right solution that fits your requirements.

In this article, we explore the best SAP & BI reporting tools that are robust and offer integration capabilities to help make the right decision for your business.

What are the best SAP & BI reporting tools available?

ZOHO Analytics – Powerful data analytics capabilities

ZOHO Analytics  Best SAP & BI Reporting Tools

ZOHO Analytics is a data integration platform that enables businesses easily connect with popular data sources such as spreadsheets, databases, cloud applications, and more.

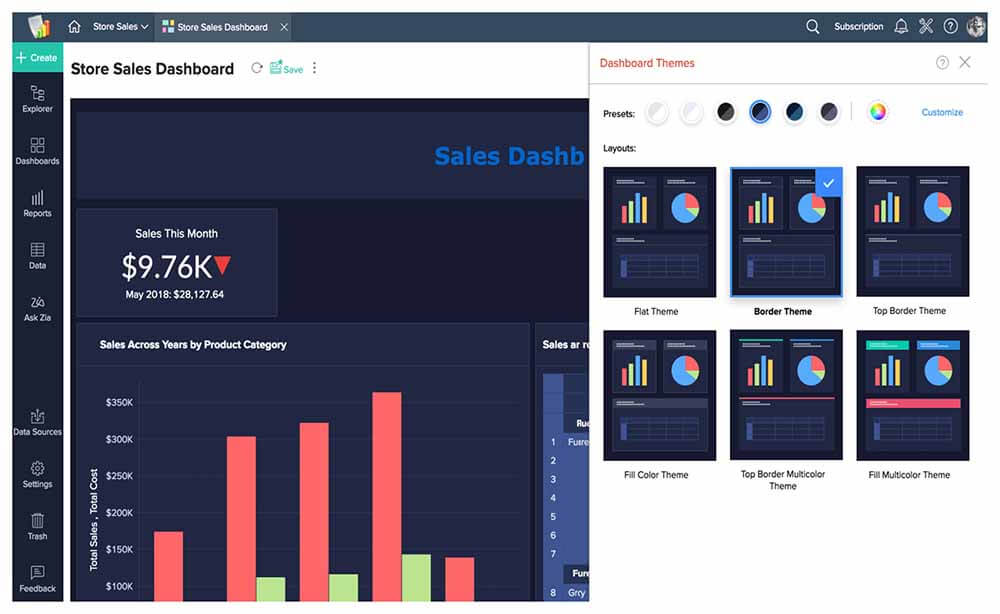
It comes with more than 40 types of charts, tables, pivot tables, and creative interactive dashboards with customizable visualization.

This data preparation tool allows users to clean, transform and enrich their data. It also offers the data manipulation functions, such as filtering, aggregation, and data merging.

ZOHO Analytics provides AI-powered insights that automatically detect patterns, outliers, and trends in data, making it easy for users to discover hidden insights and make data-driven decisions.

This tool has robust collaboration features, allowing teams to work together in real-time, share data, and collaborate on reports and dashboards.

With the Zoho Analytics Mobile BI app, you can access the data, view dashboards and reports & collaborate with your team on the go.

The Data storytelling feature of the platform enables you to raw data into meaningful insights by combining data, narrative, and visualizations to create an engaging story.

Here are some of its most notable features:

  • Integration with business tools, including Salesforce, Google Analytics, and more
  • Various sharing options, including email and public links
  • Provides role-based access control
  • Advanced predictive analytics capabilities to forecast trends
  • A user-friendly drag-and-drop interface

Zoho Analytics

Create interactive dashboards, charts, and reports that are easy to interpret and share.
Check Price Visit Website

SAP Business Intelligence – Great SAP platform

SAP Business Intelligence allows you to make better, more informed decisions with access to real-time insights on a single, scalable platform.

This centralized SAP report suite can be used for data reporting, visualization, and sharing.

SAP Business Intelligence transforms data into useful insights, which are available anytime and anywhere.

The platform offers on-premise deployment, real-time business intelligence, increased user autonomy, and simplified dynamic information consumption.

Take a look at its best features:

  • Real-time, personalized, omnichannel customer engagement
  • Cloud-based accessible dashboards
  • Send notifications to the OpenDocument users
  • Self-service visualization tools
  • Role-based BI dashboards

⇒ Get SAP Business Intelligence

DataPine – Great interactive dashboards

If you are looking for an all-in-one Business Intelligence platform, DataPine is a great option. Using this sap report tool, even non-technical users can process complex data analytics with ease.

DataPine helps you merge different data sets on the go without the need of restructuring your database.

You can explore data sets, visualize trends and patterns and build a professional dashboard to dig deeper into your data using an intuitive user interface.

It also offers different dashboards for every use case. The users can choose dashboards by function, industry, or platform.

Here are some of its most notable features:

  • Create dashboards by function, industry, or platform
  • Fast & easy data connectors
  • Multiple, effective reporting options
  • Intelligent, AI-based data alerts
  • Modern predictive analytics tools

⇒ Get DataPine

MicroStrategy – Perfect for SMBs

MicroStrategy is an intuitive Business Intelligence tool to analyze category performance. It offers powerful and high-speed dashboards and data analytics to help you monitor trends and improve productivity.

Irrespective of where the data is coming from spreadsheets, cloud services, or data software, MicroStrategy can help users connect with multiple sources with ease.

On the flip side, MicroStrategy is not the most efficient when the volume of data sets increases to thousands of rows and occasionally results in a timeout error.

MicroStrategy is an excellent tool for SMBs where the data is smaller in volume.

Here are some of its key features:

  • Build consumer-grade intelligence applications
  • View analytics content responds dynamically across any device, optimizing data analysis for users on web, desktop, or mobile
  • Enhance collaboration with live messaging features that connect departments and increase engagement
  • Deploy applications to thousands of users with automatic localization and security-by-design to protect your data

⇒ Get MicroStrategy

Yellowfin BI – Flexible solution

Yellowfin BI helps you transform your business through data-building beautiful dashboards to drive action and monitor your business in real-time automatically.

Yellowfin BI is one of the few analytics suites that combines action-based dashboards with industry-leading automated analysis and data storytelling.

You can easily filter through large volumes of data using the built-in filter. The tool’s flexibility means you can open the dashboards from anywhere through mobile and webpage.

Yellowfin BI is an end-to-end analytics platform that combines visualization, and collaboration to help you get more value from your data in new ways.

Take a look at some of its best features:

  • Action based dashboards
  • Automated Business Monitoring
  • Comprehensive data stories & management reports
  • Intuitive self-service BI options

⇒ Get Yellowfin BI

SAP & Business Intelligence tools are an excellent mode of collecting useful information regarding your business, performance, and health.

It can also be used for converting raw data into knowledge as these tools allow you to extra and present data in charts, tables, and other visualization formats.

All the SAP & BI reporting tools listed in this article are handpicked among the top reporting applications, highlight their features, and belong to different price categories.

You might also be interested in our selection of the best automated CRM software for your business.

What do you think of these SAP & BI reporting tools? Do let us know in the comments.

7 Best Recruiting Automation Software In 2023: We tested 25

In the past, the only way to go through all the applications received for a job opening was to take the big pile of CV’s on your desk, and one by one, go through every aspect of their application.

Luckily for you, there are great recruiting software options available on the market that can help you automatize many, if not all aspects of this process.

How can automated hiring software help my business?

Recruitment automation software options use artificial intelligence to identify suitable candidates and verify their email addresses and social media pages.

After that, you will be able to export entire candidate profiles to the chosen location online, or inside a specific software.

By using artificial intelligence (AI)-powered technology, these types of software can help companies in many ways.

But the most important aspect of using AI recruitment tools is the fact that you can focus on other tasks while trusting the app to calculate and analyze every aspect of the qualities required to occupy the job.

Then, they compare them with other possible candidates and offer you a comprehensive report of the entire process.

Now that we know what we’re looking for, let’s explore some of the best AI-powered hiring software on the market.

What are the best recruiting automation software tools?

Sage HR – Best HR capabilities

Sage HR is another powerful tool designed to meet all employee-management needs. It can be used by all types of businesses.

It offers a standard set of features as a starting point. It is called Core HR and it encompasses essential options all HR managers need, like an employee database, workflow organizer, announcements as well as eSignatures.

You can use the app as it is, with the basic features, or you can add different extra modules to your plan if you feel it’s necessary.

This is a great option because you can choose the exact features you need without cluttering your workspace with redundant tools, which also eliminates unnecessary additional expenses.

When it comes to the recruiting process, you will need to opt for the Recruitment module in Sage HR. 

It is designed to help throughout the hiring process without requiring the HR manager to do any work outside the app.  

All hiring stages are managed through a drag-and-drop interface which offers a pipeline overview of each particular candidate and the stage they are in.

You can schedule interviews and sync them with Outlook Calendar, add contact information, and create scorecards and reports. 

This module is paid and the pricing is decided based on your number of employees and other potential added modules. You can try it for free for 14 days.

Other key features include:

  • Unlimited applicants 
  • Custom pipeline stages
  • Application form builder
  • Friend referral
  • Other modules include leaving management, timesheets, shift scheduling, reporting, onboarding, and more

Sage HR

Take care of all recruitment stages with an easy-to-use interview scheduling planner, scorecards, contact sheets, and more.
Free trial Visit Website

Zoho Recruit – Best for resume processing and parsing

Zoho Recruit is a great automated recruitment application that allows you to easily find better-matching candidates, unifies your entire team under one hub, and allows you to make informed decisions regarding job postings, CV processing, compatibility of candidates, etc.

You can also use Zoho Recruit to automate a wide range of processes, set reminders for different tasks, and customize email templates for fast email delivery.

When it comes to privacy and the management of access in your app, Zoho Recruit’s dashboard offers you the possibility of assigning specific roles to users – recruit administrator, recruiter, guest, etc.

You also have the ability to create and manage user groups and assign specific rules based on their access level, industry, skill level, etc.

Zoho Recruit was released in 4 different versions with different features. Each of the versions of this software can be used as a trial version for 15 days.

Some of the features that are worth noting include:

  • Directly post to popular job boards
  • Social Tab – sourcing employees using your company’s social page
  • Resume parsing – standardize your company’s resume structure
  • Pare resumes from LinkedIn and other sources
  • Resume inbox – all of the applicant’s CV on one page
  • Can format resumes to add your company logo
  • Search resumes by keywords or other criteria
  • Ability to preview CVs without entering the candidate profile

Zoho Recruit

Find better candidates and automate processes with this powerful software.
Check Price Visit Website

FreshTeam – Best for applicant management and tracking

FreshTeam is another greatly useful tool that contains an applicant tracking system (ATS) and also a recruitment application.

These two features are presented in a user-friendly user interface, that allows you to easily understand the data collected and sort it into groups, based on different markers – age, sex, location, skillset, compatibility, etc.

Job posting creation is a very simple task that can be completed in minutes thanks to over 100 in-built job description templates.

And after that, all the postings can be mapped to the hiring team that is working on it so they can assess the candidates themselves.

The app also helps you create custom workflow stages in your applicant tracking software and follow their path across stages.

Another interesting feature is that the tool syncs an email inbox with the software and converts the emails you receive into an application and its sender to an applicant.

Some of the notable features include:

  • Applicant tracking
  • Recruitment CRM
  • Comprehensive dashboard & 360 – profiles
  • Collaborative hiring
  • Job posting management
  • Employment referrals
  • Employees directory
  • Searchable talent pool
  • 24/7 customer support
  • Archived talent pool

FreshTeam

Make the recruitment process easier on both ends with recruitment applications, published job postings, email application managers, and more. 
Free trial Visit Website

Arya Pulse – Best AI recruiting overall

It’s hard to find the right people for the right job, but with the right tool like Arya Pulse, the process will become the easiest ever.

This AI-powered on-demand recruiting service searches for the best matches on over 70 employment websites and social media platforms.

By just posting a job, the app will start showing a ranked list of candidates and in a few hours, the results will be filtered to get only the top-ranked.

It takes a bit of time because after the AI extracts the list, human recruiting professionals check it again to ensure that the candidates are interview-ready.

Of course, the more elaborate is your job listing, the better will be matched with the proper candidates.

But that’s not all because Arya Pulse also provides hiring-trend insights to help you understand better what are your job’s requirements.

It practically does the job of a professional agency but a lot faster and looks through a lot more sources.

The app has a free trial version that allows you to create a job listing and see the first 10 candidates. To unleash all its potential, you will have to pay for a plan.

Take a look at Arya Pulse’s best features:

  • Looks on over 70 employment websites and social media platforms
  • Uses AI and recruiting professionals
  • Get the right candidate in a matter of hours
  • Extremely easy to use
  • Great insights on how to pick the right job requirements and candidates

Arya Pulse

Get the right candidates filtered by AI and professionals from over 70 sources in just a few hours.
Check price Visit Website

JobDiva – Great for follow-ups and marketing

JobDiva is another great recruitment automated software option that allows you to track your applicants, manage talent, create and organize your data using candidate pipelines.

It can also use business intelligence (BI) reports to analyze your company, and map your workflow.

This software is perfect for mid-sized or large enterprise companies who need help when it comes to their recruitment process.

JobDiva can automatically scan through thousands of resumes, and give recommendations regarding candidates that best fit the job requirements.

Because JobDiva is entirely cloud-based, you will never have to worry about losing your candidate’s data, and it also allows you to gain access from anywhere in the world, at any time.

In JobDive you will find a wide range of features that allow you to search for candidates, either manually or by using AI.

It offers an applicant tracking system (ATS) service, and also customer relationship management (CRM), and a vendor management system (VMS).

Key features of JobDiva include:

  • Resume aggregation
  • AI candidate-to-job matching
  • Recruitment life cycle
  • Email marketing
  • Automated communication tracking
  • Qualifying parameters settings
  • Can perform searches based on text, attributes of candidates, skills, etc.
  • Reduce cost and eliminate data entry
  • Automatically sync database with all vendor management systems
  • Automatically cleanse sensitive data for your security

⇒ Get JobDiva

Ideal – Great automation features

Ideal is another great software option that is able to automate almost all features of the recruitment process for your company.

This software allows you to quickly analyze different kinds of candidate information – reumes, assessments, and performance.

Ideal uses artificial intelligence (AI) technology, to collect, analyze and process candidate information, and by combining automation with an increase in the quality of hiring, this app will surely help your business and reduce wasted time for data entry.

The entire range of data that you collected can be easily accessed from one screen that offers real-time updates and automation, and you can use the AI features to automatically discover the best applicants for the job opening.

Key features include:

  • Automatically screen candidates in real-time
  • Can combine resumes, performance data, and assessments into one data source
  • 24/7 Chatbot support – keeps every candidate informed
  • Around the clock AI analysis of candidate pool – you get a notification when a match is made

⇒ Get Ideal

ApplicantPro – Great for simplifying the recruiting process

ApplicantPro is another great tool that allows you to streamline your company’s hiring process.

This application contains applicant tracking features and recruitment options for businesses of any size and with any number of employees.

This tool can be used in education, manufacturing, healthcare, etc., makes sure your company is compliant with EEO/AA and OFFCCP guidelines, and can also be easily integrated with any third-party software.

ApplicantPro has been released in 3 different versions, each designed to fit the needs of different types of users.

Take a look at its key features below:

  • Create job posts with ease and post them on any job site
  • Track every aspect of your applicant’s profile
  • Can schedule and perform video interviews at any point of the recruitment process
  • Generate comprehensive assessments based on the data you collected
  • Perform background checks for any potential employee
  • Create professional reports based on the data you need
  • Automated thank you emails after the application is received

⇒ Get ApplicantPro

Recruitment software comes in very handy when you need to handle a big number of job openings and job applications. It allows you to streamline your company’s analysis and data collection processes.

With these tools, you can organize video interviews, automate scheduling, offer candidate suggestions and search through the entire database of applicants with incorporated search features.

By using the software options presented in this article, you will surely manage to fill open positions in your company faster, and more efficiently than doing it the old-fashioned way.

And now that you’ve found the dream team, you could be interested in our best workforce management software solutions list and test your leadership skills.

Use the comments section below to let us know which software you chose to use and why.

5 Ways to Fix a Black Screen in Roblox on Windows 10

If you are a Roblox fan, then you should be aware there are multiple user reports on the internet confirming the black screen issue in Roblox on Windows 10.

Users are facing this issue during the gameplay or right at the startup. The screen completely goes black and there is nothing that you can do instead of quitting the game. Thankfully, this guide is there to help you resolve the problem at hand. Let us get right into it.

What is causing the black screen in Roblox on Windows 10?

After checking multiple user reports, we have deduced a list of some of the most common reasons you could come across this error.

  • It is an in-game issue – Chances are the version of Roblox you are playing itself is buggy and causing the problem. You should play the latest updated version of Roblox.
  • The browser cache – Corrupt browser cache, as well as corrupt data files can often trigger problems with web apps.
  • The firewall is blocking Roblox – Chances are your firewall or antivirus software is blocking the Roblox game from launching and causing the black screen issue.
  • Some important game files are missing – If there was an interruption during the installation of the game, then this could be very well the reason why the game crashes and throws a black screen.
  • There is an issue with the browser itself – Chances are the browser that you are using to play Roblox itself is causing the problem.

How can I fix Roblox black screen issue on Windows 10?

Before jumping to the advanced troubleshooting methods, let us first go through the preliminary solutions and check if they can resolve the problem or not:

  • A simple restart can fix multiple issues you might be experiencing while running programs.
  • Try running Roblox on a different web browser. You can choose among some of the best web browsers to try out on your PC.
  • Check Roblox’s server status using websites such as DownDetector, etc.
  • Close all other background apps and run only Roblox. We have a guide that shows exactly how you can turn off background apps on your PC.
  • Restart your Wi-Fi router and see if that helps.

If nothing works, then try the detailed solutions mentioned below and possibly resolve the problem.

1. Tweak the graphics

  1. Launch Roblox.
  2. Press the Esc button.
  3. Switch to Settings.
  4. Change Graphics Mode to Automatic and check if this fixes the black screen problem.
  5. Else, you can change the Graphics Mode to Manual and use the Graphics Quality slider to the right for better graphics and to the left for better performance.

Users have reported that turning down the graphics quality has helped them fix the black screen issue in Roblox on Windows 10. On the flip side, you can also set the graphics quality to automatic and see if this resolves the issue or not.

2. Update the graphics driver

  1. Right-click on the Start menu and select Device Manager.
  2. Expand the Display adapters section.display adapters
  3. Right-click on your graphics card and select Update driver.
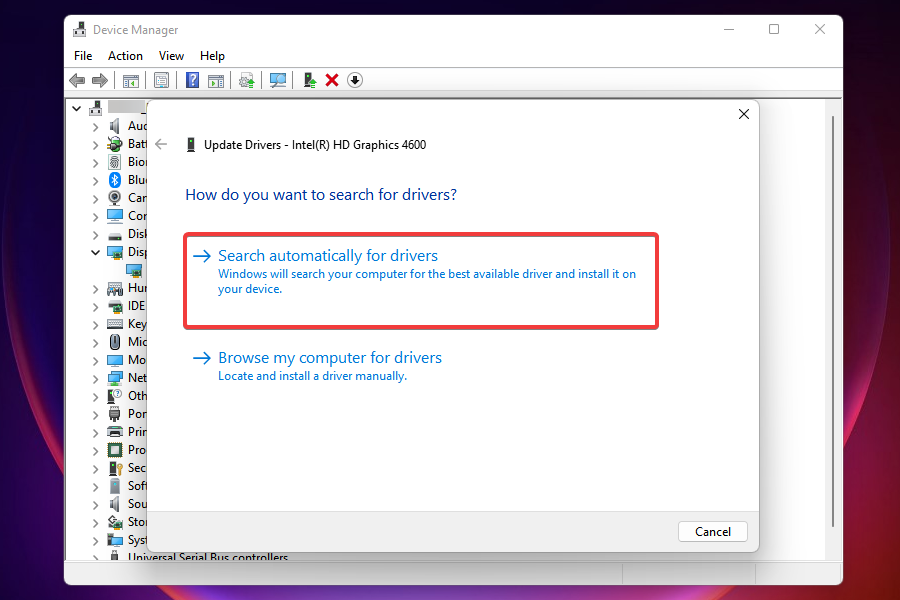
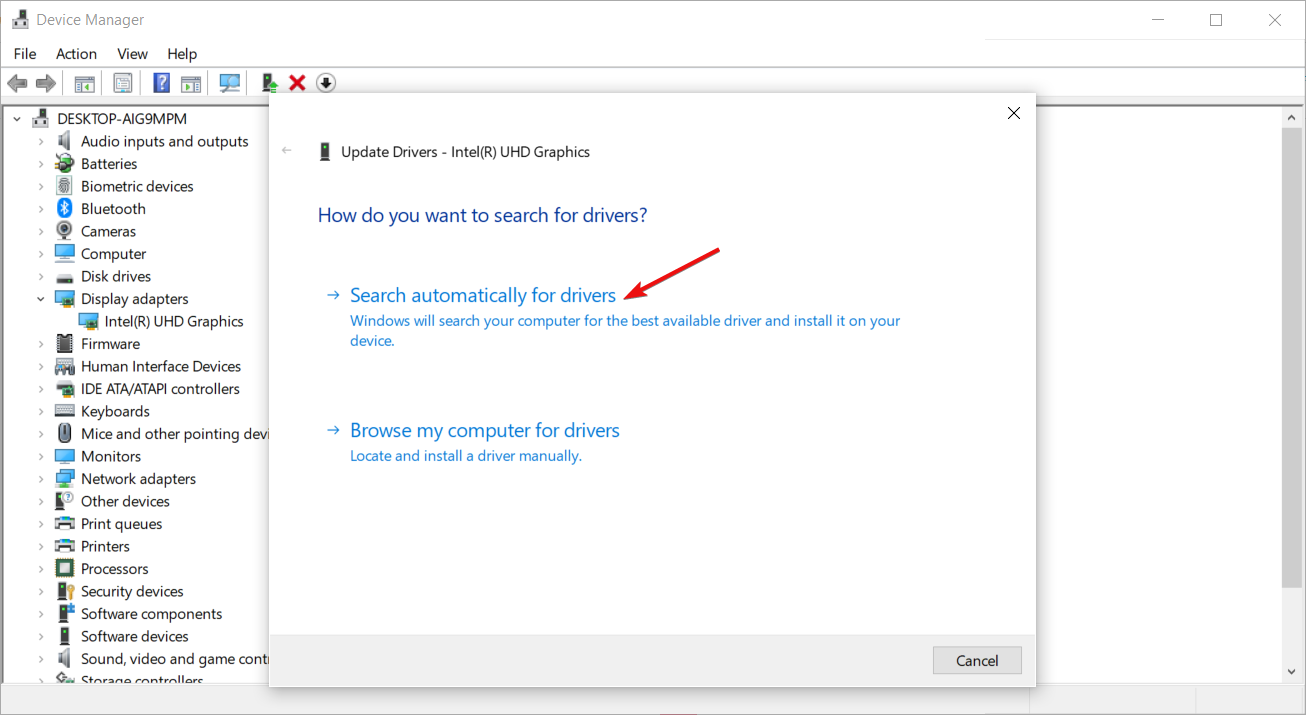
  4. Choose the option to Search automatically for drivers.search automatically for drivers
  5. Your PC will search for the update and if detected will prompt you to install the update.

If you are running Roblox using the launcher, then chances are that your outdated graphics driver is causing the problems.

While the above process will update the driver as it should, it requires a lot of manual steps to go through to update the driver.

You can always simplify the process with the help of professional driver updater tools. These allow you to scan your system and update all your drivers in just a few minutes.

3. Clear browser cache

  1. Launch Chrome.
  2. Press Ctrl + H to launch the browser history.
  3. Select Clear browsing data from the left.
  4. Click on the Time range dropdown menu, and select All time.
  5. Tick the checkbox for Cookies and other site data, and Cached images and files.
  6. Hit Clear data at the bottom.
  7. Wait for the process to complete, and then restart the browser for the changes to fully come into effect.

4. Disable browser plugins

  1. Launch the browser.
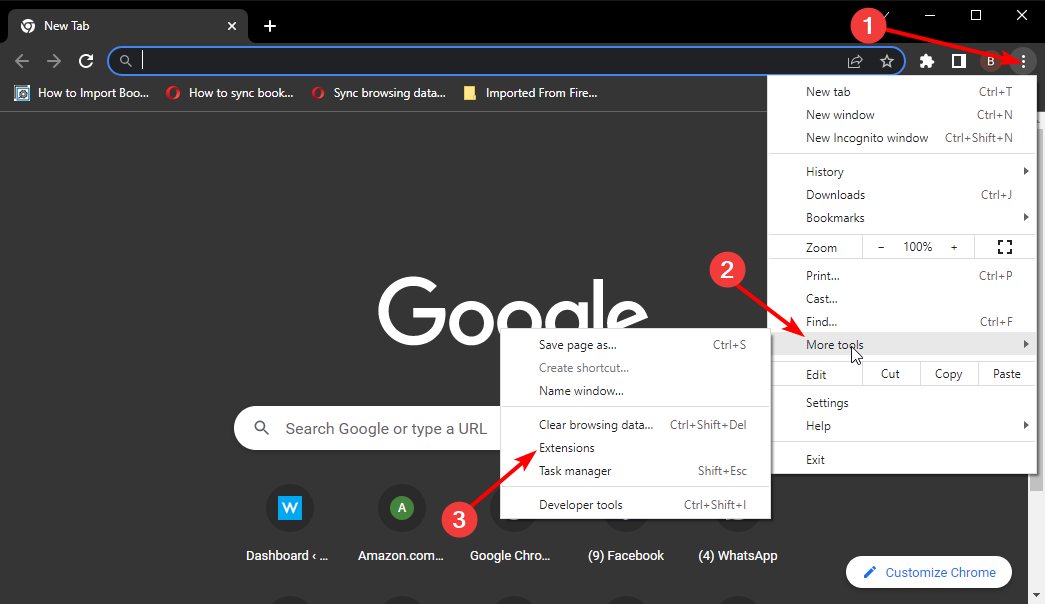
  2. Click the Menu button in the top right corner.
  3. Click on More Tools then Extensions.
  4. Disable all extensions.
  5. Restart your browser and try running Roblox again.

5. Allow Roblox through the firewall

  1. Press the Windows key to open the Start menu.
  2. Type Windows Defender Firewall and open it.
  3. From the left side, select Allow an app or feature through Windows Firewall.
  4. Add Roblox to the list of exceptions.
  5. Restart your PC and check if this fixes the issue or not.

You can also try running the SFC Scan and DISM commands in order to fix missing or corrupt system files that could very well be causing the black screen issue in Roblox on Windows 10.

On the other hand, if nothing works then it is better to reinstall the game and check if this resolves the issue. Often some important game files get misplaced or corrupt, and because of this, you will face multiple issues with it.

Well, the black screen issue isn’t the only problem that has been reported by Roblox users. We have compiled a list of solutions for some of the most common Roblox problems that you could come across.

Users have reported coming across the white screen issue while playing Roblox. Also, if the Roblox game isn’t updating or throwing an update error, then you can check out our guide that lists some effective solutions for it.

That is it from us in this guide. We hope that the above solutions helped you resolve the black screen problem on Roblox.

Missing DLL Files in Windows 11? Install Again & Fix Errors

If your Windows 11 is missing DLL files, or they have been altered or deleted by accident, you must replace them with a new copy of the original file, and this guide will show you how to fix this issue.

What can I do if my Windows 11 is missing DLL files?

1. Use a third-party DLL fixer

Firstly, you can choose a method to fix the most typical issues on your Windows 11 PC, including missing DLL problems.

Specialized system repair tools are equipped with powerful scanning tools that will detect the problematic file and try to fix or download a fresh one.

2. Update your OS

  1. Hit the Windows + I keys to open Settings.
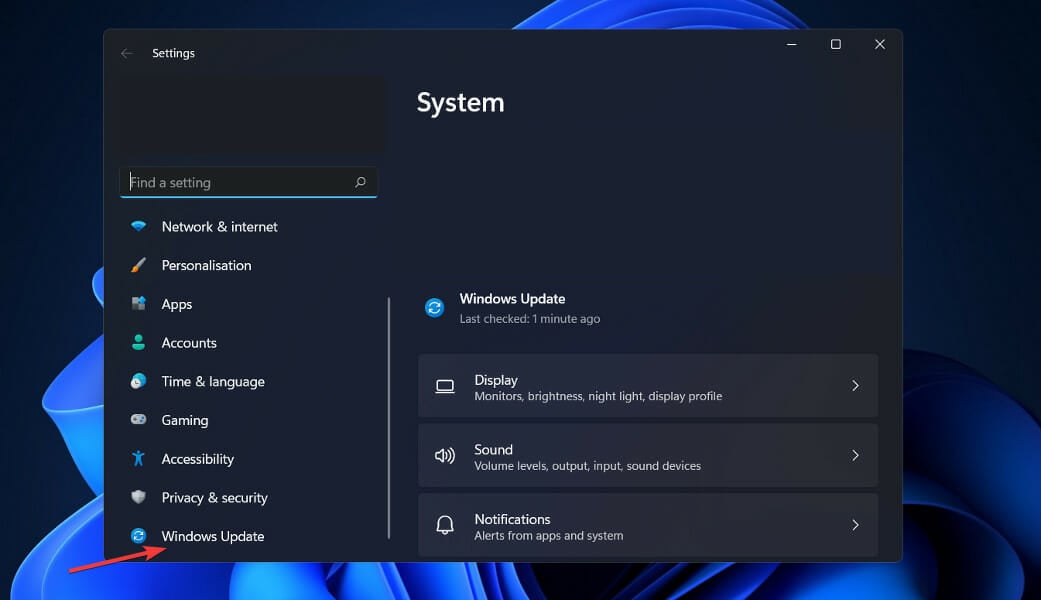
  2. Select Windows Update on the left pane.
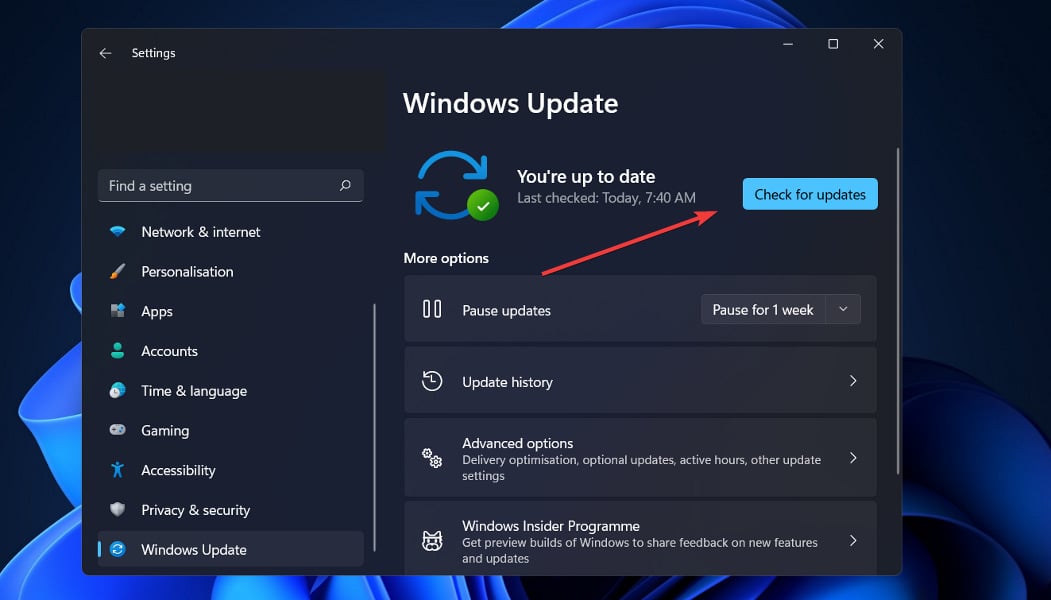
  3. Click on Check for updates.
  4. Restart your PC once the updates finish installing.

3. Scan your system

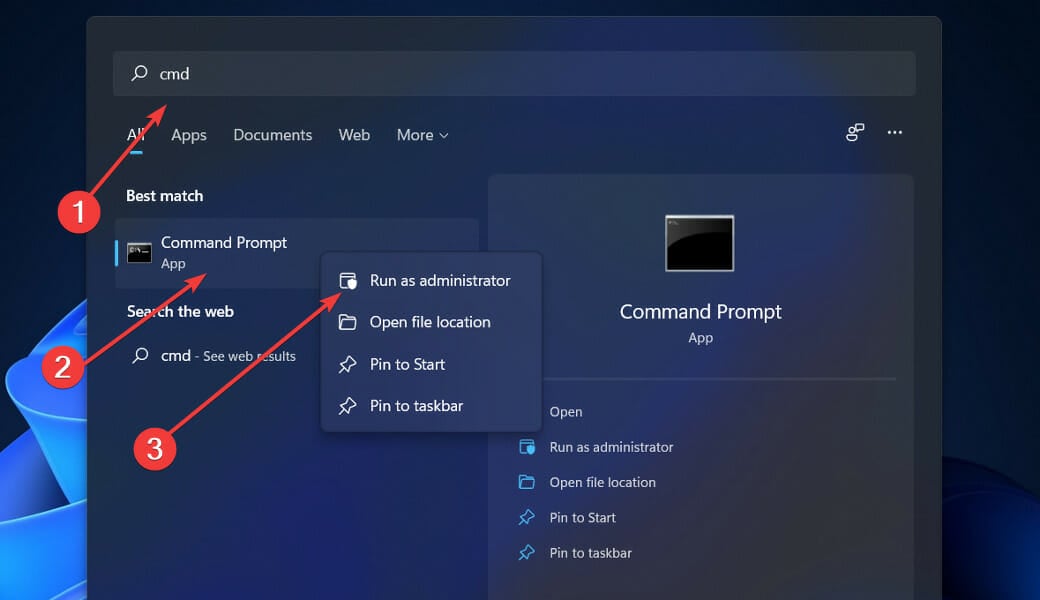
  1. Hit the Windows key, type cmd in the search bar, and select Run as administrator.
  2. Type the following command and press Enter: DISM.exe /Online /Cleanup-image /ScanHealth 
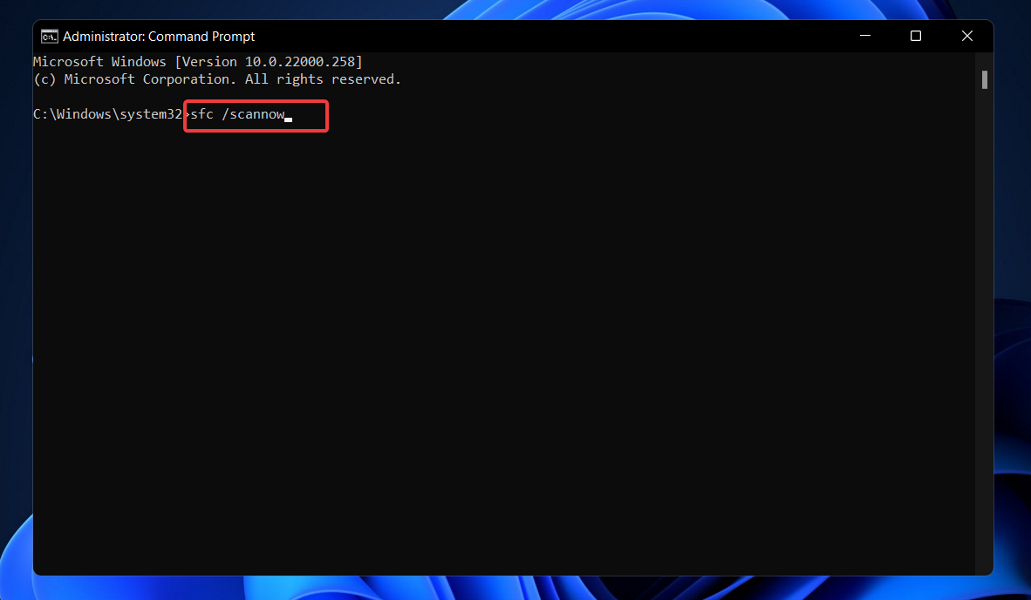
  3. Wait for the process to finish, then type in the following command: sfc /scannow
  4. If any corrupted files are detected, you will see the following message: Windows Resource Protection found corrupt files and successfully repaired them.
  5. Restart your PC and see if the problem persists.

4. Update drivers

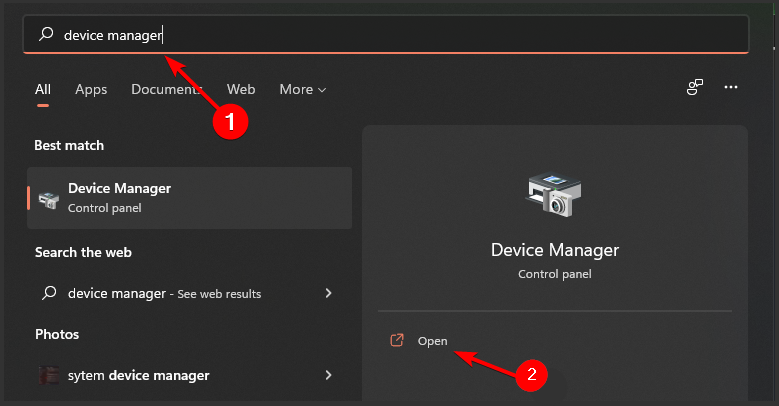
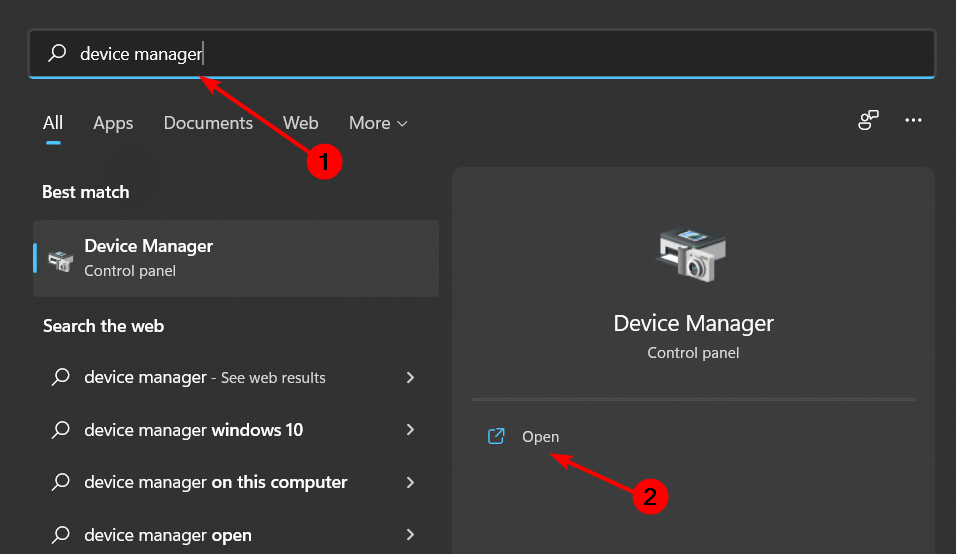
  1. Press the Windows key, type Device Manager, and select Open.
  2. Navigate to Print Queues or any other categories with a yellow sign, right-click on your printer, and select Update Driver Software.
  3. Select Search automatically for updated driver software.
  4. Restart your PC and check if the Windows 11 missing DLL files problem is solved.

Even if you are experienced at finding, downloading, and manually updating drivers, the process can still be time-consuming and requiring. Installing the wrong driver or simply an incompatible version of the right driver can worsen your problems.

That is why we recommend using tailored driver software that automatically finds, downloads and updates the drivers for you.

The solutions remain the same in all cases, say when winmmbase.dll is missing or OneSettingsClient.dll.

For users who still haven’t switched to Windows 11, we also have a guide on how to deal with missing DLL files on Windows 10.

Before you go, we also have a great guide on what to do if Dwmapi.dll or Wnaspi32.dll is missing, so don’t miss that guide.

Our latest article shows you what to do if api-ms-win-crt-math-l1-1-0.dll is missing, so you might want to check it out. We also have a guide on how to register a DLL, so don’t miss it for more information.

That brings us to the end of what to do when you encounter missing DLL files. Please let us know which solution came to your rescue in the comments section below, and share any tips and tricks you picked up in the process.

Black Screen in Warcraft 3: How to Fix It in Windows 10

Several user reports have highlighted the Warcraft 3 black screen issue on Windows 10. Because of this issue, the players cannot play the game because the game immediately shows a black screen during startup.

If you are also facing the Warcraft 3 black screen issue on Windows 10 and are looking for help, we have listed some practical solutions that have helped users overcome this black screen problem.

Why am I getting a black screen in Warcraft 3 on Windows 10?

After some research, we have deduced that there are a few common reasons why you could come across a black screen in Warcraft 3 on Windows 10. Some of them are listed below:

  • You are playing in fullscreen mode – If the game does not support fullscreen mode, then you can come across this issue. If you are having issues running games in fullscreen mode, then you can check out this guide.
  • The game is not using a dedicated GPU – For some programs, you need to manually select the dedicated GPU so that it makes use of it when you launch it. You can go through our guide where we have listed solutions to fix Nvidia graphics card not detected on Windows 10.
  • The game is running in compatibility mode – You might be running the game in compatibility mode, which could very well trigger the problem.
  • Graphics driver not updated – If the graphics driver is not updated in a while, then also you will come across such issues. Check out our guide to know how you can easily update the graphics driver on your PC.
  • You are not running it as an admin – Some programs require admin privileges in order to run smoothly. Check if you are the admin or not before running the game.
  • Your antivirus is blocking the program – Often antivirus tools mistake certain programs as viruses because f which you can come across such issues.

Now that you are aware of the most common reasons that could trigger this black screen error in Warcraft 3 on Windows 10, let us check out the solutions to resolve it.

How can I fix the black screen in Warcraft 3 on Windows 10?

Before proceeding with the advanced troubleshooting solutions, let us go through a list of preliminary checks:

  • Often a simple restart can fix several complex issues. Try restarting your PC and checking if this resolves the issue.
  • Your game might be having a hard time connecting to the official servers. In such a case, make sure that your internet is working fine. You can reboot your router, connect to the internet and check if this fixes the issue or not.
  • Launch the game as admin, so right-click on the game icon and select Run as administrator and check if this resolves the issue or not. Read how you can make yourself an admin on your Windows PC.

Let us now proceed to the advanced solutions described below.

1. Run in windowed mode

Method 1

  1. Open the Battle.net launcher.
  2. Next to the Play button, click on Options.
  3. Select Game Settings.
  4. Check the box Additional command line arguments.
  5. In the new box, type the below: -windowmode windowed
  6. Click Done.

Method 2

  1. Open up the user profile’s Documents folder.
  2. Open the Warcraft 3 folder.
  3. Double-click the text file named War3Preferences.
  4. Scroll to the bottom and locate windowmode=2.
  5. You need to change 2 to 1 for Windowed Fullscreen or 0 for Windowed mode.
  6. Save the file.

2. Select a dedicated GPU

  1. Right-click on your desktop.
  2. Select the Nvidia Control Panel.
  3. Click on Manage 3D settings from the left.
  4. Under the Global Settings tab, select the High-performance NVIDIA processor option in the Preferred graphics processor drop-down menu.
  5. Click on Apply and check if this fixes the issue or not.

3. Skip the intro

  1. Go to the Documents folder.
  2. Open Warcraft 3 folder.
  3. Right-click on the War3Preferences.txt file.
  4. Select Open with and then click on Notepad.
  5. Under Misc, change the value from 0 to 1 as shown below: seenintromovie=1
  6. If it is already set to 1, then this solution isn’t relevant to this issue.
  7. Save the file and relaunch the game and check if this resolves the problem or not.

There are chances that the intro cinematics is preventing the game to load properly and causing the black screen issue with Warcraft 3 on Windows 10.

You can follow the above steps and skip the intro scene and check if this fixes the problem with Warcraft 3 or not.

4. Disable THE antivirus

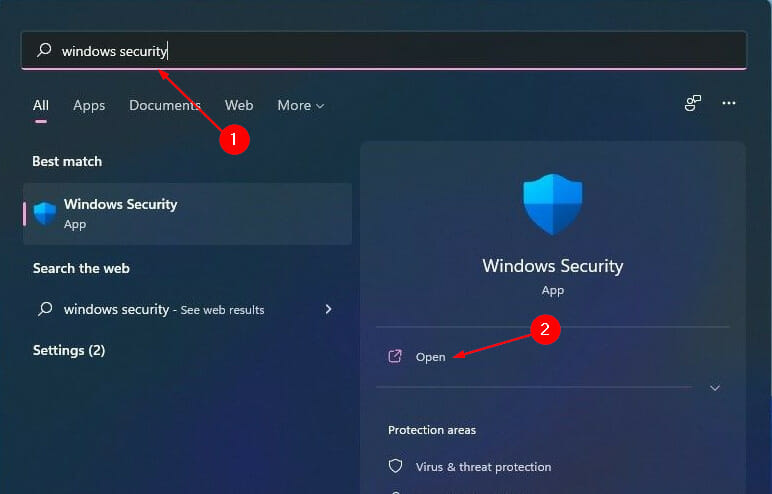
  1. Open the Start menu by pressing the Windows key.
  2. Search for Windows security and open it.windows-security-search msvcr110.dll missing windows 11
  3. Click on Virus and threat protection.
  4. Under Virus & threat protection settings, click on Manage settings.
  5. Toggle off Real-time protection.

There are chances that your antivirus software is blocking the game from running because it thinks it is an alien program that may cause issues with your PC.

You can try disabling the antivirus program and then check if this fixes the Warcraft 3 black screen on Windows 10. The above steps are for the default Windows Security antivirus tool, but the idea remains the same for any third-party software.

We hope that this guide resolved the black screen issue with Warcraft 3 on your Windows 10 PC. Let us know in the comments below, which one of the above solutions helped you resolve the problem.

How to Use edge://flags to Enable & Disable Hidden Features

There are many hidden features in edge://flags page, and in today’s guide we’re going to show you how to enable and use them, so let’s get started.

How can I use edge://flags?

How do I enable/disable edge Flags?

  1. Open the Edge browser on your device.
  2. Copy and paste edge://flags in the address bar to go to the flags menu.
     edge flags address bar
  3. All Edge flags will now appear. Search for the flag or flags you want via the search box or manually.
  4. Click the dropdown menu next to the flag you want to enable. Change the value from Default to Enabled to turn on that flag. Click Disabled to turn off that flag.
    flag menu edge
  5. Once you change the status of a flag, you will have to click Restart to restart Edge for the changes to take effect.

Now that you know how to enable flags, here are the best Edge flags to use, so don’t miss them.

For more browsing customization, you can also disable related matches in Edge to stop extra highlights when using Find on Page.

You can open Microsoft Edge through its main file, msedge.exe, before typing edge://flags in the address bar to access experimental browser features.

Learn more about customizing your browser in our Extensions Microsoft Edge guide. You can also customize how your bookmarks appear by following this guide on how to enable the Microsoft Edge favorites toolbar for quicker access to your saved sites.

What are the flags in Edge?

Flags are hidden and often experimental features in Microsoft Edge that aren’t usually enabled in the browser by default because they aren’t fully tested. Flags can also be hidden settings that aren’t easily accessible to users.

If you want even more control over your browsing experience, see our guide on how to set a homepage in Edge.

For easier online payments and autofill, set up Microsoft Edge Wallet to securely store your cards and billing information.

Exploring hidden settings can be fun, but Edge also hides a surprise game for when you need a break. See how to play the Surf Game in Microsoft Edge and enjoy an offline challenge between tweaks.

As you can see, it’s simple to open the flags menu in Edge, however, you shouldn’t toggle flags on your own, especially if you don’t know what they do.

To learn more, we have a great guide on the best Edge flags for performance, so you might want to check them out. Keep in mind that sometimes flags aren’t accessible and you might encounter Edge flags blocked by administrator message.

Do you use Edge flags? Let us know in the comments!

Windows 7 Won’t Update to Windows 10: Try These 7 Fixes

We are sure you were delighted when you discovered that you’d be able to upgrade from Windows 7 to Windows 10 for free. But that didn’t happen as expected for many. Some users reported that they can’t upgrade from Windows 7 to Windows 10.

This could be due to many reasons, and the failed upgrade process can throw several error messages or, in some cases, even fail without one.

Why can’t I update my Windows 7 to Windows 10?

Here are a few possible issues why you can’t upgrade from Windows 7 to Windows 10:

  • Computer doesn’t meet the requirements – If your computer doesn’t meet the system requirements for Windows 10, there could be an issue upgrading it.
  • Outdated drivers preventing the installation – Keeping all your system’s drivers updated ensures that no issues might occur as a result.
  • Certain applications (usually a third-party antivirus) may conflict with the upgrade process – If that is the case, the only way to resolve this issue is to temporarily disable your antivirus protection and see if that changes the situation.
  • Enough storage space is not available (16 GB for the 32-bit version and 20 GB for the 64-bit version) – To resolve this problem, you will need to free up some space on your system’s HDD.
  • Critical services not running (when upgrading through Windows Update) – This situation can occur if the update process has been interrupted abruptly or if the internet connection has called suddenly.
  • External hardware could be the reason Windows 10 updates won’t install – To start resolving this problem, simply disconnect any external hardware from your PC, restart the device, and check.
  • Not running the Windows 10 installation media as an administrator – If you have administrator access, then using it is recommended. If you don’t, then you will need to get administrator rights to fix this problem.

What can I do if Windows 7 won’t update to Windows 10?

Before we execute the slightly complex solutions, let’s try a few quick ones and see if these can fix things:

  • Disable your third-party antivirus. If that doesn’t work, uninstall it and verify if Windows 10 installation has still failed.
  • Remove all non-critical hardware and peripherals connected to the PC. For instance, headphones, speakers, printers, external hard drives, or USB sticks, amongst others.
  • Make sure you are running the installation media with administrative privileges. If you don’t see a UAC prompt when running it, right-click on the file and select Run as administrator.
  • Free up space on the computer. You typically need around 20 GB of free space to install the 64-bit version of the OS. Use Disk Cleanup or configure Storage Sense to free up additional space.

If Windows 10 upgrade fails and reverts back to Windows 7 after these methods, the ones listed in the next section should get things running. carefully

1. Change the installation settings

    In order to change the installation settings for Windows 10 version, you can select different options as described in the steps below. Follow every step carefully to run the installation efficiently.

  1. 1. Head to Microsoft’s official website and download Windows 10 installation media.

    windows 10 tool
  2. 2. Launch the tool and wait for it to get things ready.

    gettings things ready
  3. 3. Click Accept to agree to the terms and agreements.

    accept to fix windows 7 won't update to windows 10
  4. 4. Choose the Create installation media option and then click Next.

    create installation media to fix windows 7 won't update to windows 10
  5. 5. With the default options selected, click on Next.

    cant-upgrade-from-windows-7-to-windows-10
  6. 6. Select the ISO file option and click Next.

    iso file to fix windows 7 won't update to windows 10
  7. 7. Navigate to the ISO file’s desired location, and click on Save.

    cant-upgrade-from-windows-7-to-windows-10
  8. 8. After the ISO file is created, right-click on it, and select Mount.

    cant-upgrade-from-windows-7-to-windows-10
  9. 9. Now, launch the setup.exe file.

    setup
  10. 10. Click on Change how Windows Setup downloads updates.

    cant-upgrade-from-windows-7-to-windows-10
  11. 11. Finally, select Not right now and click Next.

    cant-upgrade-from-windows-7-to-windows-10
  12. 12. Now, proceed with the Windows 10 installation. The Windows 10 installation has failed to upgrade from Windows 7 issue will be solved.

2. Run the Update Troubleshooter

  1. Press Windows + I to open Settings, and select Update & Security here.Update & Security
  2. Select Troubleshoot from the navigation pane, and click on Additional troubleshooters.troubleshoot to fix windows 7 won't update to windows 10
  3. Next, locate and click on Windows Update, and then on Run the troubleshooter button.Windows update troubleshooter to fix windows 7 won't update to windows 10
  4. Follow the on-screen instructions and make the recommended changes to complete the process.troubleshooter

The Windows Update troubleshooter is one of the primary troubleshooting methods since it automatically identifies and eliminates the issue behind the problem. So, if you can’t upgrade from Windows 7 to Windows 10 Home, it should help.

3. Perform a registry tweak

  1. Press Windows + R to open Run, enter regedit in the text field, and click OK.regedit
  2. Click Yes in the UAC prompt.
  3. Paste the following path in the address bar and hit Enter:Computer\HKEY_USERS.DEFAULT\Software\Microsoft\Windows\CurrentVersion\Explorer\User Shell Folderspaste path
  4. Double-click on the AppData entry on the right.appdata
  5. Make sure the Value data is set to: %USERPROFILE%\AppData\Roamingvalue data to fix windows 7 won't update to windows 10

This is a known fix to get things up and running when you can’t upgrade from Windows 7 to Windows 10 Pro.

Additionally, you can use a specialized third-party system repair tool that will take care of your PC, including its registries.

4. Start the BITS service

  1. Press Windows + R to open the Run dialog box, type services.msc, and hit Enter.services.msc
  2. Right-click the Background Intelligent Transfer Service (BITS) service, and then click Properties.Bits properties
  3. Select Automatic from the Startup type dropdown menu.startup type
  4. Now, click on Start under Service status if the service is not running, and then click OK to save the changes.start
  5. Restart your computer

BITS (Background Intelligent Transfer Service) allows your computer to receive updates. However, if something is wrong with this service, you probably won’t be able to receive any updates, including the Windows 10 upgrade.

This problem is mainly connected with 0x80246007 because it tells you something is wrong with the update services. Once done, you wouldn’t anymore see that Windows 10 installation has failed with no error code.

5. Use a different user account

Make sure that you’re trying to install Windows 10 using an administrator account. There are two types of user accounts in Windows, Standard and Administrator. And checking for updates using the latter can fix things.

If your computer hosts several user accounts, check for updates using one that has administrator privileges.

6. Remove incompatible software

  1. Press Windows + R to open Run, type appwiz.cpl, and click OK.appwiz.cpl
  2. Locate the old applications (those likely not compatible with Windows 10), select them individually, and click Uninstall.uninstall to fix windows 7 won't update to windows 10
  3. Follow the on-screen instructions to complete the uninstall process.

In addition to your antivirus, other software can cause issues while upgrading to Windows 10. To fix that, it’s advised that you uninstall all software that you don’t need. Of course, you can always reinstall them later after the upgrade to Windows 10, given they are compatible with the iteration.

7. Check your hardware

  1. Press Windows + R, type mdsched.exe in the text field, and hit Enter.memory diagnostic tool
  2. Select Restart now and check for problems.restart now and check for problems
  3. Wait for the tool to run and identify problems with the installed RAM.

If Windows Memory Diagnostic fails to identify issues, we suggest you run Memtest86+ for a couple of hours. It’s an advanced tool that can discover many more problems with the installed RAM and get things running for you.

In case the problem lies with the RAM itself, you will need to replace it or get the PC checked by a professional.

That’s it! If Windows 7 won’t update to Windows 10 earlier, you should have fixed things. Besides, in case you can’t upgrade from Windows 7 to Windows 10 from USB, format it and then again create a bootable USB drive for Windows 10.

Also, find out the best ways to boost Windows 10 performance.

If you have any other queries or fixed things with another method, drop them in the comments section below.

3 Best Discord Call Recorder Apps [Mobile & Desktop]

If you want to review an important conversation later, it’s important to have a Discord call recorder app and store it on your PC.

You can install Discord on Xbox and mobile devices and in this article, you will find the best call-recording apps.

What is a Discord call recorder and how does it work?

A call recorder software will actually help you record the audio-video Discord conversation during a call.

Most video screen recording tools will help you do that because they are able to caption any part of your screen and save it as an audio-video clip.

Most of these software will prompt you to select a region of the screen that you want to record and hit a button.

In theory, it’s that simple but not all such tools have the same performance or quality so below, you will find our selection of the best call recorder software for Discord.

What is the best Discord call recorder software?

Vmaker – Best call recorder for Discord

Screen recorder for Windows is the ultimate tool for recording your Discord calls simply because it has all you need for that and more.

First of all, it is available as a desktop app for Windows, but it also comes as an extension for Google Chrome.

So, whether you need to record anything that goes on your PC or just Discord running on the Browser, Vmaker is there to help.

With the desktop app, you can select the video and audio source and that means you also have the option to caption or webcam or select an external microphone.

Of course, you may also select which window you want to record, in our case, the Discord app, or set a custom window, anywhere on your screen.

And if your Internet connection is good, you may even record everything in 4K quality for professional results.

You also have a recording countdown, highlight mouse clicks, flip the camera, and set shortcuts to avoid going through the menus while recording.

Will you be away during an important live online session? No problem because with Vmaker you can also schedule recordings.

But the best part is that all videos you record, are stored in your cloud account where you may also share or edit them with a dedicated video editor.

Vmaker comes with a free, limited version that only allows you to record 7-minute clips but if you commit to a Starter or Team plans, that will be unlimited.

Here are some of Vmaker’s best features:

  • Record anything on your screen, including Discord calls
  • Up to 4K recording resolution
  • Select video and audio sources
  • Mouse clicks highlights, camera flipping, and recording countdown
  • Schedule your recordings

Vmaker

Record your Discord calls seamlessly and anything on your screen with up to 4K resolution.
Free trial Visit website

Loom – Easy to use

Loom is another screen recording tool that will help you get your Discord calls to review them later.

As Vmaker, it allows you to set up the video and audio sources and in the free version, you’re stuck with a 720P resolution recording and just a few minutes of footage.

It features integration with apps such as Slack, Notion, and GitHub, but that means it’s a bit more complicated to set up.

An interesting feature of Loom is the Do not disturb mode. If you set it, you won’t get any pop-ups or other distractions from your recording.

If you need to embellish your clips, you will find annotation and drawing tools and after the recording is done, you can edit them by using an available basic video editor.

You will also find a dedicated URL of the video so you can share or embed it on your website or social media.

Take a look at its key features:

  • Allows you to record in up to 4K UHD with a paid plan
  • Built-in video editing tool
  • Integration with apps such as Slack, Notion, GitHub, etc.
  • Do not disturb mode to prevent pop-ups

Loom

This simple tool will help you record anything on your screen, including your Discord video calls.
Free trial Visit website

Camtasia – Good for editing your clips

Camtasia’s main feature is video editing, but it also comes with a screen recording feature that will help you caption your Discord video calls.

Still, like with the other two software from our list, with this software, you can select to record the entire screen, a specific area, a window, or an app.

However, Camtasia doesn’t have a mobile app or browser extension to work with, so if you’re using Discord on a mobile, it won’t help you.

The built-in video editor is more advanced but the free trial version is pretty limited. But if you need to edit your Discord clips professionally, Camtasia may be the right choice, for the right budget, of course.

Camtasia includes webcam capture, mic, system audio recording, annotations, cursor effects, applying device frames, and more.

Here are the best features of Camtasia:

  • Add different cursor effects
  • Provides video editing tools
  • Multiple options for screen recording
  • Add quizzes to your video, select from thousands of templates, and use visual effects

Camtasia

If you need to record and then fully edit your Discord calls, this tool has all you need.
Free trial Visit website

That was our selection of the best Discord call recording software and we hope that you have found the right one for you.

You may also be interested in our selection including the best screen recording software for Windows 10 & 11.

If you have tried any of the tools highlighted above, let us know about your experience in the comments section below.

Low System Resources: Causes & How to Fix This Error

A new or high-end computer usually performs better due to a lower number of apps installed and its ability to seamlessly run many simultaneously. But, several users have reported the Low system resources error, usually with Zoom and Outlook.

Also, in some cases, users get the Your computer is running low on resources, so no new users can sign in message when switching user accounts. It’s a major problem, but not something that cannot be fixed.

What does low system resources mean?

Here are some of the reasons why your computer is running low on resources:

  • High CPU usage – When you see the Low system resources error, it’s usually the high CPU consumption to blame for it.
  • High RAM usage – If you want to fix the Low system resources error during Zoom meetings, check for high RAM consumption, and try to free the memory.
  • Too many background processes – In most cases, the system runs low on free resources when there are several background processes running in the background. For instance, an update might be underway.
  • Presence of malware or virus – Malware or virus may consume a large part of the RAM or CPU and lead to the issue. In some cases, these appear in the Task Manager, which makes it easier to identify them.
  • Incompatible extensions or plug-ins installed – An incompatible or corrupt plug-in/extension for an app can wreak havoc and considerably slow down the computer.

Users also reported related issues, such as the ones below:

  • Low system resources may affect your audio quality in Teams – The error is usually encountered on Microsoft Teams when on a video call, with a few other programs running.
  • Low system resources may affect your audio quality in Windows 10 – The error, also seen on audio/video calls, indicates that the audio quality would be affected when the PC runs low on resources.
  • Low system resources when using Zoom – Zoom is another common app that frequently throws this error. And in most cases, Zoom isn’t really the one consuming many resources.

How do I fix system low resources error?

Before we head to the more complex solutions, here are a few quick ones for you to try:

  • Restart the computer.
  • Make sure Windows 11 is up-to-date. If you haven’t updated it in a while, install the latest version of the OS.
  • Scan your PC for malware using Windows Security or a reliable third-party antivirus for Windows 11.
  • Make sure you shut down your computer every once in a while, preferably once or twice a week. If you just put it to sleep, the background processes would keep accumulating, and it would soon reach a point where you see the Low system resources error.
  • If you are facing the problem on a laptop, turn it off, remove the battery for a minute, put it back in, and then turn it on.
  • Update the app that’s consuming high resources.

In case these don’t work, the following methods most certainly would.

1. Terminate all non-critical programs and process

  1. Press Ctrl + Shift + Esc to open the Task Manager, and then locate all processes consuming either high CPU, Memory, DISK, or GPU.task manager
  2. Select each one individually and click on the End task button.end task to fix low system resources
  3. Similarly, terminate all these but make sure not to kill a critical process or one that you need.

Once done, verify if you still see the Low system resources error.

2. Switch to High Performance

  1. Press Windows + S to open the Search menu, type Choose a power plan in the text field, and click on the result that goes by the same name.choose a power plan
  2. Now, select High performance here.high performance to fix low system resources

That’s it! You should now see a considerable boost in performance compared to earlier.

3. Reinstall the problematic app

  1. Press Windows + R to open Run, type appwiz.cpl in the text field, and click OK.appwiz.cpl
  2. Now, locate the problematic app, select it, and click on Uninstall.uninstall app to fix low system resources
  3. Follow the on-screen instructions to complete the uninstall process.

Once done, restart the computer for the changes to come into effect. After that, head to source, either Microsoft Store or the official website, and get the installer for the app.

4. Perform a clean boot

    When the computer restarts in a Clean boot state, the Low system resources error should be gone for good. Also, a clean boot is a great way to troubleshoot issues and identify apps, services, or drivers that cause the problem.

    1. Press Windows + R to open Run, type msconfig in the text field, and click OK.
    msconfig
  1. 2. Head to the Services tab, tick the checkbox for Hide all Microsoft services, and then click on Disable all.

    disable services to fix low system resources
  2. 3. Now, go to the Startup tab, and click on Open Task Manager.

    open task manager
  3. 4. Select the app that reads Enabled under Status, and click on Disable. Do the same for all the apps here.

    disable startup apps to fix low system resources
  4. 5. Head back to System Configuration, and click on OK.

    Save changes
  5. 6. Finally, click Restart in the confirmation prompt.

5. Fix computer memory issues

In most cases, it’s problems with the installed RAM/Memory that’s behind the Low system resources error in Windows 11. In this case, first, remove the RAM sticks and then reseat them firmly.

After that, run the built-in Windows Memory Diagnostics tools to automatically identify and fix issues.

In case this doesn’t work, you can use MemTest86+, an open-source tool that does a bunch of extensive tests on the memory to find and fix issues. Let the tool run overnight, if need be, for a thorough scan.

That’s about it! One of these methods must have helped you fix the Low system resources error. In case it didn’t, perform a System Restore or factory reset Windows 11 as a last resort.

Also, once the error is fixed, find out how to make Windows 11 faster and run more apps without affecting the PC’s performance.

Tell us which fix worked for you in the comments section below.

Microsoft testing a new feature in Bing designed to improve the search experience

Khushal Bherwani, an SEO Analyst has spotted a new feature that Microsoft is apparently testing in Bing, with the search box in Microsoft Bing appearing in the bottom right corner of the page.

When searching for something using the search box at the top left of the page and scroll down the search results, a floating magnifying glass appeared. From this point, clicking on it activated another search box at the bottom of the page as illustrated in the video attached to Khushal’s Tweet.

Personally, I was able to find the floating magnifying glass but upon clicking it the search box was not activated. Instead, I was redirected to the search box at the top of the page.

Microsoft Bing

In other Bing related news, we saw Microsoft test a new feature called more on this topic from, a movable carousel of news brand tag below the search results.

Let us know in the comment section whether you were able to access the search box in Bing.

Via: Search Engine Roundtable

A Plague Tale: Requiem custom Xbox revealed in YouTube unboxing video

A Plague Tale: Requiem has taken the Xbox gaming community by storm since its day-one release on Game Pass last week. The AAA title has lived up to the anticipation that surrounded it since it was shown off at this year’s Xbox & Bethesda Games Showcase. It has also proven to be one of the best sequels in recent memory.

Now, the game is being given the custom Xbox Series X treatment courtesy of artist and designer VaduAmka.

Developer Focus Entertainment has commissioned two of these custom, plague-themed Xbox Series X consoles. A boxed set of Plague Tale: Requiem goodies including the custom Xbox was shown off in a recent YouTube unboxing video, by YouTuber TheRelaxingEnd.

The channel, which currently has nearly nine million subscribers, also has an Elden Ring press kit unboxing video, as well as one of “Ultimate Minecraft Consoles,” just to mention a few.

In the video, which you can see below, includes a huge mystery chest filled with A Plague Tale: Requiem paraphernalia. We won’t spoil it for you with specifics.

But it begs the question: what will happen with the other of these two-of-a-kind consoles? Maybe we’ll see them in a giveaway like we have with so many other custom Xboxes.

Featured image via Pure Xbox. 

Discord Not Opening on Windows 11? Fix it in 7 Steps

Running the Discord app on Windows 11 can cause a series of issues that prevent it from opening or working. Discord not opening on Windows 11 means some problems are plaguing it.

Also, you may experience Discord installation issues on your PC. However, this guide will explore the causes and possible solutions.

Why is Discord not opening in Windows 11?

The most common cause of the issue is interference from other apps. Apps such as antivirus can block the activities of the Discord client on your device if they detect any suspicious behavior from it.

Furthermore, other factors can impede the performance:

  • Issues with Discord servers – Though it is uncommon for them to be down, they can be inaccessible for some reason. During a maintenance session on the platform, they can block access to Discord. So, you may not be able to open Discord on Windows 11.
  • Discord overlay issues – When a game plays on your PC, it can affect the Discord app due to the in-game overlay being turned on. So, you can learn how to disable Discord overlay with the steps in this guide.
  • Outdated Windows – An outdated Windows operating system on your computer can result in a series of problems. Follow this guide to fix any Windows update errors you may encounter.
  • Missing or corrupt Discord files – The Discord files on your PC may become corrupt while some go missing. Hence, it affects the Discord app and can cause it not to open or work as it should.

The reason why Discord is not opening on your PC may differ from other users. However, the same fixes can work for the issues regardless of the cause.

How do I fix Discord if it won’t open in Windows 11?

1. Temporarily disable Windows Defender Firewall

  1. Left-click the Start button on your desktop, type Windows Security in the search box, and press ENTER.
  2. Select the Virus & threat protection option, and click Manage settings.
  3. Toggle off the Real-time protection option to disable the Windows Defender Antivirus on your PC.

Disabling the Windows Defender Firewall will fix any issues blocking the Discord app on your computer from opening.

If you encounter any issues with the above steps, read about how to fix Windows Defender not working on Windows 11.

2. Configure Windows date and time

  1. Right-click on the date and time in the lower right-hand of the taskbar and click on Adjust date/time from the options.
  2. Toggle the Set time automatically option on the date & time menu to allow Windows to update your time and Date automatically.
  3. Close the page and restart your PC.

Sometimes, incorrect times and dates on your PC can affect some apps. So, configuring Windows time and date can fix Discord not opening on startup.

Read more about how to change time on Windows 11 computers.

3. End task for the Discord app

  1. Right-click the Start button and select Task Manager.
  2. Check the CPU and Memory usage options in the Task Manager.
  3. Right-click the Discord app, click on the End task option from the drop-down and click OK to confirm that you want to end the task for the app.
  4. Restart your computer to help it sync the changes effectively.

Ending tasks for the Discord app on your computer will help it kill any background activities on the app. It can help the app refresh and fix errors preventing it from opening.

If the Task Manager fails to work on your PC, check out this guide for possible fixes.

4. Clear Discord AppData

  1. Press Windows + R keys to open the Run dialog box, type the following in the text box, and press ENTER: %appdata%
  2. Right-click the Discord folder and click on Delete to clear the folder.

Clearing Discord data can help fix corrupt files that are prompting problems and allow you to resolve Elevated API latency issues as well.

If Discord starts opening but still misbehaves or shows a grey screen, follow our full guide on Discord app not working for additional fixes.

5. Restart Windows in Safe Mode

  1. Left-click the Start button, select the Power option and press the Shift key while clicking the Restart button to load the Advanced boot menu option.
  2. Click on Troubleshoot and select the Advanced options.
  3. Click on Startup Settings and select the Restart option.
  4. Press 4 to Enable Safe Mode. 

Your PC will restart in Safe Mode. The Safe Mode will help you fix issues deep-rooted into the system that may affect the Discord app.

6. Uninstall and reinstall Discord

  1. Press the Start button, type Control Panel in the search box and launch it.
  2. Click on Programs.
  3. Navigate to the Programs and Features tab and select Uninstall a program.
  4. Then find and select Discord and click Uninstall at the top of the tab, then OK.
  5. Restart your computer and go to the Discord download page to install the latest version available.

Uninstalling Discord should be the last solution to try to avoid data loss. However, it can fix issues that prevent it from opening.

If you encounter issues preventing you from uninstalling Discord, look at this guide to fix it.

7. Update Windows

  1. Left-click the Start button on the taskbar and select the Settings app or press Windows + I keys.
  2. Click on Windows Update and select the Check for updates option. (If there are any updates available, Windows will search for and install them)

Updating Windows will fix bugs affecting your PC, causing it to block the Discord client from working. Also, updating Windows will install updates for your device drivers.

We hope the solutions above help fix Discord not opening or working on Windows 11.

Read more about how to fix Discord if it won’t open on Windows. Likewise, it is expected to experience high CPU usage in Discord when using the app. We have a detailed guide to help you fix it.

Now that you have tackled the issue and want to work in peace with distraction on Discord, you might consider changing the status to invisible; read this guide to learn more.

If you have more questions or suggestions, please leave them in the comments below.

Windows 11 2022 gets an update, adds taskbar, MSA improvements

Microsoft has been busy the last few weeks polishing Windows 11 2022.  Earlier this month Microsoft released this month’s optional update for both Windows 11 and Windows 11 2022,  and the first “moment” update that featured the long-awaited tabs feature in File Explorer. Yesterday, OS Build 22621.755 was released highlighting a few more tweaks to the taskbar and more Microsoft Account enhancements.

Along with polishing the search visuals on the taskbar, you can also now right-click the taskbar to display a context menu to access the Task Manager.  Easier access to the Task Manager had been a highly requested feature.  There’s also been a few tweaks to the Microsoft Account settings, you’ll now be able to see your OneDrive settings and any storage alerts.  If you use your Microsoft Account for backups, you’ll also notice some visual enhancements.  While Microsoft has offered these enhancements the issue discovered a few weeks ago when that causes systems to slow down when copying multi-gigabyte files to Windows 11 2022 machines hasn’t been addressed yet.

If you’d like to see all the technical details in this update you can see those here.  When your system is ready for the update you can find it in Windows Update under Optional Updates Available.

Via XDA 


An Error Occurred While Loading the Troubleshooter: 5 Fixes

Microsoft introduced a unified troubleshooting tool that covers all major features. It improved the system diagnostics and gives users a better error-resolving platform. However, some users are complaining that there’s a problem with the troubleshooter.

The error message they encounter reads: An error occurred while loading the troubleshooter prompt. In this guide, we will show you everything you need to fix this and get the troubleshooter running again.

Why do errors occur while loading the troubleshooter?

There are various reasons your troubleshooter is not working on your PC. Below are some of the popular causes of this issue:

  • Faulty Windows update – The major reason you are getting an error occurred while loading the troubleshooter for your network adapter and Wi-Fi is down to a Windows update. Most users reported this issue after installing an update. The solution here is to uninstall the update.
  • Corrupt or broken system files – System files are important for the smooth running of all components of your PC. This can cause your troubleshooter not to work. Repairing and restoring these corrupted files with a dedicated tool should solve the problem.
  • Disabled services – System services work especially those related to Windows updates have been detected to cause this issue. By starting or restarting these services, this error should disappear.

Moreover, you may encounter the following error variations, that thanks to our tips below, you can also fix:

  • An error occurred while loading the troubleshooter Windows 10, Windows 11, Windows 7 – Luckily, the solutions below are applicable in all these OS iterations.
  • 0x80004005, 0x80070057, 0x803c010a An error occurred while loading the troubleshooter – Run the troubleshooter from the Settings app in order to avoid this problem.
  • An error occurred while loading the troubleshooter context restricted, network:Ethernet, Wi-Fi – Install the latest OS updates in order to solve network miscommunications.

How do I fix error occurred while loading troubleshooter?

1. Run the troubleshooter from Settings

  1. Press the Windows key + I and select the Update & Security option.
    update and securityan error occurred while loading the troubleshooter
  2. Choose the Troubleshoot option in the left pane and select Additional troubleshooters.
    troubleshoot
  3. Select the troubleshooter to use and click Run the troubleshooter.
    run trouble

Most users have complained about facing An error occurred while loading the troubleshooter with error codes 0x80070057 and 0x80004005 while trying to troubleshoot their ethernet from the Control Panel.

In this case, the solution is to run the troubleshooter from the Settings app. If this does not work, you can proceed to the next solution.

2. Restart some crucial services

    Your problem could be resolved by restarting important services. Here is how to do it carefully.

    1. Press the Windows key + R, type services.msc, and click OK.
    servicesan error occurred while loading the troubleshooter
  1. 2. Right-click the Wired AutoConfig service and click Start.

    start
  2. 3. If the service is running, click the Restart option.

    restart
  3. 4. Repeat Steps 2 and 3 for the following services:

      • Cryptographic Services
      • Background Intelligent transfer services
      • Windows Installer
      • Windows Update services

3. Run SFC and DISM

  1. Press the Windows key + S, type cmd, and select Run as administrator under Command Prompt.
    cmd adminan error occurred while loading the troubleshooter
  2. In the command line, copy and paste the command below and hit Enter: sfc/ scannowsfc scan
  3. After the scan completes or even if it fails, type the commands below and press Enter after each: DISM /online /Cleanup-Image / ScanHealth DISM /Online /Cleanup-Image /RestoreHealthdism

This solution is important if you get an error occurred while loading the troubleshooter an unexpected error has occurred message, which could be down to broken or corrupt system files. The SFC and DISM scans are the built-in repair tools that should help restore normalcy.

Alternatively, you can scan and fix faulty system files using a dedicated repair tool. These specialized tools fix most PC errors related to system files and registries.

They don’t just point to the corrupt files. Instead, they also eliminates and replaces them with original versions. It might be all you need to keep your PC running smoothly.

4. Uninstall the latest update

  1. Press the Windows key + I and choose the Update & Security option.
    update and security an error occurred while loading the troubleshooter
  2. Click the View update history option.
    view update hsitory
  3. Select Uninstall updates. This will open the Control Panel.
    uninstall updates
  4. From here, double-click the latest update to uninstall it.
    uninstall an error occurred while loading the troubleshooter

If you are facing an error occurred while loading the troubleshooter context restricted or any other variation of the error after installing an update. The quick way around it is to uninstall the update.

5. Reset your PC

  1. Open the Settings app and click on Update & Security.
    update and security an error occurred while loading the troubleshooter
  2. Select Recovery in the left and click the Get Started button under Reset this PC.
    get started
  3. Choose whether to keep your files or wipe everything and click the Next button.
    keep files
  4. Now, follow the simple onscreen instruction to complete the process.

In the end, if an error occurred while loading the troubleshooter prompt persists, you might need to reset your PC.

In comparison to a clean reinstallation, this method won’t delete any data. Furthermore, the procedure is rather fast, so you won’t lose a lot of your time.

The built-in Windows troubleshooters help in solving a lot of problems. So, when these tools are not working, it creates a real headache. But with the fixes in this guide, you should be able to restore normalcy on your PC.

Do you want to know how to fix the Windows troubleshooter not working issue? Then, check our excellent guide to know how to fix it effortlessly.

If you have any more questions or suggestions, leave them in the comments below.

Fix: WhatsApp Desktop Is Not Opening in Windows 11

WhatsApp Desktop is a free app that lets you use it on your Windows PC or Mac. Unfortunately, there are some instances that this might not be possible because it is not opening in Windows 11.

The program provides Windows 11 users with a convenient and modern way to communicate with friends and family.  Luckily, you have come to the right place as we will help you bypass this issue through our simple and easy to execute solutions.

Why is my WhatsApp Desktop not opening?

If you’re trying to open WhatsApp Desktop on your Windows 11 device, but it won’t open, there could be several reasons for it.  Here are the most common reasons:

  • Outdated application – If your WhatsApp desktop app is not up-to-date then this might be the reason why it is not launching. 
  • Third-party applications – If your device has a third-party antivirus program, then this might be the reason why you are facing this issue. 
  • Poor internet connection – An unstable or poor Wi-Fi connection might prevent the application from launching in Windows 11.

How can I fix WhatsApp Desktop not opening on Windows 11?

While there are a couple of solutions that you can try to apply with the aim of fixing the WhatsApp Desktop not opening on Windows 11 issue, you can start off by quickly checking out the following:

  • Check and close any unnecessary applications running in the background. 
  • Test your Internet speed and ensure your speeds are at an optimal level.
  • Confirm whether WhatsApp is down.
  • Log out of the application, then log back in again.
  • Try restarting your device.

Quick Tip:

Why not trying accessing directly via browser? Opera One is one of the fastest and trustworthy browsers out there, it comes with many adds and extenuation already integrated, such as VPN and AI.

It has the WhatsApp application exactly in the sidebar and you can mute or log out whenever you want. It also allows you to browse the web and chat simultaneously by pinning your conversation.

Opera One

Stay connected and browse and chat at the same time with this great browser option.
Free Download Visit website

1. Reset WhatsApp

  1. Hit the Windows key + I to open Settings.settings windows 11
  2. Select the Apps option, then select Apps & Features.
  3. Select WhatsApp, then tap on the ellipses on the right side and select Advanced options.
  4. Hit the Reset button.

2. Reinstall WhatsApp Desktop

  1. Tap on the Search icon on your Taskbar.
  2. Search for WhatsApp on your device, then click on the Uninstall option when the search results pop up.
  3. Search for the application in the Microsoft Store and download it.

3. Update WhatsApp Desktop

  1. Launch the Microsoft Store app.
  2. Click on the Library icon.
  3. Click on Get Updates to download updates for all the apps installed on your system.

This will take up a few minutes, depending on the number of applications you have installed on your device. WhatsApp Desktop will be updated as well, then check out the new screen share feature of WhatsApp, which allows you to share screen on Windows and other devices.

4. Force Close WhatsApp

  1. Click on the Windows icon in the taskbar, then select Task Manager.Open task manager
  2. Head to the Processes tab, then right-click on WhatsApp and select End task.

The WhatsApp Desktop not opening Windows 11 issue might be a result of the app processes that run in the background encountering some issues. This in turn prevents the application from launching properly. 

How do I get WhatsApp to open on startup in Windows 11?

WhatsApp being able to auto-launch every time you log into your Windows 11 device will allow you to keep tabs on your conversations. Here’s how you can set up this prompt:

  1. Open the WhatsApp application on your computer.
  2. Click on the ellipses icon at the top right of the screen and select Settings from the drop down menu.
  3. Scroll down and tap on the Desktop Settings option.
  4. Click on the checkbox next to the Start WhatsApp at Login option.

That said, if you have tried to apply the listed fixes above and you are still yet to resolve the issue, then the problem might be more complex. You can alternatively try restarting your device in Safe Mode.

By restarting your Windows 11 device in Safe Mode, all third-party applications are disabled by default. You can then try to launch the application to check whether the issue has been resolved.

You may also experience a similar error but with WhatsApp web not working so be sure to check our article on the same

And finally, we’d also like to recommend that you check out our expert guide on easy fixes if WhatsApp is showing browser not supported in case you bump into this issue.

Let us know whether you have been able to solve this issue in the comments section below.

Controller Not Working on PC: Fix Not Detected/ Not Recognized Issues Fast

Is your controller not working or not being detected by your PC? We’ll help you fix it. It’s a common problem, especially if you connect via USB. Faulty vJoy drivers are many times to blame.

Bluetooth issues can also lead to PC not detecting the control. It can also happen on specific launchers like Steam. If any of these sound familiar, follow the step-by-step instructions below.

How do I get my controller to work on my PC?

Whether your ontroller isn’t detected, not working ob Steanm or not working at all or on your PC, here’s how you fix it:

1. Uninstall Vjoy

  1. 1. Right-click the Start icon, then select Device Manager.

    device manager windows 10
  2. 2. Click on the Human Interface Devices section.

  3. 3. Right-click on Vjoy.

  4. 4. Select Uninstall device. The USB Controller not recognized in Windows 10 issue will be solved.

  5. 5. Check whether the issue persists.

  6. vJoy is a device driver that can be used to bridge the gap between any device that is not a joystick and an application that needs a joystick to function properly.

    However, sometimes it can cause more issues, such as the PC not detecting the Xbox controller. Therefore, uninstalling vJoy should fix the issue.

2. Disable the HID-compliant game controller

  1. Right-click the Start icon, then select the Device Manager option.
    device manager windows 10
  2. Expand the Human Interface Devices section, right-click the HID-compliant game controller driver and select Disable device.human interface devices

Disabling the device can also help you fix other controller issues, like Controller acting as a mouse.

3. Update HID-compliant game controller

  1. To fix the PC not detecting controller issue, right-click the Start icon then select Device Manager.device manager windows 10
  2. Expand the Human Interface Devices section, right-click the HID-compliant game controller driver and click Update driver.human interface devices
  3. Select Search automatically for drivers in the Update drivers window then reboot your PC once the process is completed.Search automatically for drivers

If you want to automate this process and never worry about outdated drivers in the future, a good alternative is using a driver updater software.

4. Update the Bluetooth driver

  1. Right-click the Start icon then select Device Manager.device manager windows 10
  2. Expand the Bluetooth section, right-click the Bluetooth driver, and select Update driver.update-driver-bluetooth pc not detecting controller
  3. Select Search automatically for drivers then reboot your PC once the process is done.Search automatically for drivers

Although the gamepad has nothing to do with the Bluetooth driver, some users reported this solution as effective. So make sure to try it as well to fix the PS4 controller not detected by PC error.

5. Access the game’s properties

  1. Open Steam, then right-click the game you are having issues with.game-prop pc not detecting controller
  2. Go to the Controller section and select Enable Steam Input. Go back to your game and see if the PC not detecting controller input error si gone.controller-steam pc not detecting controller

6. Use Windows Troubleshooter

  1. Go to Settings and select the System section.windows system settings
  2. Scroll down and select Troubleshoot.troubleshoot system settings
  3. Click on Other troubleshooters.other troubleshooters windows
  4. Scroll to Find and fix other problems.
  5. Find Bluetooth or Devices (for USB controllers), depending on your controller type.
  6. Click Run next to the relevant troubleshooter.run bluetooth troubleshooter

That’s about it for this article. Following the steps above, your controller should now work on your Windows PC. For more information, check out our guide on gamepad that is recognized but not working in games issue. So make sure to check it out!

To get the most out of your Dualsense Edge controller while playing FPS, you need to change the settings; learn all about them in this guide.

If you have further suggestions on the PC not detecting controller issue, please share them with us in the comments section below.

5 Ways to Fix Kernel Security Check Failure on Windows 11 + Video

Some users have reported seeing the Kernel Security Check Failure error message in the BSoD screen that is caused by some failing processes on their PCs. This issue is not the most difficult to solve, thankfully.

From our experience, this is caused by driver-related issues so updating them will fix the BSoD quickly.

How can I fix Kernel Security Check Failure in Windows 11?

1. Update drivers

  1. Press the Windows key + I to open the Settings app, and click on Windows Update.
  2. Now, select Advanced options.windows-update-advanced-options kernel security check failure windows 11
  3. In the Additional options section, click on Optional updates.
  4. Tap on the Driver Updates option then select all the available updates and click on the Download & install button.download-install-drivers

Driver updates are often handled by Windows, but if you encounter an issue, you can perform a manual search. Also, you can go to the manufacturer’s website to download the driver update.

This has especially proved effective for those having the AMD Audio Co-processor driver and facing the Kernel Security Check Failure on Windows 11 while trying to use WSL 1. Downloading the AMD auto-detect and running it to update the driver has helped fix the issue.

However, there is always the risk of installing the wrong drivers with the manual method. Hence, we will recommend using the greatest driver update software.

2. Update Windows

  1. Press the Windows key + I to open the Settings app and click on Windows Update in the left pane.windows-update-settings kernel security check failure windows 11
  2. Click on the Check for updates button.checl-for-updates kernel security check failure windows 11

Running an outdated version of Windows can lead to so many problems. In this case, you need to install the latest Windows 11 update to fix the Kernel Security Check Failure issue.

This is because Microsoft might have addressed the causes of the issue in a new update.

3. Use the Windows Memory Diagnostic Tool

  1. Press the Windows key + S, type in Windows Memory, and select Run as administrator under Windows Memory Diagnostic.windows-memory-diagnostic kernel security check failure windows 11
  2. Click on the Restart now and check for problems (recommended) option and let Windows Memory Diagnostic run.memory-diagnostic-option kernel security check failure windows 11

The Kernel Security Check Failure on Windows 11 might also be down to issues with the memory. The scan above should give you a report on the state of the memories. If memory is faulty, you might need to replace it.

4. Run the SFC scan

  1. Press the Windows + S key to open the Search bar, then look for cmd, and right-click on the most relevant result to run it as an admin.cmd-search-admin kernel security check failure windows 11
  2. Type or paste in the command below to run the process and press Enter:
    sfc /scannowsfc-scan-windows-11 kernel security check failure windows 11

Sometimes, the Kernel Security Check Failure might lead to your PC not restarting. In this case, the issue might be due to faulty system files.

Therefore, we will advise using a dedicated PC repair tool. It will scan for all broken system files and replace them with the original versions. At the same time, it will solve any BSoD errors automatically with just a few clicks of the mouse.

5. Use the CheckDisk tool

  1. Press the Windows key + S, type cmd, and select Run as administrator under Command Prompt.cmd-search-admin kernel security check failure windows 11
  2. After the Command Prompt launches, type in the following command and press Enter:
    chkdsk C: /f /r /xchkdsk kernel security check failure windows 11

If your drive is faulty, it might cause the Kernel Security Check Failure on startup on Windows 11. The CHKDSK command will help to scan for issues with drive and try to fix them.

The Kernel Security Check Failure on Windows 11 issue can be pretty frustrating. However, it is not the most difficult to fix if you follow the steps in this guide carefully. Read below if you need more information about this issue.

What is Kernel Security Check Failure?

The Kernel Security Check Failure error depicts that some important system files or components failed integrity or compatibility check. The easiest way around it is to replace or update these files or components.

What causes the Kernel Security Check Failure?

When troubleshooting an error, it is critical to have a clear understanding of the factors that caused it. Because of this, we have highlighted some of the most prevalent causes that might trigger a Kernel Security Check Failure error:

  • System files that have been corrupted – Even Microsoft makes mistakes from time to time, releasing flawed upgrades that cause the system to crash without the user’s knowledge or approval.
  • Hardware that is incompatible with or malfunctioning – A stop code can be generated by unseated hard drives, RAM chips, or unsecured connectors. Check that all hardware components are securely fastened, especially if your computer was recently opened. To be on the safe side, unplug and then reseat all of these components.
  • Drivers that are out of date or unsuitable – Oftentimes, old or incompatible program files or device drivers might cause intermittent BSOD STOP errors.
  • Using an older version of Windows – Staying up to date with your OS version is generally recommended as the new updates might fix bugs that you didn’t even know existed in the first place.

To avoid having to deal with kernel issues, you can check how to avoid Kernel Security Check Failure errors.

Kernel debugging is perhaps one of the most useful skills you can have, and we’ve put together a guide on how to debug the Windows kernel to help you out.

Another common error is Kernel Stack Locked At Exit, but we covered it in a separate guide, so don’t miss it. We also have a new article on the Kernel_Thread_Priority_Floor_Violation error, so feel free to visit it.

Please let us know the solution that helped you solve this problem in the comments below.

Fix: GPU Crashes When Playing Games [5 Quick Ways]

If you’ve ever played a graphically intensive game and seen the screen go black or your computer suddenly freezes, keep reading. Today we’ll show you how to fix common GPU crashes.

How can I fix my GPU if it crashes when playing games?

First, make sure your game meets the system requirements. Also, avoid overheating, and close any unnecessary background apps.

Now, proceed to the following solutions.

1. Lower your graphics settings

If you’re experiencing crashes while playing games, try setting the game’s resolution lower than its default setting and lowering the other graphics settings while keeping an eye on the frames per second (FPS) counter. 

Here are recommended settings for better performance:

  • Resolution: Lower the resolution to 1080p (1920×1080) or 720p (1280×720) if you’re experiencing severe crashes.
  • Texture Quality: Set textures to Medium or Low to reduce the strain on your GPU.
  • Shadows: Set shadows to Low or Off for better performance.Anti-Aliasing: Use FXAA or Turn Off anti-aliasing to improve stability.
  • FPS Cap: Cap your FPS to 60 for smoother performance. If your system struggles, try capping at 30 FPS.
  • V-Sync: Try enabling V-Sync if you experience screen tearing, or disable it if it causes input lag.
  • Field of View (FOV): Set FOV between 70-90 degrees to reduce the load on your system.

2. Clear disk space

Over time, the amount of information on your computer gets fragmented and eventually causes performance to lag. This is true for both hard drives and solid state drives (SSDs). The more space a file takes up, the more fragmented it becomes. 

If you’re running out of hard drive space, it may be time to delete some files. Just remember that you should always back up important files like pictures and documents first if there’s any chance that you might need them again.

3. Update your graphics card

  1. Press the Windows key, type Device Manager in the search box, and click Open.
  2. Navigate to Display adapters, right-click on your graphics card, and select Update driver.Graphic Driver Update
  3. Select Search automatically for drivers.

4. Scan for viruses

  1. Press the Windows key, search Windows Security and click Open.
  2. Select Virus & threat protection.
  3. Next, press Quick scan under Current threats.
  4. Wait for the process to finish and restart your system.

5. Update your OS

  1. Hit the Windows key and select Settings.settings windows 11
  2. Click on Windows update, then select Check for updates.check-updates-w11 windows 11 blue screen
  3. Download and install if any are available.

Why does my GPU crash when I play games?

There are a ton of reasons why your graphics card (GPU) could be crashing when you try to play games. Here are some of the reasons:

  • Low memory – It’s possible that you don’t have enough memory to play a game and it’s causing crashes.
  • Overheating – If your computer gets too hot while you’re playing games, then it will crash. You can install resource monitor software to stay on top of things.
  • Old graphics card – If you are playing a graphics-intensive game, it’s likely that the problem stems from age and wear and tear on the computer including the graphics card itself.
  • Virus infection – If you have a virus, your computer’s hardware will be affected, and that can manifest in the way your GPU works. It’s always good to install an antivirus program.
  • Outdated graphic card drivers – Many times, these problems are caused by outdated drivers. You need to update your graphics card to newer versions of Windows.
  • System requirements – If your PC crashes only when playing games, you may be playing a game that requires more graphics processing power than your graphics card can handle.

How do I know if my GPU is dying?

No matter what kind of computer you’re using, it’s likely that one day you’ll see some kind of graphics error or computer crash while in the middle of a game. These errors can be caused by different factors, and can even be attributed to normal wear and tear on your computer.

But there are warning signs that might help you decide whether your GPU is dying before things get worse and you end up stranded without a way to play your favorite games.

If you’re seeing any of the following warning signs, it’s time to get a new GPU: 

  • Frequent Blue Screen of Death when playing
  • Your graphics card doesn’t support the latest games or programs 
  • Games take longer than usual to load 
  • Your computer starts running slower than usual 
  • The screen randomly shakes or vibrates

We also have recommended fixes for when your PC keeps crashing while gaming so be sure to check that out.

In case your GPU has reached its end of life, it may be time to upgrade to a new GPU for gaming. This guarantees you enhanced performance whenever you are playing games and lowers the risk of frequent crashes.

We also have the best gaming settings for Windows 11 to ensure you get the most out of your PC and game.

For any additional thoughts on this topic, let us know in the comments section below.

0x800f0805 Windows Update Error: 5 Ways to Fix it

Keeping your system up to date is important, but sometimes update issues can occur that can prevent you from doing so. Such is the error code 0x800f0805.

These issues can appear on any version of Windows as they are quite resilient, and come in different identification codes. It’s most often present on Windows 10 and Windows 11.

What is error code 0x800f0805?

The update procedure is unable to be carried out at the present time, which is indicated by the occurrence of the error code 0x800f0805. This error may have happened as a result of any misconfigured or corrupted Windows system files.

However, in most cases, update errors appear if there are issues with required services, and starting them usually fixes the problem. Also, some users came across the 0x800f0805 Windows 10 activation error, which, too, is easily fixable.

How do I fix error 0x800f0805?

Before proceeding to more advanced troubleshooting solutions, try the following steps:

1. Create a Wufix.bat file

    This miracle file put together by Microsoft will not only run the SFC and DISM scans but will also stop the Windows Update service which will force the update download to install. The Windows Update error 0x800f0805 will be fixed afterward.

  1. 1. Press Windows, type notepad, and open the first result.

    notepad 0x800f0805
  2. 2. Copy and paste the following commands: SC config trustedinstaller start=auto net stop bits net stop wuauserv net stop msiserver net stop cryptsvc cd %windir% Ren SoftwareDistribution SoftwareDistribution.old cd %windir%\System32 Ren Catroot2 Catroot2.old dism /Online /Cleanup-image /ScanHealth dism /Online /Cleanup-image /CheckHealth dism /Online /Cleanup-image /RestoreHealth dism /Online /Cleanup-image /StartComponentCleanup Sfc /ScanNow

    0x800f0805 notepad-commands
  3. 3. Then select File followed by Save as.

    file-save 0x800f0805
  4. 4. Here, select Desktop from the left side to save the file there, name the file Wufix.bat, select All files next to Save as type, and click Save.

    save-wufix 0x800f0805
  5. 5. Right-click the Wufix file on your Desktop and select Run as administrator. Reboot your PC once the process is done.

    wufix-admin 0x800f0805

2. Reset Update services

There are four services that need to work properly for the update installation to work. In addition, all updates are stored in a single folder so they can be installed later on.

If something goes awry, you can always reset the services and confirm they indeed work and force the system to create a new folder in which updates are stored.

To see how to do that, we suggest reading our guide on how to use the Windows Update Reset script.

3. Make sure that the necessary services are running

  1. Press Windows key + R and enter services.msc. Press Enter or click OK.services can't remove bluetooth device windows 10
  2. Locate Background Intelligent Transfer Service, right-click it, and choose Start or Restart from the menu.
  3. Now right-click Windows Update and choose Start or Restart. The Windows Update download error 0x800f0805 will be solved.

Many users reported the update error, 0x800f0805, when trying to install the optional Windows 11 KB5008353 update, so if you’re having problems, make sure the Windows Update and BITS services are running.

4. Run the troubleshooter

  1. Press Windows + I then click the Troubleshoot section on the right.troubleshoot-opt-w11 0xa00f4244 nocamerasareattached
  2. Click Other troubleshooters.other-trouble file explorer crashes when i right click
  3. Locate the Windows Update troubleshooter and click Run next to it.windows-update 0x800f0805

5. Reset your PC

  1. Press Windows + I then go to System followed by Recovery on the right side.
  2. Click the Reset PC button.reset-pc-w11 0x800f0805
  3. Select the Keep my files option.keep-my-files 0x800f0805
  4. Select the Cloud download option, click Next then Reset in order to proceed with the resetting process. cloud-download 0x800f0805

As a final solution, you can opt to reset your OS in order to fix the 0x800f0805 – CBS_E_INVALID_PACKAGE error. For more ways to factory reset Windows 11, follow our dedicated guide.

How does the update error 0x800f0805 affect my PC?

This error will prevent you from downloading updates, which isn’t a big problem, but it might become one if you don’t fix it since you will need to update your OS sometime in the future.

Not being able to download updates will leave your PC vulnerable, and you might miss out on the latest security updates and features.

In case you’re still plagued by update errors, you should read our Windows Update Service isn’t running guide for additional solutions.

Finally, if you’ve run into an alternative solution, feel free to share it with us and other readers in the comments section below.

0xc00000e5: What is This Error Code & How to Fix it

Error 0xc00000e5 is a very common issue that occurs on Windows. It can appear due to various reasons, but the most common is due to low RAM. It may also occur because of a corrupt user profile or an incompatible software application, driver, or hardware component.

When you have a corrupt user profile, you may also encounter the event id 4625 an error occurred during logon. This prevents you from accessing your profile on your PC.

What does 0xc00000e5 mean?

The error code 0xc00000e5 is a common Windows error that can appear on multiple versions of Windows.

It can be related to the blue screen of death which can also appear as an instance of system instability or an application crash. The error code 0xc00000e5 is caused by a hardware problem or incompatibility with the software installed on your computer.

The following are some of the most common causes for error 0xc00000e5:

  • Damaged or incompatible hardware drivers – Incompatible hardware drivers can cause system instability and cause blue screens of deaths to appear. These types of errors are usually caused by outdated or faulty hardware drivers.
  • Corrupt registry files – The registry files are the heart of your computer. They contain all information about installed software and hardware, as well as configuration settings of your system. Sometimes they become corrupted because of malware infection or any other reason.
  • Virus infection –  If your computer is infected with a virus, then there is a chance that the virus has corrupted your computer’s settings. This can sometimes cause issues such as this one.
  • Hard drive error – It could also occur if there is an issue with your hard drive or memory, such as bad sectors on the disk or memory errors like memory leaks and memory fragmentation.

Now let’s look at some possible solutions to solve this error.

How can I fix error 0xc00000e5?

1. Run DISM and SFC commands

  1. Hit the Windows key, type cmd in the search bar and select Run as administrator.cmd-run-admin-w11 unexpected kernel mode trap windows 11
  2. Enter the following command: DISM.exe /Online /Restorehealth 
  3. Allow for the command to be executed then type in the next one: sfc /scannowsfc scan command in command prompt.

If you prefer not to do this manually, then you may choose extensive repair tools with various useful features that can repair several PC issues. They can help you repair all your PC stability issues by finding healthy components from its extensive vault.

2. Update your drivers

  1. Hit the Windows + I keys simultaneously to open Settings.settings windows 11
  2. Navigate to Windows Update and select Optional Updates.optional-updates-button How to speed up lenovo ideapad 320
  3. Select Driver updates then click Download & install.

An automated method can be very helpful here if you want to make sure that you have the right updates for your drivers. It can save you more time and assure you that all these steps are done accordingly.

3. Run chkdsk

  1. Press the Windows key, type cmd on the search bar and click Run as administrator.cmd-run-admin-w11 unexpected kernel mode trap windows 11
  2. Type in the following command then press Enter (Replace X with your hard drive): chkdsk:/f chkdsk-f repair corrupted directory

4. Scan for viruses

  1. Press the Windows key, search Windows Security and click Open.
  2. Select Virus & threat protection.
  3. Next, press Quick scan under Current threats.
  4. Wait for the process to finish and restart your system.

5. Run Windows update troubleshooter

  1. Hit the Windows + I keys simultaneously to open Settings.settings windows 11
  2. Select System then click on Troubleshoot.
  3. Click on Other-troubleshooters.other-troubleshooters windows 11 error after update
  4. Hit the Run option for the Windows Update troubleshooter.windows-update-run-troubleshooter runtimebroker.exe error

Hopefully, you have been able to solve the error 0xc00000e5 if you encountered it on your PC. You may also come across a similar error 0xc000000a5 in your Chrome browser but we have outlined various ways to fix it.

Other similar errors include: 0xc00000e, 0xc0000034, and 0xc00007b.

We’d love to know which solution worked for you in the comments section below.

Xbox revenue up from last year, according to newest earnings report

Microsoft has published its earnings report for the first quarter of FY23, and the news on the Xbox front is (mostly) encouraging. The report reveals some pretty interesting market dynamics at play here, which we break down below.

  • Xbox gaming revenue is up 4% from last year.
  • Gaming hardware revenues are up 13%.
  • However, “content and services” revenue dropped 3% over last year.

That last point is somewhat offset by the continued growth of Xbox Game Pass, as the report points out,

Driven by declines in first-party content and in third-party content, with lower engagement hours and higher monetization, partially offset by growth in Xbox Game Pass subscriptions.

PC Game Pass
PC Game Pass

PC Game Pass grew by an impressive 159% over the year. Microsoft CEO Satya Nadella pointed this out in yesterday’s earnings call, stating “We saw usage growth across all platforms driven by the strength off console.”

He also revealed that more than 20 million people have streamed Xbox games with Xbox Cloud Gaming,

With cloud gaming we’re transforming how games are distributed, played, and viewed. More than 20 million people have used the service to stream games to date.

These remarks, however, somewhat contrast with Microsoft’s stated view on cloud gaming in a filing with the CMA last week over the Activision Blizzard buyout. Nevertheless, that number is doubly impressive when you consider that it only reached 10 million back in April this year. Needless to say, cloud gaming is catching on in a big way.

PC Game Pass Subscribers Grew 159% Year-Over-Year, Nearly Half of Series S Buyers Are New to Xbox

The last—and perhaps most intriguing—tidbit to come out of the report comes again from Satya Nadella, who revealed that almost half of all Xbox Series S sales were made to gamers new to the Xbox ecosystem. But when you consider the combination of an affordable, entry-level next-gen console with Game Pass, the popularity of the Series S doesn’t seem quite so surprising.

On the whole, Microsoft surpassed its estimated $49.7 billion revenue for the quarter, taking in $50.1 billion. $9.7 billion was returned to shareholders through share repurchases and dividends, an 11% decrease compared to Q1 FY22.

8 Best Data Loss Prevention Software to Protect your Business

Valuable, and/or sensitive information, especially in this digital age, needs a data loss prevention strategy to be developed and implemented.

The best data loss prevention software will come in handy when planning the DLP strategy so that the risk of data falling into the wrong hands is nipped in the bud.

How can data loss prevention software secure my business?

Whether data is at rest, in use, or in transit, it travels through different channels in your business, and to many endpoints so data loss prevention is necessary.

The software from our list are specialized tools that detect sensitive data and prevent them from being copied or sent outside your organization network.

Here you’ll find the best data loss prevention software you can use in your company or organization.

What is the best data loss prevention software for PC?

Endpoint DLP Plus – Best loss prevention solution

Data loss prevention is a matter of identifying and protecting sensitive data and ManageEngine’s Endpoint DLP Plus does that admirably.

Essentially, this software is a complete solution for sensitive data discovery on all your endpoint.

It scans all the devices on the network and examines the apps installed on them for structured and unstructured data.

Then, it inspects the data contextually to get a forensic evaluation of the information both quantitatively and qualitatively.

Endpoint DLP Plus also assesses the user privileges so that the admins can determine if there are any inside threats.

But all the steps and processes are performed with lightning speed, this tool is prepared for high volumes of data, fit for any network size.

With its help, you can monitor any device connected to an endpoint and limit access. To ensure that no sensitive data gets out, Endpoint DLP Plus also employs Cloud protection and email security features.

Moreover, you may set up trusted apps as enterprise-friendly and contain the data that results from them as sensitive data.

Let’s review some of its best features:

  • Advanced scanning for sensitive data within your network and apps
  • Cloud protection, email security, and external devices monitoring
  • Accurate data discovery and false positive remediation
  • Easy and quick deployment within your network
  • Intuitive and detailed reports

Endpoint DLP Plus

With this smart solution, you can be sure that no sensitive data will leave your organization!
Free trial Visit website

Norton 360 – Great antivirus protection

Another good solution for data loss prevention is Norton 360, considering the necessity of powerful privacy for digital-related businesses. 

Knowing that companies use enormous quantities of data for complex tasks, it is significant to think about the prevention of data loss.

By choosing this protection software you secure the data flow that streams between departments in one’s company. 

With Norton, you obtain your pathway to smooth data secureness, through features like threat protection from emerging malware, no-log VPN, virus protection promise, LifeLock Select, and more.

Whether you need to cover your personal data online or business information, this option can resolve most of the identity issues that may occur. 

Moreover, the LifeLock Select feature comes along and it can protect data like name, address, or social security number from up to 5 devices such as PCs, Macs, or smartphones.

The worth mentioning features of Norton 360: 

  • One-Bureau credit monitoring to see key changes to your credit 
  • Privacy monitoring to know who has your personal information 
  • Anti-spyware and malware protection
  • 100 GB cloud backup 
  • Password manager 
  • Parental control
Norton 360

Norton 360

With Norton 360 you will be able to shield your entire data flow, and safely interact virtually within your business.
Check priceVisit website

CrashPlan – Great for cloud backup

Having the computers and the backup in the same place is a hazard, at least said. As they both can get destroyed by a fire or another disaster. CrashPlan gets all the data protection your business needs and secures it in one seamless cloud solution.

The best practice for data loss prevention is automatic & continuous protection, which this cloud-based program brings up-front.

Data can get lost when hard drives fail, computers get stolen, or any other incidents.
CrashPlan for Small Business comes at a great price, is really easy to use, and quick to set up.

Worth mentioning features:

  • Does not slow down your PC as it runs automatically in the background
  • External Drive Protection included for no additional cost
  • Restore your files to the latest versions in case of a ransomware attack
  • 256-bit AES data encryption
  • No charge to restore your files via the desktop app or browser
  • No file size restrictions or additional charges for storage

Get started for free with a one-month trial and decide later if you want to keep this service.

⇒ Get CrashPlan

Symantec

This data loss prevention software drives total protection of your sensitive data with the most comprehensive detection technologies and unified policies, with privacy regulations that ensure your data is properly managed.

It is configured to identify sensitive data and uses a variety of advanced detection techniques to identify data in a wide range of forms.

With this data loss prevention software, you can identify and track the user and location of data, block the flow of sensitive data (like when an employee is leaving and he wants to move with some files), protect data in the cloud by integrating with encryption and other security technologies.

You can also secure your data outside your managed perimeter by wrapping automatic protection around it such that if data leaves and is shared widely, you don’t lose much.

Symantec’s DLP identifies sensitive data and delivers advanced protection so you can control access to data, define user levels and rights, monitor access to sensitive data, and revoke access while digitally shredding a document.

Here are its key features:

  • You can deploy it on-premise or in your private/hybrid/public cloud
  • Advanced sensitive data detection techniques
  • Identify and track the user and location of data
  • Block the flow of sensitive data transfer
  • Set up and manage safety perimeters

⇒ Get Symantec

Forcepoint – Good sensitive data containment

Forcepoint’s data loss prevention software helps you gain visibility and control over your data to keep it secure against accidental loss, compromised users, and malicious insiders.

Its security focuses on people’s interaction with data, whether it is creation, storage, email, personal devices, and cloud apps.

Features include the Incident Risk Ranking that applies behavioral analytics and machine learning to cluster data loss prevention incidents in order of risk, Office 365 support, flexible deployment on-premise or cloud, integrated incident workflow to resolve DLP incidents faster, pre-defined policy templates, advanced detection with optical character recognition, and automatic detection of high-risk individuals or compromised and malicious users.

With Forcepoint, you can fast-track compliance processes, secure cloud apps, extend data protection to other apps, and use advanced analytics to focus on the biggest threats.

Other tools Forcepoint comes with include the Email Security Cloud to stop spam and phishing emails, as well as the Web Security Cloud to stop advanced web threats in the cloud.

⇒ Get Forcepoint

CA Technologies – Solid access control

With CA’s data protection, you can prevent data loss and control data access whether it is in use, at rest, or in transit, and minimize the misuse of data while complying with standards and regulations.

It helps you reduce data loss and misuse by controlling access at every endpoint in your system, defining regulatory policies, detecting sensitive and unstructured data, and monitoring both known and unknown business processes to control threats to sensitive corporate assets.

This data loss prevention software helps you reduce risk, control information across various locations, and enable critical processes to continue.

You can also transit to cloud services, discover and classify high-risk data and apps, mitigate high-risk modes of communication, and ensure precise policy enforcement through content and identity.

⇒ Get CA Technologies

VikingCloud – Good for data monitoring

As its name implies, this data loss prevention software is trusted to send a wave of protection and security against data loss in your company’s system.

With the explosive growth of data in today’s digital world, it has become more challenging to track, protect and contain sensitive data within corporate borders, so VikingCloud’s DLP helps you discover, monitor, and secure data at rest, in use, or in transit to prevent loss and ensure compliance with regulations.

It focuses on three pillars of data security: monitor, protect and discover, with features such as the Intelligent Content Control Engine that analyzes all web-based communication and attachments for violations of compliance and policies, and its Advanced Content Control works with other detection technologies and risk categories to control and secure critical operations.

This data loss prevention software has a query builder interface for specifying search parameters when looking for DLP events and incidents, a customizable console homepage to show reports and query results, plus it is built on a scalable and extensible architecture for greater efficiency and rapid integration with other third-party apps.

⇒ Get Trustwave

Digital Guardian – Great for endpoint protection

This is your guardian protector against data loss prevention in the digital space.

Digital Guardian is a cloud-based data loss prevention software that comes with advanced analytics and reporting solution which delivers threat aware data protection to safeguard your company’s data.

The endpoint DLP protects sensitive data on all endpoints of your company, against breaches (which are inevitable), giving you the deepest visibility, fine-grained control of all data movement, and data loss protection coverage.

The endpoint agent captures and records all system, user, and data events on or off the network, plus you can configure it to automatically block suspicious insider activity or outsider attacks like malware, before losing sensitive data.

Use this DLP when you need it, as it doesn’t block actions that comply with corporate policy so you and your employees remain productive and data stays safe.

⇒ Get Digital Guardian

This concludes our selection of the best data loss prevention software for your business or personal devices.

You might also be interested to check our list including the best data protection software for your PC.

Do you know which data loss prevention software you want for your company? Let us know your favorite pick in the comments section below.

20 Best Telework Software That You Can Get Today [2022]

At the tap of a button, you can chat with anyone around the world, send an email or a tweet, from practically anywhere, your office, a beach, or a mountain someplace far off.

This is about people who move around working, the type of employees who are location-independent and don’t need to be biased toward one office. Some are always moving, while others are based in one location but have customers across the globe, without necessarily having to travel.

What do I need for teleworking?

Whether you’re a blogger, consultant, freelancer, web developer, creative designer, or IT specialist, it is possible to take your work on the road thanks to teleworking software.

All one needs is a stable Wi-Fi connection, a good place to work from, drink or snacks, and a few apps or tools to make the remote work life a breeze – throw in a headset, and it comes in handy.

Besides having a smartphone, check out some other best remote working software you can use.

What’s the best teleworking software to try out?

Remote Access Plus – Best remote access management

Along with teleworking come remote problems but where those arise, ManageEngine’s Remote Access Plus solution comes to help.

It is a comprehensive enterprise remote access software that helps administrators and IT technicians troubleshoot and manage remote computers just with a snap of the fingers.

Well, in fact, not just with that, but with the over 12 system manager tools, wake on LAN, remote shutdown, secure file transfer, and a lot more.

In fact, you can completely remotely control Windows, Mac, and Linux machines and that includes installing and uninstalling software, managing all the files remotely, etc.

You can also proceed with a hands-off approach with voice, video, and text chat to engage with the remote desktop users and provide them with assistance.

With Remote Access Plus, you may even execute Command Prompt commands, modify the registry and manage the tasks on the endpoints.

So, it literally offers all the tools you need to troubleshoot any problems and the solution has a free trial version for testing.

Let’s review some of its best features below:

  • More than 12 built-in system management tools
  • Wake on LAN and remote shutdown
  • You can control Windows, Mac, and Linux endpoints
  • Voice, video and text communication
  • Simple and quick implementation

Remote Access Plus

Enable optimal teleworking by remotely troubleshooting any endpoint from your network.
Free trial Visit website

Monday.com – Ideal for project management

Monday is a more friendly take on the whole work-from-home genre, as it focuses more on personal interactions compared to other similar tools.

Of course, this doesn’t mean that the program is inefficient. The best word to define the Monday service is automation since everything within the program is meant to minimize user input.

Everything is detailed down to the last piece of data, from timetables and schedules to how projects are progressing.

That’s how you know exactly what is going on in real-time, and what areas need some quick adjustments.

Everything is shown in a crystal-clear manner, and the UI is designed to make working from home feel like an enjoyable experience, and not like actual work.

The best part about this service is that the pricing is also extremely user-friendly, as you can experiment with a 14-day trial before you actually decide whether or not to go for the full license.

Either way, if you are forced to work from home, then Monday.com is a surefire way of making things a lot more interesting and fun, while not sacrificing any efficiency.

Let’s see an overview of its most important features:

  • Extensive automation features
  • Very comprehensive UI with clear menus
  • Manage over 200 workflows
  • Sales and CRM integration
  • Cloud-based tool, accessible from anywhere

Monday

Get started now on Monday.com and increase your productivity with great project management tools.
Check price Visit website

Scalefusion – Great mobile management

Scalefusion Mobile Device Management (MDM) Software helps you monitor and control all the corporate devices on your network.

And that makes it a great tool for teleworking and protecting the security of your business assets.

Whether it’s a Windows, macOS, Android, or iOS device, Scalefusion’s MDM comes with a wide range of security policies for data leakage prevention.

For instance, you can even restrict screen captioning work apps for your employees on their personal devices.

You may block the Wi-Fi connection from unauthorized networks, remotely wipe/factory reset the devices, monitor security breaches like forceful SIM card swap, and a lot more.

The administrator will be able to install any applications remotely from the online stores or by uploading the installer and of course, delete any app without the user’s intervention.

And all the actions are possible from a single, easy-to-use, cloud-based dashboard with intuitive and comprehensive menus.

Take a look at Scalefusion’s best features:

  • Complete monitoring and control of all corporate devices
  • Enforce security and usage policies
  • Can control any Windows, macOS, Android, or iOS device
  • Reports and notifications on potential security breaches
  • Single cloud-based dashboard

Scalefusion MDM

Monitor, control, and protect all your teleworkers’ devices against any data breaches.
Free trial Visit website

SupRemo – Great cost-effective tool

SupRemo is a great alternative to TeamViewer, being a cost-effective, reliable, and secure remote desktop access, tech support, and remote work software.

Additionally, the app is cross-platform, being compatible with Windows, macOS, Linux, Android, and iOS. This means that you can connect from a PC, tablet, smartphone, to anywhere in the world.

You don’t have to worry about buying the licenses multiple times, since all of them allow unlimited installation to an unlimited number of devices. The only restriction is the number of simultaneous connections.

What this means is that you can use your license on multiple devices, and there is no limit of endpoint or seats to install the license on.

Besides the affordable plans and the well-thought licensing plans, you can use the app free for non-professional and/or non-continuous usage.

SupRemo gives you the freedom to work from anywhere you wish, giving you total mobility and security. You can work from your home, a cafeteria while traveling.

The plethora of great features gives you endless possibilities will improve your workflow and performance:

  • Installation as a service allows connections to the device without the need of an individual to attend to it
  • Allowed ID and Encrypted connections will secure data during work sessions
  • File transfer between the two connected PCs
  • Remote printing lets you print documents from the connected device after you worked on them
  • Chat through instant messages for easier interaction between coworkers
  • Online Address Book that can be transferred to other SupRemo users
  • Online Reports monitoring all the connections made during the workday by the accounts
  • Automatic update to get the latest features and changes

⇒ Get SupRemo

Desktop.com – Best for increased productivity

remote work software telework software

Desktop.com is a digital workspace platform that integrates task management, productivity, and collaboration tools.

It is an all-encompassing instrument that has helped businesses around the world make great use of the webspace.

With this application, you can create shareable workspaces, there are many ways in which you can organize and manage them in order to fit your work style and goals.

The tool lets you easily access everything you need from one central UI, which includes task lists and deadlines, calendars, chats, meetings, and more.

This remote work platform is suitable both for self-employed individuals, as well as full-scale companies with many team members.

Regarding teamwork and collaboration, you will be pleased to know that Desktop.com is very versatile.

It has its own chat that integrates other mass-used collaboration tools such as Slack or MS Teams so all the members of a team can easily communicate, regardless of the primary platform they use.

All messages are comprised in a universal chat, so you won’t have to hop from one app to another.

On the topic of integrations, you should also know that you will be able to access tons of useful tools directly from Desktop.com’s central page.

These include your email apps such as Gmail or MailChimp, productivity apps such as Notion, as well as tons of useful applications like Google Sheets, Trello, Google Drive, or Dropbox.

All in all, if you want a comprehensive tool that offers you the possibility to manage your tasks in an efficient way, collaborate with peers, and integrate all your favorite third-party tools, then Desktop.com is a great choice.

Let’s see some of its best features below:

  • Integrates task management, productivity, and collaboration tools
  • Single, comprehensive dashboard
  • Access all your apps, including Google and MailChimp
  • Great collaboration features
  • Built-in universal chat app

⇒ Get Desktop.com

eResource Scheduler – Great for corporate assessment

Next, we have an enterprise resource management and scheduling software that is proven itself to be very noteworthy because of its amazing features and ease of usage. It is designed to identify and assign resources to projects and jobs.

Thanks to features like custom fields, configurable forms, configurable filters, views, and management reports, this software’s configuration level is off the charts.

eRS Cloud supports multiple working patterns of resources as it offers configurable working calendars.

Beyond this, flexible user access rights also ensure that all the users get access to the information on a need to know basis, without affecting data confidentiality.

 eRS Cloud offers easy resources scheduling by working with the Gantt chart view. Efficient features like drag-and-drop, extend and shorten, cut/copy/paste, and split allow efficient resource scheduling and workload balancing.

This software gives special emphasis to security & privacy and everything has been designed ground up to ensure security at all levels of the application.

It has an informative and accurate financial report which will give you an in-depth view of your company’s finances (cost/revenue/profit) at all levels of the organization i.e. resources, projects, teams, departments, etc.

Another great feature of this app is that you are always updated with the latest information, by the use of the built-in email service.

The best part is that all of these features can be first tested for free before you decide to buy the tool.

  • Custom fields, configurable forms, configurable filters, views, and management reports
  • Efficient features like drag-and-drop, extend and shorten, cut/copy/paste, and split
  • Strong security and privacy features
  • Provides informative and accurate financial reports
  • Always updated with the latest information

eResource Scheduler

Take better control of your office from the comforts of your home with this cross-platform business management suite.
Free trial Visit website

Connecteam – All-in-one task management assistant

Connecteam is an all-in-one team management telework software that you can get today to boost productivity with feature-rich toolkits.

The Connecteam software and app include project and task management, communication, scheduling, time tracking, checklists, digital forms, and staff training.

Connecteam improves team communication and cooperation by making it simple to schedule employee shifts and assign activities to them.

Instead of manually checking attendance and providing timetables, Connecteam digitalizes the work of your job. You may also schedule your duties at various times each day to prevent misunderstandings.

You may also assign it to a team member who will be trained in flow management and monitoring.

You may select the job you are working on and not have to worry about writing things down just to forget where you left them. If you happen to forget what you were doing for a customer and didn’t give the assignment a descriptive enough name, you may go back and check through the logs.

Another fantastic feature is the ability to track how much time you spend on email and other administrative duties compared to actual design work.

Here is a summary of Connecteam’s best features:

  • Efficient communication tools
  • Time clock for tasks
  • Shift scheduler
  • Customizable checklists and reports
  • HR and people manager

Connecteam

Includes scheduling, task management, and communication tools to help you lead an organized and effective team.
Free trial Visit website

Kickidler – Great for personnel monitoring

One of the challenges posed by having a business where most of your employees work remotely is making sure that no one is slacking off, so that your productivity level increases, or at least is maintained at a decent pace.

Well, you as an employer will no longer have to worry about things like that once you employ a software tool like Kickidler.

This tool provides you with real-time employee monitoring so that you know at every second what each employee is doing.

More so, even if you’re not always free to monitor them yourself, depending on the settings made, Kickidler computer surveillance software automatically generates alerts if certain employee violations occur.

Here is a summary of Kickidler’s best features:

  • Online broadcast of employee desktop activity
  • Employee negligence and violations detection
  • Employee time-tracking and timekeeping
  • Employee timesheet monitoring and reporting
  • Automatic notifications
  • Remote keyboard, mouse, and clipboard control
  • One-click connection
  • Screen video recording

⇒ Get Kickidler

Wrike – Best for project management

Topping out our list is a product that makes working remotely a high priority.

As an overall goal, Wrike’s purpose seems at first glance to eliminate silos, centralize communication, and go through your to-do list easily, all from the comfort of your home.

As an example of what this product can do, you can use it to view real-time reports and status for all of your company projects.

This then allows you to easily turn strategy into an achievable plan to achieve success.

Working remotely doesn’t mean that you have to forfeit collaboration between you and your peers since you can centralize communication with stakeholders while maintaining full context.

Besides the obvious instant messaging features, you can also enable file transfers and monitoring of what everyone is doing in real-time.

Deadlines will no longer be an issue as long as everyone is doing their job.

The best part about this tool is how easily it integrates with other services. For example, you can connect your essential business tools to Wrike and make it your project management hub.

These compatible services include names like Google, Microsoft, Adobe Creative Cloud, GitHub, JIRA, and more.

As for pricing, it is available in a try-before-you-by deal, as you can request a free demo, and the signup process is completely free, and only requires that you register via an email address.

However, if you want to benefit from the full functionality of Wrike’s service, a full commercial license is the best bet for you.

Here are some of its key features:

  • Great services compatibility, including Google, Microsoft, Adobe Creative Cloud, GitHub, JIRA, and more
  • Centralized communication dashboard
  • Free sign-up process
  • Instant messaging and file transfers
  • Complete monitoring for endpoints

Wrike

Centralize communication and view reports in real-time with Wrike.
Free Trial Visit Website

AnyDesk – Great all-round teleworking tool

A list of reliable teleworking software would be incomplete if we didn’t include AnyDesk, in it, since it is a leader in terms of what it means to deliver quality software that allows users to work remotely.

Connect to a PC from halfway around the world with this tool, enjoying high-quality connectivity and allowing large companies and startups to enjoy exceptional customer service and fast problem-solving solutions from any location.

One highlight of this tool is its cross-compatibility, allowing connectivity between pretty much any two devices, including Windows, MacOS, Android, iOS, Linux, FreeBSD, Raspberry Pi, and Chrome OS.

This allows anyone to be of assistance, regardless of what device they are using, be it a desktop, laptop, or even a mobile phone.

Another strong point of this service is the flexibility of its subscriptions, as it can cater to companies of all sizes, and, speaking of subscriptions, they pride themselves on providing permanently free updates.

Lastly, large companies can also be served easily thanks to AnyDesk’s MSI packages that automatically roll out the AnyDesk client on multiple computers and configure the tool from remote locations.

As for the app itself, it is super lightweight, making it easy to download, install, and use and even those of you looking for a program for personal use can easily work around the user-friendly interface.

Consider some of its key features below:

  • Connect to a PC from anywhere in the world
  • Cross-compatibility with Windows, MacOS, Android, iOS, Linux, FreeBSD, Raspberry Pi, and Chrome OS
  • Subscription flexibility
  • Free updates permanently
  • Super lightweight, easy to download and install

⇒ Get AnyDesk

Nu – Great remote collaboration tools

Nu has a suite of collaboration tools perfect for teleworking so you should definitely try some of the products.

First, there is Backlog, a project management software that will help you with such endeavors.

For instance, each project you develop will have its own wiki and repositories. And for each task, you will benefit from its own file storage, history, and comments section.
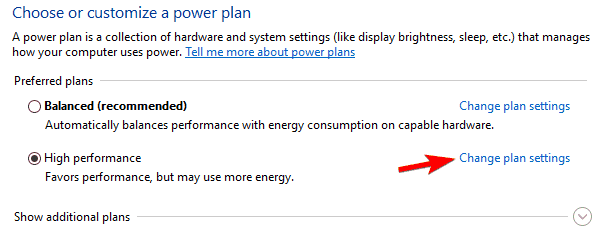
You will be able to manage the workflow with timing, color coding, and assignments for all the team members.

Another product is Cacoo, an online diagramming tool for collaborating on wireframes, flowcharts, and more.

You will benefit from multi-user editing, in-app video and chat collaboration, hundreds of flowchart templates, and more.

Next, you can also implement Typetalk, a team chat app, and Nulab Pass, enterprise-grade security for the team.

⇒ Get Nu

Task/Project Management tools

If you want to stay on top of things like tasks, or other updates on projects and foster team collaboration, then these are the best remote working software you need to have for this function:

1. Bitrix24 – Best for office applications

Bitrix remote working software tool

Bitrix24 comes with a powerful set of office tools that help you automate workflow while working remotely.

Firstly, the tool is ideal for an unlimited number of workgroups and user groups for your entire organization.

Moreover, Bitrix24 gives you the chance to enjoy real-time communication tools for all teams through both chat and video.

Even if not working in a real office, you may easily turn your emails into tasks or calendar events in a matter of clicks.  Bitrix24 helps you manage your entire team and let all members know their roles.

With time tracking features and precise task templates/task reports these roles never end up forgotten or buried under hundreds of messages.

This software also has a document management feature, which is extremely useful if file sharing and document management are a priority.

As for the included human resources management system tools, they make sure that no major hiccups could come your way.

As the leader or even a member of a remote team, you’ll most likely see why Bitrix24 is efficient.

You just need to choose this software solution that is designed to provide full support in managing your company’s teams.

Here are some of its best features:

  • Powerful set of office tools
  • File sharing and document management features
  • Built-in human resources management system tools
  • Time management options
  • Tasks and project management tools

⇒ Get Bitrix24

2. Asana – Great for project management

remote working software

This is one of the most popular tasks or project management tools you can use as part of your remote working software collection.

With Asana, you can manage and track tasks, to individuals or groups, check due dates, monitor progress, and even track time and generate timesheets.

It is a lot like your personal assistant who tells you about the happenings in the office at a glance without necessarily having to be there physically.

Take a look at some of its most important features:

  • Add integrations with tools like Slack, Google, and Microsoft Office
  • Organize and assign tasks
  • Manage dependent, overlapping, and unscheduled tasks
  • More than 200+ possible integrations
  • Communicate, collaborate, and coordinate work, from start to finish

⇒ Get Asana

Cloud storage and file organizers

When you want to organize all your stuff, here are the best remote working software to use:

1. Google Drive – Great free cloud storage

This tool has frequent updates, but it is free to use for storing and organizing all your stuff in one place. You can work on the same document with other people simultaneously.

You can also write and edit Google Docs and Sheets from any location, upload media like pictures or videos and store them, or share them with others. It also integrates well with Gmail and Google calendar.

⇒ Get Google Drive

2. OneDrive – Best for security

OneDrive is a cloud solution for you to store your personal files securely, and access them anytime, anywhere, and from any device or browser.

It works pretty much the same as Google Drive or Dropbox, but the capabilities and storage capacity may vary.

⇒ Get OneDrive

3. Dropbox – Great tool for temporary storage

If you have bulk files, you may not be able to share these over email, as some don’t take attachments larger than 25MB, which you’d then have to upload and share via apps like Google Drive.

This is where Dropbox comes in. Freelancers can use this to organize large files, by simply uploading the documents, and even organizing them in terms of months, and sending you a message once the work is submitted.

It is the cloud storage of choice, especially for software dev teams and designers.

Recently, Dropbox announced the launch of Paper, a separate app like Google Docs to allow people to collaborate in real-time.

⇒ Get Dropbox

4. Box – Great for secure collaboration

This tool is more than just another cloud storage app, as you can store any and everything in there, from sensitive documents to letters from your loved ones, recipes and so much more.

⇒ Get Box

Team management

If you want to manage onboarding, track time and expenses among other issues with your team, theseremote working software tools come in handy:

1. Time Doctor & Harvest – Ideal for automatic time-tracking

The Time Doctor tool helps you track how employees or team members spend their time, plus you can use it for productivity purposes and client billing.

Harvest is also good for time tracking and expense tracking.

⇒ Get Time Doctor
⇒ Get Harvest

2. IDoneThis – Perfect for project checklists

This remote working software is useful when you want to keep your team in sync.

With more than 160,000 users, this tool’s easy daily check-ins and powerful progress reports help run more effective and productive teams.

Get daily status updates as everybody checks in daily via browser or email, and always know what is done or getting done, or what cannot be done on time or completed and why.

Its robust reports give you a high-level view of your team and your organization’s progress over time.

⇒ Get IDoneThis

We hope that our extensive list of solutions covers all your needs and that now you’ve got all the tools to work from home.

The only condition is to set your temporary office in a place with good Internet connection coverage.

And if you’ve forgotten something on the office PC, you might want to look at the best remote access tools with a session recording option list and fix the problem.

What remote working software do you have in your toolbox? Share with us in the comments section below.

PC Inventory Software for Windows PCs: 4 Best to Use

For a network with more devices (at least 50), the network administrator should use some specialized tools to retrieve all the hardware and software characteristics of all the devices connected to the network.

With just a few PCs, it’s easy but for much larger networks, automated PC inventory software is a must and organizations are not able to deal without such programs.

Why do I need PC inventory software?

PC inventory software collects thorough data about the computers connected to your LAN. The software automatically scans the network and then retrieves all the information regarding all the devices that are being inventoried.

After retrieving this information, the software usually records it in a centralized database, allowing the administrator to access it at any time.

After the initial scan of the network is completed, the network admin can re-scan the network anytime. This will not only make the inventory up-to-date, but it will provide more information.

After the new inventory data is received, the software compares it to the previous version of the inventory information that was obtained during the last scan and then records all potential changes. After more re-scans, the network admin will have a detailed configuration of the history of each machine of the company.

The network admin can then access it at any time and also view the configuration information for each computer in a nicely created graphical form.

What are the best PC inventory tools?

Endpoint Central – Best endpoint management tool

If you need an ultimate tool to manage all your endpoints and servers, including smartphones and tablets, ManageEngine’s Endpoint Central is the ultimate solution for that.

It’s a modern take on desktop management where all the management tools can be controlled conveniently from a single dashboard.

Endpoint Central is not only about keeping your assets in check but also helps you install patches, deploy software, imaging, and entire OSes.

In addition, it allows you to manage assets and software licenses, monitor software usage statistics, manage USB device usage, control remote desktops, and more.

With Endpoint Central you may control Windows, Mac, and Linux devices remotely. However, you can also deploy profiles and policies on your mobile devices, and configure them for Wi-Fi connections, VPN, email accounts, etc.

As an added security option, it’s also possible to apply restrictions on application installs, camera and browser usage, as well as protecting your devices by enabling passcodes, remote lock/wipe, etc.

You will avoid any liabilities because you may track license and warranty details effortlessly for any installed software.

Let’s review some of its key features below:

  • Keep track of all your devices in your inventory
  • Control your endpoints remotely and troubleshoot any problem
  • Advanced hardware and software monitoring
  • Deploy profiles and policies on mobile devices
  • Apply restrictions for software installation and app usage

Endpoint Central

Free trial Visit website

N-central RMM – Great for remote monitoring

The software provides powerful automation and customizable IT tools. When you have clients with complex and large networks and systems, you will definitely need the tools that can help you efficiently manage and secure their systems without breaking down your team.

N-central RMM offers you the necessary tools that you need to handle all these complex environments including drag-and-drop automation, device settings and profiles, patch management, and more.

You can enjoy automation for almost everything, and this also includes customer onboarding, self-healing responses to alerts, device setup, and ticket creation.

This software offers support for more types of devices such as servers, endpoints, network devices, virtual machines, mobile, and IoT devices.

It is straightforward to get started with the program because you don’t need any credit card details, your login info is sent straight to you using the email, and you also benefit from tech support available during the trial in order to get you started.

Take a look at its best features:

  • On-premises or hosted environments
  • Manage complex environments easier with the help of filters, groups, and rules
  • Top-tier security, OS and third-party patch management, backup, and antivirus tools
  • Extremely rapid remote access, ticket management, and PSA integrations
  • Create reports that will prove your value to your customers

⇒ Get N-central RMM

Deskcenter Management Suite – Great inventory management

Businesses use Deskcenter Management Suite to bring some order to their IT management. The system has been developed from practical experience in such a way to become seamless and to be implemented modularly.

Its main advantage is the fact that license management, software distribution, and all functional modules work together seamlessly in the most intuitive user interface.

With a starting point of a complete and accurate inventory of all your IT assets such as Computers, Servers, Virtual Environments, Peripherals, Components, Users, and Mobile Devices this module offers you a significant level of capacity on its own.

Your organization will have assured IT compliance, and you will also see high-cost savings.

The foundation for any strategy is a clear inventory of your assets paired with financial, purchase, and contact details.

This tool will help you create all these using its agentless technology and collecting over 3,500 pieces of data about system hardware and software.

Software management means more than software distribution and Diskcenter will allow you to keep your software up to date and distribute it intelligently.

The Deskcenter tool gives you all you need to reasonably identify software applications, manage your software license assets, and create an audit-proof view of your software license position.

Take a look at its key features:

  • Extensive software recognition
  • Application metering
  • Automatic software categorization
  • License and contract repository
  • Product & release recognition
  • All license metrics supported

⇒ Get Deskcenter Management Suite

Network Inventory PRO version 2.0 – Advanced network tool

Network administrators who require detailed information about the PCs that are currently connected to a network might have some difficulties in gathering data manually.

The process is time-consuming, and it comes with various limitations. Network Inventory PRO was created to help admins overcome such issues by providing them with a complete package for network mapping.

This is an advanced network tool that inventory network computers, servers, and non-PC network equipment and builds robust reports. More than this, the tool also allows you to manage remote computers and network devices by using advanced built-in tools.

The tool automatically collects software and hardware configuration of the networked PCs and LAN equipment with Network Inventory PRO.

Anyone who requires an efficient solution for mapping out PCs connected to the LAN and for obtaining information about the devices and their characteristics will be able to use this program successfully.

It will offer admins detailed data regarding the OS, the software, and the hardware of the selected PCs and it will also allow them to carry out remote procedures.

⇒ Get Network Inventory PRO

We guarantee that all the PC inventory tools for Windows will change the way your business functions for the best. Do check them out and choose the one that will best fit your organization’s needs.

While we are on this subject, you should also consult our list of the best remote management software.

If you have experience with any of the tools highlighted above, do share your story in the comments section below.

Flight Simulator X Windows 10: How to Get It Work Perfectly

Microsoft Flight Simulator X is the most popular flight simulation game on Windows 10. This game was released many years ago, so some issues with it are expected.

It has been reported that this game can’t be installed on Windows 10 computers for some users and that there are issues with black screen and other visual problems.

Does Flight Simulator X work on Windows 10?

Yes, fortunately, the Microsoft Flight Simulator X works on Windows 10 as well, and you can download it from Steam.

But if Flight Simulator X is not working on your Windows 10 device or if you encounter some problems using it, below are a few of our top solution recommendations.

Will FSX run on Windows 11?

Yes, FSX is currently running on Windows 11, and thanks to this OS iteration’s extra gaming features, you will get the best out of this game.

Without further ado, let’s see how you can fix FSX issues on Windows 10.

How can I get Flight Simulator X to properly work on Windows 10?

  1. Use Software Licensing System Reset Tool
  2. Use the hidden Administrator account to install the game
  3. Run Microsoft Flight Simulator X in compatibility mode
  4. Verify the integrity of game cache on Steam
  5. Run Flight Simulator X in borderless window mode
  6. Reinstall Flight Simulator X on Steam

1. Use Software Licensing System Reset Tool

    If you need to benefit from Flight Simulator X, you can simply utilize the Use Software Licensing System Reset tool from your Windows PC.

  1. 1. Download the Software Licensing System Reset Tool.

  2. 2. Make sure that you save the file to your Desktop, and after the download is complete, go to your Desktop and run (double-click) MSKB928080.

    flight Simulator X windows 10
  3. 3. Accept the license agreement by clicking Yes.

    flight Simulator X windows 10
  4. 4. Click the Unzip button to extract the files to the below path.
    c:\MicrosoftKB928080

  5. 5. Open the Windows search bar, type cmd, and click Run as administrator.

  6. 6. When Command Prompt starts, type the following lines, and after each line, press Enter to run it:

      • cd C:
      • cd MicrosoftKB928080
      • resetsldl -All
  7. 7. After doing that, close Command Prompt and try installing the game again.

2. Use the hidden Administrator account to install the game

  1. Open the Windows search bar, type cmd, and click Run as administrator.
  2. In Command Prompt, type the following and press Enter to run it:
    net user administrator /active:yes
    flight Simulator X windows 10
  3. Now log out of your current account and switch to the newly enabled Administrator account.
  4. When you log in to the Administrator account, try installing Flight Simulator X, and after the game installs, you can switch back to your regular account.
  5. Start Command Prompt like we explained in Step 1 and enter the following command to disable the administrator account:
    net user administrator /active:no

3. Run Microsoft Flight Simulator X in compatibility mode

  1. Find the Flight Simulator X shortcut and right-click it, then choose Properties and go to the Compatibility tab.
  2. Check Run this program in compatibility mode for and choose Windows 8 from the menu.
  3. Click Apply and OK to save the changes and try rerunning the game.

4. Verify the integrity of the game cache on Steam

  1. Start Steam and log in to your account.
  2. Go to the Library tab and locate Flight Simulator X.
    flight Simulator X windows 10
  3. Right-click it and choose Properties.flight simulator Steam-Libraries-Games-Properties
  4. When the Properties window opens, go to the Local tab, then click the Verify integrity of game cache button.flight simulator X Steam-Game-Properties-Local-Files-Verify-Integrity-of-game-files
  5. Wait for the process to complete, and when Steam finishes verification of your game files, restart Steam and try rerunning Flight Simulator X.

5. Run Flight Simulator X in borderless window mode

To switch to windowed mode, just press Alt + Enter while running the game, and it should switch to borderless window mode.

Some users claim that running Flight Simulator X in window mode fixes certain video issues, so let’s try running the game in windowed mode.

6. Reinstall Flight Simulator X on Steam

  1. Sign out of Steam.
  2. Navigate to the path below and delete the FSX folder.
    C:\Program Files (x86)\Steam\steamapps\Common
  3. Now open Steam and go to your Library.
    flight Simulator X windows 10
  4. Find Flight Simulator X and right-click it, then choose Properties.
    flight simulator Steam-Libraries-Games-Properties
  5. Go to the Local tab, and click Verify Integrity of Games Cache. This will redownload and reinstall Flight Simulator X on your computer.
    flight simulator X Steam-Game-Properties-Local-Files-Verify-Integrity-of-game-files

That would be all. We hope this article helped you solve your problems with Flight Simulator X in Windows 10.

Last but not least, you might want to check out our post on Microsoft Flight Simulator Sale: Best Deals in 2022 in case you want to recommend it to your friends.

Tell us in the comments section below what other issues you encountered and what other solutions worked for you.

NET HELPMSG 2182 Problems with BITS Service: Diagnose & Fix

The NET HELPMSG 2182 error arises for some users when trying to update Windows 10 or install new MS Store apps.

The full error message states Problem with BITS service: The requested service has already been started. System.Management.Automation.RemoteException More help is available by typing NET HELPMSG 2182. System.Management.Automation.RemoteException

Thus, this issue usually pertains to the BITS (Background Intelligent Transfer Service) that assists update downloads from Microsoft servers.

Naturally, one of the first things to do is check the status of the Background Intelligent Transfer Service.

  1. To do this, simply type services.msc in the search area and open the Services app.
  2. Locate the BITS Service and make sure its Startup type is set to Manual.
  3. Also, check the Status column and restart or start it should it be stopped.

Users can’t get Windows apps or updates when the NET HELPMSG 2182. system.management.automation.remoteexception error arises. If you encounter this issue, make sure you use our solutions below.

How do I fix the NET HELPMSG 2182 error in Windows 10?

1. Run the Windows Update troubleshooter

  1. Press the Windows key + S keyboard shortcut to open Settings.
  2. Select Update and Security.
  3. Then you can click Troubleshoot from the left pane.
    The Troubleshoot tab NET HELPMSG 2182

  4. Select Windows Update and click Run the troubleshooter to launch it.
  5. Then you can go through the Windows Update troubleshooter for potential fixes.

First, we will show you how to use the Windows Update troubleshooter, which can fix numerous update issues. This is a Windows built-in troubleshooting tool that can help you solve numerous issues.

2. Run the BITS troubleshooter

  1. To open the BITS troubleshooter, press the Windows + R keyboard shortcut.
  2. Enter Control Panel in the Open box, and select the OK option.
  3. Click Troubleshooting to open the Control Panel applet shown directly below.
    Troubleshooting Control Panel applet NET HELPMSG 2182
  4. Click View all on the left of the window to open the list of troubleshooters.
    Troubleshooter list NET HELPMSG 2182
  5. Then click Background Intelligent Transfer Service to open that troubleshooter.
    The BITS TroubleshooterNET HELPMSG 2182
  6. Click Advanced to select the Apply repairs automatically option, and then press the Next button.

The Background Intelligent Transfer Service troubleshooter can fix BITS issues, which is what some users need to do to resolve the NET HELPMSG 2182 error.

3. Use a system repair software

Even though you can always repair your system manually by following detailed guides on the topic, having good PC repair software at your disposal can simplify the entire process considerably.

Moreover, it can prevent your PC from encountering other similar issues in the future.

4. Run a System File Checker scan

  1. Type cmd in the Windows search bar.
  2. Select the Command Prompt (Admin) option to launch an elevated Prompt window.
  3. Before initiating the SFC scan, enter the following command in the Command Prompt and press Return to fix Windows 10 image corruptions. DISM /Online /Cleanup-Image /RestoreHealth 
  4. Enter sfc /scannow and press Return to run the System File Checker scan, which might take about half an hour or longer.
    System File Checker command NET HELPMSG 2182
  5. Restart the desktop or laptop if the SFC scan does repair system files.

System File Checker scans can fix BITS errors and corrupted system files. It is another great Windows built-in troubleshooting tool you can use for various issues.

If the SFC scan stops completely on your PC before repairing the files, you can fix the problem by following the right methods.

5. Restart the Windows Update process

  1. 1. Press the Windows key and type cmd in the search box.

  2. 2. Right-click on the result for Command Prompt and select Run as Administrator.

    run cmd as admin
  3. 3. Input the following commands (and press Enter after entering each one) to turn off Windows Update:

    net stop wuauserv
    net stop cryptSvc
    net stop bits
    net stop msiserver

  4. 4. Next, input the below command and press Enter. That command will rename SoftwareDistribution to SoftwareDistribution.old:

    C:\Windows\SoftwareDistribution SoftwareDistribution.old

    input the rename command
  5. 5. Then type the next command and press Enter: ren C:\Windows\System32\catroot2 Catroot2.old 

    rename catroot cmd command
  6. 6. To restart Windows Update, input the commands below separately, and press Enter after each one:

    net start wuauserv
    net stop cryptSvc
    net stop bits
    net stop msiserver

  7. Restarting Windows Update might fix that service and the NET HELPMSG 2182 error. To do this, follow the steps above closely in exact order. You only need to use Command Prompt with administrator rights.

On a side note, these steps will also help if you’re having trouble with the Windows Update service itself.

6. Reset the Microsoft Store cache

  1. Enter Command Prompt in Windows 10’s search box.
  2. Right-click Command Prompt to select its Run as administrator context menu option.
  3. Then enter wsreset.exe in the Command Prompt window, and press the Return button.
    The MS Store reset command NET HELPMSG 2182

  4. Restart Windows after clearing the MS Store cache.

This resolution is more specifically for users who need to fix the NET HELPMSG 2182 error for MS Store. Sign out of the MS Store before clearing its cache.

If you notice that Microsoft Store is not loading, be sure to tackle the issue with confidence (as always, we got your back!).

The resolutions above have fixed the NET HELPMSG 2182 error for some users. So, they are the most probable fixes for the issue.

If you have any other suggestions that we should include here, please write us a comment below.

WD Passport Not Showing Up? Fix it in 4 Easy Steps

WD My Passport Ultra is an external hard drive that users can utilize with Windows 10 desktops and laptops. However, some users have stated that their connected desktops and laptops don’t detect the WD My Passport Ultra drives.

Consequently, the drive is unrecognized and doesn’t appear in Windows 10 File Explorer. This guide contains the solutions to help you fix this issue and start using your hard drive with your PC.

Why is my WD Passport not showing up on my computer?

If the WD Passport is not showing up on your computer, below are some of the causes of the issue:

  • Faulty USB cable or port – Sometimes, the WD MY Passport is not detected due to minor hardware issues like a faulty port or cable. The fix here is to change the port and try another port on your PC.
  • Outdated drivers – Drivers are the connecting media between the hardware and software components. You might encounter this issue if the USB controller and WD Passport drivers are outdated. The fix is to update these drivers.

Moreover, you can encounter the following error variations, that are all solvable with the solutions below:

  • My passport external hard drive not showing up
  • WD Passport not showing up in Windows 10, 11
  • WD Passport not showing up in disk utility, file explorer, disk management
  • WD Passport detected but not showing up
  • WD Passport unlocked but not showing up – WD passport not showing up after unlock
  • WD Passport beeping not showing up
  • My passport ultra not showing up
  • WD Passport light on but not working
  • My passport driver is unavailable

What can I do if WD My Passport is not showing up?

There are some basic troubleshooting steps you should try before exploring the fixes in this section. These steps are listed:

  • Try connecting the driver to another port.
  • Change the USB cable. Try to use the cable that came with the drive or any original short cable.
  • Try the WD Passport on another PC.

1. Run the Hardware and Devices Troubleshooter

  1. Press the Windows key + S, type cmd, and click Run as administrator under Command Prompt.
    run as admin wd my passport not showing up windows 10
  2. Type the command below and press Enter: msdt.exe -id DeviceDiagnosticmsdt command
  3. Wait for the scan to complete and implement any recommended troubleshooting steps.

The Hardware and devices troubleshooter helps to fix issues with hardware on your PC. Running should you detect any issue that might be causing WD My Passport detected but cannot open Windows 10 or if it is not showing at all.

2. Update the drive firmware

    Updating the drive firmware has proved to work for many users in fixing the WD MY Passport not working or unavailable issue. So be sure to try it like in the example below. 

  1. 1. Visit the Western Digital website to download the firmware update file.

    wd-passport-ultra-not-detected
  2. 2. Right-click the downloaded file and select Extract file…

    extract wd my passport not showing up windows 10
  3. 3. Connect the WD Passport to your PC (USB 2.0 port) with the cable that came with it, open the extracted folder, and double-click the WDFirmwareUpdater.exe file.

    wd-passport-ultra-not-detected
  4. 4, Now, follow the simple on screen instruction to complete the installation.


  5. 5. Once the installation is complete, your PC should show that a drive is connected to your PC and what you need to do to make it work.

3. Reinstall USB Controller and update WD My Passport driver

  1. Press the Windows key + X and select Device Manager.
    device manager
  2. Double-click the Disk drives option to expand it, right-click the WD MY Passport driver, and select Update driver.
    update driver
  3. Select Search automatically for drivers and install any available update.
    search automaticcally wd my passport not showing up windows 10
  4. Now, go back to the Device Manager and expand the Universal Serial Bus controllers option.
  5. Right-click the WD My passport USB controller and choose Uninstall device.
    uninstall device
  6. Finally, click the Uninstall button to confirm the action and restart your PC.
    uninstall button

Updating your drivers is another way to fix the WD MY Passport not showing on Windows 10 issue. However, this manual process can be time-consuming and prone to mistakes.

So we will recommend using a dedicated tool in Fortect Driver Updater. This is because it can accurately match your hardware with its corresponding drivers. This guarantees that you will not face any errors that may occur when you install an incompatible driver.

⇒ Get Fortect Driver Updater

4. Adjust the drive letter

  1. Press the Windows key + R, enter diskmgmt.msc, and click the OK button.
    diskkmgt
  2. Right-click the WD My Passport drive and select the Change Drive Letter and Paths option.
    change path
  3. To assign a drive letter, click the Add… button if it does not have a drive letter and the Change… if it already has.
    add wd my passport not showing up windows 10
  4. Finally, choose a driver letter and click the OK button.
    choose letter

If your drive does not have a drive letter, you might encounter the WD My Passport not showing on Windows 10 issue. This is because your device might find it hard to detect the drive. Assigning a drive letter and restarting your PC should help you fix the issue in this case.

The WD MY Passport not showing on Windows 10 issue can be frustrating, as it denies you access to your file. Thankfully, it is a fixable issue, as shown in this guide.

Other models are also affected by this issue, and we have a great guide on what to do if WD My Cloud is not showing on Windows 11.

Are you facing other issues, like Windows 10 external driver keeps disconnecting? Then, check our detailed guide to fix it quickly.

Feel free to let us know the solution that helped you fix the issue in the comments below.

Device PCI Requires Further Installation [Fix]

Many have reported a message in the Event Log saying Device PCI requires further installation, and are concerned that this can cause problems on their PC. Today we’re going to take a closer look and see how to fix this.

How do I fix a PCI device that requires further installation?

Before we try other solutions, make sure that the driver is installed completely and that you’re viewing the latest log entry. If possible, try reconnecting the device and check if that helps.

1. Update the driver

  1. Type Device Manager in the Search bar, and click on the relevant search result.
    device manager search
  2. Locate the problematic device, right-click on it, and select Update driver.
    update driver context menu
  3. Now, select Search automatically for drivers.
    Search automatically for drivers
  4. Wait for Windows to find the best available version on the system and install it.
  5. Restart your PC to apply the changes.

Alternatively, you can try automatic updater software such as Fortect Driver Updater. It will automatically update your drivers and fix any damaged or missing drivers on your PC.

⇒ Get Fortect Driver Updater

2. Manually install the driver

  1. Press Windows + R to open Run, type devmgmt.msc in the text field, and hit Enter.devmgmt.msc run window
  2. Right-click on the problematic device, and select Update driver.update driver context menu
  3. Now, select Browse my computer for drivers.browse my computer for drivers
  4. Select Let me pick from a list of available drivers on my computer.Let me pick from a list of available drivers on my computer
  5. Finally, choose another driver from the list, and click on Next.install an older version to fix device requires further installation
  6. Choose the appropriate response in case a confirmation prompt pops up.
  7. If this doesn’t work, try another driver from the list until you manage to fix the problem.

This method has helped several users fix the Device driver requires further installation error in Windows, and we recommend you give it a try.

3. Check for issues

  1. Type Security and Maintenance in the Search bar, and click on the search result that goes by the same name.security and maintenance
  2. Check for any issues listed here, and take the necessary actions to eliminate the root cause.resolve issues to fix device requires further installation

If wasn’t the driver, you could check for issues in Security and Maintenance and fix them in no time.

Device PCI requires further installation can affect your GPU, Wi-Fi, or any other network adapter, but hopefully, you managed to fix it with these steps.

Moreover, if you’re having trouble with updating the PCI Express Root Port driver specifically, we have a guide just for that. We also wrote about PCI Express root port errorexpress root port error express root port error express root port error so don’t miss it.

This isn’t the only issue with PCI devices and we covered what to do if PCI device driver missing as well as PCI Bus Driver Internal error.

If you have any other queries or know of another method to fix the problem, drop them in the comments section below.

How to Fix USB-C to HDMI Not Working Windows 11

In this guide, we’ll show you how to fix the USB-C to HDMI when it’s not working on Windows 11.

As you probably expect, there are several possible causes for this issue, the most common of which include an outdated or missing driver, a faulty cable or adapter, display settings interfering, or graphics card compatibility.

Here’s how you’ll address them and troubleshoot the USB-C to HDMI not connecting.

How do I fix my USB-C to HDMI adapter if it’s not working?

First, try switching ports, checking the cable for damage, or testing the adapter on another computer; if the issue persists, follow the more advanced steps below.

1. Update the USB C to HDMI driver

  1. 1. Press the Windows+ R to open Run.

  2. 2. Type devmgmt.msc, and then click OK.

    device manager
  3. 3. Double-click on Other devices to expand and view the ones under it.

    other devices
  4. 4. Now, right-click on the USB device and select Update driver.

    update driver to fix usb c to hdmi not working
  5. 5. Select Search automatically for drivers.

    search automatically for drivers
  6. The USB-C to HDMI driver in Windows 10 can often be why it is not working. So make sure to install the latest version of it.

    You can manually install the latest driver using the built-in tool called Device Manager. However, remember that the manual method is not always practical and might not work for all cases.


Update drivers automatically

You can download the latest driver for your USB to HDMI driver from the company’s website. With a bit of research, you should find the correct driver.

However, the best way to update your drivers is by using a specialized third-party tool that automatically scans your hardware for the latest available version and downloads it.

⇒ Get Fortect Driver Updater

2. Scan for hardware changes

  1. Press Windows + X to open the Power User menu, and select Device Manager.device manager
  2. Now, click on the Action menu, and select Scan for hardware changes.scan for hardware changes to fix usb c to hdmi not working
  3. Then try utilizing the USB to HDMI adapter after scanning.

If USB-C to HDMI is not working on the laptop, scan for hardware changes, and it should get the functionality up and running again.

3. Rollback to the previous Windows build

  1. Press Windows + I to open Settings and click on Update & Security.update & security
  2. Now, select Recovery from the navigation pane, and click on the Get started button under Go back to the previous version of Windows 10. Remember, you can only do this within ten days of installing an update.get started to fix usb c to hdmi not working
  3. Follow the on-screen instructions to complete the process.

Some users have found that their USB-C to HDMI adapters stopped working after a Windows update. If that happens, try reverting to the previous version or perform a System Restore if the option is available.

Does USB-C to HDMI always work?

Generally, yes, but issues with the driver or connection can occur. Most of these are fixable with the solutions we’ve provided.

How do I know if my USB-C supports video?

Look for a Lightning symbol or D (DisplayPort) logo next to the USB-C port, indicating support for video output.

If these steps don’t work, your adapter may need replacing. For other USB-related issues, check out our guides on fixing USB-C problems, USB ports not working, or USB devices not working with TVs.

If your adapter is under warranty, consider returning it for repair. Let us know in the comments if you found another solution!

Debug Software for Windows: Best 6 to Use in 2026

This guide brings you a compilation of the best debugging software for Windows. So, if you own a Windows PC and need debugging software, this piece will inform you adequately on the most suitable one.

Debugging is the process of searching for and fixing errors or other problems to avoid improper execution of a piece of software or an entire system.

How do I install debug tools on Windows 10?

  1. If you wonder how to debug a computer, first access the link of the software provided by us below, then hit the Download button.
  2. Then double-click the downloaded file in order to install it. That’s it!

So now, let us introduce you to some great options:

  • WinDbg – Specialized in Windows debugging
  • Visual Studio Debugger – Robust debugging features
  • OllyDbg – Best for 32-bit Windows
  • GNU Debugger – Great portable debugger
  • Fortect– Best debugging software overall
  • Syser Debugger – Top kerdel-mode debugger

What is the best debug software for Windows?

WinDbg – Specialized in Windows debugging

best debugging software for windows

Windows Debugger (WinDbg) is the standard debugging software for Windows. It is the official debugging tool from Windows’ developer – Microsoft. The software requires two interlinked computer systems to function at optimum capacity.

WinDbg can debug Windows OS (in kernel mode) and applications (in user mode). It also can analyze crash dumps and examine processor registers. The software is the ultimate tool for fixing any form of bug attack on a Windows PC.

Furthermore, Windows Debugger (WinDbg) supports operating systems on virtual engines. To do this, you need a durable VirtualCOM port to facilitate debugging of operating systems on virtual machines.

At times, debugging (via WinDbg) could be faster on virtual engines (especially VMWare) than on the original OS.

Important features:

  • Automatic processor detection engine
  • Integrated TTD (Time Travel Debugging)
  • Single-Click app debugging
  • Command windows
  • Powerful GUI

⇒ Get WinDbg

Visual Studio Debugger – Robust debugging features

best debugging software for windows

Visual Studio is another top-rated debugging software from Microsoft. Just like WinDbg, Visual Studio Debugger hosts exclusive support for Windows PC. Additionally, it comes preinstalled on all versions of Visual Studio, an IDE (app development) program from Microsoft.

This debugger is commonly used to debug Windows apps, as it is designed to run in debugger mode i.e. it operates in sync with any app you want to debug. Furthermore, to debug an app, you need to set the breakpoints, and you can start debugging.

Visual Studio is similar to WinDbg in terms of ease of usage and operability. However, unlike WinDbg, it cannot run kernel-mode coding (to debug a Windows OS).

As such, its functionality makes it excellent for debugging system programs and installed applications.

Important features:

  • CodeView
  • Symbol & Source Integration
  • Remote debugging,
  • Edit & Continue (live configuration)

⇒ Get Visual Studio Debugger

OllyDbg – Best for 32-bit Windows

OllyDbg is another top-rated x86 debugging software specially designed for all 32-bit Microsoft Windows NT versions. It is reverse engineering software that is often used to crack systems and install apps on Windows PCs.

OllyDbg is optimized to run binary analysis, in contrast to the conventional coding setup. Furthermore, it hosts an intuitive UI whose functions can easily be extended by plug-ins.

Additionally, it comes with Open architecture, a customizable/extensible platform, unicode support, and a customizable disassembler.

Lastly, OllyDbg is freeware, which means it is available for free download. However, there is an advanced version, which requires a paid license.

Important features:

  • Software cracking
  • Real-time editing (of bitcode)
  • Malware and code analysis
  • DLLs debugging

⇒ Get OllyDbg

GNU Debugger – Great portable debugger

GNU Debugger, GDB, is one of the best debugging software for Windows. It is a portable computer debugger that operates on multiple programming languages.

Additionally, it hosts cross-compatible support for Windows and Unix-like (multipurpose) operating systems.

GDB is program-specific, designed to identify, modify, suspend, terminate, and fix bugs on a specific application hosted on a PC. Essentially, it can examine a target application’s operational behavior, revealing all inherent elements that could cause damage.

This tool offers Python scripting support, Memory leak detectors, Watchpoints, Breakpoints, and Debugging registers.

Lastly, GDB is licensed under the GNU’s General Public License (GPL), which means it is available free of charge.

Important features:

  • 12+ programming language support
  • Remote debugging
  • Reversible debugging
  • Multi-CPU support

⇒ Get GDB Free

Fortect – Best debugging software overall

Debugging and fixing some common issues in Windows 10 involves cleaning and fixing damaged system files, registries, and DLL.

Fortect is an excellent alternative when dealing with such issues. While other third-party tools may do a similar job, Fortect has proven to be the most efficient among them.

It features a lightweight UI, and the debugging process is quite automated. Therefore, you don’t have to click too many buttons or configure too many settings to get your PC to a pristine condition.
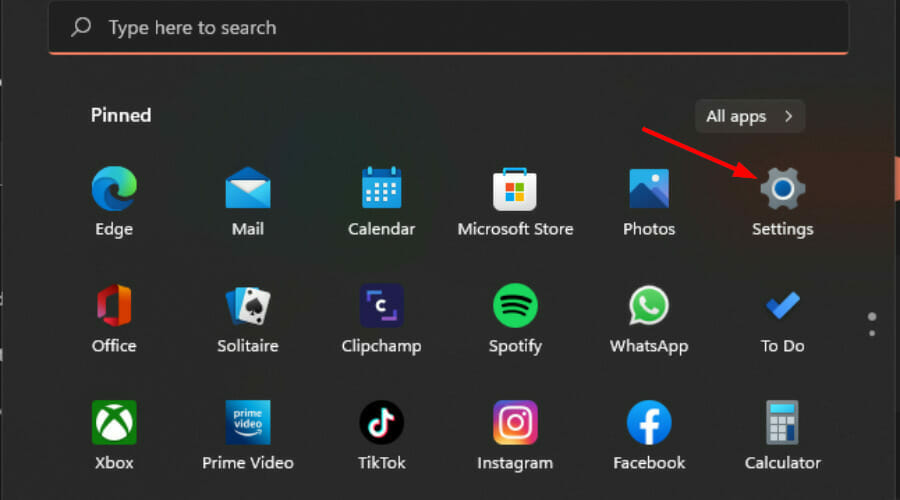
Finally, not only will it clean your registries, but it will also clean and fix your DLLs and remove the damage caused by malware, all within a single scan spanning a couple of minutes.

Important features:

  • Repairing virus damage
  • Hardware repair
  • Finding stability issues
  • Junk cleaning

Fortect

Third-party tools may not seem like the go-to solution in this case, but Fortect can get the job done right.
Free Trial Download now

Syser Debugger – Top kerdel-mode debugger

Syser Debugger is a kernel-mode debugger that serves as an operating system analyzer and a driver developer for Windows computer systems. It stands out as one of the best debugging software for Windows.

The software is a 32-bit x86 debugger for Windows NT operating systems. Additionally, it is great for monitoring all Windows commands at any point in time, and it aptly detects bugs at an early stage.

Additionally, it is durable enough to run on virtual engines like VMWare without worrying about system crashes.

Lastly, Syser Debugger’s service license fee is $198.00.

Important features:

  • Source code & assembly debugging
  • Color disassembly
  • Syntax coloring
  • Multi-CPU support

⇒ Get Syser Kernel Debugger

What are debugger tools?

A debugger app is a tool that can aid in software development by spotting code problems at different stages of creating an OS or an application. Some debuggers examine a test run to determine which lines of code were skipped.
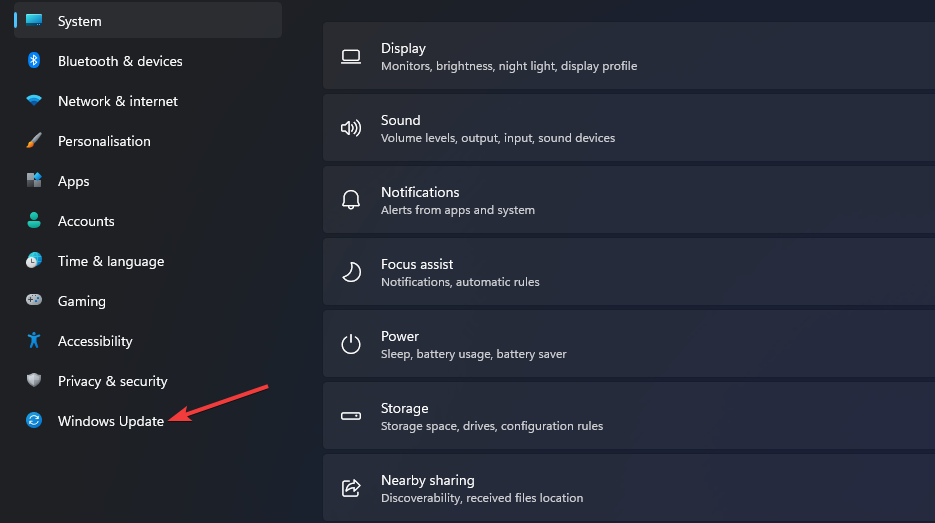
You should note that debugging software may come in various forms, including:

  • Resource monitor tools – These tools may diagnose performance issues and monitor PC resource use.
  • Web debugging tools – These may be cross-browser testing tools in some cases.
  • Specific language debugging tools – For example, there are debugging tools for c++, Java, C#, etc.
  • Native OS debuggers – In Windows 10, for example, users may use the built-in WinDbg to debug both kernel-mode and user-mode code, as well as study crash dumps and look into the registers of the CPU while the code is running.

Debugging is an essential computer process that facilitates the swift identification and repair (or removal) of various forms of bugs on computer systems.

Numerous debugging software exists, many of which are either substandard or incompatible with Windows.

Therefore, this article has compiled a list of Windows’s best debugging software to inform better your decision on which one to employ.

How to Listen to Music Together on Spotify on PC

We all love listening to our favorite music. Whether it is used to keep us company while we’re busy, to help us go through sad moments, or to celebrate joyful moments, music has always played an integral part in human life.

Now, as technology has advanced, the quality of the sound and the way we’re experiencing music has changed, but the effect is the same.

Spotify is one of the most comprehensive music platforms that besides other incredible features, allows you to explore the world of music with your friends and family.

Can two people listen to Spotify at the same time?

Spotify allows you to listen to music together with as many friends as you want, using the Remote Group feature.

It is worth mentioning that this feature is going to work only between two or more Premium accounts.

In today’s article, we will talk about the Group session feature in Spotify, and we’ll also discuss how to use it efficiently. Read on for more details.


How can I listen to music together on Spotify?

  1. 1. Launch Spotify.

  2. 2. Tap the Devices available button from the Now Playing toolbar.

    click on the devices button spotify
  3. 3. Click on Start a group session option.
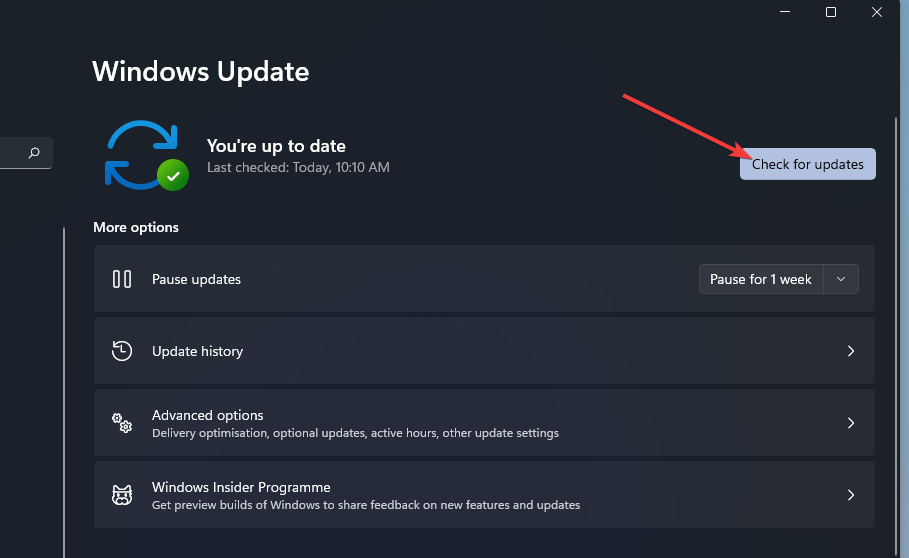
    start a group session spotify
  4. 4. Choose how you want to share the session and copy the code.

  5. 5. Share the code with the friends or family members you want to have access to the Group Session.
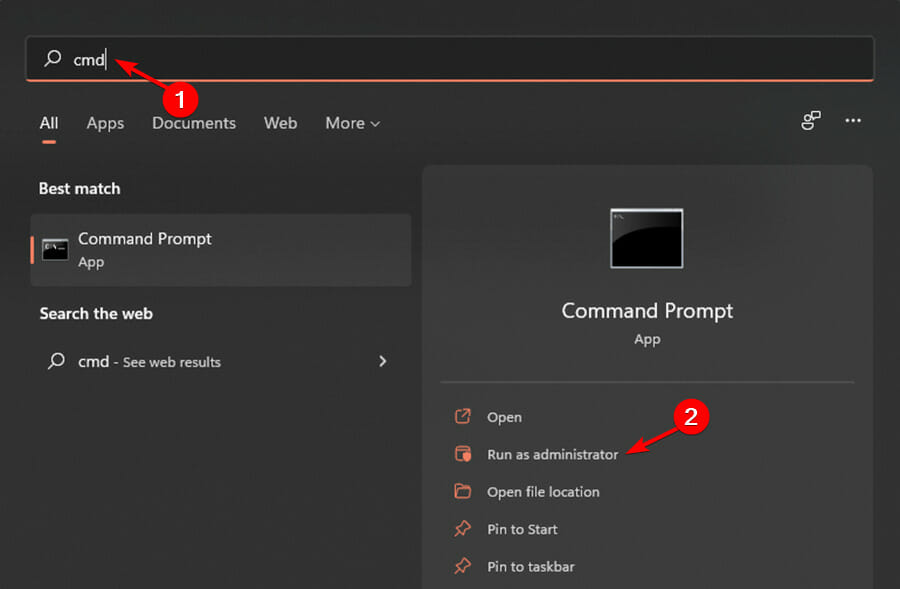
  6. If you want to listen to music together with your friends or family on Spotify, all you need to to is create a Remote Group Session.

    You can invite your friends to it via a code. A friend or family member can then use this code to join your session.

Note: If you are the Group Session creator simply click End Session to close it. If you joined the session and want out, you can tap on the Leave Session option.


As you can see, using Spotify‘s Group Session feature is very a simple and direct process. This great Spotify feature allows you, your family, and your friends to enjoy music and podcasts together.

We hope you managed to listen to music together with your friends on Spotify using the Group Session feature. Let us know in the comments section below how it went.