A lot of audio recording problems could occur in Windows 10, and they are very annoying. Many reported that the headset microphone level was stuck at 0.
Speaking of microphone issues, users reported the following problems:
Microphone level keeps going to 0 Windows 10 – According to users, their microphone level keeps going to 0. This is an annoying problem that might be caused by malware.
Microphone level resets to zero – This is a similar problem that can appear on your PC. To fix it, be sure to check your microphone settings.
Microphone level keeps muting – This is another variation of this problem, but you should be able to fix it by using one of our solutions.
Microphone volume won’t stay up – Several users reported that their microphone volume won’t stay up. This can be an annoying problem, but you can fix it by checking your microphone settings.
Microphone volume reduces automatically – This problem can occur due to your audio control software. To fix the issue, find and remove the audio control software from your PC.
Why is my headphone/mic volume so low?
There are several causes for this problem, with the following ones being the most common:
Audio glitches – Sometimes issues and bugs can occur, and they are usually fixed by using an audio troubleshooter.
Other apps – Other apps can take over your microphone and cause the volume level to change.
Drivers – Audio drivers can have issues, and those issues can prevent you from changing the microphone level.
What can I do if my headset microphone level is stuck at 0?
Here’s what you should do first:
If your headset microphone level is stuck at 0, the problem might be malware on your PC. Sometimes certain malware can interfere with your microphone and reduce the volume levels on your PC. There are many great antivirus applications, but if your antivirus can’t fix this problem, you might consider switching to the best antivirus solution on the market.
The problem might be your port. Many users reported similar problems with their USB microphone, and according to them, the issue was their port. To fix the problem, you need to disconnect your microphone and connect it to a different port. If you’re having issues with USB 3.0 port, visit our USB 3.0 port not recognized guide.
1. Run the Audio troubleshooter
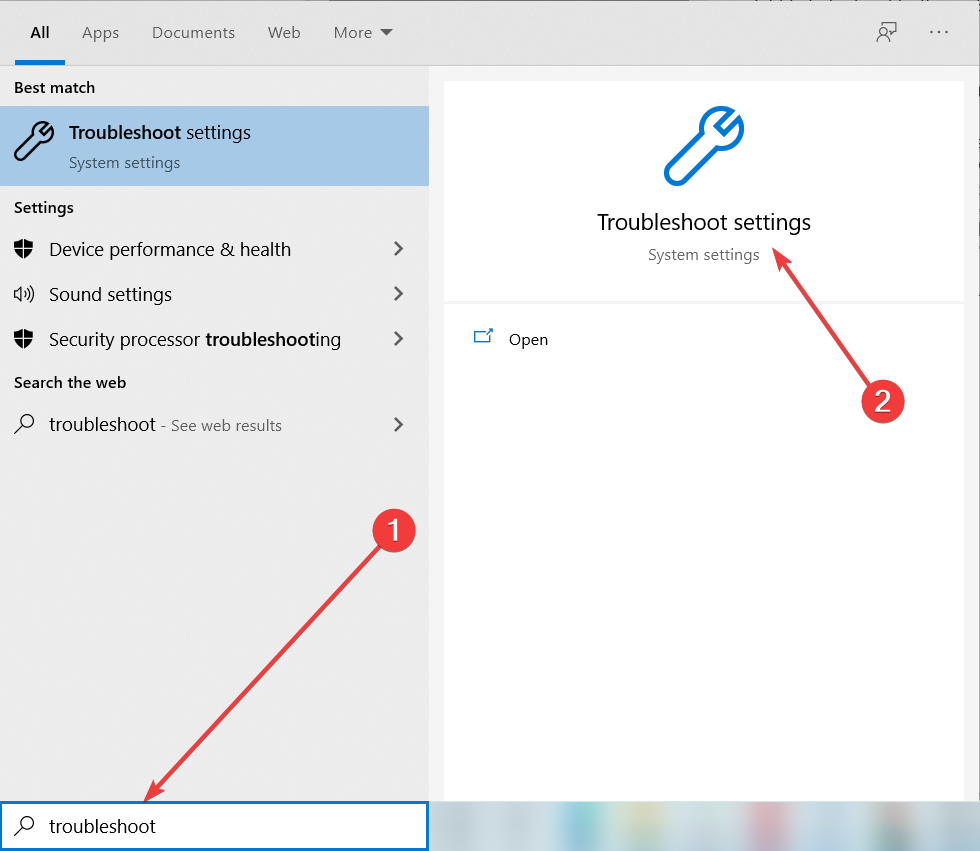
Go to Search, type troubleshoot, and open Troubleshoot settings.
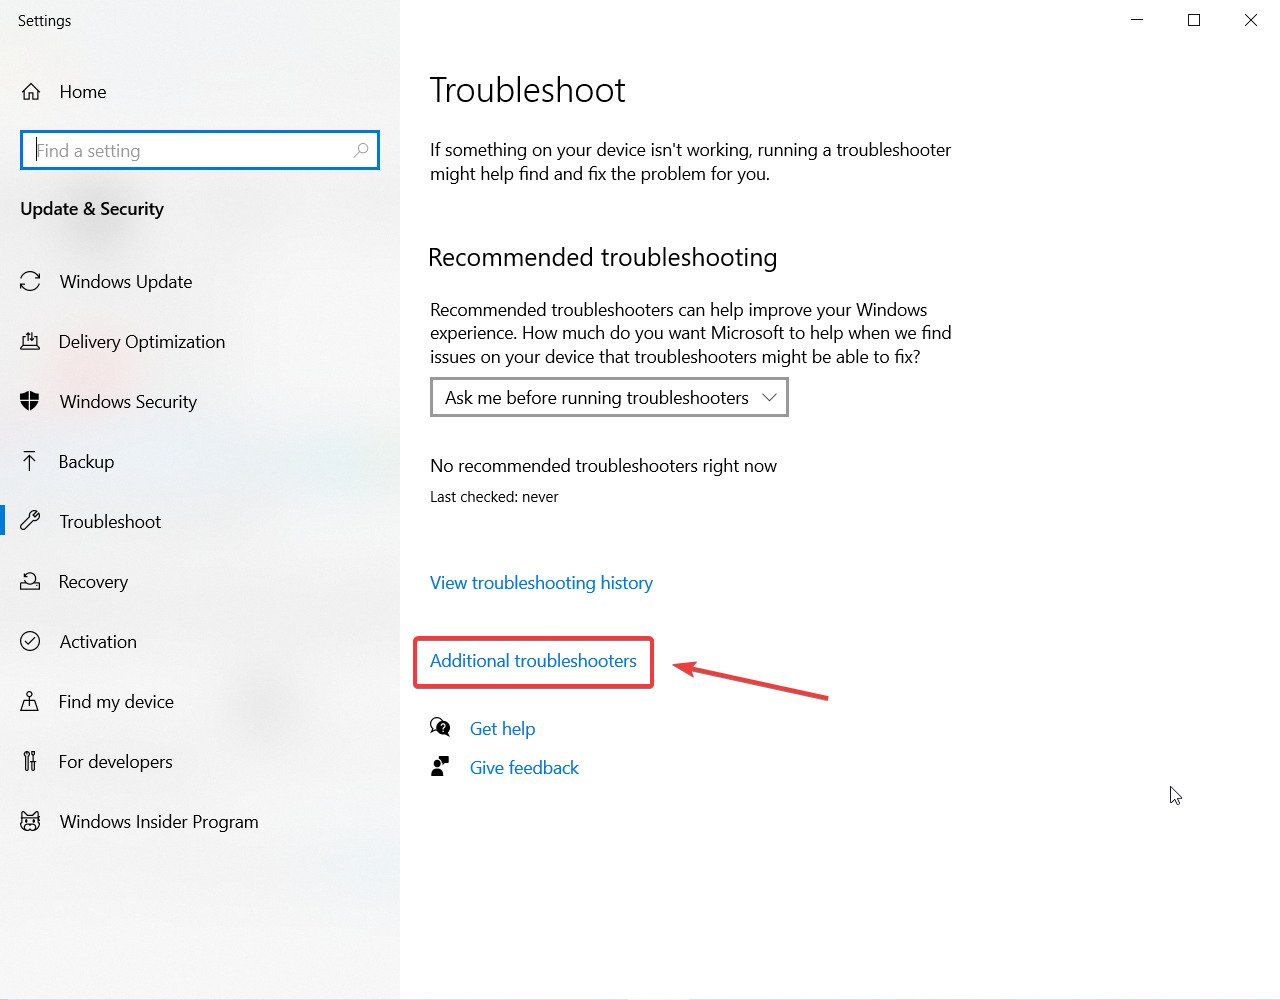
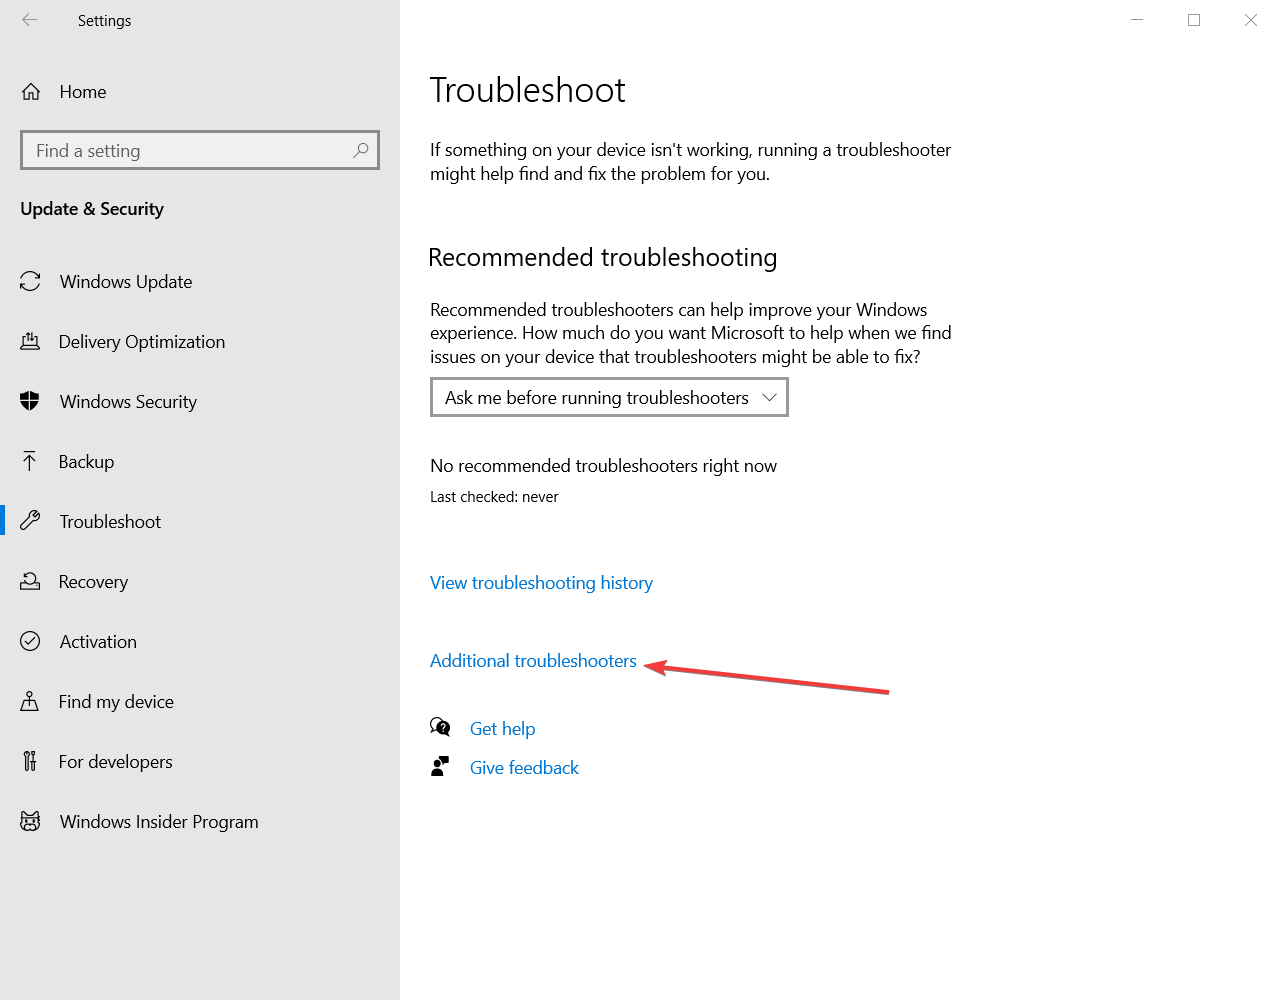
In Troubleshooting window, go to Aditional troubleshooters.
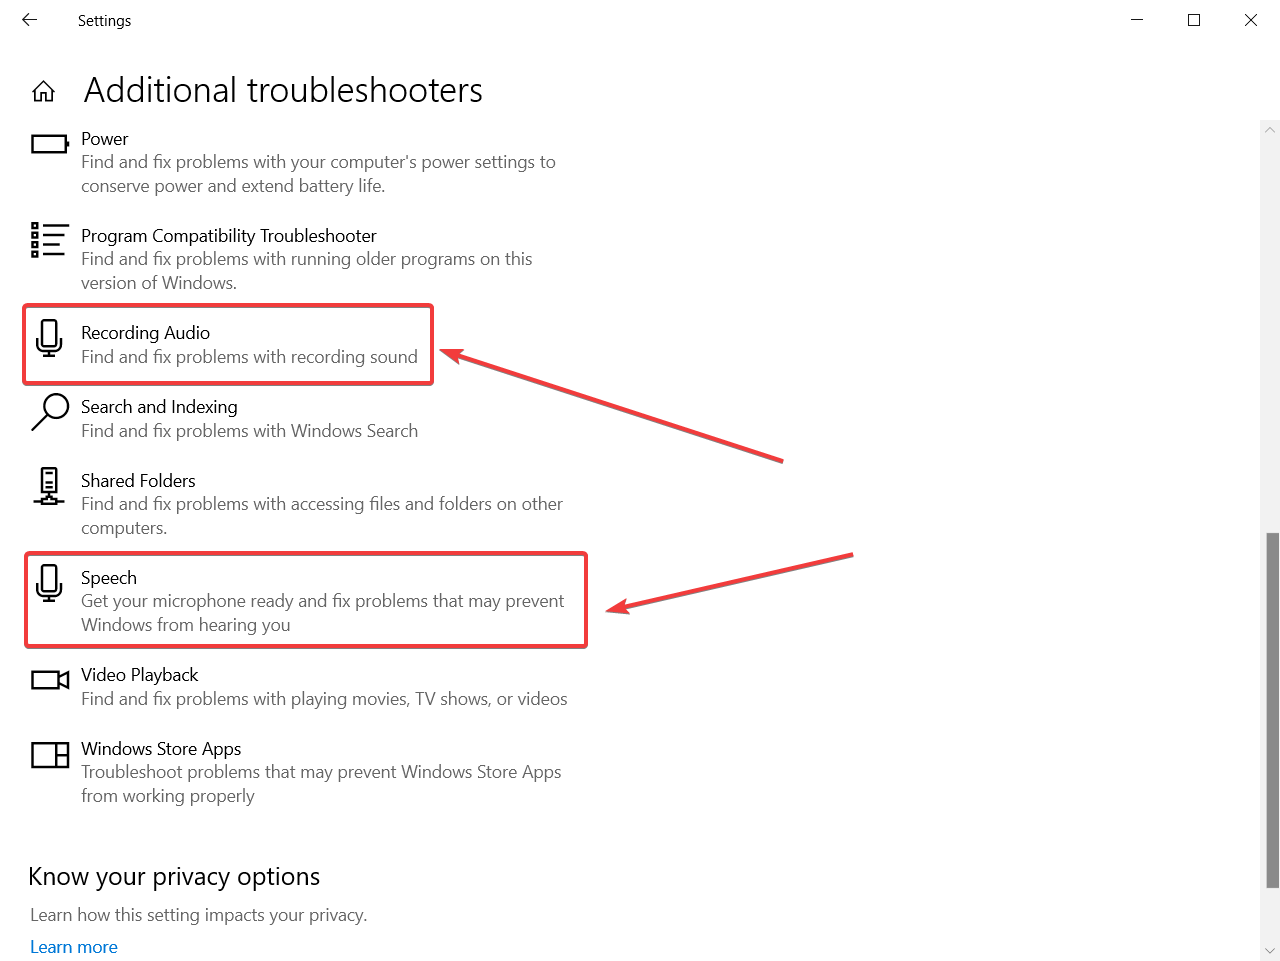
Click on the Recording Audio and then on the Run the troubleshooter button. After running the troubleshooter see if the problem has been resolved. If not, run the Speech troubleshooter from the same window.
You will ask about what device you want to troubleshoot so make sure you select the correct microphone.
2. Perform a System Restore
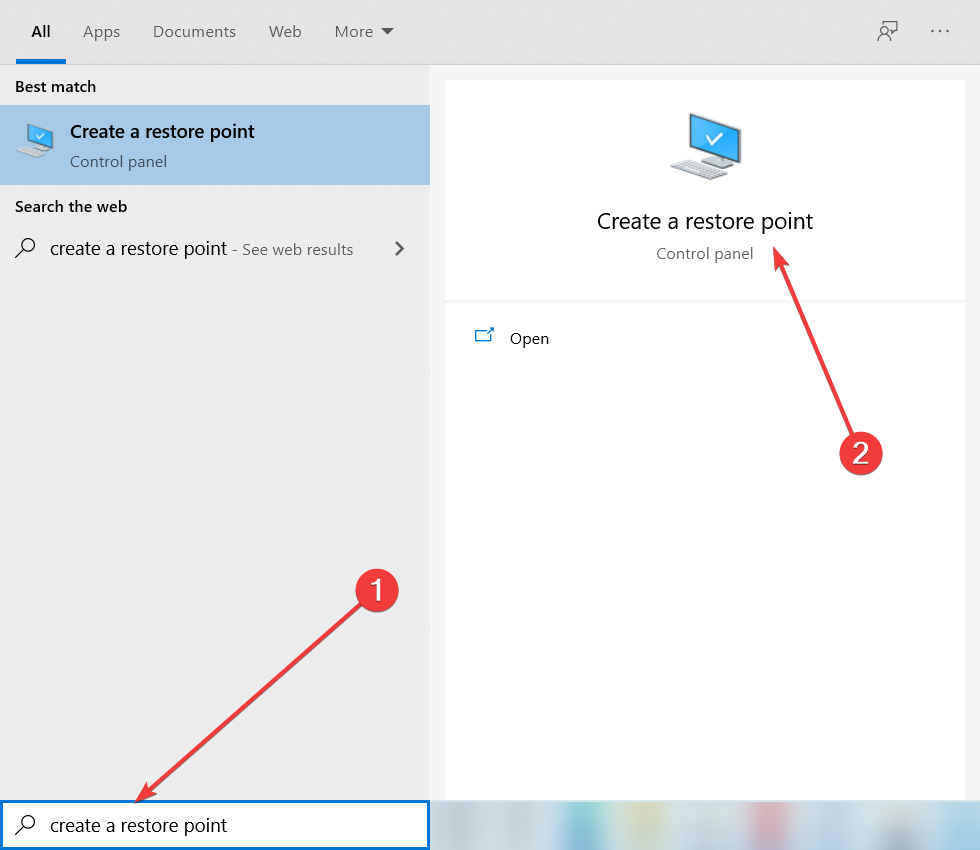
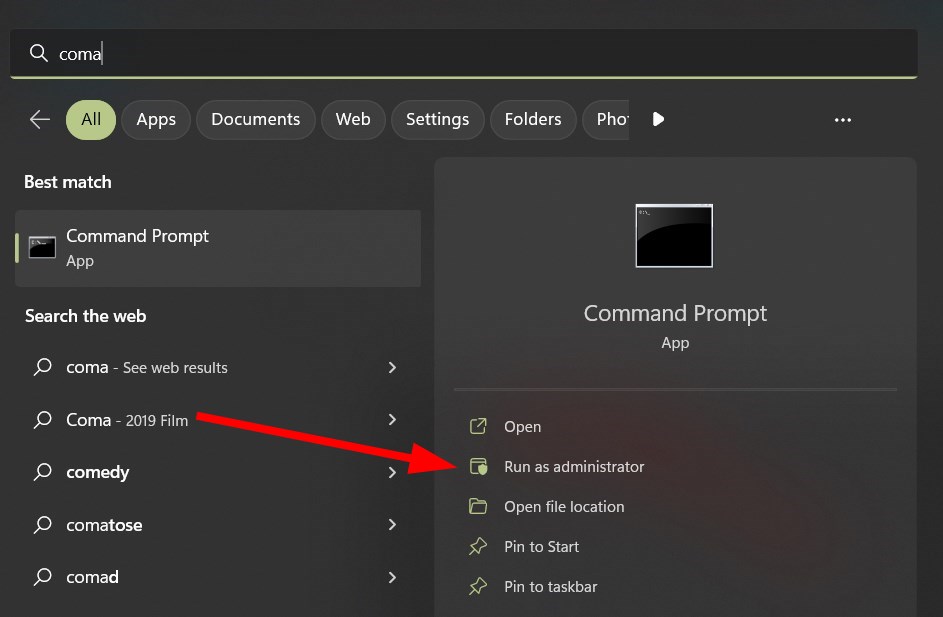
Press Windows key + S and enter system restore. Choose Create a restore point from the menu.
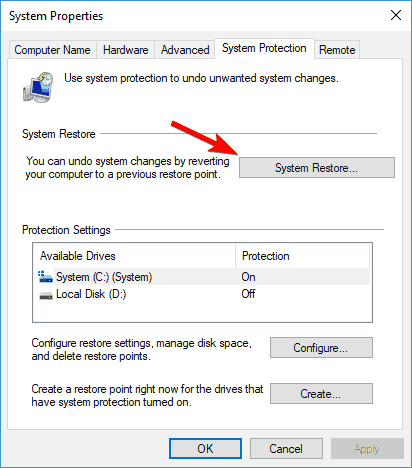
System Properties window will now appear. Click the System Restore button to proceed.
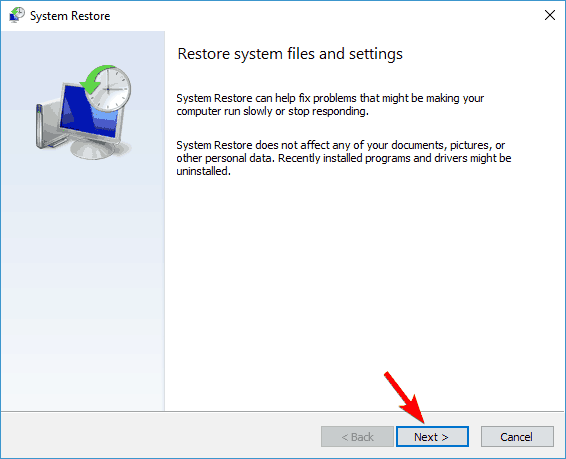
System Restore window will now appear. Click Next to continue.
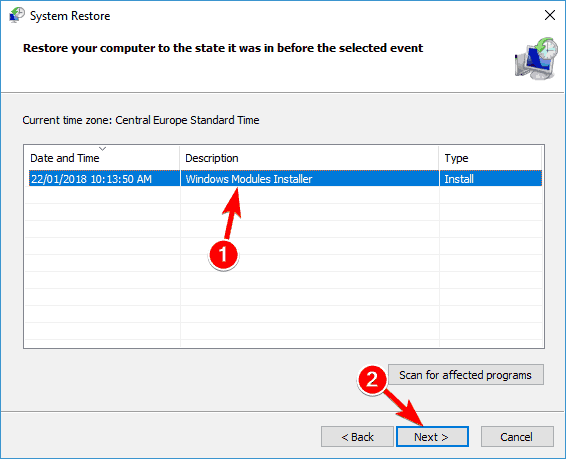
If available, check Show more restore points option. Now select the desired restore point and click Next.
Follow the instructions on the screen to complete the restoration process.
All these solutions are great, and they are working for so many users, but some of them may seem complicated for many, and they are time-consuming.
But you can get rid of this issue easily and without technical skills by using a dedicated third-party tool.
3. Forbid apps to control the microphone
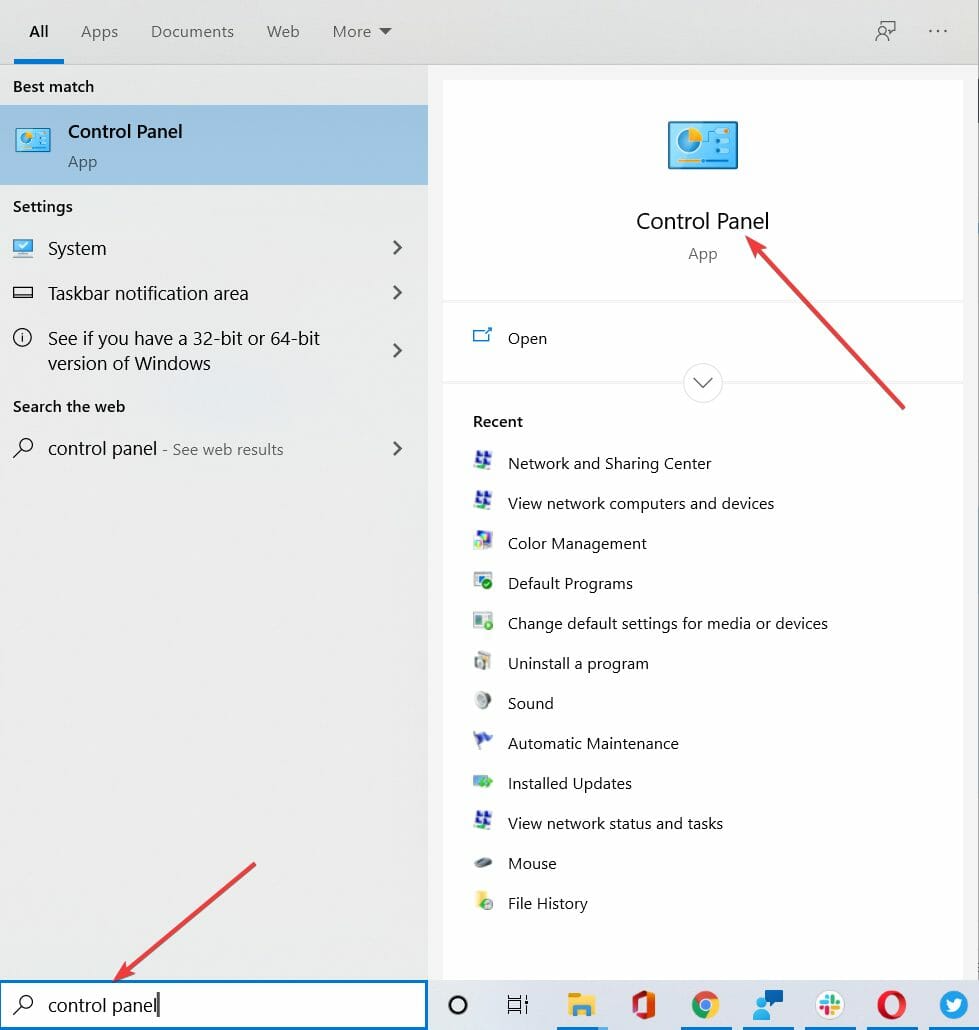
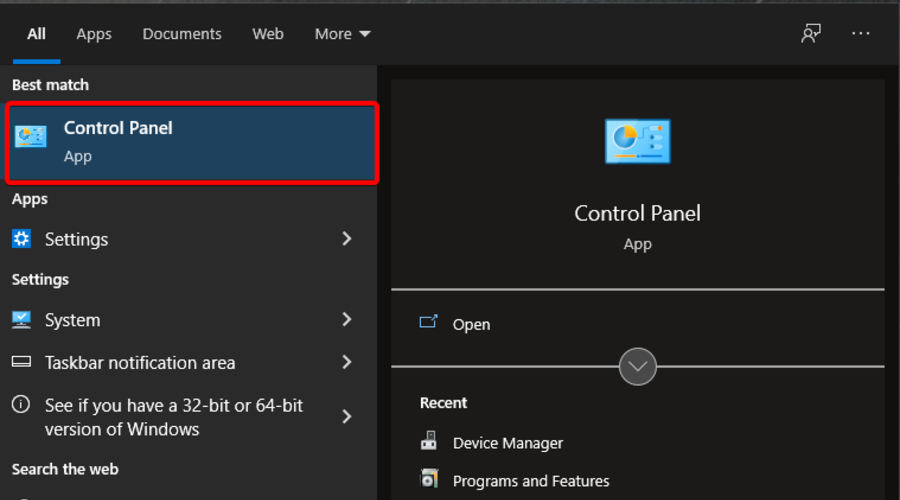
Go to Search, type control panel, and open Control Panel from the results.
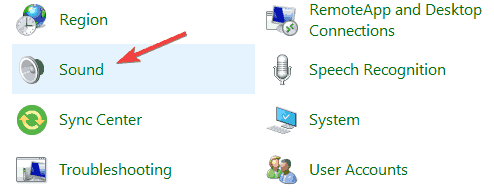
When Control Panel opens, select Sound.
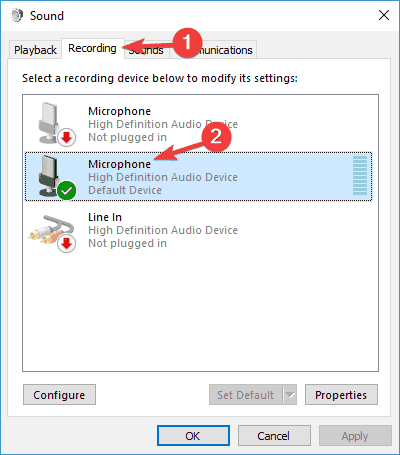
Go to Recording tab and double-click your microphone.
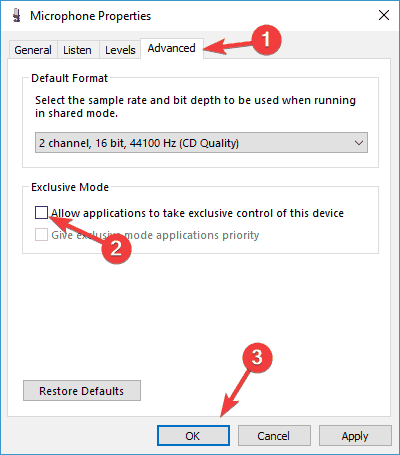
Under Advanced tab uncheck Allow applications to take exclusive control of this device. Click Apply and OK to save the changes.
Sometimes third-party apps could make your microphone go berserk, so to prevent it, you’ll have to prevent them from controlling the microphone, which is enabled by default.
Now that you know how to lock the microphone volume, be sure to do that on your PC.
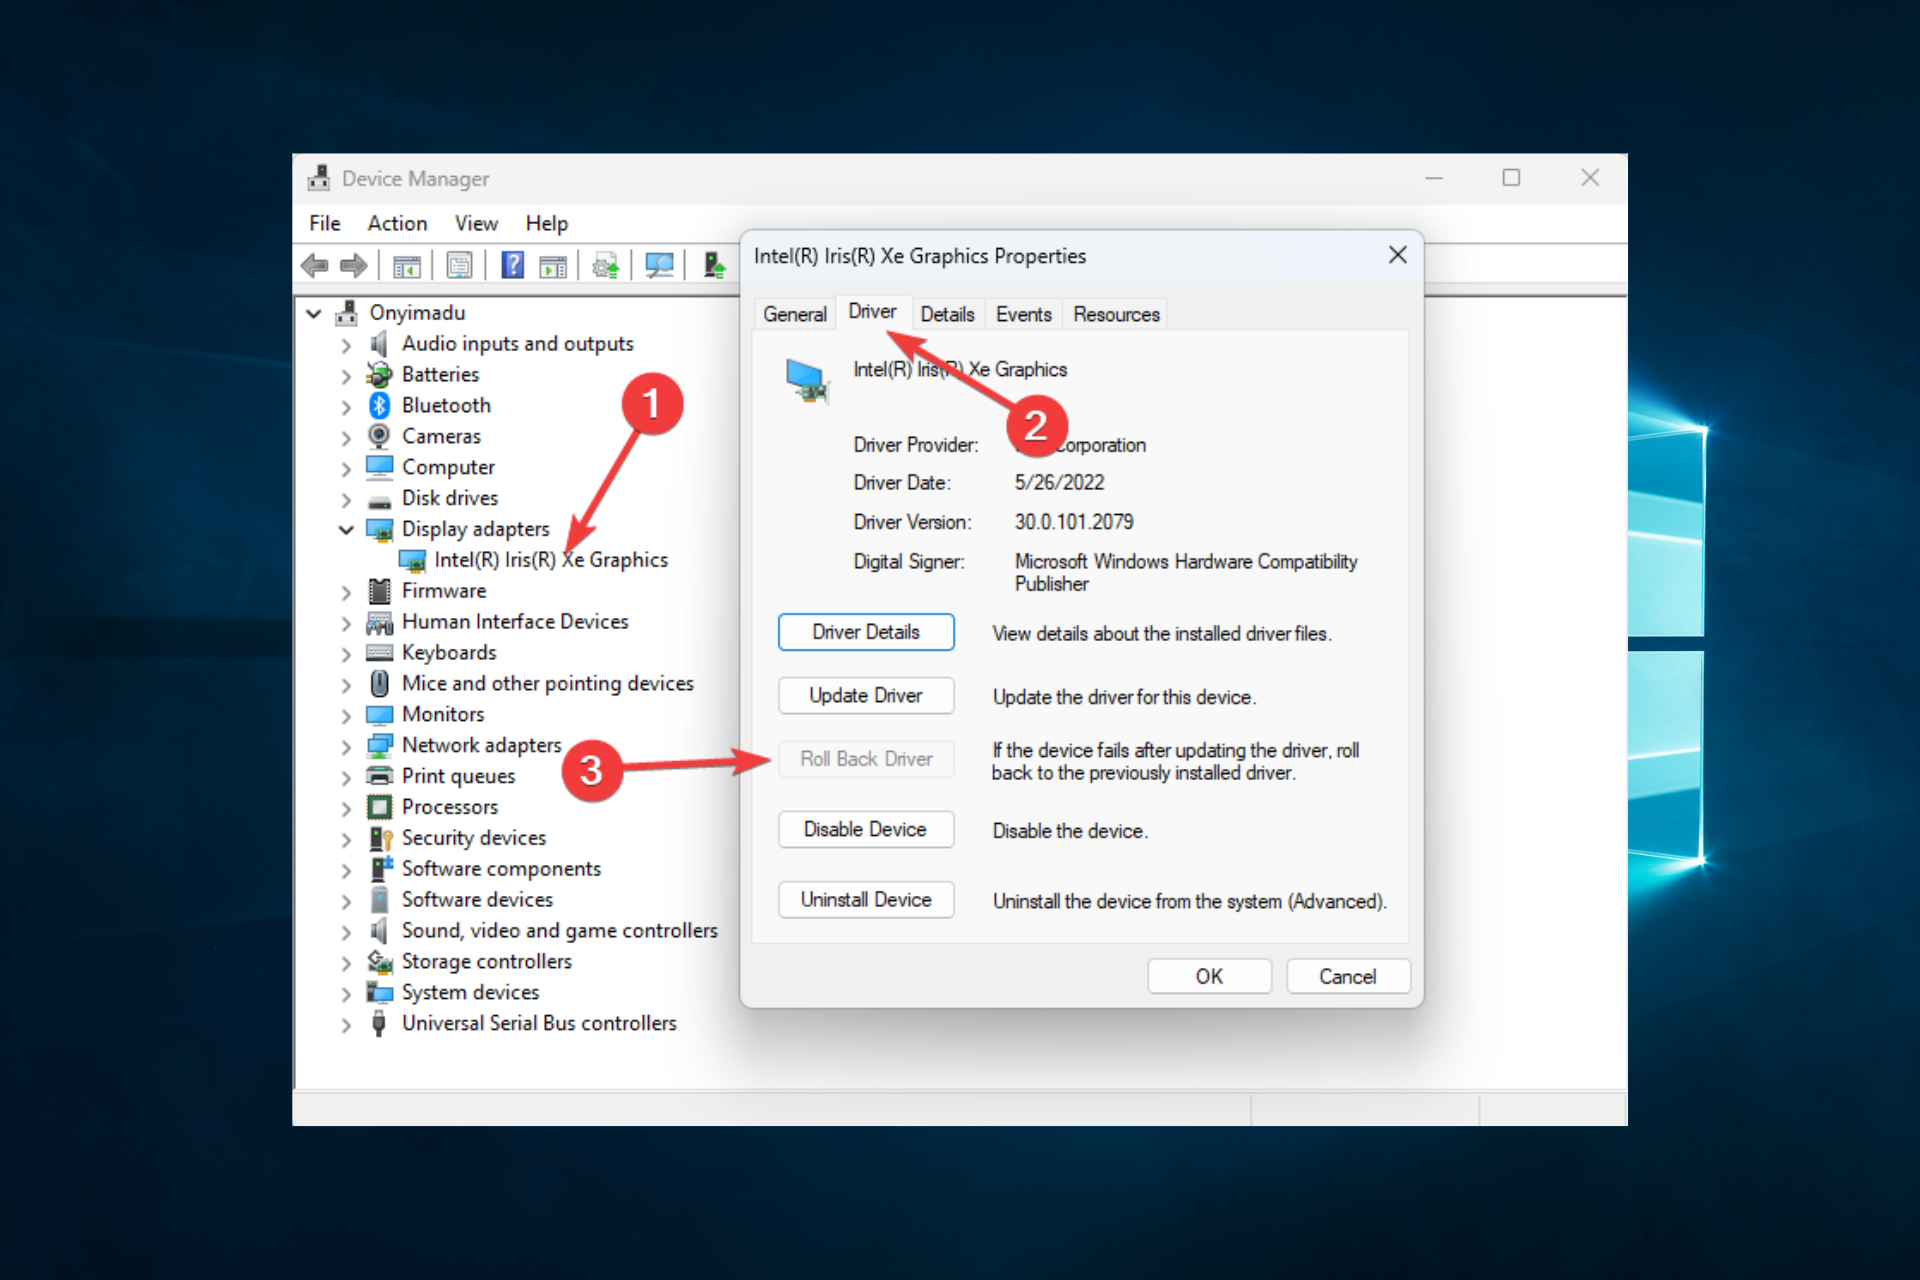
Press Windows key + X to open Win + X menu. Now select Device Manager from the list.
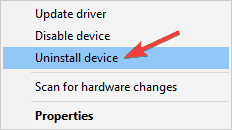
When Device Manager opens, locate the problematic device, right-click it and choose Uninstall device.
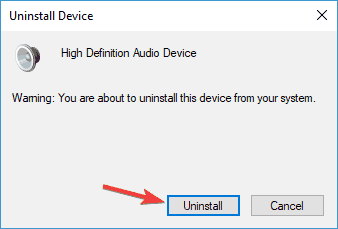
When the confirmation menu appears, click Uninstall.
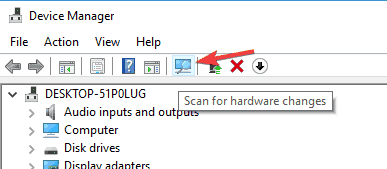
Once the driver is removed, click on Scan for hardware changes icon.
Windows will now install the default driver, and the issue should be resolved. If the problem persists with the default driver, you should try updating your driver and check if that helps.
To keep your system working properly, you need to have all drivers updated. We recommend a third-party tool to automatically update your drivers.
A professional driver updater tool will safely update and fix all your drivers in a fraction of the time needed for you to do it manually.
5. Set your microphone as the default recording device
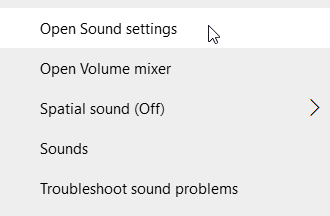
Right click the volume control icon in the bottom right corner and choose Open Sound settings from the menu.
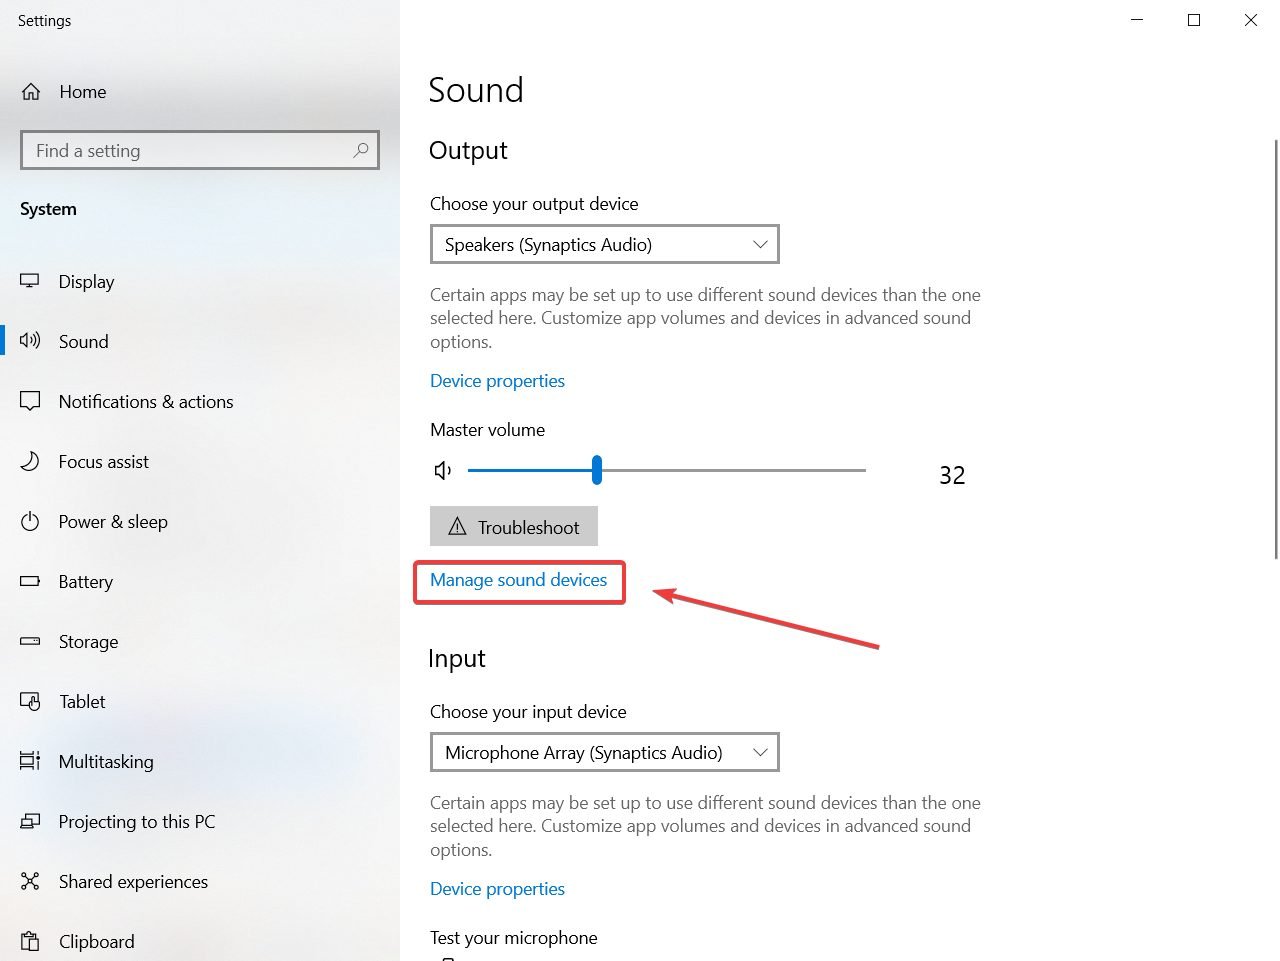
Now click on Manage sound devices.
Look at the Input devices category and find any other devices besides your microphone, click on them and select the Disable button under them.
Many webcams come with a built-in microphone, but sometimes the microphone on your webcam can be the problem.
If you have both your webcam and external microphone connected, you might encounter this issue.
6. Uninstall audio control software
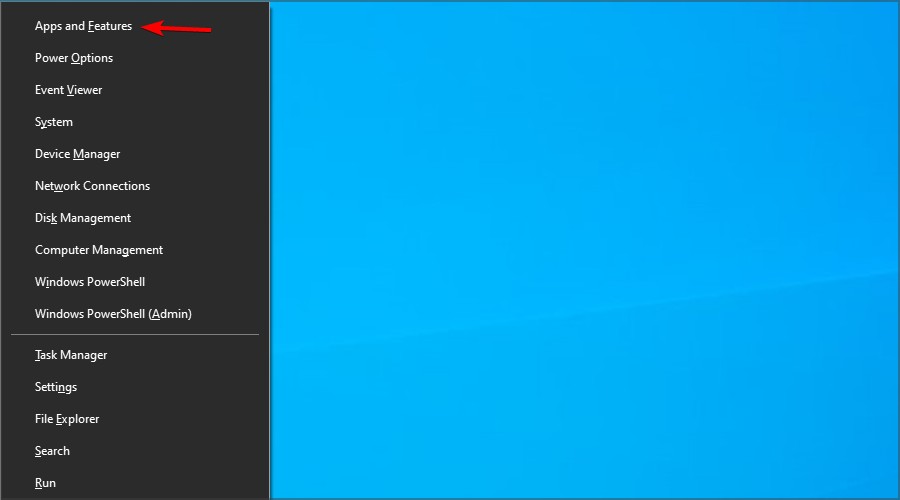
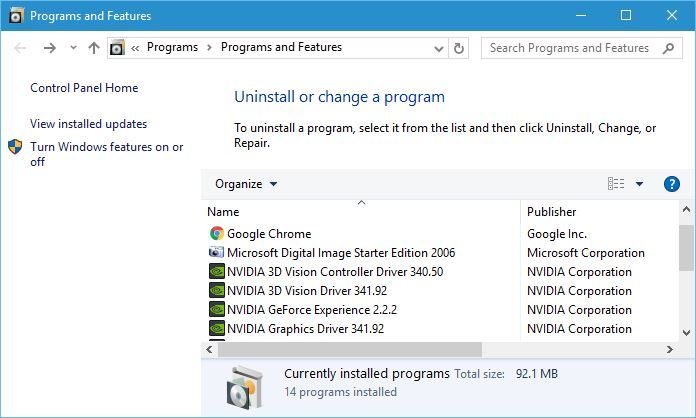
Press Windows key + X and choose Apps and features.
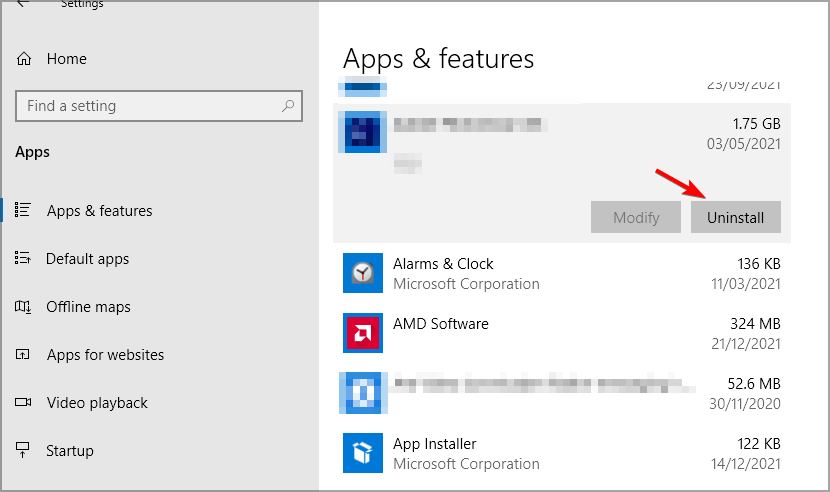
Now select your audio control software and click on Uninstall.
Follow the instructions on the screen to complete the process.
Many applications tend to leave leftover files and registry entries on the PC even after you remove them. These files can cause the same problem to reappear, so it’s always a good idea to use an uninstaller application.
For this, we recommend CCleaner because it has a capable uninstaller feature as well as other very useful PC cleaning and optimization tools.
You can find the Uninstaller in the Tools submenu. It will display a full list of all apps on your PC. Select which ones you want to be removed and wait for the process to complete. CCleaner will leave no trace of your uninstalled apps.
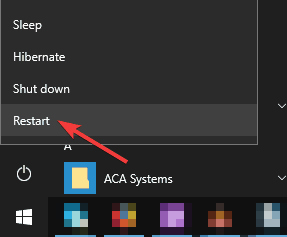
Now press and hold the Shift key and choose Restart from the menu.
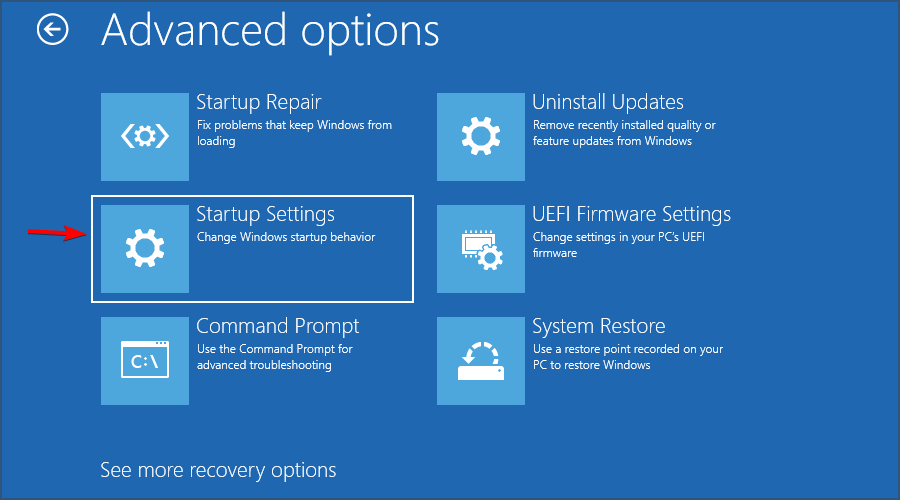
Choose Troubleshoot, select Advanced options and click on Startup Settings.
Now click the Restart button.
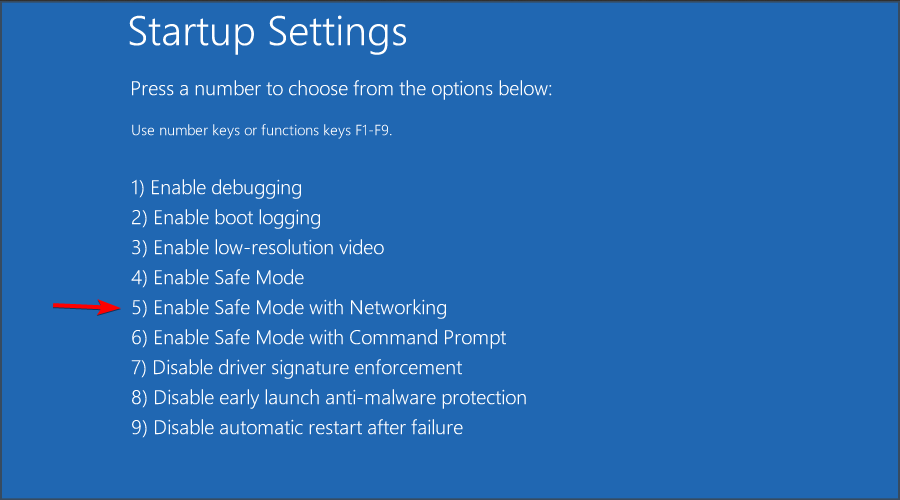
Once your PC restarts, you’ll be presented with options. Choose any version of Safe Mode by pressing the corresponding key on the key.
Safe Mode is a special segment of Windows that runs with default drivers and software. If you’re having an issue with your microphone volume, try using the microphone in Safe Mode and check if the issue reappears.
Once the Safe Mode starts, check if the problem appears. If not, it might be that your user profile is corrupted. If that’s the case, you must create a new user profile and check if the problem still appears.
Our solutions above should help if your mic volume keeps changing, and things should return to normal.
If you have other problems with the sound volume, we have a great article that will help you fix the problem of the volume being too low in Windows 10.
If you have any comments or suggestions, write them down in the comments section below, and we’ll surely check them out.
GZ files are compressed archives commonly used on Unix-based systems. You can easily extract them on Windows using tools like WinZip, Command Prompt, or PowerShell (with 7-Zip). This guide walks you through all three methods with clear steps and no guesswork.
How to Extract GZ Files on Windows (3 Easy Methods)
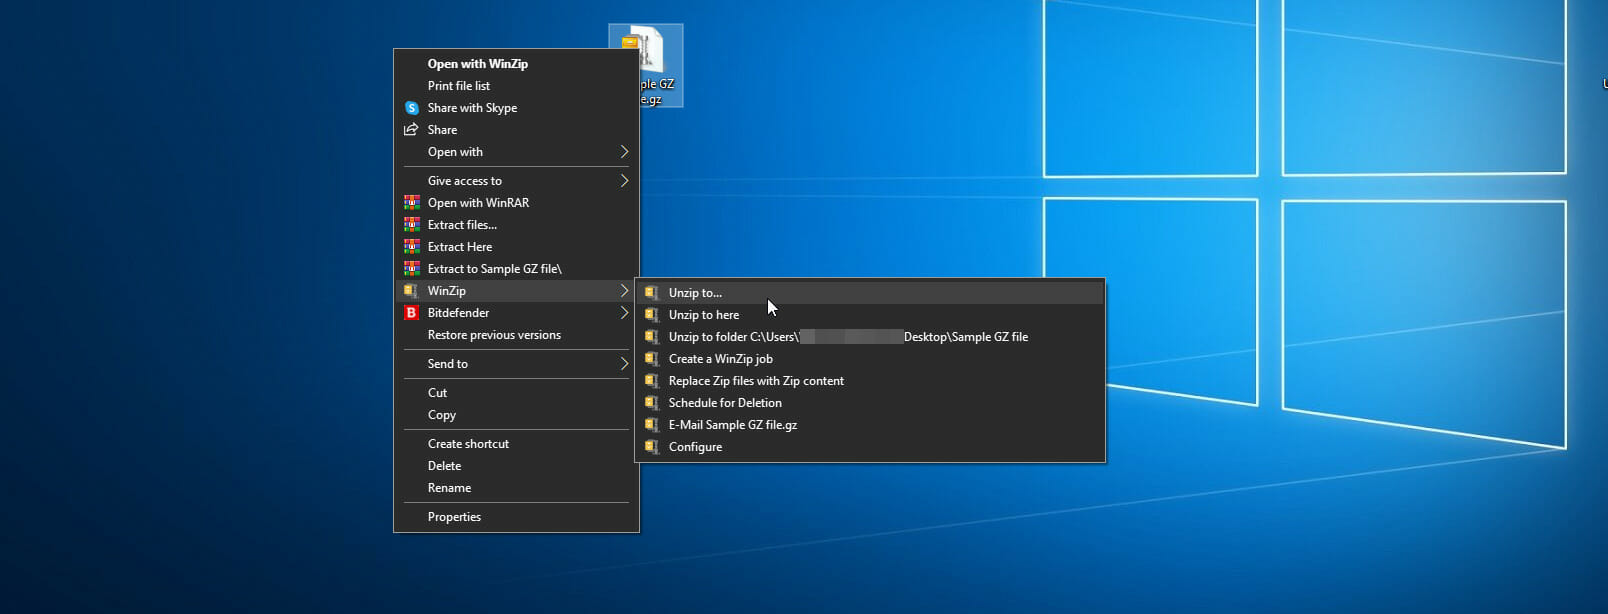
If you want a fast, beginner-friendly solution, WinZip is one of the best file archivers that can handle .gz files with ease. It supports RAR, TAR, ZIP, and more, with built-in encryption and cloud sharing.
PowerShell doesn’t natively extract .gz files, but you can use it together with 7-Zip for a simple and efficient solution. Make sure 7-Zip is installed first.
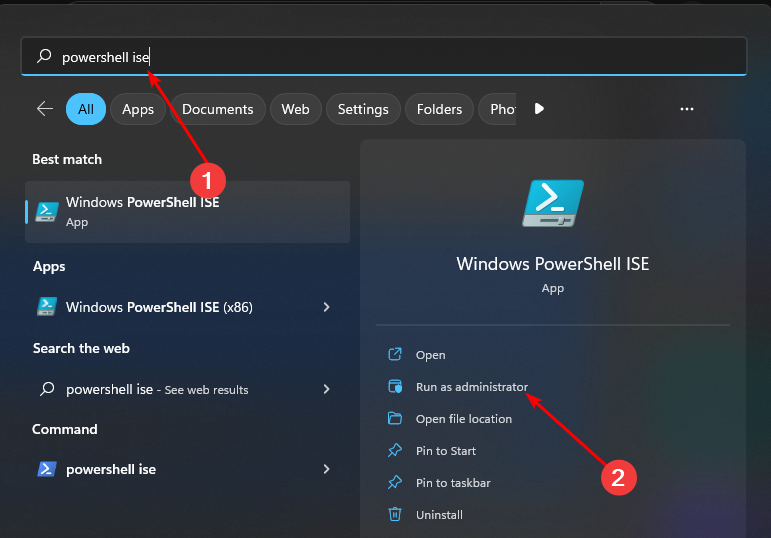
Press Start, type powershell, and open it with Admin rights
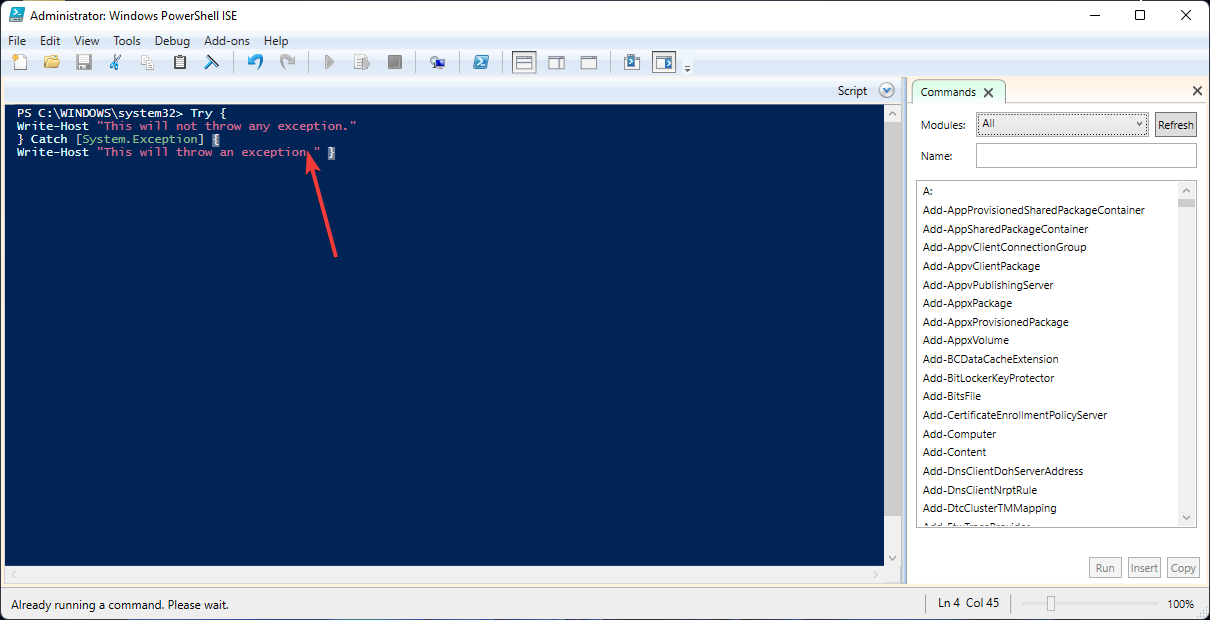
Paste the following code into PowerShell:
# Path to 7-Zip executable
$zipExePath = "C:\Program Files\7-Zip\7z.exe"

# Path to your .gz file
$gzFilePath = "C:\Path\To\Your\File.gz"

# Destination folder
$destinationFolder = "C:\Path\To\Extract"

# Build and execute the extraction command
$command = "$zipExePath x $gzFilePath -o$destinationFolder"
Invoke-Expression -Command $command
NOTE
PowerShell itself can’t extract GZ files directly. You’ll need 7-Zip installed to run this method.
Whether you use a visual tool like WinZip, the built-in Command Prompt, or a script-based approach with PowerShell, extracting .gz files in Windows is easier than it seems.
Just like Windows 8, Windows 10 was intended to improve hardware performance and speed up your computer, and most users are satisfied with their performance on Windows 10.
Sadly, not all users have a similar experience, and some of them are claiming that Windows 10 takes forever to boot.
A slow booting of Windows 10 can be a big problem, and in this article, we’re going to cover the following issues:
Slow boot SSD, hard drive
According to users, both SSD and hard drive owners have experienced slow boot issues. However, you should be able to fix this problem by using one of our solutions. Don’t be shy to check out our full guide dedicated to fixing slow booting times on SSD.
Windows 10 slow boot black screen
Users reported that they are stuck on a black screen during the boot. This is an annoying problem and it’s usually caused by your graphics card drivers.
Windows 10 slow boot after update
Many users reported this problem after a Windows update. This is a big problem, and it’s most likely caused by an incompatible driver or software.
Slow boot Windows 10 AMD, Nvidia
Your graphics card can be the cause for slow boot, and both AMD and Nvidia owners reported this issue. To fix the problem, you just have to reinstall or update your drivers.
Slow boot even in Safe Mode
If you’re having issues with slow boot in Safe Mode, the problem might be your hardware or BIOS configuration.
Slow startup time Windows 10
This is a variation of this problem, and if you have problems with slow startup time, you might be able to fix it using one of our solutions.
Long boot times on Windows operating systems are usually caused by third-party apps that you install, and since most of them start automatically with Windows 10, they tend to make your booting routine slow.
If you’re facing the Windows 10 slow boot spinning circle here are our solutions to fix it.
How can I fix a slow boot time in Windows 10?
1. Use the Windows 10 Startup Manager
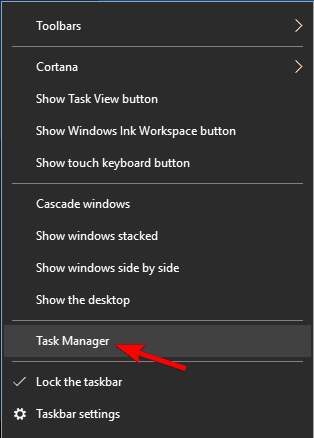
Open Task Manager by right-clicking the Taskbar and selecting Task Manager from the menu.
In addition, you can use Ctrl + Shift + Escape to open the Task Manager directly or Ctrl + Alt + Delete and select Task Manager from the list.
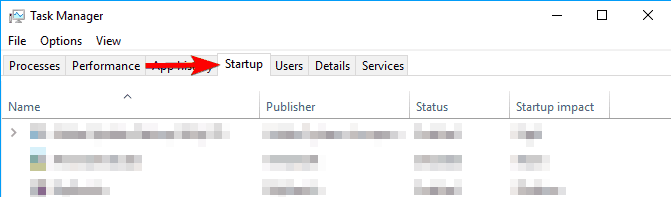
Click the More details button and then go to the Startup tab.
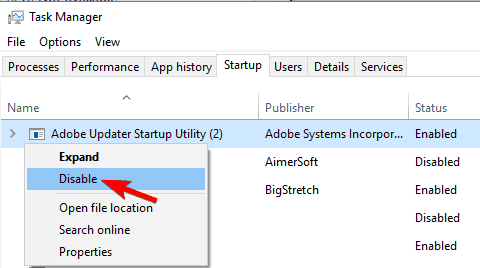
In the Startup tab, you’ll see the startup impact of each program that starts with Windows 10.
The key is to choose the right apps to disable, for example, you want to keep your Antivirus running, but you might want to disable Skype or driver update software from starting with your Windows 10.
Of course, you can manually start these services at any time if you need them.
If you’re interested in additional info on how to add or remove startup apps on Windows 10, check out this simple guide.
2. Update your BIOS
Several users reported that they fixed the slow boot problems in Windows 10 by updating their BIOS. BIOS update is an advanced and potentially dangerous procedure, so use it at your own risk.
After updating your BIOS, check if the issue is resolved. If you already have the latest version of BIOS, you might want to reflash it and install the same version again.
Few users reported that installing the same version of BIOS fixed the problem for them, so you might want to try that.
Press Windows Key + X to open Win + X menu and choose Device Manager from the list.
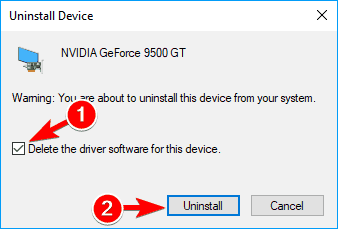
When Device Manager opens, locate your graphics card driver, right-click it and choose Uninstall device.
Check Delete this driver software for this device and click on Uninstall.
If you’re having a Windows 10 slow boot black screen, the issue might be related to your drivers. According to users, they fixed this problem simply by updating their Nvidia drivers.
Updating your graphics card drivers is relatively simple, but if you don’t know how to do it, we wrote a short guide on how to update your graphics card drivers.
In some cases, you might have to uninstall your drivers and reinstall them again. You can easily do that right from Device Manager by following the aforementioned steps.
After the driver is uninstalled, simply download the latest driver and check if the issue is resolved. If you want to completely remove your driver along with all of its associated files, be sure to check our guide on how to use Display Driver Uninstaller.
Update your drivers automatically
Updating your drivers manually isn’t that easy, especially for those who have no background knowledge. Having to find out your hardware’s model number and searching for the latest driver can be tedious.
Thankfully, there are specialized driver updating programs that will make your life easier by automatically scanning your hardware for new driver versions, and updating them accordingly.
4. Run the Windows Update Troubleshooter
Press the Windows Key + S and search for Settings.
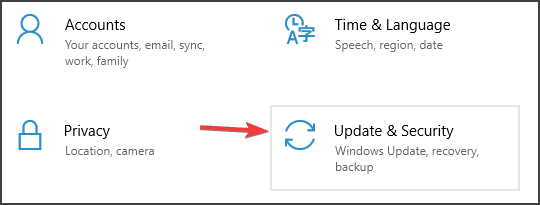
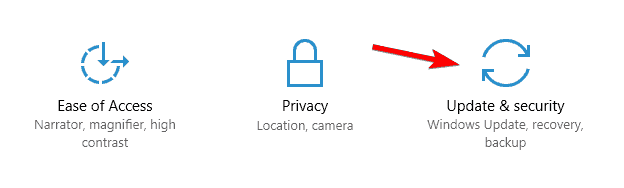
In the Settings menu, choose Update & Security.
Then, select Troubleshoot, and Additional troubleshooters.
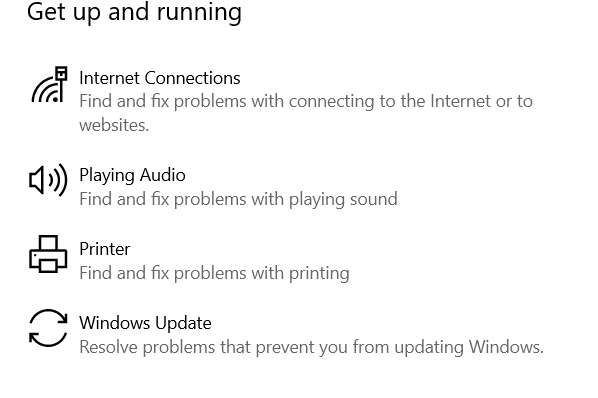
Inside the new window, under Get up and running, select Windows Update.
Next, click on Run the troubleshooter.
Many users reported slow boot problems in Windows 10, and according to users, this issue is caused by a corrupted Windows Update file. To fix this problem, you just need to use the Windows troubleshooter.
Once you start the tool, it should automatically fix any issues and corrupted files. After the troubleshooter is finished, check if the problem is resolved.
If your Windows Troubleshooter stops before completing the process, you can easily fix it with our great guide.
5. Consider getting an SSD and tweak the BIOS settings
Solid State Drives are great for your PC in terms of speed, and if you can afford one, maybe you should consider getting one in the future.
If you can’t afford it, you might want to tweak some BIOS settings to improve your booting routine. For example, you can disable BIOS checking your DVD drive or network locations each time you boot and reduce boot time.
Few users reported that this problem occurs due to the USB Storage Function in BIOS. This feature is used to boot your PC from a flash drive, and if you don’t want to do that, you can just disable it.
To see how to find and disable this feature in BIOS, we advise you to check your motherboard manual.
If you’re in the market for a fast SSD, don’t waste another minute and check this article to get the biggest ones available right now.
6. Install the latest updates
Press Windows Key + I to open the Settings app.
When Settings app opens, go to Update & security section.
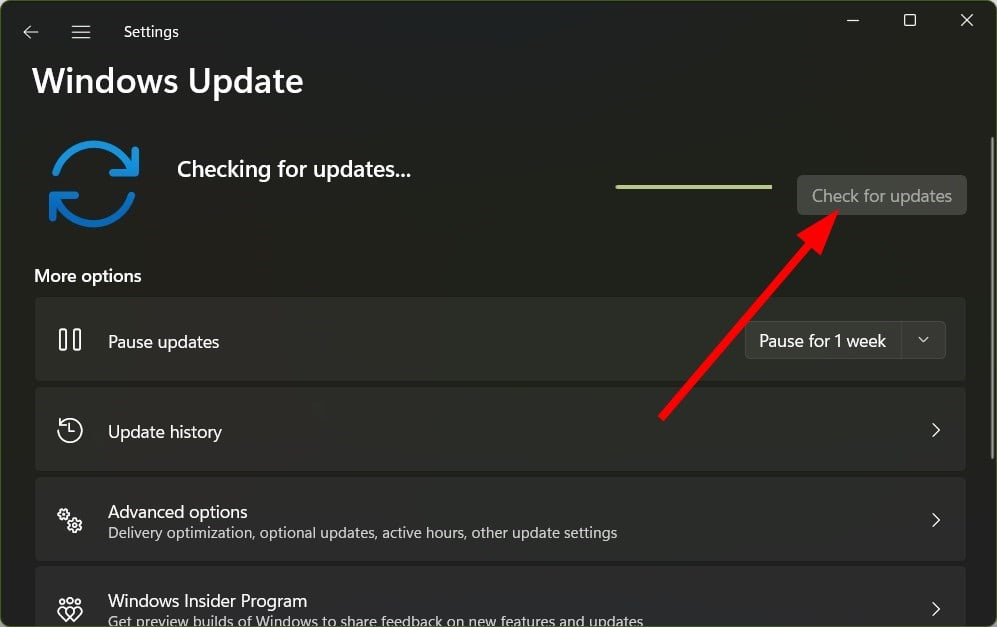
Go to the Windows Update section, and click on Check for updates.
Sometimes you can fix the slow boot problems simply by installing the latest updates. Windows 10 usually downloads the necessary updates in the background.
If any updates are available, they will be downloaded automatically and installed once you restart your PC. However, if your PC is already up to date, you might want to try a different solution.
Is the Windows Settings app giving you trouble? Follow the steps from this detailed article to solve the issue. Additionally, here’s another detailed guide dedicated to solving Windows problems.
7. Delete all files from WDI directory
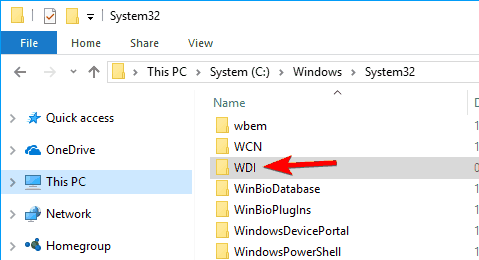
Open File Explorer and navigate to the following directory: C:/Windows/System32/
Now go to the WDI directory.
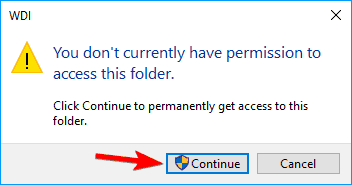
If you get a security prompt, click on Continue to proceed.
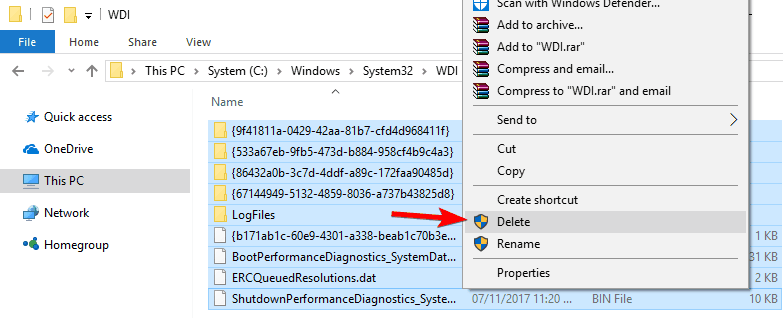
Select all files from the WDI directory, right-click them and choose Delete.
If you’re having slow boot issues, you might be able to fix the problem by deleting the contents of the WDI directory as instructed in the steps above.
After removing the contents of the WDI directory, the Windows 10 slow startup issue will be fixed.
Here’s a comprehensive guide dedicated to fixing File Explorer issues that will make sure it won’t give you any problems in the future.
8. Install the Intel Rapid Store Technology driver
To fix the problems with the slow boot, you just need to install the Intel Rapid Store Technology driver on your PC. Many users reported that this driver isn’t the latest, and that’s causing the issue to appear.
If you’re unable to install drivers on your Windows 10 PC, you’ll find all the causes and solutions for your issues in this great guide.
9. Enable/disable Fast Startup
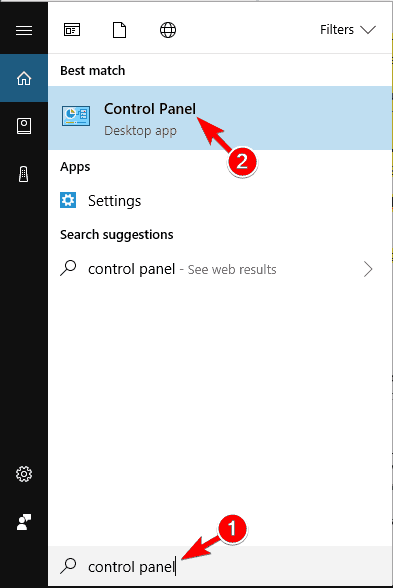
Press Windows Key + S and enter Control Panel.
Select Control Panel from the list.
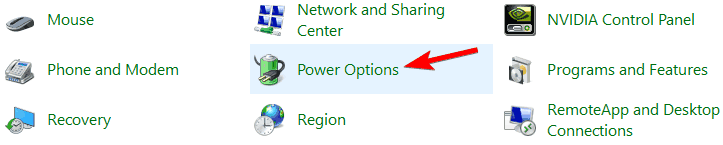
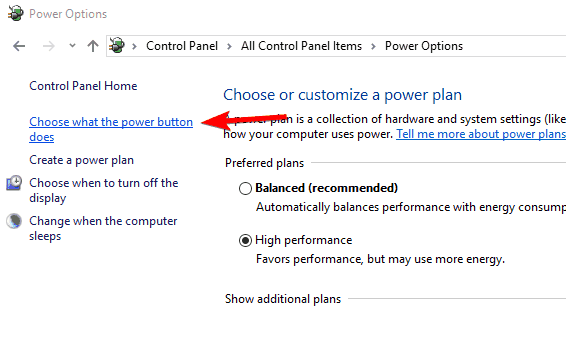
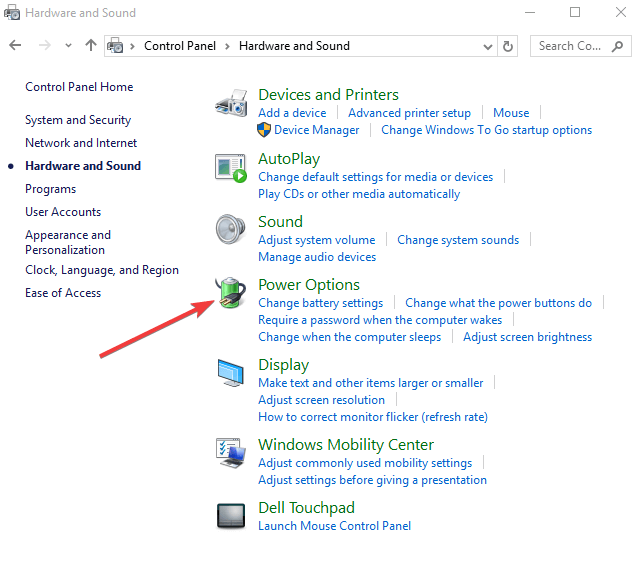
When Control Panel opens, select Power Options from the menu.
The Power Options window will now appear.
Click on Choose what the power button does from the menu on the left.
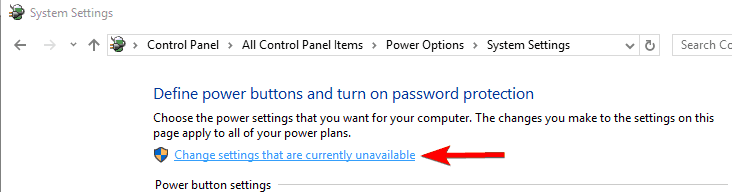
Click on Change settings that are currently unavailable.
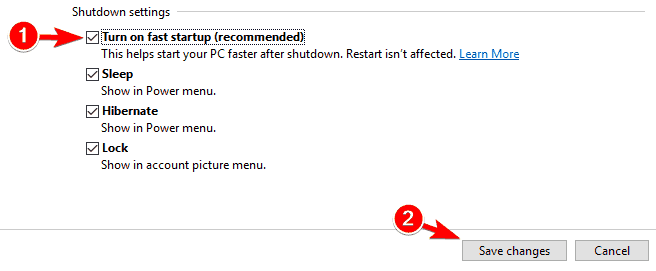
If Turn on fast startup is checked, disable it.
If this feature is not enabled, check it.
Now click on the Save changes button.
Sometimes the fast startup feature can cause this problem, but you can disable/enable it by following our method above. After disabling or enabling fast startup, the issue should be resolved.
Why does Windows 10 boot so slowly after reinstalling and how can I fix it?
Open the Control Panel and go to System.
Use the built-in search option to locate Advanced system settings and click on the link.
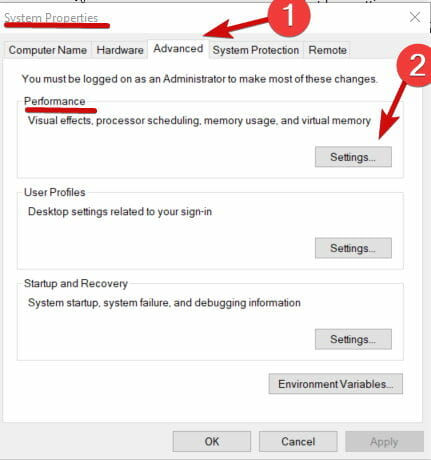
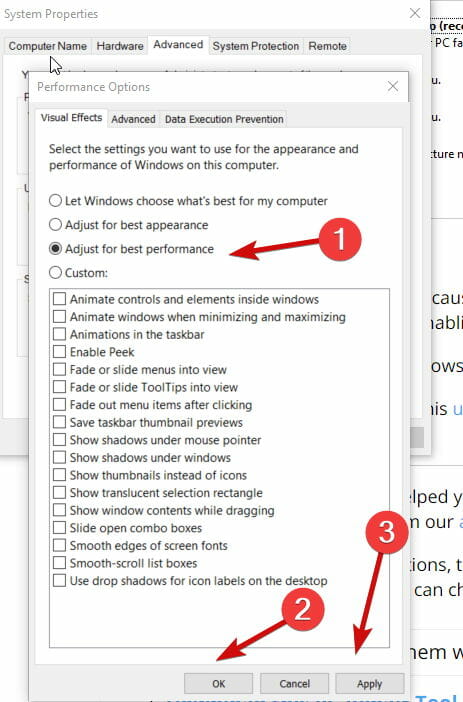
Once the System Properties window opens, go to the Advanced tab.
Select Settings, right under the first section called Performance.
Finally, check the box corresponding to Adjust for best performance and hit Apply.
If Windows 10 takes 20 minutes to boot, after reinstalling this solution will definitely help you.
How do I make Windows 10 boot faster?
Note that this simple operation, together with disabling other resource-intense services will free up more CPU and help your computer boot faster. You can even throw in a good repair and optimizer tool to speed up startup and booting.
We do have to stress that if Windows 10 slow boot issues continue after the clean install, you might have to repeat the installation.
Make sure you previously purged other versions and reformat or create a new partition on your disk.
Finally, if your computer takes a long time to boot after a clean install, the issue could be related to faulty or failing hardware equipment. Don’t forget to test your hard drives with proper diagnostics tools to make sure they are sained.
If you have any comments or suggestions, tell us in the comment section below. Also, if you have any other Windows 10-related issues you can check for the solution in our dedicated Windows 10 section.
This guide will give you many solutions to help you fix the Virtual Disk Service Error: The Disk Is Not Empty on your PC. We will also give you some reasoning behind this error. So, let us get right into it.
Why am I getting Virtual Disk Service Error: The Disk Is Not Empty error?
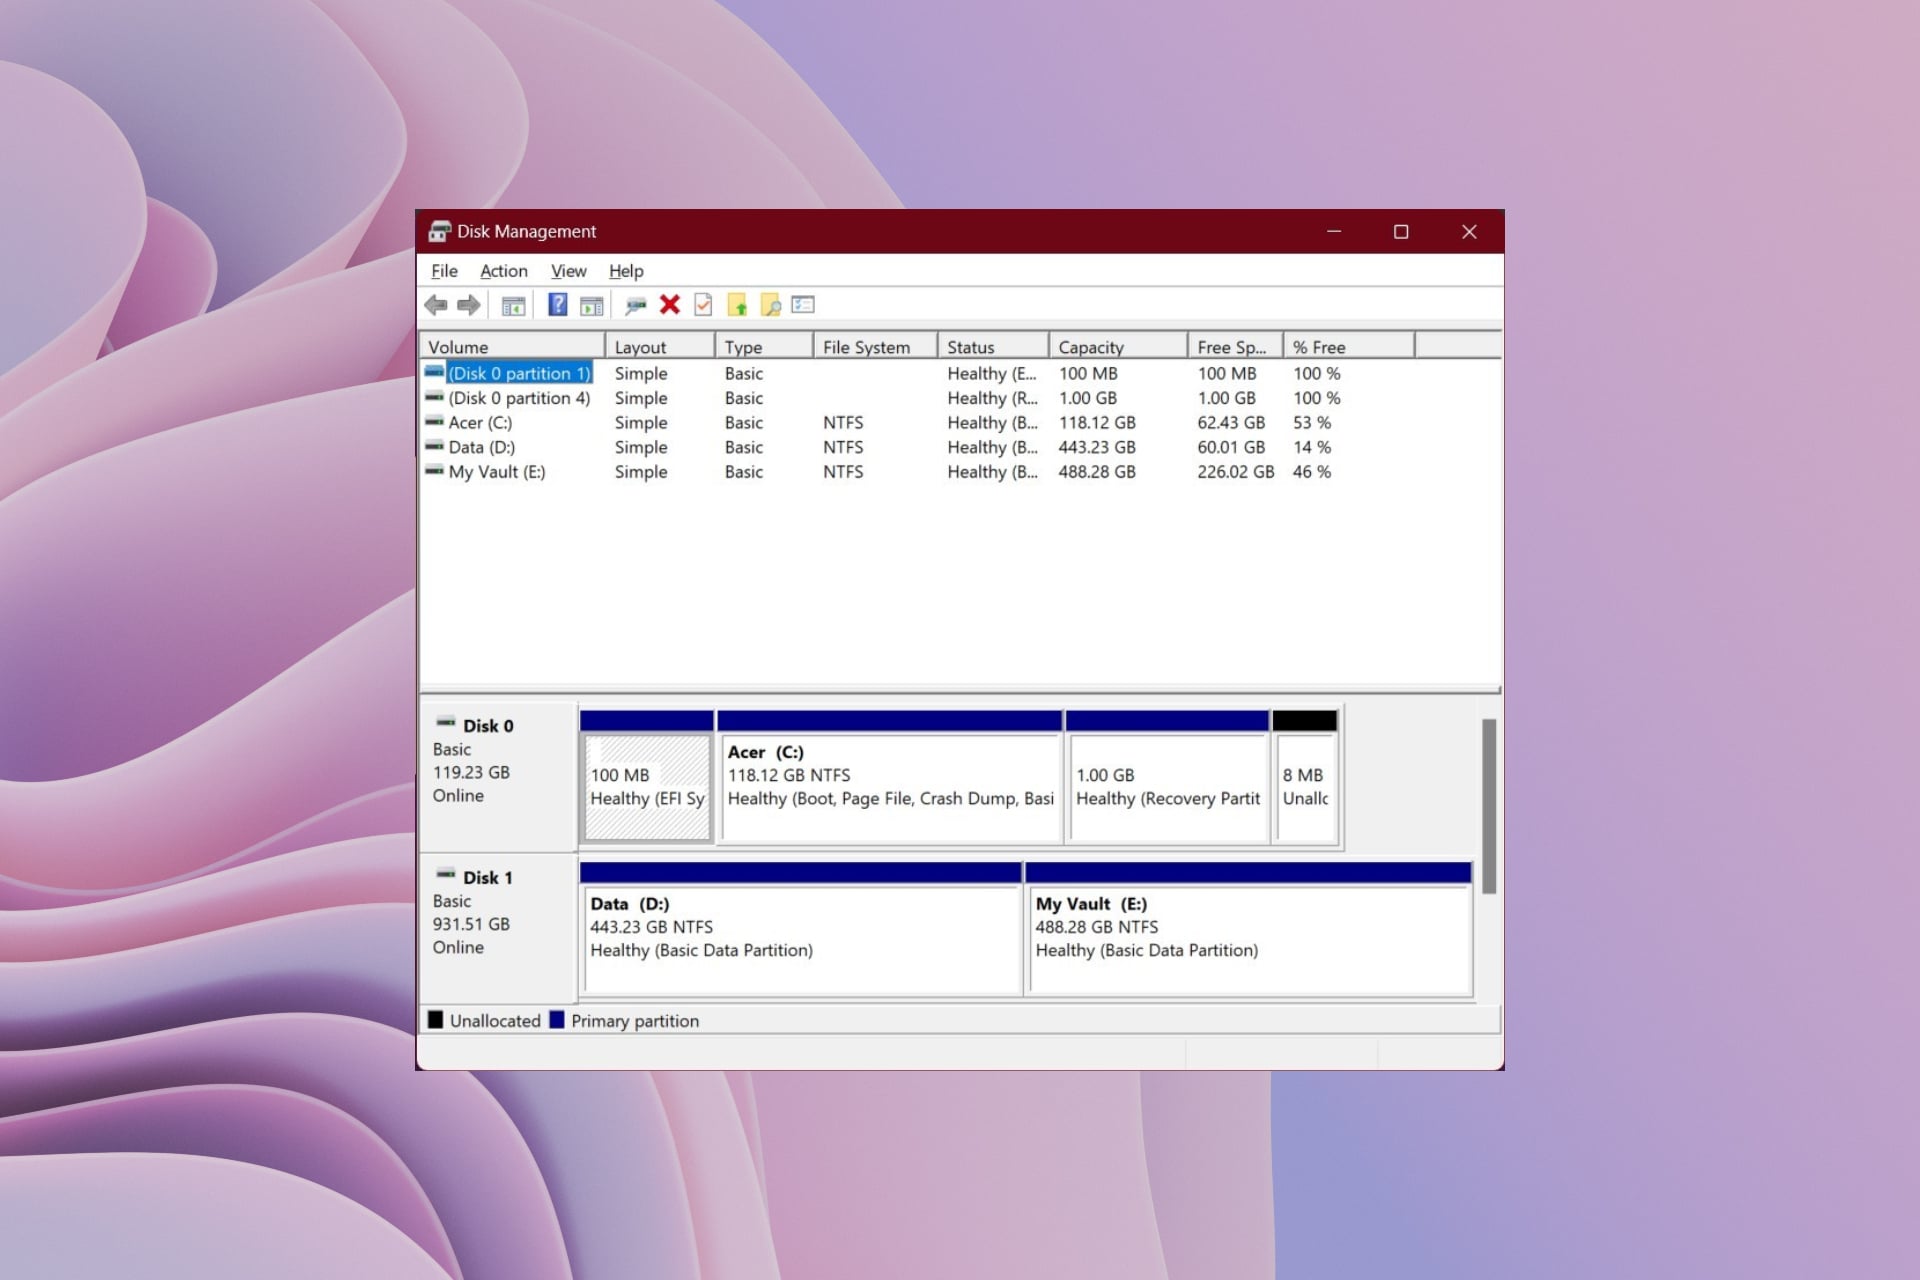
The Virtual Disk Service Error: The Disk Is Not Empty error happens when your dynamic disk contains some data or volumes. This error triggers if it contains some data or volumes and you are trying to convert the dynamic disk to a basic disk.
So, before proceeding, you need to delete all the information, data, or volume in the dynamic disk. But deleting the partitions can’t be reverted. So, you have to create a backup and delete all the disk’s partitions.
How to fix Virtual Disk Service Error: The Disk Is Not Empty error?
For our case, we need to choose the Convert a dynamic disk back to a basic disk option.
Click Next.
On the next page, you will see all the dynamic disks listed.
Choose the dynamic disk you wish to convert and click Next.
Click Yes in the prompt that appears.
Hit the checkbox that reads I have decided to execute this operation and click Proceed button to start the conversion process.
With AOMEI Partition Assistant you can safely format drives into different file systems. You can also use this tool to create bootable media or for data recovery.
Type the below commands and press Enter after each one. diskpartlist diskselect disk n (n refers to the dynamic disk number) list volumeselect volume m (m is the number of volume in the dynamic disk) delete volumeselect disk nconvert basicexit
Restart your PC and see if this fixes the Virtual Disk Service Error: The Disk Is Not Empty error or not.
That is it from us in this guide that will help you fix the Virtual Disk Service Error: The Disk Is Not Empty error.
If you are one of those users who are facing the There are no fixed disks to show DiskPart error; then we would recommend you follow our guide and apply the solutions mentioned to resolve the problem.
If you are confused and want to know the differences between the FAT32 and NTFS file systems, then you should read our dedicated and comprehensive guide on it.
Some users have reported getting the Virtual Disk Service error: The volume size is too big error. This appears when they try to format external or internal hard drives on their PCs using the Diskpart utility. Moreover, for some users, the process goes on for several hours with no result.
If you are also experiencing the same Virtual Disk Service error issue: The volume size is too big and is looking to solve the problem, then we suggest you continue reading. Because in this guide, we will show you how you can fix this issue via multiple solutions. Let us get right into it.
Why am I getting Virtual Disk Service error: The volume size is too big error?
We did some digging and found a common reason that would trigger the Virtual Disk Service error: The volume size is too big error on your PC.
You are trying to format a large partition to FAT32: If you are doing this, then you should know that Windows (using the Diskpart utility) does not allow formatting or creating a FAT32 volume greater than 32GB.
While there are better NTFS and exFAT file systems, many USB flash drives with a capacity higher than 32GB can only support FAT32. In such a case, when you try to format it to FAT32, you will come across this error.
How can I fix the Virtual Disk Service error: The volume size is too big error?
1. Format with NTFS file system
Press the Win + R keys to open the Run dialogue.
Type diskpart and press Enter.
To get the list of all disks, type the below command and press Enter. list disk
Usually, Disk 0 is the HDD where the OS is installed.
Execute the below command. select disk X (X is just a placeholder, and you need to enter the drive letter you wish to format)
Type the below command and press Enter. clean
Once the process completes, execute the below command. list disk
If there is the asterisk * sign next to your disk, then it means that the disk is selected.
To create a fresh partition, run the below command. create partition primary
Type the below command to select the fresh partition that you have created. select partition 1
To set the cRun, the below command toated partition as active, execute the below command. active
To create a partition using the NTFS file system and assign the label. format FS=NTFS label=WindowsReport quick
Assign a letter to the drive, by running the below command. assign letter=A
Exit the Diskpart utility.
Restart your PC and check if this gets rid of the Virtual Disk Service error: The volume size is too big error or not.
Locate the disk you wish to format or are getting the Virtual Disk Service error: The volume size is too big error.
Right-click on the drive and select Format Partition.
From the drop-down, select FAT32.
Click OK.
Select Apply and Proceed.
If the Diskpart utility fails to format your drive and you are still getting the Virtual Disk Service error: The volume size is too big error, then we recommend you use a dedicated tool called AOMEI.
AOMEI Partition Assistant helps you to format your drives into different file systems safely. It can also be used to create bootable media or data recovery.
Type Windows PowerShell and open it as an administrator.
Type the below command and press Enter. Format /FS:FAT32 o: (You have to replace the letter o with the letter of the drive in problem)
Once the process completes, exit PowerShell.
You can use Windows PowerShell to format a drive large than 32GB size to FAT32. This would easily do the job and also help you get rid of the Virtual Disk Service error: The volume size is too big error.
That is it from us in this guide. Some users have reported facing There are no fixed disks to show DiskPart error. You can quickly fix it by following the solutions mentioned in our guide.
Feel free to let us know in the comments below which one of the above solutions helped you resolve the Virtual Disk Service error: The volume size is too big error.
Are you also looking for a guide to help you overclock the CPU without BIOS? If so, then you are in the right place. Here we will give you some of the safest ways to overclock the CPU without BIOS.
Overclocking your CPU helps you achieve those extra and consistent FPS when playing games or editing.
However, when you overclock the CPU, it always tends to increase the temperature of the CPU, causing it to overheat. Also, overclocking would fasten your CPU’s process of wear and tear. With these things in mind, let us check out the different ways to overclock the CPU without BIOS safely.
What does overclocking the CPU actually do?
Before we check out the various steps to overclock the CPU without BIOS, the first thing to understand is what overclocking the CPU does.
Notably, when you overclock the CPU, it runs your processor at a higher speed than initially intended. This will help you to perform resource-intensive tasks faster and more smoothly without any issues. You will feel the difference in performance when playing games or editing videos or photos.
The CPU speed is determined by two factors: clock speed and the CPU core ratio. Overclocking changes the CPU’s clock speed, i.e., increases it by increasing the number of cycles your CPU executes per second.
Overclocking is safe, and the high CPU temperature cases are pretty standard but don’t do much damage. It is almost impossible to fry your CPU because of overclocking. However, it does damage the overall CPU in the long run.
XTU: This piece of software is for Intel processors that are unlocked.
Ryzen Master: It is used for AMD processors.
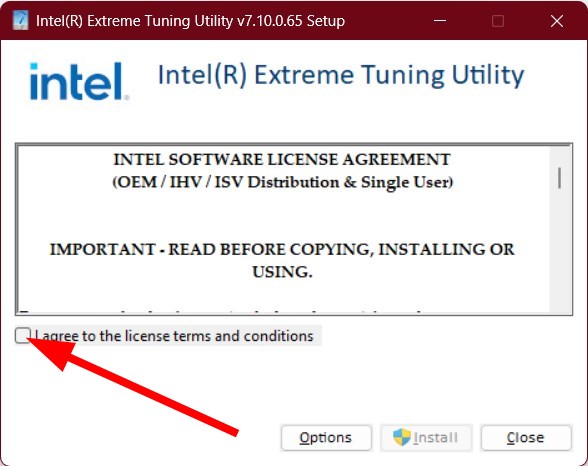
Launch the EXE.
Accept the license terms and conditions.
Hit Install.
Wait for the program to install; in our case, it is the Intel Extreme Tuning Utility (XTU).
Restart your PC.
Close all the background apps before launching the program.
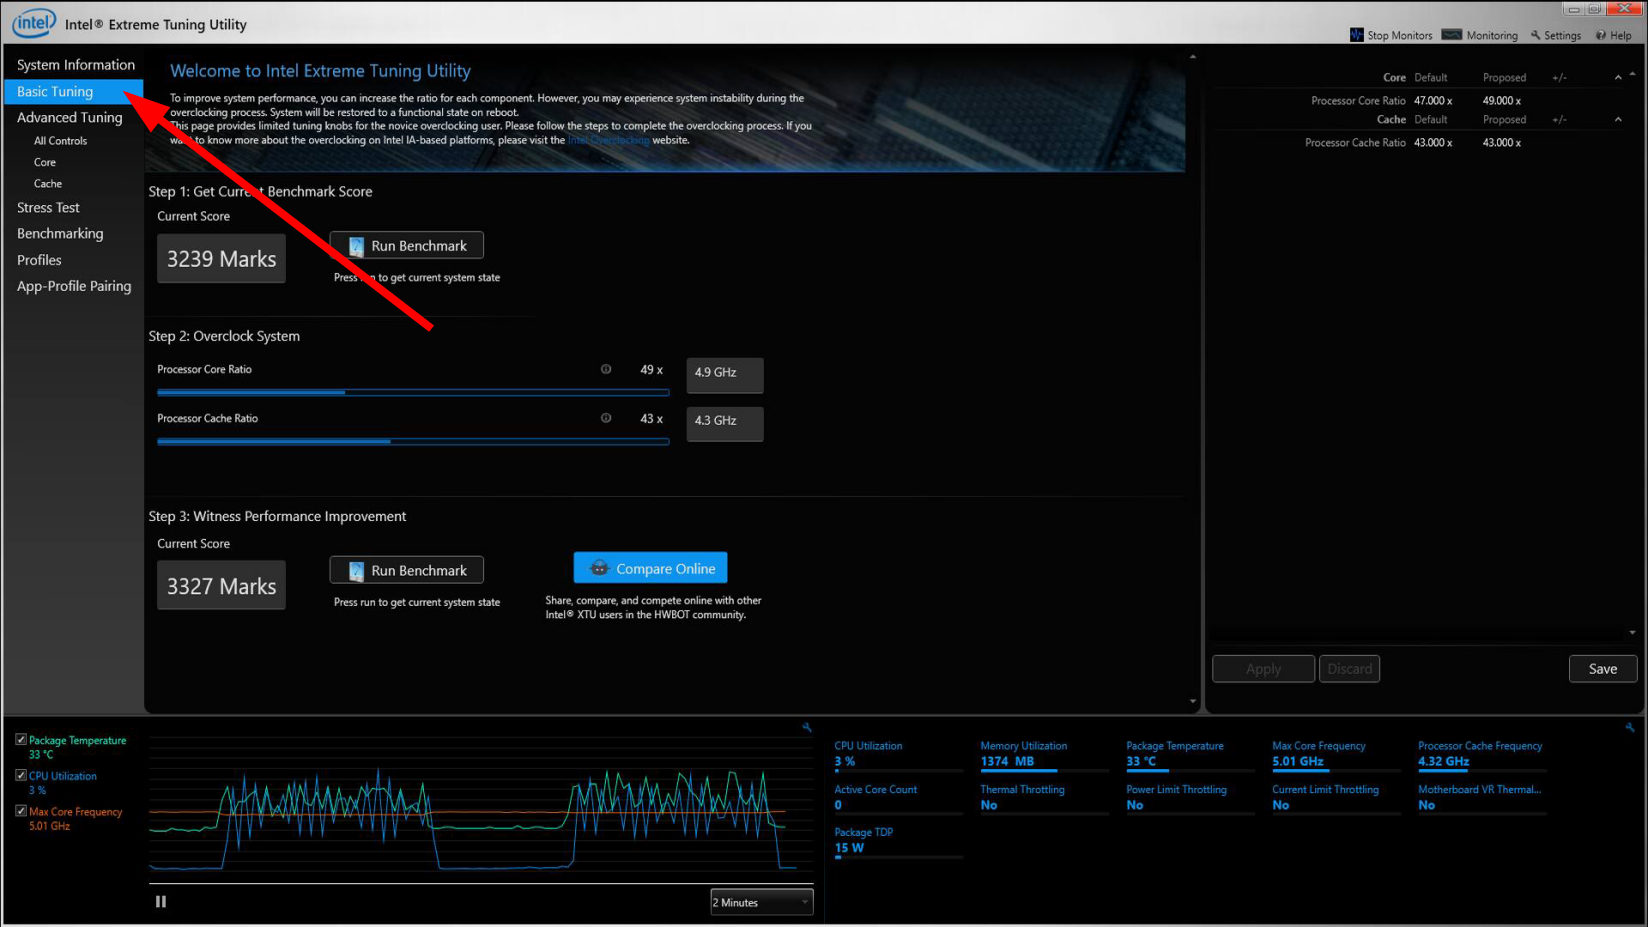
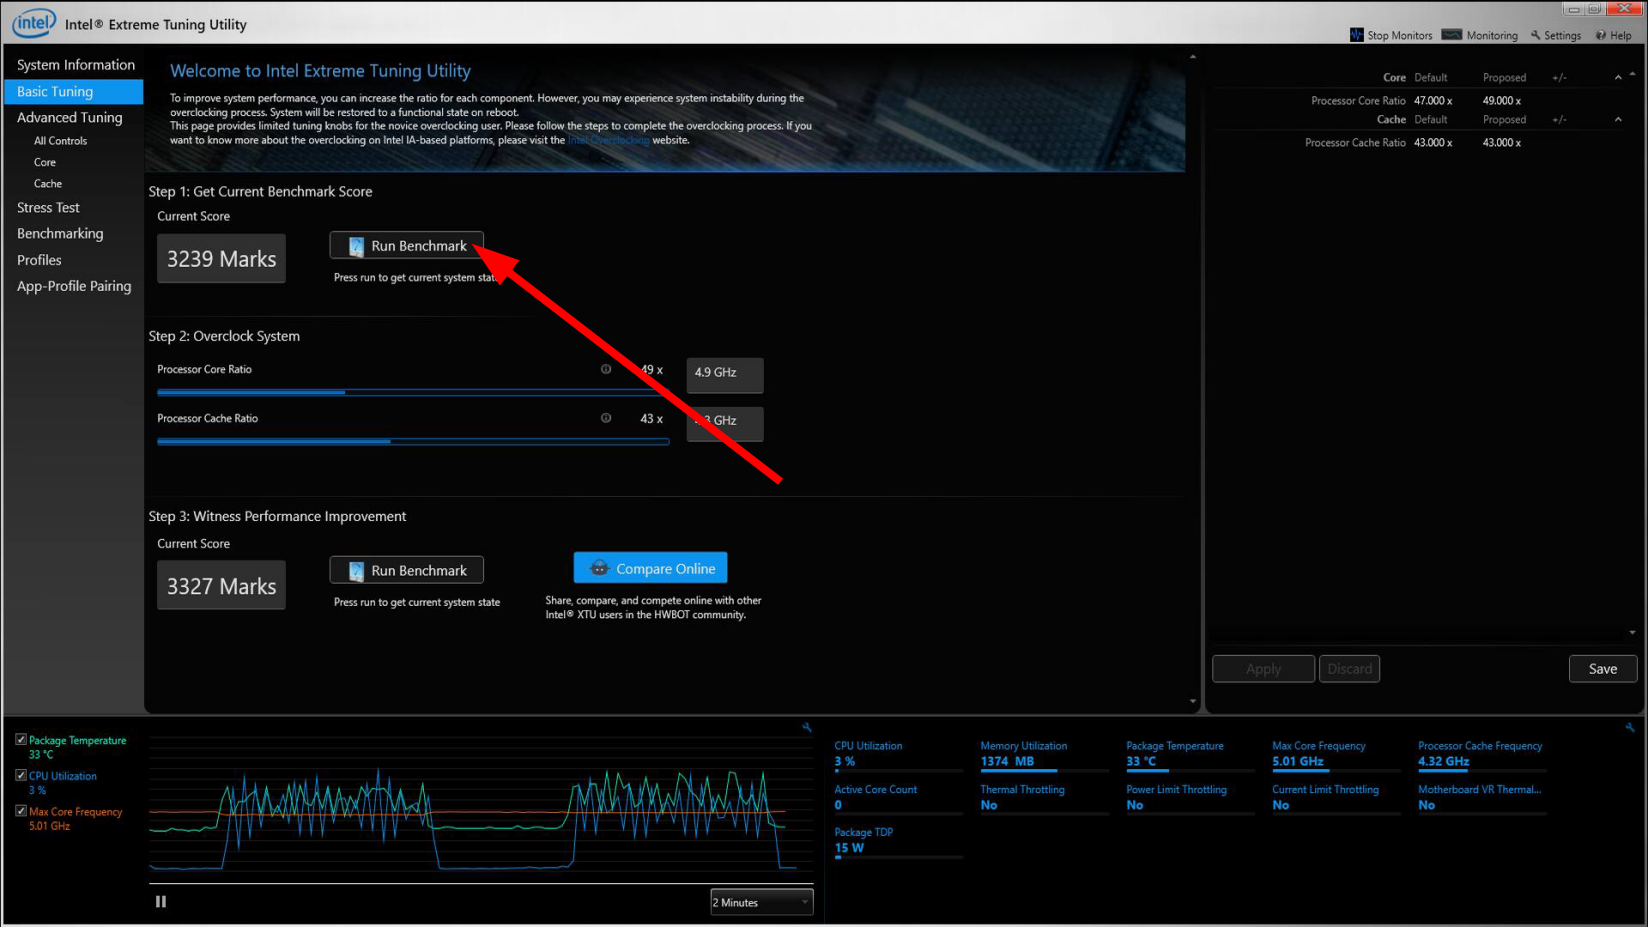
Click on the Basic Tuning tab.
Select the Run Benchmark. This will test the performance of your system and provide a score. Note down this score.
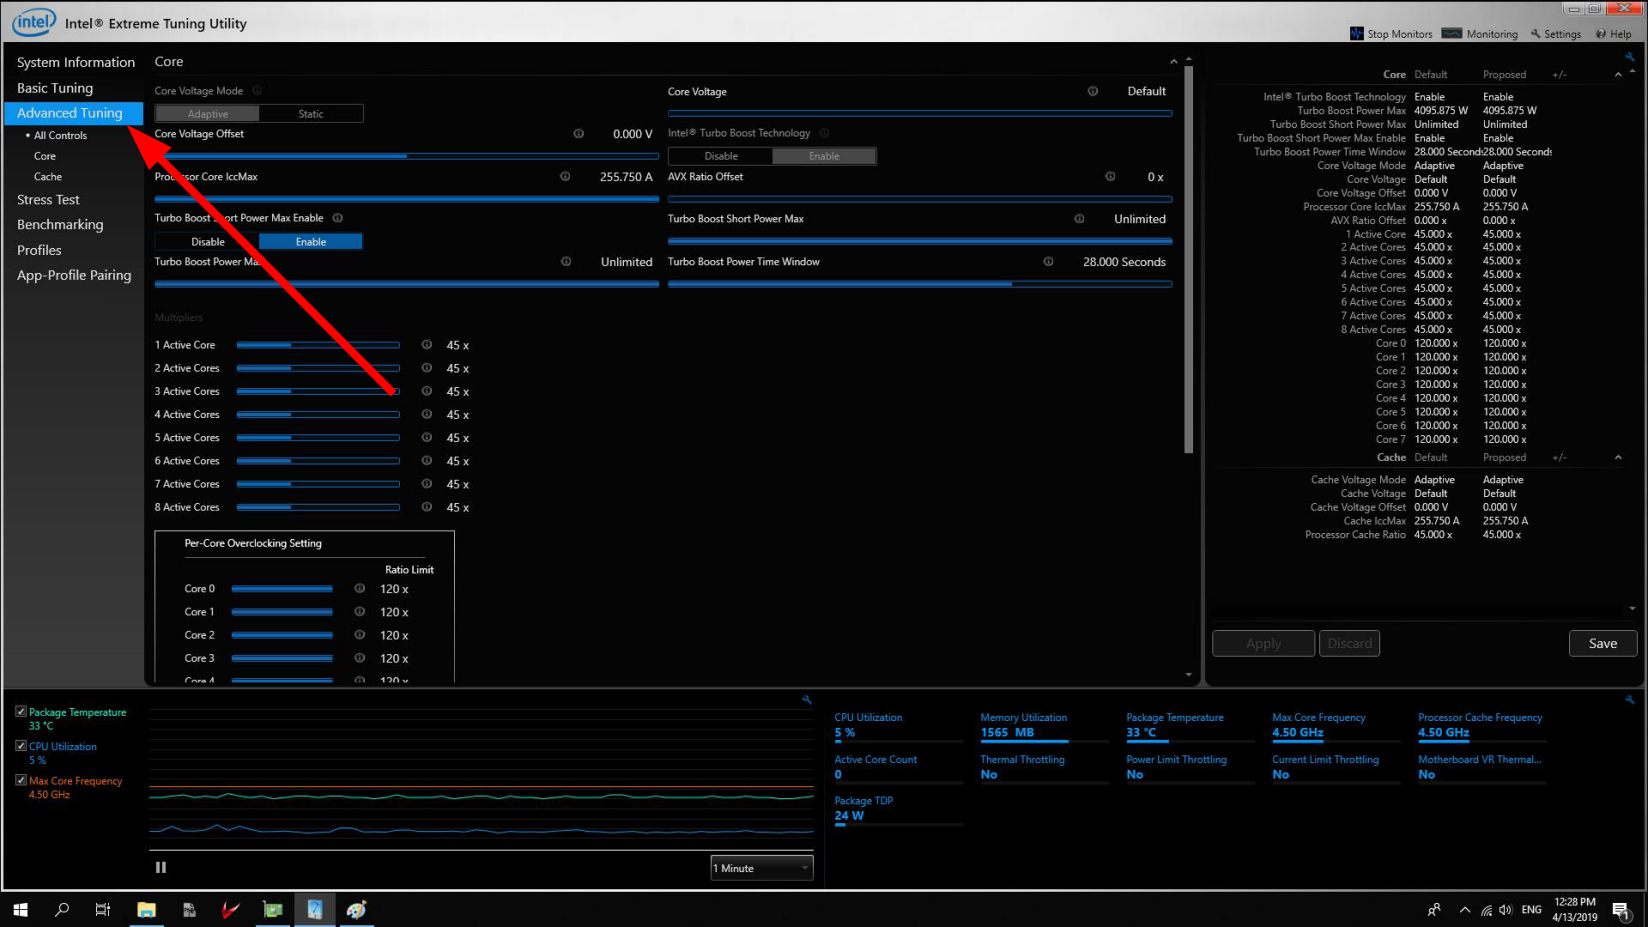
Click on the Advance Tuning tab.
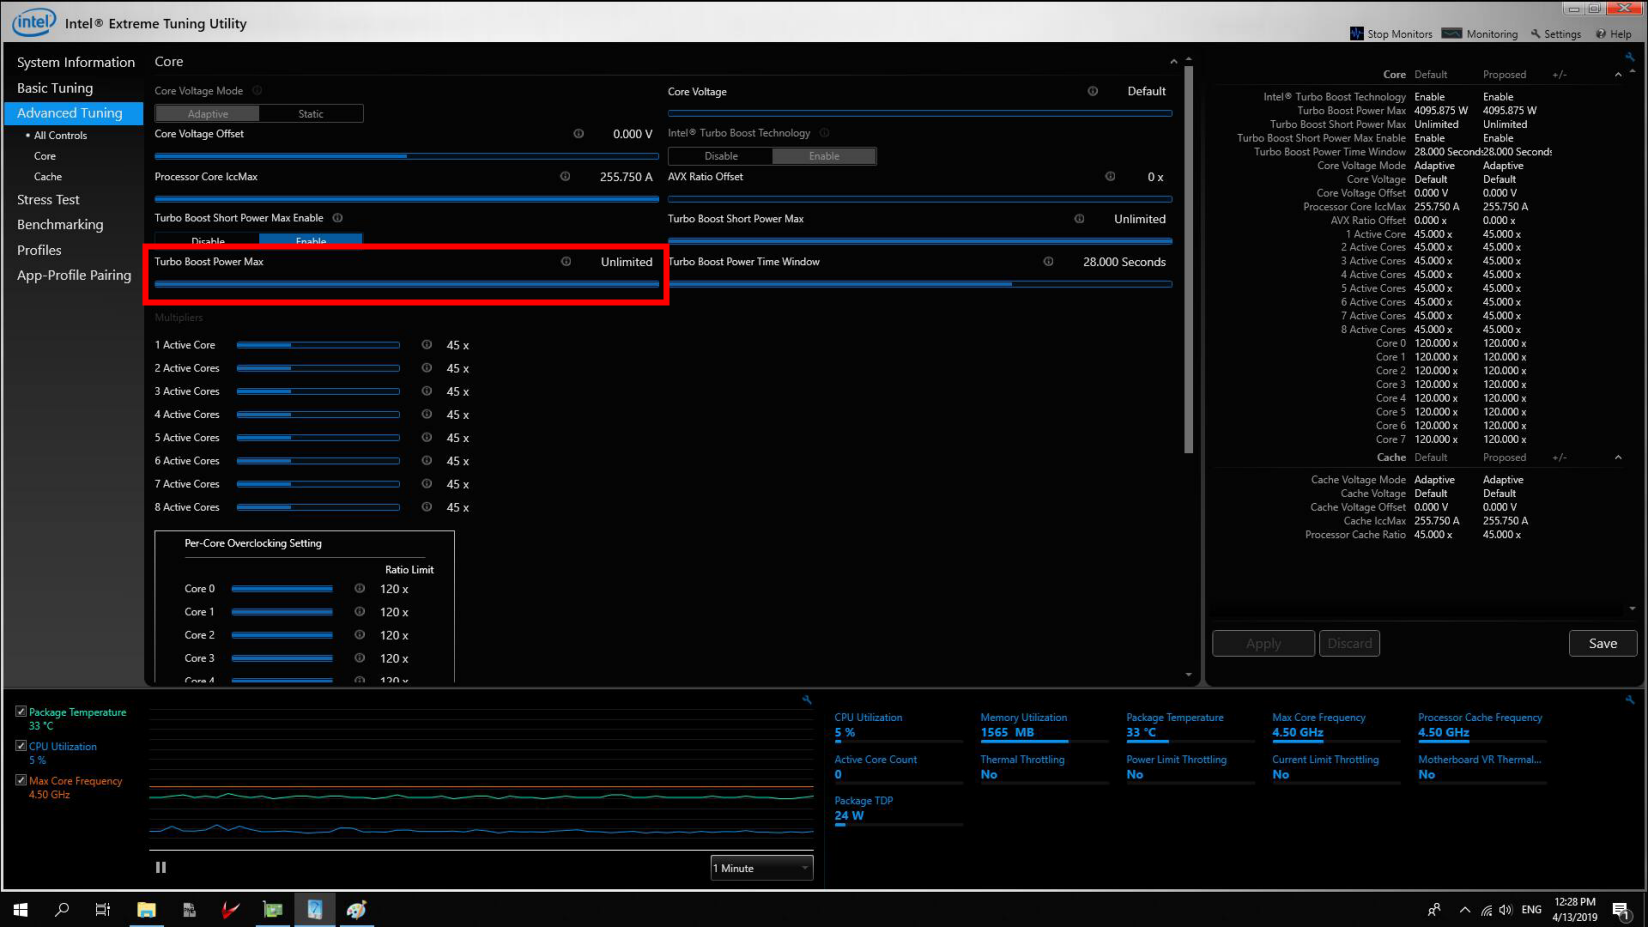
Locate the Turbo Power Boost Max, and slide it all the way to the right.
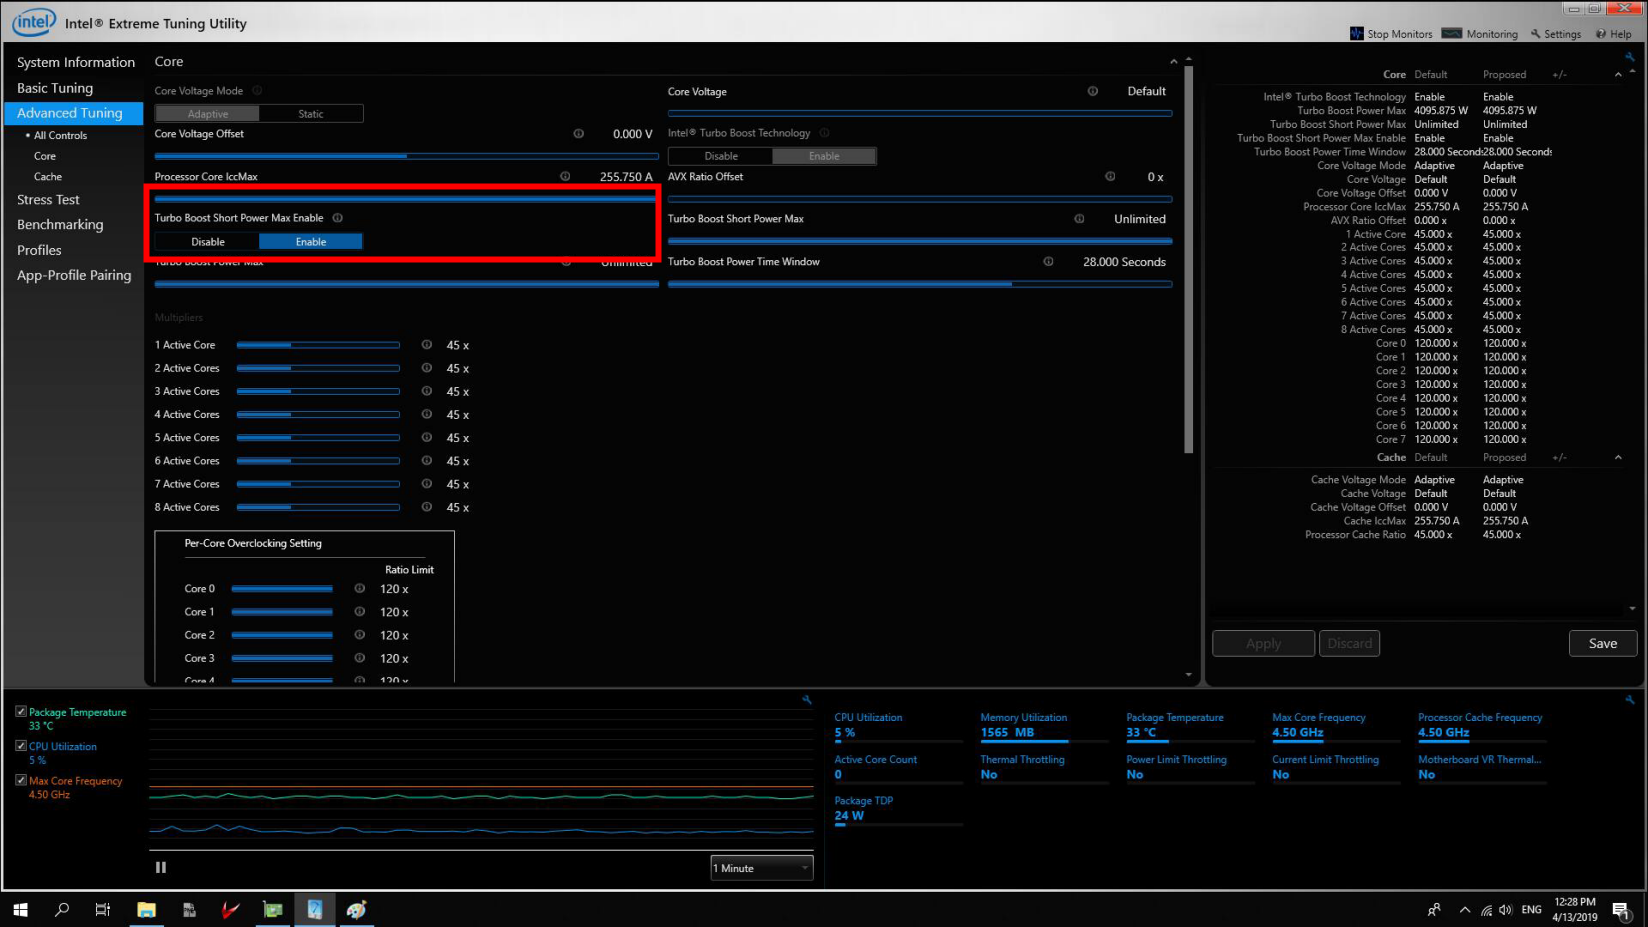
In the Turbo Boost Short Power Max option, enable it.
Slide the Processor Current Limit option all the way up.
To overclock the system, slide the Processor Core Ratio and Processor Cache Ratio to the maximum.
Click Apply.
Navigate under Witness Performance Improvement and Run Benchmark. Here you will get a new score after a while. Compare it to the benchmark score you got in step 8, and check if there was any increase.
Method 2
Alternatively, go to the Multipliers setting and increase the multiplier by 1x for each score.
Run the benchmark and wait if the system crashes.
If the system does not crash, go to the Profiles tab and save this new profile.
Increase the core by 1x and see if the system crashes.
Keep increasing the core until the system crashes.
If the system crashes, then you can reboot your PC and it will revert back to the profile you saved, which did not crash your system.
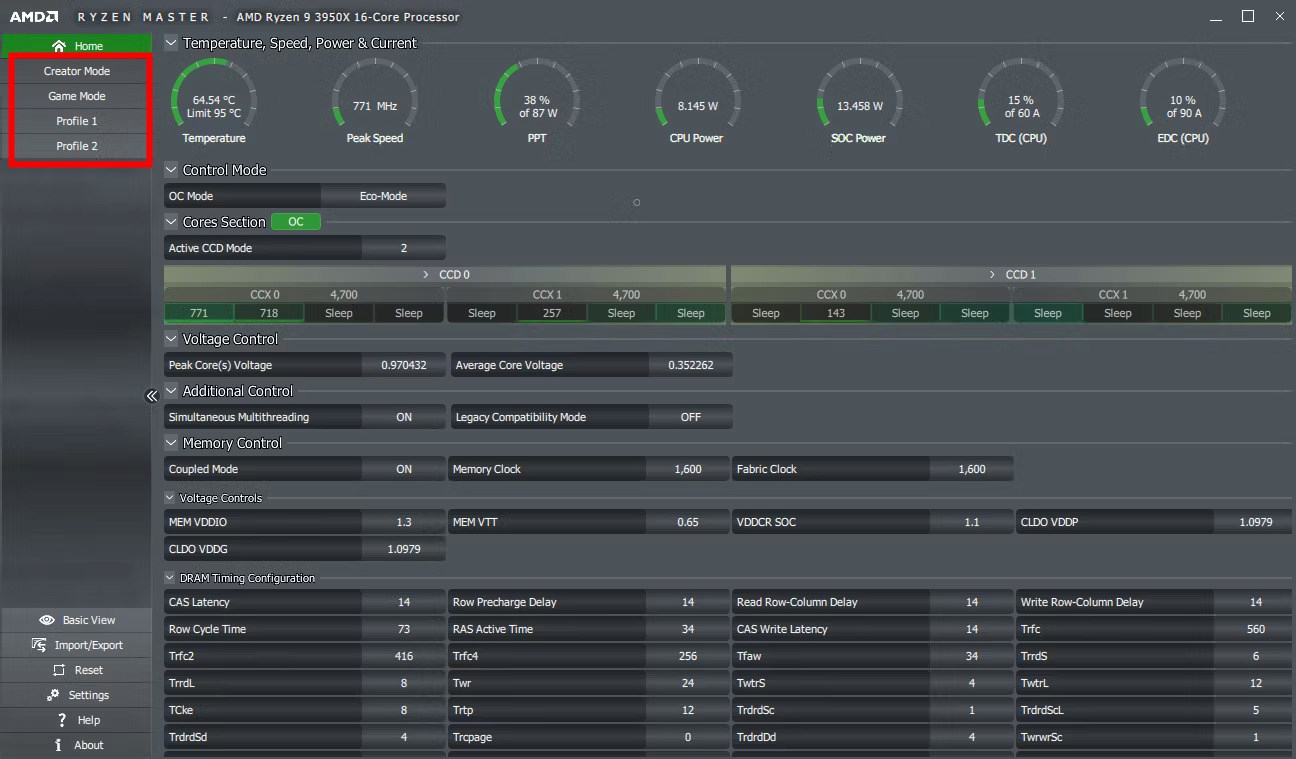
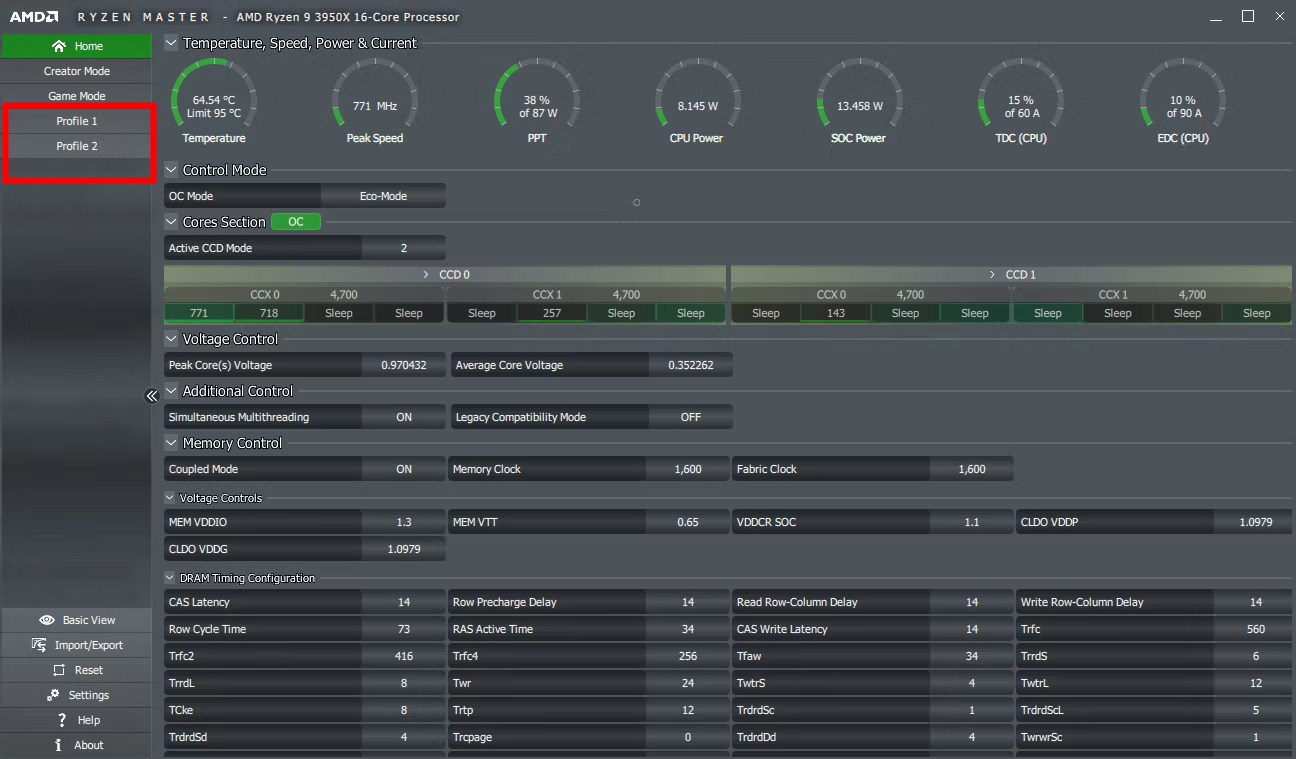
The ones that we care about our Profile 1 and Profile 2. It would be best if you avoided the Game Mode as it prevents your CPU from using 8 cores it has more than 8 cores.
Choose either Profile 1 or Profile 2.
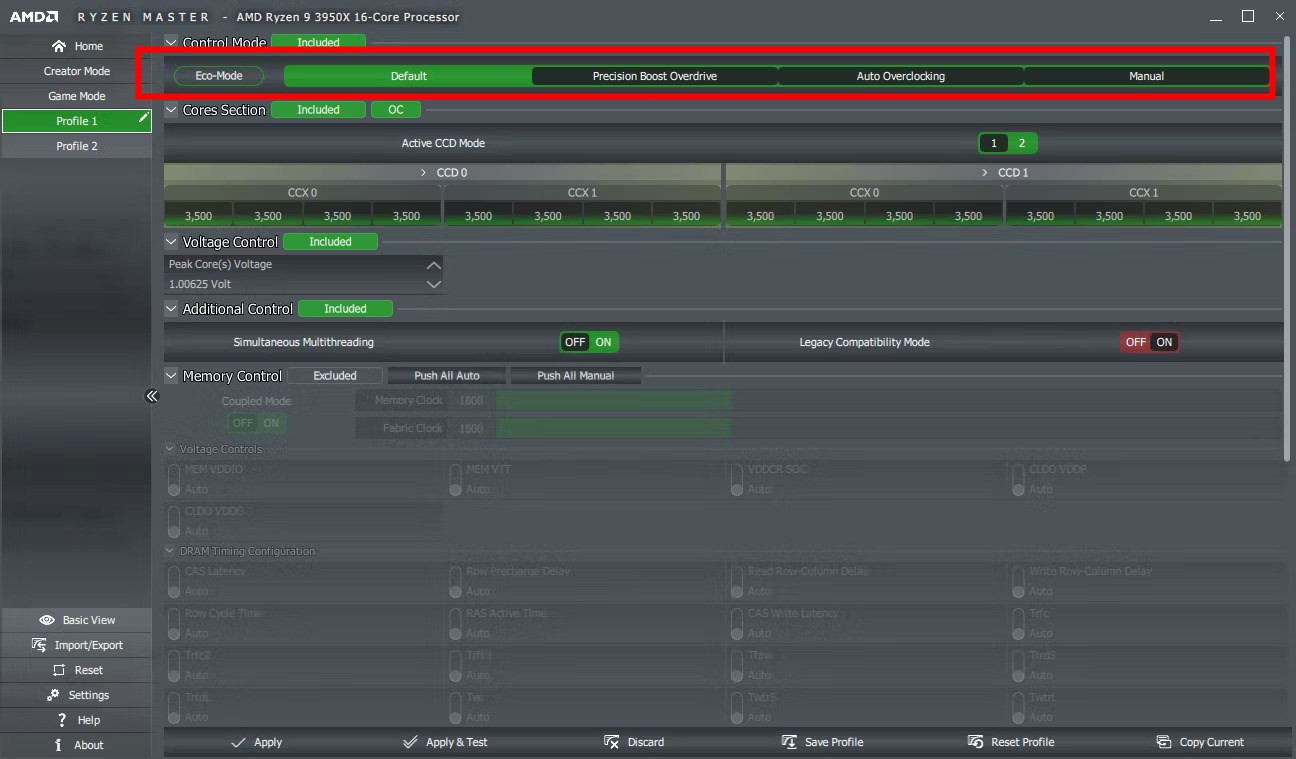
Under the Control mode, you will find different overclocking modes:
Eco mode: Lowers the power limit.
Precision Boost Overdrive (PBO): Increase the CPU power limit if it thinks it is safe.
Auto Overclocking: More aggressive than PBO.
Manual: Lets you select clock speeds.
You can choose either the Eco Mode or the PBO mode, which is the best for most users.
Overclocking will often result in game crashes. To fix the problem, we have mentioned some of the best and most effective solutions to help you resolve the issue.
As shown in the above guide on overclocking your Intel CPU with XTU software, there is NVIDIA Inspector for NVIDIA GPU. So we have demonstrated adequately how to overclock the NVIDIA GPU using the NVIDIA Inspector.
Microsoft released a new Dev Channel build to Windows 11 Insiders yesterday, but waited until today to drop the news that there are some new features and new looks added to the latest version of the Microsoft Store.
For Windows 11 Insiders in the Dev Channel, you’ll first have to make sure you’re using the latest version of the Store, 22301.1401.1.0 or higher.
The Store’s home page has been given a “complete overhaul,” with new UI and animations. The home page now supports any type of input, including touch, pen, mouse and trackpad. Note that these features are rolling out in phases to “a limited portion” of Insiders.
Along with the home page, the search results page has been updated too, along with improved product card for apps, and a new Fluent inspired settings page:
The layout of the search result page has been improved with a simplified design, allowing you to find your desired content more quickly and efficiently. More simplified search result page.
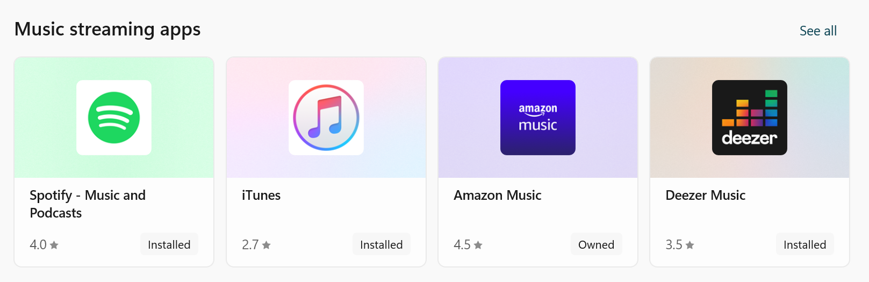
Discover the new and improved product cards for apps, featuring a refreshed design that brings your favorite apps to life. The new look highlights the content in a visually stunning way, and accurately reflects the branding of each app. Refreshed design for product cards for apps.
We’ve updated the Microsoft Store’s settings page with better alignment to our Fluent Design system controls and added a touch of new animations.
If you’re on the Windows 11 Insider Dev Channel and updated to 25300, check out the new Microsoft Store!
You must have stumbled on this article because your Steam can’t go online. A few users have reported this issue, while others can’t log in anymore after too many retries.
We have researched the actual causes and solutions. In some extreme cases, users complained about Steam going into offline mode randomly, which can be highly frustrating for avid users.
How can I fix Steam if it can’t go online?
1. Clear your download cache
Hit the Windows key, type Steam, then open the app.
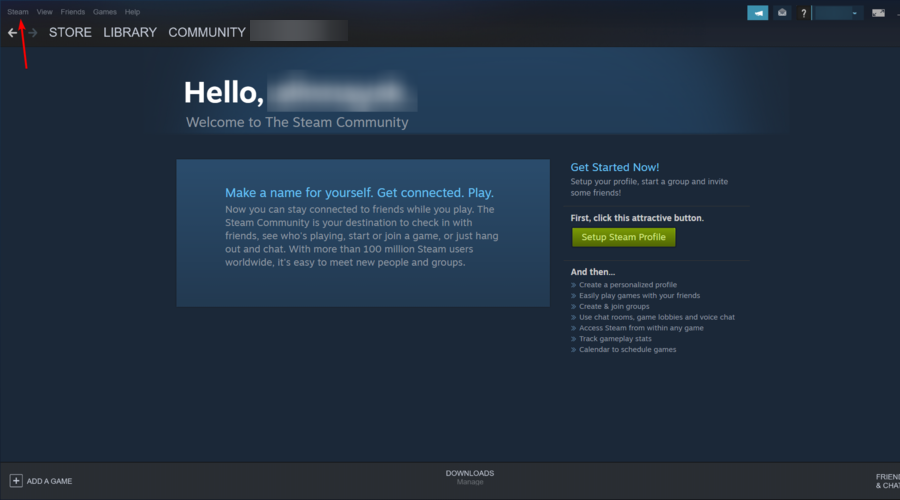
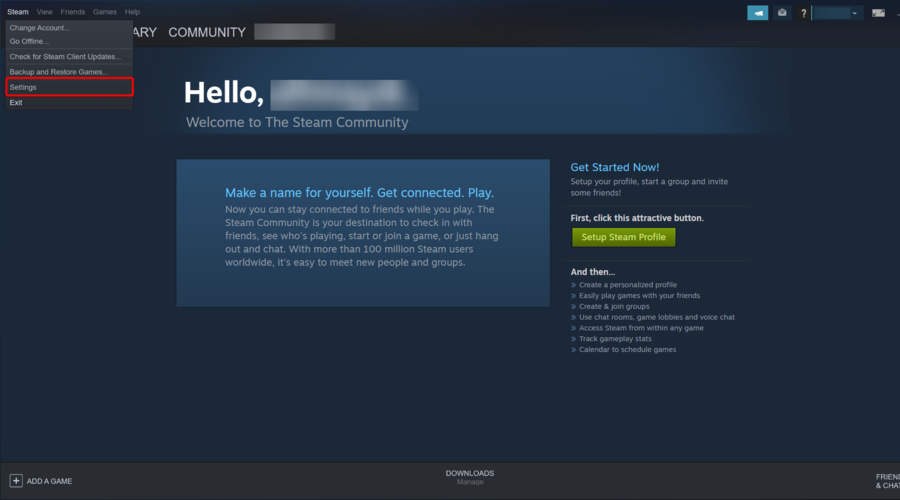
From the top-left corner of the window, click on Steam.
Navigate to Settings.
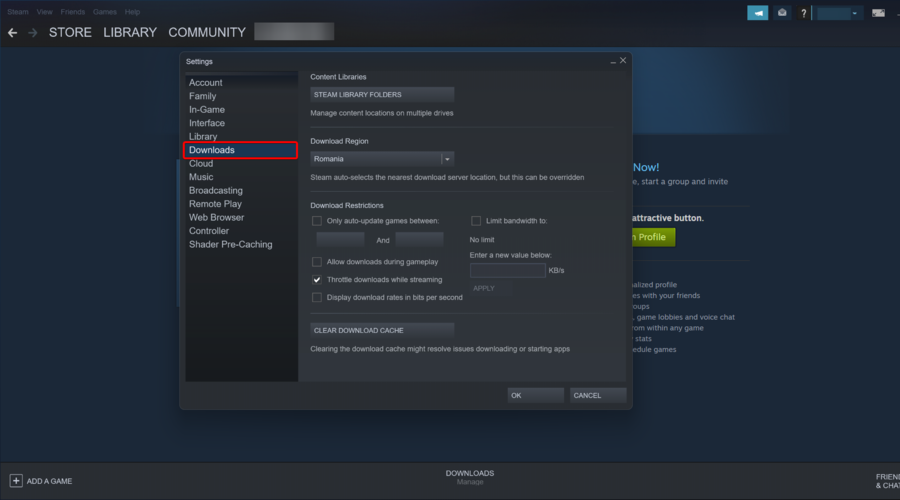
Select the Downloads tab.
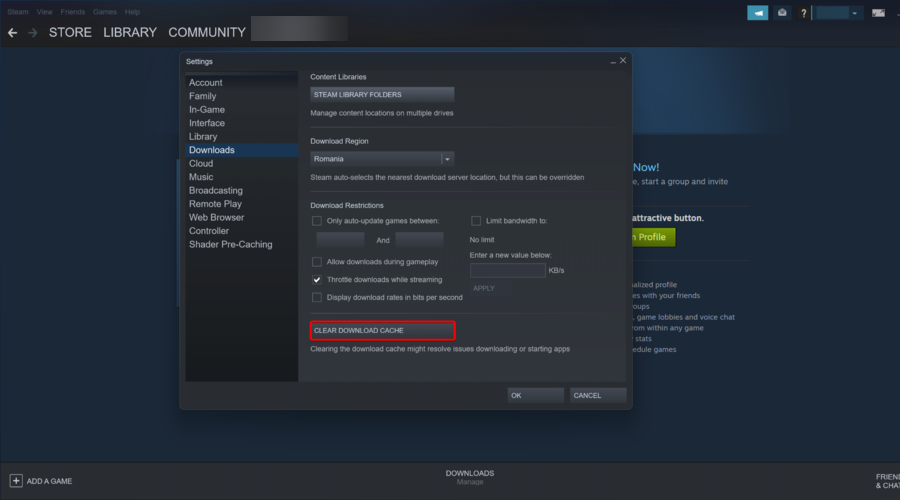
Click on Clear Download Cache.
Next, click OK to confirm your choice. Steam will ask for your login details afterward.
After logging in again, Steam will start as expected.
Clearing the download cache can also resolve issues with the server like Steam error 102.
2. Change your Internet settings
Use the following hotkey: Windows + S.
Type Control Panel, then open the first result.
Navigate to Network and Internet.
Go to Network and Sharing Center.
From the bottom left corner of the window, click on Internet Options.
Select the Advanced tab and scroll down the Security listings.
Uncheck Enable Enhanced Protected Mode.
Restart your machine and launch Steam.
If you’ve changed location recently, ensure that your Steam access isn’t geo-restricted.
On this note, we recommend using a VPN to protect your online privacy while you surf the Internet or play online games and to access gaming content from anywhere in the world.
PIA (Private Internet Access) is an excellent VPN, with hundreds of servers all around the globe, top-notch privacy (no logs), and superior mobility (access on up to 6 devices with one subscription).
Private Internet Access
Choose to use PIA & you’ll always be able to unblock your favorite Steam gaming content!
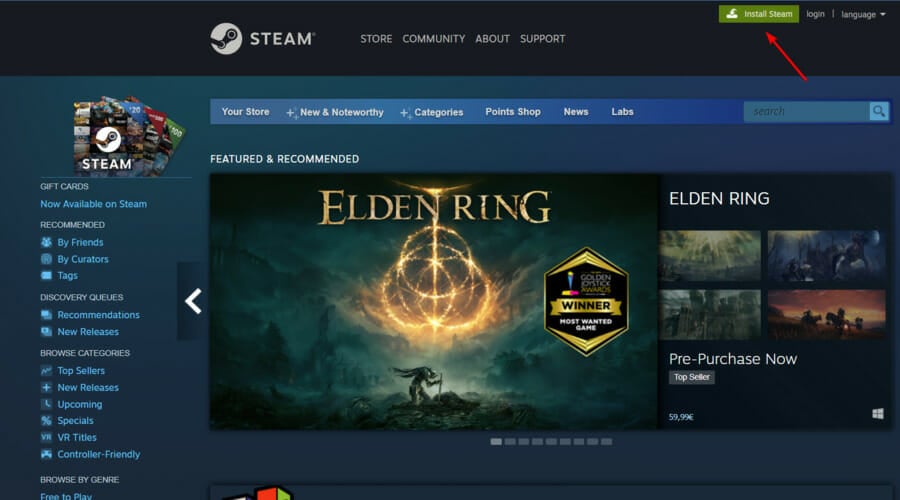
Click on the Install Steam green button from the window’s top-right corner.
Open the downloaded file, then follow the on-screen instructions to reinstall the app.
Restart your PC and launch the app with administrative privileges. Steam will start updating itself and try to replace the missing files. Hopefully, it will work as expected.
Why can I not go online on Steam?
A few users have said Steam won’t go online but I have internet. Here are the most common triggers for this Steam error:
Winsock errors – For those of you who don’t know, Windows Socket API (Winsock) is a type of app programming interface (API) dedicated to communication between Windows network software and network services. It may sometimes need a restart.
Internet settings – One of the most common causes that explain why you’re unable to go online on Steam is related to your Internet settings.
Random bugs and glitches – Steam might run into unexpected and temporary troubles like any other app or software. As an example, some users have experienced Steam windows going black. In this case, it is best to uninstall it, and then perform a clean reinstallation.
Old system cache – As browsers have their cookies and caches, the Steam app also keeps temporary downloads and other files in a specific location. However, if you’re a daily Steam user, a cache might become oversized, leading to several problems, such as the one presented today.
You can try reinstalling the app if all other solutions fail and Steam still can’t go online. If you’re unsure about cleaning all the related folders, check how to remove software leftovers on Windows 10/11.
There you go. These are just a few solutions that you can try if Steam won’t go online on your PC or if Steam is stuck in offline mode. And if you have a sign-in issue like the travis rilea error, check out our fix guide.
Feel free to try them all and let us know if they worked for you by leaving a comment in the section below.
There are various ways to move files and folders on Windows 11 PC. Moving files and folders makes the storage look organized and makes it easier to find the files we are looking for.
Moving files is different from copying files or folders because it isn’t creating a copy of your file or folder but moving it from one location to another. This guide will show you how to transfer files in Windows 11. We will show all the different ways to accomplish the task. So, let us get right into it.
How can I move files and folders in Windows 11?
1. Use drag-and-drop
Open two instances of File Explorer by pressing the Win + E keys together.
Open the location of the folder from where you wish to move the files in one instance of File Explorer.
Open the location where you wish to copy the files or folder in another instance of File Explorer.
Simply drag and drop the file from one location to another.
Right-click on the file or folder you wish to move.
Select Cut from the context menu.
Open the location where you wish to move the file or folder.
Right-click on an empty area in the final location, and select Paste from the context menu.
Cut and paste is another way of moving files or folders from one location to another. It may sound similar to copying and pasting.
But the only difference is that you move the folder from its previous location to a new one, whereas when you copy and paste, you create a copy of the file or folder in a new location.
Type the below command and press Enter. move<name of the file or folder with full source path><destination path> (For example, if you wish to move file A.doc to C:\Folder 1, then the above command will look like move A.doc C:\Folder 1)
While this may sound like an unnecessary way of making things peculiar for simply moving a file or folder from one place to another, it may come in handy when the File Explorer process is crashing, or File Explorer is freezing. You want to safeguard your files before resetting your PC.
You can type the above command and get done with your job of moving files or folders. Also, if you wish to transfer multiple files or folders, you can separate the file names using commas.
4. Use the Toolbar
Open the File Explorer.
Navigate to the file or folder you wish to move.
Select it and click on the Scissor icon at the top toolbar.
Open the target location and hit the Paste icon on the top toolbar.
You can also make use of the top toolbar and select various options, one of which is the Cut icon and use the same toolbar at the destination and select the Paste icon.
5. Modify Registry to add Move to option
Press the Win + R keys to open the Run dialogue.
Type regedit and press Enter.
Navigate to the below path. HKEY_CLASSES_ROOT\AllFilesystemObjects\shellex\ContextMenuHandlersv
Right-click on the ContextMenuHandlers key, select New, and then Key.
Rename the newly created key as {C2FBB631-2971-11D1-A18C-00C04FD75D13}.
Close the Registry Editor.
Open the target file or folder.
Right-click on it and select the Move To Folder option.
Select the destination in the new pop-up.
Click Move.
When you create a new key and add the Move To Folder option in the context menu, you no longer need to use mouse clicks or go through multiple instances of Windows to move files or folders. This also negates the need to move files using shortcuts.
6. Use Windows PowerShell
Open the Start menu by pressing the Win key.
Type Windows PowerShell and open it as an administrator.
Type the below command and press Enter. move "FileFolderPath" "PathToDestinationFolder" (To move file A.exe from one folder to another, the above command would look like move “C:\Program Files\A.exe” “D:\”)
7. Use Send to option
Locate the file that you want to move.
Right click on it and Show more options.
Select Send to> and pick a location.
That is it from us in this guide that will teach you the different ways to move files in Windows 11. In addition, we have a guide that will help you to change the default folder view in Windows 11.
If, for some reason, the copy and paste feature isn’t working on your Windows 11 PC, then you should check out our guide that will help you quickly resolve the problem.
Some users have reported that the Windows key isn’t working on their keyboards. If that is the case with you as well, then you should refer to our guide, which will help you fix that.
Our guide will discuss the detection error on SSD (m.2). If you have encountered this, spread through as we explore the best fixes.
Modern laptops either come installed with the latest generation M2 SDD or has an empty slot for the user to upgrade. However, you may sometimes encounter SSD m2 errors while turning your computer on.
This standard error can occur for several reasons, and many users have reported similar SSD detection errors in the Reddit Community.
Yesterday for the first time I got a SSD m.2 detection error after powering on the laptop. I have the same error as this screen shotposted on the Lenovo forums. I have shutdown the laptop, waited a couple of minutes and powered on again. My Linux distribution then booted fine but I started to have my journal filled with messages like: And the system was unusable. I powered off (hard shutdown) again and on again and everything is fine now. I do not seem to have loss any data but I can tell you that I was very afraid.
What causes Detection error on SSD (M.2)?
There can be various reasons why an SSD (M.2) may experience detection errors. However, users have attributed it to the following:
Physical damage – Physical damage to the SSD or the M.2 slot can cause detection errors. It is essential to ensure that the M.2 slot and the SSD are not physically damaged.
Loose connection – A loose connection between the M.2 slot and the SSD can cause detection errors.
Outdated firmware or drivers – Outdated firmware or drivers can also cause detection errors. It is recommended to keep the SSD firmware and drivers up-to-date to avoid such errors.
Incompatible hardware – Incompatible hardware can also cause detection errors.
BIOS settings – The BIOS settings can also cause detection errors. Check the BIOS settings to ensure that the M.2 slot is enabled and configured correctly.
Power issues – Power issues, such as an insufficient power supply, can also cause detection errors.
Other software issues – Other software issues such as malware, viruses, or other software conflicts can also cause detection errors.
You should note that the solutions we recommend below will come in handy regardless of the cause of the error.
How can I fix the Detection error on M.2 SSD?
Before going into any solutions, ensure that the power supply to your device is stable and adequate.
Also, ensure that the SSD is compatible with the system’s hardware and specifications. Again, you may find out more about this by reading the manual.
1. Reseat the SSD
First, check your SSD for a loose connection or the drive slipped from the slot.
Shut down your system.
Open the back cover of your laptop.
Unscrew the SSD.
Carefully unplug the SSD from the M2 slot.
Clean it with a cloth and then reseat the drive. Make sure you screw the SSD down. If the screw is loose, the SSD may cause blue screen errors.
Close the back cover and reboot the computer. Check for any improvements.
This solution will only work if a poorly inserted SSD triggers your error.
2. Update BIOS
2.1 Check the BIOS version.
Press Windows + R, type control, and hit Enter.
Search for Windows Tools, and click the option.
Select the System Information option.
Take note of BIOS-related info like the BIOS version.
2.2 Download the BIOS
Head to the manufacturer’s site. In this example, we head to the HP site.
Identify your product type.
Here you should enter your serial number or use the option for Let HP detect your device.
Once you have detected your system, expand the BIOS option and click Download.
Close all open applications, double-click on the downloaded file to start the installation, and follow the prompts.
On completion, restart the computer.
Note that this process will slightly differ for other manufacturers.
If the error occurs on a Lenovo laptop, you can download the latest version of BIOS from the website here. Alternatively, you can also use the Lenovo Vantage software pre-installed on your computer to download the BIOS update.
3. Update your driver
Head to the manufacturer’s site. In this example, we head to the HP site.
Identify your product type.
Here you should enter your serial number or use the option for Let HP detect your device.
Expand the driver, and click Download whenever there is an update.
You should ensure you have the latest drivers for your motherboard and the M.2 SSD. You can usually find them on the manufacturer’s website.
The laptop hardware or the SSD may be defective if the issue persists. In any case, contact your laptop’s manufacturer to claim the warranty. They will probably replace the computer or the SSD drive to fix the problem. If you have installed the SSD yourself, try to claim the warranty for your SSD.
That will be all for this guide. Any of these four solutions should help you resolve the issue. In most cases, the fix will entail simple steps you can perform independently.
In the comments below, let us know what has proved the most effective for you.
You may have encountered operating system errors if you’re a Windows user. One such error is the 0x80070422 Windows Firewall error.
This error can occur when trying to turn on the Windows Firewall or running certain apps that require the firewall to be active, but fortunately, there are ways to fix it.
In this article, we’ll explore the causes of the 0x80070422 Windows Firewall error and provide some solutions to help you get your firewall up and running again.
What is the 0x80070422 firewall error?
The 0x80070422 firewall error is an error code in Windows when attempting to enable or disable the Windows Firewall. This error code can also appear when trying to run certain apps that require the firewall to be active.
It usually indicates that the Windows Firewall service is not running or is disabled, so the firewall cannot be enabled. However, there are several reasons why you might encounter the error on your Windows system.
Disabled Firewall Service – If the Windows Firewall service is not running, you may encounter the 0x80070422 error when you attempt to enable or disable the firewall.
Third-Party Firewall – If you have installed a third-party firewall, it may interfere with the Windows Firewall and cause the error.
Malware or Virus Infection – Malware or virus infections can cause damage to system files and services, including the Windows Firewall service. This can lead to the 0x80070422 error.
Windows Update Issues – In some cases, a failed, or incomplete Windows update can cause issues with the Windows Firewall service, leading to the error.
Corrupted System Files – Corrupted system files can also lead to the 0x80070422 error. This occurs for various reasons, such as a power outage or a sudden system shutdown.
What are other Windows Defender firewall errors?
Specific errors can sometimes appear with Windows Firewall, and speaking of errors, these are some of the common errors that users reported:
Error code 0x80070422 Windows 10 – This error can appear on your Windows 10 PC and prevent the firewall from working correctly. However, you should be able to fix it using one of our solutions.
Windows Firewall can’t change some of your settings error code 0x80070424 – Sometimes, this error can appear while trying to change certain settings in your firewall. This might be caused by malware, so perform a detailed malware scan.
Windows Firewall won’t turn on, start – This is another problem you might encounter. To fix it, make sure that the required services are running correctly.
Windows Firewall turns itself off – Several users reported that their Windows Firewall turns itself off. This strange problem can occur due to a corrupted Windows installation.
Windows Firewall can’t change settings – If you can’t change the settings of Windows Firewall, the issue might be file corruption or any other problem. However, you can fix that problem by performing System Restore.
Windows Firewall not working – In some cases, Windows Firewall won’t work at all. This can be a significant security risk; try some of our solutions to fix that problem.
How do I fix the 0x80070422 firewall error?
1. Scan your PC for malware
Type Windows Security in the Search bar, and click on the relevant search result.
Now, click on Virus & threat protection here.
Click on Scan options.
Now, select Full scan and click on the Scan now button at the bottom.
If you’re constantly getting error 0x80070422 while trying to access Windows Firewall, the problem might be a malware infection. Certain malware can prevent you from opening Windows Firewall, but you can fix that by performing a detailed system scan.
After scanning your PC with one of these tools, the problem should be resolved, and you’ll be able to access Windows Firewall without any problems. Several users suggested using Microsoft’s Malware scanner, so you might want to try that too.
2. Make sure that the Windows Firewall service is running
Press Windows Key + R and enter services.msc. Now press Enter or click OK.
When the Services window opens, locate and double-click on Windows Defender Firewall.
Ensure that the Startup type is set to Automatic and that the service is running. Now click on Apply and OK to save changes.
After enabling this service, you should be able to start and configure Windows Defender without any problems.
In addition to Windows Defender Firewall service, it’s also recommended to configure Windows Update and Background Intelligent Transfer Services. You will repeat the steps above for these two services.
If you’re getting error 0x80070422 while trying to use Windows Firewall, the problem might be your services. Windows Firewall requires certain services to be enabled to work correctly.
3. Use the Startup repair feature
Open the Start menu, click the Power button, hold the Shift key, and select Restart from the menu.
Select Troubleshoot, then Advanced options.
Now select the Startup Repair option.
The repair process will now start.
This process can take a while, so don’t interrupt it. Once the repair process is finished, check if the problem persists.
Sometimes this problem can be related to a corrupted Windows 10 installation, and to fix this problem, you need to run Startup Repair.
4. Perform a System Restore
Press Windows Key + S and enter system restore. Now select Create a restore point from the menu.
The system Properties window will now open. Click the System Restore button to proceed.
When the System Restore window opens, click Next.
If available, check the Show more restore points option. Now select the desired restore point and click Next.
Follow the instructions on the screen to complete the restoration process.
Once your system is restored, check if the problem persists.
If you’re getting error 0x80070422 when trying to use Windows Firewall, you might be able to solve the problem by using System Restore. If you’re unfamiliar, System Restore is a useful feature that can quickly restore your PC to an earlier state and fix various problems.
To ensure a smooth process, you can try specialized applications that help you repair all Windows system issues.
5. Disable your Proxy
Open the Settings app by pressing Windows Key + I.
When the Settings app opens, go to Network & Internet section.
Select Proxy from the menu on the left and disable all options in the right pane.
After doing that, the problem with Windows Firewall should be resolved entirely.
Many users use proxies to protect their privacy online. However, proxies can sometimes interfere with your network configuration so you might encounter error 0x80070422.
After creating a new user account, switch to it and check if the problem persists. If not, you might want to move your files to the new account and start using it as your main one.
If you’re getting error 0x80070422 while trying to run Windows Firewall, the problem might be a corrupted user profile. Your profile can become corrupted for various reasons.
And you are done. If you have reached the end of this article, then it means that you have successfully fixed the error 0x80070422 in Windows.
But if the methods above did not solve your issue, please write us in the comments section of the page situated a little bit below, and we will help you further as soon as we can.
This Event ID 10010 error throws the following message: The server {1F87137D-0E7C-44D5-8C73-4EFFB68962F2} did not register with DCOM within the required timeout.
DCOM errors are present in every computer. For example, the description of Event ID 10010 reads that the server did not register with DCOM within the required time-out period.
DCOM is a Microsoft proprietary that allows Component Object Model (COM) allows the software to communicate across a network. However, the inherent problems associated with the COM model could cause a few issues.
Some components require registering themselves with DCOM; when they fail, you will encounter Event ID 10010 and other errors.
How can I fix the Event ID 10010 error on my Windows PC?
1. Tweak Component Services
Press the Win + R keys to open the Run dialogue.
Type dcomcnfg and press Enter.
Double-click on Computers.
Right-click on My computers and select Properties.
Switch to the COM Security tab.
Under Access Permissions, click on the Edit Default button.
Select the Group or user name and set the correct permissions.
Click OK.
Restart your PC and check if this resolves the issue or not.
2. Enable Function Discovery Resource Publication service
Open the Start menu by pressing the Win key.
Type services and open it.
Locate Function Discovery Resource Publication service.
Right-click on My computers and select Properties.
Switch to the Default Properties tab.
Check the box for Enable Distributed COM on this computer option.
Under the Default Authentication Level drop-down, select Connect.
For the Default Impersonation Level drop-down, select Identify.
Finally, click on Apply and OK.
4. Use SFC Scan
Open the Start menu by pressing the Win key.
Open the command prompt as an admin.
Type the below command and press Enter. sfc /scannow
Once the scan completes, restart your PC.
Windows OS has an in-built SFC Scan tool to help you scan and fix corrupt system files on your PC. However, this isn’t sometimes as impactful as a dedicated system fixer.
5. Install the latest Windows update
Press the Win + I keys to open the Settings menu.
Click on Windows Update on the left pane.
Hit the Check for updates button.
If there is a new update available, hit the Download & Install button.
Once the installation is complete, restart your PC and check whether this resolves the Event ID 10010 error.
You should ensure you are using the latest Windows version on your PC. Apart from bringing essential features, the Windows updates bring bug fixes for issues that could be causing the Event ID 10010 error.
6. Reset your PC
Press the Win + I keys to open the Settings menu.
Click on the Recovery tab on the right side.
Select Reset PC.
Choose the Keep my files option to reset your PC without deleting your personal files.
The process of resetting will begin, and your PC will restart once the process is complete.
You should opt for resetting your PC as a last resort if nothing works in your favor. Resetting your PC will bring it back to where everything is usually working.
That is it from us in this guide. We have a guide about the Event ID 161 Volmgr that explains the issue and how you can quickly resolve it.
You can also refer to our guide if you are coming across the Event ID 7023, which is a standard error in Windows 10 and 11 PCs.
Esent Error Event ID 455 is also one of the common errors that you will face on your Windows operating system computer. You can check out our guide that helps you fix the problem.
Permissions in Discord allow users to set specific access and features within their server. However, some users have reported that their set permissions are not synced with the category in Discord. Keep reading to find a solution to this issue.
Users can use permissions for anything from granting administrative privileges to the ability to edit messages. Permissions are determined based on the roles assigned to users on the server and channel. With category permissions, users have synced or not-synced channels.
Permissions will match the category with a synced channel, however, the permissions will differ for a not-synced channel. Follow the steps below to change a channel to a synced channel.
Why are my permissions not syncing with categories in Discord?
Here are a few reasons you are facing the problem in Discord:
Permissions not synced: Even after changing the category settings, these won’t automatically apply to channels unless manually synced. So, you will have to do that.
Issues with the connection: In case you have a slow Internet connection or there is an intermittent drop in connectivity, syncing issues may appear.
Improper installation of Discord: The problem may also arise due to issues with Discord which might be a result of an improper installation.
How do I fix permissions not syncing with a category?
1. Change to synced channel
Open Discord either in-app or in your browser and right-click on the channel you wish to change, then select Edit Channel.
Click on Permissions.
Select Sync Now to change the channel’s permission to match the category.
Click Sync Permissions.
Keep in mind that adjusting permissions for a category will affect all permission of synced channels and will not impact not-synced channels. If you’re Discord permission roles are not working at all, we also offer a guide for that.
2. Update Windows
Click on Start and open Settings (or press Windows + I)
Select Windows Update and allow it to scan for updates.
Perform any available updates.
If your Windows is out of date, then issues can arise in third-party apps like Discord. Try performing any available updates on your PC and check if the issue is fixed.
Click on Start and search for Discord, then select Open file location.
Right-click on the Discord application and select Show more options.
Click Troubleshoot compatibility.
Select Try recommended settings.
Click Test the program.
If your permissions are not syncing with a category even after changing to synced channel, then try troubleshooting Discord’s compatibility with your PC. Running the troubleshooter will scan and locate any issues with the Discord app and then provide recommended settings to solve the issue.
How do you create categories in Discord?
Open Discord in-app or in your browser and right-click on your server icon.
Select Create category.
Enter a category name, then click Create Category.
Users can create categories and set specific permissions for each category. Any changes made to the category will apply those changes to channels that are synced under it. Users can move categories around, and synced channels automatically update the permissions.
How do I change permissions on all channels in Discord?
At present, Discord does not offer the feature to change permissions for all channels on a server, though you could modify them for the category and then sync these with individual channels.
The feature would be a great addition and help users manage things more effectively. If and when it is released, we will update the article with the detailed steps for it. Bookmark it and keep checking!
We hope one of the above solutions helped you fix your permissions if they’re not synced with a category in Discord.
And once you have fixed the problem, find out what to do if Discord keeps freezing in Windows.
Let us know in the comments below which step worked for you or if you have any other suggestions for a fix.
After months of working on sustainable efforts across its hardware and software, Xbox’s carbon-aware downloading system is finally here under February 2023 update. The feature was available for Xbox Insiders but is now rolling out for all users.
In short, when the console is on and connected to the internet, the system will schedule updates for apps and games at specific times during the nightly maintenance window.
“Xbox is working to reduce our environmental impact to help us reach Microsoft’s goal of being a carbon negative, water positive, and zero waste company by 2030 by rethinking how we design, build, distribute, and use our products.”
With this new feature, Microsoft hopes to lower carbon emissions as an electric grid like this could cause a higher proportion of electricity.
In fact, shutting down the console completely cuts power use by 20 times more than putting it to sleep, the equivalent amount of carbon removed by one tree grown for a decade.
What other features are coming with the Xbox February update?
1. Google Home app
Starting today, the Google Home app can also serve as a touch remote control for your Xbox consoles, including power on/off, directional navigation, navigate home, navigate back, play/pause, skip/previous, volume up/down, mute/unmute, and record game clip.
To do so, you can simply check on your Google Home mobile app and pull it down to refresh and scan your Xbox console.
2. Party support
Also, with this update, Xbox selected a few users to test out the new party support that allows them to access the list of their previous parties, which now can be restarted or upgraded at any given time.
To do so, you can simply go to the Parties & Chats tab in the guide on your Xbox console. Click on the Party ➜ Party History.
Some users, however, have also reported that they’re not able to update the software on their Xbox One consoles. If you relate to this situation, we’ve prepared a simple guide for you to fix the Xbox update issue and get back to gaming.
Are you excited about these new features on Xbox? Let us know in the comments!
Many users have been reporting massive packet loss & ping spikes on Virgin Media consistently, preventing them from accessing the internet.
While in most cases, the issue seems to be on the end of Virgin Media due to an overloaded and congested network, there could be external issues as well.
Why am I having packet loss on Virgin Media? These are some of the factors to consider:
Network connection issues due to power lines, cameras, wireless speakers, and wireless phones
Link congestion to high traffic
Faulty network hardware problems
When the network is operating at a higher capacity than it was designed for
Incorrect configuration
Security risks and software bugs
So, if you suffer from huge packet loss on Virgin Media, we recommend you try the below troubleshooting methods to fix the issue.
How do I fix packet loss on Virgin Media?
Before we head to the slightly complex fixes, here are some tips for basic troubleshooting:
Restart the router.
Check the cable connections, and if any are loose, reconnect them and make sure they are firmly plugged in.
In case you are using a wireless connection, switch to a wired one to improve the Internet speed.
Make sure the hardware is not damaged. Check for cracks or sounds from within the router, and in case there are any, replace it.
If these don’t work, head to the solutions listed next.
1. Use a VPN
One of the safest options to solve packet loss is using a reliable VPN service. ExpressVPN is a top-notch software with a strong set of core features. Even though Virgin Media blocks some VPN providers, Express VPN is still compatible.
It helps you browse the internet without sacrificing your security or privacy. You can stream or download any content thanks to its unlimited bandwidth. You can also access any applications securely from anywhere.
Furthermore, ExpressVPN can improve your connection and streaming speeds if your ISP has been throttling traffic. It also keeps your online activity secure and more private because your connection is protected with tunneling and encryption. Thus, ISPs are incapable of inspecting your data packets.
This VPN can reduce ping and lower latency so you can get the most out of the streaming experience. To make sure your internet connection performs maximally, try to connect to a server location closest to your geographic location.
ExpressVPN
Boost your connection and fix packet loss with ExpressVPN’s impressive features.
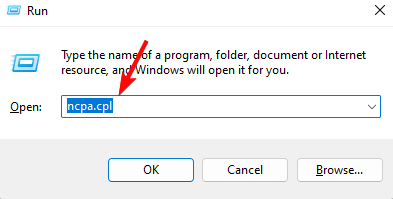
Open the Run console by pressing the Win + R hotkeys.
In the search box, type ncpa.cpland hit Enter.
Now, under Network Connections, go to your WiFi, right-click on it, and select Properties.
In the WiFi Properties dialog, go to the Networking tab, select Internet Protocol Version 4 (TCP/IP4), and click on Properties.
In the next dialog, go to the General tab, select Use the following DNS server addresses, and enter these DNS addresses in the respective fields: Preferred DNS server:8.8.8.8and Alternate DNS server:8.8.4.4.
Press OK to save the changes and exit.
4. Update your router’s software
Type the router address in your browser’s address bar (find it in the router’s manual), and sign in.
Next, locate the Firmware update, Software update, or Router Upgrade option on the left. It’s usually under Administration, Utilities, or Maintenance.
Now, on the right, click on Check to check for updates and install them.
The router will now restart, and the packet loss issue on Virgin Media should be resolved.
NOTE
You can also visit the manufacturer’s website, download the latest firmware update, and save it on your desktop. You can then browse the saved file and finish installing the update.
Is Virgin Media Internet good for gaming?
Though Virgin Media is good for gaming in general, a lot depends on the location and its services there. So, you must identify how Virgin Media Internet performs in a particular locality.
There are forums where some seem content with the services while others had ping at 7000 ms, which would make competitive gaming next to impossible. If the connection benefits others, try using a Virgin gaming broadband for better performance.
How do I test my packet loss?
You can follow the below instructions to test for packet loss on a Windows PC:
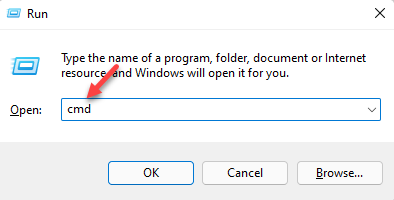
Press the Win + R keys simultaneously on your PC to launch the Run console.
In the search field, type cmd and press the Ctrl + Shift + Enter keys together to open the elevated Command Prompt window.
Now, run the below commands in the Command Prompt (Admin) window and hit Enter: ping -n 100 1.1.1.1
NOTE
Here, ping = the command to ping. Leave it as it is. -n XXX = allows you to set the number of times it runs the test. The default is 4. X.X.X.X = the IP address you are testing the connection to. You can use Google (8.8.8.8).
Once done, you can now check the results for the percentage of packet loss.
How can I improve my virgin media quality?
To improve the signal quality of the Virgin Media network, you can follow the below methods:
Unplug the router, wait for a couple of seconds, and then plug it back in
Check if your router is capable of delivering faster broadband speeds
Test each device to identify the one that’s causing the packet loss
Remove any physical interferences like cordless phones or microwaves
Place your router in an elevated space that has no obstruction
Replace older Ethernet cables with new and shorter ones
Make sure that your router has the latest updated firmware
Some users prefer to change NTFS permissions for certain folders in Windows 11, so they can access them better.
However, tinkering with permission settings can generate issues. One of our readers said that he accidentally stopped the Change task permission for a user, and his system became unstable.
Moreover, he couldn’t change the permission because he was denied access to certain folders.
Has something similar happened on your PC? If so, you’re in the same boat as the quoted user above. You can reset all NTFS permissions to default with the methods in this guide below.
What are NTFS Permissions?
NTFS stands for New Technology File System and is a type of file system for Windows PCs. However, NTFS isn’t anything new since it replaced the FAT file system for older platforms in ‘93.
The NTFS permissions control (manage) folder and file access for its filing system. You can select several permission options for folders from their Security tabs.
What is the icacls tool?
Icacls is a command-line utility with which you can modify folder and file permissions. You can input icacls commands to reset NTFS permissions for specific folders or all directories.
The icacls.exe command specified in the first method resets permissions for all subfolders and files in a directory. This Microsoft page details the icacls command syntax and its parameters.
How do I reset permissions in Windows 11?
1. Use the icacls.exe command
1. Press the Search button on the Taskbar, type cmd, and select Run as administrator.
2. Then open a folder you want to reset all permissions for in Windows 11 with the Command Prompt’s Cd\(folder path) command. You can open the root directory by executing this command:Cd\
3. To take ownership of an open directory tree, input the following text and hit Enter:takeown /R /F *
4. Input this command and press Return:icacls * /t /q /c /reset
5. Alternatively, you can reset a folder tree’s permissions to default by including its directory path in the command. Execute this command with a real folder location included within the brachets:icacls [full folder path] /reset /t /c /l
In order to reset all permissions to default on Windows 11 using the icals command, you need to use the built-in command-line tool Command Prompt.
Cmd allows you to take ownership of an open directory tree and then reset it with the icals.exe command.
Double-click the downloaded file to install it to the following path (If your system is installed on another drive then C:, replace the letter accordingly): C:\Windows\System32
Now, open Notepad and type or paste the following commands:
Click File from the menu, select Save As, and then name the file reset.cmd.
Click on Save as type, and then select All Files (*.*), save the file to any location you want, and close Notepad.
Go to the location of the file and double-click it to reset the permissions. The procedure will take a few minutes, so be patient.
That’s it! This will restore default security permissions for the hard disk partitions.
How can I back up and restore NTFS permissions in Windows?
It’s a good idea to back up NTFS permissions before messing around with folder and file permission settings. Then you’ll easily be able to restore backed-up permissions when required.
You can back up and restore NTFS permissions with the same icacls command-line tool needed for resetting them. This is how to back up and restore folder and file permissions with two commands:
Open Command Prompt with admin user rights as specified in steps one to four for method one.
Navigate to a folder tree for which to back up permissions in the Command Prompt.
To back up permissions, input and execute this icacls command: icacls c:data /save ntfs-permissions-folder.txt /t /c
You can restore permissions by executing this icacls command: icacls c: /restore ntfs-permissions-folder.txt
How do I remove administrator permission from external hard drive?
Right-click on the external hard drive, and select Properties.
Head to the Security tab, and click Advanced.
Now, click on Change.
Enter Everyone in the text field, click on Check names, and then on OK on all windows to save the changes.
Again, head to the Security tab in Properties, and click on Edit.
Make sure everyone has all the permissions, and then save the changes.
This should stop administrator permission prompts on external drives from now on, and you can easily transfer files. Also, if you were wondering how to change the read & write permissions on external hard drive, untick the suitable checkbox in the last step.
You can discuss resetting NTFS permissions in this page’s comment section. If you know of any other good way to reset NTFS permissions in Windows 11, let us know about it below.
Zoom not connecting to earphones or headphones is a real problem if you rely on this video calling app. Luckily, the underlying causes aren’t too critical to fix.
From muted headphones to audio settings, USB port settings, and conflicting apps, we’ll address all possible culprits below.
What can I do if my headphones are not working on Zoom?
Before jumping to the advanced solutions, try restarting your device. Also, make sure the mute button isn’t ON, and that your headphones are set as the default output device.
Let’s now check out more troubleshooting tips:
1. Check audio settings in Zoom
Launch Zoom.
Click on the gear icon to open Settings.
Select Audio from the left side.
Click on the drop-down menu for Speakers and select your headphones.
Click on the drop-down menu for Microphone and select your headphones. Here you can test if the app is picking up audio from your headphones or not.
Close Settings and check if this resolves the headphones are not working on Zoom problem.
2. Ensure Zoom is not muted by your PC
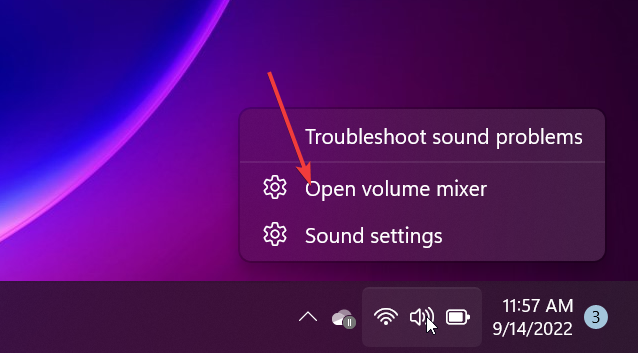
Right-click on the Sound icon at the bottom-left taskbar menu.
Select the Open volume mixer option.
Make sure the levels for Zoom are set to 100.
3. Make sure the correct device is selected
LaunchZoom.
Connectto your meeting.
Click on the upward arrow next to the Microphone icon labeled Mute.
Ensure that your headphones are selected under the Speakers section.
4. Turn off Hands-free Telephony
Open the Start menu by pressing the Windows button.
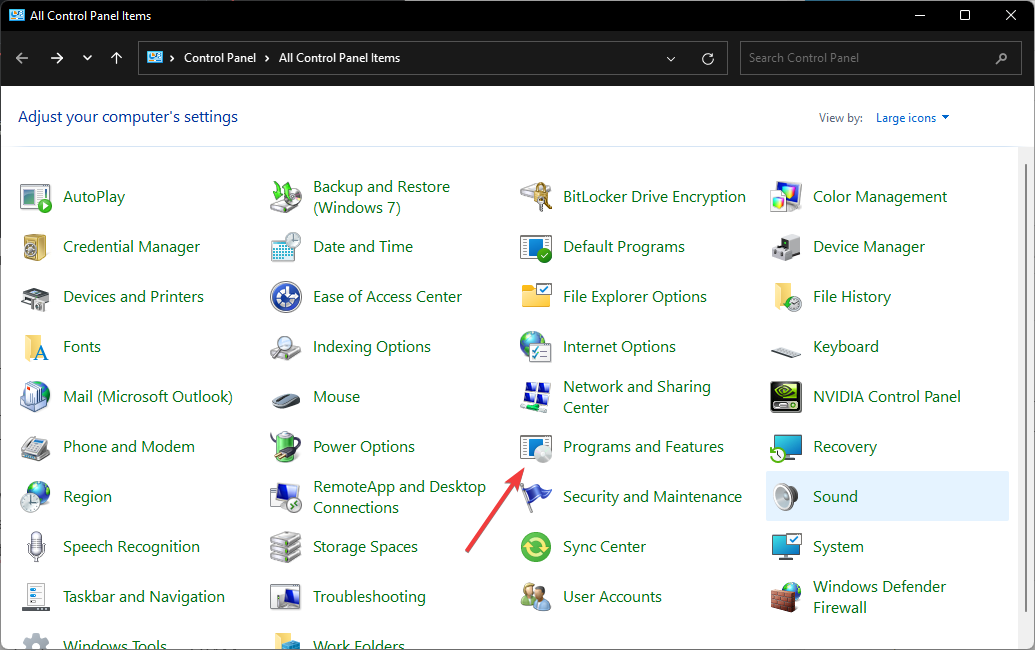
Search for Control Panel and open it.
Click on View by and select Large or Small icons.
Right-click on Devices and Printers and select Open in a new window.
Right-click on your Bluetooth headphone and select Properties.
Switch to the Services tab.
Under the Bluetooth Services section, uncheck the Hands-free Telephony option.
Click Apply and OK.
This solution was suggested by one of Zoom’s users who contacted us. Notably, disabling handsfree telephony has helped several users fix the headphones not working on Zoom issues.
Following simple tweaks like the ones above should help you fix Zoom when it’s not connecting to earphones. Leave a comment below letting us know which method helped you.
Typing and editing on your PC are easy because you can use several functions to create your documents and other written files.
However, it can be a nightmare when users encounter problems with backspace only deleting one letter when holding it down.
Why does my backspace key only delete one letter at a time?
The backspace key only deleting one letter at a time on Windows 11 causes a tiring delay in work time because of the hold at intervals. Holding down the delete key should delete letters sporadically, breaking only when the key is released.
However, the issue can be due to several underlying factors affecting the keyboard and your computer. Some of these factors are:
Enabled Filter Keys feature – If the Filter key feature is enabled, your system ignores or slows down repeated keystrokes and adjusts keyboard repeat rates and holding down the delete key becomes ineffective.
Outdated keyboard device driver – You may encounter this issue if you don’t update your keyboard driver on Windows 11.
Outdated Windows and other issues with the PC – System-related issues like outdated OS can affect the functionality of peripherals connected to the PC. It can cause the backspace key to malfunction and other keys not to work on Windows 11.
So, if you have the same problem as our readers who said, my backspace key will not delete continuously as I hold it down, we’ll discuss some fixes for the problem and get your keyboard working.
What can I do if my backspace key only deletes one letter at a time?
Before proceeding with any troubleshooting steps, try the following preliminary checks:
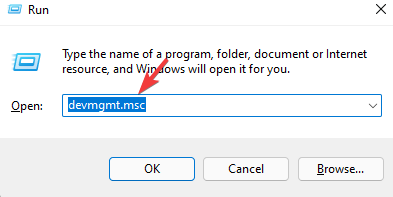
Press Windows + R keys to prompt the Run window, type devmgmt.msc, and click OK to open the Device Manager.
Expand the Keyboards entry, right-click on the keyboard devices, then select Update driver from the drop-down menu.
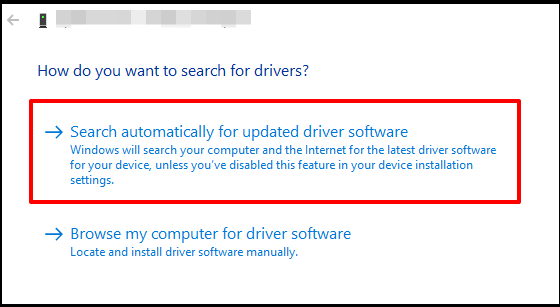
Click on Search Automatically for drivers option.
Repeat the procedure for other drivers on your PC.
Updating the keyboard driver will fix bugs affecting the device and install the latest features to improve its performance. Read our guide for other steps for updating drivers on Windows if you have any issues.
Besides this manual method of updating your keyboard driver, you can try using a dedicated program to help you accomplish this task automatically.
4. Reinstall the keyboard device
Press Windows + R keys to prompt the Run window, type devmgmt.msc, and click OK to open the Device Manager.
Select the Keyboards entry, right-click on your Keyboard device and then select Uninstall device from the drop-down menu.
Click Uninstall in the confirmation box and wait for the process to complete.
Restart your PC. It will automatically install the missing driver.
Uninstalling the keyboard device will resolve corrupt device files, settings issues, and other keyboard-felted issues.
In conclusion, after applying these fixes, backspace should cease to delete one letter at a time, and all the other keys should work smoothly. If you have further questions or suggestions, kindly use the comments section.
Many users like to keep their desktops looking fresh and tidy. However, some people report that their desktop icons won’t stay in place.
This can be frustrating, as you must repeat the changes to keep your icons organized. Thankfully, this issue can be fixed easily by following the steps in this guide.
Why are my desktop icons not staying in place?
Below are some of the factors that can cause your desktop icons not to stay in place:
Wrong settings: Some PC desktop and theme settings can rearrange your desktop icons after reboot. You need to ensure your settings are correct to fix the issue.
Outdated driver: Sometimes, your desktop icons rearrange after connecting to a monitor because your graphics driver is outdated. Updating your drivers to the latest version should fix this issue.
Faulty icon cache: Another potential cause of this issue is a corrupt icon cache. You must delete it and let your PC rebuild the cache to fix this.
What can I do if desktop icons won’t stay in place?
1. Change theme settings
Right-click on the desktop and choose Personalize.
Click on the Themes option.
Now, click on Desktop icon settings.
Uncheck the box for Allow themes to change desktop icons.
Finally, click the Apply button, followed by OK to save the changes.
One of the reasons your desktop icons won’t stay in place is because of your settings. The solution is to change your theme settings to prevent it from reversing your changes.
2. Disable auto-arrange
Right-click on your desktop and select the View option.
Now, uncheck the box for Auto-arrange icons to disable it.
Uncheck the box for Align Icons To Grid to disable it too.
Finally, restart your PC.
Your desktop has a setting that allows it to auto-arrange your icons, which can lead to them not staying in one place. It would be best if you deselected the option to make your icons stay fixed.
3. Delete the IconCache folder
Press the Windows key + E to open File Explorer and follow the path below: C:/Users/<username>/App Data/Local/IconCache
If you can’t find the App Data folder, click the View tab and check Hidden items.
Now, right-click the IconCache file and select the Delete option.
Finally, arrange your icons again and restart your PC.
Another excellent solution if your desktop icons won’t stay in place is to delete the IconCache folder. This will allow your PC to rebuild the cache and eliminate the files causing this issue.
4. Change screen resolution
Right-click the space on your desktop and select Display settings.
Click the dropdown under Display resolution and select the recommended value. If it is already set to the recommended value, switch to another option.
Now, click the Change the size of text, apps, and other items dropdown and select the recommended value.
Click the Advanced scaling settings option.
Finally, tweak the scaling percentage, try with different values, and click the Apply button.
Sometimes, your display settings might be why your desktop icons won’t stay in place. For example, if you recently changed your resolution, scaling percentage, or other display settings, you need to switch back to the default to fix this issue.
Press the Windows key + X and select the Device Manager option.
Double-click the Display adapters option to expand it and right-click the device there.
Now, select Update driver.
Finally, choose Search automatically for drivers option.
If your desktop icons keep moving on multiple Windows 10 monitors, it might be because of outdated drivers. The solution to this is to update your driver to the latest version.
Besides using the manual method, you can also try specialized applications to proceed with this task automatically.
With this, we can conclude this detailed guide on keeping your desktop icons in place. All that is left is for you to follow the instructions carefully, and you should be able to get rid of the issue.
You might have encountered many error messages the hdaudsbus.sys latency error on your Windows device and looking for a fix to it.
In the tutorial below, you will find out why the high-definition audio bus driver reacts like that. And no matter the error, this article will show you how to fix it in a few steps.
What causes the hdaudbus.sys latency?
Below are some of the potential causes of the hdaudbus.sys latency issue on your PC:
Faulty update: The primary cause of this issue, as reported by many users, is a faulty Windows update. If you started noticing the error message after updating your PC, you need to remove the update.
Outdated driver: This hdaudbus.sys error might also be because your driver is outdated or not digitally signed. The solution to this is to update your driver to the latest version.
Before making changes to your PC in a bid to fix this error, below are some preliminary troubleshooting steps:
Unplug peripherals
Check the device for overheating
If this does not fix the issue, you can now proceed to the solutions below:
1. Uninstall updates
Press the Windows key + I to open theSettings app and select Update & Security.
Click the View update history option.
Now, select Uninstall updates.
Right-click the faulty update and select the Uninstall option.
Finally, follow the onscreen instructions to complete the process.
One of the major causes of this issue is an incompatible Windows update. Hence, to fix the problem, you need to uninstall the update to fix the hdaudbus.sys latency issue.
2. Repair system files
Press the Windows key + S, type cmd, and select Run as administrator under Command Prompt.
Type the command below and hit Enter to run it: sfc /scannow
Now, wait for the scan to complete and restart your PC.
If you’re still getting this error code, maybe some system files are missing or have become corrupted.
Fortunately, you can quickly fix the hdaudbus.sys latency problem with the System File Checker. It will correct any issues found in the Registry.
3. Troubleshoot regsvr32 hdaudbus.sys in Command Prompt
Press the Windows key, type cmd, and select Run as Administrator under Command Prompt.
Type the command below and hit Enter: regsvr32 hdaudbus.sys
Finally, wait for the scan to complete and restart your PC.
Sometimes, running a few commands should fix the hdaudbus.sys latency issue. After running the command, make sure you restart your PC to effect the changes.
4. Download the latest audio/ display drivers
Go to your audio/display driver manufacturer’s website and download the latest driver versions for your Windows device.
Extract the downloaded file if it is a zipped file.
Now, right-click the driver file and select Properties.
Select the Compatibility tab.
Check the box next to Run this program in Compatibility mode.
Next, select the operating system with which the driver is compatible from the drop-down menu.
Click the Apply button, followed by OK, to confirm the action.
Finally, follow the on-screen instructions to finish the installation of the driver and restart your PC.
In some cases, this issue might be due to outdated driver display or audio drivers. In this case, you need to update your drivers to the latest version to solve the problem.
Alternatively, you fix the hdaudbus.sys latency issue by using Outbyte Driver Updater to automatically detect all the outdated drivers on your PC and download new ones. With this tool, you don’t have to go through the stress of installing the drivers one after the other.
5. Perform a System Restore
Press the Windows key + R, type rstrui.exe, and click OK.
Click the Next button on the page that pops up.
Now, select a restore point and click the Next button.
Finally, click the Finish button to confirm the action and follow the onscreen instructions to complete the process.
If you uninstall your updates and it does not fix the hdaudbus.sys latency issue, you need to perform a system restore. This will restore your PC to a time when everything is working well.
Press the Windows key, type virus, and select Virus & threat protection.
Click Scan options.
Now, select the Full Scan option and click the Scan now button.
In some cases, viruses can be the cause of this issue. Performing a full scan should eliminate these viruses and restore normalcy on your PC.
Alternatively, you can fix the hdaudbus.sys latency issue using one of the best antivirus tools, like ESET NOD32. This tool runs a deep scan and eliminates even the most hidden malware on your PC.
With this, you can scan your system files and uproot all viruses.
7. Reinstall Windows 10
If the steps above did not work, you would need to reinstall Windows 10 completely. This will give you a fresh installation of the OS that is bereft of the changes you made to your PC that might be causing the hdaudbus.sys latency error.
There you go. With the information in this guide, you should be able to fix the hduadbus.sys latency issue in the shortest time possible.
We all know the meaning of the word popular, but what is a web app? If you want to know what are some common web applications, this is your lucky day.
A web app is a type of program that runs natively on an operating system. You can download it or access it online with the help of your everyday browser.
And this could be anything. In fact, there are so many different kinds of apps on the internet that it would be impossible to count them all.
Communication apps, social media, music, streaming, education, desktop monitoring web apps, etc. There’s an open for every single thing that you can think of. Our lives would be unrecognizable without web apps.
What kind of web apps are in demand?
With so many of them ruling everyone’s lives, this begs the question of what is the most popular web app. Which apps take the spot of being the kings of the hill? That’s exactly what we shall try to establish.
Here’s what to expect from this guide:
More than 20 examples of web applications:
Most popular web design apps
Also, the most popular database apps for storage
Most popular Java web apps
Top 10 most popular web apps
Progressive web apps examples (PWA): progressive web app vs native, best progressive web apps, etc.
In addition, there will be an explanation for each of the categories. Make no mistake, though, by no means does this means these apps are the greatest.
Credit: LoboStudioHamburg/Pixabay
Whether or not an app is good is subjective and open to discussion. This guide will list what people consider essential for their phones and computers. Obviously, our web apps list will cover a wide variety of types.
But first, let’s start with what are the most popular apps of the year.
?? Top 10 most popular web apps in 2023
TikTok – massive force in social media
Instagram – change-driving social app
Facebook – post & share with the world
WhatsApp – popular communication web app
Telegram – fine-tuned for large groups chats
Shopee – best website application for e-commerce
Snapchat – the original Stories creator
Messenger – perfect for video calls
CapCut – excellent video editing app
Spotify – the ultimate app for music streaming
The following information comes from Sensor Tower, a company specializing in providing marketing data on the app industry. The data from a recent study where the company looked at data from the Google Play and Apple App Store.
These are the biggest platforms for downloading apps, and it’s an excellent barometer to start. The data only covers the topmost downloaded worldwide in Q1 2022, so these numbers might change.
Credit: Daria Shevtsova/Pexels
As the guide goes through the most downloaded apps worldwide, keep that in mind. There will also be a brief explanation of why these apps are so popular. There were 36.9 billion downloads in the first three months of 2022.
This is a 1.4 percent increase from the same time in 2021. It’s also interesting that most apps are social media platforms.
As of May 2022, the most downloaded app is TikTok, with 3.5 billion all-time downloads. This is a record that SensorTower claims TikTok has held since 2018. And this isn’t a surprise.
Since it came out, TikTok has been a massive force in social media. It’s allowed people new ways to express themselves through song, dance, or other means. Many new celebrities have come up through this platform.
TikTok is all about making short-form videos initially set to a few seconds and have grown to several minutes. Mainstream celebrities like Gordon Ramsay are on TikTok with millions of views per video.
The app is free to download like everything else on this list, and it’s easy to set up an account there. New features are constantly being rolled out, with the latest being a new way to credit creators on the platform.
The first of several Meta-owned apps is Instagram. This app sitting at number one is the beginning of a social media app pattern on this list. During Q1 2022, it saw over 150 million downloads.
This is amazing for an app that’s been around for over a decade. The driving force behind its success is its ability to change with the times and adds new features. Some might argue that Instagram steals parts from other social media platforms.
And it’s not entirely wrong to think this. Instagram Reels is basically what TikTok does, just not as well. But, on the other hand, Stories is something that it ripped off Snapchat and sees a top of usage.
For better or for worse, Instagram has been the driving factor of many movements and changes in society. It has shaped the world around it, and that’s difficult to say about many things.
Third place goes to Facebook, yet another Meta-owned app. It trails behind Instagram with just a little over 150 million downloads. The story behind Facebook’s creation is an interesting one.
They made an entire movie made out of it. Then, a group of students at Harvard College came together to create what would ultimately be a website with 2.8 billion active users a month.
It’s a platform where people can post text, videos, and other media to share with their friends or the world. In addition, you can talk to each other on Facebook Messenger or join interest groups.
Recently, Facebook has gone through massive changes. It’s been a part of significant controversies involving user privacy, fake news, and political problems, but none seems to have slowed Facebook too much.
Nowadays, the company is working on improving virtual worlds with its Metaverse concept and virtual reality headsets. It’ll be interesting to see how Facebook morphs in the future.
Next up is WhatsApp, the first app on this list that isn’t a social media platform and the first to be a communications app. However, it is the third of the Meta-owned apps, so that trend continues.
Interestingly enough, WhatsApp is much more popular outside of the United States and much more significant in regions such as Latin America, Africa, and Europe. For example, 93 percent of Brazilian mobile phone users actively use WhatsApp.
There are several reasons why WhatsApp is so popular. First, many telecommunication services are costly in those regions and offer little protection if someone gets a hold of their number.
WhatsApp is free to use and can be used over Wi-Fi. Plus, it encrypts user data and messages, so their information is safe. Plus, the app is very user-friendly so that people of all ages can use it without a problem.
Telegram is another communications app similar to WhatsApp that has recent explosive growth in the last few years. It’s gotten trendy among developers and regular consumers alike. So what gives?
Why is Telegram so popular? There are many different reasons for this, but the main one is public outcry. There was concern that WhatsApp and other similar apps were censoring people by banning them from the app.
Others were looking for ways to engage in conversations with large groups. Telegram came in and filled that niche people were looking for. They have large rooms where people can come in and discuss various topics.
Plus, Telegram has end-to-end encryption for chat rooms. Those same rooms feature stickers, video notes, voice notes, etc. It even has a self-destruct that automatically deletes messages after a specific time.
Telegram came through for a lot of people when discrete messaging was needed.
You probably have never heard of Shopee before and for a good reason. It’s an e-commerce website that focuses on Southeast Asia and Latin America markets. Think of it like Amazon, but in those specific countries.
Countries like the United States and Europe offer little room for competition, so commerce apps have had to get creative. For example, Shopee is a pretty unique e-commerce website in that it incorporates aspects of social media.
You can leave comments with images underneath postings. In addition, you can contact vendors directly in chat rooms, like items, and share them on other social media apps.
The developers behind Shopee understood the power of mobile devices. As a result, Shopee is specialized in phone usage and has a user interface that provides a personalized experience.
It also does a great job at localizing its app to the country that it’s focusing on. Mexican users will have a different experience than users in Thailand or Vietnam. You can’t underestimate what an effective marketing campaign can do.
Next is Snapchat, with a little under 100 million dollars at the beginning of 2022. Snapchat is an old-school app, and the originator of the Stories features that you see so many social media apps rip off.
The whole point of Stories is that you must be there in person to experience them. They’re short-form pictures or videos that disappear after 24 hours, and this has proved so popular that you had every other app install its version.
Instagram and YouTube renditions have proven to be pretty popular. But unfortunately, lately, others like Twitter and LinkedIn proved to be disastrous and cost the company money.
Snap Inc has expanded to other avenues and is constantly rolling out new features. For example, recently, it was revealed that the company is working on a new drone called the Pixy.
The last of the Meta-owned apps is Messenger, which has a similar download amount of under 100 million in the first three months of 2022. It used to be known as Facebook Chat way back when.
Eventually, Meta released it as a standalone app back in 2010. It’s such a massively used app that 7 percent of the world population has it on their phone.
Messenger is closely tied with Facebook, and it’s the primary way to message people on the platform. And since it’s attached to such a huge social media site, Messenger’s growth came naturally.
But it’s still a decent app regardless of the boost from Facebook. It supported video calling way before Android had that capability natively. You can play games there, and it has end-to-end encryption for added privacy.
People have criticized the app for not being super secure. However, meta is always working on improving it with new security features.
The weirdest inclusion on Sensor Tower’s list is CapCut because it’s the only app that isn’t a social media platform or a messaging app. But it is connected to a world-famous developer.
You see, Bytedance, the developer behind TikTok, created CapCut. And Bytedance took to its world-famous platform to promote CapCut, which saw it shoot up in popularity.
At this writing, CapCut has a little under 100 million downloads globally. So you may be asking what’s CapCut is and what it does. It’s an excellent video editing app.
You can add cool effects, overlays photos on top of videos, place music, and change the background. It’s a pretty engaging and robust app. It’s pretty cool to use. People can download it and express their creativity.
Admittedly, if it wasn’t for TikTok promoting, it’s doubtful that CapCut would’ve gotten so big with all the other editing apps out there. But still a decent one.
And number 10 of the most prominent apps is Spotify, with a little over 75 million downloads in the first three months of 2022. So what is there to say about Spotify that has already been said?
Spotify is a giant music streaming platform from Sweden that has all of the biggest songs on the radio from all over the world and many indie musicians just waiting to be discovered.
Recently, Spotify has made huge pushes into the podcast world, having bought the rights to big names like The Joe Rogan Experience. In addition, the platform is constantly rolling out new updates specifically for podcasts.
Spotify is so aggressive on this front that it’s eclipsing the likes of Apple and its podcast features. The former is so much better. And like Snapchat, they’re coming with new gadgets like Car Thing.
It’s a small screen that serves as an exclusive Spotify player.
Which are the most popular web design apps?
Web design apps have grown a lot in recent years. You must choose the best one to create the best possible website for you and your audience.
There are many different kinds of web design apps, and they all tackle the topic differently. Here’s a collection of the most popular ones that you will see.
Kicking things off is Wix. an easy-to-use website creator that requires no coding experience. The best creators are user-friendly and offer numerous templates that you can choose from.
As of this writing, Wix has over 500 individual templates that you can choose from for easy website creation. In addition, it offers a drag and drops editing tool with all kinds of features.
You have an image editor, social media buttons, video implementation, animations, etc. And to help you narrow down what you’re looking for, Wix will ask you a series of questions to bring up the best template for you.
Wix has multiple subscription tiers; a free one and several that you have to pay. So you can create a website for free, but you’ll have ads strewn throughout your page and have limited bandwidth.
Premium plans remove the ads while also increasing the bandwidth and storage capacity so you can add as much as you want. And if you partake in Wix Turbo, your websites will load faster.
Like Wix, WordPress is a free website-creating service that’s open-source and used by online communities worldwide. In addition, windows Report itself runs on WordPress.
It’s also important to point out that WordPress runs 43 percent of all websites worldwide and makes up 65 percent of all content management systems. That’s how widely used it is. It’s hard to imagine another service this widespread.
WordPress is so popular; on top of its free service is how easy it is to use and all of the add-ons available. It has the same drag and drops interface and template for quick website creation as Wix.
As for the add-ons, you have things like Yoast SEO for better search engine placement and Jetpack for backing up software while also protecting against malware.
Above all else, WordPress takes full advantage of SEO. Search engines tend to prefer WordPress websites, so that’s a big bonus.
And the final website creator on this list is Dreamweaver. The most significant difference between Dreamweaver and the others is that it requires some coding knowledge, and it is a pretty expensive service to use.
Dreamweaver gives you total control over how you want your website to look. You can use HTML, CSS, and JavaScript to build your web page. In addition, its addition, it offers shortcuts and multi-line editing for quick work.
On top of the programming capability, Dreamweaver also has access to Adobe’s vast media library with tons of images and videos that you can add to your webpage.
You can also optimize your page to be used on mobile and keep its design specifications.
And if you don’t feel like building from scratch, Dreamweaver has support with GitHub, so you can grab source code from there and work on it in the app.
Most popular Java web apps to bump up your creativity
Java is a programming language that gives you a ton of control over designing a website or app. It’s been around for over 25 years and sees no sign of slowing down.
As a result, developers still frequently adopt it for their software. Nevertheless, Java is pretty hard to use. This is why there are several frameworks (essentially templates) that you can pick up to make programming easier.
If you’re thinking of getting into programming, try these out.
If you’re barely starting, you give Grails a whirl. It’s a framework written in the Groovy programming language but runs on the Java platform and is compatible with other Java syntaxes.
The purpose of Grails is to make web apps quickly. If you’re skilled enough, you can make a new app from scratch in just a few minutes.
It follows the idea of coding by convention, which aims to lower the amount of work you have to do and decrease decision-making.
Grails is beginner-friendly as it comes with extensive training documents and step-by-step guides that are easy to read. It also comes with a pretty extensive plug-in library.
Next up is Spring which has a similar philosophy to Grails. It’s all about making Java easier to use and increasing productivity. And it’s because of these factors Spring has seen wide usage among programmers.
You can create business-level web apps pretty quickly and in very little time. It has two other sub-frameworks, Spring MVC and Spring Boot, that have seen wide usage by several tech industry giants.
These include Amazon, Google, and Microsoft, to name a few. Spring also allows you to test your project to see if it works and backward compatibility for older apps.
And then, we have Google Web Toolkit, a framework created by the tech giant. This framework, also known as GWT lets you quickly create a Java-based app but sees optimal usage with Google services.
This includes services like AdWords, AdSense, Blogger, and Google Wallet. Say you created an app you want to make money from, and GWT can help you implement ads.
It is a complicated service, so GWT comes with various tutorials and guides to help you. In addition, GWT offers features like compatibility with different web browsers, code optimization, and debugging so you can test it.
Most popular database web apps to keep your info organized
A database web app is an online service where you can store data. These apps also let you create and edit information as necessary. It’s pretty straightforward.
If you’re looking for a good database app, you will need one with many exemplary features and something that allows for more remarkable company growth. But, on the other hand, you don’t want to be stifled in reach.
Starting one of the more popular databases web apps is MySQL. This particular app focuses more on speed and providing a reliable service rather than having many features. Plus, it has a free version.
MySQL does see frequent updates that bring new features and improvements to its security. In addition, it runs on different platforms in addition to Windows. So if you work on Linux and Mac software, this is a handy tool.
It has an easy-to-follow user interface and allows you to process many data. However, some have complained that it takes a while to set up. And if you run into trouble, MySQL has support.
But you will have to pay for that support. To give a few examples, you will also have to pay for security features and management tools.
Microsoft SQL as a database management app can be set up to work on cloud servers and local ones simultaneously. It’s also available on Linux computers for increased compatibility.
Users have commended how fast and reliable Microsoft SQL is. It offers the ability to track changes and the performance of projects so you can see how things progress in real-time.
You can then adjust these performances to lower resource hogging. Microsoft SQL even has a mobile app you can see your projects on your mobile phone.
Plus, you can protect your data with advanced security features. if you want to step up your game, there is also the latest SQL Server 2022, up for grabs.
In the past, people have complained about difficulties importing files and how much resources Microsoft SQL takes up. It is also pretty expensive.
And the last noteworthy database app is Oracle’s service. More specifically, it is Oracle RDBMS. It pays to be the first in the market as Oracle’s service has been around since 1979, almost 50 years ago.
And in that time, Oracle RDBMS has gotten the reputation and status as the best and most widely used database. Like Microsoft, Oracle RDBMS can be hosted on the cloud or on a server.
Without getting too complicated, Oracle’s service is known for its high-performance level, flexibility, and how well it can grow with a company. As you use it more, Oracle RDBMS becomes an integral part of your business.
And because of all these features, Oracle RDBMS is a rather expensive service.
What are some popular progressive web apps?
You guessed, let’s see what are progressive Web apps, to begin with. A progressive web app is one that looks and acts like a mobile app on a desktop.
That’s the main difference between progressive web apps vs native ones and developers do this to ensure an equal experience for all users and that no one is missing out.
Plus, you don’t have to learn a whole new app when you’ve gotten used to the mobile version. It’s a nice quality of life standard. Check out some nifty mobile web app examples. Or should we say progressive web apps examples?
Making another appearance in this guide is Spotify with its PWA (progressive web app) version. There isn’t anything extra that you can say about Spotify that hasn’t already been said earlier.
The most important aspect of Spotify PWA is its user interface. It’s exactly the same as the desktop and mobile versions, so if you have a computer with little space on it, this is a great option.
All of the features and playlists that you’ve come to know and love are on PWA.
And the other noteworthy progressive web app is Twitter. Again, the developers did an excellent job unifying the desktop and browser apps. As a result, the user experience is precisely in the two versions.
You can argue that the desktop PWA version of Twitter is superior to the mobile app because it has the settings menu right in the front and what’s trending alongside.
Whichever you prefer, Twitter managed to hit a home run on two platforms.
And with that, these are all the most popular web apps on the internet. Let us know which ones are your favorites.
If the issue persists after the preliminary checks, observe the following steps.
1. Update your Graphics driver
Press Windows + R keys to launch the Run dialog box, type devmgmt.msc, and click OK.
Click the Display Adapters, then right-click the driver, and click the Update driver.
Select the Search automatically for drivers option.
Restart your PC and launch Valorant to check if the issue persists.
Updating the graphics driver will improve its performance and fix bugs affecting it. Read our detailed article on updating graphics drivers on Windows 11 if you have any issues.
2. Disable Windows Firewall
Left-lick the Start button and type control panel, then open it.
Click on the Windows Defender Firewall option.
Select the Turn Windows Defender Firewall on or off option.
Go to the Private and Public network settings, then click the radio buttons for the Turn off Windows Defender Firewall (not recommended) option.
Restart your PC.
Disabling the settings above will resolve any Windows Defender Firewall interference it’s causing the Valorant game. You can read about how to disable windows defender if you encounter issues with it.
Press Windows + R key to open the Run dialog box, type msconfig, and click OK.
Go to the Services tab and check the box for the Hide all Microsoft services option, and then click the Disable all button.
Go to the Startup tab and click Open Task Manager.
Click on the startup programs and tap the Disable button.
Restart your PC and check if Valorant’s continues to freeze.
Performing a PC clean boot will stop all startup running programs that can cause Valorant freezing at startup.
4. Set Valorant as a priority
Right-click on the Taskbar and select Task Manager to open it.
Navigate to the Processes tab and locate Valorant, then right-click on it and select Set Priority.
Set the Valorant priority as High.
Click on Change priority to confirm your choice in the dialog box.
Setting the game app as a high priority will boost the game performance preventing Valorant freezing and crashing. Check out our complete guide on how to set priority in Task Manager for more insight.
5. Uninstall and reinstall Valorant
Press the Windows + R keys to open the Run dialog box, and type in control /name Microsoft.ProgramsAndFeatures and click on OK.
Select Valorant and Riot Vanguard and click Uninstall.
Download the Valorant game file. Run the Valorant file installer and follow the Windows prompt to reinstall Valorant on your PC.
Conclusively, these are the best ways to fix Valorant if it keeps freezing on your PC. Should you have further questions on this guide or other queries entirely, kindly use the comments section.
Today we’ll show you how to uninstall a printer port in Windows 10. When you change printers, unused ports may remain on your system. It’s important to remove these to avoid interference with new printers.
Let’s get started.
How do I remove a printer port in Windows 10?
1. Stop and restart the Printer Spooler
Press Windows + R key to open the Run dialog box, type services.msc, and click on OK to open the Service Manager.
Double-click on the Print Spooler service, select Stop from the new window, and click OK.
Right-click on Print Spooler again, select Start from the new window, and click OK.
Restarting the Printer Spooler will break any impediments that may prevent you from deleting the Printer port. Check our article on what to do if the Local print spooler service is not running on your PC.
2. Uninstall Printer using the Control Panel
Left-click the Start button, type Control Panel, then select it from the result.
Navigate to Hardware and Sound.
Click on Devices and Printers and select the printer device you want to remove.
Right-click on the printer, select Remove device from the drop-down and click Yes to confirm the action.
So, this is how to remove a printer in Windows 10. Read our guide on fixing the Windows driver not available error on your PC if you cannot access the printer driver.
3. Delete the Printer port from Control Panel
Left-click the Start button, type Control Panel, then select it from the result.
Navigate to Hardware and Sound and click on Devices and Printers.
Tap on any listed printer devices, then select Printer server properties.
Click on the Ports tab, select the port you want to delete, and then click Delete port.
The above steps will remove the Printer port from your PC. However, there’s a possibility that you will run into an error saying delete printer port access denied.
In conclusion, follow all the solutions to find the best way to delete the printer port. If you have any questions on this guide or other queries in general, kindly leave them in the comments section.
Large files around your PC will consume a lot of memory space. So, compressing the files on your computer can help free some memory space. However, users complain about missing the Send to compressed folder option on their PC.
The Send to compressed folder option missing means the folder not compressing to Zip on your PC and can sometimes influence your PC not to open Zip files.
Hence, this guide will provide possible solutions to access the Send to compressed back on your PC.
Why is Send to compressed folder missing?
Furthermore, many factors can cause the compressed folder to be missing on your PC. Some are:
Corrupt .ZFSendToTarget file extension setting – The .ZFSendToTarget file extension is responsible for storing compressed files on your PC. So, If the Zip file association is not working, it can cause the Send to compressed folder option to be missing.
A Bluetooth file existing in the SendTo folder – If a 0-byte Bluetooth file exists in the SendTo folder, it can cause issues with the SendTo process for other options like the Compressed folder. It can prevent the SendTo items from being displayed in the menu.
Malware and viruses – The Send to compressed folder missing on your PC can be due to malware infection. It may impede the process of the SendTo folder, causing it to exclude the send to Compressed folder option.
These causes are liable to vary on different devices. Nonetheless, we’ll take you through some fixes to get the Send to compressed folder option to appear again.
Proceed with the steps below if you can’t fix the issue.
NOTE
These solutions apply to Windows 10 & Windows 11.
1. Unhide the Compressed (zipped) folder
Press Windows + E to launch File Explorer.
Navigate to the following path and replace your_username with your actual user name: C:\Users\your_username\AppData\Roaming\Microsoft\Windows\SendTo
Go to the Compressed (zipped) folder item, right-click on it, and select Properties from the drop-down.
Navigate to Attributes and uncheck the box for Hidden. Click Apply and OK buttons.
Restart your PC and check if the send to compressed folder shows.
Unhiding the Compressed folder will prompt its option on the SendTo folder to appear.
2. Restore the Compressed folder shortcut manually
Launch the File Explorer and go to This PC.
Click on the View tab and check the box for Hidden items.
Navigate to the following location and make sure to replace the User profile in the path with the name of your profile: C:\Users\User Profile\AppData\Roaming\Microsoft\Windows\SendTo
Press Ctrl + A to highlight all the available items, then copy and paste them into the SendTo folder in your User Profile.
Go to the file you want to compress and check if the Send to compressed folder option is available.
Restoring the compressed folder shortcut manually will add it to the SendTo folder and resolve the missing options.
3. Remove the 0-byte Bluetooth shortcut from the Send To folder
Press Windows + E to launch File Explorer.
Click on the View tab and select the Hidden Items option to prompt the hidden files and folders on your computer.
Navigate to the following location and replace the Username in the path with your actual user name: C:\Users\Username\AppData\Roaming\Microsoft\Windows\SendTo
Right-click on the Bluetooth device File and select Delete from the drop-down.
Restart your PC and check if the compressed folder option is available.
Deleting the Bluetooth folder in the SendTo folder will remove the Bluetooth file conflicting with the Compressed folder option. It doesn’t delete the Bluetooth device.
In conclusion, if Send to compressed folder goes missing, this guide should help you troubleshoot it easily. However, if you have further questions or suggestions, kindly drop them in the comments section.
iTunes is a music program that comes as default for Apple products but is also cross-platform.
Sadly, users report that they encounter The file itunes library.itl cannot be read because it was created by a newer version of iTunes, causing the app to crash or not work.
Why do I get iTunes Library.itl cannot be read error?
The iTunes Library.itl cannot be read error can occur on Mac and Windows devices after installing Mac updates and updating the iTunes app on Windows.
However, some notable factors that may be responsible are:
Playing old content on the new version of iTunes – The error may occur when you try to play old content on a newer version of iTunes than the one it plays on.
iTunes app update issues – Many users complain about getting errors after updating and using their iTunes app. The error can be due to corrupt or pending updates on your system. Also, it may be a builder’s error caused when the update was deployed for iTunes.
Mismatch of library files during update – Updating iTunes will add new patches and files to its library and can cause errors if the process is compromised. iTunes library files must be intact and ordered before it can read them.
These causes may vary on different devices. Nonetheless, we’ll take you through some basic fixes to resolve the error.
How to fix the file iTunes library.itl cannot be read error?
Before proceeding with any advanced troubleshooting, try the following:
Click on the Go option at the top bar and select the Go To Folder option in the drop-down menu.
Type the following in the Go to Folder window, and click on Go: /Users/your username/Music
In the Music folder, select the iTunes Folder, right-click on iTunes Library.itl file, and click Rename from the drop-down. Rename the file as iTunes Library.old.
Click the previous iTunes Libraries folder, select the most recent iTunes Library.itl file, and copy the file to iTunes Folder.
Right-click the copied iTunes Library file and rename it to iTunes Library.itl.
Restart iTunes and check if the error appears.
Renaming the file will help iTunes read and recover your recent iTunes Library. Hence, fixing the file itunes library.itl cannot be read because it was created by a newer version of itunes problem.
Reinstalling the iTunes app can fix update issues and corrupt installation files causing the error. Read our guide on what to do if iTunes does not install on Windows 11.
Conclusively, these steps should help you fix the file itunes library.itl cannot be read because it was created by a newer version of itunes whenever you encounter it. For further questions or suggestions, kindly drop them in the comments section.
Microsoft Windows 7 update error 80072efe means that there is a connection interruption when downloading the Windows Update.
When your PC fails to connect with the Windows servers, you will not be able to download the update and get the Windows 7 update error 80072efe.
Apart from failed communication with the servers, there are a few other common reasons that could trigger this error code.
The Windows Update database is corrupted.
The update wasn’t installed correctly earlier.
Antivirus software is configured to block the Windows Update service.
The Background Intelligent Transfer Service (BITS) service does not receive a content link header.
There are some issues in the registry files.
An important system file related to Windows Update is missing on your PC.
How do I fix the Windows 7 update error 80072efe?
1. Run a malware scan
The first step is to determine if the issue is caused by viruses, intrusive apps, or other malicious attacks. We recommend you run a full PC scan with an antivirus with a high detection rate, such as ESET Antivirus.
ESET Antivirus has a strong firewall and network inspector to ensure you always have a safe connection. It uses multi-layered protection which means it has multiple ways of detecting all sorts of threats.
To run a scan, you just have to open the main window, click on the Computer scan button in the sidebar, then select Scan your computer. Wait for the process to complete and let the antivirus remove all threats found.
Restart your PC and see if the issue is solved.
Other notable features of ESET Antivirus include:
Network and smart devices security
Protection against malware, ransomware, and phishing
Banking and online payment protection
This is a subscription-based antivirus, but you can use the 30-day free trial to try it out first.
On top of that, if you need a full PC scan as soon as possible, you should know that offers a free, one-time full PC scan.
ESET Antivirus
Make sure all your devices are secure and your online activity is private with malware, ransomware, and anti-phishing protection!
Then click the Download the package link there for your Windows 7 platform.
Click the Download button to save the KB3138612 update to your PC.
Open the folder you downloaded the KB3138612 update to.
Install the KB3138612 standalone installer file.
This is a quick and easy workaround, but it should help you fix the Windows 7 update error 80072efe with ease.
7. Disable third-party firewall and antivirus software
It’s also recommended to disable any third-party firewalls installed before trying to update Windows.
Zone Alarm, McAfee, AVG, and Panda firewalls are known to generate issues for Windows updates. So, have a look through the settings for any installed firewall to disable it.
How do I fix Windows 7 not updating?
Check your internet connection.
Make sure that the Windows Update service is running.
Run the Windows Update troubleshooter.
Disable the Firewall.
Ensure the storage space is sufficient.
Run SFC Scan and DISM command to fix corrupt or missing system files.
Users have confirmed some of the above fixes can resolve the Windows 7 Update error 80072efe.
If you have fixed the same issue with different solutions you’re welcome to share them in the comments below.
While Microsoft will purport that Windows is best on a PC designed for it, the company realizes there is money to be made from Apple users and is extending support for running Windows on M1 and M2 powered Mac computers.
Starting off with the more enterprise scenario, Mac users looking to run Windows 11 on a M-series powered processor can do so with Microsoft’s Windows 365 service which runs as a Cloud PC platform and delivers the software-as-service solution to devices.
Organizations can purchase the Windows 365 SaaS option in bulk or on a per-user, per-month basis with various pricing options available that start at $31 a month. Typically, the Windows 365 route is toured by businesses looking to run emulators, test different platform or operating system apps or capability through nested virtualization but it can be used as a simple OS replacement for workers who use Apple computers but are more familiar with 40 years of Windows workflows.
There is a second, more consumer-friendly way to get Windows on a new Mac and that’s through Parallels Desktop which is now in its 18 iteration and was recently authorized for running ARM versions of Windows 11 Pro and 11 Enterprise on Apple M-silicon.
By all accounts Parallels 18 runs Windows 11 pretty well but does buttresses against the native hardware of a ARM powered Mac. Windows specific apps that rely on DirectX 12 or OpenGL3.3 or higher will suffer performance issues, if not immediately rejected from download or installation.
Microsoft warns that multilayer virtualization workflows will also see some performance issues and there are a handful of examples that are simply not support such as the following:
▪ Windows Subsystem for Android, which enables your Windows 11 device to run Android applications that are available in the Amazon Appstore
▪ Windows Sandbox, a lightweight desktop environment to safely run applications in isolation
▪ Virtualization-based Security (VBS), which enables customers to create and isolate a secure region of memory from the normal operating system
As with Apple’s OS development, Microsoft is also deprecating its support for 32-bit apps which also includes 32-bit ARM ones, and the company suggest seeking out 64-bit ARM developed applications when running this version of Parallels. Users can also simply use apps designed with x64 or x86 architectures in emulation as intended with Parallels for M1 and M2 Macs.
Dealing with a Chrome icon missing from the taskbar, desktop, or task manager? You’re not alone.
Despite being the most popular browser, Google Chrome isn’t a perfect app. Many users deal with errors and bugs, and today we’ll show you how to fix the icon gone missing or changing.
How can I restore a missing Google Chrome icon?
1. Clear out the browser cache
Start by clicking the three dots in the upper right-hand corner.
In the menu that appears, hover over More tools and select Clear browsing data.
Check the boxes next to Cookies and other site data, as well as Cache images and files.
Set the time range to All time.
Click Clear data to empty the data cache.
Before doing any of the other solutions, clearing out the browser cache should be the first thing that you do. In some cases, this is all you need to do.
2. Google Chrome icon missing from the desktop
Bring up Chrome in the Windows Search bar. Right-click and select Open file location.
Right-click Chrome and select Show more options.
In this new menu, choose Create shortcut, which is found near the bottom.
A window may appear asking if you want to create a shortcut on the desktop. Select Yes.
In the Windows Search bar, bring up ChromeSetup.exe.
Click it to run it. Your computer will begin downloading and installing any new updates available.
Give Google Chrome enough time to finish up.
After it’s done, the browser will launch automatically. Both the desktop and taskbar icons should work now.
4. Restore the Chrome icon
Sometimes the Google Chrome icon gets replaced with a white sheet of paper. Right-click it and select Properties.
In the new window, go to the Shortcut tab.
Select the Change Icon button at the bottom.
Select a new icon for Chrome, then click OK.
Click Apply on the last page, then OK to close the window.
5. Pin Chrome icon to taskbar
In the Windows 11 Search bar, locate Google Chrome.
Right-click the entry, and in the menu that appears, select Pin to taskbar.
If Chrome on your taskbar turns into a white page icon, right-click it and select Unpin from taskbar.
Pin it again from the Start menu.
6. Reset Chrome
Open Chrome and click the three dots in the upper right-hand corner.
Go to Settings and select Reset settings.
Click Restore settings to their original defaults.
Confirm by selecting Reset settings.
Feel free to comment below if you have questions about other Windows 11 errors. And please tell us if there’s a specific guide for any Google Chrome or browser issue you’d like to see.
There’s a lot to check out with this new Dev build as well, so let’s get right into it and go through the changelog together.
What changed with Windows 11 build 25300?
Just as you’ve heard, Microsoft has just released a new Windows 11 Insider build (25300) to the Dev Channel today.
This new release brings new Snap Layouts, Live Captions in more languages, and a rendering bug fix related to WinRE, among others.
Live captions, after it was first released through the Windows 11 2022 Update (22H2), only provided captions in English, with a focus on English (United States).
However, starting with this build, live captions will gain the ability to also provide captions in Chinese (Simplified and Traditional), French, German, Italian, Japanese, Portuguese (Brazil), Spanish and other English dialects.
That being said, certain languages shown on the Language & Region settings page will indicate speech recognition support, but don’t yet have support for Live Captions.
If you aren’t familiar with the feature, know that live captions can be turned on with the Win + Ctrl + L keyboard shortcut, or from the quick settings accessibility flyout via Quick Settings.
Currently, Microsoft is looking for new ways to improve the discoverability and usage of the snap layouts such as decreasing the hover time required to invoke the flyout.
And, in addition to a few other tweaks, you’ll notice some treatments will also pull in the icon of the app window you are working in and adding a descriptive title.
Let’s also look at the rest of the changelog and see what other goodies, or known issues, Microsoft has in store for us.
Changes and improvements
[Voice typing]
The change to sync voice typing settings, Automatic punctuation and Voice typing launcher, across all devices signed in using the same Microsoft account that began rolling out with Build 25227 is now available to all Windows Insiders in the Dev Channel. You can toggle this feature via Settings > Accounts > Windows backup > Remember my preferences > Accessibility This currently only works with Microsoft accounts today with AAD support coming later.
[Settings]
Updated Settings > Apps > Startup to make it easier to access more information about the apps listed.
Right-clicking on a Win32 app in Start, or searching for the app, and choosing “Uninstall” will now take you to the Settings to uninstall the app.
[WSL]
Improved the upgrade experience to the new Windows Subsystem for Linux Store app (mentioned in Build 25272), so it now prompts for installation if wsl.exe is invoked.
Fixes
[General]
We fixed the underlying issue related to combase.dll, causing crashes with multiple apps using GetKnownFolder APIs after upgrading to Build 25290, including Notepad and Windows Terminal for IME users. This issue is also believed to be the root cause of some Insiders finding that certain actions in File Explorer were taking minutes to complete in these builds.
We fixed the issue causing rendering issues and difficulty using Windows Recovery Environment (WinRE).
Fixed an issue where some users experienced issues authenticating into enterprise websites that require windows integrated authentication.
[Taskbar & System Tray]
The ability to show seconds in the clock on the system tray, first introduced with Build 25247, should return after updating to Build 25300 if it had disappeared for you after updating to Build 25295 last week.
Fixed an issue that was causing taskbar to be cut off after resolution changes.
We fixed an issue where when hovering over app icons on the taskbar could switch window focus unexpectedly.
[Widgets]
As a result of fixing the issue causing third-party widgets to get unpinned when signed in with a Microsoft account across multiple Windows 11 devices, the most recent Widgets update in the Dev Channel will unpin third-party widgets. Insiders will need to go back to their widgets board and re-pin these widgets again. If you still see issues where widgets are being unpinned unexpectedly – please file feedback.
The link for “Find more widgets” in the widgets picker currently is no longer broke and will point to the Store collection here.
[Input]
Beginning to roll out a fix for an issue where the IME candidate window and IME toolbar weren’t shown or cropped sometimes.
[File Explorer]
Drag and dropping files and folders across tabs should work again.
[Task Manager]
Process names typed into the search box should no longer unexpectedly get spellchecked.
Fixed a couple of issues with how Narrator was reading out content in Task Manager.
Fixed an issue where the dropdowns in settings might not match your currently selected theme.
When using search on the App History page, results should no longer suddenly disappear.
If you open the Default Start Page dropdown in settings, clicking the Task Manager window should make the dropdown disappear now.
Dragging the window using the search box area should work now (like other areas of the title bar).
Fixed an issue where ending processes in the Details tab wasn’t showing a confirmation dialog.
Increasing the text scaling should no longer result in a “see more” button appearing with no contents.
If you do a search and then press the down arrow, keyboard focus should now move from the search box into the results.
If you have a contrast theme enabled and select one of the rows in the Processes page, that row should now show that it’s selected.
Fixed an issue where focus might not get set properly to search, leading to Narrator not saying that focus was on the search box.
[Other]
Fixed an issue where Narrator’s focus wasn’t going back to the Quick Settings’ window correctly when using the back button in the Cast page.
Known issues
[General]
Investigating an issue where some users are experiencing longer than expected update times installing recent builds. If you experienced this issue, please submit a new feedback item with logs in Feedback Hub.
Some AAD (Azure Active Directory joined users are now seeing “Getting ready for you” screens when signing into Windows after updating the latest builds. We are investigating the issue.
Launching Group Policy Editor may show an error about a displayName attribute not being found.
Using Windows Hello to sign in with facial recognition may not work on Arm64 PCs. A workaround for this is to use the Hello PIN path.
Investigating reports that the Windows Insider Program settings page is showing that a newer build is available in Windows Update even though they are on the latest available build in the Dev Channel.
[NEW] We’re investigating reports that the New button in Snipping Tool isn’t working for some Insiders after upgrading to Build 25295. If you are impacted by this, going to Settings > Apps > Default apps, and setting screen snipping as the default for ms-screenclip, it should resolve the issue.
[Widgets]
Investigating an issue where under certain circumstances third-party widgets may not load as expected.
[Taskbar & System Tray]
App icons on the taskbar may appear on the wrong monitor for some Insiders with multiple monitors.
[Windows Spotlight]
Clicking on a secondary monitor does not dismiss the full screen experience.
[Live captions]
On Arm64 devices, enhanced speech recognition support will install incorrectly through the Language & Region settings page. Arm64 users who don’t have support for speech recognition with live captions in their preferred language can use this work-around: (1) Uninstall all “Speech Pack – ” app entries in Settings > Apps > Installed apps; (2) Temporarily set the first language in their preferred language list in Settings > Time & language > Language & region to an acceptable alternative language; (3) Launch live captions.
Live captions for Chinese Traditional currently does not work on Arm64 devices.
Certain languages shown on the Language & Region settings page will indicate speech recognition support (e.g., Korean) but don’t yet have support for live captions.
When adding a language through the Language & Region settings page, language feature installation progress may become hidden, and you may not see install completion of “Enhanced speech recognition” (required by Live Captions). (You can use the language’s “Language options” to monitor progress.) If this happens, there may be an unexpected delay before the live captions setup experience detects this and lets you continue.
The Language & Region settings page may not offer the necessary speech recognition language support for live captions for up to an hour after first login.
Captioning performance may be degraded in non-English languages and missing out-of-language filtering in non-English (United States) languages which means that incorrect captions will be shown for speech not in the caption language.
What can I do if I can’t install build 25300?
Press Win+ I to access Settings.
Select the System category and click on Troubleshoot.
Press the Other troubleshooters button.
Press the Run button next to Windows Update.
Also, make sure to report any other issues you might come across, in order for Microsoft to address and improve the overall OS experience for us all.
This is everything you can expect if you are a Windows 11 user. Leave a comment below if you found any issues since installing this build.
While sharing of preferred pronouns has probably unneccessarily been the subject of controversy, for some it’s an important part of identity. Recognizing that, Microsoft is bringing support for pronoun sharing to profile cards in Microsoft 365, starting in March.
In a post on LinkedIn, CVP Ashok Kuppusamy laid out both the demand for expression of preferred pronouns, and some of the challenges in implementing the feature in a safe and thoughtful way.
When determining how best to implement this functionality, we were guided by our commitment to prioritize user safety. The unique challenges of building this out for a global, enterprise customer base required us to embrace our growth mindset, challenge our assumptions, and proceed with care. We evaluated the varied legal landscape globally, knowing that this is not a feature that can be used safely in all regions, company cultures or contexts. As a result, we made the intentional choice not to launch this sooner in order to design it in a way that would provide individuals with greater choice in usage.
For organizations, pronoun sharing will be off by default and IT administrators will be able to enable the feature. For individual users within orgs with the feature turned on, adoption is completely voluntary, with options to determine use based on the situation and update pronouns in real time.
Later this year, Microsoft will add pronoun sharing capabilities to Teams meetings.
An average home computer stores many files, sometimes in millions. Some are a part of Windows, while others are manually added. And when trying to run the latter, users often come across the Operation did not complete successfully error.
The complete error message reads Operation did not complete successfully because the file contains a virus or potentially unwanted software.
While the error does put you in a fix, there’s a high chance that the concerned file is completely safe and has been incorrectly identified as a virus or PUS by the built-in Windows Defender. So, let’s find out all about the problem and the solutions that work.
Why does Windows say Operation did not complete successfully?
Here are a few reasons you might be getting the error:
File behavior matches a known malware: You often get the error when a file similar to the one you are trying to run is malware.
File downloaded from an unreliable source: If the file has been downloaded from an unreliable source, it could rightly be flagged, and you should not run it without verifying the same.
Issues with Windows Defender: Often, the problem arises due to corrupt system files, which leads to issues with Windows Defender and, thus, the error.
How do I fix the Operation did not complete successfully error?
Before we head to the slightly complex solutions, try these:
Your primary approach, when faced with the error, should be to verify if the file is indeed safe. A quick way would be to scan it using a reliable third-party antivirus or check the Internet.
If there are any Windows updates available, install them. Maybe Microsoft Defender has a bug and needs a patch.
If the error appears only when running files of a particular program, update it.
Disable all third-party antivirus installed on the PC and, for a while, just rely on Windows Defender. If you don’t get the Operation did not complete successfully error anymore, your antivirus was responsible for it.
If these don’t work, head to the fixes listed next.
1. Add an exclusion
Press Windows + S to open Search, type Windows Security in the text field, and then click on the relevant search result.
Click on Virus & threat protection.
Now, click on Manage settings under Virus & threat protection settings.
Scroll down and click on Add or remove exclusions under Exclusions.
Click Yes in the UAC prompt that appears.
Click on the Add an exclusion button, and choose File from the menu.
Browse to locate the file, select it, and click on Open.
That’s it! After the file has been added as an exclusion, you shouldn’t see the Operation did not complete successfully error message again for it.
2. Disable Windows Defender
Press Windows + R to open Run, type regedit in the text field, and hit Enter.
Click Yes in the UAC prompt.
Paste the following path in the address bar and hit Enter:HKEY_LOCAL_MACHINE\SOFTWARE\Policies\Microsoft\Windows Defender
Right-click on the empty portion, hover the cursor over new, select DWORD (32-bit) Value, and name it DisableAntiSpyware.
Now, double-click on the newly created entry.
Enter 1 under Value data and click on OK.
Once done, restart the computer for the changes to come into effect.
If you are facing the Operation did not complete successfully error with several files, manually adding exclusions would be time-consuming. Instead, an easier option is to temporarily disable Windows Defender. Just make sure not to download any files in the meanwhile.
Press Windows + R to open Run, type cmd, and hit Ctrl + Shift + Enter.
Click Yes in the prompt.
Now, paste the following commands individually and hit Enter after each:sfc /SCANFILE=C:windowsexplorer.exesfc /SCANFILE=C:WindowsSysWow64explorer.exe
If this scanning method doesn’t seem to solve the issue, you should consider an advanced antivirus like TotalAV.
It has an advanced machine learning AI feature that continuously scans for signatures and blocks them the moment they look suspicious, besides providing security over the network.
Press Windows + S to open Search, type Disk Cleanup, and click on Run as administrator.
Select C: from the Drives dropdown menu, and click on OK to proceed.
Now, tick the checkboxes for all the temporary files here, and click OK.
Finally, click Delete Files in the confirmation prompt and wait for the process to complete.
In many cases, the Operation did not complete successfully error appeared due to problematic temporary files on the PC, so clear them to fix things. And make sure to delete the Temporary Windows installation files.
5. Perform an in-place upgrade
Go to Microsoft’s official website, select Windows 11 (multi-edition ISO for x64 devices) under Download Windows 11 Disk Image (ISO) for x64 devices, and click Download.
Choose English from the dropdown menu, and click Confirm.
Click on the link presented here.
After the ISO file is downloaded, double-click on it, and choose Open.
Now, run the setup.exe file.
Click Yes in the UAC prompt.
On the Install Windows 11 page, click Next to proceed.
Click Accept to agree to the notices and license terms.
Verify that the setup reads Keep personal files and apps, and click on Install.
That’s it! An in-place upgrade should help you fix the Operation did not complete successfully error for good. But how do you ensure that it doesn’t appear again?
Xbox Free Play Days is back with another round of games for subscribers of Xbox Live Gold and Xbox Game Pass Ultimate subscribers to try out free of charge. The lineup for this week features two games instead of the usual three, both selections are real doozies. Let’s check them out below.
Welcome to Yara, a tropical paradise frozen in time. As the dictator of Yara, Antón Castillo is intent on restoring his nation to its former glory by any means necessary, with his son, Diego, following in his bloody footsteps. Their oppressive rule has ignited a revolution.
Xbox Free Play Days—NBA 2K23 (Xbox One & Series X|S)
Rise to the occasion and realize your full potential in NBA 2K23. Prove yourself against the best players in the world and showcase your talent in MyCAREER. Pair today’s All-Stars with timeless legends in MyTEAM. Build a dynasty of your own in MyGM or take the NBA in a new direction with MyLEAGUE. Take on NBA or WNBA teams in PLAY NOW and experience true-to-life gameplay. How will you Answer the Call?
Wrap up
These Xbox Free Play Days games will be available from Thursday, February 16th through Sunday, February 19th. To learn more, head on over to the Xbox Free Play Days FAQ page.
Below, you’ll find the best solutions to keep your Teams status green, avoid idle detection, and ensure your availability looks uninterrupted to colleagues or clients.
Microsoft Teams automatically sets your status to Away if you’re idle too long. While there’s no official setting to make your status stay green forever, there are indirect and safe ways to achieve it, without constantly touching your mouse or hosting fake meetings.
Press Windows + I key to open the Windows Settings app.
Click on System and then click on Power & battery.
Navigate to the Power tab, click the drop-down button for Screen and sleep, then choose how long the system should stay awake before going to sleep.
You can change the above settings after the Teams meeting or work. Also, moving your mouse from time to time can help keep your computer awake during the meeting. This is the simplest hack to keep Teams status green.
Go to the top-right corner of your screen, then click on the Profile icon.
On the Availability status, click on the marked green Available.
Click on Duration and set how long you want to appear as Available.
Setting your Availability Status allows others to see you as available even when you’re not actively working on Teams. It will keep Teams status green when away from the computer.
Navigate to the top-right corner, then click on the Profile icon.
Go to the Set status message, type a note you want to send when someone messages you, then tick the box for Show when people message me.
Go to the Clear status message after and set the duration for it to appear.
A status message will appear whenever a message is delivered to you and can also appear on your profile.
4. Host a Private Meeting
Open the Microsoft Teams app.
Select the Calendar option and click on the New Meeting button.
Input the information to create a meeting and join the meeting.
Creating a private meeting space allows you to stay active by pretending to host a meeting. It prevents Teams from being inactive until the fake meeting is live, and this will also show your status as green on the phone.
5. Update Microsoft Teams
Launch the Microsoft Teams app. Click on the three dots in the top-right corner to open the Menu.
Click on the Check for updates option from the drop-down. If there are any updates available, Teams will check and automatically install them.
Updating Microsoft Teams will fix bugs affecting its processes, causing it to malfunction.
6. Use a Script to Prevent Idle Detection
If you’re comfortable running a script, a PowerShell loop can simulate minimal mouse movement every few minutes.
PowerShell Activity Simulation Script
Press Windows + X and choose Windows PowerShell (Admin).
This simulates a tiny mouse jiggle every 4 minutes, keeping your Teams status green without interfering with your workflow.
Note: Close PowerShell to stop the script when you’re back at your desk.
7. Use a Mouse Jiggler (Hardware or Software)
Microsoft Teams uses system activity to determine presence. A simple solution is to simulate activity even when you’re away.
Option 1: USB Mouse Jiggler (Hardware)
A physical USB device mimics tiny mouse movements.
Plug it into your PC and it works in the background.
It’s OS-independent and doesn’t trigger security alerts.
Top Pick:
Vaydeer Undetectable Mouse Mover – Plugs into your USB port and physically rotates the mouse subtly, bypassing all software detection.
Option 2: Software-Based Mouse Jigglers
Tools like Move Mouse or Caffeine simulate minimal input without you doing anything.
Most tools let you:
Set custom activity intervals.
Define inactive hours to pause simulation.
Automatically launch with Windows.
⚠️ Important: Always verify with your organization’s policy before using software solutions, especially if working under enterprise IT restrictions.
Why does Microsoft Teams keep showing away?
Users can experience Microsoft Teams showing their status as away for many reasons. It makes the green dot disappear, indicating that you’re unavailable. Some of them are:
Network connection issues – You may experience Teams not showing the green light if your network connection is unstable. It means you can’t connect to the servers.
Problems with your Display settings – If your PC enters Sleep mode while on Teams, it can affect your status.
Outdated Teams app – Microsoft Teams operation may fail, which can cause problems with its user status if it is not updated. Consequently, Microsoft Teams can keep showing away even when you’re active.
However, the cause of Teams frequently showing away can vary depending on the circumstances. We’ll take you through some easy fixes to get it green again.
Razer Synapse is hardware configuration software with which users can configure Razer peripherals, but many users reported that Razer Synapse isn’t opening.
And in today’s article, we’re going to address these problems once and for all, so read on!
Why is Razer Synapse not launching?
It can happen because of your Windows Firewall, or simply because the application’s files might have become corrupted.
Other expired Razer processes and various third-party applications could also get in the way of your Razer Synapse not working.
According to users, they experienced unexpected errors in Razer Synapse, among other issues, such as:
Razer Synapse not loading profile/not switching profiles – This can happen if your profile is corrupted. The best course of action would be to recreate the damaged profile.
Razer Synapse not loading opening on startup – Your settings most likely cause the issue, so adjust them.
Razer Synapse not working in-game – It’s possible that the game doesn’t fully support Synapse. Updating both the game and the software should help.
Razer Synapse not working after update – A bad update can cause this problem, so reinstalling the software should help.
Razer Synapse not downloading from the website – If this happens, check your antivirus settings and make sure the download isn’t blocked.
Razer Synapse not showing devices – Updating or reinstalling the driver, or installing the latest version of Razer Synapse fixed things for many.
Razer Synapse not detecting mouse and keyboard – This particular problem is quite common, and reinstalling Razer Synapse did the trick.
Does Razer Synapse reduce performance?
Some people say that experience reduces performance after installing and using Razer Synapse, while others say everything is fine.
The software is a little resource-hungrier than you might expect, but it shouldn’t cause performance issues.
However, if it does, uninstall it and continue gaming at optimal performance, enhancing and improving your experience.
How do I fix my Razer Synapse?
1. Reinstall Razer Synapse and Razer device drivers
If Synapse 3 or X won’t open on your PC, the issue might be related to Razer device drivers. Thus, you can simply reinstall both Razer device drivers and the Synapse software as shown in the guide below.
1. Right-click the Start button, and select the Device Manager.
2. Double-click the Mice and other pointing devices,Keyboards, and Human Interface Devicescategories on theDevice Managerwindow.
3. Right-click all the Razer devices listed in those categories, and select the Uninstall device options on their context menus.
4. Select the Delete the driver software for this device option on the dialog box window that pops up for each Razer device then press the Uninstall button to confirm.
5. Unplug all the connected Razer devices for a few minutes. Then restart your desktop or laptop.
6. Plug the Razer devices back in after restarting Windows. Windows will automatically reinstall the drivers for the devices.
7. Download the latest Razer Synapse software. Then reinstall Razer Synapse with its setup wizard.
Make sure you have the most up-to-date versions of your drivers. There are third-party programs that can do this for you automatically, such as Outbyte Driver Updater, which can detect and repair any outdated drivers.
This tool has a huge daily-updated driver database, so it will suggest the most recent drivers available after scanning your system. If you believe it is a tedious task to do this manually, try Outbyte Driver Updater and give us feedback.
Outbyte Driver Updater
A perfect tool that helps you keep your drivers updated with its automatic scans.
4. Turn off third-party antivirus/ Windows Defender Firewall
Open Run by pressing the Windows key + R keyboard shortcut.
Enter firewall.cpl in Run, and press the OK button. That will open the Windows Defender Firewall Control Panel applet.
Click Turn Windows Defender Firewall on or off.
Then select both the Turn off Windows Defender Firewall radio buttons, and click the OK button.
Third-party antivirus software and the Windows Defender Firewall can also cause Razer Synapse freezing and other issues. So turning third-party antivirus utilities and the Windows Defender Firewall off might also fix Razer Synapse.
You can temporarily disable most third-party antivirus utilities by selecting disable options on their system tray icon context menus. Follow the guidelines above to turn off the Windows Defender Firewall.
Alternatively, you can consider using an antivirus with firewall to avoid these types of issues.
5. Close Razer processes
Right-click the Taskbar, and select Task Manager.
Then select any Razer processes listed under background processes, and click End task to close them.
Thereafter, close the Task Manager and run Synapse as an administrator.
Some Synapse users have confirmed that closing Razer processes before opening Synapse 3.0 can help if Razer Synapse is not working. To do that, follow the above steps.
6. Check for Windows Updates
Open the Cortana app by clicking the Type here to search button on Windows 10’s taskbar.
Enter the keyword update in Cortana’s search box. Then click Check for updates.
There you can press the Check for updates button to see if there are any available updates.
Restart the OS after updating Windows.
Windows updates might also help if Razer Synapse won’t open. The updates are usually automatic unless you’ve adjusted Windows Update settings, but you might still miss a few.
Can I use Razer products without Synapse?
Keep in mind that basically all devices that have at least 4 onboard memory profiles are able to store macros on the onboard memory, but it’s still done only via Synapse.
Thus, on devices such as the Huntsman TKL, you’ll be able to save macros into the keyboard, then use your macros on other PC without Synapse.
Why does Razer Synapse take so long to open?
Razer Synapse may take a long to open when the RAM usage is high, or the CPU is at 100%. Here, the PC’s performance is usually to blame for the problem. Also, if you are running low on storage, apps may take longer to load.
Besides, running an outdated version of the OS or the PC not meeting the requirements for Razer Synapse could be the underlying cause here.
Can I uninstall Razer Synapse?
Yes, you can easily uninstall Razer Synapse. If not using a Razer device, there’s also no harm in doing so, and it shouldn’t take much time, either.
You can uninstall Razer Synapse from the Programs and Features window, followed by some software setup prompts to complete the process. Besides, if Razer Synapse is not opening in Windows 11, removing it and reinstalling the software often helps.
What can I do if Razer Synapse won’t open on Windows 11?
If you’re having problems with Razer Synapse on the latest version of Windows, you’ll be pleased to hear that all the solutions from this guide can be applied to Windows 11.
The two operating systems share many similarities, so the solutions are universal, and they will work on both systems, with some minor alternations.
Those are some of the resolutions that will probably fix Razer Synapse when it doesn’t open. This isn’t the only issue, and many reported that Razer Synapse won’t change lighting, but there’s a way to fix that.
If you have any other solutions for Razer Synapse, feel free to share them below.
If your screen goes black for a second then comes back, don’t rush to assume it’s a hardware failure. In most cases, it’s caused by system settings, outdated drivers, or loose connections, things you can fix yourself.
This also applies if your second monitor is going black randomly, your screen intermittently goes black, or your HDMI screen goes black randomly.
Here’s what you have to do.
How can I fix a monitor that randomly goes black?
Before trying these fixes, you should:
Ensure that all your cables are properly fitted, especially if you use a desktop.
Reset your monitor, so open its on-screen display (OSD) menu. Then look for a Factory Reset option on that menu. If you can’t find such an option, check your monitor’s manual for further details about how you can reset your VDU.
1. Update your graphics card’s driver
Press Windows Key + X to open the Power User Menu. Select Device Manager from the list.
Expand Display adapters, double-click your graphics card, go to the Driver tab and click the Update Driver.
Click Search automatically for drivers.
Alternatively, try scanning your PC with specialized driver updater software to tell you if your GPU has an outdated driver. Assuming it does, you can install the latest GPU driver with the driver updater utility.
2. Roll back your graphics card’s driver
Press Windows Key + X to open the Power User Menu. Select Device Manager from the list.
When Device Manager opens, locate your graphic card driver, double-click it, and click the Roll Back Driver button to go to the Driver tab.
Wait for the process to complete.
NOTE
This resolution is recommended for users who don’t need to update their GPU drivers or have had recent graphics card driver updates.
1. Open the Windows search tool, which you can do by pressing the Windows and S keys simultaneously.
2. Type the keyword Control Panel within the search tool’s text box, then click Control Panel to open that window.
3. Click the View by menu and select the Category option on it.
4. SelectHardware andSound.
5. Choose Power Options.
6. Select either the High Performance or Balanced setting. It doesn’t matter which, but the Power Saver option must not be selected.
7. Then click to Change plan settings for your preferred plan.
8. Select Never on the Turn off the display drop-down menu, and click the Never option for the Put computer to sleep drop-down menu.
9. Press the Save changes button.
If you experience issues with your computer screen going black by itself from time to time, you should tweak your Power Settings.
It is likely that the Power Saver option is causing you this problem. Therefore, choosing another Power Plan and configuring it to never turn off the display should get your PC working properly again.
If you’ve applied any CPU or GPU overclocking, restore your PC to its default settings with your overclocking software. Then uninstall your overclocking software for good measure.
Why does my monitor keep going black for a few seconds?
The reasons why your computer screen briefly goes black frequently are as follows:
Corrupt or outdated display adapters – Corrupted drivers could hinder how the OS relates with your monitor and result in this black screen issue.
Wrongly configured power settings – Power settings may affect your computer’s operations and could lead to erratic blackouts.
Loose connection cables – You may only be experiencing the blackout because you have not properly fitted some of your wires.
Screen goes black for a second in Windows 10/11 – Follow the solutions below, then check the health of your monitor if nothing works.
Laptop screen goes black for a second then comes back, monitor keeps going black for a second – Update your graphics card drivers as we have shown below, then adjust your PC’s power plan.
Screen goes black for a second laptop – You can also roll back your drivers, if updating them caused your screen to go black.
Screen goes black for a second when opening programs – This indicates there is no issue with the actual monitor itself, but with the software side.
Those are some of the most likely fixes for a monitor that keeps going black. However, if the fixes do nothing for you, it might be an issue with the monitor itself.
Try catch is a control flow statement that is used within PowerShell to catch errors and exceptions. It can be used when you want to handle errors in your script and stop it from proceeding further.
Although PowerShell is a powerful Windows command-line tool, sometimes, it can be hard to interpret if it returns an error. You might be stuck for days trying to figure out where you went wrong. That’s where the try-catch command comes in, and we show you how to use it in this article.
Is there a try catch in PowerShell?
Try Catch statements are a powerful way of handling errors and exceptions in PowerShell. They can handle all kinds of errors, from system exceptions to user-generated errors.
Before you understand how they work, you first need to know what they mean and what they can do.
Try Block
A try block is the first block of code that executes when an error occurs. It can run any code, but it doesn’t do anything special for errors. If an error occurs, PowerShell will continue executing the rest of the script without waiting for you to deal with the error.
A Try Catch statement is comprised of one or more Try blocks. These blocks must be placed in a specific order for the code to execute properly.
This block begins executing immediately if no error has occurred. If an error occurs during this block, it will exit that block immediately and continue executing the code within the matching Catch block(s).
Catch Block
The catch block is a part of the PowerShell pipeline that can handle errors and other exceptions. The catch block does not return any value, but it does allow you to handle the error condition in your script.
This block contains the code that handles errors while executing code within the Try block(s). It will execute if an error occurs during any Try block within the script.
The try-catch construct allows you to handle different errors in your script. For instance, if you have a function that does not return a value, you can use the try-catch construct to check for an error condition and then perform some action if there was one.
How do you write try catch in PowerShell?
It is important to note that during this scripting test, we shall be using the Windows PowerShell ISE (Integrated Scripting Environment). This is the Windows PowerShell interactive shell experience.
ISE provides an excellent development environment for writing, debugging, and testing scripts with an interactive command prompt. It includes a full suite of integrated scripting, debugging, and editing tools that enable you to rapidly develop, test and debug PowerShell scripts.
The ISE also includes script debugging features that allow you to step through your code interactively.
Hit the Windows key, type Powershell ISE and click Run as administrator.
Come up with a code that will give a positive error. The syntax for a try-catch block is:
Try {
// Code that might cause an error
} catch { // Code to execute if an error occurs during execution of the try block
}
As an example, we can use the following:
Try {
Write-Host "This will not throw any exception."
} Catch [System.Exception] {
Write-Host "This will throw an exception." }
While the two blocks can run and catch errors, you need another block to clean up the error. The Finally block is used to clean up the environment after the execution of the try block.
How do I try catch if there’s no error in PowerShell?
An error is a condition that occurs while the PowerShell script is running and prevents the script from continuing to the next line of code. It can be caused by something external (like a missing file or invalid variable) or internal (a syntax error).
PowerShell has two types of errors: terminating and nonterminating. A terminating error stops the execution of the script. On the other hand, a nonterminating error is one that doesn’t stop the execution of the script but does generate output to the console.
The try/catch block allows us to handle errors by catching them with the try keyword and then providing an action block that will be executed if an error occurs. When an error occurs, PowerShell executes the code in the Catch block.
If no error occurs, the catch block will not execute, and the script will continue as normal. If the try catch in Powershell is not working, check out our detailed article on how to fix it.
Let us know how you use the try catch command line in the comment section below.